rest api guide – supportassist enterprise...supportassist enterprise 7 rest api guide –...
TRANSCRIPT

Dell EMC Technical White Paper
REST API Guide – SupportAssist Enterprise
Dell Engineering team
September 2019

Revisions
Dell EMC Technical White Paper
Revisions
Date Description
August 2018 Initial release
October 2018 Updates to the Filter Devices section
January 2019 Updates to the Retrieve Devices section
September 2019 Support for TLS 1.2
The information in this publication is provided “as is.” Dell Inc. makes no representations or warranties of any kind with respect to the information in this
publication, and specifically disclaims implied warranties of merchantability or fitness for a particular purpose.
Use, copying, and distribution of any software described in this publication requires an applicable software license.
© 2019 Dell Inc. or its subsidiaries. All Rights Reserved. Dell, EMC, Dell EMC and other trademarks are trademarks of Dell Inc. or its subsidiaries. Other
trademarks may be trademarks of their respective owners.
Dell believes the information in this document is accurate as of its publication date. The information is subject to change without notice.

Contents
3 REST API Guide – SupportAssist Enterprise
Contents
Revisions............................................................................................................................................................................. 2
Introduction ......................................................................................................................................................................... 5
1 Key Integration Concepts ............................................................................................................................................. 6
1.1 Client Integration Overview ................................................................................................................................ 6
1.2 Base URI ............................................................................................................................................................ 6
1.3 Security ............................................................................................................................................................... 6
1.4 Authentication Mechanisms ................................................................................................................................ 6
1.5 Resource Operations .......................................................................................................................................... 7
1.6 Connectivity Considerations ............................................................................................................................... 7
1.7 Request Headers ................................................................................................................................................ 7
1.8 Response Codes ................................................................................................................................................ 8
1.9 Response Headers ............................................................................................................................................. 9
2 SupportAssist Enterprise-Specific Resource Model ................................................................................................... 10
2.1 Enable REST in SupportAssist Enterprise ....................................................................................................... 10
2.2 User authentication ........................................................................................................................................... 10
2.2.1 Generating the authentication and refresh token ............................................................................................. 10
2.2.2 Refreshing the authentication token ................................................................................................................. 11
2.3 Account Credentials ......................................................................................................................................... 12
2.3.1 Create Account Credentials .............................................................................................................................. 15
2.3.2 Edit Account Credentials .................................................................................................................................. 18
2.3.4 Retrieve Specific Account Credentials ............................................................................................................. 21
2.3.5 Delete Account Credentials .............................................................................................................................. 21
2.4 Credential Profile .............................................................................................................................................. 23
2.4.1 Create Credential Profile .................................................................................................................................. 23
2.4.2 Edit Credential Profile ....................................................................................................................................... 24
2.4.3 Delete Credential Profile ................................................................................................................................... 25
2.4.4 Retrieve Credential Profile ................................................................................................................................ 26
2.5 Retrieve Job status ........................................................................................................................................... 27
2.6 Devices ............................................................................................................................................................. 28
2.6.1 Add device ........................................................................................................................................................ 30
2.6.2 Edit device details ............................................................................................................................................. 31
2.6.3 Delete devices .................................................................................................................................................. 32
2.6.4 Retrieve devices ............................................................................................................................................... 33

Contents
4 REST API Guide – SupportAssist Enterprise
2.6.5 Filter devices ..................................................................................................................................................... 40
2.7 Maintenance mode ........................................................................................................................................... 44
2.7.1 Device maintenance mode ............................................................................................................................... 44
2.7.2 Site maintenance mode .................................................................................................................................... 44
2.8 Assign Credential Profile to devices ................................................................................................................. 46
2.9 Collection .......................................................................................................................................................... 47
2.10 Discovery Rule .................................................................................................................................................. 50
2.10.1 Retrieve Discovery Rule ............................................................................................................................... 50
2.10.2 Run Discovery Rule ...................................................................................................................................... 54
2.11 Retrieve cases .................................................................................................................................................. 55
2.12 Backup devices and groups ............................................................................................................................. 61
2.13 Restore devices and groups ............................................................................................................................. 67
A Error code appendix ................................................................................................................................................... 74
B Frequently asked questions ....................................................................................................................................... 94
C Glossary ..................................................................................................................................................................... 96

Introduction
Dell EMC Technical White Paper
Introduction
SupportAssist Enterprise is an application that automates technical support for your Dell EMC server, storage,
and networking devices. SupportAssist Enterprise monitors your devices and proactively detects hardware issues
that may occur. When a hardware issue is detected, SupportAssist Enterprise automatically opens a support case
with Technical Support and sends you an email notification.
This document provides information on integrating your data center tools and applications with SupportAssist
Enterprise using Representational State Transfer (REST) APIs. It provides examples of using REST to perform
common tasks based on integration use cases with other products.
This document is not intended to be an introduction to REST. There are several publicly available documents (for
example, Fielding’s dissertation and RESTful Web services books) that provide the necessary background
information on REST.
Note: Integration of your support tools and applications with SupportAssist Enterprise by using REST API is
supported only with SupportAssist Enterprise version 2.0 or later.

SupportAssist Enterprise
6 REST API Guide – SupportAssist Enterprise
1 Key Integration Concepts This section covers key integration concepts that are applicable to all the use cases that are addressed in the
next section.
1.1 Client Integration Overview The REST client makes standard HTTP(S) requests to the REST API end-point. Each request is sent using a
HTTP verb (for example, PUT, GET, POST, and DELETE) and includes a message body in JSON format. The
response uses a standard HTTP status code.
The REST client can be developed in a wide variety of programming languages (for example, C#, Java, and so
on) or scripting languages (for example, Python, Perl, and so on) that have basic support for HTTPS
communication and are capable of constructing and parsing JSON payloads.
1.2 Base URI The base URI for a REST request must be in the following format:
https://<HOST_ADDRESS>:<PORT_NUM>/
The parameters used in the base URI are described in the following table.
Parameter Description
HOST_ADDRESS The network address of the system where SupportAssist Enterprise is installed. The network address could be a DNS host name or an IP address.
PORT_NUM The port number that has been specifically opened on the web stack for API communication. This should be the standard port used for SSL communications or a port that is registered with Internet Assigned Numbers Authority (IANA) for that product.
An example of a base URI for SupportAssist Enterprise is as follows:
https://192.168.0.1:5700/
The rest of the document will reference this example as the <BASE_URI>.
1.3 Security The REST services will *only* be exposed through HTTPS to ensure that the common threats associated with
HTTP traffic are mitigated. This is available only for admin privileged users only.
1.4 Authentication Mechanisms The authentication process starts when the client makes a request for a token from the server by providing its
credentials. In response, SupportAssist Enterprise returns an access token and a refresh token. The refresh
token is valid for 24 hours, while the access token is valid for 30 minutes. After the access token has expired,
you can generate a new access token by using the refresh token.

SupportAssist Enterprise
7 REST API Guide – SupportAssist Enterprise
1.5 Resource Operations The standard HTTP methods are used for performing create, retrieve, update, and delete operations on
resources. The mapping of the HTTP methods to operational semantics is described in the following table.
HTTP method Description
GET Used to retrieve the resource representation. This method does not modify the resource across repeated invocations. The query parameters are appended to the URI to appropriately filter the resource instances.
POST Used to create a new instance of a resource or append to the existing resource reference.
PUT Used to update a specific instance or create a specific resource instance with a specific identifier.
DELETE Used to remove a specific resource. If the resource does not exist, success is returned.
1.6 Connectivity Considerations • REST API calls to SupportAssist Enterprise are available only on the SSL-enabled port.
• The REST API access token issued by SupportAssist Enterprise would be valid only for 30 mins.
• The REST API refresh token issued by SupportAssist Enterprise would be valid only for 24 hours.
• All the tokens are mapped with the IP address; if the IP address changes, the tokens would be discarded.
• By default, the REST API functionality is disabled.
• REST API is enabled only if the registration of SupportAssist Enterprise is complete.
• The request URLs are available only on the respective HTTP methods.
Note: Transport Layer Security (TLS) 1.2 must be enabled on the web browser.
1.7 Request Headers The request header represents headers in the client HTTPS request that are used to communicate client
preferences to the service end-point. The service will indicate the supported preference in the response header.
The following table includes a few examples of request headers. For an extensive list of request headers, see List
of HTTP header fields.
Request Header Description Example
Accept Format of the data requested by the client. This could be one or more comma-separated values.
Accept: application/json
Authorization The bearer token is a cryptic string, generated by the server in response to a login request. The client must send this token in the Authorization header
when making requests to protected resources.
Authorization: Bearer <token>
Content-Type The Content-Type header field is used to specify the nature of the data in the body of an entity.
Content-Type: application/json

SupportAssist Enterprise
8 REST API Guide – SupportAssist Enterprise
1.8 Response Codes For synchronous operations, the server returns HTTP response codes 200 or 204 depending on the request. For
long-running operations, the server returns a status code of 202 along with a HTTP response header (Location),
corresponding to the URI of the temporary resource that can be used to monitor the operation. The following table
includes a few examples of response codes. For an extensive list of response codes, see List of HTTP status
codes.
Request Response Code
Success Codes
GET 200 – OK with message body
204 – OK with no message body
POST 201 – Resource created (operation complete)
200 – OK with message body
202 – Accepted
PUT 201 – Created
202 – Accepted
DELETE 204 – Success (operation complete)
Failure Codes
Invalid parameter 400 – Invalid parameter
Authorization 401 – Authorization failure
Permission denied 403 – Permission denied
Not found 404 – Resource not found
Invalid request method 405 – Invalid request method
Internal server error 500 – Internal server error
Service unavailable 503 – Service unavailable

SupportAssist Enterprise
9 REST API Guide – SupportAssist Enterprise
1.9 Response Headers The following table includes an example of response headers. For an extensive list of response headers, see List
of HTTP header fields.
Response Header Description Example
Content-Type Specifies the format of content that is returned by the server. If there are multiple formats that could be accepted in the client request (using the Accept header), the server chooses the appropriate supported format.
Content-Type: application/json
SupportAssist Enterprise
10 REST API Guide – SupportAssist Enterprise
2 SupportAssist Enterprise-Specific Resource Model The following sub-sections represent a subset of the use cases that SupportAssist Enterprise supports. REST API
support and the operation support will be incrementally refined based on consumer feedback over multiple
SupportAssist Enterprise releases.
Note: REST API resource URIs are case sensitive.
2.1 Enable REST in SupportAssist Enterprise You can enable or disable REST API in SupportAssist Enterprise. To enable the REST API, open SupportAssist
Enterprise, point to Settings and click Preferences. On the Preferences page, in the API Interface section,
select Enable API Interfaces for SupportAssist Enterprise.
Note: You can enable REST API interfaces only if you have registered SupportAssist Enterprise.
2.2 User authentication Before performing any operation in SupportAssist Enterprise through the REST interface, it is necessary to
authenticate your user account. After successful authentication, an authentication token and a refresh token are
generated.
Note: The authentication token must be provided with every resource URI for performing any operation.
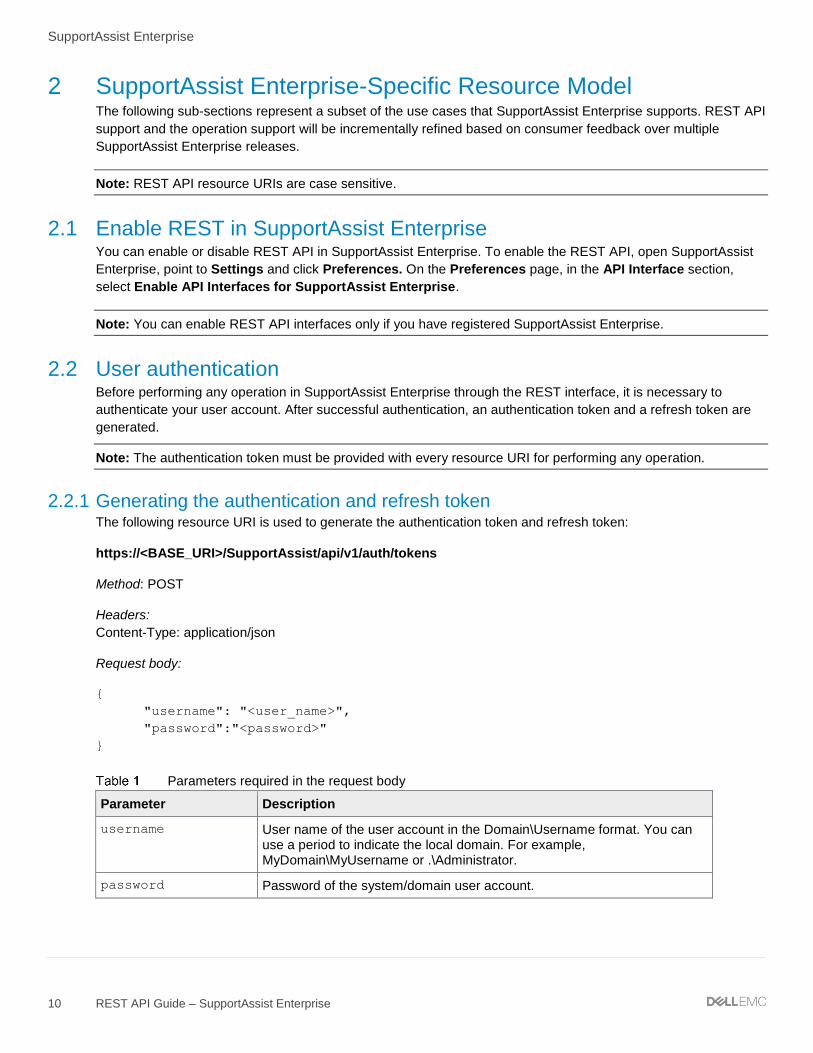
2.2.1 Generating the authentication and refresh token The following resource URI is used to generate the authentication token and refresh token:
https://<BASE_URI>/SupportAssist/api/v1/auth/tokens
Method: POST
Headers:
Content-Type: application/json
Request body:
{
"username": "<user_name>",
"password":"<password>"
}
Parameters required in the request body
Parameter Description
username User name of the user account in the Domain\Username format. You can use a period to indicate the local domain. For example, MyDomain\MyUsername or .\Administrator.
password Password of the system/domain user account.

SupportAssist Enterprise
11 REST API Guide – SupportAssist Enterprise
Response format (success – response code 200):
{
"authenticationToken":"<Authentication_Token>",
"refreshToken":"<Refresh_Token>"
}
Description of parameters returned in the response body
Parameter Description
autheticationToken Token used for authentication and authorization of the request.
refreshToken Token required for generating the authentication token.
Note: The generated authentication token expires automatically after 30 minutes. To continue your session, you
can refresh the authentication token. A refresh token is valid for up to 24 hours.
2.2.2 Refreshing the authentication token The following resource URI is used to refresh the authentication token:
https://<BASE_URI>/SupportAssist/api/v1/auth/authToken
Method: GET
Headers:
Authorization: Bearer <Refresh_Token>
Request body: None required
Response format (success – response code 200):
{
"authenticationToken":"<Authentication_Token>",
}
Parameter returned in the response body
Parameter Description
autheticationToken The refreshed authentication token used for authentication and authorization of a request.

SupportAssist Enterprise
12 REST API Guide – SupportAssist Enterprise
2.3 Account Credentials An Account Credential consists of the credentials of a specific device type. The Account Credentials is used by
SupportAssist Enterprise discover a device and to collect system information. Depending on the number of device
types in your environment, you may have to create one or more Account Credentials.
The JSON schema for creating and updating Account Credentials is as follows:
{
"type" : "object",
"id" : "CredentialAccount",
"properties" : {
"id" : {
"type" : "string"
},
"name" : {
"type" : "string"
},
"uiDeviceType" : {
"type" : "string",
"enum" : ["Server / Hypervisor", "iDRAC", "Chassis", "Networking", "Fluid
File System (Fluid FS)", "PeerStorage(PS) / Equallogic", "Storage Center (SC) /
Compellent", "Software", "Solution", "Virtual Machine"]
},
"deviceSubTypeEnum" : {
"type" : "string",
"enum" : ["Windows", "Linux", "ESX", "EXSi", "Webscale"]
},
"deviceFamilyTypeEnum" : {
"type" : "string",
"enum" : ["SCVMM", "SANHQ", "vCenter", "HitKitVSMForVMWare"]
},
"protocols" : {
"type" : "array",
"items" : {
"type" : "object",
"id" : "Protocol",
"properties" : {
"protocolType" : {
"type" : "string",
"enum" : ["WMI", "SSH", "WSMAN", "HTTPS", "REST", "VMWare",
"SNMP",”Redfish”]
},
"credential" : {
"type" : "object",
"id" : "Credential",
"properties" : {
"username" : {
"type" : "string"
},
"password" : {
"type" : "string"
},
"enablePassword" : {
"type" : "string"
},
"communityString" : {
"type" : "string"

SupportAssist Enterprise
13 REST API Guide – SupportAssist Enterprise
}
}
}
}
}
}
}
}
Description of parameters in the JSON schema
Parameter Description Additional Details
name Name that you want to assign to the Account Credentials.
This attribute is required.
uiDeviceType Type of device for which you want to create Account Credentials. SupportAssist Enterprise supports 9 different device types. For the possible values for this parameter, see the JSON schema.
This attribute is required.
deviceSubTypeEnum An additional parameter required to identify Server and Solution device types. For the possible values for this parameter, see the JSON schema.
This attribute is required for the respective device type. For information on the possible values for the respective device type, see Table 5.
deviceFamilyTypeEnum An additional parameter required to identify the Software device type. For the possible values for this parameter, see the JSON schema.
This attribute is required for the respective device type. For information on the possible values of respective device type, see Table 5.
protocols An array of protocols, required to define the protocol for communicating with the device.
This attribute is required.
protocolType Protocol applicable for communicating with the device.
This attribute is required.
credential An object required for defining the credentials of the device.
This attribute is required.
username Username required for communicating with the device.
password Password required for communicating with the device.
enablePassword Only for Networking device type: This parameter is required for communication through SSH protocol, if the enable password is configured on the device.
communityString This parameter is required for devices that support SNMP protocol.

SupportAssist Enterprise
14 REST API Guide – SupportAssist Enterprise
Parameters required in the JSON request body based on the device type
Device Type
Parameters required
uiDeviceType
deviceSubT
ypeEnum
deviceFamilyT
ypeEnum protocolType
Windows Server Server / Hypervisor Windows null WMI
Linux Server Server / Hypervisor Linux null SSH
ESX Server Server / Hypervisor ESX null SSH, VMWare
ESXi Server Server / Hypervisor EXSi null SSH, VMWare
iDRAC iDRAC Null null WSMAN
Chassis Chassis Null null SSH, Redfish
Networking Networking Null null SSH, SNMP#
Fluid FS Fluid File System (Fluid FS) Null null SSH
Equallogic PeerStorage(PS) / Equallogic Null null SSH, SNMP
Compellent Storage Center (SC) / Compellent
REST, HTTPS
SCVMM Software Null SCVMM WMI
SANHQ Software Null SANHQ WMI
vCenter Software Null vCenter VMWare
HitKitVSMForVM
Ware
Software Null HitKitVSMForVMWare
SSH
Solution Solution Webscale null Rest, SSH
Windows
Virtual
Machine
Virtual Machine Windows null WMI
Linux Virtual
Machine
Virtual Machine Linux null SSH

SupportAssist Enterprise
15 REST API Guide – SupportAssist Enterprise
Credentials required in the JSON request body based on the protocol type
Protocols Type Credentials
Username Password enablepassword communityString
WMI Required Required null null
SSH Required Required Optional# null
WSMAN Required Required null null
HTTPS Required Required null null
REST Required Required null null
VMWare Required Required null null
SNMP Null Null null Required
Note: Enable password is required only if the networking device is configured with an enable password.
2.3.1 Create Account Credentials The following resource URI is used to create an Account Credentials:
https://<BASE_URI>/SupportAssist/api/v1/CredentialAccount
Method: POST
Headers:
Content-Type: application/json
Authorization: Bearer <Authentication_Token>
The following is an example of a JSON for creating a credential account for a server running Windows.
Request body:
{
"id": null,
"name": "<name_of_account>",
"uiDeviceType": "Server / Hypervisor",
"deviceSubTypeEnum":"Windows",
"deviceFamilyTypeEnum": null,
"protocols":
[
{
"protocolType": "WMI",
"credential" : {
"username": "<device_username>",
"password": "<device_password>
}
}
]
}
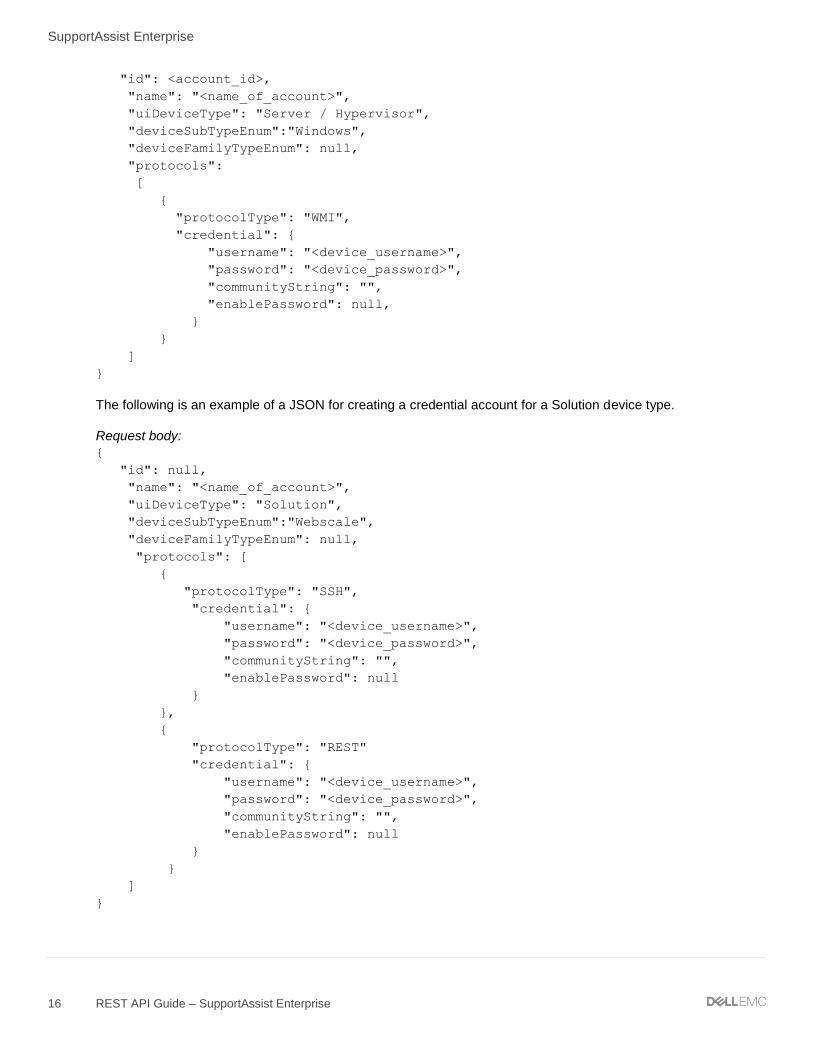
Response format (success – response code 201):
{
SupportAssist Enterprise
16 REST API Guide – SupportAssist Enterprise
"id": <account_id>,
"name": "<name_of_account>",
"uiDeviceType": "Server / Hypervisor",
"deviceSubTypeEnum":"Windows",
"deviceFamilyTypeEnum": null,
"protocols":
[
{
"protocolType": "WMI",
"credential": {
"username": "<device_username>",
"password": "<device_password>",
"communityString": "",
"enablePassword": null,
}
}
]
}
The following is an example of a JSON for creating a credential account for a Solution device type.
Request body:
{
"id": null,
"name": "<name_of_account>",
"uiDeviceType": "Solution",
"deviceSubTypeEnum":"Webscale",
"deviceFamilyTypeEnum": null,
"protocols": [
{
"protocolType": "SSH",
"credential": {
"username": "<device_username>",
"password": "<device_password>",
"communityString": "",
"enablePassword": null
}
},
{
"protocolType": "REST"
"credential": {
"username": "<device_username>",
"password": "<device_password>",
"communityString": "",
"enablePassword": null
}
}
]
}

SupportAssist Enterprise
17 REST API Guide – SupportAssist Enterprise
Response format (success – response code 201):
{
"id": <account_id>,
"name": "<provided_name>",
"uiDeviceType": "Solution",
"deviceSubTypeEnum":" Webscale",
"deviceFamilyTypeEnum": null,
"protocols": ": [
{
"protocolType": "SSH",
"credential": {
"username": "<device_username>",
"password": "<device_password>",
"communityString": "",
"enablePassword": null
}
},
{
"protocolType": "REST"
"credential": {
"username": "<device_username>",
"password": "<device_password>",
"communityString": "",
"enablePassword": null
}
}
]
}
The following is an example of a JSON for creating a credential account for a Networking device type.
Request body:
{
"id": null,
"name": "<name_to_identify>",
"uiDeviceType": "Networking",
"deviceSubTypeEnum": null,
"deviceFamilyTypeEnum": null,
"protocols": [
{
"protocolType": "SSH",
"credential": {
"username": "<device_username>",
"password": "<device_password>,
"enablePassword": "<enable_passsword_value>",
}
},
{
"protocolType": "SNMP"

SupportAssist Enterprise
18 REST API Guide – SupportAssist Enterprise
"credential": {
"communityString": "public"
}
}
]
}
Response format (success – response code 201):
{
"id”: <account_id>,
"name”: "<provided_name>",
"uiDeviceType”: "Networking",
"deviceSubTypeEnum”: null,
"deviceFamilyTypeEnum”: null,
"protocols”: ": [
{
"protocolType": "SSH",
"credential": {
"username": "<device_username>",
"password": "<device_password>",
"communityString": "<device_enable_password>",
"enablePassword": null
}
},
{
"protocolType": "SNMP"
"credential": {
"communityString": "public",
"username": "”,
"password": null,
"enablePassword": null
}
}
]
}
2.3.2 Edit Account Credentials The following resource URI is used to edit an Account Credentials:
https://<BASE_URI>/SupportAssist/api/v1/CredentialAccount/<CredentialAccount_Id>
Note: You can edit only the name and credentials of an Account Credentials.
Method: PUT
Headers:
Content-Type: application/json
Authorization: Bearer <Authentication_Token>
The following is an example of a JSON for updating the Account Credentials of a server running a Windows.

SupportAssist Enterprise
19 REST API Guide – SupportAssist Enterprise
Request body:
{
"name":"<new_name>",
"uiDeviceType":"Server / Hypervisor",
"deviceSubTypeEnum":"WINDOWS",
"protocols":[
{
"protocolType":"WMI",
"credential":{
"username":"<user_name>",
"password":"<device_password>",
"enablePassword":null,
"communityString":""
}
}
]
}
Response format (success – response code 201):
{
"id":"<CA_Id>",
"name":"<new_assigned_name>",
"uiDeviceType":"Server / Hypervisor",
"deviceSubTypeEnum":"WINDOWS",
"deviceFamilyTypeEnum":null,
"protocols":[
{
"protocolType":"WMI",
"credential":{
"username":"<user_name>",
"password":"<device_password>",
"enablePassword":null,
"communityString":""
}
}
]
}
2.3.3 Retrieve All Account Credentials
The following resource URI is used to retrieve all Account Credentials:
https://<BASE_URI>/SupportAssist/api/v1/CredentialAccount
Method: GET
Headers:
Authorization: Bearer <Authentication_Token>
The following is an example of a JSON for retrieving all Account Credentials.
Request body: none required

SupportAssist Enterprise
20 REST API Guide – SupportAssist Enterprise
Response format (success – response code 200):
[
{
"id":"<CA1_id>",
"name":"win_server1",
"uiDeviceType":"Server / Hypervisor",
"deviceSubTypeEnum":"WINDOWS",
"deviceFamilyTypeEnum":null,
"protocols":[
{
"protocolType":"WMI",
"credential":{
"username":"localhost\Administrator",
"password":"YWJjX3Bhc3N3b3Jk",
"enablePassword":null,
"communityString":""
}
}
]
},
{
"id":"<CA2_id>",
"name":"linux_server",
"uiDeviceType":"Server / Hypervisor",
"deviceSubTypeEnum":"LINUX",
"deviceFamilyTypeEnum":null,
"protocols":[
{
"protocolType":"SSH",
"credential":{
"username": "username",
"password":"YWJjX3Bhc3N3b3Jk",
"enablePassword":null,
"communityString":""
}
}
]
},
{
"id":"<Credential_account_ID>",
"name":"idrac",
"uiDeviceType":"iDRAC",
"deviceSubTypeEnum":null,
"deviceFamilyTypeEnum":null,
"protocols":[
{
"protocolType":"WSMAN",
"credential":{
"username":"root",
"password":"YWJjX3Bhc3N3b3Jk",

SupportAssist Enterprise
21 REST API Guide – SupportAssist Enterprise
"enablePassword":null,
"communityString":""
}
}
]
}
]
2.3.4 Retrieve Specific Account Credentials The following resource URI is used to retrieve a specific Account Credentials:
https://<BASE_URI>/SupportAssist/api/v1/CredentialAccount/<CredentialAccount_Id>
Method: GET
Headers:
Authorization: Bearer <Authentication_Token>
The following is an example of a JSON for retrieving a specific Account Credentials.
Request body: none required
Response format (success – response code 200):
{
"id":"<credentialAccount_id>",
"name":"fluid_fs",
"uiDeviceType":"Fluid File System (Fluid FS)",
"deviceSubTypeEnum":null,
"deviceFamilyTypeEnum":null,
"protocols":[
{
"protocolType":"SSH",
"credential":{
"username":"<device_username>",
"password":"<device_password>",
"enablePassword":null,
"communityString":""
}
}
]}
2.3.5 Delete Account Credentials The following resource URI is used to delete an Account Credentials:
https://<BASE_URI>/SupportAssist/api/v1/CredentialAccount/<CredentialAccount_Id>
Method: DELETE
Headers:
Content-Type: application/json
Authorization: Bearer <Authentication_Token>
SupportAssist Enterprise
22 REST API Guide – SupportAssist Enterprise
The following is an example of a JSON for deleting an Account Credentials.
Request body: none required
Response format (success – response code 204): none
Note: Deleting all credential accounts in a single operation is not supported.

SupportAssist Enterprise
23 REST API Guide – SupportAssist Enterprise
2.4 Credential Profile A Credential Profile is a collection of Account Credentials of various device types. Credential Profiles enable you
to assign a set of credentials to your devices, instead of entering the credentials for each device manually.
The JSON schema for creating and updating Credential Profile is as follows:
{
"type" : "object",
"id" : "CredentialProfile",
"properties" : {
"id" : {
"type" : "string"
},
"name" : {
"type" : "string"
},
"credentialAccounts" : {
"type" : "array",
"items" : {
"type" : "object",
"id" : "DeviceCredentialAccount",
"properties" : {
"id" : {
"type" : "string"
}
}
}
}
}
}
Parameters required for creating Credential Profiles
Parameter Description Additional details
id Auto-generated identifier of a Credential Profile entity.
name Name that you want to assign to the Credential Profile.
This attribute is required.
credentialAccounts A collection of Credential Accounts.
id Unique identifier assigned to the Credential Account.
SupportAssist Enterprise requires the id attribute to associate
Credential Accounts with Credential Profiles.
Note: The id of each Credential Account is required for creating or updating a Credential Profile.
2.4.1 Create Credential Profile The following resource URI is used to create a Credential Profile:
https://<BASE_URI>/SupportAssist/api/v1/CredentialProfile
Method: POST
SupportAssist Enterprise
24 REST API Guide – SupportAssist Enterprise
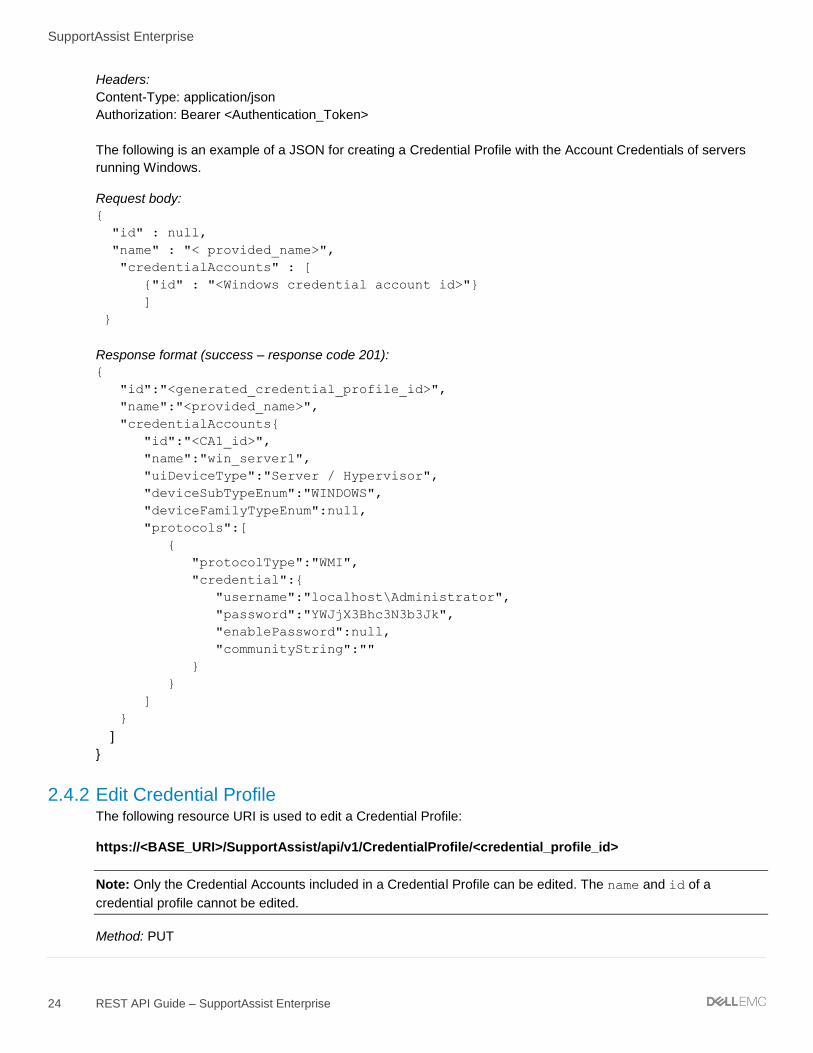
Headers:
Content-Type: application/json
Authorization: Bearer <Authentication_Token>
The following is an example of a JSON for creating a Credential Profile with the Account Credentials of servers
running Windows.
Request body:
{
"id" : null,
"name" : "< provided_name>",
"credentialAccounts" : [
{"id" : "<Windows credential account id>"}
]
}
Response format (success – response code 201):
{
"id":"<generated_credential_profile_id>",
"name":"<provided_name>",
"credentialAccounts{
"id":"<CA1_id>",
"name":"win_server1",
"uiDeviceType":"Server / Hypervisor",
"deviceSubTypeEnum":"WINDOWS",
"deviceFamilyTypeEnum":null,
"protocols":[
{
"protocolType":"WMI",
"credential":{
"username":"localhost\Administrator",
"password":"YWJjX3Bhc3N3b3Jk",
"enablePassword":null,
"communityString":""
}
}
]
}
]
}
2.4.2 Edit Credential Profile The following resource URI is used to edit a Credential Profile:
https://<BASE_URI>/SupportAssist/api/v1/CredentialProfile/<credential_profile_id>
Note: Only the Credential Accounts included in a Credential Profile can be edited. The name and id of a
credential profile cannot be edited.
Method: PUT

SupportAssist Enterprise
25 REST API Guide – SupportAssist Enterprise
Headers:
Content-Type: application/json
Authorization: Bearer <Authentication_Token>
The following is an example of a JSON for editing a Credential Profile.
Request body:
{
"id" : "<credential_profile_id >",
"name" : "<provided_name>",
"credentialAccounts" : [
{"id" : "<Windows credential account id>"},
{"id" : "<Linux credential account id>" }
]
}
Response format (success – response code 201):
{
"id":"<generated_credential_profile_id>",
"name":"<provided_name>",
"credentialAccounts":[
{
<Windows credential account details>
},
{
<Linux credential account details>
}
]
}
2.4.3 Delete Credential Profile The following resource URI is used to delete a Credential Profile:
https://<BASE_URI>/SupportAssist/api/v1/CredentialProfile/<credential_profile_id>
Note: You can only delete a Credential Profile that is not associated with any devices or discovery rules.
Method: DELETE
Headers:
Content-Type: application/json
Authorization: Bearer <Authentication_Token>
Request body: none required
Response format (success – response code 204): none

SupportAssist Enterprise
26 REST API Guide – SupportAssist Enterprise
2.4.4 Retrieve Credential Profile The following resource URI is used to retrieve all Credential Profiles:
https://<BASE_URI>/SupportAssist/api/v1/CredentialProfile
The following resource URI is used to retrieve a specific Credential Profile:
https://<BASE_URI>/SupportAssist/api/v1/CredentialProfile/<credential_profile_id>
Method: GET
Headers:
Authorization: Bearer <Authentication_Token>
Request body: none required
Response format (success – response code 200):
{
"id":"<1>",
"name":"<florida_datacenter>",
"credentialAccounts":[
{
<Windows credential account details>
},
{
<Linux credential account details>
}
]
},{
"id":"<2>",
"name":"<shanghai_datacenter>",
"credentialAccounts":[
{
<Windows credential account details>
},
{
<Linux credential account details>
},
{
<networking credential account details>
}
]
}
SupportAssist Enterprise
27 REST API Guide – SupportAssist Enterprise
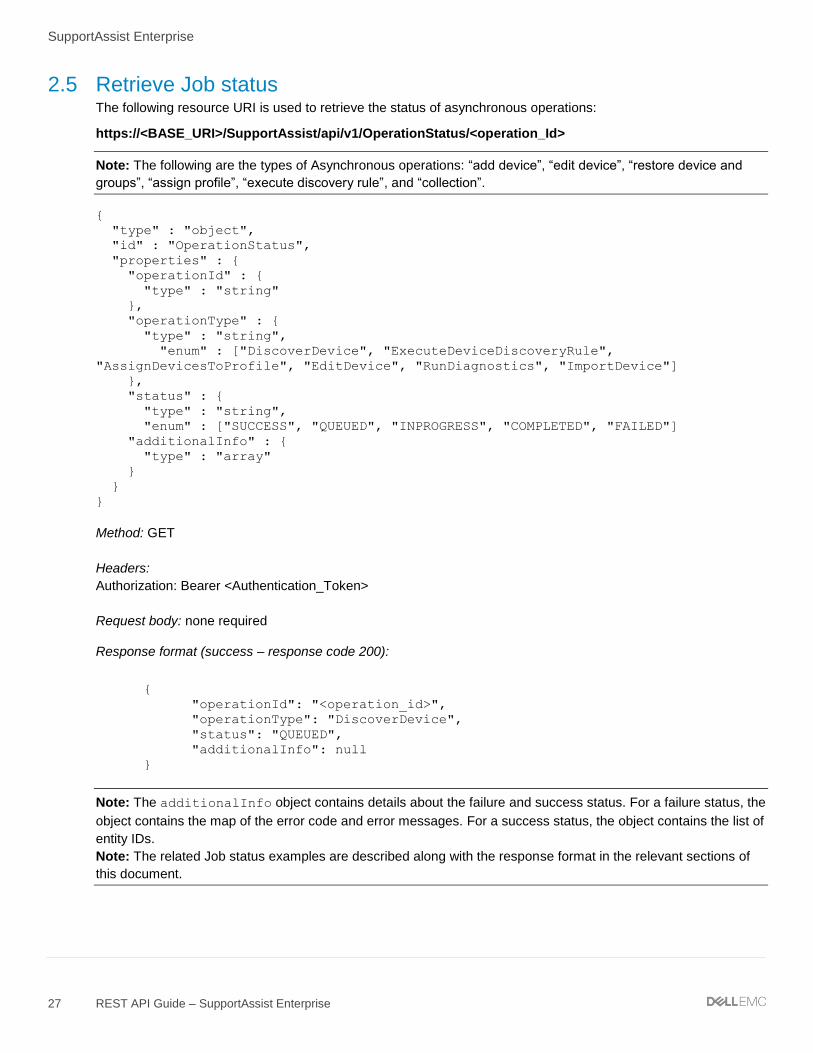
2.5 Retrieve Job status The following resource URI is used to retrieve the status of asynchronous operations:
https://<BASE_URI>/SupportAssist/api/v1/OperationStatus/<operation_Id>
Note: The following are the types of Asynchronous operations: “add device”, “edit device”, “restore device and
groups”, “assign profile”, “execute discovery rule”, and “collection”.
{
"type" : "object",
"id" : "OperationStatus",
"properties" : {
"operationId" : {
"type" : "string"
},
"operationType" : {
"type" : "string",
"enum" : ["DiscoverDevice", "ExecuteDeviceDiscoveryRule",
"AssignDevicesToProfile", "EditDevice", "RunDiagnostics", "ImportDevice"]
},
"status" : {
"type" : "string",
"enum" : ["SUCCESS", "QUEUED", "INPROGRESS", "COMPLETED", "FAILED"]
"additionalInfo" : {
"type" : "array"
}
}
}
Method: GET
Headers:
Authorization: Bearer <Authentication_Token>
Request body: none required
Response format (success – response code 200):
{
"operationId": "<operation_id>",
"operationType": "DiscoverDevice",
"status": "QUEUED",
"additionalInfo": null
}
Note: The additionalInfo object contains details about the failure and success status. For a failure status, the
object contains the map of the error code and error messages. For a success status, the object contains the list of
entity IDs.
Note: The related Job status examples are described along with the response format in the relevant sections of
this document.

SupportAssist Enterprise
28 REST API Guide – SupportAssist Enterprise
2.6 Devices SupportAssist Enterprise automates technical support for your Dell EMC server, storage, and networking devices.
When a hardware issue is detected on a system, depending on the service plan, SupportAssist Enterprise may
automatically create a support request with Dell EMC Technical Support. Information required by Technical
Support is also automatically collected and sent to Dell EMC by SupportAssist Enterprise. To experience these
automated capabilities, you must add each device in SupportAssist Enterprise.
The JSON schema for adding devices is as follows:
{
"type" : "object",
"id" : "DeviceDiscovery",
"properties" : {
"deviceAddress" : {
"type" : "string"
},
"friendlyName" : {
"type" : "string"
},
"uiDeviceType" : {
"type" : "string"
"enum" : ["Server / Hypervisor", "iDRAC", "Chassis", "Networking", "Fluid
File System (Fluid FS)", "PeerStorage(PS) / Equallogic", "Storage Center (SC) /
Compellent", "Software", "Solution", "Virtual Machine"]
},
"deviceSubType" : {
"type" : "string"
"enum" : ["Webscale"]
},
"deviceFamily" : {
"type" : "string"
"enum" : ["SCVMM", "SANHQ", "vCenter", "HitKitVSMForVMWare"]
},
"credentialAccountId" : {
"type" : "string"
},
"credentialProfileId" : {
"type" : "string"
},
"enableMonitoring" : {
"type" : "boolean"
},
"enableDeepDiscovery" : {
"type" : "boolean"
},
"configureSNMP" : {
"type" : "boolean"
},
"installOMSA" : {
"type" : "boolean"
},
"deviceGroupInformation" : {
"type" : "object",
"id" : "UIDeviceGroupInformation",
"properties" : {
"name" : {
"type" : "string"

SupportAssist Enterprise
29 REST API Guide – SupportAssist Enterprise
},
}
}
}
}
Parameters required for adding devices
Parameter Description
deviceAddress IP address or host name of the device.
friendlyName A name that you want to assign to the device.
uiDeviceType Device type defined in the GUI. For the possible values for this parameter, see the JSON schema.
deviceSubType Device sub type. For the possible values for this parameter, see the JSON schema.
deviceFamily Device family, required mostly for the software device type. For the possible values for this parameter, see the JSON schema.
credentialAccountId Unique identifier of the Account Credentials required to add the device.
credentialProfileId Unique identifier of the Credential Profile required to add the device. This parameter is required only when the enableDeepDiscovery parameter is set to true.
enableMonitoring Defines whether SupportAssist Enterprise must monitor the device. The possible values are true or false.
enableDeepDiscovery Defines whether SupportAssist Enterprise should discover other devices that are associated with a primary device. For example, blade servers in chassis. The possible values are true or false.
configureSNMP Defines whether the SNMP settings of the device should be configured after the device is added successfully. The possible values are true or false.
installOMSA Defines whether SupportAssist Enterprise should install OMSA after the device is added successfully. The possible values are true or false.
deviceGroupInformation Name of the device group where the device should be placed. If the device group information is not provided, the device is added to default or staging group.

SupportAssist Enterprise
30 REST API Guide – SupportAssist Enterprise
Parameters required in the JSON request body based on the device type
Device Type
Parameters required
uiDeviceType
deviceSubT
ypeEnum
deviceFamilyT
ypeEnum
Windows Server Server / Hypervisor null null
Linux Server Server / Hypervisor null null
ESX Server Server / Hypervisor null null
EXSi Server Server / Hypervisor null null
iDRAC iDRAC null null
Chassis Chassis null null
Networking Networking null null
Fluid FS Fluid File System (Fluid FS) null null
Equallogic PeerStorage(PS) / Equallogic null null
Compellent Storage Center (SC) / Compellent
null null
SCVMM Software null SCVMM
SANHQ Software null SANHQ
vCenter Software null vCenter
HitKitVSMForVM
Ware
Software null HitKitVSMForVMWare
Solution Solution Webscale null
Windows
Virtual
Machine
Virtual Machine null null
Linux Virtual
Machine
Virtual Machine null null
2.6.1 Add device Add device is asynchronous operation. For asynchronous operations, a job is created. You can check the status
of the job by using the “operations” API. After the add device request is submitted, SupportAssist Enterprise
returns the operation ID of the job.
The following resource URI is used to add a device:
https://<BASE_URI>/SupportAssist/api/v1/Device/Discover
Method: POST
Headers:
Content-Type: application/json
Authorization: Bearer <Authentication_Token>

SupportAssist Enterprise
31 REST API Guide – SupportAssist Enterprise
The following is an example of a JSON for adding a device.
Request body:
{
"deviceAddress": "<ip address/host name>",
"friendlyName": "device friendly name",
"uiDeviceType": "<ui device Type>",
"deviceSubType": "<Sub type>",
"deviceFamily": "<device family>",
"credentialAccountId": "<Credential Account Id>",
"credentialProfileId": "<Credential profile id>",
"enableMonitoring": <true|false>,
"configureSNMP": <true|false>,
"installOMSA": <true|false>,
"enableDeepDiscovery": <true|false>
}
Response format (Accepted – response code 202):
{
"operationId": "<operation_id>",
"operationType": "DiscoverDevice",
"status": "QUEUED",
"additionalInfo": null
}
Job success status response
{
"operationId": "<operation_id>",
"operationType": "DiscoverDevice",
"status": "SUCCESS",
"additionalInfo": [
{
"errorCode": "SA-90100",
"message": "Operation successful.",
"additionalInfo": "<device_id>"
}
]
}
Note: The response contains the device id of the added device.
2.6.2 Edit device details The following resource URI is used to edit the details of a device:
https://<BASE_URI>/SupportAssist/api/v1/Device
Method: PUT
Headers:
Content-Type: application/json
Authorization: Bearer <Authentication_Token>

SupportAssist Enterprise
32 REST API Guide – SupportAssist Enterprise
The following is an example of a JSON for editing the device details.
Request body:
{
"id":"<device_id_to_be_update>",
“credentialAccountId”:”<Credential_account_to_update>”,
"friendlyName":"<provided_name_to_Update>",
"address":"<IP Address/hostname>",
"deviceGroupInformation":{"name":"<group name>"}
}
Response format (Accepted – response code 202):
{
"operationId": "<operation_id>",
"operationType": "DiscoverDevice",
"status": "QUEUED",
"additionalInfo": null
}
Job success status response
{
"operationId": "<operation_id>",",
"operationType": "EditDevice",
"status": "SUCCESS",
"additionalInfo": [
{
"errorCode": "SA-90100",
"message": "Operation successful.",
"additionalInfo": "<device_id>","
}
]
}
Note: A device group would only be assigned if the devices are not in the Staging area.
2.6.3 Delete devices The following resource URI is used to delete devices:
https://<BASE_URI>/SupportAssist/api/v1/Device/{<Device_Id>}
Note: You can delete only one device in a single operation.
Method: DELETE
Headers:
Content-Type: application/json
Authorization: Bearer <Authentication_Token>
Response format (success – response code 204): none

SupportAssist Enterprise
33 REST API Guide – SupportAssist Enterprise
2.6.4 Retrieve devices The JSON schema for retrieving device details is as follows:
{
"type" : "object",
"id" : "Device",
"properties" : {
"id" : {
"type" : "string"
},
"friendlyName" : {
"type" : "string"
},
"address" : {
"type" : "string"
},
"serviceTag" : {
"type" : "string"
},
"uiDeviceType" : {
"type" : "string"
"enum" : ["Server , Storage , Networking , Chassis , Software , Solution ,
VirtualMachine”]
},
"deviceSubtype" : {
"type" : "string"
"enum" : ["Windows", "Linux", "ESX", "EXSi", "Webscale"]
},
"deviceFamily" : {
"type" : "string"
"enum" : ["SCVMM", "SANHQ", "vCenter", "HitKitVSMForVMWare"]
},
"model" : {
"type" : "string"
},
"osInformation" : {
"type" : "object",
"id" : "OSInformation",
"properties" : {
"code" : {
"type" : "string",
"enum" : [ "WIN", "SLES", "RHEL", "CENTOS", "DEBIAN", "UBUNTU", "ESX",
"ESXi", "XenServer", "UNCLASSIFIED", "OEL", "OracleVMserver" ]
},
"type" : {
"type" : "string"
},
"architecture" : {
"type" : "string",
"enum" : [ "x86", "x64", "UNCLASSIFIED" ]
},
"majorVersion" : {
"type" : "string"
},
"minorVersion" : {
"type" : "string"
},
"revisionNumber" : {

SupportAssist Enterprise
34 REST API Guide – SupportAssist Enterprise
"type" : "string"
},
"buildNumber" : {
"type" : "string"
},
"patchLevel" : {
"type" : "string"
}
}
},
"softwareInformation" : {
"type" : "object",
"id" : "SoftwareInformation",
"properties" : {
"softwareVersion" : {
"type" : "string"
},
"studioVersion" : {
"type" : "string"
},
"studioBuildVersion" : {
"type" : "string"
},
"softwareHostName" : {
"type" : "string"
},
"architecture" : {
"type" : "string"
},
"databaseInstanceName" : {
"type" : "string"
},
"databaseServerName" : {
"type" : "string"
},
"databaseName" : {
"type" : "string"
},
"productId" : {
"type" : "string"
},
"serverInterfaceName" : {
"type" : "string"
},
"clustureId" : {
"type" : "string"
},
"clustureName" : {
"type" : "string"
}
}
},
"omsaVersion" : {
"type" : "string"
},
"ismVersion" : {
"type" : "string"
},

SupportAssist Enterprise
35 REST API Guide – SupportAssist Enterprise
"credentialAccountId" : {
"type" : "string"
},
"credentialProfileId" : {
"type" : "string"
},
"useCredentialType" : {
"type" : "string"
},
"associatedConsoleId" : {
"type" : "string"
},
"deviceActiveStatus" : {
"type" : "string"
},
"deviceGroupInformation" : {
"type" : "object",
"id" : "DeviceGroupInformation",
"properties" : {
"orId" : {
"type" : "string"
},
"myGroupId" : {
"type" : "string"
},
"name" : {
"type" : "string"
},
"description" : {
"type" : "string"
}
}
},
"operations" : {
"type" : "object",
"id" : "DeviceOperations",
"properties" : {
"installOMSA" : {
"type" : "string"
},
"configureSNMP" : {
"type" : "string"
},
"clearSELogs" : {
"type" : "string"
},
"monitoring" : {
"type" : "string"
},
"revalidation" : {
"type" : "string"
}
}
},
"inventoryValidationStatus" : {
"type" : "object",
"id" : "InventoryValidationStatus",
"properties" : {

SupportAssist Enterprise
36 REST API Guide – SupportAssist Enterprise
"connectivityStatus" : {
"type" : "object",
"id" : "InventoryValidationOperationStatus",
"properties" : {
"status" : {
"type" : "string"
},
"errorCode" : {
"type" : "string"
},
"errorDescrition" : {
"type" : "string"
}
}
},
"collectionDependencyStatus" : {
"type" : "object",
"$ref" : "InventoryValidationOperationStatus"
},
"monitoringStatus" : {
"type" : "object",
"$ref" : "InventoryValidationOperationStatus"
},
"rollupStatus" : {
"type" : "object",
"$ref" : "InventoryValidationOperationStatus"
},
"startTime" : {
"type" : "integer",
"format" : "utc-millisec"
},
"lastValidatedon" : {
"type" : "integer",
"format" : "utc-millisec"
}
}
},
"prioritizedStatus" : {
"type" : "object",
"id" : "DeviceStatus",
"properties" : {
"operationType" : {
"type" : "string"
},
"status" : {
"type" : "string"
},
"statusCode" : {
"type" : "string"
},
"statusMessage" : {
"type" : "string"
},
"statusMessageDetails" : {
"type" : "string"
},
"statusUpdatedOn" : {
"type" : "integer",

SupportAssist Enterprise
37 REST API Guide – SupportAssist Enterprise
"format" : "utc-millisec"
}
}
},
"collectionProgressStatus" : {
"type" : "object",
"id" : "CollectionProgressStatus",
"properties" : {
"progressStatus" : {
"type" : "string"
},
"progressValue" : {
"type" : "integer"
},
"collectionType" : {
"type" : "string"
},
"collectionId" : {
"type" : "string"
},
"shCanBut" : {
"type" : "string"
},
"multiDeviceColInProgress" : {
"type" : "string"
}
}
},
"deviceDiscoveredOn" : {
"type" : "integer",
"format" : "utc-millisec"
}
}
}
Parameters in the JSON schema
Parameter Description
Id Unique identifier of the device.
friendlyName Friendly name of the device.
Address IP address or host name of the device.
serviceTag Service Tag of the devices.
uiDeviceType Device type defined in the GUI. For the possible values for this parameter, see the JSON schema.
deviceSubtype Device sub type. For the possible values for this parameter, see the JSON schema.
deviceFamily Device family. For the possible values for this parameter, see the JSON schema.
Model Model of device.
osInformation For information, see Table 11.
softwareInformation For information, see Error! Reference source not found..
SupportAssist Enterprise
38 REST API Guide – SupportAssist Enterprise
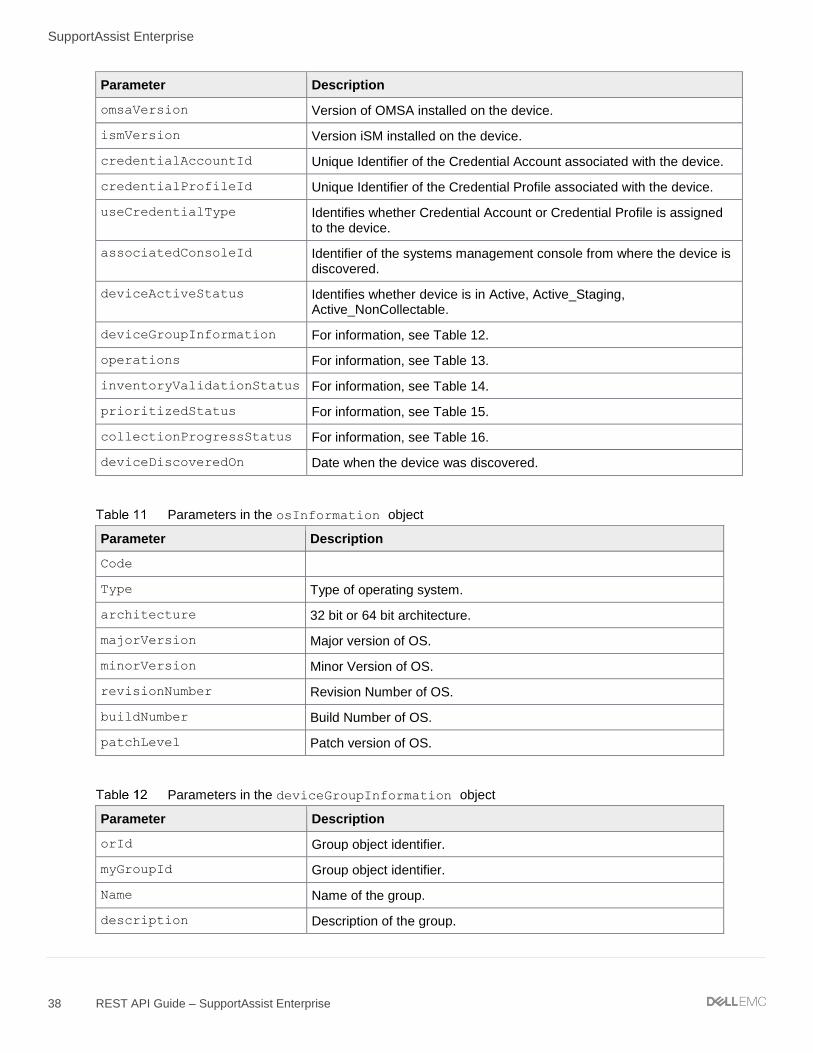
Parameter Description
omsaVersion Version of OMSA installed on the device.
ismVersion Version iSM installed on the device.
credentialAccountId Unique Identifier of the Credential Account associated with the device.
credentialProfileId Unique Identifier of the Credential Profile associated with the device.
useCredentialType Identifies whether Credential Account or Credential Profile is assigned to the device.
associatedConsoleId Identifier of the systems management console from where the device is discovered.
deviceActiveStatus Identifies whether device is in Active, Active_Staging, Active_NonCollectable.
deviceGroupInformation For information, see Table 12.
operations For information, see Table 13.
inventoryValidationStatus For information, see Table 14.
prioritizedStatus For information, see Table 15.
collectionProgressStatus For information, see Table 16.
deviceDiscoveredOn Date when the device was discovered.
Parameters in the osInformation object
Parameter Description
Code
Type Type of operating system.
architecture 32 bit or 64 bit architecture.
majorVersion Major version of OS.
minorVersion Minor Version of OS.
revisionNumber Revision Number of OS.
buildNumber Build Number of OS.
patchLevel Patch version of OS.
Parameters in the deviceGroupInformation object
Parameter Description
orId Group object identifier.
myGroupId Group object identifier.
Name Name of the group.
description Description of the group.

SupportAssist Enterprise
39 REST API Guide – SupportAssist Enterprise
Parameters in the operations object
Parameter Description
installOMSA Defines whether SupportAssist Enterprise should install OMSA after the device is added successfully. The possible values are true or false.
configureSNMP Defines whether SNMP settings of the device should be configured after the device is added successfully. The possible values are true or false.
clearSELogs System Event Log status.
monitoring Device monitoring status.
revalidation Identifies if the device is in revalidation.
Parameters in the inventoryValidationStatus object
Parameter Description
Type Inventory validation type.
errorCode Error code for inventory validation.
errorDescrition Error message.
Parameters in the prioritizedStatus object
Parameter Description
operationType Type of operation.
Status Prioritized status of the operation.
statusCode Prioritized status code of the operation.
statusMessage Status message for the operation.
statusMessageDetails Message description of the operation
statusUpdatedOn Date in millisecond, when the status was updated.
Parameters in the collectionProgressStatus object
Parameter Description
progressStatus Status of the collection.
progressValue Percentage completion of the collection.
collectionType Type of collection: Periodic or Manual.
collectionId Collection identifier.
shCanBut
multiDeviceColInProgress Identifies whether a multiple device collection is in progress.
SupportAssist Enterprise
40 REST API Guide – SupportAssist Enterprise
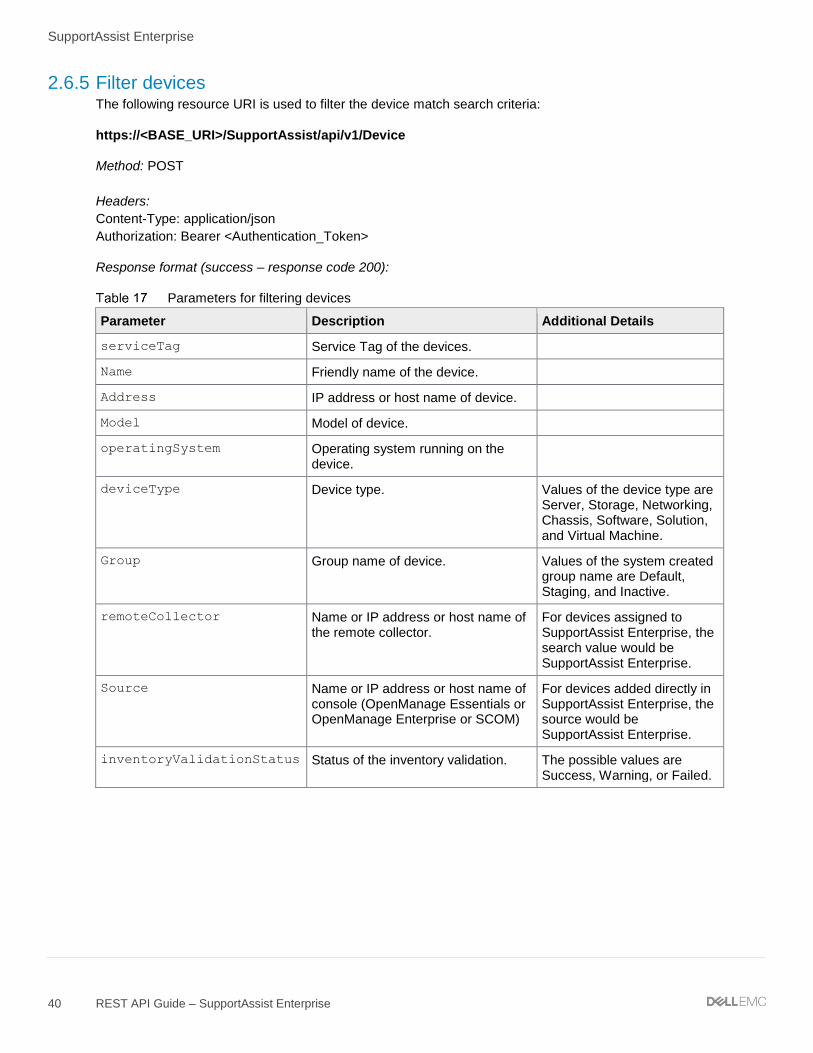
2.6.5 Filter devices The following resource URI is used to filter the device match search criteria:
https://<BASE_URI>/SupportAssist/api/v1/Device
Method: POST
Headers:
Content-Type: application/json
Authorization: Bearer <Authentication_Token>
Response format (success – response code 200):
Parameters for filtering devices
Parameter Description Additional Details
serviceTag Service Tag of the devices.
Name Friendly name of the device.
Address IP address or host name of device.
Model Model of device.
operatingSystem Operating system running on the device.
deviceType Device type. Values of the device type are Server, Storage, Networking, Chassis, Software, Solution, and Virtual Machine.
Group Group name of device. Values of the system created group name are Default, Staging, and Inactive.
remoteCollector Name or IP address or host name of the remote collector.
For devices assigned to SupportAssist Enterprise, the search value would be SupportAssist Enterprise.
Source Name or IP address or host name of console (OpenManage Essentials or OpenManage Enterprise or SCOM)
For devices added directly in SupportAssist Enterprise, the source would be SupportAssist Enterprise.
inventoryValidationStatus Status of the inventory validation. The possible values are Success, Warning, or Failed.

SupportAssist Enterprise
41 REST API Guide – SupportAssist Enterprise
Parameters in the pagination object
Parameter Description Additional Details
Offset Number of entities to be skipped. If the offset is 10 and limit is 20, then 11-20 entities would be retrieved.
Limit Number of entities to be retrieved. Maximum values would be 40 if more than 40 given then SupportAssist Enterprise would default it to 40
Total Total number of entities that match the search criteria.
The total value is reported by SupportAssist Enterprise.
Parameters in the filters object
Parameter Description Additional Details
operator Type of comparison. The possible values are “contains” or “in”.
field Parameter for filtering. For information, see Table 17.
value This parameter is required when using the “contains” operator.
values This parameter is required when using the “in” operator.
The following is an example for searching the first device where device type is server.
{
"pagination": {
"offset": 0,
"limit": 1
},
"filters": [
{
"operator": "contains",
"field":"devicetype",
"value":"server"
}
]
}

SupportAssist Enterprise
42 REST API Guide – SupportAssist Enterprise
Response format (success – response code 200):
[
{
"id":"<device_id>",",
"friendlyName":"192.168.151.65",
"address":"192.168.151.65",
"serviceTag":"HFB2X02",
"uiDeviceType":"Server / Hypervisor",
"deviceSubtype":"LINUX",
"deviceFamily":"POWEREDGE12G",
"model":"PowerEdge R520",
"osInformation":{
"code":"CENTOS",
"type":"CentOS Linux 7 (Core)",
"architecture":"x64",
"majorVersion":"7",
"minorVersion":"0",
"revisionNumber":null,
"buildNumber":null,
"patchLevel":null
},
"softwareInformation":null,
"omsaVersion":null,
"ismVersion":null,
"credentialAccountId":"Lin_1",
"credentialProfileId":null,
"useCredentialType":"DEVICE_CRED",
"associatedConsoleId":null,
"deviceActiveStatus":"ACTIVE_STAGING",
"deviceGroupInformation":{
"orId":"#13:1",
"myGroupId":null,
"name":"Staging",
"description":null,
"noOfAssetsMapped":0,
"uiCustomerProfiles":null,
"uiShippingAddressDetails":null,
"uiDeviceGroupCredentials":null,
"dispatchOptIn":false,
"myTDAccountID":null,
"myTDAccountUserName":null
},
"operations":{
"installOMSA":"NOT_SUPPORTED",
"configureSNMP":"SUPPORTED",
"clearSELogs":"NOT_SUPPORTED",
"monitoring":"SUPPORTED",
"revalidation":"N"
},
"inventoryValidationStatus":{
"connectivityStatus":{
"status":"FAILED",
"errorCode":"SA-5100",
"errorDescrition":""
},
"collectionDependencyStatus":{
"status":"WARNING",

SupportAssist Enterprise
43 REST API Guide – SupportAssist Enterprise
"errorCode":"SA-9000",
"errorDescrition":""
},
"monitoringStatus":{
"status":"WARNING",
"errorCode":"SA-9000",
"errorDescrition":""
},
"rollupStatus":{
"status":"FAILED",
"errorCode":null,
"errorDescrition":null
},
"startTime":null,
"lastValidatedon":1527085920138
},
"prioritizedStatus":{
"operationType":"REDISCOVER_DEVICE",
"status":"ERROR",
"statusCode":null,
"statusMessage":"Unable to add device",
"statusMessageDetails":"SupportAssist Enterprise is unable to add the
device 192.168.151.65 because an attempt to connect to the device is
unsuccessful.Make sure that both the system running SupportAssist Enterprise and
the device you are trying to add are connected to the network and retry the
operation.",
"statusUpdatedOn":1526064151204
},
"collectionProgressStatus":{
"progressStatus":null,
"progressValue":0,
"collectionType":null,
"collectionId":null,
"shCanBut":"N",
"multiDeviceColInProgress":"N"
},
"deviceDiscoveredOn":1526064151204
}
],
"searchQuery":{
"pagination":{
"offset":0,
"limit":1,
"total":17
}
}
Total is the total number of devices reported by SupportAssist Enterprise.

SupportAssist Enterprise
44 REST API Guide – SupportAssist Enterprise
2.7 Maintenance mode The maintenance mode feature suspends the alert processing and automatic case creation capability of
SupportAssist Enterprise, thereby preventing the creation of support cases during an alert storm or a planned
maintenance activity. If an alert storm is received from a monitored device, SupportAssist Enterprise automatically
places the device in maintenance mode. You can also manually enable the maintenance mode functionality
before a planned maintenance activity to temporarily suspend the automatic case creation capability.
2.7.1 Device maintenance mode The following resource URI is used to place the device in and out of maintenance mode:
https://<BASE_URI>/SupportAssist/api/v1/Device/MaintenanceMode/<action>
The possible values for <action> in the URI are “enable” or “disable”
Method: POST
Headers:
Content-Type: application/json
Authorization: Bearer <Authentication_Token>
The following is an example to enable maintenance mode for two devices:
https://<BASE_URI>/SupportAssist/api/v1/Device/MaintenanceMode/enable
Request body:
[
{"id": "<Device_id>"},
{"id": "<Device_id>"}
]
Response format (success – response code 204): none
The following is an example to disable maintenance mode for two devices:
https://<BASE_URI>/SupportAssist/api/v1/Device/MaintenanceMode/disable
Request body:
[
{"id": "<Device_id>"},
{"id": "<Device_id>"}
]
Response format (success – response code 204): none
2.7.2 Site maintenance mode The following resource URI is used to place SupportAssist Enterprise in maintenance mode:
https://<BASE_URI>/SupportAssist/api/v1/Global/MaintenanceMode/<action>
The possible values for action in the URI are “enable” or “disable”
Method: POST

SupportAssist Enterprise
45 REST API Guide – SupportAssist Enterprise
Headers:
Content-Type: application/json
Authorization: Bearer <Authentication_Token>
Response format (success – response code 204): none
The resource URI to enable global maintenance mode is as follows:
https://<BASE_URI>/SupportAssist/api/v1/Global/MaintenanceMode/enable
The resource URI to disable global maintenance mode is as follows:
https://<BASE_URI>/SupportAssist/api/v1/Global/MaintenanceMode/disable
SupportAssist Enterprise
46 REST API Guide – SupportAssist Enterprise
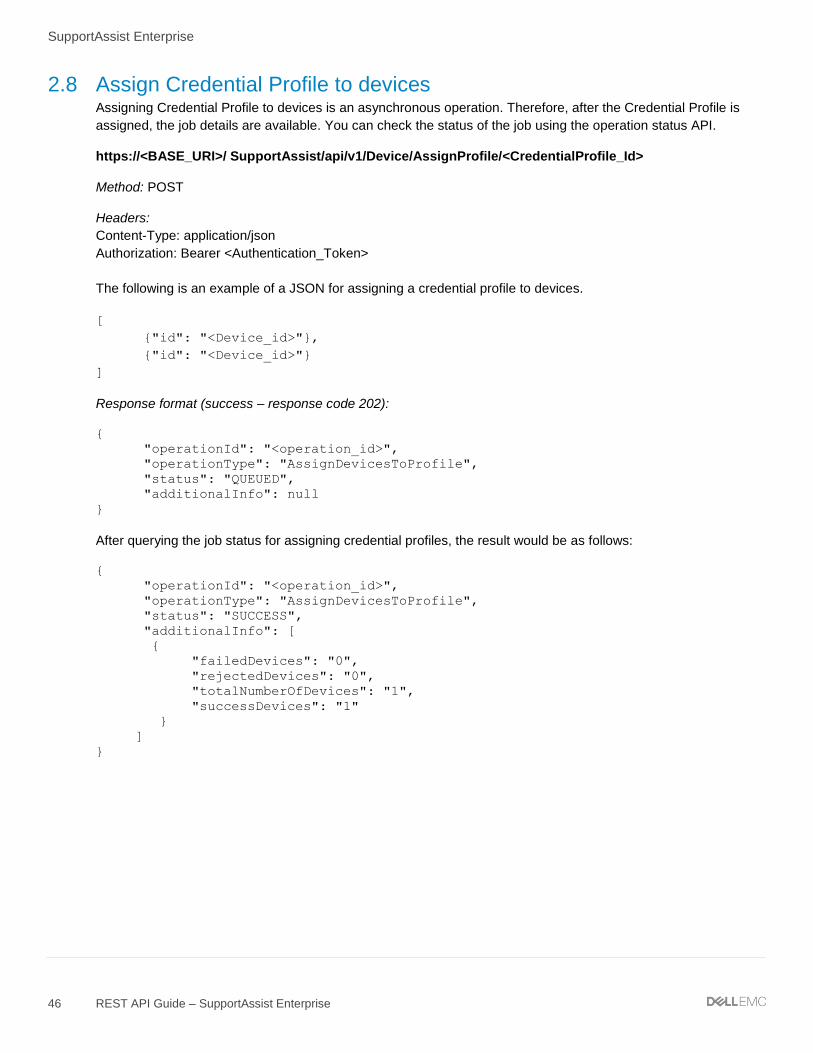
2.8 Assign Credential Profile to devices Assigning Credential Profile to devices is an asynchronous operation. Therefore, after the Credential Profile is
assigned, the job details are available. You can check the status of the job using the operation status API.
https://<BASE_URI>/ SupportAssist/api/v1/Device/AssignProfile/<CredentialProfile_Id>
Method: POST
Headers:
Content-Type: application/json
Authorization: Bearer <Authentication_Token>
The following is an example of a JSON for assigning a credential profile to devices.
[
{"id": "<Device_id>"},
{"id": "<Device_id>"}
]
Response format (success – response code 202):
{
"operationId": "<operation_id>",
"operationType": "AssignDevicesToProfile",
"status": "QUEUED",
"additionalInfo": null
}
After querying the job status for assigning credential profiles, the result would be as follows:
{
"operationId": "<operation_id>",
"operationType": "AssignDevicesToProfile",
"status": "SUCCESS",
"additionalInfo": [
{
"failedDevices": "0",
"rejectedDevices": "0",
"totalNumberOfDevices": "1",
"successDevices": "1"
}
]
}

SupportAssist Enterprise
47 REST API Guide – SupportAssist Enterprise
2.9 Collection A collection contains the system information collected by SupportAssist Enterprise from a device. The collection is
used by Technical Support to troubleshoot and provide a resolution to issues. You can perform a single or
multiple device collection.
Note: To collect system information from multiple devices, the purpose parameter is mandatory
The following is the JSON schema for performing a single or multiple device collection.
{
"type":"object",
"id":"CollectionInput",
"properties":{
"devices":{
"type":"array",
"items":{
"type":"object",
"id":"Device",
"properties":{
"id":{
"type":"string"
}
}
}
},
"collectionName":{
"type":"string"
},
"caseId":{
"type":"string"
},
"uploadRequired":{
"type":"boolean"
},
"emailId":{
"type":"string"
},
"purpose":{
"type":"string"
"enum":["Technical Support","Deployment","System
Maintenance","Consulting"]
},
"projectId":{
"type":"string"
}
}
}
Parameters required for collecting system information
Parameter Description Additional Details
devices A collection of devices; only the id property is consumed in this object.
This parameter is required.
collectionName A name that you want to assign to the collection.
This parameter is optional.

SupportAssist Enterprise
48 REST API Guide – SupportAssist Enterprise
Parameter Description Additional Details
caseId The support request number provided by the Dell EMC Technical support agent.
This parameter is optional.
uploadRequired Defines whether SupportAssist Enterprise should upload the collection after it is complete. The possible values are “true” or “false”.
This parameter is optional for a single device collection.
emailId Email address of the Dell EMC Technical support agent.
This parameter is optional for a single device collection.
purpose Reason for the collection. The possible values for purpose are:
• Technical Support
• Deployment
• System Maintenance
• Consulting
This parameter is mandatory for multiple device collections.
projectId Deployment project identifier. This parameter is optional.
The following resource URI is used to collect system information:
https://<BASE_URI>/ SupportAssist /api/v1/Collections/Invoke
Method: POST
Headers:
Content-Type: application/json
Authorization: Bearer <Authentication_Token>
Request body:
{
"devices": [
{"id": "<device_id>"},
{"id": "<device_id>"}
],
"collectionName": "provided name of collection",
"caseId": "casenumber",
"uploadRequired": true,
"emailId": "[email protected]",
"purpose":"Techsupport",
"projectId": "project_id"
}
Response format (Accepted – response code 202):
{
"operationId": "<operation_id>",
"operationType": "RunDiagnostics",
"status": "QUEUED",
"additionalInfo": null
}

SupportAssist Enterprise
49 REST API Guide – SupportAssist Enterprise
After completion of the job, the status would be as follows:
{
"operationId": ""<operation_id>",
"operationType": "RunDiagnostics",
"status": "COMPLETED",
"additionalInfo": [
{
"status": "TROUBLESHOOTING_UPLOADED",
"progressPercentage": "100",
"id": "<collection id>"
}
]
}

SupportAssist Enterprise
50 REST API Guide – SupportAssist Enterprise
2.10 Discovery Rule A device discovery rule enables you to discover and add devices that are present within one or more IP address
ranges. Creating a device discovery rule helps you add multiple devices, and reduces the effort involved in adding
each device individually.
2.10.1 Retrieve Discovery Rule The following resource URI is used to retrieve all device discovery rules:
https://<BASE_URI>/SupportAssist/api/v1/DiscoveryRule
Method: GET
Headers:
Authorization: Bearer <Authentication_Token>
The following is the JSON schema for retrieving a discovery rule.
{
"type" : "object",
"id" : "DeviceDiscoveryRuleObject",
"properties" : {
"id" : {
"type" : "string"
},
"ruleName" : {
"type" : "string"
},
"credProfileId" : {
"type" : "string"
},
"deepDiscoveryEnabled" : {
"type" : "boolean"
},
"enableMonitoring" : {
"type" : "boolean"
},
"installAgent" : {
"type" : "boolean"
},
"configureSNMP" : {
"type" : "boolean"
},
"runStatus" : {
"type" : "string"
},
"range" : {
"type" : "array",
"items" : {
"type" : "object",
"id" : "DeviceDisocveryRangeObject",
"properties" : {
"ipRange" : {
"type" : "string"
},
"subnet" : {
"type" : "string"

SupportAssist Enterprise
51 REST API Guide – SupportAssist Enterprise
}
}
}
},
"isRecurring" : {
"type" : "boolean"
},
"recurrCronString" : {
"type" : "string"
},
"uiDeviceType" : {
"type" : "array",
"items" : {
"type" : "string"
}
},
"uiDeviceSubType" : {
"type" : "array",
"items" : {
"type" : "string"
}
},
"ruleId" : {
"type" : "string"
},
"lastRunDate" : {
"type" : "integer",
"format" : "utc-millisec"
},
"typeSelected" : {
"type" : "string",
"enum" : [ "RANGE", "DEVICES" ]
},
"devices" : {
"type" : "string"
},
"recurring" : {
"type" : "boolean"
}
}
}

SupportAssist Enterprise
52 REST API Guide – SupportAssist Enterprise
Parameters in the JSON schema
Parameter Description Additional details
id Identifier for the discovery rule. This parameter is required to run the discovery rule.
ruleName Name of the discovery rule.
credProfileId Identifier for the credential profile.
deepDiscoveryEnabled Specifies whether deep discovery is to be performed.
This parameter is required for deep discovery.
enableMonitoring Specifies whether monitoring is to be enabled for the discovered devices.
installAgent Specifies whether OMSA must be installed on the discovered servers.
configureSNMP Specifies whether SNMP settings (alert forwarding) must be configured on the devices.
runStatus Running status of the rule.
range Array of range and subnet
subnet Array of IP address ranges and subnet.
isRecurring Specifies whether the rule should be run periodically.
recurrCronString Cron string if the rule is set to recur.
uiDeviceType List of device type as specified in the GUI.
uiDeviceSubType List of device subtype.
ruleId Identifier for the rule.
lastRunDate Date in UTC in milliseconds.
typeSelected Specifies whether IP address range or device names are provided for discovery.
devices Used to provide comma-separated IP addresses.
recurring Specifies whether the rule is set to recur.

SupportAssist Enterprise
53 REST API Guide – SupportAssist Enterprise
Response format (success – response code 200):
[{
"id": "<rule_id>",
"ruleName": "rule-import-devices",
"credProfileId": "<credential profile id>",
"deepDiscoveryEnabled": true,
"enableMonitoring": true,
"installAgent": true,
"configureSNMP": true,
"runStatus": "NEVEREXECUTED",
"range": [],
"isRecurring": true,
"recurrCronString": "1||Sunday||0||AM||Monthly",
"uiDeviceType": ["PowerVault",
"Software"],
"uiDeviceSubType": ["SCVMM"],
"ruleId": "<rule id>",
"lastRunDate": null,
"typeSelected": "DEVICES",
"devices":
"host1.domain.com,192.168.0.1,192.168.0.2,host2.domain.com,172.29.41.255,host3.doma
in.com,172.29.43.145,172.29.40.207",
"recurring": true
},
{
"id": "<rule_id>",
"ruleName": "rule-iprange",
"credProfileId": ""<credential profile id>",
"deepDiscoveryEnabled": true,
"enableMonitoring": true,
"installAgent": true,
"configureSNMP": true,
"runStatus": "NEVEREXECUTED",
"range": [{
"ipRange": "172.28.8.120-122",
"subnet": "255.255.255.0"
}],
"isRecurring": true,
"recurrCronString": "1||Sunday||0||AM||Monthly",
"uiDeviceType": ["PowerVault",
"Software"],
"uiDeviceSubType": ["SCVMM"],
"ruleId": ""<rule id>",
"lastRunDate": null,
"typeSelected": "RANGE",
"devices": null,
"recurring": true
}]

SupportAssist Enterprise
54 REST API Guide – SupportAssist Enterprise
2.10.2 Run Discovery Rule The following resource URI is used to run a device discovery rule:
https://<BASE_URI> api/v1/DiscoveryRule/execute/<rule id>
Method: POST
Headers:
Content-Type: application/json
Authorization: Bearer <Authentication_Token>
Response format (Accepted – response code 202):
{
"operationId": "<operation_id>",
"operationType": "ExecuteDeviceDiscoveryRule",
"status": "QUEUED",
"additionalInfo": null
}
}
After the job is complete, the status is as follows:
{
"operationId": "<operation_id>",
"operationType": "ExecuteDeviceDiscoveryRule",
"status": "COMPLETE",
"additionalInfo": [
"<rule id>"
]
}

SupportAssist Enterprise
55 REST API Guide – SupportAssist Enterprise
2.11 Retrieve cases You can retrieve up to 40 support cases. While retrieving cases you can also filter the results based on certain
criteria.
Multiple filters can be applied by using the AND operation.
{
"type" : "object",
"id" : "PaginatedData",
"properties" : {
"data" : {
"type" : "array"
},
"searchQuery" : {
"type" : "object",
"id" : "SearchQuery",
"properties" : {
"pagination" : {
"type" : "object",
"id" : "Pagination",
"properties" : {
"offset" : {
"type" : "integer"
},
"limit" : {
"type" : "integer"
},
"total" : {
"type" : "integer"
}
}
},
"filters" : {
"type" : "array",
"items" : {
"type" : "object",
"id" : "FilterDescription",
"properties" : {
"operator" : {
"type" : "string",
"enum" : ["contains", "in"]
},
"field" : {
"type" : "string"
"enum" : ["serviceTag", "number", "title", "status", "deviceName",
"ipAddress", "deviceType", " serviceContract", "source"] },
"value" : {
"type" : "string"
},
"values" : {
"type" : "array",
"items" : {
"type" : "string"
}
}
}
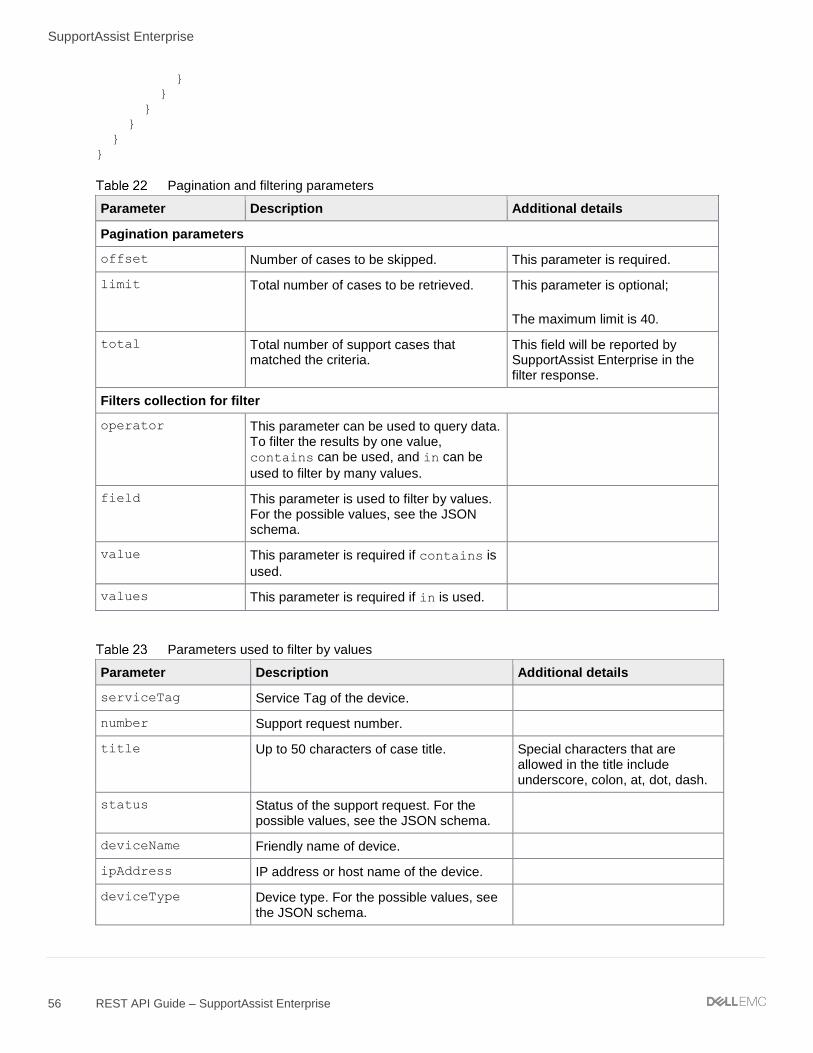
SupportAssist Enterprise
56 REST API Guide – SupportAssist Enterprise
}
}
}
}
}
}
Pagination and filtering parameters
Parameter Description Additional details
Pagination parameters
offset Number of cases to be skipped. This parameter is required.
limit Total number of cases to be retrieved. This parameter is optional;
The maximum limit is 40.
total Total number of support cases that matched the criteria.
This field will be reported by SupportAssist Enterprise in the filter response.
Filters collection for filter
operator This parameter can be used to query data. To filter the results by one value, contains can be used, and in can be
used to filter by many values.
field This parameter is used to filter by values. For the possible values, see the JSON schema.
value This parameter is required if contains is
used.
values This parameter is required if in is used.
Parameters used to filter by values
Parameter Description Additional details
serviceTag Service Tag of the device.
number Support request number.
title Up to 50 characters of case title. Special characters that are allowed in the title include underscore, colon, at, dot, dash.
status Status of the support request. For the possible values, see the JSON schema.
deviceName Friendly name of device.
ipAddress IP address or host name of the device.
deviceType Device type. For the possible values, see the JSON schema.

SupportAssist Enterprise
57 REST API Guide – SupportAssist Enterprise
Parameter Description Additional details
serviceContract Service Contract. For the possible values, see the JSON schema.
source Source of the support request. For the possible values, see the JSON schema.
The following is the JSON schema for the case object.
{
"type" : "object",
"id" : "Case",
"properties" : {
"id" : {
"type" : "string"
},
"title" : {
"type" : "string"
},
"status" : {
"type" : "string",
"enum" : ["Open", "Submitted", "InProgress", "Suspended", "ReqForClosure"]
},
"source" : {
"type" : "string",
"enum" : ["Email", "Chat", "Phone", "SupportAssist", "HelpDesk",
"TechDirect", "Others"]
},
"saDeviceId" : {
"type" : "string"
},
"deviceName" : {
"type" : "string"
},
"deviceType" : {
"type" : "string",
"enum" : ["Server", "Storage", "Networking", "Chassis"]
},
"serviceTag" : {
"type" : "string"
},
"caseCreationDate" : {
"type" : "integer",
"format" : "utc-millisec"
},
"entitlementType" : {
"type" : "string",
"enum" : ["BasicSupport", "ProSupport", "ProSupportPlus", "ProSupportFlex",
"ProSupportOneforDataCenter"]
},
"entitlementDescription" : {
"type" : "string"
}
}
}

SupportAssist Enterprise
58 REST API Guide – SupportAssist Enterprise
Parameters in the JSON schema
Parameter Description Additional details
id Identifier assigned to the support request.
title Title assigned to the support request. Special characters that are allowed in the title include underscore, colon, at, dot, dash
status Status of the support request. For the possible values, see the JSON schema.
source Source of the support request. For the possible values, see the JSON schema.
saDeviceId Associated device identifier.
deviceName Name that has been assigned to the device.
deviceType Type of device. For the possible values, see the JSON schema.
serviceTag Service Tag of the device
caseCreationDate Case created date in UTC.
entitlementType Service contract of the device.
entitlementDescription Description of the service contract.
The following resource URI is used to retrieve support case information:
https://<BASE_URI>/SupportAssist/api/v1/Cases
Method: POST
Headers:
Content-Type: application/json
Authorization: Bearer <Authentication_Token>
Request format (success – response code 202):
The following is an example of a JSON for retrieving cases for the server device type.
{
"pagination": {
"offset": 0,
"limit": 40
},
"filters": [
{
"operator": "contains",
"field":"devicetype",
"value":"server"
}

SupportAssist Enterprise
59 REST API Guide – SupportAssist Enterprise
]
}
The following is an example of a JSON for retrieving cases for both server and networking device types.
{
"pagination": {
"offset": 0,
"limit": 40
},
"filters": [
{
"operator": "IN",
"field":"devicetype",
"values":["server", "networking"]
}
]
}
The following is an example of a JSON for retrieving cases for server and chassis where the case source is Email
or SupportAssist.
{
"pagination": {
"offset": 0,
"limit": 40
},
"filters": [
{
"operator": "IN",
"field":"deviceType",
"values":["server", "Chassis"]
},
{
"operator": "IN",
"field":"source",
"values":["Email","SupportAssist"]
}
]
}
The following is an example of a JSON for retrieving the 8th and 9th case, where the offset is 7
and the limit is 2.
{
"pagination" : {
"offset" : "7",
"limit" : "2"
},
"filters":[
{
"operator" : "contains",
"field":"source",
"value" : "others"
}
]
}
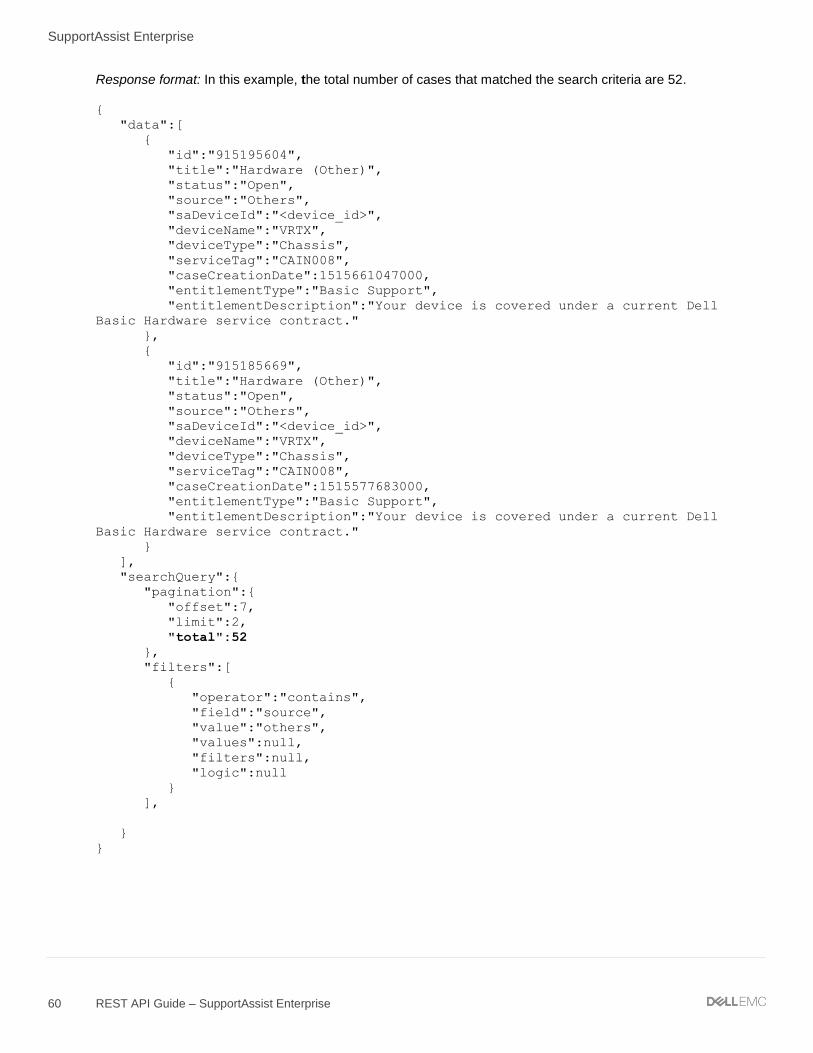
SupportAssist Enterprise
60 REST API Guide – SupportAssist Enterprise
Response format: In this example, the total number of cases that matched the search criteria are 52.
{
"data":[
{
"id":"915195604",
"title":"Hardware (Other)",
"status":"Open",
"source":"Others",
"saDeviceId":"<device_id>",
"deviceName":"VRTX",
"deviceType":"Chassis",
"serviceTag":"CAIN008",
"caseCreationDate":1515661047000,
"entitlementType":"Basic Support",
"entitlementDescription":"Your device is covered under a current Dell
Basic Hardware service contract."
},
{
"id":"915185669",
"title":"Hardware (Other)",
"status":"Open",
"source":"Others",
"saDeviceId":"<device_id>",
"deviceName":"VRTX",
"deviceType":"Chassis",
"serviceTag":"CAIN008",
"caseCreationDate":1515577683000,
"entitlementType":"Basic Support",
"entitlementDescription":"Your device is covered under a current Dell
Basic Hardware service contract."
}
],
"searchQuery":{
"pagination":{
"offset":7,
"limit":2,
"total":52
},
"filters":[
{
"operator":"contains",
"field":"source",
"value":"others",
"values":null,
"filters":null,
"logic":null
}
],
}
}

SupportAssist Enterprise
61 REST API Guide – SupportAssist Enterprise
2.12 Backup devices and groups You can create a backup of the devices that you have added and the device groups that you have created in
SupportAssist Enterprise. Backing up the devices and device groups enables you to restore the devices and
device group later, if necessary.
The following is the JSON schema for the response:
For more information about DeviceDiscovery Object, see the Add Device section.
{
"type":"array",
"items":{
"type":"object",
"id":"DeviceDiscovery",
"properties":{
"deviceAddress":{
"type":"string"
},
"friendlyName":{
"type":"string"
},
"uiDeviceType":{
"type":"string"
},
"deviceSubType":{
"type":"string"
},
"deviceFamily":{
"type":"string"
},
"credentialAccountId":{
"type":"string"
},
"credentialProfileId":{
"type":"string"
},
"enableMonitoring":{
"type":"boolean"
},
"enableDeepDiscovery":{
"type":"boolean"
},
"configureSNMP":{
"type":"boolean"
},
"installOMSA":{
"type":"boolean"
},
"deviceGroupInformation":{
"type":"object",
"id":"DeviceGroupInformation",
"properties":{
"orId":{
"type":"string"
},
"myGroupId":{
"type":"string"

SupportAssist Enterprise
62 REST API Guide – SupportAssist Enterprise
},
"name":{
"type":"string"
},
"description":{
"type":"string"
},
"noOfAssetsMapped":{
"type":"integer"
},
"uiCustomerProfiles":{
"type":"array",
"items":{
"type":"object",
"id":"CustomerProfile",
"properties":{
"customerProfileId":{
"type":"string"
},
"firstName":{
"type":"string"
},
"lastName":{
"type":"string"
},
"emailId":{
"type":"string"
},
"telephone":{
"type":"string"
},
"country":{
"type":"string"
},
"alternateTelephone":{
"type":"string"
},
"emailLanguage":{
"type":"string"
},
"company":{
"type":"string"
},
"profileType":{
"type":"string"
},
"preferredContactTimeFrame":{
"type":"string"
},
"preferredContactTimeZone":{
"type":"string"
},
"preferredContactMethod":{
"type":"string"
},
"alias":{
"type":"boolean"
},

SupportAssist Enterprise
63 REST API Guide – SupportAssist Enterprise
"dispatchDetailsEnabled":{
"type":"boolean"
},
"tdIntegrationEnabled":{
"type":"boolean"
},
"uiShippingAddressDetails":{
"type":"object",
"id":"ShippingAddressDetails",
"properties":{
"shippingAddressId":{
"type":"string"
},
"firstName":{
"type":"string"
},
"lastName":{
"type":"string"
},
"phone":{
"type":"string"
},
"email":{
"type":"string"
},
"preferredContactTimeZone":{
"type":"string"
},
"preferredContactTimeFrame":{
"type":"string"
},
"technicianRequired":{
"type":"boolean"
},
"dispatchNotes":{
"type":"string"
},
"state":{
"type":"string"
},
"country":{
"type":"string"
},
"cnjp":{
"type":"string"
},
"ie":{
"type":"string"
},
"address1":{
"type":"string"
},
"address2":{
"type":"string"
},
"city":{
"type":"string"
},

SupportAssist Enterprise
64 REST API Guide – SupportAssist Enterprise
"zip":{
"type":"string"
},
"address3":{
"type":"string"
}
}
}
}
}
}
}
}
}
}
}
The following resource URI is used to retrieve the devices and device groups:
https://<BASE_URI>/SupportAssist/api/v1/Device/Export
Method: GET
Headers:
Authorization: Bearer <Authentication_Token>
Response format (success – response code 200):
[
{
"deviceAddress": "<IP Address/hostname>",
"friendlyName": "iDRAC",
"uiDeviceType": "iDRAC",
"deviceSubType": "IDRAC",
"deviceFamily": "POWEREDGE14G",
"credentialAccountId": "",
"credentialProfileId": null,
"enableMonitoring": true,
"enableDeepDiscovery": false,
"configureSNMP": true,
"installOMSA": false,
"deviceGroupInformation": {
"orId": "#58:2",
"myGroupId": null,
"name": "One",
"description": null,
"noOfAssetsMapped": 0,
"uiCustomerProfiles": [
{
"customerProfileId": "#57:0",
"firstName": "Raj",
"lastName": "C",
"emailId": "[email protected]",
"telephone": "1234567890",
"country": null,
"alternateTelephone": "9876543210",
"emailLanguage": "en",
"company": "One",

SupportAssist Enterprise
65 REST API Guide – SupportAssist Enterprise
"profileType": "Primary",
"preferredContactTimeFrame": "8AM-8PM",
"preferredContactTimeZone": "(UTC+9:00) Asia/Jayapura",
"preferredContactMethod": "email",
"alias": false,
"dispatchDetailsEnabled": false,
"tdIntegrationEnabled": false,
"uiShippingAddressDetails": null
}
],
"uiShippingAddressDetails": {
"shippingAddressId": "#62:1",
"firstName": "Raj",
"lastName": "C",
"phone": "1234567890",
"email": "[email protected]",
"preferredContactTimeZone": "(UTC+5:00) Asia/Dushanbe",
"preferredContactTimeFrame": "9AM-5PM",
"technicianRequired": true,
"dispatchNotes": "",
"state": "karnataka",
"country": "AUT",
"address1": "dell-domlur",
"address3": "divya chambers",
"zip": "560075",
"city": "dharwad",
"cnjp": "",
"address2": "dell4",
"ie": ""
},
"uiDeviceGroupCredentials": null,
"dispatchOptIn": true,
"myTDAccountID": null
}
},
{
"deviceAddress": "172.28.41.14",
"friendlyName": "FX2",
"uiDeviceType": "Chassis",
"deviceSubType": null,
"deviceFamily": "POWEREDGE",
"credentialAccountId": null,
"credentialProfileId": "",
"enableMonitoring": true,
"enableDeepDiscovery": true,
"configureSNMP": false,
"installOMSA": false,
"deviceGroupInformation": {
"orId": "#58:2",
"myGroupId": null,
"name": "Two",
"description": null,
"noOfAssetsMapped": 0,
"uiCustomerProfiles": [
{
"customerProfileId": "#57:0",
"firstName": "Raj",
"lastName": "C",

SupportAssist Enterprise
66 REST API Guide – SupportAssist Enterprise
"emailId": "[email protected]",
"telephone": "1234567890",
"country": null,
"alternateTelephone": "9876543210",
"emailLanguage": "en",
"company": "One",
"profileType": "Primary",
"preferredContactTimeFrame": "8AM-8PM",
"preferredContactTimeZone": "(UTC+9:00) Asia/Jayapura",
"preferredContactMethod": "email",
"alias": false,
"dispatchDetailsEnabled": false,
"tdIntegrationEnabled": false,
"uiShippingAddressDetails": null
}
],
"uiShippingAddressDetails": {
"shippingAddressId": "#62:1",
"firstName": "Raj",
"lastName": "C",
"phone": "1234567890",
"email": "[email protected]",
"preferredContactTimeZone": "(UTC+5:00) Asia/Dushanbe",
"preferredContactTimeFrame": "9AM-5PM",
"technicianRequired": true,
"dispatchNotes": "",
"state": "karnataka",
"country": "AUT",
"address1": "dell-domlur",
"address3": "divya chambers",
"zip": "560075",
"city": "dharwad",
"cnjp": "",
"address2": "dell4",
"ie": ""
},
"uiDeviceGroupCredentials": null,
"dispatchOptIn": true,
"myTDAccountID": null
}
}
]

SupportAssist Enterprise
67 REST API Guide – SupportAssist Enterprise
2.13 Restore devices and groups You can restore devices and device groups by using the JSON response that was received while backing up your
devices and device groups.
The following is the JSON schema for restoring devices and device groups:
{
"type":"array",
"items":{
"type":"object",
"id":"DeviceDiscovery",
"properties":{
"deviceAddress":{
"type":"string"
},
"friendlyName":{
"type":"string"
},
"uiDeviceType":{
"type":"string"
},
"deviceSubType":{
"type":"string"
},
"deviceFamily":{
"type":"string"
},
"credentialAccountId":{
"type":"string"
},
"credentialProfileId":{
"type":"string"
},
"enableMonitoring":{
"type":"boolean"
},
"enableDeepDiscovery":{
"type":"boolean"
},
"configureSNMP":{
"type":"boolean"
},
"installOMSA":{
"type":"boolean"
},
"deviceGroupInformation":{
"type":"object",
"id":"DeviceGroupInformation",
"properties":{
"orId":{
"type":"string"
},
"myGroupId":{
"type":"string"
},
"name":{
"type":"string"

SupportAssist Enterprise
68 REST API Guide – SupportAssist Enterprise
},
"description":{
"type":"string"
},
"noOfAssetsMapped":{
"type":"integer"
},
"uiCustomerProfiles":{
"type":"array",
"items":{
"type":"object",
"id":"CustomerProfile",
"properties":{
"customerProfileId":{
"type":"string"
},
"firstName":{
"type":"string"
},
"lastName":{
"type":"string"
},
"emailId":{
"type":"string"
},
"telephone":{
"type":"string"
},
"country":{
"type":"string"
},
"alternateTelephone":{
"type":"string"
},
"emailLanguage":{
"type":"string"
},
"company":{
"type":"string"
},
"profileType":{
"type":"string"
},
"preferredContactTimeFrame":{
"type":"string"
},
"preferredContactTimeZone":{
"type":"string"
},
"preferredContactMethod":{
"type":"string"
},
"alias":{
"type":"boolean"
},
"dispatchDetailsEnabled":{
"type":"boolean"
},

SupportAssist Enterprise
69 REST API Guide – SupportAssist Enterprise
"tdIntegrationEnabled":{
"type":"boolean"
},
"uiShippingAddressDetails":{
"type":"object",
"id":"ShippingAddressDetails",
"properties":{
"shippingAddressId":{
"type":"string"
},
"firstName":{
"type":"string"
},
"lastName":{
"type":"string"
},
"phone":{
"type":"string"
},
"email":{
"type":"string"
},
"preferredContactTimeZone":{
"type":"string"
},
"preferredContactTimeFrame":{
"type":"string"
},
"technicianRequired":{
"type":"boolean"
},
"dispatchNotes":{
"type":"string"
},
"state":{
"type":"string"
},
"country":{
"type":"string"
},
"cnjp":{
"type":"string"
},
"ie":{
"type":"string"
},
"address1":{
"type":"string"
},
"address2":{
"type":"string"
},
"city":{
"type":"string"
},
"zip":{
"type":"string"
},

SupportAssist Enterprise
70 REST API Guide – SupportAssist Enterprise
"address3":{
"type":"string"
}
}
}
}
}
}
}
}
}
}
}
The following resource URI is used to restore devices and device groups:
https://<BASE_URI>/SupportAssist/api/v1/Device/Import
Method: POST
Headers:
Content-Type: application/json
Authorization: Bearer <Authentication_Token>
The following is an example of a JSON for restoring devices and the device groups.
In this example, you must enter the credentialAccountId or credentialProfileId. CredentailProfileId is required
when enableDeepDiscovery is true.
[
{
"deviceAddress": "<IP Address/hostname>",
"friendlyName": "iDRAC",
"uiDeviceType": "iDRAC",
"deviceSubType": "IDRAC",
"deviceFamily": "POWEREDGE14G",
"credentialAccountId": "<credential account id>",
"credentialProfileId": null,
"enableMonitoring": true,
"enableDeepDiscovery": false,
"configureSNMP": true,
"installOMSA": false,
"deviceGroupInformation": {
"orId": "#58:2",
"myGroupId": null,
"name": "One",
"description": null,
"noOfAssetsMapped": 0,
"uiCustomerProfiles": [
{
"customerProfileId": "#57:0",
"firstName": "Raj",
"lastName": "C",
"emailId": "[email protected]",
"telephone": "1234567890",
"country": null,
"alternateTelephone": "9876543210",
"emailLanguage": "en",

SupportAssist Enterprise
71 REST API Guide – SupportAssist Enterprise
"company": "One",
"profileType": "Primary",
"preferredContactTimeFrame": "8AM-8PM",
"preferredContactTimeZone": "(UTC+9:00) Asia/Jayapura",
"preferredContactMethod": "email",
"alias": false,
"dispatchDetailsEnabled": false,
"tdIntegrationEnabled": false,
"uiShippingAddressDetails": null
}
],
"uiShippingAddressDetails": {
"shippingAddressId": "#62:1",
"firstName": "Raj",
"lastName": "C",
"phone": "1234567890",
"email": "[email protected]",
"preferredContactTimeZone": "(UTC+5:00) Asia/Dushanbe",
"preferredContactTimeFrame": "9AM-5PM",
"technicianRequired": true,
"dispatchNotes": "",
"state": "karnataka",
"country": "AUT",
"address1": "dell-domlur",
"address3": "divya chambers",
"zip": "560075",
"city": "dharwad",
"cnjp": "",
"address2": "dell4",
"ie": ""
},
"uiDeviceGroupCredentials": null,
"dispatchOptIn": true,
"myTDAccountID": null
}
},
{
"deviceAddress": "<IP Address/hostname>”,
"friendlyName": "FX2",
"uiDeviceType": "Chassis",
"deviceSubType": null,
"deviceFamily": "POWEREDGE",
"credentialAccountId": null,
"credentialProfileId": "<credential profile id>",
"enableMonitoring": true,
"enableDeepDiscovery": true,
"configureSNMP": false,
"installOMSA": false,
"deviceGroupInformation": {
"orId": "#58:2",
"myGroupId": null,
"name": "Two",
"description": null,
"noOfAssetsMapped": 0,
"uiCustomerProfiles": [
{
"customerProfileId": "#57:0",
"firstName": "Raj",
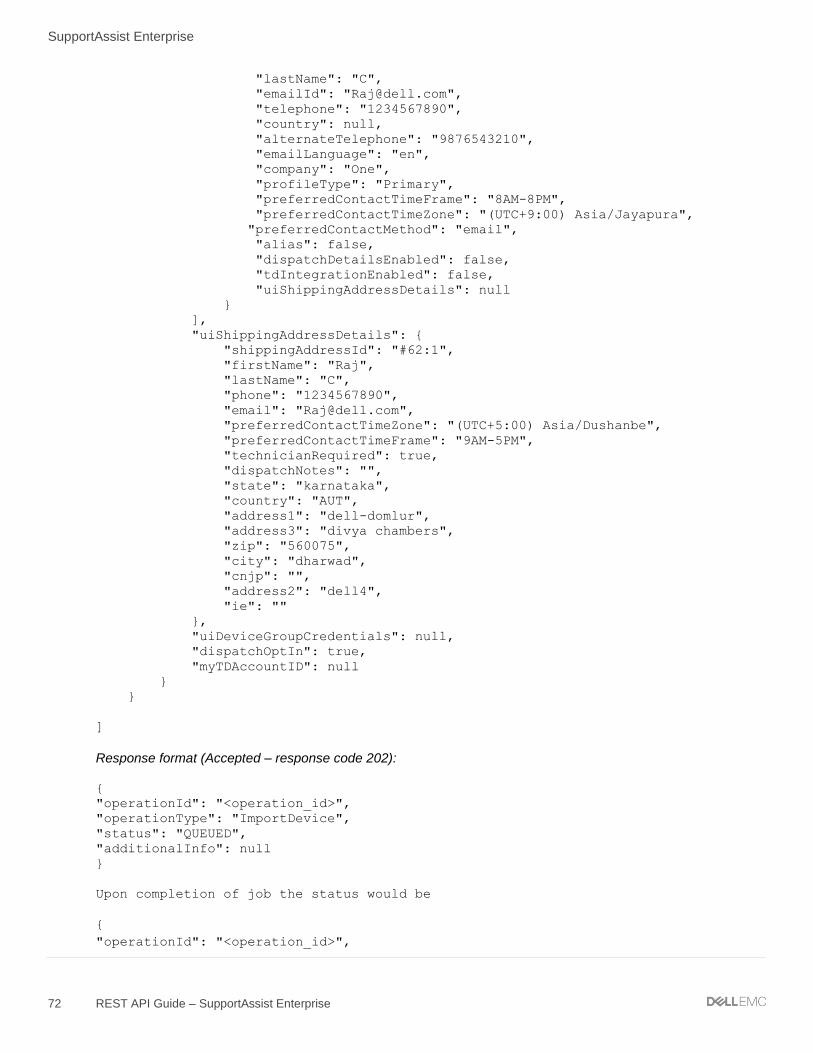
SupportAssist Enterprise
72 REST API Guide – SupportAssist Enterprise
"lastName": "C",
"emailId": "[email protected]",
"telephone": "1234567890",
"country": null,
"alternateTelephone": "9876543210",
"emailLanguage": "en",
"company": "One",
"profileType": "Primary",
"preferredContactTimeFrame": "8AM-8PM",
"preferredContactTimeZone": "(UTC+9:00) Asia/Jayapura",
"preferredContactMethod": "email",
"alias": false,
"dispatchDetailsEnabled": false,
"tdIntegrationEnabled": false,
"uiShippingAddressDetails": null
}
],
"uiShippingAddressDetails": {
"shippingAddressId": "#62:1",
"firstName": "Raj",
"lastName": "C",
"phone": "1234567890",
"email": "[email protected]",
"preferredContactTimeZone": "(UTC+5:00) Asia/Dushanbe",
"preferredContactTimeFrame": "9AM-5PM",
"technicianRequired": true,
"dispatchNotes": "",
"state": "karnataka",
"country": "AUT",
"address1": "dell-domlur",
"address3": "divya chambers",
"zip": "560075",
"city": "dharwad",
"cnjp": "",
"address2": "dell4",
"ie": ""
},
"uiDeviceGroupCredentials": null,
"dispatchOptIn": true,
"myTDAccountID": null
}
}
]
Response format (Accepted – response code 202):
{
"operationId": "<operation_id>",
"operationType": "ImportDevice",
"status": "QUEUED",
"additionalInfo": null
}
Upon completion of job the status would be
{
"operationId": "<operation_id>",

SupportAssist Enterprise
73 REST API Guide – SupportAssist Enterprise
"operationType": "ImportDevice",
"status": "COMPLETED",
"additionalInfo": [
{
"errorCode": "SA-90100",
"message": "Operation successful.",
"additionalInfo": "<device_id>"
},
{
"errorCode": "SA-90100",
"message": "Operation successful.",
"additionalInfo": "<device_id>"
},
{
"errorCode": "SA-90100",
"message": "Operation successful.",
"additionalInfo": "<device_id>"
},
{
"errorCode": "SA-90100",
"message": "Operation successful.",
"additionalInfo": "<device_id>"
},
{
"errorCode": "SA-90100",
"message": "Operation successful.",
"additionalInfo": "<device_id>"
},
{
"errorCode": "SA-90100",
"message": "Operation successful.",
"additionalInfo": "<device_id>"
}
]
}

SupportAssist Enterprise
74 REST API Guide – SupportAssist Enterprise
A Error code appendix
Error code Error message Possible Resolution
SA-0001 SupportAssist Enterprise is unable to add the devices because an device count is more than 5000.
Make sure that the device count in the csv file is less than 5000.
SA-0002 SupportAssist Enterprise is unable to add the devices because the csv file is Empty.
Make sure that both the system running SupportAssist Enterprise and the file is not Empty.
SA-0003 SupportAssist Enterprise is unable to add the devices because uploaded csv file is corrupted.
Make sure that the uploaded csv file is valid but not corrupted.
SA-0004 SupportAssist Enterprise is unable to add the devices because the csv file is not available in the specified location.
Make sure that the csv file is available at the specified location.
SA-0006 SupportAssist Enterprise is unable to add the devices because the input provided is not valid.
Make sure that the input provided is valid.
SA-0007 SupportAssist Enterprise is unable to add the devices because the imported csv file does not contain valid headers.
Make sure that the imported csv file contains valid headers.
SA-0008 User has canceled this device discovery. Device discovery has been cancelled.
SA-0009 SupportAssist Enterprise is unable to import one or more devices because the credentials of the devices were not included in the csv file.
Ensure that the credentials of the devices are included in the csv file and retry the operation.
SA-0011 SupportAssist Enterprise is unable to import devices because .csv file already exist.
Delete the .csv file available from the temporary location (C:\Users\<User Name>\AppData\Local\temp) and retry the operation.
SA-0012 SupportAssist Enterprise is unable to add the devices because the entered host name or IP address and Device Type are incorrect.
Retry adding the device with the correct host name or IP address and Device Type.
SA-0005 SupportAssist Enterprise is unable to add the device {0} because an attempt to connect to the device is unsuccessful.
Make sure that both the system running SupportAssist Enterprise and the device you are trying to add are connected to the network and retry the operation.
SA-0010 SupportAssist Enterprise is unable to add the device {0} because the entered host name or IP address is incorrect.
Retry adding the device with the correct host name or IP address.
SA-0015 SupportAssist Enterprise is unable to add the device {0} because of an unknown error while discovering the device.
Verify the following and then retry adding the device: 1. Ensure that the device is supported by SupportAssist Enterprise. For the list of supported device models, see the SupportAssist Enterprise Support Matrix at

SupportAssist Enterprise
75 REST API Guide – SupportAssist Enterprise
Error code Error message Possible Resolution
dell.com/serviceabilitytools. 2. Ensure that the user account has administrator/root privileges.
SA-0020 SupportAssist Enterprise is unable to add the device {0} because the device is already added.
Ensure that the device is not added using another IP address or Service Tag.
SA-0025 SupportAssist Enterprise is unable to add the device {0} because of an unknown error.
Verify the following and then retry adding the device: 1. Ensure that the device is supported by SupportAssist Enterprise. For the list of supported device models, see the SupportAssist Enterprise Support Matrix at dell.com/serviceabilitytools. 2. Ensure that you provide the correct device type and try again.
SA-0030 SupportAssist Enterprise is unable to add the device {0} because the device credentials are incorrect.
Perform the following and retry the operation: 1. Enter the correct device credentials. 2. Ensure that the user account has administrative privileges. 3. If the problem persists, contact your SupportAssist Enterprise administrator for assistance.
SA-0035 SupportAssist Enterprise is unable to add the device {0} because the enable password is not provided.
Enter the enable password and retry the operation, if possible.
SA-0040 SupportAssist Enterprise is unable to add the device {0} because the Display Name {1} is already in use by another device.
Retry adding the device with any other Display Name, if possible.
SA-0045 Identification or cancellation for this device is already in progress.
SA-0050 SupportAssist Enterprise is unable to add the device {0} because of an unknown error.
Verify if the device is supported by SupportAssist Enterprise. For the list of supported device models, see the SupportAssist Enterprise Support Matrix at dell.com/serviceabilitytools.
SA-0055 SupportAssist Enterprise is unable to add the device {0} because the device is not supported.
For the list of supported device models, see the SupportAssist Enterprise Support Matrix at dell.com/serviceabilitytools.
SA-0060 SupportAssist Enterprise is unable to add the device {0} because a required file has either been deleted or moved.
Restart the Dell EMC SupportAssist Enterprise service on the system running SupportAssist Enterprise, and then retry the operation.
SA-0065 SupportAssist Enterprise is unable to add the device {0} because the entered credentials do not have superuser privileges.
Enter the credentials that have superuser privileges and retry the operation.
SA-0070 Installation of Dell OpenManage Server Administrator (OMSA) is not supported on this device.
SA-0075 SupportAssist Enterprise has detected that Dell OpenManage Server Administrator (OMSA) is not installed on the device.

SupportAssist Enterprise
76 REST API Guide – SupportAssist Enterprise
Error code Error message Possible Resolution
Installing OMSA is required to generate alerts for hardware events that occur on the device.
SA-0080 SupportAssist Enterprise has detected that the Dell OpenManage Server Administrator (OMSA) services are not running on the device. For optimal SupportAssist Enterprise capability, it is recommended to restart the OMSA services.
SA-0085 SupportAssist Enterprise has detected that Dell OpenManage Server Administrator (OMSA) version {0} is installed on the device. For optimal SupportAssist Enterprise capability, it is recommended to upgrade OMSA to version {1}.
SA-0090 SupportAssist Enterprise has detected that Dell OpenManage Server Administrator (OMSA) version {0} is installed on the device. It is recommended that you download and install OMSA version {1} on the device.
SA-0095 SupportAssist Enterprise is unable to verify the OMSA version installed on the device. To resolve the issue, see the "Unable to verify OMSA version" section in the SupportAssist Enterprise User's Guide at dell.com/serviceabilitytools.
SA-0100 The recommended version of Dell OpenManage Server Administrator (OMSA) is already installed on the device.
SA-0105 SupportAssist Enterprise will monitor the device through the integrated Dell Remote Access Controller (iDRAC). Therefore, installation or upgrade of Dell OpenManage Server Administrator (OMSA) is not required.
SA-0110 SupportAssist Enterprise is unable to add the device {0} because it does not have a valid license.
SA-0115 SupportAssist Enterprise is unable to add the device {0} because the operating system is not supported.
SA-0120 SupportAssist Enterprise is unable to add the device because a required service is disabled on the device.
Make sure that the required service is running on the device, and then retry the operation. For information on the required service, see the SupportAssist Enterprise User's Guide at dell.com/serviceabilitytools.
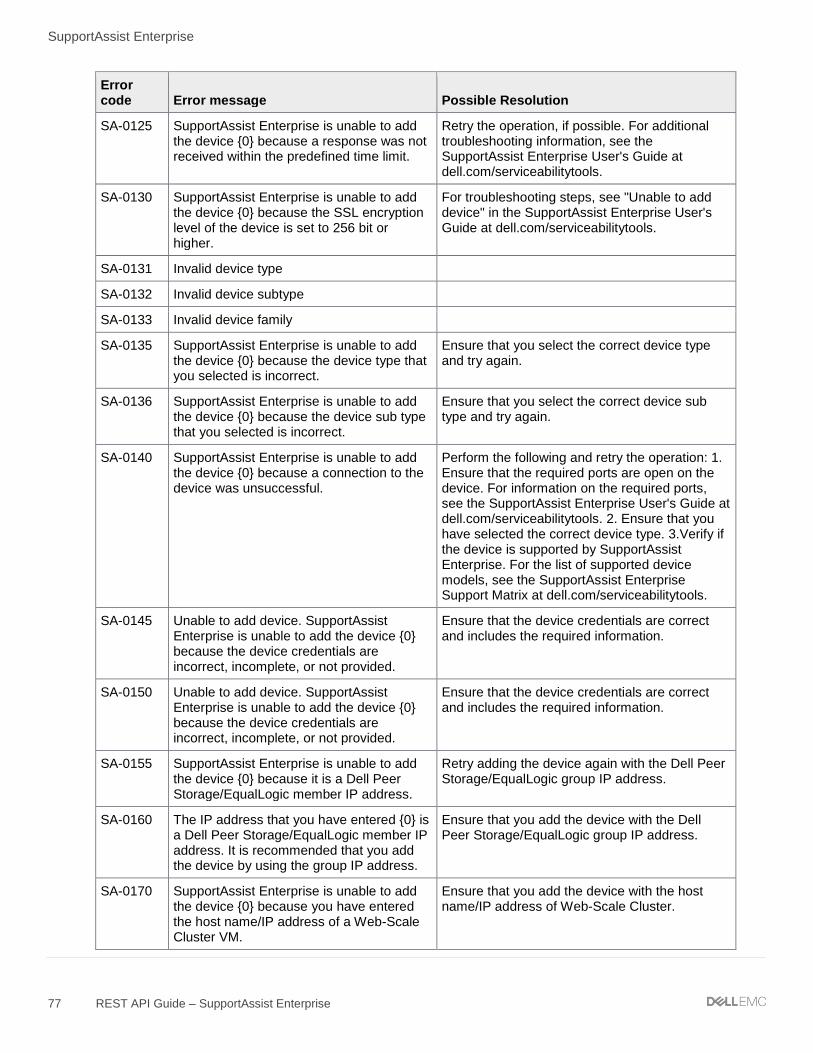
SupportAssist Enterprise
77 REST API Guide – SupportAssist Enterprise
Error code Error message Possible Resolution
SA-0125 SupportAssist Enterprise is unable to add the device {0} because a response was not received within the predefined time limit.
Retry the operation, if possible. For additional troubleshooting information, see the SupportAssist Enterprise User's Guide at dell.com/serviceabilitytools.
SA-0130 SupportAssist Enterprise is unable to add the device {0} because the SSL encryption level of the device is set to 256 bit or higher.
For troubleshooting steps, see "Unable to add device" in the SupportAssist Enterprise User's Guide at dell.com/serviceabilitytools.
SA-0131 Invalid device type
SA-0132 Invalid device subtype
SA-0133 Invalid device family
SA-0135 SupportAssist Enterprise is unable to add the device {0} because the device type that you selected is incorrect.
Ensure that you select the correct device type and try again.
SA-0136 SupportAssist Enterprise is unable to add the device {0} because the device sub type that you selected is incorrect.
Ensure that you select the correct device sub type and try again.
SA-0140 SupportAssist Enterprise is unable to add the device {0} because a connection to the device was unsuccessful.
Perform the following and retry the operation: 1. Ensure that the required ports are open on the device. For information on the required ports, see the SupportAssist Enterprise User's Guide at dell.com/serviceabilitytools. 2. Ensure that you have selected the correct device type. 3.Verify if the device is supported by SupportAssist Enterprise. For the list of supported device models, see the SupportAssist Enterprise Support Matrix at dell.com/serviceabilitytools.
SA-0145 Unable to add device. SupportAssist Enterprise is unable to add the device {0} because the device credentials are incorrect, incomplete, or not provided.
Ensure that the device credentials are correct and includes the required information.
SA-0150 Unable to add device. SupportAssist Enterprise is unable to add the device {0} because the device credentials are incorrect, incomplete, or not provided.
Ensure that the device credentials are correct and includes the required information.
SA-0155 SupportAssist Enterprise is unable to add the device {0} because it is a Dell Peer Storage/EqualLogic member IP address.
Retry adding the device again with the Dell Peer Storage/EqualLogic group IP address.
SA-0160 The IP address that you have entered {0} is a Dell Peer Storage/EqualLogic member IP address. It is recommended that you add the device by using the group IP address.
Ensure that you add the device with the Dell Peer Storage/EqualLogic group IP address.
SA-0170 SupportAssist Enterprise is unable to add the device {0} because you have entered the host name/IP address of a Web-Scale Cluster VM.
Ensure that you add the device with the host name/IP address of Web-Scale Cluster.

SupportAssist Enterprise
78 REST API Guide – SupportAssist Enterprise
Error code Error message Possible Resolution
SA-0175 The hostname/IP address {0} that you have entered is a Web-Scale Cluster VM IP address. It is recommended that you add the device by using the host name/IP address {1} of the Web-Scale Cluster.
Ensure that you add the device with the host name/IP address of Web-Scale Cluster.
SA-0165 SupportAssist Enterprise is unable to add the device {0} because an attempt to connect to the device was unsuccessful.
Perform the following and retry the operation: 1. Ensure that the FTP port is open. 2. Enter the correct device credentials. 3.If the problem persists, contact your SupportAssist Enterprise administrator for assistance.
SA-1005 SupportAssist Enterprise is unable to edit the credentials of the device {0} because an attempt to connect to the device is unsuccessful.
Make sure that both the system running SupportAssist Enterprise and the device are connected to the network, and retry the operation.
SA-1010 SupportAssist Enterprise is unable to edit the credentials of the device {0} because of an unexpected error.
Verify the following and then retry editing the device credentials: 1. Ensure that the required services are running on the device. For information on the required services, see the SupportAssist Enterprise User's Guide at dell.com/serviceabilitytools. 2. Make sure that the entered credentials have administrator/root privileges.
SA-1015 SupportAssist Enterprise is unable to edit the credentials of the device {0} because the user name or password is incorrect.
Verify the user name and password, and ensure that the user account has administrator/root privileges. If the problem persists, contact your SupportAssist Enterprise administrator for assistance.
SA-1020 Enable Password is required for edit credentials
SA-1025 SupportAssist Enterprise is unable to edit the credentials of the device {0} because the entered Display Name it is already in use by another device.
Enter any other another Display Name, and then retry editing the device credentials.
SA-1030 SupportAssist Enterprise is unable to edit the device credentials because the entered credentials do not have superuser rights.
Enter the credentials that have superuser rights, and then retry editing the device credentials.
SA-1035 SupportAssist Enterprise is unable to update the device credentials because a required service is disabled on the device.
Make sure that the required service is running on the device, and then retry editing the device credentials. For information on the required service, see the SupportAssist Enterprise User’s Guide at Dell.com/serviceabilitytools.
SA-1040 SupportAssist Enterprise is unable to edit the credentials of the device {0} because the SSL encryption level of the device is set to 256 bit or higher.
For troubleshooting steps, see "Unable to edit device credentials" in the SupportAssist Enterprise User’s Guide at Dell.com/serviceabilitytools.
SA-1045 SupportAssist Enterprise is unable to edit the credentials of the device {0} because an
Perform the following and retry the operation: 1. Ensure that the FTP port is open. 2. Enter the

SupportAssist Enterprise
79 REST API Guide – SupportAssist Enterprise
Error code Error message Possible Resolution
attempt to connect to the device was unsuccessful.
correct device credentials. 3.If the problem persists, contact your SupportAssist Enterprise administrator for assistance.
SA-30130 SupportAssist Enterprise has placed the device {0} in the Staging group because a required verification could not be completed.
Retry the operation, if possible.
SA-30180 SupportAssist Enterprise has placed the device {0} in the Staging group because the device does not have the required license.
Ensure that iDRAC Enterprise license is installed on the device and retry the operation, if possible.
SA-30260 SupportAssist Enterprise has placed the device {0} in the Staging group because SupportAssist is not enabled on the device.
Ensure that SupportAssist is enabled on the device and retry the operation, if possible.
SA-90100 Operation successful.
SA-90101 Request body is invalid or invoking wrong method.
SA-90102 Internal server error, please refer application logs for more details.
SA-90103 Operation failed.
SA-90104 {0} cannot be empty
SA-90105 {0} cannot be more than {1} characters.
SA-90106 {0} should be empty or null for {1}.
SA-90107 REST API is enabled only for registered customers. Please register and enable REST interface from preferences.
SA-90108 Operation Queued.
SA-90109 Invalid operator {0}.
SA-90110 Invalid operator for single value search {0}.
SA-90111 Invalid operator for multiple value search {0}.
SA-90112 Invalid search field {0}.
SA-90113 Search value cannot be empty or null.
SA-90114 Invalid servicetag {0}.
SA-90115 Invalid case number {0}.
SA-90116 Invalid case title {0}.
SA-90117 Invalid case status {0}.
SA-90118 Invalid device name {0}.
SA-90119 Invalid IP address or host name {0}.

SupportAssist Enterprise
80 REST API Guide – SupportAssist Enterprise
Error code Error message Possible Resolution
SA-90120 Invalid device type {0}.
SA-90121 Invalid entitlement type {0}.
SA-90122 Invalid case source {0}.
SA-90123 Invalid group name {0}.
SA-90124 Invalid model {0}.
SA-90125 Invalid os {0}.
SA-90126 Invalid device source {0}.
SA-90127 Invalid remote collector IP address or hostname or friendly name {0}.
SA-90128 Allowed method(s) are {0}.
SA-90129 Invalid device inventory validation status {0}.
SA-90201 Username or password cannot be empty.
SA-90202 Username or password is incorrect or user is not an admin user.
SA-90203 Authorization token is invalid or expired or used from different host.
SA-90204 Refresh token cannot be null or empty.
SA-90300 IP or Hostname is invalid.
SA-90301 Invalid value for configure snmp.
SA-90302 Invalid value for install omsa.
SA-90303 Invalid value for enable monitoring.
SA-90304 Invalid value for enable deep discovery.
SA-90305 Invalid credential profile.
SA-90306 Invalid credential account.
SA-90307 Invalid group name.
SA-90308 Invalid Device SubType.
SA-90309 Invalid Device Family.
SA-90370 Operation Status doesn't exist.
SA-90385 Discovery rule doesn't exist.
SA-90386 Rule is already in progress.
SA-90401 Unable to perform operation {0} as devices does not exist or device are busy with some other operation or it is not allowed. Device ids failed are {1}.

SupportAssist Enterprise
81 REST API Guide – SupportAssist Enterprise
Error code Error message Possible Resolution
SA-90410 Unable to delete device either does not exist or device are busy with some other operation or it is not allowed to delete console device.
SA-90411 Device id is invalid or empty.
SA-90412 Invalid URL.
SA-90413 Unable to perform operation as either device is busy or device does not support maintenance mode or device is not active.
SA-90414 Profile id is invalid or empty.
SA-90415 Unable to assign profile either device does not exist or device are busy with some other operation.
SA-90450 Unable to perform collection because Remote Collector is disconnected for device {0}.
SA-90451 Unable perform collection because devices do not exist or devices are busy with some other operation or it is staging or non collectable.
SA-90452 Invalid purpose for collection.
SA-90453 Unable to perform collection.
SA-90500 Unable to edit device, because device is either busy or it is non collectable.
SA-90501 Invalid Active Status for device.
SA-90502 Edit device is not required for localhost device.
3000_1 An unexpected error occurred during the installation of Dell OpenManage Server Administrator (OMSA) on {0}.
Manually install the supported version of OMSA. To identify the supported version of OMSA, see the SupportAssist Enterprise Support Matrix at Dell.com/serviceabilitytools. If the problem persists, contact your SupportAssist Enterprise administrator for assistance.
3000_2 An unexpected error occurred during the installation of Dell OpenManage Server Administrator (OMSA) on {0}.
Manually install the supported version of OMSA. To identify the supported version of OMSA, see the SupportAssist Enterprise Support Matrix at Dell.com/serviceabilitytools. If the problem persists, contact your SupportAssist Enterprise administrator for assistance.
3000_3 An unexpected error occurred during the installation of Dell OpenManage Server Administrator (OMSA) on {0}.
Manually install the supported version of OMSA. To identify the supported version of OMSA, see the SupportAssist Enterprise Support Matrix at Dell.com/serviceabilitytools. If the problem

SupportAssist Enterprise
82 REST API Guide – SupportAssist Enterprise
Error code Error message Possible Resolution
persists, contact your SupportAssist Enterprise administrator for assistance.
3000_4 An unexpected error occurred during the installation of Dell OpenManage Server Administrator (OMSA) on {0}.
Manually install the supported version of OMSA. To identify the supported version of OMSA, see the SupportAssist Enterprise Support Matrix at Dell.com/serviceabilitytools. If the problem persists, contact your SupportAssist Enterprise administrator for assistance.
3000_5 An unexpected error occurred during the installation of Dell OpenManage Server Administrator (OMSA) on {0}.
Manually install the supported version of OMSA. To identify the supported version of OMSA, see the SupportAssist Enterprise Support Matrix at Dell.com/serviceabilitytools. If the problem persists, contact your SupportAssist Enterprise administrator for assistance.
3000_6 A component required for installing Dell OpenManage Server Administrator (OMSA) could not be downloaded.
Perform the following: 1. Make sure that the system has internet connectivity. 2. Perform the Connectivity Test to make sure that the system has connectivity to the dependent resources. 3. Retry the operation, if possible or contact your SupportAssist Enterprise administrator for assistance.
3000_7 Installation of Dell OpenManage Server Administrator (OMSA) is not supported on the operating system running on {0}.
Manually install the supported version of OMSA. To identify the supported version of OMSA, see the SupportAssist Enterprise Support Matrix at Dell.com/serviceabilitytools. If the problem persists, contact your SupportAssist Enterprise administrator for assistance.
3000_8 An unexpected error occurred during the installation of Dell OpenManage Server Administrator (OMSA) on {0}.
Retry the operation, if possible or contact your SupportAssist Enterprise administrator for assistance.
3000_9 A component required for installing Dell OpenManage Server Administrator (OMSA) could not be downloaded.
Perform the following: 1. Make sure that the system has internet connectivity. 2. Retry the operation, if possible or contact your SupportAssist Enterprise administrator for assistance.
3000_10 An unexpected error occurred during the installation of Dell OpenManage Server Administrator (OMSA) on {0}.
Manually install the supported version of OMSA. To identify the supported version of OMSA, see the SupportAssist Enterprise Support Matrix at Dell.com/serviceabilitytools. If the problem persists, contact your SupportAssist Enterprise administrator for assistance.
3000_11 A component required for installing Dell OpenManage Server Administrator (OMSA) could not be downloaded.
Perform the following: 1. Make sure that the system has internet connectivity. 2. Perform the Connectivity Test to make sure that the system has connectivity to the dependent resources. 3. Retry the operation, if possible or contact your SupportAssist Enterprise administrator for assistance.

SupportAssist Enterprise
83 REST API Guide – SupportAssist Enterprise
Error code Error message Possible Resolution
3000_12 An unexpected error occurred during the installation of Dell OpenManage Server Administrator (OMSA) on {0}.
Manually install the supported version of OMSA. To identify the supported version of OMSA, see the SupportAssist Enterprise Support Matrix at Dell.com/serviceabilitytools. If the problem persists, contact your SupportAssist Enterprise administrator for assistance.
3000_13 An unexpected error occurred during the installation of Dell OpenManage Server Administrator (OMSA) on {0}.
Perform one of the following: Ensure that the device has all the required OMSA dependencies installed and then manually install the supported version of OMSA. To identify the supported version of OMSA, see the SupportAssist Enterprise Support Matrix at Dell.com/serviceabilitytools. 2. Ensure that the credentials of the device are correct in SupportAssist Enterprise and try again. 3. Retry the operation, if possible or contact your SupportAssist Enterprise administrator for assistance.
3000_14 An unexpected error occurred during the installation of Dell OpenManage Server Administrator (OMSA) on {0}.
Manually install the supported version of OMSA. To identify the supported version of OMSA, see the SupportAssist Enterprise Support Matrix at Dell.com/serviceabilitytools. If the problem persists, contact your SupportAssist Enterprise administrator for assistance.
3000_15 An unexpected error occurred during the installation of Dell OpenManage Server Administrator (OMSA) on {0}.
Make sure that the device is reachable and the configured device credentials have Administrator rights, and then manually install the supported version of OMSA. To identify the supported version of OMSA, see the SupportAssist Enterprise Support Matrix at Dell.com/serviceabilitytools. If the problem persists, contact your SupportAssist Enterprise administrator for assistance.
3000_16 An unexpected error occurred during the installation of Dell OpenManage Server Administrator (OMSA) on {0}.
Make sure that the device is reachable and the configured device credentials have Administrator rights, and then manually install the supported version of OMSA. To identify the supported version of OMSA, see the SupportAssist Enterprise Support Matrix at Dell.com/serviceabilitytools. If the problem persists, contact your SupportAssist Enterprise administrator for assistance.
3000_17 An unexpected error occurred during the installation of Dell OpenManage Server Administrator (OMSA) on {0}.
Make sure that the device is reachable and the configured device credentials have Administrator rights, and then manually install the supported version of OMSA. To identify the supported version of OMSA, see the SupportAssist Enterprise Support Matrix at Dell.com/serviceabilitytools. If the problem persists, contact your SupportAssist Enterprise administrator for assistance.

SupportAssist Enterprise
84 REST API Guide – SupportAssist Enterprise
Error code Error message Possible Resolution
3000_18 A service required for the installation of Dell OpenManage Server Administrator (OMSA) is either not running or not enabled on {0}.
If the device is running Microsoft Windows, make sure that the WMI service is running. If the device is running Linux, make sure that SSH is enabled. For more information, see the "Error code appendix" section in the SupportAssist Enterprise User's Guide at Dell.com/serviceabilitytools.
3000_19 A service required for the installation of Dell OpenManage Server Administrator (OMSA) is not running on {0}.
Make sure that the WMI service is running on the device. For more information, see the "Error code appendix" section in the SupportAssist Enterprise User's Guide at Dell.com/serviceabilitytools.
3000_20 An unexpected error occurred during the installation of Dell OpenManage Server Administrator (OMSA) on {0}.
Manually install the supported version of OMSA. To identify the supported version of OMSA, see the SupportAssist Enterprise Support Matrix at Dell.com/serviceabilitytools. If the problem persists, contact your SupportAssist Enterprise administrator for assistance.
3000_21 An unexpected error occurred during the installation of Dell OpenManage Server Administrator (OMSA) on {0}.
Manually install the supported version of OMSA. To identify the supported version of OMSA, see the SupportAssist Enterprise Support Matrix at Dell.com/serviceabilitytools. If the problem persists, contact your SupportAssist Enterprise administrator for assistance.
3000_22 An unexpected error occurred during the installation of Dell OpenManage Server Administrator (OMSA) on {0}.
Make sure that the device is reachable and the configured device credentials have Administrator rights, and then manually install the supported version of OMSA. To identify the supported version of OMSA, see the SupportAssist Enterprise Support Matrix at Dell.com/serviceabilitytools. If the problem persists, contact your SupportAssist Enterprise administrator for assistance.
3000_23 An unexpected error occurred during the installation of Dell OpenManage Server Administrator (OMSA) on {0}.
Make sure that the device is reachable and the configured device credentials have Administrator rights, and then manually install the supported version of OMSA. To identify the supported version of OMSA, see the SupportAssist Enterprise Support Matrix at Dell.com/serviceabilitytools. If the problem persists, contact your SupportAssist Enterprise administrator for assistance.
3000_24 An unexpected error occurred during the installation of Dell OpenManage Server Administrator (OMSA) on {0}.
Manually install the supported version of OMSA. To identify the supported version of OMSA, see the SupportAssist Enterprise Support Matrix at Dell.com/serviceabilitytools. If the problem persists, contact your SupportAssist Enterprise administrator for assistance.

SupportAssist Enterprise
85 REST API Guide – SupportAssist Enterprise
Error code Error message Possible Resolution
3000_25 An unexpected error occurred during the installation of Dell OpenManage Server Administrator (OMSA) on {0}.
Manually install the supported version of OMSA. To identify the supported version of OMSA, see the SupportAssist Enterprise Support Matrix at Dell.com/serviceabilitytools. If the problem persists, contact your SupportAssist Enterprise administrator for assistance.
3000_26 An unexpected error occurred during the installation of Dell OpenManage Server Administrator (OMSA) on {0}.
Manually install the supported version of OMSA. To identify the supported version of OMSA, see the SupportAssist Enterprise Support Matrix at Dell.com/serviceabilitytools. If the problem persists, contact your SupportAssist Enterprise administrator for assistance.
3000_27 An unexpected error occurred during the installation of Dell OpenManage Server Administrator (OMSA) on {0}.
Manually install the supported version of OMSA. To identify the supported version of OMSA, see the SupportAssist Enterprise Support Matrix at Dell.com/serviceabilitytools. If the problem persists, contact your SupportAssist Enterprise administrator for assistance.
3000_28 An unexpected error occurred during the installation of Dell OpenManage Server Administrator (OMSA) on {0}.
Manually install the supported version of OMSA. To identify the supported version of OMSA, see the SupportAssist Enterprise Support Matrix at Dell.com/serviceabilitytools. If the problem persists, contact your SupportAssist Enterprise administrator for assistance.
3000_29 An unexpected error occurred during the installation of Dell OpenManage Server Administrator (OMSA) on {0}.
Make sure that the device is reachable and the configured device credentials have Administrator rights, and then manually install the supported version of OMSA. To identify the supported version of OMSA, see the SupportAssist Enterprise Support Matrix at Dell.com/serviceabilitytools. If the problem persists, contact your SupportAssist Enterprise administrator for assistance.
3000_30 An unexpected error occurred during the installation of Dell OpenManage Server Administrator (OMSA) on {0}.
Manually install the supported version of OMSA. To identify the supported version of OMSA, see the SupportAssist Enterprise Support Matrix at Dell.com/serviceabilitytools. If the problem persists, contact your SupportAssist Enterprise administrator for assistance.
3000_31 An unexpected error occurred during the installation of Dell OpenManage Server Administrator (OMSA) on {0}.
Manually install the supported version of OMSA. To identify the supported version of OMSA, see the SupportAssist Enterprise Support Matrix at Dell.com/serviceabilitytools. If the problem persists, contact your SupportAssist Enterprise administrator for assistance.
3000_32 An unexpected error occurred during the installation of Dell OpenManage Server Administrator (OMSA) on {0}.
Manually install the supported version of OMSA. To identify the supported version of OMSA, see the SupportAssist Enterprise Support Matrix at Dell.com/serviceabilitytools. If the problem

SupportAssist Enterprise
86 REST API Guide – SupportAssist Enterprise
Error code Error message Possible Resolution
persists, contact your SupportAssist Enterprise administrator for assistance.
3000_33 An unexpected error occurred during the installation of Dell OpenManage Server Administrator (OMSA) on {0}.
Manually install the supported version of OMSA. To identify the supported version of OMSA, see the SupportAssist Enterprise Support Matrix at Dell.com/serviceabilitytools. If the problem persists, contact your SupportAssist Enterprise administrator for assistance.
3000_34 An unexpected error occurred during the installation of Dell OpenManage Server Administrator (OMSA) on {0}.
Manually install the supported version of OMSA. To identify the supported version of OMSA, see the SupportAssist Enterprise Support Matrix at Dell.com/serviceabilitytools. If the problem persists, contact your SupportAssist Enterprise administrator for assistance.
3000_35 An unexpected error occurred during the installation of Dell OpenManage Server Administrator (OMSA) on {0}.
Manually install the supported version of OMSA. To identify the supported version of OMSA, see the SupportAssist Enterprise Support Matrix at Dell.com/serviceabilitytools. If the problem persists, contact your SupportAssist Enterprise administrator for assistance.
3000_36 An unexpected error occurred during the installation of Dell OpenManage Server Administrator (OMSA) on {0}.
Manually install the supported version of OMSA. To identify the supported version of OMSA, see the SupportAssist Enterprise Support Matrix at Dell.com/serviceabilitytools. If the problem persists, contact your SupportAssist Enterprise administrator for assistance.
3000_37 An unexpected error occurred during the installation of Dell OpenManage Server Administrator (OMSA) on {0}.
Manually install the supported version of OMSA. To identify the supported version of OMSA, see the SupportAssist Enterprise Support Matrix at Dell.com/serviceabilitytools. If the problem persists, contact your SupportAssist Enterprise administrator for assistance.
3000_38 An unexpected error occurred during the installation of Dell OpenManage Server Administrator (OMSA) on {0}.
Manually install the supported version of OMSA. To identify the supported version of OMSA, see the SupportAssist Enterprise Support Matrix at Dell.com/serviceabilitytools. If the problem persists, contact your SupportAssist Enterprise administrator for assistance.
3000_39 An unexpected error occurred during the installation of Dell OpenManage Server Administrator (OMSA) on {0}.
Manually install the supported version of OMSA. To identify the supported version of OMSA, see the SupportAssist Enterprise Support Matrix at Dell.com/serviceabilitytools. If the problem persists, contact your SupportAssist Enterprise administrator for assistance.
3000_40 An unexpected error occurred during the installation of Dell OpenManage Server Administrator (OMSA) on {0}.
Manually install the supported version of OMSA. To identify the supported version of OMSA, see the SupportAssist Enterprise Support Matrix at Dell.com/serviceabilitytools. If the problem

SupportAssist Enterprise
87 REST API Guide – SupportAssist Enterprise
Error code Error message Possible Resolution
persists, contact your SupportAssist Enterprise administrator for assistance.
3000_41 An unexpected error occurred during the installation of Dell OpenManage Server Administrator (OMSA) on {0}.
Manually install the supported version of OMSA. To identify the supported version of OMSA, see the SupportAssist Enterprise Support Matrix at Dell.com/serviceabilitytools. If the problem persists, contact your SupportAssist Enterprise administrator for assistance.
3000_42 An unexpected error occurred during the installation of Dell OpenManage Server Administrator (OMSA) on {0}.
Manually install the supported version of OMSA. To identify the supported version of OMSA, see the SupportAssist Enterprise Support Matrix at Dell.com/serviceabilitytools. If the problem persists, contact your SupportAssist Enterprise administrator for assistance.
3000_43 An unexpected error occurred during the installation of Dell OpenManage Server Administrator (OMSA) on {0}.
Manually install the supported version of OMSA. To identify the supported version of OMSA, see the SupportAssist Enterprise Support Matrix at Dell.com/serviceabilitytools. If the problem persists, contact your SupportAssist Enterprise administrator for assistance.
3000_44 An unexpected error occurred during the installation of Dell OpenManage Server Administrator (OMSA) on {0}.
Manually install the supported version of OMSA. To identify the supported version of OMSA, see the SupportAssist Enterprise Support Matrix at Dell.com/serviceabilitytools. If the problem persists, contact your SupportAssist Enterprise administrator for assistance.
3000_45 An unexpected error occurred during the installation of Dell OpenManage Server Administrator (OMSA) on {0}.
Manually install the supported version of OMSA. To identify the supported version of OMSA, see the SupportAssist Enterprise Support Matrix at Dell.com/serviceabilitytools. If the problem persists, contact your SupportAssist Enterprise administrator for assistance.
3000_46 An unexpected error occurred during the installation of Dell OpenManage Server Administrator (OMSA) on {0}.
Manually install the supported version of OMSA. To identify the supported version of OMSA, see the SupportAssist Enterprise Support Matrix at Dell.com/serviceabilitytools. If the problem persists, contact your SupportAssist Enterprise administrator for assistance.
3000_47 An unexpected error occurred during the installation of Dell OpenManage Server Administrator (OMSA) on {0}.
Make sure that the device is reachable and the configured device credentials have Administrator rights, and then manually install the supported version of OMSA. To identify the supported version of OMSA, see the SupportAssist Enterprise Support Matrix at Dell.com/serviceabilitytools. If the problem persists, contact your SupportAssist Enterprise administrator for assistance.

SupportAssist Enterprise
88 REST API Guide – SupportAssist Enterprise
Error code Error message Possible Resolution
3000_48 An unexpected error occurred during the installation of Dell OpenManage Server Administrator (OMSA) on {0}.
Make sure that the device is reachable and the configured device credentials have Administrator rights, and then manually install the supported version of OMSA. To identify the supported version of OMSA, see the SupportAssist Enterprise Support Matrix at Dell.com/serviceabilitytools. If the problem persists, contact your SupportAssist Enterprise administrator for assistance.
3000_49 An unexpected error occurred during the installation of Dell OpenManage Server Administrator (OMSA) on {0}.
Manually install the supported version of OMSA. To identify the supported version of OMSA, see the SupportAssist Enterprise Support Matrix at Dell.com/serviceabilitytools. If the problem persists, contact your SupportAssist Enterprise administrator for assistance.
3000_50 An unexpected error occurred during the installation of Dell OpenManage Server Administrator (OMSA) on {0}.
Make sure that the device is reachable and the configured device credentials have Administrator rights, and then manually install the supported version of OMSA. To identify the supported version of OMSA, see the SupportAssist Enterprise Support Matrix at Dell.com/serviceabilitytools. If the problem persists, contact your SupportAssist Enterprise administrator for assistance.
3000_51 An unexpected error occurred during the installation of Dell OpenManage Server Administrator (OMSA) on {0}.
Manually install the supported version of OMSA. To identify the supported version of OMSA, see the SupportAssist Enterprise Support Matrix at Dell.com/serviceabilitytools. If the problem persists, contact your SupportAssist Enterprise administrator for assistance.
3000_52 An unexpected error occurred during the installation of Dell OpenManage Server Administrator (OMSA) on {0}.
Make sure that port 22 is open and SSH is enabled on the system, and then and then manually install the supported version of OMSA. To identify the supported version of OMSA, see the SupportAssist Enterprise Support Matrix at Dell.com/serviceabilitytools. If the problem persists, contact your SupportAssist Enterprise administrator for assistance.
3000_53 An unexpected error occurred during the installation of Dell OpenManage Server Administrator (OMSA) on {0}.
Make sure that port 22 is open and SSH is enabled on the system, and then and then manually install the supported version of OMSA. To identify the supported version of OMSA, see the SupportAssist Enterprise Support Matrix at Dell.com/serviceabilitytools. If the problem persists, contact your SupportAssist Enterprise administrator for assistance.
3000_54 An unexpected error occurred during the installation of Dell OpenManage Server Administrator (OMSA) on {0}.
Manually install the supported version of OMSA. To identify the supported version of OMSA, see the SupportAssist Enterprise Support Matrix at Dell.com/serviceabilitytools. If the problem

SupportAssist Enterprise
89 REST API Guide – SupportAssist Enterprise
Error code Error message Possible Resolution
persists, contact your SupportAssist Enterprise administrator for assistance.
3000_55 An unexpected error occurred during the installation of Dell OpenManage Server Administrator (OMSA) on {0}.
Manually install the supported version of OMSA. To identify the supported version of OMSA, see the SupportAssist Enterprise Support Matrix at Dell.com/serviceabilitytools. If the problem persists, contact your SupportAssist Enterprise administrator for assistance.
3000_56 An unexpected error occurred during the installation of Dell OpenManage Server Administrator (OMSA) on {0}.
Make sure that the device is reachable and the configured device credentials have Administrator rights, and then manually install the supported version of OMSA. To identify the supported version of OMSA, see the SupportAssist Enterprise Support Matrix at Dell.com/serviceabilitytools. If the problem persists, contact your SupportAssist Enterprise administrator for assistance.
3000_57 An unexpected error occurred during the installation of Dell OpenManage Server Administrator (OMSA) on {0}.
Manually install the supported version of OMSA. To identify the supported version of OMSA, see the SupportAssist Enterprise Support Matrix at Dell.com/serviceabilitytools. If the problem persists, contact your SupportAssist Enterprise administrator for assistance.
3000_58 An unexpected error occurred during the installation of Dell OpenManage Server Administrator (OMSA) on {0}.
Manually install the supported version of OMSA. To identify the supported version of OMSA, see the SupportAssist Enterprise Support Matrix at Dell.com/serviceabilitytools. If the problem persists, contact your SupportAssist Enterprise administrator for assistance.
3000_59 An unexpected error occurred during the installation of Dell OpenManage Server Administrator (OMSA) on {0}.
Manually install the supported version of OMSA. To identify the supported version of OMSA, see the SupportAssist Enterprise Support Matrix at Dell.com/serviceabilitytools. If the problem persists, contact your SupportAssist Enterprise administrator for assistance.
3000_60 An unexpected error occurred during the installation of Dell OpenManage Server Administrator (OMSA) on {0}.
Make sure that the device is reachable and the configured device credentials have Administrator rights, and then manually install the supported version of OMSA. To identify the supported version of OMSA, see the SupportAssist Enterprise Support Matrix at Dell.com/serviceabilitytools. If the problem persists, contact your SupportAssist Enterprise administrator for assistance.
3000_61 An unexpected error occurred during the installation of Dell OpenManage Server Administrator (OMSA) on {0}.
Make sure that the device is reachable and the configured device credentials have Administrator rights, and then manually install the supported version of OMSA. To identify the supported version of OMSA, see the SupportAssist

SupportAssist Enterprise
90 REST API Guide – SupportAssist Enterprise
Error code Error message Possible Resolution
Enterprise Support Matrix at Dell.com/serviceabilitytools. If the problem persists, contact your SupportAssist Enterprise administrator for assistance.
3000_62 The time allowed for OMSA installation has expired.
Manually install the supported version of OMSA. To identify the supported version of OMSA, see the SupportAssist Enterprise Support Matrix at Dell.com/serviceabilitytools. If the problem persists, contact your SupportAssist Enterprise administrator for assistance.
6000_01 System Event Log could not be cleared from device {0} because of a technical error.
Retry the operation, if possible or contact your SupportAssist Enterprise administrator for assistance.
6000_02 System Event Log could not be cleared from device {0} because the device is not reachable.
Make sure that the device is reachable from the server running SupportAssist Enterprise and retry the operation.
6000_03 System Event Log could not be cleared from device {0} because the host name of the device could not be resolved to an IP address.
If the device is a member of a domain, make sure that the host name of the device is added in the DNS server and retry the operation.
6000_04 System Event Log could not be cleared from device {0} because of an internal error.
Retry the operation, if possible.
6000_05 System Event Log could not be cleared from device {0} because of an internal error.
Retry the operation, if possible.
6000_06 System Event Log could not be cleared from device {0} because an attempt to connect to the device is unsuccessful.
Make sure that WMI service is running on the device and retry the operation.
6000_07 SupportAssist Enterprise is unable to collect system information from the device {0} because the credentials of the device are either incorrect or do not have the required privileges.
Perform the following and retry the operation: 1. Make sure that SupportAssist Enterprise is updated with the correct user name and password of the device. 2. Make sure that the user account has administrative privileges on the device.
6000_08 System Event Log could not be cleared from device {0} because an attempt to connect to the device is unsuccessful.
Make sure that WMI service is running on the device and retry the operation.
6000_09 System Event Log could not be cleared from device {0} because an attempt to connect to the device is unsuccessful.
Make sure that the firewall allows WMI communication and retry the operation.
6000_10 SupportAssist Enterprise is unable to collect system information from the device {0} because the credentials of the device do not have the required privileges.
Make sure that the user account has administrative privileges on the device and retry the operation.

SupportAssist Enterprise
91 REST API Guide – SupportAssist Enterprise
Error code Error message Possible Resolution
6000_11 System Event Log could not be cleared from device {0} because of a technical error.
Retry the operation, if possible or contact your SupportAssist Enterprise administrator for assistance.
6000_12 System Event Log could not be cleared from device {0} because of a technical error.
Retry the operation, if possible or contact your SupportAssist Enterprise administrator for assistance.
6000_13 System Event Log could not be cleared from device {0} because of a technical error.
Retry the operation, if possible or contact your SupportAssist Enterprise administrator for assistance.
6000_14 System Event Log could not be cleared from device {0} because of a technical error.
Retry the operation, if possible or contact your SupportAssist Enterprise administrator for assistance.
6000_15 SupportAssist Enterprise is unable to collect system information from the device {0} because the credentials of the device are either incorrect or do not have the required privileges.
Perform the following and retry the operation: 1. Make sure that SupportAssist Enterprise is updated with the correct user name and password of the device. 2. Make sure that the user account has administrative privileges on the device.
6000_16 System Event Log could not be cleared from device {0} because of an unknown error.
Retry the operation, if possible or contact your SupportAssist Enterprise administrator for assistance.
6000_17 System Event Log could not be cleared from device {0} because the device does not support this operation.
Retry the operation, if possible or contact your SupportAssist Enterprise administrator for assistance.
6000_18 System Event Log could not be cleared from device {0} because an attempt to connect to the device is unsuccessful.
Make sure that SSH service is running on the device and retry the operation.
6000_19 SupportAssist Enterprise is unable to collect system information from the device {0} because the credentials of the device are either incorrect or do not have the required privileges.
Perform the following and retry the operation: 1. Make sure that SupportAssist Enterprise is updated with the correct user name and password of the device. 2. Make sure that the user account has administrative privileges on the device.
6000_20 System Event Log could not be cleared from device {0} because an attempt to connect to the device is unsuccessful.
Make sure that SSH service is running on the device and retry the operation.
6000_21 SupportAssist Enterprise is unable to collect system information from the device {0} because the credentials of the device are either incorrect or do not have the required privileges.
Perform the following and retry the operation: 1. Make sure that SupportAssist Enterprise is updated with the correct user name and password of the device. 2. Make sure that the user account has administrative privileges on the device.
6000_22 System Event Log could not be cleared from device {0} because an attempt to connect to the device is unsuccessful.
Make sure that the firewall allows SSH communication and retry the operation.

SupportAssist Enterprise
92 REST API Guide – SupportAssist Enterprise
Error code Error message Possible Resolution
6000_23 SupportAssist Enterprise is unable to collect system information from the device {0} because the credentials of the device are either incorrect or do not have the required privileges.
Perform the following and retry the operation: 1. Make sure that SupportAssist Enterprise is updated with the correct user name and password of the device. 2. Make sure that the user account has administrative privileges on the device.
6000_24 System Event Log could not be cleared from device {0} because of a technical error.
Retry the operation, if possible or contact your SupportAssist Enterprise administrator for assistance.
6000_32 SupportAssist Enterprise is unable to collect system information because a connection could not be established with the Remote Collector.
Perform the following and retry the operation: 1. Verify and update the credentials of the Remote Collector in SupportAssist Enterprise. 2. Ensure that the Remote Collector is reachable from the server where SupportAssist Enterprise is installed. 3. Ensure that the Remote Collector service is running on the remote system.
5000_1 SNMP settings of the device could not be configured because of an unexpected error.
Manually configure the SNMP settings. For instructions to manually configure the SNMP settings, see "Manually configuring the alert destination of an iDRAC using the web interface" in the SupportAssist Enterprise User's Guide at Dell.com/serviceabilitytools.
5000_2 SNMP settings of the device could not be configured because the integrated Dell Remote Access Controller (iDRAC) does not have the required license installed.
Make sure that the iDRAC has an Enterprise or Express license installed, and retry the operation, if possible.
5000_3 SNMP settings of the device could not be configured because all configurable fields of the integrated Dell Remote Access Controller (iDRAC) are occupied.
Manually configure the SNMP settings. For instructions to manually configure the SNMP settings, see "Manually configuring the alert destination of an iDRAC using the web interface" in the SupportAssist Enterprise User's Guide at Dell.com/serviceabilitytools.
5000_4 SNMP settings of the device could not be configured because the credentials you have entered do not have the required privileges. |
Make sure that that the credentials have either Administrator or Operator privileges on the integrated Dell Remote Access Controller (iDRAC), and retry the operation, if possible.
5000_5 SNMP settings of the device could not be configured because an attempt to connect to the integrated Dell Remote Access Controller (iDRAC) was unsuccessful.
Make sure that the iDRAC is reachable from the system on which SupportAssist Enterprise is installed, and retry the operation, if possible.
5000_6 SNMP settings of the device could not be configured because the credentials you have entered are invalid.
Make sure that the credentials are valid, and retry the operation, if possible or contact your SupportAssist Enterprise administrator for assistance.
5000_7 SNMP settings of the device could not be configured because of an unexpected error.
Manually configure the SNMP settings. For instructions to manually configure the SNMP settings, see "Manually configuring the alert destination of an iDRAC using the web interface"

SupportAssist Enterprise
93 REST API Guide – SupportAssist Enterprise
Error code Error message Possible Resolution
in the SupportAssist Enterprise User's Guide at Dell.com/serviceabilitytools.
5000_8 SNMP settings of the device could not be configured because of an unexpected error.
Manually configure the SNMP settings. For instructions to manually configure the SNMP settings, see "Configuring the alert (SNMP trap) destination" in the SupportAssist Enterprise User's Guide at Dell.com/serviceabilitytools.
5000_9 SNMP settings of the device could not be configured because the user account does not have the sufficient privileges on the device.
Manually configure the SNMP settings. For instructions to manually configure the SNMP settings, see "Manually configuring the alert destination" in the SupportAssist Enterprise User's Guide at Dell.com/serviceabilitytools.
5000_10 SNMP settings of the device could not be configured because the hostname/IP address of the system where SupportAssist Enterprise is installed was not provided.
Provide the hostname/IP address of the system where SupportAssist Enterprise is installed, and retry the operation, if possible.
5000_11 SNMP settings of the device could not be configured because the SNMP service is not installed on the device.
Manually install the SNMP service on the device, and retry the operation, if possible.
5000_12 SNMP settings of the device could not be configured because SupportAssist Enterprise does not support the operating system running on the device.
5000_13 SNMP settings of the device could not be configured because the SNMP service has not started.
Manually start the SNMP service, and retry the operation, if possible.
5000_14 SNMP settings of the device could not be configured because the WMI service is disabled.
Manually start the WMI service, and retry the operation, if possible.
5000_15 SupportAssist Enterprise has configured the SNMP settings successfully, but the automated test to verify the SNMP settings was unsuccessful.
Verify the network settings and make sure that the SNMP port (162) is open.

SupportAssist Enterprise
94 REST API Guide – SupportAssist Enterprise
B Frequently asked questions
Question 1: How to add a device?
To add a device:
1. Create a credential account. For details see, see Create Account Credentials.
A credential account will be created and the details of the account will be present in the response body.
2. Note the credential account id from the response body and add a device. For details, see Add device.
An operation id will be present in the response body.
3. Use the operation id and check the status of the device discovery. For details, see Retrieve Job status.
After device discovery is complete, you can note the device id and use it to perform the following:
• Enabling or disabling maintenance mode
• Starting a collection
• Assigning a Credential Profile
• Editing or deleting a device.
Question 2: How to start a collection?
To start a collection: 1. Retrieve the devices. For details see Retrieve devices.
2. Note the list of device ids from the response body.
3. Start the collection. For details, see Collection.
Question 3: For which device types is deep discovery not supported?
Deep discovery is not supported for the following device types:
• Storage Center (SC) / Compellent
• Fluid File System (Fluid FS)
• Software
• Virtual Machine
• iDRAC
Question 4: How to edit the credentials of a device?
To edit the credentials of a device: 1. Retrieve the devices. For details see Retrieve devices.
2. Note the list of device ids from the response body.
3. Edit the credentials of the device. For details, see Edit device details.
Question 5: Which are the devices that will be backed up in the export api?
The export API will back up the following devices:
• All devices discovered in SupportAssist Enterprise, without an adapter.
• All devices from which SupportAssist Enterprise can collect system information.
Question 6: For which devices is configuring SNMP settings supported?
Configuring SNMP settings is supported for Server / Hypervisor and iDRAC. Question 7: For which devices is enabling monitoring not supported during device discovery?
Enabling monitoring is not supported for the following devices:
• Storage Center (SC) / Compellent

SupportAssist Enterprise
95 REST API Guide – SupportAssist Enterprise
• PeerStorage(PS) / Equallogic
• Fluid File System (Fluid FS)
• Software
• Solution
• Virtual Machine

SupportAssist Enterprise
96 REST API Guide – SupportAssist Enterprise
C Glossary
Term Meaning
REST Representational State Transfer
RO Resource Oriented
ROA Resource Oriented Architecture