rethinking the workbench - fine woodworking€¦ · 48 fine woodworking photos provided by the...
TRANSCRIPT
F I n e W O O D W O R K I n G48 Photos provided by the contributors; drawings: Christopher Mills
although the tablesaw is often cited as the center of the workshop, the workbench is where most of the action happens. For sharpening, handwork, sanding, assembling, and finishing, everyone needs a flat, solid surface to work on. But
workbenches vary widely, as do the myriad ways our readers accessorize them. This special collection of reader ideas centers on the workbench, from the surface itself to everything that happens there.
Whether you are dreaming up a new bench or looking to improve the one you have, you are likely to find some great ideas here.
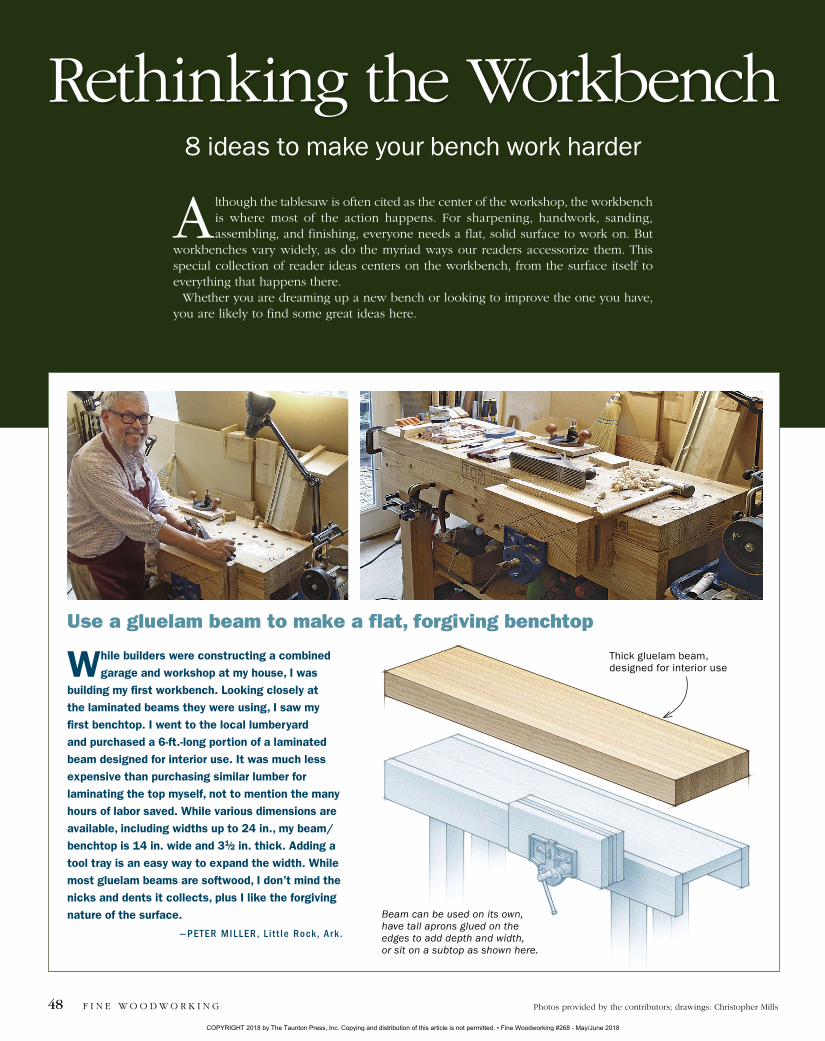
Use a gluelam beam to make a flat, forgiving benchtop
Rethinking the Workbench8 ideas to make your bench work harder
While builders were constructing a combined garage and workshop at my house, I was
building my first workbench. Looking closely at the laminated beams they were using, I saw my first benchtop. I went to the local lumberyard and purchased a 6-ft.-long portion of a laminated beam designed for interior use. It was much less expensive than purchasing similar lumber for laminating the top myself, not to mention the many hours of labor saved. While various dimensions are available, including widths up to 24 in., my beam/benchtop is 14 in. wide and 3-1⁄2 in. thick. Adding a tool tray is an easy way to expand the width. While most gluelam beams are softwood, I don’t mind the nicks and dents it collects, plus I like the forgiving nature of the surface.
—PeTer Miller, l i t t le rock , A r k .
Thick gluelam beam, designed for interior use
Beam can be used on its own, have tall aprons glued on the edges to add depth and width,or sit on a subtop as shown here.
COPYRIGHT 2018 by The Taunton Press, Inc. Copying and distribution of this article is not permitted. • Fine Woodworking #268 - May/June 2018
M ay / J u n e 2 0 1 8 49
I’m new to dovetailing, and before I made a grand investment in a leg vise or Moxon
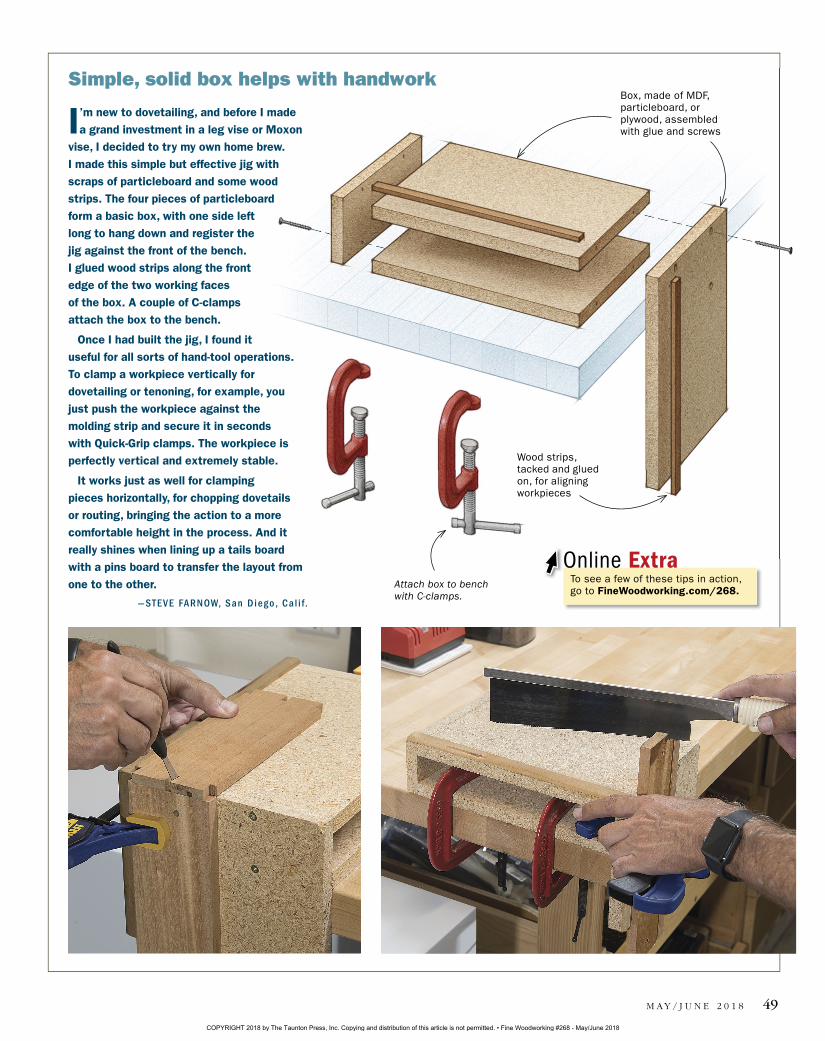
vise, I decided to try my own home brew. I made this simple but effective jig with scraps of particleboard and some wood strips. The four pieces of particleboard form a basic box, with one side left long to hang down and register the jig against the front of the bench. I glued wood strips along the front edge of the two working faces of the box. A couple of C-clamps attach the box to the bench.
Once I had built the jig, I found it useful for all sorts of hand-tool operations. To clamp a workpiece vertically for dovetailing or tenoning, for example, you just push the workpiece against the molding strip and secure it in seconds with Quick-Grip clamps. The workpiece is perfectly vertical and extremely stable.
It works just as well for clamping pieces horizontally, for chopping dovetails or routing, bringing the action to a more comfortable height in the process. And it really shines when lining up a tails board with a pins board to transfer the layout from one to the other.
—STeVe FArNoW, San diego, Ca l i f.
Simple, solid box helps with handworkBox, made of MDF, particleboard, or plywood, assembled with glue and screws
Wood strips, tacked and glued on, for aligning workpieces
Attach box to bench with C-clamps.
To see a few of these tips in action, go to FineWoodworking.com/268.
Online Extra
COPYRIGHT 2018 by The Taunton Press, Inc. Copying and distribution of this article is not permitted. • Fine Woodworking #268 - May/June 2018
F I n e W O O D W O R K I n G50 F I n e W O O D W O R K I n G
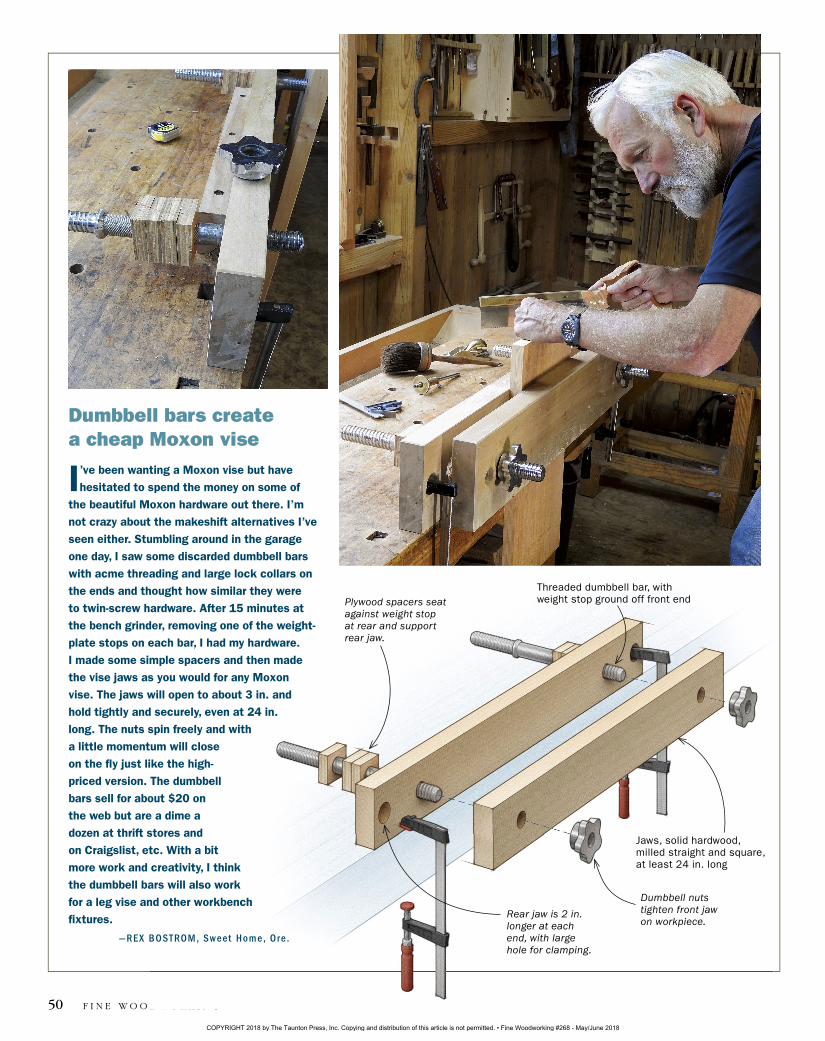
Dumbbell bars createa cheap Moxon vise
I’ve been wanting a Moxon vise but have hesitated to spend the money on some of
the beautiful Moxon hardware out there. I’m not crazy about the makeshift alternatives I’ve seen either. Stumbling around in the garage one day, I saw some discarded dumbbell bars with acme threading and large lock collars on the ends and thought how similar they were to twin-screw hardware. After 15 minutes at the bench grinder, removing one of the weight-plate stops on each bar, I had my hardware. I made some simple spacers and then made the vise jaws as you would for any Moxon vise. The jaws will open to about 3 in. and hold tightly and securely, even at 24 in. long. The nuts spin freely and with a little momentum will close on the fly just like the high-priced version. The dumbbell bars sell for about $20 on the web but are a dime a dozen at thrift stores and on Craigslist, etc. With a bit more work and creativity, I think the dumbbell bars will also work for a leg vise and other workbench fixtures.
—reX BoSTroM, Sweet Home, ore .
Dumbbell nuts tighten front jaw on workpiece.
Plywood spacers seat against weight stop at rear and support rear jaw.
Threaded dumbbell bar, with weight stop ground off front end
Rear jaw is 2 in. longer at each end, with large hole for clamping.
Jaws, solid hardwood, milled straight and square, at least 24 in. long
COPYRIGHT 2018 by The Taunton Press, Inc. Copying and distribution of this article is not permitted. • Fine Woodworking #268 - May/June 2018
M ay / J u n e 2 0 1 8 51www.finewoodworking.com
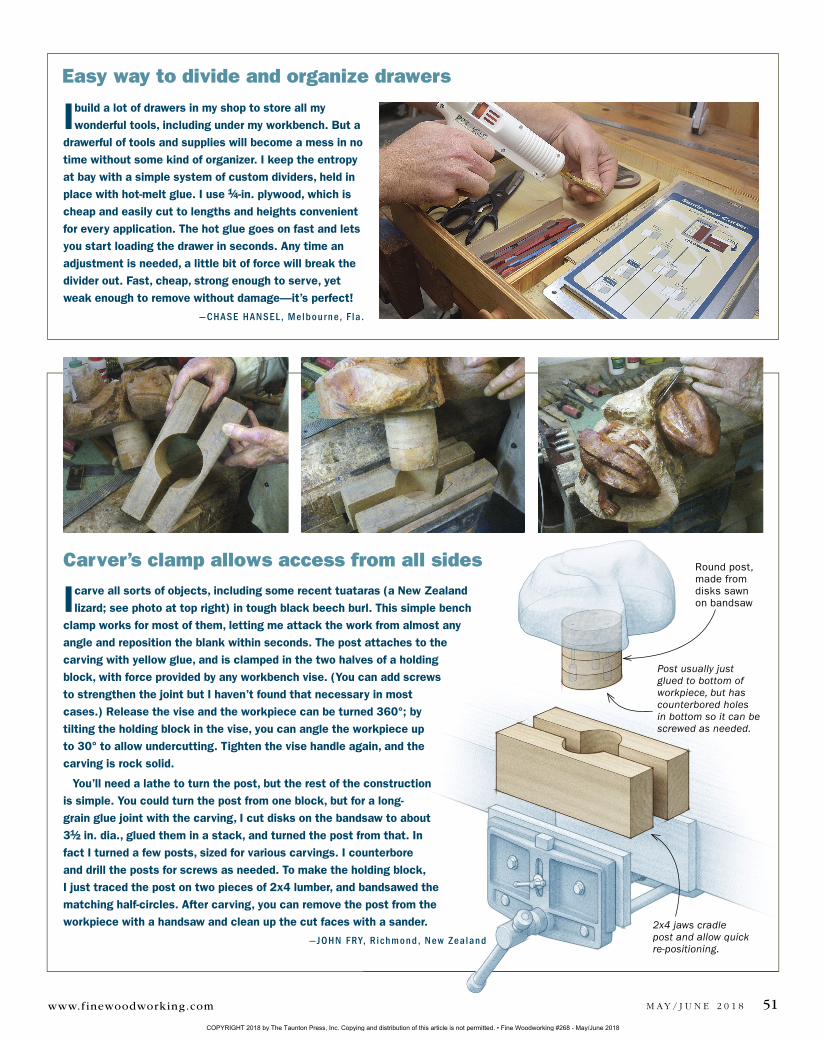
Carver’s clamp allows access from all sides
I carve all sorts of objects, including some recent tuataras (a New Zealand lizard; see photo at top right) in tough black beech burl. This simple bench
clamp works for most of them, letting me attack the work from almost any angle and reposition the blank within seconds. The post attaches to the carving with yellow glue, and is clamped in the two halves of a holding block, with force provided by any workbench vise. (You can add screws to strengthen the joint but I haven’t found that necessary in most cases.) Release the vise and the workpiece can be turned 360°; by tilting the holding block in the vise, you can angle the workpiece up to 30° to allow undercutting. Tighten the vise handle again, and the carving is rock solid.
You’ll need a lathe to turn the post, but the rest of the construction is simple. You could turn the post from one block, but for a long-grain glue joint with the carving, I cut disks on the bandsaw to about 3-1⁄2 in. dia., glued them in a stack, and turned the post from that. In fact I turned a few posts, sized for various carvings. I counterbore and drill the posts for screws as needed. To make the holding block, I just traced the post on two pieces of 2x4 lumber, and bandsawed the matching half-circles. After carving, you can remove the post from the workpiece with a handsaw and clean up the cut faces with a sander.
—JoHN FrY, r ichmond, New Zea land
I build a lot of drawers in my shop to store all my wonderful tools, including under my workbench. But a
drawerful of tools and supplies will become a mess in no time without some kind of organizer. I keep the entropy at bay with a simple system of custom dividers, held in place with hot-melt glue. I use 1⁄4-in. plywood, which is cheap and easily cut to lengths and heights convenient for every application. The hot glue goes on fast and lets you start loading the drawer in seconds. Any time an adjustment is needed, a little bit of force will break the divider out. Fast, cheap, strong enough to serve, yet weak enough to remove without damage—it’s perfect!
—CHASe HANSel, Melbourne , F la .
Easy way to divide and organize drawers
Round post, made from disks sawn on bandsaw
Post usually just glued to bottom of workpiece, but has counterbored holes in bottom so it can be screwed as needed.
2x4 jaws cradle post and allow quick re-positioning.
COPYRIGHT 2018 by The Taunton Press, Inc. Copying and distribution of this article is not permitted. • Fine Woodworking #268 - May/June 2018
F I n e W O O D W O R K I n G52
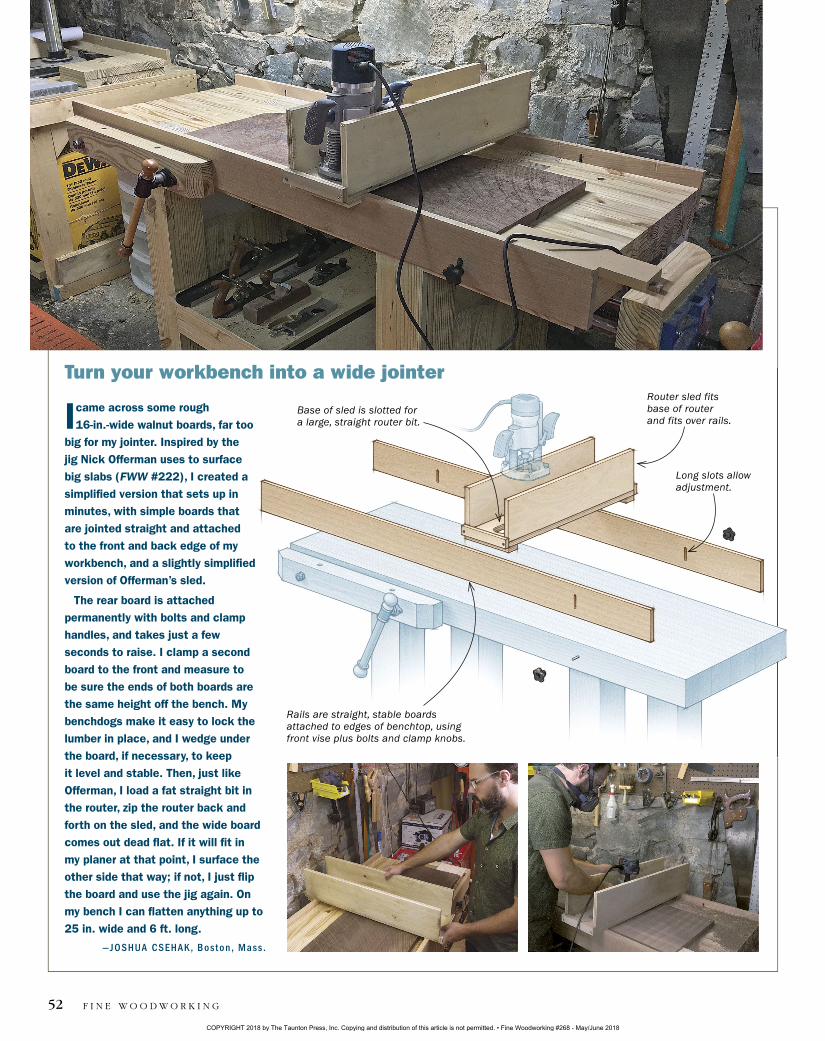
I came across some rough 16-in.-wide walnut boards, far too
big for my jointer. Inspired by the jig Nick Offerman uses to surface big slabs (FWW #222), I created a simplified version that sets up in minutes, with simple boards that are jointed straight and attached to the front and back edge of my workbench, and a slightly simplified version of Offerman’s sled.
The rear board is attached permanently with bolts and clamp handles, and takes just a few seconds to raise. I clamp a second board to the front and measure to be sure the ends of both boards are the same height off the bench. My benchdogs make it easy to lock the lumber in place, and I wedge under the board, if necessary, to keep it level and stable. Then, just like Offerman, I load a fat straight bit in the router, zip the router back and forth on the sled, and the wide board comes out dead flat. If it will fit in my planer at that point, I surface the other side that way; if not, I just flip the board and use the jig again. On my bench I can flatten anything up to 25 in. wide and 6 ft. long.
—JoSHUA CSeHAK, Boston, Mass .
Turn your workbench into a wide jointer
Rails are straight, stable boards attached to edges of benchtop, using front vise plus bolts and clamp knobs.
Long slots allow adjustment.
Router sled fits base of router and fits over rails.
Base of sled is slotted for a large, straight router bit.
COPYRIGHT 2018 by The Taunton Press, Inc. Copying and distribution of this article is not permitted. • Fine Woodworking #268 - May/June 2018
M ay / J u n e 2 0 1 8 53www.finewoodworking.com
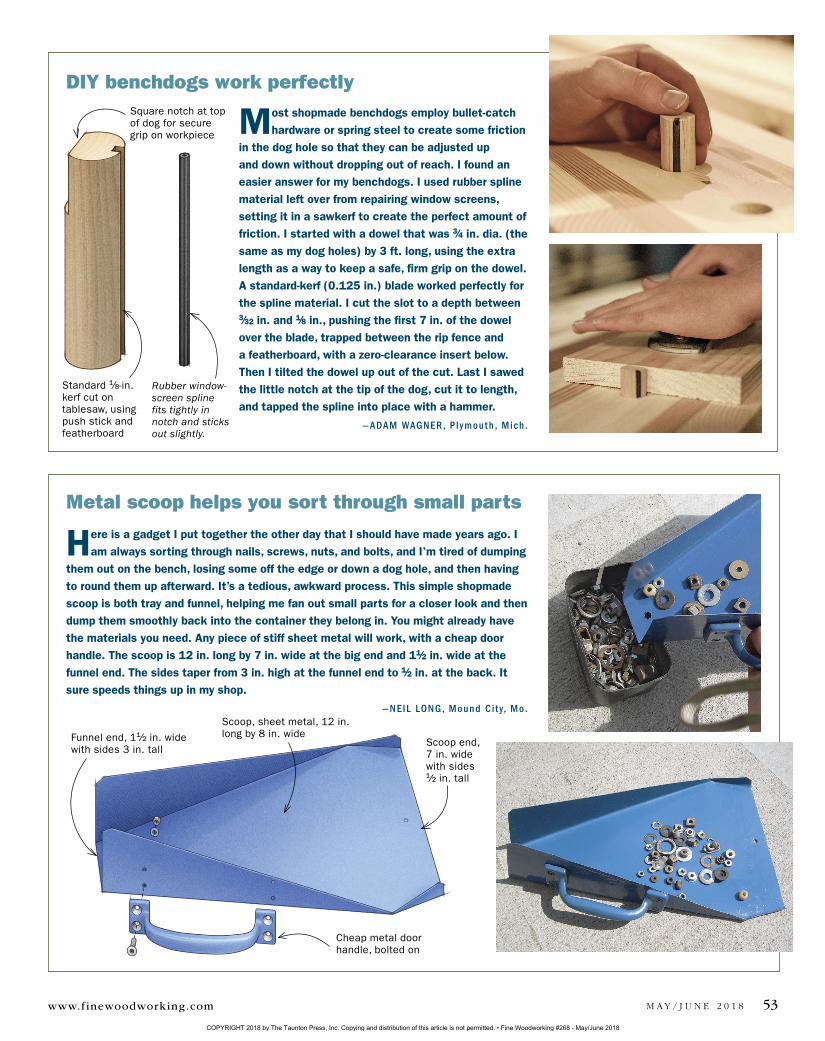
Here is a gadget I put together the other day that I should have made years ago. I am always sorting through nails, screws, nuts, and bolts, and I’m tired of dumping
them out on the bench, losing some off the edge or down a dog hole, and then having to round them up afterward. It’s a tedious, awkward process. This simple shopmade scoop is both tray and funnel, helping me fan out small parts for a closer look and then dump them smoothly back into the container they belong in. You might already have the materials you need. Any piece of stiff sheet metal will work, with a cheap door handle. The scoop is 12 in. long by 7 in. wide at the big end and 1-1⁄2 in. wide at the funnel end. The sides taper from 3 in. high at the funnel end to 1⁄2 in. at the back. It sure speeds things up in my shop.
—Neil loNg, Mound C i t y, Mo.
Metal scoop helps you sort through small parts
DIY benchdogs work perfectly
Most shopmade benchdogs employ bullet-catch hardware or spring steel to create some friction
in the dog hole so that they can be adjusted up and down without dropping out of reach. I found an easier answer for my benchdogs. I used rubber spline material left over from repairing window screens, setting it in a sawkerf to create the perfect amount of friction. I started with a dowel that was 3⁄4 in. dia. (the same as my dog holes) by 3 ft. long, using the extra length as a way to keep a safe, firm grip on the dowel. A standard-kerf (0.125 in.) blade worked perfectly for the spline material. I cut the slot to a depth between 3⁄32 in. and 1⁄8 in., pushing the first 7 in. of the dowel over the blade, trapped between the rip fence and a featherboard, with a zero-clearance insert below. Then I tilted the dowel up out of the cut. Last I sawed the little notch at the tip of the dog, cut it to length, and tapped the spline into place with a hammer.
—AdAM WAgNer, P lymouth , Mich .
Standard 1⁄8-in. kerf cut on tablesaw, using push stick and featherboard
Square notch at top of dog for secure grip on workpiece
Rubber window-screen spline fits tightly in notch and sticks out slightly.
Scoop, sheet metal, 12 in. long by 8 in. wideFunnel end, 11⁄2 in. wide
with sides 3 in. tallScoop end, 7 in. wide with sides 1⁄2 in. tall
Cheap metal door handle, bolted on
COPYRIGHT 2018 by The Taunton Press, Inc. Copying and distribution of this article is not permitted. • Fine Woodworking #268 - May/June 2018