retro gaming with exagear • docker swarm mode • … · retro gaming with exagear • docker...
TRANSCRIPT

Retro gaming with Exagear bull Docker swarm mode bull Game Controllers
Create a modern setup to get the absolute maximum performance from your computer
bull Using the Hardware encoder functions of the ODROID-XU4
bull How to Use an ODROID
like a Bluetooth Speaker
MagazineODROIDODROID
Magazine
ODROID
WaterCooledWaterCooled
Year ThreeIssue 36Dec 2016
What we stand forWe strive to symbolize the edge of technology future youth humanity and engineering
Our philosophy is based on Developers And our efforts to keep close relationships with developers around the world
For that you can always count on having the quality and sophistication that is the hallmark of our products
Simple modern and distinctiveSo you can have the best to accomplish everything you can dream of
We are now shipping the ODROID-C2 and ODROID-XU4 devices to EU countries Come and visit our online store to shop
Address Max-Pollin-Straszlige 1 85104 Pfoumlrring Germany
Telephone amp Faxphone +49 (0) 8403 920-920email servicepollinde
Our ODROID products can be found athttpbitly1tXPXwe
EDITORIAL
ODROID Magazine published monthly at httpmagazineodroidcom is your source for all things ODROIDianHard Kernel Ltd bull 704 Anyang K-Center Gwanyang Dongan Anyang Gyeonggi South Korea 431-815 Hardkernel manufactures the ODROID family of quad-core development boards and the worldrsquos first ARM bigLITTLE single board computerFor information on submitting articles contact odroidmagazinegmailcom or visit httpbitly1ypImXsYou can join the growing ODROID community with members from over 135 countries at httpforumodroidcomExplore the new technologies offered by Hardkernel at httpwwwhardkernelcom
Hardkernel attended TechCon 2016 in late October and showed off some of the capabilities of the new ODROID-C2 There were several demos of DIY projects set up in-
cluding an Ambilight display a CloudShell 2 server running the latest mainline kernel and a touchscreen media player using a
HiFi Shield The liquid cooling set-up featured on the cover this month is another example of an amazing DIY project that creates the ulti-
mate system for maximum overclocked performance Itrsquos a work of functional
art that demonstrates the technical expertise of the ODROID community
Several other projects that community mem-bers have created include using an ODROID as a Bluetooth
speaker building a real-time kernel for use in a single-threaded operat-ing system and designing a combination seedbox and Networked Access Storage unit from an ODROID-XU4 using the CloudShell Andy concludes his Docker tutorial with an overview of swarm mode our resident mad scientist Bo details his latest discoveries Tobias helps us select the best gaming controller with an in-depth review and Bruno brings us the latest in Android fun with his favorite games of the month
Manuel Adamuz Spanish EditorI am 31 years old and live in Seville Spain and was born in Granada I am married to a wonderful woman and have a child A few years ago I worked as a computer technician and programmer but my current job is related to quality management and information technology ISO 9001 ISO 27001 and ISO 20000 I am passionate about computer science especially microcomputers such as the ODROID and Raspberry Pi I love experimenting with these com-
puters My wife says Irsquom crazy because I just think of ODROIDs My other great hobby is mountain biking and I occasionally participate in semi-professional competitions
Andrew Ruggeri Assistant EditorI am a Biomedical Systems engineer located in New England currently working in the Aerospace industry An 8-bit 68HC11 microcontroller and assembly code are what got me interested in embedded systems Nowadays most proj-ects I do are in C and C++ or high-level languages such as C and Java For many projects I use ODROID boards but I still try to use 8bit controllers whenever I can (Irsquom an ATMEL fan) Apart from electronics Irsquom an analog analogue photography and film development geek who enjoys trying to speak foreign languages
Venkat Bommakanti Assistant EditorIrsquom a computer enthusiast from the San Francisco Bay Area in California I try to incorporate many of my interests into single board computer projects such as hardware tinkering metal and woodworking reusing salvaged materials software development and creating audiophile music recordings I enjoy learning something new all the time and try to share my joy and enthusiasm with the community
Josh Sherman Assistant EditorIrsquom from the New York area and volunteer my time as a writer and editor for ODROID Magazine I tinker with computers of all shapes and sizes tearing apart tablets turning Raspberry Pis into PlayStations and experimenting with ODROIDs and other SoCs I love getting into the nitty gritty in order to learn more and enjoy teaching oth-ers by writing stories and guides about Linux ARM and other fun experimental projects
Nicole Scott Art EditorNicole is a Digital Strategist and Transmedia Producer specializing in online optimization and inbound marketing strategies social media management and media production for print web video and film Managing multiple ac-counts with agencies and filmmakers from web design and programming Analytics and Adwords to video editing and DVD authoring Nicole helps clients with the all aspects of online visibility Nicole owns anODROID-U2 and a number of ODROID-U3rsquos and looks forward to using the latest technologies for both personal and business
endeavors Nicolersquos web site can be found at httpwwwnicolecscottcom
James LeFevour Art EditorIrsquom a Digital Media Specialist who is also enjoying freelance work in social network marketing and website administra-tion The more I learn about ODROID capabilities the more excited I am to try new things Irsquom learning about Being a transplant to San Diego from the Midwest I am still quite enamored with many aspects that I think most West Coast people take for granted I live with my lovely wife and our adorable pet rabbit the latter keeps my books and computer
equipment in constant peril the former consoles me when said peril manifests
Bruno Doiche Senior Art EditorSome wonder why Bruno talks to himself so much He answered ldquoOf course I talk to myself Sometimes I need expert
advice manrdquo Yea he has done a lot of crazy things on the magazine over the years After all acting normal has never been one of his greatest strengths
OUR AMAZING ODROIDIAN STAFF
Rob Roy Chief EditorIrsquom a computer programmer in San Francisco CA designing and building web applications for local clients on my network cluster of ODROIDs My primary languages are jQuery Angular JS and HTML5CSS3 I also develop pre-built operating systems custom kernels and optimized applications for the ODROID platform based on Hardkernelrsquos official releases for which I have won several Monthly Forum Awards I use my ODROIDs for a variety of purposes
including media center web server application development workstation and gaming console You can check out my 100GB collection of ODROID software prebuilt kernels and OS images at httpbitly1fsaXQs
INDEX
HaRDwaRe encODeR FuncTIOns - 18
Game cOnTROlleRs - 10
anDROID GamInG mIssIles - 14
wORlD DOmmInaTIOn HI FI - 17
BOOTInI peRsIsTence - 16
Real TIme keRnel - 24
ODROID as a BlueTOOTH speakeR - 23
exaGeaR GamInG - 8
lIquID cOOleD ODROID - 26
THeRmal ReceIpT pRInTeR - 15
HaRDkeRnel aT aRmcOn - 6
sYneRGY - 25
seeDBOx - 34
meeT an ODROIDIan - 41
DOckeR - 29
HARDKERnEL AT ARM TECHCOn 2016SHOwCASInG THE ODROID-C2by Rob Roy (robroy)
IoT DEVICE ODROID-C2
This year at ARM TechCon in Santa Clara California the engineers at Hardkernel displayed several demonstration projects using the ODROID-C2 including a HiFi Shield setup with a portable Volumio
player and a gorgeous 55-inch 4K Ambilight display Many ODROIDians stopped by to admire some of the next generation products such as the new ODROID-VU8 8-inch touchscreen with case and the new CloudShell 2 which was set up to run a RAID array using two SATA hard drives Check out the pictures to get a peek at the products Hardkernel is offering soon
ARM TECHCON 2016
The Hardkernel booth was very eye-catching with an ambilight display
The ambilight system ran on an arduino which analyzed the 4k video in realtime while the ODROID-c2 used kodi to dis-play the video simultaneously on the 55-inch 4k monitor
ODROID MAGAZINE 6
ARM TECHCON 2016
The ODROID-c2 on the right is playing music through the HiFi shield and the ODROID-c2 on the left is running oscilloscope software on the new ODROID-Vu8 8-inch touchscreen with case
High quality music played through a HiFi shield during the conference
The rarest of all devices an ubuntu 1604 touchscreen tablet
The new cloudshell 2 housing an ODROID-xu4 running linux kernel ver-sion 478 and a saTa RaID array
ODROID MAGAZINE 7
Installation is relatively easy and should essentially complete itself
Getting startedExaGear Desktop essentially runs
a virtualized version of Ubuntu that uses the x86 architecture instead of the ARM architecture that our ODROIDs utilize Letrsquos start the environment from our AMTE Terminal and take a look around
$ exagear
You can confirm that yoursquore in an x86 environment by running the ldquoarchrdquo command
$ arch
I686
We recommend that you update your apt-get repositories during the first launch of the guest system
$ sudo apt-get update
Since we are going to launch Win-dows games in this environment wersquoll also need to install Wine Wine exists for Ubuntu natively on our ODROIDs but no ARM Windows games exist yet We need to install x86 Wine inside the Exagear virtual environment This can be done easily using the apt-get com-
Itrsquos no secret that retro gaming is now back in style After buying a new gadget any true gamer instantly
wants to download and play their favor-ite titles on it Luckily for ODROID owners there is a way to turn their de-vice into a retro-gaming machine with Exagear Desktop to play your favorite Linux and Windows PC games on your ODROID In this article I will de-tail how to run some iconic PC games on the ODROID platform Arcanum Heroes of Might and Magic 3 and Sid Meierrsquos Alpha Centauri
InstallationBefore starting install Exagear Desk-
top from httpbitly2cul90r Put the ExaGear Desktop archive installation packages and ExaGear Desktop license key in the same folder Open your MATE (command line) Terminal move to this folder and unpack the archive
$ tar -xvzpf exagear-desktop-
odrxu4targz
The next step is to install and activate ExaGear on our ODROID You can do this with Exagearrsquos installation script in the folder which will automatically de-tect the packages and license key
$ sudo install-exagearsh
mand
$ sudo apt-get install wine
After installing Wine we recom-mend running winecfg and enabling the ldquoEmulate a virtual desktoprdquo bar Other-wise you can face issues when applica-tions try to switch to full-screen mode
$ winecfg
At this point yoursquore prepared and ready to try installing some PC games Itrsquos possible to run all kinds of distribu-tionss and installers but the process is quite tricky and can take some time to figure out how to make each game work especially for older games with compat-ibility issues We recommend using a
RETRO GAMInG wITH EXAGEARby Gaukhar kambarbaeva
EXAGEAR
Figure 1 - The wine configuration screen
ODROID MAGAZINE 8
from GOG at httpbitly2gftTtl This turn-based strategy game also loads nor-mally with the installer and Wine in a MATE Terminal
$ exagear
$ wine setup_homm3_com-
plete_20016exe
After loading the game installer will show up and you can proceed with instal-lation Once the installation is finished you can run HoMM3 directly from the desktop Wait until the game is loaded and then you will see the Start menu from which you can select the map and play Heroes of Might and Magic 3 on your ODROID
Sid Meierrsquos Alpha Centauri
This awesome strategy game from the maker of Civilization is also available on GOG at httpbitly2fyfVBf Since it uses the GOG installer you can down-load and install it on the guest x86 sys-tem with Wine just like the other games
$ exagear
$ wine setup_sid_meiers_alpha_
centauri_20223exe
DRM-free version of a game from a service like Good Old Games (GOG) which offers a consistent way to down-load and install games that the ExaGear Desktop environment usually supports
ArcanumThis awesome early 2000s adventure
game can run on ExaGear Desktop First purchase and download Arcanm (httpbitly2fjmVa0) Then run the installer with Wine in the MATE Ter-minal and the graphical interface of the game installer will appear
$ exagear
$ wine setup_arcanum_20015exe
After the installation is finished you can run Arcanum from your desktop If ExaGear installs any icons on your main ODROID Ubuntu desktop they should automatically start the virtual environ-ment and load the game Select your favorite hero and start playing Arcanum on an ODROID
Heroes of Might and Magic 3
Like Arcanum you can get HoMM3
EXAGEAR
After installation is finished you can run Alpha Centauri directly from the desktop or from the Start menu Select a faction and start your space coloniza-tion adventure
Exagear Desktop (httpbitly2cul90r) allows you to run a lot of great 1990s and early 2000s PC games on your ODROID You can run other x86 applications too For comments questions and suggestions please visit the original post at httpbitly2fH6Fwf
Figure 2 - arcanum
Figure 3 - The arcanum menu screen
Figure 4 - Heroes of might and magic 3 in action
Figure 5 - alpha centauri screenshot
ODROID MAGAZINE 9
while I still lived with my parents Up to that point I was only using joysticks and this was my first gamepad
I got this controller (httpbitly2fo53Wy) for my PC back then knowing well that as a PC player one rarely uses any controllers While most games run with a mouse and keyboard some work with joysticks especially space simulations and fighter simula-tions However responsiveness was of-ten inadequate Back then I blamed it on Windows because every time I cali-brated the joystick it was working fine for a little while but later it was always off again Today I know that the left analog stick did not work correctly and always points to the upper left direction which makes it nearly impossible to use this gamepad
Apart from that it is actually a very nice controller It has a nice touch to it using some kind of a rubbery finish It gives the controller a very good grip and prevents it from slipping through your fingers It is slightly heavier than other controllers that I have but not unpleas-ant Besides that it comes with 12 but-tons a D-Pad two analog sticks and two triggers on the back It has ldquorumblerdquo support and actually has two connectors one for PS2 and one USB connector for PS3 and PC It also has 4 shoulder buttons which is quite nice and allows for some nice mapping The gamepad
I normally discuss a lot about different games and emulators that work on the ODROIDs but in this article
I want to talk about one of the most important assets used by gamers the gamepad There are plenty of gamepads out there and I want to talk about a few that I own myself indicating what I use them with and which I prefer I will try to explain how to setup your own con-troller based on my ODROID GameS-tation Turbo image which is also appli-cable to my Debian Jessie images I will also point out some special cases
Trustmaster Dual Trigger 3 in 1 Rumble Force
I have a few different controllers that Irsquove collected over the years some of which I wanted needed to create com-patible images The first one I got from a German shop almost 15 years ago
is programmable but I never took the time to program it
Prosbull Very good touch and feeling
rests very good in the handbull Very good and sturdy buttons if
you shake the gamepad nothing makes a sound the buttons feel like they are high quality
bull Four shoulder buttons + 2 trigger buttons (extra buttons for special functions)
bull Playstation symbols and support (good for PSP or PS1 emulation)
Consbull Very old model probably hard
to findbull Not all emulators detect or use
the rumble supportbull Some issues with Retroarchbull No support for most emulators
Hama Black ForceThe Hama gamepad ldquoBlack Forcerdquo is
a gamepad that I got much later It is an inexpensive model but is still a rather good gamepad It is a rather cheap copy of a PS3 controller but works nonethe-less None of the buttons has a descrip-tion other than numbers There is an ldquoanalogrdquo button where the home button would be on the PS3 controller If you press the button a red LED shines below
LInuX GAMInG CHOOSInG THE RIGHT GAME COnTROLLER FOR YOuRpLAYSTYLEby Tobias schaaf (meveric)
LINUX GAMING
Figure 1 - Trustmaster Dual Trigger 3 in 1 Rumble Force Gamepad which was my first Gamepad
ODROID MAGAZINE 10
Consbull Not a ldquoname-brandrdquo that is in any
way recognized by any program Therefore other ldquono-namerdquo con-trollers will be found under the same name and they might have different button layouts which makes it nearly impossible to have different configuration files for these controllers
bull The 19m cable length could be too short for some players
XBox 360 Wireless Controller
When I started my work on ODROID GameStation Turbo I knew I needed to get my hands on one of the ldquomain-linerdquo controllers out there It turned out the XBox 360 Controllers were the most widely supported so it made sense to get one I also wanted to have a wireless controller to get rid of the cable Since the system that I was build-ing was meant for kids I did not want them to trip over any cables
The controller is probably the heavi-est of all controllers that I have but it feels good in the hands and so I do not think that its weight is much of an is-sue It is the controller that my OGST image is primary configured for and all games should work out of the box with this one There are some minor issues with the drivers your controller always blinks or it may not be recognized again after it turned off and you turn it back
the button indicating that analog mode is activated This is actually needed to send analog signal for the D-Pad or else most emulator and programs wonrsquot rec-ognize the D-Pad at all The controller has 4 shoulder buttons but is missing any triggers
This gamepad is only registered as a ldquoGeneric USB Joystickrdquo but it still works out of the box with Retroarch and other programs and emulators The con-troller is not that high of a build quality and if you shake it you can hear the but-tons rattling Most of the noise appears to come from the shoulder buttons but also some from the D-Pad The analog sticks have a rough surface which gives extra grip which is not bad while not as comfortable as the rubbery finish of the real PS3 controller They have made a new model having the Playstation X O Square Triangle button markings as well
Prosbull Inexpensive - this gamepad is re-
ally intended for those with a low budget and clones of it are nor-mally between 5-15 eurouros
bull It may not look or sound like a good controller but many re-views of this controller are quite positive It is generally ldquogoodrdquo in all categories but neither awe-some nor great
bull Works out of the box with many games programs and emulators
bull Easy to set up and configure for most emulators and games
LINUX GAMING
on while you are within a game or a pro-gram such as Kodi Besides that it is the gamepad that is probably best sup-ported under Linux It does not mean that it gets a lot of patches and bugfixes but it means that most gamesprograms are developed with XBox 360 controller support
Some games lack all but XBox 360 controller support The wireless variant needs a proprietary PC remote adapt-er since it does not use a standard like Bluetooth but that is actually not a bad thing since the adapter supports up to 4 controllers simultaneously This is quite nice because it means that with just one USB port in use you can use 4 separate gamepads It also comes with either standard AA batteries or you can buy a rechargeable battery pack and use a charging station to keep your controllers ready for play This is quite nice since you always have a working controller as long as you have batteries in the house or have another charged battery pack
What I do not like about this con-troller is the so called ldquodeadzonerdquo and the inability of the controller to go back to ldquo0rdquo (zero) when you release the con-trols The analog sticks go from -32768 to +32768 either from left to right or top to bottom When you release them they should return to 0 The range that it is straying away from 0 is what one refers to a ldquodeadzonerdquo It signifies that any value in this range should be ignored and considered 0 in order to prevent un-wanted movements On good control-lers these dead zones can be very small For example a deadzone of say 4-5 of the maximal possible value is very com-mon which would be 1300-1700 Even if you go a bit further and say every value smaller than 2000 should be ignored that should be fine for most controllers
With the XBox 360 controllers when I released the analog stick for it to go back to 0 I could see values as high as +- 7500 or higher That is a deadzone of over 20 The two previous control-lers have values between 0 and 255 so
Figure 2 - Hama Black Force Gamepad courtesy of game-debatecom
Figure 3 - The xBox 360 wireless con-troller is probably the best supported controller under linux
ODROID MAGAZINE 11
the side for emulators like yabause to play Sega Saturn games They required 6 buttons instead of 4 like most controllers have nowadays It should also work fine with some MAME games that require 6 buttons instead of 4
This controller registers as the same generic USB joypad as the Hama con-troller does which brings me back to my point that having one configuration for different controllers will not work with these kind of controllers It also registers 12 buttons which is the same as the Hama gamepad but they are just ordered differently
In the middle there are three buttons ldquoModerdquo which is the same as the ldquoAna-logrdquo button on the Hama gamepad and is required to get the D-pad to work and a ldquoTurbordquo and ldquoClearrdquo button which do not seem to be recognized as extra but-tons but must have some internal mean-ing This also means that it is missing two buttons that would normally be used as ldquoStartrdquo and ldquoSelectrdquo These but-tons appear as buttons 5 and 6 on the controller The 4 shoulder buttons are once again just buttons and do not have triggers I normally use L2 and R2 as substitute for ldquoStartrdquo and ldquoSelectrdquo The D-pad is slightly different as well This is actually the only controller that has completely separated buttons for the D-pad On all other controllers the D-pad is in some way a cross and all direction keys are somewhat connected but not on the Sabrent
This controller is no doubt one of the best controllers out there It feels good in the hand is very sturdy relatively easy to use has good supported and is a lot of fun to play with If you happen to connect the PS3 to a Linux or Windows PC that can read all the inputs from the gamepad you can see how feature rich this controller is Everything on this is actually an axis or ramp Pressing a but-ton is not just 0 and 1 but it actually registers how strong you press the but-ton
The PS3 controller has a motion sen-sor or gyroscope that registers how you turn the controller When it comes to functions the PS3 controller is probably the best I have It is also the most ex-pensive one I have A new one can cost 50-90 eurouros
Prosbull Very good controls very sturdy
good feeling in the handbull Very precise controlbull Lots of functionsbull Wireless and wired options in
one controller
Consbull Very expensivebull Has to be loaded over USB (no
exchangeable batteries)
Sabrent USB 20 Twelve Button Game Controller for PC
This is the latest gamepad that I bought The reason for this is that I wanted a gamepad with 6 buttons on
the center should be 128 They normal-ly do not stray more than 124 or 132 which is about 3-4 and mostly they settle even closer than that The PS3 controller has values between -127 and +127 and will always return to 0 when released Not even once did I see it not return to 0
Prosbull Best supported controller by
games emulators and programsbull Up to 4 controllers simultane-
ously over one USB portbull Easy to switch batteries battery
packs so it is always ready to playbull Not too expensive and easy to
buy with lots of different models and designs to choose from
Consbull Not very precisebull Rather heavy compared to other
controllers
Playstation 3 DualShock 3 Controller
The Playstation 3 controller often called the ldquoSixaxisrdquo uses standard Blue-tooth communications It makes a pre-ferred controller for mobile devices such as tablets and smartphones although they often need to be rooted They can be used both with a USB cable as well as over a Bluetooth adapter on the ODROID This makes them very flex-ible though you can only connect one PS3 controller per Bluetooth dongle
Figure 4 - playstation 3 Dualshock 3 ldquosixaxisrdquo controller
Figure 5 - leaning into the turn of your favorite racing game
Figure 6 - sabrent 12 Button gamepad cheap and gets the job done
LINUX GAMING
ODROID MAGAZINE 12
PPSSPP but there is a way that might work which I will detail sometime in the future
Since the last update Reicast has rumble support In my testing all but the Trustmaster and PS3 controllers were working with Reicast and rumble support The Trustmaster was said to not have rumble support but the PS3 is detected as a rumble However it was either so weak that I could not feel it or it is simply not working at all
With Yabause you have either the GTK or the Qt interface both of which are configured separately Buttons can be set up from within the emulator In my experience once the D-pad and the buttons are configured they seem to work with every controller Since you can reconfigure the buttons from within the emulator this is not much of an is-sue
As previously mentioned having a configuration for different ldquoGeneric USB Joysticksrdquo might not work since they are not all configured in the same way I also found that the PS3 controller on the C2 only works via wireless Blue-tooth connection and the cabled con-nection will not work
SuitabilityI normally have my entire image
configured for the use of XBox 360 con-trollers This makes it easier since ev-erything has the same configuration and you do not have to switch I recently created my own unique setup so that I can switch between controllers depend-ing on the games I play
I still play all Libretro cores on Ret-roarch using an XBox 360 controller It is often the most convenient controller and I also can control Kodi with it just fine I can navigate the menus without a mouse and keyboard which is quite nice especially since the XBox 360 con-troller is wireless Since Retroarch uses automatic configuration for its control-ler setup you can easily switch between controllers if you want to I also use
Sega Saturn emulatorRetroarch is actually the best sup-
ported emulator when it comes to game-pad and joystick support The way it is configured on my image is that it uses udev to determine the controller and has a large number of configuration files for different controllers so that they work out of the box without additional setup About 130 different controllers are sup-ported so there is a very high chance that your controller is supported as well
XBox 360 and PS3 work 100 out of the box with Retroarch So does the Hama controller and for most games probably the Sabrent as well The Trust-master is detected correctly but due to the broken left analog stick it can cause some issues Not all controllers are found correctly when it comes to rumble support The N64 emulator and a few other cores can use rumble but for some reason they donrsquot always work
PPSSPP is actually not well support-ed when it comes to controllers It offi-cially only has a mapping for XBox 360 controllers but that was actually broken on ODROIDs so I created my own I also added a controller mapping for the PS3 controller which normally should work out of the box with the emulator but I am not completely sure I know that you can configure the PS3 control-ler manually thanks to my changes and map all the buttons you need correctly
None of the other controllers are of-ficially supported so their use may not be guaranteed going forward Gener-ally all controllers should work since PPSSPP uses SDL2 as a backend which should allow for some level of control-ler support As long as you map all the keys you need it should work fine for all controllers
Reicast is a little tricky It officially also only has support for the XBox 360 controller but I also added configuration files for PS3 Other controllers are not officially supported and are unlikely to work out of the box You cannot remap the buttons within the emulator as with
I also tested the deadzone on this con-troller and while the right analog stick is perfectly centering at 128 and stands there (values are between 0 and 255) the left analog stick does not return to the center and actually permanently jumps between 135 and 140 instead of 128 which means itrsquos about 5-10 off Since this controller acts similar to the Hama controller it will also work fine in Retro-arch without configuration
Prosbull Cheap and lightbull Very long cord 3m (about 9 feet) bull 6 button layout is very good for
Sega Saturn and other emulatorsbull Works out of the box with ret-
roarch
Consbull Feels cheap and not very durablebull For my taste this controller is
slightly too small It should be a little bigger with buttons a little more separated It also feels a little uncomfortable in the hands after a while
bull Turbo and Clear buttons should rather work as Start and Select
bull One analog stick does not center but this is not the only controller that has this issue The deadzone is not too bad
Irsquove already talked about how these controllers are often detected automati-cally by Retroarch or another emulator However do they all work out of the box The answer is sadly no but that does not mean you cannot use them
On my ODROID GameStation Turbo image (OGST) I have a lot of different emulators and games that use controllers so letrsquos find out what is working Currently I have four major emulators that I find important to run with controllers Retroarch ndash for most of the emulators PPSSPP ndash Playstation Portable emulator reicast ndash Sega Dream-cast emulator and Yabause ndash a fairly new
LINUX GAMING
ODROID MAGAZINE 13
called evdev which you might have to install via pip After that itrsquos similar to Retroarch in how you create the configu-ration file This file must be copied to usrlocalsharereicastmappings using root privileges Afterwards you need to adjust the configuration file for Reicast under homeodroidreicastemucfg by following the guide in the forum at httpbitly2ggdO9Y You also need to create an entry for the mappings file sim-ilar to the following in order to load the new configuration for your controller
evdev_mapping_1= mycontrollercfg
I also have a tool installed called anti-micro which allows you to create unique configurations for your controllers You can map keyboard keys to your control-ler in case a game or an emulator does not want to work with your controller You can even map your mouse move-ments and buttons to a controller and use the controller as a substitute
Final thoughtsWhatever controller you like there is
probably a way to get it to work on my ODROID pre-built images Some users have even been able to attach authentic arcade joysticks for use on full cabinets Whatever controller you prefer there should be a way to make your gaming experience enjoyable on ODROIDs and my OGST images
the XBox 360 controller for Dreamcast since it works nicely with it
For PPSSPP I actually switched to use the PS3 controller It is much more convenient to use a Playstation control-ler for a Playstation console since the buttons all match up and it is actually very responsive
I got the Sabrent to play Sega Saturn games on the Yabause emulator but I donrsquot really use the Hama I used it in the past when I didnrsquot have my XBox 360 yet but lately I only use it on a spare ODROID if I need to test something and do not want to switch my remote adapter for an XBox 360 controller
I do not use the Trustmaster at all because of its broken left analog stick often causes issues I actually find that kind of disappointing because it is ac-tually a very nice controller which feels good in the hands
How to configure your controller for OGST
If you have a controller that is not supported by the emulators I mentioned above here is a small guide on how to setup your controller
Retroarch There should be a tool installed called ldquoretroarch-joyconfigrdquo With that tool you can create a con-figuration file for your controller It will generate text output which you need to copy and create as a new file in usrsharelibretroautoconfigudev using root privileges After that your control-ler should be found automatically by Retroarch
PPSSPP Go to the Settings -gt Con-trols menu to setup your controller and map your buttons
Yabause Just like PPSSPP you can configure the controls from within the emulator For example press CTRL + S in yabause-qt
Reicast For Reicast you use a tool called reicast-joyconfig that is similar to retroarch-joyconfig It is written in Python and requires a python module
LINUX GAMINGANDROID GAMES
MISSILES THERE IS nO bETTER wAY OF FLYInG THAn DODGInG RELEnTLESS ATTACKSby Bruno Doiche
The sky is blue and you are fly-
ing peacefully on your beloved air-plane Then suddenly you are fend-ing for your life This is Missiles which is a great twist on a casual game You are being shock-trained to try to sur-vive for more than 10 seconds and the difficulty keeps going up Although it is punishingly hard this game will keep you glued to your screen
httpsplaygooglecomstoreappsdetailsid=plmacaqueMis-siles
as soon as you get aquainted with the game go to fast mode You will have double the fun in half the time
ODROID MAGAZINE 14
ldquoOne day everything will be paper-lessrdquo you mutter under your breath as you look at your workspace clut-
tered with a mixture of electronics ca-bles and papers In the future you will only have to dig through just electronics and cables to find that lost eMMC mod-ule But right now looking for that lost eMMC or microSD card on your work-space feels like searching for a needle in a haystack where most of the haystack is made of paper
You notice that a lot of the papers are handy printouts that contain well need-ed information ldquoMost of these notes are pretty small but they take up an en-tire sheet of paperrdquo You start thinking about the problem of paper size Then you recall seeing a long-abandoned ther-mal printer from a previous world-dom-ination scheme sitting in a box in the corner of your subterranean laboratory You grab it and see it is a STAR TSP100 thermal printer with a USB interface
ldquoThatrsquos itrdquo You start planning how you can make use of a thermal printer to print out notes of any size Many of the notes will be small enough to tape to the physical objects that you are making the notes about ldquoI can add a thermal printer to the console of my fleet of ve-hicles in case the need for printing any-thing may arise on the roadrdquo
Your first attempt is to simply add it via ldquocupsrdquo accessible through the Linux menu for ldquoSystemAdministrationPrintersrdquo or ldquoSystem ToolsPrintersrdquo Assigning it to the ldquoGeneric Text Onlyrdquo printer driver didnrsquot work and there
InSTALLInG A THERMAL RECEIpT pRInTER On LInuXCHROnICLES OF A MAD SCIEnTISTby Bo lechnowsky (respectech)
THERMAL PRINTER
Thermal printer with a receipt printed from an ODROID
isnrsquot a download for LinuxARM on the manufacturerrsquos website
So how can we print to a ther-mal printer from Linux running on ODROID You research and print out the following steps (on a regular-sized sheet of paper for now) for later refer-ence
In a terminal window enter
$ sudo apt update
$ sudo apt install libcups2-dev
$ sudo apt install libcupsimage2
$ sudo apt install libcupsimage2-
dev
Next download a package con-taining the Linux source code for the STAR TSP100 printer from httpbitly2fPybtO From the command line navigate to the directory containing the download zip file and type
$ unzip TSP100U_v5_2_0_CDzip
Next move into the source directory and untar the files
$ cd TSP100_V520LinuxCUPS
$ tar -zxvf starcupsdrv-330_
linux_20110428targz
$ cd starcupsdrv-330_linux
SourceCode
$ tar -zxvf starcupsdrv-src-
330targz
$ cd starcupsdrv
Use your favorite editor and add a mark on the beginning of the two lines
that start with and contain ldquogrep lib-cupsrdquo and ldquogrep libcupsimagerdquo and save the file Then type the following into the command line
$ sudo make
$ sudo make install
Now when you open ldquocupsrdquo and click ldquoAdd Printerrdquo selecting the STAR printer it will automatically install with the proper drivers
As you replace all the large printouts on your workspace with space-efficient thermal prints including this set of in-structions you think to yourself ldquoToday I conquered my workspace organization problems tomorrow Irsquoll conquer the worldrdquo
ODROID MAGAZINE 15
on updates is a terrible choice because you are missing out on bug fixes and new features such as overclocking support In order to fix this I made some changes to the bootini package to restore user settings after a new bootini file is updated
To use this mechanism you will need to edit a file called bootinidefault which is located in mediaboot which is the vfat partition that is used in the boot process This file contains commented out versions of all the default values of the bootini settings that you can adjust This file will not be overwritten on future updates but it will be recreated if you delete it
You will need to uncomment the lines that interest you and set the values you want for those variables For example for the ODROID-C2 model you can set things like resolution (ldquomrdquo) video out mode (ldquovoutrdquo) maximum frequency (ldquomax_freqrdquo) as well as modify the boot arguments like the root partition UUID Figure 1 shows the default file while Figure 2 shows a
Picture this scenario you come home late at night ac-companied by a beautiful lady and you want to impress her by viewing a movie or listening to music on your
fancy ODROID setup You turn on the ODROID and the TV and notice that it keeps saying ldquoNo signalrdquo The blue led blinks as it should but you feel a cold sweat when your date asks you whatrsquos wrong You politely excuse yourself and hide for a second in the bathroom to ldquofreshen uprdquo You use your phone to SSH into the ODROID to investigate the problem You quickly realize that bootini had been overwritten by an update and that the resolution is not compatible with the TV After fiddling with VI on your phone and rebooting the ODROID you return to the living room Now the room is filled with Kodirsquos blueish glow and you are relieved However your date has felt something was amiss and excuses herself for the eve-ning I wonder if that could have been avoided
The problem is that when the bootini package updates it overwrites the file mediabootbootini and removes any cus-tomizations you had done on it such as setting the resolution enabling DAC support or even choosing a different root file system Every new user stumbles over this problem and so far had to either give up updates or learn to live with it Giving up
bOOTInI pERSISTEnCEpRESERVInG CHAnGES DuRInG An upGRADEby adrian popa (mad_ady)
BOOTINI
Figure 1 - all settings in the bootini file are commented out by default
Figure 2 - The desired bootini options have been set
Figure 3 - console output of the script bootini-persistencepl
ODROID MAGAZINE 16
customized version Leave commented the parameters that you donrsquot need and they will be ignored
In order to apply new settings and changes to bootinidefault you can re-configure the bootini package with the following command
$ sudo dpkg-reconfigure bootini
Alternatively you can just run the bootini-persistencepl script
$ sudo usrsharebootinibooti-
ni-persistencepl
The output shown will tell you which parameters have been changed as shown in Figure 3
To return to the original bootini file you can recopy it from the file usrsharebootinibootini with the follow-ing command
$ sudo cp usrsharebootini
bootini mediabootbootini
I have submitted a GitHub pull re-quest to the Hardkernel engineers for these improvements to be included with their official release which should be available soon I hope that these changes will make your life easier on Linux on all of your present and future ODROIDs
BOOTINI
persistence pays off
ANDROID SOFTWARE EQUALIZER
SOFTwARE EQuALIZER FOR AnDROIDCHROnICLES OF A MAD SCIEnTISTby Bo lechnowsky (respectech)
Your mind races as you sit in your dark lab The latest hurdle yoursquove encoun-tered threatens to derail your world domination plans ldquoWhat changedrdquo you wonder as you evaluate each of the ideas that floods your mind You think
back on the events that led up to this unwelcome detour of your plansYou were driving one of your vehicles to pick up some supplies for my latest in-
vention You started up your in-car touchscreen unit powered by the ODROID-C2 and began playing your ldquoworld dominationrdquo playlist Then it hit you like that time your nemesis Dr Usual tested out his nausea ray gun on you You felt a little sick You had the equalizer settings on Android set to emphasize the heavy bass on your favorite tracks but whenever there was a bass hit the vocals and other high range notes would cut out and the bass hits didnrsquot have any punch to them
How can you proceed with your world domination plans without punchy bass and strong high-range notes Itrsquos unthinkable After spending the whole night try-ing to forget about it and work on other aspects of your inventions it finally comes to you ldquoEureka Irsquom sure it has something to do with the master volume level in Android and the software equalizer settings hitting the volume ceiling when trying to modify the audio streamrdquo
You rush to your lairrsquos garage start up your in-vehicle system and check the mas-ter volume settings in Android They were set to 100 just as you had suspected You quickly activate the sound system and subwoofers and turn up the volume level on the sound system while reducing the master volume setting down to 50 on An-droid You nervously start your playlist It hits you like Dr Usualrsquos nausea ray gun except with a lot more force ldquoI did itrdquo you yell with your voice drowned out by the sounds of industrial space opera electronica thumping through the speakers ldquoThis deserves a celebrationrdquo you think as you slowly drive with pulsating speakers to the ice cream shop until you realize itrsquos 530am and theyrsquore not open yet
Your incredible software equalizer in android
ODROID MAGAZINE 17
Hardware encoders use a designed algorithm to encode video and data into streamable content
and is generally the most efficient way to watch video Hardware encoding on the ODROID-XU4 can be achieved using two options
bull a custom FFmpeg which sup-ports the hardware encoder or
bull the GStreamer framework avail-able for creating streaming media applications
The steps to enable hardware encod-ing presented below are grouped into common steps and specific steps Please note that this tutorial is designed for me-diumadvanced users and if things go wrong you might have an unbootable system It might be wise to make a back-up before starting by following the steps listed at httpbitly2gg5KGc
Common stepsFirst install a mainline kernel that
supports the MFC encoder The in-structions here use elatllatrsquos branch (httpbitly2gg82Fj) but mdrjr is also working on a branch of his own (httpbitly2g2pVVc) and so am I (httpbitly2gf0dfh) You can use my kernel configuration which tries to add all of HardKernelrsquos modules or you can modify my configuration to fit your needs (httpbitly2gAr75I) You can alternatively use whatever default con-
uSInG THE HARDwARE EnCODER FunCTIOnS OF THE ODROID-Xu4 by marian mihailescu (memeka)
HARDWARE ENCODER
figuration comes with the kernel you choose
The kernel does not support HMP (bigLITTLE extensions) and it treats all cores as equal This is because HMP patches are unstable and can lock up the system Consequently overall system performance will be lower than when using Kernel 310
I have added the kernel compilation procedure here for convenience but you should read and discuss the official kernel compilation thread at httpbitly2fo18cv or review the guide at httpbitly1NVRprY
First make a copy of your existing kernel initrd dtb and bootini
$ cd mediaboot
$ sudo -i
cp zImage zImage-3
cp uInitrd uInitrd-3
cp exynos5422-odroidxu3dtb
exynos5422-odroidxu3-3dtb
cp bootini boot3ini
Edit boot3ini to point to the newly copied files by appending -3 to the name of the zImage uInitrd and dtb By re-placing the stock bootini with this mod-ified bootini you will be able to boot your old kernel in case of problems
Next download the new kernel
$ sudo apt-get -y install bc curl
gcc git libncurses5-dev lzop
make u-boot-tools dos2unix
$ git clone --depth 1
-b odroidxu4-mihailescu2m-48
httpsgithubcomDmolelinux
git linux
$ cd linux
$ make odroidxu4_defconfig
Optionally you can get my config which supports most of the USB periph-erals (TV tuners sound cards wifi cards) and a lot of networking modules (LXC support VLANs iptables)
$ wget httppastebincom
raw7YnakKmP -O config
$ dos2unix config
Next compile the kernel
$ make menuconfig
$ make -j 8 zImage dtbs modules
$ kver=`make kernelrelease`
$ sudo cp archarmbootzImage
archarmbootdtsexynos5422-
odroidxu[34]dtb mediaboot
$ sudo cp config mediaboot
config
$ sudo make INSTALL_MOD_STRIP=1
modules_install
$ sudo make firmware_install
$ sudo cp config bootconfig-
$kver
ODROID MAGAZINE 18
HARDWARE ENCODER
the same directory as FFmpeg You can download these packages pre-compiled from here httpbitly2g2m2iZ Then install the needed packages
$ cd
$ sudo dpkg -i deb
This should replace any system-installed ffmpeg which supports the hardware encoder Let us now use the hardware encoder when transcoding Depending on what you want to trans-form with ffmpeg you might get bet-ter or worse framerate For example changing the output fps of a video cuts off about 20-30fps from encoding time The examples below do not change the fps
encode video only about 50fps
(max)
$ ffmpeg -i big_buck_bunny_720p_
h264mov -acodec aac -vcodec h264
-bv 2M -pix_fmt nv21 bbbmp4
encode video only about 110fps
(max)
$ ffmpeg -i big_buck_bunny_720p_
h264mov -codecv copy -codeca
none -bsfv h264_mp4toannexb
-f rawvideo - | ffmpeg -r 24
-i - -an -vcodec h264 -bv 2M
-profilev 10 -pix_fmt nv21 bbb
mp4
encode video and audio about
75fps (max)
$ ffmpeg -i big_buck_bunny_720p_
h264mov -codecv copy -codeca
none -bsfv h264_mp4toannexb -f
rawvideo - | ffmpeg -r 24 -i -
-i big_buck_bunny_720p_h264mov
-map 0v0 -vcodec h264 -bv 2M
-profilev 10 -pix_fmt nv21 -map
1a0 -ca1 aac bbbmp4
The encoder automatically selects h264_v4l2m2m which does the hard-
$ cd boot
$ sudo update-initramfs -c -k
$kver
$ sudo mkimage -A arm -O linux -T
ramdisk -a 0x0 -e 0x0 -n initrd
img-$kver -d initrdimg-$kver
uInitrd-$kver
$ sudo cp uInitrd-$kver media
bootuInitrd
Modify mediabootbootini and load exynos5422-odroidxu4dtb instead of exynos5422-odroidxu3dtb and save bootini Shut the system down and unplug the HDMI and power cables Without this step when you boot with the new kernel you will not have USB3 bus and onboard networking This is needed only when switching between 3x and 4x kernels as far as Irsquove seen Make sure to re-attach the cables prior to power up
Steps when using FFMPEG
Now that the kernel is ready com-pileinstall a custom ffmpeg which sup-ports the hardware encoder Compile your own ffmpeg using the commands
debian build tools
$ sudo apt-get install build-es-
sential fakeroot devscripts
libchromaprint-dev librubber-
band-dev libjs-bootstrap
get the patched ffmpeg version
$ git clone -b v4l2_m2m-302
--depth=1
httpsgithubcommihailescu2m
FFmpeggit
install ffmpegrsquos build depen-
dencies (~190 packages)
$ sudo apt-get build-dep ffmpeg
build ffmpeg as deb packages
with no checks (some checks fail)
$ cd FFmpeg
$ DEB_BUILD_OPTIONS=rdquonocheckrdquo de-
build -b -uc -us
When building is done you should have 23 deb packages one level up in
ware encoding
Stream 00 -gt 00 (h264 (na-
tive) -gt h264 (h264_v4l2m2m))
Stream 01 -gt 01 (ac3 (native)
-gt aac (native))
You may see the following errors
[h264_v4l2m2m 0xf3fa0] H264
codec detected init annexb con-
verter
[h264_v4l2m2m 0xf3fa0] Device
path not set probing devvideo
[h264_v4l2m2m 0xf3fa0] exynos-
gsc1m2m is not the one we want
[h264_v4l2m2m 0xf3fa0] exynos-
gsc0m2m is not the one we want
[h264_v4l2m2m 0xf3fa0] s5p-mfc-
dec is not the one we want
[h264_v4l2m2m 0xf3fa0] Could
not find a valid device
If so make sure the user you are run-ning ffmpeg with is part of the video group
odroidodroid~$ id
uid=1000(odroid) gid=1000(odroid)
groups=1000(odroid)4(adm)20(dia
lout)24(cdrom)27(sudo)30(dip)
44(video)46(plugdev)115(lpadmin
)116(lightdm)
Sample output is as follows
adrianpodroid~gt ffmpeg -i
Sintel2010720pmkv -acodec aac
-vcodec h264 -bv 2M -pix_fmt
nv21 sintel-encodedmp4
ffmpeg version 302-1ubuntu4
Copyright (c) 2000-2016 the FFm-
peg developers
built with gcc 540 (Ubuntu
Linaro 540-6ubuntu1~16042)
20160609
configuration --prefix=
usr --extra-version=1ubuntu4
--toolchain=hardened --libdir=
usrlibarm-linux-gnueabihf
--incdir=usrincludearm-linux-
ODROID MAGAZINE 19
Metadata
encoder libebml
v100 + libmatroska v100
creation_time 2011-04-24
172033
Duration 00144803 start
0000000 bitrate 6071 kbs
Chapter 00 start 0000000
end 103125000
Metadata
title Chapter
01
Chapter 01 start
103125000 end 148667000
Metadata
title Chapter
02
Chapter 02 start
148667000 end 349792000
Metadata
title Chapter
03
Chapter 03 start
349792000 end 437208000
Metadata
title Chapter
04
Chapter 04 start
437208000 end 472075000
Metadata
title Chapter
05
Chapter 05 start
472075000 end 678833000
Metadata
title Chapter
06
Chapter 06 start
678833000 end 744083000
Metadata
title Chapter
07
Chapter 07 start
744083000 end 888032000
Metadata
title Chapter
08
Stream 00(eng) Video
h264 (High) yuv420p(tv bt709
unknownunknown) 1280x544 SAR
11 DAR 4017 24 fps 24 tbr 1k
--enable-libflite --enable-lib-
fontconfig --enable-libfreetype
--enable-libfribidi --enable-
libgme --enable-libgsm --enable-
libmodplug --enable-libmp3lame
--enable-libopenjpeg --enable-
libopus --enable-libpulse --en-
able-librubberband --enable-
librtmp --enable-libschroedinger
--enable-libshine --enable-lib-
snappy --enable-libsoxr --en-
able-libspeex --enable-libssh
--enable-libtheora --enable-
libtwolame --enable-libvorbis
--enable-libvpx --enable-lib-
wavpack --enable-libwebp --en-
able-libx265 --enable-libxvid
--enable-libzvbi --enable-openal
--enable-opengl --enable-x11grab
--enable-libdc1394 --enable-li-
biec61883 --enable-libzmq --en-
able-frei0r --enable-chromaprint
--enable-libx264 --enable-ver-
sion3 --disable-doc --disable-
programs --disable-avdevice
--disable-avfilter --disable-
avformat --disable-avresample
--disable-postproc --disable-
swscale --enable-libopencore_am-
rnb --enable-libopencore_amrwb
--enable-libvo_amrwbenc
libavutil 55 17103 55
17103
libavcodec 57 24102 57
24102
libavformat 57 25100 57
25100
libavdevice 57 0101 57
0101
libavfilter 6 31100 6
31100
libavresample 3 0 0 3
0 0
libswscale 4 0100 4
0100
libswresample 2 0101 2
0101
libpostproc 54 0100 54
0100
Input 0 matroskawebm from
lsquoSintel2010720pmkvrsquo
gnueabihf --cc=cc --cxx=g++
--enable-gpl --enable-shared
--disable-stripping --disable-
decoder=libopenjpeg --disable-
decoder=libschroedinger --enable-
avresample --enable-avisynth
--enable-gnutls --enable-ladspa
--enable-libass --enable-lib-
bluray --enable-libbs2b --en-
able-libcaca --enable-libcdio
--enable-libflite --enable-lib-
fontconfig --enable-libfreetype
--enable-libfribidi --enable-
libgme --enable-libgsm --enable-
libmodplug --enable-libmp3lame
--enable-libopenjpeg --enable-
libopus --enable-libpulse --en-
able-librubberband --enable-
librtmp --enable-libschroedinger
--enable-libshine --enable-lib-
snappy --enable-libsoxr --en-
able-libspeex --enable-libssh
--enable-libtheora --enable-libt-
wolame --enable-libvorbis --en-
able-libvpx --enable-libwavpack
--enable-libwebp --enable-libx265
--enable-libxvid --enable-libz-
vbi --enable-openal --enable-
opengl --enable-x11grab --enable-
libdc1394 --enable-libiec61883
--enable-libzmq --enable-frei0r
--enable-chromaprint --enable-
libx264
WARNING library configuration
mismatch
avcodec configura-
tion --prefix=usr --ex-
tra-version=1ubuntu4
--toolchain=hardened --libdir=
usrlibarm-linux-gnueabihf
--incdir=usrincludearm-linux-
gnueabihf --cc=cc --cxx=g++
--enable-gpl --enable-shared
--disable-stripping --disable-
decoder=libopenjpeg --disable-
decoder=libschroedinger --enable-
avresample --enable-avisynth
--enable-gnutls --enable-ladspa
--enable-libass --enable-lib-
bluray --enable-libbs2b --en-
able-libcaca --enable-libcdio
HARDWARE ENCODER
ODROID MAGAZINE 20
06
Chapter 06 start
678833000 end 744083000
Metadata
title Chapter
07
Chapter 07 start
744083000 end 888032000
Metadata
title Chapter
08
Stream 00(eng) Video
h264 (h264_v4l2m2m) ([33][0][0]
[0] 0x0021) yuv420p 1280x544
[SAR 11 DAR 4017] q=2-31 2000
kbs 24 fps 12288 tbn 24 tbc
Metadata
encoder
Lavc5724102 h264_v4l2m2m
Stream 01(eng) Audio aac
(LC) ([64][0][0][0] 0x0040)
48000 Hz 51(side) fltp 341
kbs
Metadata
title AC3 51
640 Kbps
encoder
Lavc5724102 aac
Stream mapping
Stream 00 -gt 00 (h264 (na-
tive) -gt h264 (h264_v4l2m2m))
Stream 01 -gt 01 (ac3 (na-
tive) -gt aac (native))
edmp4rsquo
Metadata
encoder
Lavf5725100
Chapter 00 start 0000000
end 103125000
Metadata
title Chapter
01
Chapter 01 start
103125000 end 148667000
Metadata
title Chapter
02
Chapter 02 start
148667000 end 349792000
Metadata
title Chapter
03
Chapter 03 start
349792000 end 437208000
Metadata
title Chapter
04
Chapter 04 start
437208000 end 472075000
Metadata
title Chapter
05
Chapter 05 start
472075000 end 678833000
Metadata
title Chapter
tbn 48 tbc
Stream 01(eng) Audio ac3
48000 Hz 51(side) fltp 640
kbs
Metadata
title AC3 51
640 Kbps
Stream 02(ger) Subtitle
subrip
Stream 03(eng) Subtitle
subrip
Stream 04(spa) Subtitle
subrip
Stream 05(fre) Subtitle
subrip
Stream 06(ita) Subtitle
subrip
Stream 07(dut) Subtitle
subrip
Stream 08(pol) Subtitle
subrip
Stream 09(por) Subtitle
subrip
Stream 010(rus) Subtitle
subrip
Stream 011(vie) Subtitle
subrip
Codec AVOption preset (Configura-
tion preset) specified for output
file 0 (sintel-encodedmp4) has
not been used for any stream
The most likely reason is either
wrong type (eg a video option
with no video
streams) or that it is a private
option of some encoder which was
not actually used for any stream
File lsquosintel-encodedmp4rsquo already
exists Overwrite [yN] y
[h264_v4l2m2m 0xf3fe0] H264
codec detected init annexb con-
verter
[h264_v4l2m2m 0xf3fe0] Device
path not set probing devvideo
[h264_v4l2m2m 0xf3fe0] exynos-
gsc1m2m is not the one we want
[h264_v4l2m2m 0xf3fe0] exynos-
gsc0m2m is not the one we want
[h264_v4l2m2m 0xf3fe0] Using
device devvideo1
Output 0 mp4 to lsquosintel-encod-
Figure 1 - Big Buck Bunny demo
HARDWARE ENCODER
ODROID MAGAZINE 21
$ dpkg-buildpackage -us -uc -b
-j4
$ cd
$ sudo dpkg -i gstreamerdeb
Alternatively you can get the pre-built deb packages from httpbitly2gj7Iqm To transcode something you should first identify the encoding and the decoding interfaces since they change on every boot
$ decoder=`gst-inspect-10 | grep
v4l2 | grep videodec | cut -d ldquordquo
-f 2`
$ encoder=`gst-inspect-10 | grep
v4l2 | grep h264enc | cut -d ldquordquo
-f 2`
$ gst-launch-10 filesrc
location=big_buck_bunny_720p_
h264mov qtdemux h264parse
$decoder $encoder ex-
tra-controls=rdquoencodeh264_
level=10h264_profile=4frame_lev-
el_rate_control_enable=1video_
bitrate=2097152rdquo h264parse
matroskamux filesink
location=bbbmkv
For comments questions and sug-gestions please visit the original post at httpbitly2g0vnsn
Press [q] to stop [] for help
[h264_v4l2m2m 0xf3fe0] Perform-
ing useless memcpy() on output
pool because buffers do not match
[h264_v4l2m2m 0xf3fe0] This
could be avoided by using av_
v4l_buffer_pool_get_buffer() or
av_v4l_buffer_pool_make_pipe()
[mp4 0xb9c70] Timestamps are
unset in a packet for stream 0
This is deprecated and will stop
working in the future Fix your
code to set the timestamps prop-
erly
[mp4 0xb9c70] Encoder did not
produce proper pts making some
up
[h264_v4l2m2m 0xf3fe0] No
event occurred while wait-
ing01 bitrate=368813kbitss
speed=184x
frame= 2027 fps= 44 q=-00
Lsize= 383559kB time=00012520
bitrate=368770kbitss
speed=184x
video379964kB audio3551kB
subtitle0kB other streams0kB
global headers0kB muxing over-
head 0011593
Steps when using gstreamer
Compile gstreamer from memekarsquos branch using the commands
$ apt-get install gstreamer10-
plugins-bad
$ git clone httpsgithubcom
mihailescu2mgst-plugins-good
$ cd gst-plugins-good
$ sudo apt-get install
libgstreamer10-dev libgudev-10-
dev
libgstreamer-plugins-base10-dev
dh-autoreconf automake autoconf
libtool autopoint cdbs gtk-doc-
tools libshout3-dev libaa1-dev
libflac-dev libdv4-dev libdv-dev
libgtk-3-dev libtag1-dev
libsoup24-dev gstreamer10-doc
gstreamer10-plugins-base-doc
HARDWARE ENCODER
ODROID Talk Subreddit
httpwwwredditcomrodroid
ODROID Magazine
is on Reddit
Your dog will be pleased with your ODROID-u4rsquos hardware encoding
ODROID MAGAZINE 22
After the file has loaded add the following two lines to the end save the file and reboot the systemBluetooth Audio A2dp Sink
persistservicebta2dpsink=true
After the ODROID has rebooted enable the ldquoMedia Au-diordquo option dialog box as below
Finally connect the smartphone or tablet to the ODROID by pairing it via bluetooth and play your music For com-ments questions and suggestions please visit the original post at httpbitly2f2dO8H
If you have an ODROID installed as a Car PC you may want to keep your music collection on a portable device such as a phone or tablet and have it automatically con-
nect to the vehiclersquos speakers when you drive Or you may have a HiFi Shield attached to your ODROID-C2 along with a high-end stereo system and want to play music from a friendrsquos smartphone through it By following the steps in this article you can use your ODROID as a bluetooth speaker
To begin make sure that you have a bluetooth dongle at-tached to the ODROID as shown below
HOw TO uSE An ODROID AS A bLuETOOTH SpEAKERMuSIC FOR THE MASSESby codewalker
THERMAL PRINTER
ODROID with Bluetooth dongle on usB port
Next open the Terminal Emulator app on your ODROID as shown
Remount the root filesystem with readwrite privileges so that you can make changes mount -o rwremount
launching the Terminal emulator
Running the mount command
editing the buildprop file using vi
enabling the media audio option
Use a text editor such as vi to edit the file called ldquobuildproprdquo
vi buildprop
Then switch to the root user and confirm the dialog box that appears$ su
ODROID MAGAZINE 23
spinlocks and rw_semaphoresbull Converting interrupt handlers
into preemptible kernel threadsbull Converting the old Linux timer
API into separate infrastructures for high resolution kernel timers plus one for timeouts
bull Timer improvements leading to userspace POSIX timers with high resolution
Building the kernelTo build a real-time (RT) Linux
kernel we need to update the kernel with Real Time kernel patches The RT patches file can be found at httpbitly2g3MiJ2 and the latest patch-es for the 314x kernel can be found at httpbitly2goVUSQ You can checkout the Linux kernel source tree for the ODROID-C2 from httpbitly2fNFOi4 RT patches need to match the Linux kernel version so you must choose the relevant patch series
$ git clone --depth 1
-b odroidc2-314y
httpsgithubcomhardkernel
linuxgit
odroidc2-314y-rt
$ cd odroidc2-314y-rt
$ wget
httpswwwkernelorgpub
linuxkernel
projectsrt314older
A real-time operating system (RTOS) is an operating system intended to serve real-time ap-
plication process data as it comes in typically without buffering delays The standard Linux kernel only meets some real-time requirements by providing ba-sic POSIX operations for userspace time handling but it does not guarantee hard timing deadlines If we apply Ingo Mol-narrsquos real-time Preemption patch (RT-Preempt) and Thomas Gleixnerrsquos gener-ic clock event layer with high resolution support the kernel gains full real-time capabilities
The RT-Preempt patch has raised a lot of interest throughout the industry Its clean design and consequent aim towards mainline integration makes it an interesting option for hard and firm real-time applications Itrsquos no surprise to see applications ranging from profes-sional audio to industrial control using RT Linux
Use casesbull Making in-kernel locking-
primitives (using spinlocks) pre-emptible though reimplementa-tion with rtmutexes
bull Critical sections protected by spinlock_t and rwlock_t are now preemptible
bull Implementing priority inheri-tance for in-kernel mutexes
ODROID-C2 REAL-TIME KERnELGETTInG STARTED wITH An RTOSby anand moon (moonlinux)
REAL-TIME KERNEL
patch-31465-rt68patchgz
$ gunzip patch-31465-rt68
patchgz
$ patch -p1 lt
patch-31465-rt68patch
The ARM64 RT kernel has some missing patches so we have to look at the 318y kernel and apply those patch-es as well Once the additional patches are applied we can build the kernel The necessary patches can be found in 318y-rt patch series
arm64 Mark PMU interrupt IRQF_NO_THREADpatch
arm64 Allow forced irq threadingpatch
archarm64 Add lazy preempt sup-portpatch
arm64 replace read_lock to rcu lock in call_step_hook
A few files have conflicts so you need to update them manually before build-ing the kernel You can find the links for all the updated patches in the following repository at httpbitly2g6R3Di
Building the kernelCompilation is done with make
Adding -j to the make command will speed up compilation
$ make -j4 Image dtbs modules
ODROID MAGAZINE 24
REAL-TIME KERNEL
After this has completed you have will have a compiled Linux kernel (im-age) the device tree file (dtb) and kernel modules (ko) The following steps as-sume that your USB memory card read-er is assigned to devsdc Be careful and double check how your card is assigned
First insert the boot-medium either the eMMC module or SD card into the USB memory card reader and connect the USB memory card reader to your Linux host PC Then copy the image and DT (meson64_odroidc2dtb) to the 1st partition (FAT) of the boot-medium
$ mkdir -p mount
$ sudo mount devsdc1 mount
$ sudo cp archarm64bootIm-
age archarm64bootdtsmeson64_
odroidc2dtb
mount ampamp sync ampamp sudo umount
mount
Finally copy the driver modules to the 2nd partition(EXT4) of the boot-medium
$ sudo mount devsdc2 mount
$ sudo make modules_install
ARCH=arm64
INSTALL_MOD_PATH=mount ampamp sync
ampamp sudo umount mount
$ rm -rf mount
For comments questions or sugges-tions please visit the original post at httpbitly2f2b0s8
ANDROID SOFTWARE EQUALIZER
RuLInG THE wORLD wITH SYnERGYCHROnICLES OF A MAD SCIEnTISTby Bo lechnowsky (respectech)
If you had a minion not the animated kind but the ldquoPull the Switchrdquo kind he would watch in amazement as you effortlessly launched windows on multiple monitors run by multiple computers copying and pasting madly between them
You know that as a scientist with world-domination plans you cannot be slowed down by latency when launching applications and sharing data between them That is why you installed Synergy in the first place as outlined in the June 2016 issue of ODROID Magazine (httpbitly1XxSbRw)
Recently you decided to dust off a venerable ODROID-U2 in order to add to Synergy However you did not want to recompile Synergy from scratch You up-dated the system with the following commands
$ sudo apt update
$ sudo apt dist-upgrade
Then you downloaded the version compiled for the ODROID-XU4 from httpbitly22lNiL1 but after decompressing and moving the files to the usrbin folder you were greeted with
synergyc usrlibarm-linux-gnueabihflibstdc++so6 version `GLIB-
CXX_3420rsquo not found (required by synergyc)
After some searching around on the internet you found an easy fix for this prob-lem
$ sudo add-apt-repository ppaubuntu-toolchain-rtest
$ sudo apt update
$ sudo apt install g++-49
After setting up the U2 using the ldquoConfigure Serverrdquo button on Synergy Server running on your main machine and running the synergyc command on the U2 all that was needed was to ldquoStoprdquo and ldquoStartrdquo the Synergy Server and your U2 is up and running Life is good and world domination is one step closer
Run even heterogeneous environment x86 windows x aRm linux
ODROID MAGAZINE 25
heat away a radiator and fan to cool the water and a pump that lets water flow through the system On my particular build I opted for a Corsair Hydro Series H45 for many reasons one being that the pump is built into the radiator itself Many AIO (All in One) liquid cooling system have the pump on top of a CPU cooler and this is useless to us since wersquore not installing this on a standard PC Having the pump on the radiator also allows us to keep the system as com-pact as possible while making it easier to cut the CPU block off and connect our own liquid cooling block shaped to fit our ODROID
No matter what most CPU wa-ter cooling systems probably wonrsquot have a water block that supports your ODROID given their size so yoursquoll need to find one that will fit on a North
Itrsquos well known throughout the ODROID community that the tem-perature of the XU4 and XU3 starts
to rise sharply under heavy loads This can quickly lead to something called thermal throttling where the board au-tomatically slows down after reaching a certain temperature to prevent damage to the board The XU3 and XU4 tend to underclock from 2 GHz to 900 MHz in order to cool off for a little while However if we improve the ability for the ODROID to cool itself then it can maintain its peak performance for a greater amount of time This is where liquid cooling comes in There are many ways to improve cooling including a larger heatsink with a standard 40mm fan but liquid cooling has two key ad-vantages it has a far greater thermal ca-pacity and is quieter since most liquid cooling kits on the market use larger fans that are less noisy than the stock fan on an XU3 or XU4
When considering how to liquid cool the ODROID you need to consider how you are going to cool it and what hardware you are going to use There are many different types of custom cooling components on the market and if yoursquore not careful your cooling setup can cost a lot more than the board itself Every water cooler will need three main com-ponents a water block that fits your ODROIDrsquos chip in order to transfer
Bridge chipset which is similar in size to our ODROID SoC For this build I didnrsquot want to spend any money since I had an older EKWB Chipset water-cooling block lying around doing noth-ing This wasnrsquot the perfect solution as it needed to be trimmed to be able to fit on the XU4 chipset I chamfered the copper so that when it was fitted it didnrsquot touch the HDMI or Sound Ports The last thing we want is our XU4 short-ing out I also had to cut out a section of the block to get around the sound out-put port There are some blocks on the market that will fit perfectly however they can cost in the region of pound3500 (USD$43) plus post and packing and that probably wonrsquot include the rest of the cooling system
To help keep things compact I also mounted my ODROID to the radia-tor using some screws and custom laser cut plastic parts You can get these ma-
wHY ADD LIQuID COOLInG TO An ODROID-Xu3 OR Xu4by michael lee wood ( mlwood37)
LIQUID COOLING
Figure 1 - The final result of the liquid cooling project
Figure 2 - The acrylic parts needed for mounting your ODROID-xu4
ODROID MAGAZINE 26
bull Mayhems XT1 Coolant + DI water
bull Self-tapping screw and rubber washer
Build processFirst yoursquoll need to check the fit of
the water block that you have selected for your ODROID When test fitting check to make sure you are not any-where near the HDMI port or the sound ports You may have to remove the top and cut and chamfer the copper block so it fits perfectly Once this is done put the water block and your ODROID to the side
Next take the John Guest Straight Adaptor 38rdquo NPTF Thread 14rdquo Tube Connection and cut down the threaded ends with your hacksaw so they screw flushly into your water block If needed use some PFTE tape around the fittings so they create a good seal You want to make absolutely sure that your fittings are tight and have a strong seal to pre-vent leakage
Next take your 10mm tube Linear Low Density Polyethylene and cut it down to size pushing it into the end of your John Guest fittings Make sure they are tight and flush just like the fit-tings This is where you will be pushing your AIO into the block
After this has been completed wersquore ready to attach our Corsair Hydro H45 to the water block Cut off the tubes nearest to the water cooling block that comes attached to your AIO system You should leave some extra tubing in case you want to use it again in the future Take a container and collect or dump the coolant inside your Corsair cooler Itrsquos up to you if you want to reuse this coolant but it isnrsquot a very high quality coolant and will likely be contaminated with flecks of aluminum too
Next wersquoll prepare our radiator to receive coolant since it was designed as a closed loop system Take your drill and slowly drill in the top (the top right hand side is the best place for this) of
chined as shown in Figure 2 by anyone with access to a decent laser cutter using plans Irsquove made available at httpbitly2fy3llS My build also requires a cus-tomization with a drill and self-tapping screw to access the coolant and reduce the tubing size to fit my more compact size
Tools and partsNow let me go into the nitty gritty of
achieving this water cooled system in-cluding the steps I took to cut down the water block to size First herersquos a list of the tools yoursquoll need
bull Screw driversbull Dremel rotary tool with disk cut-
ting toolsbull Access to a laser cutter or 3D
printerbull Hack Sawbull Sand paper a grinder or any-
thing you can use to grind down the copper block
bull Drill with a bit that can cut and is the same size as your self-tap-ping screw
bull Stanley knife or Tube cuttersbull Syringe for filling the AIO with
fresh coolant
And here are the parts wersquoll be using
bull Hardkernel ODROID XU4 or XU3
bull Corsair Hydro H45 (part Num-ber CW-9060028-WW)
bull Chipset water cooling blockbull John Guest Straight Adaptor
38rdquo NPTF Thread 14rdquo Tube Connection
bull 025 meters of 10mm Hard tube Linear Low Density Polyethylene
bull 3mm acrylic clear or coloured (for machining your parts)
bull 12v Power supply specifically for the pump and 120mm Fan
bull Screws bolts to fit everythingbull Thermal paste (MX4 is recom-
mended)
LIQUID COOLING
the Corsair Hydro H45 radiator and if possible do this upside down so no metal flakes go into the radiator Once you have done this take a small self-tap-ping screw and add a rubber washer to it Now screw your self-tapping screw in carefully making sure that you donrsquot overtighten it
Using the plans that I mentioned above laser cut the acrylic 3mm fins and mounting plate for the XU4 XU3 for the mod You can do them in any color you wish Some of you may wish to do a 3D print or make them out of wood Use this article as inspiration to mod it in whatever way yoursquod like
Next wersquoll fit the water block to the AIO Look at how it will all fit and cut the AIO tubes down as much as possible Once you have done this remove the self-tapping screw and use a syringe to fill the radiator up with your Mayhems XT1 (a non-toxic coolant that wonrsquot cor-rode copper or aluminum) Take your time filling this as you need to get as much air out of the system possible Tilt
Figure 3 - The self-tapping screw and hole for filling your cooling block with coolant
Figure 4 - a closer look at the water block assembly
ODROID MAGAZINE 27
the circuit to drop the voltage to 5 volts and 4 amps which we can use to power the ODROID-XU4 This gives us a way to power our system from a single outlet
Last but not least Test it out Use a CPU stress testing tool to see how things go You can slowly adjust the screw heads on the water block to get optimum cool-ing Again do not overtighten them and potentially bend the PCB If you wish you can also add a brace to the back of the board to help stop any PCB bend-ing issues Good luck and enjoy your ODROID at maximum performance
and move the AIO around while filling to aid in air removal You can power up the pump after each fill to get trapped air to move to your fill port However do not turn on the pump if there is no cool-ant in it as this will damage the pump
Once the coolant is filled screw back in the self-tapping screw with the rubber washer Test the pump without fitting anything to it in case of any leaks Do this for at least 1 to 2 hours before pro-ceeding any further to ensure that every-thing is properly fitted
You are now ready to fit the plastic fins and water block to the front of the AIO Add thermal Paste onto your SoC A pea-sized ball is more than enough Take your time and remember when fit-ting the water block to not over tighten the bracing screws to the XU4 XU3 as you may start to bend the PCB which can ruin the ODROID Then simply layer the fins on the Corsair AIO and screw it all down Donrsquot forget to mount the XU4 on the larger base plate and you may wish to use the raiser washers that I have added into the plans (DXF format)
The ODROID doesnrsquot have enough power for the water cooler so I used a power brick that is rated at 12 volts and 5 amps which is connected to a con-stant currentvoltage 5-30v 5A buck regulator with 2 displays (httpebayeu2gfpnuZ) We connected the pump and fan directly to the 12V power sup-ply which draws 12 volts and 045 amps and then added the buck regulator into
Figure 5 - another angle of the final design
LIQUID COOLINGLINUX GAMES
MInI METRO A pERFECT GAME TO wOnDER AbOuT wAITInG FOR YOuR METROby Bruno Doiche
Taking the metro to go around
to places isnrsquot the thing that would keep your mind occupied but there is a certain sense of wonder when you play this game while you wait for your metro ride to come and take you home at the end of a working day If you have fond memories of playing Sim-City this game will be your next best time-waster in the greatest style possible
httpsplaygooglecomstoreappsdetailsid=nzcocodepointminimetro
For a game that had every reason to be absolutely banal you will be hooked
ODROID MAGAZINE 28
The swarm architecture
In Part 1 of this tutorial we discussed the classic ldquodocker runrdquo and other commands In Part 2 we are going to learn the swarm mode commands which are new to Docker ver-
sion 112X So what is swarm mode and why do we need itAll of the Docker commands that we discussed in Part 1
run Docker containers on the local machine There is a limit to the number of containers that can be run on a single machine due to CPU and memory limitations And when that machine fails all your applications running on the machine will be un-available To provide high availability scalability orchestration and manageability a cluster environment is needed Swarm mode is the built-in cluster environment (the swarm) for Docker engines although there are other orchestration engines for Docker (For instance Kubernetes)
A swarm consists of multiple instances of Docker engines called nodes There are two types of nodes
DOCKER 101pART 2 - SwARM MODEby andy Yuen ( mrDreamBot)
DOCKER SWARM MODE
Manager Node which dispatches units of work called tasks to worker nodes and performs orchestration management functions and maintenance of desired states of a swarm There can be multiple manager nodes but it is always an odd number of manager nodes due to the use of the Raft Consensus proto-col (httpsraftgithubio) A Manager node can also be a worker nodes at the same time The state store stores informa-tion such as state of cluster and the user defined configuration Information is organized into objects such as clusters nodes services tasks and networks
Worker Node which executes tasks received from a man-ager node
User interaction with the swarm is through services A ser-vice is the definition of tasks to be run on worker nodes Scal-ing is achieved using a replica services model in which a specific number of tasks is run on worker nodes to satisfy the desired state of the target number of replicas to be run The swarm is administered using a command line interface via the manager node In subsequent sections we shall discuss how to create a swarm services and set the desired state If you want to carry out the exercises in this tutorial you will have to fulfill the prerequisites below
PrerequisitesIn order to follow this tutorial you must have the followingTwo or more ODROID-c2 devices connected to the same ethernet switch that your pc is connected to Figure 2a shows my setup which consists of 5 ODROID-c2s and my notebook all connected into a single network environment my ODROID-c2 nodes and their roles are summarized in Figure 2b
ODROID MAGAZINE 29
Your pc must be able to ssH into the c2-swarm-00 man-ager node where the swarm is administeredYour nodes must be running Docker version 112x For those of you using an Os whose software repository does not provide the dockerio 112x package or equivalent you may install it following the instructions and binaries I put on Github at httpbitly2ejY1FE
Creating and Managing a SwarmTo create a swarm issue the following command from the
manager node
$ docker swarm init
--advertise-addr 1921681100
Which should return
$ Swam initialized current node (8jw6y313hmt3vfa1f-
me1dinro) is now a manager
This should follow with a string including a token and open port on your manager node that can be used to invite other docker instances to the swarm There are a number of options that you can use for your swarm For help you can type the following command
$ docker swarm --help
This should show a host of information about your swarm as shown next
To add workers to this swarm run the following command on each of the remaining nodes
$ docker swarm join
--token tokengoeshere
19216811002377
Your unique will be returned from the docker swarm init command we ran earlier This is a security mechanism ensur-ing that only legitimate nodes can join the swarm Note that you only have to do this once since the configuration is saved in the state store which survives reboots
We only need 1 manager node to make the swarm work For this tutorial we are not going to add additional manager nodes To see the result issue the following command from the manager
$ docker node ls
Then we take a look at what that command will show in a typical list
DOCKER SWARM MODE
my setup of five ODROID-c2 devicesswarm mode at a glance
a list of available docker nodes
chart of nodes and roles in the example swarm cluster
ODROID MAGAZINE 30
If you lost the token earlier on from the init process donrsquot worry you can retrieve it by issuing the following command from the Manager Node To get the token for a manager re-place ldquoworkerrdquo in the command by ldquomanagerrdquo
$ docker swarm join-token worker
When you want a node to unjoin the swarm issue the fol-lowing command from that node
$ docker swarm leave
By default the manager node is also a worker node if you do not want the manager to run any service tasks you can ldquodrainrdquo the manager as follows
$ docker node update --availability drain c2-swarm-00
In fact you can use the drain command on any worker node If the worker node is running service tasks when you issue the drain command it will shut down those tasks and let the swarm start them on the other worker nodes to satisfy the desired state When you want the node to run service tasks again just issue the command below on the Manager Node
$ docker node update --availability active c2-
swarm-00
Creating a serviceNow that our swarm is up and running wersquore going to cre-
ate our first service to ping the Manager Node We can see what this looks like in the next image Type the following com-mands from the manager node
$ docker service create --replicas 1 --name ping-
service mrdreambotarm64-busybox-httpd bin ping
1921681100
$ docker service ls
$ docker service inspect --pretty pingservice
We can see that there is only 1 instance of the service run-ning Type the following command
$ docker service ps pingservice
It tells us the service is running on c2-swarm-02 Start a terminal to c2-swarm-02 and type these commands
$ docker ps
$ docker logs pingservice1eic3ca0o4h0gxrb675ncveptv
For reference pingservice1eic3ca0o4h0gxrb675ncveptv is the docker container ID identified in the output of the docker ps command The logs as shown in below show that ping-service indeed is pinging my swarm manager 1921681100
To scale it to run 5 instances issue the command from the swarm manager
$ docker service scale pingservice=5
Since I used the service scale command to set the desired state to run 5 instances of the service pingservice it spins up new containers to make up the 5 service instances Note that the swarm performs load balancing by spreading the load across the nodes in the swarm When I shut down nodes c2-swarm-03 and c2-swarm-04 I expect the swarm to spin up ser-vices on the remaining nodes to maintain the 5 replica count In fact that is the case as can be seen in Figure 7 The swarm is running 2 containers on c2-swarm-00 and c2-swarm-01 and 1 on c2-swarm-02
DOCKER SWARM MODE
The service creation process
The ping log at a glance
ODROID MAGAZINE 31
When you are done with the service remove it by issuing the following command
$ docker service rm pingservice
Testing the Routing MeshIn Part 1 I deployed both MySQL and Fish on C2-swarm-00
using Docker run which was in lieu of Swarm Mode In this sec-tion I am going to deploy them as services in Swarm Mode instead
Please note that only 1 instance of MySQL mapped to the database directory on disk can be running at a time Did you remember from part 1 that only c2-swarm-00 has a hard disk I am going to run MySQL as a service with only 1 instance and set up a constraint that the service can only be run on the host c2-swarm-00 using the following command
$ docker service create --name mysql -p 33063306 -e MYSQL_USER=fishuser -e MYSQL_PASSWORD=fish456 -e MYSQL_DATABASE=fish --constraint lsquonodehostname == c2-swarm-00rsquo --mount type=bindsrc=mediasatafish-mysqldst=u01my3306data mrdreambotarm64-mysql
This is very similar to running MySQL using the classic docker run command The main difference is that if the con-tainer running the MySQL service should fall over the swarm will automatically start another instance to replace it
Also note the use of ldquo--constraint lsquonodehostname == c2-swarm-00rsquordquo which constrains MySQL to run on the node named c2-swarm-00 only There are other pre-defined con-straints as can be found in the docker documentation To run fish as a service issue the command
$ docker service create
-p 80808080 --name fish -e MYSQL_SERVER=1921681100 -e MYSQL_PORT=3306 mrdreambotarm64-fish
You can see that the services are running using the follow-ing command
$ docker service ls
Above there is a look at how this appears when yoursquore suc-cessful Note that the first time I issue the ldquodocker service lsrdquo command MySQL was still starting It was started when I issued the second lsquodocker service lsrsquo command Fish is running on c2-swarm-04
All nodes in a swarm are on an ingress routing mesh mean-ing that all nodes in the swarm can accept connections on pub-lished ports for any service (in our case port 8080 for Fish and port 3306 for MySQL) even if the task is not running on that node This implies that we can point our browser to any of the nodes in the swarm to access the fish application How-ever this was not the behavior that I witnessed on my swarm cluster I could only access the service on the nodes running it (c2-swarm-04) and not on any other nodes After I scaled up and down the number of replicas of the service several times occasionally I could not even invoke the service on the node running the service I searched the Internet and many peo-ple reported the same issue The problem was thought to be swarm mode not updating the IPVS (IP Virtual Server) tables correctly IPVS is the kernel module responsible for load bal-ancing Automatic load balancing is a great feature once it is working
User-defined networksUser-defined networks can be used to isolate containers
For example if you created a user-defined network and assign containers or services to it other containers or services not in that network will not be able to access them and vice-versa In
DOCKER SWARM MODE
The desired states performing load balancing
load balancing in effect with a Docker swarm
ODROID MAGAZINE 32
addition the containers or services in a user defined network can reference each other by name such as the name assigned to a container upon creation There are two types of user-defined networks bridge networks and overlay networks
Bridge NetworksThis is mainly used by the classic docker run commands A
bridge network can only function on the local machine For example we can create a bridge network and add the MySQL and Fish containers to it
$ docker network create --driver bridge my-net$ docker run -d --network my-net --name mysql -e MYSQL_USER=fishuser -e MYSQL_PASSWORD=fish456 -e MYSQL_DATABASE=fish -v mediasatafish-mysqlu01my3306data mrdreambotarm64-mysql$ docker run -d --network my-net -p 80808080 --name fish -e MYSQL_SERVER=mysql -e MYSQL_PORT=3306 mrdreambotarm64-fish
After creating the network one can see a bridge network (my-net) has been set up as shown in Figure 9
Note that the docker run command for Fish references the MYSQL_SERVER by its name ldquomysqlrdquo instead of using localhost or an IP address and we donrsquot even need to publish the MySQL port (ie there is no ldquo-p 33063306rdquo in the MySQL docker run command) Although we cannot access MySQL from the docker host without publishing port 3306 Fish can access MySQL port 3306 because it is on the same user defined network called my-net The bridge network is working as intended
Overlay NetworkTo create a user-defined network spanning multiple nodes
in swarm mode we have to create an overlay network The swarm mode equivalent of deploying the MySQL and Fish above in an overlay network is
$ docker network create --driver overlay --sub-net=172200016 fish-net$ docker service create --network fish-net --name mysql
-e MYSQL_USER=fishuser -e MYSQL_PASSWORD=fish456 -e MYSQL_DATABASE=fish --constraint lsquonodehostname == c2-swarm-00rsquo --mount type=bindsrc=mediasatafish-mysqldst=u01my3306data mrdreambotarm64-mysql$ docker service create --network fish-net -p 80808080 --name fish -e MYSQL_SERVER=mysql -e MYSQL_PORT=3306 mrdreambotarm64-fish
After creating the network one can see an overlay network (fish-net) has been set up for the swarm as shown in Figure 10
Unfortunately Fish did not work It showed the login screen but was not able to authenticate after I entered the username and password repeatedly and was unable to communicate to MySQL via its name There is an overlay networking problem in the version of Docker that I use where the implementation is not able to resolve the container or service by name
ConclusionAlthough there are some issues with the swarm mode in the
version of docker engine I used in this tutorial it should still give you some insight on how it might have worked and how awesome these features will be when working Swarm mode is the native cluster management and service orchestration features embedded in the Docker engine since version 1120 Before swarm mode comes along creating a swarm involved using third-party tools such as consul or etcd to provide a distributed state store for service discovery With swarm mode everything is built-in and works out-of-the-box except for the issues mentioned above routing mesh network and user defined overlay network Although this tutorial is designed to run on the ODROID-C2 swarm all the commands that you learned are exactly the same on INTEL-based machines running the Docker engine You can easily apply your Docker command line knowledge to different environments in-cluding Linux MacOS Windows and on a cloud host
DOCKER SWARM MODE
The overlay network configuration
a look at the bridged network
ODROID MAGAZINE 33
Seedboxes are far from new but Irsquove yet to find one that will do everything that I want with my ODROID-XU4 especially when integrated with the CloudShell
case and LCD interface This guide will show you how to build a seedbox that is
powered by the ODROID-xu4uses an ssD with saTa connectivity for high speed trans-fers and readwrite speedsRuns the operating system and cache on the hard drive to reduce fatigue on the sD cardsupports web-access to Transmission for remote down-loadingautomatically connects to a Vpn upon boot for maximum security
So while nothing here is original herersquos a sure-fire way to begin with a ODROID-XU4 and a CloudShell kit and end up with a working seedbox with all of these great features
BackgroundTo make things easier for my dad I built him a seedbox
network attached storage (NAS) device last year for all of his downloading and storage needs It used an old Raspberry Pi 2 I had lying around before I found out about the far more pow-erful (and USB 30 capable) ODROID-XU4 I used that RPi 2 to build him a seedbox that was a good start but it used an attached USB hard drive that just wasnrsquot very fast
I also realized how convenient and well packaged the ODROID CloudShell is so I decided to put two great things together and write a guide around turning a Cloudshell into a seedbox with VPN capabilities There are other guides out there often geared toward the RPi or Virtual Private Server
ODROID SEEDBOX
(VPS) but I really prefer turn-key guides that donrsquot require sifting through three different sets of instructions that donrsquot address the nuances of the ODROID ARM architecture or the specific tools I want to use to achieve my ideal build I intended it to be a newer faster and sleeker upgrade to his Pi2
Some credit is due to PiMylife and MakeUseOf who have some very useful Raspberry Pi guides that Irsquove adapted for the XU4 and CloudShell I also took some snippets and instruc-tions from several ODROID community members on how to properly configure this guide for the XU4 and CloudShell All in all this should run for less than $200 and offer anything yoursquod want from a home seedbox or single drive NAS
Parts listODROID xu4cloudshell xu4 kit (featuring a usB 30 to saTa adapter and 22-inch TFT lcD Display)RTc Battery256GB ssD (or other 25-inch storage device of your choice)32GB micro-sD card (Or other Os drive of your choice)Vpn subscription with OpenVpn support
The parts and tools wersquoll need to get the job done
DESIGnInG YOuR Own ODROID SEEDbOXHARnESS THE pOwER OF THE CLOuDSHELLby Joshua sherman
ODROID MAGAZINE 34
ODROID SEEDBOX
VPNThis guide does include a step for setting up traffic encryption
through a Virtual Private Network (VPN) I highly recommend you use a VPN with a seedbox or NAS yoursquore using for download-ing content for security and peace-of-mind You sacrifice your peak speed capabilities if you have a fiber optic or other high speed Internet connection but many VPN providers can offer fairly good speeds despite routing all traffic through a third party server Plus you can still locally access those files maximizing connectiv-ity and the value of the USB 30 to SATA connectivity
Local or onlineThis guide is for a local seedbox setup Can you do it online
Sure but you open yourself up to a number of security risks This guide involves plain text passwords (for the sake of simplicity and a local-only implementation) to make it easier to configure the VPN connection on each launch You may not need this depending on if you want a VPN if your VPN service provider doesnrsquot need a user-name and password There also may be a more secure way to imple-ment this so feel free to make suggestions in the thread for anyone else considering such a build I chose this method since itrsquos based on a previous method that I knew worked and meets my personal needs in having a local NAS with 100 percent encrypted traffic
Getting StartedFirst we will update our ODROID since this guide starts
with running an out-of-the-box 1604 Ubuntu MATE image
$ sudo apt-get update
$ sudo apt-get upgrade
$ sudo apt-get dist-upgrade
The update will take a while to complete We could use a more minimal image but this guide is geared toward simplic-ity Go get some coffee and come back when itrsquos done Figure 2 has a closer look at the hardware to look at in the meantime
Next we want to configure our seedboxrsquos CloudShell dis-play to make sure it works We start with smartmontools
$ sudo apt install smartmontools
Next we need to follow ODROIDrsquos instructions to con-figure the frame buffer for our TFT display in the CloudShell
$ sudo -s
$ echo ldquooptions fbtft_device name=hktft9340 busnum=1
rotate=270rdquo gt etcmodprobedodroid-cloudshellconf
$ echo ldquospi_s3c64xxrdquo gtgt etcmodules
$ echo ldquofbtft_devicerdquo gtgt etcmodules
Then wersquoll remove the blacklist on the Serial Peripheral Inter-face (SPI) through which our ODROID-XU4 and CloudShell are connected We do this by opening blacklist-odroidconf
$ sudo nano etcmodprobedblacklist-odroidconf
When yoursquore finished it should look like this Note the two SPI rows and LCD row are now commented
Comment the required lines
IO Boardblacklist ioboard_bh1780blacklist ioboard_bmp180blacklist ioboard_keyled
SPI blacklist spidev blacklist spi_s3c64xx
32rdquo LCD Touchscreen driverblacklist ads7846
Reboot the XU4 but make sure you donrsquot have any HDMI cables connected to it to ensure it connects to the LCD display
At this point we have a working device but the display is blank We want it to show all sorts of useful info about our
closeup of seedbox hardware
we have power But the display still isnrsquot working yet
ODROID MAGAZINE 35
CloudShell so letrsquos use a useful script to do this for us Eventu-ally wersquoll be using devsda2 as our storage drive so letrsquos modify mdrjrrsquos application and install it
$ sudo apt-get install curl sysstat
$ wget httpsgithubcomjsherm101cloudshell_lcd
rawmastercloudshell-lcd_20160913-3-fixeddeb
$ sudo dpkg -i cloudshell-lcd_20160913-3-fixeddeb
If we reboot again it should now show some useful infor-mation about the device
cpu usage and temperatureRam availabilityThe local Ip address of the deviceTransfer ratesDisk usage which is empty right now because we havenrsquot configured our devsda2 drive
Operating system configurationNext comes the main task of this project which is to set up
a BitTorrent protocol application to work well with the SSD This is nothing more than an apt-get command if we wanted to use our SD card where the OS is installed for storage but this poses two issues
There are large sD cards (gt256GB) but theyrsquore more expen-sive or slower than their ssD and HDD counterpartsan sD card has a much shorter readwrite lifecycle than an ssD or HDD and will fail sooner
To solve this wersquore going to actually move our ODROID installation to the SSD and boot from the SSD for both our operating system and our additional NAS storage folder All
credit goes to James MakeUseOf for this great idea This might not be a concern for most practical uses but is done as a precaution in this build given the high number of reads and writes anticipated in regular use
Once we complete this wersquoll be installing Transmission as our BitTorrent software of choice Itrsquos just as popular as Del-uge and other clients and comes down to a matter of prefer-ence in this case Both Transmission and Deluge support web-based GUIs and server-client configurations for remote access
Next letrsquos configure our storage drive Wersquove already plugged it into our assembled CloudShell and the necessary SATA-to-USB drivers are configured with smartmontools so it should appear in fdisk as the first drive
$ sudo fdisk devsda1
My drive is currently an NTFS drive from an old Windows installation Wersquoll want to press ldquodrdquo in fdisk to delete the parti-tion then ldquonrdquo to create a new one then ldquoprdquo for primary parti-tion Wersquore ultimately creating two partitions One for the OS wersquore moving to the SSD and one for the storage area wersquoll share over the local network
Create the first partition at the first sector available (prob-ably 2048) and then type ldquo+16Grdquo to create a 16GB partition in size Then start again typing ldquonrdquo and ldquoprdquo to create a second partition with the remaining storage on the drive My 256GB SSD left about 208 GB after accounting for capacity format-ting and the installation partition Once wersquore finished type ldquowrdquo to write the new partitions to the SSD
Next convert both partitions into the ext4 format and mount them to the two folders wersquove set aside for this project
$ sudo mkfsext devsda1
$ sudo mkfsext devsda2
$ sudo mkdir mediasystemdrive
$ sudo mkdir mediaNAS1
$ sudo mount devsda1 mediasystemdrive
$ sudo mount devsda2 mediaNAS1
$df -h (to see a list of drives and confirm everything
is in order)
Once yoursquove finished this your drive configuration should look similar the picture next
Now we can use rsync to move over our data on the SD card to the SSD Before we do this we should make a backup of the bootini file wersquoll end up editing which is in the FAT boot partition of the SD card
$ sudo cp mediabootbootini mediabootbootinibak
Now we need to find the UUID of the unique partition we
ODROID SEEDBOX
Things are looking much better
ODROID MAGAZINE 36
made earlier
$ lsblk -f
My disk UUID is 7d62ae29-a3cf-41d0-9127-065cf-c08fbe6 which is used as an example Next open bootini and search for ldquoBasic Ubuntu Setuprdquo You can search in Nano with CTRL+W
$ sudo nano mediabootbootini
Comment out the line thatrsquos currently below that line This is our original configuration for booting to the SD card We can always revert it if anything goes wrong by plugging the SD card into any device (PC or nix) and re-editing the bootini file Next wersquoll add our own new instructions
Boot from USB device
setenv bootrootfs ldquoconsole=tty1 consoleblank=0
root=UUID=7d62ae29-a3cf-41d0-9127-065cfc08fbe6 root-
wait rootdelay=10 ro fsckrepair=yesrdquo
Just make sure the UUID is whatever UUID comes up for your 16GB system partition under devsda1 Before we use rsync to transfer over to the new partition we need to edit fstab to mount our new drives on startup
$ sudo nano etcfstab
Comment out the first line and now add these two lines be-low assuming yoursquove used the same partition names and folders as me
$ devsda1 ext4 defaultsnoatime 0 1
$ devsda2 mediaNAS1 ext4 defaults 0 2
Finally we can move over our OS from the SD card to the
new partition wersquove set aside for it Keep in mind that once yoursquove done this any changes to the OS wonrsquot appear after you restart the computer as yoursquoll be working from the new parti-tion Itrsquos best to reboot once you finish the following rsync command
$ sudo apt-get install rsync
$ sudo rsync -axv mediasystemdrive
Yoursquoll probably have some time to grab some coffee while this transfers To elaborate on whatrsquos happening wersquore copying over our entire OS to mediasystemdrive where wersquove mount-ed our devsda1 partition Keep in mind that after we restart our fstab + bootini will remount and redirect the devsda1 partition to ldquordquo and serve as our operating system Wersquoll still be using the boot partition of your SD card so donrsquot remove it Once it finishes itrsquos time to reboot and hold our breath
$ sudo reboot
If we successfully reboot then wersquore definitely working from one of our two partitions either on the SD card or SSD You can confirm wersquore using the SSD by checking our parti-tions again
$ lsblk -f
You should see sda1 mounted at ldquordquo to confirm our suc-cess You can see this yourself in Figure 6
Transmission configurationOkay so we have our operating system transferred and our
display is showing our fancy 256GB SSD in working condition Now we need to install Transmission and setup our trans-
mission-daemon Wersquoll be using our ldquoodroidrdquo default user as well as be configuring our drive to have an incomplete and complete folder as well Letrsquos start by installing Transmission and adding our new incomplete and complete folders
$ sudo apt-get install transmission-daemon$ sudo mkdir -p mediaNAS1incomplete$ sudo mkdir -p mediaNAS1complete
ODROID SEEDBOX
Our partitions properly configured and mounted
The ssD is mounted as the root file system
ODROID MAGAZINE 37
Now we need to configure Transmission by turning off its services and opening the settings file
$ sudo service transmission-daemon stop
$ sudo nano etctransmission-daemonsettingsjson
Yoursquoll want to configure several settings
set your incomplete to ldquotruerdquo and ldquomedianas1incompleterdquoset your complete to ldquomedianas1completerdquoset rpc-authentication-required to ldquofalserdquoset the whitelist to 192168 to ensure you can access it remotely from another device on your network
Each of the rows we edited should look like this scattered around the settings file
ldquodownload-dirrdquo ldquomediaNAS1completerdquo
ldquoincomplete-dirrdquo ldquomediaNAS1incompleterdquo
ldquoincomplete-dir-enabledrdquo ldquotruerdquo
ldquorpc-authentication-requiredrdquo ldquofalserdquo
ldquorpc-whitelistrdquo ldquo127001192168100rdquo
There are also some other settings you can adjust and I rec-ommend checking out the Transmission website for instruc-tions on how to configure your tool
Before we start our transmission-daemon we need to change ownership to our user ldquoodroidrdquo in order to make every-thing work properly There are more ideal ways of doing this but I prefer to stick to a single user since this server will have no other purpose other than as a seedbox and I donrsquot see a need in this situation to stick to the transmission-daemon user that Transmission normally intends to use
$ sudo chown -R odroidodroid etctransmission-dae-
mon
$ sudo chown -R odroidodroid etcinitdtransmis-
sion-daemon
$ sudo chown -R odroidodroid varlibtransmission-
daemon
$ sudo chown -R odroidodroid mediaNAS1
We also need to open the Transmission daemon service and set user=rdquoodroidrdquo from ldquotransmission-daemonrdquo
$ sudo nano etcsystemdsystemmulti-usertarget
wantstransmission-daemonservice
We also want to do this in the initd file switching in ldquoodroidrdquo for ldquoUSERrdquo
$ sudo nano etcinitdtransmission-daemon
Finally reset that related Transmission daemon and turn back on Transmission
$ sudo systemctl daemon-reload
$ sudo service transmission-daemon start
Samba configurationNow we have everything we need to download a file but
we need a way to access the files that we download over our lo-cal network If yoursquore using a Windows device then Samba is the way to go Letrsquos get started by installing it and configuring our network share We will need to configure it in a way that allows us to login with our odroid user and easily download files as well as remove files we no longer want on our seedbox
$ sudo apt-get install samba samba-common-bin
$ sudo nano etcsambasmbconf
Letrsquos add the following as a new config for sharing our rel-evant folders
security = user
[odroid]
comment = odroid
path = mediaNAS1
valid users = odroid
force group = odroid
create mask = 0775
force create mode = 0775
security mask = 0775
force security mode = 0775
Our seedbox is starting to look pretty sharp
ODROID SEEDBOX
ODROID MAGAZINE 38
directory mask = 2775
force directory mode = 2775
directory security mask = 2775
force directory security mode = 2775
browseable = yes
writeable = yes
guest ok = no
read only = no
Before we move on wersquoll need to set a Samba password for our ldquoodroidrdquo user You can also create separate accounts if you so choose as long as those users are in the ldquoodroidrdquo group
$ sudo smbpasswd -a odroid
Now we can restart and we should be able to remotely ac-cess our seedbox folders
$ sudo service smbd restart
Keep in mind that you can always add new compatible us-ers as long as you set a proper Samba password and add those users to the ldquoodroidrdquo group or whichever group you assign ac-cess to for these files
VPN configurationFinally wersquoll want to configure our VPN for an automat-
ic secure connection upon boot Once again thanks to the James MakeUseOf who figured out this fast and easy way to get your VPN working without needing to manually start the VPN or enter credentials each time you restart your device This is essential if you want to guarantee the encryption of your connection while using the seedbox In this guide wersquore using an OpenVPN connection which depends on
an OpenVpn configuration filea certificate from your Vpn providerYour username and password for your Vpn provider stored in a text fileThree special shell scripts to start our Vpn automatically upon boot and route traffic
Storing a password in text is not ideal However itrsquos the fastest and leanest way to get things going and since wersquore only using this locally having your VPN credentials stored on this device will not risk the files to those outside your home net-work If you want to host your seedbox with port forwarding and essentially open to the Internet I highly recommend either searching for an alternative method or considering these risks before proceeding
Next letrsquos install the OpenVPN software
$ sudo apt-get install openvpn resolvconf
Wersquore going to leave everything in our home folder while doing this which is homeodroid in this case It really can be anywhere but these are not files you want in the same place where people on your home network will connect and down-load files from your seedbox
First get your OpenVPN configuration file (referred to as vpn-serveropvn in this guide) and place it in your home folder along with your certificate file (referred to as cacrt in this guide) Now create a new text file (txt) with two lines The first line should be the username of your VPN connection service and the second line should be your VPN connection servicersquos password
$ sudo nano homeodroidpasstxt
$ username
$ password
Next wersquore going to open our configuration file which in my case is ldquovpn-serveropvnrdquo
$ sudo nano homeodroidvpn-serveropvn
Wersquore going to add the following line at the bottom which will let us connect to the VPN provider without entering the credentials manually
$ auth-user-pass mnttorrentsopenvpnpasstxt
Then wersquore going to add these three lines which refer to the shell scripts wersquore about to create
$ route-up homeodroidroute-upsh
$ down-pre
$ down homeodroiddownsh
This will allow OpenVPN to connect to our VPN provider automatically Once it connects it will automatically route all traffic through these VPN connection whether incoming (downsh) or outgoing (route-upsh) Next wersquore going to cre-ate these two shell scripts
$ sudo nano homeodroidroute-upsh
Enter the following for route-upsh
binsh
iptables -t nat -I POSTROUTING -o tun0 -j MASQUERADE
ODROID SEEDBOX
ODROID MAGAZINE 39
Then edit downsh
$ sudo nano homeodroiddownsh
Enter the following for downsh
$ binsh
$ iptables -t nat -D POSTROUTING -o tun0 -j MASQUER-
ADE
Lastly we need a shell script that we can launch when our OS boots and use to initiate the VPN connection automati-cally
$ sudo nano homeodroidvpnsh
Enter the following for vpnsh
$ sudo openvpn --client --config homeodroidvpn-
serverovpn --ca homeodroidcacrt --script-securi-
ty 2
Now letrsquos make all of these files executable
$ sudo chmod +x homeodroidroute-upsh
$ sudo chmod +x homeodroiddownsh
$ sudo chmod +x homeodroidvpnsh
Now wersquore going to open up our rclocal file which runs scripts upon system startup
$ sudo nano etcrclocal
[code]
Add this line right above the ldquoexit 0rdquo line
[code]
$ homeodroidvpnsh
Your VPN is now configured and your seedbox will down-load exclusively through an encrypted connection with your VPN provider You can easily test this by using the TorGuard test file which checks your IP address when downloading the file
Connect to your Transmission web GUI at odroid9091 or whatever your local IP address is
Upload the TorGuard test file and check the IP address re-ported as ldquoSuccess Your torrent client IP is XXXXXXXXrdquo Check this IP address against what Google reports as your IP address by visiting wwwwhatismyipcom
If the IP addresses are different then your connection is se-cure You can still use your local IP address to access and down-load files via Samba My VPN provider allows me download at speeds around 75 Mbps with the ODROID- XU4 peaking at around 22 percent CPU usage which shows just how power-ful the octa-core processor is for tasks such as these However the real glory is the transfer speeds from your ODROID to your personal computer I saw 800 Mbps transfer speeds when moving some files back and forth making this seedbox an ex-tremely viable Network Attached Storage Device too
Feel free to offer any comments or suggestions in the forum topic at httpbitly2fPeek7 The setup is hardly perfect but itrsquos a surefire way for anyone to get started with their very own seedbox
The Transmission environment look at those speeds
ODROID SEEDBOX
ODROID MAGAZINE 40
system with Music Player Daemon and the YMPD interface I also run an XU4 in a Cloudshell enclosure which is mainly used for displaying statistics with DietPi-Cloudshell network attached storage (NAS) backup mirroring with DietPi-Sync which is based on rsync and running PiHole to block adver-tisements on our local network
Which ODROID is your favorite and whyWithout a doubt itrsquos the ODROID-C2 For me it is the
best all-around single-board computer (SBC) on the market today Coupled with 1GB Ethernet and an EMMC capable of 140Mbs transfer rates itrsquos a performance beast capable of any-thing from a NextCloud server to a HiFi system ODROIDs have come a long way since the original C1 All those small is-sues with unstable power supplies and SD card incompatibility have been ironed out The C2 in my eyes is SBC perfection
Your DietPi image is very popular What was your motivation for developing it and what improvements do you plan to make in the future
Please tell us a little about yourselfI live in Burton Latimer in England Itrsquos one of those ldquoye-
olderdquo village towns and is a lovely place to live and bring up a family I am currently a ldquostay-at-home Dadrdquo since I am dealing with a long term gastrointestinal illness that affects and limits my daily life Prior to that I was an IT assistant for a drainage company near Cambridge I have a 2 and a half year old son named Jack who loves the television show ldquoPAW Patrolrdquo plays with dust bins (no idea why yet) and building things with Legos Gemma my fiance is a full time mother and my rock My educational background is in Information and Commu-nications Technology School wasnrsquot really for me since I am more of a ldquohands-onrdquo person who enjoys taking things apart to see what makes them tick
How did you get started with computersMy first computer experience was with the Commodore 64
when I was around 5 or 6 years old However for some reason the only memories I have are of the tape drive with a 2+ hour loading time Even then you were lucky if the game actually loaded Those were the days I was also fortunate enough to have an Amiga 500+ in my early years For me this was the start of my love for computers I used MOD tracker to play the song Axel F and remember Workbench Elite Frontier and not having the 1MB RAM upgrade to play ldquoRise of the Robotsrdquo
What attracted you to the ODROID platform
I read reviews of the C1 and benchmark comparisons with the Raspberry Pi 2 I snapped one up right away and was sim-ply blown away by how much faster it was in every area of per-formance Ever since then Irsquove been hooked on ODROIDs Itrsquos great to see Hardkernel continually innovate and push their products to new levels Irsquod even go as far to say that ODROIDs are years ahead of anything that the Raspberry Pi Foundation currently offers
How do you use your ODROIDs
I have one ODROID-C2 which is used for daily testing with my DietPi image This is mostly due to the C2rsquos excel-lent IO performance with the eMMC allowing for an ex-tremely fast testing environment especially when it comes to automated software installation tests I also have another C2 with the HiFi Shield 2 addon which I use as a dedicated music
MEET An ODROIDIAnDAnIEL HAZE (FOuRDEE)edited by Rob Roy (robroy)
MEET AN ODROIDIAN
Daniel and his wife Gemma
ODROID MAGAZINE 41
What innovations would you like to see in future Hardkernel products
Personally I would love to see a USB 30 port and bus on the next C-series board DDR4 memory would be sublime and boost overall performance especially with the shared GPU memory An energy-efficient onboard WiFi and bluetooth would also be a welcome addition to future boards
What hobbies and interests do you have apart from computers
Music has always been close to my heart Irsquom a true au-diophile with a love for all genres but especially trance I like spending time with family and friends My son is now into Legos and itrsquos a real joy to build things together Although even when hersquos asleep itrsquos easy to get carried away and attempt to build the Millennium Falcon
What advice do you have for someone wanting to learn more about programming
If you are new to programming do not be put off by a lot of strange code on the screen Programming isnrsquot as hard as you think Follow an online guide for ldquomy first programrdquo and stick with it With practice and patience all that strange code will gradually make sense and itrsquos a great feeling
For beginners Irsquod highly recommend Python Its simple to learn with a vast community and many online guides to get started Itrsquos also the leading programming language for GPIO projects on SBCs
Finally but most importantly regardless of your skill level or chosen language always make sure you code something that excites you and enjoy every moment of it
DietPi originally started as a minimal image It was aimed at reducing the resource load of the bulky default images pro-vided by the first Raspberry Pi model We had these 700mhz devices using far more resources than was actually required by the user Now DietPi has evolved to much more than a mini-mal image offering automated installations of popular soft-ware all of which are optimized and configure for you With DietPi you get the maximum performance from your device because only the software you need is installed
As for the future DietPi has always been shaped by our end user feedback suggestions and support We do have plans for a web interface in DietPi ideally to replace the whiptail menu system and to provide a modern GUI experience for users
MEET AN ODROIDIAN
Danielrsquos hometown of Burton latimer in england
MEET AN ODROIDIAN
Danielrsquos photogenic son and master lego builder Jack
ODROID MAGAZINE 42
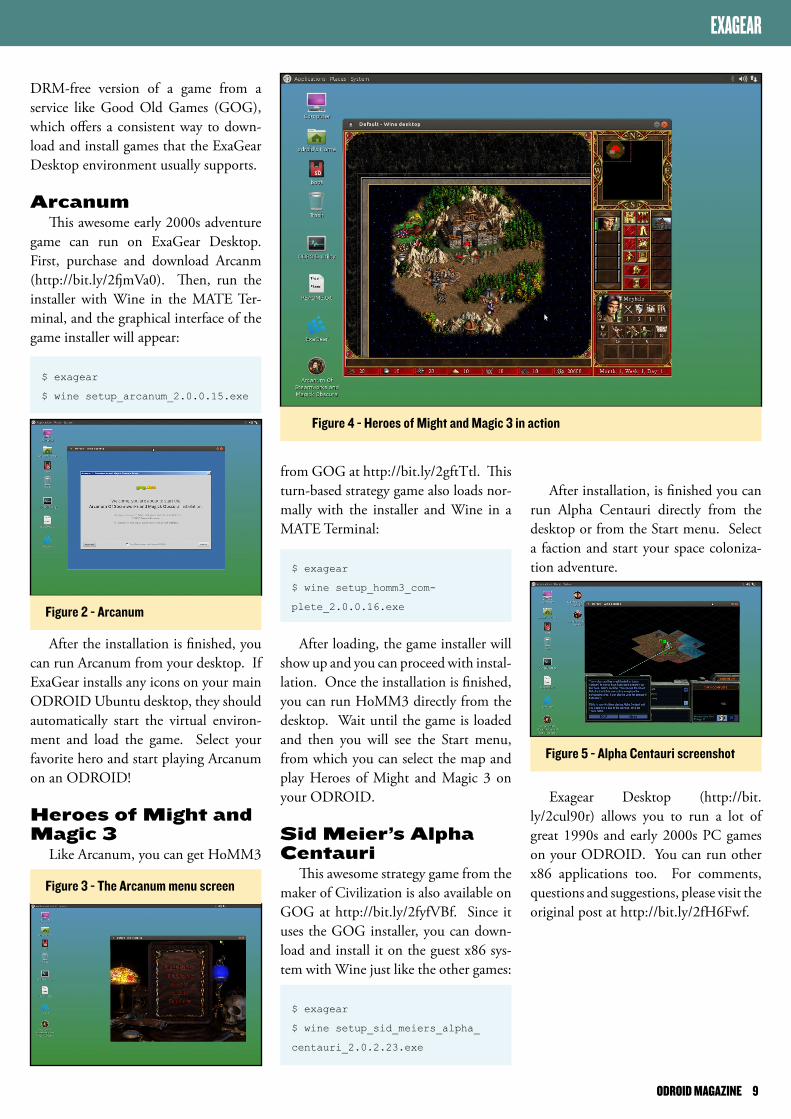
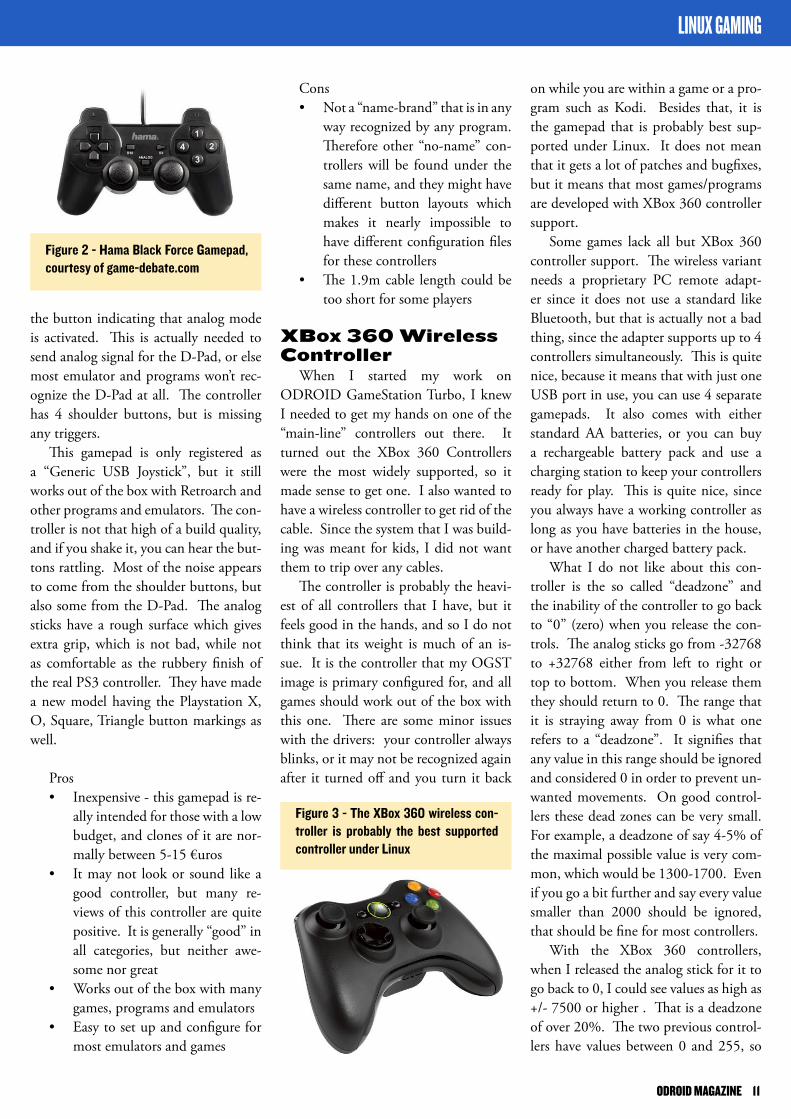
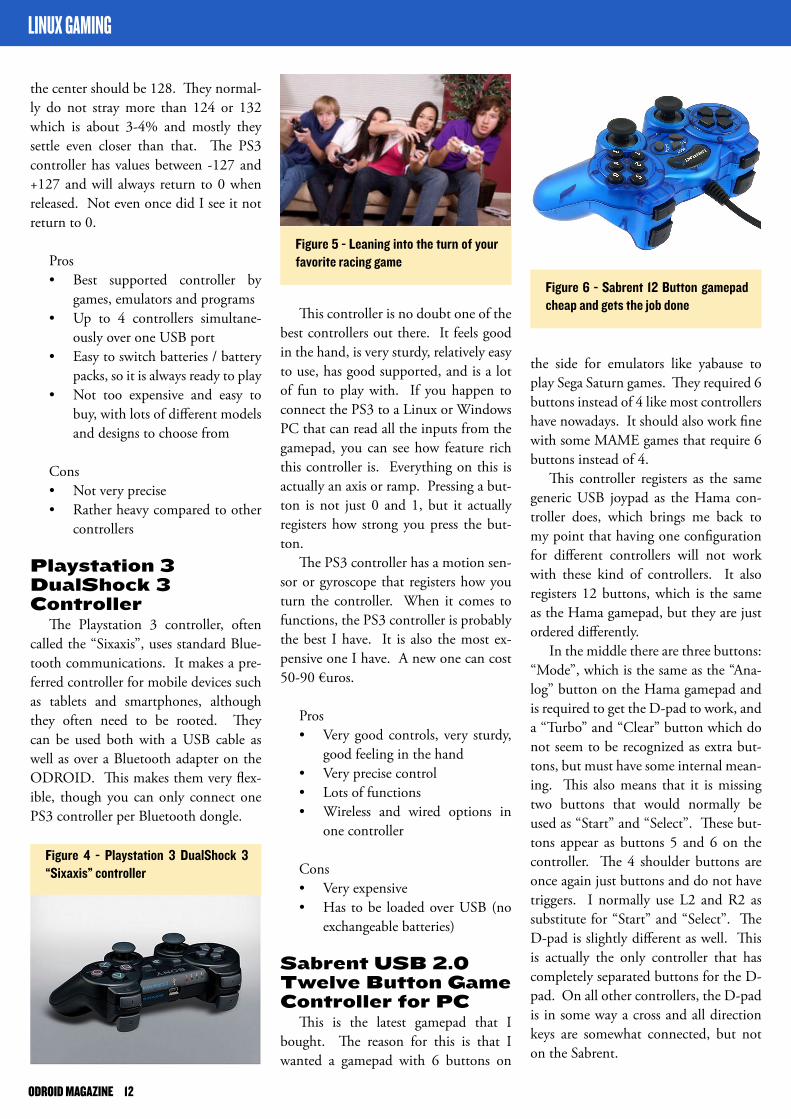
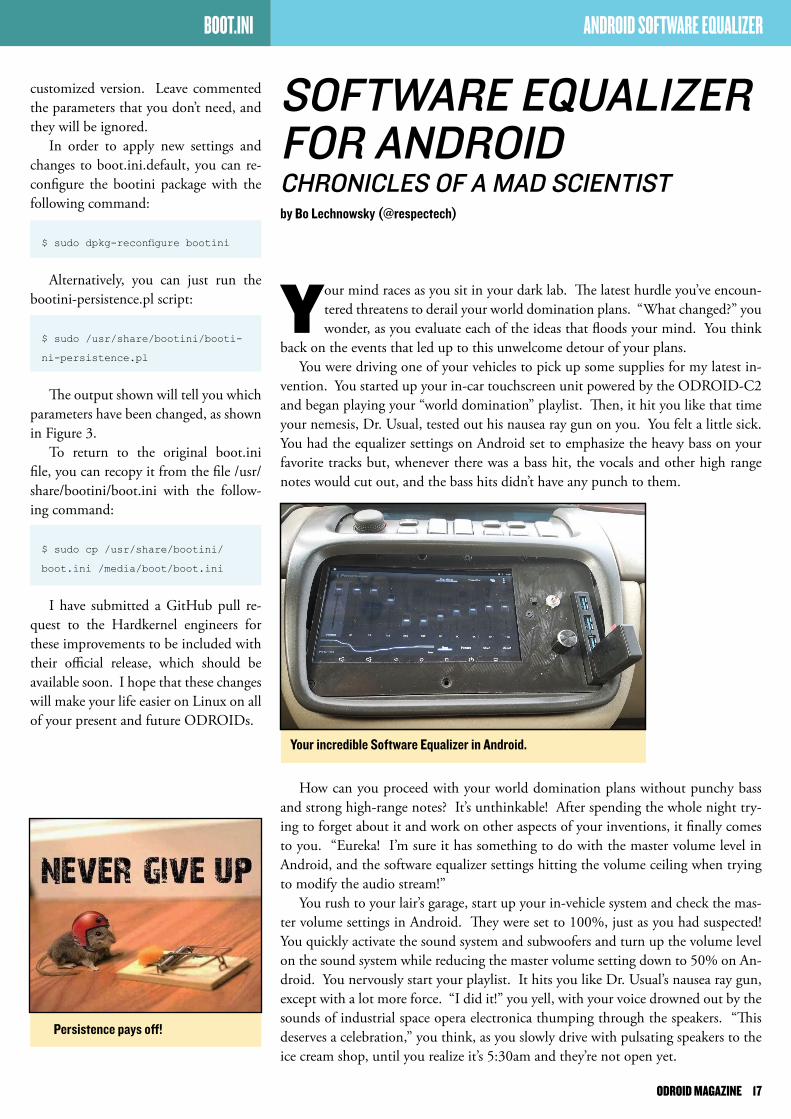

HARDWARE ENCODER
the same directory as FFmpeg You can download these packages pre-compiled from here httpbitly2g2m2iZ Then install the needed packages
$ cd
$ sudo dpkg -i deb
This should replace any system-installed ffmpeg which supports the hardware encoder Let us now use the hardware encoder when transcoding Depending on what you want to trans-form with ffmpeg you might get bet-ter or worse framerate For example changing the output fps of a video cuts off about 20-30fps from encoding time The examples below do not change the fps
encode video only about 50fps
(max)
$ ffmpeg -i big_buck_bunny_720p_
h264mov -acodec aac -vcodec h264
-bv 2M -pix_fmt nv21 bbbmp4
encode video only about 110fps
(max)
$ ffmpeg -i big_buck_bunny_720p_
h264mov -codecv copy -codeca
none -bsfv h264_mp4toannexb
-f rawvideo - | ffmpeg -r 24
-i - -an -vcodec h264 -bv 2M
-profilev 10 -pix_fmt nv21 bbb
mp4
encode video and audio about
75fps (max)
$ ffmpeg -i big_buck_bunny_720p_
h264mov -codecv copy -codeca
none -bsfv h264_mp4toannexb -f
rawvideo - | ffmpeg -r 24 -i -
-i big_buck_bunny_720p_h264mov
-map 0v0 -vcodec h264 -bv 2M
-profilev 10 -pix_fmt nv21 -map
1a0 -ca1 aac bbbmp4
The encoder automatically selects h264_v4l2m2m which does the hard-
$ cd boot
$ sudo update-initramfs -c -k
$kver
$ sudo mkimage -A arm -O linux -T
ramdisk -a 0x0 -e 0x0 -n initrd
img-$kver -d initrdimg-$kver
uInitrd-$kver
$ sudo cp uInitrd-$kver media
bootuInitrd
Modify mediabootbootini and load exynos5422-odroidxu4dtb instead of exynos5422-odroidxu3dtb and save bootini Shut the system down and unplug the HDMI and power cables Without this step when you boot with the new kernel you will not have USB3 bus and onboard networking This is needed only when switching between 3x and 4x kernels as far as Irsquove seen Make sure to re-attach the cables prior to power up
Steps when using FFMPEG
Now that the kernel is ready com-pileinstall a custom ffmpeg which sup-ports the hardware encoder Compile your own ffmpeg using the commands
debian build tools
$ sudo apt-get install build-es-
sential fakeroot devscripts
libchromaprint-dev librubber-
band-dev libjs-bootstrap
get the patched ffmpeg version
$ git clone -b v4l2_m2m-302
--depth=1
httpsgithubcommihailescu2m
FFmpeggit
install ffmpegrsquos build depen-
dencies (~190 packages)
$ sudo apt-get build-dep ffmpeg
build ffmpeg as deb packages
with no checks (some checks fail)
$ cd FFmpeg
$ DEB_BUILD_OPTIONS=rdquonocheckrdquo de-
build -b -uc -us
When building is done you should have 23 deb packages one level up in
ware encoding
Stream 00 -gt 00 (h264 (na-
tive) -gt h264 (h264_v4l2m2m))
Stream 01 -gt 01 (ac3 (native)
-gt aac (native))
You may see the following errors
[h264_v4l2m2m 0xf3fa0] H264
codec detected init annexb con-
verter
[h264_v4l2m2m 0xf3fa0] Device
path not set probing devvideo
[h264_v4l2m2m 0xf3fa0] exynos-
gsc1m2m is not the one we want
[h264_v4l2m2m 0xf3fa0] exynos-
gsc0m2m is not the one we want
[h264_v4l2m2m 0xf3fa0] s5p-mfc-
dec is not the one we want
[h264_v4l2m2m 0xf3fa0] Could
not find a valid device
If so make sure the user you are run-ning ffmpeg with is part of the video group
odroidodroid~$ id
uid=1000(odroid) gid=1000(odroid)
groups=1000(odroid)4(adm)20(dia
lout)24(cdrom)27(sudo)30(dip)
44(video)46(plugdev)115(lpadmin
)116(lightdm)
Sample output is as follows
adrianpodroid~gt ffmpeg -i
Sintel2010720pmkv -acodec aac
-vcodec h264 -bv 2M -pix_fmt
nv21 sintel-encodedmp4
ffmpeg version 302-1ubuntu4
Copyright (c) 2000-2016 the FFm-
peg developers
built with gcc 540 (Ubuntu
Linaro 540-6ubuntu1~16042)
20160609
configuration --prefix=
usr --extra-version=1ubuntu4
--toolchain=hardened --libdir=
usrlibarm-linux-gnueabihf
--incdir=usrincludearm-linux-
ODROID MAGAZINE 19
Metadata
encoder libebml
v100 + libmatroska v100
creation_time 2011-04-24
172033
Duration 00144803 start
0000000 bitrate 6071 kbs
Chapter 00 start 0000000
end 103125000
Metadata
title Chapter
01
Chapter 01 start
103125000 end 148667000
Metadata
title Chapter
02
Chapter 02 start
148667000 end 349792000
Metadata
title Chapter
03
Chapter 03 start
349792000 end 437208000
Metadata
title Chapter
04
Chapter 04 start
437208000 end 472075000
Metadata
title Chapter
05
Chapter 05 start
472075000 end 678833000
Metadata
title Chapter
06
Chapter 06 start
678833000 end 744083000
Metadata
title Chapter
07
Chapter 07 start
744083000 end 888032000
Metadata
title Chapter
08
Stream 00(eng) Video
h264 (High) yuv420p(tv bt709
unknownunknown) 1280x544 SAR
11 DAR 4017 24 fps 24 tbr 1k
--enable-libflite --enable-lib-
fontconfig --enable-libfreetype
--enable-libfribidi --enable-
libgme --enable-libgsm --enable-
libmodplug --enable-libmp3lame
--enable-libopenjpeg --enable-
libopus --enable-libpulse --en-
able-librubberband --enable-
librtmp --enable-libschroedinger
--enable-libshine --enable-lib-
snappy --enable-libsoxr --en-
able-libspeex --enable-libssh
--enable-libtheora --enable-
libtwolame --enable-libvorbis
--enable-libvpx --enable-lib-
wavpack --enable-libwebp --en-
able-libx265 --enable-libxvid
--enable-libzvbi --enable-openal
--enable-opengl --enable-x11grab
--enable-libdc1394 --enable-li-
biec61883 --enable-libzmq --en-
able-frei0r --enable-chromaprint
--enable-libx264 --enable-ver-
sion3 --disable-doc --disable-
programs --disable-avdevice
--disable-avfilter --disable-
avformat --disable-avresample
--disable-postproc --disable-
swscale --enable-libopencore_am-
rnb --enable-libopencore_amrwb
--enable-libvo_amrwbenc
libavutil 55 17103 55
17103
libavcodec 57 24102 57
24102
libavformat 57 25100 57
25100
libavdevice 57 0101 57
0101
libavfilter 6 31100 6
31100
libavresample 3 0 0 3
0 0
libswscale 4 0100 4
0100
libswresample 2 0101 2
0101
libpostproc 54 0100 54
0100
Input 0 matroskawebm from
lsquoSintel2010720pmkvrsquo
gnueabihf --cc=cc --cxx=g++
--enable-gpl --enable-shared
--disable-stripping --disable-
decoder=libopenjpeg --disable-
decoder=libschroedinger --enable-
avresample --enable-avisynth
--enable-gnutls --enable-ladspa
--enable-libass --enable-lib-
bluray --enable-libbs2b --en-
able-libcaca --enable-libcdio
--enable-libflite --enable-lib-
fontconfig --enable-libfreetype
--enable-libfribidi --enable-
libgme --enable-libgsm --enable-
libmodplug --enable-libmp3lame
--enable-libopenjpeg --enable-
libopus --enable-libpulse --en-
able-librubberband --enable-
librtmp --enable-libschroedinger
--enable-libshine --enable-lib-
snappy --enable-libsoxr --en-
able-libspeex --enable-libssh
--enable-libtheora --enable-libt-
wolame --enable-libvorbis --en-
able-libvpx --enable-libwavpack
--enable-libwebp --enable-libx265
--enable-libxvid --enable-libz-
vbi --enable-openal --enable-
opengl --enable-x11grab --enable-
libdc1394 --enable-libiec61883
--enable-libzmq --enable-frei0r
--enable-chromaprint --enable-
libx264
WARNING library configuration
mismatch
avcodec configura-
tion --prefix=usr --ex-
tra-version=1ubuntu4
--toolchain=hardened --libdir=
usrlibarm-linux-gnueabihf
--incdir=usrincludearm-linux-
gnueabihf --cc=cc --cxx=g++
--enable-gpl --enable-shared
--disable-stripping --disable-
decoder=libopenjpeg --disable-
decoder=libschroedinger --enable-
avresample --enable-avisynth
--enable-gnutls --enable-ladspa
--enable-libass --enable-lib-
bluray --enable-libbs2b --en-
able-libcaca --enable-libcdio
HARDWARE ENCODER
ODROID MAGAZINE 20
06
Chapter 06 start
678833000 end 744083000
Metadata
title Chapter
07
Chapter 07 start
744083000 end 888032000
Metadata
title Chapter
08
Stream 00(eng) Video
h264 (h264_v4l2m2m) ([33][0][0]
[0] 0x0021) yuv420p 1280x544
[SAR 11 DAR 4017] q=2-31 2000
kbs 24 fps 12288 tbn 24 tbc
Metadata
encoder
Lavc5724102 h264_v4l2m2m
Stream 01(eng) Audio aac
(LC) ([64][0][0][0] 0x0040)
48000 Hz 51(side) fltp 341
kbs
Metadata
title AC3 51
640 Kbps
encoder
Lavc5724102 aac
Stream mapping
Stream 00 -gt 00 (h264 (na-
tive) -gt h264 (h264_v4l2m2m))
Stream 01 -gt 01 (ac3 (na-
tive) -gt aac (native))
edmp4rsquo
Metadata
encoder
Lavf5725100
Chapter 00 start 0000000
end 103125000
Metadata
title Chapter
01
Chapter 01 start
103125000 end 148667000
Metadata
title Chapter
02
Chapter 02 start
148667000 end 349792000
Metadata
title Chapter
03
Chapter 03 start
349792000 end 437208000
Metadata
title Chapter
04
Chapter 04 start
437208000 end 472075000
Metadata
title Chapter
05
Chapter 05 start
472075000 end 678833000
Metadata
title Chapter
tbn 48 tbc
Stream 01(eng) Audio ac3
48000 Hz 51(side) fltp 640
kbs
Metadata
title AC3 51
640 Kbps
Stream 02(ger) Subtitle
subrip
Stream 03(eng) Subtitle
subrip
Stream 04(spa) Subtitle
subrip
Stream 05(fre) Subtitle
subrip
Stream 06(ita) Subtitle
subrip
Stream 07(dut) Subtitle
subrip
Stream 08(pol) Subtitle
subrip
Stream 09(por) Subtitle
subrip
Stream 010(rus) Subtitle
subrip
Stream 011(vie) Subtitle
subrip
Codec AVOption preset (Configura-
tion preset) specified for output
file 0 (sintel-encodedmp4) has
not been used for any stream
The most likely reason is either
wrong type (eg a video option
with no video
streams) or that it is a private
option of some encoder which was
not actually used for any stream
File lsquosintel-encodedmp4rsquo already
exists Overwrite [yN] y
[h264_v4l2m2m 0xf3fe0] H264
codec detected init annexb con-
verter
[h264_v4l2m2m 0xf3fe0] Device
path not set probing devvideo
[h264_v4l2m2m 0xf3fe0] exynos-
gsc1m2m is not the one we want
[h264_v4l2m2m 0xf3fe0] exynos-
gsc0m2m is not the one we want
[h264_v4l2m2m 0xf3fe0] Using
device devvideo1
Output 0 mp4 to lsquosintel-encod-
Figure 1 - Big Buck Bunny demo
HARDWARE ENCODER
ODROID MAGAZINE 21
$ dpkg-buildpackage -us -uc -b
-j4
$ cd
$ sudo dpkg -i gstreamerdeb
Alternatively you can get the pre-built deb packages from httpbitly2gj7Iqm To transcode something you should first identify the encoding and the decoding interfaces since they change on every boot
$ decoder=`gst-inspect-10 | grep
v4l2 | grep videodec | cut -d ldquordquo
-f 2`
$ encoder=`gst-inspect-10 | grep
v4l2 | grep h264enc | cut -d ldquordquo
-f 2`
$ gst-launch-10 filesrc
location=big_buck_bunny_720p_
h264mov qtdemux h264parse
$decoder $encoder ex-
tra-controls=rdquoencodeh264_
level=10h264_profile=4frame_lev-
el_rate_control_enable=1video_
bitrate=2097152rdquo h264parse
matroskamux filesink
location=bbbmkv
For comments questions and sug-gestions please visit the original post at httpbitly2g0vnsn
Press [q] to stop [] for help
[h264_v4l2m2m 0xf3fe0] Perform-
ing useless memcpy() on output
pool because buffers do not match
[h264_v4l2m2m 0xf3fe0] This
could be avoided by using av_
v4l_buffer_pool_get_buffer() or
av_v4l_buffer_pool_make_pipe()
[mp4 0xb9c70] Timestamps are
unset in a packet for stream 0
This is deprecated and will stop
working in the future Fix your
code to set the timestamps prop-
erly
[mp4 0xb9c70] Encoder did not
produce proper pts making some
up
[h264_v4l2m2m 0xf3fe0] No
event occurred while wait-
ing01 bitrate=368813kbitss
speed=184x
frame= 2027 fps= 44 q=-00
Lsize= 383559kB time=00012520
bitrate=368770kbitss
speed=184x
video379964kB audio3551kB
subtitle0kB other streams0kB
global headers0kB muxing over-
head 0011593
Steps when using gstreamer
Compile gstreamer from memekarsquos branch using the commands
$ apt-get install gstreamer10-
plugins-bad
$ git clone httpsgithubcom
mihailescu2mgst-plugins-good
$ cd gst-plugins-good
$ sudo apt-get install
libgstreamer10-dev libgudev-10-
dev
libgstreamer-plugins-base10-dev
dh-autoreconf automake autoconf
libtool autopoint cdbs gtk-doc-
tools libshout3-dev libaa1-dev
libflac-dev libdv4-dev libdv-dev
libgtk-3-dev libtag1-dev
libsoup24-dev gstreamer10-doc
gstreamer10-plugins-base-doc
HARDWARE ENCODER
ODROID Talk Subreddit
httpwwwredditcomrodroid
ODROID Magazine
is on Reddit
Your dog will be pleased with your ODROID-u4rsquos hardware encoding
ODROID MAGAZINE 22
After the file has loaded add the following two lines to the end save the file and reboot the systemBluetooth Audio A2dp Sink
persistservicebta2dpsink=true
After the ODROID has rebooted enable the ldquoMedia Au-diordquo option dialog box as below
Finally connect the smartphone or tablet to the ODROID by pairing it via bluetooth and play your music For com-ments questions and suggestions please visit the original post at httpbitly2f2dO8H
If you have an ODROID installed as a Car PC you may want to keep your music collection on a portable device such as a phone or tablet and have it automatically con-
nect to the vehiclersquos speakers when you drive Or you may have a HiFi Shield attached to your ODROID-C2 along with a high-end stereo system and want to play music from a friendrsquos smartphone through it By following the steps in this article you can use your ODROID as a bluetooth speaker
To begin make sure that you have a bluetooth dongle at-tached to the ODROID as shown below
HOw TO uSE An ODROID AS A bLuETOOTH SpEAKERMuSIC FOR THE MASSESby codewalker
THERMAL PRINTER
ODROID with Bluetooth dongle on usB port
Next open the Terminal Emulator app on your ODROID as shown
Remount the root filesystem with readwrite privileges so that you can make changes mount -o rwremount
launching the Terminal emulator
Running the mount command
editing the buildprop file using vi
enabling the media audio option
Use a text editor such as vi to edit the file called ldquobuildproprdquo
vi buildprop
Then switch to the root user and confirm the dialog box that appears$ su
ODROID MAGAZINE 23
spinlocks and rw_semaphoresbull Converting interrupt handlers
into preemptible kernel threadsbull Converting the old Linux timer
API into separate infrastructures for high resolution kernel timers plus one for timeouts
bull Timer improvements leading to userspace POSIX timers with high resolution
Building the kernelTo build a real-time (RT) Linux
kernel we need to update the kernel with Real Time kernel patches The RT patches file can be found at httpbitly2g3MiJ2 and the latest patch-es for the 314x kernel can be found at httpbitly2goVUSQ You can checkout the Linux kernel source tree for the ODROID-C2 from httpbitly2fNFOi4 RT patches need to match the Linux kernel version so you must choose the relevant patch series
$ git clone --depth 1
-b odroidc2-314y
httpsgithubcomhardkernel
linuxgit
odroidc2-314y-rt
$ cd odroidc2-314y-rt
$ wget
httpswwwkernelorgpub
linuxkernel
projectsrt314older
A real-time operating system (RTOS) is an operating system intended to serve real-time ap-
plication process data as it comes in typically without buffering delays The standard Linux kernel only meets some real-time requirements by providing ba-sic POSIX operations for userspace time handling but it does not guarantee hard timing deadlines If we apply Ingo Mol-narrsquos real-time Preemption patch (RT-Preempt) and Thomas Gleixnerrsquos gener-ic clock event layer with high resolution support the kernel gains full real-time capabilities
The RT-Preempt patch has raised a lot of interest throughout the industry Its clean design and consequent aim towards mainline integration makes it an interesting option for hard and firm real-time applications Itrsquos no surprise to see applications ranging from profes-sional audio to industrial control using RT Linux
Use casesbull Making in-kernel locking-
primitives (using spinlocks) pre-emptible though reimplementa-tion with rtmutexes
bull Critical sections protected by spinlock_t and rwlock_t are now preemptible
bull Implementing priority inheri-tance for in-kernel mutexes
ODROID-C2 REAL-TIME KERnELGETTInG STARTED wITH An RTOSby anand moon (moonlinux)
REAL-TIME KERNEL
patch-31465-rt68patchgz
$ gunzip patch-31465-rt68
patchgz
$ patch -p1 lt
patch-31465-rt68patch
The ARM64 RT kernel has some missing patches so we have to look at the 318y kernel and apply those patch-es as well Once the additional patches are applied we can build the kernel The necessary patches can be found in 318y-rt patch series
arm64 Mark PMU interrupt IRQF_NO_THREADpatch
arm64 Allow forced irq threadingpatch
archarm64 Add lazy preempt sup-portpatch
arm64 replace read_lock to rcu lock in call_step_hook
A few files have conflicts so you need to update them manually before build-ing the kernel You can find the links for all the updated patches in the following repository at httpbitly2g6R3Di
Building the kernelCompilation is done with make
Adding -j to the make command will speed up compilation
$ make -j4 Image dtbs modules
ODROID MAGAZINE 24
REAL-TIME KERNEL
After this has completed you have will have a compiled Linux kernel (im-age) the device tree file (dtb) and kernel modules (ko) The following steps as-sume that your USB memory card read-er is assigned to devsdc Be careful and double check how your card is assigned
First insert the boot-medium either the eMMC module or SD card into the USB memory card reader and connect the USB memory card reader to your Linux host PC Then copy the image and DT (meson64_odroidc2dtb) to the 1st partition (FAT) of the boot-medium
$ mkdir -p mount
$ sudo mount devsdc1 mount
$ sudo cp archarm64bootIm-
age archarm64bootdtsmeson64_
odroidc2dtb
mount ampamp sync ampamp sudo umount
mount
Finally copy the driver modules to the 2nd partition(EXT4) of the boot-medium
$ sudo mount devsdc2 mount
$ sudo make modules_install
ARCH=arm64
INSTALL_MOD_PATH=mount ampamp sync
ampamp sudo umount mount
$ rm -rf mount
For comments questions or sugges-tions please visit the original post at httpbitly2f2b0s8
ANDROID SOFTWARE EQUALIZER
RuLInG THE wORLD wITH SYnERGYCHROnICLES OF A MAD SCIEnTISTby Bo lechnowsky (respectech)
If you had a minion not the animated kind but the ldquoPull the Switchrdquo kind he would watch in amazement as you effortlessly launched windows on multiple monitors run by multiple computers copying and pasting madly between them
You know that as a scientist with world-domination plans you cannot be slowed down by latency when launching applications and sharing data between them That is why you installed Synergy in the first place as outlined in the June 2016 issue of ODROID Magazine (httpbitly1XxSbRw)
Recently you decided to dust off a venerable ODROID-U2 in order to add to Synergy However you did not want to recompile Synergy from scratch You up-dated the system with the following commands
$ sudo apt update
$ sudo apt dist-upgrade
Then you downloaded the version compiled for the ODROID-XU4 from httpbitly22lNiL1 but after decompressing and moving the files to the usrbin folder you were greeted with
synergyc usrlibarm-linux-gnueabihflibstdc++so6 version `GLIB-
CXX_3420rsquo not found (required by synergyc)
After some searching around on the internet you found an easy fix for this prob-lem
$ sudo add-apt-repository ppaubuntu-toolchain-rtest
$ sudo apt update
$ sudo apt install g++-49
After setting up the U2 using the ldquoConfigure Serverrdquo button on Synergy Server running on your main machine and running the synergyc command on the U2 all that was needed was to ldquoStoprdquo and ldquoStartrdquo the Synergy Server and your U2 is up and running Life is good and world domination is one step closer
Run even heterogeneous environment x86 windows x aRm linux
ODROID MAGAZINE 25
heat away a radiator and fan to cool the water and a pump that lets water flow through the system On my particular build I opted for a Corsair Hydro Series H45 for many reasons one being that the pump is built into the radiator itself Many AIO (All in One) liquid cooling system have the pump on top of a CPU cooler and this is useless to us since wersquore not installing this on a standard PC Having the pump on the radiator also allows us to keep the system as com-pact as possible while making it easier to cut the CPU block off and connect our own liquid cooling block shaped to fit our ODROID
No matter what most CPU wa-ter cooling systems probably wonrsquot have a water block that supports your ODROID given their size so yoursquoll need to find one that will fit on a North
Itrsquos well known throughout the ODROID community that the tem-perature of the XU4 and XU3 starts
to rise sharply under heavy loads This can quickly lead to something called thermal throttling where the board au-tomatically slows down after reaching a certain temperature to prevent damage to the board The XU3 and XU4 tend to underclock from 2 GHz to 900 MHz in order to cool off for a little while However if we improve the ability for the ODROID to cool itself then it can maintain its peak performance for a greater amount of time This is where liquid cooling comes in There are many ways to improve cooling including a larger heatsink with a standard 40mm fan but liquid cooling has two key ad-vantages it has a far greater thermal ca-pacity and is quieter since most liquid cooling kits on the market use larger fans that are less noisy than the stock fan on an XU3 or XU4
When considering how to liquid cool the ODROID you need to consider how you are going to cool it and what hardware you are going to use There are many different types of custom cooling components on the market and if yoursquore not careful your cooling setup can cost a lot more than the board itself Every water cooler will need three main com-ponents a water block that fits your ODROIDrsquos chip in order to transfer
Bridge chipset which is similar in size to our ODROID SoC For this build I didnrsquot want to spend any money since I had an older EKWB Chipset water-cooling block lying around doing noth-ing This wasnrsquot the perfect solution as it needed to be trimmed to be able to fit on the XU4 chipset I chamfered the copper so that when it was fitted it didnrsquot touch the HDMI or Sound Ports The last thing we want is our XU4 short-ing out I also had to cut out a section of the block to get around the sound out-put port There are some blocks on the market that will fit perfectly however they can cost in the region of pound3500 (USD$43) plus post and packing and that probably wonrsquot include the rest of the cooling system
To help keep things compact I also mounted my ODROID to the radia-tor using some screws and custom laser cut plastic parts You can get these ma-
wHY ADD LIQuID COOLInG TO An ODROID-Xu3 OR Xu4by michael lee wood ( mlwood37)
LIQUID COOLING
Figure 1 - The final result of the liquid cooling project
Figure 2 - The acrylic parts needed for mounting your ODROID-xu4
ODROID MAGAZINE 26
bull Mayhems XT1 Coolant + DI water
bull Self-tapping screw and rubber washer
Build processFirst yoursquoll need to check the fit of
the water block that you have selected for your ODROID When test fitting check to make sure you are not any-where near the HDMI port or the sound ports You may have to remove the top and cut and chamfer the copper block so it fits perfectly Once this is done put the water block and your ODROID to the side
Next take the John Guest Straight Adaptor 38rdquo NPTF Thread 14rdquo Tube Connection and cut down the threaded ends with your hacksaw so they screw flushly into your water block If needed use some PFTE tape around the fittings so they create a good seal You want to make absolutely sure that your fittings are tight and have a strong seal to pre-vent leakage
Next take your 10mm tube Linear Low Density Polyethylene and cut it down to size pushing it into the end of your John Guest fittings Make sure they are tight and flush just like the fit-tings This is where you will be pushing your AIO into the block
After this has been completed wersquore ready to attach our Corsair Hydro H45 to the water block Cut off the tubes nearest to the water cooling block that comes attached to your AIO system You should leave some extra tubing in case you want to use it again in the future Take a container and collect or dump the coolant inside your Corsair cooler Itrsquos up to you if you want to reuse this coolant but it isnrsquot a very high quality coolant and will likely be contaminated with flecks of aluminum too
Next wersquoll prepare our radiator to receive coolant since it was designed as a closed loop system Take your drill and slowly drill in the top (the top right hand side is the best place for this) of
chined as shown in Figure 2 by anyone with access to a decent laser cutter using plans Irsquove made available at httpbitly2fy3llS My build also requires a cus-tomization with a drill and self-tapping screw to access the coolant and reduce the tubing size to fit my more compact size
Tools and partsNow let me go into the nitty gritty of
achieving this water cooled system in-cluding the steps I took to cut down the water block to size First herersquos a list of the tools yoursquoll need
bull Screw driversbull Dremel rotary tool with disk cut-
ting toolsbull Access to a laser cutter or 3D
printerbull Hack Sawbull Sand paper a grinder or any-
thing you can use to grind down the copper block
bull Drill with a bit that can cut and is the same size as your self-tap-ping screw
bull Stanley knife or Tube cuttersbull Syringe for filling the AIO with
fresh coolant
And here are the parts wersquoll be using
bull Hardkernel ODROID XU4 or XU3
bull Corsair Hydro H45 (part Num-ber CW-9060028-WW)
bull Chipset water cooling blockbull John Guest Straight Adaptor
38rdquo NPTF Thread 14rdquo Tube Connection
bull 025 meters of 10mm Hard tube Linear Low Density Polyethylene
bull 3mm acrylic clear or coloured (for machining your parts)
bull 12v Power supply specifically for the pump and 120mm Fan
bull Screws bolts to fit everythingbull Thermal paste (MX4 is recom-
mended)
LIQUID COOLING
the Corsair Hydro H45 radiator and if possible do this upside down so no metal flakes go into the radiator Once you have done this take a small self-tap-ping screw and add a rubber washer to it Now screw your self-tapping screw in carefully making sure that you donrsquot overtighten it
Using the plans that I mentioned above laser cut the acrylic 3mm fins and mounting plate for the XU4 XU3 for the mod You can do them in any color you wish Some of you may wish to do a 3D print or make them out of wood Use this article as inspiration to mod it in whatever way yoursquod like
Next wersquoll fit the water block to the AIO Look at how it will all fit and cut the AIO tubes down as much as possible Once you have done this remove the self-tapping screw and use a syringe to fill the radiator up with your Mayhems XT1 (a non-toxic coolant that wonrsquot cor-rode copper or aluminum) Take your time filling this as you need to get as much air out of the system possible Tilt
Figure 3 - The self-tapping screw and hole for filling your cooling block with coolant
Figure 4 - a closer look at the water block assembly
ODROID MAGAZINE 27
the circuit to drop the voltage to 5 volts and 4 amps which we can use to power the ODROID-XU4 This gives us a way to power our system from a single outlet
Last but not least Test it out Use a CPU stress testing tool to see how things go You can slowly adjust the screw heads on the water block to get optimum cool-ing Again do not overtighten them and potentially bend the PCB If you wish you can also add a brace to the back of the board to help stop any PCB bend-ing issues Good luck and enjoy your ODROID at maximum performance
and move the AIO around while filling to aid in air removal You can power up the pump after each fill to get trapped air to move to your fill port However do not turn on the pump if there is no cool-ant in it as this will damage the pump
Once the coolant is filled screw back in the self-tapping screw with the rubber washer Test the pump without fitting anything to it in case of any leaks Do this for at least 1 to 2 hours before pro-ceeding any further to ensure that every-thing is properly fitted
You are now ready to fit the plastic fins and water block to the front of the AIO Add thermal Paste onto your SoC A pea-sized ball is more than enough Take your time and remember when fit-ting the water block to not over tighten the bracing screws to the XU4 XU3 as you may start to bend the PCB which can ruin the ODROID Then simply layer the fins on the Corsair AIO and screw it all down Donrsquot forget to mount the XU4 on the larger base plate and you may wish to use the raiser washers that I have added into the plans (DXF format)
The ODROID doesnrsquot have enough power for the water cooler so I used a power brick that is rated at 12 volts and 5 amps which is connected to a con-stant currentvoltage 5-30v 5A buck regulator with 2 displays (httpebayeu2gfpnuZ) We connected the pump and fan directly to the 12V power sup-ply which draws 12 volts and 045 amps and then added the buck regulator into
Figure 5 - another angle of the final design
LIQUID COOLINGLINUX GAMES
MInI METRO A pERFECT GAME TO wOnDER AbOuT wAITInG FOR YOuR METROby Bruno Doiche
Taking the metro to go around
to places isnrsquot the thing that would keep your mind occupied but there is a certain sense of wonder when you play this game while you wait for your metro ride to come and take you home at the end of a working day If you have fond memories of playing Sim-City this game will be your next best time-waster in the greatest style possible
httpsplaygooglecomstoreappsdetailsid=nzcocodepointminimetro
For a game that had every reason to be absolutely banal you will be hooked
ODROID MAGAZINE 28
The swarm architecture
In Part 1 of this tutorial we discussed the classic ldquodocker runrdquo and other commands In Part 2 we are going to learn the swarm mode commands which are new to Docker ver-
sion 112X So what is swarm mode and why do we need itAll of the Docker commands that we discussed in Part 1
run Docker containers on the local machine There is a limit to the number of containers that can be run on a single machine due to CPU and memory limitations And when that machine fails all your applications running on the machine will be un-available To provide high availability scalability orchestration and manageability a cluster environment is needed Swarm mode is the built-in cluster environment (the swarm) for Docker engines although there are other orchestration engines for Docker (For instance Kubernetes)
A swarm consists of multiple instances of Docker engines called nodes There are two types of nodes
DOCKER 101pART 2 - SwARM MODEby andy Yuen ( mrDreamBot)
DOCKER SWARM MODE
Manager Node which dispatches units of work called tasks to worker nodes and performs orchestration management functions and maintenance of desired states of a swarm There can be multiple manager nodes but it is always an odd number of manager nodes due to the use of the Raft Consensus proto-col (httpsraftgithubio) A Manager node can also be a worker nodes at the same time The state store stores informa-tion such as state of cluster and the user defined configuration Information is organized into objects such as clusters nodes services tasks and networks
Worker Node which executes tasks received from a man-ager node
User interaction with the swarm is through services A ser-vice is the definition of tasks to be run on worker nodes Scal-ing is achieved using a replica services model in which a specific number of tasks is run on worker nodes to satisfy the desired state of the target number of replicas to be run The swarm is administered using a command line interface via the manager node In subsequent sections we shall discuss how to create a swarm services and set the desired state If you want to carry out the exercises in this tutorial you will have to fulfill the prerequisites below
PrerequisitesIn order to follow this tutorial you must have the followingTwo or more ODROID-c2 devices connected to the same ethernet switch that your pc is connected to Figure 2a shows my setup which consists of 5 ODROID-c2s and my notebook all connected into a single network environment my ODROID-c2 nodes and their roles are summarized in Figure 2b
ODROID MAGAZINE 29
Your pc must be able to ssH into the c2-swarm-00 man-ager node where the swarm is administeredYour nodes must be running Docker version 112x For those of you using an Os whose software repository does not provide the dockerio 112x package or equivalent you may install it following the instructions and binaries I put on Github at httpbitly2ejY1FE
Creating and Managing a SwarmTo create a swarm issue the following command from the
manager node
$ docker swarm init
--advertise-addr 1921681100
Which should return
$ Swam initialized current node (8jw6y313hmt3vfa1f-
me1dinro) is now a manager
This should follow with a string including a token and open port on your manager node that can be used to invite other docker instances to the swarm There are a number of options that you can use for your swarm For help you can type the following command
$ docker swarm --help
This should show a host of information about your swarm as shown next
To add workers to this swarm run the following command on each of the remaining nodes
$ docker swarm join
--token tokengoeshere
19216811002377
Your unique will be returned from the docker swarm init command we ran earlier This is a security mechanism ensur-ing that only legitimate nodes can join the swarm Note that you only have to do this once since the configuration is saved in the state store which survives reboots
We only need 1 manager node to make the swarm work For this tutorial we are not going to add additional manager nodes To see the result issue the following command from the manager
$ docker node ls
Then we take a look at what that command will show in a typical list
DOCKER SWARM MODE
my setup of five ODROID-c2 devicesswarm mode at a glance
a list of available docker nodes
chart of nodes and roles in the example swarm cluster
ODROID MAGAZINE 30
If you lost the token earlier on from the init process donrsquot worry you can retrieve it by issuing the following command from the Manager Node To get the token for a manager re-place ldquoworkerrdquo in the command by ldquomanagerrdquo
$ docker swarm join-token worker
When you want a node to unjoin the swarm issue the fol-lowing command from that node
$ docker swarm leave
By default the manager node is also a worker node if you do not want the manager to run any service tasks you can ldquodrainrdquo the manager as follows
$ docker node update --availability drain c2-swarm-00
In fact you can use the drain command on any worker node If the worker node is running service tasks when you issue the drain command it will shut down those tasks and let the swarm start them on the other worker nodes to satisfy the desired state When you want the node to run service tasks again just issue the command below on the Manager Node
$ docker node update --availability active c2-
swarm-00
Creating a serviceNow that our swarm is up and running wersquore going to cre-
ate our first service to ping the Manager Node We can see what this looks like in the next image Type the following com-mands from the manager node
$ docker service create --replicas 1 --name ping-
service mrdreambotarm64-busybox-httpd bin ping
1921681100
$ docker service ls
$ docker service inspect --pretty pingservice
We can see that there is only 1 instance of the service run-ning Type the following command
$ docker service ps pingservice
It tells us the service is running on c2-swarm-02 Start a terminal to c2-swarm-02 and type these commands
$ docker ps
$ docker logs pingservice1eic3ca0o4h0gxrb675ncveptv
For reference pingservice1eic3ca0o4h0gxrb675ncveptv is the docker container ID identified in the output of the docker ps command The logs as shown in below show that ping-service indeed is pinging my swarm manager 1921681100
To scale it to run 5 instances issue the command from the swarm manager
$ docker service scale pingservice=5
Since I used the service scale command to set the desired state to run 5 instances of the service pingservice it spins up new containers to make up the 5 service instances Note that the swarm performs load balancing by spreading the load across the nodes in the swarm When I shut down nodes c2-swarm-03 and c2-swarm-04 I expect the swarm to spin up ser-vices on the remaining nodes to maintain the 5 replica count In fact that is the case as can be seen in Figure 7 The swarm is running 2 containers on c2-swarm-00 and c2-swarm-01 and 1 on c2-swarm-02
DOCKER SWARM MODE
The service creation process
The ping log at a glance
ODROID MAGAZINE 31
When you are done with the service remove it by issuing the following command
$ docker service rm pingservice
Testing the Routing MeshIn Part 1 I deployed both MySQL and Fish on C2-swarm-00
using Docker run which was in lieu of Swarm Mode In this sec-tion I am going to deploy them as services in Swarm Mode instead
Please note that only 1 instance of MySQL mapped to the database directory on disk can be running at a time Did you remember from part 1 that only c2-swarm-00 has a hard disk I am going to run MySQL as a service with only 1 instance and set up a constraint that the service can only be run on the host c2-swarm-00 using the following command
$ docker service create --name mysql -p 33063306 -e MYSQL_USER=fishuser -e MYSQL_PASSWORD=fish456 -e MYSQL_DATABASE=fish --constraint lsquonodehostname == c2-swarm-00rsquo --mount type=bindsrc=mediasatafish-mysqldst=u01my3306data mrdreambotarm64-mysql
This is very similar to running MySQL using the classic docker run command The main difference is that if the con-tainer running the MySQL service should fall over the swarm will automatically start another instance to replace it
Also note the use of ldquo--constraint lsquonodehostname == c2-swarm-00rsquordquo which constrains MySQL to run on the node named c2-swarm-00 only There are other pre-defined con-straints as can be found in the docker documentation To run fish as a service issue the command
$ docker service create
-p 80808080 --name fish -e MYSQL_SERVER=1921681100 -e MYSQL_PORT=3306 mrdreambotarm64-fish
You can see that the services are running using the follow-ing command
$ docker service ls
Above there is a look at how this appears when yoursquore suc-cessful Note that the first time I issue the ldquodocker service lsrdquo command MySQL was still starting It was started when I issued the second lsquodocker service lsrsquo command Fish is running on c2-swarm-04
All nodes in a swarm are on an ingress routing mesh mean-ing that all nodes in the swarm can accept connections on pub-lished ports for any service (in our case port 8080 for Fish and port 3306 for MySQL) even if the task is not running on that node This implies that we can point our browser to any of the nodes in the swarm to access the fish application How-ever this was not the behavior that I witnessed on my swarm cluster I could only access the service on the nodes running it (c2-swarm-04) and not on any other nodes After I scaled up and down the number of replicas of the service several times occasionally I could not even invoke the service on the node running the service I searched the Internet and many peo-ple reported the same issue The problem was thought to be swarm mode not updating the IPVS (IP Virtual Server) tables correctly IPVS is the kernel module responsible for load bal-ancing Automatic load balancing is a great feature once it is working
User-defined networksUser-defined networks can be used to isolate containers
For example if you created a user-defined network and assign containers or services to it other containers or services not in that network will not be able to access them and vice-versa In
DOCKER SWARM MODE
The desired states performing load balancing
load balancing in effect with a Docker swarm
ODROID MAGAZINE 32
addition the containers or services in a user defined network can reference each other by name such as the name assigned to a container upon creation There are two types of user-defined networks bridge networks and overlay networks
Bridge NetworksThis is mainly used by the classic docker run commands A
bridge network can only function on the local machine For example we can create a bridge network and add the MySQL and Fish containers to it
$ docker network create --driver bridge my-net$ docker run -d --network my-net --name mysql -e MYSQL_USER=fishuser -e MYSQL_PASSWORD=fish456 -e MYSQL_DATABASE=fish -v mediasatafish-mysqlu01my3306data mrdreambotarm64-mysql$ docker run -d --network my-net -p 80808080 --name fish -e MYSQL_SERVER=mysql -e MYSQL_PORT=3306 mrdreambotarm64-fish
After creating the network one can see a bridge network (my-net) has been set up as shown in Figure 9
Note that the docker run command for Fish references the MYSQL_SERVER by its name ldquomysqlrdquo instead of using localhost or an IP address and we donrsquot even need to publish the MySQL port (ie there is no ldquo-p 33063306rdquo in the MySQL docker run command) Although we cannot access MySQL from the docker host without publishing port 3306 Fish can access MySQL port 3306 because it is on the same user defined network called my-net The bridge network is working as intended
Overlay NetworkTo create a user-defined network spanning multiple nodes
in swarm mode we have to create an overlay network The swarm mode equivalent of deploying the MySQL and Fish above in an overlay network is
$ docker network create --driver overlay --sub-net=172200016 fish-net$ docker service create --network fish-net --name mysql
-e MYSQL_USER=fishuser -e MYSQL_PASSWORD=fish456 -e MYSQL_DATABASE=fish --constraint lsquonodehostname == c2-swarm-00rsquo --mount type=bindsrc=mediasatafish-mysqldst=u01my3306data mrdreambotarm64-mysql$ docker service create --network fish-net -p 80808080 --name fish -e MYSQL_SERVER=mysql -e MYSQL_PORT=3306 mrdreambotarm64-fish
After creating the network one can see an overlay network (fish-net) has been set up for the swarm as shown in Figure 10
Unfortunately Fish did not work It showed the login screen but was not able to authenticate after I entered the username and password repeatedly and was unable to communicate to MySQL via its name There is an overlay networking problem in the version of Docker that I use where the implementation is not able to resolve the container or service by name
ConclusionAlthough there are some issues with the swarm mode in the
version of docker engine I used in this tutorial it should still give you some insight on how it might have worked and how awesome these features will be when working Swarm mode is the native cluster management and service orchestration features embedded in the Docker engine since version 1120 Before swarm mode comes along creating a swarm involved using third-party tools such as consul or etcd to provide a distributed state store for service discovery With swarm mode everything is built-in and works out-of-the-box except for the issues mentioned above routing mesh network and user defined overlay network Although this tutorial is designed to run on the ODROID-C2 swarm all the commands that you learned are exactly the same on INTEL-based machines running the Docker engine You can easily apply your Docker command line knowledge to different environments in-cluding Linux MacOS Windows and on a cloud host
DOCKER SWARM MODE
The overlay network configuration
a look at the bridged network
ODROID MAGAZINE 33
Seedboxes are far from new but Irsquove yet to find one that will do everything that I want with my ODROID-XU4 especially when integrated with the CloudShell
case and LCD interface This guide will show you how to build a seedbox that is
powered by the ODROID-xu4uses an ssD with saTa connectivity for high speed trans-fers and readwrite speedsRuns the operating system and cache on the hard drive to reduce fatigue on the sD cardsupports web-access to Transmission for remote down-loadingautomatically connects to a Vpn upon boot for maximum security
So while nothing here is original herersquos a sure-fire way to begin with a ODROID-XU4 and a CloudShell kit and end up with a working seedbox with all of these great features
BackgroundTo make things easier for my dad I built him a seedbox
network attached storage (NAS) device last year for all of his downloading and storage needs It used an old Raspberry Pi 2 I had lying around before I found out about the far more pow-erful (and USB 30 capable) ODROID-XU4 I used that RPi 2 to build him a seedbox that was a good start but it used an attached USB hard drive that just wasnrsquot very fast
I also realized how convenient and well packaged the ODROID CloudShell is so I decided to put two great things together and write a guide around turning a Cloudshell into a seedbox with VPN capabilities There are other guides out there often geared toward the RPi or Virtual Private Server
ODROID SEEDBOX
(VPS) but I really prefer turn-key guides that donrsquot require sifting through three different sets of instructions that donrsquot address the nuances of the ODROID ARM architecture or the specific tools I want to use to achieve my ideal build I intended it to be a newer faster and sleeker upgrade to his Pi2
Some credit is due to PiMylife and MakeUseOf who have some very useful Raspberry Pi guides that Irsquove adapted for the XU4 and CloudShell I also took some snippets and instruc-tions from several ODROID community members on how to properly configure this guide for the XU4 and CloudShell All in all this should run for less than $200 and offer anything yoursquod want from a home seedbox or single drive NAS
Parts listODROID xu4cloudshell xu4 kit (featuring a usB 30 to saTa adapter and 22-inch TFT lcD Display)RTc Battery256GB ssD (or other 25-inch storage device of your choice)32GB micro-sD card (Or other Os drive of your choice)Vpn subscription with OpenVpn support
The parts and tools wersquoll need to get the job done
DESIGnInG YOuR Own ODROID SEEDbOXHARnESS THE pOwER OF THE CLOuDSHELLby Joshua sherman
ODROID MAGAZINE 34
ODROID SEEDBOX
VPNThis guide does include a step for setting up traffic encryption
through a Virtual Private Network (VPN) I highly recommend you use a VPN with a seedbox or NAS yoursquore using for download-ing content for security and peace-of-mind You sacrifice your peak speed capabilities if you have a fiber optic or other high speed Internet connection but many VPN providers can offer fairly good speeds despite routing all traffic through a third party server Plus you can still locally access those files maximizing connectiv-ity and the value of the USB 30 to SATA connectivity
Local or onlineThis guide is for a local seedbox setup Can you do it online
Sure but you open yourself up to a number of security risks This guide involves plain text passwords (for the sake of simplicity and a local-only implementation) to make it easier to configure the VPN connection on each launch You may not need this depending on if you want a VPN if your VPN service provider doesnrsquot need a user-name and password There also may be a more secure way to imple-ment this so feel free to make suggestions in the thread for anyone else considering such a build I chose this method since itrsquos based on a previous method that I knew worked and meets my personal needs in having a local NAS with 100 percent encrypted traffic
Getting StartedFirst we will update our ODROID since this guide starts
with running an out-of-the-box 1604 Ubuntu MATE image
$ sudo apt-get update
$ sudo apt-get upgrade
$ sudo apt-get dist-upgrade
The update will take a while to complete We could use a more minimal image but this guide is geared toward simplic-ity Go get some coffee and come back when itrsquos done Figure 2 has a closer look at the hardware to look at in the meantime
Next we want to configure our seedboxrsquos CloudShell dis-play to make sure it works We start with smartmontools
$ sudo apt install smartmontools
Next we need to follow ODROIDrsquos instructions to con-figure the frame buffer for our TFT display in the CloudShell
$ sudo -s
$ echo ldquooptions fbtft_device name=hktft9340 busnum=1
rotate=270rdquo gt etcmodprobedodroid-cloudshellconf
$ echo ldquospi_s3c64xxrdquo gtgt etcmodules
$ echo ldquofbtft_devicerdquo gtgt etcmodules
Then wersquoll remove the blacklist on the Serial Peripheral Inter-face (SPI) through which our ODROID-XU4 and CloudShell are connected We do this by opening blacklist-odroidconf
$ sudo nano etcmodprobedblacklist-odroidconf
When yoursquore finished it should look like this Note the two SPI rows and LCD row are now commented
Comment the required lines
IO Boardblacklist ioboard_bh1780blacklist ioboard_bmp180blacklist ioboard_keyled
SPI blacklist spidev blacklist spi_s3c64xx
32rdquo LCD Touchscreen driverblacklist ads7846
Reboot the XU4 but make sure you donrsquot have any HDMI cables connected to it to ensure it connects to the LCD display
At this point we have a working device but the display is blank We want it to show all sorts of useful info about our
closeup of seedbox hardware
we have power But the display still isnrsquot working yet
ODROID MAGAZINE 35
CloudShell so letrsquos use a useful script to do this for us Eventu-ally wersquoll be using devsda2 as our storage drive so letrsquos modify mdrjrrsquos application and install it
$ sudo apt-get install curl sysstat
$ wget httpsgithubcomjsherm101cloudshell_lcd
rawmastercloudshell-lcd_20160913-3-fixeddeb
$ sudo dpkg -i cloudshell-lcd_20160913-3-fixeddeb
If we reboot again it should now show some useful infor-mation about the device
cpu usage and temperatureRam availabilityThe local Ip address of the deviceTransfer ratesDisk usage which is empty right now because we havenrsquot configured our devsda2 drive
Operating system configurationNext comes the main task of this project which is to set up
a BitTorrent protocol application to work well with the SSD This is nothing more than an apt-get command if we wanted to use our SD card where the OS is installed for storage but this poses two issues
There are large sD cards (gt256GB) but theyrsquore more expen-sive or slower than their ssD and HDD counterpartsan sD card has a much shorter readwrite lifecycle than an ssD or HDD and will fail sooner
To solve this wersquore going to actually move our ODROID installation to the SSD and boot from the SSD for both our operating system and our additional NAS storage folder All
credit goes to James MakeUseOf for this great idea This might not be a concern for most practical uses but is done as a precaution in this build given the high number of reads and writes anticipated in regular use
Once we complete this wersquoll be installing Transmission as our BitTorrent software of choice Itrsquos just as popular as Del-uge and other clients and comes down to a matter of prefer-ence in this case Both Transmission and Deluge support web-based GUIs and server-client configurations for remote access
Next letrsquos configure our storage drive Wersquove already plugged it into our assembled CloudShell and the necessary SATA-to-USB drivers are configured with smartmontools so it should appear in fdisk as the first drive
$ sudo fdisk devsda1
My drive is currently an NTFS drive from an old Windows installation Wersquoll want to press ldquodrdquo in fdisk to delete the parti-tion then ldquonrdquo to create a new one then ldquoprdquo for primary parti-tion Wersquore ultimately creating two partitions One for the OS wersquore moving to the SSD and one for the storage area wersquoll share over the local network
Create the first partition at the first sector available (prob-ably 2048) and then type ldquo+16Grdquo to create a 16GB partition in size Then start again typing ldquonrdquo and ldquoprdquo to create a second partition with the remaining storage on the drive My 256GB SSD left about 208 GB after accounting for capacity format-ting and the installation partition Once wersquore finished type ldquowrdquo to write the new partitions to the SSD
Next convert both partitions into the ext4 format and mount them to the two folders wersquove set aside for this project
$ sudo mkfsext devsda1
$ sudo mkfsext devsda2
$ sudo mkdir mediasystemdrive
$ sudo mkdir mediaNAS1
$ sudo mount devsda1 mediasystemdrive
$ sudo mount devsda2 mediaNAS1
$df -h (to see a list of drives and confirm everything
is in order)
Once yoursquove finished this your drive configuration should look similar the picture next
Now we can use rsync to move over our data on the SD card to the SSD Before we do this we should make a backup of the bootini file wersquoll end up editing which is in the FAT boot partition of the SD card
$ sudo cp mediabootbootini mediabootbootinibak
Now we need to find the UUID of the unique partition we
ODROID SEEDBOX
Things are looking much better
ODROID MAGAZINE 36
made earlier
$ lsblk -f
My disk UUID is 7d62ae29-a3cf-41d0-9127-065cf-c08fbe6 which is used as an example Next open bootini and search for ldquoBasic Ubuntu Setuprdquo You can search in Nano with CTRL+W
$ sudo nano mediabootbootini
Comment out the line thatrsquos currently below that line This is our original configuration for booting to the SD card We can always revert it if anything goes wrong by plugging the SD card into any device (PC or nix) and re-editing the bootini file Next wersquoll add our own new instructions
Boot from USB device
setenv bootrootfs ldquoconsole=tty1 consoleblank=0
root=UUID=7d62ae29-a3cf-41d0-9127-065cfc08fbe6 root-
wait rootdelay=10 ro fsckrepair=yesrdquo
Just make sure the UUID is whatever UUID comes up for your 16GB system partition under devsda1 Before we use rsync to transfer over to the new partition we need to edit fstab to mount our new drives on startup
$ sudo nano etcfstab
Comment out the first line and now add these two lines be-low assuming yoursquove used the same partition names and folders as me
$ devsda1 ext4 defaultsnoatime 0 1
$ devsda2 mediaNAS1 ext4 defaults 0 2
Finally we can move over our OS from the SD card to the
new partition wersquove set aside for it Keep in mind that once yoursquove done this any changes to the OS wonrsquot appear after you restart the computer as yoursquoll be working from the new parti-tion Itrsquos best to reboot once you finish the following rsync command
$ sudo apt-get install rsync
$ sudo rsync -axv mediasystemdrive
Yoursquoll probably have some time to grab some coffee while this transfers To elaborate on whatrsquos happening wersquore copying over our entire OS to mediasystemdrive where wersquove mount-ed our devsda1 partition Keep in mind that after we restart our fstab + bootini will remount and redirect the devsda1 partition to ldquordquo and serve as our operating system Wersquoll still be using the boot partition of your SD card so donrsquot remove it Once it finishes itrsquos time to reboot and hold our breath
$ sudo reboot
If we successfully reboot then wersquore definitely working from one of our two partitions either on the SD card or SSD You can confirm wersquore using the SSD by checking our parti-tions again
$ lsblk -f
You should see sda1 mounted at ldquordquo to confirm our suc-cess You can see this yourself in Figure 6
Transmission configurationOkay so we have our operating system transferred and our
display is showing our fancy 256GB SSD in working condition Now we need to install Transmission and setup our trans-
mission-daemon Wersquoll be using our ldquoodroidrdquo default user as well as be configuring our drive to have an incomplete and complete folder as well Letrsquos start by installing Transmission and adding our new incomplete and complete folders
$ sudo apt-get install transmission-daemon$ sudo mkdir -p mediaNAS1incomplete$ sudo mkdir -p mediaNAS1complete
ODROID SEEDBOX
Our partitions properly configured and mounted
The ssD is mounted as the root file system
ODROID MAGAZINE 37
Now we need to configure Transmission by turning off its services and opening the settings file
$ sudo service transmission-daemon stop
$ sudo nano etctransmission-daemonsettingsjson
Yoursquoll want to configure several settings
set your incomplete to ldquotruerdquo and ldquomedianas1incompleterdquoset your complete to ldquomedianas1completerdquoset rpc-authentication-required to ldquofalserdquoset the whitelist to 192168 to ensure you can access it remotely from another device on your network
Each of the rows we edited should look like this scattered around the settings file
ldquodownload-dirrdquo ldquomediaNAS1completerdquo
ldquoincomplete-dirrdquo ldquomediaNAS1incompleterdquo
ldquoincomplete-dir-enabledrdquo ldquotruerdquo
ldquorpc-authentication-requiredrdquo ldquofalserdquo
ldquorpc-whitelistrdquo ldquo127001192168100rdquo
There are also some other settings you can adjust and I rec-ommend checking out the Transmission website for instruc-tions on how to configure your tool
Before we start our transmission-daemon we need to change ownership to our user ldquoodroidrdquo in order to make every-thing work properly There are more ideal ways of doing this but I prefer to stick to a single user since this server will have no other purpose other than as a seedbox and I donrsquot see a need in this situation to stick to the transmission-daemon user that Transmission normally intends to use
$ sudo chown -R odroidodroid etctransmission-dae-
mon
$ sudo chown -R odroidodroid etcinitdtransmis-
sion-daemon
$ sudo chown -R odroidodroid varlibtransmission-
daemon
$ sudo chown -R odroidodroid mediaNAS1
We also need to open the Transmission daemon service and set user=rdquoodroidrdquo from ldquotransmission-daemonrdquo
$ sudo nano etcsystemdsystemmulti-usertarget
wantstransmission-daemonservice
We also want to do this in the initd file switching in ldquoodroidrdquo for ldquoUSERrdquo
$ sudo nano etcinitdtransmission-daemon
Finally reset that related Transmission daemon and turn back on Transmission
$ sudo systemctl daemon-reload
$ sudo service transmission-daemon start
Samba configurationNow we have everything we need to download a file but
we need a way to access the files that we download over our lo-cal network If yoursquore using a Windows device then Samba is the way to go Letrsquos get started by installing it and configuring our network share We will need to configure it in a way that allows us to login with our odroid user and easily download files as well as remove files we no longer want on our seedbox
$ sudo apt-get install samba samba-common-bin
$ sudo nano etcsambasmbconf
Letrsquos add the following as a new config for sharing our rel-evant folders
security = user
[odroid]
comment = odroid
path = mediaNAS1
valid users = odroid
force group = odroid
create mask = 0775
force create mode = 0775
security mask = 0775
force security mode = 0775
Our seedbox is starting to look pretty sharp
ODROID SEEDBOX
ODROID MAGAZINE 38
directory mask = 2775
force directory mode = 2775
directory security mask = 2775
force directory security mode = 2775
browseable = yes
writeable = yes
guest ok = no
read only = no
Before we move on wersquoll need to set a Samba password for our ldquoodroidrdquo user You can also create separate accounts if you so choose as long as those users are in the ldquoodroidrdquo group
$ sudo smbpasswd -a odroid
Now we can restart and we should be able to remotely ac-cess our seedbox folders
$ sudo service smbd restart
Keep in mind that you can always add new compatible us-ers as long as you set a proper Samba password and add those users to the ldquoodroidrdquo group or whichever group you assign ac-cess to for these files
VPN configurationFinally wersquoll want to configure our VPN for an automat-
ic secure connection upon boot Once again thanks to the James MakeUseOf who figured out this fast and easy way to get your VPN working without needing to manually start the VPN or enter credentials each time you restart your device This is essential if you want to guarantee the encryption of your connection while using the seedbox In this guide wersquore using an OpenVPN connection which depends on
an OpenVpn configuration filea certificate from your Vpn providerYour username and password for your Vpn provider stored in a text fileThree special shell scripts to start our Vpn automatically upon boot and route traffic
Storing a password in text is not ideal However itrsquos the fastest and leanest way to get things going and since wersquore only using this locally having your VPN credentials stored on this device will not risk the files to those outside your home net-work If you want to host your seedbox with port forwarding and essentially open to the Internet I highly recommend either searching for an alternative method or considering these risks before proceeding
Next letrsquos install the OpenVPN software
$ sudo apt-get install openvpn resolvconf
Wersquore going to leave everything in our home folder while doing this which is homeodroid in this case It really can be anywhere but these are not files you want in the same place where people on your home network will connect and down-load files from your seedbox
First get your OpenVPN configuration file (referred to as vpn-serveropvn in this guide) and place it in your home folder along with your certificate file (referred to as cacrt in this guide) Now create a new text file (txt) with two lines The first line should be the username of your VPN connection service and the second line should be your VPN connection servicersquos password
$ sudo nano homeodroidpasstxt
$ username
$ password
Next wersquore going to open our configuration file which in my case is ldquovpn-serveropvnrdquo
$ sudo nano homeodroidvpn-serveropvn
Wersquore going to add the following line at the bottom which will let us connect to the VPN provider without entering the credentials manually
$ auth-user-pass mnttorrentsopenvpnpasstxt
Then wersquore going to add these three lines which refer to the shell scripts wersquore about to create
$ route-up homeodroidroute-upsh
$ down-pre
$ down homeodroiddownsh
This will allow OpenVPN to connect to our VPN provider automatically Once it connects it will automatically route all traffic through these VPN connection whether incoming (downsh) or outgoing (route-upsh) Next wersquore going to cre-ate these two shell scripts
$ sudo nano homeodroidroute-upsh
Enter the following for route-upsh
binsh
iptables -t nat -I POSTROUTING -o tun0 -j MASQUERADE
ODROID SEEDBOX
ODROID MAGAZINE 39
Then edit downsh
$ sudo nano homeodroiddownsh
Enter the following for downsh
$ binsh
$ iptables -t nat -D POSTROUTING -o tun0 -j MASQUER-
ADE
Lastly we need a shell script that we can launch when our OS boots and use to initiate the VPN connection automati-cally
$ sudo nano homeodroidvpnsh
Enter the following for vpnsh
$ sudo openvpn --client --config homeodroidvpn-
serverovpn --ca homeodroidcacrt --script-securi-
ty 2
Now letrsquos make all of these files executable
$ sudo chmod +x homeodroidroute-upsh
$ sudo chmod +x homeodroiddownsh
$ sudo chmod +x homeodroidvpnsh
Now wersquore going to open up our rclocal file which runs scripts upon system startup
$ sudo nano etcrclocal
[code]
Add this line right above the ldquoexit 0rdquo line
[code]
$ homeodroidvpnsh
Your VPN is now configured and your seedbox will down-load exclusively through an encrypted connection with your VPN provider You can easily test this by using the TorGuard test file which checks your IP address when downloading the file
Connect to your Transmission web GUI at odroid9091 or whatever your local IP address is
Upload the TorGuard test file and check the IP address re-ported as ldquoSuccess Your torrent client IP is XXXXXXXXrdquo Check this IP address against what Google reports as your IP address by visiting wwwwhatismyipcom
If the IP addresses are different then your connection is se-cure You can still use your local IP address to access and down-load files via Samba My VPN provider allows me download at speeds around 75 Mbps with the ODROID- XU4 peaking at around 22 percent CPU usage which shows just how power-ful the octa-core processor is for tasks such as these However the real glory is the transfer speeds from your ODROID to your personal computer I saw 800 Mbps transfer speeds when moving some files back and forth making this seedbox an ex-tremely viable Network Attached Storage Device too
Feel free to offer any comments or suggestions in the forum topic at httpbitly2fPeek7 The setup is hardly perfect but itrsquos a surefire way for anyone to get started with their very own seedbox
The Transmission environment look at those speeds
ODROID SEEDBOX
ODROID MAGAZINE 40
system with Music Player Daemon and the YMPD interface I also run an XU4 in a Cloudshell enclosure which is mainly used for displaying statistics with DietPi-Cloudshell network attached storage (NAS) backup mirroring with DietPi-Sync which is based on rsync and running PiHole to block adver-tisements on our local network
Which ODROID is your favorite and whyWithout a doubt itrsquos the ODROID-C2 For me it is the
best all-around single-board computer (SBC) on the market today Coupled with 1GB Ethernet and an EMMC capable of 140Mbs transfer rates itrsquos a performance beast capable of any-thing from a NextCloud server to a HiFi system ODROIDs have come a long way since the original C1 All those small is-sues with unstable power supplies and SD card incompatibility have been ironed out The C2 in my eyes is SBC perfection
Your DietPi image is very popular What was your motivation for developing it and what improvements do you plan to make in the future
Please tell us a little about yourselfI live in Burton Latimer in England Itrsquos one of those ldquoye-
olderdquo village towns and is a lovely place to live and bring up a family I am currently a ldquostay-at-home Dadrdquo since I am dealing with a long term gastrointestinal illness that affects and limits my daily life Prior to that I was an IT assistant for a drainage company near Cambridge I have a 2 and a half year old son named Jack who loves the television show ldquoPAW Patrolrdquo plays with dust bins (no idea why yet) and building things with Legos Gemma my fiance is a full time mother and my rock My educational background is in Information and Commu-nications Technology School wasnrsquot really for me since I am more of a ldquohands-onrdquo person who enjoys taking things apart to see what makes them tick
How did you get started with computersMy first computer experience was with the Commodore 64
when I was around 5 or 6 years old However for some reason the only memories I have are of the tape drive with a 2+ hour loading time Even then you were lucky if the game actually loaded Those were the days I was also fortunate enough to have an Amiga 500+ in my early years For me this was the start of my love for computers I used MOD tracker to play the song Axel F and remember Workbench Elite Frontier and not having the 1MB RAM upgrade to play ldquoRise of the Robotsrdquo
What attracted you to the ODROID platform
I read reviews of the C1 and benchmark comparisons with the Raspberry Pi 2 I snapped one up right away and was sim-ply blown away by how much faster it was in every area of per-formance Ever since then Irsquove been hooked on ODROIDs Itrsquos great to see Hardkernel continually innovate and push their products to new levels Irsquod even go as far to say that ODROIDs are years ahead of anything that the Raspberry Pi Foundation currently offers
How do you use your ODROIDs
I have one ODROID-C2 which is used for daily testing with my DietPi image This is mostly due to the C2rsquos excel-lent IO performance with the eMMC allowing for an ex-tremely fast testing environment especially when it comes to automated software installation tests I also have another C2 with the HiFi Shield 2 addon which I use as a dedicated music
MEET An ODROIDIAnDAnIEL HAZE (FOuRDEE)edited by Rob Roy (robroy)
MEET AN ODROIDIAN
Daniel and his wife Gemma
ODROID MAGAZINE 41
What innovations would you like to see in future Hardkernel products
Personally I would love to see a USB 30 port and bus on the next C-series board DDR4 memory would be sublime and boost overall performance especially with the shared GPU memory An energy-efficient onboard WiFi and bluetooth would also be a welcome addition to future boards
What hobbies and interests do you have apart from computers
Music has always been close to my heart Irsquom a true au-diophile with a love for all genres but especially trance I like spending time with family and friends My son is now into Legos and itrsquos a real joy to build things together Although even when hersquos asleep itrsquos easy to get carried away and attempt to build the Millennium Falcon
What advice do you have for someone wanting to learn more about programming
If you are new to programming do not be put off by a lot of strange code on the screen Programming isnrsquot as hard as you think Follow an online guide for ldquomy first programrdquo and stick with it With practice and patience all that strange code will gradually make sense and itrsquos a great feeling
For beginners Irsquod highly recommend Python Its simple to learn with a vast community and many online guides to get started Itrsquos also the leading programming language for GPIO projects on SBCs
Finally but most importantly regardless of your skill level or chosen language always make sure you code something that excites you and enjoy every moment of it
DietPi originally started as a minimal image It was aimed at reducing the resource load of the bulky default images pro-vided by the first Raspberry Pi model We had these 700mhz devices using far more resources than was actually required by the user Now DietPi has evolved to much more than a mini-mal image offering automated installations of popular soft-ware all of which are optimized and configure for you With DietPi you get the maximum performance from your device because only the software you need is installed
As for the future DietPi has always been shaped by our end user feedback suggestions and support We do have plans for a web interface in DietPi ideally to replace the whiptail menu system and to provide a modern GUI experience for users
MEET AN ODROIDIAN
Danielrsquos hometown of Burton latimer in england
MEET AN ODROIDIAN
Danielrsquos photogenic son and master lego builder Jack
ODROID MAGAZINE 42

Metadata
encoder libebml
v100 + libmatroska v100
creation_time 2011-04-24
172033
Duration 00144803 start
0000000 bitrate 6071 kbs
Chapter 00 start 0000000
end 103125000
Metadata
title Chapter
01
Chapter 01 start
103125000 end 148667000
Metadata
title Chapter
02
Chapter 02 start
148667000 end 349792000
Metadata
title Chapter
03
Chapter 03 start
349792000 end 437208000
Metadata
title Chapter
04
Chapter 04 start
437208000 end 472075000
Metadata
title Chapter
05
Chapter 05 start
472075000 end 678833000
Metadata
title Chapter
06
Chapter 06 start
678833000 end 744083000
Metadata
title Chapter
07
Chapter 07 start
744083000 end 888032000
Metadata
title Chapter
08
Stream 00(eng) Video
h264 (High) yuv420p(tv bt709
unknownunknown) 1280x544 SAR
11 DAR 4017 24 fps 24 tbr 1k
--enable-libflite --enable-lib-
fontconfig --enable-libfreetype
--enable-libfribidi --enable-
libgme --enable-libgsm --enable-
libmodplug --enable-libmp3lame
--enable-libopenjpeg --enable-
libopus --enable-libpulse --en-
able-librubberband --enable-
librtmp --enable-libschroedinger
--enable-libshine --enable-lib-
snappy --enable-libsoxr --en-
able-libspeex --enable-libssh
--enable-libtheora --enable-
libtwolame --enable-libvorbis
--enable-libvpx --enable-lib-
wavpack --enable-libwebp --en-
able-libx265 --enable-libxvid
--enable-libzvbi --enable-openal
--enable-opengl --enable-x11grab
--enable-libdc1394 --enable-li-
biec61883 --enable-libzmq --en-
able-frei0r --enable-chromaprint
--enable-libx264 --enable-ver-
sion3 --disable-doc --disable-
programs --disable-avdevice
--disable-avfilter --disable-
avformat --disable-avresample
--disable-postproc --disable-
swscale --enable-libopencore_am-
rnb --enable-libopencore_amrwb
--enable-libvo_amrwbenc
libavutil 55 17103 55
17103
libavcodec 57 24102 57
24102
libavformat 57 25100 57
25100
libavdevice 57 0101 57
0101
libavfilter 6 31100 6
31100
libavresample 3 0 0 3
0 0
libswscale 4 0100 4
0100
libswresample 2 0101 2
0101
libpostproc 54 0100 54
0100
Input 0 matroskawebm from
lsquoSintel2010720pmkvrsquo
gnueabihf --cc=cc --cxx=g++
--enable-gpl --enable-shared
--disable-stripping --disable-
decoder=libopenjpeg --disable-
decoder=libschroedinger --enable-
avresample --enable-avisynth
--enable-gnutls --enable-ladspa
--enable-libass --enable-lib-
bluray --enable-libbs2b --en-
able-libcaca --enable-libcdio
--enable-libflite --enable-lib-
fontconfig --enable-libfreetype
--enable-libfribidi --enable-
libgme --enable-libgsm --enable-
libmodplug --enable-libmp3lame
--enable-libopenjpeg --enable-
libopus --enable-libpulse --en-
able-librubberband --enable-
librtmp --enable-libschroedinger
--enable-libshine --enable-lib-
snappy --enable-libsoxr --en-
able-libspeex --enable-libssh
--enable-libtheora --enable-libt-
wolame --enable-libvorbis --en-
able-libvpx --enable-libwavpack
--enable-libwebp --enable-libx265
--enable-libxvid --enable-libz-
vbi --enable-openal --enable-
opengl --enable-x11grab --enable-
libdc1394 --enable-libiec61883
--enable-libzmq --enable-frei0r
--enable-chromaprint --enable-
libx264
WARNING library configuration
mismatch
avcodec configura-
tion --prefix=usr --ex-
tra-version=1ubuntu4
--toolchain=hardened --libdir=
usrlibarm-linux-gnueabihf
--incdir=usrincludearm-linux-
gnueabihf --cc=cc --cxx=g++
--enable-gpl --enable-shared
--disable-stripping --disable-
decoder=libopenjpeg --disable-
decoder=libschroedinger --enable-
avresample --enable-avisynth
--enable-gnutls --enable-ladspa
--enable-libass --enable-lib-
bluray --enable-libbs2b --en-
able-libcaca --enable-libcdio
HARDWARE ENCODER
ODROID MAGAZINE 20
06
Chapter 06 start
678833000 end 744083000
Metadata
title Chapter
07
Chapter 07 start
744083000 end 888032000
Metadata
title Chapter
08
Stream 00(eng) Video
h264 (h264_v4l2m2m) ([33][0][0]
[0] 0x0021) yuv420p 1280x544
[SAR 11 DAR 4017] q=2-31 2000
kbs 24 fps 12288 tbn 24 tbc
Metadata
encoder
Lavc5724102 h264_v4l2m2m
Stream 01(eng) Audio aac
(LC) ([64][0][0][0] 0x0040)
48000 Hz 51(side) fltp 341
kbs
Metadata
title AC3 51
640 Kbps
encoder
Lavc5724102 aac
Stream mapping
Stream 00 -gt 00 (h264 (na-
tive) -gt h264 (h264_v4l2m2m))
Stream 01 -gt 01 (ac3 (na-
tive) -gt aac (native))
edmp4rsquo
Metadata
encoder
Lavf5725100
Chapter 00 start 0000000
end 103125000
Metadata
title Chapter
01
Chapter 01 start
103125000 end 148667000
Metadata
title Chapter
02
Chapter 02 start
148667000 end 349792000
Metadata
title Chapter
03
Chapter 03 start
349792000 end 437208000
Metadata
title Chapter
04
Chapter 04 start
437208000 end 472075000
Metadata
title Chapter
05
Chapter 05 start
472075000 end 678833000
Metadata
title Chapter
tbn 48 tbc
Stream 01(eng) Audio ac3
48000 Hz 51(side) fltp 640
kbs
Metadata
title AC3 51
640 Kbps
Stream 02(ger) Subtitle
subrip
Stream 03(eng) Subtitle
subrip
Stream 04(spa) Subtitle
subrip
Stream 05(fre) Subtitle
subrip
Stream 06(ita) Subtitle
subrip
Stream 07(dut) Subtitle
subrip
Stream 08(pol) Subtitle
subrip
Stream 09(por) Subtitle
subrip
Stream 010(rus) Subtitle
subrip
Stream 011(vie) Subtitle
subrip
Codec AVOption preset (Configura-
tion preset) specified for output
file 0 (sintel-encodedmp4) has
not been used for any stream
The most likely reason is either
wrong type (eg a video option
with no video
streams) or that it is a private
option of some encoder which was
not actually used for any stream
File lsquosintel-encodedmp4rsquo already
exists Overwrite [yN] y
[h264_v4l2m2m 0xf3fe0] H264
codec detected init annexb con-
verter
[h264_v4l2m2m 0xf3fe0] Device
path not set probing devvideo
[h264_v4l2m2m 0xf3fe0] exynos-
gsc1m2m is not the one we want
[h264_v4l2m2m 0xf3fe0] exynos-
gsc0m2m is not the one we want
[h264_v4l2m2m 0xf3fe0] Using
device devvideo1
Output 0 mp4 to lsquosintel-encod-
Figure 1 - Big Buck Bunny demo
HARDWARE ENCODER
ODROID MAGAZINE 21
$ dpkg-buildpackage -us -uc -b
-j4
$ cd
$ sudo dpkg -i gstreamerdeb
Alternatively you can get the pre-built deb packages from httpbitly2gj7Iqm To transcode something you should first identify the encoding and the decoding interfaces since they change on every boot
$ decoder=`gst-inspect-10 | grep
v4l2 | grep videodec | cut -d ldquordquo
-f 2`
$ encoder=`gst-inspect-10 | grep
v4l2 | grep h264enc | cut -d ldquordquo
-f 2`
$ gst-launch-10 filesrc
location=big_buck_bunny_720p_
h264mov qtdemux h264parse
$decoder $encoder ex-
tra-controls=rdquoencodeh264_
level=10h264_profile=4frame_lev-
el_rate_control_enable=1video_
bitrate=2097152rdquo h264parse
matroskamux filesink
location=bbbmkv
For comments questions and sug-gestions please visit the original post at httpbitly2g0vnsn
Press [q] to stop [] for help
[h264_v4l2m2m 0xf3fe0] Perform-
ing useless memcpy() on output
pool because buffers do not match
[h264_v4l2m2m 0xf3fe0] This
could be avoided by using av_
v4l_buffer_pool_get_buffer() or
av_v4l_buffer_pool_make_pipe()
[mp4 0xb9c70] Timestamps are
unset in a packet for stream 0
This is deprecated and will stop
working in the future Fix your
code to set the timestamps prop-
erly
[mp4 0xb9c70] Encoder did not
produce proper pts making some
up
[h264_v4l2m2m 0xf3fe0] No
event occurred while wait-
ing01 bitrate=368813kbitss
speed=184x
frame= 2027 fps= 44 q=-00
Lsize= 383559kB time=00012520
bitrate=368770kbitss
speed=184x
video379964kB audio3551kB
subtitle0kB other streams0kB
global headers0kB muxing over-
head 0011593
Steps when using gstreamer
Compile gstreamer from memekarsquos branch using the commands
$ apt-get install gstreamer10-
plugins-bad
$ git clone httpsgithubcom
mihailescu2mgst-plugins-good
$ cd gst-plugins-good
$ sudo apt-get install
libgstreamer10-dev libgudev-10-
dev
libgstreamer-plugins-base10-dev
dh-autoreconf automake autoconf
libtool autopoint cdbs gtk-doc-
tools libshout3-dev libaa1-dev
libflac-dev libdv4-dev libdv-dev
libgtk-3-dev libtag1-dev
libsoup24-dev gstreamer10-doc
gstreamer10-plugins-base-doc
HARDWARE ENCODER
ODROID Talk Subreddit
httpwwwredditcomrodroid
ODROID Magazine
is on Reddit
Your dog will be pleased with your ODROID-u4rsquos hardware encoding
ODROID MAGAZINE 22
After the file has loaded add the following two lines to the end save the file and reboot the systemBluetooth Audio A2dp Sink
persistservicebta2dpsink=true
After the ODROID has rebooted enable the ldquoMedia Au-diordquo option dialog box as below
Finally connect the smartphone or tablet to the ODROID by pairing it via bluetooth and play your music For com-ments questions and suggestions please visit the original post at httpbitly2f2dO8H
If you have an ODROID installed as a Car PC you may want to keep your music collection on a portable device such as a phone or tablet and have it automatically con-
nect to the vehiclersquos speakers when you drive Or you may have a HiFi Shield attached to your ODROID-C2 along with a high-end stereo system and want to play music from a friendrsquos smartphone through it By following the steps in this article you can use your ODROID as a bluetooth speaker
To begin make sure that you have a bluetooth dongle at-tached to the ODROID as shown below
HOw TO uSE An ODROID AS A bLuETOOTH SpEAKERMuSIC FOR THE MASSESby codewalker
THERMAL PRINTER
ODROID with Bluetooth dongle on usB port
Next open the Terminal Emulator app on your ODROID as shown
Remount the root filesystem with readwrite privileges so that you can make changes mount -o rwremount
launching the Terminal emulator
Running the mount command
editing the buildprop file using vi
enabling the media audio option
Use a text editor such as vi to edit the file called ldquobuildproprdquo
vi buildprop
Then switch to the root user and confirm the dialog box that appears$ su
ODROID MAGAZINE 23
spinlocks and rw_semaphoresbull Converting interrupt handlers
into preemptible kernel threadsbull Converting the old Linux timer
API into separate infrastructures for high resolution kernel timers plus one for timeouts
bull Timer improvements leading to userspace POSIX timers with high resolution
Building the kernelTo build a real-time (RT) Linux
kernel we need to update the kernel with Real Time kernel patches The RT patches file can be found at httpbitly2g3MiJ2 and the latest patch-es for the 314x kernel can be found at httpbitly2goVUSQ You can checkout the Linux kernel source tree for the ODROID-C2 from httpbitly2fNFOi4 RT patches need to match the Linux kernel version so you must choose the relevant patch series
$ git clone --depth 1
-b odroidc2-314y
httpsgithubcomhardkernel
linuxgit
odroidc2-314y-rt
$ cd odroidc2-314y-rt
$ wget
httpswwwkernelorgpub
linuxkernel
projectsrt314older
A real-time operating system (RTOS) is an operating system intended to serve real-time ap-
plication process data as it comes in typically without buffering delays The standard Linux kernel only meets some real-time requirements by providing ba-sic POSIX operations for userspace time handling but it does not guarantee hard timing deadlines If we apply Ingo Mol-narrsquos real-time Preemption patch (RT-Preempt) and Thomas Gleixnerrsquos gener-ic clock event layer with high resolution support the kernel gains full real-time capabilities
The RT-Preempt patch has raised a lot of interest throughout the industry Its clean design and consequent aim towards mainline integration makes it an interesting option for hard and firm real-time applications Itrsquos no surprise to see applications ranging from profes-sional audio to industrial control using RT Linux
Use casesbull Making in-kernel locking-
primitives (using spinlocks) pre-emptible though reimplementa-tion with rtmutexes
bull Critical sections protected by spinlock_t and rwlock_t are now preemptible
bull Implementing priority inheri-tance for in-kernel mutexes
ODROID-C2 REAL-TIME KERnELGETTInG STARTED wITH An RTOSby anand moon (moonlinux)
REAL-TIME KERNEL
patch-31465-rt68patchgz
$ gunzip patch-31465-rt68
patchgz
$ patch -p1 lt
patch-31465-rt68patch
The ARM64 RT kernel has some missing patches so we have to look at the 318y kernel and apply those patch-es as well Once the additional patches are applied we can build the kernel The necessary patches can be found in 318y-rt patch series
arm64 Mark PMU interrupt IRQF_NO_THREADpatch
arm64 Allow forced irq threadingpatch
archarm64 Add lazy preempt sup-portpatch
arm64 replace read_lock to rcu lock in call_step_hook
A few files have conflicts so you need to update them manually before build-ing the kernel You can find the links for all the updated patches in the following repository at httpbitly2g6R3Di
Building the kernelCompilation is done with make
Adding -j to the make command will speed up compilation
$ make -j4 Image dtbs modules
ODROID MAGAZINE 24
REAL-TIME KERNEL
After this has completed you have will have a compiled Linux kernel (im-age) the device tree file (dtb) and kernel modules (ko) The following steps as-sume that your USB memory card read-er is assigned to devsdc Be careful and double check how your card is assigned
First insert the boot-medium either the eMMC module or SD card into the USB memory card reader and connect the USB memory card reader to your Linux host PC Then copy the image and DT (meson64_odroidc2dtb) to the 1st partition (FAT) of the boot-medium
$ mkdir -p mount
$ sudo mount devsdc1 mount
$ sudo cp archarm64bootIm-
age archarm64bootdtsmeson64_
odroidc2dtb
mount ampamp sync ampamp sudo umount
mount
Finally copy the driver modules to the 2nd partition(EXT4) of the boot-medium
$ sudo mount devsdc2 mount
$ sudo make modules_install
ARCH=arm64
INSTALL_MOD_PATH=mount ampamp sync
ampamp sudo umount mount
$ rm -rf mount
For comments questions or sugges-tions please visit the original post at httpbitly2f2b0s8
ANDROID SOFTWARE EQUALIZER
RuLInG THE wORLD wITH SYnERGYCHROnICLES OF A MAD SCIEnTISTby Bo lechnowsky (respectech)
If you had a minion not the animated kind but the ldquoPull the Switchrdquo kind he would watch in amazement as you effortlessly launched windows on multiple monitors run by multiple computers copying and pasting madly between them
You know that as a scientist with world-domination plans you cannot be slowed down by latency when launching applications and sharing data between them That is why you installed Synergy in the first place as outlined in the June 2016 issue of ODROID Magazine (httpbitly1XxSbRw)
Recently you decided to dust off a venerable ODROID-U2 in order to add to Synergy However you did not want to recompile Synergy from scratch You up-dated the system with the following commands
$ sudo apt update
$ sudo apt dist-upgrade
Then you downloaded the version compiled for the ODROID-XU4 from httpbitly22lNiL1 but after decompressing and moving the files to the usrbin folder you were greeted with
synergyc usrlibarm-linux-gnueabihflibstdc++so6 version `GLIB-
CXX_3420rsquo not found (required by synergyc)
After some searching around on the internet you found an easy fix for this prob-lem
$ sudo add-apt-repository ppaubuntu-toolchain-rtest
$ sudo apt update
$ sudo apt install g++-49
After setting up the U2 using the ldquoConfigure Serverrdquo button on Synergy Server running on your main machine and running the synergyc command on the U2 all that was needed was to ldquoStoprdquo and ldquoStartrdquo the Synergy Server and your U2 is up and running Life is good and world domination is one step closer
Run even heterogeneous environment x86 windows x aRm linux
ODROID MAGAZINE 25
heat away a radiator and fan to cool the water and a pump that lets water flow through the system On my particular build I opted for a Corsair Hydro Series H45 for many reasons one being that the pump is built into the radiator itself Many AIO (All in One) liquid cooling system have the pump on top of a CPU cooler and this is useless to us since wersquore not installing this on a standard PC Having the pump on the radiator also allows us to keep the system as com-pact as possible while making it easier to cut the CPU block off and connect our own liquid cooling block shaped to fit our ODROID
No matter what most CPU wa-ter cooling systems probably wonrsquot have a water block that supports your ODROID given their size so yoursquoll need to find one that will fit on a North
Itrsquos well known throughout the ODROID community that the tem-perature of the XU4 and XU3 starts
to rise sharply under heavy loads This can quickly lead to something called thermal throttling where the board au-tomatically slows down after reaching a certain temperature to prevent damage to the board The XU3 and XU4 tend to underclock from 2 GHz to 900 MHz in order to cool off for a little while However if we improve the ability for the ODROID to cool itself then it can maintain its peak performance for a greater amount of time This is where liquid cooling comes in There are many ways to improve cooling including a larger heatsink with a standard 40mm fan but liquid cooling has two key ad-vantages it has a far greater thermal ca-pacity and is quieter since most liquid cooling kits on the market use larger fans that are less noisy than the stock fan on an XU3 or XU4
When considering how to liquid cool the ODROID you need to consider how you are going to cool it and what hardware you are going to use There are many different types of custom cooling components on the market and if yoursquore not careful your cooling setup can cost a lot more than the board itself Every water cooler will need three main com-ponents a water block that fits your ODROIDrsquos chip in order to transfer
Bridge chipset which is similar in size to our ODROID SoC For this build I didnrsquot want to spend any money since I had an older EKWB Chipset water-cooling block lying around doing noth-ing This wasnrsquot the perfect solution as it needed to be trimmed to be able to fit on the XU4 chipset I chamfered the copper so that when it was fitted it didnrsquot touch the HDMI or Sound Ports The last thing we want is our XU4 short-ing out I also had to cut out a section of the block to get around the sound out-put port There are some blocks on the market that will fit perfectly however they can cost in the region of pound3500 (USD$43) plus post and packing and that probably wonrsquot include the rest of the cooling system
To help keep things compact I also mounted my ODROID to the radia-tor using some screws and custom laser cut plastic parts You can get these ma-
wHY ADD LIQuID COOLInG TO An ODROID-Xu3 OR Xu4by michael lee wood ( mlwood37)
LIQUID COOLING
Figure 1 - The final result of the liquid cooling project
Figure 2 - The acrylic parts needed for mounting your ODROID-xu4
ODROID MAGAZINE 26
bull Mayhems XT1 Coolant + DI water
bull Self-tapping screw and rubber washer
Build processFirst yoursquoll need to check the fit of
the water block that you have selected for your ODROID When test fitting check to make sure you are not any-where near the HDMI port or the sound ports You may have to remove the top and cut and chamfer the copper block so it fits perfectly Once this is done put the water block and your ODROID to the side
Next take the John Guest Straight Adaptor 38rdquo NPTF Thread 14rdquo Tube Connection and cut down the threaded ends with your hacksaw so they screw flushly into your water block If needed use some PFTE tape around the fittings so they create a good seal You want to make absolutely sure that your fittings are tight and have a strong seal to pre-vent leakage
Next take your 10mm tube Linear Low Density Polyethylene and cut it down to size pushing it into the end of your John Guest fittings Make sure they are tight and flush just like the fit-tings This is where you will be pushing your AIO into the block
After this has been completed wersquore ready to attach our Corsair Hydro H45 to the water block Cut off the tubes nearest to the water cooling block that comes attached to your AIO system You should leave some extra tubing in case you want to use it again in the future Take a container and collect or dump the coolant inside your Corsair cooler Itrsquos up to you if you want to reuse this coolant but it isnrsquot a very high quality coolant and will likely be contaminated with flecks of aluminum too
Next wersquoll prepare our radiator to receive coolant since it was designed as a closed loop system Take your drill and slowly drill in the top (the top right hand side is the best place for this) of
chined as shown in Figure 2 by anyone with access to a decent laser cutter using plans Irsquove made available at httpbitly2fy3llS My build also requires a cus-tomization with a drill and self-tapping screw to access the coolant and reduce the tubing size to fit my more compact size
Tools and partsNow let me go into the nitty gritty of
achieving this water cooled system in-cluding the steps I took to cut down the water block to size First herersquos a list of the tools yoursquoll need
bull Screw driversbull Dremel rotary tool with disk cut-
ting toolsbull Access to a laser cutter or 3D
printerbull Hack Sawbull Sand paper a grinder or any-
thing you can use to grind down the copper block
bull Drill with a bit that can cut and is the same size as your self-tap-ping screw
bull Stanley knife or Tube cuttersbull Syringe for filling the AIO with
fresh coolant
And here are the parts wersquoll be using
bull Hardkernel ODROID XU4 or XU3
bull Corsair Hydro H45 (part Num-ber CW-9060028-WW)
bull Chipset water cooling blockbull John Guest Straight Adaptor
38rdquo NPTF Thread 14rdquo Tube Connection
bull 025 meters of 10mm Hard tube Linear Low Density Polyethylene
bull 3mm acrylic clear or coloured (for machining your parts)
bull 12v Power supply specifically for the pump and 120mm Fan
bull Screws bolts to fit everythingbull Thermal paste (MX4 is recom-
mended)
LIQUID COOLING
the Corsair Hydro H45 radiator and if possible do this upside down so no metal flakes go into the radiator Once you have done this take a small self-tap-ping screw and add a rubber washer to it Now screw your self-tapping screw in carefully making sure that you donrsquot overtighten it
Using the plans that I mentioned above laser cut the acrylic 3mm fins and mounting plate for the XU4 XU3 for the mod You can do them in any color you wish Some of you may wish to do a 3D print or make them out of wood Use this article as inspiration to mod it in whatever way yoursquod like
Next wersquoll fit the water block to the AIO Look at how it will all fit and cut the AIO tubes down as much as possible Once you have done this remove the self-tapping screw and use a syringe to fill the radiator up with your Mayhems XT1 (a non-toxic coolant that wonrsquot cor-rode copper or aluminum) Take your time filling this as you need to get as much air out of the system possible Tilt
Figure 3 - The self-tapping screw and hole for filling your cooling block with coolant
Figure 4 - a closer look at the water block assembly
ODROID MAGAZINE 27
the circuit to drop the voltage to 5 volts and 4 amps which we can use to power the ODROID-XU4 This gives us a way to power our system from a single outlet
Last but not least Test it out Use a CPU stress testing tool to see how things go You can slowly adjust the screw heads on the water block to get optimum cool-ing Again do not overtighten them and potentially bend the PCB If you wish you can also add a brace to the back of the board to help stop any PCB bend-ing issues Good luck and enjoy your ODROID at maximum performance
and move the AIO around while filling to aid in air removal You can power up the pump after each fill to get trapped air to move to your fill port However do not turn on the pump if there is no cool-ant in it as this will damage the pump
Once the coolant is filled screw back in the self-tapping screw with the rubber washer Test the pump without fitting anything to it in case of any leaks Do this for at least 1 to 2 hours before pro-ceeding any further to ensure that every-thing is properly fitted
You are now ready to fit the plastic fins and water block to the front of the AIO Add thermal Paste onto your SoC A pea-sized ball is more than enough Take your time and remember when fit-ting the water block to not over tighten the bracing screws to the XU4 XU3 as you may start to bend the PCB which can ruin the ODROID Then simply layer the fins on the Corsair AIO and screw it all down Donrsquot forget to mount the XU4 on the larger base plate and you may wish to use the raiser washers that I have added into the plans (DXF format)
The ODROID doesnrsquot have enough power for the water cooler so I used a power brick that is rated at 12 volts and 5 amps which is connected to a con-stant currentvoltage 5-30v 5A buck regulator with 2 displays (httpebayeu2gfpnuZ) We connected the pump and fan directly to the 12V power sup-ply which draws 12 volts and 045 amps and then added the buck regulator into
Figure 5 - another angle of the final design
LIQUID COOLINGLINUX GAMES
MInI METRO A pERFECT GAME TO wOnDER AbOuT wAITInG FOR YOuR METROby Bruno Doiche
Taking the metro to go around
to places isnrsquot the thing that would keep your mind occupied but there is a certain sense of wonder when you play this game while you wait for your metro ride to come and take you home at the end of a working day If you have fond memories of playing Sim-City this game will be your next best time-waster in the greatest style possible
httpsplaygooglecomstoreappsdetailsid=nzcocodepointminimetro
For a game that had every reason to be absolutely banal you will be hooked
ODROID MAGAZINE 28
The swarm architecture
In Part 1 of this tutorial we discussed the classic ldquodocker runrdquo and other commands In Part 2 we are going to learn the swarm mode commands which are new to Docker ver-
sion 112X So what is swarm mode and why do we need itAll of the Docker commands that we discussed in Part 1
run Docker containers on the local machine There is a limit to the number of containers that can be run on a single machine due to CPU and memory limitations And when that machine fails all your applications running on the machine will be un-available To provide high availability scalability orchestration and manageability a cluster environment is needed Swarm mode is the built-in cluster environment (the swarm) for Docker engines although there are other orchestration engines for Docker (For instance Kubernetes)
A swarm consists of multiple instances of Docker engines called nodes There are two types of nodes
DOCKER 101pART 2 - SwARM MODEby andy Yuen ( mrDreamBot)
DOCKER SWARM MODE
Manager Node which dispatches units of work called tasks to worker nodes and performs orchestration management functions and maintenance of desired states of a swarm There can be multiple manager nodes but it is always an odd number of manager nodes due to the use of the Raft Consensus proto-col (httpsraftgithubio) A Manager node can also be a worker nodes at the same time The state store stores informa-tion such as state of cluster and the user defined configuration Information is organized into objects such as clusters nodes services tasks and networks
Worker Node which executes tasks received from a man-ager node
User interaction with the swarm is through services A ser-vice is the definition of tasks to be run on worker nodes Scal-ing is achieved using a replica services model in which a specific number of tasks is run on worker nodes to satisfy the desired state of the target number of replicas to be run The swarm is administered using a command line interface via the manager node In subsequent sections we shall discuss how to create a swarm services and set the desired state If you want to carry out the exercises in this tutorial you will have to fulfill the prerequisites below
PrerequisitesIn order to follow this tutorial you must have the followingTwo or more ODROID-c2 devices connected to the same ethernet switch that your pc is connected to Figure 2a shows my setup which consists of 5 ODROID-c2s and my notebook all connected into a single network environment my ODROID-c2 nodes and their roles are summarized in Figure 2b
ODROID MAGAZINE 29
Your pc must be able to ssH into the c2-swarm-00 man-ager node where the swarm is administeredYour nodes must be running Docker version 112x For those of you using an Os whose software repository does not provide the dockerio 112x package or equivalent you may install it following the instructions and binaries I put on Github at httpbitly2ejY1FE
Creating and Managing a SwarmTo create a swarm issue the following command from the
manager node
$ docker swarm init
--advertise-addr 1921681100
Which should return
$ Swam initialized current node (8jw6y313hmt3vfa1f-
me1dinro) is now a manager
This should follow with a string including a token and open port on your manager node that can be used to invite other docker instances to the swarm There are a number of options that you can use for your swarm For help you can type the following command
$ docker swarm --help
This should show a host of information about your swarm as shown next
To add workers to this swarm run the following command on each of the remaining nodes
$ docker swarm join
--token tokengoeshere
19216811002377
Your unique will be returned from the docker swarm init command we ran earlier This is a security mechanism ensur-ing that only legitimate nodes can join the swarm Note that you only have to do this once since the configuration is saved in the state store which survives reboots
We only need 1 manager node to make the swarm work For this tutorial we are not going to add additional manager nodes To see the result issue the following command from the manager
$ docker node ls
Then we take a look at what that command will show in a typical list
DOCKER SWARM MODE
my setup of five ODROID-c2 devicesswarm mode at a glance
a list of available docker nodes
chart of nodes and roles in the example swarm cluster
ODROID MAGAZINE 30
If you lost the token earlier on from the init process donrsquot worry you can retrieve it by issuing the following command from the Manager Node To get the token for a manager re-place ldquoworkerrdquo in the command by ldquomanagerrdquo
$ docker swarm join-token worker
When you want a node to unjoin the swarm issue the fol-lowing command from that node
$ docker swarm leave
By default the manager node is also a worker node if you do not want the manager to run any service tasks you can ldquodrainrdquo the manager as follows
$ docker node update --availability drain c2-swarm-00
In fact you can use the drain command on any worker node If the worker node is running service tasks when you issue the drain command it will shut down those tasks and let the swarm start them on the other worker nodes to satisfy the desired state When you want the node to run service tasks again just issue the command below on the Manager Node
$ docker node update --availability active c2-
swarm-00
Creating a serviceNow that our swarm is up and running wersquore going to cre-
ate our first service to ping the Manager Node We can see what this looks like in the next image Type the following com-mands from the manager node
$ docker service create --replicas 1 --name ping-
service mrdreambotarm64-busybox-httpd bin ping
1921681100
$ docker service ls
$ docker service inspect --pretty pingservice
We can see that there is only 1 instance of the service run-ning Type the following command
$ docker service ps pingservice
It tells us the service is running on c2-swarm-02 Start a terminal to c2-swarm-02 and type these commands
$ docker ps
$ docker logs pingservice1eic3ca0o4h0gxrb675ncveptv
For reference pingservice1eic3ca0o4h0gxrb675ncveptv is the docker container ID identified in the output of the docker ps command The logs as shown in below show that ping-service indeed is pinging my swarm manager 1921681100
To scale it to run 5 instances issue the command from the swarm manager
$ docker service scale pingservice=5
Since I used the service scale command to set the desired state to run 5 instances of the service pingservice it spins up new containers to make up the 5 service instances Note that the swarm performs load balancing by spreading the load across the nodes in the swarm When I shut down nodes c2-swarm-03 and c2-swarm-04 I expect the swarm to spin up ser-vices on the remaining nodes to maintain the 5 replica count In fact that is the case as can be seen in Figure 7 The swarm is running 2 containers on c2-swarm-00 and c2-swarm-01 and 1 on c2-swarm-02
DOCKER SWARM MODE
The service creation process
The ping log at a glance
ODROID MAGAZINE 31
When you are done with the service remove it by issuing the following command
$ docker service rm pingservice
Testing the Routing MeshIn Part 1 I deployed both MySQL and Fish on C2-swarm-00
using Docker run which was in lieu of Swarm Mode In this sec-tion I am going to deploy them as services in Swarm Mode instead
Please note that only 1 instance of MySQL mapped to the database directory on disk can be running at a time Did you remember from part 1 that only c2-swarm-00 has a hard disk I am going to run MySQL as a service with only 1 instance and set up a constraint that the service can only be run on the host c2-swarm-00 using the following command
$ docker service create --name mysql -p 33063306 -e MYSQL_USER=fishuser -e MYSQL_PASSWORD=fish456 -e MYSQL_DATABASE=fish --constraint lsquonodehostname == c2-swarm-00rsquo --mount type=bindsrc=mediasatafish-mysqldst=u01my3306data mrdreambotarm64-mysql
This is very similar to running MySQL using the classic docker run command The main difference is that if the con-tainer running the MySQL service should fall over the swarm will automatically start another instance to replace it
Also note the use of ldquo--constraint lsquonodehostname == c2-swarm-00rsquordquo which constrains MySQL to run on the node named c2-swarm-00 only There are other pre-defined con-straints as can be found in the docker documentation To run fish as a service issue the command
$ docker service create
-p 80808080 --name fish -e MYSQL_SERVER=1921681100 -e MYSQL_PORT=3306 mrdreambotarm64-fish
You can see that the services are running using the follow-ing command
$ docker service ls
Above there is a look at how this appears when yoursquore suc-cessful Note that the first time I issue the ldquodocker service lsrdquo command MySQL was still starting It was started when I issued the second lsquodocker service lsrsquo command Fish is running on c2-swarm-04
All nodes in a swarm are on an ingress routing mesh mean-ing that all nodes in the swarm can accept connections on pub-lished ports for any service (in our case port 8080 for Fish and port 3306 for MySQL) even if the task is not running on that node This implies that we can point our browser to any of the nodes in the swarm to access the fish application How-ever this was not the behavior that I witnessed on my swarm cluster I could only access the service on the nodes running it (c2-swarm-04) and not on any other nodes After I scaled up and down the number of replicas of the service several times occasionally I could not even invoke the service on the node running the service I searched the Internet and many peo-ple reported the same issue The problem was thought to be swarm mode not updating the IPVS (IP Virtual Server) tables correctly IPVS is the kernel module responsible for load bal-ancing Automatic load balancing is a great feature once it is working
User-defined networksUser-defined networks can be used to isolate containers
For example if you created a user-defined network and assign containers or services to it other containers or services not in that network will not be able to access them and vice-versa In
DOCKER SWARM MODE
The desired states performing load balancing
load balancing in effect with a Docker swarm
ODROID MAGAZINE 32
addition the containers or services in a user defined network can reference each other by name such as the name assigned to a container upon creation There are two types of user-defined networks bridge networks and overlay networks
Bridge NetworksThis is mainly used by the classic docker run commands A
bridge network can only function on the local machine For example we can create a bridge network and add the MySQL and Fish containers to it
$ docker network create --driver bridge my-net$ docker run -d --network my-net --name mysql -e MYSQL_USER=fishuser -e MYSQL_PASSWORD=fish456 -e MYSQL_DATABASE=fish -v mediasatafish-mysqlu01my3306data mrdreambotarm64-mysql$ docker run -d --network my-net -p 80808080 --name fish -e MYSQL_SERVER=mysql -e MYSQL_PORT=3306 mrdreambotarm64-fish
After creating the network one can see a bridge network (my-net) has been set up as shown in Figure 9
Note that the docker run command for Fish references the MYSQL_SERVER by its name ldquomysqlrdquo instead of using localhost or an IP address and we donrsquot even need to publish the MySQL port (ie there is no ldquo-p 33063306rdquo in the MySQL docker run command) Although we cannot access MySQL from the docker host without publishing port 3306 Fish can access MySQL port 3306 because it is on the same user defined network called my-net The bridge network is working as intended
Overlay NetworkTo create a user-defined network spanning multiple nodes
in swarm mode we have to create an overlay network The swarm mode equivalent of deploying the MySQL and Fish above in an overlay network is
$ docker network create --driver overlay --sub-net=172200016 fish-net$ docker service create --network fish-net --name mysql
-e MYSQL_USER=fishuser -e MYSQL_PASSWORD=fish456 -e MYSQL_DATABASE=fish --constraint lsquonodehostname == c2-swarm-00rsquo --mount type=bindsrc=mediasatafish-mysqldst=u01my3306data mrdreambotarm64-mysql$ docker service create --network fish-net -p 80808080 --name fish -e MYSQL_SERVER=mysql -e MYSQL_PORT=3306 mrdreambotarm64-fish
After creating the network one can see an overlay network (fish-net) has been set up for the swarm as shown in Figure 10
Unfortunately Fish did not work It showed the login screen but was not able to authenticate after I entered the username and password repeatedly and was unable to communicate to MySQL via its name There is an overlay networking problem in the version of Docker that I use where the implementation is not able to resolve the container or service by name
ConclusionAlthough there are some issues with the swarm mode in the
version of docker engine I used in this tutorial it should still give you some insight on how it might have worked and how awesome these features will be when working Swarm mode is the native cluster management and service orchestration features embedded in the Docker engine since version 1120 Before swarm mode comes along creating a swarm involved using third-party tools such as consul or etcd to provide a distributed state store for service discovery With swarm mode everything is built-in and works out-of-the-box except for the issues mentioned above routing mesh network and user defined overlay network Although this tutorial is designed to run on the ODROID-C2 swarm all the commands that you learned are exactly the same on INTEL-based machines running the Docker engine You can easily apply your Docker command line knowledge to different environments in-cluding Linux MacOS Windows and on a cloud host
DOCKER SWARM MODE
The overlay network configuration
a look at the bridged network
ODROID MAGAZINE 33
Seedboxes are far from new but Irsquove yet to find one that will do everything that I want with my ODROID-XU4 especially when integrated with the CloudShell
case and LCD interface This guide will show you how to build a seedbox that is
powered by the ODROID-xu4uses an ssD with saTa connectivity for high speed trans-fers and readwrite speedsRuns the operating system and cache on the hard drive to reduce fatigue on the sD cardsupports web-access to Transmission for remote down-loadingautomatically connects to a Vpn upon boot for maximum security
So while nothing here is original herersquos a sure-fire way to begin with a ODROID-XU4 and a CloudShell kit and end up with a working seedbox with all of these great features
BackgroundTo make things easier for my dad I built him a seedbox
network attached storage (NAS) device last year for all of his downloading and storage needs It used an old Raspberry Pi 2 I had lying around before I found out about the far more pow-erful (and USB 30 capable) ODROID-XU4 I used that RPi 2 to build him a seedbox that was a good start but it used an attached USB hard drive that just wasnrsquot very fast
I also realized how convenient and well packaged the ODROID CloudShell is so I decided to put two great things together and write a guide around turning a Cloudshell into a seedbox with VPN capabilities There are other guides out there often geared toward the RPi or Virtual Private Server
ODROID SEEDBOX
(VPS) but I really prefer turn-key guides that donrsquot require sifting through three different sets of instructions that donrsquot address the nuances of the ODROID ARM architecture or the specific tools I want to use to achieve my ideal build I intended it to be a newer faster and sleeker upgrade to his Pi2
Some credit is due to PiMylife and MakeUseOf who have some very useful Raspberry Pi guides that Irsquove adapted for the XU4 and CloudShell I also took some snippets and instruc-tions from several ODROID community members on how to properly configure this guide for the XU4 and CloudShell All in all this should run for less than $200 and offer anything yoursquod want from a home seedbox or single drive NAS
Parts listODROID xu4cloudshell xu4 kit (featuring a usB 30 to saTa adapter and 22-inch TFT lcD Display)RTc Battery256GB ssD (or other 25-inch storage device of your choice)32GB micro-sD card (Or other Os drive of your choice)Vpn subscription with OpenVpn support
The parts and tools wersquoll need to get the job done
DESIGnInG YOuR Own ODROID SEEDbOXHARnESS THE pOwER OF THE CLOuDSHELLby Joshua sherman
ODROID MAGAZINE 34
ODROID SEEDBOX
VPNThis guide does include a step for setting up traffic encryption
through a Virtual Private Network (VPN) I highly recommend you use a VPN with a seedbox or NAS yoursquore using for download-ing content for security and peace-of-mind You sacrifice your peak speed capabilities if you have a fiber optic or other high speed Internet connection but many VPN providers can offer fairly good speeds despite routing all traffic through a third party server Plus you can still locally access those files maximizing connectiv-ity and the value of the USB 30 to SATA connectivity
Local or onlineThis guide is for a local seedbox setup Can you do it online
Sure but you open yourself up to a number of security risks This guide involves plain text passwords (for the sake of simplicity and a local-only implementation) to make it easier to configure the VPN connection on each launch You may not need this depending on if you want a VPN if your VPN service provider doesnrsquot need a user-name and password There also may be a more secure way to imple-ment this so feel free to make suggestions in the thread for anyone else considering such a build I chose this method since itrsquos based on a previous method that I knew worked and meets my personal needs in having a local NAS with 100 percent encrypted traffic
Getting StartedFirst we will update our ODROID since this guide starts
with running an out-of-the-box 1604 Ubuntu MATE image
$ sudo apt-get update
$ sudo apt-get upgrade
$ sudo apt-get dist-upgrade
The update will take a while to complete We could use a more minimal image but this guide is geared toward simplic-ity Go get some coffee and come back when itrsquos done Figure 2 has a closer look at the hardware to look at in the meantime
Next we want to configure our seedboxrsquos CloudShell dis-play to make sure it works We start with smartmontools
$ sudo apt install smartmontools
Next we need to follow ODROIDrsquos instructions to con-figure the frame buffer for our TFT display in the CloudShell
$ sudo -s
$ echo ldquooptions fbtft_device name=hktft9340 busnum=1
rotate=270rdquo gt etcmodprobedodroid-cloudshellconf
$ echo ldquospi_s3c64xxrdquo gtgt etcmodules
$ echo ldquofbtft_devicerdquo gtgt etcmodules
Then wersquoll remove the blacklist on the Serial Peripheral Inter-face (SPI) through which our ODROID-XU4 and CloudShell are connected We do this by opening blacklist-odroidconf
$ sudo nano etcmodprobedblacklist-odroidconf
When yoursquore finished it should look like this Note the two SPI rows and LCD row are now commented
Comment the required lines
IO Boardblacklist ioboard_bh1780blacklist ioboard_bmp180blacklist ioboard_keyled
SPI blacklist spidev blacklist spi_s3c64xx
32rdquo LCD Touchscreen driverblacklist ads7846
Reboot the XU4 but make sure you donrsquot have any HDMI cables connected to it to ensure it connects to the LCD display
At this point we have a working device but the display is blank We want it to show all sorts of useful info about our
closeup of seedbox hardware
we have power But the display still isnrsquot working yet
ODROID MAGAZINE 35
CloudShell so letrsquos use a useful script to do this for us Eventu-ally wersquoll be using devsda2 as our storage drive so letrsquos modify mdrjrrsquos application and install it
$ sudo apt-get install curl sysstat
$ wget httpsgithubcomjsherm101cloudshell_lcd
rawmastercloudshell-lcd_20160913-3-fixeddeb
$ sudo dpkg -i cloudshell-lcd_20160913-3-fixeddeb
If we reboot again it should now show some useful infor-mation about the device
cpu usage and temperatureRam availabilityThe local Ip address of the deviceTransfer ratesDisk usage which is empty right now because we havenrsquot configured our devsda2 drive
Operating system configurationNext comes the main task of this project which is to set up
a BitTorrent protocol application to work well with the SSD This is nothing more than an apt-get command if we wanted to use our SD card where the OS is installed for storage but this poses two issues
There are large sD cards (gt256GB) but theyrsquore more expen-sive or slower than their ssD and HDD counterpartsan sD card has a much shorter readwrite lifecycle than an ssD or HDD and will fail sooner
To solve this wersquore going to actually move our ODROID installation to the SSD and boot from the SSD for both our operating system and our additional NAS storage folder All
credit goes to James MakeUseOf for this great idea This might not be a concern for most practical uses but is done as a precaution in this build given the high number of reads and writes anticipated in regular use
Once we complete this wersquoll be installing Transmission as our BitTorrent software of choice Itrsquos just as popular as Del-uge and other clients and comes down to a matter of prefer-ence in this case Both Transmission and Deluge support web-based GUIs and server-client configurations for remote access
Next letrsquos configure our storage drive Wersquove already plugged it into our assembled CloudShell and the necessary SATA-to-USB drivers are configured with smartmontools so it should appear in fdisk as the first drive
$ sudo fdisk devsda1
My drive is currently an NTFS drive from an old Windows installation Wersquoll want to press ldquodrdquo in fdisk to delete the parti-tion then ldquonrdquo to create a new one then ldquoprdquo for primary parti-tion Wersquore ultimately creating two partitions One for the OS wersquore moving to the SSD and one for the storage area wersquoll share over the local network
Create the first partition at the first sector available (prob-ably 2048) and then type ldquo+16Grdquo to create a 16GB partition in size Then start again typing ldquonrdquo and ldquoprdquo to create a second partition with the remaining storage on the drive My 256GB SSD left about 208 GB after accounting for capacity format-ting and the installation partition Once wersquore finished type ldquowrdquo to write the new partitions to the SSD
Next convert both partitions into the ext4 format and mount them to the two folders wersquove set aside for this project
$ sudo mkfsext devsda1
$ sudo mkfsext devsda2
$ sudo mkdir mediasystemdrive
$ sudo mkdir mediaNAS1
$ sudo mount devsda1 mediasystemdrive
$ sudo mount devsda2 mediaNAS1
$df -h (to see a list of drives and confirm everything
is in order)
Once yoursquove finished this your drive configuration should look similar the picture next
Now we can use rsync to move over our data on the SD card to the SSD Before we do this we should make a backup of the bootini file wersquoll end up editing which is in the FAT boot partition of the SD card
$ sudo cp mediabootbootini mediabootbootinibak
Now we need to find the UUID of the unique partition we
ODROID SEEDBOX
Things are looking much better
ODROID MAGAZINE 36
made earlier
$ lsblk -f
My disk UUID is 7d62ae29-a3cf-41d0-9127-065cf-c08fbe6 which is used as an example Next open bootini and search for ldquoBasic Ubuntu Setuprdquo You can search in Nano with CTRL+W
$ sudo nano mediabootbootini
Comment out the line thatrsquos currently below that line This is our original configuration for booting to the SD card We can always revert it if anything goes wrong by plugging the SD card into any device (PC or nix) and re-editing the bootini file Next wersquoll add our own new instructions
Boot from USB device
setenv bootrootfs ldquoconsole=tty1 consoleblank=0
root=UUID=7d62ae29-a3cf-41d0-9127-065cfc08fbe6 root-
wait rootdelay=10 ro fsckrepair=yesrdquo
Just make sure the UUID is whatever UUID comes up for your 16GB system partition under devsda1 Before we use rsync to transfer over to the new partition we need to edit fstab to mount our new drives on startup
$ sudo nano etcfstab
Comment out the first line and now add these two lines be-low assuming yoursquove used the same partition names and folders as me
$ devsda1 ext4 defaultsnoatime 0 1
$ devsda2 mediaNAS1 ext4 defaults 0 2
Finally we can move over our OS from the SD card to the
new partition wersquove set aside for it Keep in mind that once yoursquove done this any changes to the OS wonrsquot appear after you restart the computer as yoursquoll be working from the new parti-tion Itrsquos best to reboot once you finish the following rsync command
$ sudo apt-get install rsync
$ sudo rsync -axv mediasystemdrive
Yoursquoll probably have some time to grab some coffee while this transfers To elaborate on whatrsquos happening wersquore copying over our entire OS to mediasystemdrive where wersquove mount-ed our devsda1 partition Keep in mind that after we restart our fstab + bootini will remount and redirect the devsda1 partition to ldquordquo and serve as our operating system Wersquoll still be using the boot partition of your SD card so donrsquot remove it Once it finishes itrsquos time to reboot and hold our breath
$ sudo reboot
If we successfully reboot then wersquore definitely working from one of our two partitions either on the SD card or SSD You can confirm wersquore using the SSD by checking our parti-tions again
$ lsblk -f
You should see sda1 mounted at ldquordquo to confirm our suc-cess You can see this yourself in Figure 6
Transmission configurationOkay so we have our operating system transferred and our
display is showing our fancy 256GB SSD in working condition Now we need to install Transmission and setup our trans-
mission-daemon Wersquoll be using our ldquoodroidrdquo default user as well as be configuring our drive to have an incomplete and complete folder as well Letrsquos start by installing Transmission and adding our new incomplete and complete folders
$ sudo apt-get install transmission-daemon$ sudo mkdir -p mediaNAS1incomplete$ sudo mkdir -p mediaNAS1complete
ODROID SEEDBOX
Our partitions properly configured and mounted
The ssD is mounted as the root file system
ODROID MAGAZINE 37
Now we need to configure Transmission by turning off its services and opening the settings file
$ sudo service transmission-daemon stop
$ sudo nano etctransmission-daemonsettingsjson
Yoursquoll want to configure several settings
set your incomplete to ldquotruerdquo and ldquomedianas1incompleterdquoset your complete to ldquomedianas1completerdquoset rpc-authentication-required to ldquofalserdquoset the whitelist to 192168 to ensure you can access it remotely from another device on your network
Each of the rows we edited should look like this scattered around the settings file
ldquodownload-dirrdquo ldquomediaNAS1completerdquo
ldquoincomplete-dirrdquo ldquomediaNAS1incompleterdquo
ldquoincomplete-dir-enabledrdquo ldquotruerdquo
ldquorpc-authentication-requiredrdquo ldquofalserdquo
ldquorpc-whitelistrdquo ldquo127001192168100rdquo
There are also some other settings you can adjust and I rec-ommend checking out the Transmission website for instruc-tions on how to configure your tool
Before we start our transmission-daemon we need to change ownership to our user ldquoodroidrdquo in order to make every-thing work properly There are more ideal ways of doing this but I prefer to stick to a single user since this server will have no other purpose other than as a seedbox and I donrsquot see a need in this situation to stick to the transmission-daemon user that Transmission normally intends to use
$ sudo chown -R odroidodroid etctransmission-dae-
mon
$ sudo chown -R odroidodroid etcinitdtransmis-
sion-daemon
$ sudo chown -R odroidodroid varlibtransmission-
daemon
$ sudo chown -R odroidodroid mediaNAS1
We also need to open the Transmission daemon service and set user=rdquoodroidrdquo from ldquotransmission-daemonrdquo
$ sudo nano etcsystemdsystemmulti-usertarget
wantstransmission-daemonservice
We also want to do this in the initd file switching in ldquoodroidrdquo for ldquoUSERrdquo
$ sudo nano etcinitdtransmission-daemon
Finally reset that related Transmission daemon and turn back on Transmission
$ sudo systemctl daemon-reload
$ sudo service transmission-daemon start
Samba configurationNow we have everything we need to download a file but
we need a way to access the files that we download over our lo-cal network If yoursquore using a Windows device then Samba is the way to go Letrsquos get started by installing it and configuring our network share We will need to configure it in a way that allows us to login with our odroid user and easily download files as well as remove files we no longer want on our seedbox
$ sudo apt-get install samba samba-common-bin
$ sudo nano etcsambasmbconf
Letrsquos add the following as a new config for sharing our rel-evant folders
security = user
[odroid]
comment = odroid
path = mediaNAS1
valid users = odroid
force group = odroid
create mask = 0775
force create mode = 0775
security mask = 0775
force security mode = 0775
Our seedbox is starting to look pretty sharp
ODROID SEEDBOX
ODROID MAGAZINE 38
directory mask = 2775
force directory mode = 2775
directory security mask = 2775
force directory security mode = 2775
browseable = yes
writeable = yes
guest ok = no
read only = no
Before we move on wersquoll need to set a Samba password for our ldquoodroidrdquo user You can also create separate accounts if you so choose as long as those users are in the ldquoodroidrdquo group
$ sudo smbpasswd -a odroid
Now we can restart and we should be able to remotely ac-cess our seedbox folders
$ sudo service smbd restart
Keep in mind that you can always add new compatible us-ers as long as you set a proper Samba password and add those users to the ldquoodroidrdquo group or whichever group you assign ac-cess to for these files
VPN configurationFinally wersquoll want to configure our VPN for an automat-
ic secure connection upon boot Once again thanks to the James MakeUseOf who figured out this fast and easy way to get your VPN working without needing to manually start the VPN or enter credentials each time you restart your device This is essential if you want to guarantee the encryption of your connection while using the seedbox In this guide wersquore using an OpenVPN connection which depends on
an OpenVpn configuration filea certificate from your Vpn providerYour username and password for your Vpn provider stored in a text fileThree special shell scripts to start our Vpn automatically upon boot and route traffic
Storing a password in text is not ideal However itrsquos the fastest and leanest way to get things going and since wersquore only using this locally having your VPN credentials stored on this device will not risk the files to those outside your home net-work If you want to host your seedbox with port forwarding and essentially open to the Internet I highly recommend either searching for an alternative method or considering these risks before proceeding
Next letrsquos install the OpenVPN software
$ sudo apt-get install openvpn resolvconf
Wersquore going to leave everything in our home folder while doing this which is homeodroid in this case It really can be anywhere but these are not files you want in the same place where people on your home network will connect and down-load files from your seedbox
First get your OpenVPN configuration file (referred to as vpn-serveropvn in this guide) and place it in your home folder along with your certificate file (referred to as cacrt in this guide) Now create a new text file (txt) with two lines The first line should be the username of your VPN connection service and the second line should be your VPN connection servicersquos password
$ sudo nano homeodroidpasstxt
$ username
$ password
Next wersquore going to open our configuration file which in my case is ldquovpn-serveropvnrdquo
$ sudo nano homeodroidvpn-serveropvn
Wersquore going to add the following line at the bottom which will let us connect to the VPN provider without entering the credentials manually
$ auth-user-pass mnttorrentsopenvpnpasstxt
Then wersquore going to add these three lines which refer to the shell scripts wersquore about to create
$ route-up homeodroidroute-upsh
$ down-pre
$ down homeodroiddownsh
This will allow OpenVPN to connect to our VPN provider automatically Once it connects it will automatically route all traffic through these VPN connection whether incoming (downsh) or outgoing (route-upsh) Next wersquore going to cre-ate these two shell scripts
$ sudo nano homeodroidroute-upsh
Enter the following for route-upsh
binsh
iptables -t nat -I POSTROUTING -o tun0 -j MASQUERADE
ODROID SEEDBOX
ODROID MAGAZINE 39
Then edit downsh
$ sudo nano homeodroiddownsh
Enter the following for downsh
$ binsh
$ iptables -t nat -D POSTROUTING -o tun0 -j MASQUER-
ADE
Lastly we need a shell script that we can launch when our OS boots and use to initiate the VPN connection automati-cally
$ sudo nano homeodroidvpnsh
Enter the following for vpnsh
$ sudo openvpn --client --config homeodroidvpn-
serverovpn --ca homeodroidcacrt --script-securi-
ty 2
Now letrsquos make all of these files executable
$ sudo chmod +x homeodroidroute-upsh
$ sudo chmod +x homeodroiddownsh
$ sudo chmod +x homeodroidvpnsh
Now wersquore going to open up our rclocal file which runs scripts upon system startup
$ sudo nano etcrclocal
[code]
Add this line right above the ldquoexit 0rdquo line
[code]
$ homeodroidvpnsh
Your VPN is now configured and your seedbox will down-load exclusively through an encrypted connection with your VPN provider You can easily test this by using the TorGuard test file which checks your IP address when downloading the file
Connect to your Transmission web GUI at odroid9091 or whatever your local IP address is
Upload the TorGuard test file and check the IP address re-ported as ldquoSuccess Your torrent client IP is XXXXXXXXrdquo Check this IP address against what Google reports as your IP address by visiting wwwwhatismyipcom
If the IP addresses are different then your connection is se-cure You can still use your local IP address to access and down-load files via Samba My VPN provider allows me download at speeds around 75 Mbps with the ODROID- XU4 peaking at around 22 percent CPU usage which shows just how power-ful the octa-core processor is for tasks such as these However the real glory is the transfer speeds from your ODROID to your personal computer I saw 800 Mbps transfer speeds when moving some files back and forth making this seedbox an ex-tremely viable Network Attached Storage Device too
Feel free to offer any comments or suggestions in the forum topic at httpbitly2fPeek7 The setup is hardly perfect but itrsquos a surefire way for anyone to get started with their very own seedbox
The Transmission environment look at those speeds
ODROID SEEDBOX
ODROID MAGAZINE 40
system with Music Player Daemon and the YMPD interface I also run an XU4 in a Cloudshell enclosure which is mainly used for displaying statistics with DietPi-Cloudshell network attached storage (NAS) backup mirroring with DietPi-Sync which is based on rsync and running PiHole to block adver-tisements on our local network
Which ODROID is your favorite and whyWithout a doubt itrsquos the ODROID-C2 For me it is the
best all-around single-board computer (SBC) on the market today Coupled with 1GB Ethernet and an EMMC capable of 140Mbs transfer rates itrsquos a performance beast capable of any-thing from a NextCloud server to a HiFi system ODROIDs have come a long way since the original C1 All those small is-sues with unstable power supplies and SD card incompatibility have been ironed out The C2 in my eyes is SBC perfection
Your DietPi image is very popular What was your motivation for developing it and what improvements do you plan to make in the future
Please tell us a little about yourselfI live in Burton Latimer in England Itrsquos one of those ldquoye-
olderdquo village towns and is a lovely place to live and bring up a family I am currently a ldquostay-at-home Dadrdquo since I am dealing with a long term gastrointestinal illness that affects and limits my daily life Prior to that I was an IT assistant for a drainage company near Cambridge I have a 2 and a half year old son named Jack who loves the television show ldquoPAW Patrolrdquo plays with dust bins (no idea why yet) and building things with Legos Gemma my fiance is a full time mother and my rock My educational background is in Information and Commu-nications Technology School wasnrsquot really for me since I am more of a ldquohands-onrdquo person who enjoys taking things apart to see what makes them tick
How did you get started with computersMy first computer experience was with the Commodore 64
when I was around 5 or 6 years old However for some reason the only memories I have are of the tape drive with a 2+ hour loading time Even then you were lucky if the game actually loaded Those were the days I was also fortunate enough to have an Amiga 500+ in my early years For me this was the start of my love for computers I used MOD tracker to play the song Axel F and remember Workbench Elite Frontier and not having the 1MB RAM upgrade to play ldquoRise of the Robotsrdquo
What attracted you to the ODROID platform
I read reviews of the C1 and benchmark comparisons with the Raspberry Pi 2 I snapped one up right away and was sim-ply blown away by how much faster it was in every area of per-formance Ever since then Irsquove been hooked on ODROIDs Itrsquos great to see Hardkernel continually innovate and push their products to new levels Irsquod even go as far to say that ODROIDs are years ahead of anything that the Raspberry Pi Foundation currently offers
How do you use your ODROIDs
I have one ODROID-C2 which is used for daily testing with my DietPi image This is mostly due to the C2rsquos excel-lent IO performance with the eMMC allowing for an ex-tremely fast testing environment especially when it comes to automated software installation tests I also have another C2 with the HiFi Shield 2 addon which I use as a dedicated music
MEET An ODROIDIAnDAnIEL HAZE (FOuRDEE)edited by Rob Roy (robroy)
MEET AN ODROIDIAN
Daniel and his wife Gemma
ODROID MAGAZINE 41
What innovations would you like to see in future Hardkernel products
Personally I would love to see a USB 30 port and bus on the next C-series board DDR4 memory would be sublime and boost overall performance especially with the shared GPU memory An energy-efficient onboard WiFi and bluetooth would also be a welcome addition to future boards
What hobbies and interests do you have apart from computers
Music has always been close to my heart Irsquom a true au-diophile with a love for all genres but especially trance I like spending time with family and friends My son is now into Legos and itrsquos a real joy to build things together Although even when hersquos asleep itrsquos easy to get carried away and attempt to build the Millennium Falcon
What advice do you have for someone wanting to learn more about programming
If you are new to programming do not be put off by a lot of strange code on the screen Programming isnrsquot as hard as you think Follow an online guide for ldquomy first programrdquo and stick with it With practice and patience all that strange code will gradually make sense and itrsquos a great feeling
For beginners Irsquod highly recommend Python Its simple to learn with a vast community and many online guides to get started Itrsquos also the leading programming language for GPIO projects on SBCs
Finally but most importantly regardless of your skill level or chosen language always make sure you code something that excites you and enjoy every moment of it
DietPi originally started as a minimal image It was aimed at reducing the resource load of the bulky default images pro-vided by the first Raspberry Pi model We had these 700mhz devices using far more resources than was actually required by the user Now DietPi has evolved to much more than a mini-mal image offering automated installations of popular soft-ware all of which are optimized and configure for you With DietPi you get the maximum performance from your device because only the software you need is installed
As for the future DietPi has always been shaped by our end user feedback suggestions and support We do have plans for a web interface in DietPi ideally to replace the whiptail menu system and to provide a modern GUI experience for users
MEET AN ODROIDIAN
Danielrsquos hometown of Burton latimer in england
MEET AN ODROIDIAN
Danielrsquos photogenic son and master lego builder Jack
ODROID MAGAZINE 42
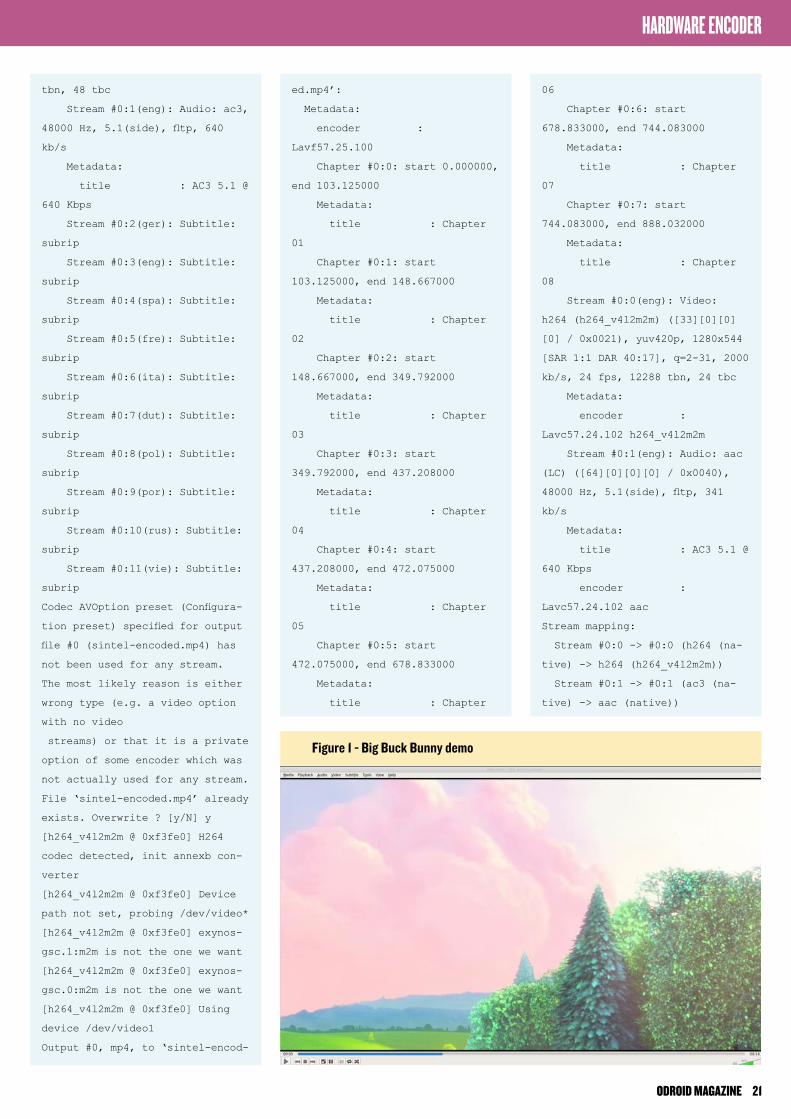
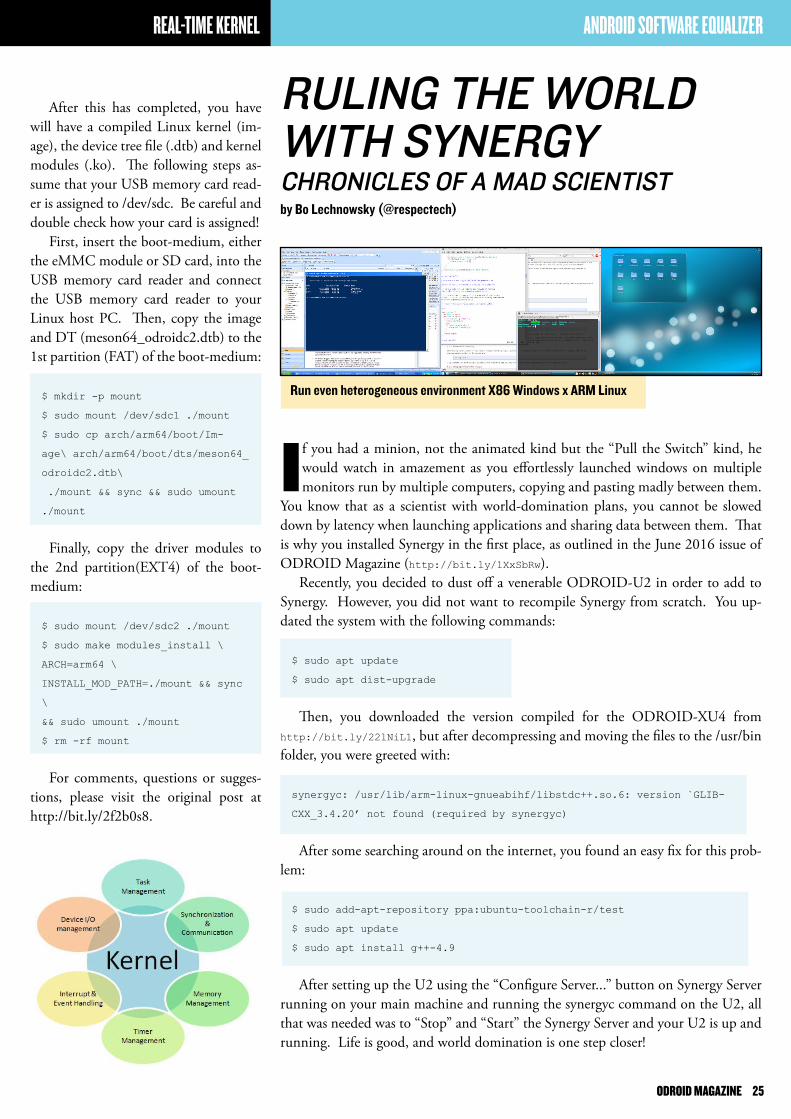
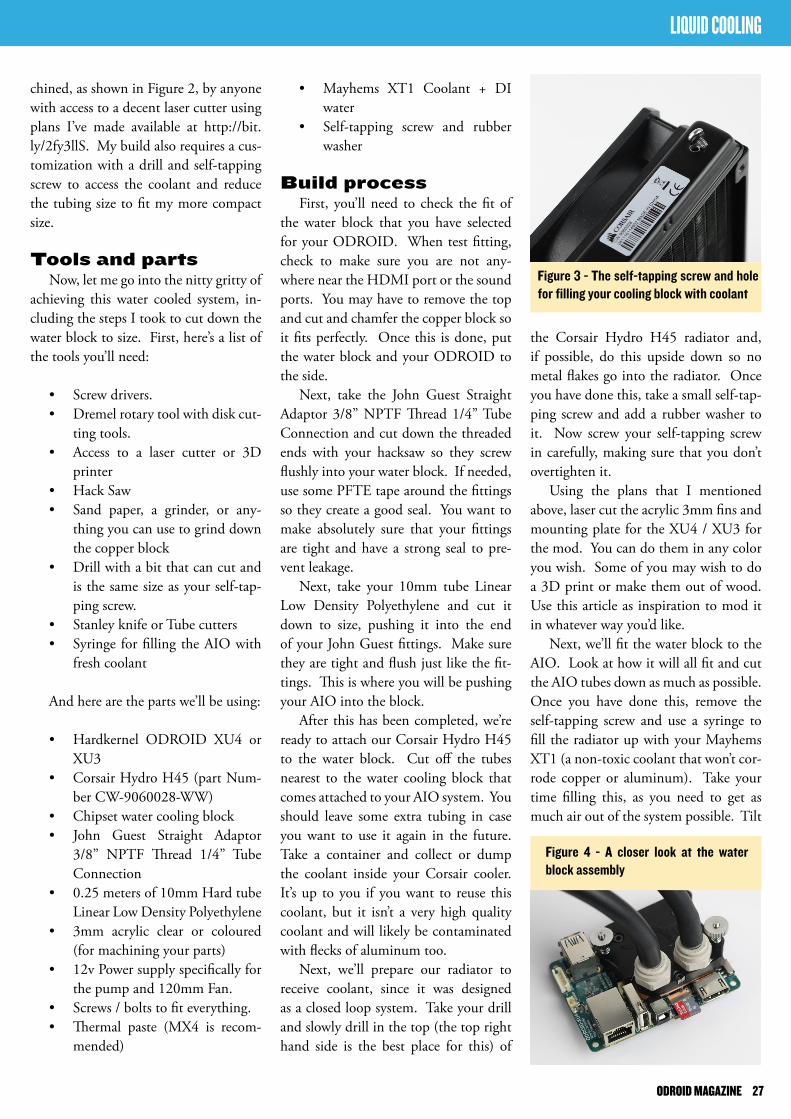
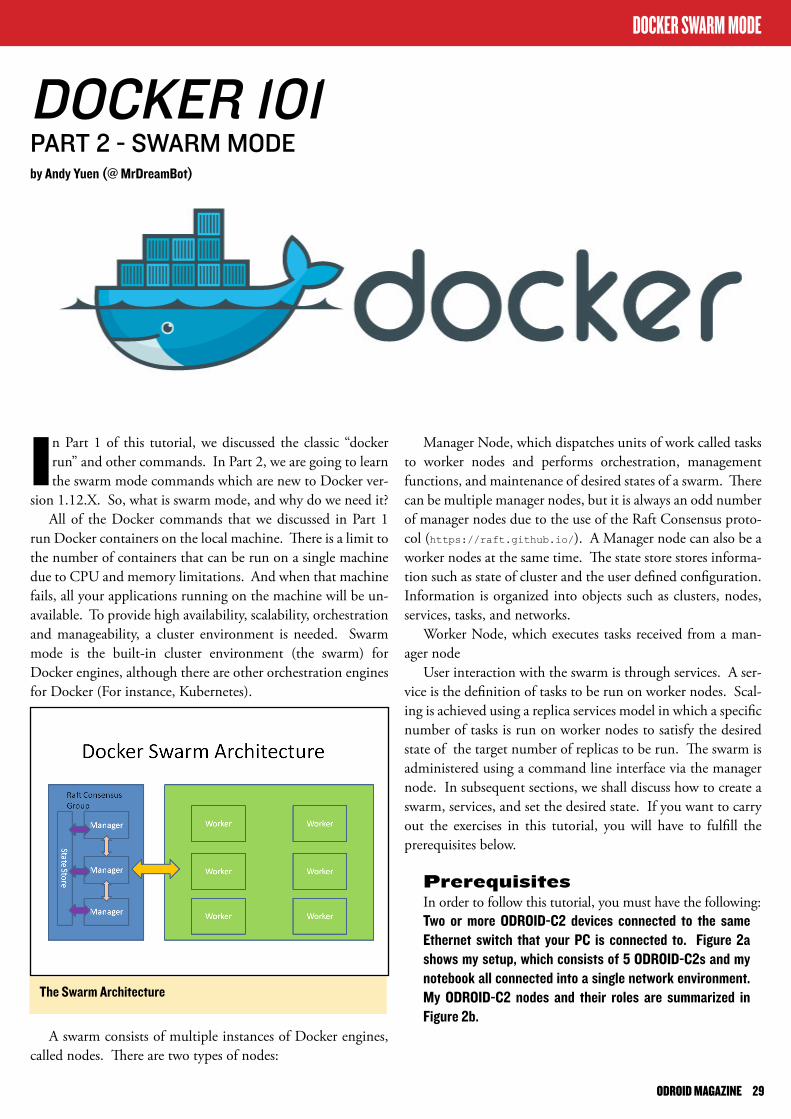
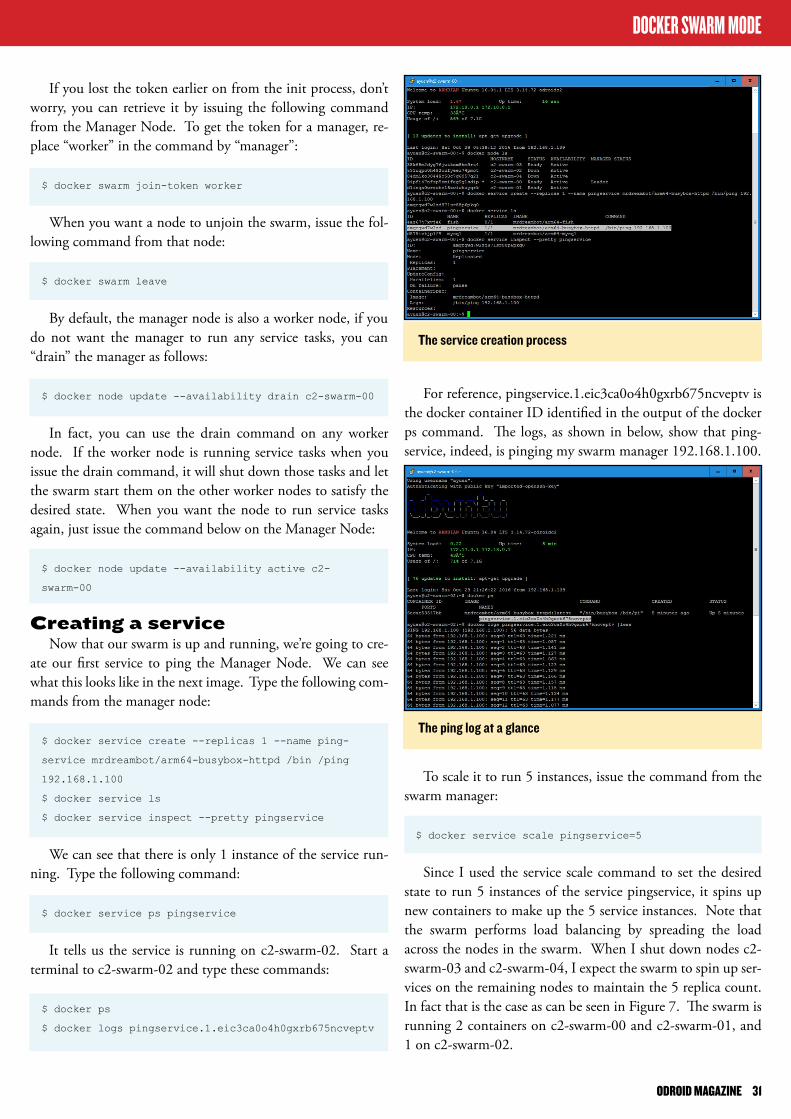
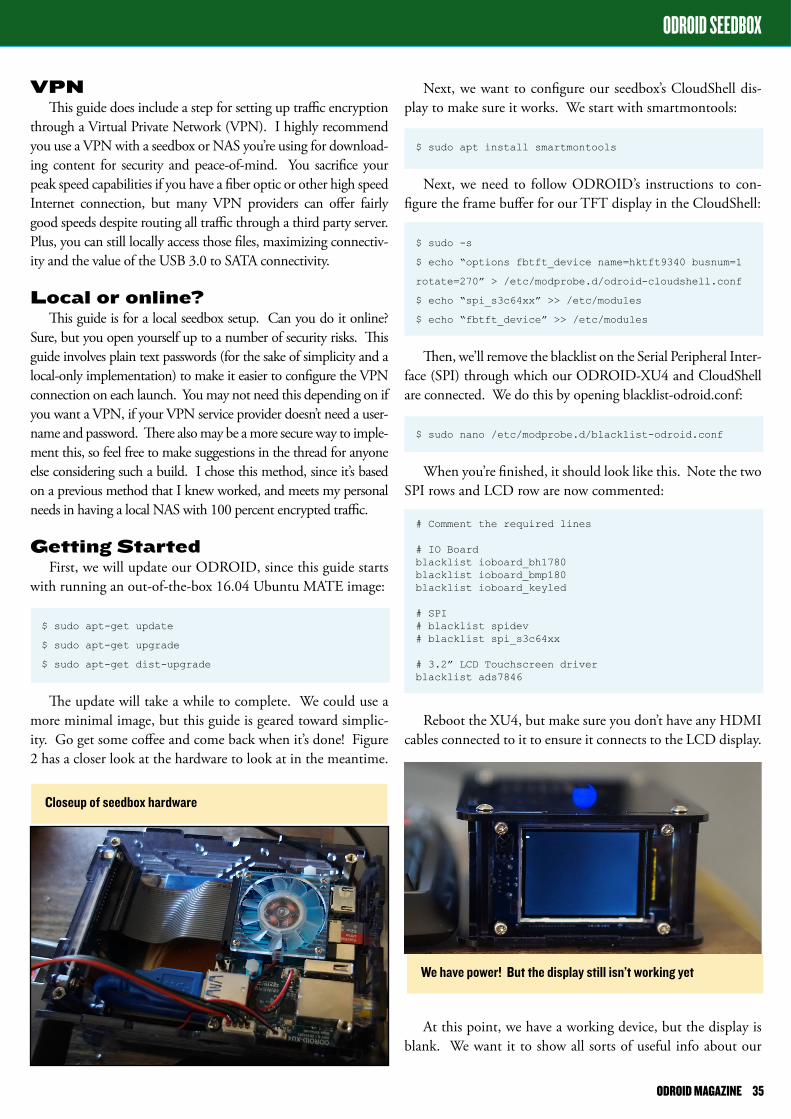
ODROID SEEDBOX
VPNThis guide does include a step for setting up traffic encryption
through a Virtual Private Network (VPN) I highly recommend you use a VPN with a seedbox or NAS yoursquore using for download-ing content for security and peace-of-mind You sacrifice your peak speed capabilities if you have a fiber optic or other high speed Internet connection but many VPN providers can offer fairly good speeds despite routing all traffic through a third party server Plus you can still locally access those files maximizing connectiv-ity and the value of the USB 30 to SATA connectivity
Local or onlineThis guide is for a local seedbox setup Can you do it online
Sure but you open yourself up to a number of security risks This guide involves plain text passwords (for the sake of simplicity and a local-only implementation) to make it easier to configure the VPN connection on each launch You may not need this depending on if you want a VPN if your VPN service provider doesnrsquot need a user-name and password There also may be a more secure way to imple-ment this so feel free to make suggestions in the thread for anyone else considering such a build I chose this method since itrsquos based on a previous method that I knew worked and meets my personal needs in having a local NAS with 100 percent encrypted traffic
Getting StartedFirst we will update our ODROID since this guide starts
with running an out-of-the-box 1604 Ubuntu MATE image
$ sudo apt-get update
$ sudo apt-get upgrade
$ sudo apt-get dist-upgrade
The update will take a while to complete We could use a more minimal image but this guide is geared toward simplic-ity Go get some coffee and come back when itrsquos done Figure 2 has a closer look at the hardware to look at in the meantime
Next we want to configure our seedboxrsquos CloudShell dis-play to make sure it works We start with smartmontools
$ sudo apt install smartmontools
Next we need to follow ODROIDrsquos instructions to con-figure the frame buffer for our TFT display in the CloudShell
$ sudo -s
$ echo ldquooptions fbtft_device name=hktft9340 busnum=1
rotate=270rdquo gt etcmodprobedodroid-cloudshellconf
$ echo ldquospi_s3c64xxrdquo gtgt etcmodules
$ echo ldquofbtft_devicerdquo gtgt etcmodules
Then wersquoll remove the blacklist on the Serial Peripheral Inter-face (SPI) through which our ODROID-XU4 and CloudShell are connected We do this by opening blacklist-odroidconf
$ sudo nano etcmodprobedblacklist-odroidconf
When yoursquore finished it should look like this Note the two SPI rows and LCD row are now commented
Comment the required lines
IO Boardblacklist ioboard_bh1780blacklist ioboard_bmp180blacklist ioboard_keyled
SPI blacklist spidev blacklist spi_s3c64xx
32rdquo LCD Touchscreen driverblacklist ads7846
Reboot the XU4 but make sure you donrsquot have any HDMI cables connected to it to ensure it connects to the LCD display
At this point we have a working device but the display is blank We want it to show all sorts of useful info about our
closeup of seedbox hardware
we have power But the display still isnrsquot working yet
ODROID MAGAZINE 35
CloudShell so letrsquos use a useful script to do this for us Eventu-ally wersquoll be using devsda2 as our storage drive so letrsquos modify mdrjrrsquos application and install it
$ sudo apt-get install curl sysstat
$ wget httpsgithubcomjsherm101cloudshell_lcd
rawmastercloudshell-lcd_20160913-3-fixeddeb
$ sudo dpkg -i cloudshell-lcd_20160913-3-fixeddeb
If we reboot again it should now show some useful infor-mation about the device
cpu usage and temperatureRam availabilityThe local Ip address of the deviceTransfer ratesDisk usage which is empty right now because we havenrsquot configured our devsda2 drive
Operating system configurationNext comes the main task of this project which is to set up
a BitTorrent protocol application to work well with the SSD This is nothing more than an apt-get command if we wanted to use our SD card where the OS is installed for storage but this poses two issues
There are large sD cards (gt256GB) but theyrsquore more expen-sive or slower than their ssD and HDD counterpartsan sD card has a much shorter readwrite lifecycle than an ssD or HDD and will fail sooner
To solve this wersquore going to actually move our ODROID installation to the SSD and boot from the SSD for both our operating system and our additional NAS storage folder All
credit goes to James MakeUseOf for this great idea This might not be a concern for most practical uses but is done as a precaution in this build given the high number of reads and writes anticipated in regular use
Once we complete this wersquoll be installing Transmission as our BitTorrent software of choice Itrsquos just as popular as Del-uge and other clients and comes down to a matter of prefer-ence in this case Both Transmission and Deluge support web-based GUIs and server-client configurations for remote access
Next letrsquos configure our storage drive Wersquove already plugged it into our assembled CloudShell and the necessary SATA-to-USB drivers are configured with smartmontools so it should appear in fdisk as the first drive
$ sudo fdisk devsda1
My drive is currently an NTFS drive from an old Windows installation Wersquoll want to press ldquodrdquo in fdisk to delete the parti-tion then ldquonrdquo to create a new one then ldquoprdquo for primary parti-tion Wersquore ultimately creating two partitions One for the OS wersquore moving to the SSD and one for the storage area wersquoll share over the local network
Create the first partition at the first sector available (prob-ably 2048) and then type ldquo+16Grdquo to create a 16GB partition in size Then start again typing ldquonrdquo and ldquoprdquo to create a second partition with the remaining storage on the drive My 256GB SSD left about 208 GB after accounting for capacity format-ting and the installation partition Once wersquore finished type ldquowrdquo to write the new partitions to the SSD
Next convert both partitions into the ext4 format and mount them to the two folders wersquove set aside for this project
$ sudo mkfsext devsda1
$ sudo mkfsext devsda2
$ sudo mkdir mediasystemdrive
$ sudo mkdir mediaNAS1
$ sudo mount devsda1 mediasystemdrive
$ sudo mount devsda2 mediaNAS1
$df -h (to see a list of drives and confirm everything
is in order)
Once yoursquove finished this your drive configuration should look similar the picture next
Now we can use rsync to move over our data on the SD card to the SSD Before we do this we should make a backup of the bootini file wersquoll end up editing which is in the FAT boot partition of the SD card
$ sudo cp mediabootbootini mediabootbootinibak
Now we need to find the UUID of the unique partition we
ODROID SEEDBOX
Things are looking much better
ODROID MAGAZINE 36
made earlier
$ lsblk -f
My disk UUID is 7d62ae29-a3cf-41d0-9127-065cf-c08fbe6 which is used as an example Next open bootini and search for ldquoBasic Ubuntu Setuprdquo You can search in Nano with CTRL+W
$ sudo nano mediabootbootini
Comment out the line thatrsquos currently below that line This is our original configuration for booting to the SD card We can always revert it if anything goes wrong by plugging the SD card into any device (PC or nix) and re-editing the bootini file Next wersquoll add our own new instructions
Boot from USB device
setenv bootrootfs ldquoconsole=tty1 consoleblank=0
root=UUID=7d62ae29-a3cf-41d0-9127-065cfc08fbe6 root-
wait rootdelay=10 ro fsckrepair=yesrdquo
Just make sure the UUID is whatever UUID comes up for your 16GB system partition under devsda1 Before we use rsync to transfer over to the new partition we need to edit fstab to mount our new drives on startup
$ sudo nano etcfstab
Comment out the first line and now add these two lines be-low assuming yoursquove used the same partition names and folders as me
$ devsda1 ext4 defaultsnoatime 0 1
$ devsda2 mediaNAS1 ext4 defaults 0 2
Finally we can move over our OS from the SD card to the
new partition wersquove set aside for it Keep in mind that once yoursquove done this any changes to the OS wonrsquot appear after you restart the computer as yoursquoll be working from the new parti-tion Itrsquos best to reboot once you finish the following rsync command
$ sudo apt-get install rsync
$ sudo rsync -axv mediasystemdrive
Yoursquoll probably have some time to grab some coffee while this transfers To elaborate on whatrsquos happening wersquore copying over our entire OS to mediasystemdrive where wersquove mount-ed our devsda1 partition Keep in mind that after we restart our fstab + bootini will remount and redirect the devsda1 partition to ldquordquo and serve as our operating system Wersquoll still be using the boot partition of your SD card so donrsquot remove it Once it finishes itrsquos time to reboot and hold our breath
$ sudo reboot
If we successfully reboot then wersquore definitely working from one of our two partitions either on the SD card or SSD You can confirm wersquore using the SSD by checking our parti-tions again
$ lsblk -f
You should see sda1 mounted at ldquordquo to confirm our suc-cess You can see this yourself in Figure 6
Transmission configurationOkay so we have our operating system transferred and our
display is showing our fancy 256GB SSD in working condition Now we need to install Transmission and setup our trans-
mission-daemon Wersquoll be using our ldquoodroidrdquo default user as well as be configuring our drive to have an incomplete and complete folder as well Letrsquos start by installing Transmission and adding our new incomplete and complete folders
$ sudo apt-get install transmission-daemon$ sudo mkdir -p mediaNAS1incomplete$ sudo mkdir -p mediaNAS1complete
ODROID SEEDBOX
Our partitions properly configured and mounted
The ssD is mounted as the root file system
ODROID MAGAZINE 37
Now we need to configure Transmission by turning off its services and opening the settings file
$ sudo service transmission-daemon stop
$ sudo nano etctransmission-daemonsettingsjson
Yoursquoll want to configure several settings
set your incomplete to ldquotruerdquo and ldquomedianas1incompleterdquoset your complete to ldquomedianas1completerdquoset rpc-authentication-required to ldquofalserdquoset the whitelist to 192168 to ensure you can access it remotely from another device on your network
Each of the rows we edited should look like this scattered around the settings file
ldquodownload-dirrdquo ldquomediaNAS1completerdquo
ldquoincomplete-dirrdquo ldquomediaNAS1incompleterdquo
ldquoincomplete-dir-enabledrdquo ldquotruerdquo
ldquorpc-authentication-requiredrdquo ldquofalserdquo
ldquorpc-whitelistrdquo ldquo127001192168100rdquo
There are also some other settings you can adjust and I rec-ommend checking out the Transmission website for instruc-tions on how to configure your tool
Before we start our transmission-daemon we need to change ownership to our user ldquoodroidrdquo in order to make every-thing work properly There are more ideal ways of doing this but I prefer to stick to a single user since this server will have no other purpose other than as a seedbox and I donrsquot see a need in this situation to stick to the transmission-daemon user that Transmission normally intends to use
$ sudo chown -R odroidodroid etctransmission-dae-
mon
$ sudo chown -R odroidodroid etcinitdtransmis-
sion-daemon
$ sudo chown -R odroidodroid varlibtransmission-
daemon
$ sudo chown -R odroidodroid mediaNAS1
We also need to open the Transmission daemon service and set user=rdquoodroidrdquo from ldquotransmission-daemonrdquo
$ sudo nano etcsystemdsystemmulti-usertarget
wantstransmission-daemonservice
We also want to do this in the initd file switching in ldquoodroidrdquo for ldquoUSERrdquo
$ sudo nano etcinitdtransmission-daemon
Finally reset that related Transmission daemon and turn back on Transmission
$ sudo systemctl daemon-reload
$ sudo service transmission-daemon start
Samba configurationNow we have everything we need to download a file but
we need a way to access the files that we download over our lo-cal network If yoursquore using a Windows device then Samba is the way to go Letrsquos get started by installing it and configuring our network share We will need to configure it in a way that allows us to login with our odroid user and easily download files as well as remove files we no longer want on our seedbox
$ sudo apt-get install samba samba-common-bin
$ sudo nano etcsambasmbconf
Letrsquos add the following as a new config for sharing our rel-evant folders
security = user
[odroid]
comment = odroid
path = mediaNAS1
valid users = odroid
force group = odroid
create mask = 0775
force create mode = 0775
security mask = 0775
force security mode = 0775
Our seedbox is starting to look pretty sharp
ODROID SEEDBOX
ODROID MAGAZINE 38
directory mask = 2775
force directory mode = 2775
directory security mask = 2775
force directory security mode = 2775
browseable = yes
writeable = yes
guest ok = no
read only = no
Before we move on wersquoll need to set a Samba password for our ldquoodroidrdquo user You can also create separate accounts if you so choose as long as those users are in the ldquoodroidrdquo group
$ sudo smbpasswd -a odroid
Now we can restart and we should be able to remotely ac-cess our seedbox folders
$ sudo service smbd restart
Keep in mind that you can always add new compatible us-ers as long as you set a proper Samba password and add those users to the ldquoodroidrdquo group or whichever group you assign ac-cess to for these files
VPN configurationFinally wersquoll want to configure our VPN for an automat-
ic secure connection upon boot Once again thanks to the James MakeUseOf who figured out this fast and easy way to get your VPN working without needing to manually start the VPN or enter credentials each time you restart your device This is essential if you want to guarantee the encryption of your connection while using the seedbox In this guide wersquore using an OpenVPN connection which depends on
an OpenVpn configuration filea certificate from your Vpn providerYour username and password for your Vpn provider stored in a text fileThree special shell scripts to start our Vpn automatically upon boot and route traffic
Storing a password in text is not ideal However itrsquos the fastest and leanest way to get things going and since wersquore only using this locally having your VPN credentials stored on this device will not risk the files to those outside your home net-work If you want to host your seedbox with port forwarding and essentially open to the Internet I highly recommend either searching for an alternative method or considering these risks before proceeding
Next letrsquos install the OpenVPN software
$ sudo apt-get install openvpn resolvconf
Wersquore going to leave everything in our home folder while doing this which is homeodroid in this case It really can be anywhere but these are not files you want in the same place where people on your home network will connect and down-load files from your seedbox
First get your OpenVPN configuration file (referred to as vpn-serveropvn in this guide) and place it in your home folder along with your certificate file (referred to as cacrt in this guide) Now create a new text file (txt) with two lines The first line should be the username of your VPN connection service and the second line should be your VPN connection servicersquos password
$ sudo nano homeodroidpasstxt
$ username
$ password
Next wersquore going to open our configuration file which in my case is ldquovpn-serveropvnrdquo
$ sudo nano homeodroidvpn-serveropvn
Wersquore going to add the following line at the bottom which will let us connect to the VPN provider without entering the credentials manually
$ auth-user-pass mnttorrentsopenvpnpasstxt
Then wersquore going to add these three lines which refer to the shell scripts wersquore about to create
$ route-up homeodroidroute-upsh
$ down-pre
$ down homeodroiddownsh
This will allow OpenVPN to connect to our VPN provider automatically Once it connects it will automatically route all traffic through these VPN connection whether incoming (downsh) or outgoing (route-upsh) Next wersquore going to cre-ate these two shell scripts
$ sudo nano homeodroidroute-upsh
Enter the following for route-upsh
binsh
iptables -t nat -I POSTROUTING -o tun0 -j MASQUERADE
ODROID SEEDBOX
ODROID MAGAZINE 39
Then edit downsh
$ sudo nano homeodroiddownsh
Enter the following for downsh
$ binsh
$ iptables -t nat -D POSTROUTING -o tun0 -j MASQUER-
ADE
Lastly we need a shell script that we can launch when our OS boots and use to initiate the VPN connection automati-cally
$ sudo nano homeodroidvpnsh
Enter the following for vpnsh
$ sudo openvpn --client --config homeodroidvpn-
serverovpn --ca homeodroidcacrt --script-securi-
ty 2
Now letrsquos make all of these files executable
$ sudo chmod +x homeodroidroute-upsh
$ sudo chmod +x homeodroiddownsh
$ sudo chmod +x homeodroidvpnsh
Now wersquore going to open up our rclocal file which runs scripts upon system startup
$ sudo nano etcrclocal
[code]
Add this line right above the ldquoexit 0rdquo line
[code]
$ homeodroidvpnsh
Your VPN is now configured and your seedbox will down-load exclusively through an encrypted connection with your VPN provider You can easily test this by using the TorGuard test file which checks your IP address when downloading the file
Connect to your Transmission web GUI at odroid9091 or whatever your local IP address is
Upload the TorGuard test file and check the IP address re-ported as ldquoSuccess Your torrent client IP is XXXXXXXXrdquo Check this IP address against what Google reports as your IP address by visiting wwwwhatismyipcom
If the IP addresses are different then your connection is se-cure You can still use your local IP address to access and down-load files via Samba My VPN provider allows me download at speeds around 75 Mbps with the ODROID- XU4 peaking at around 22 percent CPU usage which shows just how power-ful the octa-core processor is for tasks such as these However the real glory is the transfer speeds from your ODROID to your personal computer I saw 800 Mbps transfer speeds when moving some files back and forth making this seedbox an ex-tremely viable Network Attached Storage Device too
Feel free to offer any comments or suggestions in the forum topic at httpbitly2fPeek7 The setup is hardly perfect but itrsquos a surefire way for anyone to get started with their very own seedbox
The Transmission environment look at those speeds
ODROID SEEDBOX
ODROID MAGAZINE 40
system with Music Player Daemon and the YMPD interface I also run an XU4 in a Cloudshell enclosure which is mainly used for displaying statistics with DietPi-Cloudshell network attached storage (NAS) backup mirroring with DietPi-Sync which is based on rsync and running PiHole to block adver-tisements on our local network
Which ODROID is your favorite and whyWithout a doubt itrsquos the ODROID-C2 For me it is the
best all-around single-board computer (SBC) on the market today Coupled with 1GB Ethernet and an EMMC capable of 140Mbs transfer rates itrsquos a performance beast capable of any-thing from a NextCloud server to a HiFi system ODROIDs have come a long way since the original C1 All those small is-sues with unstable power supplies and SD card incompatibility have been ironed out The C2 in my eyes is SBC perfection
Your DietPi image is very popular What was your motivation for developing it and what improvements do you plan to make in the future
Please tell us a little about yourselfI live in Burton Latimer in England Itrsquos one of those ldquoye-
olderdquo village towns and is a lovely place to live and bring up a family I am currently a ldquostay-at-home Dadrdquo since I am dealing with a long term gastrointestinal illness that affects and limits my daily life Prior to that I was an IT assistant for a drainage company near Cambridge I have a 2 and a half year old son named Jack who loves the television show ldquoPAW Patrolrdquo plays with dust bins (no idea why yet) and building things with Legos Gemma my fiance is a full time mother and my rock My educational background is in Information and Commu-nications Technology School wasnrsquot really for me since I am more of a ldquohands-onrdquo person who enjoys taking things apart to see what makes them tick
How did you get started with computersMy first computer experience was with the Commodore 64
when I was around 5 or 6 years old However for some reason the only memories I have are of the tape drive with a 2+ hour loading time Even then you were lucky if the game actually loaded Those were the days I was also fortunate enough to have an Amiga 500+ in my early years For me this was the start of my love for computers I used MOD tracker to play the song Axel F and remember Workbench Elite Frontier and not having the 1MB RAM upgrade to play ldquoRise of the Robotsrdquo
What attracted you to the ODROID platform
I read reviews of the C1 and benchmark comparisons with the Raspberry Pi 2 I snapped one up right away and was sim-ply blown away by how much faster it was in every area of per-formance Ever since then Irsquove been hooked on ODROIDs Itrsquos great to see Hardkernel continually innovate and push their products to new levels Irsquod even go as far to say that ODROIDs are years ahead of anything that the Raspberry Pi Foundation currently offers
How do you use your ODROIDs
I have one ODROID-C2 which is used for daily testing with my DietPi image This is mostly due to the C2rsquos excel-lent IO performance with the eMMC allowing for an ex-tremely fast testing environment especially when it comes to automated software installation tests I also have another C2 with the HiFi Shield 2 addon which I use as a dedicated music
MEET An ODROIDIAnDAnIEL HAZE (FOuRDEE)edited by Rob Roy (robroy)
MEET AN ODROIDIAN
Daniel and his wife Gemma
ODROID MAGAZINE 41
What innovations would you like to see in future Hardkernel products
Personally I would love to see a USB 30 port and bus on the next C-series board DDR4 memory would be sublime and boost overall performance especially with the shared GPU memory An energy-efficient onboard WiFi and bluetooth would also be a welcome addition to future boards
What hobbies and interests do you have apart from computers
Music has always been close to my heart Irsquom a true au-diophile with a love for all genres but especially trance I like spending time with family and friends My son is now into Legos and itrsquos a real joy to build things together Although even when hersquos asleep itrsquos easy to get carried away and attempt to build the Millennium Falcon
What advice do you have for someone wanting to learn more about programming
If you are new to programming do not be put off by a lot of strange code on the screen Programming isnrsquot as hard as you think Follow an online guide for ldquomy first programrdquo and stick with it With practice and patience all that strange code will gradually make sense and itrsquos a great feeling
For beginners Irsquod highly recommend Python Its simple to learn with a vast community and many online guides to get started Itrsquos also the leading programming language for GPIO projects on SBCs
Finally but most importantly regardless of your skill level or chosen language always make sure you code something that excites you and enjoy every moment of it
DietPi originally started as a minimal image It was aimed at reducing the resource load of the bulky default images pro-vided by the first Raspberry Pi model We had these 700mhz devices using far more resources than was actually required by the user Now DietPi has evolved to much more than a mini-mal image offering automated installations of popular soft-ware all of which are optimized and configure for you With DietPi you get the maximum performance from your device because only the software you need is installed
As for the future DietPi has always been shaped by our end user feedback suggestions and support We do have plans for a web interface in DietPi ideally to replace the whiptail menu system and to provide a modern GUI experience for users
MEET AN ODROIDIAN
Danielrsquos hometown of Burton latimer in england
MEET AN ODROIDIAN
Danielrsquos photogenic son and master lego builder Jack
ODROID MAGAZINE 42
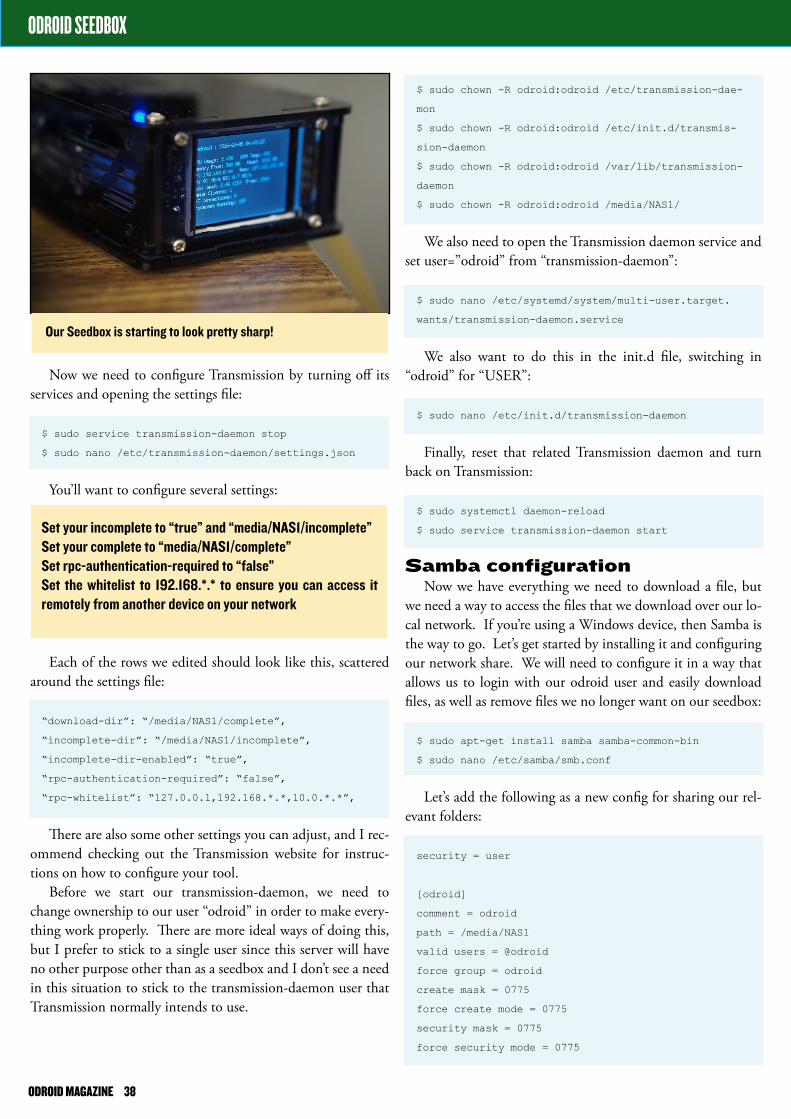
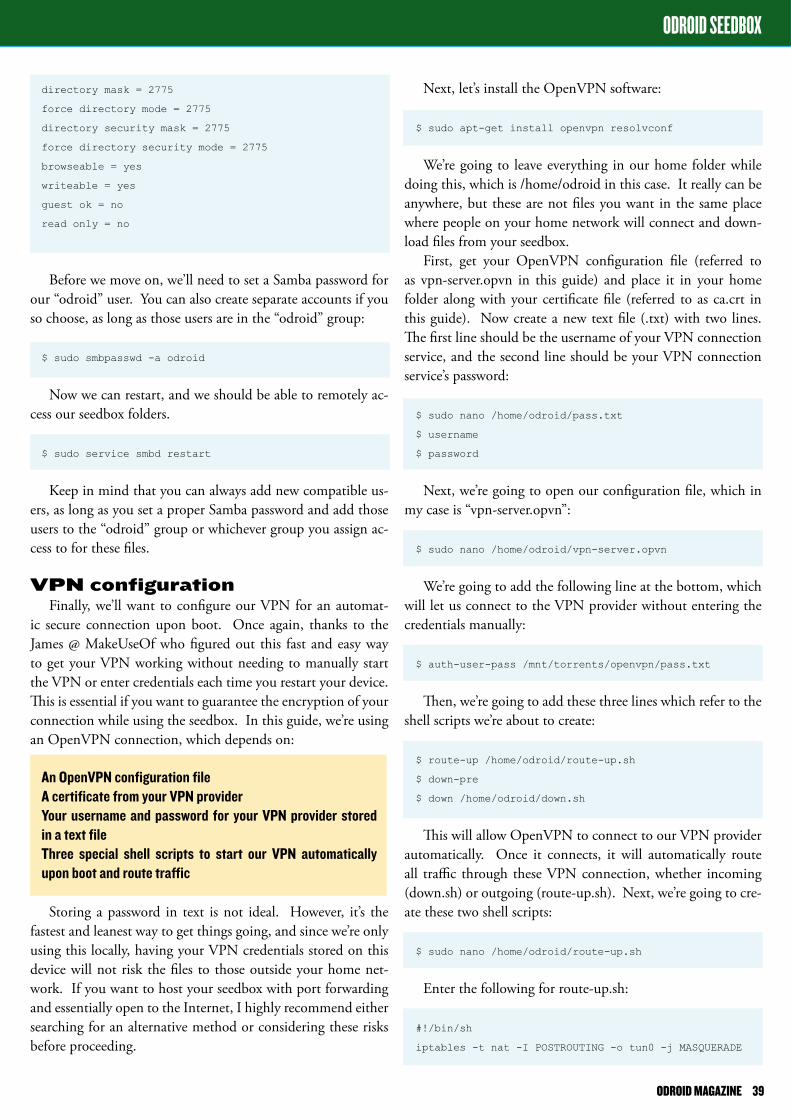