retrograde-tunneling insertion poster - teleflex · retrograde-tunneling insertion poster arrow ......
TRANSCRIPT

RetRogRade-tunneling inseRtion PosteRArrow® NextStep® and Arrow® Cannon® II Plus
Chronic Hemodialysis Catheters
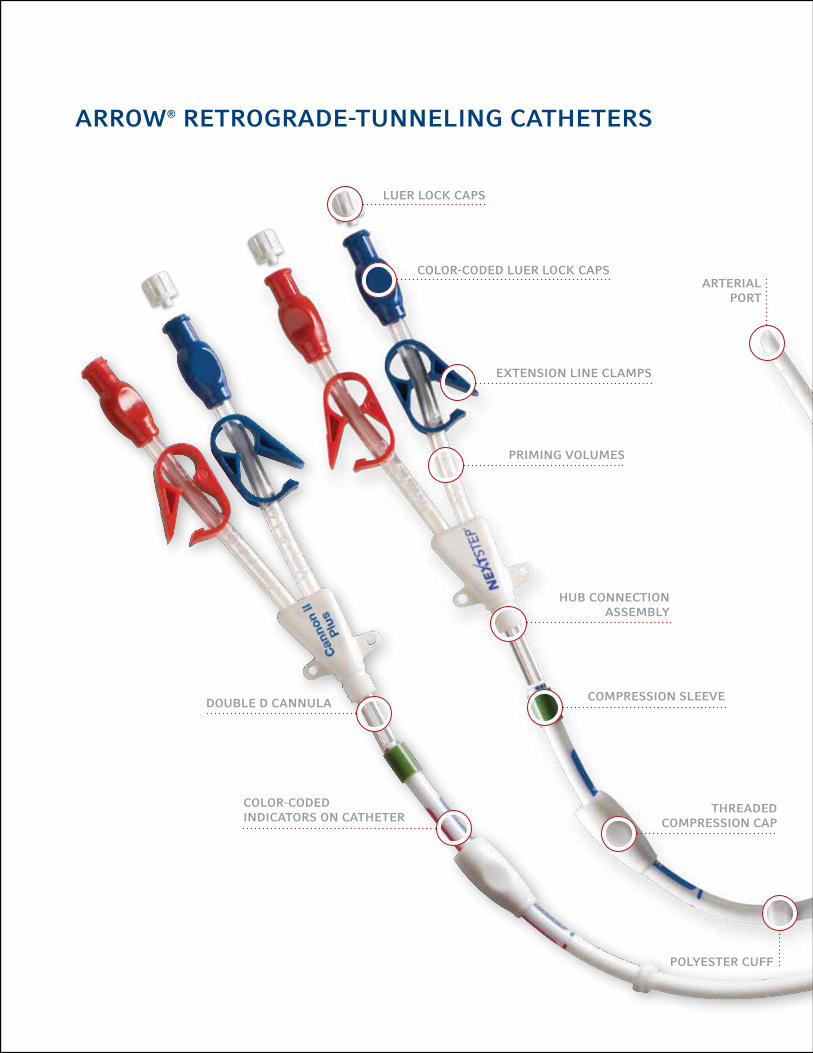
PRiming volumes
aRRow® RetRogRade-tunneling catheteRs
coloR-coded lueR lock caPs
extension line clamPs
comPRession sleeve
thReaded comPRession caP
lueR lock caPs
PolyesteR cuff
hub connection assembly
coloR-coded indicatoRs on catheteR
double d cannula
aRteRial PoRt

does not contain natuRal RubbeR latex
technique to imPRove oveRall Placement accuRacy
Retrograde tunneling improves your ability to ideally position the catheter tip, cuff and hub.1 The Arrow® NextStep® Catheter’s unique design is engineered to take advantage of retrograde tunneling, and to help you achieve the outcomes you want for your patients.
aRRow® cannon® ii Plus
V-tip design: The orientation of the venous 1 and arterial 2 ports on the Arrow® Cannon® II Plus Catheters are designed to provide high flow with less recirculation when placed in right atrium.
2
1
1
aRRow® nextsteP®
Reversed ports: To help deliver sustained, high flow, the Arrow® NextStep® Catheter’s ports are reversed and significantly separated to take better advantage of blood flow dynamic. The venous port 1 resides in the SVC, the arterial port 2 in the right atrium.
venous PoRt
v-tiP design
mR conditional advisory: The device was determined to be MR Conditional. Non-clinical testing demonstrated that the device is MR Conditional. A patient with this device can be scanned safely immediately after placement under specific conditions. More detailed information regarding the use of this device in an MR environment is available upon request from Arrow.
2
MR
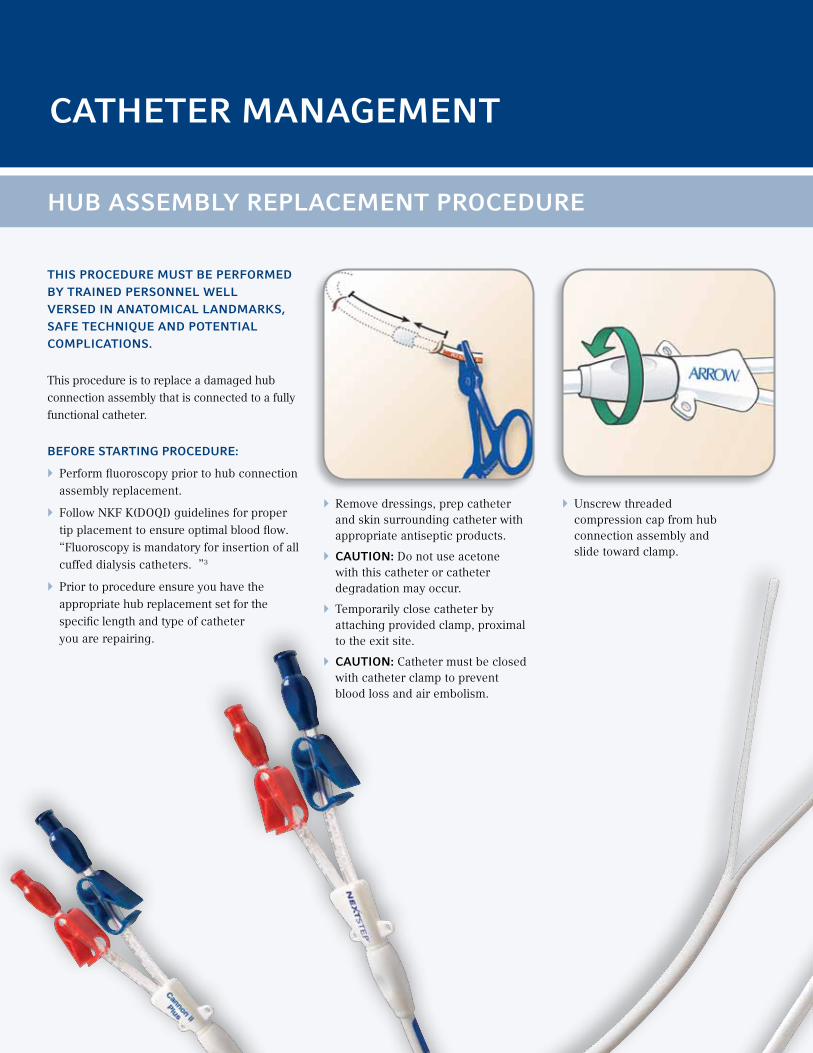
} Remove dressings, prep catheter and skin surrounding catheter with appropriate antiseptic products.
} caution: Do not use acetone with this catheter or catheter degradation may occur.
} Temporarily close catheter by attaching provided clamp, proximal to the exit site.
} caution: Catheter must be closed with catheter clamp to prevent blood loss and air embolism.
} Unscrew threaded compression cap from hub connection assembly and slide toward clamp.
this PRoceduRe must be PeRfoRmed by tRained PeRsonnel well veRsed in anatomical landmaRks, safe technique and Potential comPlications.
This procedure is to replace a damaged hub connection assembly that is connected to a fully functional catheter.
befoRe staRting PRoceduRe:
} Perform fluoroscopy prior to hub connection assembly replacement.
} Follow NKF K(DOQI) guidelines for proper tip placement to ensure optimal blood flow. “Fluoroscopy is mandatory for insertion of all cuffed dialysis catheters. ”3
} Prior to procedure ensure you have the appropriate hub replacement set for the specific length and type of catheter you are repairing.
catheteR management
hub assembly RePlacement PRoceduRe

} Place new threaded compression cap, tapered end first, onto proximal shaft of catheter. Wet compression sleeve with saline to slide components freely over catheter. Place compression sleeve onto proximal shaft of catheter. Advance toward clamp.
} Prime hub replacement connection assembly with sterile normal saline and clamp. Insert hub connection assembly double D cannulas into catheter lumens.
} caution: To minimize the risk of crushing, orient the catheter so either the red or blue print side is facing up.
} caution: Orient catheter lumens before connecting; blue printed side connects to blue connector hub line, red to red hub side. Ensure that hub connection assembly cannula is fully seated in catheter and that no cannula is visible. Failure to do so could compromise compression of catheter onto connector and separation could occur. Ensure extension line clamps are closed before attaching catheter.
} waRning: Green compression sleeve MUST be present when threading compression cap onto hub connection assembly. Failure to do so may result in air embolism, blood loss or catheter separation.
} Slide threaded compression cap over compression sleeve toward hub connection assembly with compression sleeve seated completely inside.
} Cut catheter at a point immediately where the double D cannula ends, approximately 4 mm from proximal end of catheter. Remove and discard threaded compression cap and compression sleeve.

} Attach syringes to extension line hubs and open clamps. Blood should aspirate without difficulty from both extension lines. Reposition catheter to obtain adequate blood flows, if either extension line exhibits excessive resistance during blood aspiration.
} Flush catheter thoroughly with normal saline to remove residual blood, post-treatment and before instilling heparin.
} Inject designated priming volumes as indicated into appropriate lumens, Priming volumes are printed on extension lines. In the event that catheter is cut other than at cut line, the priming volume is changed by 0.13 mL/cm of length change.
} caution: Ensure designated priming volumes are achieved.
} Close extension clamps, remove syringes and place a Luer Lock cap on each injection site. When not in use, clamp extension lines to minimize air embolism risk. Before each use, aspirate and irrigate catheter with saline. With each tubing connection change, purge air from catheter and all connecting tubing and caps. Confirm catheter tip position with hospital/institutional protocol.
} caution: Failure to verify tip position may result in serious trauma or fatal complications.
} Tape Luer Lock caps and clamps securely to prevent inadvertent disconnection.
} caution: Tape Luer Lock caps and clamps between treatments to reduce risk of accidental opening of both thereby potentially causing blood loss and/or air embolism.
} Suture hub to skin using suture wing and apply dressing according to hospital protocol.
} Thread compression cap onto hub connection assembly firmly, but do not overtighten. There should be no threads visible on hub connection assembly.
} caution: Ensure that compression sleeve is securely positioned inside threaded compression cap. Avoid attempts to place compression sleeve onto hub connection assembly cannula and then apply threaded compression cap. Incomplete compression may occur, causing catheter separation.
} Remove catheter clamp.
} Provided there is no resistance, flush catheter vigorously with sterile normal saline to try to move tip away from vessel wall
contRaindications
The Arrow® NextStep® and the Arrow® Cannon® II Plus Catheters are intended for long-term hemodialysis vascular access only and should not be used for any purpose other than those indicated herein.2 Do not use this catheter in patients with thrombosed vessels.
management of one-way obstRuctions
One-way obstructions exist when a lumen can be flushed easily, but blood cannot be aspirated. This is usually caused by tip malposition. One of the following adjustments may resolve obstruction:
} Reposition catheter
} Reposition patient
} Have patient cough
} Air embolus
} Bacteremia
} Brachial plexus injury
} Caval perforation w/ bronchial communication
} Cardiac arrhythmia
} Cardiac tamponade
} Central venous thrombosis
} Endocarditis
} Exit site infection
} Exsanguination
} Femoral nerve damage
} Hematoma
} Hemorrhage
} Hemothorax
} Laceration of vessel
} Lumen thrombosis
} Mediastinal injury
} Puncture/Perforation of vessel
} Pleural injury
} Pneumothorax
} Retroperitoneal bleed
} Right atrial puncture
} Septicemia
} Thoracic duct laceration
} Tunnel infection
} Vascular thrombosis
} Venous stenosis
Potential comPlications (but not limited to):

RetRogRade-tunneling inseRtion techniquecatheteR inseRtion PRoceduRe
this PRoceduRe must be PeRfoRmed by tRained PeRsonnel well veRsed in anatomical landmaRks, safe technique and Potential comPlications.
Retrograde insertion provides numerous advantages. In particular, this technique:
} Facilitates fast, precise tip placement within the right atrium.
} Helps create a smooth, contoured tunnel tract that:
- Minimizes catheter kinking - Inhibits catheter migration - Minimizes retrograde
bleeding
} Exit demarcation permits reproducible cuff positioning and exit site location.
} Flush both catheter lumens with saline; clamp irrigation tube with catheter pinch clamp. Also flush juncture hub assembly with saline; clamp extension lines with catheter pinch clamps. NOTE: Complete this step prior to access.
} Securely attach irrigation tube to proximal end of catheter shaft.
} Access vessel. } Dilate tissue.

} Position introducer sheath.
} Position catheter on the chest with a gentle curve, locate exit site mark on catheter (next to cuff) and make a small incision.
} Create catheter pocket using blunt dissection.
} Remove tissue dilator and guidewire from sheath and occlude.
} Place catheter through sheath into vessel.
} Remove peel-away sheath. Verify that tips are in the proper position.
catheteR inseRtion PRoceduRe

} 1: Securely attach proximal portion of catheter to tunneler tip.
} 2: Remove clamp from catheter.
} Gently pull catheter through tunnel tract.
} Advance threaded compression cap and sleeve onto catheter beyond cut line.
} Precurve tunneler and create tunnel tract.
} 1: Clamp catheter distal to irrigation tube.
} 2: Remove irrigation tube.
} Dilate tunnel tract with tunnel dilator (optional).
} Do not pass through exit site.
} 1: Insert tunnel dilator distal tip to cuff position.
} 2: Remove tunnel dilator.
catheteR inseRtion PRoceduRe
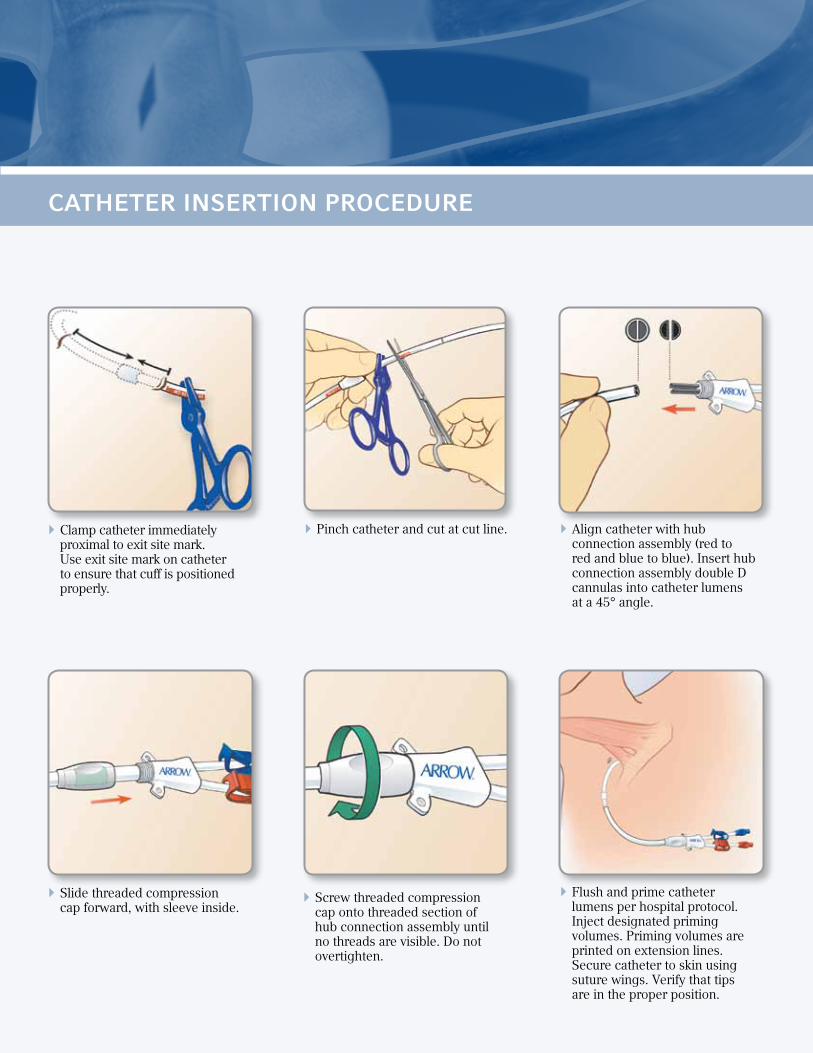
} Slide threaded compression cap forward, with sleeve inside.
} Screw threaded compression cap onto threaded section of hub connection assembly until no threads are visible. Do not overtighten.
} Flush and prime catheter lumens per hospital protocol. Inject designated priming volumes. Priming volumes are printed on extension lines. Secure catheter to skin using suture wings. Verify that tips are in the proper position.
} Clamp catheter immediately proximal to exit site mark. Use exit site mark on catheter to ensure that cuff is positioned properly.
} Pinch catheter and cut at cut line. } Align catheter with hub connection assembly (red to red and blue to blue). Insert hub connection assembly double D cannulas into catheter lumens at a 45° angle.
catheteR inseRtion PRoceduRe

catheteR Removal PRoceduRe
this PRoceduRe must be PeRfoRmed by tRained PeRsonnel well veRsed in anatomical landmaRks, safe technique and Potential comPlications.
befoRe Removing:
} waRning: Read all package insert warnings, precautions and instructions. Failure to do so may result in severe patient injury or death.
} Place patient in supine position.
} Remove Dressing. waRning: Do not use scissors to remove dressing to reduce risk of cutting catheter.
infection PRevention, tReatment} Sterile technique is mandatory for all procathedral techniques.
} Promptly treat clinically recognized infection at a catheter exit site with appropriate antibiotic therapy.
} If a catheterized patient develops a fever, take a minimum of two blood cultures from a site distant from catheter exit site. If blood culture is positive, remove catheter immediately and initiate appropriate antibiotic therapy. Wait 48 hours before catheter replacement. Insertion should be made on opposite side of original catheter exit site, if possible.
} Palpate along catheter tunnel tract to locate cuff.
} Anesthetize catheter exit and cuff sites.
} Remove all sutures used to secure catheter, per hospital protocol.
} Make a small incision along length of catheter starting at cuff site.
} Using blunt dissection, dissect down cuff at small incision. caution: Be careful not to cut catheter.
See reverse for instructions for replacing a catheter hub assembly.

site caRe} Alcohol, alcohol-based solutions (e.g.,
Hibiclens®, ChloraPrep®), iodine-based solutions (povidone-iodine), PEG-based ointments (e.g., Bactroban®), hydrogen peroxide or ExSept Plus® are accepted for use with these catheters. Solution must be completely dry before applying an occlusive dressing.
} waRning: Avoid excessive or prolonged use of alcohol-based solutions and ointments to clean catheter or for site care.
} Clean skin around catheter using accepted solution antiseptics. Cover exit site with sterile occlusive dressing for the duration of implantation. If catheter swelling is observed, discontinue use and replace catheter.
} Wound dressings must be kept clean and dry. caution: Do not submerge the catheter under water. Showering should be permitted if precautions can be taken to reduce the likelihood of introducing organisms into the catheter.4
} If excessive perspiration or accidental wetting compromises dressing adhesion, medical or nursing staff must change dressing under sterile conditions.
} Heparinization: To maintain patency of catheter between treatments, a heparin lock must be created in each catheter lumen. Follow hospital protocol for concentration of heparin used. If catheter is not going to be used, it’s recommended that catheter be flushed and re-packed with heparin every 48–72 hours.
} The manufacturer shall not be liable for any damages caused by re-sterilization or re-use of this catheter or accessories.
catheteR Removal PRoceduRe
} When visible, clamp catheter between cuff and exit site.
} Cut catheter between cuff and exit site, and remove internal portion of catheter through cuff incision site.
} Check catheter integrity for tears. Measure catheter when removed; it must be equal to length of catheter when inserted. Confirm presence of entire cuff.
} Remove other catheter section through catheter exit site.
} Follow hospital protocol for wound hemostasis and closure.
} Dress insertion site.} Document removal procedure.
catheteR Removal PRoceduRe
catheteR PRecautions} Do not use acetone; catheter degradation may occur (refer to Site Care
information for specific catheter body antiseptic requirements).
} Do not use sharp instruments near extension lines or catheter lumen.
} Do not use scissors to remove dressing to minimize risk of cutting catheter.
} Do not use clamps other than those that are provided. Using other clamps will damage the catheter.
} Clamping tubing repeatedly in same location will weaken tubing.
} Avoid clamping near Luer Lock fittings.
} Examine catheter and extension lines for any signs of damage before and after each treatment.
} Tape Luer Lock caps and clamps between treatments to reduce risk of accidental opening of both, thereby potentially causing blood loss and/or air embolism.
} Repeated overtightening of bloodlines, syringes and caps will reduce connector life and could lead to potential connector failure.
} Catheter must be compressed closed with catheter clamp to prevent blood loss and air embolism.
} Orient the catheter so the scissor symbol is facing up. This will permit accurate clamping/cutting of catheter.
} Ensure 6 cm of exposed catheter remains proximal to exit site line. Remaining recommended catheter length facilitates catheter repair should extension line damage occur over time.
} Orient catheter lumen prior to connection; blue printed side of catheter is connected to blue connector hub line and red printed side to red hub line.
} Ensure that hub connection assembly cannula is fully seated into catheter and that no cannula is visible. Failure to do so could compromise compression of catheter onto connector and catheter separation could occur.
} Ensure extension line clamps are closed prior to catheter attachment.
} Ensure designated priming volumes are achieved.
} Ensure that compression sleeve is securely positioned inside threaded compression cap. Avoid attempts to place compression sleeve onto hub connection assembly cannula and then apply threaded compression cap. Incomplete compression may occur causing catheter separation. Remove catheter clamp.

catheteR Removal PRoceduRe
waRnings} Rx only.
} Read all package insert warnings, precautions, and instructions prior to use. Failure to do so may result in severe patient injury or death. Catheter should be inserted, manipulated and removed by a qualified, licensed physician or other qualified health care professional under direction of a physician.
} Medical techniques and procedures described in these instructions for use do not represent all medically acceptable protocols, nor are they intended as a substitute for physician’s experience and judgment in treating any specific patient.
} Sterile, single use: Do not reuse, reprocess or resterilize. Reuse of device creates a potential risk of serious injury and/or infection which may lead to death.
} Take appropriate actions immediately to prevent blood loss or air from entering the catheter (air embolism) if a Luer connector should become detached from catheter at any time.
} Do not use chronic dialysis catheters for extended use unless no other hemodialysis access options exist. Chronic dialysis catheters should be used only as bridge devices.
} Do not leave open needles or uncapped, unclamped catheters in central venous puncture site. Air embolism can occur with these practices.
} Use only securely tightened Luer-Lock connections with any Venous Access Device (VAD) to guard against inadvertent disconnect and to help guard against air embolism and blood loss.
} Tape connections of bloodlines during treatment to reduce risk of accidental disconnection.
} Pulsatile flow is usually an indicator of inadvertent arterial puncture.
} Do not alter the catheter/sheath or any other kit/set component during insertion, use or removal.
} All chronic dialysis catheters should be used as bridge devices and are not intended for extended use unless no other hemodialysis access options exist.
} Green compression sleeve MUST be present when threading compression cap onto hub connection assembly. Failure to do so may result in air embolism, blood loss, or catheter separation.
} Avoid excessive or prolonged use of alcohol-based solutions and ointments to clean catheter or site care.
} Do not apply excessive force in placing or removing catheter. Excessive force can cause catheter breakage. If placement or withdrawal cannot be easily accomplished, an X-ray should be obtained and further consultation requested.
} Physician caution is strongly advised when inserting this catheter into patients who are unable to take and hold a deep breath.
} Patients requiring ventilator support are at an increased risk of pneumothorax during subclavian vein cannulation.
} Extended use of subclavian vein may be associated with subclavian vein stenosis.
} To ensure proper right atrial placement, appropriate catheter length is required.
} Confirm final position of catheter with a chest X-ray. Routine X-ray should always follow initial insertion or repositioning of this catheter to confirm proper tip placement prior to use.

teleflex medical PO Box 12600 Research Triangle Park, NC 27709 Toll Free: 866.246.6990 Phone: 919.544.8000 Intl: 919.433.8088teleflex.com
Teleflex is a global provider of medical products designed to enable healthcare providers to protect against infections and improve patient and provider safety. The company specializes in products and services for vascular access, respiratory, general and regional anesthesia, cardiac care, urology and surgery. Teleflex also provides specialty products for device manufacturers.
Bactroban is a registered trademark of GlaxoSmithKline. Hibiclens is registered globally to one or more of the Mölnlycke Health Care Group of Companies. ChloraPrep is a registered trademark of CareFusion Corporation or one of its affiliates. ExSept Plus is a registered trademark of Alcavis HDC, LLC or one of its affiliates.
Teleflex, Arrow, NextStep and Cannon are trademarks or registered trademarks of Teleflex Incorporated or its affiliates. © 2012 Teleflex Incorporated. All rights reserved. 2012-0989
RefeRences:
1 DaVanzo, W. “Efficacy and Safety of a Retrograde-Tunneled Hemodialysis Catheter – 6-Month Clinical Experience With the Cannon Chronic Hemodialysis Catheter.” Journal of Vascular Access, January–March 2005, Vol. 6, Issue 1, pp. 38-44.
2 Di Lorio, B., Lopez, T., Procida, M., et al. “Successful Use of Central Venous Catheter as Permanent Hemodialysis Access: 84-Month Follow-Up in Lucania.” Blood Purification, June 2001, Vol. 19, pp. 39-43.
3 NKF-DOQI Clinical Practice Guide for Vascular Access, New York, National Kidney Foundation, 1997, p. 26.
4 O’Grady, N.P., Alexander, M., Dellinger, E.P., Gerberding, J.L., Heard, S.O., Maki, D.G., Masur, H., McCormick, R.D., Mermel, L.A., Pearson, M.L., Raad, I.I., Randolph, A., Weinstein, R.A. “Guidelines for the Prevention of Intravascular Catheter-Related Infections.” Centers for Disease Control, August 9, 2002, Vol. 51, No. RR10, pp. 1-26.
Full bibliography available upon request.