richtextbox for wpf and silverlight - help.grapecity.com · rich document object model patterned...
TRANSCRIPT

ComponentOne
RichTextBox for WPF andSilverlight
GrapeCity US
GrapeCity201 South Highland Avenue, Suite 301Pittsburgh, PA 15206Tel: 1.800.858.2739 | 412.681.4343Fax: 412.681.4384Website: https://www.grapecity.com/en/E-mail: [email protected]
Trademarks
The ComponentOne product name is a trademark and ComponentOne is a registered trademark of GrapeCity, Inc. Allother trademarks used herein are the properties of their respective owners.
Warranty
ComponentOne warrants that the media on which the software is delivered is free from defects in material andworkmanship, assuming normal use, for a period of 90 days from the date of purchase. If a defect occurs during thistime, you may return the defective media to ComponentOne, along with a dated proof of purchase, andComponentOne will replace it at no charge. After 90 days, you can obtain a replacement for the defective media bysending it and a check for $25 (to cover postage and handling) to ComponentOne.
Except for the express warranty of the original media on which the software is delivered is set forth here,ComponentOne makes no other warranties, express or implied. Every attempt has been made to ensure that theinformation contained in this manual is correct as of the time it was written. ComponentOne is not responsible for anyerrors or omissions. ComponentOne’s liability is limited to the amount you paid for the product. ComponentOne isnot liable for any special, consequential, or other damages for any reason.
Copying and Distribution
While you are welcome to make backup copies of the software for your own use and protection, you are notpermitted to make copies for the use of anyone else. We put a lot of time and effort into creating this product, and weappreciate your support in seeing that it is used by licensed users only.
Table of ContentsRichTextBox for WPF and Silverlight Overview 3
Help with ComponentOne Studio for WPF 3
The C1.Silverlight.RichTextBox.dll Assembly 3
The C1.Silverlight.RichTextBox.Toolbar.dll Assembly 3
The C1.Silverlight.RichTextBox.RtfFilter.dll Assembly 3-4
RichTextBox for WPF and Silverlight Key Features 5
RichTextBox for WPF and Silverlight Quick Start 6
Step1: Creating a WPF Application 6
Step 2: Adding Spell Checking Functionality 6-7
Step 3: Using the Control at Runtime 7-9
XAML Quick Reference 10
Working with RichTextBox for WPF and Silverlight 11
C1RichTextBox Concepts and Main Properties 11-13
C1RichTextBox Content 13-14
Saving and Loading HTML 14
Custom Command Bars 14
Clipboard Functions 14-15
Alignment Functions 15
Font Functions 15-16
Formatting Functions 16-17
Select Text Function 17
Document History Functions 17-18
Hyperlinks 18-20
Accessing Layout Information 21-23
Painters 23-24
Spell-Checking 24
Modal Spell-Checking 24-28
Syntax Coloring 28-32
Overriding Styles 32-35
Hit-Testing 35-39
HtmlFilter Customization 39-41
Working with the C1Document Object 42
Creating Documents and Reports 42-51
Implementing Split Views 51-53
RichTextBox for WPF and Silverlight 1
Copyright © 2019 GrapeCity, Inc. All rights reserved.

Using the C1Document Class 53-54
Understanding C1TextPointer 54-58
Working with C1RichTextBoxToolbar 59
Edit Group 59-60
Font Group 60-62
Paragraph Group 62-63
Insert Group 63-65
Tools Group 65-66
Working with C1SimplifiedRichTextBoxToolbar 67-68
Elements Supported in RichTextBox 69
HTML Elements 69-71
HTML Attributes 72-78
CSS2 Properties 78-81
CSS2 Selectors 81-82
C1RichTextBox Appearance 83
ComponentOne ClearStyle Technology 83
How ClearStyle Works 83
C1RichTextBox ClearStyle Properties 83-84
C1RichTextBox Themes 84-89
C1RichTextBox Samples 90
RichTextBox for Silverlight Samples 91
Annotations Sample 91
C1.Silverlight.RichTextBox.RtfFilter Sample 91
C1.Silverlight.RichTextBox.Toolbar Sample 91
C1RichTextBox_Localization Sample 91-92
PdfExport Sample 92
Printing Sample 92
RichTextBoxSamples Sample 92
SyntaxHighlight Sample 92
C1RichTextBox Task-Based Help 93
Setting the Text Content 93
Setting the HTML Content 93-94
Connecting a C1RichTextBoxToolbar to a C1RichTextBox 94-95
Implementing a Simple Formatting Toolbar 95-98
Adding Spell Checking 98-99
RichTextBox for WPF and Silverlight 2
Copyright © 2019 GrapeCity, Inc. All rights reserved.

RichTextBox for WPF and Silverlight OverviewRichTextBox for WPF and Silverlight is the most complete rich text editor available for WPF or Silverlight. Load, edit,and save formatted text as HTML or RTF documents. The C1RichTextBox control provides rich formatting, automaticline wrapping, HTML and RTF import/export, table support, images, annotations, and more.
Help with ComponentOne Studio for WPFGetting Started
For information on installing ComponentOne Studio WPF Edition, licensing, technical support, namespaces andcreating a project with the control, please visit Getting Started with WPF Edition.
For information on installing ComponentOne Studio Silverlight Edition, licensing, technical support,namespaces and creating a project with the control, please visit Getting Started with Silverlight Edition.
The C1.Silverlight.RichTextBox.dll AssemblyC1.Silverlight.RichTextBox.dll contains the C1RichTextBox control, a full-fledged editor with a document-basedarchitecture similar to the one used in WPF.
Main Classes
The following main classes are included in the C1.Silverlight.RichTextBox.dll assembly:
C1RichTextBox: Control used to view and edit C1Document documents. The control can import and exportHTML, and supports rich formatting including fonts, foreground and background colors, borders, paragraphalignment, images, hyperlinks, lists, arbitrary UIElement objects, and more.C1Document: Class that represents documents as a hierarchical list of elements that represent documentcomponents such as paragraphs, lists, images, and so on. The object model exposed by the C1Documentobject is similar to the one used in the WPF FlowDocument class and in the HTML DOM.
The C1.Silverlight.RichTextBox.Toolbar.dll AssemblyC1.Silverlight.RichTextBox.Toolbar.dll contains the C1RichTextBoxToolbar control, a toolbar that attaches toa C1RichTextBox control and provides common formatting commands. The toolbar is packaged in a separate DLLbecause many applications may choose to implement their own custom toolbars (or no toolbars at all) for theC1RichTextBox. These applications don't have to deploy the standard toolbar.
Main Classes
The following main classes are included in the C1.Silverlight.RichTextBox.Toolbar.dll assembly:
C1RichTextBoxToolbar: Toolbar control that attaches to a C1RichTextBox control and provides commonformatting commands such as bold, italics, underline, font size, alignment, and so on.
The C1.Silverlight.RichTextBox.RtfFilter.dll AssemblyC1.Silverlight.RichTextBox.RtfFilter.dll contains the filter required to import/export Rich Text Format documents
RichTextBox for WPF and Silverlight 3
Copyright © 2019 GrapeCity, Inc. All rights reserved.

from/to the C1RichTextBox (C1Document).
Main Classes
The following main classes are included in the C1.Silverlight.RichTextBox.RtfFilter.dll assembly:
RrfFilter: This class provides the methods: ConvertToDocument and ConvertFromDocument that can beused with any C1Document.
RichTextBox for WPF and Silverlight 4
Copyright © 2019 GrapeCity, Inc. All rights reserved.

RichTextBox for WPF and Silverlight Key FeaturesRichTextBox for WPF and Silverlight allows you to create customized, rich applications. Make the most ofRichTextBox for WPF and Silverlight by taking advantage of the following key features:
Import and Export FormatsRichTextBox for WPF and Silverlight supports importing and exporting RTF, HTML, and plain text. Loadexisting rich text or HTML into the C1RichTextBox control, edit the document, and then export it back to RTFor HTML.Apply Rich FormattingEdit and format text containing multiple fonts, decorations, colors, tables, images, lists, and more.Language SupportC1RichTextBox now supports input in Chinese, Japanese, and Korean languages.C1RichTextBoxToolbarGet started immediately with the full-featured C1RichTextBoxToolbar control, or build your own customtoolbar. The included actions are: Font Family, Font Size, Grow Font, Shrink Font, Bold, Italic, Underline, ChangeCase, Subscript, Superscript, Text Color, Text Highlight Color, Align Left, Align Center, Align Right, Justify,Bullets, Numbering, Text Wrapping, Border Thickness, Border Color, Paragraph Color, Margin, Padding, InsertImage, Insert Symbol, Insert Hyperlink, Remove Hyperlink, Cut, Copy, Paste, Undo, Redo, Find and Replace, andSpell Check. The RichTextBoxToolbar uses the C1Toolbar control enabling complete customization. See theWorking with C1RichTextBoxToolbar topics for more information.Page ZoomingRichTextBox supports page zooming in both print layout and draft views.Spell-check Your TextRichTextBox supports two types of spell-checking using the C1SpellChecker component:
Modal spell checking: Shows a Spell dialog box and selects each spelling mistake in the document. Theend-user may choose to ignore the mistake, fix it by typing or picking from a list of suggestions, or addthe word to a user dictionary. See the Modal Spell-Checking topic for more information.As-you-type checking: Highlights spelling mistakes as the end-user types, typically with a wavy, redunderline. The end-user may right-click the mistake in the document to see a menu with options thatinclude options to ignore, add to dictionary, or pick a suggestion to correct the mistake automatically.See the Spell-Checking topic for more information.
Undo/Redo SupportEdit data in the RichTextBox with confidence. You have the ability to easily undo and redo your changes withthe click of a button.Clipboard SupportC1RichTextBox fully supports the clipboard. Implement cut/copy/paste activities within the RichTextBox.AnnotationsAdd highlights and annotations to your documents with C1RichTextBox. Annotations are comments, notes,remarks or explanations that can be attached to specific part of a Web document.Save as PDFIn addition to direct printing, The C1RichTextBox content can be exported to PDF format.Rich Document Object ModelPatterned after the Document class in WPF, RichTextBox's rich document object model (DOM) supportsimages, lists, hyperlinks, borders, background and foreground colors for text ranges, and more. Use the richDOM to create and modify documents programmatically. See the Working with the C1Document Object topicfor more information.Lightning-speed PerformanceRichTextBox allows instantaneous editing and really fast document loading.
RichTextBox for WPF and Silverlight 5
Copyright © 2019 GrapeCity, Inc. All rights reserved.

RichTextBox for WPF and Silverlight Quick Start
In this quick start, you begin by creating a WPF or Silverlight application in Visual Studio, add the RichTextBoxand RichTextBoxToolbar controls to the application, add code to customize the application, and run the application toview possible run-time interactions.
Step1: Creating a WPF ApplicationIn this step, you create a new WPF application and add the RichTextBox and RichTextBoxToolbar controls in XAML.After completing this step, you have a mostly functional text-rich editor.
In Design View
To add the RichTextBox control to your WPF application in Design view, perform the following steps
1. Create a new WPF application in Visual Studio.2. Navigate to the Toolbox and locate the C1RichTextBox and C1RichTextBoxToolbar controls.3. Double-click the C1RichTextBox and C1RichTextBoxToolbar icons to add the controls to the MainWindow.4. In the XAML view, add the relevant namespaces to the page by editing the MainWindow tags.
XAML
xmlns="http://schemas.microsoft.com/winfx/2006/xaml/presentation"xmlns:x="http://schemas.microsoft.com/winfx/2006/xaml"xmlns:c1="http://schemas.componentone.com/winfx/2006/xaml" x:Class="RTBQuickStart.MainWindow"Title="MainWindow" Height="350" Width="525">
5. Place the cursor between the <Grid> and </Grid> tags, click once, and add the following markup within the<Grid> tags to add a StackPanel panel.XAML
<StackPanel HorizontalAlignment="Left" Margin="0,10,0,0" x:Name="SP" VerticalAlignment="Top" Height="418" Width="645" Grid.ColumnSpan="2" Grid.Column="1"/>
6. Click between the StackPanel tags and add the following markup to edit the appearance and positioning of
RichTextBox and RichTextBoxToolbar controls in the XAML view.XAML
<c1:C1RichTextBox Name="c1RichTextBox1" Margin="0,127,0,10"/><c1:C1RichTextBoxToolbar RichTextBox="{Binding ElementName= c1RichTextBox1}" Name="C1RTBTB" Margin="3,0,-3,197" />
On running the application, you see an almost fully functional RichTextBox application. You can enter text inthe RichTextBox control and edit the text using the options in the RichTextBoxToolbar. In the next step, you set upspell-checking and customize the application further.
copyCode
copyCode
Step 2: Adding Spell-Check FunctionalityIn the previous step, you created a new application and added the RichTextBox and RichTextBoxToolbar controls to the application. If you currently click the Spell Check button in the toolbar at runtime, you receive a message that spell checking is currently not set up. In this step, you customize the application further and add spell-checking functionality to the application.
To add spell checking to the application, complete the following steps:
1. In the Solution Explorer, right-click the project and select Add | Existing Item.2. In the Add Existing Item dialog, locate the C1Spell_en-US.dct file that can be found in the installed folder at the following location: C:\...\Documents\ComponentOne Samples\WPF\C1.WPF.RichTextBox\CS\RichTextBoxSamples\Resources
This is a US English dictionary file – if you add another file, instead, you can adapt the steps below with the appropriate code.3. In the Solution Explorer, right-click the MainPage.xaml file and select View Code to open the code file.4. In the code editor, add the required import statements.
Visual BasicImports C1.WPF.RichTextBoxImports C1.WPF.SpellChecker
C#using C1.WPF.RichTextBox;
RichTextBox for WPF and Silverlight 6
Copyright © 2019 GrapeCity, Inc. All rights reserved.

using C1.WPF.SpellChecker;5. Add code to the MainPage constructor to add spell-check functionality in the RichTextBox control.
Visual BasicInitializeComponent()Dim spell = New C1SpellChecker()spell.MainDictionary.LoadAsync("C1Spell_en-US.dct")Me.c1RichTextBox1.SpellChecker = spell
C#InitializeComponent();var spell = new C1SpellChecker();spell.MainDictionary.LoadAsync("C1Spell_en-US.dct");this.c1RichTextBox1.SpellChecker = spell;
6. Set the Text property for RichTextBox control to add content for spell checking.Visual Basic
Me.c1RichTextBox1.Text = "Hello World! Weelcome to the most complete rich text editor availible for WPF. Load, edit, and save formattted text as HTML or RTF documents with ComponentOne RichTextBox for WPF. The C1RichTextBox control provids rich formatting, automatic line wrapping, HTML and RTF import/export, table support, images, anotations, and more."C#
this.c1RichTextBox1.Text = "Hello World! Weelcome to the most complete rich text editor availible for WPF. Load, edit, and save formattted text as HTML or RTF documents with ComponentOne RichTextBox for WPF. The C1RichTextBox control provids rich formatting, automatic line wrapping, HTML and RTF import/export, table support, images, anotations, and more." ;
Step 3: Using the Control at RuntimeIn the previous steps, you created a WPF application, added the RichTextBox and RichTextBoxToolbar controls, andadded spell-check functionality to the application. Run the application and try out some possible runtime interactions.
1. Press F5 to run the application.
Note that as you type, spell-checking is visibly implemented as indicated by wavy red lines under words notincluded in the dictionary.
2. Right-click the first misspelled word, "Welcome", and from the options that appear, choose the correct spelling:
RichTextBox for WPF and Silverlight 7
Copyright © 2019 GrapeCity, Inc. All rights reserved.

3. Click the Spell Check button in the Tools group. The Spelling dialog box appears
4. Click Change to accept the suggested spelling. The dialog box moves onto the next word.5. Click Add in the Spelling dialog box to add "WPF" to the dictionary.6. Click Change for each of the following words to accept the suggested spellings.7. Use the mouse to highlight "ComponentOne RichTextBox for Silverlight" and click the Bold button in the Font
group to bold the text.8. Highlight "C1RichTextBox" and click the Hyperlink button in the Insert group to open the Insert Hyperlink
dialog box.9. In the URL box of the Insert Hyperlink dialog box, enter http://ww.componentone.com/ and click OK to close
the dialog box. The link will be added.
RichTextBox for WPF and Silverlight 8
Copyright © 2019 GrapeCity, Inc. All rights reserved.
The text gets linked to the ComponentOne website.
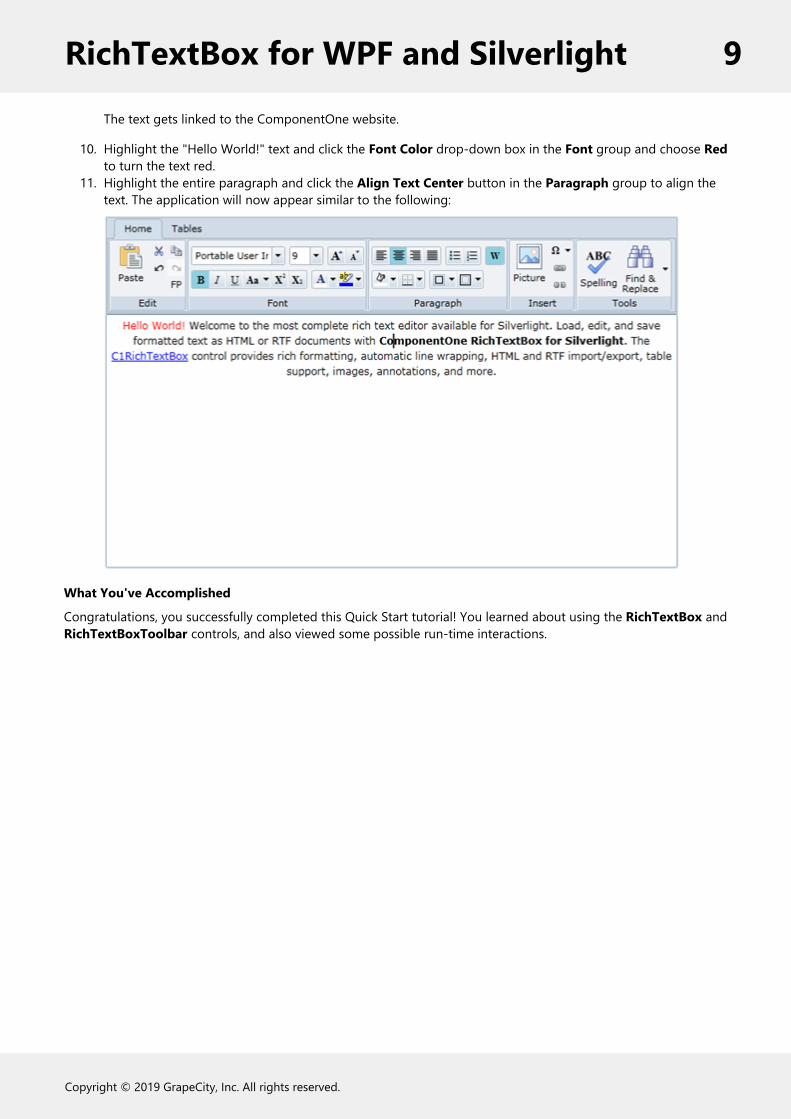
10. Highlight the "Hello World!" text and click the Font Color drop-down box in the Font group and choose Redto turn the text red.
11. Highlight the entire paragraph and click the Align Text Center button in the Paragraph group to align thetext. The application will now appear similar to the following:
What You've Accomplished
Congratulations, you successfully completed this Quick Start tutorial! You learned about using the RichTextBox andRichTextBoxToolbar controls, and also viewed some possible run-time interactions.
RichTextBox for WPF and Silverlight 9
Copyright © 2019 GrapeCity, Inc. All rights reserved.

XAML Quick ReferenceThis topic is dedicated to providing a quick overview of the XAML used to create a C1RichTextBox and C1RichTextBoxToolbar control.
To get started developing, add a c1 namespace declaration in the root element tag:
XAML
xmlns:c1="http://schemas.componentone.com/winfx/2006/xaml"
Here is a sample C1RichTextBox and C1RichTextBoxToolbar:
Below is the XAML code for the sample:
WPF<Window x:Class="RichTextBoxWPFXAML.MainWindow"xmlns="http://schemas.microsoft.com/winfx/2006/xaml/presentation"xmlns:x="http://schemas.microsoft.com/winfx/2006/xaml"Title="MainWindow"Height="370"Width="697"xmlns:c1="http://schemas.componentone.com/winfx/2006/xaml"><GridHeight="310"><StackPanelHorizontalAlignment="Left"Name="SP"VerticalAlignment="Top"Height="327"Width="663"> <c1:C1SimplifiedRichTextBoxToolbarx:Name="richToolbar"RichTextBox="{BindingElementName=C1RTB}" /> <c1:C1RichTextBoxx:Name="C1RTB"Grid.Row="1"BorderThickness="0"Height="165" /> </StackPanel> </Grid></Window>
Silverlight<UserControl xmlns:c1="http://schemas.componentone.com/winfx/2006/xaml" x:Class="SilverlightApplication2.MainPage" xmlns="http://schemas.microsoft.com/winfx/2006/xaml/presentation" xmlns:x="http://schemas.microsoft.com/winfx/2006/xaml" xmlns:d="http://schemas.microsoft.com/expression/blend/2008" xmlns:mc="http://schemas.openxmlformats.org/markup-compatibility/2006" mc:Ignorable="d" d:DesignHeight="489" d:DesignWidth="668"> <Grid x:Name="LayoutRoot" Background="White"> <c1:C1RichTextBox Name="C1RTB" Margin="0,133,12,28" /> <c1:C1RichTextBoxToolbar Name="richToolbar" RichTextBox="{Binding ElementName=C1RTB}" Margin="2,12,12,0" Height="123" VerticalAlignment="Top" /> </Grid></UserControl>
RichTextBox for WPF and Silverlight 10
Copyright © 2019 GrapeCity, Inc. All rights reserved.

Working with RichTextBox for WPF and SilverlightThe most complete rich text editor available for WPF, load, edit, and save formatted text as HTML or RTF documentswith RichTextBox for WPF and Silverlight. The C1RichTextBox control provides rich formatting, automatic linewrapping, HTML and RTF import/export, table support, images, annotations, and more.
The C1.WPF.RichTextBox assembly contains two main objects: the C1RichTextBox control and the C1Documentobject.
C1RichTextBox is a powerful text editor that allows you to display and edit formatted text. C1RichTextBox supportsall the usual formatting options, including fonts, background and foreground colors, lists, hyperlinks, images, borders,and so on. C1RichTextBox also supports loading and saving documents in HTML format.
C1Document is the class that represents the contents of a C1RichTextBox. It is analogous to the FlowDocumentclass in WPF. As in WPF, a C1Document is composed of stacked elements (C1Block objects) which in turn arecomposed of inline elements (C1Run objects).
Many applications may deal only with the C1RichTextBox control, which provides a simple linear view of thedocument. Other applications may choose to use the rich object model provided by the C1Document class to createand manage documents directly, with full access to the document structure.
You can also use related elements such as the C1RichTextBoxToolbar control and C1SpellChecker component toexpand the functionality of the C1RichTextBox control. C1RichTextBoxToolBar is a Ribbon-like toolbar included inthe C1.WPF.RichTextBox.Toolbar assembly. You can easily add a C1RichTextBoxToolBar control and link it to aC1RichTextBox control to create a full featured Rich Text editor. C1SpellChecker is located in theC1.WPF.SpellChecker assembly and can be used to add spell-checking functionality to the editor.
C1RichTextBox Concepts and Main PropertiesOn the surface, the C1RichTextBox control appears just like a standard TextBox. It provides the same properties tocontrol the font, colors, text, and selection. That can be an advantage – if you have an application that uses TextBoxcontrols, you may be able to simply replace them with C1RichTextBox controls without any additional changes.
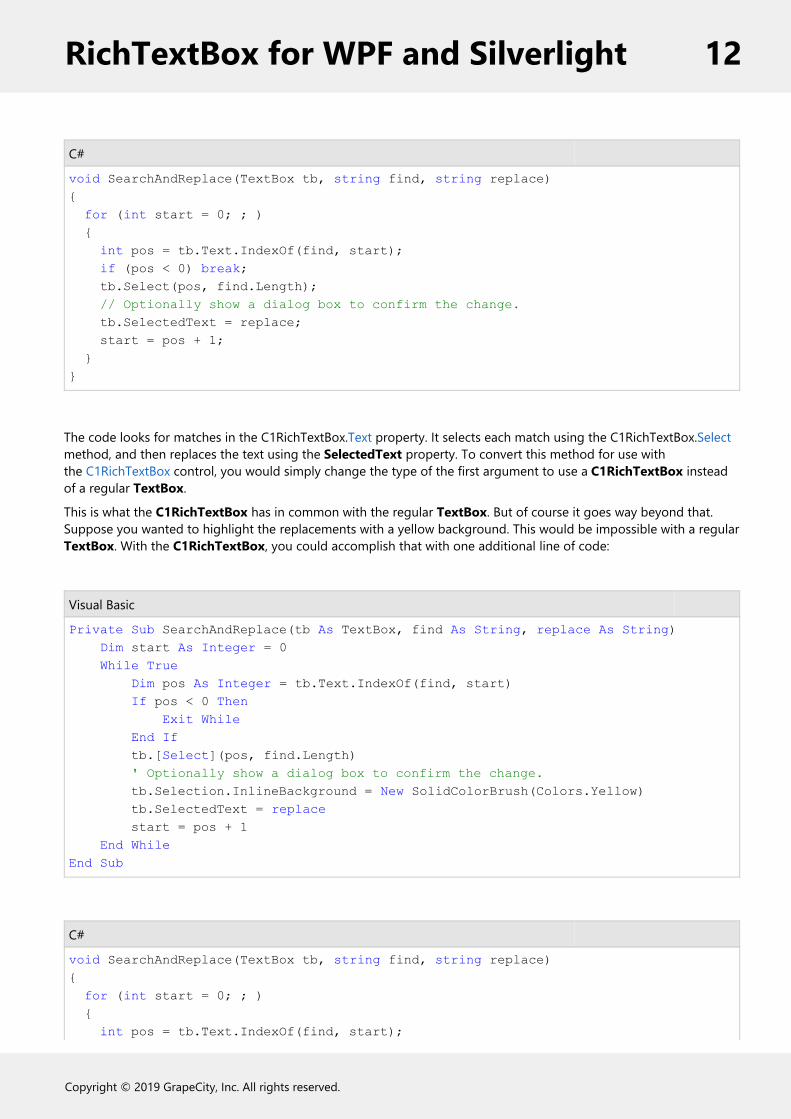
For example, the following code implements a simple search-and-replace routine that works on TextBox and onC1RichTextBox controls:
Visual Basic
Private Sub SearchAndReplace(tb As TextBox, find As String, replace As String) Dim start As Integer = 0 While True Dim pos As Integer = tb.Text.IndexOf(find, start) If pos < 0 Then Exit While End If tb.[Select](pos, find.Length) ' Optionally show a dialog box to confirm the change. tb.SelectedText = replace start = pos + 1 End WhileEnd Sub
RichTextBox for WPF and Silverlight 11
Copyright © 2019 GrapeCity, Inc. All rights reserved.
C#
void SearchAndReplace(TextBox tb, string find, string replace){ for (int start = 0; ; ) { int pos = tb.Text.IndexOf(find, start); if (pos < 0) break; tb.Select(pos, find.Length); // Optionally show a dialog box to confirm the change. tb.SelectedText = replace; start = pos + 1; }}
The code looks for matches in the C1RichTextBox.Text property. It selects each match using the C1RichTextBox.Selectmethod, and then replaces the text using the SelectedText property. To convert this method for use withthe C1RichTextBox control, you would simply change the type of the first argument to use a C1RichTextBox insteadof a regular TextBox.
This is what the C1RichTextBox has in common with the regular TextBox. But of course it goes way beyond that.Suppose you wanted to highlight the replacements with a yellow background. This would be impossible with a regularTextBox. With the C1RichTextBox, you could accomplish that with one additional line of code:
Visual Basic
Private Sub SearchAndReplace(tb As TextBox, find As String, replace As String) Dim start As Integer = 0 While True Dim pos As Integer = tb.Text.IndexOf(find, start) If pos < 0 Then Exit While End If tb.[Select](pos, find.Length) ' Optionally show a dialog box to confirm the change. tb.Selection.InlineBackground = New SolidColorBrush(Colors.Yellow) tb.SelectedText = replace start = pos + 1 End WhileEnd Sub
C#
void SearchAndReplace(TextBox tb, string find, string replace){ for (int start = 0; ; ) { int pos = tb.Text.IndexOf(find, start);
RichTextBox for WPF and Silverlight 12
Copyright © 2019 GrapeCity, Inc. All rights reserved.

if (pos < 0) break; tb.Select(pos, find.Length); // Optionally show a dialog box to confirm the change. tb.Selection.InlineBackground = new SolidColorBrush(Colors.Yellow); tb.SelectedText = replace; start = pos + 1; }}
The C1RichTextBox.Selection property provides properties that allow you to inspect and modify the formatting of thecurrent selection. With this property and the ones in common with the TextBox control, you can easily createdocuments and add rich formatting.
You could use the technique described above to implement a toolbar or to add syntax coloring to documents. Thesetopics are described in more detail in later sections.
C1RichTextBox ContentThe content of the C1RichTextBox can be specified in two ways, using the C1RichTextBox.Text property or theC1RichTextBox.Html property. The Text property is used to assign and retrieve the control content as plain text.
Visual Basic
Me.C1RichTextBox1.Text = "Hello World!"
C#
this.c1RichTextBox1.Text = "Hello World!";
The Html property is used to assign and retrieve formatted text as HTML. The HTML text needs to be encoded in theXAML file, so, for example, instead of <b> for bold, tags are encoded as <b>.
Visual Basic
Me.C1RichTextBox1.Html = "<b>Hello World!</b>"
C#
this.c1RichTextBox1.Html = "<b>Hello World!</b>"
The C1RichTextBox exposes a C1RichTextBox.TextWrapping property that specifies whether the control should wraplong lines or whether it should keep the lines together and provide a horizontal scrollbar instead.
Visual Basic
Me.C1RichTextBox1.TextWrapping = TextWrapping.NoWrap
C#
this.c1RichTextBox1.TextWrapping = TextWrapping.NoWrap;
The code above sets the C1RichTextBox control so that text content will not wrap in the control and will appear in acontinuous line.
RichTextBox for WPF and Silverlight 13
Copyright © 2019 GrapeCity, Inc. All rights reserved.

Saving and Loading HTMLYou can persist the contents of a simple TextBox control using the Text property. You can also use theC1RichTextBox.Text property to persist content in the C1RichTextBox control, but you will lose any rich formatting.Instead, you can use the C1RichTextBox.Html property to persist the content of a C1RichTextBox while preserving theformatting.
The Html property gets or sets the formatted content of a C1RichTextBox as an HTML string. The HTML filter builtinto the C1RichTextBox is fairly rich. It supports CSS styles, images, hyperlinks, lists, and so on. But the filter does notsupport all HTML; it is limited to features supported by the C1RichTextBox control itself. For example, the currentversion of C1RichTextBox does not support tables. Still, you can use the Html property to display simple HTMLdocuments.
If you type "Hello world." into a C1RichTextBox, the Html property will return the following markup:
HTML
<html><head> <style type="text/css"> .c0 { font-family:Portable User Interface;font-size:9pt; } .c1 { margin-bottom:7.5pt; } </style></head><body class="c0"><p class="c1">Hello world.</p></body></html>
Note that the Html property is just a filter between HTML and the internal C1Document class. Any information in theHTML stream that is not supported by the C1RichTextBox (for example, comments and meta information) isdiscarded, and will not be preserved when you save the HTML document later.
Custom Command BarsYou can create your own custom toolbar, context menu, or pop-up controls that apply formatting and functionality tothe C1RichTextBox control. The following section describes the code necessary to perform the most basic formattingcommands. It does not include code for setting up a toolbar or an AppBar.
The following code snippets assume the name of the C1RichTextBox control on your page is rtb.
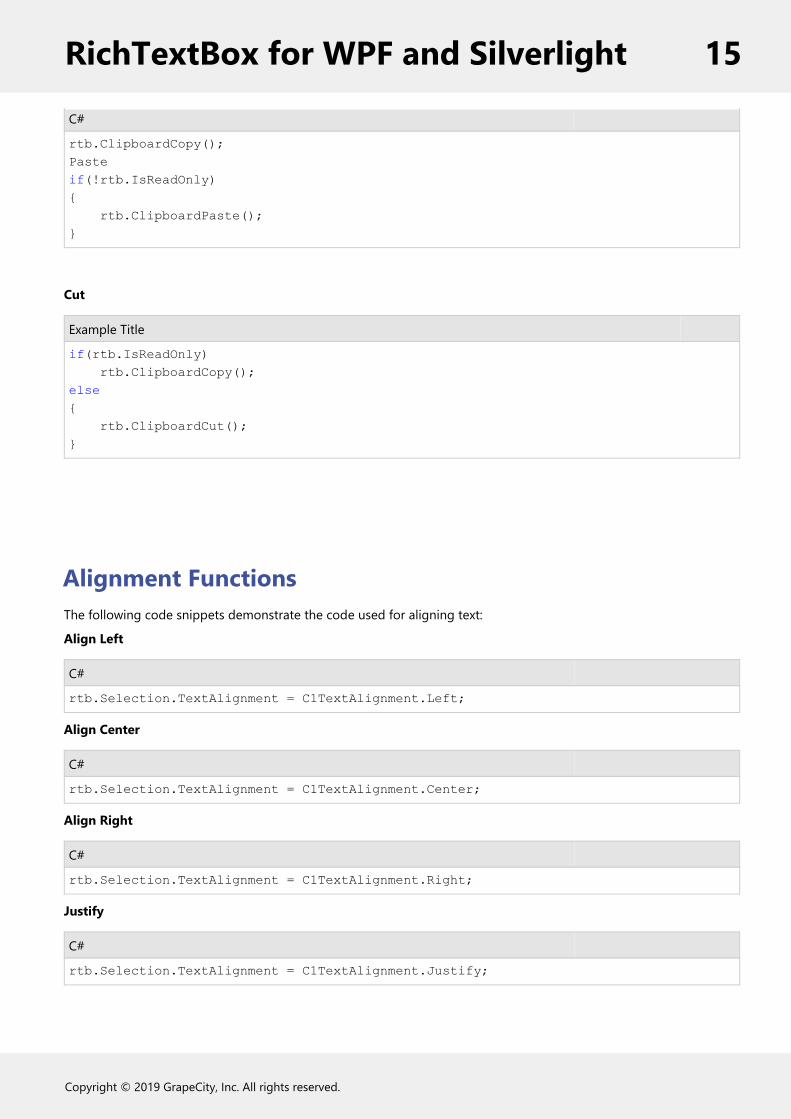
Clipboard FunctionsThe following code snippets demonstrate the code used for clipboard functions:
Copy
RichTextBox for WPF and Silverlight 14
Copyright © 2019 GrapeCity, Inc. All rights reserved.
C#
rtb.ClipboardCopy();Pasteif(!rtb.IsReadOnly){ rtb.ClipboardPaste();}
Cut
Example Title
if(rtb.IsReadOnly) rtb.ClipboardCopy();else{ rtb.ClipboardCut();}
Alignment FunctionsThe following code snippets demonstrate the code used for aligning text:
Align Left
C#
rtb.Selection.TextAlignment = C1TextAlignment.Left;
Align Center
C#
rtb.Selection.TextAlignment = C1TextAlignment.Center;
Align Right
C#
rtb.Selection.TextAlignment = C1TextAlignment.Right;
Justify
C#
rtb.Selection.TextAlignment = C1TextAlignment.Justify;
RichTextBox for WPF and Silverlight 15
Copyright © 2019 GrapeCity, Inc. All rights reserved.

Font FunctionsThe following code snippets demonstrate the code used for font functions:
Font Family
C#
rtb.Selection.FontFamily = newFontFamily("Arial");Font Sizertb.Selection.TrimRuns();foreach(varrun inrtb.Selection.Runs){ run.FontSize = size;}
Formatting FunctionsThe following code snippets demonstrate the code used for formatting functions.
You can also use Ctrl+a shortcut to select the entire text, Ctrl+b shortcut to bold the text, Ctrl+i shortcut to italicizethe text, and Ctrl+u shortcut to underline the text.
Foreground Color
C#
rtb.Selection.Foreground = newSolidColorBrush(Colors.Red);Highlight (background) colorrtb.Selection.InlineBackground = newSolidColorBrush(Colors.Yellow);Toggle Boldif(rtb.Selection.FontWeight != null&& rtb.Selection.FontWeight.Value.Weight == FontWeights.Bold.Weight){ rtb.Selection.FontWeight = FontWeights.Normal;}else{ rtb.Selection.FontWeight = FontWeights.Bold;}
Toggle Italic
C#
if(rtb.Selection.FontStyle != null&& rtb.Selection.FontStyle == FontStyle.Italic){ rtb.Selection.FontStyle = FontStyle.Normal;}else{ rtb.Selection.FontStyle = FontStyle.Italic;
RichTextBox for WPF and Silverlight 16
Copyright © 2019 GrapeCity, Inc. All rights reserved.
}
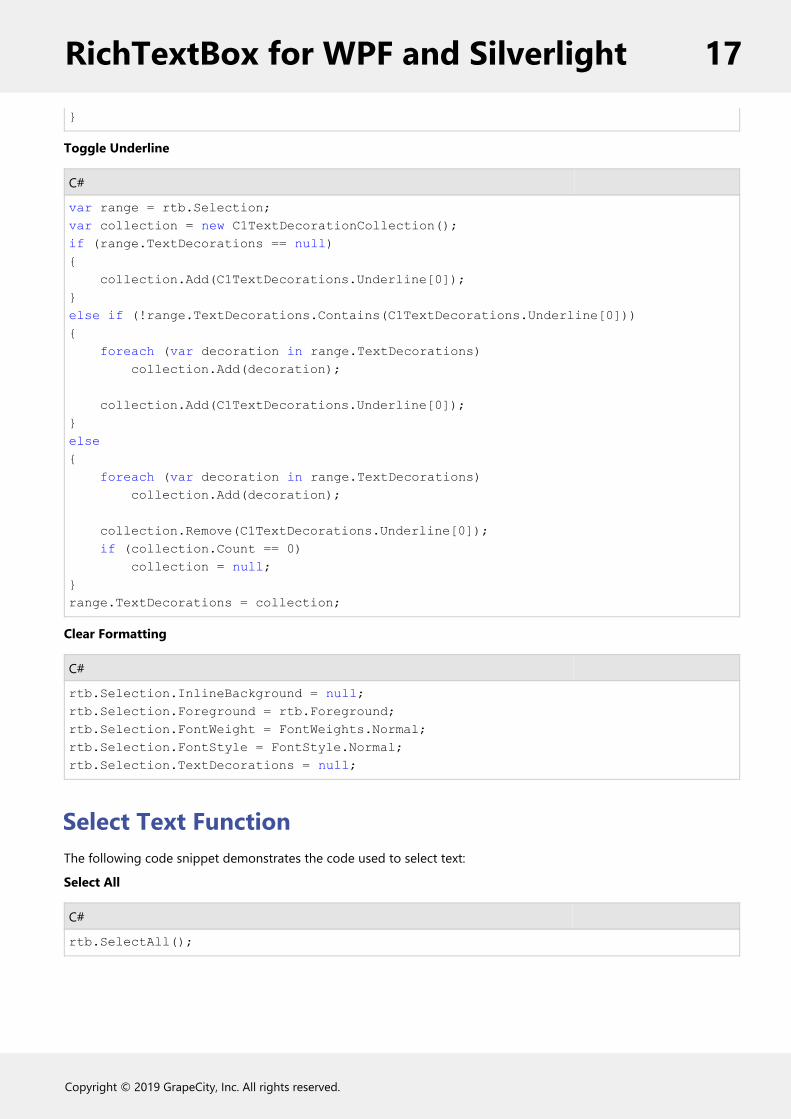
Toggle Underline
C#
var range = rtb.Selection;var collection = new C1TextDecorationCollection();if (range.TextDecorations == null){ collection.Add(C1TextDecorations.Underline[0]);}else if (!range.TextDecorations.Contains(C1TextDecorations.Underline[0])){ foreach (var decoration in range.TextDecorations) collection.Add(decoration);
collection.Add(C1TextDecorations.Underline[0]);}else{ foreach (var decoration in range.TextDecorations) collection.Add(decoration);
collection.Remove(C1TextDecorations.Underline[0]); if (collection.Count == 0) collection = null;}range.TextDecorations = collection;
Clear Formatting
C#
rtb.Selection.InlineBackground = null;rtb.Selection.Foreground = rtb.Foreground;rtb.Selection.FontWeight = FontWeights.Normal;rtb.Selection.FontStyle = FontStyle.Normal;rtb.Selection.TextDecorations = null;
Select Text FunctionThe following code snippet demonstrates the code used to select text:
Select All
C#
rtb.SelectAll();
RichTextBox for WPF and Silverlight 17
Copyright © 2019 GrapeCity, Inc. All rights reserved.

Document History FunctionsThe following snippets demonstrates the code used to create document history functions:
Undo
C#
if(rtb.DocumentHistory.CanUndo){ rtb.DocumentHistory.Undo();}
Redo
C#
if(rtb.DocumentHistory.CanRedo){ rtb.DocumentHistory.Redo();}
HyperlinksThe C1RichTextBox supports hyperlinks. As in regular HTML documents, this feature allows you to make certain partsof the document active. When the user clicks them, the application receives a notification and takes some action.
The code below shows how you can create a hyperlink:
Visual Basic
Public Sub New() InitializeComponent()
' Set text _rtb.Text = "This is some text with a hyperlink in it."
' Create hyperlink Dim pos As Integer = _rtb.Text.IndexOf("hyperlink") _rtb.[Select](pos, 9) Dim uri = New Uri("http://www.grapecity.com", UriKind.Absolute) _rtb.Selection.MakeHyperlink(uri)
' Handle navigation requests _rtb.NavigationMode = NavigationMode.OnControlKey AddHandler _rtb.RequestNavigate, AddressOf _rtb_RequestNavigate;End Sub
C#
public MainPage(){ InitializeComponent();
RichTextBox for WPF and Silverlight 18
Copyright © 2019 GrapeCity, Inc. All rights reserved.
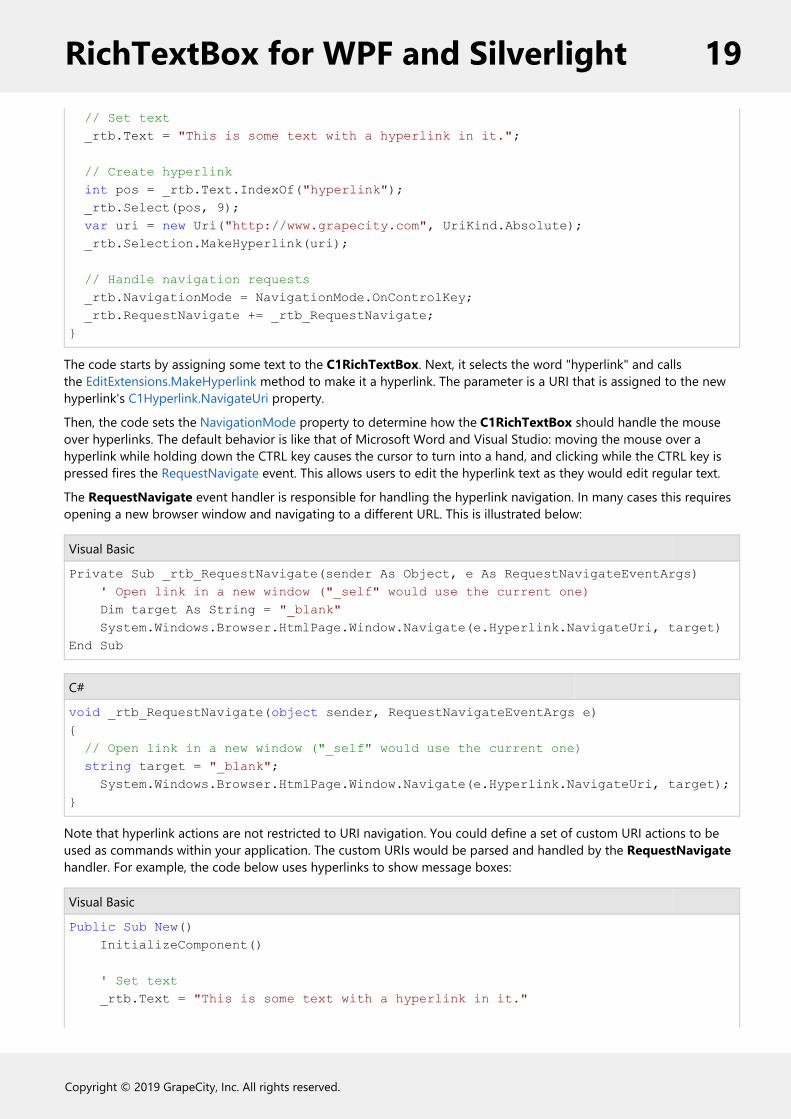
// Set text _rtb.Text = "This is some text with a hyperlink in it.";
// Create hyperlink int pos = _rtb.Text.IndexOf("hyperlink"); _rtb.Select(pos, 9); var uri = new Uri("http://www.grapecity.com", UriKind.Absolute); _rtb.Selection.MakeHyperlink(uri);
// Handle navigation requests _rtb.NavigationMode = NavigationMode.OnControlKey; _rtb.RequestNavigate += _rtb_RequestNavigate;}
The code starts by assigning some text to the C1RichTextBox. Next, it selects the word "hyperlink" and callsthe EditExtensions.MakeHyperlink method to make it a hyperlink. The parameter is a URI that is assigned to the newhyperlink's C1Hyperlink.NavigateUri property.
Then, the code sets the NavigationMode property to determine how the C1RichTextBox should handle the mouseover hyperlinks. The default behavior is like that of Microsoft Word and Visual Studio: moving the mouse over ahyperlink while holding down the CTRL key causes the cursor to turn into a hand, and clicking while the CTRL key ispressed fires the RequestNavigate event. This allows users to edit the hyperlink text as they would edit regular text.
The RequestNavigate event handler is responsible for handling the hyperlink navigation. In many cases this requiresopening a new browser window and navigating to a different URL. This is illustrated below:
Visual Basic
Private Sub _rtb_RequestNavigate(sender As Object, e As RequestNavigateEventArgs) ' Open link in a new window ("_self" would use the current one) Dim target As String = "_blank" System.Windows.Browser.HtmlPage.Window.Navigate(e.Hyperlink.NavigateUri, target)End Sub
C#
void _rtb_RequestNavigate(object sender, RequestNavigateEventArgs e){ // Open link in a new window ("_self" would use the current one) string target = "_blank"; System.Windows.Browser.HtmlPage.Window.Navigate(e.Hyperlink.NavigateUri, target);}
Note that hyperlink actions are not restricted to URI navigation. You could define a set of custom URI actions to beused as commands within your application. The custom URIs would be parsed and handled by the RequestNavigatehandler. For example, the code below uses hyperlinks to show message boxes:
Visual Basic
Public Sub New() InitializeComponent()
' Set text _rtb.Text = "This is some text with a hyperlink in it."
RichTextBox for WPF and Silverlight 19
Copyright © 2019 GrapeCity, Inc. All rights reserved.
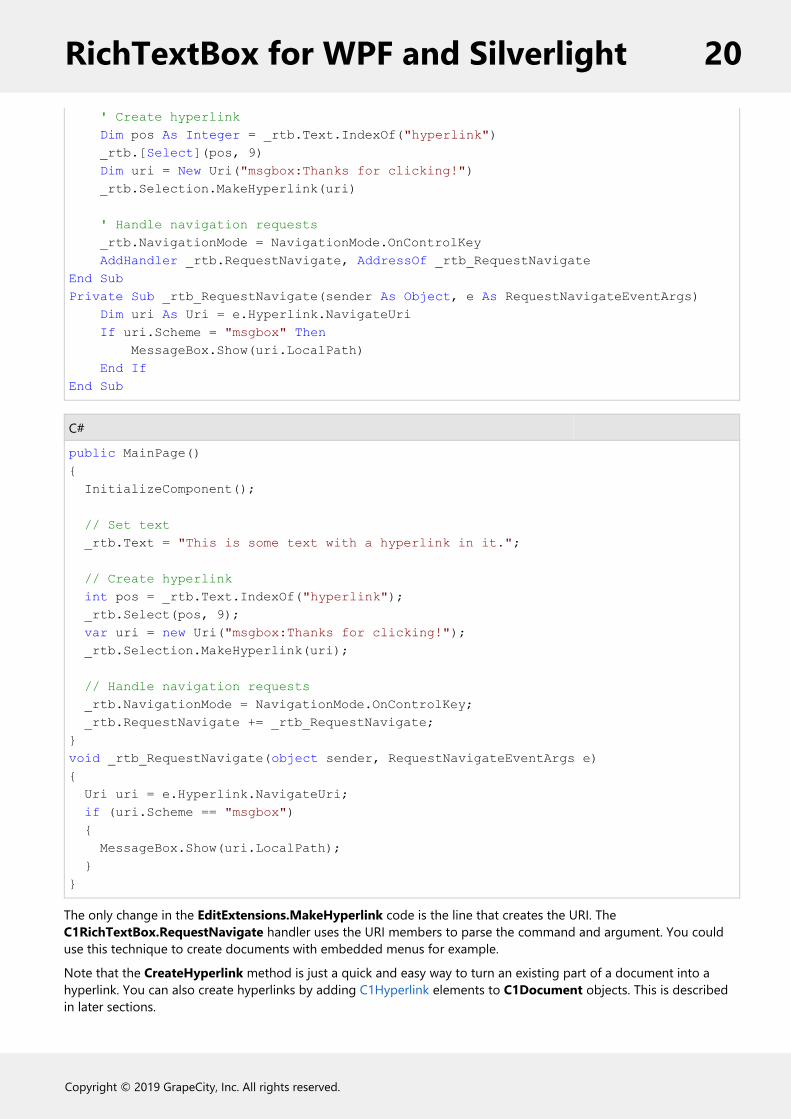
' Create hyperlink Dim pos As Integer = _rtb.Text.IndexOf("hyperlink") _rtb.[Select](pos, 9) Dim uri = New Uri("msgbox:Thanks for clicking!") _rtb.Selection.MakeHyperlink(uri)
' Handle navigation requests _rtb.NavigationMode = NavigationMode.OnControlKey AddHandler _rtb.RequestNavigate, AddressOf _rtb_RequestNavigateEnd SubPrivate Sub _rtb_RequestNavigate(sender As Object, e As RequestNavigateEventArgs) Dim uri As Uri = e.Hyperlink.NavigateUri If uri.Scheme = "msgbox" Then MessageBox.Show(uri.LocalPath) End IfEnd Sub
C#
public MainPage(){ InitializeComponent();
// Set text _rtb.Text = "This is some text with a hyperlink in it.";
// Create hyperlink int pos = _rtb.Text.IndexOf("hyperlink"); _rtb.Select(pos, 9); var uri = new Uri("msgbox:Thanks for clicking!"); _rtb.Selection.MakeHyperlink(uri);
// Handle navigation requests _rtb.NavigationMode = NavigationMode.OnControlKey; _rtb.RequestNavigate += _rtb_RequestNavigate;}void _rtb_RequestNavigate(object sender, RequestNavigateEventArgs e){ Uri uri = e.Hyperlink.NavigateUri; if (uri.Scheme == "msgbox") { MessageBox.Show(uri.LocalPath); }}
The only change in the EditExtensions.MakeHyperlink code is the line that creates the URI. TheC1RichTextBox.RequestNavigate handler uses the URI members to parse the command and argument. You coulduse this technique to create documents with embedded menus for example.
Note that the CreateHyperlink method is just a quick and easy way to turn an existing part of a document into ahyperlink. You can also create hyperlinks by adding C1Hyperlink elements to C1Document objects. This is describedin later sections.
RichTextBox for WPF and Silverlight 20
Copyright © 2019 GrapeCity, Inc. All rights reserved.

Accessing Layout InformationWhen C1RichTextBox creates the C1Document layout, it creates a parallel tree composed of C1TextElementViewobjects. For each C1TextElement in the C1Document tree, there is at least one C1TextElementView that is taskedwith its layout and drawing.
Take this C1Document tree as an example:
Its corresponding view tree will look like the following:
Each C1TextElementView provides some basic layout information for its corresponding C1TextElement:
C1TextElementView.Origin: this is the origin of the view in document coordinates.C1TextElementView.DesiredSize: this is the desired size of the view from the last time it was measured.
Multiple C1TextElementViews can be composed to handle layout and drawing for out C1TextElement. When this isdone, the C1TextElementView.Content property contains the inner most C1TextElementView in the composition. Thecontent view’s children correspond to the C1TextElementView.Children collection of the associated C1TextElement.
View composition is used in C1BoxView to handle margin, padding and border for its C1TextElementView.Contentview. This means that the origin of each C1BoxView is outside the margin, padding and border box, while the originof its C1TextElementView.Content is inside.
RichTextBox for WPF and Silverlight 21
Copyright © 2019 GrapeCity, Inc. All rights reserved.
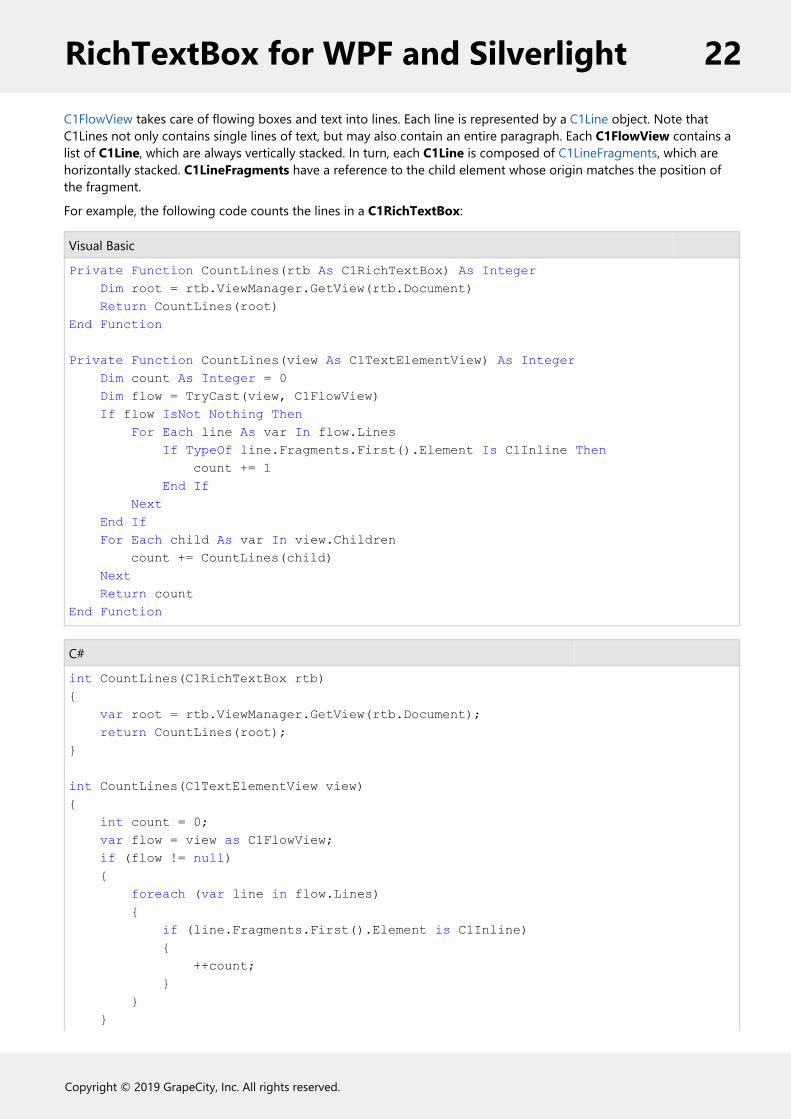
C1FlowView takes care of flowing boxes and text into lines. Each line is represented by a C1Line object. Note thatC1Lines not only contains single lines of text, but may also contain an entire paragraph. Each C1FlowView contains alist of C1Line, which are always vertically stacked. In turn, each C1Line is composed of C1LineFragments, which arehorizontally stacked. C1LineFragments have a reference to the child element whose origin matches the position ofthe fragment.
For example, the following code counts the lines in a C1RichTextBox:
Visual Basic
Private Function CountLines(rtb As C1RichTextBox) As Integer Dim root = rtb.ViewManager.GetView(rtb.Document) Return CountLines(root)End Function
Private Function CountLines(view As C1TextElementView) As Integer Dim count As Integer = 0 Dim flow = TryCast(view, C1FlowView) If flow IsNot Nothing Then For Each line As var In flow.Lines If TypeOf line.Fragments.First().Element Is C1Inline Then count += 1 End If Next End If For Each child As var In view.Children count += CountLines(child) Next Return countEnd Function
C#
int CountLines(C1RichTextBox rtb){ var root = rtb.ViewManager.GetView(rtb.Document); return CountLines(root);}
int CountLines(C1TextElementView view){ int count = 0; var flow = view as C1FlowView; if (flow != null) { foreach (var line in flow.Lines) { if (line.Fragments.First().Element is C1Inline) { ++count; } } }
RichTextBox for WPF and Silverlight 22
Copyright © 2019 GrapeCity, Inc. All rights reserved.

foreach (var child in view.Children) { count += CountLines(child); } return count;}
At first, the root view is obtained. That's the same as the view associated to root element,so C1RichTextViewManager.GetView is used to get the view of rtb.Document. After that, the view tree is traversedcounting the lines in each C1FlowView found. Note that you only count the lines with C1Inline elements; otherwiseyou would also count paragraphs and other container blocks.
PaintersPainters are a way of extending C1RichTextBox by displaying UIElements in the same canvas where C1RichTextBoxdisplays text. This allows more general extensions than style overrides, but might be harder to use. Painters are usedinternally by C1RichTextBox to display the selection.
A painter is an implementation of the IRichTextPainter interface. This interface has two methods, IRichTextPainter.Paintand IRichTextPainter.PaintInline, which are called at different stages of C1RichTextBox's painting pass. Each methodreceives a C1PaintingContext object that is used to check the viewport being painted, and has the methods that areused for painting custom UIElements.
IRichTextPainter.Paint is called each time the entire screen is repainted. Note that each time this method is called, allUIElements must be painted by calling C1PaintingContext.Paint, otherwise they will be removed. Passing the sameUIElement each time is more efficient, as it is not removed from the visual tree.
IRichTextPainter.PaintInline is called for each C1Line that is painted. This method allows finer control over the layerwhere custom UIElements are painted. For instance, it is possible to paint above the text background, but below thetext itself. It has the same rule as IRichTextPainter.Paint. All UIElements must be painted by callingC1PaintingContext.PaintInline, otherwise they will be removed.
The Annotations sample uses painters to display sticky notes. Here is the implementation:
Visual Basic
Class StickyPainter Implements IRichTextPainter Private _stickies As List(Of StickyNote)
Public Sub New(stickies As List(Of StickyNote)) _stickies = stickies End Sub
Public Sub Paint(context As C1PaintingContext) For Each sticky As var In _stickies Dim rect = context.ViewManager.GetRectFromPosition(sticky.Range.Start) context.Paint(Math.Round(rect.X), Math.Round(rect.Bottom), False, sticky) Next End Sub
Public Sub PaintInline(context As C1PaintingContext, line As C1Line) End Sub
RichTextBox for WPF and Silverlight 23
Copyright © 2019 GrapeCity, Inc. All rights reserved.
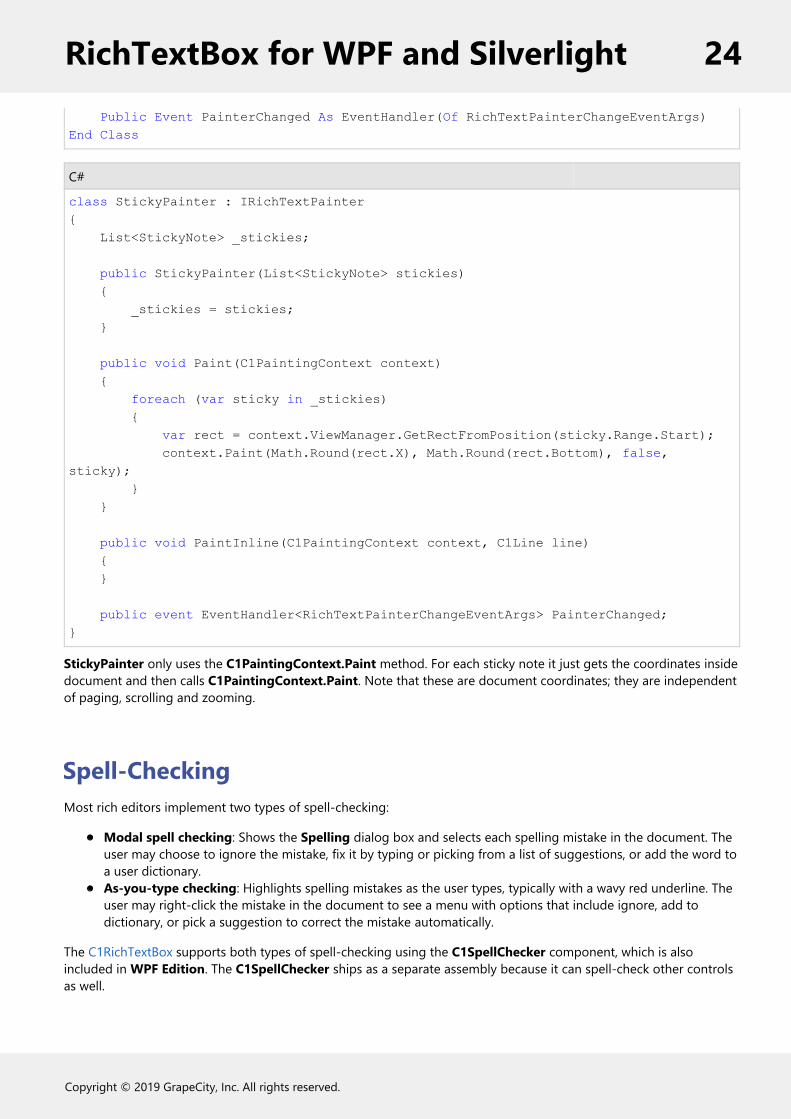
Public Event PainterChanged As EventHandler(Of RichTextPainterChangeEventArgs)End Class
C#
class StickyPainter : IRichTextPainter{ List<StickyNote> _stickies;
public StickyPainter(List<StickyNote> stickies) { _stickies = stickies; }
public void Paint(C1PaintingContext context) { foreach (var sticky in _stickies) { var rect = context.ViewManager.GetRectFromPosition(sticky.Range.Start); context.Paint(Math.Round(rect.X), Math.Round(rect.Bottom), false, sticky); } }
public void PaintInline(C1PaintingContext context, C1Line line) { }
public event EventHandler<RichTextPainterChangeEventArgs> PainterChanged;}
StickyPainter only uses the C1PaintingContext.Paint method. For each sticky note it just gets the coordinates insidedocument and then calls C1PaintingContext.Paint. Note that these are document coordinates; they are independentof paging, scrolling and zooming.
Spell-CheckingMost rich editors implement two types of spell-checking:
Modal spell checking: Shows the Spelling dialog box and selects each spelling mistake in the document. Theuser may choose to ignore the mistake, fix it by typing or picking from a list of suggestions, or add the word toa user dictionary.As-you-type checking: Highlights spelling mistakes as the user types, typically with a wavy red underline. Theuser may right-click the mistake in the document to see a menu with options that include ignore, add todictionary, or pick a suggestion to correct the mistake automatically.
The C1RichTextBox supports both types of spell-checking using the C1SpellChecker component, which is alsoincluded in WPF Edition. The C1SpellChecker ships as a separate assembly because it can spell-check other controlsas well.
RichTextBox for WPF and Silverlight 24
Copyright © 2019 GrapeCity, Inc. All rights reserved.

Modal Spell-CheckingTo implement modal spell checking, you start by adding to your project a reference to the C1.WPF.SpellCheckerassembly. Then, add the following code to your project:
Visual Basic
Imports C1.WPF.SpellChecker
Public Partial Class MainPage Inherits UserControl ' Spell-checker used by all controls on this page Private _spell As New C1SpellChecker()
' Page constructor Public Sub New() ' Regular Standard initialization InitializeComponent()
' Load main spelling dictionary AddHandler _spell.MainDictionary.LoadCompleted, AddressOf MainDictionary_LoadCompleted _spell.MainDictionary.LoadAsync("C1Spell_en-US.dct")
' Load user dictionary Dim ud As UserDictionary = _spell.UserDictionary ud.LoadFromIsolatedStorage("Custom.dct")
' Other initializations ' ... AddHandler App.Current.[Exit], AddressOf App_Exit End SubEnd Class
C#
using C1.WPF.SpellChecker;
public partial class MainPage : UserControl{ // Spell-checker used by all controls on this page C1SpellChecker _spell = new C1SpellChecker();
// Page constructor public MainPage() { // Standard initialization InitializeComponent(); // Load main spelling dictionary _spell.MainDictionary.LoadCompleted += MainDictionary_LoadCompleted; _spell.MainDictionary.LoadAsync("C1Spell_en-US.dct");
RichTextBox for WPF and Silverlight 25
Copyright © 2019 GrapeCity, Inc. All rights reserved.

// Load user dictionary UserDictionary ud = _spell.UserDictionary; ud.LoadFromIsolatedStorage("Custom.dct"); App.Current.Exit += App_Exit;
// Other initializations // ... }}
The code creates a new C1SpellChecker object to be shared by all controls on the page that require spell-checking.
Later, the page constructor invokes the LoadAsync method to load the main spell dictionary. In this case, we areloading C1Spell_en-US.dct, the American English dictionary. This file must be present on the application folder on theserver. C1SpellChecker includes over 20 other dictionaries which can be downloaded from our site.
The code adds a handler to the SpellDictionaryBase.LoadCompleted event so it can detect when the maindictionary finishes loading and whether there were any errors. Here is a typical event handler:
Visual Basic
Private Sub MainDictionary_LoadCompleted(sender As Object, e As OpenReadCompletedEventArgs) If e.[Error] IsNot Nothing Then MessageBox.Show("Error loading spell dictionary, " & "spell-checking is disabled.") End IfEnd Sub
C#
void MainDictionary_LoadCompleted(object sender, OpenReadCompletedEventArgs e){ if (e.Error != null) MessageBox.Show("Error loading spell dictionary, " + "spell-checking is disabled.");}
The code also loads a user dictionary from isolated storage. This step is optional. The user dictionary stores wordssuch as names and technical terms. The code attaches an event handler to the application's Exit event to save the userdictionary when the application finishes executing:
Visual Basic
Private Sub App_Exit(sender As Object, e As EventArgs) Dim ud As UserDictionary = _spell.UserDictionary ud.SaveToIsolatedStorage("Custom.dct")End Sub
C#
void App_Exit(object sender, EventArgs e){ UserDictionary ud = _spell.UserDictionary; ud.SaveToIsolatedStorage("Custom.dct");}
RichTextBox for WPF and Silverlight 26
Copyright © 2019 GrapeCity, Inc. All rights reserved.
Once the dictionary has been loaded, you can invoke the modal spell-checker by calling theC1SpellChecker.CheckControlAsync method. For example:
Visual Basic
Private Sub SpellCheck_Click(sender As Object, e As RoutedEventArgs) AddHandler _spell.CheckControlCompleted, AddressOf _spell_CheckControlCompleted _spell.CheckControlAsync(_rtb)End SubPrivate Sub _spell_CheckControlCompleted(sender As Object, e As CheckControlCompletedEventArgs) If Not e.Cancelled Then Dim msg = String.Format("Spell-check complete. {0} error(s) found.", e.ErrorCount) MessageBox.Show(msg, "Spell-check complete", MessageBoxButton.OK) End IfEnd Sub
C#
private void SpellCheck_Click(object sender, RoutedEventArgs e){ _spell.CheckControlCompleted += _spell_CheckControlCompleted; _spell.CheckControlAsync(_rtb);}void _spell_CheckControlCompleted(object sender, CheckControlCompletedEventArgs e){ if (!e.Cancelled) { var msg = string.Format( "Spell-check complete. {0} error(s) found.", e.ErrorCount); MessageBox.Show(msg, "Spell-check complete..", MessageBoxButton.OK); }}
The code calls C1SpellChecker.CheckControlAsync. When the modal checking is complete, theC1SpellChecker.CheckControlCompleted event fires and shows a dialog box to indicate that the spell-checkingoperation is complete.
The image below shows the spell-checking dialog box in action:
RichTextBox for WPF and Silverlight 27
Copyright © 2019 GrapeCity, Inc. All rights reserved.

Syntax ColoringThe Understanding C1TextPointer section describes how you can use the Selection property to obtain a C1TextRangeobject that corresponds to the current selection, and how to use that object to inspect and apply custom formattingto parts of the document.
In some cases, however, you may want to inspect and apply formatting to ranges without selecting them. To do thatusing the Selection property, you would have to save the current selection, apply all the formatting, and then restorethe original selection. Also, changing the selection may cause the document to scroll in order to keep the selection inview.
To handle these situations, the C1RichTextBox exposes a GetTextRange method. The GetTextRange method returnsa C1TextRange object that may be used without affecting the current selection.
For example, you could use the GetTextRange method to add HTML syntax coloring to a C1RichTextBox. The firststep is to detect any changes to the document. The changes will trigger the method that performs the actual syntaxcoloring:
Visual Basic
' Update syntax coloring on a timerPrivate _updating As BooleanPrivate _syntax As Storyboard
' Start the timer whenever the document changesPrivate Sub tb_TextChanged(sender As Object, e As C1TextChangedEventArgs) If Not _updating Then ' Create storyboard if it's still null If _syntax Is Nothing Then _syntax = New Storyboard() AddHandler _syntax.Completed, AddressOf _syntax_Completed _syntax.Duration = New Duration(TimeSpan.FromMilliseconds(1000)) End If
RichTextBox for WPF and Silverlight 28
Copyright © 2019 GrapeCity, Inc. All rights reserved.
' Re-start storyboard _syntax.[Stop]() _syntax.Seek(TimeSpan.Zero) _syntax.Begin() End IfEnd Sub' Timer elapsed, update syntax coloringPrivate Sub _syntax_Completed(sender As Object, e As EventArgs) _updating = True UpdateSyntaxColoring(_rtb) _updating = FalseEnd Sub
C#
// Update syntax coloring on a timerbool _updating;Storyboard _syntax;
// Start the timer whenever the document changesvoid tb_TextChanged(object sender, C1TextChangedEventArgs e){ if (!_updating) { // Create storyboard if it's still null if (_syntax == null) { _syntax = new Storyboard(); _syntax.Completed += _syntax_Completed; _syntax.Duration = new Duration(TimeSpan.FromMilliseconds(1000)); }
// Re-start storyboard _syntax.Stop(); _syntax.Seek(TimeSpan.Zero); _syntax.Begin(); }}// Timer elapsed, update syntax coloringvoid _syntax_Completed(object sender, EventArgs e){ _updating = true; UpdateSyntaxColoring(_rtb); _updating = false;}
The code creates a timer that starts ticking whenever the user changes the document in any way. If the user changesthe document while the timer is active, then the timer is reset. This prevents the code from updating the syntaxcoloring too often, while the user is typing quickly.
When the timer elapses, the code sets a flag to prevent the changes made while updating the syntax coloring fromtriggering the timer, then calls the UpdateSyntaxColoring method:
RichTextBox for WPF and Silverlight 29
Copyright © 2019 GrapeCity, Inc. All rights reserved.

Visual Basic
' Perform syntax coloringPrivate Sub UpdateSyntaxColoring(rtb As C1RichTextBox) ' Initialize regular expression used to parse HTML Dim pattern As String = "</?(?<tagName>[a-zA-Z0-9_:\-]+)" & "(\s+(?<attName>[a-zA-Z0-9_:\-]+)(?<attValue>(=""[^""]+"")?))*\s*/?>"
' Initialize brushes used to color the document Dim brDarkBlue As Brush = New SolidColorBrush(Color.FromArgb(255, 0, 0, 180)) Dim brDarkRed As Brush = New SolidColorBrush(Color.FromArgb(255, 180, 0, 0)) Dim brLightRed As Brush = New SolidColorBrush(Colors.Red)
' Remove old coloring Dim input = rtb.Text Dim range = rtb.GetTextRange(0, input.Length) range.Foreground = rtb.Foreground
' Highlight the matches For Each m As Match In Regex.Matches(input, pattern) ' Select whole tag, make it dark blue range = rtb.GetTextRange(m.Index, m.Length) range.Foreground = brDarkBlue
' Select tag name, make it dark red Dim tagName = m.Groups("tagName") range = rtb.GetTextRange(tagName.Index, tagName.Length) range.Foreground = brDarkRed
' Select attribute names, make them light red Dim attGroup = m.Groups("attName") If attGroup IsNot Nothing Then Dim atts = attGroup.Captures For i As Integer = 0 To atts.Count - 1 Dim att = atts(i) range = rtb.GetTextRange(att.Index, att.Length) range.Foreground = brLightRed Next End If NextEnd Sub
C#
// Perform syntax coloringvoid UpdateSyntaxColoring(C1RichTextBox rtb){ // Initialize regular expression used to parse HTML string pattern = @"</?(?<tagName>[a-zA-Z0-9_:\-]+)" + @"(\s+(?<attName>[a-zA-Z0-9_:\-]+)(?<attValue>(=""[^""]+"")?))*\s*/?>";
RichTextBox for WPF and Silverlight 30
Copyright © 2019 GrapeCity, Inc. All rights reserved.

// Initialize brushes used to color the document Brush brDarkBlue = new SolidColorBrush(Color.FromArgb(255, 0, 0, 180)); Brush brDarkRed = new SolidColorBrush(Color.FromArgb(255, 180, 0, 0)); Brush brLightRed = new SolidColorBrush(Colors.Red);
// Remove old coloring var input = rtb.Text; var range = rtb.GetTextRange(0, input.Length); range.Foreground = rtb.Foreground;
// Highlight the matches foreach (Match m in Regex.Matches(input, pattern)) { // Select whole tag, make it dark blue range = rtb.GetTextRange(m.Index, m.Length); range.Foreground = brDarkBlue;
// Select tag name, make it dark red var tagName = m.Groups["tagName"]; range = rtb.GetTextRange(tagName.Index, tagName.Length); range.Foreground = brDarkRed;
// Select attribute names, make them light red var attGroup = m.Groups["attName"]; if (attGroup != null) { var atts = attGroup.Captures; for (int i = 0; i < atts.Count; i++) { var att = atts[i]; range = rtb.GetTextRange(att.Index, att.Length); range.Foreground = brLightRed; } } }}
The code starts by defining a regular expression pattern to parse the HTML. This is not the most efficient way to parseHTML, and the expression is not terribly easy to read or maintain. We don't recommend using regular expressions forparsing HTML except in sample code, where it may help keep the code compact and easy to understand.
The next step is to remove any old coloring left over. This is done by creating a range that spans the whole documentand setting its Foreground property to match the Foreground of the C1RichTextBox control.
Next, the regular expression is used to parse the document. The code scans each match, creates a C1TextRangeobject, and sets the C1TextRange.Foreground property to the desired value. We use dark blue for the HTML tag, darkred for the tag name, and light red for the attribute names.
That's all the code that is required. The image below shows an HTML document viewed in the syntax-coloringC1RichTextBox we just created:
RichTextBox for WPF and Silverlight 31
Copyright © 2019 GrapeCity, Inc. All rights reserved.

Test the application by typing or pasting some HTML text into the control. Notice that shortly after you stop typing,the new text is colored automatically.
A real application could optimize the syntax coloring process by detecting the type of text change and updating thecoloring of small parts of the document. Also, it would detect additional elements such as style sheets and comments,and it probably would use a specialized parser instead of regular expressions.
The essential mechanism would be the same, however: detect ranges within the document, get C1TextRange objects,and apply the formatting.
Overriding StylesThe Syntax Coloring section described how you can use C1TextRange objects to modify the style of parts of adocument without moving the selection. In some cases, however, you may want to modify only the view, and not thedocument itself.
For example, the current selection is highlighted with different foreground and background colors. This style changedoes not belong to the document itself; it belongs to the view. Other examples are syntax coloring and as-you-typespell-checking.
The C1RichTextBox control supports these scenarios with the StyleOverrides property. This property contains acollection of objects that specify ranges and style modifications to be applied to the view only. This approach has twoadvantages over applying style modifications to C1TextRange objects as you did in the previous section:
The style overrides are not applied to the document, and therefore are not applied when you save a documentas HTML (you would not normally want the current selection and spelling error indicators to be persisted to afile).Because the changes are not added to the document, and only affect the part that is currently visible, thisapproach is much more efficient than changing C1TextRange objects directly.
The limitation of this approach is that the style changes cannot involve style elements that affect the document flow.You can use style overrides to change the background, foreground, and to underline parts of the document. But you
RichTextBox for WPF and Silverlight 32
Copyright © 2019 GrapeCity, Inc. All rights reserved.
cannot change the font size or style, for example, since that would affect the document flow.
Let us demonstrate the use of style overrides by modifying the previous syntax coloring example.
First, we need to declare a C1RangeStyleCollection object and add that to the control's StyleOverrides collection.Once that is done, any overrides added to our collection will be applied to the control. We will later populate thecollection with the syntax-colored parts of the document.
Visual Basic
Private _rangeStyles As New C1RangeStyleCollection()
Public Sub New() InitializeComponent()
_rtb = New C1RichTextBox() LayoutRoot.Children.Add(_rtb)
AddHandler _rtb.TextChanged, AddressOf tb_TextChanged _rtb.FontFamily = New FontFamily("Courier New") _rtb.FontSize = 16 _rtb.Text = GetStringResource("w3c.htm")
' Add our C1RangeStyleCollection to the control's ' StyleOverrides collection _rtb.StyleOverrides.Add(_rangeStyles)End Sub
C#
C1RangeStyleCollection _rangeStyles = new C1RangeStyleCollection();
public MainPage(){ InitializeComponent();
_rtb = new C1RichTextBox(); LayoutRoot.Children.Add(_rtb);
_rtb.TextChanged += tb_TextChanged; _rtb.FontFamily = new FontFamily("Courier New"); _rtb.FontSize = 16; _rtb.Text = GetStringResource("w3c.htm");
// Add our C1RangeStyleCollection to the control's // StyleOverrides collection _rtb.StyleOverrides.Add(_rangeStyles);}
Now, all we need to do is modify the UpdateSyntaxColoring method shown earlier and have it populate ourcollection of range styles (instead of applying the coloring to the document as we did before):
Visual Basic
' Perform syntax coloring using StyleOverrides collection
RichTextBox for WPF and Silverlight 33
Copyright © 2019 GrapeCity, Inc. All rights reserved.

' (takes a fraction of a second to highlight the default document)Private Sub UpdateSyntaxColoring(ByVal rtb As C1RichTextBox) ' Initialize regular expression used to parse HTML String pattern = "</?(?<tagName>[a-zA-Z0-9_:\-]+)" + "(\s+(?<attName>[a-zA-Z0-9_:\-]+)" + (?<attValue>(\s*=\s*""(^"")+"")?))*\s*/?>"
' Initialize styles used to color the document Dim key As var = C1TextElement.ForegroundProperty Dim brDarkBlue As var = New C1TextElementStyle() brDarkBlue(key) = New SolidColorBrush(Color.FromArgb(255, 0, 0, 180)) Dim brDarkRed As var = New C1TextElementStyle() brDarkRed(key) = New SolidColorBrush(Color.FromArgb(255, 180, 0, 0)) Dim brLightRed As var = New C1TextElementStyle() brLightRed(key) = New SolidColorBrush(Colors.Red)
' Remove old coloring _rangeStyles.Clear()
' Highlight the matches Dim input As var = rtb.Text Dim m As Match For Each m In Regex.Matches(input,pattern) ' Select whole tag, make it dark blue Dim range As var = rtb.GetTextRange(m.Index,m.Length) _rangeStyles.Add(New C1RangeStyle(range,brDarkBlue))
' Select tag name, make it dark red Dim tagName As var = m.Groups("tagName") range = rtb.GetTextRange(tagName.Index, tagName.Length) _rangeStyles.Add(New C1RangeStyle(range,brDarkRed))
' Select attribute names, make them light red Dim attGroup As var = m.Groups("attName") If Not attGroup Is Nothing Then Dim att As Capture For Each att In attGroup.Captures range = rtb.GetTextRange(att.Index, att.Length) _rangeStyles.Add(New C1RangeStyle(range,brLightRed)) Next End If NextEnd Sub
C#
// Perform syntax coloring using StyleOverrides collection// (takes a fraction of a second to highlight the default document)void UpdateSyntaxColoring(C1RichTextBox rtb){ // Initialize regular expression used to parse HTML
RichTextBox for WPF and Silverlight 34
Copyright © 2019 GrapeCity, Inc. All rights reserved.

string pattern = @"</?(?<tagName>[a-zA-Z0-9_:\-]+)" + @"(\s+(?<attName>[a-zA-Z0-9_:\-]+)" + (?<attValue>(\s*=\s*""[^""]+"")?))*\s*/?>";
// Initialize styles used to color the document var key = C1TextElement.ForegroundProperty; var brDarkBlue = new C1TextElementStyle(); brDarkBlue[key] = new SolidColorBrush(Color.FromArgb(255, 0, 0, 180)); var brDarkRed = new C1TextElementStyle(); brDarkRed[key] = new SolidColorBrush(Color.FromArgb(255, 180, 0, 0)); var brLightRed = new C1TextElementStyle(); brLightRed[key] = new SolidColorBrush(Colors.Red);
// Remove old coloring _rangeStyles.Clear();
// Highlight the matches var input = rtb.Text; foreach (Match m in Regex.Matches(input, pattern)) { // Select whole tag, make it dark blue var range = rtb.GetTextRange(m.Index, m.Length); _rangeStyles.Add(new C1RangeStyle(range, brDarkBlue));
// Select tag name, make it dark red var tagName = m.Groups["tagName"]; range = rtb.GetTextRange(tagName.Index, tagName.Length); _rangeStyles.Add(new C1RangeStyle(range, brDarkRed));
// Select attribute names, make them light red var attGroup = m.Groups["attName"]; if (attGroup != null) { foreach (Capture att in attGroup.Captures) { range = rtb.GetTextRange(att.Index, att.Length); _rangeStyles.Add(new C1RangeStyle(range, brLightRed)); } } }}
The revised code is very similar to the original. Instead of creating brushes to color the document, it createsC1TextElementStyle objects that contain an override for the foreground property. The code starts by clearing theoverride collection, then uses a regular expression to locate each HTML tag in the document, and finally populates theoverrides collection with C1RangeStyle objects that associate ranges with C1TextElementStyle objects.
If you run this new version of the code, you should notice the dramatic performance increase. The new version isthousands of times faster than the original.
RichTextBox for WPF and Silverlight 35
Copyright © 2019 GrapeCity, Inc. All rights reserved.
Hit-TestingThe C1RichTextBox supports hyperlinks, which provide a standard mechanism for implementing user interactivity. Insome cases, you may want to go beyond that and provide additional, custom mouse interactions. For example, youmay want to apply some custom formatting or show a context menu when the user clicks an element.
To enable these scenarios, the C1RichTextBox exposes ElementMouse* events anda C1RichTextBox.GetPositionFromPoint method.
If all you need to know is the element that triggered the mouse event, you can get it from the source parameter inthe event handler. If you need more detailed information (the specific word that was clicked within the element forexample), then you need the C1RichTextBox.GetPositionFromPoint method.C1RichTextBox.GetPositionFromPoint takes a point in client coordinates and returns a C1TextPosition object thatexpresses the position in document coordinates.
The C1TextPosition object has two main properties: Element and Offset. The Element property represents anelement within the document; Offset is a character index (if the element is a C1Run) or the index of the child elementat the given point.
For example, the code below creates a C1RichTextBox and attaches a handler tothe C1RichTextBox.ElementMouseLeftButtonDown event:
Visual Basic
Public Sub New() ' Default initialization InitializeComponent()
' Create a C1RichTextBox and add it to the page _rtb = New C1RichTextBox() LayoutRoot.Children.Add(_rtb)
' Attach event handler Add Handler _rtb.ElementMouseLeftButtonDown AddressOf rtb_ElementMouseLeftButtonDownEnd Sub
C#
public MainPage(){ // Default initialization InitializeComponent();
// Create a C1RichTextBox and add it to the page _rtb = new C1RichTextBox(); LayoutRoot.Children.Add(_rtb);
// Attach event handler _rtb.ElementMouseLeftButtonDown += rtb_ElementMouseLeftButtonDown;}
The event handler below toggles the C1TextElement.FontWeight property for the entire element that was clicked. Thiscould be a word, a sentence, or a whole paragraph:
RichTextBox for WPF and Silverlight 36
Copyright © 2019 GrapeCity, Inc. All rights reserved.

Visual Basic
Private Sub _rtb_ElementMouseLeftButtonDown(sender As Object, e As MouseButtonEventArgs) If Keyboard.Modifiers <> 0 Then Dim run = TryCast(sender, C1Run) If run IsNot Nothing Then run.FontWeight = If(run.FontWeight = FontWeights.Bold, FontWeights.Normal, FontWeights.Bold) End If End IfEnd Sub
C#
void _rtb_ElementMouseLeftButtonDown(object sender, MouseButtonEventArgs e){ if (Keyboard.Modifiers != 0) { var run = sender as C1Run; if (run != null) { run.FontWeight = run.FontWeight == FontWeights.Bold ? FontWeights.Normal : FontWeights.Bold; } }}
The code gets the element that was clicked by casting the sender parameter to a C1Run object.
If you wanted to toggle the C1TextElement.FontWeight value of a single word instead, then you would need todetermine which character was clicked and expand the selection to the whole word. This is wherethe C1RichTextBox.GetPositionFromPoint method becomes necessary. Here is a revised version of the event handlerthat accomplishes that:
Visual Basic
Private Sub _rtb_ElementMouseLeftButtonDown(sender As Object, e As MouseButtonEventArgs) If Keyboard.Modifiers <> 0 Then ' Get position in control coordinates Dim pt = e.GetPosition(_rtb)
' Get text pointer at position Dim pointer = _rtb.GetPositionFromPoint(pt)
' Check that the pointer is pointing to a C1Run Dim run = TryCast(pointer.Element, C1Run) If run IsNot Nothing Then ' Get the word within the C1Run Dim text = run.Text Dim start = pointer.Offset Dim [end] = pointer.Offset
RichTextBox for WPF and Silverlight 37
Copyright © 2019 GrapeCity, Inc. All rights reserved.
While start > 0 AndAlso Char.IsLetterOrDigit(text, start - 1) start -= 1 End While While [end] < text.Length - 1 AndAlso Char.IsLetterOrDigit(text, [end] + 1) [end] += 1 End While
' Toggle the bold property for the run that was clicked Dim word = New C1TextRange(pointer.Element, start, [end] - start + 1) word.FontWeight = If(word.FontWeight.HasValue AndAlso word.FontWeight.Value = FontWeights.Bold, FontWeights.Normal, FontWeights.Bold) End If End IfEnd Sub
C#
void _rtb_ElementMouseLeftButtonDown(object sender, MouseButtonEventArgs e){ if (Keyboard.Modifiers != 0) { // Get position in control coordinates var pt = e.GetPosition(_rtb);
// Get text pointer at position var pointer = _rtb.GetPositionFromPoint(pt);
// Check that the pointer is pointing to a C1Run var run = pointer.Element as C1Run; if (run != null) { // Get the word within the C1Run var text = run.Text; var start = pointer.Offset; var end = pointer.Offset; while (start > 0 && char.IsLetterOrDigit(text, start - 1)) start--; while (end < text.Length - 1 && char.IsLetterOrDigit(text, end + 1)) end++;
// Toggle the bold property for the run that was clicked var word = new C1TextRange(pointer.Element, start, end - start + 1); word.FontWeight = word.FontWeight.HasValue && word.FontWeight.Value == FontWeights.Bold ? FontWeights.Normal : FontWeights.Bold; } }}
Notice that the C1TextElement.FontWeight property returns a nullable value. If the range contains a mix of values
RichTextBox for WPF and Silverlight 38
Copyright © 2019 GrapeCity, Inc. All rights reserved.
for this attribute, the property returns null. The code used to toggle the FontWeight property is the same we usedearlier when implementing the formatting toolbar.
The GetPositionFromPoint allows you to get a C1TextPosition object from a point on the screen. TheGetRectFromPosition method performs the reverse operation, returning a Rect that represents the screen positionof a C1TextPosition object. This is useful in situations where you want to present a UI element near a specific portionof a document.
HtmlFilter CustomizationHtmlFilter is the component in C1RichTextBox that transforms HTML strings to C1Documents and back. It's alsocapable of transforming to and from an intermediate representation of an HTML document called C1HtmlDocument.
When transforming between C1HtmlDocument and C1Document, several events are fired allowing customization ofeach node that is transformed. These events are:
HtmlFilter.ConvertingHtmlNode: this event is fired just before an HTML node is transformed. If marked ashandled by the event handler then HtmlFilter assumes the node was transformed and skips it.HtmlFilter.ConvertedHtmlNode: this event is fired after a node was transformed. It can be used to make minorchanges to the transformation result.HtmlFilter.ConvertingTextElement: this event is fired just before a C1TextElement is transformed. If marked ashandled by the event handler then HtmlFilter assumes the element was transformed and skips it.HtmlFilter.ConvertedTextElement: this event is fired after a C1TextElement is transformed. It can be used tomake minor changes to the transformation result.
As an example you can see how the HtmlFilterCustomization sample adds support for GIF images usingC1.WPF.Imaging. It uses both HtmlFilter.ConvertingHtmlNode and HtmlFilter.ConvertingTextElement events.Here is the HtmlFilter.ConvertingHtmlNode event handler:
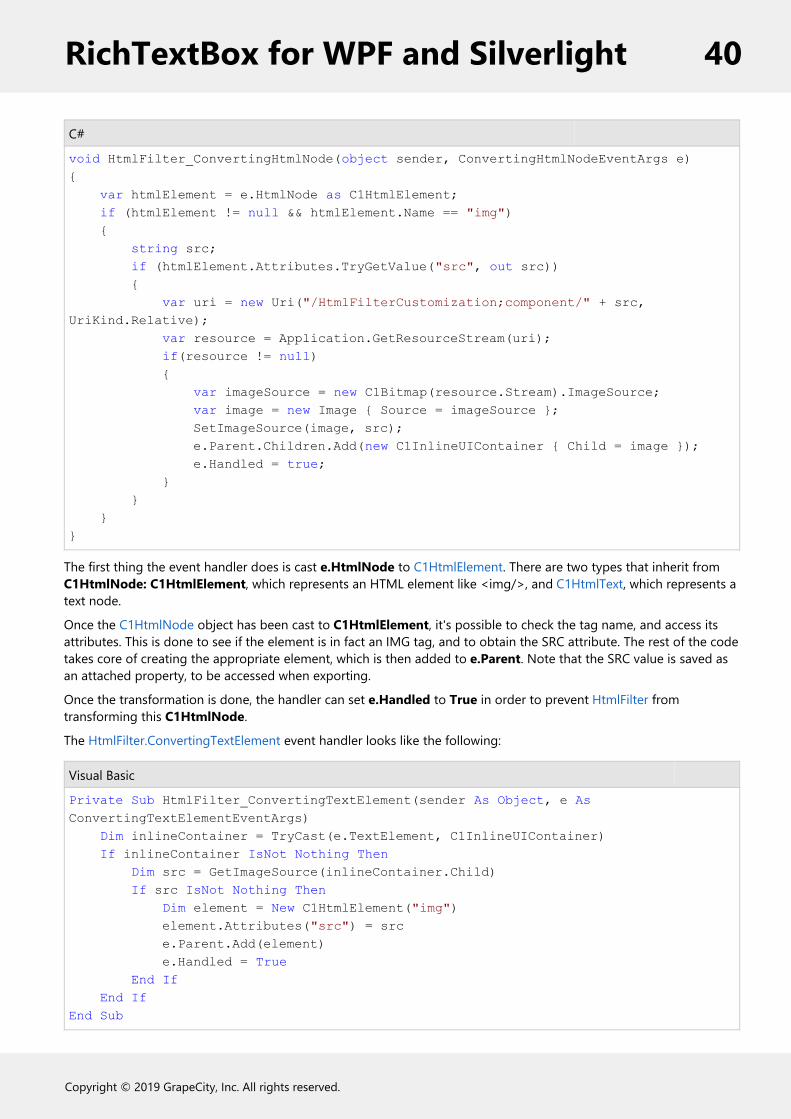
Visual Basic
Private Sub HtmlFilter_ConvertingHtmlNode(sender As Object, e As ConvertingHtmlNodeEventArgs) Dim htmlElement = TryCast(e.HtmlNode, C1HtmlElement) If htmlElement IsNot Nothing AndAlso htmlElement.Name = "img" Then Dim src As String If htmlElement.Attributes.TryGetValue("src", src) Then Dim uri = New Uri("/HtmlFilterCustomization;component/" & src, UriKind.Relative) Dim resource = Application.GetResourceStream(uri) If resource IsNot Nothing Then Dim imageSource = New C1Bitmap(resource.Stream).ImageSource Dim image = New Image() With { _ Key .Source = imageSource _ } SetImageSource(image, src) e.Parent.Children.Add(New C1InlineUIContainer() With { _ Key .Child = image _ }) e.Handled = True End If End If End IfEnd Sub
RichTextBox for WPF and Silverlight 39
Copyright © 2019 GrapeCity, Inc. All rights reserved.
C#
void HtmlFilter_ConvertingHtmlNode(object sender, ConvertingHtmlNodeEventArgs e){ var htmlElement = e.HtmlNode as C1HtmlElement; if (htmlElement != null && htmlElement.Name == "img") { string src; if (htmlElement.Attributes.TryGetValue("src", out src)) { var uri = new Uri("/HtmlFilterCustomization;component/" + src, UriKind.Relative); var resource = Application.GetResourceStream(uri); if(resource != null) { var imageSource = new C1Bitmap(resource.Stream).ImageSource; var image = new Image { Source = imageSource }; SetImageSource(image, src); e.Parent.Children.Add(new C1InlineUIContainer { Child = image }); e.Handled = true; } } }}
The first thing the event handler does is cast e.HtmlNode to C1HtmlElement. There are two types that inherit fromC1HtmlNode: C1HtmlElement, which represents an HTML element like <img/>, and C1HtmlText, which represents atext node.
Once the C1HtmlNode object has been cast to C1HtmlElement, it's possible to check the tag name, and access itsattributes. This is done to see if the element is in fact an IMG tag, and to obtain the SRC attribute. The rest of the codetakes core of creating the appropriate element, which is then added to e.Parent. Note that the SRC value is saved asan attached property, to be accessed when exporting.
Once the transformation is done, the handler can set e.Handled to True in order to prevent HtmlFilter fromtransforming this C1HtmlNode.
The HtmlFilter.ConvertingTextElement event handler looks like the following:
Visual Basic
Private Sub HtmlFilter_ConvertingTextElement(sender As Object, e As ConvertingTextElementEventArgs) Dim inlineContainer = TryCast(e.TextElement, C1InlineUIContainer) If inlineContainer IsNot Nothing Then Dim src = GetImageSource(inlineContainer.Child) If src IsNot Nothing Then Dim element = New C1HtmlElement("img") element.Attributes("src") = src e.Parent.Add(element) e.Handled = True End If End IfEnd Sub
RichTextBox for WPF and Silverlight 40
Copyright © 2019 GrapeCity, Inc. All rights reserved.

C#
void HtmlFilter_ConvertingTextElement(object sender, ConvertingTextElementEventArgs e){ var inlineContainer = e.TextElement as C1InlineUIContainer; if (inlineContainer != null) { var src = GetImageSource(inlineContainer.Child); if (src != null) { var element = new C1HtmlElement("img"); element.Attributes["src"] = src; e.Parent.Add(element); e.Handled = true; } }}
This is pretty similar to the other handler, only it transforms a C1TextElement to a C1HtmlElement. Note that the SRCvalue is recovered from the attached property, and a C1HtmlElement is created with that attribute. As before, thenew element is added to e.Parent, and the event is marked as Handled.
RichTextBox for WPF and Silverlight 41
Copyright © 2019 GrapeCity, Inc. All rights reserved.
Working with the C1Document ObjectSo far we have focused on the object model of the C1RichTextBox control. But the control is just an editable view of aC1Document object, which exposes a rich object model for creating and editing the underlying document. Thisarchitecture is similar to the one used by the Microsoft WPF RichTextBox control, which provides a view of aFlowDocument object.
Programming directly against the C1Document object is the best way to perform many tasks, including reportgeneration and the implementation of import and export filters. For example, the Html property exposes an HTMLfilter with methods that convert C1Document objects to and from HTML strings. You could implement a similar filterclass to import and export other popular formats such as RTF or PDF.
The C1RichTextBox deals mainly with text. It provides a flat, linear view of the control content. The C1Document, onthe other hand, exposes the structure of the document. The document model makes it easy to enumerate the runswithin each paragraph, items within each list, and so on. This will be shown in a later section.
Creating Documents and ReportsTo illustrate the process of creating a C1Document, we will walk through the steps required to implement a simpleassembly documentation utility.
To start, create a new project and add a reference to the C1.WPF and C1.WPF.RichTextBox assemblies. Then edit thepage constructor as follows:
Visual Basic
Imports C1.WPFImports C1.WPF.RichTextBoxImports C1.WPF.RichTextBox.Documents
Public Partial Class MainPage Inherits UserControl ' C1RichTextBox that will display the C1Document Private _rtb As C1RichTextBox
Public Sub New() ' Default initialization InitializeComponent()
' Create the C1RichTextBox and add it to the page _rtb = New C1RichTextBox() LayoutRoot.Children.Add(_rtb)
' Create document and show it in the C1RichTextBox _rtb.Document = DocumentAssembly(GetType(C1RichTextBox).Assembly) _rtb.IsReadOnly = True End SubEnd Class
C#
using C1.WPF;
RichTextBox for WPF and Silverlight 42
Copyright © 2019 GrapeCity, Inc. All rights reserved.
using C1.WPF.RichTextBox;using C1.WPF.RichTextBox.Documents;
public partial class MainPage : UserControl{ // C1RichTextBox that will display the C1Document C1RichTextBox _rtb;
public MainPage() { // Default initialization InitializeComponent();
// Create the C1RichTextBox and add it to the page _rtb = new C1RichTextBox(); LayoutRoot.Children.Add(_rtb);
// Create document and show it in the C1RichTextBox _rtb.Document = DocumentAssembly(typeof(C1RichTextBox).Assembly); _rtb.IsReadOnly = true; }}
The code creates the C1RichTextBox and assigns its C1RichTextBox.Document property to the result of a call to theDocumentAssembly method. It then makes the control read-only so users can't change the report.
The DocumentAssembly method takes an Assembly as argument and builds a C1Document containing theassembly documentation. Here is the implementation:
Visual Basic
Private Function DocumentAssembly(asm As Assembly) As C1Document ' Create document Dim doc As New C1Document() doc.FontFamily = New FontFamily("Tahoma")
' Assembly doc.Blocks.Add(New Heading1("Assembly" & vbCr & vbLf + asm.FullName.Split(","C)(0)))
' Types For Each t As Type In asm.GetTypes() DocumentType(doc, t) Next
' Done Return docEnd Function
C#
C1Document DocumentAssembly(Assembly asm){
RichTextBox for WPF and Silverlight 43
Copyright © 2019 GrapeCity, Inc. All rights reserved.

// Create document C1Document doc = new C1Document(); doc.FontFamily = new FontFamily("Tahoma");
// Assembly doc.Blocks.Add(new Heading1("Assembly\r\n" + asm.FullName.Split(',')[0]));
// Types foreach (Type t in asm.GetTypes()) DocumentType(doc, t);
// Done return doc;}
The method starts by creating a new C1Document object and setting its C1TextElement.FontFamily property. This willbe the default value for all text elements added to the document.
Next, the method adds a Heading1 paragraph containing the assembly name to the new document's Blockscollection. Blocks are elements such as paragraphs and list items that flow down the document. They are similar to"div" elements in HTML. Some document elements contain an Inlines collection instead. These collections containelements that flow horizontally, similar to "span" elements in HTML.
The Heading1 class inherits from C1Paragraph and adds some formatting. We will add several such classes to theproject, for normal paragraphs and headings 1 through 4.
The Normal paragraph is a C1Paragraph that takes a content string in its constructor:
Visual Basic
Class Normal Inherits C1Paragraph Public Sub New(text As String) Me.Inlines.Add(New C1Run() With { _ Key .Text = text _ }) Me.Padding = New Thickness(30, 0, 0, 0) Me.Margin = New Thickness(0) End SubEnd Class
C#
class Normal : C1Paragraph{ public Normal(string text) { this.Inlines.Add(new C1Run() { Text = text }); this.Padding = new Thickness(30, 0, 0, 0); this.Margin = new Thickness(0); }}
The Heading paragraph extends Normal and makes the text bold:
RichTextBox for WPF and Silverlight 44
Copyright © 2019 GrapeCity, Inc. All rights reserved.
Visual Basic
Class Heading Inherits Normal Public Sub New(text As String) MyBase.New(text) Me.FontWeight = FontWeights.Bold End SubEnd Class
C#
class Heading : Normal{ public Heading(string text) : base(text) { this.FontWeight = FontWeights.Bold; }}
Heading1 through Heading4 extend Heading to specify font sizes, padding, borders, and colors:
Visual Basic
Class Heading1 Inherits Heading Public Sub New(text As String) MyBase.New(text) Me.Background = New SolidColorBrush(Colors.Yellow) Me.FontSize = 24 Me.Padding = New Thickness(0, 10, 0, 10) Me.BorderBrush = New SolidColorBrush(Colors.Black) Me.BorderThickness = New Thickness(3, 1, 1, 0) End SubEnd ClassClass Heading2 Inherits Heading Public Sub New(text As String) MyBase.New(text) Me.FontSize = 18 Me.FontStyle = FontStyles.Italic Me.Background = New SolidColorBrush(Colors.Yellow) Me.Padding = New Thickness(10, 5, 0, 5) Me.BorderBrush = New SolidColorBrush(Colors.Black) Me.BorderThickness = New Thickness(3, 1, 1, 1) End SubEnd ClassClass Heading3 Inherits Heading Public Sub New(text As String) MyBase.New(text) Me.FontSize = 14 Me.Background = New SolidColorBrush(Colors.LightGray) Me.Padding = New Thickness(20, 3, 0, 0)
RichTextBox for WPF and Silverlight 45
Copyright © 2019 GrapeCity, Inc. All rights reserved.

End SubEnd ClassClass Heading4 Inherits Heading Public Sub New(text As String) MyBase.New(text) Me.FontSize = 14 Me.Padding = New Thickness(30, 0, 0, 0) End SubEnd Class
C#
class Heading1 : Heading{ public Heading1(string text) : base(text) { this.Background = new SolidColorBrush(Colors.Yellow); this.FontSize = 24; this.Padding = new Thickness(0, 10, 0, 10); this.BorderBrush = new SolidColorBrush(Colors.Black); this.BorderThickness = new Thickness(3, 1, 1, 0); }}class Heading2 : Heading{ public Heading2(string text): base(text) { this.FontSize = 18; this.FontStyle = FontStyles.Italic; this.Background = new SolidColorBrush(Colors.Yellow); this.Padding = new Thickness(10, 5, 0, 5); this.BorderBrush = new SolidColorBrush(Colors.Black); this.BorderThickness = new Thickness(3, 1, 1, 1); }}class Heading3 : Heading{ public Heading3(string text) : base(text) { this.FontSize = 14; this.Background = new SolidColorBrush(Colors.LightGray); this.Padding = new Thickness(20, 3, 0, 0); }}class Heading4 : Heading{ public Heading4(string text): base(text) { this.FontSize = 14; this.Padding = new Thickness(30, 0, 0, 0); }
RichTextBox for WPF and Silverlight 46
Copyright © 2019 GrapeCity, Inc. All rights reserved.

}
Now that we have classes for all paragraph types in the document, it's time to add the content. Recall that we used aDocumentType method in the first code block. Here is the implementation for that method:
Visual Basic
Private Sub DocumentType(doc As C1Document, t As Type) ' Skip non-public/generic If Not t.IsPublic OrElse t.ContainsGenericParameters Then Return End If
' Type doc.Blocks.Add(New Heading2("Class " & Convert.ToString(t.Name)))
' Properties doc.Blocks.Add(New Heading3("Properties")) For Each pi As PropertyInfo In t.GetProperties() If pi.DeclaringType = t Then DocumentProperty(doc, pi) End If Next
' Methods doc.Blocks.Add(New Heading3("Methods")) For Each mi As MethodInfo In t.GetMethods() If mi.DeclaringType = t Then DocumentMethod(doc, mi) End If Next
' Events doc.Blocks.Add(New Heading3("Events")) For Each ei As EventInfo In t.GetEvents() If ei.DeclaringType = t Then DocumentEvent(doc, ei) End If NextEnd Sub
C#
void DocumentType(C1Document doc, Type t){ // Skip non-public/generic if (!t.IsPublic || t.ContainsGenericParameters) return;
// Type doc.Blocks.Add(new Heading2("Class " + t.Name));
// Properties
RichTextBox for WPF and Silverlight 47
Copyright © 2019 GrapeCity, Inc. All rights reserved.
doc.Blocks.Add(new Heading3("Properties")); foreach (PropertyInfo pi in t.GetProperties()) { if (pi.DeclaringType == t) DocumentProperty(doc, pi); }
// Methods doc.Blocks.Add(new Heading3("Methods")); foreach (MethodInfo mi in t.GetMethods()) { if (mi.DeclaringType == t) DocumentMethod(doc, mi); }
// Events doc.Blocks.Add(new Heading3("Events")); foreach (EventInfo ei in t.GetEvents()) { if (ei.DeclaringType == t) DocumentEvent(doc, ei); }}
The method adds a Heading2 paragraph with the class name and then uses reflection to enumerate all the publicproperties, events, and methods in the type. The code for these methods is simple:
Visual Basic
Private Sub DocumentProperty(doc As C1Document, pi As PropertyInfo) If pi.PropertyType.ContainsGenericParameters Then Return End If
doc.Blocks.Add(New Heading4(pi.Name))
Dim text = String.Format("public {0} {1} {{ {2}{3} }}", pi.PropertyType.Name, pi.Name, If(pi.CanRead, "get; ", String.Empty), If(pi.CanWrite, "set; ", String.Empty)) doc.Blocks.Add(New Normal(text))End Sub
C#
void DocumentProperty(C1Document doc, PropertyInfo pi){ if (pi.PropertyType.ContainsGenericParameters) return;
doc.Blocks.Add(new Heading4(pi.Name));
var text = string.Format("public {0} {1} {{ {2}{3} }}", pi.PropertyType.Name,
RichTextBox for WPF and Silverlight 48
Copyright © 2019 GrapeCity, Inc. All rights reserved.

pi.Name, pi.CanRead ? "get; " : string.Empty, pi.CanWrite ? "set; " : string.Empty); doc.Blocks.Add(new Normal(text));}
The method adds a Heading4 paragraph containing the property name, then some Normal text containing theproperty type, name, and accessors.
The methods used for documenting events and properties are analogous:
Visual Basic
Private Sub DocumentMethod(doc As C1Document, mi As MethodInfo) If mi.IsSpecialName Then Return End If
doc.Blocks.Add(New Heading4(mi.Name)) Dim parms = New StringBuilder() For Each parm As var In mi.GetParameters() If parms.Length > 0 Then parms.Append(", ") End If parms.AppendFormat("{0} {1}", parm.ParameterType.Name, parm.Name) Next Dim text = String.Format("public {0} {1}({2})", mi.ReturnType.Name, mi.Name, parms.ToString())
doc.Blocks.Add(New Normal(text))End Sub
Private Sub DocumentEvent(doc As C1Document, ei As EventInfo) doc.Blocks.Add(New Heading4(ei.Name))
Dim text = String.Format("public {0} {1}", ei.EventHandlerType.Name, ei.Name)
doc.Blocks.Add(New Normal(text))End Sub
C#
void DocumentMethod(C1Document doc, MethodInfo mi){ if (mi.IsSpecialName) return;
doc.Blocks.Add(new Heading4(mi.Name)); var parms = new StringBuilder(); foreach (var parm in mi.GetParameters()) { if (parms.Length > 0) parms.Append(", ");
RichTextBox for WPF and Silverlight 49
Copyright © 2019 GrapeCity, Inc. All rights reserved.

parms.AppendFormat("{0} {1}", parm.ParameterType.Name, parm.Name); } var text = string.Format("public {0} {1}({2})", mi.ReturnType.Name, mi.Name, parms.ToString());
doc.Blocks.Add(new Normal(text));}
void DocumentEvent(C1Document doc, EventInfo ei){ doc.Blocks.Add(new Heading4(ei.Name));
var text = string.Format("public {0} {1}", ei.EventHandlerType.Name, ei.Name);
doc.Blocks.Add(new Normal(text));}
If you run the project now, you will see a window like the one shown below:
The resulting document can be viewed and edited in the C1RichTextBox like any other. It can also be exported toHTML using the C1RichTextBox.Html property in the C1RichTextBox, or copied through the clipboard to applicationssuch as Microsoft Word or Excel.
You could use the same technique to create reports based on data from a database. In addition to formatted text, the
RichTextBox for WPF and Silverlight 50
Copyright © 2019 GrapeCity, Inc. All rights reserved.
C1Document object model supports the following features:
ListsLists are created by adding C1List objects to the document. The C1List object has a C1List.ListItems propertythat contains C1ListItem objects, which are also blocks.HyperlinksHyperlinks are created by adding C1Hyperlink objects to the document. The C1Hyperlink object hasan C1Span.Inlines property that contains a collection of runs (typically C1Run elements that contain text), and aNavigateUrl property that determines the action to be taken when the hyperlink is clicked.ImagesImages and other FrameworkElement objects are created by adding C1BlockUIContainer objects to thedocument. The C1BlockUIContainer object has a C1BlockUIContainer.Child property that can be set to anyFrameworkElement object.Note that not all objects can be exported to HTML. Images are a special case that the HTML filter knows howto handle.
Implementing Split ViewsMany editors offer split-views of a document, allowing you to keep a part of the document visible while you work onanother part.
You can achieve this easily by connecting two or more C1RichTextBox controls to the same underlying C1Document.Each control acts as an independent view, allowing you to scroll, select, and edit the document as usual. Changesmade to one view are reflected on all other views.
To show how this works, let's extend the previous example by adding a few lines of code to the page constructor:
Visual Basic
Public Sub New() ' Default initialization InitializeComponent()
' Create the C1RichTextBox and add it to the page _rtb = New C1RichTextBox() LayoutRoot.Children.Add(_rtb)
' Create document and show it in the C1RichTextBox _rtb.Document = DocumentAssembly(GetType(C1RichTextBox).Assembly) _rtb.IsReadOnly = True
' Attach event handler AddHandler _rtb.ElementMouseLeftButtonDown, AddressOf _rtb_ElementMouseLeftButtonDown
' Add a second C1RichTextBox to the page LayoutRoot.RowDefinitions.Add(New RowDefinition()) LayoutRoot.RowDefinitions.Add(New RowDefinition()) Dim rtb2 = New C1RichTextBox() rtb2.SetValue(Grid.RowProperty, 1) LayoutRoot.Children.Add(rtb2)
' Bind the second C1RichTextBox to the same document rtb2.Document = _rtb.Document
RichTextBox for WPF and Silverlight 51
Copyright © 2019 GrapeCity, Inc. All rights reserved.
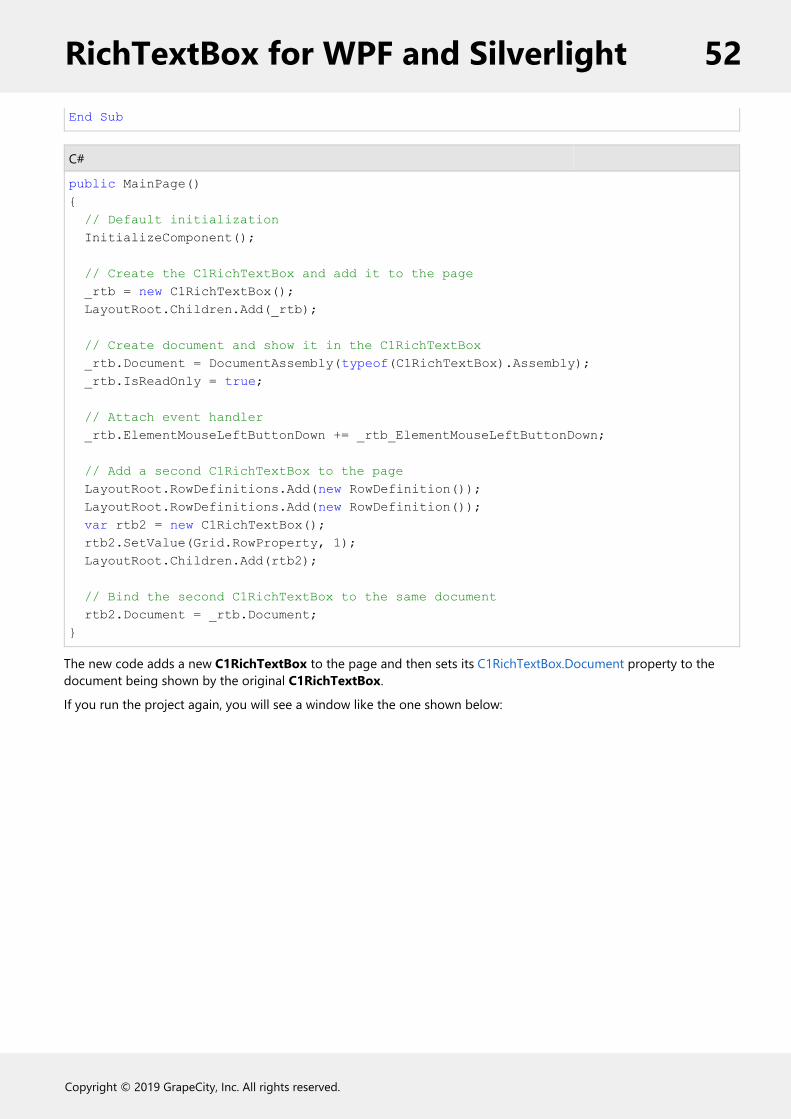
End Sub
C#
public MainPage(){ // Default initialization InitializeComponent();
// Create the C1RichTextBox and add it to the page _rtb = new C1RichTextBox(); LayoutRoot.Children.Add(_rtb);
// Create document and show it in the C1RichTextBox _rtb.Document = DocumentAssembly(typeof(C1RichTextBox).Assembly); _rtb.IsReadOnly = true;
// Attach event handler _rtb.ElementMouseLeftButtonDown += _rtb_ElementMouseLeftButtonDown;
// Add a second C1RichTextBox to the page LayoutRoot.RowDefinitions.Add(new RowDefinition()); LayoutRoot.RowDefinitions.Add(new RowDefinition()); var rtb2 = new C1RichTextBox(); rtb2.SetValue(Grid.RowProperty, 1); LayoutRoot.Children.Add(rtb2);
// Bind the second C1RichTextBox to the same document rtb2.Document = _rtb.Document;}
The new code adds a new C1RichTextBox to the page and then sets its C1RichTextBox.Document property to thedocument being shown by the original C1RichTextBox.
If you run the project again, you will see a window like the one shown below:
RichTextBox for WPF and Silverlight 52
Copyright © 2019 GrapeCity, Inc. All rights reserved.
The bottom control is editable (we did not set its C1RichTextBox.IsReadOnly property to False). If you type into it, youwill see the changes on both controls simultaneously.
The mechanism is general; we could easily attach more views of the same document. Moreover, any changes youmake to the underlying document are immediately reflected on all views.
Using the C1Document ClassAs we mentioned earlier, the C1RichTextBox provides a linear, flat view of the control content, while C1Documentclass exposes the document structure.
To illustrate the advantages of working directly with the document object, suppose you wanted to add somefunctionality to the previous sample: when the user presses the CTRL key, you want to capitalize the text in allparagraphs of type Heading2.
The object model exposed by the C1RichTextBox is not powerful enough to do this reliably. You would have tolocate spans based on their formatting, which would be inefficient and unreliable (what if the user formatted someplain text with the same format used by Heading2?).
Using the C1Document object model, this task becomes trivial:
Visual Basic
Public Sub New() ' Default initialization InitializeComponent()
' No changes here...
' Bind the second C1RichTextBox to the same document rtb2.Document = _rtb.Document AddHandler rtb2.KeyDown, AddressOf rtb2_KeyDown
RichTextBox for WPF and Silverlight 53
Copyright © 2019 GrapeCity, Inc. All rights reserved.

End SubPrivate Sub rtb2_KeyDown(sender As Object, e As KeyEventArgs) If e.Key = Key.Ctrl Then For Each heading2 As var In _rtb.Document.Blocks.OfType(Of Heading2)() Dim text = heading2.ContentRange.Text heading2.ContentRange.Text = text.ToUpper() Next End IfEnd Sub
C#
public MainPage(){ // Default initialization InitializeComponent();
// No changes here...
// Bind the second C1RichTextBox to the same document rtb2.Document = _rtb.Document; rtb2.KeyDown += rtb2_KeyDown;}void rtb2_KeyDown(object sender, KeyEventArgs e){ if (e.Key == Key.Ctrl) { foreach (var heading2 in _rtb.Document.Blocks.OfType<Heading2>()) { var text = heading2.ContentRange.Text; heading2.ContentRange.Text = text.ToUpper(); } }}
The code monitors the keyboard. When the user presses the CTRL key, it enumerates all Heading2 elements in thedocument and replaces their content with capitals.
Doing the same thing using the C1RichTextBox object model would require a lot more code and the result would notbe as reliable.
Understanding C1TextPointerThe C1TextPointer class represents a position inside a C1Document. It is intended to facilitate traversal andmanipulation of C1Documents. The functionality is analogous to WPF's TextPointer class, although the object modelhas many differences.
A C1TextPointer is defined by a C1TextElement and an offset inside of it. Let's take this document as an example:
RichTextBox for WPF and Silverlight 54
Copyright © 2019 GrapeCity, Inc. All rights reserved.

The blue bracketed nodes above are C1TextElements; the offset of a C1TextPointer indicates between which childrenthe position is located. For instance, a position that points to the C1Document above with offset 0 is just before thefirst C1Paragraph, offset 1 is between the two paragraphs, and offset 2 is after the second paragraph. When aC1TextPointer points to a C1Run, each character in its text is considered a child of C1Run, so the offset indicates aposition inside the text. A C1InlineUIContainer is considered to have a single child (the UIElement it displays) so it hastwo positions, one before and one after the child.
An alternative way to visualize a document is as a sequence of symbols, where a symbol can be either an element tagor some type of content. An element tag indicates the start or end of an element. In XML, the above document wouldbe written as:
XML
<C1Document> <C1Paragraph> <C1Run>CAT</C1Run> <C1InlineUIContainer><UI/></C1InlineUIContainer> </C1Paragraph> <C1Paragraph> <C1Run>DOG</C1Run> </C1Paragraph></C1Document>
Viewing the document like this, a C1TextPointer points to a position between tags or content. This view also gives aclear order to C1TextPointer. In fact, C1TextPointer implements IComparable, and also overloads the comparisonoperators for convenience.
The symbol that is after a C1TextPointer can be obtained using the C1TextPointer.Symbol property. This propertyreturns an object that can be of type StartTag, EndTag, char or UIElement.
If you want to iterate through the positions in a document, there are two methods available: GetPositionAtOffsetand Enumerate. GetPositionAtOffset is the low-level method; it just returns the position at a specified integer offset.Enumerate is the recommended way to iterate through positions. It returns an IEnumerable<C1TextPointer> thatiterates through all the positions in a specified direction. For instance, this returns all the positions in a document:
document.ContentStart.Enumerate()
Note that ContentStart returns the first C1TextPointer in a C1TextElement; there is also a ContentEnd propertythat returns the last position.
The interesting thing about Enumerate is that it returns a lazy enumeration. That is, C1TextPointer objects are onlycreated when the IEnumerable is iterated. This allows for efficient use of LINQ extensions methods for filtering,finding, selecting, and so on. As an example, let's say you want to get the C1TextRange for the word contained undera C1TextPointer. You can do the following:
RichTextBox for WPF and Silverlight 55
Copyright © 2019 GrapeCity, Inc. All rights reserved.
Visual Basic
Private Function ExpandToWord(pos As C1TextPointer) As C1TextRange ' Find word start Dim wordStart = If(pos.IsWordStart, pos, pos.Enumerate(LogicalDirection.Backward).First(Function(p) p.IsWordStart))
' Find word end Dim wordEnd = If(pos.IsWordEnd, pos, pos.Enumerate(LogicalDirection.Forward).First(Function(p) p.IsWordEnd))
' Return new range from word start to word end Return New C1TextRange(wordStart, wordEnd)End Function
C#
C1TextRange ExpandToWord(C1TextPointer pos){ // Find word start var wordStart = pos.IsWordStart ? pos : pos.Enumerate(LogicalDirection.Backward).First(p => p.IsWordStart);
// Find word end var wordEnd = pos.IsWordEnd ? pos : pos.Enumerate(LogicalDirection.Forward).First(p => p.IsWordEnd);
// Return new range from word start to word end return new C1TextRange(wordStart, wordEnd);}
The Enumerate method returns the positions in a specified direction, but it doesn't include the current position. Sothe code first checks if the parameter position is a word start, and if not, searches backward for a position that is aword start. Likewise for the word end, it checks the parameter position and then searches forward. We want to findthe word that contains the parameter position, so we need the first word end moving forward and the first word startmoving backward. C1TextPointer already contains the properties IsWordStart and IsWordEnd that tells you whethera position is a word start or end depending on the surrounding symbols. We use the First LINQ extension method tofind the first position that satisfies our required predicate. And finally we create a C1TextRange from the twopositions.
LINQ extension methods can be very useful when working with positions. As another example we can count the wordsin a document like this:
Visual Basic
document.ContentStart.Enumerate().Count(Function(p) p.IsWordStart AndAlso TypeOf p.Symbol Is Char)
C#
document.ContentStart.Enumerate().Count(p => p.IsWordStart && p.Symbol is char)
Note that we need to check that the symbol following a word start is a char because IsWordStart returns True for
RichTextBox for WPF and Silverlight 56
Copyright © 2019 GrapeCity, Inc. All rights reserved.
positions that are not exactly at the start of a word. For instance the position just before a C1Run start tag isconsidered a word start if the first position of the C1Run is a word start.
Let's implement a Find method as another example:
Visual Basic
Private Function FindWordFromPosition(position As C1TextPointer, word As String) As C1TextRange ' Get all ranges whose text length is equal to word.Length Dim ranges = position.Enumerate().[Select](Function(pos) ' Get a position that is at word.Length offset ' but ignoring tags that do not change the text flow Dim [end] = pos.GetPositionAtOffset(word.Length, C1TextRange.TextTagFilter) Return New C1TextRange(pos, [end])
End Function) ' returned value will be null if word is not found. Return ranges.FirstOrDefault(Function(range) range.Text = word)End Function
C#
C1TextRange FindWordFromPosition(C1TextPointer position, string word){ // Get all ranges whose text length is equal to word.Length var ranges = position.Enumerate().Select(pos => { // Get a position that is at word.Length offset // but ignoring tags that do not change the text flow var end = pos.GetPositionAtOffset(word.Length, C1TextRange.TextTagFilter); return new C1TextRange(pos, end); }); // returned value will be null if word is not found. return ranges.FirstOrDefault(range => range.Text == word);}
We want to find the word from a specified position, so we enumerate all positions forward, and select all rangeswhose text length is word.Length. For each position we need to find the position that is at word.Length distance. Forthis we use the GetPositionAtOffset method. This method returns a position at a specified offset, but it also countsall inline tags as valid positions, we need to ignore this to account for the case when a word is split between twoC1Run elements. That is why we use C1TextRange.TextTagFilter; this is the same filter method used by the internallogic that translates document trees into text. As a final step we search for the range whose text matches the searchedword.
As a last example let's replace the first occurrence of a word:
Visual Basic
Dim wordRange = FindWordFromPosition(document.ContentStart, "cat")If wordRange IsNot Nothing Then wordRange.Text = "dog"End If
C#
RichTextBox for WPF and Silverlight 57
Copyright © 2019 GrapeCity, Inc. All rights reserved.

var wordRange = FindWordFromPosition(document.ContentStart, "cat");if (wordRange != null){ wordRange.Text = "dog";}
We can use the previous example to first find the word, and then replace the text by just assigningto C1TextRange.Text property.
RichTextBox for WPF and Silverlight 58
Copyright © 2019 GrapeCity, Inc. All rights reserved.

Working with C1RichTextBoxToolbarThe C1RichTextBoxToolbar control is a full-featured, ribbon-like toolbar that easily turns the C1RichTextBox controlinto a complete text editor. The C1RichTextBoxToolbar control is based on the C1Toolbar control allowingcomplete customization.
To connect a C1RichTextBoxToolbar control to a C1RichTextBox control you would need to setthe C1RichTextBoxToolbar.RichTextBox property to the name of the control you want to link with the toolbar. For anexample, see Connecting a C1RichTextBoxToolbar to a C1RichTextBox topic.
When you add the C1RichTextBoxToolbar to your application, it appears similar to the following:
The buttons within the toolbar appear very similar to options in Microsoft Word and other editors, so they shouldappear familiar to end-users. There are two tabs: Home and Tables.
Home Tab
The Home tab includes five defined groups of elements: Edit, Font, Paragraph, Insert, and Tools.
Tables Tab
The Tables tab includes four defined groups of elements: Table, Rows & Columns, Merge, and Cell.
The following topics explain the elements within each group.
Edit GroupThe Edit group provides standard editing tools, such as copy, paste, and undo. It looks similar to the following image:
RichTextBox for WPF and Silverlight 59
Copyright © 2019 GrapeCity, Inc. All rights reserved.

The Edit group includes the following options:
Paste: Clicking the Paste button pastes the selected text into the C1RichTextBox. You can also paste text bypressing the CTRL + V key combination while text is selected.Cut: Clicking the Cut button cuts the selected text and places it on the clipboard. You can also cut text bypressing the CTRL + X key combination while text is selected.Copy: Clicking the Copy button copies the selected text so that it can be pasted into the C1RichTextBox oranother application. You can also copy text by pressing the CTRL + C key combination while text is selected.Undo: Clicking the Undo button reverses the previous changes made to the content of the C1RichTextBox.The Undo button is not active unless changes have been made. You can also undo changes by pressing theCTRL + Z key combination.Redo: Clicking the Redo button after the Undo button has been clicked repeats the changes that had beenpreviously reversed. The Redo button is not active unless the Undo button has been clicked. You can also redochanges by pressing the CTRL + Y key combination.FP: Clicking the FP button copies the formatting of the selected text and allows you to apply it to other text.
Font GroupThe Font group includes several options for customizing the font used in the C1RichTextBox control. The Font groupappears similar to the following image:
The Font group includes the following options:
Font: The Font option is a drop-down list that allows you to choose the font that will be applied to text in theC1RichTextBox control. The default font is Portable User Interface.
RichTextBox for WPF and Silverlight 60
Copyright © 2019 GrapeCity, Inc. All rights reserved.

Font Size: The Font Size option is a drop-down list that allows you to choose the size of the font that will beapplied to text in the C1RichTextBox control. The default font size is 9.Grow Font: Clicking the Grow Font button increases the size of the selected text.Shrink Font: Clicking the Shrink Font button decreases the size of the selected text.Bold: Clicking the Bold button bolds or removes bolding from the selected text. You can also use Ctrl+bshortcut key to bold the text.Italic: Clicking the Italic button italicizes or removes italics from the selected text. You can also use Ctrl+ishortcut key to italicize the text.Underline: Clicking the Underline button underlines or removes underlining from the selected text. You canalso use Ctrl+u shortcut key to underline the text.Strikethrough - Clicking the Strikethrough draws a line through text which indicates deletion of text in thedocument.Change Case: The Change Case option is a drop-down list that lists options that will change the case of theselected text. Options include: lowercase, UPPERCASE, Capitalize Each Word, and tOGGLE cASE (which turnslowercase text into uppercase text and uppercase text into lowercase text).
Superscript: Clicking the Superscript button turns the selected text into superscript text (the text will appearplaced higher vertically than text that is not superscript text).Subscript: Clicking the Subscript button turns the selected text into subscript text (the text will appear placedlower vertically than text that is not superscript text).Font Color: The Font Color option is a drop-down color picker that lists common colors that will change thecolor of the selected text.
RichTextBox for WPF and Silverlight 61
Copyright © 2019 GrapeCity, Inc. All rights reserved.

Text Highlight Color: The Text Highlight Color option is a drop-down color picker that lists common colorsthat will change the color of the background surrounding the selected text.
Paragraph GroupThe Paragraph group includes several options for customizing the paragraph settings used in the C1RichTextBoxcontrol. The Paragraph group appears similar to the following image:
The Paragraph group includes the following options:
Align Text Left: The Align Text Left option aligns the selected text so that it is left justified. This is the defaultalignment option.Align Text Center: The Align Text Center option aligns the selected text so that it is centered in theRichTextBox control.Align Text Right: The Align Text Right option aligns the selected text so that it is right justified.Justify: The Justify option spaces the selected text so that it is fully justified.Bullets: The Bullets option is a button that adds or removes bulleting from the selected text.Numbering: The Numbering option is a button that adds or removes numbering from the selected text.Text Wrapping: The Text Wrapping option determines if lines of text should be wrapped to fit in theRichTextBox. By default text is wrapped.Borders: The Borders drop-down box allows you to set the border color, thickness, and where the bordersappear.
RichTextBox for WPF and Silverlight 62
Copyright © 2019 GrapeCity, Inc. All rights reserved.

Paragraph Color: The Paragraph Color option is a drop-down color picker that lists common colors that willchange the color of the background of the entire paragraph. By default this option is set to White.
Margin: The Margin drop-down box, allows you to set the margin thickness of the Left, Right, Top, andBottom margins surrounding the text. By default the Left, Right, and Top values are set to 0 and the Bottommargin is set to 10.Padding: The Padding drop-down box, allows you to set the padding space of the Left, Right, Top, andBottom areas surrounding the selected text. By default these values are set to 0 and there is no padding.
Insert GroupThe Insert group allows inserting content in the C1RichTextBox control. The Insert group appears similar to thefollowing image:
RichTextBox for WPF and Silverlight 63
Copyright © 2019 GrapeCity, Inc. All rights reserved.
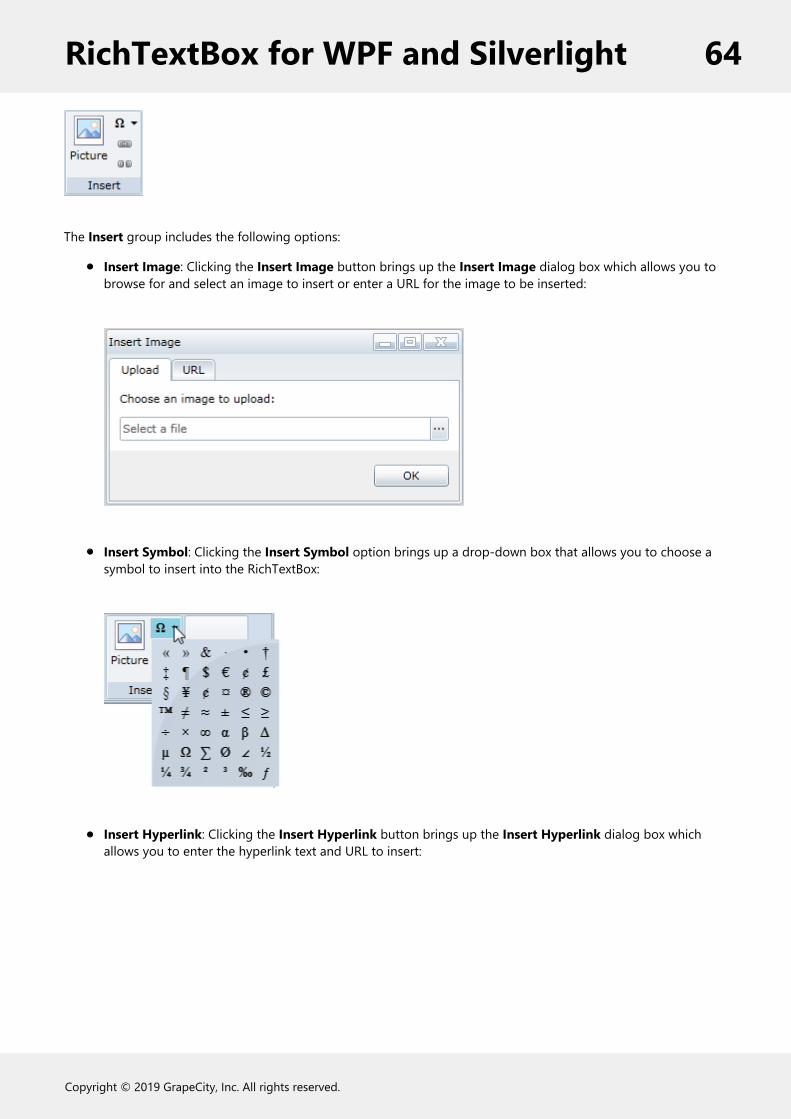
The Insert group includes the following options:
Insert Image: Clicking the Insert Image button brings up the Insert Image dialog box which allows you tobrowse for and select an image to insert or enter a URL for the image to be inserted:
Insert Symbol: Clicking the Insert Symbol option brings up a drop-down box that allows you to choose asymbol to insert into the RichTextBox:
Insert Hyperlink: Clicking the Insert Hyperlink button brings up the Insert Hyperlink dialog box whichallows you to enter the hyperlink text and URL to insert:
RichTextBox for WPF and Silverlight 64
Copyright © 2019 GrapeCity, Inc. All rights reserved.

Remove Hyperlink: Clicking the Remove Hyperlink button removes any hyperlinks within the selected text.Highlight the hyperlink in the RichTextBox and click the Remove Hyperlink button to remove the link.
Tools GroupThe Tools group allows manipulating and editing content in the C1RichTextBox control. The Tools group appearssimilar to the following image:
The Tools group includes the following options:
Spell Check: Clicking the Spell Check button opens the Spelling dialog box. Note that spell-checking must beset up for this button to be active. See Spell-Checking for details. In the Spelling dialog box you can viewsuggested spellings and Ignore the error, Ignore All errors in instances of the same word, Change the currentspelling to a suggested one, Change All instances of the current spelling, Add the current spelling to the spell-checking dictionary, Suggest to view additional spellings based on a suggested spelling, and Cancel to closethe dialog box and cancel the spell-check operation.
RichTextBox for WPF and Silverlight 65
Copyright © 2019 GrapeCity, Inc. All rights reserved.
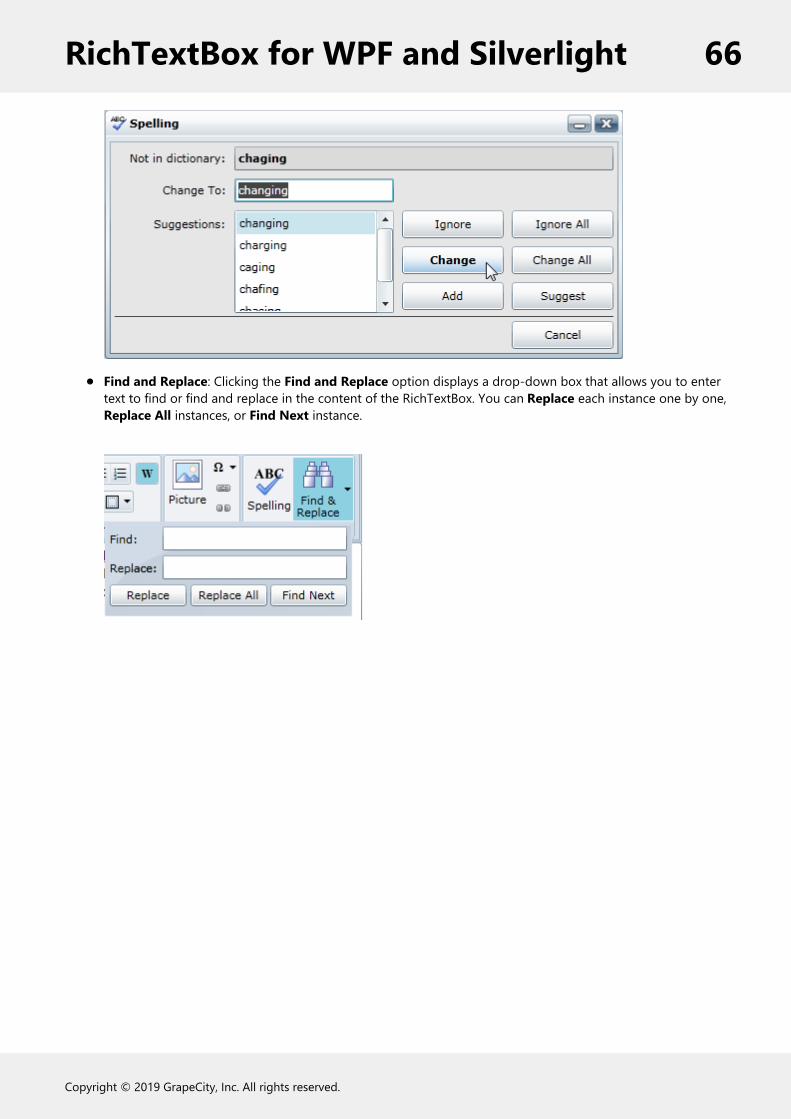
Find and Replace: Clicking the Find and Replace option displays a drop-down box that allows you to entertext to find or find and replace in the content of the RichTextBox. You can Replace each instance one by one,Replace All instances, or Find Next instance.
RichTextBox for WPF and Silverlight 66
Copyright © 2019 GrapeCity, Inc. All rights reserved.

Working with C1SimplifiedRichTextBoxToolbarThe new C1SimplifiedRichTextBoxToolbar control is represented by the C1SimplifiedRichTextBoxToolbar class. Ithas new features and improvised look and feel in comparison to C1RichTextBoxToolbar as shown in GIF below.
C1SimplifiedRichTextBoxToolbar provides a wide set of formatting and editing features likeC1RichTextBoxToolbar. Also, it contains a newly added View Tab which includes two defined group of elements;Views and Zoom as shown in the image below.
The Views group allows you to view the document in Print Layout and Draft mode.The Zoom group allows you to Zoom In and Zoom out the document for specific purposes. It also allows youto view the document pages in multiple modes like One Page, Two Pages, and Fit Width.
In C1SimplifiedRichTextBoxToolbar, the Home Tab contains a new Strikethrough feature which indicates removalof text by a horizontal line drawn through it. For more information about the toolbar features, refer Working withC1RichTextBoxToolbar.
Quick Start
In this step, you create a new WPF application and add the RichTextBox and SimplifiedRichTextBoxToolbarcontrols in XAML. After completing this step, you have a mostly functional text-rich editor.
In Design View
To add the RichTextBox control to your WPF application in Design view, perform the following steps
1. Create a new WPF application in Visual Studio.2. Navigate to the Toolbox and locate the C1RichTextBox and C1SimplifiedRichTextBoxToolbar controls.3. Double-click the C1RichTextBox and C1SimplifiedRichTextBoxToolbar icons to add the controls to the
MainWindow.4. In the XAML view, add the relevant namespaces to the page by editing the MainWindow tags.
XAML
xmlns="http://schemas.microsoft.com/winfx/2006/xaml/presentation"xmlns:x="http://schemas.microsoft.com/winfx/2006/xaml"xmlns:c1="http://schemas.componentone.com/winfx/2006/xaml" x:Class="RTBQuickStart.MainWindow"Title="MainWindow" Height="350" Width="525">
5. Place the cursor between the <Grid> and </Grid> tags, click once, and add the following markup within the
copyCode
RichTextBox for WPF and Silverlight 67
Copyright © 2019 GrapeCity, Inc. All rights reserved.

<Grid> tags to add a StackPanel panel.XAML
<StackPanel HorizontalAlignment="Left" Margin="0,10,0,0" x:Name="SP" VerticalAlignment="Top" Height="418" Width="645" Grid.ColumnSpan="2" Grid.Column="1"/>
6. Click between the StackPanel tags and add the following markup to edit the appearance and positioning of
RichTextBox and SimplifiedRichTextBoxToolbar controls in the XAML view.XAML
<c1:C1RichTextBox Name="c1RichTextBox1" Margin="0,127,0,10"/><c1:C1SimplifiedRichTextBoxToolbar RichTextBox="{Binding ElementName= c1RichTextBox1}" Name="C1RTBTB" Margin="3,0,-3,197" />
You can enter text in the RichTextBox control and edit, format, and position the text using latest options in theSimplifiedRichTextBoxToolbar. To set up spell-checking and customize the application further, refer to RichTextBox forWPF Quick Start.
copyCode
RichTextBox for WPF and Silverlight 68
Copyright © 2019 GrapeCity, Inc. All rights reserved.
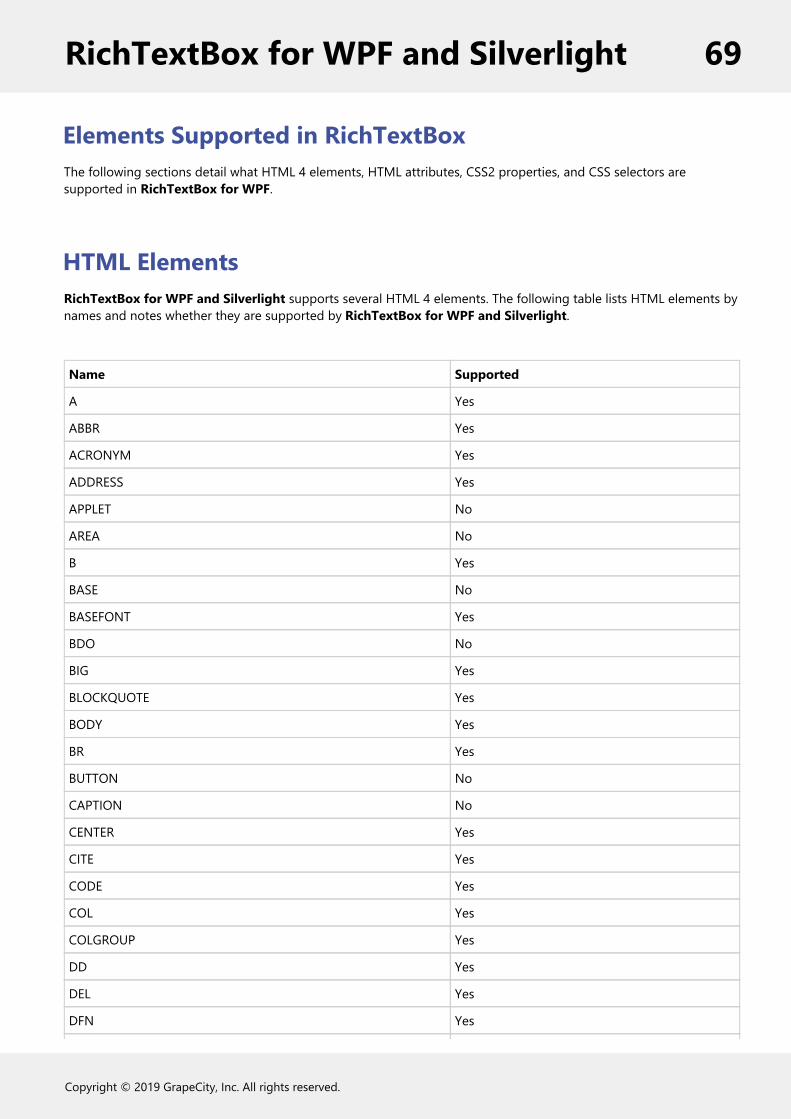
Elements Supported in RichTextBoxThe following sections detail what HTML 4 elements, HTML attributes, CSS2 properties, and CSS selectors aresupported in RichTextBox for WPF.
HTML ElementsRichTextBox for WPF and Silverlight supports several HTML 4 elements. The following table lists HTML elements bynames and notes whether they are supported by RichTextBox for WPF and Silverlight.
Name Supported
A Yes
ABBR Yes
ACRONYM Yes
ADDRESS Yes
APPLET No
AREA No
B Yes
BASE No
BASEFONT Yes
BDO No
BIG Yes
BLOCKQUOTE Yes
BODY Yes
BR Yes
BUTTON No
CAPTION No
CENTER Yes
CITE Yes
CODE Yes
COL Yes
COLGROUP Yes
DD Yes
DEL Yes
DFN Yes
RichTextBox for WPF and Silverlight 69
Copyright © 2019 GrapeCity, Inc. All rights reserved.
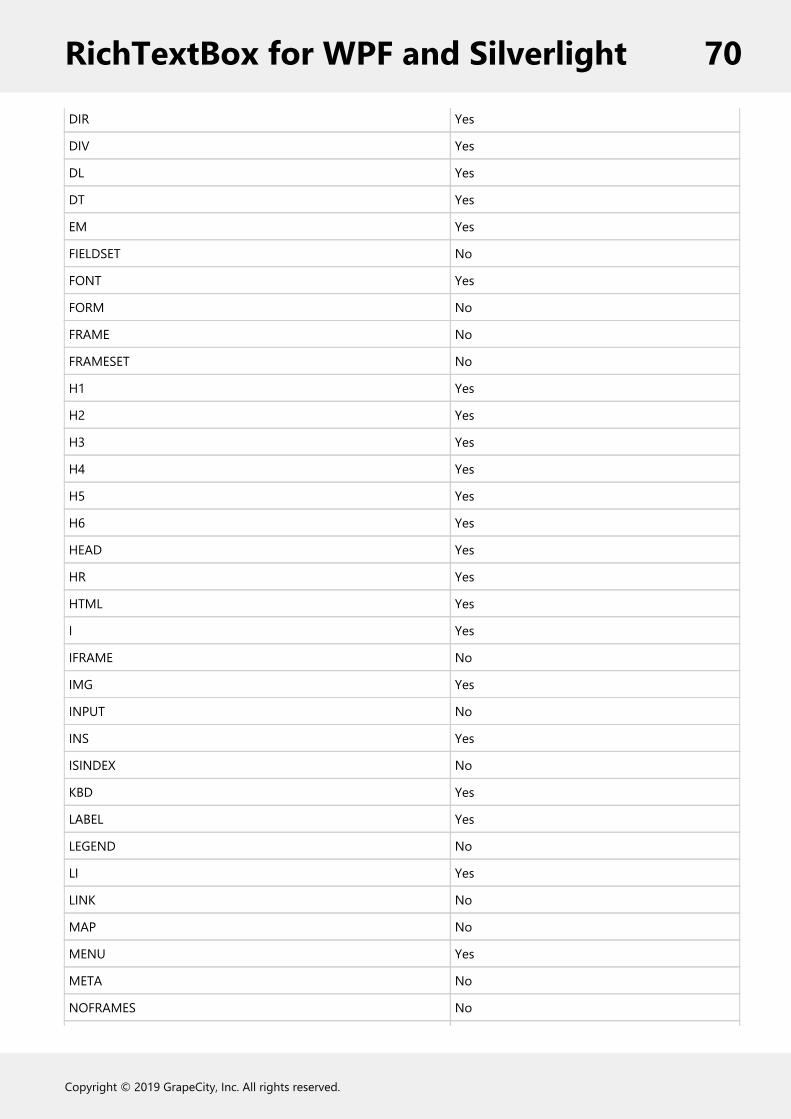
DIR Yes
DIV Yes
DL Yes
DT Yes
EM Yes
FIELDSET No
FONT Yes
FORM No
FRAME No
FRAMESET No
H1 Yes
H2 Yes
H3 Yes
H4 Yes
H5 Yes
H6 Yes
HEAD Yes
HR Yes
HTML Yes
I Yes
IFRAME No
IMG Yes
INPUT No
INS Yes
ISINDEX No
KBD Yes
LABEL Yes
LEGEND No
LI Yes
LINK No
MAP No
MENU Yes
META No
NOFRAMES No
RichTextBox for WPF and Silverlight 70
Copyright © 2019 GrapeCity, Inc. All rights reserved.

NOSCRIPT No
OBJECT No
OL Yes
OPTGROUP No
OPTION No
P Yes
PARAM No
PRE Yes
Q No
S Yes
SAMP Yes
SCRIPT No
SELECT No
SMALL Yes
SPAN Yes
STRIKE Yes
STRONG Yes
STYLE Yes
SUB Yes
SUP Yes
TABLE Yes
TBODY Yes
TD Yes
TEXTAREA No
TFOOT Yes
TH Yes
THEAD Yes
TITLE No
TR Yes
TT Yes
U Yes
UL Yes
VAR Yes
RichTextBox for WPF and Silverlight 71
Copyright © 2019 GrapeCity, Inc. All rights reserved.
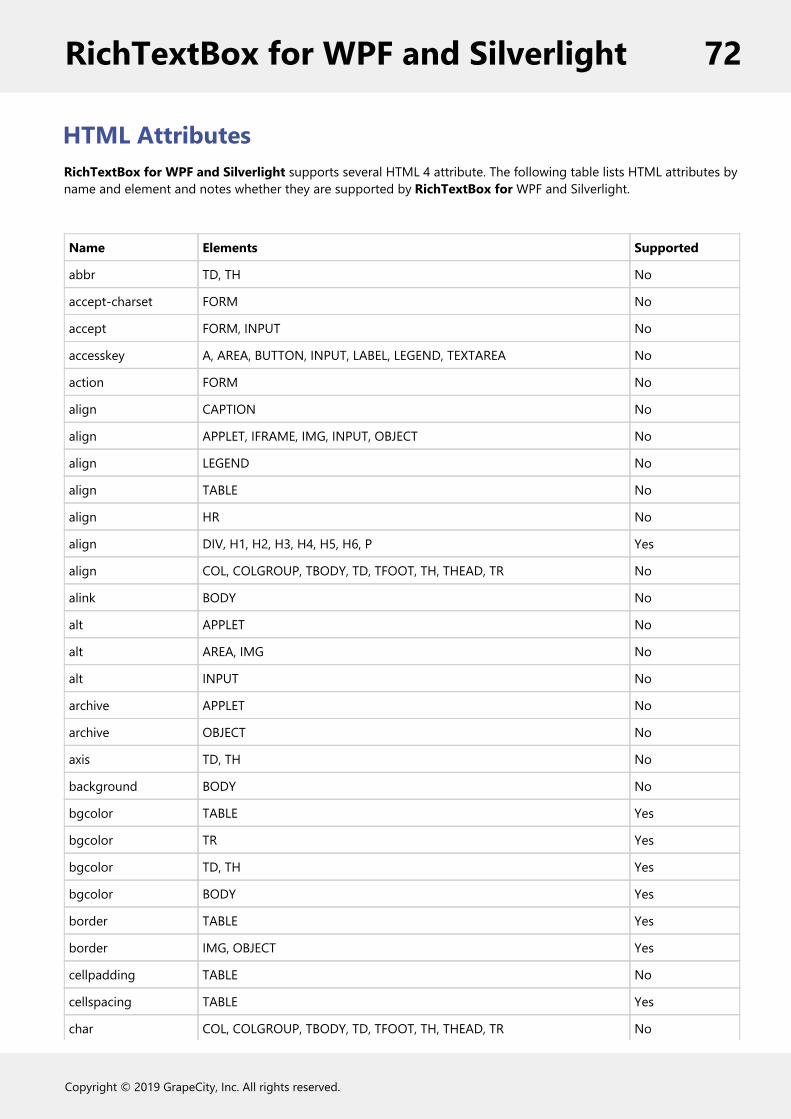
HTML AttributesRichTextBox for WPF and Silverlight supports several HTML 4 attribute. The following table lists HTML attributes byname and element and notes whether they are supported by RichTextBox for WPF and Silverlight.
Name Elements Supported
abbr TD, TH No
accept-charset FORM No
accept FORM, INPUT No
accesskey A, AREA, BUTTON, INPUT, LABEL, LEGEND, TEXTAREA No
action FORM No
align CAPTION No
align APPLET, IFRAME, IMG, INPUT, OBJECT No
align LEGEND No
align TABLE No
align HR No
align DIV, H1, H2, H3, H4, H5, H6, P Yes
align COL, COLGROUP, TBODY, TD, TFOOT, TH, THEAD, TR No
alink BODY No
alt APPLET No
alt AREA, IMG No
alt INPUT No
archive APPLET No
archive OBJECT No
axis TD, TH No
background BODY No
bgcolor TABLE Yes
bgcolor TR Yes
bgcolor TD, TH Yes
bgcolor BODY Yes
border TABLE Yes
border IMG, OBJECT Yes
cellpadding TABLE No
cellspacing TABLE Yes
char COL, COLGROUP, TBODY, TD, TFOOT, TH, THEAD, TR No
RichTextBox for WPF and Silverlight 72
Copyright © 2019 GrapeCity, Inc. All rights reserved.

charoff COL, COLGROUP, TBODY, TD, TFOOT, TH, THEAD, TR No
charset A, LINK, SCRIPT No
checked INPUT No
cite BLOCKQUOTE, Q No
cite DEL, INS No
class All elements but BASE, BASEFONT, HEAD, HTML, META, PARAM, SCRIPT,STYLE, TITLE
Yes
classid OBJECT No
clear BR No
code APPLET No
codebase OBJECT No
codebase APPLET No
codetype OBJECT No
color BASEFONT, FONT No
cols FRAMESET No
cols TEXTAREA No
colspan TD, TH Yes
compact DIR, DL, MENU, OL, UL No
content META No
coords AREA No
coords A No
data OBJECT No
datetime DEL, INS No
declare OBJECT No
defer SCRIPT No
dir All elements but APPLET, BASE, BASEFONT, BDO, BR, FRAME, FRAMESET,IFRAME, PARAM, SCRIPT
No
dir BDO No
disabled BUTTON, INPUT, OPTGROUP, OPTION, SELECT, TEXTAREA No
enctype FORM No
face BASEFONT, FONT Yes
for LABEL No
frame TABLE Yes
frameborder FRAME, IFRAME No
headers TD, TH No
RichTextBox for WPF and Silverlight 73
Copyright © 2019 GrapeCity, Inc. All rights reserved.

height IFRAME No
height TD, TH No
height IMG, OBJECT Yes
height APPLET No
href A, AREA, LINK Yes
href BASE No
hreflang A, LINK No
hspace APPLET, IMG, OBJECT Yes
http-equiv META No
id All elements but BASE, HEAD, HTML, META, SCRIPT, STYLE, TITLE Yes
ismap IMG, INPUT No
label OPTION No
label OPTGROUP No
lang All elements but APPLET, BASE, BASEFONT, BR, FRAME, FRAMESET,IFRAME, PARAM, SCRIPT
No
language SCRIPT No
link BODY No
longdesc IMG No
longdesc FRAME, IFRAME No
marginheight FRAME, IFRAME No
marginwidth FRAME, IFRAME No
maxlength INPUT No
media STYLE No
media LINK No
method FORM No
multiple SELECT No
name BUTTON, TEXTAREA No
name APPLET No
name SELECT No
name FORM No
name FRAME, IFRAME No
name IMG No
name A No
name INPUT, OBJECT No
name MAP No
RichTextBox for WPF and Silverlight 74
Copyright © 2019 GrapeCity, Inc. All rights reserved.
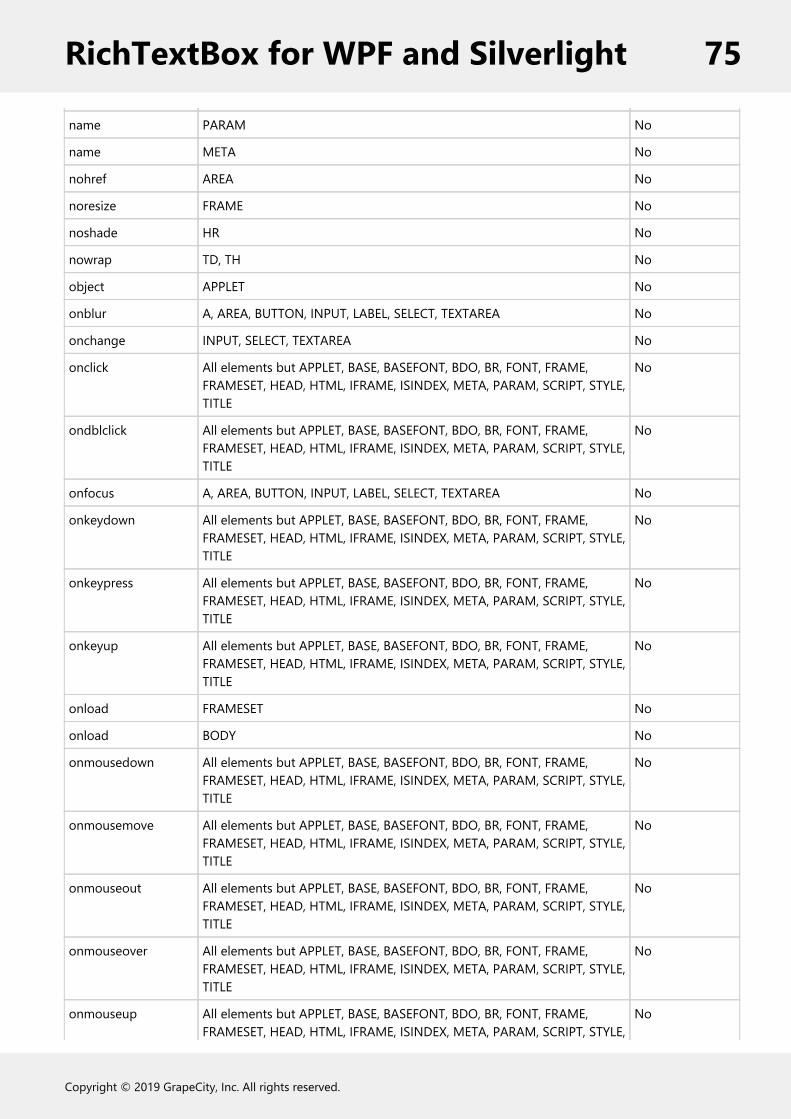
name PARAM No
name META No
nohref AREA No
noresize FRAME No
noshade HR No
nowrap TD, TH No
object APPLET No
onblur A, AREA, BUTTON, INPUT, LABEL, SELECT, TEXTAREA No
onchange INPUT, SELECT, TEXTAREA No
onclick All elements but APPLET, BASE, BASEFONT, BDO, BR, FONT, FRAME,FRAMESET, HEAD, HTML, IFRAME, ISINDEX, META, PARAM, SCRIPT, STYLE,TITLE
No
ondblclick All elements but APPLET, BASE, BASEFONT, BDO, BR, FONT, FRAME,FRAMESET, HEAD, HTML, IFRAME, ISINDEX, META, PARAM, SCRIPT, STYLE,TITLE
No
onfocus A, AREA, BUTTON, INPUT, LABEL, SELECT, TEXTAREA No
onkeydown All elements but APPLET, BASE, BASEFONT, BDO, BR, FONT, FRAME,FRAMESET, HEAD, HTML, IFRAME, ISINDEX, META, PARAM, SCRIPT, STYLE,TITLE
No
onkeypress All elements but APPLET, BASE, BASEFONT, BDO, BR, FONT, FRAME,FRAMESET, HEAD, HTML, IFRAME, ISINDEX, META, PARAM, SCRIPT, STYLE,TITLE
No
onkeyup All elements but APPLET, BASE, BASEFONT, BDO, BR, FONT, FRAME,FRAMESET, HEAD, HTML, IFRAME, ISINDEX, META, PARAM, SCRIPT, STYLE,TITLE
No
onload FRAMESET No
onload BODY No
onmousedown All elements but APPLET, BASE, BASEFONT, BDO, BR, FONT, FRAME,FRAMESET, HEAD, HTML, IFRAME, ISINDEX, META, PARAM, SCRIPT, STYLE,TITLE
No
onmousemove All elements but APPLET, BASE, BASEFONT, BDO, BR, FONT, FRAME,FRAMESET, HEAD, HTML, IFRAME, ISINDEX, META, PARAM, SCRIPT, STYLE,TITLE
No
onmouseout All elements but APPLET, BASE, BASEFONT, BDO, BR, FONT, FRAME,FRAMESET, HEAD, HTML, IFRAME, ISINDEX, META, PARAM, SCRIPT, STYLE,TITLE
No
onmouseover All elements but APPLET, BASE, BASEFONT, BDO, BR, FONT, FRAME,FRAMESET, HEAD, HTML, IFRAME, ISINDEX, META, PARAM, SCRIPT, STYLE,TITLE
No
onmouseup All elements but APPLET, BASE, BASEFONT, BDO, BR, FONT, FRAME,FRAMESET, HEAD, HTML, IFRAME, ISINDEX, META, PARAM, SCRIPT, STYLE,
No
RichTextBox for WPF and Silverlight 75
Copyright © 2019 GrapeCity, Inc. All rights reserved.

TITLE
onreset FORM No
onselect INPUT, TEXTAREA No
onsubmit FORM No
onunload FRAMESET No
onunload BODY No
profile HEAD No
prompt ISINDEX No
readonly TEXTAREA No
readonly INPUT No
rel A, LINK No
rev A, LINK No
rows FRAMESET No
rows TEXTAREA No
rowspan TD, TH Yes
rules TABLE Yes
scheme META No
scope TD, TH No
scrolling FRAME, IFRAME No
selected OPTION No
shape AREA No
shape A No
size HR No
size FONT No
size INPUT No
size BASEFONT No
size SELECT No
span COL No
span COLGROUP No
src SCRIPT No
src INPUT No
src FRAME, IFRAME No
src IMG No
standby OBJECT No
RichTextBox for WPF and Silverlight 76
Copyright © 2019 GrapeCity, Inc. All rights reserved.

start OL Yes
style All elements but BASE, BASEFONT, HEAD, HTML, META, PARAM, SCRIPT,STYLE, TITLE
Yes
summary TABLE No
tabindex A, AREA, BUTTON, INPUT, OBJECT, SELECT, TEXTAREA No
target A, AREA, BASE, FORM, LINK No
text BODY No
title All elements but BASE, BASEFONT, HEAD, HTML, META, PARAM, SCRIPT,TITLE
Yes
type A, LINK No
type OBJECT No
type PARAM No
type SCRIPT No
type STYLE No
type INPUT No
type LI No
type OL No
type UL No
type BUTTON No
usemap IMG, INPUT, OBJECT No
valign COL, COLGROUP, TBODY, TD, TFOOT, TH, THEAD, TR Yes
value INPUT No
value OPTION No
value PARAM No
value BUTTON No
value LI No
valuetype PARAM No
version HTML No
vlink BODY No
vspace APPLET, IMG, OBJECT Yes
width HR No
width IFRAME No
width IMG, OBJECT Yes
width TABLE No
width TD, TH No
RichTextBox for WPF and Silverlight 77
Copyright © 2019 GrapeCity, Inc. All rights reserved.
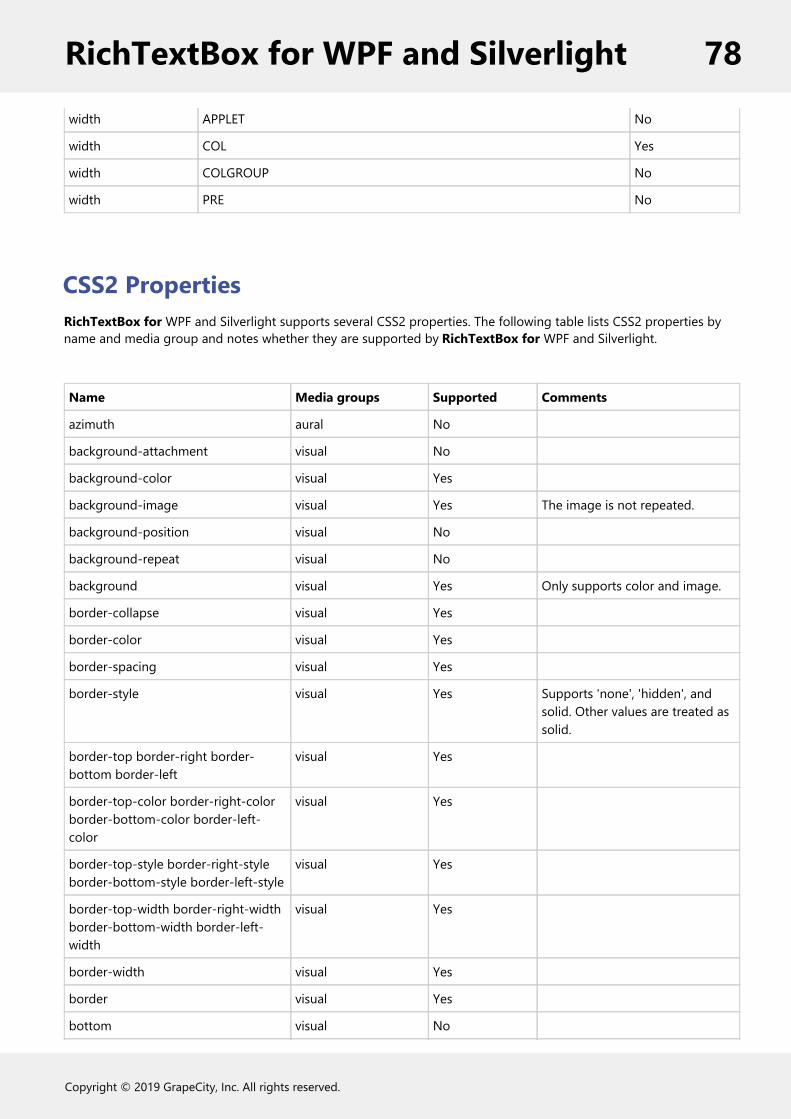
width APPLET No
width COL Yes
width COLGROUP No
width PRE No
CSS2 PropertiesRichTextBox for WPF and Silverlight supports several CSS2 properties. The following table lists CSS2 properties byname and media group and notes whether they are supported by RichTextBox for WPF and Silverlight.
Name Media groups Supported Comments
azimuth aural No
background-attachment visual No
background-color visual Yes
background-image visual Yes The image is not repeated.
background-position visual No
background-repeat visual No
background visual Yes Only supports color and image.
border-collapse visual Yes
border-color visual Yes
border-spacing visual Yes
border-style visual Yes Supports 'none', 'hidden', andsolid. Other values are treated assolid.
border-top border-right border-bottom border-left
visual Yes
border-top-color border-right-colorborder-bottom-color border-left-color
visual Yes
border-top-style border-right-styleborder-bottom-style border-left-style
visual Yes
border-top-width border-right-widthborder-bottom-width border-left-width
visual Yes
border-width visual Yes
border visual Yes
bottom visual No
RichTextBox for WPF and Silverlight 78
Copyright © 2019 GrapeCity, Inc. All rights reserved.

caption-side visual No
clear visual No
clip visual No
color visual Yes
content all No
counter-increment all No
counter-reset all No
cue-after aural No
cue-before aural No
cue aural No
cursor visual, interactive Yes All values except crosshair, move,progress, help, and <uri>.
direction visual No
display all Yes All values except run-in, inline-block, inline-table, and table-caption.
elevation aural No
empty-cells visual No
float visual No
font-family visual Yes
font-size visual Yes
font-style visual Yes
font-variant visual No
font-weight visual Yes
font visual Yes
height visual Yes Only in img elements.
left visual No
letter-spacing visual No
line-height visual Yes
list-style-image visual Yes
list-style-position visual No
list-style-type visual Yes All values except georgian,armenian and, lower-greek.
list-style visual Yes
margin-right margin-left visual Yes
margin-top margin-bottom visual Yes
RichTextBox for WPF and Silverlight 79
Copyright © 2019 GrapeCity, Inc. All rights reserved.

margin visual Yes
max-height visual No
max-width visual No
min-height visual No
min-width visual No
orphans visual, paged No
outline-color visual, interactive No
outline-style visual, interactive No
outline-width visual, interactive No
outline visual, interactive No
overflow visual No
padding-top padding-right padding-bottom padding-left
visual Yes
padding visual Yes
page-break-after visual, paged No
page-break-before visual, paged No
page-break-inside visual, paged No
pause-after aural No
pause-before aural No
pause aural No
pitch-range aural No
pitch aural No
play-during aural No
position visual No
quotes visual No
richness aural No
right visual No
speak-header aural No
speak-numeral aural No
speak-punctuation aural No
speak aural No
speech-rate aural No
stress aural No
table-layout visual No
RichTextBox for WPF and Silverlight 80
Copyright © 2019 GrapeCity, Inc. All rights reserved.
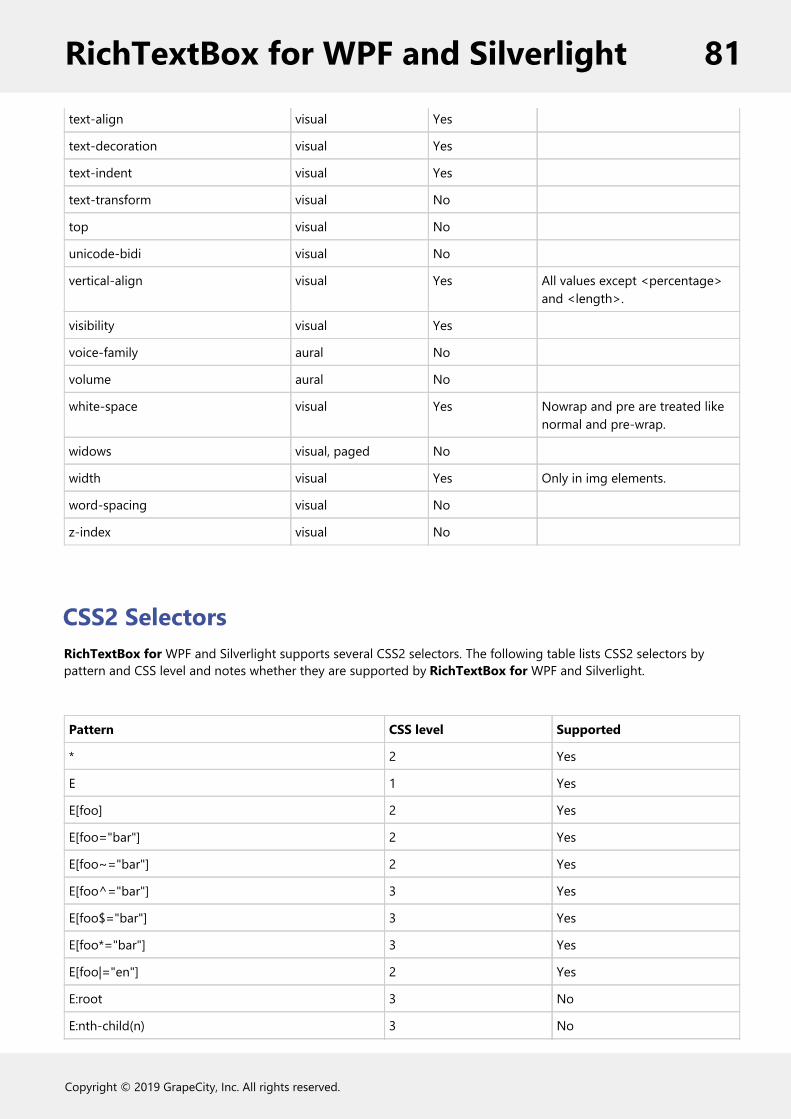
text-align visual Yes
text-decoration visual Yes
text-indent visual Yes
text-transform visual No
top visual No
unicode-bidi visual No
vertical-align visual Yes All values except <percentage>and <length>.
visibility visual Yes
voice-family aural No
volume aural No
white-space visual Yes Nowrap and pre are treated likenormal and pre-wrap.
widows visual, paged No
width visual Yes Only in img elements.
word-spacing visual No
z-index visual No
CSS2 SelectorsRichTextBox for WPF and Silverlight supports several CSS2 selectors. The following table lists CSS2 selectors bypattern and CSS level and notes whether they are supported by RichTextBox for WPF and Silverlight.
Pattern CSS level Supported
* 2 Yes
E 1 Yes
E[foo] 2 Yes
E[foo="bar"] 2 Yes
E[foo~="bar"] 2 Yes
E[foo^="bar"] 3 Yes
E[foo$="bar"] 3 Yes
E[foo*="bar"] 3 Yes
E[foo|="en"] 2 Yes
E:root 3 No
E:nth-child(n) 3 No
RichTextBox for WPF and Silverlight 81
Copyright © 2019 GrapeCity, Inc. All rights reserved.
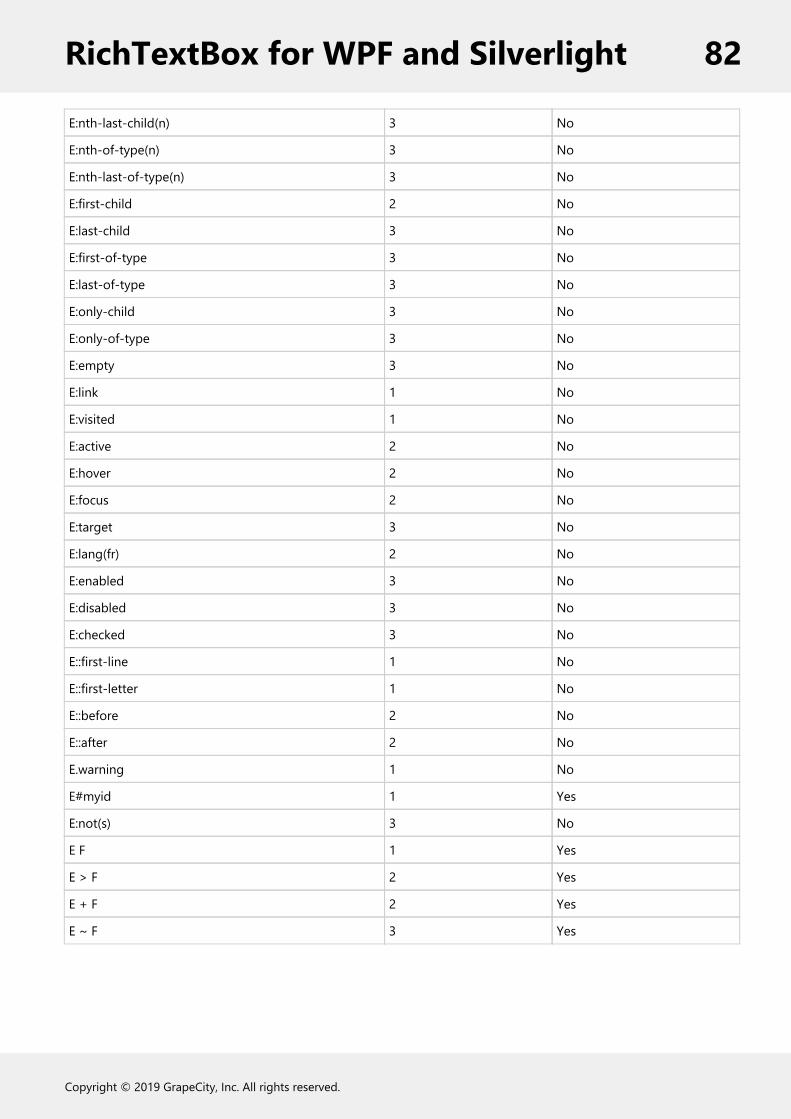
E:nth-last-child(n) 3 No
E:nth-of-type(n) 3 No
E:nth-last-of-type(n) 3 No
E:first-child 2 No
E:last-child 3 No
E:first-of-type 3 No
E:last-of-type 3 No
E:only-child 3 No
E:only-of-type 3 No
E:empty 3 No
E:link 1 No
E:visited 1 No
E:active 2 No
E:hover 2 No
E:focus 2 No
E:target 3 No
E:lang(fr) 2 No
E:enabled 3 No
E:disabled 3 No
E:checked 3 No
E::first-line 1 No
E::first-letter 1 No
E::before 2 No
E::after 2 No
E.warning 1 No
E#myid 1 Yes
E:not(s) 3 No
E F 1 Yes
E > F 2 Yes
E + F 2 Yes
E ~ F 3 Yes
RichTextBox for WPF and Silverlight 82
Copyright © 2019 GrapeCity, Inc. All rights reserved.

C1RichTextBox AppearanceThe following topics detail how to customize the C1RichTextBox control's layout and appearance. You can useComponentOne ClearStyle Technology to quickly style pieces of the grid. Themes allow you to customize theappearance of the grid and take advantage of WPF's XAML-based styling.
ComponentOne ClearStyle TechnologyClearStyle technology is a new, quick and easy approach to providing Silverlight and WPF control styling. ClearStyleallows you to create a custom style for a control without having to deal with the hassle of XAML templates and styleresources.
Currently, to add a theme to all standard WPF controls, you must create a style resource template. In Microsoft VisualStudio, this process can be difficult; this is why Microsoft introduced Expression Blend to make the task a bit easier.Having to jump between two environments can be a bit challenging to developers who are not familiar with Blend ordo not have the time to learn it. You could hire a designer, but that can complicate things when your designer andyour developers are sharing XAML files.
That's where ClearStyle comes in. With ClearStyle, the styling capabilities are brought to you in Visual Studio in themost intuitive manner possible. In most situations you just want to make simple styling changes to the controls inyour application so this process should be simple. For example, if you just want to change the row color of your datagrid this should be as simple as setting one property. You shouldn't have to create a full and complicated-lookingtemplate just to simply change a few colors.
How ClearStyle WorksEach key piece of the control's style is surfaced as a simple color property. This leads to a unique set of styleproperties for each control. For example, a Gauge has PointerFill and PointerStroke properties, whereas a DataGridhas SelectedBrush and MouseOverBrush for rows.
Let's say you have a control on your form that does not support ClearStyle. You can take the XAML resource createdby ClearStyle and use it to help mold other controls on your form to match (such as grabbing exact colors). Or let'ssay you'd like to override part of a style set with ClearStyle (such as your own custom scrollbar). This is also possiblebecause ClearStyle can be extended and you can override the style where desired.
ClearStyle is intended to be a solution to quick and easy style modification but you're still free to do it the oldfashioned way with ComponentOne's controls to get the exact style needed. ClearStyle does not interfere with thoseless common situations where a full custom design is required.
C1RichTextBox ClearStyle PropertiesRichTextBox for WPF and Silverlight supports ComponentOne's new ClearStyle technology that allows you to easilychange control colors without having to change control templates. By just setting a few color properties you canquickly style the control.
The following table outlines the brush properties of the C1RichTextBox control:
RichTextBox for WPF and Silverlight 83
Copyright © 2019 GrapeCity, Inc. All rights reserved.

Brush Description
Background Gets or sets the brush of the control’s background.
BorderBrush Gets or sets the brush of the control’s border.
SelectionBackground Gets or sets the brush used to fill the background of the selected text.
SelectionForeground Gets or sets the brush used to fill the foreground of the selected text.
You can completely change the appearance of the C1RichTextBox control by setting one or more properties, Forexample, if you set the Background property to "# FFE20C0C ", the C1RichTextBox control would appear similar tothe following:
C1RichTextBox ThemesRichTextBox for WPF and Silverlight incorporates several themes that allow you to customize the appearance of your grid.When you first add a C1RichTextBox control to the page, it appears similar to the following image:
RichTextBox for WPF and Silverlight 84
Copyright © 2019 GrapeCity, Inc. All rights reserved.
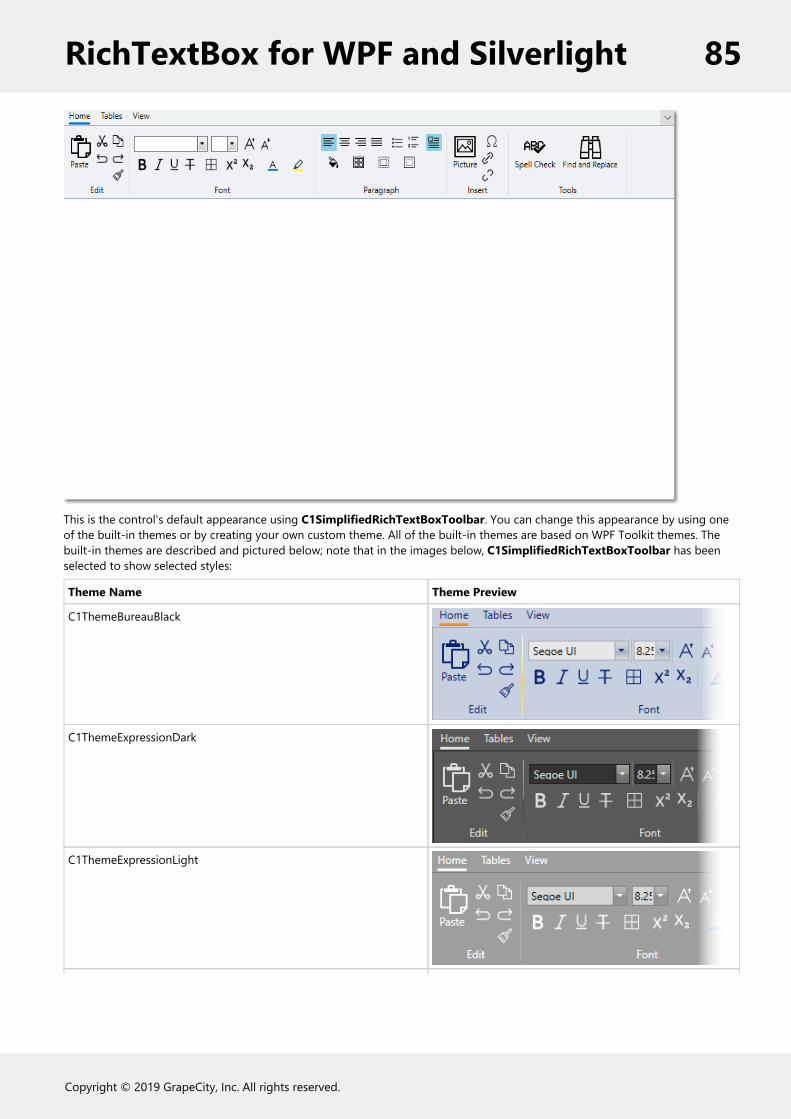
This is the control's default appearance using C1SimplifiedRichTextBoxToolbar. You can change this appearance by using oneof the built-in themes or by creating your own custom theme. All of the built-in themes are based on WPF Toolkit themes. Thebuilt-in themes are described and pictured below; note that in the images below, C1SimplifiedRichTextBoxToolbar has beenselected to show selected styles:
Theme Name Theme Preview
C1ThemeBureauBlack
C1ThemeExpressionDark
C1ThemeExpressionLight
RichTextBox for WPF and Silverlight 85
Copyright © 2019 GrapeCity, Inc. All rights reserved.
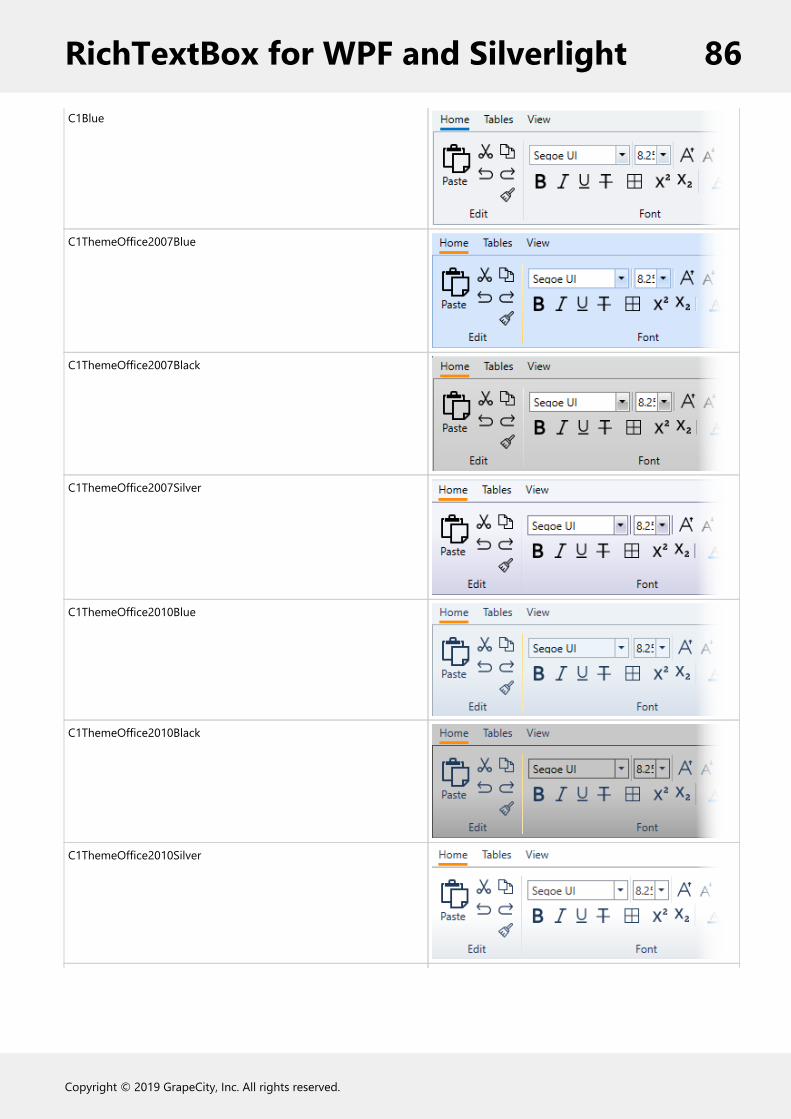
C1Blue
C1ThemeOffice2007Blue
C1ThemeOffice2007Black
C1ThemeOffice2007Silver
C1ThemeOffice2010Blue
C1ThemeOffice2010Black
C1ThemeOffice2010Silver
RichTextBox for WPF and Silverlight 86
Copyright © 2019 GrapeCity, Inc. All rights reserved.

C1ThemeShinyBlue
C1ThemeWhistlerBlue
C1ThemeOffice2013White
C1ThemeOffice2013LightGray
C1ThemeOffice2013DarkGray
C1ThemeOffice2016Black
C1ThemeOffice2016Colorful
RichTextBox for WPF and Silverlight 87
Copyright © 2019 GrapeCity, Inc. All rights reserved.
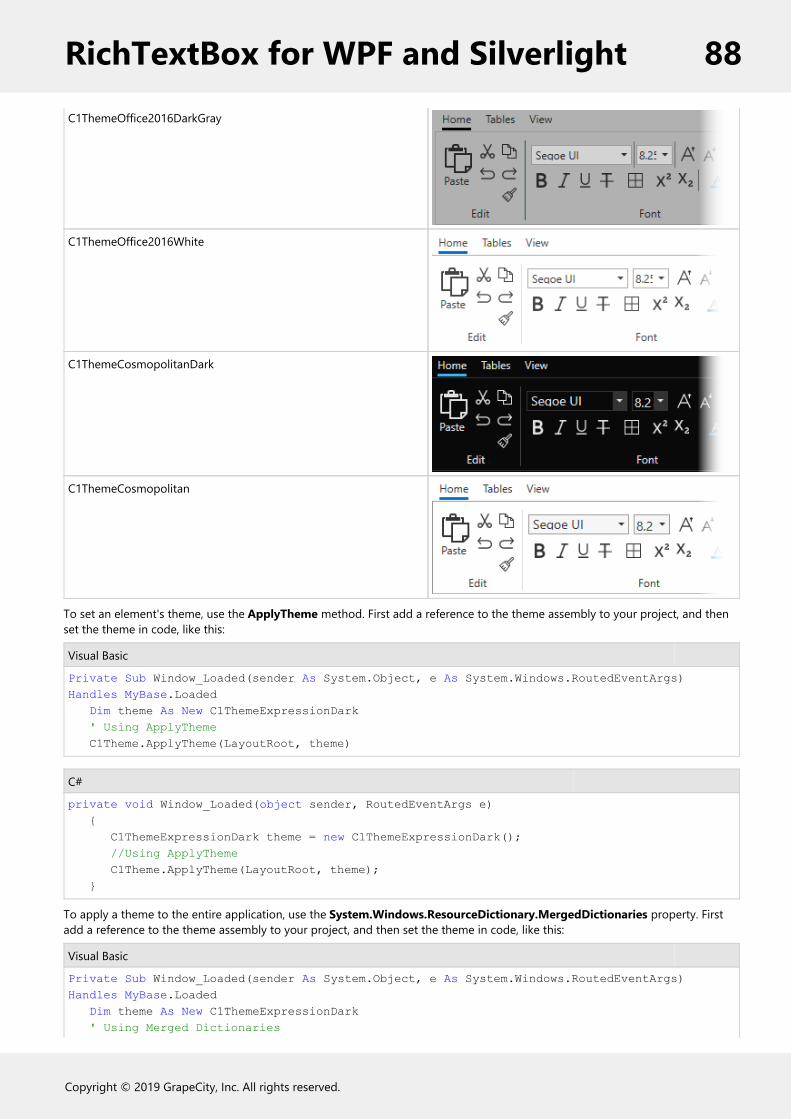
C1ThemeOffice2016DarkGray
C1ThemeOffice2016White
C1ThemeCosmopolitanDark
C1ThemeCosmopolitan
To set an element's theme, use the ApplyTheme method. First add a reference to the theme assembly to your project, and thenset the theme in code, like this:
Visual Basic
Private Sub Window_Loaded(sender As System.Object, e As System.Windows.RoutedEventArgs) Handles MyBase.Loaded Dim theme As New C1ThemeExpressionDark ' Using ApplyTheme C1Theme.ApplyTheme(LayoutRoot, theme)
C#
private void Window_Loaded(object sender, RoutedEventArgs e) { C1ThemeExpressionDark theme = new C1ThemeExpressionDark(); //Using ApplyTheme C1Theme.ApplyTheme(LayoutRoot, theme); }
To apply a theme to the entire application, use the System.Windows.ResourceDictionary.MergedDictionaries property. Firstadd a reference to the theme assembly to your project, and then set the theme in code, like this:
Visual Basic
Private Sub Window_Loaded(sender As System.Object, e As System.Windows.RoutedEventArgs) Handles MyBase.Loaded Dim theme As New C1ThemeExpressionDark ' Using Merged Dictionaries
RichTextBox for WPF and Silverlight 88
Copyright © 2019 GrapeCity, Inc. All rights reserved.

Application.Current.Resources.MergedDictionaries.Add(C1Theme.GetCurrentThemeResources(theme))End Sub
C#
private void Window_Loaded(object sender, RoutedEventArgs e) { C1ThemeExpressionDark theme = new C1ThemeExpressionDark(); //Using Merged Dictionaries Application.Current.Resources.MergedDictionaries.Add(C1Theme.GetCurrentThemeResources(theme)); }
Note that this method works only when you apply a theme for the first time. If you want to switch to another ComponentOnetheme, first remove the previous theme from Application.Current.Resources.MergedDictionaries.
RichTextBox for WPF and Silverlight 89
Copyright © 2019 GrapeCity, Inc. All rights reserved.
C1RichTextBox SamplesPlease be advised that this ComponentOne software tool is accompanied by various sample projects and/or demoswhich may make use of other development tools included with the ComponentOne Studio.
Samples can be accessed from the ComponentOne Control Explorer. Please refer to the pre installed samplesthrough the following paths:
Documents\ComponentOne Samples\WPF
or
Documents\ComponentOne Samples\Silverlight
The following pages within the ControlExplorer sample installed with WPF Edition detail the C1RichTextBoxcontrol's functionality:
C# Sample
Sample Description
RichTextBoxSamples Shows a demo, how to check spelling as you type, and formatting in the C1RichTextBoxcontrol.
RichTextBox for WPF and Silverlight 90
Copyright © 2019 GrapeCity, Inc. All rights reserved.

RichTextBox for Silverlight SamplesIf you just installed Silverlight Edition, open Visual Studio 2008 and load the Samples.sln solution located inthe Documents\ComponentOne Samples\Silverlight folder. This solution contains all the samples that ship with thisrelease. Each sample has a readme.txt file that describes it and two projects named as follows:
<SampleName> Silverlight project (client-side project)
<SampleName>Web ASP.NET project that hosts the Silverlight project (server-side project)
To run a sample, right-click the <SampleName>Web project in the Solution Explorer, select Set as Startup Project,and press F5.
The following topics, organized by folder, describe each of the included samples.
Annotations SampleThe Annotations sample is installed in the C1.Silverlight.RichTextBox\Annotations folder in the samples directory.
This sample shows how to use the C1RichTextBox control in the C1.Silverlight.RichTextBox.dll assembly. The sampledemonstrates adding notes and annotations to text in the C1RichTextBox control.
C1.Silverlight.RichTextBox.RtfFilter SampleThe C1.Silverlight.RichTextBox.RtfFilter sample is installed in theC1.Silverlight.RichTextBox\C1.Silverlight.RichTextBox.RtfFilter folder in the samples directory.
This sample shows how to use the C1RichTextBox control in the C1.Silverlight.RichTextBox.dll assembly. The sampledemonstrates the filter required to import/export Rich Text Format documents from/to the C1RichTextBox control.This sample project includes elements that are incorporated in other sample projects.
C1.Silverlight.RichTextBox.Toolbar SampleThe C1.Silverlight.RichTextBox.Toolbar sample is installed in theC1.Silverlight.RichTextBox\C1.Silverlight.RichTextBox.Toolbar folder in the samples directory.
This sample shows how to use the C1RichTextBox control in the C1.Silverlight.RichTextBox.dll assembly. The sampledemonstrates a toolbar that attaches to a C1RichTextBox control and provides common formatting commands. Thissample project includes elements that are incorporated in other sample projects.
C1RichTextBox_Localization SampleThe C1RichTextBox_Localization sample is installed in theC1.Silverlight.RichTextBox\C1RichTextBox_Localization folder in the samples directory.
This sample shows how to use the C1RichTextBox control in the C1.Silverlight.RichTextBox.dll assembly anddemonstrates how C1RichTextBox's toolbar is localized. This sample sets the current culture of the application to
RichTextBox for WPF and Silverlight 91
Copyright © 2019 GrapeCity, Inc. All rights reserved.
Spanish to show C1RichTextBox's toolbar localized. The toolbar ships localized inseveral languages, and newlanguages can be added by developers.
PdfExport SampleThe PdfExport sample is installed in the C1.Silverlight.RichTextBox\PdfExport folder in the samples directory.
This sample shows how to use the C1RichTextBox control in the C1.Silverlight.RichTextBox.dll assembly and showshow to support a way to export the content of a C1RichTextBox control to a PDF. The export is done in the serverand it requires the C1Pdf component.
Printing SampleThe Printing sample is installed in the C1.Silverlight.RichTextBox\PrintHtml folder in the samples directory.
This sample shows how to print the content of a rich text box or a data grid. This sample shows how to print thecontent of a RichTextBox. It takes the HTML and shows a browser window with the preview and the printing dialogbox. In the data grid case it builds the HTML using properties of the grid.
RichTextBoxSamples SampleThe RichTextBoxSamples sample is installed in the C1.Silverlight.RichTextBox\RichTextBoxSamples folder in thesamples directory.
This sample shows how to use the C1RichTextBox control in the C1.Silverlight.RichTextBox.dll assembly and samples ofthe rich text box control. This sample includes the following examples:
Spell checkingHTML import /exportRTF import /export
SyntaxHighlight SampleThe SyntaxHighlight sample is installed in the C1.Silverlight.RichTextBox\SyntaxHighlight folder in the samplesdirectory.
This sample shows how to use the C1RichTextBox control in the C1.Silverlight.RichTextBox.dll assembly and showshow to use C1RichTextBox to implement an editor with syntax highlighting. This sample demonstrates theStyleOverride feature of C1RichTextBox to implement a syntax highlighted editor with great performance. TheStyleOverride feature allows easy and fast styling of sections of a document, without modifying it. Multiple layers ofstyle overrides can be used to display different information, like syntax highlighting or spell checking.
RichTextBox for WPF and Silverlight 92
Copyright © 2019 GrapeCity, Inc. All rights reserved.

C1RichTextBox Task-Based HelpThe task-based help assumes that you are familiar with programming in Visual Studio and know how to use theC1RichTextBox control in general. If you are unfamiliar with the RichTextBox for WPF product, please see theRichTextBox for WPF Quick Start first.
Each topic in this section provides a solution for specific tasks using the RichTextBox for WPF product.
Each task-based help topic also assumes that you have created a new WPF project.
Setting the Text ContentThe C1RichTextBox.Text property determines the text content of the C1RichTextBox control. By default theC1RichTextBox control starts blank and without content but you can customize this at design time, in XAML, and incode. Note that you can also set HTML markup as the control's content. See Setting the HTML Content for details.
At Design Time
To set the C1RichTextBox.Text property, complete the following steps:
1. Click the C1RichTextBox control once to select it.2. Navigate to the Properties window, and enter text, for example "Hello World!", in the text box next to the
C1RichTextBox.Text property.
This will set the C1RichTextBox.Text property to the value you chose.
In XAML
For example, to set the C1RichTextBox.Text property addText="Hello World!" to the <c1rtb:C1RichTextBox> tag sothat it appears similar to the following:
<c1rtb:C1RichTextBox HorizontalAlignment="Left" Margin="10,10,0,0" Name="C1RichTextBox1"VerticalAlignment="Top" Height="83" Width="208" Text="Hello World!" />
In Code
For example, to set the C1RichTextBox.Text property add the following code to your project:
Visual Basic
C1RichTextBox1.Text = "Hello World!"
C#
c1RichTextBox1.Text = "Hello World!";
What You've Accomplished
You've set the text content of the C1RichTextBox control. Run your application and observe that initially "HelloWorld!" (or the text you chose) will appear in the control:
Note that you can also set HTML markup as the control's content. See Setting the HTML Content for details.
RichTextBox for WPF and Silverlight 93
Copyright © 2019 GrapeCity, Inc. All rights reserved.

Setting the HTML ContentThe C1RichTextBox.Html property determines the HTML markup content of the C1RichTextBox control. By default theC1RichTextBox control starts blank and without content but you can customize this at design time, in XAML, and incode. Note that you can also set text as the control's content. See Setting the Text Content for details.
At Design Time
To set the C1RichTextBox.Html property, complete the following steps:
1. Click the C1RichTextBox control once to select it.2. Navigate to the Properties window, and enter text, for example "<h1>Hello World!</h1>", in the text
box next to the C1RichTextBox.Html property.
This will set the C1RichTextBox.Html property to the value you chose.
In XAML
For example, to set the C1RichTextBox.Html property addHtml="Hello World!" to the <c1rtb:C1RichTextBox> tag sothat it appears similar to the following:
<c1rtb:C1RichTextBox HorizontalAlignment="Left" Margin="10,10,0,0" Name="C1RichTextBox1"VerticalAlignment="Top" c1:C1NagScreen.Nag="True" Height="83" Width="208" Html="<h1>HelloWorld!</h1>" />
In Code
For example, to set the C1RichTextBox.Html property add the following code to your project:
Visual Basic
Me.C1RichTextBox1.Html = "<h1>Hello World!</h1>"
C#
this.c1RichTextBox1.Html = "<h1>Hello World!</h1>";
What You've Accomplished
You've set the text content of the C1RichTextBox control. Note that you had to represent angle brackets (< >) as"<" and ">". Run your application and observe that initially "Hello World!" (or the text you chose) will appear inthe control in large text:
Note that you can also set text as the control's content. See Setting the Text Content for details. For an example ofadding a hyperlink to the content of the C1RichTextBox control, see the Hyperlinks topic.
Connecting a C1RichTextBoxToolbar to a C1RichTextBoxTo connect a C1RichTextBoxToolbar control to a C1RichTextBox control you would need to setthe C1RichTextBoxToolbar.RichTextBox property to the name of the control you want to link with the toolbar. You canconnect a C1RichTextBoxToolbar control to a C1RichTextBox control at design time, in XAML, and in code.
At Design Time
To set the C1RichTextBoxToolbar.RichTextBox property in Microsoft Expression Blend, complete the following
RichTextBox for WPF and Silverlight 94
Copyright © 2019 GrapeCity, Inc. All rights reserved.

steps:
1. Click the C1RichTextBox control once to select it.2. Navigate to the Properties window, and click the Advanced Options button next to the
C1RichTextBoxToolbar.RichTextBox property.3. In the Create Data Binding dialog box, click the Element Property tab.4. In the Element Property tab, select the C1RichTextBox1 item and click OK.
This will set the C1RichTextBoxToolbar.RichTextBox property to C1RichTextBox1.
In XAML
For example, to set the C1RichTextBoxToolbar.RichTextBox property addRichTextBox="{BindingElementName=C1RichTextBox1}" to the <c1rtb:C1RichTextBox> tag so that it appears similar to the following:
<c1rtb:C1RichTextBox HorizontalAlignment="Left" Margin="10,10,0,0" Name="C1RichTextBox1"VerticalAlignment="Top" c1:C1NagScreen.Nag="True" Height="83" Width="208" RichTextBox="{BindingElementName=C1RichTextBox1}" />
In Code
For example, to set the C1RichTextBoxToolbar.RichTextBox property add the following code to your project:
Visual Basic
Me.C1RichTextBoxToolbar1.RichTextBox = C1RichTextBox1
C#
this.c1RichTextBoxToolbar1.RichTextBox = c1RichTextBox1;
What You've Accomplished
You've linked a C1RichTextBoxToolbar to a C1RichTextBox control. Now when you type text in the C1RichTextBox,for example, change the content appearance, for example, the font. For more information about the C1RichTextBoxcontrol, see the Working with C1RichTextBoxToolbar topics.
Implementing a Simple Formatting ToolbarWhile you can use the C1RichTextBox control to add a full toolbar to use with the C1RichTextBox control, you canalso easily create your own simple toolbar. Most rich editors include a toolbar with buttons that format the currentselection, making it bold, italic, or underlined. The buttons also change state when you move the selection, to showthat the selected text is bold, italic, underlined, and so on.
Implementing a simple toolbar with the C1RichTextBox is easy. For example, complete the following steps:
1. In the Solution Explorer, right-click the project and, from the context menu, choose Add Reference.2. In the Add Reference dialog box, select the C1.WPF.RichTextBox assembly and click OK.3. Update the XAML on the page, so it appears similar to the following:
XAML
<Window xmlns:c1="http://schemas.componentone.com/winfx/2006/xaml" x:Class=" C1RichTextBoxIntro.MainWindow" xmlns="http://schemas.microsoft.com/winfx/2006/xaml/presentation" xmlns:x="http://schemas.microsoft.com/winfx/2006/xaml" Title="MainWindow"><Grid x:Name="LayoutRoot" Background="White"> <Grid.RowDefinitions>
RichTextBox for WPF and Silverlight 95
Copyright © 2019 GrapeCity, Inc. All rights reserved.

<RowDefinition Height="Auto" /> <RowDefinition /> </Grid.RowDefinitions> <StackPanel Orientation="Horizontal" > <ToggleButton x:Name="_btnBold" Content="B" Click="_btnBold_Click" Checked="_btnBold_Click" /> <ToggleButton x:Name="_btnItalic" Content="I" Click="_btnItalic_Click" /> <ToggleButton x:Name="_btnUnderline" Content="U" Click="_btnUnderline_Click" /> </StackPanel> <c1:C1RichTextBox x:Name="_rtb" Grid.Row="1" AcceptsReturn="True" SelectionChanged="_rtb_SelectionChanged"/> </Grid>
This markup adds a C1RichTextBox control and three buttons (bold, italic, and underline) that control itsformatting. When a button is clicked, the attached event handlers are responsible for updating the format ofthe selection. The code in the next step accomplishes that.
4. Right-click the page and choose View Code to switch to the Code Editor.5. Add the following code to your application:
Visual Basic
Private Sub _btnBold_Click(sender As Object, e As RoutedEventArgs) Dim fw As System.Nullable(Of FontWeight) = _rtb.Selection.FontWeight _rtb.Selection.FontWeight = If(fw.HasValue AndAlso fw.Value = FontWeights.Bold, FontWeights.Normal, FontWeights.Bold)End Sub
C#
private void _btnBold_Click(object sender, RoutedEventArgs e){ FontWeight? fw = _rtb.Selection.FontWeight; _rtb.Selection.FontWeight = fw.HasValue && fw.Value == FontWeights.Bold ? FontWeights.Normal : FontWeights.Bold;}
The code starts by getting the value of the FontWeight property for the current selection. Note that the valuereturned is nullable (hence the '?' in the type declaration). If the selection contains a mix of different fontweights, the value returned is null. The code above sets the font weight to "normal" if the whole selection has asingle font weight and is bold; otherwise, the code sets the font weight to "bold".
6. Add the following code to initialize the italics button:
Visual Basic
Private Sub _btnItalic_Click(sender As Object, e As RoutedEventArgs) Dim fs As System.Nullable(Of FontStyle) = _rtb.Selection.FontStyle _rtb.Selection.FontStyle = If(fs.HasValue AndAlso fs.Value = FontStyles.Italic, FontStyles.Normal, FontStyles.Italic)End Sub
RichTextBox for WPF and Silverlight 96
Copyright © 2019 GrapeCity, Inc. All rights reserved.

C#
private void _btnItalic_Click(object sender, RoutedEventArgs e){ FontStyle? fs = _rtb.Selection.FontStyle; _rtb.Selection.FontStyle = fs.HasValue && fs.Value == FontStyles.Italic ? FontStyles.Normal : FontStyles.Italic;}
The code that handles the italics button is very similar to the code that handles the bold button, except it usesthe FontStyle property instead of FontWeight.
7. Add the following code to initialize the underline button:
Visual Basic
Private Sub _btnUnderline_Click(sender As Object, e As RoutedEventArgs) If _btnUnderline.IsChecked.HasValue Then rtb.Selection.TextDecorations = If(_btnUnderline.IsChecked.Value, C1TextDecorations.Underline, Nothing) End IfEnd Sub
C#
private void _btnUnderline_Click(object sender, RoutedEventArgs e){ if (_btnUnderline.IsChecked.HasValue) { _rtb.Selection.TextDecorations = _btnUnderline.IsChecked.Value ? C1.WPF.RichTextBox.Documents.C1TextDecorations.Underline : null; }}
The code that handles the underline button is similar, this time using the TextDecorations property. Note thatTextDecorations property returns an actual object, and thus is not a nullable property. The above code is all ittakes to make the three buttons work.
8. Add the following code to implement the event handler for the C1RichTextBox.SelectionChanged event:
Visual Basic
Private Sub _rtb_SelectionChanged(sender As Object, e As EventArgs) Dim fw As System.Nullable(Of FontWeight) = _rtb.Selection.FontWeight _btnBold.IsChecked = fw.HasValue AndAlso fw.Value = FontWeights.Bold
Dim fs As System.Nullable(Of FontStyle) = _rtb.Selection.FontStyle _btnItalic.IsChecked = fs.HasValue AndAlso fs.Value = FontStyles.Italic
_btnUnderline.IsChecked = (sel.TextDecorations IsNot Nothing)End Sub
RichTextBox for WPF and Silverlight 97
Copyright © 2019 GrapeCity, Inc. All rights reserved.

C#
void _rtb_SelectionChanged(object sender, EventArgs e){ var sel = _rtb.Selection;
FontWeight? fw = _rtb.Selection.FontWeight; _btnBold.IsChecked = fw.HasValue && fw.Value == FontWeights.Bold;
FontStyle? fs = _rtb.Selection.FontStyle; _btnItalic.IsChecked = fs.HasValue && fs.Value == FontStyles.Italic;
_btnUnderline.IsChecked = (sel.TextDecorations != null);}
This event handler is responsible for changing the state of the buttons as the user moves the selection. For example,selecting a word that is bold and underlined would make the buttons appear pressed.
The code uses the C1TextElement.FontWeight, C1TextElement.FontStyle, and C1TextElement.TextDecorationsproperties as before, and sets the IsChecked property on the corresponding buttons.
What You've Accomplished
You've created a simple toolbar. When run, the application would appear similar to the following image:
You can enter text and press the bold, italic, and underline buttons to format the text as in the above image.
A full toolbar would include more buttons and controls, and would handle them in a similar fashion. WPF Editionincludes C1RichTextBoxToolbar, a complete toolbar as a separate assembly. The source code for theC1RichTextBoxToolbar control is included so you can create your own customized version. For details, see Workingwith C1RichTextBoxToolbar.
Adding Spell CheckingIn this topic you'll add spell-checking to your application. This topic assumes you have added a C1RichTextBox controland a C1RichTextBoxToolbar control to your page and linked the two together. If you currently click the Spell Checkbutton in the toolbar at run time, you'll receive a message that spell checking is currently not set up. In this step you'lladd a dictionary and set up spell-checking.
Complete the following steps:
1. In the Solution Explorer, right-click the .Web project and select Add | Existing Item. The Add Existing Itemdialog box will appear.
2. In the Add Existing Item dialog box locate the C1Spell_en-US.dct file included in the RichTextBoxSamplessample folder. By default, you can access the samples folder through the following path :
RichTextBox for WPF and Silverlight 98
Copyright © 2019 GrapeCity, Inc. All rights reserved.

Documents\ComponentOne Samples\WPF.
This is a US English dictionary file – if you add another file, instead, you can adapt the steps below with theappropriate code.
1. In the Solution Explorer, right-click the MainPage.xaml file and select View Code to open the code file.2. In the Code Editor, add the following code to import the following namespaces:
Visual Basic
Imports C1.WPF.RichTextBoxImports C1.WPF.SpellChecker
C#
using C1.WPF.RichTextBox;using C1.WPF.SpellChecker;
3. Add code to the MainPage constructor so that it appears similar to the following: Visual Basic
Public Sub New() InitializeComponent() Dim spell As New C1SpellChecker() spell.MainDictionary.LoadAsync("C1Spell_en-US.dct") Me.C1RichTextBox.SpellChecker = spellEnd Sub
C#
public MainPage(){ InitializeComponent(); var spell = new C1SpellChecker(); spell.MainDictionary.LoadAsync("C1Spell_en-US.dct"); this.c1RichTextBox.SpellChecker = spell;}
This code adds spell-checking – including as-you-type spell-checking – to the application.
What You've Accomplished
In this step you added spell-checking to your C1RichTextBox application. Type in the C1RichTextBox and noticethat as-you-type spell-checking is initialized and misspelled words appear with a red line underneath. If you click theSpell Check button in the C1RichTextBoxToolbar, notice that the Spelling dialog box now appears.
RichTextBox for WPF and Silverlight 99
Copyright © 2019 GrapeCity, Inc. All rights reserved.