ricoh aficio 340-350-450 operators manual
DESCRIPTION
User Manual for Ricoh Aficio 340-350-450TRANSCRIPT

Read this manual carefully before you use this product and keep it handyfor future reference.For safety, please follow the instructions in this manual.
SYSTEM SETTINGS
340/350/450
OPERATING INSTRUCTIONS
User Tools (System Settings)Modes

IntroductionThis manual contains detailed instructions on the operation and maintenance of this machine. To getmaximum versatility from this machine all operators should carefully read and follow the instructions inthis manual. Please keep this manual in a handy place near the machine.
Please read the Safety Information before using this machine. It contains important information relatedto USER SAFETY and PREVENTING EQUIPMENT PROBLEMS.
- Notes:Some illustrations may be slightly different from your machine.
Certain options may not be available in some countries. For details, please contact your local dealer.
Operator Safety:
This machine is considered a CDRH class I laser device, safe for office/ EDP use. The machine con-tains two 5-milliwat, 760 - 800 nanometer wavelength, GaAIAs laser diodes. Direct (or indirect reflect-ed) eye contact with the laser beam might cause serious eye damage. Safety precautions and interlockmechanisms have been designed to prevent any possible laser beam exposure to the operator.
Laser Safety:
The Center for Devices and Radiological Health (CDRH) prohibits the repair of laser-based optical unitin the field. The optical housing unit can only be repaired in a factory or at a location with the requisiteequipment. The laser subsystem is replaceable in the field by a qualified Customer Engineer. The laserchassis is not repairable in the field. Customer engineers are therefore directed to return all chassisand laser subsystems to the factory or service depot when replacement or the optical subsystem is re-quired.
Warning:
Use of controls or adjustment or performance of procedures other than those specified in this manualmight result in hazardous radiation exposure.
Notes:
The model names of the machines do not appear in the following pages. Check the type of your ma-chine before reading this manual. (For details, see ⇒ P.2 “Machine Types”.)
• Type 1: Aficio 340
• Type 2: Aficio 350
• Type 3: Aficio 450
Certain types might not be available in some countries. For details, please contact your local dealer.
Two kinds of size notation are employed in this manual. With this machine refer to the Inch version.
For good copy quality, Ricoh recommends that you use genuine Ricoh toner.
Ricoh shall not be responsible for any damage or expense that might result from the use of parts otherthan genuine Ricoh parts in your Ricoh office product.
Power Source:
120 V, 60 Hz, 10 A or more
Please be sure to connect the power cord to a power source as above. For details about power source,see “Power Connection” of the “Copy Reference”.

L
HOW TO READ THIS MANUAL
Symbols
In this manual, the following symbols are used:
R WARNING:This symbol indicates a potentially hazardous situation that might result indeath or serious injury when you misuse the machine without following the in-structions under this symbol. Be sure to read the instructions, all of which are de-scribed in the Safety Information in the “Copy Reference”.
R CAUTION:This symbol indicates a potentially hazardous situation that might result in mi-nor or moderate injury or property damage that does not involve personal injurywhen you misuse the machine without following the instructions under thissymbol. Be sure to read the instructions, all of which are described in the SafetyInformation in the “Copy Reference”.* The statements above are notes for your safety.
ImportantIf this instruction is not followed, paper might be misfed, originals might bedamaged, or data might be lost. Be sure to read this.
PreparationThis symbol indicates the prior knowledge or preparations required before op-erating.
NoteThis symbol indicates precautions for operation, or actions to take after misop-eration.
LimitationThis symbol indicates numerical limits, functions that cannot be used together,or conditions in which a particular function cannot be used.
ReferenceThis symbol indicates a reference.
[ ]Keys that appear on the machine's panel display.
{ }
Keys built into the machine's operation panel.

LL
TABLE OF CONTENTSMANUALS FOR THIS MACHINE ................................................................. 1
MACHINE TYPES ......................................................................................... 2
ADDITIONAL FUNCTIONS PROVIDED BY OPTIONAL MEMORY UNITS 3Copy Mode.................................................................................................... 3Facsimile Mode (Option) ............................................................................... 4
1.MODES
CHANGING MODES ..................................................................................... 5
MULTI-ACCESS............................................................................................ 6
COPY MODE............................................................................................... 10Changing To Copy Mode ............................................................................ 10
FAX MODE.................................................................................................. 12Changing To Facsimile Mode ..................................................................... 12Printing A Received Fax.............................................................................. 12Sending A Fax............................................................................................. 13
2.USER TOOLS (SYSTEM SETTINGS)
KEYS FOR USER TOOLS (SYSTEM SETTINGS) .................................... 15
ACCESSING THE USER TOOLS (SYSTEM SETTINGS)................................................................................. 16
Exiting from User Tools............................................................................... 17
USER TOOLS MENU (SYSTEM SETTINGS) ............................................ 18
SETTINGS YOU CAN CHANGE WITH THE USER TOOLS ..................... 19System Settings 1/6 ..................................................................................... 19System Settings 2/6 ..................................................................................... 20System Settings 3/6 ..................................................................................... 21System Settings 4/6 ..................................................................................... 23System Settings 5/6 ..................................................................................... 25System Settings 6/6 ..................................................................................... 26
INDEX........................................................................................................ 27

1
MANUALS FOR THIS MACHINE
This is a multi-functional machine combining copying and facsimile functions.This manual describes procedures common to these functions. Each function'sreference describes the operational procedures separately for the copying andfacsimile functions. Please consult the manual that suits your needs.
❖❖❖❖ System Settings (this manual)Provides an overview of the machine. This manual introduces the functionsof the machine. It also introduces the options allowing you to use additionalfunctions and describes how to access the system user tools to make the ma-chine easier to use.
❖❖❖❖ When using as a copier• Copy Reference
Describes the various copying functions from basic copying to more ad-vanced functions such as reducing/enlarging copies or combining origi-nals into one copy.
❖❖❖❖ When using as a facsimile• Facsimile Reference (option)
Describes the operational procedures and functions to use the machine asa facsimile.

2
MACHINE TYPES
There are three models of this machine. The main differences between them arememory capacity and copy speed. To make sure which model you have, see theinside front cover.
Type 1 Type 2 Type 3
Copy speed 35 copies/minute (A4K, 81/2" × 11"K)
35 copies/minute (A4K, 81/2" × 11"K)
45 copies/minute (A4K, 81/2" × 11"K)
Memory capacity 4 MB
(8 MB optional memory available)
12 MB 12 MB
Fax unit Option Option Option

3
ADDITIONAL FUNCTIONS PROVIDED BY OPTIONAL MEMORY UNITS
You can expand the capabilities of this machine to include fax functions. Whenyou want to add a function, contact your sales or service representative.
Copy Mode
In copy mode you can make basic copies and also copy using more sophisticatedtechniques, such as reduction/enlargement or combining several originals ontoone copy. You can install an optional memory expansion for storage of docu-ment images, thereby making the best use of memory with various copy func-tions.
Expansion Memory (option)
❖❖❖❖ 8 MB copier memory unit (Electric sort kit) (option for Type 1)Provides various functions including Image Rotate, Sort, and Duplex Copy.
❖❖❖❖ Copier hard disk (Image enhance kit)Provides various functions such as:• Archive File (copying stored images)• Following functions using the Enhanced Image Copy:
Sort/Rotate Sort/Rotate Stack/Shift Sort/Shift Stack/StapleCombineDuplexRepeatImage Rotate

4
Facsimile Mode (Option)
You can send and receive fax messages in facsimile mode. Installation of option-al expansion memory allows more functions to be used, and more data to bestored.
Options for Memory Expansion
❖❖❖❖ 4 MB memory cardProvides a variety of memory-based functions including confidential recep-tion, envelope reception, and two-sided printing. Also increases the numberof personal codes, groups, speed dials, files in memory, special stations, etc.
❖❖❖❖ Fax hard diskIncreases memory capacity, allowing you to increase the number of transmitoriginals and receive images to be stored in memory.
❖❖❖❖ 400 dpi high resolution cardAllows sending/receiving in super fine mode. Also allows JBIG compression.

è
1. MODES
CHANGING MODES
You can use this machine not only as a copier, but optionally as a fax machine aswell. Press the {Copy} key to use copy functions, or press the {Fax} key to usefacsimile functions.
Limitation❒ You cannot switch modes in any of the following cases:
• When scanning in a fax message for transmission.• During immediate transmission.• When accessing the user tools.• During interrupt copying.
1
3 4
2
EnhancedImage
Menu
SeriesCopies
MarginAdjust
Auto Reduce/Enlarge
Zoom
CombineCopies
Erase Center/Border
Copy
Fax
Copy Mode
Facsimile Mode
ND0X02EE

MODES
ç
1
MULTI-ACCESS
You can carry out another job using a different function while the current job isbeing performed.This allows you to handle your jobs efficiently regardless of how the machine isbeing used. For example:• While making copies, the machine can send a fax message that has been
stored in memory.• You can make copies while receiving fax data.Performing multiple functions simultaneously like this is called Multi-accessing.
Limitation❒ You cannot use Multi-accessing during interrupt copying.
Note❒ You can choose which mode has highest priority for print jobs. The default is
the current mode shown on the display. See “16. Print Priority” in ⇒ P.23“System Settings 4/6”.
❒ When your machine is equipped with the optional internal tray 2, you canspecify the tray used for each function so that completed documents are notmixed. For example, set one tray for faxes and another tray for copies. If yourequire the optional internal tray 2, contact your local dealer or service repre-sentative. See “15. Output Tray” in ⇒ P.23 “System Settings 4/6”.

MULTI-ACCESS
æ
1
-Multi-accessing exampleThe order of multi-accessing operations is as follows:
*1 This job runs in the background, regardless of any current data scanning/writing op-erations.Note that you can also receive faxes into memory with such a job.
----Sample operationsThis chart is based on the following conditions:• When “16. Print priority” is set to “Interleave” (See “16. Print Priority” in ⇒
P.23 “System Settings 4/6”)• For details on operations under other conditions, contact your service repre-
sentative.
1st 2nd 3rd 4th
Start1stcopy
2ndcopy
Bac
kgro
und*
1S
cann
ing
Prin
ting
Fac
sim
ileC
opy
Completion
JobOperation ModePrint
Start
MULTI2EE
Time
Copying2 originals
Printing 2receivedfaxes
Memorytransmissionoperation(2 pages)
Memoryreception *1
1st page
for
memory
reception
2nd page formemoryreception
Printingthe 2ndreceivedfax
Printingthe 1streceivedfax
Scanning the1st page
Scanning the2nd page
Startreceiving
Memoryreception
Receiveddataprocessing

MODES
å
1
Mode afteryou select
Copy Facsimile
Transmission Reception
Mode before you select C
opyi
ng
Enh
ance
d Im
age
Cop
y
Mem
ory
Cop
y
Sort
Stap
ling
Scan
ning
An
Ori
gina
l for
M
emor
y T
rans
mis
sion
Mem
ory
Tra
nsm
issi
on
Imm
edia
te T
rans
mis
sion
Mem
ory
Rec
epti
on
Prin
ting
Rec
eive
d D
ata
Copy Copying ❍ ❍ ❍ *4 ❍ *4 ❍ *4 ❍ ✩ ❍ ✩ ✩
En-hanced Image Copy
❍ ❍ ❍ *4 ❍ *4 ❍ *4 × ✩ × ✩ ✩
Memory Copy
❍ ❍ ❍ *4 ❍ *4 ❍ *4 × ✩ × ✩ ✩
Sort ❍ ❍ ❍ *4 ❍ *4 ❍ *4 ❍ *1 ✩ ❍ *1 ✩ ✩
Stapling ❍ *5 ❍ *5 ❍ *4 *5
❍ *4 *5
× ❍ *1 ✩ ❍ *1 ✩ ✩ *5
Facs
imile
Tra
nsm
issi
on
Scan-ning An Original for Memory Trans-mission
× × × × × × ✩ × ✩ ✩ *2
Memory Trans-mission
✩ ✩ ✩ ✩ ✩ ✩ × × × ✩
Immedi-ate Trans-mission
× × × × × × × × × ×
Rec
epti
on
Memory Recep-tion
✩ ✩ ✩ ✩ ✩ ✩ × × × ✩
Printing Re-ceived Data
✩ ✩ ✩ ✩ ✩ *5 ✩ *2 ✩ *6 → *3 ✩ *6 →

MULTI-ACCESS
ä
1
✩…means that these functions can be used together.❍…means that you can interrupt the current job with Function keys or the {In-terrupt } key to proceed to a subsequent job.→…means that another job will automatically start after the current job is fin-ished.×…means that you will manually start another job after the current job is fin-ished (i.e. these functions cannot be used together).
*1 Simultaneous operations are only available when copies are being made after theiroriginals are all scanned.
*2 You might fail to print received data, depending on size or orientation of the original.*3 Priority is given to the subsequent job; after the subsequent job is finished, the inter-
rupted operation is automatically resumed.*4 If the optional copier hard disk is installed, you can make interrupt copies with the
{Interrupt } key.*5 If you are making stapling copies on paper larger than A4, 81/2" × 11" with the op-
tional 1000-sheet finisher, the subsequent operation is disabled until the current jobis finished. After you start interrupt copying with the {Interrupt } key, the Output Trayis automatically changed to “Internal Tray”.
*6 During parallel receptions, any subsequent job is disabled until the receptions arecompleted.

MODES
ìí
1
COPY MODE
Changing To Copy Mode
You can always make a copy whenthe machine isn't printing or scanninga fax data.
A Press the {Copy} key.The copy display appears on thepanel display.
ReferenceFor details, see the “Copy Refer-ence”.
Interrupt Copying To Make Urgently Needed Copies
You can interrupt the current copyingjob or printing of a received fax tomake a copy.
Limitation❒ When the optional copier hard disk
is not installed, you cannot use thefollowing functions during inter-rupt copying:• Duplex• Combine• Sort• Copying archive files
❒ You cannot use the interrupt copyfunction in the following cases:• during fax immediate transmis-
sion• while scanning an original for
memory transmission• during interrupt copying
A Press the {Interrupt } key.If the machine is scanning origi-nals, it will immediately stop thescanning job. On the other hand, ifthe machine is performing a copyor print job, it will still continue thejob until you press the {Start} keyafter pressing the {Interrupt } key.When the current job stops, the in-terrupt copy display appears onthe panel display.
Note❒ When you interrupt a copying
job, remove the previous origi-nal.
B Make your copies.
Important❒ If the remaining memory space
is 0 %, the machine fails to re-ceive fax data. Wait until themachine completes printing areceived fax, then start makingcopies.
Note❒ While copying, a received fax
document is stored in memoryand the Receive File indicator islit.
C After interrupt copying is com-pleted, remove the original anddelivered copies.
D Press the {Interrupt } key again.The machine resumes the printingjob of the received fax document.

COPY MODE
ìì
1
Resuming the interrupted copying job
A Reset the previous original.B Press the {Start} key.
The machine resumes the inter-rupted copy run.
Copying And Multi-accessing
Note❒ Machine operations are different
depending “16. Print Priority” (See⇒ P.23 “System Settings 4/6”) or “18.User Code Manage” (See ⇒ P.25“System Settings 5/6”) settings.
Reference⇒ P.6 “Multi-Access”
❖❖❖❖ When “Print Priority” = “Fax” or “Dis-play” (default)The machine completes the opera-tion of the function set by Print pri-ority before performing theoperation of another function.
Limitation❒ While the machine is perform-
ing two-sided printing in faxmode, you cannot make two-sided copies until the printingends.
❖❖❖❖ When “Print Priority” = “Interleave”The machine performs the opera-tions in the order in which they areinitiated. If another function is ini-tiated during operation, the ma-chine completes the currentoperation before performing theoperation of the function initiated.

MODES
ìë
1
FAX MODE
Changing To Facsimile Mode
You can always use the machine as afacsimile when you are not copying.
A Press the {Fax} key.The facsimile display appears onthe panel display.
Note❒ The Memory Transmission/Re-
ception function is performedautomatically even when an-other function is being used.You need not switch the dis-play. When data is received inmemory, the Receive File indi-cator is lit.
ReferenceFor details, see the “FacsimileReference”.
Printing A Received Fax
When you are not copying, a receivedfax is printed automatically. You donot need to switch to Facsimile mode.If you wish to print a received faxwhile copying, see below.
PreparationMachine operations are differentdepending “16. Print Priority” (See⇒ P.23 “System Settings 4/6”) or “18.User Code Manage” (See ⇒ P.25“System Settings 5/6”) settings.
ReferenceSee ⇒ P.6 “Multi-Access”.
Printing a received fax while copying
❖❖❖❖ When “Print Priority” = “Fax” or “Dis-play” (default)The machine once interrupts thecopying and receives a fax. Uponcompleting the fax reception, it re-sumes the interrupted copying job.
❖❖❖❖ When “Print Priority” = “Interleave”The machine performs the opera-tions in the order in which they areinitiated. If another function is ini-tiated during operation, the ma-chine completes the currentoperation before performing theoperation of the function initiated.
❖❖❖❖ Printing a received fax in a hurryPress the {Fax} key to switch to thefacsimile display. The copying jobis interrupted and the machinestarts printing the received fax au-tomatically. After printing the fax,

FAX MODE
ìê
1
press the {Copy} key and do theprevious job again. Sending A Fax
Sending a fax while printing a received fax
Scanning originals for memory transmission
The machine can scan your originalsfor memory transmission even whileprinting a received fax.
A Complete the usual operationsfor sending a fax, then press the{Start} key.
Immediate transmission
Immediate transmission interruptsthe job of printing a received fax. Thisis because the page memory is occu-pied as your originals are scanned.
A Complete the usual operationsfor sending a fax, then press the{Start} key.
Sending a fax while copying
While scanning copy originals
A Press the {Clear/Stop } key andthen the {Fax} key.Copying is stopped and the dis-play is switched to the Facsimilemode.
Note❒ Remove the copy originals.

MODES
ìé
1
While outputting copy
A Press the {Fax} key to switch tothe facsimile display.You can send a fax while copying.
Note❒ Remove any originals of your
copy job.
B Complete the usual operationsfor sending a fax, then press the{Start} key.
C After the transmission has fin-ished, press the {Copy} key.
D Reset the copy job originals, thenpress the {Start} key.The machine resumes the inter-rupted copy run.

ìè
2. USER TOOLS (SYSTEMSETTINGS)
KEYS FOR USER TOOLS (SYSTEM SETTINGS)
1. {User Tools/Counter } key
2. Panel Display
3. {Selection } keysPress the key under the item you wish toselect.
4. < and > keys (Cursor keys)Press to select an item on the panel dis-play.
5. {Number } keysUse to enter a numeric value.
6. {#} keyPress to set a value you have entered.
7. {Clear/Stop } keyPress to delete a number you have en-tered.
ND2A01EE
TX FileStatus
01 02 03 04 05 06 07
08 01 10 11 12 13 14
15 16 17 18 19 20 21
22 23 24 25 26 27 28
2
1
3 4
2
2
2 2 3
4 5 6
7 8
0
9
1
C
2
11
F1 F2 F3 F4 F5
A B C D E F G
H I J K L M N
O P Q R S T U
V W X Y Z
*
Sort
Staple
Stack
1-Sided 2-Sided
2-Sided 2-Sided User Tools / Counter
EnhancedImage
Menu
SeriesCopies
MarginAdjust
Auto Reduce/Enlarge
Zoom
CombineCopies
Erase Center/Border
Copy
FaxText PhotoPhotoSpecial Orig. Lighter Darker
Speed Dial
On Hook Dial
Pause /Redial
Tone
Program Clear Modes /Energy Saver
Interrupt
Clear / Stop
Start
Enter
MainPower
Auto Image Density
Book 2-Sided ImmediateTrans.MemoryTrans.
Standard
Detail
Super Fine
Commu-nicating
ReceiveFile
ConfidentialFile
StartManual RX
TELMode
.
ABC DEF
MNOJKLGHI
WXYTUV
OPER
PRS
C
On
1 2
75 643

86(5ý722/6ýõ6<67(0ý6(77,1*6ô
ìç
ë
ACCESSING THE USER TOOLS (SYSTEM SETTINGS)
This section is for the key operators incharge of this machine. You canchange or set the machine's defaultsettings.
PreparationAfter using the user tools, be sureto exit it to return to Copy mode.The settings are not canceled evenif the operation switch is turned offor the {Clear Modes/Energy Saver }key is pressed.
Limitation❒ Function names displayed in a
faint font become available whenthe machine is expanded.
ReferenceFor information on Copy and FaxUser Tools, see the appropriate ref-erence manual.
A Press the {User Tools/Counter } key.The User Tools Main Menu ap-pears.
B Enter {1} with the {Number } keys.The system settings menu appears.
C Search for the desired menu. En-ter its number with the {Number }keys.
Note❒ [↓↓↓↓Next]: Press to go to the next
page.❒ [↑↑↑↑Prev. ]: Press to go back to the
previous page.
Reference⇒ P.18 “User Tools Menu (Sys-tem Settings)”
2
2
22
11
Sort
Staple
Stack
1-Sided 2-Sided
2-Sided 2-Sided User Tools / Counter
Enhanced Auto Reduce/
Book 2-Sided
ND2L0103

$&&(66,1*ý7+(ý86(5ý722/6ýõ6<67(0ý6(77,1*6ô
ìæ
ë
D Change the settings by followingthe instructions on the panel dis-play. Then press the [OK] key.
Reference⇒ P.19 “Settings You Can ChangeWith The User Tools”
Note❒ [OK]: Press to set the new set-
tings and return to the previousmenu.
❒ [Cancel ]: Press to return to theprevious menu without chang-ing any data.
Exiting from User Tools
A After changing the user tools set-tings, press the {User Tools/Counter } key.
Note❒ You can also exit from user tools
by pressing the [Exit ] key on theUser Tools Main Menu.
2
2
22
11
Sort
Staple
Stack
1-Sided 2-Sided
2-Sided 2-Sided User Tools / Counter
Enhanced Auto Reduce/
Book 2-Sided
ND2L0103

86(5ý722/6ýõ6<67(0ý6(77,1*6ô
ìå
ë
USER TOOLS MENU (SYSTEM SETTINGS)

6(77,1*6ý<28ý&$1ý&+$1*(ý:,7+ý7+(ý86(5ý722/6
ìä
ë
SETTINGS YOU CAN CHANGE WITH THE USER TOOLS
ReferenceFor how to access the user tools, see ⇒ P.16 “Accessing The User Tools (SystemSettings)”.
System Settings 1/6
Menu Description
01. Function Priority (facsimile option re-quired)
You can specify the mode to be displayed immediately after the operation switch is turned on or System Reset mode is turned on.
Note❒ Default: Copy
02. Panel Beeper The beeper (key tone) sounds when a key is pressed.
This beeper can be turned on or off.
Note❒ Default: ON
03. Ready·Beeper Choose whether the machine beeps when it becomes ready for a copy run after power up.
Note❒ Default: ON
04. Copy Count Display The copy counter can be set to show the number of copies made (count up) or the number of copies remaining to be made (count down).
Note❒ Default: Up (count up)

86(5ý722/6ýõ6<67(0ý6(77,1*6ô
ëí
ë
System Settings 2/6
Menu Description
05. System Reset The machine returns to its prioritized mode automatically after your job is finished, after the selected time. This func-tion is called “System Reset”. The time can be set from 10 to 999 seconds, or no system reset.
Note❒ Default: YES (60 seconds)
❒ You can specify the prioritized mode with the user tools. See “01. Function Priority” in ⇒ P.19 “System Settings 1/6”
06. Function Switch (facsimile option re-quired)
How long the machine waits before switching to the default mode if no operation has been performed after an operation has finished.
Note❒ Default: 3 seconds
07. Low Pwr. Shift Time The machine enters Low Power mode automatically after your job is finished, after the selected time. The time can be set from 1 to 240 minutes.
In Low Power mode, power consumption is saved about 35 % as compared with Stand-by mode. This value is a refer-ence applicable to Type 1 (mainframe only).
Note❒ Default: 15 minutes
08. Low Power Timer The machine enters to Energy Saver mode automatically af-ter your job is finished, after the selected time. The time can be set from 10 to 999 seconds, or off.
Note❒ Default: Yes (60 seconds)

6(77,1*6ý<28ý&$1ý&+$1*(ý:,7+ý7+(ý86(5ý722/6
ëì
ë
System Settings 3/6
Menu Description
09. Energy Saver Mode The machine enters Energy Saver mode in the following cases:
• If you hold down the {Clear Modes/Energy Saver } key for about a second or more.
• When the preset time selected with the Low Power Timer has passed.
ReferenceSee “08. Low Power Timer” in ⇒ P.20 “System Settings 2/6”.
In Energy Saver mode, power consumption is saved as shown below, as compared with Stand-by mode.
• Level 1 (default): Saving about 25 %
• Level 2: Saving about 30 %
Warm-up time required for Energy Saver mode to return to the ready condition is as follows:
• Level 1 (default): About 3 seconds
• Level 2: About 10 seconds
Note❒ Default: Level 1
❒ The values above are references applicable to Type 1 (mainframe only).
10. Auto Off Timer The machine turns itself off automatically to conserve ener-gy after your job is finished, after the selected time. This function is called “Auto Off ”. The time can be set from 1 to 240 minutes.
Note❒ Default: 60 minutes
❒ Auto Off might not be effective when the machine is in the following conditions:
• An error message is displayed.
• The remaining memory space for facsimile mode is less than 100%.
❒ To return to the ready condition from Auto Off, the ma-chine requires the same warm-up time as the time for be-coming ready after its power is turned on.
❒ When the machine receives a fax in Auto Off mode, it au-tomatically prints the fax.

86(5ý722/6ýõ6<67(0ý6(77,1*6ô
ëë
ë
11. Paper Size-Tray Select the size of the copy paper set in the paper tray.
Note❒ If the specified paper size differs from the size of paper
actually set in the paper tray, a paper misfeed might oc-cur because the paper size is not detected correctly.
ReferenceSee “Changing The Paper Size” in the “Copy Reference”.
12. Pap.Tray Priority (for Copy mode only)
You can select the paper tray which will be selected as a de-fault in the following conditions:
• When the operation switch is turned on.
• When System Reset or Auto Reset mode is turned on.
• When the {Clear Modes/Energy Saver } key is pressed.
• When the Auto Paper Select mode is not selected.
Note❒ Default: Tray 1
❒ Tray 3, Tray 4, and LCT (Large Capacity Tray) are op-tions.
Menu Description
Tray1
Tray2
Tray3
Tray4
ND6A0200
LCT
Optional Trays

6(77,1*6ý<28ý&$1ý&+$1*(ý:,7+ý7+(ý86(5ý722/6
ëê
ë
System Settings 4/6
Menu Description
13. Auto Tray Switch If you load paper of the same size in two or more trays, the machine automatically shifts another tray when the tray in use runs out of paper. You can set or cancel this setting.
Note❒ Default: Yes
❒ If you put recycled paper or special paper in paper trays using the Special Paper Indicate menu, the Auto Tray Switch function is available to these trays only when their settings are identical.
ReferenceSee “14. Sp. Paper Ind.” in ⇒ P.23 “System Settings 4/6”
14. Sp. Paper Ind. When recycled paper or special paper is in the paper trays, paper type can be indicated on the panel display.
Note❒ Default: No Display
❒ “Rcyd. ppr.” appears on the panel display when recycled paper is selected, and “Sp. ppr.” appears when special paper is selected.
15. Output Tray You can specify a tray to which documents are delivered for each mode (copy and facsimile).
Note❒ You can specify a single tray for two or more modes.
❒ With the optional 3000-sheet finisher installed, B4, 81/2" × 14" or larger paper will be automatically delivered to the “Finisher Proof” even if you specified “Internal Tray” as an output tray.
ND0P0202
External Tray
FinisherProof
Finisher
Finisher
Internal Tray 2
Internal Tray

86(5ý722/6ýõ6<67(0ý6(77,1*6ô
ëé
ë
16. Print Priority (set-ting the multi-accessing function)
Sets the print priority for each mode.
• “Display”Print priority is given to the mode displayed on the dis-play.
• “Copy”Print priority is given to the copy function.
• “Fax”Print priority is given to the fax function.
• “Interleave”Prints jobs in the order in which they are initiated regard-less of mode/function.
Different function's print output might be mixed. If you want to avoid such mixing, specify an independent tray for each feature using “Output Tray”. When using different functions, attaching internal tray 2 allows you to specify an independent tray for each function. If you want to attach one, contact your local dealer.
Note❒ Interrupt printing is disabled functions that have “User
Code Manage” set to “Yes”. The machine switches the display after the time specified by “Function Switch” and starts printing with the function.
Reference⇒ P.6 “Multi-Access”
“15. Output Tray” in ⇒ P.23 “System Settings 4/6”
“18. User Code Manage” in ⇒ P.25 “System Settings 5/6”
“06. Function Switch” in ⇒ P.20 “System Settings 2/6”
Menu Description

6(77,1*6ý<28ý&$1ý&+$1*(ý:,7+ý7+(ý86(5ý722/6
ëè
ë
System Settings 5/6
Menu Description
17. Contrast You can adjust the brightness of the panel display.
18. User Code Manage
If the machine is set to use the User Code function, operators must input their user codes before the machine can operate. The machine keeps count of the number of cop-ies made under each user code.
Note❒ Enter a previously registered key operator code with the {Number } keys.
Reference“Key Operator Code”
Code Manage-Copy Specify whether to employ user codes to restrict copier us-ers and manage the number of copies made.
Note❒ Default: No
19. Management Setting
Use these settings to manage use of the machine.
Note❒ Enter a previously registered key operator code with the {Number } keys.
Reference“Key Operator Code”
Show/PrintCounter You can check and print the number of copies made under each function.
Print CounterList You can print the counter data for all functions.
Key Operator Code If you select “Yes”, only operators who know the key oper-ator code can access the “18. User Code Manage” and “19. Management Setting” user tools.
Note❒ Default: No
❒ If you select “Yes”, you should register the key operator code. See below.
Reg/Chg KeyOpCode Use to register or change the key operator code (up to 8 dig-its).

86(5ý722/6ýõ6<67(0ý6(77,1*6ô
ëç
ë
System Settings 6/6
Menu Description
22. ADF Orig. Ejection As a default setting, the scanned originals from the docu-ment feeder (ADF) are ejected to the ADF external tray. But, if there is no space to attach an ADF external tray, you can change the output tray to the ADF tray. However, if the out-put tray is set to the ADF tray, it takes a little more time than to the ADF external tray.
Note❒ Default: ADF External Tray
24. <F/F4>Size Setting Currently three types of F size are available; 81/2" × 13", 81/4" × 13" and 8" × 13".
The document feeder or platen cover sensor cannot distin-guish these 3 types of originals.
This function sets the F size from the document feeder or platen cover sensor.
Auto Paper Select or Auto Reduce/Enlarge in the case of F size originals functions based on this setting.
Note❒ Default: 81/2" × 13"L

ëæ
INDEXSymbols
# key, ìè
A
ADF Orig. Ejection, ëçAuto Off Timer, ëìAuto Tray Switch, ëê
C
Clear/Stop key, ìèCode Manage-Copy, ëèContrast, ëèCopy Count Display, ìäCopy Mode, ì, ê, ìíCursor keys, ìè
E
Energy Saver Mode, ëì
F
F/F4 Size Setting, ëçFacsimile Mode, ì, é, ìëFunction Priority, ìäFunction Switch, ëí
I
Interrupt Copying, ìí
K
Key Operator Code, ëèKeys for User Tools (System Settings), ìè
L
Low Power Timer, ëíLow Pwr. Shift Time, ëí
M
Management Setting, ëèModes, èMulti-Access, ç
N
Number keys, ìè
O
Output Tray, ëê
P
Panel Beeper, ìäPanel Display, ìèPap. Tray Priority, ëëPaper Size-Tray, ëëPrint CounterList, ëèPrint Priority, ëé
R
Ready·Beeper, ìäReg/Chg KeyOpCode, ëè
S
Selection keys, ìèShow/PrintCounter, ëèSp. Paper Ind., ëêSystem Reset, ëí
U
User Code Manage, ëèUser Tools (System Settings), ìèUser Tools/Counter key, ìè

Note to users in the United States of America
Notice:This equipment has been tested and found to comply with the limits for a Class B digital device, pursu-ant to Part 15 of the FCC Rules. These limits are designed to provide reasonable protection againstharmful interference in a residential installation. This equipment generates, uses and can radiate radiofrequency energy and, if not installed and used in accordance with the instructions, may cause harmfulinterference to radio communications. However, there is no guarantee that interference will not occurin a particular installation. If this equipment does cause harmful interference to radio or television re-ception, which can be determined by turning the equipment off and on, the user is encouraged to try tocorrect the interference by one more of the following measures:
Reorient or relocate the receiving antenna.
Increase the separation between the equipment and receiver.
Connect the equipment into an outlet on a circuit different from that to which the receiver isconnected.
Consult the dealer or an experienced radio /TV technician for help.
WarningChanges or modifications not expressly approved by the party responsible for compliance could voidthe user's authority to operate the equipment.
1. Properly shielded and grounded cables and connectors must be used for connections to host com-puter (and/or peripheral) in order to meet FCC emission limits.
2. AC adapter with ferrite core must be used for RF interference suppression.This device complies with Part 15 of FCC Rules.Operation is subject to the following two conditions:1. This device may not cause harmful interference, and2. This device must accept any interference received,including interference that may cause undesired operation.Ricoh Corporation, 5 Dedrick Place, West Caldwell, NJ 07006201-882-2000
Note to users in Canada
Warning:This Class B digital apparatus meets all requirements of the Canadian Interference-Causing Equip-ment Regulations.
Remarque concernant les utilisateurs au Canada
Avertissement:Cet appareil numérique de la classe B respecte toutes les exigences du Règlement sur le matérielbrouilleur du Canada.
In accordance with ISO Standard 7001, this machine uses the following symbols for the main powerswitch:
a means POWER ON.c means STAND BY.
Copyright © 1998 Ricoh Co., Ltd.

Overseas AffiliatesU.S.A.RICOH CORPORATION5 Dedrick Place West Caldwell, New Jersey 07006(TEL) 973-882-2000
NetherlandsRICOH EUROPE B.V.Groenelaan 3 P.O. Box 114 1180 AC - Amstelveen Holland(TEL) 020-5474111
United KingdomRICOH U.K. LTD.Ricoh House 1 Plane Tree Crescent, Feltham, Middlesex, TW13 7HG(TEL) 181-261-4000
GermanyRICOH DEUTSCHLAND GMBHMergenthalerallee 38-40, 65760 Eschborn(TEL) (06196) 906-0
SingaporeRICOH ASIA PACIFIC PTE. LTD.#15-01/02 The Heeren, 260 Orchard Road, Singapore 238855(TEL) 65-830-5888
SpainRICOH ESPAÑA S.A.Guitard, 45 08014 Barcelona(TEL) 490-09-60
ItalyRICOH ITALIA S.p.A.Via della Metallurgia, 12 (zona Basson) - 37139 VERONA(TEL) 045-851 00 44
Hong KongRICOH HONG KONG LTD.23/F., China Overseas Building, 139, Hennessy Road, Wan Chai, Hong Kong(TEL) 2862-2888
FranceRICOH FRANCE S.A.383 Avenue du Général de Gaulle, B.P. 307, 92143 Clamart Cedex(TEL) 01-4094-3838
RICOH COMPANY, LTD.15-5, 1 chome, Minami-Aoyama, Minato-ku, TokyoTelephone: Tokyo 3479-3111
Printed in ChinaUE USA A2308607
340/350/450O
perating Instructions

Read this manual carefully before you use this product and keep it handyfor future reference.For safety, please follow the instructions in this manual.
COPY REFERENCE
340/350/450
OPERATING INSTRUCTIONS
ND0A0101

IntroductionThis manual contains detailed instructions on the operation and maintenance of this machine. To getmaximum versatility from this machine all operators should carefully read and follow the instructions inthis manual. Please keep this manual in a handy place near the machine.
Please read the Safety Information before using this machine. It contains important information relatedto USER SAFETY and PREVENTING EQUIPMENT PROBLEMS.
- Notes:Some illustrations may be slightly different from your machine.
Certain options may not be available in some countries. For details, please contact your local dealer.
Operator Safety:
This machine is considered a CDRH class I laser device, safe for office/ EDP use. The machine con-tains two 5-milliwat, 760 - 800 nanometer wavelength, GaAIAs laser diodes. Direct (or indirect reflect-ed) eye contact with the laser beam might cause serious eye damage. Safety precautions and interlockmechanisms have been designed to prevent any possible laser beam exposure to the operator.
Laser Safety:
The Center for Devices and Radiological Health (CDRH) prohibits the repair of laser-based optical unitin the field. The optical housing unit can only be repaired in a factory or at a location with the requisiteequipment. The laser subsystem is replaceable in the field by a qualified Customer Engineer. The laserchassis is not repairable in the field. Customer engineers are therefore directed to return all chassisand laser subsystems to the factory or service depot when replacement or the optical subsystem is re-quired.
Warning:
Use of controls or adjustment or performance of procedures other than those specified in this manualmight result in hazardous radiation exposure.
Notes:
The model names of the machines do not appear in the following pages. Check the type of your ma-chine before reading this manual. (For details, see ⇒ P.1 “Machine Types”.)
• Type 1: Aficio 340
• Type 2: Aficio 350
• Type 3: Aficio 450
Certain types might not be available in some countries. For details, please contact your local dealer.
Two kinds of size notation are employed in this manual. With this machine refer to the Inch version.
For good copy quality, Ricoh recommends that you use genuine Ricoh toner.
Ricoh shall not be responsible for any damage or expense that might result from the use of parts otherthan genuine Ricoh parts in your Ricoh office product.
Power Source:
120 V, 60 Hz, 10 A or more
Please be sure to connect the power cord to a power source as above. For details about power source,see ⇒ P.167 “Power Connection”.

i
SAFETY INFORMATION
When using your machine, the following safety precautions should be always befollowed.
Safety During Operation
In this manual, the following important symbols are used:
Examples Of Indications
R WARNING:Ignoring this warning could cause serious injury or even death.
R CAUTION:Ignoring this caution could cause injury or damage to property.
Symbols R mean a situation that requires you take care.
Symbols v mean “Hot surface”.
Do NOT carry out the operation represented by this symbol m.
This example means “Do not take apart”.
Symbols ● mean you MUST perform this operation.
This example means “You must remove the wall plug”.

ii
R WARNING:
• Only connect the machine to the power source described onthe inside front cover of this manual.
• Avoid multi-wiring.
• Do not damage, break or make any modifications to the pow-er cord. Do not place heavy objects on it, pull it hard or bendit more than necessary. These actions could cause an elec-tric shock or fire.
• Do not plug or unplug the power cord with your hands wet.Otherwise, an electric shock might occur.
• Make sure the wall outlet is near the machine and freely ac-cessible so that in event of an emergency it can be un-plugged easily.
• Do not remove any covers or screws other than those spec-ified in this manual. Some parts of the machine are at a highvoltage and could give you an electric shock. Also, if the ma-chine has laser systems, direct (or indirect) reflected eyecontact with the laser beam may cause serious eye damage.When the machine needs to be checked, adjusted, or re-paired, contact your service representative.
• Do not take apart or attempt any modifications to this ma-chine. There is a risk of fire, electric shock, explosion or lossof sight. If the machine has laser systems, there is a risk ofserious eye damage.
• If the machine looks damaged or breaks down, smoke iscoming out, there is a strange smell or anything looks un-usual, immediately turn off the operation and main powerswitches then unplug the power cord from the wall. Do notcontinue using the machine in this condition. Contact yourservice representative.
• If metal, liquid or foreign matter falls into the machine, turnoff the operation and main power switches, and unplug themain power cord. Contact your service representative. Donot keep using the machine with a fault or defect.
• Do not put any metal objects or containers holding water(e.g. vases, flowerpots, glasses) on the machine. If the con-tents fall inside the machine, a fire or electric shock couldoccur.

iii
• Do not incinerate used toner or toner containers. Toner dustmight ignite when exposed to an open flame. Dispose of theused toner containers according to local regulations forplastics.

LY
R CAUTION:
• Keep the machine away from humidity and dust. A fire or an elec-tric shock might occur.
• Do not place the machine on an unstable or tilted surface. If it top-ples over, it could cause injury.
• After you move the machine, fix it with the caster fixture. Other-wise, the machine might move or come down to cause a personalinjury.
• When you move the machine, unplug the power cord from thewall outlet to avoid fire or electric shock.
• When the machine will not be used for a long time, unplug thepower cord.
• When you pull out the plug from the socket, grip the plug to avoiddamaging the cord and causing fire or electric shock.
• If you use the machine in a confined space, make sure there is acontinuous air turnover.
• Do not reuse stapled paper. Do not use aluminum foil, carbon-containing paper or other conductive paper. Otherwise, a firemight occur.
• When removing misfed paper, do not touch the fusing section be-cause it could be very hot.
• This machine has been tested for safety using this supplier'sparts and consumables. We recommend you only use thesespecified supplies.
• Do not eat or swallow toner.
• Keep toner (used or unused) and toner containers out of reach ofchildren.
• This equipment is only to be installed by a qualified service per-sonnel.

v
• Deliver to collection point for waste products. Do not be disposedof via domestic refuse collection.

vi
ENERGY STAR
As an Energy Star Partner, we have determined that this machine model meetsEnergy Star Guidelines for energy efficiency.This product was designed to reduce the environmental impact associated withcopying equipment by means of energy saving feature such as Auto Off mode.For details, see the following pages.
❖❖❖❖ Auto Off TimerSee “10. Auto Off Timer” in “System Settings 3/6” in the System Settings.
❖❖❖❖ Low Pwr. Shift TimeSee “07. Low Pwr. Shift Time” in “System Settings 2/6” in the System Settings.
❖❖❖❖ Duplex PrioritySee “10. Duplex Priority” in ⇒ P.153 “1. General Features 3/4”.
----Recycled PaperPlease contact your sales or service representative for recommended recycledpaper types that may be used in this machine.

vii
HOW TO READ THIS MANUAL
Symbols
In this manual, the following symbols are used:
R WARNING:This symbol indicates a potentially hazardous situation that might result indeath or serious injury when you misuse the machine without following the in-structions under this symbol. Be sure to read the instructions, all of which are de-scribed in the Safety Information section.
R CAUTION:This symbol indicates a potentially hazardous situation that might result in mi-nor or moderate injury or property damage that does not involve personal injurywhen you misuse the machine without following the instructions under thissymbol. Be sure to read the instructions, all of which are described in the SafetyInformation section.* The statements above are notes for your safety.
ImportantIf this instruction is not followed, paper might be misfed, originals might bedamaged, or data might be lost. Be sure to read this.
PreparationThis symbol indicates the prior knowledge or preparations required before op-erating.
NoteThis symbol indicates precautions for operation, or actions to take after misop-eration.
LimitationThis symbol indicates numerical limits, functions that cannot be used together,or conditions in which a particular function cannot be used.
ReferenceThis symbol indicates a reference.
[ ]Keys that appear on the machine's panel display.
{ }Keys built into the machine's operation panel.

YLLL
WHAT YOU CAN DO WITH THIS MACHINE (COPY MODE)
10
5
1
10
5
1
32
13
21
32
13
21 *1
*1
Cover / Paper Designate ⇒ Page 91.
Paper Designate
Both Covers
Front Cover
Image Repeat ⇒ Page 99.
Image Repeat
Double Copies
R
R
R
RRR R R R
R R R
A"
B"
a"
b"
Directional Size Magnification(inch) ⇒ Page 69.
a%
b%
Directional Magnification(%) ⇒ Page 71.
222121 11*1
OHP Slip Sheet ⇒ Page 96.
Positive / Negative ⇒ Page 98.
*2
Archive File ⇒ Page 102.
Store
Recall
MAP
Memory
Series Copies ⇒ Page 82.
Enhanced Image Copy ⇒ Page 38.
Clear Image CopyMap
ND0X0400
1 2 1 2
L[
*1 Type 1 requires the optional bypass tray.
*2 The optional copier hard disk is required
*3 Type 1 reguires the optional 8MB copier
memory unit.
*4 The optional finisher is required.
*5 Type 1 requires the optional duplex unit,
interchange unit and 8MB copier memory
unit.
ND0X0401
Margin Adjustment ⇒ Page 73.
A A
Combine ⇒ Page 78.
43
1 2
Erase Center / Border ⇒ Page 75.
Erase Border
Erase Center
BA BA
BA BA
Text·Photo Mode ⇒ Page 39.
Photo + Text Clear Image Copy
Photo Mode ⇒ Page 39.
Sort ⇒ Page 45. Staple ⇒ Page 49.
21
3
21
3
21
3
*3 *4*3
RRRRRR
Zoom ⇒ Page 67.
Auto Reduce / Enlarge⇒ Page 42.
Duplex ⇒ Page 85.
1 2 1
2
*5
2
1
3 4
2
2
22
11
*
Sort
Staple
Stack
1-Sided 2-Sided
2-Sided 2-Sided User Tools / Counter
EnhancedImage
Menu
SeriesCopies
MarginAdjust
Auto Reduce/Enlarge
Zoom
CombineCopies
Erase Center/Border
Copy
FaxText PhotoPhotoSpecial Orig. Lighter Darker
Speed Dial
On Hook Dial
Pause /Redial
Tone
Program
Auto Image Density
Book 2-Sided
.
1 2
3 4
8 / x 11"11" x 17"
12
Photo Clear Image Copy
The game of go The game of go

x
TABLE OF CONTENTSMACHINE TYPES....................................................................................... 1
GUIDE TO COMPONENTS ........................................................................ 2Guide............................................................................................................. 5
OPTIONS .................................................................................................... 7Type 1 ........................................................................................................... 7Type 2 and Type 3 ........................................................................................ 8
FUNCTION LIST BASED ON OPTIONS.................................................... 9
OPERATION PANEL................................................................................ 12
PANEL DISPLAY...................................................................................... 14Displays And Key Operations ..................................................................... 14Display Panel Layout .................................................................................. 16
1.BASICS
STARTING THE MACHINE ...................................................................... 17Turning On The Power................................................................................ 17Turning Off The Power................................................................................ 18
CHANGING MODES................................................................................ 19
ORIGINALS............................................................................................... 20Sizes And Weights Of Recommended Originals......................................... 20Sizes Difficult To Detect .............................................................................. 21Original Sizes And Scanning Area/Missing Image Area ............................. 22
COPY PAPER........................................................................................... 23Recommended Paper Sizes And Types ..................................................... 23Non-recommended Paper........................................................................... 25Paper Storage ............................................................................................. 26
TONER...................................................................................................... 27Handling Toner............................................................................................ 27Toner Storage ............................................................................................. 27Used Toner ................................................................................................. 27
2.COPYING
BASIC PROCEDURE ............................................................................... 29
SETTING ORIGINALS.............................................................................. 31Setting Originals On The Exposure Glass .................................................. 31Setting Originals In The Document Feeder................................................. 32Using SADF, Mixed Sized, and Thin Paper modes .................................... 33
BASIC FUNCTIONS ................................................................................. 37Adjusting Copy Image Density .................................................................... 37Enhanced Image Copy................................................................................ 38Selecting Original Type Setting................................................................... 39

xi
Selecting Copy Paper ................................................................................. 40Auto Reduce/Enlarge—Having The Machine Choose The Reproduction Ratios .......................................................................................................... 42
SORT/STACK/STAPLE............................................................................ 43Sort—Sorting Into Sets (123, 123, 123) ...................................................... 45Stack—Stacking Together All Copies Of A Page (111, 222, 333) .............. 47Staple .......................................................................................................... 49
COPYING FROM THE BYPASS TRAY.................................................... 55When copying onto OHP transparencies or thick paper ............................. 58
PROGRAM—STORING YOUR COPY SETTINGS IN MEMORY ............ 60Storing Your Settings .................................................................................. 60Deleting A Program..................................................................................... 61Recalling A Program ................................................................................... 62
OTHER FUNCTIONS................................................................................ 63Energy Saver Mode—Saving Energy ......................................................... 63Interrupt—Temporarily Stopping One Job To Copy Something Else.......... 63User Codes ................................................................................................. 63Auto Start—Entering Copy Job Settings During The Warm-up Period ....... 64Original Beeper ........................................................................................... 64
PRESET REDUCE/ENLARGE—REDUCING AND ENLARGING USING PRESET RATIOS...................................................................................... 65
ZOOM—REDUCING AND ENLARGING IN 1 % STEPS......................... 67
DIRECTIONAL SIZE MAGNIFICATION (INCH)—STRETCHING AND SQUEEZING THE IMAGE INTO THE COPY AREA ................................ 69
DIRECTIONAL MAGNIFICATION (%)—STRETCHING AND SQUEEZING THE IMAGE IN 1 % STEPS...................................................................... 71
MARGIN ADJUSTMENT—ADJUSTING THE MARGIN .......................... 73
ERASE CENTER/BORDER—ERASING THE CENTER AND THE BORDER................................................................................................... 75
COMBINE—COMBINING ORIGINALS INTO ONE COPY ...................... 78
SERIES COPIES—MAKING ONE-SIDED COPIES FROM VARIOUS ORIGINALS............................................................................................... 82
Book → 1-Sided—Making One-sided Copies From Two Facing Page Of A Bound Original (Book)................................................................................. 822-Sided→1-Sided—Making One-sided Copies From Two-sided Originals ...................................................................................................... 84
DUPLEX—MAKING TWO-SIDED COPIES.............................................. 851-Sided → 2-Sided—Making Two-sided Copies From One-sided Originals ...................................................................................................... 86Book → 2-Sided—Making Two-Sided Copies From Facing Pages Of A Bound Original (Book) ............................................................................................ 892-Sided → 2-Sided—Making Two-sided Copies From Two-sided Originals ...................................................................................................... 90
COVER/PAPER DESIGNATE—ADDING OR INSERTING SHEETS ...... 91

xii
Front Cover—Copying Or Adding A Front Cover........................................ 91Both Covers—Copying Or Adding Front And Back Covers ........................ 93Paper Designate—Copying Designated Pages Of Originals Onto Slip Sheets ......................................................................................................... 94
OHP SLIP SHEET—COPYING OR INSERTING SLIP SHEET................ 96
POSITIVE/NEGATIVE—COPYING IN COMPLEMENTALY COLORS.... 98
IMAGE REPEAT—REPEATING AN IMAGE............................................ 99Double Copies—Copying The Image Twice On One Page ........................ 99Image Repeat—Repeating An Image Over The Entire Copy ................... 100
ARCHIVE FILE—STORING THE IMAGES OF YOUR ORIGINALS INTO MEMORY ................................................................................................ 102
Storing The Images................................................................................... 103Deleting The Stored Images ..................................................................... 105Printing A List Of The Stored Images........................................................ 106Recalling The Stored Images.................................................................... 107
COMBINATION CHART ......................................................................... 108
3.WHAT TO DO IF SOMETHING GOES WRONG
IF YOUR MACHINE DOES NOT OPERATE AS YOU WANT ............... 111Message.................................................................................................... 111Display ...................................................................................................... 112
IF YOU CANNOT MAKE CLEAR COPIES............................................. 113
IF YOU CANNOT MAKE COPIES AS YOU WANT ............................... 115Adjust Image ............................................................................................. 116Combine.................................................................................................... 117Duplex ....................................................................................................... 118
BBBB LOADING PAPER.............................................................................. 119Loading Paper In The Large Capacity Tray .............................................. 120
DDDD ADDING TONER................................................................................ 121
xxxx CLEARING MISFEEDS ..................................................................... 124
CHANGING THE PAPER SIZE .............................................................. 132
dddd ADDING STAPLES............................................................................ 1341000-Sheet Finisher.................................................................................. 1343000-Sheet Finisher.................................................................................. 136
eeee REMOVING JAMMED STAPLES...................................................... 1391000-Sheet Finisher.................................................................................. 1393000-Sheet Finisher.................................................................................. 141
yyyy REMOVING PUNCH WASTE ............................................................ 144
4.USER TOOLS (COPY FEATURES)
ACCESSING THE USER TOOLS (COPY FEATURES)......................... 145Exiting From User Tools............................................................................ 146

xiii
USER TOOLS MENU (COPY FEATURES)............................................ 148
SETTINGS YOU CAN CHANGE WITH THE USER TOOLS.................. 1501. General Features 1/4 ............................................................................. 1501. General Features 2/4 ............................................................................. 1521. General Features 3/4 ............................................................................. 1531. General Features 4/4 ............................................................................. 1542. Adjust Image 1/2 .................................................................................... 1552. Adjust Image 2/2 .................................................................................... 1573. Input/Output 1/2...................................................................................... 1603. Input/Output 2/2...................................................................................... 1624. Shortcut Keys 1/1 ................................................................................... 164
5.REMARKS
DO'S AND DON'TS................................................................................. 165
WHERE TO PUT YOUR MACHINE........................................................ 166Machine Environment ............................................................................... 166Power Connection..................................................................................... 167Access To Machine................................................................................... 168
MAINTAINING YOUR MACHINE ........................................................... 169Cleaning The Exposure Glass .................................................................. 169Cleaning The Platen Cover ....................................................................... 169Cleaning The Document Feeder ............................................................... 169
6.SPECIFICATION
MAINFRAME........................................................................................... 171
DOCUMENT FEEDER (OPTION) ........................................................... 176
PAPER TRAY UNIT (OPTION)............................................................... 177
INTERNAL TRAY 2 (1 BIN TRAY) (OPTION) ........................................ 178
1000-SHEET FINISHER (OPTION) ........................................................ 179
3000-SHEET FINISHER (OPTION) ........................................................ 180
PUNCH KIT (OPTION)............................................................................ 182
LARGE CAPACITY TRAY (LCT) (OPTION) .......................................... 183
DUPLEX UNIT (OPTION) ....................................................................... 184
BYPASS TRAY (OPTION)...................................................................... 185
8 MB COPIER MEMORY UNIT (ELECTRIC SORT KIT) (OPTION) ...... 186
COPIER HARD DISK (IMAGE ENHANCE KIT) ..................................... 187
INDEX...................................................................................................... 188

xiv

1
MACHINE TYPES
There are three models of this machine. The main differences between them arememory capacity and copy speed. To make sure which model you have, see theinside front cover.
Type 1 Type 2 Type 3
Copy speed 35 copies/minute (A4K, 81/2" × 11"K)
35 copies/minute (A4K, 81/2" × 11"K)
45 copies/minute (A4K, 81/2" × 11"K)
Memory capacity 4 MB
(8 MB optional memory available)
12 MB 12 MB
Fax unit Option Option Option

2
GUIDE TO COMPONENTS
1. Platen cover (option) or Docu-ment Feeder (ADF) (option)Lower the platen cover over originalsplaced on the exposure glass for copying.If you have the document feeder, insert astack of originals here. They will be fedautomatically.(The illustration shows the documentfeeder.)
2. Exposure glassPosition originals here face down forcopying. See ⇒ P.20 “Originals”.
3. Internal trayCopied paper is delivered here face down.
4. Main power switchDo not touch this switch. This switch isused only by a service representativewhen the optional fax unit is installed.
Note❒ If the machine does not operate after
turning on the operation switch, check
if the main power switch is turned on.If it is off, turn it on.
5. ADF external trayOriginals are delivered here.
6. Main Power indicatorThis indicator lights up when the mainpower switch is turned on, and goes offwhen the switch is turned off.
7. On indicatorThis indicator lights up when the opera-tion switch is turned on, and goes offwhen the switch is turned off.
8. Operarion switchPress this switch to turn the power on(the On indicator lights up). To turn thepower off, press this switch again (the Onindicator goes off).
9. Operation panelSee ⇒ P.12 “Operation Panel”.
10. Duplex unit (Unit for two-sidedcopies) (option for Type 1)Makes two-sided copies.
1
3
4
2
5
1011
12
13
9
ND0A02EE
8
On/Off
MainPower
On
6
7

3
11. Front coverOpen to access the inside of the machine.
12. Paper traySet paper here. See ⇒ P.119 “B LoadingPaper”.
13. Paper tray unit (option)

4
1. Bypass tray (option for Type 1)Use to copy onto OHP transparencies,adhesive labels, translucent paper, postcards, and non-standard size paper. See⇒ P.55 “Copying From The Bypass Tray”.
2. Right side coverOpen this cover before making 2-sidedcopies on B4, 8 1/2" × 14" or larger copypaper.
3. Lower right coverOpen this cover to remove jammed paperwhich fed from the optional paper trayunit.
1. Ventilation holePrevents overheating. Do not obstructthe ventilation hole by placing or leaning
an object near it. If the machine over-heats, a fault might occur.
ND6A0101
1 2
3
ND8A0102
1
Preface2 Page 4 Tuesday, May 19, 1998 1:55 PM

5
Guide
The guides of the internal tray minimize curled copies when they are delivered.Raise these guides when you make copies on A3, 11" × 17" or thin paper.
❖❖❖❖ To copy onto A3, 11" × 17" paperRaise the end fence.
❖❖❖❖ If either side of the OHP transparencies or thin paper is curled
Raise the left end of the guide until it clicks.
ND3P0100
ND3P0200

6
❖❖❖❖ If the end of the sheet is curled
A Remove the guide.
B Reinstall the guide in the opposite direction.
ND3P0300
ND3P0400

7
OPTIONS
Type 1
1. 1000-sheet finisherSorts, stacks, and staples copies.
2. External trayIf you selected this as the output tray,copied paper is delivered here facedown. See “15. Output Tray” in the Sys-tem Settings.
3. Platen coverLower this cover over originals for copy-ing.
4. Document feeder (ADF)Insert a stack of originals here.They will be fed automatically.
5. Internal tray 2 (1 bin tray)If you selected this as the output tray,copied paper is delivered here facedown. See “15. Output Tray” in the Sys-tem Settings.
6. Bridge unitRelays copies to the external tray or fin-isher. (The Punch function is optional.)
7. Paper tray unitConsists of two paper trays.
8. Large Capacity Tray (LCT)Holds 1,500 sheets of paper.
9. Bypass trayUse to copy onto OHP transparencies,adhesive labels, translucent paper, postcards, and non-standard size paper. See⇒ P.55 “Copying From The Bypass Tray”.
10. Duplex unitUse to make two-sided copies.
Other options:• Interchange unit• 8 MB copier memory unit (Electric
sort kit)• Copier hard disk (Image enhance
kit)
ND0P01EE
1 2 3 4 5
109876

8
Type 2 and Type 3
1. 1000-sheet finisherSorts, stacks, and staples copies.
2. External trayIf you selected this as the output tray,copied paper is delivered here facedown. See “15. Output Tray” in the Sys-tem Settings.
3. Platen coverLower this cover over originals for copy-ing.
4. Document feeder (ADF)Insert a stack of originals here.They will be fed automatically.
5. Internal tray 2 (1 bin tray)If you selected this as the output tray,copied paper is delivered here facedown. See “15. Output Tray” in the Sys-tem Settings.
6. 3000-sheet finisher (only for Type3)Sorts, stacks, staples copies, and makespunch holes (The Punch function is op-tional).
• 1: Proof tray• 2: Shift tray
7. Bridge unitRelays copies to the external tray or fin-isher.
8. Paper tray unitConsists of two paper trays.
9. Large Capacity Tray (LCT)Holds 1,500 sheets of paper.
Other options:• Copier hard disk (Image enhance
kit)• Punch kit (only for Type 3 with
3000-sheet finisher)
ND0P02EE
1 2
6 7 8 9
3 4 5

9
FUNCTION LIST BASED ON OPTIONS
The function that are available to you depend on your machine configurationand which options you have. See the table below.❍…Available×…Not available
Model Place originals
Typ
e 1
Typ
e 1
wit
h 8
MB
cop
ier
mem
ory
un
it
Typ
e 1
wit
h 8
MB
cop
ier
mem
ory
un
it a
nd
cop
ier
har
d d
isk
Typ
e 2,
Typ
e 3
Typ
e 2,
Typ
e 3
wit
h
cop
ier
har
d d
isk
on th
e ex
pos
ure
gla
ss
in th
e d
ocu
men
t fee
der
Adjusting Image Density ❍ ❍ ❍ ❍ ❍ ❍ ❍
Selecting Original Type ❍ ❍ ❍ ❍ ❍ ❍ ❍
Auto Paper Select ❍ ❍ ❍ ❍ ❍ ❍ ❍
Selecting Copy Paper ❍ ❍ ❍ ❍ ❍ ❍ ❍
Auto Reduce/Enlarge ❍ ❍ ❍ ❍ ❍ ❍ ❍
Enhanced Image Copy ❍ ❍ *1 ❍ *1 ❍ ❍
Sort × ❍ ❍ ❍ ❍ ❍ ❍
Rotate Sort/Rotate Stack × *2 *2 *2 *2 ❍ ❍
Shift Sort/Shift Stack × *3 *3 *3 *3 ❍ ❍
Stapling × *3 *3 *3 *3 ❍ ❍
Copying from the Bypass Tray *4 *4 *4 ❍ ❍ ❍ ❍
Program ❍ ❍ ❍ ❍ ❍ ❍ ❍
Reduce/Enlarge ❍ ❍ ❍ ❍ ❍ ❍ ❍
Zoom ❍ ❍ ❍ ❍ ❍ ❍ ❍
Directional Size Magnification (inch)
❍ ❍ ❍ ❍ ❍ ❍ ❍
Directional Magnification (%) ❍ ❍ ❍ ❍ ❍ ❍ ❍
Margin Adjustment ❍ ❍ ❍ ❍ ❍ ❍ ❍
Erase Center/Border ❍ ❍ ❍ ❍ ❍ ❍ ❍

10
*1 Standard setting.*2 Set the paper of the same size KL in the paper trays.*3 Finisher required.*4 Bypass tray required.*5 Duplex unit and interchange unit required.*6 Document Feeder required.*7 Only a set of copies can be made.
Combine 2 pages → 1-sided ❍ ❍ ❍ ❍ ❍ ❍ ❍
4 pages → 1-sided ❍ ❍ ❍ ❍ ❍ ❍ ❍
8 pages → 2-sided × *5 *5 ❍ ❍ ❍ ❍
4 pages → 2-sided × *5 *5 ❍ ❍ ❍ ❍
16 pages → booklet × *5 *5 ❍ ❍ ❍ ❍
Series Cop-ies
Book → 1-sided ❍ ❍ ❍ ❍ ❍ ❍ ❍
2-sided→ 1-sided *6 *6 *6 *6 *6 × ❍
Duplex 1-sided → 2-sided × *5 *5 ❍ ❍ ❍ ❍
Book → 2-sided × *5 *5 ❍ ❍ ❍ ❍
2-sided → 2-sided × *5 *5 ❍ ❍ ❍ ❍
Cover/Paper Designate *4 *7 *4 *4 ❍ ❍ ❍ ❍
OHP Slip Sheet *4 *4 *4 ❍ ❍ ❍ ❍
Positive/Negative ❍ ❍ ❍ ❍ ❍ ❍ ❍
Repeat Double copies ❍ ❍ ❍ ❍ ❍ ❍ ❍
Image Repeat ❍ ❍ ❍ ❍ ❍ ❍ ❍
Archive File × × ❍ × ❍ ❍ ×
Model Place originals
Typ
e 1
Typ
e 1
wit
h 8
MB
cop
ier
mem
ory
un
it
Typ
e 1
wit
h 8
MB
cop
ier
mem
ory
un
it a
nd
cop
ier
har
d d
isk
Typ
e 2,
Typ
e 3
Typ
e 2,
Typ
e 3
wit
h
cop
ier
har
d d
isk
on th
e ex
pos
ure
gla
ss
in th
e d
ocu
men
t fee
der

11

12
OPERATION PANEL
TX FileStatus
01 02 03 04 05 06 07
08 01 10 11 12 13 14
15 16 17 18 19 20 21
22 23 24 25 26 27 28
2
1
3 4
2
2
22
11
F1 F2 F3 F4 F5
A B C D E F G
H I J K L M N
O P Q R S T U
V W X Y Z
Sort
Staple
Stack
1-Sided 2-Sided
2-Sided 2-Sided User Tools / Counter
EnhancedImage
Menu
SeriesCopies
MarginAdjust
Auto Reduce/Enlarge
Zoom
CombineCopies
Erase Center/Border
Copy
Fax
Book 2-Sided ImmediateTrans.MemoryTrans.
Standard
Detail
Super Fine
Commu-nicating
ReceiveFile
ConfidentialFile
StartManual RX
TELMode
1 2 3 4 5
1817
161514
13
1. Operation panel for facsimilemode (for machine with optional faxfunction)See the “Facsimile Reference”.
2. {Sorter } keySort/Rotate Sort/Shift Sort: automatical-ly sorts copies.Rotate Stack/Shift Stack: stacks togethercopies of each page.Staple: staples each set of copies together.
3. {Duplex } keyMakes two-sided copies. See ⇒ P.85 “Du-plex—Making Two-Sided Copies”.
4. {User Tools/Counter } key• User Tools
Press to change the default settingsand conditions to meet your re-quirements.
• CounterPress to check or print the totalnumber of copies made.
See ⇒ P.145 “USER TOOLS (COPY FEA-TURES)”.
5. IndicatorsThese indicators show errors or the statusof the machine.See ⇒ P.111 “WHAT TO DO IF SOME-THING GOES WRONG”.
6. Panel displayShows operation status, error messages,and function menus. See ⇒ P.14 “PanelDisplay”.
7. {Program } keyPress to select the program mode. See ⇒P.60 “Program—Storing Your Copy Set-tings In Memory”.
8. {Clear Modes/Energy Saver } keyPress to clear the previously entered copyjob settings. Also use to switch to andfrom Energy Saver mode. See ⇒ P.63“Energy Saver Mode—Saving Energy”.
9. {Interrupt } keyPress to make interrupt copies during acopy run. See ⇒ P.63 “Interrupt—Tempo-rarily Stopping One Job To Copy SomethingElse”.
10. Main Power indicatorThis indicator lights up when the mainpower switch is turned on, and goes offwhen the switch is turned off.
11. On indicatorThis indicator lights up when the opera-tion switch is turned on, and goes offwhen the switch is turned off.

13
2 3
4 5 6
7 8
0
9
1
C
*Text PhotoPhotoSpecial Orig. Lighter Darker
Speed Dial
On Hook Dial
Pause /Redial
Tone
Program Clear Modes /Energy Saver
Interrupt
Clear / Stop
Start
Enter
MainPower
Auto Image Density
.
ABC DEF
MNOJKLGHI
WXYTUV
OPER
PRS
C
On
6 7 8 9 10
1112
2625242322212019
12. Operation switchPress this switch to turn the power on(the On indicator lights up). To turn thepower off, press this switch again (the Onindicator goes off).
13. {Enhanced Image } keyReproduces copies with a better imagequality.
14. {Menu} keyDisplays the names of available func-tions.
15. Shortcut keysPress to use the stored functions you fre-quently use.
16. {Zoom} keyChanges the reproduction ratio in 1 %steps.
17. {Auto Reduce/Enlarge } keyEnlarges or reduces the image automati-cally according to the specified papersize.
18. Function keysPress to change modes. To use copy func-tions, press the {Copy} key.
19. {Original Type } keyPress to select the type of your originals.
20. {Lighter } and {Darker} keys and{Auto Image Density } keyAdjusts the copy image density.
21. Selection keysPress the key under the item you wish toselect.
22. <> keys (Cursor keys)Press to select an item on the panel dis-play.
23. Operation panel for facsimilemode (for machines with optionalfax function)See the “Facsimile Reference”.
24. {Number } keysUse to enter the desired number of copiesand data for selected modes.Use the {#} key to enter data in selectedmodes.
25. {Start} keyPress to start copying. Use to set the AutoStart. See ⇒ P.64 “Auto Start—EnteringCopy Job Settings During The Warm-up Pe-riod”.
26. {Clear/Stop } keyWhile entering numbers, press to cancel anumber to have entered. While copying,press to stop copying.

14
PANEL DISPLAY
The panel display shows operational status, error messages, and function menus.
Important❒ Do not apply a strong shock or force of about 30 N (about 3 kgf) or more to
the panel display. Otherwise, the display might be damaged.
Note❒ When you select or specify an item on the panel display, it is highlighted like
.❒ Keys appearing as cannot be used.❒ By default, the machine is in Copy mode when you switch on. This can be
changed. See “Settings You Can Change With The User Tools” of the SystemSettings.
Displays And Key Operations
Note❒ The following illustrations are examples for the machine with the optional
paper tray unit and large capacity tray installed.
❖❖❖❖ Copy initial display
1. The function items for the selected function are displayed.
2. Number of originals set.
3. Displays operational status or messages.
4. These keys correspond to the item on the display.Press a relevant key to select a function.
• To move the selection to the left, press the < key.• To move the selection to the right, press the > key.
5. Displays items which can be selected or specified.
Auto
OK
GAMEN00
1 2 3
4 5

15
❖❖❖❖ Function menu display
1. When you select a function name, ' mark appears before the name.
2. Displays operational status or message.
3. Displays items which can be selected or specified.
❖❖❖❖ Common keys
[OK] Sets a selected function or entered value and returns to the previ-ous display.
[Cancel ] Cancels a selected function or entered value and returns to the pre-vious display.
[↑↑↑↑Prev. ][ ↓↓↓↓Next ] When there are too many items fit on the display, use these keys to move between pages.
<> Press to highlight the selection you wish to select.
[Menu] Press to return to the previous menu.
[Exit ] Sets a selected function or entered value and returns to the initial display.
GAMEN01
1
2
3

16
Display Panel Layout
The basic elements used on the display are shown below. Understanding theirmeaning helps you exploit this machine's features quickly and easily.
❖❖❖❖ Sample Display for Erasing the Center/Border
1. Operational status or message.
2. Selectable/specifiable functions are displayed.
3. Screened key means to press it.kPress the [Center ] key.
1. Selectable/specifiable functions are displayed.
2. Cancels the settings and returns to the previous display.
3. Confirms the settings and returns to the previous display.
GAMEN02
1
2
3
GAMEN03
1
2 3

17
1. BASICS
STARTING THE MACHINE
To start the machine, turn on the op-eration switch.
Note❒ This machine automatically enters
Energy Saver mode or turns itselfoff if you do not use the machinefor a while. See “09. Energy SaverMode”, “10. Auto Off Timer” ofthe System Settings.
----Power switchesThis machine has two power switch-es: See ⇒ P.2 “Guide To Components”.
❖❖❖❖ Operation switch (right side of the op-eration panel)Turn on this switch to activate themachine. When the machine haswarmed up, you can make copiesor send faxes.
❖❖❖❖ Main power switch (left side of the ma-chine)Do not touch the main powerswitch. It should be used only by aservice representative when theoptional fax unit is installed.
Important❒ If you leave the main power switch
off for more than about one hour,all fax files in memory will be lost.See “Turning Off The Power” ofthe Facsimile Reference.
Turning On The Power
A Make sure that the power cord isplugged into the wall outlet firm-ly and the Main Power indicatoris lit.
B Press the operation switch tomake the On indicator light up.
The panel display will come on.
Note❒ During the warm-up period,
you can use the Auto Start func-tion. See ⇒ P.64 “Auto Start—Entering Copy Job Settings Dur-ing The Warm-up Period”.
❒ Warm-up period is as follows:• Type 1 and Type 2: less than
85 seconds• Type 3: less than 100 seconds
r / Stop
ND1M01EE
MainPower
On

BASICS
18
1
When the machine is set for user codes
A Enter your user code using the{Number } keys. Then press the {#}key.
Note❒ To prevent others from making
copies with your user code,press the {Clear Modes/EnergySaver} key and the {Clear/Stop }key simultaneously after copy-ing.
ReferenceFor setting user codes, see ⇒P.154 “1. General Features 4/4”.
When the {Clear Modes/Energy Saver } indicator is lit
The machine is in Energy Savermode.
A Press the {Clear Modes/Energy Sav-er} key.The machine will return to theready condition.
Note❒ The machine will also return to
the ready condition when anoriginal is set in the documentfeeder, or when the platen coveror document feeder is opened.
ReferenceSee “08. Low Power Timer” ofthe System Settings.
Turning Off The Power
A Press the operation switch tomake the On indicator go off.
Important❒ If you want to unplug the pow-
er cord or turn off the mainpower switch, make sure thatthe remaining memory spaceindicates 100 % on the displayfor facsimile mode.
❒ Fax files stored in memory willbe lost an hour after you turnthe main power switch off oryou unplug the power cord. See“Turning Off The Power” of theFacsimile Reference.
r / Stop
ND1M01EE
MainPower
On

CHANGING MODES
19
1
CHANGING MODES
You can use this machine not only as a copier, but optionally as a fax machine aswell. Press the {Copy} key to use functions, or press the {Fax} key to use facsim-ile functions.
Limitation❒ You cannot switch modes in any of the following cases:
• When scanning in a fax message for transmission.• During immediate transmission.• When accessing the user tools.• During interrupt copying.
1
3 4
2
EnhancedImage
Menu
SeriesCopies
MarginAdjust
Auto Reduce/Enlarge
Zoom
CombineCopies
Erase Center/Border
Copy
Fax
Copy Mode
Facsimile Mode
ND0X02EE

BASICS
20
1
ORIGINALS
Sizes And Weights Of Recommended Originals
❖❖❖❖ Metric version
❖❖❖❖ Inch versions
Non-recommended originals for the document feeder
Setting the following originals in the document feeder might cause paper mis-feeds or damage to the originals. Set these originals on the exposure glass.• Originals other than those specified in ⇒ P.20 “Sizes And Weights Of Recom-
mended Originals”• Stapled or clipped originals• Perforated or torn originals• Curled, folded, or creased originals• Pasted originals• Originals with any kind of coating, such as thermal fax paper, art paper, alu-
minum foil, carbon paper, or conductive paper• Originals with indexes, tags, or other projecting parts• Sticky originals such as translucent paper• Thin original that has low stiffness
Where original is set Original Size Original WeightExposure glass Up to A3 --Document feeder 1-sided originals:
A3L – B6KL52 – 128 g/m2
2-sided originals: A3L – A5KL
52 – 105 g/m2
Thin Paper mode: A3L – A5KL
41 – 128 g/m2
Where original is set Original Size Original WeightExposure glass Up to 11" × 17" --Document feeder 1-sided originals: 11" ×
17"L – 51/2" × 81/2"KL14 – 34 lb
2-sided originals: 11" × 17"L – 51/2" × 81/2"KL
14 – 28 lb
Thin Paper mode: 11" × 17"L – 51/2" × 81/2"KL
11 – 34 lb

ORIGINALS
21
1
• Originals of inappropriate weight ⇒ P.20 “Sizes And Weights Of RecommendedOriginals”
• Bound originals such as books• Transparent originals such as OHP transparencies or translucent paper
Sizes Difficult To Detect
It is difficult for the machine to detect the sizes of the following originals, so se-lect the paper size manually.• Originals with indexes, tags, or other projecting parts• Transparent originals such as OHP transparencies or translucent paper• Dark originals with many letters and drawings• Originals which partially contain solid image • Originals which have solid image at their edges• Originals other than those (with ❍) in the table below. See ⇒ P.21 “Sizes de-
tectable by the Auto Paper Select”.
Sizes detectable by the Auto Paper Select
❖❖❖❖ Metric version
*1 You can select from 81/2" × 13", 81/4" × 13" and 8" × 13" using the user tool (systemsettings). See "24. <F/F4> Size Setting" in the System Settings.
❖❖❖❖ Inch version
*1 You can select from 81/2" × 13", 81/4" × 13" and 8" × 13" using the user tool (systemsettings). See "24. <F/F4> Size Setting" in the System Settings.
Size A3L
B4L
A4KL
B5KL
A5KL
11 " × 17"L
81/2" × 14"L
81/2" × 11"KL
51/2" × 81/2"KL
81/2" × 13"L *1
Place of originalExposure glass
❍ ❍ ❍ ❍ × × × × × ❍
Docu-ment feeder
❍ ❍ ❍ ❍ ❍ ❍ × ❍ × ❍
Size A3L
B4L
A4KL
B5KL
A5KL
11 " × 17"L
81/2" × 14"L
81/2" × 11"KL
51/2" × 81/2"KL
81/2" × 13"L *1
Place of originalExposure glass
× × × × × ❍ ❍ ❍ × ×
Docu-ment feeder
× × ❍ × × ❍ ❍ ❍ ❍ ❍

BASICS
22
1
Original Sizes And Scanning Area/Missing Image Area
❖❖❖❖ Exposure glass
❖❖❖❖ Document feeder
Limitation❒ Even if you correctly set originals in the document feeder or on the exposure
glass, 3 mm margins on all four sides might not be copied.
A3
A3A4
Horizontal size
Vertical size
Referenceposition
Maximum Scanning areaA3 (297x420mm)11"x17" (279x432mm)
CP01AEE
A3A4
Horizontal size
Vertical size
Maximum Scanning area (297x432mm)
CP02AEE

COPY PAPER
23
1
COPY PAPER
Recommended Paper Sizes And Types
The following limitations apply to each tray:
*1 When you set non-standard size paper in the bypass tray, you have to specify thesize. See ⇒ P.55 “Copying From The Bypass Tray”.
Important❒ If you use damp or curled paper, a misfeed might occur. In such a case, try
turning over the paper stack in the paper tray. If there is no improvement,change to copy paper with less curl.
Metric version Inch version Paper weight Paper capacity
Paper tray A3L, B4L, A4KL, B5KL, A5L, 11" × 17"L, 81/2" × 14"L, 81/2" × 11"KL, 51/2" × 81/2"L, 71/4" × 101/2"L, 8" × 13"L, 81/2" × 13"L, 81/4" × 13"L
Note❒ You have to specify paper
size using the user tools. See ⇒ P.132 “Changing The Paper Size”.
64 – 105 g/m2, 20 – 28 lb
500 sheets
Paper tray unit
(option)
Bypass tray
Standard size
A3L, A4L, A5L, 81/2" × 13"L
A3L, 11" × 17"L, 81/2" × 14"L, 81/2" × 11"L, 51/2" × 81/2"L
52 – 157 g/m2, 16 – 42 lb
50 sheets (52 – 90 g/m2, 16 – 20 lb), 25 sheets (91 – 157 g/m2, 20 – 42 lb)
Non-stan-dard size *1
Vertical: 100 – 297 mm
Horizontal: 148 – 432 mm
Vertical: 4.0" – 11.7"
Horizontal: 6.0" – 17.0"
52 – 157 g/m2, 16 – 42 lb
1 sheet
Postcards, adhesive labels, translucent paper
Large capacity tray
(option)
A4K 81/2" × 11"K 64 – 105 g/m2, 20 – 28 lb
1,500 sheets

BASICS
24
1
Note❒ When you use the bypass tray, it is recommended to set the copy paper direc-
tion to L.❒ Post cards should be fed from the bypass tray.❒ If you load paper of the same size and in the same direction in two or more
trays, the machine automatically shifts to another tray when the tray in useruns out of paper. This function is called Auto Tray Switch. (If you put recy-cled paper or special paper in paper trays using the Special Paper Indicatemenu, this function is not available to these trays unless their settings areidentical.) This saves interrupting a copy run to replenish paper even whenyou make a large number of copies. You can cancel this setting. See “13. AutoTray Switch” and “14. Sp. Paper Ind.” of the System Settings.
ReferenceIf you want to add paper, see ⇒ P.119 “B Loading Paper”.If you want to change the paper size, see ⇒ P.132 “Changing The Paper Size”.

COPY PAPER
25
1
Non-recommended Paper
R CAUTION:
Important❒ Do not use paper with any kind of coating such as:
• Thermal fax paper• Art paper• Aluminum foil• Carbon paper• Conductive paperOtherwise, a fault might occur.
❒ Do not use copy paper that has been already copied on. Otherwise, a faultmight occur.
Note❒ Do not use the following type of paper because a paper misfeed might occur.
• Bent, folded, or creased paper• Torn paper• Slippery paper• Perforated paper• Rough paper• Thin paper that has low stiffness• Paper with much paper dust on its surface
❒ If you make a copy on rough grain paper, the copy image might be blurred.❒ Do not use paper which has been copied or printed on.
• Do not reuse stapled paper. Do not use aluminum foil, carbon-containing paper or other conductive paper. Otherwise, a firemight occur.

BASICS
26
1
Paper Storage
Note❒ When storing paper, the following precautions should always be followed:
• Do not store paper where it will be exposed to direct sunlight.• Avoid storing paper in humid areas (humidity: 70 % or less).• Store on a flat surface.
❒ Keep open reams of papers in the package, and store as you would unopenedpaper.
❒ Under high temperature and high humidity, or low temperature and low hu-midity conditions, store papers in a vinyl bag.

TONER
27
1
TONER
Handling Toner
R WARNING:
R CAUTION:
R CAUTION:
Important❒ If you use toner other than that recommended, a fault might occur.
ReferenceIf you want to add toner, see ⇒ P.121 “D Adding Toner”.
Toner Storage
Note❒ When storing toner, the following precautions should always be followed:
• Store toner containers in a cool, dry place free from direct sunlight.• Do not store toner where it will be exposed to heat.• Do not eat or swallow toner, and keep it out of reach of children.• Store on a flat surface.
Used Toner
Note❒ Used toner cannot be re-used.
• Do not incinerate used toner or toner containers. Toner dustmight ignite when exposed to an open flame. Dispose of theused toner containers according to local regulations forplastics.
• Do not eat or swallow toner.
• Keep toner (used or unused) and toner containers out of reach ofchildren.
• This machine has been tested for safety using this supplier'sparts and consumables. We recommend you only use thesespecified supplies.

BASICS
28
1

ëä
2. COPYING
BASIC PROCEDURE
Note❒ As default, Type 1 with the duplex
unit, Type 2, and Type 3 are initial-ly in Duplex mode (1-sided → 2-sided). You can cancel Duplexmode by pressing the {Duplex } key.You can also change the defaultvalue. See “10. Duplex Priority” in⇒ P.153 “1. General Features 3/4”.
A When the machine is set for usercode, enter the user code with the{Number } keys and then press the{#} key.
ReferenceSee ⇒ P.63 “User Codes”.
B Make sure that the machine is inCopy mode.
Note❒ If not, press the {Copy} key.
C Make sure that there are no previ-ous settings remaining.
Note❒ To clear settings, press the
{Clear Modes/Energy Saver } key.
D Set your originals.
ReferenceSee ⇒ P.31 “Setting Originals”.
E Set your desired settings.
F Enter the number of copies re-quired with the {Number } keys.
Note❒ The maximum copy quantity
can be set between 1 and 999(default: 999). See “05. 0D[ï&RS\ý4öW\” in ⇒ P.152 “1. Gener-al Features 2/4”.
❒ To change the number entered,press the {Clear/Stop } key andenter the new number.
G Press the {Start} key.The machine starts copying.
Note❒ To stop the machine during the
multi-copy run, press the {Clear/Stop} key.
❒ To return the machine to the ini-tial condition after copying,press the {Clear Modes/EnergySaver} key.
C
eed Dial
n Hook Dial
ause /edial
one
Clear / Stop
Start
Enter
ND2R02EE
2 3
4 5 6
7 8
0
9
1ABC DEF
JKLGHI
WXYTUV
OPER
PRS

COPYING
êí
2
-Auto ResetThe machine returns to its initial con-dition automatically after your job isfinished, after a certain period oftime. This function is called “AutoReset”.
Note❒ You can change the Auto Reset
time. See “11. Auto Reset” in ⇒P.153 “1. General Features 3/4”.
----Auto OffThe machine turns itself off automat-ically after your job is finished, after acertain period of time. This function iscalled “Auto Off”.
Note❒ You can change the Auto Off time.
See “10. Auto Off Timer" in theSystem Settings.
❒ You can change the default set-tings for basic functions. See ⇒P.150 “Settings You Can ChangeWith The User Tools” and “USERTOOLS (SYSTEM SETTINGS)” inthe System Settings.

SETTING ORIGINALS
êì
2
SETTING ORIGINALS
Limitation❒ Set the original after correction flu-
id and ink has completely dried.Not taking this precaution couldmark the exposure glass and causemarks to be copied.
Note❒ Basically the originals should be
aligned to the rear left corner.However, some copy functionsmay produce different results de-pending on the direction of theoriginals. For details, see explana-tions of each function.
ReferenceSee ⇒ P.20 “Originals”.
Setting Originals On The Exposure Glass
A Lift the platen cover or the docu-ment feeder.
Note❒ Be sure to open the platen cover
or the document feeder by morethan 30°, otherwise the originalsize might not be detected cor-rectly.
B Set the original face down on theexposure glass. The originalshould be aligned to the rear leftcorner.
1: Reference mark2: Scale
C Lower the platen cover or the doc-ument feeder.
Originals Set in the document feeder
Set on the exposure glass
set1EE
R R
set2EE
R RND1C01EE
1
2

COPYING
êë
2
Setting Originals In The Document Feeder
Note❒ Do not stack originals above the
limit mark.❒ When copying thin originals (41 –
52 g/m2, 11 – 14 lb), select [DF Set-ting ] and set to Thin Paper mode,or set your originals on the expo-sure glass to avoid damage due toa multi-sheet feed (if several sheetsare fed together at the same time).See ⇒ P.35 “Thin paper mode”.
❒ The original might become dirty ifit is written with a pencil or similartools.
❒ For 1-sided originals, you can se-lect the ADF tray or the ADF exter-nal tray as an output tray. See “22.ADF Orig. Ejection” in the SystemSettings.
1: ADF tray2: ADF external tray
❒ Copying or scanning speed mightbe a little reduced if the ADF tray isselected as an output tray.
ReferenceRegarding originals that the docu-ment feeder can handle, see ⇒ P.20“Originals”.
Setting a stack of originals in the document feeder
A Adjust the guide to the originalsize.
B Set the aligned originals face upinto the document feeder.
1: Limit mark2: Document guide
Note❒ To avoid a multi-sheet feed,
shuffle the originals before set-ting them in the document feed-er.
When SADF mode is selected
ReferenceSee ⇒ P.33 “SADF mode”.
A Set one original face up into thedocument feeder. Then, press the{Start} key.The Auto Feed indicator is lit.
B Set the next original while theAuto Feed indicator is lit.
ND1D04EE
1 2
ND1D01EE
1 2

SETTING ORIGINALS
êê
2
The second and subsequent origi-nals can be fed automatically with-out pressing the {Start} key.
Note❒ You can adjust the time the ma-
chine waits before being readyfor the next original. See “SADFAuto Reset” in ⇒ P.160 “3. In-put/Output 1/2”.
Using SADF, Mixed Sized, and Thin Paper modes
SADF mode
If you set one original at a time in thedocument feeder, the second and sub-sequent originals can be fed automat-ically without pressing the {Start}key.
Limitation❒ Copying or scanning speed might
be a little reduced.
A Press the {Menu} key.
B Press the [↓↓↓↓Next] key until [DF Set-ting ] is displayed.
ND1D0201
1
3 4
2
EnhancedImage
Menu
SeriesCopies
MarginAdjust
Auto Reduce/Enlarge
Zoom
CombineCopies
Erase Center/Border
Copy
Fax
ND2L0203
ND2C0102

COPYING
êé
2
C Select [DF Setting ] with the <>keys, then press the [Select ] key.
D Press the [Select ] key.
Note❒ To deselect [SADF], press the
[Select ] key again.
E Press the [Exit ] key.
Mixed sizes mode
Limitation❒ The weight of originals that can be
set with this function is 52 – 81 g/m2, 14 – 20 lb.
❒ The paper sizes that can be set withthis function are as follows:
❒ You can set originals of two differ-ent sizes at a time.
❒ Copying speed and scanningspeed will be reduced.
❒ For smaller originals, the copy im-age might be slanted since the orig-inals might not be correctlyaligned with the original guide.
A Press the {Menu} key.
B Press the [↓↓↓↓Next] key until [DF Set-ting ] is displayed.
ND2C0109
ND2C0104
ND2C0103
Metric version B5 – A3
Inch version 51/2" × 81/2" – 11" × 17"
1
3 4
2
EnhancedImage
Menu
SeriesCopies
MarginAdjust
Auto Reduce/Enlarge
Zoom
CombineCopies
Erase Center/Border
Copy
Fax
ND2L0203
ND2C0102

SETTING ORIGINALS
êè
2
C Select [DF Setting ] with the <>keys, then press the [Select ] key.
D Select [Mixed Sizes ] with the <>keys, then press the [Select ] key.
Note❒ To deselect [Mixed Sizes ], press
the [Select ] key again.
E Press the [Exit ] key.
F Align the rear and left edges ofthe originals as shown in the il-lustration.
1: Set into the document feeder(ADF).
Important❒ If the originals are of different
vertical sizes, put the longeroriginal on the bottom; other-wise the original size might notbe detected correctly.
G Adjust the guide to the widestoriginal size.
H Set the aligned originals face upinto the document feeder.
Thin paper mode
Note❒ Set to Thin Paper mode when you
place thin paper into the documentfeeder; otherwise your originalsmay be damaged.
A Press the {Menu} key.
ND2C0109
ND2C0109
ND2C0103
B4 A31
CP19AEE
1
3 4
2
EnhancedImage
Menu
SeriesCopies
MarginAdjust
Auto Reduce/Enlarge
Zoom
CombineCopies
Erase Center/Border
Copy
Fax
ND2L0203

COPYING
êç
2
B Press the [↓↓↓↓Next] key until [DF Set-ting ] is displayed.
C Select [DF Setting ] with the <>keys, then press the [Select ] key.
D Select [Thin Paper ] with the <>keys, then press the [Select ] key.
Note❒ To deselect [Thin Paper ], press
the [Select ] key again.
E Press the [Exit ] key.
ND2C0102
ND2C0109
ND2C0109
ND2C0103

BASIC FUNCTIONS
êæ
2
BASIC FUNCTIONS
The following basic functions are ex-plained in this section.
❖❖❖❖ Adjusting Copy Image DensityAuto and Manual Image Density
❖❖❖❖ Enhanced Image CopyThis function provides clearercopy image.
❖❖❖❖ Selecting Original Type SettingText, Text·Photo, Photo, Copiedoriginal, Low density original
❖❖❖❖ Selecting Copy PaperAuto Paper Select and Manual Pa-per Select
❖❖❖❖ Auto Reduce/EnlargeThe machine can choose an appro-priate reproduction ratio based onthe paper and original sizes you se-lect.
Note❒ You can select functions to be acti-
vated when Auto Reset is turnedon, when Energy Saver is turnedoff, or after the machine is pow-ered on. See ⇒ P.150 “1. GeneralFeatures 1/4”.
❒ You can change default settings forbasic functions. See ⇒ P.150 “Set-tings You Can Change With The UserTools”.
Adjusting Copy Image Density
You can adjust the copy image densi-ty to match your originals.There are three types in this function:
❖❖❖❖ Auto Image DensityThe machine automatically adjuststhe image density.
❖❖❖❖ Manual Image DensityIf you require darker or lightercopies, adjust the image densityyourself.
❖❖❖❖ Combined Auto and Manual ImageDensityUse when copying originals with adirty background (such as news-papers). You can adjust the fore-ground density while leaving thebackground unchanged.
ReferenceYou can change the density levelwith the user tools. See “12. Densi-ty Pattern” in ⇒ P.153 “1. GeneralFeatures 3/4”.
A Select one of Image Densitymodes.
Auto Image Density
A Make sure that the Auto ImageDensity indicator is lit.
Note❒ If not, press the {Auto Image
Density } key.
Text PhotoPhotoSpecial Orig. Lighter Darker Auto Image Density
.
ND2C0201

COPYING
êå
2
Manual Image Density
A Press the {Auto Image Density }key to cancel it.
B Press the {Lighter } or {Darker}key to adjust the image density.
Combined Auto and Manual Image Density
A Make sure that the Auto ImageDensity indicator is lit.
B Press the {Lighter } or {Darker}key to adjust the density.
Enhanced Image Copy
This function reproduces copies ofbetter image quality. It is useful whencopying detailed originals such asmaps.This function is turned on automati-cally if you have the optional copierhard disk.
Limitation❒ The optional copier hard disk is re-
quired to use this image enhancedfeature with the following func-tions:• Rotate Copy• Sort/Stack/Staple• Combine Copy• Double Copy• Sort involving cover/slip sheets• Double Copy• Repeat Copy
Note❒ Copying speed decreases from the
normal speed as follows. Howev-er, the copying speed remains un-changed with the optional copierhard disk.
Text PhotoPhotoSpecial Orig. Lighter Darker Auto Image Density
.
ND2C0202
Text PhotoPhotoSpecial Orig. Lighter Darker Auto Image Density
.
ND2C0202
Type 1, Type 2 35 → 30 copies/min
Type3 45 → 40 copies/min
for A4K, 81/2" × 11"K

BASIC FUNCTIONS
êä
2
A Press the {Enhanced Image } key. Selecting Original Type Setting
Select one of the following types tomatch your originals:
❖❖❖❖ TextSelect this mode when your origi-nals contain only letters (no pic-tures).
❖❖❖❖ Text·PhotoSelect Text·Photo when your origi-nals contains photographs or pic-tures with letters.
❖❖❖❖ PhotoDelicate tones of photographs andpictures can be reproduced withthis mode.
❖❖❖❖ Special original (Copied original)If your originals are copies (gener-ation copies), the copy image canbe reproduced sharply and clearly.To use this mode, activate the En-hanced Image Copy function first.
❖❖❖❖ Special original (Low density original)Select this mode for originals thathave lighter lines written in pencil,or for faint copied slips. The faintlines will be clearly copied.To use this mode, activate the En-hanced Image Copy function first.
If you do not select any mode, youroriginals will be scanned with the set-tings suitable for text originals (Textmode).
A Press the {Original Type } key andselect the original type.
1
3 4
2
EnhancedImage
Menu
SeriesCopies
MarginAdjust
Auto Reduce/Enlarge
Zoom
CombineCopies
Erase Center/Border
Copy
Fax
ND2L0201
Text PhotoPhotoSpecial Orig. Lighter Darker Auto Image Density
.
ND2C0203

COPYING
éí
2
Note❒ Press the {Original Type } key to
step through the followingtypes:
❒ To use Special Original mode,press the {Enhanced Image } keyfirst.
Special Original
A Select [Copied Orig. ] or [LowDens. Orig. ] with the <> keys,then press the [OK] key.
Selecting Copy Paper
There are two ways to select copy pa-per:
❖❖❖❖ Auto Paper SelectThe machine selects a suitable sizeof copy paper automatically basedon the original size and the repro-duction ratio.
Note❒ When the original is set at a dif-
ferent direction from the copypaper in the paper tray withAuto Tray Switch mode ON, themachine automatically rotatesthe original image by 90° tomatch the copy paper direction.This applies to the following pa-per sizes:
ReferenceFor Auto Tray Switch, see “13.Auto Tray Switch” in the Sys-tem Settings.
❖❖❖❖ Manual Paper SelectYou can select the desired copy pa-per size manually. You can also se-lect the bypass tray.
ReferenceSee ⇒ P.55 “Copying From TheBypass Tray”.
Note❒ When you use Auto Paper Select,
refer to the following table for pos-sible copy paper sizes and direc-tions. (if the ratio is 100 %)
No indicator lit Text
Top indicator lit Text·Photo
Center indicator lit
Photo
Bottom indicator lit
Special Origi-nal
ND2C0109
Metric version A4 KL, B5 KL
Inch version 81/2" × 11" KL

BASIC FUNCTIONS
éì
2
❖❖❖❖ Metric version
*1 You can select from 81/2" × 13", 81/4" × 13" and 8" × 13" using theuser tool (system settings). See "24.<F/F4> Size Setting" in the SystemSettings.
❖❖❖❖ Inch version
*1 You can select from 81/2" × 13", 81/4" × 13" and 8" × 13" using theuser tool (system settings). See "24.<F/F4> Size Setting" in the SystemSettings.
❒ For some originals, the originalsize might not be detected correct-ly. See ⇒ P.21 “Sizes Difficult ToDetect”.
❒ When you set special paper, suchas recycled paper, in the papertray, you can have the kind of pa-per shown on the display. See “14.Sp. Paper Ind.” of the System Set-tings.
A Select the copy paper.
Auto Paper Select
A Make sure that the Auto (AutoPaper Select) is selected.
Manual Paper Select
A Select the paper tray or bypasstray by pressing the [Paper] or<>keys.
Where original is set
Paper size and di-rection
Exposure glass A3 L, B4 L, A4 KL, B5 KL, 81/2" × 13" L *1
Document feeder A3 L, B4 L, A4 KL, B5 KL, A5 KL, 11" × 17" L, 81/2" × 11" KL, 81/2" × 13"L *1
Where original is set
Paper size and di-rection
Exposure glass 11" × 17" L, 81/2" × 14" L, 81/2" × 11"KL
Document feeder A4 KL, 11" × 17" L, 81/2" × 14" L, 81/2" × 11"KL, 51/2" × 81/2" KL, 81/2" × 13" L *1
ND2C0109

COPYING
éë
2
Auto Reduce/Enlarge—Having The Machine Choose The Reproduction Ratios
The machine can choose an appropri-ate reproduction ratio based on thepaper and original sizes you select.
Note❒ When you use Auto Reduce/En-
large, refer to the following tablefor possible original sizes and di-rections:
❖❖❖❖ Metric version
*1 You can select from 81/2" × 13", 81/4" × 13" and 8" × 13" using theuser tool (System Settings). See“24. <F/F4>Size Setting” in theSystem Settings.
❖❖❖❖ Inch version
*1 You can select from 81/2" × 13", 81/4" × 13" and 8" × 13" using theuser tool (System Settings). See“24. <F/F4>Size Setting” in theSystem Settings.
❒ The reproduction ratios the ma-chine will select are as follows:• Type 1, Type 2
Metric version: 25 – 400 %Inch version: 25 – 400 %
• Type 3Metric version: 35 – 400 %Inch version: 32 – 400 %
❒ For some originals, the original sizemight not be detected correctly. See⇒ P.21 “Sizes Difficult To Detect”.
❒ You can set originals of differentsizes in the document feeder at atime. See ⇒ P.34 “Mixed sizes mode”.
A Press the {Auto Reduce/Enlarge } key.
B Select the paper tray by pressingthe [Paper] or <>.
Where origi-nal is set Original size and direction
Exposure glass
A3 L, B4 L, A4 KL, B5 KL,
81/2" × 13" L *1
Document feeder
A3 L, B4 L, A4 KL, B5 KL, A5 KL, 11" × 17" L, 81/2" × 11" KL, 81/2" × 13" L *1
Where orig-inal is set Original size and direction
Exposure glass
11" × 17" L, 81/2" × 14" L, 81/2" × 11" KL
Document feeder
A4 KL, 11" × 17" L, 81/2" × 14" L, 81/2" × 11" KL, 51/2" × 81/2"KL, 81/2" × 13"L *1
Where orig-inal is set Original size and direction
1
3 4
2
EnhancedImage
Menu
SeriesCopies
MarginAdjust
Auto Reduce/Enlarge
Zoom
CombineCopies
Erase Center/Border
Copy
Fax
ND2L0202
ND2C0109

SORT/STACK/STAPLE
éê
2
SORT/STACK/STAPLE
Type 1 requires the optional 8 MB copier memory unit to use these functions.
The machine can scan your originalsinto memory and automatically sortthe copies.
❖❖❖❖ Sort• Sort• Rotate Sort• Shift Sort
(the optional finisher required)
❖❖❖❖ Stack• Rotate Stack• Shift Stack
(the optional finisher required)
❖❖❖❖ Staple (the optional 1000-sheet finish-er required)• Top 2
❖❖❖❖ Staple (the optional 3000-sheet finish-er required)• Top 1
• Top 2
• Top 3
• Double
❖❖❖❖ Punch (the optional 3000-sheet finish-er and punch kit required)• Makes punch holes in combina-
tion with Sort/Stack/Staple.
Limitation❒ The optional 3000-sheet finisher
and punch kit are for Type 3 only.❒ You cannot use the bypass tray
with this function.
Note❒ The maximum tray capacity is as
follows. When the number of cop-ies exceeds the tray capacity, re-move copies from the tray.
❖❖❖❖ Metric version
Internal tray 1 • B4 or larger: 250 sheets (80 g/m2)
• A4 or smaller: 500 sheets (80 g/m2)
Internal tray 2 125 sheets (80 g/m2)
External tray 125 sheets (80 g/m2)
1000-sheet fin-isher
• B4 or larger: 500 sheets (80 g/m2)
• A4 or smaller: 1,000 sheets (80 g/m2)
3000-sheet fin-isher (without punch)
• Except A4: 1,500 sheets (80 g/m2)
• A4: 3,000 sheets (80 g/m2)

COPYING
éé
2
❖❖❖❖ Inch version
❒ The maximum tray capacity mightbe less than the above when youuse the Rotate Sort, Punch, or Sta-ple function.
❒ The maximum tray capacity mightalso be reduced when copy paperis considerably curled.
-Punching (Type 3 only, the optional 3000-sheet finisher and punch kit required)
You can make punch holes in combi-nation with Sort/Stack/Staple.
Limitation❒ You cannot make punch holes
with Rotate Sort or Rotate Stack.
Note❒ Originals orientation and punch
holes position are as follows:
ReferenceIf the punch waste box is full, see⇒ P.144 “y Removing PunchWaste”.For the size and thickness (paperweight) of paper to which punch-ing is applicable, see ⇒ P.182“Punch Kit (Option)”.
Internal tray 1 • 81/2" × 14" or larger: 250 sheets (20 lb)
• 81/2" × 11" or small-er: 500 sheets (20 lb)
Internal tray 2 125 sheets (20 lb)
External tray 125 sheets (20 lb)
1000-sheet fin-isher
• 81/2" × 14" or larger: 500 sheets (20 lb)
• 81/2" × 11" or small-er: 1,000 sheets (20 lb)
3000-sheet fin-isher (without punch)
• Except 81/2" × 11": 1,500 sheets (20 lb)
• 81/2" × 11": 3,000 sheets (20 lb)
Original setting Punch hole posi-tion
Exposure glass
Auto Doc-ument Feeder
K
L

SORT/STACK/STAPLE
éè
2
Sort—Sorting Into Sets (123, 123, 123)
Copies can be assembled as sets in se-quential order.
❖❖❖❖ Sort
❖❖❖❖ Rotate Sort
❖❖❖❖ Shift Sort
There are three types in the Sort func-tion:
❖❖❖❖ SortCopies can be assembled as sets insequential order.
❖❖❖❖ Rotate SortEvery other copy set is rotated by90°KL and delivered to the copytray.
❖❖❖❖ Shift Sort (optional finisher required)Every other copy set is shifted forease of separation. The shift tray of
the finisher provides this functionby sliding from side to side.
Note❒ To switch among Sort, Rotate Sort,
and Shift Sort modes, access theuser tools. See “6. Sort” in ⇒ P.162“3. Input/Output 2/2”.
❒ The paper sizes that can be used inSort function are as follows:
❒ The paper sizes that can be used inRotate Sort function are as follows:
❒ To use the Rotate Sort function,two paper trays identical in sizeand different in direction (K L)are required.
❒ The paper sizes that can be used inShift Sort function are as follows:
ReferenceFor the paper capacity of the op-tional finisher, see ⇒ P.49 “Staple”.
21
3 21
3 21
3 21
3
21
3 21
3 21
321
3
21
3
321
321
321
Metric version A3LB4LA4KLB5KLA5L
Inch version 11" × 17" L, 81/2" × 14" L, 11" × 81/2" KL, 51/2" × 81/2" L
Metric version A4KLB5KL
Inch version 81/2" × 11"KL
1000-sheet finisher
3000-sheet finisher
Metric version
A3L, B4L, A4KL, B5K
A3L, B4L, A4KL, B5KL
Inch version
11" × 17" L, 81/2" × 14" L, 81/2" × 11" KL
11" × 17" L, 81/2" × 14" L, 81/2" × 11" KL

COPYING
éç
2
A Press the {Sorter } key until theSort indicator (top) is lit.
B To make punch holes, press the[Punch ] key.
Limitation❒ The optional 3000-sheet finisher
and punch kit are required touse this function (Type 3 only).
❒ You cannot make punch holeswith Rotate Sort.
Note❒ If you do not make punch holes,
go to Step D.
C Make sure that [ON] is selected,then press the [OK] key.
D Enter the number of copy setswith the {Number } keys.
Limitation❒ The maximum number of sets is
999.
E Set your originals.
When setting a stack of originals in the document feeder
A Set a stack of originals in thedocument feeder, then pressthe {Start} key.After all the originals arescanned, the copies are deliv-ered to the tray.
Note❒ The last page should be on
the bottom.❒ If an original is misfed dur-
ing sorted copying, resetyour originals in the docu-ment feeder according to theinstruction on the display.The display will indicate thenumber of originals youshould return.
When setting an original on the exposure glass or in the document feeder
ReferenceSee ⇒ P.33 “SADF mode”
A Set the original, then press the{Start} key.
Note❒ Start with the first page to be
copied.B Set the next original, then
press the {Start} key.
2
2
22
11
Sort
Staple
Stack
1-Sided 2-Sided
2-Sided 2-Sided User Tools / Counter
Enhanced Auto Reduce/
Book 2-Sided
ND2L0101
ND2C0101
ND2C0104

SORT/STACK/STAPLE
éæ
2
Note❒ Set the original in the same
direction as the first one.C After all originals are scanned,
press the {#} key.The copies are delivered to thetray.
Stack—Stacking Together All Copies Of A Page (111, 222, 333)
Copies can be assembled with eachpage set.
❖❖❖❖ Rotate Stack
❖❖❖❖ Shift Stack
There are two types in the Stack func-tion:
❖❖❖❖ Rotate StackEvery other page set is rotated90°KL and delivered to the copytray.
❖❖❖❖ Shift Stack (optional finisher re-quired)Every other page set is shifted forease of separation. The shift tray ofthe finisher provides this functionby sliding from side to side.
Note❒ To select Rotate Stack or Shift Stack,
access the user tools. See “7. Stack”in ⇒ P.162 “3. Input/Output 2/2”.
❒ The sizes that can be used in thisfunction are as follows:
11
1 33
322
22 31
21
3
333
222
111

COPYING
éå
2 ❒ The paper sizes that can be used inthe Rotate Stack function are as fol-lows:
❒ To use the Rotate Stack function,two paper trays identical in sizeand different in direction (KL)are required.
ReferenceFor the maximum tray capacity ofthe optional finisher, see ⇒ P.49“Staple”.
A Press the {Sorter } key until theStack indicator (bottom) is lit.
B To make punch holes, press the[Punch ] key.
Limitation❒ The optional 3000-sheet finisher
and punch kit are required touse this function (Type 3 only).
❒ You cannot make punch holeswith Rotate Stack.
Note❒ If you do not wish to make
punch holes, go to Step D.
C Make sure that [ON] is selected.Then, press the [OK] key.
D Enter the number of copies withthe {Number } keys.
E Set your originals.
When setting a stack of originals in the document feeder
A Set a stack of originals in thedocument feeder, then pressthe {Start} key.After all the originals arescanned, the copies are deliv-ered to the tray.
Note❒ The last page should be on
the bottom.
Metric version A3LB4LA4KLB5KLA5L
Inch version 11" × 17" L, 81/2" × 14" L, 11" × 81/2" KL, 51/2" × 81/2" L
Metric version A4KL, B5KL
Inch version 81/2" × 11" KL
2
2
22
11
Sort
Staple
Stack
1-Sided 2-Sided
2-Sided 2-Sided User Tools / Counter
Enhanced Auto Reduce/
Book 2-Sided
ND2L0101
ND2C0101
ND2C0104

SORT/STACK/STAPLE
éä
2
When setting an original on the exposure glass or in the document feeder
ReferenceSee ⇒ P.33 “SADF mode”
A Set the original, then press the{Start} key.
Note❒ Start with the first page to be
copied.B Set the next original, then
press the {Start} key.
Note❒ Set the original in the same
direction as the first one.C After all originals are scanned,
press the {#} key.The copies are delivered to thetray.
Staple
The optional finisher is required to usethis function.
Each copy set can be stapled together.
Limitation❒ You cannot use the following pa-
per in this function:• Post cards• Translucent paper• OHP transparencies• Adhesive labels• Curled paper• Low stiffness paper
Note❒ For this mode, the following limi-
tation apply. When the number ofcopies exceeds the tray capacity,copying stops. In this case, removethe copies from the shift tray andthen resume copying.

COPYING
èí
2
❖❖❖❖ Metric version
❖❖❖❖ Inch version
❒ In the following cases, the copieswill be delivered to the shift traywithout stapling.• When the number of copies for
one set is over the stapler capac-ity.
• When memory reaches 0 % dur-ing copying.
• When “Add Staple” is dis-played during copying.
❒ When you select Staple, Sort modeis automatically selected.
ReferenceIf you want to add staples, see ⇒P.134 “d Adding Staples”.When staple is jammed, see ⇒ P.139“e Removing Jammed Staples”.
1000-sheet finisher
3000-sheet finisher
Paper size
A3L, B4L, A4KL, B5K
A3L, B4L, A4KL, B5KL
Stapler capacity
• A4 or smaller: 30 sheets (80 g/m2)
• B4 or larger: 20 sheets (80 g/m2)
• A4 or smaller: 50 sheets (80 g/m2)
• B4 or larger: 30 sheets (80 g/m2)(without punch)
Shift tray capacity (A4K)
1,000 sheets (80 g/m2)
3,000 sheets (80 g/m2)
1000-sheet finisher
3000-sheet finisher
Paper size
11" × 17"L, 81/2" × 14"L, 81/2" × 11"KL
11" × 17"L, 81/2" × 14"L, 81/2" × 11"KL
Stapler capacity
• 81/2" × 11" or smaller: 30 sheets (20 lb)
• 81/2" × 14" or larger: 20 sheets (20 lb)
• 81/2" × 11" or smaller: 50 sheets (20 lb)
• 81/2" × 14" or larger: 30 sheets (20 lb)(without punch)
Shift tray capacity (81/2" × 11"K)
1,000 sheets (20 lb)
3,000 sheets (20 lb)

SORT/STACK/STAPLE
èì
2
-Stapling position and original setting
❖❖❖❖ 1000-sheet finisherWhen your machine is equippedwith the 1000-sheet finisher, thestapling position will be fixed to‘Top 2’.
Note❒ Original images are not rotated.❒ To staple in combination with
Combine: 2 pages → 1-sided or4 pages → 2-sided, or with Dou-ble Copies, select L paper forK originals, or select K paperfor L originals.
❖❖❖❖ 3000-sheet finisherWhen your machine is equippedwith the 3000-sheet finisher, sta-pling positions when there is copypaper that is identical in size anddirection as your original are asfollows:
Original setting Stapling positionExpo-
sure glass
Docu-ment Feeder
Top
2
K
L
Original setting Stapling positionExpo-
sure glass
Docu-ment Feeder
Top
1
K
LT
op2
K
L
Top
3
K
L
Dou
ble
K
L

COPYING
èë
2
Note❒ You cannot change stapling po-
sitions during copying.❒ When the original image is ro-
tated, the stapling directionturns by 90°.
❒ When you select 1 staple mode(Top or Bottom), the paper ofwhich size is the same but thedirection is different from theoriginals.
❒ The maximum original imagesize that can be rotated is as fol-lows:
❒ The copy image can not be ro-tated if you select [Top 2] or[Double ].
❒ To staple at the Top 2 or Doubleposition in combination withCombine: 2 pages → 1-sided or4 pages → 2-sided, or with Dou-ble Copies, select L paper forK originals, or select K paperfor L originals.
A Press the {Sorter } key until theSort (top) and Staple (center)indicators are lit.
B Select one of four stapling posi-tions.
Note❒ When your machine is
equipped with the 1000-sheetfinisher, this display is notavailable. Go to Step E.
C To make punch holes, press the[Punch ] key.
Note❒ If you do not wish to make
punch holes, go to Step D.
D Press the [OK] key.
E Enter the number of copy setswith the {Number } keys.
F Set your originals.
Metric version A4
Inch version 81/2" × 11"
2
2
22
11
Sort
Staple
Stack
1-Sided 2-Sided
2-Sided 2-Sided User Tools / Counter
Enhanced Auto Reduce/
Book 2-Sided
ND2L0101
ND2C0105
ND2C0101
ND2C0104

SORT/STACK/STAPLE
èê
2
When setting a stack of originals in the document feeder
A Set a stack of originals in thedocument feeder, then pressthe {Start} key.After all the originals arescanned, the copies are deliv-ered to the tray.
Note❒ The last page should be on
the bottom.
When setting an original on the exposure glass or in the document feeder
ReferenceSee ⇒ P.33 “SADF mode”
A Set the original, then press the{Start} key.
Note❒ Start with the first page to be
copied.B Set the next original, then
press the {Start} key.
Note❒ Set the original in the same
direction as the first one.C After all originals are scanned,
press the {#} key.The copies are delivered to thetray.
To stop scanning
When you are using the Sort, Stack, orStaple function, the originals arescanned into memory.
A Press the {Clear/Stop } key.
To resume scanning
A Press the [No] key.Scanning is resumed.
Note❒ Scanned images in memory
are not cleared.
To clear scanned images of the originals
A Press the [Yes] key.Scanning is stopped with theimages cleared.
When memory reaches 0 %
Scanning will be stopped if the size ofscanned image data exceeds memorycapacity.
Note❒ There is enough memory to store
approximate 50 originals of A4size. (Type 1 requires the optional8 MB copier memory unit.)
ND2C0103
ND2C0104

COPYING
èé
2
❒ See ⇒ P.187 “Copier Hard Disk (Im-age Enhance Kit)” for the number oforiginals that can be stored withthe optional copier hard disk.
ReferenceScanning will stop when memoryreaches 0 % during sorted copying.However, you can change this set-ting so that all the scanned pagesare copied and delivered to thetray first, then the machine auto-matically continues scanning theremaining originals. See “8.Mem.full-AutoStrt” in ⇒ P.162 “3.Input/Output 2/2”.
A Press the {Start} key.The scanned pages are delivered tothe tray. Then, the image data inmemory is cleared.
B Remove the copies and continuecopying by following the instruc-tions on the display.

COPYING FROM THE BYPASS TRAY
èè
2
COPYING FROM THE BYPASS TRAY
To use this function on Type 1, the optional bypass tray is required.
Use the bypass tray to copy onto OHPtransparencies, adhesive labels, trans-lucent paper, post cards, and copy pa-per that cannot be set in the papertray.
Limitation❒ You cannot use the bypass tray for
the Duplex function.
Note❒ The machine can automatically de-
tect the following sizes as standardsize copy papers:
❒ If you do not use the standard sizecopy paper, you should input ver-tical and horizontal dimensions.The sizes that you can input are asfollows:
ReferenceFor details about paper capacity ofthe bypass tray, see ⇒ P.23 “CopyPaper”.
A If Duplex mode is selected, pressthe {Duplex } key to cancel themode.
B Open the bypass tray.
C Adjust the guides to copy papersize.
Important❒ If the guides are not flush with
the copy paper, a skew image orpaper misfeeds might occur.
D Lightly insert the copy paper facedown until the beeper sounds.The k indicator on the display isautomatically selected.
1: Horizontal size2: Vertical size3: Extender4: Paper guide
Metric version A3L, A4 L, A5L, 81/2" × 13"L
Inch version A3L, 11" × 17"L, 81/2" × 14"L, 81/2" × 11"L, 51/2" × 81/2"L
Metric version • Vertical: 100 – 297 mm
• Horizontal: 148 – 432 mm
Inch version • Vertical: 4.0" – 11.7"
• Horizontal: 6.0" – 17.0"
ND6H0300
ND6H04EE
3
2
4
1

COPYING
èç
2
Note❒ Do not stack paper over the lim-
it mark; otherwise a skew imageor paper misfeeds might occur.
❒ If the beeper is turned off, light-ly insert the copy paper until itstops. See “Settings You CanChange With The User Tools”in the System Settings.
❒ When the platen cover is open,set the direction of the copy pa-per to L.
❒ Swing out the extender to sup-port larger size copy paper larg-er than A4L, 81/2" × 11"L.
❒ Fan paper to get air between thesheets and avoid a multi-sheetfeed.
When copying onto non-standard size copy paper
Important❒ You should specify the size of
copy paper to avoid paper mis-feeds.
A Make sure the k indicator isselected.
B Press the {#} key.C Press the [Ppr. Size ] key.
D Press the [OK] key.
E Enter the vertical size of the pa-per with the {Number } keys,then press the {#} key.
Note❒ To change the number en-
tered, press the {Clear/Stop }key and enter the new num-ber.
F Enter the horizontal size of thepaper with the {Number } keys,then press the [OK] key.
Note❒ To change the number en-
tered, press the {Clear/Stop }key and enter the new num-ber.
❒ When you specify the papersize, !appears on the dis-play to indicate bypass traycopying.
ND2C0101
ND2C0104
ND2C0104

COPYING FROM THE BYPASS TRAY
èæ
2
G Press the [Exit ] key.
When copying onto standard size copy paper
A Make sure the k indicator isselected.
B Press the {#} key.C Press the [Ppr. Size ] key.
D Press the [↓↓↓↓Next] key until yourdesired size is displayed.
E Select the desired size with the<> keys, then press the [OK]key.
F Press the [Exit ] key.
E Set your originals, then press the{Start} key.
ND2C0104
ND2C0101
ND2C0102
ND2C0109
ND2C0109
ND2C0109
ND2C0104

COPYING
èå
2
When copying onto OHP transparencies or thick paper
To make copies onto OHP transpar-encies or thick paper, you need tospecify the paper type.
Note❒ Select [Thick Paper ] if the paper
weight is more than 91 g/m2 (20lb).
A If Duplex mode is selected, pressthe {Duplex } key to cancel themode.
B Open the bypass tray, and adjustthe guides to the paper size.
Important❒ If the guides are not flush with
the copy paper, a skew image orpaper misfeeds might occur.
C Lightly insert the OHP transpar-encies or thick paper face downuntil the beeper sounds.The kindicator on the display isautomatically selected.
Note❒ When you set a OHP transpar-
encies, make sure that its frontand back faces are properly po-sitioned.
❒ To avoid paper misfeeds, shuf-fle a stack of paper before set-ting it in the tray.
D Press the {#} key.
E Press the [Ppr. Type ] key.
F Select [OHP] or [Thick Paper ] withthe <> keys. Then, press the[OK] key.
G Press the [Exit ] key.
ReferenceTo go on to specify a paper size,press the [Ppr. Size ] key.See ⇒ P.56 “When copying ontonon-standard size copy paper”ïSee ⇒ P.57 “When copying ontostandard size copy paper”.
ND5H05EE
ND2C0102
ND2C0109
ND2C0104

COPYING FROM THE BYPASS TRAY
èä
2
H Set your originals and press the{Start} key.
Important❒ When copying onto OHP trans-
parencies, remove copied sheetsone by one.

COPYING
çí
2
PROGRAM—STORING YOUR COPY SETTINGS IN MEMORY
You can store frequently used copyjob settings in machine memory, andrecall them for future use.
❖❖❖❖ Storing Your SettingsYou can store your settings youfrequently use.
❖❖❖❖ Deleting A ProgramYou can delete a stored program.
❖❖❖❖ Recalling A ProgramYou can recall a stored program.
Note❒ You can store up to ten programs.❒ Paper settings are stored based on
paper size. So if you place morethan one paper tray of a same size,the paper tray prioritized with theuser tools will be selected first. See“12. Pap.Tray Priority” of the Sys-tem Settings.
❒ Programs are not cleared by turn-ing the power off or by pressingthe {Clear Modes/Energy Saver } key.They are canceled only when youdelete or overwrite them with an-other program.
Storing Your Settings
A Edit the copy settings so that allfunctions you want to store in thisprogram are selected.
B Press the {Program } key.
C Press the [Store ] key.
D Select the program number youwant to store these settings inwith the <> keys. Then, pressthe [OK] key.When the settings are successfullystored, the m indicator appears.
Note❒ Program numbers with m al-
ready have settings in them.❒ If this program number is al-
ready being used, the machinewill ask you if you wish to over-write it - press the [Yes] or [No]key.
2 31eed Dial
Program Clear Modes /Energy Saver
InterruptC
ND2R01EE
ND2C0101
ND2C0109

PROGRAM—STORING YOUR COPY SETTINGS IN MEMORY
çì
2
Deleting A Program
You can delete a stored program.
A Press the {Program } key.
B Press the [Delete] key.
C Select the program number youwant to delete with the <> keys.Then press the [OK] key.
D Press the [Yes] key.
Note❒ To cancel the deletion, press the
[No] key.
E To delete another program, repeatsteps C and D.
F Press the [Exit ] key.
2 31eed Dial
Program Clear Modes /Energy Saver
InterruptC
ND2R01EE
ND2C0102
ND2C0109
ND2C0103
ND2C0103

COPYING
çë
2
Recalling A Program
You can recall a stored program.
A Press the {Program } key.
B Select the program number youwant to recall with the <> keys.Then, press the [OK] key.The stored settings are displayed.
Note❒ Only programs with m contain
a program.
C Set your originals, then press the{Start} key.
2 31eed Dial
Program Clear Modes /Energy Saver
InterruptC
ND2R01EE
ND2C0109

OTHER FUNCTIONS
çê
2
OTHER FUNCTIONS
Energy Saver Mode—Saving Energy
If you do not operate the machine fora certain period after copying, orwhen you press and hold the {ClearModes/Energy Saver } key for more thanone second, the display disappearsand the machine enters Energy Savermode. When you press the {ClearModes/Energy Sever } key again, whenthe originals are set in the documentfeeder, or when the platen cover ordocument feeder is opened, the ma-chine returns to the ready condition.In Energy Saver mode, the machineuses less electricity.The Energy Saver mode makes a two-step reduction in electricity: one forthe period up to the time set for LowPower mode, the other for the periodafter that time.
Note❒ The period for which the machine
remains in Energy Saver mode (i.e.the period until the mode is turnedoff to return to the ready condi-tion) varies with the effectivenessof energy saving.
❒ If you press the {Clear Modes/EnergySaver} key during the operation,the current settings will be cleared.
ReferenceSee “8. Low Power Timer” of theSystem Settings.
Interrupt—Temporarily Stopping One Job To Copy Something Else
You can make urgently needed copiesduring a multi-copy run.
A Press the {Interrupt } key.The key indicator lights.
B Remove the originals currentlyset for copying, and set your orig-inals for interrupt copying. Makeyour copies.
C After interrupt copying, removethe originals for interrupt copy-ing and the copies.
D Press the {Interrupt } key again.The key indicator goes off.
E Reset the previous originals.Then, press the {Start} key.
Note❒ The previous copy settings are
recalled and the previous copyjob can be resumed by pressingthe {Start} key.
User Codes
If the machine is set to use the UserCode function, operators must inputtheir user codes before the machinecan be operated. The machine keepscount of the number of copies madeunder each user code.
Note❒ When the machine is set for user
codes, the machine will prompt

COPYING
çé
2
you for your user codes after theoperation switch is on or the AutoReset comes into effect.
❒ To prevent others from makingcopies using your user code, pressthe {Clear Modes/Energy Saver } and{Clear/Stop } keys simultaneouslyafter copying.
ReferenceFor setting user codes, see ⇒ P.154“1. General Features 4/4”.
Auto Start—Entering Copy Job Settings During The Warm-up Period
If you press the {Start} key during thewarm-up period, the {Start} key willblink, and your copies will be madeas soon as warm-up finishes.
A Make any adjustments to copysettings during the warm-up peri-od.
B Set your originals.
C Press the {Start} key.The {Start} key indicator alternate-ly flashes red and green.
Note❒ To cancel Auto Start, press the
{Clear/Stop } key.
Original Beeper
The beeper sounds and an error mes-sage is displayed when you leaveyour originals on the exposure glassfor about two seconds after copying.
Note❒ To cancel this function, see “06.
Original beeper” in ⇒ P.152 “1.General Features 2/4”.

PRESET REDUCE/ENLARGE—REDUCING AND ENLARGING USING PRESET RATIOS
çè
2
PRESET REDUCE/ENLARGE—REDUCING AND ENLARGING USING PRESET RATIOS
You can select a preset ratio for copy-ing.
Note❒ You can select one of 12 present ra-
tios (5 enlargement ratios, 7 reduc-tion ratios).
❒ You can change the preset ratios toother ratios you frequently use. See“08. Reproduction Ratio” in⇒P.152 “1. General Features 2/4”.
❒ You can select a ratio regardless ofthe size of an original or copy pa-per. With some ratios, parts of theimage might not be copied or mar-gins will appear on copies.
❒ Copies can be reduced or enlargedas follows:
❖❖❖❖ Metric version
*1 Type 3 only*2 Type 1 and Type 2 only
Ratio (%)Original → Copy paper size
400 (enlarge area by 16)
--
200 (enlarge area by 4)
A5→Α3
141 (enlarge area by 2)
A4→Α3, Α5→Α4
122 F→Α3, Α4→Β4
115 B4→Α3
93 A little reduced.
87 A3→Β4
82 F→Α4, Β4→F
71 (reduce area by 1/2)
A3→Α4, Α4→A5
65 A3→F
50 (reduce area by 1/4)
A3→Α5, F→Α5
35 *1 --
25 *2 --

COPYING
çç
2
❖❖❖❖ Inch version
*1 Type 3 only*2 Type 1 and Type 2 only
A Press the [Enlarge ] or [Reduce ] keyto select a ratio.
Note❒ Another preset ratio is dis-
played every time you press thekey.
B Set your originals, then press the{Start} key.Ratio(%) Original → Copy paper
size
400 (enlargearea by 16)
--
200 (enlarge area by 4)
51/2" × 81/2"→11" × 17"
155 (enlarge area by 2)
51/2" × 81/2"→81/2" × 14"
129 81/2" × 11"→11" × 17"
121 81/2" × 14"→11" × 17"
93 A little reduced.
85 F→81/2" × 11"
78 81/2" × 14"→81/2" × 11"
73 11" × 14"→81/2" × 11"
65 11" × 17"→81/2" × 11"
50 (reduce area by 1/4)
11" × 17"→51/2" × 81/2"
32 *1 --
25 *2 --
ND2C0110

ZOOM—REDUCING AND ENLARGING IN 1 % STEPS
çæ
2
ZOOM—REDUCING AND ENLARGING IN 1 % STEPS
You can change the reproduction ra-tio in 1 % steps.
Note❒ The following ratios can be select-
ed:• Type 1, Type 2
Metric version: 25 – 400 %Inch version: 25 – 400 %
• Type 3Metric version: 35 – 400 %Inch version: 32 – 400 %
❒ You can select a ratio regardless ofthe size of an original or copy pa-per. With some ratios, parts of theimage might not be copied or mar-gins will appear on copies.
❒ You can select a preset ratio whichis near the desired ratio, then pressthe {Zoom} key and adjust the ratiowith the [n] or [o] key.
A Press the {Zoom} key.
B Enter the ratio.
When using the [n] or [o] key
A Enter the desired reproductionratios with the [o] or [n] key.
Note❒ To change the ratio in 1 %
steps, just press the [n] or[o] key. To change the ratioin 10 % steps, press and holddown the [n] or[o] key.
When using the {Number } keys
A Enter the desired ratio with the{Number } keys.
1
3 4
2
EnhancedImage
Menu
SeriesCopies
MarginAdjust
Auto Reduce/Enlarge
Zoom
CombineCopies
Erase Center/Border
Copy
Fax
ND2L0204
ND2C0100

COPYING
çå
2
Note❒ To change the ratio entered,
press the {Clear/Stop } keyand enter the new ratio.
C Set your originals, then press the{Start} key.

DIRECTIONAL SIZE MAGNIFICATION (INCH)—STRETCHING AND SQUEEZING THEIMAGE INTO THE COPY AREA
çä
2
DIRECTIONAL SIZE MAGNIFICATION (INCH)—STRETCHING AND SQUEEZING THE IMAGE INTO THE COPY AREA
The suitable reproduction ratios willbe automatically selected when youenter the horizontal and verticallengths of the original and copy im-age you want.
PreparationSpecify the vertical and horizontalsizes of the original and those of thecopy, as shown in the illustration.
1: Horizontal original size2: Vertical original size3: Horizontal copy size4: Vertical copy size
Note❒ You can enter sizes within the fol-
lowing ranges:
❒ If the calculated ratio is over themaximum or under the minimumratio, it is corrected within therange of the ratio automatically.However, with some ratios, parts
of the image might not be copiedor blank margins will appear oncopies.
A Press the {Menu} key.
B Press the [Select ] key.
C Enter the vertical size of the origi-nal with the {Number } keys. Then,press the {#} or > key.
Note❒ To change the value entered:
• If you have not pressed the{#} key yet, press the {Clear/Stop} key and enter the newvalue.
Metric version 1 – 999 mm (in 1 mm steps)
Inch version 0.1" – 99.9" (in 0.1" steps)
13
2 4
CP2M01EE
1
3 4
2
EnhancedImage
Menu
SeriesCopies
MarginAdjust
Auto Reduce/Enlarge
Zoom
CombineCopies
Erase Center/Border
Copy
Fax
ND2L0203
ND2C0104

COPYING
æí
2
• If you have already pressedthe {#} key, select the[Orig.:Vrt. ] with the <> keysand enter the new value.
D Enter the vertical size of the copywith the {Number } keys. Then,press the {#} or >key.
E Enter the horizontal size of theoriginal with the {Number } keys.Then, press the {#} or >key.
F Enter the horizontal size of thecopy with the {Number } keys.Then, press the [OK] key.
G Set your originals, then press the{Start} key.

DIRECTIONAL MAGNIFICATION (%)—STRETCHING AND SQUEEZING THE IMAGE IN1 % STEPS
æì
2
DIRECTIONAL MAGNIFICATION (%)—STRETCHING AND SQUEEZING THE IMAGE IN 1 % STEPS
Copies can be reduced or enlarged atdifferent reproduction ratios horizon-tally and vertically.
1: Horizontal %2: Vertical %
Note❒ The following ratios can be select-
ed:• Type 1, Type 2
Metric version: 25 – 400 %Inch version: 25 – 400 %
• Type 3Metric version: 35 – 400 %Inch version: 32 – 400 %
❒ You can select a ratio regardless ofthe size of an original or copy pa-per. With some ratios, parts of theimage might not be copied orblank margins will appear on cop-ies.
A Press the {Menu} key.
B Select the [Direct Mag. (%) ] key with< or > keys. Then, press the [Se-lect ] key.
C Enter the desired vertical ratiowith the {Number } keys. Then,press the {#} key or the > key.
a%
b%
CP2P01EE
1
3 4
2
EnhancedImage
Menu
SeriesCopies
MarginAdjust
Auto Reduce/Enlarge
Zoom
CombineCopies
Erase Center/Border
Copy
Fax
ND2L0203
ND2C0109

COPYING
æë
2
D Enter the desired horizontal ratiowith the {Number } keys. Then,press the [OK] key.
Note❒ To change the number entered,
press the {#} key or the <>keys, then enter the new num-ber.
E Set your originals, then press the{Start} key.
ND2C0104

MARGIN ADJUSTMENT—ADJUSTING THE MARGIN
æê
2
MARGIN ADJUSTMENT—ADJUSTING THE MARGIN
You can shift the image either left orright to make a binding margin.
Limitation❒ If you set too wide margin, areas
you do not want to delete might beerased.
Note❒ You can change the width of the
binding margin as follows:
❒ The margin width default is as fol-lows. You can change this defaultsetting with the user tools. See “3.Marg.Adjust.Front” in ⇒ P.155 “2.Adjust Image 1/2”.
A Press the {Menu} key.
B Select the [Margin Adjust. ] with the<> keys. Then, press the [Select ]key.
C Select [Left ] (left margin) or [Right ](right margin) with the <> keys.
D Enter the desired margin widthwith the {Number } keys.
Note❒ To change the value entered,
press the {Clear/Stop } key andenter the new value.
Metric version 0 – 30 mm (in 1 mm steps)
Inch version 0" – 1.0" (in 0.1" steps)
Metric version • Front: 5 mm Left
• Back: 5 mm Right
Inch version • Front: 0.2" Left
• Back: 0.2" Right
A A1
3 4
2
EnhancedImage
Menu
SeriesCopies
MarginAdjust
Auto Reduce/Enlarge
Zoom
CombineCopies
Erase Center/Border
Copy
Fax
ND2L0203
ND2C0109
ND2C0105

COPYING
æé
2
E To specify a binding margin forback pages, press the [Back ] key.
Note❒ You can specify the back margin
only when the Duplex or theTwo-Sided copy with Combineis selected.
❒ If you do not need to specify theback margin, press the [OK] keyand go to Step Hï
F Select [Left ] (left margin) or [Right ](right margin) with the <> keys.
G Enter the desired margin widththe {Number } keys. Then, pressthe [OK] key.
H Set your originals, then press the{Start} key.
ND2C0101
ND2C0105

ERASE CENTER/BORDER—ERASING THE CENTER AND THE BORDER
æè
2
ERASE CENTER/BORDER—ERASING THE CENTER AND THE BORDER
This function erases the center and/or all four sides of the original image,such as book originals.
❖❖❖❖ Erase Center
❖❖❖❖ Erase Border
There are two types in this function:
❖❖❖❖ CenterThis mode erases the center mar-gin of the original image.
❖❖❖❖ BorderThis mode erases the surroundingarea of the original image.
Note❒ You can change the width of the
erased margin as follows:
❒ The default setting of the erasedmargin is as follows. You canchange this settings with the usertools. See “1. Erase Border” and “2.Erase Center” in ⇒ P.155 “2. AdjustImage 1/2”.
❒ The position of the margin to beerased is determined according tothe original size and reproductionratio.
1: Erased part❒ You can use the Erase Center and
Erase Border functions together.
A Press the {Menu} key.
Metric version 3 – 50 mm (in 1 mm steps)
Inch version 0.1" – 2.0" (in 0.1" steps)
BA BA
CenterEE
BA BA
BorderEE
Metric version 10 mm
Inch version 0.4"
L copy paper K copy paper
1 3~50mm
1
1
3 4
2
EnhancedImage
Menu
SeriesCopies
MarginAdjust
Auto Reduce/Enlarge
Zoom
CombineCopies
Erase Center/Border
Copy
Fax
ND2L0203

COPYING
æç
2
B Select the [Erase Ctr./Bdr. ] with the<> keys. Then, press the [Select ]key.
C Select the part to be erased.
Center
A Press the [Center ] key.
B Enter the center width with the{Number } keys. Then press the[OK] key.
Note❒ To change the value entered,
press the {Clear/Stop } keyand enter the new value.
C Press the [Exit ] key.
Border
A Press the [Border ] key.
B Enter the border width withthe {Number } keys. Then pressthe [OK] key.
Note❒ To change the value entered,
press the {Clear/Stop } keyand enter the new value.
ND2C0109
ND2C0101
ND2C0104
ND2C0104
ND2C0102
ND2C0104

ERASE CENTER/BORDER—ERASING THE CENTER AND THE BORDER
ææ
2
C Press the [Exit ] key.
D Set your originals, then press the{Start} key.
ND2C0104

COPYING
æå
2
COMBINE—COMBINING ORIGINALS INTO ONE COPY
The optional document feeder is required to use this function.
You can make 1 sheet of copies from 2or more one-sided originals.
❖ 2 pages →1-sided
❖ 4 pages →1-sided, 4 pages →2-sided
❖ 8 pages →2-sided
❖❖❖❖ 16 pages →booklet
1: Front2: BackThere are five types in this function.
❖❖❖❖ 2 pages →1-sidedThis mode makes two facing pageson one-sided copy.
❖❖❖❖ 4 pages →1-sided4 one-sided pages are copied on to1 one-sided sheet.
❖❖❖❖ 4 pages →2-sided (Type 1 requires theoptional 8 MB copier memory unit andduplex unit.)4 one-sided paper are copied onto1 two-sided sheet, 2 original imag-es on each side.
❖❖❖❖ 8 pages →2-sided (Type 1 requires theoptional 8 MB copier memory unit andduplex unit.)8 one-sided pages are copied on to1 two-sided sheet, 4 original imag-es on each side.
Combine1
1 2 1 2
Combine2
43
1 2
2 31
4
3
1
4
2
Combine3
21
87 3 4
1 2
7 8
5 6
1 2
Combine4
14 13 16
5 812 9
76 11 10
3 214 15
21
16151
2

COMBINE—COMBINING ORIGINALS INTO ONE COPY
æä
2
❖❖❖❖ 16 pages →booklet (Type 1 requiresthe optional 8 MB copier memory unitand duplex unit.)This mode makes a booklet copy of16 pages from 16 one-sided origi-nals.
Setting Originals (Originals set in thedocument feeder)• Originals reading from left to right
• Originals reading from top to bot-tom
Limitation❒ You cannot use this function in
Duplex mode.❒ You cannot use the bypass tray
with this function.❒ The machine cannot copy originals
different in size and direction.
Note❒ The number of originals copied
(combined) can be 2, 4, 8, or 16.❒ In this mode, the machine selects
the reproduction ratio automati-cally. This reproduction ratio de-pends on the copy paper sizes andthe number of originals.
❒ The machine uses ratios in the fol-lowing range:• Type 1, Type 2
Metric version: 25 – 400 %Inch version: 25 – 400 %
• Type 3Metric version: 35 – 400 %Inch version: 32 – 400 %
❒ If the calculated ratio is under theminimum ratio, it is correctedwithin the range of the ratio auto-matically. However, with some ra-tios, parts of the image might notbe copied or blank margins appearon copies.
❒ Separation line between originalscan be printed with the user tools.See “6. Combine Copy” in⇒ P.157“2. Adjust Image 2/2”.
❒ Even if the direction of originals isdifferent from that of the copy pa-per, the machine will automatical-ly rotate the image by 90° to makecopies properly.
❒ You can make copies even if thenumber of originals is less than thenumber required in the selectedmode. You can also disable thisfunction with the user tools. See “2.Comb. Auto Eject” in ⇒ P.160 “3.Input/Output 1/2”.
❒ When the number of originalsplaced is less than the numberspecified for combining, the lastpage (s) will be copied blank asshown in the illustration.
Combine5
3 41 2
4321
Combine6
34124321
321
3
21

COPYING
åí
2
❒ In the 4 pages→2-sided mode or 8pages→2-sided mode, you canspecify the orientation of originals([Top to Top ][Top to Bottom ]). See ⇒P.88 “Specifying Orientation ofBound Originals”.
A If Duplex mode is selected, pressthe {Duplex } key to cancel themode.
B Press the {Menu} key.
C Press the [↓↓↓↓Next] key until the[Combine ] is displayed.
D Press the [Select ] key.
E Select the desired combine modeswith the <> keys. Then, pressthe [OK] key.
F Press the [Exit ] key.
G Press the [Paper] key or <> keysto select the copy paper.
H Set your originals, then press the{Start} key.
When setting an original on the exposure glass or in the document feeder
A Set the original, then press the{Start} key.
Note❒ Start with the first page to be
copied.B Set the next original, then
press the {Start} key.
Note❒ To finish copying, press the
{#} key to eject the copy.
When setting a stack of originals in the document feeder
A Set your originals, then pressthe {Start} key.
Note❒ The last page should be on
the bottom.
1
3 4
2
EnhancedImage
Menu
SeriesCopies
MarginAdjust
Auto Reduce/Enlarge
Zoom
CombineCopies
Erase Center/Border
Copy
Fax
ND2L0203
ND2C0102
ND2C0104
ND2C0109

COMBINE—COMBINING ORIGINALS INTO ONE COPY
åì
2
----Making a bookletIf you want to make a booklet from 16originals, fold copies as shown in theillustration.
6
31
16
98
51169
1

COPYING
åë
2
SERIES COPIES—MAKING ONE-SIDED COPIES FROM VARIOUS ORIGINALS
You can make one-sided copies fromtwo facing pages of bound (book)originals and from two-sided origi-nals.There are two types in this function:
❖❖❖❖ Book → 1-SidedYou can make one-sided copiesfrom two facing pages of a boundoriginal (book).
❖❖❖❖ 2-Sided → 1-Sided (The optional doc-ument feeder is required.)You can make one-sided copiesfrom two-sided originals.
Limitation❒ You cannot use this function in
Duplex mode.
Book → 1-Sided—Making One-sided Copies From Two Facing Page Of A Bound Original (Book)
Note❒ Refer to the following table when
you select original and copy papersizes with 100 % ratio:
❖❖❖❖ Metric version
❖❖❖❖ Inch version
A If Duplex mode is selected, pressthe {Duplex } key to cancel themode.
B Press the {Menu} key.
1 21 2
Original Copy paper
A3L A4K × 2 sheets
B4L B5K × 2 sheets
A4L A5K × 2 sheets
Original Copy paper
11" × 17"L 81/2" × 11"K × 2 sheets
81/2" × 11"L 51/2" × 81/2"K × 2 sheets
1
3 4
2
EnhancedImage
Menu
SeriesCopies
MarginAdjust
Auto Reduce/Enlarge
Zoom
CombineCopies
Erase Center/Border
Copy
Fax
ND2L0203

SERIES COPIES—MAKING ONE-SIDED COPIES FROM VARIOUS ORIGINALS
åê
2
C Press the [↓↓↓↓Next ] key until [Series ]is displayed.
D Select [Series ] with the <> keys.Then, press the [Select ] key.
With the optional document feeder
A Select the [Book → 1-Sided ] withthe <> keys. Then, press the[OK] key.
Without the optional document feeder
A Press the [OK] key.
E Set your originals, then press the{Start} key.
ND2C0102
ND2C0109
ND2C0109
ND2C0104

COPYING
åé
2
2-Sided →1-Sided—Making One-sided Copies From Two-sided Originals
The optional document feeder is requiredto use this function.
A If Duplex mode is selected, pressthe {Duplex } key to cancel themode.
B Press the {Menu} key.
C Press the [↓↓↓↓Next ] key until [Series ]is displayed.
D Select [Series ] with the <> keys.Then, press the [Select ] key.
E Press the [OK] key.
F Set your originals, then press the{Start} key.
1 21
2
1
3 4
2
EnhancedImage
Menu
SeriesCopies
MarginAdjust
Auto Reduce/Enlarge
Zoom
CombineCopies
Erase Center/Border
Copy
Fax
ND2L0203
ND2C0102
ND2C0109
ND2C0104

DUPLEX—MAKING TWO-SIDED COPIES
åè
2
DUPLEX—MAKING TWO-SIDED COPIES
Type 1 requires the optional duplex unit, interchange unit, and 8 MB copier memoryunit is required to use this function.
There are three ways in this function:
❖❖❖❖ 1-sided → 2-sidedThis mode makes two-sided copiesfrom one-sided originals.
❖❖❖❖ Book → 2-sidedThis mode makes two-sided copiesfrom facing pages of a bound orig-inal (book).
❖❖❖❖ 2-sided → 2-sidedThis mode makes two-sided copiesfrom two-sided originals.
Limitation❒ You cannot use the following copy
paper in this function:• Paper smaller than A5, 51/2" ×
81/2"• Translucent paper• Adhesive labels• OHP transparencies• Post cards
❒ You cannot use the bypass traywith this function.
❒ The optional copier hard disk is re-quired to make enhanced-imagecopies.
Note❒ The following paper limitations
apply:
❒ When you make 2-sided copies onB4, 81/2" × 14" or larger copy pa-per, open the right side cover. Alsoopen the bypass tray, if installed.
Metric ver-sion
Minimum size
A5
Weight 64 – 105 g/m2
Inch ver-sion
Minimum size
51/2" × 81/2"
Weight 20 – 28 lb
ND6H0200

COPYING
86
2
1-Sided → 2-Sided—Making Two-sided Copies From One-sided Originals
Note❒ If you set an odd number of 1-sid-
ed originals in the document feed-er (ADF), the reverse side of thelast page is left blank. You can dis-able this function to make the de-livered last page not be blank. See“1. Duplex Auto Eject” in ⇒ P.160“3. Input/Output 1/2”.
❒ When original images are copied,the images are shifted by a widthof binding margin. You can adjustthe binding margin or binding po-sition. You can also change theirdefault values. See “4. Margin Ad-just Back” in ⇒ P.155 “2. Adjust Im-age 1/2”.
-Originals and copy directionYou can select the orientation ([Top toTop], [Top to Bottom]). See ⇒ P.88“Specifying Orientation of Bound Origi-nals”.• Top to Top
• Top to Bottom
1 2
2
1
Duplex1
Duplex2
Chapter2 Page 86 Tuesday, May 19, 1998 1:58 PM

DUPLEX—MAKING TWO-SIDED COPIES
åæ
2
-Original direction and completed copies
The resulting copy image will differaccording to the direction in whichyou set your original (lengthwise Kor widthwise L).
*1 The illustrations show the directionsof copied images on the front andback, not the directions of delivery.
A Press the {Duplex } key until the 1-Sided →2-Sided indicator (top)is lit.
B Set your originals.
When setting an original on the exposure glass or in the document feeder
ReferenceSee ⇒ P.33 “SADF mode”
A Set the original, then press the{Start} key.
Note❒ Start with the first page to be
copied.B Set the next original, then
press the {Start} key.
When setting a stack of originals in the document feeder
A Set your originals, then pressthe {Start} key.
Note❒ The last page should be on
the bottom.
Original Orientation Result *1
• [Top to Top]
• [Top to Bottom ]
• [Top to Top]
• [Top to Bottom ]
Duplex3
ABC
Duplex5
ABC
Duplex9
Duplex10 Duplex6
AB
C
Duplex4
BA
Duplex7
BA
Duplex11
Duplex12
Duplex8
BA
2
2
22
11
Sort
Staple
Stack
1-Sided 2-Sided
2-Sided 2-Sided User Tools / Counter
Enhanced Auto Reduce/
Book 2-Sided
ND2L0102

COPYING
åå
2
Specifying Orientation of Bound Originals
You can specify the orientation ofbound originals (how you turn thepages). The default setting is [Top toTop].
A Press the {Menu} key.
B Press the [↓↓↓↓Next ] key until [Orienta-tion ] is displayed.
C Select the [Orientation ] with the<> keys. Then press the [Select ]key.
D Select the desired orientationwith the <>keys. Then, pressthe [OK] key.
1
3 4
2
EnhancedImage
Menu
SeriesCopies
MarginAdjust
Auto Reduce/Enlarge
Zoom
CombineCopies
Erase Center/Border
Copy
Fax
ND2L0203
ND2C0102
ND2C0109
ND2C0109

DUPLEX—MAKING TWO-SIDED COPIES
åä
2
Book → 2-Sided—Making Two-Sided Copies From Facing Pages Of A Bound Original (Book)
Note❒ Refer to the following table when
you select original and copy papersizes with 100 % ratio:
❖❖❖❖ Metric version
❖❖❖❖ Inch version
A Press the {Duplex } key until theBook→2-Sided indicator (cen-ter) is lit.
B Set your originals.
When setting an original on the exposure glass or in the document feeder
A Set the original, then press the{Start} key.
Note❒ Start with the first page to be
copied.B Set the next original, then
press the {Start} key.
When setting a stack of originals in the document feeder
A Set your originals, then pressthe {Start} key.
Note❒ The last page should be on
the bottom.
Original Copy paper
A3L A4 (2-sided)
B4L B5 (2-sided)
A4L A5 (2-sided)
Original Copy paper
11" × 17"L 81/2" × 11" (2-sid-ed)
81/2" × 11"L 51/2" × 81/2" (2-sid-ed)
1 2 1
2
2
2
22
11
Sort
Staple
Stack
1-Sided 2-Sided
2-Sided 2-Sided User Tools / Counter
Enhanced Auto Reduce/
Book 2-Sided
ND2L0102

COPYING
äí
2
2-Sided → 2-Sided—Making Two-sided Copies From Two-sided Originals
A Press the {Duplex } key until the 2-Sided →2-Sided indicator (bot-tom) is lit.
B Set your originals.
When setting an original on the exposure glass or in the document feeder
A Set the original, then press the{Start} key.
Note❒ Start with the first page to be
copied.B Set the next original, then
press the {Start} key.
When setting a stack of originals in the document feeder
A Set your originals, then pressthe {Start} key.
Note❒ The last page should be on
the bottom.
1
2
1
2
2
2
22
11
Sort
Staple
Stack
1-Sided 2-Sided
2-Sided 2-Sided User Tools / Counter
Enhanced Auto Reduce/
Book 2-Sided
ND2L0102

COVER/PAPER DESIGNATE—ADDING OR INSERTING SHEETS
äì
2
COVER/PAPER DESIGNATE—ADDING OR INSERTING SHEETS
In this function, you can add or insertcover or paper designate.There are three types in this function:
❖❖❖❖ Front Cover (Type 1 requires the op-tional bypass tray)The first page of your originals iscopied on a specific paper sheetsfor covers.
❖❖❖❖ Both Covers (Type 1 requires the op-tional bypass tray)The first and last pages of youroriginals are copied on specific pa-per sheets for covers.
❖❖❖❖ Paper DesignateAny specified page of your origi-nals is copied on specific papersheets for slip sheet.
Note❒ The cover or slip sheets should be
identical in size and direction withthe copy paper.
❒ If Blank Cover mode is selected,the cover will not be counted as acopy.
Front Cover—Copying Or Adding A Front Cover
Type 1 requires the optional bypass trayto use this function.
The first page of your originals is cop-ied on a specific paper sheets for cov-ers.
❖❖❖❖ Copy
❖❖❖❖ Blank
Note❒ The optional 8 MB copier memory
unit is required to make 2 or moresets of copies on Type 1.
❒ You can specify whether to make acopy on a sheet for covers. If youselect [Copy ], the first page will becopied on the cover sheet. If youselect [Blank ], a cover sheet will justbe inserted before the first copy.
32
13
21
32
13
21

COPYING
äë
2
A Press the {Menu} key.
B Press the [↓↓↓↓Next ] key until [Cover/Ppr.Des. ] is displayed.
C Press the [Select ] key.
D Press the [Front ] key.
E Specify whether to copy on a cov-er sheet with the <> keys. Then,press the [OK] key.
F Press the [Exit ] key.
G Set cover sheets on the bypasstray.
H Set your originals, then press the{Start} key.
1
3 4
2
EnhancedImage
Menu
SeriesCopies
MarginAdjust
Auto Reduce/Enlarge
Zoom
CombineCopies
Erase Center/Border
Copy
Fax
ND2L0203
ND2C0104
ND2C0101
ND2C0109
ND2C0104

COVER/PAPER DESIGNATE—ADDING OR INSERTING SHEETS
äê
2
Both Covers—Copying Or Adding Front And Back Covers
Type 1 requires the optional bypass trayto use this function.
The first and last pages of your origi-nals are copied on specific papersheets for covers.
❖❖❖❖ Copy
❖❖❖❖ Blank
Note❒ You can specify whether to make a
copy on a cover sheet. If you select[Copy ], the first and last pages willbe copied on the cover sheets. Ifyou select [Blank ], a cover sheetwill just be inserted before the firstcopy and another sheet after thelast copy.
A Press the {Menu} key.
B Press the [↓↓↓↓Next ] key until [Cover/Ppr. Des. ] is displayed.
C Press the [Select ] key.
D Press the [Both ] key.
43
21
43
21
32
13
21
1
3 4
2
EnhancedImage
Menu
SeriesCopies
MarginAdjust
Auto Reduce/Enlarge
Zoom
CombineCopies
Erase Center/Border
Copy
Fax
ND2L0203
ND2C0102
ND2C0104
ND2C0102

COPYING
äé
2
E Specify whether to copy on a cov-er sheet with the <> keys. Then,press the [OK] key.
F Press the [Exit ] key.
G Set cover sheets on the bypasstray.
H Set your originals, then press the{Start} key.
Paper Designate—Copying Designated Pages Of Originals Onto Slip Sheets
Any specified page of your originalsis copied on specific paper sheets forslip sheet.
Note❒ You can specify up to 10 page
numbers.❒ Before using this function, set the
special paper tray for slip sheetsusing the user tools. See “09. SlipSheet Tray” in ⇒ P.153 “1. GeneralFeatures 3/4”.
A Press the {Menu} key.
ND2C0109
ND2C0104
10
5
1
10
5
1
1
3 4
2
EnhancedImage
Menu
SeriesCopies
MarginAdjust
Auto Reduce/Enlarge
Zoom
CombineCopies
Erase Center/Border
Copy
Fax
ND2L0203

COVER/PAPER DESIGNATE—ADDING OR INSERTING SHEETS
äè
2
B Press the [↓↓↓↓Next ] key until [Cover/Ppr. Des. ] is displayed.
C Press the [Select ] key.
D Press the [Ppr. Des. ] key.
Note❒ If your machine is not equipped
with the bypass tray, the dis-play above does not appear. Goto Step E.
E Enter the page number you wantto copy onto a slip sheet with the{Number } keys. Then, press the{#} key.
Note❒ To change the value entered,
press the {Clear/Stop } key andenter the new value.
F To specify another page number,repeat Step E.
G When you finish specifying thepage number (s), press the [OK]key.
Note❒ To change the number entered,
select the desired item with the<> keys, then enter the newnumber.
H Press the [Exit ] key.
I Set your originals, then press the{Start} key.
ND2C0102
ND2C0104
ND2C0103
ND2C0104
ND2C0104

COPYING
äç
2
OHP SLIP SHEET—COPYING OR INSERTING SLIP SHEET
Type 1 requires the optional bypass tray.
Whenever a different original is cop-ied in OHP Slip Sheet mode, a slipsheet will be placed after each copy,or a slip sheet will be fed and thesame original image is copied ontothis slip sheet.
❖❖❖❖ Copy
❖❖❖❖ Blank
Limitation❒ You cannot use this function in
Duplex mode.
Note❒ Set slip sheets of the same size and
in the same orientation as OHPtransparencies.
❒ You can specify whether to makecopies onto the inserted slip sheets.
❒ If you do not copy onto a slip sheet,the sheet is excluded from thenumber of copies counted.
A If Duplex mode is selected, pressthe {Duplex } key to cancel themode.
B Press the {Menu} key.
C Press the [↓↓↓↓Next] key until [OHPSlip Sheet ] is displayed.
D Select the [OHP Slip Sheet ] with the<> keys. Then, press the [Select ]key.
222121 11
2221 11
1
3 4
2
EnhancedImage
Menu
SeriesCopies
MarginAdjust
Auto Reduce/Enlarge
Zoom
CombineCopies
Erase Center/Border
Copy
Fax
ND2L0203
ND2C0102
ND2C0109

OHP SLIP SHEET—COPYING OR INSERTING SLIP SHEET
äæ
2
E Specify whether to copy on a slipsheet with the <> keys. Then,press the [OK] key.
F Set OHP transparencies in the by-pass tray.
G Set the slip sheets in the papertray, then select this tray pressingthe [Paper] key or the <> keys.
H Set your originals, then press the{Start} key.
ND2C0109

COPYING
äå
2
POSITIVE/NEGATIVE—COPYING IN COMPLEMENTALY COLORS
If you use a black and white original,black and white areas of the originalare reversed.
A Press the {Menu} key.
B Press the [↓↓↓↓Next] key until [Posi-tive/Negative ] is displayed.
C Press the [Select ] key.
D Set your originals, then press the{Start} key.
1
3 4
2
EnhancedImage
Menu
SeriesCopies
MarginAdjust
Auto Reduce/Enlarge
Zoom
CombineCopies
Erase Center/Border
Copy
Fax
ND2L0203
ND2C0102
ND2C0104

IMAGE REPEAT—REPEATING AN IMAGE
ää
2
IMAGE REPEAT—REPEATING AN IMAGE
You can copy the original image re-peatedly, or make two copies of thesame image on one sheet.There are two types in this function:
❖❖❖❖ Double CopiesThe one original image is copiedtwice on one copy.
❖❖❖❖ Image RepeatThe original image is copied re-peatedly.
Double Copies—Copying The Image Twice On One Page
The one original image is copiedtwice on one copy as shown in the il-lustration.
Limitation❒ The following originals cannot be
detected properly on the exposureglass. Be sure to select the copy pa-per manually or set the originals inthe optional document feeder.
❒ You cannot use the bypass tray forthe Double Copies function.
Note❒ Two copy images appear vertically
on K paper for L originals, andhorizontally on L paper for Koriginals.
❒ You can insert separate lines be-tween repeated images. See “5.Double Copy” in ⇒ P.157 “2. Ad-just Image 2/2”.
❒ Refer to the following table whenyou select original and copy papersizes with 100 % ratio:
❖❖❖❖ Metric version
❖❖❖❖ Inch version
Metric version A5L, B6L
Inch version 51/2" × 81/2"L
Original size and direction
Copy paper size and direction
A5L A4K
B6L B5K
A4K A3L
A5K A4L
B6K B5L
Original size and direction
Copy paper size and direction
51/2" × 81/2"L 81/2" × 11"K
51/2" × 81/2"K 81/2" × 11"L
81/2" × 11"K 11" × 17"L

COPYING
ìíí
2
A Press the {Menu} key.
B Press the [↓↓↓↓Next ] key until [ImageRepeat ] is displayed.
C Select [Image Repeat ] with the <>keys. Then, press the [Select ] key.
D Press the [OK] key.
E Set your originals, then press the{Start} key.
Image Repeat—Repeating An Image Over The Entire Copy
The original image is copied repeat-edly.
Note❒ The number of repeated images
depends on the original size, copypaper size, and reproduction ratio.Refer to the following table.
❖❖❖❖ Original: 5 1/2" × 81/2"K/Copy paper: 8 1/2" × 11"K or Original: 5 1/2" × 81/2"L/Copy paper 8 1/2" × 11"L
1
3 4
2
EnhancedImage
Menu
SeriesCopies
MarginAdjust
Auto Reduce/Enlarge
Zoom
CombineCopies
Erase Center/Border
Copy
Fax
ND2L0203
ND2C0102
ND2C0109
ND2C0104
4 repeats (71 %) 16 repeats (35 %)
Repeat1 Repeat2

IMAGE REPEAT—REPEATING AN IMAGE
ìíì
2
❖❖❖❖ Original: 5 1/2" × 81/2"K/Copy paper: 8 1/2" × 11"L or Original: 5 1/2" × 81/2"L/Copy paper 8 1/2" × 11"K
❒ Part of a repeated image might notbe copied depending on copy pa-per size, copy paper direction orreproduction ratio.
❒ You can insert separate lines be-tween repeated images. See “7. Im-age Repeat” in⇒ P.157 “2. AdjustImage 2/2”.
A Select the size of the copy paperand the reproduction ratio.
B Press the {Menu} key.
C Press the [↓↓↓↓Next] key until [ImageRepeat] is displayed.
D Select [Image Repeat ] with the <>keys. Then, press the [Select ] key.
E Select [Image Repeat ] with the <>keys. Then, press the [OK] key.
F Set your original, then press the{Start} key.
2 repeats (100 %)
8 repeats (50 %)
32 repeats (25 %)
Repeat3 Repeat4 Repeat5
1
3 4
2
EnhancedImage
Menu
SeriesCopies
MarginAdjust
Auto Reduce/Enlarge
Zoom
CombineCopies
Erase Center/Border
Copy
Fax
ND2L0203
ND2C0102
ND2C0109
ND2C0109

COPYING
ìíë
2
ARCHIVE FILE—STORING THE IMAGES OF YOUR ORIGINALS INTO MEMORY
The optional copier hard disk is required to use this function.
You can store images you frequentlyuse, and recall and copy them anytime.There are four types in this function:
❖❖❖❖ Storing The ImagesStores image pages you frequentlyuse.
❖❖❖❖ Deleting The Stored ImagesDeletes a set of image pages al-ready stored.
❖❖❖❖ Printing A List Of The Stored ImagesMakes a combined copy of eachfirst page of all the stored files (8pages into one 1-sided, or 16 pagesinto one 2-sided).
❖❖❖❖ Recalling The Stored ImagesRecalls a set of stored image pagesand copies them onto the A4, 81/2"× 11" copy paper.
Note❒ The maximum capacity is 16 files
or 32 pages. If you store more thantwo pages in one file, the maxi-mum number of files might be lessthan 16.
❒ Image pages to be stored should beA4K, 81/2" × 11"Ksize.
❒ The functions that can be storedare as follows:• 1-sided copy or 2-sided copy• Type of originals• Image density
❒ Set your originals on the exposureglass.
❒ The stored images are not clearedby turning the power off or bypressing the {Clear Modes/EnergySaver} key. They are canceled onlywhen you delete or overwritethem.

ARCHIVE FILE—STORING THE IMAGES OF YOUR ORIGINALS INTO MEMORY
ìíê
2
Storing The Images
You can store images you frequentlyuse.
A Press the {Menu} key.
B Press the [↓↓↓↓Next] key until [ArchiveFile] is displayed.
C Select [Archive File ] with the <>keys. Then, press the [Select ] key.
D Press the [Store ] key.
E Select the file number you wantto store the images in with the<> keys. Then, press the [OK]key.
Note❒ File numbers with m already
have images in them.
To overwrite images already stored
A Check the stored content, andselect whether to overwrite it.
Note❒ You can check the stored
content by printing a list ofthe stored images. See ⇒P.106 “Printing A List Of TheStored Images”.
B Press the [Yes] key to overwritethe images, or press the [No]key not to overwrite them.
1
3 4
2
EnhancedImage
Menu
SeriesCopies
MarginAdjust
Auto Reduce/Enlarge
Zoom
CombineCopies
Erase Center/Border
Copy
Fax
ND2L0203
ND2C0102
ND2C0109
ND2C0101
ND2C0109

COPYING
ìíé
2
Note❒ When you overwrite with an-
other images, the previouslystored images will be lost.
F Select the type of originals withthe <> keys. Then, press the[OK] key.
Note❒ If you are using Type 1 without
the duplex unit installed, thedisplay above does not appear.Go to Step G.
G Set your originals on the exposureglass, then press the {Start} key.The images will be scanned.
Note❒ If you have more than one orig-
inal pages, repeat the stepsabove.
❒ Start with the first page of youroriginals.
1: Reference position
H Press the [OK] key.
ND2C0109
1
CP138BEE
ND2C0104

ARCHIVE FILE—STORING THE IMAGES OF YOUR ORIGINALS INTO MEMORY
ìíè
2
Deleting The Stored Images
You can delete images already stored.
Note❒ Images are deleted on a file basis.
A Press the {Menu} key.
B Press the [↓↓↓↓Next] key until [ArchiveFile] is displayed.
C Select [Archive File ] with the <>keys. Then, press the [Select ] key.
D Press the [Delete] key.
E Select the file number you wantto delete the images in with the<> keys. Then, press the [OK]key.
F Press the [Yes] key.
Note❒ To cancel deletion, press the
[No] key.
G Press the [Exit ] key.
1
3 4
2
EnhancedImage
Menu
SeriesCopies
MarginAdjust
Auto Reduce/Enlarge
Zoom
CombineCopies
Erase Center/Border
Copy
Fax
ND2L0203
ND2C0102
ND2C0109
ND2C0102
ND2C0109
ND2C0103
ND2C0103

COPYING
ìíç
2
Printing A List Of The Stored Images
You can make a combined copy ofeach first page of all the stored files (8pages into one 1-sided, or 16 pagesinto one 2-sided).
Note❒ If any file number has nothing
stored, its page will be copied inblank with no image or number.
A Press the {Menu} key.
B Press the [↓↓↓↓Next] key until [ArchiveFile] is displayed.
C Select [Archive File ] with the <>keys. Then, press the [Select ] key.
D Press the [List ] key.
E Select the [8pages →1sided ] or[16pages →2sided ] with the <>keys.
Note❒ [16pages →2sided ] is not avail-
able, if your machine is Type 1without the duplex unit.
F Press the {Start} key.
1
3 4
2
EnhancedImage
Menu
SeriesCopies
MarginAdjust
Auto Reduce/Enlarge
Zoom
CombineCopies
Erase Center/Border
Copy
Fax
ND2L0203
ND2C0102
ND2C0109
ND2C0103
ND2C0105
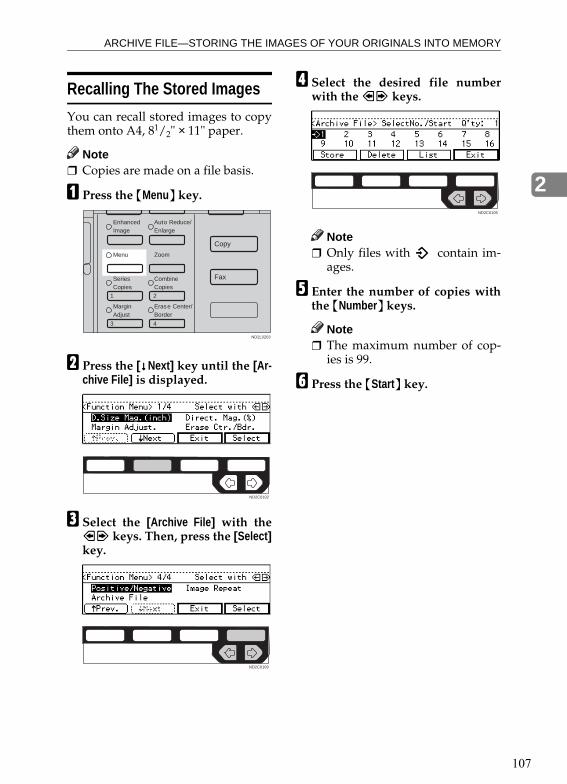
ARCHIVE FILE—STORING THE IMAGES OF YOUR ORIGINALS INTO MEMORY
ìíæ
2
Recalling The Stored Images
You can recall stored images to copythem onto A4, 81/2" × 11" paper.
Note❒ Copies are made on a file basis.
A Press the {Menu} key.
B Press the [↓↓↓↓Next] key until the [Ar-chive File ] is displayed.
C Select the [Archive File ] with the<> keys. Then, press the [Select ]key.
D Select the desired file numberwith the <> keys.
Note❒ Only files with m contain im-
ages.
E Enter the number of copies withthe {Number } keys.
Note❒ The maximum number of cop-
ies is 99.
F Press the {Start} key.
1
3 4
2
EnhancedImage
Menu
SeriesCopies
MarginAdjust
Auto Reduce/Enlarge
Zoom
CombineCopies
Erase Center/Border
Copy
Fax
ND2L0203
ND2C0102
ND2C0109
ND2C0105

COPYING
ìíå
2
COMBINATION CHART
The combination chart given below shows which modes can be used together.When you read the chart, please refer to the following table.
The following shows the combinations of functions.
✩ means that these modes can be used together.
→ means that these modes cannot be used together. The mode after you select will be the mode you're working in.
× means that these modes cannot be used together. The mode before you select will be the mode you're working in.
Mode after you Select
Sel
ecti
ng
Cop
y P
aper
Au
to P
aper
Sel
ect
Au
to R
edu
ce/E
nla
rge
En
han
ced
Im
age
Cop
y
Sor
t
Rot
ate
Sor
t/R
otat
e S
tack
Sh
ift S
ort/
Sh
ift S
tack
Sta
ple
Cop
yin
g Fr
om T
he
Byp
ass
Tra
y
Pre
set R
edu
ce/E
nla
rge
Zoo
m
Dir
ecti
onal
Siz
e M
agn
ific
atio
n (i
nch
)
Dir
ecti
onal
Mag
nif
icat
ion
(%)
Mar
gin
Ad
just
men
t
Era
se C
ente
r/B
ord
er
Com
bin
e
Ser
ies
Cop
ies
Du
ple
x
Cov
er/P
age
Des
ign
ate
OH
P S
lip
Sh
eet
Pos
itiv
e/N
egat
ive
Imag
e R
epea
t
2 p
ages
→ 1
-sid
ed
4 p
ages
→ 1
-sid
ed
4 p
ages
→ 2
-sid
ed
8 p
ages
→ 2
-sid
ed
16 p
ages
→ b
ook
let
Boo
k →
1-s
ided
2-si
ded
→ 1
-sid
ed
1-si
ded
→ 2
-sid
ed
Boo
k →
2-s
ided
2-si
ded
→ 2
-sid
ed
Dou
ble
Cop
ies
Imag
e R
epea
t
Mod
e be
fore
you
sel
ect
Selecting Copy Paper
-- ✩ ✩ ✩ ✩ ✩ ✩ ✩ ✩ ✩ ✩ ✩ ✩ ✩ ✩ ✩ ✩ ✩ ✩ ✩ ✩ ✩ ✩ ✩ ✩ ✩ ✩ ✩ ✩ ✩
Auto Paper Select ✩ -- → ✩ ✩ ✩ ✩ ✩ → ✩ ✩ ✩ ✩ ✩ ✩ *2
*2
*2
*2
*2
✩ ✩ ✩ ✩ ✩ → → ✩ *2
→
Auto Reduce/Enlarge
✩ × -- ✩ ✩ ✩ ✩ ✩ × → → → → ✩ ✩ ✩ ✩ ✩ ✩ ✩ ✩ ✩ ✩ ✩ ✩ ✩ ✩ ✩ ✩ →
Enhanced Image Copy
✩ ✩ ✩ -- *1
*1
*1
*1
✩ ✩ ✩ ✩ ✩ ✩ ✩ *1
*1
*1
*1
*1
✩ ✩ *1
*1
*1
*3
× ✩ *1
*1
Mod
e be
fore
you
sel
ect Sort ✩ ✩ ✩ *
1-- → → → × ✩ ✩ ✩ ✩ ✩ ✩ ✩ ✩ ✩ ✩ ✩ ✩ ✩ ✩ ✩ ✩ ✩ ✩ ✩ ✩ ✩
Rotate Sort/Rotate Stack
✩ ✩ ✩ *1
→ -- → → × ✩ ✩ ✩ ✩ ✩ ✩ ✩ ✩ ✩ ✩ ✩ ✩ ✩ ✩ ✩ ✩ → ✩ ✩ ✩ ✩
Shift Sort/Shift Stack
✩ ✩ ✩ *1
→ → -- → × ✩ ✩ ✩ ✩ ✩ ✩ ✩ ✩ ✩ ✩ ✩ ✩ ✩ ✩ ✩ ✩ ✩ ✩ ✩ ✩ ✩
Staple ✩ ✩ ✩ *1
→ → → -- × ✩ ✩ ✩ ✩ ✩ ✩ ✩ ✩ ✩ ✩ ✩ ✩ ✩ ✩ ✩ ✩ ✩ ✩ ✩ ✩ ✩
Mod
e be
fore
you
sel
ect
Copying From The Bypass Tray
✩ → → ✩ → → → → -- ✩ ✩ ✩ ✩ ✩ ✩ → → → → → ✩ ✩ → → → → → ✩ → ✩
Preset Reduce/Enlarge
✩ ✩ → ✩ ✩ ✩ ✩ ✩ ✩ -- → → → ✩ ✩ *2
*2
*2
*2
*2
✩ ✩ ✩ ✩ ✩ ✩ ✩ ✩ *2
✩
Zoom ✩ ✩ → ✩ ✩ ✩ ✩ ✩ ✩ → -- → → ✩ ✩ *2
*2
*2
*2
*2
✩ ✩ ✩ ✩ ✩ ✩ ✩ ✩ *2
✩
Directional Size Magnification (inch)
✩ ✩ → ✩ ✩ ✩ ✩ ✩ ✩ → → -- → ✩ ✩ *2
*2
*2
*2
*2
✩ ✩ ✩ ✩ ✩ ✩ ✩ ✩ *2
✩
Directional Magnifi-cation (%)
✩ ✩ → ✩ ✩ ✩ ✩ ✩ ✩ → → → -- ✩ ✩ *2
*2
*2
*2
*2
✩ ✩ ✩ ✩ ✩ ✩ ✩ ✩ *2
✩
Margin Adjustment ✩ ✩ ✩ ✩ ✩ ✩ ✩ ✩ ✩ ✩ ✩ ✩ ✩ -- ✩ ✩ ✩ ✩ ✩ ✩ ✩ ✩ ✩ ✩ ✩ ✩ ✩ ✩ ✩ ✩
Erase Centre/Border
✩ ✩ ✩ ✩ ✩ ✩ ✩ ✩ ✩ ✩ ✩ ✩ ✩ ✩ -- ✩ ✩ ✩ ✩ ✩ ✩ ✩ ✩ ✩ ✩ ✩ ✩ ✩ ✩ ✩

COMBINATION CHART
ìíä
2
*1 Available if the optional copier hard disk is installed.*2 When you select the mode after you select, the machine returns to Auto Reduce/En-
large mode. However, you can select the mode before you select again.*3 The Paper Designate function is available. The optional copier hard disk is required
to use the Cover function.
Mod
e be
fore
you
sel
ect
Com
bine
2 pages → 1-sided
✩ × ✩ *1
✩ ✩ ✩ ✩ × ✩ ✩ ✩ ✩ ✩ ✩ -- → → → → × × × × × × × ✩ × ×
4 pages → 1-sided
✩ × ✩ *1
✩ ✩ ✩ ✩ × ✩ ✩ ✩ ✩ ✩ ✩ → -- → → → × × × × × × × ✩ × ×
4 pages → 2-sided
✩ × ✩ *1
✩ ✩ ✩ ✩ × ✩ ✩ ✩ ✩ ✩ ✩ → → -- → → × × × × × × × ✩ × ×
8 pages → 2-sided
✩ × ✩ *1
✩ ✩ ✩ ✩ × ✩ ✩ ✩ ✩ ✩ ✩ → → → -- → × × × × × × × ✩ × ×
16 pages → booklet
✩ × ✩ *1
✩ ✩ ✩ ✩ × ✩ ✩ ✩ ✩ ✩ ✩ → → → → -- × × × × × × × ✩ × ×
Seri
es C
opie
s Book → 1-sid-ed
✩ ✩ ✩ ✩ ✩ ✩ ✩ ✩ ✩ ✩ ✩ ✩ ✩ ✩ ✩ × × × × × -- → × × × × ✩ ✩ ✩ ✩
2-sided → 1-sided
✩ ✩ ✩ ✩ ✩ ✩ ✩ ✩ ✩ ✩ ✩ ✩ ✩ ✩ ✩ × × × × × → -- × × × × ✩ ✩ ✩ ✩
Dup
lex
1-sided → 2-sided
✩ ✩ ✩ ✩ ✩ ✩ ✩ ✩ × ✩ ✩ ✩ ✩ ✩ ✩ × × × × × × × -- → → ✩ × ✩ ✩ ✩
Book → 2-sided
✩ ✩ ✩ ✩ ✩ ✩ ✩ ✩ × ✩ ✩ ✩ ✩ ✩ ✩ × × × × × × × → -- → ✩ × ✩ ✩ ✩
2-sided → 2-sided
✩ ✩ ✩ ✩ ✩ ✩ ✩ ✩ × ✩ ✩ ✩ ✩ ✩ ✩ × × × × × × × → → -- ✩ × ✩ ✩ ✩
Mod
e be
fore
you
sel
ect
Cover/Page Designate
✩ × ✩ *3
✩ × ✩ ✩ × ✩ ✩ ✩ ✩ ✩ ✩ × × × × × × × ✩ ✩ ✩ -- × ✩ × ×
OHP Slip Sheet ✩ × ✩ × ✩ ✩ ✩ ✩ × ✩ ✩ ✩ ✩ ✩ ✩ × × × × × ✩ ✩ × × × × -- ✩ × ×
Positive/Negative ✩ ✩ ✩ ✩ ✩ ✩ ✩ ✩ ✩ ✩ ✩ ✩ ✩ ✩ ✩ ✩ ✩ ✩ ✩ ✩ ✩ ✩ ✩ ✩ ✩ ✩ ✩ -- ✩ ✩
Imag
e R
epea
t Double Copies
✩ ✩ ✩ *1
✩ ✩ ✩ ✩ × ✩ ✩ ✩ ✩ ✩ ✩ × × × × × ✩ ✩ ✩ ✩ ✩ ✩ × ✩ -- →
Image Repeat ✩ × ✩ *1
✩ ✩ ✩ ✩ ✩ ✩ ✩ ✩ ✩ ✩ ✩ × × × × × ✩ ✩ ✩ ✩ ✩ ✩ × ✩ → --
Interrupt ✩ ✩ ✩ ✩ *1
*1
*1
*1
✩ ✩ ✩ ✩ ✩ ✩ ✩ *1
*1
*1
*1
*1
✩ ✩ *1
*1
*1
✩ ✩ ✩ *1
*1
Mode after you Select
Sel
ecti
ng
Cop
y P
aper
Au
to P
aper
Sel
ect
Au
to R
edu
ce/E
nla
rge
En
han
ced
Im
age
Cop
y
Sor
t
Rot
ate
Sor
t/R
otat
e S
tack
Sh
ift S
ort/
Sh
ift S
tack
Sta
ple
Cop
yin
g Fr
om T
he
Byp
ass
Tra
y
Pre
set R
edu
ce/E
nla
rge
Zoo
m
Dir
ecti
onal
Siz
e M
agn
ific
atio
n (i
nch
)
Dir
ecti
onal
Mag
nif
icat
ion
(%)
Mar
gin
Ad
just
men
t
Era
se C
ente
r/B
ord
er
Com
bin
e
Ser
ies
Cop
ies
Du
ple
x
Cov
er/P
age
Des
ign
ate
OH
P S
lip
Sh
eet
Pos
itiv
e/N
egat
ive
Imag
e R
epea
t
2 p
ages
→ 1
-sid
ed
4 p
ages
→ 1
-sid
ed
4 p
ages
→ 2
-sid
ed
8 p
ages
→ 2
-sid
ed
16 p
ages
→ b
ook
let
Boo
k →
1-s
ided
2-si
ded
→ 1
-sid
ed
1-si
ded
→ 2
-sid
ed
Boo
k →
2-s
ided
2-si
ded
→ 2
-sid
ed
Dou
ble
Cop
ies
Imag
e R
epea
t

COPYING
ììí
2

111
3. WHAT TO DO IF SOMETHINGGOES WRONG
IF YOUR MACHINE DOES NOT OPERATE AS YOU WANT
Message
Machine's Condition Problem/Cause Action
The machine instructs you to wait.
The machine is warming up.
Wait for the machine to warm-up.
ReferenceYou can use Auto Start mode during warm-up period. See ⇒ P.64 “Au-to Start—Entering Copy Job Settings During The Warm-up Period”
The machine cannot detect the original size.
Improper original is set. See ⇒ P.21 “Sizes Difficult To Detect”.
Set non-standard size orig-inal on the exposure glass.
Input the both horizontal and vertical sizes of the non-standard original. See ⇒ P.31 “Setting Originals On The Exposure Glass”.
Select paper manually, not in Auto Paper Select mode.
Do not use Auto Reduce/Enlarge mode.
Original is not set. Set your originals.
The machine instructs you to check the original direc-tion.
There is no copy paper that is the same direction as the originals.
Set the original in the same direction as the copy paper.
The machine instructs you to check paper size.
Improper original size is set.
Select the proper paper size.
The machine cannot staple this size paper.
-- Select the proper paper size that can be used in Staple mode. See ⇒ P.49 “Staple”

WHAT TO DO IF SOMETHING GOES WRONG
112
3
Display
You cannot enter the de-sired copy set number.
The number of copies ex-ceeds the maximum copy quantity.
You can change the maxi-mum copy quantity that you can make at a time. See “05. Maximum copy quan-tity” in ⇒ P.152 “1. General Features 2/4”
The machine instructs you to set the duplex tray.
-- Reset the duplex tray cor-rectly. See ⇒ P.2 “Guide To Components”.
The machine instructs you to open the right side cover of the duplex unit.
The right cover of the du-plex unit is not open.
When you make 2-sided copies on B4, 81/2" × 14" or larger copy paper, open the right cover of the duplex unit. See ⇒ P.85 “Duplex—Making Two-Sided Copies”.
Problem Cause Action
The panel display is off. The machine is in Energy Saver mode.
Press the {Clear Modes/Ener-gy Saver } key to cancel En-ergy Saver mode.
The operation switch is turned off.
Turn on the operation switch.
Nothing happens when the operation switch is turned on.
The main power switch is turned off.
Turn on the main power switch. See ⇒ P.2 “Guide To Components”
Machine's Condition Problem/Cause Action

IF YOU CANNOT MAKE CLEAR COPIES
113
3
IF YOU CANNOT MAKE CLEAR COPIES
Problem Cause Action
Copies appear dirty. The image density is too dark.
Adjust the image density. ⇒ P.37 “Adjusting Copy Im-age Density”.
Auto Image Density is not selected.
Select Auto Image Density.
The reverse side of an orig-inal image is copied.
The image density is too dark.
Adjust the image density. ⇒ P.37 “Adjusting Copy Im-age Density”.
Auto Image Density is not selected.
Select Auto Image Density.
A shadow appears on cop-ies if you use the pasted originals.
The image density is too dark.
Adjust the image density. ⇒ P.37 “Adjusting Copy Im-age Density”.
Change the direction of the original.
Put mending tape on the pasted part.
The same copy area is dirty whenever making copies.
The exposure glass, platen cover, or document feeder belt is dirty.
Clean them. ⇒ P.169 “Main-taining Your Machine”.
Copies are too light. The image density is too light.
Adjust the image density. ⇒ P.37 “Adjusting Copy Im-age Density”.
Damp or rough grain pa-per is used.
Use dry paper without rough grain.
Toner cartridge is almost empty.
Add toner. ⇒ P.121 “D Adding Toner”.
Parts of the image are not copied.
The original is not set cor-rectly.
Set originals correctly. ⇒ P.31 “Setting Originals”.
An improper paper size is selected.
Select the proper paper size.
Copies are blank. The original is not set cor-rectly.
Set originals correctly. ⇒ P.31 “Setting Originals”.

WHAT TO DO IF SOMETHING GOES WRONG
114
3
A moire pattern is pro-duced on copies.
Your original has dot pat-tern image or many lines.
Place the original on the ex-posure glass at a slight an-gle.
Problem Cause Action
�������������
yyyyyyyyyyyyy
R

IF YOU CANNOT MAKE COPIES AS YOU WANT
115
3
IF YOU CANNOT MAKE COPIES AS YOU WANT
Problem Cause Action
Copies are not stapled. There are jammed staples in the stapler.
Remove jammed staples. See ⇒ P.139 “e Removing Jammed Staples”.
Note❒ After removing jammed
staples, staples might not be ejected the first few times you try to use the stapler.
The number of copies ex-ceeds the capacity of the stapler.
Check the stapler capacity. See ⇒ P.49 “Staple”.
Staples are wrongly posi-tioned.
Originals are not set cor-rectly.
Set originals correctly. See ⇒ P.49 “Staple”.
Misfeeds occur frequently. Copy paper size setting is not correct.
Set the proper paper size. See ⇒ P.132 “Changing The Paper Size”.
You cannot combine sever-al functions.
Selected functions cannot be used together.
Refer to the combination chart. See ⇒ P.108 “Combi-nation Chart”.

WHAT TO DO IF SOMETHING GOES WRONG
116
3
Adjust Image
Problem Cause Action
In Double Copies mode, parts of the original image are not copied.
Combination of original and copy paper is not cor-rect.
Select the proper original and copy paper. See ⇒ P.20 “Originals”.
In Center/Border mode, parts of the original image are not copied.
You set the wide erased margin.
Set the narrow margin with the user tools. See “1. Erase Border” in ⇒ P.155 “2. Ad-just Image 1/2”. See “2. Erase Center” in ⇒ P.155 “2. Ad-just Image 1/2”.
Your original has narrow margins on four sides.
In Margin Adjustment mode, parts of the original image are not copied.
You set the wide erased margin.
Set the narrow margin with the user tools. See “3. Marg.Adj.Front” in ⇒ P.155 “2. Adjust Image 1/2”. See “4. Margin Adjust Back” in ⇒ P.155 “2. Adjust Image 1/2”.
In Image Repeat mode, the original image is not cop-ied repeatedly.
You selected the same size copy paper as originals, and did not select the prop-er reproduction ratio.
Select copy paper larger than the originals. See ⇒ P.99 “Image Repeat—Repeat-ing An Image”.
Select the proper reproduc-tion ratio. See ⇒ P.99 “Im-age Repeat—Repeating An Image”.

IF YOU CANNOT MAKE COPIES AS YOU WANT
117
3
Combine
Problem Cause Action
You cannot make a booklet from 16 originals by fold-ing copies.
Combine Original Booklet Format is not correct.
Change the setting.⇒ P.78 “Combine—Combining Originals Into One Copy”
Parts of the image are not copied.
You specified an improper reproduction ratio that does not meet the sizes of your originals and copy pa-per.
When you specify a repro-duction ratio using Manual Paper Select mode, make sure the ratio matches your originals and the copy pa-per.
Note❒ Select the correct repro-
duction ratio before us-ing Combine mode.
Your originals are not iden-tical in size and direction.
Use originals that are iden-tical in size and direction.
Order of copies is not cor-rect.
You set originals in the in-correct order.
When setting a stack of original in the document feeder, the last page should be on the bottom.
If you set an original on the exposure glass, start with the first page to be copied.

WHAT TO DO IF SOMETHING GOES WRONG
118
3
Duplex
Problem Cause Action
Order of copies is not cor-rect.
You set originals in the in-correct order.
When setting a stack of originals in the document feeder, the last page should be on the bottom.
If you set an original on the exposure glass, start with the first page to be copied.
Orientation of copies (Top to Top, or Top to Bottom) is not correct.
You set originals in an in-correct direction or the ori-entation Setting is incorrect.
Select the correct orienta-tion, or set originals cor-rectly. ⇒ P.85 “Duplex—Making Two-Sided Copies”
Note❒ If you set A3, 11" × 17"
or B4, 81/2" × 14" origi-nals as shown below, for example, take one of the two actions described below the illustration.
❒ Select [Top to Bottom ] to make copies in “Top to Top” orientation. Select [Top to Top ] to make cop-ies in “Top to Bottom” orientation.
❒ Alternate the originals as shown below when setting them.

B LOADING PAPER
119
3
B LOADING PAPER
Note❒ If you want to change the paper
size, see ⇒ P.132 “Changing The Pa-per Size”.
ReferenceRegarding paper types and sizesthat can be set, see ⇒ P.23 “CopyPaper”.
A Pull out the paper tray until itstops.
B Remove the back fence.
C Square the paper and set it in thetray.
Important❒ Do not stack paper over the lim-
it mark.
Note❒ Shuffle the paper before setting
it in the tray.❒ Make sure that the leading cor-
ners of the paper are under thecorners.
D Reinstall the back fence.
E Push the paper tray in until itstops.
ND5T0802
ND5T0801

WHAT TO DO IF SOMETHING GOES WRONG
120
3
Loading Paper In The Large Capacity Tray
A Press the {Down} key if it is not lit.The key blinks while the bottomplate is moving down.
1: Down key
B When the key stops blinking andlights up, open the top cover.
Note❒ Make sure no paper sheet is in-
volved in the feeding part of theLarge Capacity Tray. Removethe sheet, if any.
C Place the paper in the tray alongthe edge on the left.
Note❒ The Tray contains up to 1,500
sheets.
D Close the top cover.
1
ND6L04EE
ND6L0500
ND6L0600
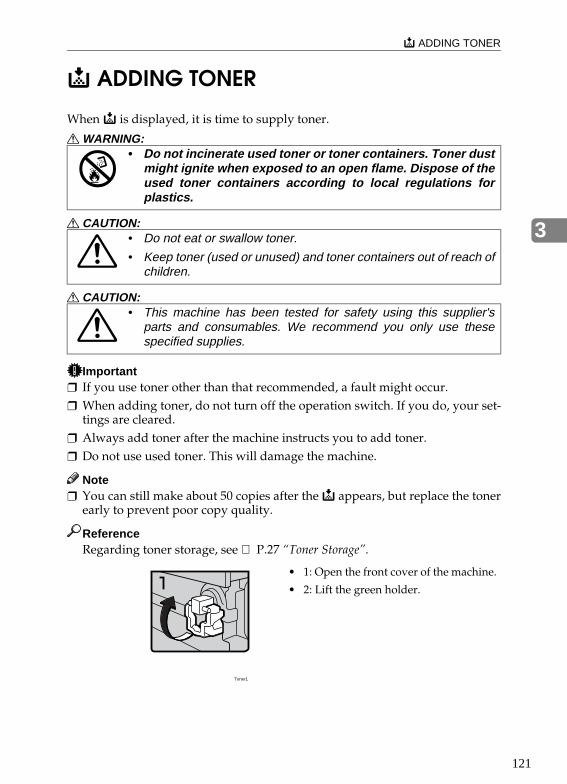
D ADDING TONER
121
3
D ADDING TONER
When D is displayed, it is time to supply toner.
R WARNING:
R CAUTION:
R CAUTION:
Important❒ If you use toner other than that recommended, a fault might occur.❒ When adding toner, do not turn off the operation switch. If you do, your set-
tings are cleared.❒ Always add toner after the machine instructs you to add toner.❒ Do not use used toner. This will damage the machine.
Note❒ You can still make about 50 copies after the D appears, but replace the toner
early to prevent poor copy quality.
ReferenceRegarding toner storage, see ⇒ P.27 “Toner Storage”.
• Do not incinerate used toner or toner containers. Toner dustmight ignite when exposed to an open flame. Dispose of theused toner containers according to local regulations forplastics.
• Do not eat or swallow toner.
• Keep toner (used or unused) and toner containers out of reach ofchildren.
• This machine has been tested for safety using this supplier'sparts and consumables. We recommend you only use thesespecified supplies.
• 1: Open the front cover of the machine.
• 2: Lift the green holder.
Toner1

WHAT TO DO IF SOMETHING GOES WRONG
122
3
• 3: Push the green lever, and gently pull out the holder.
• 4: Press the toner bottle backward to raise its head, then gently pull out the bottle.
• 5: Hold a new bottle horizontally and shake it 5 or 6 times.
Note❒ Do not remove the black cap when
shaking.
• 6: Remove the black cap.
Note❒ Do not remove the inner cap.
Toner2
12
Toner3
2
1
Toner4
5 6
1
2

D ADDING TONER
123
3
• 7: Put the toner bottle on the holder, then press its head forward.
• 8: Push the holder until it clicks.
• 9: Push down the green holder.
• 10: Close the front cover of the ma-chine.
Toner5
1
2
Toner6

WHAT TO DO IF SOMETHING GOES WRONG
124
3
x CLEARING MISFEEDS
R CAUTION:
Important❒ When clearing misfeeds, do not turn off the operation switch. If you do, your
copy settings are cleared.❒ To prevent misfeeds, do not leave any torn scraps of paper within the ma-
chine.❒ If paper misfeeds occur repeatedly, contact your service representative.
Note❒ More than one misfed areas may be indicated. In this case, check every appli-
cable area. Refer to the following charts: A, B, C, D, E, R, P, U, Y, Z.❒ You can find a sticker explaining how to remove misfed paper inside of the
front cover, upper side of the finisher.❒ When the machine instructs you to reset originals, reset your originals to the
feeding position. The display will indicate the number of originals you should return.
• When removing misfed paper, do not touch the fusing section be-cause it could be very hot.
P
Y
RD C
Z
AB
E
U
ND4X0200
Chapter3 Page 124 Tuesday, May 19, 1998 1:59 PM

x CLEARING MISFEEDS
125
3

WHAT TO DO IF SOMETHING GOES WRONG
126
3
2
1
1. Open the duplex unit.
1
2
A2
3. Push handle A2 to the left and remove misfed paper.
1
2
2. Push up the lever and open the cover.
1. Open the right cover of the interchange unit to the left.
2. Remove misfed paper.3. Close the cover.
4. If you cannot remove misfed paper, open the bottom covers of the interchange unit.
5. Remove misfed paper.6. Close the covers.
2
1
1. Open the duplex unit.
1
2
2. Push up the lever and open the cover.
1
2
B
3. Open the front cover of the main frame.
4. Turn knob B counterclockwise and remove misfed paper.
When D is lit
When B is lit
When A is lit

x CLEARING MISFEEDS
127
3
P
Y
RD C
Z
AB
E
U
4. If you cannot remove misfed paper, open the cover.If your machine is equipped with the large capacity tray, slide it to the right.
A1
5. Turn knob A1 downward.
1
2
A2
6. Push handle A2 to theleft and remove misfedpaper.
7. Open the bypass tray and remove misfed paper.
2
1
1. Open the duplex unit.
1
2
2. Push up the lever and open the cover.
1
2
C
3. Open the front cover of the main frame.
4. Turn knob C clockwise and remove misfed paper.
1. Open the cover. 2. Remove misfed paper.
You can make an enlarged copy of this page and stick it on wall.
When E is lit
When C is lit
ND4X0302

WHAT TO DO IF SOMETHING GOES WRONG
128
3
1
R1
2
1. Open the front cover of the finisher.
2. Hold up handle R1 and remove misfed paper.
1
2
R2
3. If you cannot remove misfed paper, hold down handle R2 and remove misfed paper.
1
2
R3
4. Hold up handle R3 and remove misfed paper.
When R1, R2, or R3 is lit
1
2
R4
1. Open the front cover of the finisher.
2. Push handle R4 to the left and remove misfed paper.
1
2
R5
3. If you cannot remove misfed paper, hold up handle R5 and remove misfed paper.
1
2
R6
4. Hold handle R6 and pull out the staple unit, then remove misfed paper.
3000-sheet finisher
When R4, R5, or R6 is lit
When R is lit

x CLEARING MISFEEDS
129
3
P
Y
RD C
Z
AB
E
U
1000-sheet finisher
1. Remove misfed paper. 2. If you cannot remove misfed paper, open the top cover.
3. Remove misfed paper.
1
2
4. If you cannot remove misfed paper, pull out the front cover and remove misfed paper.
You can make an enlarged copy of this page and stick it on wall.
ND4X0402

WHAT TO DO IF SOMETHING GOES WRONG
130
3
1. Slide the large capacity tray to the right.
2. Open the top cover of the large capacity tray.
3. Remove misfed paper. 4. If you cannot remove misfed paper, remove misfed paper from the left side of the large capacity tray.
1. Open the right cover of the paper tray unit.If your machine is equipped with the large capacity tray, slide it to the right and open the right cover of the paper tray unit.
2. Remove misfed paper.
12
1. Open the right cover of the document feeder, remove misfed originals.
12
2
2. Open the left cover of the document feeder, remove misfed originals.
3. If the misfed original does not come out, turn the lever and remove it.
When P is lit
When Y is lit
When U is lit

x CLEARING MISFEEDS
131
3
P
Y
RD C
Z
AB
E
U
You can make an enlarged copy of this page and stick it on wall.
1
2
1. Open the duplex unit. 2. Open cover Z1 and remove misfed paper.
3. If you cannot find misfed paper, open cover Z2 and remove misfed paper.
1
2
Z1
1
2
Z2
When Z is lit
ND4X0502

WHAT TO DO IF SOMETHING GOES WRONG
132
3
CHANGING THE PAPER SIZE
Important❒ Make sure to select paper size with
the user tools. Otherwise, misfeedsmight occur.
ReferenceFor paper sizes, weight, and capac-ity that can be set in each tray, see⇒ P.23 “Copy Paper”.
A Make sure that the paper tray isnot being used.
B Pull the paper tray, then lift andremove it.
Note❒ Remove any remaining copy
paper.
C Remove the screws fastening theside fences using the screwdriver.
1: Screwdriver
Note❒ A screwdriver is contained in
the front area of the top tray.
D Re-position the side fences to thepaper size you want to use.
E Fasten the fences with screws.
F Adjust the back fence to the newpaper size.
ND5T0900
ND5T10EE
1
ND5T1100
ND5T1001
ND5T1200
A
Chapter3 Page 132 Tuesday, May 19, 1998 2:00 PM

CHANGING THE PAPER SIZE
133
3
Note❒ For 11" × 17" paper, put the back
fence inside A.
G Square the paper and set it in thetray.
Important❒ Do not stack paper over the lim-
it mark.
Note❒ Shuffle the paper before setting
it in the tray.❒ Make sure the leading corners
of the paper are under the cor-ners.
H Push the paper tray in until itstops.
I Select the paper size with the usertools.
To adjust the paper size
A Press the {User Tools/Counter }key.
B Enter “1” with the {Number }key.
C Press the [↓↓↓↓Next] key twice.D Enter “1” and “1” with the
{Number } key.E Select your desired size. Then,
press the [OK] key.
ReferenceFor details, see “User Tools(System Settings)” in the Sys-tem Settings .
ND5T0801

WHAT TO DO IF SOMETHING GOES WRONG
134
3
d ADDING STAPLES
R CAUTION:
Important❒ If you use a staple cartridge other than that recommended, staple failure or
staple jams might occur.
1000-Sheet Finisher
• This machine has been tested for safety using this supplier'sparts and consumables. We recommend you only use thesespecified supplies.
• 1: Open the front cover.
• 2: Remove the cartridge.
• 3: Take out the empty refill in the ar-row direction.
fin101EE
fin102EE
fin103EE

d ADDING STAPLES
135
3
• 4: Push in the new refill until it clicks.
• 5: Pull out the ribbon.
• 6: Reinstall the cartridge.
• 7: Close the front cover.
fin104EE
fin105EE
fin106EE
fin107EE

WHAT TO DO IF SOMETHING GOES WRONG
136
3
3000-Sheet Finisher
• 1: Open the front cover of the finisher.
• 2: Pull out the staple unit.
• 3: Lift the cartridge until it clicks.
• 4: Pull out the cartridge gently.
R6
fin301EE
fin302EE
fin303EE

d ADDING STAPLES
137
3
• 5: Take out the empty refill in the direc-tion of the arrow.
• 6: Align the arrows on the new refill and the cartridge, then push in the re-fill until it clicks.
• 7: Pull out the ribbon.
fin304EE
fin305EE
fin306EE

WHAT TO DO IF SOMETHING GOES WRONG
138
3
• 8: Reinstall the cartridge.
• 9: Press down the cartridge until it clicks.
• 10: Bring the staple unit back into place.
• 11: Close the front cover of the finisher.
fin307EE
fin308EE
fin309EE

e REMOVING JAMMED STAPLES
139
3
e REMOVING JAMMED STAPLES
Note❒ Staples might be jammed because of curled copies. In this case, try turning the
copy paper over in the tray. If there is no improvement, change the copy pa-per with less curls.
❒ After removing jammed staples, staples might not be ejected the first fewtimes you try to use the stapler.
1000-Sheet Finisher
• 1: Open the front cover.
• 2: Remove the cartridge.
• 3: Open the face plate.
fin108EE
fin109EE
fin110EE

WHAT TO DO IF SOMETHING GOES WRONG
140
3
• 4: Remove the jammed staples.
• 5: Reinstall the cartridge.
• 6: Close the front cover.
fin111EE
fin112EE
fin113EE

e REMOVING JAMMED STAPLES
141
3
3000-Sheet Finisher
• 1: Open the front cover of the finisher.
• 2: Pull out the staple unit.
• 3: Lift the cartridge until it clicks.
• 4: Pull out the cartridge gently.
• 5: Open the face plate by pressing the lock on the right.
fin310EE
R6
fin311EE
fin312EE
fin313EE

WHAT TO DO IF SOMETHING GOES WRONG
142
3
• 6: Remove the jammed staples.
• 7: Close the face plate by pressing it un-til it clicks.
• 8: Reinstall the cartridge.
• 9: Press down the cartridge until it clicks.
fin314EE
fin315EE
fin316EE
fin317EE

e REMOVING JAMMED STAPLES
143
3
• 10: Bring the staple unit back into place.
• 11: Close the front cover of the finisher.
fin318EE

WHAT TO DO IF SOMETHING GOES WRONG
144
3
y REMOVING PUNCH WASTE
Note❒ While the y indicator is lit, you
cannot use the punch function.
A Open the front cover of the 3000-sheet finisher.
B Pull out the punch waste box andremove punch waste.
C Reinstall the punch waste box.
D Close the front cover of the finish-er.The y indicator goes off.
Note❒ If the indicator is still lit, rein-
stall the punch waste box .
ND7B2600
ND7B2700
ND7B2701

ìéè
4. USER TOOLS (COPYFEATURES)
ACCESSING THE USER TOOLS (COPY FEATURES)
This section is for the key operators inchange of this machine. You canchange or set the machine's defaultsettings.
PreparationAfter using the user tools, be sureto exit from user tools.
ReferenceRegarding about the user tools forsystem setting, see “Accessing TheUser Tools (System Settings)” inthe System Settings.Regarding the user tools for the faxmode, see each Operating Instruc-tions.
A Press the {User Tools/Counter } key.
B Enter {2} with the {Number } key.
C Enter the number of the desiredUser Tools menu with the {Num-ber} keys.
Note❒ To return to the previous menu,
press the [Menu] key.
D Search for the desired settingwith the [↓↓↓↓Next ] key. Enter itsnumber with the {Number } keys.
Note❒ [↓↓↓↓Next ]: Press to go to the next
page.❒ [↑↑↑↑Prev. ]: Press to go back to the
previous page.
ReferenceSee ⇒ P.145 “USER TOOLS(COPY FEATURES)”.
E Change the settings by followingthe instructions on the panel dis-play. Then, press the [OK] key.
ReferenceSee ⇒ P.150 “Settings You CanChange With The User Tools”.
Note❒ [OK] key: Press to set the new
settings and return to the previ-ous menu.
2
2
22
11
Sort
Staple
Stack
1-Sided 2-Sided
2-Sided 2-Sided User Tools / Counter
Enhanced Auto Reduce/
Book 2-Sided
ND2L0103

USER TOOLS (COPY FEATURES)
ìéç
4
❒ [Cancel ] key: Press to return tothe previous menu withoutchanging any data.
Exiting From User Tools
A After changing the user tools set-tings, press the {User Tools/Counter } key.
Note❒ The settings are not canceled
even if the operation switch isturned off or the {Clear Modes/Energy Saver } key is pressed.
2
2
22
11
Sort
Staple
Stack
1-Sided 2-Sided
2-Sided 2-Sided User Tools / Counter
Enhanced Auto Reduce/
Book 2-Sided
ND2L0103

ACCESSING THE USER TOOLS (COPY FEATURES)
ìéæ
4

USER TOOLS (COPY FEATURES)
ìéå
4
USER TOOLS MENU (COPY FEATURES)
1 General Features 4/4
1 General Features 1/4
1 General Features 2/4
1 General Features 3/4

USER TOOLS MENU (COPY FEATURES)
ìéä
4
3 Input / Output 1/3
3 Input / Output 2/3
3 Input / Output 3/3
2 Adjust Image 1/2
2 Adjust Image 2/2
4 Shortcut Keys
ND0X0301

USER TOOLS (COPY FEATURES)
ìèí
4
SETTINGS YOU CAN CHANGE WITH THE USER TOOLS
ReferenceFor how to access the user tools, see ⇒ P.145 “Accessing The User Tools (CopyFeatures)”.
1. General Features 1/4
Menu Description
01. APS Priority As a default setting, Auto Paper Select is selected. You can cancel this setting.
Note❒ Default: Yes
02. AID Priority In each mode of Text, Text·Photo, Photo, Copied Original, and Low Density Original, you can specify whether to select Auto Image Density.
Note❒ Default:
• Text: Yes
• Text·Photo: No
• Photo: No
• Copied Original: Yes
• Low Density Original: Yes
03. Original Priority As a default setting, Text is selected as original Type. You can change it to Text·Photo, Photo, Copied Original, or Low Density Original.
Note❒ Default: Text

SETTINGS YOU CAN CHANGE WITH THE USER TOOLS
ìèì
4
04. Show All Keys You can specify whether all the keys are displayed. If you change the default setting to [No], the display shows as fol-lows:
Note❒ Default: Yes
Menu Description

USER TOOLS (COPY FEATURES)
ìèë
4
1. General Features 2/4
Menu Description
05. Max. Copy Q'ty The maximum copy quantity can be set between 1 and 999.
Note❒ Default: 999
06. Original Beeper The beeper (key tone) sounds when you forgot to remove originals after copying.
Note❒ Default: On
❒ If the Panel beeper setting is set to Off, (see “System Set-tings”), the beeper does not sound irrespective of the set-ting (On or Off) of this Original Beeper function.
07. Photo Mode You can select the image quality when you select Photo mode with the {Original Type } key or Enhanced Image Copy mode.
Note❒ Default:
• Enhanced image: OFF: Coarse
• Enhanced image: ON: Normal
08. Reproduction Ratio Up to 2 reproduction ratios which you frequently use can be registered.

SETTINGS YOU CAN CHANGE WITH THE USER TOOLS
ìèê
4
1. General Features 3/4
Menu Description
09. Slip Sheet Tray You can select a special tray for slip sheets.
Note❒ Default:
• Machine with bypass tray: Bypass
• Machine without bypass tray: None
10. Duplex Priority You can select the type of the Duplex function to be effective when the machine is turned on, Energy Saver mode is off, or Auto Reset is on.
Note❒ Default: 1-Sided → 2-Sided
11. Auto Reset The machine returns to its initial condition automatically af-ter your job is finished. The time can be set from 10 to 180 seconds.
Note❒ Default: 60 seconds
12. Density Pattern You can change density levels.

USER TOOLS (COPY FEATURES)
ìèé
4
1. General Features 4/4
Menu Description
13. Initial Mode Set You can select the initial mode or Program No. 10 as the mode to be effective when modes are cleared.
Note❒ Default: Initial
14. Management Setting
You can change settings for user access limitation for copier functions.
Counter Reset You can check the number of copies made under each user code. You can also reset each user code's counter to 0.
Note❒ If more than one user code is registered, you can view all
the counters using the [↑↑↑↑Prev.] or [↓↓↓↓Next ] key.
Clear Code/Counter You can delete all user codes or reset all counters to 0.
Reg. User Code You can register user codes.
Note❒ Up to 50 user codes (8 digits or less) can be registered.
Chg/Del User Code You can change or delete user codes.
Note❒ The number of copies made under the old code is added
to that made under the new user code.
❒ The number of copies made under the deleted code is also deleted.
Counter List Print You can print a list of counters shown by user code.
Note❒ To stop the printing, press the [Cancel ] key.

SETTINGS YOU CAN CHANGE WITH THE USER TOOLS
ìèè
4
2. Adjust Image 1/2
Menu Description
1. Erase Border The default setting of the width of the erased margins in the Erase Border mode can be changed as follows:
• Metric version: 3 – 50 mm in 1 mm steps
• Inch version: 0.1 – 2.0" in 0.1" steps
Note❒ Default:
• Metric version: 10 mm
• Inch version: 0.4"
2. Erase Center The default setting of the width of the erased margins in the Erase Center mode can be changed as follows:
• Metric version: 3 – 50 mm in 1 mm steps
• Inch version: 0.1 – 2.0" in 0.1" steps
Note❒ Default:
• Metric version: 10 mm
• Inch version: 0.4"
3. Marg. Adj. Front You can adjust the margin width on the front side of copies in Margin Adjust mode. You can change this setting as fol-lows:
• Metric version: 0 – 30 mm in 1 mm steps
• Inch version: 0 – 1.0" in 0.1" steps
Note❒ Default:
• Metric version: 5 mm
• Inch version: 0.2"

USER TOOLS (COPY FEATURES)
ìèç
4
4. Margin Adjust Back You can specify a binding margin on the back side of copies for the following modes: 1-Sided → 2-Sided, Book → 2-Sid-ed, and 2-Sided → 2-sided.
You can change this setting as follows:
• Metric version: 0 – 30 mm in 1 mm steps
• Inch version: 0 – 1.0" in 0.1" steps
Limitation❒ Type 1 requires the optional duplex unit.
Note❒ Default:
• Metric version: 5 mm
• Inch version: 0.2"
Menu Description

SETTINGS YOU CAN CHANGE WITH THE USER TOOLS
ìèæ
4
2. Adjust Image 2/2
Menu Description
5. Double Copy You can select a separation line in Double Copy mode from no line, Solid line, Broken line, or Crop marks.
• None
• Solid
• Broken Line
• Crop Marks
Note❒ Default: None (no line)

USER TOOLS (COPY FEATURES)
ìèå
4
6. Combine Copy You can select a separation line in Combine mode from no line, Solid line, Broken line 1, Broken line 2, or Crop marks.
• None
• Solid
• Broken Line 1
• Broken Line 2
• Crop Marks
Note❒ Default: None (no line)
Menu Description

SETTINGS YOU CAN CHANGE WITH THE USER TOOLS
ìèä
4
7. Image Repeat You can select a separation line in Image Repeat mode from no line, Solid line, Broken line 1, Broken line 2, or Crop marks.
• None
• Solid
• Broken Line 1
• Broken Line 2
• Crop Marks
Note❒ Default: None (no line)
8. Booklet: Original You can select type of originals for “16 pages → booklet”. See ⇒ P.78 “Combine—Combining Originals Into One Copy”.
Limitation❒ Type 1 requires the optional 8MB copier memory unit
and duplex unit.
Note❒ Default: Portrait
Menu Description

USER TOOLS (COPY FEATURES)
ìçí
4
3. Input/Output 1/2
Menu Description
1. Duplex Auto Eject When making two-sided copies from one-sided originals, if the last original is an odd page, the last copy will be auto-matically delivered with the reverse side blank. You can cancel this setting. ⇒ P.85 “Duplex—Making Two-Sided Cop-ies”
Limitation❒ Type 1 requires the optional duplex unit.
Note❒ When you set one original at a time in the document
feeder or set an original on the exposure glass, this func-tion does not come effect.
❒ Default: Yes
2. Comb. Auto Eject As a default setting, even if the number of originals in the optional document feeder is less than the number required in the selected Combine mode, the lacking number of copies are automatically made in blank. You can cancel this set-ting.⇒ P.78 “Combine—Combining Originals Into One Copy”
Limitation❒ When you set one original at a time in the document
feeder or set an original on the exposure glass, this func-tion does not come effect.
Note❒ Default: Yes
3. Original Count As a default setting, the display shows the copy quantity you specified and the number of copies made. You can can-cel this setting, and instead view the number of originals to be fed in the document feeder and the number of copies made.
Note❒ Default: No

SETTINGS YOU CAN CHANGE WITH THE USER TOOLS
ìçì
4
4. SADF Auto Reset When you set one original at a time in the optional docu-ment feeder, the Auto Feed indicator lights for a selected time after an original is fed to show that the document feed-er is ready for another original. You can adjust this time from 3 seconds to 99 seconds in 1 second steps.
Limitation❒ The optional document feeder (ADF) is required.
Note❒ Default: 5 seconds
Menu Description

USER TOOLS (COPY FEATURES)
ìçë
4
3. Input/Output 2/2
Menu Description
5. Rotate Sort If you select [No] when the paper tray in use runs out of pa-per, the machine stops allowing you to add paper to the tray. So you can have all the copies rotate-sorted.
Note❒ Default: No
6. Sort You can select a Sort function. ⇒ P.45 “Sort—Sorting Into Sets (123, 123, 123)”
Limitation❒ The optional finisher is required to use the Shift Sort
function.
Note❒ Default:
• Machine with finisher: Shift Sort
• Machine without finisher: Sort
7. Stack You can select a Stack function. ⇒ P.47 “Stack—Stacking To-gether All Copies Of A Page (111, 222, 333)”
Limitation❒ The optional finisher is required to use the Shift Stack
function.
Note❒ Default:
• Machine with finisher: Shift Stack
• Machine without finisher: Rotate Stack

SETTINGS YOU CAN CHANGE WITH THE USER TOOLS
ìçê
4
8. Mem.full-AutoStrt When the memory becomes full while scanning originals, the machine can make copies of the scanned originals first, then automatically proceeds to scanning the remaining orig-inals.
You can enable or disable this function.
• If you select [No]When the memory becomes full, the machine stops its operation allowing you to remove the copy pages deliv-ered on the output tray.
• If you select [Yes]You can leave the machine unattended to make all the copies, but the resulting sorted pages will not be sequen-tial.
Note❒ Default: No
9. Auto Sort Mode You can specify whether Sort mode is selected when the ma-chine is turned on or the mode is cleared.
Note❒ Default: No
Menu Description

USER TOOLS (COPY FEATURES)
ìçé
4
4. Shortcut Keys 1/1
Menu Description
Shortcut Keys You can register up to four frequently used functions with shortcut keys.
Note❒ First press the desired shortcut key, then select the func-
tion you want to assign to the key.

165
5. REMARKS
DO'S AND DON'TS
R CAUTION:
Important❒ Make sure the remaining memory space is 100 %, before you unplug the pow-
er cord.❒ While the machine is unplugged, you can neither send nor receive a fax.
ReferenceFor details, see the Facsimile Reference.
• Do not touch areas on or around the fusing unit. These areas get hot.• After making copies continuously, you may feel the exposure glass is heated.
But this is not a malfunction. • You may feel warm around the ventilation hole. This is caused by exhaust air,
and not a malfunction.• Do not turn off the operation switch while copying or printing. When turning
off the operation switch, make sure that copying or printing is completed.• The machine might fail to produce good copy images if there should occur
condensation inside caused by temperature change.• Do not open the covers of machine while copying or printing. If you do, mis-
feeds might occur.• Do not move the machine while copying or printing.• If you operate the machine improperly or a failure occurs on the machine,
your machine settings might be lost. Be sure to take a note of your machinesettings.
• Supplier shall not be liable for any loss or damages resulting from a failure onthe machine, loss of machine settings, and use of the machine.
• When you move the machine, unplug the power cord from thewall outlet to avoid fire or electric shock.
• When the machine will not be used for a long time, unplug thepower cord.

REMARKS
166
5
WHERE TO PUT YOUR MACHINE
Machine Environment
Your machine's location should be carefully chosen because environmental con-ditions greatly affect its performance.
Optimum environmental conditions
R CAUTION:
R CAUTION:
• Temperature: 10 – 32°C (50 – 89.6°F)(humidity to be 50 % at 32°C, 89.6°F)• Humidity: 15 – 80 % (temperature to be 27°C, 80.6°F at 80 %)• A strong and level base.• The machine must be level within 5 mm, 0.2" both front to rear and left to
right.• To avoid possible build-up of ozone, make sure to locate this machine in a
large well ventilated room that has an air turnover of more than 30 m3/hr/person.
Environments to avoid
• Locations exposed to direct sunlight or strong light (more than 1,500 lux).• Locations directly exposed to cool air from an air conditioner or heated air
from a heater. (Sudden temperature changes might cause condensation with-in the machine.)
• Places where the machine might be subjected to frequent strong vibration.• Dusty areas.• Areas with corrosive gases.
• Keep the machine away from humidity and dust. A fire or an elec-tric shock might occur.
• Do not place the machine on an unstable or tilted surface. If it top-ples over, it could cause injury.
• If you use the machine in a confined space, make sure there is acontinuous air turnover.

WHERE TO PUT YOUR MACHINE
167
5
Power Connection
R WARNING:
R WARNING:
R WARNING:
R CAUTION:
R CAUTION:
• When the main switch is in the Stand-by positions, the optional anti-conden-sation heaters are on. In case of emergency, unplug the machine's power cord.
• When you unplug the power cord, the anti-condensation heaters turn off.• Make sure the plug is firmly inserted in the outlet.• Voltage must not fluctuate more than 10 %.
• Only connect the machine to the power source described onthe inside front cover of this manual.
• Avoid multi-wiring.• Do not damage, break or make any modifications to the pow-
er cord. Do not place heavy objects on it, pull it hard or bendit more than necessary. These actions could cause an elec-tric shock or fire.
• Do not plug or unplug the power cord with your hands wet.Otherwise, an electric shock might occur.
• Make sure the wall outlet is near the machine and freely ac-cessible so that in event of an emergency it can be un-plugged easily.
• When you move the machine, unplug the power cord from thewall outlet to avoid fire or electric shock.
• When the machine will not be used for a long time, unplug thepower cord.
• When you pull out the plug from the socket, grip the plug to avoiddamaging the cord and causing fire or electric shock.

REMARKS
168
5
Access To Machine
Place the machine near the power source, providing clearance as shown.
1. Rear: more than 10 cm (4.0")
2. Right: more than 10 cm (4.0")
3. Front: more than 75 cm (29.6")
4. Left: more than 10 cm (4.0")
Note❒ For the required space when options are installed, please contact your service
representative.
2
1
3
4
CP999EE

MAINTAINING YOUR MACHINE
169
5
MAINTAINING YOUR MACHINE
If the exposure glass, platen covers ordocument feeder belt is dirty, youmight not be able to make copies asyou want. Clean them if you findthem dirty.
❖❖❖❖ Cleaning the machineWipe the machine with a soft,damp cloth. Then, wipe it with adry cloth to remove the water.
Important❒ Do not use chemical cleaner or or-
ganic solvent, such as thinner orbenzene. If they get into the ma-chine or melt plastic parts, a failuremight occur.
❒ Do not clean parts other than thosespecified in this manual. Suchparts should be cleaned by yourservice representative.
Cleaning The Exposure Glass
Cleaning The Platen Cover
Cleaning The Document Feeder
ND1C0200
AM1P0100
ND1D0300

REMARKS
170
5

171
6. SPECIFICATION
MAINFRAME
❖❖❖❖ Configuration:Desktop
❖❖❖❖ Photosensitivity type:OPC drum (Φ60)
❖❖❖❖ Original scanning:One-dimensional solid scanning system through CCD
❖❖❖❖ Copy process:Dry electrostatic transfer system
❖❖❖❖ Development:Dry two-component magnetic brush development system
❖❖❖❖ Fusing:Heating roll system
❖❖❖❖ Resolution:400 dpi
❖❖❖❖ Exposure glass:Stationary original exposure type
❖❖❖❖ Original reference position:Rear left corner
❖❖❖❖ Warm-up time:• Type 1, 2: Less than 85 seconds (20°C)• Type 3: Less than 100 seconds (20°C)
❖❖❖❖ Originals:Sheet/book/objects
❖❖❖❖ Maximum original size:A3L, 11" × 17"L
❖❖❖❖ Copy paper size:• Trays: A3L – A5L, 11" × 17"L – 51/2" × 81/2"L• Bypass: A3L – A6L, 11" × 17"L – 51/2" × 81/2"L

SPECIFICATION
172
6
• Bypass (non-standard size):Vertical: 100 – 297 mm, 4.0” – 11.7”Horizontal: 148 – 432 mm, 6.0” – 17.0”
• Duplex: A3L – A5K, 11" × 17"L – 81/2" × 11"K• LCT: A4K, 81/2" × 11"K
❖❖❖❖ Copy paper weight:• Paper tray: 64 – 105 g/m2 (20 – 28 lb)• Bypass tray: 52 – 157 g/m2 (16 – 42 lb)• Duplex unit: 64 – 105 g/m2 (20 – 28 lb)
❖❖❖❖ Non-reproduction area:• Leading edge: 3 ± 2 mm• Trailing edge: 2 ± 2 mm• Left edge: 2 ± 1.5 mm• Right edge: 2 + 2.5/-1.5 mm
❖❖❖❖ First copy time:
(100 %, feeding from 1st or 2nd paper tray, Text·Photo mode, Auto ImageDensity)
❖❖❖❖ Copying speed: (Type 1 and Type 2)• 19 copies/minute (A3L, 11" × 17"L)• 35 copies/minute (A4K, 81/2" × 11"K)
❖❖❖❖ Copying speed: (Type 3)• 22 copies/minute (A3L, 11" × 17"L)• 45 copies/minute (A4K, 81/2" × 11"K)
A4K 81/2" × 11"K
Type 1, 2 3.9 seconds or less 4.0 seconds or less
Type 3 3.2 seconds or less 3.3 seconds or less

MAINFRAME
173
6
❖❖❖❖ Reproduction ratio:Preset reproduction ratios:
Zoom:• Type 1, 2
Metric version: 25 – 400 %Inch version: 25 – 400 %
• Type 3Metric version: 35 – 400 %Inch version: 32 – 400 %
❖❖❖❖ Continuous copying count:1 – 999 copies
❖❖❖❖ Copy paper capacity:• 1st and 2nd paper trays: 500 sheets (80 g/m2, 20 lb)• Bypass tray: 50 sheets (80 g/m2, 20 lb)
Metric version Inch version
Enlargement 400 % 400 %
200 % 200 %
141 % 155 %
122 % 129 %
115 % 121 %
Full Size 100 % 100 %
Reduction 93 % 93 %
87 % 85 %
82 % 78 %
71 % 73 %
65 % 65 %
50 % 50 %
35 % (Type 3 only) 32 % (Type 3 only)
25 % (Type 1 and Type 2 only) 25 % (Type 1 and Type 2 only)

SPECIFICATION
174
6
❖❖❖❖ Power consumption:• Mainframe only
• System
*1 Mainframe with the document feeder, bridge unit, paper tray unit, large capac-ity tray, copier hard disk, and 1000-sheet finisher.
*2 Mainframe with the document feeder, bridge unit, paper tray unit, large capac-ity tray, copier hard disk, and 3000-sheet finisher.
❖❖❖❖ Dimensions (W × D × H up to exposure glass):• Type 1: 600 × 640 × 720 mm, 23.7" × 25.2" × 28.4"• Type 2, 3: 670 × 640 × 720 mm, 26.4" × 25.2" × 28.4"
❖❖❖❖ Space for main frame (W × D):• With duplex unit:
630 × 640 mm, 24.9" × 25.2" (Unit closed)900 × 640 mm, 35.5" × 25.2" (Unit opened)
• With bypass tray unit:670 × 640 mm, 26.4" × 25.2" (Unit closed)850 × 640 mm, 33.5" × 25.2" (Unit opened)980 × 640 mm, 38.6" × 25.2" (Bypass tray extender is used for large size paper)
Type 1, 2 Type 3
Warm up About 1.05 kW About 1.15 kW
Stand-by About 200 Wh About 220 Wh
Copying About 1.15 kW About 1.3 kW
Maximum Less than 1.44 kW Less than 1.44 kW
Type 1, 2 *1 Type 3 *2
Warm up About 1.05 kW About 1.15 kW
Stand-by About 220 Wh About 260 Wh
Copying About 1.2 kW About 1.35 kW
Maximum Less than 1.44 kW Less than 1.44 kW

MAINFRAME
175
6
❖❖❖❖ Noise Emission:Sound pressure level: The measurement are made according to ISO7779.
*1 for Type 1, 2: Mainframe with the document feeder, 1000-sheet finisher, bridgeunit, paper tray unit, large capacity tray, and copier hard disk.
*2 for Type 3: Mainframe with the document feeder, 3000-sheet finisher, bridge unit,paper tray unit, large capacity tray, and copier hard disk.
❖❖❖❖ Noise Emission:Sound power level: The measurement are made according to ISO7779.
*1 for Type 1, 2: Mainframe with the document feeder, 1000-sheet finisher, bridgeunit, paper tray unit, large capacity tray, and copier hard disk.
*2 for Type 3: Mainframe with the document feeder, 3000-sheet finisher, bridge unit,paper tray unit, large capacity tray, and copier hard disk.
❖❖❖❖ Weight:• Type 1: Approx. 67 kg, 147.8 lb• Type 2, 3: Approx. 75 kg, 165.4 lb
Note❒ Specifications are subject to change without notice.
Mainframe only System *1 *2
Stand-by Type 1, 2 27 dB (A) or less 28 dB (A) or less
Type 3 27 dB (A) or less 28 dB (A) or less
Copying Type 1, 2 52 dB (A) or less 60 dB (A) or less
Type 3 56 dB (A) or less 62 dB (A) or less
Mainframe only System *1 *2
Stand-by Type 1, 2 42 dB (A) or less 44 dB (A) or less
Type 3 42 dB (A) or less 44 dB (A) or less
Copying Type 1, 2 69 dB (A) or less 73 dB (A) or less
Type 3 70 dB (A) or less 74 dB (A) or less

SPECIFICATION
176
6
DOCUMENT FEEDER (OPTION)
❖❖❖❖ Mode:ADF mode, SADF mode
❖❖❖❖ Original size:• A3L – A5KL• 11" × 17"L – 51/2" × 81/2"KL
❖❖❖❖ Original weight:• 1-sided originals: 52 – 128 g/m2 (14 – 34 lb)• 2-sided originals: 52 – 105 g/m2 (14 – 28 lb) (Duplex)• Thin paper mode: 41 – 128 g/m2 (11 – 34 lb)
❖❖❖❖ Number of originals to be set:50 sheets (80 g/m2, 20 lb)
❖❖❖❖ Maximum power consumption:50 W (power is supplied from the main frame.)
❖❖❖❖ Dimensions (W × D × H):600 × 580 × 150 mm, 23.7" × 22.9" × 5.9"
❖❖❖❖ Weight:Approx. 12 kg, 26.5 lb
Note❒ Specifications are subject to change without notice.

PAPER TRAY UNIT (OPTION)
177
6
PAPER TRAY UNIT (OPTION)
❖❖❖❖ Copy paper weight:64 – 105 g/m2 (20 – 28 lb)
❖❖❖❖ Available paper size:A3L, B4L, A4KL, B5KL, A5L, 11" × 17"L, 81/2" × 14"L, 81/2" ×11"KL, 5 1/2" × 8 1/2"L, 7 1/4" × 10 1/2"L, 8" × 13"L, 81/2" × 13"L, 81/4" ×13"L
❖❖❖❖ Maximum power consumption:50 W (power is supplied from the main frame.)
❖❖❖❖ Paper capacity:500 sheets (80 g/m2, 20 lb) × 2 trays
❖❖❖❖ Dimensions (W × D × H):540 × 600 × 270 mm, 21.3" × 23.7" × 10.7"
❖❖❖❖ Weight: Approx. 25 kg, 55.2 lb
Note❒ Specifications are subject to change without notice.

SPECIFICATION
178
6
INTERNAL TRAY 2 (1 BIN TRAY) (OPTION)
❖❖❖❖ Number of bins:1
❖❖❖❖ Available paper size:A3L, B4L, A4KL, B5KL, A5L, 11" × 17"L, 8 1/2" × 14"L, 8 1/2" ×11"KL, 5 1/2 × "8 1/2"L
❖❖❖❖ Paper capacity:125 sheets (80 g/m2, 20 lb)
Note❒ The paper capacity might be less than 125 sheets when copy paper is con-
siderably curled.
❖❖❖❖ Copy paper weight:60 – 105 g/m2 (16 – 28 lb)
❖❖❖❖ Maximum power consumption:15 W (power is supplied from the main frame.)
❖❖❖❖ Dimensions (W × D × H):470 × 550 × 110 mm, 18.6" × 21.7" × 4.4"
❖❖❖❖ Weight:Approx. 4 kg, 8.9 lb
Note❒ Specifications are subject to change without notice.

1000-SHEET FINISHER (OPTION)
179
6
1000-SHEET FINISHER (OPTION)
❖❖❖❖ Paper size:A3L, B4L, A4KL, B5KL, A5KL, B6L, A6L, 11" × 17"L, 8 1/2" × 14"L,8 1/2" × 11"KL, 5 1/2" × 8 1/2"L
❖❖❖❖ Paper weight:52 – 157 g/m2, 14 – 42 lb
❖❖❖❖ Stack capacity:• 1,000 sheets (A4K, 81/2" × 11"K or smaller) (80 g/m2, 20 lb)• 500 sheets (B4, 81/2" × 14" or larger) (80 g/m2, 20 lb)
❖❖❖❖ Staple capacity:• 30 sheets (A4, 81/2" × 11" or smaller) (80 g/m2, 20 lb)• 20 sheets (B4, 81/2" × 14" or larger) (80 g/m2, 20 lb)
❖❖❖❖ Staple paper size:A3L, B4L, A4KL, B5K, 11" × 17"L, 8 1/2" × 14"L, 81/2" × 11"KL
❖❖❖❖ Staple paper weight:64 – 80 g/m2, 17 – 20 lb
❖❖❖❖ Staple position:1 position (upper left)
❖❖❖❖ Power consumption:48 W (power is supplied from the main frame.)
❖❖❖❖ Dimensions (W × D × H):568 × 520 × 625 mm, 22.4" × 20.5" × 24.6"
❖❖❖❖ Weight:Approx. 21 kg, 46.3 lb

SPECIFICATION
180
6
3000-SHEET FINISHER (OPTION)
Note❒ Optional unit for Type 3.Shift Tray:
❖❖❖❖ Paper size:A3L, B4L, A4KL, B5KL, 11" × 17"L, 8 1/2" × 14"L, 8 1/2" × 11"KL
❖❖❖❖ Paper weight:52 – 157 g/m2, 14 – 42 lb
❖❖❖❖ Stack capacity:without punch:• 3,000 sheets (A4K, 81/2" × 11"K) (80 g/m2, 20 lb)• 1,500 sheets (A3L, B4L, A4L, B5KL, 11" × 17"L) (80 g/m2, 20 lb)with punch (the optional punch kit is required):• 2,500 sheets (A4K, 81/2" × 11"K) (80 g/m2,20 lb)• 1,500 sheets (A3L, B4L, A4L, B5KL, 11" × 17"L, 81/2" × 14"L, 8 1/2" ×
11"L) (80 g/m2, 20 lb)Proof Tray:
❖❖❖❖ Paper size:A3L, B4L, A4KL, B5KL, A5KL, B6L, A6L, 11" × 17"L, 8 1/2" × 14"L,8 1/2" × 11"KL, 8 1/2" × 5 1/2"KL
❖❖❖❖ Paper weight:52 – 157 g/m2, 14 – 42 lb
❖❖❖❖ Stack capacity:without punch:• 250 sheets (A4, 81/2" × 11" or smaller) (80 g/m2, 20 lb)• 50 sheets (B4, 81/2" × 14" or larger) (80 g/m2, 20 lb)with punch (the optional punch kit is required):• 200 sheets (A4, 81/2" × 11" or smaller) (80 g/m2, 20 lb)• 50 sheets (B4, 81/2" × 14" or larger) (80 g/m2, 20 lb)
Staple:
❖❖❖❖ Staple capacity:without punch:• 50 sheets (A4, 81/2" × 11" or smaller) (80 g/m2, 20 lb)• 30 sheets (B4, 81/2" × 14" or larger) (80 g/m2, 20 lb)with punch (the optional punch kit is required):• 40 sheets (A4, 81/2" × 11" or smaller) (80 g/m2, 20 lb)• 25 sheets (B4, 81/2" × 14" or larger) (80 g/m2, 20 lb)

3000-SHEET FINISHER (OPTION)
181
6
❖❖❖❖ Staple paper size:A3L, B4L, A4KL, B5KL, 11" × 17"L, 8 1/2" × 11"KL
❖❖❖❖ Staple paper weight:64 – 80 g/m2, 17 – 21 lb
❖❖❖❖ Staple position:• 1 staple – 3 positions• 2 staples – 1 position
❖❖❖❖ Power consumption:48 W (power is supplied from the main frame.)
❖❖❖❖ Dimensions (W × D × H):625 × 545 × 960 mm, 24.7" × 21.5" × 37.8"
❖❖❖❖ Weight:Approx. 45 kg, 99.3 lb

SPECIFICATION
182
6
PUNCH KIT (OPTION)
Note❒ Optional unit for the 3000-sheet finisher.
❖❖❖❖ Paper size (2 holes version):• L: A3 – A5, 11" × 17" – 81/2" × 11"• K: A4 – A5, 81/2" × 11"
❖❖❖❖ Paper size (3 holes version):• L: A3, B4, 11" × 17"• K: A4, B5, 81/2" × 11"
❖❖❖❖ Paper weight:• 2 holes version: 52 g/m2 – 128 g/m2, 14 – 34 lb• 3 holes version: 52 g/m2 – 105 g/m2, 14 – 28 lb
❖❖❖❖ Power consumption:33.6 W (power is supplied from the 3000-sheet finisher.)
❖❖❖❖ Dimensions (W × D × H):92 × 463 × 100 mm, 3.7" × 18.3" × 4.0"
❖❖❖❖ Weight:2.4 kg, 5.3 lb

LARGE CAPACITY TRAY (LCT) (OPTION)
183
6
LARGE CAPACITY TRAY (LCT) (OPTION)
❖❖❖❖ Paper size:A4K, 81/2" × 11"K
❖❖❖❖ Paper weight:64 – 105 g/m2, 20 – 28 lb
❖❖❖❖ Paper capacity:1,500 sheets (80 g/m2, 20 lb)
❖❖❖❖ Power consumptionApprox. 40 W (power is supplied from the main frame.)
❖❖❖❖ Dimensions (W × D × H):390 × 500 × 390 mm, 15.4" × 19.7" × 15.4"
❖❖❖❖ Weight:Approx. 17 kg, 37.5 lb

SPECIFICATION
184
6
DUPLEX UNIT (OPTION)
Note❒ Optional unit for Type 1.
❖❖❖❖ Paper size:A3L – A5L, 11" × 17"L – 51/2" × 81/2" L
❖❖❖❖ Paper weight:64 – 105 g/m2, 20 – 28 lb
❖❖❖❖ Power consumption (Max):35 W
❖❖❖❖ Dimensions (W × D × H):90 × 520 × 400 mm, 3.6" × 20.5" × 15.8"
❖❖❖❖ WeightApprox. 6 kg, 13.3 lb

BYPASS TRAY (OPTION)
185
6
BYPASS TRAY (OPTION)
This is option for Type 1.
❖❖❖❖ Available paper size:• Standard size (metric version): A3L, A4L, A5L, 8 1/2" × 13"L• Standard size (inch version): A3L, 11" × 17"L, 8 1/2" × 14"L, 8 1/2" × 11"L,
5 1/2" × 81/2"L• Non-standard size: Vertical (100 – 297 mm, 4.0” – 11.7”), Horizontal (148 –
432 mm, 6.0” – 17.0”)
❖❖❖❖ Copy paper weight:52 – 157 g/m2,16 – 42 lb
❖❖❖❖ Dimensions (W × D × H):310 × 550 × 75 mm, 12.3” × 21.7” × 3.0"
❖❖❖❖ Paper capacity:• 52 – 90 g/m2, 16 – 20 lb: 50 sheets• 91 – 157 g/m2, 20 – 42 lb: 25 sheets
❖❖❖❖ Weight:Approx. 3 kg, 6.7 lb

SPECIFICATION
186
6
8 MB COPIER MEMORY UNIT (ELECTRIC SORT KIT) (OPTION)
This is option for Type 1.
❖❖❖❖ Memory capacity:8 MB
❖❖❖❖ Additional functions:Image rotate, Sort, 2-sided copy

COPIER HARD DISK (IMAGE ENHANCE KIT)
187
6
COPIER HARD DISK (IMAGE ENHANCE KIT)
❖❖❖❖ Originals scanned:100 pages (A4) min.
❖❖❖❖ Originals stored for Archive File function:32 pages (A4) max.
❖❖❖❖ Additional function:Archive file, and sort in enhanced image copy mode

ìåå
INDEXNumerics
1 bin tray, æ, å, ìæå1000-sheet finisher, æ, å, éê, ìêé, ìêä,ìæä3000-sheet finisher, å, éê, ìêç, ìéì, ìåí8 MB copier memory unit, æ, ìåç
A
Access To Machine, ìçåAdding Staples, ìêéAdding Toner, ìëìADF external tray, ë, êëADF tray, êëAdjusting Copy Image Density, êæArchive File, ìíëAuto Image Density, êæAuto Image Density key, ìêAuto Off, êíAuto Paper Select, éìAuto Reduce/Enlarge, éëAuto Reduce/Enlarge key, ìêAuto Reset, êíAuto Start, çé
B
Basic Functions, êæBoth Covers, äêBridge unit, æ, åBypass tray, é, æ, èè, ìåè
C
Changing The Paper Size, ìêëClear key, ìêClear Modes/Energy Saver key, ìëClearing Misfeeds, ìëéCombination Chart, ìíåCombine, æåcopier hard disk, æ, å, ìåæcopy initial display, ìéCopy Paper, ëêCopying From The Bypass Tray, èèCover, äì
Cursor keys, ìê
D
Deleting A Program, çìDeleting The Stored Images, ìíèDirectional Magnification (%), æìDirectional Size Magnification (inch), çäDo’s and Don’ts, ìçèDocument feeder (ADF), ë, æ, å, êë, ìçä,ìæçDouble Copies, ääDuplex, åèDuplex key, ìëDuplex unit, ë, æ, ìåé
E
Electric sort kit, æ, ìåçEnergy Saver, çêEnhanced Image Copy, êåEnhanced Image key, ìêEnlarging, çèErase Border, æèErase Center, æèExposure glass, ë, ëí, ëë, êì, ìçäExternal tray, æ, å
F
Fax key, ìäFront Cover, äìFront cover, êFunction keys, ìê
G
Guide, è
I
Image enhance kit, æ, å, ìåæImage Repeat, ää, ìííIndicators, ìëInterchange unit, æInternal tray, ëInternal tray 2, æ, å, ìæå

ìåä
Interrupt, çêInterrupt key, ìë
J
Jammed Staples, ìêä
L
Large Capacity Tray (LCT), æ, å, ìëí,ìåêLighter and Darker keys, ìêLoading Paper, ììäLower right cover, é
M
Machine Environment, ìççMain Power indicator, ë, ìëMain power switch, ë, ìæMainframe, ìæìMaintaining, ìçäManual Image Density, êåMargin Adjustment, æêMenu key, ìêMessage, ìììMixed sizes mode, êé
N
Number keys, ìê
O
OHP Slip Sheet, äçOn indicator, ë, ìëOperation panel, ë, ìëOperation switch, ë, ìê, ìæOptions, æOriginal Beeper, çéOriginal type, êäOriginal Type key, ìêOriginals, ëí, êì
P
Panel display, ìë, ìéPaper Designate, äéPaper tray, êPaper tray unit, ê, æ, å, ìææ
Platen cover, ë, æ, å, ìçäPositive/Negative, äåPower Connection, ìçæPreset Reduce/Enlarge, çèPrinting A List Of The Stored Images,ìíçProgram, çíProgram key, ìëProof tray, åPunch kit, å, ìåëPunch Waste, ìééPunching, éé
R
Recalling A Program, çëRecalling The Stored Images, ìíæReducing, çèRemarks, ìçèRight side cover, éRotate Sort, éèRotate Stack, éæ
S
SADF mode, êêSafety Information, LSelecting Copy Paper, éíSelecting Original Type Setting, êäSelection keys, ìêSeries Copies, åëShift Sort, éèShift Stack, éæShift tray, åShortcut key, ìêSort, éèSorter key, ìëSPECIFICATION, ìæìStack, éæStaple, éäStart key, ìêStop, ìêStoring The Images, ìíêStoring Your Settings, çí
T
Thin paper mode, êè

ìäí
Toner, ëæ
U
Unit for two-sided copies, ëUser Codes, çêUser Tools, ìéèUser Tools/Counter key, ìë
V
Ventilation hole, é
Z
Zoom, çæZoom key, ìê

USA (This information is for facsimile option users only.)
❖❖❖❖ FCC Requirements1. This equipment complies with Part 68 of the FCC rules. On the cover of this equipment is a label that
contains, among other information, the FCC registration number and ringer equivalence number(REN) for this equipment. If requested, this information must be provided to the telephone company.
2. This equipment uses the following USOC jack: RJ11C
3. The REN is used to determine the quantity of devices which may be connected to the telephone line.Excessive REN's on the telephone line may result in the devices not ringing in response to an incom-ing call. In most, but not all areas, the sum of the REN's should not exceed five (5.0). Contact thetelephone company to determine the maximum REN for the calling area.
4. If this equipment causes harm to the telephone network, the telephone company will notify you in ad-vance that temporary discontinuance of service may be required. If advance notice is not practical,the telephone company will notify the customer as soon as possible. Also, you will be advised of yourright to file a complaint with the FCC if you believe it is necessary.
5. The telephone company may make changes in its facilities, equipment, operations, or proceduresthat could affect the operation of the equipment. If this happens, the telephone company will provideadvance notice in order for you to make necessary modifications in order to maintain uninterruptedservice.
6. In the event of operation problems (document jam, copy jam, communication error indication), referto the solving problems section in this manual.
7. If you cannot correct the problem, please contact the RICOH CORP. CUSTOMER SUPPORT DEPT.at 1-800-FASTFIX for repair and warranty information. If it is causing harm to the telephone network,the telephone company may request you to disconnect the equipment from the network until the prob-lem is resolved.
8. This equipment cannot be used on telephone company-provided coin service. Connection to PartyLine Service is subject to state tariffs.
❖❖❖❖ WHEN PROGRAMMING EMERGENCY NUMBERS AND/OR MAKING TEST CALLS TO EMERGENCY NUMBERS:1. Remain on the line and briefly explain to the dispatcher the reason for the call before hanging up.
2. Perform such activities in the off-peak hours, such as early morning hours or late evenings.
CANADA (This information is for facsimile option users only.)
The Industry Canada label identifies certified equipment. This certification means that the equipment meetstelecommunications network protective, operational, and safety requirements as prescribed in the appropri-ate Terminal Equipment Technical Requirements document(s). The department does not guarantee theequipment will operate to the user's satisfaction.
Before installing this equipment, users should ensure that it is permissible to be connected to the facilities ofthe local telecommunications company. The equipment must also be installed using an acceptable methodof connection. The customer should be aware that compliance with the above conditions may not preventdegradation of service in some situations.
Repairs to certified equipment should be coordinated by a representative designated by the supplier. Anyrepairs or alterations made by the user to this equipment, or equipment malfunctions, may give the telecom-munications company cause to request the user disconnect the equipment.
Users should ensure for their own protection that the electrical ground connections of the power utility, tele-phone lines, and internal metallic water pipe system, if present, are connected together. This precaution maybe particularly important in rural areas.
Caution: Users should not attempt to make such connections themselves, but should contact the appropriateelectric inspection authority, or electrician, as appropriate.
The Ringer Equivalence Number (REN) assigned to each terminal device provides an indication of the max-imum number of terminals allowed to be connected to a telephone interface. The termination on an interfacemay consist of any combination of devices subject only to the requirement that the sum of the Ringer Equiv-alence Numbers of all the devices does not exceed 5.
In accordance with ISO Standard 7001, this machine uses the followingsymbols for the main power switch:
a means POWER ON.c means STAND BY.
Copyright © 1998 Ricoh Co., Ltd.

ERRATA
A mistake is found on the inside front cover of this
operating instructions and should be corrected as
follows:
Incorrect
Power Source:
120 V, 60 Hz, 10 A or more
Correct
Power Source:
120 V, 60 Hz, 12 A or more
Printed in China
A2328650

Overseas AffiliatesU.S.A.RICOH CORPORATION5 Dedrick Place West Caldwell, New Jersey 07006(TEL) 973-882-2000
NetherlandsRICOH EUROPE B.V.Groenelaan 3 P.O. Box 114 1180 AC - Amstelveen Holland(TEL) 020-5474111
United KingdomRICOH U.K. LTD.Ricoh House 1 Plane Tree Crescent, Feltham, Middlesex, TW13 7HG(TEL) 181-261-4000
GermanyRICOH DEUTSCHLAND GMBHMergenthalerallee 38-40, 65760 Eschborn(TEL) (06196) 906-0
SingaporeRICOH ASIA PACIFIC PTE. LTD.#15-01/02 The Heeren, 260 Orchard Road, Singapore 238855(TEL) 65-830-5888
SpainRICOH ESPAÑA S.A.Guitard, 45 08014 Barcelona(TEL) 490-09-60
ItalyRICOH ITALIA S.p.A.Via della Metallurgia, 12 (zona Basson) - 37139 VERONA(TEL) 045-851 00 44
Hong KongRICOH HONG KONG LTD.23/F., China Overseas Building, 139, Hennessy Road, Wan Chai, Hong Kong(TEL) 2862-2888
FranceRICOH FRANCE S.A.383 Avenue du Général de Gaulle, B.P. 307, 92143 Clamart Cedex(TEL) 01-4094-3838
RICOH COMPANY, LTD.15-5, 1 chome, Minami-Aoyama, Minato-ku, TokyoTelephone: Tokyo 3479-3111
Printed in ChinaUE USA A2318607
340/350/450O
perating Instructions

FAX Option Type 450
OPERATING INSTRUCTIONS
FACSIMILE REFERENCE (option)
uture
Read this manual carefully before you use this manual and keep it handy for freference. For safety, please follow the instructions in this manual.ND0A0101

Available Options
• Stamp Unit (FAX Stamp Type 450)
• Fax Feature Expander (FAX Feature Expander Type 450)
• 130MB Hard Disk (FAX Feature Expander Type 460)
• 400 dpi Option (FAX 400dpi Option Type 450)
• ISDN Unit (ISDN Option Type 450)
• Handset (Handset Type 450)
Supplies
• Marker Ink (Maker Type 30 is recommended for the best performance.)

NOTICE
R CAUTION:
Use of controls, adjustments or performance of procedures other than thosespecified herein may result in hazardous radiation exposure.Shielded interconnect cables must be employed with this equipment to ensurecompliance with the pertinent RF emission limits governing this device.Although this equipment can use either loop disconnect or DTMF signalling,only the performance of the DTMF signalling is subject to regulatory require-ments for correct operation. It is therefore strongly recommended that the equip-ment is set to use DTMF signalling for access to public or private emergencyservices. DTMF signalling also provides faster call set up.
Note❒ Some illustrations may be slightly different from your machine.❒ Certain options may not be available in some countries. For details, please
contact your local dealer.
----Notice about the Telephone Consumer Protection Act (Valid in USA only).
The Telephone Consumer Protection Act of 1991 among other things makes itunlawful for any person to send any message via a telephone fax machine unlesssuch message clearly contains in a margin at the top or bottom of each transmit-ted page or on the first page of the transmission, the date and time it is sent andan identification of the business, other entity, or other individual sending themessage and the telephone number of the sending machine or such business,other entity or individual. This information is transmitted with your documentby the TTI (Transmit Terminal Identification) feature. The telephone numberprovided may not be a 900 number or any other number for which charges ex-ceed local or long distance transmission charges. In order for you to meet the re-quirement, your machine must be programmed by following the instructions inthe accompanying Operation Manual. In particular, please refer to the chapterof Installation. Also refer to the TTI (Transmit Terminal Identification) program-ming procedure to enter the business identification and telephone number of theterminal or business. Do not forget to set the date and time.Thank you.
Direct (or indirect reflected eye contact with the laser beam may cause serious eye dam-age. Safety precautions and interlock mechanisms have been designed to prevent any possible laser beam exposure to the operator.
i

ii
----ENERGY SAVING INFORMATIONAs an Energy Star Partner, we have determined that this fax model meets Ener-gy Star guidelines for energy efficiency. This product was designed to reduce theenvironmental impact associated with fax equipment. This is accomplished bymeans of energy saving features such as Low Power mode. Please see applicablesections of operating instructions for details.
Note to users in the United States of America
----Notice:This equipment has been tested and found to comply with the limits for a ClassB digital device, pursuant to Part 15 of the FCC Rules. These limits are designedto provide reasonable protection against harmful interference in a residential in-stallation. This equipment generates, uses and can radiate radio frequency ener-gy and, if not installed and used in accordance with the instructions, may causeharmful interference to radio communications. However, there is no guaranteethat interference will not occur in a particular installation. If this equipment doescause harmful interference to radio or television reception, which can be deter-mined by turning the equipment off and on, the user is encouraged to try to cor-rect the interference by one more of the following measures:• Reorient or relocate the receiving antenna.• Increase the separation between the equipment and receiver.• Connect the equipment into an outlet on a circuit different from that to which
the receiver is connected.• Consult the dealer or an experienced radio /TV technician for help.
M001

----WarningChanges or modifications not expressly approved by the party responsible forcompliance could void the user's authority to operate the equipment.
iii

iv
1
Delete
Check
2
FUNCTION MAP
01
02
03
06
05
07
08
04
09
10
11
12
[ Mode ]

1
De
Pr
Ch
2
09
10
11
12
lete
int
eck
3
4
7
8
51
2
3 6
[ Info. ]
Select the file
ND0X01E7
v

vi
TABLE OF CONTENTSFUNCTION MAP
1.Getting Started
GUIDE TO COMPONENTS ........................................................................ 1Front View ..................................................................................................... 1Rear View...................................................................................................... 2
OPERATION PANEL.................................................................................. 4
STARTING THE MACHINE ........................................................................ 7Turning On The Power.................................................................................. 7Turning Off The Power.................................................................................. 8
SWITCHING BETWEEN COPY MODE AND FAX MODE ......................... 9
READING THE DISPLAY ......................................................................... 10Standby Display .......................................................................................... 10Communication Display .............................................................................. 10Display Prompts .......................................................................................... 11
USEFUL FUNCTIONS .............................................................................. 12Automatic Power Reception Function ......................................................... 12Dual Access ................................................................................................ 12Personal Code Access................................................................................ 12Transmission With Image Rotation ............................................................. 12
ACCEPTABLE TYPES OF ORIGINALS .................................................. 14Acceptable Original Sizes ........................................................................... 14Original Sizes Difficult to Detect .................................................................. 15Paper Size and Scanned Area.................................................................... 16
HOW TO SET AN ORIGINAL................................................................... 18Setting a Single Original on the Exposure Glass ........................................ 19Setting Originals in the Document Feeder (ADF)........................................ 20
WHERE INCOMING MESSAGE ARE DELIVERED—OUTPUT TRAY ... 22When the Selected Output Tray Becomes Full ........................................... 22When the Finisher is Installed ..................................................................... 22
2.Sending a Fax Message
OVERVIEW ............................................................................................... 23Overview ..................................................................................................... 23
MEMORY TRANSMISSION...................................................................... 24Memory Storage Report.............................................................................. 28Transmission Result Report (Memory Transmission) ................................. 29Communication Failure Report ................................................................... 29
CANCELING A MEMORY TRANSMISSION............................................ 30Canceling a Transmission While the Original Is Being Scanned in ............ 30Canceling a Transmission While the Message is Being Sent ..................... 30

IMMEDIATE TRANSMISSION.................................................................. 32Transmission Result Report (Immediate Transmission) ............................. 33On-hook Dial ............................................................................................... 34Manual Dial ................................................................................................. 35
CANCELING AN IMMEDIATE TRANSMISSION ..................................... 36Canceling a Transmission Before You Have Pressed Start........................ 36Canceling a Transmission After You Have Pressed the Start Key ............. 36
SCAN SETTINGS ..................................................................................... 37Resolution ................................................................................................... 37Original Type............................................................................................... 38Image Density (Contrast) ............................................................................ 38Mixing Scan Settings in a Multiple Page Original........................................ 39
CHANGING LINE TYPE ........................................................................... 41
DIALING.................................................................................................... 43Number Keys .............................................................................................. 43Quick Dials .................................................................................................. 46Speed Dials................................................................................................. 47Groups ........................................................................................................ 48Optional Group Dial .................................................................................... 49Redial .......................................................................................................... 50
TRANSMISSION FEATURES................................................................... 52Stamp.......................................................................................................... 52ID Transmission .......................................................................................... 52F Code (SUB).............................................................................................. 53F Code (PWD)............................................................................................. 54JBIG Transmission...................................................................................... 54
3.Receiving a Fax Message
IMMEDIATE RECEPTION ........................................................................ 55
MEMORY RECEPTION ............................................................................ 56
Substitute Reception............................................................................... 57Screening messages from anonymous senders ......................................... 57
SELECTING THE RECEPTION MODE.................................................... 59Fax Mode (Auto Reception Mode) .............................................................. 59Telephone Mode ......................................................................................... 59
RECEPTION FUNCTIONS........................................................................ 60Transfer Station........................................................................................... 60Transfer Result Report................................................................................ 61ID Reception ............................................................................................... 61F Code (SEP).............................................................................................. 61F Code (PWD)............................................................................................. 63JBIG Reception ........................................................................................... 63
PRINTING FUNCTIONS ........................................................................... 64Print Completion Beep ................................................................................ 64
vii

viii
Checkered Mark.......................................................................................... 64Center Mark ................................................................................................ 64Reception Time ........................................................................................... 64Multi-copy Reception................................................................................... 652-Sided Printing........................................................................................... 65180 Degree Rotation Printing...................................................................... 66Image Rotation............................................................................................ 67Two In One.................................................................................................. 67Page Separation and Length Reduction (not available in some countries) 67Reverse Order Printing ............................................................................... 68Page Reduction........................................................................................... 68TSI Print ...................................................................................................... 69CIL/TID Print ............................................................................................... 69When There is No Paper of the Correct Size.............................................. 69Having Incoming Messages Printed on Paper From the Bypass Tray........ 72
4.Advanced Transmission Features
OVERVIEW ............................................................................................... 73Overview ..................................................................................................... 73
SEND LATER............................................................................................ 74
CONFIDENTIAL TRANSMISSION ........................................................... 76
PERSONAL CODE TRANSMISSION....................................................... 78
SENDING AN AUTO DOCUMENT........................................................... 80
2-SIDED TRANSMISSION (DOUBLE-SIDED TRANSMISSION) ............ 82
BOOK FAX................................................................................................ 84Bound Original Page Order......................................................................... 85
CHOOSING THE AREA TO BE SCANNED YOURSELF (IRREGULAR SCAN AREA) ............................................................................................ 86
TRANSMISSION DEADLINE (TRD)......................................................... 88
POLLING TRANSMISSION...................................................................... 90Polling Transmission Clear Report.............................................................. 92
POLLING RECEPTION............................................................................. 94Polling Reserve Report ............................................................................... 95Polling Result Report .................................................................................. 95
TRANSFER REQUEST............................................................................. 96Specifying an End Receiver ........................................................................ 98
TRANSMISSION OPTIONS...................................................................... 99Selecting Transmission Options for a Single Transmission ...................... 100
5.Communication Information
CHECKING AND CANCELING TRANSMISSION FILES ...................... 103Canceling a Transmission......................................................................... 103

Printing a File ............................................................................................ 104Checking and Editing a File ...................................................................... 105
PRINTING A LIST OF FILES IN MEMORY (PRINT TX FILE LIST)....... 109
CHECKING THE TRANSMISSION RESULT (TX STATUS).................. 110
CHECKING THE RECEPTION RESULT (RX STATUS) ........................ 111
PRINTING A CONFIDENTIAL MESSAGE............................................. 112Confidential File Report............................................................................. 113
PRINTING A FILE RECEIVED WITH MEMORY LOCK......................... 114
PRINTING THE TCR............................................................................... 116
DISPLAYING THE MEMORY STATUS.................................................. 117
6.Troubleshooting
WHEN TONER RUNS OUT .................................................................... 119
ERROR MESSAGES AND THEIR MEANINGS ..................................... 120
SOLVING PROBLEMS........................................................................... 121
INDICATORS .......................................................................................... 123When the Receive File Indicator is Lit or Flashing .................................. 123When the Confidential File Indicator is Lit............................................... 124When the {{{{Fax}}}} key is Lit in Red............................................................... 124
WHEN AN ERROR REPORT IS PRINTED ............................................ 125
WHEN POWER IS TURNED OFF OR FAILS......................................... 126
7.Facsimile User Tools
ACCESSING THE USER TOOLS........................................................... 127Exiting User Tool mode............................................................................. 128
REGISTER/DELETE MENU ................................................................... 129Registering Quick Dials............................................................................. 129Deleting Quick Dials.................................................................................. 131Quick Dial Key and Function Key Label (Dial label).................................. 132Registering Groups ................................................................................... 135Deleting Groups ........................................................................................ 137Registering Optional Groups..................................................................... 139Deleting Optional Groups.......................................................................... 142Registering Speed Dials............................................................................ 143Deleting Speed Dials................................................................................. 145Storing Keystroke Programs ..................................................................... 147Deleting a Keystroke Program .................................................................. 150Registering Auto Documents .................................................................... 151Deleting an Auto Document ...................................................................... 153Registering Irregular Area ......................................................................... 154Deleting an Irregular Area ......................................................................... 156
REPORTS/LISTS.................................................................................... 158
ix

x
INITIAL SETUP TX ................................................................................. 159
INITIAL SETUP RX................................................................................. 161To set the Bypass Paper Size................................................................... 162
ASSIGNING USER FUNCTION KEYS................................................... 164Storing/Editing the Contents of a User Function Key................................ 164Using a User Function............................................................................... 165
KEY OPERATOR SETTINGS................................................................. 166Personal Codes......................................................................................... 166ECM .......................................................................................................... 171Memory Lock............................................................................................. 172Multistep Transfer ..................................................................................... 173Forwarding ................................................................................................ 175Special Senders to Treat Differently (Special RX Nos.) ............................ 182Authorized Reception................................................................................ 188Monitor Volume ......................................................................................... 192RTI/TTI ...................................................................................................... 193Registering The Economy Transmission Time ........................................ 195ID Code ..................................................................................................... 196G3 Analog Line ......................................................................................... 198G3 Digital Line........................................................................................... 199G4 Digital Line........................................................................................... 200Changing the User Parameters................................................................. 203Date/Time.................................................................................................. 208Summer Time............................................................................................ 209Counters.................................................................................................... 209Auto Reset ................................................................................................ 210Paper Feed Selection................................................................................ 211RDS (Remote Diagnostic System)............................................................ 211
8.Entering Text
ENTERING AND MODIFYING TEXT...................................................... 213Available Characters ................................................................................. 213Keys .......................................................................................................... 213How To Enter Text .................................................................................... 214
9.Maintaining Your Machine
CONNECTING THE MACHINE TO A TELEPHONE LINE AND TELEPHONE... 217Connecting The Telephone Line ............................................................... 217Connecting The Machine To The ISDN .................................................... 218Connecting The Optional External Telephone .......................................... 218Selecting The Line Type ........................................................................... 219
REPLACING THE STAMP CARTRIDGE ............................................... 220Stamp Cover Layout ................................................................................. 221

10.Appendix
OPTIONAL EQUIPMENT........................................................................ 223Fax Feature Expander and Hard Disk....................................................... 223400 dpi High Resolution Option (FAX 400dpi Option Type 450)............... 224ISDN Unit (ISDN Option Type 450)........................................................... 224Stamp (FAX STAMP TYPE 450)............................................................... 224Duplex Unit (AD340) ................................................................................. 224
SPECIFICATIONS .................................................................................. 225
FUNCTION LIST ..................................................................................... 226Advanced Transmission Features............................................................. 226Communication Information ...................................................................... 228User Tools................................................................................................. 229
INDEX...................................................................................................... 234
xi

xii
This page is intentionally blank.

1. Getting Started
GUIDE TO COMPONENTS
Front View
1. Document Feeder (ADF) / PlatenCoverThis holds up to 50 sheets which are fedat a time. Place the document face uphere. Close this platen cover when youset a document on the Exposure Glass.
2. Exposure GlassPlace the original aligning its upper leftcorner with the reference mark at the up-per left corner of the exposure glass.
3. Internal TrayUsually received fax messages are print-ed to the Internal Tray. Other tray canalso be selected for other prints or copies.See “Changing the Machine's Settings” ofthe System Settings.
1
2
3
4
5
6
7
8
ND0A02E4
MainPower
On
1

GETTING STARTED
2
1
4. ISDN Line connector⇒ P.218“Connecting The Machine To The IS-DN”
5. Main Power SwitchDo not touch this switch. This switch isused only by a service representative.
Note❒ If the Operation switch is on and there
is still no power, turn on the MainPower switch.
❒ If you leave the Main Power off formore than about an hour, all files inmemory are lost.
6. Optional HandsetThis permits voice communication.
7. Operation SwitchPress this switch to turn the power on(the On indicator lights up). To turn thepower off, press this switch again (the Onindicator goes off).⇒ P.7 “Turning On ThePower”, P.12 “Automatic Power ReceptionFunction”,P.126 “WHEN POWER ISTURNED OFF OR FAILS”
8. Optional Upper TrayThis tray can also be selected for otherprints or copies.
Rear View
1. Bypass TraySelect this tray to use non-standard sizepaper.
See P.18 “HOW TO SET AN ORIGINAL”in the Copy Reference.
ND8A01E4
1
2
3

GUIDE TO COMPONENTS
1
2. Analog Line Connector
3. Optional Handset/External Tele-phone connector
3

GETTING STARTED
4
1
Auto Image Density
9
212019
OPERATION PANEL
1. Communicating IndicatorLights during transmission or reception.
2. Receive File IndicatorLights to tell you a message has been re-ceived into memory. Blinks when aMemory Lock file has been stored inmemory. Note that this indicator doesnot inform you of a Confidential recep-tion.
3. Confidential File IndicatorLights when a message has been receivedinto memory with Confidential Recep-tion. ⇒ P.112 “PRINTING A CONFIDEN-TIAL MESSAGE”
4. User Function keysEach of these can be programmed forrapid access to frequently used features.
❖❖❖❖ Features Programmed by Default
*Text PhotoPhotoSpecial Orig. Lighter Darker
.
8
1817
TX FileStatus
01 02 03 04 05 06 07
08 01 10 11 12 13 14
15 16 17 18 19 20 21
22 23 24 25 26 27 28
2
1
3 4
2
2
22
11
F1 F2 F3 F4 F5
A B C D E F G
H I J K L M N
O P Q R S T U
V W X Y Z
Sort
Staple
Stack
1-Sided 2-Sided
2-Sided 2-Sided User Tools / Counter
EnhancedImage
Menu
SeriesCopies
MarginAdjust
Auto Reduce/Enlarge
Zoom
CombineCopies
Erase Center/Border
Copy
Fax
Book 2-Sided ImmediateTrans.MemoryTrans.
Standard
Detail
Super Fine
Commu-nicating
ReceiveFile
ConfidentialFile
StartManual RX
TELMode
1 2 3 5 6 7
1614 15
4
Key Standard With ISDN or stamp options
F1 Start Manual RX
←
F2 Transmission Result Display
←
F3 TEL Mode ←
F4 - ISDN selection
F5 - Stamp

OPERATION PANEL
1
Spe
On H
PauRed
TonAuto Image Density
9
212019
5. Resolution keyPress to switch between Standard, Detailand Super Fine (optional 400dpi Optionrequired).
6. Transmission Mode keyPress the key to toggle between MemoryTransmission (Memory Trans.) and Im-mediate Transmission (ImmediateTrans.) modes.
7. {{{{User Tools/Counter }}}} keyPress to enter User Tools mode. Thesetools allow you to customize the defaultsettings.
8. LCD displayThis guides you through tasks and in-forms you of the machine status. Messag-es appear here.
9. {{{{Speed Dial }}}} keyPress to select a Speed Dial.
10. {{{{On Hook Dial }}}} keyUse for making a phone call from thekeypad. You do not have to lift the hand-set.
11. {{{{Program }}}} keyThis key is used in Copier mode.
12. {{{{Clear Modes/Energy Saver }}}} keyEnergy saver: Hold down for more than a second to en-ter energy saving mode.Clear Modes: Cancels the current setting and returns tostandby with a single keystroke.
2 3
4 5 6
7 8
0
9
1
C
ed Dial
ook Dial
se /ial
e
Program Clear Modes /Energy Saver
Interrupt
Clear / Stop
Start
Enter
MainPower
ABC DEF
MNOJKLGHI
WXYTUV
OPER
PRS
C
On
1110 12 13
2522 2423
ND2A10E2
5

GETTING STARTED
6
1
13. {{{{Interrupt }}}} keyInterrupts the current fax operation tostart copying.
14. Quick Dial Flip PlateFlip this plate down to access Quick Dialkeys 01 through 28, flip up to access keys29 through 56.
15. Quick Dial keysUse to dial numbers at a single touch orto enter letters and symbols. Also use forGroup Dial, Keystroke and Program fea-tures.
16. {{{{Fax}}}} keyPress to switch to fax mode. It lights inred if the optional Facsimile unit hasproblem, there is a communication erroror there is no paper in the cassette .⇒P.124 “When the {Fax} key is Lit in Red”
17. {{{{Original Type }}}} keyUse when sending a halftone image suchas a photograph or a color original.
18. {{{{Lighter }}}} and {{{{Darker }}}} keys and{{{{Auto Image Density }}}} keyPress this key to adjust the density.
19. {{{{Selection }}}} keysPress the key under the item you wish toselect.
20. <<<< >>>> keysPress to move the cursor or select func-tions
21. {{{{Pause/Redial }}}} keyPause:Inserts a pause when you are dialing orstoring a fax number. A pause cannot beinserted as the first digit.Redial:Press to redial one of the last ten num-bers.
22. {{{{Tone}}}} keyPress to send tonal signals down a pulsedialing line.
23. Number keysUse to dial fax numbers or enter the num-ber of copies.
24. {{{{Start }}}} keyPress to start all tasks.
25. {{{{Clear/Stop }}}} keyClear:Deletes one character or digitStop:Interrupts the current operation (trans-mission, scanning, copying or printing).

STARTING THE MACHINE
1
STARTING THE MACHINE
To start the machine, turn on the op-eration switch.
Note❒ This machine automatically enters
Energy Saver mode or turns itselfoff if you do not use the machinefor a while. See “09. Energy SaverMode”, “10. Auto Off Timer” ofthe System Settings.
----Power switchesThis machine has two power switch-es: See P.1 “GUIDE TO COMPO-NENTS”
❖❖❖❖ Operation switchTurn on this switch to activate themachine. When the machine haswarmed up, you can make copiesor send faxes.
❖❖❖❖ Main power switchDo not touch the main powerswitch. It should be used only by aservice representative when theoptional fax unit is installed.
Important❒ If you leave the main power switch
off for more than one hour, all filesin memory are lost. See “TurningOff The Power” below.
Turning On The Power
AMake sure that the power cord isplugged into the wall outlet firm-ly and Main Power Switch is on.
B Turn on the operation switch tomake the On indicator light up.The panel display will come on.
Note❒ If nothing happens when you
turn on the operation switch,check if the main power switchis turned on.
❒ During the warm-up period,you can use the Auto Start func-tion. See “10. Auto Start” of theCopy Reference.
❒ Warming-up time is as follows.• 35 copy per minute model :
less than 85 seconds• 45 copy per minute model :
less than 100 seconds
top
ND1M01E0
MainPower
On
7

GETTING STARTED
8
1
Turning Off The Power
A Turn off the operation switch tomake the On indicator go off.
Important❒ Before you unplug the power
cord, make sure that the re-maining memory space indi-cates 100 % on the display forfacsimile mode.
❒ Files stored in memory will belost an hour after you turn themain power switch off or youunplug the power cord. ⇒ P.126“WHEN POWER IS TURNEDOFF OR FAILS”
top
ND1M01E0
MainPower
On

SWITCHING BETWEEN COPY MODE AND FAX MODE
1
SWITCHING BETWEEN COPY MODE AND FAX MODE
You can use this machine both as a fax machine and a copier. Ordinarily whenyou turn on the power switch, the Copy screen is shown and you are ready tomake copies. When you wish to use fax functions, press the {{{{Fax}}}} key on the leftof the operation panel.
Limitation❒ You cannot switch modes under the following circumstances:
• While scanning in a fax• During Immediate Transmission• While editing the System Settings• During Interrupt Copying• While using On-hook Dial
1
3 4
2
EnhancedImage
Menu
SeriesCopies
MarginAdjust
Auto Reduce/Enlarge
Zoom
CombineCopies
Erase Center/Border
Copy
Fax
Copy Mode
Facsimile Mode
ND0X02E0
9

GETTING STARTED
10
1
READING THE DISPLAY
The display tells you the machine sta-tus and guides you through opera-tions.
Note❒ Functions that have been selected
are hilighted as shown ( ).Keys that you can not select areshown with a dashed outline( ).
❒ All procedures in this manual as-sume you are in Fax mode. By de-fault, when you turn the machineon it is in Copy mode. Press the{{{{Fax}}}} key change to Fax mode.You can have the machine start inFax mode. See “Changing the Ma-chine's Settings” of the System Set-tings.
Standby Display
While the machine is in the standbymode (immediately after it is turnedon or after the {{{{Clear Modes/Energy Sav-er}}}} key is pressed), the following dis-play is shown.
❖❖❖❖ Memory Transmission
❖❖❖❖ Immediate Transmission
Note❒ To return the machine to standby
mode, perform one of the follow-ing:• If you have set an original and
are in the sending process, re-move the original.
• If you have not set an originaland are in the sending process,press the {{{{Clear modes/Energysaver }}}} key.
• If you are in User Tools mode,press the {{{{User Tools }}}} key.
Communication Display
While the machine is communicatingthe status is displayed.
❖❖❖❖ Display during Memory Transmission or Memory Reception:
Note❒ Even when the machine is sending
or receiving a fax message from/
11 17

READING THE DISPLAY
1
into memory, you can still scan thenext original into memory. ⇒ P.12“Dual Access”
❖❖❖❖ Immediate Transmission:
Display Prompts
Depending on the situation, the ma-chine will show various prompts onthe display.
❖❖❖❖ Instructions and Requests
❖❖❖❖ Questions
❖❖❖❖ Selections
❖❖❖❖ Status
11

GETTING STARTED
12
1
USEFUL FUNCTIONS
Automatic Power Reception Function
This machine can be set to shut downautomatically if nobody has used themachine for a while. In these situa-tions even through the operationswitch is off, the machine can still re-ceive incoming messages as long asthe Main Power switch is on.
Important❒ Reception is not possible if both
the operation switch and MainPower switch are turned off.
Note❒ By default, messages are printed as
soon as they are received (Immedi-ate Reception). To change this, seeP.203 “Changing the User Parame-ters”
Dual Access
The machine can scan other messagesinto memory even while sending afax message from memory, receivinga message into memory , or automat-ically printing a report. Since the ma-chine starts sending the secondmessage immediately after the cur-rent transmission terminates, the linewill be used efficiently.Note that during Immediate Trans-mission or when in User Tools mode,the machine cannot scan an original.
Personal Code Access
The machine can be set up so that no-body can use it without entering a
personal code. This prevents unau-thorized people from sending faxmessages and can be used to track Faxmachine use by giving a personalcode to each user.
Note❒ Register personal codes and turn
Personal Code Access on. The de-fault setting is off. ⇒ P.166 “Regis-tering Personal Codes”, P.169“Personal Code Access”
❒ Even if Restricted Access is en-abled, the machine can receive andprint a fax message.
A If Personal Code Access is turnedon, the display is shown as fol-lowing:
B Enter a personal code (4-digitnumber) using the number keys.
Note❒ If a user enters a personal code
that is not registered, the ma-chine returns to step 1.
Transmission With Image Rotation
For most purposes, set A4/LT origi-nals in the lengthwise direction (L).If you set an A4/LT original in thesideways direction (K), the image

USEFUL FUNCTIONS
1
will be sent rotated by 90°. Providingthe receiver has A4/LT lengthwisepaper (L), the message will be print-ed the same size as the original.
Limitation❒ The Quick Memory Transmission
feature is not available when usingthis feature.
❒ When Image Rotation is used, allmessages are sent by normal Mem-ory Transmission.
13

GETTING STARTED
14
1
ACCEPTABLE TYPES OF ORIGINALS
Make sure your originals are completely dry before setting them in the machine.Originals containing wet ink or correcting fluid will mark the exposure glass andresulting image will be affected.
Acceptable Original Sizes
Limitation❒ When using 2–sided transmission, A5K and HLTK cannot be available.
Originals Unsuitable for the Document Feeder (ADF)
Do not set the following types of originals in the Document Feeder (ADF) be-cause they may be damaged. Place them on the exposure glass instead.• Originals of sizes other than those specified in the previous table• Originals containing staples or clips• Perforated or torn originals• Curled, folded, or creased originals• Pasted originals• Originals with any kind of coating, such as thermosensitive paper, art paper,
aluminum foil, carbon paper, or conductive paper• Originals with indexes, tags, or other projecting parts• Sticky originals such as translucent paper• Thin and soft originals• Originals of inappropriate weight (see table above)
Where original is set
Acceptable original size Maximum number of sheets
Paper thickness
Exposure glass Maximum A3 (297 × 420 mm), 11" × 17" (279 × 432 mm)
1 ----
Document Feeder (ADF) Single Sided Document
Fax transmission: A5 L to A3 L (up to 432mm long) 8" × 51/2" L to 11" × 17" (DLT) L
50 52 - 128 g/m2 (14 - 34lb in inch version)
Document Feeder (ADF) Double-Sid-ed Document
Fax transmission: A5 L to A3 L (up to 432mm long) 8" × 51/2" L to 11" × 17" (DLT) L
50 52 - 105 g/m2 (14 - 28lb in inch version)

ACCEPTABLE TYPES OF ORIGINALS
1
• Originals in bound form, such as books• Transparent originals such as OHP transparencies or translucent paper
Original Sizes Difficult to Detect
The machine finds it difficult to detect the size of the following kinds of origi-nals. If this happens, the receiving machine may not select print paper of the cor-rect size. ⇒ P.17 “If the Machine Cannot Detect the Size of Your Original”• Document size other than the following (set on the exposure glass).• Originals with indexes, tags, or projecting parts• Transparent originals such as OHP transparencies or translucent paper• Dark originals with many characters or drawings• Originals which partially contain solid printing• Originals which have solid printing at their edgesThe following paper sizes are automatically detected in Fax mode.
❖❖❖❖ Inch Version
Limitation❒ A5 and HLT sizes are not available for 2-sided Transmission.
Paper size
Where original is placed
Exposure glass Document Feeder (ADF)
11" × 17" L Ο Ο
8 1/2" × 14"L Ο Ο
8 1/2" × 11" K L Ο Ο
5 1/2" × 8 1/2" K L × Ο
10" × 14" L Ο Ο
8 1/2" × 13" L Ο Ο
8 × 10" K Ο Ο
15
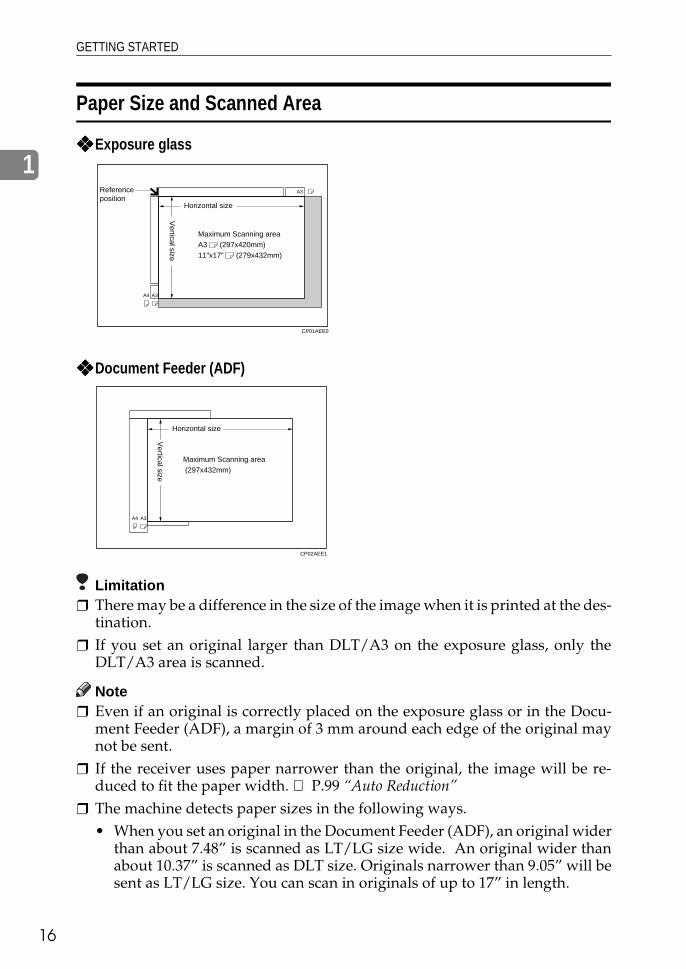
GETTING STARTED
16
1
Paper Size and Scanned Area
❖❖❖❖ Exposure glass
❖❖❖❖ Document Feeder (ADF)
Limitation❒ There may be a difference in the size of the image when it is printed at the des-
tination.❒ If you set an original larger than DLT/A3 on the exposure glass, only the
DLT/A3 area is scanned.
Note❒ Even if an original is correctly placed on the exposure glass or in the Docu-
ment Feeder (ADF), a margin of 3 mm around each edge of the original maynot be sent.
❒ If the receiver uses paper narrower than the original, the image will be re-duced to fit the paper width. ⇒ P.99 “Auto Reduction”
❒ The machine detects paper sizes in the following ways.• When you set an original in the Document Feeder (ADF), an original wider
than about 7.48” is scanned as LT/LG size wide. An original wider thanabout 10.37” is scanned as DLT size. Originals narrower than 9.05” will besent as LT/LG size. You can scan in originals of up to 17” in length.
A3
A3A4
Horizontal size
Vertical size
Referenceposition
Maximum Scanning areaA3 (297x420mm)11"x17" (279x432mm)
CP01AEE0
A3A4
Horizontal size
Vertical size
Maximum Scanning area (297x432mm)
CP02AEE1

ACCEPTABLE TYPES OF ORIGINALS
1
• When you set an original on the exposure glass, an original narrower thanabout 9.25” is scanned as LT/LG size wide. An original wider than 10.83”is scanned as DLT size wide. Normally, lengths up to a maximum of 17”can be scanned (this figure varies slightly depending on the type of origi-nal). If you select Irregular Scan Area, lengths up to 17” are possible.
----Maximum Scan AreaMemory Transmission/Immediate Transmission• From the Document Feeder (ADF): 297 × 432 mm (W × L) • From the exposure glass : 297 × 432 mm (W × L)
If the Machine Cannot Detect the Size of Your Original
If the machine cannot detect the original size, the following display is shown:
If this happens, carry out the following steps.
A Remove the original and replace it on the exposure glass. Press the {{{{Start }}}}key to scan the original again. If the machine still cannot detect the originalsize, the following display is shown:
B Press the <<<< and >>>> keys to switch the scan size and press the {{{{Start }}}} keyagain.
Length
width ∼"9.80 "9.80∼"10.79 "10.79∼"12.44 "12.44∼
∼"9.57 not detected LTL LTL LGL
"10.55∼ LTK DLTL DLTL DLTL
17
GETTING STARTED
18
1
HOW TO SET AN ORIGINAL
In this manual an original can mean a single or multiple page document. Youcan set your originals either in the Document Feeder (ADF) or on the exposureglass. Some types of originals are unsuitable for the Document Feeder (ADF) sothey must be set on the exposure glass. ⇒ P.14 “ACCEPTABLE TYPES OF ORIG-INALS” Which way you place your original depends on its size and whether you are us-ing the Document Feeder (ADF) or the exposure glass.
Limitation❒ If you set A5 size documents on the exposure glass, they will not be detected.
Note❒ When sending a fax, the image output at the other end depends on the size
and direction of paper used in the receiver's terminal. If the receiver does notuse paper of the same size and direction as that of the original, the fax imagemay be output reduced, trimmed at the both edges, or divided into two ormore sheets. When sending an important original, we recommend you to askthe receiver about the size and direction of the paper used in their terminal.
❒ When sending an original of an irregular (i.e. non-standard) size or part of alarge original, you can specify the scan area precisely. ⇒ P.86 “CHOOSINGTHE AREA TO BE SCANNED YOURSELF (IRREGULAR SCAN AREA)”
❒ You can scan non-standard sized documents as standard sized documentswith the Irregular Scan Area feature. When you turn on this feature, the areascanned will be in the specified range regardless of the actual document size.A blank margin will appear or the image will be truncated at the receivingend.
❒ Make sure that all ink, correcting fluid etc., has completely dried before set-ting your original. If it is still wet, the contact glass will be marked and thosemarks will appear on the received image.
❒ If you set an A4 size original in the sideways direction, the machine rotatesthe image by 90 degrees before sending it. ⇒ P.12 “Transmission With ImageRotation”

HOW TO SET AN ORIGINAL
1
----How to set A4, B4, A3, LT, LG and DLT size originals
----How to set A4, A5 and B5 size originals
Limitation❒ A5 size on the exposure glass is not detected.
Setting a Single Original on the Exposure Glass
Set originals that cannot be placed inthe Document Feeder (ADF) such as abook on the exposure glass one pageat a time.
A Lift the Document Feeder (ADF)by at least 30 degrees. Place theoriginal face down and align itsupper left corner with the refer-ence mark at the upper left cornerof the exposure glass.
1. Reference mark2. Scale
Where original is setExposure glass Document Feeder(ADF)
Original
ND0X01E2
Where original is setExposure glass Document Feeder(ADF)
Original
ND0X01E1
ND1C01E0
1
2
19

GETTING STARTED
20
1
Note❒ If you do not raise the Docu-
ment Feeder (ADF) by at least30 degrees, the original size willnot be detected.
B Close the Document Feeder(ADF).
Note❒ When sending a bound original,
the received image may containsome black areas. To reduce thiseffect, hold down the original toprevent its bound part from ris-ing.
----Bound Original Page OrderWhen sending bound originals(books, magazines, etc.), you canchoose to have either the left page orright page sent first.
Note❒ The default setting is Send Left
Page First. ⇒ P.203 “Changing theUser Parameters”
Setting Originals in the Document Feeder (ADF)
Use the Document Feeder (ADF) toscan in a stack of originals in one op-eration. The Document Feeder (ADF)can handle both single-sided anddouble-sided originals.
Limitation❒ Place all the originals to be sent in
a single stack. ❒ You cannot set originals in the
Document Feeder (ADF) one pageat a time or in sheaves.
❒ Do not open the Document Feeder(ADF) while it is scanning the orig-inals. Otherwise, document will bejammed.
❒ You cannot scan the original usingthe Document Feeder (ADF), Scan-ning is not possible if there are anydocuments left on the exposureglass. Remove any remaining doc-uments from the exposure glassbefore you begin.
Note❒ If an original jams, press the {{{{Clear/
Stop}}}} key then remove the originalcarefully.
❒ If your original is bent or folded,flatten it before you set it.
❒ Set thin originals on the exposureglass.
ReferenceFor information about the sizesand number of originals that canbe placed in the Document Feeder(ADF), see P.14 “ACCEPTABLETYPES OF ORIGINALS”.
ND0X04E1
Original is on exposure glass.Remove original.
OK

HOW TO SET AN ORIGINAL
1
A Adjust the original guide tomatch the size of your originals.Align the edge of your originalsand stack them in the DocumentFeeder (ADF) face up.
1. Limit mark2. Document guide
----Scanning In Mixed Sized Originals
If you wish to scan in stacks of origi-nals containing mixed paper sizesfrom Document Feeder (ADF), youcan have the machine automaticallydetect the size of each original.
Note❒ By default this feature is turned
off. To turn it on, adjust the UserParameters. ⇒ P.203 “Changing theUser Parameters”
❒ Scanning may take slightly longerwhen this function is turned on.
❒ Small originals may be sent at aslight slant if they are not stackedflush against the Document Feeder(ADF) document guides.
❒ If you try and set a stack of mixedsize originals in the Document
Feeder (ADF) with this functionturned off, a paper jam may occur.
----Destination Tray for Originals Scanned From the Document Feeder (ADF)
You can have originals scanned infrom the Document Feeder (ADF) ei-ther delivered to the Document Feed-er Tray, or the External Tray.
1. ADF tray2. ADF external tray
Note❒ If you select the ADF external tray,
you cannot use the Stamp feature.❒ To choose which tray is used, edit
the Output Tray setting in the Sys-tem Settings. See “USER TOOLS”of the System Settings.
ND1X02E5
1
2
ND1D04E0
1 2
21

GETTING STARTED
22
1
WHERE INCOMING MESSAGE ARE DELIVERED—OUTPUT TRAY
To change where incoming messagesare delivered, adjust the Output Traysetting in the System Settings.
When the Selected Output Tray Becomes Full
If you install the optional Finisher, themachine automatically detects whenthe selected Output Tray becomesfull. When this happens, a warningwill appear on the display and themessage will be received using Sub-stitute Reception. Messages receivedthis way will be automatically print-ed as soon as you empty the OutputTray.
When the Finisher is Installed
You can use the Finisher for large ca-pacity paper delivery and sort deliv-ery.
Limitation❒ When the optional 3000-sheet Fin-
isher is installed and you set theOutput Tray to Internal Tray, re-ceived messages longer than 12.9”(330mm) are delivered to the Fin-isher Proof Tray. For example, ifthe first page sent is 8.5" × 11" L/A4L and the following pages are11" × 17" L/A3L, the first pagewill be delivered to the InternalTray and the following pages tothe Finisher Proof Tray.
❒ If you have selected the optional1000-sheet Finisher as the OutputTray and a copy document longerthan 13.3” (340mm) is left in the
Finisher, incoming messages areautomatically delivered to the In-ternal Tray.
Note❒ If you receive messages larger than
12.9” (330mm) on a regular basis,we recommend that you choose anOutput Tray setting other than In-ternal Tray.

2. Sending a Fax Message
OVERVIEW
Overview
The basic procedure to send a fax message is:A Make sure the Fax indicator is litB Set your originalC Dial the numberD Press {{{{Start }}}}The rest of this section describes these steps and the various features that areavailable in more detail.There are two ways to send a fax message:• Memory Transmission• Immediate TransmissionCheck the indicators on the operation panel to check which mode is currently ac-tive and press the Transmission Mode key to toggle between them.
23

SENDING A FAX MESSAGE
24
2
MEMORY TRANSMISSION
In Memory Transmission mode, afteryou press the {{{{Start }}}} key, the machinedoesn't dial the destination until allpages of your fax message havescanned into memory (in contrastwith Immediate Transmission, wherethe number is dialed first and pagesare scanned and sent one by one).Memory Transmission is useful be-cause:• You can take your original away
from the machine without havingto wait too long
• While your message is being sent,other people can operate the ma-chine
• You can send the same message tomore than one place in a single op-eration (Broadcasting)
Important❒ If there is a power failure (main
power switch is off) or the plug ispulled out for more than 1 hour, allthe files stored in memory are de-leted. As soon as power is restored,the Power Failure Report is print-ed to help you identify deletedfiles . If you turn just the operationswitch off, files are not deleted. ⇒P.126 “WHEN POWER ISTURNED OFF OR FAILS”
Limitation❒ If memory is full (0% appears on
the display), Memory Transmis-sion is disabled. Use ImmediateTransmission instead.
Note❒ Maximum number of Memory
Transmission files: 200
❒ Maximum number of destinationsper Memory Transmission: 200
❒ Combined total number of desti-nations that can be stored: 500
❒ The number of pages that you canstore in memory depends on theoriginal images and the scan set-tings. You can store up to 160 stan-dard pages (ITU-T No.1 chart,Resolution: Standard, photo mode:OFF).
❒ As default, the machine will returnto the default transmission mode(Memory Transmission) after ev-ery transmission. You can changethis so that the current mode ismaintained. ⇒ P.203 “Changing theUser Parameters”
❒ You can expand the amount ofmemory available for storing doc-uments by installing either of thefollowing options: • With optional Fax Feature Ex-
pander: Up to about 480 pages• With optional Fax Feature Ex-
pander and the Hard Disk: Upto about 3000 pages
AMake sure that the MemoryTransmission indicator is lit.
If it isn't, press the {{{{TransmissionMode}}}} key.
B Set the original.
Limitation❒ You can send the first pages
from the exposure glass then
TX FileStatus
F1 F2 F3 F4 F5
ImmediateTrans.MemoryTrans.
Standard
Detail
Super Fine
Commu-nicating
ReceiveFile
ConfidentialFile
StartManual RX
TELMode
ND2L03E1

MEMORY TRANSMISSION
2
the remaining pages from theDocument Feeder (ADF). Afteryou place the last page on theexposure glass, you have 60 sec-onds to insert the remainingpages in the Document Feeder(ADF).
❒ Note that you cannot set pageson the exposure glass after youhave started using the Docu-ment Feeder (ADF).
❒ Do not open the DocumentFeeder (ADF) while it is scan-ning in originals.
Note❒ Place the original you want to
store in memory on the expo-sure glass or the DocumentFeeder (ADF). To store multiplepage originals from the expo-sure glass, set them page bypage.
❒ You can scan half the pages ofyour original from the exposureglass and the remainder fromthe Document Feeder (ADF).When you have finished scan-ning from the exposure glass,place the rest of the pages in theDocument Feeder (ADF) andpress{{{{Start }}}} .
❒ The original can be placed atany time up until you press the{{{{Start }}}} key.
ReferenceP.18 “HOW TO SET AN ORIGI-NAL”
C Select any scan settings you re-quire. ⇒ P.37 “SCAN SETTINGS”
D Dial. If you wish to send the samemessage to more than one desti-nation, press [Add ] and dial anoth-
er destination. Repeat this stepfor all destinations.
If you make a mistake, press the{{{{Clear/Stop }}}} key and enter the cor-rect number again.
Note❒ When dialing with the number
keys or using Chain Dial (P.46“Chain Dial”), you can select theline type (G3 or G4) beforepressing [Add ] in step 4.
❒ If you do not set an originalwithin 30 seconds of entering adestination fax number, thetransmission is cancelled.
ReferenceP.43 “DIALING”
E Press the {{{{Start }}}} key.
The machine starts scanning theoriginal.The machine calls the destination.The name or fax number which isprogrammed as the RTI or CSI in
C
d Dial
ook Dial
e /al
Clear / Stop
Start
Enter
ND2R02E1
2 3
4 5 6
7 8
0
9
1ABC DEF
JKL MNOGHI
WXYTUV
OPER
PRS
25

SENDING A FAX MESSAGE
26
2
the other end is shown on the dis-play.
ReferenceP.193 “RTI/TTI”
After transmission, the machinewill return to standby mode.
----Checking the Transmission Result
• Turn the Transmission Result Re-port on if you want a report to beprinted after every successfultransmission. ⇒ P.24 “MEMORYTRANSMISSION”If you leave the Transmission Re-sult Report off, the report will notbe printed after every transmis-sion. However, should a transmis-sion fail, a Communication FailureReport will be printed instead.
• If you turn the Transmission Re-sult Report (Memory Transmis-sion) off, the Error Report will beprinted when the communicationon fails.
• You can also check the transmis-sion result by examining the TCR.⇒ P.116 “PRINTING THE TCR”You can either print or scrollthrough the TCR on the display. ⇒P.110 “CHECKING THE TRANS-MISSION RESULT (TX STATUS)”
----Sending a Fax Message Immediately
To send a fax message immediately,use Immediate Transmission. If youhave just set up an original for broad-casting, Immediate Transmission willinterrupt the current communication. If there are files queued in addition tothe file being currently sent, youroriginal is not be sent until thequeued files have been sent.
----Automatic RedialIf a fax message could not be trans-mitted because the line was busy oran error occurred during transmis-sion, redialing is done 4 times at 5minutes intervals (these figures varyaccording to which country you arein).If redialing fails after four redials, themachine cancels the transmission andprints the Transmission Result Reportor Communication Failure Report. ⇒P.29 “Transmission Result Report(Memory Transmission)”, P.29 “Com-munication Failure Report”, P.126“WHEN POWER IS TURNED OFFOR FAILS”
----Broadcasting SequenceIf you dial several destinations for thesame message (Broadcasting) themessages are sent in the order inwhich they were dialed. If the faxmessage could not be transmitted, themachine redials that destination afterthe last destination specified forBroadcasting. For example, if you

MEMORY TRANSMISSION
2
specify four destinations A through Dfor broadcasting, and if the lines todestinations A and C are busy, themachine dials the destinations in thefollowing order: A, B, C, D, A, and C.
----Broadcasting: Checking Progress
To check which destinations the faxmessage has been sent to so far, printthe TX file list. ⇒ P.109 “PRINTING ALIST OF FILES IN MEMORY (PRINTTX FILE LIST)”
----If Memory Runs Out While Storing an Original
If you run out of memory while stor-ing an original (free space reaches0%), “Memory full” is displayed.Press Exit to transmit the stored pagesonly.
Note❒ By default, successfully scanned
pages are sent. If you wish tochange this setting, please contactyour service representative.
----Batch TransmissionIf you send a fax message by MemoryTransmission and there is another faxmessage waiting in memory to besent to the same destination, thatmessage is sent along with your orig-inal. Several fax messages can be sentwith a single call, thus eliminating theneed for several separate calls. Thishelps save communication costs andreduce transmission time.Fax messages for which the transmis-sion time has been set in advance aresent by batch transmission when thattime is reached.
Note❒ By default Batch Transmission is
switched on. You can switch it onor off with the User Parameters. ⇒P.203 “Changing the User Parame-ters”
----ECM (Error Correction Mode)This feature automatically resendsdata that wasn't transmitted success-fully using a system that complieswith international standards.ECM requires that the destinationmachine has the same feature.
Note❒ By default ECM is switched on.
You can change this with the KeyOperator Settings. ⇒ P.166 “KEYOPERATOR SETTINGS”
ND1X03E0
27

SENDING A FAX MESSAGE
28
2
----Parallel Memory TransmissionThis function dials while the originalis being scanned. Standard MemoryTransmission stores the original inmemory, then dials the destination.Parallel Memory Transmission al-lows you to quickly determinewhether a connection was made. Inaddition, this function scans the orig-inal faster than Immediate Transmis-sion and is useful when you are in ahurry and need to use the original foranother purpose.
Note❒ By default this feature is turned on.
You can change this with the UserParameters. ⇒ P.203 “Changing theUser Parameters”
Limitation❒ Standard Memory Transmission is
used instead of Parallel MemoryTransmission in the following cas-es. • When the line is busy and could
not be connected to• With Send Later• With Transfer Request• With 2-Sided Transmission• When you store an original for
Memory Transmission whileanother communication is inprogress
• When two or more destinationsare specified
• When you send just an AutoDocument
• When the original is set on theexposure glass
• With the image rotation
❒ If you press the {{{{Clear/Stop }}}} key,the original jams, or memory be-comes full during Parallel MemoryTransmission, the machine stopstransmitting and prints the Trans-mission Result Report (MemoryTransmission). The file is erased.
❒ Total stored page numbers are notprinted in the Parallel MemoryTransmission. Only the page num-bers are printed, such as P.1, P,2not 1/2, 2/2
Note❒ If you run out of memory, normal
Memory Transmission takes place.When and if this happens variesdepending on the various optionsyou have installed.
Memory Storage Report
This report is printed after an originalis stored in memory. It helps you re-view the contents and the destina-tions of stored originals. Even if themachine is set up not to print this re-port, it is still printed if an originalcould not be stored.
Note❒ You can turn this report on and off.
By default it is not printed. ⇒ P.203“Changing the User Parameters”
❒ You can choose whether to includepart of the original image on the re-port (part of the image is printedby default). ⇒ P.203 “Changing theUser Parameters”

MEMORY TRANSMISSION
2
Transmission Result Report (Memory Transmission)
This report is printed when a Memo-ry Transmission is completed so youcan check the result of the transmis-sion. If two or more destinations arespecified, this report is printed afterthe fax message has been sent to allthe destinations. If the machine is setup not to print this report and the faxmessage could not be successfullytransmitted, the Communication Fail-ure Report is printed. ⇒ P.29 “Com-munication Failure Report”
Note❒ By default this function is turned
on so you need to turn it off. ⇒P.203 “Changing the User Parame-ters”
❒ You can choose whether to includepart of the original image on the re-port (by default, part of the imageis printed).⇒ P.203 “Changing theUser Parameters”
Communication Failure Report
This report is only printed if theTransmission Result Report is turnedoff and a message could not be suc-cessfully transmitted with MemoryTransmission. Use it to keep a recordof failed transmissions so you cansend them again.
Note❒ You can choose whether to include
part of the original image on the re-port (by default, part of the imageis printed). ⇒ P.203 “Changing theUser Parameters”
29

SENDING A FAX MESSAGE
30
2
CANCELING A MEMORY TRANSMISSION
Canceling a Transmission While the Original Is Being Scanned in
A Press the {{{{Clear/Stop }}}} key.
The machine will stop storing theoriginal and the data will not besent.
Canceling a Transmission While the Message is Being Sent
Use this procedure to cancel a trans-mission after the original has beenscanned in.
Limitation❒ If transmission finishes while you
are caring out this procedure, itwill not be canceled.
Note❒ If you cancel a file while it is being
sent, transmission is halted as soonas you finish this procedure. How-ever, some pages of your messagemay have already been sent andwill be received at the other end.
A Press [Info. ].
The Information menu is shown.
B Enter the “Check/Cancel TXFiles” function number with thenumber keys.
Note❒ If “Check/Cancel TX Files” is
not shown, press [↑↑↑↑Prev. ] or [↓↓↓↓N-ext ].
C Press the <<<< or >>>> key until thefile you want to delete is shownand press [Delete].
C
d Dial
ook Dial
e /al
Clear / Stop
Start
Enter
ND2R02E2
2 3
4 5 6
7 8
0
9
1ABC DEF
JKL MNOGHI
WXYTUV
OPER
PRS
ND1X03E0
ND1X02E7

CANCELING A MEMORY TRANSMISSION
2
D Press [Yes].
The file is erased.
E Press [Exit ].
Note❒ To delete another file, repeat
steps 3 and 4.
F Press [Exit ].
ND1X03E0
ND1X03E0
ND1X03E0
31

SENDING A FAX MESSAGE
32
2
IMMEDIATE TRANSMISSION
With Immediate Transmission, whenyou press the {{{{Start }}}} key, the faxnumber is dialed straight away (i.e.immediately). The message isscanned and transmitted page bypage without being stored in memo-ry. This contrasts with MemoryTransmission which scans in all pagesinto memory before dialing the desti-nation.Immediate Transmission is useful ifyou want immediate confirmationthat the message is being sent to thecorrect destination (just check the oth-er terminal's RTI or CSI on the opera-tion panel during transmission).
Note❒ You cannot send the same message
to multiple destinations (Broad-casting). Use Memory Transmis-sion for this purpose.
❒ Place the original on the exposureglass or in the Document Feeder(ADF). To send two or more pagesfrom the exposure glass, set themone page at a time.
❒ You can scan some pages of youroriginal from the exposure glassand the remainder from the Docu-ment Feeder (ADF). When youhave finished scanning from theexposure glass, place the remain-der of the pages in the DocumentFeeder (ADF) and press{{{{Start }}}}within ten seconds.
❒ By default, the transmission modeselected when the machine isturned on or when modes arecleared (transmission mode homesetting) is Memory Transmission.You can change this with the User
Parameters. ⇒ P.203 “Changing theUser Parameters”
A Check that the Immediate Trans-mission indicator is lit.
If it is not lit, press the {{{{Transmis-sion mode. }}}} key.
B Set your original.
Limitation❒ Do not open the Document
Feeder (ADF) while it is scan-ning the originals. Otherwise,document will be jammed.
Note❒ You can set the original any
time up until you press the{{{{Start }}}} key.
ReferenceHow to Set an Original ⇒ P.18“HOW TO SET AN ORIGINAL”
C Select any scan settings you re-quire. ⇒ P.37 “SCAN SETTINGS”
D Dial.
If you make a mistake, press the{{{{Clear/Stop }}}} key and enter the cor-rect number again.
Note❒ If you are dialing with the num-
ber keys or Chain Dial (P.46
TX FileStatus
F1 F2 F3 F4 F5
ImmediateTrans.MemoryTrans.
Standard
Detail
Super Fine
Commu-nicating
ReceiveFile
ConfidentialFile
StartManual RX
TELMode
ND2L03E1

IMMEDIATE TRANSMISSION
2
“Chain Dial”), you can select thetype of line you want (G3 orG4).
ReferenceP.43 “DIALING”P.41 “CHANGING LINE TYPE”
E Press the {{{{Start}}}} key.
The machine calls the destination.While it is dialing, the number orname which is programmed as theRTI or CSI in the machine of theother party is shown on the dis-play. When connected, the ma-chine starts scanning the original.
ReferenceP.193 “RTI/TTI”
After transmission the machinewill return to standby mode.
----If the Connection Could Not Be Made
If it was not possible to make a con-nection with the number you dialed(e.g., the line was busy or there is aline problem), the following displaywill appear.
You have two options:• To have the machine redial and try
and send the message by MemoryTransmission, press [Memory TX ].All originals will be scanned intomemory then redialing will begin.
• To cancel this transmission, press[Cancel ] then [OK].
----ECM (Error Correction Mode)This feature automatically sends datathat wasn't transmitted successfullyagain using a technique called ECM,an internationally recognized proto-col (requires that the destination ma-chine has the same feature).
Note❒ By default, ECM is on. You can
turn it off. ⇒ P.171 “ECM”
Transmission Result Report (Immediate Transmission)
If you turn this report on, a report willbe printed after every ImmediateTransmission so you have a record ofwhether the transmission was suc-
C
d Dial
ook Dial
e /al
Clear / Stop
Start
Enter
ND2R02E1
2 3
4 5 6
7 8
0
9
1ABC DEF
JKL MNOGHI
WXYTUV
OPER
PRS
33

SENDING A FAX MESSAGE
34
2
cessful or not. If the machine is set upnot to print this report and the faxmessage could not be successfullytransmitted, the Error report is print-ed instead.
Note❒ You can switch this report on or off
with the User Parameters. ⇒ P.203“Changing the User Parameters”
On-hook Dial
This is just like using the external tele-phone, except you do not have to pickup the external telephone before dial-ing. Just press the On Hook Dial keyand dial the number. If you hear avoice, you can pick up the externaltelephone and speak with the otherparty.
Limitation❒ This feature is not available in
some countries.❒ On-hook Dial does not work with
ISDN lines.
ReferenceP.192 “Monitor Volume”
A Set your original and select anyscan settings you require.
ReferenceP.18 “HOW TO SET AN ORIGI-NAL”P.37 “SCAN SETTINGS”
B Press the {{{{On Hook Dial }}}} key.
You will hear a low tone from theinternal speaker. If you wish tocancel this operation, press the {{{{OnHook Dial }}}} key again.
C Dial.
The machine immediately dials thedestination. If you make a mistake,press the {{{{On hook dial }}}} or {{{{ClearModes/Energy Saver }}}} key and returnto step 2.
DWhen the line is connected andyou hear a high-pitched tone,press the {{{{Start }}}} key.
• If you hear a voice, pick up theexternal telephone before youpress the {{{{Start }}}} key and notifythe destination that you want tosend a fax message (ask them toswitch to Fax mode).
C
Speed Dial
On Hook Dial
Pause /Redial
Tone
Clear / Stop
Start
Enter
ND2R03E2
2 3
4 5 6
7 8
0
9
1ABC DEF
JKL MNOGHI
WXYTUV
OPER
PRS

IMMEDIATE TRANSMISSION
2
• After transmission the machinewill return to standby mode.
Manual Dial
The external telephone is required to usethis function.
Pick up the handset of the externaltelephone and dial. When the line isconnected and you hear a high-pitched tone, press the {{{{Start }}}} key tosend your fax message. If, on the oth-er hand, you hear a voice at the otherend, continue your conversation asyou would normally over the tele-phone.
Limitation❒ Manual Dial does not work with
ISDN lines.❒ The result of the transmission with
manual dial is not mentioned inthe Transmission Result Report(Immediate Transmission).
❒ In energy saving mode, you mayhear no sound for a few seconds af-ter picking up the external tele-phone. You can operate after youcan hear the tone.
A Set your original and select anyscan settings you require.
ReferenceP.18 “HOW TO SET AN ORIGI-NAL”P.37 “SCAN SETTINGS”
B Pick up the external telephone.
You will hear a tone.
C Dial.
If you make a mistake, replace theexternal telephone and try againfrom step 2.
DWhen the line is connected andyou hear a high-pitched tone,press the {{{{Start }}}} key to send yourfax message.
E Replace the handset of the exter-nal telephone.
After transmission the machinewill return to standby mode.
35

SENDING A FAX MESSAGE
36
2
CANCELING AN IMMEDIATE TRANSMISSION
Canceling a Transmission Before You Have Pressed Start
Use this procedure to cancel a trans-mission before you have pressed the{{{{Start }}}} key.
A Press the {{{{Clear Modes/Energy Sav-er}}}} key.
Note❒ When you have already set the
original, you can also cancel anImmediate Transmission by re-moving the original from themachine.
Canceling a Transmission After You Have Pressed the Start Key
A Press the {{{{Clear/Stop }}}} key then re-move the original.
Note❒ If the transmission finishes
while you are carrying out thisprocedure, it will not be can-celed.
2 31eed Dial
Program Clear Modes /Energy Saver
InterruptC
ND2R01E0
C
d Dial
ook Dial
e /al
Clear / Stop
Start
Enter
ND2R02E2
2 3
4 5 6
7 8
0
9
1ABC DEF
JKL MNOGHI
WXYTUV
OPER
PRS

SCAN SETTINGS
2
SCAN SETTINGS
You may wish to send many differenttypes of fax message. Some of thesemay be difficult to reproduce at theother end. However, your machinehas three settings that you can adjustto help you transmit your documentwith the best possible image quality.
❖❖❖❖ Resolution:Standard, Detail, Super Fine (op-tion)
❖❖❖❖ Image density:Auto Image Density, Manual Im-age Density (5 levels)
❖❖❖❖ Original type:Text, Text·Photo, Photo
Resolution
Images and text are scanned into themachine by converting them to se-quences of dots. The frequency ofdots determines the quality of the im-age and how long it takes to transmit.Therefore, images scanned at highresolution (Super Fine) have highquality but transmission takes longer.Conversely, low resolution (Stan-dard) scanning results in less qualitybut your original is sent more quick-ly. Choose the setting that matchesyour needs based upon this trade offbetween speed and image clarity.
❖❖❖❖ Standard (8 ×××× 3.85 lines/mm, 200 ××××100dpi)Select for originals containing nor-mal sized characters.
❖❖❖❖ Detail (8 ×××× 7.7 lines/mm, 200 ×××× 200 dpi)Select for originals containingsmall characters or when you re-
quire greater clarity. This resolu-tion is twice as fine as Standard.
❖❖❖❖ Super Fine (Optional 400dpi card isrequired: 16 ××××15.4 lines/mm, 400 ××××400dpi)Select for originals with very finedetails or when you require thebest possible image clarity. Thisresolution is eight times as fine asStandard.
Limitation❒ If the other party's machine does
not support the resolution atwhich you are sending, this ma-chine automatically switches to aresolution which is supported.
❒ Sending with Super Fine resolu-tion requires that your machinehas the optional 400dpi option andthe other party's machine has thecapability to receive fax messagesat Super Fine resolution. Note thateven if the option is installed onyour machine, transmission andreception may take place usingDetail resolution if the other par-ty's machine does not support thisfeature.
Note❒ When the machine is turned on or
modes are cleared, the resolution isset to Standard by default. You canchange this with the User Parame-ters. ⇒ P.203 “Changing the UserParameters”
❒ By default, the resolution returnsto the home setting after everytransmission. You change this withthe User Parameters. ⇒ P.203“Changing the User Parameters”
37

SENDING A FAX MESSAGE
38
2
A Press the Resolution key toswitch between resolutions. Theindicators above the key show thecurrent selection.
Original Type
If your original contains photo-graphs, illustrations or diagrams withcomplex shading patterns or grays,select the appropriate Original Typeto optimize image clarity.
❖❖❖❖ Text (Default Setting)Text is selected when the Photoand Text·Photo indicators are notlit. Select Text to send an originalcontaining a high-contrast black-and-white image. Use this settingeven if your original contains textand photographs if you only wantto send clearer text.
❖❖❖❖ Text·PhotoText·Photo is selected when theText·Photo indicator is lit. SelectText·Photo to send an original con-taining both a high-contrast black-and-white image, such as text, anda halftone image such as a photo-graph.
❖❖❖❖ PhotoPhoto is selected when the Photoindicator is lit.Select Photo to send an originalcontaining a halftone image suchas a photograph or a color original.
Limitation❒ If you select Text·Photo or Photo,
the Resolution is automatically setto Detail. Even if you select Stan-
dard again, the image density willnot return to Standard.
Note❒ If you select Text·Photo or Photo,
the transmission will take longerthan when Text is selected.
❒ If you send a fax message withText·Photo or Photo and the back-ground of the received image isdirty, reduce the density settingand re-send the fax.
❒ When the machine is turned on ormodes are cleared, Original Typeis set to Text. You can change thiswith the User Parameters. ⇒ P.203“Changing the User Parameters”
❒ By default, the machine returns tothe Original Type home setting af-ter every transmission. You canchange this with the User Parame-ters. ⇒ P.203 “Changing the UserParameters”
A Press the {{{{Original Type }}}} key re-peatedly until the indicatormatching the type you require islit.
When both indicators are not lit,the Original Type is Text.
Image Density (Contrast)
The text and diagrams in your origi-nal should stand out clearly from thepaper they are written on. If youroriginal has a darker backgroundthan normal (for example, a newspa-per clipping), or if the writing is faint,adjust the image density.
TX FileStatus
F1 F2 F3 F4 F5
ImmediateTrans.MemoryTrans.
Standard
Detail
Super Fine
Commu-nicating
ReceiveFile
ConfidentialFile
StartManual RX
TELMode
ND2L03E2
Text PhotoPhotoSpecial Orig. Lighter Darker Auto Image Density
.
ND2C02E3

SCAN SETTINGS
2
By default, this machine will auto-matically select a density setting ap-propriate to the original (Auto ImageDensity). If you wish to set the densi-ty yourself, use Manual Image Densi-ty.
Auto Image Density
The machine automatically selects animage density which is the most ap-propriate for the original.By default, Auto Image Density is se-lected when the machine is turned onor modes are cleared. You can changethis with the User Parameters. ⇒P.203 “Changing the User Parameters”
A If the Auto Image Density indica-tor is not lit, press the llll key toturn it on.
Manual Image Density
Use the Image Density keys to varythe image density within 5 levels.
AMake sure that the Auto ImageDensity indicator is not lit. If it islit press the llll key to turn it off.
B Press the iiii or jjjj key to changethe density. The indicators abovethe keys show the level.
Mixing Scan Settings in a Multiple Page Original
When sending an original consistingof several pages, you can select differ-ent Image Density, Resolution andOriginal Types for each page.Set your original, select the scan set-tings for the first page, dial and press{{{{Start }}}} as you would normally. Thenfollow one of the following two pro-cedures.
When Setting Originals on the Exposure Glass
While the machine is bleeping, youhave about 60 seconds (10 for Imme-diate Transmission) to select density,resolution and original type. The re-maining time is shown on the display.
A Check the pages you wish tochange the setting.
B Remove the previous page and setthe next page.
C Select the Image Density, Resolu-tion and Original type.
Note❒ You adjust settings for each
page before you press the{{{{Start }}}} key.
Text PhotoPhotoSpecial Orig. Lighter Darker Auto Image Density
.
ND2C02E1
Text PhotoPhotoSpecial Orig. Lighter Darker Auto Image Density
.
ND2C02E1
Text PhotoPhotoSpecial Orig. Lighter Darker Auto Image Density
.
ND2C02E2
ND2L03E0
TX FileStatus
F1 F2 F3 F4 F5
ImmediateTrans.MemoryTrans.
Standard
Detail
Super Fine
Commu-nicating
ReceiveFile
ConfidentialFile
StartManual RX
TELMode
Text PhotoPhotoSpecial Orig. Lighter Darker Auto Image Density
.
ND2C02E0
39

SENDING A FAX MESSAGE
40
2
When Setting Originals in the Document Feeder (ADF)
A Check the pages you wish tochange the setting.
B Select the Image Density, Resolu-tion and Original Type before thenext page is scanned.
ND2L03E0
TX FileStatus
F1 F2 F3 F4 F5
ImmediateTrans.MemoryTrans.
Standard
Detail
Super Fine
Commu-nicating
ReceiveFile
ConfidentialFile
StartManual RX
TELMode
Text PhotoPhotoSpecial Orig. Lighter Darker Auto Image Density
.
ND2C02E0

CHANGING LINE TYPE
2
CHANGING LINE TYPE
The optional ISDN unit is required to use this function.
This machine comes with a single An-alog (PSTN) line connection for G3communication as standard. If youinstall the ISDN Unit option, an extradigital (ISDN) line connection forboth G3 and G4 communication be-comes available.When you use G4, press the {{{{F4}}}} keyto lit the lamp.G4 is selected when this key is lit, G3is selected when it is not lit.Press the key once to switch betweenG3 and G4.
Limitation❒ Under the operation procedure for
transmission, you can select theline type if dialing with the num-ber keys or Chain Dial.
----To Switch to G3If the {{{{F4}}}} key is lit, press it once toswitch to G3.
----To Switch to G4If the {{{{F4}}}} key is not lit, press it onceto switch to G4.
Limitation❒ If you select G4 mode, JBIG com-
pression is not available.
----Which line is used for G3 transmissions?
ISDN lines can be used for G3 com-munication as well as G4 communica-tions, so this machine is set by defaultto use the ISDN line for both G3 andG4 transmissions. If you wish to usethe Analog (PSTN) line for G3 trans-missions, please contact your servicerepresentative.
Note❒ When you use G3 with ISDN, you
can set the subaddress.
TX FileStatus
01 02 03 04 05 06
F1 F2 F3 F4 F5
De
Su
nicating File File
StartManual RX
TELMode
ND2L04E1
TX FileStatus
01 02 03 04 05 06
F1 F2 F3 F4 F5
De
Su
nicating File File
StartManual RX
TELMode
ND2L04E1
41

SENDING A FAX MESSAGE
42
2
----Auto IdentificationThis feature used when G4 is selected.The machine first tries a G4 commu-nication and if it cannot connect be-cause the receiver is not a G4terminal, it automatically switches toG3 and redials.
Note❒ If the G3 line at the destination is
connected to the ISDN via a TA(Terminal adapter) or a PBX, sincethe called number is on ISDN, it isregarded as G4 and the Auto Iden-tification feature may not automat-ically switch this machine to G3.

DIALING
2
DIALING
There are three main ways to dial anumber:
❖❖❖❖ Number keys:Enter numbers directly using thekey pad on the right side of the op-eration panel.
❖❖❖❖ Quick Dials:When you have stored a destina-tion's number in a Quick Dial key,you can dial the number by justpressing that key. Additionally,you can store a name that will ap-pear on the display whenever youpress that Quick Dial.
❖❖❖❖ Speed Dials:If you store a number in a SpeedDial, when you want to dial it, justpress the Speed Dial key followedby a 2 or 3 digit code. Like QuickDials, you can store a name alongwith the number.
This section covers these features andothers in more detail.
Number Keys
Enter numbers directly using the keypad on the right side of the operationpanel.
Note❒ Maximum length of a fax number:
254 digits.❒ You can insert pauses and tones in
a fax number. ⇒ P.44 “Pause”, P.45“Tone”
❒ If the ISDN unit is installed, youmay need to enter a subaddress. ⇒P.45 “Subaddress (ISDN option re-quired)”
A Set your original and select anyscan settings you require.
ReferenceP.18 “HOW TO SET AN ORIGI-NAL”P.37 “SCAN SETTINGS”
B Enter the fax number with thenumber keys.
The digits appear on the display asyou enter them.
Note❒ If you make a mistake, press the{{{{Clear/Stop }}}} key to erase thewrong digits and try again.
❒ If you wish to send this messageto more than one destination,press [Add ], then enter the nextdestination.
❒ If the optional ISDN unit is in-stalled, select G3 or G4 beforeyou go to the next step. ⇒ P.41“CHANGING LINE TYPE”
C Press the {{{{Start }}}} key.
C
d Dial
ook Dial
e /al
Clear / Stop
Start
Enter
ND2R02E0
2 3
4 5 6
7 8
0
9
1ABC DEF
JKL MNOGHI
WXYTUV
OPER
PRS
43

SENDING A FAX MESSAGE
44
2
----Restrictions When Dialing with the Number Keys
Fax numbers entered with the num-ber keys are stored in internal memo-ry (separate from memory for storingoriginal data). Therefore, you cannotprogram more than 99 numbers withthe number Keys for the following:• Destinations specified in a Memo-
ry Transmission (including Confi-dential Transmission and PollingReception)
• Transfer Stations and End Receiv-ers specified in a Transfer Request
• Destinations and Transfer Stationsspecified in a Group
For example, when 90 destinationsare registered in a Group with thenumber keys, only 9 destinations canbe dialed for Memory Transmissionfrom thenumber keys.
Note❒ When this machine is requested to
transfer a call (i.e. becomes aTransfer Station), 2 fax numbersare automatically stored. There-fore, the number of destinationsthat can be dialed from the numberkeys decreases by two wheneverthis machine is requested to trans-fer a call.
❒ When a total of 99 fax numbers isstored, only Immediate Transmis-sion is allowed.
❒ If a Group is defined when thereare files queued for transmission,the message “Memory is fulland you cannot enter withnumber keys” may be shown onthe display and no additional faxnumbers can be stored even if thenumber of destinations specifiedfrom the number keys is less than
99. That is because the fax numbershave been dialed from the numberkeys for some of the waiting files.When the waiting files have beensent and their fax numbers are de-leted from memory, additional faxnumbers can be dialed.
❒ The display shows the percentageof free space in memory for storingoriginals. Since fax numbers arestored in separate memory, dialingfax numbers from the number keysdoes not change the percentage onthe display.
Pause
Press the {{{{Pause/Redial }}}} key when di-aling or storing a number to insertabout a two-second pause.
Limitation❒ You cannot insert a pause before
the first digit of a fax number.
Note❒ A pause is shown as a “-” on the
display. ❒ You can insert a pause in numbers
stored in Quick Dials and SpeedDials.
C
Speed Dial
On Hook Dial
Pause /Redial
Tone
Clear / Stop
Start
Enter
ND2R03E1
2 3
4 5 6
7 8
0
9
1ABC DEF
JKL MNOGHI
WXYTUV
OPER
PRS

DIALING
2
Tone
This feature allows a machine con-nected to a pulse dialing line to sendtonal signals (for example if you wantto use a special service on a tone dial-ing line). When you press the {{{{Tone}}}}key, the machine dials the number us-ing tonal signals.
Limitation❒ You cannot place a tone before the
first digit of a fax number.❒ Some services may not be available
when using the {{{{Tone}}}} key.
Note❒ A tone is shown as a “ • ” on the
display.
----Sending Tonal Signals by ISDN (ISDN Option Required)
You can still send tone signals to a G3user even if the machine is only con-nected to an ISDN line.
Note❒ This feature can only be used for
Memory or Immediate Transmis-sion. You cannot dial throughISDN using On-hook Dial or Man-ual Dial.
Subaddress (ISDN option required)
ISDN allows two or more terminals(such as a facsimile and digital tele-phone) to be connected to a singleline. These terminals are identified bytheir subaddress numbers. If the ter-minals connected to the line at a des-tination are assigned subaddresses,dialing a subaddress allows you to di-
rect your fax message to a particularterminal at the destination.
Limitation❒ Subaddress can only be used with
ISDN.
Note❒ You need to program a User Func-
tion key with the subaddress func-tion. ⇒ P.164 “ASSIGNING USERFUNCTION KEYS”
❒ You can program a subaddressnumber in a Quick Dial or SpeedDial.
❒ If you want to assign a subaddressto your fax machine, contact yourservice representative.
A Set your original and select anyscan settings you require.
B Select either G4 or G3 (ISDN).
C Dial the fax number with thenumber keys.
D Press the User Function key({{{{F1}}}}-{{{{F5}}}}) where the subaddressfunction has been registered.
“/” will appear on the display.
E Enter the destination subaddresswith the number keys.
F Press the {{{{Start }}}} key.
ND2L04E3
TX FileStatus
01 02 03 04 05 06
F1 F2 F3 F4 F5
De
Su
nicating File File
StartManual RX
TELMode
45

SENDING A FAX MESSAGE
46
2
Chain Dial
This allows you to compose a tele-phone number from various parts,some of which may be stored inQuick Dials or Speed Dials and someof which may be input using thenumber keys.
Limitation❒ Maximum length of telephone or
fax number: 254 digits
Note❒ For Memory Transmission and Im-
mediate Transmission, insert apause between numbers. For On-hook Dial and Manual Dial, nopause is needed.
----(Example) 01133-1-555333Assume that 01133 is stored in QuickDial 01 and that 1 is stored in SpeedDial 01.A Place the original and select any
scan settings you require.B Press {{{{Quick Dial }}}} key 01.C Press the {{{{Pause/Redial }}}} key.D Press the {{{{Speed Dial }}}} key and {{{{0}}}}
and {{{{1}}}} using the number keys. E Press {{{{5}}}}, {{{{5}}}}, {{{{5}}}}, {{{{3}}}}, {{{{3}}}} and{{{{3}}}} using the number keys.
F Press the {{{{Start }}}} key.
Quick Dials
When you have stored a destination'snumber in a Quick Dial key, you candial the number by just pressing thatkey.
Additionally, you can store a namethat will appear on the display when-ever you press that Quick Dial.
Note❒ To check the contents of the Quick
dial, print the list. ⇒ P.158 “RE-PORTS/LISTS”
❒ If the Quick Dial key is used as oth-er functions like Groups, you can-not program the Quick Dial in it.
❒ Flip the Quick Dial plate over toaccess Quick Dial keys 01-28 or 29-56.
❒ You can have the label stored witha Quick Dial printed on the firstpage received at the other end. ⇒P.99 “Label Insertion”
Reference P.43 “DIALING”
A Set your original and select anyscan settings you require. ⇒ P.37“SCAN SETTINGS”
B Press the {{{{Quick Dial }}}} key inwhich the destination's number isprogrammed.
If the destination's name has beenstored, the name is shown on thedisplay. Otherwise, the fax num-ber is shown.
01 02 03 04 05 06 07
08 01 10 11 12 13 14
15 16 17 18 19 20 21
22 23 24 25 26 27 28
A B C D E F
H I K L M N
O P Q R S T U
V W X Y Z
G
J
ND2L05E1

DIALING
2
Note❒ If you make a mistake, press the{{{{Clear/Stop }}}} key and try again.
❒ If you wish to dial another des-tination, press [Add ] and dial an-other fax number.
C Press the {{{{Start}}}} key.
Speed Dials
If you store a number in a Speed Dial,when you want to dial it, just pressthe Speed Dial key followed by a 2 or3 digit code. ⇒ P.143 “RegisteringSpeed Dials”
Note❒ To check the contents of the Speed
Dials, print the list.❒ As standard, you can use codes 00-
99 for Speed Dials. If the OptionalFax Feature Expander is installed,codes 000 to 999 become available.
❒ If a search letter is registered witha Speed Dial, you can find thisnumber quickly using the Tele-phone Directory feature. ⇒ P.47“Telephone Directory”
❒ You can have the label stored witha Speed Dial printed on the firstpage received at the other end. ⇒P.99 “Label Insertion”
A Place your original and select anyscan settings you require. ⇒ P.37“SCAN SETTINGS”
B Press the {{{{Speed Dial }}}} key.
C Enter the two-digit code (00 to 99)or three-digit code (000 to 999) forthe destination with the numberkeys.
If the destination's name has beenprogrammed, it flashes up on thedisplay. Otherwise, the fax num-ber appears.
Note❒ If you make a mistake, press the{{{{Clear/Stop }}}} key and try again.
❒ If you wish to dial another des-tination, press [Add ] and dial an-other fax number.
D Press the {{{{Start }}}} key.
Telephone Directory
This feature lets you find a storedSpeed Dial quickly by just entering asingle letter, e.g., the first letter of thename stored for that number.
C
Speed Dial
On Hook Dial
Pause /Redial
Tone
Clear / Stop
Start
Enter
ND2R03E3
2 3
4 5 6
7 8
0
9
1ABC DEF
JKL MNOGHI
WXYTUV
OPER
PRS
47

SENDING A FAX MESSAGE
48
2
PreparationTo use the telephone directory,you need to register a search letterwhen you program Speed Dials. ⇒P.143 “Registering Speed Dials”
Limitation❒ Speed Dial codes cannot be
searched for by symbol or number.❒ Names enclosed within ( ) are not
searched for.
A Set your original and select anyscan settings you require.
B Press the {{{{Speed Dial }}}} key.
C Press [Tel.Dir. ] .
D Enter the search letter by pressingone of the Quick Dial keys (A toZ).
The names or fax numbers regis-tered in Speed Dials are shown innumerical order on the display.
E Enter the two-digit code (00 to 99)or three-digit code (000 to 999) forthe destination with the numberkeys.
Note❒ If the list does not contain the
desired destination, press[↑↑↑↑Prev. ] or [↓↓↓↓Next].
❒ If you make a mistake, press the{{{{Clear/Stop }}}} key to try again.
❒ If you wish to dial another des-tination, press [Add ] and dial an-other fax number.
F Press the {{{{Start }}}} key.
Groups
If you frequently send the same mes-sage to more than one place, programthese numbers into a Group. Thenyou can send the messages to all the
C
Speed Dial
On Hook Dial
Pause /Redial
Tone
Clear / Stop
Start
Enter
ND2R03E3
2 3
4 5 6
7 8
0
9
1ABC DEF
JKL MNOGHI
WXYTUV
OPER
PRS
ND1X02E8
01 02 03 04 05 06 07
08 01 10 11 12 13 14
15 16 17 18 19 20 21
22 23 24 25 26 27 28
A B C D E F
H I K L M N
O P Q R S T U
V W X Y Z
G
J
ND2L05E1

DIALING
2
destinations in that Group with just afew keystrokes. You can also pro-gram a name for the Group (for exam-ple, “Branch Offices”) which will bedisplayed before you press the {{{{Start }}}}key.
PreparationYou need to program the Groups.⇒ P.129 “Registering Quick Dials”
Limitation❒ A Quick Dial programmed for
Group cannot be used for otherfunctions.
❒ Group Dial can be used only forMemory Transmission and Pollingreception; it cannot be used for Im-mediate Transmission.
Note❒ Groups are only available with
Memory Transmission and Pollingreception.
❒ To check the contents of theGroups, print the list.
❒ You can program up to 9 Groups.❒ You can store up to 200 destina-
tions in a Group. If a Quick Dial orSpeed Dial is registered in twoGroups, it takes up the space ofone destination.
❒ Groups can contain Transfer Sta-tion codes, but note that theseGroups cannot be used for normaltransmission because the TransferStation codes are not dialable num-bers. ⇒ P.173 “Multistep Transfer”
Reference⇒ P.135 “Registering Groups”
A Set your original and select anyscan settings you require.
B Press the Quick Dial key in whichthe Group is programmed.
The Group number is shown onthe display. If the Group name isprogrammed, the name is alsoshown on the display.
Note❒ If you make a mistake, press the{{{{Clear/Stop }}}} key and start again.
❒ If you wish to dial another des-tination, press [Add ] and dial an-other fax number.
C Press the {{{{Start }}}} key.
Optional Group Dial
An Optional Fax Feature Expander is re-quired to use this function.
If the Optional Group Dial functionhas been assigned to a User Functionkey, dialing is easy. Just press theUser Function key and enter the Op-tional Group number (10 - 30).You can use Optional Groups to spec-ify several destinations at a time. Youcan program up to 9 Groups and upto 21 Optional Groups.
PreparationTo use this function, you need tohave programmed a User Functionkey as the Optional Group Dial
01 02 03 04 05 06 07
08 01 10 11 12 13 14
15 16 17 18 19 20 21
22 23 24 25 26 27 28
A B C D E F
H I K L M N
O P Q R S T U
V W X Y Z
G
J
ND2L05E1
49

SENDING A FAX MESSAGE
50
2
function in advance. ⇒ P.164 “AS-SIGNING USER FUNCTIONKEYS”
Limitation❒ Optional Group Dial can only be
used only with Memory Transmis-sion. If you select the ImmediateTransmission mode, it automati-cally switch to the Memory Trans-mission mode.
Note❒ You can include up to 200 destina-
tions in a Group. If a Quick Dial orSpeed Dial is registered in twoGroups, it takes up the space ofone destination.
❒ Groups can contain Transfer Sta-tion codes, but note that theseGroups cannot be used for normaltransmission because the TransferStation codes are not dialable num-bers. ⇒ P.173 “Multistep Transfer”
ReferenceP.139 “Registering Optional Groups”
A Set your original and select anyscan settings you require.
B Press the User Function key ({{{{F1}}}}through {{{{F5}}}}) in which the op-tional Group Dial function is reg-istered.
C Enter an Optional Group numberwith the number keys.
The Optional Group number isshown on the display. If you havepreviously registered a name withthis group, it is also shown on thedisplay.
Note❒ If you make a mistake, press the{{{{Clear/Stop }}}} key and try again.
❒ If you wish to dial more destina-tions, press [Add ] and dial an-other number.
D Press the {{{{Start }}}} key.
Redial
The machine memorizes the last 10destinations that have been dialed. Ifyou wish to send a message to a des-tination which you faxed to recently,the Redial feature saves you findingand entering the number again.
A Press the {{{{Pause/Redial }}}} key.
B A list of previously dialed num-bers will flash up. If you cannotsee the number you need use the[↑↑↑↑Prev. ] and [↓↓↓↓Next] keys to scrollthrough them. Then enter the
ND2L04E3
TX FileStatus
01 02 03 04 05 06
F1 F2 F3 F4 F5
De
Su
nicating File File
StartManual RX
TELMode
C
Speed Dial
On Hook Dial
Pause /Redial
Tone
Clear / Stop
Start
Enter
ND2R03E1
2 3
4 5 6
7 8
0
9
1ABC DEF
JKL MNOGHI
WXYTUV
OPER
PRS

DIALING
2
code for the number you wish toredial e.g., “01”.
Limitation❒ The following kinds of destina-
tions are not memorized:• Quick Dials• Speed Dials• Group Dials• Destinations dialed by a Pro-
gram• Destinations dialed as End
Receivers for Transfer Re-quest
• Forwarding terminal of thesubstitute reception.
• Destination of Memory FileTransfer
• Destinations dialed using theexternal telephone keypad
• Destinations dialed by Redi-al (regarded as already mem-orized)
• Any destinations after thefirst number if multiple des-tinations were dialed.
❒ Do not dial any digits beforeyou press the Redial key. If youpress the {{{{Pause/Redial }}}} key af-ter entering digits using thenumber keys, a pause will beentered instead.
Note❒ If the receiver uses a facsimile of
the same manufacturer that iscapable of registering the RTI,that name may be shown on thedisplay instead of the fax num-ber.
51

SENDING A FAX MESSAGE
52
2
TRANSMISSION FEATURES
Stamp
Optional Stamp Unit is required
When sending a fax message usingthe Document Feeder (ADF), the ma-chine can stamp a circle mark at thebottom of the original. When sendinga double sided document, they aremarked at top and bottom side on thefront page. This stamp indicates thatthe original has been successfullystored in memory for Memory Trans-mission, or that it has been successful-ly sent for Immediate Transmission.
Limitation❒ Stamp only works when scanning
from the Document Feeder (ADF).❒ When you select the ADF internal
tray, Stamp does not work.❒ While scanning the document, you
cannot switch stamp on or off.❒ Do not open the document feeder
(ADF) while scanning the docu-ment. Document jam should occur.
Note❒ When the Stamp Unit installed,{{{{F5}}}} key is automatically assignedas the Stamp key.
❒ When the stamp starts gettinglighter, replace the cartridge. ⇒P.220 “REPLACING THE STAMPCARTRIDGE”
❒ If a page was not stamped eventhough the Stamp feature is turnedon, you need to re-send that page.
❒ By default, Stamp is turned off. Ifyou use this feature often, you canadjust the User Parameters so thatthe home setting is on. In this case,Stamp can easily be turned off forany single transmission by press-ing the {{{{Stamp }}}} key. ⇒ P.203“Changing the User Parameters”
A Press the {{{{F5}}}} key.
The Stamp indicator will light.Pressing the {{{{F5}}}} key again willturn Stamp off.
ID Transmission
This feature allows you to restricttransmission of messages only to ma-chines of the same make, and only tothose machines that have the samePolling ID. The transmission optionslet you switch ID transmission on andoff for each separate transmission.
Note❒ The default setting is off. Turn this
feature on with the User Parame-ters. ⇒ P.203 “Changing the UserParameters”
AND0X01E0
TX FileStatus
01 02 03 04 05 06
F1 F2 F3 F4 F5
De
Su
nicating File File
StartManual RX
TELMode
ND2L04E2

TRANSMISSION FEATURES
2
F Code (SUB)
Normally you can only use Confiden-tial Transmission to send to fax ma-chines of the same make that have theConfidential Reception feature. How-ever, if the other machine supports asimilar feature called “F Code”, youcan send fax messages to the otherparty using this method instead.
PreparationYou need to assign the F Code fea-ture to a User Function key before-hand.You can only use this feature in aG3 communications (not with G4).You cannot use Chain Dial withthis feature.You cannot select this functionwhen carrying out standard Confi-dential Transmission
Note❒ The ID can be up to 20 digits long
and consist of digits, spaces, * and# .
❒ Make sure the ID matches thespecification of the fax you aresending to.
❒ You can store IDs in Quick Dials,Speed Dials, Groups and Pro-grams.
❒ Messages you send using this fea-ture are marked “SUB” on all re-ports.
A Set your document and make anychanges to the scan settings if nec-essary.
B Dial the destination fax numberusing the number keys.
C Press the User Function key as-signed with the F Code feature.
D Enter the function number forSUB(S) on the number keys.
E Enter the ID code on the numberkeys.
F Press the {{{{Start }}}} key.
Note❒ If you use Immediate Transmis-
sion and the destination fax ma-chine does not support the Fcode feature, a message will ap-pear on the display to informyou of this. In this case, pressOK to cancel the transmission.
ND2L04E3
TX FileStatus
01 02 03 04 05 06
F1 F2 F3 F4 F5
De
Su
nicating File File
StartManual RX
TELMode
53

SENDING A FAX MESSAGE
54
2
F Code (PWD)
There are times when you may wishto use a password when sending con-fidential faxes with the F Code fea-ture.
Limitation❒ You can enter a password up to 20
digits long.
Note❒ Messages you send using this fea-
ture are marked “PWD” on all re-ports. ⇒ P.158 “REPORTS/LISTS”
JBIG Transmission
FAX 400dpi option is required
If you use JBIG (Joint Bi-level ImageExperts Group) compression you cansend photographic originals at highspeed across G3/IG3 lines.
Limitation❒ If ECM is turned off, JBIG Trans-
mission is not available.❒ This feature requires that the other
party's fax machine has both theJBIG function and ECM function(G3 communication only).

3. Receiving a Fax Message
IMMEDIATE RECEPTION
Each page of a received fax message isprinted as soon as it is received. Thismethod is used for standard fax mes-sages.
----Display During ReceptionThe sender's RTI or CSI appears onthe first line.
----Reception Resolution This machine supports Standard, De-tail and Super Fine (option) resolu-tions for reception. If you do not havethe 400dpi option, faxes sent at SuperFine resolution will be printed onyour machine at Detail resolution.This may result in a slightly differentfrom the sender's intention.Reception will not take place if thereis not enough free memory left. If freememory reaches 0 % during Immedi-ate Reception, any further reception
becomes impossible and the currentcommunication is terminated.
Receiver (your machine)
Sender
ND1X00E2
55

RECEIVING A FAX MESSAGE
56
3
MEMORY RECEPTION
The machine waits until all pages ofthe message have been received intomemory before printing the message.
This method is used with the follow-ing features:• Two in one P.38 “Photo”• Multi-copy when set to multiple
copies P.65 “Multi-copy Reception”• Reverse Order Printing P.68 “Re-
verse Order Printing”• Substitute Reception P.57 “Substi-
tute Reception”• 2-sided Printing (Both Optional
Duplex Tray and Fax Feature Ex-pander are required) P.65 “2-SidedPrinting”
Important❒ All the messages stored in memory
are deleted if the power isswitched off for more than onehour. However, note that if the op-tional Hard Disk is installed, allstored messages are not deleted.
❒ If Memory Reception is switchedon, the machine may not be able toreceive large numbers of messagesor messages with a high data con-tent. In such cases, we recommendyou switch Memory Receptionmode off or add a memory card.
Limitation❒ The machine may not be able to re-
ceive fax messages when the freememory space is low.
Note❒ If the memory free space reaches 0
% during Memory Reception, themachine can no longer receive thecurrent fax message and stopscommunicating.
Receiver (your machine)Sender
ND1X00E3

SUBSTITUTE RECEPTION
3
SUBSTITUTE RECEPTION
If any of the conditions listed beloware met, the machine automaticallyswitches to Memory Reception modeand stores messages in memory in-stead of printing them. This receptionmode, in which a received fax mes-sage is stored in memory unprinted,is called Substitute Reception. Mes-sages received using Substitute Re-ception are automatically printedwhen the condition which caused themachine to use Substitute Receptionis rectified. Substitute Reception takesplace when:• Paper runs out• Toner runs out• Paper is jammed• The front or side cover is open• A fax is received during a copy or
print run• When the delivery tray is full
Limitation❒ Reception may not take place if
there is not enough free memoryleft.
Note❒ The Receive File indicator lights to
let you know when message(s)have been received using Substi-tute Reception.
❒ If free memory reaches 0 % duringSubstitute Reception, any furtherreception becomes impossible andthe current communication is ter-minated.
Screening messages from anonymous senders
To help you screen out unwantedmessages that may fill up your mem-ory, the machine can be programmedto only use Substitute Reception formessages that arrive with RTI/CSIidentification.Two settings are available:• “When RTI or CSI is received”• “Free”
Note❒ The default setting is “When RTI
or CSI is received”, i.e. only storemessages when the RTI/CSI ispresent. You can change this withthe User Parameters. ⇒ P.203“Changing the User Parameters”
❒ Even if the sender does not have anRTI or CSI, the machine will stillreceive messages using SubstituteReception if:• Paper becomes jammed while
the power switch is on• For some reason printing is not
possible e.g., copy job is inprogress
----When an RTI or CSI is ReceivedThe machine switches to SubstituteReception only when the sender hasprogrammed their RTI or CSI. If thepower is switched off for more thanan hour, all the messages receivedinto memory are deleted. In such acase, the Power Failure Report or theTCR can be used to identify which
57

RECEIVING A FAX MESSAGE
58
3
messages are lost so you can ask thesenders to transmit them again.
Important❒ If a sender has not programmed
their RTI or CSI, the machine mayreject an important fax message.We recommend that you ask im-portant senders to register an RTIor CSI in advance.
----FreeThe machine switches to SubstituteReception regardless of whether ornot the sender has programmed theirRTI or CSI.

SELECTING THE RECEPTION MODE
3
SELECTING THE RECEPTION MODE
There are two ways you can set upyour machine to handle incomingcalls:• Fax mode• Tel mode (handset option or exter-
nal telephone required)The default setting is Fax mode. Youcan change this with the User Tools.⇒ P.203 “Changing the User Parame-ters”
Fax Mode (Auto Reception Mode)
When a telephone call comes in, themachine receives it automatically as afax message. Use this setting for adedicated fax line.
Telephone Mode
When a call comes in, you have topick up the handset or external tele-phone and decide whether the call isa fax message yourself. If you hear avoice, continue your conversation asyou would using a normal telephone.If you hear high pitched beeps, in-struct the machine to receive the faxby following the procedure below.Use this setting if you wish to sharethe line between the fax machine anda telephone.
----Receiving a Fax in Telephone Mode
This feature needs a User Functionkey programmed as {{{{Start Manual RX }}}}.By default, {{{{F1}}}} is already assigned
this function. ⇒ P.164 “ASSIGNINGUSER FUNCTION KEYS”A When the machine rings, pick up
the handset.B If you hear beeps, press the User
Function key ({{{{F1}}}}–{{{{F5}}}}) whichhas been programmed as the {{{{StartManual RX }}}} key.
C Replace the handset. The machinewill start receiving.
----Changing from Fax Mode to TEL Mode
This function also requires the use ofa User Function key. By default, {{{{F3}}}}is assigned as the [TEL Mode ] key.To change the reception mode, pressthe User Function key which has beenprogrammed as the TEL Mode key({{{{F3}}}} by default).
59

RECEIVING A FAX MESSAGE
60
3
RECEPTION FUNCTIONS
Transfer Station
Transfer Stations allow you to expandthe standard features of your fax ma-chine to set up complex networks.Transfer Stations must be machines ofthe same make.The diagram below may make theconcept clearer.
The following terminology is used inthis section.
❖❖❖❖ Requesting PartyThe machine where the messageoriginates from, i.e. the machinemaking a Transfer Request.
❖❖❖❖ Transfer StationThe machine that forwards the in-coming message to another desti-nation, i.e. the machine thatreceives the Transfer Request. Inthis section this refers to your ma-chine.
❖❖❖❖ End ReceiverThe final destination of the mes-sage, i.e. the machine that theTransfer Station sends to. End Re-ceivers must be programmed intoQuick Dials, Speed Dials orGroups in the Transfer Station(this machine).
Limitation❒ Polling ID's of the Requesting Par-
ty and Transfer Station must beidentical for this feature to work.
❒ This machine will not receive aTransfer Request unless it hasenough free memory to store twoor more destinations dialed fromthe number keys.
❒ If the Requesting Party specifies aGroup for the End Receivers andthe total number of End Receiversexceeds 200, the Transfer Stationcannot transfer the message andsends a Transfer Result Report tothe Requesting Party.
ReferenceP.96 “TRANSFER REQUEST”
----Multi-step TransferThe principles of Transfer Stationscan be used to build up a multi-stepfacsimile network where messagesare passed through several TransferStations. By programming the end re-ceivers in a Transfer Station Group,you can enable this machine to trans-fer messages onto other Transfer Sta-tions. For more information, contact yourservice representative.This feature can only be used if themachines are made by the same mak-er.
Note❒ The optional Fax Feature Expand-
er is required for this function.
Transfer stationRequestingparty
Transferresult report
End Receiver
End Receiver
End Receiver
ND1X00E4

RECEPTION FUNCTIONS
3
ReferenceP.173 “Multistep Transfer”
----Sending the Transfer Result Report
This machine compares the own faxnumber of the Requesting Party withthe Requesting Party's number pro-grammed in a Quick Dial or SpeedDial, and if the lower five digits of thetwo numbers match, it sends theTransfer Result report to the Request-ing Party.For example:• Requesting Party's own dial num-
ber:001813-11112222
• Transfer Station's Quick Dial:03-11112222
Transfer Result Report
This reports whether transmission tothe End Receivers was successful ornot.
PreparationRegister the own fax number in ad-vance. ⇒ P.41 “CHANGING LINETYPE”
When the Transfer Station has trans-ferred the message to all End Receiv-ers, it sends the Transfer ResultReport back to the Requesting Party.The machine prints the report if itcannot be sent back to the RequestingParty. You must program the faxnumber of the requesting party in aQuick Dial or Speed Dial in the Trans-
fer Station. ⇒ P.129 “Registering QuickDials”, P.143 “Registering Speed Dials”
Note❒ By default, a portion of the original
image is printed on this report.You can turn this off with the UserParameters. ⇒ P.203 “Changing theUser Parameters”
ID Reception
If you wish to limit reception of mes-sages to those from machines of thesame make and with the same PollingID, contact your service representa-tive to turn this feature on.
F Code (SEP)
Normally you can only use PollingReception to receive faxes from ma-chines that have the Polling Recep-tion feature. However, if the othermachine supports a polling reception,you can receive fax messages fromthe other party using this method in-stead.
PreparationYou need to assign the F Code fea-ture to a User Function key before-hand. ⇒ P.164 “Storing/Editing theContents of a User Function Key”
Limitation❒ You can only use this feature with
a G3 line (not with G4).❒ You cannot use Chain Dial with
this feature.
Note❒ The ID can be up to 20 digits long
and consist of digits.
61

RECEIVING A FAX MESSAGE
62
3
❒ Make sure the ID matches thespecification of the fax you aresending to.
❒ You can store IDs in Quick Dials,Speed Dials, Groups and Pro-grams with number keys, space, #and *.
❒ Messages you receive using thisfeature are marked “SEP” on all re-ports.
AMake sure that the machine is inFacsimile mode and the standbydisplay is shown. Then enter thefax number.
B Press the User Function key as-signed with the F Code feature.
C Enter the function number forSEP(P) on the number keys.
D Enter the ID code on the numberkeys.
E Press the [Mode] key.
The [Mode] menu is displayed.
F Enter the function number forPolling Reception on the numberkeys.
Note❒ If you can't see the function
number, search for it using the[↑↑↑↑Prev. ] and [↓↓↓↓Next] arrow keys.
G Depending which method youare using, choose one of the fol-lowing procedures:
Default ID Polling Reception
A Press the <<<< or >>>> key tochange the Default ID andpress [OK].
ID Override Polling Reception
A Press the <<<< or >>>> key tochange the Override ID andpress [OK].
B Enter a polling ID (4 charac-ters) with the number keys andthe letter (A–F).
ND2L04E3
TX FileStatus
01 02 03 04 05 06
F1 F2 F3 F4 F5
De
Su
nicating File File
StartManual RX
TELMode

RECEPTION FUNCTIONS
3
Note❒ If you make a mistake, press
the {{{{Clear/Stop }}}} key and tryagain.• 0000 and FFFF is not avail-
able.
H Press [OK].
I Press [Exit ].
The display returns to the [Mode]menu and the Polling Receptionfunction is now checked.
J Press the {{{{Start}}}} key.
F Code (PWD)
There are times when you may wishto use a password when sending con-fidential faxes with the F Code “SUB”and “SEP”features. ⇒ P.63 “F Code(PWD)”
Limitation❒ You can enter a password up to 20
digits long.
Note❒ Messages you send using this fea-
ture are marked "PWD" on all re-ports.
JBIG Reception
The Fax 400dpi Option is required to usethis function.
It allows you to receive messages sentin the JBIG format.
Limitation❒ If ECM is turned off, JBIG Recep-
tion is not available.❒ This feature is not available with
G4 lines.
63

RECEIVING A FAX MESSAGE
64
3
PRINTING FUNCTIONS
Print Completion Beep
By default, the machine beeps to letyou know when a received messagehas been printed.
Note❒ You can alter the volume of the
beep or turn it off completely (setthe volume at minimum). ⇒ P.192“Monitor Volume”
Checkered Mark
By default, a checkered mark is print-ed on the first page of fax messages tohelp you separate them.
Note❒ You can turn this feature off. ⇒
P.203 “Changing the User Parame-ters”
Center Mark
By default, marks are printed halfwaythe left side and at the top center ofeach page received. This makes iteasy for you to position a hole punch-
er correctly when you file receivedmessages.
Limitation❒ The center mark may deviate a lit-
tle from the exact center of theedge.
Note❒ You can turn this feature on or off.
⇒ P.203 “Changing the User Param-eters”
Reception Time
You can have the date and time whena message was received printed at thebottom of the received image. Thisfeature is turned off by default–turn iton with the User Parameters. ⇒ P.203“Changing the User Parameters”
Limitation❒ When a received message is print-
ed on two or more sheets, the dateand time is printed on the lastpage.
Note❒ The date and time when the mes-
sage was printed can be also be re-corded on the message. If you needthis feature, please contact yourservice representative.
ND1X00E5
ND1X00E6

PRINTING FUNCTIONS
3
Multi-copy Reception
The Optional Fax Feature Expander is re-quired to use this function.
If you switch this feature on, multiplecopies of each incoming fax messagewill be printed. You can also chooseto have multiple copies made of mes-sages from particular senders. ⇒P.161 “INITIAL SETUP RX”, P.182“Special Senders to Treat Differently(Special RX Nos.)”
Limitation❒ The maximum number of copies
that can be made of each messageis 10. If you are using Multi-copywith Specified Senders, the maxi-mum number is 10.
Note❒ By default this feature is turned
off. Switch it on and set the num-ber of copies with the Initial SetupRX. ⇒ P.161 “INITIAL SETUP RX”
❒ Note that the machine will useMemory Reception for Multi-copy.
2-Sided Printing
An optional Duplex Tray and Fax Fea-ture Expander are required to use thisfunction.
With this option installed, you canhave a received message printed onboth sides of the paper. By default,this feature is turned off. Switch it onwith the Initial Setup RX and selectlengthwise L copy paper. ⇒ P.161“INITIAL SETUP RX”
Limitation❒ To use this function all pages of the
received document must be of thesame size-inform the sending par-ty of this beforehand if necessary.You must also have paper set inyour machine of the same size asthat sent by the sending party(A4→A4, B4→B4 are typical exam-ples, whether A3 and B5 sizes arescanned in correctly will dependon the fax machine). This machinewill scan in correctly landscapeA3,B4,A4,B5 and portrait A4, B5and A5. The table below shows theresults that can be achieved when
ND1X00E7
ND1X00E8
65

RECEIVING A FAX MESSAGE
66
3
sending and receiving using thismachine.
❒ If the Duplex Unit cover is notopen, you cannot print double-sid-ed documents that are more than11.7” long and they will be printedsingle-sided only.
❒ This feature works only when allpages are of the same width andare received into memory.
❒ Note that the machine will useMemory Reception for 2-SidedPrinting.
❒ This feature cannot be used withTwo in One.
❒ Printouts may vary in their direc-tion/orientation depending onhow the sender set them.
❒ If another party sends you a faxand their machine is not able to de-tect the size of the original correct-ly, the message may come outtruncated, separated or containingexcess white space when printed atyour end. For example, if the send-ing machine thinks a B5 original isa B4 original, it will be printed atyour end on B4 size paper even ifyou have B5 paper available inyour machine.
Note❒ You can choose to have messages
only from selected senders printedin this way. ⇒ P.203 “Changing theUser Parameters”
180 Degree Rotation Printing
When printing on both sides of thepaper, this machine rotates images asshown in the diagram.
LT
LG
DLT
.
ND0X05E3
Originals Top Binding Side Binding
ABC
BA
BA
BA
AB
CA
BC
ND6A01E2
CP2B02E0
1 2 1 2

PRINTING FUNCTIONS
3
Image Rotation
If you have installed paper in the cas-sette sideways K, incoming fax mes-sages will be rotated automatically tofit on the paper.
Limitation❒ You can choose to have received
messages printed from the a speci-fied tray. ⇒ P.203 “Changing theUser Parameters”
Two In One
When two messages of the same sizeand direction are received consecu-tively, they are printed on a singlesheet when you turn this feature on.This can help you economize on pa-per.• Two A5 K messages are printed
side by side on a sheet of A4 L.• Two B5 K messages are printed
side by side on a sheet of B4 L.• Two A4 K messages are printed
side by side on a sheet of A3 L.
• Two 81/2 × 5.5 “ K messages areprinted side by side on a sheet of81/2 × 11” L.
Limitation❒ This feature does not work with
messages larger than A5 K, B5 K,A4 K, or LT K. When A5 K, B5K, A4 K or LT K size paper isloaded in the machine, each pageof the received message is outputon a single sheet.
❒ If paper matching the size and di-rection of a received document isnot available, Two In One is notpossible.
Note❒ By default this feature is turned
off. Switch it on with the User Pa-rameters. ⇒ P.203 “Changing theUser Parameters”
❒ This feature uses Memory Recep-tion.
Page Separation and Length Reduction (not available in some countries)
When the size of a received messageis longer than the paper loaded in themachine, each page of the messagecan be split and printed on severalsheets, or reduced and printed on asingle sheet. For example, when LT
ND1X00E9
your machine
ND1X01E0
67

RECEIVING A FAX MESSAGE
68
3
L paper is loaded, this feature splitsthe received message if the excesslength is about 0.79” or more, and re-duces it if the excess length is withinabout 0.79”. When a message is split,the split mark (*) is inserted at thesplit position and about 0.39” of thesplit area is duplicated on the top ofthe second sheet.
Note❒ Your service representative can
customize this feature with the fol-lowing settings. Bracketed valuesare defaults. • Reduction (on)• Print split mark (on)• Overprinting (on)• Overprinting length (0.39”)• Guideline for split (when mes-
sage is 0.79” longer than paper)❒ You can adjust the overprinting
length and length of reductionwithin the following ranges:• Guideline for split: 0 – 6.1”• Overprinting length: 0.16”,
0.39”, 0.79”, 1.57”
Reverse Order Printing
Normally, received pages are printedand stacked on the tray in the orderthey are received. If you turn this fea-ture on, the machine will start print-
ing the message from the last pagereceived. By default, this feature isturned off but you can turn it on withthe Initial Setup RX. ⇒ P.161 “INI-TIAL SETUP RX” Note that when on,this feature will use Memory Recep-tion.When this feature is on, the first pagewill be printed last.
Page Reduction
If you have switched this feature onand you receive a message that islonger than the paper in the cassette,usually the machine prints it on twopages. If you turn this feature on themachine reduces the width andlength of the received image so that itwill fit on one page. If A4 L papersize is loaded and a message of B4 Lsize is received, the machine will re-duce the message to a single A4 Lsheet.
ABC(Document)
ND1X01E1
your machine
PrintND1X01E2
your machine
reduction
(A4 size)
(B4 size)
ND1X01E3

PRINTING FUNCTIONS
3
Note❒ By default this feature is turned
off. Switch it on with the User Pa-rameters. ⇒ P.203 “Changing theUser Parameters”
ReferenceP.67 “Page Separation and Length Re-duction (not available in some coun-tries)”
TSI Print
Usually the sender's TTI is printed onreceived messages. If the sender hasnot programmed their TTI, you willnot be able to identify them. Howev-er, if you turn this feature on, thesender's RTI P.193 “RTI/TTI” or CSIP.193 “RTI/TTI” is printed instead soyou can find out where the messagecame from.
Note❒ You can turn it on or off with the
User Parameters. ⇒ P.203 “Chang-ing the User Parameters”
CIL/TID Print
The ISDN unit is required to use thisfunction.
Two features are provided for identi-fication of messages received by G4(ISDN). If turned on, this informationwill be printed on every page. TurnCIL and TID on and off with the UserParameters. ⇒ P.203 “Changing theUser Parameters”The CIL (Call Identification Line) re-fers to the combination of the receiv-er's own fax number, name, thesender's own fax number and name,time, and page number. The defaultsetting is on. The TID refers to thename registered by the sender in theirTTI. The default setting is on.
Limitation❒ This feature is available only when
receiving in G4 mode.
Note❒ You can turn CIL off with the User
Parameters.
When There is No Paper of the Correct Size
If there is no paper in your machine that matches the size of a received message,the machine will choose a paper size based upon the paper you have available.For example, if your machine has LG (8.5 × 15”) L installed and you receive anLT (8.5 × 14”) L size message, check the LT column of the table below. The pa-per size at the top has the highest priority. In this case, since LG (8.5 × 14”) L ishigher priority than DLT (11 × 17”) K, the message is printed on LG (8.5 × 14”)L.
❖❖❖❖ Priority Table
Page Reduction Disabled
Reduction in Sub-scan Direction Enabled
Page Separation Threshold 20 mm
Width or Length Priority Width
69

RECEIVING A FAX MESSAGE
70
3
• KK and LL indicate that the message is split over two pages of paper withthe orientation and size shown.
Limitation❒ Paper placed in the bypass tray is not usually selected for printing a received
message. However, you can use this tray if you select the bypass tray as themain paper tray using Reception with Specified Senders. ⇒ P.182 “SpecialSenders to Treat Differently (Special RX Nos.)”
❒ The paper size used to print a received message may be different from the sizeof the sent original.
Note❒ Widths that this machine can receive are A4, B4, LT, LG, and A3. Any mes-
sages narrower than A4 or LT are sent as A4 or LT width with the length un-changed.
A4A3 B4 A4 11x17" 8.5x14" 8.5x11" F/F4
8.5x
11"
B5 A5
A4A3 B4 A4 8.5x14" 8.5x11" F/F4B5 A4
A4A3 B5A4
A5 A3
A411x17"8.5x11"11x17" 8.5x14"
8.5x
11"
B4
B4
A3
A3 B5
B4 B4 A3A3 B4F/F4
A4 B4 B4A3 11x17"11x17" 8.5x11" 8.5x14"
B4 A4F/F411x17"
8.5x
11"
8.5x
11"
8.5x
11"
A4A3 A3 A4 A3
8.5x
11"
F/F
4
A4
B5
A4 A48.5x14" 8.5x11" 8.5x11"
F/F4
8.5x11"
F/F4F/F4 8.5x14"
11x17"
8.5x14"
11x17"
11x17"
11x17"8.5x14" 11x17" 8.5x14" 11x17"
1
2
3
4
5
6
7
8
9
10
11
12
Received Image Size
Pap
er S
elec
t Prio
ritie
s
A4
A4 A4 A4
A4 B5 A4A4
8.5x11"
8.5x11" 8.5x11" 8.5x11" F/F4A4
8.5x
11"
F/F4 F/F4
8.5x
11"
8.5x
11"
B4 B4
8.5x14" 8.5x11" 8.5x14"
A5 A5A5
B5B5 B5 B5
8.5x14" B5 B5 B5B5
Lengthwise
Sideways
Image RotationHalf of the page is blankPage Reduction
ND0X01E5
F/F4 A5
8.5x
11"
8.5x
11"
8.5x
11"
B5
A4

PRINTING FUNCTIONS
3
ReferenceP.67 “Page Separation and Length Reduction (not available in some countries)”P.68 “Page Reduction”P.67 “Image Rotation”
Just Size Printing
If you turn this feature on and no paper tray is stocked with paper of a suitablesize to print a received document, a message will appear on the display prompt-ing you to load paper of the required size. When you have loaded the new paper,you can then print the message.Two messages can appear:• Paper Cassette
• Bypass Tray
Note❒ You can turn this message on or off with the User Parameters ⇒ P.203
“Changing the User Parameters”. By default this message is turned off.
Out Of Paper Display Message
If the paper tray runs out of paper, you can have a message appear on the dis-play asking you to add more paper.
Note❒ By default this message is turned off. You can turn it with the User Parame-
ters. See P.203 “Changing the User Parameters”
ND0X04E0
Paper designated to print FAX/Lists areempty.Refill A4 paper.
OK
ND0X01E6
Paper designated to print FAX/Lists areempty.Refill A4 paper to Bypass trey.
OK
71

RECEIVING A FAX MESSAGE
72
3
Having Incoming Messages Printed on Paper From the Bypass Tray
You can have messages sent fromSpecified Senders printed on paperfrom the Bypass Tray. This is useful ifyou need messages printed on a sizeof paper not stocked in the paper cas-sette(s).
Limitation❒ When the optional Fax Feature Ex-
pander is installed, you can set pa-per between 128 and 800 mm longin the Bypass Tray.
Note❒ Before you can use this feature,
you need to turn on AuthorizedReception (Initial Setup RX set-tings, P.161 “INITIAL SETUPRX”), program the Specified Send-ers (Key Operator Settings, SpecialRX No.) along with the Paper Trayset to “Bypass Tray”.
❒ When you set paper sizes otherthan A4 landscape, B4 landscapeand portrait, A3 landscape andportrait in the Bypass Tray, specifythe paper size.⇒ P.162 “To set theBypass Paper Size”
❒ If the specified paper size and thesize of paper set in the Bypass Traydo not match, paper jams may oc-cur and the image may be truncat-ed.
❒ If you use this feature, Image Rota-tion is not possible.

4. Advanced TransmissionFeatures
OVERVIEW
Overview
This feature describes various options that you can choose when sending a faxmessage. The selections you make will only apply to the current fax message.
73

ADVANCED TRANSMISSION FEATURES
74
4
SEND LATER
Using this feature, you can instructthe machine to delay transmission ofyour fax message until a later timewhich you specify. This allows you totake advantage of off-peak telephonecharges without having to be by themachine at the time.
For ease of use, you can program thetime when your phone charges be-come cheaper as the Economy Trans-mission time. ⇒ P.195 “RegisteringThe Economy Transmission Time”Then if you have a non urgent fax,just select Send Later with EconomyTransmission when you scan it in.Faxes will be queued in memory andwill start being sent at EconomyTransmission time.
Note❒ You can not specify a time more
than 24 hours into the future.❒ If you wish to use Economy Trans-
mission, program the time whenyour phone charges get cheaper. ⇒P.195 “Registering The EconomyTransmission Time”
❒ This feature is only available withMemory Transmission.
A Set your original and select anyscan settings you require.
B Press [Mode].
The Transmission Mode menu ap-pears.
C Enter the “Send Later” functionnumber with number keys.
D Enter the time with the numberkeys. To change AM/PM, pressthe [AM ↔↔↔↔ PM] (North Americaonly) or press [Economy TX ].
Note❒ If the current time shown on the
display is not correct, adjust it.⇒ P.208 “Date/Time”
❒ When entering numbers small-er than 10, add a leading zero.
❒ If you make a mistake, press the{{{{Clear/Stop }}}} key and try again.
❒ To cancel Send Later, press[Cancel ] and the display will re-turn to the Transmission Modemenu.
Transmitter
Send Laterat 21:00 (9:00PM)
Receiver
ND1X01E4
ND1X02E9

SEND LATER
4
E Press [OK].
The Transmission Mode menu isshown on the display. A checkmark is added to Send Later.
F Press [Exit ].
The initial display is shown.
Note❒ “Send Later” is shown on the
display. If you set up anotheradvanced transmission function(except Polling Reception),“Others” is displayed.
G Dial and press the {{{{Start }}}} key.
Note❒ You can cancel transmission of
a message set up for Send Later.⇒ P.103 “Canceling a Transmis-sion”
ND1X03E0
75

ADVANCED TRANSMISSION FEATURES
76
4
CONFIDENTIAL TRANSMISSION
If you do not want your message to bepicked up casually at the other end,use this feature. The message will bestored in memory at the other endand will not be printed until an ID isentered.
PreparationIf you install the optional Fax Fea-ture Expander or Hard Disk op-tion, program the Confidential ID.⇒ P.196 “ID Code”
There are two types of ConfidentialTransmission:
❖❖❖❖ Default IDThe other party can print the mes-sage by entering the ConfidentialID programmed in their machine.
❖❖❖❖ ID OverrideShould you wish to send a confi-dential message to a particular per-son at the other end, you canspecify the Confidential ID thatperson has to enter to see that mes-sage. Before you send the message,don't forget to tell the intended re-ceiver the ID that must be enteredto print it.
Limitation❒ The destination machine must be
of the same make and have theConfidential Reception feature.
❒ The destination machine musthave enough memory available.
Note❒ If the optional Fax Feature Ex-
pander is installed, we recommendthat you program the ConfidentialID beforehand.
❒ An ID can be any 4 digit numberexcept 0000.
A Set your original and select anyscan settings you require.
B Press [Mode].
The Transmission Mode menu ap-pears.
C Enter the “Confidential TX” func-tion number with the numberkeys.
D Depending on the ConfidentialTransmission type, use one of thefollowing procedures:
ND1X01E5
Transmitter
Receiver
ND1X02E9

CONFIDENTIAL TRANSMISSION
4
Default ID
A Press the <<<< or >>>> keys to turnDefault ID on and press [OK].
The Transmission Mode menuis shown again. A check mark isadded to Confidential TX.
Note❒ To cancel the Confidential
Transmission, press [Cancel ].The Transmission Modemenu is shown on the dis-play.
Override ID
A Press the <<<< or >>>>keys to turnOverride ID on.
B Enter the Confidential ID (4-digit number) with the numberkeys and press [OK].
The Transmission Mode menuis shown again. A check mark isadded to Confidential TX.
Note❒ To Cancel the Confidential
Transmission, press [Cancel ].The Transmission Modemenu is shown on the dis-play.
E Press [Exit ].
The initial display is shown.
Note❒ “Conf.Trans” is shown on the
display. If you set up anotheradvanced transmission function(except Polling Reception),“Others” is displayed.
F Dial and press the {{{{Start}}}} key.
Note❒ For details on deleting a Confi-
dential Transmission. ⇒ P.76“CONFIDENTIAL TRANSMIS-SION”
ND1X03E0
ND1X03E0
77

ADVANCED TRANSMISSION FEATURES
78
4
PERSONAL CODE TRANSMISSION
Personal Codes allow you to keeptrack of machine usage (e.g., for bill-ing purposes). If everybody uses aPersonal Code when they use the faxmachine, the codes or the names pro-grammed for the codes will be print-ed in the TCR and other reports. Thiswill help you to check up on who hasbeen using the machine and how of-ten. ⇒ P.116 “PRINTING THE TCR”
Limitation❒ Personal codes may be any 4-digit
number except 0000 (0001 through9999). You can program up to 20personal codes. If the Optional FaxFeature Expander is installed, upto 50 personal codes can be pro-grammed. ⇒ P.166 “RegisteringPersonal Codes”
A Set your original and select anyscan settings you require.
B Press [Mode].
The Transmission Mode menu ap-pears.
C Enter a “Personal Code” functionnumber with the number keys.
D Enter a personal code (4-digitnumber) with the number keys.
Note❒ If a personal code is pro-
grammed with a name, it isshown below the personal codeon the display.
❒ If you make a mistake, press the{{{{Clear/Stop }}}} key and try again.
❒ To cancel the Personal CodeTransmission, press [Cancel ].The Transmission Mode menuis shown on the display.
E Press [OK].
The Transmission Mode menu isshown again. A check mark is add-ed to “Personal Code”.
F Press [Exit ].
The initial display is shown.
ND1X02E9
ND1X03E0

PERSONAL CODE TRANSMISSION
4
Note❒ “Pers. Code XXXX” is shown on
the display. If you set up anoth-er advanced transmission func-tion (except Polling Reception),“Others” is displayed.
G Dial and press the {{{{Start }}}} key.
79

ADVANCED TRANSMISSION FEATURES
80
4
SENDING AN AUTO DOCUMENT
If you often have to send a particularpage to people (e.g., a map, a stan-dard attachment or a set of instruc-tions), store it as an Auto Documentassigned to a Quick Dial key. Then,when you need to send that page tosomebody, just press the Quick Dialthat you assigned it to instead of hav-ing to scan the whole page in again.
PreparationYou need to program an Auto Doc-ument.
You can fax an Auto Document by it-self, or attach it to a normal fax mes-sage.
Important❒ Whenever you store or change an
Auto Document, we recommendthat you print the Auto Documentlist for reference. ⇒ P.153 “AutoDocument list”
Limitation❒ You can attach one Auto Docu-
ment to each transmission.❒ You can store up to 6 Auto Docu-
ments. With optional Feature Ex-pander, you can store up to 18Auto Documents. ⇒ P.151 “Regis-tering Auto Documents”
Note❒ Originals with Auto Documents
are sent by Memory Transmission.❒ When sending an Auto Document
with another original, the AutoDocument is sent first.
❒ Storing Auto Documents reducesthe amount of free memory slight-ly. Unless you delete the docu-ment, free memory will not returnto 100%.
❒ You can print an Auto Documentor a summary of Auto Documentscurrently stored in memory. ⇒P.158 “REPORTS/LISTS”
A Set your original and select anyscan settings you require.
B Press [Mode ].
The Transmission Mode menu ap-pears.
C Enter the “Auto Document” func-tion number with the numberkeys.
D Enter the number of the AutoDocument you want to send withthe number keys.
Note❒ If the list does not contain the
Auto Document you want tosend, press [↑↑↑↑Prev. ] or [↓↓↓↓Next] .
❒ If you make a mistake, press the{{{{Clear/Stop }}}} key and try again.
ND1X02E9

SENDING AN AUTO DOCUMENT
4
❒ To cancel the Auto Document,press [Cancel ]. The Transmis-sion Mode menu is shown.
E If you are sending just the AutoDocument, press [#]. If you wishto send it along with another orig-inal, press [OK].
The Transmission Mode menu isredisplayed. A check mark is add-ed to “Auto Document”.
F Press [Exit ].
The initial display is shown.
Note❒ “Auto Doc.” is shown on the
display. If you set up anotheradvanced transmission function(except Polling Reception),“Others” is displayed.
G Dial and press the {{{{Start }}}} key.
ND2C0104
81

ADVANCED TRANSMISSION FEATURES
82
4
2-SIDED TRANSMISSION (DOUBLE-SIDED TRANSMISSION)
Use this feature to send 2-sided origi-nals from the Document Feeder(ADF). Both sides of an original willbe scanned. The front and back of thescanned original will be printed in or-der, on separate sheets at the otherend. Note that the orientation of alter-nate sheets may be reversed at theother end.
Limitation❒ The front and back of a 2-sided
document are scanned in differentdirections. This means that whenthe front and back sheets of eachpage are printed at the other end,they may be upside-down in rela-tion to each other.
Note❒ If the first page is a single-sided
cover sheet, you can choose tohave this page sent using single-sided transmission. The remainingpages will be sent using Duplex.
❒ You can confirm whether bothsides were properly scanned inwith the Stamp feature ⇒ P.52“Stamp”.
A Set your original in the DocumentFeeder (ADF) and select any scansettings you require.
B Press [Mode].
The Transmission Mode menu ap-pears.
C Enter the “2-Sided TX” functionnumber with the number keys.
D Press the <<<< or >>>> key to select thefirst page that you want to bescanned on both sides.
Note❒ If your document contains the
single-sided cover letter as thefirst page, select From 2ndsheet, so that the machine scanboth sides from the secondpage.
E Press [OK] .
ND1X02E9

2-SIDED TRANSMISSION (DOUBLE-SIDED TRANSMISSION)
4
F Press [Exit ].
The initial display is shown.
Note❒ “2-Sided TX” is shown on the
display. If you set up anotheradvanced transmission function(except Polling Reception),“Others” is displayed.
The Transmission Mode menu isredisplayed. A check mark is add-ed to “2-Sided TX”.
G Dial and press the {{{{Start }}}} key.
83

ADVANCED TRANSMISSION FEATURES
84
4
BOOK FAX
Use to send book originals from theexposure glass. Pages are scanned inthe order shown below.Note that depending on the paper siz-es available on the destination ma-chine, the message may be reducedwhen printed at the other end.
Note❒ You can have bound originals
scanned in left page first or rightpage first. By default, the machinescans in the left page first but youcan change this setting with theUser Parameters. ⇒ P.203 “Chang-ing the User Parameters”
A Set your original on the exposureglass and select any scan settingsyou require.
B Press [Mode] .
The Transmission Mode menu ap-pears.
C Enter the “Book Fax” functionnumber with the number keys.
D Press the <<<< or >>>> keys to selectthe size of the original.
Note❒ To cancel this mode, press [Can-
cel ]. The Transmission Modemenu is shown on the display.
❒ If you choose 11×17”, the origi-nal will be sent using Image Ro-tation Transmission.
E Press [SSSS Pages] to toggle betweenpages 1 and 2 (see middle rightcorner of the display).
Note❒ Select “From Page 1” to send a
book original from the firstpage. Select “From Page 2” ifyou want to send a cover letteras the first page.
F Press [OK].
ND1X01E6
Exposure glass
ND1X02E9
ND1X02E7

BOOK FAX
4
The Transmission Mode menu isshown. A check mark is added to“Book Fax”.
G Press [Exit ].
The initial display is shown.
Note❒ “Book Fax” is shown on the dis-
play. If you set up another ad-vanced transmission function(except Polling Reception),“Others” is displayed.
H Dial and press the {{{{Start }}}} key.
Bound Original Page Order
When sending bound originals(books, magazines etc.), you canchoose to have either the left page orright page sent first.
Note❒ The default setting is Send Left
Page First. You can change this set-ting with the User Parameters ⇒P.203 “Changing the User Parame-ters”.
ND1X03E0
85

ADVANCED TRANSMISSION FEATURES
86
4
CHOOSING THE AREA TO BE SCANNED YOURSELF (IRREGULAR SCAN AREA)
Usually the machine automaticallydetects the size of an original when itis scanned. However, you may wishto override this and choose the area tobe scanned yourself.
You can either choose one of the stan-dard paper sizes (A4 KL, B4 L, A3L, 81/2 × 11" K L, 11" × 17" K) orone of two custom sizes programmedin advance (Area 1 and Area 2). ⇒P.16 “Paper Size and Scanned Area”Although you can specify a differentscan area for each page when usingthe exposure glass, only one size is al-lowed when scanning from the Docu-ment Feeder (ADF).
A Set your original and select anyscan settings you require.
B Press [Mode].
The Transmission Mode menu ap-pears.
C Enter the “Irreg. Scan Area” func-tion number with the numberkeys.
D Press the <<<< or >>>> key to select thepaper size.
Note❒ To see which paper sizes have
already been programmed,press [Status ].
❒ To cancel the Irreg. Scan Area,press [Cancel ]. The Transmis-sion Mode menu is shown.
E Press [OK].
The Transmission Mode menu isshown again. A check mark is add-ed to Irreg. Scan Area.
F Press [Exit ].
exposure glassADF
ND0X01E3
ND1X02E9
ND1X03E0

CHOOSING THE AREA TO BE SCANNED YOURSELF (IRREGULAR SCAN AREA)
4
The initial display is shown.
Note❒ “Irreg.Area” is shown on the
display. If you set up anotheradvanced transmission function(except Polling Reception),“Others” is displayed.
G Dial and press the {{{{Start }}}} key.
87

ADVANCED TRANSMISSION FEATURES
88
4
TRANSMISSION DEADLINE (TRD)
If you have to send an urgent mes-sage and the line is busy, this featuresaves you standing by the machineand redialing the number. If the mes-sage cannot be sent the first time, themachine redials automatically at in-tervals of five minutes any number oftimes until the deadline passes. Afterthe deadline passes, the TransmissionResult Report is automatically print-ed. This indicates whether or not themessage was sent within the dead-line.
Limitation❒ You can not specify a deadline
more than 24 hours into the future.
Note❒ If the message cannot be sent be-
fore the deadline and the numberof redials is less than 5, the ma-chine continues redialing until ithas redialed five times then printsthe Transmission Result report. Ifthe number of redials has alreadyreached 5, the machine prints theTransmission Result report andstops transmission.
A Set your original and select anyscan settings you require.
B Press [Mode].
The Transmission Mode menu ap-pears.
C Enter the “Trans. Deadline” func-tion number with the numberkeys.
Note❒ If the appropriate display is not
shown, press [↑↑↑↑Prev. ] or [↓↓↓↓Next ].
D Enter the deadline with the num-ber keys.
Note❒ If the current time on the dis-
play is not correct, adjust it. ⇒P.208 “Date/Time”
❒ To enter a number smaller than10, add a leading zero.
❒ If you make a mistake, press the{{{{Clear/Stop }}}} key and try again.
❒ To cancel the TransmissionDeadline, press [Cancel ]. TheTransmission Mode menu isshown.
E Press [OK].The Transmission Mode menu isshown. A check mark is added to“Trans. Deadline”.
ND1X02E9

TRANSMISSION DEADLINE (TRD)
4
F Press [Exit ].
The initial display is shown.
Note❒ “TRD” is displayed. If you set
up another advanced transmis-sion function (except PollingReception), “Others” is shown.
G Dial and press the {{{{Start }}}} key.
ND1X03E0
89

ADVANCED TRANSMISSION FEATURES
90
4
POLLING TRANSMISSION
Use Polling Transmission when youwant to leave an original in the ma-chine's memory for others to pick up.The message will be sent when theother party calls you up.
There are three types of PollingTransmission.
❖❖❖❖ Free Polling TransmissionAnybody can poll the messagefrom your machine. The machinesends it regardless of whether Poll-ing ID's match.
❖❖❖❖ Default ID Polling TransmissionThe message will only be sent if thePolling ID of the machine trying topoll your message is the same asthe Polling ID stored in your ma-chine. Make sure that both ma-chines' Polling IDs are identical inadvance.
❖❖❖❖ Override ID Polling TransmissionYou must enter an Override Poll-ing ID unique to this transmission.This ID overrides that stored in thePolling ID. The user must supplythis ID when they poll your ma-chine and if the IDs match, themessage is sent. Make sure the oth-er end knows the ID you are usingin advance.
Limitation❒ Polling Transmission is allowed
only if the receiver's machine hasthe Polling Reception feature. WithFree Polling, a message can also besent to other manufacturer's ma-chines as long as they have thePolling Reception feature. WithDefault ID and Override ID Poll-ing Transmission, an original canbe sent only to a the machine of thesame make with the Polling Recep-tion feature.
❒ Free Polling and ID Polling Trans-mission allow only one file to bestored in memory. Personal IDPolling Transmission allows a fileto be stored in memory for each ID;a total of up to 200 files for varyingID's can be stored.
❒ Before using “Default ID Polling”and “Override ID Polling”, youneed to program the polling ID.
❒ A polling ID may be any string offour numbers (0 to 9) and charac-ters (A to F) except 0000 and FFFF.
Note❒ The communication fee is charged
to the receiver.
A Set your original and select anyscan settings you require.
B Press [Mode].
TransmissionRequest
Transmitter(This machine)
Receiver
ND1X01E7
ND1X02E9

POLLING TRANSMISSION
4
The Transmission Mode menu ap-pears.
C Enter the “Polling TX” functionnumber with the number keys.
Note❒ If the appropriate display is not
shown, press [↑↑↑↑Prev. ] or [↓↓↓↓Next].
D Depending on the Polling Trans-mission type, use one of the fol-lowing procedures:
Free Polling Transmission
A Press the <<<< or >>>> key to se-lect[Free Poll. ] then press [OK].
B Press[SSSS File ] and specifywhether to save the stored orig-inal or not.
Each time you press the key, thetext at the middle right corner ofthe display toggles between“Save” and “Use once”.
Note❒ To delete the original imme-
diately after transmission, se-
lect “Use once”. To repeated-ly send the original, select“Save”.
Default ID Polling Transmission
A Press the <<<< or >>>>key to select“Default ID” and press [OK].
B Press [SSSS File ] and specifywhether to save the stored orig-inal or not.
Each time you press the key, thetext at the middle right corner ofthe display toggles between“Save” and “Use once”.
Note❒ To delete the original imme-
diately after transmission, se-lect “Use once”. To repeated-ly send the original, select“Save”.
ID Override Polling Transmission
A Press the <<<< or >>>>key to selectID Override and press [OK].
ND1X02E7
ND1X02E7
91

ADVANCED TRANSMISSION FEATURES
92
4
B Enter the 4 character Polling IDwith letter keys/ number keysand the letter (A–F).
Note❒ If you make a mistake, press
the {{{{Clear/Stop }}}} key and tryagain.
0000 and FFFF is not available.C Press [SSSS File ] and specify
whether to save the stored orig-inal.
Each time you press the key, thetext at the middle right corner ofthe display toggles between“Save” and “Use once”.
Note❒ To delete the original imme-
diately after transmission, se-lect “Use once”. To repeated-ly send the original, select“Save”.
E Press [OK].The Transmission Mode menu isshown. A check mark is added to“Polling TX”.
Note❒ To cancel the Polling Transmis-
sion, press [Cancel ]. The Trans-mission Mode menu is shown.
F Press [Exit ].
The initial display is shown.
Note❒ “Polling TX” is displayed. If
you set up other advancedtransmission function (exceptPolling Reception), “Others” isdisplayed.
G Press the {{{{Start }}}} key.
Polling Transmission Clear Report
This report allows you to verifywhether Polling Transmission hastaken place.
Limitation❒ This report is not printed if the
User Parameters are set to allowthe stored originals to be repeated-ly sent (Save). ⇒ P.203 “Changingthe User Parameters”
Note❒ This report is turned on by default.
You can turn it off if you wish. ⇒P.203 “Changing the User Parame-ters”
❒ By default, a portion of the sent im-age is printed on the report. You
ND1X02E7
ND1X03E0

POLLING TRANSMISSION
4
can turn this off with the User Pa-rameters. ⇒ P.203 “Changing theUser Parameters”
❒ You can also check the result of aPolling Transmission with theTCR.
93

ADVANCED TRANSMISSION FEATURES
94
4
POLLING RECEPTION
Use this function if you want to poll amessage from another terminal. Youcan also poll documents from manyterminals with only one operation(use Groups and Keystroke programsto fully exploit this feature).
There are two types of Polling Recep-tion.
❖❖❖❖ Default ID Polling Reception (FreePolling Reception)Use this method for Free Polling orDefault ID Polling. If the Polling IDis programmed in your machine,any messages waiting in the trans-mitting machine with the same IDare received. If the other machinedoes not have any messages wait-ing with the same Polling ID, anymessages that do not require IDare received (Free Polling).
❖❖❖❖ Override ID Polling ReceptionYou must enter an Override Poll-ing ID unique to this transmission.This ID overrides that stored in thePolling ID.Your machine will receive anymessages waiting in the transmit-ting machine with matching ID's.If no ID's match, any messages thatdo not require ID are received(Free Polling).
Limitation❒ Polling Reception requires that the
other machine can perform PollingTransmission.
❒ To receive a message sent by anyDefault ID Polling Transmission orOverride ID Polling Transmission,it is necessary to specify the samepolling ID as the sender's.
❒ To receive a message sent by De-fault ID Polling Transmission orOverride ID Polling Transmission,the sender must use a machine ofthe same make that has polling ca-pability. With Free Polling Recep-tion, a message can be alsoreceived from other manufactur-ers' machines as long as they havepolling capability.
❒ A Polling ID may be any four num-bers (0 to 9) and characters (A to F)except 0000 and FFFF.
A Press [Mode].
The Transmission Mode menu ap-pears.
B Enter the “Polling RX” functionnumber with the number keys.
TransmissionRequest
Receiver(This machine) Sender
ND1X01E8
ND1X02E9

POLLING RECEPTION
4
Note❒ If the appropriate display is not
shown, press [↑↑↑↑Prev. ] or [↓↓↓↓Next].
C Depending which method youare using, choose one of the fol-lowing procedures:
Default ID Polling Reception
A Press the <<<< or >>>> key to selectthe Default ID and press [OK].
ID Override Polling Reception
A Press the <<<< or >>>> key to selectthe Override ID and press [OK].
B Enter a polling ID (4 charac-ters) with the number keys andthe letter (A–F).
Note❒ If you make a mistake, press
the {{{{Clear/Stop }}}} key and tryagain.
❒ 0000 and FFFF is not avail-able.
D Press [OK].The Transmission Mode menu isshown. A check mark is added toPolling Reception.
Note❒ To cancel Polling Reception,
press [Cancel ]. The Transmis-sion Mode menu is shown.
E Press [Exit ].
The following display is shown.
Note❒ “Polling RX” is displayed.
F Dial and press the {{{{Start}}}} key.
Polling Reserve Report
This report is printed after Polling Re-ception has been set up.
Note❒ By default this report is turned off.
Turn it on with the User Parame-ters. ⇒ P.203 “Changing the UserParameters”
Polling Result Report
This report is printed after a PollingReception has been completed andshows the result of the Polling Recep-tion.
Note❒ You can also check the result of a
Polling Reception with the TCR.❒ By default this report is turned on.
Turn it on with the User Parame-ters. ⇒ P.203 “Changing the UserParameters”
ND1X03E0
95

ADVANCED TRANSMISSION FEATURES
96
4
TRANSFER REQUEST
Transfer Request allows fax machinesthat have this feature to automaticallydistribute incoming messages ontomultiple fax destinations. This featurehelps you save costs when you sendthe same message to more than oneplace in a distant area, and saves timesince many messages can be sent in asingle operation.The diagram below may make theconcept clearer.
PreparationBefore you can use this feature youmust program the Polling ID andyour own dial number. ⇒ P.196“Polling ID”, P.198 “G3 AnalogLine”Polling ID's of the requesting party(this machine) and Transfer Sta-tions must be identical.
The following terminology is used inthis section.
❖❖❖❖ Requesting PartyThe machine where the messageoriginates from, i.e. the machinemaking a Transfer Request (in thissection, this machine).
❖❖❖❖ Transfer StationThe machine that forwards the in-coming message to another desti-
nation, i.e. the machine thatreceives the Transfer Request.
❖❖❖❖ End ReceiverThe final destination of the mes-sage, i.e. the machine that theTransfer Station sends to. End Re-ceivers must be programmed intoQuick Dials, Speed Dials orGroups in the Transfer Station.
Limitation❒ The Transfer Stations you specify
must be machines of the samemake as this machine and have theTransfer Station function.
❒ You can specify up to 99 TransferStations in a Transfer Request.
❒ You can have up to 30 End Receiv-ers per Transfer Station. If youspecify a Transfer Station Group,the Group counts as a single re-ceiver.
❒ The combined total of End Receiv-ers and Transfer Stations you spec-ify with the number keys cannotexceed 99.
A Set an original and select any scansettings you require.
B Press [Mode].
The Transmission Mode menu ap-pears.
TransferStation
Requestingparty
TransferResult Report
End Receiver
End Receiver
End Receiver
ND1X01E9
ND1X02E9

TRANSFER REQUEST
4
C Enter the “Transfer Request”function number with the num-ber keys.
Note❒ If the appropriate display is not
shown, press [↑↑↑↑Prev. ] or [↓↓↓↓Next].
D Enter a Transfer Stations andpress [Recv. Stn ].
Note❒ Enter the fax numbers of the
Transfer Stations with eitherQuick Dials, Speed Dials or thenumber keys.
❒ If you make a mistake, press the{{{{Clear/Stop }}}} key and try again.
❒ To cancel the Transfer Request,press[Cancel ] . The Transmis-sion Mode menu is shownagain.
E Enter one or more End Receivers.
Note❒ You cannot enter the numbers
of the End Receivers directly.The numbers must be stored inQuick Dials, Speed Dials orGroups in the Transfer Sta-tion(s). To specify an End Re-ceiver, use the special formatdescribed in ⇒ P.98 “Specifyingan End Receiver”.
❒ Press [Add RcvStn ] if you wishenter more End Receivers.
❒ Press < or > to see the End Re-ceivers already entered. Youcan select an End Receiver fromthis list and cancel it by pressingthe {{{{Clear/Stop }}}} key.
❒ To cancel the Transfer Request,press [Cancel ].
FWhen you have specified all theEnd Receivers, press [OK].
G If you want to enter an additionalTransfer Station, press [Yes] andrepeat steps 4 to 6.
If you press [No], the TransmissionMode menu is shown and a checkmark is added to Transfer Request.
H Press [Exit ].
ND1X03E0
ND1X03E0
ND1X03E0
97

ADVANCED TRANSMISSION FEATURES
98
4
The following display is shown.
Note❒ The numbers of Transfer Sta-
tions and End Receivers are dis-played.
I Press the {{{{Start}}}} key.
Specifying an End Receiver
When you make a Transfer Request,you must specify the final destina-tions (End Receivers) for your mes-sage.You cannot enter the numbers of theEnd Receivers directly. Instead, entera simple code that describes wherethe numbers are stored in the Trans-fer Station (in Quick Dials, Speed Di-als or Groups).The numbers must first have beenstored in Quick Dials, Speed Dials orGroups in the Transfer Station(s).
❖❖❖❖ Quick DialEnter {{{{q }}}} followed by the num-ber (2 digits) of the Quick Dialwhere the End Receiver is stored.For example, to choose the numberstored in Quick Dial 01 in theTransfer Station, enter: {{{{q }}}} {{{{0}}}}{{{{1}}}}
❖❖❖❖ Speed DialEnter {{{{q }}}}, {{{{p}}}} followed by theSpeed Dial code (2 or 3 digits).For example, to choose the numberstored in Speed Dial 12 in theTransfer Station, enter:{{{{q }}}} {{{{p}}}}{{{{1}}}} {{{{2}}}}
❖❖❖❖ Group DialEnter{{{{q }}}} , {{{{p}}}}, {{{{p}}}} followedby the Group number (2 digits).For example, to choose the numberstored in Group 04 in the TransferStation, enter:{{{{q }}}} {{{{p}}}} {{{{p}}}} {{{{0}}}}{{{{4}}}}

TRANSMISSION OPTIONS
4
TRANSMISSION OPTIONS
This section describes various fea-tures that you can switch on and offfor any particular transmission by fol-lowing the procedure at the end ofthis section.In addition, if you frequently use acertain configuration of options, youcan change the default home position(on or off) of each option with theUser Parameters. ⇒ P.203 “Changingthe User Parameters”
----TTI (Transmit Terminal Identification) Print
By default, the machine adds yourTTI identification to each messageyou send so it appears on the printedfax at the other end. You can changeyour TTI with the Key Operator Set-tings. ⇒ P.166 “KEY OPERATORSETTINGS”
Note❒ You can switch this feature off
with the User Parameters. ⇒ P.203“Changing the User Parameters”
----Label InsertionWith this feature you can have the re-ceiver's name printed on the messagewhen it is received at the other end.The name will be printed at the top ofthe page and will be preceded by“To”.
Limitation❒ If you select Label Insertion, the la-
bel might be printed over a portion
of the image when received at theother end.
Note❒ Program the receiver's name and
number in a Quick Dial or SpeedDial with Label Insertion turnedon with the user parameter.
----Auto ReductionBy default, if the receiver's paper issmaller than the paper you are send-ing on, the message is automaticallyreduced to fit onto the paper availableat the other end.
Important❒ If you turn this feature off, the
scale of the original is maintainedand some parts of the image maybe lost when printed at the otherend.
Note❒ You can switch this feature on and
off with the User Parameters. The
Transmitter(This machine)
Receiver
ReductionND1X02E0
ND1X02E1
99

ADVANCED TRANSMISSION FEATURES
100
4
default setting is on. ⇒ P.203“Changing the User Parameters”
----ID TransmissionIf you turn this feature on, transmis-sion will only take place if the desti-nation's Polling ID is the same asyours. This feature can stop you fromaccidentally sending information tothe wrong place (you need to co-ordi-nate Polling ID's with the other par-ty).
Note❒ You can switch this feature on and
off with the User Parameters. Thedefault setting is off. ⇒ P.203“Changing the User Parameters”
Selecting Transmission Options for a Single Transmission
A Set the original and select anyscan settings you require.
B Press [Mode].
The Transmission Mode menu ap-pears.
C Enter the “Options” functionnumber with the number keys.
Note❒ If “Options” is not shown, press
[↑↑↑↑Prev. ] or [↓↓↓↓Next].
D Press the <<<< or >>>> key to switchTTI Print on or off.
Note❒ The default setting is on.
E If you want to set another option,press [↓↓↓↓Next].
Note❒ To finish, go to step 12.
F Press the <<<< or >>>> key to switchLabel Insertion on or off.
Note❒ The default setting is off.❒ To cancel the changes, press
[Cancel ]. The TransmissionMode menu is shown.
G If you want to set another option,press [↑↑↑↑Prev.] or [↓↓↓↓Next].
Note❒ To finish, go to step 12.
ND1X02E9

TRANSMISSION OPTIONS
4
H Press the <<<< or >>>> key to switchAuto Reduction on or off.
Note❒ The default setting is on.❒ To cancel the setting, press [Can-
cel]. The Transmission Modemenu is shown.
I If you want to set another option,press [↑↑↑↑Prev. ] or [↓↓↓↓Next].
Note❒ To finish, go to step 12.
J Press the <<<< or >>>> key to switchclosed network on or off.
K If you want to set another option,press [↑↑↑↑Prev. ].
Note❒ To finish, go to step 12.
L Press [OK].The Transmission Mode menu isshown. A check mark is added toOptions.
M Press [Exit ].
The initial display is shown.
Note❒ “Options” is shown. If you set
up another advanced transmis-sion function (except PollingReception), “Others” is shown.
N Dial and press the {{{{Start}}}} key.
ND1X03E0
101

ADVANCED TRANSMISSION FEATURES
102
4
This page is intentionally blank.

5. CommunicationInformation
CHECKING AND CANCELING TRANSMISSION FILES
Transmission files are originals thathave been stored in memory and areawaiting transmission. The featuresthat produce transmission files areMemory Transmission, ConfidentialTransmission, Transfer Request, Poll-ing Reception and Polling Transmis-sion. These features are described indetail elsewhere in this document.This section describes how you can:• Delete a file (cancel transmission)• Print a file *1
• Check the destination(s) and op-tions selected
• Alter when a file will be sent• Resend a file• Change destinations• Delete destinations• Add destinations*1 This does not apply to Polling Recep-
tion or Confidential Transmission.
Limitation❒ If you cancel a file being sent, the
communication is immediatelystopped and the file is canceled. Apage which has already been sentcannot be canceled.
❒ You cannot change the start timeadd/delete a destination while afile is being sent.
Canceling a Transmission
A Press [Info. ].
The Information menu is shown.
B Enter the “Check/Cancel TXFiles” function number with thenumber keys.
Note❒ If “Check/Cancel TX Files” is
not shown, press [↑↑↑↑Prev. ] or [↓↓↓↓N-ext ].
ND1X03E0
103

COMMUNICATION INFORMATION
104
5
C Press the <<<< or >>>> key until thefile you want to delete is shownand press [Delete].
D Press [Yes].
The file is erased.
E Press [Exit ].
Note❒ To delete another file, repeat
steps 3 and 4.
F Press [Exit ].
The initial display is shown.
Printing a File
If you wish to check the contents of afax that is stored in memory and hasnot been sent yet, use this procedureto print it out.
A Press [Info. ].
The Information menu is shown.
B Enter the “Check/Cancel TXFiles” function number with thenumber keys.
Note❒ If “Check/Cancel TX Files” is
not shown, press [↑↑↑↑Prev. ] or [↓↓↓↓N-ext ].
ND1X02E7
ND1X03E0
ND1X03E0
ND1X03E0
ND1X03E0

CHECKING AND CANCELING TRANSMISSION FILES
5
C Press the <<<< or >>>> key until thefile you want to print is shownand press [Print ].
D Press the {{{{Start}}}} key.
The file is printed.
Note❒ Press [Cancel ] to stop printing
the file and return to the step 3display.
E Press [Exit ].
The Information menu is shownagain.
F Press [Exit ].
The initial display is shown.
Checking and Editing a File
Use this procedure to check or editdestination(s), check options selectedor alter the transmission time.
A Press [Info. ].
The Information menu is shown.
B Enter the “Check/Cancel TXFiles” function number with thenumber keys.
Note❒ If “Check/Cancel TX Files” is
not shown, press [↑↑↑↑Prev. ] or [↓↓↓↓N-ext ].
ND1X02E8
ND1X03E0
ND1X03E0
ND1X03E0
105

COMMUNICATION INFORMATION
106
5
C Press the <<<< or >>>> key until thefile you want to print is shown.Then press [Check ].
D Depending on the setting youwant to check or change, use oneof the following procedures.
Checking Destinations (Destination List)
A Enter the “Destination List”function number with thenumber keys.
The total number of destina-tions and the fax number oreach destination's name isshown.
Note❒ To see hidden destinations,
press [↑↑↑↑Prev. ] or [↓↓↓↓Next].
Changing the Transmission Time
A Enter the “Change Start Time”function number with thenumber keys.
B Enter the transmission time (4digits) with the number keys.
Use 24-hour or 12-hour formatdepending on your area. For 12-hour format, press [AM ↔ PM]to switch between AM and PM.
Note❒ You can not specify a start
time more than 24 hours intothe future.
❒ To start transmission imme-diately, press [Immediate ]. Ifmemory contains other filesqueued for transmission,those files are sent first.
Re-sending a File
If you select the failed transmis-sion file, you can resend it. Thisfeature allows you to transmit a faxmessage again. You can choose tohave files that were not transmit-ted successfully stored in memory.These files will be kept for eitherup to 24 or 72 hours depending onhow you program this feature. ⇒P.203 “Changing the User Parame-ters”
ND1X02E9

CHECKING AND CANCELING TRANSMISSION FILES
5
A Enter the “Retransmit ” func-tion number with the numberkeys.
B Press [Yes].
Note❒ If you do not want to send
the file, press [No].C Enter the start time with the
number keys.
Use 24-hour or 12-hour formatdepending on your area. For12-hour format, press [AM ↔PM] to switch AM and PM.
Note❒ You can not specify a start
time more than 24 hours intothe future.
❒ To start transmission imme-diately, press [Immediate ]. Ifmemory contains other filesqueued for transmission,those files are sent first.
Changing a Destination
You can delete or add destinations.
A Enter the “Change Dest.” func-tion number with the numberkeys.
B Change the destination.
Note❒ To cancel a destination, press
the < or > key until the des-tination you want to cancel isshown and press the {{{{Clear/Stop}}}} key.
❒ To add a destination, press[Add ] and enter the fax num-ber with the number keys.Destinations can be specifiedonly by using the numberkeys. The destination is add-ed to the end of the list.
❒ If you change a destination ofa file that is automatically be-ing dialed or awaiting redial,redial is canceled so you willneed to resend that file. ⇒P.106 “Re-sending a File”
E Press [Exit ].
F Press [Exit ].
ND1X03E0
ND1X03E0
107

COMMUNICATION INFORMATION
108
5
G Press [Exit ].
The Information menu is shown.
H Press [Exit ].
The initial display is shown.
ND1X03E0
ND1X03E0

PRINTING A LIST OF FILES IN MEMORY (PRINT TX FILE LIST)
5
PRINTING A LIST OF FILES IN MEMORY (PRINT TX FILE LIST)
Print this list if you wish to find outwhich files are stored in memory andwhat their file numbers are. Knowingthe file number can be useful (e.g.,when erasing files).
Note❒ The contents of an original stored
in memory can also be printed. ⇒P.104 “Printing a File”
A Press [Info. ].
The Information menu is dis-played.
B Enter the “Print TX File list ”function number with the num-ber keys.
Note❒ If “Print TX File list ” is not
shown, press [↑↑↑↑Prev. ] or [↓↓↓↓Next].
C Press the {{{{Start}}}} key.
The transmission file list is printed.When the printing is completed,the Information menu is shown.
Note❒ Press [Cancel ] to stop printing
the file list and return to the In-formation Menu display.
D Press [Exit ].
The initial display is shown.
109

COMMUNICATION INFORMATION
110
5
CHECKING THE TRANSMISSION RESULT (TX STATUS)
If you wish to find out whether a filewas sent successfully, you don't haveto always print the TCR. With thisfunction you can browse through thelast 50 completed transmissions onthe display.
Limitation❒ Only the last 50 transmissions are
shown. Earlier transmissions arenot available.
❒ If a transmission is completedwhile you are using this function,the result will not be shown untilyou exit TX File Status and start itagain.
A Press [Info. ].
The Information menu is shown.
B Enter the “TX Files Status ” func-tion number with the numberkeys.
Note❒ If “TX Files Status ” is not
shown, press [↑↑↑↑Prev. ] or [↓↓↓↓Next].
C Press [↑↑↑↑Prev.] or [↓↓↓↓Next ] to scrollthrough the list.
The results are shown two at a timewith the most recent above.
D Press [OK].
The initial display is shown.
ND1X03E0

CHECKING THE RECEPTION RESULT (RX STATUS)
5
CHECKING THE RECEPTION RESULT (RX STATUS)
This function lets you check up on thelast 50 messages received withouthaving to print the TCR. You canbrowse through the received messag-es on the display.
Limitation❒ Only the last 50 messages are dis-
played. Earlier messages are notavailable.
❒ If a message is received while youare using this function, the resultwill not be shown until you exit RXFile Status and start it again.
A Press [Info. ].
The Information menu is shown.
B Enter the “RX Files Status” func-tion number with the numberkeys.
Note❒ If “RX Files Status” is not
shown, press [↑↑↑↑Prev. ] or [↓↓↓↓Next].
C Press [↑↑↑↑Prev.] or [↓↓↓↓Next ] to scrollthrough the messages.
The results are shown two at a timewith the most recent above.
D Press [OK].
The initial display is shown.
E Press [Exit ].
ND1X03E0
111

COMMUNICATION INFORMATION
112
5
PRINTING A CONFIDENTIAL MESSAGE
The optional Fax Feature Expander is required to use this function.
This feature is designed to preventmessages being picked up casually byanyone when they are received. Ifsomeone sends you a message usingConfidential Transmission, it isstored in memory and not automati-cally printed. To print the messageyou have to enter the Confidential IDcode. When your machine has re-ceived a confidential message, theConfidential File indicator lights.
PreparationBefore using this function, pro-gram your Confidential ID. ⇒P.196 “ID Code”
Important❒ If the Main Power Switch is off
more than an hour, all Confiden-tial Messages are deleted. In such acase, use the Power Failure Reportto identify which messages havebeen lost. ⇒ P.126 “WHEN POW-ER IS TURNED OFF OR FAILS”
Limitation❒ You must program the Confiden-
tial ID for Confidential Receptionto work.
A Press [Info. ].
The Information menu is shown.
B Enter the “Print Conf. RX” func-tion number with the numberkeys.
Note❒ If “Print Conf. RX” is not
shown, press [↑↑↑↑Prev. ] or [↓↓↓↓Next ].
C Enter the Confidential ID (4-digitnumber) with the number keys.
Note❒ If you receive a fax by Confiden-
tial ID Override Reception, en-ter the override Confidential ID.
❒ You need to obtain the overrideConfidential ID from the send-er.
D Press the {{{{Start }}}} key.
The received messages are printed.When printing has finished, the In-formation menu is shown.
Note❒ If no Confidential Messages
have been received, the mes-sage “No reception file(s) ex-ists.” is shown. Press [OK].
❒ If the Confidential IDs or Per-sonal Confidential IDs do notmatch, the message “No file(s)exist for this Confidential ID.” is
ND1X03E0

PRINTING A CONFIDENTIAL MESSAGE
5
displayed. Press [OK] to cancelthe operation, check the Confi-dential ID or Personal Confi-dential ID with the other partyand try again.
E Press [Exit ].
The initial display is shown.
Confidential File Report
By default, this report is printedwhenever your machine receives aConfidential Message.
Note❒ You can turn this report off with
the User Parameters. ⇒ P.203“Changing the User Parameters”
ND1X03E0
113

COMMUNICATION INFORMATION
114
5
PRINTING A FILE RECEIVED WITH MEMORY LOCK
Optional Fax Feature Expander is required to use this function.
This is a security feature designed toprevent unauthorized users fromreading your messages. If MemoryLock is switched on, all received mes-sages are stored in memory and arenot automatically printed. To printthe messages, you have to enter theMemory Lock ID code. When yourmachine has received a message withMemory Lock, the Receive File indi-cator blinks.
PreparationBefore you start, program yourMemory Lock ID.⇒ P.196 “Memo-ry Lock ID”
Note❒ Messages received by Polling Re-
ception are automatically printedeven if this feature is switched on.
❒ If the Main Power Switch is turnedoff for more than an hour, all mes-sages protected by Memory Lockwill be deleted. In such a case, thePower Failure Report will be print-ed so you can confirm which mes-sages have been lost. ⇒ P.126“WHEN POWER IS TURNED OFFOR FAILS”
❒ Memory Lock is switched off bydefault. Turn it on using the Fac-simile User Tools. ⇒ P.172 “Memo-ry Lock”
❒ You can also apply Memory Lockto messages that come only fromcertain senders. ⇒ P.182 “SpecialSenders to Treat Differently (SpecialRX Nos.)”
AMake sure that the Receive Fileindicator blinks. Press [Info. ].
The Information menu is shown.
B Enter the “Print Mem. Lock”function number with the num-ber keys.
Note❒ If “Print Mem. Lock” is not
shown on the display, press ❒ [↑↑↑↑Prev. ] or [↓↓↓↓Next].
C Enter the Memory Lock ID (4-dig-it number).
D Press the {{{{Start }}}} key.
The received messages are printed.When the printing is completed,the Information menu is shown.
ND1X03E0

PRINTING A FILE RECEIVED WITH MEMORY LOCK
5
Note❒ If no messages have been re-
ceived, while Memory Lock isswitched on, the following mes-sage will appear.”No receptionfile(s) exists.” Press [OK].
❒ If the Memory Lock IDs do notmatch, the following messagewill appear. “Wrong MemoryLock ID.”Press [OK] and retryafter checking the MemoryLock ID.
E Press [Exit ].
The initial display is shown.
ND1X03E0
115

COMMUNICATION INFORMATION
116
5
PRINTING THE TCR
The TCR (Transaction ConfirmationReport) contains information aboutthe last 49 communications made byyour machine. By default, it is printedautomatically after every 50 commu-nications (receptions + transmis-sions).You can also print a copy of the TCRat any time by following the proce-dure below.
Note❒ The sender's name column of the
TCR is useful when you need toregister a special sender.
❒ If you do not want the TCR print-ed, you can turn it off. ⇒ P.203“Changing the User Parameters”
A Press [Info. ].
The Information menu is shown.
B Enter the “Print TCR” functionnumber with the number keys.
Note❒ If “Print TCR” is not shown,
press [↑↑↑↑Prev. ] or [↓↓↓↓Next].
C Press the <<<< or >>>> key to select theformat you want to print.
Note❒ Select “File No.” to enter a 4-
digit file number with the num-ber keys.
❒ Select “Pers. Code” to enter aPersonal Code (4-digit number)with the number keys.
❒ Press [Cancel ] to return to the In-formation menu.
D Press the {{{{Start }}}} key.
The TCR is printed.
E Press [Exit ].
The initial display is shown.
ND1X03E0
ND1X03E0
ND1X03E0

DISPLAYING THE MEMORY STATUS
5
DISPLAYING THE MEMORY STATUS
Use this function to display a summa-ry of current memory usage. Itemsshown are the percentage of freememory space, the number of re-ceived confidential messages, thenumber of files to be sent, and thenumber of received messages to beprinted.
A Press [Info. ].
The Information menu is shown.
B Enter the “Memory Status” func-tion number with the numberkeys.
Note❒ If “Memory Status” is not
shown, press [↑↑↑↑Prev. ] or [↓↓↓↓Next].
C The usage is displayed. Whenyou have finished, press [OK].
Note❒ If “Others” is displayed, it
means that one or more AutoDocuments have been stored. ⇒P.151 “Registering Auto Docu-ments”
D Press [Exit ].
The initial display is shown.ND1X03E0
ND1X03E0
ND1X03E0
117

COMMUNICATION INFORMATION
118
5
This page is intentionally blank.

6. Troubleshooting
WHEN TONER RUNS OUT
When the machine has run out of ton-er the D symbol appears on the dis-play. Note that even if there is notoner left you can still send fax mes-sage.
Important❒ If you continue receiving and
sending faxes after toner runs out,communication will not be possi-ble after 200 ( 900 with the Fax Fea-ture Expander ) communications.
Limitation❒ The Memory Storage Report, Poll-
ing Reserve Report and Confiden-tial File Report are not printed.
AMake sure that the machine is inFacsimile mode and the standbydisplay is shown.
Note❒ If the standby display is not
shown, press the {{{{Fax}}}} key.
B Press [Exit ].The error display closes.⇒ P.24 “MEMORY TRANSMIS-SION”
⇒ P.32 “IMMEDIATE TRANSMIS-SION”
1
3 4
2
EnhancedImage
Menu
SeriesCopies
MarginAdjust
Auto Reduce/Enlarge
Zoom
CombineCopies
Erase Center/Border
Copy
Fax
ND2L02E8
119

TROUBLESHOOTING
120
6
ERROR MESSAGES AND THEIR MEANINGS
If there is an error, one of the following messages may appear on the display. Itmight just flash up briefly, so if you are watching for errors, stay by the machineand check the display.
Message Problem and Solution
Clear Misfeed(s)
Remove originals from the Document Feeder.
• Original misfeed
• Remove originals from Document Feeder.
• Set any pages of the original that were not scanned and send again.
Reset originals and press Start. Original jammed during Memory Trans-mission. Reset originals that haven't been scanned.
Error. Transmission has been cancelled. A document jam occurred during Imme-diate Transmission. Press [OK] and resend the page which has been not sent.
An error occurred during Immediate Transmission. Press [OK] and re-send the original.
Note❒ There may be a problem with the ma-
chine or the telephone line (e.g. noise or cross talk). If the error re-occurs fre-quently, contact your service represen-tative.
Cannot detect original size. Reset origi-nal(s) and press Start key.
The machine failed to detect the size of the original. Press < or > to select the size and press the {{{{Start }}}} key again.
<FAX>
Personal Code Access. Please enter your Personal Code.
Personal Codes Access are switched on. You need to enter a previously pro-grammed 4 digit ID code. For more infor-mation, see P.166 “Personal Codes”.
LService call
Functional problem with the fax. Please contact your service representative.
There is a problem with the fax function. Contact your service representative and tell the code number shown in the dis-play. The copier function will still work normally.
Memory is full. Cannot store additional originals. (Stored original(s) will be trans-mitted.)
If you press OK, the machine returns to the standby mode and start transmitting pages which has been scanned.

SOLVING PROBLEMS
6
SOLVING PROBLEMS
This table lists some common problems and their solutions.
Problem Solution Refer to
Image background appears dirty when received at the other end.
Adjust the scan density. P.38 “Image Density (Con-trast)”
Printed or sent im-age contains spots.
The Document Feeder (ADF) or exposure glass is dirty. Clean them. See the Copy Reference
Make sure that ink or eraser is dry before setting the original.
---
Received image is too light.
Request the sender to increase the image density.
P.14 “ACCEPTABLE TYPES OF ORIGINALS”
When using moist, rough or pro-cessed paper, the printed image may be partly invisible. Only use recommended paper.
When D is blinking, toner is be-ginning to run out. Replace the toner cartridge soon. ⇒See the Copy Reference.
---
Message appears blank at the other end.
The original was set upside down. Set it properly.
P.18 “HOW TO SET AN ORIGINAL”
You want to cancel a Memory Transmis-sion.
If the original is being stored, press the {{{{Clear/Stop }}}} key.
P.4 “OPERATION PANEL”
If the original is being sent, use “Check/Cancel TX Files” in the Information menu.
P.18 “HOW TO SET AN ORIGINAL”
You want to cancel an Immediate Trans-mission.
Press the {{{{Clear/Stop }}}} key. P.4 “OPERATION PANEL”
You cannot add any destination in Group though it does not reach the maximum number.
99 (with the Fax Feature Expander it is 999) destination has been pro-grammed with the number keys. Program it with the Quick Dial key or Speed Dial instead.
P.44 “Restrictions When Di-aling with the Number Keys”
121

TROUBLESHOOTING
122
6
Immediate transmis-sion error occurs while copying in multiple numbers.
Use memory transmission while copying in multiple numbers.
P.24 “MEMORY TRANS-MISSION”
Problem Solution Refer to

INDICATORS
6
INDICATORS
When the Receive File Indicator is Lit or Flashing
If the Receive File indicator is blinking, a message has been received and storedin memory with Memory Lock. You need to print it out manually. ⇒ P.114“PRINTING A FILE RECEIVED WITH MEMORY LOCK”If the Receive File indicator is lit, a message has been received but could not beprinted for some reason. The message was stored in memory (Substitute Recep-tion). When you solve the problem, the message will be automatically printedout. The table below lists some problems that could have caused Substitute Re-ception to take place and their solutions.
ReferenceP.114 “PRINTING A FILE RECEIVED WITH MEMORY LOCK”
Why Substitute Reception Occurred
Indication/Status Solution
Paper has run out B and/or {{{{Fax}}}} key is lit in red.
Add paper.
⇒See the "Loading Paper" in the Copy Reference."
Toner is empty D is lit Replace the toner cartridge.
⇒See the "Adding Toner" in the Copy Reference.
Paper is jammed x is lit Remove the jammed paper.
⇒See the "Clearing Mis-feed" in the Copy Refer-ence.
Cover is open The message “Doors/Cov-ers open” appears.
A cover other than the Doc-ument Feeder (ADF) or front cover is open.
⇒Close the cover.
Machine is busy printing with another function
The machine is printing with another function.
The message will be print-ed after the current job fin-ishes automatically.
Output Tray is full. The Ouput Tray is full. Re-move paper.
Remove paper from the Output Tray.
123

TROUBLESHOOTING
124
6
When the Confidential File Indicator is Lit
If this indicator is lit, a message has been received into memory with Confiden-tial Reception. You need to print it out manually. ⇒ P.112 “PRINTING A CON-FIDENTIAL MESSAGE”
When the {{{{Fax}}}} key is Lit in Red
If this key is lit, refer to the table below and take the appropriate action.
Problem Solution
Paper has run out. Add paper.
⇒See the Loading Paper in the Copy Reference.
The paper output tray is full. Remove the paper from the tray.
The machine is in RDS (Remote Diagnositc System) mode.
Wait with the main power switch on. Machine will go to the standby mode after it exits from the RDS mode.
A facsimile error has occurred. The facsimile has a problem. Contact a service rep-resentative. The copier will still function normally.

WHEN AN ERROR REPORT IS PRINTED
6
WHEN AN ERROR REPORT IS PRINTED
An error report is printed when a message could not be successfully sent or re-ceived.Possible causes include a problem with your machine or the receiver's, noise onthe telephone line etc. If an error occurs during transmission, re-send the origi-nal. If an error occurs during reception, ask the sender to re-send the message.
Note❒ If the error happens frequently, contact your service representative.
125

TROUBLESHOOTING
126
6
WHEN POWER IS TURNED OFF OR FAILS
Even if the main power switch is turned off, the contents of the machine's mem-ory (programmed numbers etc.) will not be lost. However, if power is lost formore than 1 hour through the main power switch being turned off, a power cutor the power cable being removed, memory contents will be lost. Lost items willinclude any fax messages stored in memory using Memory Transmission or Re-ception.If a file has been deleted from memory, a Power Failure Report is automaticallyprinted as soon has power is restored. This report can be used to identify lostfiles. If an original stored for Memory Transmission was lost, re-send it. If a mes-sage received by Memory Reception or Substitute Reception was lost, ask thesender to re-send it. If an Auto Document was lost, you will need to store it inmemory again.
Important❒ Make sure that 100 % is shown on the display before you unplug the machine.
If a lower value is shown, some data is currently stored in memory.❒ Right after a power failure, the internal battery needs to be sufficiently re-
charged to guard against future data loss. Please keep the machine pluggedin and the main power switch on for at least one week after the power lossoccurs.
Note❒ If you install the Hard disk option, all files stored in memory are not erased
even if there is a power failure.

7. Facsimile User Tools
ACCESSING THE USER TOOLS
The User Tools allow you to programthe machine with your identification,store frequently used numbers andsettings, and customize the defaultsettings to match your needs.So you can find the User Tool youwant quickly and easily, they aregrouped by function:
❖❖❖❖ Register/DeleteUse to program or delete: QuickDials, Groups, Optional Groups,Speed Dial, Keystroke Programs,Auto Documents, Irregular scanArea
❖❖❖❖ Reports/ListsUse to print: the TCR, Group list,Keystroke Program list, Speed Diallist, Auto Document list, Forward-ing list, Quick Dial list and AutoDocuments, Authorized Receptionlist
❖❖❖❖ Initial Setup TXUse to set defaults for: Transmis-sion mode (Memory/Immediate),scanning conditions (Resolution,Image Density and Original Type)
❖❖❖❖ Initial Setup RXUse to turn on or off: Reverse Or-der Printing Checkered Mark,Center Mark, Print RX Time,Multi-copy Reception, AuthorizedReception, Special RX NOS., For-warding, 2-sided printing.
❖❖❖❖ User FunctionsUse to program settings you fre-quently use into the User FunctionKeys
❖❖❖❖ Key Op. SettingsUse to program/check: yourname, your fax number, line type,various ID codes, monitor volume,date and time, number of docu-ments transmitted/received
PreparationSome menus will not fit on the dis-play. Press [↑↑↑↑Prev. ] and [↓↓↓↓Next] toscroll through them if you cannotsee the item you need.Press [PrevMenu ] to return to thePrevious menu.Items that are currently selectedappear highlighted.Press the [OK] key to accept thenew settings.Note that the changes will not bemade if you do not press the [OK]key.Press [OK] or [Cancel ] to return tothe previous display.
AMake sure that the machine is inFacsimile mode and the standbydisplay is shown.
Note❒ If the standby display is not
shown, press the {{{{Fax}}}} key.
127

FACSIMILE USER TOOLS
128
7
B Press the {{{{User Tools/Counter }}}} key.
C Enter the number of the “Fax”.
The Facsimile User Tool mainmenu appears.
ReferenceFor how to use the System UserTools, refer to the System Set-tings manual.
D Enter the number that matchesthe category you require.
Note❒ If you select “Key Op. Settings,”
you must enter the functionnumber for “Key Op. Settings”with number keys and press the{{{{#}}}} (Enter) key within 3 sec-onds.
E Enter the function number of theUser Tool you require.
Note❒ Function numbers are different
depending on the machinemodel and options attached.
F Follow the instructions on thedisplay.
For more details on each UserTool, see the relevant pages of thismanual..
Exiting User Tool mode
AWhen you have made your chang-es and pressed [OK], press the {{{{Us-er Tools/Counter }}}} key to return tostandby mode.
Note❒ To exit “Key Op. Settings”, you
need to return to the FacsimileUser Tools initial display. Press[PrevMenu ] on each display untilyou reach the main menu, thenpress the {{{{User Tools/Counter }}}}key.
2
2
22
11
Sort
Staple
Stack
1-Sided 2-Sided
2-Sided 2-Sided User Tools / Counter
Enhanced Auto Reduce/
Book 2-Sided
ND2L01E0

REGISTER/DELETE MENU
7
REGISTER/DELETE MENU
Registering Quick Dials
To save time, you can program a faxnumber that you use often into aQuick Dial key. Then, whenever youare sending a message to that loca-tion, just press that Quick Dial key todial.Use the following steps to program anew Quick Dial or to edit or overwriteexisting Quick Dials. There are 56Quick Dials available.You can register the following itemsin each key:• Destination fax number (up to 254
digits)• Destination name
Important❒ We recommend that you print the
Quick Dial list and keep it whenyou program or change fax num-bers. ⇒ P.158 “REPORTS/LISTS”
Limitation❒ When a registered Quick Dial key
is being used for a standby Memo-ry Transmission, the message“This destination is in use forstandby transmission file. Pleasemodify/delete after transmis-sion.” is shown and you cannotchange the destination for this key.
AMake sure that the machine is inFacsimile mode and the standbydisplay is shown.
Note❒ If the standby display is not
shown, press the {{{{Fax}}}} key.
B Press the {{{{User Tools/Counter }}}} key.
C Enter the number of the “Fax”.
The Facsimile User Tool mainmenu appears.
ReferenceFor how to use the System UserTools, refer to the System Set-tings manual.
D Enter the function number for“Register/Delete” using the num-ber keys.
E Enter the function number for“Reg. Quick Dial” using the num-ber keys.
2
2
22
11
Sort
Staple
Stack
1-Sided 2-Sided
2-Sided 2-Sided User Tools / Counter
Enhanced Auto Reduce/
Book 2-Sided
ND2L01E0
129

FACSIMILE USER TOOLS
130
7
F Press the Quick Dial key whichyou want to register.
Note❒ If you press a wrong key, press
[PrevMenu ] then try again.❒ You can press [Status ] to see
which Quick Dial keys havebeen programmed.
G Enter a fax number using thenumber keys.
Note❒ If you make a mistake, press the{{{{Clear/Stop }}}} key and try again.
❒ If a fax number is already regis-tered in this Quick Dial key, thenumber and communicationtype are shown on the display.If you wish to change the faxnumber, press the {{{{Clear/Stop }}}}key and enter another number.
❒ You cannot omit the fax num-ber.
H Press [Name] .
Note❒ If you wish to omit the destina-
tion name, go to step 11.
I Enter the destination name.
Note❒ If a destination name is already
registered in this Quick Dialkey, the name is shown on thedisplay. If you wish to changethis name, press the {{{{Clear/Stop }}}}key and enter another name.
ReferenceP.213 “Entering Text”
J Press [OK].The fax number and name are dis-played.
K Press [OK] to register the new set-ting.
Note❒ If you press [Cancel ], the entered
values are canceled and the dis-play shown in step 7 appearsagain.
L Press [Exit ].The display shown in step 6 ap-pears again.
M Press the {{{{User Tools/Counter }}}} key.
ND1X03E0

REGISTER/DELETE MENU
7
Quick Dial List
Printing the Quick Dial list allowsyou to check destinations registeredin Quick Dial keys. ⇒ P.158 “RE-PORTS/LISTS”
Deleting Quick Dials
This procedure describes how to finda programmed Quick Dial and deleteit.
Limitation❒ When a Quick Dial key is being
used for a standby Memory Trans-mission, the message “This desti-nation is in use for standbytransmission file. Please modify/delete after transmission.” isshown and you cannot delete thedestination for this key.
AMake sure that the machine is inFacsimile mode and the standbydisplay is shown.
Note❒ If the standby display is not
shown, press the {{{{Fax}}}} key.
B Press the {{{{User Tools/Counter }}}} key.
C Enter the number of the “Fax”mode.
The Facsimile User Tool mainmenu appears.
ReferenceFor how to use the System UserTools, refer to the System Set-tings manual.
D Enter the function number for“Register/Delete” using the num-ber keys.
E Enter the function number for“Delete QuickDial” using thenumber keys.
F Press the Quick Dial key whichyou want to delete.
The current contents of the key aredisplayed.
Note❒ If you press the wrong key,
press [No] then try again.2
2
22
11
Sort
Staple
Stack
1-Sided 2-Sided
2-Sided 2-Sided User Tools / Counter
Enhanced Auto Reduce/
Book 2-Sided
ND2L01E0
131

FACSIMILE USER TOOLS
132
7
❒ You can press [Status ] to seeQuick Dial keys that have beenalready programmed.
G Press [Yes].
Note❒ If you press [No], the destination
is not deleted and the display isshown in step 6 appears again.
H Press [Yes] to delete the destina-tion stored in this Quick Dial.
Note❒ If you press [No], the destination
is not deleted and the displayshown in step 6 appears again.
I Press the {{{{User Tools/Counter }}}} key.
Quick Dial Key and Function Key Label (Dial label)
You can print a template that can beused to make labels for Quick Dialand User Function keys. The templatewill have destination or Group namesprogrammed in Quick Dials, and the
names of functions assigned to UserFunction keys.
Limitation❒ Print the template on A4 label pa-
per that can be peeled and stuck onthe operation panel.
Note❒ You can print the template from
the Bypass Tray.❒ You can choose whether to print
on transparent or non-transparentlabel paper with the User Parame-ters. ⇒ P.203 “Changing the UserParameters”By default the setting is“Non-transparent”.
❒ To print the label template, seeP.158 “REPORTS/LISTS”.
ND1X03E0

REGISTER/DELETE MENU
7
Non-transparent label paper
1. Quick Dial key number
2. Destination name
3. Group name (G)
4. Program name (P)
5. Programmed contents of User Function keys
Dial label (Jan. 9. 1998 2:14PM)
Please cut and stick on above the One Touch key
ABC COMPANY
01 NEW YOR 02 TRONTG 03 SEND L 04 05 *LONDON 06 PARIS O 07 MAIN OFP
G P
08 09 10 11 12 13 14
15 16 17 18 19 20 21
22 23 24 25 26 27 28
29 30 31 32 33 34 35
36 37 38 39 40 41 42
43 44 45 46 47 48 49
50
01-07
08-14
15-21
22-28
29-35
36-42
43-49
50-56
F CodeTX FllesStatus TEL Mode G4 Stamp
51 52
NEW YORK O LONDON OFF PARIS OFFI MAIN OFFICTRONT OFF SEND LATE
53 54 55 56
1 2 3 4
1
5
2 3 4
ND0X03E6
133

FACSIMILE USER TOOLS
134
7
Transparent label paper
1. Quick Dial key number
1. Destination name
1. Group name (G)
1. Program name (P)
1. Programmed contents of User Function keys
Dial label (Jan. 9. 1998 2:14PM)
Please cut and stick on above the One Touch key
ABC COMPANY
G P01-07
08-14
15-21
22-28
29-35
36-42
43-49
50-56
F CodeTX FllesStatus TEL Mode G4 Stamp
NEW YORK O LONDON OFF PARIS OFFI MAIN OFFICTRONT OFF SEND LATE
1
5
2 3 4
ND0X03E5

REGISTER/DELETE MENU
7
Registering Groups
If you send the same message to sev-eral destinations at the same time on aregular basis, program these destina-tion numbers as a Group. This allowsyou to dial these destinations with asingle key press.Use these steps to program a newGroup or to edit or overwrite an exist-ing Group.You can register the following itemsin a Group:• Destination fax numbers (up to 200
numbers for each group, up to 254digits for each number)
• Group name (up to 20 characters)You can enter destination numberswith Quick Dial keys, Speed Dials, orthe number keys.
Important❒ It is recommend that you print the
Group Dial list and keep it whenyou register or change destina-tions. ⇒ P.158 “REPORTS/LISTS”
Limitation❒ The maximum number of Groups
you can register is 9.❒ The maximum number of destina-
tion you can register in a Group is200. This 200 can be composed ofup to 55 Quick Dial numbers, 100Speed Dial numbers and 98 num-bers entered directly with thenumber keys. The maximum num-ber of the destination you can reg-ister in all group is 255.
❒ The number of destinations thatcan be registered with the numberkeys depends on how the machineis used. You can register up to 99destinations for all the Groups.
❒ If you register a Group with thenumber keys when a file is waitingto be transmitted, a message isshown. You sometimes cannot reg-ister any more destinations evenwhen the number of specified des-tinations is 99 or less. This is be-cause a fax number is stored inmemory for the file to be transmit-ted. When the transmission is com-pleted and the fax number isdeleted, you can register theGroup.
❒ When a lot of destinations are reg-istered in a Group using numberkeys, you sometimes cannot entera destination for a Memory Trans-mission with the number keys.
❒ When a registered group is beingused for a standby Memory Trans-mission, the message “This desti-nation is in use for standbytransmission file. Please modify/delete after transmission” isshown and you cannot change des-tinations for this Group.
AMake sure that the machine is inFacsimile mode and the standbydisplay is shown.
Note❒ If the standby display is not
shown, press the {{{{Fax}}}} key.
135

FACSIMILE USER TOOLS
136
7
B Press the {{{{User Tools/Counter }}}} key.
C Enter the number of the Fax.
The Facsimile User Tool mainmenu appears.
ReferenceFor how to use the System UserTools, refer to the System Set-tings manual.
D Enter the function number for“Register/Delete” using the num-ber keys.
E Enter the function number for“Reg. Group Dial” using thenumber keys.
F Press the Quick Dial key in whichyou want to register the Group.
Note❒ If you make a mistake, press
[Cancel ] then try again.
❒ You can press [Status ] to seewhich Quick Dial keys are cur-rently programmed.
G Enter the first fax number thenpress [Add ] before you enter thenext.
Note❒ Enter a destination in any of the
following three ways:• Enter the fax number using
the number keys.• Press a Quick Dial key in
which the destination is reg-istered.
• Press the {{{{Speed Dial }}}} keyand enter a Speed Dial code.
❒ If you make a mistake, press the{{{{Clear/Stop }}}} key and re-enterthe correct Group number.
❒ If destinations are already regis-tered, they are shown on thedisplay. Press the < or > keyto scroll through the destina-tions on the display. If you wantto change a destination, select itand press the {{{{Clear/Stop }}}} key.Press the {{{{Clear/Stop }}}} key onceto erase a Quick Dial or SpeedDial number, or press it repeat-edly to erase a number enteredwith the number keys. Whenyou specify the destination us-ing the number keys, the digitwill be erased one by one. When
2
2
22
11
Sort
Staple
Stack
1-Sided 2-Sided
2-Sided 2-Sided User Tools / Counter
Enhanced Auto Reduce/
Book 2-Sided
ND2L01E0

REGISTER/DELETE MENU
7
using Quick dial or Speed dial,they will be erased at once.
❒ You cannot omit the fax num-ber.
H Repeat step 7 for all the destina-tions you want registered in theGroup.
I Press [Name].
J Enter the Group name.
Note❒ If the Group name is already
registered, it is shown on thedisplay. If you wish to changethe Group name, press the{{{{Clear/Stop }}}} key and enter an-other name.
ReferenceP.213 “Entering Text”
K Press [OK].The entered fax numbers andGroup name are shown on the dis-play.
Note❒ Press the < or > key to scroll
through the destinations on thedisplay. If you want to change adestination, select it and pressthe {{{{Clear/Stop }}}} key. Press the{{{{Clear/Stop }}}} key once to erase aQuick Dial or Speed Dial num-ber, or press it repeatedly toerase a number entered with thenumber keys.
L Press [OK] to register the Group.
Note❒ If you press [Cancel ], the Group
is not programmed and the dis-play shown in step 6 appearsagain.
M Press [Exit ].
The display shown in step 6 ap-pears again.
N Press the {{{{User Tools/Counter }}}} key.
Group Dial list
The Group list allows you to printand check destinations registered inGroups and Optional Groups. ⇒P.158 “REPORTS/LISTS”
Deleting Groups
This function deletes all destinationsregistered in a Group.
Limitation❒ When a registered Group is being
used for a Memory Transmissionon standby, the message “This des-tination is in use for standby trans-mission file. Please modify/deleteafter transmission.” is displayedand you cannot delete destinationsfor this Group.
ND1X03E0
137

FACSIMILE USER TOOLS
138
7
AMake sure that the machine is inFacsimile mode and the standbydisplay is shown.
Note❒ If the standby display is not
shown, press the {{{{Fax}}}} key.
B Press the {{{{User Tools/Counter }}}} key.
C Enter the number of the “Fax”.
The Facsimile User Tool mainmenu appears.
D Enter the function number for“Register/Delete” using the num-ber keys.
E Enter the function number for“Delete Group Dial” using thenumber keys.
F Press the Quick Dial key whoseGroup you wish to delete.
The registered Group is shown onthe display.
Note❒ If you make a mistake, press
[No] and press the correct key.❒ You can press [Status ] to see
Quick Dial keys are pro-grammed with Group.
G Press [Yes].
Note❒ If you press [No], the Group is
not deleted and the display isshown in step 6 appears again.
H Press [Yes].
The Group is deleted.
2
2
22
11
Sort
Staple
Stack
1-Sided 2-Sided
2-Sided 2-Sided User Tools / Counter
Enhanced Auto Reduce/
Book 2-Sided
ND2L01E0
ND1X03E0
ND1X03E0

REGISTER/DELETE MENU
7
Note❒ If you press [No], the Group is
not deleted and the displayshown in step 6 appears again.
I Press the {{{{User Tools/Counter }}}} key.
Registering Optional Groups
An optional Fax Feature Expander is re-quired to use this function.
Installing the Fax Feature Expanderoption enables you to store moreGroups. These extra Groups are re-ferred to as Optional Groups.Use these steps to program a new Op-tional Group or edit or overwrite anexisting one. You can register the fol-lowing items in each Optional Group:• Destination fax numbers (up to 200
numbers for each group, up to 254digits for each number)
• Group name (up to 20 characters)To specify destinations you can useQuick Dial keys, Speed Dials, or thenumber keys.
Important❒ We recommend that you print the
Optional Group Dial list and keepit when you register or change des-tinations. ⇒ P.158 “REPORTS/LISTS”
Limitation❒ The maximum number of Optional
Groups you can register is 21.❒ Before you can use this feature you
must program a User FunctionKey with the Optional Group func-tion. ⇒ P.164 “ASSIGNING USERFUNCTION KEYS”
❒ The maximum number of destina-tions you can register in Groups is
2000; 56 in quick dial keys, 1000speed dials, and 999 numbers en-tered directory with the numberkeys.
❒ The number of destinations thatcan be registered with the numberkeys depends on how the machineis used. It is possible to register 999destinations for all the OptionalGroups. If you register 999 destina-tions with the number keys, how-ever, you cannot perform aMemory Transmission or specify aGroup. When you register destina-tions on the number keys, thenumber of destinations must be998 or less. ⇒ P.43 “Number Keys”
❒ If you register an Optional Groupwith the number keys when a fileis waiting to be transmitted, themessage “You have exceeded themaximum machine specifications.No additional entry with numberkeys” is shown and you sometimescannot register any more destina-tions even when the number ofspecified destinations is 998 orless. This is because a fax numberis stored in memory for the file tobe transmitted. When the filetransmission is completed and thefax number is deleted, you can reg-ister a Group.
❒ When a lot of destinations are reg-istered in the number keys for anOptional Group, you sometimescannot dial a destination for aMemory Transmission with thenumber keys.
❒ When a previously registered Op-tional Group is being used for astandby transmission, the message“This destination is in use forstandby transmission file. Peacemodify/delete after transmission”
139

FACSIMILE USER TOOLS
140
7
is shown and you cannot changedestinations for this Group.
AMake sure that the machine is inFacsimile mode and the standbydisplay is shown.
Note❒ If the standby display is not
shown, press the {{{{Fax}}}} key.
B Press the {{{{User Tools/Counter }}}} key.
C Enter the number of the “Fax”mode.
The Facsimile User Tool mainmenu appears.
ReferenceFor how to use the System UserTools, refer to the System Set-tings manual.
D Enter the function number for“Register/Delete” using the num-ber keys.
E Enter the function number for“Reg. Opt. G.Dial” using thenumber keys.
F Enter the Optional Group num-ber (10 to 30) you want to registerusing the number keys.
Note❒ If you make a mistake with the
first digit, press the {{{{Clear/Stop }}}}key and enter a correct number.If you make a mistake with thesecond digit, press [Cancel ] andenter the number again.
❒ You can press [Status ] to see thecurrently registered OptionalGroups.
G Enter the first destination, thenpress [Add ] before entering thenext.
Note❒ You can enter destinations in
any of the following three ways:• Enter a fax number with the
number keys.
2
2
22
11
Sort
Staple
Stack
1-Sided 2-Sided
2-Sided 2-Sided User Tools / Counter
Enhanced Auto Reduce/
Book 2-Sided
ND2L01E0
REGISTER/DELETE MENU
7
• Press a Quick Dial key inwhich a destination is regis-tered.
• Press the {{{{Speed Dial }}}} keyand enter a code.
❒ If you make a mistake, press the{{{{Clear/Stop }}}} key and try again.
❒ If destinations are already regis-tered, they are shown on thedisplay. Press the < or > keyto scroll through the destina-tions on the display. If you wantto change a destination, select itand press the {{{{Clear/Stop }}}} key.Press the {{{{Clear/Stop }}}} key onceto erase a Quick Dial or SpeedDial number, or press it repeat-edly to erase a number enteredwith the number keys.
Note❒ You cannot omit a fax number.
H Repeat step 7 for all the destina-tions to be registered in the Op-tional Group.
I Press [Name].
J Enter the name.
Note❒ If a Group name is already reg-
istered, it is shown on the dis-play. If you want to change thename, press the {{{{Clear/Stop }}}} keyand enter another name.
ReferenceP.213 “Entering Text”
K Press [OK].
The entered fax numbers and Op-tional Group name are shown onthe display.
Note❒ If destinations are already regis-
tered, they are shown on thedisplay. Press the < or > keyto scroll through the destina-tions on the display. If youwant to change a destination,select it and press the {{{{Clear/Stop}}}} key. Press the {{{{Clear/Stop }}}}key once to erase a Quick Dialor Speed Dial number, or pressit repeatedly to erase a numberentered with the number keys
L Press [OK] to store the informationyou have just entered.
Note❒ If you press [Cancel ], the Op-
tional Group is not registeredand the display shown in step 6appears again.
M Press [Exit ].
The display shown in 6 appearsagain.
N Press the {{{{User Tools/Counter }}}} key.
ND1X03E0
141

FACSIMILE USER TOOLS
142
7
----Checking the Contents of Optional Groups
Print the Optional Group dial list (seeP.158 “REPORTS/LISTS”).
Deleting Optional Groups
This function deletes all destinationsregistered in an Optional Group.
Limitation❒ If a registered Optional Group is
being used for a standby MemoryTransmission, the message “Thisdestination is in use for astandby transmission file.Please modify/delete aftertransmission” is shown and youcannot change destinations for thisGroup.
AMake sure that the machine is inFacsimile mode and the standbydisplay is shown.
Note❒ If the standby display is not
shown, press the {{{{Fax}}}} key.
B Press the {{{{User Tools/Counter }}}} key.
C Enter the number of the “Fax”.
The Facsimile User Tool mainmenu appears.
ReferenceFor how to use the System UserTools, refer to the System Set-tings manual.
D Enter the function number for“Register/Delete” using the num-ber keys.
E Enter the function number for“Delete Opt.G.Dial” using thenumber keys.
F Enter the Optional Group num-ber (10 to 30) you wish to deleteusing the number keys.
Note❒ If you make a mistake with the
first digit, press the {{{{Clear/Stop }}}}or [Cancel ] and enter the correctnumber. If you make a mistakewith the second digit, press Noand enter the number again.
2
2
22
11
Sort
Staple
Stack
1-Sided 2-Sided
2-Sided 2-Sided User Tools / Counter
Enhanced Auto Reduce/
Book 2-Sided
ND2L01E0

REGISTER/DELETE MENU
7
❒ You can press [Status ] to seewhich Optional Groups are pro-grammed.
G Press [Yes].
Note❒ If you press [No], the Optional
Group is not deleted and thedisplay shown in step 6 appearsagain.
❒ The registered destinations areshown.
H Press [Yes] to delete the OptionalGroup.
Note❒ If you press [No], the Optional
Group is not deleted and thedisplay shown in step 6 appearsagain.
I Press the {{{{User Tools/Counter }}}} key.
Registering Speed Dials
If you register a destination in aSpeed Dial, you can dial that numberby just pressing the {{{{Speed Dial }}}} keyfollowed by a two or three digit code.Use these steps to program a newSpeed Dial or overwrite an existingone. You can register the followingitems in a Speed Dial:• Destination fax number (up to 100
numbers, up to 254 digits for eachnumber)
• Destination name• A Telephone Directory search let-
ter (A to Z)
Important❒ It is recommended that you print
the Speed Dial list and keep itwhen you register or change a des-tination. ⇒ P.158 “REPORTS/LISTS”
Limitation❒ When a registered Speed Dial is
being used for a standby MemoryTransmission, the message “Thisdestination is in use forstandby transmission file.Please modify/delete aftertransmission” is shown and youcannot change the destination forthis Quick Dial.
❒ You can specify codes 00 to 99.❒ If you install the Function Upgrade
Card (option), you can register upto 1,000 numbers in Speed Dials.In this case codes 000 to 999 areused.
ND1X03E0
ND1X03E0
143

FACSIMILE USER TOOLS
144
7
AMake sure that the machine is inFacsimile mode and the standbydisplay is shown.
Note❒ If the standby display is not
shown, press the {{{{Fax}}}} key.
B Press the {{{{User Tools/Counter }}}} key.
C Enter the number of the “Fax”.
The Facsimile User Tool mainmenu appears.
ReferenceFor how to use the System UserTools, refer to the System Set-tings manual.
D Enter the function number for“Register/Delete” using the num-ber keys.
E Enter the function number for “Reg. Speed Dial” using the num-ber keys.
F Enter the Speed Dial code youwant to register using the numberkeys.
Note❒ If you make a mistake, press the{{{{Clear/Stop }}}} key and enter thecorrect number.
❒ You can press [Status ] to seewhich Speed Dials are pro-grammed.
G Enter a fax number using thenumber keys, and select the com-munication type.
Note❒ If you make a mistake, press the{{{{Clear/Stop }}}} key and enter thecorrect number.
❒ If a fax number is already regis-tered in this Speed Dial, thenumber is shown on the dis-play. If you wish to change thefax number, press the {{{{Clear/Stop}}}} key and enter anothernumber.
❒ You cannot omit the fax num-ber. Be sure to register it.
H Press [Name].
2
2
22
11
Sort
Staple
Stack
1-Sided 2-Sided
2-Sided 2-Sided User Tools / Counter
Enhanced Auto Reduce/
Book 2-Sided
ND2L01E0

REGISTER/DELETE MENU
7
Note❒ If you wish to omit the destina-
tion name, go to step 11.
I Enter the destination name.
Note❒ If a destination name is already
registered in the Speed Dial, thename is shown on the display. Ifyou wish to change the destina-tion name, press the {{{{Clear/Stop}}}} key and enter anothername.
ReferenceP.213 “Entering Text”
J Press [OK].
The entered destination numberand name are shown on the dis-play.
K Press [Tel.Dir. ].
L Enter a search letter (A to Z) forthe Telephone Directory.
Reference⇒ P.213 “Entering Text”
M Press [OK].
The search letter you entered isshown.
N Press [OK].
The fax number, destination name,and search letter are registered.
Note❒ If you press [Cancel ], the Speed
Dial is not registered.
O Press [Exit ].
P Press the {{{{User Tools/Counter }}}} key.
Speed Dial list
Print this list to check which destina-tions are programmed. ⇒ P.158 “RE-PORTS/LISTS”
Deleting Speed Dials
Use this procedure to delete anySpeed Dials you are not using any-more.
ND1X03E0
ND1X03E0
ND1X03E0
145

FACSIMILE USER TOOLS
146
7
Limitation❒ If a registered Speed Dial is being
used for a standby Memory Trans-mission, the message “This des-tination is in use forstandby transmission file.Please modify/delete aftertransmission. ” is shown andyou cannot change the destinationfor this Speed Dial.
AMake sure that the machine is inFacsimile mode and the standbydisplay is shown.
Note❒ If the standby display is not
shown, press the {{{{Fax}}}} key.
B Press the {{{{User Tools/Counter }}}} key.
C Enter the number of the “Fax”.
The Facsimile User Tool mainmenu appears.
ReferenceFor how to use the System UserTools, refer to the System Set-tings manual.
D Enter the function number for“Register/Delete” using the num-ber keys.
E Enter the function number for“Delete Speed Dial” using thenumber keys.
F Enter the Speed Dial code youwish to delete.
The registered destination isshown on the display.
Note❒ If you make a mistake before en-
tering the first digit, press the{{{{Clear/Stop }}}} key and enter thecorrect number. If you make amistake after entering the lastdigit, press [No] and enter thenumber again.
❒ You can press [Status ] to seewhich Speed Dials are currentlyprogrammed.
G Press [Yes].
Note❒ If you press [No], the Speed Dial
is not deleted and the displayshown in 6 appears again.
2
2
22
11
Sort
Staple
Stack
1-Sided 2-Sided
2-Sided 2-Sided User Tools / Counter
Enhanced Auto Reduce/
Book 2-Sided
ND2L01E0

REGISTER/DELETE MENU
7
H Press [Yes].
The Speed Dial is deleted.
Note❒ If you press [No], the Speed Dial
is not deleted and the displayshown in 6 appears again.
I Press the {{{{User Tools/Counter }}}} key.
Storing Keystroke Programs
If you regularly send messages to aparticular destination or transmit us-ing the same features, you can save alot of repetitive keypad operations bystoring this information in a Key-stroke Program.Keystroke Programs can then be re-called by just pressing a Quick Dialkey. The following procedure can beused to program a new KeystrokeProgram or overwrite an old one.You can register the following itemsin Keystroke Programs:• Memory Transmission, Immediate
Transmission, destinations (up to200 numbers), Resolution, OriginalType, G3 or G4 communicationmode, Stamp, Send Later, Confi-dential Transmission, PersonalCode transmission, Auto Docu-ment, Book Fax, Irregular Scan Ar-ea, Transmission Deadline, PollingTransmission, Polling Reception,Transfer Request, and optionalfunctions
• Program name (up to 20 charac-ters)
Important❒ We recommend that you print the
Keystroke Program list and keep itwhen you register or change afunction. ⇒ P.158 “REPORTS/LISTS”
Limitation❒ The maximum number of pro-
grams you can register is 56.❒ You cannot register a program in a
Quick Dial key used for anotherfunction.
❒ When a registered program key isbeing used for a Memory Trans-mission on standby, the message“This destination is in usefor standby transmissionfile. Please modify/deleteafter transmission” is dis-played and you cannot change thefunction for this key.
AMake sure that the machine is inFacsimile mode and the standbydisplay is shown.
Note❒ If the standby display is not
shown, press the {{{{Fax}}}} key.
B Press the {{{{User Tools/Counter }}}} key.
ND1X03E0
2
2
22
11
Sort
Staple
Stack
1-Sided 2-Sided
2-Sided 2-Sided User Tools / Counter
Enhanced Auto Reduce/
Book 2-Sided
ND2L01E0
147

FACSIMILE USER TOOLS
148
7
C Enter the number of the “Fax”.
The Facsimile User Tool mainmenu appears.
ReferenceFor how to use the System UserTools, refer to the System Set-tings manual.
D Enter the function number for“Register/Delete” using the num-ber keys.
E Enter the function number for“Store Program” using the num-ber keys.
F Press a Quick Dial key you wantto register.
The “Store Program” display isshown.
Note❒ If you make a mistake, press
[Cancel ] and press the correctkey.
❒ You can press [Status ] to seeQuick Dial keys with KeystrokePrograms already in them.
G Press [Feature ].
H Carry out the sequence of opera-tions you wish to store in this pro-gram, then press the [OK] key youselected in step 6.
Note❒ If you press the {{{{Clear Modes/En-
ergy Saver }}}} key, the display re-turns to the steps beforekeystroke programming.
❒ For example, say you wish touse Send Later to destinationnumber 0123456789. The se-quence of operations would be:• Enter “0123456789” using the
number keys.• Press [Mode].• Enter the function number
for Send Later using thenumber keys.
• Set Send Later ⇒ P.74“SEND LATER”.
❒ If a program is already stored inthe Quick Dial key, the functionname is shown on the display. Ifyou want to change the pro-
ND1X03E0
ND1X03E0

REGISTER/DELETE MENU
7
gram, press the {{{{Clear Modes/En-ergy Saver }}}} key and programfunction again.
I Press [OK].
J Press [Name].
Note❒ You cannot omit a program
name. Be sure to register it.
K Enter the program name.
Note❒ If a program name is already
registered in the Quick Dial key,the name is shown on the dis-play. If you wish to change theprogram name, press the {{{{Clear/Stop}}}} key and enter anothername.
ReferenceP.213 “Entering Text”
L Press [OK]
The function and program nameare shown on the display.
M Press [OK].
The program is stored.
Note❒ If you press [Cancel ], the Key-
stroke Program is canceled andthe display shown in step 6 ap-pears again.
N Press [Exit ].
The screen shown in step 6 appearsagain.
O Press the {{{{User Tools/Counter }}}} key.
Keystroke program list
The Keystroke Program list allowsyou to print and check functions reg-istered in keystroke programs.⇒P.158 “REPORTS/LISTS”
Using a Keystroke Program
E.g., execute a program using Send Later for the fax number “0123456789.”
A Set your original.
Note❒ If the destination, resolution,
contrast and/or original typeare not registered in the pro-gram, carry out these opera-tions now.
ND1X03E0
149

FACSIMILE USER TOOLS
150
7
B Press the Quick Dial key pro-grammed with the Keystroke Pro-gram.
In this example, the fax numberand program name “Send Later”are shown on the display.
C Press the [OK] key then the {{{{Start }}}}key.
The machine starts scanning theoriginal.The message will be sent at thespecified time.
Deleting a Keystroke Program
Limitation❒ When a registered program is be-
ing used for a standby MemoryTransmission, the message “Thisdestination is in use forstandby transmission file.Please modify/delete aftertransmission” is shown and youcannot delete the program.
Note❒ If you delete a program, the regis-
tered program name is also delet-ed.
AMake sure that the machine is inFacsimile mode and the standbydisplay is shown.
Note❒ If the standby display is not
shown, press the {{{{Fax}}}} key.
B Press the {{{{User Tools/Counter }}}} key.
C Enter the number of the “Fax”.
The Facsimile User Tool mainmenu appears.
ReferenceFor how to use the System UserTools, refer to the System Set-tings manual.
D Enter the function number for“Register/Delete” using the num-ber key.
E Enter the function number for“Delete Program” using the num-ber keys.
F Press the Quick Dial containingthe program you wish to delete.
2
2
22
11
Sort
Staple
Stack
1-Sided 2-Sided
2-Sided 2-Sided User Tools / Counter
Enhanced Auto Reduce/
Book 2-Sided
ND2L01E0

REGISTER/DELETE MENU
7
The contents of the program areshown on the display.
Note❒ If you make a mistake, press
[No] and the correct key.❒ You can press [Status ] to see the
Keystroke Programs currentlyprogrammed.
G Press [Yes].
Note❒ If you press [No], the program is
not deleted and the displayshown in step 6 appears again.
H Press [Yes].
The program is deleted.
Note❒ If you press [No], the program is
not deleted and the displayshown in step 6 appears again.
I Press the {{{{User Tools/Counter }}}} key.
Registering Auto Documents
If you find that you often have to senda particular page to people (e.g., amap, a standard attachment, or a setof instructions), store that page inmemory as an Auto Document. Thissaves re-scanning the original everytime you wish to send it.Use the following procedure to pro-gram a new Auto Document or over-write an existing one.
Important❒ You can store the following items
in an Auto Document:• Original (up to 6 documents/
with optional Fax Feature Ex-pander, 18), one page for eachmessage)
• Scanning conditions (Resolu-tion, Original Type, and ImageDensity)
• Irregular Scan Area• Document name (up to 10 char-
acters)❒ We recommend that you print the
Auto Document list and keep itwhen you register or change a doc-ument. ⇒ P.158 “REPORTS/LISTS”
Limitation❒ You can only send one Auto Docu-
ment per transmission.❒ If you install the optional Fax Fea-
ture Expander, you can store up to18 Auto Documents.
ND1X03E0
ND1X03E0
151

FACSIMILE USER TOOLS
152
7
AMake sure that the machine is inFacsimile mode and the standbydisplay is shown.
Note❒ If the standby display is not
shown, press the {{{{Fax}}}} key.
B Press the {{{{User Tools/Counter }}}} key.
C Enter the number of the “Fax”.
The Facsimile User Tool mainmenu appears.
ReferenceFor how to use the System UserTools, refer to the System Set-tings manual.
D Enter the function number for“Register/Delete” using the num-ber keys.
E Enter the function number for"Reg. Auto Doc." using the num-ber keys.
F Enter the number of the AutoDocument you want to registerusing the number keys.
Note❒ If you make a mistake with the
first digit, press the {{{{Clear/Stop }}}}key and enter the correct num-ber. If you make a mistake fordigit, press [Cancel ] key and en-ter the correct number.
❒ If a document is already regis-tered with that Auto Documentnumber, the name is shown onthe display.
G Press [Name].
Note❒ You cannot omit a document
name. Be sure to register it.
H Enter the Auto Document name.
Note❒ If the Name is already regis-
tered, it is shown on the display.If you want to change the docu-ment name, press the {{{{Clear/
2
2
22
11
Sort
Staple
Stack
1-Sided 2-Sided
2-Sided 2-Sided User Tools / Counter
Enhanced Auto Reduce/
Book 2-Sided
ND2L01E0
ND1X02E7

REGISTER/DELETE MENU
7
Stop}}}} key and enter anothername.
ReferenceP.213 “Entering Text”
I Press [OK].
Note❒ If you are storing a standard
size document, go to step 12.
J Press [Size].
K Select a size using the <<<< and >>>>keys and press [OK].
The document name and originalsize are shown on the display.
L Set your original and press the{{{{Start }}}} key.
The machine starts scanning theoriginal.
MWhen the original has been com-pletely scanned in, press [Exit ].
The Auto Document is stored. Thedisplay shown in step 6 appearsagain.
N Press the {{{{User Tools/Counter }}}} key.
Auto Document list
The Auto Document list allows you toprint and check stored Auto Docu-ment names. To print this list, followthe steps shown in “Reports/Lists”.⇒ P.158 “REPORTS/LISTS”
Deleting an Auto Document
Limitation❒ You cannot delete an Auto Docu-
ment waiting to be transmitted.Delete it after the transmission ordelete the Auto Document afterdeleting the file waiting to betransmitted.
AMake sure that the machine is inFacsimile mode and the standbydisplay is shown.
Note❒ If the standby display is not
shown, press the {{{{Fax}}}} key.
B Press the {{{{User Tools/Counter }}}} key.
ND1X02E8
ND1X03E0
2
2
22
11
Sort
Staple
Stack
1-Sided 2-Sided
2-Sided 2-Sided User Tools / Counter
Enhanced Auto Reduce/
Book 2-Sided
ND2L01E0
153

FACSIMILE USER TOOLS
154
7
C Enter the number of the “Fax”.
The Facsimile User Tool mainmenu appears.
ReferenceFor how to use the System UserTools, refer to the System Set-tings manual.
D Enter the function number for“Register/Delete” using the num-ber keys.
E Enter the function number for“Delete Auto Doc.” using thenumber keys.
F Enter the number of the AutoDocument you want to delete us-ing the number keys.
The stored document is shown onthe display.
Note❒ If you make a mistake with the
first digit, press the {{{{Clear/Stop }}}}key and enter the correct num-ber.
G Press [Yes].
Note❒ If you press [No], the document
is not deleted and the displayshown in step 6 appears again.
H Press [Yes].
The Auto Document is deleted.
Note❒ If you press [No], the document
is not deleted and the displayshown in step 6 appears again.
I Press the {{{{User Tools/Counter }}}} key.
Registering Irregular Area
When you select Irregular Area toscan a non-standard size original, twocustom sizes of original are available(Area 1 and Area 2). Use this functionto register these custom sizes in ad-vance.To change an existing Irregular Scansize, just use the following procedureto overwrite it.
ND1X03E0
ND1X03E0

REGISTER/DELETE MENU
7
Important❒ When registering or changing an
original size, we recommend thatyou make a memo of the new size.
Limitation❒ For the vertical length (width), se-
lect “Auto,” “A4 (210 mm),” “B4(257 mm),” “A3 (297 mm),” “8 1/2inch,” or “11 inch.”
❒ For the horizontal length, specifyfrom 128 to 432 mm or from 5.5 to17 inches. You cannot set a lengthless than 128 mm or longer than432 mm.
AMake sure that the machine is inFacsimile mode and the standbydisplay is shown.
Note❒ If the standby display is not
shown, press the {{{{Fax}}}} key.
B Press the {{{{User Tools/Counter }}}} key.
C Enter the number of the “Fax”.
The Facsimile User Tool mainmenu appears.
ReferenceFor how to use the System UserTools, refer to the System Set-tings manual.
D Enter the function number for“Register/Delete” using the num-ber keys.
E Enter the function for “Reg. Irreg.Area” using the number keys.
Note❒ If the appropriate display is not
shown, press [↑↑↑↑Prev. ] or [↓↓↓↓Next ].
F Press [Area 1] or [Area 2].
Note❒ If a size is already registered, it
is shown on the display.
G Press [Vert. ].
2
2
22
11
Sort
Staple
Stack
1-Sided 2-Sided
2-Sided 2-Sided User Tools / Counter
Enhanced Auto Reduce/
Book 2-Sided
ND2L01E0
ND1X03E6
ND1X02E7
155

FACSIMILE USER TOOLS
156
7
H Select a size you want to registerusing the <<<< or >>>> key and press[OK].
The specified size is shown on thedisplay.
Note❒ When you select “[Auto ]”, “---”
is shown on the display.
I Press [Horiz. ].
J Enter a length using the numberkeys and press [OK].
The specified size is shown on thedisplay.
Note❒ Each time you press [mm ↔↔↔↔
inch ], the units change between“inch” and “mm” alternately. Ifyou enter a length and changethe unit by pressing [mm ↔↔↔↔inch ], the length is converted au-tomatically according to theunit (fractions are rounded off).For example, when you enter{{{{2}}}}, {{{{5}}}}, and {{{{0}}}} in millimetersand change to “inch,” the length“9.8 inch” is shown on the dis-play. If you press “mm” again“249 mm” is displayed.
K Press [OK].
The display shown in 6 appearsagain.
L Press the {{{{User Tools/Counter }}}} key.
Deleting an Irregular Area
AMake sure that the machine is inFacsimile mode and the standbydisplay is shown.
Note❒ If the standby display is not
shown, press the {{{{Fax}}}} key.
ND1X03E0
ND1X02E8
ND1X03E0

REGISTER/DELETE MENU
7
B Press the {{{{User Tools/Counter }}}} key.
C Enter the number of the “Fax”.
The Facsimile User Tool mainmenu appears.
ReferenceFor how to use the System UserTools, refer to the System Set-tings manual.
D Enter the function number for“Register/Delete” using the num-ber keys.
E Enter the function number for“Delete Irreg.Area” using thenumber keys.
Note❒ If the appropriate display is not
shown, press [↑↑↑↑Prev. ] or [↓↓↓↓Next].The registered sizes are displayed.
F Press [Area 1] or [Area 2].
Note❒ If you make a mistake, press
[No] and choose a correct one.
G Press [Yes].
The Irregular Area is deleted.
Note❒ If you press [No], the Irregular
Area is not deleted and the dis-play shown in step 6 appearsagain.
H Press the {{{{User Tools/Counter }}}} key.
2
2
22
11
Sort
Staple
Stack
1-Sided 2-Sided
2-Sided 2-Sided User Tools / Counter
Enhanced Auto Reduce/
Book 2-Sided
ND2L01E0
ND1X03E6
ND1X03E0
157

FACSIMILE USER TOOLS
158
7
REPORTS/LISTS
This function allows you to print thefollowing reports and lists manually.Select a report or list as needed.• TCR (Transaction Confirmation
Report) ⇒ P.116 “PRINTING THETCR”
• Quick Dial list ⇒ P.131 “Quick DialList”
• Group Dial list ⇒ P.137 “GroupDial list”
• Keystroke Program list ⇒ P.149“Keystroke program list”
• Speed Dial list ⇒ P.145 “Speed Diallist”
• Auto Document list ⇒ P.153 “AutoDocument list”Auto Document list
• Authorized Reception list ⇒ P.191“Sender/Authorized Reception List”
AMake sure that the machine is inFacsimile mode and the standbydisplay is shown.
Note❒ If the standby display is not
shown, press the {{{{Fax}}}} key.
B Press the {{{{User Tools/Counter }}}} key.
C Enter the number of the “Fax”.
The Facsimile User Tool mainmenu appears.
ReferenceFor how to use the System UserTools, refer to the System Set-tings manual.
D Enter the function number for“Register/Delete” using the num-ber keys.
E Enter the Reports/Lists numberyou want to print out using thenumber keys.
Note❒ If you can't see the item you
need, press [↑↑↑↑Prev. ] or [↓↓↓↓Next].❒ If you make a mistake, press
[Cancel ] and enter the correctnumber.
F Press the {{{{Start }}}} key.When printing is completed, thedisplay shown in step 5 appearsagain.
Note❒ If you press Cancel before print-
ing starts, the printing stops andthe display shown in step 5 ap-pears again.
G Press the {{{{User Tools/Counter }}}} key.
2
2
22
11
Sort
Staple
Stack
1-Sided 2-Sided
2-Sided 2-Sided User Tools / Counter
Enhanced Auto Reduce/
Book 2-Sided
ND2L01E0

INITIAL SETUP TX
7
INITIAL SETUP TX
When you turn on the machine or re-turn to Copy mode, the machine re-turns to the home settings. You canchange these home settings so thatthe machine starts with your most fre-quently used features selected.This procedure can be used to changethe home settings for the transmis-sion mode (Memory/ImmediateTransmission) and scanning condi-tions (Resolution, Original Type, Im-age Density, and Auto ImageDensity).
Note❒ You can also choose whether the
machine returns to the home set-tings after each communication. ⇒P.203 “Changing the User Parame-ters”
AMake sure that the machine is inFacsimile mode and the standbydisplay is shown.
Note❒ If the standby display is not
shown, press the {{{{Fax}}}} key.
B Press the {{{{User Tools/Counter }}}} key.
C Enter the number of the “Fax”.
The Facsimile User Tool mainmenu appears.
ReferenceFor how to use the System UserTools, refer to the System Set-tings manual.
D Enter the function number for“Initial Setup TX” using the num-ber keys.
The “Initial Setup TX” menu isshown on the display.
E Enter a function number usingthe number keys.
Note❒ If you make a mistake, press
Cancel and enter the correctnumber.
F Select the mode you want tochange using the <<<< or >>>> keysthen press [OK].
2
2
22
11
Sort
Staple
Stack
1-Sided 2-Sided
2-Sided 2-Sided User Tools / Counter
Enhanced Auto Reduce/
Book 2-Sided
ND2L01E0
159

FACSIMILE USER TOOLS
160
7
❖❖❖❖ Transmission Mode Example
❖❖❖❖ Resolution Example
Note❒ If you want to change other set-
tings, repeat steps 5 and 6.
G Press the {{{{User Tools/Counter }}}} key.
ND1X03E0
ND1X03E0

INITIAL SETUP RX
7
INITIAL SETUP RX
The Initial Setup Reception functionallows you to turn the following re-ception functions on or off. • Reception Mode P.59 “SELECT-
ING THE RECEPTION MODE”• Checkered Mark P.64 “Checkered
Mark” • Center Mark P.64 “Center Mark”• Print RX Time P.64 “Reception
Time”• Multi-copy Reception P.65 “Multi-
copy Reception”• 2-sided Printing P.65 “2-Sided
Printing”• Reverse Order Printing P.68 “Re-
verse Order Printing” • Authorized RX P.188 “Authorized
Reception”• Special RX Nos. P.182 “Special
Senders to Treat Differently (SpecialRX Nos.)”
• Forwarding P.175 “Forwarding”• Bypass Paper Size⇒ P.162 “To set
the Bypass Paper Size”
AMake sure that the machine is inFacsimile mode and the standbydisplay is shown.
Note❒ If the standby display is not
shown, press the {{{{Fax}}}} key.
B Press the {{{{User Tools/Counter }}}} key.
C Enter the number of the “Fax”.
The Facsimile User Tool mainmenu appears.
ReferenceFor how to use the System UserTools, refer to the System Set-tings manual.
D Enter the function number for“Initial Setup RX” using the num-ber keys. The Initial Setup RXmenu is shown on the display.
E Enter the function number of theitem you want to change with thenumber keys.
Note❒ If you make a mistake, press the{{{{Clear/Stop }}}} key and enter thecorrect number.
F Change the setting with the <<<<and >>>> keys and press [OK].
2
2
22
11
Sort
Staple
Stack
1-Sided 2-Sided
2-Sided 2-Sided User Tools / Counter
Enhanced Auto Reduce/
Book 2-Sided
ND2L01E0
161

FACSIMILE USER TOOLS
162
7
❖❖❖❖ Reception Mode Example
❖❖❖❖ Checkered Mark Example
Note❒ If you wish to change other
functions, repeat steps 5 and 6.❒ Select on or off for Checkered
Mark, Center Mark, Print RXTime, 2-Sided Printing, Autho-rized RX, Special RX Nos., andReverse Printing.
❒ For Multi-copy Recp., enter thenumber of copies using thenumber keys.
❒ For Forwarding, select the mes-sages to forward, either from allthe senders, from specifiedsenders or nothing.
G Press the {{{{User Tools/Counter }}}} key.
To set the Bypass Paper Size
A Press the <<<<and >>>>keys to selectAuto.
B Press Ppr.Size.
C Press Vert..
D Press the <<<< and >>>> keys to selectsize and press [OK].
ND2C0104
ND1X03E0
ND1X03E1
ND1X02E6
ND1X02E7
ND1X03E5

INITIAL SETUP RX
7
E Press Horiz..
ND1X02E7
163

FACSIMILE USER TOOLS
164
7
ASSIGNING USER FUNCTION KEYS
You can program each of the UserFunction keys ({{{{F1}}}} –{{{{F5}}}}) with afunction that you use frequently.When you wish to use that function,instead of having to search throughseveral menus to find it, just press theappropriate User Function key. Thisprocedure can be used to edit, deleteor change the contents of the UserFunction keys.
Note❒ At default the following functions
are programmed by default. Telmode cannot be programmed inF1/F2 keys.
Storing/Editing the Contents of a User Function Key
AMake sure that the machine is inFacsimile mode and the standbydisplay is shown.
Note❒ If the standby display is not
shown, press the {{{{Fax}}}} key.
B Press the {{{{User Tools/Counter }}}} key.
C Enter the number of the “Fax”.
The Facsimile User Tool mainmenu appears.
ReferenceFor how to use the System UserTools, refer to the System Set-tings manual.
D Enter the function number for“User Functions” using the num-ber keys.
E Press the User Function key youwant to use.
Note❒ If you make a mistake, press
Cancel and press the correctkey.
Key Standard With Options
F1 Start Manual RX
←
F2 Transmission Result Display
←
F3 TEL Mode ←
F4 - G3/G4 Mode Selection (with ISDN option)
F5 - Stamp with Stamp option
2
2
22
11
Sort
Staple
Stack
1-Sided 2-Sided
2-Sided 2-Sided User Tools / Counter
Enhanced Auto Reduce/
Book 2-Sided
ND2L01E0

ASSIGNING USER FUNCTION KEYS
7
❒ You can press [Status ] to seehow the User Function keys arecurrently programmed.
❒ If you have the optional ISDNunit installed, you can not re-as-sign User Function key {{{{F4}}}}.
❒ If you have the optional stampunit installed, you can not re-as-sign User Function key {{{{F5}}}}.
F Enter the function number youwant to register into the UserFunction key using the numberkeys and press [OK].
Note❒ To see a function number not
displayed on the display, press[↑↑↑↑Prev. ] or [↓↓↓↓Next].
❒ If you wish to store more func-tions, repeat steps 5 and 6 forother keys.
❒ If you press Cancel, the functionis not stored and the displayshown in step 5 appears again.
G Press the {{{{User Tools/Counter }}}} key.
Using a User Function
A Press the User Function Key({{{{F1}}}}–{{{{F5}}}}) in which the functionyou want to use is stored.
The stored function's display isshown.
❖❖❖❖ E.g., “Print TCR”
ND1X03E0
165

FACSIMILE USER TOOLS
166
7
KEY OPERATOR SETTINGS
Personal Codes
This function allows you to keeptrack of machine usage. When Per-sonal Codes are programmed andPersonal Code Access is turned on us-ers have to enter their Personal Codebefore they send a fax. ⇒ P.207“Printing the User Parameter List”
Important❒ We recommend that you print the
Personal Code list and keep itwhen you register or change a Per-sonal Code. ⇒ P.158 “REPORTS/LISTS”
Note❒ To enter a Personal Code when
send a fax, follow the steps shownin “Personal Code Transmission”.⇒ P.78 “PERSONAL CODETRANSMISSION”
❒ If Personal Code Access isswitched on, users cannot use thefacsimile feature unless they entertheir Personal Code. ⇒ P.169 “Per-sonal Code Access”
Registering Personal Codes
You can register the following itemsin a Personal Code:• Personal Code (any 4 digit number
except 0000)• Name (up to 20 characters)To change an existing Personal code,just overwrite it with a new one.
Limitation❒ On a standard model you can reg-
ister up to 20 codes. If you installthe Fax Feature Expander option,
the maximum number of personalcodes you can register is 50.
AMake sure that the machine is inFacsimile mode and the standbydisplay is shown.
Note❒ If the standby display is not
shown, press the {{{{Fax}}}} key.
B Press the {{{{User Tools/Counter }}}} key.
C Enter the number of the “Fax”.
The Facsimile User Tool mainmenu appears.
ReferenceFor how to use the System UserTools, refer to the System Set-tings manual.
D Enter the function number for“Key Op. Settings” using the
2
2
22
11
Sort
Staple
Stack
1-Sided 2-Sided
2-Sided 2-Sided User Tools / Counter
Enhanced Auto Reduce/
Book 2-Sided
ND2L01E0

KEY OPERATOR SETTINGS
7
number keys and press the {{{{#}}}}(Enter) key within 3 seconds.
Note❒ If “Key Op. Settings” is not
shown, press [↑↑↑↑Prev. ] or [↓↓↓↓Next].
E Enter the function number for“Personal Code” using the num-ber keys.
F Enter the function number for“Reg. Pers. Code” using the num-ber keys.
G Enter a Personal Code using thenumber keys.
Note❒ If you enter a wrong number for
the first, second, or third digit,press the {{{{Clear/Stop }}}} key andenter a correct number. If youenter a wrong value for thefourth digit, press Cancel andenter the correct number fromthe first digit.
❒ If you enter a Personal code thathas already been programmed,the contents appear on the dis-
play. If you wish to change thename, press [Name] and enteranother name. If you wish toprogram another code, press[Cancel ] and enter the new code.
❒ You can press [Status ] to seewhich codes have been alreadyprogrammed.
H Press [Name].
I Enter the name.
Note❒ If the name has already been
programmed, it appears on thedisplay. If you wish to changethe name, press the {{{{Clear/Stop }}}}key and enter another name.
ReferenceP.213 “Entering Text”
J Press [OK].The entered Personal Code andname are shown on the display.
ND1X02E7
167
FACSIMILE USER TOOLS
168
7
K Press [OK] to register the code andname.
Note❒ If you press [Cancel ], the entered
Personal Code is canceled andthe display shown in step 7 ap-pears again.
L Press [Exit ].
The display shown in step 7 ap-pears again.
M Press [PrevMenu ] 3 times.
N Press the {{{{User Tools/Counter }}}} key.
Deleting a Personal Code
AMake sure that the machine is inFacsimile mode and the standbydisplay is shown.
Note❒ If the standby display is not
shown, press the {{{{Fax}}}} key.
B Press the {{{{User Tools/Counter }}}} key.
C Enter the number of the “Fax”.
The Facsimile User Tool mainmenu appears.
ReferenceFor how to use the System UserTools, refer to the System Set-tings manual.
D Enter the function number for“Key Op. Settings” using thenumber keys and press the {{{{#}}}}(Enter) key within 3 seconds.
Note❒ If “Key Op. Settings” is not
shown, press [↑↑↑↑Prev. ] or [↓↓↓↓Next ].
E Enter the function number for“Personal Code” using the num-ber keys.
ND1X03E0
2
2
22
11
Sort
Staple
Stack
1-Sided 2-Sided
2-Sided 2-Sided User Tools / Counter
Enhanced Auto Reduce/
Book 2-Sided
ND2L01E0

KEY OPERATOR SETTINGS
7
F Enter the function number for"Delete Pers. Code" using thenumber keys.
G Enter the Personal Code you wantto delete using the number keys.
Note❒ If you make a mistake, press the{{{{Clear/Stop }}}} key and enter thecorrect code.
❒ You can press [Status ] to seewhich codes have been alreadyprogrammed.
H Press [Yes].
If you press [No], the PersonalCode is not deleted and the displayshown in step 7 appears again.
I Press [Yes].
The Personal Code is deleted.
Note❒ If you press [No], the Personal
Code is not deleted and the dis-play shown in step 7 appearsagain.
J Press [PrevMenu ] 3 times.
K Press the {{{{User Tools/Counter }}}} key.
Personal Code Access
The machine can be set up so that us-ers cannot use it without entering aregistered Personal Code. This pre-vents an unauthorized person fromsending a fax message and helpstrack the activity of each user.
AMake sure that the machine is inFacsimile mode and the standbydisplay is shown.
Note❒ If the standby display is not
shown, press the {{{{Fax}}}} key.
ND2C0104
ND1X03E0
169

FACSIMILE USER TOOLS
170
7
B Press the {{{{User Tools/Counter }}}} key.
C Enter the number of the “Fax”.
The Facsimile User Tool mainmenu appears.
ReferenceFor how to use the System UserTools, refer to the System Set-tings manual.
D Enter the number for “Key Op.Settings” using the number keysand press the {{{{#}}}} key within 3seconds.
Note❒ If “Key Op. Settings” is not
shown, press [↑↑↑↑Prev. ] or [↓↓↓↓Next].
E Enter the number for “PersonalCode” using the number keys.
F Enter the number for “Pers.CodeAccess” using the number keys.
G Switch access on or off using the<<<< or >>>> key and then press [OK].
Note❒ If you press [Cancel ], the previ-
ous setting is not changed andthe display shown in step 6 ap-pears again.
H Press [PrevMenu ] twice.
I Press the {{{{User Tools/Counter }}}} key.
The display returns to the PersonalCode screen.
Printing the Personal Code List
Print this list to find out the registeredPersonal Codes and their names.
AMake sure that the machine is inFacsimile mode and the standbydisplay is shown.
2
2
22
11
Sort
Staple
Stack
1-Sided 2-Sided
2-Sided 2-Sided User Tools / Counter
Enhanced Auto Reduce/
Book 2-Sided
ND2L01E0
ND1X03E0

KEY OPERATOR SETTINGS
7
Note❒ If the standby display is not
shown, press the {{{{Fax}}}} key.
B Press the {{{{User Tools/Counter }}}} key.
C Enter the number of the “Fax”.
The Facsimile User Tool mainmenu appears.
ReferenceFor how to use the System UserTools, refer to the System Set-tings manual.
D Enter the number for “Key Op.Settings” using the number keysand press the {{{{#}}}} key within 3seconds.
Note❒ If “Key Op. Settings” is not
shown, press [↑↑↑↑Prev. ] or [↓↓↓↓Next].
E Enter the number for “PersonalCode” using the number keys.
F Enter the function number for“Print Pers. Code” using the num-ber keys.
G Press the {{{{Start }}}} key.
When printing is completed, thedisplay shown in step 4 appearsagain.
Note❒ If you press [Cancel ] before
printing starts, the printingstops and the display shown instep 6 appears again.
H Press [PrevMenu ] twice.
I Press the {{{{User Tools/Counter }}}} key.
ECM
If a part of a transmission fails be-cause of a line problem, the lost datais automatically resent. For this fea-ture to work, the other machine musthave ECM. By default, ECM is turnedon, but you can change this with thefollowing procedure. When ECM is off data transmissionspeed shifts down below 14.4 Kbpsand JBIG compression is not avail-able.
AMake sure that the machine is inFacsimile mode and the standbydisplay is shown.
2
2
22
11
Sort
Staple
Stack
1-Sided 2-Sided
2-Sided 2-Sided User Tools / Counter
Enhanced Auto Reduce/
Book 2-Sided
ND2L01E0
171

FACSIMILE USER TOOLS
172
7
Note❒ If the standby display is not
shown, press the {{{{Fax}}}} key.
B Press the {{{{User Tools/Counter }}}} key.
C Enter the number of the Faxmode.
The Facsimile User Tool mainmenu appears.
ReferenceFor how to use the System UserTools, refer to the System Set-tings manual.
D Enter the function number for“Key Op. Settings” using thenumber keys and press the {{{{#}}}}(Enter) key within 3 seconds.
Note❒ If “Key Op. Settings” is not
shown, press [↑↑↑↑Prev. ] or [↓↓↓↓Next].
E Enter the function number for“ECM” using the number keys.
F Switch ECM on or off using the<<<< or >>>> key and press [OK].
Note❒ If you press [Cancel ], the previ-
ous setting is not changed andthe display shown in step 5 ap-pears again.
G Press [PrevMenu ].
H Press the {{{{User Tools/Counter }}}} key.
Memory Lock
The optional Fax Feature Expander is re-quired to use this function.
When you switch Memory Lock On,received messages are stored in mem-ory and not printed automatically.When a message is received in Mem-ory Lock mode, the Receive File indi-cator blinks. To print this message,enter the Memory Lock ID. A userwho does not know the ID cannotprint the message. This prevents anunauthorized person from seeing themessage.To use Memory Lock, program theMemory Lock ID and switch it on.
2
2
22
11
Sort
Staple
Stack
1-Sided 2-Sided
2-Sided 2-Sided User Tools / Counter
Enhanced Auto Reduce/
Book 2-Sided
ND2L01E0
ND1X03E0

KEY OPERATOR SETTINGS
7
AMake sure that the machine is inFacsimile mode and the standbydisplay is shown.
Note❒ If the standby display is not
shown, press the {{{{Fax}}}} key.
B Press the {{{{User Tools/Counter }}}} key.
C Enter the number of the “Fax”.
The Facsimile User Tool mainmenu appears.
ReferenceFor how to use the System UserTools, refer to the System Set-tings manual.
D Enter the function number for“Key Op. Settings” using thenumber keys and press the {{{{#}}}}(Enter) key within 3 seconds.
Note❒ If “Key Op. Settings” is not
shown, press [↑↑↑↑Prev. ] or [↓↓↓↓Next].
E Enter the function number for“Memory Lock” using the num-ber keys.
F Switch Memory Lock on or off us-ing the <<<< and >>>> keys and pressOK.
Note❒ If you press Cancel, Memory
Lock is not switched on and thedisplay shown in 5 appearsagain.
G Press [PrevMenu ].
H Press the {{{{User Tools/Counter }}}} key.
Multistep Transfer
The optional Fax Feature Expander is re-quired to use this function.
This machine can be used to build upa multi-step facsimile network that al-lows messages to be sent via multipleTransfer Stations and achieve greaterefficiency in processing Transfer Re-quests.The following procedure describeshow to program a Transfer Stationnumber into a Group. Providing thisGroup contains the appropriate EndReceiver Information (Group codes),
2
2
22
11
Sort
Staple
Stack
1-Sided 2-Sided
2-Sided 2-Sided User Tools / Counter
Enhanced Auto Reduce/
Book 2-Sided
ND2L01E0ND1X03E0
173

FACSIMILE USER TOOLS
174
7
when your machine receives a Trans-fer Request, it will pass the messageto the Transfer Station(s) you specify.
AMake sure that the machine is inFacsimile mode and the standbydisplay is shown.
Note❒ If the standby display is not
shown, press the {{{{Fax}}}} key.
B Press the {{{{User Tools/Counter }}}} key.
C Enter the number of the “Fax”.
The Facsimile User Tool mainmenu appears.
ReferenceFor how to use the System UserTools, refer to the System Set-tings manual.
D Enter the function number for“Key Op. Settings” using thenumber keys and press the {{{{#}}}}(Enter) key within 3 seconds.
Note❒ If “Key Op. Settings” is not
shown, press [↑↑↑↑Prev. ] or [↓↓↓↓Next ].
E Enter the function number for“Multistep Transf” using thenumber keys.
F Press the Quick Dial key youwant to store this Transfer Groupin.
Note❒ You can press [Status ] to see the
current status of the Group.❒ If the machine has the Optional
Group feature (optional FaxFeature Expander is required),you can register a Transfer Sta-tion. Select the Group type youwish to register using the num-ber keys. To select a Group,press a Quick Dial key. To selectan Optional Group, enter theOptional Group code using thenumber keys. In this example,Optional Group is selected.
2
2
22
11
Sort
Staple
Stack
1-Sided 2-Sided
2-Sided 2-Sided User Tools / Counter
Enhanced Auto Reduce/
Book 2-Sided
ND2L01E0

KEY OPERATOR SETTINGS
7
G Specify a Transfer Station.
Note❒ Enter the Transfer Station's fax
number using a Quick Dial key,Speed Dial or the number keys.⇒ P.46 “Quick Dials”, P.47“Speed Dials”, P.43 “NumberKeys”
❒ If you make a mistake, press the{{{{Clear/Stop }}}} key and enter thecorrect number.
❒ If you press Cancel, the settingis canceled and the displayshow in 6 appears again.
H Press [OK].
I Press [OK].
J Press [PrevMenu ].
K Press the {{{{User Tools/Counter }}}} key.
Forwarding
The optional Fax Feature Expander is re-quired to use this function.
Using this feature, you can selectmessages from Specified Senders tobe printed on your machine and thensent on to another fax machine.
This is useful if, for example, you arevisiting another office and would likea copy of your messages sent to thatoffice so you can read them.In this section, the machines that mes-sages are forwarded to are referred toas Forwarding Stations. The locationsfrom which you would like messagesforwarded from are referred to asSpecific Senders.You can register:• 5 Forwarding Stations (up to 32
digits for each number)• 30 Specific Senders (maximum 10
per Forwarding Station, up to 20characters each with G3 and 24with G4)
• Wild Cards ⇒ P.213 “Wild Cards”
Important❒ It is recommended that you print
the Forwarding/Sender list andkeep it when you register orchange a receiver or sender. ⇒P.158 “REPORTS/LISTS”
Limitation❒ This feature only works if the in-
coming message is from anotherparty that has been programmedas a Specific Sender.
❒ The Forwarding function does notforward messages received withConfidential Reception, MemoryLock, Polling Reception mode, ormessages received by Transfer Re-quest.
❒ You cannot register a sender whodoes not have an RTI or CSI.
❒ You can register up to 30 SpecificSenders for Forwarding, SpecialRX Nos., and Authorized Recep-tion functions. You sometimes can-not register 30 senders dependingon the number of senders regis-
ND1X03E0
175

FACSIMILE USER TOOLS
176
7
tered with other functions. If youinstall the optional Fax Feature Ex-pander, you can register up to 50senders.
Note❒ You can print a forwarding mark
on forward messages. ⇒ P.207“Printing the User Parameter List”
❒ To register a sender, use an RTI orCSI. When you communicate witha sender using G4, register the G4TID.
❒ You can find out the RTI or CSI ofa sender by looking in the destina-tion name column of the TCR.
❒ Before using the Forwarding func-tion, register Forwarding Stationsand select the messages to for-ward. ⇒ P.161 “INITIAL SETUPRX”
❒ You can specify whether or not tosend received messages on to an-other fax machine automatically.See “Changing User Parameters”⇒ P.203 “Changing the User Param-eters”. This feature is called “For-warding”. The default setting is“Off”.
❒ You can specify whether or not toprint forwarded messages. Thisfeature is called “Local Printing”.The default setting is on. ⇒ P.203“Changing the User Parameters”
Registering Forwarding Stations
AMake sure that the machine is inFacsimile mode and the standbydisplay is shown.
Note❒ If the standby display is not
shown, press the {{{{Fax}}}} key.
B Press the {{{{User Tools/Counter }}}} key.
C Enter the number of the “Fax”.
The Facsimile User Tool mainmenu appears.
ReferenceFor how to use the System UserTools, refer to the System Set-tings manual.
D Enter the function number for“Key Op. Settings” using thenumber keys and press the {{{{#}}}}key within 3 seconds.
Note❒ If “Key Op. Settings” is not
shown, press [↑↑↑↑Prev. ] or [↓↓↓↓Next ].
E Enter the function number for“Forwarding” using the numberkeys.
2
2
22
11
Sort
Staple
Stack
1-Sided 2-Sided
2-Sided 2-Sided User Tools / Counter
Enhanced Auto Reduce/
Book 2-Sided
ND2L01E0

KEY OPERATOR SETTINGS
7
F Enter the function number for“Reg. Receiver” using the num-ber keys.
G Choose a receiver (ForwardingStation) to program be enteringthe its code number.
Note❒ If you make a mistake, press
[Cancel ] and enter a correctnumber.
H Enter the Forwarding Station'sfax number using the numberkeys and select the communica-tion type, then press [OK].
Note❒ If you make a mistake, press the{{{{Clear/Stop }}}} key and enter a cor-rect number.
❒ If you have the optional ISDNunit, select the line type to beused before specifying a faxnumber. ⇒ P.41 “CHANGINGLINE TYPE”
I Press [Exit ].
J Press [PrevMenu ] 3 times.
K Press the {{{{User Tools/Counter }}}} key.
Deleting a Forwarding Station
AMake sure that the machine is inFacsimile mode and the standbydisplay is shown.
Note❒ If the standby display is not
shown, press the {{{{Fax}}}} key.
B Press the {{{{User Tools/Counter }}}} key.
C Enter the number of the “Fax”.
The Facsimile User Tool mainmenu appears.
ND1X03E0
ND1X03E0
2
2
22
11
Sort
Staple
Stack
1-Sided 2-Sided
2-Sided 2-Sided User Tools / Counter
Enhanced Auto Reduce/
Book 2-Sided
ND2L01E0
177

FACSIMILE USER TOOLS
178
7
ReferenceFor how to use the System UserTools, refer to the System Set-tings manual.
D Enter the function number for“Key Op. Settings” using thenumber keys and press the {{{{#}}}}(Enter) key within 3 seconds.
Note❒ If “Key Op. Settings” is not
shown, press [↑↑↑↑Prev. ] or [↓↓↓↓Next].
E Enter the function number for“Forwarding” using the numberkeys.
F Enter the function number for“Delete Receiver” using the num-ber keys.
G Choose the receiver (ForwardingStation) to delete by entering itscode number.
Note❒ If you make a mistake, press
[No] and enter a correct number.
H Press Yes.
Note❒ If you press No, the Forwarding
Station is not deleted and thedisplay shown in 5 appearsagain.
I Press [Yes].
The Forwarding Station is deleted.
Note❒ When you press [No], the For-
warding Station is not deletedand the display shown in 5 ap-pears again.
J Press [PrevMenu ] 3 times.
K Press the {{{{User Tools/Counter }}}} key.
Registering Specific Senders (Forwarding)
AMake sure that the machine is inFacsimile mode and the standbydisplay is shown.
Note❒ If the standby display is not
shown, press the {{{{Fax}}}} key.
ND2C0104
ND1X03E0

KEY OPERATOR SETTINGS
7
B Press the {{{{User Tools/Counter }}}} key.
C Enter the number of the Faxmode.
The Facsimile User Tool mainmenu appears.
ReferenceFor how to use the System UserTools, refer to the System Set-tings manual.
D Enter the function number for“Key Op. Settings” using thenumber keys and press the {{{{#}}}}(Enter) key within 3 seconds.
Note❒ If “Key Op. Settings” is not
shown, press [↑↑↑↑Prev. ] or [↓↓↓↓Next].
E Enter the function number for“Forwarding” using the numberkeys.
F Enter the function number for“Register Sender” using the num-ber keys.
G Choose a Specific Sender to regis-ter by entering its code number.
Note❒ If you make a mistake, press the{{{{Clear/Stop }}}} key and enter a cor-rect number.
H Press [RTI/CSI].
I Register an RTI or CSI of a senderand press [OK].
Reference⇒ P.213 “Entering Text”
J Select whether or not to register asender as a wild card. ⇒ P.213“Wild Cards”.
2
2
22
11
Sort
Staple
Stack
1-Sided 2-Sided
2-Sided 2-Sided User Tools / Counter
Enhanced Auto Reduce/
Book 2-Sided
ND2L01E0
ND2C0101
ND1X03E0
179

FACSIMILE USER TOOLS
180
7
K Press [Receiver ].
L Choose the Forwarding Stationyou want to assign this SpecificSender to: enter its code and press[OK].
M Press [OK].
Note❒ If you press [Cancel ], the sender
is not registered and the displayshown in 7 appears again.
N Press [Exit ].
O Press [PrevMenu ] 3 times.
P Press the {{{{User Tools/Counter }}}} key.
Deleting a Specific Sender (Forwarding)
AMake sure that the machine is inFacsimile mode and the standbydisplay is shown.
Note❒ If the standby display is not
shown, press the {{{{Fax}}}} key.
B Press the {{{{User Tools/Counter }}}} key.
C Enter the number of the “Fax”.
The Facsimile User Tool mainmenu appears.
ND1X02E8
ND1X03E0
ND1X03E0
ND1X03E0
2
2
22
11
Sort
Staple
Stack
1-Sided 2-Sided
2-Sided 2-Sided User Tools / Counter
Enhanced Auto Reduce/
Book 2-Sided
ND2L01E0

KEY OPERATOR SETTINGS
7
ReferenceFor how to use the System UserTools, refer to the System Set-tings manual.
D Enter the function number for“Key Op. Settings” using thenumber keys and press the {{{{#}}}}(Enter) key within 3 seconds.
Note❒ If “Key Op. Settings” is not
shown, press [↑↑↑↑Prev. ] or [↓↓↓↓Next].
E Enter the function number for“Forwarding” using the numberkeys.
F Enter the function number for“Delete Sender” using the num-ber keys.
G Choose the Specified Sender youwant to delete by entering its codewith the number keys.
Note❒ If you make a mistake, press the{{{{Clear/Stop }}}} key and enter a cor-rect number.
❒ If you have a mistake with thesecond digit, press [No] and en-ter the number again.
H Press [Yes].
Note❒ If you press [No], the sender is
not deleted and the displayshown in 7 appears again.
I Press [Yes].The sender is deleted.
Note❒ If you press [No], the sender is
not deleted and the displayshown in 5 appears again.
J Press [PrevMenu ] 3 times.
K Press the {{{{User Tools/Counter }}}} key.
Specified Sender/Forwarding Station list
Print this list to find out which Specif-ic Senders are assigned to which For-warding Stations.
ND1X03E0
ND1X03E0
181

FACSIMILE USER TOOLS
182
7
AMake sure that the machine is inFacsimile mode and the standbydisplay is shown.
Note❒ If the standby display is not
shown, press the {{{{Fax}}}} key.
B Press the {{{{User Tools/Counter }}}} key.
C Enter the number of the “Fax”.
The Facsimile User Tool mainmenu appears.
ReferenceFor how to use the System UserTools, refer to the System Set-tings manual.
D Enter the function number for“Key Op. Settings” using thenumber keys and press the {{{{#}}}}(Enter) key within 3 seconds.
Note❒ If “Key Op. Settings” is not
shown, press [↑↑↑↑Prev. ] or [↓↓↓↓Next].
E Enter the function number for“Forwarding” using the numberkeys.
F Enter the function number for“Print Sender List” using thenumber keys.
G Press the {{{{Start }}}} key.
Note❒ If you press [Cancel ] before
printing starts, the printingstops.
H Press [PrevMenu ] twice.
I Press the {{{{User Tools/Counter }}}} key.
Special Senders to Treat Differently (Special RX Nos.)
Special Reception numbers (SpecialRX Nos.) allow you to treat incomingmessages from certain locations dif-ferently.For example, you might want mes-sages from your branch offices print-ed on a different color paper toidentity them at a glance. In this case,program the branch office RTI/CSI'sas Specific Senders and select a papertray loaded with colored paper. • Multi-copy *1 (Number of prints
setting).You can have several copies ofmessages printed.
• Cassette Select (tray from whichmessages are printed). You can choose the paper cassetteused when printing messages. Ifyou set different color paper in thiscassette, you will be able to recog-nize messages from certain send-ers at a glance.
2
2
22
11
Sort
Staple
Stack
1-Sided 2-Sided
2-Sided 2-Sided User Tools / Counter
Enhanced Auto Reduce/
Book 2-Sided
ND2L01E0

KEY OPERATOR SETTINGS
7
Note❒ If you receive a fax with a paper
size different from that set in thepaper cassette, the printout willbe split across several pages orreduced to fit on the paper.
❒ If you choose the optional By-pass Feed Tray, make sure thesize you programmed for thistray matches the paper size inthis tray. For more details, P.14“Acceptable Original Sizes”.
• Memory Lock *1
You can have messages receivedinto memory. To print them out,P.114 “PRINTING A FILE RE-CEIVED WITH MEMORY LOCK”.
• 2-Sided Printing *2
Print on both sides of the paper.
Limitation❒ The function requires both the
optional Duplex Unit and FaxMemory Board.
• Reverse Printing *1
You can have pages printed in theopposite order in which they werereceived.You can adjust the following set-tings for this function:• Specified Senders (maximum of
30, up to 20 characters each withG3, up to 24 characters eachwith G4)
• Wildcards P.213 “Wild Cards”*1 The optional Fax Feature Expander is
required.*2 Duplex Tray option and Fax Feature
Expander are required
Important❒ It is recommended that you print
the Sender/Specified Number listand keep it when you register orchange a sender. ⇒ P.158 “RE-PORTS/LISTS”
Limitation❒ The Special Reception Numbers
function cannot used to treat mes-sages received from a SpecificSenders if they are received withPolling Reception or Free Polling.
❒ You cannot register a SpecificSender who does not have an RTIor CSI.
❒ You can register up to 30 sendersfor Forwarding, Special ReceptionNumbers, and Authorized Recep-tion functions. You sometimes can-not register 30 senders dependingon the number of senders regis-tered with other functions. If youinstall the optional Fax Feature Ex-pander, you can register up to 50senders.
Note❒ To register a sender, use an RTI or
CSI. When you communicate witha sender using G4, register a G4TID
❒ You can find the RTI or CSI of asender by looking in the destina-tion name column of the TCR
❒ Before using the Special RX Nos.function, switch this function toOn by following the steps shownin Initial Setup RX. ⇒ P.161 “INI-TIAL SETUP RX”
Registering Specific Senders (Special X Nos.)
AMake sure that the machine is inFacsimile mode and the standbydisplay is shown.
183

FACSIMILE USER TOOLS
184
7
Note❒ If the standby display is not
shown, press the {{{{Fax}}}} key.
B Press the {{{{User Tools/Counter }}}} key.
C Enter the number of the “Fax”.
The Facsimile User Tool mainmenu appears.
ReferenceFor how to use the System UserTools, refer to the System Set-tings manual.
D Enter the function number for“Key Op. Settings” using thenumber keys and press the {{{{#}}}}key within 3 seconds.
Note❒ If “Key Op. Settings” is not
shown, press [↑↑↑↑Prev. ] or [↓↓↓↓Next].
E Enter the function number for“Special RX Nos.”. using thenumber keys.
F Enter the function number for“Register Sender” using the num-ber keys.
G Choose a number where you wantto program a Specific Sender.
Note❒ If you make a mistake, press the{{{{Clear/Stop }}}} key and reenter acorrect value. If you enter awrong value for the second dig-it, press [Cancel ] and enter itagain.
H Press [RTI/CSI].
I Enter an RTI or CSI of a senderand press [OK].
2
2
22
11
Sort
Staple
Stack
1-Sided 2-Sided
2-Sided 2-Sided User Tools / Counter
Enhanced Auto Reduce/
Book 2-Sided
ND2L01E0
ND1X02E7
ND1X03E0

KEY OPERATOR SETTINGS
7
ReferenceP.213 “Entering Text”
J Select whether or not to registerthe sender as a wild card. ⇒ P.213“Wild Cards”.
K Press [RX Mode].
L Select any features for this Specif-ic Sender. You can scroll throughthem by pressing [↑↑↑↑Prev. ] or [↓↓↓↓N-ext]. Then press [OK].
❖❖❖❖ Multi-copy
❖❖❖❖ Tray Select
❖❖❖❖ Memory Lock
❖❖❖❖ Reverse Printing
❖❖❖❖ 2-Sided Printing
Note❒ Select only items you want to
change.❒ If you press [Cancel ], the speci-
fied setting are canceled and thedisplay shown in 11 appearsagain.
ND1X02E8
ND1X03E0
ND1X03E0
ND1X03E0
ND1X03E0
ND1X03E0
185

FACSIMILE USER TOOLS
186
7
M Press [OK].
N Press [Exit ].
O Press [PrevMenu ] 3 times.
P Press the {{{{User Tools/Counter }}}} key.
Deleting a Specific Sender
AMake sure that the machine is inFacsimile mode and the standbydisplay is shown.
Note❒ If the standby display is not
shown, press the {{{{Fax}}}} key.
B Press the {{{{User Tools/Counter }}}} key.
C Enter the number of the “Fax”.
The Facsimile User Tool mainmenu appears.
ReferenceFor how to use the System UserTools, refer to the System Set-tings manual.
D Enter the function number for“Key Op. Settings” using thenumber keys and press the {{{{#}}}}key within 3 seconds.
Note❒ If “Key Op. Settings” is not
shown, press [↑↑↑↑Prev. ] or [↓↓↓↓Next ].
E Enter the function number for“Special RX Nos.” using the num-ber keys.
F Enter the function number for“Delete Sender” using the num-ber keys.
G Choose a sender number youwant to delete by entering its code
ND1X03E0
ND1X03E0
2
2
22
11
Sort
Staple
Stack
1-Sided 2-Sided
2-Sided 2-Sided User Tools / Counter
Enhanced Auto Reduce/
Book 2-Sided
ND2L01E0

KEY OPERATOR SETTINGS
7
with the number keys. The regis-tered RTI or CSI is flash up.
Note❒ If you make a mistake, press the{{{{Clear/Stop }}}} key and enter a cor-rect value.
H Press [Yes].
Note❒ If you press [No], the sender is
not deleted and the displayshown in 5 appears again.
I Press [Yes].The sender is deleted.
Note❒ If you press [No], the sender is
not deleted and the displayshown in 5 appears again.
J Press [PrevMenu ] 3 times.
K Press the {{{{User Tools/Counter }}}} key.
Specified Sender List
Print this list to see the currently pro-grammed Specific Senders.
AMake sure that the machine is inFacsimile mode and the standbydisplay is shown.
Note❒ If the standby display is not
shown, press the {{{{Fax}}}} key.
B Press the {{{{User Tools/Counter }}}} key.
C Enter the number of the “Fax”.
The Facsimile User Tool mainmenu appears.
ReferenceFor how to use the System UserTools, refer to the System Set-tings manual.
D Enter the function number for“Key Op. Settings” using the
ND1X03E0
ND1X03E0
2
2
22
11
Sort
Staple
Stack
1-Sided 2-Sided
2-Sided 2-Sided User Tools / Counter
Enhanced Auto Reduce/
Book 2-Sided
ND2L01E0
187

FACSIMILE USER TOOLS
188
7
number keys and press the {{{{#}}}}(Enter) key within 3 seconds.
Note❒ If “Key Op. Settings” is not
shown, press [↑↑↑↑Prev. ] or [↓↓↓↓Next].
E Enter the function number for“Special RX Nos.”. using thenumber keys.
F Enter the function number for“Print Sender List” using thenumber keys.
G Press the {{{{Start}}}} key.When the printing job is complet-ed, the display shown in 6 appearsagain.
Note❒ If you press [Cancel ] before
printing starts, printing stopsand the display shown in 6 ap-pears again.
H Press [PrevMenu ] twice.
I Press the {{{{User Tools/Counter }}}} key.
Authorized Reception
This feature helps you to reject junkmail. It lets you specify which termi-nals you wish to receive fax messagesfrom; the others will be shut out. Thisis useful if you are very annoyed withsomeone.You can register the following:• 30 Specified Senders (up to 20
characters for each sender with G3,24 with G4)
• Wild Card ⇒ P.213 “Wild Cards”
Important❒ It is recommended that you print
the Sender/Authorized Receptionlist and keep it when you registeror change a sender. ⇒ P.158 “RE-PORTS/LISTS”
Limitation❒ You cannot register a Specified
Sender who does not have an RTIor CSI.
❒ You can register up to 30 sendersfor Forwarding, Special RX Nos.,and Authorized Reception func-tions. You sometimes cannot regis-ter 30 senders depending on thenumber of senders registered withother functions. If you attach theoptional Fax Feature Expander tothe machine, you can register up to50 senders.
Note❒ To register a sender, use an RTI or
CSI. If you communicate with asender using G4, register the G4TID.
❒ To find out a senders RTI/CSI,check the TCR.
❒ You need to switch Authorized Re-ception on. ⇒ P.161 “INITIAL SET-UP RX”
❒ You can specify whether to receivemessages from only SpecifiedSenders or to exclude messagesfrom Specified Senders. The de-fault setting is “Receive from Au-thorized Senders”. ⇒ P.203“Changing the User Parameters”

KEY OPERATOR SETTINGS
7
Programming Specified Senders
AMake sure that the machine is inFacsimile mode and the standbydisplay is shown.
Note❒ If the standby display is not
shown, press the {{{{Fax}}}} key.
B Press the {{{{User Tools/Counter }}}} key.
C Enter the number of the “Fax”.
The Facsimile User Tool mainmenu appears.
ReferenceFor how to use the System UserTools, refer to the System Set-tings manual.
D Enter the function number for“Key Op. Settings” using thenumber keys and press the {{{{#}}}}(Enter) key within 3 seconds.
Note❒ If “Key Op. Settings” is not
shown, press [↑↑↑↑Prev. ] or [↓↓↓↓Next ].
E Enter the function number for“Authorized RX” using the num-ber keys.
F Enter the function number for“Register Sender” using the num-ber keys.
G Choose a sender number youwish to register.
Note❒ If you make a mistake, press the{{{{Clear/Stop }}}} key and reenter acorrect value.
H Press [RTI/CSI].
2
2
22
11
Sort
Staple
Stack
1-Sided 2-Sided
2-Sided 2-Sided User Tools / Counter
Enhanced Auto Reduce/
Book 2-Sided
ND2L01E0
ND1X02E7
189

FACSIMILE USER TOOLS
190
7
I Enter an RTI or CSI of a senderand press [OK].
ReferenceP.213 “Entering Text”
J Select whether or not to registerthe sender on a P.213 “Wild Cards”.
K Press [OK].
L Press [Exit ].
M Press [PrevMenu ] 3 times.
N Press the {{{{User Tools/Counter }}}} key.
Deleting a Specific Sender (Authorized Reception)
AMake sure that the machine is inFacsimile mode and the standbydisplay is shown.
Note❒ If the standby display is not
shown, press the {{{{Fax}}}} key.
B Press the {{{{User Tools/Counter }}}} key.
C Enter the number of the “Fax”.
The Facsimile User Tool mainmenu appears.
ReferenceFor how to use the System UserTools, refer to the System Set-tings manual.
D Enter the function number for“Key Op. Settings” using thenumber keys and press the {{{{#}}}}(Enter) key within 3 seconds.
ND1X03E0
ND1X03E0
ND1X03E0
2
2
22
11
Sort
Staple
Stack
1-Sided 2-Sided
2-Sided 2-Sided User Tools / Counter
Enhanced Auto Reduce/
Book 2-Sided
ND2L01E0

KEY OPERATOR SETTINGS
7
Note❒ If “Key Op. Settings” is not
shown, press [↑↑↑↑Prev. ] or [↓↓↓↓Next].
E Enter the function number for“Authorized RX” using the num-ber keys.
F Enter the function number for“Delete Sender” using the num-ber keys.
G Choose the sender to delete by en-tering its code. The RTI/CSI willflash up.
Note❒ If you make a mistake, press{{{{Clear/Stop }}}} and enter a correctnumber.
H Press [Yes].
Note❒ If you press [No], the sender is
not deleted and the displayshown in 7 appears again.
I Press [Yes].
The sender is deleted.
Note❒ If you press [No], the sender is
not deleted and the displayshown in 5 appears again.
J Press [PrevMenu ] 3 times.
K Press the {{{{User Tools/Counter }}}} key.
Sender/Authorized Reception List
Print this list to find out which Specif-ic Senders are currently programmed.
AMake sure that the machine is inFacsimile mode and the standbydisplay is shown.
Note❒ If the standby display is not
shown, press the {{{{Fax}}}} key.
B Press the {{{{User Tools/Counter }}}} key.
ND1X03E0
ND1X03E0
2
2
22
11
Sort
Staple
Stack
1-Sided 2-Sided
2-Sided 2-Sided User Tools / Counter
Enhanced Auto Reduce/
Book 2-Sided
ND2L01E0
191

FACSIMILE USER TOOLS
192
7
C Enter the number of the “Fax”.
The Facsimile User Tool mainmenu appears.
ReferenceFor how to use the System UserTools, refer to the System Set-tings manual.
D Enter the function number for“Key Op. Settings” using thenumber keys and press the {{{{#}}}}(Enter) key within 3 seconds.
Note❒ If “Key Op. Settings” is not
shown, press [↑↑↑↑Prev. ] or [↓↓↓↓Next].
E Enter the function number for“Authorized RX” using the num-ber keys.
F Enter the function number for“Print Sender List” using thenumber keys.
G Press the {{{{Start}}}} key.
Note❒ When you press [Cancel ], the
printing stops and the displayshown in 4 appears again.
H Press [PrevMenu ] twice.
I Press the {{{{User Tools/Counter }}}} key.
Monitor Volume
You can change the volume of the fol-lowing sounds the machine makes.
❖❖❖❖ On HookWhen you press the {{{{On Hook Dial }}}}key.
❖❖❖❖ TransmissionWhen the machine send a mes-sage.
❖❖❖❖ ReceptionWhen the machine receive a mes-sage.
❖❖❖❖ DiallingDialingAfter pressing the {{{{Start}}}} key, thissound is output until the line con-nects to the destination.
❖❖❖❖ PrintingSounds when a received messagehas been printed. See P.64 “PrintCompletion Beep”.
AMake sure that the machine is inFacsimile mode and the standbydisplay is shown.
Note❒ If the standby display is not
shown, press the {{{{Fax}}}} key.
B Press the {{{{User Tools/Counter }}}} key.
2
2
22
11
Sort
Staple
Stack
1-Sided 2-Sided
2-Sided 2-Sided User Tools / Counter
Enhanced Auto Reduce/
Book 2-Sided
ND2L01E0

KEY OPERATOR SETTINGS
7
C Enter the number of the “Fax”.
The Facsimile User Tool mainmenu appears.
ReferenceFor how to use the System UserTools, refer to the System Set-tings manual.
D Enter the function number for“Key Op. Settings” using thenumber keys and press the {{{{#}}}}(Enter) key within 3 seconds.
Note❒ If “Key Op. Settings” is not
shown, press [↑↑↑↑Prev. ] or [↓↓↓↓Next].
E Enter the function number for“Monitor Volume” using thenumber keys.
F Select an item you want to adjustpressing [↑↑↑↑Prev. ] and [↓↓↓↓Next].
Note❒ On Hook, Transmission, Recep-
tion, Dialling, and Printing areshown in that order.
❖❖❖❖ On Hook
G Adjust the volume using the <<<< or>>>> key and press [OK].
Note❒ When you press [Cancel ], the
volume setting is canceled andthe display shown in 5 appearsagain.
❒ Lowest = OFF
H Press [PrevMenu ].
I Press the {{{{User Tools/Counter }}}} key.
RTI/TTI
An RTI (Receive Terminal Identifica-tion) is passed to a receiver or senderwhen you send or receive a fax. Whenthe RTI is received, it is shown on thedisplay and printed in a report at theother end.The TTI (Transmitter Terminal Identi-fication) is printed on the header ofevery fax you send.You usually should contain yourname in both of these identifications.
ND1X03E6
ND1X03E5
193

FACSIMILE USER TOOLS
194
7
Limitation❒ The RTI does not work unless the
other party has the same make ma-chine with the RTI feature.
❒ You can program up to 20 charac-ters in a RTI and 32 in a TTI.
❒ You can program letter, symbols,number, and spaces in an RTI andTTI.
AMake sure that the machine is inFacsimile mode and the standbydisplay is shown.
Note❒ If the standby display is not
shown, press the {{{{Fax}}}} key.
B Press the {{{{User Tools/Counter }}}} key.
C Enter the number of the “Fax”.
The Facsimile User Tool mainmenu appears.
ReferenceFor how to use the System UserTools, refer to the System Set-tings manual.
D Enter the function number for“Key Op. Settings” using thenumber keys and press the {{{{#}}}}key within 3 seconds.
Note❒ If “Key Op. Settings” is not
shown, press [↑↑↑↑Prev. ] or [↓↓↓↓Next ].
E Enter the function number for“RTI/TTI” using the numberkeys.
F Press [ RTI].
G Enter an RTI and press [OK].
ReferenceP.213 “Entering Text”
2
2
22
11
Sort
Staple
Stack
1-Sided 2-Sided
2-Sided 2-Sided User Tools / Counter
Enhanced Auto Reduce/
Book 2-Sided
ND2L01E0 ND1X02E7
ND1X03E0

KEY OPERATOR SETTINGS
7
H Press [TTI].
I Enter a TTI and press [OK].
ReferenceP.213 “Entering Text”
J Press [OK] to confirm.
Note❒ If you press [Cancel ], the entered
characters are canceled and thedisplay shown in 3 appearsagain.
K Press [PrevMenu ].
L Press the {{{{User Tools/Counter }}}} key.
Registering The Economy Transmission Time
Economy Transmission allow you totake advantage of off-peak line ratesby delaying transmission of messagesuntil a later time.Use the procedure below to programthe Economy Transmission Time for
when you phone rates are cheaper. ⇒P.74 “SEND LATER”
Limitation❒ You can program only one Econo-
my Transmission time.
AMake sure that the machine is inFacsimile mode and the standbydisplay is shown.
Note❒ If the standby display is not
shown, press the {{{{Fax}}}} key.
B Press the {{{{User Tools/Counter }}}} key.
C Enter the number of the “Fax”.
The Facsimile User Tool mainmenu appears.
ReferenceFor how to use the System UserTools, refer to the System Set-tings manual.
D Enter the function number for“Key Op. Settings” using the
ND1X02E8
ND1X03E0
2
2
22
11
Sort
Staple
Stack
1-Sided 2-Sided
2-Sided 2-Sided User Tools / Counter
Enhanced Auto Reduce/
Book 2-Sided
ND2L01E0
195

FACSIMILE USER TOOLS
196
7
number keys and press the {{{{#}}}}(Enter) key within 3 seconds.
Note❒ If “Key Op. Settings” is not
shown, press [↑↑↑↑Prev. ] or [↓↓↓↓Next].
E Enter the function number for“Economy TX” using the numberkeys.
F Enter an economy transmissiontime using the number keys andpress [OK]. To change AM/PM,press the [AM ↔↔↔↔ PM] key (NorthAmerica only)
Note❒ If you press [Cancel ], the entered
time is canceled and the displayshown in 5 appears again.
G Press [PrevMenu ].
H Press the {{{{User Tools/Counter }}}} key.
ID Code
Use this procedure to register the fol-lowing kinds of ID codes.
❖❖❖❖ Confidential IDThis ID is usually required forprinting a message received in theConfidential Reception. ⇒ P.112
“PRINTING A CONFIDENTIALMESSAGE”
❖❖❖❖ Polling IDThis ID is required for using Trans-fer Request ⇒ P.96 “TRANSFERREQUEST”, Transfer Station ⇒P.60 “Transfer Station”, Default IDPolling Transmission ⇒ P.90 “FreePolling Transmission”, Default IDPolling Reception ⇒ P.94 “DefaultID Polling Reception (Free PollingReception)”, ID Transmission ⇒P.52 “ID Transmission”, ID Recep-tion ⇒ P.61 “ID Reception”func-tion.
❖❖❖❖ Memory Lock IDThis ID is required for printing amessage received using MemoryLock. ⇒ P.114 “PRINTING A FILERECEIVED WITH MEMORYLOCK”
Limitation❒ A Polling ID can be any combina-
tion of digits (0 - 9) and letters (A -F) except for 0000 and FFFF. Whenyou use Transfer Request, TransferStation, or ID Transmission, regis-ter the same ID code as that regis-tered on the sender's machine.
❒ A Confidential ID and MemoryLock ID can be any a four digit nu-meric code except for 0000.
❒ For Confidential ID and MemoryLock ID, the optional Fax FeatureExpander is required.
AMake sure that the machine is inFacsimile mode and the standbydisplay is shown.

KEY OPERATOR SETTINGS
7
Note❒ If the standby display is not
shown, press the {{{{Fax}}}} key.
B Press the {{{{User Tools/Counter }}}} key.
C Enter the number of the “Fax”.
The Facsimile User Tool mainmenu appears.
ReferenceFor how to use the System UserTools, refer to the System Set-tings manual.
D Enter the function number for“Key Op. Settings” using thenumber keys and press the {{{{#}}}}key within 3 seconds.
Note❒ If “Key Op. Settings” is not
shown, press [↑↑↑↑Prev. ] or [↓↓↓↓Next].
E Enter the function number for“ID Code” using the numberkeys.
F Choose the ID you wish to pro-gram using the number keys.
G Enter an ID code and press [OK].
Note❒ For a Confidential ID and Mem-
ory Lock ID, use the numberkeys to enter an ID code. For aPolling ID, use the number keysand letter keys (A to F).
❒ If you make a mistake, press the{{{{Clear/Stop }}}} key and enter a cor-rect code.
❒ If you press [Cancel ], the enteredID is canceled.
❖❖❖❖ Confidential ID
❖❖❖❖ Memory Lock ID
H Press [PrevMenu ] twice.
I Press the {{{{User Tools/Counter }}}} key.
2
2
22
11
Sort
Staple
Stack
1-Sided 2-Sided
2-Sided 2-Sided User Tools / Counter
Enhanced Auto Reduce/
Book 2-Sided
ND2L01E0
ND1X03E0
197

FACSIMILE USER TOOLS
198
7
G3 Analog Line
This function must be set up beforeyou connect the machine to a G3 ana-log line.You can register the following itemswith a G3 analog Line:• PSTN Line Type (Dial Pulse/Tone)• CSI (up to 20 digits)• Own Analog Number (up to 16
digits)
Note❒ A CSI (Called Station Identifica-
tion) is notified to a receiver orsender when you send or receive afax. When the CSI is received, it isshown on the display or printed ina report by the receiver's or send-er's machine. The CSI works evenif the receiver or sender uses a dif-ferent make machine.
❒ The CSI can contain numerals, aplus sign (+), and spaces. You usu-ally should register your countrycode, area code (minus the leadingzero) and your fax number in thatorder.
❒ Specify your own analog number(the telephone number to whichyour machine is connected) so thatthe transfer station can return theTransfer Result report to you. Youcan program numbers and a pausein your own number. Be sure to en-ter a pause after the area code.
AMake sure that the machine is inFacsimile mode and the standbydisplay is shown.
Note❒ If the standby display is not
shown, press the {{{{Fax}}}} key.
B Press the {{{{User Tools/Counter }}}} key.
C Enter the number of the “Fax”.
The Facsimile User Tool mainmenu appears.
ReferenceFor how to use the System UserTools, refer to the System Set-tings manual.
D Enter the function number for“Key Op. Settings” using thenumber keys and press the {{{{#}}}}(Enter) key within 3 seconds.
Note❒ If “Key Op. Settings” is not
shown, press [↑↑↑↑Prev. ] or [↓↓↓↓Next ].
E Enter the function number for“G3 Analog Line” using the num-ber keys.
2
2
22
11
Sort
Staple
Stack
1-Sided 2-Sided
2-Sided 2-Sided User Tools / Counter
Enhanced Auto Reduce/
Book 2-Sided
ND2L01E0

KEY OPERATOR SETTINGS
7
F Enter the function number for“PSTN Line Type” using thenumber keys.
G Select the desired line type andpress [OK].
H Enter the function number for“CSI” using the number keys.
I Enter CSI and press [OK].In some countries, you can not usethis function.
J Enter the function number for“Own Analog Number” using thenumber keys.
K Enter an own analog number us-ing the number keys and press[OK].
L Press [PrevMenu ] twice.
M Press the {{{{User Tools/Counter }}}} key.
G3 Digital Line
This function must be set when youconnect the machine to an ISDN G3digital line.You can register the following items.• CSI (up to 20 digits) • Own Digital Number (up to 29
digits)
Note❒ Optional ISDN required.❒ You need to register a CSI and
your own digital number. ⇒ P.198“G3 Analog Line”
❒ If you wish to change your subad-dress, contact your service repre-sentative.
❒ Program a User Function key forthe subaddress function.
AMake sure that the machine is inFacsimile mode and the standbydisplay is shown.
ND1X03E0
ND1X03E0
ND1X03E0
199

FACSIMILE USER TOOLS
200
7
Note❒ If the standby display is not
shown, press the {{{{Fax}}}} key.
B Press the {{{{User Tools/Counter }}}} key.
C Enter the number of the “Fax”.
The Facsimile User Tool mainmenu appears.
ReferenceFor how to use the System UserTools, refer to the System Set-tings manual.
D Enter the function number for“Key Op. Settings” using thenumber keys and press the {{{{#}}}}(Enter) key within 3 seconds.
Note❒ If “Key Op. Settings” is not
shown, press [↑↑↑↑Prev. ] or [↓↓↓↓Next].
E Enter the function number for“G3 Digital Line” using the num-ber keys.
F Enter the function number for“CSI” using the number keys.
G Enter the CSI and press [OK].
H Enter the function number for“Own Digital Number” using thenumber keys.
I Enter your own digital numberusing the number keys and press[OK].
J Press [PrevMenu ] twice.
K Press the {{{{User Tools/Counter }}}} key.
G4 Digital Line
This function must be set when youconnect the machine to the ISDN dig-ital line.You can register the following items:• TID (up to 24 digit)
2
2
22
11
Sort
Staple
Stack
1-Sided 2-Sided
2-Sided 2-Sided User Tools / Counter
Enhanced Auto Reduce/
Book 2-Sided
ND2L01E0
ND1X03E0
ND1X03E0

KEY OPERATOR SETTINGS
7
• Own Digital Number (up to 29digit)
Note❒ Optional ISDN unit is required.❒ You can use a G4 TID if you use the
ISDN. The G4 TID is informationto be printed on a destination ma-chine when you send a fax usingG4 down the ISDN.
AMake sure that the machine is inFacsimile mode and the standbydisplay is shown.
Note❒ If the standby display is not
shown, press the {{{{Fax}}}} key.
B Press the {{{{User Tools/Counter }}}} key.
C Enter the number of the “Fax”.
The Facsimile User Tool mainmenu appears.
ReferenceFor how to use the System UserTools, refer to the System Set-tings manual.
D Enter the function number for“Key Op. Settings” using thenumber keys and press the {{{{#}}}}(Enter) key within 3 seconds.
Note❒ If “Key Op. Settings” is not
shown, press [↑↑↑↑Prev. ] or [↓↓↓↓Next ].
E Enter the function number for“G4 Digital Line” using the num-ber keys.
F Enter the function number for“TID” using the number keys. Insome countries, you can not usethis function.
G Enter the number for “CountryCode”.
2
2
22
11
Sort
Staple
Stack
1-Sided 2-Sided
2-Sided 2-Sided User Tools / Counter
Enhanced Auto Reduce/
Book 2-Sided
ND2L01E0
201

FACSIMILE USER TOOLS
202
7
H Enter your Country Code usingthe number keys and press [OK].
I Enter the number for “Own Digi-tal Number” using the numberkeys.
J Enter your fax number and press[OK].
K Enter the number for “TerminalName.”
L Enter your terminal name andpress [OK].
ReferenceP.213 “Entering Text”
M Press [PrevMenu ].
N Enter the function number for“Own Digital Number ” using thenumber keys.
O Enter your own digital numberusing the number keys and press[OK].
P Press [PrevMenu ] twice.
Q Press the {{{{User Tools/Counter }}}} key.
ND1X03E0
ND1X03E0
ND1X03E0
ND1X03E0

KEY OPERATOR SETTINGS
7
Changing the User Parameters
The User Parameters allow you to customize various settings to match yourneeds.To change the function settings, set the user parameter switches.
PreparationAccess to some User Parameter Settings requires installation of optionalequipment or that other settings be made beforehand.
----Switches and BitsUser Parameters are divided into Switches and each switch is divided into eightbits. The right most bit is bit 0 and the left most is bit 7.
----User Parameter List
Switch 00
0 1 0 0 0 0 0 0
↓ ↓ ↓ ↓ ↓ ↓ ↓ ↓
7 6 5 4 3 2 1 0
Switch Bit Item 0 1
00 0 Stamp home position Off On
3,2,1 Image density adjustment level home position
The higher the level, the greater the image density.
000: Auto Image Density, 001: Level 1 (lightest), 010: Level 2, 011: Level 3, 100: Level 4, 101: Level 5 (darkest)
5,4 Character size (resolution) home position
00: Standard, 01: Detail, 10: Super fine
6 Transmission Mode home position
Memory Trans-mission
Immediate Transmission
203

FACSIMILE USER TOOLS
204
7
01 0 Label Insertion home posi-tion
Off On
1 ID Transmission home posi-tion
Off On
2 Auto Reduction home posi-tion
Off On
4,3 Original type home position
00: Text, 01: Photo/Text, 10: Photo
5 TTI Print home position Off On
7 Return the machine to the initial settings after each communication
Off On
02 0 Forwarding Mark Off On
1 Center Mark Off On
2 Print RX Time Off On
3 TSI Print Off On
4 Checkered Mark Off On
5 CIL Print Off On
6 TID Print Off On
03 0 Printing a Transmission Re-sult Report (Memory Trans-mission) automatically
Off On
2 Printing a Memory Storage Report automatically
Off On
3 Printing a Polling Reserve Report automatically
Off On
4 Printing a Polling Result Re-port
Off On
5 Printing a Transmission Re-sult Report (Immediate Transmission) automatically
Off On
6 Printing a Polling Clear Re-port automatically
Off On
7 Printing a TCR automatical-ly
Off On
Switch Bit Item 0 1

KEY OPERATOR SETTINGS
7
04 0 Printing a Confidential File Report automatically
Off On
7 Containing an image in a Transmission Result Report (Memory Transmission), Memory Storage Report, Communication Failure Re-port, or Transfer Result
Off On
05 0 Receiving in Service Call (SC) Condition
Possible (Sub-stitute Recep-tion)
Not possible
2,1 Receiving when the machine can not print.
00: Enabled unconditionally, 01: Enabled for RTI/CSI is re-ceived, 10: Enabled for Polling ID match, 11: Disabled
4 Personal Code Access Off On
5 Just Size Printing Off On
6 Scanning in Mixed Paper Size Available
Off On
7 Empty cassette alert Off On
06 1 Fax communication mode home position
G3 G4
5 Selecting the Sheet to Print the a Quick Dial Label
Paper label sheet
Transparent la-bel sheet
6 Scanning Start Page of the Book Original
From the left page
From the right page
07 2 Parallel Memory Transmis-sion
Off On
08 2 Authorized Reception condi-tion
Receive from authorized Senders
Receive from other than au-thorized Send-ers
10 1 Two in One Off On
3 Auto Reduction in printing Off On
11 1 Send PB/UUI to ISDN UUI PB
6 Local Printing at Forwarding Off On
7 Polling file after sending Delete Standby
Switch Bit Item 0 1
205

FACSIMILE USER TOOLS
206
7
How to Specify a User Parameter• It is recommended that you printthe User Parameter list and keep itwhen you register or change a userparameter. ⇒ P.207 “Printing theUser Parameter List”
• Do not change any bit switchesother than those shown on the pre-vious pages.
AMake sure that the machine is inFacsimile mode and the standbydisplay is shown.
Note❒ If the standby display is not
shown, press the {{{{Fax}}}} key.
B Press the {{{{User Tools/Counter }}}} key.
C Enter the number of the “Fax”.
The Facsimile User Tool mainmenu appears.
ReferenceFor how to use the System UserTools, refer to the System Set-tings manual.
14 0 Printing a document re-ceived with Auto Power-On Reception
Immediate printing
When turning on the opera-tion
2 Batch Transmission Off On
3 Clear modes when switching the application
Off On
7 Manual Service report Transmission
Off On
15 2,1,0 Paper feed Tray
001: First, 010: Second, 011: Third, 100: 4th, 101:LCT
5 Fixed Input tray On Off
16 2 Paper Size Priority when re-ceiving A4
A3 B4
24 1,0 Storing a message in memory which could not be transmitted
00: Off, 01: Store for 24 hours, 11: Store for 72 hours
25 7 Summer Time Off On
Switch Bit Item 0 1
2
2
22
11
Sort
Staple
Stack
1-Sided 2-Sided
2-Sided 2-Sided User Tools / Counter
Enhanced Auto Reduce/
Book 2-Sided
ND2L01E0

KEY OPERATOR SETTINGS
7
D Enter the function number for“Key Op. Settings” using thenumber keys and press the {{{{#}}}}(Enter) key within 3 seconds.
Note❒ If “Key Op. Settings” is not
shown, press [↑↑↑↑Prev. ] or [↓↓↓↓Next].
E Enter the function number for“User Parameters” using thenumber keys.
F Select a number for a switch youwish to change by pressing[↑↑↑↑Switch ] or [↓↓↓↓Switch ].
G Press a number key correspond-ing to the bit number you wish tochange e.g., press {{{{0}}}} to changebit 0.
HWhen you have finished, press[OK].
Note❒ If you press [Cancel ], the speci-
fied settings are canceled andthe display shown in 3 appearsagain.
I Press [PrevMenu ].
J Press the {{{{User Tools/Counter }}}} key.
Printing the User Parameter List
Print this list to see the current UserParameter settings.
AMake sure that the machine is inFacsimile mode and the standbydisplay is shown.
Note❒ If the standby display is not
shown, press the {{{{Fax}}}} key.
B Press the {{{{User Tools/Counter }}}} key.
C Enter the number of the “Fax”.
The Facsimile User Tool mainmenu appears.
ReferenceFor how to use the System UserTools, refer to the System Set-tings manual.
D Enter the function number for“Key Op. Settings” using the
ND1X03E6
2
2
22
11
Sort
Staple
Stack
1-Sided 2-Sided
2-Sided 2-Sided User Tools / Counter
Enhanced Auto Reduce/
Book 2-Sided
ND2L01E0
207

FACSIMILE USER TOOLS
208
7
number keys and press the {{{{#}}}}(Enter) key within 3 seconds.
Note❒ If “Key Op. Settings” is not
shown, press [↑↑↑↑Prev. ] or [↓↓↓↓Next].
E Enter the function “Prt.U.Parame-ters” using the number keys.
F Press the {{{{Start }}}} key to print thelist.
Note❒ If you press [Cancel ] before
printing starts, the printingstops and the display shown in3 appears again.
G Press [PrevMenu ].
H Press the {{{{User Tools/Counter }}}} key.
Date/Time
Use this function to set your ma-chine's internal clock to the currenttime and date. This time is shown onthe display, printed on pages andused for various features, such asSend Later.If the current date and time arewrong, use this procedure to correctthem.
AMake sure that the machine is inFacsimile mode and the standbydisplay is shown.
Note❒ If the standby display is not
shown, press the {{{{Fax}}}} key.
B Press the {{{{User Tools/Counter }}}} key.
C Enter the number of the “Fax”.
The Facsimile User Tool mainmenu appears.
ReferenceFor how to use the System UserTools, refer to the System Set-tings manual.
D Enter the function number for“Key Op. Settings” using thenumber keys and press the {{{{#}}}}(Enter) key within 3 seconds.
Note❒ If “Key Op. Settings” is not
shown, press [↑↑↑↑Prev. ] or [↓↓↓↓Next ].
2
2
22
11
Sort
Staple
Stack
1-Sided 2-Sided
2-Sided 2-Sided User Tools / Counter
Enhanced Auto Reduce/
Book 2-Sided
ND2L01E0

KEY OPERATOR SETTINGS
7
E Enter the function number for “Date/Time” using the numberkeys.
F Select an item you want to changeusing the <<<< and >>>> keys, enterthe month using [↑↑↑↑Prev.] or [↓↓↓↓Next ]and enter the correct date or timeusing the number keys. Thenpress [OK].
Note❒ When you enter a date, the day
is set automatically.❒ Depending on your area, your
machine will either except thedate in 12 hours format or 24hours format.
G Press [PrevMenu ].
H Press the {{{{User Tools/Counter }}}} key.
Summer Time
Whenever local custom requires ad-vancing the clock or setting the clockback, use this feature. You can easilymove the clock forwards when day-light saving time begins, and backwhen it ends. To turn this feature on,change the User Parameter Switch 25digit 7. ⇒ P.207 “Printing the User Pa-rameter List”
Counters
This function allows you to check thetotal number of transmitted, received,scanned, and printed pages on thedisplay.• Transmissions
: Total number of transmitted pag-es
• Receptions: Total number of received pages
AMake sure that the machine is inFacsimile mode and the standbydisplay is shown.
Note❒ If the standby display is not
shown, press the {{{{Fax}}}} key.
B Press the {{{{User Tools/Counter }}}} key.
C Enter the number of the “Fax”.
The Facsimile User Tool mainmenu appears.
ReferenceFor how to use the System UserTools, refer to the System Set-tings manual.
2
2
22
11
Sort
Staple
Stack
1-Sided 2-Sided
2-Sided 2-Sided User Tools / Counter
Enhanced Auto Reduce/
Book 2-Sided
ND2L01E0
209

FACSIMILE USER TOOLS
210
7
D Enter the function number for“Key Op. Settings” using thenumber keys and press the {{{{#}}}}(Enter) within 3 seconds.
Note❒ If “Key Op. Settings” is not
shown, press [↑↑↑↑Prev. ] or [↓↓↓↓Next].
E Enter the function number for“Counters” using the numberkeys.
The totals are displayed.
FWhen you have checked the totalpages, press [OK].
G Press [PrevMenu ].
H Press the {{{{User Tools/Counter }}}} key.
Auto Reset
If the machine is not used for a while,the display will return to the Readycondition. By default, the time thatmust elapse before this happens is 30seconds. If you wish, you can changethis interval to one of the followingsettings:• 1 minute • 3 minutes
• 5 minutes
AMake sure that the machine is inFacsimile mode and the standbydisplay is shown.
Note❒ If the standby display is not
shown, press the {{{{Fax}}}} key.
B Press the {{{{User Tools/Counter }}}} key.
C Enter the number of the “Fax”.
The Facsimile User Tool mainmenu appears.
ReferenceFor how to use the System UserTools, refer to the System Set-tings manual.
D Enter the function number for“Key Op. Settings” using thenumber keys and press the {{{{#}}}}within 3 seconds.
2
2
22
11
Sort
Staple
Stack
1-Sided 2-Sided
2-Sided 2-Sided User Tools / Counter
Enhanced Auto Reduce/
Book 2-Sided
ND2L01E0

KEY OPERATOR SETTINGS
7
Note❒ If “Key Op. Settings” is not
shown, press [↑↑↑↑Prev. ] or [↓↓↓↓Next].
E Enter the function number for“Auto Reset” using the numberkeys.
The totals are displayed.
F Select the interval with the <<<< and>>>> keys. Then press [OK] key.
G Press [PrevMenu ].
H Press the {{{{User Tools/Counter }}}} key.
Paper Feed Selection
Using this feature, you can selectwhich tray to print out the message. Ifyou wish to use this feature, changeUser Parameter Switch digits 0 to 2.
RDS (Remote Diagnostic System)
If your machine has a problem, a ser-vice representative can perform vari-ous diagnostic tasks over thetelephone line from the service sta-tion to try to find out what is wrongwith your machine. The service tech-nician can also use RDS to changesome of your machine's settings ifyou request it.
211

FACSIMILE USER TOOLS
212
7
This page is intentionally blank.
8. Entering Text
ENTERING AND MODIFYING TEXT
This section describes how to entercharacters. When you enter a charac-ter, it is shown at the position of thecursor. If there is a character at thecursor position, the entered characteris shown before the character.
Available Characters
• Alphabetic charactersABCDEFGHIJKLMNOPQRSTU-VWXYZabcdefghijklmnopqrstu-vwxyz
• Symbols• Numerals
0123456789
Keys
❖❖❖❖ Number keysUse to enter numbers.
❖❖❖❖ Quick Dial 01/29 to Quick Dial 28/56 (Ato Z)Press these keys to enter upper andlower case letters.
❖❖❖❖ [A←←←←→→→→a] keyUse to switch between upper andlower case.
❖❖❖❖ Quick Dial 27/55Press to enter a space.
❖❖❖❖ {{{{Clear/Stop }}}} keyDeletes a character at the cursorposition. You can delete a charac-ter at the right end of a line even ifthe cursor is placed to the right ofthe character.
❖❖❖❖ <<<< and >>>>Use to move the cursor left orright.
❖❖❖❖ {{{{Insert }}}} keyPress if you wish to insert charac-ters.
Note❒ If you wish to enter symbols, use
the [Symbols ] key.
❒ Flip the plate to access Quick Dialkeys not shown.
❒ Quick Dial 01/29 means QuickDial key 01 or 29.
----Wild CardsWhen you register RTIs or CSIs formultiple destinations, you can regis-ter a sequence of characters commonto these identifications as a wild cardinstead of registering every identifi-cation.If a destination has an RTI or CSI con-taining a wild card, the machine de-termines that the destination matchesthe registered destination.
ND2C0102
213

ENTERING TEXT
214
8
❖❖❖❖ Not using a wild card
❖❖❖❖ Using a wild card
Limitation❒ You can register up to 30 wild
cards.
Note❒ Compare identifications by ne-
glecting spaces.❒ You can use wild cards for the fol-
lowing functions:• P.175 “Forwarding”• P.182 “Special Senders to Treat
Differently (Special RX Nos.)”• P.188 “Authorized Reception”
How To Enter Text
Entering letters
A Press [A←←←←→→→→a] to switch betweenUppercase and Lowercase.
B Press a Quick Dial key.A letter is entered and the cursormoves.
Note❒ If you wish to you enter another
character continuously, repeatstep 2.
Entering symbols
A Press [Symbols ].The available symbols are shownon the display.
Destination to be registered (RTI)
Number of regis-tered identifica-tions
NEW YORK BRANCH
HONG KONG BRANCH
SYDNEY BRANCH
3
Destination to be registered (RTI)
Number of regis-tered identifica-tions
BRANCH 1
ND2C0101

ENTERING AND MODIFYING TEXT
8
B Select the desired symbol bypressing [↑↑↑↑Prev. ] and [↓↓↓↓Next].
C Enter the number for the symbolsusing the number keys.
The symbols is entered and thecursor moves.
Note❒ If you wish to you enter another
symbol, repeat steps 2 and 3.
Entering numbers
A Press a number keys.
The numeral is entered and thecursor moves.
Deleting characters
A Press the <<<< and >>>> keys to movethe cursor to a character you wantto delete.
B Press the {{{{Clear/Stop }}}} key.
The character at the cursor posi-tion is deleted .
Note❒ If you wish to delete another
character, repeat steps 1 and 2.
ND2C0102
ND2C0110
ND2C0101
215

ENTERING TEXT
216
8
This page is intentionally blank.

9. Maintaining Your Machine
CONNECTING THE MACHINE TO A TELEPHONE LINE AND TELEPHONE
Connecting The Telephone Line
To connect the machine to a telephone line, use a snap-in modular type connec-tor.
Important❒ Make sure the type of modular connector.
❖❖❖❖ Where to connect the machine
❖❖❖❖ When using a modular type connector
ND8A02E0
AnalogExternalTelephone
ISDN
ND8F01E0
ExternalTelephone
217

MAINTAINING YOUR MACHINE
218
9
Connecting The Machine To The ISDN
Connect the machine to the ISDN if you have the optional ISDN unit. Use a mod-ular type connector for the ISDN.
Important❒ When you connect the machine to the ISDN, contact your service representa-
tive.
Connecting The Optional External Telephone
You can connect the handset and an external telephone to the machine. You canuse them for telephone calls.
Note❒ Some telephone may not be connected or may suffer reduced functionality.
❖❖❖❖ Specifying the handset line type
The switch on the handset should be in the appropriate position-TT (Tone Dial-ing) or DP (Pulse Dialing).
ND8F03E1
DPTT
ND1X00E0

CONNECTING THE MACHINE TO A TELEPHONE LINE AND TELEPHONE
9
❖❖❖❖ Adjusting the handset bell volume
Adjust the handset ringer volume using the volume switch.
Selecting The Line Type
Select the line type to which the machine is connected. There are two types: toneand pulse dial.Select the Line Type using “PSTN Line Type” in ”Key Operator Settings”.⇒P.198 “G3 Analog Line” The default settings is ”Tone”.
Ringer
13
2
6
9
5
8
04
7
ND1X00E1
219

MAINTAINING YOUR MACHINE
220
9
REPLACING THE STAMP CARTRIDGE
Stamp option is option.When the stamp is getting to become lighter, replace the cartridge.
Note❒ Use the cartridge specified for this machine.
A Lift the document feeder and press the tab to open the stamp cover.
Limitation❒ Do not pull the stamp cover strongly because cords are attached.
B Pull out the cartridge.
NDID05E0
NDID06E0

REPLACING THE STAMP CARTRIDGE
9
C Set a new cartridge.
D Replace the stamp cover until it clicks.
E Close the document feeder.
Note❒ Hold down the center part of the cover to make sure that it is closed com-
pletely.
Stamp Cover Layout
NDID06E2
New Cartridge
NDID05E1
StampCartridge
CatchTabs
ND1D07E1
221

MAINTAINING YOUR MACHINE
222
9
This page is intentionally blank.

10. Appendix
OPTIONAL EQUIPMENT
Fax Feature Expander and Hard Disk
A Fax Feature Expander and a 130-Mbytes hard disk can be added. By installingthem, you can increase the memory capacity and use the following features. With the Fax Feature Expander, features of Multicopy RX, 2-Sided Printing,Confidential reception, Memory Lock, Multi-Step Transfer, Forwarding, Memo-ry Lock ID, Confidential ID are available.
----Memory Capacity• With Fax Feature Expander Type 450 ( + 4MB, total 6MB):
480 pages• With Fax Feature Expander and 130-Mbytes hard disk:
3,000 pagesMeasured using a ITU-T#1 chart (Slerexe letter) at standard resolution.
Note❒ If you would like to install both of these, please contact your service represen-
tative.
----Extended FeaturesYou can use the optional Group dial and extend the following features.
Function Without Fax Feature Ex-pander
With Fax Feature Expander
Speed dial code 100 1000
Personal code 20 50
Memory Capacity for Memory Transmission
160 sheet 480 sheet (with Fax Feature Expander) 3000 sheet (with Fax Feature Expander and Hard Disk)
Memory Transmission file 200 1000
Auto Document 6 18
Communication Result last 200 communication last 900 communication
223

APPENDIX
224
10
400 dpi High Resolution Option (FAX 400dpi Option Type 450)
This allows you to send and receive the fax messages at high resolution. JBIGcompression is also available with this option.
ISDN Unit (ISDN Option Type 450)
This allows you to send and receive messages using the ISDN (Integrated Ser-vice Digital Network).
Stamp (FAX STAMP TYPE 450)
Single-sided documents you send from the Document Feeder (ADF) have amark stamped on the top of the scanned side after they are scanned in. Double-sided documents you send from the Document Feeder (ADF) have a markstamped on top and bottom of one scanned side. Use these marks to checkwhether a document was properly stored in memory when using MemoryTransmission, or if the originals was properly sent when using ImmediateTransmission.
Duplex Unit (AD340)
With Duplex Unit, 2–sided printing is available.
Specific Sender 30 50
Function Without Fax Feature Ex-pander
With Fax Feature Expander

SPECIFICATIONS
10
SPECIFICATIONS
❖❖❖❖ Power Consumption
Standard G3, G4 (option)
Resolution G3:
8 × 3.85/mm•200 × 100 dpi (Standard), 8 × 7.7/mm•200 × 200 dpi (Detail), 8 × 15.4/mm•200×400 dpi (Fine), 16 × 15.4/mm•400 × 400 dpi (Super Fine: 400dpi Option Re-quired)
G4:
200 × 100 dpi (Standard), 200 × 200 dpi (Detail), 400 × 400 dpi (Super Fine: 400dpi Option Required)
Transmission Time G3: 3 seconds at 28,800bps, Standard resolution
G4: 3 seconds, Detail resolution
Data Compression MH, MR, MMR, SSC, JBIG (400dpi Option Required)
Maximum Original Size Standard size: A3/DLT Irregular size: 304 × 432 mm
Maximum Scanning Size 294 mm × 432 mm/11" × 17"
Print Process Printing on standard paper using the laser
Transmission Speed G3:
33,600/31,200/28,800/26,400/24,000/21,600/19,200/16,800/14,400/12,000/9,600/7,200/4,800/2,400 bps (auto shift down system)
G4:
64/56 kbps (auto speed matching)
Type1•Type2 (35 copy per minute) model
Type 3 (45 copy per minute) model
Transmission 255W 270W
Reception 235W 250W
Printing (Average) 365W 555W
Standby mode 265W 280W
Energy Saving mode 13W 13W
Maximum power con-sumption
1440W 1440W
225

APPENDIX
226
10
FUNCTION LIST
Advanced Transmission Features
Feature name Description Reference
Send Later Sets the machine to auto-matically start transmis-sion or polling reception at an appointed time.
P.74 “SEND LATER”
Confidential Transmission Sends a confidential mes-sage. This feature is divid-ed into Default ID Confidential Transmission and Override ID Confiden-tial Transmission.
P.76 “CONFIDENTIAL TRANSMISSION”
Personal Code TX This will help you to check up on who has been using the machine and how of-ten.
P.78 “PERSONAL CODE TRANSMISSION”
Auto Document Stores a commonly used original and prints or sends it directly.
P.80 “SENDING AN AUTO DOCUMENT”
2-Sided Transmission Use to send 2-Sided origi-nals (double-sided origi-nal) from the Document Feeder (ADF).
P.82 “2-SIDED TRANS-MISSION (DOUBLE-SID-ED TRANSMISSION)”
Book Fax When sending a book-type original, this feature scans and sends the right and left pages one by one.
P.84 “BOOK FAX”
Irregular Scan Area When sending a non-stan-dard size original, this fea-ture specifies the length and width. The machine scans the original in the specified size.
P.86 “CHOOSING THE AREA TO BE SCANNED YOURSELF (IRREGULAR SCAN AREA)”

FUNCTION LIST
10
Transmission Deadline You specify the deadline for the transmission and, when it cannot be sent be-cause the line to the desti-nation is busy, the machine redials any number of times until the specified time is reached.
P.88 “TRANSMISSION DEADLINE (TRD)”
Polling Transmission Upon request from a desti-nation, the machine sends an original stored in mem-ory. This feature is divided into Free Polling, default ID Polling Transmission, and Override ID Polling Transmission.
P.90 “POLLING TRANS-MISSION”
Polling Reception Sends a transmission re-quest to the other party and receives a message from the receiver. This feature is divided into Default ID polling Reception and ID Override Polling Recep-tion.
P.94 “POLLING RECEP-TION”
Transfer Request Sends an original to a desti-nation via a facsimile equipped with the transfer station capability.
P.96 “TRANSFER RE-QUEST”
Options Description Reference
TTI Print You can print a message including the name registered as a TTI on the received message for each file.
P.99 “TTI (Transmit Termi-nal Identification) Print”
Label Insertion If you register the receiver's name in a Quick dial or speed dial, something followed by the receiv-er's name is automatically printed at the top of the received message.
P.99 “Label Insertion”
Auto Reduction If the receiver uses paper narrow-er than the message, it is sent re-duced to the receiver paper.
P.99 “Auto Reduction”
ID Transmission Sends an original only to the ma-chine of the same Polling ID as that registered in the machine.
P.100 “ID Transmission”
Feature name Description Reference
227

APPENDIX
228
10
Communication Information
Feature name Description Reference
Checking and Canceling the Transmission Files
This feature cancels, con-firms, or changes a file (res-ervation) for Memory Transmission, Confidential Transmission, Transfer Re-quest, Polling Reception, or Polling Transmission.
P.103 “CHECKING AND CANCELING TRANSMIS-SION FILES”
Printing the TX File List The transmission file list can be manually printed. This list allows you to know the files stored in memory or the file num-bers.
P.109 “PRINTING A LIST OF FILES IN MEMORY (PRINT TX FILE LIST)”
Displaying the Transmis-sion Result
Part of the TCR can be shown on the display. The results of the last 50 trans-missions are displayed from the latest one.
P.110 “CHECKING THE TRANSMISSION RESULT (TX STATUS)”
Displaying the Reception Result
Part of the TCR (Transac-tion Confirmation Report) can be shown on the dis-play. The results of the last 50 receptions are displayed from the latest one.
P.111 “CHECKING THE RECEPTION RESULT (RX STATUS)”
Printing a Confidential Document
Prints messages received in Confidential Reception mode.
P.112 “PRINTING A CON-FIDENTIAL MESSAGE”
Printing the Memory Lock Prints messages received in Memory Lock mode.
P.114 “PRINTING A FILE RECEIVED WITH MEMO-RY LOCK”
Printing the TCR The TCR (Transaction Con-firmation Report) can be manually printed. This re-port shows the results of the last 50 communica-tions.
P.116 “PRINTING THE TCR”
Displaying the Memory Status
The status of the memory is shown on the display.
P.117 “DISPLAYING THE MEMORY STATUS”

FUNCTION LIST
10
User Tools
Feature name Description Reference
Register/Delete Quick Dial When you register a desti-nation in a Quick Dial, you can specify the destination only by pressing the Quick Dial key.
P.129 “Registering Quick Di-als”
Register/Delete Group Dial
When you register several destinations as a group in a quick dial, you can specify all the destinations by just pressing a quick dial key.
P.135 “Registering Groups”
Register/Delete Opt. Group Dial
When you register several destinations as an optional group, you can specify all the destinations by enter-ing the two-digit group number after pressing the optional group dial key (F1–F5).
P.139 “Registering Optional Groups”
Register/Delete Speed Dial When you register a desti-nation in a speed dial, you can specify the destination by entering the two-digit or three-digit speed dial code after pressing the Speed Dial key.
P.143 “Registering Speed Di-als”
Store/Delete Keystroke Program
Allows you to store a fre-quently used function or destination in a Quick Dial.
P.147 “Storing Keystroke Programs”
Register/Delete Auto Doc-ument
Allows you to store a fre-quently used original in. You can print or send the original directly as neces-sary.
P.151 “Registering Auto Documents”
Register/Delete Irregular Area
Registers a frequently used original size in advance when you send a message with the Irregular Scan Area function.
P.86 “CHOOSING THE AREA TO BE SCANNED YOURSELF (IRREGULAR SCAN AREA)”
229

APPENDIX
230
10
REPORTS/LISTS This feature allows you to print various reports and lists manually. You can print the following reports and lists:
• TCR (Transaction Con-firmation Report)
• Quick Dial list
• Group Dial list
• Keystroke Program list
• Speed Dial list
• Auto Document list
• Sender/Forwarding list
P.158 “REPORTS/LISTS”
INITIAL SETUP TX Setting the default setting for the transmission mode and scanning conditions. When you switch the pow-er on, the machine settings the items specified with this feature.
P.159 “INITIAL SETUP TX”
INITIAL SET UP RX Allows you to switch the following reception func-tions to On/Off:
• Reception Mode
• Checkered Mark
• Center Mark
• Print RX Time
• Multi-copy Reception
• Authorized RX
• Special RX Nos.
• Forwarding
• 2-Sided Printing
• Reverse Order Printing
• Bypass Paper Size
P.161 “INITIAL SETUP RX”
Assigning User Function Keys
Stores a frequently used function in a User Function Key ({{{{F1}}}} to {{{{F5}}}}).
P.164 “ASSIGNING USER FUNCTION KEYS”
Feature name Description Reference

FUNCTION LIST
10
Key Operator Settings / Personal Code
Registers personal code for each person. When every user enters a personal codes in sending messages, you can check the usage status for each person.
P.166 “KEY OPERATOR SETTINGS”
ECM If a part of transmission fails due to a telephone line fault, this feature resends the failed part automatical-ly.
P.171 “ECM”
Memory Lock Switch the Memory Lock On or Off. To use it, register an ID for printing a mes-sage received in Memory Lock mode.
P.172 “Memory Lock”
Multistep Transfer Registers a transfer station in a group dial. This allows the message to be transmit-ted via multiple transfer stations more efficiently when the requesting party sends a transfer request to your machine.
P.173 “Multistep Transfer”
Forwarding Transfers received messag-es to a registered receiver (forwarding destination).
P.175 “Forwarding”
Special RX Nos. Allow messages from spec-ified senders to be treated differently.
P.182 “Special Senders to Treat Differently (Special RX Nos.)”
Authorized Reception When you register specific senders in advance, you can restrict senders from whom you receive mes-sage.
P.188 “Authorized Recep-tion”
Monitor Volume Adjusts the volume of monitoring and beeper sounds from the speaker inside the machine.
P.192 “Monitor Volume”
Feature name Description Reference
231

APPENDIX
232
10
RTI/TTI Registers information (RTI) to be shown on the display and printed in a report by a receiver's or sender's ma-chine. This feature also reg-isters information (TTI) to be printed from a destina-tion machine when you send a fax.
P.193 “RTI/TTI”
Economy Transmission Economy Transmission means to send a fax when communication charges are lower. The Economy TX feature registers this time.
P.195 “Registering The Econ-omy Transmission Time”
ID Code Registers an ID required for Transfer Request, Transfer Station, Default ID Polling Transmission, Default ID Polling Recep-tion, or ID Transmission.
P.196 “ID Code”
G3 Analog Line Registers an own analog number, line type, and CSI when you connect the ma-chine to the G3 analog line.
P.198 “G3 Analog Line”
G3 Digital Line Registers own digital num-ber and CSI, when you con-nect the machine to a ISDN.
P.199 “G3 Digital Line”
G4 Digital Line Registers an own digital number, TID (Terminal ID) and subaddress when you connect the machine to a G4 digital line.
⇒ P.200 “G4 Digital Line”
Changing User Parameters Allows you to change the function settings to meet your needs.
P.203 “Changing the User Parameters”
Printing User Parameter List
Allows you to print and check User Parameters set-tings.
P.207 “Printing the User Pa-rameter List”
Date/Time Adjusts the date and the time as a reference.
P.208 “Date/Time”
Feature name Description Reference
FUNCTION LIST
10
Counters Check the transmission, re-ception, and totals on the display.
P.209 “Counters”
Auto Reset Set the interval returning to the standby mode.
⇒ P.210 “Auto Reset”
Feature name Description Reference
233

234
INDEX
180 Degree Rotation Printing, 662-Sided Printing, 56, 65, 185, 1612-Sided Transmission, 14, 15, 28, 82, 226,
A
Acceptable types of Originals, 14Analog Line Connector, 3Authorized Reception, 188, 231Authorized Reception List, 158, 191Authorized RX, 161Auto Document, 80, 151, 226, 229Auto Document List, 153, 158Auto Identification, 42Auto Image Density, 39Automatic Power Reception Function, 12Automatic Redial, 26Auto Reduction, 99, 227Auto Reset, 210
B
Batch Transmission, 27Book Fax, 84, 226Broadcasting, 24Bypass Paper Size, 161, 162Bypass Tray, 2
C
Canceling a Transmission, 103Center Mark, 64, 161Chain Dial, 46Changing a Destination, 107Changing Line Type, 41Changing the Transmission Time, 106Checkered Mark, 64, 161Checking and Canceling the TransmissionFiles, 228Checking and Editing a File, 105Checking Destinations (Destination List),106Checking the Reception Result (RX Sta-tus), 111Checking the Transmission Result (TXStatus), 110CIL/TID Print, 69Clear Modes/Energy Saver key, 5
Clear/Stop key, 6Communicating Indicator, 4Communication Failure Report, 29Components, 1Confidential File Report, 113Confidential ID, 196Confidential Reception Indicator, 4Confidential Transmission, 76, 226Counters, 209, 233
D
Date/Time, 208, 232Default ID Polling Reception, 62, 94, 95Default ID Polling Transmission, 90, 91Density key (Contrast key), 6Detail, 37Dialing, 43Dial label, 132Display, 10Displaying the Memory Status, 117, 228Displaying the Reception Result, 228Displaying the Transmission Result, 228Document Feeder (ADF), 1Dual Access, 12
E
ECM, 27, 33, 171, 231Economy Transmission Time, 74, 195,232End Receiver, 60, 96, 98Entering letters, 214Entering numbers, 215Entering symbols, 214Entering Text, 213Error Messages, 120Error Report, 125Exposure Glass, 1
F
Fax Feature Expander, 223Fax key, 6Fax Mode (Auto Reception Mode), 59F Code (PWD), 54, 63F Code (SEP), 61F Code (SUB), 53Forwarding, 161, 175, 231Forwarding Stations, 176

Free Polling Transmission, 90, 91Function List, 226Function Map, iv
G
G3, 41G3 Analog Line, 198, 232G3 Digital Line, 199, 232G3/G4 Mode Selection, 164G4, 41G4 Digital Line, 200Group Dial, 229Group Dial List, 137, 158Groups, 48, 135
H
Hard Disk, 223High Resolution Option, 5, 224How to Set an Original, 18
I
ID Code, 196, 232ID Override Polling Reception, 62, 95ID Override Polling Transmission, 91ID Reception, 61ID Transmission, 52, 100, 227Image density, 37Image Density (Contrast), 38Image Rotation, 67Immediate Reception, 55Immediate Transmission, 10, 23, 32Indicators, 123Initial Setup RX, 127, 161, 230Initial Setup TX, 127, 159, 230Internal Tray, 1Interrupt key, 6Irregular Area, 154, 229Irregular Scan Area, 86, 226ISDN, 218ISDN Line connector, 2
J
JBIG Reception, 63JBIG Transmission, 54
K
Key Operator Settings, 127, 166Keystroke Program, 147, 229
Keystroke Program List, 149, 158
L
Label Insertion, 99, 227Letters, 214
M
Main Power Switch, 2Maintaining Your Machine, 217Manual Dial, 35Manual Image Density, 39Memory Lock, 172, 185, 231Memory Lock ID, 196Memory Reception, 56Memory Storage Report, 28Memory Transmission, 10, 23Monitor Volume, 192, 231Multi-copy, 56, 185Multi-copy Reception, 65, 161Multistep Transfer, 60, 173, 231
N
Number key, 6, 43Numbers, 215
O
On-hook Dial, 34On Hook Dial key, 5Operation Panel, 4Operation Switch, 2Opt. Group Dial, 229Optional Group Dial, 49Optional Groups, 139Original Type, 37, 38Original Type key, 6Override ID Polling Reception, 94Override ID Polling Transmission, 90
P
Page Reduction, 68Page Separation and Length Reduction,67Paper Feed Selection, 211Parallel Memory Transmission, 28Pause, 44Pause/Redial key, 6Personal Code, 166, 231Personal Code Access, 12, 169
235

236
Personal Code List, 170Personal Code Transmission, 78Personal Code TX, 226Photo, 38Photo/Text, 38Polling ID, 196Polling Reception, 94, 227Polling Reserve Report, 95Polling Result Report, 95Polling Transmission, 90, 227Polling Transmission Clear Report, 92Print Completion Beep, 64Printing a Confidential Document, 228Printing a Confidential Message, 112Printing a File, 104Printing a File Received with MemoryLock, 114Printing a List of Files in Memory (PrintTX File List), 109Printing Functions, 64Printing the TCR, 228Printing the Memory Lock, 228Printing the TX File List, 228Print RX Time, 161
Q
Quick Dial, 43, 46, 129, 229Quick Dial Flip Plate, 6Quick Dial keys, 6Quick Dial List, 131, 158
R
RDS (Remote Diagnostic System), 211Receive File Indicator, 4, 123Reception Functions, 60Reception Mode, 161Reception Time, 64Redial, 50Register/Delete, 127, 129Reports/Lists, 127, 158, 230Requesting Party, 60, 96Re-sending a File, 106Resolution, 37, 159Resolution key, 5Reverse Order Printing, 56, 68, 161Reverse Printing, 185RTI/TTI, 193, 232
S
Scan Settings, 37
Selecting the Reception Mode, 59Selection keys, 6Sender/Authorized Reception List, 191Send Later, 74, 226Solving Problems, 121Special Reception numbers, 182Special RX Nos., 161, 183, 231Specifications, 225Specific Senders (Forwarding), 178Specified Sender/Forwarding Station list,181Specified Sender List, 187Speed Dial, 43, 47, 143, 229Speed Dial keys, 5Speed Dial List, 145, 158Stamp, 52, 220Standard, 37Start key, 6Subaddress, 45Substitute Reception, 56, 57, 123Summer Time, 209Super Fine, 37Switches and Bits, 203Symbols, 214
T
TCR, 228TCR (Transaction Confirmation Report),116, 158Telephone Directory, 47Telephone Line, 217Telephone Mode, 59Text, 38Tonal Signals, 45Tone, 45Tone key, 6Toner, 119Transfer Request, 96, 227Transfer Result Report, 61Transfer Station, 60, 96Transmission Deadline (TRD), 88, 227Transmission Features, 52Transmission Mode, 159Transmission Mode key, 5Transmission Options, 99Transmission Result Display, 164Transmission Result Report (ImmediateTransmission), 33Transmission Result Report (MemoryTransmission), 29Transmission With Image Rotation, 12

Tray Select, 185Troubleshooting, 119TSI Print, 69TTI Print, 99, 227Two In One, 67, 56
U
User Function Keys, 4, 164, 230User Functions, 127User Parameter List, 203, 232User Parameters, 203, 232User Tools, 5, 127, 229
W
When the Confidential Reception Indica-tor is Lit, 124When the Fax key is Lit, 124When the Receive File Indicator is Lit orFlashing, 123Wild Cards, 213
237

FAX
Op
tion Typ
e 450 O
PERATIN
G IN
STRUC
TION
S
Printed in Japan
UE USA A6938607