right on replicas - 20 page, full-color...2014/01/03 · a guide to build your own trailer and with...
TRANSCRIPT

Right On Replicas LLC copy2014 All rights reserved All registered trademarks are the property of their respective brands
RoR Step-by-Step Review 20140103 How to Build a Scale Model Cargo Trailer
If yoursquove ever seen a scale model car or emergency vehicle that would look better with a cargo trailer attached there is a way to make one that looks great and theyrsquore not as hard to build as you might think Many sources and models over the years have offered trailers but they are usually simple tilt-bed units that need to be modified to fill the bill This article shows you how to use a donor kitrsquos unit to build a custom emergency services cargo trailer for the Polk County Florida Fire Department You can use these steps as a guide to build your own trailer and with some of the many sources for aftermarket decals or decal making products you customize it to your exact specifications There are a number of sources for trailers to use in this build and theirs is a partial list of those at the end of the article The Chevy Caprice MPC 75312 model kit came with a Tilt Bed trailer for hauling race cars The trailer is mostly accurate looking but for the length should have been a dual wheel trailer to support the weight A real trailer would have a support frame and full axles also The Cargo trailers are based on the basic frame design as a Tilt Bed so conversion is not difficult Many people would use a Flatbed or Tilt Bed trailer to build the cargo box onto as an alternative to purchasing a new unit This will be the premise of my build For the Modeler This is the trailer unit from MPC kit number 75312 model in 125 scale recently re-released by Round 2 Models It is a Skill Level 2 kit for the average builder The kit is molded in White Chrome and Vinyl Tires with approximately 24 parts Shelf space is roughly 9 inches long 4 frac14 inches wide and 1 inch tall as a Tilt Bed it is almost 3 frac34 inches tall with the cargo box The kit comes as a Tilt Bed Trailer I will be building a simple Cargo Box out of sheet and angle styrene to attach to the trailer frame You can also do this with any similarly styled scale model trailer All phases of construction and a complete source list are fully examined in this pictorial 20 page full-color Step-by-Step article in PDF format
Right On Replicas LLC copy2014 All rights reserved All registered trademarks are the property of their respective brands
Some Construction Caveats An organized and dedicated building space is best setup for construction But even without dedicated space organization and a place to leave your build as you work is important for quality builds Being able to lay out your parts in assembly order or just in some organized fashion helps the build as you are not digging for parts in the box possibly losing or damaging them One of the major benefits of using automotive paint is it fast drying time Automotive paint is cured in less than an hour and clear about 6 hours You can certainly use spray cans and get good results but they will take much longer to dry Also do not use a cheap airbrush the Lacquer Thinner and paints will destroy it QUICKLY I prefer to use automotive type paint products sprayed with an airbrush This is a basic cube build that most modelers with moderate skills can accomplish NOTE Due to the SCRATCH BUILDING required some additional tools will be needed A sharp knife and a scale ruler are needed at the least If you do not have a ruler look online for a printable one httpwwwhungrylizardstudiocomoldssmscalerulershtml Just print it out at 100 on Transparency Paper andor regular paper
PIC 1 shows the original instruction sheets from the Auto World Race Car Hauler Chevy Caprice AMT753 donor kit packaging used for this build Once again you can use just about any trailer of this type just by compensating for different dimensions and using appropriate adhesives As an example resin trailers require the use of epoxy or superglue for construction
PIC 2 shows the parts as they come from the box and the styrene I will use to create the cargo box You can set all of the Tilt Bed parts aside for but some parts will be used later Those are the tilt bed inner ramps Adhesives used in the construction consists of Testors Tube Glue (Orange Tube) and Standard Superglue Before beginning your build soak and wash your parts with a mild detergent like DAWN to remove any mold release agents and help with paint adhesion
Right On Replicas LLC copy2014 All rights reserved All registered trademarks are the property of their respective brands
There will be two sub-assemblies for the project First is the base trailer and second is the addition of the cargo box Also custom decals need to be created or purchased for the trailer I will show the details of the construction as I go The important thing is to have a predetermined plan and design before you start building Get your research and design specs together to make sure you purchase the right items and enough stock to complete the project MATERIALS INVENTORY LIST 2- Evergreen Item 4050 Sheet Styrene 1- Evergreen Item 295 Angle Stock 532 1- Evergreen Item 296 Angle Stock 316 1- Evergreen Item 108 Strip Stock 316 1- Tilt Bed Trailer kit Parts box red lenses Clear sheet Styrene or Picture framing plastic at least 7rdquox4rdquo (average 040rdquo thick) Decal Inkjet Paper
PIC 4 shows the plastic sheet I am using It is Evergreen V-Groove part number 4050 That is a 040 inches thick with grooves at 050 inches apart This will create the walls floor and rear door of the box
PIC 5 We are going to start with cutting the parts for the walls first This shows the length of the side walls I need which is 13 scale feet
Right On Replicas LLC copy2014 All rights reserved All registered trademarks are the property of their respective brands
PIC 6 shows the height of the walls For an almost 7 scale foot tall box I went with 6 foot 4 inches Why 6 foot 4 inches The sheet of styrene is 6 inch by 12 inch and that is exactly HALF the sheetrsquos width And it works out with the inner floor area and raised platform the wall sits on it is really close to 7 scale feet
PIC 7 shows the cut line for the 13 scale foot long wall Doing this on both halves of the sheet I cut will give me the side walls
PIC 8 shows the trailer width I need for the front wall and rear door It will be a scale 7 feet wide
Right On Replicas LLC copy2014 All rights reserved All registered trademarks are the property of their respective brands
PIC 9 shows the cutline for the front wall By using the sheet I already cut at scale 6 foot 4 inch all I need to do is measure 7 scale feet and cut both pieces
PIC 10 ALWAYS TEST FIT This photo shows a mock-up of the four walls sitting on the trailer While not perfect it will give you a very close idea of how it is all fitting together If there was an error in measuring it is better to catch it early and repair it I want to have a lowered floor and take advantage of the existing inner rail of the trailer but there are two pegs that need removed and an additional strip of styrene that will need to be installed on both sides
PIC 11 shows the pegs that need removed and the area where some support is needed I will add some Evergreen Part number 295 which is 532 inch angle strip styrene I need to do this before I can measure and cut the floor
Right On Replicas LLC copy2014 All rights reserved All registered trademarks are the property of their respective brands
PIC 12A and 12B show the rear ends of the trailer kit Both sides have a small warp that needs work I will use hot water running over the warped part to soften the plastic enough to straighten it out This method usually works on slightly warped parts like this I need to fix this damage before adding the angle styrene so the bed will lay flat
PIC 13 shows the repaired trailer Hot water and a little pressure straightened the rails nicely Now we can actually build on them
PIC 14 shows the 532 angle stock installed It is at a scale 6 foot long Attach one to each side We want to stop at the spot on the trailer where the trailer rail ends as that will be the back of the cargo box
PIC 15 shows how the floor will lay on the rails we just added and inside the actual trailer frame making a lower floor giving us a few scale inches extra of interior height
Right On Replicas LLC copy2014 All rights reserved All registered trademarks are the property of their respective brands
PIC 16 is a shot of the floor in place and ready to cut for length I measured the inside trailer frame rail to rail to get the width first Reference PIC 8 to see the rails with a ruler in place I took the inside measurement earlier and just wrote it in my notes for later You need a scale 12 foot 8 inch length
PIC 17 shows the floor cut and set in place to test Remember the 6 foot 4 inch walls That is the width of the inside floor too
Right On Replicas LLC copy2014 All rights reserved All registered trademarks are the property of their respective brands
PIC 18 After it looking over after cutting the walls and floor I decided that a plain cube would just be boring I dug through my parts boxes and found some clear panels It is actually a picture framing product that is about the same thickness as the styrene I am using called NONGLAS (SHHH donrsquot tell my wife she may never miss ithellip) Remember the mottordquo Modelers can use anything to build with if it worksrdquo The new plan is to replace the roof panel with a clear sheet that will be removable so at a later date I can get stuff to fill the trailer as a diorama This is the NONGLAS sheet I found although any clear sheet material should work that can
be glued into place It was abandoned so I saved it (thatrsquos my story and I will swear by it)
PIC 19 To fit the roof in place I need to assemble the box to have the most accurate fit Shown here is the 532 angle stock I am using in the corners to frame all the walls with
PIC 20 As the roof will sit flush inside the walls I need to cut the angle stock a little shorter than the wall height I did a scale six foot piece The Clear sheet I am using for the roof is roughly four scale inches thick There will be a total of four pieces needed
PIC 21 Using the side walls mount the angle stock FLUSH with the side edges on both ends of the walls
PIC 22 Glue it even with the bottom of the wall so the top has the open area as shown in PIC 22
Right On Replicas LLC copy2014 All rights reserved All registered trademarks are the property of their respective brands
PIC 23 and PIC 24 show the Front wall installed Glue the side wall FLUSH with the front wall outer edges making the outside corner of the box The overlapping panel will make the corner which will later have a molding to cover it Do the same process to the back panel as you did on the front You should
now have the four walls assembled and ready to fit on the trailer frame just inside the wheel wells
PIC 25 Yoursquoll need an accurate measurement of the roof opening Another tool I use is a small ruler with a sliding clip that I can adjust and it will hold my measurement exact My roof is a scale 6 foot 9 inches by 13 foot 1 inch I will measure that out on the NONGLAS and cut it When the measurement is critical you should measure and cut a little over as you can always remove material if needed it is better than having to have to start over if it is too small
Right On Replicas LLC copy2014 All rights reserved All registered trademarks are the property of their respective brands
PIC 26 PIC 27 This shows the clear panel in place Cutting the angle stock short allows the panel to sit flush with the top of the walls I will go in and add supports for the sides for the roof to sit on They will be glued even with the existing corner braces as that gives the proper height (See PIC 27) The braces are cut to a scale 12 foot 4 inches NOTE- There is a molding needed on the roof and sides to hide the corners and give it the finished look I used Evergreen Part Number 296 which is 316 inch angle stock Using the mitered corner design I will cut the meeting corners at 45 degree angles I will mount the molding to the roof panel that way it gives an overhang to remove the roof later For the bottom I will use Evergreen Part Number 108 which is a 010 inch thick 316 inch tall flat strip This will be a finishing look only and will be cut flat-faced not at an angle The corner moldings only get the 45 degree cut on the top
PIC 28 shows one of the corners cut and in place Note the cut on the top at 45 degrees and flat on the bottom with the added flat strip The Corner molding is cut at a scale 6 foot 4 inch and the flat strip is cut at a scale 6 foot 5 inches for the front and a scale 12 foot 6 inches for the sides
PIC 29 is the roof with the moldings installed and corners cut and in place The front and rear moldings are scale 7 feet cut at 45 degrees both ends and sides The side moldings are a scale 13 feet The roof now sits on top and can be easily removed
Right On Replicas LLC copy2014 All rights reserved All registered trademarks are the property of their respective brands
PIC 30 To make a non-functional fold down door for the rear I need to cut a panel for the door Measure the rear panel opening with the roof in place The measurements need to be inside the moldings the side to side is 6 foot 5 inches wide I want a little overhang at the bottom that would have the springs and pivot mounts in the real thing By chance the 6 foot 4 inch scrap gives the perfect height Measure and cut the panel at the 6 foot 5 mark You have a door panel PIC 30 is the finished door cut Glue the door (smooth side out) onto the rear frame
This completes the major SCRATCH BUILDING part of the build
PIC 31 shows the parts for the tire assembly PIC 32 (right) shows the tires assembled Painting Paint the wheel backs and retainer Flat Black with a Silver rim to replicate a chrome rim Use 220 grit sandpaper and press and roll the tire on the sandpaper to give the treads a worn used look Install the retainer into the wheel back and the wheel back into the tire The tires are not directional and the sidewalls match on both sides so it is not necessary to specify which tire to use where Insert
the wheel cover This completes the wheels
PIC 33 shows the parts to complete the trailer assembly before painting
PIC 34 shows the crank wheel and hitch plate in place mounted on the tongue
Right On Replicas LLC copy2014 All rights reserved All registered trademarks are the property of their respective brands
PIC 35 shows the leaf spring mounted in place in the wheel well Do both sides
PIC 36 shows the rear lights mounted on the end of the trailer rail and step area Do both sides NOTE - I later moved them to the trailer corners as I thought they looked better there
PIC 37 shows the license plate mounted on the rear door of the cargo box This is a fairly typical spot but there is no required spot to attach the plate as long as it is on the rear
PIC 38 For the rear door the locking handles need to be made Take the thin strip styrene from earlier and cut 2 pieces at a scale 2 foot length and glue one on top of the other Cut 2 pieces at a scale 6 inches Glue the 2 shorter pieces on top of each other and at the end of the longer piece Cut that lengthwise in half You have 2 scale 6 inch wide by 2 foot long handles
Right On Replicas LLC copy2014 All rights reserved All registered trademarks are the property of their respective brands
In PIC 39 remember the tilt bed we set aside Grab it and cut the cross member rails off Trim around the ends and cut the excess off leaving just the strips Sand the bottom side that was mounting them to the ramp flat See PIC 40 (lower)
PIC 41 shows the assembled handles on the cross members Glue the handles on the back side of the cross member a little higher than half way on both pieces Make sure they match but go opposite ways
Right On Replicas LLC copy2014 All rights reserved All registered trademarks are the property of their respective brands
PIC 42 shows the completed units painted and ready to mount on the rear door Paint Aluminum with Black handles
Looking at the build and cleaning up some of the scrap styrene got me thinking Why not add a small tool box on the front of the trailer on the tongue Another one of those ldquoPlans Changedrdquo situationshellip To save on space and repetition I will walk through the building steps as they are the same as the cargo box just smaller Decide on the size you want the box to be The average tongue box is 5 or 6 feet long and 2 feet wide and 2 feet deep The box I made is a scale 6 foot by 2 foot by 2 foot Measure the Floor and long walls at a scale 6 foot by 2 foot and cut them The side walls are 2 foot by 2 foot
PIC 43 Assembly Using some scrap angle stock glue it to the bottom of the long walls flush with the edge Glue the walls to the floor on the top so the walls sit flush to the edges with the floor as the base Fit the sides into the walls here you will need to trim the sides to fit right Just rub the side on 220 Grit sandpaper checking fit often until it sits flush inside the long walls and floor
PIC 44 Use some scrap angle and glue it like you did on the walls Glue a small angle in each corner Now you have a box The lid is made by measuring the 6 foot by 2 foot then adding the thickness of a sheet of styrene for both sides and the front Cut the lid Measure the lid it is a scale 6 foot 2 inch long by 2 foot 3 inch wide Cut a front panel lip at a scale 6 foot 2 inch long and 6 inch wide Glue that flush onto the lid inside edge
PIC 45 Cut 2 pieces at a scale 2 foot 2 inch by 6 inch and glue those flush edged to the inside of the top on both ends After painting I use a piece of packing tape inside the back wall and lid to make it hinge
Right On Replicas LLC copy2014 All rights reserved All registered trademarks are the property of their respective brands
PIC 46 The finished toolbox Painting At this point you can prime and paint the subassemblies The trailer frame will go Red The cargo box will be painted White with a Red Stripe on the sides and front If you built the toolbox Paint it any color I did mine Black Paint the floor a wood color NOTE I used Primer on all the parts prior to the color coats REMEMBER TO WATERSAND THE PARTS WITH 800 GRIT SANDPAPER Sand the parts Prime the parts and Sand the parts again Being a trailer I did not want it super glossy like an automobile so I did not clear coat the build as I usually do on my cars I left the paint raw which is a more semi-gloss look typical of a trailer
PIC 47 is the floor On the Floor I used a Saddle Tan spray paint for an overall base coat I then took a lighter tan and lightly spritzed the paint on the floor from a distance of about a foot not covering the whole floor but giving a splotch look like a sheet of MDF board That is ready to install as is when it dries
Right On Replicas LLC copy2014 All rights reserved All registered trademarks are the property of their respective brands
PIC 48 shows the tool box painted I used a Gloss Black spray can to give it the simple painted steel box look I will make a ldquohingerdquo for the lid with packing tape and mount it as is
PIC 49 shows the trailer frame in Red basecoat For detail painting use Black and paint just the wheel and just the small handle on the trailer support crank on the tongue
Right On Replicas LLC copy2014 All rights reserved All registered trademarks are the property of their respective brands
PIC 50 shows the cargo box in White basecoat PIC 51(right) shows the masking for the red stripe I will put on the sides For detail painting just paint the brake lights using Stop Light Red
PIC 52 is the cargo box painted and ready to decal
PIC 53 shows all of the decals I created for the trailer I searched for the logo used by Polk County Fire Department on Google The side decals are a patch that is worn on the shirts and the Maltese Cross is the logo I sized the patch at 1 inch tall with constrain properties on and the cross at 1 frac14 inch tall I then used the text with a Stencil Font and typed the print at 28 point font I made a test print on regular paper to test fit the size and will print the final on Clear decal paper To create a decal
purchase some Inkjet Decal Paper in Clear or White depending on your need Using a photo program like Photoshop or even Microsoft Paint to size the image to your needs and print it as a PHOTO on the decal paper Use 300DPI for crisp details Using KRYLON Crystal Clear spray paint carefully over the decal paper with a few coats of clear You can now trim it close to the image and use it like a standard waterslide decal I get my paper from wwwdecalpapercom I always print 2 sets of decals in case I damage one
Right On Replicas LLC copy2014 All rights reserved All registered trademarks are the property of their respective brands
NOTE - You can also search for photos online for period correct license plates to add to the authenticity of your build You can save the photo and resize it to fit a model Just print it on paper and cover it with clear tape and you have a plate of your own Or go to httpwwwacmecomlicensemaker and create any custom plate you want To print your plate for 125 scale kit open your photo program and crop the plate so you just have the plate only Re-size the image size to make the Width 45 inches and make sure CONSTRAIN PROPORTIONS is on Use 300 DPI for a crisp print Save that and Print it on White paper and use clear tape to cover front and back You now have a proper sized plate to glue on your build FINAL ASSEMBLY
PIC 54 On the trailer frame attach the tires to the axles On the trailer tongue there is a small chrome hitch cover attach it over the ball hole in the hitch Mount the floor into the rails of the trailer
PIC 55 shows the rear door completed On the cargo box attach the door handles so they are even and in the middle of the door Using some of the scrap angle stock I cut 4 pieces a scale 4 inches long I cut one side of the angles in half and glued 2 on top of each other to make a U shape I painted that Silver and glued them on the rear door with the handle in the U to make the lock down SEE PIC 56 (right) Glue the license plate onto the plate holder
Right On Replicas LLC copy2014 All rights reserved All registered trademarks are the property of their respective brands
PIC 56a Glue the completed Cargo box on to the frame
PIC 57 is a photo of some parts box red lenses that come from an old big rig kit Using some of the lenses add running lights to each corner of the molding on the roof and a couple in the middle of the back molding of the roof You can add some on the trailer also if you would like This is a completely arbitrary thing as all trailers have different lighting setups You can also find similar looking beads at larger hobby shops Add the roof to the cargo box
On the trailer tongue center the tool box and attach it to the middle against the cargo box CONGRATULATIONS YOU HAVE JUST BUILT YOUR OWN CARGO TRAILER
Right On Replicas LLC copy2014 All rights reserved All registered trademarks are the property of their respective brands
PIC 999 Overall Impressions What can I say as this is a custom build I would hope that the directions and walk through I made are clear and concise enough that any model builder with basic skills in measuring and cutting could tackle this project and create a nice trailer for themselves I consider myself a moderate to average builder with limited abilities at scratch building This project taught me a few things along the way and I really enjoyed building it and consider it a real achievement that it came out as nice as it did The total construction costs for the cargo box part of the build were fairly nominal I think I spent around $20 for two sheets of Evergreen panels and two packs of Evergreen angle stock and a pack of Evergreen strip stock The decal paper is about $1 or so The few other items came from the parts bin and the basic trailer kit Overall the build was not highly expensive or difficult Please give this a try I think you would enjoy it too Trailer Source List 1- Tilt Bed Trailer kit (Currently available online at HobbyLinc) 125 Kurtis Kraft Edlebrock Midget Racer wTrailer by Revell-Monogram Kit 85-4249 125 Auto World Chevy Caprice wTrailer MPC Kit 75312 124 Tandem Car Trailer (Metal) by Testors Decal Source List Decal Inkjet Paper - White or Clear (Currently available online at HobbyLinc) Pre manufactured Emergency Vehicle Decals (Currently Available Online at PoliceCarModels) Materials Source List Plastic Construction Material (Currently Available Online at HobbyLinc) 2- Evergreen Item 4050 Sheet Styrene 1- Evergreen Item 295 Angle Stock 532 1- Evergreen Item 296 Angle Stock 316 1- Evergreen Item 108 Strip Stock 316 Miscellaneous Items Red Lenses (Spare Parts Box or Avery Stickers) Clear sheet Styrene (HobbyLinc) or Picture framing plastic (NonGlas) at least 7rdquox4rdquo (average 040rdquo thick)

Right On Replicas LLC copy2014 All rights reserved All registered trademarks are the property of their respective brands
PIC 16 is a shot of the floor in place and ready to cut for length I measured the inside trailer frame rail to rail to get the width first Reference PIC 8 to see the rails with a ruler in place I took the inside measurement earlier and just wrote it in my notes for later You need a scale 12 foot 8 inch length
PIC 17 shows the floor cut and set in place to test Remember the 6 foot 4 inch walls That is the width of the inside floor too
Right On Replicas LLC copy2014 All rights reserved All registered trademarks are the property of their respective brands
PIC 18 After it looking over after cutting the walls and floor I decided that a plain cube would just be boring I dug through my parts boxes and found some clear panels It is actually a picture framing product that is about the same thickness as the styrene I am using called NONGLAS (SHHH donrsquot tell my wife she may never miss ithellip) Remember the mottordquo Modelers can use anything to build with if it worksrdquo The new plan is to replace the roof panel with a clear sheet that will be removable so at a later date I can get stuff to fill the trailer as a diorama This is the NONGLAS sheet I found although any clear sheet material should work that can
be glued into place It was abandoned so I saved it (thatrsquos my story and I will swear by it)
PIC 19 To fit the roof in place I need to assemble the box to have the most accurate fit Shown here is the 532 angle stock I am using in the corners to frame all the walls with
PIC 20 As the roof will sit flush inside the walls I need to cut the angle stock a little shorter than the wall height I did a scale six foot piece The Clear sheet I am using for the roof is roughly four scale inches thick There will be a total of four pieces needed
PIC 21 Using the side walls mount the angle stock FLUSH with the side edges on both ends of the walls
PIC 22 Glue it even with the bottom of the wall so the top has the open area as shown in PIC 22
Right On Replicas LLC copy2014 All rights reserved All registered trademarks are the property of their respective brands
PIC 23 and PIC 24 show the Front wall installed Glue the side wall FLUSH with the front wall outer edges making the outside corner of the box The overlapping panel will make the corner which will later have a molding to cover it Do the same process to the back panel as you did on the front You should
now have the four walls assembled and ready to fit on the trailer frame just inside the wheel wells
PIC 25 Yoursquoll need an accurate measurement of the roof opening Another tool I use is a small ruler with a sliding clip that I can adjust and it will hold my measurement exact My roof is a scale 6 foot 9 inches by 13 foot 1 inch I will measure that out on the NONGLAS and cut it When the measurement is critical you should measure and cut a little over as you can always remove material if needed it is better than having to have to start over if it is too small
Right On Replicas LLC copy2014 All rights reserved All registered trademarks are the property of their respective brands
PIC 26 PIC 27 This shows the clear panel in place Cutting the angle stock short allows the panel to sit flush with the top of the walls I will go in and add supports for the sides for the roof to sit on They will be glued even with the existing corner braces as that gives the proper height (See PIC 27) The braces are cut to a scale 12 foot 4 inches NOTE- There is a molding needed on the roof and sides to hide the corners and give it the finished look I used Evergreen Part Number 296 which is 316 inch angle stock Using the mitered corner design I will cut the meeting corners at 45 degree angles I will mount the molding to the roof panel that way it gives an overhang to remove the roof later For the bottom I will use Evergreen Part Number 108 which is a 010 inch thick 316 inch tall flat strip This will be a finishing look only and will be cut flat-faced not at an angle The corner moldings only get the 45 degree cut on the top
PIC 28 shows one of the corners cut and in place Note the cut on the top at 45 degrees and flat on the bottom with the added flat strip The Corner molding is cut at a scale 6 foot 4 inch and the flat strip is cut at a scale 6 foot 5 inches for the front and a scale 12 foot 6 inches for the sides
PIC 29 is the roof with the moldings installed and corners cut and in place The front and rear moldings are scale 7 feet cut at 45 degrees both ends and sides The side moldings are a scale 13 feet The roof now sits on top and can be easily removed
Right On Replicas LLC copy2014 All rights reserved All registered trademarks are the property of their respective brands
PIC 30 To make a non-functional fold down door for the rear I need to cut a panel for the door Measure the rear panel opening with the roof in place The measurements need to be inside the moldings the side to side is 6 foot 5 inches wide I want a little overhang at the bottom that would have the springs and pivot mounts in the real thing By chance the 6 foot 4 inch scrap gives the perfect height Measure and cut the panel at the 6 foot 5 mark You have a door panel PIC 30 is the finished door cut Glue the door (smooth side out) onto the rear frame
This completes the major SCRATCH BUILDING part of the build
PIC 31 shows the parts for the tire assembly PIC 32 (right) shows the tires assembled Painting Paint the wheel backs and retainer Flat Black with a Silver rim to replicate a chrome rim Use 220 grit sandpaper and press and roll the tire on the sandpaper to give the treads a worn used look Install the retainer into the wheel back and the wheel back into the tire The tires are not directional and the sidewalls match on both sides so it is not necessary to specify which tire to use where Insert
the wheel cover This completes the wheels
PIC 33 shows the parts to complete the trailer assembly before painting
PIC 34 shows the crank wheel and hitch plate in place mounted on the tongue
Right On Replicas LLC copy2014 All rights reserved All registered trademarks are the property of their respective brands
PIC 35 shows the leaf spring mounted in place in the wheel well Do both sides
PIC 36 shows the rear lights mounted on the end of the trailer rail and step area Do both sides NOTE - I later moved them to the trailer corners as I thought they looked better there
PIC 37 shows the license plate mounted on the rear door of the cargo box This is a fairly typical spot but there is no required spot to attach the plate as long as it is on the rear
PIC 38 For the rear door the locking handles need to be made Take the thin strip styrene from earlier and cut 2 pieces at a scale 2 foot length and glue one on top of the other Cut 2 pieces at a scale 6 inches Glue the 2 shorter pieces on top of each other and at the end of the longer piece Cut that lengthwise in half You have 2 scale 6 inch wide by 2 foot long handles
Right On Replicas LLC copy2014 All rights reserved All registered trademarks are the property of their respective brands
In PIC 39 remember the tilt bed we set aside Grab it and cut the cross member rails off Trim around the ends and cut the excess off leaving just the strips Sand the bottom side that was mounting them to the ramp flat See PIC 40 (lower)
PIC 41 shows the assembled handles on the cross members Glue the handles on the back side of the cross member a little higher than half way on both pieces Make sure they match but go opposite ways
Right On Replicas LLC copy2014 All rights reserved All registered trademarks are the property of their respective brands
PIC 42 shows the completed units painted and ready to mount on the rear door Paint Aluminum with Black handles
Looking at the build and cleaning up some of the scrap styrene got me thinking Why not add a small tool box on the front of the trailer on the tongue Another one of those ldquoPlans Changedrdquo situationshellip To save on space and repetition I will walk through the building steps as they are the same as the cargo box just smaller Decide on the size you want the box to be The average tongue box is 5 or 6 feet long and 2 feet wide and 2 feet deep The box I made is a scale 6 foot by 2 foot by 2 foot Measure the Floor and long walls at a scale 6 foot by 2 foot and cut them The side walls are 2 foot by 2 foot
PIC 43 Assembly Using some scrap angle stock glue it to the bottom of the long walls flush with the edge Glue the walls to the floor on the top so the walls sit flush to the edges with the floor as the base Fit the sides into the walls here you will need to trim the sides to fit right Just rub the side on 220 Grit sandpaper checking fit often until it sits flush inside the long walls and floor
PIC 44 Use some scrap angle and glue it like you did on the walls Glue a small angle in each corner Now you have a box The lid is made by measuring the 6 foot by 2 foot then adding the thickness of a sheet of styrene for both sides and the front Cut the lid Measure the lid it is a scale 6 foot 2 inch long by 2 foot 3 inch wide Cut a front panel lip at a scale 6 foot 2 inch long and 6 inch wide Glue that flush onto the lid inside edge
PIC 45 Cut 2 pieces at a scale 2 foot 2 inch by 6 inch and glue those flush edged to the inside of the top on both ends After painting I use a piece of packing tape inside the back wall and lid to make it hinge
Right On Replicas LLC copy2014 All rights reserved All registered trademarks are the property of their respective brands
PIC 46 The finished toolbox Painting At this point you can prime and paint the subassemblies The trailer frame will go Red The cargo box will be painted White with a Red Stripe on the sides and front If you built the toolbox Paint it any color I did mine Black Paint the floor a wood color NOTE I used Primer on all the parts prior to the color coats REMEMBER TO WATERSAND THE PARTS WITH 800 GRIT SANDPAPER Sand the parts Prime the parts and Sand the parts again Being a trailer I did not want it super glossy like an automobile so I did not clear coat the build as I usually do on my cars I left the paint raw which is a more semi-gloss look typical of a trailer
PIC 47 is the floor On the Floor I used a Saddle Tan spray paint for an overall base coat I then took a lighter tan and lightly spritzed the paint on the floor from a distance of about a foot not covering the whole floor but giving a splotch look like a sheet of MDF board That is ready to install as is when it dries
Right On Replicas LLC copy2014 All rights reserved All registered trademarks are the property of their respective brands
PIC 48 shows the tool box painted I used a Gloss Black spray can to give it the simple painted steel box look I will make a ldquohingerdquo for the lid with packing tape and mount it as is
PIC 49 shows the trailer frame in Red basecoat For detail painting use Black and paint just the wheel and just the small handle on the trailer support crank on the tongue
Right On Replicas LLC copy2014 All rights reserved All registered trademarks are the property of their respective brands
PIC 50 shows the cargo box in White basecoat PIC 51(right) shows the masking for the red stripe I will put on the sides For detail painting just paint the brake lights using Stop Light Red
PIC 52 is the cargo box painted and ready to decal
PIC 53 shows all of the decals I created for the trailer I searched for the logo used by Polk County Fire Department on Google The side decals are a patch that is worn on the shirts and the Maltese Cross is the logo I sized the patch at 1 inch tall with constrain properties on and the cross at 1 frac14 inch tall I then used the text with a Stencil Font and typed the print at 28 point font I made a test print on regular paper to test fit the size and will print the final on Clear decal paper To create a decal
purchase some Inkjet Decal Paper in Clear or White depending on your need Using a photo program like Photoshop or even Microsoft Paint to size the image to your needs and print it as a PHOTO on the decal paper Use 300DPI for crisp details Using KRYLON Crystal Clear spray paint carefully over the decal paper with a few coats of clear You can now trim it close to the image and use it like a standard waterslide decal I get my paper from wwwdecalpapercom I always print 2 sets of decals in case I damage one
Right On Replicas LLC copy2014 All rights reserved All registered trademarks are the property of their respective brands
NOTE - You can also search for photos online for period correct license plates to add to the authenticity of your build You can save the photo and resize it to fit a model Just print it on paper and cover it with clear tape and you have a plate of your own Or go to httpwwwacmecomlicensemaker and create any custom plate you want To print your plate for 125 scale kit open your photo program and crop the plate so you just have the plate only Re-size the image size to make the Width 45 inches and make sure CONSTRAIN PROPORTIONS is on Use 300 DPI for a crisp print Save that and Print it on White paper and use clear tape to cover front and back You now have a proper sized plate to glue on your build FINAL ASSEMBLY
PIC 54 On the trailer frame attach the tires to the axles On the trailer tongue there is a small chrome hitch cover attach it over the ball hole in the hitch Mount the floor into the rails of the trailer
PIC 55 shows the rear door completed On the cargo box attach the door handles so they are even and in the middle of the door Using some of the scrap angle stock I cut 4 pieces a scale 4 inches long I cut one side of the angles in half and glued 2 on top of each other to make a U shape I painted that Silver and glued them on the rear door with the handle in the U to make the lock down SEE PIC 56 (right) Glue the license plate onto the plate holder
Right On Replicas LLC copy2014 All rights reserved All registered trademarks are the property of their respective brands
PIC 56a Glue the completed Cargo box on to the frame
PIC 57 is a photo of some parts box red lenses that come from an old big rig kit Using some of the lenses add running lights to each corner of the molding on the roof and a couple in the middle of the back molding of the roof You can add some on the trailer also if you would like This is a completely arbitrary thing as all trailers have different lighting setups You can also find similar looking beads at larger hobby shops Add the roof to the cargo box
On the trailer tongue center the tool box and attach it to the middle against the cargo box CONGRATULATIONS YOU HAVE JUST BUILT YOUR OWN CARGO TRAILER
Right On Replicas LLC copy2014 All rights reserved All registered trademarks are the property of their respective brands
PIC 999 Overall Impressions What can I say as this is a custom build I would hope that the directions and walk through I made are clear and concise enough that any model builder with basic skills in measuring and cutting could tackle this project and create a nice trailer for themselves I consider myself a moderate to average builder with limited abilities at scratch building This project taught me a few things along the way and I really enjoyed building it and consider it a real achievement that it came out as nice as it did The total construction costs for the cargo box part of the build were fairly nominal I think I spent around $20 for two sheets of Evergreen panels and two packs of Evergreen angle stock and a pack of Evergreen strip stock The decal paper is about $1 or so The few other items came from the parts bin and the basic trailer kit Overall the build was not highly expensive or difficult Please give this a try I think you would enjoy it too Trailer Source List 1- Tilt Bed Trailer kit (Currently available online at HobbyLinc) 125 Kurtis Kraft Edlebrock Midget Racer wTrailer by Revell-Monogram Kit 85-4249 125 Auto World Chevy Caprice wTrailer MPC Kit 75312 124 Tandem Car Trailer (Metal) by Testors Decal Source List Decal Inkjet Paper - White or Clear (Currently available online at HobbyLinc) Pre manufactured Emergency Vehicle Decals (Currently Available Online at PoliceCarModels) Materials Source List Plastic Construction Material (Currently Available Online at HobbyLinc) 2- Evergreen Item 4050 Sheet Styrene 1- Evergreen Item 295 Angle Stock 532 1- Evergreen Item 296 Angle Stock 316 1- Evergreen Item 108 Strip Stock 316 Miscellaneous Items Red Lenses (Spare Parts Box or Avery Stickers) Clear sheet Styrene (HobbyLinc) or Picture framing plastic (NonGlas) at least 7rdquox4rdquo (average 040rdquo thick)
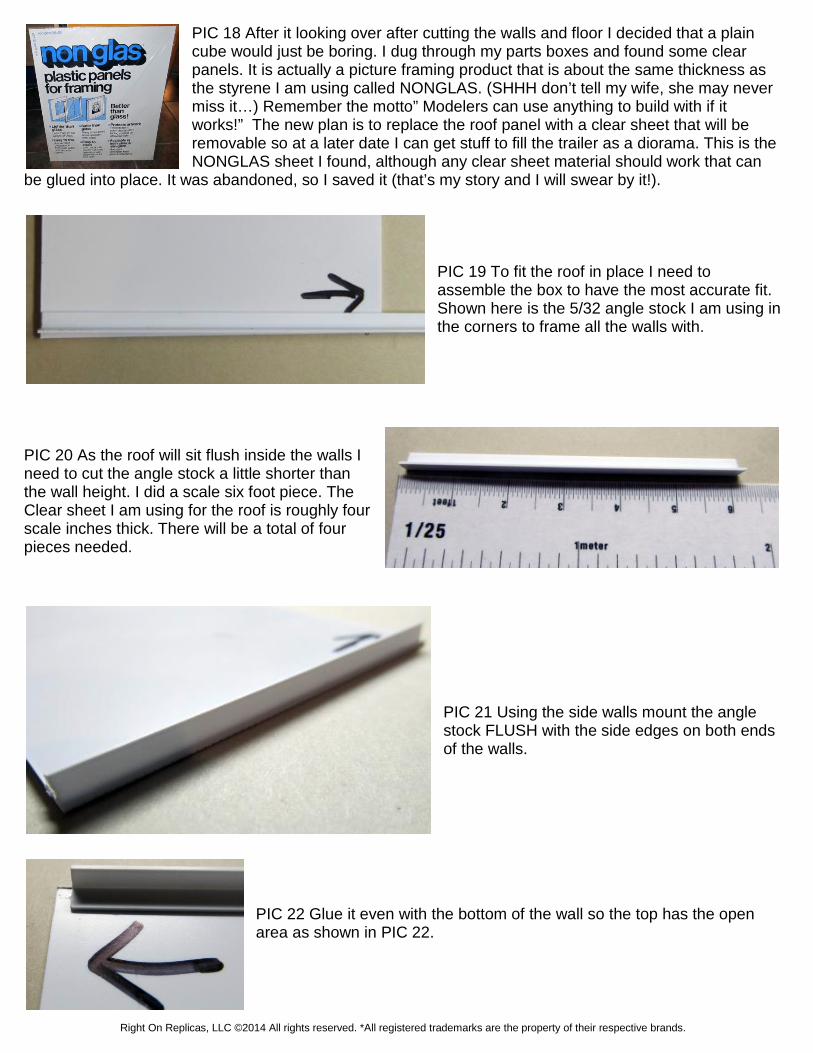
Right On Replicas LLC copy2014 All rights reserved All registered trademarks are the property of their respective brands
PIC 46 The finished toolbox Painting At this point you can prime and paint the subassemblies The trailer frame will go Red The cargo box will be painted White with a Red Stripe on the sides and front If you built the toolbox Paint it any color I did mine Black Paint the floor a wood color NOTE I used Primer on all the parts prior to the color coats REMEMBER TO WATERSAND THE PARTS WITH 800 GRIT SANDPAPER Sand the parts Prime the parts and Sand the parts again Being a trailer I did not want it super glossy like an automobile so I did not clear coat the build as I usually do on my cars I left the paint raw which is a more semi-gloss look typical of a trailer
PIC 47 is the floor On the Floor I used a Saddle Tan spray paint for an overall base coat I then took a lighter tan and lightly spritzed the paint on the floor from a distance of about a foot not covering the whole floor but giving a splotch look like a sheet of MDF board That is ready to install as is when it dries
Right On Replicas LLC copy2014 All rights reserved All registered trademarks are the property of their respective brands
PIC 48 shows the tool box painted I used a Gloss Black spray can to give it the simple painted steel box look I will make a ldquohingerdquo for the lid with packing tape and mount it as is
PIC 49 shows the trailer frame in Red basecoat For detail painting use Black and paint just the wheel and just the small handle on the trailer support crank on the tongue
Right On Replicas LLC copy2014 All rights reserved All registered trademarks are the property of their respective brands
PIC 50 shows the cargo box in White basecoat PIC 51(right) shows the masking for the red stripe I will put on the sides For detail painting just paint the brake lights using Stop Light Red
PIC 52 is the cargo box painted and ready to decal
PIC 53 shows all of the decals I created for the trailer I searched for the logo used by Polk County Fire Department on Google The side decals are a patch that is worn on the shirts and the Maltese Cross is the logo I sized the patch at 1 inch tall with constrain properties on and the cross at 1 frac14 inch tall I then used the text with a Stencil Font and typed the print at 28 point font I made a test print on regular paper to test fit the size and will print the final on Clear decal paper To create a decal
purchase some Inkjet Decal Paper in Clear or White depending on your need Using a photo program like Photoshop or even Microsoft Paint to size the image to your needs and print it as a PHOTO on the decal paper Use 300DPI for crisp details Using KRYLON Crystal Clear spray paint carefully over the decal paper with a few coats of clear You can now trim it close to the image and use it like a standard waterslide decal I get my paper from wwwdecalpapercom I always print 2 sets of decals in case I damage one
Right On Replicas LLC copy2014 All rights reserved All registered trademarks are the property of their respective brands
NOTE - You can also search for photos online for period correct license plates to add to the authenticity of your build You can save the photo and resize it to fit a model Just print it on paper and cover it with clear tape and you have a plate of your own Or go to httpwwwacmecomlicensemaker and create any custom plate you want To print your plate for 125 scale kit open your photo program and crop the plate so you just have the plate only Re-size the image size to make the Width 45 inches and make sure CONSTRAIN PROPORTIONS is on Use 300 DPI for a crisp print Save that and Print it on White paper and use clear tape to cover front and back You now have a proper sized plate to glue on your build FINAL ASSEMBLY
PIC 54 On the trailer frame attach the tires to the axles On the trailer tongue there is a small chrome hitch cover attach it over the ball hole in the hitch Mount the floor into the rails of the trailer
PIC 55 shows the rear door completed On the cargo box attach the door handles so they are even and in the middle of the door Using some of the scrap angle stock I cut 4 pieces a scale 4 inches long I cut one side of the angles in half and glued 2 on top of each other to make a U shape I painted that Silver and glued them on the rear door with the handle in the U to make the lock down SEE PIC 56 (right) Glue the license plate onto the plate holder
Right On Replicas LLC copy2014 All rights reserved All registered trademarks are the property of their respective brands
PIC 56a Glue the completed Cargo box on to the frame
PIC 57 is a photo of some parts box red lenses that come from an old big rig kit Using some of the lenses add running lights to each corner of the molding on the roof and a couple in the middle of the back molding of the roof You can add some on the trailer also if you would like This is a completely arbitrary thing as all trailers have different lighting setups You can also find similar looking beads at larger hobby shops Add the roof to the cargo box
On the trailer tongue center the tool box and attach it to the middle against the cargo box CONGRATULATIONS YOU HAVE JUST BUILT YOUR OWN CARGO TRAILER
Right On Replicas LLC copy2014 All rights reserved All registered trademarks are the property of their respective brands
PIC 999 Overall Impressions What can I say as this is a custom build I would hope that the directions and walk through I made are clear and concise enough that any model builder with basic skills in measuring and cutting could tackle this project and create a nice trailer for themselves I consider myself a moderate to average builder with limited abilities at scratch building This project taught me a few things along the way and I really enjoyed building it and consider it a real achievement that it came out as nice as it did The total construction costs for the cargo box part of the build were fairly nominal I think I spent around $20 for two sheets of Evergreen panels and two packs of Evergreen angle stock and a pack of Evergreen strip stock The decal paper is about $1 or so The few other items came from the parts bin and the basic trailer kit Overall the build was not highly expensive or difficult Please give this a try I think you would enjoy it too Trailer Source List 1- Tilt Bed Trailer kit (Currently available online at HobbyLinc) 125 Kurtis Kraft Edlebrock Midget Racer wTrailer by Revell-Monogram Kit 85-4249 125 Auto World Chevy Caprice wTrailer MPC Kit 75312 124 Tandem Car Trailer (Metal) by Testors Decal Source List Decal Inkjet Paper - White or Clear (Currently available online at HobbyLinc) Pre manufactured Emergency Vehicle Decals (Currently Available Online at PoliceCarModels) Materials Source List Plastic Construction Material (Currently Available Online at HobbyLinc) 2- Evergreen Item 4050 Sheet Styrene 1- Evergreen Item 295 Angle Stock 532 1- Evergreen Item 296 Angle Stock 316 1- Evergreen Item 108 Strip Stock 316 Miscellaneous Items Red Lenses (Spare Parts Box or Avery Stickers) Clear sheet Styrene (HobbyLinc) or Picture framing plastic (NonGlas) at least 7rdquox4rdquo (average 040rdquo thick)
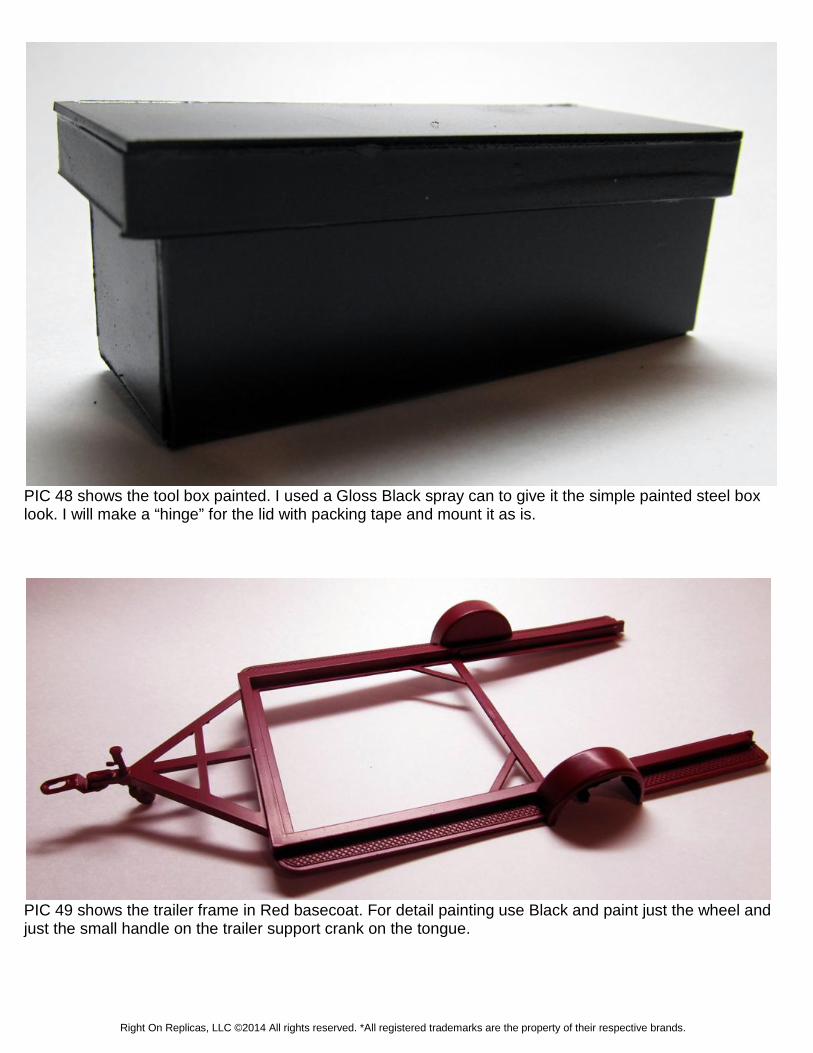
Right On Replicas LLC copy2014 All rights reserved All registered trademarks are the property of their respective brands
PIC 999 Overall Impressions What can I say as this is a custom build I would hope that the directions and walk through I made are clear and concise enough that any model builder with basic skills in measuring and cutting could tackle this project and create a nice trailer for themselves I consider myself a moderate to average builder with limited abilities at scratch building This project taught me a few things along the way and I really enjoyed building it and consider it a real achievement that it came out as nice as it did The total construction costs for the cargo box part of the build were fairly nominal I think I spent around $20 for two sheets of Evergreen panels and two packs of Evergreen angle stock and a pack of Evergreen strip stock The decal paper is about $1 or so The few other items came from the parts bin and the basic trailer kit Overall the build was not highly expensive or difficult Please give this a try I think you would enjoy it too Trailer Source List 1- Tilt Bed Trailer kit (Currently available online at HobbyLinc) 125 Kurtis Kraft Edlebrock Midget Racer wTrailer by Revell-Monogram Kit 85-4249 125 Auto World Chevy Caprice wTrailer MPC Kit 75312 124 Tandem Car Trailer (Metal) by Testors Decal Source List Decal Inkjet Paper - White or Clear (Currently available online at HobbyLinc) Pre manufactured Emergency Vehicle Decals (Currently Available Online at PoliceCarModels) Materials Source List Plastic Construction Material (Currently Available Online at HobbyLinc) 2- Evergreen Item 4050 Sheet Styrene 1- Evergreen Item 295 Angle Stock 532 1- Evergreen Item 296 Angle Stock 316 1- Evergreen Item 108 Strip Stock 316 Miscellaneous Items Red Lenses (Spare Parts Box or Avery Stickers) Clear sheet Styrene (HobbyLinc) or Picture framing plastic (NonGlas) at least 7rdquox4rdquo (average 040rdquo thick)