right on replicas, llc step-by-step review 20150922 ... · 9/22/2015 · hugely popular when...
TRANSCRIPT
Right On Replicas, LLC ©2015 All rights reserved. *All registered trademarks are the property of their respective brands. Follow the manufacturer’s safety recommendations for any product mentioned here.
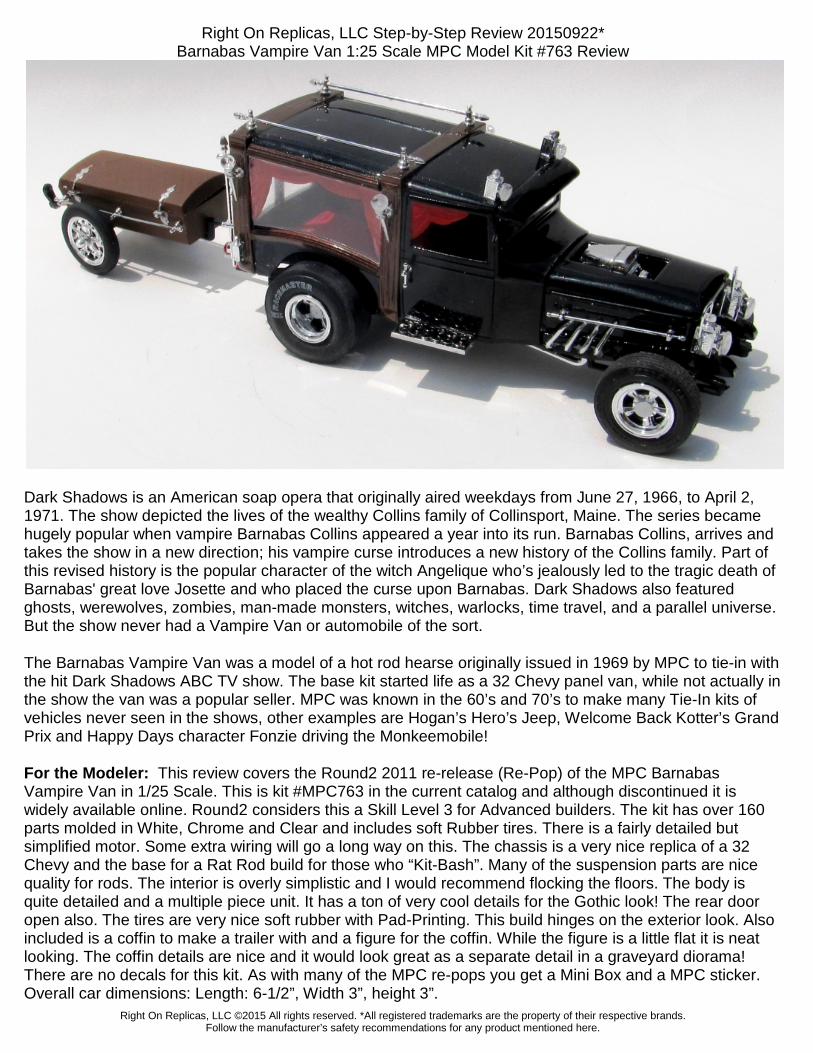
Right On Replicas, LLC Step-by-Step Review 20150922* Barnabas Vampire Van 1:25 Scale MPC Model Kit #763 Review
Dark Shadows is an American soap opera that originally aired weekdays from June 27, 1966, to April 2, 1971. The show depicted the lives of the wealthy Collins family of Collinsport, Maine. The series became hugely popular when vampire Barnabas Collins appeared a year into its run. Barnabas Collins, arrives and takes the show in a new direction; his vampire curse introduces a new history of the Collins family. Part of this revised history is the popular character of the witch Angelique who’s jealously led to the tragic death of Barnabas' great love Josette and who placed the curse upon Barnabas. Dark Shadows also featured ghosts, werewolves, zombies, man-made monsters, witches, warlocks, time travel, and a parallel universe. But the show never had a Vampire Van or automobile of the sort.
The Barnabas Vampire Van was a model of a hot rod hearse originally issued in 1969 by MPC to tie-in with the hit Dark Shadows ABC TV show. The base kit started life as a 32 Chevy panel van, while not actually in the show the van was a popular seller. MPC was known in the 60’s and 70’s to make many Tie-In kits of vehicles never seen in the shows, other examples are Hogan’s Hero’s Jeep, Welcome Back Kotter’s Grand Prix and Happy Days character Fonzie driving the Monkeemobile!
For the Modeler: This review covers the Round2 2011 re-release (Re-Pop) of the MPC Barnabas Vampire Van in 1/25 Scale. This is kit #MPC763 in the current catalog and although discontinued it is widely available online. Round2 considers this a Skill Level 3 for Advanced builders. The kit has over 160 parts molded in White, Chrome and Clear and includes soft Rubber tires. There is a fairly detailed but simplified motor. Some extra wiring will go a long way on this. The chassis is a very nice replica of a 32 Chevy and the base for a Rat Rod build for those who “Kit-Bash”. Many of the suspension parts are nice quality for rods. The interior is overly simplistic and I would recommend flocking the floors. The body is quite detailed and a multiple piece unit. It has a ton of very cool details for the Gothic look! The rear door open also. The tires are very nice soft rubber with Pad-Printing. This build hinges on the exterior look. Also included is a coffin to make a trailer with and a figure for the coffin. While the figure is a little flat it is neat looking. The coffin details are nice and it would look great as a separate detail in a graveyard diorama! There are no decals for this kit. As with many of the MPC re-pops you get a Mini Box and a MPC sticker. Overall car dimensions: Length: 6-1/2”, Width 3”, height 3”.

Right On Replicas, LLC ©2015 All rights reserved. *All registered trademarks are the property of their respective brands. Follow the manufacturer’s safety recommendations for any product mentioned here.
BUILDING CAVIATS: Having organization and a proper work area is important if you want to build a model properly. But even without dedicated space a place to leave your build while you work is necessary. Being able to lay out your parts organized helps the build as you are not digging for parts in the box possibly losing or damaging them. Also you really should have a place to let painted parts cure.
Throughout the review you will find OPTIONAL IDEAS that I suggest. These are completely your choice. Not doing these steps will in no way affect the build, they are just ways to offer some personal and custom touches to your builds. OPTIONS will be noted. One of the best parts of model building is using your imagination to create the car YOU want! Unless you are building a “Factory Stock” or a “Replica” car your choices of color and build options is completely up to you. The instruction give recommendations but you are free to substitute whatever options you want. There is no “Wrong way” to build your kit! Have fun and enjoy your hobby. Review the instruction sheet thoroughly to get familiar with the assembly sequence. Decide your color scheme in advance and your custom options so you can build accordingly.
PIC 1 This is the box art for this kit as released in the 2011 Round2 version. Unless otherwise stated I use Testors Tube Glue (Orange Tube) for assembly of the parts. Other adhesives used in the construction are Superglue and Elmer’s White Glue. Paints consist of Testors Enamel or Tamiya Acrylic bottle paints and different brands of “Rattle can” spray paints. The body is finished using 1:1 automotive use paint products shot with an airbrush. One of the major benefits of using automotive paint is a very fast drying time. You can get just as good results using Spray can products but they require a longer drying time. Automotive paint is FULLY cured in less than an hour and clear about 6 hours. Use a good quality airbrush to paint automotive products because Lacquer Thinner will destroy the cheaper ones quickly. Assembly paint colors may vary from instructions as I use simplified colors that most model builders should have on hand. Before beginning your build soak and wash your parts with a mild detergent like DAWN to remove any mold release agents and help with paint adhesion.
Note to remember: Always follow the Manufacturer’s Safety and Use Guidelines when using any of the products mentioned in the review for your own protection.

Right On Replicas, LLC ©2015 All rights reserved. *All registered trademarks are the property of their respective brands. Follow the manufacturer’s safety recommendations for any product mentioned here.
PIC 2 PIC 3 Start the motor assembly. The block halves are assembled and painted Red with an Aluminum transmission. I painted the headers Steel, intake Aluminum and the starter Black. Attach the oil pan, starter, intake and valve covers to the block. Assemble the blower with the front, rear and both halves of the breather. Install that on the intake. Add the belt cover in place. PIC 4 PIC 5 OPTIONAL: I wanted to do a little extra detail so I will wire this motor. I used a prewired distributor and coil for this add on. While there are many different brands I use home-made ones that I have.
PIC 5 Using a Chevy wiring diagram I will wire the motor. First drill out the hole for the shaft and install it with superglue. Drill out the locations on the heads. Match the wires up to the diagram and cut to fit. Slide each wire into the hole to make it look correct. Superglue all the wires in place. Add the coil to the center wire with it cut to fit sitting it on the motor.
Right On Replicas, LLC ©2015 All rights reserved. *All registered trademarks are the property of their respective brands. Follow the manufacturer’s safety recommendations for any product mentioned here.
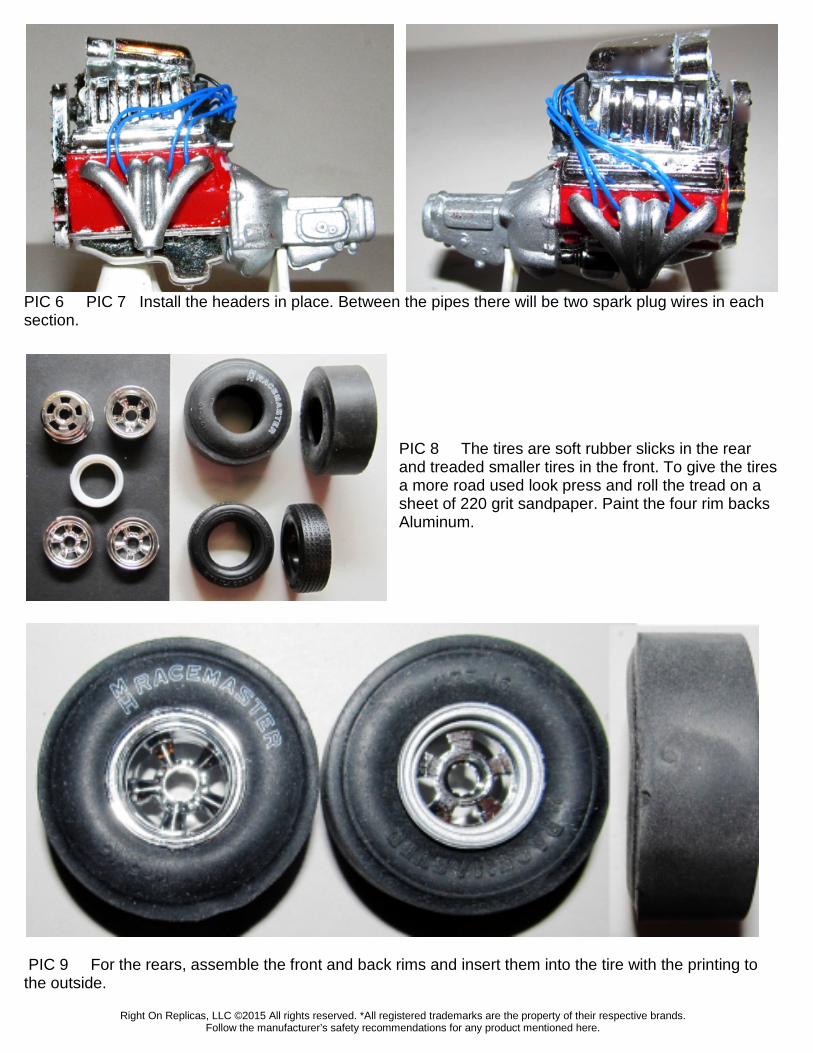
PIC 6 PIC 7 Install the headers in place. Between the pipes there will be two spark plug wires in each section.
PIC 8 The tires are soft rubber slicks in the rear and treaded smaller tires in the front. To give the tires a more road used look press and roll the tread on a sheet of 220 grit sandpaper. Paint the four rim backs Aluminum.
PIC 9 For the rears, assemble the front and back rims and insert them into the tire with the printing to the outside.

Right On Replicas, LLC ©2015 All rights reserved. *All registered trademarks are the property of their respective brands. Follow the manufacturer’s safety recommendations for any product mentioned here.
PIC 10 On the front tires insert a front rim and a back rim into the tires. They are not directional and the printing is on both sides so location is not important.
PIC 11 The front suspension is installed on to the chassis prior to painting.

Right On Replicas, LLC ©2015 All rights reserved. *All registered trademarks are the property of their respective brands. Follow the manufacturer’s safety recommendations for any product mentioned here.
PIC 12 Attach the leaf springs to the frame. On the axle attach the spindles by only gluing the outer face edges as they will be steerable when done. Add the brake drums. Add the tie rod but do not glue it. Add the steering rod without glue and snap the steering link on to the rod.
PIC 13 Prior to painting add the rear suspension in place.

Right On Replicas, LLC ©2015 All rights reserved. *All registered trademarks are the property of their respective brands. Follow the manufacturer’s safety recommendations for any product mentioned here.
PIC 14 Assemble the axle halves and attach the brake drums. Install this unit to the frame.
PIC 15 PIC 16 Prior to paint add the engine mount and steering pin. Paint the whole unit Flat Black.
PIC 17 PIC 18 Paint the wheel pins Aluminum and install the front tires on to the front brake drums. Note they will be a little loose to allow them to roll. Only glue the pin.

Right On Replicas, LLC ©2015 All rights reserved. *All registered trademarks are the property of their respective brands. Follow the manufacturer’s safety recommendations for any product mentioned here.
PIC 19 PIC 20 Paint the wheel pins Aluminum and install the rear tires on to the rear brake drums. Note they will be a little loose to allow them to roll. Only glue the pin.
PIC 21 Assemble the gas tank and attach it to the rear panel.
PIC 22 To install the motor, attach the driveshaft to the transmission and glue the motor to the mounts.

Right On Replicas, LLC ©2015 All rights reserved. *All registered trademarks are the property of their respective brands. Follow the manufacturer’s safety recommendations for any product mentioned here.
PIC 23 Install the exhaust pipes.
PIC 24 The rolling chassis is completed for now. PIC 25 The interior is started next. The steering column and pedals are Flat Black. The wheel is Black with Silver spokes. The seats are Red. The floor underside is Flat Black and the top side Red.
Right On Replicas, LLC ©2015 All rights reserved. *All registered trademarks are the property of their respective brands. Follow the manufacturer’s safety recommendations for any product mentioned here.
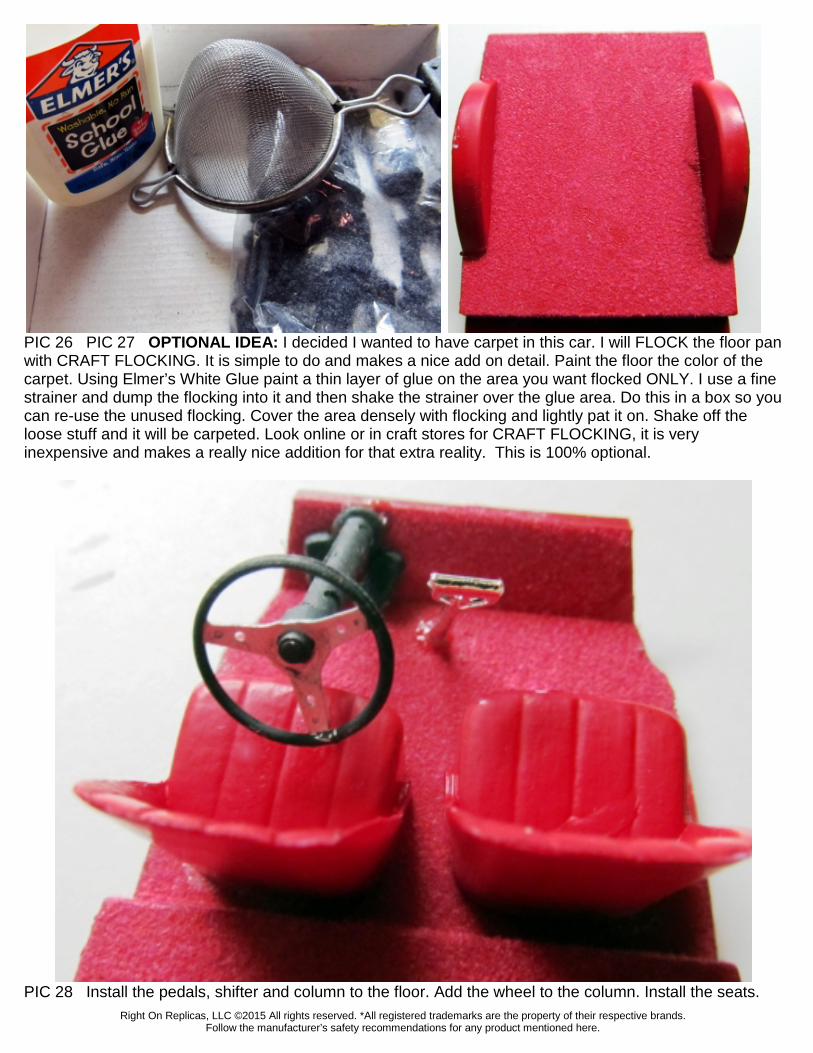
PIC 26 PIC 27 OPTIONAL IDEA: I decided I wanted to have carpet in this car. I will FLOCK the floor pan with CRAFT FLOCKING. It is simple to do and makes a nice add on detail. Paint the floor the color of the carpet. Using Elmer’s White Glue paint a thin layer of glue on the area you want flocked ONLY. I use a fine strainer and dump the flocking into it and then shake the strainer over the glue area. Do this in a box so you can re-use the unused flocking. Cover the area densely with flocking and lightly pat it on. Shake off the loose stuff and it will be carpeted. Look online or in craft stores for CRAFT FLOCKING, it is very inexpensive and makes a really nice addition for that extra reality. This is 100% optional.
PIC 28 Install the pedals, shifter and column to the floor. Add the wheel to the column. Install the seats.

Right On Replicas, LLC ©2015 All rights reserved. *All registered trademarks are the property of their respective brands. Follow the manufacturer’s safety recommendations for any product mentioned here.
PIC 29 PIC 30 The body needs to be prepared before any paint work. Remove any Flash or blemishes as needed. You can attach some of the parts prior to any paint work. The visor, firewall and side roof details can be installed onto the body.
PIC 31 PIC 32 Assemble the engine compartment and fenders. There are two sides and an inner panel to attach. NOTE: In the photo you can see the sides are different sizes. This is a serious issue and should be repaired prior to any paint work.

Right On Replicas, LLC ©2015 All rights reserved. *All registered trademarks are the property of their respective brands. Follow the manufacturer’s safety recommendations for any product mentioned here.
PIC 33 PIC 34 The easiest way to repair the panel is to use a sheet of sandpaper lying flat on a solid surface and evenly sand the bottom of the panel checking your work as you sand to get the panels to sit flush. Once you get the proper height of the panels attach them to the fenders. Use putty, Superglue Gel of whatever your favorite method is of filling gaps and lines and fill the part line on the front of the part. I used Superglue Gel with sanding dust mixed in. Sand the part smooth and Primer it. Repeat as necessary until you have a smooth surface.
PIC 35 All of the body parts are primed inside and out. As there is so much detail it is difficult to sand. Use an etching primer and do a light coat so as not to lose the details.
Right On Replicas, LLC ©2015 All rights reserved. *All registered trademarks are the property of their respective brands. Follow the manufacturer’s safety recommendations for any product mentioned here.
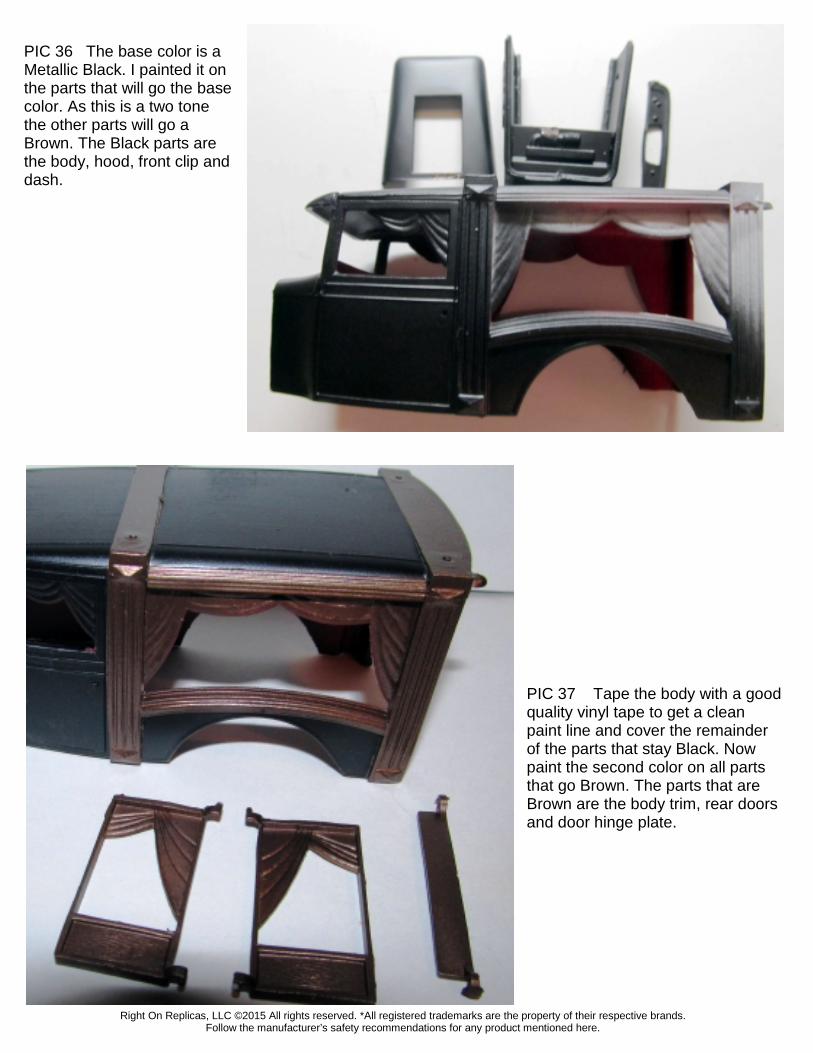
PIC 36 The base color is a Metallic Black. I painted it on the parts that will go the base color. As this is a two tone the other parts will go a Brown. The Black parts are the body, hood, front clip and dash.
PIC 37 Tape the body with a good quality vinyl tape to get a clean paint line and cover the remainder of the parts that stay Black. Now paint the second color on all parts that go Brown. The parts that are Brown are the body trim, rear doors and door hinge plate.

Right On Replicas, LLC ©2015 All rights reserved. *All registered trademarks are the property of their respective brands. Follow the manufacturer’s safety recommendations for any product mentioned here.
PIC 38 PIC 39 The dash can have the center panel installed. Install the windshield from the inside with Elmer’s White Glue and add the dash under the windshield.
PIC 40 The interior is slid into the body and glued in place.
PIC 41 PIC 42 Install the body onto the chassis. Also install the front clip. Note the front clip does not line up to the body.
Right On Replicas, LLC ©2015 All rights reserved. *All registered trademarks are the property of their respective brands. Follow the manufacturer’s safety recommendations for any product mentioned here.
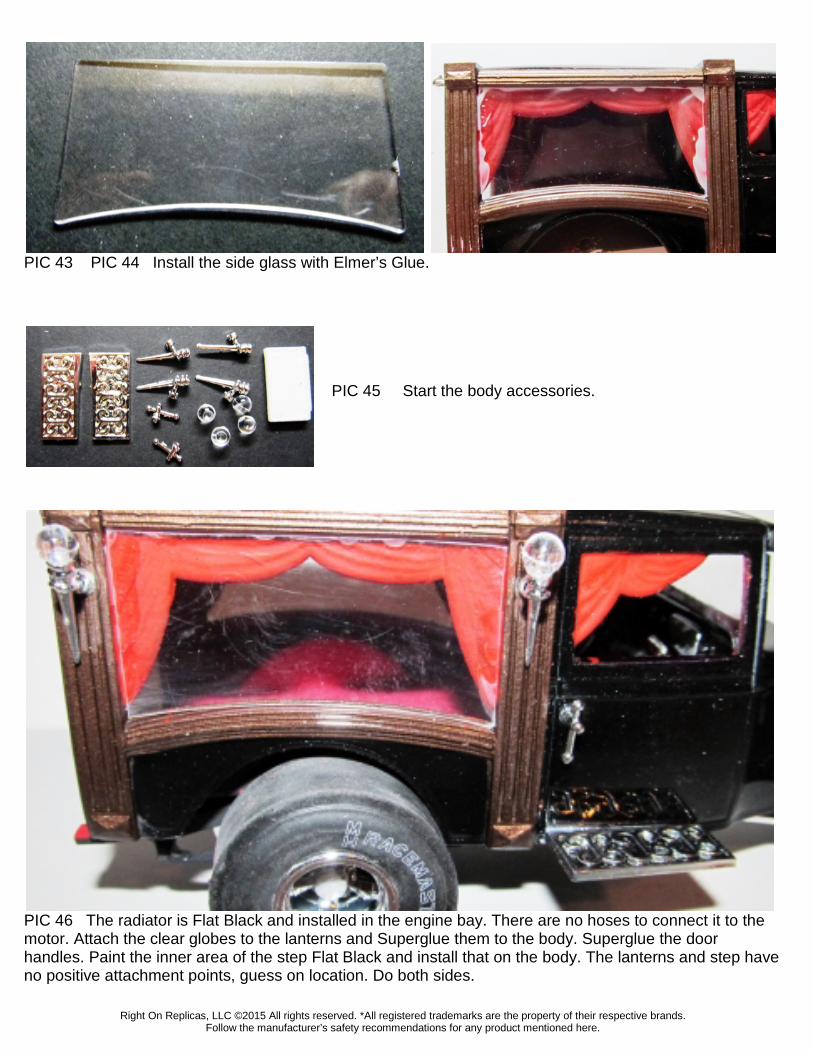
PIC 43 PIC 44 Install the side glass with Elmer’s Glue.
PIC 45 Start the body accessories.
PIC 46 The radiator is Flat Black and installed in the engine bay. There are no hoses to connect it to the motor. Attach the clear globes to the lanterns and Superglue them to the body. Superglue the door handles. Paint the inner area of the step Flat Black and install that on the body. The lanterns and step have no positive attachment points, guess on location. Do both sides.

Right On Replicas, LLC ©2015 All rights reserved. *All registered trademarks are the property of their respective brands. Follow the manufacturer’s safety recommendations for any product mentioned here.
PIC 47 PIC 48 The back end is assembled next. Install the glass in the doors and add an handle to each. Slide the door into the top hinge and superglue the bottom hinge in place to the body allowing the doors to freely open. Assembly the tail lamps and paint the lens Stop Light Red. Install the grab bars. Paint the recessed area of the step Flat Black and install the step.
PIC 49 PIC 50 The front fenders and traction bars are completed next. Install a traction bar from each axle to the frame. Install four exhaust pipes to the fenders and add a grab handle to each side.
Right On Replicas, LLC ©2015 All rights reserved. *All registered trademarks are the property of their respective brands. Follow the manufacturer’s safety recommendations for any product mentioned here.
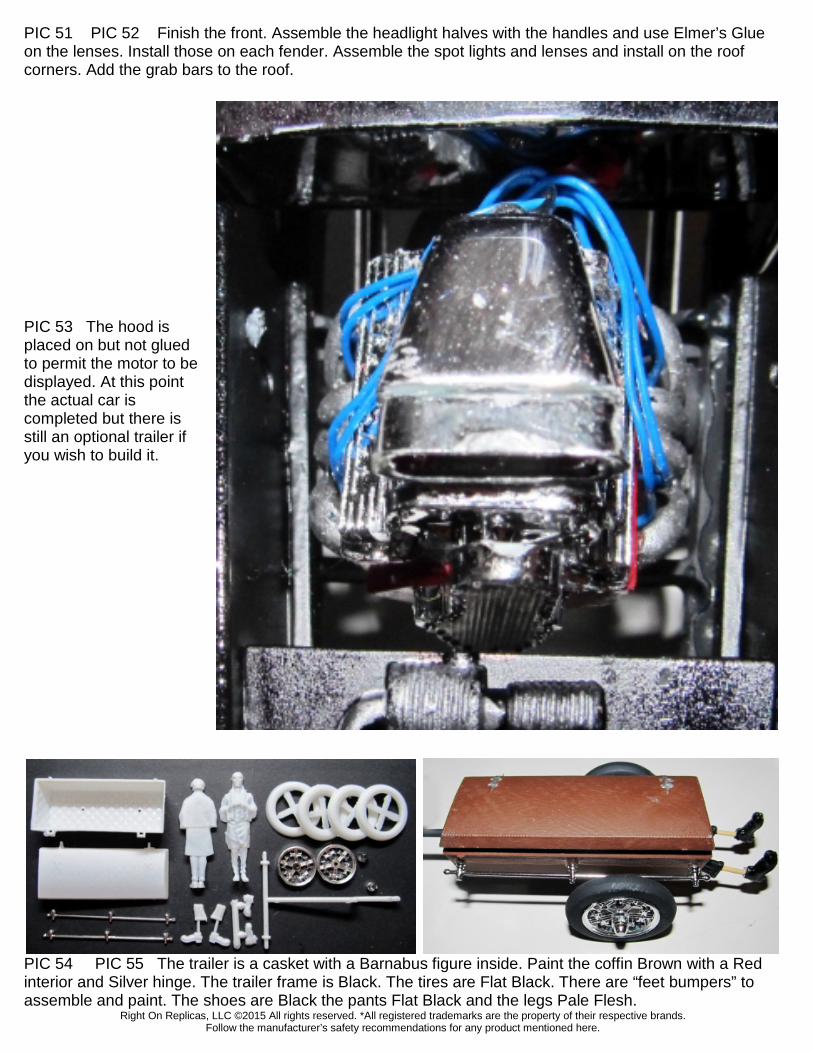
PIC 51 PIC 52 Finish the front. Assemble the headlight halves with the handles and use Elmer’s Glue on the lenses. Install those on each fender. Assemble the spot lights and lenses and install on the roof corners. Add the grab bars to the roof. PIC 53 The hood is placed on but not glued to permit the motor to be displayed. At this point the actual car is completed but there is still an optional trailer if you wish to build it.
PIC 54 PIC 55 The trailer is a casket with a Barnabus figure inside. Paint the coffin Brown with a Red interior and Silver hinge. The trailer frame is Black. The tires are Flat Black. There are “feet bumpers” to assemble and paint. The shoes are Black the pants Flat Black and the legs Pale Flesh.
Right On Replicas, LLC ©2015 All rights reserved. *All registered trademarks are the property of their respective brands. Follow the manufacturer’s safety recommendations for any product mentioned here.
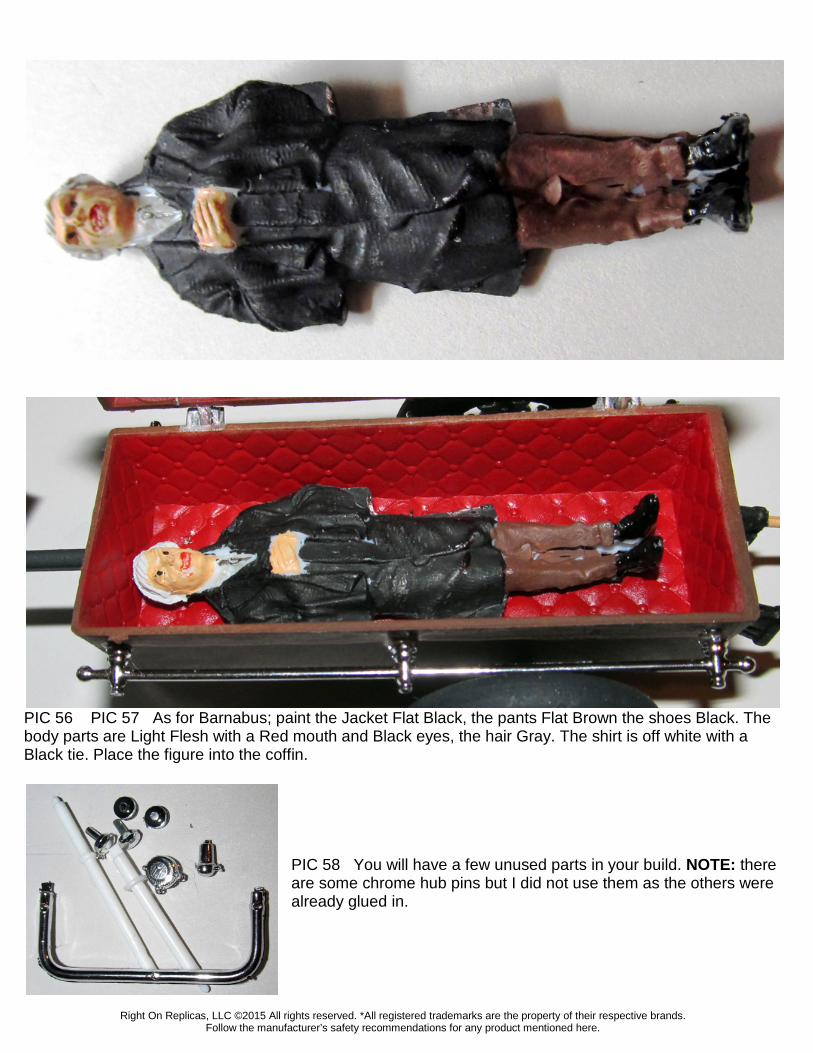
PIC 56 PIC 57 As for Barnabus; paint the Jacket Flat Black, the pants Flat Brown the shoes Black. The body parts are Light Flesh with a Red mouth and Black eyes, the hair Gray. The shirt is off white with a Black tie. Place the figure into the coffin.
PIC 58 You will have a few unused parts in your build. NOTE: there are some chrome hub pins but I did not use them as the others were already glued in.
Right On Replicas, LLC ©2015 All rights reserved. *All registered trademarks are the property of their respective brands. Follow the manufacturer’s safety recommendations for any product mentioned here.
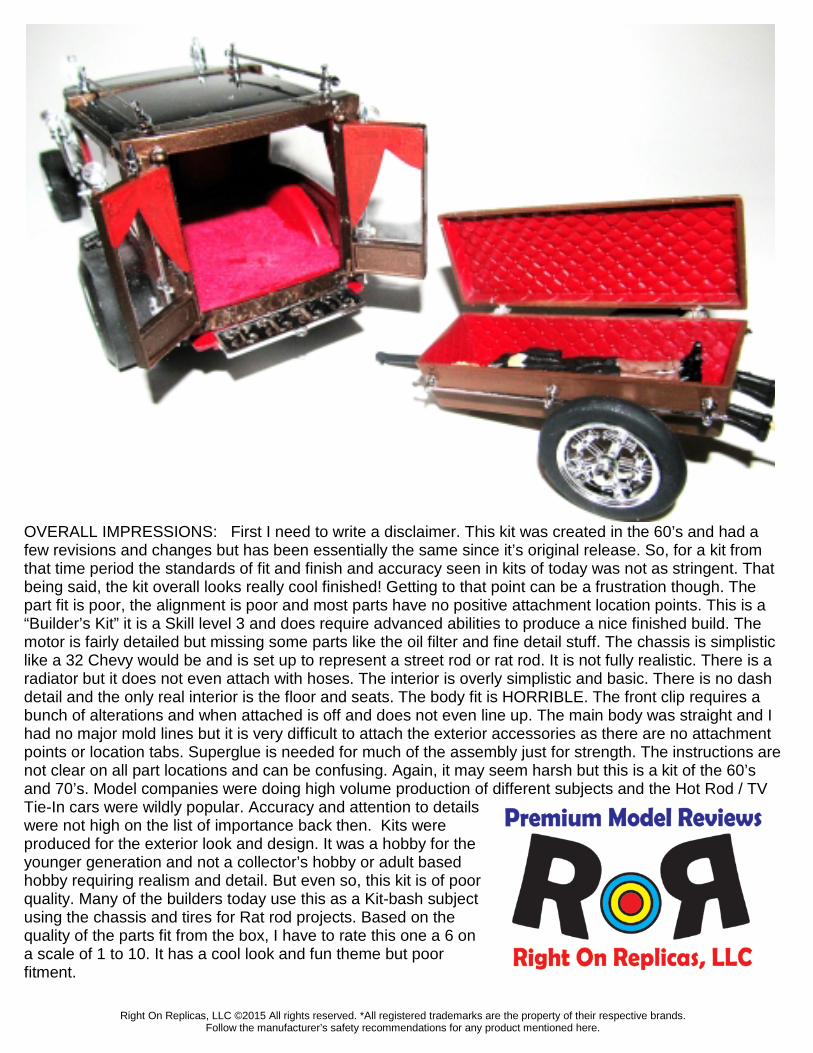
OVERALL IMPRESSIONS: First I need to write a disclaimer. This kit was created in the 60’s and had a few revisions and changes but has been essentially the same since it’s original release. So, for a kit from that time period the standards of fit and finish and accuracy seen in kits of today was not as stringent. That being said, the kit overall looks really cool finished! Getting to that point can be a frustration though. The part fit is poor, the alignment is poor and most parts have no positive attachment location points. This is a “Builder’s Kit” it is a Skill level 3 and does require advanced abilities to produce a nice finished build. The motor is fairly detailed but missing some parts like the oil filter and fine detail stuff. The chassis is simplistic like a 32 Chevy would be and is set up to represent a street rod or rat rod. It is not fully realistic. There is a radiator but it does not even attach with hoses. The interior is overly simplistic and basic. There is no dash detail and the only real interior is the floor and seats. The body fit is HORRIBLE. The front clip requires a bunch of alterations and when attached is off and does not even line up. The main body was straight and I had no major mold lines but it is very difficult to attach the exterior accessories as there are no attachment points or location tabs. Superglue is needed for much of the assembly just for strength. The instructions are not clear on all part locations and can be confusing. Again, it may seem harsh but this is a kit of the 60’s and 70’s. Model companies were doing high volume production of different subjects and the Hot Rod / TV Tie-In cars were wildly popular. Accuracy and attention to details were not high on the list of importance back then. Kits were produced for the exterior look and design. It was a hobby for the younger generation and not a collector’s hobby or adult based hobby requiring realism and detail. But even so, this kit is of poor quality. Many of the builders today use this as a Kit-bash subject using the chassis and tires for Rat rod projects. Based on the quality of the parts fit from the box, I have to rate this one a 6 on a scale of 1 to 10. It has a cool look and fun theme but poor fitment.