rman incremental backups
TRANSCRIPT
RMAN Incremental BackupsRMAN Incremental Backups
RMAN incremental backups backup only datafile blocks that have changed since a specified
previous backup. We can make incremental backups of databases, individual tablespaces or
datafiles.
The primary reasons for making incremental backups part of your strategy are:
For use in a strategy based on incrementally updated backups, where these incremental
backups are used to periodically roll forward an image copy of the database
To reduce the amount of time needed for daily backups
To save network bandwidth when backing up over a network
To get adequate backup performance when the aggregate tape bandwidth available for
tape write I/Os is much less than the aggregate disk bandwidth for disk read I/Os
To be able to recover changes to objects created with the NOLOGGING option. For
example, direct load inserts do not create redo log entries and their changes cannot be reproduced
with media recovery. They do, however, change data blocks and so are captured by incremental
backups.
To reduce backup sizes for NOARCHIVELOG databases. Instead of making a whole database
backup every time, you can make incremental backups.
As with full backups, if you are in ARCHIVELOG mode, you can make incremental backups if the
database is open; if the database is in NOARCHIVELOG mode, then you can only make incremental
backups after a consistent shutdown.
One effective strategy is to make incremental backups to disk, and then back up the resulting
backup sets to a media manager with BACKUP AS BACKUPSET. The incremental backups are
generally smaller than full backups, which limits the space required to store them until they are
moved to tape. Then, when the incremental backups on disk are backed up to tape, it is more likely
that tape streaming can be sustained because all blocks of the incremental backup are copied to
tape. There is no possibility of delay due to time required for RMAN to locate changed blocks in the
datafiles.
RMAN backups can be classified in these ways:
Full or incremental
Open or closed
Consistent or inconsistent
Note that these backup classifications apply only to datafile backups. Backups of other files, such
as archivelogs and control files, always include the complete file and are never inconsistent.
Backup
Type Definition
Full A backup of a datafile that includes every allocated block in the file being backed up. A
full backup of a datafile can be an image copy, in which case every data block is
backed up. It can also be stored in a backup set, in which case datafile blocks not in
use may be skipped.
A full backup cannot be part of an incremental backup strategy; that is, it cannot be
the parent for a subsequent incremental backup.
Incremental An incremental backup is either a level 0 backup, which includes every block in the file
except blocks compressed out because they have never been used, or a level 1
backup, which includes only those blocks that have been changed since the parent
backup was taken.
A level 0 incremental backup is physically identical to a full backup. The only
difference is that the level 0 backup is recorded as an incremental backup in the RMAN
repository, so it can be used as the parent for a level 1 backup.
Open A backup of online, read/write datafiles when the database is open.
Closed A backup of any part of the target database when it is mounted but not open. Closed
backups can be consistent or inconsistent.
Consistent A backup taken when the database is mounted (but not open) after a normal
shutdown. The checkpoint SCNs in the datafile headers match the header information
in the control file. None of the datafiles has changes beyond its checkpoint. Consistent
backups can be restored without recovery.
Note: If you restore a consistent backup and open the database in read/write mode
without recovery, transactions after the backup are lost. You still need to perform
an OPEN RESETLOGS.
Inconsistent A backup of any part of the target database when it is open or when a crash occurred
or SHUTDOWN ABORT was run prior to mounting.
An inconsistent backup requires recovery to become consistent.
The goal of an incremental backup is to back up only those data blocks that have changed since a
previous backup. You can use RMAN to create incremental backups of datafiles, tablespaces, or the
whole database.
During media recovery, RMAN examines the restored files to determine whether it can recover
them with an incremental backup. If it has a choice, then RMAN always chooses incremental
backups over archived logs, as applying changes at a block level is faster than reapplying
individual changes.
RMAN does not need to restore a base incremental backup of a datafile in order to apply
incremental backups to the datafile during recovery. For example, you can restore non-incremental
image copies of the datafiles in the database, and RMAN can recover them with incremental
backups.
Incremental backups allow faster daily backups, use less network bandwidth when backing up over
a network, and provide better performance when tape I/O bandwidth limits backup performance.
They also allow recovery of database changes not reflected in the redo logs, such as direct load
inserts. Finally, incremental backups can be used to back up NOARCHIVELOG databases, and are
smaller than complete copies of the database (though they still require a clean database
shutdown).
One effective strategy is to make incremental backups to disk (as image copies), and then back up
these image copies to a media manager with BACKUP AS BACKUPSET. Then, you do not have the
problem of keeping the tape streaming that sometimes occurs when making incremental backups
directly to tape. Because incremental backups are not as big as full backups, you can create them
on disk more easily.
Incremental Backup Algorithm
Each data block in a datafile contains a system change number (SCN), which is the SCN at which
the most recent change was made to the block. During an incremental backup, RMAN reads the
SCN of each data block in the input file and compares it to the checkpoint SCN of the parent
incremental backup. If the SCN in the input data block is greater than or equal to the checkpoint
SCN of the parent, then RMAN copies the block.
Note that if you enable the block change tracking feature, RMAN can refer to the change tracking
file to identify changed blocks in datafiles without scanning the full contents of the datafile. Once
enabled, block change tracking does not alter how you take or use incremental backups, other
than offering increased performance.
Level 0 and Level 1 Incremental Backups
Incremental backups can be either level 0 or level 1. A level 0 incremental backup, which is the
base for subsequent incremental backups, copies all blocks containing data, backing the datafile
up into a backup set just as a full backup would. The only difference between a level 0 incremental
backup and a full backup is that a full backup is never included in an incremental strategy.
A level 1 incremental backup can be either of the following types:
A differential backup, which backs up all blocks changed after the most recent
incremental backup at level 1 or 0
A cumulative backup, which backs up all blocks changed after the most recent
incremental backup at level 0
Incremental backups are differential by default.
Note:
Cumulative backups are preferable to differential backups when recovery time is more important
than disk space, because during recovery each differential backup must be applied in succession.
Use cumulative incremental backups instead of differential, if enough disk space is available to
store cumulative incremental backups.
The size of the backup file depends solely upon the number of blocks modified and the incremental
backup level.
Differential Incremental Backups
In a differential level 1 backup, RMAN backs up all blocks that have changed since the most recent
cumulative or differential incremental backup, whether at level 1 or level 0. RMAN determines
which level 1 backup occurred most recently and backs up all blocks modified after that backup. If
no level 1 is available, RMAN copies all blocks changed since the level 0 backup.
The following command performs a level 1 differential incremental backup of the database:
RMAN> BACKUP INCREMENTAL LEVEL 1 DATABASE;
If no level 0 backup is available, then the behavior depends upon the compatibility mode setting. If
compatibility is >=10.0.0, RMAN copies all blocks changed since the file was created, and stores
the results as a level 1 backup. In other words, the SCN at the time the incremental backup is
taken is the file creation SCN. If compatibility <10.0.0, RMAN generates a level 0 backup of the file
contents at the time of the backup, to be consistent with the behavior in previous releases.
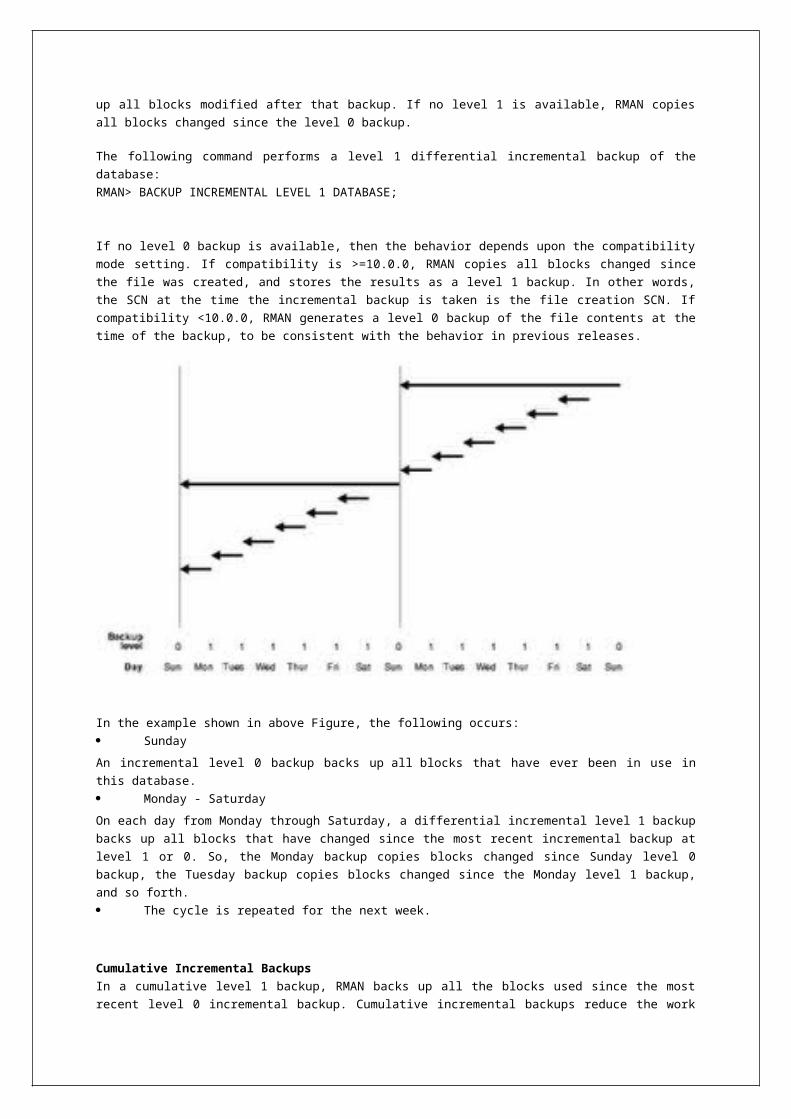
In the example shown in above Figure, the following occurs:
Sunday
An incremental level 0 backup backs up all blocks that have ever been in use in this database.
Monday - Saturday
On each day from Monday through Saturday, a differential incremental level 1 backup backs up all
blocks that have changed since the most recent incremental backup at level 1 or 0. So, the Monday
backup copies blocks changed since Sunday level 0 backup, the Tuesday backup copies blocks
changed since the Monday level 1 backup, and so forth.
The cycle is repeated for the next week.
Cumulative Incremental Backups
In a cumulative level 1 backup, RMAN backs up all the blocks used since the most recent level 0
incremental backup. Cumulative incremental backups reduce the work needed for a restore by
ensuring that you only need one incremental backup from any particular level. Cumulative backups
require more space and time than differential backups, however, because they duplicate the work
done by previous backups at the same level.
The following command performs a cumulative level 1 incremental backup of the database:
BACKUP INCREMENTAL LEVEL 1 CUMULATIVE DATABASE; # blocks changed since level 0
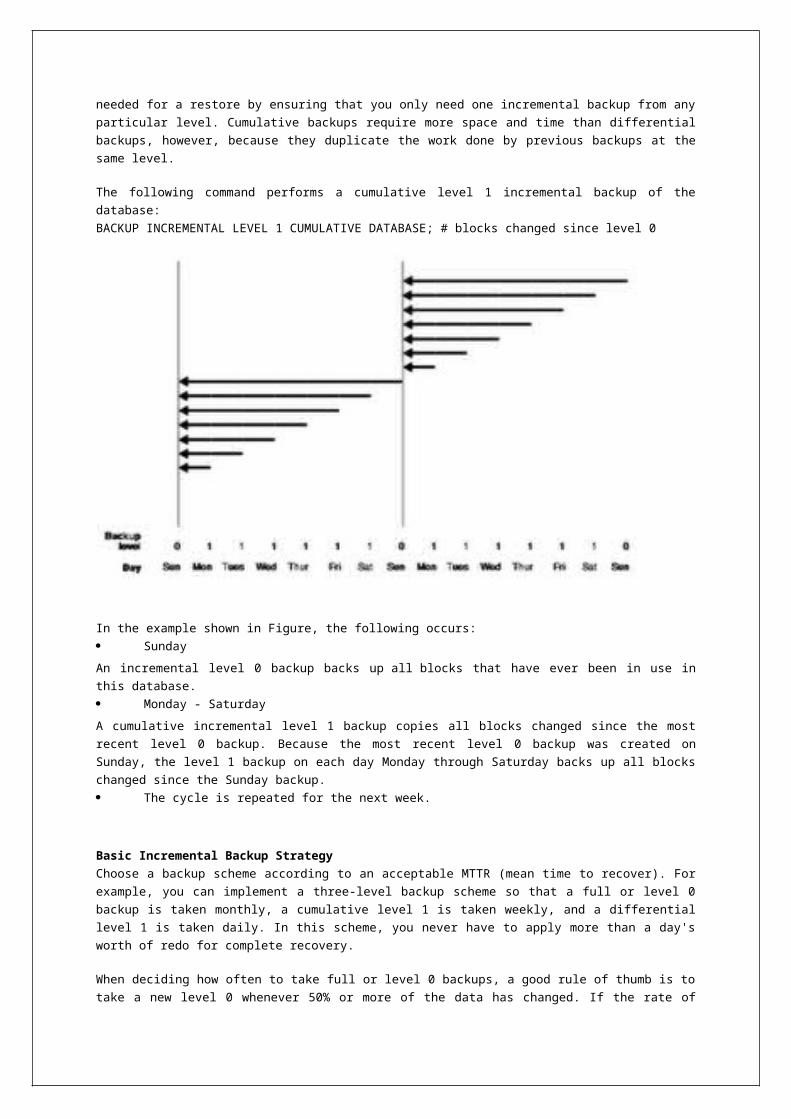
In the example shown in Figure, the following occurs:
Sunday
An incremental level 0 backup backs up all blocks that have ever been in use in this database.
Monday - Saturday
A cumulative incremental level 1 backup copies all blocks changed since the most recent level 0
backup. Because the most recent level 0 backup was created on Sunday, the level 1 backup on
each day Monday through Saturday backs up all blocks changed since the Sunday backup.
The cycle is repeated for the next week.
Basic Incremental Backup Strategy
Choose a backup scheme according to an acceptable MTTR (mean time to recover). For example,
you can implement a three-level backup scheme so that a full or level 0 backup is taken monthly, a
cumulative level 1 is taken weekly, and a differential level 1 is taken daily. In this scheme, you
never have to apply more than a day's worth of redo for complete recovery.
When deciding how often to take full or level 0 backups, a good rule of thumb is to take a new level
0 whenever 50% or more of the data has changed. If the rate of change to your database is
predictable, then you can observe the size of your incremental backups to determine when a new
level 0 is appropriate. The following query displays the number of blocks written to a backup set for
each datafile with at least 50% of its blocks backed up:
SELECT FILE#, INCREMENTAL_LEVEL, COMPLETION_TIME, BLOCKS, DATAFILE_BLOCKS FROM
V$BACKUP_DATAFILE WHERE INCREMENTAL_LEVEL > 0 AND BLOCKS / DATAFILE_BLOCKS > .5
ORDER BY COMPLETION_TIME;
Compare the number of blocks in differential or cumulative backups to a base level 0 backup. For
example, if you only create level 1 cumulative backups, then when the most recent level 1 backup
is about half of the size of the base level 0 backup, take a new level 0.
Making Incremental Backups: BACKUP INCREMENTAL
After starting RMAN, run the BACKUP INCREMENTAL command at the RMAN prompt. This example
makes a level 0 incremental backup of the database:
BACKUP INCREMENTAL LEVEL 0 DATABASE;
This example makes a differential level 1 backup of the SYSTEM tablespace and
datafile tools01.dbf. It will only back up those data blocks changed since the most recent level 1 or
level 0 backup:
BACKUP INCREMENTAL LEVEL 1 TABLESPACE SYSTEM DATAFILE
'ora_home/oradata/trgt/tools01.dbf';
This example makes a cumulative level 1 backup of the tablespace users, backing up all blocks
changed since the most recent level 0 backup.
BACKUP INCREMENTAL LEVEL = 1 CUMULATIVE TABLESPACE users;
Incrementally Updated Backups: Rolling Forward Image Copy Backups
Oracle's Incrementally Updated Backups feature lets you avoid the overhead of taking full image
copy backups of datafiles, while providing the same recovery advantages as image copy backups.
At the beginning of a backup strategy, RMAN creates an image copy backup of the datafile. Then,
at regular intervals, such as daily, level 1 incremental backups are taken, and applied to the image
copy backup, rolling it forward to the point in time when the level 1 incremental was created.
During restore and recovery of the database, RMAN can restore from this incrementally updated
copy and then apply changes from the redo log, with the same results as restoring the database
from a full backup taken at the SCN of the most recently applied incremental level 1 backup.
A backup strategy based on incrementally updated backups can help minimize time required for
media recovery of your database. For example, if you run scripts to implement this strategy daily,
then at recovery time, you never have more than one day of redo to apply.
What's New in Oracle 9iThe following new features were introduced with Oracle 9i:
Oracle 9i Release 1 (9.0.1) - June 2001 Traditional Rollback Segments (RBS) are still available, but can be replaced with automated System Managed Undo (SMU). Using SMU, Oracle will create it's own "Rollback Segments" and size them automatically without any DBA involvement.
Flashback query (dbms_flashback.enable) - one can query data as it looked at some point in the past. This feature will allow users to correct wrongly committed transactions without contacting the DBA to do a database restore.
Use Oracle Ultra Search for searching databases, file systems, etc. The UltraSearch crawler fetches data and hand it to Oracle Text to be indexed.
Oracle Nameserver is still available, but deprecate in favor of LDAP Naming (using the Oracle Internet Directory Server). A nameserver proxy is provided for backwards compatibility as pre-8i client cannot resolve names from an LDAP server.
Oracle Parallel Server's (OPS) scalability was improved - now called Real Application Cluster (RAC). Full Cache Fusion implemented. Any application can scale in a database cluster. Applications don't need to be cluster aware anymore.
The Oracle Standby DB feature renamed to Oracle Data Guard. New Logical Standby databases replay SQL on standby site allowing the database to be used for normal read write operations. The Data Guard Broker allows single step fail-over when disaster strikes.
Scrolling cursor support. Oracle9i allows fetching backwards in a result set.

Dynamic Memory Management - Buffer Pools and shared pool can be resized on-the-fly. Introduced sga_max_size parameter. This eliminates the need to restart the database each time parameter changes were made.
On-line table and index reorganization.
VI (Virtual Interface) protocol support, an alternative to TCP/IP, available for use with Oracle Net (SQL*Net). VI provides fast communications between components in a cluster.
Build in XML Developers Kit (XDK). New data types for XML (XMLType), URI's, etc. XML integrated with AQ.
Cost Based Optimizer now also considers memory and CPU, not only disk access cost as before.
PL/SQL programs can be natively compiled to binaries.
Deep data protection - fine grained security and auditing. Put security on DB level. SQL access does not mean unrestricted access.
Resumable backups and statements - suspend statement instead of rolling back immediately.
List partitioning - partitioning on a list of values.
ETL (eXtract, Transformation, Load) Operations - with external tables and pipelining.
Oracle OLAP- Express functionality included in the DB.
Data Mining - Oracle Darwin's features included in the DB.
DBA can specify a default temporary tablespace for the database.
In Oracle9i, significant improvements have been made to materialized view refresh:
o Fast refresh is now possible on materialized views that contain joins and aggregates even when base table data has changed using DMLs. In Oracle8i, fast refresh was possible, on materialized views that contain joins and aggregates, only if base table data was inserted using SQL*Loader direct path.
o Fast refresh is possible after partition maintenance operations, such as TRUNCATE PARTITION, on tables referenced in the materialized view.
o A new mechanism called Partition Change Tracking (PCT) has been introduced. This mechanism keeps track of the base table partitions that have been updated since the materialized view was last refreshed. This allows Oracle to identify fresh data in the materialized view.
Oracle 9i Release 2 (9.2.0) - May 2002 Locally Managed SYSTEM tablespaces.
Oracle Streams - new data sharing/replication feature (can potentially replace Oracle Advance Replication and Standby Databases).
XML DB (Oracle is now a standards compliant XML database).
Data segment compression (compress keys in tables - only when loading data).
Cluster File System (CFS) for Windows and Linux (raw devices are no longer required).
Create logical standby databases with Data Guard.
Java JDK 1.3 used inside the database (JVM).
New system privilege, "GRANT ANY OBJECT PRIVILEGE" is introduced to control the grant and revoke object privileges.
Oracle Data Guard Enhancements (SQL Apply mode - logical copy of primary database, automatic failover).
Security Improvements - Default Install Accounts locked, VPD on synonyms, AES, Migrate Users to Directory.
What's New in Oracle 11g Release 2Oracle 11g Release 2 (11.2.0) - Sept 2009
A separate tool, named deinstall, introduced for deinstallation and deconfiguration of Oracle products. Oracle Universal Installer no longer removes Oracle software.
chopt tool, a command-line utility, to configure the database options. Oracle Universal Installer no longer provides the custom installation option of individual components.
Unusable indexes and index partitions no longer consume space in the database because they become segmentless.
Complete IPv6 Support for JDBC Thin Clients.
From this release, Oracle/ASM will Support 4KB Sector Disk Drives.
Edition-based redefinition allows an application's database objects to be changed without interrupting the application's availability by making the changes in the privacy of a new edition.
CREATE or REPLACE TYPE will allow FORCE option. The FORCE option can now be used in conjunction with the CREATE or REPLACE TYPE command.
New SQL*Plus command SET EXITCOMMIT specifies whether the default EXIT behavior is COMMIT or ROLLBACK.SET EXITC[OMMIT] {ON|OFF}
LISTAGG Analytic FunctionThis function making very easy to aggregate strings. It also allows us to order the elements in the concatenated list.COLUMN employees FORMAT A50SQL> SELECT deptno, LISTAGG(ename, ',') WITHIN GROUP (ORDER BY ename) AS employees FROM emp GROUP BY deptno;DEPTNO EMPLOYEES---------- --------------------------------------------------10 CLARK,KING,MILLER20 ADAMS,FORD,JONES,SCOTT,SMITH30 ALLEN,BLAKE,JAMES,MARTIN,TURNER,WARD
Oracle Database 11g Release 2, provides the new PRECEDES keyword in trigger definition which allows trigger-upon-trigger dependencies.
Audit filename will be prefixed with the instance name and ends with a sequence number. For example:SID_ora_pid_seqNumber.aud or SID_ora_pid_seqNumber.xmlAn existing audit file is never appended.
From Oracle 11g R2, we can change audit table's (SYS.AUD$ and SYS.FGA_LOG$) tablespace and we can periodically delete the audit trail records using DBMS_AUDIT_MGMT.
The initial segment creation for non partitioned tables and indexes can be delayed until data is first inserted into an object. Depending on the module usage, only a subset of the objects is really being used. With delayed segment creation, empty database objects do not consume any space, reducing the installation footprint and speeding up the installation.
Flashback Data Archive support for DDL.
In Oracle Database 11g Release 2 (11.2), support for the LZO compression algorithm on SecureFiles has been added. The new compression option is designated as COMPRESS LOW.
Fast decompression - LZO compression is 2 times faster than ZLIB. Fast compression - LZO compression is 3 times faster than ZLIB.
IGNORE_ROW_ON_DUPKEY_INDEX hint for INSERT Statement With INSERT INTO
TARGET ... SELECT ... FROM SOURCE, a unique key for some to-be-inserted rows may collide with
existing rows. The IGNORE_ROW_ON_DUPKEY_INDEX allows the collisions to be silently ignored and
the non-colliding rows to be inserted.
Oracle Database Smart Flash Cache is a new feature, for Oracle Linux & Oracle Solaris,
which increases the size of the database buffer cache without having to add RAM to host.
Concurrent Statistics gathering feature is introduced in Oracle 11g release 2, which
enables user to gather statistics on multiple tables in a schema, and multiple (sub)partitions within
a table concurrently.
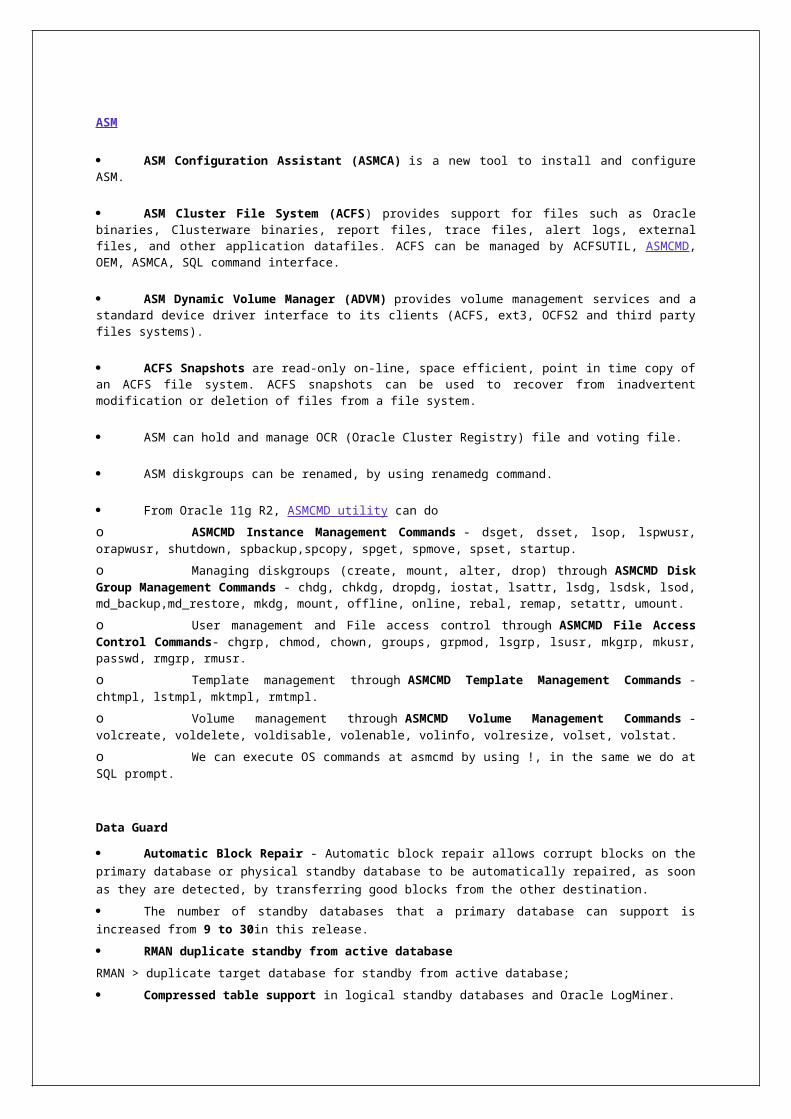
ASM
ASM Configuration Assistant (ASMCA) is a new tool to install and configure ASM.
ASM Cluster File System (ACFS) provides support for files such as Oracle binaries, Clusterware binaries, report files, trace files, alert logs, external files, and other application datafiles. ACFS can be managed by ACFSUTIL, ASMCMD, OEM, ASMCA, SQL command interface.
ASM Dynamic Volume Manager (ADVM) provides volume management services and a standard device driver interface to its clients (ACFS, ext3, OCFS2 and third party files systems).
ACFS Snapshots are read-only on-line, space efficient, point in time copy of an ACFS file system. ACFS snapshots can be used to recover from inadvertent modification or deletion of files from a file system.
ASM can hold and manage OCR (Oracle Cluster Registry) file and voting file.
ASM diskgroups can be renamed, by using renamedg command.
From Oracle 11g R2, ASMCMD utility can do
o ASMCMD Instance Management Commands - dsget, dsset, lsop, lspwusr, orapwusr, shutdown, spbackup,spcopy, spget, spmove, spset, startup.
o Managing diskgroups (create, mount, alter, drop) through ASMCMD Disk Group Management Commands - chdg, chkdg, dropdg, iostat, lsattr, lsdg, lsdsk, lsod, md_backup,md_restore, mkdg, mount, offline, online, rebal, remap, setattr, umount.
o User management and File access control through ASMCMD File Access Control Commands- chgrp, chmod, chown, groups, grpmod, lsgrp, lsusr, mkgrp, mkusr, passwd, rmgrp, rmusr.
o Template management through ASMCMD Template Management Commands - chtmpl, lstmpl, mktmpl, rmtmpl.
o Volume management through ASMCMD Volume Management Commands - volcreate, voldelete, voldisable, volenable, volinfo, volresize, volset, volstat.
o We can execute OS commands at asmcmd by using !, in the same we do at SQL prompt.
Data Guard
Automatic Block Repair - Automatic block repair allows corrupt blocks on the primary
database or physical standby database to be automatically repaired, as soon as they are detected,
by transferring good blocks from the other destination.
The number of standby databases that a primary database can support is increased from 9
to 30in this release.
RMAN duplicate standby from active database
RMAN > duplicate target database for standby from active database;
Compressed table support in logical standby databases and Oracle LogMiner.
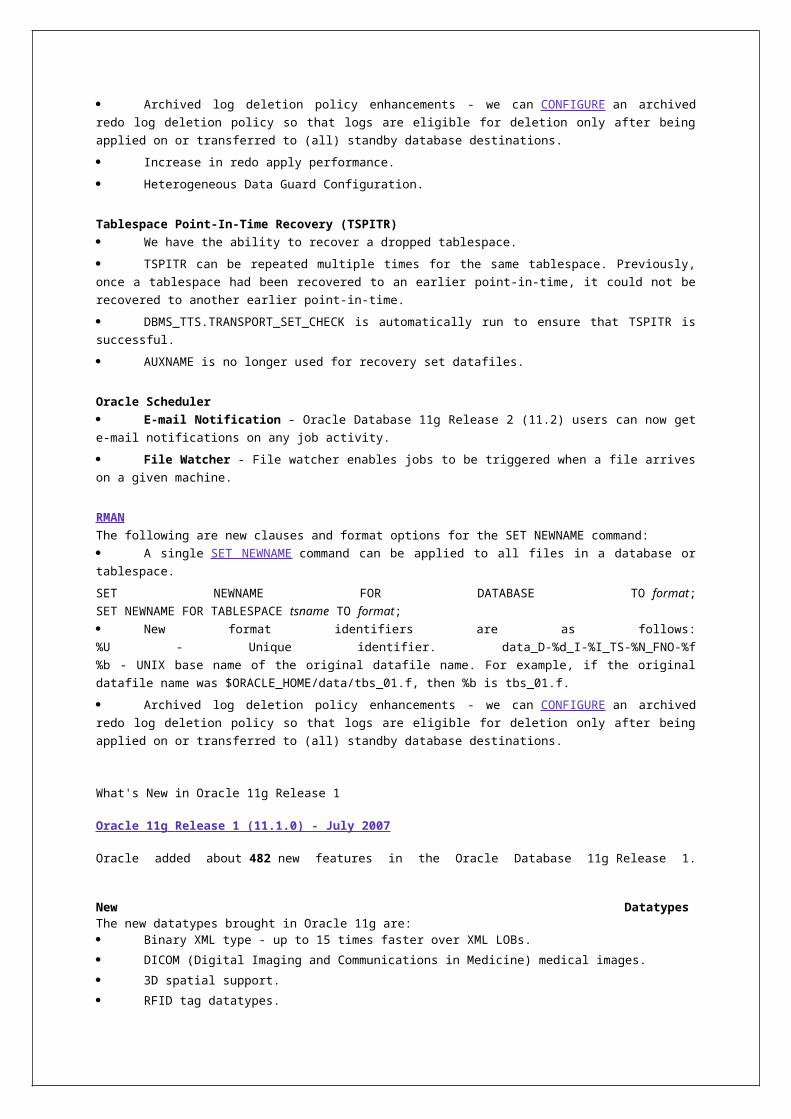
Archived log deletion policy enhancements - we can CONFIGURE an archived redo log
deletion policy so that logs are eligible for deletion only after being applied on or transferred to (all)
standby database destinations.
Increase in redo apply performance.
Heterogeneous Data Guard Configuration.
Tablespace Point-In-Time Recovery (TSPITR)
We have the ability to recover a dropped tablespace.
TSPITR can be repeated multiple times for the same tablespace. Previously, once a
tablespace had been recovered to an earlier point-in-time, it could not be recovered to another
earlier point-in-time.
DBMS_TTS.TRANSPORT_SET_CHECK is automatically run to ensure that TSPITR is
successful.
AUXNAME is no longer used for recovery set datafiles.
Oracle Scheduler
E-mail Notification - Oracle Database 11g Release 2 (11.2) users can now get e-mail
notifications on any job activity.
File Watcher - File watcher enables jobs to be triggered when a file arrives on a given
machine.
RMAN
The following are new clauses and format options for the SET NEWNAME command:
A single SET NEWNAME command can be applied to all files in a database or tablespace.
SET NEWNAME FOR DATABASE TO format;
SET NEWNAME FOR TABLESPACE tsname TO format;
New format identifiers are as follows:
%U - Unique identifier. data_D-%d_I-%I_TS-%N_FNO-%f
%b - UNIX base name of the original datafile name. For example, if the original datafile name was
$ORACLE_HOME/data/tbs_01.f, then %b is tbs_01.f.
Archived log deletion policy enhancements - we can CONFIGURE an archived redo log
deletion policy so that logs are eligible for deletion only after being applied on or transferred to (all)
standby database destinations.
What's New in Oracle 11g Release 1
Oracle 11g Release 1 (11.1.0) - July 2007
Oracle added about 482 new features in the Oracle Database 11g Release 1.
New Datatypes The new datatypes brought in Oracle 11g are: Binary XML type - up to 15 times faster over XML LOBs.
DICOM (Digital Imaging and Communications in Medicine) medical images.
3D spatial support.
RFID tag datatypes.
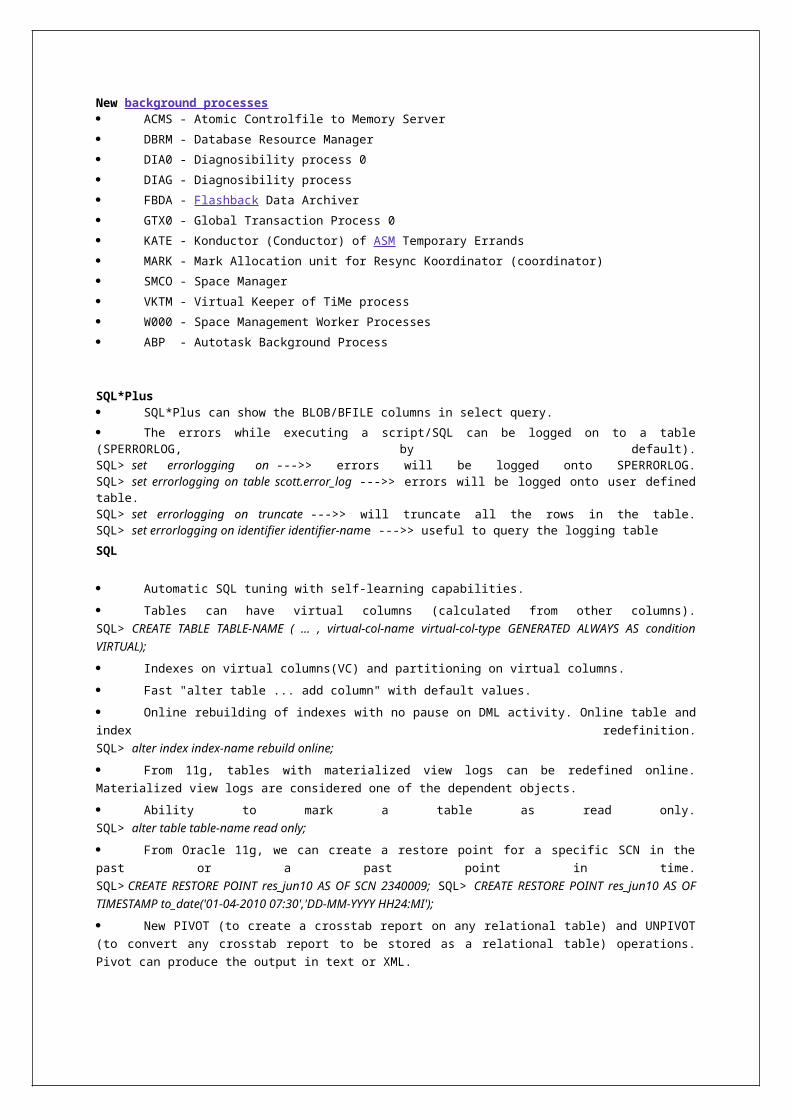
New background processes ACMS - Atomic Controlfile to Memory Server
DBRM - Database Resource Manager
DIA0 - Diagnosibility process 0
DIAG - Diagnosibility process
FBDA - Flashback Data Archiver
GTX0 - Global Transaction Process 0
KATE - Konductor (Conductor) of ASM Temporary Errands
MARK - Mark Allocation unit for Resync Koordinator (coordinator)
SMCO - Space Manager
VKTM - Virtual Keeper of TiMe process
W000 - Space Management Worker Processes
ABP - Autotask Background Process
SQL*Plus SQL*Plus can show the BLOB/BFILE columns in select query.
The errors while executing a script/SQL can be logged on to a table (SPERRORLOG, by default).SQL> set errorlogging on --->> errors will be logged onto SPERRORLOG.SQL> set errorlogging on table scott.error_log --->> errors will be logged onto user defined table.SQL> set errorlogging on truncate --->> will truncate all the rows in the table.SQL> set errorlogging on identifier identifier-name --->> useful to query the logging table
SQL
Automatic SQL tuning with self-learning capabilities.
Tables can have virtual columns (calculated from other columns).
SQL> CREATE TABLE TABLE-NAME ( ... , virtual-col-name virtual-col-type GENERATED ALWAYS AS
condition VIRTUAL);
Indexes on virtual columns(VC) and partitioning on virtual columns.
Fast "alter table ... add column" with default values.
Online rebuilding of indexes with no pause on DML activity. Online table and index
redefinition.
SQL> alter index index-name rebuild online;
From 11g, tables with materialized view logs can be redefined online. Materialized view
logs are considered one of the dependent objects.
Ability to mark a table as read only.
SQL> alter table table-name read only;
From Oracle 11g, we can create a restore point for a specific SCN in the past or a past
point in time.
SQL> CREATE RESTORE POINT res_jun10 AS OF SCN 2340009; SQL> CREATE RESTORE POINT
res_jun10 AS OF TIMESTAMP to_date('01-04-2010 07:30','DD-MM-YYYY HH24:MI');
New PIVOT (to create a crosstab report on any relational table) and UNPIVOT (to convert
any crosstab report to be stored as a relational table) operations. Pivot can produce the output in
text or XML.
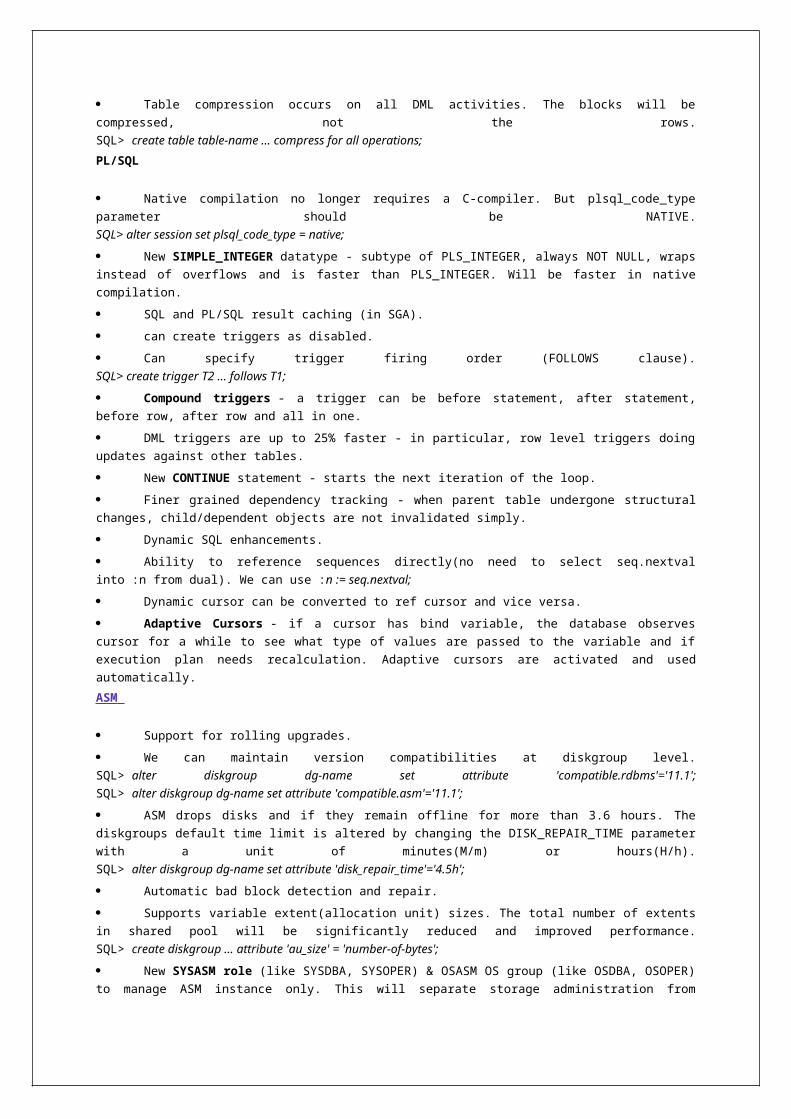
Table compression occurs on all DML activities. The blocks will be compressed, not the
rows.
SQL> create table table-name ... compress for all operations;
PL/SQL
Native compilation no longer requires a C-compiler. But plsql_code_type parameter should
be NATIVE.
SQL> alter session set plsql_code_type = native;
New SIMPLE_INTEGER datatype - subtype of PLS_INTEGER, always NOT NULL, wraps
instead of overflows and is faster than PLS_INTEGER. Will be faster in native compilation.
SQL and PL/SQL result caching (in SGA).
can create triggers as disabled.
Can specify trigger firing order (FOLLOWS clause).
SQL> create trigger T2 ... follows T1;
Compound triggers - a trigger can be before statement, after statement, before row,
after row and all in one.
DML triggers are up to 25% faster - in particular, row level triggers doing updates against
other tables.
New CONTINUE statement - starts the next iteration of the loop.
Finer grained dependency tracking - when parent table undergone structural changes,
child/dependent objects are not invalidated simply.
Dynamic SQL enhancements.
Ability to reference sequences directly(no need to select seq.nextval into :n from dual). We
can use :n := seq.nextval;
Dynamic cursor can be converted to ref cursor and vice versa.
Adaptive Cursors - if a cursor has bind variable, the database observes cursor for a while
to see what type of values are passed to the variable and if execution plan needs recalculation.
Adaptive cursors are activated and used automatically.
ASM
Support for rolling upgrades.
We can maintain version compatibilities at diskgroup level.
SQL> alter diskgroup dg-name set attribute 'compatible.rdbms'='11.1';
SQL> alter diskgroup dg-name set attribute 'compatible.asm'='11.1';
ASM drops disks and if they remain offline for more than 3.6 hours. The diskgroups default
time limit is altered by changing the DISK_REPAIR_TIME parameter with a unit of minutes(M/m) or
hours(H/h).
SQL> alter diskgroup dg-name set attribute 'disk_repair_time'='4.5h';
Automatic bad block detection and repair.
Supports variable extent(allocation unit) sizes. The total number of extents in shared pool
will be significantly reduced and improved performance.
SQL> create diskgroup ... attribute 'au_size' = 'number-of-bytes';
New SYSASM role (like SYSDBA, SYSOPER) & OSASM OS group (like OSDBA, OSOPER) to
manage ASM instance only. This will separate storage administration from database
administration.
$ sqlplus "/as sysasm" or $ asmcmd -a sysasm
ASM Preferred Mirror Read or Preferred Read Failure Groups -
ASM_PREFERRED_READ_FAILURE_GROUPS parameter is set to the preferred failure groups for each
node.
Faster Mirror Resync - Fast mirror resync after temporary connectivity lost.
We can drop a diskgroup forcefully.
SQL> drop diskgroup dg-name force including contents;
Can mount the disk in restricted mode, to rebalance faster.
SQL> alter diskgroup dg-name mount restricted;
New commands in ASMCMD.
o cp - to copy between ASM and local or remote destination.
o md_backup - to backup metadata.
o md_restore - to restore metadata.
o lsdsk - to list(check) disks.
o remap - to repair a range of physical blocks on disk.
Datapump New options in Datapump export.DATA_OPTIONS, ENCRYPTION, ENCRYPTION_ALGORITHM, ENCRYPTION_MODE, REMAP_DATA, REUSE_DUMPFILES, TRANSPORTABLE
New options in Datapump import.DATA_OPTIONS, PARTITION_OPTIONS, REMAP_DATA, REMAP_TABLE, TRANSPORTABLE
New option in Datapump export interactive mode - REUSE_DUMPFILES.
In datapump import, we can specify how the partitions should transform by using PARTITION_OPTIONS.
Dumpfile can be compressed. In Oracle 10g, only metadata can be compressed. From 11g, both data & metadata can be compressed. Dumpfile will be uncompressed automatically before importing.
Encryption: The dumpfile can be encrypted while creating. This encryption occurs on the entire dumpfile, not just on the encrypted columns as it was in the Oracle Database 10g.
Masking: when we import data from production to test or development instances, we have to make sure sensitive data such as credit card details, etc. are obfuscated/remapped (altered in such a way that they are not identifiable). From 11g, Data Pump enables us do that by creating a masking function and then using that during import.
RMAN
Multisection backups of same file - RMAN can backup or restore a single file in parallel by
dividing the work among multiple channels. Each channel backs up one file section, which is a
contiguous range of blocks. This speeds up overall backup and restore performance, and
particularly for bigfile tablespaces, in which a datafile can be sized upwards of several hundred GB
to TB's.
Recovery will make use of flashback logs in FRA (Flash/Fast Recovery Area).
Fast Backup Compression - in addition to the Oracle Database 10g backup compression
algorithm (BZIP2), RMAN now supports the ZLIB algorithm, which offers 40% better performance,
with a trade-off of no more than 20% lower compression ratio, versus BZIP2.
RMAN> configure compression algorithm 'ZLIB' ;
Will backup uncommitted undo only, not committed undo.
Data Recovery Advisor (DRA) - quickly identify the root cause of failures; auto fix or
present recovery options to the DBA.
Archived Redo log failover - this feature enables RMAN to complete backups even when
some archiving destinations having missing logs or contain logs with corrupted blocks where local
archive log destination is configured along with FRA.
Virtual Private Catalog - a recovery catalog administrator can grant visibility of a subset
of registered databases in the catalog to specific RMAN users.
RMAN> grant catalog for database db-name to user-name;
Catalogs can be merged/moved/imported from one database to another.
New commands in RMAN
o RMAN> list failure;
o RMAN> list failure errnumber detail;
o RMAN> advise failure;
o RMAN> repair failure;
o RMAN> repair failure preview;
o RMAN> validate database; -- checks for corrupted blocks
o RMAN> create virtual catalog;
Partitioning
Partition advisor - figure out what partitions to create.
Automated partitioning by interval (new partitions are added automatically).
Automated reference partitioning by Parent/Child reference (as partitions are created,
partitions are created in tables that reference them).
Partitioning by virtual columns.
New composite partitioning types: Range-Range, List-Range, List-Hash, List-List,
Interval-Range, Interval-List and Interval-Interval.
System partitioning is introduced.
Support for transportable partitions (tablespace transport of single partition) - for moving
partitions between different databases/operating systems.
Staleness checking in partitions - only outdated partitions will be refreshed when we run
dbms_mview.refresh().
Compression
Support compression on INSERT, UPDATE and DELETE operations. 10g only supported
compression for bulk data-loading operations.
Advanced compression allows for a 2-3 X compression rate of structured and unstructured
data.
From Oracle 11g, we can compress individual partitions also.
Performance improvements
RAC - 70% faster (ADDM has a better global view of the RAC cluster).
Streams - 30-50% faster.
Optimizer stats collection - 10x faster.
OLAP (Online Analytic Processing) based materialized views for fast OLAP cube building.
Cube-organized MView supports automatic query rewrite and automatic refresh of the cube.
SQL Result Cache - new memory area in SGA for storing SQL query results, PL/SQL
function results and OCI call results. When we execute a query with the hint result_cache, the
results are stored in the SQL Result Cache. Query results caching is 25% faster. The size of the
cache is determined by result_cache_max_size, result_cache_max_result, result_cache_mode,
result_cache_remote_expiration.
Invisible indexes - indexes will be ignored by the optimizer. Handy for testing without
dropping. To make it visible, recreate it.
SQL> alter index index-name invisible;
Oracle secure files - 5x faster than normal file systems.
Availability improvements
Ability to apply many patches on-line without downtime (RAC and single instance
databases).
XA transactions spanning multiple servers.
Improved runtime connection load balancing.
Flashback Transaction/Oracle Total Recall.
Security improvements
Support for case sensitive and multi-byte passwords (disabled by setting
SEC_CASE_SENSITIVE_LOGON parameter to FALSE).
Transparent Data Encryption - support for tablespace level encryption.
Hardware based master key protection.
Encrypt backups.
Kerberos authentication - strong passwords.
Add Multi-factor DBA controls with Data Vault.
New parameters have been added to enhance the default security of the database.
* SEC_RETURN_SERVER_RELEASE_BANNER
* SEC_PROTOCOL_ERROR_FURTHER_ACTION
* SEC_PROTOCOL_ERROR_TRACE_ACTION
* SEC_MAX_FAILED_FAILED_LOGIN_ATTEMPTS
* SEC_DISABLE_OLDER_ORACLE_RPCS
Manageability improvements
New MEMORY_TARGET, MEMORY_MAX_TARGET parameters. When we set
MEMORY_TARGET, Oracle will dynamically assign memory to SGA & PGA as and when needed
i.e.MEMORY_TARGET=SGA_TARGET+PGA_AGGREGATE_TARGET. New views related this are
v$memory_dynamic_components, v$memory_resize_ops.
From Oracle 11g, SID clause in "alter system reset" command is optional.
SQL> alter system [SID=instance-name] reset parameter-name;
New DIAGNOSTIC_DEST parameter as replacement for BACKGROUND_DUMP_DEST,
CORE_DUMP_DEST and USER_DUMP_DEST. It defaults to $ORACLE_BASE/diag/.
From 11g, we have two alert log files. One is the
traditional alert_SID.log (inDIAGNOSTIC_DEST/trace) and the other one is
a log.xml file (in DIAGNOSTIC_DEST/alert). The xml file gives a lot more information than the
traditional alert log file. We can have logging information for DDL operations in the alert log files. If
log.xml reaches 10MB size, it will be renamed and will create new alert log file. log.xml can be
accessed from ADR command line.
ADRCI> show alert
Logging information for DDL operations will be written into alert log files, is not enabled by
default and we must change the new parameter to TRUE.
SQL> ALTER SYSTEM SET enable_ddl_logging=TRUE SCOPE=BOTH;
Parameter(p) file & server parameter(sp) file can be created from memory.
SQL> create pfile[=location] from memory;
SQL> create spfile[=location] from memory;
From 11g, server parameter file (spfile) is in new format that is compliant with Oracle
Hardware Assisted Resilient Data(HARD).
DDL wait option - Oracle will automatically wait for the specified time period during DDL
operations and will try to run the DDL again.
SQL> ALTER SYSTEM/SESSION SET DDL_LOCK_TIMEOUT = n;
We can define the statistics to be pending, which means newly gather statistics will not be
published or used by the optimizer — giving us an opportunity to test the new statistics before we
publish them.
From Oracle Database 11g, we can create extended statistics on
(i) expressions of values, not only on columns
(ii) on multiple columns (column group), not only on single column.
Table level control of CBO statistics refresh threshold.
SQL> exec dbms_stats.set_table_prefs(’HR’, EMP’, ‘STALE_PERCENT’, ‘20');
Flashback Data Archive - flashback will make use of flashback logs, explicitly created for
that table, in FRA (Flash/Fast Recovery Area), will not use undo. Flashback data archives can be
defined on any table/tablespace. Flashback data archives are written by a dedicatedbackground
process called FBDA so there is less impact on performance. Can be purged at regular intervals
automatically.
Analytic Workspace Manager (AWM) - a tool to manage OLAP objects in the database.
Users with default passwords can be found in DBA_USERS_WITH_DEFPWD.
Hash value of the passwords in DBA_USERS (in ALL_USERS and USER_USERS) will be blank.
If you want to see the value, query USER$.
Default value for audit_trail is DB, not NULL. By default some system privileges will
beaudited.
LogMiner can be accessed from Oracle Enterprise Manager.
Data Guard improvements
Oracle Active Data Guard - Standby databases can now simultaneously be in read and
recovery mode - so use it for running reports 24x7.
Online upgrades: Test on standby and roll to primary.
Snapshot standby database - physical standby database can be temporarily converted into
an updateable one called snapshot standby database.
Creation of physical standby is become easier.
From Oracle 11g, we can control archive log deletion by setting the log_auto_delete
initialization parameter to TRUE. The log_auto_delete parameter must be coupled with the
log_auto_del_retention_target parameter to specify the number of minutes an archivelog is
maintained until it is purged. Default is 24 hours (1440 minutes).
Incremental backup on physical readable physical standby.
Offload: Complete database and fast incremental backups.
Logical standby databases now support XML and CLOB datatypes as well as transparent
data encryption.
We can compress the redo data that goes to the standby server, by
setting compression=enable.
From Oracle 11g, logical standby provides support for DBMS_SCHEDULER.
When transferring redo data to standby, if the standby does not respond in time, the log
transferring service will wait for specified timeout value (set by net_timeout=n) and then give up.
New package and procedure, DBMS_DG.INITIATE_FS_FAILOVER, introduced to
programmatically initiate a failover.
SecureFiles SecureFiles provide faster access to unstructured data than normal file systems, provides the benefits of LOBs and external files. For example, write access to SecureFiles is faster than a standard Linux file system, while read access is about the same. SecureFiles can be encrypted for security, de-duplicated and compressed for more efficient storage, cached (or not) for faster access (or save the buffer cache space), and logged at several levels to reduce the mean time to recover (MTTR) after a crash.
create table table-name ( ... lob-column lob-type [deduplicate] [compress high/low] [encrypt using 'encryption-algorithm'] [cache/nocache] [logging/nologging] ...) lob (lob-column) store as securefile ...;
To create SecureFiles:(i) The initialization parameter db_securefile should be set to PERMITTED (the default value).(ii) The tablespace where we are creating the securefile should be Automatic Segment Space Management (ASSM) enabled (default mode in Oracle Database 11g).
Real Application Testing(RAT)
Real Application Testing (RAT) will make decision making easier in migration, upgradation, patching, initialization parameter changes, object changes, hardware replacements, and operating system changes and moving to RAC environment. RAT consists of two components:
Database Replay - capture production workload and replay on different
(standby/test/development) environment. Capture the activities from source database in the form
of capture files in capture directory. Transfer these files to target box. Replay the process on target
database.
SQL Performance Analyzer (SPA) - identifies SQL execution plan changes and
performance regressions. SPA allows us to get results of some specific SQL or entire SQL workload
against various types of changes such as initialization parameter changes,
optimizer statisticsrefresh, and database upgrades, and then produces a comparison report to help
us assess their impact. Accessible through Oracle Enterprise Manager or dbms_sqlpa package.
Other features
Temporary tablespace or it's tempfile can be shrinked, up to specified size.
SQL> alter tablespace temp-tbs shrink space;
SQL> alter tablespace temp-tbs shrink space keep n{K|M|G|T|P|E};
SQL> alter tablespace temp-tbs shrink tempfile '.../temp03.dbf' keep n{K|M|G|T|P|E};
We can check free temp space in new view DBA_TEMP_FREE_SPACE.
From 11g, while creating global temporary tables, we can specify TEMPORARY tablespaces.
Online application upgrades and hot patching. Features based patching is also available.
Real-time SQL Monitoring, allows us to see the different metrics of the SQL being
executed in real time. The stats are exposed through V$SQL_MONITOR, which is refreshed every
second.
"duality" between SQL and XML - users can embed XML within PL/SQL and vice versa.
New binary XML datatype, a new XML index & better XQuery support.
Query rewriting will occur more frequently and for remote tables also.
Automatic Diagnostic Repository (ADR)- automated capture of fault diagnostics for
faster fault resolution. The location of the files depends on DIAGNOSTIC_DEST parameter. This can
be managed from Database control or command line. For command line, execute $ ./adrci
Repair advisors to guide DBAs through the fault diagnosis and resolution process.
SQL Developer is installed with the database server software (all editions). The Windows
SQL*Plus GUI is deprecated.
APEX (Oracle Application Express), formerly known as HTML DB, shipped with the DB.
Checkers - DB Structure Integrity Checker, Data Block Integrity Checker, Redo Integrity
Checker, Undo Segment Integrity Checker, Transaction Integrity Checker, Dictionary Integrity
Checker.
11g SQL Access Advisor provides recommendations with respect to the entire workload,
including considering the cost of creation and maintaining access structure.
hangman Utility – hangman(Hang Manager) utility to detect database bottlenecks.
Health Monitor (HM) utility - Health Monitor utility is an automation of the dbms_repair
corruption detection utility.
The dbms_stats package has several new procedures to aid in supplementing histogram
data, and the state of these extended histograms can be seen in the user_tab_col_statistics view:
dbms_stats.create_extended_stats
dbms_stats.show_extended_stats_name
dbms_stats.drop_extended_stats
New package DBMS_ADDM introduced in 11g.
Oracle 11g introduced server side connection pool called Database Resident Connection
Pool (DRCP).
Desupported features The following features are desupported/deprecated in Oracle Database 11g Release 1 (11.1.0):
Oracle export utility (exp) . Imp is still supported for backwards compatibility.
Windows SQL*Plus GUI & iSQLPlus will not be shipped anymore. Use SQL Developer
instead.
Oracle Enterprise Manager Java console.
copy command is deprecated.
What's New in Oracle 10gThe following new features were introduced with Oracle 10g:Oracle 10g Release 1 (10.1.0) - January 2004 Grid computing - an extension of the clustering feature (Real Application Clusters).
SYSAUX tablespace has been introduced as an auxiliary to SYSTEM, as LOCAL managed tablespace.
Datapump - faster data movement with expdp and impdp, successor for normal exp/imp.
NID utility has been introduced to change the database name and id.
Oracle Enterprise Manager (OEM) became browser based. Through any browser we can access data of a database in Oracle Enterprise Manager Database Control. Grid Control is used for accessing/managing multiple instances.
Automated Storage Management ( ASM ) . ASMB, RBAL, ARBx are the new background processes related to ASM.
Manageability improvements (self-tuning features).
Performance and scalability improvements.
Automatic Workload Repository (AWR).
Automatic Database Diagnostic Monitor (ADDM).
Active Session History (ASH).
Flashback operations available on row, transaction, table or database level.
Ability to UNDROP (Flashback Drop) a table using a recycle bin.
Ability to rename tablespaces (except SYSTEM and SYSAUX), whether permanent or temporary, using the following command:SQL> ALTER TABLESPACE oldname RENAME TO newname;
Ability to transport tablespaces across platforms (e.g. Windows to Linux, Solaris to HP-UX), which has same ENDIAN formats. If ENDIAN formats are different we have to use RMAN.
In Oracle 10g, undo tablespace can guarantee the retention of unexpired undo extents.SQL> CREATE UNDO TABLESPACE ... RETENTION GUARANTEE;SQL> ALTER TABLESPACE UNDO_TS RETENTION GUARANTEE;

New 'drop database' statement, will delete the datafiles, redolog files mentioned in control file and will delete SP file also.SQL> STARTUP RESTRICT MOUNT EXCLUSIVE;SQL> DROP DATABASE;
New memory structure in SGA i.e. Streams pool (streams_pool_size parameter), useful fordatapump activities & streams replication.
Introduced new init parameter, sga_target, to change the value of SGA dynamically. This is called Automatic Shared Memory Management (ASMM). It includes buffer cache, shared pool, java pool and large pool. It doesn't include log buffer, streams pool and the buffer pools for nonstandard block sizes and the non-default ones for KEEP or RECYCLE.SGA_TARGET = DB_CACHE_SIZE + SHARED_POOL_SIZE + JAVA_POOL_SIZE + LARGE_POOL_SIZE
New background processes in Oracle 10g
o Memory Manager (maximum 1) MMAN - MMAN dynamically adjust the sizes of the SGA components like DBC, large pool, shared pool and java pool. It is a new process added to Oracle 10g as part of automatic shared memory management.
o Memory Monitor (maximum 1) MMON - MMON monitors SGA and performs various manageability related background tasks.
o Memory Monitor Light (maximum 1) MMNL - New background process in Oracle 10g.
o Change Tracking Writer (maximum 1) CTWR - CTWR will be useful in RMAN.
o ASMB - This ASMB process is used to provide information to and from cluster synchronization services used by ASM to manage the disk resources. It's also used to update statistics and provide a heart beat mechanism.
o Re-Balance RBAL - RBAL is the ASM related process that performs rebalancing of disk resources controlled by ASM.
o Actual Rebalance ARBx - ARBx is configured by ASM_POWER_LIMIT.
DBA can specify a default tablespace for the database.
Temporary tablespace groups to group multiple temporary tablespaces into a single group.
From Oracle Database 10g, the ability to prepare the primary database and logical standby for a switchover, thus reducing the time to complete the switchover.
On primary,
ALTER DATABASE PREPARE TO SWITCHOVER TO LOGICAL STANDBY;
On logical standby,
ALTER DATABASE PREPARE TO SWITCHOVER TO PRIMARY;
New packages
o DBMS_SCHEDULER, which can call OS utilities and programs, not just PL/SQL program units like DBMS_JOB package. By using this package we can create jobs, programs, schedules and job classes.
o DBMS_FILE_TRANSFER package to transfer files.
o DBMS_MONITOR, to enable end-to-end tracing (tracing is not done only by session, but by client identifier).
o DBMS_ADVISOR, will help in working with several advisors.
o DBMS_WORKLOAD_REPOSITORY, to aid AWR, ADDM, ASH.
Support for bigfile tablespaces are up to 8EB (Exabytes) in size.
Rules-Based Optimizer (RBO) is desupported (not deprecated).
Auditing : FGA (Fine-grained auditing) now supports DML statements in addition to selects.
New features in RMAN
o Managing recovery related files with flash/fast recovery area.
o Optimized incremental backups using block change tracking (Faster incremental backups) using a file (named block change tracking file). CTWR (Change Tracking Writer) is the background process responsible for tracking the blocks.
o Reducing the time and overhead of full backups with incrementally updated backups.
o Comprehensive backup job tracking and administration with Enterprise Manager.
o Backup set binary compression.
o New compression algorithm BZIP2 brought in.
o Automated Tablespace Point-in-Time Recovery.
o Automatic channel failover on backup & restore.
o Cross-platform tablespace conversion.
o Ability to preview the backups required to perform a restore operation.RMAN> restore database preview [summary];RMAN> restore tablespace tbs1 preview;
SQL*Plus enhancements
1. The default SQL> prompt can be changed by setting the below parameters in
$ORACLE_HOME/sqlplus/admin/glogin.sql
_connect_identifier (will prompt DBNAME>)
_date (will prompt DATE>)
_editor
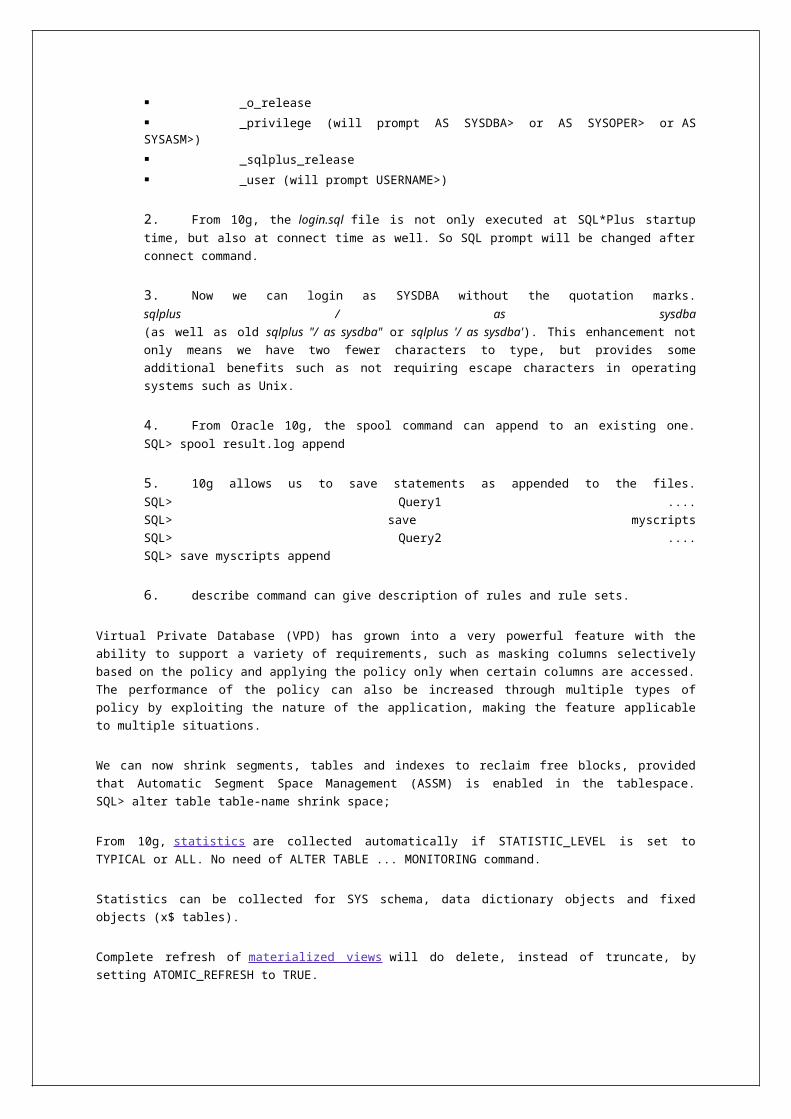
_o_version
_o_release
_privilege (will prompt AS SYSDBA> or AS SYSOPER> or AS SYSASM>)
_sqlplus_release
_user (will prompt USERNAME>)
2. From 10g, the login.sql file is not only executed at SQL*Plus startup time, but also
at connect time as well. So SQL prompt will be changed after connect command.
3. Now we can login as SYSDBA without the quotation marks.
sqlplus / as sysdba
(as well as old sqlplus "/ as sysdba" or sqlplus '/ as sysdba'). This enhancement not only
means we have two fewer characters to type, but provides some additional benefits such
as not requiring escape characters in operating systems such as Unix.
4. From Oracle 10g, the spool command can append to an existing one.
SQL> spool result.log append
5. 10g allows us to save statements as appended to the files.
SQL> Query1 ....
SQL> save myscripts
SQL> Query2 ....
SQL> save myscripts append
6. describe command can give description of rules and rule sets.
Virtual Private Database (VPD) has grown into a very powerful feature with the ability to support a
variety of requirements, such as masking columns selectively based on the policy and applying the
policy only when certain columns are accessed. The performance of the policy can also be
increased through multiple types of policy by exploiting the nature of the application, making the
feature applicable to multiple situations.
We can now shrink segments, tables and indexes to reclaim free blocks, provided that Automatic
Segment Space Management (ASSM) is enabled in the tablespace.
SQL> alter table table-name shrink space;
From 10g, statistics are collected automatically if STATISTIC_LEVEL is set to TYPICAL or ALL. No
need of ALTER TABLE ... MONITORING command.
Statistics can be collected for SYS schema, data dictionary objects and fixed objects (x$ tables).
Complete refresh of materialized views will do delete, instead of truncate, by setting
ATOMIC_REFRESH to TRUE.
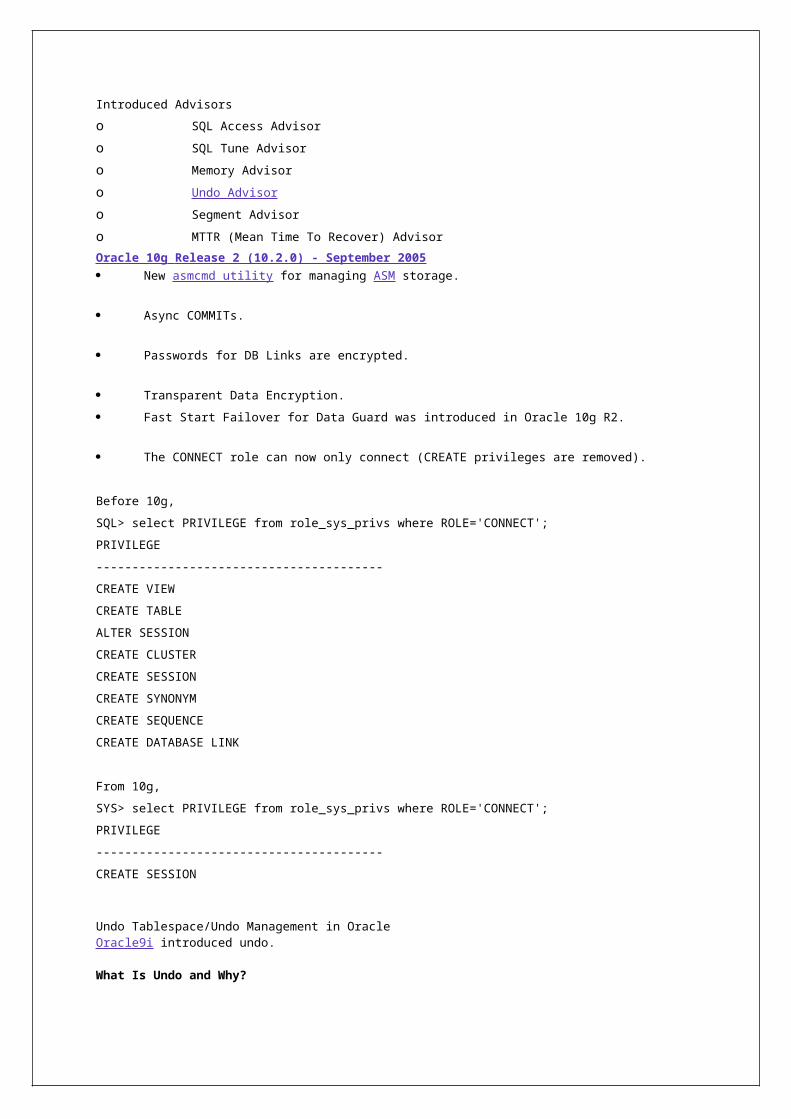
Introduced Advisors
o SQL Access Advisor
o SQL Tune Advisor
o Memory Advisor
o Undo Advisor
o Segment Advisor
o MTTR (Mean Time To Recover) Advisor
Oracle 10g Release 2 (10.2.0) - September 2005
New asmcmd utility for managing ASM storage.
Async COMMITs.
Passwords for DB Links are encrypted.
Transparent Data Encryption.
Fast Start Failover for Data Guard was introduced in Oracle 10g R2.
The CONNECT role can now only connect (CREATE privileges are removed).
Before 10g,
SQL> select PRIVILEGE from role_sys_privs where ROLE='CONNECT';
PRIVILEGE
----------------------------------------
CREATE VIEW
CREATE TABLE
ALTER SESSION
CREATE CLUSTER
CREATE SESSION
CREATE SYNONYM
CREATE SEQUENCE
CREATE DATABASE LINK
From 10g,
SYS> select PRIVILEGE from role_sys_privs where ROLE='CONNECT';
PRIVILEGE
----------------------------------------
CREATE SESSION
Undo Tablespace/Undo Management in OracleOracle9i introduced undo.
What Is Undo and Why?
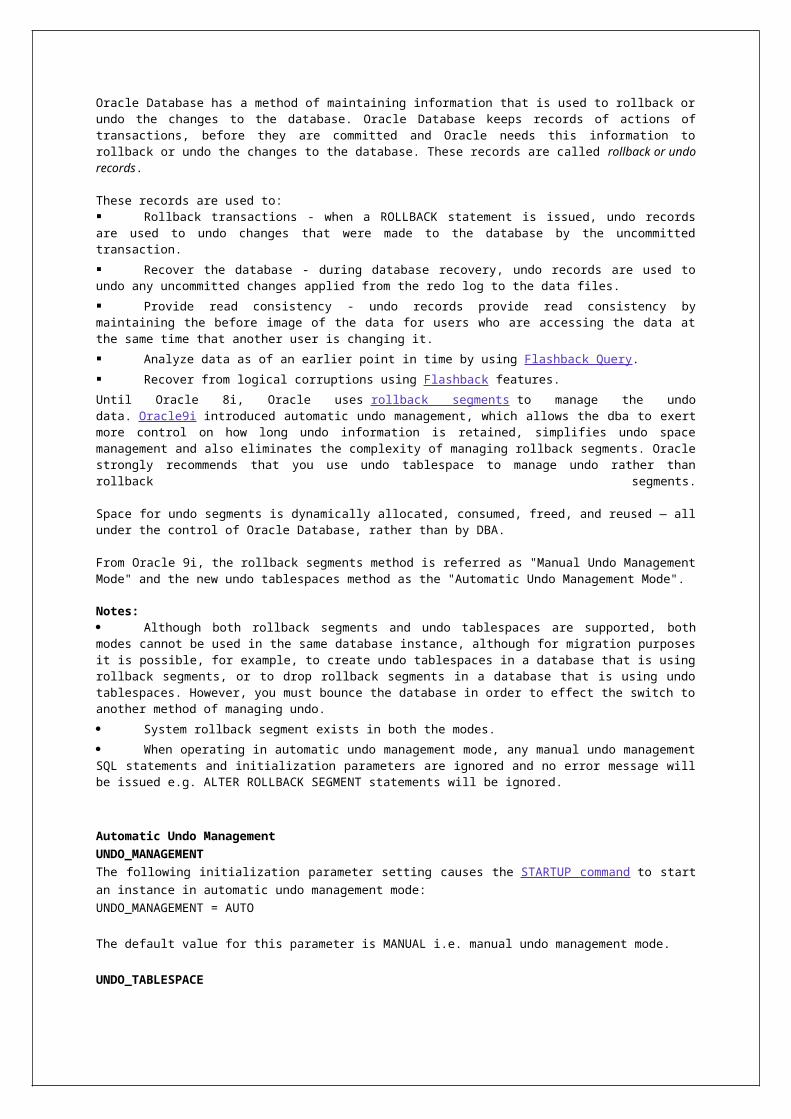
Oracle Database has a method of maintaining information that is used to rollback or undo the changes to the database. Oracle Database keeps records of actions of transactions, before they are committed and Oracle needs this information to rollback or undo the changes to the database. These records are called rollback or undo records.
These records are used to: Rollback transactions - when a ROLLBACK statement is issued, undo records are used to undo changes that were made to the database by the uncommitted transaction.
Recover the database - during database recovery, undo records are used to undo any uncommitted changes applied from the redo log to the data files.
Provide read consistency - undo records provide read consistency by maintaining the before image of the data for users who are accessing the data at the same time that another user is changing it.
Analyze data as of an earlier point in time by using Flashback Query.
Recover from logical corruptions using Flashback features.
Until Oracle 8i, Oracle uses rollback segments to manage the undo data. Oracle9i introduced automatic undo management, which allows the dba to exert more control on how long undo information is retained, simplifies undo space management and also eliminates the complexity of managing rollback segments. Oracle strongly recommends that you use undo tablespace to manage undo rather than rollback segments.
Space for undo segments is dynamically allocated, consumed, freed, and reused — all under the control of Oracle Database, rather than by DBA.
From Oracle 9i, the rollback segments method is referred as "Manual Undo Management Mode" and the new undo tablespaces method as the "Automatic Undo Management Mode".
Notes: Although both rollback segments and undo tablespaces are supported, both modes cannot be used in the same database instance, although for migration purposes it is possible, for example, to create undo tablespaces in a database that is using rollback segments, or to drop rollback segments in a database that is using undo tablespaces. However, you must bounce the database in order to effect the switch to another method of managing undo.
System rollback segment exists in both the modes.
When operating in automatic undo management mode, any manual undo management SQL statements and initialization parameters are ignored and no error message will be issued e.g. ALTER ROLLBACK SEGMENT statements will be ignored.
Automatic Undo Management
UNDO_MANAGEMENT
The following initialization parameter setting causes the STARTUP command to start an instance in
automatic undo management mode:
UNDO_MANAGEMENT = AUTO
The default value for this parameter is MANUAL i.e. manual undo management mode.
UNDO_TABLESPACE
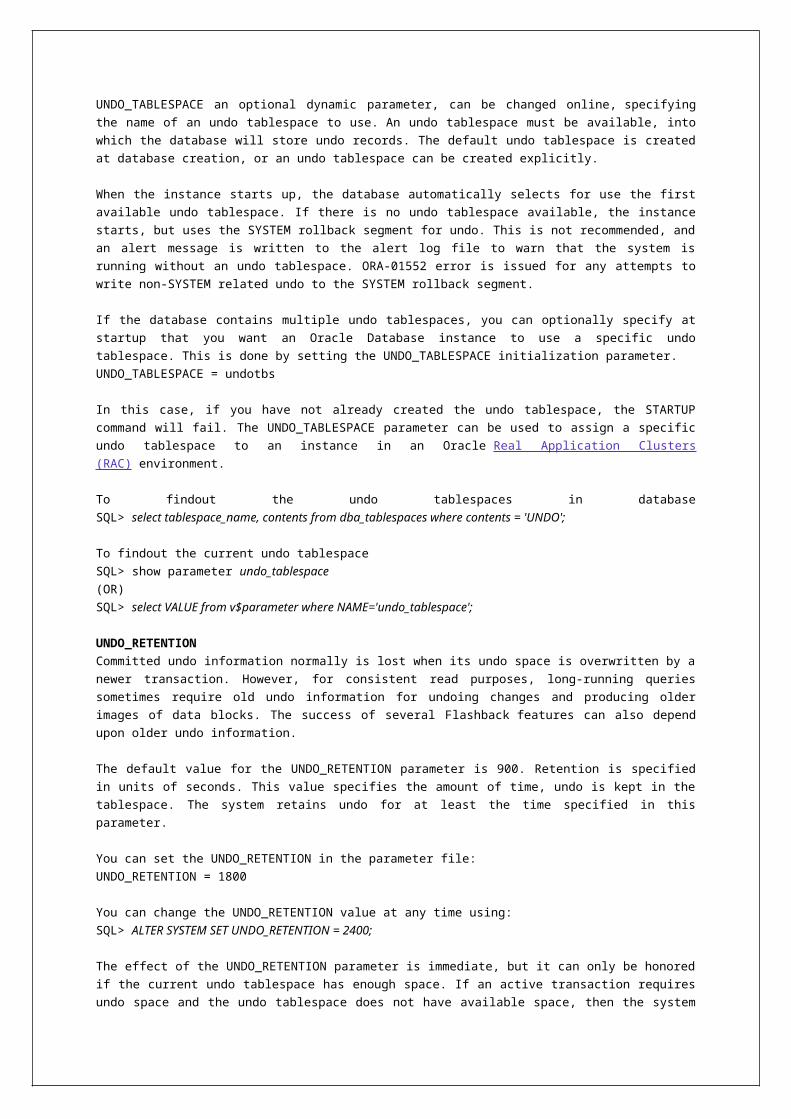
UNDO_TABLESPACE an optional dynamic parameter, can be changed online, specifying the name
of an undo tablespace to use. An undo tablespace must be available, into which the database will
store undo records. The default undo tablespace is created at database creation, or an undo
tablespace can be created explicitly.
When the instance starts up, the database automatically selects for use the first available undo
tablespace. If there is no undo tablespace available, the instance starts, but uses the SYSTEM
rollback segment for undo. This is not recommended, and an alert message is written to the alert
log file to warn that the system is running without an undo tablespace. ORA-01552 error is issued
for any attempts to write non-SYSTEM related undo to the SYSTEM rollback segment.
If the database contains multiple undo tablespaces, you can optionally specify at startup that you
want an Oracle Database instance to use a specific undo tablespace. This is done by setting the
UNDO_TABLESPACE initialization parameter.
UNDO_TABLESPACE = undotbs
In this case, if you have not already created the undo tablespace, the STARTUP command will fail.
The UNDO_TABLESPACE parameter can be used to assign a specific undo tablespace to an instance
in an Oracle Real Application Clusters (RAC) environment.
To findout the undo tablespaces in database
SQL> select tablespace_name, contents from dba_tablespaces where contents = 'UNDO';
To findout the current undo tablespace
SQL> show parameter undo_tablespace
(OR)
SQL> select VALUE from v$parameter where NAME='undo_tablespace';
UNDO_RETENTION
Committed undo information normally is lost when its undo space is overwritten by a newer
transaction. However, for consistent read purposes, long-running queries sometimes require old
undo information for undoing changes and producing older images of data blocks. The success of
several Flashback features can also depend upon older undo information.
The default value for the UNDO_RETENTION parameter is 900. Retention is specified in units of
seconds. This value specifies the amount of time, undo is kept in the tablespace. The system
retains undo for at least the time specified in this parameter.
You can set the UNDO_RETENTION in the parameter file:
UNDO_RETENTION = 1800
You can change the UNDO_RETENTION value at any time using:
SQL> ALTER SYSTEM SET UNDO_RETENTION = 2400;
The effect of the UNDO_RETENTION parameter is immediate, but it can only be honored if the
current undo tablespace has enough space. If an active transaction requires undo space and the
undo tablespace does not have available space, then the system starts reusing unexpired undo
space (if retention is not guaranteed). This action can potentially cause some queries to fail with
the ORA-01555 "snapshot too old" error message.
UNDO_RETENTION applies to both committed and uncommitted transactions since the introduction
offlashback query feature in Oracle needs this information to create a read consistent copy of the
data in the past.
Oracle Database 10g automatically tunes undo retention by collecting database use statistics and
estimating undo capacity needs for the successful completion of the queries. You can set a low
threshold value for the UNDO_RETENTION parameter so that the system retains the undo for at
least the time specified in the parameter, provided that the current undo tablespace has enough
space. Under space constraint conditions, the system may retain undo for a shorter duration than
that specified by the low threshold value in order to allow DML operations to succeed.
The amount of time for which undo is retained for Oracle Database for the current undo tablespace
can be obtained by querying the TUNED_UNDORETENTION column of the V$UNDOSTAT dynamic
performance view.
SQL> select tuned_undoretention from v$undostat;
Automatic tuning of undo retention is not supported for LOBs. The RETENTION value for LOB
columns is set to the value of the UNDO_RETENTION parameter.
UNDO_SUPRESS_ERRORS
In case your code has the alter transaction commands that perform manual undo management
operations. Set this to true to suppress the errors generated when manual management SQL
operations are issued in an automated management mode.
UNDO_SUPRESS_ERRORS = false
Retention Guarantee
Oracle Database 10g lets you guarantee undo retention. When you enable this option, the
database never overwrites unexpired undo data i.e. undo data whose age is less than the undo
retention period. This option is disabled by default, which means that the database can overwrite
the unexpired undo data in order to avoid failure of DML operations if there is not enough free
space left in the undo tablespace.
You enable the guarantee option by specifying the RETENTION GUARANTEE clause for the undo
tablespace when it is created by either the CREATE DATABASE or CREATE UNDO TABLESPACE
statement or you can later specify this clause in an ALTER TABLESPACE statement. You do not
guarantee that unexpired undo is preserved if you specify the RETENTION NOGUARANTEE clause.
In order to guarantee the success of queries even at the price of compromising the success of DML
operations, you can enable retention guarantee. This option must be used with caution, because it
can cause DML operations to fail if the undo tablespace is not big enough. However, with proper
settings, long-running queries can complete without risk of receiving the ORA-01555 "snapshot too
old" error message, and you can guarantee a time window in which the execution of Flashback
features will succeed.
From 10g, you can use the DBA_TABLESPACES view to determine the RETENTION setting for the
undo tablespace. A column named RETENTION will contain a value on GUARANTEE,
NOGUARANTEE, or NOT APPLY (used for tablespaces other than the undo tablespace).
A typical use of the guarantee option is when you want to ensure deterministic and predictable
behavior of Flashback Query by guaranteeing the availability of the required undo data.
Size of Undo Tablespace
You can size the undo tablespace appropriately either by using automatic extension of the undo
tablespace or by manually estimating the space.
Oracle Database supports automatic extension of the undo tablespace to facilitate capacity
planning of the undo tablespace in the production environment. When the system is first running in
the production environment, you may be unsure of the space requirements of the undo tablespace.
In this case, you can enable automatic extension for datafiles of the undo tablespace so that they
automatically increase in size when more space is needed. By combining automatic extension of
the undo tablespace with automatically tuned undo retention, you can ensure that long-running
queries will succeed by guaranteeing the undo required for such queries.
After the system has stabilized and you are more familiar with undo space requirements, Oracle
recommends that you set the maximum size of the tablespace to be slightly (10%) more than the
current size of the undo tablespace.
If you have decided on a fixed-size undo tablespace, the Undo Advisor can help us estimate
needed capacity, and you can then calculate the amount of retention your system will need. You
can access the Undo Advisor through Enterprise Manager or through the DBMS_ADVISOR package.
The Undo Advisor relies for its analysis on data collected in the Automatic Workload Repository
(AWR). An adjustment to the collection interval and retention period for AWR statistics can affect
the precision and the type of recommendations the advisor produces.
Undo Advisor
Oracle Database provides an Undo Advisor that provides advice on and helps automate the
establishment of your undo environment. You activate the Undo Advisor by creating an undo
advisor task through the advisor framework. The following example creates an undo advisor task to
evaluate the undo tablespace. The name of the advisor is 'Undo Advisor'. The analysis is based on
AWR snapshots, which you must specify by setting parameters START_SNAPSHOT and
END_SNAPSHOT.
In the following example, the START_SNAPSHOT is "1" and END_SNAPSHOT is "2".
DECLARE
tid NUMBER;
tname VARCHAR2(30);
oid NUMBER;
BEGIN
DBMS_ADVISOR.CREATE_TASK('Undo Advisor', tid, tname, 'Undo Advisor Task');
DBMS_ADVISOR.CREATE_OBJECT(tname,'UNDO_TBS',null, null, null, 'null', oid);
DBMS_ADVISOR.SET_TASK_PARAMETER(tname, 'TARGET_OBJECTS', oid);
DBMS_ADVISOR.SET_TASK_PARAMETER(tname, 'START_SNAPSHOT', 1);
DBMS_ADVISOR.SET_TASK_PARAMETER(tname, 'END_SNAPSHOT', 2);
DBMS_ADVISOR.execute_task(tname);
end;
/
Once you have created the advisor task, you can view the output and recommendations in the
Automatic Database Diagnostic Monitor (ADDM) in Enterprise Manager. This information is also
available in the DBA_ADVISOR_* data dictionary views.
Calculating space requirements for Undo tablespace
You can calculate space requirements manually using the following formula:
Undo Space = UNDO_RETENTION in seconds * undo blocks for each second + overhead
where:
* Undo Space is the number of undo blocks
* overhead is the small overhead for metadata and based on extent and file size (DB_BLOCK_SIZE)
As an example, if UNDO_RETENTION is set to 2 hours, and the transaction rate (UPS) is 200 undo
blocks for each second, with a 4K block size, the required undo space is computed as follows:
(2 * 3600 * 200 * 4K) = 5.8GBs
Such computation can be performed by using information in the V$UNDOSTAT view. In the steady
state, you can query the view to obtain the transaction rate. The overhead figure can also be
obtained from the view.
Managing Undo Tablespaces
Creating Undo Tablespace
There are two methods of creating an undo tablespace. The first method creates the undo
tablespace when the CREATE DATABASE statement is issued. This occurs when you are creating a
new database, and the instance is started in automatic undo management mode
(UNDO_MANAGEMENT = AUTO). The second method is used with an existing database. It uses the
CREATE UNDO TABLESPACE statement.
You cannot create database objects in an undo tablespace. It is reserved for system-managed undo
data.
Oracle Database enables you to create a single-file undo tablespace.
The following statement illustrates using the UNDO TABLESPACE clause in a CREATE DATABASE
statement. The undo tablespace is named undotbs_01 and one datafile, is allocated for it.
SQL> CREATE DATABASE ...
UNDO TABLESPACE undotbs_01 DATAFILE '/path/undo01.dbf' RETENTION GUARANTEE;
If the undo tablespace cannot be created successfully during CREATE DATABASE, the entire
operation fails.
The CREATE UNDO TABLESPACE statement is the same as the CREATE TABLESPACE statement, but
the UNDO keyword is specified. The database determines most of the attributes of the undo
tablespace, but you can specify the DATAFILE clause.
This example creates the undotbs_02 undo tablespace:
SQL> CREATE UNDO TABLESPACE undotbs_02 DATAFILE '/path/undo02.dbf' SIZE 2M REUSE
AUTOEXTEND ONRETENTION NOGUARANTEE;
You can create more than one undo tablespace, but only one of them can be active at any one
time.
Altering Undo Tablespace
Undo tablespaces are altered using the ALTER TABLESPACE statement. However, since most
aspects of undo tablespaces are system managed, you need only be concerned with the following
actions
Adding datafile
SQL> ALTER TABLESPACE undotbs ADD DATAFILE '/path/undo0102.dbf' AUTOEXTEND ON NEXT 1M MAXSIZE UNLIMITED;
Renaming data file
SQL> ALTER DATABASE RENAME FILE 'old_full_path' TO 'new_full_path';
Resizing datafile
SQL> ALTER DATABASE DATAFILE 'data_file_name|data_file_number' RESIZE nK|M|G|T|P|E;
when resizing the undo tablespace you may encounter ORA-03297 error: file contains used data beyond the requested RESIZE value. This means that some undo information stills stored above the datafile size we want to set. We can check the most high used block to check the minimum size that we can resize a particular datafile, by querying the dba_free_space view.Another way to set undo tablespace to the size that we want is, to create another undo tablespace, set it the default one, take offline the old and then just drop the big old tablespace.
Making datafile online or offline
SQL> ALTER TABLESPACE undotbs offline;
SQL> ALTER TABLESPACE undotbs online;
Beginning or ending an open backup on datafile
Enabling and disabling undo retention guarantee
SQL> ALTER TABLESPACE undotbs RETENTION GUARANTEE;
SQL> ALTER TABLESPACE undotbs RETENTION NOGUARANTEE;
These are also the only attributes you are permitted to alter.
If an undo tablespace runs out of space, or you want to prevent it from doing so, you can add more
files to it or resize existing datafiles.
Dropping Undo Tablespace
Use the DROP TABLESPACE statement to drop an undo tablespace.
SQL> DROP TABLESPACE undotbs_01;
An undo tablespace can only be dropped if it is not currently used by any instance. If the undo
tablespace contains any outstanding transactions (e.g. a transaction died but has not yet been
recovered), the DROP TABLESPACE statement fails. However, since DROP TABLESPACE drops an
undo tablespace even if it contains unexpired undo information (within retention period), you must
be careful not to drop an undo tablespace if undo information is needed by some existing queries.

DROP TABLESPACE for undo tablespaces behaves like DROP TABLESPACE ... INCLUDING
CONTENTS. All contents of the undo tablespace are removed.
Switching Undo Tablespaces
You can switch from using one undo tablespace to another. Because the UNDO_TABLESPACE
initialization parameter is a dynamic parameter, the ALTER SYSTEM SET statement can be used to
assign a new undo tablespace.
SQL> ALTER SYSTEM SET UNDO_TABLESPACE = undotbs_02;
Assuming undotbs_01 is the current undo tablespace, after this command successfully executes,
the instance uses undotbs_02 in place of undotbs_01 as its undo tablespace.
If any of the following conditions exist for the tablespace being switched to, an error is reported
and no switching occurs: The tablespace does not exist
The tablespace is not an undo tablespace
The tablespace is already being used by another instance (in RAC environment)
The database is online while the switch operation is performed, and user transactions can be
executed while this command is being executed. When the switch operation completes
successfully, all transactions started after the switch operation began are assigned to transaction
tables in the new undo tablespace.
The switch operation does not wait for transactions in the old undo tablespace to commit. If there
are any pending transactions in the old undo tablespace, the old undo tablespace enters into a
PENDING OFFLINE mode. In this mode, existing transactions can continue to execute, but undo
records for new user transactions cannot be stored in this undo tablespace.
An undo tablespace can exist in this PENDING OFFLINE mode, even after the switch operation
completes successfully. A PENDING OFFLINE undo tablespace cannot be used by another instance,
nor can it be dropped. Eventually, after all active transactions have committed, the undo
tablespace automatically goes from the PENDING OFFLINE mode to the OFFLINE mode. From then
on, the undo tablespace is available for other instances (in an RAC environment).
If the parameter value for UNDO TABLESPACE is set to '' (two single quotes), then the current undo
tablespace is switched out and the next available undo tablespace is switched in. Use this
statement with care, because if there is no undo tablespace available, the SYSTEM rollback
segment is used. This causes ORA-01552 error to be issued for any attempts to write non-SYSTEM
related undo to the SYSTEM rollback segment.
The following example unassigns the current undo tablespace:
SQL> ALTER SYSTEM SET UNDO_TABLESPACE = '';
Establishing User Quotas for Undo Space
The Oracle Database Resource Manager can be used to establish user quotas for undo space. The
Database Resource Manager directive UNDO_POOL allows DBAs to limit the amount of undo space
consumed by a group of users (resource consumer group).
You can specify an undo pool for each consumer group. An undo pool controls the amount of total
undo that can be generated by a consumer group. When the total undo generated by a consumer
group exceeds it's undo limit, the current UPDATE transaction generating the redo is terminated.
No other members of the consumer group can perform further updates until undo space is freed
from the pool.
When no UNDO_POOL directive is explicitly defined, users are allowed unlimited undo space.
Monitoring Undo Tablespaces
Oracle Database also provides proactive help in managing tablespace disk space use by alerting
you when tablespaces run low on available space.
In addition to the proactive undo space alerts, Oracle Database also provides alerts if your system
has long-running queries that cause SNAPSHOT TOO OLD errors. To prevent excessive alerts, the
long query alert is issued at most once every 24 hours. When the alert is generated, you can check
the Undo Advisor Page of Enterprise Manager to get more information about the undo tablespace.
The following dynamic performance views are useful for obtaining space information about the
undo tablespace:
View Description
V$UNDOSTATContains statistics for monitoring and tuning undo space. Use this view to help estimate the amount of undo space required for the current workload. Oracle uses this view information to tune undo usage in the system.
V$ROLLSTATFor automatic undo management mode, information reflects behavior of the undo segments in the undo tablespace.
V$TRANSACTION Contains undo segment information.DBA_UNDO_EXTENTS Shows the status and size of each extent in the undo tablespace.WRH$_UNDOSTAT Contains statistical snapshots of V$UNDOSTAT information.WRH$_ROLLSTAT Contains statistical snapshots of V$ROLLSTAT information.
To findout the undo segments in the database.
SQL> select segment_name, tablespace_name from dba_rollback_segs;
The V$UNDOSTAT view is useful for monitoring the effects of transaction execution on undo space
in the current instance. Statistics are available for undo space consumption, transaction
concurrency, the tuning of undo retention, and the length and SQL ID of long-running queries in the
instance. This view contains information that spans over a 24 hour period and each row in this view
contains data for a 10 minute interval specified by the BEGIN_TIME and END_TIME.
Each row in the view contains statistics collected in the instance for a 10minute interval. The rows
are in descending order by the BEGIN_TIME column value. Each row belongs to the time interval
marked by (BEGIN_TIME, END_TIME). Each column represents the data collected for the particular
statistic in that time interval. The first row of the view contains statistics for the (partial) current
time period. The view contains a total of 1008 rows, spanning a 7 day cycle.
Flashback Features
Oracle Database includes several features that are based upon undo information and that allow
administrators and users to access database information from a previous point in time. These
features are part of the overall flashback strategy incorporated into the database and include: Flashback Query
Flashback Versions Query
Flashback Transaction Query
Flashback Table
Flashback Database
The retention period for undo information is an important factor for the successful execution of
flashback features. It determines how far back in time a database version can be established.
We must choose an undo retention interval that is long enough to enable users to construct a
snapshot of the database for the oldest version of the database that they are interested in, e.g. if
an application requires that a version of the database be available reflecting its content 12 hours
previously, then UNDO_RETENTION must be set to 43200.
You might also want to guarantee that unexpired undo is not overwritten by specifying the
RETENTION GUARANTEE clause for the undo tablespace.
Migration to Automatic Undo Management
If you are still using rollback segments to manage undo space, Oracle strongly recommends that
you migrate your database to automatic undo management. From 10g, Oracle Database provides a
function that provides information on how to size your new undo tablespace based on the
configuration and usage of the rollback segments in your system. DBA privileges are required to
execute this function:
set serveroutput on
DECLARE
utbsize_in_MB NUMBER;
BEGIN
utbsize_in_MB := DBMS_UNDO_ADV.RBU_MIGRATION;
dbms_output.put_line(utbsize_in_MB||'MB');
END;
/
The function returns the undo tablespace size in MBs.
Best Practices for Undo Tablespace/Undo Management in Oracle
This following list of recommendations will help you manage your undo space to best advantage. You need not set a value for the UNDO_RETENTION parameter unless your system has flashback or LOB retention requirements.
Allow 10 to 20% extra space in your undo tablespace to provide for some fluctuation in your workload.
Set the warning and critical alert thresholds for the undo tablespace alert properly.
To tune SQL queries or to check on runaway queries, use the value of the SQLID column provided in the long query or in the V$UNDOSTAT or WRH$_UNDOSTAT views to retrieve SQL text and other details on the SQL from V$SQL view.
Transportable Tablespaces (TTS) in OracleWe can use the transportable tablespaces feature to copy/move subset of data (set of user tablespaces), from an Oracle database and plug it in to another Oracle database. The tablespaces being transported can be either dictionary managed or locally managed.
With Oracle 8i, Oracle introduced transportable tablespace (TTS) technology that moves tablespaces between databases. Oracle 8i supports tablespace transportation between databases that run on same OS platforms and use the same database block size.
With Oracle 9i, TTS (Transportable Tablespaces) technology was enhanced to support tablespace transportation between databases on platforms of the same type, but using different block sizes.
With Oracle 10g, TTS (Transportable Tablespaces) technology was further enhanced to support transportation of tablespaces between databases running on different OS platforms (e.g. Windows to Linux, Solaris to HP-UX), which has same ENDIAN formats. If ENDIAN formats are different you
have to use RMAN (e.g. Windows to Solaris, Tru64 to AIX). From this version we can transport whole database, this is called Transportable Database.
From Oracle 11g, we can transport single partition of a tablespace between databases.
You can also query the V$TRANSPORTABLE_PLATFORM view to see all the platforms that are supported, and to determine their platform names and IDs and their endian format.
SQL> select * from v$transportable_platform order by platform_id;PLATFORM_ID PLATFORM_NAME ENDIAN_FORMAT----------- ---------------------------------------- --------------1 Solaris[tm] OE (32-bit) Big2 Solaris[tm] OE (64-bit) Big3 HP-UX (64-bit) Big4 HP-UX IA (64-bit) Big5 HP Tru64 UNIX Little6 AIX-Based Systems (64-bit) Big7 Microsoft Windows IA (32-bit) Little8 Microsoft Windows IA (64-bit) Little9 IBM zSeries Based Linux Big10 Linux IA (32-bit) Little11 Linux IA (64-bit) Little12 Microsoft Windows x86 64-bit Little13 Linux x86 64-bit Little15 HP Open VMS Little16 Apple Mac OS Big17 Solaris Operating System (x86) Little18 IBM Power Based Linux Big19 HP IA Open VMS Little20 Solaris Operating System (x86-64) Little21 Apple Mac OS (x86-64) Little (from Oracle 11g R2)To find out your platform name and it's endian format
SQL> select tp.PLATFORM_NAME, tp.ENDIAN_FORMAT from v$database d, v$transportable_platform tp where d.platform_name=tp.platform_name;PLATFORM_NAME ENDIAN_FORMAT---------------------------------------- --------------Solaris[tm] OE (64-bit) BigTransporting tablespaces is particularly useful for(i) Updating data from production to development and test instances.(ii) Updating data from OLTP systems to data warehouse systems.(iii) Transportable Tablespace (TTS) is used to take out of the database pieces of data for various reasons (Archiving, Moving to other databases etc).(iv) Performing tablespace point-in-time-recovery (TSPITR).
Moving data using transportable tablespaces can be much faster than performing either anexport/import or unload/load of the same data, because transporting a tablespace only requires copying of datafiles and integrating the tablespace structural information. You can also use transportable tablespaces to move both table and index data, thereby avoiding the index rebuilds you would have to perform when importing or loading table data.
In Oracle 8i, there were three restrictions with TTS. First, both the databases must have same block size. Second, both platforms must be the same OS. Third, you cannot rename the tablespace. Oracle 9iremoves the first restriction. Oracle 10g removes the second restriction. Oracle 10g also makes available a command to rename tablespaces.
Limitations/RestrictionsFollowing are limitations/restrictions of transportable tablespace:
System, undo, sysaux and temporary tablespaces cannot be transported.
The source and target database must be on the same hardware platform. e.g. we can transport
tablespaces between Sun Solaris databases, or we can transport tablespaces between Windows NT
databases. However, you cannot transport a tablespace from a Sun Solaris database to a Windows
NT database.
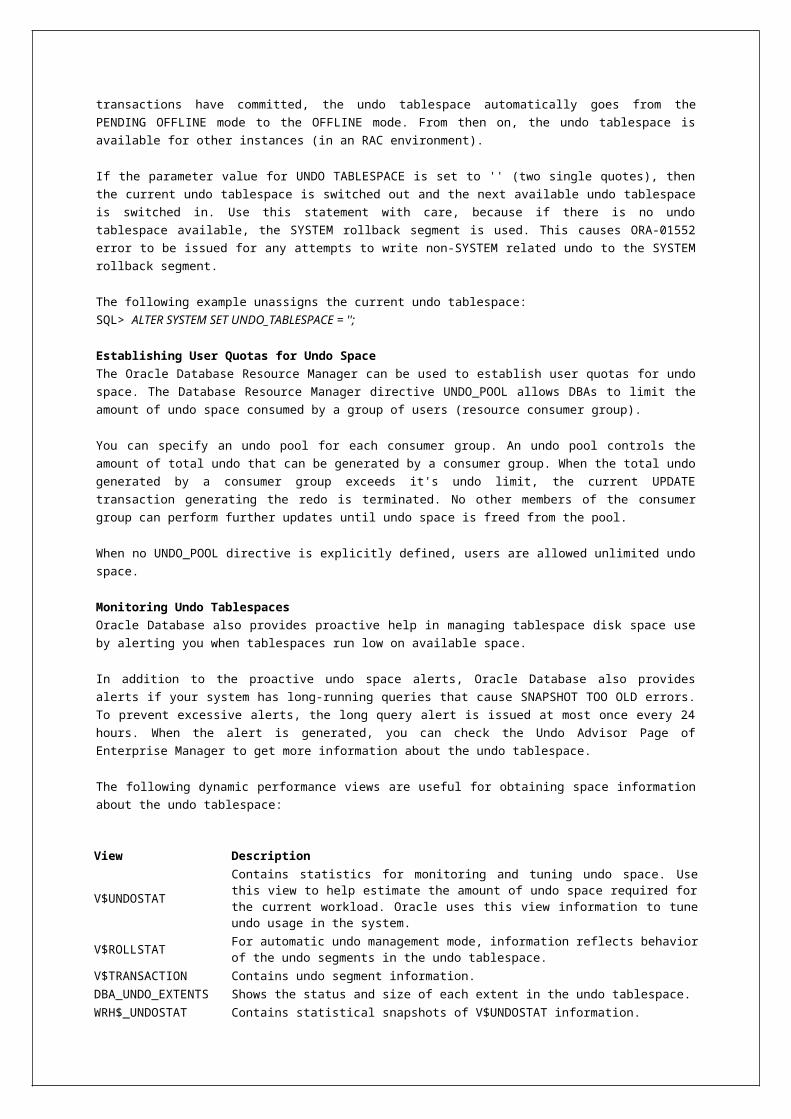
The source and target database must use the same character set and national character set.
If Automatic Storage Management (ASM) is used with either the source or destination database,
you must use RMAN to transport/convert the tablespace.
You cannot transport a tablespace to a target database in which a tablespace with the same name
already exists. However, you can rename either the tablespace to be transported or the destination
tablespace before the transport operation.
Transportable tablespaces do not support: Materialized views/replication Function-based indexes.
Binary_Float and Binary_Double datatypes (new in Oracle 10g) are not supported.
At Source:
Validating Self Containing Property
TTS requires all the tablespaces, which we are moving, must be self contained. This means that the
segments within the migration tablespace set cannot have dependency to a segment in a
tablespace out of the transportable tablespace set. This can be checked using the
DBMS_TTS.TRANSPORT_SET_CHECK procedure.
SQL> exec DBMS_TTS.TRANSPORT_SET_CHECK('tbs', TRUE);
SQL> exec DBMS_TTS.TRANSPORT_SET_CHECK('tbs1, tbs2, tbs3', FALSE, TRUE);
SQL> SELECT * FROM transport_set_violations;
No rows should be displayed
If it were not self contained you should either remove the dependencies by dropping/moving them
or include the tablespaces of segments into TTS set to which migration set is depended.
Put Tablespaces in READ ONLY Mode
We will perform physical file system copy of tablespace datafiles. In order those datafiles to not to
require recovery, they need to be in consistent during the copy activity. So put all the tablespaces
in READ ONLY mode.
SQL> alter tablespace tbs-name read only;
Export the Metadata
Export the metadata of the tablespace set.
exp FILE=/path/dump-file.dmp LOG=/path/tts_exp.log TABLESPACES=tbs-names
TRANSPORT_TABLESPACE=y STATISTICS=none
(or)
expdp DUMPFILE=tts.dmp LOGFILE=tts_exp.log DIRECTORY=exp_dir
TRANSPORT_TABLESPACES=tts TRANSPORT_FULL_CHECK=y
for transporting partition,
expdp DUMPFILE=tts_partition.dmp LOGFILE=tts_partition_exp.log DIRECTORY=exp_dir
TRANSPORTABLE=always TABLES=trans_table:partition_Q1
If the tablespace set being transported is not self-contained, then the export will fail.
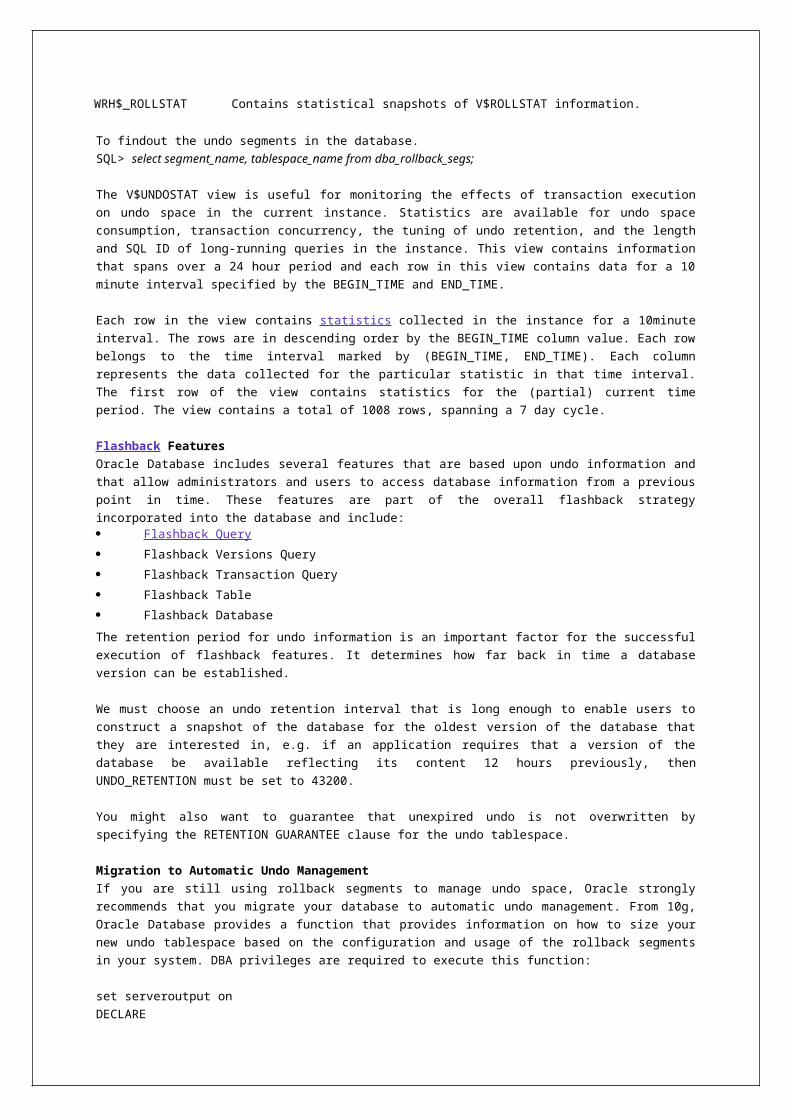
You can drop the tablespaces at source, if you don’t want them.
SQL> drop tablespace tbs-name including contents;
Otherwise, make all the tablespaces as READ WRITE
SQL> alter tablespace tbs-name read write;
Copying Datafiles and export file
Copy the datafiles and export file to target server.
At Target:
Import the export file.
imp FILE=/path/dump-file.dmp LOG=/path/tts_imp.log TTS_OWNERS=user-name FROMUSER=user-
name TOUSER=user-name TABLESPACES=tbs-name TRANSPORT_TABLESPACE=y
DATAFILES=/path/tbs-name.dbf
(or)
impdp DUMPFILE=tts.dmp LOGFILE=tts_imp.log DIRECTORY=exp_dir
REMAP_SCHEMA=master:scott TRANSPORT_DATAFILES='/path/tts.dbf'
for transporting partition,
impdp DUMPFILE=tts_partition.dmp LOGFILE=tts_partition_imp.log
DIRECTORY=exp_dir TRANSPORT_DATAFILES='/path/tts_part.dbf' PARTITION_OPTIONS=departition
Finally we have to switch the new tablespaces into read write mode:
SQL> alter tablespace tbs-name read write;
TRANSPORT TABLESPACE Using RMAN
Create transportable tablespace sets from backup for one or more tablespaces.
RMAN> TRANSPORT TABLESPACE example, tools TABLESPACE DESTINATION '/disk1/trans'
AUXILIARY DESTINATION '/disk1/aux' UNTIL TIME 'SYSDATE-15/1440';
RMAN> TRANSPORT TABLESPACE exam TABLESPACE DESTINATION '/disk1/trans' AUXILIARY
DESTINATION '/disk1/aux' DATAPUMP DIRECTORY dpdir DUMP FILE 'dmpfile.dmp' IMPORT SCRIPT
'impscript.sql' EXPORT LOG 'explog.log';
Using Transportable Tablespaces with a Physical Standby Database
We can use the Oracle transportable tablespaces feature to move a subset of an Oracle database
and plug it in to another Oracle database, essentially moving tablespaces between the databases.
To move or copy a set of tablespaces into a primary database when a physical standby is being
used, perform the following steps:
1. Generate a transportable tablespace set that consists of datafiles for the set of tablespaces
being transported and an export file containing structural information for the set of tablespaces.
2. Transport the tablespace set:
a. Copy the datafiles and the export file to the primary database.
b. Copy the datafiles to the standby database.
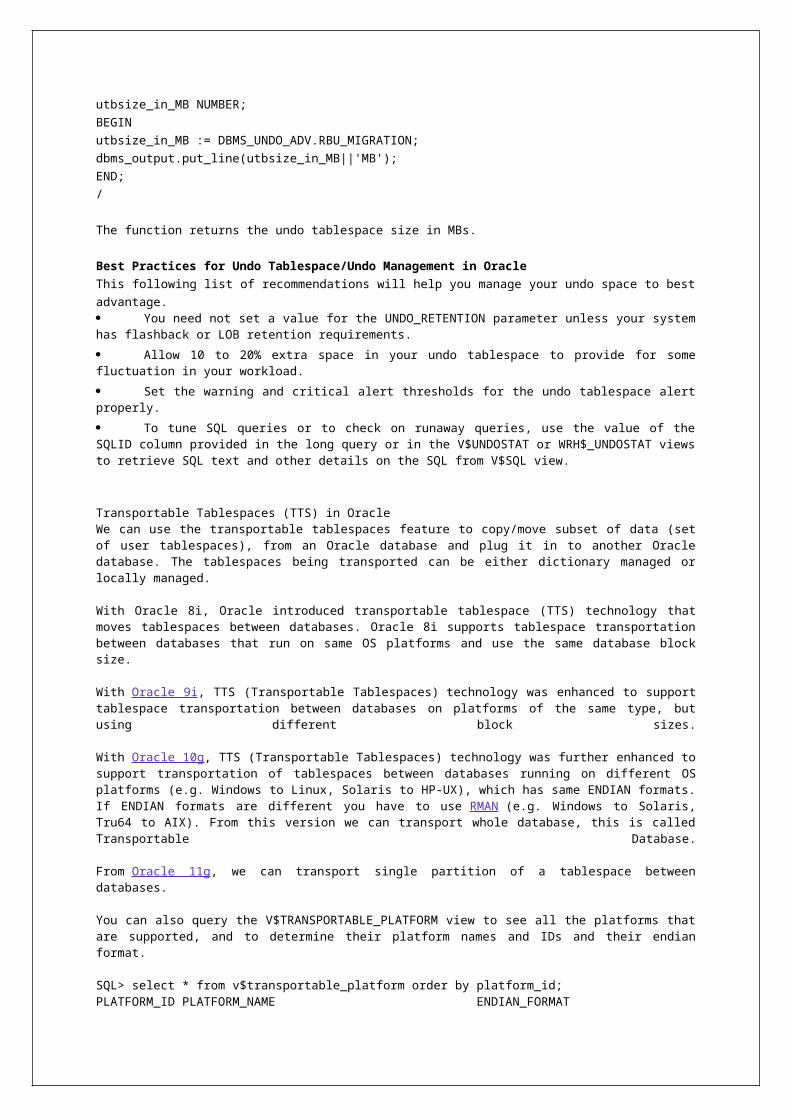
The datafiles must be copied in a directory defined by the DB_FILE_NAME_CONVERT initialization
parameter. If DB_FILE_NAME_CONVERT is not defined, then issue the ALTER DATABASE RENAME
FILE statement to modify the standby control file after the redo data containing the transportable
tablespace has been applied and has failed. The STANDBY_FILE_MANAGEMENT initialization
parameter must be set to AUTO.
3. Plug in the tablespace.
Invoke the Data Pump utility to plug the set of tablespaces into the primary database. Redo data
will be generated and applied at the standby site to plug the tablespace into the standby database.
Related Packages
DBMS_TTS
DBMS_EXTENDED_TTS_CHECKS
Temporary Tablespace GroupTemporary Tablespace Groups in OracleOracle 10g introduced the concept of temporary tablespace groups.This allows grouping multiple temporary tablespaces into a single group and assigning to a user, this group of tablespaces instead of a single temporary tablespace.
A tablespace group lets you assign multiple temporary tablespaces to a single user and increases the addressability of temporary tablespaces.
A temporary tablespace group has the following properties: It contains one or more temporary tablespaces (there is no upper limit).
It contains only temporary tablespaces.
It is not explicitly created. It is created implicitly when the first temporary tablespace is assigned to it, and is deleted when the last temporary tablespace is removed from the group.
There is no CREATE TABLESPACE GROUP statement, as implicitly created during the creation of a temporary tablespace with the CREATE TEMPORARY TABLESPACE command and by specifying the TABLESPACE GROUP clause.
Temporary Tablespace Group Benefits It allows multiple default temporary tablespaces to be specified at the database level.
It allows the user to use multiple temporary tablespaces in different sessions at the same time.
Reduced contention when multiple temporary tablespaces are defined.
It allows a single SQL operation to use multiple temporary tablespaces for sorting.
Finer granularity so you can distribute operations across temporary tablespaces.
The following statement creates temporary tablespace temp as a member of the temp_grp
tablespace group. If the tablespace group does not already exist, then Oracle Database creates it
during execution of this statement.
SQL> CREATE TEMPORARY TABLESPACE temp TEMPFILE 'temp01.dbf' SIZE 5M AUTOEXTEND
ON TABLESPACE GROUP temp_grp;
Adding a temporary tablespace to temporary tablespace group:
SQL> ALTER TEMPORARY TABLESPACE temp TABLESPACE GROUP temp_grp;
Removing a temporary tablespace from temporary tablespace group:
SQL> ALTER TEMPORARY TABLESPACE temp TABLESPACE GROUP '';
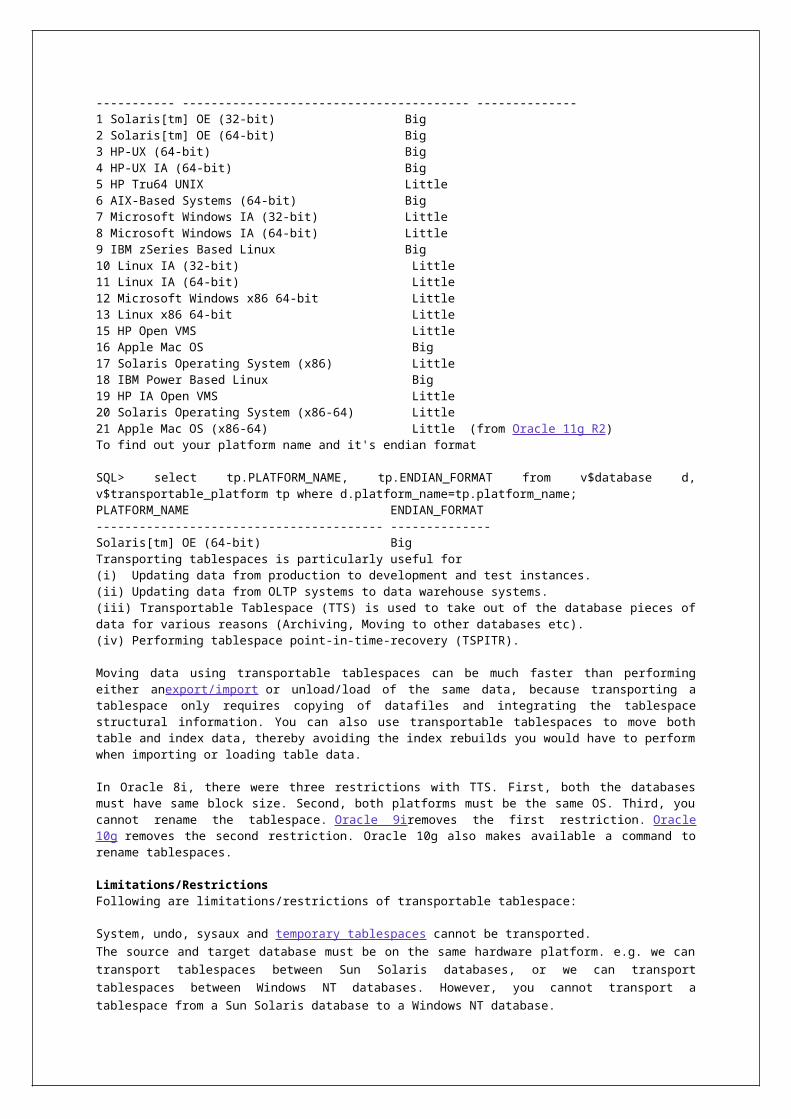
Assigning temporary tablespace group to a user (same as assigning temporary tablespace to a
user):
SQL> ALTER USER scott TEMPORARY TABLESPACE temp_grp;
Assigning temporary tablespace group as default temporary tablespace:
SQL> ALTER DATABASE DEFAULT TEMPORARY TABLESPACE temp_grp;
To see the tablespaces in the temporary tablespace group:
SQL> select * from DBA_TABLESPACE_GROUPS;
Related Views:
DBA_TABLESPACE_GROUPS
DBA_TEMP_FILESV$TEMPFILE
V$TEMPSTATV$TEMP_SPACE_HEADER
V$TEMPSEG_USAGE
Temporary Tablespace in OracleOracle introduced temporary tablespaces in Oracle 7.3
Temporary tablespaces are used to manage space for database sort and joining operations and for storing global temporary tables. For joining two large tables or sorting a bigger result set, Oracle cannot do in memory by using SORT_AREA_SIZE in PGA (Programmable Global Area). Space will be allocated in a temporary tablespace for doing these types of operations. Other SQL operations that might require disk sorting are: CREATE INDEX, ANALYZE, SELECT DISTINCT, ORDER BY, GROUP BY, UNION, INTERSECT, MINUS, Sort-Merge joins, etc.
Note that a temporary tablespace cannot contain permanent objects and therefore doesn't need to be backed up. A temporary tablespace contains schema objects only for the duration of a session.
Creating Temporary Tablespace
From Oracle 9i, we can specify a default temporary tablespace when you create a database, using the DEFAULT TEMPORARY TABLESPACE extension to the CREATE DATABASE statement.e.g.SQL> CREATE DATABASE oracular .....
DEFAULT TEMPORARY TABLESPACE temp_ts .....;
Oracle provides various ways of creating TEMPORARY tablespaces.
Prior to Oracle 7.3 - CREATE TABLESPACE temp DATAFILE ...;
Example:SQL> CREATE TABLESPACE TEMPTBS DATAFILE '/path/temp.dbf' SIZE 2048M AUTOEXTEND ON NEXT 1M MAXSIZE UNLIMITED LOGGING DEFAULT NOCOMPRESS ONLINE EXTENT MANAGEMENT DICTIONARY;
Oracle 7.3 & 8.0 - CREATE TABLESPACE temp DATAFILE ... TEMPORARY;
Example:SQL> CREATE TABLESPACE TEMPTBS DATAFILE '/path/temp.dbf' SIZE 2048M AUTOEXTEND ON NEXT 1M MAXSIZE UNLIMITED LOGGING DEFAULT NOCOMPRESS ONLINE TEMPORARY EXTENT MANAGEMENT DICTIONARY;
Oracle 8i and above - CREATE TEMPORARY TABLESPACE temp TEMPFILE ...;
Examples:
SQL> CREATE TEMPORARY TABLESPACE TEMPTBS TEMPFILE '/path/temp.dbf' SIZE 1000M
AUTOEXTEND ON NEXT 8K MAXSIZE 1500M EXTENT MANAGEMENT LOCAL UNIFORM SIZE
1M BLOCKSIZE 8K;
SQL> CREATE TEMPORARY TABLESPACE TEMPTBS2 TEMPFILE '/path/temp2.dbf' SIZE 1000M
AUTOEXTEND OFF EXTENT MANAGEMENT LOCAL BLOCKSIZE 2K;
The MAXSIZE clause will default to UNLIMITED, if no value is specified.
All extents of temporary tablespaces are the same size, so UNIFORM keyword is optional - if
UNIFORM is not defined it will default to 1 MB.
Example using OMF (Oracle Managed Files):
SQL> CREATE TEMPORARY TABLESPACE temp;
Restrictions:
(1) We cannot specify nonstandard block sizes for a temporary tablespace or if you intend to assign
this tablespace as the temporary tablespace for any users.
(2) We cannot specify FORCE LOGGING for an undo or temporary tablespace.
(3) We cannot specify AUTOALLOCATE for a temporary tablespace.
Tempfiles (Temporary Datafiles)
Unlike normal datafiles, tempfiles are not fully allocated. When you create a tempfiles, Oracle only
writes to the header and last block of the file. This is why it is much quicker to create a tempfiles
than
to create a normal datafile.
Tempfiles are not recorded in the database's control file. This implies that just recreate them
whenever you restore the database, or after deleting them by accident. You can have different
tempfile configurations between primary and standby databases in dataguard environment, or
configure tempfiles to be local instead of shared in a RAC environment.
One cannot remove datafiles from a tablespace until you drop the entire tablespace. However, one
can remove a tempfile from a database. Look at this example:
SQL> alter database tempfile 'tempfile_name' drop including datafiles;
//If the file was created as tempfile
SQL> alter database datafile 'tempfile_name' drop;
//If the file was created as datafile
Dropping temp tablespace
SQL> drop tablespace temp_tbs;
SQL> drop tablespace temp_tbs including contents and datafiles;
If you remove all tempfiles from a temporary tablespace, you may encounter error:
ORA-25153: Temporary Tablespace is Empty.
Use the following statement to add a tempfile to a temporary tablespace:
SQL> ALTER TABLESPACE temp ADD TEMPFILE '/path/temp01.dbf' SIZE 512m
AUTOEXTEND ON NEXT 250m MAXSIZE UNLIMITED;
Except for adding a tempfile, you cannot use the ALTER TABLESPACE statement for a locally
managed temporary tablespace (operations like rename, set to read only, recover, etc. will fail).
Locally managed temporary tablespaces have temporary datafiles (tempfiles), which are similar to
ordinary datafiles except: You cannot create a tempfile with the ALTER DATABASE statement.
You cannot rename a tempfile or set it to read-only.
Tempfiles are always set to NOLOGGING mode.
When you create or resize tempfiles, they are not always guaranteed allocation of disk space for the file size specified. On certain file systems (like UNIX) disk blocks are allocated not at file creation or resizing, but before the blocks are accessed.
Tempfile information is shown in the dictionary view DBA_TEMP_FILES and the dynamic performance view V$TEMPFILE.
Note: This arrangement enables fast tempfile creation and resizing, however, the disk could run
out of space later when the tempfiles are accessed.
Default Temporary Tablespaces
From Oracle 9i, we can define a default temporary tablespace at database creation time, or by
issuing an "ALTER DATABASE" statement:
SQL> ALTER DATABASE DEFAULT TEMPORARY TABLESPACE temp;
By default, the default temporary tablespace is SYSTEM. Each database can be assigned one and
only one default temporary tablespace. Using this feature, a temporary tablespace is automatically
assigned to users.
The following restrictions apply to default temporary tablespaces:
-DEFAULT TEMPORARY TABLESPACE must be of type TEMPORARY.
-DEFAULT TEMPORARY TABLESPACE cannot be taken off-line.
-DEFAULT TEMPORARY TABLESPACE cannot be dropped until you create another one.
To see the default temporary tablespace for a database, execute the following query:
SQL> select PROPERTY_NAME,PROPERTY_VALUE from database_properties where property_name
like '%TEMP%';
The DBA should assign a temporary tablespace to each user in the database to prevent them from
allocating sort space in the SYSTEM tablespace. This can be done with one of the following
commands:
SQL> CREATE USER scott TEMPORARY TABLESPACE temp;
SQL> ALTER USER scott TEMPORARY TABLESPACE temp;
To change a user account to use a non-default temp tablespace
SQL> ALTER USER user1 SET TEMPORARY TABLESPACE temp_tbs;
Assigning temporary tablespace group as default temporary tablespace:
SQL> ALTER DATABASE DEFAULT TEMPORARY TABLESPACE temp_grp;
Assigning temporary tablespace group to a user (same as assigning temporary tablespace to a
user):
SQL> ALTER USER scott TEMPORARY TABLESPACE temp_grp;
All new users that are not explicitly assigned a TEMPORARY TABLESPACE will get the default temporary tablespace as its TEMPORARY TABLESPACE. Also, when you assign a TEMPORARY tablespace to a user, Oracle will not change this value next time you change the default temporary tablespace for the database.
Performance Considerations
Some performance considerations for temporary tablespaces:
o Always use temporary tablespaces instead of permanent content tablespaces for sorting &
joining (no logging and uses one large sort segment to reduce recursive SQL and ST space
management enqueue contention).
o Ensure that you create your temporary tablespaces as locally managed instead of
dictionary managed (i.e. use sort space bitmap instead of sys.fet$ and sys.uet$ for allocating
space).
o Always use TEMPFILE instead of DATAFILE (reduce backup and recovery time).
o Stripe your temporary tablespaces over multiple disks to alleviate possible disk contention
and to speed-up operations (user processes can read/write to it directly).
o The UNIFORM SIZE must be a multiple of the SORT_AREA_SIZE parameter.
Monitoring Temporary Tablespaces
Unlike datafiles, tempfiles are not listed in V$DATAFILE and DBA_DATA_FILES. Use V$TEMPFILE and DBA_TEMP_FILES instead.
SQL> SELECT tablespace_name, file_name, bytes FROM dba_temp_files WHERE tablespace_name = 'TEMP';TABLESPACE_NAME FILE_NAME BYTES----------------- -------------------------------- --------------TEMP /../temp01.dbf 11,175,650,000
SQL> select file#, name, round(bytes/(1024*1024),2) "SIZE IN MB's" from v$tempfile;
One can monitor temporary segments from V$SORT_SEGMENT and V$SORT_USAGE.
DBA_FREE_SPACE does not record free space for temporary tablespaces. Use DBA_TEMP_FREE_SPACE or V$TEMP_SPACE_HEADER instead.
SQL> select TABLESPACE_NAME, BYTES_USED, BYTES_FREE from V$TEMP_SPACE_HEADER;TABLESPACE_NAME BYTES_USED BYTES_FREE------------------------------ ---------- ----------TEMPTBS 4214226944 80740352
From 11g, we can check free temp space in new view DBA_TEMP_FREE_SPACE.SQL> select * from DBA_TEMP_FREE_SPACE;
Resizing tempfile
SQL> alter database tempfile temp-name resize integer K|M|G|T|P|E;SQL> alter database tempfile '/path/temp01.dbf' resize 1000M;

Resizing temporary tablespace
SQL> alter tablespace temptbs resize 1000M;
Renaming (temporary) tablespace, this is from Oracle 10g
SQL> alter tablespace temp rename to temp2;
In Oracle 11g, temporary tablespace or it's tempfiles can be shrinked, up to specified size.
Shrinking frees as much space as possible while maintaining the other attributes of the tablespace
or temp files. The optional KEEP clause defines a minimum size for the tablespace or temp file.
SQL> alter tablespace temp-tbs shrink space;
SQL> alter tablespace temp-tbs shrink space keep n{K|M|G|T|P|E};
SQL> alter tablespace temp-tbs shrink tempfile 'tempfile-name' ;
SQL> alter tablespace temp-tbs shrink tempfile 'tempfile-name' keep n{K|M|G|T|P|E};
The below script reports temporary tablespace usage (script was created for Oracle9i Database).
With this script we can monitor the actual space used in a temporary tablespace and see HWM
(High Water Mark) of the temporary tablespace. The script is designed to run when there is only
one temporary tablespace in the database.
SQL> select sum( u.blocks * blk.block_size)/1024/1024 "MB. in sort segments", (hwm.max *
blk.block_size)/1024/1024 "MB. High Water Mark"
from v$sort_usage u, (select block_size from dba_tablespaces where contents = 'TEMPORARY') blk,
(select segblk#+blocks max from v$sort_usage where segblk# = (select max(segblk#) from
v$sort_usage) ) hwm group by hwm.max * blk.block_size/1024/1024;
How to reclaim used space
Several methods existed to reclaim the space used for a larger than normal temporary tablespace.
(1) Restarting the database, if possible.
(2) The method that exists for all releases of Oracle is, simply drop and recreate the temporary
tablespace back to its original (or another reasonable) size.
(3) If you are using Oracle9i or higher, drop the large tempfile (which will drop the tempfile from
the data dictionary and the OS file system).
From 11g, while creating global temporary tables, we can specify TEMPORARY tablespaces.
Related Views:
DBA_TEMP_FILES
DBA_DATA_FILES
DBA_TABLESPACES
DBA_TEMP_FREE_SPACE (Oracle 11g)
V$TEMPFILE
V$TEMP_SPACE_HEADER
V$TEMPORARY_LOBS
V$TEMPSTAT
V$TEMPSEG_USAGE
Statspack in OracleStatspack was introduced in Oracle8i.
Statspack is a set of performance monitoring, diagnosis and reporting utility provided by Oracle. Statspack provides improved UTLBSTAT/UTLESTAT functionality, as it’s successor, though the old BSTAT/ESTAT scripts are still available.
Statspack package is a set of SQL, PL/SQL, and SQL*Plus scripts that allow the collection, automation, storage, and viewing of performance data. Statspack stores the performance statistics permanently in Oracle tables, which can later be used for reporting and analysis. The data collected can be analyzed using Statspack reports, which includes an instance health and load summary page, high resource SQL statements, the traditional wait events and initialization parameters.
Statspack is a diagnosis tool for instance-wide performance problems; it also supports application tuning activities by providing data which identifies high-load SQL statements. Statspack can be used both proactively to monitor the changing load on a system, and also reactively to investigate a performance problem.
Although AWR and ADDM (introduced in Oracle 10g) provide better statistics than STATSPACK, users that are not licensed to use the Enterprise Manager Diagnostic Pack, should continue to use Statspack.
Statspack versus UTLBSTAT/UTLESTATThe BSTAT-ESTAT utilities capture information directly from the Oracle's in-memory structures and then compare the information from two snapshots in order to produce an elapsed-time report showing the activity of the database. If we look inside utlbstat.sql and utlestat.sql, we see the SQL that samples directly from the v$ views. e.g. V$SYSSTAT;SQL> insert into stats$begin_stats select * from v$sysstat;SQL> insert into stats$end_stats select * from v$sysstat;
Statspack improves on the existing UTLBSTAT/UTLESTAT performance scripts in the following ways: Statspack collects more data, including high resource SQL (and the optimizer execution plans for those statements).
Statspack pre-calculates many ratios useful when performance tuning, such as cache hit ratios, per transaction and per second statistics (many of these ratios must be calculated manually when using BSTAT/ESTAT).
Permanent tables owned by PERFSTAT store performance statistics; instead of creating/dropping tables each time, data is inserted into the pre-existing tables. This makes historical data comparisons easier.
Statspack separates the data collection from the report generation. Data is collected when a 'snapshot' is taken; viewing the data collected is in the hands of the performance engineer when they run the performance report.
Data collection is easy to automate using either dbms_job or an OS utility.
NOTE: If you choose to run BSTAT/ESTAT in conjunction with statspack, do not run both as the same user. There is a name conflict with the STATS$WAITSTAT table.
Installing and Configuring Statspack
$ cd $ORACLE_HOME/rdbms/admin
$ sqlplus "/as sysdba" @spcreate.sql
You will be prompted for the PERFSTAT user's password, default tablespace, and temporary
tablespace.
This will create PERFSTAT user, statspack objects in it and STATSPACK package.
NOTE: Default tablespace or temporary tablespace must not be SYSTEM for PERFSTAT user.

The SPCREATE.SQL script runs the following scripts: SPCUSR.SQL: Creates PERFSTAT user and grants privileges
SPCTAB.SQL: Creates STATSPACK tables
SPCPKG.SQL: Creates STATSPACK package
Check the log files (created in present directory): spcusr.lis, spctab.lis and spcpkg.lis and ensure
that no errors were encountered during the installation.
To install statspack in batch mode, you must assign values to the SQL*Plus variables that specify
the default and temporary tablespaces before running SPCREATE.SQL. DEFAULT_TABLESPACE: For the default tablespace
TEMPORARY_TABLESPACE: For the temporary tablespace
PERFSTAT_PASSWORD: For the PERFSTAT user password
$ sqlplus "/as sysdba"
SQL> define default_tablespace='STATS'
SQL> define temporary_tablespace='TEMP_TBS'
SQL> define perfstat_password='perfstat'
SQL> @?/rdbms/admin/spcreate
When SPCREATE.SQL is run, it does not prompt for the information provided by the variables.
Taking snapshots of the database
Each snapshot taken is identified by a snapshot ID, which is a unique number generated at the
time the snapshot is taken. Each time a new collection is taken, a new SNAP_ID is generated. The
SNAP_ID, along with the database identifier (DBID) and instance number (INSTANCE_NUMBER),
comprise the unique key for a snapshot. Use of this unique combination allows storage of multiple
instances of an OracleReal Application Clusters (RAC) database in the same tables.
When a snapshot is executed, the STATSPACK software will sample from the RAM in-memory
structures inside the SGA and transfer the values into the corresponding STATSPACK tables. Taking
such a snapshot stores the current values for the performance statistics in the statspack tables.
This snapshot can be used as a baseline for comparison with another snapshot taken at a later
time.
$ sqlplus perfstat/perfstat
SQL> exec statspack.snap;
or
SQL> exec statspack.snap(i_snap_level=>10);
instruct statspack to do gather more details in the snapshot.
SQL> select name,snap_id,to_char(snap_time,'DD.MM.YYYY:HH24:MI:SS') "Date/Time" from
stats$snapshot,v$database;
Note that in most cases, there is a direct correspondence between the v$view in the SGA and the
corresponding STATSPACK table.
e.g. the stats$sysstat table is similar to the v$sysstat view.
Remember to set timed_statistics to true for the instance. Statspack will then include important
timing information in the data it collects.
Note: In RAC environment, you must connect to the instance for which you want to collect data.
Scheduling Snapshots gathering
There are three methods to automate/schedule the gathering statspack snapshots/statistics. SPAUTO.SQL - script can be customized and executed to schedule, a dbms_job to automate, and the collection of statspack snapshots.
DBMS_JOB procedure to schedule snapshots (you must set the initialization parameter JOB_QUEUE_PROCESSES to greater than 0).
BEGIN SYS.DBMS_JOB.SUBMIT (job => 999, what => 'statspack.snap;', next_date => to_date('17/08/2009 18:00:00','dd/mm/yyyy hh24:mi:ss'), interval => 'trunc(SYSDATE+1/24,''HH'')', no_parse => FALSE );END;/ Use an OS utility, such as cron.
Statspack reporting
The information captured by a STATSPACK snapshot has accumulated values. The information from
the v$views collects database information at startup time and continues to add the values until the
instance is shutdown. In order to get a meaningful elapsed-time report, you must run a STATSPACK
report that compares two snapshots.
After snapshots were taken, you can generate performance reports.
SQL> connect perfstat/perfstat
SQL> @?/rdbms/admin/spreport.sql
When the report is run, you are prompted for the following: The beginning snapshot ID
The ending snapshot ID
The name of the report text file to be created
It is not correct to specify begin and end snapshots where the begin snapshot and end snapshot
were taken from different instance startups. In other words, the instance must not have been
shutdown between the times that the begin and end snapshots were taken.
This is necessary because the database's dynamic performance tables, which statspack queries to
gather the data, reside in memory. Hence, shutting down the Oracle database resets the values in
the performance tables to 0. Because statspack subtracts the begin-snapshot statistics from the
end-snapshot statistics, end snapshot will have smaller values than the begin snapshot, the
resulting output is invalid and then the report shows an appropriate error to indicate this.
To get list of snapshots
SQL> select SNAP_ID, SNAP_TIME from STATS$SNAPSHOT;
To run the report without being prompted, assign values to the SQL*Plus variables that specify the
begin snap ID, the end snap ID, and the report name before running SPREPORT. The variables are:
BEGIN_SNAP: Specifies the begin snapshot ID
END_SNAP: Specifies the end snapshot ID
REPORT_NAME: Specifies the report output name
SQL> connect perfstat
SQL> define begin_snap=1
SQL> define end_snap=2
SQL> define report_name=batch_run
SQL> @?/rdbms/admin/spreport
When SPREPORT.SQL is run, it does not prompt for the information provided by the variables.
The statspack package includes two reports. Run statspack report, SPREPORT.SQL, which is general instance health report that covers all aspects of instance performance. This report calculates and prints ratios and differences for all statistics between the two snapshots, similar to the BSTAT/ESTAT report.
After examining the instance report, run SQL report, SPREPSQL.SQL, on a single SQL statement (identified by its hash value). The SQL report only reports on data relating to the single SQL statement.
Adjusting Statspack collection level & threshold
These parameters are used as thresholds when collecting data on SQL statements, data is
captured on any SQL statements that breach the specified thresholds.
Statspack has two types of collection options, level and threshold. The level parameter controls the
type of data collected from Oracle, while the threshold parameter acts as a filter for the collection
of SQL statements into the stats$sql_summary table.
SQL> SELECT * FROM stats$level_description ORDER BY snap_level;
Level 0Captures general statistics, including rollback segment, row cache, buffer pool statistics, SGA, system events, background events, session events, system statistics, wait statistics, lock statistics, and latch information.
Level 5 (default)
Includes capturing high resource usage SQL Statements, along with all data captured by lower levels.
Level 6Includes capturing SQL plan and SQL plan usage information for high resource usage SQL Statements, along with all data captured by lower levels.
Level 7Captures segment level statistics, including logical and physical reads, row lock, ITL and buffer busy waits, along with all data captured by lower levels.
Level 10Includes capturing parent & child latch statistics, along with all data captured by lower levels.
You can change the default parameters used for taking snapshots so that they are tailored to the
instance's workload.
To temporarily use a snapshot level or threshold that is different from the instance's default
snapshot values, you specify the required threshold or snapshot level when taking the snapshot.
This value is used only for the immediate snapshot taken; the new value is not saved as the
default.
For example, to take a single level 6 snapshot:
SQL> EXECUTE STATSPACK.SNAP(i_snap_level=>6);
You can save the new value as the instance's default in either of two ways.
Simply use the appropriate parameter and the new value with the statspack
MODIFY_STATSPACK_PARAMETER or SNAP procedure.
1) You can change the default level of a snapshot with the STATSPACK.SNAP function. The
i_modify_parameter=>'true' changes the level permanent for all snapshots in the future.
SQL> EXEC STATSPACK.SNAP(i_snap_level=>8, i_modify_parameter=>'true');
Setting the I_MODIFY_PARAMETER value to TRUE saves the new thresholds in the
STATS$STATSPACK_PARAMETER table. These thresholds are used for all subsequent snapshots.
If the I_MODIFY_PARAMETER was set to FALSE or omitted, then the new parameter values are not
saved. Only the snapshot taken at that point uses the specified values. Any subsequent snapshots
use the preexisting values in the STATS$STATSPACK_PARAMETER table.
2) Change the defaults immediately without taking a snapshot, using the
STATSPACK.MODIFY_STATSPACK_PARAMETER procedure. For example, the following statement
changes the snapshot level to 10 and modifies the SQL thresholds for BUFFER_GETS and
DISK_READS:
SQL> EXECUTE STATSPACK.MODIFY_STATSPACK_PARAMETER
(i_snap_level=>10, i_buffer_gets_th=>10000, i_disk_reads_th=>1000);
This procedure changes the values permanently, but does not take a snapshot.
Snapshot level and threshold information used by the package is stored in the
STATS$STATSPACK_PARAMETER table.
Creating Execution Plan of an SQL
When you examine the instance report, if you find high-load SQL statements that you want to
examine more closely or if you have identified one or more problematic SQL statement, you may
want to check the execution plan. The SQL statement to be reported on is identified by a hash
value, which is a numerical representation of the statement's SQL text. The hash value for each
statement is displayed for each statement in the SQL sections of the instance report. The SQL
report, SPREPSQL.SQL, displays statistics, the complete SQL text, and (if level is more than six)
information on any SQL plan(s) associated with that statement.
$ sqlplus perfstat/perfstat
SQL> @?/rdbms/admin/sprepsql.sql
The SPREPSQL.SQL report prompts you for the following: Beginning snapshot ID
Ending snapshot ID
Hash value for the SQL statement
Name of the report text file to be created
The SPREPSQL.SQL script can run in batch mode. To run the report without being prompted, assign
values to the SQL*Plus variables that specify the begin snap ID, the end snap ID, the hash value,
and the report name before running the SPREPSQL.SQL script. The variables are: BEGIN_SNAP: specifies the begin snapshot ID
END_SNAP: specifies the end snapshot ID
HASH_VALUE: specifies the hash value
REPORT_NAME: specifies the report output name
SQL> connect perfstat
SQL> define begin_snap=66
SQL> define end_snap=68
SQL> define hash_value=2342342385
SQL> define report_name=sql_report
SQL> @?/rdbms/admin/sprepsql
When SPREPSQL.SQL is run, it does not prompt for the information provided by the variables.
If you want to gather session statistics and wait events for a particular session (in addition to the
instance statistics and wait events), specify the session ID in the call to statspack. The statistics
gathered for the session include session statistics, session events, and lock activity. The default
behavior is to not gather session level statistics.
e.g.: SQL> exec statspack.snap(i_session_id=>333);
Purging Statspack Data
Purge unnecessary data from the PERFSTAT schema using the SPPURGE.SQL script. This deletes
snapshots that fall between the begin and end snapshot IDs you specify.
Purging can require the use of a large rollback segment, because all data relating to each snapshot
ID will be deleted. You can avoid rollback segment extension errors in one of two ways: Specify a smaller range of snapshot IDs to purge.
Explicitly use a large rollback segment, by executing the SET TRANSACTION USE ROLLBACK SEGMENT statement before running the SPPURGE.SQL script.
SQL> connect perfstat/perfstat
SQL> @?/rdbms/admin/sppurge
When you run SPPURGE.SQL, it displays the instance to which you are connected and the available
snapshots. It then prompts you for the low snap ID and high snap ID. All snapshots that fall within
this range are purged.
Running SPPURGE.SQL in batch mode
SQL> connect perfstat/perfstat
SQL> define losnapid=1
SQL> define hisnapid=2
SQL> @?/rdbms/admin/sppurge
When SPPURGE.SQL is run, it does not prompt for the information provided by the variables.
Note: Better to export the schema as backup before running this script, either using your own
export parameters or those provided in SPUEXP.PAR.
Truncating Statspack Data
To truncate all performance data and gathered statistics data indiscriminately, use SPTRUNC.SQL.
SQL> connect perfstat/perfstat
SQL> @?/rdbms/admin/sptrunc.sql
Note: Better to export the schema as backup before running this script, either using your own
export parameters or those provided in SPUEXP.PAR.
Uninstalling Statspack from Oracle Database
If you want to remove the STATSPACK.
$ sqlplus "/as sysdba"
SQL> @?/rdbms/admin/spdrop.sql
This script will drop statspack objects and the PERFSTAT user.
The SPDROP.SQL script calls the following scripts: SPDTAB.SQL - drops tables and public synonyms
SPDUSR.SQL - drops the user
Check output files produced, in present directory, SPDTAB.LIS & SPDUSR.LIS, to ensure that the
package was completely uninstalled.
Problems in using Statspack
Statspack reporting suffers from the following problems:
1) Some statistics may only be reported on COMPLETION of a query. For example, if a query runs
for 12 hours, its processing won't be reported during any of the snapshots taken while the query
was busy executing.
2) If queries are aged out of the shared pool, the stats from V$SQL are reset. This can throw off the
delta calculations and even make it negative. For example, query A has 10,000 buffer_gets at
snapshot 1, but at snapshot #2, it has been aged out of the pool and reloaded and now shows only
1,000 buffer_gets. So, when you run spreport.sql from snapshot 1 to 2, you'll get 1,000-10,000 = -
9,000 for this query.
Oracle Statspack Scripts
Installation and Uninstallation
The statspack installation and removal scripts must be run as a user with the SYSDBA privilege. SPCREATE.SQL: Installs the statspack user (PERFSTAT), tables and package, by calling the following scripts:
o SPCUSR.SQL: Creates statspack user (PERFSTAT), it’s objects and grants privileges.
o SPCTAB.SQL: Creates statspack tables (run as PERFSTAT).
o SPCPKG.SQL: Creates statspack package (run as PERFSTAT).
SPDROP.SQL: Uninstall statspack from database, by calling the following scripts:
o SPDTAB.SQL: Drops statspack tables, synonyms, package.
o SPDUSR.SQL: Drops statspack user (PERFSTAT).
Upgrading Statspack
The statspack upgrade scripts must be run as a user with the SYSDBA privilege.
SPUP102.SQL: Upgrading statspack to 11 schema.
SPUP10.SQL: Upgrading statspack to 10.2 schema.
SPUP92.SQL: Upgrading statspack to 10.1 schema.
SPUP90.SQL: Upgrading statspack to 9.2 schema.
SPUP817.SQL: Upgrading statspack from 8.1.7 to 9.0
SPUP816.SQL: Upgrading statspack from 8.1.6 to 8.1.7
NOTE:
1. Backup the existing schema before running the upgrade scripts.
2. Downgrade scripts are not provided.
3. Upgrade scripts should only be run once.
Reporting and Automation
The statspack reporting and automation scripts must be run as the PERFSTAT user. SPREPORT.SQL: Generates a statspack report. Report on differences between values recorded in two snapshots. This calls SPREPINS.SQL.
SPREPSQL.SQL: StatsPack REPort SQL. Generates a statspack SQL report for the specific SQL hash value specified. This calls SPRSQINS.SQL.
SPREPINS.SQL: StatsPack REPort INStance. Generates a statspack report for the database and instance specified. This calls SPREPCON.SQL.
SPAUTO.SQL: Automates statspack statistics collection. Script can be customized and executed to schedule, a dbms_job to automate, and the collection of STATSPACK snapshots.
SPREPCON.SQL: StatsPack REPort CONfiguration. Allows configuration of certain aspects of the instance report.
SPRSQINS.SQL: StatsPack Report SQl Instance. Statspack SQL report to show resource usage, SQL Text and any SQL Plans. This calls SPREPCON.SQL.
Performance Data Maintenance
The statspack data maintenance scripts must be run as the PERFSTAT user. SPPURGE.SQL: Purges a limited range of snapshot IDs for a given database instance.
SPTRUNC.SQL: Truncates all performance data in statspack tables.Caution: Do not use this script unless you want to remove all data in the schema you are using. You can choose to export the data as a backup before using this script.
SPUEXP.PAR: An export parameter file supplied for exporting the whole PERFSTAT user.$ exp file=spuexp.dmp log=spuexp.log compress=y grants=y indexes=y rows=y constraints=y owner=PERFSTAT consistent=y
Statspack Documentation
The SPDOC.TXT file in the $ORACLE_HOME/rdbms/admin directory contains instructions and
documentation on the statspack package.
Tables in PERFSTAT schema (in Oracle 11g)
28 tables in Oracle8i
68 tables in Oracle 10g
73 tables in Oracle 11g
STATS$BG_EVENT_SUMMARY
STATS$BUFFER_POOL_STATISTICS
STATS$BUFFERED_QUEUES
STATS$BUFFERED_SUBSCRIBERS
STATS$CR_BLOCK_SERVER
STATS$CURRENT_BLOCK_SERVER
STATS$DATABASE_INSTANCE
STATS$DB_CACHE_ADVICE
STATS$DLM_MISC
STATS$DYNAMIC_REMASTER_STATS
STATS$ENQUEUE_STATISTICS
STATS$EVENT_HISTOGRAM
STATS$FILE_HISTOGRAM
STATS$FILESTATXS
STATS$IDLE_EVENT
STATS$INSTANCE_CACHE_TRANSFER
STATS$INSTANCE_RECOVERY
STATS$INTERCONNECT_PINGS
STATS$IOSTAT_FUNCTION
STATS$IOSTAT_FUNCTION_NAME
STATS$JAVA_POOL_ADVICE
STATS$LATCH
STATS$LATCH_CHILDREN
STATS$LATCH_MISSES_SUMMARY
STATS$LATCH_PARENT
STATS$LEVEL_DESCRIPTION
STATS$LIBRARYCACHE
STATS$MEMORY_DYNAMIC_COMPS
STATS$MEMORY_RESIZE_OPS
STATS$MEMORY_TARGET_ADVICE
STATS$MUTEX_SLEEP
STATS$OSSTAT
STATS$OSSTATNAME
STATS$PARAMETER
STATS$PGA_TARGET_ADVICE
STATS$PGASTAT
STATS$PROCESS_MEMORY_ROLLUP
STATS$PROCESS_ROLLUP
STATS$PROPAGATION_RECEIVER
STATS$PROPAGATION_SENDER
STATS$RESOURCE_LIMIT
STATS$ROLLSTAT
STATS$ROWCACHE_SUMMARY
STATS$RULE_SET
STATS$SEG_STAT
STATS$SEG_STAT_OBJ
STATS$SESS_TIME_MODEL
STATS$SESSION_EVENT
STATS$SESSTAT
STATS$SGA
STATS$SGA_TARGET_ADVICE
STATS$SGASTAT
STATS$SHARED_POOL_ADVICE
STATS$SNAPSHOT
STATS$SQL_PLAN
STATS$SQL_PLAN_USAGE
STATS$SQL_STATISTICS
STATS$SQL_SUMMARY
STATS$SQL_WORKAREA_HISTOGRAM
STATS$SQLTEXT
STATS$STATSPACK_PARAMETER
STATS$STREAMS_APPLY_SUM
STATS$STREAMS_CAPTURE
STATS$STREAMS_POOL_ADVICE
STATS$SYS_TIME_MODEL
STATS$SYSSTAT
STATS$SYSTEM_EVENT
STATS$TEMP_SQLSTATS
STATS$TEMPSTATXS
STATS$THREAD
STATS$TIME_MODEL_STATNAME
STATS$UNDOSTAT
STATS$WAITSTAT
Oracle StatisticsWhenever a valid SQL statement is processed Oracle has to decide how to retrieve the necessary data. This decision can be made using one of two methods: Rule Based Optimizer (RBO) - This method is used if the server has no internal statistics relating to the objects referenced by the statement. This method is no longer favoured by Oracle and was desupported from Oracle 10g.
Cost Based Optimizer (CBO) - This method is used if internal statistics are present. The CBO checks several possible execution plans and selects the one with the lowest cost, where cost relates to system resources. Since Oracle 8i the Cost Based Optimizer (CBO) is the preferred optimizer for Oracle.
Oracle statistics tell us the size of the tables, the distribution of values within columns, and other important information so that SQL statements will always generate the best execution plans. If new objects are created, or the amount of data in the database changes the statistics will no longer represent the real state of the database so the CBO decision process may be seriously impaired.
Oracle can do things in several different ways, e.g. select might be done by table scan or by using indexes. It uses statistics, a variety of counts and averages and other numbers, to figure out the best way to do things. It does the figuring automatically, using the Cost Based Optimizer. DBA job is to make sure the numbers are good enough for that optimizer to work properly.
Oracle statistics may refer to historical performance statistics that are kept in STATSPACK or AWR, but more common use of the term Oracle statistics is about Oracle optimizer Metadata statistics in order to provide the cost-based SQL optimizer with the information about the nature of the tables. The statistics mentioned here are optimizer statistics, which are created for the purposes of query optimization and are stored in the data dictionary. These statistics should not be confused with performance statistics visible through V$ views.
The optimizer is influenced by the following factors: OPTIMIZER_MODE in the initialization file
Statistics in the data dictionary
Hints
OPTIMIZER_MODE can have the following values:CHOOSE
ALL_ROWSFIRST_ROWSRULE
If we provide Oracle with good statistics about the schema the CBO will almost always generate an optimal execution plan. The areas of schema analysis include:
Object statistics - Statistics for all tables, partitions, IOTs, etc should be sampled with a
deep and statistically valid sample size.
Critical columns - Those columns that are regularly-referenced in SQL statements that are:
o Heavily skewed columns - This helps the CBO properly choose between an index range scan and a full table scan.
o Foreign key columns - For n-way table joins, the CBO needs to determine the optimal table join order and knowing the cardinality of the intermediate results sets is critical.
External statistics - Oracle will sample the CPU cost and I/O cost during statistics collection
and use this information to determine the optimal execution plan, based on optimizer_mode.
External statistics are most useful for SQL running in the all_rows optimizer mode.
Optimizer statistics are a collection of data that describe more details about the database and the objects in the database. These statistics are used by the query optimizer to choose the best execution plan for each SQL statement. Optimizer statistics include the following:
Table statistics
o Number of rows
o Number of blocks
o Average row length
Column statistics
o Number of distinct values (NDV) in column
o Number of nulls in column
o Data distribution (histogram)
Index statistics
o Number of leaf blocks
o Levels
o Clustering factor
System statistics
o I/O performance and utilization
o CPU performance and utilization
The optimizer statistics are stored in the data dictionary. They can be viewed using data dictionary views. Only statistics stored in the dictionary itself have an impact on the cost-based optimizer.
When statistics are updated for a database object, Oracle invalidates any currently parsed SQL statements that access the object. The next time such a statement executes, the statement is re-parsed and the optimizer automatically chooses a new execution plan based on the new statistics. Distributed statements accessing objects with new statistics on remote databases are not invalidated. The new statistics take effect the next time the SQL statement is parsed.
Because the objects in a database can be constantly changing, statistics must be regularly updated so that they accurately describe these database objects. Statistics are maintained automatically by Oracle or we can maintain the optimizer statistics manually using the DBMS_STATS package.
DBMS_STATS package provides procedures for managing statistics. We can save and restore copies of statistics. You can export statistics from one system and import those statistics into
another system. For example, you could export statistics from a production system to a test system. We can lock statistics to prevent those statistics from changing.
For data warehouses and database using the all_rows optimizer_mode, from Oracle9i release 2 we can collect the external cpu_cost and io_cost metrics. The ability to save and re-use schema statistics is important:
Bi-Modal databases - Many databases get huge benefits from using two sets of stats, one
for OLTP (daytime), and another for batch (evening jobs).
Test databases - Many Oracle professionals will export their production statistics into the
development instances so that the test execution plans more closely resemble the production
database.
Creating statisticsIn order to make good use of the CBO, we need to create statistics for the data in the database. There are several options to create statistics.
Automatic Statistics GatheringThe recommended approach to gathering statistics is to allow Oracle to automatically gather the statistics. Oracle gathers statistics on all database objects automatically and maintains those statistics in a regularly-scheduled maintenance job. Automated statistics collection eliminates many of the manual tasks associated with managing the query optimizer, and significantly reduces the chances of getting poor execution plans because of missing or stale statistics.
GATHER_STATS_JOBOptimizer statistics are automatically gathered with the job GATHER_STATS_JOB. This job gathers statistics on all objects in the database which have missing statistics and stale statistics.
This job is created automatically at database creation time and is managed by the Scheduler. The Scheduler runs this job when the maintenance window is opened. By default, the maintenance window opens every night from 10 P.M. to 6 A.M. and all day on weekends. The stop_on_window_close attribute controls whether the GATHER_STATS_JOB continues when the maintenance window closes. The default setting for the stop_on_window_close attribute is TRUE, causing Scheduler to terminate GATHER_STATS_JOB when the maintenance window closes. The remaining objects are then processed in the next maintenance window.
The GATHER_STATS_JOB job gathers optimizer statistics by calling the DBMS_STATS.GATHER_DATABASE_STATS_JOB_PROC procedure. The GATHER_DATABASE_STATS_JOB_PROC procedure collects statistics on database objects when the object has no previously gathered statistics or the existing statistics are stale because the underlying object has been modified significantly (more than 10% of the rows).The GATHER_DATABASE_STATS_JOB_PROC is an internal procedure, but its operates in a very similar fashion to the DBMS_STATS.GATHER_DATABASE_STATS procedure using the GATHER AUTO option. The primary difference is that the GATHER_DATABASE_STATS_JOB_PROC procedure prioritizes the database objects that require statistics, so that those objects which most need updated statistics are processed first. This ensures that the most-needed statistics are gathered before the maintenance window closes.
Enabling Automatic Statistics GatheringAutomatic statistics gathering is enabled by default when a database is created, or when a database is upgraded from an earlier database release. We can verify that the job exists by viewing the DBA_SCHEDULER_JOBS view:SQL> SELECT * FROM DBA_SCHEDULER_JOBS WHERE JOB_NAME = 'GATHER_STATS_JOB';
In situations when you want to disable automatic statistics gathering, then disable the GATHER_STATS_JOB as follows:BEGINDBMS_SCHEDULER.DISABLE('GATHER_STATS_JOB');
END;/
Automatic statistics gathering relies on the modification monitoring feature. If this feature is disabled, then the automatic statistics gathering job is not able to detect stale statistics. This feature is enabled when the STATISTICS_LEVEL parameter is set to TYPICAL (default) or ALL.
When to Use Manual StatisticsAutomatic statistics gathering should be sufficient for most database objects which are being modified at a moderate speed. However, there are cases where automatic statistics gathering may not be adequate. Because the automatic statistics gathering runs during an overnight batch window, the statistics on tables which are significantly modified during the day may become stale. There are typically two types of such objects:
Volatile tables that are being deleted or truncated and rebuilt during the course of the day.
Objects which are the target of large bulk loads which add 10% or more to the object's
total size.
For highly volatile tables, there are two approaches:
The statistics on these tables can be set to NULL. When Oracle encounters a table with no
statistics, Oracle dynamically gathers the necessary statistics as part of query optimization. This
dynamic sampling feature is controlled by the OPTIMIZER_DYNAMIC_SAMPLING parameter, and this
parameter should be set to a value of 2 or higher. The default value is 2. The statistics can set to
NULL by deleting and then locking the statistics:
BEGIN
DBMS_STATS.DELETE_TABLE_STATS('SCOTT','EMP');
DBMS_STATS.LOCK_TABLE_STATS('SCOTT','EMP');
END;
/
The statistics on these tables can be set to values that represent the typical state of the
table. We should gather statistics on the table when the tables have a representative number of
rows, and then lock the statistics.
This is more effective than the GATHER_STATS_JOB, because any statistics generated on the table during the overnight batch window may not be the most appropriate statistics for the daytime workload.For tables which are being bulk-loaded, the statistics-gathering procedures should be run on those tables immediately following the load process, preferably as part of the same script or job that is running the bulk load.
For external tables, statistics are not collected during GATHER_SCHEMA_STATS, GATHER_DATABASE_STATS, and automatic statistics gathering processing. However, you can collect statistics on an individual external table using GATHER_TABLE_STATS. Sampling on external tables is not supported so the ESTIMATE_PERCENT option should be explicitly set to NULL. Because data manipulation is not allowed against external tables, it is sufficient to analyze external tables when the corresponding file changes.
If the monitoring feature is disabled by setting STATISTICS_LEVEL to BASIC, automatic statistics gathering cannot detect stale statistics. In this case statistics need to be manually gathered.
Another area in which statistics need to be manually gathered is the system statistics. These statistics are not automatically gathered.
Statistics on fixed objects, such as the dynamic performance tables, need to be manually collected using GATHER_FIXED_OBJECTS_STATS procedure. Fixed objects record current database activity; statistics gathering should be done when database has representative activity.
Whenever statistics in dictionary are modified, old versions of statistics are saved automatically for future restoring. Statistics can be restored using RESTORE procedures of DBMS_STATS package.
In some cases, we may want to prevent any new statistics from being gathered on a table or schema by the DBMS_STATS_JOB process, such as highly volatile tables. In those cases, the DBMS_STATS package provides procedures for locking the statistics for a table or schema.
Scheduling StatsScheduling the gathering of statistics using DBMS_JOB is the easiest way to make sure they are always up to date:
SET SERVEROUTPUT ONDECLAREl_job NUMBER;BEGINDBMS_JOB.submit(l_job, 'BEGIN DBMS_STATS.gather_schema_stats(''SCOTT''); END;',SYSDATE,'SYSDATE + 1');COMMIT;DBMS_OUTPUT.put_line('Job: ' || l_job);END;/
The above code sets up a job to gather statistics for SCOTT for the current time every day. We can list the current jobs on the server using the DBA_JOBS and DBA_JOBS_RUNNING views.
Existing jobs can be removed using:EXEC DBMS_JOB.remove(X);COMMIT;Where 'X' is the number of the job to be removed.
Manual Statistics GatheringIf you choose not to use automatic statistics gathering, then you need to manually collect statistics in all schemas, including system schemas. If the data in the database changes regularly, you also need to gather statistics regularly to ensure that the statistics accurately represent characteristics of your database objects.
The preferred tool for collecting statistics used to be the ANALYZE command. Over the past few releases, the DBMS_STATS package in the PL/SQL Packages and Types reference has taken over the statistics functions, and left the ANALYZE command with more mundane 'health check' work like analyzing chained rows.
Analyze StatementThe ANALYZE statement can be used to gather statistics for a specific table, index or cluster. The statistics can be computed exactly, or estimated based on a specific number of rows, or a percentage of rows.
The ANALYZE command is available for all versions of Oracle, however to obtain faster and better statistics use the procedures supplied - in 7.3.4 and 8.0 DBMS_UTILITY.ANALYZE_SCHEMA, and in 8i and above - DBMS_STATS.GATHER_SCHEMA_STATS.
The analyze table can be used to create statistics for 1 table, index or cluster.Syntax:ANALYZE table tableName {compute|estimate|delete} statistics optionsANALYZE index indexName {compute|estimate|delete} statistics optionsANALYZE cluster clusterName {compute|estimate|delete} statistics options
ANALYZE TABLE emp COMPUTE STATISTICS;ANALYZE TABLE emp COMPUTE STATISTICS FOR COLUMNS sal SIZE 10;ANALYZE TABLE emp PARTITION (p1) COMPUTE STATISTICS;ANALYZE INDEX emp_pk COMPUTE STATISTICS;
ANALYZE TABLE emp ESTIMATE STATISTICS;ANALYZE TABLE emp ESTIMATE STATISTICS SAMPLE 500 ROWS;ANALYZE TABLE emp ESTIMATE STATISTICS SAMPLE 15 PERCENT;ANALYZE TABLE emp ESTIMATE STATISTICS FOR ALL COLUMNS;
ANALYZE TABLE emp DELETE STATISTICS;ANALYZE INDEX emp_pk DELETE STATISTICS;
ANALYZE TABLE emp VALIDATE STRUCTURE CASCADE; ANALYZE INDEX emp_pk VALIDATE STRUCTURE;ANALYZE CLUSTER emp_custs VALIDATE STRUCTURE CASCADE;
ANALYZE TABLE emp VALIDATE REF UPDATE;ANALYZE TABLE emp LIST CHAINED ROWS INTO cr;
Note: Do not use the COMPUTE and ESTIMATE clauses of ANALYZE statement to collect optimizer statistics. These clauses are supported solely for backward compatibility and may be removed in a future release. The DBMS_STATS package collects a broader, more accurate set of statistics, and gathers statistics more efficiently.
We may continue to use ANALYZE statement to for other purposes not related to optimizer statistics collection:
To use the VALIDATE or LIST CHAINED ROWS clauses
To collect information on free list blocks
To sample a number (rather than a percentage) of rows
DBMS_UTILITYThe DBMS_UTILITY package can be used to gather statistics for a whole schema or database. With DBMS_UTILITY.ANALYZE_SCHEMA you can gather all the statistics for all the tables, clusters and indexes of a schema. Both methods follow the same format as the ANALYZE statement:
EXEC DBMS_UTILITY.ANALYZE_SCHEMA('SCOTT','COMPUTE');EXEC DBMS_UTILITY.ANALYZE_SCHEMA('SCOTT','ESTIMATE',ESTIMATE_ROWS=>100);EXEC DBMS_UTILITY.ANALYZE_SCHEMA('SCOTT','ESTIMATE',ESTIMATE_PERCENT=>25);EXEC DBMS_UTILITY.ANALYZE_SCHEMA('SCOTT','DELETE');EXEC DBMS_UTILITY.ANALYZE_DATABASE('COMPUTE');EXEC DBMS_UTILITY.ANALYZE_DATABASE('ESTIMATE',ESTIMATE_ROWS=>100);EXEC DBMS_UTILITY.ANALYZE_DATABASE('ESTIMATE',ESTIMATE_PERCENT=>15);
DBMS_STATSThe DBMS_STATS package was introduced in Oracle 8i and is Oracles preferred method of gathering object statistics. Oracle list a number of benefits to using it including parallel execution, long term storage of statistics and transfer of statistics between servers. This PL/SQL package is also used to modify, view, export, import, and delete statistics. It follows a similar format to the other methods.
The DBMS_STATS package can gather statistics on table and indexes, and well as individual columns and partitions of tables. It does not gather cluster statistics; however, we can use DBMS_STATS to gather statistics on the individual tables instead of the whole cluster.
When we generate statistics for a table, column, or index, if the data dictionary already contains statistics for the object, then Oracle updates the existing statistics. The older statistics are saved and can be restored later if necessary.
Procedures in the DBMS_STATS package for gathering statistics on database objects:
Procedure Collects
GATHER_INDEX_STATS Index statistics
GATHER_TABLE_STATS Table, column, and index statistics
GATHER_SCHEMA_STATS Statistics for all objects in a schema
GATHER_DICTIONARY_STATS Statistics for all dictionary objects
GATHER_DATABASE_STATS Statistics for all objects in a database
EXEC DBMS_STATS.GATHER_DATABASE_STATS;EXEC DBMS_STATS.GATHER_DATABASE_STATS(ESTIMATE_PERCENT=>20);
EXEC DBMS_STATS.GATHER_SCHEMA_STATS(ownname, estimate_percent, block_sample, method_opt, degree, granularity, cascade, stattab, statid, options, statown, no_invalidate, gather_temp, gather_fixed);EXEC DBMS_STATS.GATHER_SCHEMA_STATS('SCOTT');EXEC DBMS_STATS.GATHER_SCHEMA_STATS(OWNNAME=>'MRT');EXEC DBMS_STATS.GATHER_SCHEMA_STATS('SCOTT',ESTIMATE_PERCENT=>10);
EXEC DBMS_STATS.GATHER_TABLE_STATS('SCOTT','EMP');EXEC DBMS_STATS.GATHER_TABLE_STATS('SCOTT','EMP',ESTIMATE_PERCENT=>15);
EXEC DBMS_STATS.GATHER_INDEX_STATS('SCOTT','EMP_PK');EXEC DBMS_STATS.GATHER_INDEX_STATS('SCOTT','EMP_PK',ESTIMATE_PERCENT=>15);
This package also gives us the ability to delete statistics:EXEC DBMS_STATS.DELETE_DATABASE_STATS;EXEC DBMS_STATS.DELETE_SCHEMA_STATS('SCOTT');EXEC DBMS_STATS.DELETE_TABLE_STATS('SCOTT','EMP');EXEC DBMS_STATS.DELETE_INDEX_STATS('SCOTT','EMP_PK');EXEC DBMS_STATS.DELETE_PENDING_STATS('SH','SALES');
EXEC DBMS_STATS.GATHER_SCHEMA_STATS(OWNNAME=>'"DWH"',OPTIONS=>'GATHER AUTO');EXEC DBMS_STATS.GATHER_SCHEMA_STATS(OWNNAME=>'PERFSTAT',CASCADE=>TRUE);
When gathering statistics on system schemas, we can use the procedure
DBMS_STATS.GATHER_DICTIONARY_STATS. This procedure gathers statistics for all system schemas, including SYS and SYSTEM, and other optional schemas, such as CTXSYS and DRSYS.
Statistics Gathering Using SamplingThe statistics-gathering operations can utilize sampling to estimate statistics. Sampling is an important technique for gathering statistics. Gathering statistics without sampling requires full table scans and sorts of entire tables. Sampling minimizes the resources necessary to gather statistics.
Sampling is specified using the ESTIMATE_PERCENT argument to the DBMS_STATS procedures. While the sampling percentage can be set to any value, Oracle Corporation recommends setting the ESTIMATE_PERCENT parameter of the DBMS_STATS gathering procedures to DBMS_STATS.AUTO_SAMPLE_SIZE to maximize performance gains while achieving necessary statistical accuracy. AUTO_SAMPLE_SIZE lets Oracle determine the best sample size necessary for good statistics, based on the statistical property of the object. Because each type of statistics has different requirements, the size of the actual sample taken may not be the same across the table, columns, or indexes. For example, to collect table and column statistics for all tables in the SCOTT schema with auto-sampling, you could use:EXEC DBMS_STATS.GATHER_SCHEMA_STATS('SCOTT',DBMS_STATS.AUTO_SAMPLE_SIZE);EXEC DBMS_STATS.GATHER_SCHEMA_STATS(OWNNAME=>'SCOTT', ESTIMATE_PERCENT=>DBMS_STATS.AUTO_SAMPLE_SIZE);
When the ESTIMATE_PERCENT parameter is manually specified, the DBMS_STATS gathering procedures may automatically increase the sampling percentage if the specified percentage did not produce a large enough sample. This ensures the stability of the estimated values by reducing fluctuations.EXEC DBMS_STATS.GATHER_SCHEMA_STATS(OWNNAME=>'SCOTT',ESTIMATE_PERCENT=>25);
Parallel Statistics GatheringThe statistics-gathering operations can run either serially or in parallel. The degree of parallelism can be specified with the DEGREE argument to the DBMS_STATS gathering procedures. Parallel statistics gathering can be used in conjunction with sampling. Oracle recommends setting the DEGREE parameter to DBMS_STATS.AUTO_DEGREE. This setting allows Oracle to choose an appropriate degree of parallelism based on the size of the object and the settings for the parallel-related init.ora parameters.
Note that certain types of index statistics are not gathered in parallel, including cluster indexes, domain indexes, and bitmap join indexes.
EXEC DBMS_STATS.GATHER_SCHEMA_STATS(OWNNAME=>'SCOTT', ESTIMATE_PERCENT=> DBMS_STATS.AUTO_SAMPLE_SIZE, METHOD_OPT=> 'FOR ALL COLUMNS SIZE AUTO',DEGREE=>7);EXEC DBMS_STATS.GATHER_TABLE_STATS(OWNNAME=>’DWH, METHOD_OPT=>’FOR ALL COLUMNS SIZE AUTO’,DEGREE=>6,ESTIMATE_PERCENT=>5, NO_INVALIDATE=>FALSE);
Statistics on Partitioned ObjectsFor partitioned tables and indexes, DBMS_STATS can gather separate statistics for each partition, as well as global statistics for the entire table or index. Similarly, for composite partitioning, DBMS_STATS can gather separate statistics for subpartitions, partitions, and the entire table or index. The type of partitioning statistics to be gathered is specified in the GRANULARITY argument to the DBMS_STATS gathering procedures.
Depending on the SQL statement being optimized, the optimizer can choose to use either the partition (or subpartition) statistics or the global statistics. Both types of statistics are important for most applications, and Oracle recommends setting the GRANULARITY parameter to AUTO to gather both types of partition statistics.
Column Statistics and Histograms
When gathering statistics on a table, DBMS_STATS gathers information about the data distribution of the columns within the table. The most basic information about the data distribution is the maximum value and minimum value of the column. However, this level of statistics may be insufficient for the optimizer's needs if the data within the column is skewed. For skewed data distributions, histograms can also be created as part of the column statistics to describe the data distribution of a given column.
Histograms are specified using the METHOD_OPT argument of the DBMS_STATS gathering procedures. Oracle recommends setting the METHOD_OPT to FOR ALL COLUMNS SIZE AUTO. With this setting, Oracle automatically determines which columns require histograms and the number of buckets (size) of each histogram. You can also manually specify which columns should have histograms and the size of each histogram.
EXEC DBMS_STATS.GATHER_TABLE_STATS('SH','SALES',method_opt=>'FOR COLUMNS (empno, deptno)');EXEC DBMS_STATS.GATHER_TABLE_STATS('SH','SALES',method_op =>'FOR COLUMNS (sal+comm)');
Note: If you need to remove all rows from a table when using DBMS_STATS, use TRUNCATE instead of dropping and re-creating the same table. When a table is dropped, workload information used by the auto-histogram gathering feature and saved statistics history used by the RESTORE_*_STATS procedures will be lost. Without this data, these features will not function properly.
Determining Stale StatisticsStatistics must be regularly gathered on database objects as those database objects are modified over time. In order to determine whether or not given database object needs new database statistics, Oracle provides a table monitoring facility. This monitoring is enabled by default when STATISTICS_LEVEL is set to TYPICAL or ALL. Monitoring tracks the approximate number of INSERTs, UPDATEs, and DELETEs for that table, as well as whether the table has been truncated, since the last time statistics were gathered. The information about changes of tables can be viewed in the USER_TAB_MODIFICATIONS view. Following a data-modification, there may be a few minutes delay while Oracle propagates the information to this view. Use the DBMS_STATS.FLUSH_DATABASE_MONITORING_INFO procedure to immediately reflect the outstanding monitored information kept in the memory.
-- Table levelALTER TABLE emp NOMONITORING;ALTER TABLE emp MONITORING;
-- Schema levelEXEC DBMS_STATS.alter_schema_tab_monitoring('SCOTT', TRUE);EXEC DBMS_STATS.alter_schema_tab_monitoring('SCOTT', FALSE);
-- Database levelEXEC DBMS_STATS.alter_database_tab_monitoring(TRUE);EXEC DBMS_STATS.alter_database_tab_monitoring(FALSE);
The GATHER_DATABASE_STATS or GATHER_SCHEMA_STATS procedures gather new statistics for tables with stale statistics when the OPTIONS parameter is set to GATHER STALE or GATHER AUTO. If a monitored table has been modified more than 10%, then these statistics are considered stale and gathered again.
User-defined StatisticsYou can create user-defined optimizer statistics to support user-defined indexes and functions. When you associate a statistics type with a column or domain index, Oracle calls the statistics collection method in the statistics type whenever statistics are gathered for database objects.
You should gather new column statistics on a table after creating a function-based index, to allow Oracle to collect column statistics equivalent information for the expression. This is done by calling the statistics-gathering procedure with the METHOD_OPT argument set to FOR ALL HIDDEN COLUMNS.
When to Gather StatisticsWhen gathering statistics manually, we not only need to determine how to gather statistics, but also when and how often to gather new statistics.
For an application in which tables are being incrementally modified, we may only need to gather new statistics every week or every month. The simplest way to gather statistics in these environments is to use a script or job scheduling tool to regularly run the GATHER_SCHEMA_STATS and GATHER_DATABASE_STATS procedures. The frequency of collection intervals should balance the task of providing accurate statistics for the optimizer against the processing overhead incurred by the statistics collection process.
For tables which are being substantially modified in batch operations, such as with bulk loads, statistics should be gathered on those tables as part of the batch operation. The DBMS_STATS procedure should be called as soon as the load operation completes.
For partitioned tables, there are often cases in which only a single partition is modified. In those cases, statistics can be gathered only on those partitions rather than gathering statistics for the entire table. However, gathering global statistics for the partitioned table may still be necessary.
Transferring Statistics between databasesIt is possible to transfer statistics between servers allowing consistent execution plans between servers with varying amounts of data. First the statistics must be collected into a statistics table. It can be very handy to use production statistics on development database, so that we can forecast the optimizer behaviour.
Statistics can be exported and imported from the data dictionary to user-owned tables. This enables you to create multiple versions of statistics for the same schema. It also enables you to copy statistics from one database to another database. You may want to do this to copy the statistics from a production database to a scaled-down test database.
Note: Exporting and importing statistics is a distinct concept from the EXP and IMP utilities of the database. The DBMS_STATS export and import packages do utilize IMP and EXP dumpfiles.
Before exporting statistics, you first need to create a table for holding the statistics. This statistics table is created using the procedure DBMS_STATS.CREATE_STAT_TABLE. After this table is created, then you can export statistics from the data dictionary into your statistics table using the DBMS_STATS.EXPORT_*_STATS procedures. The statistics can then be imported using the DBMS_STATS.IMPORT_*_STATS procedures.
Note that the optimizer does not use statistics stored in a user-owned table. The only statistics used by the optimizer are the statistics stored in the data dictionary. In order to have the optimizer use the statistics in user-owned tables, you must import those statistics into the data dictionary using the statistics import procedures.
In order to move statistics from one database to another, you must first export the statistics on the first database, then copy the statistics table to the second database, using the EXP and IMP utilities or other mechanisms, and finally import the statistics into the second database.
Note: The EXP and IMP utilities export and import optimizer statistics from the database along with
the table. One exception is that statistics are not exported with the data if a table has columns with system-generated names.
In the following example the statistics for the APPSCHEMA user are collected into a new table, STATS_TAB, which is owned by DBASCHEMA:
1. Create the statistics table.EXEC DBMS_STATS.CREATE_STAT_TABLE(ownname =>'SCHEMA_NAME', stat_tab => 'STATS_TABLE', tblspace => 'STATS_TABLESPACE');
SQL> EXEC DBMS_STATS.CREATE_STAT_TABLE('DBASCHEMA','STATS_TAB');
2. Export statistics to statistics table.EXEC DBMS_STATS.EXPORT_SCHEMA_STATS('ORIGINAL_SCHEMA', 'STATS_TABLE', NULL, 'STATS_TABLE_OWNER');
SQL> EXEC DBMS_STATS.EXPORT_SCHEMA_STATS('APPSCHEMA','STATS_TAB',NULL, 'DBASCHEMA');(or)EXEC DBMS_STATS.EXPORT_SCHEMA_STATS(OWNNAME=>'APPSCHEMA', STATTAB=>'STAT_TAB',STATID=>'030610',STATOWN=>'DBASCHEMA');
3. This table can be transferred to another server using any one of the below methods.SQLPlus Copy:SQL> insert into dbaschema.stats_tab select * from dbaschema.stats_tab@source;
Export/Import:exp file=stats.dmp log=stats_exp.log tables=dbaschema.stats_tabimp file=stats.dmp log=stats_imp.log
Datapump:expdp directory=dpump_dir dumpfile=stats.dmp logfile=stats_exp.log tables= dbaschema.stats_tabimpdp directory=dpump_dir dumpfile=stats.dmp logfile=stats_imp.log
4. Import statistics into the data dictionary.EXEC DBMS_STATS.IMPORT_SCHEMA_STATS('NEW_SCHEMA', 'STATS_TABLE', NULL, 'SYSTEM');
SQL> EXEC DBMS_STATS.IMPORT_SCHEMA_STATS('APPSCHEMA','STATS_TAB',NULL, 'DBASCHEMA');(or)EXEC DBMS_STATS.IMPORT_SCHEMA_STATS(OWNNAME=>'APPSCHEMA', STATTAB=>'STAT_TAB',STATID=>'030610',STATOWN=>'DBASCHEMA');
5. Drop the statistics table (optional step).EXEC DBMS_STATS.DROP_STAT_TABLE('SYSTEM','STATS_TABLE');SQL> EXEC DBMS_STATS.DROP_STAT_TABLE('DBASCHEMA','STATS_TAB');
Getting top-quality statsBecause Oracle9i schema statistics work best with external system load, we like to schedule a valid sample (using dbms_stats.auto_sample_size) during regular working hours. For example, here we refresh statistics using the "auto" option which works with the table monitoring facility to only re-analyze those Oracle tables that have experienced more than a 10% change in row content:begin
dbms_stats.gather_schema_stats(ownname => 'SCOTT',estimate_percent => dbms_stats.auto_sample_size, method_opt => 'for all columns size auto',degree => 7);end;/
Optimizer HintsALL_ROWSFIRST_ROWSFIRST_n_ROWSAPPENDFULLINDEXDYNAMIC_SAMPLINGBYPASS_RECURSIVE_CHECKBYPASS_RECURSIVE_CHECK APPEND
Examples:SELECT /*+ ALL_ROWS */ empid, last_name, sal FROM emp;SELECT /*+ FIRST_ROWS */ * FROM emp;SELECT /*+ FIRST_20_ROWS */ * FROM emp;SELECT /*+ FIRST_ROWS(100) */ empid, last_name, sal FROM emp;
System StatisticsSystem statistics describe the system's hardware characteristics, such as I/O and CPU performance and utilization, to the query optimizer. When choosing an execution plan, the optimizer estimates the I/O and CPU resources required for each query. System statistics enable the query optimizer to more accurately estimate I/O and CPU costs, enabling the query optimizer to choose a better execution plan.
When Oracle gathers system statistics, it analyzes system activity in a specified time period (workload statistics) or simulates a workload (noworkload statistics). The statistics are collected using the DBMS_STATS.GATHER_SYSTEM_STATS procedure. Oracle highly recommends that you gather system statistics.
Note: You must have DBA privileges or GATHER_SYSTEM_STATISTICS role to update dictionary system statistics.
EXEC DBMS_STATS.GATHER_SYSTEM_STATS (interval=>720, stattab=>'mystats', statid=>'OLTP');EXEC DBMS_STATS.IMPORT_SYSTEM_STATS('mystats', 'OLTP');Unlike table, index, or column statistics, Oracle does not invalidate already parsed SQL statements when system statistics get updated. All new SQL statements are parsed using new statistics.
These options better facilitate the gathering process to the physical database and workload: when workload system statistics are gathered, noworkload system statistics will be ignored. Noworkload system statistics are initialized to default values at the first database startup.
Workload StatisticsWorkload statistics, introduced in Oracle 9i, gather single and multiblock read times, mbrc, CPU speed (cpuspeed), maximum system throughput, and average slave throughput. The sreadtim, mreadtim, and mbrc are computed by comparing the number of physical sequential and random reads between two points in time from the beginning to the end of a workload. These values are implemented through counters that change when the buffer cache completes synchronous read requests. Since the counters are in the buffer cache, they include not only I/O delays, but also waits related to latch contention and task switching. Workload statistics thus depend on the activity the system had during the workload window. If system is I/O bound—both latch contention and I/O throughput—it will be reflected in the statistics and will therefore promote a less I/O intensive plan
after the statistics are used. Furthermore, workload statistics gathering does not generate additional overhead.
In Oracle release 9.2, maximum I/O throughput and average slave throughput were added to set a lower limit for a full table scan (FTS).To gather workload statistics, either:
Run the dbms_stats.gather_system_stats('start') procedure at the beginning of the
workload window, then the dbms_stats.gather_system_stats('stop') procedure at the end of the
workload window.
Run dbms_stats.gather_system_stats('interval', interval=>N) where N is the number of
minutes when statistics gathering will be stopped automatically.
To delete system statistics, run dbms_stats.delete_system_stats(). Workload statistics will be deleted and reset to the default noworkload statistics.
Noworkload StatisticsNoworkload statistics consist of I/O transfer speed, I/O seek time, and CPU speed (cpuspeednw). The major difference between workload statistics and noworkload statistics lies in the gathering method.
Noworkload statistics gather data by submitting random reads against all data files, while workload statistics uses counters updated when database activity occurs. isseektim represents the time it takes to position the disk head to read data. Its value usually varies from 5 ms to 15 ms, depending on disk rotation speed and the disk or RAID specification. The I/O transfer speed represents the speed at which one operating system process can read data from the I/O subsystem. Its value varies greatly, from a few MBs per second to hundreds of MBs per second. Oracle uses relatively conservative default settings for I/O transfer speed.
In Oracle 10g, Oracle uses noworkload statistics and the CPU cost model by default. The values of noworkload statistics areinitialized to defaults at the first instance startup:ioseektim = 10msiotrfspeed = 4096 bytes/mscpuspeednw = gathered value, varies based on system
If workload statistics are gathered, noworkload statistics will be ignored and Oracle will use workload statistics instead. To gather noworkload statistics, run dbms_stats.gather_system_stats() with no arguments. There will be an overhead on the I/O system during the gathering process of noworkload statistics. The gathering process may take from a few seconds to several minutes, depending on I/O performance and database size.
The information is analyzed and verified for consistency. In some cases, the value of noworkload statistics may remain its default value. In such cases, repeat the statistics gathering process or set the value manually to values that the I/O system has according to its specifications by using the dbms_stats.set_system_stats procedure.
Managing StatisticsRestoring Previous Versions of StatisticsWhenever statistics in dictionary are modified, old versions of statistics are saved automatically for future restoring. Statistics can be restored using RESTORE procedures of DBMS_STATS package. These procedures use a time stamp as an argument and restore statistics as of that time stamp. This is useful in case newly collected statistics leads to some sub-optimal execution plans and the administrator wants to revert to the previous set of statistics.There are dictionary views that display the time of statistics modifications. These views are useful in determining the time stamp to be used for statistics restoration.

Catalog view DBA_OPTSTAT_OPERATIONS contain history of statistics operations performed
at schema and database level using DBMS_STATS.
The views *_TAB_STATS_HISTORY views (ALL, DBA, or USER) contain a history of table
statistics modifications.
The old statistics are purged automatically at regular intervals based on the statistics history retention setting and the time of the recent analysis of the system. Retention is configurable using the ALTER_STATS_HISTORY_RETENTION procedure of DBMS_STATS. The default value is 31 days, which means that you would be able to restore the optimizer statistics to any time in last 31 days.
Automatic purging is enabled when STATISTICS_LEVEL parameter is set to TYPICAL or ALL. If automatic purging is disabled, the old versions of statistics need to be purged manually using the PURGE_STATS procedure.
The other DBMS_STATS procedures related to restoring and purging statistics include:
PURGE_STATS: This procedure can be used to manually purge old versions beyond a time
stamp.
GET_STATS_HISTORY_RENTENTION: This function can be used to get the current statistics
history retention value.
GET_STATS_HISTORY_AVAILABILITY: This function gets the oldest time stamp where
statistics history is available. Users cannot restore statistics to a time stamp older than the oldest
time stamp.
When restoring previous versions of statistics, the following limitations apply:
RESTORE procedures cannot restore user-defined statistics.
Old versions of statistics are not stored when the ANALYZE command has been used for
collecting statistics.
Note: If you need to remove all rows from a table when using DBMS_STATS, use TRUNCATE instead of dropping and re-creating the same table. When a table is dropped, workload information used by the auto-histogram gathering feature and saved statistics history used by the RESTORE_*_STATS procedures will be lost. Without this data, these features will not function properly.
Restoring Statistics versus Importing or Exporting StatisticsThe functionality for restoring statistics is similar in some respects to the functionality of importing and exporting statistics. In general, you should use the restore capability when:
You want to recover older versions of the statistics. For example, to restore the optimizer
behaviour to an earlier date.
You want the database to manage the retention and purging of statistics histories.
You should use EXPORT/IMPORT_*_STATS procedures when:
You want to experiment with multiple sets of statistics and change the values back and
forth.
You want to move the statistics from one database to another database. For example,
moving statistics from a production system to a test system.
You want to preserve a known set of statistics for a longer period of time than the desired
retention date for restoring statistics.
Locking Statistics for a Table or SchemaStatistics for a table or schema can be locked. Once statistics are locked, no modifications can be made to those statistics until the statistics have been unlocked. These locking procedures are
useful in a static environment in which you want to guarantee that the statistics never change.
The DBMS_STATS package provides two procedures for locking and two procedures for unlocking statistics:
LOCK_SCHEMA_STATS
LOCK_TABLE_STATS
UNLOCK_SCHEMA_STATS
UNLOCK_TABLE_STATS
EXEC DBMS_STATS.LOCK_SCHEMA_STATS('AP');EXEC DBMS_STATS.UNLOCK_SCHEMA_STATS('AP');
Setting StatisticsWe can set table, column, index, and system statistics using the SET_*_STATISTICS procedures. Setting statistics in the manner is not recommended, because inaccurate or inconsistent statistics can lead to poor performance.
Dynamic SamplingThe purpose of dynamic sampling is to improve server performance by determining more accurate estimates for predicate selectivity and statistics for tables and indexes. The statistics for tables and indexes include table block counts, applicable index block counts, table cardinalities, and relevant join column statistics. These more accurate estimates allow the optimizer to produce better performing plans.
You can use dynamic sampling to:
Estimate single-table predicate selectivities when collected statistics cannot be used or are
likely to lead to significant errors in estimation.
Estimate statistics for tables and relevant indexes without statistics.
Estimate statistics for tables and relevant indexes whose statistics are too out of date to
trust.
This dynamic sampling feature is controlled by the OPTIMIZER_DYNAMIC_SAMPLING parameter. For dynamic sampling to automatically gather the necessary statistics, this parameter should be set to a value of 2(default) or higher.
The primary performance attribute is compile time. Oracle determines at compile time whether a query would benefit from dynamic sampling. If so, a recursive SQL statement is issued to scan a small random sample of the table's blocks, and to apply the relevant single table predicates to estimate predicate selectivities. The sample cardinality can also be used, in some cases, to estimate table cardinality. Any relevant column and index statistics are also collected. Depending on the value of the OPTIMIZER_DYNAMIC_SAMPLING initialization parameter, a certain number of blocks are read by the dynamic sampling query.
For a query that normally completes quickly (in less than a few seconds), we will not want to incur the cost of dynamic sampling. However, dynamic sampling can be beneficial under any of the following conditions:
A better plan can be found using dynamic sampling.
The sampling time is a small fraction of total execution time for the query.
The query will be executed many times.
Dynamic sampling can be applied to a subset of a single table's predicates and combined with standard selectivity estimates of predicates for which dynamic sampling is not done.
We control dynamic sampling with the OPTIMIZER_DYNAMIC_SAMPLING parameter, which can be set to a value from 0 to 10. The default is 2.
A value of 0 means dynamic sampling will not be done.
Increasing the value of the parameter results in more aggressive application of dynamic
sampling, in terms of both the type of tables sampled (analyzed or unanalyzed) and the amount of
I/O spent on sampling.
Dynamic sampling is repeatable if no rows have been inserted, deleted, or updated in the table being sampled. The parameter OPTIMIZER_FEATURES_ENABLE turns off dynamic sampling if set to a version prior to 9.2.0.
Dynamic Sampling LevelsThe sampling levels are as follows if the dynamic sampling level used is from a cursor hint or from the OPTIMIZER_DYNAMIC_SAMPLING initialization parameter:
Level 0: Do not use dynamic sampling.
Level 1: Sample all tables that have not been analyzed if the following criteria are met: (1)
there is at least 1 unanalyzed table in the query; (2) this unanalyzed table is joined to another
table or appears in a subquery or non-mergeable view; (3) this unanalyzed table has no indexes;
(4) this unanalyzed table has more blocks than the number of blocks that would be used for
dynamic sampling of this table. The number of blocks sampled is the default number of dynamic
sampling blocks (32).
Level 2: Apply dynamic sampling to all unanalyzed tables. The number of blocks sampled is
two times the default number of dynamic sampling blocks.
Level 3: Apply dynamic sampling to all tables that meet Level 2 criteria, plus all tables for
which standard selectivity estimation used a guess for some predicate that is a potential dynamic
sampling predicate. The number of blocks sampled is the default number of dynamic sampling
blocks. For unanalyzed tables, the number of blocks sampled is two times the default number of
dynamic sampling blocks.
Level 4: Apply dynamic sampling to all tables that meet Level 3 criteria, plus all tables that
have single-table predicates that reference 2 or more columns. The number of blocks sampled is
the default number of dynamic sampling blocks. For unanalyzed tables, the number of blocks
sampled is two times the default number of dynamic sampling blocks.
Levels 5, 6, 7, 8, and 9: Apply dynamic sampling to all tables that meet the previous level
criteria using 2, 4, 8, 32, or 128 times the default number of dynamic sampling blocks respectively.
Level 10: Apply dynamic sampling to all tables that meet the Level 9 criteria using all
blocks in the table.
The sampling levels are as follows if the dynamic sampling level for a table is set using the DYNAMIC_SAMPLING optimizer hint:
Level 0: Do not use dynamic sampling.
Level 1: The number of blocks sampled is the default number of dynamic sampling blocks
(32).
Levels 2, 3, 4, 5, 6, 7, 8, and 9: The number of blocks sampled is 2, 4, 8, 16, 32, 64, 128, or
256 times the default number of dynamic sampling blocks respectively.
Level 10: Read all blocks in the table.
Handling Missing StatisticsWhen Oracle encounters a table with missing statistics, Oracle dynamically gathers the necessary statistics needed by the optimizer. However, for certain types of tables, Oracle does not perform dynamic sampling. These include remote tables and external tables. In those cases and also when
dynamic sampling has been disabled, the optimizer uses default values for its statistics.
Default Table Values When Statistics Are Missing
Table Statistic Default Value Used by Optimizer Cardinality num_of_blocks * (block_size - cache_layer) / avg_row_len Average row length 100 bytes Number of blocks 100 or actual value based on the extent map Remote cardinality 2000 rows Remote average row length 100 bytes Default Index Values When Statistics Are Missing
Index Statistic Default Value Used by Optimizer Levels 1 Leaf blocks 25 Leaf blocks/key 1 Data blocks/key 1 Distinct keys 100 Clustering factor 800
Viewing StatisticsStatistics on Tables, Indexes and ColumnsStatistics on tables, indexes, and columns are stored in the data dictionary. To view statistics in the data dictionary, query the appropriate data dictionary view (USER, ALL, or DBA). These DBA_* views include the following:
· DBA_TAB_STATISTICS · ALL_TAB_STATISTICS· USER_TAB_STATISTICS· DBA_TAB_COL_STATISTICS · ALL_TAB_COL_STATISTICS· USER_TAB_COL_STATISTICS· DBA_TAB_HISTOGRAMS · ALL_TAB_HISTOGRAMS· USER_TAB_HISTOGRAMS
· DBA_TABLES· DBA_OBJECT_TABLES· DBA_TAB_HISTOGRAMS· DBA_INDEXES· DBA_IND_STATISTICS· DBA_CLUSTERS· DBA_TAB_PARTITIONS· DBA_TAB_SUBPARTITIONS· DBA_IND_PARTITIONS· DBA_IND_SUBPARTITIONS· DBA_PART_COL_STATISTICS· DBA_PART_HISTOGRAMS· DBA_SUBPART_COL_STATISTICS· DBA_SUBPART_HISTOGRAMS
Viewing HistogramsColumn statistics may be stored as histograms. These histograms provide accurate estimates of the distribution of column data. Histograms provide improved selectivity estimates in the presence of data skew, resulting in optimal execution plans with non uniform data distributions.
Oracle uses two types of histograms for column statistics: height-balanced histograms and frequency histograms. The type of histogram is stored in the HISTOGRAM column of the *TAB_COL_STATISTICS views (USER and DBA). This column can have values of HEIGHT BALANCED, FREQUENCY, or NONE.
Height-Balanced HistogramsIn a height-balanced histogram, the column values are divided into bands so that each band contains approximately the same number of rows. The useful information that the histogram provides is where in the range of values the endpoints fall. Height-balanced histograms can be viewed using the *TAB_HISTOGRAMS tables.
Example for Viewing Height-Balanced Histogram StatisticsBEGINDBMS_STATS.GATHER_TABLE_STATS (OWNNAME => 'OE', TABNAME => 'INVENTORIES', METHOD_OPT => 'FOR COLUMNS SIZE 10 QUANTITY_ON_HAND');END;/
SELECT COLUMN_NAME, NUM_DISTINCT, NUM_BUCKETS, HISTOGRAM FROM USER_TAB_COL_STATISTICSWHERE TABLE_NAME = 'INVENTORIES' AND COLUMN_NAME = 'QUANTITY_ON_HAND';
COLUMN_NAME NUM_DISTINCT NUM_BUCKETS HISTOGRAM------------------------------ ------------ ----------- ---------------QUANTITY_ON_HAND 237 10 HEIGHT BALANCED
SELECT ENDPOINT_NUMBER, ENDPOINT_VALUE FROM USER_HISTOGRAMSWHERE TABLE_NAME = 'INVENTORIES' AND COLUMN_NAME = 'QUANTITY_ON_HAND'ORDER BY ENDPOINT_NUMBER;
ENDPOINT_NUMBER ENDPOINT_VALUE--------------- --------------0 01 272 423 574 745 986 1237 1498 1759 20210 353
In the query output, one row corresponds to one bucket in the histogram.
Frequency HistogramsIn a frequency histogram, each value of the column corresponds to a single bucket of the histogram. Each bucket contains the number of occurrences of that single value. Frequency histograms are automatically created instead of height-balanced histograms when the number of distinct values is less than or equal to the number of histogram buckets specified. Frequency histograms can be viewed using the *TAB_HISTOGRAMS tables.
Example for Viewing Frequency Histogram StatisticsBEGINDBMS_STATS.GATHER_TABLE_STATS (OWNNAME => 'OE', TABNAME => 'INVENTORIES', METHOD_OPT => 'FOR COLUMNS SIZE 20 WAREHOUSE_ID');END;/
SELECT COLUMN_NAME, NUM_DISTINCT, NUM_BUCKETS, HISTOGRAM FROM USER_TAB_COL_STATISTICSWHERE TABLE_NAME = 'INVENTORIES' AND COLUMN_NAME = 'WAREHOUSE_ID';
COLUMN_NAME NUM_DISTINCT NUM_BUCKETS HISTOGRAM------------------------------ ------------ ----------- ---------------WAREHOUSE_ID 9 9 FREQUENCY
SELECT ENDPOINT_NUMBER, ENDPOINT_VALUE FROM USER_HISTOGRAMSWHERE TABLE_NAME = 'INVENTORIES' AND COLUMN_NAME = 'WAREHOUSE_ID'ORDER BY ENDPOINT_NUMBER;
ENDPOINT_NUMBER ENDPOINT_VALUE--------------- --------------36 1213 2261 3370 4484 5692 6798 7984 81112 9
Issues
Exclude dataload tables from your regular stats gathering, unless you know they will be full
at the time that stats are gathered.
Gathering stats for the SYS schema can make the system run slower, not faster.
Gathering statistics can be very resource intensive for the server so avoid peak workload
times or gather stale stats only.
Even if scheduled, it may be necessary to gather fresh statistics after database
maintenance or large data loads.
If a table goes from 1 row to 200 rows, that's a significant change. When a table goes from
100,000 rows to 150,000 rows, that's not a terribly significant change. When a table goes from
1000 rows all with identical values in commonly-queried column X to 1000 rows with nearly unique
values in column X, that's a significant change.
Statistics store information about item counts and relative frequencies. Things that will let it "guess" at how many rows will match a given criteria. When it guesses wrong, the optimizer can pick a very suboptimal query plan.
Startup/Shutdown Options in Oracle DatabaseSYSDBA or SYSOPER (or SYSASM in ASM instance) system privilege is required to issue the STARTUP & SHUTDOWN commands.
Startup options
STARTUP [FORCE][RESTRICT][NOMOUNT][MIGRATE][QUIET][PFILE=file_name | SPFILE=file_name][MOUNT [EXCLUSIVE] database_name | OPEN READ {ONLY | WRITE [RECOVER]}| RECOVER database_name]STARTUPSTARTUP OPEN
STARTUP OPEN READ ONLYSTARTUP OPEN READ WRITESTARTUP OPEN WRITE RECOVERSTARTUP OPEN RECOVER;STARTUP OPEN database_name PFILE='/path/' PARALLELSTARTUP NOMOUNTSTARTUP MOUNT (or STARTUP MOUNT EXCLUSIVE or STARTUP MOUNT SHARED)STARTUP RESTRICTSTARTUP RESTRICT MOUNTSTARTUP [PFILE='/path/'] {UPGRADE | DOWNGRADE} [QUIET]STARTUP UPGRADESTARTUP DOWNGRADESTARTUP MIGRATESTARTUP FORCE (= SHUT IMMEDIATE + STARTUP)STARTUP FORCE pfile='/path/'STARTUP FORCE RESTRICT PFILE='/path/' OPEN [database_name]STARTUP pfileSTARTUP pfile = '/path/'STARTUP spfileSTARTUP spfile = '/path/'
NOMOUNT -- Background processes will be started upon reading the parameter file (initSID.ora) or server parameter file (spfileSID.ora) at $ORACLE_SID/dbs and allocate the shared memory and semaphores.MOUNT -- control files will be read and opened.OPEN -- datafiles, redolog files are opened.
Shutdown options
SHUTDOWN {NORMAL | TRANSACTIONAL [LOCAL] | IMMEDIATE | ABORT}SHUSHUTSHUTDOWNSHUTDOWN NORMAL
SHUTDOWN TRANSACTIONAL
SHUTDOWN TRANSACTIONAL LOCAL -- in RAC environmentSHUTDOWN IMMEDIATE
SHUTDOWN ABORT
Misc
alter database mount;
alter database open;
alter database open;
alter database close;
alter database mount;
alter database dismount;
alter database open read only;
alter database mount exclusive;
alter database mount standby database;
SQL*Loader in OracleSQL*Loader
SQL*Loader (sqlldr) is, the utility, to use for high performance data loads, which has a powerful data parsing engine which puts little limitation on the format of the data in the datafile. The data can be loaded from any flat file and inserted into the Oracle database.
SQL*Loader is a bulk loader utility used for moving data from external files into the Oracle
database. SQL*Loader supports various load formats, selective loading, and multi-table loads.
SQL*Loader reads data file(s) and description of the data which is defined in the control file. Using this information and any additional specified parameters (either on the command line or in the PARFILE), SQL*Loader loads the data into the database.
During processing, SQL*Loader writes messages to the log file, bad rows to the bad file, and discarded rows to the discard file.
The Control File The SQL*Loader control file, is a flat file or text file, contains information that describes how the data will be loaded. It contains the table name, column data types, field delimiters, bad file name, discard file name, conditions to load, SQL functions to be applied and may contain data or infile name.
Control file can have three sections:
1. The first section contains session-wide information.e.g.: * global options such as bindsize, rows, records to skip, etc.* INFILE clauses to specify where the input data is located* data character set specification2. The second section consists of one or more "INTO TABLE" blocks. Each of these blocks contains information about the table into which the data is to be loaded such as the table name and the columns of the table.3. The third section is optional and, if present, contains input data.
Some control file syntax considerations are:* The syntax is free-format (statements can extend over multiple lines).* It is case insensitive, however, strings enclosed in single or double quotation marks are taken literally, including case.* In control file syntax, comments extend from the two hyphens (--), which mark the beginning of the comment, to the end of the line. Note that the optional third section of the control file is interpreted as data rather than as control file syntax; consequently, comments in this section are not supported.* Certain words have special meaning to SQL*Loader and are therefore reserved. If a particular literal or a database object name (column name, table name, etc.) is also a reserved word (keyword), it must be enclosed in single or double quotation marks.
Options in SQL*Loader while loading the data.(a) INSERT: Specifies that you are loading into an empty table. SQL*Loader will abort the load if the table contains data to start with. This is the default.(b) APPEND: If we want to load the data into a table which is already containing some rows.(c) REPLACE: Specifies that, we want to replace the data in the table before loading. Will 'DELETE' all the existing records and replace them with new.
(d) TRUNCATE: This is same as 'REPLACE', but SQL*Loader will use the 'TRUNCATE' command instead of 'DELETE' command.
This sample control file will load an external data file containing delimited data:
load data
infile 'c:\data\emp.csv'
into table emp //here INSERT is default
fields terminated by "," optionally enclosed by '"'
(empno, empname, sal, deptno)
The emp.csv file may look like this:
10001,"Scott Tiger", 1000, 40
10002,"Frank Naude", 5000, 20
Another Sample control file with in-line data formatted as fix length records.
load data
infile *
replace
into table departments
(dept position (02:05) char(4),
deptname position (08:27) char(20)
)
begindata
COSC COMPUTER SCIENCE
ENGL ENGLISH LITERATURE
MATH MATHEMATICS
POLY POLITICAL SCIENCE
"infile *" means, the data is within the control file; otherwise we’ve to specify the file name and location. The trick is to specify "*" as the name of the data file, and use BEGINDATA to start the data section in the control file:
Loading variable length(delimited) data
In the first example we will see how delimited (variable length) data can be loaded into Oracle.Example 1:
LOAD DATA
INFILE *
CONTINUEIF THIS (1) = '*'
INTO TABLE delimited_data
FIELDS TERMINATED BY "," OPTIONALLY ENCLOSED BY '"'
TRAILING NULLCOLS
(data1 "UPPER(:data1)",
data2 "TRIM(:data2)"
data3 "DECODE(:data2, 'hello', 'goodbye', :data1)"
)
BEGINDATA
*11111,AAAAAAAAAA,hello
*22222,"A,B,C,D,",Testttt
NOTE: The default data type in SQL*Loader is CHAR(255). To load character fields longer than 255 characters, code the type and length in your control file. By doing this, Oracle will allocate a bigger buffer to hold the entire column, thus eliminating potential "Field in data file exceeds maximum length" errors.
e.g.:...resume char(4000),...
Example 2:
LOAD DATA
INFILE 'table.dat'
INTO TABLE ‘table-name’
FIELDS TERMINATED BY ','
TRAILING NULLCOLS
(
COL1 DECIMAL EXTERNAL NULLIF (COL1=BLANKS),
COL2 DECIMAL EXTERNAL NULLIF (COL2=BLANKS),
COL3 CHAR NULLIF (COL3=BLANKS),
COL4 CHAR NULLIF (COL4=BLANKS),
COL5 CHAR NULLIF (COL5=BLANKS),
COL6 DATE "MM-DD-YYYY" NULLIF (COL6=BLANKS)
)
Numeric data should be specified as type ‘external’, otherwise, it is read as characters rather than
as binary data.
Decimal numbers need not contain a decimal point; they are assumed to be integers if not
specified.
The standard format for date fields is DD-MON-YY.
Loading fixed length (positional) data
The control file can also specify that records are in fixed format. A file is in fixed record format
when all records in a datafile are the same length. The control file specifies the specific starting
and ending byte location of each field. This format is harder to create and less flexible but can yield
performance benefits. A control file specifying a fixed format could look like the following.
Example 1:
LOAD DATAINFILE *INTO TABLE positional_data(data1 POSITION(1:5),data2 POSITION(6:15))BEGINDATA11111AAAAAAAAAA22222BBBBBBBBBB
In the above example, position(01:05) will give the 1st to the 5th character (11111 and 22222).
Example 2:
LOAD DATAINFILE 'table.dat'INTO TABLE ‘table-name’(COL1 POSITION(1:4) INTEGER EXTERNAL,COL2 POSITION(6:9) INTEGER EXTERNAL,COL3 POSITION(11:46) CHAR,COL4 POSITION(48:83) CHAR,
COL5 POSITION(85:120) CHAR,COL6 POSITION(122:130) DATE "MMDDYYYY")
SQL*Loader Options
Usage: sqlldr keyword=value [keyword=value ...]
Invoke the utility without arguments to get a list of available parameters.
$ sqlldr
To check which options are available in any release of SQL*Loader uses this command:
$ sqlldr help=y
Look at the following example:
$ sqlldr username@server/password control=loader.ctl
$ sqlldr username/password@server control=loader.ctl
SQL*Loader provides the following options, which can be specified either on the command line or
within a parameter file:
userid – The Oracle username and password.
control – The name of the control file. This file specifies the format of the data to be loaded.
log – The name of the file used by SQL*Loader to log results. The log file contains information
about the SQL*Loader execution. It should be viewed after each SQL*Loader job is completed.
Especially interesting is the summary information at the bottom of the log, including CPU time and
elapsed time. It has details like no. of lines readed, no. of lines loaded, no. of rejected lines (full
data will be in discard file), no. of bad lines, actual time taken load the data.
bad – A file that is created when at least one record from the input file is rejected. The rejected
data records are placed in this file. A record could be rejected for many reasons, including a non-
unique key or a required column being null.
data – The name of the file that contains the data to load.
discard – The name of the file that contains the discarded rows. Discarded rows are those that fail
the WHEN clause condition when selectively loading records.
discardmax – [ALL] The maximum number of discards to allow.
skip – [0] Allows the skipping of the specified number of logical records.
load – [ALL] The number of logical records to load.
errors – [50] The number of errors to allow on the load. SQL*Loader will tolerates this many errors
(50 by default). After this limit, it'll abort the loading and rollbacks the already inserted records.
rows – [64] The number of rows to load before a commit is issued (in conventional path).
[ALL] For direct path loads, rows are the number of rows to read from the data file before saving
the data in the datafiles. Committing less frequently (higher value of ROWS) will improve the
performance of SQL*Loader.
bindsize – [256000] The size of the conventional path bind array in bytes. Larger bindsize will
improve the performance of SQL*Loader.
silent – Suppress messages/errors during data load. A value of ALL will suppress all load
messages. Other options include DISCARDS, ERRORS, FEEDBACK, HEADER, and PARTITIONS.
direct – [FALSE] Specifies whether or not to use a direct path load or conventional. Direct path
load (DIRECT=TRUE) will load faster than conventional.
_synchro – internal testing.
parfile – [Y] The name of the file that contains the parameter options for SQL*Loader.
parallel – [FALSE] do parallel load. Available with direct path data loads only, this option allows
multiple SQL*Loader jobs to execute concurrently and will improve the performance.
file – Used only with parallel loads, this parameter specifies the file to allocate extents from.
Specify a filename that contains index creation statements.
skip_unusable_indexes – [FALSE] Determines whether SQL*Loader skips the building of indexes
or index partitions that are in an unusable state.
skip_index_maintenance – [FALSE] Stops index maintenance for direct path loads only. Do not
maintain indexes, mark affected indexes as unusable.
commit_discontinued – [FALSE] commit loaded rows when load is discontinued. This is from 10g.
_display_exitcode – Display exit code for SQL*Loader execution.
readsize – [1048576] The size of the read buffer used by SQL*Loader when reading data from the
input file. This value should match that of bindsize.
external_table – [NOT_USED] Determines whether or not any data will be loaded using external
tables. The other valid options include GENERATE_ONLY and EXECUTE.
columnarrayrows – [5000] Specifies the number of rows to allocate for direct path column arrays.
streamsize – [256000] Specifies the size of direct path stream buffer size in bytes.
multithreading – use multithreading in direct path. The default is TRUE on multiple CPU systems
and FALSE on single CPU systems.
resumable – [FALSE] Enables and disables resumable space allocation. When “TRUE”, the
parameters resumable_name and resumable_timeout are utilized.
resumable_name – User defined string that helps identify a resumable statement that has been
suspended. This parameter is ignored unless resumable = TRUE.
resumable_timeout – [7200 seconds] The time period in which an error must be fixed. This
parameter is ignored unless resumable = TRUE.
date_cache – [1000] Size (in entries) of date conversion cache.
no_index_errors - [FALSE] abort load on any index errors (This is from Oracle 11g release2).
_testing_ncs_to_clob – test non character scalar to character lob conversion. This is from Oracle
10g.
_parallel_lob_load – allow direct path parallel load of lobs. This is from Oracle 10g.
_trace_events – Enable tracing during run by specifying events and levels
(SQLLDR_LOWEST,...). This is from Oracle 11g.
_testing_server_slot_size – test with non default direct path server slot buffer size. This is
from Oracle 11g.
_testing_server_ca_rows – test with non default direct path server column array rows. This is
from Oracle 11g.
_testing_server_max_rp_ccnt – test with non default direct path max row piece columns. This is
from Oracle 11g.
Note: values within parenthesis are the default values.
PLEASE NOTE: Command-line parameters may be specified either by position or by keywords. An
example of the former case is 'sqlldr scott/tiger foo'; an example of the latter is 'sqlldr control=foo
userid=scott/tiger'. One may specify parameters by position before but not after parameters
specified by keywords.
For example, 'sqlldr scott/tiger control=foo logfile=log' is allowed, but 'sqlldr scott/tiger
control=foo log' is not, even though the position of the parameter 'log' is correct.
Miscellaneous
1. To load MS-Excel data into Oracle, Open the MS-Excel spreadsheet and save it as a CSV (Comma
Separated Values) file. This file can now be copied to the Oracle machine and loaded using the
SQL*Loader utility.
2. Oracle does not supply any data unload utilities (like SQL*Unloader), to get the data from
database. You can use SQL*Plus to select and format your data and then spool it to a file or you
have to use any third party tool.
3. Skipping header records while loading
We can skip unwanted header records or continue an interrupted load (e.g. run out of space) by
specifying the "SKIP=n" keyword. "n" specifies the number of logical rows to skip. Look at this
example:
OPTIONS (SKIP=5)LOAD DATAINFILE *INTO TABLE load_positional_data(data1 POSITION(1:5),data2 POSITION(6:15))BEGINDATA11111AAAAAAAAAA
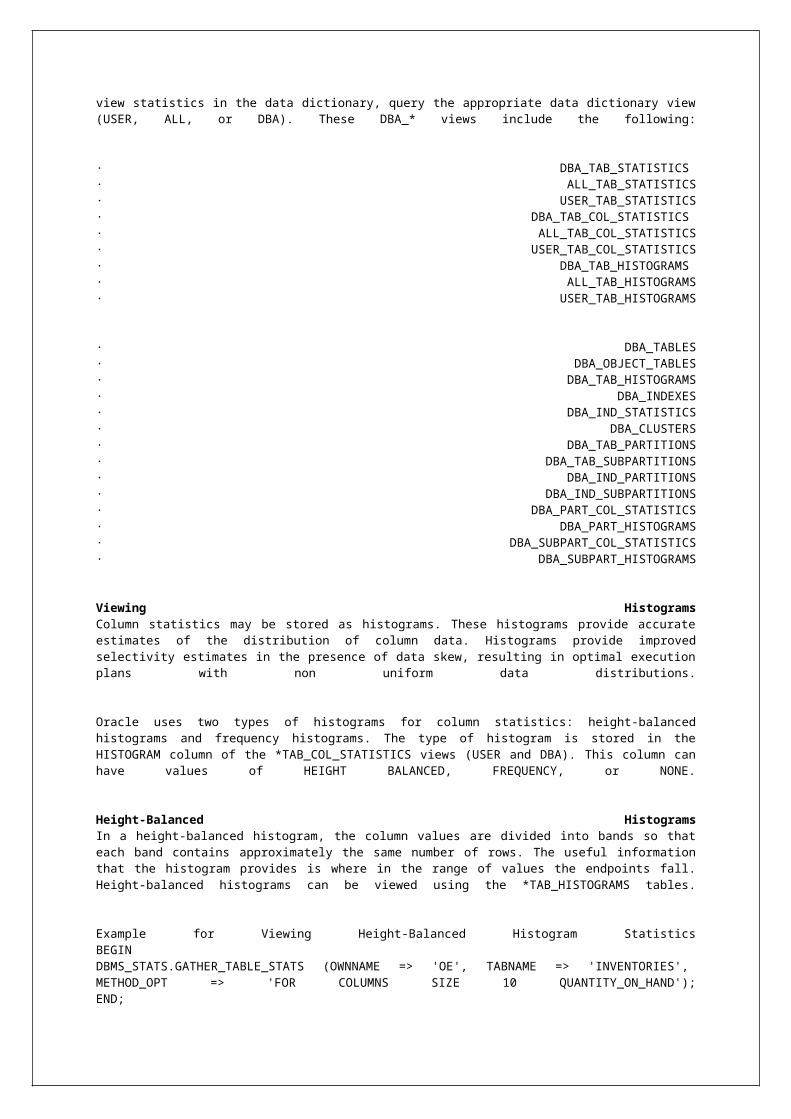
22222BBBBBBBBBB...
$ sqlldr userid=id/passwd control=control_file_name.ctl skip=4
If you are continuing a multiple table direct path load, you may need to use the CONTINUE_LOAD
clause instead of the SKIP parameter. CONTINUE_LOAD allows you to specify a different number of
rows to skip for each of the tables you are loading.
4. Modifying data as the database gets loaded
Data can be modified as it loads into the Oracle Database. One can also populate columns with
static or derived values. However, this only applies for the conventional load path (and not for
direct path loads). Here are some examples:
LOAD DATAINFILE *INTO TABLE modified_data(rec_no "my_db_sequence.nextval",region CONSTANT '31',time_loaded "to_char(SYSDATE, 'HH24:MI')",data1 POSITION(1:5) ":data1/100",data2 POSITION(6:15) "upper(:data2)",data3 POSITION(16:22)"to_date(:data3, 'YYMMDD')")BEGINDATA11111AAAAAAAAAA99120122222BBBBBBBBBB990112
LOAD DATAINFILE 'mail_orders.txt'BADFILE 'bad_orders.txt'APPENDINTO TABLE mailing_listFIELDS TERMINATED BY ","(addr,city,state,zipcode,mailing_addr "decode(:mailing_addr,null, :addr, :mailing_addr)",mailing_city "decode(:mailing_city,null, :city, :mailing_city)",mailing_state,move_date "substr(:move_date, 3, 2) || substr(:move_date, 7, 2)")
5. Loading from multiple input files
One can load from multiple input files provided they use the same record format by repeating the
INFILE clause. Here is an example:
LOAD DATAINFILE file1.datINFILE file2.datINFILE file3.datAPPENDINTO TABLE emp(empno POSITION(1:4) INTEGER EXTERNAL,ename POSITION(6:15) CHAR,deptno POSITION(17:18) CHAR,mgr POSITION(20:23) INTEGER EXTERNAL)
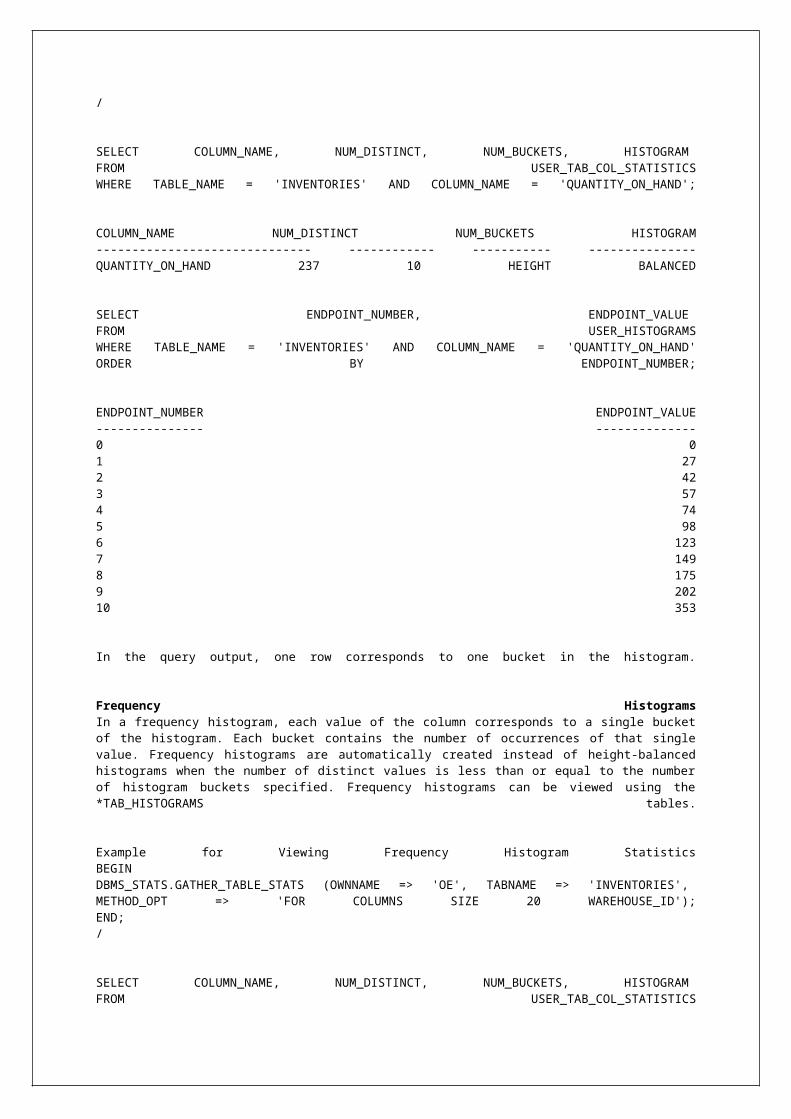
6. Loading into multiple tables
One can also specify multiple "INTO TABLE" clauses in the SQL*Loader control file to load into
multiple tables. Look at the following example:
LOAD DATAINFILE *INTO TABLE tab1 WHEN tab = 'tab1'(tab FILLER CHAR(4),col1 INTEGER)INTO TABLE tab2 WHEN tab = 'tab2'(tab FILLER POSITION(1:4),col1 INTEGER)BEGINDATAtab1|1tab1|2tab2|2tab3|3
The "tab" field is marked as FILLER as we don't want to load it.
Note the use of "POSITION" on the second routing value (tab = 'tab2'). By default field scanning
doesn't start over from the beginning of the record for new INTO TABLE clauses. Instead, scanning
continues where it left off. POSITION is needed to reset the pointer to the beginning of the record
again.
Another example:
LOAD DATAINFILE 'mydata.dat'REPLACEINTO TABLE emp WHEN empno != ' '(empno POSITION(1:4) INTEGER EXTERNAL,ename POSITION(6:15) CHAR,deptno POSITION(17:18) CHAR,mgr POSITION(20:23) INTEGER EXTERNAL)INTO TABLE proj WHEN projno != ' '(projno POSITION(25:27) INTEGER EXTERNAL,empno POSITION(1:4) INTEGER EXTERNAL)
7. In SQL*Loader, one cannot COMMIT only at the end of the load file, but by setting the ROWS
parameter to a large value, committing can be reduced. Make sure you have big rollback
segments ready when you use a high value for ROWS.
8. Selectively loading filtered records
Look at this example, (01) is the first character, (30:37) are characters 30 to 37:
LOAD DATAINFILE 'mydata.dat' BADFILE 'mydata.bad' DISCARDFILE 'mydata.dis'APPENDINTO TABLE my_selective_tableWHEN (01) <> 'H' and (01) <> 'T' and (30:37) = '20031217'(region CONSTANT '31',service_key POSITION(01:11) INTEGER EXTERNAL,call_b_no POSITION(12:29) CHAR)
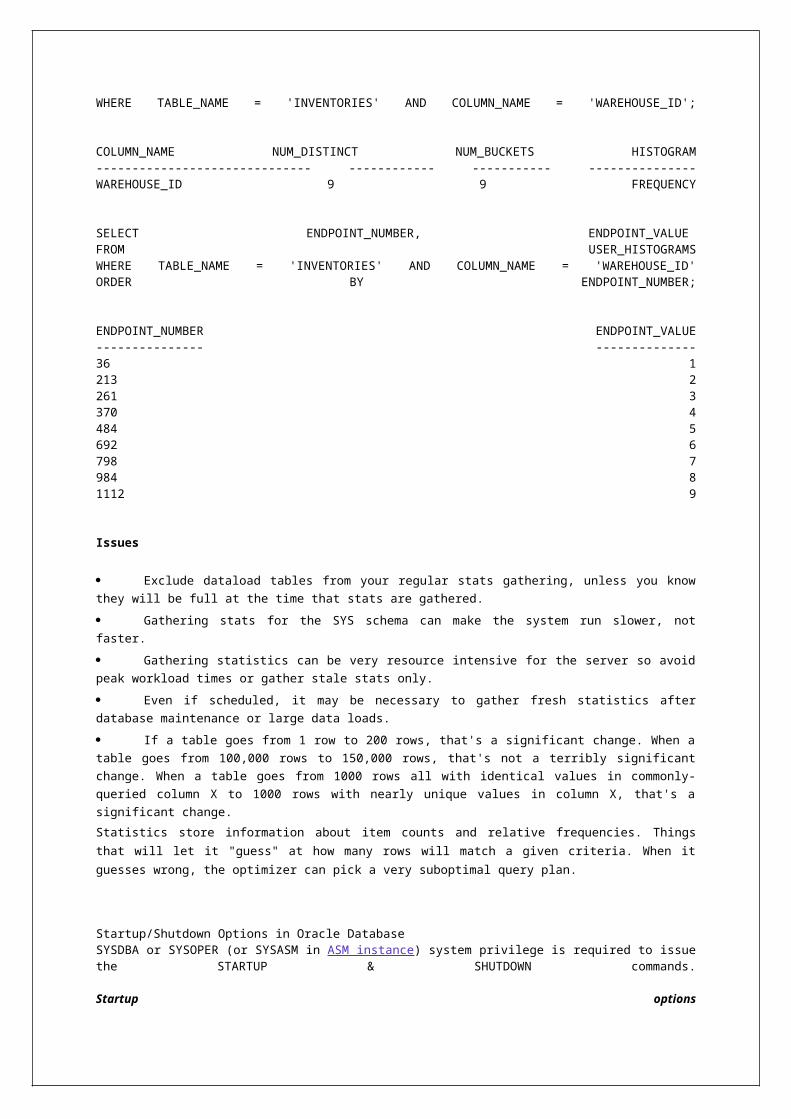
NOTE: SQL*Loader does not allow the use of OR in the WHEN clause. You can only use AND as in
the example above! To workaround this problem, code multiple "INTO TABLE ... WHEN" clauses.
Here is an example:
LOAD DATAINFILE 'mydata.dat' BADFILE 'mydata.bad' DISCARDFILE 'mydata.dis'APPENDINTO TABLE my_selective_tableWHEN (01) <> 'H' and (01) <> 'T'(region CONSTANT '31',service_key POSITION(01:11) INTEGER EXTERNAL,call_b_no POSITION(12:29) CHAR)INTO TABLE my_selective_tableWHEN (30:37) = '20031217'(region CONSTANT '31',service_key POSITION(01:11) INTEGER EXTERNAL,call_b_no POSITION(12:29) CHAR)
9. Skipping certain columns while loading data
One cannot use POSITION(x:y) with delimited data. Luckily, from Oracle 8i one can specify FILLER
columns. FILLER columns are used to skip columns/fields in the load file, ignoring fields that one
does not want. Look at this example:
LOAD DATATRUNCATE INTO TABLE T1FIELDS TERMINATED BY ','(field1,field2 FILLER,field3)
BOUNDFILLER (available with Oracle 9i and above) can be used if the skipped column's value will
be required later again. Here is an example:
LOAD DATAINFILE *TRUNCATE INTO TABLE sometableFIELDS TERMINATED BY "," trailing nullcols(c1,field2 BOUNDFILLER,field3 BOUNDFILLER,field4 BOUNDFILLER,field5 BOUNDFILLER,c2 ":field2 || :field3",c3 ":field4 + :field5")
10. Loading images, sound clips and documents
SQL*Loader can load data from a "primary data file", SDF (Secondary Data file - for loading nested
tables and VARRAYs) or LOBFILE. The LOBFILE method provides an easy way to load documents,
photos, images and audio clips into BLOB and CLOB columns.
Given the following table:
CREATE TABLE image_table (
image_id NUMBER(5),
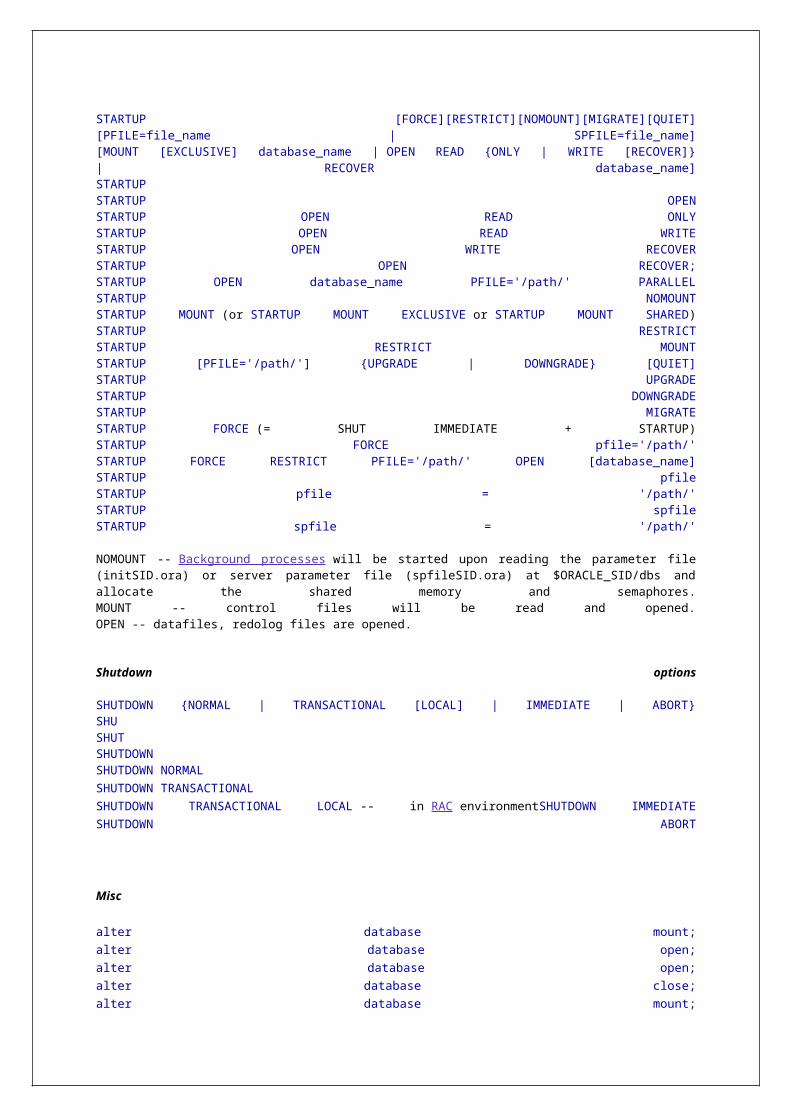
file_name VARCHAR2(30),
image_data BLOB);
Control File:
LOAD DATAINFILE *INTO TABLE image_tableREPLACEFIELDS TERMINATED BY ','(image_id INTEGER(5),file_name CHAR(30),image_data LOBFILE (file_name) TERMINATED BY EOF)BEGINDATA001,image1.gif002,image2.jpg003,image3.bmp
11. Loading EBCDIC data
SQL*Loader is character set aware (you can specify the character set of the data). Specify the
character set WE8EBCDIC500 for the EBCDIC data. The following example shows the SQL*Loader
controlfile to load a fixed length EBCDIC record into the Oracle Database:
LOAD DATACHARACTERSET WE8EBCDIC500INFILE data.ebc "fix 86 buffers 1024"BADFILE 'data.bad'DISCARDFILE 'data.dsc'REPLACEINTO TABLE temp_data(field1 POSITION (1:4) INTEGER EXTERNAL,field2 POSITION (5:6) INTEGER EXTERNAL,field3 POSITION (7:12) INTEGER EXTERNAL,field4 POSITION (13:42) CHAR,field5 POSITION (43:72) CHAR,field6 POSITION (73:73) INTEGER EXTERNAL)
12. Reading multiple rows per record
If the data is in fixed format the number of rows of data to be read for each record can be specified
using the concatenate clause,
e.g.: concatenate 3
reads 3 rows of data for every record. The data rows are literally concatenated together so that
positions 81 to 160 are used to specify column positions for data in the second row (assuming that
the record length of the file is 80). You should also specify the record length (240 in this case) with
a reclen clause when concatenating data, that is:
reclen 240
The continueif clause may specify more than one character.
e.g.: continueif this (1:4) = 'two'
specifies that if the first four characters of the current line are 'two', the next line is a continuation
of this line. In this case the first four columns of each record are assumed to contain only a
continuation indicator and are not read as data.
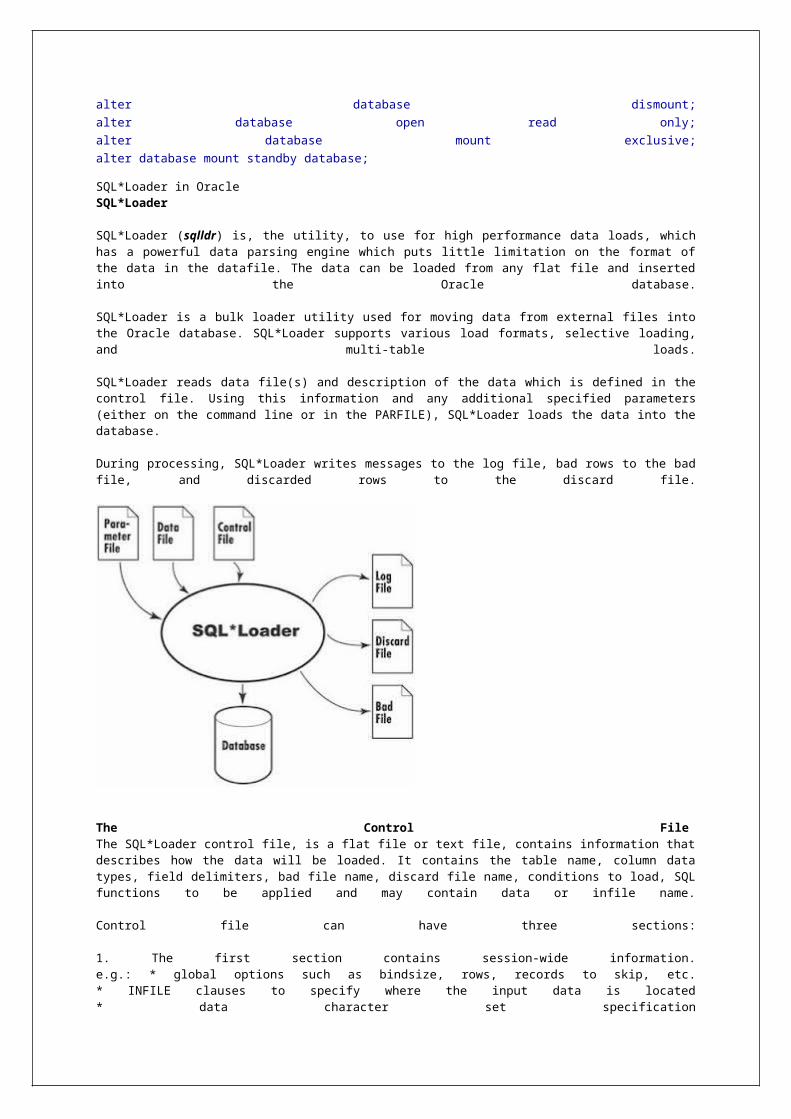
When using fixed format data, the continuation character may be in the last column of the data
record. For example:
continueif last = '+'
specifies that if the last non-blank character in the line is '+', the next line is a continuation of the
current line. This method does not work with free format data because the continuation character
is read as the value of the next field.
Common Errors in SQL*Loader are
(i) Foreign key is not found.
(ii) Length of the column in the infile/datafile may be bigger than the target table column size.
(iii) Mismatching of datatypes.
How to improve SQL*Loader Performance
SQL*Loader is flexible and offers many options that should be considered to maximize the speed of
data loads.
1. Use Direct Path Loads - The conventional path loader essentially loads the data by using
standard insert statements. Direct path load builds blocks of data in memory and saves these
blocks directly into the extents allocated for the table being loaded. The direct path loader
(DIRECT=TRUE) loads directly into the Oracle datafiles and creates blocks in Oracle database block
format. This will effectively bypass most of the RDBMS processing. The fact that SQL is not being
issued makes the entire process much less taxing on the database. There are certain cases, in
which direct path loads cannot be used (clustered tables).
To prepare the database for direct path loads, the script $ORACLE_HOME/rdbms/admin/catldr.sql
must be executed (no need to run this, if you ran catalog.sql at the time of database creation).
Differences between direct path load and conventional path load
Direct Path Load Conventional Path Load
The direct path loader (DIRECT=TRUE) bypasses much of the overhead involved, and loads directly into the Oracle datafiles
The conventional path loader essentially loads the data by using standard INSERT statements
Loads directly to datafile Loads via buffers
No redolog Redolog will be generated
Will not use Oracle instance and RAM Will use Oracle instance and RAM
Can't disable constraints and indexes Can disable constraints and indexes
---Default buffer size is 256KB(bindsize) or 64 rows
Can do parallel load Can't do parallel load
Will use streams (default stream buffer size - 256K) Will not use streams
Will use multithreading Will not use multithreading
---Data can be modified as it loads into the Oracle Database, also populate columns with static or derived values
Can use UNRECOVERABLE option Can't use UNRECOVERABLE option
Several restrictions associated with direct path loading:
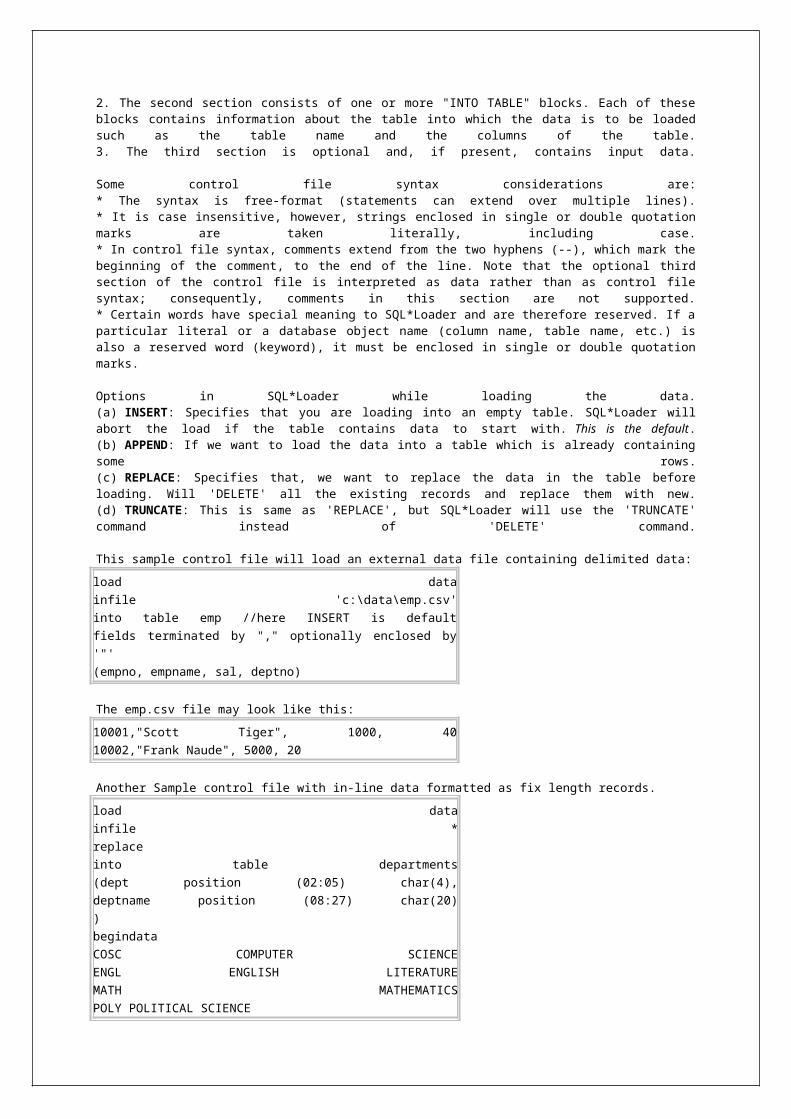
• Tables and associated indexes will be locked during load.
• SQL*Net access is available only under limited circumstances, and its use will slow performance.
• Clustered tables cannot be loaded.
• Loaded data will not be replicated.
• Constraints that depend on other tables are disabled during load and applied when the load is
completed.
• SQL functions are not available. Cannot always use SQL strings for column processing in the
control file (something like this will probably fail: col1 date "ddmonyyyy" "substr(:period,1,9)").
2. External Table Load - An External table load creates an external table for data in a datafile
and executes INSERT statements to insert the data from datafile into target table.
Advantages over conventional & direct:
(i) An external table load attempts to load datafiles in parallel, if datafile is big enough.
(ii) An external table load allows modification of the data being loaded by using SQL and PL/SQL
functions as part of the insert statement that is used to create external table.
3. Disable Indexes and Constraints - For only conventional data loads, the disabling of indexes
and constraints can greatly enhance the performance of SQL*Loader. This will significantly slow
down load times even with ROWS set to a high value.
4. Use a Larger Bind Array. For conventional data loads only, larger bind arrays limit the number
of calls to the database and increase performance. The size of the bind array is specified using the
bindsize parameter. The bind array's size is equivalent to the number of rows it contains (rows=)
times the maximum length of each row.
5. Use ROWS=n to commit less frequently. For conventional data loads only, the rows parameter
specifies the number of rows per commit. Issuing fewer commits will enhance performance.
6. Use Parallel Loads. Available with direct path data loads only, this option allows multiple
SQL*Loader jobs to execute concurrently.
$ sqlldr control=first.ctl parallel=true direct=true
$ sqlldr control=second.ctl parallel=true direct=true
7. Use Fixed Width Data. Fixed width data format saves Oracle some processing when parsing
the data. The savings can be tremendous, depending on the type of data and number of rows.
8. Disable Archiving During Load. While this may not be feasible in certain environments,
disabling database archiving can increase performance considerably.
9. Use unrecoverable. The UNRECOVERABLE option (unrecoverable load data) disables the
writing of the data to the redo logs. This option is available for direct path loads only.
Benchmarking
The following benchmark tests were performed with the various SQL*Loader options. The table was
truncated after each test.
SQL*Loader Option Elapsed Time(Seconds) Time Reduction
direct=falserows=64
135 -
direct=falsebindsize=512000
92 32%
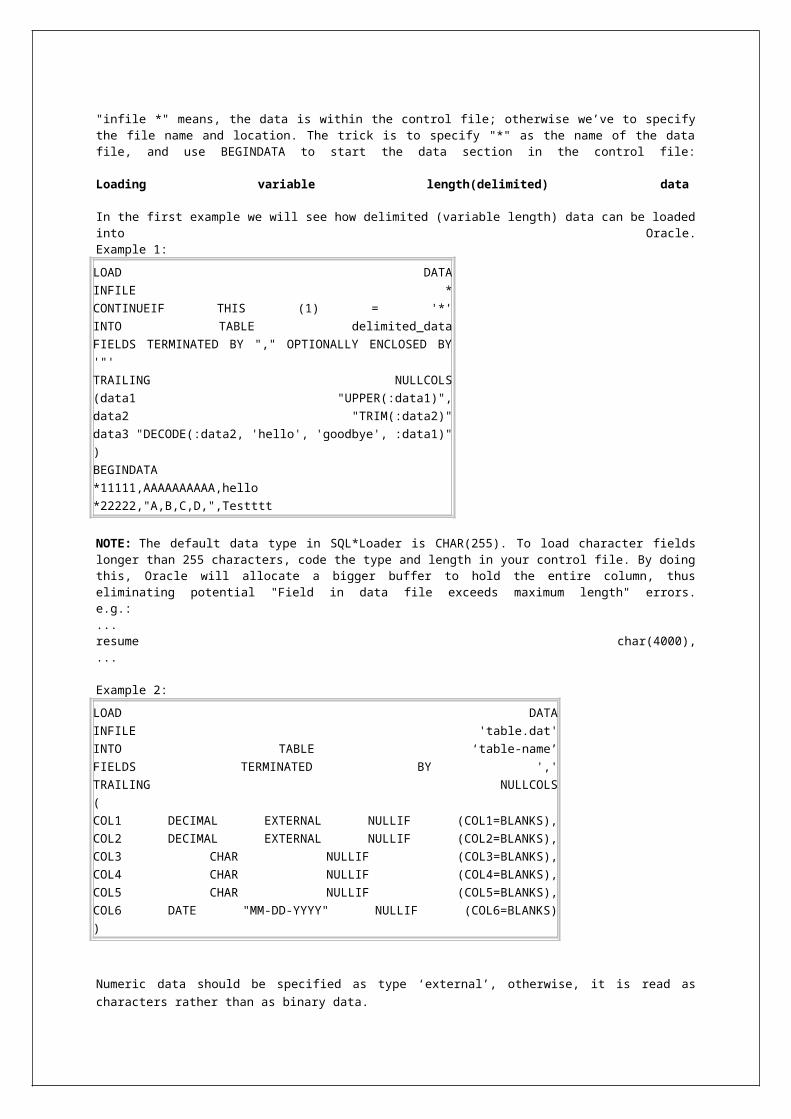
rows=10000
direct=falsebindsize=512000rows=10000database innoarchivelog mode
85 37%
direct=true 47 65%
direct=trueunrecoverable
41 70%
direct=trueunrecoverablefixed width data
41 70%
The results above indicate that conventional path loads take the longest. However, the bindsize
and rows parameters can aid the performance under these loads. The test involving the
conventional load didn’t come close to the performance of the direct path load with the
unrecoverable option specified.
It is also worth noting that the fastest import time achieved (earlier) was 67 seconds, compared to
41 for SQL*Loader direct path – a 39% reduction in execution time. This proves that SQL*Loader
can load the same data faster than import.
These tests did not compensate for indexes. All database load operations will execute faster when
indexes are disabled.
Rollback Segments
ROLLBACK SEGMENTS in OracleIn order to support the rollback facility in oracle database, oracle takes the help of rollback segments. Rollback segments basically holds the before image or undo data or uncommitted data of a particular transaction, once the transaction is over the blocks in that rollback segment can help any other transaction.
Rollback segment is just like any other table segments and index segments, which consist of extents, also demand space and they get created in a tablespace. In order to perform any DML operation against a table which is in a non system tablespace ('emp' in 'user' tablespace), oracle requires a rollback segment from a non system tablespace.
When a transaction is going on a segment which is in non system tablespace, then Oracle needs a rollback segment which is also in non system tablespace. This is the reason we create a separate tablespace just for the rollback segment.
Why rollback segments?
o Undo the changes when a transaction is rolled back.
o Ensure read consistency (other transactions do not see uncommitted changes made to the database).
o Recover the database to a consistent state in case of failures.
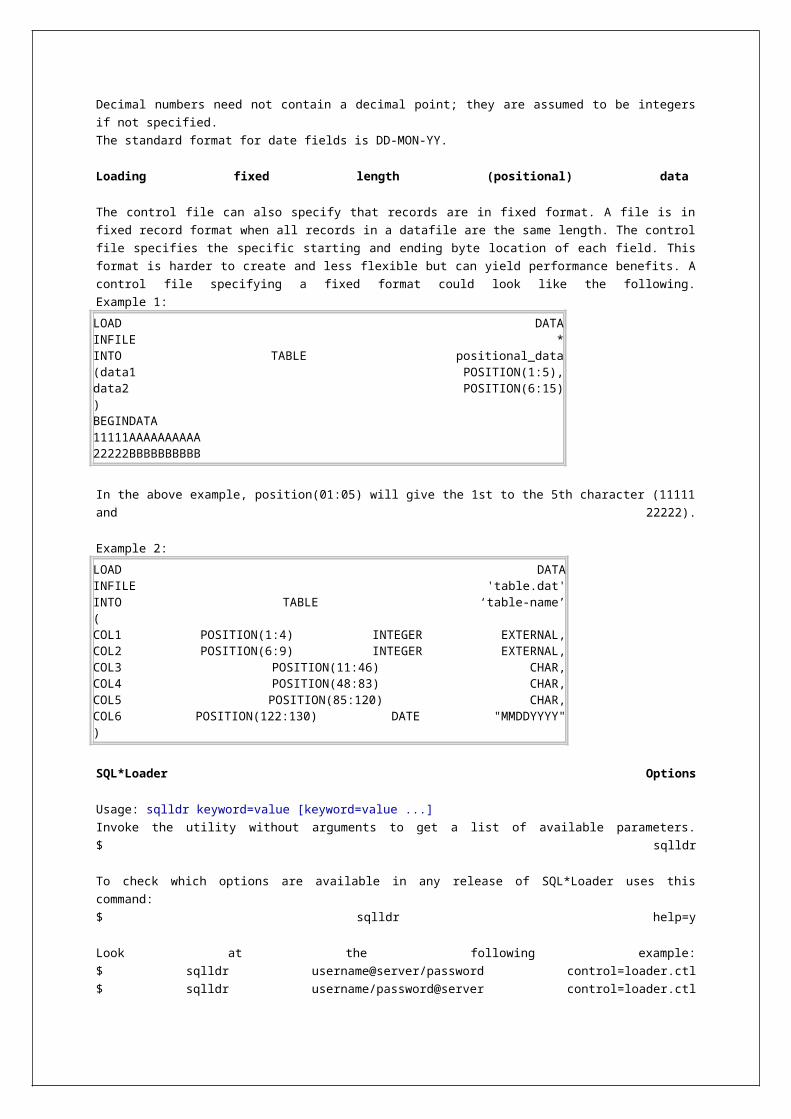
There are two types of rollback segmentsa) Private rollback segments (for single instance database).b) Public rollback segments (for RAC or Oracle Parallel Server).
At the time of database creation oracle by default creates a rollback segment by name SYSTEM in system tablespace and it's ONLINE. This rollback segment can't be brought OFFLINE since Oracle needs it as long as DB is up & running. This can't be dropped also.
Only DBA can create the rollback segments (SYS is the owner) and can not accessible to ordinary users.
SQL> CREATE [PUBLIC] ROLLBACK SEGMENT rbs-name
[TABLESPACE tbs-name]
STORAGE (INITIAL 20K NEXT 40K MINEXTENTS 2 MAXEXTENTS 50);
A rollback segment also has its own storage parameters, and the rules in creating RBS are:
1. We can't define PCTINCREASE for RBS (not even 0).
2. We have to have at least 2 as MINEXTENTS.
Apart from regular storage parameters rollback segments can also be defined with OPTIMAL. We
better create these rollback segments in a separate tablespace where no tables or indexes exist.
We should prefer to create different rollback segments in different tablespaces.
Though we have created rollback segments, we have to bring them ONLINE, either by using init.ora
or by using a SQL statement.
In order to utilize/enable rollback segments by having a parameter in init.ora,
ROLLBACK_SEGMENTS = R1,R2,R3
There is another way to bring any rollback segment ONLINE, by DBA in Oracle is:
SQL> ALTER ROLLBACK SEGMENT rbs-name ONLINE;
Similarly we can also make it offline.
SQL> ALTER ROLLBACK SEGMENT rbs-name OFFLINE;
The number of rollback segments that are needed in the database are decided by the concurrent
DML activity users (number of transactions). Maximum number of rollback segments can be
defined in init.ora by MAX_ROLLBACK_SEGMENTS parameter (until 9i).
To execute CREATE ROLLBACK SEGMENT and ALTER ROLLBACK SEGMENT commands,
UNDO_MANAGEMENT must not be set or set to MANUAL.
The assignment of the rollback segment to a transaction will be done using load balancing method
(with respect to the number of transactions but not the size of transactions). A user can request
oracle for a particular rollback segment for his transaction.
SQL> SET TRANSACTION USE ROLLBACK SEGMENT;
SQL> SET TRANSACTION USE ROLLBACK SEGMENT rbs-name;
To assign a rollback segment at session level
SQL> ALTER SESSION USE ROLLBACK SEGMENT rbs-name;
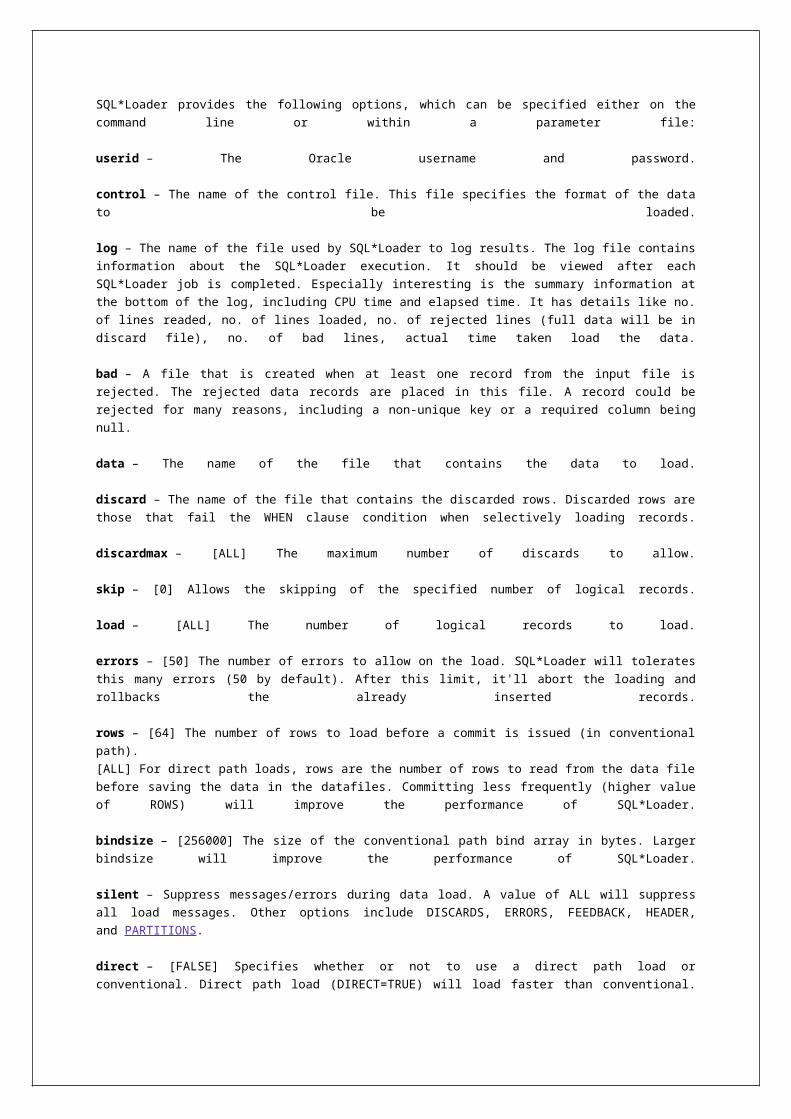
In a production database environment, we have to design different types of rollback segments to
help different types of transactions. Usually in the day hours we have smaller transactions (data
entry operations) by the end-users, and in the night we perform processing (batch jobs), example
clear sql procedure updating tables and committing at the end of the transaction.
Points to ponder:
1. Oracle strongly recommends to have smaller rollback segments.
2. Its good to have not more than 4 transactions per rollback segment.
3. One transaction can only take place in one rollback segment. If there is any space problem the
transaction has to fail, but cannot switch over to another rollback segment and Oracle rollbacks the
transaction.
4. One rollback segment can have multiple transactions. We can limit the maximum transactions a
rollback segment can support. Should limit to 10 by having an init.ora parameter
TRANSACTIONS_PER_ROLLBACK_SEGMENT=10.
5. If we are having problems like "Read Inconsistencies" or "Snapshot Too Old" problems, we can
do these things: Increase the size of the rollback segment (so that "wrapping" issue may not occur so frequently).
Decrease the "Commit" Frequency, so that "blocks" can’t be overwritten as they are still belonging to "Open" DML.
6. Constantly DBA should observe the HWM (High Water Mark) line for rollback segment.
7. If you bounce the database, the rollback segment will be offline, unless you added the rollback
segment name to parameter file.
ROLLBACK_SEGMENTS = r1, r2, r3, r4
8. DBA should define the optimal value for rollback segment. Otherwise if the rollback segment
becomes big, it'll stay at that size which is unwanted (as Oracle recommends smaller RBS). So it's
nice to comeback to some reasonable size after growing while helping a transaction. Though we
define this, rollback segment by default it'll not comeback to this size right after the transaction is
finished, rather it'll wait until another transaction wants to use it. Then it becomes smaller and
again starts growing if necessary.
The biggest issue for a DBA is maintaining the rollback segments especially in a high-activity
environment.
The reasons for a transaction to fail in Oracle, are:
1. RBS is too small to carry entire transaction. Nothing but the tablespace limitation.
2. RBS is already reached MAXEXTENTS, i.e. although tablespace has some free space to offer,
rollback segment can't grow anymore because it has already grabbed it's MAXEXTENTS.
Or you have defined the NEXT EXTENT size wrongly, thus it has reached its MAXEXTENTS so
quickly.
3. Our transaction, say it grabbed one rollback segment and some other transaction also grabbed

the same rollback segment. In this case, our transaction couldn't find sufficient space to have all
the before image blocks.
Operations on rollback segments
Shrinking rollback segment:
The rollback segment cannot shrink to less than two extents.
SQL> ALTER ROLLBACK SEGMENT rbs-name SHRINK [TO int {K|M}];
Managing storage options of rollback segment:
You cannot change the values of the INITIAL and MINEXTENTS.
SQL> ALTER ROLLBACK SEGMENT rbs-name STORAGE storage-options;
Dropping rollback segment:
you can drop only non-system and offline rollback segments.
SQL> DROP ROLLBACK SEGMENT rbs-name;
ORA-1555 error (Snapshot too old error)
$ oerr ora 1555
01555, 00000, "snapshot too old: rollback segment number seg-number with name rbs-name too
small"
// *Cause: rollback records needed by a reader for consistent read are overwritten by other writers.
i.e. One user continuously updating on one table where as the another user trying to retrieve
continuously on that same table.
// *Action: If in automatic undo management mode, increase undo_retention setting and undo
tablespace size. Otherwise, use larger/more rollback segments and avoid long running queries.
Related Views
DBA_SEGMENTS --> Here you can see all the rollback segments regardless they are offline or
online (without status online/offline).
SQL> select SEGMENT_NAME, TABLESPACE_NAME from DBA_SEGMENTS where
SEGMENT_TYPE='ROLLBACK';
DBA_ROLLBACK_SEGS --> You can see the status of a RBS.
Possible statuses are: ONLINE, OFFLINE, Pending Offline.
SQL> select SEGMENT_NAME, TABLESPACE_NAME, STATUS from DBA_ROLLBACK_SEGS;
V$ROLLNAME --> Here you USN and the RBS Name, which are ONLINE.
V$ROLLSTAT --> You can see USN, which are ONLINE, and it's complete details like
1. Size of the rollback segment.
2. Carrying any transactions or not.
3. What is the High-Water-Mark size.
4. Optimal size of the RBS.
5. Wrap information and much more info about each RBS.
From Oracle 10g, you should use UNDO Segments, instead of rollback segments.
RMAN in OracleOracle Recovery Manager (RMAN)
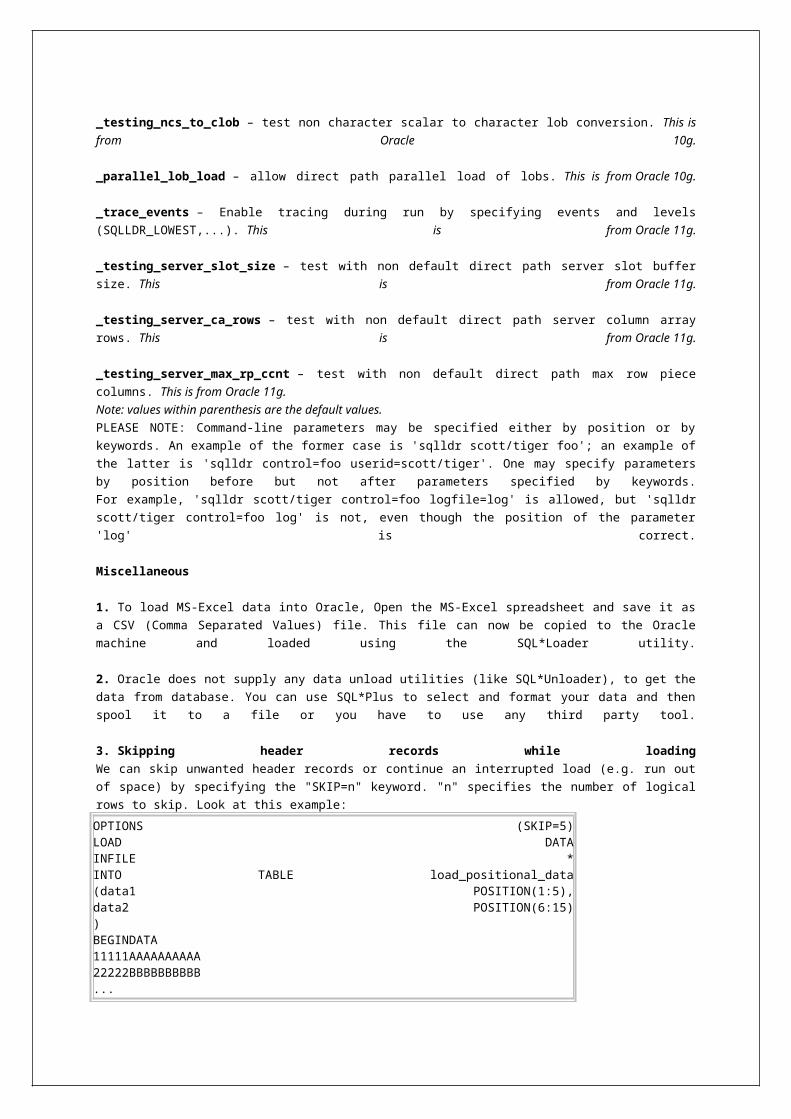
RMAN was introduced in Oracle8, RMAN has since been enhanced (in Oracle 9i), enhanced (in Oracle 10g) and enhanced (in Oracle 11g).
Recovery Manager(RMAN) is an Oracle provided (free) utility for backing-up, restoring and recovering Oracle databases. RMAN ships with the Oracle database and doesn't require a separate installation. The RMAN executable is located in $ORACLE_HOME/bin directory.
RMAN is a Pro*C application that translates commands to a PL/SQL interface through RPC (Remote Procedure Call). The PL/SQL calls are statically linked into the Oracle kernel, and does not require the database to be opened (mapped from the ?/rdbms/admin/recover.bsq file).
The RMAN environment consists of the utilities and databases that play a role in backing up our data. At a minimum, the environment for RMAN must include the following: The target database to be backed up.
The RMAN client (rman executable and recover.bsq), which interprets backup and recovery commands, directs server sessions to execute those commands, and records our backup and recovery activity in the target database control file.
Some environments will also use these optional components: A recovery catalog database, a separate database schema used to record RMAN activity against one or more target databases (this is optional, but highly recommended).
A flash recovery area, called as fast recovery area from 11g release2, a disk location in which the database can store and manage files related to backup and recovery.
Media management software, required for RMAN to interface with backup devices such as tape drives.
Large pool (LARGE_POOL_SIZE) is used for RMAN.
Benefits of RMANSome of the benefits provided by RMAN include: Backups are faster and uses less tapes (RMAN will skip empty blocks)
Less database archiving while database is being backed-up
RMAN checks the database for block corruptions
Automated restores from the catalog
Files are written out in parallel instead of sequential
RMAN can be operated from Oracle Enterprise Manager, or from command line. Here are
the command line arguments:
Argument Value Description
target quoted-string connect-string for target database
catalog quoted-string connect-string for recovery catalog
nocatalog none if specified, then no recovery catalog
cmdfile quoted-string name of input command file
log quoted-string name of output message log file
trace quoted-string name of output debugging message log file
append none if specified, log is opened in append mode
debug optional-args activate debugging
msgno none show RMAN-nnnn prefix for all messages
send quoted-string send a command to the media manager
pipe string building block for pipe names
timeout integer number of seconds to wait for pipe input
checksyntax none check the command file for syntax errors
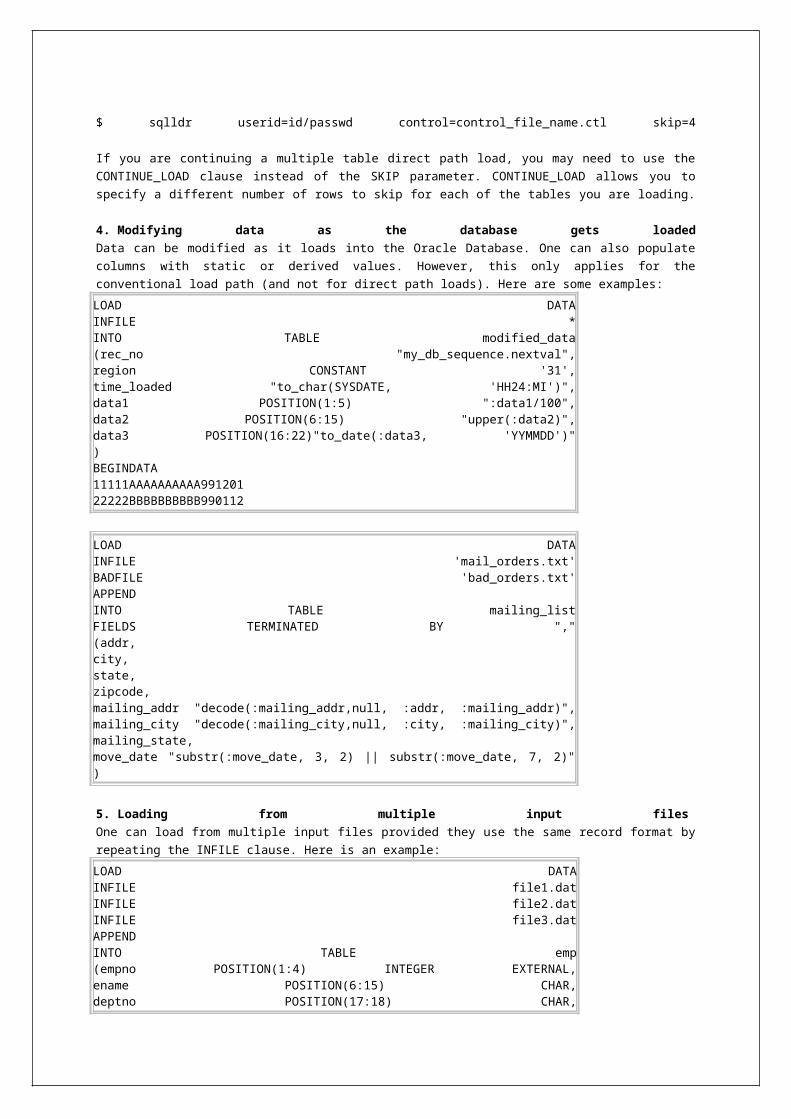
$ rman
$ rman TARGET SYS/pwd@target
$ rman TARGET SYS/pwd@target NOCATALOG
$ rman TARGET SYS/pwd@target CATALOG rman/pwd@cat
$ rman TARGET=SYS/pwd@target CATALOG=rman/pwd@cat
$ rman TARGET SYS/pwd@target LOG $ORACLE_HOME/dbs/log/rman_log.log APPEND
$ rman TARGET / CATALOG rman/pwd@cat
$ rman TARGET / CATALOG rman/pwd@cat CMDFILE cmdfile.rcv LOG outfile.txt
$ rman CATALOG rman/pwd@cat$ rman @/my_dir/my_commands.txt
Using recovery catalog
One (base) recovery catalog can manage multiple target databases. All the target databases
should be register with the catalog.
Start by creating a database schema (usually named rman), in catalog database. Assign an
appropriate tablespace to it and grant it the recovery_catalog_owner role.
$ sqlplus "/as sysdba"
SQL> create user rman identified by rman default tablespace rmants quota unlimited on rmants;
SQL> grant resource, recovery_catalog_owner to rman;
No need to grant connect role explicitly, because recovery_catalog_owner role has it.
Log in to catalog database with rman and create the catalog.
$ rman catalog rman/rman
RMAN> create catalog;
RMAN> exit;
Now you can continue by registering your databases in the catalog.
$ rman catalog rman/rman@cat target system/manager@tgt
RMAN> register database;
Using virtual private catalog
A virtual private catalog is a set of synonyms and views that enable user access to a subset of a
base recovery catalog. The owner of the base recovery catalog can GRANT or REVOKE restricted
access to the catalog to other database users. Each restricted user has full read/write access to his
own metadata, which is called a virtual private catalog. The RMAN metadata is stored in the
schema of the virtual private catalog owner. The owner of the base recovery catalog controls what
each virtual catalog user can access.
$ sqlplus "/as sysdba"
SQL> create user vpc identified by vpc default tablespace rmants quota unlimited on rmants;
SQL> grant resource, recovery_catalog_owner to vpc;
Log in to catalog database with rman and grant the catalog to vpc.
$ rman catalog rman/rman
RMAN> GRANT CATALOG FOR DATABASE target_db TO vpc;
RMAN> exit;
Log in to catalog database with vpc and create the virtual private catalog.
$ rman catalog vpc/vpc
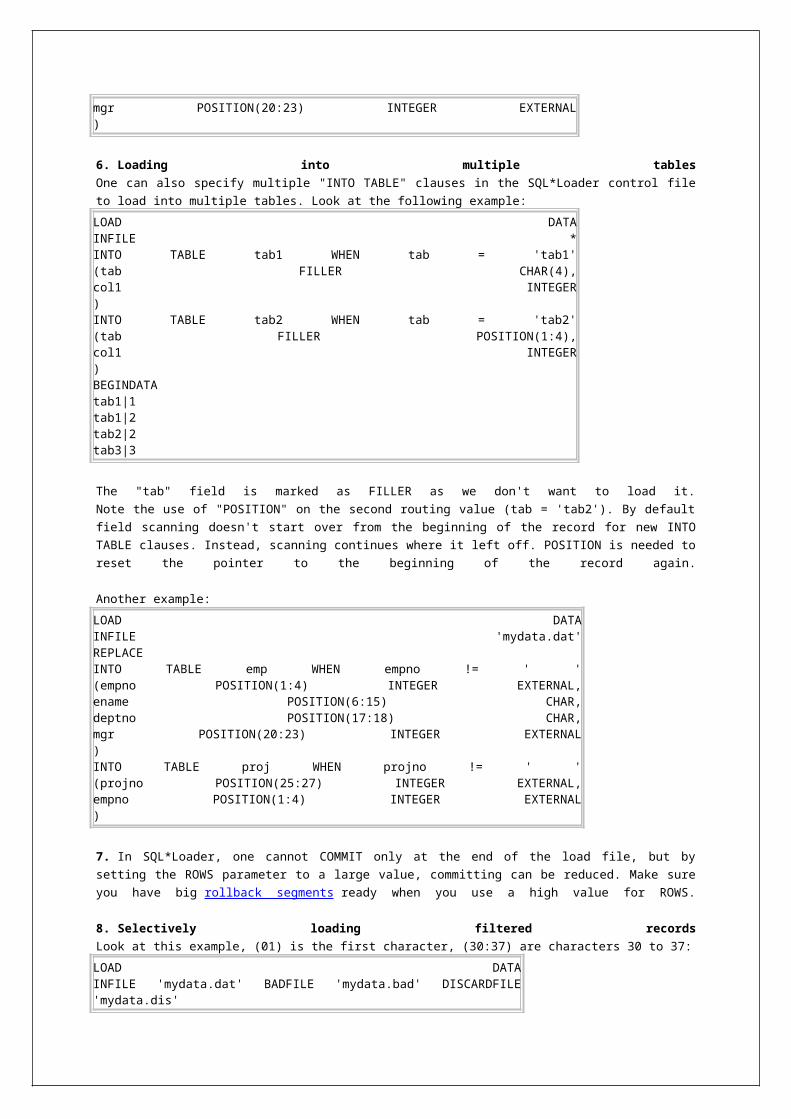
RMAN> CREATE VIRTUAL CATALOG;
RMAN> exit;
$ sqlplus vpc/vpc
SQL>exec rman.DBMS_RCVCAT.CREATE_VIRTUAL_CATALOG;
Recovery Manager commands
ADVISE FAILURE Will display repair options for the specified failures. 11g R1 command.
ALLOCATEEstablish a channel, which is a connection between RMAN and a database instance.
ALTER DATABASE Mount or open a database.
BACKUP Backup database, tablespaces, datafiles, control files, spfile, archive logs.
BLOCKRECOVER Will recover the corrupted blocks.
CATALOGAdd information about file copies and user-managed backups to the catalog repository.
CHANGE Update the status of a backup in the RMAN repository.
CONFIGURE To change RMAN settings.
CONNECTEstablish a connection between RMAN and a target, auxiliary, or recovery catalog database.
CONVERTConvert datafile formats for transporting tablespaces and databases across platforms.
CREATE CATALOG Create the base/virtual recovery catalog.
CREATE SCRIPT Create a stored script and store it in the recovery catalog.
CROSSCHECK Check whether backup items still exist or not.
DELETE Delete backups from disk or tape.
DELETE SCRIPT Delete a stored script from the recovery catalog.
DROP CATALOG Remove the base/virtual recovery catalog.
DROP DATABASE Delete the target database from disk and unregisters it.
DUPLICATEUse backups of the target database to create a duplicate database that we can use for testing purposes or to create a standby database.
EXECUTE SCRIPT Run an RMAN stored script.
EXIT or QUIT Exit/quit the RMAN console.
FLASHBACK DATABASE
Return the database to its state at a previous time or SCN.
GRANT Grant privileges to a recovery catalog user.
HOSTInvoke an operating system command-line subshell from within RMAN or run a specific operating system command.
IMPORT CATALOG Import the metadata from one recovery catalog into another recovery catalog.
LIST List backups and copies.
PRINT SCRIPT Display a stored script.
RECOVERApply redo logs or incremental backups to a restored backup set in order to recover it to a specified time.
REGISTER Register the target database in the recovery catalog.
RELEASE CHANNEL Release a channel that was allocated.
REPAIR FAILUREWill repair database failures identified by the Data Recovery Advisor. 11g R1 command.
REPLACE SCRIPTReplace an existing script stored in the recovery catalog. If the script does not exist, then REPLACE SCRIPT creates it.
REPORT Report backup status - database, files, backups.
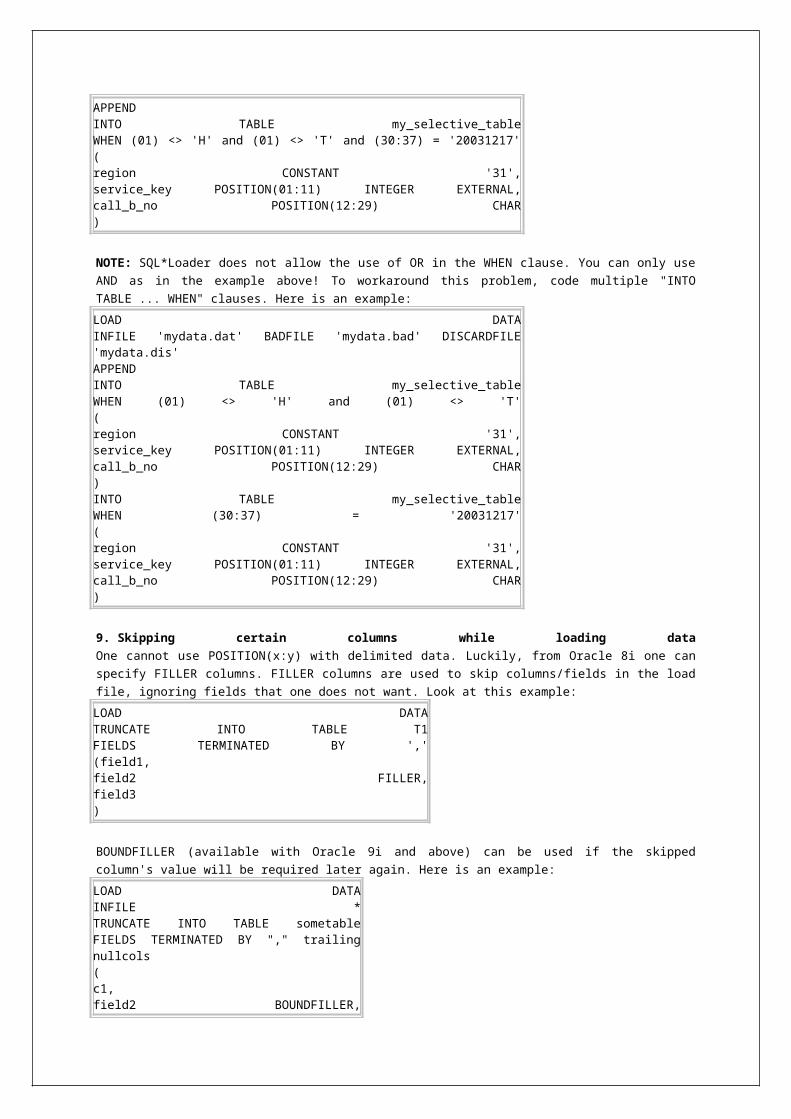
RESET DATABASEInform RMAN that the SQL statement ALTER DATABASE OPEN RESETLOGS has been executed and that a new incarnation of the target database has been created, or reset the target database to a prior incarnation.
RESTORE Restore files from RMAN backup.
RESYNC CATALOGPerform a full resynchronization, which creates a snapshot control file and then copies any new or changed information from that snapshot control file to the recovery catalog.
REVOKE Revoke privileges from a recovery catalog user.
RUNTo run set of RMAN commands, only some RMAN commands are valid inside RUN block.
SEND Send a vendor-specific quoted string to one or more specific channels.
SET Settings for the current RMAN session.
SHOW Display the current configuration.
SHUTDOWN Shutdown the database.
SPOOL To direct RMAN output to a log file.
SQL Execute a PL/SQL procedure or SQL statement (not SELECT).
STARTUP Startup the database.
SWITCHSpecify that a datafile copy is now the current datafile, that is, the datafile pointed to by the control file.
TRANSPORT TABLESPACE
Create transportable tablespace sets from backup for one or more tablespaces.
UNREGISTER Unregister a database from the recovery catalog.
UPGRADE CATALOGUpgrade the recovery catalog schema from an older version to the version required by the RMAN executable.
VALIDATE To validate. 11g R1 command.
All RMAN commands executed through channels. A channel is a connection (session) from RMAN to
target database. These connections or channels are used to perform the desired operations.
Flash/Fast Recovery Area (FRA)
Flash recovery area is a disk location in which the database can store and manage files related to
backup and recovery.
To set the flash recovery area location and size,
use DB_RECOVERY_FILE_DEST andDB_RECOVERY_FILE_DEST_SIZE.
RMAN new features in Oracle 10g
Managing recovery related files with flash recovery area.
Optimized incremental backups using block change tracking (Faster incremental backups) using a file (named block change tracking file). CTWR (Change Tracking Writer) is the background process responsible for tracking the blocks.
Reducing the time and overhead of full backups with incrementally updated backups.
Comprehensive backup job tracking and administration with Enterprise Manager.
Backup set binary compression.
New compression algorithm BZIP2 brought in.
Automated Tablespace Point-in-Time Recovery.
Automatic channel failover on backup & restore.
Cross-Platform tablespace conversion.
Ability to preview the backups required to perform a restore operation.RMAN> restore database preview [summary];RMAN> restore tablespace tbs1 preview;
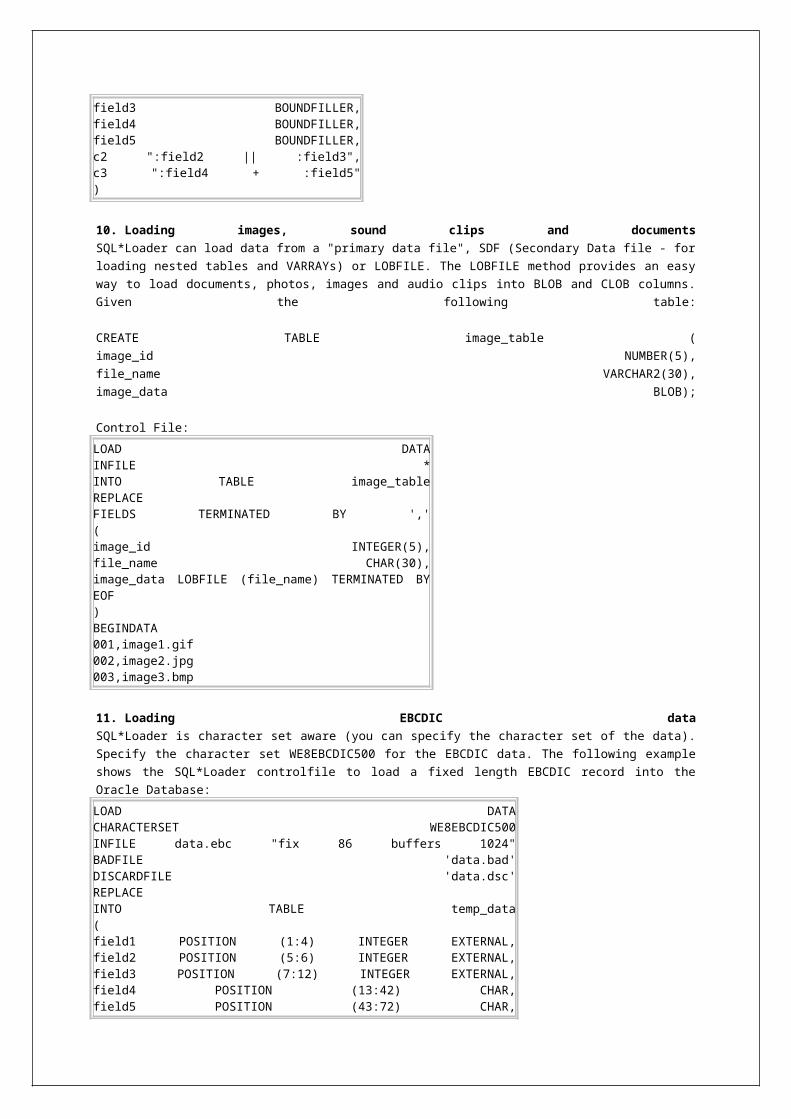
RMAN new features in Oracle 11g Release 1 Multisection backups of same file - RMAN can backup or restore a single file in parallel by dividing the work among multiple channels. Each channel backs up one file section, which is a contiguous range of blocks. This speeds up overall backup and restore performance, and particularly for bigfile tablespaces, in which a datafile can be sized upwards of several hundred GB to TB's.
Recovery will make use of flashback logs in FRA (Flash Recovery Area).
Fast Backup Compression - in addition to the Oracle Database 10 g backup compression algorithm (BZIP2), RMAN now supports the ZLIB algorithm, which offers 40% better performance, with a trade-off of no more than 20% lower compression ratio, versus BZIP2.RMAN> configure compression algorithm 'ZLIB' ;
Will backup uncommitted undo only, not committed undo.
Data Recovery Advisor (DRA) - quickly identify the root cause of failures; auto fix or present recovery options to the DBA.
Virtual Private Catalog - a recovery catalog administrator can grant visibility of a subset of registered databases in the catalog to specific RMAN users.RMAN> grant catalog for database db-name to user-name;
Catalogs can be merged/moved/imported from one database to another.
New commands in RMAN
o RMAN> list failure;
o RMAN> list failure errnumber detail;
o RMAN> advise failure;
o RMAN> repair failure;
o RMAN> repair failure preview;
o RMAN> validate database; -- checks for corrupted blocks
o RMAN> create virtual catalog;
RMAN new features in Oracle 11g Release2 The following are new clauses and format options for the SET NEWNAME command:A single SET NEWNAME command can be applied to all files in a database or tablespace.SET NEWNAME FOR DATABASE TO format;SET NEWNAME FOR TABLESPACE tsname TO format;
# New format identifiers are as follows:# %U - Unique identifier. data_D-%d_I-%I_TS-%N_FNO-%f# %b - UNIX base name of the original datafile name. For example, if the original datafile name was $ORACLE_HOME/data/tbs_01.f, then %b is tbs_01.f.
RMAN related views
Control File V$ View Recovery Catalog View View Describes
V$ARCHIVED_LOG RC_ARCHIVED_LOG Archived and unarchived redo logs
V$BACKUP_DATAFILE RC_BACKUP_CONTROLFILE Control files in backup sets
V$BACKUP_CORRUPTION RC_BACKUP_CORRUPTIONCorrupt block ranges in datafile backups
V$BACKUP_DATAFILE RC_BACKUP_DATAFILE Datafiles in backup sets
V$BACKUP_FILES RC_BACKUP_FILESRMAN backups and copies in the repository
V$BACKUP_PIECE RC_BACKUP_PIECE Backup pieces
V$BACKUP_REDOLOG RC_BACKUP_REDOLOG Archived logs in backups
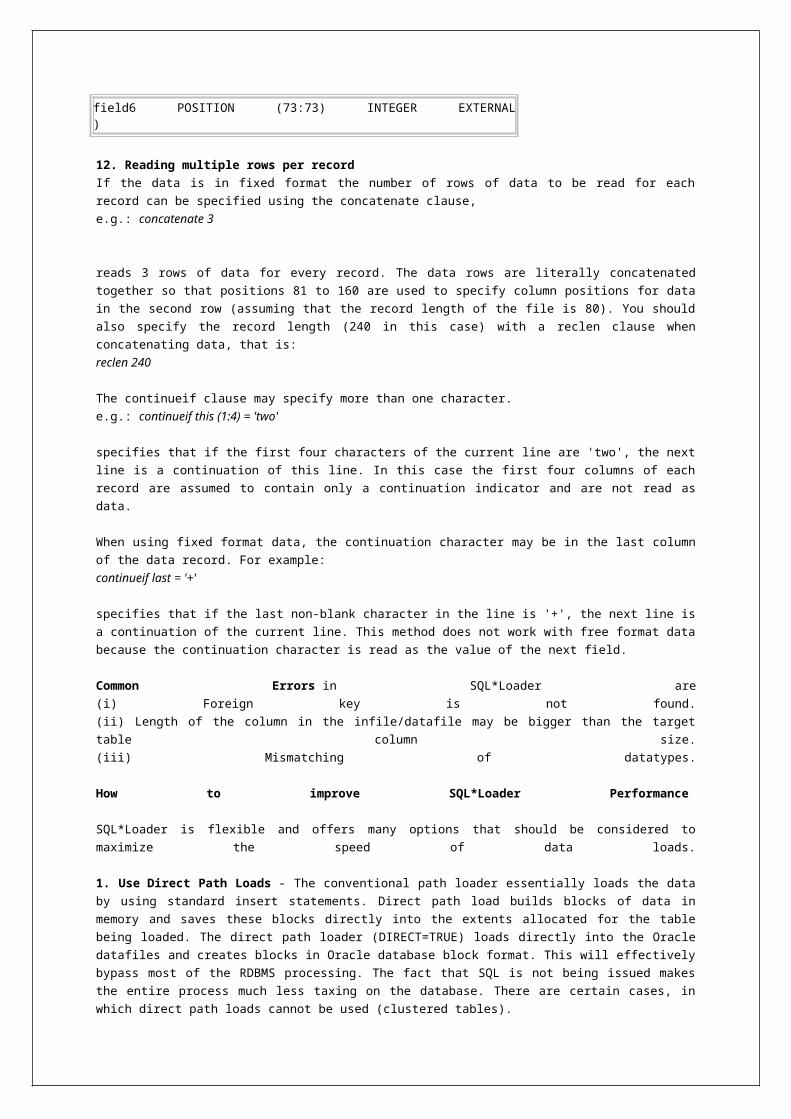
V$BACKUP_SET RC_BACKUP_SET Backup sets
V$BACKUP_SPFILE RC_BACKUP_SPFILE Server parameter files in backup sets
V$DATAFILE_COPY RC_CONTROLFILE_COPY Control file copies on disk
V$COPY_CORRUPTION RC_COPY_CORRUPTIONInformation about datafile copy corruptions
V$DATABASE RC_DATABASE
Databases registered in the recovery catalog (RC_DATABASE) or information about the currently mounted database (V$DATABASE)
V$DATABASE_BLOCK_CORRUPTION
RC_DATABASE_BLOCK_CORRUPTION
Database blocks marked as corrupt in the most recent RMAN backup or copy
V$DATABASE_INCARNATION RC_DATABASE_INCARNATIONAll database incarnations registered in the catalog
V$DATAFILE RC_DATAFILEAll datafiles registered in the recovery catalog
V$DATAFILE_COPY RC_DATAFILE_COPY Datafile image copies
V$LOG_HISTORY RC_LOG_HISTORYHistorical information about online redo logs
V$OFFLINE_RANGE RC_OFFLINE_RANGE Offline ranges for datafiles
V$PROXY_ARCHIVEDLOG RC_PROXY_ARCHIVEDLOGArchived log backups created by proxy copy
V$PROXY_CONTROLFILE RC_PROXY_CONTROLFILEControl file backups created by proxy copy
V$PROXY_DATAFILE RC_PROXY_DATAFILEDatafile backups created by proxy copy
V$LOG and V$LOGFILE RC_REDO_LOGOnline redo logs for all incarnations of the database since the last catalog resynchronization
V$THREAD RC_REDO_THREADAll redo threads for all incarnations of the database since the last catalog resynchronization
V$RESTORE_POINT RC_RESTORE_POINTAll restore points for all incarnations of the database since the last catalog resynchronization
- RC_RESYNC Recovery catalog resynchronizations
V$RMAN_CONFIGURATION RC_RMAN_CONFIGURATIONRMAN persistent configuration settings
V$RMAN_OUTPUT RC_RMAN_OUTPUTOutput from RMAN commands for use in Enterprise Manager
V$RMAN_STATUSRC_RMAN_STATUS
Historical status information about RMAN operations
V$TABLESPACE RC_TABLESPACE
All tablespaces registered in the recovery catalog, all dropped tablespaces, and tablespaces that belong to old incarnations
RC_TEMPFILE V$TEMPFILEAll tempfiles registered in the recovery catalog
RMAN related Packages
DBMS_RCVCAT
DBMS_RCVMAN
DBMS_BACKUP_RESTORE
RMAN (Recovery Manager) Commands in Oracle
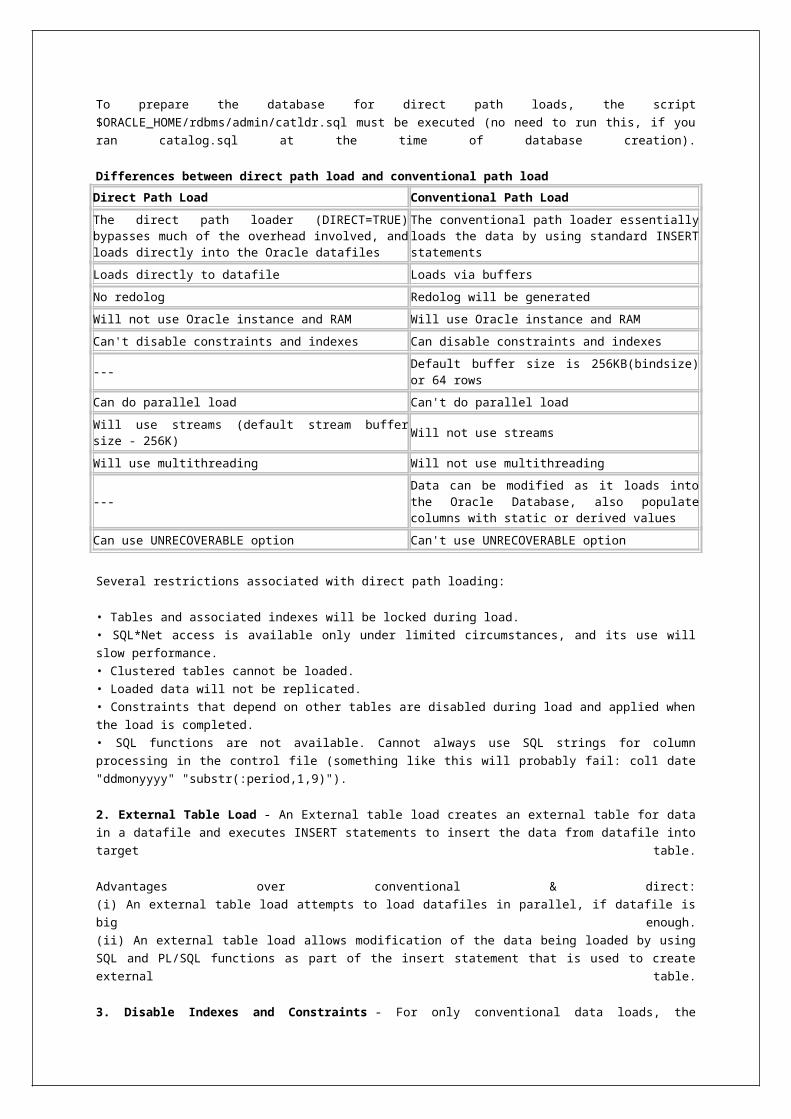
rman commandsStart RMAN from the OS command line.
rman[ TARGET [=] ['] [userid][/[password]][@net_service_name] [']| {CATALOG [=] ['] [userid][/[password]][@net_service_name] [']| LOG [=] [']filename['] [APPEND]...]...
$ rman$ rman NOCATALOG$ rman TARGET SYS/pwd@target$ rman TARGET SYS/pwd@target NOCATALOG$ rman TARGET SYS/pwd@target LOG $ORACLE_HOME/dbs/my_log.log APPEND$ rman CATALOG rman/pwd@catdb$ rman TARGET=SYS/pwd@target CATALOG=rman/pwd@cat$ rman TARGET / CATALOG rman/rman@cat$ rman TARGET / SCRIPT dwh LOG /tmp/dwh.log$ rman PIPE newpipe TARGET / TIMEOUT 90$ rman @/my_dir/my_commands.txt$ rman @backup_ts_generic.rman "/tmp" USERS$ rman CMDFILE=backup_ts_users.rman$ rman TARGET / @backup_db.rman$ rman TARGET / CATALOG rman/pwd@cat CMDFILE cmdfile.rcv LOG outfile.txt$ rman TARGET / CATALOG rman/pwd@cat DEBUG TRACE trace.log$ rman TARGET SYS/pwd@prod CATALOG rman/rman@rcat @'/oracle/dbs/whole.rcv'$ rman TARGET user/pwd CMDFILE=takefulldb.cmd @@takefulldb.cmd$ rman CHECKSYNTAX @'/tmp/backup_db.cmd'$ rman MSGNO$ rman | tee rman.log$ rman help=yes
@ (at sign) Run a command file.@@ (double at sign) Run a command file in the same directory as another command file that is currently running. The @@ command differs from the @ command only when run from within a command file.RMAN> @backup_db.rmanRMAN> @/my_dir/my_command_file.txtRMAN> @/tmp/bkup_db.rman whole_dbRMAN> @backup_ts_generic.rman "/tmp" $1RMAN> RUN {@backup_db.rman}
CONNECT commandEstablish a connection between RMAN and a target, auxiliary, or recovery catalog database.RMAN> CONNECT TARGET;RMAN> CONNECT TARGET /RMAN> CONNECT TARGET sys@tgt;RMAN> CONNECT TARGET sys/pwd@tgt;RMAN> CONNECT CATALOG rman@catdb;RMAN> CONNECT CATALOG rman/pwd@catdb;RMAN> CONNECT AUXILIARY /RMAN> CONNECT AUXILIARY rman@auxdb;RMAN> CONNECT AUXILIARY rman/pwd@auxdb;CREATE CATALOG commandCreate Oracle schema for the recovery catalog.RMAN> CREATE CATALOG;RMAN> CREATE CATALOG TABLESPACE rmants;RMAN> CREATE VIRTUAL CATALOG; -- Oracle 11g R1SQL> EXEC rman.DBMS_RCVCAT.CREATE_VIRTUAL_CATALOG; -- Oracle 11g R1
RMAN> SQL "EXEC catown.DBMS_RCVCAT.CREATE_VIRTUAL_CATALOG"; -- Oracle 11g R1
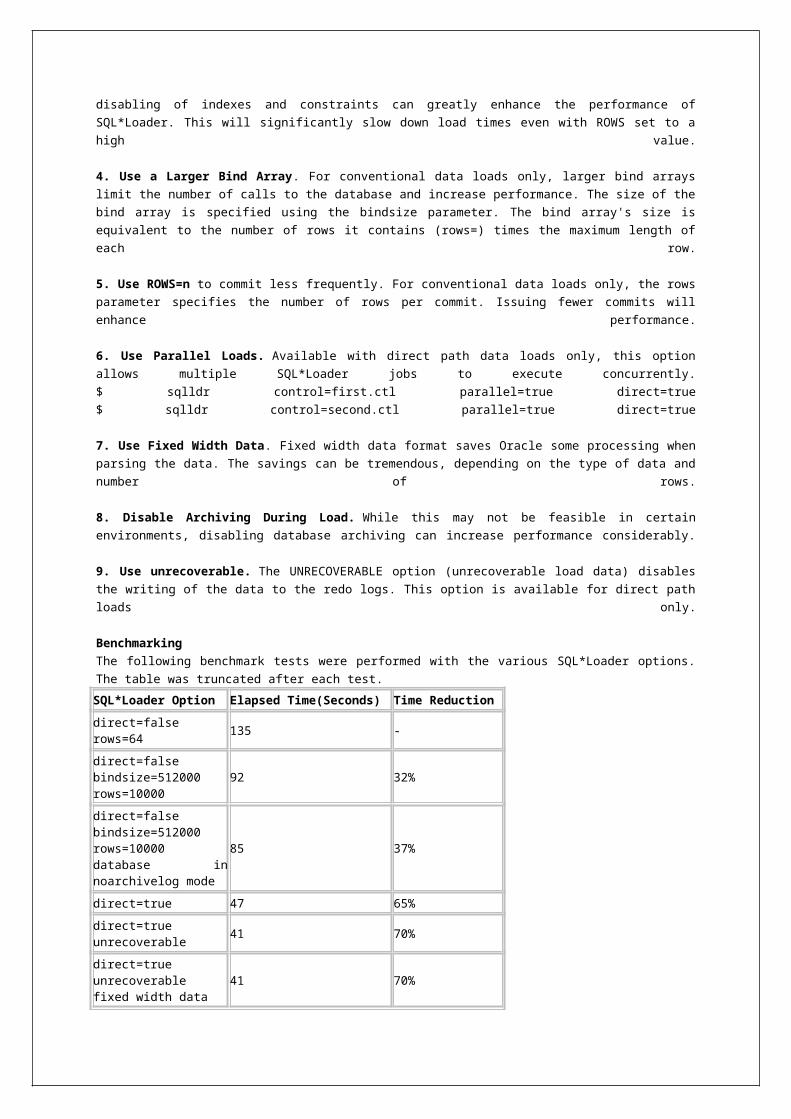
DROP CATALOG commandRemove Oracle schema from the recovery catalog.RMAN> DROP CATALOG;
RESYNC CATALOG commandPerform a full resynchronization, which creates a snapshot control file and then copies any new or changed information from that snapshot control file to the recovery catalog.RMAN> RESYNC CATALOG;RMAN> RESYNC CATALOG FROM DB_UNIQUE_NAME prod_db;RMAN> RESYNC CATALOG FROM DB_UNIQUE_NAME ALL;
UPGRADE CATALOG commandUpgrade the recovery catalog schema from an older version to the version required by the RMAN executable.RMAN> UPGRADE CATALOG;
IMPORT CATALOG commandImport the metadata from one recovery catalog into another recovery catalog.RMAN> IMPORT CATALOG cat@srcdb;RMAN> IMPORT CATALOG rcat@inst DBID=2871507123;RMAN> IMPORT CATALOG cat@srcdb DBID=1844750987, 61738563;RMAN> IMPORT CATALOG cat@srcdb DB_NAME=prod2;RMAN> IMPORT CATALOG cat@srcdb DB_NAME=prod3, prod4;RMAN> IMPORT CATALOG rman/rman@catdb1 DB_NAME=prod1 NO UNREGISTER;RMAN> IMPORT CATALOG rman/oracle@catdb1 NO UNREGISTER;
REGISTER commandRegister the target database in the recovery catalog.RMAN> REGISTER DATABASE;RMAN> REGISTER CATALOG;RMAN> REGISTER CATALOG TABLESPACE tbs-name;
UNREGISTER commandUnregister a Oracle database from the recovery catalog.RMAN> UNREGISTER DATABASE;RMAN> UNREGISTER DATABASE NOPROMPT;RMAN> UNREGISTER DATABASE prod1;RMAN> UNREGISTER DATABASE prod2 NOPROMPT;RMAN> UNREGISTER DB_UNIQUE_NAME prod2;RMAN> UNREGISTER DB_UNIQUE_NAME prod1 NOPROMPT;RMAN> UNREGISTER DB_UNIQUE_NAME prod2 INCLUDING BACKUPS;RMAN> UNREGISTER DB_UNIQUE_NAME prod3 INCLUDING BACKUPS NOPROMPT;
GRANT commandGrant privileges to a recovery catalog user.RMAN> GRANT CATALOG FOR DATABASE prod1 TO vpc1; -- Oracle 11g R1RMAN> GRANT REGISTER DATABASE TO bckop2;RMAN> GRANT RECOVERY_CATALOG_OWNER TO rmanop1, rmanop3;
REVOKE commandRevoke privileges from a recovery catalog user.RMAN> REVOKE CATALOG FOR DATABASE prod1 FROM vpc1; -- Oracle 11g R1RMAN> REVOKE REGISTER DATABASE FROM bckop2;RMAN> REVOKE RECOVERY_CATALOG_OWNER FROM bckop;
RESET DATABASE commandInform RMAN that the SQL statement ALTER DATABASE OPEN RESETLOGS has been executed and that a new incarnation of the target database has been created, or reset the target database to a prior incarnation.RMAN> RESET DATABASE TO INCARNATION 3;
STARTUP commandStartup the target database. This command is equivalent to the SQL*Plus STARTUP command.RMAN> STARTUP;RMAN> STARTUP PFILE=’/u01/app/oracle/admin/pfile/initsid.ora’RMAN> STARTUP NOMOUNT;RMAN> STARTUP MOUNT;RMAN> STARTUP FORCE;RMAN> STARTUP FORCE DBA;RMAN> STARTUP FORCE DBA PFILE=c:\Oracle\Admin\pfile\init.ora;RMAN> STARTUP FORCE NOMOUNT;RMAN> STARTUP FORCE MOUNT DBA PFILE=/tmp/inittrgt.ora;
RMAN> STARTUP AUXILIARY nomount;
SHUTDOWN commandShutdown the target database. This command is equivalent to the SQL*Plus SHUTDOWN command.RMAN> SHUTDOWN;RMAN> SHUTDOWN NORMAL;RMAN> SHUTDOWN TRANSACTIONAL;RMAN> SHUTDOWN IMMEDIATE;RMAN> SHUTDOWN ABORT;
ALTER DATABASE commandMount or open a database.RMAN> ALTER DATABASE MOUNT;RMAN> ALTER DATABASE OPEN;RMAN> ALTER DATABASE OPEN RESETLOGS;
SHOW commandDisplay the current CONFIGURE settings.
SHOW{ RETENTION POLICY| BACKUP OPTIMIZATION| [DEFAULT] DEVICE TYPE| CONTROLFILE AUTOBACKUP [FORMAT]| [AUXILIARY] CHANNEL [FOR DEVICE TYPE deviceSpecifier]| MAXSETSIZE| DATAFILE BACKUP COPIES| ARCHIVELOG [BACKUP COPIES|DELETION POLICY]
| AUXNAME| EXCLUDE| ENCRYPTION {ALGORITHM | FOR [DATABASE|TABLESPACE]}| COMPRESSION ALGORITHM| SNAPSHOT CONTROLFILE NAME| DB_UNIQUE_NAME| ALL} FOR [DB_UNIQUE_NAME [‘db_unique_name’|ALL]];
RMAN> SHOW ALL;CONFIGURE RETENTION POLICY TO REDUNDANCY 1; # defaultCONFIGURE BACKUP OPTIMIZATION OFF; # defaultCONFIGURE DEFAULT DEVICE TYPE TO DISK; # defaultCONFIGURE CONTROLFILE AUTOBACKUP OFF; # defaultCONFIGURE CONTROLFILE AUTOBACKUP FORMAT FOR DEVICE TYPE DISK TO '%F'; # defaultCONFIGURE DEVICE TYPE DISK PARALLELISM 1 BACKUP TYPE TO BACKUPSET; # defaultCONFIGURE DATAFILE BACKUP COPIES FOR DEVICE TYPE DISK TO 1; # defaultCONFIGURE ARCHIVELOG BACKUP COPIES FOR DISK TO 1; # defaultCONFIGURE MAXSETSIZE TO UNLIMITED; # defaultCONFIGURE DEVICE TYPE DISK PARALLELISM 1; # defaultCONFIGURE DATAFILE BACKUP COPIES FOR SBT TO 1; # defaultCONFIGURE ARCHIVELOG BACKUP COPIES FOR SBT TO 1; # defaultCONFIGURE ENCRYPTION FOR DATABASE OFF; # defaultCONFIGURE ENCRYPTION ALGORITHM 'AES128'; # defaultCONFIGURE COMPRESSION ALGORITHM 'BASIC' AS OF RELEASE 'DEFAULT' OPTIMIZE FOR LOAD TRUE; # default --Oracle 11g R2CONFIGURE ARCHIVELOG DELETION POLICY TO NONE; # defaultCONFIGURE SNAPSHOT CONTROLFILE NAME TO '.../dbs/snapcf_sid.f'; # default
%F = dbid, day, month, year and sequence%U = %u_%p_%c%u = eight characters of the backup set and time ...%p = piece number within the backupset%c = copy number of the backup piece ...
RMAN> SHOW RETENTION POLICY;RMAN> SHOW RETENTION POLICY FOR DB_UNIQUE_NAME ALL;RMAN> SHOW DEVICE TYPE;RMAN> SHOW DEVICE TYPE FOR DB_UNIQUE_NAME prod3;RMAN> SHOW DEFAULT DEVICE TYPE;RMAN> SHOW CHANNEL;RMAN> SHOW MAXSETSIZE;RMAN> SHOW BACKUP OPTIMIZATION;RMAN> SHOW SNAPSHOT CONTROLFILE NAME;RMAN> SHOW CONTROLFILE AUTOBACKUP;RMAN> SHOW COMPRESSION ALGORITHM;RMAN> SHOW ENCRYPTION ALGORITHM;RMAN> SHOW ALL FOR DB_UNIQUE_NAME ALL;RMAN> SHOW ALL FOR DB_UNIQUE_NAME 'STANDBY';
CONFIGURE commandTo configure persistent RMAN settings. These settings apply to all RMAN sessions until explicitly changed or disabled.
CONFIGURE deviceConf;CONFIGURE backupConf;CONFIGURE AUXNAME FOR DATAFILE datafileSpec {TO 'filename' | CLEAR};CONFIGURE SNAPSHOT CONTROLFILE NAME {TO 'filename' | CLEAR};CONFIGURE cfauConf;
CONFIGURE ARCHIVELOG DELETION POLICY
{CLEAR | TO {APPLIED ON [ALL] STANDBY | BACKED UP integer TIMES TO DEVICE TYPE
deviceSpecifier | NONE | SHIPPED TO [ALL] STANDBY}
[{APPLIED ON [ALL] STANDBY | BACKED UP integer TIMES TO DEVICE TYPE deviceSpecifier | NONE |
SHIPPED TO [ALL] STANDBY}] …
}
deviceConf::={ DEFAULT DEVICE TYPE { TO deviceSpec | CLEAR }| DEVICE TYPE deviceSpec { PARALLELISM integer | CLEAR }| [AUXILIARY] CHANNEL [integer] DEVICE TYPE deviceSpec {allocOperandList|CLEAR}}
allocOperandList::={ PARMS [=] 'channel_parms'| FORMAT [=] 'format_string' [, 'format_string']...| { MAXPIECESIZE [=] integer | RATE [=] integer } [K | M | G]...}...
connectStringSpec::=['] [userid] [/[password]] [@net_service_name] [']
backupConf::={RETENTION POLICY {TO {RECOVERY WINDOW OF integer DAYS| REDUNDANCY [=] integer | NONE}| CLEAR}| MAXSETSIZE {TO {integer [K | M | G]| UNLIMITED}| CLEAR}| {ARCHIVELOG | DATAFILE}BACKUP COPIES FOR DEVICE TYPE deviceSpec {TO integer | CLEAR}| BACKUP OPTIMIZATION {ON | OFF | CLEAR}| EXCLUDE FOR TABLESPACE tablespace_name [CLEAR]}
cfauConf::==CONTROLFILE AUTOBACKUP {ON | OFF | CLEAR | FORMAT FOR DEVICE TYPE deviceSpec {TO 'format string'|CLEAR}}
RMAN> CONFIGURE CONTROLFILE AUTOBACKUP ON;RMAN> CONFIGURE CONTROLFILE AUTOBACKUP OFF;RMAN> CONFIGURE CONTROLFILE AUTOBACKUP FORMAT FOR DEVICE TYPE DISK TO 'cf%F';RMAN> CONFIGURE CONTROLFILE AUTOBACKUP FORMAT FOR DEVICE TYPE DISK TO '+BACKUP';RMAN> CONFIGURE CONTROLFILE AUTOBACKUP FORMAT FOR DEVICE TYPE DISK CLEAR;RMAN> CONFIGURE RETENTION POLICY TO REDUNDANCY 3;RMAN> CONFIGURE RETENTION POLICY TO RECOVERY WINDOW OF 7 DAYS;RMAN> CONFIGURE RETENTION POLICY CLEAR;RMAN> CONFIGURE DATAFILE BACKUP COPIES FOR DEVICE TYPE DISK TO 2;
RMAN> CONFIGURE ARCHIVELOG BACKUP COPIES FOR DEVICE TYPE DISK TO 2;RMAN> CONFIGURE ARCHIVELOG DELETION POLICY CLEAR; --11gRMAN> CONFIGURE ARCHIVELOG DELETION POLICY TO NONE;RMAN> CONFIGURE ARCHIVELOG DELETION POLICY TO SHIPPED TO STANDBY;RMAN> CONFIGURE ARCHIVELOG DELETION POLICY TO SHIPPED TO ALL STANDBY;RMAN> CONFIGURE ARCHIVELOG DELETION POLICY TO APPLIED ON STANDBY;RMAN> CONFIGURE ARCHIVELOG DELETION POLICY TO APPLIED ON ALL STANDBY;
RMAN> CONFIGURE ARCHIVELOG DELETION POLICY TO BACKED UP 2 TIMES TO sbt;
RMAN> CONFIGURE ARCHIVELOG DELETION POLICY TO BACKED UP 3 TIMES TO disk;
RMAN> CONFIGURE DEFAULT DEVICE TYPE TO sbt;RMAN> CONFIGURE DEFAULT DEVICE TYPE TO DISK;RMAN> CONFIGURE DEVICE TYPE sbt PARALLELISM 3;RMAN> CONFIGURE DEVICE TYPE DISK PARALLELISM 4;
RMAN> CONFIGURE DEVICE TYPE DISK PARALLELISM 3 BACKUP TYPE TO BACKUPSET;
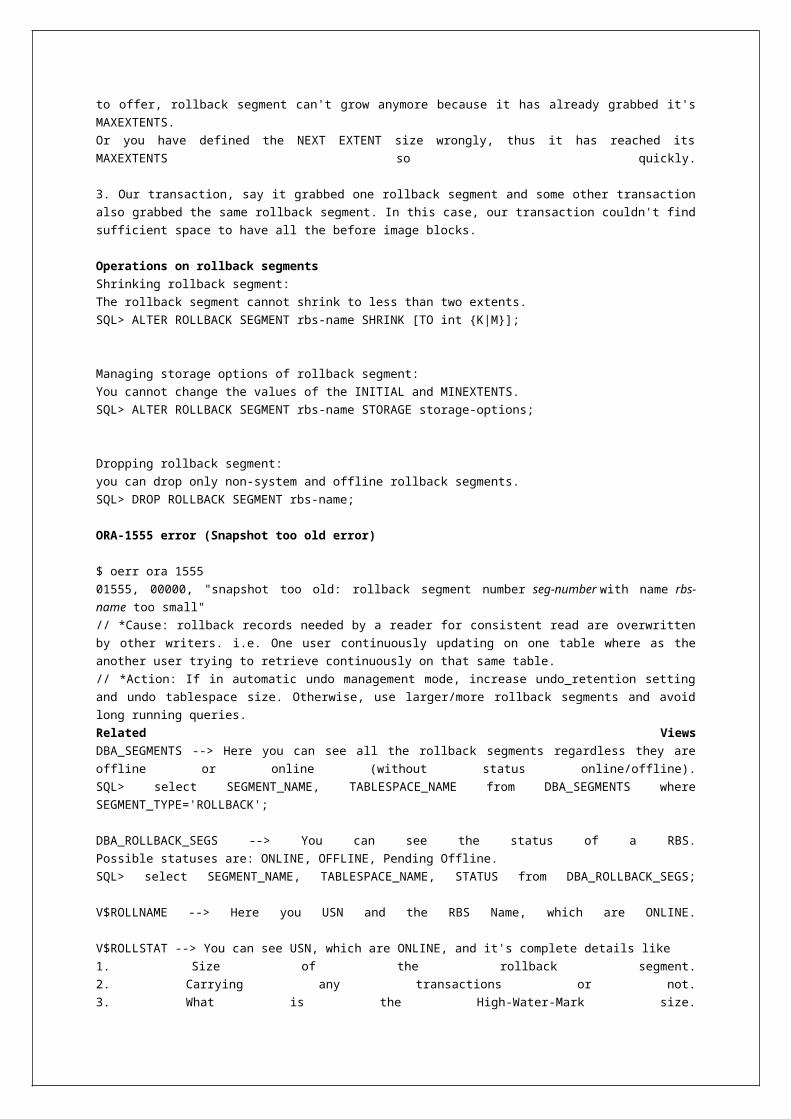
RMAN> CONFIGURE DEVICE TYPE DISK BACKUP TYPE TO COMPRESSED BACKUPSET;
RMAN> CONFIGURE CHANNEL DEVICE TYPE sbt;RMAN> CONFIGURE CHANNEL DEVICE TYPE sbt PARMS='ENV=mml_env_settings';RMAN> CONFIGURE CHANNEL DEVICE TYPE sbt PARMS 'ENV=(NSR_SERVER=bksrv1)';RMAN> CONFIGURE CHANNEL DEVICE TYPE sbt PARMS 'BLKSIZE=1048576';RMAN> CONFIGURE CHANNEL DEVICE TYPE sbt FORMAT 'bkup_%U';RMAN> CONFIGURE CHANNEL DEVICE TYPE sbt CLEAR;RMAN> CONFIGURE CHANNEL 2 DEVICE TYPE sbt CONNECT 'SYS/pwd@node2' PARMS 'ENV=(NSR_SERVER=bksrv2)';RMAN> CONFIGURE CHANNEL DEVICE TYPE DISK FORMAT '/tmp/%U';RMAN> CONFIGURE CHANNEL DEVICE TYPE DISK FORMAT 'C:\backup\df%t_s%s_s%p';RMAN> CONFIGURE CHANNEL 2 DEVICE TYPE DISK FORMAT '/backup/db_%s%d_%p';RMAN> CONFIGURE CHANNEL DEVICE TYPE DISK FORMAT CLEAR;RMAN> CONFIGURE CHANNEL DEVICE TYPE DISK DEBUG 5;
RMAN> CONFIGURE BACKUP OPTIMIZATION ON;RMAN> CONFIGURE BACKUP OPTIMIZATION OFF;RMAN> CONFIGURE SNAPSHOT CONTROLFILE NAME TO ‘/backup/snapcf_%d.f‘;RMAN> CONFIGURE SNAPSHOT CONTROLFILE NAME TO ‘+FRA/snap/snapcf_%d.f‘;RMAN> CONFIGURE SNAPSHOT CONTROLFILE NAME TO ‘/ocfs/oradata/snapcf‘;RMAN> CONFIGURE SNAPSHOT CONTROLFILE NAME TO ‘/dev/sda‘;RMAN> CONFIGURE MAXSETSIZE TO 100M;RMAN> CONFIGURE MAXSETSIZE TO UNLIMITED;RMAN> CONFIGURE CHANNEL DEVICE TYPE sbt MAXPIECESIZE 1G;RMAN> CONFIGURE EXCLUDE FOR TABLESPACE example;RMAN> CONFIGURE EXCLUDE CLEAR;RMAN> CONFIGURE AUXNAME FOR DATAFILE 4 TO '/oracle/auxfiles/aux_4.f';RMAN> CONFIGURE AUXNAME FOR DATAFILE 2 CLEAR;
RMAN> CONFIGURE COMPRESSION ALGORITHM 'BZIP2';RMAN> CONFIGURE COMPRESSION ALGORITHM 'ZLIB'; --Oracle 11g R1RMAN> CONFIGURE COMPRESSION ALGORITHM 'LOW'; --11g R2,corresponds to LZORMAN> CONFIGURE COMPRESSION ALGORITHM 'MEDIUM'; --11g R2,corresponds to ZLIBRMAN> CONFIGURE COMPRESSION ALGORITHM 'HIGH'; --11g R2,corresponds to unmodified BZIP2RMAN> CONFIGURE COMPRESSION ALGORITHM 'BASIC'; --Oracle 11g R2,corresponds to BZIP2
RMAN> CONFIGURE DB_UNIQUE_NAME 'standby' CONNECT IDENTIFIER 'standby_cs';RMAN> CONFIGURE DEFAULT DEVICE TYPE TO DISK FOR DB_UNIQUE_NAME 'standby';RMAN> CONFIGURE DEFAULT DEVICE TYPE TO DISK FOR DB_UNIQUE_NAME ALL;RMAN> CONFIGURE DEFAULT DEVICE TYPE TO SBT FOR DB_UNIQUE_NAME po;
SET commandSet the value of various attributes that affect RMAN behaviour for the duration of a RUN block or a session.
SET {set_rman_option [;] | set_run_option;}
set_rman_option::={ECHO {ON|OFF} | DBID [=] integer| CONTROLFILE AUTOBACKUP FORMAT FOR DEVICE TYPE deviceSpec TO 'frmt_string'
set_run_option::={ NEWNAME FOR DATAFILE datafileSpec TO {'filename' | NEW}| ARCHIVELOG DESTINATION TO 'log_archive_dest'| untilClause| COMMAND ID TO 'string'| CONTROLFILE AUTOBACKUP FORMAT FOR DEVICE TYPE deviceSpec TO 'frmt_string'...}
ECHO - Controls whether RMAN commands are displayed in the message log.
DBID - A unique 32-bit identification number computed when the database is created. RMAN
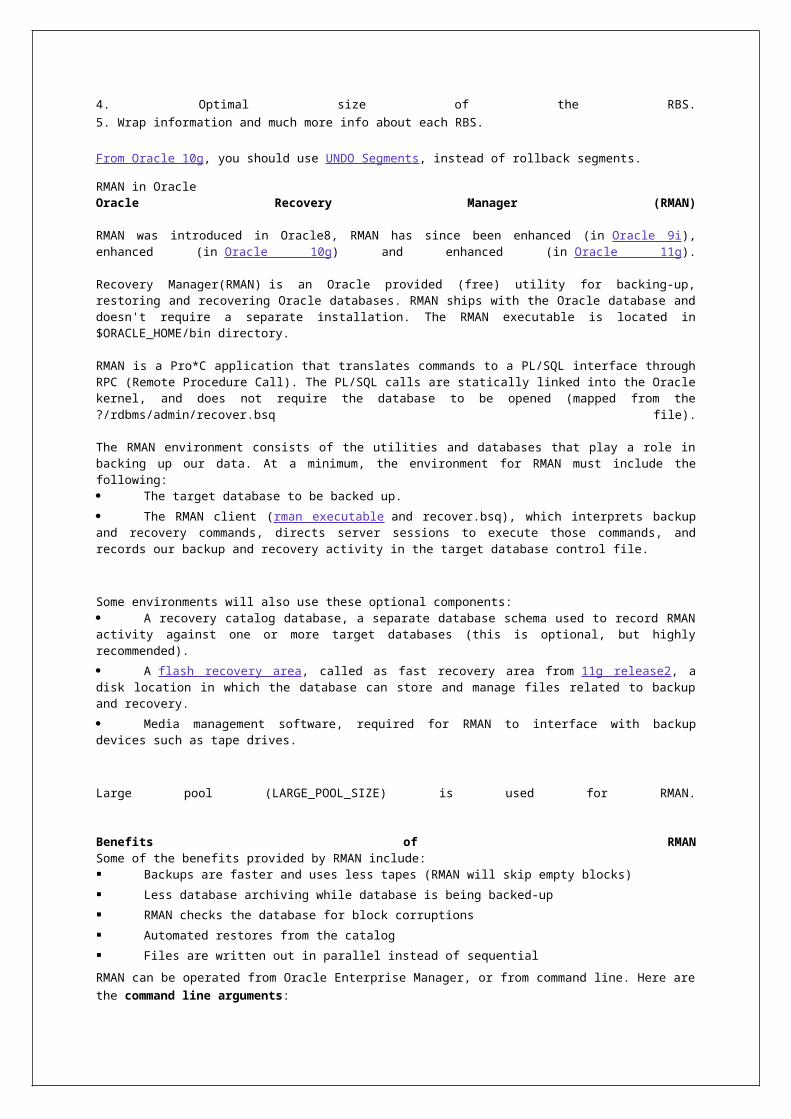
displays the DBID upon connection to the target database. We can obtain the DBID by querying V$DATABASE or RC_DATABASE.
NEWNAME FOR DATAFILE - The default name for all subsequent RESTORE or SWITCH commands that affect the specified datafile.
MAXCORRUPT FOR DATAFILE - A limit on the number of previously undetected physical block corruptions that Oracle will allow in the datafile(s).
AUTOLOCATE - Force RMAN to automatically discover which nodes of an Oracle Real Application Clustersconfiguration contain the backups that you want to restore.
RMAN> SET ECHO ON;RMAN> SET ECHO OFF;RMAN> SET DATABASE prod;RMAN> SET DBID=4240978820;RMAN> SET DBID 591329635;RMAN> SET COMMAND ID TO 'rman';RMAN> SET MAXCORRUPT FOR DATABASE TO 2;RMAN> SET MAXCORRUPT FOR DATAFILE 13 TO 200;RMAN> SET BACKUP COPIES = 2;
RMAN> SET NEWNAME FOR DATABASE TO '/oradata1/%b';RMAN> SET NEWNAME FOR TABLESPACE users TO '/oradata2/%U';RMAN> SET NEWNAME FOR DATAFILE 1 to ‘/oradata/system01.dbf’;RMAN> SET NEWNAME FOR DATAFILE '/disk7/tbs11.f' TO '/disk9/tbs11.f';RMAN> SET NEWNAME FOR TEMPFILE 1 TO '/newdisk/dbs/temp1.f';
RMAN> SET CONTROLFILE AUTOBACKUP FORMAT FOR DEVICE TYPE sbt TO 'cf_%F';RMAN> SET CONTROLFILE AUTOBACKUP FORMAT FOR DEVICE TYPE DISK TO 'cf_%F.bak';RMAN> SET UNTIL TIME ’04-23-2010:23:50:04’;RMAN> SET ARCHIVELOG DESTINATION TO '/oracle/temp_restore';RMAN> SET COMPRESSION ALGORITHM 'LOW';RMAN> SET COMPRESSION ALGORITHM 'LOW' OPTIMIZE FOR LOAD FALSE;RMAN> SET COMPRESSION ALGORITHM 'MEDIUM';RMAN> SET COMPRESSION ALGORITHM 'HIGH';
BACKUP commandBacks up Oracle database files, copies of database files, archived logs, or backup sets.
BACKUP FULL OptionsBACKUP FULL AS (COPY | BACKUPSET) OptionsBACKUP INCREMENTAL LEVEL [=] integer OptionsBACKUP INCREMENTAL LEVEL [=] integer AS (COPY | BACKUPSET) OptionsBACKUP AS (COPY | BACKUPSET) OptionsBACKUP AS (COPY | BACKUPSET) (FULL | INCREMENTAL LEVEL [=] integer) Options
Options::=[backupOperand [backupOperand]...] backupSpec [backupSpec]...[PLUS ARCHIVELOG [backupSpecOperand [backupSpecOperand]...]];
backupOperand::={ FORMAT [=] 'format_string' [, 'format_string']...| CHANNEL ['] channel_id [']| CUMULATIVE| MAXSETSIZE [=] integer [K | M | G]| TAG [=] ['] tag_name [']| keepOption| SKIP {OFFLINE | READONLY | INACCESSIBLE}| VALIDATE| NOT BACKED UP [SINCE TIME [=] 'date_string']| COPIES [=] integer| DEVICE TYPE deviceSpecifier...
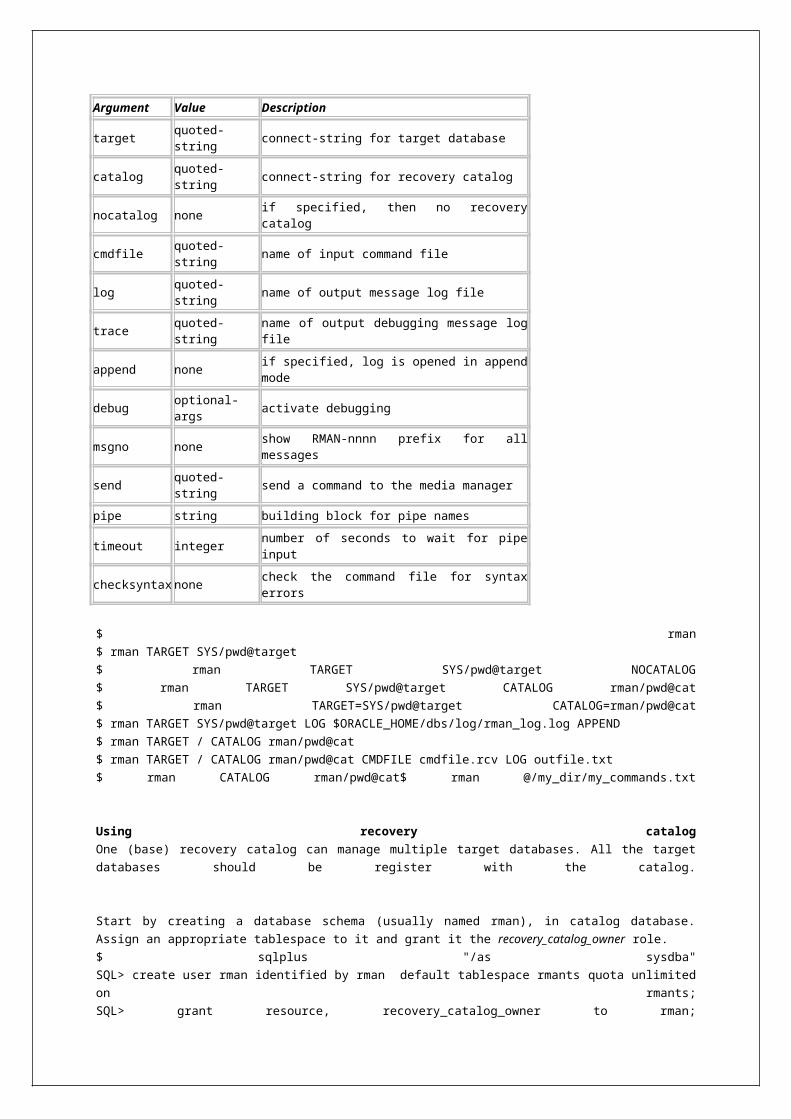
}
backupSpec::=[(]{ BACKUPSET{ {ALL | completedTimeSpec } | primary_key) [, primary_key]... }| COPY OF { DATABASE| TABLESPACE ['] tablespace_name ['] [, ['] tablespace_name [']]...| DATAFILE datafileSpec [, datafileSpec]...}| DATAFILE datafileSpec [, datafileSpec]...| DATAFILECOPY 'filename' [, 'filename']...| DATAFILECOPY FROM TAG [=] ['] tag_name ['] [, ['] tag_name [']]...| DATAFILECOPY { ALL | LIKE 'string_pattern' }| TABLESPACE ['] tablespace_name ['] [, ['] tablespace_name [']]...| DATABASE| archivelogRecordSpecifier| CURRENT CONTROLFILE [FOR STANDBY]| CONTROLFILECOPY 'filename'| SPFILE}[backupSpecOperand [backupSpecOperand]...]
backupSpecOperand::={ FORMAT [=] 'format_string' [, 'format_string']...| CHANNEL ['] channel_id [']| CUMULATIVE| MAXSETSIZE [=] integer [K | M | G]| TAG [=] ['] tag_name [']| keepOption| SKIP {OFFLINE | READONLY | INACCESSIBLE}| NOT BACKED UP [SINCE TIME [=] 'date_string' | integer TIMES]| DELETE [ALL] INPUT...}
RMAN> BACKUP DATABASE;RMAN> BACKUP DATABASE TAG=’test backup’;RMAN> BACKUP DATABASE COMMENT=’full backup’;RMAN> BACKUP TAG 'weekly_full_db_bkup' DATABASE MAXSETSIZE 10M;RMAN> BACKUP MAXSETSIZE 500M DATABASE PLUS ARCHIVELOG;RMAN> BACKUP DURATION 00:60 DATABASE;RMAN> BACKUP DURATION 00:30 MINIMIZE TIME DATABASE;RMAN> BACKUP DURATION 00:45 MINIMIZE LOAD DATABASE;
RMAN> BACKUP DATABASE PLUS ARCHIVELOG;RMAN> BACKUP DATABASE KEEP FOREVER;RMAN> BACKUP DATABASE KEEP UNTIL TIME=’SYSDATE+30’;RMAN> BACKUP DATABASE UNTIL 'SYSDATE+365' NOLOGS;RMAN> BACKUP DATABASE NOEXCLUDE;RMAN> BACKUP DATABASE NOEXCLUDE KEEP FOREVER TAG=’abc’;RMAN> BACKUP DATABASE SKIP READONLY;RMAN> BACKUP DATABASE SKIP OFFLINE;RMAN> BACKUP DATABASE SKIP INACCESSIBLE;RMAN> BACKUP DATABASE SKIP READONLY SKIP OFFLINE SKIP INACCESSIBLE;RMAN> BACKUP DATABASE FORCE; -- backup read only database alsoRMAN> BACKUP DATABASE NOT BACKED UP;RMAN> BACKUP DATABASE NOT BACKED UP SINCE TIME=’SYSDATE–3’;RMAN> BACKUP NOT BACKED UP SINCE TIME 'SYSDATE-10' MAXSETSIZE 500M DATABASE PLUS ARCHIVELOG;
RMAN> BACKUP DATABASE COPIES=2;RMAN> BACKUP DATABASE FORMAT '/disk1/backups/db_%U.bck'TAG quarterly KEEP UNTIL TIME 'SYSDATE+365' RESTORE POINT Q1FY12;RMAN> BACKUP DEVICE TYPE DISK DATABASE;RMAN> BACKUP DEVICE TYPE sbt DATABASE PLUS ARCHIVELOG;
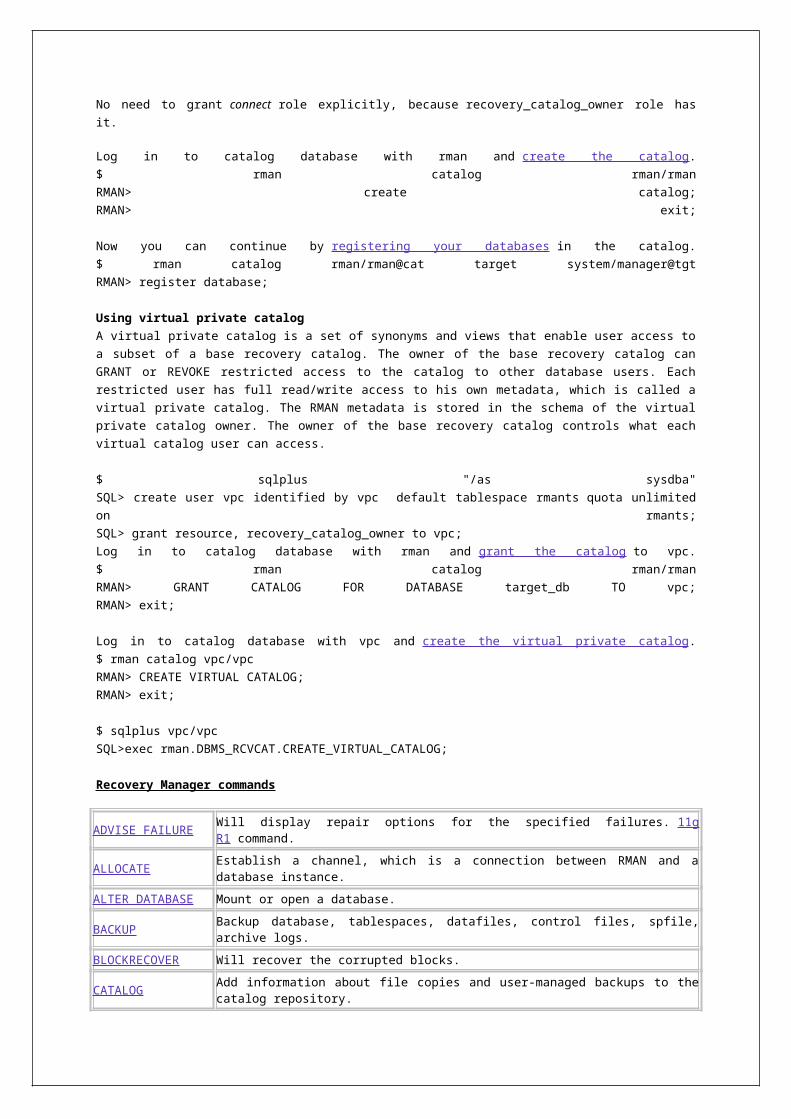
RMAN> BACKUP DEVICE TYPE sbt DATAFILECOPY FROM TAG 'latest' FORMAT 'df%f_%d';RMAN> BACKUP DEVICE TYPE sbt ARCHIVELOG LIKE '/disk%arc%' DELETE ALL INPUT;RMAN> BACKUP DEVICE TYPE sbt BACKUPSET COMPLETED BEFORE 'SYSDATE-14'DELETE INPUT;RMAN> BACKUP CHECK LOGICAL DATABASE;RMAN> BACKUP VALIDATE CHECK LOGICAL DATABASE;RMAN> BACKUP VALIDATE DATABASE;RMAN> BACKUP VALIDATE DATABASE ARCHIVELOG ALL;
RMAN> BACKUP TABLESPACE test;RMAN> BACKUP TABLESPACE system, users, tools;RMAN> BACKUP TABLESPACE 4;RMAN> BACKUP TABLESPACE gld PLUS ARCHIVELOG;RMAN> BACKUP TABLESPACE invd INCLUDE CURRENT CONTROLFILE;RMAN> BACKUP TABLESPACE appsd INCLUDE CURRENT CONTROLFILE PLUS ARCHIVELOG;RMAN> BACKUP TABLESPACE dwh SECTION SIZE 100M;RMAN> BACKUP SECTION SIZE 250M TABLESPACE datamart;
RMAN> BACKUP DATAFILE 1;RMAN> BACKUP DATAFILE 3, 2, 14;RMAN> BACKUP DATAFILE ‘/u01/data/...’;RMAN> BACKUP DATAFILE 1 PLUS ARCHIVELOG;RMAN> BACKUP KEEP FOREVER FORMAT '?/dbs/%U_longterm.cpy' TAG longterm_bck DATAFILE 1 DATAFILE 2;RMAN> BACKUP SECTION SIZE 500M DATAFILE 6;
RMAN> BACKUP ARCHIVELOG ALL;RMAN> BACKUP ARCHIVELOG ALL DELETE INPUT;RMAN> BACKUP ARCHIVELOG LIKE '/arch%' DELETE ALL INPUT;RMAN> BACKUP ARCHIVELOG FROM TIME ‘SYSDATE–3’;RMAN> BACKUP ARCHIVELOG FROM SEQUENCE 100;RMAN> BACKUP ARCHIVELOG FROM SEQUENCE 999 DELETE INPUT;
RMAN> BACKUP ARCHIVELOG FROM SEQUENCE 123 DELETE ALL INPUT;
RMAN> BACKUP ARCHIVELOG FROM SEQUENCE 21531 UNTIL SEQUENCE 21590 FORMAT
'/tmp/archive_backup.bkp';
RMAN> BACKUP ARCHIVELOG ALL FROM SEQUENCE 1200 DELETE ALL INPUT;RMAN> BACKUP ARCHIVELOG NOT BACKED UP 2 TIMES;RMAN> BACKUP ARCHIVELOG COMPLETION TIME BETWEEN 'SYSDATE-28' AND 'SYSDATE-7';RMAN> BACKUP FORMAT='AL_%d/%t/%s/%p' ARCHIVELOG LIKE '%arc_dest%';
RMAN> BACKUP CURRENT CONTROLFILE;ORRMAN> SQL “ALTER DATABASE BACKUP CONTROLFILE TO ’’/u01/ .../bkctl.ctl’’ “;
RMAN> BACKUP CURRENT CONTROLFILE TO '/backup/cntrlfile.copy';RMAN> BACKUP CONTROLFILE COPY ‘/u10/backup/control.bkp’;RMAN> BACKUP SPFILE;RMAN> BACKUP DEVICE TYPE sbt SPFILE ARCHIVELOG ALL;RMAN> BACKUP DEVICE TYPE sbt DATAFILECOPY ALL NODUPLICATES;
RMAN> BACKUP RECOVERY FILES;
BACKUP setRMAN> BACKUP BACKUPSET ALL;RMAN> BACKUP BACKUPSET ALL FORMAT = ‘/u01/.../backup_%u.bak’;RMAN> BACKUP BACKUPSET COMPLETED BEFORE ‘SYSDATE-3’ DELETE INPUT;RMAN> BACKUP DEVICE TYPE sbt BACKUPSET COMPLETED BEFORE 'SYSDATE-14' DELETE INPUT;RMAN> BACKUP COPIES 2 DEVICE TYPE sbt BACKUPSET ALL;RMAN> BACKUP AS COMPRESSED BACKUPSET;RMAN> BACKUP AS COMPRESSED BACKUPSET DEVICE TYPE DISK COPIES 2 DATABASE FORMAT '/disk1/db_%U', '/disk2/db_%U';
RMAN> BACKUP AS COMPRESSED BACKUPSET INCREMENTAL FROM SCN 4111140000000
DATABASE TAG 'RMAN_RECOVERY';RMAN> BACKUP AS BACKUPSET DATAFILE '$ORACLE_HOME/oradata/users01.dbf','$ORACLE_HOME/oradata/tools01.dbf';

RMAN> BACKUP AS BACKUPSET DATAFILECOPY ALL;RMAN> BACKUP AS BACKUPSET DATAFILECOPY ALL NODUPLICATES;
IMAGE copyRMAN> BACKUP AS COPY DATABASE;RMAN> BACKUP AS COPY COPY OF DATABASE FROM TAG 'test' CHECK LOGICAL TAG 'duptest';RMAN> BACKUP AS COPY TABLESPACE 8;RMAN> BACKUP AS COPY TABLESPACE test;RMAN> BACKUP AS COPY TABLESPACE system, tools, users, undotbs;RMAN> BACKUP AS COPY DATAFILE 1;RMAN> BACKUP AS COPY DATAFILE 2 FORMAT '/disk2/df2.cpy' TAG my_tag;RMAN> BACKUP AS COPY CURRENT CONTROLFILE;RMAN> BACKUP AS COPY CURRENT CONTROLFILE FORMAT ‘/....’;RMAN> BACKUP AS COPY ARCHIVELOG ALL;RMAN> BACKUP AS COPY KEEP FOREVER NOLOGS CURRENT CONTROLFILE FORMAT '?/oradata/cf_longterm.cpy',DATAFILE 1 FORMAT '?/oradata/df1_longterm.cpy', DATAFILE 2 FORMAT '?/oradata/df2_longterm.cpy';RMAN> BACKUP AS COPY DATAFILECOPY 'bar' FORMAT 'foobar';RMAN> BACKUP AS COPY DATAFILECOPY '/disk2/df2.cpy' FORMAT '/disk1/df2.cpy';
RMAN> BACKUP AS COPY REUSE TARGETFILE '/u01/oracle/11.2.0.2/dbs/orapwcrd' AUXILIARY
FORMAT '/u01/oracle/11.2.0.2/dbs/orapwcrd';
RMAN> BACKUP AS COPY CURRENT CONTROLFILE FOR STANDBY AUXILIARY format
'+DATA/crd/data1/control01.ctl';
Incremental backupsRMAN> BACKUP INCREMENTAL LEVEL=0 DATABASE;RMAN> BACKUP INCREMENTAL LEVEL=1 DATABASE;RMAN> BACKUP INCREMENTAL LEVEL=2 DATABASE;RMAN> BACKUP INCREMENTAL LEVEL 2 CUMULATIVE DATABASE;RMAN> BACKUP INCREMENTAL LEVEL 2 DATABASE;RMAN> BACKUP INCREMENTAL LEVEL=0 DATABASE PLUS ARCHIVELOG;RMAN> BACKUP INCREMENTAL LEVEL 1 CUMULATIVE SKIP INACCESSIBLE DATABASE;RMAN> BACKUP INCREMENTAL LEVEL 1 FOR RECOVER OF COPY WITH TAG 'incr' DATABASE;RMAN> BACKUP DEVICE TYPE DISK INCREMENTAL LEVEL 1 FOR RECOVER OF COPY WITH TAG 'oltp' DATABASE;RMAN> BACKUP DEVICE TYPE DISK INCREMENTAL FROM SCN 351986 DATABASE FORMAT '/tmp/incr_standby_%U';RMAN> BACKUP INCREMENTAL FROM SCN 629184 DATAFILE 5 FORMAT '/tmp/ForStandby_%U' TAG 'FORSTANDBY';
RMAN> BACKUP INCREMENTAL LEVEL = --- tablespace/datafile
RMAN> BACKUP BLOCKS ALL CHECK LOGICAL VALIDATE DATAFILE 1398;
LIST commandProduce a detailed listing of backup sets or copies.
LIST{ INCARNATION [OF DATABASE [[']database_name[']]]| [EXPIRED] {listObjectSpec[ maintQualifier | RECOVERABLE [untilClause] ]... | recordSpec}};
listObjectSpec::={BACKUP [OF listObjectList] [listBackupOption] | COPY [OF listObjectList] | archivelogRecordSpecifier}
listObjectList::=[ DATAFILE datafileSpec [, datafileSpec]...| TABLESPACE [']tablespace_name['] [, [']tablespace_name[']]...| archivelogRecordSpecifier
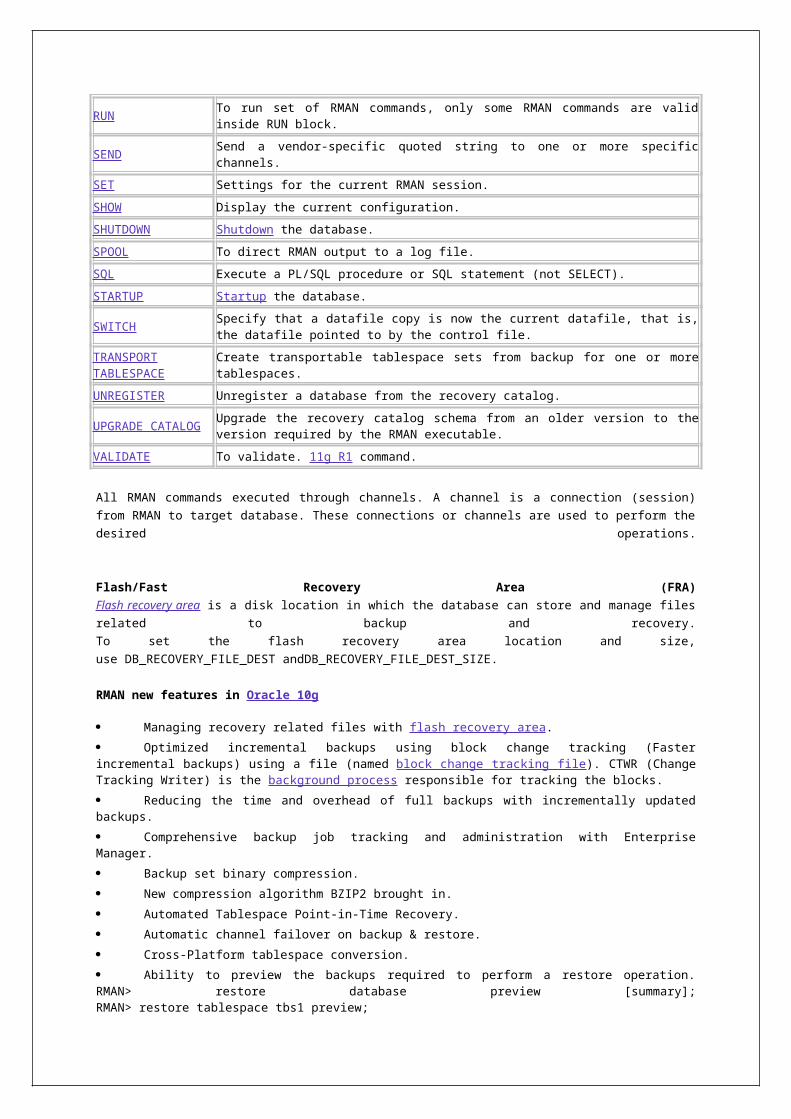
| DATABASE [SKIP TABLESPACE [']tablespace_name['] [, [']tablespace_name[']] ...]| CONTROLFILE| SPFILE]...
listBackupOption::=[[BY BACKUP] [VERBOSE] | SUMMARY | BY {BACKUP SUMMARY|FILE}]
RMAN> LIST INCARNATION;RMAN> LIST INCARNATION OF DATABASE;RMAN> LIST INCARNATION OF DATABASE vis;RMAN> LIST DB_UNIQUE_NAME ALL;RMAN> LIST DB_UNIQUE_NAME OF DATABASE;
RMAN> LIST BACKUP;RMAN> LIST BACKUP SUMMARY;RMAN> LIST BACKUP BY FILE;RMAN> LIST BACKUP OF DATABASE;RMAN> LIST BACKUP OF DATABASE BY BACKUP;RMAN> LIST BACKUP OF TABLESPACE test SUMMARY;RMAN> LIST BACKUP OF DATAFILE 65;RMAN> LIST BACKUP OF DATAFILE 11 SUMMARY;RMAN> LIST BACKUP OF CONTROLFILE;RMAN> LIST BACKUP OF ARCHIVELOG FROM SEQUENCE 2222;
RMAN> LIST BACKUP OF ARCHIVELOG FROM TIME 'sysdate-1';
RMAN> LIST BACKUP OF ARCHIVELOG ALL COMPLETED BEFORE 'sysdate-2';RMAN> LIST BACKUP RECOVERABLE;RMAN> LIST EXPIRED BACKUP;RMAN> LIST EXPIRED BACKUP OF ARCHIVELOG ALL SUMMARY;
RMAN> LIST COPY;RMAN> LIST COPY OF DATABASE ARCHIVELOG ALL;RMAN> LIST COPY OF TABLESPACE appl_idx;RMAN> LIST COPY OF DATAFILE 11, 60, 98;RMAN> LIST COPY OF CONTROLFILE;RMAN> LIST EXPIRED COPY;
RMAN> LIST BACKUPSET SUMMARY;RMAN> LIST BACKUPSET 109;RMAN> LIST BACKUPSET OF DATAFILE 1;RMAN> LIST ARCHIVELOG;
RMAN> LIST ARCHIVELOG ALL LIKE '%5515%';RMAN> LIST CONTROLFILECOPY "/tmp/cntrlfile.copy";
RMAN> LIST SCRIPT NAMES;RMAN> LIST ALL SCRIPT NAMES;RMAN> LIST GLOBAL SCRIPT NAMES;
RMAN> LIST FAILURE; -- 11g R1 RMAN> LIST FAILURE 420 DETAIL; -- 11g R1RMAN> LIST FAILURE ALL; -- 11g R1
RMAN> LIST RESTORE POINT ALL;
REPORT commandReport backup status: database, files, and backups. Perform detailed analyses of the content of the recovery catalog.
REPORT{{NEED BACKUP [{INCREMENTAL | DAYS} [=] integer| REDUNDANCY [=] integer | RECOVERY WINDOW OF integer DAYS)]| UNRECOVERABLE
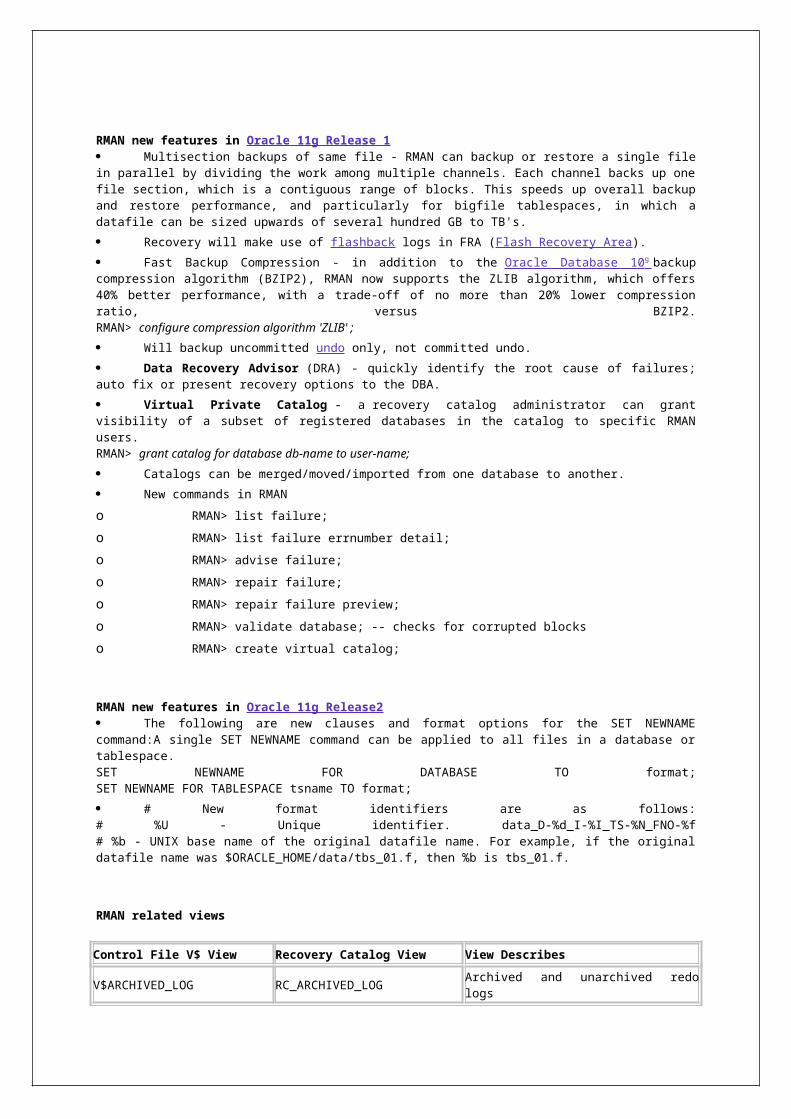
}reportObject| SCHEMA [atClause]| OBSOLETE [obsOperandList]}[DEVICE TYPE deviceSpecifier [,deviceSpecifier]... ]
reportObject::=[ DATAFILE datafileSpec [, datafileSpec]...| TABLESPACE [']tablespace_name['] [, [']tablespace_name[']] ...| DATABASE [SKIP TABLESPACE [']tablespace_name['] [, [']tablespace_name[']] ...]]
atClause::={AT TIME [=] 'date_string' | AT SCN [=] integer|AT SEQUENCE [=] integer THREAD [=] integer}
obsOperandList::=[REDUNDANCY [=] integer | RECOVERY WINDOW OF integer DAYS | ORPHAN]...
RMAN> REPORT OBSOLETE;RMAN> REPORT NEED BACKUP;RMAN> REPORT NEED BACKUP DAYS=5;RMAN> REPORT NEED BACKUP REDUNDANCY=3;RMAN> REPORT NEED BACKUP RECOVERY WINDOW OF 7 DAYS;RMAN> REPORT NEED BACKUP DATABASE;RMAN> REPORT NEED BACKUP INCREMENTAL 1;RMAN> REPORT UNRECOVERABLE;RMAN> REPORT SCHEMA;RMAN> REPORT SCHEMA AT TIME 'sysdate-20/1440';
CHANGE commandUpdate the status of a backup in the RMAN repository. Mark a backup piece, image copy, or archived redo log as having the status UNAVAILABLE or AVAILABLE; remove the repository record for a backup or copy; override the retention policy for a backup or copy; update the recovery catalog with the DB_UNIQUE_NAME for the target database.
CHANGE {BACKUP | COPY} [OF listObjList] [maintQualifier [maintQualifier]...]{AVAILABLE | UNAVAILABLE | UNCATALOG | keepOption}[DEVICE TYPE deviceSpecifier [, deviceSpecifier]...];
CHANGE archivelogRecordSpecifier {AVAILABLE | UNAVAILABLE | UNCATALOG | keepOption}[DEVICE TYPE deviceSpecifier [, deviceSpecifier]...];
CHANGE recordSpec [DEVICE TYPE deviceSpecifier [, deviceSpecifier]...{AVAILABLE | UNAVAILABLE | UNCATALOG | keepOption}[DEVICE TYPE deviceSpecifier [, deviceSpecifier]...];
listObjList::=[DATAFILE datafileSpec [, datafileSpec]...| TABLESPACE ['] tablespace_name ['] [, ['] tablespace_name [']]...| archivelogRecordSpecifier| DATABASE [SKIP TABLESPACE [']tablespace_name['] [, [']tablespace_name[']] ...]| CONTROLFILE| SPFILE]...
recordSpec::={{BACKUPPIECE | PROXY}{'media_handle' [, 'media_handle']... | primary_key [, primary_key]... | TAG [=] ['] tag_name [']}| BACKUPSET primary_key [, primary_key]...| {CONTROLFILECOPY | DATAFILECOPY}{{primary_key [, primary_key]... | 'filename' [, 'filename']...}
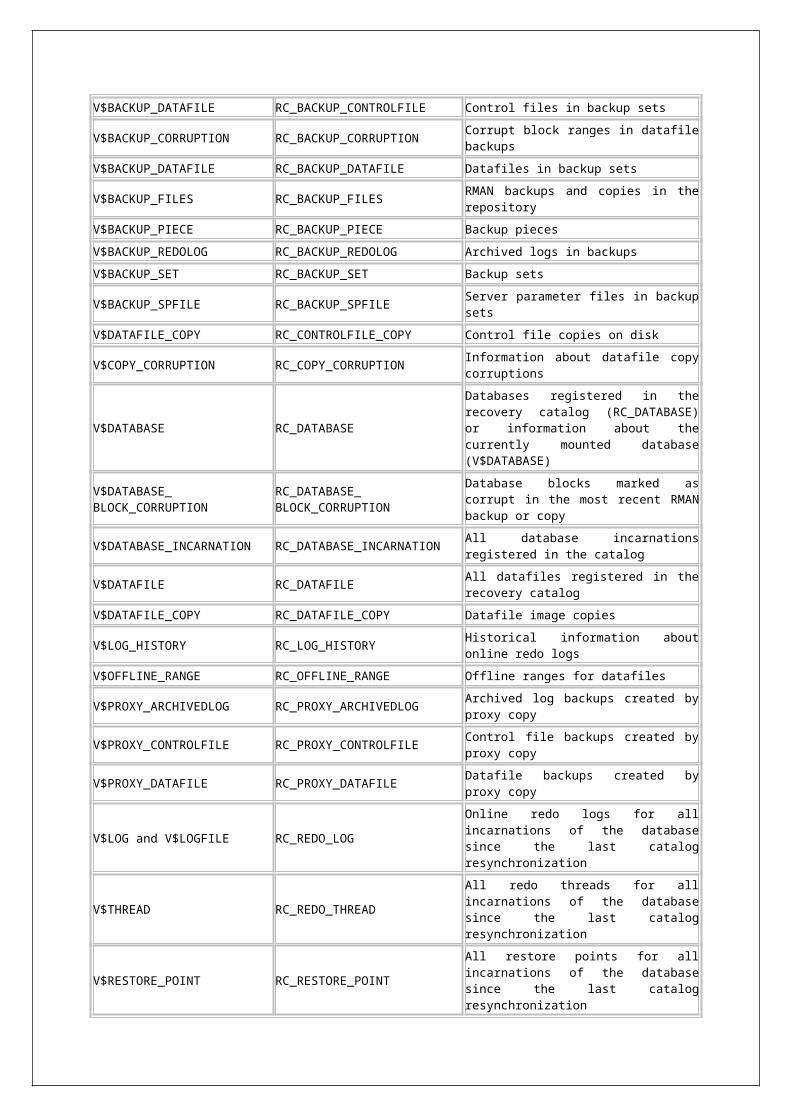
| TAG [=] ['] tag_name ['] [, ['] tag_name [']]...}| ARCHIVELOG {primary_key [, primary_key]... | 'filename' [, 'filename']...}}
RMAN> CHANGE BACKUPSET 666 KEEP FOREVER;RMAN> CHANGE BACKUPSET 431 KEEP FOREVER NOLOGS;RMAN> CHANGE BACKUPSET 100 UNAVAILABLE;RMAN> CHANGE BACKUPSET 123 NOKEEP;RMAN> CHANGE BACKUPSET 121,122,127,203,300 UNCATALOG;RMAN> CHANGE BACKUP OF DATABASE TAG=’abc’ UNAVAILABLE;RMAN> CHANGE BACKUP OF DATABASE DEVICE TYPE DISK UNAVAILABLE;
RMAN> CHANGE COPY OF DATABASE CONTROLFILE NOKEEP;RMAN> CHANGE BACKUP OF SPFILE COMPLETED BEFORE 'SYSDATE-3' UNAVAILABLE;RMAN> CHANGE BACKUP TAG 'consistent_db_bkup' KEEP FOREVER;
RMAN> CHANGE BACKUP TAG 'consistent_db_bkup' DATABASE KEEP FOREVER;RMAN> CHANGE BACKUP TAG 'consistent_db_bkup' KEEP FOREVER NOLOGS;RMAN> CHANGE BACKUP TAG 'consistent_db_bkup' NOKEEP;
RMAN> CHANGE ARCHIVELOG ALL UNCATALOG;RMAN> CHANGE CONTROLFILECOPY '/tmp/cf.cpy' UNCATALOG;RMAN> CHANGE FAILURE 5 PRIORITY LOW;
RMAN> CHANGE BACKUP FOR DB_UNIQUE_NAME standby1 RESET DB_UNIQUE_NAME;
RMAN> CHANGE BACKUP FOR DB_UNIQUE_NAME standby3 RESET DB_UNIQUE_NAME TO standby2;
RMAN> CHANGE DB_UNIQUE_NAME FROM rdbms4 TO rdbms_dev;
CROSSCHECK commandCheck whether files managed by RMAN, such as archived logs, datafile copies, and backup pieces, still exist on disk or tape.
CROSSCHECK{{BACKUP [OF listObjList] | COPY [OF listObjList] | archivelogRecordSpecifier} [maintQualifier [maintQualifier]...]| recordSpec [DEVICE TYPE deviceSpecifier [, deviceSpecifier]...]};
listObjList::=[ DATAFILE datafileSpec [, datafileSpec]...| TABLESPACE ['] tablespace_name ['] [, ['] tablespace_name [']]...| archivelogRecordSpecifier| DATABASE [SKIP TABLESPACE [']tablespace_name['] [, [']tablespace_name[']] ...]| CONTROLFILE| SPFILE]...
recordSpec::={{ BACKUPPIECE | PROXY }{ 'media_handle' [, 'media_handle']...| primary_key [, primary_key]... | TAG [=] ['] tag_name ['] }| BACKUPSET primary_key [, primary_key]...| { CONTROLFILECOPY | DATAFILECOPY }{ {primary_key [, primary_key]... | 'filename' [, 'filename']...}| TAG [=] ['] tag_name ['] [, ['] tag_name [']]...}| ARCHIVELOG { primary_key [, primary_key]... | 'filename' [, 'filename']... }}
RMAN> CROSSCHECK BACKUP;RMAN> CROSSCHECK BACKUP TAG=’full db’;RMAN> CROSSCHECK BACKUP COMPLETED BETWEEN ‘SYSDATE-7’ AND ‘SYSDATE–1’;RMAN> CROSSCHECK BACKUP COMPLETED BETWEEN '01-JAN-10' AND '14-FEB-10';RMAN> CROSSCHECK BACKUP DEVICE TYPE sbt COMPLETED BETWEEN '01-AUG-09' AND '31-DEC-09';RMAN> CROSSCHECK BACKUP DEVICE TYPE DISK COMPLETED BETWEEN '01-JAN-10' AND '23-MAR-
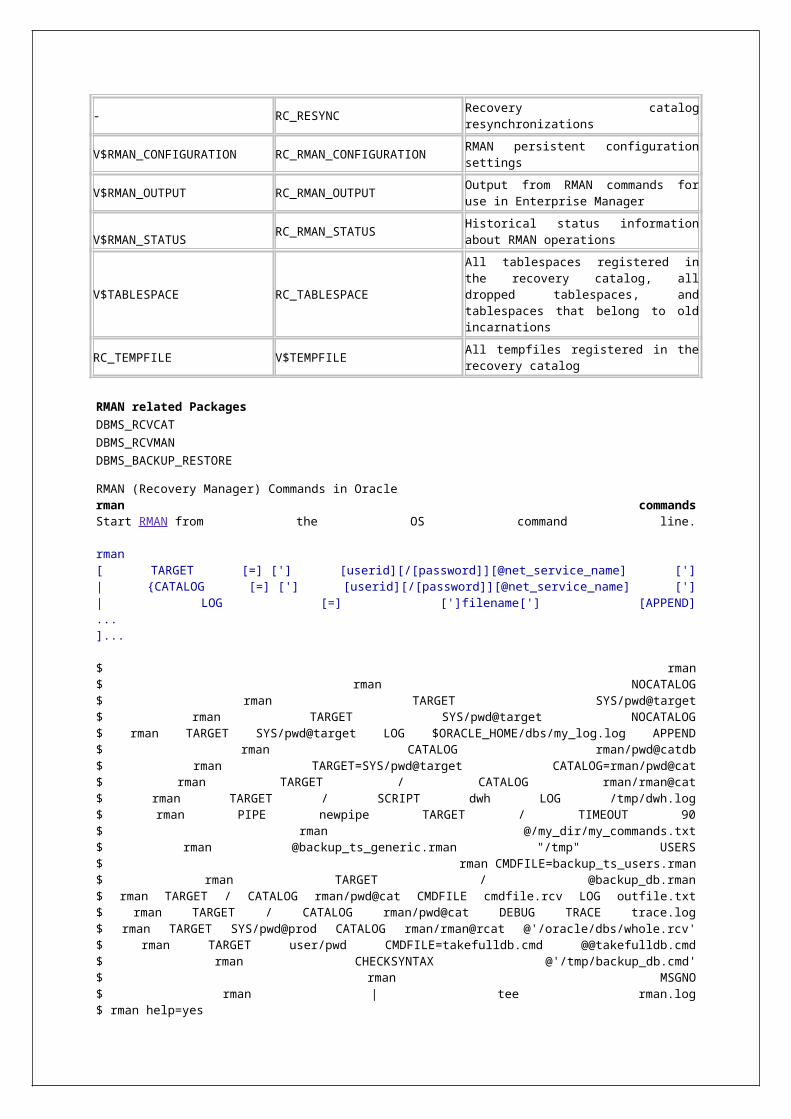
10';
RMAN> CROSSCHECK BACKUP OF DATABASE;RMAN> CROSSCHECK BACKUP OF TABLESPACE warehouse;RMAN> CROSSCHECK BACKUP OF TABLESPACE userd COMPLETED BEFORE 'SYSDATE-14';RMAN> CROSSCHECK BACKUP OF TABLESPACES gld, invd;RMAN> CROSSCHECK BACKUP OF DATAFILE 9;RMAN> CROSSCHECK BACKUP OF DATAFILE 4 COMPLETED AFTER 'SYSDATE-14';RMAN> CROSSCHECK BACKUP OF DATAFILE "?/oradata/dwh/system01.dbf" COMPLETED AFTER 'SYSDATE-14';RMAN> CROSSCHECK BACKUP OF CONTROLFILE;RMAN> CROSSCHECK BACKUP OF SPFILE;RMAN> CROSSCHECK BACKUP OF ARCHIVELOG ALL;RMAN> CROSSCHECK BACKUP OF ARCHIVELOG ALL SPFILE;
RMAN> CROSSCHECK COPY;RMAN> CROSSCHECK COPY OF DATABASE;RMAN> CROSSCHECK DATAFILECOPY 113, 114, 115;RMAN> CROSSCHECK CONTROLFILECOPY '/tmp/control01.ctl';RMAN> CROSSCHECK ARCHIVELOG ALL;RMAN> CROSSCHECK BACKUPSET;RMAN> CROSSCHECK BACKUPSET 1338, 1339, 1340;RMAN> CROSSCHECK BACKUPPIECE TAG = 'nightly_backup';RMAN> CROSSCHECK PROXY 789;
SQL commandExecute a SQL statement from within Recovery Manager.
SQL [CHANNEL ‘channel_id’] ‘command’;
RMAN> SQL 'ALTER TABLESPACE users ONLINE';RMAN> SQL 'ALTER DATABASE DATAFILE 64 OFFLINE';RMAN> SQL "ALTER SYSTEM ARCHIVE LOG CURRENT";RMAN> SQL "ALTER SYSTEM SWITCH LOGFILE";RMAN> SQL "ALTER DATABASE BACKUP CONTROLFILE TO TRACE";RMAN> SQL "ALTER TABLESPACE users ADD DATAFILE ''/disk1/ora/users02.dbf'' SIZE 100K AUTOEXTEND ON NEXT 10K MAXSIZE 100K";
RESTORE commandRestore files from backup sets or from disk copies to the default or a new location.
RESTORE[(] restoreObject [(restoreSpecOperand [restoreSpecOperand]...] [)]...[ CHANNEL ['] channel_id [']| PARMS [=] 'channel_parms'| FROM { BACKUPSET | DATAFILECOPY }| untilClause| FROM TAG [=] ['] tag_name [']| VALIDATE| DEVICE TYPE deviceSpecifier [, deviceSpecifier]...]...;
restoreObject::={ CONTROLFILE [TO 'filename']| DATABASE [SKIP [FOREVER] TABLESPACE [']tablespace_name['] [, [']tablespace_name[']] ...]| DATAFILE datafileSpec [, datafileSpec]...| TABLESPACE ['] tablespace_name ['] [, ['] tablespace_name [']]...| archivelogRecordSpecifier| SPFILE [TO [PFILE] 'filename']}
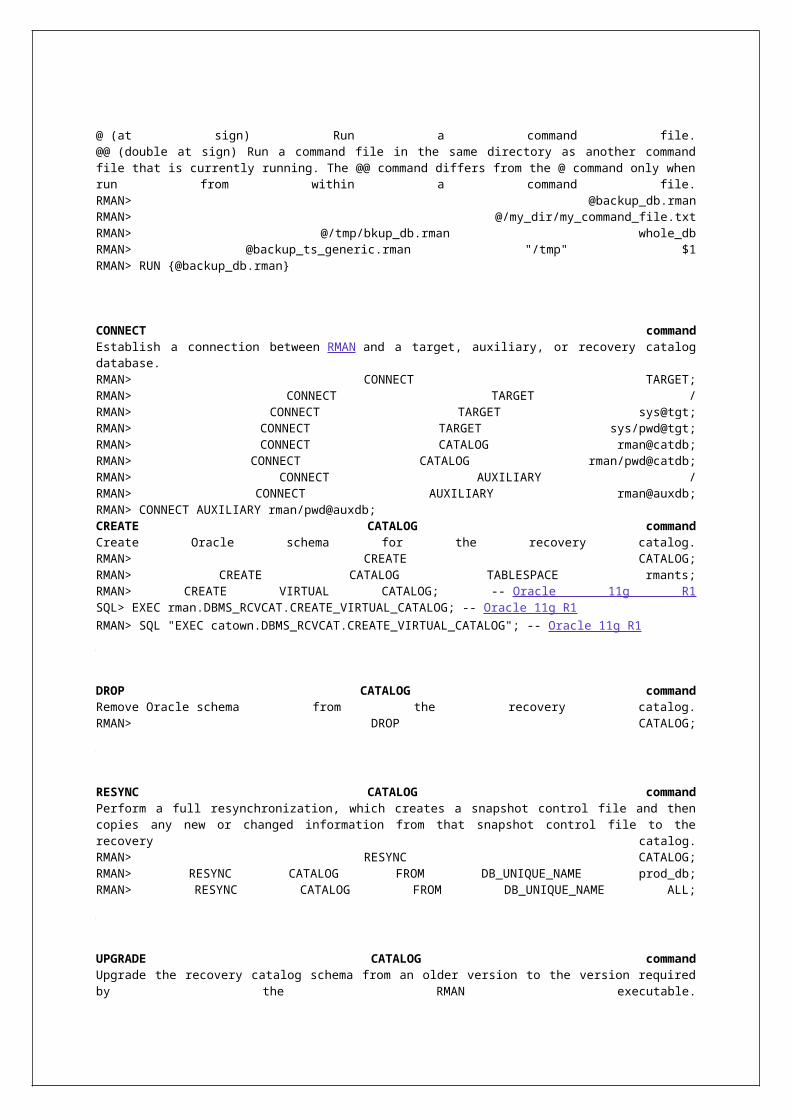
restoreSpecOperand::={ CHANNEL ['] channel_id ['] | FROM TAG [=] ['] tag_name ['] | PARMS [=] 'channel_parms'| FROM {AUTOBACKUP [{MAXSEQ | MAXDAYS} [=] integer)]... | 'media_handle'}}
RMAN> RESTORE DATABASE;RMAN> RESTORE DATABASE VALIDATE;RMAN> RESTORE DATABASE PREVIEW;RMAN> RESTORE DATABASE PREVIEW SUMMARY;RMAN> RESTORE DATABASE SKIP TABLESPACE temp, history;RMAN> RESTORE DATABASE UNTIL SCN 154876;
RMAN> RESTORE TABLESPACE users;RMAN> RESTORE TABLESPACE dwh1, dwh2;RMAN> RESTORE TABLESPACE tbs1 PREVIEW;RMAN> RESTORE TABLESPACE users VALIDATE;
RMAN> RESTORE DATAFILE 45;RMAN> RESTORE DATAFILE 23 PREVIEW;RMAN> RESTORE DATAFILE 12 VALIDATE;
RMAN> RESTORE CONTROLFILE;RMAN> RESTORE CONTROLFILE FROM AUTOBACKUP;RMAN> RESTORE CONTROLFILE FROM TAG 'monday_cf_backup';
RMAN> RESTORE CONTROLFILE FROM '/u01/control01.ctl';RMAN> RESTORE CONTROLFILE VALIDATE;RMAN> RESTORE CONTROLFILE TO '/tmp/autobkp.dbf' FROM AUTOBACKUP MAXSEQ 20 MAXDAYS 150;
RMAN> RESTORE SPFILE;RMAN> RESTORE SPFILE FROM AUTOBACKUP;RMAN> RESTORE ARCHIVELOG ALL VALIDATE;RMAN> RESTORE ARCHIVELOG ALL PREVIEW;RMAN> RESTORE ARCHIVELOG ALL PREVIEW RECALL;RMAN> RESTORE ARCHIVELOG ALL DEVICE TYPE sbt PREVIEW;
RMAN> RESTORE ARCHIVELOG LOW LOGSEQ 78311 HIGH LOGSEQ 78340 THREAD 1 ALL;
RMAN> RESTORE ARCHIVELOG FROM LOGSEQ=21531 UNTIL LOGSEQ=21590;RMAN> RESTORE STANDBY CONTROLFILE FROM TAG 'forstandby';
RMAN> RESTORE CLONE CONTROLFILE TO '+DATA/pcrd/data2/control02.ctl' FROM
'+DATA/pcrd/data1/control01.ctl';
Restore the control file, (to all locations specified in the parameter file) then restore the database, using that control file:STARTUP NOMOUNT;RUN{ALLOCATE CHANNEL c1 DEVICE TYPE sbt;RESTORE CONTROLFILE;ALTER DATABASE MOUNT;RESTORE DATABASE;}
RECOVER commandPerform media recovery from RMAN backups and copies. Apply redo log files and incremental backups to datafiles or data blocks restored from backup or datafile copies, to update them to a specified time.
RECOVER [DEVICE TYPE deviceSpecifier [, deviceSpecifier]...]recoverObject [recoverOptionList];
recoverObject::={ DATABASE
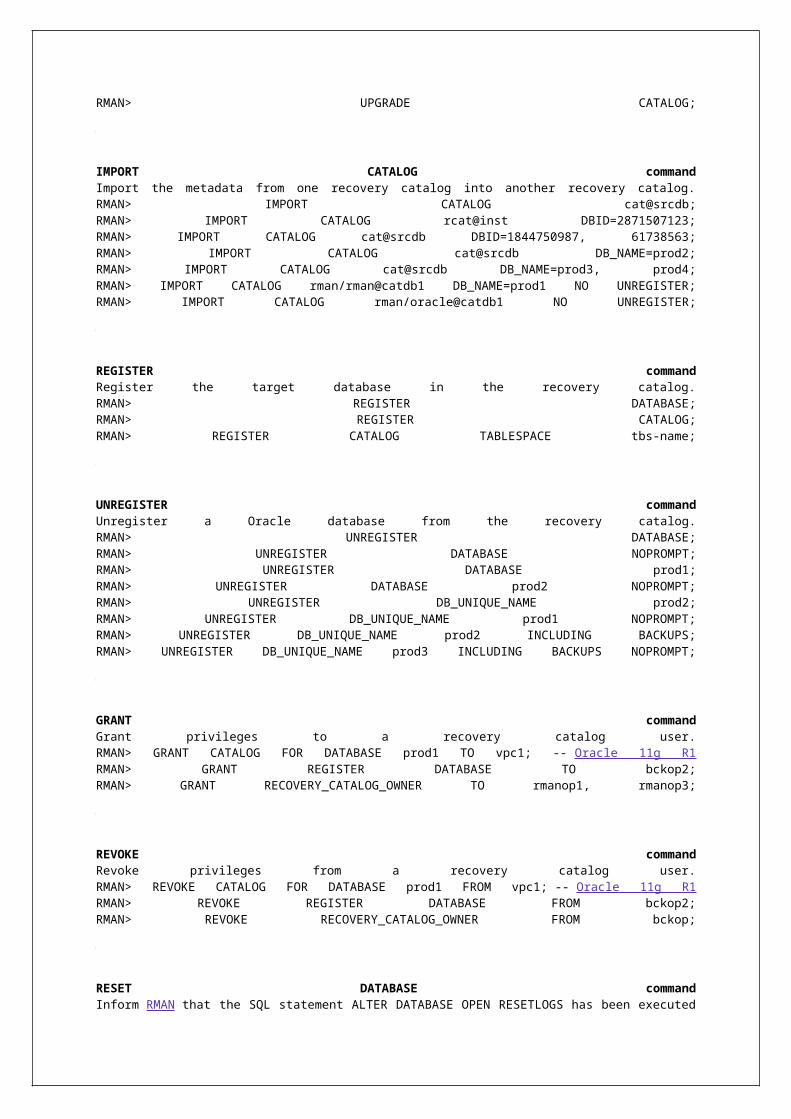
[ untilClause| [untilClause] SKIP [FOREVER] TABLESPACE [']tablespace_name['] [, [']tablespace_name[']] ...]| TABLESPACE [']tablespace_name['] [, [']tablespace_name[']]...| DATAFILE datafileSpec [, datafileSpec]...}
recoverOptionList::={ DELETE ARCHIVELOG [MAXSIZE {integer [K | M | G]}]| CHECK READONLY| NOREDO| {FROM TAG | ARCHIVELOG TAG} [=] ['] tag_name [']...}
RMAN> RECOVER DATABASE;RMAN> RECOVER DATABASE NOREDO;RMAN> RECOVER DATABASE SKIP TABLESPACE temp;RMAN> RECOVER DATABASE SKIP FOREVER TABLESPACE exam;RMAN> RECOVER DATABASE UNTIL SCN 154876;
RMAN> RECOVER TABLESPACE users;RMAN> RECOVER TABLESPACE dwh DELETE ARCHIVELOG MAXSIZE 2M;RMAN> RECOVER DATAFILE 33;
RMAN> RECOVER DATAFILE 3 BLOCK 116 DATAFILE 4 BLOCK 10;
RMAN> RECOVER DATAFILE 2 BLOCK 204 DATAFILE 9 BLOCK 109 FROM TAG=sundaynight;RMAN> RECOVER DATAFILECOPY '/disk1/img.df' UNTIL TIME 'SYSDATE-7';RMAN> RECOVER COPY OF DATABASE WITH TAG 'incr';RMAN> RECOVER COPY OF DATABASE WITH TAG 'upd' UNTIL TIME 'SYSDATE - 7';RMAN> RECOVER CORRUPTION LIST;
Restore and recover the whole databaseRMAN> STARTUP FORCE MOUNT;RMAN> RESTORE DATABASE;RMAN> RECOVER DATABASE;RMAN> ALTER DATABASE OPEN;
Restore and recover a tablespaceRMAN> SQL 'ALTER TABLESPACE users OFFLINE';RMAN> RESTORE TABLESPACE users;RMAN> RECOVER TABLESPACE users;RMAN> SQL 'ALTER TABLESPACE users ONLINE';
Restore and recover a datafileRMAN> SQL 'ALTER DATABASE DATAFILE 64 OFFLINE';RMAN> RESTORE DATAFILE 64;RMAN> RECOVER DATAFILE 64;RMAN> SQL 'ALTER DATABASE DATAFILE 64 ONLINE';
Steps for media recovery:1. Mount or open the Oracle database. Mount the database when performing whole database recovery, or open the database when performing online tablespace/datafile recovery.2. To perform incomplete recovery, use the SET UNTIL command to specify the time, SCN, or log sequence number at which recovery terminates. Alternatively, specify the UNTIL clause on the RESTORE and RECOVER commands.3. Restore the necessary files with the RESTORE command.4. Recover the datafiles with the RECOVER command.5. Place the database in its normal state. For example, open it or bring recovered tablespaces/datafiles online.
DELETE commandDelete backups and copies, remove references to them from the recovery catalog, and update their control file records to status DELETED.
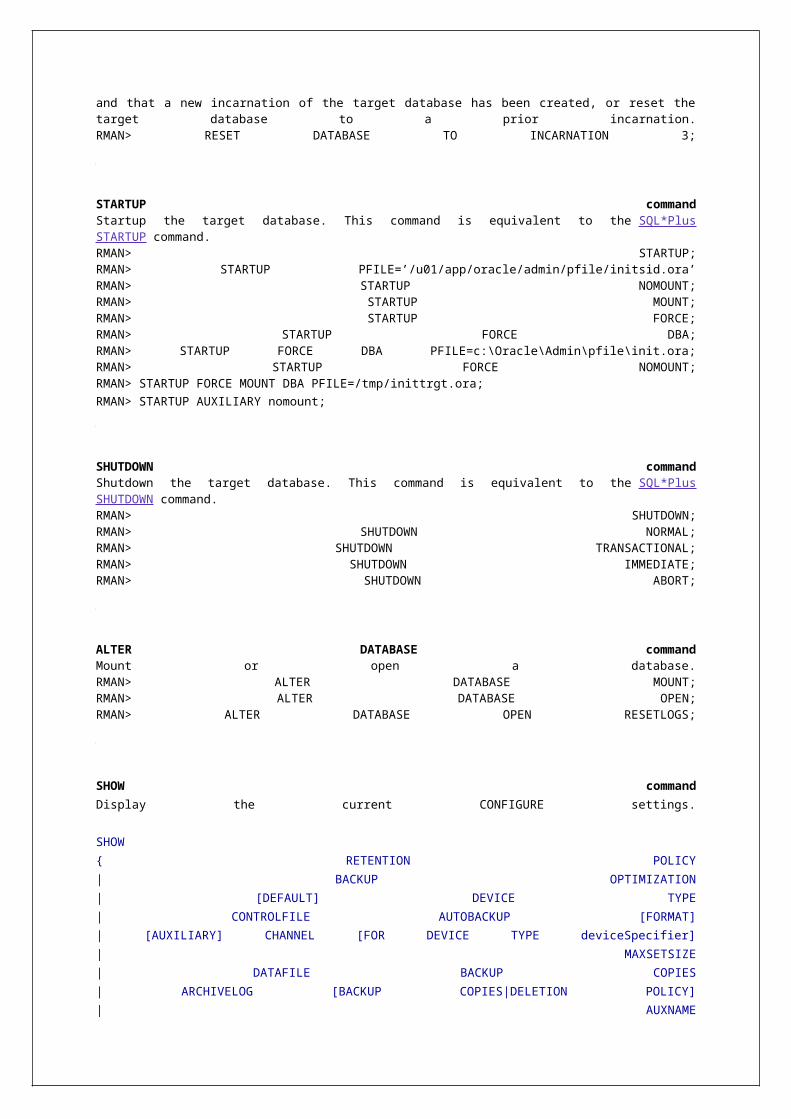
DELETE [FORCE] [NOPROMPT]{[EXPIRED]{{BACKUP [OF listObjectList] | COPY [OF listObectjList] | archivelogRecordSpecifier} [maintQualifier [maintQualifier]...]| recordSpec [DEVICE TYPE deviceSpecifier [, deviceSpecifier]...]}| OBSOLETE [REDUNDANCY [=] integer | RECOVERY WINDOW OF integer DAYS | ORPHAN] [DEVICE TYPE (deviceSpecifier [, deviceSpecifier]...]};
recordSpec::={ { BACKUPPIECE | PROXY }{ 'media_handle' [, 'media_handle']...| primary_key [, primary_key]...| TAG [=] ['] tag_name ['] }| BACKUPSET primary_key [, primary_key]...| { CONTROLFILECOPY | DATAFILECOPY }{ {primary_key [, primary_key]... | 'filename' [, 'filename']...}| TAG [=] ['] tag_name ['] [, ['] tag_name [']]...}| ARCHIVELOG { primary_key [, primary_key]... | 'filename' [, 'filename']... }
listObjectList::=[ DATAFILE datafileSpec [, datafileSpec]...| TABLESPACE ['] tablespace_name ['] [, ['] tablespace_name [']]...| archivelogRecordSpecifier| DATABASE [SKIP TABLESPACE [']tablespace_name['] [, [']tablespace_name[']] ...]| CONTROLFILE| SPFILE]...
RMAN> DELETE OBSOLETE;RMAN> DELETE NOPROMPT OBSOLETE;RMAN> DELETE NOPROMPT OBSOLETE RECOVERY WINDOW OF 7 DAYS;RMAN> DELETE EXPIRED BACKUP;RMAN> DELETE EXPIRED BACKUP DEVICE TYPE sbt;RMAN> DELETE BACKUP OF DATABASE LIKE '/tmp%';RMAN> DELETE NOPROMPT EXPIRED BACKUP OF TABLESPACE userd COMPLETED BEFORE 'SYSDATE-14';RMAN> DELETE BACKUP OF SPFILE TABLESPACE users DEVICE TYPE SBT;
RMAN> DELETE ARCHIVELOG ALL;
RMAN> DELETE ARCHIVELOG ALL COMPLETED BEFORE 'sysdate-2';RMAN> DELETE ARCHIVELOG ALL BACKED UP 2 TIMES TO DEVICE TYPE SBT;
RMAN> DELETE ARCHIVELOG ALL LIKE '%755153075%';
RMAN> DELETE ARCHIVELOG UNTIL SEQUENCE=79228;
RMAN> DELETE FORCE ARCHIVELOG ALL COMPLETED BEFORE 'sysdate-1.5';
RMAN> DELETE FORCE ARCHIVELOG UNTIL SEQUENCE=16364;RMAN> DELETE NOPROMPT ARCHIVELOG UNTIL SEQUENCE = 7300;RMAN> DELETE EXPIRED ARCHIVELOG ALL;RMAN> DELETE NOPROMPT EXPIRED ARCHIVELOG ALL;RMAN> DELETE BACKUPSET 101, 102, 103;RMAN> DELETE NOPROMPT BACKUPSET TAG weekly_bkup;RMAN> DELETE FORCE NOPROMPT BACKUPSET TAG weekly_bkup;
RMAN> DELETE DATAFILECOPY "+DG_DATA/db/datafile/system.259.699468079";RMAN> DELETE CONTROLFILECOPY '/tmp/cntrlfile.copy';RMAN> DELETE BACKUP DEVICE TYPE SBT;RMAN> DELETE BACKUP DEVICE TYPE DISK;RMAN> DELETE COPY;RMAN> DELETE EXPIRED COPY;RMAN> DELETE COPY TAG 'lastest';
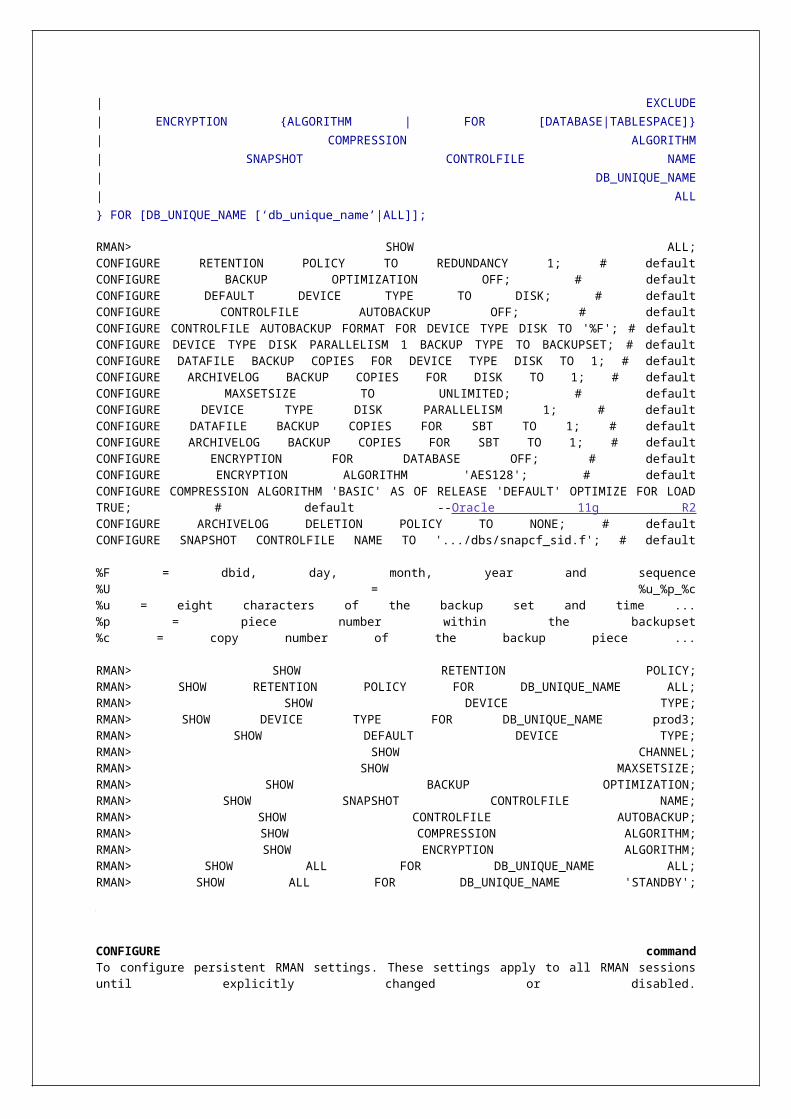
DROP DATABASE commandDelete the target database from disk and unregisters it.RMAN> DROP DATABASE;RMAN> DROP DATABASE NOPROMPT;RMAN> DROP DATABASE INCLUDING BACKUPS;RMAN> DROP DATABASE INCLUDING BACKUPS NOPROMPT;
DUPLICATE commandUse backups of the target database to create a duplicate database that we can use for testing purposes or to create a standby database.RMAN> DUPLICATE TARGET DATABASE;RMAN> DUPLICATE TARGET DATABASE TO dwhdb;RMAN> DUPLICATE TARGET DATABASE TO test PFILE=/u01/apps/db/inittest.ora;RMAN> DUPLICATE TARGET DATABASE TO devdb NOFILENAMECHECK;RMAN> DUPLICATE DATABASE 'prod' DBID 139525561 TO 'dupdb' NOFILENAMECHECK;
RMAN> DUPLICATE DATABASE TO "cscp" NOFILENAMECHECK BACKUP LOCATION
'/apps/oracle/backup';RMAN> DUPLICATE TARGET DATABASE TO dup FROM ACTIVE DATABASE NOFILENAMECHECK PASSWORD FILE SPFILE;
RMAN> DUPLICATE TARGET DATABASE TO dupdb LOGFILE GROUP 1 ('?/dbs/dupdb_log_1_1.f','?/dbs/dupdb_log_1_2.f') SIZE 200K, GROUP 2 ('?/dbs/dupdb_log_2_1.f','?/dbs/dupdb_log_2_2.f') SIZE 200K REUSE;RMAN> DUPLICATE TARGET DATABASE TO dup FOR STANDBY FROM ACTIVE DATABASE PASSWORD FILE SPFILEPARAMETER_VALUE_CONVERT '/disk1', '/disk2' SET DB_FILE_NAME_CONVERT '/disk1','/disk2' SET LOG_FILE_NAME_CONVERT '/disk1','/disk2' SET SGA_MAX_SIZE 200M SET SGA_TARGET 125M;
RMAN> DUPLICATE TARGET DATABASE FOR STANDBY NOFILENAMECHECK;
RMAN> DUPLICATE TARGET DATABASE FOR STANDBY FROM ACTIVE DATABASE;
RMAN> DUPLICATE TARGET DATABASE FOR STANDBY FROM ACTIVE DATABASE
NOFILENAMECHECK;
RMAN> DUPLICATE TARGET DATABASE FOR STANDBY FROM ACTIVE DATABASE
SPFILE PARAMETER_VALUE_CONVERT '/stg/','/muc/'
SET "DB_UNIQUE_NAME"="muc"
SET LOG_FILE_NAME_CONVERT '/stg/','/muc/'
SET DB_FILE_NAME_CONVERT '/stg/','/muc/'
DORECOVER;
RMAN> DUPLICATE DATABASE TO newdb
UNTIL RESTORE POINT firstquart12
DB_FILE_NAME_CONVERT='/u01/prod1/dbfiles/','/u01/newdb/dbfiles'
PFILE = '/u01/newdb/admin/init.ora';
SWITCH commandSpecify that a datafile copy is now the current datafile, i.e. the datafile pointed to by the control file. This command is equivalent to the SQL statement ALTER DATABASE RENAME FILE as it applies to datafiles.RMAN> SWITCH DATABASE TO COPY;RMAN> SWITCH TABLESPACE users TO COPY;RMAN> SWITCH DATAFILE ALL;RMAN> SWITCH DATAFILE '/disk1/tols.dbf' TO DATAFILECOPY '/disk2/tols.copy';RMAN> SWITCH DATAFILE "+DG_OLD/db/datafile/sysaux.260.699468081" TO COPY;RMAN> SWITCH TEMPFILE 1;RMAN> SWITCH TEMPFILE 1 TO '/newdisk/dbs/temp1.f';RMAN> SWITCH TEMPFILE ALL;
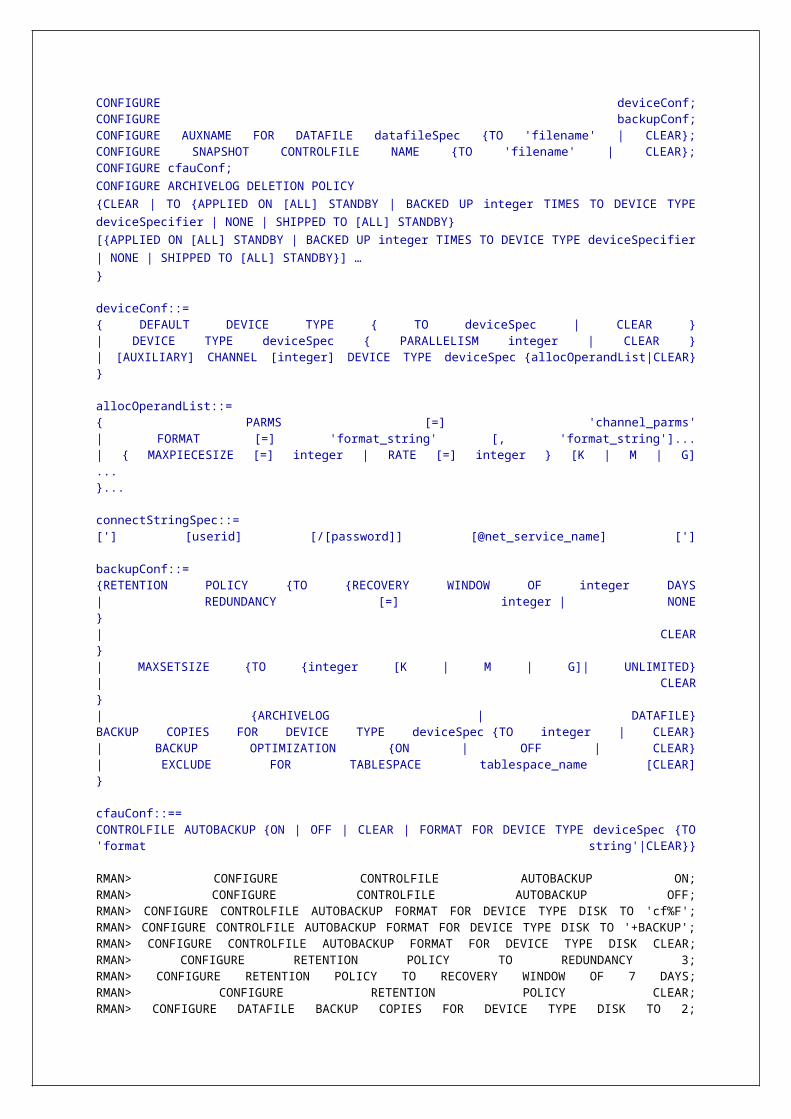
RMAN> SWITCH CLONE DATAFILE ALL;
CATALOG commandAdd information about file copies and user-managed backups to the catalog repository.RMAN> CATALOG DATAFILECOPY '/disk1/old_datafiles/01_10_2009/users01.dbf';RMAN> CATALOG DATAFILECOPY '/disk2/backup/users01.bkp' LEVEL 0;RMAN> CATALOG CONTROLFILECOPY '/disk3/backup/cf_copy.bkp';RMAN> CATALOG ARCHIVELOG '/disk1/arch1_731.dbf', '/disk1/arch1_732.dbf';RMAN> CATALOG BACKUPPIECE '/disk1/c-874220581-20090428-01';RMAN> CATALOG LIKE '/backup';RMAN> CATALOG START WITH '/fs2/arch';RMAN> CATALOG START WITH '/disk2/archlog' NOPROMPT;RMAN> CATALOG START WITH '+dg2';RMAN> CATALOG RECOVERY AREA;
ALLOCATE commandEstablish a channel, which is a connection between RMAN and a database instance.RMAN> ALLOCATE CHANNEL c1 DEVICE TYPE sbt;RMAN> ALLOCATE CHANNEL ch DEVICE TYPE DISK FORMAT ‘C:\ORACLEBKP\DB_U%’;RMAN> ALLOCATE CHANNEL t1 DEVICE TYPE DISK CONNECT 'sys/pwd@bkp1’;RMAN> ALLOCATE CHANNEL c1 DEVICE TYPE sbt PARMS 'ENV=(OB_MEDIA_FAMILY=wholedb_mf)';RMAN> ALLOCATE CHANNEL t1 DEVICE TYPE sbt PARMS 'ENV=(OB_DEVICE_1=tape1, OB_DEVICE_2=tape3)';RMAN> ALLOCATE CHANNEL t1 TYPE 'sbt_tape' PARMS='SBT_LIBRARY=/usr/openv/netbackup/bin/libobk.so.1';RMAN> ALLOCATE CHANNEL t1 TYPE 'sbt_tape' SEND "NB_ORA_CLIENT=CLIENT_MACHINE_NAME";RMAN> ALLOCATE CHANNEL 'dev1' TYPE 'sbt_tape' PARMS 'ENV=OB2BARTYPE=ORACLE8, OB2APPNAME=ORCL, OB2BARLIST=MACHINENAME_ORCL_ARCHLOGS)';
RMAN> ALLOCATE CHANNEL y1 TYPE DISK RATE 70M;RMAN> ALLOCATE AUXILIARY CHANNEL ac1 TYPE DISK;RMAN> ALLOCATE AUXILIARY CHANNEL ac2 DEVICE TYPE sbt;
ALLOCATE CHANNEL FOR MAINTENANCE - allocate a channel in preparation for issuing maintenance commands such as DELETE.RMAN> ALLOCATE CHANNEL FOR MAINTENANCE DEVICE TYPE DISK;RMAN> ALLOCATE CHANNEL FOR MAINTENANCE DEVICE TYPE DISK FORMAT "/disk2/%U";RMAN> ALLOCATE CHANNEL FOR MAINTENANCE DEVICE TYPE DISK CONNECT '@test1';RMAN> ALLOCATE CHANNEL FOR MAINTENANCE DEVICE TYPE sbt;RMAN> ALLOCATE CHANNEL FOR MAINTENANCE DEVICE TYPE sbt PARMS 'SBT_LIBRARY=/usr/local/oracle/backup/lib/libobk.so, ENV=(OB_DEVICE_1=tape2)';
RELEASE CHANNEL commandRelease a channel that was allocated with an ALLOCATE CHANNEL or ALLOCATE CHANNEL FOR MAINTENANCE command.RMAN> RELEASE CHANNEL;RMAN> RELEASE CHANNEL c1;
BLOCKRECOVER commandWill recover the corrupted blocks.RMAN> BLOCKRECOVER CORRUPTION LIST;RMAN> BLOCKRECOVER DATAFILE 8 BLOCK 22;RMAN> BLOCKRECOVER DATAFILE 7 BLOCK 233,235 DATAFILE 4 BLOCK 101;RMAN> BLOCKRECOVER DATAFILE 2 BLOCK 12,13 DATAFILE 3 BLOCK 5,98,99 DATAFILE 4 BLOCK 19;RMAN> BLOCKRECOVER DATAFILE 3 BLOCK 2,4,5 TABLESPACE sales DBA 4194405,4194412 FROM
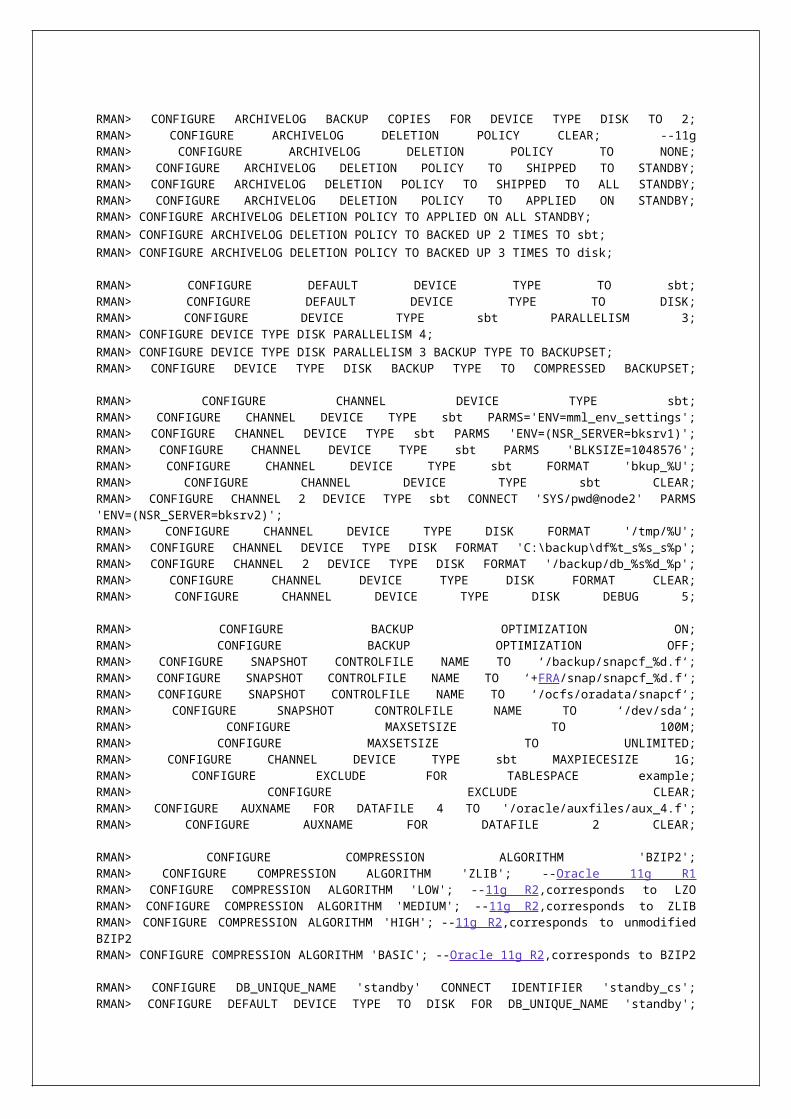
DATAFILECOPY;RMAN> BLOCKRECOVER TABLESPACE dwh DBA 4194404,4194405 FROM TAG "weekly";RMAN> BLOCKRECOVER TABLESPACE dwh DBA 94404 RESTORE UNTIL TIME 'SYSDATE-2';
ADVISE FAILURE command (From Oracle 11g R1)Display repair options.RMAN> ADVISE FAILURE;RMAN> ADVISE FAILURE 555, 242;RMAN> ADVISE FAILURE ALL;RMAN> ADVISE FAILURE CRITICAL;RMAN> ADVISE FAILURE HIGH;RMAN> ADVISE FAILURE LOW;RMAN> ADVISE FAILURE HIGH EXCLUDE FAILURE 625;
REPAIR FAILURE command (From Oracle 11g R1)Repair one or more failures recorded in the automated diagnostic repository.RMAN> REPAIR FAILURE;RMAN> REPAIR FAILURE PREVIEW;RMAN> REPAIR FAILURE NOPROMPT;RMAN> REPAIR FAILURE USING ADVISE OPTION integer;
VALIDATE commandExamine a backup set and report whether its data is intact. RMAN scans all of the backup pieces in the specified backup sets and looks at the checksums to verify that the contents can be successfully restored.RMAN> VALIDATE BACKUPSET 218;RMAN> VALIDATE BACKUPSET 3871, 3890;RMAN> VALIDATE DATABASE; -- 11g R1
RMAN> VALIDATE CHECK LOGICAL DATABASE;
RMAN> VALIDATE SKIP INACCESSIBLE DATABASE;
RMAN> VALIDATE COPY OF DATABASE;RMAN> VALIDATE TABLESPACE dwh;RMAN> VALIDATE COPY OF TABLESPACE dwh;RMAN> VALIDATE DATAFILE 2;RMAN> VALIDATE DATAFILE 4,8;RMAN> VALIDATE DATAFILE 4 BLOCK 56;
RMAN> VALIDATE DATAFILE 8 SECTION SIZE = 200M;RMAN> VALIDATE CURRENT CONTROLFILE;RMAN> VALIDATE SPFILE;RMAN> VALIDATE RECOVERY FILES;RMAN> VALIDATE RECOVERY AREA;RMAN> VALIDATE DB_RECOVERY_FILE_DEST;
SPOOL commandWrite RMAN output to a log file.RMAN> SPOOL LOG TO '/tmp/spool.log';RMAN> SPOOL LOG TO '/tmp/backup.log' APPEND;RMAN> SPOOL LOG OFF;
run commandExecute a sequence of one or more RMAN commands, which are one or more statements executed within the braces of RUN.RMAN> run {
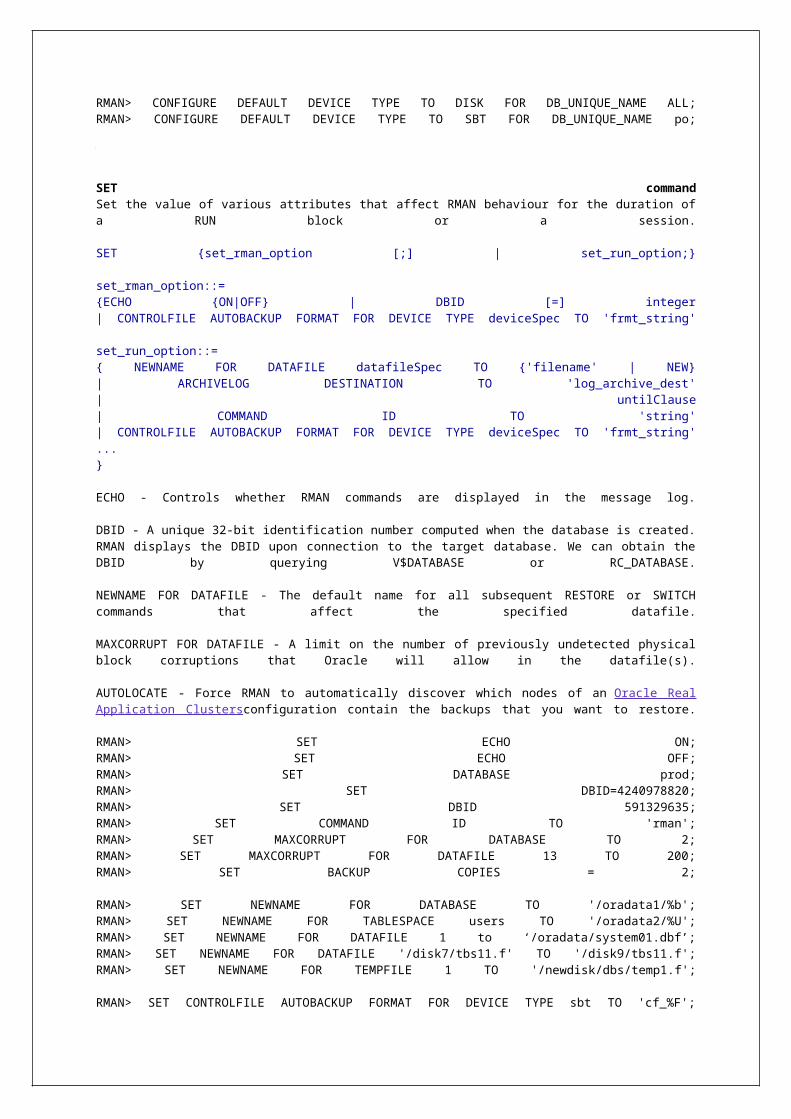
ALLOCATE CHANNEL c1 TYPE DISK FORMAT '/orabak/%U';BACKUP TABLESPACE users;}RMAN> run { ALLOCATE CHANNEL c1 TYPE DISK FORMAT '&1/%U'; BACKUP TABLESPACE &2;}RMAN> run{ ALLOCATE CHANNEL dev1 DEVICE TYPE DISK FORMAT '/fs1/%U'; ALLOCATE CHANNEL dev2 DEVICE TYPE DISK FORMAT '/fs2/%U'; BACKUP(TABLESPACE system,fin,mark FILESPERSET 20) (DATAFILE 2,3,6);}
CREATE SCRIPT commandCreate a stored script and store it in the recovery catalog.
RMAN> CREATE SCRIPT backup_wholeCOMMENT "backup whole database and archived redo log files"{BACKUP INCREMENTAL LEVEL 0 TAG backup_whole FORMAT "/disk2/backup/%U" DATABASE PLUS ARCHIVELOG;}
RMAN> CREATE SCRIPT backup_ts_usersCOMMENT 'tablespace users backup'{ALLOCATE CHANNEL c1 TYPE DISK FORMAT 'c:\temp\%U';BACKUP TABLESPACE users;}
RMAN> CREATE SCRIPT df {BACKUP DATAFILE &1 TAG &2.1 FORMAT '/disk1/&3_%U';}RMAN> CREATE SCRIPT backup_ts_users FROM FILE 'backup_ts_users.rman';RMAN> CREATE GLOBAL SCRIPT gl_backup_db {BACKUP DATABASE PLUS ARCHIVELOG;}RMAN> CREATE GLOBAL SCRIPT backup_dbCOMMENT "back up any database from the recovery catalog, with logs"{BACKUP DATABASE;}
PRINT SCRIPT commandDisplay a stored script.RMAN> PRINT SCRIPT backup_db;RMAN> PRINT GLOBAL SCRIPT backup_db;RMAN> PRINT GLOBAL SCRIPT gl_backup_db TO FILE "/tmp/gl_backupdb.rman";
REPLACE SCRIPT commandReplace an existing script stored in the recovery catalog. If the script does not exist, then REPLACE SCRIPT creates it.RMAN> REPLACE SCRIPT backup_db {BACKUP DATABASE PLUS ARCHIVELOG;}RMAN> REPLACE SCRIPT df {BACKUP DATAFILE &1 TAG &2.1 FORMAT '&3_%U';}RMAN> REPLACE GLOBAL SCRIPT backup_db {BACKUP DATABASE PLUS ARCHIVELOG;}RMAN> REPLACE GLOBAL SCRIPT gl_full_bkp FROM FILE '/tmp/script_file.txt';
EXECUTE SCRIPT commandRun an RMAN stored script.RMAN> RUN {EXECUTE SCRIPT backup_whole;}RMAN> RUN {EXECUTE SCRIPT backup_ts_any USING 'example';}RMAN> RUN {EXECUTE SCRIPT backup_df USING 3 test_backup df3;}RMAN> RUN {EXECUTE GLOBAL SCRIPT global_backup_db;}
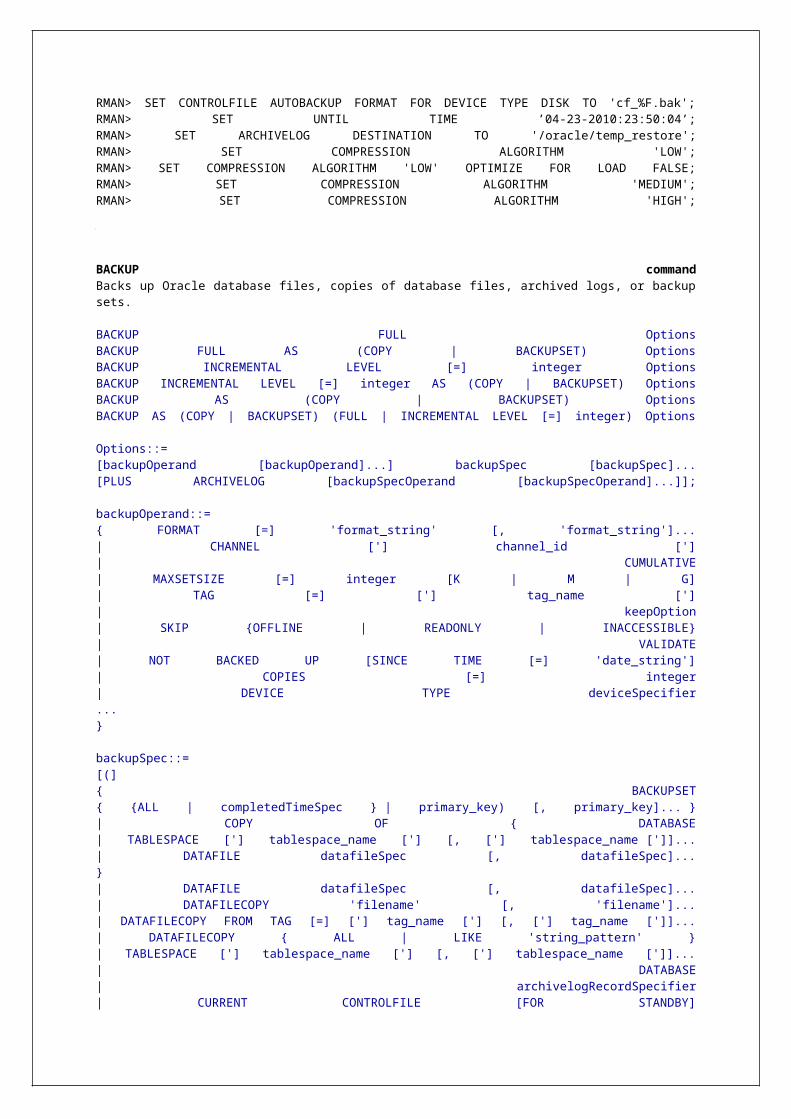
DELETE SCRIPT commandDelete a stored script from the recovery catalog.RMAN> DELETE SCRIPT backup_db;RMAN> DELETE GLOBAL SCRIPT global_backup_db;
FLASHBACK DATABASE commandReturn the database to its state at a previous time or SCN.RMAN> FLASHBACK DATABASE TO SCN 411010;RMAN> FLASHBACK DATABASE TO RESTORE POINT 'before_update';
TRANSPORT TABLESPACE commandCreate transportable tablespace sets from backup for one or more tablespaces.RMAN> TRANSPORT TABLESPACE example, toolsTABLESPACE DESTINATION '/disk1/trans' AUXILIARY DESTINATION '/disk1/aux' UNTIL TIME 'SYSDATE-15/1440';RMAN> TRANSPORT TABLESPACE examTABLESPACE DESTINATION '/disk1/trans' AUXILIARY DESTINATION '/disk1/aux' DATAPUMP DIRECTORY dpdir DUMP FILE 'dmpfile.dmp' IMPORT SCRIPT 'impscript.sql' EXPORT LOG 'explog.log';
CONVERT commandConvert datafile formats for transporting tablespaces and databases across platforms.RMAN> CONVERT DATABASE NEW DATABASE 'prodwin' TRANSPORT SCRIPT '/tmp/convertdb/transportscript' TO PLATFORM 'Microsoft Windows IA (32-bit)' DB_FILE_NAME_CONVERT '/disk1/oracle/dbs','/tmp/convertdb';RMAN> CONVERT DATABASE ON DESTINATION PLATFORM CONVERT SCRIPT '/tmp/convertdb/convertscript.rman'TRANSPORT SCRIPT '/tmp/convertdb/transportscript.sql' NEW DATABASE 'prodwin' FORMAT '/tmp/convertdb/%U';RMAN> CONVERT DATABASE ON DESTINATION PLATFORM CONVERT SCRIPT '/tmp/convert_newdb.rman' TRANSPORT SCRIPT '/tmp/transport_newdb.sql' NEW DATABASE 'prodaix' DB_FILE_NAME_CONVERT '/u01/oradata/datafile','+DATA';
RMAN> CONVERT TABLESPACE tbs_2 FORMAT '/tmp/tbs_2_%U.df';RMAN> CONVERT TABLESPACE fin, hr TO PLATFORM 'Solaris[tm] OE (32-bit)';RMAN> CONVERT TABLESPACE fin, hr TO PLATFORM 'Solaris[tm] OE (32-bit)' FORMAT '/tmp/transport_to_solaris/%U';
RMAN> CONVERT DATAFILE '/disk1/oracle/dbs/tbs_f1.df', '/disk1/oracle/dbs/ax1.f' FORMAT '+DATAFILE';RMAN> CONVERT DATAFILE '/u01/oradata/datafile/system.dbf' FROM PLATFORM 'Linux x86 64-bit' FORMAT '+DATA/system.dbf';RMAN> CONVERT DATAFILE'/tmp/from_solaris/fin/fin01.dbf', '/tmp/from_solaris/fin/fin02.dbf','/tmp/from_solaris/hr/hr01.dbf', '/tmp/from_solaris/hr/hr02.dbf'DB_FILE_NAME_CONVERT '/tmp/from_solaris/fin','/disk2/orahome/dbs/fin','/tmp/from_solaris/hr','/disk2/orahome/dbs/hr'FROM PLATFORM 'Solaris[tm] OE (64-bit)';
RMAN> CONVERT DATAFILE '/tmp/PSMN.dbf' TO PLATFORM='Solaris Operating System (x86-64)'
FROM PLATFORM='Solaris[tm] OE (64-bit)'
FORMAT '/tmp/test/%N.dbf' DB_FILE_NAME_CONVERT='/ui/prod/oracle/oradata/SEARCHP/data/',
'/tmp/test';
EXIT or QUIT CommandExit the RMAN console.
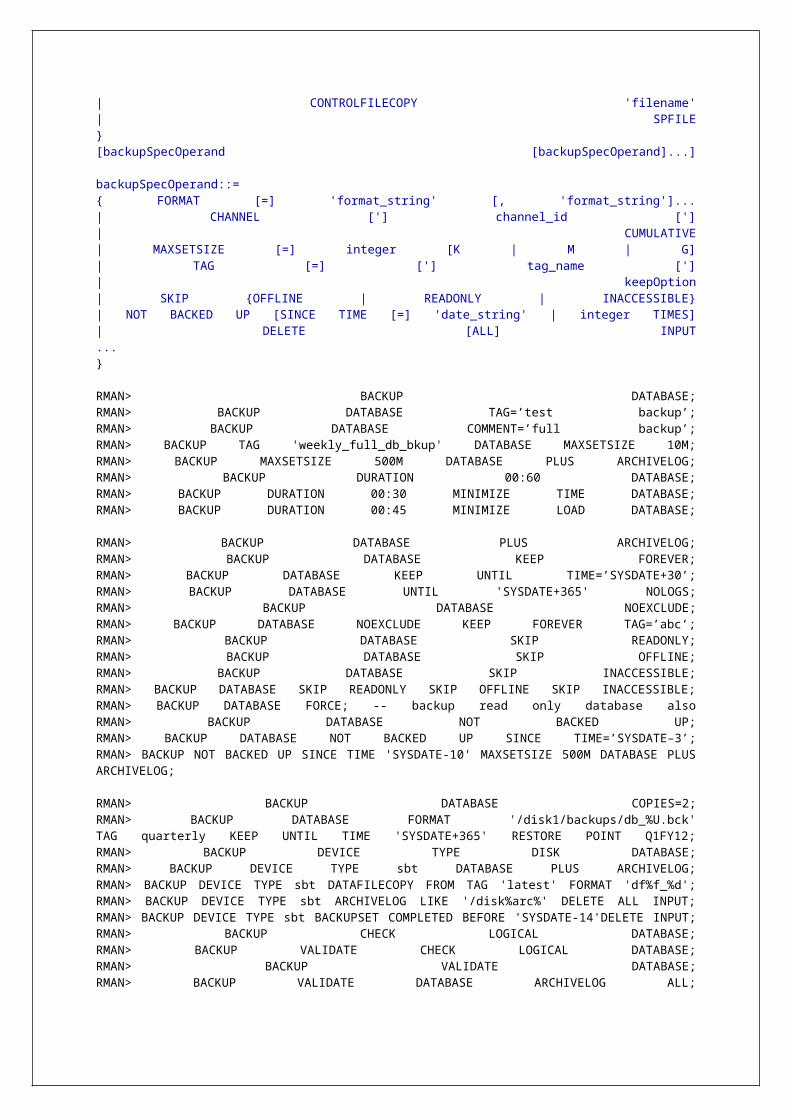
RMAN> exit;RMAN> quit;
SEND commandSend a vendor-specific quoted string to one or more specific channels.RMAN> SEND 'OB_DEVICE tape1';
HOST commandInvoke an operating system command-line subshell from within RMAN or run a specific operating system command.RMAN> HOST;RMAN> HOST 'ls -lt /disk2/*';RMAN> HOST '/bin/mv $ORACLE_HOME/dbs/*.arc /disk2/archlog/';
Oracle Remote Diagnostic Agent (RDA)RDA (Remote Diagnostic Agent) is a utility, a set of shell scripts (or) a PERL script, that can be downloaded from Metalink, to collect diagnostics information from an Oracle database and its environment (RAC, ASM, Exadata).
This utility is focused at collecting information that will aid in problem diagnosis. When logging a call, Oracle Support will often request that you install the RDA utility, run it and upload the output to Metalink for analysis.
It’s not only a great tool for troubleshooting but also very helpful for documenting an Oracle environment.
RDA offers lots of reporting options, is relatively unobtrusive and provides easy to read results. You can run it on just about any version of the Database or Oracle Applications or Operating System and it is smart enough to figure out where to go and what to gather.Once installed and run rda.sh or rda.pl, you have to answer some questions and send it off to gather information about your environment. As result you will get a lot of TXT and HTML files. The simplest way of reviewing the output files is to launch a web browser on the same machine where rda.sh has run and open the file RDA__START.htm located in the RDA_Output directory. If you pull up the RDA__START.htm, you can browse through information about your database, server, Java, applications tier, forms and just about anything else you ever wanted to know. And it’s all nicely formatted in HTML with drill-down links.
Download the patch from Metalink, FTP to database box and unzip it.
To find out whether RDA installation is successful or not$./rda.sh -cv
To run RDA$./rda.sh –vdt or $perl rda.pl[[Answer bundle of questions]]
For more options, read the README_UNIX.txt or README_WINDOWS.txt in the installation directory.
Examples:
./rda.sh -f -y -e RPT_GROUP='XD',ORACLE_SID=$ORACLE_SID,ORACLE_HOME=`grep -v -e ^[#,*,
+] /etc/oratab | grep $ORACLE_SID |cut -f2 -
d:`,SQL_LOGIN='/',SQL_SYSDBA=1,ASM_ORACLE_SID=`grep ASM /etc/oratab |cut -f1 -
d:`,ASM_ORACLE_HOME=`grep ASM /etc/oratab |cut -f2 -d:` -p Exadata_Assessment
./rda.sh -p Exadata_Assessment
./rda.sh -vT ora600:`grep -i ora-00600 $B_D_D |cut -f1 -d:`
./rda.sh -p advanced DBM
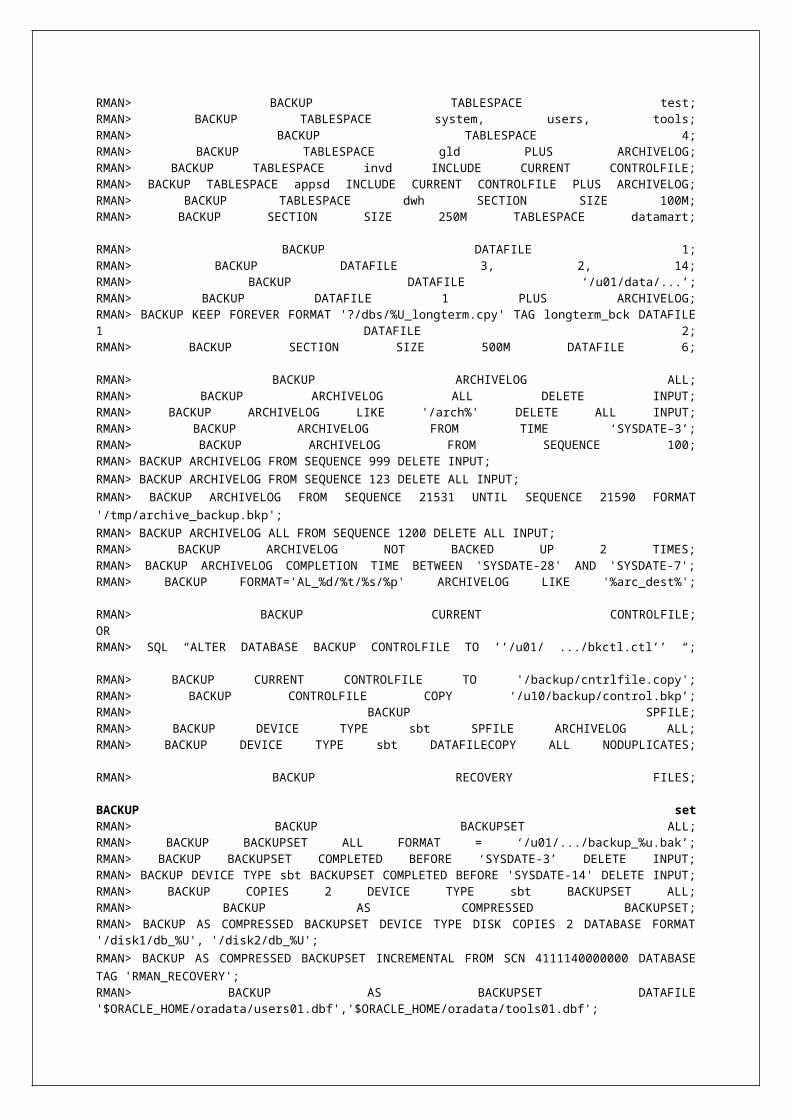
./rda.sh -p Exadata_FailedDrives
./rda.sh ONET
./rda.sh -f -y -e RPT_GROUP='XD2',ORACLE_SID=$ORACLE_SID,ORACLE_HOME=`grep -v -e ^[#,*,
+] /etc/oratab | grep $ORACLE_SID |cut -f2 -
d:`,SQL_LOGIN='/',SQL_SYSDBA=1,ASM_ORACLE_SID=`grep ASM /etc/oratab |cut -f1 -
d:`,ASM_ORACLE_HOME=`grep ASM /etc/oratab |cut -f2 -d:` ONET
./rda.sh -T oraddc
./rda.sh -f -y -e RPT_GROUP='XD2',ORACLE_SID=$ORACLE_SID,ORACLE_HOME=`grep -v -e ^[#,*,
+] /etc/oratab | grep $ORACLE_SID |cut -f2 -
d:`,SQL_LOGIN='/',SQL_SYSDBA=1,ASM_ORACLE_SID=`grep ASM /etc/oratab |cut -f1 -
d:`,ASM_ORACLE_HOME=`grep ASM /etc/oratab |cut -f2 -d:` -T oraddc
./rda.sh EXA
./rda.sh -f -y -e RPT_GROUP='XD2',ORACLE_SID=$ORACLE_SID,ORACLE_HOME=`grep -v -e ^[#,*,
+] /etc/oratab | grep $ORACLE_SID |cut -f2 -
d:`,SQL_LOGIN='/',SQL_SYSDBA=1,ASM_ORACLE_SID=`grep ASM /etc/oratab |cut -f1 -
d:`,ASM_ORACLE_HOME=`grep ASM /etc/oratab |cut -f2 -d:` EXA
./rda.sh -p Exadata_SickCell
./rda.sh -p Exadata_IbSwitch
./rda.sh -p Exadata_NetworkCabling
Recycle binRecycle bin in Oracle
Recycle bin was introduced in Oracle 10g
Recycle bin is actually a data dictionary table containing information about dropped objects. When an object has been dropped from a locally managed tablespace (LMTS), which is not the SYSTEM tablespace, the database does not immediately delete the object & reclaim the space associated with the object. Instead, it places the object and any dependent objects in the recycle bin, which is similar to deleting a file/folder from Windows/Macintosh. You can then restore the object, its data and its dependent objects from the recycle bin.
The FLASHBACK DROP and the FLASHBACK TABLE feature places the object in the recycle bin after removing the object from the database. This eliminates the need to perform a point-in-time recovery operation.
When objects are dropped, the objects are not moved from the tablespace they were in earlier; they still occupy the space there. The recycle bin is merely a logical structure that catalogs the dropped objects.
The recyclebin is enabled, by default, from Oracle 10g.But you can turn it on or off with the RECYCLEBIN initialization parameter, at the system or session level.SQL> ALTER SYSTEM/SESSION SET RECYCLEBIN=ON/OFF SCOPE=BOTH;SQL> SHOW PARAMETER RECYCLEBIN
When the recycle bin is enabled, dropped tables and their dependent objects are placed in the recycle bin.
SQL> DROP TABLE attachment;SQL> SELECT * FROM TAB;TNAME TABTYPE CLUSTERID------------------------------ ------- ----------BIN$Wk/N7nbuC2DgRAAAd7F0UA==$0 TABLEThe deleted table has been renamed with system name, physically it’s not dropped.
The renaming convention is as follows:BIN$unique_id$versionwhere:
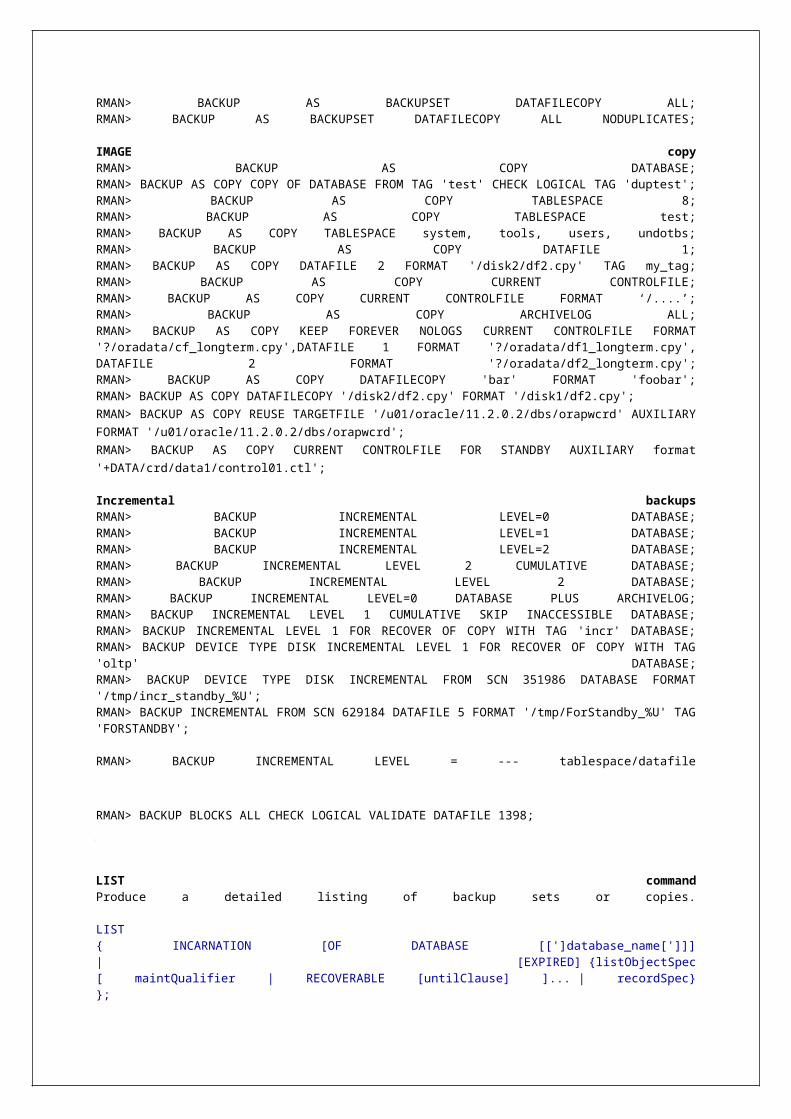
unique_id is a 26-character globally unique identifier for this object, which makes the
recycle bin name unique across all databases
version is a version number assigned by the database
Use the following command to see recycle bin contents:SQL> SELECT * FROM RECYCLEBIN;orSQL> SHOW RECYCLEBINORIGINAL NAME RECYCLEBIN NAME OBJECT TYPE DROP TIME------------- ------------------------ ---------- -----------------ATTACHMENT BIN$Wk/N7nbuC2DgRAAAd7F0UA==$0 TABLE 2008-10-28:11:46:55
This shows the original name of the table, as well as the new name in the bin.
Note that users can see only objects that they own in the recycle bin.
Remember, placing tables in the recycle bin does not free up space in the original tablespace. To free the space, you need to purge the bin using:SQL> PURGE RECYCLEBIN;
But what if you want to drop the table completely, without needing a flashback feature, in that case, you can drop it permanently using:SQL> DROP TABLE table-name PURGE;
This is similar to SHIFT+DELETE in Windows. This command will not rename the table to the recycle bin name; rather, it will be deleted permanently, as it would have been before Oracle 10g.
To get back the deleted table and its contentsSQL> FLASHBACK TABLE table-name/bin-name TO BEFORE DROP [RENAME TO new-name];
You can query objects that are in the recycle bin, just as you can query other objects. However, you must specify the name of the object as it is identified in the recycle bin.SQL> SELECT * FROM "BIN$W1PPyhVRSbuv6g+V69OgRQ==$0";
Managing Recycle Bin in Oracle
If the tables are not really dropped in this process, therefore not releasing the tablespace, what happens when the dropped objects take up all of that space?When a tablespace is completely filled up with recycle bin data such that the datafiles have to extend to make room for more data, the tablespace is said to be under "space pressure." In that scenario, objects are automatically purged from the recycle bin in a first-in-first-out manner. The dependent objects (such as indexes) are removed before a table is removed.
Similarly, space pressure can occur with user quotas as defined for a particular tablespace. The tablespace may have enough free space, but the user may be running out of his or her allotted portion of it. In such situations, Oracle automatically purges objects belonging to that user in that tablespace.
In addition, there are several ways you can manually control the recycle bin. If you want to purge the specific table from the recyclebin after its drop, you could issueSQL> PURGE TABLE table-name;
or using its recycle bin name
SQL> PURGE TABLE "BIN$Wk/N7nbuC2DgRCBAd7F0UA==$0";
This command will remove table and all dependent objects such as indexes, constraints, and so on from the recycle bin, saving some space.
If you want to permanently drop an index from the recycle bin, you can do so using:SQL> PURGE INDEX index-name;
This will remove the index only, leaving the copy of the table in the recycle bin. Sometimes it might be useful to purge at a higher level. For instance, you may want to purge all the objects in recycle bin in a tablespace.You would issue:
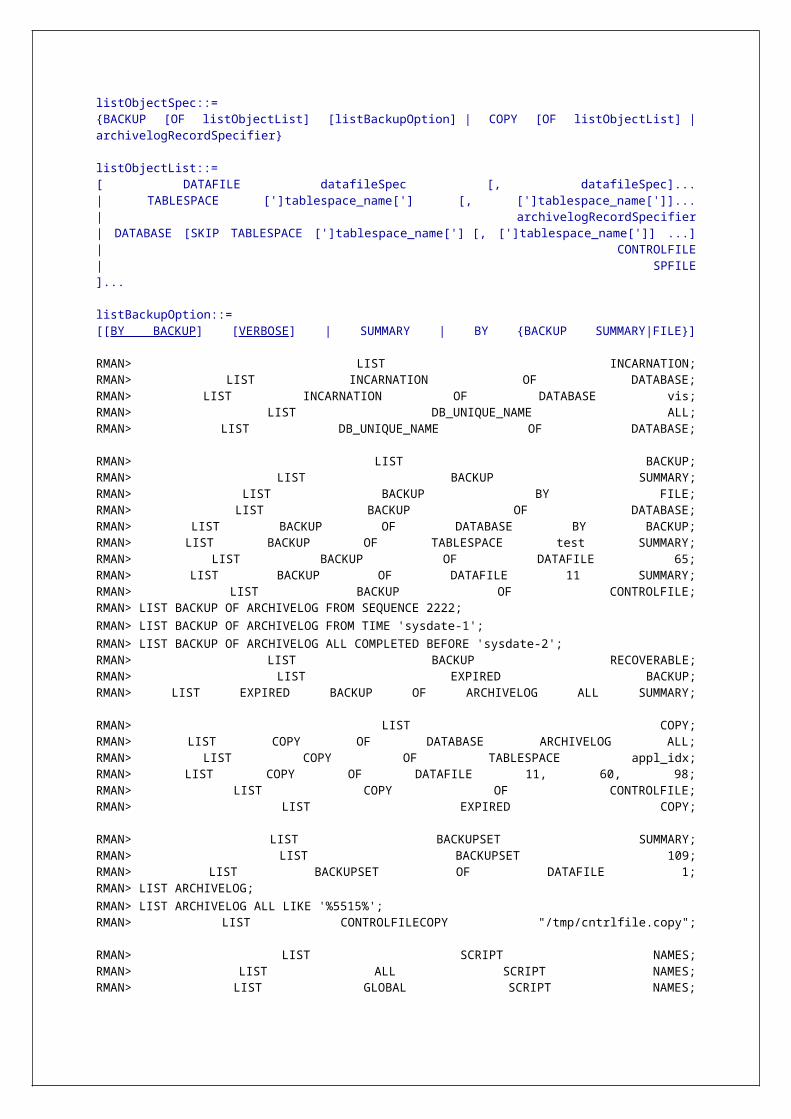
SQL> PURGE TABLESPACE tablespace-name;
You may want to purge only the recycle bin for a particular user in that tablespace. This approach could come handy in data warehouse environments where users create and drop many transient tables. You could modify the command above to limit the purge to a specific user only:SQL> PURGE TABLESPACE tablespace-name USER user-name;
The PURGE TABLESPACE command only removes recyclebin segments belonging to the currently connected user. Therefore, it may not remove all the recyclebin segments in the tablespace. You can determine which users have recyclebin segments in a target tablespace using the following query:SQL> SELECT DISTINCT owner FROM dba_recyclebin WHERE ts_name = "tablespace-name";
You can then use the above PURGE TABLESPACE command to purge the segments for each of the users.
A normal user, such as SCOTT, could clear his own recycle bin withSQL> PURGE RECYCLEBIN;
A DBA can purge all the objects in any tablespace usingSQL> PURGE DBA_RECYCLEBIN;
The PURGE DBA_RECYCLEBIN command can be used only if you have SYSDBA system privileges. It removes all objects from the recycle bin, regardless of user.
Note: When a table is retrieved from the recycle bin, all the dependent objects for the table that are in the recycle bin are retrieved with it. They cannot be retrieved separately.
The un-drop feature brings the table back to its original name, but not the associated objects like indexes and triggers, which are left with the recycled names. Sources such as views and procedures defined on the table are not recompiled and remain in the invalid state. These old names must be retrieved/renamed manually and then applied to the flashed-back table.
A few types of dependent objects are not handled like the simple index above.
o Bitmap join indexes are not put in the recyclebin when their base table is DROPped, and
not retrieved when the table is restored with FLASHBACK DROP.
o The same goes for materialized view logs; when you drop a table, all mview logs defined on
that table are permanently dropped, not put in the recyclebin.
o Referential integrity constraints that reference another table are lost when the table is put
in the recyclebin and then restored.
If space limitations force Oracle to start purging objects from the recyclebin, it purges indexes first.
The constraint names are also not retrievable from the view. They have to be renamed from other
sources.
When you drop a tablespace including its contents, the objects in the tablespace are not placed in
the recycle bin and the database purges any entries in the recycle bin for objects located in the
tablespace.
The database also purges any recycle bin entries for objects in a tablespace when you drop the
tablespace, not including contents, and the tablespace is otherwise empty. Likewise: When you drop a user, any objects belonging to the user are not placed in the recycle bin and any objects in the recycle bin are purged.
When you drop a cluster, its member tables are not placed in the recycle bin and any former member tables in the recycle bin are purged.
When you drop a type, any dependent objects such as subtypes are not placed in the recycle bin and any former dependent objects in the recycle bin are purged.
When the recycle bin is disabled, dropped tables and their dependent objects are not placed in the
recycle bin; they are just dropped, and you must use other means to recover them (such as
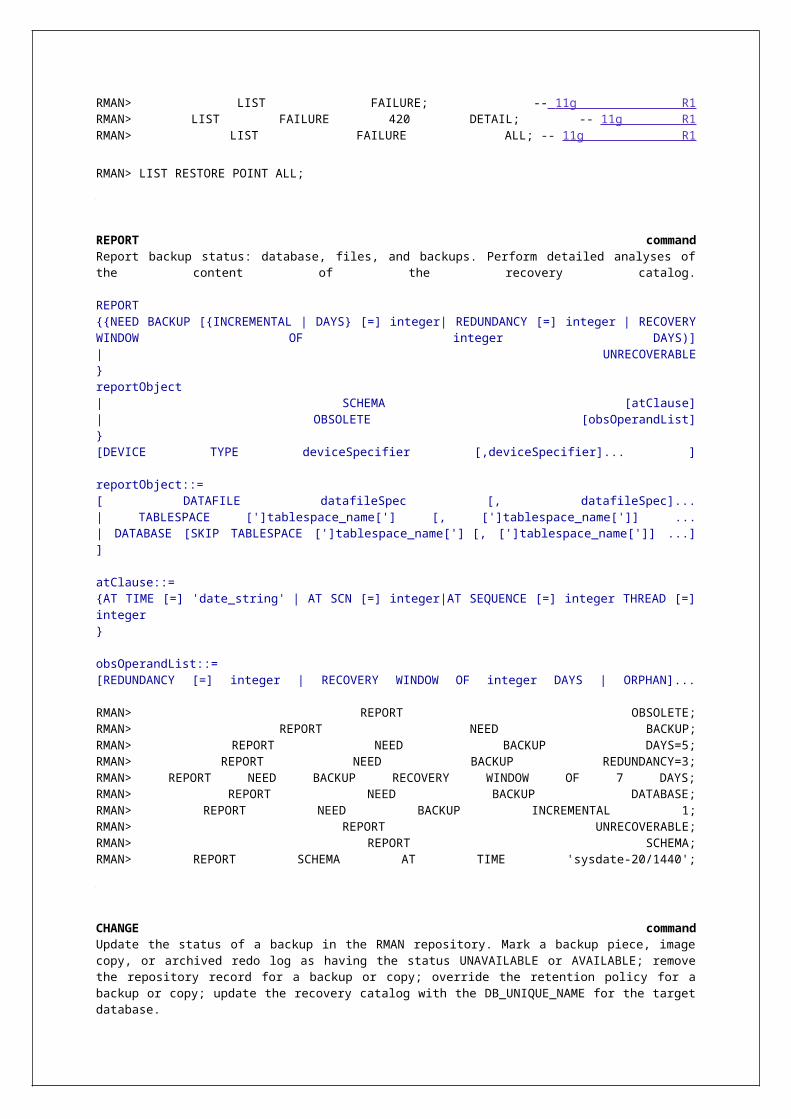
recovering from backup). Disabling the recycle bin does not purge or otherwise affect objects
already in the recycle bin.
Related Views
RECYCLEBIN$ (base table)
DBA_RECYCLEBIN
USER_RECYCLEBIN
RECYCLEBIN (synonym for USER_RECYCLEBIN)
ProfilesProfiles in OracleProfiles were introduced in Oracle 8.
Profiles are, set of resource limits, used to limit system resources a user can use. It allows us to regulate the amount of resources used by each database user by creating and assigning profiles to them.
Whenever you create a database, one default profile will be created and assigned to all the users you have created. The name of default profile is DEFAULT.
Kernel Resources sessions_per_user -- Maximum concurrent sessions allowed for a user.
cpu_per_session -- Maximum CPU time limit per session, in hundredth of a second.
cpu_per_call -- Maximum CPU time limit per call, in hundredth of a second. Call being parsed, executed and fetched.
connect_time -- Maximum connect time per session, in minutes.
idle_time -- Maximum idle time before user is disconnected, in minutes.
logical_reads_per_session -- Maximum blocks read per session.
logical_reads_per_call -- Maximum blocks read per call.
private_sga -- Maximum amount of private space in SGA.
composite_limit -- Sum of cpu_per_session, connect_time, logical_reads_per_session and private_sga.
In order to enforce above kernel resource limits, init parameter resource_limit must be set to true.SQL> ALTER SYSTEM SET resource_limit=TRUE SCOPE=BOTH;
Password limiting functionality is not affected by this parameter.
Password Resources
failed_login_attempts -- Maximum failed login attempts.Query to count failed login attemptsSQL> SELECT name, lcount FROM USER$ WHERE lcount <> 0;
password_life_time -- Maximum time a password is valid.
password_reuse_max -- Minimum of different passwords before password can be reused.
password_reuse_time -- Minimum of days before a password can be reused.
password_lock_time -- Number of days an account is locked after failed login attempts.
password_grace_time -- The number of days after the grace period begins, during which a warning is issued and login is allowed. If the password is not changed during the grace period, the password expires.
password_verify_function -- This function will verify the complexity of passwords.
Notes:
If PASSWORD_REUSE_TIME is set to an integer value, PASSWORD_REUSE_MAX must be set to UNLIMITED and vice versa.

If PASSWORD_REUSE_MAX=DEFAULT and PASSWORD_REUSE_TIME is set to UNLIMITED, then Oracle uses the PASSWORD_REUSE_MAX value defined in the DEFAULT profile and vice versa.
If both PASSWORD_REUSE_TIME and PASSWORD_REUSE_MAX are set to DEFAULT, then Oracle uses whichever value is defined in the DEFAULT profile.
The system resource limits can be enforced at the session level or at the call level or both.
If a session exceeds one of these limits, Oracle will terminate the session. If there is a logoff
trigger, it won't be executed.
In order to track password limits, Oracle stores the history of passwords for a user in
USER_HISTORY$.
Creating Profiles
In Oracle, the default cost assigned to a resource is unlimited. By setting resource limits, you can
prevent users from performing operations that will tie up the system and prevent other users from
performing operations. You can use resource limits for security to ensure that users log off the
system and do not leave the sessions connected for long periods of time.
Syntax for CREATE and ALTER command:
CREATE/ALTER PROFILE profile-name LIMIT
[SESSIONS_PER_USER value|UNLIMITED|DEFAULT]
[CPU_PER_SESSION value|UNLIMITED|DEFAULT]
[CPU_PER_CALL value|UNLIMITED|DEFAULT]
[CONNECT_TIME value|UNLIMITED|DEFAULT]
[IDLE_TIME value|UNLIMITED|DEFAULT]
[LOGICAL_READS_PER_SESSION value|UNLIMITED|DEFAULT]
[LOGICAL_READS_PER_CALL value|UNLIMITED|DEFAULT]
[COMPOSITE_LIMIT value|UNLIMITED|DEFAULT]
[PRIVATE_SGA value[K|M]|UNLIMITED|DEFAULT]
[FAILED_LOGIN_ATTEMPTS expr|UNLIMITED|DEFAULT]
[PASSWORD_LIFE_TIME expr|UNLIMITED|DEFAULT]
[PASSWORD_REUSE_TIME expr|UNLIMITED|DEFAULT]
[PASSWORD_REUSE_MAX expr|UNLIMITED|DEFAULT]
[PASSWORD_LOCK_TIME expr|UNLIMITED|DEFAULT]
[PASSWORD_GRACE_TIME expr|UNLIMITED|DEFAULT]
[PASSWORD_VERIFY_FUNCTION function_name|NULL|DEFAULT]
e.g:SQL> CREATE PROFILE onsite LIMITPASSWORD_LIFE_TIME 45PASSWORD_GRACE_TIME 12PASSWORD_REUSE_TIME 3PASSWORD_REUSE_MAX 5FAILED_LOGIN_ATTEMPTS 4PASSWORD_LOCK_TIME 2CPU_PER_CALL 5000PRIVATE_SGA 250KLOGICAL_READS_PER_CALL 2000;
Following is the create profile statement for DEFAULT profile (with all default values):SQL> CREATE PROFILE "DEFAULT" LIMITCPU_PER_SESSION UNLIMITEDCPU_PER_CALL UNLIMITEDCONNECT_TIME UNLIMITEDIDLE_TIME UNLIMITEDSESSIONS_PER_USER UNLIMITEDLOGICAL_READS_PER_SESSION UNLIMITEDLOGICAL_READS_PER_CALL UNLIMITED
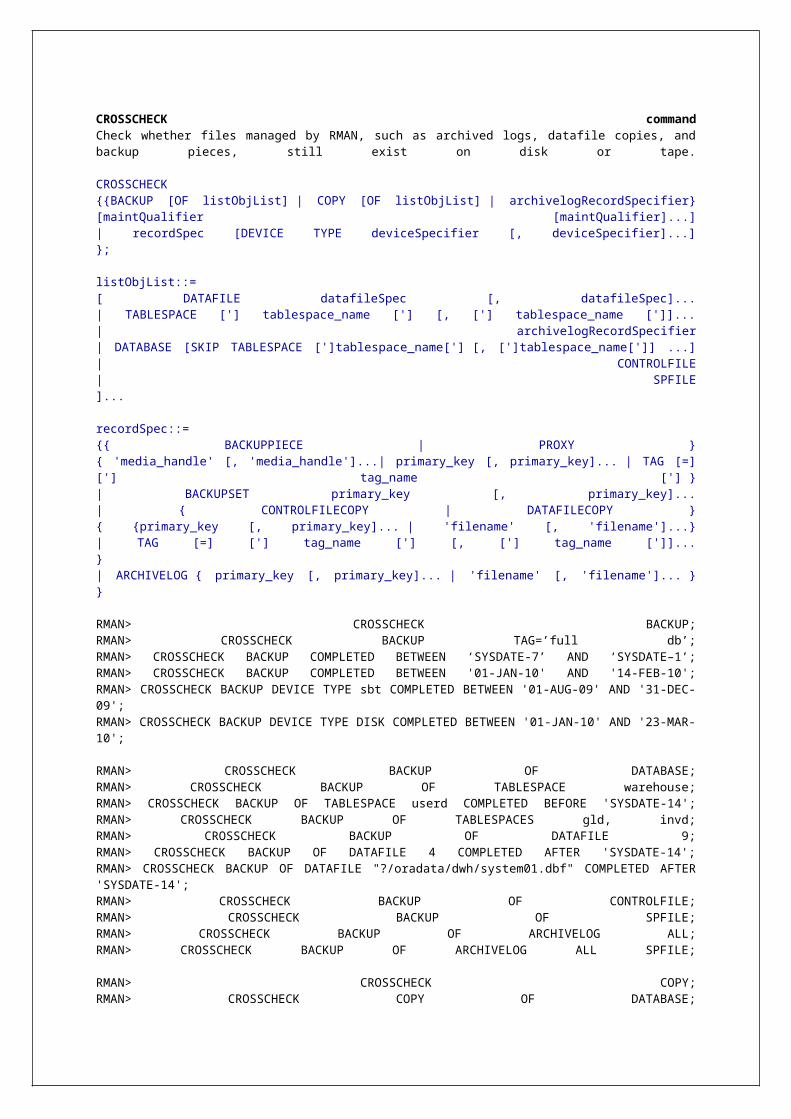
PRIVATE_SGA UNLIMITEDCOMPOSITE_LIMIT UNLIMITEDPASSWORD_LIFE_TIME 180PASSWORD_GRACE_TIME 7PASSWORD_REUSE_MAX UNLIMITEDPASSWORD_REUSE_TIME UNLIMITEDPASSWORD_LOCK_TIME 1FAILED_LOGIN_ATTEMPTS 10PASSWORD_VERIFY_FUNCTION NULL;
SQL> ALTER PROFILE onsite LIMIT FAILED_LOGIN_ATTEMPTS 3;
Assigning ProfilesBy default, when you create a user, they are assigned to the DEFAULT profile. If you don't want thatCREATE USER user-name IDENTIFIED BY password PROFILE profile-name;e.g. SQL> CREATE USER satya IDENTIFIED BY satya PROFILE onsite;
You can alter the existing user's profiles byALTER USER user-name PROFILE profile-name ;e.g. SQL> ALTER USER surya PROFILE offshore;
Dropping ProfilesSyntax for dropping a profile, without dropping users.
DROP PROFILE profile-namee.g. SQL> DROP PROFILE onsite;Syntax for dropping a profile with CASCADE clause, all the users who are having this profile will be deleted.
DROP PROFILE profile-name CASCADEe.g. SQL> DROP PROFILE offshore CASCADE;
Password Verify Function in Oracle
This will verify passwords for length, content and complexity.The function requires the old and new passwords, so password changes can not be done with ALTER USER. Password changes should be performed with the SQL*Plus PASSWORD command or through a stored procedure that requires the correct inputs.
CREATE/ALTER PROFILE profile-name LIMIT PASSWORD_VERIFY_FUNCTION function-name;
It's possible to restrict a password's format by creating a PL/SQL procedure that validates passwords. It’ll check for minimum width, letters, numbers, or mixed case, or verifying that the password isn't a variation of the username.
If you want to remove this password verify function, assign NULL value to PASSWORD_VERIFY_FUNCTION.ALTER PROFILE profile-name LIMIT PASSWORD_VERIFY_FUNCTION NULL;
Related Viewsprofile$profname$DBA_PROFILESRESOURCE_COST (shows the unit cost associated with each resource)USER_RESOURCE_LIMITS (each user can find information on his resources and limits)Password file (orapwd utility) in OracleOracle password file stores passwords for users with administrative privileges.
If the DBA wants to start up an Oracle instance there must be a way for Oracle to authenticate the DBA. Obviously, DBA password cannot be stored in the database, because Oracle cannot access the database before the instance is started up. Therefore, the authentication of the DBA must happen outside of the database. There are two distinct mechanisms to authenticate the DBA:(i) Using the password file or(ii) Through the operating system (groups). Any OS user under dba group, can login as SYSDBA.
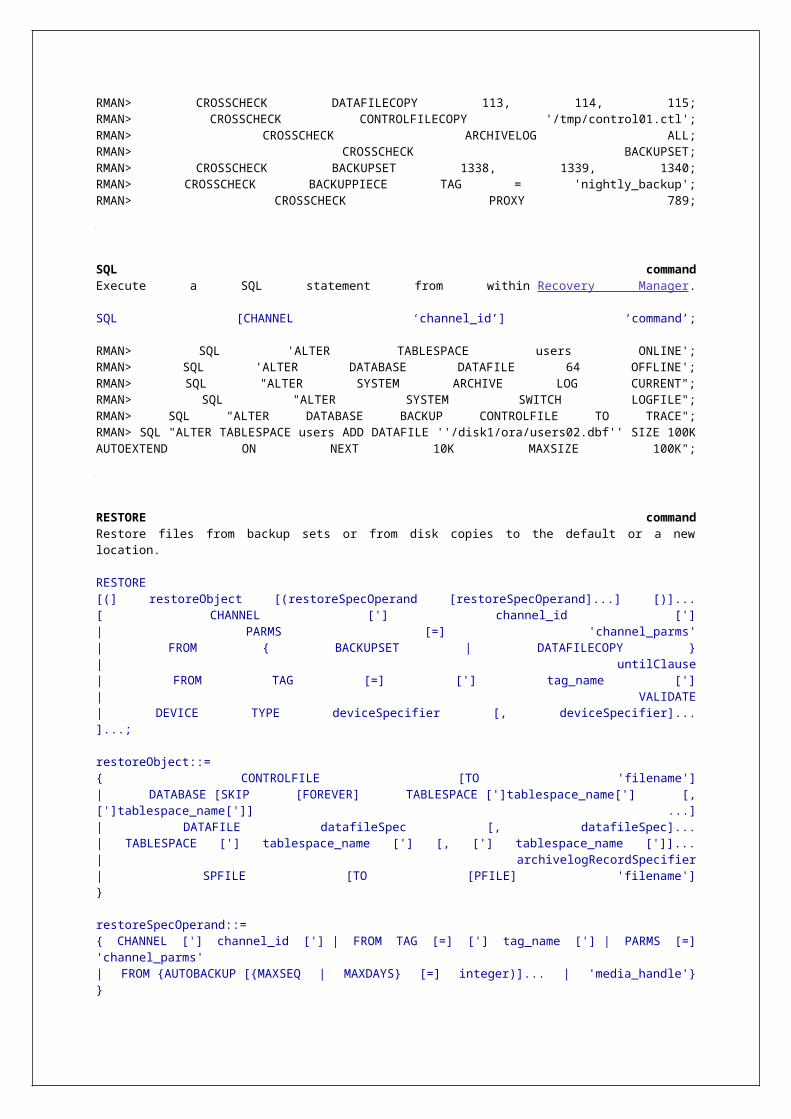
The default location for the password file is:$ORACLE_HOME/dbs/orapw$ORACLE_SID on Unix, %ORACLE_HOME%\database\PWD%ORACLE_SID%.ora on Windows.
REMOTE_LOGIN_PASSWORDFILEThe init parameter REMOTE_LOGIN_PASSWORDFILE specifies if a password file is used to authenticate the Oracle DBA or not. If it set either to SHARED or EXCLUSIVE, password file will be used.
REMOTE_LOGIN_PASSWORDFILE is a static initialization parameter and therefore cannot be changed without bouncing the database.
Following are the valid values for REMOTE_LOGIN_PASSWORDFILE:
NONE - Oracle ignores the password file if it exists i.e. no privileged connections are allowed over non secure connections. If REMOTE_LOGIN_PASSWORDFILE is set to EXCLUSIVE or SHARED and the password file is missing, this is equivalent to setting REMOTE_LOGIN_PASSWORDFILE to NONE.
EXCLUSIVE (default) - Password file is exclusively used by only one (instance of the) database. Any user can be added to the password file. Only an EXCLUSIVE file can be modified. EXCLUSIVE password file enables you to add, modify, and delete users. It also enables you to change the SYS password with the ALTER USER command.
SHARED - The password file is shared among databases. A SHARED password file can be used by multiple databases running on the same server, or multiple instances of an Oracle Real Application Clusters (RAC) database. However, the only user that can be added/authenticated is SYS.
A SHARED password file cannot be modified i.e. you cannot add users to a SHARED password file.
Any attempt to do so or to change the password of SYS or other users with the SYSDBA or SYSOPER
or SYSASM (this is from Oracle 11g) privileges generates an error. All users needing SYSDBA or
SYSOPER or SYSASM system privileges must be added to the password file when
REMOTE_LOGIN_PASSWORDFILE is set to EXCLUSIVE. After all users are added, you can change
REMOTE_LOGIN_PASSWORDFILE to SHARED.
This option is useful if you are administering multiple databases or a RAC database.
If a password file is SHARED or EXCLUSIVE is also stored in the password file. After its creation, the
state is SHARED. The state can be changed by setting REMOTE_LOGIN_PASSWORDFILE and starting
the database i.e. the database overwrites the state in the password file when it is started up.
ORAPWD
You can create a password file using orapwd utility. For some Operating systems, you can create
this file as part of standard installation.
Users are added to the password file when they are granted the SYSDBA or SYSOPER or SYSASM
privilege.
The Oracle orapwd utility assists the DBA while granting SYSDBA, SYSOPER and SYSASM privileges
to other users. By default, SYS is the only user that has SYSDBA and SYSOPER privileges. Creating
a password file, via orapwd, enables remote users to connect with administrative privileges.
$ orapwd file=password_file_name [password=the_password] [entries=n] [force=Y|N]
[ignorecase=Y|N] [nosysdba=Y|N]
Examples:
$ orapwd file=orapwSID password=sys_password force=y nosysdba=y
$ orapwd file=$ORACLE_HOME/dbs/orapw$ORACLE_SID password=secret
$ orapwd file=orapwprod entries=30 force=y
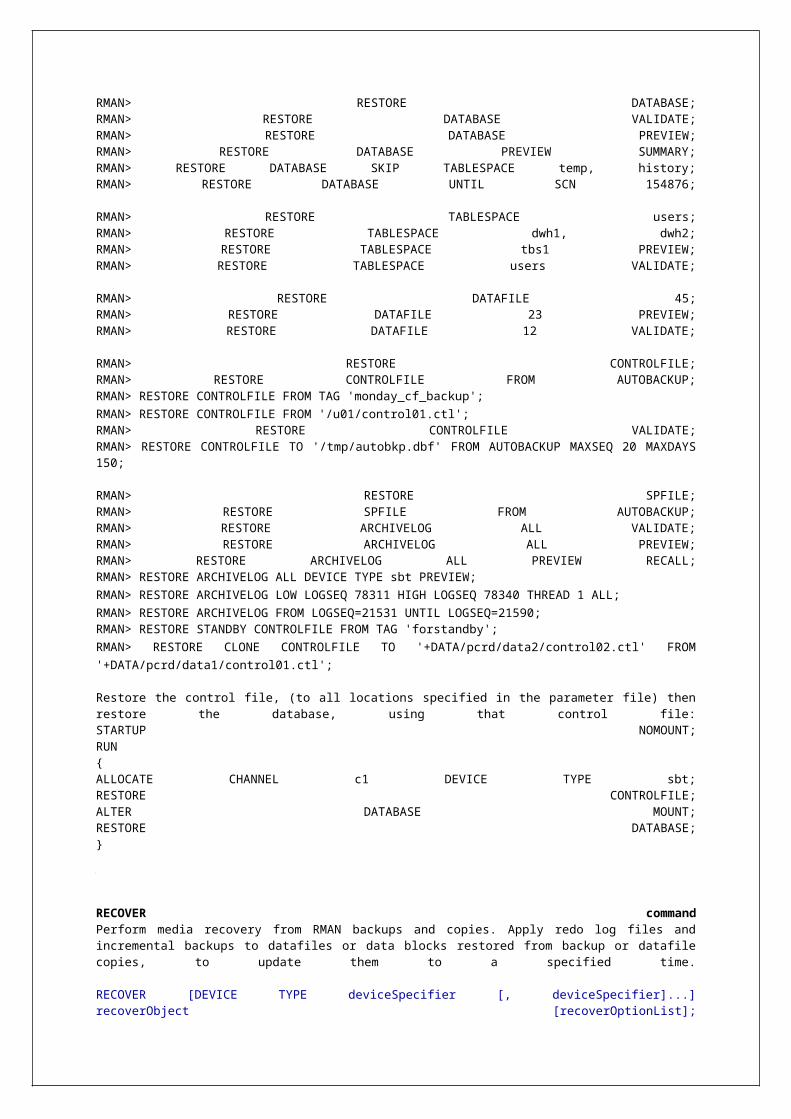
C:\orapwd file=%ORACLE_HOME%\database\PWD%ORACLE_SID%.ora password=2012 entries=20
C:\orapwd file=D:\oracle11g\product\11.1.0\db_1\database\pwdsfs.ora password=id entries=6
force=y
$ orapwd file=orapwPRODB3 password=abc123 entries=10 ignorecase=n
$ orapwd file=orapwprodb password=oracle1 ignorecase=y
There are no spaces permitted around the equal-to (=).
The following describe the orapwd command line arguments.
FILE
Name to assign to the password file, which will hold the password information. You must supply
complete path. If you supply only filename, the file is written to the current directory. The contents
are encrypted and are unreadable. This argument is mandatory.
The filenames allowed for the password file are OS specific. Some operating systems require the
password file to adhere to a specific format and be located in a specific directory. Other operating
systems allow the use of environment variables to specify the name and location of the password
file.
If you are running multiple instances of Oracle Database using Oracle Real Application Clusters
(RAC), the environment variable for each instance should point to the same password file.
It is critically important to secure password file.
PASSWORD
This is the password the privileged users should enter while connecting as SYSDBA or SYSOPER or
SYSASM.
ENTRIES
Entries specify the maximum number of distinct SYSDBA, SYSOPER and SYSASM users that can be
stored in the password file.
This argument specifies the number of entries that you require the password file to accept. The
actual number of allowable entries can be higher than the number of users, because
the orapwd utility continues to assign password entries until an OS block is filled. For example, if
your OS block size is 512 bytes, it holds four password entries. The number of password entries
allocated is always a multiple of four.
Entries can be reused as users are added to and removed from the password file. When you
exceed the allocated number of password entries, you must create a new password file. To avoid
this necessity, allocate a number of entries that is larger than you think you will ever need.
FORCE
(Optional) If Y, permits overwriting an existing password file. An error will be returned if password
file of the same name already exists and this argument is omitted or set to N.
IGNORECASE
(Optional) If Y, passwords are treated as case-insensitive i.e. case is ignored when comparing the
password that the user supplies during login with the password in the password file.
NOSYSDBA
(Optional) For Oracle Data Vault installations.
Granting SYSDBA or SYSOPER or SYSASM privileges
Use the V$PWFILE_USERS view to see the users who have been granted SYSDBA or SYSOPER or
SYSASM system privileges for a database.
SQL> select * from v$pwfile_users;
USERNAME SYSDBA SYSOPER SYSASM
-------- ------ ------- ------
SYS TRUE TRUE FALSE
The columns displayed by the view V$PWFILE_USERS are:
Column Description
USERNAMEThis column contains the name of the user that is recognized by the password file.
SYSDBAIf the value of this column is TRUE, then the user can log on with SYSDBA system privilege.
SYSOPERIf the value of this column is TRUE, then the user can log on with SYSOPER system privilege.
SYSASMIf the value of this column is TRUE, then the user can log on with SYSASM system privilege.
If orapwd has not yet been executed or password file is not available, attempting to grant SYSDBA
or SYSOPER or SYSASM privileges will result in the following error:
SQL> grant sysdba to satya;
ORA-01994: GRANT failed: cannot add users to public password file
If your server is using an EXCLUSIVE password file, use the GRANT statement to grant the SYSDBA
or SYSOPER or SYSASM system privilege to a user, as shown in the following example:
SQL> grant sysdba to satya;
SQL> select * from v$pwfile_users;
USERNAME SYSDBA SYSOPER SYSASM
-------- ------ ------- ------
SYS TRUE TRUE FALSE
SATYA TRUE FALSE FALSE
SQL> grant sysoper to satya;
SQL> select * from v$pwfile_users;
USERNAME SYSDBA SYSOPER SYSASM
-------- ------ ------- ------
SYS TRUE TRUE FALSE
SATYA TRUE TRUE FALSE
SQL> grant sysasm to satya;
SQL> select * from v$pwfile_users;
USERNAME SYSDBA SYSOPER SYSASM
-------- ------ ------- ------
SYS TRUE TRUE FALSE
SATYA TRUE TRUE TRUE
When you grant SYSDBA or SYSOPER or SYSASM privileges to a user, that user's name and
privilege information are added to the password file. If the server does not have an EXCLUSIVE
password file (i.e. if the initialization parameter REMOTE_LOGIN_PASSWORDFILE is NONE or
SHARED, or the password file is missing), Oracle issues an error if you attempt to grant these
privileges.
Use the REVOKE statement to revoke the SYSDBA or SYSOPER or SYSASM system privilege from a
user, as shown in the following example:
SQL> revoke sysoper from satya;
SQL> select * from v$pwfile_users;
USERNAME SYSDBA SYSOPER SYSASM
-------- ------ ------- ------
SYS TRUE TRUE FALSE
SATYA TRUE FALSE TRUE
A user's name remains in the password file only as long as that user has at least one of these three
privileges. If you revoke all 3 privileges, Oracle removes the user from the password file.
Because SYSDBA, SYSOPER and SYSASM are the most powerful database privileges, the WITH
ADMIN OPTION is not used in the GRANT statement. That is, the grantee cannot in turn grant the
SYSDBA or SYSOPER or SYSASM privilege to another user. Only a user currently connected as
SYSDBA can grant or revoke another user's SYSDBA or SYSOPER or SYSASM system privileges.
These privileges cannot be granted to roles, because roles are available only after database
startup.
If you receive the file full error (ORA-01996) when you try to grant SYSDBA or SYSOPER or SYSASM
system privileges to a user, you must create a larger password file and regrant the privileges to the
users.
Removing Password File
If you determine that you no longer require a password file to authenticate users, you can delete
the password file and then optionally reset the REMOTE_LOGIN_PASSWORDFILE initialization
parameter to NONE. After you remove this file, only those users who can be authenticated by the
OS can perform SYSDBA or SYSOPER or SYSASM database administration operations.
ADRCI Commands in OracleADRCI CommandsAutomatic Diagnostic Repository (ADR) Command Interpreter, from Oracle 11g
$ adrci [-HELP] [SCRIPT=script_filename] [EXEC="command [;command;...]"]$ adrci -help$ adrci script=adrci_script.adi$ adrci script=env.adrci$ adrci exec="show alert"$ adrci exec="show home; export incident -p "incident_id>120""$ adrci exec="dde show available actions; show tracefile"$ adrci exec="begin backup; cp -R log /tmp; end backup"
$ adrciadrci> HELP [COMMAND]
adrci> help
HELP [topic]Available Topics:CREATE REPORTECHOEXITHELPHOSTIPSPURGERUNSET BASESET BROWSERSET CONTROLSET ECHOSET EDITORSET HOMES | HOME | HOMEPATHSET TERMOUTSHOW ALERTSHOW BASESHOW CONTROLSHOW HM_RUNSHOW HOMES | HOME | HOMEPATHSHOW INCDIRSHOW INCIDENTSHOW PROBLEMSHOW REPORTSHOW TRACEFILESPOOLadrci> help set browseradrci> help ips get remote keysadrci> help merge fileadrci> help register incident file
adrci> CREATE REPORT report_type report_idadrci> create report hm_run hm_run_6HM - Health Monitor
adrci> ECHO quoted_stringadrci> echo "Hello world"
adrci> EXITadrci> exit
adrci> QUITadrci> quitadrci> HOST ["host_command_string"]adrci> hostadrci> host "ls -l *.sh"adrci> host "vi tailalert.adrci"
Incident Packaging Service (IPS)
adrci> help ips
HELP IPS [topic]
Available Topics:
ADD
ADD FILE
ADD NEW INCIDENTS
CHECK REMOTE KEYS
COPY IN FILE
COPY OUT FILE
CREATE PACKAGE
DELETE PACKAGE
FINALIZE PACKAGE
GENERATE PACKAGE
GET MANIFEST
GET METADATA
GET REMOTE KEYS
PACK
REMOVE
REMOVE FILE
SET CONFIGURATION
SHOW CONFIGURATION
SHOW FILES
SHOW INCIDENTS
SHOW PACKAGE
UNPACK FILE
UNPACK PACKAGE
USE REMOTE KEYS
adrci> IPS ADD [INCIDENT inc_id | PROBLEM prob_id | PROBLEMKEY problem_key | SECONDS secs | TIME start_time TO end_time] PACKAGE pkg_idadrci> ips add incident 22 package 33adrci> ips add problem 3 package 1adrci> ips add seconds 60 package 9adrci> ips add time '2011-10-01 10:00:00.00 -07:00' to '2011-10-01 23:00:00.00 -07:00' package 7
adrci> IPS ADD FILE filespec PACKAGE package_idadrci> ips add file /u01/app/oracle/diag/rdbms/orcl/orcl/trace/alert_orcl.log package 99
adrci> IPS ADD NEW INCIDENTS PACKAGE package_idadrci> ips add new incidents package 321
adrci> IPS CHECK REMOTE KEYS FILE file_spec
adrci> ips check remote keys file /tmp/key_file.txt
adrci> IPS COPY IN FILE filename [TO new_name][OVERWRITE] PACKAGE pkgid [INCIDENT incid]adrci> ips copy in file /home/sona/trace/orcl_ora_63175.trc to ADR_HOME/trace/orcl_ora_63175.trc package 11 incident 6
adrci> ips copy in file /tmp/key_file.txt to new_file.txt overwrite package 12
adrci> IPS COPY OUT FILE source TO target [OVERWRITE]adrci> ips copy out file ADR_HOME/trace/orcl_ora_63175.trc to /home/sona/trace/orcl_ora_63175.trc
adrci> ips copy out file ADR_HOME/trace/orcl_ora_11595.trc to /tmp/orcl_ora_11595.trc overwrite
adrci> IPS CREATE PACKAGE [INCIDENT inc_id | PROBLEM problem_id | PROBLEMKEY problem_key | SECONDS secs | TIME start_time TO end_time} [CORRELATE BASIC|TYPICAL|ALL]adrci> ips create package adrci> ips create package incident 111adrci> ips create package incident 222 correlate basicadrci> ips create package problem 6adrci> ips create package problemkey '?'adrci> ips create package problemkey "?"adrci> ips create package seconds 333adrci> ips create package seconds 444 correlate alladrci> ips create package time '2011-10-01 00:00:00 -05:30' to '2011-10-02 23.59.59 -05:30'
adrci> IPS DELETE PACKAGE pkg_idadrci> ips delete package 22
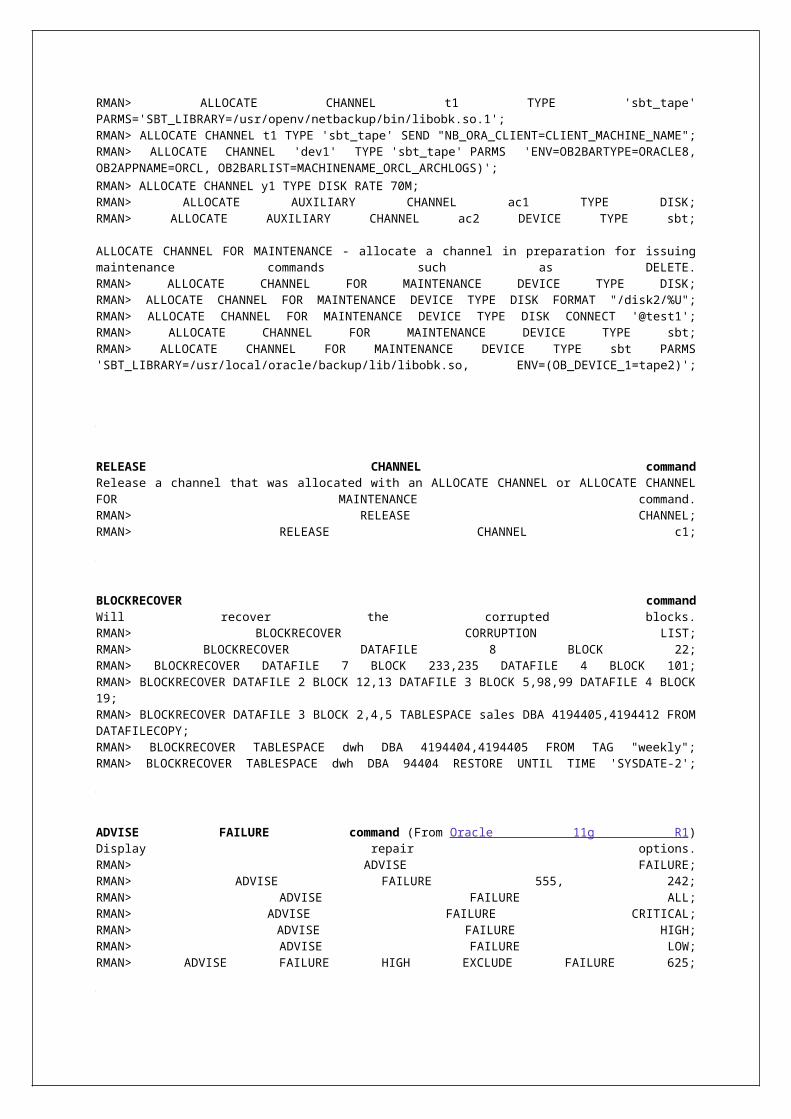
adrci> IPS FINALIZE PACKAGE pkg_idadrci> ips finalize package 33
adrci> IPS GENERATE PACKAGE pkg_id [IN location] [COMPLETE|INCREMENTAL]adrci> ips generate package 4 in /tmpadrci> ips generate package 14 incremental
adrci> ips generate package 345 complete
adrci> IPS GET MANIFEST FROM FILE filenameadrci> ips get manifest from file /home/satya/ORA603_20101006235311_INC_1.zip
adrci> IPS GET METADATA [FROM FILE filename | FROM ADR]adrci> ips get metadata from file /home/satya/ORA600_20101006135346_COM_1.zipadrci> ips get metadata from adr
adrci> IPS GET REMOTE KEYS FILE file_spec PACKAGE package_id
adrci> ips get remote keys file /tmp/key_file.txt package 12
adrci> IPS PACK [INCIDENT inc_id | PROBLEM prob_id | PROBLEMKEY prob_key | SECONDS secs | TIME start_time TO end_time] [CORRELATE {BASIC|TYPICAL|ALL}] [IN path]adrci> ips packadrci> ips pack incident 41
adrci> ips pack incident 24001 in /tmp
adrci> ips pack problem 5
adrci> ips pack problemkey ORA 4031
adrci> ips pack seconds 60 correlate all
adrci> ips pack time '2011-12-31 23:59:59.00 -07:00' to '2012-01-01 01:01:01.00 -07:00';
adrci> IPS REMOVE [INCIDENT inc_id | PROBLEM prob_id | PROBLEMKEY prob_key] PACKAGE pkg_id
adrci> ips remove incident 2 package 7
adrci> ips remove problem 4 package 8
adrci> IPS REMOVE FILE file_name PACKAGE pkg_id
adrci> ips remove file ADR_HOME/trace/orcl_ora_3579.trc package 4
adrci> IPS SET CONFIGURATION parameter_id value (parameter_id = 1 to 23)
adrci> ips set configuration 4 8
adrci> IPS SHOW CONFIGURATION [parameter_id] (parameter_id = 1 to 23)
adrci> ips show configuration
adrci> ips show configuration 21
adrci> IPS SHOW FILES PACKAGE pkg_id
adrci> ips show files package 9
adrci> IPS SHOW INCIDENTS PACKAGE package_id
adrci> ips show incidents package 333
adrci> IPS SHOW PACKAGE [package_id] [BASIC | BRIEF | DETAIL]
adrci> ips show package
adrci> ips show package 12 detail
adrci> ips show package 999 basic
adrci> IPS UNPACK FILE file_name [INTO path]
adrci> ips unpack file /home/oracle/ORA4030_20111008145306_COM_1.zip into /tmp/newadr
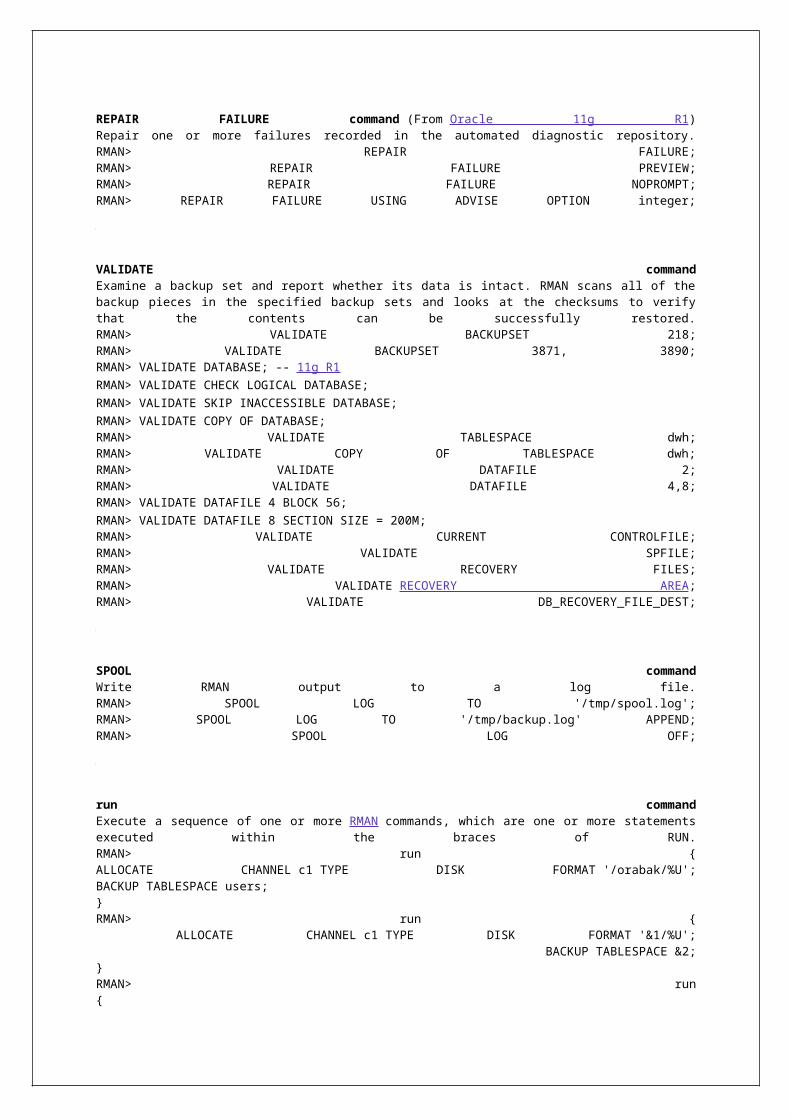
unpack file /home/oracle/ORA4030_20111008145306_INC_1.zip
adrci> IPS UNPACK PACKAGE pkg_name [INTO path]
adrci> ips unpack package IPSPKG_20111029010503 into /tmp/newadr
adrci> IPS USE REMOTE KEYS FILE file_spec PACKAGE package_id
adrci> ips use remote keys file /tmp/key_file.txt package 12
adrci> PURGE [[-i id1 | start_id end_id] | [-age mins [-type ALERT|INCIDENT|TRACE|CDUMP|HM|UTSCDMP]adrci> purgeadrci> purge -i 123 456adrci> purge -age 600 -type incidentadrci> purge –age 720 –type alert
adrci> RUN script_name@script_name@@script_nameadrci> run adrscr9adrci> run adrscr.adiadrci> @adr.scr
adrci> SET BASE base_string | -product product_nameadrci> set base /u01/app/oracle/product
adrci> set base .
adrci> set base -product client
adrci> set base -product adrci
adrci> SET BROWSER browser_programadrci> set browser firefoxadrci> set browser mozilla
adrci> SET CONTROL (SHORTP_POLICY = [720|value] | LONGP_POLICY = [8760|value])adrci> set control (SHORTP_POLICY = 360)adrci> set control (LONGP_POLICY = 4380)
adrci> SET ECHO ON|OFFadrci> set echo onadrci> set echo off
adrci> SET EDITOR editor_program (default editor is vi)adrci> set editor viadrci> set editor xemacs
adrci> SET HOME home_locationadrci> set home diag\rdbms\orabase\orabase
adrci> SET HOMES home_location1, home_location2 [, ...]adrci> set homes diag\rdbms\orabase\orabase, diag\tnslsnr\testdb\listener
adrci> SET HOMEPATH homepath_str1 [homepath_str2] [...]adrci> set homepath diag\dbms\orabase\orabaseadrci> set homepath diag/rdbms/orcl/orcl4adrci> set homepath diag/rdbms/dwh3/dwh31 diag/rdbms/dwh3/dwh32
adrci> SET TERMOUT ON|OFFadrci> set termout onadrci> set termout off
adrci> SHOW ALERT [-p predicate_string] [-term] [[-tail [num] [-f]] | [-file alert_file_name]]
The fields in the predicate are the fields:
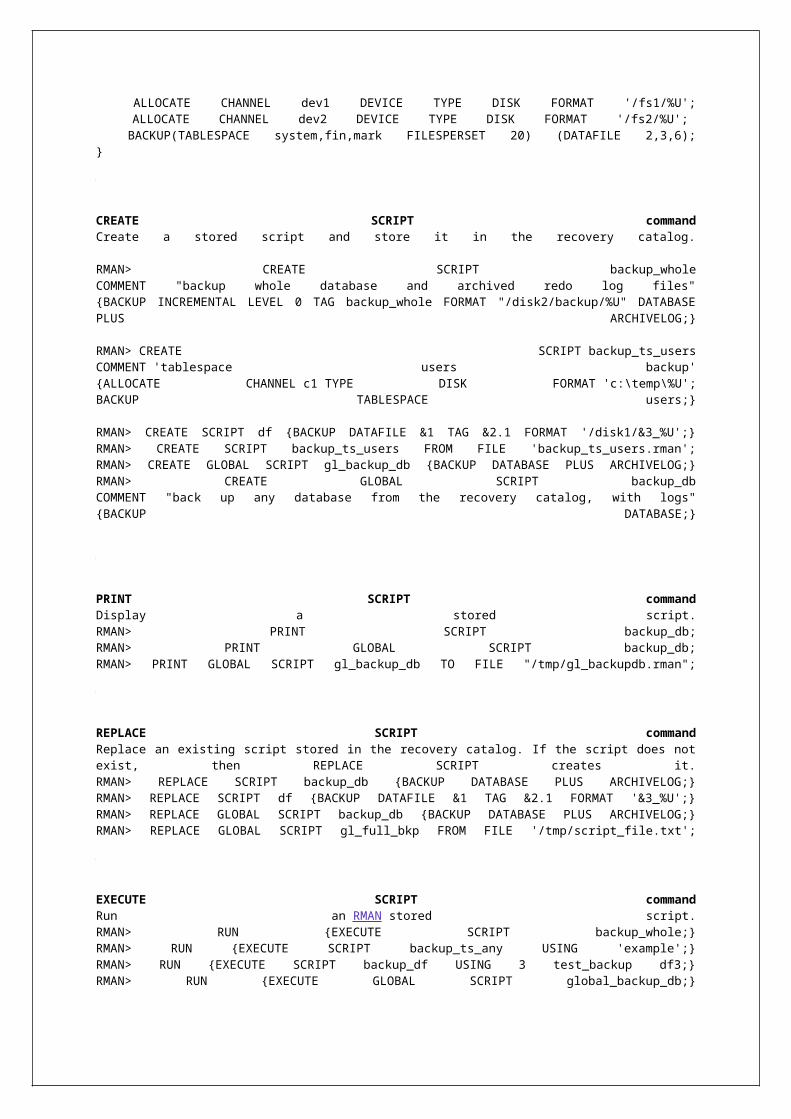
ORIGINATING_TIMESTAMP timestamp
NORMALIZED_TIMESTAMP timestamp
ORGANIZATION_ID text(65)
COMPONENT_ID text(65)
HOST_ID text(65)
HOST_ADDRESS text(17)
MESSAGE_TYPE number
MESSAGE_LEVEL number
MESSAGE_ID text(65)
MESSAGE_GROUP text(65)
CLIENT_ID text(65)
MODULE_ID text(65)
PROCESS_ID text(33)
THREAD_ID text(65)
USER_ID text(65)
INSTANCE_ID text(65)
DETAILED_LOCATION text(161)
UPSTREAM_COMP_ID text(101)
DOWNSTREAM_COMP_ID text(101)
EXECUTION_CONTEXT_ID text(101)
EXECUTION_CONTEXT_SEQUENCE number
ERROR_INSTANCE_ID number
ERROR_INSTANCE_SEQUENCE number
MESSAGE_TEXT text(2049)
MESSAGE_ARGUMENTS text(129)
SUPPLEMENTAL_ATTRIBUTES text(129)
SUPPLEMENTAL_DETAILS text(129)
PROBLEM_KEY text(65)adrci> show alert -- it will open alert in vi editoradrci> show alert -tail -- like Unix command tail adrci> show alert -tail 200 -- like Unix command tail -200adrci> show alert -tail -f -- like Unix command tail –fadrci> show alert -tail 20 -fadrci> show alert -termadrci> show alert -P "MESSAGE_TEXT LIKE '%ORA-%'"-- To list all the "ORA-" errors
adrci> SHOW BASE [-product product_name]adrci> show baseadrci> show base -product clientadrci> show base -product adrci
adrci> SHOW CONTROLadrci> show control
adrci> SHOW HM_RUN [-p predicate_string]
The fields can appear in the predicate are:
RUN_ID number
RUN_NAME text(31)
CHECK_NAME text(31)
NAME_ID number
MODE number
START_TIME timestamp
RESUME_TIME timestamp
END_TIME timestamp
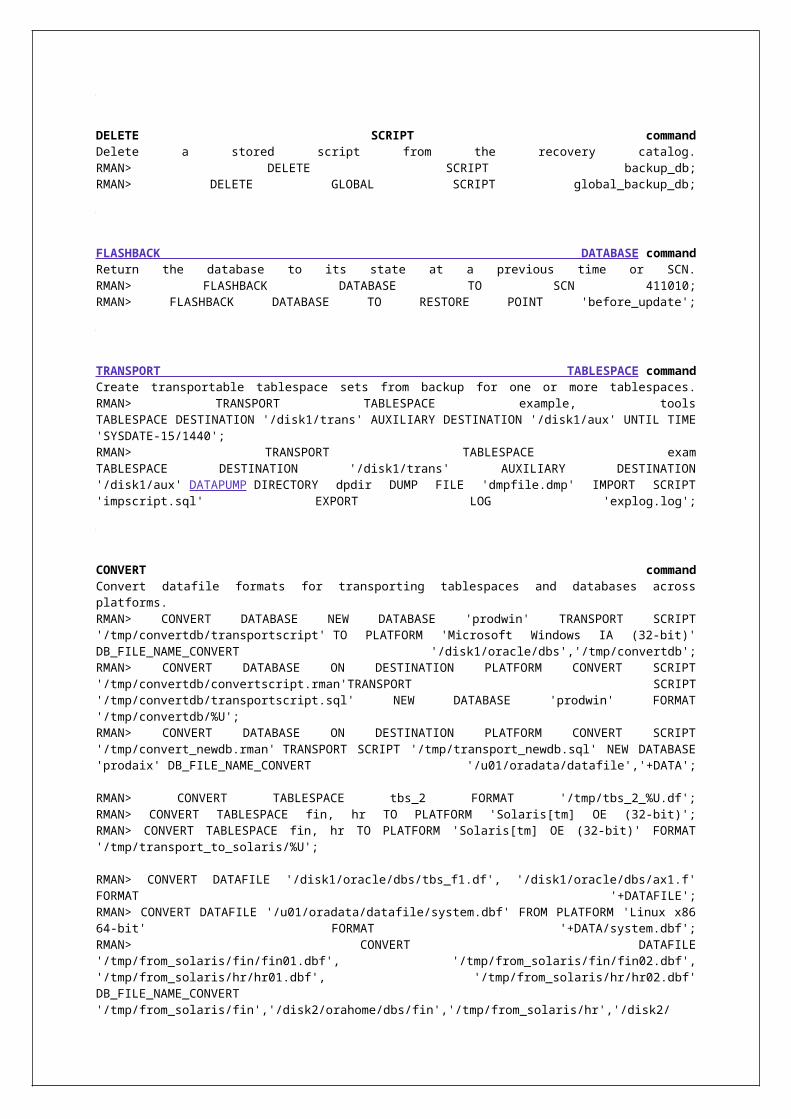
MODIFIED_TIME timestamp
TIMEOUT number
FLAGS number
STATUS number
SRC_INCIDENT_ID number
NUM_INCIDENTS number
ERR_NUMBER number
REPORT_FILE bfileadrci> show hm_runadrci> show hm_run -p "run_id=293"
adrci> SHOW HOMEadrci> show home
adrci> SHOW HOMES [-ALL | -base base_str | homepath_str1 ... ]adrci> show homes
adrci> show homes -all
adrci> show homes -base /temp
adrci> show homes rdbms
adrci> SHOW HOMEPATHadrci> show homepath
adrci> SHOW INCDIR [id | id_low id_high]adrci> show incdiradrci> show incdir 317adrci> show incdir 3801 3804
adrci> SHOW INCIDENT [-p predicate_string] [-mode BASIC|BRIEF|DETAIL] [-last50|num|-all] [-orderby (field1, field2, ...) [ASC|DSC]]adrci> show incidentadrci> show incident -mode briefadrci> show incident -mode basic -p "incident_id=905"adrci> show incident -mode detailadrci> show incident -mode detail -p "incident_id=33"adrci> show incident -p "CREATE_TIME > '2011-09-18 21:35:25.012579 +00:00'"
adrci> show incident -p "problem_key='ORA 600 [ksmnfy2]'"
adrci> show incident -p "problem_key='ORA 700 [kfnReleaseASM1]'" -mode basic -last -all
adrci> SHOW PROBLEM [-p predicate_string] [-last 50|num|-all] [-orderby (field1, field2, ...) [ASC|DSC]]
The field names that users can specify in the predicate are:
PROBLEM_ID number
PROBLEM_KEY text(550)
FIRST_INCIDENT number
FIRSTINC_TIME timestamp
LAST_INCIDENT number
LASTINC_TIME timestamp
IMPACT1 number
IMPACT2 number
IMPACT3 number
IMPACT4 number
SERVICE_REQUEST text(64)
BUG_NUMBER text(64)adrci> show problemadrci> show problem -alladrci> show problem -p "problem_id=44"
adrci> show problem -p "problem_key='ORA 600 [krfw_switch_4]'"
adrci> SHOW REPORT report_type run_nameadrci> show report hm_run hm_run_9
adrci> SHOW TRACEFILE [file1 file2 ...] [-rt | -t] [-i inc1 inc2 ...] [-path path1 path2 ...]
adrci> show tracefileadrci> show tracefile -tadrci> show tracefile -rtadrci> show tracefile %pmon%adrci> show tracefile alert%logadrci> show tracefile %mmon% -rtadrci> show tracefile %smon% -path /home/satya/tempadrci> show tracefile -i 916adrci> show tracefile -i 1 4 -path diag/rdbms/orabase/orabase
adrci> SPOOL full_file_name [APPEND|OFF]adrci> spool c:\dwh\alrt.txtadrci> spool /home/satya/myalert.logadrci> spool myfile.ado appendadrci> spool off -- Turn off the spooling
adrci> spool -- Check the current spooling status
adrci> HELP EXTENDED
adrci> help extended
HELP [topic]
Available Topics:
BEGIN BACKUP
CD
CREATE STAGING XMLSCHEMA
CREATE VIEW
DDE
DEFINE
DELETE
DESCRIBE
DROP VIEW
END BACKUP
INSERT
LIST DEFINE
MERGE ALERT
MERGE FILE
MIGRATE
QUERY
REPAIR
SELECT
SET COLUMN
SHOW CATALOG
SHOW DUMP
SHOW SECTION
SHOW TRACE
SHOW TRACEMAP
SWEEP
UNDEFINE
UPDATE
VIEW
adrci> BEGIN BACKUP
adrci> begin backup
adrci> CREATE STAGING XMLSCHEMA [arguments]
adrci> create staging xmlschema
adrci> CREATE [OR REPLACE] [PUBLIC | PRIVATE] VIEW viewname [(alias)] AS select_stmt
adrci> create view my_incident as select incident_id from incident
Diagnostic Data Extractor (DDE)
adrci> help DDE
HELP DDE [topic]
Available Topics:
CREATE INCIDENT
EXECUTE ACTION
SET INCIDENT
SET PARAMETER
SHOW ACTIONS
SHOW AVAILABLE ACTIONS
adrci> DDE CREATE INCIDENT TYPE type
adrci> dde create incident type wrong_results
adrci> DDE EXECUTE ACTION [INCIDENT incident_id] ACTIONNAME action_name INVOCATION
invocation_id
adrci> dde execute action incident 12 actionname LSNRCTL_STATUS invocation 1
adrci> dde execute action actionname LSNRCTL_STATUS invocation 1
adrci> DDE SET INCIDENT incident_id
adrci> dde set incident 867
adrci> DDE SET PARAMETER value [INCIDENT incident_id] ACTIONNAME action_name INVOCATION
invocation_id POSITION position
adrci> dde set parameter incident 12 actionname LSNRCTL_STATUS invocation 1 position 1 service
adrci> DDE SHOW ACTIONS [INCIDENT incident_id]
adrci> dde show actions
adrci> dde show actions incident 222
adrci> DDE SHOW AVAILABLE ACTIONS
adrci> dde show available actions
adrci> DEFINE variable_name variable_value
adrci> define spool_file 'my_spool_file'
adrci> define alertLog "alert_prod.log"
adrci> DELETE FROM relation [WHERE predicate_string]
adrci> delete from incident where "incident_id > 99"
adrci> DESCRIBE relation_name [-SURROGATE] [-HOMEPATH homepath_str]
adrci> describe incident
adrci> describe problem -surrogate
adrci> describe hm_run
adrci> describe DDE_USER_INCIDENT_TYPE
adrci> describe DDE_USER_ACTION
adrci> DROP VIEW viewname
adrci> drop view my_incident
adrci> END BACKUP
adrci> end backup
adrci> INSERT INTO relation (field_list) VALUES (values_list)
adrci> insert into incident(create_time) values (systimestamp)
adrci> LIST DEFINE
adrci> list define
adrci> MERGE ALERT [(projection_list)] [-t ref_time_str beg_sec end_sec] [-tdiff|-tfull] [-term] [-
plain]
adrci> merge alert
adrci> merge alert (fct ti)
adrci> merge alert -tfull -term
adrci> merge alert -t "2012-05-25 09:50:20.442132 -05:30" 10 10 -term
adrci> MERGE FILE [(projection_list)] [file1 file2 ...] [-t ref_time_str beg_sec end_sec | -i incid
[beg_sec end_sec]] [-tdiff|-tfull] [-alert] [-insert_incident] [-term] [-plain]
adrci> merge file (pid fct) orcl_m000_8544.trc -alert -term
adrci> merge file -i 1 -alert -tfull
adrci> merge file orcl_m000_8544.trc -i 1 600 10 -alert
adrci> merge file -t "2012-04-25 22:32:40.442132 -05:30" 10 10 -term
adrci> MIGRATE [RELATION name | SCHEMA] [-DOWNGRADE | -RECOVER]
adrci> migrate schema
adrci> migrate relation incident
adrci> migrate relation hm_run -recover
adrci> migrate relation problem -downgrade
adrci> QUERY [(field1, field2, ...)] relation_name [-p predicate_string] [-orderby (field1, field2, ...)
[ASC|DSC]]
adrci> query (incident_id, create_time) incident -p "incident_id > 111"
adrci> query (problem_key) problem -p "PROBLEM_KEY like '%700%'"
adrci> REPAIR [RELATION | SCHEMA] name
adrci> repair relation incident
adrci> repair relation hm_run
adrci> SELECT [* | field1, ...] FROM relation_name [WHERE predicate_string] [ORDER BY field1, ...
[ASC|DSC|DESC]] [GROUP BY field1, ... ] [HAVING having_predicate]
adrci> select incident_id, create_time from incident where "incident_id > 90"

adrci> select * from problem where "PROBLEM_KEY like '%7445%'"
adrci> SET COLUMN TEXT num
adrci> set column text 32
adrci> SHOW CATALOG
adrci> show catalog
adrci> SHOW DUMP dump_name [(projection_list)] <[file1 file2 ...] | [[file1 file2 ...] -i inc1 inc2 ...] |
[[file1 file2 ...] -path path1 path2 ...]> [-plain] [-term]
adrci> show dump error_stack orcl_ora_27483.trc
adrci> SHOW SECTION section_name [(projection_list)] <[file1 file2 ...] | [[file1 file2 ...] -i inc1
inc2 ...] | [[file1 file2 ...] -path path1 path2 ...]> [-plain] [-term]
adrci> show section sql_exec orcl_ora_27483.trc
adrci> SHOW TRACE [(projection_list)] <[file1 file2 ...] | [[file1 file2 ...] -i inc1 inc2 ...] | [[file1
file2 ...] -path path1 path2 ...]> [-plain] [-xp "path_pred_string"] [-xr display_path] [-term]
adrci> show trace (co, fi, li) orcl_ora_27483.trc
adrci> show trace (id, co) -i 145 152
adrci> show trace orcl_ora_27483.trc -xp "/dump[nm='Data block']" -xr /*
adrci> show trace alert_dwh.log
adrci> show trace ~alertLog
adrci> SHOW TRACEMAP [(projection_list)] <[file1 file2 ...] | [[file1 file2 ...] -i inc1 inc2 ...] | [[file1
file2 ...] -path path1 path2 ...]> [-level level_num] [-xp "path_pred_string"] [-term]
adrci> show tracemap (nm)
adrci> show tracemap (co, nm) orcl_ora_27483.trc
adrci> show tracemap -level 3 -i 145 152
adrci> show tracemap orcl_ora_27483.trc -xp "/dump[nm='Data block']"
adrci> SWEEP ALL | id1 | id1 id2 | -RESWEEP -FORCE
adrci> sweep all
adrci> sweep 123
adrci> sweep 41 100
adrci> sweep 91 200 -resweep
adrci> sweep 16 600 -force
adrci> UNDEFINE variable_name
adrci> undefine spool_file
adrci> undefine alertLog
adrci> UPDATE relation SET {field1=val, ... } [WHERE predicate_string]
adrci> update incident set create_time = systimestamp where "incident_id > 6"
adrci> VIEW file1 file2 ...
adrci> view foo.trc foo1.trc
adrci> view alert.log
adrci> HELP HIDDEN
adrci> help hidden
HELP [topic]
Available Topics:
CREATE HOME
CREATE INCIDENT
REGISTER INCIDENT FILE
adrci> CREATE HOME keyname=key_value [keyname=key_value ...]adrci> create home base=/tmp product_type=rdbms product_id=prod1 instance_id=inst1
Mandatory parameters are "BASE", "PRODUCT_TYPE", "PRODUCT_ID", and "INSTANCE_ID".
adrci> CREATE INCIDENT keyname=key_value [keyname=key_value ...]
adrci> create incident problem_key="ORA-00600: [Memory corruption]" error_facility=ORA
error_number=600 error_message="ORA-00600: [Memory corruption]"
Mandatory keynames are "PROBLEM_KEY", "ERROR_FACILITY", "ERROR_NUMBER",
"ERROR_MESSAGE".
adrci> REGISTER INCIDENT FILE keyname=key_value [keyname=key_value ...]adrci> register incident file filename=ora_pmon_12345.trc incident_id=1
"FILENAME" and "INCIDENT_ID" are mandatory keys.
adrci> EXPORT relation_name [-p predicate_string] [-file filename] [-overwrite] [-dir]adrci> export incidentadrci> export incident -p “incident_id>80″
adrci> export problem -p "problem_id>123" -overwrite
adrci> export hm_run -p "run_id-456" -file hm_run_456.exp
adrci> IMPORT file_name [-dir dir_name]adrci> import incident_99.imp
adrci> import hm_run_456.exp -dir diag/clients/user_oracle/host
Automatic Storage Management
Oracle Database 10g Release 1, introduced Automatic Storage Management(ASM), a new framework for managing Oracle database files,to bypass the OS overhead,to simplify Oracle data management,to enforce the SAME (Stripe And Mirror Everywhere, RAID10), andto provide a platform for file sharing in RAC and Grid computing.
Automatic Storage Management (ASM) is a new type of file system. ASM provided a foundation for highly efficient storage management with kernelized asynchronous I/O, direct I/O, redundancy, striping, and an easy way to manage storage. ASM is recommended file system for RAC and single instance ASM for storing database files. This provides direct I/O to the file and performance is comparable with that provided by raw devices. Oracle creates a separate instance for this purpose.
ASM includes volume management functionality similar to that of a generic logical volume manager. Automatic Storage Management (ASM) will take physical disk partitions and manages their contents in a way that efficiently supports the files needed to create an Oracle database.
Automatic Storage Management (ASM) simplifies administration of Oracle related files by allowing the administrator to reference diskgroups rather than hundreds of individual disks and files, which are managed by ASM. The ASM functionality is an extension of the Oracle Managed Files (OMF) functionality that also includes striping and mirroring to provide balanced and secure storage. The ASM functionality can be used in combination with existing raw and cooked file systems, along with OMF and manually managed files.
Before ASM, there were only two choices: file system storage and raw disk storage. File system storage is flexible, allowing the DBA to see the individual files and to move them, copy them, and
back them up easily, but it also incurs overhead. Raw disk storage has no file directories on it, and Oracle manages its blocks directly, which makes it more efficient. Raw disk storage is such a manageability nightmare that few DBAs use it.
ASM is the middle ground. It's raw disk storage managed by Oracle, and it is very efficient. Oracle uses a scaled down Oracle instance to simulate a file structure on it where none exists, by recording all the metadata. The metadata enables the Recovery Manager (RMAN) to backup and restore Oracle files easily within it.
Setting up storage takes a significant amount of time during most database installations. Zeroing on a specific disk configuration from among the multiple possibilities requires careful planning and analysis, and most important, intimate knowledge of storage technology, volume managers, and file systems. The design tasks at this stage can be loosely described as follows:
1. Confirm that storage is recognized at the OS level and determine the level of redundancy protection that might already be provided (hardware RAID, called external redundancy in ASM).
2. Assemble and build logical volume groups and determine if striping or mirroring is also necessary.
3. Build a file system on the logical volumes created by the logical volume manager.
4. Set the ownership and privileges so that the Oracle process can open, read, and write to the devices.
5. Create a database on that file system while taking care to create special files such as redo logs, temporary tablespaces, and undo tablespaces in non-RAID locations, if possible.
All above tasks, striping, mirroring, logical file system building, are done to serve Oracle database. Oracle database offers some techniques of its own to simplify or enhance the process. Lets DBAs execute many of the above tasks completely within the Oracle framework. Using ASM you can transform a bunch of disks to a highly scalable and performance file system/volume manager using nothing more than what comes with Oracle database software at no extra cost and you don't need to be an expert in disk, volume managers, or file system management.
You can store the following file types in ASM diskgroups:o Datafiles
o Control files
o Online redo logs
o Archive logs
o Flashback logs
o SPFILEs
o RMAN backups
o Temporary datafiles
o Datafile copies
o Disaster recovery configurations
o Change tracking bitmaps
o Datapump dumpsets
In summary, ASM provides the following functionality/features: Manages groups of disks, called diskgroups. Must be careful while choosing disks for a diskgroup.
Manages disk redundancy within a diskgroup.
Provides near-optimal I/O balancing without any manual tuning.
Enables management of database objects without specifying mount points and filenames.
Supports large files.
Replacement for CFS (Cluster File System).
Also useful for Non-RAC databases.
A new instance type - ASM is introduced in 10g.
ASM instance has no data dictionary.
A Disk can be a partial, full or a LUN from the RG.
I/O is spread evenly across all disks of a diskgroup.
Disks can be dynamically added to any diskgroup.
When combined with OMF increases manageability.
ASM cannot maintain empty directories “delete input” has issues, create a dummy directory.
Use of ASM diskgroup is very simple create tablespace.
Enterprise Manager can also be used for administering diskgroups
Only RMAN can be used with ASM.
Introduces three additional Oracle background processes – RBAL, ARBx and ASMB.
o ASMB - This ASMB process is used to provide information to and from cluster synchronization services used by ASM to manage the disk resources. It's also used to update statistics and provide a heart beat mechanism.
o Re-Balance, RBAL - RBAL is the ASM related process that performs rebalancing of disk resources controlled by ASM.
o Actual Rebalance, ARBx - ARBx is configured by ASM_POWER_LIMIT.
ASM instance has it own set of v$views and init.ora parameters.
The advantages of ASM are Disk Addition - Adding a disk is very easy. No downtime is required and file extents are redistributed automatically.
I/O Distribution - I/O is spread over all the available disks automatically, without manual intervention, reducing chances of a hot spot.
Stripe Width - Striping can be fine grained as in redolog files (128K for faster transfer rate) and coarse for datafiles (1MB for transfer of a large number of blocks at one time).
Mirroring - Software mirroring can be set up easily, if hardware mirroring is not available.
Buffering - The ASM file system is not buffered, making it direct I/O capable by design.
Kernelized Asynchronous I/O - There is no special setup necessary to enable kernelized asynchronous I/O, without using raw or third-party file systems such as Veritas Quick I/O.
ASM Instance
The ASM functionality is controlled by an ASM instance. This is a special instance, not a database
where users can create objects, just the memory structures and as such is very small and
lightweight.
With ASM, you don't have to create anything on the OS side; the feature will group a set of physical
disks to a logical entity known as a diskgroup. A diskgroup is analogous to a striped and optionally
mirrored, file system, with important differences: it's not a general-purpose file system for storing
user files and it's not buffered. Diskgroup offers the advantage of direct access to this space as a
raw device, yet provides the convenience and flexibility of a file system. All the metadata about the
disks are stored in the diskgroups themselves, making them as self-describing as possible.
This special ASM instance is similar to other file systems in that it must be running for ASM to work
and can't be modified by the user. One ASM instance can serve number of Oracle databases. ASM
instance and database instances have to be present on same server. Otherwise it will not work.
Logical volume managers typically use a function, such as hashing, to map the logical address of
the blocks to the physical blocks. This computation uses CPU cycles. When a new disk is added,
this typical striping function requires each bit of the entire data set to be relocated. In contrast,
ASM uses this special instance to address the mapping of the file extents to the physical disk
blocks. This design, in addition to being fast in locating the file extents, helps while adding or
removing disks because the locations of file extents need not be coordinated.
You should start the instance up when the server is booted i.e. it should be started before the
database instances, and it should be one of the last things stopped when the server is shutdown.
From11.2.0, we can use ASMCMD to start and stop the ASM instances.
The initialization parameters that are specific to an ASM instance are: INSTANCE_TYPE - Set to ASM. The default is RDBMS.
ASM_DISKGROUPS - The list of diskgroups that should be mounted by an ASM instance during instance startup, or by the ALTER DISKGROUP ALL MOUNT statement. ASM configuration changes are automatically reflected in this parameter.
ASM_DISKSTRING - Specifies a value that can be used to limit the disks considered for discovery. The default value is NULL allowing all suitable disks to be considered. Altering the default value may improve the speed of diskgroup mount time and the speed of adding a disk to a diskgroup. Changing the parameter to a value which prevents the discovery of already mounted disks results in an error.
ASM_POWER_LIMIT -The maximum power for a rebalancing operation on an ASM instance. The valid values range from 1 (default) to 11. The higher the limit the more resources are allocated resulting in faster rebalancing operations. This value is also used as the default when the POWER clause is omitted from a rebalance operation. A value of 0 disables rebalancing.
ASM_PREFERRED_READ_FAILURE_GROUPS - This initialization parameter value (default is NULL) is a comma-delimited list of strings that specifies the failure groups that should be preferentially read by the given instance. This parameter is generally used only for clustered ASM instances and its value can be different on different nodes. This is fromOracle 11g.
DB_UNIQUE_NAME - Specifies a globally unique name for the database. This defaults to +ASM but must be altered if you intend to run multiple ASM instances.
To create an ASM instance first create pfile, init+ASM.ora, in the /tmp directory, containing the
following parameter.
INSTANCE_TYPE = ASM
Next, connect to the ideal instance.
$ export ORACLE_SID=+ASM
SQL> sqlplus "/as sysdba"
Create a spfile using the contents of the init+ASM.ora file.
SQL> CREATE SPFILE FROM PFILE='/tmp/init+ASM.ora';
SQL> startup nomount
ASM instance started
Total System Global Area 130023424 bytes
Fixed Size 2028368 bytes
Variable Size 102829232 bytes
ASM Cache 25165824 bytes
The ASM instance is now ready to use for creating and mounting diskgroups.
Once an ASM instance is present, diskgroups can be used for the following parameters in database
instances (INSTANCE_TYPE=RDBMS) to allow ASM file creation: CONTROL_FILES
DB_CREATE_FILE_DEST
DB_CREATE_ONLINE_LOG_DEST_n
DB_RECOVERY_FILE_DEST
LOG_ARCHIVE_DEST_n
LOG_ARCHIVE_DEST
STANDBY_ARCHIVE_DEST
Startup of ASM Instances
ASM instances are started and stopped in a similar way to normal database instances.
The options for the STARTUP command are: NOMOUNT - Starts the ASM instance without mounting any diskgroups.
MOUNT - Starts the ASM instance and mounts the diskgroups specified by the ASM_DISKGROUPS parameter.
OPEN - ASM instance does not have open stage.
FORCE - Performs a SHUTDOWN ABORT before restarting the ASM instance.
ASMCMD equivalent for this command is startup (11g R2 command).
Shutdown of ASM Instances
The options for the SHUTDOWN command are: NORMAL - The ASM instance waits for all connected ASM instances and SQL sessions to exit then shuts down.
IMMEDIATE - The ASM instance waits for any SQL transactions to complete then shuts down. It doesn't wait for sessions to exit.
TRANSACTIONAL - Same as IMMEDIATE.
ABORT - The ASM instance shuts down instantly.
ASMCMD equivalent for this command is shutdown (11g R2 command).
ASM Diskgroups
The main components of ASM are diskgroups, each of which comprise of several physical disks that
are controlled as a single unit. The physical disks are known as ASM disks, while the files that
reside on the disks are known as ASM files. The locations and names for the files are controlled by
ASM, but user-friendly aliases and directory structures can be defined for ease of reference.
Diskgroup is a terminology used for logical structure which holds the database files. Each diskgroup
consists of disks/raw devices where the files are actually stored. Any ASM file (and it's redundant
copy) is completely contained within a single diskgroup. A diskgroup might contain files belonging
to several databases and a single database can use files from multiple diskgroups.
In the initial release of Oracle 10g, ASM diskgroups were a black box. We had to manipulate ASM
diskgroups with SQL statements while logged in to the special ASM instance that manages the
diskgroups.
In Oracle 10g Release 2, Oracle introduced a new command line tool called ASMCMD that lets you
look inside ASM volumes (which are called diskgroups). Now you can do many tasks from the
command line.
While creating a diskgroup, we have to specify an ASM diskgroup type based on one of the
following three redundancy levels: Normal redundancy - for 2-way mirroring, requiring two failure groups, when ASM allocates an extent for a normal redundancy file, ASM allocates a primary copy and a secondary copy. ASM chooses the disk on which to store the secondary copy in a different failure group other than the primary copy.
High redundancy - for 3-way mirroring, requiring three failure groups, in this case the extent is mirrored across 3 disks.
External redundancy - to not use ASM mirroring. This is used if you are using hardware mirroring or third party redundancy mechanism like RAID, Storage arrays.
ASM is supposed to stripe the data and also mirror the data (if using Normal, High redundancy). So
this can be used as an alternative for RAID (Redundant Array of Inexpensive Disks) 0+1 solutions.
No, we cannot modify the redundancy for diskgroup once it has been created. To alter it we will be
required to create a new diskgroup and move the files to it. This can also be done by restoring full
backup on the new diskgroup.
Failure groups are defined within a diskgroup to support the required level of redundancy, using
normal/high redundancy. They contain the mirrored ASM extents and must be containing different
disks and preferably on separate disk controller.
In addition failure groups and preferred names for disks can be defined in CREATE DISKGROUP
statement. If the NAME clause is omitted the disks are given a system generated name like
"disk_group_1_0001". The FORCE option can be used to move a disk from another diskgroup into
this one.
Creating diskgroups
SQL> CREATE DISKGROUP dg_asm_data NORMAL REDUNDANCY
FAILGROUP failure_group_1 DISK
'/devices/diska1' NAME diska1, '/devices/diska2' NAME diska2,
FAILGROUP failure_group_2 DISK
'/devices/diskb1' NAME diskb1, '/devices/diskb2' NAME diskb2;
For two-way mirroring we would expect a diskgroup to contain two failure groups, so individual files
are written to two locations.
SQL> CREATE DISKGROUP dg_asm_fra HIGH REDUNDANCY
FAILGROUP failure_group_1 DISK
'/devices/diska1' NAME diska1, '/devices/diska2' NAME diska2,
FAILGROUP failure_group_2 DISK
'/devices/diskb1' NAME diskb1, '/devices/diskb2' NAME diskb2,
FAILGROUP failure_group_3 DISK
'/devices/diskc1' NAME diskc1, '/devices/diskc2' NAME diskc2;
For three-way mirroring we would expect a diskgroup to contain three failure groups, so individual
files are written to three locations.
SQL> CREATE DISKGROUP dg_grp1 EXTERNAL REDUNDANCY
DISK '/dev/d1','/dev/d2','/dev/d3','/dev/d4' ... ...;
In the above command, database will create a diskgroup named dg_grp1 with the physical disks
named /dev/d1, /dev/d2, and so on. Instead of giving disks separately, we can also specify disk
names in wildcards in the DISK clause as DISK '/dev/d*'.
We have also specified a clause EXTERNAL REDUNDANCY, which indicates that the failure of a disk
will bring down the diskgroup. This is usually the case when the redundancy is provided by the
hardware, such as mirroring. If there is no hardware based redundancy, the ASM can be set up to
create a special set of disks called failgroup in the diskgroup to provide that redundancy.
SQL> CREATE DISKGROUP dskgrp1 NORMAL REDUNDANCY
FAILGROUP failgrp1 DISK '/dev/d1','/dev/d2',
FAILGROUP failgrp2 DISK '/dev/d3','/dev/d4';
Although it may appear as such, d3 and d4 are not mirrors of d1 and d2. Rather, ASM uses all the
disks to create a fault-tolerant system. For example, a file on the diskgroup might be created in d1
with a copy maintained on d4. A second file may be created on d3 with copy on d2, and so on. That
is, primary copy will be on one failure group and secondary copy will be another (third copy will be
another, for high redundancy).
Failure of a specific disk allows a copy on another disk so that the operation can continue. For
example, you could lose the controller for both disks d1 and d2 and ASM would mirror copies of the
extents across the failure group to maintain data integrity.
SQL> CREATE DISKGROUP dg1 DISK '/dev/raw/*'
ATTRIBUTE 'compatible.rdbms' = '11.1', 'compatible.asm' = '11.1'; (11g R1 command)
SQL> CREATE DISKGROUP dg2 EXTERNAL REDUNDANCY
DISK '/dev/sde1' ATRRIBUTE 'au_size' = '32M'; (11g R1 command)
SQL> CREATE DISKGROUP archdg NORMAL REDUNDANCY
FAILGROUP fg1 DISK
'/devices/diska1','/devices/diska2','/devices/diska3','/devices/diska4'
FAILGROUP fg2 DISK
'/devices/diskb1','/devices/diskb2','/devices/diskb3','/devices/diskb4'
ATTRIBUTE
'au_size'='4M','compatible.asm'='11.2','compatible.rdbms'='11.2','compatible.advm'='11.2';(11g
R2 command)
ASMCMD equivalent for this command is mkdg (11g R2 command).
Listing diskgroups
To find out all the diskgroups:
SQL> SELECT * FROM V$ASM_DISKGROUP;
ASMCMD equivalent for this command is lsdg.
Dropping diskgroups
Diskgroups can be deleted using the DROP DISKGROUP statement.
SQL> DROP DISKGROUP disk_group_1 INCLUDING CONTENTS;
SQL> DROP DISKGROUP disk_group_1 FORCE; (11g R1 command)
SQL> DROP DISKGROUP disk_group_1 FORCE INCLUDING CONTENTS; (11gR1 command)
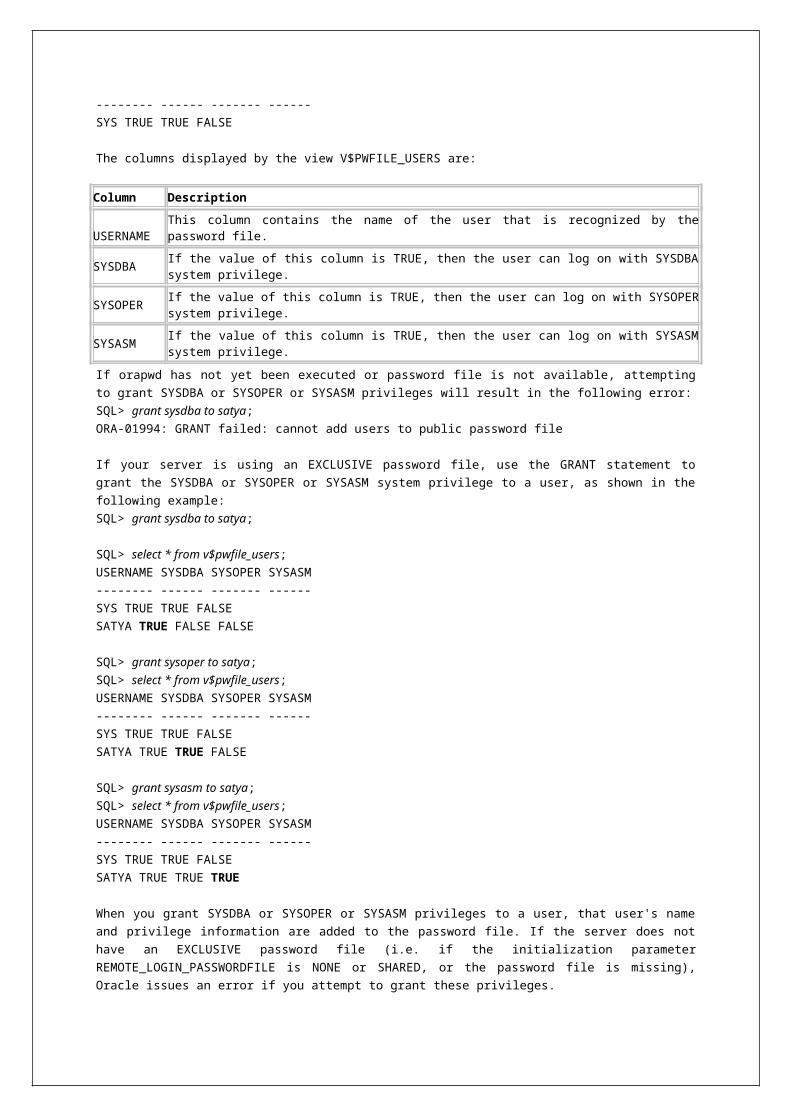
ASMCMD equivalent for this command is dropdg (11g R2 command).
Altering diskgroups
Disks can be added or removed from diskgroups using the ALTER DISKGROUP statement.
Remember that the wildcard "*" can be used to reference disks so long as the resulting string does
not match a disk already used by an existing diskgroup.
Adding disks
We may have to add additional disks into the diskgroup to accommodate growing demand.
SQL> ALTER DISKGROUP dskgrp1 ADD DISK '/dev/d5';
SQL> ALTER DISKGROUP dg1 ADD DISK '/devices/disk*3', '/devices/disk*4';
ASMCMD equivalent for this command is chdg (11g R2 command).
Listing disks
The following command shows all the disks managed by the ASM instance for all the client
databases.
SQL> SELECT * FROM V$ASM_DISK;
ASMCMD equivalent for this command is lsdsk (11g R1 command).
Listing client databases
The following command shows all the database instances connected to the ASM instance.
SQL> SELECT * FROM V$ASM_CLIENT;
ASMCMD equivalent for this command is lsct.
Dropping disks
We can remove a disk from diskgroup.
SQL> ALTER DISKGROUP dg4 DROP DISK diska4;
ASMCMD equivalent for this command is chdg (11g R2 command).
Resizing disks
Disks can be resized using the RESIZE clause of the ALTER DISKGROUP statement. The statement
can be used to resize individual disks, all disks in a failure group or all disks in the diskgroup. If the
SIZE clause is omitted the disks are resized to the size of the disk returned by the OS.
SQL> ALTER DISKGROUP dg_data_1 RESIZE DISK diska1 SIZE 150G;
Resizing all disks in a failure group
SQL> ALTER DISKGROUP dg_data_1 RESIZE DISKS IN FAILGROUP fg_1 SIZE 50G;
Resizing all disks in a diskgroup
SQL> ALTER DISKGROUP dg_data_1 RESIZE ALL SIZE 100G;
Undropping disks
The UNDROP DISKS clause of the ALTER DISKGROUP statement allows pending disk drops to be
undone. It will not revert drops that have completed, or disk drops associated with the dropping of
a diskgroup.
SQL> ALTER DISKGROUP disk_group_1 UNDROP DISKS;
Online disks
SQL> ALTER DISKGROUP data ONLINE DISK 'disk_0000', 'disk_0001';
SQL> ALTER DISKGROUP data ONLINE DISKS IN FAILGROUP 'fg_99';
SQL> ALTER DISKGROUP data ONLINE ALL;
ASMCMD equivalent for this command is online (11gR2 command).
Offline disks
SQL> ALTER DISKGROUP data OFFLINE DISK 'disk_0000', 'disk_0001';
SQL> ALTER DISKGROUP data OFFLINE DISKS IN FAILGROUP 'fg_99';
SQL> ALTER DISKGROUP data OFFLINE DISK d1_0001 DROP AFTER 30m;
ASMCMD equivalent for this command is offline (11gR2 command).
Mounting diskgroups
Diskgroups are mounted at ASM instance startup and unmounted at ASM instance shutdown.
Manual mounting and dismounting can be accomplished using the ALTER DISKGROUP statement as
below.
SQL> ALTER DISKGROUP ALL MOUNT;
SQL> ALTER DISKGROUP dg_data2 MOUNT;
SQL> ALTER DISKGROUP dg_data2 MOUNT RESTRICTED; (11gR1 command)
ASMCMD equivalent for this command is mount (11gR2 command).
Dismounting diskgroups
SQL> ALTER DISKGROUP ALL DISMOUNT;
SQL> ALTER DISKGROUP dg_fra DISMOUNT;
ASMCMD equivalent for this command is umount (11gR2 command).
Changing attributes
SQL> ALTER DISKGROUP data3 SET ATTRIBUTE 'compatible.rdbms' = '11.1'; (11gR1 command)
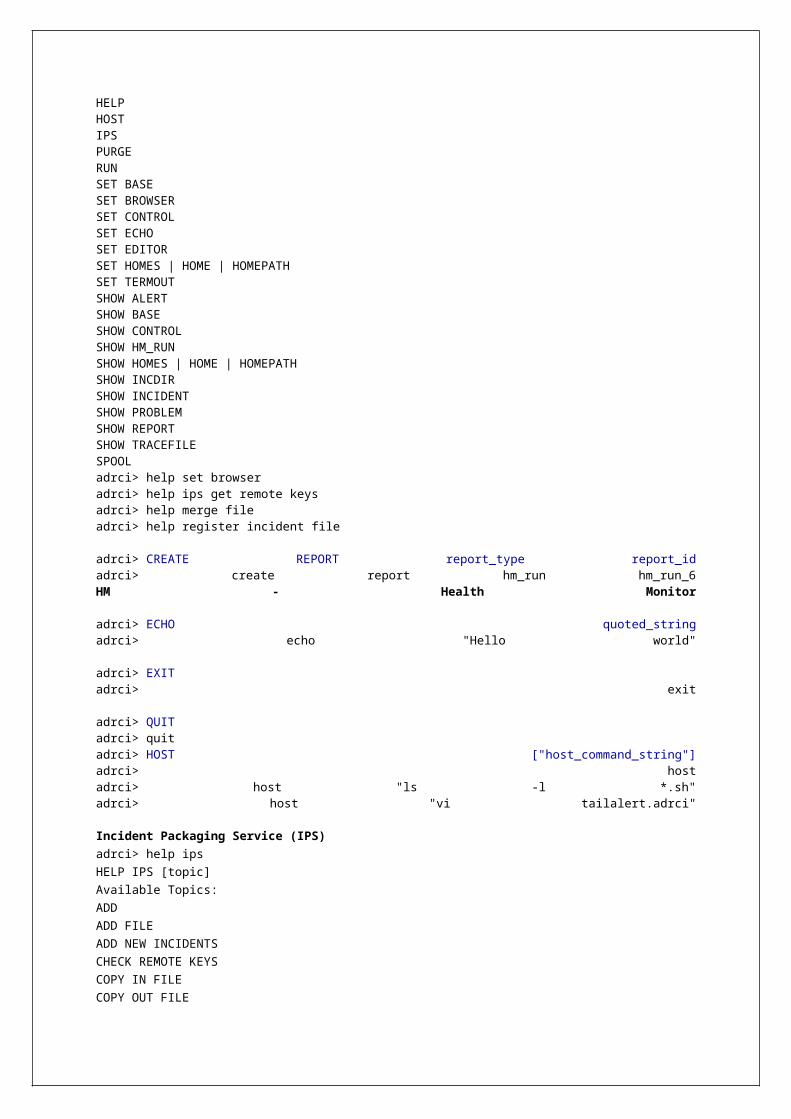
SQL> ALTER DISKGROUP data3 SET ATTRIBUTE 'compatible.asm' = '11.2';
(11gR1 command)
SQL> ALTER DISKGROUP data3 SET ATTRIBUTE 'disk_repair_time' = '4.5h'; (11gR1 command)
ASMCMD equivalent for this command is setattr (11gR2 command).
Listing attributes
SQL> SELECT * FROM V$ASM_ATTRIBUTE;
ASMCMD equivalent for this command is lsattr (11gR2 command).
Rebalancing
Diskgroups can be rebalanced manually using the REBALANCE clause of the ALTER DISKGROUP
statement. If the POWER clause is omitted the ASM_POWER_LIMIT parameter value is used.
Rebalancing is only needed when the speed of the automatic rebalancing is not appropriate.
SQL> ALTER DISKGROUP disk_group_1 REBALANCE POWER 6;
ASMCMD equivalent for this command is rebal (11gR2 command).
IO statistics of a diskgroup
SQL> SELECT * FROM V$ASM_DISK_IOSTAT;
ASMCMD equivalent for this command is iostat (11gR2 command).
Until 11.1.0, all the above commands can not be performed with ASMCMD. From 11.2.0,
we can.
Directories
As in other file systems, an ASM directory is a container for files, and an ASM directory can be part
of a tree structure of other directories. The fully qualified filename represents a hierarchy of
directories in which the plus sign (+) represent the root directory. In each diskgroup, ASM
automatically creates a directory hierarchy that corresponds to the structure of the fully qualified
filenames in the diskgroup. The directories in this hierarchy are known as system-generated
directories.
An absolute path refers to the full path of a file or directory. An absolute path begins with a plus
sign (+) followed by a diskgroup name, followed by subsequent directories in the directory tree.
The absolute path includes directories until the file or directory is reached. A fully qualified
filename is an example of an absolute path to a file. A relative path includes only the part of the
filename or directory name that is not part of the current directory. That is, the path to the file or
directory is relative to the current directory.
A directory hierarchy can be defined using the ALTER DISKGROUP statement to support ASM file
aliasing.
Creating a directory
SQL> ALTER DISKGROUP dg_1 ADD DIRECTORY '+dg_1/my_dir';
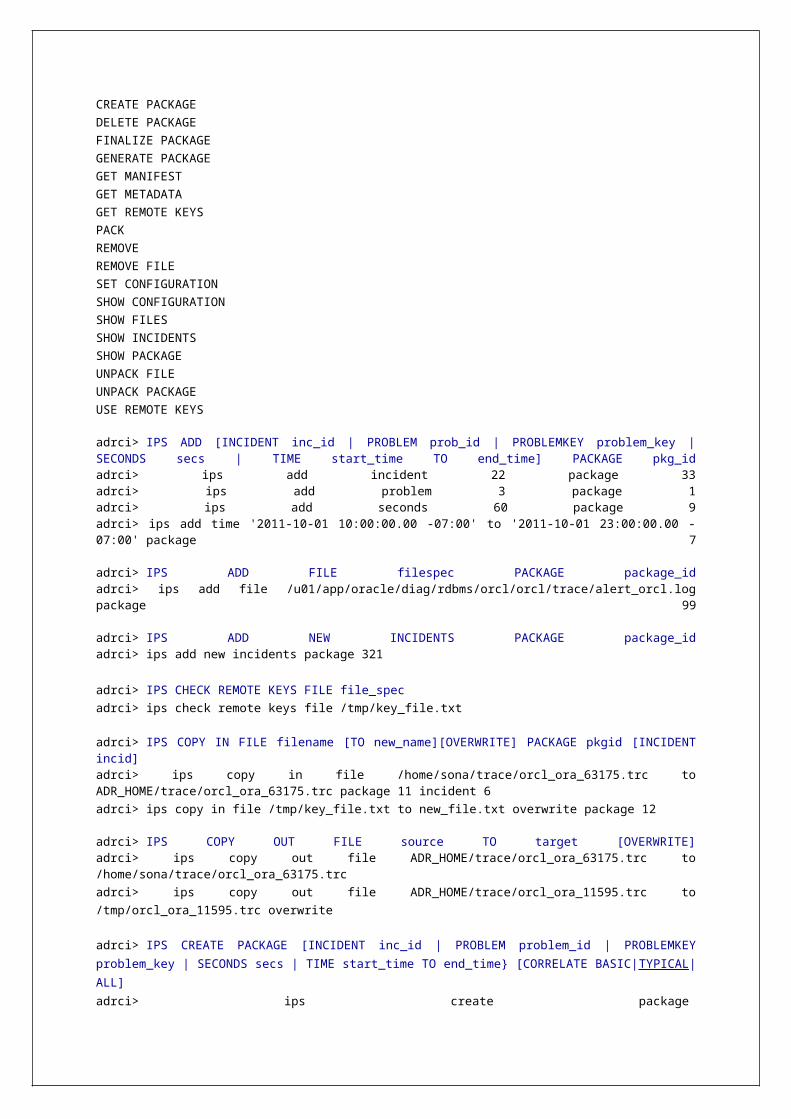
ASMCMD equivalent for this command is mkdir.
Renaming a directory
SQL> ALTER DISKGROUP dg_1 RENAME DIRECTORY '+dg_1/my_dir' TO '+dg_1/my_dir_2';
Deleting a directory
SQL> ALTER DISKGROUP dg_1 DROP DIRECTORY '+dg_1/my_dir_2' FORCE;
ASMCMD equivalent for this command is rm.
Files
There are several ways to reference ASM files. Some forms are used during creation and some for
referencing ASM files. Every file created in ASM gets a system-generated filename, known as fully
qualified filename, this is same as complete path name in a local file system.
The forms of the ASM filenames are:Filename Type Format
Fully Qualified ASM Filename +dgroup/dbname/file_type/ file_type_tag.file.incarnation
Numeric ASM Filename +dgroup.file.incarnation
Alias ASM Filenames +dgroup/directory/filename
Alias ASM Filename with Template +dgroup(template)/alias
Incomplete ASM Filename +dgroup
Incomplete ASM Filename with Template +dgroup(template)
ASM generates filenames according to the following scheme:
+diskGroupName/databaseName/fileType/fileTypeTag.fileNumber.incarnation
e.g: +dgroup2/crm/CONTROLFILE/Current.256.541956473
+dg_fra/hrms/DATAFILE/users.309.621906475
ASM does not place system-generated files into user-created directories; it places them only in
system-generated directories. We can add aliases or other directories to a user-created directory.
Dropping Files
Files are not deleted automatically if they are created using aliases, as they are not Oracle
Managed Files (OMF), or if a recovery is done to a point-in-time before the file was created. For
these circumstances it is necessary to manually delete the files, as shown below.
Dropping file using an alias
SQL> ALTER DISKGROUP dg_2 DROP FILE '+dg_2/my_dir/my_file.dbf';
Dropping file using a numeric form filename
SQL> ALTER DISKGROUP dg_2 DROP FILE '+dg_2.321.123456789';
Dropping file using a fully qualified filename
SQL> ALTER DISKGROUP dg_2 DROP FILE '+dg_2/mydb/datafile/my_ts.292.265390671';
ASMCMD equivalent for this command is rm.
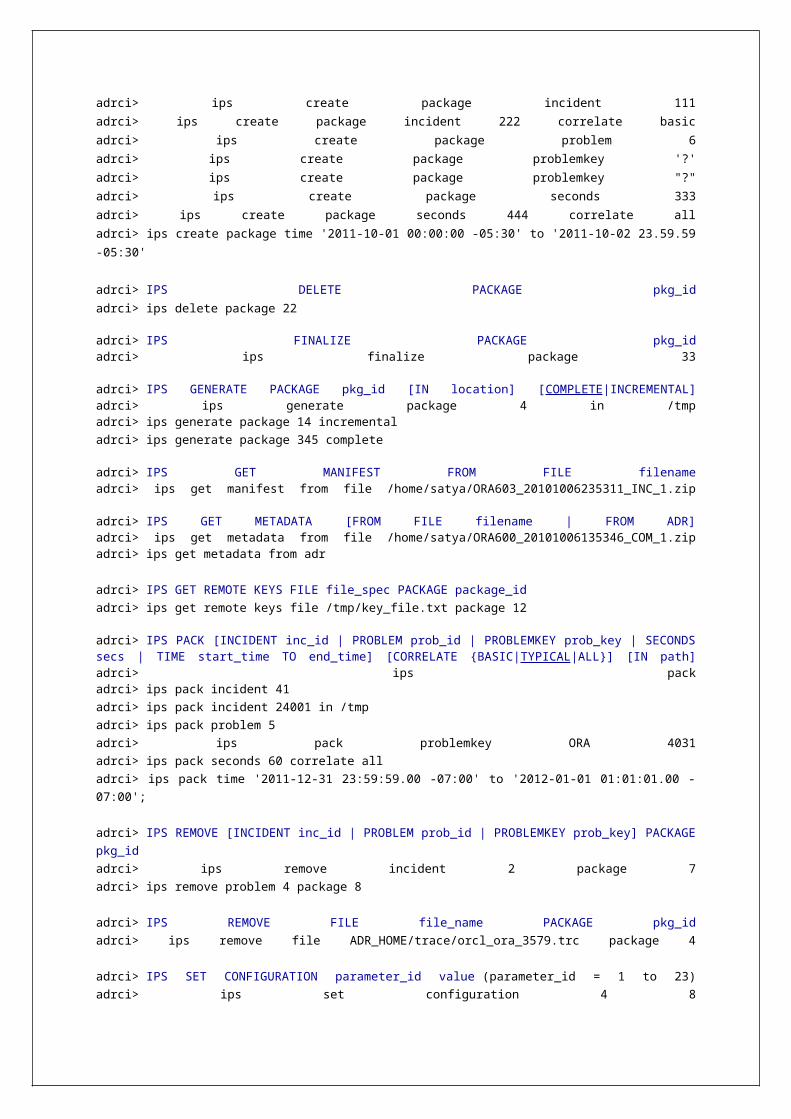
Aliases
Aliases allow you to reference ASM files using user-friendly names, rather than the fully qualified
ASM filenames.
Creating an alias
Creating an alias, using the fully qualified filename
SQL> ALTER DISKGROUP dg_3 ADD ALIAS '+dg_3/my_dir/users.dbf' FOR
'+dg_3/mydb/datafile/users.392.333222555';
Creating an alias, using the numeric form filename
SQL> ALTER DISKGROUP dg_3 ADD ALIAS '+dg_3/my_dir/my_file.dbf' FOR '+dg_3.317.111222333';
ASMCMD equivalent for this command is mkalias.
Renaming an alias
SQL> ALTER DISKGROUP dg_3 RENAME ALIAS '+dg_3/my_dir/my_file.dbf' TO
'+dg_3/my_dir/my_file2.dbf';
Deleting an alias
SQL> ALTER DISKGROUP dg_3 DELETE ALIAS '+dg_3/my_dir/my_file.dbf';
ASMCMD equivalent for this command is rmalias.
Attempting to drop a system alias results in an error.
Templates
Templates are named groups of attributes that can be applied to the files within a diskgroup. The
level of redundancy and the granularity of the striping can be controlled using templates. Default
templates are provided for each file type stored by ASM, but additional templates can be defined
as needed.
Available attributes are: UNPROTECTED - No mirroring or striping regardless of the redundancy setting.
MIRROR - Two-way mirroring for normal redundancy and three-way mirroring for high redundancy.
COARSE - Specifies lower granularity for striping.
FINE - Specifies higher granularity for striping.
MIRROR, COARSE, FINE attributes are cannot be set for external redundancy.
Creating a template
SQL> ALTER DISKGROUP dg_4 ADD TEMPLATE mf_template ATTRIBUTES (MIRROR FINE);
ASMCMD equivalent for this command is mktmpl (11gR2 command).
Modifying a template
SQL> ALTER DISKGROUP dg_4 ALTER TEMPLATE c_template ATTRIBUTES (COARSE);
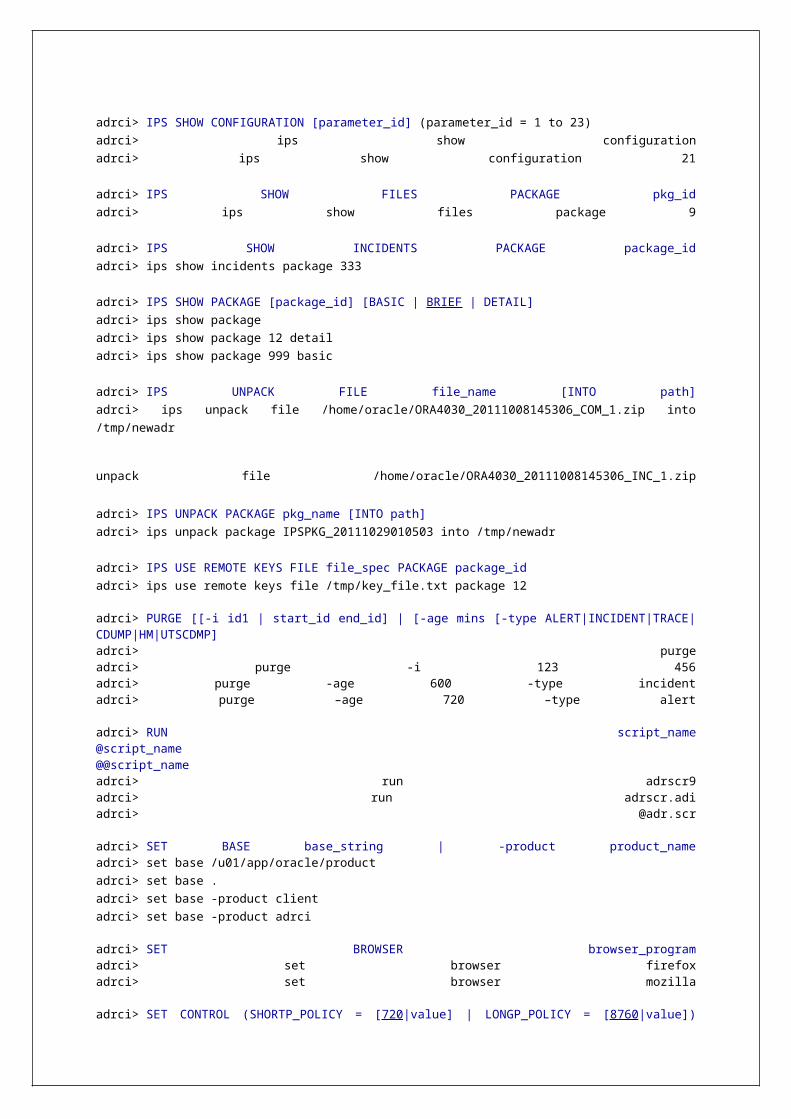
ASMCMD equivalent for this command is chtmpl (11gR2 command).
Listing templates
SQL> SELECT * FROM V$ASM_TEMPLATE;
ASMCMD equivalent for this command is lstmpl (11gR2 command).
Dropping a template
SQL> ALTER DISKGROUP dg_4 DROP TEMPLATE u_template;
ASMCMD equivalent for this command is rmtmpl (11gR2 command).
Checking Metadata
The internal consistency of diskgroup metadata can be checked in a number of ways using the
CHECK clause of the ALTER DISKGROUP statement.
Checking metadata for a specific file
SQL> ALTER DISKGROUP dg_5 CHECK FILE '+dg_5/my_dir/my_file.dbf'
Checking metadata for a specific disk in the diskgroup
SQL> ALTER DISKGROUP dg_5 CHECK DISK diska1;
Checking metadata for a specific failure group in the diskgroup
SQL> ALTER DISKGROUP dg_5 CHECK FAILGROUP failure_group_1;
Checking metadata for all disks in the diskgroup
SQL> ALTER DISKGROUP dg_5 CHECK ALL;
SQL> ALTER DISKGROUP dg_5 CHECK;
SQL> ALTER DISKGROUP dg_5 CHECK NOREPAIR;
SQL> ALTER DISKGROUP dg_5 CHECK REPAIR;
ASMCMD equivalent for this command is chkdg (11gR2 command).
User Management
From Oracle 11g release 2, we can create ASM users and usergroups and manipulate the
permissions and ownership of files.
Creating an ASM usergroup
SQL> ALTER DISKGROUP data_dg ADD USERGROUP 'grp1';
SQL> ALTER DISKGROUP data_dg ADD USERGROUP 'grp2' WITH MEMBER 'oracle1','oracle2';
ASMCMD equivalent for this command is mkgrp (11gR2 command).
Listing ASM usergroups
To find out the list of ASM usergroups.
SQL> SELECT * FROM V$ASM_USERGROUP;
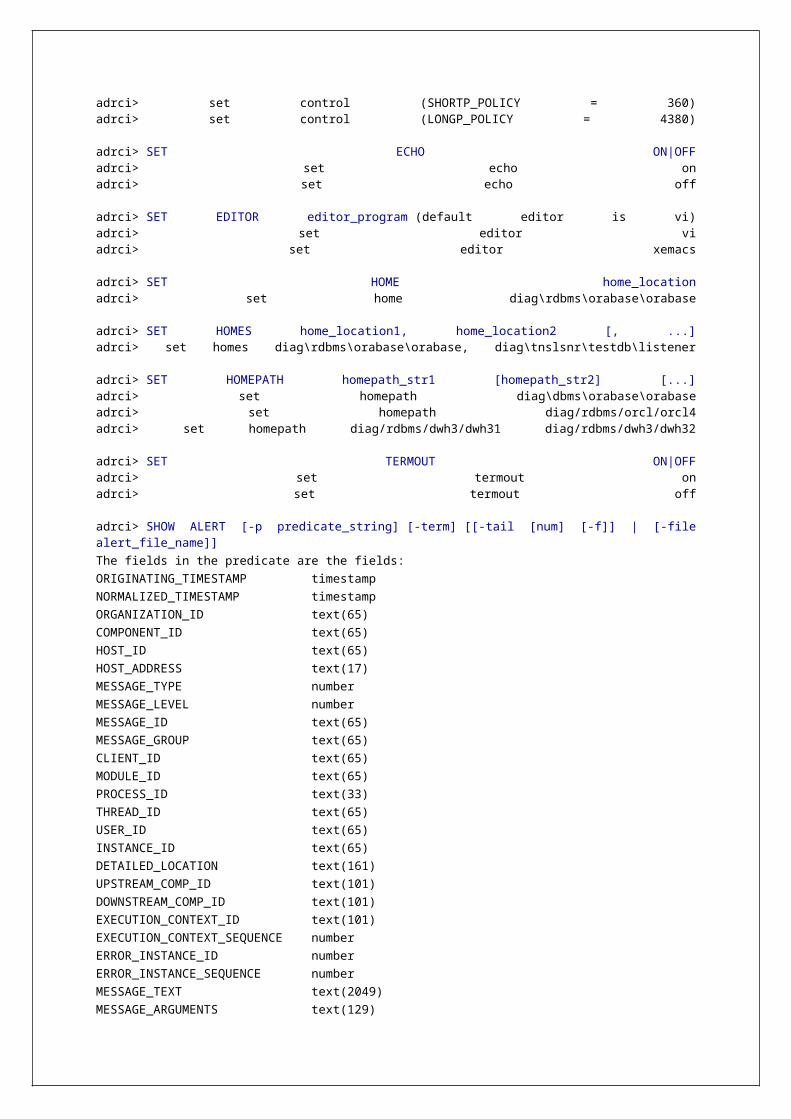
ASMCMD equivalent for this command is lsgrp (11gR2 command).
Dropping an ASM usergroup
SQL> ALTER DISKGROUP data_dg DROP USERGROUP 'grp1';
ASMCMD equivalent for this command is rmgrp (11gR2 command).
Modifying(adding/deleting ASM users to/from) an ASM usergroup
SQL> ALTER DISKGROUP data_dg MODIFY USERGROUP 'grp2' ADD MEMBER 'oracle3';
SQL> ALTER DISKGROUP data_dg MODIFY USERGROUP 'grp2' DROP MEMBER 'oracle3';
ASMCMD equivalent for this command is grpmod (11gR2 command).
Creating an ASM user
SQL> ALTER DISKGROUP data_dg ADD USER 'oracle1';
ASMCMD equivalent for this command is mkusr (11gR2 command).
Listing ASM users
To find out the list of ASM users.
SQL> SELECT * FROM V$ASM_USER;
ASMCMD equivalent for this command is lsusr (11gR2 command).
Listing ASM usergroups to which user belongs
SQL> SELECT * FROM V$ASM_USERGROUP_MEMBER;
ASMCMD equivalent for this command is groups (11gR2 command).
Dropping an ASM user
SQL> ALTER DISKGROUP data_dg DROP USER 'oracle1';
ASMCMD equivalent for this command is rmusr (11gR2 command).
Modifying permissions for a file
SQL> ALTER DISKGROUP data_dg SET PERMISSION OWNER=read write, GROUP=read only,
OTHER=none FOR FILE '+data_dg/controlfile.f';
ASMCMD equivalent for this command is chmod (11gR2 command).
Modifying ownership of a file
SQL> ALTER DISKGROUP data_dg SET OWNERSHIP OWNER='oracle1', GROUP='grp1' FOR FILE
'+data_dg/controlfile.f';
ASMCMD equivalent for this command is chown (11gR2 command).
Volume Management
From 11g release 2, we can create Oracle ASM Dynamic Volume Manager (Oracle ADVM) volumes
in a diskgroups. The volume device associated with the dynamic volume can then be used to host
an (Oracle ACFS) file system.
Creating a volume
SQL> ALTER DISKGROUP data_dg ADD VOLUME volume1 SIZE 20G;
ASMCMD equivalent for this command is volcreate (11gR2 command).
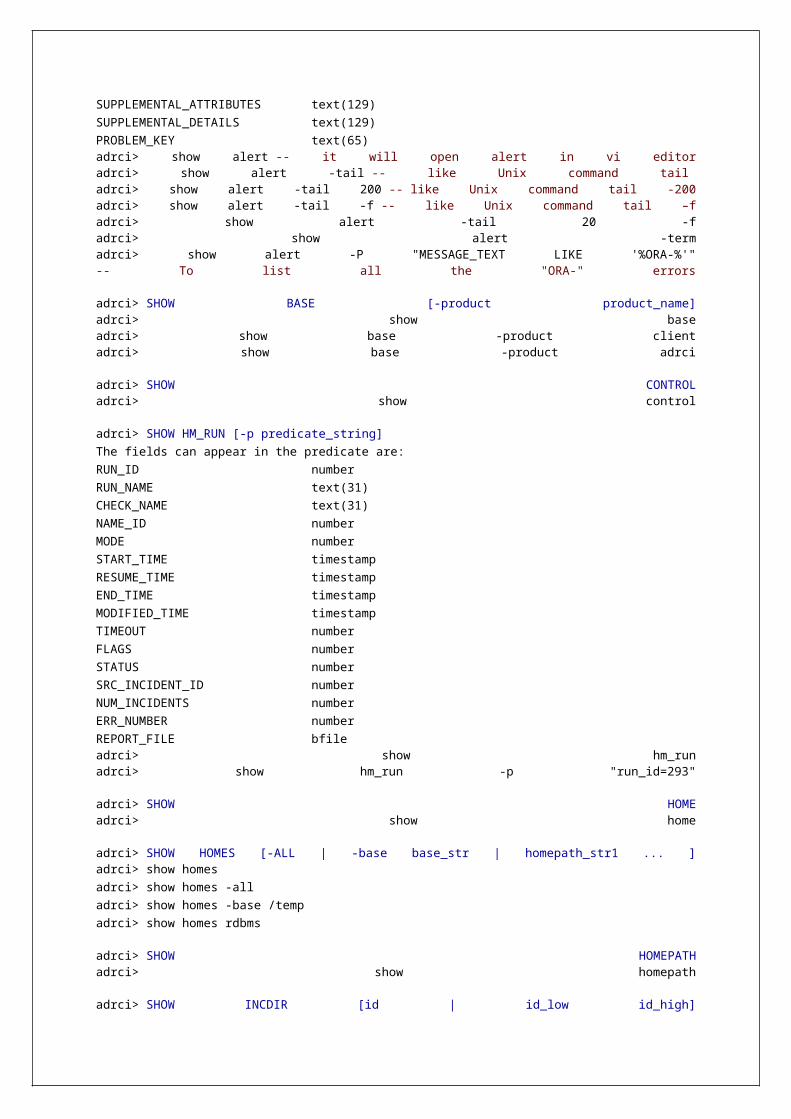
Listing volume information
To find out the volumes information.
SQL> SELECT * FROM V$ASM_VOLUME;
ASMCMD equivalent for this command is volinfo (11gR2 command).
Listing volume statistics
To find out the volumes statistics information.
SQL> SELECT * FROM V$ASM_VOLUME_STAT;
ASMCMD equivalent for this command is volstat (11gR2 command).
Dropping a volume
SQL> ALTER DISKGROUP data_dg DROP VOLUME volume1;
ASMCMD equivalent for this command is voldelete (11gR2 command).
Resizing a volume
SQL> ALTER DISKGROUP fra_dg RESIZE VOLUME volume1 SIZE 25G;
ASMCMD equivalent for this command is volresize (11gR2 command).
Disabling a volume
SQL> ALTER DISKGROUP redo_dg DISABLE VOLUME volume1;
SQL> ALTER DISKGROUP ALL DISABLE VOLUME ALL;
ASMCMD equivalent for this command is voldisable (11gR2 command).
Enabling a volume
SQL> ALTER DISKGROUP arch_dg ENABLE VOLUME volume1;
ASMCMD equivalent for this command is volenable (11gR2 command).
Setting a volume
SQL> ALTER DISKGROUP asm_dg_data MODIFY VOLUME volume1 USAGE 'acfs';
ASMCMD equivalent for this command is volset (11gR2 command).
Misc
Listing the current operations
SQL> SELECT * FROM V$ASM_OPERATION;
ASMCMD equivalent for this command is lsop (11gR2 command).
Creating Tablespaces
Now create a tablespace in the main database using a datafile in the ASM-enabled storage.
SQL> CREATE TABLESPACE user_data DATAFILE '+dskgrp1/user_data_01'
SIZE 1024M;
ASM filenames can be used in place of conventional filenames for most Oracle file types, including
controlfiles, datafiles, logfiles etc. For example, the following command creates a new tablespace
with a datafile in the disk_group_1 diskgroup.
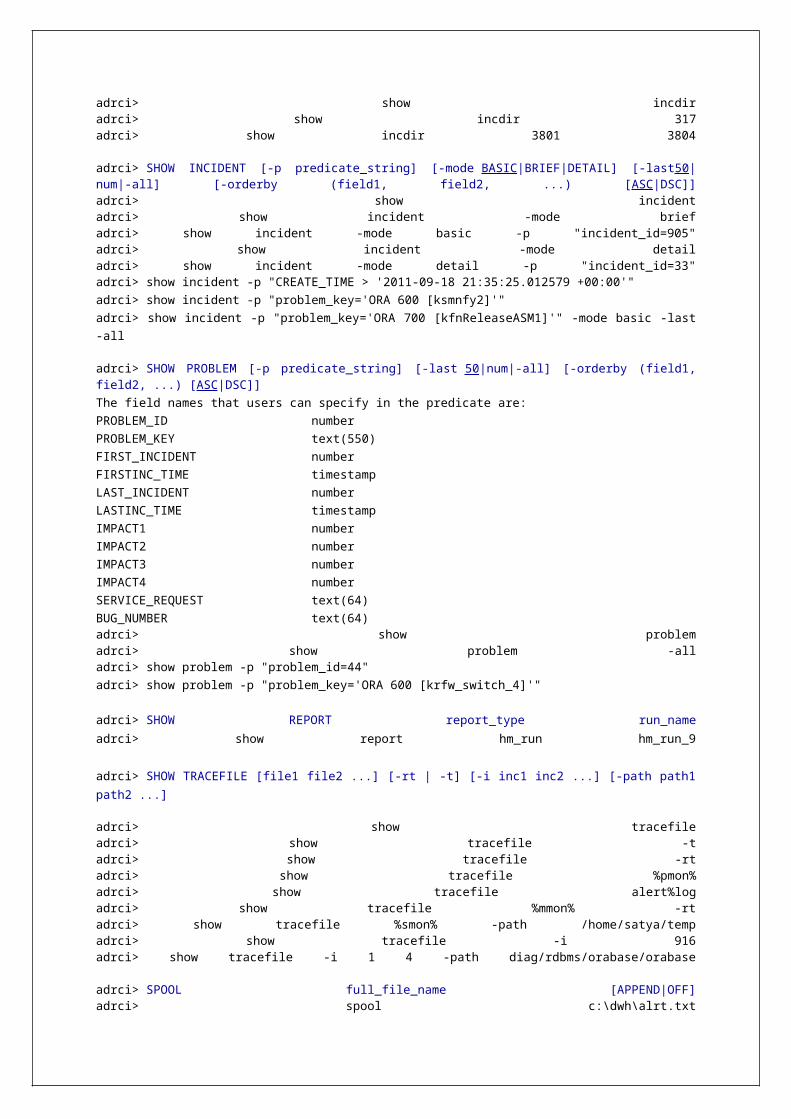
SQL> CREATE TABLESPACE my_ts DATAFILE '+disk_group_1' SIZE 100M AUTOEXTEND ON;
Note how the diskgroup is used as a virtual file system. This approach is useful not only in
datafiles, but in other types of Oracle files as well. For instance, we can create online redo log files
as
...
LOGFILE GROUP 1 (
'+dskgrp1/redo/group_1.258.659723485',
'+dskgrp2/redo/group_1.258.659723485'
) SIZE 50M,
...
Archived log destinations can also be set to a diskgroup. Everything related to Oracle database can
be created in an ASM diskgroup. Backup is another great use of ASM. You can set up a bunch of
inexpensive disks to create the recovery area of a database, which can be used by RMAN to create
backup datafiles and archived log files.
ASM supports files created by and read by the Oracle database only; it is not a replacement for a
general-purpose file system.
Until Oracle 11g release1, we cannot store binaries or flat files. We cannot use ASM for storing the
voting disk and OCR. It is due to the fact that Clusterware starts before ASM instance and it should
be able to access these files which are not possible if you are storing it on ASM. You will have to
use raw devices or OCFS or any other shared storage. But from 11g release 2, we can store ALL
files on ASM.
Can we see the files stored in the ASM instance using standard Unix commands?
No, you cannot see the files using standard Unix commands like ls. You need to use utility called
asmcmd to do this. Oracle 10g release2 introduces asmcmd which makes administration very easy.
$ asmcmd
ASMCMD>
ASMLIB is the support library for the ASM. ASMLIB allows an Oracle database using ASM more
efficient and capable access to diskgroups. The purpose of ASMLIB, is to provide an alternative
interface to identify and access block devices. ASMLIB API enables storage and OS vendors to
supply extended storage-related features.
Migrating to ASM using RMAN
The following method shows how a database can be migrated to ASM from a disk based backup:
1) Shutdown the database.
SQL> SHUTDOWN IMMEDIATE
2) Modify the parameter file of the database as follows:
Set DB_CREATE_FILE_DEST and DB_CREATE_ONLINE_LOG_DEST_n parameters to the relevant ASM
diskgroups.
3) Remove CONTROL_FILES parameter from the spfile so the control files will be moved to the
DB_CREATE_* destination and the spfile gets updated automatically. If you are using a pfile the
CONTROL_FILES parameter must be set to the appropriate ASM files or aliases.
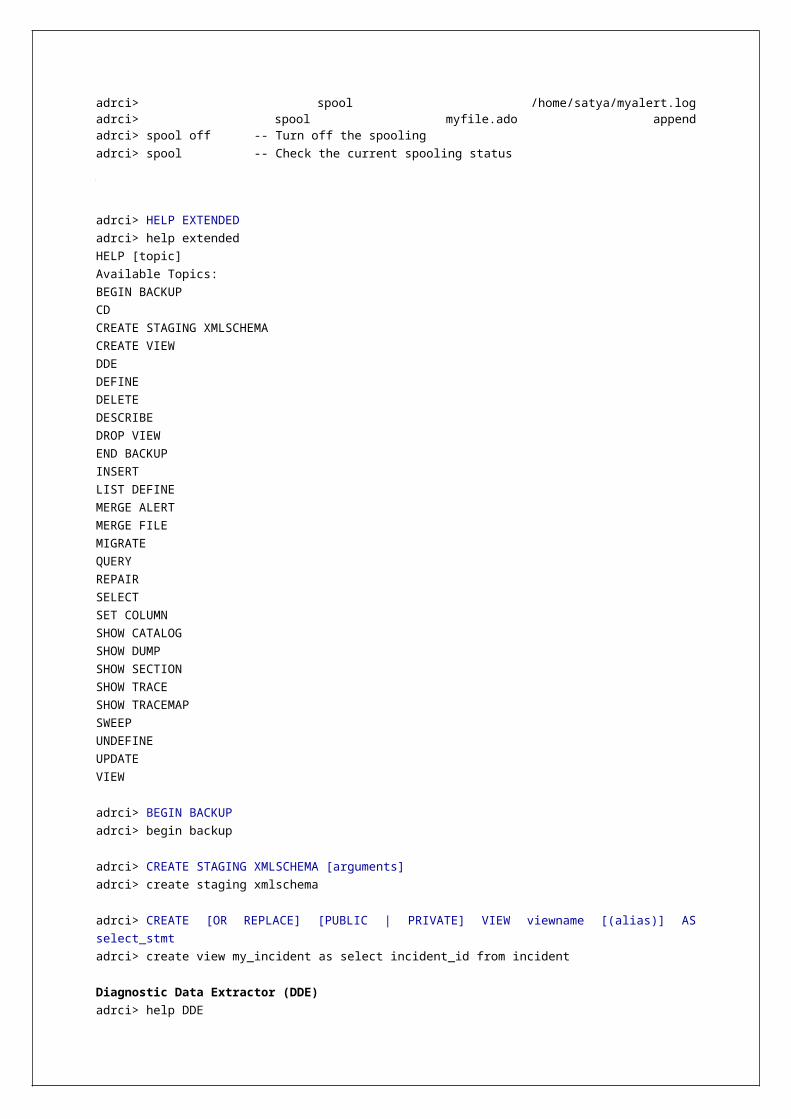
4) Start the database in nomount mode.
RMAN> STARTUP NOMOUNT
5) Restore the controlfile into the new location from the old location.
RMAN> RESTORE CONTROLFILE FROM 'old_control_file_name';
6) Mount the database.
RMAN> ALTER DATABASE MOUNT;
7) Copy the database into the ASM diskgroup.
RMAN> BACKUP AS COPY DATABASE FORMAT '+disk_group';
8) Switch all datafile to the new ASM location.
RMAN> SWITCH DATABASE TO COPY;
9) Open the database.
RMAN> ALTER DATABASE OPEN;
10) Create new redo logs in ASM and delete the old ones.
ASM New features in Oracle 11g release1 Support for rolling upgrades.
We can maintain version compatibilites at diskgroup level.SQL> alter diskgroup dg-name set attribute 'compatible.rdbms'='11.1';SQL> alter diskgroup dg-name set attribute 'compatible.asm'='11.1';
ASM drops disks and if they remain offline for more than 3.6 hours. The diskgroups default time limit is altered by changing the DISK_REPAIR_TIME parameter with a unit of minutes(M/m) or hours(H/h).SQL> alter diskgroup dg-name set attribute 'disk_repair_time'='4.5h';
Automatic bad block detection and repair.
Supports variable extent(allocation unit) sizes. The total number of extents in shared pool will be significantly reduced and improved performance.SQL> create diskgroup ... attribute 'au_size' = 'number-of-bytes';
New SYSASM role (like SYSDBA, SYSOPER) & OSASM OS group (like OSDBA, OSOPER) to manage ASM instance only. This will separate storage administration from database administration.$ sqlplus "/as sysasm" or $ asmcmd -a sysasm
ASM Preferred Mirror Read or Preferred Read Failure Groups - ASM_PREFERRED_READ_FAILURE_GROUPS parameter is set to the preferred failure groups for each node.
Faster Mirror Resync - Fast mirror resync after temporary connectivity lost.
We can drop a diskgroup forcefully.SQL> drop diskgroup dg-name force including contents;
Can mount the disk in restricted mode, to rebalance faster.SQL> alter diskgroup dg-name mount restricted;
New commands in ASMCMD.
o cp - to copy between ASM and local or remote destination.
o md_backup - to backup metadata.
o md_restore - to restore metadata.
o lsdsk - to list(check) disks.
o remap - to repair a range of physical blocks on disk.
ASM New features in Oracle 11g release2
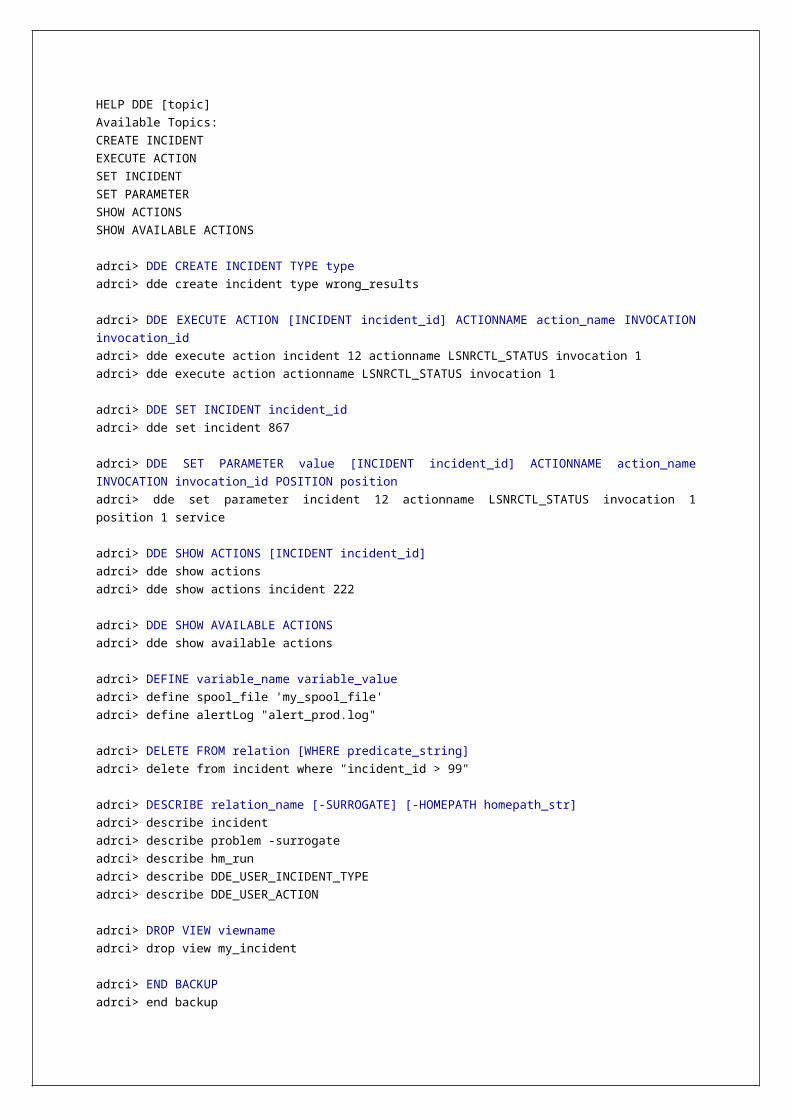
ASM Configuration Assistant (ASMCA) is a new tool to install and configure ASM.
ASM Cluster File System (ACFS) provides support for files such as Oracle binaries, Clusterware binaries, report files, trace files, alert logs, external files, and other application datafiles. ACFS can be managed by ACFSUTIL, ASMCMD, OEM, ASMCA, SQL command interface.
ASM Dynamic Volume Manager (ADVM) provides volume management services and a standard device driver interface to its clients (ACFS, ext3, OCFS2 and third party files systems).
ACFS Snapshots are read-only on-line, space efficient, point in time copy of an ACFS file system. ACFS snapshots can be used to recover from inadvertent modification or deletion of files from a file system.
ASM can hold and manage OCR (Oracle Cluster Registry) file and voting file.
ASM diskgroups can be renamed, by using renamedg command.
ASMCMD utility can do
o startup and shutdown of ASM instances.
o Managing diskgroups (create, mount, alter, drop).
o File access control (like OS, ugo and rwx ...).
o User management.
o Template management.
o Volume management.
o We can execute OS commands at asmcmd by using !, in the same we do at SQL prompt.
ASM Views
The ASM configuration can be viewed using the V$ASM_% views, which contain information
depending on whether they are queried from the ASM instance, or a dependant database instance.
View In ASM instance In DB instance
V$ASM_ALIASDisplays a row for each alias present in every diskgroup mounted by the ASM instance.
Returns no rows.
V$ASM_ATTRIBUTE (11gR2)Displays attributes of diskgroups.
Displays attributes of diskgroups.
V$ASM_CLIENT
Displays a row for each database instance using a diskgroup managed by the ASM instance.
Displays a row for the ASM instance if the database has open ASM files.
V$ASM_DISK or V$ASM_DISK_STAT
Displays a row for each disk discovered by the ASM instance, including disks which are not part of any diskgroup.
Displays a row for each disk in diskgroups in use by the database instance.
V$ASM_DISK_IOSTAT(11gR2) Displays IO statistics of disks.Displays IO statistics of disks.
V$ASM_DISKGROUP or V$ASM_DISKGROUP_STAT
Displays a row for each diskgroup discovered by the ASM instance.
Displays a row for each diskgroup mounted by the local ASM instance.
V$ASM_FILEDisplays a row for each file for each diskgroup mounted by the ASM instance.
Displays no rows.
V$ASM_FILESYSTEM(11gR2)Displays a row for each filesystem for each diskgroup mounted by the ASM instance.
Displays no rows.
V$ASM_OPERATIONDisplays a row for each file for each long running operation executing in the ASM instance.
Displays no rows.
V$ASM_TEMPLATE Displays a row for each Displays a row for each
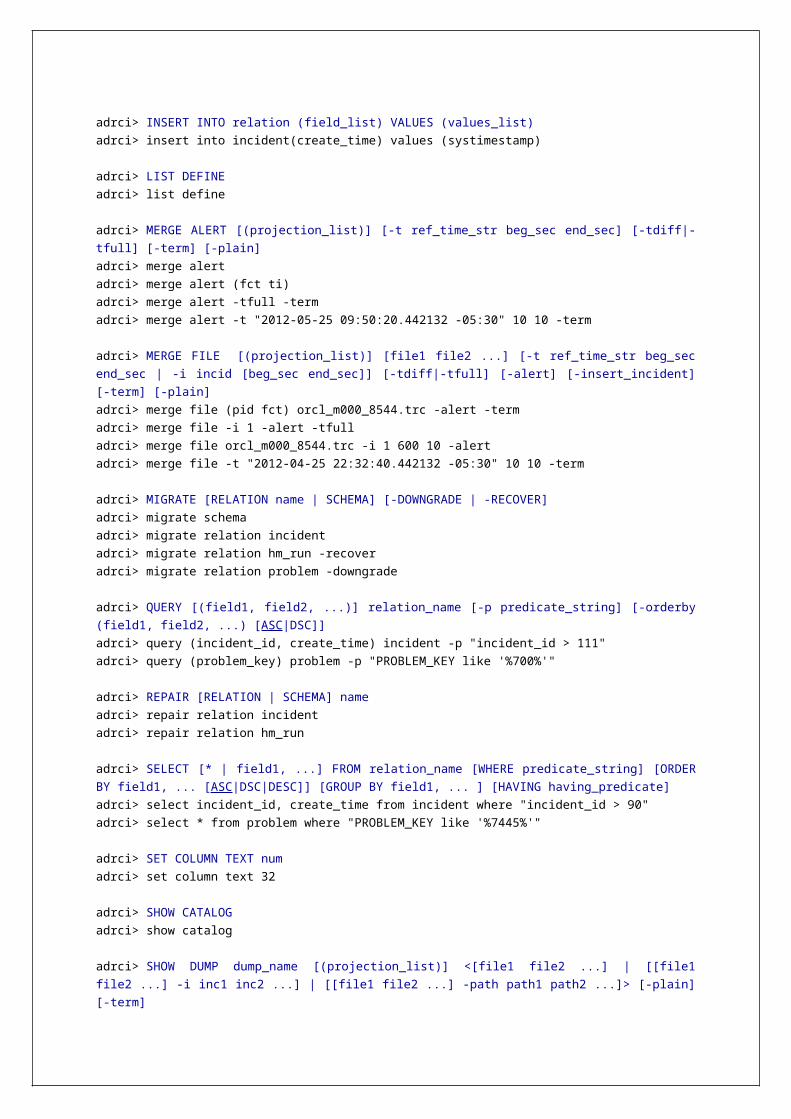
template present in each diskgroup mounted by the ASM instance.
template present in each diskgroup mounted by the ASM instance.
V$ASM_USER (11gR2)Displays a row for each ASM user.
-
V$ASM_USERGROUP(11gR2)Displays a row for each ASM usergroup.
-
V$ASM_USERGROUP_MEMBER(11gR2)Displays ASM usergroups and it's members.
-
V$ASM_VOLUME orV$ASM_VOLUME_STAT(11gR2)
Displays a row for each volume. -
ASM backup can be taken by spooling the output of the ASM views to text file.
SPOOL asm_views.log
SET ECHO ON
SELECT * FROM V$ASM_ALIAS;
SELECT * FROM V$ASM_ATTRIBUTE;
SELECT * FROM V$ASM_CLIENT;
SELECT * FROM V$ASM_DISK;
SELECT * FROM V$ASM_DISK_IOSTAT;SELECT * FROM V$ASM_DISK_STAT;
SELECT * FROM V$ASM_DISKGROUP;
SELECT * FROM V$ASM_DISKGROUP_STAT;
SELECT * FROM V$ASM_FILE;
SELECT * FROM V$ASM_FILESYSTEM;
SELECT * FROM V$ASM_OPERATION;
SELECT * FROM V$ASM_TEMPLATE;
SELECT * FROM V$ASM_USER;
SELECT * FROM V$ASM_USERGROUP;
SELECT * FROM V$ASM_USERGROUP_MEMBER;
SELECT * FROM V$ASM_VOLUME;
SELECT * FROM V$ASM_VOLUME_STAT;
SPOOL OFF
asmcmd utility in OracleAutomatic Storage Management (ASM) Command line utility (ASMCMD), introduced with Oracle Database 10g release 2.
Managing ASM through SQL interfaces, in Oracle Database 10g Release 1, posed a challenge for administrators who were not very familiar with SQL and preferred a more conventional command line interface. From Oracle Database 10g Release 2, we have an option to manage the ASM files by using ASMCMD, a powerful and easy to use command line tool.
In Oracle Database 10g Release 1, ASM diskgroups are not visible outside the database for regular file system administration tasks such as copying and creating directories. From Oracle Database 10g Release 2, we can transfer the files from ASM to locations outside of the diskgroups via FTP and through a web browser using HTTP.
(From 11.2.0) ASMCMD is used to start/stop ASM instances
create or alter or drop diskgroups
mount or dismount diskgroups
list the contents, statistics and attributes of diskgroups, and files on them
backup and restore the metadata of diskgroups
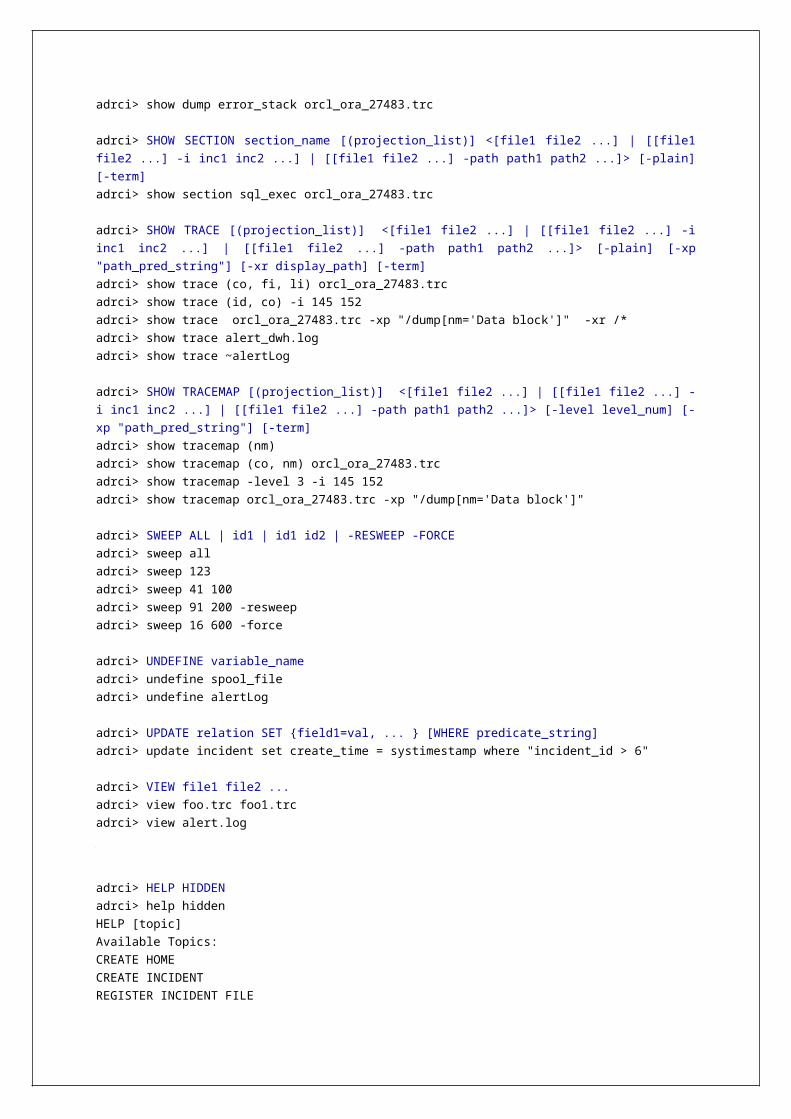
create and remove directories, templates and aliases
managing volumes
make online or offline the disks/failure groups
can rebalance the diskgroups
repair physical blocks
copy the files between the diskgroups and OS
backup and restore of SP file
add/remove/modify/list users from password file
add/remove/modify/list templates
manipulate diskstring
create/modify/remove ASM users, groups
change ASM file permissions, owners and groups
display space utilization
perform searches
ASMCMD has equivalent commands for all the SQL commands that can be performed through SQL*Plus.
ASMCMD is included in the installation of the Oracle Database software (from 10g Release 2), no
separate setup is required.
We can’t see the files stored in the ASM instance using standard UNIX commands like ls. We need
to use asmcmd. The asmcmd command line interface is very similar to standard UNIX/Linux
commands, but it only manages files at the OS level. The asmcmd utility supports all common
Linux commands. The idea of this tool is to make administering the ASM files similar to
administering standard OS files.
Invoking asmcmd
To start using ASMCMD, You must log in as a user that has SYSASM or SYSDBA privileges through
OS authentication. The environmental variables ORACLE_HOME and ORACLE_SID must be set to
the ASM instance. Ensure that $ORACLE_HOME/bin is in PATH environment variable. You must have
ASM configured on the machine and started, and the ASM diskgroups are mounted.
The default value of the ASM SID for a single instance database is +ASM. In Real Application
Clusters (RAC) environments, the default value of the ASM SID on any node is +ASMnode#
(+ASM1, +ASM2, ...).
$ export ORACLE_SID=+ASM
To enter in interactive mode, type asmcmd, which brings up the ASM command prompt.
$ asmcmd
ASMCMD>
To run a specific ASMCMD command, non interactively, we can type
$ asmcmd command arguments
We can specify the -p option with the asmcmd command to include the current directory in the
ASMCMD prompt.
$ asmcmd -p
ASMCMD [+] > cd dgroup1/hrms
ASMCMD [+dgroup1/hrms] >
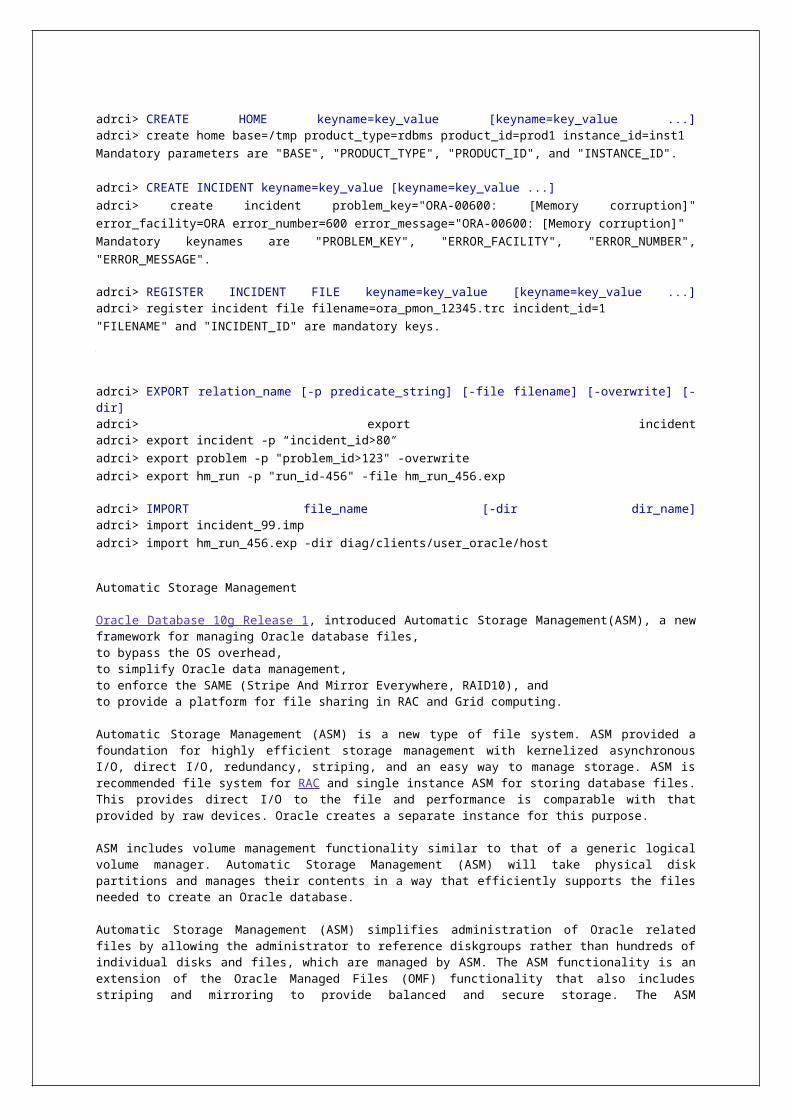
We can specify the -a option to choose the type of connection, either SYSASM or SYSDBA.
From 11g, the SYSASM privilege is preferred & default.
$ asmcmd -a sysasm or asmcmd -a sysdba
We can specify the -V option when starting asmcmd to displays the asmcmd version number. This
is from 11g.
$ asmcmd -V
asmcmd version 11.1.0.6.0
We can specify the -v option when starting asmcmd to displays the additional information. This is
from 11g.
$ asmcmd -v
ASM Filenames & Directories
Pathnames within ASMCMD, can use either the forward slash (/) as in UNIX or the backward slash
(\) as in Windows, they're interchangeable. Also, we can use either the UNIX wildcard "*" to match
any string in a pathname, or its SQL equivalent, "%".
Filenames are not case sensitive, but are case retentive, that is, ASMCMD retains the case of the
directory that you entered.
The fully qualified filename represents a hierarchy of directories in which the plus sign (+)
represent the root directory. We can also create our own directories as subdirectories of the
system-generated directories using the ALTER DISKGROUP command or with the ASMCMD mkdir
command. Those directories can have subdirectories, and we can navigate the hierarchy of both
system-generated directories and user-created directories with the cd command.
When we run an ASMCMD command that accepts a filename or directory name as an argument, we
can use the name as either an absolute path or a relative path.
An absolute path refers to the full path of a file or directory. An absolute path begins with a plus
sign (+) followed by a diskgroup name, followed by subsequent directories in the directory tree.
The absolute path includes directories until the file or directory is reached. A fully qualified
filename is an example of an absolute path to a file.
Using an absolute path enables the command to access the file or directory regardless of where
the current directory is set. The following rm command uses an absolute path for the filename:
ASMCMD [+] > rm +dgroup1/hrms/datafile/users.280.555341999
A relative path includes only the part of the filename or directory name that is not part of the
current directory. That is, the path to the file or directory is relative to the current directory.
ASMCMD [+dgroup1/hrms/DATAFILE] > ls -l undotbs1.267.557429239
Paths to directories can also be relative and we can use the pseudo-directories "." and ".." in place
of a directory name. The wildcard characters * and % match zero or more characters anywhere
within an absolute or relative path, which saves typing of the full directory or file name. These two
wildcard characters behave identically.
Alias
As in UNIX, we can create alias names for files listed in the diskgroup. Aliases are user-friendly
filenames that are references or pointers to system-generated filenames. Aliases are similar to
symbolic links in UNIX flavors. ASM's auto generated names can be a bit strange, so creating
aliases makes working with ASM files with ASMCMD easier. Aliases simplify ASM filename
administration. We can create aliases with an ALTER DISKGROUP command or with the mkalias
ASMCMD command.
An alias has at a minimum the diskgroup name as part of its complete path. We can create aliases
at the diskgroup level or in any system-generated or user-created subdirectory. The following are
examples of aliases:
+dgroup1/ctl1.f
+dgroup1/crm/ctl1.f
+dgroup1/mydir/ctl1.f
If you run the ASMCMD ls (list directory) with the -l flag, each alias is listed with the system-
generated file to which the alias refers.
ctl1.f => +dgroup2/hrms/CONTROLFILE/Current.256.541956473
We can run the ASMCMD utility in either interactive or non interactive mode.
ASMCMD in Interactive Mode
The interactive mode of the ASMCMD utility provides an environment like shell or SQL*Plus, where
we are prompted to enter ASMCMD commands.
To run ASMCMD in interactive mode:
1. Enter the following at the OS command prompt:
$ asmcmd
Oracle displays an ASMCMD command prompt as follows:
ASMCMD>
2. Enter an ASMCMD command and press Enter. The command runs and displays its output, and
then ASMCMD prompts for the next command.
3. Continue entering ASMCMD commands. Enter the command exit to exit ASMCMD.
ASMCMD in Non Interactive Mode
In non interactive mode, you run a single ASMCMD command by including the command and
command arguments on the command line that invokes ASMCMD. ASMCMD runs the command,
generates output, and then exits. The non interactive mode is especially useful for running scripts.
To run ASMCMD in non interactive mode, where command is any valid ASMCMD command and
arguments is a list of command flags and arguments, at the command prompt enter the following:
$ asmcmd command arguments
$ asmcmd ls -l
State Type Rebal Unbal Name
MOUNTED NORMAL N N DG_GROUP1/
MOUNTED NORMAL N N DG_GROUP2/
$ asmcmd lsdg ASM_DG_FRA
$ asmcmd mkdir +data/hrms/archives
$ asmcmd md_restore -b /u01/app/oracle/BACKUP/asm_md_backup -t nodg
Oracle 10g (Release 2) commands
cd command
Changes to a specified directory. We can go up or down the hierarchy of the current directory tree
by providing a directory argument to the cd command.
cd dir_name
dir_name may be specified as either an absolute path or a relative path, including the . and ..
pseudo-directories and wildcards.
ASMCMD [+dgroup2/crm] > cd +dgroup1/hrms
ASMCMD [+dgroup1/hrms] > cd DATAFILE
ASMCMD [+dgroup1/hrms/DATAFILE] > cd ..
ASMCMD [+]> cd +dgroup1/sample/C*
If a wildcard pattern matches only one directory when using wildcard characters with cd, then cd
changes the directory to that destination. If the wildcard pattern matches multiple directories, then
ASMCMD does not change the directory but instead returns an error.
pwd command
Displays the absolute path of the current directory.
pwd
ASMCMD> pwd
help command
Displays the syntax of a command and description of the command parameters.
help [command] or ? [command]
If you do not specify a value for command, then the help command lists all of the ASMCMD
commands and general information about using the ASMCMD utility.
ASMCMD> help
ASMCMD> help lsct
ASMCMD> ?
ASMCMD> ? mkgrp
du command
Displays the total space used for files in the specified directory and in the entire directory tree
under the directory.
du [-H] [dir_name]
The -H flag suppresses column headings from the output.
This command is similar to the du -s command on UNIX flavors. If you do not specify dir_name,
then information about the current directory is displayed. dir_name can contain wildcard
characters.
ASMCMD [+dgroup1/prod] > du
Used_MB Mirror_used_MB
1251 2507
Used_MB - The total space used in the directory, this value does not include mirroring.
Mirror_used_MB - This value includes mirroring.
For example, if a normal redundancy diskgroup contains 100 MB of data, then assuming that each
file in the diskgroup is 2way mirrored, Used_MB is 100 MB and Mirror_used_MB is 200 MB.
ASMCMD> du TEMPFILE
Used_MB Mirror_used_MB
24582 24582
In this case, Used_MB & Mirror_used_MB are the same, because the diskgroups are not mirrored.
ASMCMD [+ASM_DG_DATA/CRM] > du -H DATAFILE/
98203 98203
find command
Displays the absolute paths of all occurrences of the specified name pattern (can have wildcards)
in a specified directory and its subdirectories.
find [-t type] dir_name name_pattern
find [--type type] dir_name name_pattern (Oracle 11g R2 syntax)
type can be (these are the type values from the type column of the V$ASM_FILE)
CONTROLFILE,DATAFILE,ONLINELOG,ARCHIVELOG,TEMPFILE,BACKUPSET,PARAMETERFILE,DATAGU
ARDCONFIG,FLASHBACK,CHANGETRACKING,DUMPSET,AUTOBACKUP,XTRANSPORT
This command searches the specified directory and all subdirectories under it in the directory tree
for the supplied name_pattern. The value that you use for name_pattern can be a directory name
or a filename.
ASMCMD> find +dgroup1 undo*
+dgroup1/crm/DATAFILE/UNDOTBS1.258.555341963
+dgroup1/crm/DATAFILE/UNDOTBS1.272.557429239
ASMCMD> find -t CONTROLFILE +dg_data/hrms *
+dg_data/hrms/CONTROLFILE/Current.260.555342185
+dg_data/hrms/CONTROLFILE/Current.261.555342183
ASMCMD [+] > find --type CONTROLFILE +data/devdb *
+data/devdb/CONTROLFILE/Current.260.691577263
ls command
Lists the contents of an ASM directory, the attributes of the specified file, or the names and
attributes of all diskgroups from the V$ASM_DISKGROUP_STAT (default) or V$ASM_DISKGROUP.
ls [-lsdrtLacgH] [name]
ls [-lsdtLacgH] [--reverse] [--permission] [pattern] (11g R2 syntax)
name can be a filename or directory name, can include wildcards.
If name is a directory name, then ASMCMD lists the contents of the directory and depending on flag
settings, ASMCMD also lists information about each directory member. Directories are listed with a
trailing forward slash (/) to distinguish them from files.
If name is a filename, then ASMCMD lists the file and depending on the flag settings, ASMCMD also
lists information about the file.
Flag Description
(none) Displays only filenames and directory names.
-l
Displays extended file information, including striping and redundancy information and whether the file was system-generated (indicated by Y under the SYS column) or user-created (as in the case of an alias, indicated by N under the SYS column). Note that not all possible file attributes or diskgroup attributes are included.
-s Displays file space information.
-dIf the value for the name argument is a directory, then ASMCMD displays information about that directory, rather than the directory contents. Typically used with another flag, such as the -l flag.
-r or--reverse
Reverses the sort order of the listing.
-t Sorts the listing by timestamp.
-LIf the value for the name argument is an alias, then ASMCMD displays information about the file that it references. Typically used with another flag, such as the -l flag.
-a For each listed file, displays the absolute path of the alias that references it.
-c Selects from V$ASM_DISKGROUP or GV$ASM_DISKGROUP if the -g flag is also specified.
-gSelects from GV$ASM_DISKGROUP_STAT or GV$ASM_DISKGROUP if the -c flag is also specified. GV$ASM_DISKGOUP.INST_ID is included in the output.
-H Suppresses column headings.
--permission
Shows the permissions of a file (V$ASM_FILE.permission, V$ASM_FILE.owner, V$ASM_FILE.usergroup, V$ASM_ALIAS.name).
pattern Name of a file, directory, or pattern.
If you specify all of the flags, then the command shows a union of their attributes, with duplicates
removed. To see the complete set of column values for a file or a diskgroup, query the V$ASM_FILE
and V$ASM_DISKGROUP.
ASMCMD [+dgroup1/sample/DATAFILE] > ls
EXAMPLE.269.555342243
SYSAUX.257.555341961
SYSTEM.256.555341961
UNDOTBS1.258.555341963
UNDOTBS1.272.557429239
USERS.259.555341963
ASMCMD [+dgroup1/sample/DATAFILE] > ls -l
Type Redund Striped Time Sys Name
DATAFILE MIRROR COARSE APR 18 19:16:07 Y EXAMPLE.269.555342243
DATAFILE MIRROR COARSE MAY 09 22:01:28 Y SYSAUX.257.555341961
DATAFILE MIRROR COARSE APR 19 19:16:24 Y SYSTEM.256.555341961
DATAFILE MIRROR COARSE MAY 05 12:28:42 Y UNDOTBS1.258.555341963
DATAFILE MIRROR COARSE MAY 04 17:27:34 Y UNDOTBS1.272.557429239
DATAFILE MIRROR COARSE APR 18 19:16:07 Y USERS.259.555341963
ASMCMD [+dgroup1/sample/DATAFILE] > ls -lt
Type Redund Striped Time Sys Name
DATAFILE MIRROR COARSE MAY 09 22:01:28 Y SYSAUX.257.555341961
DATAFILE MIRROR COARSE MAY 05 12:28:42 Y UNDOTBS1.258.555341963
DATAFILE MIRROR COARSE MAY 04 17:27:34 Y UNDOTBS1.272.557429239
DATAFILE MIRROR COARSE APR 19 19:16:24 Y SYSTEM.256.555341961
DATAFILE MIRROR COARSE APR 18 19:16:07 Y USERS.259.555341963
DATAFILE MIRROR COARSE APR 18 19:16:07 Y EXAMPLE.269.555342243
ASMCMD [+] > ls --permission +data/prod/datafile
User Group Permission Name
rw-rw-rw- EXAMPLE.265.691577295
rw-rw-rw- SYSAUX.257.691577149
rw-rw-rw- SYSTEM.256.691577149
rw-rw-rw- UNDOTBS1.258.691577151
rw-rw-rw- USERS.259.691577151
ASMCMD [+dgroup1/sample/DATAFILE] > ls -l undo*
Type Redund Striped Time Sys Name
DATAFILE MIRROR COARSE MAY 05 12:28:42 Y UNDOTBS1.258.555341963
DATAFILE MIRROR COARSE MAY 04 17:27:34 Y UNDOTBS1.272.557429239
ASMCMD [+dgroup1/sample/DATAFILE] > ls -s
Block_Size Blocks Bytes Space Name
8192 12801 104865792 214958080 EXAMPLE.269.555342243
8192 48641 398467072 802160640 SYSAUX.257.555341961
8192 61441 503324672 101187584 SYSTEM.256.555341961
8192 6401 52436992 110100480 UNDOTBS1.258.555341963
8192 12801 104865792 214958080 UNDOTBS1.272.557429239
8192 641 5251072 12582912 USERS.259.555341963
ASMCMD [+dgroup1] > ls +dgroup1/sample
CONTROLFILE/
DATAFILE/
ONLINELOG/
PARAMETERFILE/
TEMPFILE/
spfilesample.ora
ASMCMD [+dgroup1] > ls -l +dgroup1/sample
Type Redund Striped Time Sys Name
Y CONTROLFILE/
Y DATAFILE/
Y ONLINELOG/
Y PARAMETERFILE/
Y TEMPFILE/
N spfilesample.ora=>+dgroup1/sample/PARAMETERFILE/spfile.270.555342443
ASMCMD [+dgroup1] > ls -r +dgroup1/sample
spfilesample.ora
TEMPFILE/
PARAMETERFILE/
ONLINELOG/
DATAFILE/
CONTROLFILE/
ASMCMD [+dgroup1] > ls -lL example_df2.f
Type Redund Striped Time Sys Name
DATAFILE MIRROR COARSE APR 27 11:04 N example_df2.f =>
+dgroup1/sample/DATAFILE/EXAMPLE.271.556715087
ASMCMD [+dgroup1] > ls -a +dgroup1/sample/DATAFILE/EXAMPLE.271.556715087
+dgroup1/example_df2.f => EXAMPLE.271.556715087
ASMCMD [+dgroup1] > ls -lH +dgroup1/sample/PARAMETERFILE
PARAMETERFILE MIRROR COARSE MAY 04 21:48 Y spfile.270.555342443
If you enter ls +, then the command returns information about all diskgroups, including information
about whether the diskgroups are mounted.
ASMCMD [+dgroup1] > ls -l +
State Type Rebal Unbal Name
MOUNTED NORMAL N N DGROUP1/
MOUNTED HIGH N N DGROUP2/
MOUNTED EXTERN N N DGROUP3/
ASMCMD [+USERDG2/prod] > ls -l
Type Redund Striped Time Sys Name
- - - - Y CONTROLFILE/
- - - - Y DATAFILE/
- - - - Y ONLINELOG/
- - - - Y TEMPFILE/
- - - - N control01.ctl => +USERDG2/prod/CONTROLFILE/Current.260.573852215
- - - - N control02.ctl => +USERDG2/prod/CONTROLFILE/Current.261.573852215
- - - - N control03.ctl => +USERDG2/prod/CONTROLFILE/Current.262.573852215
- - - - N example01.dbf => +USERDG2/prod/DATAFILE/UNKNOWN.267.573852295
- - - - N redo01.log => +USERDG2/prod/ONLINELOG/group_1.263.573852243
- - - - N redo02.log => +USERDG2/prod/ONLINELOG/group_2.264.573852249
- - - - N redo03.log => +USERDG2/prod/ONLINELOG/group_3.265.573852255
- - - - N sysaux01.dbf => +USERDG2/prod/DATAFILE/SYSAUX.257.573852115
- - - - N system01.dbf => +USERDG2/prod/DATAFILE/SYSTEM.256.573852113
- - - - N temp01.dbf => +USERDG2/prod/TEMPFILE/TEMP.266.573852277
- - - - N undotbs01.dbf => +USERDG2/prod/DATAFILE/UNDOTBS1.258.573852115
- - - - N users01.dbf => +USERDG2
The Sys column, immediately to the left of the Name column, shows if the file or directory was
created by the ASM system. Because the CONTROLFILE directory is not a real file but an alias, the
attributes of the alias, such as size, free space, and redundancy, shown in the first few columns of
the output are null.
The following examples illustrate the use of wildcards.
ASMCMD> ls +dgroup1/mydir1/d*
data1.f
dummy.f
ASMCMD> ls +group1/sample/*
+dgroup1/sample/CONTROLFILE/:
Current.260.555342185
Current.261.555342183
+dgroup1/sample/DATAFILE/:
EXAMPLE.269.555342243
SYSAUX.257.555341961
SYSTEM.256.555341961
UNDOTBS1.272.557429239
USERS.259.555341963
+dgroup1/sample/ONLINELOG/:
group_1.262.555342191
group_1.263.555342195
group_2.264.555342197
group_2.265.555342201
+dgroup1/sample/PARAMETERFILE/:
spfile.270.555342443
+dgroup1/sample/TEMPFILE/:
TEMP.268.555342229
lsct command
Lists information about current ASM clients (from V$ASM_CLIENT). A client, is a database or Oracle
ASM Dynamic Volume Manager (Oracle ADVM), uses diskgroups that are managed by the ASM
instance to which ASMCMD is currently connected.
lsct [-gH] [disk_group]
Flag Description
(none) Displays information about current ASM clients from V$ASM_CLIENT.
-g Selects from GV$ASM_CLIENT. GV$ASM_CLIENT.INST_ID is included in the output.
-H Suppresses column headings.
An ASM instance serves as a storage container; it's not a database by itself. Other databases use
the space in the ASM instance for datafiles, control files, and so on.
How do you know how many databases are using an ASM instance?
ASMCMD [+DG1_FRA] > lsct
DB_Name Status Software_Version Compatible_version Instance_Name
PROD CONNECTED 10.2.0.1.0 10.2.0.1.0 PROD
REP CONNECTED 10.2.0.1.0 10.2.0.1.0 REP
ASMCMD [+] > lsct flash (in 11g)
DB_Name Status Software_Version Compatible_version Instance_Name Group_Name
TESTDB CONNECTED 11.2.0.1.0 11.2.0.1.0 TESTDB FLASH
SQL equivalent for lsct command is:
SQL> SELECT * FROM V$ASM_CLIENT;
lsdg command
Lists all diskgroups and their attributes from V$ASM_DISKGROUP_STAT (default) or
V$ASM_DISKGROUP. The output also includes notification of any current rebalance operation. The
output also includes notification of any current rebalance operation for a diskgroup. If a diskgroup
is specified, then lsdg returns only information about that diskgroup.
lsdg [-gcH] [disk_group]
lsdg [-gH][--discovery][pattern] (11.2.0 syntax)
If group is specified, then information about only that diskgroup is listed.
Flag Description
(none) Displays all the diskgroup attributes.
-c or --discovery
Selects from V$ASM_DISKGROUP or GV$ASM_DISKGROUP if the -g flag is also specified. This option is ignored if the ASM instance is version 10.1 or earlier.
-gSelects from GV$ASM_DISKGROUP_STAT or GV$ASM_DISKGROUP if the -c or --discovery flag is also specified. GV$ASM_DISKGOUP.INST_ID is included in the output. The REBAL column of the GV$ASM_OPERATION is also included in the output.
-H Suppresses column headings.
patternReturns only information about the specified diskgroup or diskgroups that match the supplied pattern.
To see the complete set of attributes for a diskgroup, use the V$ASM_DISKGROUP_STAT or
V$ASM_DISKGROUP.
Attribute Name Description
StateState of the diskgroup (BROKEN, CONNECTED, DISMOUNTED, MOUNTED, QUIESCING, and UNKNOWN).
Type Diskgroup redundancy (NORMAL, HIGH, EXTERN).
Rebal Y if a rebalance operation is in progress.
Sector Sector size in bytes.
Block Block size in bytes.
AU Allocation unit size in bytes.
Total_MB Size of the diskgroup in MB.
Free_MBFree space in the diskgroup in MB, without redundancy, from V$ASM_DISKGROUP.
Req_mir_free_MBAmount of space that must be available in the diskgroup to restore full redundancy after the most severe failure that can be tolerated by the diskgroup. This is the REQUIRED_MIRROR_FREE_MB column from V$ASM_DISKGROUP.
Usable_file_MBAmount of free space, adjusted for mirroring, that is available for new files, from V$ASM_DISKGROUP.
Offline_disks Number of offline disks in the diskgroup. Offline disks are eventually dropped.
Name Diskgroup name.
Voting_files Specifies whether the diskgroup contains voting files (Y or N).
ASMCMD [+] > lsdg dgroup2
State Type Rebal Sector Block AU Total_MB Free_MB Req_mir_free_MB Usable_file_MB Offline_disks
Name
MOUNTED NORMAL N 512 4096 1048576 206 78 0 39 0 dgroup2
The following example lists the attributes of the dg_data diskgroup (in 11.2.0).
ASMCMD [+] > lsdg dg_data
State Type Rebal Sector Block AU Total_MB Free_MB Req_mir_free_MB Usable_file_MB Offline_disks
Voting_files Name
MOUNTED NORMAL N 512 4096 4194304 12288 8835 1117 3859 0 N DG_DATA
SQL equivalent for lsdg command is:
SQL> SELECT * FROM V$ASM_DISKGROUP;
SQL> SELECT * FROM V$ASM_DISKGROUP_STAT;
mkalias command
Creates an alias for specified system-generated filename.
mkalias file alias
alias must be in the same diskgroup as the system-generated file. Only one alias is permitted for
each ASM file.
ASMCMD [+dgroup1/sample/DATAFILE] > mkalias SYSAUX.257.555341961 sysaux.f
SQL equivalent for mkalias command is:
SQL> ALTER DISKGROUP dg_name ADD ALIAS user_alias FOR file;
mkdir command
Creates ASM directories under the current directory.
mkdir dir_name [dir_name...]
The current directory can be created by the system or by the user. You cannot create a directory at
the root (+) level, which is a diskgroup.
ASMCMD [+dgroup1] > mkdir subdir1 subdir2
SQL equivalent for mkdir command is:
SQL> ALTER DISKGROUP dg_name ADD DIRECTORY dir_name[, dir_name ...];
rm command
Deletes specified ASM files and directories.
rm [-rf] name [name]...
Flag Description
-f Force, remove it without user interaction.
-r Recursive, remove sub-directories also.
If name is a file or alias (can contain wildcard characters), then the rm command can delete the file
or alias, only if it is not currently in use by a client database.
If name is a directory, then the rm command can delete it only if it is empty (unless the -r flag is
used) and it is not a system-generated directory.
If name is an alias, then the rm command deletes both the alias and the file to which the alias
refers.
For example, if we have an alias,
+dg1/dir1/file.alias => +dg/orcl/DATAFILE/System.256.146589651
then running the
rm -r +dg1/dir1
command removes the +dg1/dir1/file.alias as well as +dg/orcl/DATAFILE/System.256.146589651.
To delete only an alias and retain the file that the alias references, use the rmalias command.
If you use a wildcard, the rm command deletes all of the matches except nonempty directories,
unless you use the -r flag. To recursively delete, use the -r flag. This enables you to delete a
nonempty directory, including all files and directories in it and in the entire directory tree
underneath it. If you use the -r flag or a wildcard character, then the rm command prompts you to
confirm the deletion before proceeding, unless you specify the -f flag. When using the -r flag, either
the system-generated file or the alias must be present in the directory in which you run the rm
command.
ASMCMD [+dgroup1/sample/DATAFILE] > rm alias293.f
ASMCMD> rm -rf +dg/orcl/DATAFILE
ASMCMD> rm -rf fradg/*
SQL equivalents for rm command are:
SQL> ALTER DISKGROUP dg_name DROP FILE ...;
SQL> ALTER DISKGROUP dg_name DROP DIRECTORY ...;
rmalias command
Deletes the specified aliases, retaining the files that the aliases reference.
rmalias [-r] alias [alias]...
To recursively delete, use the -r flag. This enables you to delete all of the aliases in the current
directory and in the entire directory tree beneath the current directory. If any user-created
directories become empty as a result of deleting aliases, they are also deleted. Files and
directories created by the system are not deleted.
ASMCMD [+dgroup1/orcl/DATAFILE] > rmalias sysaux.f
ASMCMD > rmalias –r +dgroup1/orcl/ARCHIVES
SQL equivalent for rmalias command is:
SQL> ALTER DISKGROUP dg_name DELETE ALIAS user_alias;
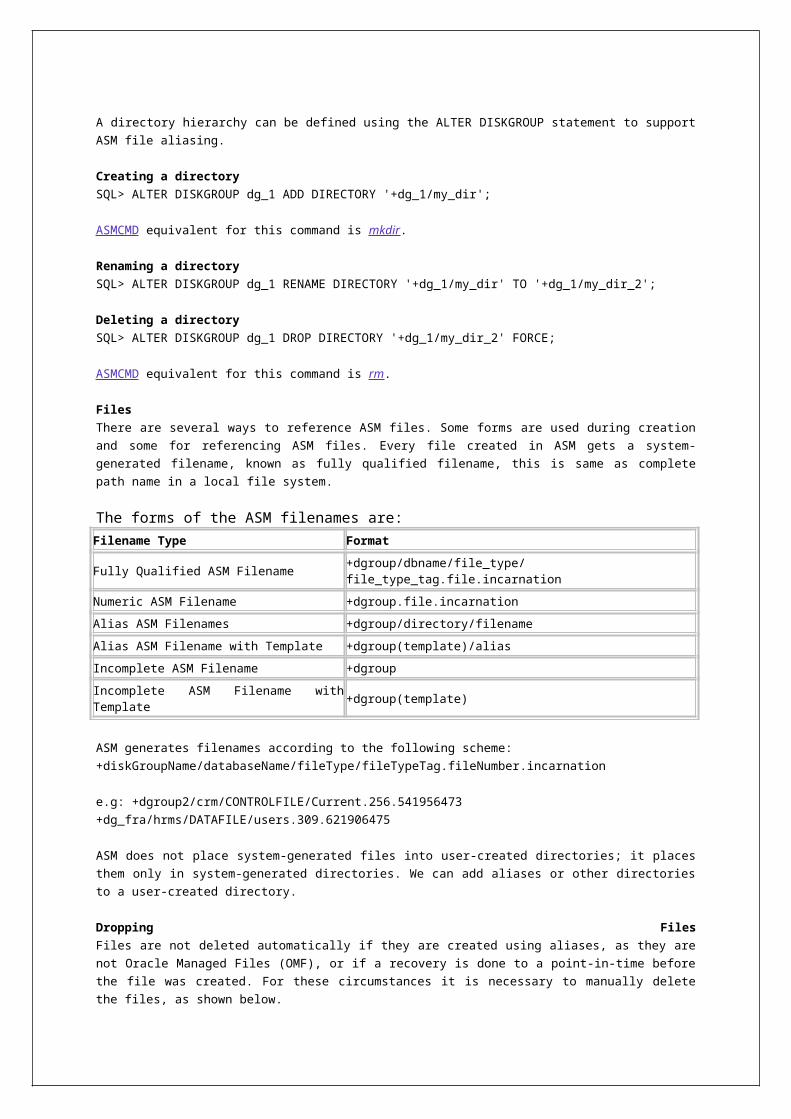
exit command
Exits ASMCMD and returns control to the OS command prompt.
exit
ASMCMD> exit
Oracle 11g Release1 commands
cp command
Used to copy files between ASM diskgroups on local instances to and from remote instances. The
file copy cannot be between remote instances. The local ASM instance must be either the source or
the target. We can also use this command to copy files from ASM diskgroups to the OS.
cp [-ifr] [\@connect_identifier:]src_fname [\@connect_identifier:]tgt_fname
cp [-ifr] [\@connect_identifier:]src_fnameN[, src_fnameN+1…] [\@connect_identifier:]tgt_directory
Flag Description
-i Interactive, prompt before copy file or overwrite.
-f Force, if an existing destination file, remove it and try again without user interaction.
-r Recursive, copy forwarding sub-directories recursively.
The connect_identifier parameter is not required for a local instance copy, which is default. In case
of a remote instance copy, we need to specify the connect_identifier and ASM prompts for a
password in a non-echoing prompt. The connect_identifier is in the form of:
user_name@host_name[.port_number].SID
The user_name, host_name, and SID are required. The default port number is 1521.
src_fname(s) - Source file name to copy from. Enter either the fully qualified file name, or the ASM
alias.
tgt_fname - A user alias for the created target file name or alias directory name.
tgt_directory - A target alias directory within an ASM diskgroup. The target directory must exist,
otherwise the file copy returns an error.
The format of copied files is portable between Little-Endian and Big-Endian systems, if the files
exist in an ASM diskgroup. ASM automatically converts the format when it writes the files. For
copying non-ASM files from or to an ASM diskgroup, you can copy the files to a different endian
platform and then use one of the commonly used utilities to convert the file.
ASMCMD [+] > cp +DG1/vdb.ctf1 /backups/vdb.ctf1
copying file(s)...
source +DG1/vdb.ctf1
target /backups/vdb.ctf1
file, /backups/vdb.ctf1, copy committed.
ASMCMD [+DG3/prod/DATAFILE] > cp warehouse.dbf /tmp
copying file(s)...
source +DG3/prod/DATAFILE/warehouse.dbf
target /tmp/warehouse.dbf
file, /tmp/warehouse.dbf, copy committed.
ASMCMD [+] > cp +DATA/db11g/datafile/users.273.661514191 /tmp/users.dbf
ASMCMD [+] > cp +DATA1/db11g/datafile/users.273.661514191 +DATA2/db11g/datafile/users.f
md_backup command
Creates a backup file containing metadata for one or more diskgroups. By default, all the mounted
diskgroups are included in the backup file which is saved in the current working directory. If the
name of the backup file is not specified, ASM names the file AMBR_BACKUP_INTERMEDIATE_FILE.
Here AMBR stands for ASM Managed Backup Recovery.
md_backup [-b location_of_backup] [-g dgname [-g dgname...]]
md_backup [-b location_of_backup] [-g dgname[, dgname...]]
Flag Description
-b Specifies the location in which you want to store the intermediate backup file.
-g Specifies the diskgroup name that needs to be backed up.
This example backs up all of the mounted diskgroups and creates the backup in the current
working directory.
ASMCMD > md_backup
The following example creates a backup of diskgroup asmdsk1 and asmdsk2. The backup will be
saved in the /tmp/dgbackup100221 file.
ASMCMD > md_backup –b /tmp/dgbackup100221 –g admdsk1 –g asmdsk2
ASMCMD > md_backup -b /u01/backup/backup.txt -g dg_fra,dg_data
md_restore command
This command restores a diskgroup metadata backup.
md_restore -b backup_file [-li] [-t (full)|nodg|newdg] [-f sql_script_file] [-g 'dg_name,dg_name,...'] [-
o 'old_dg_name:new_dg_name,...']
md_restore backup_file [--silent]
[--full|--nodg|--newdg -o 'old_diskgroup:new_diskgroup [,...]']
[-S sql_script_file] [-G 'diskgroup [,diskgroup...]'] (11g R2 syntax)
Flag Description
-b Reads the metadata information from backup_file.
-l Prints the messages to a file.
-i or --silent If md_restore encounters an error, it will stop. Specifying this flag ignores any errors.
-t
Specifies the type of diskgroup to be created:full - Create diskgroup and restore metadata.nodg - Restore metadata only.newdg - Create diskgroup with a different name and restore metadata, -o is required to rename.
-f or -S Write SQL commands to sql_script_file instead of executing them.
-g or -GSelect the diskgroups to be restored. If no diskgroups are defined, then all diskgroups will be restored.
-o Rename diskgroup old_dg_name to new_dg_name.
ASMCMD> md_restore -b /tmp/backup.txt -t full -g data
ASMCMD> md_restore –t newdg –of override.txt –i backup_file
Example restores the diskgroup asmdsk1 from the backup script and creates a copy.
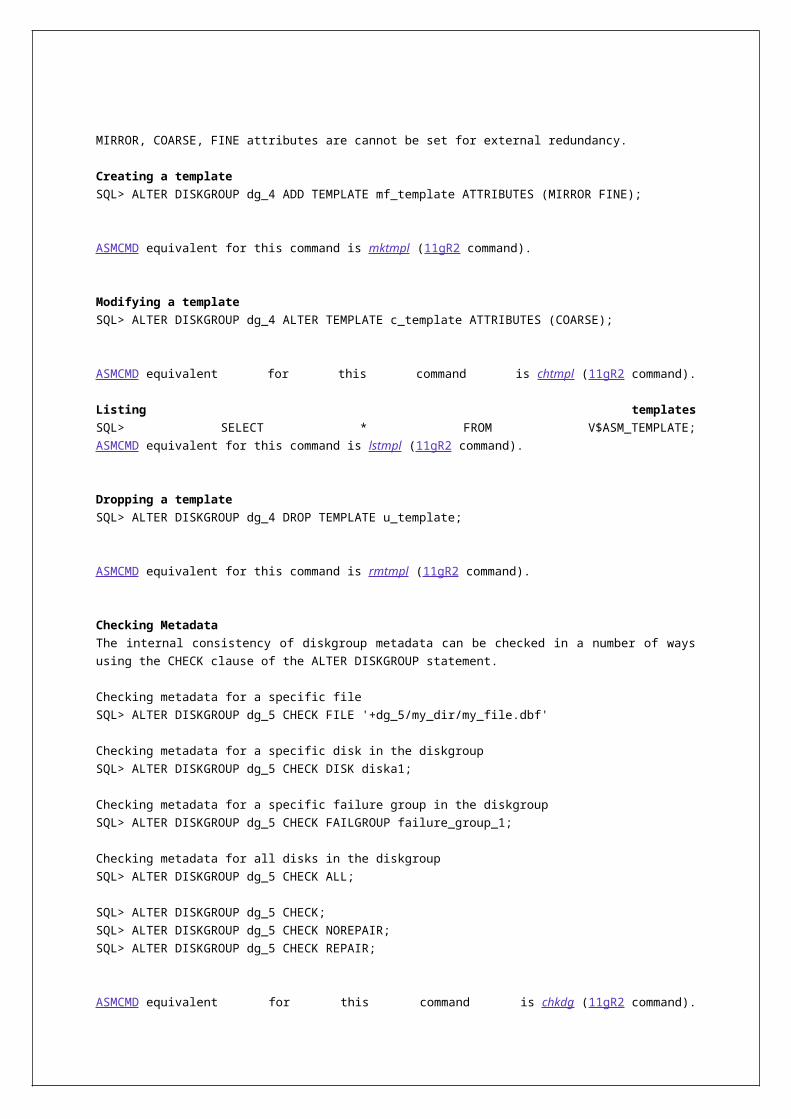
ASMCMD> md_restore –t full –g asmdsk1 –i backup_file
Example takes an existing diskgroup asmdsk6 and restores its metadata.
ASMCMD> md_restore –t nodg –g asmdsk6 –i backup_file
Example restores diskgroup asmdsk1 completely but the new diskgroup that is created is called
asmdsk2.
ASMCMD> md_restore –t newdg -o 'asmdsk1:asmdsk2' –i backup_file
Example restores from the backup file after applying the overrides defined in the file override.txt.
ASMCMD> md_restore –t newdg –of override.txt –i backup_file
Example restores the diskgroup data from the backup script and creates a copy.
ASMCMD [+] > md_restore –-full –G data –-silent /tmp/dgbackup20090714
Example takes an existing diskgroup data and restores its metadata.
ASMCMD [+] > md_restore –-nodg –G data –-silent /tmp/dgbackup20090714
Example restores diskgroup data completely but the new diskgroup that is created is called data2.
ASMCMD [+] > md_restore –-newdg -o 'data:data2' --silent /tmp/dgbackup20090714
Example restores from the backup file after applying the overrides defined in the override.sql script
file.
ASMCMD [+] > md_restore -S override.sql --silent /tmp/dgbackup20090714
ASMCMD> md_restore -b dg7.backup -t full -f cr8_dg7.sql
lsdsk command
List the disks that are visible to ASM, using V$ASM_DISK_STAT (default) or V$ASM_DISK.
lsdsk [-ksptcgHI] [-d diskgroup_name] [pattern]
lsdsk [-kptgMHI] [-G diskgroup] [--member|--candidate]
[--discovery] [--statistics] [pattern] (11g R2 syntax)
Flag Description
(none) Displays PATH column of V$ASM_DISK.
-kDisplays TOTAL_MB, FREE_MB, OS_MB, NAME, FAILGROUP, LIBRARY, LABEL, UDID, PRODUCT, REDUNDANCY, and PATH columns of V$ASM_DISK.
-s or --statistics
Displays READS, WRITES, READ_ERRS, WRITE_ERRS, READ_TIME, WRITE_TIME, BYTES_READ, BYTES_WRITTEN, and PATH columns of V$ASM_DISK.
-pDisplays GROUP_NUMBER, DISK_NUMBER, INCARNATION, MOUNT_STATUS, HEADER_STATUS, MODE_STATUS, STATE, and PATH columns of V$ASM_DISK.
-tDisplays CREATE_DATE, MOUNT_DATE, REPAIR_TIMER, and PATH columns of V$ASM_DISK.
-gSelects from GV$ASM_DISK_STAT or GV$ASM_DISK if the -c flag is also specified. GV$ASM_DISK.INST_ID is included in the output.
-cSelects from V$ASM_DISK or GV$ASM_DISK, if the -g flag is also specified. This option is ignored if the ASM instance is version 10.1 or earlier.
-H Suppresses column headings.
-IScans disk headers for information rather than extracting the information from an ASM instance. This option forces the non-connected mode.
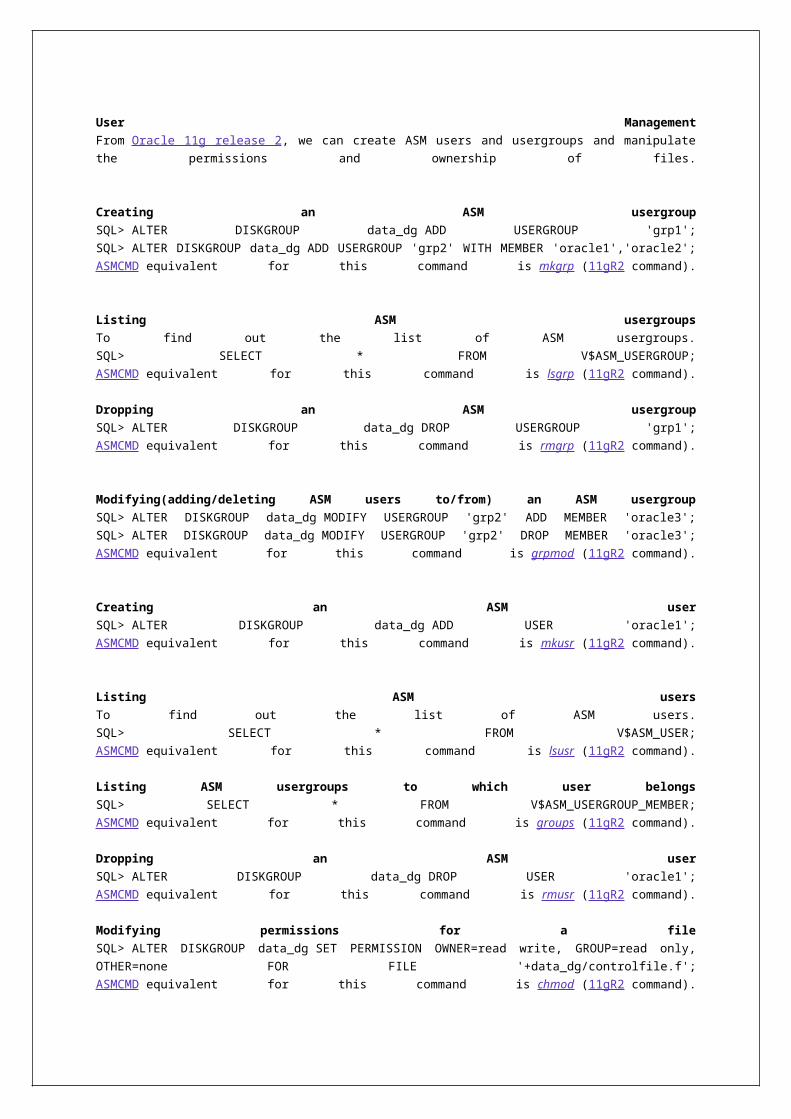
-d or -GRestricts results to only those disks that belong to the group specified by diskgroup_name.
--discoverySelects from V$ASM_DISK, or from GV$ASM_DISK if the -g flag is also specified. This option is always enabled if the Oracle ASM instance is version 10.1 or earlier. This flag is disregarded if lsdsk is running in non-connected mode.
-MDisplays the disks that are visible to some but not all active instances. These are disks that, if included in a diskgroup, cause the mount of that diskgroup to fail on the instances where the disks are not visible.
--candidate Restricts results to only disks having membership status equal to CANDIDATE.
--member Restricts results to only disks having membership status equal to MEMBER.
pattern Returns only information about the specified disks that match the supplied pattern.
The k, s, p, and t flags modify how much information is displayed for each disk. If any combinations
of the flags are specified, then the output shows the union of the attributes associated with each
flag.
pattern restricts the output to only disks that matches the pattern specified.
ASMCMD> lsdsk -d DG_DATA -k
ASMCMD> lsdsk -g -t -d DATA1 *_001
This command can run in connected or non-connected mode. The connected mode is always
attempted first. The -I option forces the non-connected mode.
In connected mode, ASMCMD uses dynamic views to retrieve disk information.
In non-connected mode, ASMCMD scans disk headers to retrieve disk information, using an ASM
disk string to restrict the discovery set. This is not supported on Windows.
ASMCMD> lsdsk -k -d ASM_DG_DATA *_001
ASMCMD> lsdsk -sp -d ASM_DG_FRA *_001
ASMCMD> lsdsk -Ik
ASMCMD> lsdsk -t -d ASM_DG_IDX *_001
ASMCMD> lsdsk -Ct -d ASM_DG_DATA *_001
The first and second examples list information about disks in the data diskgroup.
ASMCMD [+] > lsdsk -t -G data
Create_Date Mount_Date Repair_Timer Path
13-JUL-09 13-JUL-09 0 /devices/diska1
13-JUL-09 13-JUL-09 0 /devices/diska2
13-JUL-09 13-JUL-09 0 /devices/diskb1
13-JUL-09 13-JUL-09 0 /devices/diskb2
ASMCMD [+] > lsdsk -p -G data /devices/diska*
Group_Num Disk_Num Incarn Mount_Stat Header_Stat Mode_Stat State Path
1 0 2105454210 CACHED MEMBER ONLINE NORMAL /devices/diska1
1 1 2105454199 CACHED MEMBER ONLINE NORMAL /devices/diska2
1 2 2105454205 CACHED MEMBER ONLINE NORMAL /devices/diska3
The third example lists information about candidate disks.
ASMCMD [+] > lsdsk --candidate -p
Group_Num Disk_Num Incarn Mount_Stat Header_Stat Mode_Stat State Path
0 5 2105454171 CLOSED CANDIDATE ONLINE NORMAL /devices/diske1
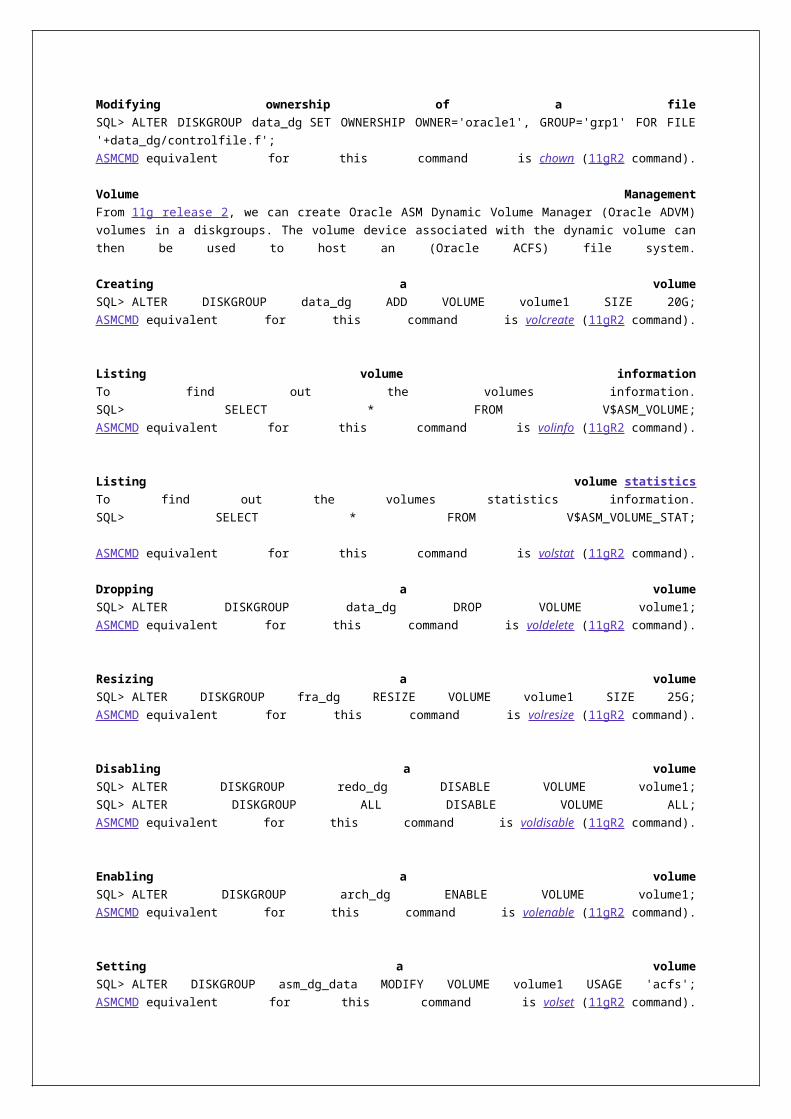
0 25 2105454191 CLOSED CANDIDATE ONLINE NORMAL /devices/diske2
0 18 2105454184 CLOSED CANDIDATE ONLINE NORMAL /devices/diske3
SQL equivalent for lsdsk command is:
SQL> SELECT * FROM V$ASM_DISK;
SQL> SELECT * FROM V$ASM_DISK_STAT;
remap command
Repairs range of physical blocks on a disk. The remap command only repairs blocks that have read
disk I/O errors. It does not repair blocks that contain corrupted contents, whether those blocks can
be read or not. The command assumes a physical block size of 512 bytes and supports all
allocation unit sizes (1MB to 64MB).
It reads the blocks from a good copy of an ASM mirror and rewrites them to an alternate location
on disk if the blocks on the original location cannot be read properly.
remap diskgroup_name disk_name block_range
Flag Description
diskgroup_name Name of the diskgroup in which a disk must be repaired.
disk_name Name of the disk that must be repaired.
block_range Range of physical blocks to repair, in the format: starting_number-ending_number
The following example repairs blocks 4500 through 5599 for disk DATA_001 in diskgroup
DISK_GRP_DATA.
ASMCMD> remap DISK_GRP_DATA DATA_001 4500-5599
The following example repairs blocks 7200 through 8899 for disk largedisk_2 in diskgroup
DISK_GRP_GRA.
ASMCMD> remap DISK_GRP_FRA largedisk_2 7200-8899
Oracle 11g Release2 commands
From 11g release 2, ASMCMD utility can also do startup and shutdown of ASM instances.
Managing diskgroups (create, mount, alter, drop).
File access control (like OS, ugo and rwx ...).
User management.
Template management.
Volume management.
ASMCMD Instance Management Commands
startup command
Starts up an Oracle ASM instance.
startup [--nomount] [--restrict] [--pfile pfile_name]
Flag Description
(default) Will mount diskgroups and enables Oracle ADVM volumes.
--nomount Specifies no mount operation.
--restrict Specifies restricted mode.
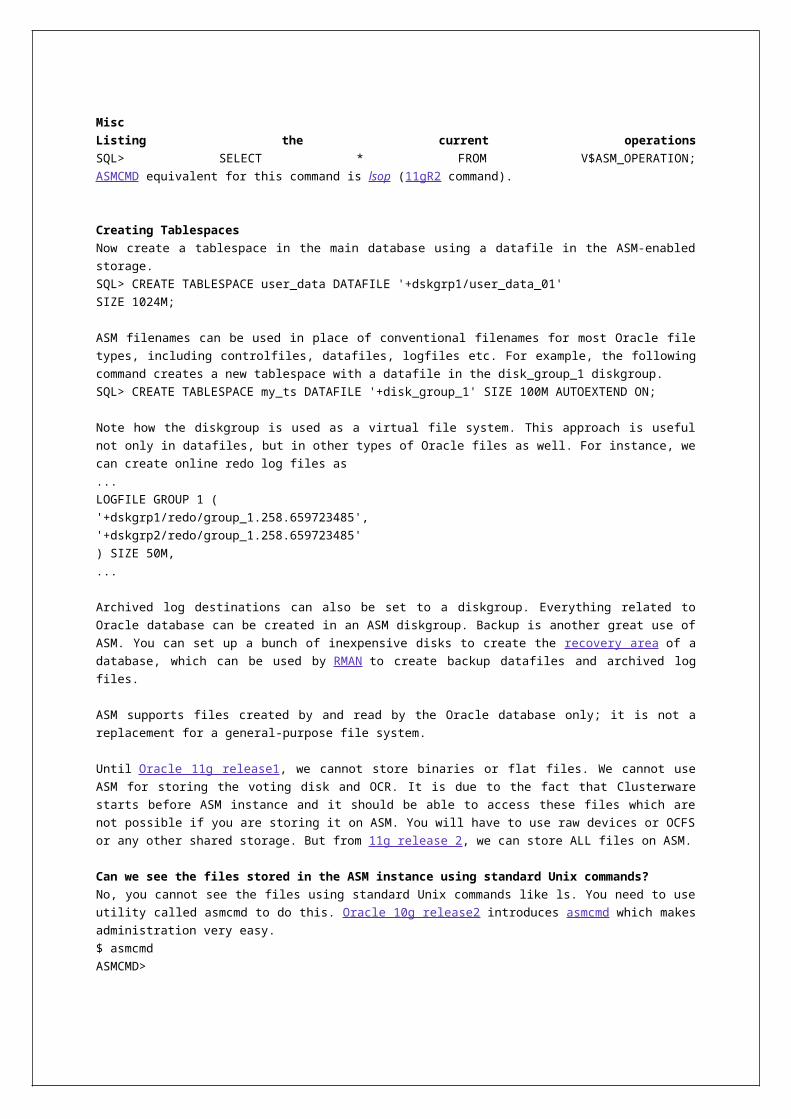
--pfile Oracle ASM initialization parameter file.
The following is an example of the startup command that starts the Oracle ASM instance without
mounting diskgroups and uses the asm_init.ora initialization parameter file.
ASMCMD> startup --nomount --pfile asm_init.ora
SQL equivalent for startup command is:
SQL> STARTUP ... ;
shutdown command
Shuts down an Oracle ASM instance.
shutdown [--abort|--immediate]
Flag Description
(default) normal shutdown.
--abort Shut down aborting all existing operations.
--immediate Shut down immediately.
Oracle strongly recommends that you shut down all database instances that use the Oracle ASM
instance and dismount all file systems mounted on Oracle ASM Dynamic Volume Manager (Oracle
ADVM) volumes before attempting to shut down the Oracle ASM instance with the abort (--abort)
option.
The first example performs a shutdown of the Oracle ASM instance with normal action.
ASMCMD [+] > shutdown
The second example performs a shut down with immediate action
ASMCMD [+] > shutdown –-immediate
The third example performs a shut down that aborts all existing operations.
ASMCMD [+] > shutdown --abort
SQL equivalent for shutdown command is:
SQL> SHUTDOWN ... ;
dsset command
Sets the discovery diskstring value that is used by the Oracle ASM instance and its clients. The
specified diskstring must be valid for existing mounted diskgroups. The updated value takes effect
immediately.dsset [--normal] [--parameter] [--profile [--force]] diskstring
Flag Description
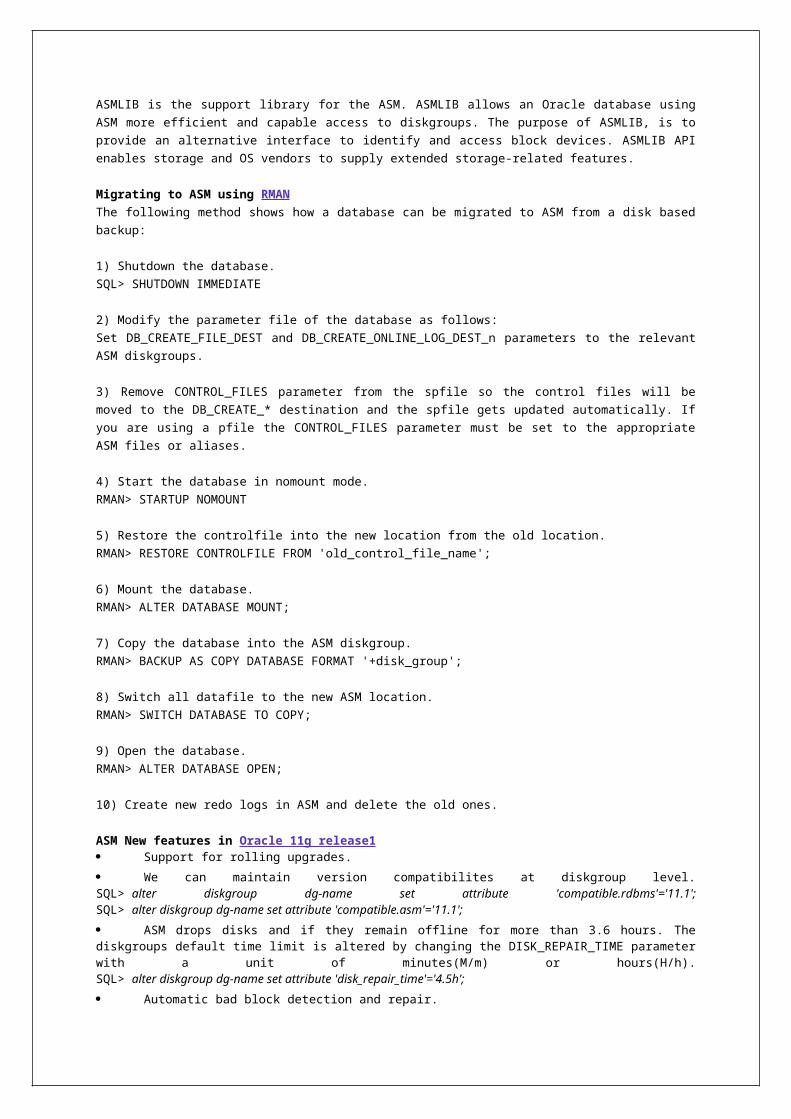
--normal
Sets the discovery string in the Grid Plug and Play (GPnP) profile and in the Oracle ASM instance. The update occurs after the Oracle ASM instance has successfully validated that the specified discovery string has discovered all the necessary diskgroups and voting files. This command fails if the instance is not using a server parameter file (SPFILE).This is the default setting.
--profile [--force]
Specifies the discovery diskstring that is pushed to the GPnP profile without any validation by the Oracle ASM instance, ensuring that the instance can discover all the required diskgroups. The update is guaranteed to be propagated to all the nodes that are part of the cluster.If --force is specified, the specified diskstring is pushed to the local GPnP profile without any synchronization with other nodes in the cluster. This command option updates only the local profile file. This option should only be used for recovery. The command fails if the Oracle Clusterware stack is running.
--parameterSpecifies that the diskstring is updated in memory after validating that the discovery diskstring discovers all the current mounted diskgroups and voting files. The diskstring is not persistently recorded in either the SPFILE or the GPnP profile.
diskstring Specifies the value for the discovery diskstring.
The following example uses dsset to set the current value of the discovery diskstring in the GPnP
profile.
ASMCMD [+] > dsset /devices/disk*
dsget command
Retrieves the discovery diskstring value that is used by the Oracle ASM instance and its clients.dsget [[--normal] [--profile [--force]] [--parameter]]
Flag Description
--normalRetrieves the discovery string from the Grid Plug and Play (GPnP) profile and the one that is set in the Oracle ASM instance. It returns one row each for the profile and parameter setting. This is the default setting.
--profile [--force]
Retrieves the discovery string from the GPnP profile. If --force is specified, retrieves the discovery string from the local GPnP profile.
--parameter Retrieves the ASM_DISKSTRING parameter setting of the Oracle ASM instance.
The following example uses dsget to retrieve the current discovery diskstring value from the GPnP
profile and the ASM_DISKSTRING parameter.
ASMCMD [+] > dsget
profile: /devices/disk*
parameter: /devices/disk*
lspwusr command
List the current users from the local Oracle ASM password file.
lspwusr [-H]
-H Suppresses column headers from the output.
ASMCMD [+] > lspwusr
Username sysdba sysoper sysasm
SYS TRUE TRUE TRUE
ASMSNMP TRUE FALSE FALSE
ASMCMD [+] > lspwusr -H
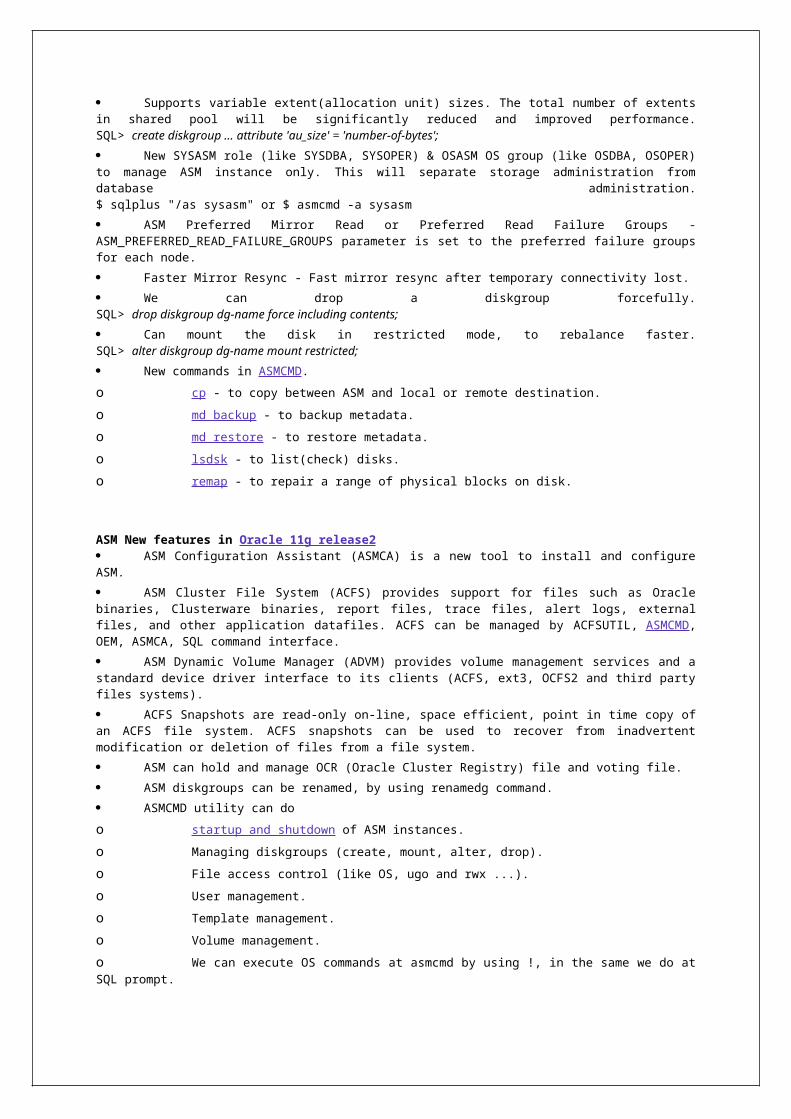
SYS TRUE TRUE TRUE
Satya TRUE TRUE FALSE
orapwusr command
Add, drop, or modify an Oracle ASM password file user. The command requires the SYSASM
privilege to run. A user logged in as SYSDBA cannot change its password using this command.
orapwusr {{ {--add | --modify [--password]}
[--privilege {sysasm|sysdba|sysoper}] } | --delete} user
Flag Description
--add Adds a user to the password file. Also prompts for a password.
--delete Drops a user from the password file.
--modify Changes a user in the password file.
--privilege Sets the role for the user. The options are sysasm, sysdba, and sysoper.
--password Prompts for and then changes the password of a user.
user Name of the user to add, drop, or modify.
orapwusr attempts to update passwords on all nodes in a cluster.
This example adds the Satya to the Oracle ASM password file with the role of the user set to
SYSASM.
ASMCMD [+] > orapwusr --add --privilege sysasm Satya
ASMCMD [+] > lspwusr
Username sysdba sysoper sysasm
SYS TRUE TRUE TRUE
Satya TRUE TRUE TRUE
spset command
Sets the location of the Oracle ASM SPFILE in the Grid Plug and Play (GPnP) profile.
spset location
The following is an example of the spset command that sets the location of the Oracle ASM SPFILE
command in the dg_data diskgroup.
ASMCMD> spset +DG_DATA/asm/asmparameterfile/asmspfile.ora
spget command
Retrieves the location of the Oracle ASM SPFILE from the Grid Plug and Play (GPnP) profile.
spget
The location retrieved by spget is the location in the GPnP profile, but not always the location of the
SPFILE currently used. For example, the location could have been recently updated by spset or
spcopy with the -u option on an Oracle ASM instance that has not been restarted. After the next
restart of the Oracle ASM, this location point to the ASM SPFILE currently is being used.
The following is an example of the spget command that retrieves and displays the location of the
SPFILE from the GPnP profile.
ASMCMD [+] > spget
+DATA/asm/asmparameterfile/registry.253.691575633
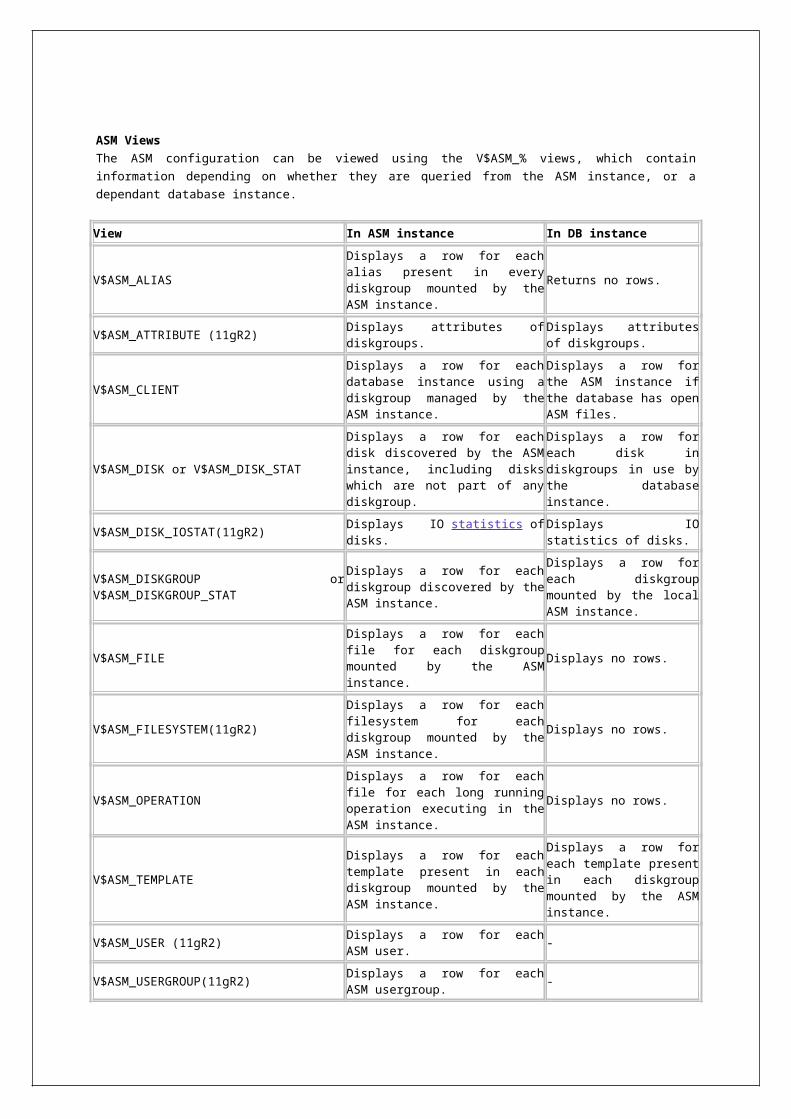
spbackup command
Backs up an Oracle ASM SPFILE. spbackup does not affect the GPnP profile.
spbackup source destination
The backup file that is created is not a special file type and is not identified as a SPFILE. This file
cannot be copied with spcopy. To copy this backup file, use the ASMCMD cp command.
The first example backs up the Oracle ASM SPFILE from one operating system location to another.
ASMCMD> spbackup /u01/oracle/dbs/spfile+ASM.ora /u01/oracle/dbs/bakspfileASM.ora
The second example backs up the SPFILE from an operating system location to the
data/bakspfileASM.ora diskgroup.
ASMCMD> spbackup /u01/oracle/dbs/spfile+ASM.ora +DG_DATA/bakspfileASM.ora
spcopy command
Copies an Oracle ASM SPFILE from source to destination. To use spcopy to copy an Oracle ASM
SPFILE into a diskgroup, the diskgroup attribute COMPATIBLE.ASM must be set to 11.2 or greater.
spcopy [-u] source destination
-u updates the Grid Plug and Play (GPnP) profile. We can also use spset to update the GPnP profile.
Note the following about the use of spcopy: spcopy can copy an Oracle ASM SPFILE from a diskgroup to a different diskgroup or to an operating system file.
spcopy can copy an Oracle ASM SPFILE from an operating system file to a diskgroup or to an operating system file.
spcopy can copy an Oracle ASM SPFILE when the SPFILE is being used by an open Oracle ASM instance.
After copying the SPFILE, you must restart the instance with the SPFILE in the new location to use
that SPFILE. When the Oracle ASM instance is running with the SPFILE in the new location, you can
remove the source SPFILE.
The first example copies the Oracle ASM SPFILE from one operating system location to another.
ASMCMD> spcopy /u01/oracle/dbs/spfile+ASM.ora /u01/oracle/dbs/testspfileASM.ora
The second example copies the SPFILE from an operating system location to the data diskgroup
and updates the GPnP profile.
ASMCMD> spcopy -u /u01/oracle/dbs/spfile+ASM.ora +DATA/testspfileASM.ora
spmove command
Moves an Oracle ASM SPFILE from source to destination and automatically updates the GPnP
profile. To use spmove to move an Oracle ASM SPFILE into a diskgroup, the diskgroup attribute
COMPATIBLE.ASM must be set to 11.2 or greater.
spmove source destination
Note the following about the use of spmove: spmove can move an Oracle ASM SPFILE when the open instance is using a PFILE or a different SPFILE. After moving the SPFILE, you must restart the instance with the SPFILE in the new location to use that SPFILE.
spmove cannot move an Oracle ASM SPFILE when the SPFILE is being used by an open Oracle ASM instance.
The first example moves the Oracle ASM SPFILE from one operating system location to another.

ASMCMD> spmove /u01/oracle/dbs/spfile+ASM.ora /u01/oracle/dbs/testspfileASM.ora
The second example moves the SPFILE from an operating system location to the data diskgroup.
ASMCMD> spmove /u01/oracle/dbs/spfile+ASM.ora +DATA/testspfileASM.ora
lsop command
Lists the current operations on diskgroups or Oracle ASM instance, from V$ASM_OPERATION.
lsop
ASMCMD [+] > lsop
Group_Name Dsk_Num State Power
DG_DATA REBAL WAIT 2
ASMCMD [+] > lsop
Group_Name Dsk_Num State Power
DG_FRA REBAL REAP 3
SQL equivalent for lsop command is:
SQL> SELECT * FROM V$ASM_OPERATION
ASMCMD File Access Control Commands
mkusr command
Adds a valid operating system user to a diskgroup. Only users authenticated as SYSASM can run
this command.
mkusr diskgroup user
The following example adds the asmdba2 user to the dg_fra diskgroup.
ASMCMD [+] > mkusr dg_fra asmdba2
SQL equivalent for mkusr command is:
SQL> ALTER DISKGROUP disk_group ADD USER 'user_name';
lsusr command
Lists Oracle ASM users in a diskgroup.
lsusr [-Ha] [-G diskgroup] [pattern]
Flag Description
-H Suppresses column headings.
-a List all users and the diskgroups to which the users belong.
-G Limits the results to the specified diskgroup name.
pattern Displays the users that match the pattern expression.
The example lists users in the asm_dg_data diskgroup and also shows the OS user Id assigned to
the user.
ASMCMD [+] > lsusr -G asm_dg_data
User_Num OS_ID OS_Name
3 1001 oradba
1 1021 asmdba1
2 1022 asmdba2
ASMCMD [+] > lsusr -G asm_dg_fra asm*
User_Num OS_ID OS_Name
1 1021 asmdba1
2 1022 asmdba2
SQL equivalent for lsusr command is:
SQL> SELECT * FROM V$ASM_USER;
passwd command
Changes the password of a user. The command requires the SYSASM privilege to run.
passwd user
The user is first prompted for the current password, then the new password. An error will be raised
if the user does not exist in the Oracle ASM password file.
ASMCMD [+] > passwd asmdba2
Enter old password (optional):
Enter new password: ******
rmusr command
Deletes an OS user from a diskgroup. Only a user authenticated as SYSASM can run this command.
rmusr [-r] diskgroup user
-r removes all files in the diskgroup that the user owns at the same time that the user is removed.
The following is an example to remove the asmdba2 user from the dg_data2 diskgroup.
ASMCMD [+] > rmusr dg_data2 asmdba2
SQL equivalent for rmusr command is:
SQL> ALTER DISKGROUP disk_group DROP USER 'user_name';
mkgrp command
Creates a new Oracle ASM user group. We can optionally specify a list of users to be included as
members of the new user group. User group name can have maximum 30 characters.
mkgrp diskgroup usergroup [user] [user...]
This example creates the asm_data user group in the dg_data diskgroup and adds the asmdba1
and asmdba2 users to the user group.
ASMCMD [+] > mkgrp dg_data asm_data asmdba1 asmdba2
ASMCMD [+] > mkgrp dg_fra asm_fra
SQL equivalent for mkgrp command is:
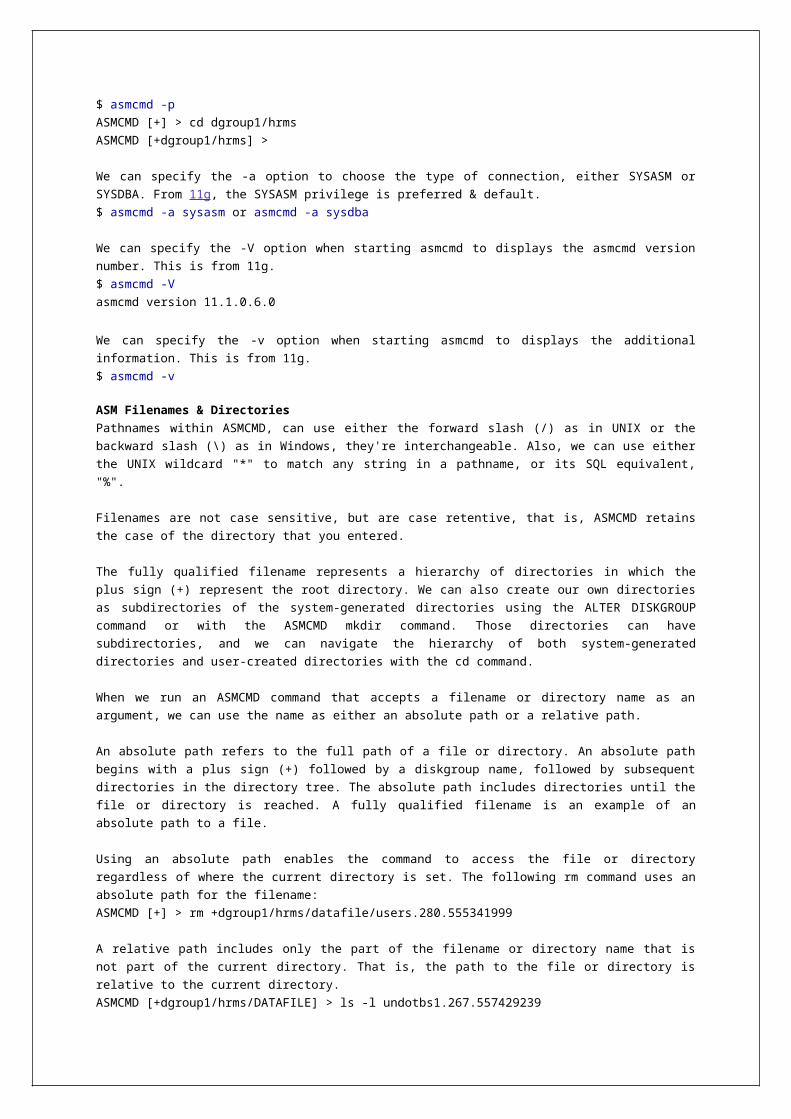
SQL> ALTER DISKGROUP disk_group ADD USERGROUP 'usergroup_name';
SQL> ALTER DISKGROUP disk_group ADD USERGROUP 'usergroup_name' WITH MEMBER
'user_names';
lsgrp command
Lists all Oracle ASM user groups.
lsgrp [-Ha] [-G diskgroup] [pattern]
Flag Description
-H Suppresses column headings.
-a Lists all columns.
-G Limits the results to the specified diskgroup name.
pattern Displays the user groups that match the pattern expression.
The following example displays a subset of information about the user groups whose name
matches the asm% pattern.
ASMCMD [+] > lsgrp asm%
DG_Name Grp_Name Owner
DG_FRA asm_fra grid
DG_DATA asm_data grid
The second example displays all information about all the user groups.
ASMCMD [+] > lsgrp –a –G DG_DATA
DG_Name Grp_Name Owner Members
DG_DATA asm_data grid asmdba1 asmdba2
SQL equivalent for lsgrp command is:
SQL> SELECT * FROM V$ASM_USERGROUP;
rmgrp command
Removes a user group from a diskgroup. The command must be run by the owner of the group and
also requires the SYSASM privilege to run.
rmgrp diskgroup usergroup
Removing a group might leave some files without a valid group. To ensure that those files have a
valid group, explicitly update those files to a valid group.
The following is an example of the rmgrp command that removes the asm_data user group from
the dg_data diskgroup.
ASMCMD [+] > rmgrp dg_data asm_data
SQL equivalent for rmgrp command is:
SQL> ALTER DISKGROUP disk_group DROP USERGROUP 'usergroup_name';
grpmod command
Adds or removes OS users to and from an existing Oracle ASM user group. Only the owner of the
user group can use this command. The command requires the SYSASM privilege to run. This
command accepts an OS user name or multiple user names separated by spaces. The OS users are
typically owners of a database instance home.
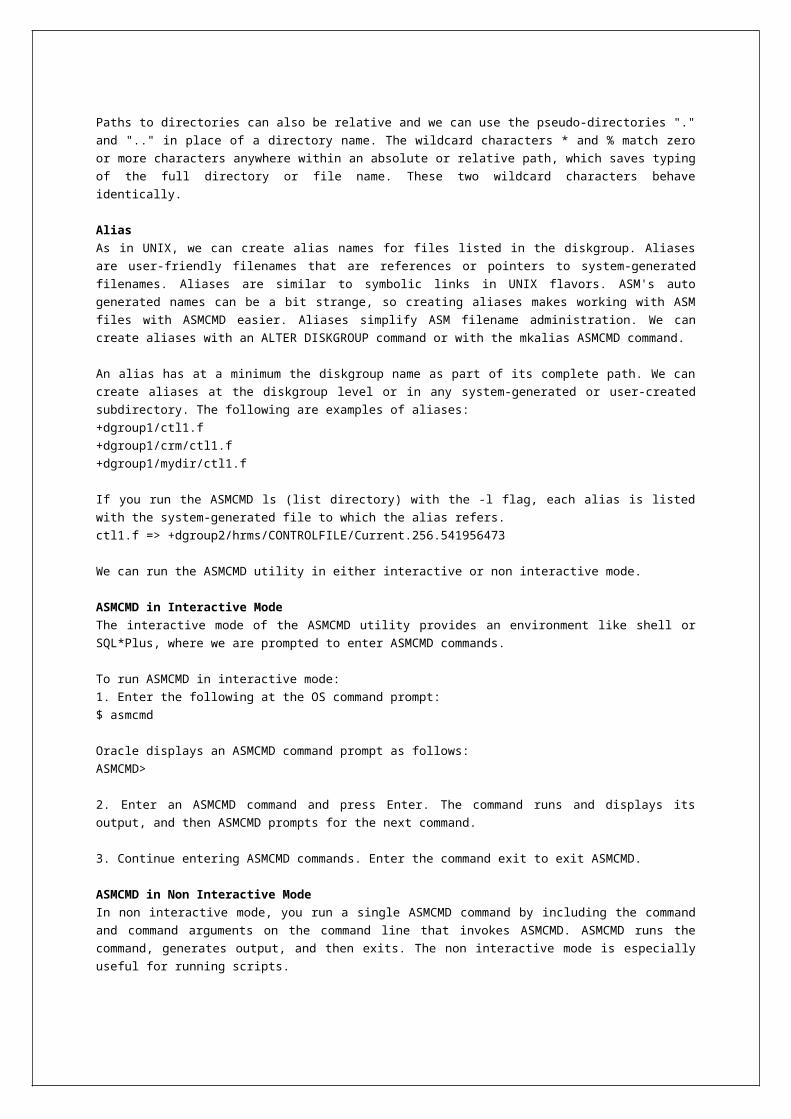
grpmod {--add | --delete} diskgroup usergroup user [user...]
Flag Description
--add Specifies to add users to the user group.
--delete Specifies to delete users from the user group.
usergroup Name of the user group.
user Name of the user to add or remove from the user group.
The following example adds the asmdba1 and asmdba2 users to the asm_fra user group of the
dg_fra diskgroup.
ASMCMD [+] > grpmod –-add dg_fra asm_fra asmdba1 asmdba2
The second example removes the asmdba2 user from the asm_data user group of the dg_data
diskgroup.
ASMCMD [+] > grpmod –-delete dg_data asm_data asmdba2
SQL equivalent for grpmod command is:
SQL> ALTER DISKGROUP disk_group MODIFY USERGROUP 'usergroup_name' ADD MEMBER
'user_name';
SQL> ALTER DISKGROUP disk_group MODIFY USERGROUP 'usergroup_name' DROP MEMBER
'user_name';
groups command
Lists all the user groups to which the specified user belongs.
groups diskgroup user
ASMCMD [+] > groups dg9 asmdba1
asm_data
SQL equivalent for groups command is:
SQL> SELECT * FROM V$ASM_USERGROUP_MEMBER;
chmod command
Changes permissions of a file or list of files. This command accepts a file name or multiple file
names separated by spaces. The specified files must be closed.
chmod mode file [file ...]
mode can be one of the following forms: {ugo|ug|uo|go|u|g|o|a} {+|-} {r|w|rw}a specifies permissions for all users, u specifies permissions for the owner/user of the file, g specifies the group permissions, and o specifies permissions for other users.
{0|4|6} {0|4|6} {0|4|6}The first digit specifies owner permissions, the second digit specifies group permissions, and the third digit specifies other permissions.
Flag Description
6 Read write permissions
4 Read only permissions
0 No permissions

u Owner permissions, used with r or w
g Group permissions, used with r or w
o Other user permissions, used with r or w
a All user permissions, used with r or w
+ Add a permission, used with r or w
- Removes a permission, used with r or w
r Read permission
w Write permission
file Name of a file
We can only set file permissions to read-write, read-only, and no permissions. We cannot set file
permissions to write-only.
ASMCMD [+fra/orcl/archivelog/flashback] > chmod ug+rw log_7.264.684968167
log_8.265.684972027
ASMCMD [+fra/orcl/archivelog/flashback] > chmod 640 log_7.264.684968167
log_8.265.684972027
To view the permissions on a file, use the ASMCMD ls command with the --permission option.
ASMCMD [+] > ls --permission +fra/orcl/archivelog/flashback
User Group Permission Name
grid asm_fra rw-r----- log_7.264.684968167
grid asm_fra rw-r----- log_8.265.684972027
ASMCMD> chmod ug+rw +data/hrms/Controlfile/Current.175.654892547
SQL equivalent for chmod command is:
SQL> ALTER DISKGROUP disk_group SET PERMISSION OWNER=read write, GROUP=read only,
OTHER=none FOR FILE '..path..';
chown command
Changes the owner of a file or list of files. This command accepts a file name or multiple file names
separated by spaces. The specified files must be closed. Only the Oracle ASM administrator can
use this command.
chown user[:usergroup ] file [file ...]
user typically refers to the user that owns the database instance home. Oracle ASM File Access
Control uses the OS name to identify a database.
ASMCMD [+fra/orcl/archivelog/flashback] > chown asmdba1 log_7.264.684968167
log_8.265.684972027
ASMCMD [+fra/orcl/archivelog/flashback] > chown asmdba1:asm_fra log_9.264.687650269
ASMCMD> chown oracle1:asm_users +data/hrms/Controlfile/Current.175.654892547
SQL equivalent for chown command is:
SQL> ALTER DISKGROUP disk_group SET OWNERSHIP OWNER='user_name',
GROUP='usergroup_name' FOR FILE '..path..';
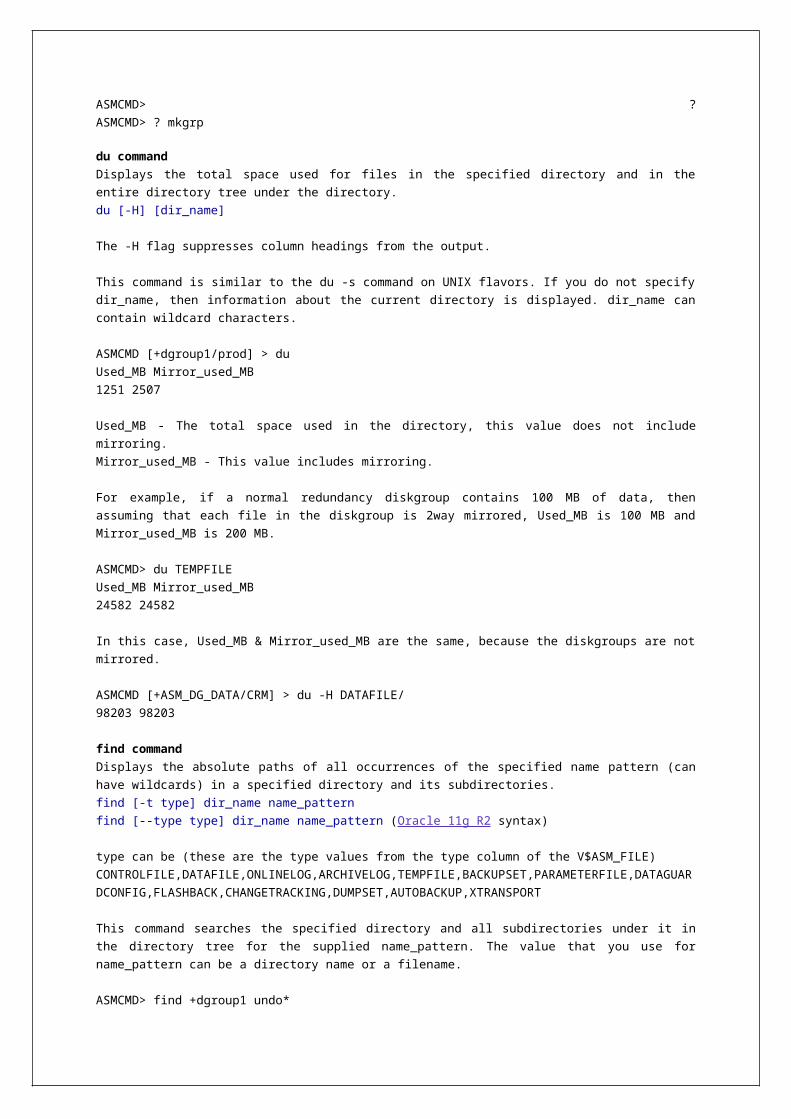
chgrp command
Changes the Oracle ASM user group of a file or list of files. This command accepts a file name or
multiple file names separated by spaces. Only the file owner or the Oracle ASM administrator can
use this command. If the user is the file owner, then he must also be either the owner or a member
of the group for this command to succeed.
chgrp usergroup file [file ...]
ASMCMD [+] > chgrp asm_data +data/orcl/controlfile/Current.260.684924747
ASMCMD [+fra/orcl/archivelog/flashback] > chgrp asm_fra log_7.264.684968167
log_8.265.684972027
ASMCMD Diskgroup Management Commands
mkdg command
Creates a diskgroup based on an XML configuration file which specifies the name of the diskgroup,
redundancy, attributes, and paths of the disks that form the diskgroup.
mkdg {config_file.xml | 'contents_of_xml_file'}
Flag Description
config_fileName of the XML file that contains the configuration for the new diskgroup. mkdg searches for the XML file in the directory where ASMCMD was started unless a path is specified.
contents_of_xml_file The XML script enclosed in single quotations.
Redundancy is an optional parameter; the default is normal redundancy. For some types of
redundancy, disks are required to be gathered into failure groups. In the case that failure groups
are not specified for a diskgroup, each disk in the diskgroup belongs to its own failure group.
It is possible to set some diskgroup attribute values during diskgroup creation. Some attributes,
such as AU_SIZE and SECTOR_SIZE, can be set only during diskgroup creation.
The default diskgroup compatibility settings are 10.1 for Oracle ASM compatibility, 10.1 for
database compatibility, and no value for Oracle ADVM compatibility.
Tags for mkdg XML Configuration File
<dg> diskgroup
name diskgroup name
redundancy normal, external, high
<fg> failure group
name failure group name
</fg>
<dsk> disk
name disk name
path disk path
size size of the disk to add
</dsk>
<a> attribute
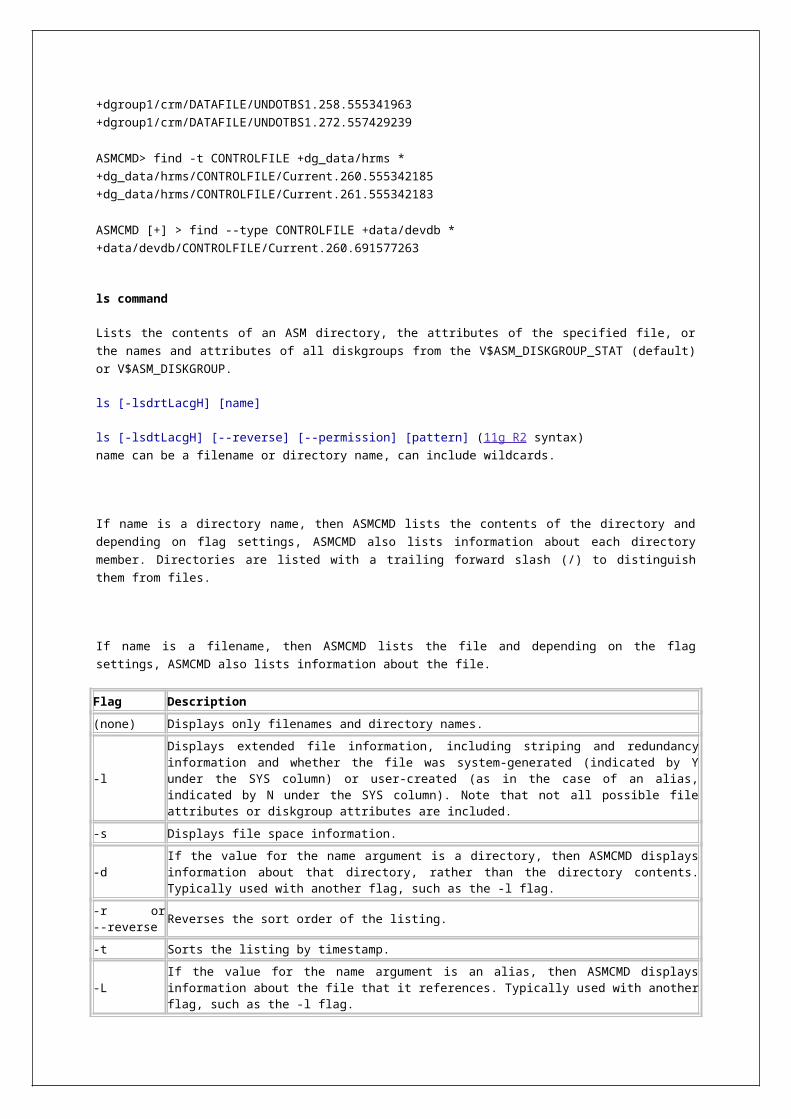
name attribute name
value attribute value
</a>
</dg>
The following is an example of an XML configuration file for mkdg. The configuration file creates a
diskgroup named dg_data with normal redundancy. Two failure groups, fg1 and fg2, are created,
each with two disks identified by associated disk strings. The diskgroup compatibility attributes are
all set to 11.2.
<dg name="dg_data" redundancy="normal">
<fg name="fg1">
<dsk string="/dev/disk1"/>
<dsk string="/dev/disk2"/>
</fg>
<fg name="fg2">
<dsk string="/dev/disk3"/>
<dsk string="/dev/disk4"/>
</fg>
<a name="compatible.asm" value="11.2"/>
<a name="compatible.rdbms" value="11.2"/>
<a name="compatible.advm" value="11.2"/>
</dg>
The first example executes mkdg with an XML configuration file in the directory where ASMCMD
was started.
ASMCMD [+] > mkdg data_config.xml
The second example executes mkdg using information on the command line.
ASMCMD [+] > mkdg '<dg name="data"><dsk path="/dev/disk*"/></dg>'
SQL equivalent for mkdg command is:
SQL> CREATE DISKGROUP diskgroup_name ... ;
chdg command
Changes a diskgroup (adds disks, drops disks, or rebalances) based on an XML configuration file.
chdg {config_file.xml | 'contents_of_xml_file'}
Flag Description
config_fileName of the XML file that contains the changes for the diskgroup. chdg searches for the XML file in the directory where ASMCMD was started unless a path is specified.
contents_of_xml_file The XML script enclosed in single quotations.
The modification includes adding or deleting disks from an existing diskgroup, and the setting
rebalance power level. The power level can set from 0 to the maximum of 11, the same values as
the ASM_POWER_LIMIT initialization parameter.
When adding disks to a diskgroup, the diskstring must be specified in a format similar to the
ASM_DISKSTRING initialization parameter.
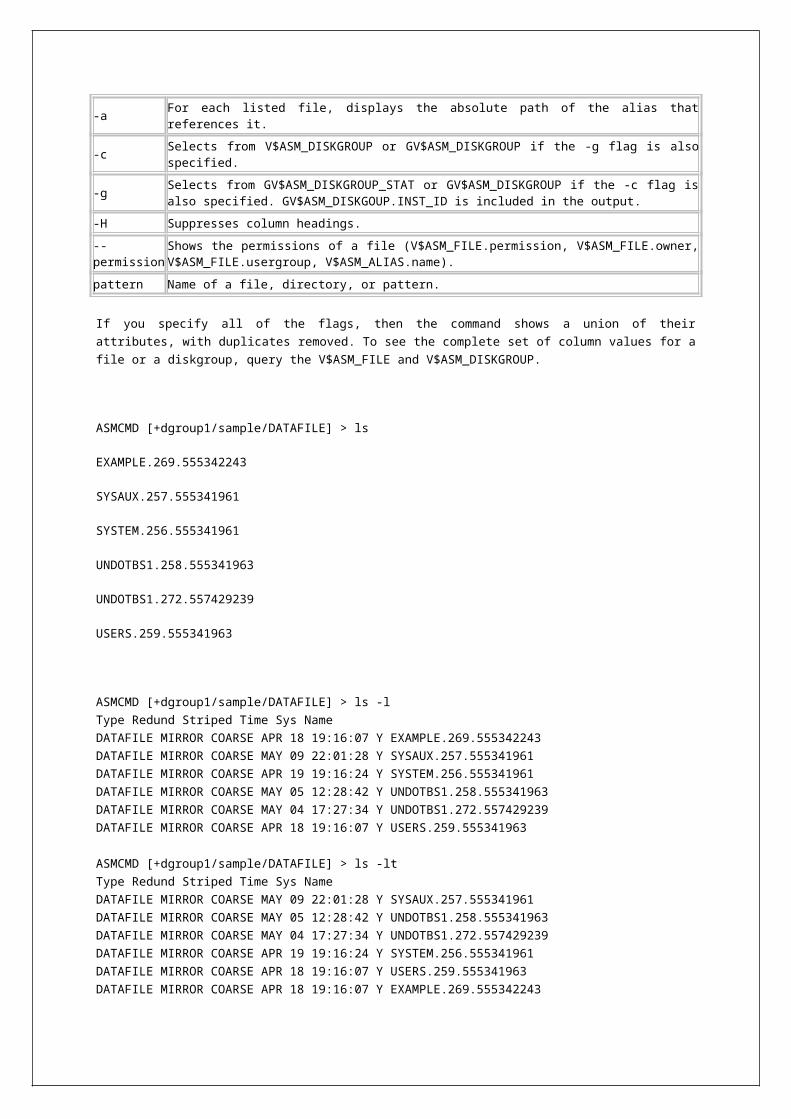
The failure groups are optional parameters. The default causes every disk to belong to a its own
failure group.
Dropping disks from a diskgroup can be performed through this operation. An individual disk can
be referenced by its Oracle ASM disk name. A set of disks that belong to a failure group can be
specified by the failure group name.
We can resize a disk inside a diskgroup with chdg. The resize operation fails if there is not enough
space for storing data after the resize.
Tags for the chdg XML Configuration Template
<chdg> update disk clause (add/delete disks/failure groups)
name diskgroup to change
power power to perform rebalance
<add> items to add are placed here</add>
<drop> items to drop are placed here</drop>
<fg> failure group
name failure group name
</fg>
<dsk> disk
name disk name
path disk path
size size of the disk to add
</dsk>
</chdg>
The following is an example of an XML configuration file for chdg. This XML file alters the diskgroup
named data. The failure group fg1 is dropped and the disk data_0001 is also dropped. The
/dev/disk8 disk is added to failure group fg2. The rebalance power level is set to 4.
<chdg name="data" power="4">
<drop>
<fg name="fg1"></fg>
<dsk name="data_0001"/>
</drop>
<add>
<fg name="fg2">
<dsk string="/dev/disk8"/>
</fg>
</add>
</chdg>
The following are examples of the chdg command with the configuration file or configuration
information on the command line.
ASMCMD [+] > chdg data_config.xml
ASMCMD [+] > chdg '<chdg name="data" power="3">
<drop><fg name="fg1"></fg><dsk name="data_0001"/></drop>
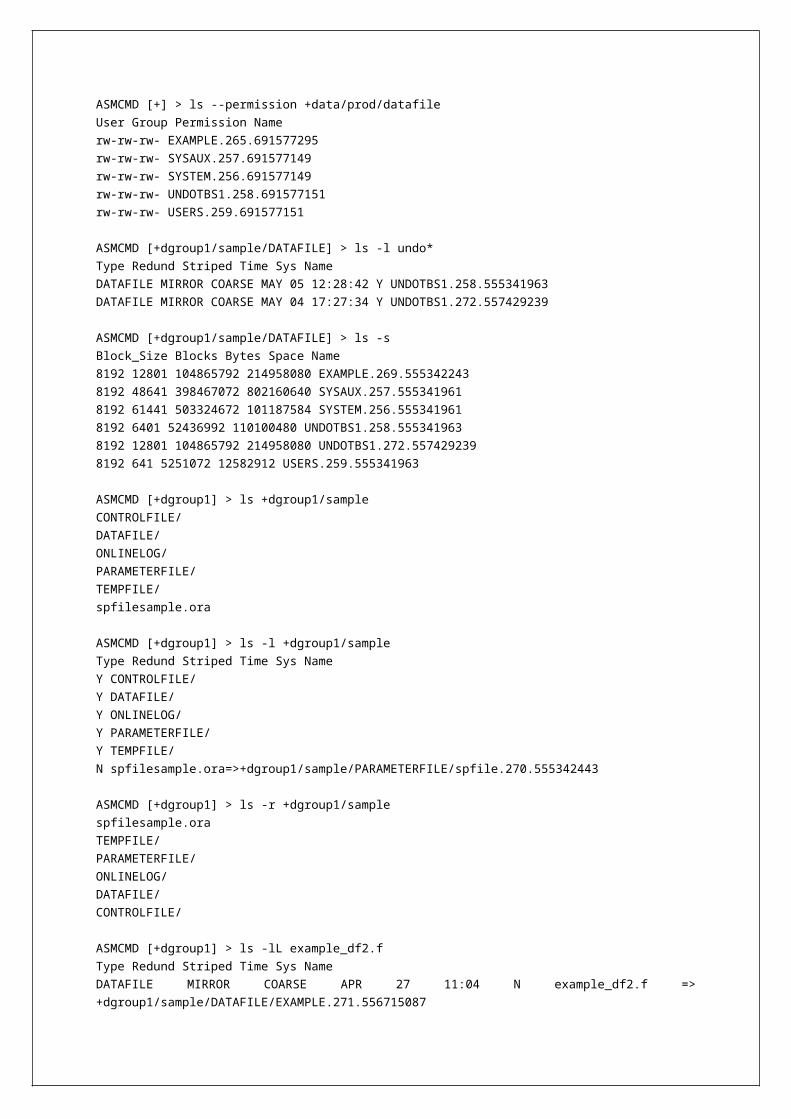
<add><fg name="fg2"><dsk string="/dev/disk5"/></fg></add></chdg>'
SQL equivalent for chdg command is:
SQL> ALTER DISKGROUP diskgroup_name ... ;
dropdg command
Drops an existing diskgroup. The diskgroup cannot be mounted on multiple nodes.
dropdg [-r] [-f] diskgroup
Flag Description
-f Force the operation. Only applicable if the diskgroup cannot be mounted.
-r Recursive, include contents.
diskgroup Name of diskgroup to drop.
The first example forces the drop of the diskgroup dg_data, including any data in the diskgroup.
ASMCMD [+] > dropdg -r -f dg_data
The second example drops the diskgroup dg_fra, including any data in the diskgroup.
ASMCMD [+] > dropdg -r dg_fra
SQL equivalent for dropdg command is:
SQL> DROP DISKGROUP diskgroup_name ... ;
chkdg command
Checks or repairs the metadata of a diskgroup. chkdg checks the metadata of a diskgroup for
errors and optionally repairs the errors.
chkdg [--repair] diskgroup
The following is an example of the chkdg command used to check and repair the dg_data
diskgroup.
ASMCMD [+] > chkdg --repair dg_data
SQL equivalent for chkdg command is:
SQL> ALTER DISKGROUP diskgroup_name CHECK ... ;
mount command
Will mount the specified diskgroups. This operation mounts one or more diskgroups. A diskgroup
can be mounted with or without force or restricted options.
mount [--restrict] {[-a] | [-f] diskgroup[,diskgroup,...]}
Flag Description
--restrict Mounts in restricted mode.
-a Mounts all diskgroups.
-f Forces the mount operation.
diskgroup Name of the diskgroup.
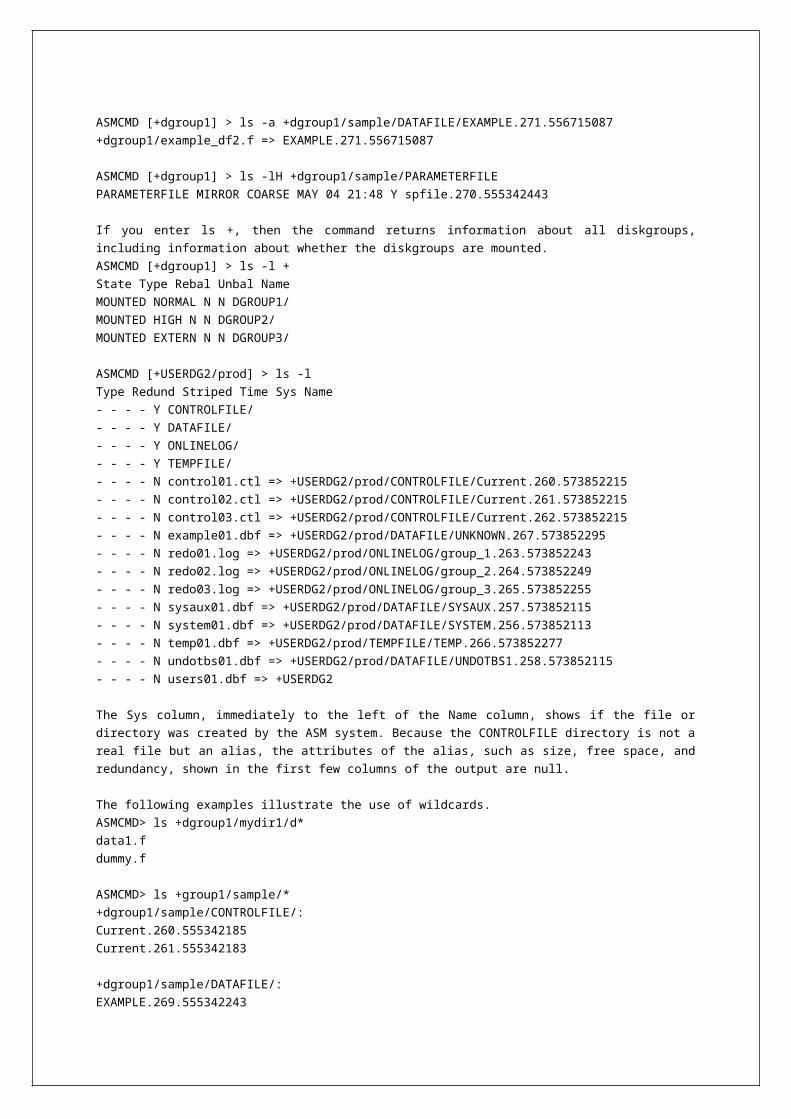
The following are examples of the mount command showing the use of the force, restrict, and all
options.
ASMCMD [+] > mount -f data
ASMCMD [+] > mount --restrict data
ASMCMD [+] > mount -a
SQL equivalent for mount command is:
SQL> ALTER DISKGROUP diskgroup_name MOUNT;
umount command
Will dismount the specified diskgroup.
umount {-a | [-f] diskgroup}
Flag Description
-aDismounts all mounted diskgroups. These disk groups are listed in the output of the V$ASM_DISKGROUP view.
-f Forces the dismount operation.
diskgroup Name of the diskgroup.
The first example dismounts all diskgroups mounted on the Oracle ASM instance.
ASMCMD [+] > umount -a
The second example forces the dismount of the data disk group.
ASMCMD [+] > umount -f data
SQL equivalent for umount command is:
SQL> ALTER DISKGROUP diskgroup_name DISMOUNT;
offline command
Offline disks or failure groups that belong to a diskgroup.
offline -G diskgroup {-F failgroup|-D disk} [-t {minutes|hours}]
Flag Description
-G Diskgroup name.
-F Failure group name.
-D Specifies a single disk name.
-tSpecifies the time before the specified disk is dropped as nm or nh, where m specifies minutes and h specifies hours. The default unit is hours.
When a failure group is specified, this implies all the disks that belong to it should be offlined.
The first example offlines the failgroup1 failure group of the dg_data diskgroup.
ASMCMD [+] > offline -G dg_data -F failgroup1
The second example offlines the data_0001 disk of the dg_data diskgroup with a time of 1.5 hours
before the disk is dropped.
ASMCMD [+] > offline -G dg_data -D data_0001 -t 1.5h
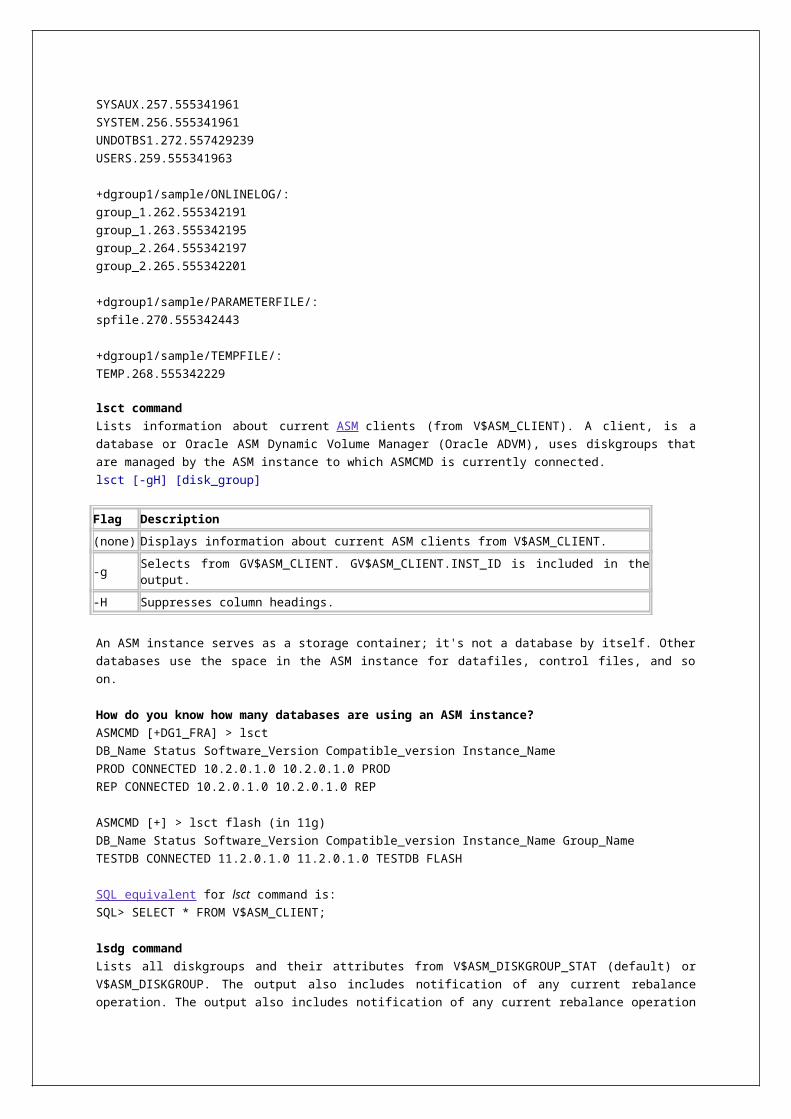
SQL equivalent offline command is:
SQL> ALTER DISKGROUP diskgroup_name OFFLINE ...;
online command
Online all disks, a single disk, or a failure group that belongs to a diskgroup.
online {[-a] -G diskgroup|-F failgroup|-D disk} [-w]
Flag Description
-a Online all offline disks in the diskgroup.
-G Diskgroup name.
-F Failure group name.
-D Disk name.
-wWait option. Causes ASMCMD to wait for the diskgroup to be rebalanced before returning control to the user. The default is not waiting.
When a failure group is specified, this implies all the disks that belong to it should be onlined.
The first example onlines all disks in the failgroup1 failure group of the dg_data diskgroup with the
wait option enabled.
ASMCMD [+] > online -G dg_data -F failgroup1 -w
The second example onlines the data_0001 disk in the dg_data diskgroup.
ASMCMD [+] > online -G dg_data -D data_0001
SQL equivalent online command is:
SQL> ALTER DISKGROUP diskgroup_name ONLINE ...;
rebal command
Rebalances a diskgroup. The power level can be set from 0 to 11. A value of 0 disables
rebalancing. If the rebalance power is not specified, the value defaults to the setting of the
ASM_POWER_LIMIT initialization parameter.
rebal [--power power_value] [-w] diskgroup
Flag Description
--power Power setting (0 to 11).
-wWait option. Causes ASMCMD to wait for the diskgroup to be rebalanced before returning control to the user. The default is not waiting.
diskgroup Diskgroup name.
The following example rebalances the dg_fra diskgroup with a power level set to 6.
ASMCMD [+] > rebal --power 6 dg_fra
We can determine if a rebalance operation is occurring with the ASMCMD lsop command.
ASMCMD [+] > lsop
Group_Name Dsk_Num State Power
FRA REBAL RUN 6
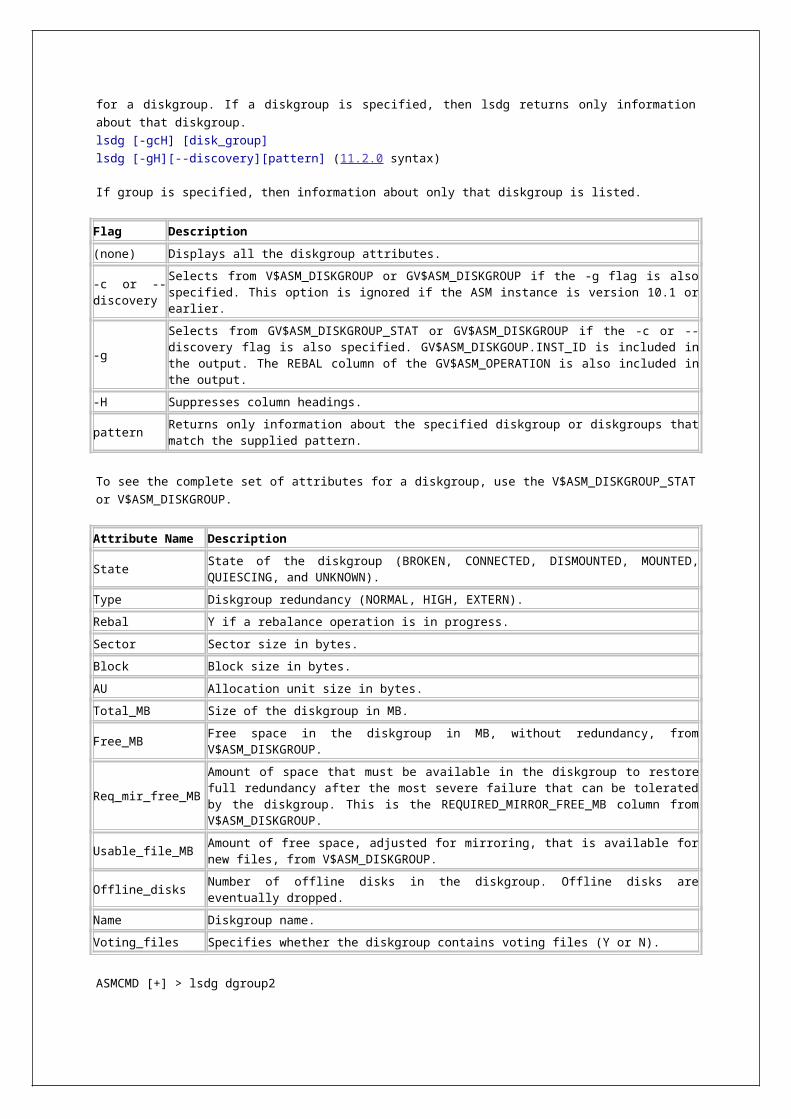
SQL equivalent rebal command is:
SQL> ALTER DISKGROUP diskgroup_name REBALANCE POWER n;
iostat command
Will display I/O statistics of disks in mounted ASM diskgroups, by using V$ASM_DISK_IOSTAT.
iostat [-etH] [--io] [--region] [-G diskgroup] [interval]
Flag Description
-e Displays error statistics (Read_Err, Write_Err).
-t Displays time statistics (Read_Time, Write_Time).
-H Suppresses column headings.
--io Displays information in number of I/Os, instead of bytes.
--regionDisplays information for cold and hot disk regions (Cold_Reads, Cold_Writes, Hot_Reads, Hot_Writes).
-G Displays statistics for the diskgroup name.
intervalRefreshes the statistics display based on the interval value (seconds). Use Ctrl-C to stop the interval display.
To see the complete set of statistics for a diskgroup, use the V$ASM_DISK_IOSTAT view.Attribute Name
Description
Group_Name Name of the diskgroup.
Dsk_Name Name of the disk.
ReadsNumber of bytes read from the disk. If the --io option is entered, then the value is displayed as number of I/Os.
WritesNumber of bytes written from the disk. If the --io option is entered, then the value is displayed as number of I/Os.
Cold_ReadsNumber of bytes read from the cold disk region. If the --io option is entered, then the value is displayed as number of I/Os.
Cold_WritesNumber of bytes written from the cold disk region. If the --io option is entered, then the value is displayed as number of I/Os.
Hot_ReadsNumber of bytes read from the hot disk region. If the --io option is entered, then the value is displayed as number of I/Os.
Hot_WritesNumber of bytes written from the hot disk region. If the --io option is entered, then the value is displayed as number of I/Os.
Read_Err Number of failed I/O read requests for the disk.
Write_Err Number of failed I/O write requests for the disk.
Read_TimeI/O time (in hundredths of a second) for read requests for the disk if the TIMED_STATISTICSinitialization parameter is set to TRUE (0 if set to FALSE).
Write_TimeI/O time (in hundredths of a second) for write requests for the disk if the TIMED_STATISTICSinitialization parameter is set to TRUE (0 if set to FALSE).
If a refresh interval is not specified, the number displayed represents the total number of bytes or
I/Os. If a refresh interval is specified, then the value displayed (bytes or I/Os) is the difference
between the previous and current values, not the total value.
The first example displays disk I/O statistics for the data diskgroup in total number of bytes.
ASMCMD> iostat -G DG_DATA
Group_Name Disk_Name Reads Writes
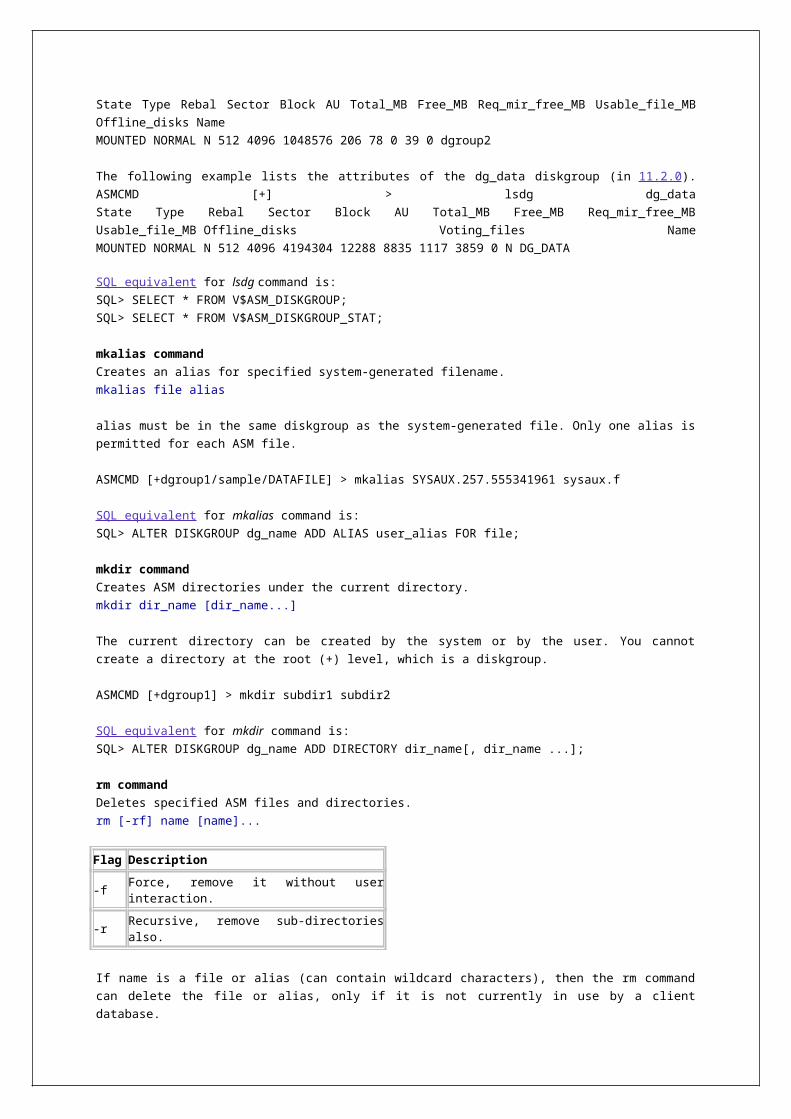
DG_DATA DATA_0010 58486 29183
DG_DATA DATA_0011 4860 18398
The second example displays disk I/O statistics for the data diskgroup in total number of I/O
operations.
ASMCMD [+] > iostat --io -G data
Group_Name Dsk_Name Reads Writes
DATA DATA_0000 2801 34918
DATA DATA_0001 58301 35700
DATA DATA_0002 3320 36345
ASMCMD> iostat -t
Group_Name Disk_Name Reads Writes Read_Time Write_Time
FRA DATA_0099 54601 38411 441.234546 672.694266
SQL equivalent for iostat command is:
SQL> SELECT * FROM V$ASM_DISK_IOSTAT;
setattr command
setattr command will change an attribute of a diskgroup.
setattr -G disk_group attribute_name attribute_value
ASMCMD> setattr -G DG_ASM_FRA compatible.asm 11.2.0.0.0
ASMCMD> setattr -G DG_ASM_DATA compatible.rdbms 11.1.0.0.0
ASMCMD> setattr -G DG_ASM_DATA au_size 2M
SQL equivalent for setattr command is:
SQL> ALTER DISKGROUP disk_group SET ATTRIBUTE attribute_name=attribute_value;
lsattr command
List attributes of a diskgroup, from V$ASM_ATTRIBUTE.
lsattr [-G diskgroup] [-Hlm] [pattern]
Flag Description
-G Diskgroup name.
-H Suppresses column headings.
-l Display names with values.
-m Displays additional information, such as the RO and Sys columns.
pattern Display the attributes that contain pattern expression.
The RO (read-only) column identifies those attributes that can only be set when a diskgroup is
created. The Sys column identifies those attributes that are system-created.
ASMCMD> lsattr -l -G DG_ASM_FRAName Valueaccess_control.enabled FALSEaccess_control.umask 066au_size 1048576cell.smart_scan_capable FALSEcompatible.asm 11.2.0.0.0compatible.rdbms 10.1.0.0.0

disk_repair_time 3.6hsector_size 512
ASMCMD> setattr -G DG_ASM_FRA compatible.rdbms 11.2.0.0.0ASMCMD> lsattr -l -G DG_ASM_FRAName Valueaccess_control.enabled FALSEaccess_control.umask 066au_size 1048576cell.smart_scan_capable FALSEcompatible.asm 11.2.0.0.0compatible.rdbms 11.2.0.0.0disk_repair_time 3.6hsector_size 512
ASMCMD [+] > lsattr -l -G fra %compat*
Name Value
compatible.asm 11.2.0.0.0
compatible.rdbms 10.1.0.0.0
SQL equivalent for lsattr command is:
SQL> SELECT * FROM V$ASM_ATTRIBUTE;
lsod command
Lists the open ASM disks.
lsod [-H] [-G diskgroup] [--process process_name] [pattern]
Flag Description
-H Suppresses column header information from the output.
-G Specifies the diskgroup that contains the open disks.
--process Specifies a pattern to filter the list of processes.
pattern Specifies a pattern to filter the list of disks.
The rebalance operation (RBAL) opens a disk both globally and locally so the same disk may be
listed twice in the output for the RBAL process.
The first example lists the open devices associated with the data diskgroup and the LGWR process.
ASMCMD [+] > lsod -G data --process LGWR
Instance Process OSPID Path
1 oracle@dadvmn0652 (LGWR) 26593 /devices/diska1
1 oracle@dadvmn0652 (LGWR) 26593 /devices/diska2
1 oracle@dadvmn0652 (LGWR) 26593 /devices/diska3
1 oracle@dadvmn0652 (LGWR) 26593 /devices/diskb1
1 oracle@dadvmn0652 (LGWR) 26593 /devices/diskb2
1 oracle@dadvmn0652 (LGWR) 26593 /devices/diskb3
1 oracle@dadvmn0652 (LGWR) 26593 /devices/diskd1
The second example lists the open devices associated with the LGWR process for disks that match
the diska pattern.
ASMCMD [+] > lsod --process LGWR diska
Instance Process OSPID Path
1 oracle@dadvmn0652 (LGWR) 26593 /devices/diska1
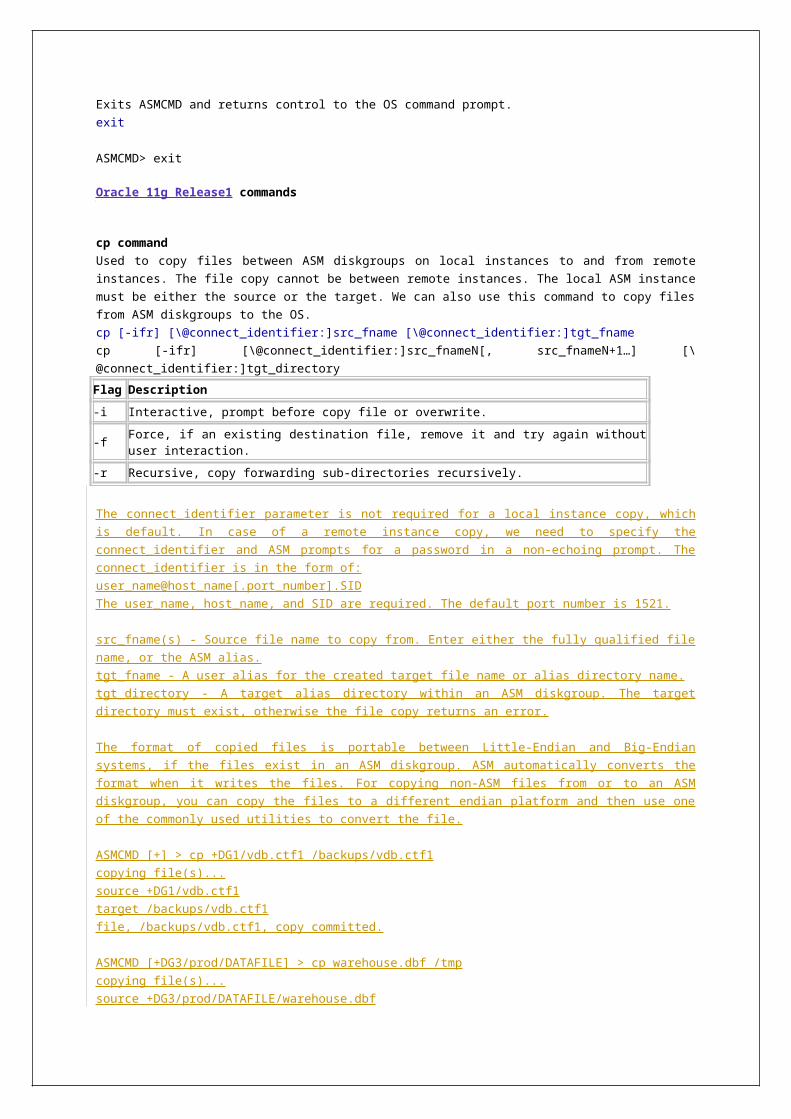
1 oracle@dadvmn0652 (LGWR) 26593 /devices/diska2
1 oracle@dadvmn0652 (LGWR) 26593 /devices/diska3
ASMCMD Template Management Commands
mktmpl command
Adds a template to a diskgroup.
mktmpl -G diskgroup [--striping {coarse|fine}]
[--redundancy {high|mirror|unprotected}] [--primary {hot|cold}]
[--secondary {hot|cold}] template
Flag Description
-G Name of the diskgroup.
--striping Striping specification, either coarse or fine.
--redundancy Redundancy specification, either high, mirror, or unprotected.
--primary Intelligent Data Placement specification for primary extents, either hot or cold region.
--secondaryIntelligent Data Placement specification for secondary extents, either hot or cold region.
template Name of the template to create.
The following example adds temp_mc template to the dg_data diskgroup. The new template has
the redundancy set to mirror and the striping set to coarse.
ASMCMD [+] > mktmpl -G dg_data --redundancy mirror --striping coarse temp_mc
SQL equivalent for mktmpl command is:
SQL> ALTER DISKGROUP disk_group ADD TEMPLATE template_name ...;
lstmpl command
Lists all templates or the templates for a specified diskgroup.
lstmpl [-Hl] [-G diskgroup] [pattern]
Flag Description
-H Suppresses column headings.
-l Displays all details.
-G Specifies diskgroup name.
pattern Displays the templates that match pattern expression.
The example lists all details of the templates in the dg_data diskgroup.
ASMCMD [+] > lstmpl -l -G dg_data
Group_Name Group_Num Name Stripe Sys Redund PriReg MirrReg
DG_DATA 1 ARCHIVELOG COARSE Y MIRROR COLD COLD
DG_DATA 1 ASMPARAMETERFILE COARSE Y MIRROR COLD COLD
DG_DATA 1 AUTOBACKUP COARSE Y MIRROR COLD COLD
DG_DATA 1 BACKUPSET COARSE Y MIRROR COLD COLD
DG_DATA 1 CHANGETRACKING COARSE Y MIRROR COLD COLD
DG_DATA 1 CONTROLFILE FINE Y HIGH COLD COLD
DG_DATA 1 DATAFILE COARSE Y MIRROR COLD COLD
DG_DATA 1 DATAGUARDCONFIG COARSE Y MIRROR COLD COLD
DG_DATA 1 DUMPSET COARSE Y MIRROR COLD COLD
DG_DATA 1 FLASHBACK COARSE Y MIRROR COLD COLD
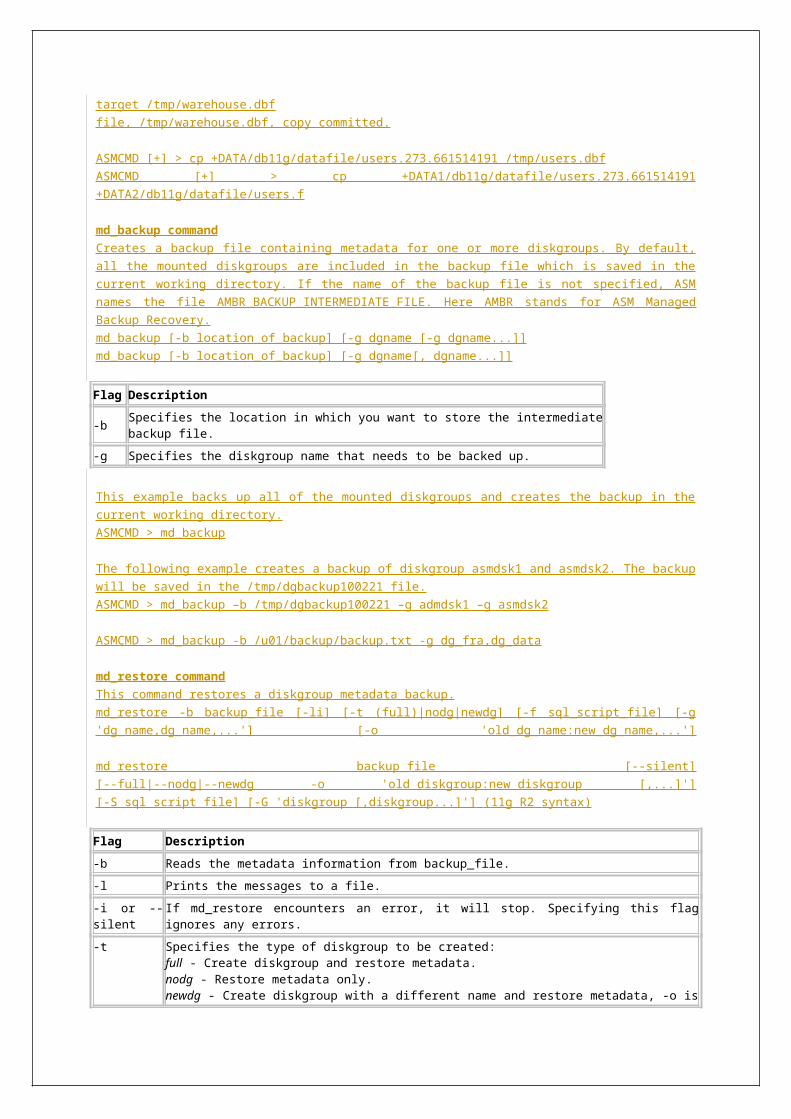
DG_DATA 1 MYTEMPLATE FINE N HIGH COLD COLD
DG_DATA 1 OCRFILE COARSE Y MIRROR COLD COLD
DG_DATA 1 ONLINELOG COARSE Y MIRROR COLD COLD
DG_DATA 1 PARAMETERFILE COARSE Y MIRROR COLD COLD
DG_DATA 1 TEMPFILE COARSE Y MIRROR COLD COLD
DG_DATA 1 XTRANSPORT COARSE Y MIRROR COLD COLD
SQL equivalent for lstmpl command is:
SQL> SELECT * FROM V$ASM_TEMPLATE;
chtmpl command
Changes the attributes of a template.
chtmpl -G diskgroup { [--striping {coarse|fine}]
[--redundancy {high|mirror|unprotected}] [--primary {hot|cold}]
[--secondary {hot|cold}]} template
Flag Description
-G Name of the diskgroup.
--striping Striping specification, either coarse or fine.
--redundancy Redundancy specification, either high, mirror, or unprotected.
--primary Intelligent Data Placement specification for primary extents, either hot or cold region.
--secondaryIntelligent Data Placement specification for secondary extents, either hot or cold region.
template Name of the template to change.
At least one of these options is required: --striping, --redundancy, --primary, or --secondary.
The following example updates temp_hf template of the dg_fra diskgroup. The redundancy
attribute is set to high and the striping attribute is set to fine.
ASMCMD [+] > chtmpl -G dg_fra --redundancy high --striping fine temp_hf
SQL equivalent for chtmpl command is:
SQL> ALTER DISKGROUP disk_group ALTER TEMPLATE template_name ...;
rmtmpl command
Removes a template from a diskgroup.
rmtmpl -G diskgroup template
The following example removes temp_uf template from the dg_data diskgroup.
ASMCMD [+] > rmtmpl -G dg_data temp_uf
SQL equivalent for rmtmpl command is:
SQL> ALTER DISKGROUP disk_group DROP TEMPLATE template_name ...;
ASMCMD Volume Management Commands
volcreate command
Creates an Oracle ADVM volume in the specified diskgroup.
volcreate -G diskgroup -s size [--column number] [--width stripe_width] [--redundancy {high|mirror|
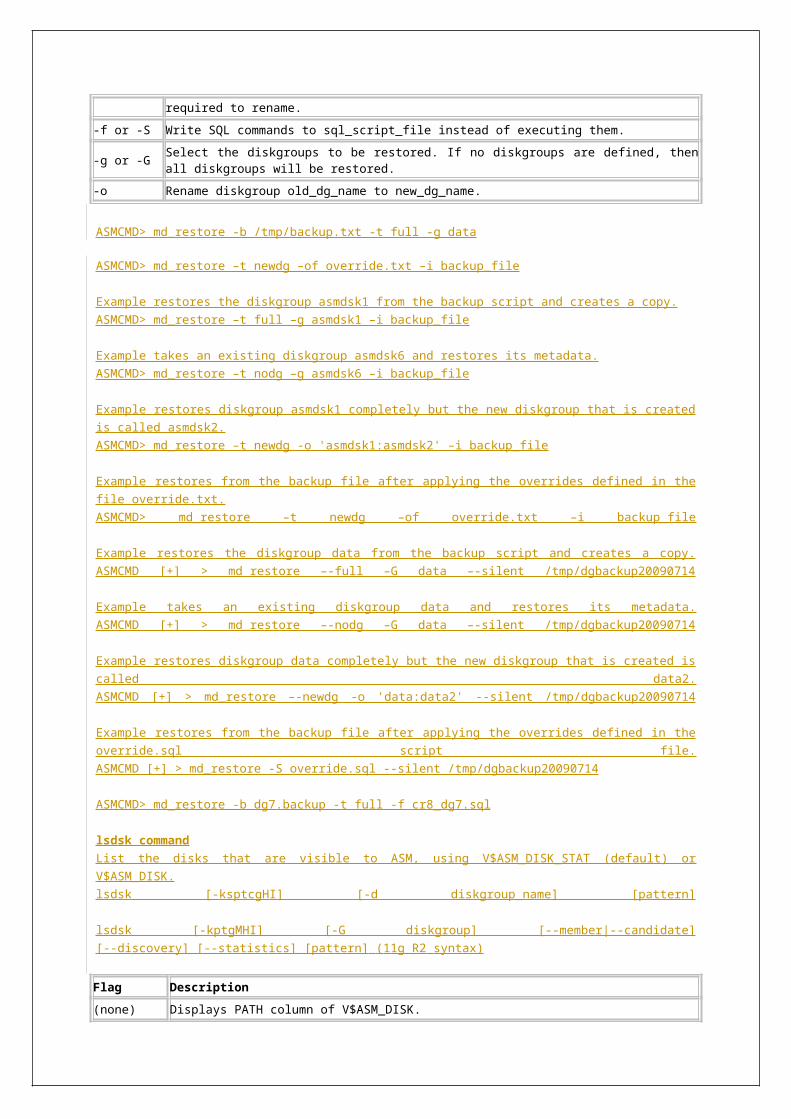
unprotected}]
[--primary {hot|cold}] [--secondary {hot|cold}] volume
Flag Description
-G Name of the diskgroup containing the volume.
-s sizeSize of the volume to be created in units of K, M, G, T, P, or E. The unit designation must be appended to the number specified. No space is allowed. For example: 20G
--column Number of columns in a stripe set. Values range from 1 to 8. The default value is 4.
--widthStripe width of a volume. The value can range from 4 KB to 1 MB, at power-of-two intervals, with a default of 128 KB.
--redundancy
Redundancy of the Oracle ADVM volume which can be specified for normal redundancy diskgroups. The range of values are as follows: unprotected for non-mirrored redundancy, mirror for double-mirrored redundancy, or high for triple-mirrored redundancy. If redundancy is not specified, the setting defaults to the redundancy level of the diskgroup.
--primary Intelligent Data Placement specification for primary extents, either hot or cold region.
--secondaryIntelligent Data Placement specification for secondary extents, either hot or cold region.
volumeName of the volume to be created. Can be a maximum of 11 alphanumeric characters; dashes are not allowed. The first character must be alphabetic.
When creating an Oracle ADVM volume, a volume device name is created with a unique Oracle
ADVM persistent diskgroup number that is concatenated to the end of the volume name. The
unique number can be one to three digits.
On Linux, the volume device name is in the format volume_name-nnn, such as volume1-123. On
Windows the volume device name is in the format asm-volume_name-nnn, such as asm-volume1-
123.
A successful volume creation automatically enables the volume device.
The volume device file functions as any other disk or logical volume to mount file systems or for
applications to use directly.
The following example creates volume1 in the dg_data diskgroup with the size set to 10 gigabytes.
ASMCMD [+] > volcreate -G dg_data -s 10G --width 64K --column 8 volume1
You can determine the volume device name with the volinfo command.
ASMCMD [+] > volinfo -G dg_data volume1
Diskgroup Name: DATA
Volume Name: VOLUME1
Volume Device: /dev/asm/volume1-123
State: ENABLED
Size (MB): 10240
Resize Unit (MB): 512
Redundancy: MIRROR
Stripe Columns: 8
Stripe Width (K): 64
Usage:
Mountpath:
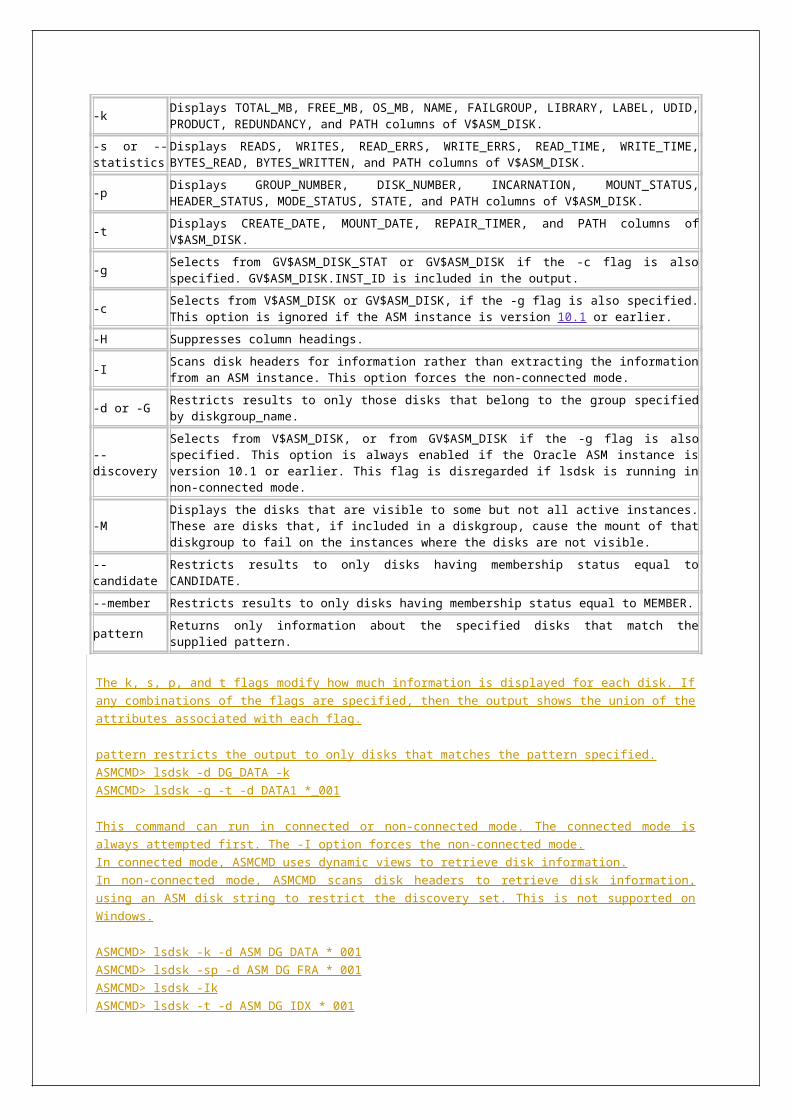
ASMCMD [+] > volcreate -G dg_fra -s 100M vol2
SQL equivalent for volcreate command is:
SQL> ALTER DISKGROUP disk_group ADD VOLUME volume_name SIZE n;
volinfo command
Displays information about Oracle ADVM volumes.
volinfo {-a | -G diskgroup -a | -G diskgroup volume}
volinfo [--show_diskgroup|--show_volume] volumedevice}
Flag Description
-aWhen used without a diskgroup name, specifies all volumes within all diskgroups. When used with a diskgroup name (-G diskgroup -a), specifies all volumes within that diskgroup.
-G Name of the diskgroup containing the volume.
volume Name of the volume.
--show_diskgroup Returns only the diskgroup name. A volume device name is required.
--show_volume Returns only the volume name. A volume device name is required.
volumedevice Name of the volume device.
The first example displays information about the volume1 volume in the dg_data diskgroup and
was produced in a Linux environment. The mount path field displays the last mount path for the
volume.
ASMCMD [+] > volinfo -G dg_data volume1
Diskgroup Name: DG_DATA
Volume Name: VOLUME1
Volume Device: /dev/asm/volume1-123
State: ENABLED
Size (MB): 10240
Resize Unit (MB): 512
Redundancy: MIRROR
Stripe Columns: 8
Stripe Width (K): 64
Usage: ACFS
Mountpath: /u01/app/acfsmounts/acfs1
The second example displays information about the asm-volume1 volume in the dg_data diskgroup
and was produced in a Windows environment.
ASMCMD [+] > volinfo -G dg_data -a
Diskgroup Name: DG_DATA
Volume Name: VOLUME1
Volume Device: \\.\asm-volume1-311
State: ENABLED
Size (MB): 1024
Resize Unit (MB): 256
Redundancy: MIRROR
Stripe Columns: 4
Stripe Width (K): 128
Usage: ACFS
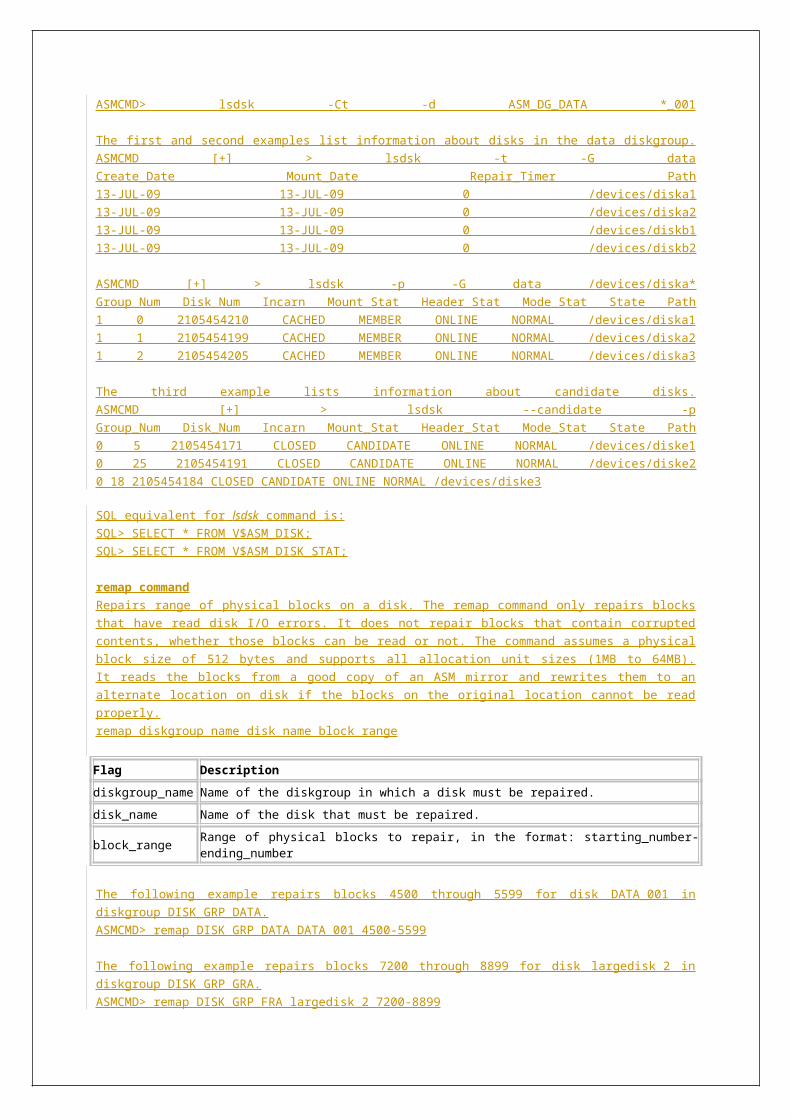
Mountpath: C:\oracle\acfsmounts\acfs1
ASMCMD [+] > volinfo -a
SQL equivalent for volinfo command is:
SQL> SELECT * FROM V$ASM_VOLUME;
SQL> SELECT * FROM V$ASM_VOLUME_STAT;
voldelete command
Deletes an Oracle ADVM volume.
voldelete -G diskgroup volume
To successfully execute this command, the local Oracle ASM instance must be running and the
diskgroup required by this command must be mounted in the Oracle ASM instance. Before deleting
a volume, you must ensure that there are no active file systems associated with the volume.
The following example deletes volume1 from the dg_data diskgroup.
ASMCMD [+] > voldelete -G dg_data volume1
SQL equivalent for voldelete command is:
SQL> ALTER DISKGROUP disk_group DROP VOLUME volume_name;
voldisable command
Disables Oracle ADVM volumes in mounted diskgroups and removes the volume device on the local
node.
voldisable {-a | -G diskgroup -a | -G diskgroup volume}
Flag Description
-aWhen used without a diskgroup name, specifies all volumes within all diskgroups.When used with a diskgroup name (-G diskgroup -a), specifies all volumes within that diskgroup.
-G Name of the diskgroup containing the volume.
volumeName of the volume to be operated on. Can be maximum of 30 alphanumeric characters. The first character must be alphabetic.
You can disable volumes before shutting down an Oracle ASM instance or dismounting a diskgroup
to verify that the operations can be accomplished normally without including a force option due to
open volume files. Disabling a volume also prevents any subsequent opens on the volume or
device file because it no longer exists.
Before disabling a volume, you must ensure that there are no active file systems associated with
the volume. You must first dismount the Oracle ACFS file system before disabling the volume. You
can delete a volume without first disabling the volume.
The following example disables volume1 in the dg_data diskgroup.
ASMCMD [+] > voldisable -G dg_data volume1
SQL equivalent for voldisable command is:
SQL> ALTER DISKGROUP disk_group DISABLE VOLUME volume_name;
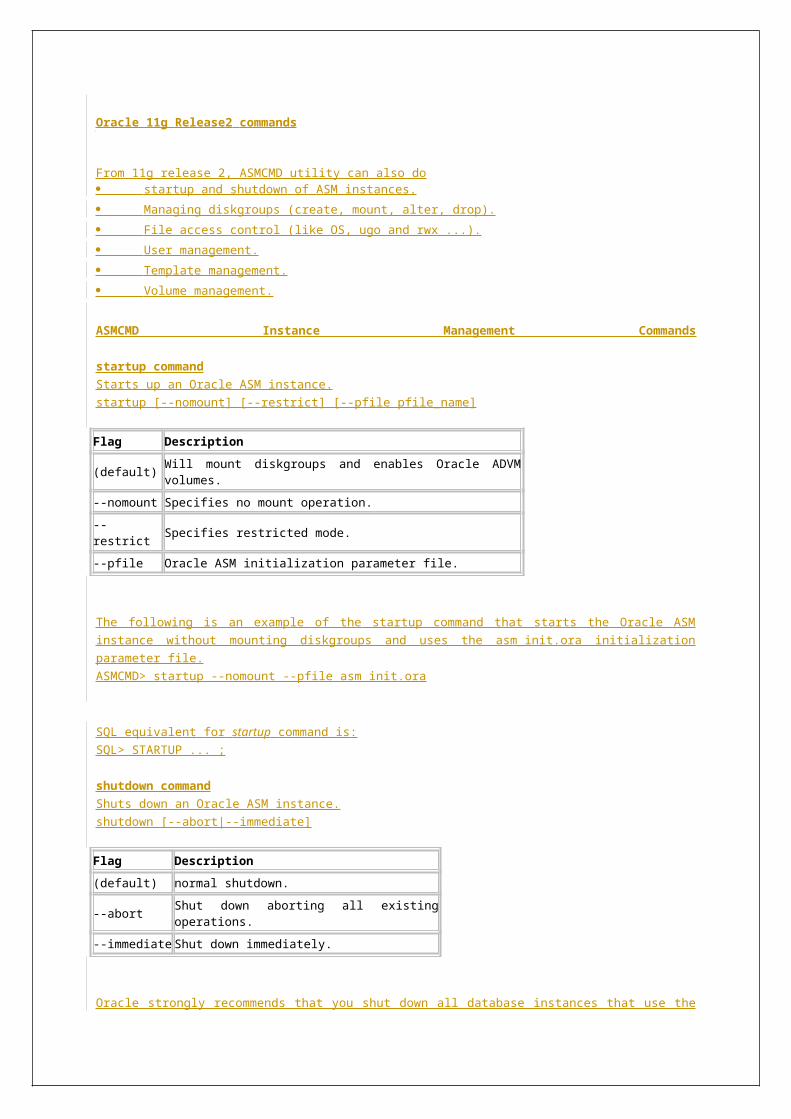
volenable command
Enables Oracle ADVM volumes in mounted diskgroups. A volume is enabled when it is created.
volenable {-a | -G diskgroup -a | -G diskgroup volume}
FlagDescription
-aWhen used without a diskgroup name, specifies all volumes within all diskgroups.When used with a diskgroup name (-G diskgroup -a), specifies all volumes within that diskgroup.
-G Name of the diskgroup containing the volume.
volume Name of the volume to be operated on.
The following example enables volume1 in the dg_data diskgroup.
ASMCMD [+] > volenable -G dg_data volume1
SQL equivalent for volenable command is:
SQL> ALTER DISKGROUP disk_group ENABLE VOLUME volume_name;
volresize command
Resizes an Oracle ADVM volume.
volresize -G diskgroup -s size [-f] volume
Flag Description
-G Name of the diskgroup containing the volume.
-fForce the shrinking of a volume that is not an Oracle ACFS volume to suppress the warning message.
volume Name of the volume to be operated on.
-s New size of the volume in units of K, M, G, or T.
If the volume is mounted on a non-Oracle ACFS file system, then dismount the file system first
before resizing. If the new size is smaller than current, you are warned of possible data corruption.
Unless the -f (force) option is specified, you are prompted whether to continue with the operation.
If there is an Oracle ACFS file system on the volume, then you cannot resize the volume with the
volresize command. You must use the acfsutil size command, which also resizes the volume and
file system.
The following is an example of the volresize command that resizes volume1 in the dg_data
diskgroup to 20 gigabytes.
ASMCMD [+] > volresize -G dg_data -s 20G volume1
SQL equivalent for volresize command is:
SQL> ALTER DISKGROUP disk_group RESIZE VOLUME volume_name SIZE n;
volset commnad
Sets attributes of an Oracle ADVM volume in mounted diskgroups.
volset -G diskgroup [--usagestring string] [--mountpath mount_path] [--primary {hot|cold}] [--
secondary {hot|cold}] volume
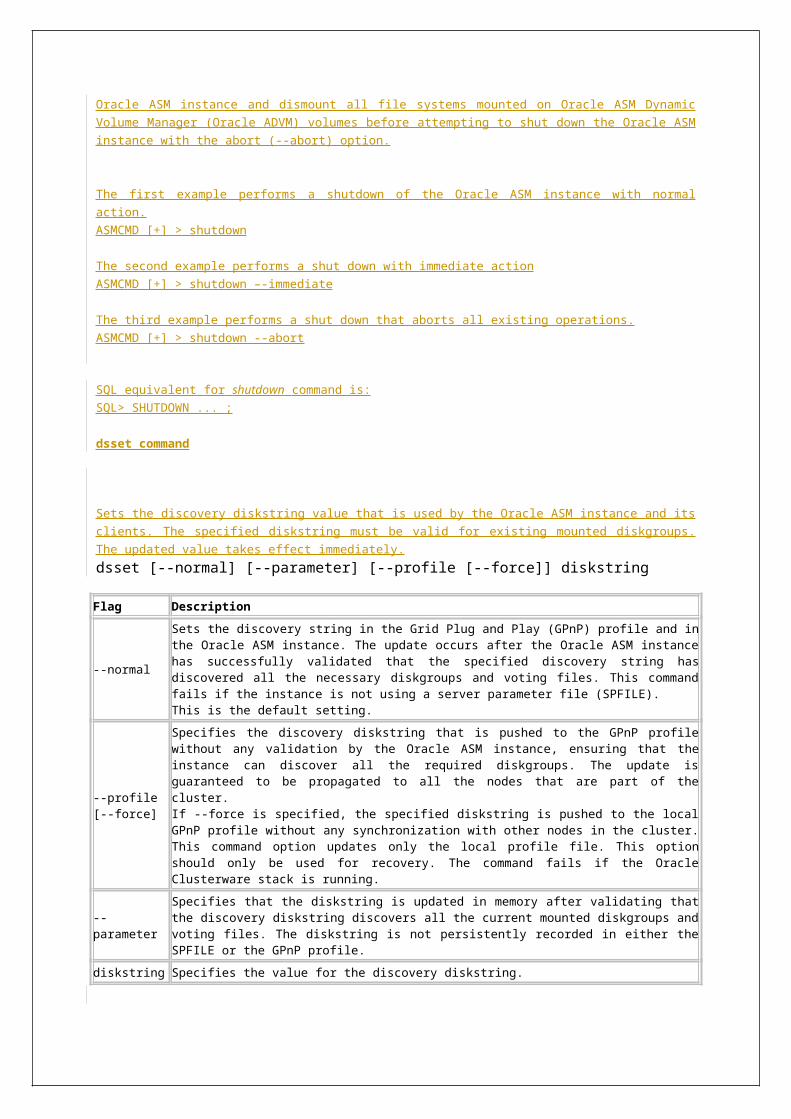
Flag Description
-G Name of the diskgroup containing the volume.
--usagestringOptional usage string to tag a volume which can be up to 30 characters. This string is set to ACFS when the volume is attached to an Oracle ACFS file system and should not be changed.
--mountpathOptional string to tag a volume with its mount path string which can be up to 1024 characters. This string is set when the file system is mounted and should not be changed.
--primary Intelligent Data Placement specification for primary extents, either hot or cold region.
--secondaryIntelligent Data Placement specification for secondary extents, either hot or cold region.
volume Name of the volume to be operated on.
When running the mkfs command to create a file system, the usage field is set to ACFS and
mountpath field is reset to an empty string if it has been set. The usage field should remain at
ACFS.
When running the mount command to mount a file system, the mountpath field is set to the mount
path value to identify the mount point for the file system. After the value is set by the mount
command, the mountpath field should not be updated.
The following is an example of a volset command that sets the usage string for a volume that is not
associated with a file system.
ASMCMD [+] > volset -G dg_arch --usagestring 'no file system created' volume1
ASMCMD [+] > volset -G dg_data --usagestring 'acfs' volume1
SQL equivalent for volset command is:
SQL> ALTER DISKGROUP disk_group MODIFY VOLUME volume_name USAGE 'usage_string;
volstat command
Reports I/O statistics for Oracle ADVM volumes.
volstat [-G diskgroup] [volume]
The following apply when using the volstat command. If the diskgroup is not specified and the volume name is specified, all mounted diskgroups are searched for the specified volume name.
If the diskgroup name is specified and the volume name is omitted, all volumes are displayed for the named diskgroup.
If both the diskgroup name and the volume name are omitted, all volumes on all diskgroups are displayed.
The following is an example of the volstat command that displays information about volumes in the
dg_data diskgroup.
ASMCMD [+] > volstat -G dg_data
DISKGROUP NUMBER / NAME: 1 / DG_DATA
---------------------------------------
VOLUME_NAME
READS BYTES_READ READ_TIME READ_ERRS
WRITES BYTES_WRITTEN WRITE_TIME WRITE_ERRS
-------------------------------------------------------------
VOLUME1
10085 2290573312 22923 0
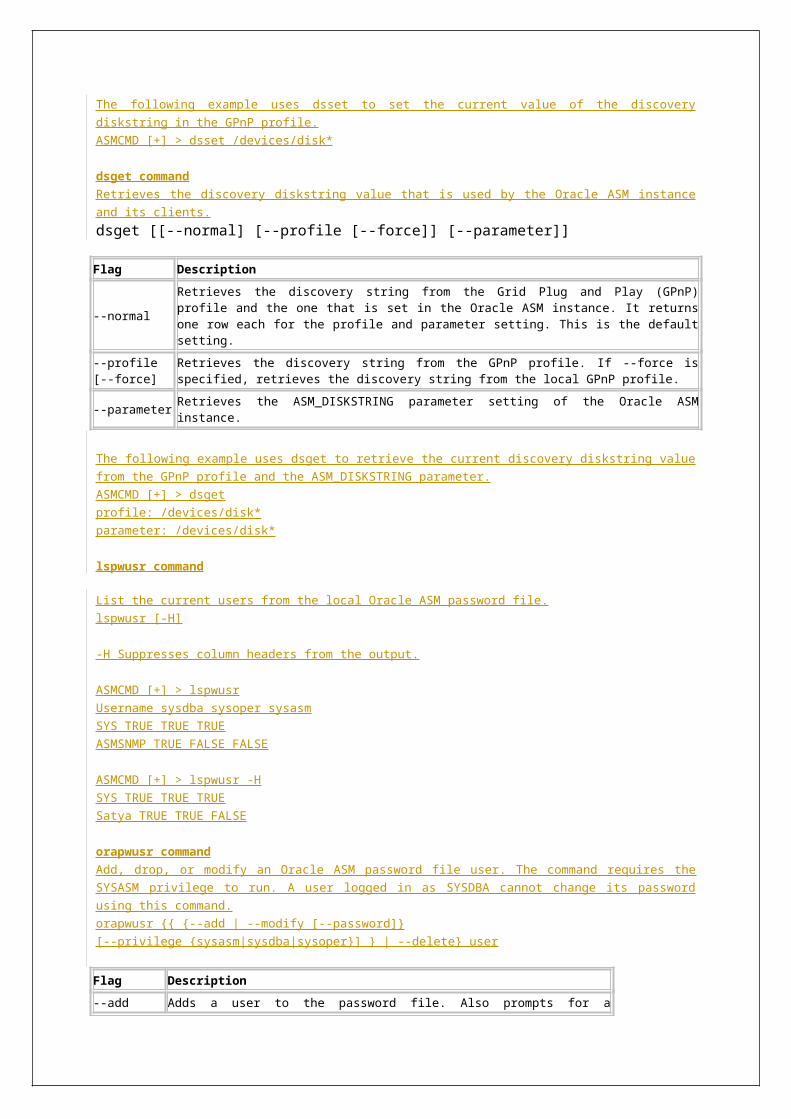
1382 5309440 1482 0
SQL equivalent for volstat command is:
SQL> SELECT * FROM V$ASM_VOLUME_STAT;
ASMCMD File Management Commands
lsof command
Lists the open files of the local clients.
lsof [-H] {-G diskgroup|--dbname db|-C instance}
Flag Description
-H Suppresses column headings.
-G List files only from this specified disk group.
--dbname List files only from this specified database.
-C List files only from this specified instance.
ASMCMD [+] > lsof -G dg_data
DB_Name Instance_Name Path
orcl orcl +dg_data/orcl/controlfile/current.260.691577263
orcl orcl +dg_data/orcl/datafile/example.265.691577295
orcl orcl +dg_data/orcl/datafile/sysaux.257.691577149
orcl orcl +dg_data/orcl/datafile/system.256.691577149
orcl orcl +dg_data/orcl/datafile/undotbs1.258.691577151
orcl orcl +dg_data/orcl/datafile/users.259.691577151
orcl orcl +dg_data/orcl/onlinelog/group_1.261.691577267
orcl orcl +dg_data/orcl/onlinelog/group_2.262.691577271
orcl orcl +dg_data/orcl/onlinelog/group_3.263.691577275
orcl orcl +dg_data/orcl/tempfile/temp.264.691577287
ASMCMD [+] > lsof -C +ASM
DB_Name Instance_Name Path
asmvol +ASM +data/VOLUME1.271.679226013
asmvol +ASM +data/VOLUME2.272.679227351
Other file management commands are
cd, cp, du, find, ls, mkalias, pwd, rm, rmalias
asmcmd command line history
The asmcmd utility does not provide command history with the up-arrow key. With rlwrap utility
installed, that can be done by adding the following entry to the oracle user’s profile file:
alias asmcmd='rlwrap asmcmd'
Auditing in OracleAuditing in Oracle
The auditing mechanism for Oracle is extremely flexible. Oracle stores
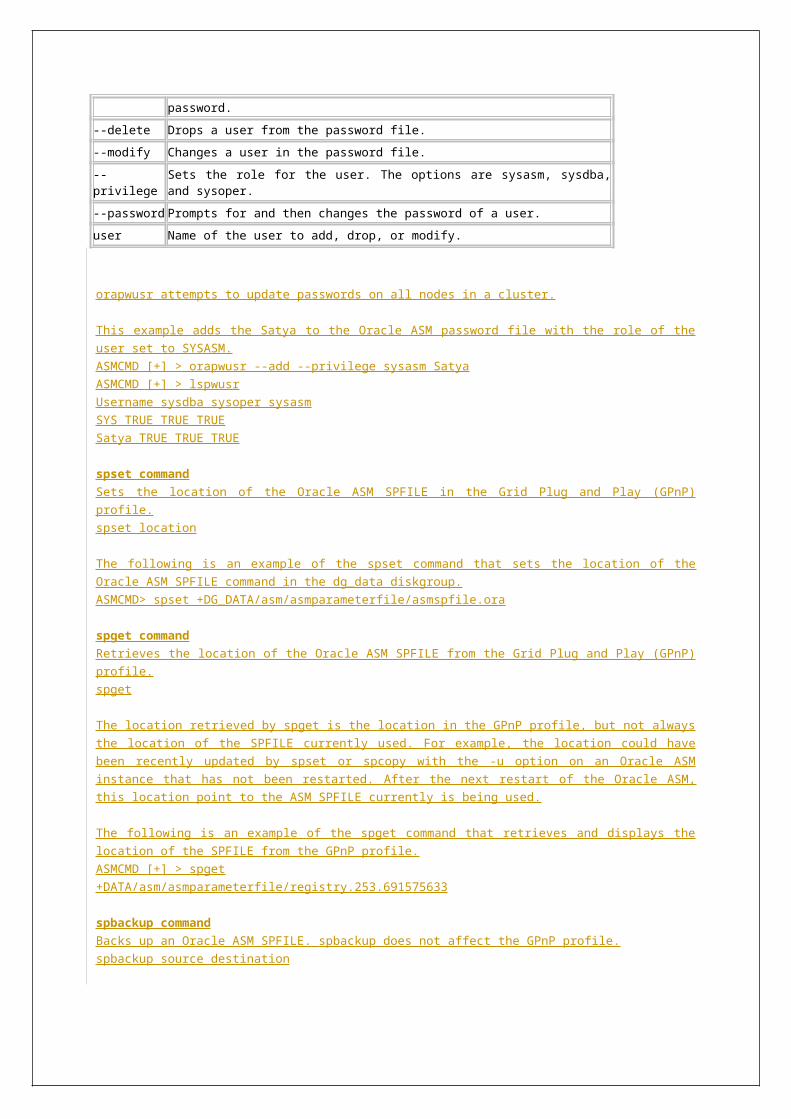
information that is relevant to auditing in its data dictionary.
Every time a user attempts anything in the database where audit is enabled the Oracle kernel checks to see if an audit record should be created or updated (in the case or a session record) and generates the record in a table owned by the SYS user called AUD$. This table is, by default, located in the SYSTEM tablespace. This in itself can cause problems with potential denial of service attacks. If the SYSTEM tablespace fills up, the database will hang.
init parametersUntil Oracle 10g, auditing is disabled by default, but can be enabled by setting the AUDIT_TRAIL static parameter in the init.ora file.
From Oracle 11g, auditing is enabled for some system level privileges.
SQL> show parameter audit
NAME TYPE VALUE
---------------------- ------------ -------------
audit_file_dest string ?/rdbms/audit
audit_sys_operations boolean FALSE
audit_syslog_level string NONE
audit_trail string DB
transaction_auditing boolean TRUE
AUDIT_TRAIL can have the following values.AUDIT_TRAIL={NONE or FALSE| OS| DB or TRUE| DB_EXTENDED| XML |XML_EXTENDED}
The following list provides a description of each value:
NONE or FALSE -> Auditing is disabled. Default until Oracle 10g.
DB or TRUE -> Auditing is enabled, with all audit records stored in the database audit trial (AUD$). Default from Oracle 11g.
DB_EXTENDED –> Same as DB, but the SQL_BIND and SQL_TEXT columns are also populated.
XML-> Auditing is enabled, with all audit records stored as XML format OS files.
XML_EXTENDED –> Same as XML, but the SQL_BIND and SQL_TEXT columns are also populated.
OS -> Auditing is enabled, with all audit records directed to the operating system's file specified by AUDIT_FILE_DEST.

Note: In Oracle 10g Release 1, DB_EXTENDED was used in place of "DB,EXTENDED". The XML options were brought in Oracle 10g Release 2.
The AUDIT_FILE_DEST parameter specifies the OS directory used for the audit trail when the OS, XML and XML_EXTENDED options are used. It is also the location for all mandatory auditing specified by the AUDIT_SYS_OPERATIONS parameter.
The AUDIT_SYS_OPERATIONS static parameter enables or disables the auditing of operations issued by users connecting with SYSDBA or SYSOPER privileges, including the SYS user. All audit records are written to the OS audit trail.
Run the $ORACLE_HOME/rdbms/admin/cataudit.sql script while connected as SYS (no need to run this, if you ran catalog.sql at the time of database creation).
Start AuditingSyntax of audit command:audit {statement_option|privilege_option} [by user] [by {session|access}] [whenever {successful|not successful}]
Only the statement_option or privilege_option part is mandatory. The other clauses are optional and enabling them allows audit be more specific.
There are three levels that can be audited:
Statement levelAuditing will be done at statement level.Statements that can be audited are found in STMT_AUDIT_OPTION_MAP.SQL> audit table by scott;
Audit records can be found in DBA_STMT_AUDIT_OPTS.SQL> select * from DBA_STMT_AUDIT_OPTS;
Object levelAuditing will be done at object level.These objects can be audited: tables, views, sequences, packages, stored procedures and stored functions.SQL> audit insert, update, delete on scott.emp by hr;
Audit records can be found in DBA_OBJ_AUDIT_OPTS.SQL> select * from DBA_OBJ_AUDIT_OPTS;
Privilege levelAuditing will be done at privilege level.All system privileges that are found in SYSTEM_PRIVILEGE_MAP can be audited.SQL> audit create tablespace, alter tablespace by all;
Specify ALL PRIVILEGES to audit all system privileges.
Audit records can be found in DBA_PRIV_AUDIT_OPTS.SQL> select * from DBA_PRIV_AUDIT_OPTS;
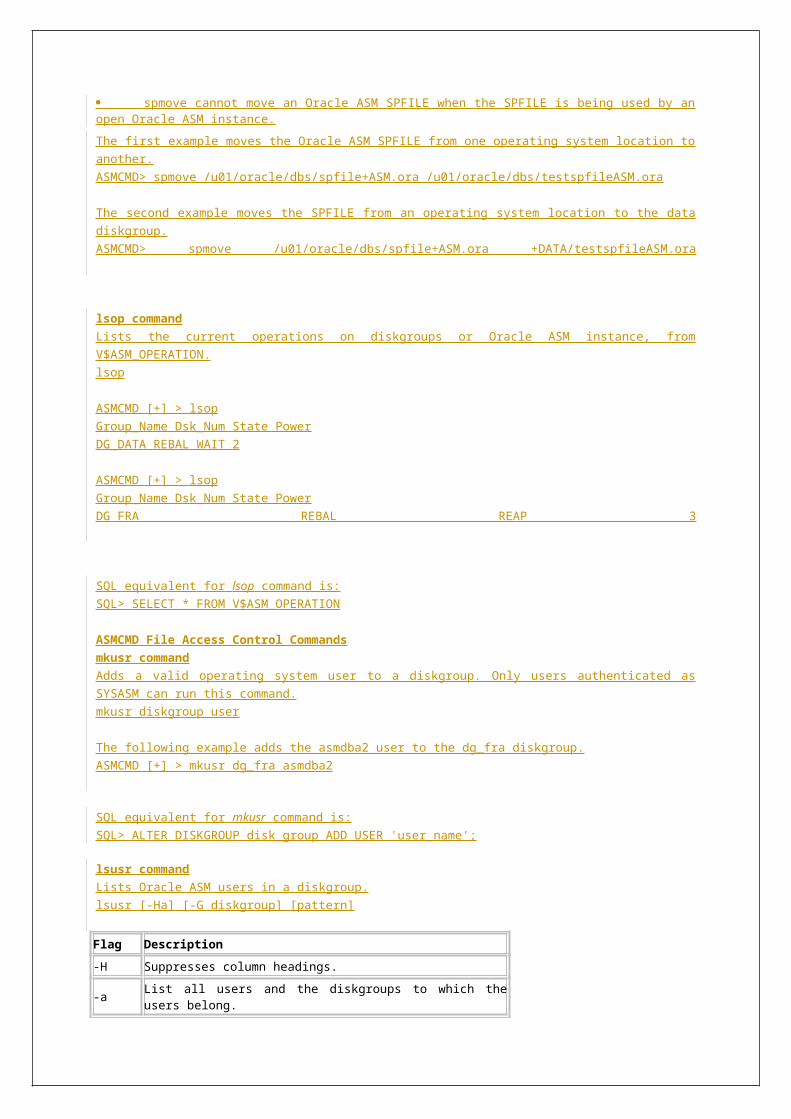
Audit optionsBY SESSIONSpecify BY SESSION if you want Oracle to write a single record for all SQL statements of the same type issued and operations of the same type executed on the same schema objects in the same session.
Oracle database can write to an operating system audit file but cannot read it to detect whether an entry has already been written for a particular operation. Therefore, if you are using an operating system file for the audit trail (that is, the AUDIT_TRAIL initialization parameter is set to OS), then the database may write multiple records to the audit trail file even if you specify BY SESSION.SQL> audit create, alter, drop on currency by xe by session;SQL> audit alter materialized view by session;
BY ACCESS Specify BY ACCESS if you want Oracle database to write one record for each audited statement and operation.
If you specify statement options or system privileges that audit data definition language (DDL) statements, then the database automatically audits by access regardless of whether you specify the BY SESSION clause or BY ACCESS clause.
For statement options and system privileges that audit SQL statements other than DDL, you can specify either BY SESSION or BY ACCESS. BY SESSION is the default.SQL> audit update on health by access;SQL> audit alter sequence by tester by access;
WHENEVER [NOT] SUCCESSFUL Specify WHENEVER SUCCESSFUL to audit only SQL statements and operations that succeed.Specify WHENEVER NOT SUCCESSFUL to audit only SQL statements and operations that fail or result in errors.
If you omit this clause, then Oracle Database performs the audit regardless of success or failure.SQL> audit insert, update, delete on hr.emp by hr by session whenever not successful;SQL> audit materialized view by pingme by access whenever successful;
ExamplesAuditing for every SQL statement related to roles (create, alter, drop or set a role).SQL> AUDIT ROLE;
Auditing for every statement that reads files from database directory

SQL> AUDIT READ ON DIRECTORY ext_dir;
Auditing for every statement that performs any operation on the sequenceSQL> AUDIT ALL ON hr.emp_seq;
View Audit TrailThe audit trail is stored in the base table SYS.AUD$.It's contents can be viewed in the following views:· DBA_AUDIT_TRAIL· DBA_OBJ_AUDIT_OPTS· DBA_PRIV_AUDIT_OPTS· DBA_STMT_AUDIT_OPTS· DBA_AUDIT_EXISTS· DBA_AUDIT_OBJECT· DBA_AUDIT_SESSION· DBA_AUDIT_STATEMENT· AUDIT_ACTIONS· DBA_AUDIT_POLICIES· DBA_AUDIT_POLICY_COLUMNS· DBA_COMMON_AUDIT_TRAIL· DBA_FGA_AUDIT_TRAIL (FGA_LOG$)· DBA_REPAUDIT_ATTRIBUTE· DBA_REPAUDIT_COLUMN
The audit trail contains lots of data, but the following are most likely to be of interest: Username - Oracle Username. Terminal - Machine that the user performed the action from. Timestamp - When the action occurred. Object Owner - The owner of the object that was interacted with. Object Name - name of the object that was interacted with. Action Name - The action that occurred against the object (INSERT, UPDATE, DELETE, SELECT, EXECUTE)
Fine Grained Auditing (FGA), introduced in Oracle9i, allowed recording of row-level changes along with SCN numbers to reconstruct the old data, but they work for select statements only, not for DML such as update, insert, and delete.From Oracle 10g, FGA supports DML statements in addition to selects.
Several fields have been added to both the standard and fine-grained audit trails:
EXTENDED_TIMESTAMP - A more precise value than the existing TIMESTAMP column.
PROXY_SESSIONID - Proxy session serial number when an enterprise user is logging in via the proxy method.
GLOBAL_UID - Global Universal Identifier for an enterprise user.
INSTANCE_NUMBER - The INSTANCE_NUMBER value from the actioning instance.
OS_PROCESS - Operating system process id for the oracle process.
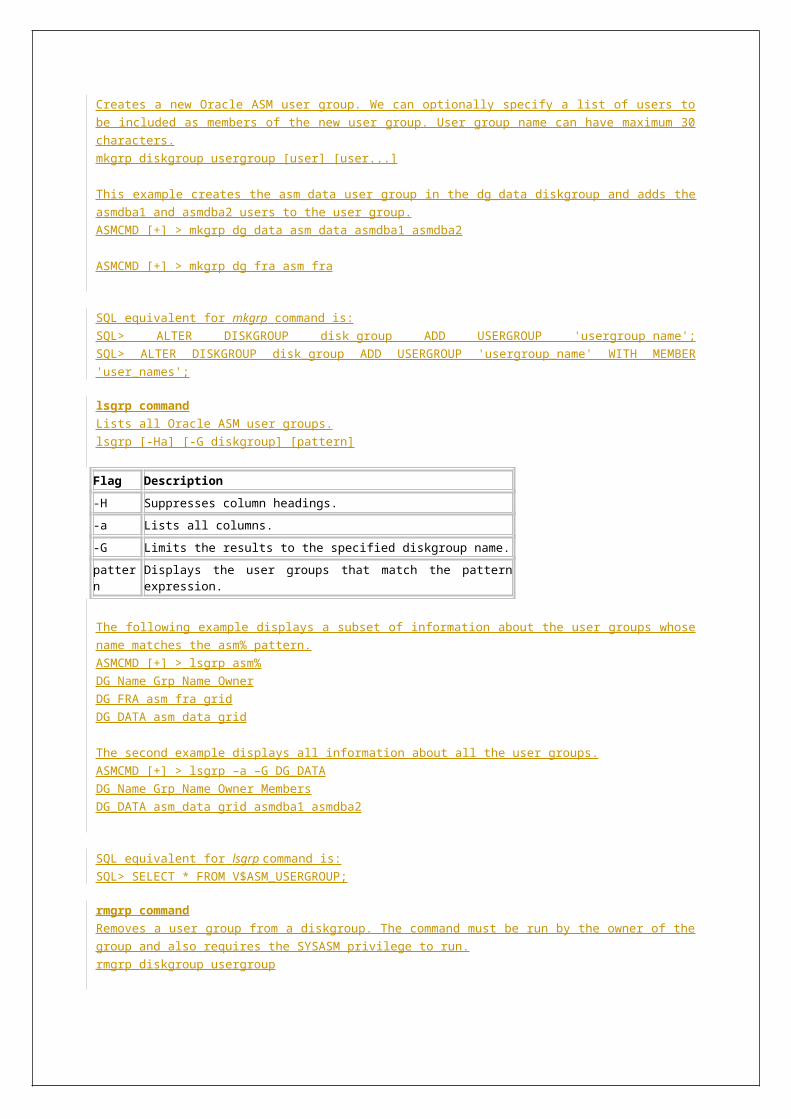
TRANSACTIONID - Transaction identifier for the audited transaction. This column can be used to join to the XID column on the FLASHBACK_TRANSACTION_QUERY view.
SCN - System change number of the query. This column can be used in flashback queries.
SQL_BIND - The values of any bind variables if any.
SQL_TEXT - The SQL statement that initiated the audit action.The SQL_BIND and SQL_TEXT columns are only populated when the AUDIT_TRAIL=DB_EXTENDED or AUDIT_TRAIL=XML_EXTENDED initialization parameter is set.
MaintenanceThe audit trail must be deleted/archived on a regular basis to prevent the SYS.AUD$ table growing to an unacceptable size.
Only users who have been granted specific access to SYS.AUD$ can access the table to select, alter or delete from it. This is usually just the user SYS or any user who has had permissions. There are two specific roles that allow access to SYS.AUD$ for select and delete, these are DELETE_CATALOG_ROLE and SELECT_CATALOG_ROLE. These roles should not be granted to general users.
Auditing modifications of the data in the audit trail itself can be achieved as followsSQL> AUDIT INSERT, UPDATE, DELETE ON sys.aud$ BY ACCESS;
To delete all audit records from the audit trail:SQL> DELETE FROM sys.aud$;
From Oracle 11g R2, we can change audit table's (SYS.AUD$ and SYS.FGA_LOG$) tablespace and we can periodically delete the audit trail records using DBMS_AUDIT_MGMT package.
Disabling AuditingThe NOAUDIT statement turns off the various audit options of Oracle. Use it to reset statement, privilege and object audit options. A NOAUDIT statement that sets statement and privilege audit options can include the BY USER option to specify a list of users to limit the scope of the statement and privilege audit options.
SQL> NOAUDIT;SQL> NOAUDIT session;SQL> NOAUDIT session BY scott, hr;SQL> NOAUDIT DELETE ON emp;SQL> NOAUDIT SELECT TABLE, INSERT TABLE, DELETE TABLE, EXECUTE PROCEDURE;SQL> NOAUDIT ALL;SQL> NOAUDIT ALL PRIVILEGES;SQL> NOAUDIT ALL ON DEFAULT;
Background Processes in oracleTo maximize performance and accommodate many users, a multiprocess Oracle database system uses background processes. Background processes are the
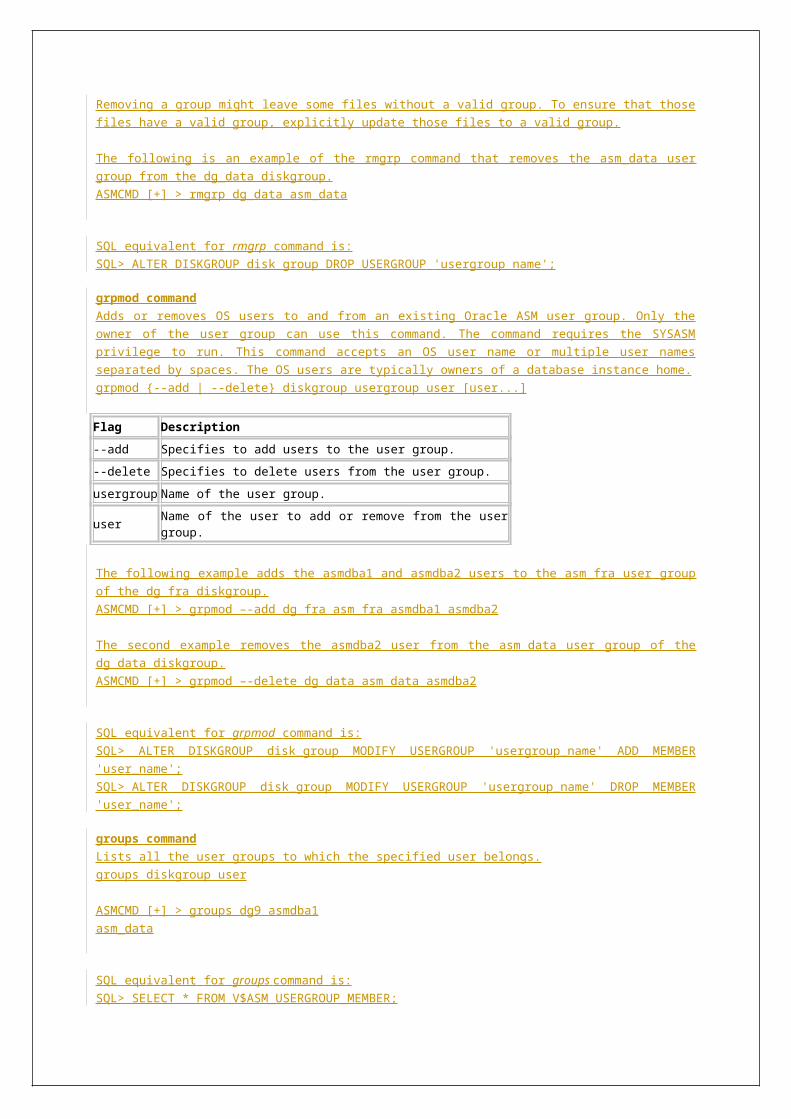
processes running behind the scene and are meant to perform certain maintenance activities or to deal with abnormal conditions arising in the instance. Each background process is meant for a specific purpose and its role is well defined.
Background processes consolidate functions that would otherwise be handled by multiple database programs running for each user process. Background processes asynchronously perform I/O and monitor other Oracle database processes to provide increased parallelism for better performance and reliability.
Not all background processes are mandatory for an instance. Some are mandatory and some are optional. Mandatory background processes are DBWn, LGWR, CKPT, SMON, PMON, and RECO. All other processes are optional, will be invoked if that particular feature is activated.
Oracle background processes are visible as separate operating system processes in Unix/Linux. In Windows, these run as separate threads within the same service. Any issues related to background processes should be monitored and analyzed from the trace files generated and the alert log.
Background processes are started automatically when the instance is started.
To findout background processes from database:SQL> select SID,PROGRAM from v$session where TYPE='BACKGROUND';
To findout background processes from OS:$ ps -ef|grep ora_|grep SID
Mandatory Background Processes in OracleIf any one of these 6 mandatory background processes is killed/not running, the instance will be aborted.
1) Database Writer (maximum 20) DBW0-DBW9,DBWa-DBWjWhenever a log switch is occurring as redolog file is becoming CURRENT to ACTIVE stage, oracle calls DBWn and synchronizes all the dirty blocks in database buffer cache to the respective datafiles, scattered or randomly.
Database writer (or Dirty Buffer Writer) process does multi-block writing to disk asynchronously. One DBWn process is adequate for most systems. Multiple database writers can be configured by initialization parameter DB_WRITER_PROCESSES, depends on the number of CPUs allocated to the instance. To have more than one DBWn only make sense if each DBWn has been allocated its own list of blocks to write to disk. This is done through the initialization parameter DB_BLOCK_LRU_LATCHES. If this parameter is not set correctly, multiple DB writers can end up contending for the same block list.
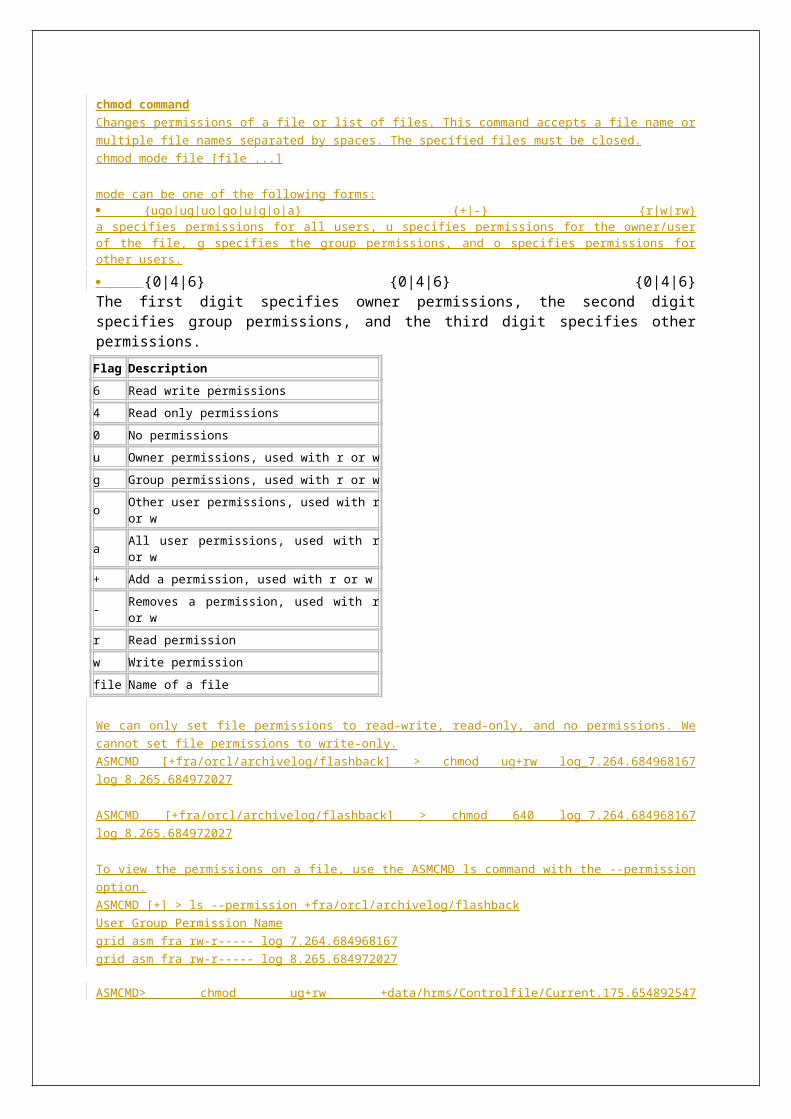
The possible multiple DBWR processes in RAC must be coordinated through the locking and global cache processes to ensure efficient processing is accomplished.
DBWn will be invoked in following scenarios:
When the dirty blocks in SGA reaches to a threshold value, oracle calls DBWn.
When the database is shutting down with some dirty blocks in the SGA, then oracle calls DBWn.
DBWn has a time out value (3 seconds by default) and it wakes up whether there are any dirty blocks or not.
When a checkpoint is issued.
When a server process cannot find a clean reusable buffer after scanning a threshold number of buffers.
When a huge table wants to enter into SGA and oracle could not find enough free space where it decides to flush out LRU blocks and which happens to be dirty blocks. Before flushing out the dirty blocks, oracle calls DBWn.
Oracle RAC ping request is made.
When Table DROPped or TRUNCATEed.
When tablespace is going to OFFLINE/READ ONLY/BEGIN BACKUP.
2) Log Writer (maximum 1) LGWR
LGWR writes redo data from redolog buffers to (online) redolog files, sequentially.
Redolog file contains changes to any datafile. The content of the redolog file is file id, block id and new content.
LGWR will be invoked more often than DBWn as log files are really small when compared to datafiles (KB vs GB). For every small update we don’t want to open huge gigabytes of datafiles, instead write to the log file.
Redolog file has three stages CURRENT, ACTIVE, INACTIVE and this is a cyclic process. Newly created redolog file will be in UNUSED state.
When the LGWR is writing to a particular redolog file, that file is said to be in CURRENT status. If the file is filled up completely then a log switch takes place and the LGWR starts writing to the second file (this is the reason every database requires a minimum of 2 redolog groups). The file which is filled up now becomes from CURRENT to ACTIVE.
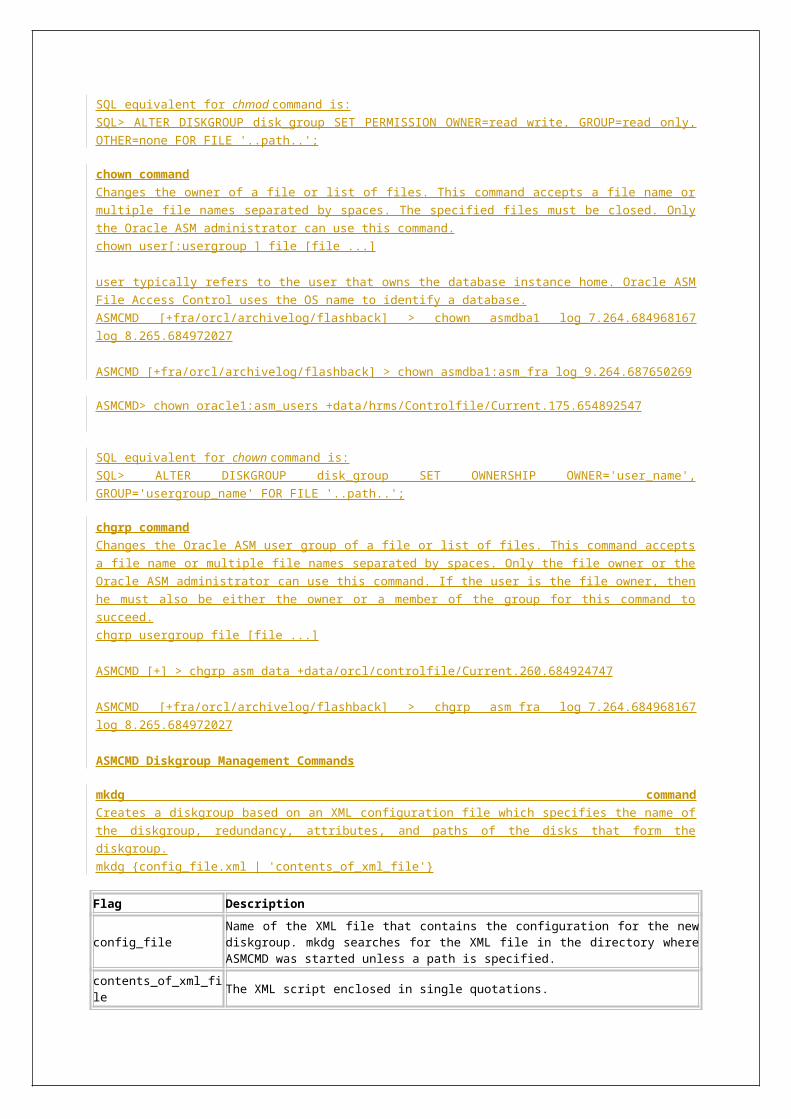
Log writer will write synchronously to the redolog groups in a circular fashion. If any damage is identified with a redolog file, the log writer will log an error in the LGWR trace file and the alert log. Sometimes, when additional redolog buffer space is required, the LGWR will even write uncommitted redolog entries to release the held buffers. LGWR can also use group commits (multiple committed transaction's redo entries taken together) to write to redologs when a database is undergoing heavy write operations.
In RAC, each RAC instance has its own LGWR process that maintains that instance’s thread of redo logs.
LGWR will be invoked in following scenarios:
LGWR is invoked whenever 1/3rd of the redo buffer is filled up.
Whenever the log writer times out (3sec).
Whenever 1MB of redolog buffer is filled (This means that there is no sense in making the redolog buffer more than 3MB).
Shutting down the database.
Whenever checkpoint event occurs.
When a transaction is completed (either committed or rollbacked) then oracle calls the LGWR and synchronizes the log buffers to the redolog files and then only passes on the acknowledgement back to the user. Which means the transaction is not guaranteed although we said commit, unless we receive the acknowledgement. When a transaction is committed, a System Change Number (SCN) is generated and tagged to it. Log writer puts a commit record in the redolog buffer and writes it to disk immediately along with the transaction's redo entries. Changes to actual data blocks are deferred until a convenient time (Fast-Commit mechanism).
When DBWn signals the writing of redo records to disk. All redo records associated with changes in the block buffers must be written to disk first (The write-ahead protocol). While writing dirty buffers, if the DBWn process finds that some redo information has not been written, it signals the LGWR to write the information and waits until the control is returned.
3) Checkpoint (maximum 1) CKPTCheckpoint is a background process which triggers the checkpoint event, to synchronize all database files with the checkpoint information. It ensures data consistency and faster database recovery in case of a crash.
When checkpoint occurred it will invoke the DBWn and updates the SCN block of the all datafiles and the control file with the current SCN. This is done by LGWR. This SCN is called checkpoint SCN.
Checkpoint event can be occurred in following conditions:
o Whenever database buffer cache filled up.
o Whenever times out (3seconds until 9i, 1second from 10g).
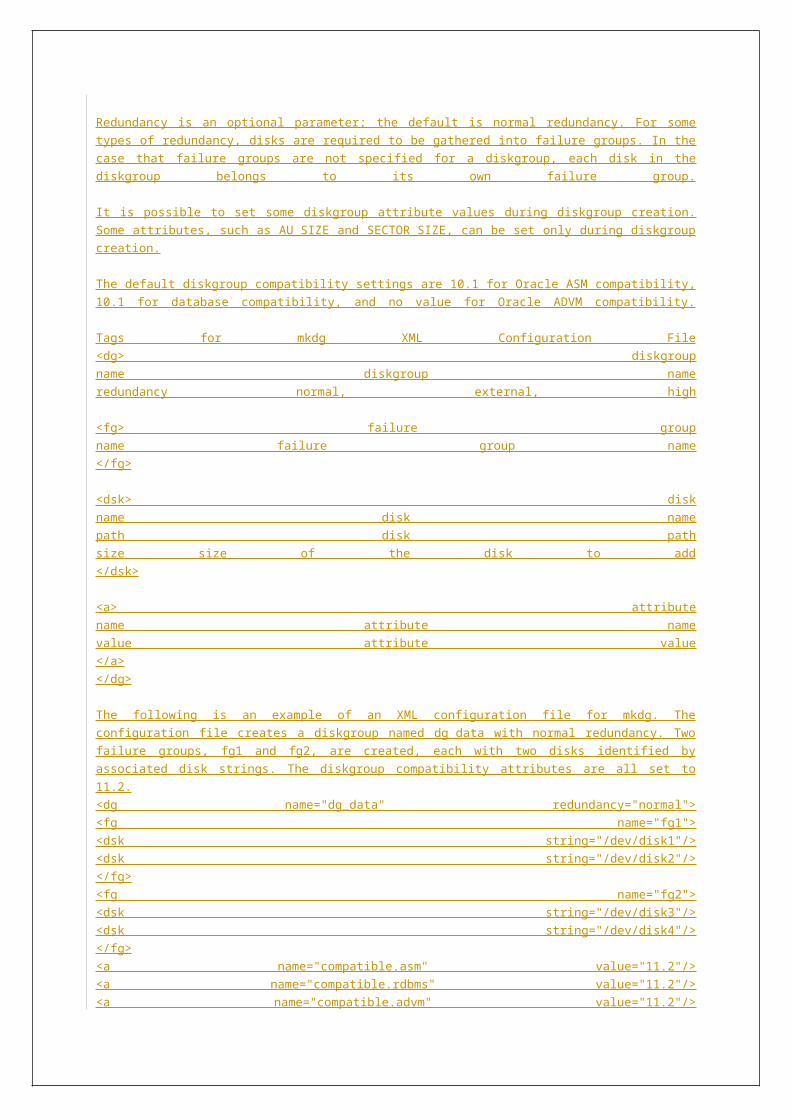
o Log switch occurred.
o Whenever manual log switch is done.SQL> ALTER SYSTEM SWITCH LOGFILE;
o Manual checkpoint.SQL> ALTER SYSTEM CHECKPOINT;
o Graceful shutdown of the database.
o Whenever BEGIN BACKUP command is issued.
o When the time specified by the initialization parameter LOG_CHECKPOINT_TIMEOUT (in seconds), exists between the incremental checkpoint and the tail of the log.
o When the number of OS blocks specified by the initialization parameter LOG_CHECKPOINT_INTERVAL, exists between the incremental checkpoint and the tail of the log.
o The number of buffers specified by the initialization parameter FAST_START_IO_TARGET required to perform roll-forward is reached.
o Oracle 9i onwards, the time specified by the initialization parameter FAST_START_MTTR_TARGET (in seconds) is reached and specifies the time required for a crash recovery. The parameter FAST_START_MTTR_TARGET replaces LOG_CHECKPOINT_INTERVAL and FAST_START_IO_TARGET, but these parameters can still be used.
4) System Monitor (maximum 1) SMON If the database is crashed (power failure) and next time when we restart the database SMON observes that last time the database was not shutdown gracefully. Hence it requires some recovery, which is known as INSTANCE CRASH RECOVERY. When performing the crash recovery before the database is completely open, if it finds any transaction committed but not found in the datafiles, will now be applied from redolog files to datafiles.
If SMON observes some uncommitted transaction which has already updated the table in the datafile, is going to be treated as a in doubt transaction and will be rolled back with the help of before image available in rollback segments.
SMON also cleans up temporary segments that are no longer in use.
It also coalesces contiguous free extents in dictionary managed tablespaces that have PCTINCREASE set to a non-zero value.
In RAC environment, the SMON process of one instance can perform instance recovery for other instances that have failed.
SMON wakes up about every 5 minutes to perform housekeeping activities.
5) Process Monitor (maximum 1) PMON
If a client has an open transaction which is no longer active (client session is closed) then PMON comes into the picture and that transaction becomes in doubt transaction which will be rolled back.
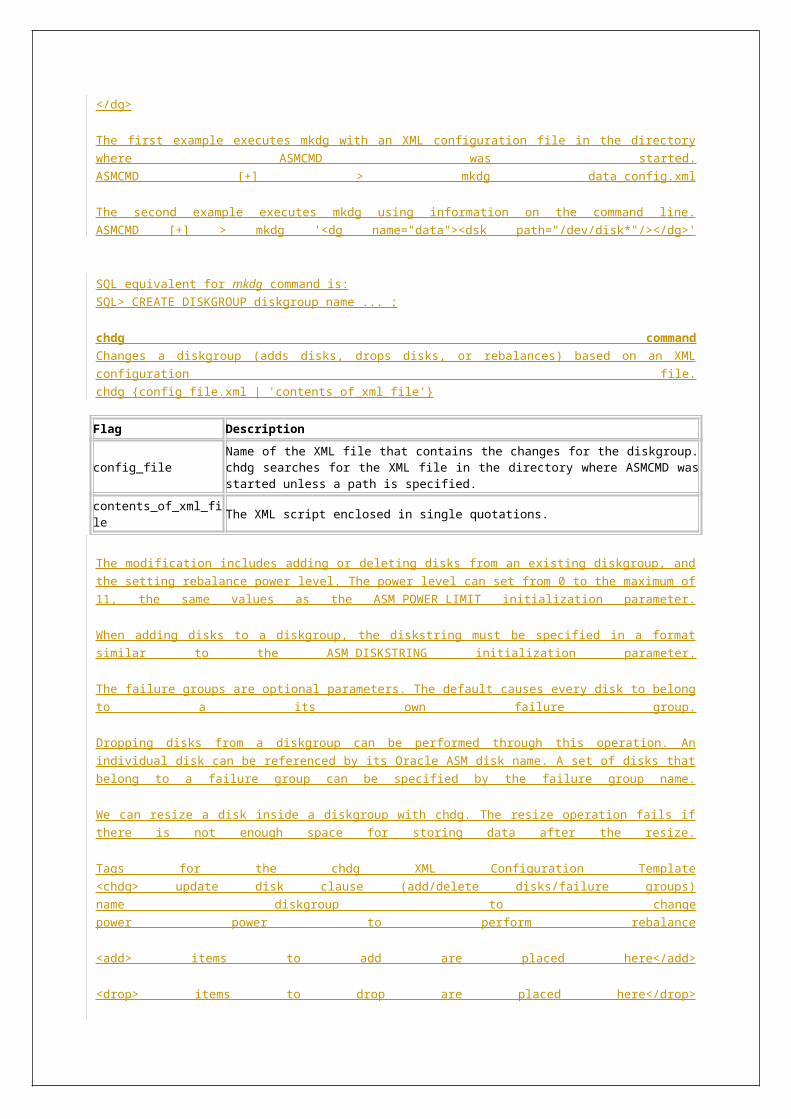
PMON is responsible for performing recovery if a user process fails. It will rollback uncommitted transactions. If the old session locked any resources that will be unlocked by PMON.
PMON is responsible for cleaning up the database buffer cache and freeing resources that were allocated to a process.
PMON also registers information about the instance and dispatcher processes with Oracle (network) listener.
PMON also checks the dispatcher & server processes and restarts them if they have failed.
PMON wakes up every 3 seconds to perform housekeeping activities.
In RAC, PMON’s role as service registration agent is particularly important.
6) Recoverer (maximum 1) RECO [Mandatory from Oracle 10g]
This process is intended for recovery in distributed databases. The distributed transaction recovery process finds pending distributed transactions and resolves them. All in-doubt transactions are recovered by this process in the distributed database setup. RECO will connect to the remote database to resolve pending transactions.
Pending distributed transactions are two-phase commit transactions involving multiple databases. The database that the transaction started is normally the coordinator. It will send request to other databases involved in two-phase commit if they are ready to commit. If a negative request is received from one of the other sites, the entire transaction will be rolled back. Otherwise, the distributed transaction will be committed on all sites. However, there is a chance that an error (network related or otherwise) causes the two-phase commit transaction to be left in pending state (i.e. not committed or rolled back). It's the role of the RECO process to liaise with the coordinator to resolve the pending two-phase commit transaction. RECO will either commit or rollback this transaction.
Optional Background Processes in Oracle
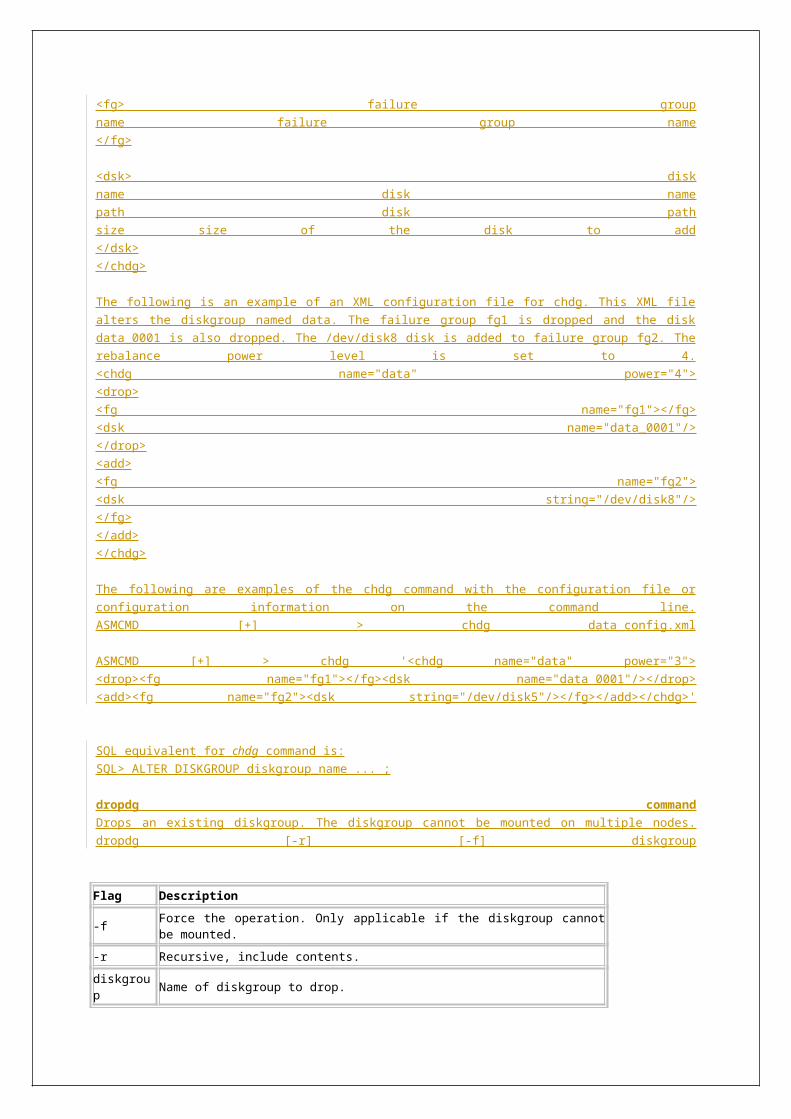
Archiver (maximum 10) ARC0-ARC9
The ARCn process is responsible for writing the online redolog files to the mentioned archive log destination after a log switch has occurred. ARCn is present only if the database is running in archivelog mode and automatic archiving is enabled. The log writer process is responsible for starting multiple ARCn processes when the workload increases. Unless ARCn completes the copying of a redolog file, it is not released to log writer for overwriting.
The number of archiver processes that can be invoked initially is specified by the initialization parameter LOG_ARCHIVE_MAX_PROCESSES (by default 2, max 10). The actual number of archiver processes in use may vary based on the workload.
ARCH processes, running on primary database, select archived redo logs and send them to standby database. Archive log files are used for media recovery (in case of a hard disk failure and for maintaining an Oracle standby database via log shipping). Archives the standby redo logs applied by the managed recovery process (MRP).
In RAC, the various ARCH processes can be utilized to ensure that copies of the archived redo logs for each instance are available to the other instances in the RAC setup should they be needed for recovery.
Coordinated Job Queue Processes (maximum 1000) CJQ0/Jnnn
Job queue processes carry out batch processing. All scheduled jobs are executed by these processes. The initialization parameter JOB_QUEUE_PROCESSES specifies the maximum job processes that can be run concurrently. These processes will be useful in refreshing materialized views.
This is the Oracle’s dynamic job queue coordinator. It periodically selects jobs (from JOB$) that need to be run, scheduled by the Oracle job queue. The coordinator process dynamically spawns job queue slave processes (J000-J999) to run the jobs. These jobs could be PL/SQL statements or procedures on an Oracle instance.
CQJ0 - Job queue controller process wakes up periodically and checks the job log. If a job is due, it spawns Jnnnn processes to handle jobs.
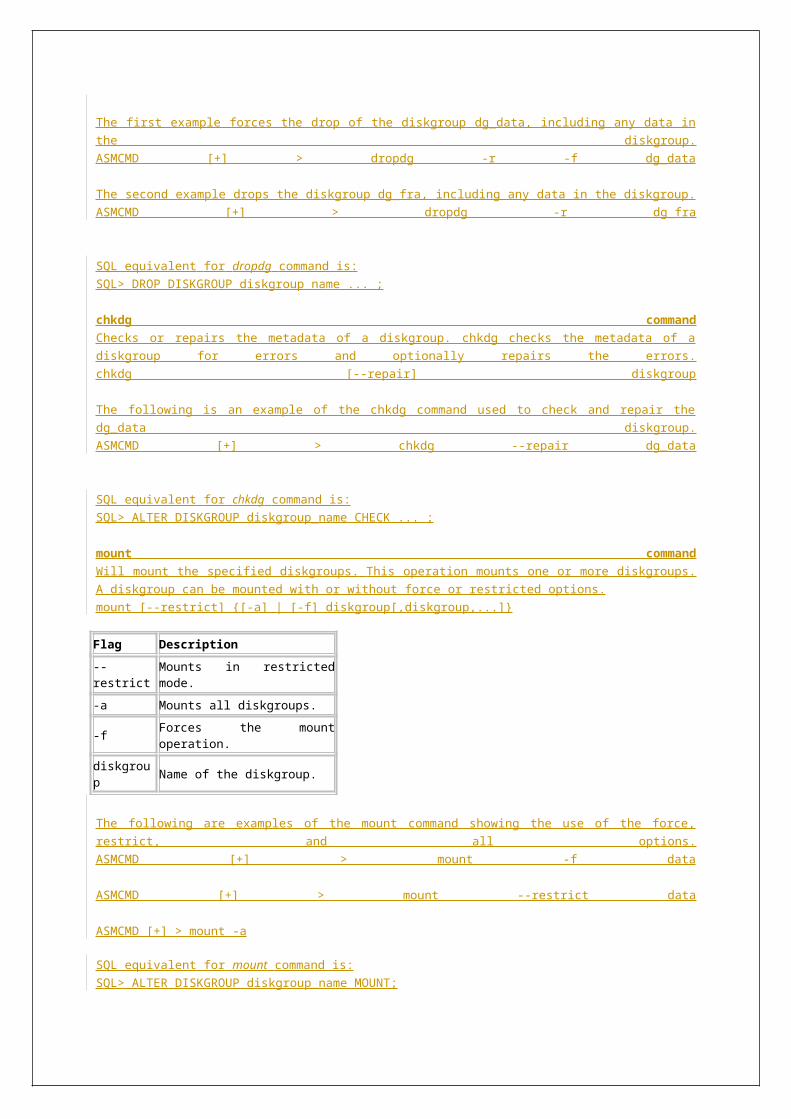
From Oracle 11g release2, DBMS_JOB and DBMS_SCHEDULER work without setting JOB_QUEUE_PROCESSES. Prior to 11gR2 the default value is 0, and from 11gR2 the default value is 1000.
Dedicated ServerDedicated server processes are used when MTS is not used. Each user process gets a dedicated connection to the database. These user processes also handle disk reads from database datafiles into the database block buffers.
LISTENERThe LISTENER process listens for connection requests on a specified port and passes these requests to either a distributor process if MTS is configured, or to a dedicated process if MTS is not used. The LISTENER process is responsible for load balance and failover in case a RAC instance fails or is overloaded.
CALLOUT ListenerUsed by internal processes to make calls to externally stored procedures.
Lock Monitor (maximum 1) LMON
Lock monitor manages global locks and resources. It handles the redistribution of instance locks whenever instances are started or shutdown. Lock monitor also recovers instance lock information prior to the instance recovery process. Lock monitor co-ordinates with the Process Monitor (PMON) to recover dead processes that hold instance locks.
Lock Manager Daemon (maximum 10) LMDn
LMDn processes manage instance locks that are used to share resources between instances. LMDn processes also handle deadlock detection and remote lock requests.
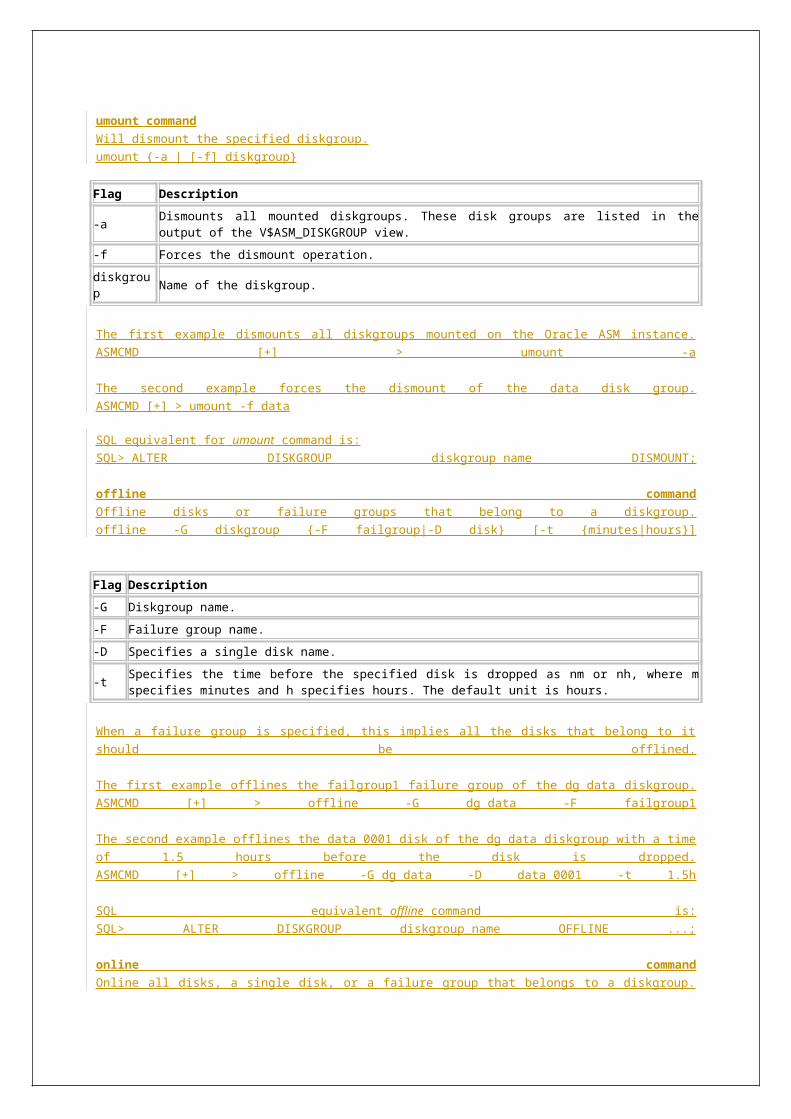
Global Cache Service (LMS)In an Oracle Real Application Clusters environment, this process manages resources and provides inter-instance resource control.
Lock processes (maximum 10) LCK0- LCK9
The instance locks that are used to share resources between instances are held by the lock processes.
Block Server Process (maximum 10) BSP0-BSP9
Block server Processes have to do with providing a consistent read image of a buffer that is requested by a process of another instance, in certain circumstances.
Queue Monitor (maximum 10) QMN0-QMN9
This is the advanced queuing time manager process. QMNn monitors the message queues. QMN used to manage Oracle Streams Advanced Queuing.
Event Monitor (maximum 1) EMN0/EMON
This process is also related to advanced queuing, and is meant for allowing a publish/subscribe style of messaging between applications.
Dispatcher (maximum 1000) Dnnn
Intended for multi threaded server (MTS) setups. Dispatcher processes listen to and receive requests from connected sessions and places them in the request queue for further processing. Dispatcher processes also pickup outgoing responses from the result queue and transmit them back to the clients. Dnnn are mediators between the client processes and the shared server processes. The maximum number of dispatcher process can be specified using the initialization parameter MAX_DISPATCHERS.
Shared Server Processes (maximum 1000) Snnn
Intended for multi threaded server (MTS) setups. These processes pickup requests from the call request queue, process them and then return the results to a result queue. These user processes also handle disk reads from database datafiles into the database block buffers. The number of shared server processes to be created at instance startup can be specified using
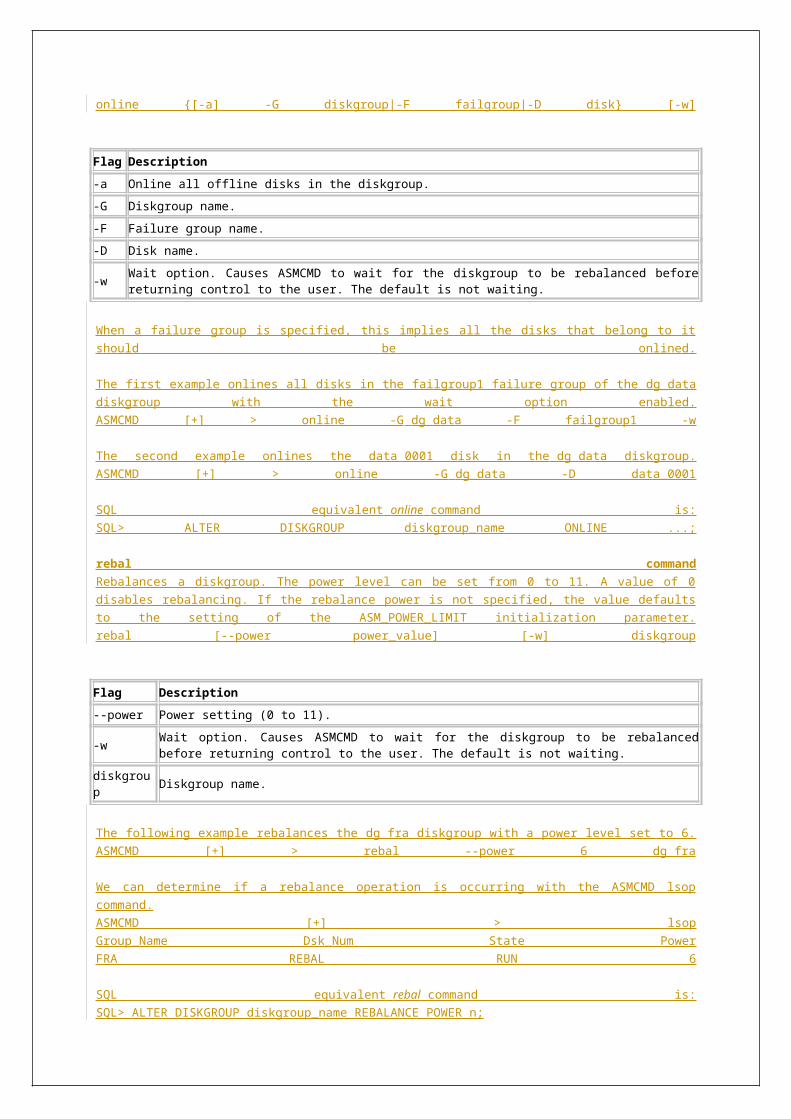
the initialization parameter SHARED_SERVERS. Maximum shared server processes can be specified by MAX_SHARED_SERVERS.
Parallel Execution/Query Slaves (maximum 1000) Pnnn
These processes are used for parallel processing. It can be used for parallel execution of SQL statements or recovery. The Maximum number of parallel processes that can be invoked is specified by the initialization parameter PARALLEL_MAX_SERVERS.
Trace Writer (maximum 1) TRWR
Trace writer writes trace files from an Oracle internal tracing facility.
Input/Output Slaves (maximum 1000) Innn
These processes are used to simulate asynchronous I/O on platforms that do not support it. The initialization parameter DBWR_IO_SLAVES is set for this purpose.
Dataguard Monitor (maximum 1) DMON
The Dataguard broker process. DMON is started when Dataguard is started.
LGWR Network Server process LNS
In Data Guard, LNS process performs actual network I/O and waits for each network I/O to complete. Each LNS has a user configurable buffer that is used to accept outbound redo data from the LGWR process. The NET_TIMEOUT attribute is used only when the LGWR process transmits redo data using a LGWR Network Server(LNS) process.
Managed Recovery Process MRP
In Data Guard environment, this managed recovery process will apply archived redo logs to the standby database.
Remote File Server process RFS
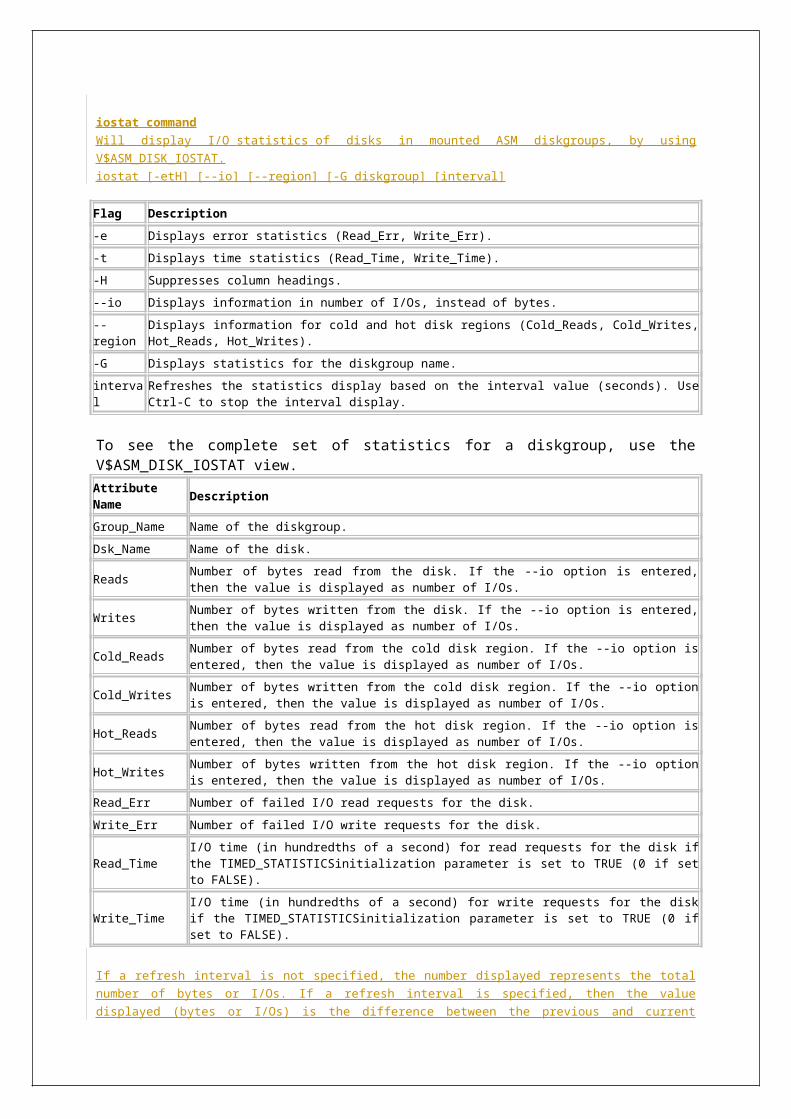
The remote file server process, in Data Guard environment, on the standby database receives archived redo logs from the primary database.
Logical Standby Process LSP
The logical standby process is the coordinator process for a set of processes that concurrently read, prepare, build, analyze, and apply completed SQL transactions from the archived redo logs. The LSP also maintains metadata in the database. The RFS process communicates with the logical standby process (LSP) to coordinate and record which files arrived.
Wakeup Monitor Process (maximum 1) WMON
This process was available in older versions of Oracle to alarm other processes that are suspended while waiting for an event to occur. This process is obsolete and has been removed.
Recovery Writer (maximum 1) RVWRThis is responsible for writing flashback logs (to FRA).
Fetch Archive Log (FAL) ServerServices requests for archive redo logs from FAL clients running on multiple standby databases. Multiple FAL servers can be run on a primary database, one for each FAL request.
Fetch Archive Log (FAL) ClientPulls archived redo log files from the primary site. Initiates transfer of archived redo logs when it detects a gap sequence.
New Background Processes in Oracle 10g
Memory Manager (maximum 1) MMAN
MMAN dynamically adjust the sizes of the SGA components like buffer cache, large pool, shared pool and java pool and serves as SGA memory broker. It is a new process added to Oracle 10g as part of automatic shared memory management.
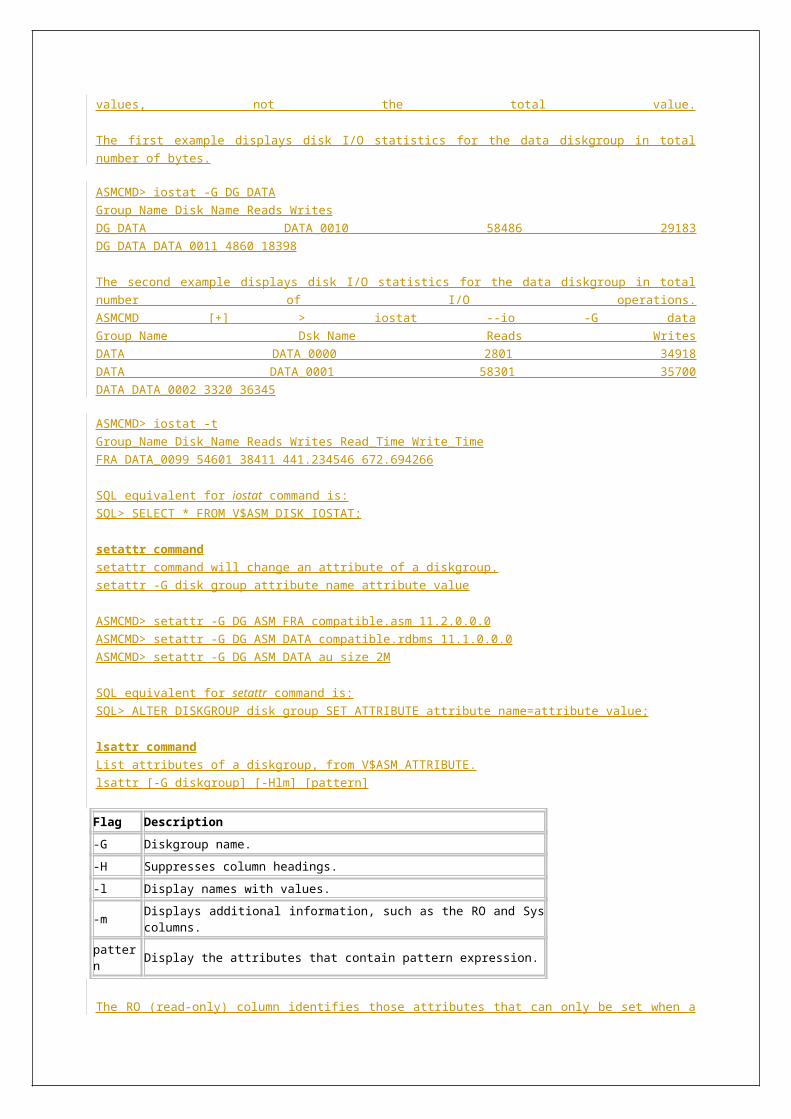
Memory Monitor (maximum 1) MMON
MMON monitors SGA and performs various manageability related background tasks. MMON, the Oracle 10g background process, used to collect statistics for the Automatic Workload Repository (AWR).
Memory Monitor Light (maximum 1) MMNL
New background process in Oracle 10g. This process performs frequent and lightweight manageability-related tasks, such as session history capture and metrics computation.
Change Tracking Writer (maximum 1) CTWR
CTWR will be useful in RMAN. Optimized incremental backups using block change tracking (faster incremental backups) using a file (named block change tracking file). CTWR (Change Tracking Writer) is the background process responsible for tracking the blocks.
ASMB
This ASMB process is used to provide information to and from cluster synchronization services used byASM to manage the disk resources. It's also used to update statistics and provide a heart beat mechanism.
Re-Balance RBAL
RBAL is the ASM related process that performs rebalancing of disk resources controlled by ASM.
Actual Rebalance ARBx
ARBx is configured by ASM_POWER_LIMIT.
New Background Processes in Oracle 11g ACMS - Atomic Controlfile to Memory Server
DBRM - Database Resource Manager
DIA0 - Diagnosibility process 0
DIAG - Diagnosibility process
FBDA - Flashback Data Archiver
GTX0 - Global Transaction Process 0
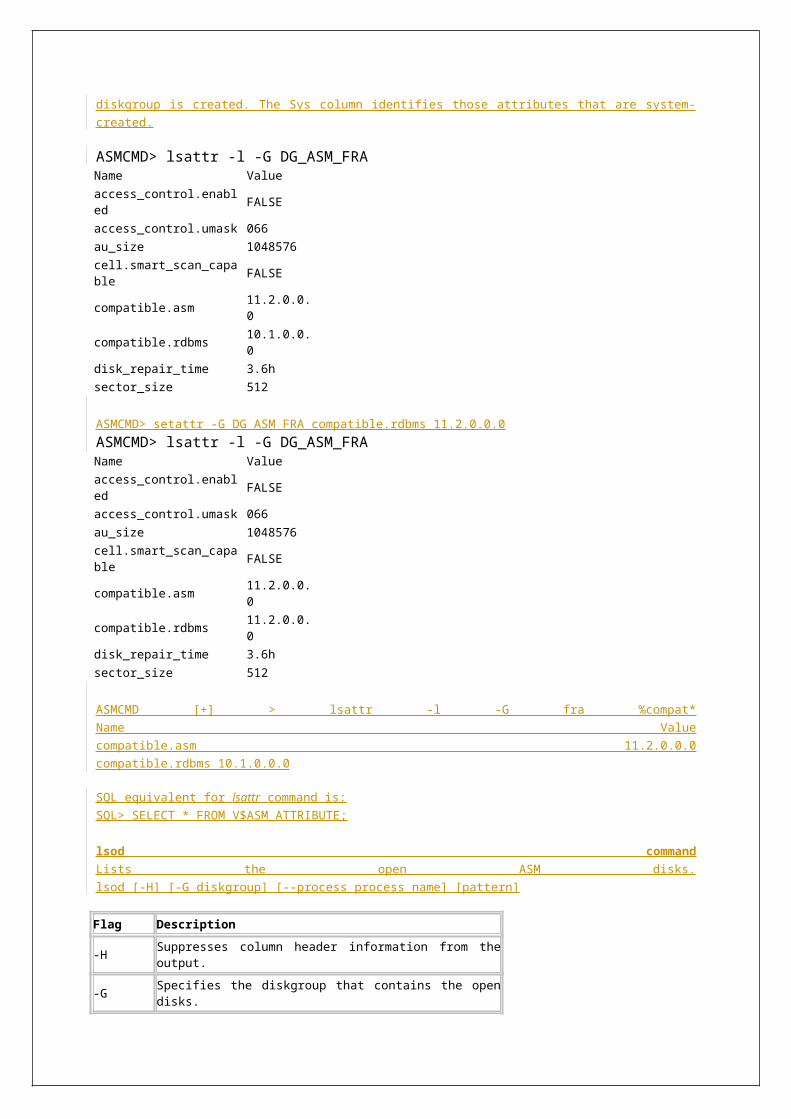
KATE - Konductor (Conductor) of ASM Temporary Errands
MARK - Mark Allocation unit for Resync Koordinator (coordinator)
SMCO - Space Manager
VKTM - Virtual Keeper of TiMe process
W000 - Space Management Worker Processes
ABP - Autotask Background Process
Autotask Background Process (ABP)It translates tasks into jobs for execution by the scheduler. It determines the list of jobs that must be created for each maintenance window. Stores task execution history in the SYSAUX tablespace. It is spawned by the MMON background process at the start of the maintenance window.
File Monitor (FMON)
The database communicates with the mapping libraries provided by storage vendors through an external non-Oracle Database process that is spawned by a background process called FMON. FMON is responsible for managing the mapping information. When you specify the FILE_MAPPING initialization parameter for mapping datafiles to physical devices on a storage subsystem, then the FMON process is spawned.
Dynamic Intimate Shared Memory (DISM)By default, Oracle uses intimate shared memory (ISM) instead of standard System V shared memory on Solaris Operating system. When a shared memory segment is made into an ISM segment, it is mapped using large pages and the memory for the segment is locked (i.e., it cannot be paged out). This greatly reduces the overhead due to process context switches, which improves Oracle's performance linearity under load.
Data Dictionary views Vs V$ views in OracleHere are the differences between data dictionary views and V$ views, in Oracle.
Data Dictionary views
V$ views
Data will not be lost even after instance is shutdowned
Data will be lost if instance is shutdowned
Will be accessible (some are) Will be
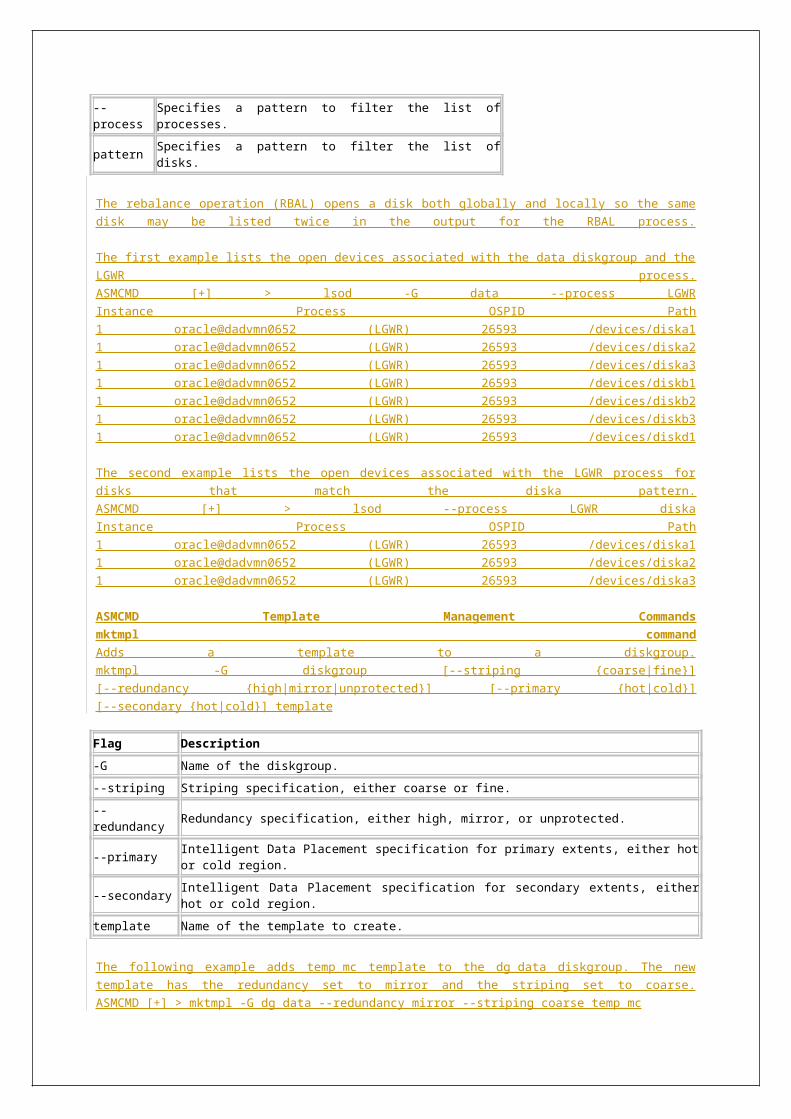
only if instance is OPENED
accessible even if instance is in mount or nomount stage (STARTED)
Data dictionary view names are plural
V$ view names are singular
Datapump
Datapump utility in OracleOracle Datapump was brought in Oracle Database 10g,as replacement for the original Export and Import utilities.
From Oracle Database 10g, new Datapump Export (expdp) and Import (impdp) clients that use this interface have been provided. Oracle recommends that customers use these new Datapump Export and Import clients rather than the Original Export and Original Import clients, since the new utilities have vastly improved performance and greatly enhanced functionality.
Oracle Datapump provides high speed, parallel, bulk data and metadata movement of Oracle database contents. It’s a server-side replacement for the original Export and Import utilities. A new public interface package, DBMS_DATAPUMP, provides a server-side infrastructure for fast data and metadata movement.
Datapump will make use of streams_pool_size.
Datapump is available on the Standard Edition, Enterprise Edition and Personal Edition. However, the parallel capability is only available on Oracle 10g and Oracle 11g Enterprise Editions. Datapump is included on all the platforms supported by Oracle 10g, Oracle 11g.
Original Export and Import Limitations
Design not scalable to large databases
Slow unloading and loading of data, no parallelism
Difficult to monitor job progress
Limited flexibility in object selection
No callable API
Difficult to maintain
Non-restartable
Client-side, single threaded execution
Limited tuning mechanisms
Limited object filtering
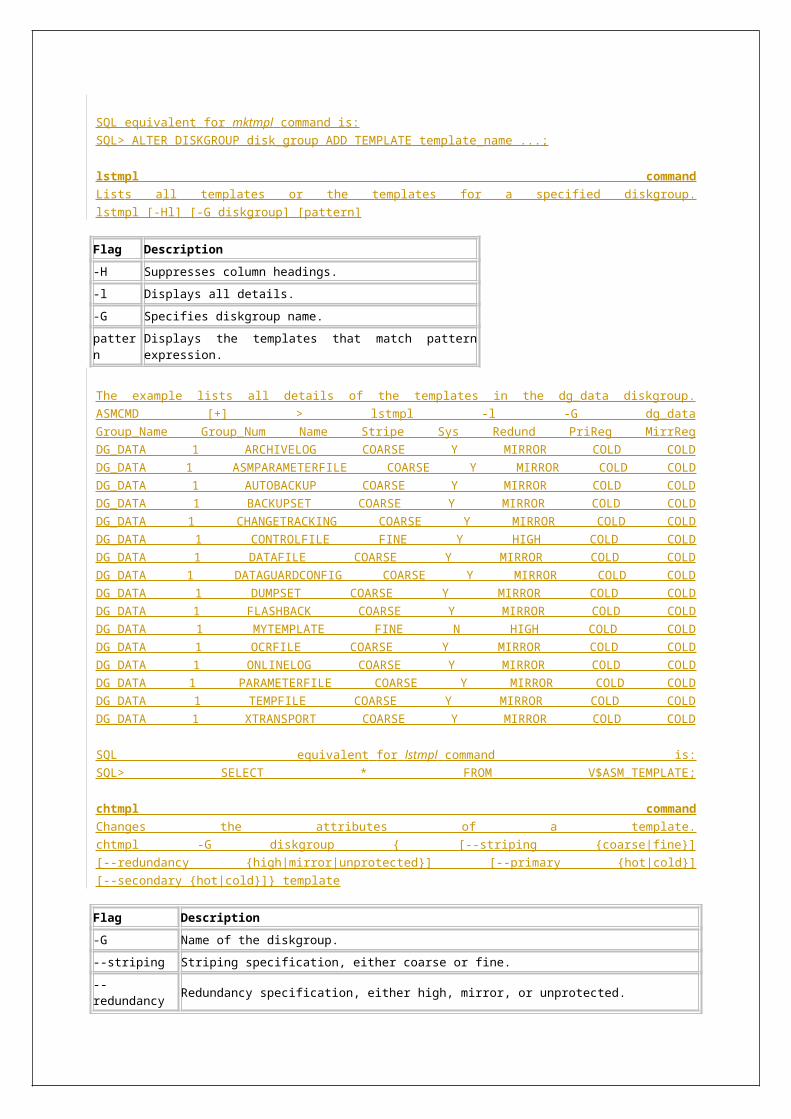
The Datapump system requirements are the same as the standard Oracle Database 10g requirements. Datapump doesn’t need a lot of additional system or database resources, but the time to extract and treat the information will be dependent on the CPU and memory available on each machine. If system resource consumption becomes an issue while a Datapump job is executing, the job can be dynamically throttled to reduce the number of execution threads.
Using the Direct Path method of unloading, a single stream of data unload is about 2 times faster than normal Export because the Direct Path API has been modified to be even more efficient. Depending on the level of parallelism, the level of improvement can be much more.
A single stream of data load is 15-45 times faster than normal Import. The reason it is so much faster is that Conventional Import uses only conventional mode inserts, whereas Datapump Import uses the Direct Path method of loading. As with Export, the job can be parallelized for even more improvement.
Datapump Features
1.Writes either– Direct Path unloads– External tables (part of cluster, has LOB, etc)2.Command line interface3.Writing to external tables4.DBMS_DATAPUMP – Datapump API5.DBMS_METADATA – Metadata API6.Checkpoint / Job Restart
Job progress recorded in Master Table - All stopped Datapump jobs can be restarted without loss of data as long as the master table and dump file set remain undisturbed while the job is stopped. It doesn’t matter if the job was stopped voluntarily by a user of if the stoppage was involuntary due to a crash,power outage, etc.
May be stopped and restarted later
Abnormally terminated job is also restartable
Current objects can be skipped on restart if problematic
7.Better Job Monitoring and Control
Can detach from and attach to running jobs from any location - Multiple clients can attach to a job to see what is going on. Clients may also detach from an executing job without affecting it.
Initial job space estimate and overall percent done - At Export time, the approximate size of the job is estimated before it gets underway. The default method for determining this is to estimate the size of a partition by counting the number of blocks currently allocated to it. If tables have been analyzed, statistics can also be used which should provide a more accurate estimate. The user gets an estimate of how much dump file space will be consumed for the operation.
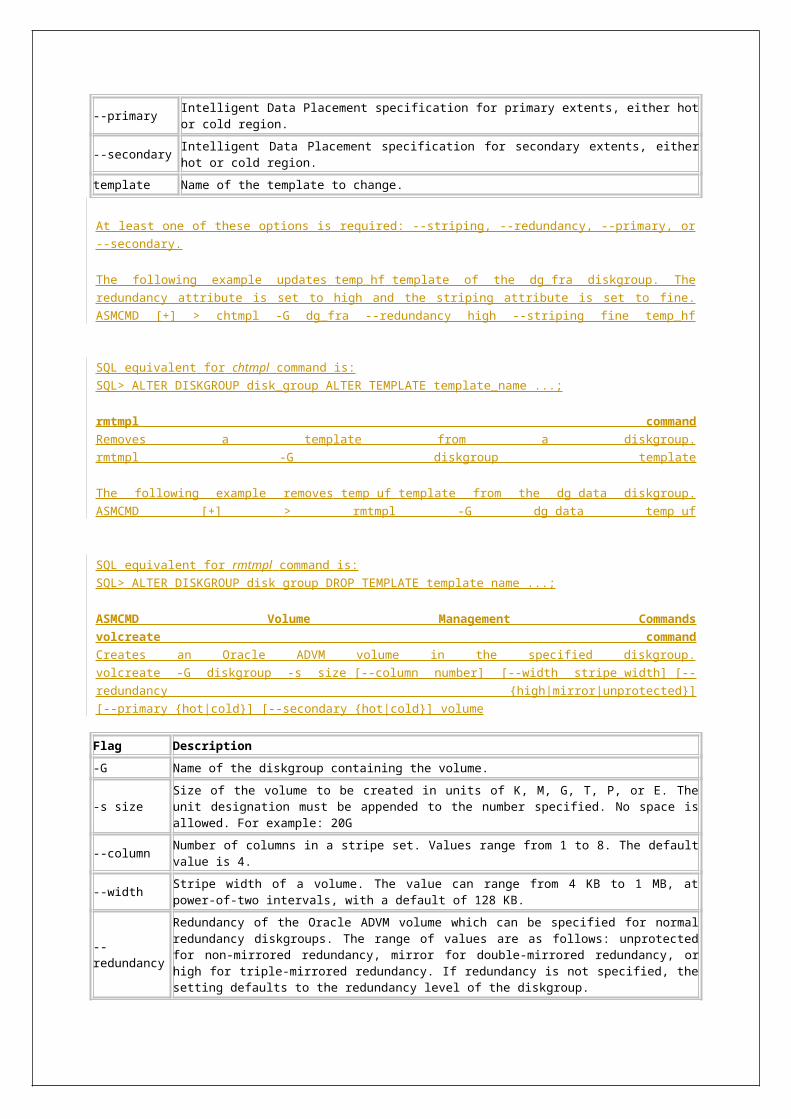
Job state and description - Once the Export begins, the user can get a status of the job by seeing a percentage of how far along he is in the job. He can then extrapolate the time required to get the job completed.
Per-worker status showing current object and percent done
Enterprise Manager interface available - The jobs can be monitored from any location
8.Interactive Mode for expdp and impdp clients
PARALLEL: add or remove workers
ADD_FILE: add dump files and wildcard specs
STATUS: get detailed per-worker status
STOP_JOB {=IMMEDIATE}: stop the job, leaving it restartable, immediate doesn’t wait for workers to finish current work items.
START_JOB: Restart a previously stopped job, can change reporting interval
KILL_JOB: stop job and delete all its resources, leaving it unrestartable, the master table and dump files are deleted
CONTINUE: leave interactive mode, continue logging
EXIT: exit client, leave job running
All modes of operation are supported: full, schema, table, tablespace, and transportable tablespace.
9.Dumpfile Set Management
Directory based: e.g., DMPDIR:export01.dmp where DMPDIR is external directory
Can specify maximum size of each dumpfile
Can dynamically add dumpfiles to jobs - If a job ran out of space, can use ADD_FILE command and specify a FILESIZE value
Wildcard file specs supported - Wildcard file support makes it easy to spread the I/O load over multiple spindles:e.g.: Dumpfile=dmp1dir:full1%u.dmp, dmp2dir:full2%u.dmp
Dump file compression of metadata - Metadata is compressed before being written to the dumpfile set COMPRESSION=METADATA_ONLY
In Oracle Database 11g, this compression capability has been extended so that we can now compress table data on export. Datapump compression is an inline operation, so the reduced dumpfile size means a significant savings in disk space.
Automatically uncompressed during Import. Datapump compression is fully inline on the import side as well, so there is no need to uncompress a dumpfile before importing it.
Dumpfile set coherency automatically maintained
Datapump supplies encryption options for more flexible and robust security.
10.Network ModeDatapump Export and Import both support a network mode in which the job’s source is a remote Oracle instance. This is an overlap of unloading the data, using Export, and loading the data, using Import, so those processes
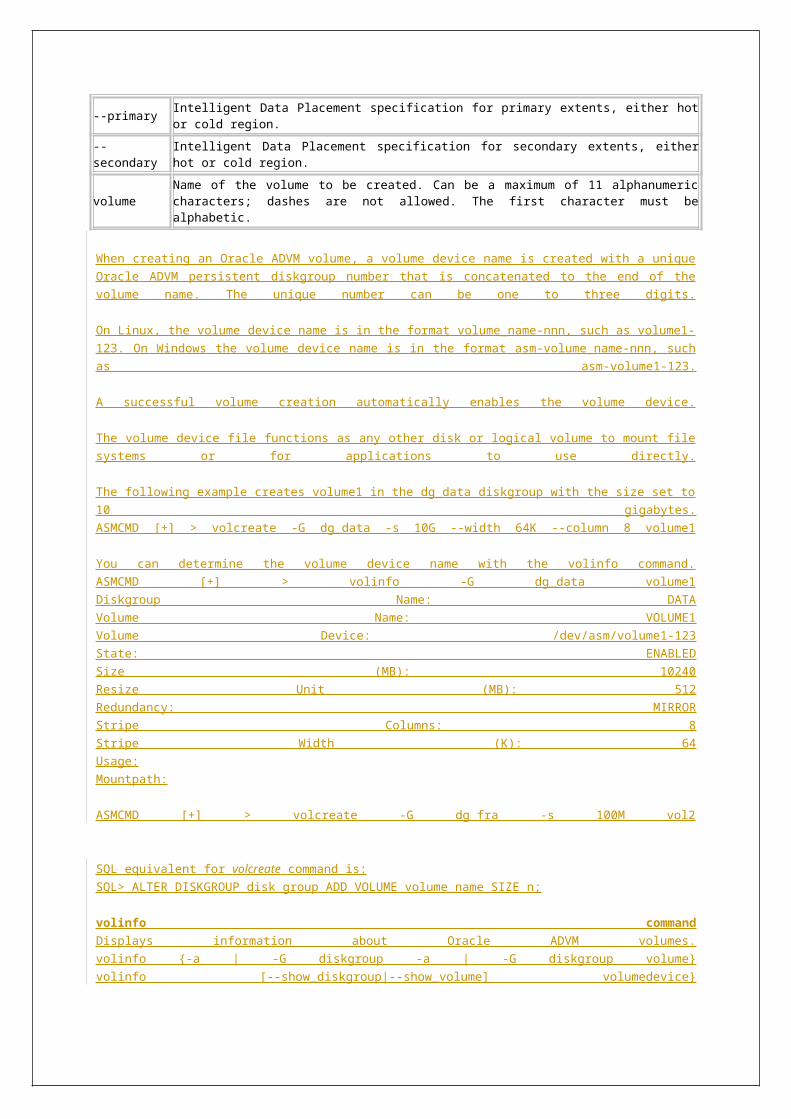
don’t have to be serialized. A database link is used for the network. We don’t have to worry about allocating file space because there are no intermediate dump files.
Network Export– Unload a remote database to a local dump file set– Allows export of read-only databases for archiving
Network Import– Overlap execution of extract and load– No intermediate dump files
Because Datapump maintains a Master Control Table and must perform database writes, Datapump can’t directly Export a Read-only database. Network mode allows the user to export Read-Only databases: The Datapump Export job runs locally on a read/write instance and extracts the data and metadata from the remote read-only instance. Both network export and import use database links to communicate with the remote source.
First level parallelism is supported for both network export and import. I/O servers do not operate remotely, so second level, intra-partition parallelism is not supported in network operations.
11.Fine-Grained Object Selection
All object types are supported - With the new EXCLUDE and INCLUDE parameters, a Datapump job can include or exclude any type of object and any subset of objects within a type.
Exclude parameter: specified object types are excluded from the operation
Include parameter: only the specified object types are included
Both take an optional name filter for even finer granularity:INCLUDE/ PACKAGE: “LIKE PAYROLL%’”EXCLUDE TABLE: “in (‘FOO’,’BAR’,…)’”e.g.:EXCLUDE=functionEXCLUDE=procedureEXCLUDE=package:”like ‘PAYROLL%’ “Would exclude all functions, procedures, and packages with names starting with ‘PAYROLL’ from the job.
Using INCLUDE instead of EXCLUDE above, would include the functions, procedures, and packages with names starting with ‘PAYROLL’.
12.DDL TransformationsEasy with XML, because object metadata is stored as XML in the dump file set,it is easy to apply transformations when DDL is being formed (via XSL-T) during import.
REMAP_SCHEMA -> REMAP_SCHEMA provides the old ‘FROMUSER / TOUSER’ capability to change object ownership.
REMAP_TABLESPACE -> REMAP_TABLESPACE allows objects to be moved from one tablespace to another. This changes the tablespace definition as well
REMAP_DATAFILE -> REMAP_DATAFILE is useful when moving databases across platforms that have different file system semantics.
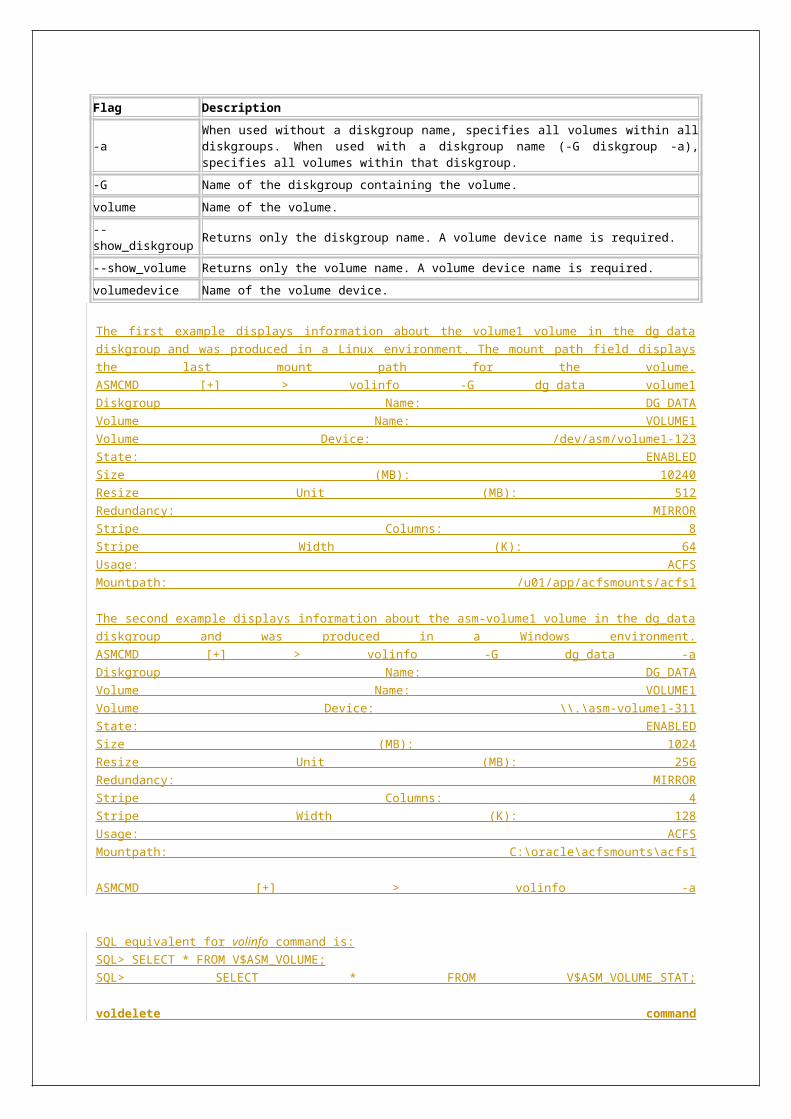
Segment and storage attributes can be suppressed -> The TRANSFORM parameter can also be used so that storage clauses are not generated in the DDL. This is useful if the storage characteristics of the target instance are very different from those of the source.
Datapump Benefits (advantages over normal export & import)
o Restartable
o Improved control
o Files will created on server, not on client side
o Parallel execution
o Automated performance tuning
o Simplified monitoring
o Improved object filtering
o Dump will be compressed
o Data can be encrypted (in Oracle 11g or later)
o Remap of data during export or import (in 11g or later)
o We can export one or more partitions of a table without having to move the entire table (in 11g or later)
o XML schemas and XMLType columns are supported for both export and import (in 11g or later)
o Using the Direct Path method of unloading or loading data, a single stream of Datapump export (unload) is approximately 2 times faster than original Export, because the Direct Path API has been modified to be even more efficient. Depending on the level of parallelism, the level of improvement can be much more.
o Original Import uses only conventional mode inserts, so a single stream of Datapump Import is 10-45 times faster than normal Import. As with Export, the job’s single stream can be changed to parallel streams for even more improvement.
o With Datapump, it is much easier for the DBA to manage and monitor jobs. During a long-running job, the DBA can monitor a job from multiple locations and know how far along it is, how much there is left to go, what objects are being worked on, etc. The DBA can also affect the job’s operation, i.e. abort it, adjust its resource consumption, and stop it for later restart.
o Since the jobs are completed much more quickly than before, production systems have less downtime.
o Datapump is publicly available as a PL/SQL package (DBMS_DATAPUMP), so customers can write their own data movement utilities if so desired. The metadata capabilities of the Datapump are also available as a separate PL/SQL package, DBMS_METADATA.
o While importing, if destination schema is not existed, datapump will create the user and import the objects.
Datapump requires no special tuning. Datapump runs optimally “out of the box”. Original Export and (especially) Import require careful tuning to achieve optimum results. There are no Datapump performance tuning
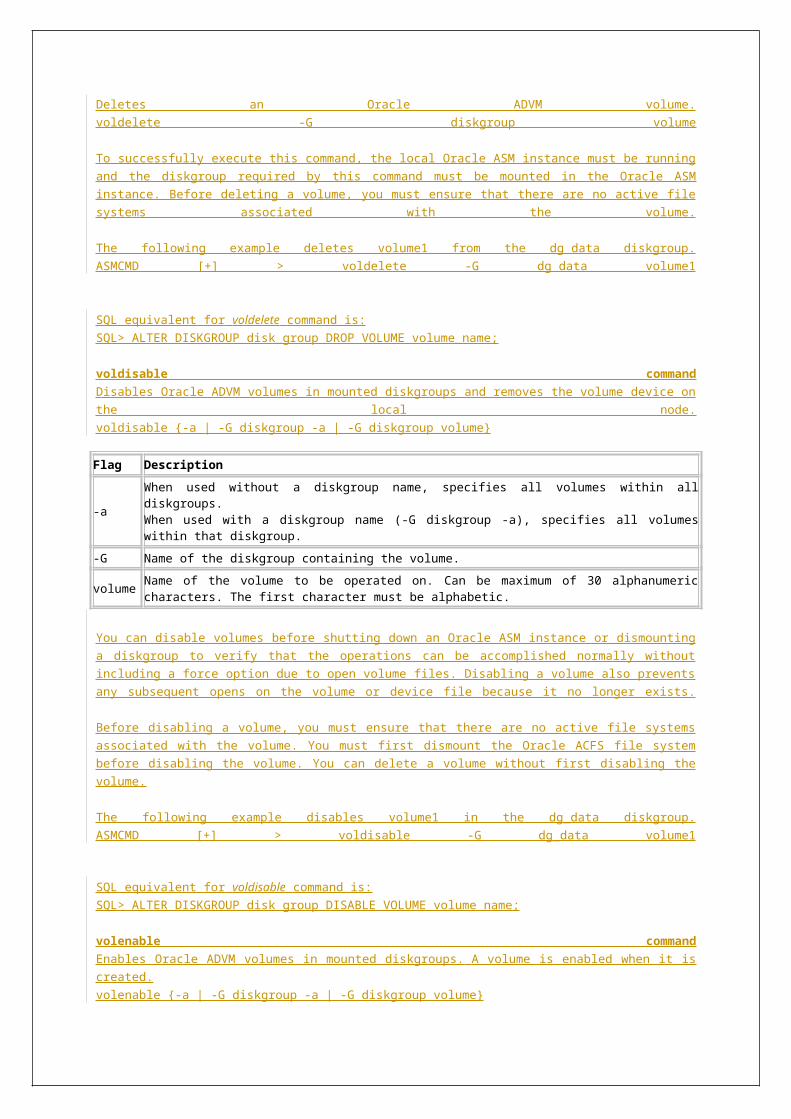
parameters other than the ability to dynamically adjust the degree of parallelism.
We can dynamically throttle the number of threads of execution throughout the lifetime of the job. There is an interactive command mode where we can adjust the level of parallelism. For example, we can start up a job during the day with a PARALLEL=2, and then increase it at night to a higher level.
All the Oracle database data types are supported via Datapump’s two data movement mechanisms, Direct Path and External Tables.
With Datapump, there is much more flexibility in selecting objects for unload and load operations. We can now unload any subset of database objects (such as functions, packages, and procedures) and reload them on the target platform. Almost all database object types can be excluded or included in an operation using the new Exclude and Include parameters.
We can either use the Command line interface or the Oracle Enterprise Manager web-based GUI interface.
Datapump handles all the necessary compatibility issues between hardware platforms and operating systems.
Oracle Datapump supports Oracle Apps 11i.
We can use the “ESTIMATE ONLY” command to see how much disk space is required for the job’s dump file set before we start the operation.
Jobs can be monitored from any location is going on. Clients may also detach from an executing job without affecting it.
Every Datapump job creates a Master Table in which the entire record of the job is maintained. The Master Table is the directory to the job, so if a job is stopped for any reason, it can be restarted at a later point in time, without losing any data. Whenever datapump export or import is running, Oracle will create a table with the JOB_NAME and will be deleted once the job is done. From this table, Oracle will find out how much job has been completed and from where to continue etc.
With Datapump, it is now possible to change the definition of some objects as they are created at import time. For example, we can remap the source datafile name to the target datafile name in all DDL statements where the source datafile is referenced. This is really useful if we are moving across platforms with different file system syntax.
Datapump supports the Flashback infrastructure, so we can perform an export and get a dumpfile set that is consistent with a specified point in time or SCN.
Datapump Vs SQL*LoaderWe can use SQL*Loader to load data from external files into tables of an Oracle database. Many customers use SQL*Loader on a daily basis to load files (e.g. financial feeds) into their databases. Datapump Export and Import may be used less frequently, but for very important tasks, such as migrating between platforms, moving data between development, test, and production databases, logical database backup, and for application deployment throughout a corporation.
Datapump Vs Transportable TablespacesWe can use Transportable Tablespaces when we want to move an entire
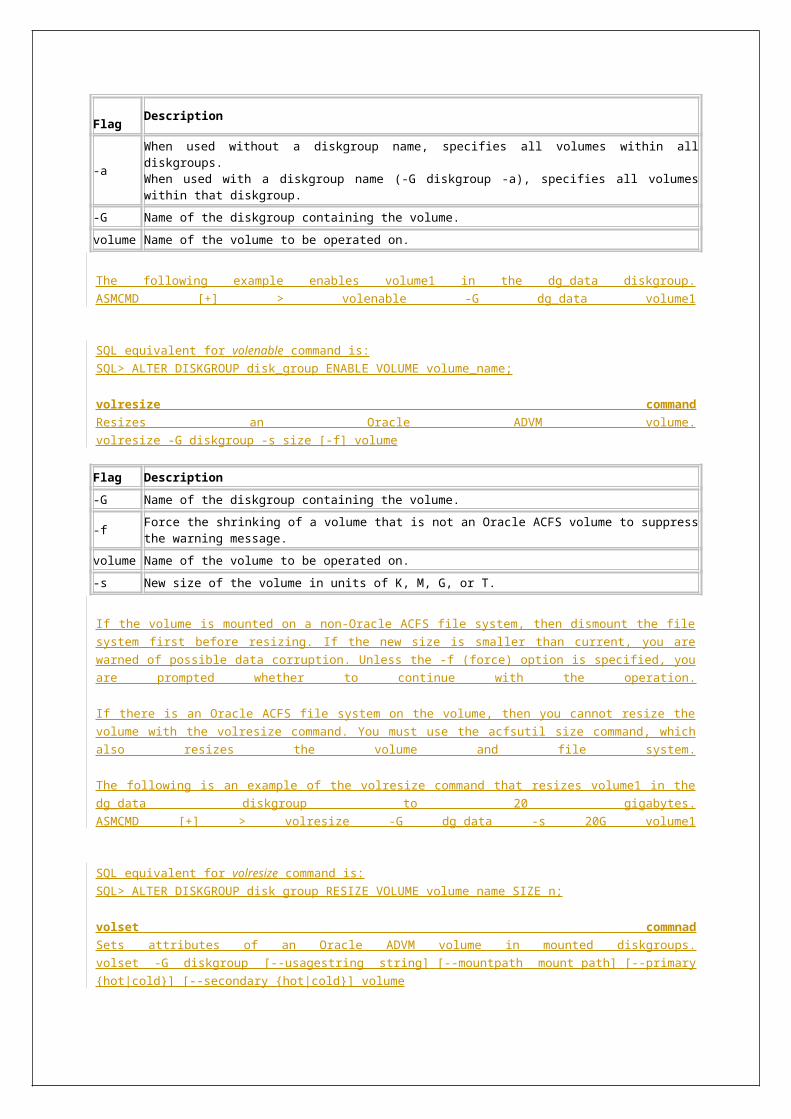
tablespace of data from one Oracle database to another. Transportable Tablespaces allows Oracle data files to be unplugged from a database, moved or copied to another location, and then plugged into another database. Moving data using Transportable Tablespaces can be much faster than performing either an export or import of the same data, because transporting a tablespace only requires the copying of datafiles and integrating the tablespace dictionary information. Even when transporting a tablespace, Datapump Export and Import are still used to handle the extraction and recreation of the metadata for that tablespace.
Datapump Disadvantages•Can’t use UNIX pipes•Can't run as SYS (/ as sysdba)
Related ViewsDBA_DATAPUMP_JOBSUSER_DATAPUMP_JOBSDBA_DIRECTORIESDATABASE_EXPORT_OBJECTSSCHEMA_EXPORT_OBJECTSTABLE_EXPORT_OBJECTSDBA_DATAPUMP_SESSIONS
Datapump Export & Import utilities in OracleContinuation of Datapump ....
expdp utilityThe Data Pump export utility provides a mechanism for transferring data objects between Oracle databases.
With datapump, we can do all exp/imp activities, except incremental backups.
Format: expdp KEYWORD=value or KEYWORD=(value1,value2,...,valueN)
USERID must be the first parameter on the command line. This user must have read & write permissions on DIRECTORY.
$ expdp help=y
Keyword Description (Default)
ATTACH Attach to an existing job, e.g. ATTACH [=job name].
COMPRESSIONReduce the size of a dumpfile. Valid keyword values are: ALL, (METADATA_ONLY),DATA_ONLY and NONE.
CONTENTSpecifies data to unload. Valid keyword values are: (ALL), DATA_ONLY, and METADATA_ONLY.
DATA_OPTIONSData layer flags. Valid value is: XML_CLOBS - write XML datatype in CLOB format.
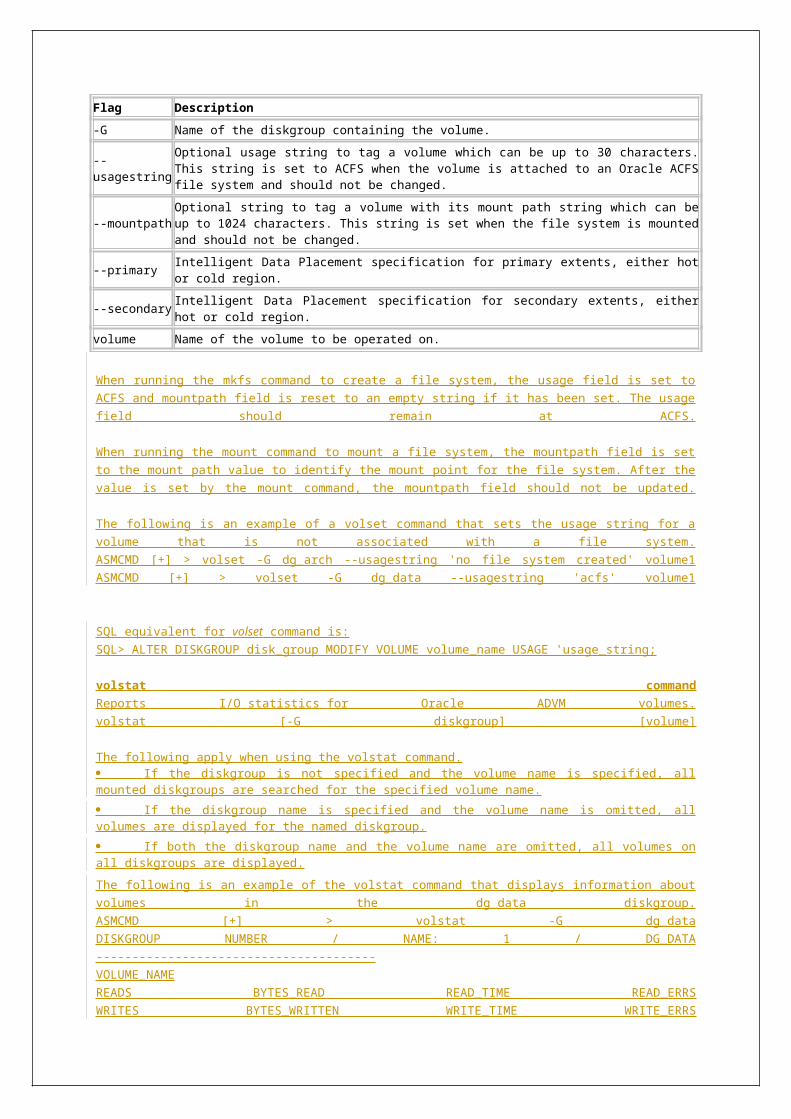
DIRECTORYDirectory object to be used for dumpfiles and logfiles. (DATA_PUMP_DIR)e.g. create directory extdir as '/path/';
DUMPFILEList of destination dump files (EXPDAT.DMP),e.g. DUMPFILE=scott1.dmp, scott2.dmp, dmpdir:scott3.dmp.
ENCRYPTIONEncrypt part or all of a dump file. Valid keyword values are: ALL, DATA_ONLY, METADATA_ONLY, ENCRYPTED_COLUMNS_ONLY, or NONE.
ENCRYPTION_ALGORITHMSpecify how encryption should be done. Valid keyword values are: (AES128), AES192, and AES256.
ENCRYPTION_MODEMethod of generating encryption key. Valid keyword values are: DUAL, PASSWORD, and (TRANSPARENT).
ENCRYPTION_PASSWORDPassword key for creating encrypted data within a dump file.
ESTIMATECalculate job estimates. Valid keyword values are: (BLOCKS) and STATISTICS.
ESTIMATE_ONLY Calculate job estimates without performing the export.
EXCLUDE Exclude specific object types. e.g. EXCLUDE=TABLE:EMP
FILESIZE Specify the size of each dumpfile in units of bytes.
FLASHBACK_SCN SCN used to reset session snapshot.
FLASHBACK_TIME Time used to find the closest corresponding SCN value.
FULLExport entire database (N). To use this option user must have EXP_FULL_DATABASE role.
HELP Display help messages (N).
INCLUDEInclude specific object types. e.g. INCLUDE=TABLE_DATA.
JOB_NAMEName of export job (default name will be SYS_EXPORT_XXXX_01, where XXXX can be FULL or SCHEMA or TABLE).
LOGFILE Specify log file name (EXPORT.LOG).
NETWORK_LINK Name of remote database link to the source system.
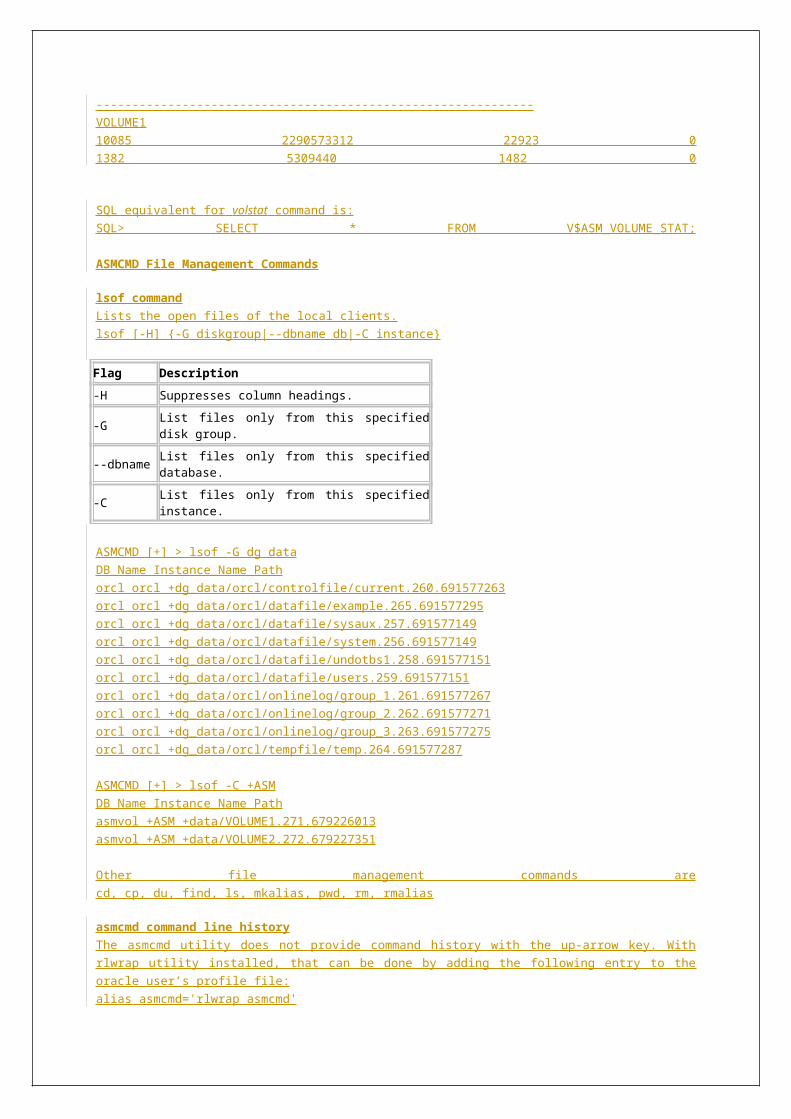
NOLOGFILE Do not write logfile (N).
PARALLEL Change the number of active workers for current job.
PARFILE Specify parameter file name.
QUERYPredicate clause used to export a subset of a table. e.g. QUERY=emp:"WHERE dept_id > 10".
REMAP_DATASpecify a data conversion function. e.g.REMAP_DATA=EMP.EMPNO:SCOTT.EMPNO
REUSE_DUMPFILES Overwrite destination dump file if it exists (N).
SAMPLE Percentage of data to be exported.
SCHEMAS List of schemas to export (login schema).
SOURCE_EDITIONEdition to be used for extracting metadata (from Oracle 11g release2).
STATUSFrequency (secs) job status is to be monitored where the default (0) will show new status when available.
TABLESIdentifies a list of tables to export. e.g. TABLES=HR.EMP,SH.SALES:SALES_1995.
TABLESPACES Identifies a list of tablespaces to export.
TRANSPORTABLESpecify whether transportable method can be used. Valid keyword values are: ALWAYS, (NEVER).
TRANSPORT_FULL_CHECK Verify storage segments of all tables (N).
TRANSPORT_TABLESPACESList of tablespaces from which metadata will be unloaded.
VERSIONVersion of objects to export. Valid keywords are: (COMPATIBLE), LATEST, or any valid database version.
The following commands are valid while in interactive mode.Note: abbreviations are allowed
Datapump Export interactive modeWhile exporting is going on, press Control-C to go to interactive mode, it will stop the displaying of the messages on the screen, but not the export process itself.
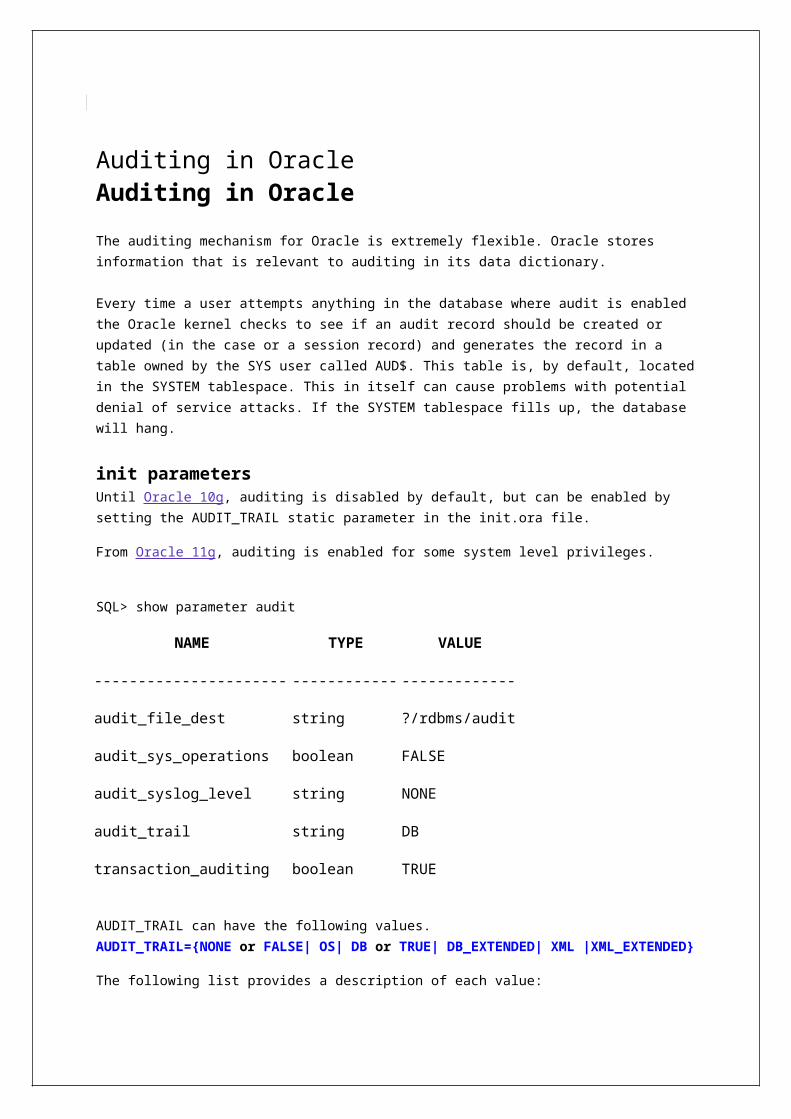
Export> [[here you can use the below interactive commands]]
Command Description
ADD_FILE Add dumpfile to dumpfile set.
CONTINUE_CLIENT Return to logging mode. Job will be re-started if idle.
EXIT_CLIENT Quit client session and leave job running.
FILESIZE Default filesize (bytes) for subsequent ADD_FILE commands.
HELP Summarize interactive commands.
KILL_JOB Detach and delete job.
PARALLELChange the number of active workers for current job. PARALLEL=number of workers
REUSE_DUMPFILESOverwrite destination dump file if it exists (N).
START_JOB Start/resume current job. Valid value is: SKIP_CURRENT.
STATUSFrequency (secs) job status is to be monitored where the default (0) will show new status when available. STATUS[=interval]
STOP_JOBOrderly shutdown of job execution and exits the client. STOP_JOB=IMMEDIATE performs an immediate shutdown of Datapump job.
Note: values within parenthesis are the default values.The options in sky blue color are the enhancements in Oracle 11g Release1.The options in blue color are the enhancements in Oracle 11g Release2.
Whenever datapump export or import is running, Oracle will create a table with the JOB_NAME and will be deleted once the job is done. From this table, Oracle will find out how much job has been completed and from where to continue etc.
Datapump Export Examples
SQL> CREATE DIRECTORY dp_dir AS '/u02/dpdata';
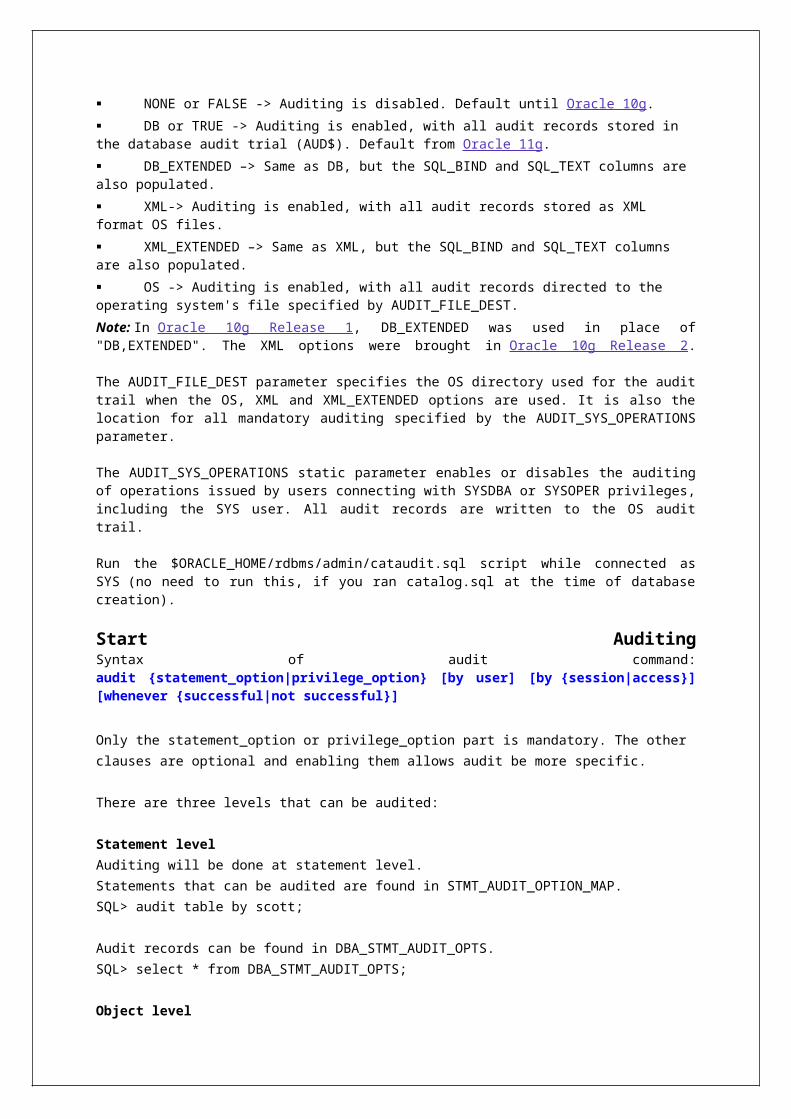
SQL> GRANT READ, WRITE ON DIRECTORY dp_dir TO user_name;
==> creating an external directory and granting privileges.
$ expdp DUMPFILE=liv_full.dmp LOGFILE=liv_full.log FULL=y PARALLEL=4
==> exporting whole database, with the help of 4 processes.
$ expdp DUMPFILE=master.dmp LOGFILE=master.log SCHEMAS=satya
(or)
$ expdp system/manager SCHEMAS=hr DIRECTORY=data_pump_dir LOGFILE=example1.log FILESIZE=300000 DUMPFILE=example1.dmp JOB_NAME=example1
==> exporting all the objects of a schema.
$ expdp ATTACH=EXAMPLE1
==> continuing or attaching job to background process.
$ expdp DUMPFILE=search.dmp LOGFILE=search.log SCHEMAS=search,own,tester
==> exporting all the objects of multiple schemas.
$ expdp anand/coffee TABLES=kick DIRECTORY=ext_dir DUMPFILE=expkick_%U.dmp PARALLEL=4 JOB_NAME=kick_export
==> exporting all the rows in table.
$ expdp DUMPFILE=t5.dmp LOGFILE=t5.log SCHEMAS=ym ESTIMATE_ONLY=Y
(or)
$ expdp LOGFILE=t5.log SCHEMAS=manage ESTIMATE_ONLY=Y
==> estimating export time and size.
$ expdp DUMPFILE=extdir:avail.dmp LOGFILE=extdir:avail.log
==> exporting without specifying DIRECTORY option and specifying the external directory name within the file names.
$ expdp SCHEMAS=u1,u6 .... COMPRESSION=metadata_only
==> exporting two schemas and compressing the metadata.
$ expdp SCHEMAS=cpp,java .... COMPRESSION=all
==> exporting two schemas and compressing the data (valid in 11g or later).
$ expdp username/password FULL=y DUMPFILE=dba.dmp DIRECTORY=dpump_dir INCLUDE=GRANT INCLUDE=INDEX CONTENT=ALL
==> exporting an entire database to a dump file with all GRANTS, INDEXES and data
$ expdp DUMPFILE=dba.dmp DIRECTORY=dpump_dir INCLUDE=PROCEDURE
==> exporting all the procedures.
$ expdp username/password DUMPFILE=dba.dmp DIRECTORY=dpump_dir INCLUDE=PROCEDURE:\"=\'PROC1\'\",FUNCTION:\"=\'FUNC1\'\"
==> exporting procedure PROC1 and function FUNC1.
$ expdp username/password DUMPFILE=dba.dmp DIRECTORY=dpump_dir
INCLUDE=TABLE:"LIKE 'TAB%'"
(or)
$ expdp username/password DUMPFILE=dba.dmp DIRECTORY=dpump_dir EXCLUDE=TABLE:"NOT LIKE 'TAB%'"
==> exporting only those tables whose name start with TAB.
$ expdp TABLES=hr.employees VERSION=10.1 DIRECTORY=dpump_dir1 DUMPFILE=emp.dmp
==> exporting data with version. Datapump Import can always read dump file sets created by older versions of Data Pump Export.
$ expdp TABLES=holder,activity REMAP_DATA=holder.cardno:hidedata.newcc
REMAP_DATA=activity.cardno:hidedata.newcc DIRECTORY=dpump_dir DUMPFILE=hremp2.dmp
==> exporting and remapping of data.
Exporting using Datapump API (DBMS_DATAPUMP package)
declare handle number;begin handle := dbms_datapump.open ('EXPORT', 'SCHEMA'); dbms_datapump.add_file(handle, 'scott.dmp', 'EXTDIR'); dbms_datapump.metadata_filter(handle, 'SCHEMA_EXPR','=''SCOTT'''); dbms_datapump.set_parallel(handle,4); dbms_datapump.start_job(handle); dbms_datapump.detach(handle);exception when others then dbms_output.put_line(substr(sqlerrm, 1, 254));end;/
impdp utilityThe Data Pump Import utility provides a mechanism for transferringdata objects between Oracle databases.
Format: impdp KEYWORD=value or KEYWORD=(value1,value2,...,valueN)
USERID must be the first parameter on the command line. This user must have read & write permissions on DIRECTORY.
$ impdp help=y
Keyword Description (Default)
ATTACHAttach to an existing job, e.g. ATTACH [=job name].
CONTENTSpecifies data to load. Valid keywords are:(ALL), DATA_ONLY, and METADATA_ONLY.
DATA_OPTIONSData layer flags. Valid value is: SKIP_CONSTRAINT_ERRORS-constraint errors are not fatal.
DIRECTORY Directory object to be used for dump, log, and
sql files. (DATA_PUMP_DIR)
DUMPFILEList of dumpfiles to import from (EXPDAT.DMP), e.g. DUMPFILE=scott1.dmp, scott2.dmp, dmpdir:scott3.dmp.
ENCRYPTION_PASSWORDPassword key for accessing encrypted data within a dump file. Not valid for network import jobs.
ESTIMATECalculate job estimates. Valid keywords are:(BLOCKS) and STATISTICS.
EXCLUDEExclude specific object types. e.g. EXCLUDE=TABLE:EMP
FLASHBACK_SCN SCN used to reset session snapshot.
FLASHBACK_TIMETime used to find the closest corresponding SCN value.
FULLImport everything from source (Y). To use this option (full import of the database) the user must have IMP_FULL_DATABASE role.
HELP Display help messages (N).
INCLUDEInclude specific object types. e.g. INCLUDE=TABLE_DATA.
JOB_NAMEName of import job (default name will be SYS_IMPORT_XXXX_01, where XXXX can be FULL or SCHEMA or TABLE).
LOGFILE Log file name (IMPORT.LOG).
NETWORK_LINKName of remote database link to the source system.
NOLOGFILE Do not write logfile.
PARALLELChange the number of active workers for current job.
PARFILE Specify parameter file name.
PARTITION_OPTIONS Specify how partitions should be transformed. Valid keywords are: DEPARTITION, MERGE and
(NONE).
QUERYPredicate clause used to import a subset of a table. e.g. QUERY=emp:"WHERE dept_id > 10".
REMAP_DATASpecify a data conversion function.e.g. REMAP_DATA=EMP.EMPNO:SCOTT.EMPNO
REMAP_DATAFILERedefine datafile references in all DDL statements.
REMAP_SCHEMAObjects from one schema are loaded into another schema.
REMAP_TABLETable names are remapped to another table.e.g. REMAP_TABLE=EMP.EMPNO:SCOTT.EMPNO.
REMAP_TABLESPACETablespace object are remapped to another tablespace.
REUSE_DATAFILESTablespace will be initialized if it already exists(N).
SCHEMAS List of schemas to import.
SKIP_UNUSABLE_INDEXESSkip indexes that were set to the Index Unusable state.
SOURCE_EDITIONEdition to be used for extracting metadata (from Oracle 11g release2).
SQLFILE Write all the SQL DDL to a specified file.
STATUSFrequency (secs) job status is to be monitored where the default (0) will show new status when available.
STREAMS_CONFIGURATION Enable the loading of streams metadata.
TABLE_EXISTS_ACTIONAction to take if imported object already exists. Valid keywords: (SKIP), APPEND, REPLACE and TRUNCATE.
TABLESIdentifies a list of tables to import. e.g. TABLES=HR.EMP,SH.SALES:SALES_1995.
TABLESPACES Identifies a list of tablespaces to import.
TARGET_EDITIONEdition to be used for loading metadata (from Oracle 11g release2).
TRANSFORMMetadata transform to apply to applicable objects. Valid keywords: SEGMENT_ATTRIBUTES, STORAGE, OID and PCTSPACE.
TRANSPORTABLE
Options for choosing transportable data movement. Valid keywords: ALWAYS and (NEVER).Only valid in NETWORK_LINK mode import operations.
TRANSPORT_DATAFILESList of datafiles to be imported by transportable mode.
TRANSPORT_FULL_CHECK Verify storage segments of all tables (N).
TRANSPORT_TABLESPACESList of tablespaces from which metadata will be loaded. Only valid in NETWORK_LINK mode import operations.
VERSION
Version of objects to export. Valid keywords are:(COMPATIBLE), LATEST, or any valid database version. Only valid for NETWORK_LINK and SQLFILE.
The following commands are valid while in interactive mode.Note: abbreviations are allowed
Datapump Import interactive modeWhile importing is going on, press Control-C to go to interactive mode.
Import> [[here you can use the below interactive commands]]
Command Description (Default)
CONTINUE_CLIENTReturn to logging mode. Job will be re-started if idle.
EXIT_CLIENT Quit client session and leave job running.
HELP Summarize interactive commands.
KILL_JOB Detach and delete job.
PARALLELChange the number of active workers for current job. PARALLEL=number of workers
START_JOBStart/resume current job. START_JOB=SKIP_CURRENT will start the job after skipping any action which was in progress when job was stopped.
STATUSFrequency (secs) job status is to be monitored where the default (0) will show new status when available. STATUS[=interval]
STOP_JOBOrderly shutdown of job execution and exits the client. STOP_JOB=IMMEDIATE performs an immediate shutdown of Datapump job.
Note: values within parenthesis are the default values.The options in sky blue color are the enhancements in Oracle 11g Release1.The options in blue color are the enhancements in Oracle 11g Release2.
The order of importing objects is: Tablespaces
Users
Roles
Database links
Sequences
Directories
Synonyms
Types
Tables/Partitions
Views
Comments
Packages/Procedures/Functions
Materialized views
Datapump Import Examples
$ impdp DUMPFILE=aslv_full.dmp LOGFILE=aslv_full.log PARALLEL=4
==> importing all the exported data, with the help of 4 processes.
$ impdp system/manager DUMPFILE=testdb_emp.dmp LOGFILE=testdb_emp_imp.log TABLES=tester.employee
==> importing all the records of table (employee table records in tester schema).
$ impdp DUMPFILE=visi.dmp LOGFILE=ref1imp.log TABLES=(brand, mba)
==> importing all the records of couple of tables.
$ impdp system DUMPFILE=example2.dmp REMAP_TABLESPACE=system:example2 LOGFILE=example2imp.log JOB_NAME=example2
==> importing data of one tablespace into another tablespace.
$ impdp DUMPFILE=prod.dmp LOGFILE=prod.log REMAP_TABLESPACE=FRI:WED TABLE_EXISTS_ACTION=REPLACE PARALLEL=4
==> importing data and replacing already existing tables.
$ impdp user1/user1 DUMPFILE=btw:avail.dmp INCLUDE=PROCEDURE
==> importing only procedures from the dump file.
$ impdp username/password DIRECTORY=dpump_dir DUMPFILE=scott.dmp TABLES=scott.emp REMAP_SCHEMA=scott:jim
==> importing of tables from scott’s account to jim’s account
$ impdp DIRECTORY=dpump_dir FULL=Y DUMPFILE=db_full.dmp
REMAP_DATAFILE=”’C:\DB1\HR\PAYROLL\tbs6.dbf’:’/db1/hr/payroll/tbs6.dbf’”
==> importing data by remapping one datafile to another.
$ impdp username/password DIRECTORY=dpump DUMPFILE=expfull.dmp SQLFILE=dpump_dir2:expfull.sql INCLUDE=TABLE,INDEX
==> will create sqlfile with DDL that could be executed in another database/schema to create the tables and indexes.
$ impdp DIRECTORY=dpump_dir DUMPFILE=emps.dmp REMAP_DATA=emp.empno:fixusers.newempid REMAP_DATA=card.empno:fixusers.newempi TABLE_EXISTS_ACTION=append
==> importing and remapping of data.
Importing using Datapump API (DBMS_DATAPUMP package)
declare handle number;begin handle := dbms_datapump.open ('IMPORT', 'SCHEMA'); dbms_datapump.add_file(handle, 'scott.dmp', 'EXTDIR'); dbms_datapump.set_parameter(handle,'TABLE_EXISTS_ACTION','REPLACE'); dbms_datapump.set_parallel(handle,4); dbms_datapump.start_job(handle); dbms_datapump.detach(handle);exception when others then dbms_output.put_line(substr(sqlerrm, 1, 254));end;/
Here is a general guideline for using the PARALLEL parameter: - Set the degree of parallelism to two times the number of CPUs, then tune from there. - For Data Pump Export, the PARALLEL parameter value should be less than or equal to the number of dump files. - For Data Pump Import, the PARALLEL parameter value should not be much larger than the number of files in the dump file set. - A PARALLEL greater than one is only available in Enterprise Edition.
Original Export is desupported from 10g release 2.
Original Import will be maintained and shipped forever, so that Oracle Version 5.0 through Oracle9idump files will be able to be loaded into Oracle 10g and later. Datapump Import can only read Oracle Database 10g (and later) Datapump Export dump files. Oracle recommends that customers convert to use the Oracle Datapump.
Export Import
Export & Import utilities in OracleExport and Import are the Oracle utilities that allow us to make exports & imports of the data objects, and transfer the data across databases that reside on different hardware platforms on different Oracle versions.
Export (exp) and import (imp) utilities are used to perform logical
database backup and recovery. When exporting, database objects are dumped to a binary file which can then be imported into another Oracle database.
catexp.sql (in $ORACLE_HOME/rdbms/admin) will create EXP_FULL_DATABASE & IMP_FULL_DATABASE roles (no need to run this, if you ran catalog.sql at the time of database creation).
Before using these commands, you should set ORACLE_HOME, ORACLE_SID and PATH environment variables.
exp utility
Objects owned by SYS cannot be exported.If you want to export objects of another schema, you need EXP_FULL_DATABASE role.
Format: exp KEYWORD=value or KEYWORD=(value1,value2,...,valueN)
USERID must be the first parameter on the command line.
$ exp help=y
Keyword Description (Default)
USERID username/password
FULLexport entire file (N). To do full database export, that user must have EXP_FULL_DATABASE role
BUFFER size of data buffer. OS dependent
OWNER list of owner usernames
FILE output files (EXPDAT.DMP)
TABLES list of table names
COMPRESS import into one extent (Y)
RECORDLENGTH length of IO record
GRANTS export grants (Y)
INCTYPEincremental export type. valid values areCOMPLETE, INCREMENTAL, CUMULATIVE
INDEXES export indexes (Y)
RECORD track incremental export (Y)
DIRECT direct path (N)
TRIGGERS export triggers (Y)
LOG log file of screen output
STATISTICS analyze objects (ESTIMATE)
ROWS export data rows (Y)
PARFILE parameter filename
CONSISTENTcross-table consistency(N). Implements SET TRANSACTION READ ONLY
CONSTRAINTS export constraints (Y)
OBJECT_CONSISTENT transaction set to read only during object export (N)
FEEDBACK display progress (a dot) for every N rows (0)
FILESIZE maximum size of each dump file
FLASHBACK_SCN SCN used to set session snapshot back to
FLASHBACK_TIME time used to get the SCN closest to the specified time
QUERY select clause used to export a subset of a table
RESUMABLE suspend when a space related error is encountered(N)
RESUMABLE_NAME text string used to identify resumable statement
RESUMABLE_TIMEOUT wait time for RESUMABLE
TTS_FULL_CHECK perform full or partial dependency check for TTS
VOLSIZEnumber of bytes to write to each tape volume (not available from Oracle 11g Release2)
TABLESPACES list of tablespaces to export
TRANSPORT_TABLESPACE export transportable tablespace metadata (N)
TEMPLATE template name which invokes iAS mode export
Note: values within parenthesis are the default values.
Examples:
$ exp system/manager file=emp.dmp log=emp_exp.log full=y==> exporting full database.
$ exp system/manager file=owner.dmp log=owner.log owner=owner direct=y STATISTICS=none==> exporting all the objects of a schema.
$ exp file=schemas.dmp log=schemas.log owner=master,owner,user direct=y STATISTICS=none==> exporting all the objects of multiple schemas.
$ exp file=testdb_emp.dmp log=testdb_emp.log tables=scott.emp direct=y STATISTICS=none==> exporting all the rows in table (emp table records in scott schema).
$ exp file=itinitem.dmp log=itinitem.log tables=tom.ITIN,tom.ITEMquery=\"where CODE in \(\'OT65FR7H\',\'ATQ56F7H\'\)\"statistics=none==> exporting the records of some tables which satisfies a particular criteria.
$ exp transport_tablespace=y tablespaces=THU statistics=none file=THU.dmp log=thu_exp.log==> exporting at tablespace level.
$ exp FILE=file1.dmp,file2.dmp,file3.dmp FILESIZE=10M LOG=multiple.log==> exporting to multiple files.$ exp file=scott.dmp log=scott.log inctype=complete==> exporting full database (after some incremental/cumulative backups).
$ exp file=scott.dmp log=scott.log inctype=cumulative==> exporting cumulatively (taking backup from last complete or cumulative backup).
$ exp file=scott.dmp log=scott.log inctype=incremental==> exporting incrementally (taking backup from last complete or cumulative or incremental backup).
imp utility
imp provides backward compatibility i.e. it will allows you toimport the objects that you have exported in lower Oracle versions also.
imp doesn't recreate already existing objects. It either abort the import process (default) or ignores the errors (if you specify IGNORE=Y).
Format: imp KEYWORD=value or KEYWORD=(value1,value2,...,valueN)
USERID must be the first parameter on the command line.
$ imp help=y
Keyword Description (Default)
USERID username/password
FULLimport entire file (N). To do the full database import, that user must have IMP_FULL_DATABASE role
BUFFER size of data buffer. OS dependent
FROMUSER list of owner usernames
FILE input files (EXPDAT.DMP)
TOUSER list of usernames
SHOWjust list file contents (N), will be used to check the validity of the dump file
TABLES list of table names
IGNORE ignore create errors (N)
RECORDLENGTH length of IO record
GRANTS import grants (Y)
INCTYPEincremental import type. valid keywords areSYSTEM (for definitions), RESTORE (for data)
INDEXES import indexes (Y)
COMMIT commit array insert (N)
ROWS import data rows (Y)
PARFILE parameter filename
LOG log file of screen output
CONSTRAINTS import constraints (Y)
DESTROY overwrite tablespace datafile (N)
INDEXFILEwill write DDLs of the objects in the dumpfile into the specified file
SKIP_UNUSABLE_INDEXES skip maintenance of unusable indexes (N)
FEEDBACK display progress every x rows(0)
TOID_NOVALIDATE skip validation of specified type ids
FILESIZE maximum size of each dump file
STATISTICS import precomputed statistics (ALWAYS)
RESUMABLE suspend when a space related error is encountered(N)
RESUMABLE_NAME text string used to identify resumable statement
RESUMABLE_TIMEOUT wait time for RESUMABLE
COMPILE compile procedures, packages, and functions (Y)
STREAMS_CONFIGURATION import streams general metadata (Y)
STREAMS_INSTANTIATION import streams instantiation metadata (N)
VOLSIZEnumber of bytes in file on each volume of a file on tape (not available fromOracle 11g Release2)
DATA_ONLY import only data (N) (from Oracle 11g Release2)
The following keywords only apply to transportable tablespacesTRANSPORT_TABLESPACE import transportable tablespace metadata (N)TABLESPACES tablespaces to be transported into databaseDATAFILES datafiles to be transported into databaseTTS_OWNERS users that own data in the transportable tablespace set
Note: values within parenthesis are the default values.Examples:$ imp system/manager file=emp.dmp log=emp_imp.log full=y==> importing all the exported data.
$ imp system/manager file=testdb_emp.dmp log=testdb_emp_imp.log tables=tester.employee==> importing all the records of table (employee table records in tester schema).
$ imp FILE=two.dmp LOG=two.log IGNORE=Y GRANTS=N INDEXES=N COMMIT=Y TABLES=(brand, book)==> importing all the records of couple of tables.
$ imp system/manager file=intenary.dmp log=intenary.log FROMUSER=tom TOUSER=jerry ignore=y==> importing data of one schema into another schema
$ imp "/as sysdba" file=TUE.dmp TTS_OWNERS=OWNER tablespaces=TUE transport_tablespace=y datafiles=TUE.dbf
$ imp file=transporter3.dmp log=transporter3.log inctype=system==> importing definitions from backup.
$ imp file=transporter3.dmp log=transporter3.log inctype=restore==> importing data from backup.
$ imp file=spider.dmp log=spider.log show=y==> checks the validity of the dumpfile.
$ imp file=scott.dmp log=scott.log indexfile=scott_schema.sql
==> will write DDLs of the objects in exported dumpfile (scott schema) into specified file. This command won't import the objects.
How to improve Export & Importexp:1. Set the BUFFER parameter to a high value. Default is 256KB.2. Stop unnecessary applications to free the resources.3. If you are running multiple sessions, make sure they write to different disks.4. Do not export to NFS (Network File Share). Exporting to disk is faster.5. Set the RECORDLENGTH parameter to a high value.6. Use DIRECT=yes (direct mode export).
imp:1. Place the file to be imported in separate disk from datafiles.2. Increase the DB_CACHE_SIZE.3. Set LOG_BUFFER to big size.4. Stop redolog archiving, if possible.5. Use COMMIT=n, if possible.6. Set the BUFFER parameter to a high value. Default is 256KB.7. It's advisable to drop indexes before importing to speed up the import process or set INDEXES=N and building indexes later on after the import. Indexes can easily be recreated after the data was successfully imported.8. Use STATISTICS=NONE9. Disable the INSERT triggers, as they fire during import.10. Set Parameter COMMIT_WRITE=NOWAIT(in 10g) or COMMIT_WAIT=NOWAIT (in 11g) during import.
Related ViewsDBA_EXP_VERSIONDBA_EXP_FILESDBA_EXP_OBJECTS
Flash/Fast Recovery Area
Flash/Fast Recovery Area(FRA) in Oracle
The flash recovery area is the most powerful tool available from Oracle 10g, that plays a vital role in performing database backup & recovery operations. From Oracle 11g release2, flash recovery area is called as fast recovery area.
Flash Recovery Area can be defined as a single, centralized, unified storage area that keep all the database backup & recovery related files and performs those activities in Oracle databases.
Unified Backup Files Storage, all backup components can be stored in one consolidated spot. The flash recovery area is managed via Oracle Managed Files (OMF), and it can utilize disk resources managed byAutomatic Storage Management (ASM). Flash recovery area can be configured for use by multiple database instances.
Automated Disk-Based Backup and Recovery, once the flash recovery area is configured, all backup components are managed automatically by Oracle.
Automatic Deletion of Backup Components, once backup components have been successfully created, RMAN (Recovery Manager) can be configured to automatically clean up files that are no longer needed (thus reducing risk of insufficient disk space for backups).
Disk Cache for Tape Copies, if your disaster recovery (DR) plan involves backing up to alternate media, the flash recovery area can act as a disk cache area for those backup components that are eventually copied to tape.
Flashback Logs, the FRA is also used to store and manage flashback logs, which are used during flashback backup operations to quickly restore a database to a prior desired state.
You can designate the FRA as the location for one of the control files and redo log members to limit the exposure in case of disk failure.
In case of a media failure or a logical error, the flash recovery area is referred to retrieve all the files needed to recover a database.
Following are the various entities that can be considered as FRA:
File System: 1. A single directory 2. An entire file system
Raw Devices: 1. Automatic storage management (ASM)
FRA Components
The flash/fast recovery area can contain the following:
Control files: During database creation, a copy of the control file is created in the flash recovery area.
Online redologs: Online redologs can be kept in FRA.
Archived log files: During the configuration of the FRA, the LOG_ARCHIVE_DEST_10 parameter in init.ora file is automatically set to the flash recovery area location. Archived log files are created by ARCn processes in the flash recovery area location and the location defined by LOG_ARCHIVE_DEST_n.
Flashback logs: Flashback logs are kept in the flash recovery area when flashback database is enabled.
Control file and SPFILE backups: The flash recovery area also keeps the control file and SPFILE backups, which is automatically generated by Recovery Manager (RMAN) only if RMAN has been configured for control file autobackup.
Datafile copies: The flash recovery area also keeps the datafile copies.
RMAN backup sets: The default destination of backup sets and image copies generated by RMAN is the flash recovery area.
Notes:
The FRA is shared among databases in order to optimize the usage of disk space for database recovery operations.
Before any backup and recovery activity can take place, the Flash Recovery Area must be set up. The flash recovery area is a specific area of disk storage that is set aside exclusively for retention of backup components such as datafile image copies, archived redo logs, and control file auto backup copies.
RMAN also transfers the restored archive files from tape to the flash recovery area in order to perform recovery operations.
Configuring FRAFollowing are the three initialization parameters that should be defined in order to set up the flash recovery area:
o DB_RECOVERY_FILE_DEST_SIZE
o DB_RECOVERY_FILE_DEST
o DB_FLASHBACK_RETENTION_TARGET
DB_RECOVERY_FILE_DEST_SIZE specifies the total size of all files that can be stored in the Flash Recovery Area. The size of the flash recovery area should be large enough to hold a copy of all data files, all incremental backups, online redo logs, archived redo log not yet backed up on tape, control files, and control file auto backups.
SQL> ALTER SYSTEM SET db_recovery_file_dest_size = 10g SCOPE = BOTH;DB_RECOVERY_FILE_DEST parameter is to specify the physical location where all the flash recovery files are to be stored. Oracle recommends that this be a separate location from the datafiles, control files, and redo
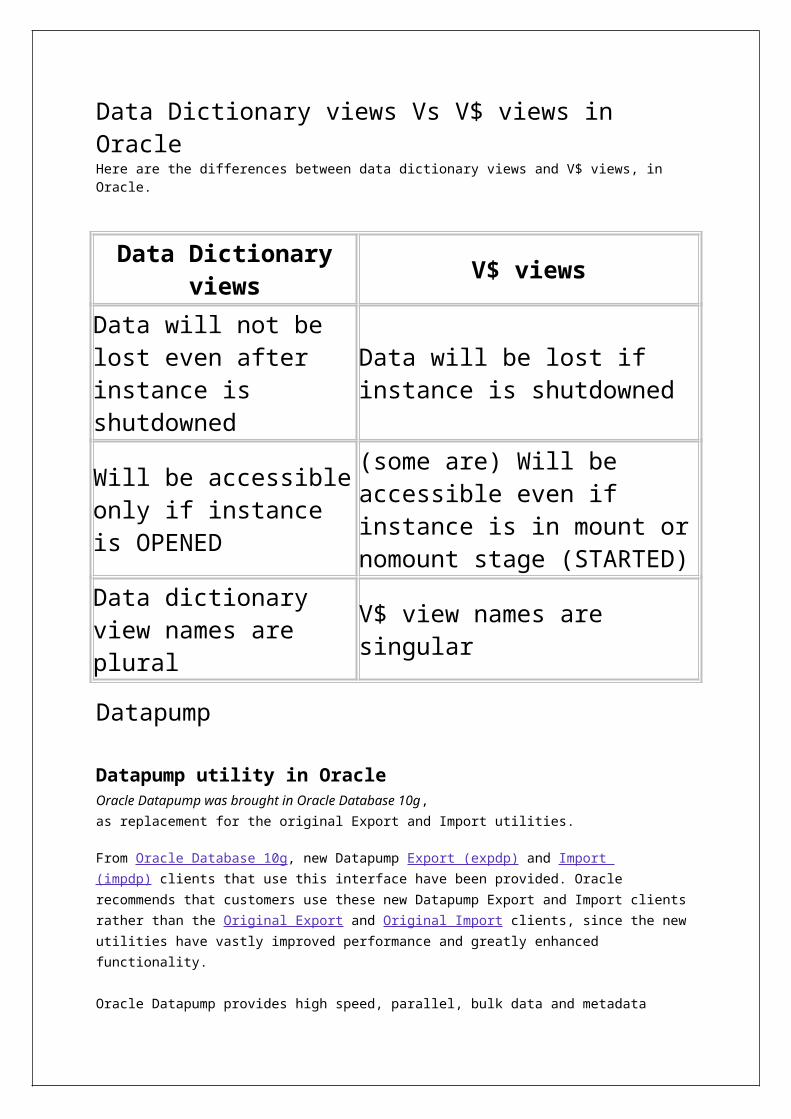
logs.
SQL> ALTER SYSTEM SET db_recovery_file_dest = '/OFR1' SCOPE = BOTH;If the database is using Automatic Storage Management (ASM) feature, then the shared disk area that ASM manages can be targeted for the Flashback Recovery Area.
SQL> ALTER SYSTEM SET db_recovery_file_dest = '+dgroup1' SCOPE = BOTH;The DB_RECOVERY_FILE_DEST_SIZE and DB_RECOVERY_FILE_DEST are defined to make the flash recovery area usable without shutting down and restarting the database instance i.e. these two parameters are dynamic.
SQL> ALTER SYSTEM SET db_flashback_retention_target = 1440 SCOPE = BOTH;Notes:
DB_RECOVERY_FILE_DEST_SIZE is defined before DB_RECOVERY_FILE_DEST in order to define the size of the flash recovery area. If the value specified in the DB_RECOVERY_FILE_DEST parameter is cleared then as a result the flash recovery area is disabled. DB_RECOVERY_FILE_DEST_SIZE parameter cannot be cleared up prior to the DB_RECOVERY_FILE_DEST parameter.The flash recovery area can be created and maintained using Oracle Enterprise Manager Database Control.
Enabling Flashback
SQL> alter database flashback on;
The database must be in archive log mode to enable flashback.Configuring Online Redolog Creation in Flash Recovery AreaTo store online redologs in FRA, you have to set DB_CREATE_ONLINE_LOG_DEST_1 (OMF init parameter) to FRA location and create the online log groups/members.
The initialization parameters that determine where online redolog files are created are DB_CREATE_ONLINE_LOG_DEST_n, DB_RECOVERY_FILE_DEST and DB_CREATE_FILE_DEST.
Configuring Control File Creation in Flash Recovery AreaTo store control file in FRA, you have to set CONTROL_FILES parameter to FRA location.
The initialization parameters CONTROL_FILES, DB_CREATE_ONLINE_LOG_DEST_n, DB_RECOVERY_FILE_DEST and DB_CREATE_FILE_DEST all interact to determine the location where the database control files are created.
Configuring Archived Redolog Creation in Flash Recovery AreaIf Archive log mode is enabled and LOG_ARCHIVE_DEST & DB_RECOVERY_FILE_DEST are not set, then the archive logs will be generated in $ORACLE_HOME/dbs directory.
If LOG_ARCHIVE_DEST is set & DB_RECOVERY_FILE_DEST is not set, then the archive logs will be generated at LOG_ARCHIVE_DEST path.
If you enable FRA (DB_RECOVERY_FILE_DEST is set), then the archive log files will be generated in FRA, and it will ignore the LOG_ARCHIVE_DEST and LOG_ARCHIVE_FORMAT i.e. FRA will follow its own naming convention. The generated filenames for the archived redologs in the flash recovery area are Oracle Managed Filenames and are not determined by LOG_ARCHIVE_FORMAT.
It is recommended to use flash recovery area as an archived log location because the archived logs are automatically managed by the database. Whatever archiving scheme you choose, it is always advisable to create multiple copies of archived logs.
You can always define a different location for archive redo logs, if you use a different location, then you can’t just erase the values of the parameters for LOG_ARCHIVE_DEST and LOG_ARCHIVE_DUPLEX_DEST in order to specify the location of the FRA.
To place your log files somewhere else other than the FRA you should use a different parameter to specify the archived redo log locations: use LOG_ARCHIVE_DEST_1 instead of LOG_ARCHIVE_DEST.
Suppose log_archive_dest was set to ‘+arc_disk3′, you can use LOG_ARCHIVE_DEST_1 to specify the same location for the archived redologs.Query the parameter to verify its current value:SQL> show parameter log_archive_destSQL> show parameter log_archive_dest_1SQL> alter system set log_archive_dest_1=’location=+arc_disk3′ scope=both;SQL> alter system set log_archive_dest=” scope=both;
Managing Flash/Fast Recovery Area
As the DB_RECOVERY_FILE_DEST_SIZE parameter specifies the space for the flash recovery area. In a situation when the space does not prove enough for all flash recovery files, then in such a case Oracle itself keeps track of those files that are not required on the disk. These unnecessary files are then deleted to resolve the space issue in the flash recovery area.
Whenever a file is deleted from the flash recovery area, a message is written in the alert log.
There are various other circumstances in which messages are written in the alert log:1. When none of the files are deleted.2. When the used space in the FRA is 85 percentage (a warning).3. When the used space in the FRA is 97 percentage (a critical warning).4. The warning messages issued can be viewed in the DBA_OUTSTANDING_ALERTS data dictionary view and are also available in the OEM Database Control main window.
To recover from these alerts, a number of steps can be taken as remedial options:1. Adjust the retention policy to keep fewer copies of data files.In case the retention policy is sounds good, then the steps taken to recover from the alerts are:
More disk space should be added.
Backup some of the flash recovery files to another destination such as another disk or tape drive.
2. Reduce the number of days in the recovery window
RMAN files creation in the Flash Recovery Area
This section describes RMAN commands or implicit actions (such as control file auto backup) that can create files in the flash recovery area, and how to control whether a specific command creates files there or in some other destination. The assumption in all cases is that a flash recovery area has already been configured for your database. The commands are:
· BACKUPDo not specify a FORMAT option to the BACKUP command, and do not configure a FORMAT option for disk backups. In such a case, RMAN creates backup pieces and image copies in the flash recovery area, with names in Oracle Managed Files name format.
· CONTROLFILE AUTOBACKUPRMAN can create control file autobackups in the flash recovery area. Use the RMAN command CONFIGURE CONTROLFILE AUTOBACKUP FORMAT FOR DEVICE TYPE DISK CLEAR to clear any configured format option for the control file autobackup location on disk. Control file autobackups will be placed in the flash recovery area when no other destination is configured.
· RESTORE ARCHIVELOGExplicitly or implicitly (as in the case of, set one of the LOG_ARCHIVE_DEST_n) parameters to 'LOCATION=USE_DB_RECOVERY_FILE_DEST'. If you do not specify SET ARCHIVELOG DESTINATION to override this behavior, then restored archived redo log files will be stored in the flash recovery area.
· RECOVER DATABASE or TABLESPACE, BLOCKRECOVER, and FLASHBACK DATABASEThese commands restore archived redo logs from backup for use during media
recovery, as required by the command. RMAN restores any redo log files needed during these operations to the flash recovery area, and delete them once they are applied during media recovery.
To direct the restored archived redo logs to the flash recovery area, set one of the LOG_ARCHIVE_DEST_n parameters to 'LOCATION=USE_DB_RECOVERY_FILE_DEST", and make sure you are not using SET ARCHIVELOG DESTINATION to direct restored archived logs to some other destination.
You can use RMAN to remove old archivelog:$ rman target=/RMAN> delete noprompt archivelog all;RMAN> delete noprompt backup of database;RMNA> delete noprompt copy of database;
Resolving full Flash Recovery Area
You have a number of choices on how to resolve full flash/fast recovery area when there are no files eligible for deletion: Make more disk space available, and increase DB_RECOVERY_FILE_DEST_SIZE to reflect the new space.
Move backups from the flash recovery area to a tertiary device such as tape. One convenient way to back up all of your flash recovery area files to tape at once is the BACKUP RECOVERY AREA command.
After you transfer backups from the flash recovery area to tape, you can resolve the full recovery area condition by deleting files from the flash recovery area, using forms of the RMAN DELETE command.
Note: Flashback logs cannot be backed up outside the flash recovery area. Therefore, in a BACKUP RECOVERY AREA operation the flashback logs are not backed up to tape.
Flashback logs are deleted automatically to satisfy the need for space for other files in the flash recovery area. However, a guaranteed restore point can force the retention of flashback logs required to perform Flashback Database to the restore point SCN. See
Delete unnecessary files from the flash recovery area using the RMAN DELETE command. (Note that if you use host operating system commands to delete files, then the database will not be aware of the resulting free space. You can run the RMAN CROSSCHECK command to have RMAN re-check the contents of the flash recovery area and identify expired files, and then use the DELETE EXPIRED command to remove missing files from the RMAN repository.)
You may also need to consider changing your backup retention policy and, if using Data Guard, consider changing your archivelog deletion policy.
Changing the Flash Recovery Area to a new location
If you need to move the flash recovery area of your database to a new location, you can follow this procedure:
1. Change the DB_RECOVERY_FILE_DEST initialization parameter.
SQL> ALTER SYSTEM SET DB_RECOVERY_FILE_DEST='+disk1' SCOPE=BOTH SID='*';2. After you change this parameter, all new flash recovery area files will be created in the new location.3. The permanent files (control files and online redo log files), flashback logs and transient files can be left in the old flash recovery area location. The database will delete the transient files from the old flash recovery area location as they become eligible for deletion.
Oracle will clean up transient files remaining in the old flash recovery area location as they become eligible for deletion.
In Oracle Database 11g, a new feature introduced i.e. Flashback Data Archive - flashback will make use of flashback logs, explicitly created for that table, in FRA, will not use undo. Flashback data archives can be defined on any table/tablespace. Flashback data archives are written by a dedicatedbackground process called FBDA so there is less impact on performance. Can be purged at regular intervals automatically.
Related viewsV$RECOVERY_FILE_DESTV$FLASH_RECOVERY_AREA_USAGEV$DBA_OUTSTANDING_ALERTSV$FLASHBACK_DATABASE_LOGFILE
FlashbackFlashback Technology in Oracle
Oracle has a number of products and features that provide high availability in cases of unplanned or planned downtime. These include Fast-Start Fault Recovery, Real Application Clusters (RAC), Recovery Manager (RMAN) , backup and recovery solutions, Oracle Flashback, partitioning, Oracle Data Guard, LogMiner, multiplexed redolog files and online reorganization.
To correct problems caused by logical data corruptions or user errors, we can use Oracle Flashback.
Flashback is possible only in Locally Managed Tablespace(LMTS).
Following are the Flashback options we have in Oracle database:
Flashback Query (from Oracle 9i)
Flashback Table (from Oracle 10g)
Flashback Drop (from Oracle 10g)
Flashback Version Query (from Oracle 10g)
Flashback Transaction Query (from Oracle 10g)
Flashback Database (from Oracle 10g)
Flashback Data Archive (from Oracle 11g)
Flashback Transaction (from Oracle 11g)
Flashback Query useful to view the data at a point-in-time in the past. This can be used (only) to view and reconstruct lost data that was deleted or changed by accident.
Flashback Table useful to recover a table to a point-in-time in the past without restoring a backup. Flashback Table is a push button solution to restore the contents of a table to a given point-in-time. An application on top of Flashback Query can achieve this, but with less efficiency.
Flashback Drop provides a way to restore accidentally dropped tables. This will be done with the help of Recyclebin feature.
Flashback Version Query uses undo data stored in the database to view the changes to one or more rows along with all the metadata of the changes.
Flashback Transaction Query useful to examine changes to the database at the transaction level. As a result, we can diagnose problems, perform analysis and audit transactions.
Flashback Database useful to bring database to a prior point in time by undoing all the changes that have taken place since that time. This operation is fast, because we do not need to restore the backups. This in turn results in much less downtime following data corruption or human error. Flashback Database applies to the entire database. It requires configuration and resources, but it provides a fast alternative to performing incomplete database recovery.
Flashback Data Archive - from Oracle 11g, flashback will make use of flashback logs, explicitly created for that table, in FRA (Flash/Fast Recovery Area), will not use undo. Flashback data archives can be defined on any table/tablespace. Flashback data archives are written by a dedicated background process called FBDA so there is less impact on performance. Can be purged at regular intervals automatically.
Rules in order to Flashback
1. DBA must have enabled undo tablespace, with appropriate retention period.
2. User must have realized the mistake before the retention period.
3. User must not exited from the session.
4. Even frontend must be enabled with flashback option (package).
When to Use Oracle Flashback(Flashback Database Vs Flashback Table)
Flashback Table uses information in the undo tablespace to restore the table. This provides significant benefits over media recovery in terms of ease of use, availability, and faster restoration.
Flashback Database and Flashback Table differ in granularity, performance, and restrictions. For a primary database, consider using Flashback Database rather than Flashback Table in the following situations:
A user error affected the whole database.
A user error affected a table or a small set of tables, but the impact of reverting this set of tables is not clear because of the logical relationships between tables.
A user error affected a table or a small set of tables, but using Flashback Table would fail because of its DDL restrictions.
Flashback Database works through all DDL operations, whereas Flashback Table does not. Flashback Database moves the entire database back in time, constraints are not an issue, whereas they are with Flashback Table. Flashback Table cannot be used on a standby database.
Flashback QueryFlashback Query in Oracle
Flashback Query was introduced in Oracle 9i
Oracle Flashback Query allows us to view and repair historical data. We can perform queries on the database as of a certain time or specified system change number (SCN).
Flashback Query uses Oracle's multiversion read-consistency capabilities to restore data by applyingundo as needed. Oracle Database 10g automatically tunes a parameter called the undo retention period. The undo retention period indicates the amount of time that must pass before old undo information, i.e. undo information for committed transactions, can be overwritten. The database collects usagestatistics and tunes the undo retention period based on these statistics and on undo tablespace size.
Using Flashback Query, we can query the database as it existed this morning, yesterday, or last week (if undo_retention parameter is set appropriately). The speed of this operation depends only on the amount of data being queried and the number of changes to the data that need to be backed out.
Note: If Oracle’s default locking is overridden at any level, the database administrator or application developer should ensure that the overriding locking procedures operate correctly. The locking procedures must satisfy the following criteria: data integrity is guaranteed, data concurrency is acceptable, and deadlocks are not possible or are appropriately handled.
You set the date and time you want to view. Then, any SQL query you run operates on data as it existed at that time. If you are an authorized user, then you can correct errors and back out the restored data without needing the intervention of an administrator.
SQL> select * from dept as of timestamp sysdate-3/1440;With the AS OF sql clause, we can choose different snapshots for each table in the query. Associating a snapshot with a table is known as table decoration. If you do not decorate a table with a snapshot, then a default snapshot is used for it. All tables without a specified snapshot get the same default snapshot e.g. suppose you want to write a query to find all the new customer accounts created in the past hour. You could do set operations on two instances of the same table decorated with different AS OF clauses.
DML and DDL operations can use table decoration to choose snapshots within sub queries. Operations such as CREATE TABLE AS SELECT and INSERT TABLE AS SELECT can be used with table decoration in the sub queries to repair tables from which rows have been mistakenly deleted. Table decoration can be any arbitrary expression: a bind variable, a constant, a string, date operations, and so on. You can open a cursor and dynamically bind a snapshot value (a timestamp or an SCN) to decorate a table with.
SQL> create table emp_old select * from emp as of timestamp sysdate-1;
Flashback Query Benefits
■ Application TransparencyPackaged applications, like report generation tools that only do queries, can run in Flashback Query mode by using logon triggers. Applications can run transparently without requiring changes to code. All the constraints that the application needs to be satisfied are guaranteed to hold good, because there is a consistent version of the database as of the Flashback Query time.
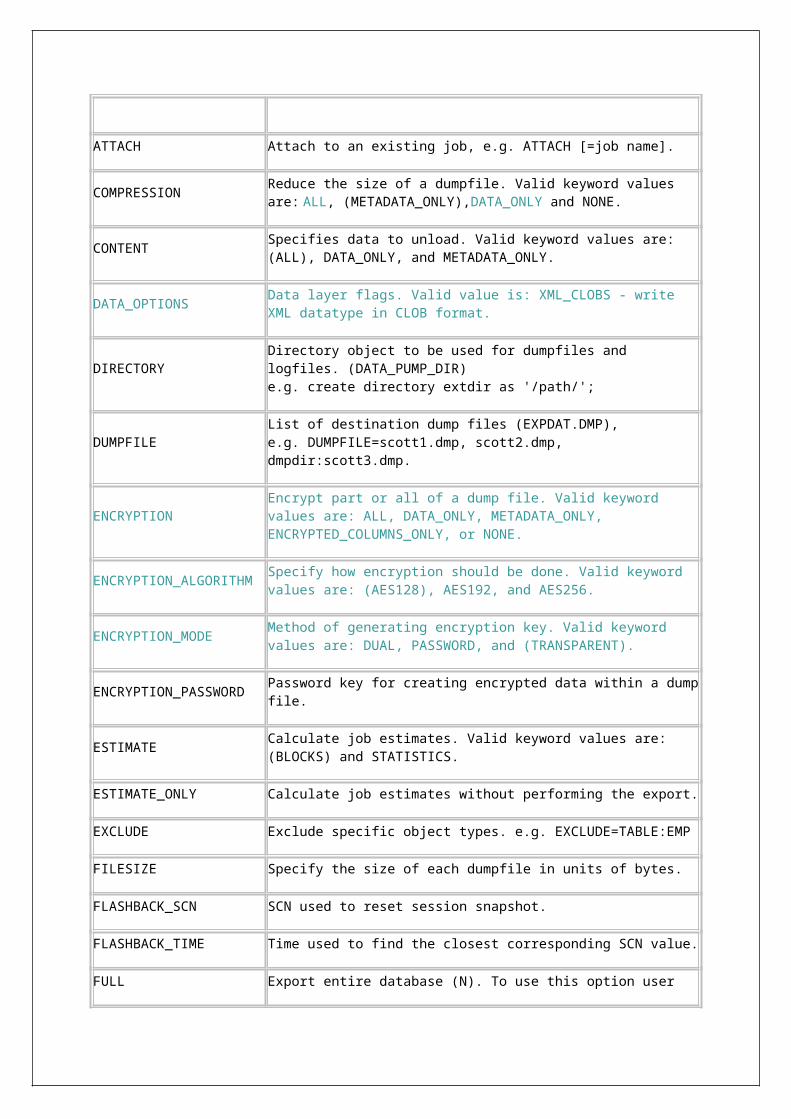
■ Application PerformanceIf an application requires recovery actions, it can do so by saving SCNs and flashing back to those SCNs. This is lot easier and faster than saving data sets and restoring them later, which would be required if the application were to do explicit versioning. Using Flashback Query, there are no costs for logging that would be incurred by explicit versioning.
■ Online OperationFlashback Query is an online operation. Concurrent DMLs and queries from other sessions are allowed while an object is queried inside Flashback Query. The speed of these operations is unaffected. Moreover, different sessions can flash back to different Flashback times or SCNs on the same object concurrently. The speed of the Flashback Query itself depends on the amount of undo that needs to be applied, which is proportional to how far back in time the query goes.
■ Easy ManageabilityThere is no additional management on the part of the user, except setting the appropriate retention interval, having the right privileges, and so on. No additional logging has to be turned on, because past versions are constructed automatically, as needed.
Notes:
Flashback Query does not undo anything. It is only a query mechanism. We can take the output from a Flashback Query and perform an undo in many circumstances.
Flashback Query does not tell us what changed, LogMiner does that.
Flashback Query can undo changes and can be very efficient if we know the rows that need to be moved back in time. We can use it to move a full table back in time, but this is very expensive if the table is large since it involves a full table copy.
Flashback Query does not work through DDL operations that modify columns, or drop or truncate tables.
LogMiner is very good for getting change history, but it gives changes in terms of deltas (insert, update, delete), not in terms of the before and after image of a row. These can be difficult to deal with in some applications.
When to Use Flashback Query
■ Self-Service RepairPerhaps you accidentally deleted some important rows from a table and wanted to recover the deleted rows. To do the repair, you can move backward in time and see the missing rows and re-insert the deleted row into the current table.
■ E-mail or Voice Mail ApplicationsYou might have deleted mail in the past. Using Flashback Query, you can restore the deleted mail by moving back in time and re-inserting the deleted message into the current message box.
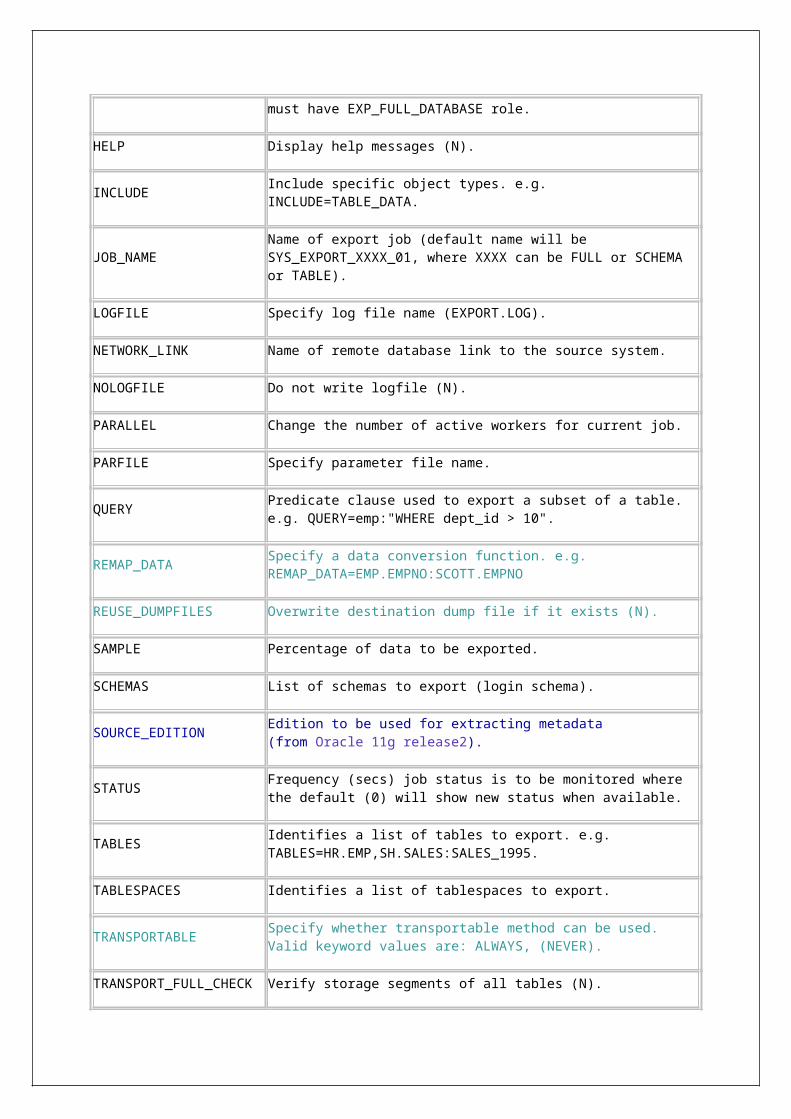
■ Account BalancesYou can view account prior account balances as of a certain day in the month.
■ Packaged ApplicationsPackaged applications (like report generation tools) can make use of Flashback Query without any changes to application logic. Any constraints that the application expects are guaranteed to be satisfied, because users see a consistent version of the Database as of the given time or SCN.
In addition, Flashback Query could be used after examination of audit information to see the before image of the data. In DSS environments, it could be used for extraction of data as of a consistent point in time from OLTP systems.