roland jd-xa – tips and tricks from the internet · roland jd-xa ... arpeggios ... connecting to...
TRANSCRIPT

Roland JD-XA
Lesson’s Learned / Tips & Tricks Challenges and Opportunities Peeled from the many excellent tips and tricks shared on the forums…
Table of Contents Roland JD-XA .................................................................................................................................. 1
1: Setup ........................................................................................................................................... 4
Connecting to DAW / Setup ........................................................................................................ 4
Setup / Testing it at a Brick-n-Mortar Store ............................................................................... 4
FA _ XA Connectivity ( a ramble) ................................................................................................ 5
MIDI IMPLEMENTATION ............................................................................................................. 6
JD-XA System Setting Recommendation .................................................................................... 6
Editing Effects and Reverb ..Easily (Manual Mode) .................................................................... 6
Shortcut for Setting Key Ranges ................................................................................................. 7
Lighting ........................................................................................................................................ 7
Split the keyboard into 4 parts and have an arpeggiator pattern going on just one of the split parts. ........................................................................................................................................... 7
2: Moving Around, Shortcut Keys ................................................................................................... 8
Menu Hold ................................................................................................................................ 13
Favorites Keys ........................................................................................................................... 13
Shift-Enter = Reflect the Current Physical Settings .................................................................. 13
Initializing a Program button .................................................................................................... 13
Assigning Controls – Mapping Performance parameters ......................................................... 13
3: Sounds, Parts, Setup ................................................................................................................. 14
Piano Patching Tips ................................................................................................................... 14
LFO with Aftertouch ( Analog Part ) .......................................................................................... 14
Hard Sync .................................................................................................................................. 14
A Better Piano ........................................................................................................................... 15

2 Roland JD-XA – Tips and Tricks From The Internet
Creating Programs – general tips .............................................................................................. 15
Comparing Programs while editing........................................................................................... 16
Analog Section – Polyphony / Macros ...................................................................................... 16
Hard Sync with Pitch Envelope ................................................................................................. 17
Hard Sync with LFOs.................................................................................................................. 17
The Steps: .............................................................................................................................. 17
OSC Sync .................................................................................................................................... 18
LFOs ........................................................................................................................................... 18
Aftertouch to LFO...................................................................................................................... 19
Great Bass ................................................................................................................................. 19
Another Great bass 2 ................................................................................................................ 20
4: Sequencer, Patterns, Arpeggios ................................................................................................ 21
Sequencer ................................................................................................................................. 21
Sequences ................................................................................................................................. 25
Arpeggio – listening to the included patterns.. ........................................................................ 25
Sequence Resolution for Patterns – More detailed ................................................................. 25
Transposing Sequences ............................................................................................................. 26
5: MFX, TFX, Effects....................................................................................................................... 27
Effects Paths .............................................................................................................................. 27
Effects........................................................................................................................................ 27
6: Saving, Sharing, Importing ....................................................................................................... 28
Saving / Sharing programs (Studio Sets) ................................................................................... 28
Using A USB Stick for Storing Programs (for Dummies) ........................................................... 28
Importing Tones ........................................................................................................................ 28
7: Learning, General Tips, Library ................................................................................................. 30
Random Tips / First use............................................................................................................. 30
Filter Velocity Sensitivity ........................................................................................................... 32
Librarian Functions.................................................................................................................... 32
Copy Tones From One Patch to Another .............................................................................. 32
Write Patches or Patch Collections to the JD-XA .................................................................. 32
Control Cutoff with AfterTouch ................................................................................................ 32
JD-XA Librarian: Things You Can Do .......................................................................................... 33
Create Custom Patch Collections .......................................................................................... 33
Retrieve Patches from the JD-XA .......................................................................................... 33
Download Patch Collections from the Axial Website ........................................................... 33
Axial JD-XA patch collection directory in the JD-XA Librarian. ............................................. 33
Audition Sounds on Your JD-XA ............................................................................................ 34
Copy Tones From One Patch to Another .............................................................................. 34
Write Patches or Patch Collections to the JD-XA .................................................................. 34
More Info .............................................................................................................................. 35
JD-XA Filters – Emulation ...................................................................................................... 35
Copy Tone from One Program To Another (Librarian) ......................................................... 35
More Programming Tips ........................................................................................................... 36
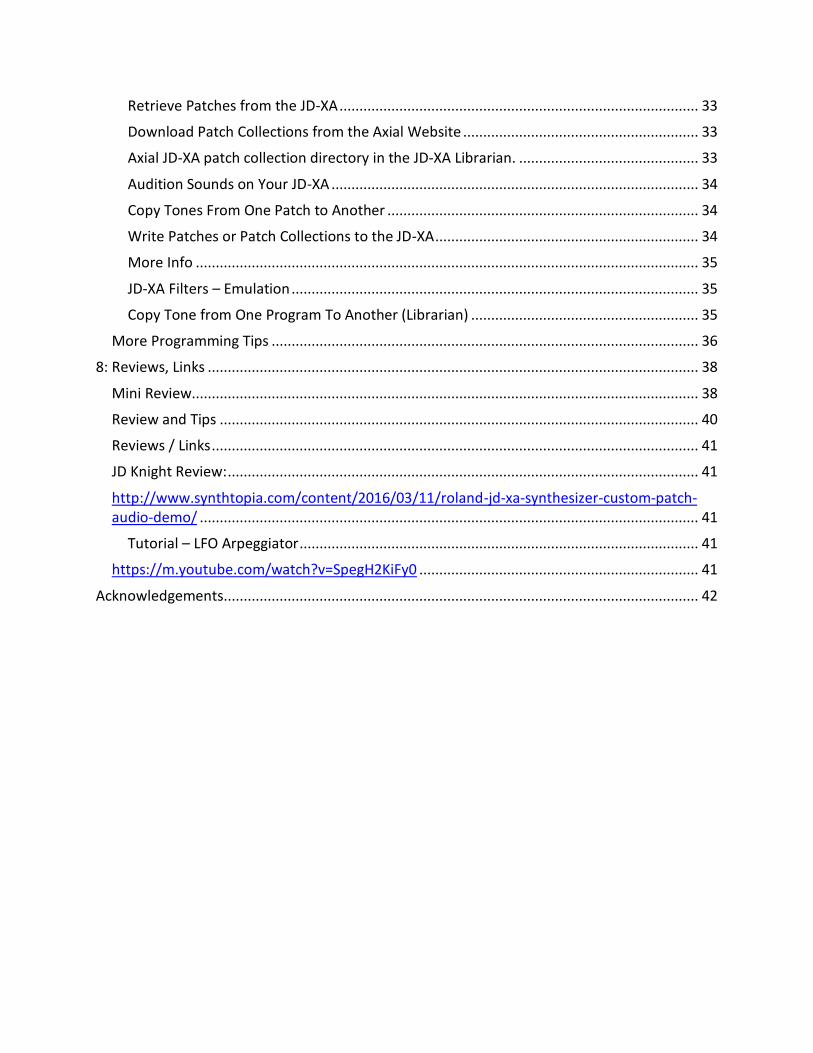
8: Reviews, Links ........................................................................................................................... 38
Mini Review............................................................................................................................... 38
Review and Tips ........................................................................................................................ 40
Reviews / Links .......................................................................................................................... 41
JD Knight Review: ...................................................................................................................... 41
http://www.synthtopia.com/content/2016/03/11/roland-jd-xa-synthesizer-custom-patch-audio-demo/ ............................................................................................................................. 41
Tutorial – LFO Arpeggiator .................................................................................................... 41
https://m.youtube.com/watch?v=SpegH2KiFy0 ...................................................................... 41
Acknowledgements....................................................................................................................... 42

4 Roland JD-XA – Tips and Tricks From The Internet
1: Setup
Connecting to DAW / Setup
After spending another hour making it the master controller for my entire studio with the hardest part getting the Xa's USB audio to play nice with the iconnectAUDIO's USB into my DAW when run in parallel, and I actually liked the sequencer much better than expected when I got it integrated since it's limitations are actually perfect for me when using it as a scratch pad for ideas with the only time spend in front of my computer will be setting up patches on VST's or recording. Someone was asking about how well it works as the central synth so here's my setup. Xa & iconnect are the only audio over USB devices I have setup and it also allows me to bypass the iconnect if I want to send things directly to or from the Xa. Click track goes into the Sample sync in. Xa's midi channels are as follows: 1-8 = Internal 9-10 = CV 1&2 controlling the minibrute pitch, gate, and filter CH 11 C0-A0 = Sent to a Midipal with each note getting re-routed to CH 1-10. That is then sent to the 5 pin iconnect, with the 5 pin midi out going to the sample. Rest of 11 - 16 = Either being sent to apps on my ipad or VST's in my DAW. The only thing that's not hooked up to everything right now is my MS-20 because I'm waiting for the SQ-1 that my wife is making me wait until christmas to open but that will just plug into the open USB port on the iconnect, the sync out from the Sample will go into the SQ-1's sync in, and the midi out from the SQ-1 will be used to sync the clock on the Mangler.
Setup / Testing it at a Brick-n-Mortar Store
- take an empty usb stick and your laptop with you (or i'm sure you can use a shop computer) then you need the librarian from which you can directly dl the axial sounds from both, the JDXA as well as the INTEGRA7 banks ( i recommend the bass bank, or better check them all out ) it's really easy and fast to do and you will get a much better impression of what the synth can also do (amongst a lot of other stuff) to go into the sequencer section, the "Program Select" button has to be off.

FA _ XA Connectivity ( a ramble)
Yes, I actually think the combo of the FA06 and the XA would be pretty spectacular. Its not just that you can use the XA control panel to turn the FA into a whole higher level of synth though its real time hands-on control panel....but you can use the FA sequencer (arguably the best hardware workstation sequencer out there currently) to take the XA (along with the FA internal engine) to a whole other level. You can control ALL of this easily, including part selection on both synths AND transport control, directly from the XA panel. And then you've got the 404sx style sampling on the FA which can work sort of like a real time audio looper for both synths...and of course the FA adds in the SuperNatural Acoustic parts, as well as the two expansion SRX slots. And there is a similarity of the build materials, and style/color/weight of the gear. I happen to LOVE the FA screen (its a mini version of the Fantom G screen, which was fantastic!). You've got the FA 61 key, slightly higher quality keybed to use....but the XA keybed brings you aftertouch....so in either direction you're adding functionality to the other. Rather than overlap....these two compliment each other greatly. All in all...I personally think that the combo represents the best of what Roland has to offer today. And with all the talk about the analog engine on the XA (which I happen to love...especially when PAIRED with the Supernatural Synth engine)....layering the SuperNatural Synth engine by itself can get VERY deep. The more Parts the better! When you build IT up with so many layers (parts), considering how many filters and envelopes and LFO's and effects you can get going at once...the results can be stunning. I was really feeling that between the Integra 7 and the XA the other day...and none of that even included the Analog part on the XA at all. That's part of why I'm personally ~surprised~ by the strong reactions many people are posting up about the XA "sound". Its the SAME old SuperNatural Synth engine that's been around for many years now, beginning with the Jupiter 80. It should come as NO surprise to anyone. Love it or hate it....its a very well known commodity, that's now in several Roland products. It sounds no different than the I7 or Jup-80 or FA or Xi. The difference is in the INTERFACE for you to edit it in real time....and THAT makes a HUGE difference in what you can get out of the synth! Rather than being tied to presets, with awkward and/or limited editing functions....you suddenly have a very playable and patchable synth. The ~real time~ implications are spectacular! Oh...and then they layered on an analog synth. Ok....that's new...so certainly subject to new analysis and scrutiny. Fair enough. But whats all this ruckus about the XA SuperNatural Synth engine sounding "lifeless" or "generic". It sounds the same way its sounded for years in 4 other products! Its what you can now DO with it, with all those knobs and sliders, that makes it special. I'd buy it JUST for that. Never touch the analog engine if you don't like it. Heck if it had NO synth engine inside, and was just a dedicated controller surface for the SNS engine...I'd be in for THAT (well, not at $2000....but I'd still want it!).

6 Roland JD-XA – Tips and Tricks From The Internet
MIDI IMPLEMENTATION
The JD-XA handles MIDI on separate channels for each part. So each Analog Part and each part of the digital section gets its own channel. When in Poly Stack mode, the four Analog Parts merge into channel 1. The JD-XA can also act as an eight-channel MIDI controller. By selecting the corresponding part, you can transmit messages via MIDI out or USB to outboard gear on channels 9 through 16 from the knobs, sliders, and even the 16 sequencer buttons. The front panel no longer controls the internal sounds while in this mode.
JD-XA System Setting Recommendation
1. Turn up the master gain in the menu - globally - to +10 or w/e people were advising, it gives it more beef somehow. 2. Adjust the master EQ in the menus. The 'modern' clean/hard sound can be from a super flat factory eq, while old synths often had boosted lows (Juno 106) and cut mids. Or sometimes a mid - forward sound (JX-3P in the low mids IIRC), so you could try that. Cut back on the high mids a few DB around 1k perhaps. Leave the top end alone for now, boost the bottom 1/2 db and the low mids 2/3. If it sounds warmer try some high end boost to give it some sparkle, just a little.
Editing Effects and Reverb ..Easily (Manual Mode)
1) Reverb Send: each Part has its own separate dry/wet mix. You find this parameter in the Part edit menu. MENU - PART - and scroll through the Part parameters to get to Reverb Send. Raising the number (between 0 and 127) will send more of the dry signal into the Global Reverb Effect. So, 64 is 50/50 dry/wet. The factory Init patch defaults to this level at 20, I believe. Very low for most applications. Remember, each separate Part has its own send level here. So parts A1 thru 4, and D1 thru 4. You must set each Send level for each part desired. While in this menu, change parts by selecting them with the part select buttons (so they light blue). Once adjusted to taste, writing the Program will automatically save all 8 parts and their settings. A program is the container of all 8 parts, plus one sequencer pattern, plus the Global effects settings. Just write the program. Thus, initializing a factory program, and adjusting the reverb sends on the 8 parts (and any other custom settings you desire), then writing the program to a blank location, renaming it to "my Init patch"...will leave you with a custom template to begin a new project with.
Note the above: Save this (at minimum) as your INIT Program setting, so every patch you generate has these Reverb settings.. 2) Reverb Level: this is the knob labelled Reverb on the control panel (top right). It's the main overall level of the Global Reverb effect that all 8 parts send to. So this knob is dynamic, in that the MOST reverb it can raise to at full-on, is the highest reverb send level you've set in each part (see above). So, this knob addresses whatever part(s) you

have selected (lighted in blue) with the part select buttons. One part, or many parts. At minimum, the knob will silence all selected parts reverb. At maximum, the knob will bring each selected part up to the Reverb Send parameter level that you've set for that part(s). If the send levels are low, the most this knob can do is get you up to THAT level. This all pertains to the global reverb. This is not in any way connected to any MFX or TFX that you may use where you manually select a reverb INSERT effect. You CAN insert reverbs in all of these slots. 8 part MFX SLOTS, plus 2 TFX slots...they can each have a reverb effect inserted here if you choose, in ADDITION to the always running global send reverb discussed above. In such case, the reverb knob on the control panel has nothing to do with these user selectable insert effects (those would be adjusted by the MFX & TFX knobs and menu settings). The reverb knob on the front panel ALWAYS adjusts only the a Global Send effect of each part, as mentioned above. So you have a LOT of power there. You COULD get 11 separate reverbs going at once. 8 MFX, 2 TFX, and the Global Send reverb. Not sure why you'd want to...but you could. Just remember to ALWAYS pay attention to which part you are addressing with the part select buttons....THAT is what the control panel knobs and sliders is editing at the moment. Whether one part or many parts (or, if digital parts...one or more of each parts 3 partials). THAT is the KEY secret to understanding the control panel. If something is not responding as you expect w a knob or slider, there's a great chance you haven't selected or deselected the relevant parts (or partials).
Shortcut for Setting Key Ranges
Another good 'shortcut' for those that need it is setting the ranges for splits, if you use 2 mono analog sounds for ex you can hold down the RED lit button for a part, keep holding it and the screen will flash the keyrange, then press on the actual keybed the lowest key and highest key you want that to play over - done! hold the next part button and do the same. Very simple way to set up key ranges instead of menu diving.
Lighting
In the menu system you can turn OFF the red backlighting for the sliders and knobs
Split the keyboard into 4 parts and have an arpeggiator pattern going on just one of the split parts.
Press and hold the arpeggio button. You'll see each parts 'on' button light up yellow. This denotes if the arp is on for each part. If it lights yellow that part will be arpeggiated. If off the arp wont affect the part. Turn a parts arp switch off, simply click and hold the arp button and hit any of the 'on' buttons that are lit yellow to turn it off. Once off the button will no longer be lit when the arp button is clicked and held. Oh and make sure the arp button is glowing red for the arp to be on (do this per part).

8 Roland JD-XA – Tips and Tricks From The Internet
2: Moving Around, Shortcut Keys
Here are some JD-XA SHIFT parameters
SHIFT + Cutoff = Cutoff Fine -50 to +50
SHIFT + Key Follow = Key Follow Fine -50 to +50
SHIFT + ENV Depth = Velocity Amount -63 to +63
SHIFT + VCA = Velocity Amount -63 to +63
SHIFT + Pitch ENV = Velocity Amount -63 to +63
SHIFT + OSC Sync = OSC Phase Sync
SHIFT + LFO Tempo Sync = LFO Key Trigger
SHIFT + Octave Transpose +/- = Tone (Part) Octave -3 to +3
Digital Only
SHIFT + OSC Pitch = AMP Pan L64 to R64
List of Shortcut Keys
Part [Shift]+ Part On [01]–[04] Turns part mute on/off (p. 4) [Arpeggio]+ Part On [01]–[04] Turns each part’s Arpeggio Sw on/off (p. 9). [Vocoder]+ Part On [01]–[04] Turns each part’s Vocoder Send Sw on/off. Press Part On [01]–[04] + keyboard twice (to specify the lower and upper limit) Specifies the key range of each part.
Controllers [Shift]+[Modulation] lever Enters the Modulation LFO setting state. To exit this state, use [Shift] + [Modulation] lever once again. [Shift] + operate Wheel 1 Displays the Wheel 1 assignment (p. 12). [Shift] + operate Wheel 2 Displays the Wheel 2 assignment (p. 12). [Shift]+ operate Pedal 1 Displays the Pedal 1 assignment (p. 12).

[Shift]+ operate Pedal 2 Displays the Pedal 2 assignment (p. 12).
Common section [Exit] + controller Displays the parameter (the value does not change). [-], [+] Hold down one button while pressing the other button to make the value change rapidly. [Shift]+[-] [+] Makes the value change more greatly. [Shift]+[K] [J] Moves to the previous/next parameter section. [Shift]+[MIDI CTRL] Turns trigger mode on/off (p. 11). [Shift]+[Menu] Display Lock on/off. If this is on, the corresponding parameter is not displayed when you move a controller (the value is changed). [Shift]+[Write] Displays the LED Customize screen (p. 15). [Shift]+[Enter] Executes the Manual function (p. 2). [Shift]+[Program Select] Displays the Init screen (p. 7). (In the Arpeggio Edit screen, initializes the arpeggio pattern.) [Shift]+[Bank] Displays the Copy screen (p. 7). [Shift]+[Favorite] Displays the Favorite Util screen (p. 7). [Program Select]+[01]–[16] Selects a program [Bank]+[01]–[16]

10 Roland JD-XA – Tips and Tricks From The Internet
Normally: Switches the program bank (p. 4). Favorites: Switches the favorite bank (p. 7). [Favorite]+[01]–[16] Registers the current program number as a favorite (p. 7).
LFO [Shift]+ [Tempo Sync] Analog part: Turns LFO Key Trigger on/off. Digital part: Turns LFO Key Trigger on/off. [Shift]+ [AMP Depth] Analog part: No function. Digital part: Adjusts LFO Pan Depth.
OSC1 [Shift]+[Pitch] Analog part: No function. Digital part: Adjusts AMP Pan. Part Select [01]–[04]+[Pitch] Adjust the pan of each part. [Shift]+[PW] Analog part: No function. Digital part: Adjusts OSC PW Shift (Pulse Width Shift).
PITCH ENV [Shift]+[Depth] Analog part: Adjusts Pitch Env Velo Sens (Velocity Sens). Digital part:

No function.
FILTER [Shift]+[Cutoff ] Analog part: Adjusts FILTER Cutoff Fine. Digital part: No function. [Shift]+[Key Follow] Analog part: Adjusts FILTER KF Fine (Key Follow Fine). Digital part: No function. [Shift]+[Env Depth] Analog part: Adjusts FILTER Velo Sens (Velocity Sens). Digital part: Adjusts FILTER Velo Sens (Velocity Sens).
AMP [Shift]+[Level] Analog part: Adjusts AMP Velo Sens (Velocity Sens). Digital part: Adjusts AMP Velo Sens (Velocity Sens). Part Sel [01]–[04]+[AMP Level] Adjust the volume of each part.
EFFECTS [Shift]+[TFX 1 On] Displays the TFX 1 screen (TFX1 Sw setting does not change). [Shift]+[TFX 2 On] Displays the TFX 2 screen (TFX2 Sw setting does not change). [Shift]+[Part MFX On] Displays the Part MFX screen (Part MFX Sw setting does not change). Shortcut Explanation
PATTERN SEQ [Shift]+[01]–[16]

12 Roland JD-XA – Tips and Tricks From The Internet
[Pattern Length]+[01]–[16] Use the [01]–[16] buttons to move the region (measures) of performance data that is displayed (p. 8). [01]–[16] + knob (during Step REC2) Records the knob operation at the specified step (position) (p. 8). Keyboard + [01]–[16] (during Step REC2) Records the keyboard note at the specified step (position). [Shift]+[Erase] Displays the Pattern Erase menu (p. 9). [Erase]+Part On [01]–[04] Displays the Pattern Erase menu and assigns the specified part as the target for erasure (p. 9). [Erase]+[01]–[16] Erases the all recorded data included in the specified step of the applicable Step REC part (p. 8). [Erase] + knob During Realtime Erase: Assigns the knob data as the target for erasure (p. 8). [Shift]+[Step REC] Displays the Step REC setting screen (p. 8). (The Step REC status does not change) [Shift]+[Realtime REC] Displays the Realtime REC setting screen (p. 8). (The Realtime REC status does not change) [Shift]+[Tap] Displays the tempo parameter. At the left side of the keyboard [Shift]+OCTAVE [Up] [Down] Sets Tone Common Oct Shift (Octave Shift). [Shift]+[Key Hold] Switches the Kbd Velocity setting (Real ,fixed value (default:127)) (p. 12). [Shift]+[Arpeggio] Displays the arpeggio screen (p. 9). (The arpeggio switch does not change)

Menu Hold
[Shift + Menu] prevents the menu from automatically jumping to whatever parameter you touch or manipulate on the control panel.
SCROLLING Pressing BOTH scroll buttons for fast scrolling, rather than just {Shift + Cursor] for Tens scrolling
Favorites Keys
Shift+Fav displays the favorites banks and lists the tones and sets in those banks. When this display is active, the 0 - 9 number keys can be used to select the favorites within a bank. Keys < & > are used to switch between banks.
Shift-Enter = Reflect the Current Physical Settings
Shift+enter will make the sound reflect the current panel layout, and maybe is something beginners should start with, that way everything is WYSIWYG and may be less confusing for true beginners, you'll get to understand the layout better and why knobs/sliders do what they do.
Initializing a Program button
press the Program Select button
press the button for the program location you will be writing to
Hold Shift - Click the Program button - "<INIT> [Ent]" comes up in the display
Press the Enter button - "Program Init?" [Exit]:N [Ent]" comes up in the display
Press the Enter button again - "Completed!" will flash in the display Want better? Copy the “My Init Patch” you created in the Reverb setup section as your default. Typically, I initialize the button first, then copy My Init Patch on top of the same location.
Assigning Controls – Mapping Performance parameters
Another thing the XA does well is CONTROL. For example if you want to vary the pitch of OSC 1 using the Mod wheel (or stick) then hold shift and push the wheel up, then hit enter, all the controls start flashing, just turn pitch knob of osc 1, then hit enter again. Now when you move the mod wheel you'll manually adjust pitch of OSC 1 (Of course you could just use the knob in this basic example but it's nice to map "performance" parameters to the wheel/stick if you feel they are part of what makes the sound come alive in a performance)

14 Roland JD-XA – Tips and Tricks From The Internet
3: Sounds, Parts, Setup
Piano Patching Tips
If I recall, as it's been a while since I made that video, it's 3 piano parts mixed together. Using different effects/filter/eq. and all going through a very wet reverb to mask some of the deficiencies of it. I think I had one part going w very high eq boost, and even the HPF...and then a compressor. Another part was focused on the bottom end, Using LPF and bass boost. Very slight pan spread between the 3 parts. All routed to the master Hall2 verb which I tweaked carefully to give a very high frequency tail, and a short delay. As to the velocity response...while I did adjust the velocity curve and my playing style (hit the keys with more exaggerated dynamics) in that line, I confess to having tweaked some velocity and notes in logic on the midi track (basically just cleaned it up) before recording as audio. Also remember the piano there is buried in a mix of pads, further masking some of its finer nuances. I don't think I'd use the XA as a concert piano...but in a mix it's certainly workable. Similar piano to what's in a jv1080. But nothing as nice as a Korg Kronos or Integra 7. The piano patch (around :40) on this is actually good, whereas the "JD Piano" on my JD-XA is unusable, due to the velocity being all or nothing. Is his a custom patch or is mine a lemon? That is how the preset is programmed. I went in turned down its sensitivity to velocity on both the filter and the volume and it became much more fun to play.
Link: https://www.youtube.com/watch?v=pSiuC54_Ssw
LFO with Aftertouch ( Analog Part )
Tone edit/Matrix control1/Src = AFT (press minus button to get to it) Press right arrow to get to Dest and then press plus button to select PIT-LFO1 Press right arrow and set Sens to +15
Hard Sync
Created a great hard sync sound last night on the JD-XA, I read previously someone saying he couldn't get them, but all you have to do is pitch osc 1 right after putting on sync then applying some slow LFO change to the pitch of that osc, sounds great, reminds me of my Moog I had but a bit 'nicer' if anything. Having the two LFOs means you can use one to slowly sweep the pitch to get the varied sync 'owww' sound, then (while using saw on one osc and square/PWM on the other) use LFO 2 WITH a delay/fade to affect the PW of the other osc only, and have this around twice as fast or more than the slow lfo and you get a very lively, animated sync that

sounds really mean but musically beautiful. After the initial sync evolves, this extra PWM slowly fades in and colours the top of the sweep. Very easy to do on the JD-XA with all the tools at hand!
A Better Piano
1. Start with Factory B15 (JD Piano) 2. Velocity Curve LIGHT –Touch Real (his defaults for his JDXA) 3. Reverb -- 64 velocity wet-dry mix; High Frequency Damping DOWN All the way 4. TFX1 – Compressor – Threshold -9db 5. TFX2 – EQ – Control knob adjusted to taste Did this all with a SINGLE PARTIAL, SINGLE PART!
Creating Programs – general tips
a quick thing to know that save time is this - this is for sub edit menu parts. Hit menu / press enter The < and > buttons scroll thought the edit pages by type in this Order System Program Edit Part Edit Tone Edit Effects Edit Mic Edit LED Customize Pattern Utility Favourite Utility Ultility Version Info Navigating this way when you want to edit bits like looping EG's, Ring Switch on the Digital Voices, Analog Feel, Waveshaper which LFO does what in the Analog engine etc (as they can work on both oscillators for example or osc 1 or osc 2 only). NB:PWM can be controlled by LFO too for both or one oscillator as well. Boosting the output signal and EQ make a difference and look at the MFX and all there editing parameters - the modulation delay and various multipa delays are great with the ability to do super fast delays (down to 1ms) and have a combination of tempo and no tempo synced delay

16 Roland JD-XA – Tips and Tricks From The Internet
lines. If feeding digital part through the anlog engine you can get filters in series with one digital (non paraphonic full multimode filter) and a paraphonic analog multimode filter). On digital voices if you have 3 partials sya with different detuned waveforms but wnat them all to have common filter EG's and Amp EG's for exampleturn all three one, select all three (blue leds) and any edits will be globally applied for filter LFO, amp, filter eg etc also. Makes for faster editing of some patches but you can for example have two partials with looping EG's one set to tempo sync and one free running + one standard ADSR for filter and amp too if you want. All of these have independent LFO's and Mod LFO's per partial. If layering and routing these through the analog engine any filter or amp mods done with LFO's will affect the digital parts too. Selecting two analog voices will trigger a 4 oscillator mono patch, 3 will create 6 and 4 will create 8 with all parts having there own independent synthesis engine - great for complex lead lines, super chunky basses and the like. That said i can stupidly room shattering from a simple two oscillator patch. You can of course always use one digital oscillator and a layer sub oscillator on a two oscillator analog patch. I always program from initialized patches on the JD - just faster once you get the work flow and do explore the effects and what is on offer. Don't just flip through the MFX and TFX as you can do an awful lot with them once you get editing.
Comparing Programs while editing
No compare function but there's what I do. Format a USB B stick write the program to the same Bank and Program Number in the USB Bank and use one as the reference for AB comparisons whilst programming. not always the tone I actually prefer, I'm more into the 80s Roland sound.
Analog Section – Polyphony / Macros
To use the Analog section as a polyphonic synth - to the immediate left is a button labeled Poly Stack. Pressing this assigns one part per note for four-voice polyphony. This also disables the Part Select buttons, but not the Part On buttons. Pressing one of these will switch to that particular Part, but the section will still be in Poly Stack mode. You can actually create four different polyphonic sounds per Program this way and switch between them. It’s not that this magically increases the analog voice count to 16 (it doesn’t). Instead, it seems that the Part On buttons become “macros” that can switch between four sets of memorized knob settings.
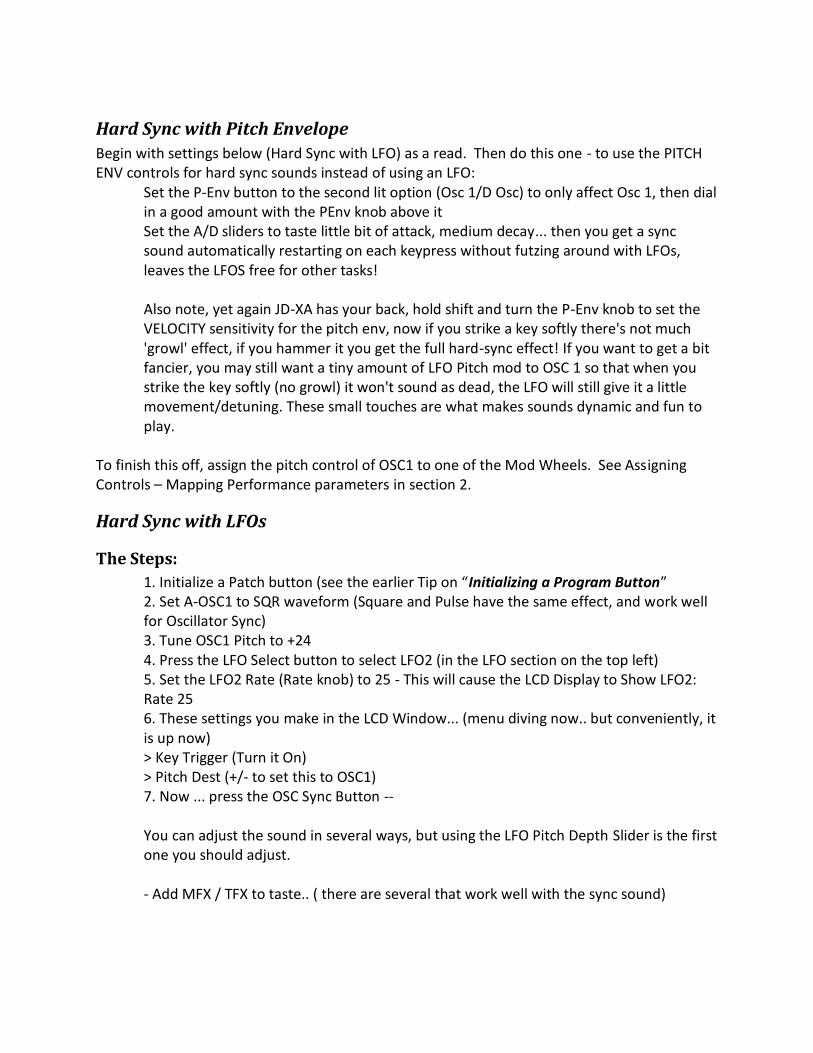
Hard Sync with Pitch Envelope
Begin with settings below (Hard Sync with LFO) as a read. Then do this one - to use the PITCH ENV controls for hard sync sounds instead of using an LFO:
Set the P-Env button to the second lit option (Osc 1/D Osc) to only affect Osc 1, then dial in a good amount with the PEnv knob above it Set the A/D sliders to taste little bit of attack, medium decay... then you get a sync sound automatically restarting on each keypress without futzing around with LFOs, leaves the LFOS free for other tasks! Also note, yet again JD-XA has your back, hold shift and turn the P-Env knob to set the VELOCITY sensitivity for the pitch env, now if you strike a key softly there's not much 'growl' effect, if you hammer it you get the full hard-sync effect! If you want to get a bit fancier, you may still want a tiny amount of LFO Pitch mod to OSC 1 so that when you strike the key softly (no growl) it won't sound as dead, the LFO will still give it a little movement/detuning. These small touches are what makes sounds dynamic and fun to play.
To finish this off, assign the pitch control of OSC1 to one of the Mod Wheels. See Assigning Controls – Mapping Performance parameters in section 2.
Hard Sync with LFOs
The Steps:
1. Initialize a Patch button (see the earlier Tip on “Initializing a Program Button” 2. Set A-OSC1 to SQR waveform (Square and Pulse have the same effect, and work well for Oscillator Sync) 3. Tune OSC1 Pitch to +24 4. Press the LFO Select button to select LFO2 (in the LFO section on the top left) 5. Set the LFO2 Rate (Rate knob) to 25 - This will cause the LCD Display to Show LFO2: Rate 25 6. These settings you make in the LCD Window... (menu diving now.. but conveniently, it is up now) > Key Trigger (Turn it On) > Pitch Dest (+/- to set this to OSC1) 7. Now ... press the OSC Sync Button -- You can adjust the sound in several ways, but using the LFO Pitch Depth Slider is the first one you should adjust. - Add MFX / TFX to taste.. ( there are several that work well with the sync sound)

18 Roland JD-XA – Tips and Tricks From The Internet
OSC Sync
osc-sync, knowing that osc 2 is the "main sound" and osc 1 will be what affects it, and to get proper sync sounds you'll want to make sure the pitch of osc 1 is higher than osc 2, set it way up it doesn't have to be "in tune" because you won't hear it as such. Then you'll realise "hold I want osc 1's pitch to MOVE via an LFO to get that typical synch noise" - no problem, bring up one of the LFOs (one you may not be using for filter or PWM on osc2 - again something the and P6 can't do due to having a sever shortage of direct, no trickery, modulation/LFOs that cause you to surrender an osc or use an env), say LFO 2, set it to triangle, put the speed to med-slow, the menu screen will have changed to LFO settings now, move left/right till you see "pitch destination" [Pitch Dst] for that LFO - and set it to affect ONLY osc 1 (or osc 2 will be going up and down like a siren which you don't want in this case), then using the pitch depth slider, increase it to affect the depth of modulation applied to OSC 1 "behind the scenes" of the main sound, and this will give you the sync sounds you want. Set key trigger to on (in the same LFO menu) to make each new key press restart the LFO for that note, for the Jarre laser harp thing.... (Maybe even hit polystack and put it back into MONO for this... the choice is yours but at least you have a choice and it's all very simply laid out to do what YOU want to do) EDIT Should mention you can of course use the PITCH ENV controls for hard sync sounds instead of using an LFO. Set the P-Env button to the second lit option (Osc 1/D osc) to only affect osc 1, then dial in a good amount with the PEnv knob above it, Set the A/D sliders to taste little bit of attack, medium decay... then you get a sync sound automatically restarting on each keypress without futzing around with LFOs, leaves the LFOS free for other tasks! Also note, yet again JD-XA has your back, hold shift and turn the P-Env knob to set the VELOCITY sensitivty for the pitch env, now if you strike a key softly there's not much 'growl' effect, if you hammer it you get the full hard-sync effect! If you want to get a bit fancier, you may still want a tiny amount of LFO Pitch mod to OSC 1 so that when you strike the key softly (no growl) it won't sound as dead, the LFO will still give it a little movement/detuning. These small touches are what makes sounds dynamic and fun to play. And once you've worked through making them a couple of times you'll remember this stuff for ANY synth that offers the power to do it. It's like learning to drive, one size fits all in most cases (with similar subtraction synths with all the features you expect in a two-osc)
LFOs
There's actually THREE LFOS for the analog section, if you sacrifice 'performance' style mod LFO (the stick) and use the wheel and set it to full. You can then set the "MOD LFO" to control the usual destinations independently (wave, speed, sync) of the other 2 main LFOS. So you can have this do a filter sweep perpetually, while LFO 1 controls Pitch of OSC1 and LFO 2 controls PWM of osc 2 (as an example) Shortcut to access the "third" mod lfo - hold shift and push forward on the mod lever (not the wheel! as that will just put you into wheel assign mode). You can then use the physical LFO controls to set the MOD LFO stuff (all the same independent stuff available as the 2 main LFOS

except for "fade" as it would make no sense for a control I guess). The LFO waveform select light will flash when in MOD LFO editing mode. Press the LFO 1/2 button to get back to main LFOs.
Aftertouch to LFO
Aftertouch to lfo mod at a max rate and wheel to lfo at a faster rate with filter control. Can have vibrato with our without filter change, excited passages open the sound and can speed vibrato rate to note speed. Tail of horn emulation features splitting the sound using the pitch envelope to spread to a 1/4 or 1/5 as the sound decays, this emulates dying breath, and provides ear-catching early reflections to go along with the typical high-eq attenuated longer reverb tails as the sound decays. Cycling both a phase and flanger together at slow rates to get a resonant overdriven peak at irregular intervals. Dual lfo rates sync'd to clock to provide extra tension to dissonant chords for emotive "push". Check the mellotron emulation for barely there overdrive that helps to trick the ear that this is saturated tape. The Star Wars POD racer features reverb in a pre stage before lfo attenuation of the amp. Yikes!
Great Bass
Easy in this instance - VennD-jd-xa-analog-pad-demo In Main meu set output gain to +12 DB. Set keyboard to -1 Octave Dual Analog Saw waves OSC 1 Saw -12 Fine -11 OSC 2 Saw Pitch 0 Fine -12 LPF1 - Cut off around 43 Resonance around 10 (set to taste) Filter Envelope Depth +28 Filter EG - Attack 0 Decay 49 Release 40 (Sustain realtime modulation when playing from zero though full level @127) helps accentuate the growl. OSC 1 mix at 127 OSC 2 mix at 100 Amp EG Attack - 0, Decay around 75, Sustain Full and release around 40. Very slight - Pitch polarity (around -3) with a hint of decay around 4 on the Pitch EG. Drive is set to Full Part MFX uses the compressor in default mode with zero fx on TFX and no reverb or delay. Create sequence and tweak Filter EG sustain and Filter EG Polarity to taste in realtime. Add some delay to taste (send return in your daw) on the bass and that is pretty much it. I have no further eq or processing on the JD-XA bass patch in this example bar a limiter on the

20 Roland JD-XA – Tips and Tricks From The Internet
master out to prevent clipping on the realtime render. Bass line is sequenced using the JD-XA sequencer.
Another Great bass 2
SoundCLoud example: VennD- Bass The second example uses 1 SQUARE wave + 1 PWM waveform - same tuning with OSC2 as RingMod source for OSC 1. Slightly less decay on the amp envelope and just modulation the filter envelope depth in this instance for a more dirty house bass groove. It uses the Analog LPF2 with the TFX Filter+Drive on and set at around 34 in tandem with the analog filter for extra dirt. A triangle wave LFo with slight fad and very slow rate is modulating the PW of OSC 2 only

4: Sequencer, Patterns, Arpeggios
Sequencer
So lets talk about the JDXA sequencer for a moment... I was going to do a tutorial video about the sequencer, as its been requested many times. In preparation, I sat down and really studied the manual/guide, as well as spending serious hours experimenting with it...to be sure the information I would deliver in such a video would be on-point and valuable. But...after really delving into the JDXA sequencer...I've come to a conclusion: Roland REALLY blew it on the JDXA sequencer! And its NOT because of how it differs from the JDXi sequencer! That difference I totally get. JDXA is NOT a pattern-chain sequencer like the JDXi, its a note/parameter sequencer. And THAT is just fine by me. Arguably, even the JDXi is NOT a pattern-CHAIN sequencer....because it has no song or chain mode. All you can do is assign Favorites....and change them MANUALLY. But...that's a whole different synth, and a whole other thread! So the JDXA has such a basic sequencer....its easy enough to use...but frankly, even within its basic-ness...its broken! Forget about what features may be "missing" (not included in its development). I'm saying that certain key features that ARE included....do not work as they should, or in an intuitive way, whatsoever. And I can't fathom what Roland was thinking about it...in the end. I've decided NOT to do a video...I'm doing this post instead...because other than the most BASIC of sequencer functions, any advanced features of the JDXA sequencer are seriously flawed. NO tutorial is going to circumvent THAT. So let me first give some tips that are valuable...before describing whats "broken"... 1) First, you have to understand that the JDXA has two Modes that it can operate in. Program Mode and Sequencer Mode. This is not identified by name at all in the documentation. But...a KEY thing to learn about using the sequencer, is that you must switch from Program Mode (the default at power-up, OR when selecting any new Program) TO Sequencer Mode, in order to "keep track of" the sequencer. To do this, you have to turn OFF the Program Select Button, so that its NOT illuminated in RED. Now...you are in "Sequencer mode": the program select buttons will now show any sequencer activity and recorded sequencer events, and most importantly, the PART Select buttons now become TRACK select buttons! Until you learn THIS little secret.....using the sequencer can be VERY confusing and frustrating! 2) Because many Programs use multiple Parts to make up the synth patch you hear when
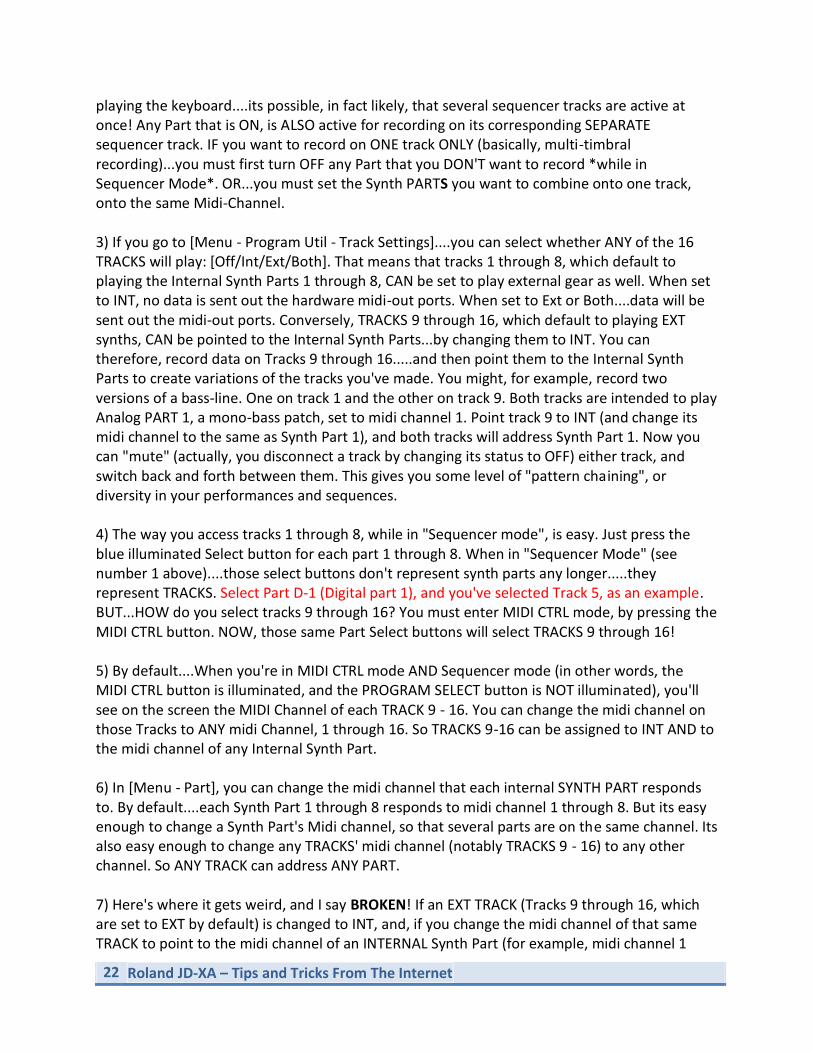
22 Roland JD-XA – Tips and Tricks From The Internet
playing the keyboard....its possible, in fact likely, that several sequencer tracks are active at once! Any Part that is ON, is ALSO active for recording on its corresponding SEPARATE sequencer track. IF you want to record on ONE track ONLY (basically, multi-timbral recording)...you must first turn OFF any Part that you DON'T want to record *while in Sequencer Mode*. OR...you must set the Synth PARTS you want to combine onto one track, onto the same Midi-Channel. 3) If you go to [Menu - Program Util - Track Settings]....you can select whether ANY of the 16 TRACKS will play: [Off/Int/Ext/Both]. That means that tracks 1 through 8, which default to playing the Internal Synth Parts 1 through 8, CAN be set to play external gear as well. When set to INT, no data is sent out the hardware midi-out ports. When set to Ext or Both....data will be sent out the midi-out ports. Conversely, TRACKS 9 through 16, which default to playing EXT synths, CAN be pointed to the Internal Synth Parts...by changing them to INT. You can therefore, record data on Tracks 9 through 16.....and then point them to the Internal Synth Parts to create variations of the tracks you've made. You might, for example, record two versions of a bass-line. One on track 1 and the other on track 9. Both tracks are intended to play Analog PART 1, a mono-bass patch, set to midi channel 1. Point track 9 to INT (and change its midi channel to the same as Synth Part 1), and both tracks will address Synth Part 1. Now you can "mute" (actually, you disconnect a track by changing its status to OFF) either track, and switch back and forth between them. This gives you some level of "pattern chaining", or diversity in your performances and sequences. 4) The way you access tracks 1 through 8, while in "Sequencer mode", is easy. Just press the blue illuminated Select button for each part 1 through 8. When in "Sequencer Mode" (see number 1 above)....those select buttons don't represent synth parts any longer.....they represent TRACKS. Select Part D-1 (Digital part 1), and you've selected Track 5, as an example. BUT...HOW do you select tracks 9 through 16? You must enter MIDI CTRL mode, by pressing the MIDI CTRL button. NOW, those same Part Select buttons will select TRACKS 9 through 16! 5) By default....When you're in MIDI CTRL mode AND Sequencer mode (in other words, the MIDI CTRL button is illuminated, and the PROGRAM SELECT button is NOT illuminated), you'll see on the screen the MIDI Channel of each TRACK 9 - 16. You can change the midi channel on those Tracks to ANY midi Channel, 1 through 16. So TRACKS 9-16 can be assigned to INT AND to the midi channel of any Internal Synth Part. 6) In [Menu - Part], you can change the midi channel that each internal SYNTH PART responds to. By default....each Synth Part 1 through 8 responds to midi channel 1 through 8. But its easy enough to change a Synth Part's Midi channel, so that several parts are on the same channel. Its also easy enough to change any TRACKS' midi channel (notably TRACKS 9 - 16) to any other channel. So ANY TRACK can address ANY PART. 7) Here's where it gets weird, and I say BROKEN! If an EXT TRACK (Tracks 9 through 16, which are set to EXT by default) is changed to INT, and, if you change the midi channel of that same TRACK to point to the midi channel of an INTERNAL Synth Part (for example, midi channel 1
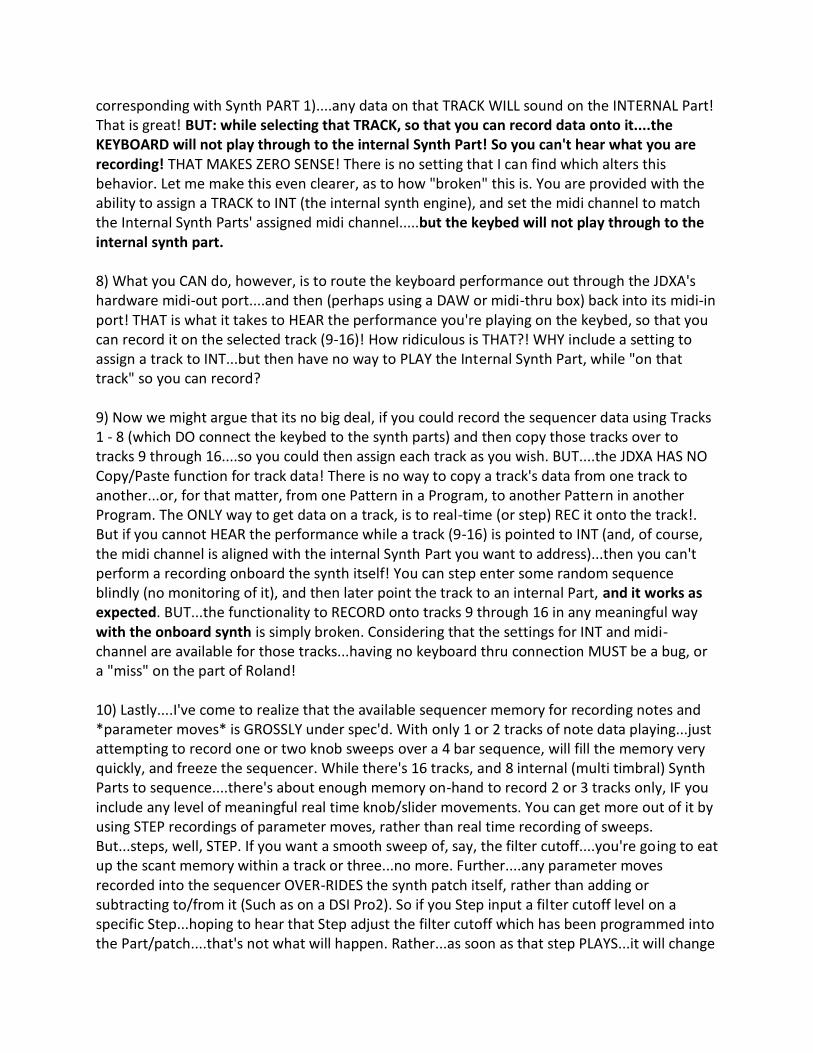
corresponding with Synth PART 1)....any data on that TRACK WILL sound on the INTERNAL Part! That is great! BUT: while selecting that TRACK, so that you can record data onto it....the KEYBOARD will not play through to the internal Synth Part! So you can't hear what you are recording! THAT MAKES ZERO SENSE! There is no setting that I can find which alters this behavior. Let me make this even clearer, as to how "broken" this is. You are provided with the ability to assign a TRACK to INT (the internal synth engine), and set the midi channel to match the Internal Synth Parts' assigned midi channel.....but the keybed will not play through to the internal synth part. 8) What you CAN do, however, is to route the keyboard performance out through the JDXA's hardware midi-out port....and then (perhaps using a DAW or midi-thru box) back into its midi-in port! THAT is what it takes to HEAR the performance you're playing on the keybed, so that you can record it on the selected track (9-16)! How ridiculous is THAT?! WHY include a setting to assign a track to INT...but then have no way to PLAY the Internal Synth Part, while "on that track" so you can record? 9) Now we might argue that its no big deal, if you could record the sequencer data using Tracks 1 - 8 (which DO connect the keybed to the synth parts) and then copy those tracks over to tracks 9 through 16....so you could then assign each track as you wish. BUT....the JDXA HAS NO Copy/Paste function for track data! There is no way to copy a track's data from one track to another...or, for that matter, from one Pattern in a Program, to another Pattern in another Program. The ONLY way to get data on a track, is to real-time (or step) REC it onto the track!. But if you cannot HEAR the performance while a track (9-16) is pointed to INT (and, of course, the midi channel is aligned with the internal Synth Part you want to address)...then you can't perform a recording onboard the synth itself! You can step enter some random sequence blindly (no monitoring of it), and then later point the track to an internal Part, and it works as expected. BUT...the functionality to RECORD onto tracks 9 through 16 in any meaningful way with the onboard synth is simply broken. Considering that the settings for INT and midi-channel are available for those tracks...having no keyboard thru connection MUST be a bug, or a "miss" on the part of Roland! 10) Lastly....I've come to realize that the available sequencer memory for recording notes and *parameter moves* is GROSSLY under spec'd. With only 1 or 2 tracks of note data playing...just attempting to record one or two knob sweeps over a 4 bar sequence, will fill the memory very quickly, and freeze the sequencer. While there's 16 tracks, and 8 internal (multi timbral) Synth Parts to sequence....there's about enough memory on-hand to record 2 or 3 tracks only, IF you include any level of meaningful real time knob/slider movements. You can get more out of it by using STEP recordings of parameter moves, rather than real time recording of sweeps. But...steps, well, STEP. If you want a smooth sweep of, say, the filter cutoff....you're going to eat up the scant memory within a track or three...no more. Further....any parameter moves recorded into the sequencer OVER-RIDES the synth patch itself, rather than adding or subtracting to/from it (Such as on a DSI Pro2). So if you Step input a filter cutoff level on a specific Step...hoping to hear that Step adjust the filter cutoff which has been programmed into the Part/patch....that's not what will happen. Rather...as soon as that step PLAYS...it will change

24 Roland JD-XA – Tips and Tricks From The Internet
the filter cutoff of the whole patch to this new Steps' level. This means that in order to get movement on the filter over the timeline of a sequence...you MUST program in the BASE filter cutoff level on EVERY step, as well as the modulated events you wish to effect....so a step will change the value, and the next step will change it BACK. Ok...while this is very inconvenient, its do-able. BUT....due to the limited sequencer memory....doing so is again eating up the very limited resources you have! All in all....I've explored the CRAP out the JDXA sequencer. EVEN IF all these functions worked as they SHOULD.....the relationship between TRACKS and PARTS and MIDI-CHANNELS and PART On/Off buttons and PART Select Buttons and TRACK Select Buttons....is SO confusing and difficult to keep "track of" (sorry for the pun)....that its a nightmare to record anything other than the most basic of recordings. I.E.: Go to a program...press REC...and play 4 bars of the Program/patch you hear. It will play it back as expected. But ANY level of editing, track selection, multi-track layering or track/channel assignment.....is miserably difficult and confusing. If ALL the JDXA sequencer was intended to be was a basic note and parameter sequencer, a la the Prophet 08/Tetra...then it should have a KEYBOARD Trigger mode....not ONLY a Play Button. No one thinking about buying the JDXA should consider its sequencer to be anything more than, perhaps, the same level of basic phrase sequencer that's on DSI Prophet 6...which is about the most basic of sequencers. But, even still, while the P6 is a one Part synth (no layers, as opposed to the JDXA's 8 part multi-timbral layers)...the P6 actually has MORE memory for notes and real time tweaks! As a multi-timbral, multi-track, multi-part synthesizer (which the JDXA EXCEL's at!)...its got a sequencer which is SO underpowered and broken as to fail in comparison to a mono-timbral, single track, single part synthesizer (the P6). Lastly – during playback, if you hold <SHIFT> and press a Part Number – it will be muted. THIS is handy, if you want to bring parts in and out of playback. I still LOVE the JDXA. As a SYNTH, it really is a modern enhanced JD-800 and more. But the sequencer on this machine is (for me, IMHO) an inescapable MISTAKE. You all know how much of an advocate I've been for the JDXA. But...Roland NEEDS to FIX these broken functions. Forget about pattern chain.....thats the least of its problems. Even in the ONE pattern it has...its broken! No track copy/paste. Insufficient sequencer memory for the functions provided. And several clearly available functions (track, channel, and part assignment) are broken. The settings are there...but Roland hasn't thought it through enough to connect the keyboard to the synth so that you can RECORD without resorting to using an external midi-thru device. And...we've heard from Nick Batt (a credible source who purportedly spoke directly to Roland to confirm) that the DSP is maxed, making such significant changes as adding sequencer memory, somewhat unlikely through an update.

But...I'll throw this out there...even through I highly doubt that Roland reads GearSlutz or other forums.....if anyone wants to collaborate with me briefly on the phone or email about my findings....I'd be happy to share very PRACTICAL and REALISTIC feedback on where the sequencer is genuinely flawed (not wishful opinions about missing features, but rather...commentary on *included features* that do not function as they apparently were designed!). I love this synth! But I've gotta be real about my findings.
Sequences
By having different pattern sequences on different parts. Each part (8 in total) can have their own sequence. And you can program keyboard splits, I believe? So, use it in a kind of Dual mode? You also have to deselect (turn off) the tracks you don't want to play while your performing the lead or whatever track you want to respond to your playing on top of the sequencer.
Arpeggio – listening to the included patterns..
Select a Program/Patch (can be anything .. but something without a lengthy release/sustain is better. Press the “Key Hold” button (so whatever chords / notes you hit will sustain. Next press the Arpeggio button (next to the Key Hold). Now play a chord.. Any chord will do. Now the LCD should be lit up with something from the Arpeggio menu (when you hit the Arpeggio button, it makes the LCD go to that menu). Press the < or > button to get to the “ARPEGGIO: [Ent] Select Template” menu option, and press the Enter/Manual button. With the Arpeggio playing, you can now press the + or – keys to hear various arpeggio patterns. While this is going, you can twiddle with knobs, select different patterns, choose different tones, or even change up the other Arpeggio settings in the menu.
Sequence Resolution for Patterns – More detailed
Super easy - just enter step mode and +/- the step type to what ever resolution you want on that step point. If in 16th note grid obviously you get 2 or four note entries per step depending on if the step resolution is 1/32 or 1/64. Another neat trick if you sue the second last scale mode - 3rd from the bottom active led on the scale indicator each single step is by default a 32nd note and not a 16th. If you half tempo the sequencer from what your intended tempo is you can use it as an 8 bar step sequencer per step. This means that any step divisor above the 32nd note default step is acting like the double notation note for longer step patterns. ie; a 1/64 in this instance should be viewed as 1/32,
26 Roland JD-XA – Tips and Tricks From The Internet
1/32 as 1/16, 1/16 as 1/8 and 1/8 as 1/4 and 1/4 as 1/2 (with triplet timing divisions). In essence you are treating the default 32nd note as a 16th note in this grid giving you 8 measures instead of 4 for the internal sequencer. All you have to do in your DAW is lock the tempo to the same as your JD and make sure to perform a midi time stretch of 50% on any of your other notation so it clocks at double the tempo. IE: if you have a track that you want playing at 140 BPM in your DAW but you want 8 measure step sequences from your JD-XA set the XA and DAW to 70BPM and make sure any previously created midi data plays with a 50% time stretch - ie: if you had a two mar midi at 140 it would become stretched /compressed to a 1 bar loop at 70 BPM to retain its original tempo. I quite often interplay between various sequencers like this. with the Monomachine doing double time, XA on half time for 8 bar sequence patterns and then clock the A4 at a different timing division as well whilst double timing the midi data in Logic X. I also get the option of odd step sequences on the Elektron gear allowing for some interesting melodic poly rhythmic work outs too. Sounds complicated but its just rudimentary subtraction of division of a master tempo and deciding at what speed you want each part to play. As long as everything is in a quantifiable tempo ratio ie: x 0.5 or x 2.0 you're pretty good to go. The sequencer is a handy sketch pad. All they need to do is to enable key based transpose when its playing and it would hugely more flexible in application.
Transposing Sequences
Just a quick tip. Though we can't transpose sequences using the keyboard (yet,) if you go into the system menu and use the 'masterkeysft' parameter, you can transpose your sequences with the +/- buttons. Not ideal, but it does work well. I make whole sequences in my XA, then record transposed versions at several pitches into logic. Works well! It seems all Roland need to do is link the keyboard to this parameter and that would give us keyboard sequencer transpose. Here's hoping they will sort it out soon anyway. All the best guys.

5: MFX, TFX, Effects
Effects Paths MFX: 67 types, TFX: 29 types
Part 1-> [MFX][EQ]\
Part 2-> [MFX][EQ] \
Part 3-> [MFX][EQ] \
Part 4-> [MFX][EQ] \
>[DELAY][REVERB][EQ][TFX1][TFX2]
Part 5-> [MFX][EQ] /
Part 6-> [MFX][EQ] /
Part 7-> [MFX][EQ] /
Part 8-> [MFX][EQ]/
Effects
Each of the four Analog and four Digital Parts has its own MFX slot, with 67 different effects available. These include more reverbs and delays, rotary sims, electric piano amp sims, filters, lo-fi, and 22 combination chains. The options and quality of the effects is impressive. MFX can be turned off or on per Part via a button but the effects themselves and their parameters are set in the menu system.

28 Roland JD-XA – Tips and Tricks From The Internet
6: Saving, Sharing, Importing
Saving / Sharing programs (Studio Sets)
The XA works better than the FA re saving/importing single sounds. A program is a little like a studio set in that it contains all the sounds (analog and digital along with its effects). To save it as a 'single' you simply select to save the sound to USB stick and it's done. Anyone wanting to use that sound puts into one of the import folders (A, B, C, etc) and it can be imported and saved onboard or kept on the USB stick for future reference.
Using A USB Stick for Storing Programs (for Dummies)
Properly format a USB Stick for the JD-XA by using the JD-XA Menu command (see the manual). You Should have the following File structure on the USB IMPORT ROLAND JD-XA BACKUP (this is where backups are put, when you backup on the JD-XA PROGRAM this is where you will copy Programs you get from others A B . . P The A-P Folders represent Banks.. banks. The .SVQ and .SVD files you copy there are the Programs On The JD-XA … to get to these Programs… Press the USB Memory button Now .. you use the Bank and Program Buttons, just like you do for internal programs. Thing is… pressing the USB Memory button.. makes the USB drive your program drive… When it’s pressed… you are working off the USB Drive. When you pop the USB drive out of your JD-XA… you can write / share in the A-P folders. You can format and setup multiple USB sticks for various purposes. For example: Live gig sets; patches based on genre (e.g. orchestral, experimental, 80s); work in progress; studio setups; share sticks; etc.
Importing Tones
SHIFT + BANK Arrow across to TONE -> PRESS ENTER

Scroll across to the .SVD file you have in the IMPORT FOLDER Press Enter However many sounds in the >SVD file can be scrolled through and read. Select the one you want - you will be asked to select a digital part - all 4 buttons link. Select one and tone copy -> press enter Once done save to the Program you want. You can repeat the process for each digital voice or go back to that program later and add another in the next digital voice and so on and just reserve the same program number and the extra vice is added. Sounds convoluted but once you've done it once or twice it takes all of 3 seconds to do. It will only survive the power cycle once you have saved it to a program.

30 Roland JD-XA – Tips and Tricks From The Internet
7: Learning, General Tips, Library
Random Tips / First use
Well, I finally got to have a session on this today, had been reading the manual in anticipation. TL;DR - the sound is everything I always imagined a combined DCO/Digital synth could be. Rather than fight to go through all four delivered banks of 16 patches in a sitting, I concentrated on understanding the first two patches -- "4V Heaven" (4-voice Heaven, I assume) and the next one, primarily an analogue Supersaw demo. I'm actually happy Roland didn't stuff all banks A-P with patches; I'm sure they'll add some more, people will share their own patchsets, etc. etc. It encourages saving what you're doing with the knobs and sliders instead of worrying about writing over something you might decide later that you like. This is a knob-twiddling synth, not a preset tourist synth, in any event. Hard to do comparisons with my experience with the A6, it being in a different place, but in fact I think it actually sounds silkier and warmer -- more Roland-like, less Oberheim-like. Ironically, the sequencer on the A6 seems more sophisticated. I kept thinking of the JP-8000 more than anything else in Roland's more recent lineup; the layout, the architecture, has echoes with it. As, in some ways, does the sound. The Drive on the analogue section is cool, but it'd be nice if there were some options associated with it (I couldn't find any, just the knob). I didn't do much menu-diving, played it mainly as a one-knob, one-function kind of interface, which is what I'd value it for, but I would hope the analogue Drive knob would either have some options, or have some added in a future update. There's of course the Overdrive and Distortion stuff in the FX section, which, combined with it, really goes noisy if you want. But in 4V Heaven, for instance, the Drive/Pitch for the analoguy Poly-Stacked section is modulated by an LFO, which is a little too regular (perhaps I should have tried the noise or RNDom LFO waveforms, duh, oh well). I do like the blue Part Selection buttons. Select each part, and the whole interface reconfigures itself to represent that Part as a full-on synth you have knob-slider access to. Once you get it, it's very intuitive, and fast. I thought something was broken when trying to go through the digital filter options (figured it'd be the usual standard Roland digital filter set available since 1997 in basically the same form...), then realized that to get to the PKG/-12db etc. filters, you have to set the Analogue OSC1/Digital knob to Variation, THEN go into the menu and edit to your filter of choice from there. Not as direct as the analogue filter choices, but manageable. I'd have thought maybe repeatedly pressing the Variation button under the above-named OSC selection would have

done the same thing. Oh well, I always like the quirky, WTF aspect of Roland design. The dual wheels _and_ pitchbend/modulation stick, that's luxury, really liked having all that. They seem pretty much mapped to do the same thing in the factory patches, but you can edit to set the MIDI CC targets to whatever you want, so that's monstrous flexibility in terms of modulation control, along with all the other options. It's a truly deep synth; it doesn't seem it at first glance, but once you realize you can do all the Partial editing on the "SN" digital part, along with having four analog voices of two oscs each (that's eight analogue oscs; the A6 has sixteen, so it's a good ways into that direction!) which can run alongside, that's eight analog oscs alongside basically up to 12 digital voices (four digital parts, 3 partials per part), that's a good 20-voice synth, well..... it's more than enough, I say! The two 24db filters on the analogue section are distinct, one "Roland" style, one "Moog" (transistor ladder) style, and each self-oscillates nicely, and does what an analogue oscillator does when you increase resonance and filtration (i.e., among other things, you lose amplitude at a certain point). The third LP analogue filter is wild, esp. with resonance turned up, I spent quite a bit of time experimenting with the subtleties of that! It both has a lovely tone, and the instability of analogue, and feels very integrated in the way you can use both the digital and analogue aspects. The FX section is top-notch Roland best of breed, so no qualms there. Didn't have the chance to work with the MIC/Vocoder, but I'm sure it's derived from Roland's excellent VP tech, though clearly without all the options you'd have on ye olde VP-9000 (ye gods, has it been that long?! Time flies, for sure). As for the sequencer and arpeggiator: I respect what Nick Batt has to say in his review on the former, but really, the sequencer here feels more to me like the "motion sequencer," again, that came with the JP-8000. Seems like its best use would not be for introducing sequenced phrases, but for recording modulation patterns for live use. In other words, the more you constrain what you're trying to do with it, and the less you worry that it's not the typical Roland built-in digital sequencer we've been seeing for 20 years, the happier you'll be. I tried turning both this "pattern generator" and the arpeggiator on at the same time, but it seemed to me like it was either/or. You could have both on, but the arpeggiator is triggered by key presses, which I _think_ interrupt the pattern sequence you have running....??? Anyways, it was maddeningly close enough in some ways to the V-Synth sequencer to be confusing when it ended up clearly not being that. Again, Roland's built-in sequencers, from 1997 onwards, have always been
oddities. You live with them, or you go mad. Or buy an MPC. Or Reaper/Ableton/Maschine etc. No other major notes, so to speak. The build quality seems just fine; as with the JP-8000, it _seems_ lightweight/plasticky, but also seems quite solid as well, and the light weight is a huge benefit. I did feel a bit worried seeing the keybed bend a little when I laid into the aftertouch, but I highly doubt it's more than an aesthetic thing. The shiny.... oh, the shiny.... I think Roland

32 Roland JD-XA – Tips and Tricks From The Internet
and the Japanese are just mystified by why iPhone proved such a world-smashing success, and decided, "it MUST be the shiny!" -- and so, they went for the shiny. So if you have any OCD over
keeping your iPhone shiny, warning, you'll ruin your soul keeping this thing clean, too. OTOH..... yes... yes.... precious.... so shiny.....
Filter Velocity Sensitivity
Some parameters are hidden in the menus, including filter velocity sensitivity and many of the modulation matrix values, but overall the most commonly needed parameters are at your fingertips thanks to all the dedicated controls.
Librarian Functions
Click a collection to go its dedicated page, where you’ll find a description, audio examples, and download links. To load the collection into the JD-XA Librarian, scroll down and click the “Download for Librarian” button (this is a special .xal file for use with the JD-XA Librarian). When the download is complete, it appears as a patch collection in the librarian. After that, use the Save As command to save the collection to the desired location on your computer.
Copy Tones From One Patch to Another
If you’d like to use a tone from one JD-XA patch in another, it’s easy with the JD-XA Librarian. Just right-click on a patch in the librarian and select Copy Tone. Next, select the desired to tone (Analog 1-4 or Digital 1-4) from the dropdown menu. After that, right-click the destination patch, select Paste Tone, and then choose a location for the copied tone.
Write Patches or Patch Collections to the JD-XA
In the librarian’s Main screen, you can write individual patches or entire patch collections to the JD-XA’s internal memory. Just copy the patches you want to use from different patch collections and insert them into the Main screen at the desired memory locations. There are 256 memory locations available, and the numbers directly correspond to the patch numbers in the JD-XA. After that, click the Write All button in the librarian to send all patches in the Main screen to the JD-XA. To send one or more specific patches, highlight the desired patch number(s) in the Main screen and click the Write Selected button. An important note: these procedures overwrite the current patch data in the JD-XA. If there are any patches you want to save, make sure you first back up the data in a patch collection before proceeding.
Control Cutoff with AfterTouch
Pages 5-6 of the Parameters Guide

JD-XA Librarian: Things You Can Do
Create Custom Patch Collections
The JD-XA Librarian provides an intuitive interface for building your own custom collections of JD-XA patches. You can create collections for specific projects, music styles, or live performances, and then load them into the JD-XA whenever you need them. To start a new patch collection, select New from the librarian’s File menu. Next, use the Save or Save As commands to save the collection on your computer. Collections can be populated with patches retrieved from the JD-XA, including factory patches and user patches you’ve created. You can also grab patches from other collections, including those you’ve downloaded from the Axial website. More? Copy the patch collection to a USB Stick, and save it for later, or for sharing with others.
Retrieve Patches from the JD-XA
The Main screen is the JD-XA Librarian’s primary workspace. This area communicates directly with the JD-XA, and it’s where you transfer patches to and from the synth’s patch memories. To grab all current patches in the JD-XA, click the Read All button in the Main screen. To retrieve one patch at a time, highlight the desired patch number in the Main screen and click the Read Selected button. Multiple patches can be selected using Command-click (Mac) or Ctrl-click (Windows).
Main screen in the JD-XA Librarian.
After you retrieve patches from the JD-XA, they appear in the librarian’s Main screen. To save one or more patches to a patch collection, copy them from the Main screen and insert them into patch collections as desired.
Download Patch Collections from the Axial Website
With the JD-XA Librarian, you can directly download JD-XA patch collections from Roland’s Axial website. When you’re connected to the Internet, clicking the Axial button in the librarian’s Main screen will take you directly to Roland’s Axial sound site. The site opens in a separate window. Once there, scroll to the bottom of the Axial home page and select the JD-XA in the “Select Your Synthesizer” dropdown menu. This will take you to all available JD-XA patch collections.
Axial JD-XA patch collection directory in the JD-XA Librarian.
Click a collection to go its dedicated page, where you’ll find a description, audio examples, and download links. To load the collection into the JD-XA Librarian, scroll down and click the “Download for Librarian” button (this is a special .xal file for use with the JD-XA Librarian). When the download is complete, it appears as a patch collection in the librarian. After that, use the Save As command to save the collection to the desired location on your computer.

34 Roland JD-XA – Tips and Tricks From The Internet
A Note About INTEGRA-7 Patch Compatibility
The JD-XA’s digital side features Roland’s SuperNATURAL Synth engine, and its architecture is similar to the synthesizer engine used in the INTEGRA-7 sound module. Because of this, the JD-XA can work with some (but not all) Axial patch collections created for that product. The JD-XA Librarian is needed to convert them to the .xal format that works with the JD-XA. During conversion, the librarian loads the data for each patch into Digital Tone 1. After you transfer a patch to the JD-XA, you can use it as is or enhance the sound with analog tones, other digital tones, and effects to create your own new patches. To download these collections, access the Axial site from within the JD-XA Librarian and navigate to the INTEGRA-7 patch collection pages. Next, click on a collection to go to its dedicated page, and then click the Download button near the bottom of the page. If a collection is compatible with the JD-XA, it’s automatically converted during the download and appears as a patch collection in the librarian. If it’s not, the librarian displays a message that says, “Cannot read files of this type.”
Audition Sounds on Your JD-XA
When a patch collection is open, you’ll see that each patch has its own “Temporary Play” button. When you click it, the patch is transferred to the temporary buffer in the JD-XA, and you can play it right away. If you want to immediately save the patch to the JD-XA, use the synth’s Write procedure to save it to the desired memory location. In a patch collection, click a patch’s Temporary Play button in the left hand column to transfer it to the JD-XA’s temporary buffer for auditioning.
Copy Tones From One Patch to Another
If you’d like to use a tone from one JD-XA patch in another, it’s easy with the JD-XA Librarian. Just right-click on a patch in the librarian and select Copy Tone. Next, select the desired to tone (Analog 1-4 or Digital 1-4) from the dropdown menu. After that, right-click the destination patch, select Paste Tone, and then choose a location for the copied tone. In the JD-XA Librarian, you can copy tones from one patch to another.
Write Patches or Patch Collections to the JD-XA
In the librarian’s Main screen, you can write individual patches or entire patch collections to the JD-XA’s internal memory. Just copy the patches you want to use from different patch collections and insert them into the Main screen at the desired memory locations. There are 256 memory locations available, and the numbers directly correspond to the patch numbers in the JD-XA. After that, click the Write All button in the librarian to send all patches in the Main screen to the JD-XA. To send one or more specific patches, highlight the desired patch number(s) in the Main screen and click the Write Selected button. An important note: these procedures overwrite the current patch data in the JD-XA. If there are any patches you want to save, make sure you first back up the data in a patch collection before proceeding.
More Info
For complete instructions on using the JD-XA Librarian, refer to the manual that comes with the librarian download. For more information on operating the JD-XA, refer to the JD-XA Owner’s Manual and JD-XA Parameter Guide.
JD-XA Filters – Emulation
Digital LPF2 is based on the Jupiter 8's Digital LPF3 is Moog Digital LPF4 is Prophet-5 Analog LPF1 is similar to the one used in the Jupiter-8 and Juno-60 Analog LPF2 is Moog-style, Analog LPF3 is SEM/Oberheim)
Copy Tone from One Program To Another (Librarian)
An Example Copy Analog part 02 of Program 06 in Bank F (ProgramNo F06) to Analog Part 01 of Program 04 in Bank B (ProgramNo B04). 1. I start by writing down the Program and Tone/Part I will be copying from and to. It's easy to forget these, and I haven’t found a way to sample them, if I've forgotten which part mid-process. So for this example… I write down • From: 086: A02 (ProgramNo F06) • To: 020: A01 (ProgramNo B04) 2. Launch the Librarian, and make sure the JD-XA is connected to your computer (USB is plugged in). 3. Make sure your computer has a connection to the JD-XA. Sometimes it means I have to select
the Librarian Menu Item under Setup / Setup Midi Device (even though I am already set up and hit OK. Sometimes it involves restarting the JDXA. In any case – you HAVE to have a connection between the JD- and your computer, or all bets are off. Usually… I skip this step, unless the following Steps don’t work. - the following steps, you do from the Librarian - 4. On the Main window, click on the row for the Program you're going to copy the tone 'To'. For this example, I’ll click on row 020 (and click the “Read Selected” button up top. If this works, the * ProgramName field will be filled in, and display the Program Name I am going to be copying to. If not.. I go back to Step 3 until this works. Sometimes I have to do this a couple of times. The important thing, is this connection HAS to be established for the rest to work, and sometimes it's fiddly. 5. I now select the Program Row, I am going to be copying the tone from. For this example.. It is Bank F, Program 06. Click on row 086 (ProgramNo F06) and click “Read Selected” from the

36 Roland JD-XA – Tips and Tricks From The Internet
button up top. This should work without any issue, if you got past step 4. 6. Right-Click on the '086' on Row 86, and choose Copy Tone. 7. The "Select Tone" menu will popup. Select the part you want copied. For this example... select "A: 02" and hit OK . This places Analog Part 02 of Program 06, in Bank F, into memory. 8. Go back and click on the row you will be copying to (row 020). Now right-click on the 020, select Paste Tone… 9. On the "Select Tone" popup menu, choose the part you want to paste to. For this example... Part 01. 10. Done? Not so fast.. it's still in memory.. so, double-click the row to temporarily write the changes into that row (020). At this point – you should be able to hear the tone on the JD-XA, play it.. make sure it’s what you wanted. 11. If it's right immediate click the Write button, to write the Program / changes... If you move off the program, your edit is lost. If you don't like what you hear... move off the program (Select a different program) , and start fresh. Lot of steps. Some of them may be unnecessary. I tend to stick with what works for me... and these work. It can be a PITA - but it allows me to copy tones from one Program to another.
More Programming Tips
No compare function but there's what I do. Format a USB B stick write the program to the same Bank and Program Number in the USB Bank and use one as the reference for AB comparisons whilst programming.
Also a quick thing to know that save time is this - this is for sub edit menu parts. Hit menu / press enter The < and > buttons scroll thought the edit pages by type in this Order System Program Edit Part Edit Tone Edit Effects Edit Mic Edit LED Customize Pattern Utility Favourite Utility Ultility Version Info

Navigating this way when you want to edit bits like looping EG's, Ring Switch on the Digital Voices, Analog Feel, Waveshaper which LFO does what in the Analog engine etc (as they can work on both oscillators for example or osc 1 or osc 2 only).
38 Roland JD-XA – Tips and Tricks From The Internet
8: Reviews, Links
Mini Review
Analog Engine Each of the JD-XA's four analog parts has two oscillators, along with filter and amp sections and four envelopes all with incredibly fast attack and response times. You also get two LFOs, with super-smooth coverage from ultra-slow to ultra-fast. Start by creating your sound from scratch, or configure the JD-XA as an eight-oscillator, pure analog version of the legendary Supersaw waveform. Additionally you can invoke the power of Poly Stack mode for warm, organic four-note chords that will sweep you away. Once you've got that killer analog sound, you can route it directly to the analog dry output or send it to the on board digital effects for further experiments in the art of sound design. Digital Engine The JD-XA doesn't just do classic analog it's also equipped with a completely separate four-part, 64-voice digital sound engine powered by Roland's acclaimed SuperNATURAL synthesizer technology. This lets you play some of the most expressive and natural sounds available anywhere, as the JD-XA is compatible with the synth engine from the INTEGRA-7 sound module, a firm favourite of top producers, composers, and sound designers. And if you need some extra inspiration, visit Roland's online Axial community and download the latest creations from high-end programmers to tap into great sounds for a wide variety of genres. Analog and Digital Crossover With its distinctive crossover design, the JD-XA is very unique in its approach to synthesis. Not only can blend the engines together, but you can also use them completely independently, truly giving you two synths in one. Additionally, the analog and digital engines are able to interact in many creative ways. For example, digital sounds can be routed through the analog filters, or used as modulation sources for the Cross Mod and Ring Mod functions in the analog section. If you've got big ideas when it comes to sound design, you need a powerful and flexible synth, and the JD-XA really delivers. Powerful & Versatile Effects When it comes to effects, the JD-XA is well equipped to handle any sound shaping you want to apply. Each analog and digital section is equipped with a powerful and versatile MFX processor that offers 67 different effect types, including high-impact processing options like Bit Crusher. The essentials are also covered via the five system effects processors, which provide reverb, delay, and master EQ plus two TFX processors with 29 effect types each.

16-Track Pattern Sequencer & Real-Time / Step Recording To get your creativity flowing, the JD-XA has a comprehensive 16-track pattern sequencer with 8 tracks for internal parts and 8 tracks for external sources, allowing you to build sequences and loops quickly and intuitively. Use real-time recording mode to lay down parts in a familiar linear fashion, or step recording mode to create in the old-school pattern style. However you like to work, this sequencer is designed to keep you connected to your music. Flexible Routing and Connectivity Providing unprecedented routing options thanks to a flexible system the JD-XA lets you route a single mod source to four destinations. In addition, you're able to control external modules or DAW plug-ins via MIDI, USB, and CV/GATE, making this a synth that can sit at the heart of any live or studio setup. If you can imagine it, you can probably do it on the JD-XA. Mic-Controlled Modulation The JD-XA's mic input brings an extra dimension to your music. For starters, you can use the mic as a modulation source, controlling filter cut-off, Cross Mod, or other parameters with your voice. Alternatively, you can dial up Vocoder tones, or simply add some pro-grade vocal reverb via the mic's dedicated reverb processor. Features Advanced synthesizer with independent analog and digital sound engines Discrete analog synth engine (four parts) with 2 x OSC, Filter, Amp, 4 x Env (2 x Pitch, Filter, Amp), and 2 x LFO per voice plus Analog Dry Out for raw signal output Analog filter section features 4-Pole, transistor-ladder, and multi-mode (LPF/HPF/BPF) filters with supremely smooth, natural response OSC section includes Cross Mod, Ring Mod, and OSC Sync, all of which can be used simultaneously LFO rate covers a wide range from ultra-slow to ultra-fast Incredibly fast attack envelope time Separate digital section built around SuperNATURAL synth engine (four parts, 64 voices) that's compatible with INTEGRA-7 sound libraries Digital parts can be routed through the analog filter section for warm, organic results Comprehensive effects with MFX for all parts plus five system effects (Reverb, TFX1, TFX2, Delay, and Master EQ) Flexible routing options for highly creative sound design Intuitive 16-track pattern sequencer (8 tracks for internal parts, 8 tracks for external parts) for fast creation of songs and loops Onboard USB, MIDI, and CV/GATE interfaces plus flexible MIDI control functionality

40 Roland JD-XA – Tips and Tricks From The Internet
Mic input allows you to modulate synth sounds with your voice and explore classic Vocoder functionality Plenty of backlit knobs, sliders, and controllers for hands-on sound shaping Specifications Sound Engines: Analog, Digital Number Of Keys: 49 Key Action: Velocity Sensitive (Aftertouch) Inputs: 1 x XLR (Microphone), 1 x MIDI In Outputs: 2 x Master Out, 1 x Headphones, 1 x Analog Dry, 1 x Click, 2 x Gate Out, 2 x CV Out, 1 x MIDI Out Additional Connections: 3 x Foot Pedal, 1 x USB (Computer), 1 x USB (Memory) Analog Oscillators: 2 Analog Filters: 2 Analog Amps: 2 Analog Envelopes: 4 Analog LFO (Per Voice): 2 System Effects: Reverb, TFX1, TFX2, Delay, Master EQ Sequencer: 16-Track
Review and Tips
Programming was a pleasant surprise, and in short order I had a nice plucky synth tone, mixing a saw and rectangle wave through the first filter (Jupiter-type I believe). It had kind of a Vangelis CS-80 sound to it. I had no manual but the programming using the panel controls was totally old school ease. Now something I had wondered was, if I could blend the analog and SN synth together more or less seamlessly to give the illusion of much more polyphony than the skimpy four of the analog section. And without disabling an analog voice to send the digital section through a filter paraphonically, reducing it to even skimpier three analog notes. So off I went to the SN synth part to make a similar sound as close as possible, muting the analog section so I could focus. Having programmed a JP-50 before, it was a breeze with that well endowed control panel, even if some functions were off in menu/shortcut limbo. Holding two Select buttons down, it was a quick job to make two identical partials (layers in Rolandese) as they were both programmed together by that panel. Then select one to detune up a few cents, select the other to tune down and shape a rectangle wave, and it sounded pretty much like the other. Now to see if the hypothesis was correct. Selecting each section and tone to balance them with the AMP level control, tweak filters here and there, and... yeah! Playing big chords, laying down the notes one by one, it sounded amazingly like the analog section had suddenly gained all kinds of voices. Very, very nice. Add some chorus to make it even richer, and I had a nice plucky Vangelis patch, sounding quite reminiscent of his CS-80s.

Yes, the analog filters have a certain juice and bounce that the SN filters don't quite match, but the SN voice sounds just great on its own, and harmonizes very well with the analog voice. So now I don't fret about only having four analog notes to play with. One is not the icing and the other the cake. It's more like two similar flavors of cake layered together to make a whole dessert. Obviously some patches, like hard sync, won't blend so much as layer, and the same for audio rate modulation. But for just about everything else, it seems like the hybrid concept will work outstandingly well, and I can see that just about all of the patches I'll make on my own XA when it becomes mine, will be hybrid patches like this one. Each synth engine complimenting and supporting the other in near seamless harmony.
Reviews / Links
JD Knight Review:
http://www.synthtopia.com/content/2016/03/11/roland-jd-xa-synthesizer-custom-patch-audio-demo/
Tutorial – LFO Arpeggiator
https://m.youtube.com/watch?v=SpegH2KiFy0
42 Roland JD-XA – Tips and Tricks From The Internet
Acknowledgements This document has been pulled from various posts across the internet. Notably Roland Clans Forums, and the GearSlutz forums. There are other tips that were posted in various other places, or passed along word of mouth or via the internet. In any case, while I have tried to edit these - please take the tips and tricks herein, with a grain of salt. Not all of them have been tested nor verified. joe Some of the notable contributors, certainly not all — and my apologies for missing folks in this list! bennyseven cello goldphinga JDBoy jdoo ToneKontrol TonStrom Venn Diagram … <— MANY more . .