roland td-1k manual
DESCRIPTION
Roland TD-1K owners' manual, courtesy of digitalDrummer (www.digitaldrummermag.com)TRANSCRIPT

To obtain the PDF manual1. Enter the following URL in your computer.
http://www.roland.com/manuals/
I
2. Choose “TD-1KV”or“TD-1K”at the product name.
* TheillustrationshowstheTD-1KV.
Before using this unit, carefully read the sections entitled“USINGTHEUNITSAFELY”and“IMPORTANTNOTES” (Leaflet"USINGTHEUNITSAFELY"andOwner'sManualp.16).Thesesectionsprovideimportant informationconcerningtheproperoperationoftheunit.Additionally, inordertofeelassuredthatyouhavegainedagoodgraspofeveryfeatureofyournewunit,readOwner'sManualinitsentirety.Thismanualshouldbesavedandkeptonhandasaconvenientreference.
Copyright©2014ROLANDCORPORATION
Allrightsreserved.NopartofthispublicationmaybereproducedinanyformwithoutthewrittenpermissionofROLANDCORPORATION.
ENG
JPN
DEU
FRA
ITA
ESL
POR
NLD
Owner’s Manual
Let’s Learn About Drums . . . . . . . . . . . . . . . . . . . . . . . . . . . . . . . . . . . . . . . 2
DrumSetElements. . . . . . . . . . . . . . . . . . . . . . . . . . . . . . . . . . . . . . . . . . . .2
TheBasicsofPlaying . . . . . . . . . . . . . . . . . . . . . . . . . . . . . . . . . . . . . . . . . .2
Assembly . . . . . . . . . . . . . . . . . . . . . . . . . . . . . . . . . . . . . . . . . . . . . . . . . . . . . . 4
KitAssembly. . . . . . . . . . . . . . . . . . . . . . . . . . . . . . . . . . . . . . . . . . . . . . . . . .4
ConnectingtheCables. . . . . . . . . . . . . . . . . . . . . . . . . . . . . . . . . . . . . . . .7
Quick Start . . . . . . . . . . . . . . . . . . . . . . . . . . . . . . . . . . . . . . . . . . . . . . . . . . . . 8
ConnectingYourEquipment. . . . . . . . . . . . . . . . . . . . . . . . . . . . . . . . . . .8
FrontPanel. . . . . . . . . . . . . . . . . . . . . . . . . . . . . . . . . . . . . . . . . . . . . . . . . . . .8
SwitchingthePowerOnandOff. . . . . . . . . . . . . . . . . . . . . . . . . . . . . . .8
Playing . . . . . . . . . . . . . . . . . . . . . . . . . . . . . . . . . . . . . . . . . . . . . . . . . . . . . . .9
SelectingaDrumKit. . . . . . . . . . . . . . . . . . . . . . . . . . . . . . . . . . . . .9
PlayingwiththeMetronome . . . . . . . . . . . . . . . . . . . . . . . . . . . .9
Practicing . . . . . . . . . . . . . . . . . . . . . . . . . . . . . . . . . . . . . . . . . . . . . . . . . . . .10
PracticinginCoachMode . . . . . . . . . . . . . . . . . . . . . . . . . . . . . . . . . . . 10
CorrectlyPlayinginTimewiththeBeat. . . . . . . . . . . . . . . . . 10
PlayingAlongwithaChangingRhythm. . . . . . . . . . . . . . . . 10
PlayingAlongwithaChangingTempo. . . . . . . . . . . . . . . . . 11
DevelopingInternalTimingSense . . . . . . . . . . . . . . . . . . . . . 11
ContinuingtoPlayataSteadyTempo. . . . . . . . . . . . . . . . . . 11
MatchingtheStrikingStrengthoftheRightandLeftHands................................................. 12
PracticingforaSpecifiedTime. . . . . . . . . . . . . . . . . . . . . . . . . 12
RecordingandCheckingYourOwnPerformance. . . . . . . 12
PracticingAlongwithaSong. . . . . . . . . . . . . . . . . . . . . . . . . . . . . . . . 13
SelectingaSong. . . . . . . . . . . . . . . . . . . . . . . . . . . . . . . . . . . . . . 13
Playing/StoppingtheSong. . . . . . . . . . . . . . . . . . . . . . . . . . . . 13
Connecting to your Computer/iPad . . . . . . . . . . . . . . . . . . . . . . . . . . . .13
Making Detailed Settings. . . . . . . . . . . . . . . . . . . . . . . . . . . . . . . . . . . . . .14
AdjustthePadSensitivity. . . . . . . . . . . . . . . . . . . . . . . . . . . . . . 14
ChangingtheTypeofPad . . . . . . . . . . . . . . . . . . . . . . . . . . . . . 14
ChangingtheTimeofAutoOff. . . . . . . . . . . . . . . . . . . . . . . . . 14
ChangingMIDINoteNumberofthePad . . . . . . . . . . . . . . . 14
RestoringtheFactorySettings. . . . . . . . . . . . . . . . . . . . . . . . . . . . . . . 14
Appendix . . . . . . . . . . . . . . . . . . . . . . . . . . . . . . . . . . . . . . . . . . . . . . . . . . . . .15
Troubleshooting. . . . . . . . . . . . . . . . . . . . . . . . . . . . . . . . . . . . . . . . . . . . 15
MainSpecifications. . . . . . . . . . . . . . . . . . . . . . . . . . . . . . . . . . . . . . . . . . 15
USINGTHEUNITSAFELY. . . . . . . . . . . . . . . . . . . . . . . . . . . . . . . . . . . . . 16
IMPORTANTNOTES. . . . . . . . . . . . . . . . . . . . . . . . . . . . . . . . . . . . . . . . . . 16
Contents
2
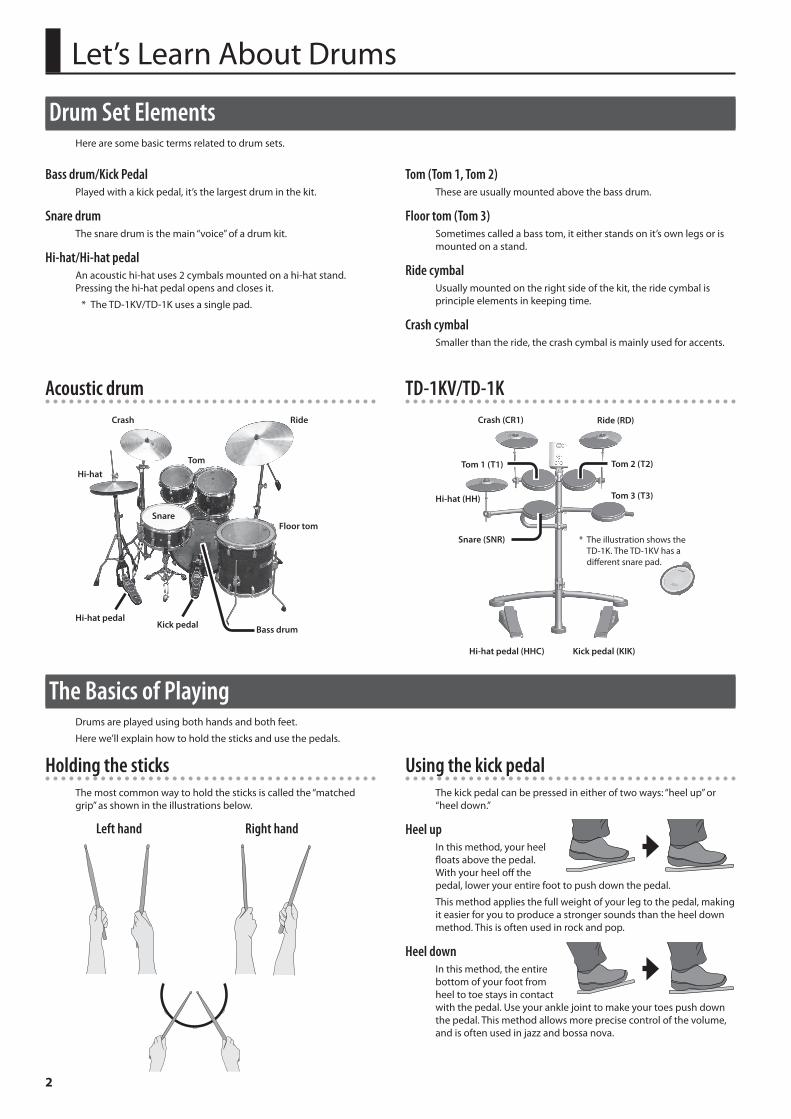
Let’sLearnAboutDrums
Bass drum/Kick PedalPlayedwithakickpedal,it’sthelargestdruminthekit.
Snare drumThesnaredrumisthemain“voice”ofadrumkit.
Hi-hat/Hi-hat pedalAnacoustichi-hatuses2cymbalsmountedonahi-hatstand.Pressingthehi-hatpedalopensandclosesit.
* TheTD-1KV/TD-1Kusesasinglepad.
Tom (Tom 1, Tom 2)Theseareusuallymountedabovethebassdrum.
Floor tom (Tom 3)Sometimescalledabasstom,iteitherstandsonit’sownlegsorismountedonastand.
Ride cymbalUsuallymountedontherightsideofthekit,theridecymbalisprincipleelementsinkeepingtime.
Crash cymbalSmallerthantheride,thecrashcymbalismainlyusedforaccents.
Drum Set ElementsHerearesomebasictermsrelatedtodrumsets.
Acoustic drum
Hi-hat
Ride
Snare
Tom
Floor tom
Hi-hat pedalBass drumKick pedal
Crash
TD-1KV/TD-1K
Tom 1 (T1) Tom 2 (T2)
Tom 3 (T3)
Crash (CR1)
Hi-hat (HH)
Hi-hat pedal (HHC) Kick pedal (KIK)
Snare (SNR)
Ride (RD)
* TheillustrationshowstheTD-1K.TheTD-1KVhasadifferentsnarepad.
The Basics of PlayingDrumsareplayedusingbothhandsandbothfeet.
Herewe’llexplainhowtoholdthesticksandusethepedals.
Holding the sticksThemostcommonwaytoholdthesticksiscalledthe“matchedgrip”asshownintheillustrationsbelow.
Left hand Right hand
Using the kick pedalThekickpedalcanbepressedineitheroftwoways:“heelup”or“heeldown.”
Heel upInthismethod,yourheelfloatsabovethepedal.Withyourheeloffthepedal,loweryourentirefoottopushdownthepedal.
Thismethodappliesthefullweightofyourlegtothepedal,makingiteasierforyoutoproduceastrongersoundsthantheheeldownmethod.Thisisoftenusedinrockandpop.
Heel downInthismethod,theentirebottomofyourfootfromheeltotoestaysincontactwiththepedal.Useyouranklejointtomakeyourtoespushdownthepedal.Thismethodallowsmoreprecisecontrolofthevolume,andisoftenusedinjazzandbossanova.
Let’s Learn About Drums
3
ENG
JPN
DEU
FRA
ITA
ESL
POR
NLD
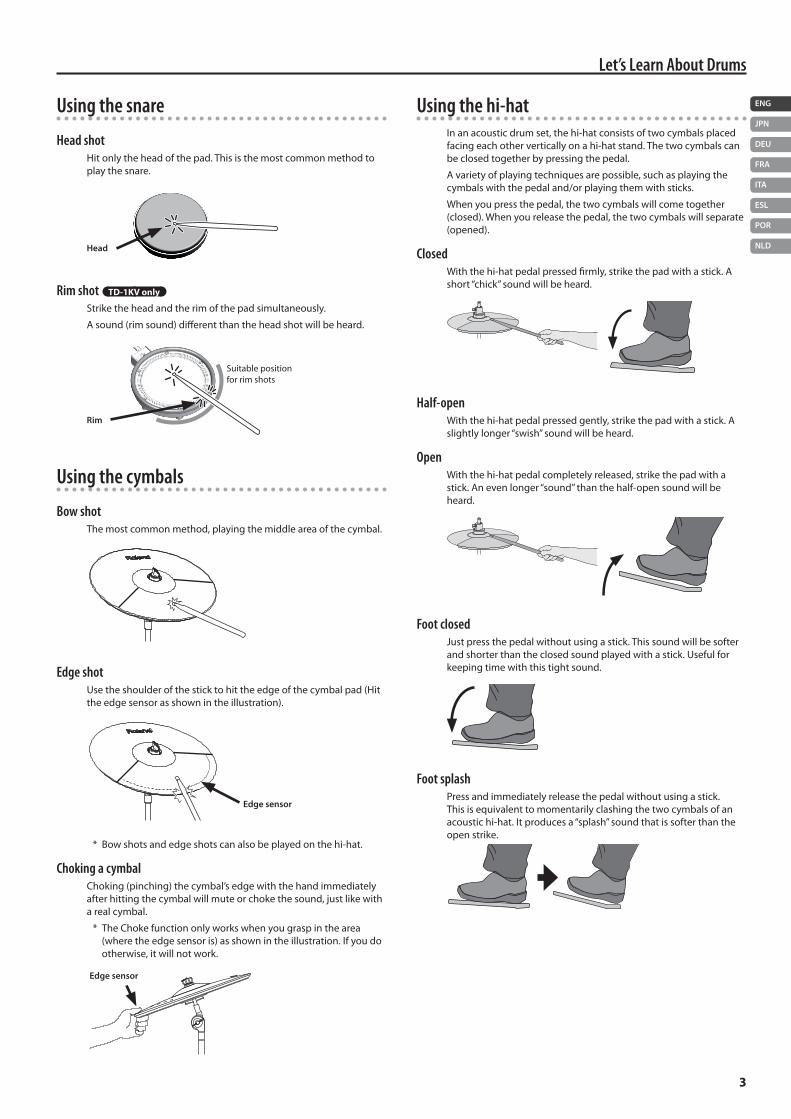
Using the snare
Head shotHitonlytheheadofthepad.Thisisthemostcommonmethodtoplaythesnare.
Head
Rim shot TD-1KVonly
Striketheheadandtherimofthepadsimultaneously.
Asound(rimsound)differentthantheheadshotwillbeheard.
Rim
Suitablepositionforrimshots
Using the cymbals
Bow shotThemostcommonmethod,playingthemiddleareaofthecymbal.
Edge shotUsetheshoulderofthesticktohittheedgeofthecymbalpad(Hittheedgesensorasshownintheillustration).
Edge sensor
* Bowshotsandedgeshotscanalsobeplayedonthehi-hat.
Choking a cymbalChoking(pinching)thecymbal’sedgewiththehandimmediatelyafterhittingthecymbalwillmuteorchokethesound,justlikewitharealcymbal.
* TheChokefunctiononlyworkswhenyougraspinthearea(wheretheedgesensoris)asshownintheillustration.Ifyoudootherwise,itwillnotwork.
Edge sensor
Using the hi-hatInanacousticdrumset,thehi-hatconsistsoftwocymbalsplacedfacingeachotherverticallyonahi-hatstand.Thetwocymbalscanbeclosedtogetherbypressingthepedal.
Avarietyofplayingtechniquesarepossible,suchasplayingthecymbalswiththepedaland/orplayingthemwithsticks.
Whenyoupressthepedal,thetwocymbalswillcometogether(closed).Whenyoureleasethepedal,thetwocymbalswillseparate(opened).
ClosedWiththehi-hatpedalpressedfirmly,strikethepadwithastick.Ashort“chick”soundwillbeheard.
Half-openWiththehi-hatpedalpressedgently,strikethepadwithastick.Aslightlylonger“swish”soundwillbeheard.
OpenWiththehi-hatpedalcompletelyreleased,strikethepadwithastick.Anevenlonger“sound”thanthehalf-opensoundwillbeheard.
Foot closedJustpressthepedalwithoutusingastick.Thissoundwillbesofterandshorterthantheclosedsoundplayedwithastick.Usefulforkeepingtimewiththistightsound.
Foot splashPressandimmediatelyreleasethepedalwithoutusingastick.Thisisequivalenttomomentarilyclashingthetwocymbalsofanacoustichi-hat.Itproducesa“splash”soundthatissofterthantheopenstrike.
4
Assembly
Kit Assembly
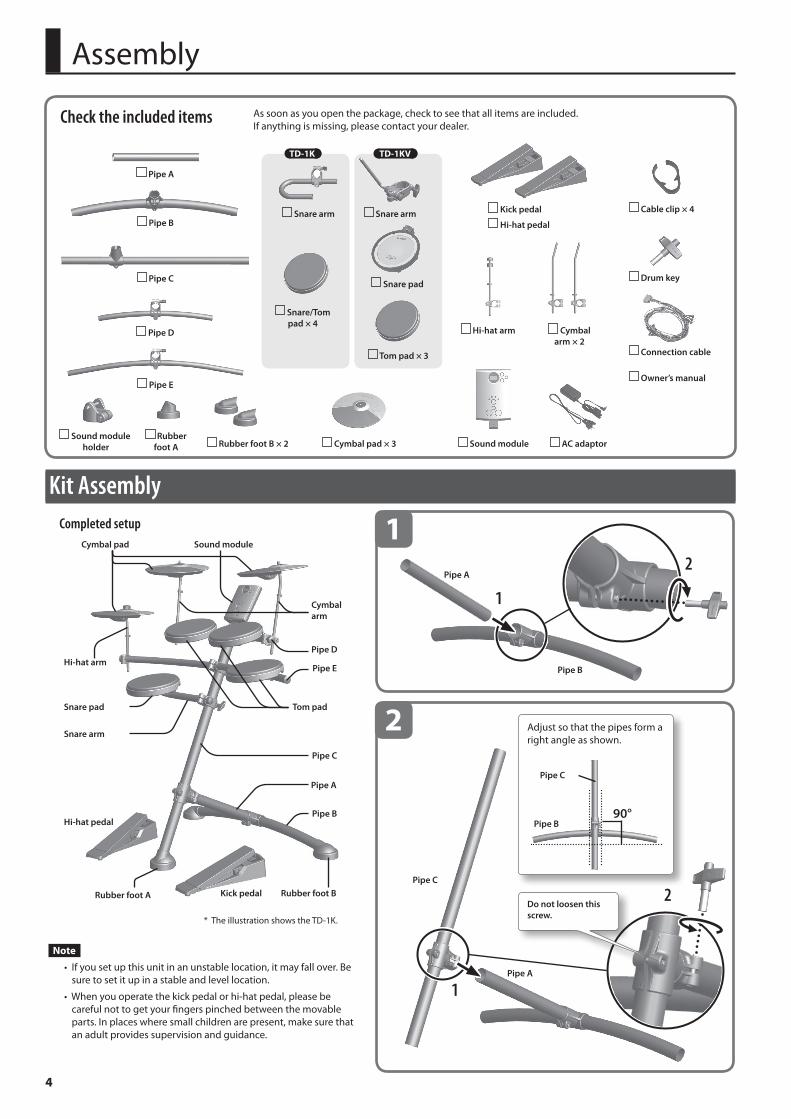
Check the included items Assoonasyouopenthepackage,checktoseethatallitemsareincluded.Ifanythingismissing,pleasecontactyourdealer.
Cymbal pad × 3 Sound module
Connection cable
Owner’s manual
Cable clip × 4
Drum key
Pipe A
Snare arm Snare arm
Snare pad
Tom pad × 3
Snare/Tom pad × 4
Hi-hat arm Cymbal arm × 2
Sound module holder
Rubber foot A Rubber foot B × 2
Pipe B
Pipe C
Pipe D
Pipe E
AC adaptor
Kick pedal
Hi-hat pedal
1
Pipe B
Pipe A
1
2
Note
• Ifyousetupthisunitinanunstablelocation,itmayfallover.Besuretosetitupinastableandlevellocation.
• Whenyouoperatethekickpedalorhi-hatpedal,pleasebecarefulnottogetyourfingerspinchedbetweenthemovableparts.Inplaceswheresmallchildrenarepresent,makesurethatanadultprovidessupervisionandguidance.
2
Pipe C
Pipe A
Adjustsothatthepipesformarightangleasshown.
Pipe C
Pipe B
1
2Do not loosen this screw.
TD-1K TD-1KV
Completed setup
Pipe C
Snare pad Tom pad
Pipe E
Pipe D
Cymbal arm
Hi-hat arm
Cymbal pad Sound module
Snare arm
Pipe A
Pipe B
Rubber foot BRubber foot A Kick pedal
Hi-hat pedal
* TheillustrationshowstheTD-1K.
Assembly
5
ENG
JPN
DEU
FRA
ITA
ESL
POR
NLD
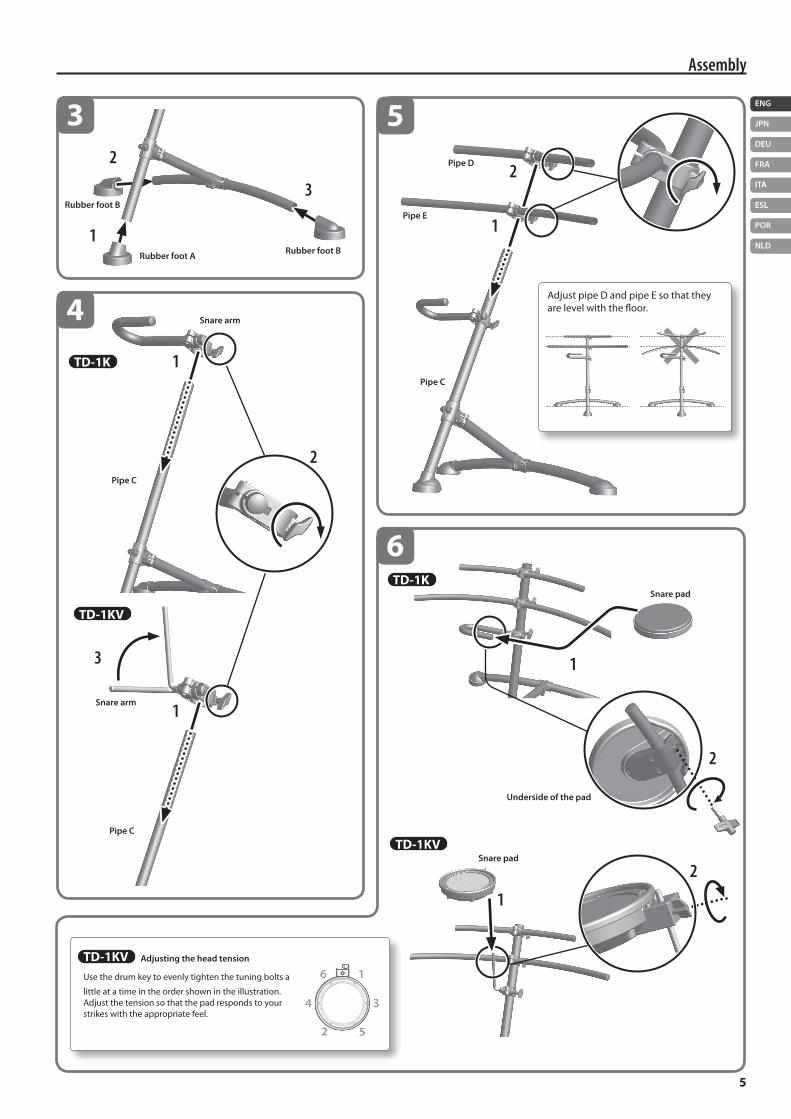
3
Rubber foot A
Rubber foot B
Rubber foot B1
2
3
4
Snare arm1
Pipe C
Pipe C
5
6
Pipe C
Pipe D
Pipe E1
1
1
2
2
2
Underside of the pad
Snare pad
Snare pad
2
3
TD-1KV Adjusting the head tension
Usethedrumkeytoevenlytightenthetuningboltsa
littleatatimeintheordershownintheillustration.Adjustthetensionsothatthepadrespondstoyourstrikeswiththeappropriatefeel.
TD-1KV
TD-1K
TD-1KV
Snare arm
1TD-1K
AdjustpipeDandpipeEsothattheyarelevelwiththefloor.
Assembly
6
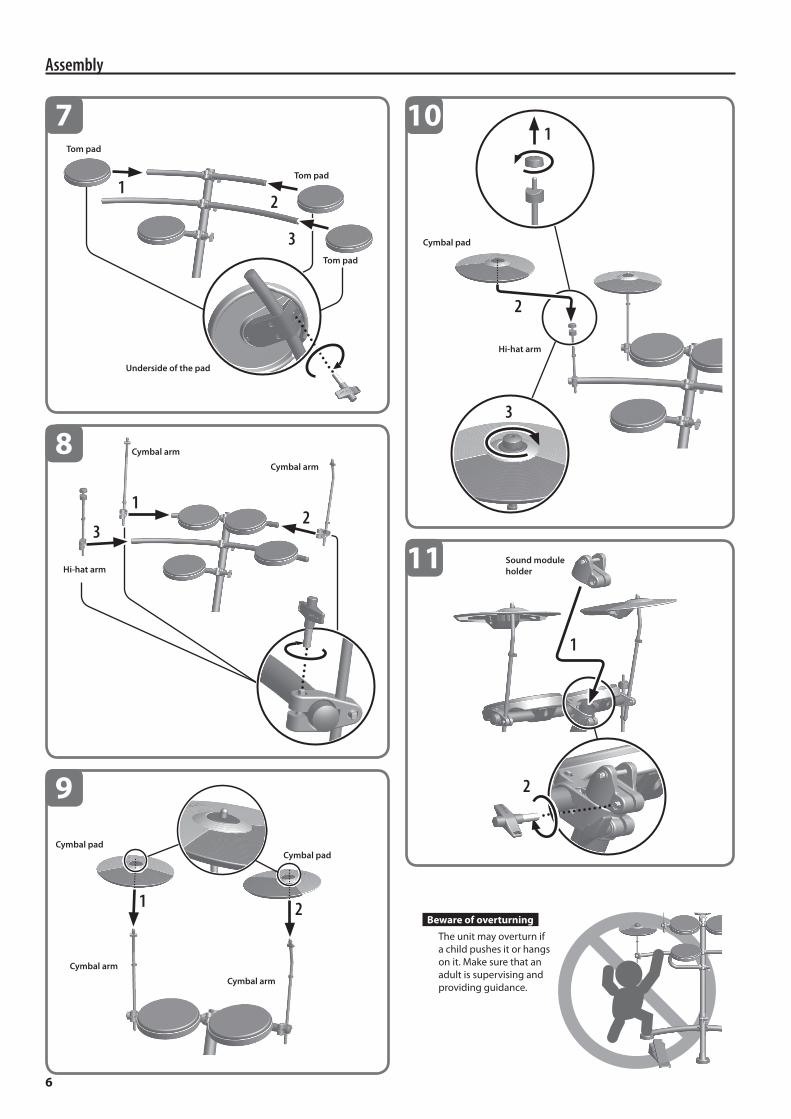
10
11
2
3
Cymbal pad
Hi-hat arm
2
1
Sound module holder
Bewareofoverturning
Theunitmayoverturnifachildpushesitorhangsonit.Makesurethatanadultissupervisingandprovidingguidance.
7
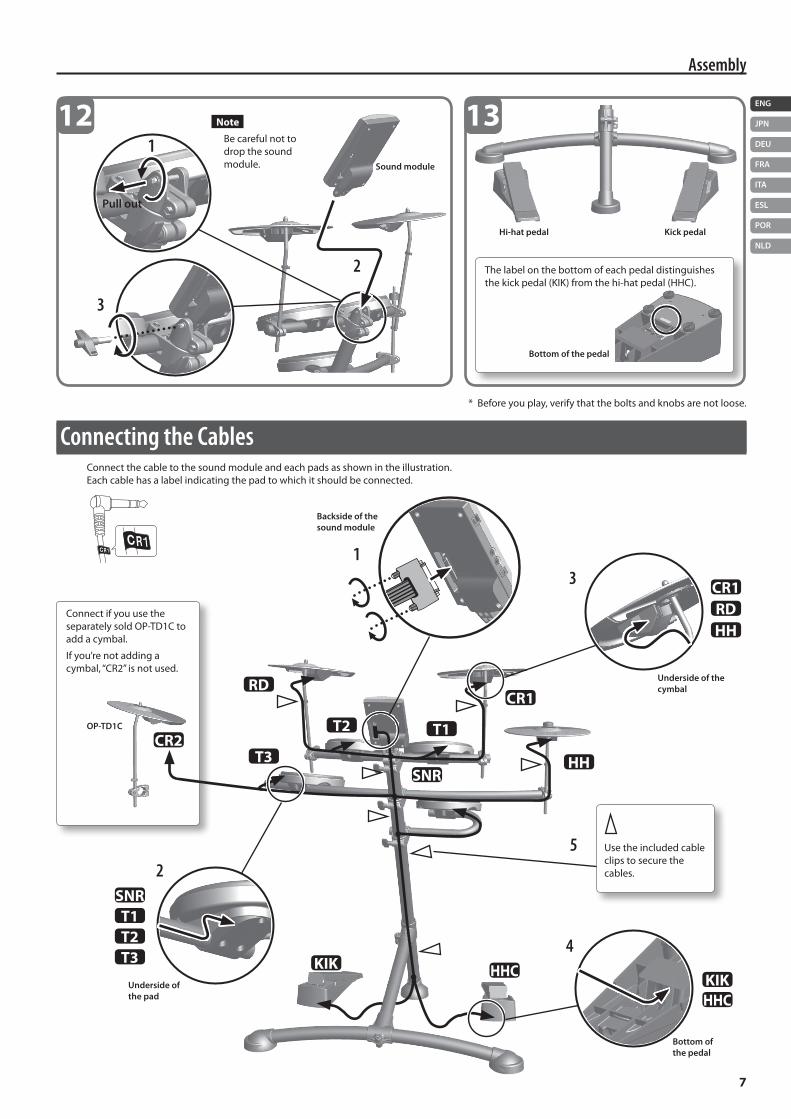
12
3
Underside of the pad
Tom pad
Cymbal arm
Cymbal arm
Cymbal arm
Cymbal arm
Hi-hat arm
Tom pad
Tom pad
8
9
23
Cymbal padCymbal pad
1
1 2
1
Assembly
7
ENG
JPN
DEU
FRA
ITA
ESL
POR
NLD
1
2
3
4
5
12
2
3
Sound module
Note
Becarefulnottodropthesoundmodule.
1
Thelabelonthebottomofeachpedaldistinguishesthekickpedal(KIK)fromthehi-hatpedal(HHC).
Bottom of the pedal
Kick pedalHi-hat pedal
ConnectifyouusetheseparatelysoldOP-TD1Ctoaddacymbal.
Ifyou’renotaddingacymbal,“CR2”isnotused.
Usetheincludedcableclipstosecurethecables.
Connecting the CablesConnectthecabletothesoundmoduleandeachpadsasshownintheillustration.Eachcablehasalabelindicatingthepadtowhichitshouldbeconnected.
SNR
SNR
T1
T1
T2
T2
T3
T3
HH
HH
CR1
CR1
RD
RD
HHC
HHC
KIKKIK
CR2
Bottom of the pedal
Underside of the cymbal
Backside of the sound module
Underside of the pad
Pull out
13
* Beforeyouplay,verifythattheboltsandknobsarenotloose.
OP-TD1C
8
QuickStart
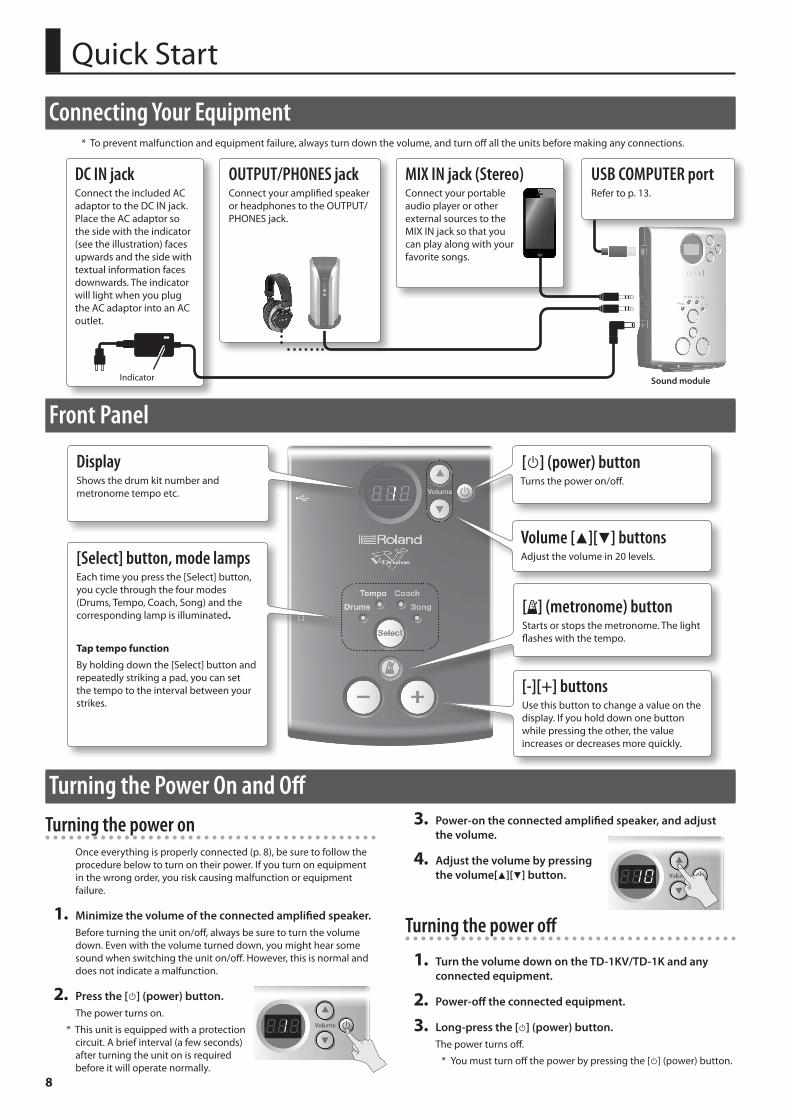
Front Panel
[L] (power) buttonTurnsthepoweron/off.
Volume [H][I] buttonsAdjustthevolumein20levels.
DisplayShowsthedrumkitnumberandmetronometempoetc.
Turning the power onOnceeverythingisproperlyconnected(p.8),besuretofollowtheprocedurebelowtoturnontheirpower.Ifyouturnonequipmentinthewrongorder,youriskcausingmalfunctionorequipmentfailure.
1. Minimize the volume of the connected amplified speaker.Beforeturningtheuniton/off,alwaysbesuretoturnthevolumedown.Evenwiththevolumeturneddown,youmighthearsomesoundwhenswitchingtheuniton/off.However,thisisnormalanddoesnotindicateamalfunction.
2. Press the [L] (power) button.Thepowerturnson.
* Thisunitisequippedwithaprotectioncircuit.Abriefinterval(afewseconds)afterturningtheunitonisrequiredbeforeitwilloperatenormally.
3. Power-on the connected amplified speaker, and adjust the volume.
4. Adjust the volume by pressing the volume[H][I] button.
Turning the power off
1. Turn the volume down on the TD-1KV/TD-1K and any connected equipment.
2. Power-off the connected equipment.
3. Long-press the [L] (power) button.Thepowerturnsoff.
* Youmustturnoffthepowerbypressingthe[L](power)button.
Turning the Power On and Off
[ ] (metronome) buttonStartsorstopsthemetronome.Thelightflasheswiththetempo.
[-][+] buttonsUsethisbuttontochangeavalueonthedisplay.Ifyouholddownonebuttonwhilepressingtheother,thevalueincreasesordecreasesmorequickly.
[Select] button, mode lampsEachtimeyoupressthe[Select]button,youcyclethroughthefourmodes(Drums,Tempo,Coach,Song)andthecorrespondinglampisilluminated.
Taptempofunction
Byholdingdownthe[Select]buttonandrepeatedlystrikingapad,youcansetthetempototheintervalbetweenyourstrikes.
Connecting Your Equipment* Topreventmalfunctionandequipmentfailure,alwaysturndownthevolume,andturnoffalltheunitsbeforemakinganyconnections.
Sound module
DC IN jackConnecttheincludedACadaptortotheDCINjack.PlacetheACadaptorsothesidewiththeindicator(seetheillustration)facesupwardsandthesidewithtextualinformationfacesdownwards.TheindicatorwilllightwhenyouplugtheACadaptorintoanACoutlet.
MIX IN jack (Stereo)ConnectyourportableaudioplayerorotherexternalsourcestotheMIXINjacksothatyoucanplayalongwithyourfavoritesongs.
OUTPUT/PHONES jackConnectyouramplifiedspeakerorheadphonestotheOUTPUT/PHONESjack.
USB COMPUTER portRefertop.13.
Indicator
Quick Start
9
ENG
JPN
DEU
FRA
ITA
ESL
POR
NLD
PlayingPlayingdrumsisnotonlyfun,butjustaboutanyonecaneasilystartplaying—theymakesoundwhenyousimplyhitthem!Let’sstartplayingdrumsusingthewidevarietyofbuilt-insounds.
Selecting a Drum KitAdrumkitconsistsofsoundsassignedtoeachpad.Insomecases,thesoundwillchangedependinguponyourplayingdynamics.
1. Use the [Select] button to select Drums mode.
* Whenyouturnonthepower,Drumsmodeisselected.
Thedisplayshowsthedrumkitnumber.
2. Press the [-][+] buttons to select a drum kit.
* Foralistofthedrumkits,refertotheendofthismanual.
3. Play the drums by striking the pad.
Playing with the MetronomeHere’showyoucanplaythedrumswhilelisteningtothemetronome.Thisisthebestwaytopracticeandlearntoplayatasteadytempo.
1. Use the [Select] button to select Tempo mode.Thedisplayshowsthemetronometempo.
2. Press the [ ] (metronome) button.Themetronometurnson,andthebuttonblinksintimewiththemetronometempo.
* EveninDrumsmode,youcanpressthe[ ](metronome)buttontosoundthemetronome.
3. Press the [-][+] buttons to change the tempo.* YoucanalsospecifythetempowithTaptempofunction(p.8).
4. Press the [ ] (metronome) button once again to turn the metronome off.
Changing how the metronome sounds1. In Tempo mode, long-press the [ ] (metronome)
button.Themetronomesounds.
2. Use the [Select] button to select the item (parameter) that you want to change, and use the [-][+] buttons to change its setting.
Parameter Display Explanation
Beats b 1(1beat)–b g(9beats)
Setsthenumberofbeats
Rhythm type
r 0(wholenote)
Setsthebeatunit
r 4(quarternotes)
r 8(eighthnotes)
r83(eighthnotetriplets)
r16(sixteenthnotes)
Volume L 0–L10 Setsthevolume
Sound S 1–S 8 Setsthesound
3. Press the [ ] (metronome) button to complete the settings.
About Auto Off functionThepowertothisunitwillbeturnedoffautomaticallyafterapredeterminedamountoftimehaspassedsinceitwaslastusedforplayingmusic,oritsbuttonsorcontrolswereoperated(AutoOfffunction).Ifyoudonotwantthepowertobeturnedoffautomatically,disengagetheAutoOfffunction(p.14).
Torestorepower,turnthepoweronagain.
10
Practicing
Practicing in Coach ModeTheTD-1KV/TD-1KCoachmodeisauniquesetofexercisesspecificallydesignedtohelpbuildspeed,accuracyandstamina,aswellasdevelopbettertimingskills.
Selecting a practice menu
1. Use the [Select] button to select Coach mode.TheCoachmodemenuscreenappears.
2. Press the [-][+] buttons to select a practice menu C-1–C10.FordetailsonthecontentsoftheCoachmodemenu,refertothenextsection.
Correctly Playing in Time with the Beat
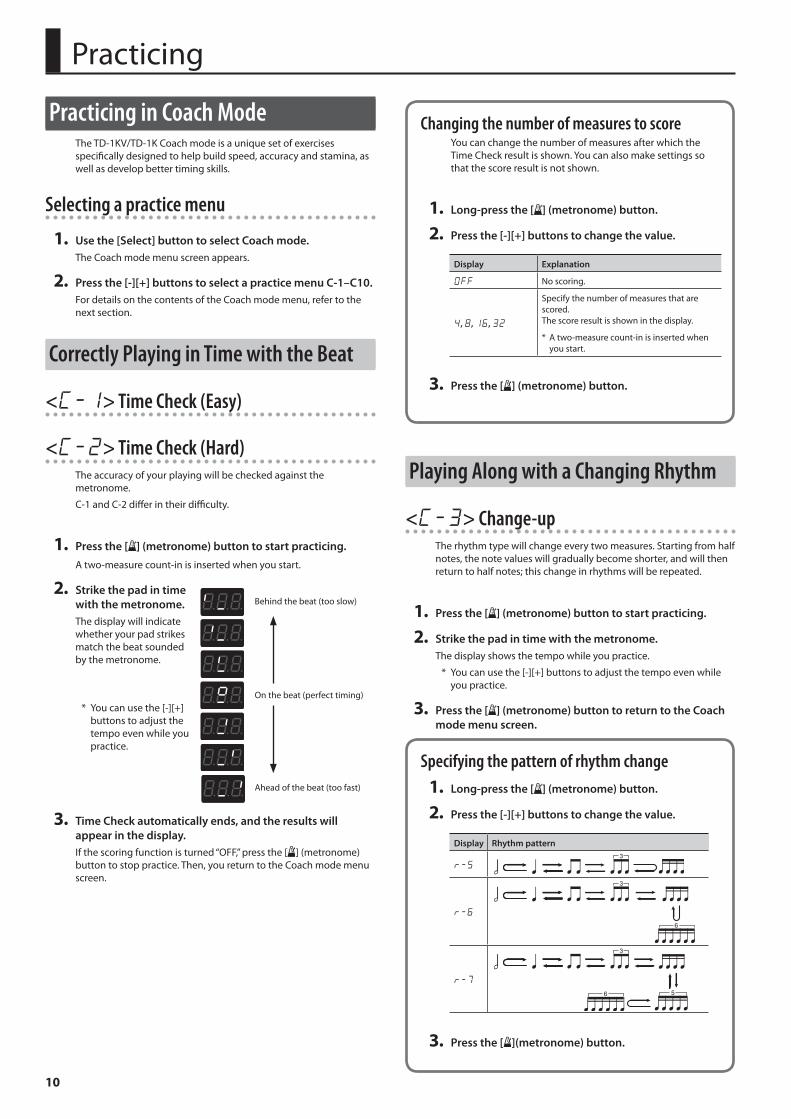
<C-1> Time Check (Easy)
<C-2> Time Check (Hard)Theaccuracyofyourplayingwillbecheckedagainstthemetronome.
C-1andC-2differintheirdifficulty.
1. Press the [ ] (metronome) button to start practicing.Atwo-measurecount-inisinsertedwhenyoustart.
2. Strike the pad in time with the metronome.Thedisplaywillindicatewhetheryourpadstrikesmatchthebeatsoundedbythemetronome.
* Youcanusethe[-][+]buttonstoadjustthetempoevenwhileyoupractice.
3. Time Check automatically ends, and the results will appear in the display.Ifthescoringfunctionisturned“OFF,”pressthe[ ](metronome)buttontostoppractice.Then,youreturntotheCoachmodemenuscreen.
Changing the number of measures to scoreYoucanchangethenumberofmeasuresafterwhichtheTimeCheckresultisshown.Youcanalsomakesettingssothatthescoreresultisnotshown.
1. Long-press the [ ] (metronome) button.
2. Press the [-][+] buttons to change the value.
Display Explanation
OFF Noscoring.
4, 8, 16, 32
Specifythenumberofmeasuresthatarescored.Thescoreresultisshowninthedisplay.
* Atwo-measurecount-inisinsertedwhenyoustart.
3. Press the [ ] (metronome) button.
Playing Along with a Changing Rhythm
<C-3> Change-upTherhythmtypewillchangeeverytwomeasures.Startingfromhalfnotes,thenotevalueswillgraduallybecomeshorter,andwillthenreturntohalfnotes;thischangeinrhythmswillberepeated.
1. Press the [ ] (metronome) button to start practicing.
2. Strike the pad in time with the metronome.Thedisplayshowsthetempowhileyoupractice.
* Youcanusethe[-][+]buttonstoadjustthetempoevenwhileyoupractice.
3. Press the [ ] (metronome) button to return to the Coach mode menu screen.
Onthebeat(perfecttiming)
Behindthebeat(tooslow)
Aheadofthebeat(toofast)
Specifying the pattern of rhythm change1. Long-press the [ ] (metronome) button.
2. Press the [-][+] buttons to change the value.
Display Rhythm pattern
r-5
r-6
r-7
3. Press the [ ](metronome) button.
Practicing
11
ENG
JPN
DEU
FRA
ITA
ESL
POR
NLD
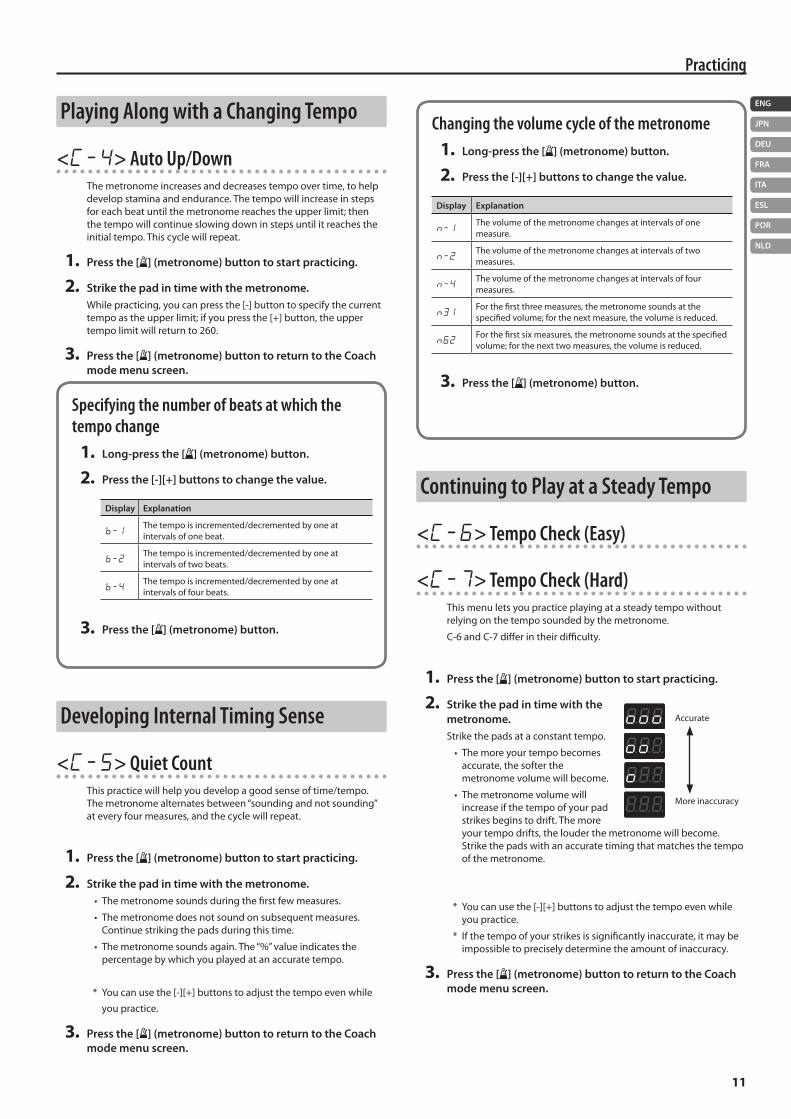
Playing Along with a Changing Tempo
<C-4> Auto Up/DownThemetronomeincreasesanddecreasestempoovertime,tohelpdevelopstaminaandendurance.Thetempowillincreaseinstepsforeachbeatuntilthemetronomereachestheupperlimit;thenthetempowillcontinueslowingdowninstepsuntilitreachestheinitialtempo.Thiscyclewillrepeat.
1. Press the [ ] (metronome) button to start practicing.
2. Strike the pad in time with the metronome.Whilepracticing,youcanpressthe[-]buttontospecifythecurrenttempoastheupperlimit;ifyoupressthe[+]button,theuppertempolimitwillreturnto260.
3. Press the [ ] (metronome) button to return to the Coach mode menu screen.
Specifying the number of beats at which the tempo change
1. Long-press the [ ] (metronome) button.
2. Press the [-][+] buttons to change the value.
Display Explanation
b-1Thetempoisincremented/decrementedbyoneatintervalsofonebeat.
b-2Thetempoisincremented/decrementedbyoneatintervalsoftwobeats.
b-4Thetempoisincremented/decrementedbyoneatintervalsoffourbeats.
3. Press the [ ] (metronome) button.
Developing Internal Timing Sense
<C-5> Quiet CountThispracticewillhelpyoudevelopagoodsenseoftime/tempo.Themetronomealternatesbetween“soundingandnotsounding”ateveryfourmeasures,andthecyclewillrepeat.
1. Press the [ ] (metronome) button to start practicing.
2. Strike the pad in time with the metronome.• Themetronomesoundsduringthefirstfewmeasures.
• Themetronomedoesnotsoundonsubsequentmeasures.Continuestrikingthepadsduringthistime.
• Themetronomesoundsagain.The“%”valueindicatesthepercentagebywhichyouplayedatanaccuratetempo.
* Youcanusethe[-][+]buttonstoadjustthetempoevenwhileyoupractice.
3. Press the [ ] (metronome) button to return to the Coach mode menu screen.
Changing the volume cycle of the metronome1. Long-press the [ ] (metronome) button.
2. Press the [-][+] buttons to change the value.
Display Explanation
n-1Thevolumeofthemetronomechangesatintervalsofonemeasure.
n-2Thevolumeofthemetronomechangesatintervalsoftwomeasures.
n-4Thevolumeofthemetronomechangesatintervalsoffourmeasures.
n31Forthefirstthreemeasures,themetronomesoundsatthespecifiedvolume;forthenextmeasure,thevolumeisreduced.
n62Forthefirstsixmeasures,themetronomesoundsatthespecifiedvolume;forthenexttwomeasures,thevolumeisreduced.
3. Press the [ ] (metronome) button.
Continuing to Play at a Steady Tempo
<C-6> Tempo Check (Easy)
<C-7> Tempo Check (Hard)Thismenuletsyoupracticeplayingatasteadytempowithoutrelyingonthetemposoundedbythemetronome.
C-6andC-7differintheirdifficulty.
1. Press the [ ] (metronome) button to start practicing.
2. Strike the pad in time with the metronome.Strikethepadsataconstanttempo.
• Themoreyourtempobecomesaccurate,thesofterthemetronomevolumewillbecome.
• Themetronomevolumewillincreaseifthetempoofyourpadstrikesbeginstodrift.Themoreyourtempodrifts,thelouderthemetronomewillbecome.Strikethepadswithanaccuratetimingthatmatchesthetempoofthemetronome.
* Youcanusethe[-][+]buttonstoadjustthetempoevenwhileyoupractice.
* Ifthetempoofyourstrikesissignificantlyinaccurate,itmaybeimpossibletopreciselydeterminetheamountofinaccuracy.
3. Press the [ ] (metronome) button to return to the Coach mode menu screen.
Accurate
Moreinaccuracy
Practicing
12
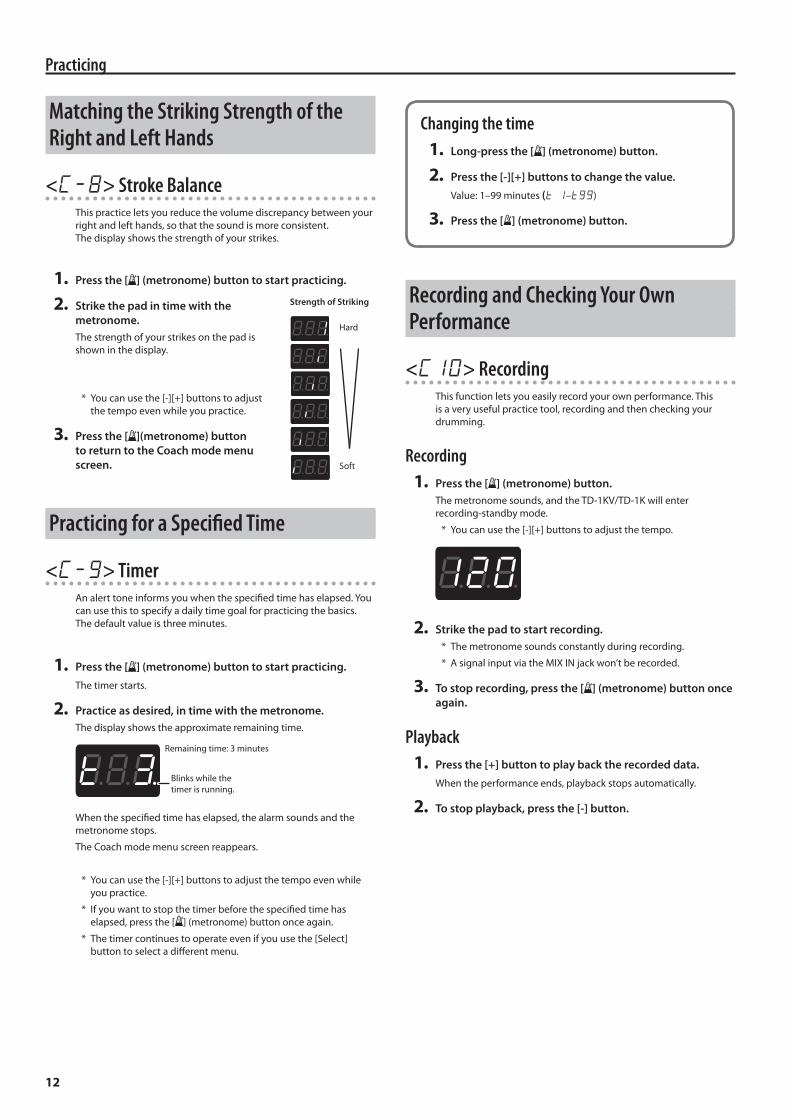
Matching the Striking Strength of the Right and Left Hands
<C-8> Stroke BalanceThispracticeletsyoureducethevolumediscrepancybetweenyourrightandlefthands,sothatthesoundismoreconsistent.Thedisplayshowsthestrengthofyourstrikes.
1. Press the [ ] (metronome) button to start practicing.
2. Strike the pad in time with the metronome.Thestrengthofyourstrikesonthepadisshowninthedisplay.
* Youcanusethe[-][+]buttonstoadjustthetempoevenwhileyoupractice.
3. Press the [ ](metronome) button to return to the Coach mode menu screen.
Practicing for a Specified Time
<C-g> TimerAnalerttoneinformsyouwhenthespecifiedtimehaselapsed.Youcanusethistospecifyadailytimegoalforpracticingthebasics.Thedefaultvalueisthreeminutes.
1. Press the [ ] (metronome) button to start practicing.Thetimerstarts.
2. Practice as desired, in time with the metronome.Thedisplayshowstheapproximateremainingtime.
Remainingtime:3minutes
Blinkswhilethetimerisrunning.
Whenthespecifiedtimehaselapsed,thealarmsoundsandthemetronomestops.
TheCoachmodemenuscreenreappears.
* Youcanusethe[-][+]buttonstoadjustthetempoevenwhileyoupractice.
* Ifyouwanttostopthetimerbeforethespecifiedtimehaselapsed,pressthe[ ](metronome)buttononceagain.
* Thetimercontinuestooperateevenifyouusethe[Select]buttontoselectadifferentmenu.
Changing the time1. Long-press the [ ] (metronome) button.
2. Press the [-][+] buttons to change the value.Value:1–99minutes(t 1–tgg)
3. Press the [ ] (metronome) button.
Recording and Checking Your Own Performance
<C10> RecordingThisfunctionletsyoueasilyrecordyourownperformance.Thisisaveryusefulpracticetool,recordingandthencheckingyourdrumming.
Recording1. Press the [ ] (metronome) button.
Themetronomesounds,andtheTD-1KV/TD-1Kwillenterrecording-standbymode.
* Youcanusethe[-][+]buttonstoadjustthetempo.
2. Strike the pad to start recording.* Themetronomesoundsconstantlyduringrecording.
* AsignalinputviatheMIXINjackwon’tberecorded.
3. To stop recording, press the [ ] (metronome) button once again.
Playback1. Press the [+] button to play back the recorded data.
Whentheperformanceends,playbackstopsautomatically.
2. To stop playback, press the [-] button.
Strength of Striking
Hard
Soft
Connecting to your Computer/iPad
13
ENG
JPN
DEU
FRA
ITA
ESL
POR
NLD
Practicing Along with a SongTheTD-1KV/TD-1Kcontainssongsthataresuitableforpracticing.
Selecting a Song1. Press the [Select] button to select Song mode.
2. Press the [-][+] buttons to select a song.
* Foralistofthesong,refertotheendofthismanual.
Playing/Stopping the Song1. Press the [ ] (metronome) button to play back the song.
* Aone-measurecount-inisinsertedwhenyoustart.
* Youcan’tchangethetempoofthesong.
2. Press the [ ] (metronome) button once again, and the song stops.
* NodataforthemusicthatisplayedwillbeoutputfromtheUSBCOMPUTERport.
Silencing the metronomeYoucanpracticealongwiththesongwithouthearingthemetronome.
1. Long-press the [ ] (metronome) button.
2. Use the [-][+] buttons to make the display indicate OFF.
* Ifyouwanttohearthemetronome,makethedisplayindicateOn.
1. Press the [ ] (metronome) button.
WhatisV-DrumsFriendJam?
V-DrumsFriendJamisadrummer’ssocialnetworkingtoolthatletsyouusetheV-Drumsandyourcomputertoenjoypracticing/competingwithfriendsaroundtheworld.PracticesongscanbeautomaticallydownloadedfromtheInternet,andarealsolinkedwithTwitter.
Accesshttp://vdru.ms/fjanddownloadit!
WhatisV-DrumsTutor?
TheV-DrumsTutor(soldseparately)isadrummingpracticesoftwaredesignedtobeusedwithRolandV-Drums,makingyourpracticetimesimple,enjoyable,challengingandeffective.
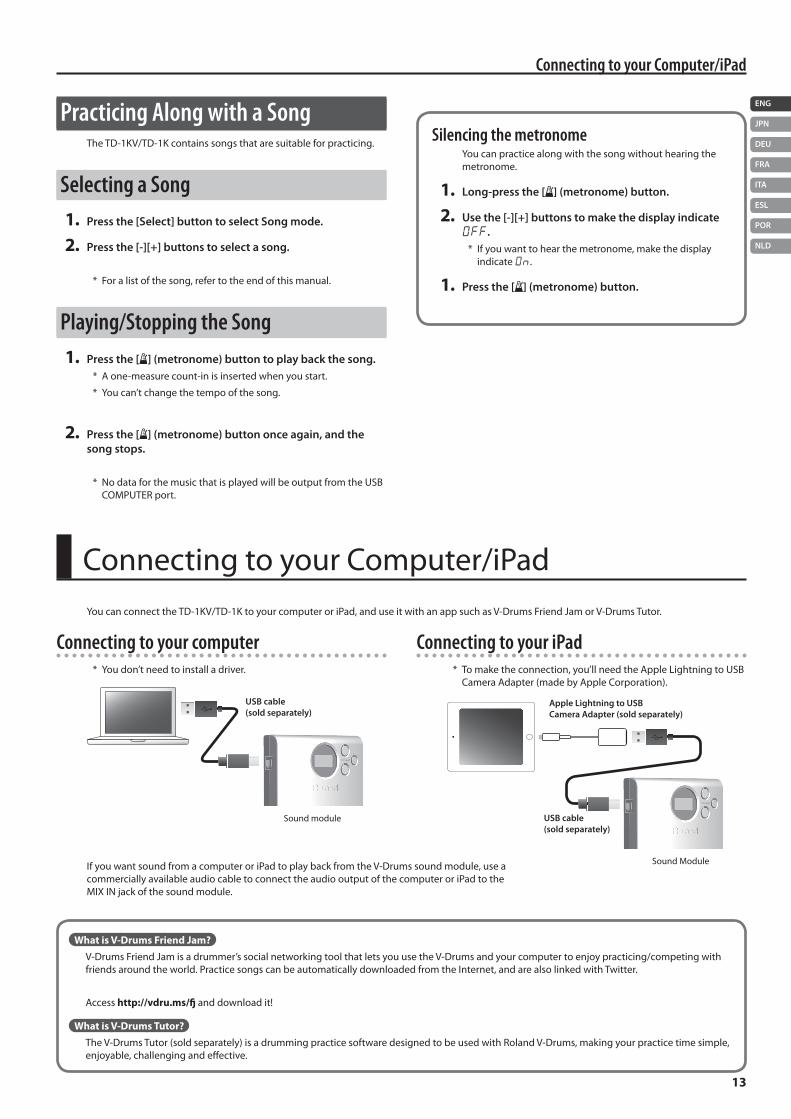
ConnectingtoyourComputer/iPadYoucanconnecttheTD-1KV/TD-1KtoyourcomputeroriPad,anduseitwithanappsuchasV-DrumsFriendJamorV-DrumsTutor.
Connecting to your computer* Youdon’tneedtoinstalladriver.
Soundmodule
USB cable (sold separately)
Connecting to your iPad* Tomaketheconnection,you’llneedtheAppleLightningtoUSB
CameraAdapter(madebyAppleCorporation).
SoundModule
USB cable (sold separately)
Apple Lightning to USB Camera Adapter (sold separately)
IfyouwantsoundfromacomputeroriPadtoplaybackfromtheV-Drumssoundmodule,useacommerciallyavailableaudiocabletoconnecttheaudiooutputofthecomputeroriPadtotheMIXINjackofthesoundmodule.
14
MakingDetailedSettings1. Press the [Select] button to select Drums mode.
2. Long-press the [ ] (metronome) button.* Themodelampblinks.
Adjust the Pad Sensitivity3. Press the [Select] button to blink Drums mode lamp.
4. Play the pad or kick pedal whose sensitivity you want to change.
5. Use the [-][+] buttons to adjust the sensitivity.Thedisplayshowsthesensitivityvalue.Highersensitivityallowsthepadtoproducealoudvolumeevenwhenplayedsoftly.Lowersensitivitywillkeepthepadproducingalowvolumeevenwhenplayedforcefully.
6. Press the [ ](metronome) button to complete the setting.
Changing the Type of PadIfyouuseaseparatelysoldkicktriggerormeshpad,you’llneedtochangethepadtype.
3. Press the [Select] button to blink Tempo mode lamp.
4. Play the pad or kick pedal.
5. Use the [-][+] buttons to change the type.
Display Type of Pad
Kick pedal
1 (TD-1KV/TD-1Kdefaultvalue)
2 KD-9
3 KT-10
Snare pad
S 1 (TD-1Kdefaultvalue)
S 2 PDX-8,PDX-6(TD-1KVdefaultvalue)
6. Press the [ ] (metronome) button to complete the setting.
Changing MIDI Note Number of the Pad3. Press the [Select] button to blink Coach mode lamp.
4. Play the pad whose note number you want to change.Thedisplayshowsthenotenumber.
5. Use the [-][+] buttons to change the setting.Value:0–127,OFF
6. Press the [ ] (metronome) button to complete the setting.
Notenumbers(default)
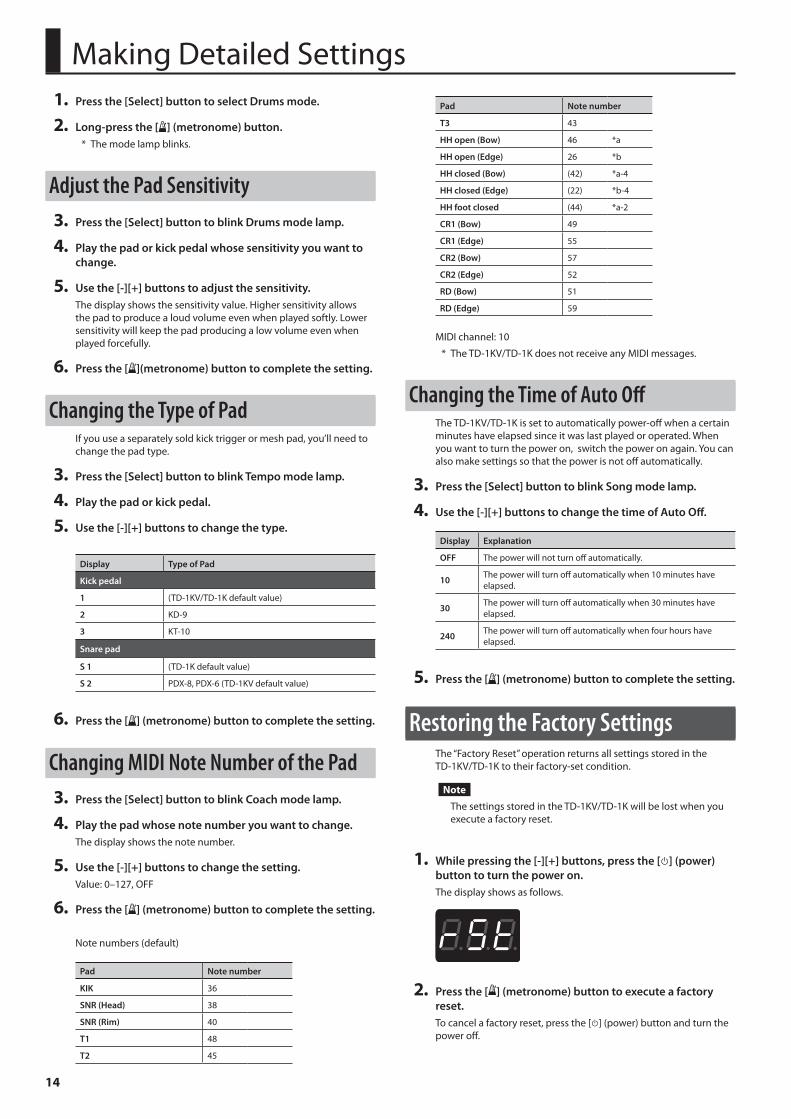
Pad Note number
KIK 36
SNR (Head) 38
SNR (Rim) 40
T1 48
T2 45
Pad Note number
T3 43
HH open (Bow) 46 *a
HH open (Edge) 26 *b
HH closed (Bow) (42) *a-4
HH closed (Edge) (22) *b-4
HH foot closed (44) *a-2
CR1 (Bow) 49
CR1 (Edge) 55
CR2 (Bow) 57
CR2 (Edge) 52
RD (Bow) 51
RD (Edge) 59
MIDIchannel:10
* TheTD-1KV/TD-1KdoesnotreceiveanyMIDImessages.
Changing the Time of Auto OffTheTD-1KV/TD-1Kissettoautomaticallypower-offwhenacertainminuteshaveelapsedsinceitwaslastplayedoroperated.Whenyouwanttoturnthepoweron,switchthepoweronagain.Youcanalsomakesettingssothatthepowerisnotoffautomatically.
3. Press the [Select] button to blink Song mode lamp.
4. Use the [-][+] buttons to change the time of Auto Off.
Display Explanation
OFF Thepowerwillnotturnoffautomatically.
10 Thepowerwillturnoffautomaticallywhen10minuteshaveelapsed.
30 Thepowerwillturnoffautomaticallywhen30minuteshaveelapsed.
240 Thepowerwillturnoffautomaticallywhenfourhourshaveelapsed.
5. Press the [ ] (metronome) button to complete the setting.
Restoring the Factory SettingsThe“FactoryReset”operationreturnsallsettingsstoredintheTD-1KV/TD-1Ktotheirfactory-setcondition.
Note
ThesettingsstoredintheTD-1KV/TD-1Kwillbelostwhenyouexecuteafactoryreset.
1. While pressing the [-][+] buttons, press the [L] (power) button to turn the power on.Thedisplayshowsasfollows.
2. Press the [ ] (metronome) button to execute a factory reset.Tocancelafactoryreset,pressthe[L](power)buttonandturnthepoweroff.
15
ENG
JPN
DEU
FRA
ITA
ESL
POR
NLD
Appendix
TroubleshootingProblem Items to check Action
Problems with sound
No sound
IstheTD-1KV/TD-1Kcorrectlyconnectedtotheexternaldevices?
Checktheconnections.Couldthecablebeconnectedtoanoutputjack(insteadoftheinput)oftheconnectedamplifiedspeaker?
Arethecablescorrectlyconnectedtotheunit’sOUTPUT/PHONESjack?
Couldanaudiocablebebroken? Tryusingadifferentcable.
Checkwhetheryouhearsoundthroughheadphones. Ifyouhearsoundintheheadphones,thereisaproblemwiththeconnectioncablesorwiththeconnectedamplifiedspeaker.
Couldyoubeusingaconnectioncablethatcontainsaresistor? Useaconnectioncablethatdoesnotcontainaresistor.
CouldtheTD-1KV/TD-1Kvolumebelowered?
Adjustthevolumetoanappropriatelevel.Couldthevolumeoftheconnectedamplifiedspeakerbelowered?
CouldthevolumebeloweredonthedeviceconnectedtotheMIXINjack?
IstheconnectioncablecorrectlyconnectedtotheTRIGGERINPUTconnector? Checktheconnections.
A specific pad does not sound
Arethecablescorrectlyconnectedtoeachpadandpedal?
Couldthepad’s“Sensitivity”belowered? Adjustthepad’s“Sensitivity.”
Isthepad’s“Type”setcorrectly? Setthepad’s“Type.”
No sound when you press the kick pedal IsthecablelabeledKIKconnectedtothekickpedal?
Checktheconnections.No sound when you press the hi-hat pedal IsthecablelabeledHHCconnectedtothehi-hatpedal?
The sound of another pad is alsoheard when you strike the pad.
Ifmultiplepadsareattachedtothesamestand,thevibrationofastrikecanbetransmittedtoanotherpad,causingittosoundinadvertently. Reattachthepadatadifferentlocation.
Two or more notes are sounded when you strike once Isthepadfastenedtothestand? Fastenthepadfirmlytothestand.
Sounds do not play reliablyTD-1KV
Isthepad’smeshheadtensionedevenly?Adjustthemeshheadtension.Slightlyhighertensionisgoodforpropertriggering.
Problems with USB
Can’t connect with a computer IstheUSBcableconnectedcorrectly? MakesurethattheUSBcableiscorrectlyconnected.
Problems with MIDI
No sound from external MIDI device
IstheMIDIchannelsetcorrectly? SettheMIDIchannelofexternalMIDIdeviceto10.
Hasthenotenumberbeensetproperly? Checkthepad’s“Note#.”
Main SpecificationsRoland TD-1KV: Drum kitRoland TD-1K: Drum kit
Drum Kits 15
Songs 15
Display 7segments,3characters(LED)
Connectors
OUTPUT/PHONESjack:Stereominiaturephonetype
MIXINjack:Stereominiaturephonetype
USBCOMPUTERport:USBtypeB
TRIGGERINPUTconnector:DB-25type
DCINjack
Interface USBMIDI(Transmittingonly)
Power Supply ACadaptor
Current Draw 150mA
Dimensions800(W)x700(D)x1,150(H)mm
31-1/2(W)x27-9/16(D)x45-5/16(H)inches
Weight (excluding AC adaptor)
TD-1KV 11.8kg 26lbs1oz
TD-1K 11.4kg 25lbs3oz
AccessoriesOwner’smanual,Leaflet“USINGTHEUNITSAFELY,”Drumkey,Cableclip,Specialconnectioncable,ACadaptor
Options (sold separately)
Cymbal:OP-TD1C
Kick:KD-9,KT-10
Snare:PDX-8,PDX-6*1
PersonalDrumMonitor:PM-03
*1 ToupgradeTD-1KtotheTD-1KV,V-PadPDX-8(soldseparately)andPadMount
MDH-12(soldseparately)areneeded.
* Intheinterestofproductimprovement,thespecificationsand/orappearanceofthisunitaresubjecttochangewithoutpriornotice.
16
WARNINGTo completely turn off power to the unit, pull out the plug from the outletEvenwiththepowerswitchturnedoff,thisunitisnotcompletelyseparatedfromitsmainsourceofpower.Whenthepowerneedstobecompletelyturnedoff,turnoffthepowerswitchontheunit,thenpullouttheplugfromtheoutlet.Forthisreason,theoutletintowhichyouchoosetoconnectthepowercord’splugshouldbeonethatiswithineasyreachandreadilyaccessible.
Concerning the Auto Off functionThepowertothisunitwillbeturnedoffautomaticallyafterapredeterminedamountoftimehaspassedsinceitwaslastusedforplayingmusic,oritsbuttonsorcontrolswereoperated(AutoOfffunction).Ifyoudonotwantthepowertobeturnedoffautomatically,disengagetheAutoOfffunction(p.14).
Use only the supplied AC adaptor and the correct voltageBesuretouseonlytheACadaptorsuppliedwiththeunit.Also,makesurethelinevoltageattheinstallationmatchestheinputvoltagespecifiedontheACadaptor’sbody.OtherACadaptorsmayuseadifferentpolarity,orbedesignedforadifferentvoltage,sotheirusecouldresultindamage,malfunction,orelectricshock.
Use only the supplied power cordUseonlytheattachedpowercord.Also,thesuppliedpowercordmustnotbeusedwithanyotherdevice.
CAUTIONTake care so as not to get fingers pinchedWhenhandlingthefollowingmovingparts,takecaresoasnottogetfingers,etc.,pinched.Anadultshouldalwaysbeinchargeofhandlingtheseitems.
• Pipes,arms,kickpedal,andhi-hatpedal(p.4)
Keep small items out of the reach of childrenTopreventaccidentalingestionofthepartslistedbelow,alwayskeepthemoutofthereachofsmallchildren.
• RemovableParts
Screws(p.4)
Capofthespecialconnectioncable
Repairs and Data• Beforesendingtheunitawayforrepairs,besuretomakeabackupofthedata
storedwithinit;oryoumayprefertowritedowntheneededinformation.Althoughwewilldoourutmosttopreservethedatastoredinyourunitwhenwecarryoutrepairs,insomecases,suchaswhenthememorysectionisphysicallydamaged,restorationofthestoredcontentmaybeimpossible.Rolandassumesnoliabilityconcerningtherestorationofanystoredcontentthathasbeenlost.
Additional Precautions• Anydatastoredwithintheunitcanbelostastheresultofequipmentfailure,
incorrectoperation,etc.Toprotectyourselfagainsttheirretrievablelossofdata,trytomakeahabitofcreatingregularbackupsofthedatayou’vestoredintheunit.
• Rolandassumesnoliabilityconcerningtherestorationofanystoredcontentthathasbeenlost.
• Sincesoundvibrationscanbetransmittedthroughfloorsandwallstoagreaterdegreethanexpected,takecarenottoallowsuchsoundtobecomeanuisancetoothersnearby.Althoughthedrumpadsandpedalsaredesignedsothereisaminimalamountofextraneoussoundproducedwhenthey’restruck,rubberheadstendtoproduceloudersoundscomparedtomeshheads.Youcaneffectivelyreducemuchoftheunwantedsoundfromthepadsbyswitchingtomeshheads.
• Thisinstrumentisdesignedtominimizetheextraneoussoundsproducedwhenit’splayed.However,sincesoundvibrationscanbetransmittedthroughfloorsandwallstoagreaterdegreethanexpected,takecarenottoallowthesesoundstobecomeanuisanceothersnearby.
• Whenyouoperatethekickpedalorhi-hatpedal,pleasebecarefulnottogetyourfingerspinchedbetweenthemovableparts.Inplaceswheresmallchildrenarepresent,makesurethatanadultprovidessupervisionandguidance.
• Therubberportionofthestrikingsurfaceistreatedwithapreservativetomaintainitsperformance.Withthepassageoftime,thispreservativemayappearonthesurfaceasawhitestain,orrevealhowthepadswerestruckduringproducttesting.Thisdoesnotaffecttheperformanceorfunctionalityoftheproduct,andyoumaycontinueusingitwithconfidence.
• Continuousplayingmaycausedis-colorationofthepad,butthiswillnotaffectthePad’sfunction.
About copyrights and trademarks• Itisforbiddenbylawtomakeanaudiorecording,videorecording,copy
orrevisionofathirdparty’scopyrightedwork(musicalwork,videowork,broadcast,liveperformance,orotherwork),whetherinwholeorinpart,anddistribute,sell,lease,perform,orbroadcastitwithoutthepermissionofthecopyrightowner.
• Donotusethisproductforpurposesthatcouldinfringeonacopyrightheldbyathirdparty.Weassumenoresponsibilitywhatsoeverwithregardtoanyinfringementsofthird-partycopyrightsarisingthroughyouruseofthisproduct.
• Thecopyrightofcontentinthisproduct(thesoundwaveformdata,styledata,accompanimentpatterns,phrasedata,audioloopsandimagedata)isreservedbyRolandCorporation.
• Purchasersofthisproductarepermittedtoutilizesaidcontent(exceptsongdatasuchasDemoSongs)forthecreating,performing,recordinganddistributingoriginalmusicalworks.
• PurchasersofthisproductareNOTpermittedtoextractsaidcontentinoriginalormodifiedform,forthepurposeofdistributingrecordedmediumofsaidcontentormakingthemavailableonacomputernetwork.
• RolandandV-DrumsareeitherregisteredtrademarksortrademarksofRolandCorporationintheUnitedStatesand/orothercountries.
• Companynamesandproductnamesappearinginthisdocumentareregisteredtrademarksortrademarksoftheirrespectiveowners.
USING THE UNIT SAFELYPleasereadthisinconjunctionwiththeleaflet“USINGTHEUNITSAFELY.”
IMPORTANT NOTES
Placement• Dependingonthematerialandtemperatureofthesurfaceonwhichyouplace
theunit,itsrubberfeetmaydiscolorormarthesurface.Youcanplaceapieceoffeltorclothundertherubberfeettopreventthisfromhappening.Ifyoudoso,pleasemakesurethattheunitwillnotslipormoveaccidentally.
Maintenance• Foreverydaycleaningwipetheunitwithasoft,dryclothoronethathas
beenslightlydampenedwithwater.Toremovestubborndirt,useaclothimpregnatedwithamild,non-abrasivedetergent.Afterwards,besuretowipetheunitthoroughlywithasoft,drycloth.
• Thepedalsofthisdrumsetaremadeofstainlesssteel.Dependingontheconditionsofuse,thestainlesssteelmayrust.Ifrustingoccurs,usecommerciallyavailablemetalpolishtoremoveit.