romfor international ltd. - edcromfor.comedcromfor.com/wp-content/uploads/bestpractices/trip in the...
TRANSCRIPT

Romfor International Ltd.
TRIP IN THE
HOLE
TRIP IN THE
HOLE
TR
IP
IN
TH
E H
OL
E
Backup HandBackup Hand

Romfor International Ltd.
BEFORE ANY TRIP OR AFTER ANY CHANGE
OF OPERATIONS DURING THE TRIP:
100% TIE-OFF VERIFICATION OF THE
DERRICKMAN
ALL MEMBERS OF THE CREW ARE TO VERIFY
THAT THE DERRICKMAN IS PROPERLY TIED-
OFF AND READY TO WORK BEFORE THE
BLOCKS ARE MOVED.
VERIFY THAT TWO-WAY COMMUNICATION IS
ESTABLISHED BETWEEN THE DRILLER AND
THE DERRICKMAN.
PRACTICE: TRIPPING IN OR OUT OF THE HOLE
POSITION: UPDATE FOR ALL POSITIONS
Systems Proceedures
DR
IL
L C
OL
LA
RS

Romfor International Ltd.
TRIP IN THE
HOLE
TRIP IN THE
HOLE
Backup HandBackup Hand
TO
P D
RIV
E
DR
IL
L P
IP
E
TOP DRIVE
DRILL PIPE
TOP DRIVE
DRILL PIPE
Romfor International Ltd. Backup Hand
STEP SUB PROCEDURE REMARKS
TOP DRIVE DRILL PIPE
T R I P IN THE H O L E
1
OR
1
2
3
4
5
0
1
2
5 1
2
1
2
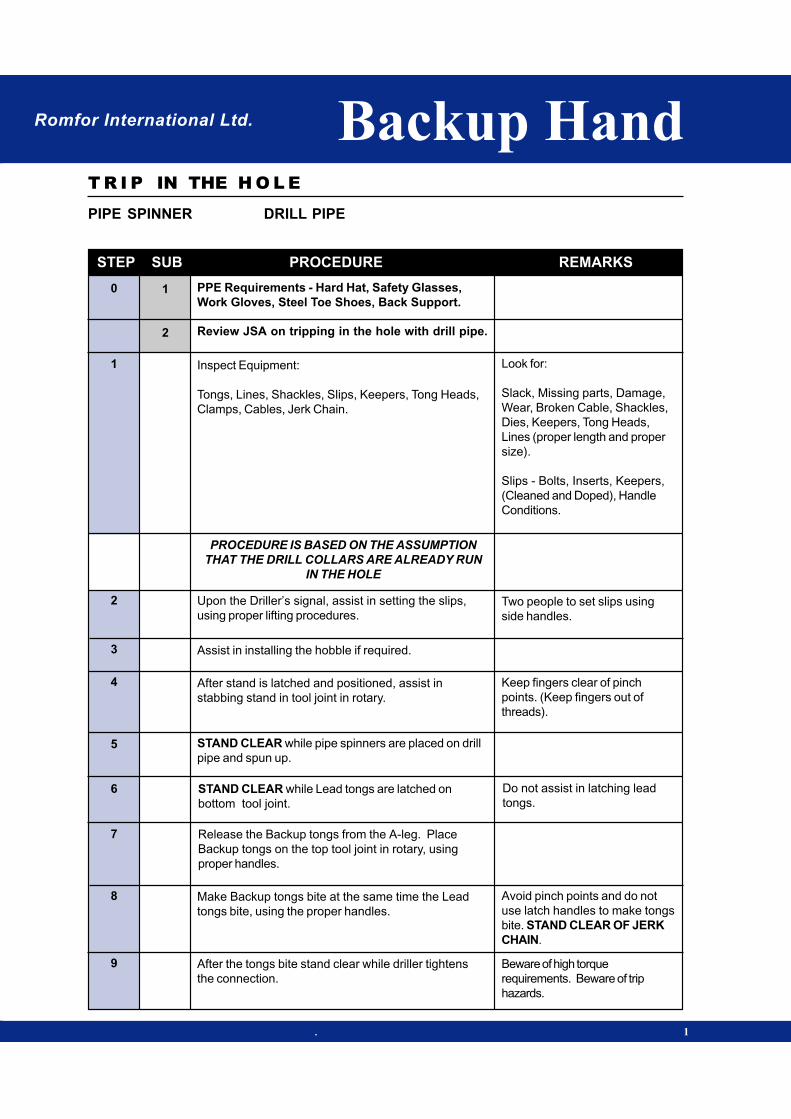
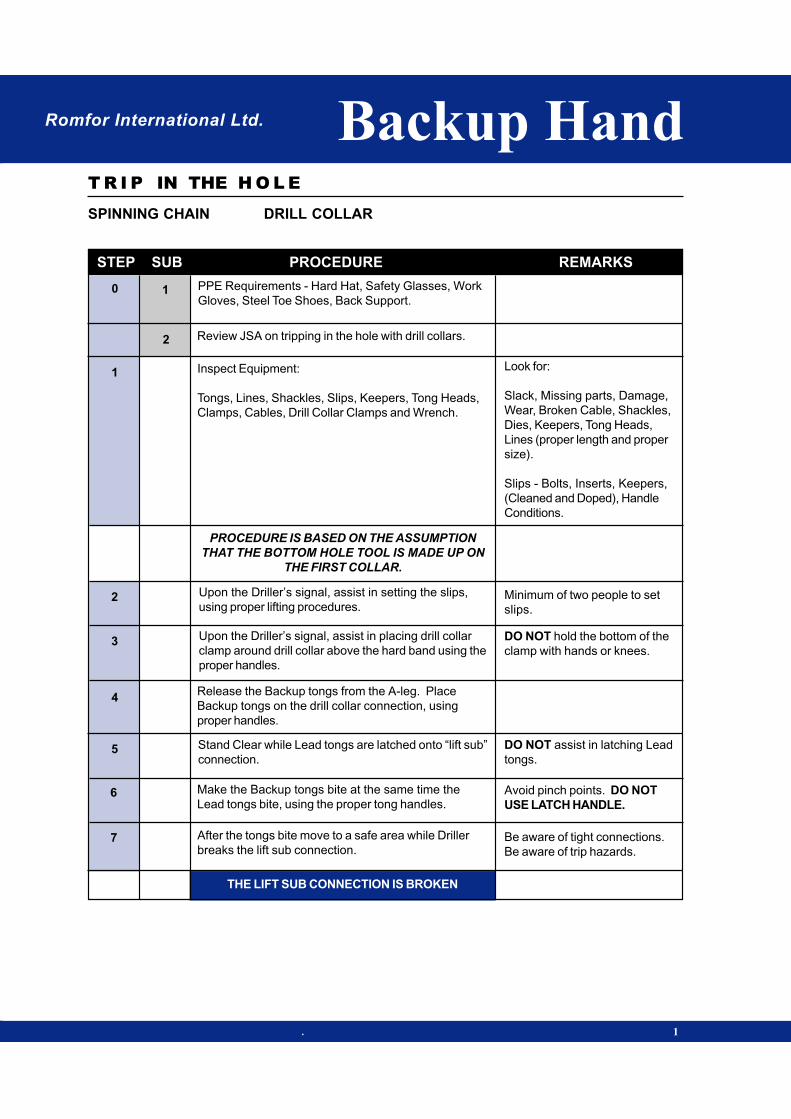
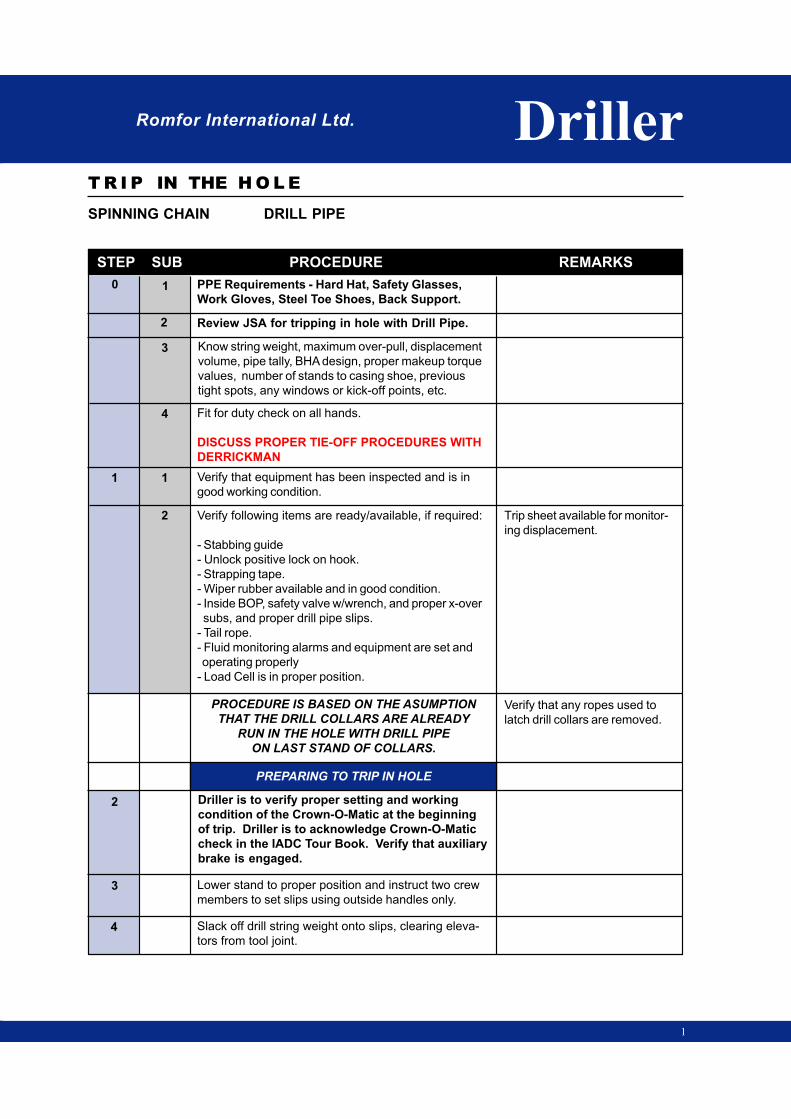
PPE Requirements - Hard Hat, Safety Glasses,
Work Gloves, Steel Toe Shoes, Back Support.
Review JSA on tripping in the hole with drill pipe.
Inspect Equipment: Tongs, Lines, Shackles, Slips,
Keepers, Tong Heads, Clamps, Cables, Spinning
Chain & Tail, Jerk Chain.
PROCEDURE IS BASED ON THE ASSUMPTION
THAT THE DRILL COLLARS ARE ALREADY RUN
IN THE HOLE.
Upon the Driller’s signal, assist in setting the slips,
using proper lifting procedures.
Assist in installing the hobble if required.
After stand is latched and positioned, assist in
stabbing stand in tool joint in rotary.
MAKE UP WITH PIPE SPINNER- STAND CLEAR
while pipe spinners are placed on drill pipe and spun up.
STAND CLEAR while Lead tongs are latched on
bottom tool joint.
Place Backup tongs on the top tool joint in rotary,
using proper handles.
MAKE UP WITH SPINNING CHAIN- After traveling
equipment is cleared place backup tongs on the tool
joint in rotary, using proper handles.
Wrap spinning chain counter clockwise on tool joint
in rotary.
3
Look for:
Slack, Missing parts, Damage,
Wear, Broken Cable, Shackles,
Dies, Keepers, Tong Heads,
Lines (proper length and proper
size).
Slips - Bolts, Inserts, Keepers,
(Cleaned and Doped), Handle
Conditions.
Two people to set slips using
side handles.
Keep fingers clear of pinch
points. (Keep fingers out of
threads).
Do not assist in latching lead
tongs.
Allow enough space for stabbing
guide.
STEP SUB PROCEDURE REMARKS
Backup Hand
TOP DRIVE DRILL PIPE
T R I P IN THE H O L E
Romfor International Ltd.
2
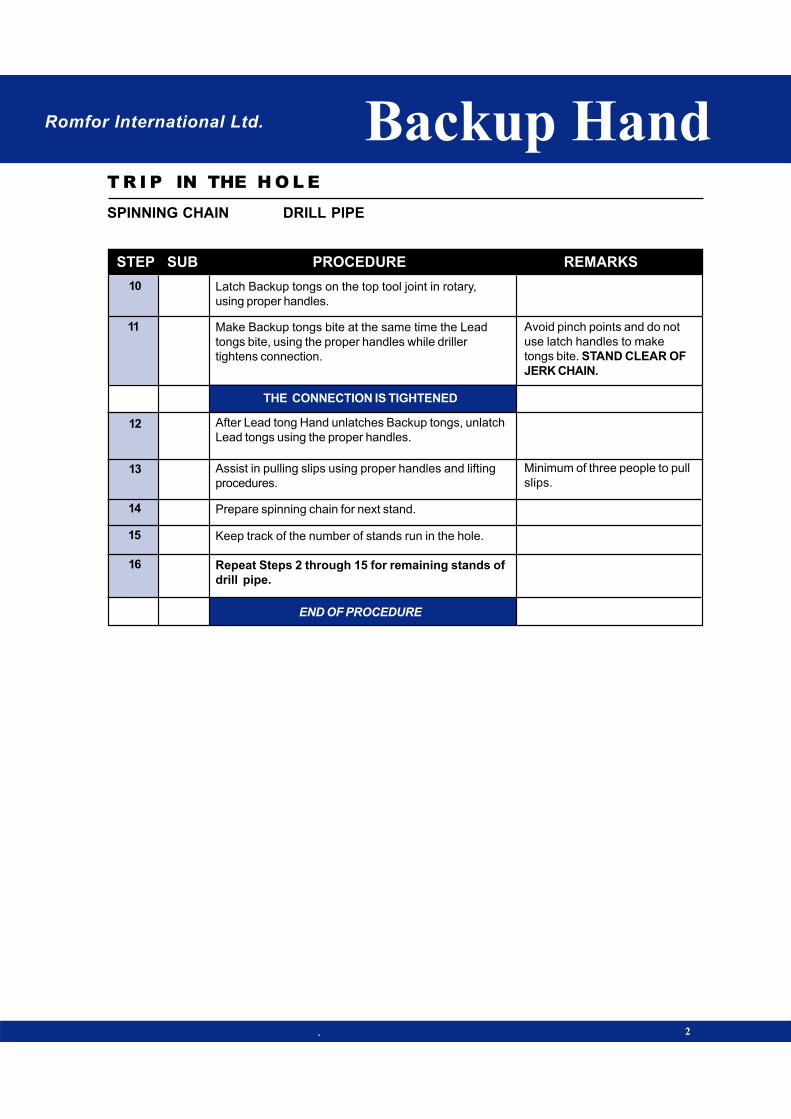
END OF PROCEDURE
6
7
8
9
3
4
5
6
7
10
11
Stay out of Drillers view.
Make sure to hold proper
tension on tail of chain. Make
sure your hands and fingers are
in proper position.
Do not assist in latching lead
tongs.
Avoid pinch points and do not
use latch handles to make
tongs bite. STAND CLEAR OF
JERK CHAIN.
Minimum of three people to pull
slips.
THE CONNECTION IS TIGHTENED
Stand clear while stand is latched and stabbed.
While Driller is pulling on chain, Throw and control
spinning chain using proper technique while stand is
being spun up.
After the stand stops spinning, remove excess chain
and stand clear while Lead Tong hand unlatches the
Backup Tongs.
Hold Backup Tongs clear while Lead Tong hand
latches Lead Tongs on bottom tool joint.
Latch Backup tongs on the top tool joint in rotary,
using proper handles.
Make Backup tongs bite at the same time the Lead
tongs bite, using the proper handles, while driller
tightens the connection.
After Lead tong Hand unlatches Backup tongs, unlatch
Lead tongs using the proper handles.
Assist in pulling slips using proper handles and lifting
procedures.
Prepare spinning chain for next stand. (if applicable)
Keep track of the number of stands run in the hole.
Repeat Steps 2 through 10 for remaining stands of
drill pipe.

Romfor International Ltd.
TRIP IN THE
HOLE
TRIP IN THE
HOLE
Backup HandBackup Hand
TO
P D
RIV
E
DR
ILL C
OLLA
R
TOP DRIVE
DRILL COLLAR
TOP DRIVE
DRILL COLLAR
Romfor International Ltd. Backup Hand
STEP SUB PROCEDURE REMARKS
TOP DRIVE DRILL COLLAR
T R I P IN THE H O L E
. 1
THE LIFT SUB CONNECTION IS BROKEN
1
2
3
4
5
6
7
8
1
2
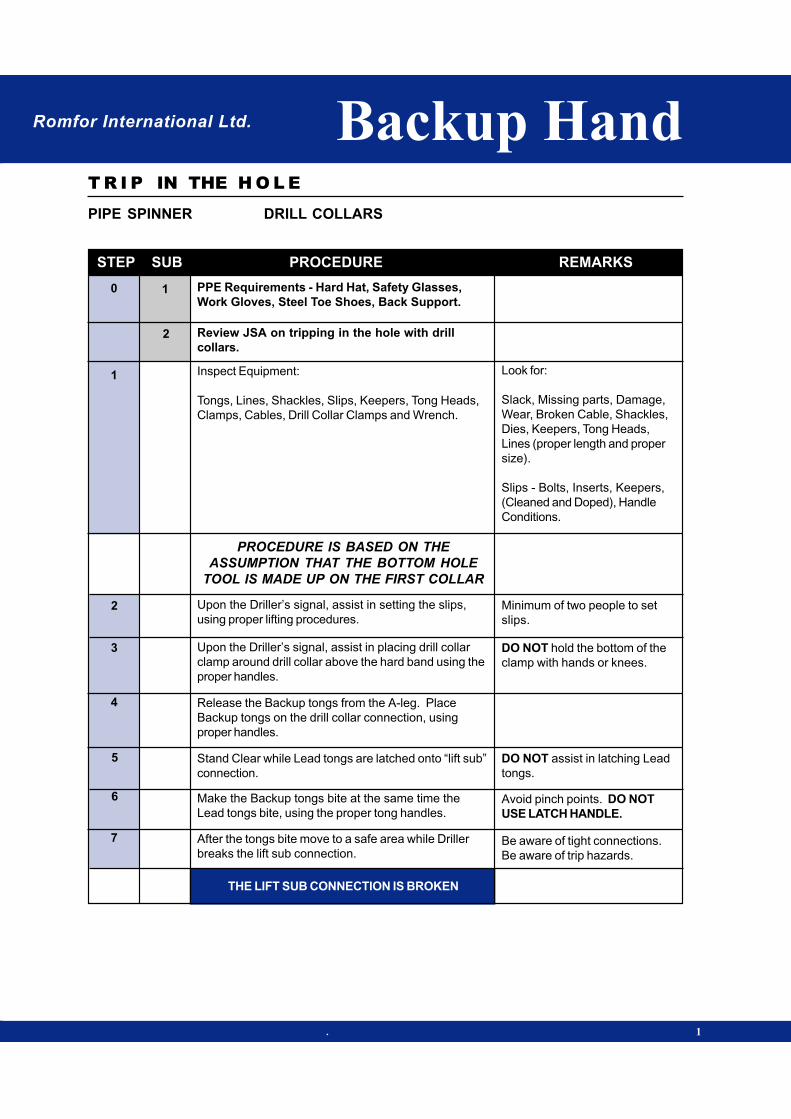
Look for:
Slack, Missing parts, Damage,
Wear, Broken Cable, Shackles,
Dies, Keepers, Tong Heads,
Lines (proper length and proper
size).
Slips - Bolts, Inserts, Keepers,
(Cleaned and Doped), Handle
Conditions.
Minimum of two people to set
slips.
DO NOT assist in latching Lead
tongs.
DO NOT hold the bottom of the
clamp with hands or knees.
Avoid pinch points and jerk
chain.
Be aware of tight connections.
Be aware of trip hazards.
PPE Requirements - Hard Hat, Safety Glasses,
Work Gloves, Steel Toe Shoes, Back Support.
Review JSA on tripping in the hole with drill
collars.
Inspect Equipment:
Tongs, Lines, Shackles, Slips, Keepers, Tong Heads,
Clamps, Cables, Drill Collar Clamps and Wrench.
PROCEDURE IS BASED ON THE ASSUMPTION
THAT THE BOTTOM HOLE TOOL IS MADE UP ON
THE FIRST COLLAR.
Upon the Driller’s signal, assist in setting the slips,
using proper lifting procedures.
Make the Backup tongs bite at the same time the
Lead tongs bite, using the proper tong handles.
Upon the Driller’s signal, assist in placing drill collar
clamp around drill collar above the hard band using the
proper handles.
Release the Backup tongs from the A-leg. Place
Backup tongs on the drill collar connection, using
proper handles.
Stand Clear while Lead tongs are latched onto “lift
sub” connection.
After the tongs bite move to a safe area while Driller
breaks the lift sub connection.
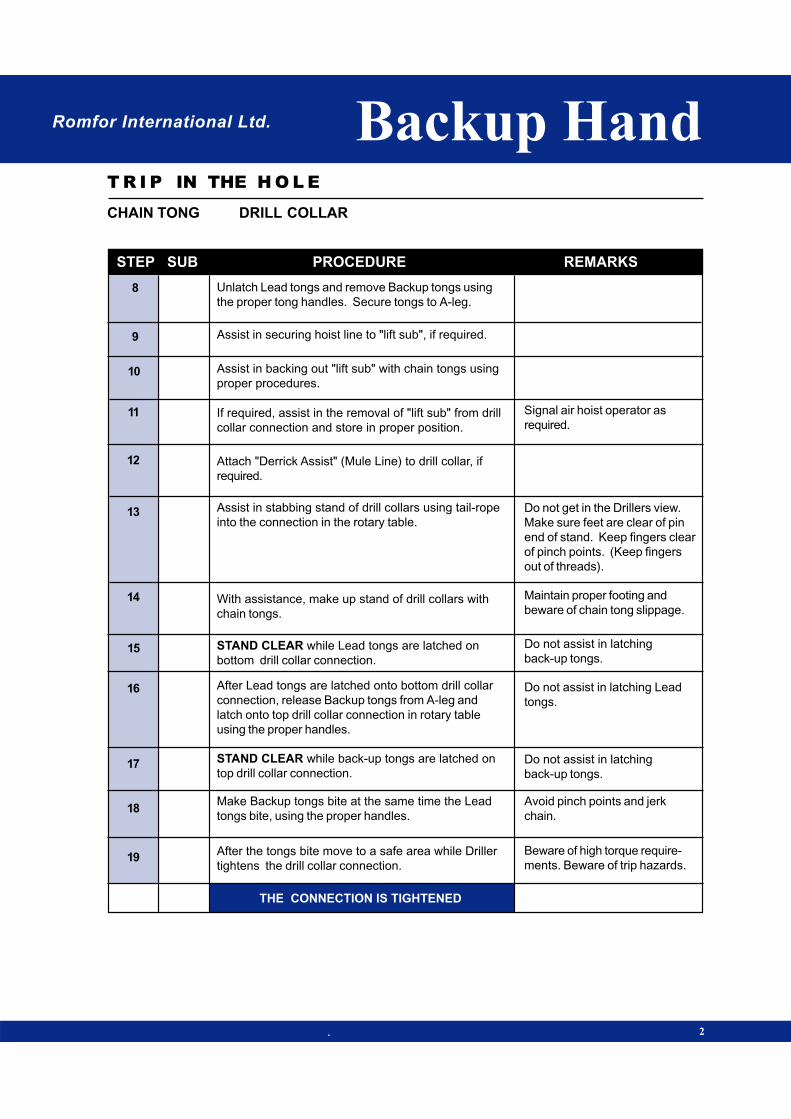
Unlatch Lead tongs and remove Backup tongs using
the proper tong handles. Secure tongs to A-leg.
STEP SUB PROCEDURE REMARKS
Backup Hand
TOP DRIVE DRILL COLLAR
T R I P IN THE H O L E
Romfor International Ltd.
2
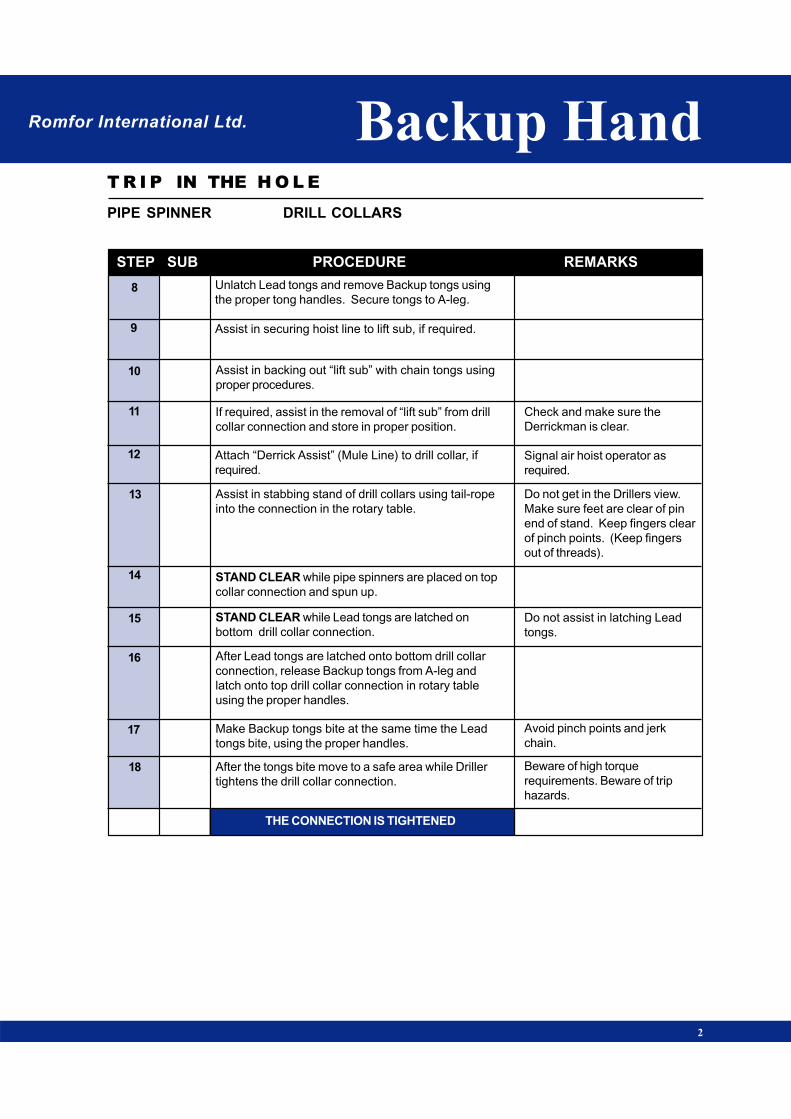
9
10
11
12
13
14
15
15
15
16
1
1
2
3
1
Make sure spinning chain is
placed in a one-gallon bucket.
Make sure to hold proper
tension on chain.
Signal air hoist operator as
required.
Do not get in the Drillers view.
Make sure feet are clear of pin
end of stand. Keep fingers clear
of pinch points. (Keep fingers
out of threads).
Use only with small drill collars.
Do not assist in latching lead
tongs.
Assist in backing out “lift sub” with chain tongs using
proper procedures.
SPINNING UP WITH PIPE SPINNER - STAND
CLEAR while pipe spinners are placed on top collar
connection and spun up.
SPINNING UP WITH SPINNING CHAIN - Wrap chain
counter-clockwise around top drill collar connection.
While Driller is pulling on chain, make sure your
hands and fingers are in proper position. Control
chain, especially tail, while spinning up stand.
AFTER STAND STOPS TURNING, remove the
excess chain from drill collars.
STAND CLEAR while Driller picks up “lift sub” and
places on floor using link-tilts.
Unlatch elevators from “lift sub” and assist in storing
in proper position.
After Driller slacks-off, assist in securing hoist line to
“lift sub”, if required.
Attach “Derrick Assist” (Mule Line) to drill collar, if
required.
Assist in stabbing stand of drill collars using tail-rope
into the connection in the rotary table.
MAKING UP WITH CHAIN TONGS - With assistance,
make up stand of drill collars with chain tongs.
STAND CLEAR while Lead tongs are latched on
bottom drill collar connection.
OR
OR

Romfor International Ltd. Backup Hand
STEP SUB PROCEDURE REMARKS
TOP DRIVE DRILL COLLAR
T R I P IN THE H O L E
3
17
18
19
20
21
22
23
24
Avoid pinch points and jerk
chain.
Beware of high torque require-
ments. Beware of trip hazards.
DO NOT use pipe wrench.
Minimum of two people to pull
slips.
After Lead tongs are latched onto bottom drill collar
connection, release Backup tongs from A-leg and
latch onto top drill collar connection in rotary table
using the proper handles.
Make Backup tongs bite at the same time the Lead
tongs bite, using the proper handles.
After Driller picks up on the string to the proper height,
assist in removing drill collar clamp, using the proper
wrench.
After the tongs bite move to a safe area while Driller
tightens the drill collar connection.
After Lead tong Hand unlatches Backup tongs, secure
tongs to A-leg.
Unlatch Lead tongs using the proper handles.
Assist in pulling slips using proper handles and lifting
procedures.
Keep track of the number of collars run in the hole.
Repeat Steps 2 through 24 for remaining drill collars.
END OF PROCEDURE
25
THE CONNECTION IS TIGHTENED
Romfor International Ltd.
TRIP IN THE
HOLE
TRIP IN THE
HOLE
Backup HandBackup Hand
PIPE SPINNER
DRILL PIPE
PIPE SPINNER
DRILL PIPE
PIP
E S
PIN
NE
R
DR
IL
L P
IP
E
Romfor International Ltd. Backup Hand
STEP SUB PROCEDURE REMARKS
PIPE SPINNER DRILL PIPE
T R I P IN THE H O L E
. 1
0 1
1
2
2
3
4
5
6
7
8
9 After the tongs bite stand clear while driller tightens
the connection.
PPE Requirements - Hard Hat, Safety Glasses,
Work Gloves, Steel Toe Shoes, Back Support.
Review JSA on tripping in the hole with drill pipe.
Inspect Equipment:
Tongs, Lines, Shackles, Slips, Keepers, Tong Heads,
Clamps, Cables, Jerk Chain.
PROCEDURE IS BASED ON THE ASSUMPTION
THAT THE DRILL COLLARS ARE ALREADY RUN
IN THE HOLE
Upon the Driller’s signal, assist in setting the slips,
using proper lifting procedures.
Assist in installing the hobble if required.
After stand is latched and positioned, assist in
stabbing stand in tool joint in rotary.
STAND CLEAR while pipe spinners are placed on drill
pipe and spun up.
STAND CLEAR while Lead tongs are latched on
bottom tool joint.
Release the Backup tongs from the A-leg. Place
Backup tongs on the top tool joint in rotary, using
proper handles.
Make Backup tongs bite at the same time the Lead
tongs bite, using the proper handles.
Look for:
Slack, Missing parts, Damage,
Wear, Broken Cable, Shackles,
Dies, Keepers, Tong Heads,
Lines (proper length and proper
size).
Slips - Bolts, Inserts, Keepers,
(Cleaned and Doped), Handle
Conditions.
Two people to set slips using
side handles.
Keep fingers clear of pinch
points. (Keep fingers out of
threads).
Do not assist in latching lead
tongs.
Avoid pinch points and do not
use latch handles to make tongs
bite. STAND CLEAR OF JERK
CHAIN.
Beware of high torque
requirements. Beware of trip
hazards.

STEP SUB PROCEDURE REMARKS
Backup Hand
PIPE SPINNER DRILL PIPE
T R I P IN THE H O L E
Romfor International Ltd.
2
After Lead tong Hand unlatches Backup tongs, unlatch
Lead tongs using the proper handles. Secure backup
tongs to A-leg.
10
Assist in pulling slips using proper handles and lifting
procedures.11
Keep track of the number of stands run in the hole.12
Repeat Steps 2 through 12 for remaining stands of
drill pipe.13
END OF PROCEDURE
Minimum of three people to pull
slips.

Romfor International Ltd.
TRIP IN THE
HOLE
TRIP IN THE
HOLE
Backup HandBackup Hand
PIP
E S
PIN
NE
R
DR
ILL C
OLLA
R
PIPE SPINNER
DRILL COLLAR
PIPE SPINNER
DRILL COLLAR
Backup Hand
STEP SUB PROCEDURE REMARKS
PIPE SPINNER DRILL COLLARS
T R I P IN THE H O L E
Backup HandRomfor International Ltd.
. 1
0 1
1
2
2
3
4
5
6
7
PPE Requirements - Hard Hat, Safety Glasses,
Work Gloves, Steel Toe Shoes, Back Support.
Review JSA on tripping in the hole with drill
collars.
Inspect Equipment:
Tongs, Lines, Shackles, Slips, Keepers, Tong Heads,
Clamps, Cables, Drill Collar Clamps and Wrench.
PROCEDURE IS BASED ON THE
ASSUMPTION THAT THE BOTTOM HOLE
TOOL IS MADE UP ON THE FIRST COLLAR
Upon the Driller’s signal, assist in setting the slips,
using proper lifting procedures.
Upon the Driller’s signal, assist in placing drill collar
clamp around drill collar above the hard band using the
proper handles.
Release the Backup tongs from the A-leg. Place
Backup tongs on the drill collar connection, using
proper handles.
Stand Clear while Lead tongs are latched onto “lift sub”
connection.
Make the Backup tongs bite at the same time the
Lead tongs bite, using the proper tong handles.
After the tongs bite move to a safe area while Driller
breaks the lift sub connection.
Look for:
Slack, Missing parts, Damage,
Wear, Broken Cable, Shackles,
Dies, Keepers, Tong Heads,
Lines (proper length and proper
size).
Slips - Bolts, Inserts, Keepers,
(Cleaned and Doped), Handle
Conditions.
Minimum of two people to set
slips.
DO NOT hold the bottom of the
clamp with hands or knees.
DO NOT assist in latching Lead
tongs.
Avoid pinch points. DO NOT
USE LATCH HANDLE.
Be aware of tight connections.
Be aware of trip hazards.
THE LIFT SUB CONNECTION IS BROKEN
STEP SUB PROCEDURE REMARKS
Backup Hand
PIPE SPINNER DRILL COLLARS
T R I P IN THE H O L E
Romfor International Ltd.
THE CONNECTION IS TIGHTENED
2
Unlatch Lead tongs and remove Backup tongs using
the proper tong handles. Secure tongs to A-leg.
Assist in securing hoist line to lift sub, if required.
If required, assist in the removal of “lift sub” from drill
collar connection and store in proper position.
Attach “Derrick Assist” (Mule Line) to drill collar, if
required.
Assist in stabbing stand of drill collars using tail-rope
into the connection in the rotary table.
STAND CLEAR while pipe spinners are placed on top
collar connection and spun up.
After Lead tongs are latched onto bottom drill collar
connection, release Backup tongs from A-leg and
latch onto top drill collar connection in rotary table
using the proper handles.
STAND CLEAR while Lead tongs are latched on
bottom drill collar connection.
Make Backup tongs bite at the same time the Lead
tongs bite, using the proper handles.
After the tongs bite move to a safe area while Driller
tightens the drill collar connection.
Assist in backing out “lift sub” with chain tongs using
proper procedures.
Check and make sure the
Derrickman is clear.
Signal air hoist operator as
required.
Do not get in the Drillers view.
Make sure feet are clear of pin
end of stand. Keep fingers clear
of pinch points. (Keep fingers
out of threads).
Do not assist in latching Lead
tongs.
Avoid pinch points and jerk
chain.
Beware of high torque
requirements. Beware of trip
hazards.
8
9
10
11
12
13
14
15
16
17
18

r Backup Hand
STEP SUB PROCEDURE REMARKS
PIPE SPINNER DRILL COLLARS
T R I P IN THE H O L E
Backup HandRomfor International Ltd.
3
After Lead tong Hand unlatches Backup tongs, secure
tongs to A-leg.
Unlatch Lead tongs using the proper handles.
After Driller picks up on the string to the proper height,
assist in removing drill collar clamp, using the proper
wrench.
Assist in pulling slips using proper handles and lifting
procedures.
Keep track of the number of collars run in the hole.
Repeat Steps 2 through 23 for remaining drill
collars.
DO NOT use pipe wrench.
Minimum of two people to pull
slips.
19
END OF PROCEDURE
20
21
22
23
24
Romfor International Ltd.
TRIP IN THE
HOLE
TRIP IN THE
HOLE
Backup HandBackup Hand
SPIN
NIN
G C
HA
IN
DR
IL
L P
IP
E
SPINNING CHAIN
DRILL PIPE
SPINNING CHAIN
DRILL PIPE

Romfor International Ltd. Backup Hand
STEP SUB PROCEDURE REMARKS
SPINNING CHAIN DRILL PIPE
T R I P IN THE H O L E
. 1
0 1
1
2
2
3
4
5
6
7
PPE Requirements - Hard Hat, Safety Glasses,
Work Gloves, Steel Toe Shoes, Back Support.
Review JSA on tripping in the hole with drill pipe.
Inspect Equipment:
Tongs, Lines, Shackles, Slips, Keepers, Tong Heads,
Clamps, Cables, Spinning Chain & Tail, Jerk Chain.
PROCEDURE IS BASED ON THE ASSUMPTION
THAT THE DRILL COLLARS ARE ALREADY RUN
IN THE HOLE
Upon the Driller’s signal, assist in setting the slips,
using proper lifting procedures.
Assist in installing the hobble if required.
After traveling equipment is cleared, place back up
tongs on tool joint in rotary using proper handles.
Wrap spinning chain counter clockwise on tool joint in
rotary.
Stand clear while stand is latched, stabbed and
stabbing guide is removed.
Look for:
Slack, Missing parts, Damage,
Wear, Broken Cable, Shackles,
Dies, Keepers, Tong Heads,
Lines (proper length and proper
size).
Slips - Bolts, Inserts, Keepers,
(Cleaned and Doped), Handle
Conditions.
Two people to set slips using
side handles.
Allow enough room for stabbing
guide.
While Driller is pulling on chain, Throw and control
spinning chain using proper technique while stand is
being spun up. DO NOT THROW CHAIN WITH
RIGHT HAND.
After the stand stops spinning, remove excess chain
and stand clear while Lead Tong hand unlatches the
Backup Tongs.
Stay out of Drillers view.
Hold Backup Tongs clear while Lead Tong hand latches
Lead Tongs on bottom tool joint.
Make sure to hold proper tension
on tail of chain. Make sure your
hands and fingers are in proper
position.
Do not assist in latching lead
tongs.
8
9
STEP SUB PROCEDURE REMARKS
Backup Hand
SPINNING CHAIN DRILL PIPE
T R I P IN THE H O L E
Romfor International Ltd.
. 2
Repeat Steps 2 through 15 for remaining stands of
drill pipe.
END OF PROCEDURE
10
11
12
13
14
15
16
Latch Backup tongs on the top tool joint in rotary,
using proper handles.
Make Backup tongs bite at the same time the Lead
tongs bite, using the proper handles while driller
tightens connection.
THE CONNECTION IS TIGHTENED
After Lead tong Hand unlatches Backup tongs, unlatch
Lead tongs using the proper handles.
Assist in pulling slips using proper handles and lifting
procedures.
Avoid pinch points and do not
use latch handles to make
tongs bite. STAND CLEAR OF
JERK CHAIN.
Prepare spinning chain for next stand.
Keep track of the number of stands run in the hole.
Minimum of three people to pull
slips.

Romfor International Ltd.
TRIP IN THE
HOLE
TRIP IN THE
HOLE
Backup HandBackup Hand
SPIN
NIN
G C
HA
IN
DR
ILL C
OLLA
R
SPINNING CHAIN
DRILL COLLAR
SPINNING CHAIN
DRILL COLLAR
Romfor International Ltd. Backup Hand
STEP SUB PROCEDURE REMARKS
SPINNING CHAIN DRILL COLLAR
T R I P IN THE H O L E
. 1
THE LIFT SUB CONNECTION IS BROKEN
0 1
1
2
2
3
4
5
6
7
PPE Requirements - Hard Hat, Safety Glasses, Work
Gloves, Steel Toe Shoes, Back Support.
Review JSA on tripping in the hole with drill collars.
Inspect Equipment:
Tongs, Lines, Shackles, Slips, Keepers, Tong Heads,
Clamps, Cables, Drill Collar Clamps and Wrench.
PROCEDURE IS BASED ON THE ASSUMPTION
THAT THE BOTTOM HOLE TOOL IS MADE UP ON
THE FIRST COLLAR.
Upon the Driller’s signal, assist in setting the slips,
using proper lifting procedures.
Upon the Driller’s signal, assist in placing drill collar
clamp around drill collar above the hard band using the
proper handles.
Release the Backup tongs from the A-leg. Place
Backup tongs on the drill collar connection, using
proper handles.
Stand Clear while Lead tongs are latched onto “lift sub”
connection.
Look for:
Slack, Missing parts, Damage,
Wear, Broken Cable, Shackles,
Dies, Keepers, Tong Heads,
Lines (proper length and proper
size).
Slips - Bolts, Inserts, Keepers,
(Cleaned and Doped), Handle
Conditions.
Minimum of two people to set
slips.
DO NOT hold the bottom of the
clamp with hands or knees.
DO NOT assist in latching Lead
tongs.
Avoid pinch points. DO NOT
USE LATCH HANDLE.
Make the Backup tongs bite at the same time the
Lead tongs bite, using the proper tong handles.
After the tongs bite move to a safe area while Driller
breaks the lift sub connection.Be aware of tight connections.
Be aware of trip hazards.

STEP SUB PROCEDURE REMARKS
Backup Hand
SPINNING CHAIN DRILL COLLAR
T R I P IN THE H O L E
Romfor International Ltd.
. 2
8
9
10
11
12
13
14
15
16
17
18
Unlatch Lead tongs and remove Backup tongs using
the proper tong handles. Secure tongs to A-leg.
Assist in securing hoist line to lift sub, if required.
Assist in backing out “lift sub” with chain tongs using
proper procedures.
If required, assist in the removal of “lift sub” from drill
collar connection and store in proper position.
Attach “Derrick Assist” (Mule Line) to drill collar, if
required.
Assist in stabbing stand of drill collars using tail-rope
into the connection in the rotary table.
Check and make sure the
Derrickman is clear.
Signal air hoist operator as
required.
Wrap chain counter-clockwise around top drill collar
connection.
While Driller is pulling on chain, make sure your hands
and fingers are in proper position. Control chain,
especially tail, while spinning up stand.
AFTER STAND STOPS TURNING, remove the excess
chain from drill collars.
After Lead tongs are latched onto bottom drill collar
connection, release Backup tongs from A-leg and
latch onto top drill collar connection in rotary table
using the proper handles.
STAND CLEAR while Lead tongs are latched on
bottom drill collar connection.
Do not get in the Drillers view.
Make sure feet are clear of pin
end of stand. Keep fingers clear
of pinch points. (Keep fingers
out of threads).
Make sure spinning chain is
placed in a one-gallon bucket.
Make sure to hold proper
tension on chain.
Do not assist in latching Lead
tongs.

Romfor International Ltd. Backup Hand
STEP SUB PROCEDURE REMARKS
SPINNING CHAIN DRILL COLLAR
T R I P IN THE H O L E
3
19
20
21
22
23
24
25
26
Make Backup tongs bite at the same time the Lead
tongs bite, using the proper handles.
After the tongs bite move to a safe area while Driller
tightens the drill collar connection.
THE CONNECTION IS TIGHTENED
After Lead tong Hand unlatches Backup tongs, secure
tongs to A-leg.
Unlatch Lead tongs using the proper handles.
After Driller picks up on the string to the proper height,
assist in removing drill collar clamp, using the proper
wrench.
Avoid pinch points and jerk
chain.
Beware of high torque require-
ments. Beware of trip hazards.
Assist in pulling slips using proper handles and lifting
procedures.
Keep track of the number of collars run in the hole.
Repeat Steps 3 through 25 for remaining drill collars.
END OF PROCEDURE
DO NOT use pipe wrench.
Minimum of two people to pull
slips.
Romfor International Ltd.
TRIP IN THE
HOLE
TRIP IN THE
HOLE
Backup HandBackup Hand
RO
TA
RY
TA
BLE
DR
IL
L P
IP
E
ROTARY TABLE
DRILL PIPE
ROTARY TABLE
DRILL PIPE

Romfor International Ltd.
STEP SUB PROCEDURE REMARKS
ROTARY TABLE DRILL PIPE
T R I P IN THE H O L E
Backup Hand
1
IT IS NOT A ROMFOR RECOMMENDED BEST PRACTICE TO REVERSE INTO
DRILL PIPE WITH A ROTARY TABLE.
Romfor International Ltd.
TRIP IN THE
HOLE
TRIP IN THE
HOLE
Backup HandBackup Hand
RO
TA
RY
TA
BL
E
DR
IL
L C
OL
LA
R
ROTARY TABLE
DRILL COLLAR
ROTARY TABLE
DRILL COLLAR

Romfor International Ltd. Backup Hand
STEP SUB PROCEDURE REMARKS
ROTARY TABLE DRILL COLLAR
T R I P IN THE H O L E
. 1
IT IS NOT A ROMFOR RECOMMENDED BEST PRACTICE TO REVERSE INTO
DRILL COLLARS WITH A ROTARY TABLE
Romfor International Ltd.
TRIP IN THE
HOLE
TRIP IN THE
HOLE
Backup HandBackup Hand
CHAIN TONG
DRILL COLLAR
CHAIN TONG
DRILL COLLAR
CH
AIN
TO
NG
DR
ILL C
OLLA
R

Romfor International Ltd. Backup Hand
STEP SUB PROCEDURE REMARKS
CHAIN TONG DRILL COLLAR
T R I P IN THE H O L E
. 1
0 1
1
2
2
3
4
5
6
7
PPE Requirements - Hard Hat, Safety Glasses,
Work Gloves, Steel Toe Shoes, Back Support.
Review JSA on tripping in the hole with drill collars.
Inspect Equipment:
Tongs, Lines, Shackles, Slips, Keepers, Tong Heads,
Clamps, Cables, Drill Collar Clamps and Wrench.
PROCEDURE IS BASED ON THE ASSUMPTION
THAT THE BOTTOM HOLE TOOL IS MADE UP ON
THE FIRST COLLAR.
Upon the Driller's signal, assist in setting the slips,
using proper lifting procedures.
Upon the Driller's signal, assist in placing drill collar
clamp around drill collar above the hard band using the
proper handles.
Release the Backup tongs from the A-leg. Place
Backup tongs on the drill collar connection, using
proper handles.
Stand Clear while Lead tongs are latched onto "lift
sub" connection.
Make the Backup tongs bite at the same time the
Lead tongs bite, using the proper tong handles.
Look for:
Slack, Missing parts, Damage,
Wear, Broken Cable, Shackles,
Dies, Keepers, Tong Heads,
Lines (proper length and proper
size).
Slips - Bolts, Inserts, Keepers,
(Cleaned and Doped), Handle
Conditions.
Minimum of two people to set
slips.
DO NOT hold the bottom of the
clamp with hands or knees.
DO NOT assist in latching Lead
tongs.
Avoid pinch points. DO NOT
USE LATCH HANDLE.
Be aware of tight connections.
Be aware of trip hazards.
After the tongs bite move to a safe area while Driller
breaks the "lift sub" connection.
THE "LIFT SUB" CONNECTION IS BROKEN
STEP SUB PROCEDURE REMARKS
Backup Hand
CHAIN TONG DRILL COLLAR
T R I P IN THE H O L E
Romfor International Ltd.
. 2
8
9
10
11
12
13
14
15
16
17
18
19
Unlatch Lead tongs and remove Backup tongs using
the proper tong handles. Secure tongs to A-leg.
Assist in securing hoist line to "lift sub", if required.
Assist in backing out "lift sub" with chain tongs using
proper procedures.
If required, assist in the removal of "lift sub" from drill
collar connection and store in proper position.
Attach "Derrick Assist" (Mule Line) to drill collar, if
required.
Assist in stabbing stand of drill collars using tail-rope
into the connection in the rotary table.
Signal air hoist operator as
required.
With assistance, make up stand of drill collars with
chain tongs.
STAND CLEAR while Lead tongs are latched on
bottom drill collar connection.
After Lead tongs are latched onto bottom drill collar
connection, release Backup tongs from A-leg and
latch onto top drill collar connection in rotary table
using the proper handles.
Make Backup tongs bite at the same time the Lead
tongs bite, using the proper handles.
STAND CLEAR while back-up tongs are latched on
top drill collar connection.
Do not get in the Drillers view.
Make sure feet are clear of pin
end of stand. Keep fingers clear
of pinch points. (Keep fingers
out of threads).
Maintain proper footing and
beware of chain tong slippage.
Do not assist in latching
back-up tongs.
Do not assist in latching
back-up tongs.
Avoid pinch points and jerk
chain.
Do not assist in latching Lead
tongs.
After the tongs bite move to a safe area while Driller
tightens the drill collar connection.
THE CONNECTION IS TIGHTENED
Beware of high torque require-
ments. Beware of trip hazards.

Romfor International Ltd. Backup Hand
STEP SUB PROCEDURE REMARKS
CHAIN TONG DRILL COLLAR
T R I P IN THE H O L E
20
21
22
23
24
25
After Lead tong Hand unlatches Backup tongs, secure
tongs to A-leg.
Unlatch Lead tongs using the proper handles.
After Driller picks up on the string to the proper height,
assist in removing drill collar clamp, using the proper
wrench.
Assist in pulling slips using proper handles and lifting
procedures.
Keep track of the number of collars run in the hole.
Repeat Steps 2 through 24 for remaining drill collars.
END OF PROCEDURE
DO NOT use pipe wrench.
Minimum of two people to pull
slips.
3

Romfor International Ltd.
TRIP IN THE
HOLE
TRIP IN THE
HOLE
TR
IP
IN
TH
E H
OL
E
DerrickmanDerrickman

Romfor International Ltd.
DerrickmanDerrickman
TRIP IN THE
HOLE
TRIP IN THE
HOLE
SP
IN
NIN
G C
HA
IN
PIP
E S
PIN
NE
R C
HA
IN
TO
NG
TO
P D
RIV
E
DR
IL
L P
IP
E
SPINNING CHAIN
PIPE SPINNER
CHAIN TONG
TOP DRIVE
DRILL PIPE
SPINNING CHAIN
PIPE SPINNER
CHAIN TONG
TOP DRIVE
DRILL PIPE
R
STEP SUB PROCEDURE REMARKS
SPINNING CHAIN, PIPE SPINNER, OR TOP DRIVE DRILL PIPE
T R I P IN THE H O L E
Copyright © 1999, by Nabors Drilling U.S.A., Inc.
DerrickmanDerrickmanRomfor International Ltd.
1
0
1
2
3
4
5
1
2
3
1
2
3
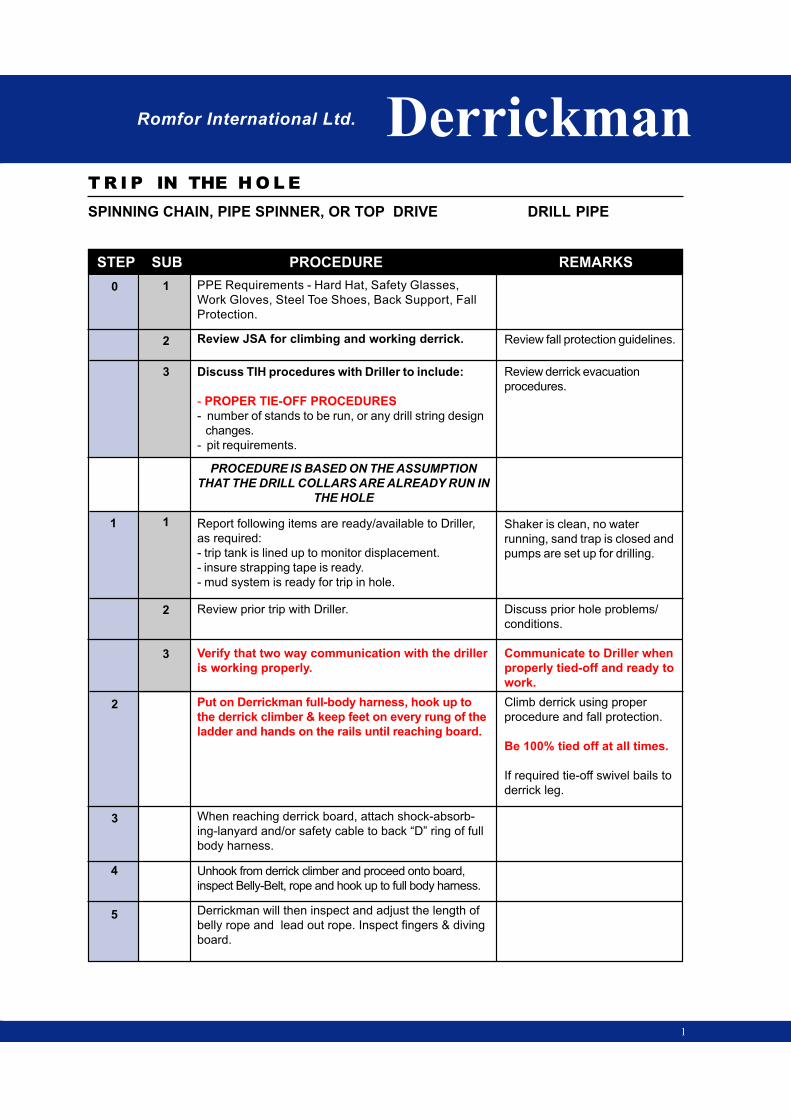
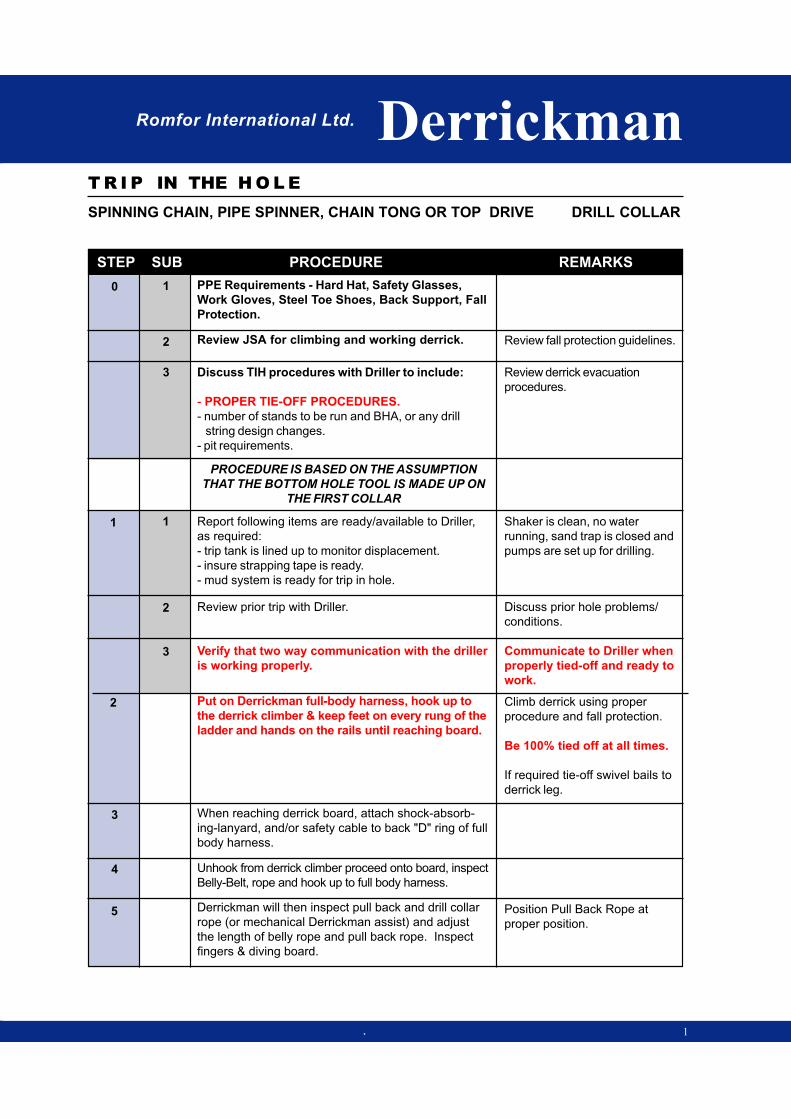
PPE Requirements - Hard Hat, Safety Glasses,
Work Gloves, Steel Toe Shoes, Back Support, Fall
Protection.
PROCEDURE IS BASED ON THE ASSUMPTION
THAT THE DRILL COLLARS ARE ALREADY RUN IN
THE HOLE
Review JSA for climbing and working derrick.
Discuss TIH procedures with Driller to include:
- PROPER TIE-OFF PROCEDURES
- number of stands to be run, or any drill string design
changes.
- pit requirements.
Report following items are ready/available to Driller,
as required:
- trip tank is lined up to monitor displacement.
- insure strapping tape is ready.
- mud system is ready for trip in hole.
Review prior trip with Driller.
Verify that two way communication with the driller
is working properly.
Put on Derrickman full-body harness, hook up to
the derrick climber & keep feet on every rung of the
ladder and hands on the rails until reaching board.
When reaching derrick board, attach shock-absorb-
ing-lanyard and/or safety cable to back “D” ring of full
body harness.
Unhook from derrick climber and proceed onto board,
inspect Belly-Belt, rope and hook up to full body harness.
Review fall protection guidelines.
Review derrick evacuation
procedures.
Shaker is clean, no water
running, sand trap is closed and
pumps are set up for drilling.
Discuss prior hole problems/
conditions.
Communicate to Driller when
properly tied-off and ready to
work.
Climb derrick using proper
procedure and fall protection.
Be 100% tied off at all times.
If required tie-off swivel bails to
derrick leg.
Derrickman will then inspect and adjust the length of
belly rope and lead out rope. Inspect fingers & diving
board.
STEP SUB PROCEDURE REMARKS
Derrickman
SPINNING CHAIN, PIPE SPINNER, OR TOP DRIVE DRILL PIPE
T R I P IN THE H O L E
Romfor International Ltd.
. 2
6
7
8
8
9
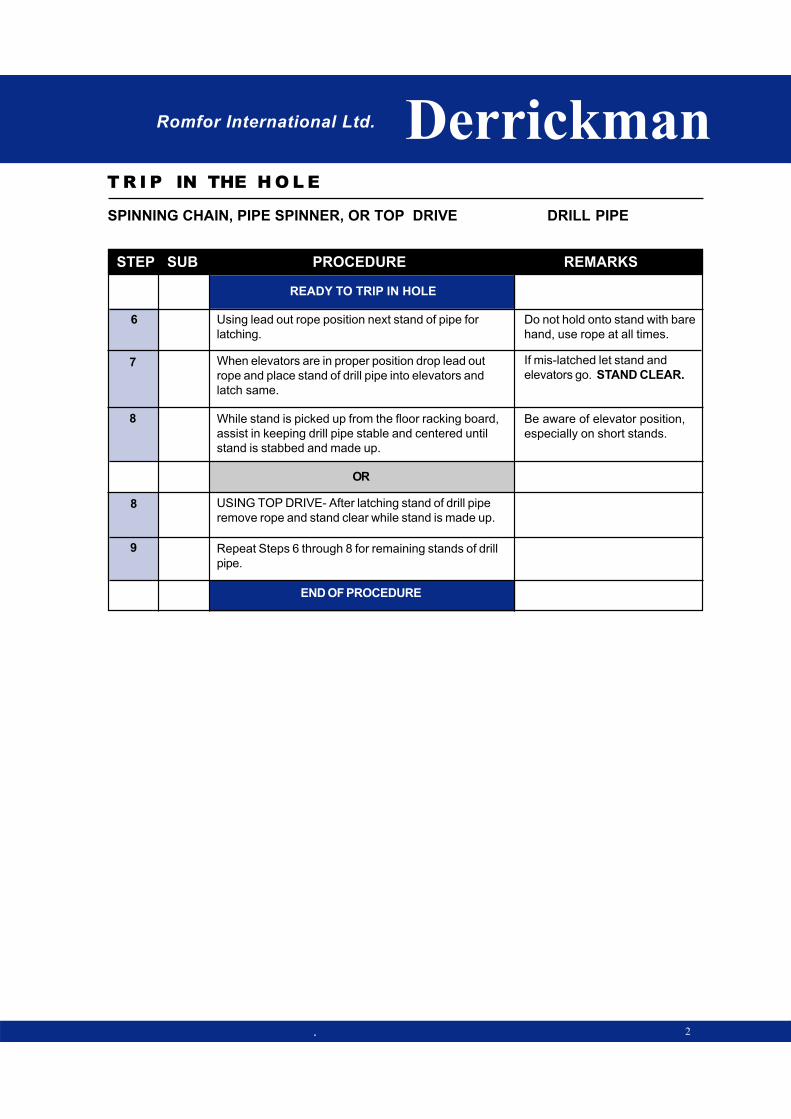
READY TO TRIP IN HOLE
Using lead out rope position next stand of pipe for
latching.
When elevators are in proper position drop lead out
rope and place stand of drill pipe into elevators and
latch same.
While stand is picked up from the floor racking board,
assist in keeping drill pipe stable and centered until
stand is stabbed and made up.
OR
USING TOP DRIVE- After latching stand of drill pipe
remove rope and stand clear while stand is made up.
Repeat Steps 6 through 8 for remaining stands of drill
pipe.
Do not hold onto stand with bare
hand, use rope at all times.
If mis-latched let stand and
elevators go. STAND CLEAR.
Be aware of elevator position,
especially on short stands.
END OF PROCEDURE

Romfor International Ltd.
DerrickmanDerrickman
TRIP IN THE
HOLE
TRIP IN THE
HOLE
SPINNING CHAIN
PIPE SPINNER
CHAIN TONG
TOP DRIVE
DRILL COLLAR
SPINNING CHAIN
PIPE SPINNER
CHAIN TONG
TOP DRIVE
DRILL COLLAR
SP
IN
NIN
G C
HA
IN
PIP
E S
PIN
NE
R C
HA
IN
TO
NG
TO
P D
RIV
E
DR
ILL C
OLLA
R
STEP SUB PROCEDURE REMARKS
SPINNING CHAIN, PIPE SPINNER, CHAIN TONG OR TOP DRIVE DRILL COLLAR
T R I P IN THE H O L E
Romfor International Ltd. Derrickman
. 1
0
1
2
3
4
5
1
2
3
1
2
3
PPE Requirements - Hard Hat, Safety Glasses,
Work Gloves, Steel Toe Shoes, Back Support, Fall
Protection.
PROCEDURE IS BASED ON THE ASSUMPTION
THAT THE BOTTOM HOLE TOOL IS MADE UP ON
THE FIRST COLLAR
Review JSA for climbing and working derrick.
Discuss TIH procedures with Driller to include:
- PROPER TIE-OFF PROCEDURES.
- number of stands to be run and BHA, or any drill
string design changes.
- pit requirements.
Report following items are ready/available to Driller,
as required:
- trip tank is lined up to monitor displacement.
- insure strapping tape is ready.
- mud system is ready for trip in hole.
Review prior trip with Driller.
Verify that two way communication with the driller
is working properly.
Put on Derrickman full-body harness, hook up to
the derrick climber & keep feet on every rung of the
ladder and hands on the rails until reaching board.
When reaching derrick board, attach shock-absorb-
ing-lanyard, and/or safety cable to back "D" ring of full
body harness.
Unhook from derrick climber proceed onto board, inspect
Belly-Belt, rope and hook up to full body harness.
Review fall protection guidelines.
Review derrick evacuation
procedures.
Shaker is clean, no water
running, sand trap is closed and
pumps are set up for drilling.
Discuss prior hole problems/
conditions.
Communicate to Driller when
properly tied-off and ready to
work.
Climb derrick using proper
procedure and fall protection.
Be 100% tied off at all times.
If required tie-off swivel bails to
derrick leg.
Derrickman will then inspect pull back and drill collar
rope (or mechanical Derrickman assist) and adjust
the length of belly rope and pull back rope. Inspect
fingers & diving board.
Position Pull Back Rope at
proper position.
STEP SUB PROCEDURE REMARKS
Derrickman
SPINNING CHAIN, PIPE SPINNER, CHAIN TONG OR TOP DRIVE DRILL COLLAR
T R I P IN THE H O L E
Romfor International Ltd.
. 2
6
7
8
9
10
11
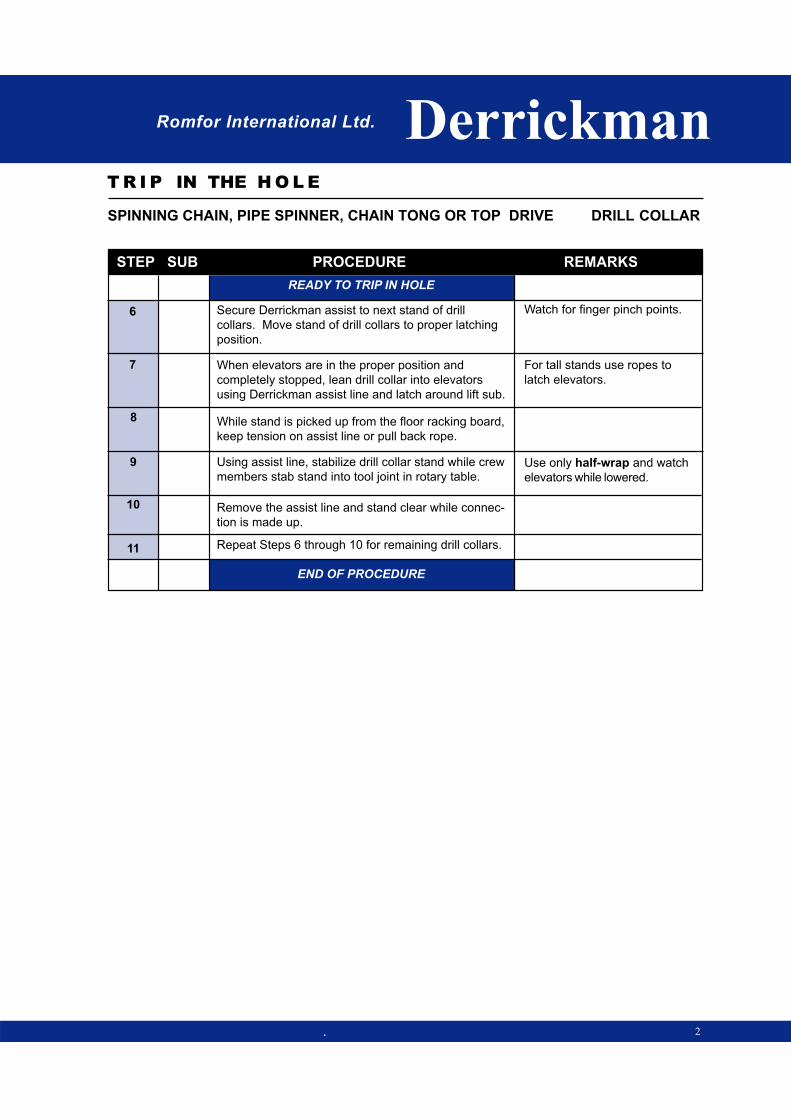
READY TO TRIP IN HOLE
Secure Derrickman assist to next stand of drill
collars. Move stand of drill collars to proper latching
position.
When elevators are in the proper position and
completely stopped, lean drill collar into elevators
using Derrickman assist line and latch around lift sub.
While stand is picked up from the floor racking board,
keep tension on assist line or pull back rope.
Using assist line, stabilize drill collar stand while crew
members stab stand into tool joint in rotary table.
Remove the assist line and stand clear while connec-
tion is made up.
Watch for finger pinch points.
For tall stands use ropes to
latch elevators.
Use only half-wrap and watch
elevators while lowered.
Repeat Steps 6 through 10 for remaining drill collars.
END OF PROCEDURE

Romfor International Ltd.
TRIP IN THE
HOLE
TRIP IN THE
HOLE
TR
IP
IN
TH
E H
OL
E
DrillerDriller

Romfor International Ltd.
TRIP IN THE
HOLE
TRIP IN THE
HOLE
DrillerDriller
TO
P D
RIV
E
DR
IL
L P
IP
E
TOP DRIVE
DRILL PIPE
TOP DRIVE
DRILL PIPE
Romfor International Ltd. Driller
STEP SUB PROCEDURE REMARKS
TOP DRIVE DRILL PIPE
T R I P IN THE H O L E
. 1
1
2
1
2
3
4
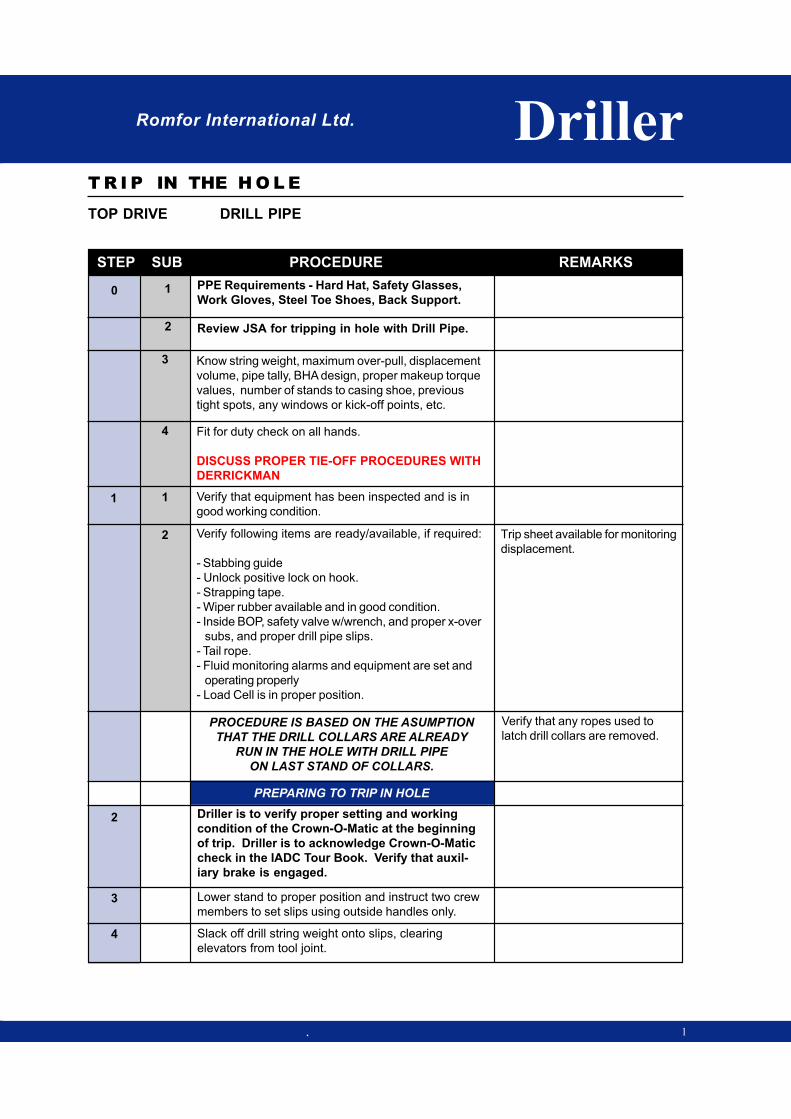
0 1
2
PPE Requirements - Hard Hat, Safety Glasses,
Work Gloves, Steel Toe Shoes, Back Support.
Review JSA for tripping in hole with Drill Pipe.
Know string weight, maximum over-pull, displacement
volume, pipe tally, BHA design, proper makeup torque
values, number of stands to casing shoe, previous
tight spots, any windows or kick-off points, etc.
Fit for duty check on all hands.
DISCUSS PROPER TIE-OFF PROCEDURES WITH
DERRICKMAN
Verify that equipment has been inspected and is in
good working condition.
Verify following items are ready/available, if required:
- Stabbing guide
- Unlock positive lock on hook.
- Strapping tape.
- Wiper rubber available and in good condition.
- Inside BOP, safety valve w/wrench, and proper x-over
subs, and proper drill pipe slips.
- Tail rope.
- Fluid monitoring alarms and equipment are set and
operating properly
- Load Cell is in proper position.
PROCEDURE IS BASED ON THE ASUMPTION
THAT THE DRILL COLLARS ARE ALREADY
RUN IN THE HOLE WITH DRILL PIPE
ON LAST STAND OF COLLARS.
PREPARING TO TRIP IN HOLE
Driller is to verify proper setting and working
condition of the Crown-O-Matic at the beginning
of trip. Driller is to acknowledge Crown-O-Matic
check in the IADC Tour Book. Verify that auxil-
iary brake is engaged.
Lower stand to proper position and instruct two crew
members to set slips using outside handles only.
Slack off drill string weight onto slips, clearing
elevators from tool joint.
Trip sheet available for monitoring
displacement.
Verify that any ropes used to
latch drill collars are removed.
3
4
STEP SUB PROCEDURE REMARKS
Driller
TOP DRIVE DRILL PIPE
T R I P IN THE H O L E
Romfor International Ltd.
2
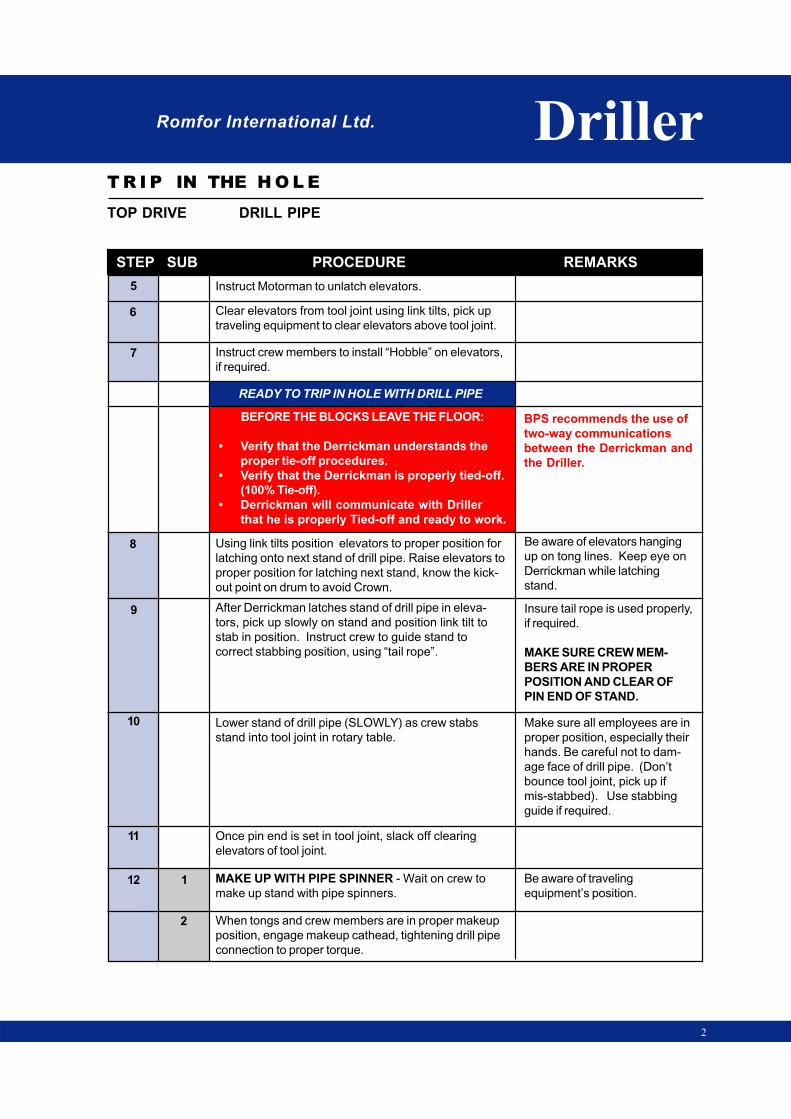
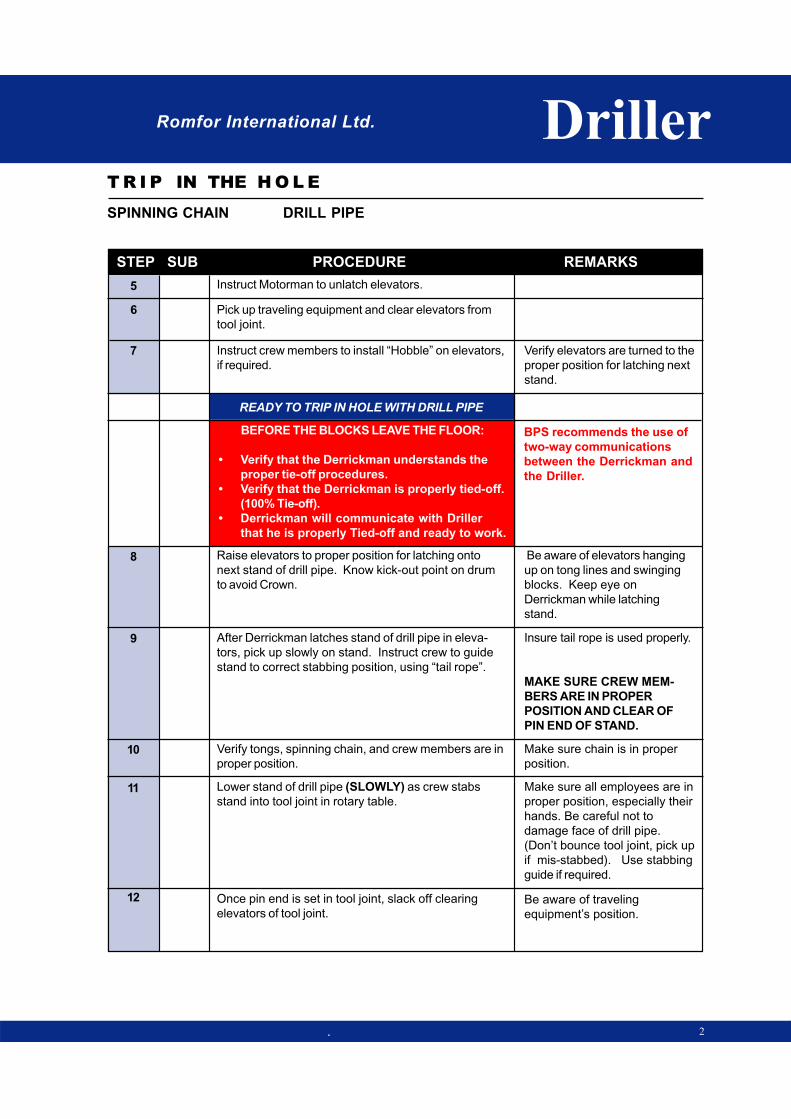
BEFORE THE BLOCKS LEAVE THE FLOOR:
• Verify that the Derrickman understands the
proper tie-off procedures.
• Verify that the Derrickman is properly tied-off.
(100% Tie-off).
• Derrickman will communicate with Driller
that he is properly Tied-off and ready to work.
BPS recommends the use of
two-way communications
between the Derrickman and
the Driller.
5
6
7
8
1
2
9
Be aware of elevators hanging
up on tong lines. Keep eye on
Derrickman while latching
stand.
Insure tail rope is used properly,
if required.
MAKE SURE CREW MEM-
BERS ARE IN PROPER
POSITION AND CLEAR OF
PIN END OF STAND.
Instruct Motorman to unlatch elevators.
Clear elevators from tool joint using link tilts, pick up
traveling equipment to clear elevators above tool joint.
Instruct crew members to install “Hobble” on elevators,
if required.
READY TO TRIP IN HOLE WITH DRILL PIPE
Using link tilts position elevators to proper position for
latching onto next stand of drill pipe. Raise elevators to
proper position for latching next stand, know the kick-
out point on drum to avoid Crown.
After Derrickman latches stand of drill pipe in eleva-
tors, pick up slowly on stand and position link tilt to
stab in position. Instruct crew to guide stand to
correct stabbing position, using “tail rope”.
Lower stand of drill pipe (SLOWLY) as crew stabs
stand into tool joint in rotary table.
Once pin end is set in tool joint, slack off clearing
elevators of tool joint.
MAKE UP WITH PIPE SPINNER - Wait on crew to
make up stand with pipe spinners.
When tongs and crew members are in proper makeup
position, engage makeup cathead, tightening drill pipe
connection to proper torque.
Make sure all employees are in
proper position, especially their
hands. Be careful not to dam-
age face of drill pipe. (Don’t
bounce tool joint, pick up if
mis-stabbed). Use stabbing
guide if required.
Be aware of traveling
equipment’s position.
10
11
12
Romfor International Ltd. Driller
STEP SUB PROCEDURE REMARKS
TOP DRIVE DRILL PIPE
T R I P IN THE H O L E
12
13
14
3
15
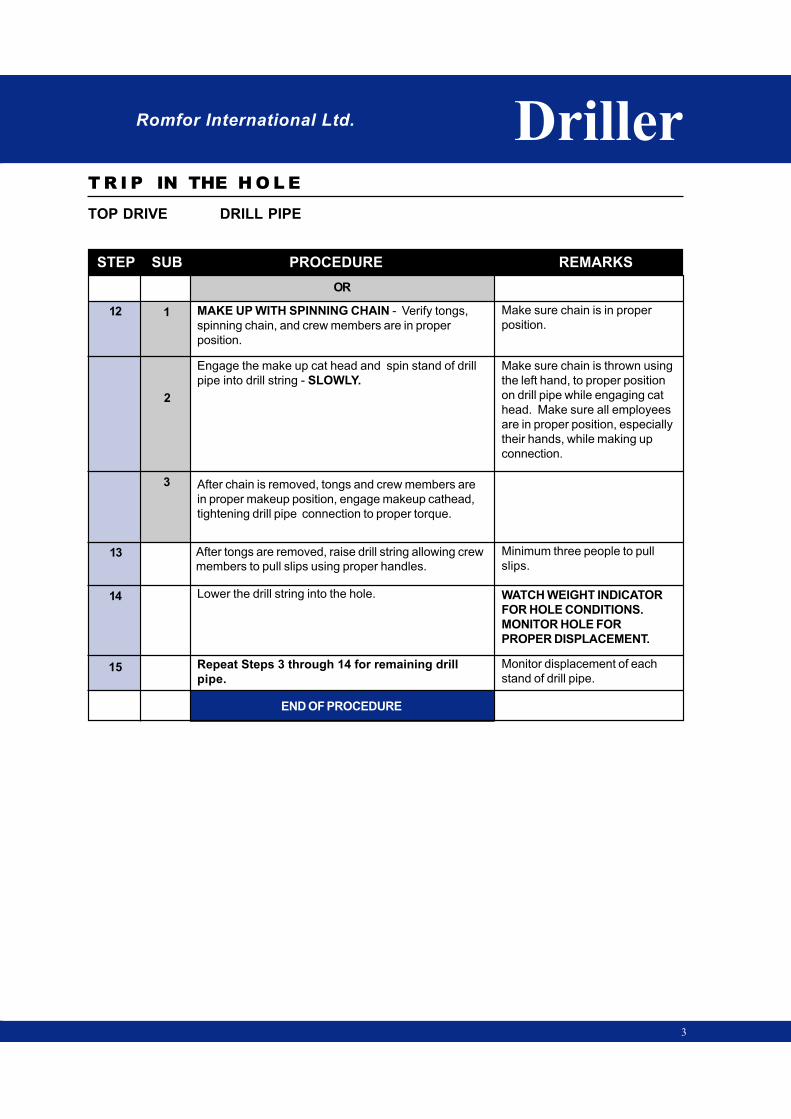
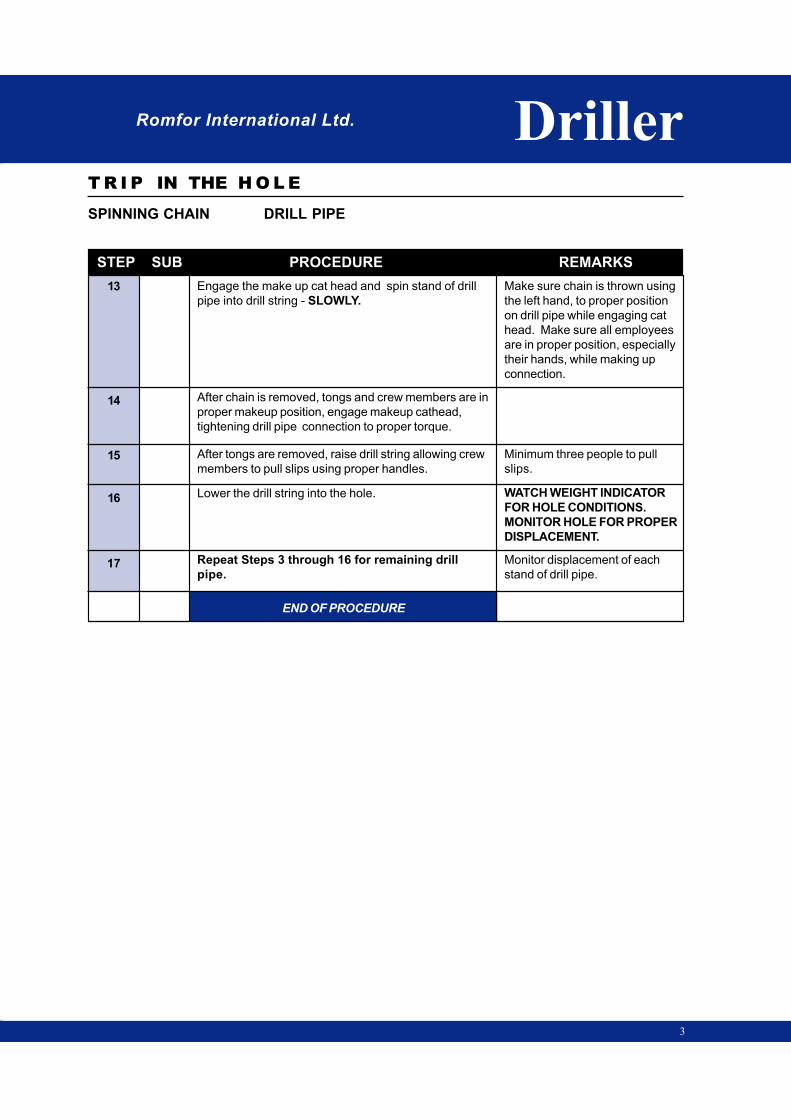
Make sure chain is in proper
position.
Make sure chain is thrown using
the left hand, to proper position
on drill pipe while engaging cat
head. Make sure all employees
are in proper position, especially
their hands, while making up
connection.
Minimum three people to pull
slips.
OR
MAKE UP WITH SPINNING CHAIN - Verify tongs,
spinning chain, and crew members are in proper
position.
Engage the make up cat head and spin stand of drill
pipe into drill string - SLOWLY.
After chain is removed, tongs and crew members are
in proper makeup position, engage makeup cathead,
tightening drill pipe connection to proper torque.
After tongs are removed, raise drill string allowing crew
members to pull slips using proper handles.
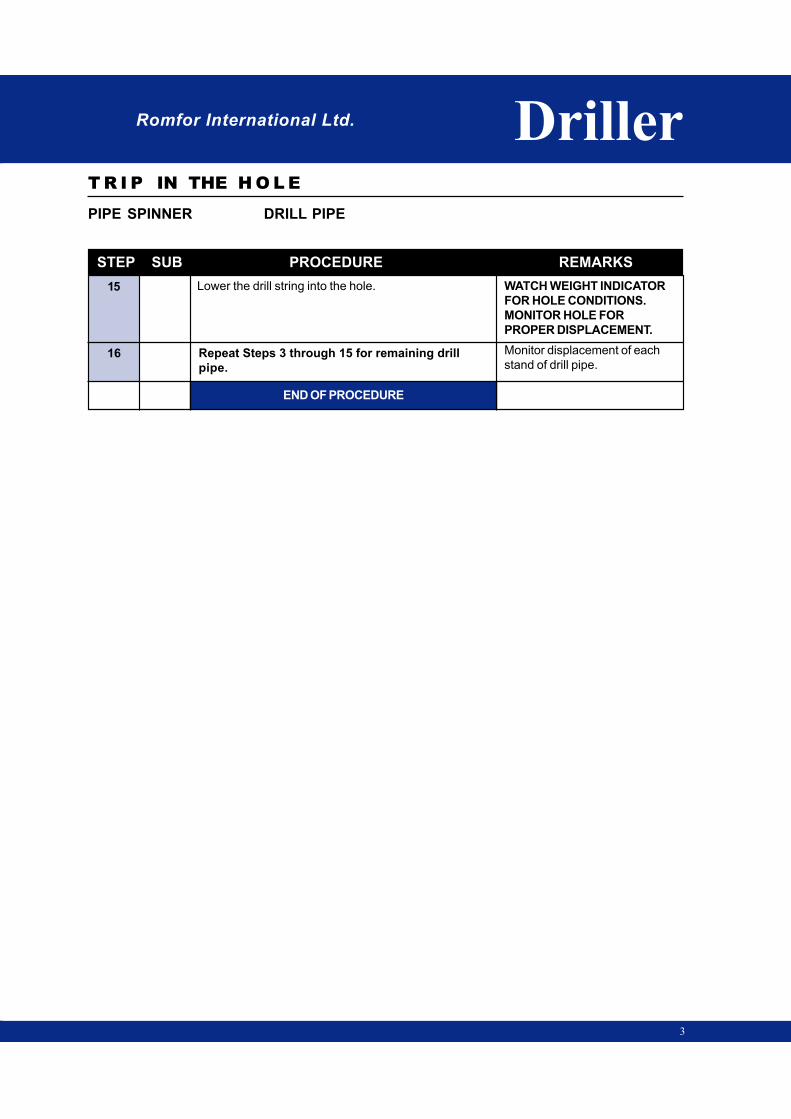
Lower the drill string into the hole. WATCH WEIGHT INDICATOR
FOR HOLE CONDITIONS.
MONITOR HOLE FOR
PROPER DISPLACEMENT.
Repeat Steps 3 through 14 for remaining drill
pipe.
END OF PROCEDURE
Monitor displacement of each
stand of drill pipe.
1
2
3

Romfor International Ltd.
TRIP IN THE
HOLE
TRIP IN THE
HOLE
DrillerDriller
TO
P D
RIV
E
DR
ILL C
OLLA
R
TOP DRIVE
DRILL COLLAR
TOP DRIVE
DRILL COLLAR
Romfor International Ltd.
STEP SUB PROCEDURE REMARKS
TOP DRIVE DRILL COLLAR
T R I P IN THE H O L E
Driller
1
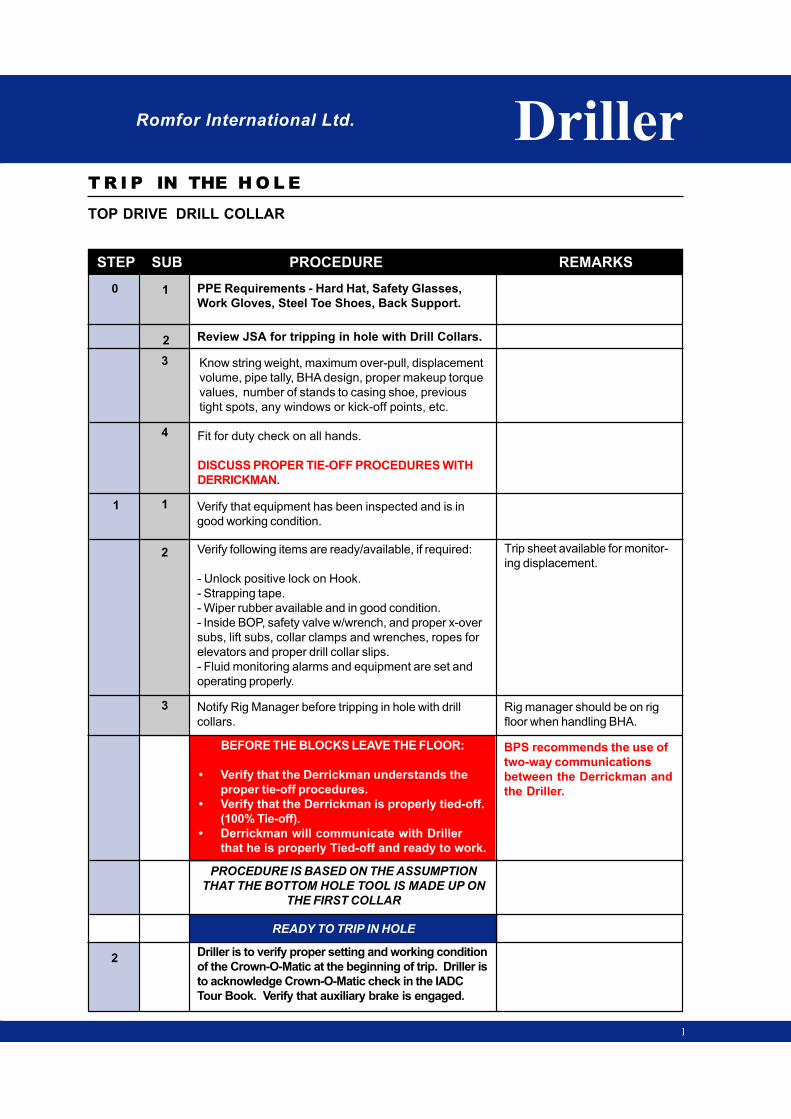
BEFORE THE BLOCKS LEAVE THE FLOOR:
• Verify that the Derrickman understands the
proper tie-off procedures.
• Verify that the Derrickman is properly tied-off.
(100% Tie-off).
• Derrickman will communicate with Driller
that he is properly Tied-off and ready to work.
BPS recommends the use of
two-way communications
between the Derrickman and
the Driller.
0 1
1
2
2
PPE Requirements - Hard Hat, Safety Glasses,
Work Gloves, Steel Toe Shoes, Back Support.
Review JSA for tripping in hole with Drill Collars.
Know string weight, maximum over-pull, displacement
volume, pipe tally, BHA design, proper makeup torque
values, number of stands to casing shoe, previous
tight spots, any windows or kick-off points, etc.
Fit for duty check on all hands.
DISCUSS PROPER TIE-OFF PROCEDURES WITH
DERRICKMAN.
Verify that equipment has been inspected and is in
good working condition.
Verify following items are ready/available, if required:
- Unlock positive lock on Hook.
- Strapping tape.
- Wiper rubber available and in good condition.
- Inside BOP, safety valve w/wrench, and proper x-over
subs, lift subs, collar clamps and wrenches, ropes for
elevators and proper drill collar slips.
- Fluid monitoring alarms and equipment are set and
operating properly.
Notify Rig Manager before tripping in hole with drill
collars.
PROCEDURE IS BASED ON THE ASSUMPTION
THAT THE BOTTOM HOLE TOOL IS MADE UP ON
THE FIRST COLLAR
READY TO TRIP IN HOLE
Trip sheet available for monitor-
ing displacement.
Rig manager should be on rig
floor when handling BHA.
Driller is to verify proper setting and working condition
of the Crown-O-Matic at the beginning of trip. Driller is
to acknowledge Crown-O-Matic check in the IADC
Tour Book. Verify that auxiliary brake is engaged.
3
4
1
2
3
STEP SUB PROCEDURE REMARKS
Driller
TOP DRIVE DRILL COLLAR
T R I P IN THE H O L E
Romfor International Ltd.
. 2
4
5
6
7
8
9
10
11
Be careful not to damage face of
drill collar.
12
13
14
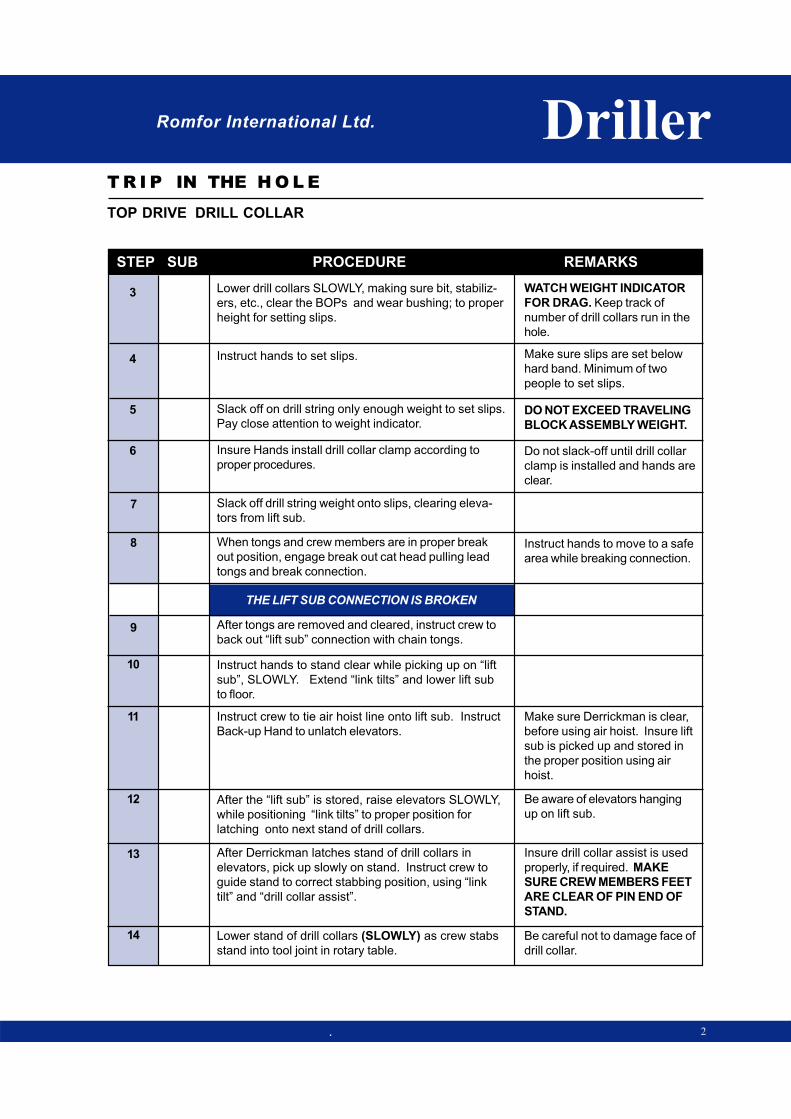
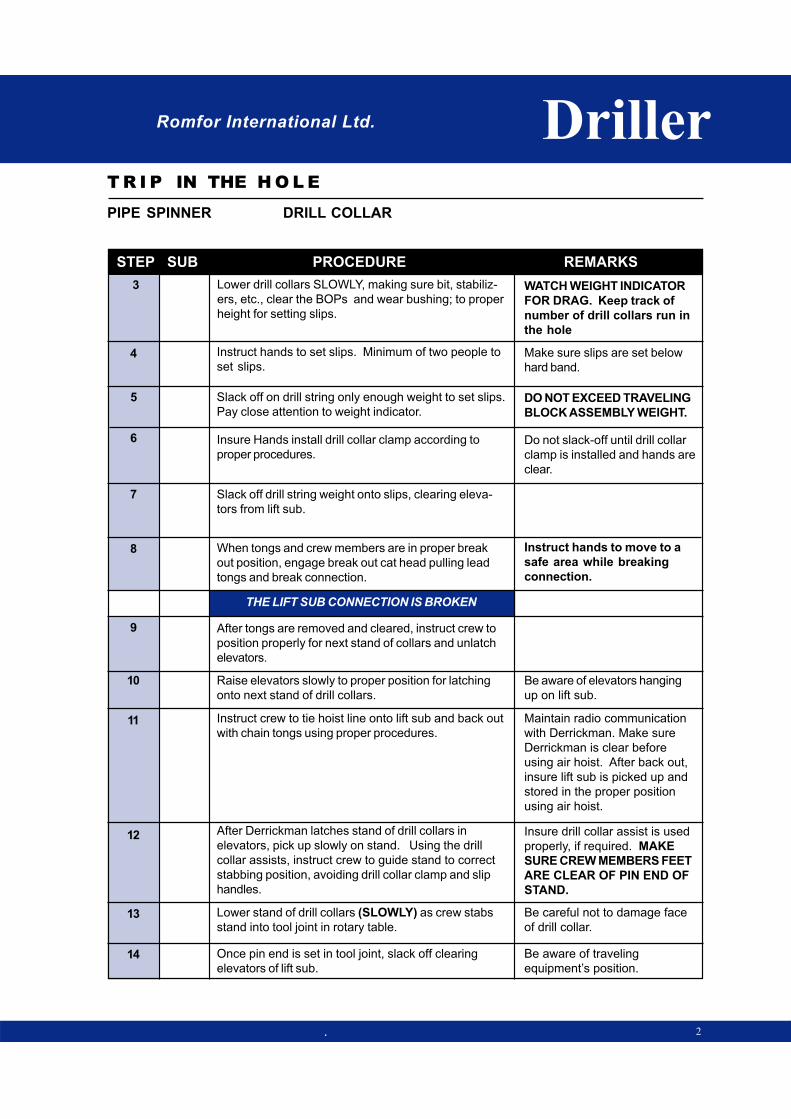
Instruct hands to set slips.
Slack off on drill string only enough weight to set slips.
Pay close attention to weight indicator.
Insure Hands install drill collar clamp according to
proper procedures.
Slack off drill string weight onto slips, clearing eleva-
tors from lift sub.
When tongs and crew members are in proper break
out position, engage break out cat head pulling lead
tongs and break connection.
THE LIFT SUB CONNECTION IS BROKEN
Make sure slips are set below
hard band. Minimum of two
people to set slips.
DO NOT EXCEED TRAVELING
BLOCK ASSEMBLY WEIGHT.
Do not slack-off until drill collar
clamp is installed and hands are
clear.
After tongs are removed and cleared, instruct crew to
back out “lift sub” connection with chain tongs.
Instruct hands to stand clear while picking up on “lift
sub”, SLOWLY. Extend “link tilts” and lower lift sub
to floor.
Instruct crew to tie air hoist line onto lift sub. Instruct
Back-up Hand to unlatch elevators.
After Derrickman latches stand of drill collars in
elevators, pick up slowly on stand. Instruct crew to
guide stand to correct stabbing position, using “link
tilt” and “drill collar assist”.
After the “lift sub” is stored, raise elevators SLOWLY,
while positioning “link tilts” to proper position for
latching onto next stand of drill collars.
Instruct hands to move to a safe
area while breaking connection.
Make sure Derrickman is clear,
before using air hoist. Insure lift
sub is picked up and stored in
the proper position using air
hoist.
Be aware of elevators hanging
up on lift sub.
Lower stand of drill collars (SLOWLY) as crew stabs
stand into tool joint in rotary table.
Insure drill collar assist is used
properly, if required. MAKE
SURE CREW MEMBERS FEET
ARE CLEAR OF PIN END OF
STAND.
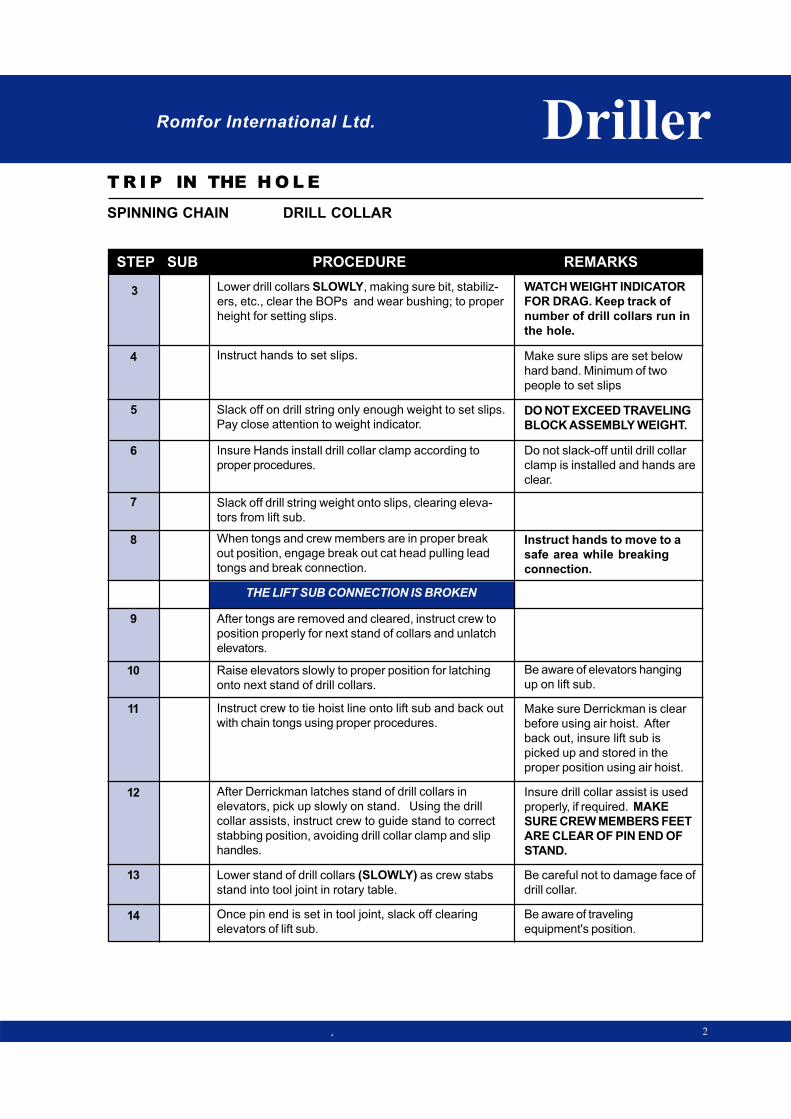
3 Lower drill collars SLOWLY, making sure bit, stabiliz-
ers, etc., clear the BOPs and wear bushing; to proper
height for setting slips.
WATCH WEIGHT INDICATOR
FOR DRAG. Keep track of
number of drill collars run in the
hole.

Romfor International Ltd.
STEP SUB PROCEDURE REMARKS
TOP DRIVE DRILL COLLAR
T R I P IN THE H O L E
Driller
3
15
16
16
16
17
1
18
19
20
Based on proper make up
torque the breakout cathead
may have to be used.
1
1
Verify crew members are
using proper procedures in
removing drill collar clamp.
WATCH WEIGHT INDICATOR
FOR DRAG. Minimum two
people to pull slips.
Monitor displacement of each
stand of drill collars.
THE CONNECTION IS TIGHTENED
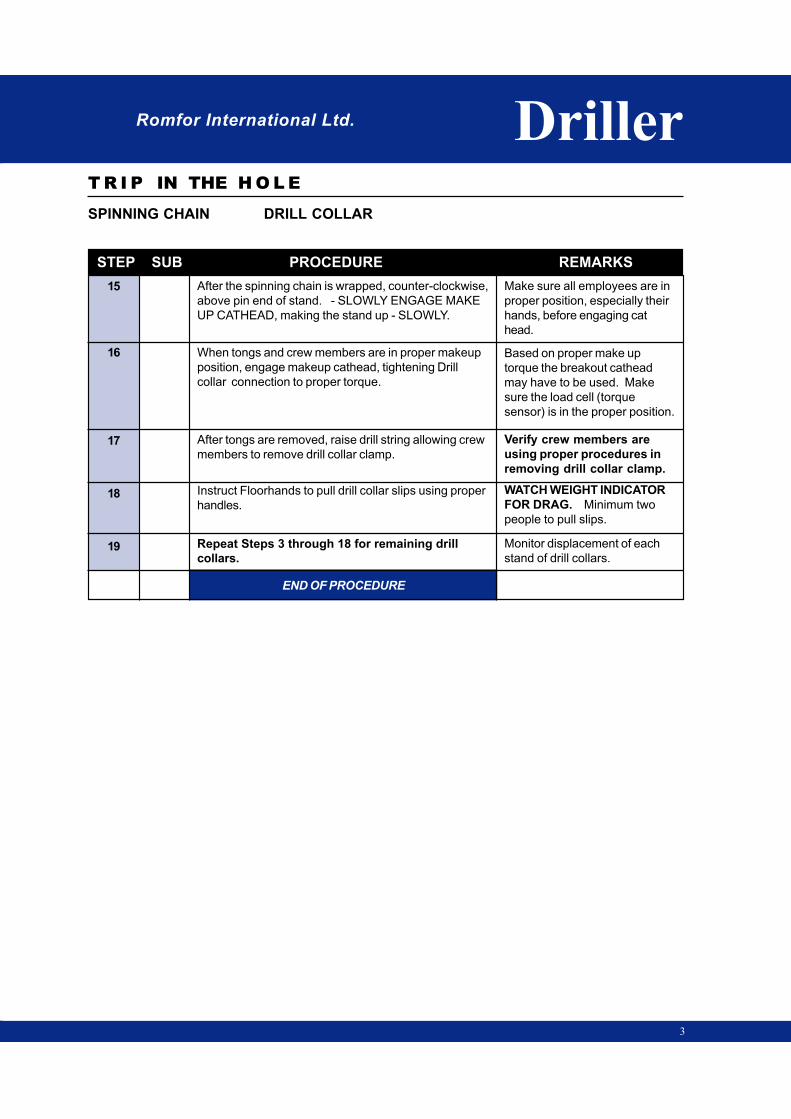
Once pin end is set in tool joint, slack off SLOWLY,
clearing the elevators , while the crew makes up
stand.
MAKE UP WITH PIPE SPINNER - Wait on crew to
make up stand with pipe spinners.
OR
MAKE UP WITH SPINNING CHAIN - After the spin-
ning chain is wrapped, counter-clockwise, above pin
end of stand. - SLOWLY ENGAGE MAKE UP
CATHEAD, making the stand up - SLOWLY.
OR
Be aware of traveling
equipment’s position.
Make sure all employees are in
proper position, especially their
hands, before engaging cat
head.
MAKE UP WITH CHAIN TONGS - Once pin end is set
in tool joint, slack off SLOWLY, clearing the elevators,
while the crew makes up stand using chain tongs.
NOTE: If the collar size does not allow make up with
chain tongs, revert to spinning chain procedure.
When tongs and crew members are in proper makeup
position, engage makeup cathead, tightening drill collar
connection to proper torque.
After tongs are removed, raise drill string allowing crew
members to remove drill collar clamp.
Instruct Floorhands to pull drill collar slips using proper
handles and lifting procedures.
Repeat Steps 3 through 19 for remaining drill
collars.
END OF PROCEDURE
Be aware of traveling
equipment’s position. Maintain
constant weight of stand by
slacking-off as the connection is
made up.

Romfor International Ltd.
TRIP IN THE
HOLE
TRIP IN THE
HOLE
DrillerDriller
PIPE SPINNER
DRILL PIPE
PIPE SPINNER
DRILL PIPE
PIP
E S
PIN
NE
R
DR
IL
L P
IP
E

Romfor International Ltd.
STEP SUB PROCEDURE REMARKS
PIPE SPINNER DRILL PIPE
T R I P IN THE H O L E
Driller
1
0 1
1
2
2
3
4 Slack off drill string weight onto slips, clearing elevators
from tool joint.
PPE Requirements - Hard Hat, Safety Glasses,
Work Gloves, Steel Toe Shoes, Back Support.
Review JSA for tripping in hole with Drill Pipe.
Know string weight, maximum over-pull, displacement
volume, pipe tally, BHA design, proper makeup torque
values, number of stands to casing shoe, previous
tight spots, any windows or kick-off points, etc.
Fit for duty check on all hands.
DISCUSS PROPER TIE-OFF PROCEDURES WITH
DERRICKMAN
Verify that equipment has been inspected and is in
good working condition.
Verify following items are ready/available, if required:
- Stabbing guide
- Unlock positive lock on hook.
- Strapping tape.
- Wiper rubber available and in good condition.
- Inside BOP, safety valve w/wrench, and proper x-over
subs, and proper drill pipe slips.
- Tail rope.
- Fluid monitoring alarms and equipment are set and
operating properly.
- Load Cell is in proper position.
PROCEDURE IS BASED ON THE ASSUMPTION
THAT THE DRILL COLLARS ARE ALREADY
RUN IN THE HOLE DRILL PIPE ON
LAST STAND OF COLLARS.
PREPARING TO TRIP IN HOLE
Trip sheet available for monitor-
ing displacement.
Verify that any ropes used to
latch drill collars are removed.
Driller is to verify proper setting and working condition
of the Crown-O-Matic at the beginning of trip. Driller is
to acknowledge Crown-O-Matic check in the IADC
Tour Book. Verify that auxiliary brake is engaged.
Lower stand to proper position and instruct two crew
members to set slips using outside handles only.
3
4
1
2

STEP SUB PROCEDURE REMARKS
Driller
PIPE SPINNER DRILL PIPE
T R I P IN THE H O L E
Romfor International Ltd.
. 2
BEFORE THE BLOCKS LEAVE THE FLOOR:
• Verify that the Derrickman understands the
proper tie-off procedures.
• Verify that the Derrickman is properly tied-off.
(100% Tie-off).
• Derrickman will communicate with Driller that
he is properly Tied-off and ready to work.
BPS recommends the use of
two-way communications
between the Derrickman and
the Driller.
5
6
7
8
9
10
11
12
13
After tongs are removed, raise drill string allowing crew
members to pull slips using proper handles.Minimum three people to pull
slips.14
Instruct Motorman to unlatch elevators.
Pick up traveling equipment and clear elevators from
tool joint.
Instruct crew members to install “Hobble” on elevators,
if required.
READY TO TRIP IN HOLE WITH DRILL PIPE
Raise elevators to proper position for latching onto
next stand of drill pipe. Know kick-out point on drum
to avoid Crown.
Verify elevators are turned to the
proper position for latching next
stand.
After Derrickman latches stand of drill pipe in eleva-
tors, pick up slowly on stand. Instruct crew to guide
stand to correct stabbing position, using “tail rope”.
Lower stand of drill pipe (SLOWLY) as crew stabs
stand into tool joint in rotary table.
Wait on crew to make up stand with pipe spinners.
Once pin end is set in tool joint, slack off clearing
elevators of tool joint.
Be aware of elevators hanging
up on tong lines and swinging
blocks. Keep eye on
Derrickman while latching
stand.
Insure tail rope is used properly.
MAKE SURE CREW MEM-
BERS ARE IN PROPER
POSITION AND CLEAR OF
PIN END OF STAND.
Be careful not to damage face
of drill pipe. (Don’t bounce tool
joint, pick up if mis-stabbed).
Use stabbing guide if required.
Be aware of traveling
equipment’s position.
When tongs and crew members are in proper makeup
position, engage makeup cathead, tightening drill pipe
connection to proper torque.
Romfor International Ltd.
STEP SUB PROCEDURE REMARKS
PIPE SPINNER DRILL PIPE
T R I P IN THE H O L E
Driller
3
15
16
Lower the drill string into the hole.
Repeat Steps 3 through 15 for remaining drill
pipe.
END OF PROCEDURE
WATCH WEIGHT INDICATOR
FOR HOLE CONDITIONS.
MONITOR HOLE FOR
PROPER DISPLACEMENT.
Monitor displacement of each
stand of drill pipe.
Romfor International Ltd.
TRIP IN THE
HOLE
TRIP IN THE
HOLE
DrillerDriller
PIP
E S
PIN
NE
R
DR
ILL C
OLLA
R
PIPE SPINNER
DRILL COLLAR
PIPE SPINNER
DRILL COLLAR

Romfor International Ltd.
STEP SUB PROCEDURE REMARKS
PIPE SPINNER DRILL COLLAR
T R I P IN THE H O L E
Driller
1
BEFORE THE BLOCKS LEAVE THE FLOOR:
• Verify that the Derrickman understands the
proper tie-off procedures.
• Verify that the Derrickman is properly tied-off.
(100% Tie-off).
• Derrickman will communicate with Driller that
he is properly Tied-off and ready to work.
BPS recommends the use of
two-way communications
between the Derrickman and
the Driller.
0 1
1
2
2
PPE Requirements - Hard Hat, Safety Glasses,
Work Gloves, Steel Toe Shoes, Back Support.
Review JSA for tripping in hole with Drill Collars.
Know string weight, maximum over-pull, displacement
volume, pipe tally, BHA design, proper makeup torque
values, number of stands to casing shoe, previous
tight spots, any windows or kick-off points, etc.
Fit for duty check on all hands.
DISCUSS PROPER TIE-OFF PROCEDURES WITH
DERRICKMAN
Verify that equipment has been inspected and is in
good working condition.
Verify following items are ready/available, if required:
- Unlock positive lock on hook.
- Strapping tape.
- Wiper rubber available and in good condition.
- Inside BOP, safety valve w/wrench, and proper x-over
subs, lift subs, collar clamps and wrenches, ropes for
elevators and proper drill collar slips.
- Fluid monitoring alarms and equipment are set and
operating properly.
Notify Rig Manager before tripping in hole with drill
collars.
PROCEDURE IS BASED ON THE ASSUMPTION
THAT THE BOTTOM HOLE TOOL IS MADE UP ON
THE FIRST COLLAR
Trip sheet available for monitor-
ing displacement.
Rig manager should be on rig
floor when handling BHA.
READY TO TRIP IN HOLE
Driller is to verify proper setting and working
condition of the Crown-O-Matic at the beginning
of trip. Driller is to acknowledge Crown-O-Matic
check in the IADC Tour Book. Verify that auxiliary
brake is engaged.
3
4
1
2
3
STEP SUB PROCEDURE REMARKS
Driller
PIPE SPINNER DRILL COLLAR
T R I P IN THE H O L E
Romfor International Ltd.
. 2
4
5
6
7
8
9
Maintain radio communication
with Derrickman. Make sure
Derrickman is clear before
using air hoist. After back out,
insure lift sub is picked up and
stored in the proper position
using air hoist.
10
11
12 After Derrickman latches stand of drill collars in
elevators, pick up slowly on stand. Using the drill
collar assists, instruct crew to guide stand to correct
stabbing position, avoiding drill collar clamp and slip
handles.
Insure drill collar assist is used
properly, if required. MAKE
SURE CREW MEMBERS FEET
ARE CLEAR OF PIN END OF
STAND.
13 Lower stand of drill collars (SLOWLY) as crew stabs
stand into tool joint in rotary table.
Once pin end is set in tool joint, slack off clearing
elevators of lift sub.
Be careful not to damage face
of drill collar.
Be aware of traveling
equipment’s position.14
3 Lower drill collars SLOWLY, making sure bit, stabiliz-
ers, etc., clear the BOPs and wear bushing; to proper
height for setting slips.
WATCH WEIGHT INDICATOR
FOR DRAG. Keep track of
number of drill collars run in
the hole
Instruct hands to set slips. Minimum of two people to
set slips.
Slack off on drill string only enough weight to set slips.
Pay close attention to weight indicator.
Insure Hands install drill collar clamp according to
proper procedures.
Slack off drill string weight onto slips, clearing eleva-
tors from lift sub.
Make sure slips are set below
hard band.
DO NOT EXCEED TRAVELING
BLOCK ASSEMBLY WEIGHT.
When tongs and crew members are in proper break
out position, engage break out cat head pulling lead
tongs and break connection.
THE LIFT SUB CONNECTION IS BROKEN
Raise elevators slowly to proper position for latching
onto next stand of drill collars.
After tongs are removed and cleared, instruct crew to
position properly for next stand of collars and unlatch
elevators.
Do not slack-off until drill collar
clamp is installed and hands are
clear.
Instruct hands to move to a
safe area while breaking
connection.
Instruct crew to tie hoist line onto lift sub and back out
with chain tongs using proper procedures.
Be aware of elevators hanging
up on lift sub.
Romfor International Ltd.
STEP SUB PROCEDURE REMARKS
PIPE SPINNER DRILL COLLAR
T R I P IN THE H O L E
Driller
3
15
Verify crew members are
using proper procedures in
removing drill collar clamp.
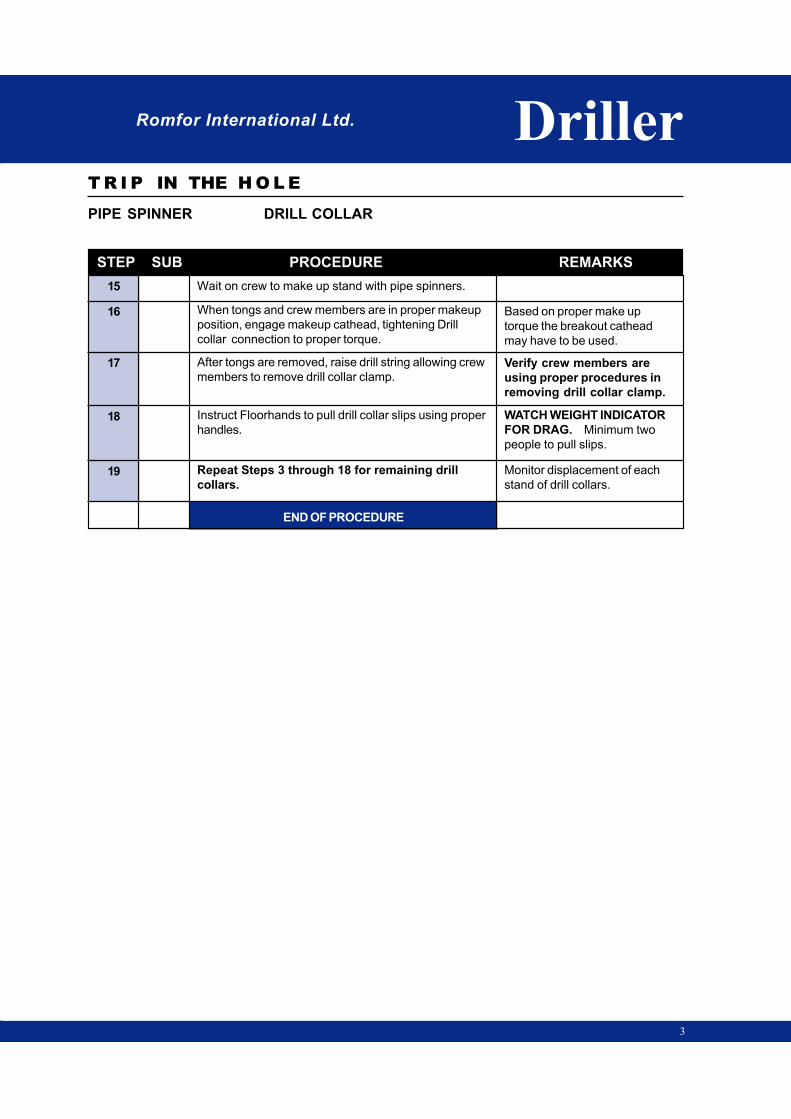
Instruct Floorhands to pull drill collar slips using proper
handles.
Repeat Steps 3 through 18 for remaining drill
collars.
END OF PROCEDURE
WATCH WEIGHT INDICATOR
FOR DRAG. Minimum two
people to pull slips.
Monitor displacement of each
stand of drill collars.
16
17
18
19
Wait on crew to make up stand with pipe spinners.
When tongs and crew members are in proper makeup
position, engage makeup cathead, tightening Drill
collar connection to proper torque.
After tongs are removed, raise drill string allowing crew
members to remove drill collar clamp.
Based on proper make up
torque the breakout cathead
may have to be used.

Romfor International Ltd.
TRIP IN THE
HOLE
TRIP IN THE
HOLE
DrillerDriller
SPIN
NIN
G C
HA
IN
DR
IL
L P
IP
E
SPINNING CHAIN
DRILL PIPE
SPINNING CHAIN
DRILL PIPE
Romfor International Ltd.
STEP SUB PROCEDURE REMARKS
SPINNING CHAIN DRILL PIPE
T R I P IN THE H O L E
Driller
1
0 1
1
2
2
3
4
PPE Requirements - Hard Hat, Safety Glasses,
Work Gloves, Steel Toe Shoes, Back Support.
Review JSA for tripping in hole with Drill Pipe.
Know string weight, maximum over-pull, displacement
volume, pipe tally, BHA design, proper makeup torque
values, number of stands to casing shoe, previous
tight spots, any windows or kick-off points, etc.
Fit for duty check on all hands.
DISCUSS PROPER TIE-OFF PROCEDURES WITH
DERRICKMAN
Verify that equipment has been inspected and is in
good working condition.
Verify following items are ready/available, if required:
- Stabbing guide
- Unlock positive lock on hook.
- Strapping tape.
- Wiper rubber available and in good condition.
- Inside BOP, safety valve w/wrench, and proper x-over
subs, and proper drill pipe slips.
- Tail rope.
- Fluid monitoring alarms and equipment are set and
operating properly
- Load Cell is in proper position.
PROCEDURE IS BASED ON THE ASUMPTION
THAT THE DRILL COLLARS ARE ALREADY
RUN IN THE HOLE WITH DRILL PIPE
ON LAST STAND OF COLLARS.
PREPARING TO TRIP IN HOLE
Trip sheet available for monitor-
ing displacement.
Verify that any ropes used to
latch drill collars are removed.
Driller is to verify proper setting and working
condition of the Crown-O-Matic at the beginning
of trip. Driller is to acknowledge Crown-O-Matic
check in the IADC Tour Book. Verify that auxiliary
brake is engaged.
Lower stand to proper position and instruct two crew
members to set slips using outside handles only.
3
4
1
2
Slack off drill string weight onto slips, clearing eleva-
tors from tool joint.
STEP SUB PROCEDURE REMARKS
Driller
SPINNING CHAIN DRILL PIPE
T R I P IN THE H O L E
Romfor International Ltd.
. 2
BEFORE THE BLOCKS LEAVE THE FLOOR:
• Verify that the Derrickman understands the
proper tie-off procedures.
• Verify that the Derrickman is properly tied-off.
(100% Tie-off).
• Derrickman will communicate with Driller
that he is properly Tied-off and ready to work.
BPS recommends the use of
two-way communications
between the Derrickman and
the Driller.
5
6
7
8
9
10
Make sure all employees are in
proper position, especially their
hands. Be careful not to
damage face of drill pipe.
(Don’t bounce tool joint, pick up
if mis-stabbed). Use stabbing
guide if required.
11
12 Once pin end is set in tool joint, slack off clearing
elevators of tool joint.Be aware of traveling
equipment’s position.
Instruct Motorman to unlatch elevators.
Pick up traveling equipment and clear elevators from
tool joint.
Instruct crew members to install “Hobble” on elevators,
if required.
READY TO TRIP IN HOLE WITH DRILL PIPE
Raise elevators to proper position for latching onto
next stand of drill pipe. Know kick-out point on drum
to avoid Crown.
After Derrickman latches stand of drill pipe in eleva-
tors, pick up slowly on stand. Instruct crew to guide
stand to correct stabbing position, using “tail rope”.
Verify tongs, spinning chain, and crew members are in
proper position.
Verify elevators are turned to the
proper position for latching next
stand.
Be aware of elevators hanging
up on tong lines and swinging
blocks. Keep eye on
Derrickman while latching
stand.
Insure tail rope is used properly.
MAKE SURE CREW MEM-
BERS ARE IN PROPER
POSITION AND CLEAR OF
PIN END OF STAND.
Lower stand of drill pipe (SLOWLY) as crew stabs
stand into tool joint in rotary table.
Make sure chain is in proper
position.
Romfor International Ltd.
STEP SUB PROCEDURE REMARKS
SPINNING CHAIN DRILL PIPE
T R I P IN THE H O L E
Driller
3
13
Minimum three people to pull
slips.
After tongs are removed, raise drill string allowing crew
members to pull slips using proper handles.
Lower the drill string into the hole.
Repeat Steps 3 through 16 for remaining drill
pipe.
WATCH WEIGHT INDICATOR
FOR HOLE CONDITIONS.
MONITOR HOLE FOR PROPER
DISPLACEMENT.
Monitor displacement of each
stand of drill pipe.
14
15
16
END OF PROCEDURE
17
Engage the make up cat head and spin stand of drill
pipe into drill string - SLOWLY.
After chain is removed, tongs and crew members are in
proper makeup position, engage makeup cathead,
tightening drill pipe connection to proper torque.
Make sure chain is thrown using
the left hand, to proper position
on drill pipe while engaging cat
head. Make sure all employees
are in proper position, especially
their hands, while making up
connection.
Romfor International Ltd.
TRIP IN THE
HOLE
TRIP IN THE
HOLE
DrillerDriller
SPIN
NIN
G C
HA
IN
DR
ILL C
OLLA
R
SPINNING CHAIN
DRILL COLLAR
SPINNING CHAIN
DRILL COLLAR

Romfor International Ltd.
STEP SUB PROCEDURE REMARKS
SPINNING CHAIN DRILL COLLAR
T R I P IN THE H O L E
Driller
1
BEFORE THE BLOCKS LEAVE THE FLOOR:
• Verify that the Derrickman understands the
proper tie-off procedures.
• Verify that the Derrickman is properly tied-off.
(100% Tie-off).
• Derrickman will communicate with Driller that
he is properly Tied-off and ready to work.
BPS recommends the use of
two-way communications
between the Derrickman and
the Driller.
0 1
1
2
2
PPE Requirements - Hard Hat, Safety Glasses,
Work Gloves, Steel Toe Shoes, Back Support.
Review JSA for tripping in hole with Drill Collars.
Know string weight, maximum over-pull, displacement
volume, pipe tally, BHA design, proper makeup torque
values, number of stands to casing shoe, previous
tight spots, any windows or kick-off points, etc.
Fit for duty check on all hands.
DISCUSS PROPER TIE-OFF PROCEDURES WITH
DERRICKMAN
Verify that equipment has been inspected and is in
good working condition.
Verify following items are ready/available, if required:
- Unlock positive lock on hook.
- Strapping tape.
- Wiper rubber available and in good condition.
- Inside BOP, safety valve w/wrench, and proper x-over
subs, lift subs, collar clamps and wrenches, ropes for
elevators and proper drill collar slips.
- Fluid monitoring alarms and equipment are set and
operating properly.
Notify Rig Manager before tripping in hole with drill
collars.
PROCEDURE IS BASED ON THE ASSUMPTION
THAT THE BOTTOM HOLE TOOL IS MADE
UP ON THE FIRST COLLAR
Trip sheet available for monitor-
ing displacement.
Rig manager should be on rig
floor when handling BHA.
READY TO TRIP IN HOLE
Driller is to verify proper setting and working
condition of the Crown-O-Matic at the beginning
of trip. Driller is to acknowledge Crown-O-Matic
check in the IADC Tour Book. Verify that auxiliary
brake is engaged.
3
4
1
2
3
STEP SUB PROCEDURE REMARKS
Driller
SPINNING CHAIN DRILL COLLAR
T R I P IN THE H O L E
Romfor International Ltd.
. 2
4
5
6
7
8
9
Be aware of elevators hanging
up on lift sub.10
11 Instruct crew to tie hoist line onto lift sub and back out
with chain tongs using proper procedures.Make sure Derrickman is clear
before using air hoist. After
back out, insure lift sub is
picked up and stored in the
proper position using air hoist.
After Derrickman latches stand of drill collars in
elevators, pick up slowly on stand. Using the drill
collar assists, instruct crew to guide stand to correct
stabbing position, avoiding drill collar clamp and slip
handles.
Insure drill collar assist is used
properly, if required. MAKE
SURE CREW MEMBERS FEET
ARE CLEAR OF PIN END OF
STAND.
Lower stand of drill collars (SLOWLY) as crew stabs
stand into tool joint in rotary table.
Once pin end is set in tool joint, slack off clearing
elevators of lift sub.
Be careful not to damage face of
drill collar.
Be aware of traveling
equipment's position.
12
13
14
3 Lower drill collars SLOWLY, making sure bit, stabiliz-
ers, etc., clear the BOPs and wear bushing; to proper
height for setting slips.
WATCH WEIGHT INDICATOR
FOR DRAG. Keep track of
number of drill collars run in
the hole.
Instruct hands to set slips.
Slack off on drill string only enough weight to set slips.
Pay close attention to weight indicator.
Insure Hands install drill collar clamp according to
proper procedures.
Slack off drill string weight onto slips, clearing eleva-
tors from lift sub.
Make sure slips are set below
hard band. Minimum of two
people to set slips
DO NOT EXCEED TRAVELING
BLOCK ASSEMBLY WEIGHT.
When tongs and crew members are in proper break
out position, engage break out cat head pulling lead
tongs and break connection.
THE LIFT SUB CONNECTION IS BROKEN
After tongs are removed and cleared, instruct crew to
position properly for next stand of collars and unlatch
elevators.
Do not slack-off until drill collar
clamp is installed and hands are
clear.
Instruct hands to move to a
safe area while breaking
connection.
Raise elevators slowly to proper position for latching
onto next stand of drill collars.
Romfor International Ltd.
STEP SUB PROCEDURE REMARKS
SPINNING CHAIN DRILL COLLAR
T R I P IN THE H O L E
Driller
3
15
Based on proper make up
torque the breakout cathead
may have to be used. Make
sure the load cell (torque
sensor) is in the proper position.
After tongs are removed, raise drill string allowing crew
members to remove drill collar clamp.
Instruct Floorhands to pull drill collar slips using proper
handles.
Repeat Steps 3 through 18 for remaining drill
collars.
Verify crew members are
using proper procedures in
removing drill collar clamp.
WATCH WEIGHT INDICATOR
FOR DRAG. Minimum two
people to pull slips.
16
17
18
END OF PROCEDURE
19 Monitor displacement of each
stand of drill collars.
After the spinning chain is wrapped, counter-clockwise,
above pin end of stand. - SLOWLY ENGAGE MAKE
UP CATHEAD, making the stand up - SLOWLY.
When tongs and crew members are in proper makeup
position, engage makeup cathead, tightening Drill
collar connection to proper torque.
Make sure all employees are in
proper position, especially their
hands, before engaging cat
head.

Romfor International Ltd.
TRIP IN THE
HOLE
TRIP IN THE
HOLE
DrillerDriller
RO
TA
RY
TA
BLE
DR
IL
L P
IP
E
ROTARY TABLE
DRILL PIPE
ROTARY TABLE
DRILL PIPE

Romfor International Ltd.
STEP SUB PROCEDURE REMARKS
ROTARY TABLE DRILL PIPE
T R I P IN THE H O L E
Driller
1
IT IS NOT A ROMFOR RECOMMENDED BEST PRACTICE TO REVERSE INTO
DRILL PIPE WITH A ROTARY TABLE.

Romfor International Ltd.
TRIP IN THE
HOLE
TRIP IN THE
HOLE
DrillerDriller
RO
TA
RY
TA
BL
E
DR
IL
L C
OL
LA
R
ROTARY TABLE
DRILL COLLAR
ROTARY TABLE
DRILL COLLAR

Romfor International Ltd.
STEP SUB PROCEDURE REMARKS
ROTARY TABLE DRILL COLLAR
T R I P IN THE H O L E
Driller
1
IT IS NOT A ROMFOR RECOMMENDED BEST PRACTICE TO REVERSE INTO
DRILL COLLAR WITH A ROTARY TABLE.
Romfor International Ltd.
TRIP IN THE
HOLE
TRIP IN THE
HOLE
DrillerDriller
CHAIN TONG
DRILL COLLAR
CHAIN TONG
DRILL COLLAR
CH
AIN
TO
NG
DR
ILL C
OLLA
R
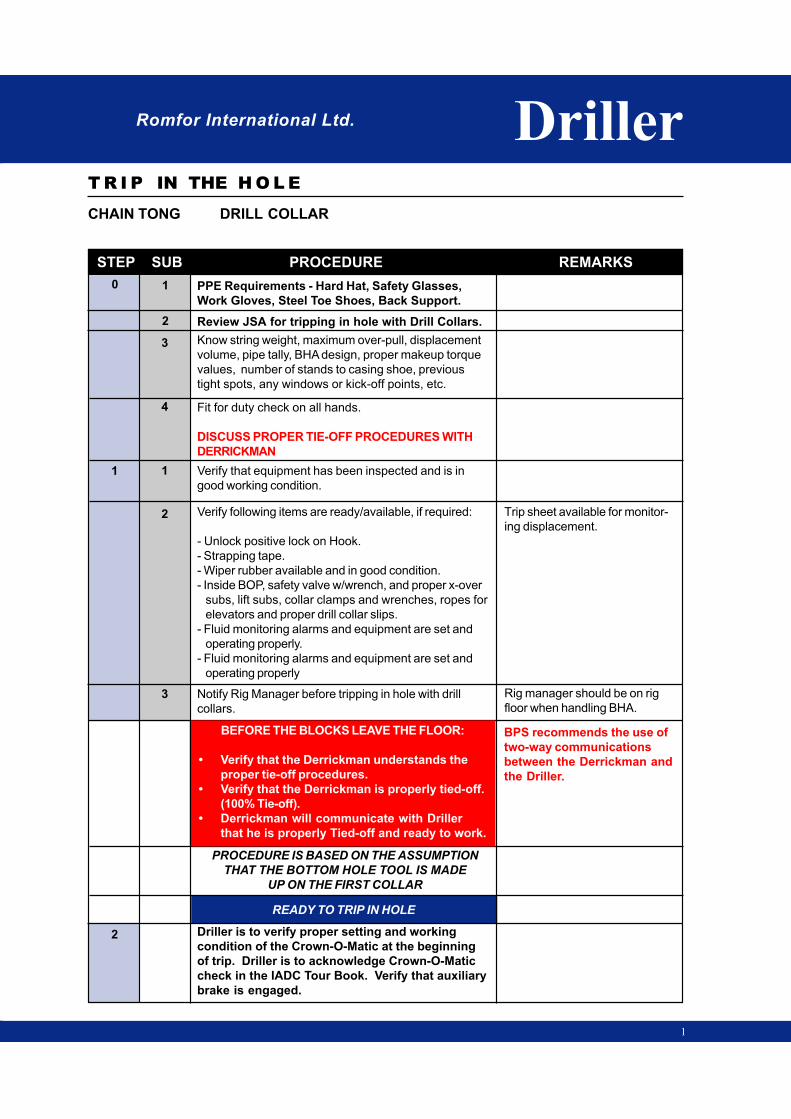
Romfor International Ltd.
STEP SUB PROCEDURE REMARKS
CHAIN TONG DRILL COLLAR
T R I P IN THE H O L E
Driller
1
3
4
1
2
3
0 1
1
2
2
BEFORE THE BLOCKS LEAVE THE FLOOR:
• Verify that the Derrickman understands the
proper tie-off procedures.
• Verify that the Derrickman is properly tied-off.
(100% Tie-off).
• Derrickman will communicate with Driller
that he is properly Tied-off and ready to work.
BPS recommends the use of
two-way communications
between the Derrickman and
the Driller.
PPE Requirements - Hard Hat, Safety Glasses,
Work Gloves, Steel Toe Shoes, Back Support.
Review JSA for tripping in hole with Drill Collars.
Know string weight, maximum over-pull, displacement
volume, pipe tally, BHA design, proper makeup torque
values, number of stands to casing shoe, previous
tight spots, any windows or kick-off points, etc.
Fit for duty check on all hands.
DISCUSS PROPER TIE-OFF PROCEDURES WITH
DERRICKMAN
Verify that equipment has been inspected and is in
good working condition.
Verify following items are ready/available, if required:
- Unlock positive lock on Hook.
- Strapping tape.
- Wiper rubber available and in good condition.
- Inside BOP, safety valve w/wrench, and proper x-over
subs, lift subs, collar clamps and wrenches, ropes for
elevators and proper drill collar slips.
- Fluid monitoring alarms and equipment are set and
operating properly.
- Fluid monitoring alarms and equipment are set and
operating properly
Notify Rig Manager before tripping in hole with drill
collars.
PROCEDURE IS BASED ON THE ASSUMPTION
THAT THE BOTTOM HOLE TOOL IS MADE
UP ON THE FIRST COLLAR
Trip sheet available for monitor-
ing displacement.
Rig manager should be on rig
floor when handling BHA.
READY TO TRIP IN HOLE
Driller is to verify proper setting and working
condition of the Crown-O-Matic at the beginning
of trip. Driller is to acknowledge Crown-O-Matic
check in the IADC Tour Book. Verify that auxiliary
brake is engaged.

STEP SUB PROCEDURE REMARKS
CHAIN TONG DRILL COLLAR
T R I P IN THE H O L E
Romfor International Ltd. Driller
2
Instruct hands to set slips.
Slack off on drill string only enough weight to set slips.
Pay close attention to weight indicator.
Insure Hands install drill collar clamp according to
proper procedures.
Slack off drill string weight onto slips, clearing eleva-
tors from lift sub.
When tongs and crew members are in proper break
out position, engage break out cat head pulling Lead
tongs and break connection.
Make sure slips are set below
hard band. Minimum of two
people to set slips.
DO NOT EXCEED TRAVELING
BLOCK ASSEMBLY WEIGHT.
Do not slack-off until drill collar
clamp is installed and hands are
clear.
THE LIFT SUB CONNECTION IS BROKEN
After tongs are removed and cleared, instruct crew to
position properly for next stand of collars and unlatch
elevators.
Raise elevators slowly to proper position for latching
onto next stand of drill collars.
Instruct crew to tie hoist line onto lift sub and back out
with chain tongs using proper procedures.
Instruct hands to move to a
safe area while breaking
connection.
4
5
6
7
8
9
10 Be aware of elevators hanging
up on lift sub.
Maintain radio communication
with Derrickman. Make sure
Derrickman is clear before
using air hoist. After back out,
insure lift sub is picked up and
stored in the proper position
using air hoist.
Insure drill collar assist is used
properly, if required. MAKE
SURE CREW MEMBERS FEET
ARE CLEAR OF PIN END OF
STAND.
Be careful not to damage face
of drill collar.
After Derrickman latches stand of drill collars in
elevators, pick up slowly on stand. Using the drill
collar assists, instruct crew to guide stand to correct
stabbing position, avoiding drill collar clamp and slip
handles.
Lower stand of drill collars (SLOWLY) as crew stabs
stand into tool joint in rotary table.
11
12
13
Be aware of traveling equipment's
position. Maintain constant weight
of stand by slacking-off as the
connection is made up.
14 Once pin end is set in tool joint, support the weight of
the drill collars in the elevators while the crew makes
up stand using chain tongs.
3 WATCH WEIGHT INDICATOR
FOR DRAG. Keep track of
number of drill collars run in
the hole.
Lower drill collars SLOWLY, making sure bit, stabiliz-
ers, etc., clear the BOPs and wear bushing; to proper
height for setting slips.
Romfor International Ltd.
STEP SUB PROCEDURE REMARKS
CHAIN TONG DRILL COLLAR
T R I P IN THE H O L E
Driller
3
When tongs and crew members are in proper makeup
position, engage makeup cathead, tightening drill collar
connection to proper torque.
After tongs are removed, raise drill string allowing crew
members to remove drill collar clamp.
Instruct Floorhands to pull drill collar slips using proper
handles.
Based on proper make up
torque, the breakout cathead
may have to be used. Make
sure the load cell (torque
sensor) is in the proper position.
Repeat Steps 3 through 17 for remaining drill
collars.
END OF PROCEDURE
Verify crew members are
using proper procedures in
removing drill collar clamp.
WATCH WEIGHT INDICATOR
FOR DRAG. Minimum two
people to pull slips.
15
16
17
18 Monitor displacement of each
stand of drill collars.

Romfor International Ltd.
TRIP IN THE
HOLE
TRIP IN THE
HOLE
TR
IP
IN
TH
E H
OL
E
Lead TongLead Tong

Romfor International Ltd.
TRIP IN THE
HOLE
TRIP IN THE
HOLE
Lead Tong
Hand
Lead Tong
Hand
TO
P D
RIV
E
DR
IL
L P
IP
E
TOP DRIVE
DRILL PIPE
TOP DRIVE
DRILL PIPE
Romfor International Ltd.
STEP SUB PROCEDURE REMARKS
TOP DRIVE DRILL PIPE
T R I P IN THE H O L E
Lead Tong Hand
1
0
1
2
3
4
5
6
1
2
PPE Requirements - Hard Hat, Safety Glasses,
Work Gloves, Steel Toe Shoes, Back Support.
Review JSA on tripping in the hole with Drill Pipe.Inspect Equipment:
Tongs, Lines, Shackles, Slips, Keepers, Tong Heads,
Clamps, Stabbing Guide and Cables.
PROCEDURE IS BASED ON THE ASSUMPTION
THAT THE DRILL COLLARS ARE ALREADY
RUN IN THE HOLE WITH DRILL PIPE
ON LAST STAND OR COLLARS.
Upon the Driller's signal, assist in setting the slips,
using proper lifting procedures.
Stand clear while elevators are unlatched and cleared.
Dope the connection using the proper pipe dope.
Install stabbing guide.
Assist in stabbing stand of drill pipe into the connec-
and place in the proper storing position.
tion in the rotary table using the stabbing guide.
After the pipe is stabbed, remove the stabbing guide
Look for:
Slack, Missing parts, Damage,
Wear, Broken Cable, Shackles,
Dies, Keepers, Tong Heads,
Lines (proper length and proper
size).
Slips - Bolts, Inserts, Keepers,
(Cleaned and Doped), Handle
Conditions.
Two people to set slips using
side handles.
Do not get in the Drillers view.
Make sure feet are clear of pin
end of stand. Keep fingers clear
of pinch points.(Keep fingers out
of threads).
Before doping, perform a quick
visual inspection for washout
and debris in box.
STEP SUB PROCEDURE REMARKS
Lead Tong Hand
TOP DRIVE DRILL PIPE
T R I P IN THE H O L E
Romfor International Ltd.
. 2
END OF PROCEDURE
7
8
9
10
11
12
13
14
7
1
1
2
2
MAKE UP WITH PIPE SPINNERS -Assist in placing
pipe spinners on top pipe connection. STAND CLEAR
while connection is spun up.
If required, assist in securing pipe spinner to A-leg or
out of the way.
OR
MAKE UP WITH SPINNING CHAIN - STAND CLEAR
while chain is thrown and connection is spun up.
Unlatch the backup tongs.
Short ropes can be used on
handles.
Latch lead tongs on bottom connection using proper
handles.
STAND CLEAR while backup tongs are latched onto
top connection.
Make the Lead tongs bite, at the same time the
backup tongs bite while the Driller tightens connec-
tion, using the proper handles.
Unlatch back-up tongs using the proper handles.
THE CONNECTION IS TIGHTENED
Do not assist in latching backup
tongs.
Avoid the pinch points. Beware
of high torque requirements.
Minimum of three people to pull
slips.
Assist in pulling slips using proper handles and lifting
procedures.
Keep track of the number of stands run in the hole.
Repeat Steps 2 through 13 for remaining stands
of drill pipe.
Romfor International Ltd.
TRIP IN THE
HOLE
TRIP IN THE
HOLE
Lead Tong
Hand
Lead Tong
Hand
TO
P D
RIV
E
DR
ILL C
OLLA
R
TOP DRIVE
DRILL COLLAR
TOP DRIVE
DRILL COLLAR

Romfor International Ltd.
STEP SUB PROCEDURE REMARKS
TOP DRIVE DRILL COLLAR
T R I P IN THE H O L E
Lead Tong Hand
1
0 1
1
2
2
3
4
5
6
PPE Requirements - Hard Hat, Safety Glasses,
Work Gloves, Steel Toe Shoes, Back Support.
Review JSA on tripping in the hole with drill collars.
Inspect Equipment:
Tongs, Lines, Shackles, Slips, Keepers, Tong Heads,
Clamps, Cables, Drill Collar Clamps, Chain Tongs and
Wrench.
PROCEDURE IS BASED ON THE ASSUMPTION
THAT THE BOTTOM HOLE TOOL IS MADE UP ON
THE FIRST COLLAR.
Upon the Driller’s signal, assist in setting the slips,
using proper lifting procedures.
Upon the Driller’s signal, place drill collar clamp around
drill collar above the hard band using the proper
handles.
After Backup tong is latched onto the drill collar
connection, release the Lead tongs from the A-leg.
Place Lead tongs on the top of the lift sub connection,
using proper handles.
Make the Lead tongs bite at the same time the Backup
tongs bite, using the proper tong handles.
After the tongs bite move to a safe area while Driller
breaks the lift sub connection.
Look for:
Slack, Missing parts, Damage,
Wear, Broken Cable, Shackles,
Dies, Keepers, Tong Heads,
Lines (proper length and proper
size).
Slips - Bolts, Inserts, Keepers,
(Cleaned and Doped), Handle
Conditions.
Minimum of two people to set
slips.
DO NOT hold the bottom of the
clamp with hands or knees.
DO NOT assist in latching
Backup tongs.
Avoid pinch points. Avoid break
out line.
Be aware of tight connections.
Be aware of trip hazards.
THE LIFT SUB CONNECTION IS BROKEN

STEP SUB PROCEDURE REMARKS
Lead Tong Hand
TOP DRIVE DRILL COLLAR
T R I P IN THE H O L E
Romfor International Ltd.
. 2
7
8
9
10
11
12
13
13
Remove LEAD tongs and unlatch BACKUP tongs
using the proper tong handles. Secure tongs to A-leg.
Assist in securing hoist line to lift sub, if required.
Assist in backing out lift sub with chain tongs using
proper procedures.
If required, assist in the removal of lift sub from drill
collar connection and store in proper position.
Dope the drill collar connection using the proper pipe
dope.
Assist in stabbing stand of drill collars into the
connection in the rotary table.
Signal air hoist operator as
required.
MAKE UP WITH PIPE SPINNER - Assist in placing
pipe spinners on top collar connection. STAND
CLEAR while connection is spun up.
If required, assist in securing pipe spinner to A-leg or
out of the way.
OR
After spinning chain is removed, release Lead tongs
from A-leg and latch onto drill collar connection in
rotary table using the proper handles.
MAKE UP WITH SPINNING CHAIN - Assist wrap-
ping spinning chain onto drill collars. STAND CLEAR
while connection is spun up.
Before doping, perform a quick
visual inspection for washout
and debris in box.
Do not get in the Drillers’ view.
Make sure feet are clear of pin
end of stand. Keep fingers clear
of pinch points.(Keep fingers out
of threads).
Short ropes can be used on
handles.1
2
1
2
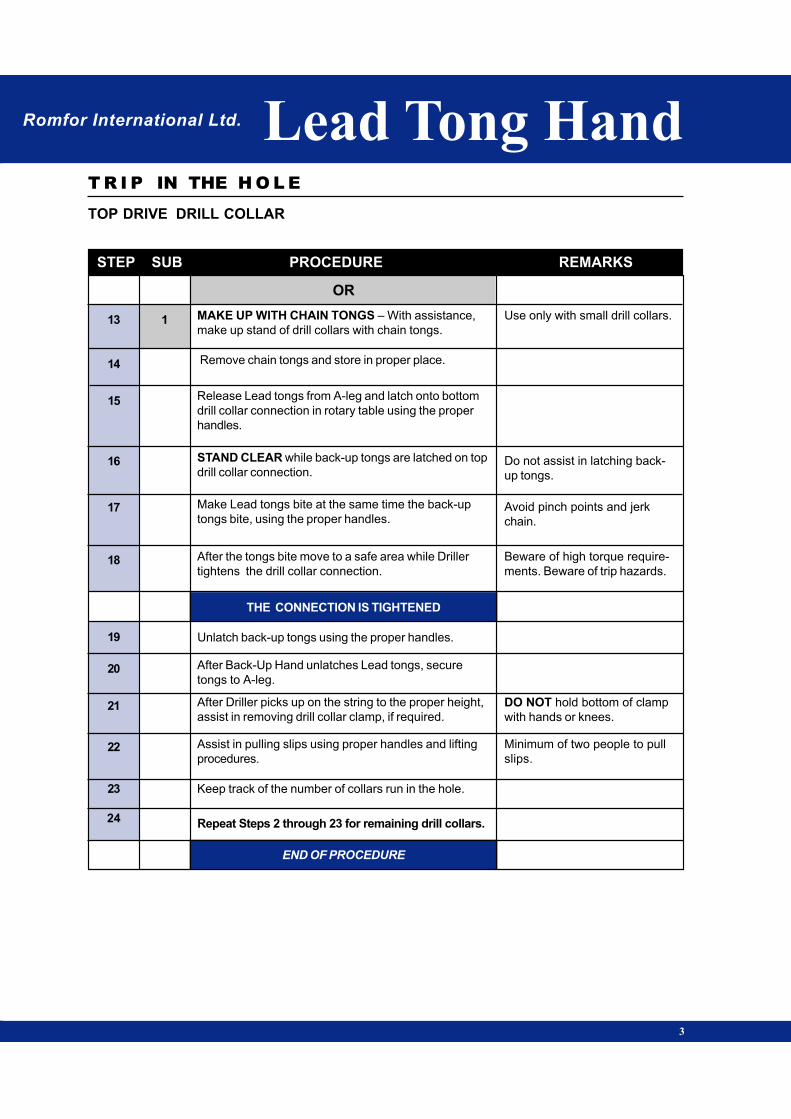
Romfor International Ltd.
STEP SUB PROCEDURE REMARKS
TOP DRIVE DRILL COLLAR
T R I P IN THE H O L E
Lead Tong Hand
3
13
14
15
16
17
1
18
19
20
21
22
DO NOT hold bottom of clamp
with hands or knees.
OR
MAKE UP WITH CHAIN TONGS – With assistance,
make up stand of drill collars with chain tongs.
Remove chain tongs and store in proper place.
Release Lead tongs from A-leg and latch onto bottom
drill collar connection in rotary table using the proper
handles.
STAND CLEAR while back-up tongs are latched on top
drill collar connection.
Make Lead tongs bite at the same time the back-up
tongs bite, using the proper handles.
Use only with small drill collars.
After the tongs bite move to a safe area while Driller
tightens the drill collar connection.
Do not assist in latching back-
up tongs.
Avoid pinch points and jerk
chain.
THE CONNECTION IS TIGHTENED
Unlatch back-up tongs using the proper handles.
After Back-Up Hand unlatches Lead tongs, secure
tongs to A-leg.
After Driller picks up on the string to the proper height,
assist in removing drill collar clamp, if required.
Assist in pulling slips using proper handles and lifting
procedures.
Keep track of the number of collars run in the hole.
Repeat Steps 2 through 23 for remaining drill collars.
Beware of high torque require-
ments. Beware of trip hazards.
END OF PROCEDURE
Minimum of two people to pull
slips.
23
24

Romfor International Ltd.
TRIP IN THE
HOLE
TRIP IN THE
HOLE
Lead Tong
Hand
Lead Tong
Hand
PIPE SPINNER
DRILL PIPE
PIPE SPINNER
DRILL PIPE
PIP
E S
PIN
NE
R
DR
IL
L P
IP
E
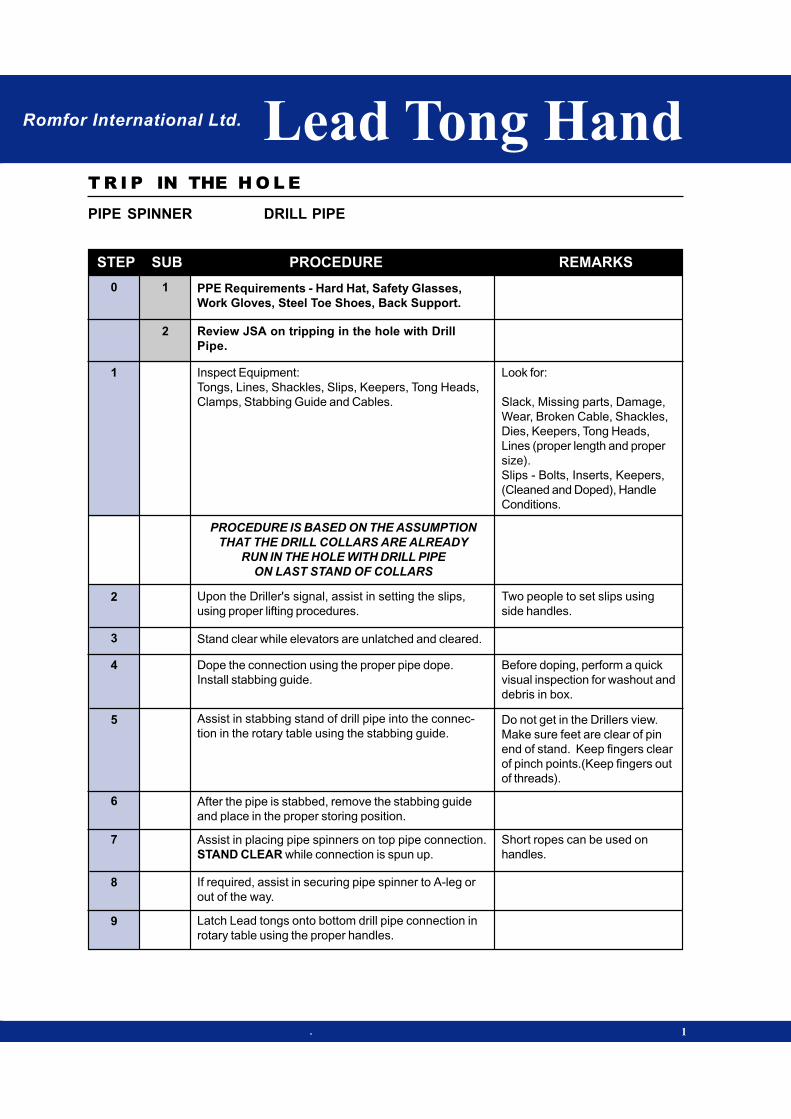
Romfor International Ltd. Lead Tong Hand
STEP SUB PROCEDURE REMARKS
PIPE SPINNER DRILL PIPE
T R I P IN THE H O L E
. 1
0 1
1
2
2
3
4
5
6
7
8
PPE Requirements - Hard Hat, Safety Glasses,
Work Gloves, Steel Toe Shoes, Back Support.
Review JSA on tripping in the hole with Drill
Pipe.
Inspect Equipment:
Tongs, Lines, Shackles, Slips, Keepers, Tong Heads,
Clamps, Stabbing Guide and Cables.
PROCEDURE IS BASED ON THE ASSUMPTION
THAT THE DRILL COLLARS ARE ALREADY
RUN IN THE HOLE WITH DRILL PIPE
ON LAST STAND OF COLLARS
Upon the Driller's signal, assist in setting the slips,
using proper lifting procedures.
Stand clear while elevators are unlatched and cleared.
Dope the connection using the proper pipe dope.
Install stabbing guide.
After the pipe is stabbed, remove the stabbing guide
and place in the proper storing position.
Assist in placing pipe spinners on top pipe connection.
STAND CLEAR while connection is spun up.
If required, assist in securing pipe spinner to A-leg or
out of the way.
Look for:
Slack, Missing parts, Damage,
Wear, Broken Cable, Shackles,
Dies, Keepers, Tong Heads,
Lines (proper length and proper
size).
Slips - Bolts, Inserts, Keepers,
(Cleaned and Doped), Handle
Conditions.
Two people to set slips using
side handles.
Before doping, perform a quick
visual inspection for washout and
debris in box.
Do not get in the Drillers view.
Make sure feet are clear of pin
end of stand. Keep fingers clear
of pinch points.(Keep fingers out
of threads).
Short ropes can be used on
handles.
Latch Lead tongs onto bottom drill pipe connection in
rotary table using the proper handles.
Assist in stabbing stand of drill pipe into the connec-
tion in the rotary table using the stabbing guide.
9
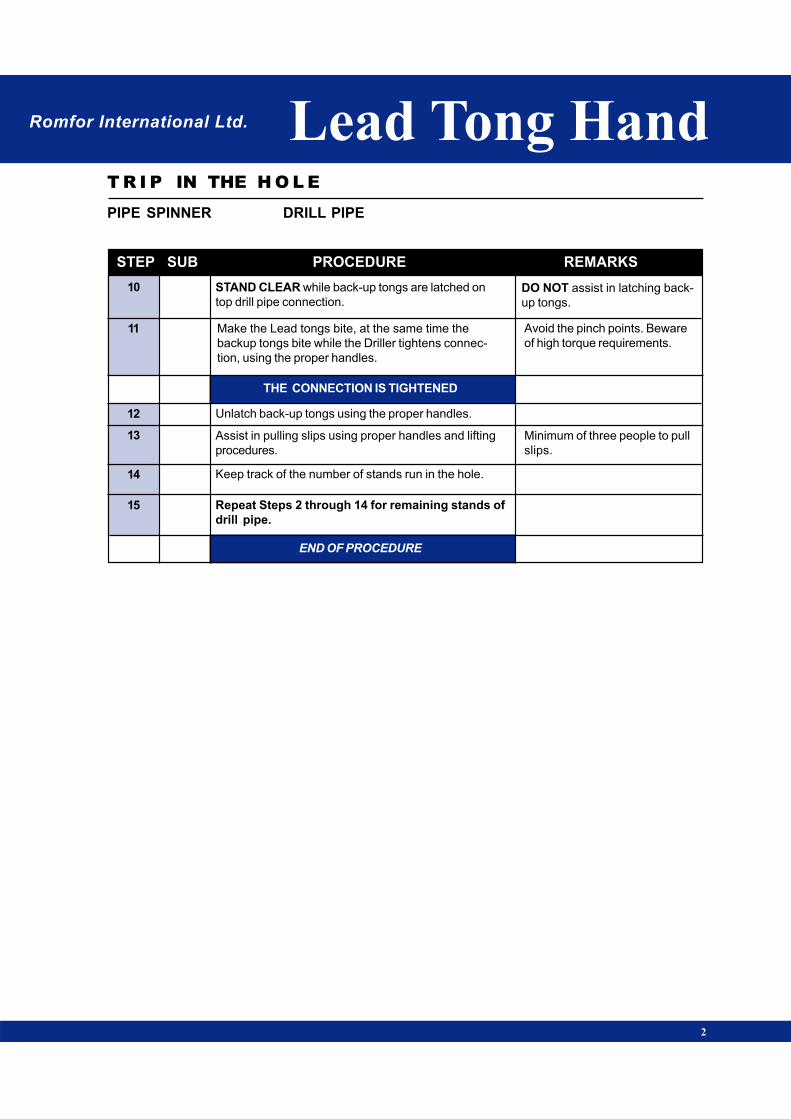
STEP SUB PROCEDURE REMARKS
Lead Tong Hand
PIPE SPINNER DRILL PIPE
T R I P IN THE H O L E
Romfor International Ltd.
2
14
15
Minimum of three people to pull
slips.
STAND CLEAR while back-up tongs are latched on
top drill pipe connection.
10
Make the Lead tongs bite, at the same time the
backup tongs bite while the Driller tightens connec-
tion, using the proper handles.
11
THE CONNECTION IS TIGHTENED
12 Unlatch back-up tongs using the proper handles.
13
DO NOT assist in latching back-
up tongs.
Avoid the pinch points. Beware
of high torque requirements.
Assist in pulling slips using proper handles and lifting
procedures.
Keep track of the number of stands run in the hole.
Repeat Steps 2 through 14 for remaining stands of
drill pipe.
END OF PROCEDURE

Romfor International Ltd.
TRIP IN THE
HOLE
TRIP IN THE
HOLE
Lead Tong
Hand
Lead Tong
Hand
PIP
E S
PIN
NE
R
DR
ILL C
OLLA
R
PIPE SPINNER
DRILL COLLAR
PIPE SPINNER
DRILL COLLAR
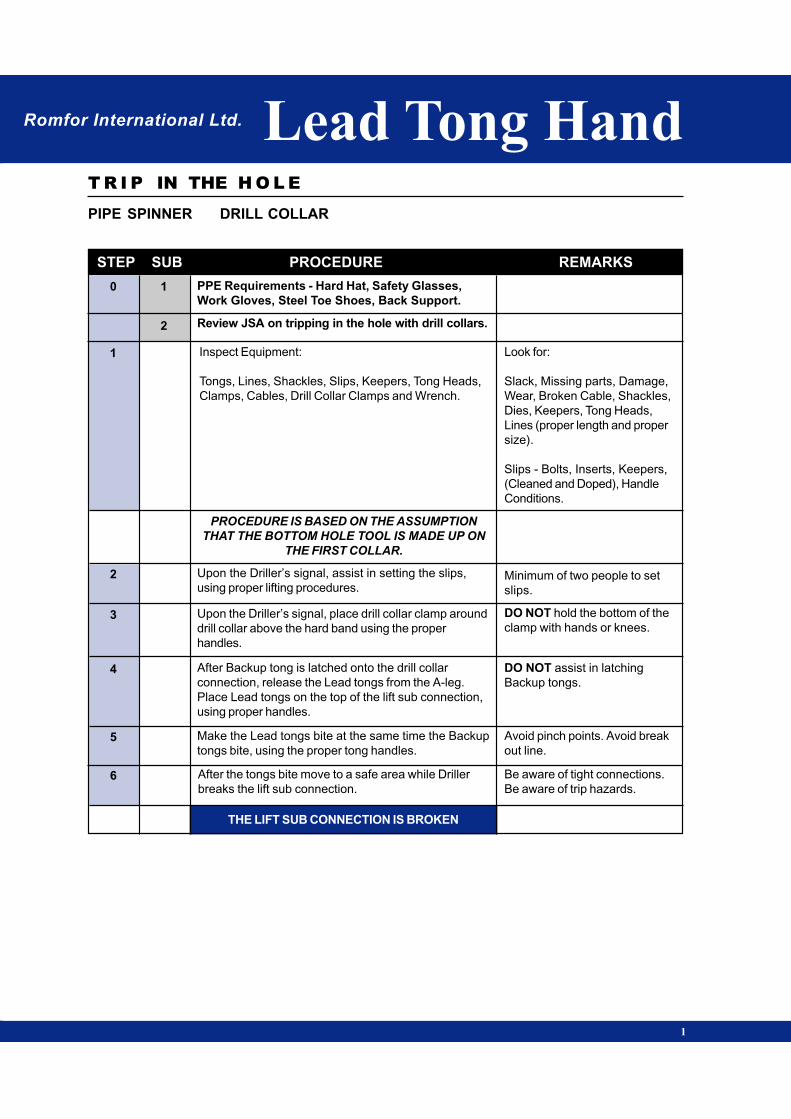
Romfor International Ltd.
STEP SUB PROCEDURE REMARKS
PIPE SPINNER DRILL COLLAR
T R I P IN THE H O L E
Lead Tong Hand
1
0 1
1
2
2
3
4
5
6
PPE Requirements - Hard Hat, Safety Glasses,
Work Gloves, Steel Toe Shoes, Back Support.
Review JSA on tripping in the hole with drill collars.
Inspect Equipment:
Tongs, Lines, Shackles, Slips, Keepers, Tong Heads,
Clamps, Cables, Drill Collar Clamps and Wrench.
PROCEDURE IS BASED ON THE ASSUMPTION
THAT THE BOTTOM HOLE TOOL IS MADE UP ON
THE FIRST COLLAR.
Upon the Driller’s signal, assist in setting the slips,
using proper lifting procedures.
Upon the Driller’s signal, place drill collar clamp around
drill collar above the hard band using the proper
handles.
After Backup tong is latched onto the drill collar
connection, release the Lead tongs from the A-leg.
Place Lead tongs on the top of the lift sub connection,
using proper handles.
Make the Lead tongs bite at the same time the Backup
tongs bite, using the proper tong handles.
After the tongs bite move to a safe area while Driller
breaks the lift sub connection.
Look for:
Slack, Missing parts, Damage,
Wear, Broken Cable, Shackles,
Dies, Keepers, Tong Heads,
Lines (proper length and proper
size).
Slips - Bolts, Inserts, Keepers,
(Cleaned and Doped), Handle
Conditions.
Minimum of two people to set
slips.
DO NOT hold the bottom of the
clamp with hands or knees.
DO NOT assist in latching
Backup tongs.
Avoid pinch points. Avoid break
out line.
Be aware of tight connections.
Be aware of trip hazards.
THE LIFT SUB CONNECTION IS BROKEN
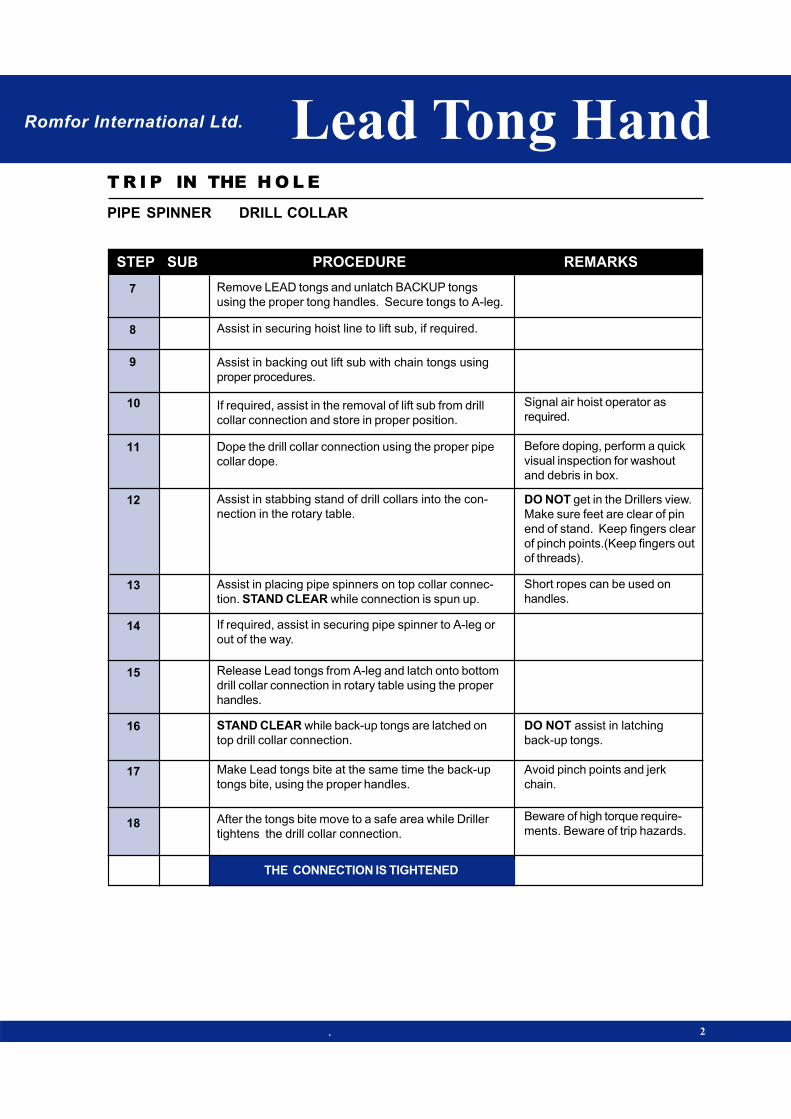
STEP SUB PROCEDURE REMARKS
Lead Tong Hand
PIPE SPINNER DRILL COLLAR
T R I P IN THE H O L E
Romfor International Ltd.
. 2
7
8
9
10
11
12
13
14
15
16
17
18
Remove LEAD tongs and unlatch BACKUP tongs
using the proper tong handles. Secure tongs to A-leg.
Assist in securing hoist line to lift sub, if required.
Assist in backing out lift sub with chain tongs using
proper procedures.
If required, assist in the removal of lift sub from drill
collar connection and store in proper position.
Dope the drill collar connection using the proper pipe
collar dope.
Assist in stabbing stand of drill collars into the con-
nection in the rotary table.
Signal air hoist operator as
required.
Before doping, perform a quick
visual inspection for washout
and debris in box.
Assist in placing pipe spinners on top collar connec-
tion. STAND CLEAR while connection is spun up.
If required, assist in securing pipe spinner to A-leg or
out of the way.
Release Lead tongs from A-leg and latch onto bottom
drill collar connection in rotary table using the proper
handles.
Make Lead tongs bite at the same time the back-up
tongs bite, using the proper handles.
STAND CLEAR while back-up tongs are latched on
top drill collar connection.
DO NOT get in the Drillers view.
Make sure feet are clear of pin
end of stand. Keep fingers clear
of pinch points.(Keep fingers out
of threads).
Short ropes can be used on
handles.
DO NOT assist in latching
back-up tongs.
Avoid pinch points and jerk
chain.
Beware of high torque require-
ments. Beware of trip hazards.After the tongs bite move to a safe area while Driller
tightens the drill collar connection.
THE CONNECTION IS TIGHTENED
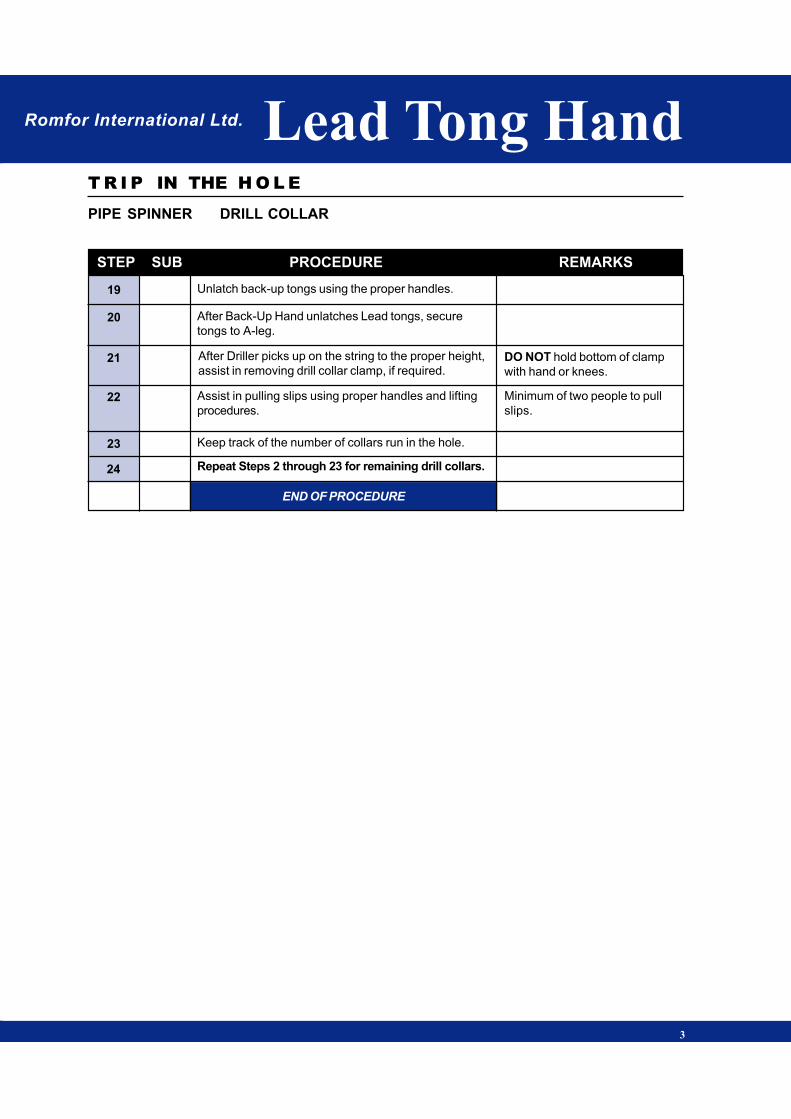
Romfor International Ltd.
STEP SUB PROCEDURE REMARKS
PIPE SPINNER DRILL COLLAR
T R I P IN THE H O L E
Lead Tong Hand
3
19
20
21
22
23
24
Unlatch back-up tongs using the proper handles.
After Back-Up Hand unlatches Lead tongs, secure
tongs to A-leg.
After Driller picks up on the string to the proper height,
assist in removing drill collar clamp, if required.
Assist in pulling slips using proper handles and lifting
procedures.
Keep track of the number of collars run in the hole.
DO NOT hold bottom of clamp
with hand or knees.
Repeat Steps 2 through 23 for remaining drill collars.
Minimum of two people to pull
slips.
END OF PROCEDURE
Romfor International Ltd.
TRIP IN THE
HOLE
TRIP IN THE
HOLE
Lead Tong
Hand
Lead Tong
Hand
SPIN
NIN
G C
HA
IN
DR
IL
L P
IP
E
SPINNING CHAIN
DRILL PIPE
SPINNING CHAIN
DRILL PIPE

Romfor International Ltd.
STEP SUB PROCEDURE REMARKS
SPINNING CHAIN DRILL PIPE
T R I P IN THE H O L E
Lead Tong Hand
1
0 1
1
2
2
3
4
5
6
PPE Requirements - Hard Hat, Safety Glasses,
Work Gloves, Steel Toe Shoes, Back Support.
Review JSA on tripping in the hole with Drill Pipe.
Inspect Equipment:
Tongs, Lines, Shackles, Slips, Keepers, Tong Heads,
Clamps, Stabbing guide, and Cables.
PROCEDURE IS BASED ON THE ASUMPTION
THAT THE DRILL COLLARS ARE ALREADY RUN
IN THE HOLE WITH DRILL PIPE ON
LAST STAND OF COLLARS
Upon the Driller's signal, assist in setting the slips,
using proper lifting procedures.
Stand clear while elevators are unlatched and cleared.
After the chain is wrapped, dope the connections using
the proper pipe dope. Install stabbing guide.
Assist in stabbing stand of drill pipe into the connec-
tion in the rotary table using the stabbing guide.
After the pipe is stabbed, remove the stabbing guide
and place in the proper storing position.
Look for:
Slack, Missing parts, Damage,
Wear, Broken Cable, Shackles,
Dies, Keepers, Tong Heads,
Lines (proper length and proper
size).
Slips - Bolts, Inserts, Keepers,
(Cleaned and Doped), Handle
Conditions.
Two people to set slips using
side handles.
Before doping, perform a quick
visual inspection for washout
and debris in box.
DO NOT get in the Drillers view.
Make sure feet are clear of pin
end of stand. Keep fingers clear
of pinch points.(Keep fingers out
of threads).

STEP SUB PROCEDURE REMARKS
Lead Tong Hand
SPINNING CHAIN DRILL PIPE
T R I P IN THE H O L E
Romfor International Ltd.
. 2
7
8
9
10
11
12
13
14
15
STAND CLEAR while chain is thrown and connection
is spun up.
Unlatch the backup tongs.
Latch lead tongs on bottom connection using proper
handles.
STAND CLEAR while backup tongs are latched onto
top connection.
Make the Lead tongs bite, at the same time the
backup tongs bite while the Driller tightens connec-
tion, using the proper handles.
THE CONNECTION IS TIGHTENED
DO NOT assist in latching
backup tongs.
Avoid the pinch points. Beware
of high torque requirements.
Unlatch back-up tongs using the proper handles.
Assist in pulling slips using proper handles and lifting
procedures.
Keep track of the number of stands run in the hole.
END OF PROCEDURE
Repeat Steps 2 through 14 for remaining stands
of drill pipe.
Minimum of three people to pull
slips.
Romfor International Ltd.
TRIP IN THE
HOLE
TRIP IN THE
HOLE
Lead Tong
Hand
Lead Tong
Hand
SPIN
NIN
G C
HA
IN
DR
ILL C
OLLA
R
SPINNING CHAIN
DRILL COLLAR
SPINNING CHAIN
DRILL COLLAR
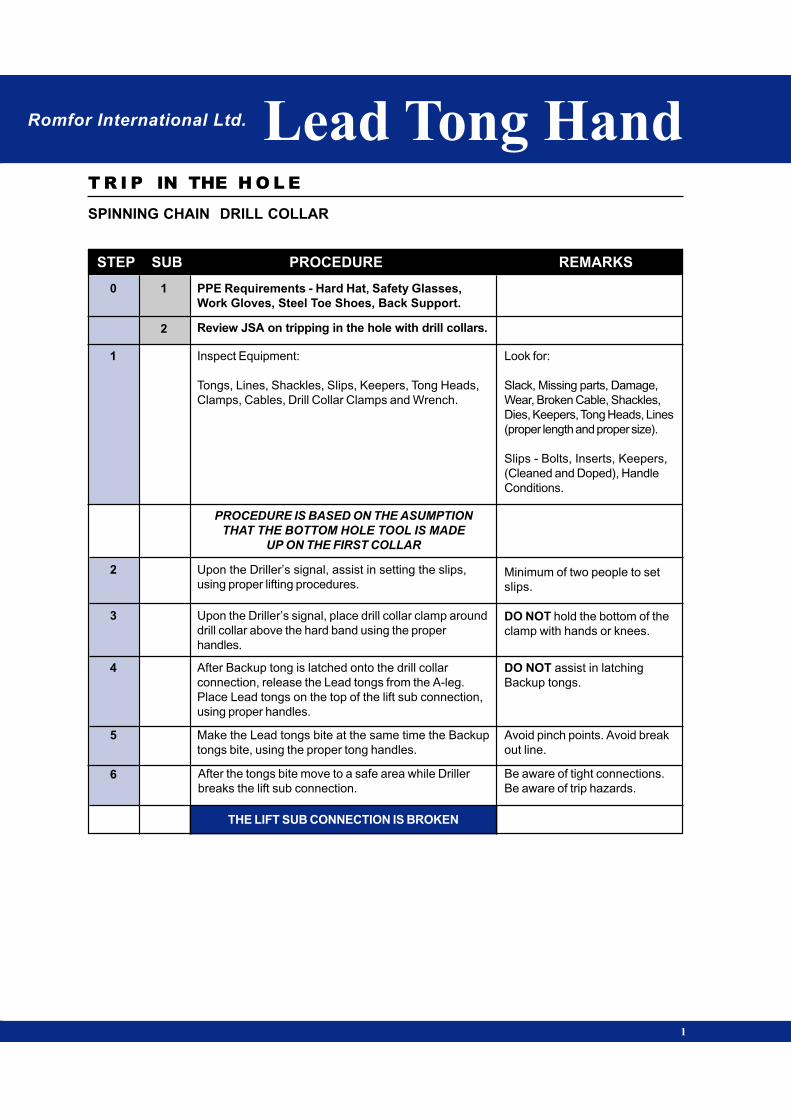
Romfor International Ltd.
STEP SUB PROCEDURE REMARKS
SPINNING CHAIN DRILL COLLAR
T R I P IN THE H O L E
Lead Tong Hand
1
0 1
1
2
2
3
4
5
6
PPE Requirements - Hard Hat, Safety Glasses,
Work Gloves, Steel Toe Shoes, Back Support.
Review JSA on tripping in the hole with drill collars.
Inspect Equipment:
Tongs, Lines, Shackles, Slips, Keepers, Tong Heads,
Clamps, Cables, Drill Collar Clamps and Wrench.
PROCEDURE IS BASED ON THE ASUMPTION
THAT THE BOTTOM HOLE TOOL IS MADE
UP ON THE FIRST COLLAR
Upon the Driller’s signal, assist in setting the slips,
using proper lifting procedures.
Upon the Driller’s signal, place drill collar clamp around
drill collar above the hard band using the proper
handles.
After Backup tong is latched onto the drill collar
connection, release the Lead tongs from the A-leg.
Place Lead tongs on the top of the lift sub connection,
using proper handles.
Make the Lead tongs bite at the same time the Backup
tongs bite, using the proper tong handles.
After the tongs bite move to a safe area while Driller
breaks the lift sub connection.
Look for:
Slack, Missing parts, Damage,
Wear, Broken Cable, Shackles,
Dies, Keepers, Tong Heads, Lines
(proper length and proper size).
Slips - Bolts, Inserts, Keepers,
(Cleaned and Doped), Handle
Conditions.
Minimum of two people to set
slips.
DO NOT hold the bottom of the
clamp with hands or knees.
DO NOT assist in latching
Backup tongs.
Avoid pinch points. Avoid break
out line.
Be aware of tight connections.
Be aware of trip hazards.
THE LIFT SUB CONNECTION IS BROKEN

STEP SUB PROCEDURE REMARKS
Lead Tong Hand
SPINNING CHAIN DRILL COLLAR
T R I P IN THE H O L E
Romfor International Ltd.
. 2
7
8
9
10
11
12
13
14
15
16
17
Remove LEAD tongs and unlatch BACKUP tongs
using the proper tong handles. Secure tongs to A-leg.
Assist in securing hoist line to lift sub, if required.
Assist in backing out lift sub with chain tongs using
proper procedures.
If required, assist in the removal of lift sub from drill
collar connection and store in proper position.
Dope the drill collar connection using the proper pipe
dope.
Assist in stabbing stand of drill collars into the con-
nection in the rotary table.
Signal air hoist operator as
required.
Before doping, perform a quick
visual inspection for washout
and debris in box.
Assist wrapping spinning chain onto drill collars.
STAND CLEAR while connection is spun up.
After spinning chain is removed, release Lead tongs
from A-leg and latch onto bottom drill collar connection
in rotary table using the proper handles.
STAND CLEAR while back-up tongs are latched on
top drill collar connection.
After the tongs bite move to a safe area while Driller
tightens the drill collar connection.
Make Lead tongs bite at the same time the back-up
tongs bite, using the proper handles.
DO NOT get in the Drillers’ view.
Make sure feet are clear of pin
end of stand. Keep fingers clear
of pinch points.(Keep fingers out
of threads).
DO NOT assist in latching
back-up tongs.
Avoid pinch points and jerk
chain.
Beware of high torque require-
ments. Beware of trip hazards.
THE CONNECTION IS TIGHTENED

Romfor International Ltd.
STEP SUB PROCEDURE REMARKS
SPINNING CHAIN DRILL COLLAR
T R I P IN THE H O L E
Lead Tong Hand
18
19
20
21
22
23
Unlatch back-up tongs using the proper handles.
After Back-Up Hand unlatches Lead tongs, secure
tongs to A-leg.
After Driller picks up on the string to the proper height,
assist in removing drill collar clamp, if required.
Assist in pulling slips using proper handles and lifting
procedures.
Keep track of the number of collars run in the hole.
DO NOT hold bottom of clamp
with hand or knees.
Repeat Steps 2 through 22 for remaining drill collars.
Minimum of two people to pull
slips.
END OF PROCEDURE
3

Romfor International Ltd.
TRIP IN THE
HOLE
TRIP IN THE
HOLE
Lead Tong
Hand
Lead Tong
Hand
RO
TA
RY
TA
BLE
DR
IL
L P
IP
E
ROTARY TABLE
DRILL PIPE
ROTARY TABLE
DRILL PIPE

Romfor International Ltd.
STEP SUB PROCEDURE REMARKS
ROTARY TABLE DRILL PIPE
T R I P IN THE H O L E
Lead Tong Hand
1
IT IS NOT A ROMFOR RECOMMENDED BEST PRACTICE TO REVERSE INTO
DRILL PIPE WITH A ROTARY TABLE.

Romfor International Ltd.
TRIP IN THE
HOLE
TRIP IN THE
HOLE
Lead Tong
Hand
Lead Tong
Hand
RO
TA
RY
TA
BL
E
DR
IL
L C
OL
LA
R
ROTARY TABLE
DRILL COLLAR
ROTARY TABLE
DRILL COLLAR

Romfor International Ltd.
STEP SUB PROCEDURE REMARKS
ROTARY TABLE DRILL COLLAR
T R I P IN THE H O L E
Lead Tong Hand
1
IT IS NOT A ROMFOR RECOMMENDED BEST PRACTICE TO REVERSE INTO
DRILL COLLARS WITH A ROTARY TABLE
Romfor International Ltd.
TRIP IN THE
HOLE
TRIP IN THE
HOLE
Lead Tong
Hand
Lead Tong
Hand
CHAIN TONG
DRILL COLLAR
CHAIN TONG
DRILL COLLAR
CH
AIN
TO
NG
DR
ILL C
OLLA
R

Romfor International Ltd.
STEP SUB PROCEDURE REMARKS
CHAIN TONG DRILL COLLAR
T R I P IN THE H O L E
Lead Tong Hand
1
0 1
1
2
2
3
4
5
6
PPE Requirements - Hard Hat, Safety Glasses,
Work Gloves, Steel Toe Shoes, Back Support.
Review JSA on tripping in the hole with drill collars.
Inspect Equipment:
Tongs, Lines, Shackles, Slips, Keepers, Tong Heads,
Clamps, Cables, Drill Collar Clamps, Chain Tongs and
Wrench.
PROCEDURE IS BASED ON THE ASSUMPTION
THAT THE BOTTOM HOLE TOOL IS MADE
UP ON THE FIRST COLLAR
Upon the Driller’s signal, assist in setting the slips,
using proper lifting procedures.
Upon the Driller’s signal, place drill collar clamp around
drill collar above the hard band using the proper
handles.
After Backup tong is latched onto the drill collar
connection, release the Lead tongs from the A-leg.
Place Lead tongs on the top of the lift sub connection,
using proper handles.
Make the Lead tongs bite at the same time the Backup
tongs bite, using the proper tong handles.
After the tongs bite move to a safe area while Driller
breaks the lift sub connection.
Look for:
Slack, Missing parts, Damage,
Wear, Broken Cable, Shackles,
Dies, Keepers, Tong Heads, Lines
(proper length and proper size).
Slips - Bolts, Inserts, Keepers,
(Cleaned and Doped), Handle
Conditions.
Minimum of two people to set
slips.
DO NOT hold the bottom of the
clamp with hands or knees.
DO NOT assist in latching
Backup tongs.
Avoid pinch points. Avoid break
out line.
Be aware of tight connections.
Be aware of trip hazards.
THE LIFT SUB CONNECTION IS BROKEN
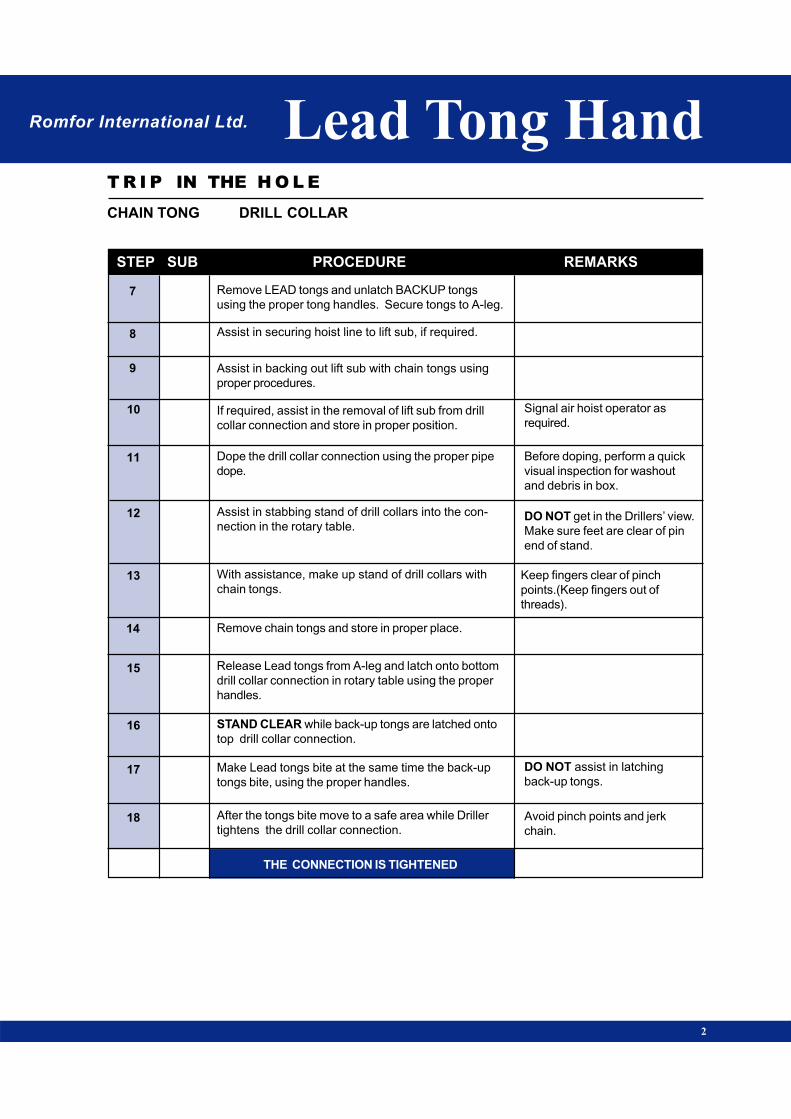
STEP SUB PROCEDURE REMARKS
CHAIN TONG DRILL COLLAR
T R I P IN THE H O L E
Romfor International Ltd. Lead Tong Hand
2
7
8
9
10
11
12
13
14
15
16
17
18
Remove LEAD tongs and unlatch BACKUP tongs
using the proper tong handles. Secure tongs to A-leg.
Assist in securing hoist line to lift sub, if required.
Assist in backing out lift sub with chain tongs using
proper procedures.
If required, assist in the removal of lift sub from drill
collar connection and store in proper position.
Dope the drill collar connection using the proper pipe
dope.
Assist in stabbing stand of drill collars into the con-
nection in the rotary table.
Signal air hoist operator as
required.
With assistance, make up stand of drill collars with
chain tongs.
Remove chain tongs and store in proper place.
Release Lead tongs from A-leg and latch onto bottom
drill collar connection in rotary table using the proper
handles.
Make Lead tongs bite at the same time the back-up
tongs bite, using the proper handles.
STAND CLEAR while back-up tongs are latched onto
top drill collar connection.
Before doping, perform a quick
visual inspection for washout
and debris in box.
DO NOT get in the Drillers’ view.
Make sure feet are clear of pin
end of stand.
Keep fingers clear of pinch
points.(Keep fingers out of
threads).
DO NOT assist in latching
back-up tongs.
After the tongs bite move to a safe area while Driller
tightens the drill collar connection.
THE CONNECTION IS TIGHTENED
Avoid pinch points and jerk
chain.
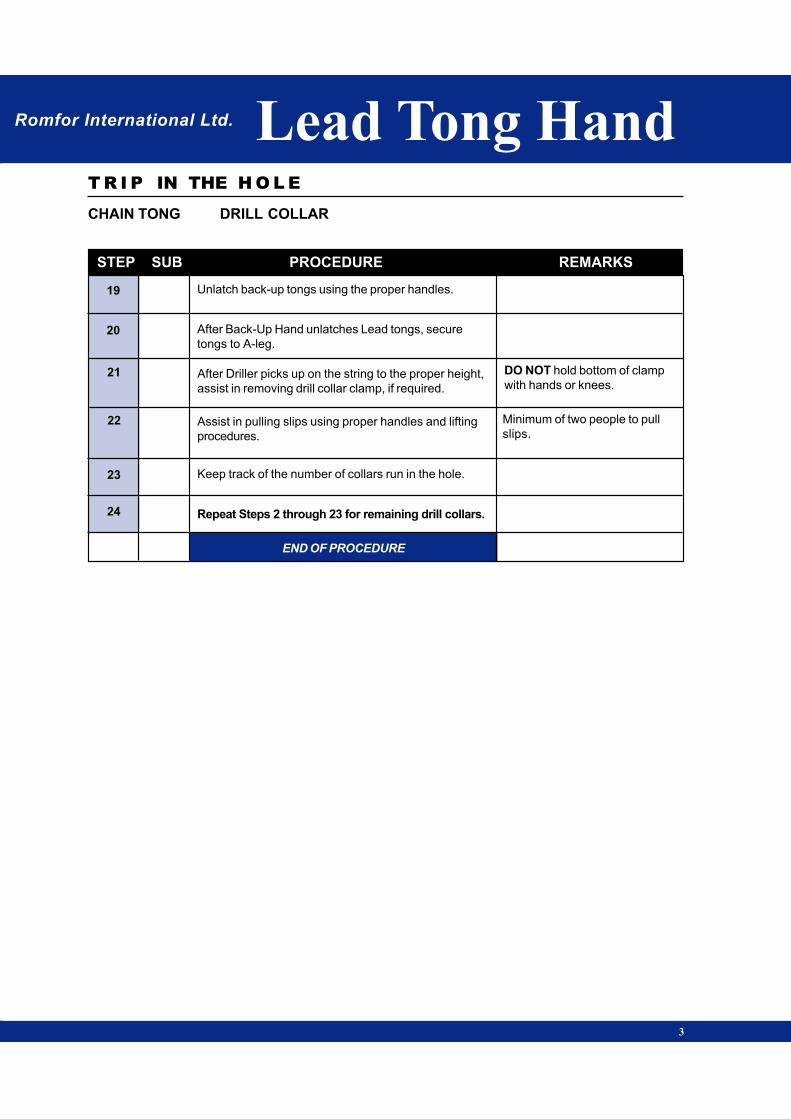
Romfor International Ltd.
STEP SUB PROCEDURE REMARKS
CHAIN TONG DRILL COLLAR
T R I P IN THE H O L E
Lead Tong Hand
3
19
20
21
22
23
24
Unlatch back-up tongs using the proper handles.
After Back-Up Hand unlatches Lead tongs, secure
tongs to A-leg.
After Driller picks up on the string to the proper height,
assist in removing drill collar clamp, if required.
Assist in pulling slips using proper handles and lifting
procedures.
Keep track of the number of collars run in the hole.
Repeat Steps 2 through 23 for remaining drill collars.
DO NOT hold bottom of clamp
with hands or knees.
Minimum of two people to pull
slips.
END OF PROCEDURE

Romfor International Ltd.
TRIP IN THE
HOLE
TRIP IN THE
HOLE
TR
IP
IN
TH
E H
OL
E
MotormanMotorman

Romfor International Ltd.
TRIP IN THE
HOLE
TRIP IN THE
HOLE
MotormanMotorman
TO
P D
RIV
E
DR
IL
L P
IP
E
TOP DRIVE
DRILL PIPE
TOP DRIVE
DRILL PIPE
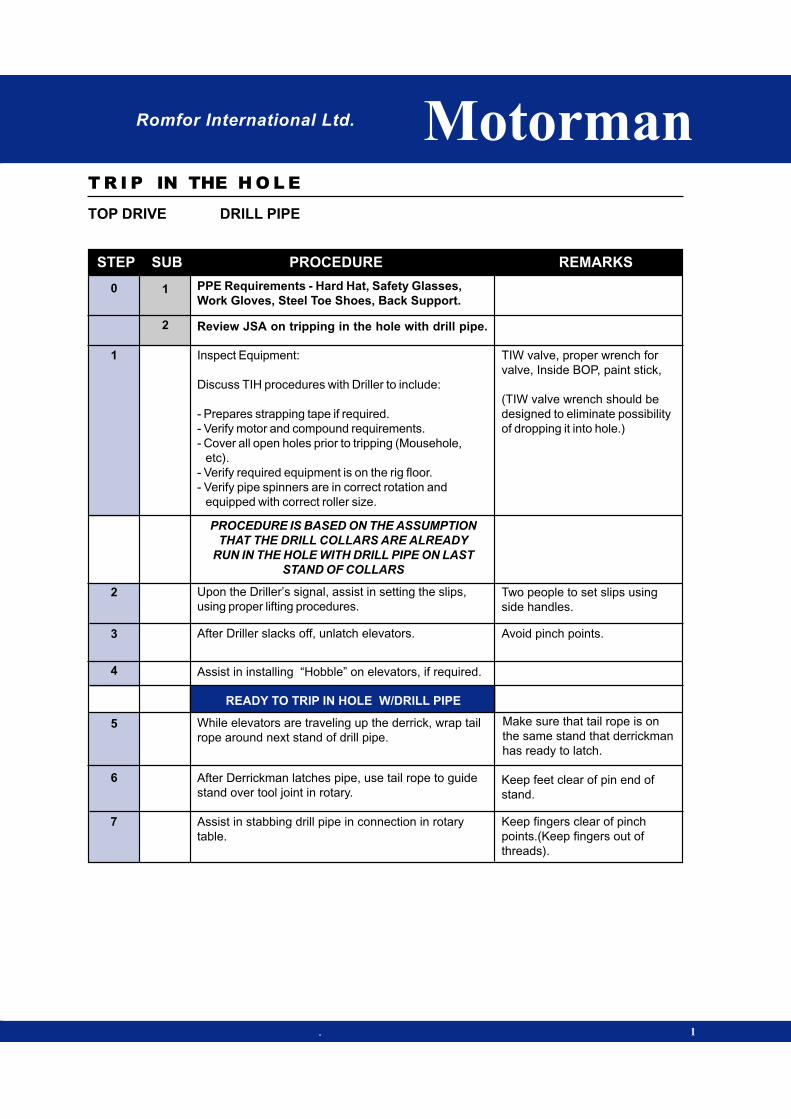
Romfor International Ltd. Motorman
STEP SUB PROCEDURE REMARKS
TOP DRIVE DRILL PIPE
T R I P IN THE H O L E
. 1
0 1
1
2
2
3
4
5
6
7
PPE Requirements - Hard Hat, Safety Glasses,
Work Gloves, Steel Toe Shoes, Back Support.
Review JSA on tripping in the hole with drill pipe.
Inspect Equipment:
Discuss TIH procedures with Driller to include:
- Prepares strapping tape if required.
- Verify motor and compound requirements.
- Cover all open holes prior to tripping (Mousehole,
etc).
- Verify required equipment is on the rig floor.
- Verify pipe spinners are in correct rotation and
equipped with correct roller size.
PROCEDURE IS BASED ON THE ASSUMPTION
THAT THE DRILL COLLARS ARE ALREADY
RUN IN THE HOLE WITH DRILL PIPE ON LAST
STAND OF COLLARS
Upon the Driller’s signal, assist in setting the slips,
using proper lifting procedures.
After Driller slacks off, unlatch elevators.
Assist in installing “Hobble” on elevators, if required.
While elevators are traveling up the derrick, wrap tail
rope around next stand of drill pipe.
After Derrickman latches pipe, use tail rope to guide
stand over tool joint in rotary.
Assist in stabbing drill pipe in connection in rotary
table.
TIW valve, proper wrench for
valve, Inside BOP, paint stick,
(TIW valve wrench should be
designed to eliminate possibility
of dropping it into hole.)
Two people to set slips using
side handles.
Avoid pinch points.
Make sure that tail rope is on
the same stand that derrickman
has ready to latch.
Keep feet clear of pin end of
stand.
Keep fingers clear of pinch
points.(Keep fingers out of
threads).
READY TO TRIP IN HOLE W/DRILL PIPE

STEP SUB PROCEDURE REMARKS
Motorman
TOP DRIVE DRILL PIPE
T R I P IN THE H O L E
Romfor International Ltd.
2
11
1
2
3
4
1
MAKE UP WITH PIPE SPINNER - Assist in placing
pipe spinners on drill pipe, close pipe spinner jaws
around pipe.
8
With pipe spinner control in the make-up position, spin
stand of drill pipe into connection in the rotary table.
8
When stand is completely made up, release pipe
spinner from stand of drill pipe.
9
If required, assist in securing pipe spinner to A-leg or
out of the way.
10
OR
Keep eye on Floor Hands to
verify that no one is in harm’s
way. Short ropes can be used on
handles.
SLOWLY operate control lever
until stand is rotating.
DO NOT assist in placing
tongs.
Minimum of three people to pull
slips.
MAKE UP WITH SPINNING CHAIN - STAND CLEAR
while stand is spun up with spinning chain.
STAND CLEAR while floor-hands place tongs on drill
pipe connection and Driller tightens the connection.
THE CONNECTION IS TIGHTENED
Assist in pulling slips using proper handles and lifting
procedures.
Keep track of the number of stands run in the hole.
Repeat Steps 2 through 11 for remaining drill pipe.
END OF PROCEDURE

Romfor International Ltd.
TRIP IN THE
HOLE
TRIP IN THE
HOLE
MotormanMotorman
TO
P D
RIV
E
DR
ILL C
OLLA
R
TOP DRIVE
DRILL COLLAR
TOP DRIVE
DRILL COLLAR
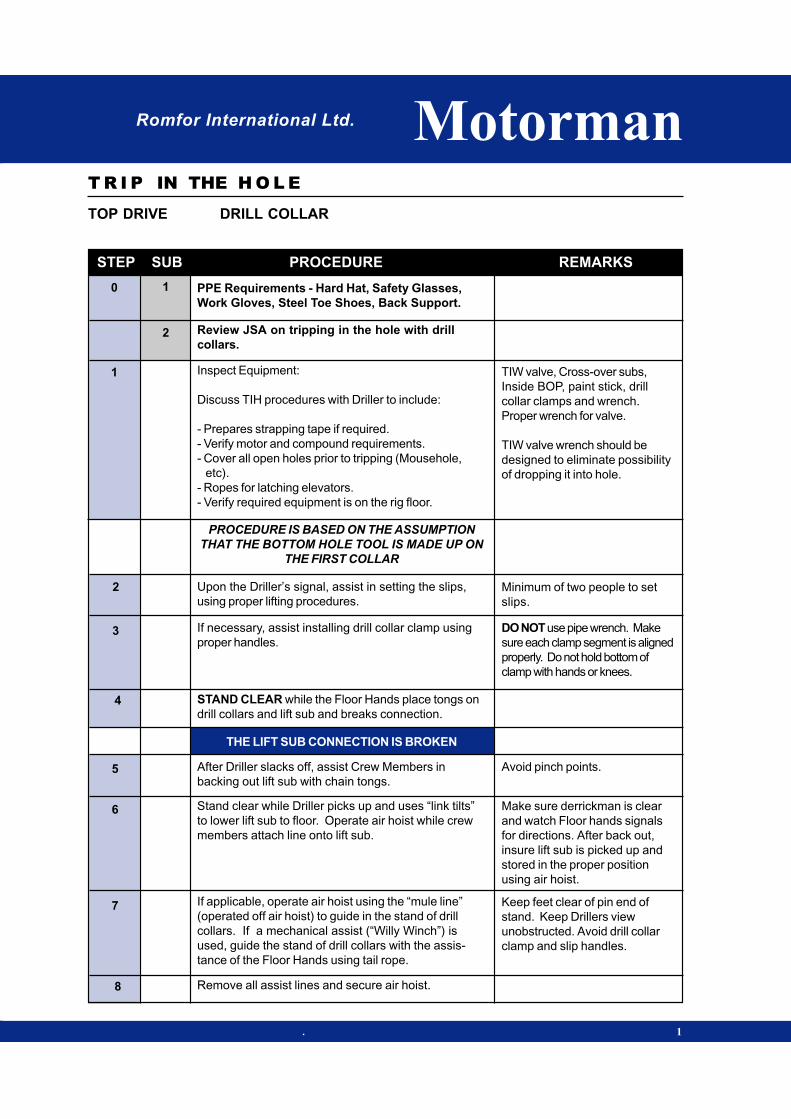
Romfor International Ltd. Motorman
STEP SUB PROCEDURE REMARKS
TOP DRIVE DRILL COLLAR
T R I P IN THE H O L E
. 1
1
2
3
4
5
6
7
8
1
2
TIW valve, Cross-over subs,
Inside BOP, paint stick, drill
collar clamps and wrench.
Proper wrench for valve.
TIW valve wrench should be
designed to eliminate possibility
of dropping it into hole.
Minimum of two people to set
slips.
DO NOT use pipe wrench. Make
sure each clamp segment is aligned
properly. Do not hold bottom of
clamp with hands or knees.
Avoid pinch points.
Make sure derrickman is clear
and watch Floor hands signals
for directions. After back out,
insure lift sub is picked up and
stored in the proper position
using air hoist.
PPE Requirements - Hard Hat, Safety Glasses,
Work Gloves, Steel Toe Shoes, Back Support.
Review JSA on tripping in the hole with drill
collars.
Inspect Equipment:
Discuss TIH procedures with Driller to include:
- Prepares strapping tape if required.
- Verify motor and compound requirements.
- Cover all open holes prior to tripping (Mousehole,
etc).
- Ropes for latching elevators.
- Verify required equipment is on the rig floor.
PROCEDURE IS BASED ON THE ASSUMPTION
THAT THE BOTTOM HOLE TOOL IS MADE UP ON
THE FIRST COLLAR
Upon the Driller’s signal, assist in setting the slips,
using proper lifting procedures.
After Driller slacks off, assist Crew Members in
backing out lift sub with chain tongs.
If necessary, assist installing drill collar clamp using
proper handles.
STAND CLEAR while the Floor Hands place tongs on
drill collars and lift sub and breaks connection.
THE LIFT SUB CONNECTION IS BROKEN
Stand clear while Driller picks up and uses “link tilts”
to lower lift sub to floor. Operate air hoist while crew
members attach line onto lift sub.
If applicable, operate air hoist using the “mule line”
(operated off air hoist) to guide in the stand of drill
collars. If a mechanical assist (“Willy Winch”) is
used, guide the stand of drill collars with the assis-
tance of the Floor Hands using tail rope.
Keep feet clear of pin end of
stand. Keep Drillers view
unobstructed. Avoid drill collar
clamp and slip handles.
Remove all assist lines and secure air hoist.
0
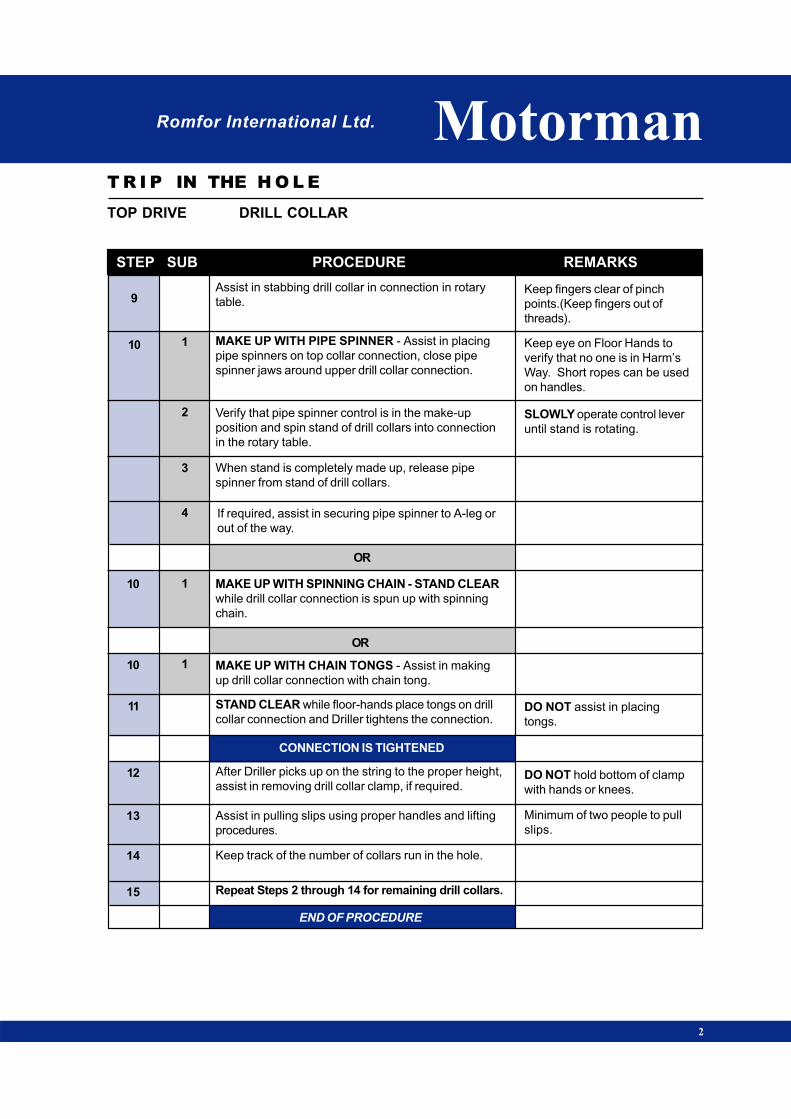
STEP SUB PROCEDURE REMARKS
Motorman
TOP DRIVE DRILL COLLAR
T R I P IN THE H O L E
Romfor International Ltd.
2
9
10
10
10
11
12
1
1
1
2
3
4
13
14
15
DO NOT assist in placing
tongs.
DO NOT hold bottom of clamp
with hands or knees.
Minimum of two people to pull
slips.
Assist in stabbing drill collar in connection in rotary
table.
MAKE UP WITH SPINNING CHAIN - STAND CLEAR
while drill collar connection is spun up with spinning
chain.
MAKE UP WITH CHAIN TONGS - Assist in making
up drill collar connection with chain tong.
STAND CLEAR while floor-hands place tongs on drill
collar connection and Driller tightens the connection.
CONNECTION IS TIGHTENED
MAKE UP WITH PIPE SPINNER - Assist in placing
pipe spinners on top collar connection, close pipe
spinner jaws around upper drill collar connection.
When stand is completely made up, release pipe
spinner from stand of drill collars.
Verify that pipe spinner control is in the make-up
position and spin stand of drill collars into connection
in the rotary table.
If required, assist in securing pipe spinner to A-leg or
out of the way.
OR
Assist in pulling slips using proper handles and lifting
procedures.
Keep track of the number of collars run in the hole.
OR
After Driller picks up on the string to the proper height,
assist in removing drill collar clamp, if required.
Keep fingers clear of pinch
points.(Keep fingers out of
threads).
Keep eye on Floor Hands to
verify that no one is in Harm’s
Way. Short ropes can be used
on handles.
SLOWLY operate control lever
until stand is rotating.
Repeat Steps 2 through 14 for remaining drill collars.
END OF PROCEDURE

Romfor International Ltd.
TRIP IN THE
HOLE
TRIP IN THE
HOLE
MotormanMotorman
PIPE SPINNER
DRILL PIPE
PIPE SPINNER
DRILL PIPE
PIP
E S
PIN
NE
R
DR
IL
L P
IP
E
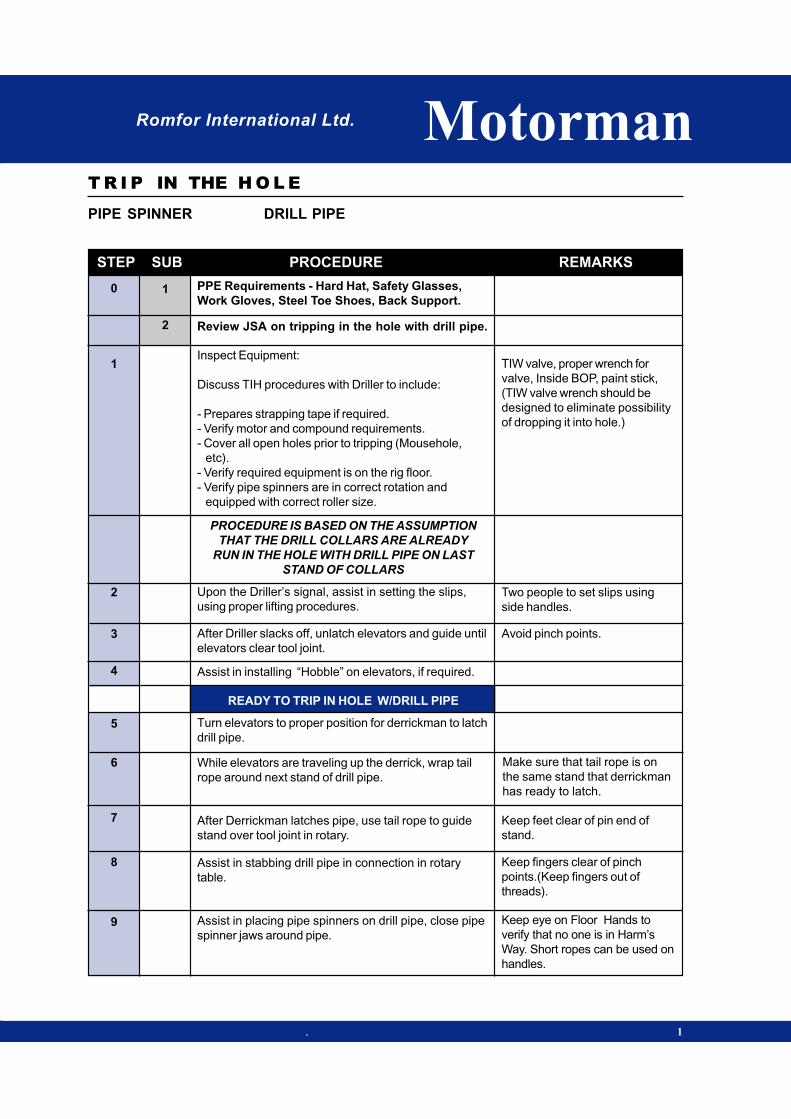
Romfor International Ltd. Motorman
STEP SUB PROCEDURE REMARKS
PIPE SPINNER DRILL PIPE
T R I P IN THE H O L E
. 1
0 1
1
2
2
3
4
5
6
7
8
PPE Requirements - Hard Hat, Safety Glasses,
Work Gloves, Steel Toe Shoes, Back Support.
Review JSA on tripping in the hole with drill pipe.
Inspect Equipment:
Discuss TIH procedures with Driller to include:
- Prepares strapping tape if required.
- Verify motor and compound requirements.
- Cover all open holes prior to tripping (Mousehole,
etc).
- Verify required equipment is on the rig floor.
- Verify pipe spinners are in correct rotation and
equipped with correct roller size.
PROCEDURE IS BASED ON THE ASSUMPTION
THAT THE DRILL COLLARS ARE ALREADY
RUN IN THE HOLE WITH DRILL PIPE ON LAST
STAND OF COLLARS
Upon the Driller’s signal, assist in setting the slips,
using proper lifting procedures.
After Driller slacks off, unlatch elevators and guide until
elevators clear tool joint.
Assist in installing “Hobble” on elevators, if required.
Turn elevators to proper position for derrickman to latch
drill pipe.
While elevators are traveling up the derrick, wrap tail
rope around next stand of drill pipe.
After Derrickman latches pipe, use tail rope to guide
stand over tool joint in rotary.
Assist in stabbing drill pipe in connection in rotary
table.
TIW valve, proper wrench for
valve, Inside BOP, paint stick,
(TIW valve wrench should be
designed to eliminate possibility
of dropping it into hole.)
Two people to set slips using
side handles.
Avoid pinch points.
Make sure that tail rope is on
the same stand that derrickman
has ready to latch.
Keep feet clear of pin end of
stand.
Keep fingers clear of pinch
points.(Keep fingers out of
threads).
Assist in placing pipe spinners on drill pipe, close pipe
spinner jaws around pipe.
Keep eye on Floor Hands to
verify that no one is in Harm’s
Way. Short ropes can be used on
handles.
READY TO TRIP IN HOLE W/DRILL PIPE
9

STEP SUB PROCEDURE REMARKS
Motorman
PIPE SPINNER DRILL PIPE
T R I P IN THE H O L E
Romfor International Ltd.
2
14
15
Minimum of three people to pull
slips.
16
With pipe spinner control in the make-up position, spin
stand of drill pipe into connection in the rotary table.10
When stand is completely made up, release pipe
spinner from stand of drill pipe.
11
If required, assist in securing pipe spinner to A-leg or
out of the way.12
STAND CLEAR while floor-hands place tongs on drill
pipe connection and Driller tightens the connection.
13
THE CONNECTION IS TIGHTENED
SLOWLY operate control lever
until stand is rotating.
DO NOT assist in placing
tongs.
Assist in pulling slips using proper handles and lifting
procedures.
Keep track of the number of stands run in the hole.
Repeat Steps 2 through 15 for remaining drill pipe.
END OF PROCEDURE

Romfor International Ltd.
TRIP IN THE
HOLE
TRIP IN THE
HOLE
MotormanMotorman
PIP
E S
PIN
NE
R
DR
ILL C
OLLA
R
PIPE SPINNER
DRILL COLLAR
PIPE SPINNER
DRILL COLLAR
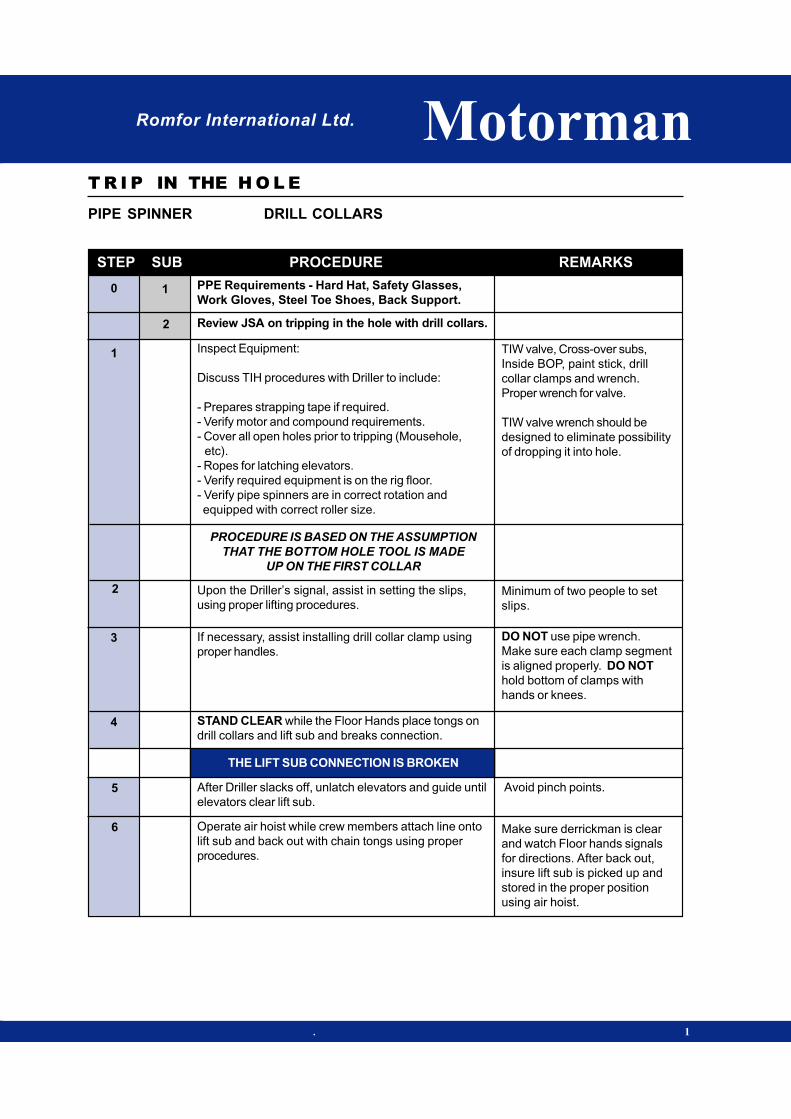
Romfor International Ltd. Motorman
STEP SUB PROCEDURE REMARKS
PIPE SPINNER DRILL COLLARS
T R I P IN THE H O L E
. 1
0 1
1
2
2
3
4
5
6
PPE Requirements - Hard Hat, Safety Glasses,
Work Gloves, Steel Toe Shoes, Back Support.
Review JSA on tripping in the hole with drill collars.
Inspect Equipment:
Discuss TIH procedures with Driller to include:
- Prepares strapping tape if required.
- Verify motor and compound requirements.
- Cover all open holes prior to tripping (Mousehole,
etc).
- Ropes for latching elevators.
- Verify required equipment is on the rig floor.
- Verify pipe spinners are in correct rotation and
equipped with correct roller size.
PROCEDURE IS BASED ON THE ASSUMPTION
THAT THE BOTTOM HOLE TOOL IS MADE
UP ON THE FIRST COLLAR
Upon the Driller’s signal, assist in setting the slips,
using proper lifting procedures.
If necessary, assist installing drill collar clamp using
proper handles.
STAND CLEAR while the Floor Hands place tongs on
drill collars and lift sub and breaks connection.
THE LIFT SUB CONNECTION IS BROKEN
After Driller slacks off, unlatch elevators and guide until
elevators clear lift sub.
Operate air hoist while crew members attach line onto
lift sub and back out with chain tongs using proper
procedures.
TIW valve, Cross-over subs,
Inside BOP, paint stick, drill
collar clamps and wrench.
Proper wrench for valve.
TIW valve wrench should be
designed to eliminate possibility
of dropping it into hole.
Minimum of two people to set
slips.
DO NOT use pipe wrench.
Make sure each clamp segment
is aligned properly. DO NOT
hold bottom of clamps with
hands or knees.
Avoid pinch points.
Make sure derrickman is clear
and watch Floor hands signals
for directions. After back out,
insure lift sub is picked up and
stored in the proper position
using air hoist.

STEP SUB PROCEDURE REMARKS
Motorman
PIPE SPINNER DRILL COLLARS
T R I P IN THE H O L E
Romfor International Ltd.
Assist in pulling slips using proper handles and lifting
procedures.
Keep track of the number of collars run in the hole.
Repeat Steps 2 through 17 for remaining drill collars.
END OF PROCEDURE
2
If applicable, operate air hoist using the “mule line”
(operated off air hoist) to guide in the stand of drill
collars. If mechanical assist (“Willy Winch”) is used,
guide the stand of drill collars with the assistance of
the Floor Hands using tail rope.
Assist in stabbing drill collar in connection in rotary
table.
Assist in placing pipe spinners on top collar connec-
tion, close pipe spinner jaws around upper drill collar
connection.
Verify that pipe spinner control is in the make-up
position and spin stand of drill collars into connection
in the rotary table.
When stand is completely made up, release pipe
spinner from stand of drill collars.
STAND CLEAR while floor-hands place tongs on drill
collar connection and Driller tightens the connection.
If required, assist in securing pipe spinner to A-leg or
out of the way.
THE CONNECTION IS TIGHTENED
After Driller picks up on the string to the proper height,
assist in removing drill collar clamp, if required.
Remove all assist lines and secure air hoist.
Keep feet clear of pin end of
stand. Keep Drillers view
unobstructed. Avoid drill collar
clamp and slip handles.
Keep fingers clear of pinch
points. (Keep fingers out of
threads).
Keep eye on Floor Hands to
verify that no one is in harm’s
way. Short ropes can be used
on handles.
SLOWLY operate control lever
until stand is rotating.
DO NOT assist in placing
tongs.
DO NOT hold bottom of clamps
with hands or knees.
Minimum of two people to pull
slips.
7
8
9
10
11
12
13
14
15
16
17
18

Romfor International Ltd.
TRIP IN THE
HOLE
TRIP IN THE
HOLE
MotormanMotorman
SPIN
NIN
G C
HA
IN
DR
IL
L P
IP
E
SPINNING CHAIN
DRILL PIPE
SPINNING CHAIN
DRILL PIPE
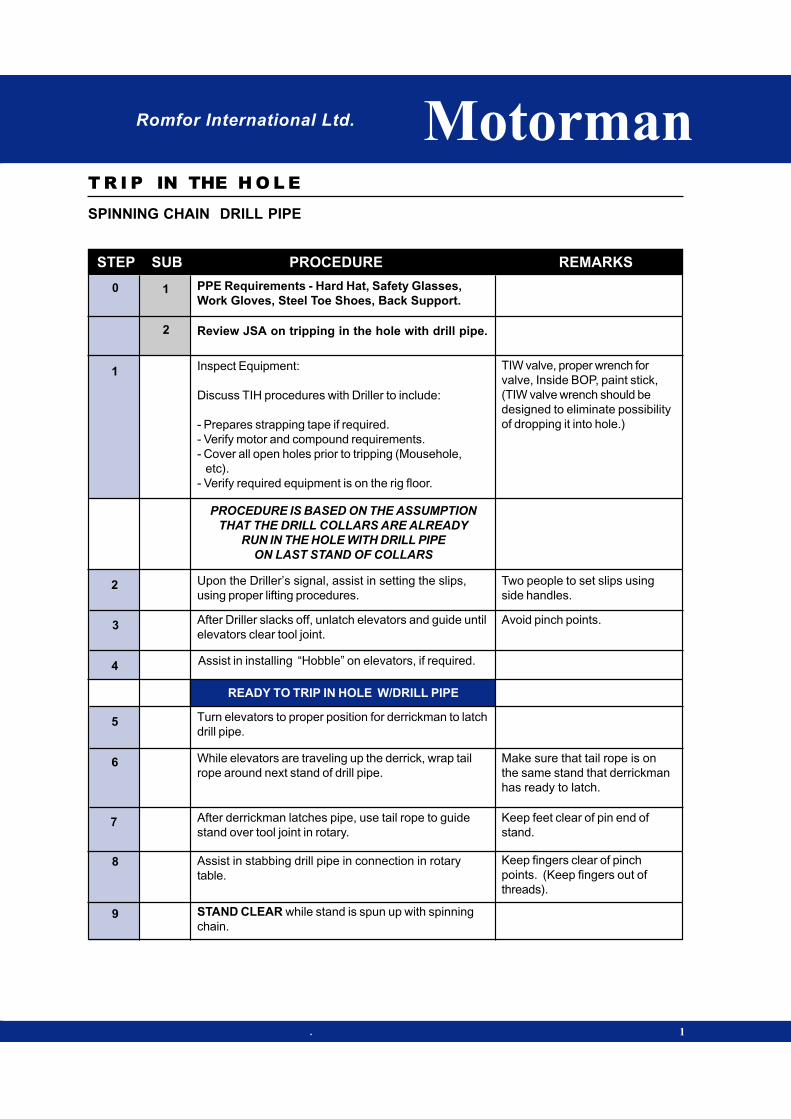
Romfor International Ltd. Motorman
STEP SUB PROCEDURE REMARKS
SPINNING CHAIN DRILL PIPE
T R I P IN THE H O L E
. 1
0 1
1
2
2
3
4
5
6
7
PPE Requirements - Hard Hat, Safety Glasses,
Work Gloves, Steel Toe Shoes, Back Support.
Review JSA on tripping in the hole with drill pipe.
Inspect Equipment:
Discuss TIH procedures with Driller to include:
- Prepares strapping tape if required.
- Verify motor and compound requirements.
- Cover all open holes prior to tripping (Mousehole,
etc).
- Verify required equipment is on the rig floor.
PROCEDURE IS BASED ON THE ASSUMPTION
THAT THE DRILL COLLARS ARE ALREADY
RUN IN THE HOLE WITH DRILL PIPE
ON LAST STAND OF COLLARS
Upon the Driller’s signal, assist in setting the slips,
using proper lifting procedures.
After Driller slacks off, unlatch elevators and guide until
elevators clear tool joint.
Assist in installing “Hobble” on elevators, if required.
READY TO TRIP IN HOLE W/DRILL PIPE
Turn elevators to proper position for derrickman to latch
drill pipe.
TIW valve, proper wrench for
valve, Inside BOP, paint stick,
(TIW valve wrench should be
designed to eliminate possibility
of dropping it into hole.)
Two people to set slips using
side handles.
Avoid pinch points.
While elevators are traveling up the derrick, wrap tail
rope around next stand of drill pipe.
After derrickman latches pipe, use tail rope to guide
stand over tool joint in rotary.
Make sure that tail rope is on
the same stand that derrickman
has ready to latch.
Assist in stabbing drill pipe in connection in rotary
table.
Keep feet clear of pin end of
stand.
Keep fingers clear of pinch
points. (Keep fingers out of
threads).
STAND CLEAR while stand is spun up with spinning
chain.
8
9

STEP SUB PROCEDURE REMARKS
Motorman
SPINNING CHAIN DRILL PIPE
T R I P IN THE H O L E
Romfor International Ltd.
. 2
10
11
12
13
STAND CLEAR while floor-hands place tongs on drill
pipe connection and Driller tightens the connection.
THE CONNECTION IS TIGHTENED
Assist in pulling slips using proper handles and lifting
procedures.
Keep track of the number of stands run in the hole.
Repeat Steps 2 through 12 for remaining drill
pipe.
DO NOT assist in placing
tongs. Stay out of danger zone
behind tongs..
Minimum of three people to pull
slips.
END OF PROCEDURE
Romfor International Ltd.
TRIP IN THE
HOLE
TRIP IN THE
HOLE
MotormanMotorman
SPIN
NIN
G C
HA
IN
DR
ILL C
OLLA
R
SPINNING CHAIN
DRILL COLLAR
SPINNING CHAIN
DRILL COLLAR
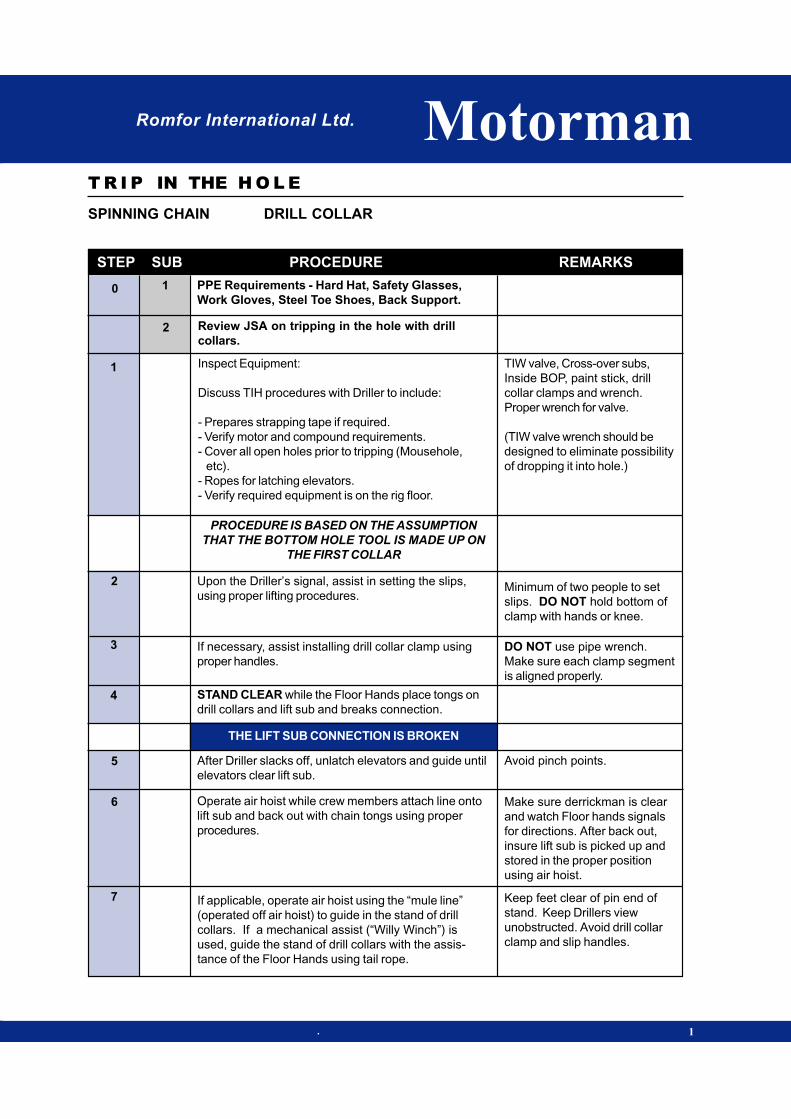
Romfor International Ltd. Motorman
STEP SUB PROCEDURE REMARKS
SPINNING CHAIN DRILL COLLAR
T R I P IN THE H O L E
. 1
0 1
1
2
2
3
4
5
6
7
PPE Requirements - Hard Hat, Safety Glasses,
Work Gloves, Steel Toe Shoes, Back Support.
Review JSA on tripping in the hole with drill
collars.
Inspect Equipment:
Discuss TIH procedures with Driller to include:
- Prepares strapping tape if required.
- Verify motor and compound requirements.
- Cover all open holes prior to tripping (Mousehole,
etc).
- Ropes for latching elevators.
- Verify required equipment is on the rig floor.
PROCEDURE IS BASED ON THE ASSUMPTION
THAT THE BOTTOM HOLE TOOL IS MADE UP ON
THE FIRST COLLAR
Upon the Driller’s signal, assist in setting the slips,
using proper lifting procedures.
If necessary, assist installing drill collar clamp using
proper handles.
STAND CLEAR while the Floor Hands place tongs on
drill collars and lift sub and breaks connection.
THE LIFT SUB CONNECTION IS BROKEN
After Driller slacks off, unlatch elevators and guide until
elevators clear lift sub.
TIW valve, Cross-over subs,
Inside BOP, paint stick, drill
collar clamps and wrench.
Proper wrench for valve.
(TIW valve wrench should be
designed to eliminate possibility
of dropping it into hole.)
Minimum of two people to set
slips. DO NOT hold bottom of
clamp with hands or knee.
DO NOT use pipe wrench.
Make sure each clamp segment
is aligned properly.
Avoid pinch points.
Make sure derrickman is clear
and watch Floor hands signals
for directions. After back out,
insure lift sub is picked up and
stored in the proper position
using air hoist.
Operate air hoist while crew members attach line onto
lift sub and back out with chain tongs using proper
procedures.
If applicable, operate air hoist using the “mule line”
(operated off air hoist) to guide in the stand of drill
collars. If a mechanical assist (“Willy Winch”) is
used, guide the stand of drill collars with the assis-
tance of the Floor Hands using tail rope.
Keep feet clear of pin end of
stand. Keep Drillers view
unobstructed. Avoid drill collar
clamp and slip handles.
STEP SUB PROCEDURE REMARKS
Motorman
SPINNING CHAIN DRILL COLLAR
T R I P IN THE H O L E
Romfor International Ltd.
. 2
8
9
10
11
12
13
14
15
Remove all assist lines and secure air hoist.
Assist in stabbing drill collar in connection in rotary
table.
STAND CLEAR while drill collar connection is spun up
with spinning chain.
STAND CLEAR while floor-hands place tongs on drill
collar connection and Driller tightens the connection.
THE CONNECTION IS TIGHTENED
After Driller picks up on the string to the proper height,
assist in removing drill collar clamp, if required.
Keep fingers clear of pinch
points. (Keep fingers out of
threads).
DO NOT assist in placing
tongs.
Assist in pulling slips using proper handles and lifting
procedures.
Keep track of the number of collars run in the hole.
DO NOT hold bottom of clamp
with hands or knees.
Minimum of two people to pull
slips.
Repeat Steps 2 through 14 for remaining drill
collars.
END OF PROCEDURE

Romfor International Ltd.
TRIP IN THE
HOLE
TRIP IN THE
HOLE
MotormanMotorman
RO
TA
RY
TA
BLE
DR
IL
L P
IP
E
ROTARY TABLE
DRILL PIPE
ROTARY TABLE
DRILL PIPE

Romfor International Ltd.
STEP SUB PROCEDURE REMARKS
ROTARY TABLE DRILL PIPE
T R I P IN THE H O L E
Motorman
1
IT IS NOT A ROMFOR RECOMMENDED BEST PRACTICE TO REVERSE INTO
DRILL PIPE WITH A ROTARY TABLE.

Romfor International Ltd.
TRIP IN THE
HOLE
TRIP IN THE
HOLE
MotormanMotorman
RO
TA
RY
TA
BL
E
DR
IL
L C
OL
LA
R
ROTARY TABLE
DRILL COLLAR
ROTARY TABLE
DRILL COLLAR

Romfor International Ltd. Motorman
STEP SUB PROCEDURE REMARKS
ROTARY TABLE DRILL COLLAR
T R I P IN THE H O L E
. 1
IT IS NOT A ROMFOR RECOMMENDED BEST PRACTICE TO REVERSE INTO
DRILL COLLARS WITH A ROTARY TABLE
Romfor International Ltd.
TRIP IN THE
HOLE
TRIP IN THE
HOLE
MotormanMotorman
CHAIN TONG
DRILL COLLAR
CHAIN TONG
DRILL COLLAR
CH
AIN
TO
NG
DR
ILL C
OLLA
R
Romfor International Ltd.
STEP SUB PROCEDURE REMARKS
CHAIN TONG DRILL COLLAR
T R I P IN THE H O L E
Motorman
1
0 1
1
2
2
3
4
5
6
7
PPE Requirements - Hard Hat, Safety Glasses,
Work Gloves, Steel Toe Shoes, Back Support.
Review JSA on tripping in the hole with drill
collars.
Inspect Equipment:
Discuss TIH procedures with Driller to include:
- Prepares strapping tape if required.
- Verify motor and compound requirements.
- Cover all open holes prior to tripping (Mousehole, etc).
- Ropes for latching elevators.
- Verify required equipment is on the rig floor.
PROCEDURE IS BASED ON THE ASSUMPTION
THAT THE BOTTOM HOLE TOOL IS MADE UP ON
THE FIRST COLLAR
Upon the Driller’s signal, assist in setting the slips,
using proper lifting procedures.
If necessary, assist installing drill collar clamp using
proper handles.
STAND CLEAR while the Floor Hands place tongs on
drill collars and lift sub and breaks connection.
THE LIFT SUB CONNECTION IS BROKEN
After Driller slacks off, unlatch elevators and guide until
elevators clear lift sub.
TIW valve, Cross-over subs,
Inside BOP, paint stick, drill
collar clamps and wrench.
Proper wrench for valve.
(TIW valve wrench should be
designed to eliminate possibility
of dropping it into hole.)
Minimum of two people to set
slips. DO NOT hold bottom of
clamp with hands or knees.
DO NOT use pipe wrench.
Make sure each clamp segment
is aligned properly.
Avoid pinch points.
Watch Floor hands signals for
directions. After back out,
insure lift sub is picked up and
stored in the proper position
using air hoist.
Operate air hoist while crew members attach line onto
lift sub and back out with chain tongs using proper
procedures.
If applicable, operate air hoist using the “mule line”
(operated off air hoist) to guide in the stand of drill
collars. If a mechanical assist (“Willy Winch”) is
used, guide the stand of drill collars with the assis-
tance of the Floor Hands using tail rope.
Keep feet clear of pin end of
stand. Keep Drillers view
unobstructed.

STEP SUB PROCEDURE REMARKS
CHAIN TONG DRILL COLLAR
T R I P IN THE H O L E
Romfor International Ltd. Motorman
2
Remove all assist lines and secure air hoist.
Assist in stabbing drill collar in connection in rotary
table.
Assist in making up drill collar connection with chain
tong.
STAND CLEAR while floor-hands place tongs on drill
collar connection and Driller tightens the connection.
THE CONNECTION IS TIGHTENED
After Driller picks up on the string to the proper height,
assist in removing drill collar clamp, if required.
Keep fingers clear of pinch
points. (Keep fingers out of
threads).
DO NOT assist in placing
tongs.
Assist in pulling slips using proper handles and lifting
procedures.
Keep track of the number of collars run in the hole.
Repeat Steps 2 through 14 for remaining drill
collars.
END OF PROCEDURE
Minimum of two people to pull
slips.
8
9
10
11
12
13
14
15