roof • rack • fence -...
TRANSCRIPT

Required: Roof Mounting Kit #SK-43
Tools: • Silicone Sealant, (GE II or equivalent) if on roof.• Phillips Head Screwdriver• Hand Drill with 1/8” drill bit
Important: Use only mounting hardware from the manufacturer.Adding or using other hardware will void the warranty.
Remove the collector from the box and allow the material to relax inthe sun (30 minutes to an hour). Do not lay the collector on the grass- it can burn the lawn underneath. Allow at least one foot around thesolar system for brackets and piping. Roof obstructions like ventsshould be taken into consideration when laying out collectors. With aroof vent up to 3” in diameter, the collectors can be placed on eitherside of the vent.
Determine the position of the collector. The top mounting bracket willbe located at each slot along the length of the collector. The collectorshould slope slightly toward the end caps to drain (winterization).Locate the bottom mounting brackets directly below each top bracket(see photos at left).
Drill 1/8” pilot holes for all brackets. Lag screws should be longenough to reach the subroof under the shingles. Inject a generousamount of silicone sealant into the holes and onto the surroundingroof surface. Mount the bracket to the roof as shown with the bracketcentered in the slot. Inject additional silicone over screw head area.
OPTIONAL MOUNTING ON SLOPED SURFACER O O F • R A C K • F E N C E
HIGH WIND AREAS: Additional high wind hold down kit isavailable for installations that may be subject to high winds. Notincluded - see back page under “OPTIONS” for product number.
ROOF INSTALLATIONS: It is suggested that you use rigid PVCpipe for roof installations.
Strap is provided in the proper lengths to span the collectorsvertically. Start by tying the strap to the top of the bracket andrun the strap to the bracket below it and tie to the bottom brack-et. Do not add additional mounting hardware - the collector must“float” on the brackets to expand and contract.
Fence mounting installations arean option if space is a problem.The collector may not heat aseffectively when mounted vertically,especially early in the year, whenthe sun is right overhead, but willstill heat your pool.
Montage facultatif sur surface inclinéet o i t • b â t i • c l ô t u r e
RÉGIONS DE VENTS FORTS : Une trousse supplémentaire est disponible pourles installations assujetties aux vents forts. Voir la dernière page sous ‘‘Options’’pour trouver le numéro du produit.
INSTALLATION SUR TOIT : Il est conseillé d'utiliser le PVC rigide dans uneinstallation sur toit.
Les courroies sont fournies en longueurs suffisantes pour couvrir les tuyauxcollecteurs dans le sens vertical. Commencez en attachant la courroie à la partiesupérieure du support; étendez la courroie et attachez-la au support inférieur.N'utilisez pas de supports de montage supplémentaires : il faut que les tuyauxcollecteurs puissent flotter librement sur les supports métalliques, pour permettrel'expansion et la contraction du système.
Le collecteur peut être monté à la verticalesur une clôture, si l'espace disponible estrestreint. Le chauffage sera moins efficaceavec un collecteur ainsi monté, surtout audébut de la saison, quand le soleil est hautdans le ciel, mais vous obtiendrez quandmême un chauffage de l'eau dans la piscine.
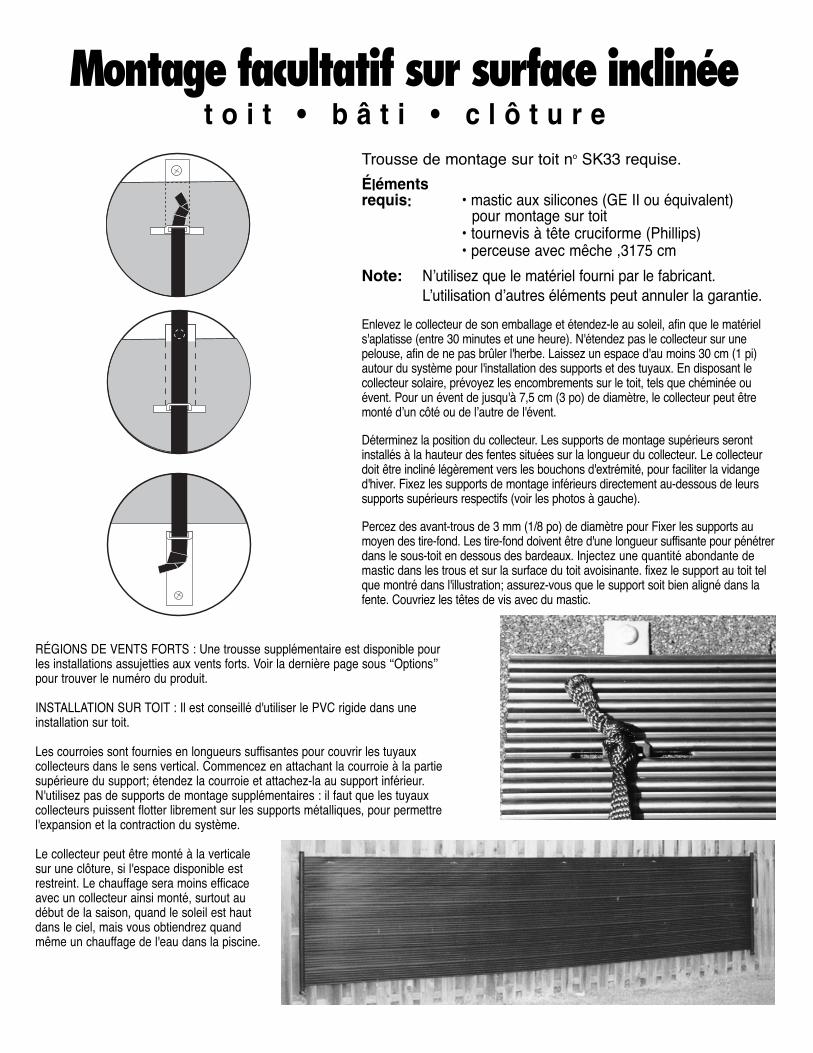
Trousse de montage sur toit no SK33 requise.
Élémentsrequis: • mastic aux silicones (GE II ou équivalent)
pour montage sur toit• tournevis à tête cruciforme (Phillips)• perceuse avec mêche ,3175 cm
Note: N’utilisez que le matériel fourni par le fabricant.L’utilisation d’autres éléments peut annuler la garantie.
Enlevez le collecteur de son emballage et étendez-le au soleil, afin que le matériels'aplatisse (entre 30 minutes et une heure). N'étendez pas le collecteur sur unepelouse, afin de ne pas brûler l'herbe. Laissez un espace d'au moins 30 cm (1 pi)autour du système pour l'installation des supports et des tuyaux. En disposant lecollecteur solaire, prévoyez les encombrements sur le toit, tels que chéminée ouévent. Pour un évent de jusqu'à 7,5 cm (3 po) de diamètre, le collecteur peut êtremonté d’un côté ou de l’autre de l'évent.
Déterminez la position du collecteur. Les supports de montage supérieurs serontinstallés à la hauteur des fentes situées sur la longueur du collecteur. Le collecteurdoit être incliné légèrement vers les bouchons d'extrémité, pour faciliter la vidanged'hiver. Fixez les supports de montage inférieurs directement au-dessous de leurssupports supérieurs respectifs (voir les photos à gauche).
Percez des avant-trous de 3 mm (1/8 po) de diamètre pour Fixer les supports aumoyen des tire-fond. Les tire-fond doivent être d'une longueur suffisante pour pénétrerdans le sous-toit en dessous des bardeaux. Injectez une quantité abondante demastic dans les trous et sur la surface du toit avoisinante. fixez le support au toit telque montré dans l'illustration; assurez-vous que le support soit bien aligné dans lafente. Couvriez les têtes de vis avec du mastic.

Erforderlich: Dach-Montagesatz Nr. SK33
Werkzeuge: • Silikon-Dichtungsmasse bei Dachinstallation• Schraubendreher für Kreuzschlitzschrauben• Handbohrer mit 32 mm-Holzspiralbohrer
Achtung: Verwenden Sie ausschließlich Montageteile des Herstellers. Bei der Verwendung zusätzlicher oderanderer Teile verlieren Sie Ihren Garantieanspruch.
Nehmen Sie den Kollektor aus der Verpackung und lassen Sie ihn zurGlättung des Materials ausgebreitet in der Sonne liegen (30 Minuten bis 1Stunde). Breiten Sie den Kollektor nicht auf dem Rasen aus, da dasdarunter befindliche Gras verdorren könnte. Kalkulieren Sie im Minimum30 cm rings um das Solarsystem für Halterungen und Leitungen ein.Berücksichtigen Sie beim Ausbreiten der Kollektoren auf dem Dachmögliche Hindernisse wie Entlüftungssysteme. Bei Vorhandensein einerDachentlüftung mit einem Durchmesser von bis zu 8 cm können dieKollektoren auf beiden Seiten der Entlüftung installiert werden.
Legen Sie die gewünschte Position des Kollektors fest. Die obereHalterung wird an jedem der Schlitze entlang der gesamten Länge desKollektors platziert. Der Kollektor sollte in Richtung derEndverschlusskappen leicht schräg abfallen, um das Ablassen desWassers (wenn Sie die Anlage winterfest machen) zu ermöglichen.Bringen Sie die unteren Halterungen direkt unter jeder der oberenHalterungen an (siehe Foto links).
Bohren Sie für alle Halterungen 32 mm-Löcher vor. Die Schrauben solltenlang genug sein, um die unter den Schindeln befindliche Dachkonstruktionzu erreichen. Geben Sie eine ausreichende Menge an Silikon-Dichtmassein die Löcher und auf die ringsum befindliche Dachfläche. Befestigen Siedie Halterungen wie in der Abbildung so, dass sie sich direkt in der Mittedes Schlitzes befinden. Dichten Sie den Bereich über dem Schraubenkopfmit zusätzlicher Silikon-Dichtmasse ab.
OPTION: MONTAGE AUF SCHRÄGEN FLÄCHEND A C H • G E S T E L L • Z A U N
GEGENDEN MIT STARKEN WINDEN: Ein zusätzlicherBefestigungsbausatz kann für Installationen in Regionen mit starkenWinden bereitgestellt werden. Zwecks Produktnummer siehe Rückseiteunter "OPTIONEN".
DACHINSTALLATIONEN: Für Dachinstallationen wird die Verwendung vonHart-PVC-Rohren empfohlen.
Um die Kollektoren vertikal zu spannen, wurde Gurtmaterial in derentsprechenden Länge bereitgestellt. Befestigen Sie den Gurt zunächst ander oberen Halterung und führen Sie ihn dann zur darunter befindlichenHalterung, um ihn dort ebenfalls zu befestigen. Benutzen Sie keine zusät-zlichen Montagehalterungen – der Kollektormuss auf den Halterungen "schweben",um sich entsprechend ausdehnen undzusammenziehen zu können.
Bei Platzmangel ist die Montage amZaun eine weitere Installationsoption.Unter Umständen leidet die Heizleistungder Kollektoren bei einer vertikalenInstallation ein wenig, insbesondere zuBeginn des Jahres oder wenn sich dieSonne hoch am Himmel befindet.

MONTAJE OPCIONAL EN SUPERFICIE INCLINADAT E J A D O • B A S T I D O R • V A L L A
ZONAS DE MUCHO VIENTO: Puede obtenerse un kit de sujeción adi-cional para instalaciones en zonas que puedan estar expuesta amucho viento. No incluido; véase la última página bajo “OPCIONES”para obtener el número de producto.
INSTALACIONES EN TEJADO: Se sugiere que utilice tuberías rígidasde PVC para instalaciones en tejado.
Se suministra una correa con longitud adecuada para abarcar loscolectores verticalmente. Empiece atando la correa a la parte superiordel soporte y pase la correa hasta el soporte por debajo de éste yátelo al soporte inferior. No añada otras piezas de montaje de ferre-tería; el colector debe “flotar” en los soportes para expandirse y con-traerse.
Las instalaciones de montaje en vallasson una opción si hay problemas deespacio. Es posible que el colector nocaliente tan eficazmente cuando semonta verticalmente, especialmentea principios de año, cuando el sol estájusto por encima, pero de todas formascalentará la piscina.
SE NECESITA: • Kit de montaje en tejado nº SK33
Herramientas: • Sellador de silicona, (GE II o equivalente)si se coloca en tejado
• Destornillador con cabeza Phillips• Taladro manual con broca de 32 mm
Importante: Utilice sólo las piezas de montaje del fabricante.El añadir o utilizar otros artículos de ferreteríaanulará la garantía.
Saque el colector de la caja y deje reposar el material al sol (entre 30 minu-tos y una hora). No ponga el colector sobre el césped, ya que éste puedequemarse por debajo. Deje un espacio de al menos un pie alrededor delsistema solar para los soportes y la tubería. Cuando se coloquen los colec-tores deben tenerse en cuenta las obstrucciones de los tejados como losconductos de ventilación. Los colectores pueden colocarse a cualquier ladode un conducto de ventilación de tejado de hasta 7,6 cm de diámetro.
Determine la posición del colector. El soporte de montaje superior se situaráen cada ranura a lo largo del colector. El colector debería inclinarse lige-ramente hacia las tapas de extremos para drenarse (acondicionamientopara el invierno). Localice los soportes de montaje inferiores directamentedebajo de cada soporte superior (véanse las fotos a la izquierda).
Taladre orificios de guía de 32 mm para todos los soportes. Los tornillos derosca de madera deben ser lo suficientemente largos como para llegar a laparte bajo el tejado por debajo de las tejas. Inyecte una cantidad abun-dante de sellador de silicona en los orificios y en la superficie del tejado dealrededor. Monte el soporte en el tejado como se muestra con el soportecentrado en la ranura. Inyecte más silicona en la zona de la cabeza deltornillo.

Requisito: Kit di montaggio su tetto #SK33
Attrezzi: • Silicone sigillante, (GEII o simile), per il tetto.• Cacciavite a testa Phillips• Trapano a mano con punta da 32 mm
Importante: Usate solo gli attrezzi forniti dal produttore. L’aggiuntao l’utilizzo di altri attrezzi rende nulla la garanzia.
Togliete il collettore dalla scatola e lasciate che il materiale riprendaforma al sole (da 30 minuti ad un’ora). Non lasciate il collettore adiretto contatto con l’erba, in quanto potrebbe bruciarla. Lasciatealmeno uno spazio di circa 30 cm. attorno al sistema solare per l’in-stallazione dei tubi e sostegni. Quando vengono installati i collettori sidovrebbero prendere in considerazione gli ostacoli del tetto, come adesempio le prese d’aria. Con una presa d’aria fino a circa 7,6 cm didiametro, i collettori possono essere installati da entrambi i lati dellapresa d’aria.
Determinate il posizionamento del collettore. I supporti in alto saran-no posizionati in ciascuna scanalatura sulla lunghezza del collettore.Il collettore dovrebbe essere leggermente inclinato verso i tappi ter-minali per lo scolo (preparazione per l’inverno).Posizionate i supporti in basso in corrispondenza di ciascun supportoin alto (vedere foto a sinistra).
Trapanate fori di guida di 32 mm per tutti i supporti. Le viti mordentea testa quadra devono essere abbastanza lunghe per raggiungere ilsottotetto sotto alle tegole. Iniettate una buona quantità di silicone neibuchi e nella superficie del tetto circostante. Montate i supporti sultetto come mostrato, con il supporto centrato nelle scanalature.Iniettate ancora silicone sopra le teste delle viti.
MONTATURA FACOLTATIVA SU SUPERFICIE INCLINATAT E T T O • R A S T R E L L I E R A • S T E C C AT O
ZONE VENTOSE: È possibile ottenere un kit di ulteriori supportiper l’installazione dei collettori in zone soggette a forti venti. Il kitnon è incluso. Vedere il numero di prodotto all’ultima pagina allavoce “OPZIONI”.
INSTALLAZIONI SU TETTO: Si consiglia l’uso di tubi di PVCrigido per le installazioni su tetto.
Vengono anche fornite le cinghie di appropriata lunghezza perattraversare i collettori verticalmente. Allacciate la cinghia alsupporto in alto e assicuratelo al supporto in basso. Nonaggiungete altro materiale di supporto, perché il collettore deve“fluttuare” sui supporti per espandersi e contrarsi.
Se ci sono problemi di spazio, è possibile montare i collettori ad uno steccato. È possibile che i collettori non riscaldino in modo del tutto efficiente quando sono montati verticalmente, specialmente agli inizi dell’anno quando il sole è sopratesta, ma possono lo stesso riscaldare la vostra piscina.

MONTAGEM FACULTATIVA SOBRE ÁREA INCLINADAT E L H A D O * E S T R U T U R A * V E D A Ç Ã O
ZONAS COM VENTOS FORTES: No caso de os painéis ficarem sujeitos aventos fortes, existe um acessório para retenção do vento que não seencontra incluído (para obter o número do artigo, consulte a secção“Opções” na última página).
MONTAGEM EM TELHADO: Sugere-se o emprego de tubo rígido em PVCpara as montagens em telhados.
Acompanha o produto uma tira com comprimento suficiente que tem a final-idade de atravessar os painéis no sentido vertical. Comece por prender atira ao topo do suporte e, fazendo-a correr até ao suporte seguinte, ate-a aosuporte inferior. Não acrescente mais ferragens – o painel deve ficar soltonos suportes a fim de poder encolher ou esticar.
Se tiver problemas de espaço, a montagem na vedação da piscina poderá ser uma opção a considerar. Apesar de ainda aquecer um pouco a piscina, o painel poderá não aquecer tão bem quando montado na posição vertical, sobretudo no início da estação quando o sol se encontra precisamente a pique.
Material necessário:• Conjunto de montagem para telhado SK33Ferramentasnecessárias • Isolante em silicone (GE II ou equivalente), no
caso de a montagem ser efectuada no telhado.• Chave de estrela• Berbequim com uma broca de 32 mm
Importante: Para a montagem, utilizar apenas as ferragens recomendadas pelo fabricante.O emprego de outras ferragens anulará a garantia.
Retire o painel da caixa e deixe-o estendido ao sol (30 minutos a umahora). Não exponha o painel em contacto directo com a relva em virtudede a poder queimar. Reserve um espaço mínimo de um pé à volta dopainel solar para os suportes e mangueiras. Antes de colocar os painéissolares no telhado, dever-se-á levar em consideração determinadosobstáculos, nomeadamente ventiladores. Para um ventilador com umdiâmetro de até 7,6 cm os painéis podem ser colocados em qualquer ladodo ventilador.
Determine a posição do painel. O suporte superior ficará montado em cadaranhura a todo o comprimento do painel. Este deverá ficar ligeiramenteinclinado na direcção dos tampões a fim de facilitar o escoamento de águadurante o Inverno. Coloque os suportes inferiores de montagem imediata-mente abaixo de cada suporte superior (ver imagem à esquerda).
Para todos os suportes, perfure orifícios piloto com 3,175 mm de dimensão.Os parafusos compridos devem ter tamanho suficiente para chegarem àparte interior do telhado. Introduza uma quantidade abundante de vedanteem silicone nos orifícios e na área adjacente do telhado. Instale o suporteno telhado de modo a ficar centrado em relação à ranhura, conforme a ilus-tração. Introduza mais silicone na zona da cabeça do parafuso.

Vereistmateriaal: Kit voor dakmontage SK33
Gereedschap: • Siliconenkit (GE II of equivalent) indien op dak • Kruiskopschroevendraaier • Handboor met boorkop van 3 mm
Belangrijk: Gebruik uitsluitend montagemateriaal van de fabrikant. De garantie is ongeldig indien ander materiaal wordt toegevoegd of gebruikt.
Neem de collector uit de doos en laat het materiaal (30 minuten tot een uur) in de zon liggen. Leg de collector niet op het gazon. Het graskan namelijk verbranden. Laat een afstand van ten minste 30 cm rondhet zonneverwarmingssysteem voor de beugels en de buizen. Houdrekening met de dakconstructie (bijv. luchtopeningen) wanneer u decollectoren plaatst. Bij een luchtopening met een diameter tot 7,5 mmkunnen de collectoren aan beide zijden van de opening wordengeplaatst.
Bepaal de positie van de collector. De bovenste montagebeugelsbevinden zich aan iedere sleuf over de hele lengte van de collector.De collector moet lichtjes schuin aflopen naar de eindstoppen toezodat het water kan wegstromen (winteriseren). Plaats de onderstemontagebeugels direct onder iedere bovenste beugel (zie foto’s links).
Boor geleidegaten van 3 mm voor alle beugels. Kraagschroevenmoeten lang genoeg zijn zodat ze door de dakspanen het onderdakraken. Spuit een grote hoeveelheid siliconenkit in de gaten en op hetomliggende dak. Monteer de beugel op het dak zoals afgebeeld, metde beugel in het midden van de sleuf. Spuit extra silicone over deschroefkop..
OPTIONELE MONTAGE OP SCHUIN OPPERVLAKD A K • S T E L L A G E • S C H U T T I N G
WINDERIGE PLEKKEN: Voor installaties die aan veel wind kunnenblootstaan, is een extra kit beschikbaar. Niet inbegrepen: zie laatstepagina, onder ‘OPTIES’ voor het productnummer.
INSTALLATIE OP EEN DAK: Het is raadzaam onbuigzame pvc-buizente gebruiken voor installatie op een dak.
U krijgt riemen van de gepaste lengte om de collectoren verticaal teoverspannen. Maak de riem eerst vast aan de bovenzijde van debeugel en leid hem naar de beugel eronder. Bevestig hem aan deonderste beugel. Voeg geen extra montagemateriaal toe; de collectormoet op de beugels ‘drijven’ om te kunnen uitzetten en inkrimpen.
Indien u niet veel ruimte hebt, kan het systeem op een schutting wordengemonteerd. In geval van verticale montage is het mogelijk dat de collector niet even efficiënt verwarmt, vooral aan het begin van het jaar, wanneer de zon loodrecht aan de hemel staat; uw zwembad wordt echter nog altijd verwarmd.

SmartPool LLC • Lakewood, NJ 08701 • (732) 730-9880www.smartpool.com SK43-042313