root lesson 1 pire summer 2009 lecture series tony kelly
TRANSCRIPT

ROOT Lesson 1PIRE Summer 2009 Lecture Series
Tony Kelly

Review from Snapshot
• Learned what ROOT was, what it offered, and how to acquire it.
• Learned how to work from the ROOT command line (called working interactively).
• Learned the difference between named and unnamed macros and when to use which
• Recall to use .h for header files, .cc for named macros, and .C for unnamed macros.
• Learned about TBrowser and how to call it from the command line
• Learned how to run ROOT in batch mode (background)
• Recall root -b -q Ninja.C &> logfile

Let’s Define a Problem
• Let’s pretend we have a problem. A professor has approached us. This professor happens to be really old school and still does things in Fortran, but the professor would like to be able to participate in the CMS experiment and realizes it is time to branch out and learn how to use C, C++, ROOT, and CMSSW. This prof gives YOU the following task to help out:
• Create a program that will create imaginary particles. This program needs to not only create the particles, but it also needs to be “friendly,” meaning that someone can just load up ROOT, load the script, and *POOF!* virtual particles will automatically be created.
• How do we even go about this? We need to first understand how to define our particles. We then need to program these particles. THEN we need to write a script that someone can load to just create the particles.
Defining a Particle
• When programming, the hardest part is generally trying to identify the problem and what is important about the problem. (Personal Opinion.) I think defining a problem in a useful way is the key to then finding the solution.
• Let’s think back to the lectures we attended:

PID
• In the second lecture of the PIRE 2009 Summer Lecture Series, we discussed PID. Recall, this stands for particle identification. We learned what aspects of a particle are used to help identify particle.
• It would make sense that we use the same particle characteristics used to identify a particle as a means of describing a particle. What were those characteristics again?
1. Mass
2. Charge
3. Momentum

The Header File (.h)
• Now that we have an idea of how we will describe our particles (by their mass, charge, and momentum), we need to figure out how we program these particles.
• In this ROOT Lesson, we will be writing our own header file, named macro, and unnamed macro. Think of the header file as a place to declare and describe objects (physical or virtual). In this case then, it makes sense that we need a Particle.h file to initially describe our particles.
• Let’s continue on and see just how we will write this header file, what goes into the header file, etc.

Time-Out• Quick, blow the whistle! Time-out. Alright, so we are about to write some
code. But to write the code, I am sure you are wondering HOW do I write code?
• Well, there are different camps of people out there. Personally, I program a lot on my laptop then port the code wherever I need it. However, there are many options:
• vim
• nedit
• xemacs
• xcode
• notepad
• These are just some of the tools out there. Remember the brief vim lessons from the ROOT Prelesson? If you are going to use vim, “i” will put you into typing/insert mode, “esc” will put you back into command mode. “wq” will write the file and quit vim, while “q!” will quit without changing anything, or “q” if you just want to quit vim.

The First Step
• Everyone should now have ROOT installed on their laptops, PCs, Macs, etc. (Otherwise see the ROOT Prelecture, which will be saved and resized for useful reading then placed on the PIRE wiki.)
• Create a directory on your desktop. Call it whatever you wish. If you are doing things from a terminal, you should be able to do something similar to as follows:

Writing the Header File
• Now we will make the Paricle.h file inside this folder on the desktop.
• I will use vim commands to write the program (since vim is nearly universal), though feel free to use any software you wish.

vim Particle.h• Now we will make
the Paricle.h file inside this folder on the desktop.
• I will use vim commands to write the program (since vim is nearly universal), though feel free to use any software you wish.

Code GuardThis is called the “Code Guard.” You won’t always see it in header files (sometimes called the interface), but it is bash script that will first check to see if the Particle.h file exists, and then if it doesn’t creates the file to exist. It is good programming to make sure you always have this at the top of your header files, though perhaps Samvel will discuss this more in his C++ lectures.

Comment Blocks
This is called a “comment block.” There are two ways to make text comment within a code. One is using a double slash ( //) the other to set off an entire section of code is to use what you see below (/* ..... */) where the dots represent text. The asterisks I use in between are just for formatting and to help guide the eye when someone reads the code.
Notice that in my header file, I include a comment block at the top. This is an essential programming feature. PLEASE do this. As some of you are discovering, it is a nightmare to read someone else’s code and try to figure out what is going on without documentation. Additionally, you may return a year later or more and wonder what you were doing yourself! It is good programming to include your name, date of creation, and some description of what the code is about in some initial comment block at the top of any code you write.
Repeat!
Always include some comment block at the top of your code with your name and documentation of what the code is about. You may include also the date and an email.

Including other Header FilesTo include other header files (or interfaces), in ROOT, one must use one of two methods.
For non-ROOT header files, use brackets such as
#include <iostream>
For ROOT header files, use the parenthesis such as
#include “TMath.h”

These Particular Headers
• #include <iostream>
• These is from the C++ Standard Library. In general, this is one of the most commonly used libraries. It will allow you to display text and variable values to the screen, and it will also allow you to feed information into your scripts. For those familiar with C++, this library lets you use commands such as “cout” , “cin” and “endl”
• #include “TMath.h”
• This is the ROOT’s math library. It has a bunch of premade math functions such as square roots, power functions, addition, etc. It is a very useful library to include so that you don’t have to write your own functions, when you are using ROOT. When using ROOT, you might as well use all the power that comes with it!

Declaring the Class Particle
Here we declare the class Particle
A class is a C++ object. These means we can create multiple instances of this class. In general, in the header file we define the characteristics that a collection of objects will share. We can then distinguish between those objects by the particular values of those characteristics.
So after you have typed -> class Particle {
We will then go on to give the general descriptions of any particle. I will show you how this can be done, and in what order any class object should be created.

Public Domain
Right after the class name declaration, you will see the word “public:” Samvel will probably cover all of this in more detail, but a class declaration may have three domains: public, friend, and private. These domains decide what other classes and functions/methods may interact with your current class (in this case Particle) and to what extent. Anything in the “public” domain is pretty much fair game and can be accessed by anything and anyone.
If you only wanted certain parameters to be accessed by the owning class (say you wanted your Particle class to be the only object able to access particle masses), then you would make such declarations in a private domain.
For simplicity, we will be working with everything in the public domain.

Constructors and Destructor
The first thing to notice is how I offset this part of the class declaration. Remember, the double slash means I am making a comment, and the ROOT compiler will completely ignore this.
The constructor is important as it will tell the class how to put together your Particle object. Imagine it like this. What if we had a class “human.” The computer has no idea what makes up a human, but if we give it various instructions (i.e. construction blueprints) on how to take eyes, arms, legs, etc and put them together, then the computer code will know how to construct a virtual human.
ALL class objects need a constructor and a destructor, and this is declared in the public domain. It is good coding practice to allow a general constructor that takes no arguments, then the special constructors.
See the next slides to learn more about our constructors.

General ConstructorThe general constructor is---> Particle()
It takes no arguments. If someone were to create an instance of a particle with this, it would create an empty particle with no defined mass, charge, or momentum. It would essentially be a completely undefined, virtual particle in which we would then have to define the parameters piece by piece to build our particle object.

Specific ConstructorThe first specific constructor is
---> Particle(double mass, double charge, double momentum)
If someone were to create an instance of a Particle object in this way, they would be defining the Particle’s initial mass, charge, and momentum off the bat.

Specific Constructor
This constructor constructs a particle based on the particle’s PID and gives it some initial momentum. This is the first time you may hear about something called The Particle Data Guide, or sometimes just called the PDG.
The PDG has TONS and TONS of information on high energy physics, detectors, and most importantly, about almost any known particle thus far discovered. It will contain mass, charge, quark construction, lepton numbers, baronic numbers, and more. Many particles have something called a pid (as opposed to making a PID), which is the particle ID number. For example, if I were to say I found a pid 13 particle in a detector, I would be using terminology that means I found a muon in my detector.
In our code, we will give the option of someone using more commonly known “pid” for a particle, rather than making people set a particle’s mass and charge everytime. This should make our professor happy, for I’m sure the less work it takes for him or her to create particles, the happier they will be with the work of this project.

The DestructorMemory is the name of the game when it comes to programming. I’m sure when you have ran code like PSIexpert you see a lot of “possible memory leaks.” This is generally due to memory mismanagement that comes about with not correctly deleting pointers.
When you make a class, not only do you have to tell the computer how to put the object together, but you have to allow the code to take it apart. This is called the destructor. For the most part, it always looks the same. Use a little tilda, then just use the general constructor form.

The Members
We now go to the next section: The Members. The Members of the our class object are basically the variables that will be associated with the object. Since we already decided a particle is described by its mass, charge, and momentum, we should create variables of these. I also create a variable for the pid, so we have this way of describing particles as well (per the last special constructor we made).
If we were creating a human, we might want members called eyes, arms, legs, etc. Of special importance is something called “Type”, which Samvel might go more into. Different “types” fill up different amounts of memory blocks within your computer. I make pid an integer, but the other parameters are all doubles.
You may be wondering about the small “f” in front of the member names. This is computer science convention. It helps to separate the member variables from possible other variables of the same name once you start working with your named macros. It is very good programming convention to always defined your class members with a small “f” in front of their names, that way someone who is looking at your code will know at a glance wether a variable in a code is part of an object or something more local.

The Methods
If a class has variables associated with it, then it must have functions (or to be fancy once again->Methods) associated with it.
Notice!
Just like with the members, we aren’t saying anything about the methods, only that they exist. We don’t say anything about how they look, how they work, only that the exist and what is required to use them. All the Set methods are of type void (so that they return nothing), but all of them take some argument. All the Get functions are of some type that will be returned but don’t require arguments.
Typo, shouldn’t need an argument

The End of the Header FileEnd of class Particle declaration.
We can now “Esc” then “:wq” our header file.
We have successfully written an interface (header file) called Particle.h that will explain how an object Particle is to be understood, whether by pid, mass, charge, and/or its momentum.

Full Blown Script

Writing the Named Macro
• Now we will make the Paricle.cc file
• If you are using vim, after you ESC then :wq you should be back at your terminal prompt. Now just vim the “.cc” file of the name Particle

Comment Block• Again, we begin coding by
placing a comment block at the top of our code. If there is anything you walk away from with the ROOT talks, let it be this lesson. It is ALWAYS a good idea to document your code, this can’t be stressed enough.
• In this case, I include the author and a contact in case anyone else who uses this code has questions.

Inclusions• Notice that I then include the
Particle header file in parenthesis. This allows my named macro to know all the definitions of my objects, members, and variables. It also saves space and makes for easier reading, since any other header files that I might need are included in the Particle.h file as well. In this case, we have access to iostream and TMath.
• I also have something called namespace std. This is standard programming. What it means is I am telling the compiler that I will be using the standard (std) library for C++. Thus, I can make calls to “cout” and “cin” more easily, than having to type std::cout or std::endl etc all the time.

Default/General Constructor• In the header file we declared
that three methods of making a particle would exist. There would be the empty/general constructor where no arguments were given, another were mass-charge-momentum were given, and a third method where pid and momentum were given.
• NOW, in the named macro we get to say how this is done exactly. We explain things to the computer in the same order that we declared them. So taking first the empty constructor....

Default/General Constructor
We have Particle::Particle()
This tells us that we are looking at the class Particle and then at the constructor Particle() . This may seem silly, but it isn’t actually too silly if you wonder what might have happened if we had declared TWO different class objects in the header file.

Default/General ConstructorWe then have all the members of the class Particle being initialized. You always want to initialize your members (class variables), otherwise they may automatically given some initial value that would be potentially harmful to your computer. A C++ developer (one of the actual members who help develop the standard library) was very fond of saying undefined behavior could potentially reformat your hardrive!
Maybe that would be a little extreme, but it is true that memory within your computer could be corrupted. So always make sure you initialize your allocated memory.
In my case, I am initializing all the members to zero. Thus, if someone calls the empty constructor, they will literally get an object with all the members set to zero.

Default/General ConstructorI then give some routine to this particular constructor.
This is called a switch-case. It actually heralds back to the C (before C++) days.
A switch takes a variable as an argument, then it compares to a bunch of possible cases (think simplified “if-then” statements).
In this case, I don’t really compare the switch to anything, we already set fPID to zero initially, and by default we displaying some text to the screen then reset the pid to 211 (which is a pion), set the mass to the pion mass, and set the charge to some positive charge. We then break from the switch.

Next Constructor
We then have the constructor that initializes the mass, charge, and momentum. Notice I pass this constructor three variables mass, charge, and momentum.

Next ConstructorWe then have the constructor that initializes the mass, charge, and momentum. Notice I pass this constructor three variables mass, charge, and momentum.
I then take these and again I initialize my members in the order of their declaration in the header file. This time, I initialize them (except for pid) according to the arguments I passed to the constructor.
I don’t include any initializing routine within this particular constructor.

Last Constructor
The last constructor declared in the header file takes a pid and momentum as arguments.
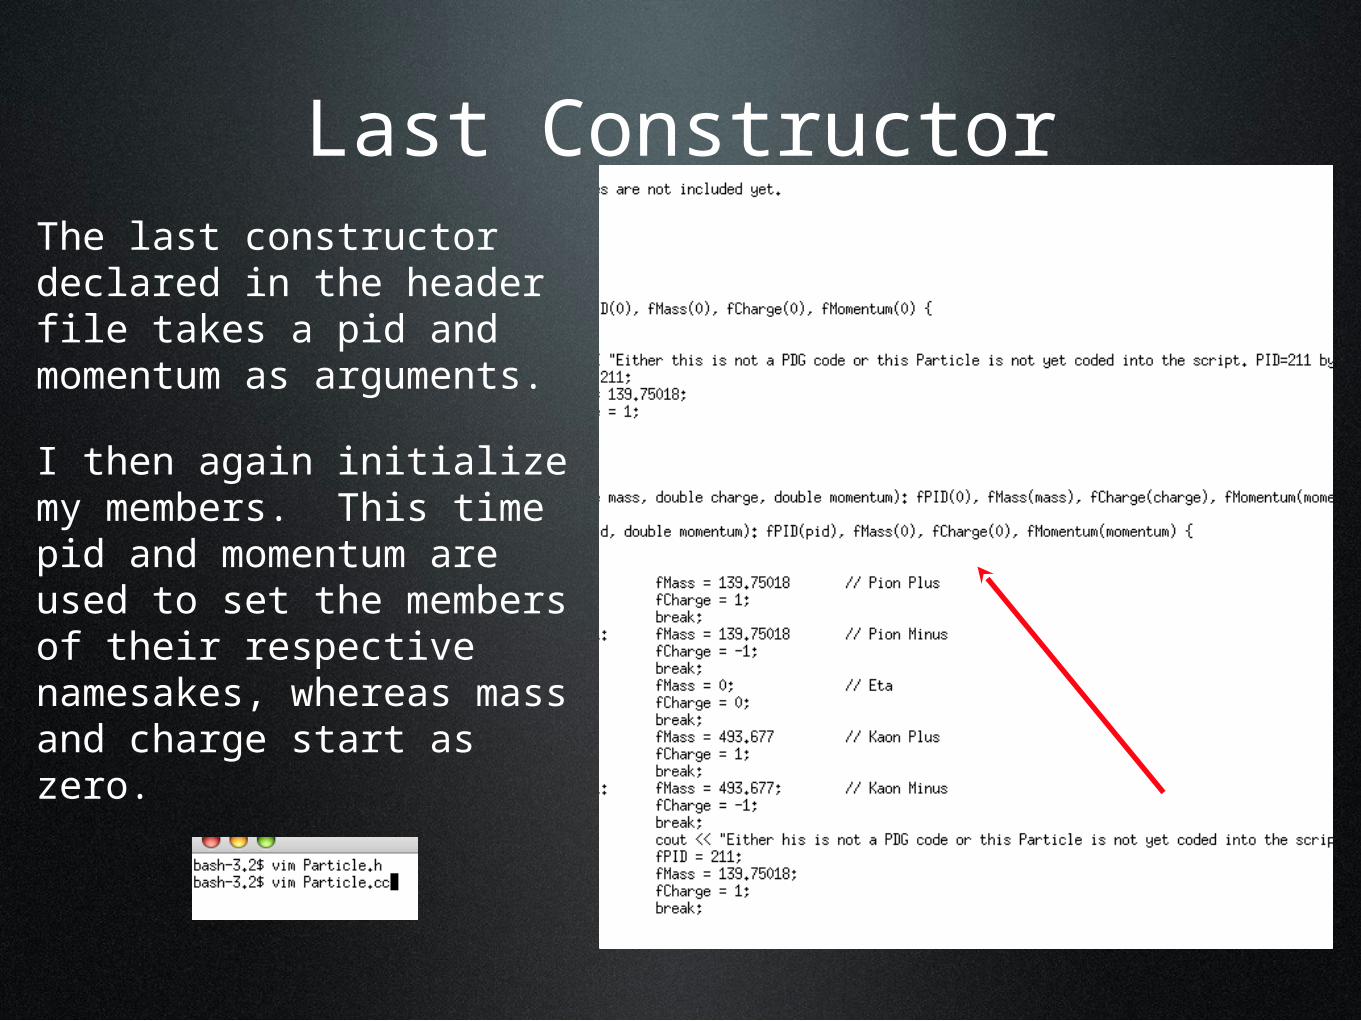
Last Constructor
The last constructor declared in the header file takes a pid and momentum as arguments.
I then again initialize my members. This time pid and momentum are used to set the members of their respective namesakes, whereas mass and charge start as zero.

Last ConstructorThe initializing routine I have for this constructor is again a giant switch. While the switch-case in the empty constructor was trivial and hardly necessary, we see this one has some meat to it.
Recall, we wanted to give our Professor using this code the option to just pass a pid (13,211, etc) with some momentum to the code to create a particle very easily. We see that I have programmed so that the pid is compared to a list. At the moment, if someone passes 211, -211, 0, 321, or -321 to the constructor, then the mass and charge are automatically set for the particle. Very handy! No need to memorize long lists of masses and charges for all particles!
Currently our code lets us create pions, etas, and kaons.

Full Blown Script (1)

Full Blown Script (2)
We then define the destructor.

Full Blown Script (2)
And the various methods

Another Time-Out
• Remember, what was out task?
• Create a program that will create imaginary particles. This program needs to not only create the particles, but it also needs to be “friendly,” meaning that someone can just load up ROOT, load the script, and *POOF!* virtual particles will automatically be created.
• So far, we have defined how particles will look and we have written a named macro that can create these particles.
• But, the professor wants to just be able to load up an Unnamed Macro (load up a script into ROOT) and just create particles! Well, let us do that next then....

The Unnamed Macro
Create the Unnamed Macro.

Comment Block
You should have the comment block down by now.

Variables
Define some variables that will be used to pass arguments to the constructors.

Load and CompileRemember from the PreLesson of ROOT, this is how you can load and compile a Named Macro through an UnNamed Macro.
We want to compile and execute our new particle macro.

Some Gnarly If-ElseNow we have some spiffy if-else statements (could have been down with switch-case as well), that will give the professor a choice between creating a ghost particle, a particle by mass-charge-moment, or a particle by PID-momentum.

Check to See if Worked
To make sure the code works correctly, I then have the code spit out the particle’s mass, charge, and momentum at the end of the script’s execution.

Beautiful Particles
And there we have it! We have been presented a problem. We defined the problem. We described the problem. then we executed the solution.
Defined particle class - header file
Described particle class - Named Macro
Executed particle class - UnNamed Macro

Next Time?
• Using some ROOT functionality
• I.e. What if we create a whole flow of particles, can we count how many of each we create?
• Attempt to use features of ROOT such as TRandom, TH, etc
• As always, if there is some specific question you have or something you want to go over, be sure to tell me or email me, so I can incorporate it into the next talk!