rota-lok system
TRANSCRIPT

0086
Rota-LokTM System
Surgical Technique Manual
For Augmentation of Massive Rotator Cuff Tear

Rota-Lok™ System
HeaderIntroduction
This technique utilizes a wide, open weave tape that bridges the gap between the torn rotator cuff and humeral head. The tape partially covers the superior aspect of the humeral head. It is firmly attached to it and tensioned to restore the humeral head to its normal position relative to the glenoid and surrounding structure, thus maximizing the function of the deltoid.
The open weave structure of the tape is intended to encourage tissue ingrowth to speed up healing in the region of the tear. Furthermore, the use of tape instead of sutures reduces the likelihood of cutting through the tissue and thereby jeopardizing the repair.
This technique is easy, quick and effective in preventing impingement and relieving the associated pain as well as in restoring function and improving abduction strength1,2. It thus improves the quality of life of the patient.
Additionally:• This device carries none of the risks or availability
problems of allograft• There is no donor site morbidity as encountered with
autograft
We would like to thank Mr. A. M. Nada, Consultant Orthopaedic Surgeon, Nevill Hall Hospital, UK, for his work in developing this product and technique.

Pre- and postoperative MRI scans show the successful outcome when using an open weave tape to encourage tissue ingrowth. The preoperative MRI shows the gap between the retracted cuff and its original insertion point on the humeral head. This gap has been bridged with the open weave tape, which is covered with tissue and remains intact at the three year postoperative scan.
Preoperative
Postoperative

Product Overview
INSTRUMENTATION The following instrument is packaged with the implant set:• 2.5 mm diameter drill bit (plain shank)
The user must ensure that the following standard instruments are available before starting surgery:
• Two Kocher artery forceps, 1:2 teeth, straight, 18cm• Two bone awls, straight with eye, 2.4 mm• Fraser Kelly artery forceps, curved, 18cm• Curved hook, blunt, 24 cm
The user should ensure that a USP #2 (metric 5) suture with curved needle is available before starting surgery, or an appropriate instrument to aid threading the Rota-Lok through bone tunnels.
IMPLANTThe Rota-Lok is a flexible textile device made from polyester, a biocompatible material that has been in use for the reconstruction of ligaments and tendons for over 25 years. The Rota-Lok has different structural features intended to facilitate the surgery and improve its outcome:• Continuous longitudinal yarns provide sufficient
strength to allow early mobilization• Flat, central, open weave section acts as a scaffold
that encourages tissue ingrowth, expediting healing in the region of the tear
• Open weave section also provides resistance to cutting through tissue, allowing tensioning when pulling the tissue towards its site of attachment to bone
• Both ends taper into a strong, thin cord with sealed tips, allowing easy passage through soft tissue and bone tunnels
• Undulating structure of the thin cord ensures both a secure and small knot
Tapered ends for ease of implantation
120 mm long central flat open weave section for tissue ingrowth
Cord with undulations improves knot performance
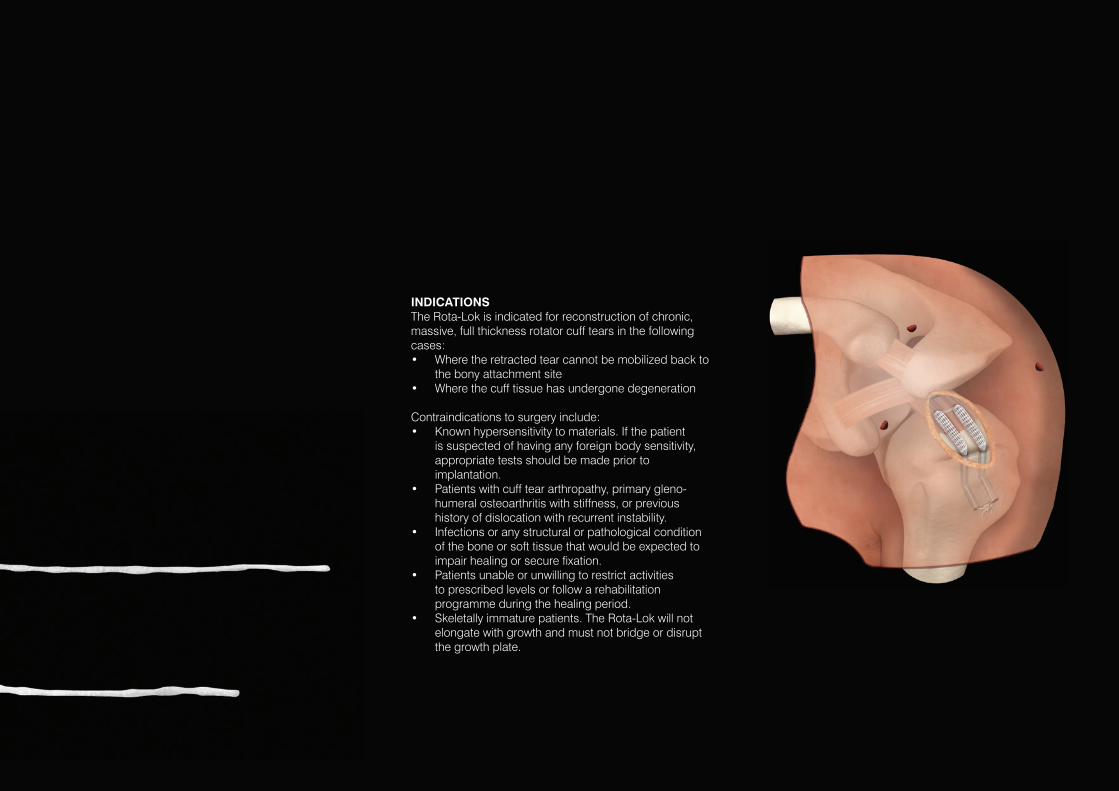
INDICATIONSThe Rota-Lok is indicated for reconstruction of chronic, massive, full thickness rotator cuff tears in the following cases:• Where the retracted tear cannot be mobilized back to
the bony attachment site• Where the cuff tissue has undergone degeneration
Contraindications to surgery include:• Known hypersensitivity to materials. If the patient
is suspected of having any foreign body sensitivity, appropriate tests should be made prior to implantation.
• Patients with cuff tear arthropathy, primary gleno-humeral osteoarthritis with stiffness, or previous history of dislocation with recurrent instability.
• Infections or any structural or pathological condition of the bone or soft tissue that would be expected to impair healing or secure fixation.
• Patients unable or unwilling to restrict activities to prescribed levels or follow a rehabilitation programme during the healing period.
• Skeletally immature patients. The Rota-Lok will not elongate with growth and must not bridge or disrupt the growth plate.

1 2
INSPECTION AND CLASSIFICATIONThe procedure is performed in the beach chair position under general anaesthesia and/or interscalene block. Preoperative antibiotics should be given.
The shoulder is arthroscopically evaluated through standard anterior-superior (antro-superior), posterior and lateral portals and the edge of the torn cuff is identified. A routine subacromial decompression is performed by removing any impingement lesions using an arthroscopic wand and shavers. The lateral portal is positioned in line with the anterior border of the acromion, approximately 2 cm lateral to its anterolateral margin (Figure 1). This enables the portal to be extended, providing a lateral mini-open incision.
A thorough, systematic inspection of the rotator cuff is performed. If the tendon appears healthy and the tear is small, it should be repaired with appropriate sutures and anchors. However, if there is a massive, chronic, retracted tear that cannot be mobilized back to the bony attachment site, or if the cuff tissue has undergone degeneration, the Rota-Lok implant should be considered.
RECOMMENDED APPROACHOnce it is determined that the cuff is irreparable with standard suture and anchor techniques, the incision at the lateral portal site is extended superiorly to the tip of the acromion and inferiorly to provide a total incision of approximately 5 cm in length.
Skin and subcutaneous tissue are dissected, a haemostasis is secured, the deltoid is split along its fibres and a self-retaining retractor is inserted. Care is taken to avoid splitting the deltoid too far inferiorly, to avoid damage to the axillary nerve.
A second retractor is applied to separate the head from the acromion to visualize the cuff. The cuff is grasped with Kocher artery forceps and mobilized by blunt dissection.
A stab wound is made through a modified Neviaser portal (a supraspinatus portal). This portal is made 1 cm medial to the standard Neviaser portal (i.e. 1 cm medial to the apex of the posterior border of the clavicle and the medial border of the acromion). This modified portal is used to minimize the risk of disrupting the nerves and arteries in this region.
The cuff is grasped with two Kocher artery forceps and pulled to keep it under tension. A pair of Fraser Kelly artery forceps is passed through the healthy posterior portion of the retracted rotator cuff, medial to the tear.
NOTE: Ensure that there is sufficient healthy cuff tissue between the Fraser Kelly artery forceps and the edge of the tear to prevent the Rota-Lok from pulling through the soft tissue.
NOTE: Avoid pushing the Fraser Kelly artery forceps with excessive force through the cuff to prevent puncturing the underlying cartilage surface on the humeral head.
Surgical Technique
Modified Neviaser portal
Anterior-superior portal
Lateral portal
Posterior portal
1 cm medial to standardNeviaser portal
Push Fraser Kelly artery forceps through cuff
Apply tension on the rotator cuff
2 cm
5 cm

3 4 5
The Rota-Lok is introduced into the wound and the corded end is grasped with the tip of the Fraser Kelly artery forceps. The Fraser Kelly artery forceps and Rota-Lok are pulled back through the cuff and out of the modified Neviaser portal until approximately 5 cm of the central open weave section remains protruding from the inferior surface of the cuff.
NOTE: The Fraser Kelly artery forceps are clipped to the superior cord to prevent it passing back into the Neviaser portal. The Fraser Kelly artery forceps are released when the superior arm has been pulled with the curved hook and is visible in the wound, as described by the following step.
A curved hook is introduced over the upper surface of the cuff and the superior arm of the Rota-Lok is drawn out of the lateral wound.
Depending on the extent and location of the tear, the same procedure is repeated (either through the Neviaser or the anterior-superior portal) to pass the lower arm of the Rota-Lok through the inferior surface of the cuff to its superior surface, and then out of the lateral wound.
Pull lower arm of Rota-Lokwith Fraser Kelly artery forceps
Pull superior arm of Rota-Lok withFraser Kelly artery forceps
Pull superiorarm with curved hook
5 cm

6 7 8
NOTE: Both arms of the Rota-Lok should lie on the superior surface of the cuff. Ensure that the Rota-Lok is centrally located such that each arm has a similar length of open mesh structure protruding from the cuff.
Both corded ends of the Rota-Lok are tensioned so that the mesh is tightly seated against the cuff with no slackness.
The corded ends are pulled towards the original attachment site to mobilize the cuff and identify the location for the two bone tunnels within the footprint on the greater tuberosity.
A 2.5 mm drill bit (provided) is used to create two tunnels as follows:
When drilling the first (anterior) tunnel, the arm is externally rotated. The tunnel is drilled slightly obliquely in the footprint of the cuff (shown as “A” in Figure 7). The tunnel entrance is marked with diathermy and a bone awl is introduced into that tunnel. An oblique drill hole is made at the outer side of the humerus to meet the tip of the bone awl and then the tunnel is marked with diathermy (shown as “B” in Figure 7).
NOTE: It is difficult to find the entrances to the bone tunnels later on in the procedure if they are not marked.
A bone awl is placed in each tunnel. The two bone awls are used to “ream” the intersection of the tunnels to ensure it is smooth and free from obstruction.
When drilling the second (posterior) tunnel, the arm is internally rotated. At the bed of the tuberosity the actions described in Stage 7 are repeated to make a second bone tunnel parallel to the first.
NOTE: Take care to leave a substantial gap between the two parallel tunnels to prevent collapse of the bone bridge. Where possible, round the tunnel edges to prevent abrasion of the Rota-Lok.
NOTE: With an anterosuperior tear (which includes the subscapularis and supraspinatus tendons) the two tunnels will typically be located with one tunnel in the anterior region of the cuff insertion footprint and one slightly anterior to the middle of the footprint.With a posterosuperior tear (which includes the supra- and infraspinatus tendons) one tunnel will be typically located in the posterior region of the footprint and the other tunnel slightly posterior to the middle of the footprint.
Ensure both arms of the Rota-Loklie on top of the cuff
Ensure sufficient depth to prevent collapse of bone bridge
Internally rotate arm then drill posterior tunnel
Ensure sufficient bone bridge between tunnels to prevent collapse of bone
Externally rotate arm then drill anterior tunnel
Drill hole in thefootprint of cuff A.
B. Drill to meet first hole to create a curved tunnel
Identify the location for the two bone tunnels

9
Using a USP #2 suture with curved needle, or suture snare, each corded end of the Rota-Lok is passed through the tunnel nearest to it, while tension on the rotator cuff is maintained.
The cords are pulled to ensure that the cuff has partially covered the head.
NOTE: The cuff should cover at least the superior convex surface of the humeral head.
The arm is held in 20-30º abduction and the cords are tensioned to ensure the length of the reconstruction is physiological. Over- or under-tensioning is avoided to ensure adequate joint function can be achieved. Stability and range of motion are checked before the corded ends of the Rota-Lok are tied. The two corded ends are tied on the outside of the humerus using a reef knot with an extra throw (triple knot), while tension is maintained in the cords and rotator cuff.
A second check of shoulder movement is performed before cutting the cords to length.
NOTE: Ensure the knot is locked before trimming any excess cord. Each cord is cut with scissors at right angles to its length, to minimize the generation of loose fibres.
IMPORTANT:• Any loose fibres created when trimming to length
must be carefully removed from the incision site• After trimming to length it may be necessary to
restrain the cut ends by stitching them back to the cord
• It is vital to ensure that the knot is covered with, and remains buried in, tissue
The remnant of the cuff is sutured to the flattenedRota-Lok to close the defect as much as possible.
WOUND CLOSUREThe wound is washed and closed in layers.
Tie cords using a reefknot with an extra throw
POSTOPERATIVE MANAGEMENT
Immediate Postoperative Actions• The patient should be given two doses of IV
antibiotics.
• The patient should be discharged home with the rehabilitation instructions.
Rehabilitation ProgrammeThe rehabilitation programme (right) should be supervised by a specialist physiotherapist. All mobilization and exercises should be performed within the pain free range of movement.
The patient should be warned not to exceed the prescribed activity levels or to overload the repair before complete healing has occurred.
REFERENCES 1. Nada AM, Debnath UK, Rogers C. Dacron ligament augmentation of massive rotator cuff tear. Proceedings of the American Association of Orthopedic Surgeons, San Francisco. 2008;Poster presentation:P313.
2. Nada AM, Debnath UK, Robinson DA, Jordan C. Treatment of massive rotator-cuff tears with a polyester ligament (Dacron) augmentation: clinical outcome. J Bone Joint Surg. 2010;92B(10):1397-402.
Days 1-5• The arm is kept in a polysling.
• Active finger, wrist and elbow movements are allowed.
Days 5-14• The arm is kept intermittently in a polysling.
• Gentle active and passive shoulder mobilization including pendulum exercises are allowed to prevent tissue adhesions.
• Stitches are removed if wound healing is satisfactory.
Days 14-42• Active assisted and isometric exercises are
appropriate at this stage.
Week 6 Onwards• Scapular stabilization exercises with gradual
progression to resistance exercises.
• On agreement with the physiotherapist return to activity is allowed.

Ordering Information
102-1064 Rota-Lok System Implant Set, includes:
Rota-Lok, 10 mm x 500 mm (supplied sterile) Packaged with the following disposable: Drill Bit, plain shank to fit Jacobs Chuck, 2.5 mm diameter (supplied sterile)
Individual re-order codes
102-1066 Rota-Lok, 10 mm x 500 mm (supplied sterile)
Please refer to the Instructions for Use leaflet packaged with the Rota-Lok for essential information including Use, Sterility, Indications, Contraindications, Warnings and Precautions, Potential Adverse Effects and Storage. Additional copies may be obtained from the Neoligaments™ Sales Department, or downloaded from www.neoligaments.com

Neoligaments™ A division of Xiros™ Springfield House Whitehouse Lane Leeds LS19 7UE
Tel. +44 (0) 113 238 7202 Fax. +44 (0) 113 238 7201 [email protected] www.neoligaments.com
Xiros Limited, registered in England No. 1664824.
All rights reserved. © Neoligaments™ 2017. Worldwide patents and patents pending. Neoligaments, Rota-Lok and Xiros are trademarks of Xiros.
Developed and manufactured by
LAB 121 7.00