rowhouse manual
TRANSCRIPT
New York City Landmarks Preservation Commission
ROWHOUSE MANUAL
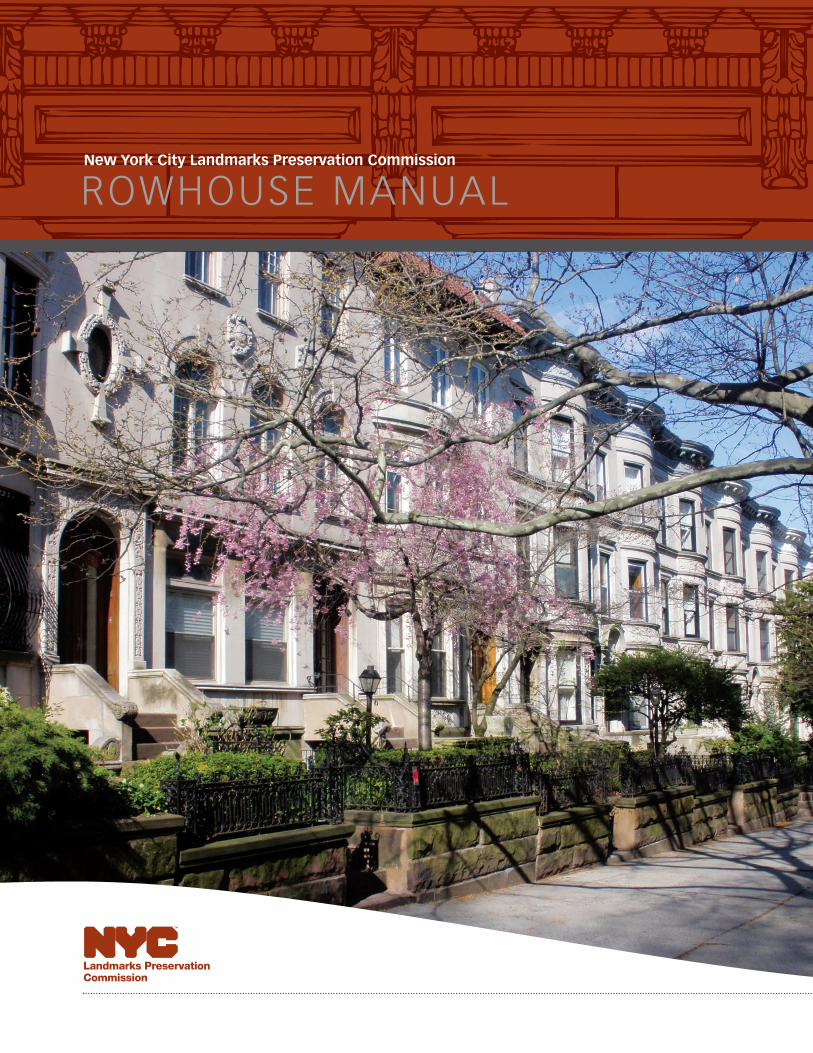
Front cover image: Renaissance Revival style rowhouses in the Park Slope Historic District
Dear Fellow New Yorker,
I’m pleased to present the Landmarks Preservation Commission’s RowhouseManual, a guide that’s designed to help you work successfully with the Commissionto protect, maintain and enhance your architecturally and historically significanthome.
There currently are more than 100 historic districts throughout New York City,all of which are as diverse as the owners and residents who live in them. Theyencompass a variety of styles, from the simple brick buildings of RidgewoodNorth Historic District, Queens to the elegant Beaux-Arts limestone maisonettesof the Upper East Side and the ornate Queen Anne and Romanesque Revivalstyle 19th-century mansions and rowhouses of Crown Heights North in Brooklyn.
Preserving the outstanding buildings that lie within the boundaries of these special neighborhoods is truly a partnership between you, the Commission andits staff. As the City’s expert historic preservation agency, the Commission is responsible for preventing the loss of the special features that contribute to thedistinctive character of your building, and by extension New York City. But ourefforts to safeguard these buildings and sites could not succeed without you.
This manual is meant to assist you care for your property for the long term. Itcontains a great deal of helpful information, and we’ve done our best to make it informative and interesting. On behalf of my fellow Commissioners and theCommission’s staff, I’d like to thank you for helping us protect the quality of lifeof every New Yorker, and attract tens of millions of visitors to our City each year.We look forward to continuing to work with you, and for you, in the years anddecades to come.
Sincerely,
Robert B. Tierney, ChairNew York City Landmarks Preservation Commission
CONTENTS
Introduction .......................................2
Rowhouse Styles...............................3
Applying for Permits .........................7
Doors and Doorways ........................8
Windows..........................................12
Wall and Façade Surfaces
Masonry Wall Surfaces ...............18
Wood: Clapboard andShingle Wall Surfaces .................23
Air Conditioning ..............................25
Cornices...........................................27
Roofs................................................29
Stoops, Fences and Handrails ........32
Yards, Areaways, Sidewalksand Driveways.................................36
Glossary ...........................................39
Repair Recipes.................................44
CH
AIR
’S F
OR
EW
OR
D
New York City Landmarks Preservation Commission • Rowhouse Manual 1
MayorMichael R. Bloomberg
CommissionersRobert B. TierneyChair
Pablo E. VengoecheaVice Chair
Frederick BlandStephen ByrnsDiana ChapinJoan GernerRoberta Brandes Gratz
Christopher MooreMargery PerlmutterElizabeth RyanRoberta Washington
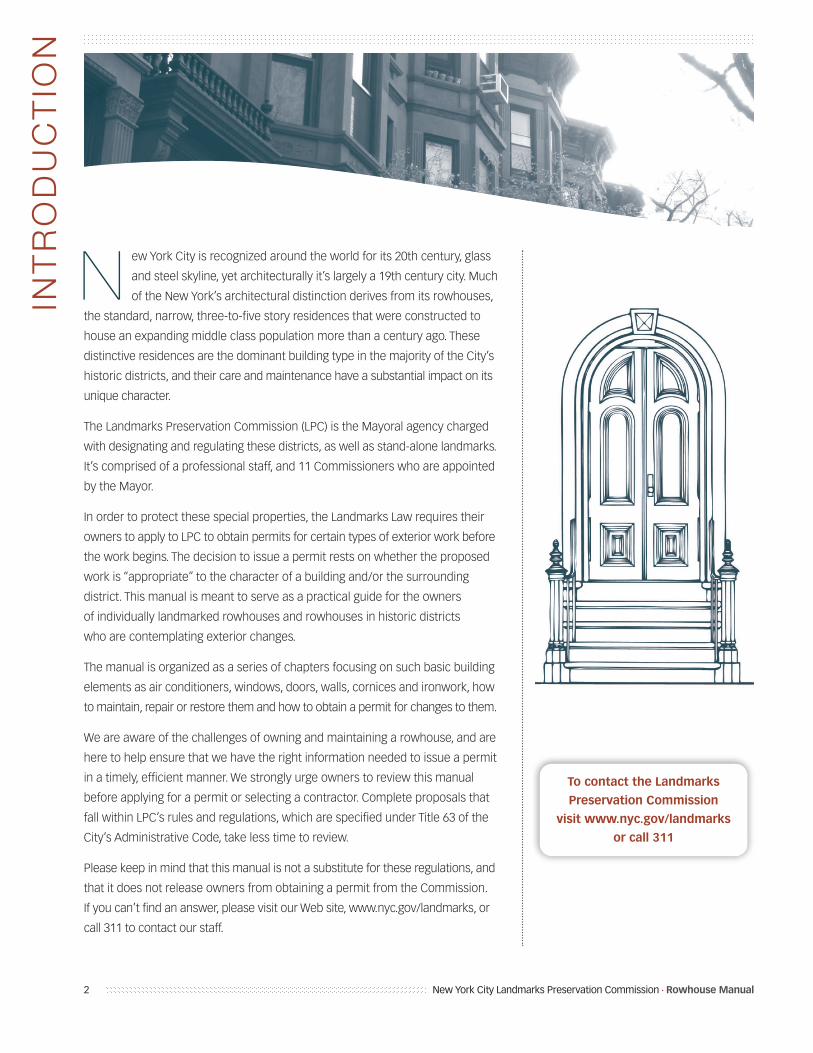
ew York City is recognized around the world for its 20th century, glass
and steel skyline, yet architecturally it’s largely a 19th century city. Much
of the New York’s architectural distinction derives from its rowhouses,
the standard, narrow, three-to-five story residences that were constructed to
house an expanding middle class population more than a century ago. These
distinctive residences are the dominant building type in the majority of the City’s
historic districts, and their care and maintenance have a substantial impact on its
unique character.
The Landmarks Preservation Commission (LPC) is the Mayoral agency charged
with designating and regulating these districts, as well as stand-alone landmarks.
It’s comprised of a professional staff, and 11 Commissioners who are appointed
by the Mayor.
In order to protect these special properties, the Landmarks Law requires their
owners to apply to LPC to obtain permits for certain types of exterior work before
the work begins. The decision to issue a permit rests on whether the proposed
work is “appropriate” to the character of a building and/or the surrounding
district. This manual is meant to serve as a practical guide for the owners
of individually landmarked rowhouses and rowhouses in historic districts
who are contemplating exterior changes.
The manual is organized as a series of chapters focusing on such basic building
elements as air conditioners, windows, doors, walls, cornices and ironwork, how
to maintain, repair or restore them and how to obtain a permit for changes to them.
We are aware of the challenges of owning and maintaining a rowhouse, and are
here to help ensure that we have the right information needed to issue a permit
in a timely, efficient manner. We strongly urge owners to review this manual
before applying for a permit or selecting a contractor. Complete proposals that
fall within LPC’s rules and regulations, which are specified under Title 63 of the
City’s Administrative Code, take less time to review.
Please keep in mind that this manual is not a substitute for these regulations, and
that it does not release owners from obtaining a permit from the Commission.
If you can’t find an answer, please visit our Web site, www.nyc.gov/landmarks, or
call 311 to contact our staff.
INT
RO
DU
CT
ION
New York City Landmarks Preservation Commission • Rowhouse Manual2
N
To contact the Landmarks
Preservation Commission
visit www.nyc.gov/landmarks
or call 311
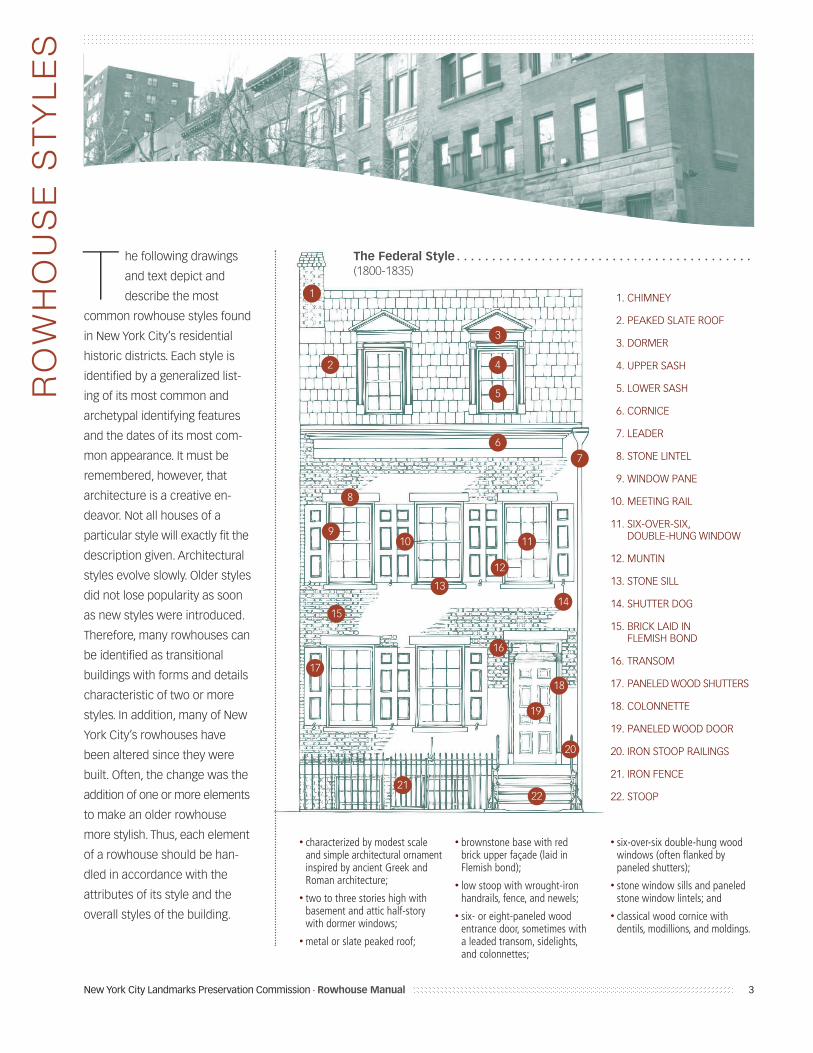
he following drawings
and text depict and
describe the most
common rowhouse styles found
in New York City’s residential
historic districts. Each style is
identified by a generalized list-
ing of its most common and
archetypal identifying features
and the dates of its most com-
mon appearance. It must be
remembered, however, that
architecture is a creative en-
deavor. Not all houses of a
particular style will exactly fit the
description given. Architectural
styles evolve slowly. Older styles
did not lose popularity as soon
as new styles were introduced.
Therefore, many rowhouses can
be identified as transitional
buildings with forms and details
characteristic of two or more
styles. In addition, many of New
York City’s rowhouses have
been altered since they were
built. Often, the change was the
addition of one or more elements
to make an older rowhouse
more stylish. Thus, each element
of a rowhouse should be han-
dled in accordance with the
attributes of its style and the
overall styles of the building.
RO
WH
OU
SE
ST
YL
ES
New York City Landmarks Preservation Commission • Rowhouse Manual 3
T
• characterized by modest scaleand simple architectural ornamentinspired by ancient Greek andRoman architecture;
• two to three stories high withbasement and attic half-story with dormer windows;
• metal or slate peaked roof;
• brownstone base with red brick upper façade (laid in Flemish bond);
• low stoop with wrought-ironhandrails, fence, and newels;
• six- or eight-paneled wood entrance door, sometimes with a leaded transom, sidelights, and colonnettes;
• six-over-six double-hung woodwindows (often flanked by paneled shutters);
• stone window sills and paneledstone window lintels; and
• classical wood cornice with dentils, modillions, and moldings.
The Federal Style . . . . . . . . . . . . . . . . . . . . . . . . . . . . . . . . . . . . . . . . . . (1800-1835)
1. CHIMNEY
2. PEAKED SLATE ROOF
3. DORMER
4. UPPER SASH
5. LOWER SASH
6. CORNICE
7. LEADER
8. STONE LINTEL
9. WINDOW PANE
10. MEETING RAIL
11. SIX-OVER-SIX, DOUBLE-HUNG WINDOW
12. MUNTIN
13. STONE SILL
14. SHUTTER DOG
15. BRICK LAID IN FLEMISH BOND
16. TRANSOM
17. PANELED WOOD SHUTTERS
18. COLONNETTE
19. PANELED WOOD DOOR
20. IRON STOOP RAILINGS
21. IRON FENCE
22. STOOP
1
2
3
4
5
6
7
10 11
12
13
15
17
18
19
20
2122
16
14
9
8
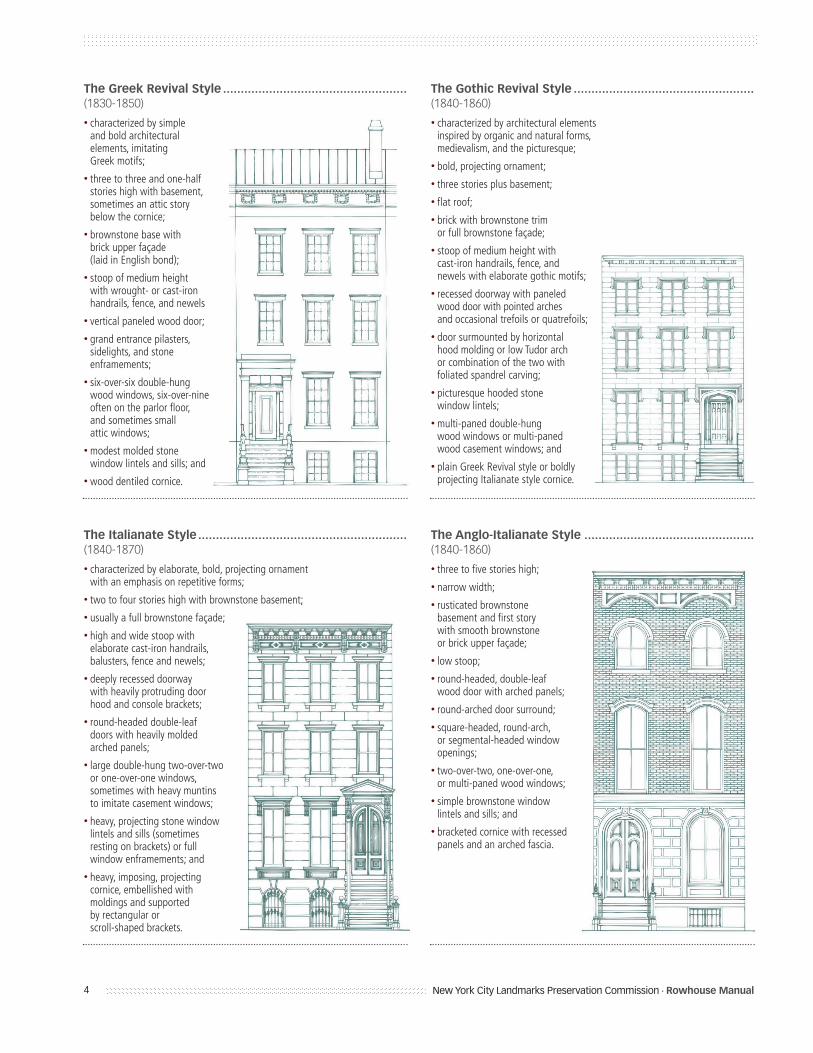
The Greek Revival Style ....................................................(1830-1850)
• characterized by simple and bold architectural elements, imitating Greek motifs;
• three to three and one-half stories high with basement,sometimes an attic story below the cornice;
• brownstone base with brick upper façade (laid in English bond);
• stoop of medium height with wrought- or cast-ironhandrails, fence, and newels
• vertical paneled wood door;
• grand entrance pilasters, sidelights, and stone enframements;
• six-over-six double-hung wood windows, six-over-nineoften on the parlor floor, and sometimes small attic windows;
• modest molded stonewindow lintels and sills; and
• wood dentiled cornice.
The Gothic Revival Style ...................................................(1840-1860)
• characterized by architectural elements inspired by organic and natural forms, medievalism, and the picturesque;
• bold, projecting ornament;
• three stories plus basement;
• flat roof;
• brick with brownstone trim or full brownstone façade;
• stoop of medium height with cast-iron handrails, fence, and newels with elaborate gothic motifs;
• recessed doorway with paneled wood door with pointed arches and occasional trefoils or quatrefoils;
• door surmounted by horizontal hood molding or low Tudor arch or combination of the two with foliated spandrel carving;
• picturesque hooded stone window lintels;
• multi-paned double-hung wood windows or multi-paned wood casement windows; and
• plain Greek Revival style or boldly projecting Italianate style cornice.
The Italianate Style ...........................................................(1840-1870)
• characterized by elaborate, bold, projecting ornament with an emphasis on repetitive forms;
• two to four stories high with brownstone basement;
• usually a full brownstone façade;
• high and wide stoop with elaborate cast-iron handrails, balusters, fence and newels;
• deeply recessed doorway with heavily protruding door hood and console brackets;
• round-headed double-leaf doors with heavily molded arched panels;
• large double-hung two-over-two or one-over-one windows, sometimes with heavy muntins to imitate casement windows;
• heavy, projecting stone window lintels and sills (sometimes resting on brackets) or full window enframements; and
• heavy, imposing, projecting cornice, embellished with moldings and supported by rectangular or scroll-shaped brackets.
The Anglo-Italianate Style ................................................(1840-1860)
• three to five stories high;
• narrow width;
• rusticated brownstone basement and first story with smooth brownstone or brick upper façade;
• low stoop;
• round-headed, double-leaf wood door with arched panels;
• round-arched door surround;
• square-headed, round-arch, or segmental-headed window openings;
• two-over-two, one-over-one, or multi-paned wood windows;
• simple brownstone window lintels and sills; and
• bracketed cornice with recessed panels and an arched fascia.
4 New York City Landmarks Preservation Commission • Rowhouse Manual
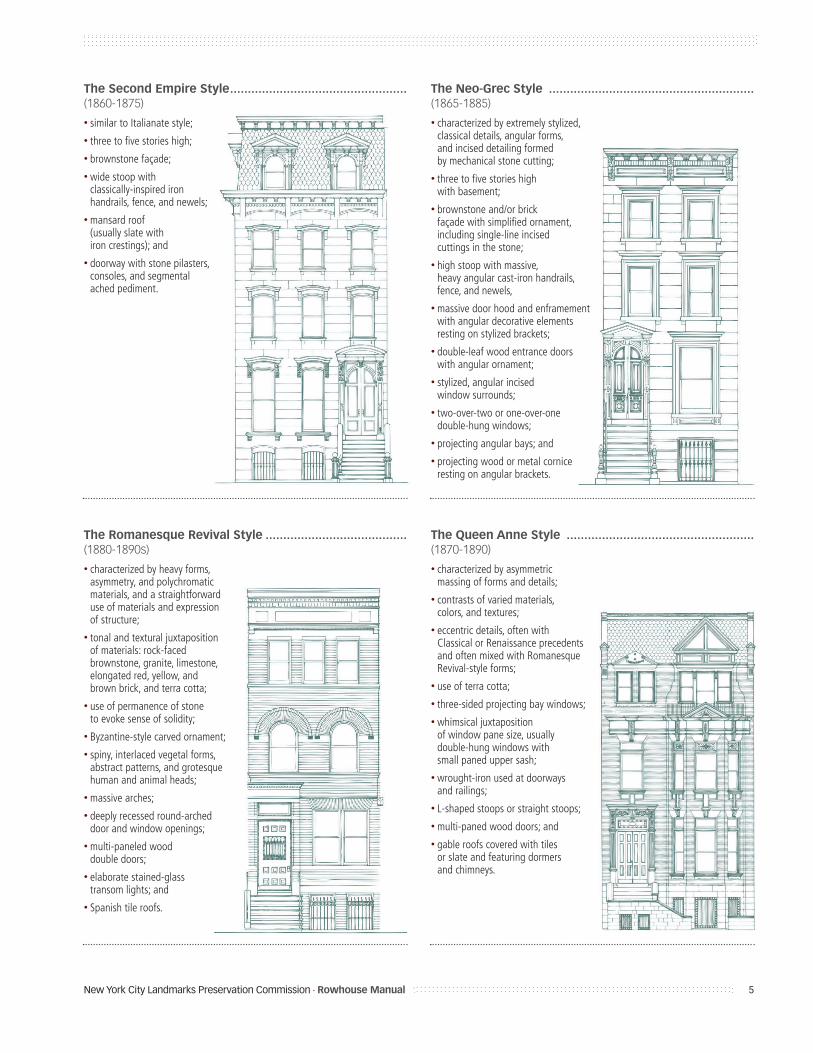
The Second Empire Style..................................................(1860-1875)
• similar to Italianate style;
• three to five stories high;
• brownstone façade;
• wide stoop with classically-inspired iron handrails, fence, and newels;
• mansard roof (usually slate with iron crestings); and
• doorway with stone pilasters, consoles, and segmental ached pediment.
The Neo-Grec Style ..........................................................(1865-1885)
• characterized by extremely stylized, classical details, angular forms, and incised detailing formed by mechanical stone cutting;
• three to five stories high with basement;
• brownstone and/or brick façade with simplified ornament, including single-line incised cuttings in the stone;
• high stoop with massive, heavy angular cast-iron handrails, fence, and newels,
• massive door hood and enframement with angular decorative elements resting on stylized brackets;
• double-leaf wood entrance doors with angular ornament;
• stylized, angular incised window surrounds;
• two-over-two or one-over-one double-hung windows;
• projecting angular bays; and
• projecting wood or metal cornice resting on angular brackets.
5
The Romanesque Revival Style ........................................(1880-1890s)
• characterized by heavy forms, asymmetry, and polychromatic materials, and a straightforward use of materials and expression of structure;
• tonal and textural juxtaposition of materials: rock-faced brownstone, granite, limestone,elongated red, yellow, and brown brick, and terra cotta;
• use of permanence of stone to evoke sense of solidity;
• Byzantine-style carved ornament;
• spiny, interlaced vegetal forms, abstract patterns, and grotesquehuman and animal heads;
• massive arches;
• deeply recessed round-arched door and window openings;
• multi-paneled wood double doors;
• elaborate stained-glass transom lights; and
• Spanish tile roofs.
The Queen Anne Style .....................................................(1870-1890)
• characterized by asymmetric massing of forms and details;
• contrasts of varied materials, colors, and textures;
• eccentric details, often with Classical or Renaissance precedentsand often mixed with Romanesque Revival-style forms;
• use of terra cotta;
• three-sided projecting bay windows;
• whimsical juxtaposition of window pane size, usually double-hung windows with small paned upper sash;
• wrought-iron used at doorways and railings;
• L-shaped stoops or straight stoops;
• multi-paned wood doors; and
• gable roofs covered with tiles or slate and featuring dormers and chimneys.
New York City Landmarks Preservation Commission • Rowhouse Manual
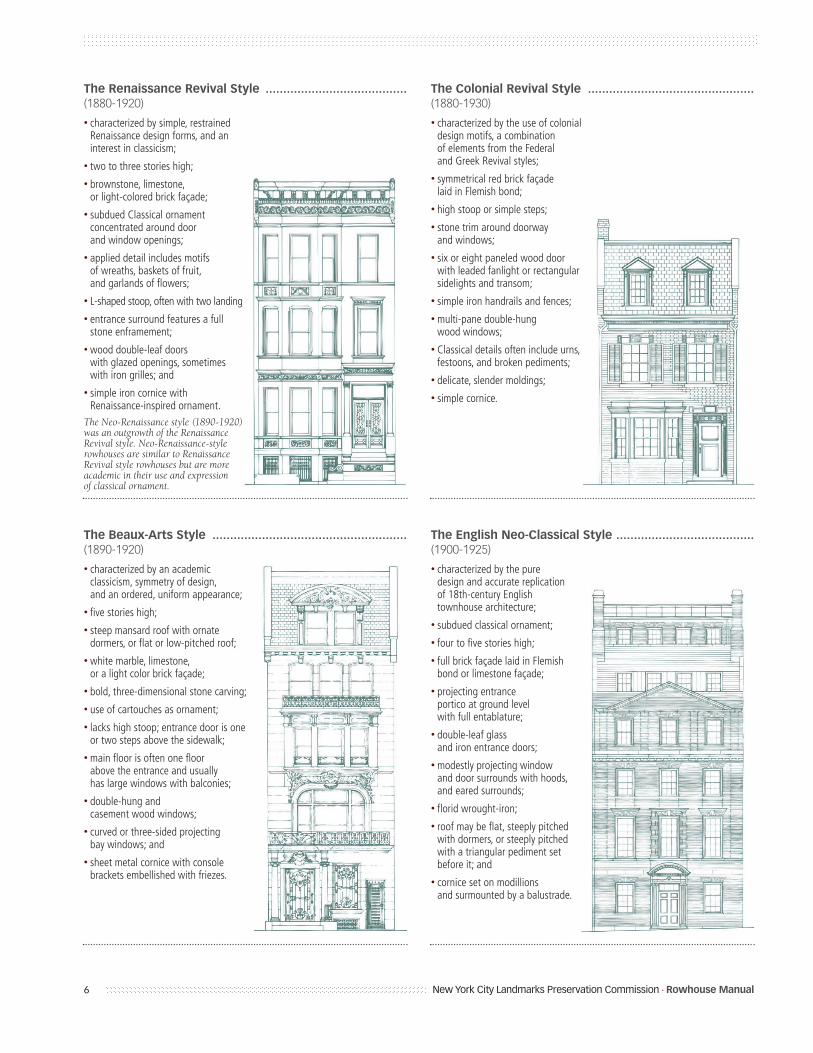
The Renaissance Revival Style ........................................(1880-1920)
• characterized by simple, restrained Renaissance design forms, and an interest in classicism;
• two to three stories high;
• brownstone, limestone, or light-colored brick façade;
• subdued Classical ornament concentrated around door and window openings;
• applied detail includes motifs of wreaths, baskets of fruit, and garlands of flowers;
• L-shaped stoop, often with two landings;
• entrance surround features a full stone enframement;
• wood double-leaf doors with glazed openings, sometimes with iron grilles; and
• simple iron cornice with Renaissance-inspired ornament.
The Neo-Renaissance style (1890-1920)was an outgrowth of the Renaissance Revival style. Neo-Renaissance-style rowhouses are similar to Renaissance Revival style rowhouses but are more academic in their use and expression of classical ornament.
The Colonial Revival Style ...............................................(1880-1930)
• characterized by the use of colonial design motifs, a combination of elements from the Federal and Greek Revival styles;
• symmetrical red brick façade laid in Flemish bond;
• high stoop or simple steps;
• stone trim around doorway and windows;
• six or eight paneled wood door with leaded fanlight or rectangularsidelights and transom;
• simple iron handrails and fences;
• multi-pane double-hung wood windows;
• Classical details often include urns, festoons, and broken pediments;
• delicate, slender moldings;
• simple cornice.
The Beaux-Arts Style .......................................................(1890-1920)
• characterized by an academic classicism, symmetry of design, and an ordered, uniform appearance;
• five stories high;
• steep mansard roof with ornate dormers, or flat or low-pitched roof;
• white marble, limestone, or a light color brick façade;
• bold, three-dimensional stone carving;
• use of cartouches as ornament;
• lacks high stoop; entrance door is oneor two steps above the sidewalk;
• main floor is often one floor above the entrance and usually has large windows with balconies;
• double-hung and casement wood windows;
• curved or three-sided projecting bay windows; and
• sheet metal cornice with console brackets embellished with friezes.
The English Neo-Classical Style .......................................(1900-1925)
• characterized by the pure design and accurate replication of 18th-century English townhouse architecture;
• subdued classical ornament;
• four to five stories high;
• full brick façade laid in Flemish bond or limestone façade;
• projecting entrance portico at ground level with full entablature;
• double-leaf glass and iron entrance doors;
• modestly projecting window and door surrounds with hoods, and eared surrounds;
• florid wrought-iron;
• roof may be flat, steeply pitched with dormers, or steeply pitched with a triangular pediment set before it; and
• cornice set on modillions and surmounted by a balustrade.
6 New York City Landmarks Preservation Commission • Rowhouse Manual
AP
PLY
ING
fo
rP
ER
MIT
S
New York City Landmarks Preservation Commission • Rowhouse Manual 7
How To Apply for a PermitYou can obtain an application and a copy of filing instructions on our Web site, www.nyc.gov/landmarks, bycalling 311 or in person at our offices, 1 Centre Street,9th Floor, New York, NY 10007.
In many cases, applications must be accompanied byphotographs, drawings, building material samples and/orphotomontages to illustrate the existing condition of thefeature that is to be repaired or replaced, and the proposed new work.
Before filing your application, you are welcome to callan LPC staff member to discuss which materials areneeded, or to arrange a meeting at our offices. By usingthe manual and working closely with the staff, you arelikely to develop a proposal that LPC can find appropriate,and approve.
After you complete the application form, and add thenecessary descriptive materials, you can mail or deliverthem to our offices, where they will be docketed and assigned to a staff member. The staff member then determines whether the application is complete, andwhich type of permit is needed for the proposed work.
About PermitsThe Commission issues three different types of permitsfor work on rowhouses: 1) a Certificate of No Effect 2) aPermit for Minor Work and 3) a Certificate of Appropri-ateness. After they’re submitted to the Commission, applications are assigned to a staff member, who will determine the type of permit and documentation yourproject requires.
The project will be authorized by either a staff member or the full Commission, depending upon its complexity. If Commission approval is necessary, yourproject must be first reviewed by your Community Boardand then by the Commission after a public hearing.
Permits come in the form of a letter, describe the approved work and explain why it was approved. Permitsmust be posted prominently while the work is under way.
Permits issued for work on rowhouses and the work they cover:
Certificate of No Effect (CNE)• Issued when the proposed work requires a Department of Buildings
(DOB) permit, but either does not affect the protected architectural features of a building, or meets criteria spelled out in LPC’s Rules for specific alterations to the exterior of buildings
• Work covered: interior renovations, plumbing and heating equipment installation; rear wall alterations, cleaning or repair that require DOB approval, such as Local Law 11 repairs
• Valid for four years
• Public hearing not required
Permit for Minor Work (PMW)• Issued when the proposed work does not require a Department of
Buildings (DOB) permit, and which either meets the criteria under LPC’s Rules for specific exterior alterations or is considered to be good preservation practice.
• Work covered: exterior painting, replacing doors or window sash, installing storm windows, or masonry restoration, cleaning or repair, and restoration of architectural detail
• Valid for four years
• Public hearing not required
Certificate of Appropriateness (CofA)• Issued when the proposed work affects significant architectural
features or when any proposed changes do not meet the LPC’s Rules for staff level approval. This work may or may not require a Departmentof Buildings permit.
• Work covered: additions, demolition, new buildings, store fronts, removal of important architectural features such as stoops and cornices, or installation of replacement windows that do not meet LPC’s Rules
• Valid for six years
• Public hearing is required
he Landmarks Preservation Commission preserves and protects New York City’s historic districts by regulating proposed
changes to the buildings that lie within them. To ensure that planned alterations are consistent with the style and materials
of a particular building, as well as others in a historic district, owners are required to apply for a work permit before a
project begins.
T
oors and doorways have always had great symbolic importance, and
in historic rowhouses the doorway is often the most richly ornamented
part of the building. Therefore, it is important to retain any original,
historic or significant doorway components, including the door, sidelights or
transom, door frame, and wood or masonry hood and decorative moldings.
If it is necessary to replace or alter any of these elements, changes should be
compatible with the architectural character of the building. An inappropriate
alteration will change the character of a doorway from an architecturally important
and harmonious part of the house to an awkward and obtrusive modernization.
DO
OR
S a
nd
DO
OR
WA
YS
8
D IN BRIEF
No permit required• Painting doors or door frames
the same color;• Sanding or refinishing doors
or door frames that are already stained or varnished;
• Repairing wood door and frame components by filling with woodputty or similar materials;
• Replacing or installing new locks or hardware on doors;
• Replacing broken glass;• Weather stripping
Permit required• Painting doors or door frames
a different color;• Installing intercom boxes
on the exterior of building;• Installing light fixtures
on exterior of building;• Installing door awnings;• Installing new doors,
storm doors or door frames• Installing protective grilles
or bars on exterior of building• Replacing solid panels
with transparent materials;• Replacing transparent materials
with solid panels;• Repairs requiring alterations
to door entry enframement;• Changing door configuration,
including material, shape, size number of doors, transoms or glazing within existing opening.
Door ConfigurationThe basic configuration of a doorwayshould be preserved in any proposed al-teration. Blocking up or changing the sizeor shape of door transoms or sidelights isdiscouraged. Reducing or enlarging dooropenings, cutting new openings wherenone previously existed, or blocking indoor openings are all alterations that notonly affect the design of a building, butpermanently destroy its physical integrity.
Door Entry EnframementThe door enframement is the part of thedoorway that surrounds the door itself,and its wood or metal frame. The entryenframement can very from simple, un-decorated lintels and sills, to elaborate architraves or hoods with pediments,brackets, and carved moldings in wood,stone, brick or terra cotta.
Because of their exposed location anddegree of ornamentation, elaborate doorenframements are often the first part of abuilding façade to deteriorate. Such dete-rioration has been commonly handled ina number of inappropriate and unsympa-thetic ways: removal or shaving of erodedelements, resulting in a simplified appear-ance; sheathing with another material,such as metal over wood or stone; or, most
drastically, complete removal of entire enframements.
Historic door entry enframementsshould be preserved and the removal ofhistoric elements is discouraged. Whereverpossible, unsound material should be stabilized.
Repairs and MaintenanceRestoring stone molding profiles and ornamentation is a skill that has been mastered by many restoration contractors.Using masonry consolidants, such assilanes, acrylics and epoxies, disintegrating,crumbling, spalling and sugaring masonrycan be brought back together and increasethe masonry’s strength and resistance tofurther deterioration. These consolidantspenetrate deeply to fill the pores within thestone.
Sections of wood doors, door frames,and enframements that have deterioratedbut are essentially sound can also be con-solidated. The loss of wood is progressive;at first the mass of the wood diminishes,but retains its size and shape. As decaycontinues, the wood shrinks and begins tocrumble. Wood epoxy consolidants replacethe lost mass, restoring strength to thewood. Holes and gaps can be filled andbuilt up with epoxy paste fillers.
New York City Landmarks Preservation Commission • Rowhouse Manual
9New York City Landmarks Preservation Commission • Rowhouse Manual
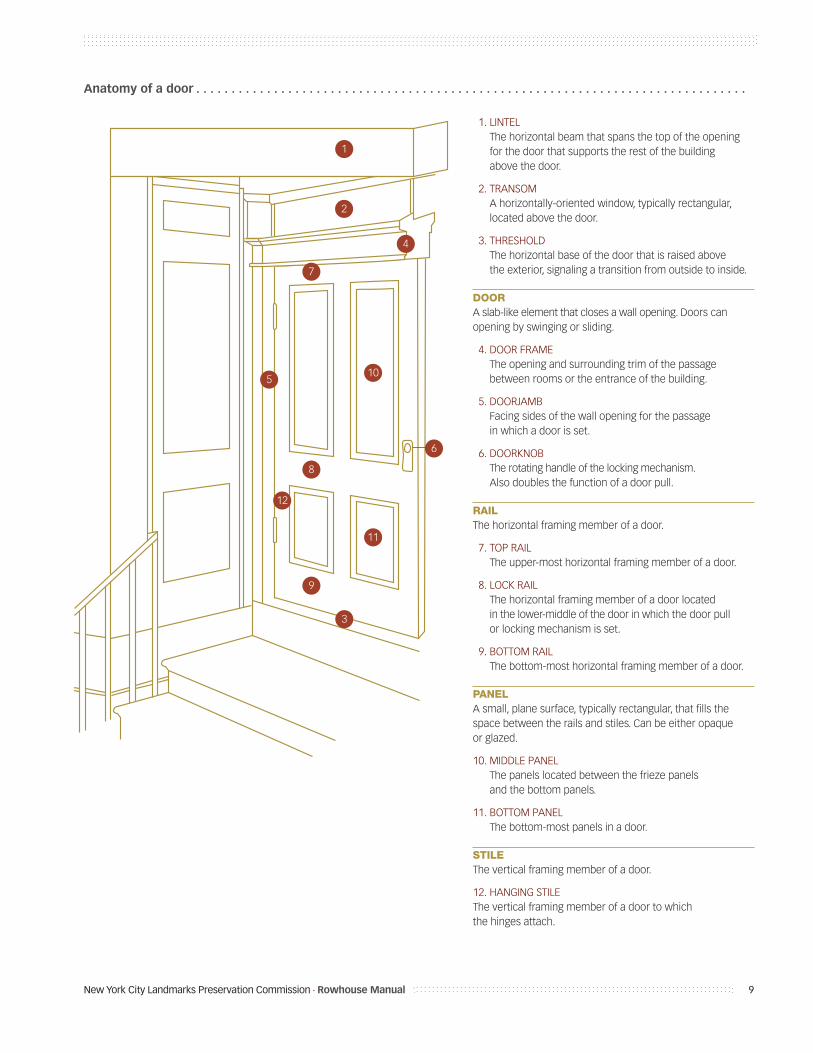
Anatomy of a door . . . . . . . . . . . . . . . . . . . . . . . . . . . . . . . . . . . . . . . . . . . . . . . . . . . . . . . . . . . . . . . . . . . . . . . . . . . . . .
1. LINTELThe horizontal beam that spans the top of the openingfor the door that supports the rest of the building above the door.
2. TRANSOMA horizontally-oriented window, typically rectangular, located above the door.
3. THRESHOLDThe horizontal base of the door that is raised above the exterior, signaling a transition from outside to inside.
DOORA slab-like element that closes a wall opening. Doors canopening by swinging or sliding.
4. DOOR FRAMEThe opening and surrounding trim of the passage between rooms or the entrance of the building.
5. DOORJAMBFacing sides of the wall opening for the passage in which a door is set.
6. DOORKNOBThe rotating handle of the locking mechanism. Also doubles the function of a door pull.
RAILThe horizontal framing member of a door.
7. TOP RAILThe upper-most horizontal framing member of a door.
8. LOCK RAILThe horizontal framing member of a door located in the lower-middle of the door in which the door pull or locking mechanism is set.
9. BOTTOM RAILThe bottom-most horizontal framing member of a door.
PANELA small, plane surface, typically rectangular, that fills thespace between the rails and stiles. Can be either opaque or glazed.
10. MIDDLE PANELThe panels located between the frieze panels and the bottom panels.
11. BOTTOM PANELThe bottom-most panels in a door.
STILEThe vertical framing member of a door.
12. HANGING STILEThe vertical framing member of a door to which the hinges attach.
1
2
4
5
6
8
7
9
10
11
12
3
Epoxy consolidants are syrupy liquidsthat permeate porous or decayed wood and areapplied to the deteriorated areas to saturatethe decayed wood. In order for consolidantsto penetrate deeply and to be effective, allwood must be dry. Any gaps in the wood arethen filled with epoxy paste (a consolidantcombined with powdery fillers, which whenhardened has characteristics and flexibilitysimilar to wood). After the filler is cured, itcan be worked with ordinary woodworkingtools and methods, then primed, painted orvarnished.
Painting and RefinishingDepending on a building’s style, its exteriordoors would have been finished originally bypainting, varnishing, or graining. Graining isa process in which a wood or metal door ispainted a natural wood color followed by anoverlay color applied to simulate wood grain.The Commission staff can identify an appro-priate finish and color for an exterior door.Guidelines for preparation, painting, and selection of pain color for wood doors are thesame as those for wood wall surfaces.
New Doors and Door FramesWhen replacing doors, it is important toreplicate their historic design, material, andconfiguration. Double doors should be replacedwith double doors; single doors should be replaced with single doors. Unfortunately, existing doors cannot always be relied uponas models for duplication; doors are amongthe most frequently altered building features.
The design and material of doors andframes should match the historic ones or bearchitecturally appropriate. If they are missingon your building, appropriate examples cansometimes be found on similar neighboringhistoric buildings.
Doorway LightingLighting fixtures are installed at doorways forsecurity, safety, and to meet code require-ments. However, most rowhouses in historicdistricts did not originally have exterior light-ing. Occasionally, historic gas or early electriclanterns survive, and these should be retained.Light fixtures should be attached to the ma-sonry with wiring run inside the building sothat there is no exposed conduit. The instal-lation should minimize damage to the façadeand should not damage decorative stone orwoodwork. The light source can be of thewhite incandescent or compact fluorescenttype. If high intensity flood or spot lightingis used, the light source should be shielded.
10
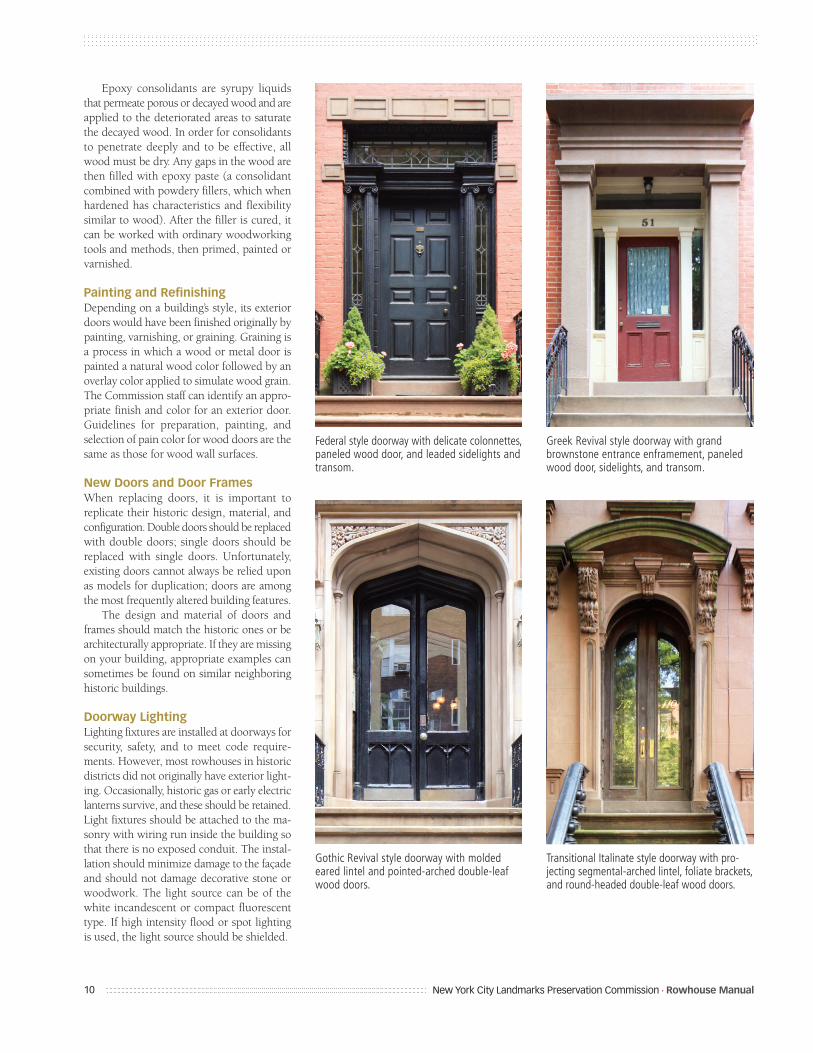
Federal style doorway with delicate colonnettes,paneled wood door, and leaded sidelights andtransom.
Greek Revival style doorway with grandbrownstone entrance enframement, paneledwood door, sidelights, and transom.
Gothic Revival style doorway with moldedeared lintel and pointed-arched double-leafwood doors.
Transitional Italinate style doorway with pro-jecting segmental-arched lintel, foliate brackets,and round-headed double-leaf wood doors.
New York City Landmarks Preservation Commission • Rowhouse Manual
Options for fixtures include simple andunobtrusive modern residential-style fixtures,or antique or old-style gas or electric fixturesthat harmonize with the architectural style ofthe rowhouse.
Intercoms and MailboxesIntercoms and mailboxes are not consideredhistoric elements of rowhouses, and can havean adverse impact on the composition of afaçade. The Commission can issue a permit forthem as long as they’re appropriate to the styleand character of your rowhouse. It’s advisedthat you consult with the Commission staff before installing them to help you determinethe best solution for your particular entry.
Entrance AwningsMany rowhouses in the 19th and 20th cen-turies had retractable canvas awnings overdoorways. Awnings were used then, and canstill be used today, to reduce heat gain byscreening the sun and to shield the entrancefrom rain. As with window awnings, they canbe an effective façade decoration.
To avoid obscuring any significant archi-tectural features, the shape of retractable canvas awnings on doorways and windowsshould correspond to the shape of the open-ings to which they are attached, whetherarched or square-headed. Striped canvasawnings were frequently used in the nine-teenth century. Plain or scalloped awningskirts provide a place for silk-screened housenumbers.
Fixed awnings, such as those made ofaluminum or fiberglass, are not recom-mended on residential buildings in historicdistricts.
For additional information on awnings, pleaserefer to Title 63 of the Rules of the City of NewYork, Chapter 2, Subchapter B, Section 2-12:Installation of Retractable Awnings, on LPC’sWeb site, www.nyc.gov/landmarks.
11New York City Landmarks Preservation Commission • Rowhouse Manual
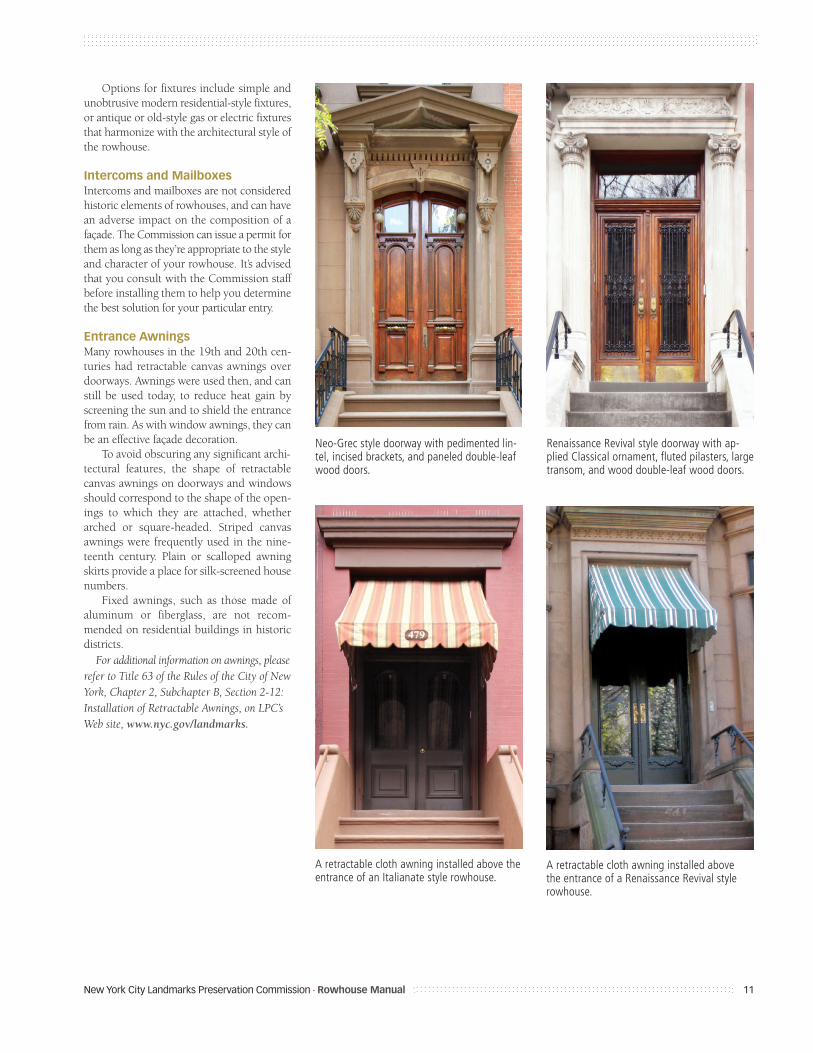
Neo-Grec style doorway with pedimented lin-tel, incised brackets, and paneled double-leafwood doors.
Renaissance Revival style doorway with ap-plied Classical ornament, fluted pilasters, largetransom, and wood double-leaf wood doors.
A retractable cloth awning installed above theentrance of an Italianate style rowhouse.
A retractable cloth awning installed above the entrance of a Renaissance Revival stylerowhouse.
n most historic buildings, the window sash, window framing, and the architec-
tural detail surrounding them were all carefully designed to harmonize with
the style, scale, and character of the building. It is important, therefore, to
retain the original window configuration, including the size of openings, sills,
lintels, decorative wood or masonry moldings, as well as the sashes themselves.
Replacing sashes and frames is often unnecessary, because in many cases
existing historic windows can be repaired. If it is necessary to replace or alter
any window elements, such changes must be made according to the Commis-
sion’s Window Rules. The historic and architectural character of a building can
be seriously damaged by inappropriate window treatments.
The deterioration of historic windows is caused by age, weathering, and inade-
quate maintenance. Such deterioration makes window operation impossible
or inefficient, and diminishes energy performance. Because it is desirable to
maintain the original materials in historic buildings, the installation of new
window sashes and frames is appropriate only when the windows are in such
poor condition that replacement is required.
Deteriorated wood windows can often be restored in a cost-effective manner
by treatment with preservatives, wood fillers and epoxies, and by replacement
of only severely damaged sections. Broken, sticky, or loose sashes can be
removed from the frames for repair, excess paint can be stripped from the
sash and tracks, and weather stripping installed.
Repairing and preserving historic windows rather than replacing them is
strongly encouraged, and will save original material while saving money.
For additional information on window replacement and permit requirements, please refer to Title 63 of the Rules of the City of New York, Chapter 3, Sections 3-01 – 3-07: Repair andReplacement of Windows in Landmarks and Historic District Buildings (“Window Guidelines”)on LPC’s Web site, www.nyc.gov/landmarks.
WIN
DO
WS
12
I IN BRIEF
No permit required• Weather stripping• Caulking• Puttying• Replacing broken glass• Repairing suspension systems
(cords, pulleys, etc.)• Repairing or replacing
window hardware• Repairing window components
by partial replacement, scraping, filling, or sanding
• Painting window sash or frames the same color
• Installing most interior storm windows or panels
• Installing interior security gates or grilles
• Installing regulation child guard
Permit required• Painting window sash or frames
a different color• Installing new window sash or frames• Installing exterior storm windows
and exterior storm window frames• Installing or removing exterior shutters• Installing window awnings• Repairing or altering
window enframements• Installing or removing exterior
security window grilles or bars• Changing the shape or design
of window openings• Blocking in existing windows
or opening up new ones• Restoring original or architecturally
appropriate window openings• Replacing (extensive) original window
materials or consolidating with epoxiesor other plastics
New York City Landmarks Preservation Commission • Rowhouse Manual
New York City Landmarks Preservation Commission • Rowhouse Manual 13
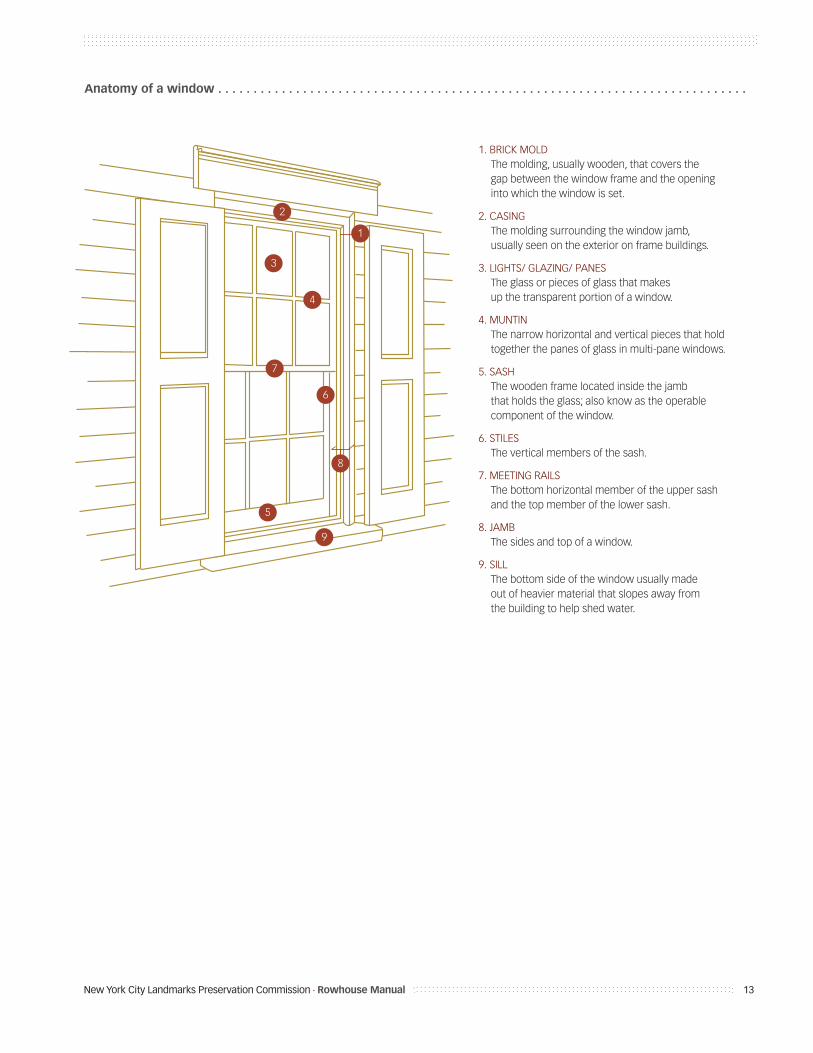
Anatomy of a window . . . . . . . . . . . . . . . . . . . . . . . . . . . . . . . . . . . . . . . . . . . . . . . . . . . . . . . . . . . . . . . . . . . . . . . . . . .
1. BRICK MOLDThe molding, usually wooden, that covers the gap between the window frame and the opening into which the window is set.
2. CASINGThe molding surrounding the window jamb, usually seen on the exterior on frame buildings.
3. LIGHTS/ GLAZING/ PANESThe glass or pieces of glass that makes up the transparent portion of a window.
4. MUNTINThe narrow horizontal and vertical pieces that hold together the panes of glass in multi-pane windows.
5. SASHThe wooden frame located inside the jamb that holds the glass; also know as the operable component of the window.
6. STILESThe vertical members of the sash.
7. MEETING RAILSThe bottom horizontal member of the upper sash and the top member of the lower sash.
8. JAMBThe sides and top of a window.
9. SILLThe bottom side of the window usually made out of heavier material that slopes away from the building to help shed water.
3
9
5
4
7
6
2
8
1

Window EnframementsThe window enframement is the part of thewindow that surrounds the sash and its woodor metal frame. Window enframements varygreatly from simple, undecorated lintels andsills to elaborate architraves with pediments,brackets, and carved moldings. The Commis-sion encourages the preservation of windowenframements. Removal of any element isdiscouraged. Stabilizing unsound materials isrecommended.
Because of their exposed location and degree of ornamentation, elaborate windowenframements are often among the first fea-tures of a building façade to deteriorate. Suchdeterioration is sometimes addressed in suchinappropriate ways as removing or smoothingover of eroded elements; sheathing with othermaterial, such as metal over wood or stone;or, most drastically, completely removing orshaving them.
Repairs and Maintenance
Weather StrippingShrinkage of wood parts often causes win-dow sash to become loose and drafty. A goodway to stop drafts is to install weather strip-ping. Although weather stripping is one ofthe least expensive components of a window,it can increase energy performance by asmuch as 50 percent. Weather strippingshould be installed at the upper, lower, andmeeting rails of windows, and around thesash and frame.
Caulking, Puttying, and Prevention of Moisture Build-UpThe major causes of water damage to windowsare interior condensation and exterior expo-sure to the elements. In cold weather, watervapor contained in the warm air inside abuilding condenses on cold surfaces such asglass panes in windows and doors, or onwindow and door frames. Condensation attacks glazing putty and paint, causing loos-ening, disintegration, blistering, and peeling.
To prevent water damage to exterior com-ponents, it is important to seal all placeswhere water might seep into the building.Windows should be regularly repainted, be-fore old pain cracks and flakes off, exposingthe wood. All horizontal surfaces on win-dows, such as the sills and the tops of lintels,should be slightly pitched so that water doesnot collect on them.
Window-glazing putty solves this prob-lem on the actual sash by directing wateraway from the window muntins. Priming thewood muntins under the putty helps to pro-tect the wood, should the putty crack andwater seep in, and helps to form a betterbond between the putty and wood.
In masonry buildings, the joint betweenwindow frames and the masonry wall shouldbe caulked to prevent water seepage duringdriving rains or when ice accumulates. Thecaulking compound used should be selectedfor its color, adhesion, and flexibility.
14
A six-over-six, double-hung window with brownstone linteland sill.
A multi-paned casement windowwith a molded eared stone linteland bracketed sill.
A segmental-headed, one-over-one, double-hung window with abracketed stone lintel and moldedenframement.
A two-over-two, double-hung window with full window enframement with incised detailing.
New York City Landmarks Preservation Commission • Rowhouse Manual

Paint Build-UpA frequent problem with many old windowsis that they become difficult to operate, orcompletely inoperable, due to the accumula-tions of numerous layers of paint on the sashand frame. Paint can be best removed byscraping or stripping it off the window com-ponents with a chemical paint remover orheat gun.
ConsolidantsWhere sections of wood window sash, frames,or sills have deteriorated but are essentiallysound, the deteriorated wood can be consol-idated. The loss of wood is progressive. Atfirst the mass of the wood diminishes but retains its original size and shape. As decaycontinues, the wood shrinks and begins tocrumble. Epoxy consolidants can replace thelost mass, restoring strength to the wood.Holes and gaps can be covered with epoxy-paste fillers.
Epoxy consolidants are syrupy liquidsthat permeate porous or decayed woods andare applied to the deteriorated areas to saturatethe decayed wood. For consolidants to pen-etrate deeply and to be effective, all woodmust be dry. Any gaps in the wood are thenfilled with epoxy paste, which is a consoli-dant that’s combined with powdery fillers andhas the characteristics and flexibility of wood.Filler can be primed and painted, once it’scured.
Preparation and Repainting of WindowsThe exterior surfaces of wood windows andwindow frames should always be painted,rather than varnished. Varnishes and otherclear finishes are not durable and historicallywere very rarely used on windows. Guide-lines for the preparation, painting, and selec-tion of paint color for windows are the sameas those for façade surfaces made of wood.
New Window Sashes and Frames on Primary FacadesIn rowhouses where complete window re-placement is unavoidable, new windowsashes and frames on primary facades shouldbe designed to replicate existing sashes andframes (if these are historic) in configuration,operation, material, finish, and details. If theexisting windows are replacements, the newwindows should be designed to match thehistoric windows in configuration, operation,material, finish, and details.
Other rowhouses of the same style andperiod in the row or on the block can be usedas models to determine the characteristics ofthe historic windows.
Replacement windows on rear or sec-ondary facades that are visible from a publicthoroughfare should match the historic win-dows in configuration and finish but not nec-essarily the material.
Security Window Grilles or BarsProtective metal window grilles or bars areusually found on residential buildings on thebasement floor. Such grilles were generallyinstalled at the time of the building’s con-struction for both ornamental and securityreasons. They are also found on floor-lengthparlor windows on Greek Revival and Ital-ianate style buildings, although these bars aregenerally confined to the lower third of parlorfloor windows. Original window grilles shouldbe maintained rather than replaced or re-moved.
However, if window grilles are proposedfor basement floor windows where they donot currently exist, they should be of a stylis-tically compatible design and be installed sothat the wood frame and the surroundingmasonry are not damaged. The color of thegrilles should be black, or another dark colorto match the balance of the ironwork on thebuilding.
It is usually not desirable to install secu-rity grilles on windows of buildings thatwould not originally have had them. Alternatesecurity measures should be explored forthese windows, such as alarm systems or in-terior security bars. However, in certain cases,window grilles may be found appropriate onparlor floor windows. It’s a good idea to consultwith the Commission staff for further infor-mation on security window grilles.
Child Protective Security BarriersChild security barriers are permitted on theinterior of windows.
New York City Landmarks Preservation Commission • Rowhouse Manual 15
An Italianate style basement level windowwith an historic iron security grille.
Operable wood shutters on a shingle-cladrowhouse.
Storm WindowsThe purpose of storm windows is to insulateagainst noise and drafts, to save on heatingcosts, and to protect primary windows fromweathering. Unfortunately, their installationon buildings of architectural merit can have adetrimental aesthetic effect. Reflectionscaused by storm windows obscure the detailsand configuration of historic windows. Also,depending on their design and color, stormwindows can be extremely distracting, di-minishing the architectural quality of thestructure.
If the installation of storm windows isnecessary, they should be as unobtrusive aspossible. One option is to install interiorstorm windows or panels, which are easilyaccessible for cleaning and have a minimal effect on the exterior appearance of a building.A permit is not required for installation of interior storm windows if the interior stormwindows have no mullions, muntins, or wideframes that are visible from the exterior of thebuilding and if the glazing consists of clearglass or other transparent material.
A permit is required for the installation ofexterior storm windows. Exterior storm win-dows should fit tightly within openings without the need for panning around theperimeter. The color of the frames of exteriorstorm windows should match the exteriorcolor of the primary window frame, and theglass must be clear. The storm sash must beset as far back from the plane of the exterior wallsurface as practicable. Meeting rails may beused only in conjunction with double-hungwindows and should align with the primarysash. Insect screens can be manufactured tobe part of the storm windows.
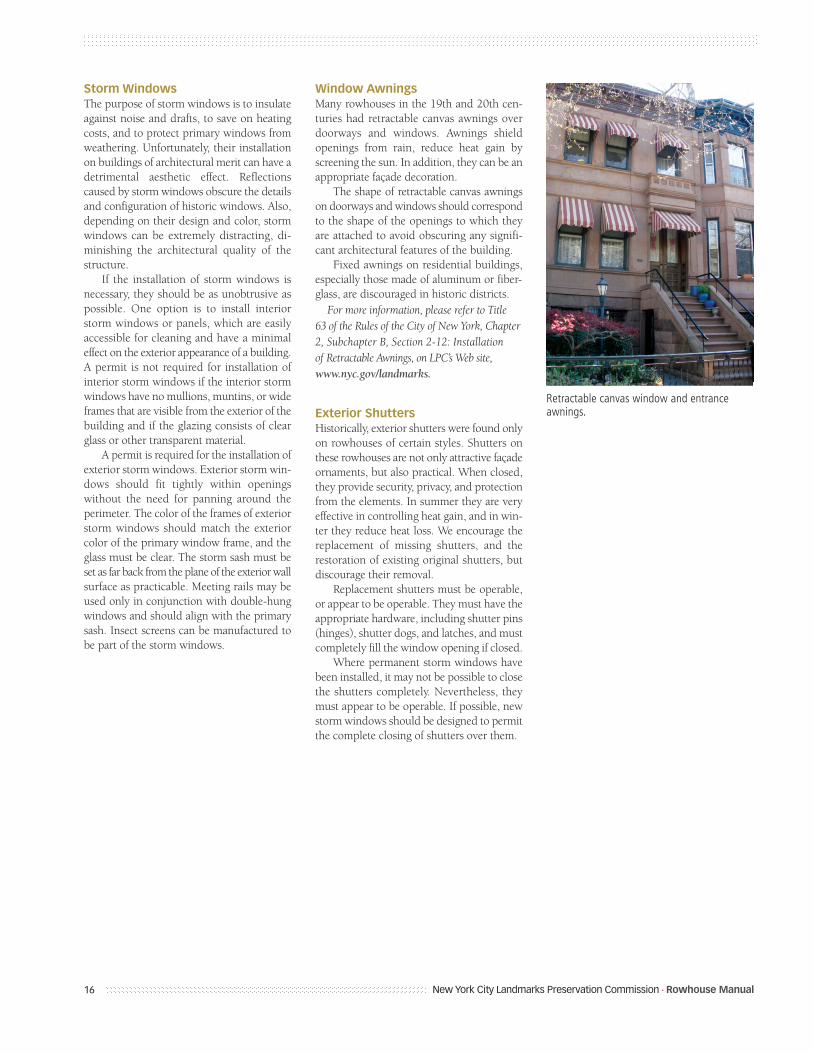
Window AwningsMany rowhouses in the 19th and 20th cen-turies had retractable canvas awnings overdoorways and windows. Awnings shieldopenings from rain, reduce heat gain byscreening the sun. In addition, they can be anappropriate façade decoration.
The shape of retractable canvas awningson doorways and windows should correspondto the shape of the openings to which theyare attached to avoid obscuring any signifi-cant architectural features of the building.
Fixed awnings on residential buildings,especially those made of aluminum or fiber-glass, are discouraged in historic districts.
For more information, please refer to Title 63 of the Rules of the City of New York, Chapter2, Subchapter B, Section 2-12: Installation of Retractable Awnings, on LPC’s Web site,www.nyc.gov/landmarks.
Exterior ShuttersHistorically, exterior shutters were found onlyon rowhouses of certain styles. Shutters onthese rowhouses are not only attractive façadeornaments, but also practical. When closed,they provide security, privacy, and protectionfrom the elements. In summer they are veryeffective in controlling heat gain, and in win-ter they reduce heat loss. We encourage thereplacement of missing shutters, and therestoration of existing original shutters, butdiscourage their removal.
Replacement shutters must be operable,or appear to be operable. They must have theappropriate hardware, including shutter pins(hinges), shutter dogs, and latches, and mustcompletely fill the window opening if closed.
Where permanent storm windows havebeen installed, it may not be possible to closethe shutters completely. Nevertheless, theymust appear to be operable. If possible, newstorm windows should be designed to permitthe complete closing of shutters over them.
16
Retractable canvas window and entranceawnings.
New York City Landmarks Preservation Commission • Rowhouse Manual
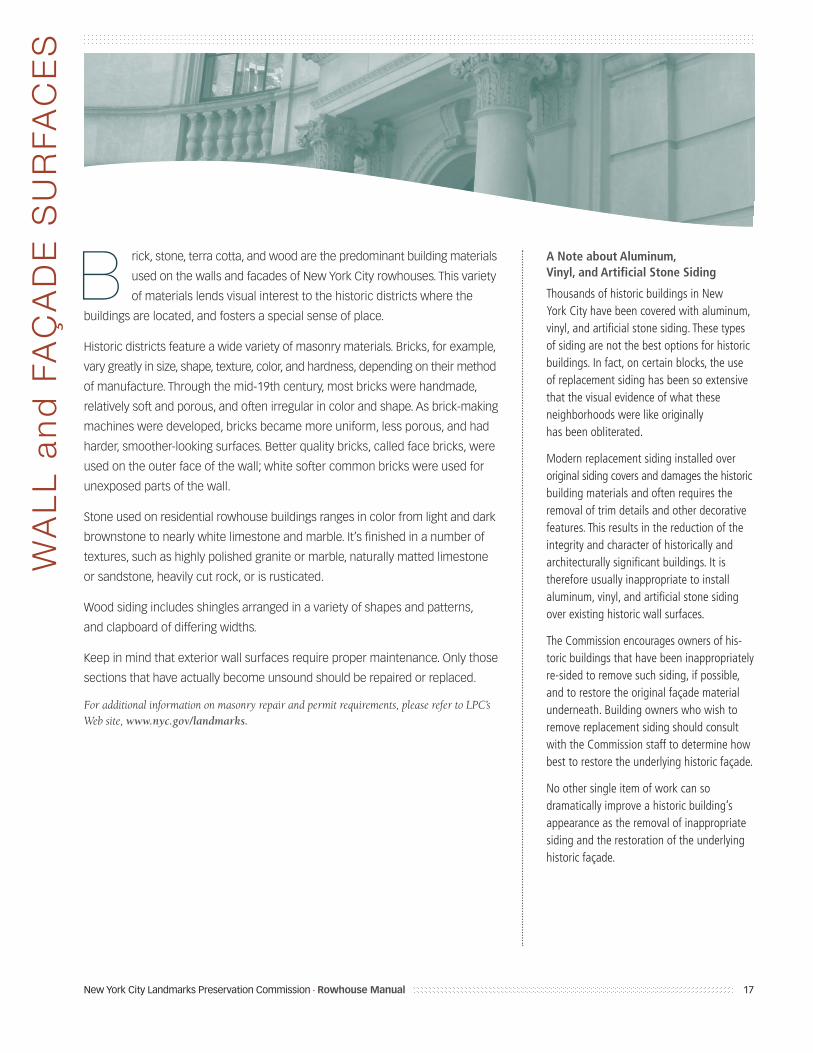
rick, stone, terra cotta, and wood are the predominant building materials
used on the walls and facades of New York City rowhouses. This variety
of materials lends visual interest to the historic districts where the
buildings are located, and fosters a special sense of place.
Historic districts feature a wide variety of masonry materials. Bricks, for example,
vary greatly in size, shape, texture, color, and hardness, depending on their method
of manufacture. Through the mid-19th century, most bricks were handmade,
relatively soft and porous, and often irregular in color and shape. As brick-making
machines were developed, bricks became more uniform, less porous, and had
harder, smoother-looking surfaces. Better quality bricks, called face bricks, were
used on the outer face of the wall; white softer common bricks were used for
unexposed parts of the wall.
Stone used on residential rowhouse buildings ranges in color from light and dark
brownstone to nearly white limestone and marble. It’s finished in a number of
textures, such as highly polished granite or marble, naturally matted limestone
or sandstone, heavily cut rock, or is rusticated.
Wood siding includes shingles arranged in a variety of shapes and patterns,
and clapboard of differing widths.
Keep in mind that exterior wall surfaces require proper maintenance. Only those
sections that have actually become unsound should be repaired or replaced.
For additional information on masonry repair and permit requirements, please refer to LPC’sWeb site, www.nyc.gov/landmarks.
WA
LL
an
dFA
ÇA
DE
SU
RFA
CE
S
New York City Landmarks Preservation Commission • Rowhouse Manual 17
BA Note about Aluminum, Vinyl, and Artificial Stone Siding
Thousands of historic buildings in New York City have been covered with aluminum,vinyl, and artificial stone siding. These typesof siding are not the best options for historicbuildings. In fact, on certain blocks, the useof replacement siding has been so extensivethat the visual evidence of what these neighborhoods were like originally has been obliterated.
Modern replacement siding installed overoriginal siding covers and damages the historicbuilding materials and often requires the removal of trim details and other decorativefeatures. This results in the reduction of theintegrity and character of historically and architecturally significant buildings. It istherefore usually inappropriate to install aluminum, vinyl, and artificial stone sidingover existing historic wall surfaces.
The Commission encourages owners of his-toric buildings that have been inappropriatelyre-sided to remove such siding, if possible,and to restore the original façade materialunderneath. Building owners who wish to remove replacement siding should consultwith the Commission staff to determine howbest to restore the underlying historic façade.
No other single item of work can so dramatically improve a historic building’s appearance as the removal of inappropriatesiding and the restoration of the underlyinghistoric façade.

MASONRY WALL SURFACES
Causes and Prevention of Masonry DeteriorationMasonry of all kinds is subject to manysources of deterioration. Airborne particlesand other pollutants from natural and indus-trial sources can be carried onto porous brickor stone by rainwater and can crystallize beneath the surface as the water evaporates,expanding and pushing the material apartfrom within. The rising and consequent ex-pansion of iron bolts embedded in masonrycan force it to crack. High sulphur-contentheating fuels, when burned, create acids thatetch the surface of masonry materials, pittingthe masonry and roughening the texture. Ivytendrils work their way into small crevicesand joints, spreading them apart. Long-termphysical erosion results from the constant action of wind and water.
The ultimate result of these forces is thatthe masonry is left more vulnerable to waterpenetration and subsequent freezing andthawing. Harder, denser stone and brick arenaturally more resistant to deterioration, butall masonry material is affected to some degreeby age and weathering. Since water is theeventual cause of most masonry deteriora-tion, the best way to ensure that masonry willremain sound is to keep it as dry as possible.It is important to maintain cornices, roofs,gutters, and leaders in good condition to pre-vent water from spilling down the face of thewall and being absorbed. Storm drainsaround the foundations of a building shouldbe kept functioning to prevent water fromcollecting in this area and soaking the lowerwalls, increasing their rate of deteriorationand adding to the level of dampness insidebasements.
In addition, it is important to protect thehard outer surface of brick. If this surface isdamaged through abrasion, especially sand-blasting, the brick will deteriorate morequickly.
Repairing Stone FacadesThe two most common facing stones in NewYork City rowhouses are sandstone and lime-stone. Sandstone in its most common formin New York City is brown brownstone, butit also found in other colors: orange, red,pink, and blue. Bluestone’s main use is as apavement material, but it is occasionallyfound on facades, especially around the baseor stoop. Limestone can be off-white, cream,or gray.
Limestone and sandstone are both sedi-
mentary stones formed of parallel layers ofmaterial pressed together and hardened overtime. The direction of the layers is called the“grain.” For maximum durability in buildingconstruction, the stone should be set with thegrain running horizontally. Unfortunately,when using stone as a veneer, it was simplerand faster to set it with the grain running vertically, or parallel to the face of the building;this is the way it was used in many brown-stone-faced rowhouses.
The problem with setting stone, especiallybrownstone and bluestone, in this matter isthat if any water finds its way between thelayers, either through open mortar joints orsurface absorption, and then freezes and ex-pands, it forces the stone apart, layer by layer.This condition is typically known as spalling.
Spalling is the most frequent problemthat occurs in brownstone and bluestonemasonry. Once stone has spalled, it must either be repaired with applied layers oftinted stucco or replaced with new stone.Since brownstone is no longer regularly quar-ried, repairing the stone is often a practicaloption, unless matching salvaged stone canbe acquired.
Unlike sandstone, limestone rarely spalls.Instead it pits, and exposure to mildly acidicrainwater and other pollutants converts lime-stone to friable gypsum. Limestone is stillreadily available from stone suppliers.
Consolidation is a process in which asmall area of deteriorated masonry is coatedwith a liquid chemical applied to the surface,which penetrates the stone and solidifieswithin it. The use of consolidants such assilanes, acrylics, and epoxies can bring ma-sonry back together, and increase its strengthand resistance to further deterioration.
The procedure for patching damagedareas of stone or resurfacing an entire façade isessentially the same. Because the repair of small
18
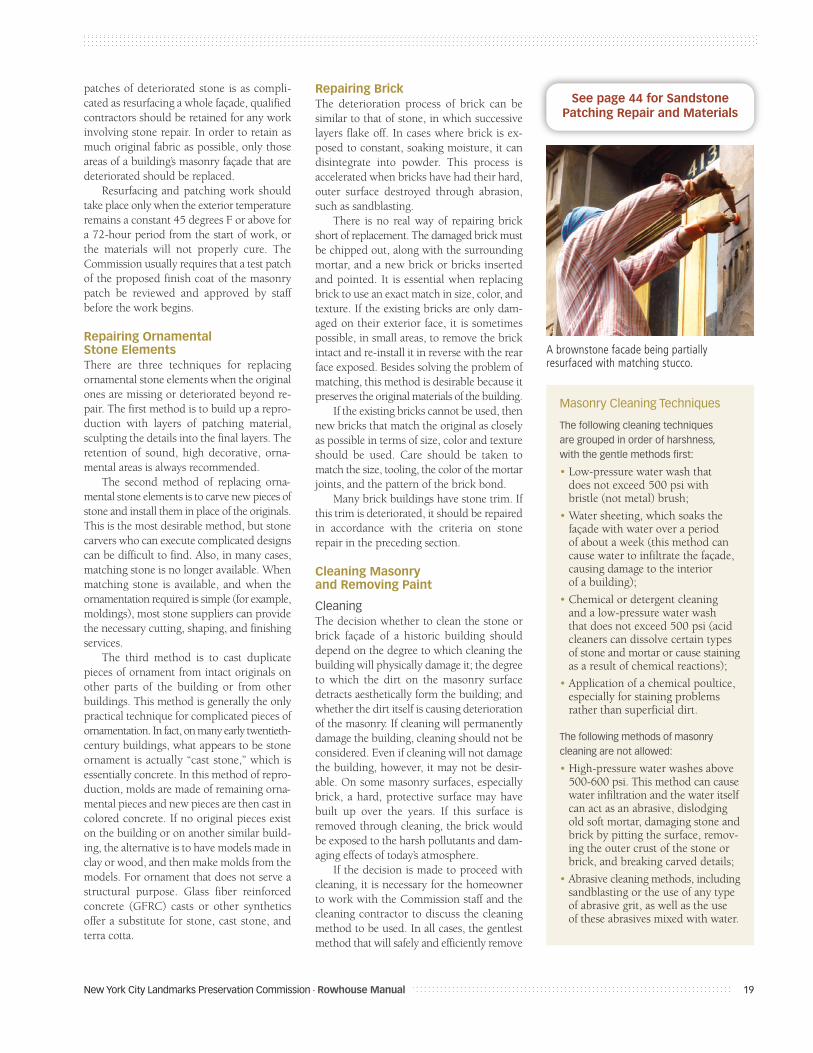
Brick, brownstone, and limestone facade surfaces.
IN BRIEFMasonry Wall Surfaces
No permit required• Repairing previously-painted
masonry the same color• Removing a small amount of graffiti
with a non-abrasive chemical formu-lated for graffiti removal and lowpressure water wash
Permit required• Repairing or resurfacing masonry• Cleaning exterior wall surfaces• Stripping paint from the façade• Painting façade surfaces that were
previously painted in a new color• Painting previously unpainted masonry• Applying preservative coatings• Applying anti-graffiti coatings• Repointing stone or brick surfaces• Repairing settlement cracks
New York City Landmarks Preservation Commission • Rowhouse Manual
patches of deteriorated stone is as compli-cated as resurfacing a whole façade, qualifiedcontractors should be retained for any workinvolving stone repair. In order to retain asmuch original fabric as possible, only thoseareas of a building’s masonry façade that aredeteriorated should be replaced.
Resurfacing and patching work shouldtake place only when the exterior temperatureremains a constant 45 degrees F or above fora 72-hour period from the start of work, orthe materials will not properly cure. TheCommission usually requires that a test patchof the proposed finish coat of the masonrypatch be reviewed and approved by staff before the work begins.
Repairing Ornamental Stone ElementsThere are three techniques for replacing ornamental stone elements when the originalones are missing or deteriorated beyond re-pair. The first method is to build up a repro-duction with layers of patching material,sculpting the details into the final layers. Theretention of sound, high decorative, orna-mental areas is always recommended.
The second method of replacing orna-mental stone elements is to carve new pieces ofstone and install them in place of the originals.This is the most desirable method, but stonecarvers who can execute complicated designscan be difficult to find. Also, in many cases,matching stone is no longer available. Whenmatching stone is available, and when the ornamentation required is simple (for example,moldings), most stone suppliers can providethe necessary cutting, shaping, and finishingservices.
The third method is to cast duplicatepieces of ornament from intact originals onother parts of the building or from otherbuildings. This method is generally the onlypractical technique for complicated pieces ofornamentation. In fact, on many early twentieth-century buildings, what appears to be stoneornament is actually “cast stone,” which is essentially concrete. In this method of repro-duction, molds are made of remaining orna-mental pieces and new pieces are then cast incolored concrete. If no original pieces existon the building or on another similar build-ing, the alternative is to have models made inclay or wood, and then make molds from themodels. For ornament that does not serve astructural purpose. Glass fiber reinforcedconcrete (GFRC) casts or other syntheticsoffer a substitute for stone, cast stone, andterra cotta.
Repairing BrickThe deterioration process of brick can be similar to that of stone, in which successivelayers flake off. In cases where brick is ex-posed to constant, soaking moisture, it candisintegrate into powder. This process is accelerated when bricks have had their hard,outer surface destroyed through abrasion,such as sandblasting.
There is no real way of repairing brickshort of replacement. The damaged brick mustbe chipped out, along with the surroundingmortar, and a new brick or bricks insertedand pointed. It is essential when replacingbrick to use an exact match in size, color, andtexture. If the existing bricks are only dam-aged on their exterior face, it is sometimespossible, in small areas, to remove the brickintact and re-install it in reverse with the rearface exposed. Besides solving the problem ofmatching, this method is desirable because itpreserves the original materials of the building.
If the existing bricks cannot be used, thennew bricks that match the original as closelyas possible in terms of size, color and textureshould be used. Care should be taken tomatch the size, tooling, the color of the mortarjoints, and the pattern of the brick bond.
Many brick buildings have stone trim. Ifthis trim is deteriorated, it should be repairedin accordance with the criteria on stone repair in the preceding section.
Cleaning Masonry and Removing Paint
CleaningThe decision whether to clean the stone orbrick façade of a historic building should depend on the degree to which cleaning thebuilding will physically damage it; the degreeto which the dirt on the masonry surface detracts aesthetically form the building; andwhether the dirt itself is causing deteriorationof the masonry. If cleaning will permanentlydamage the building, cleaning should not beconsidered. Even if cleaning will not damagethe building, however, it may not be desir-able. On some masonry surfaces, especiallybrick, a hard, protective surface may havebuilt up over the years. If this surface is removed through cleaning, the brick wouldbe exposed to the harsh pollutants and dam-aging effects of today’s atmosphere.
If the decision is made to proceed withcleaning, it is necessary for the homeownerto work with the Commission staff and thecleaning contractor to discuss the cleaningmethod to be used. In all cases, the gentlestmethod that will safely and efficiently remove
New York City Landmarks Preservation Commission • Rowhouse Manual 19
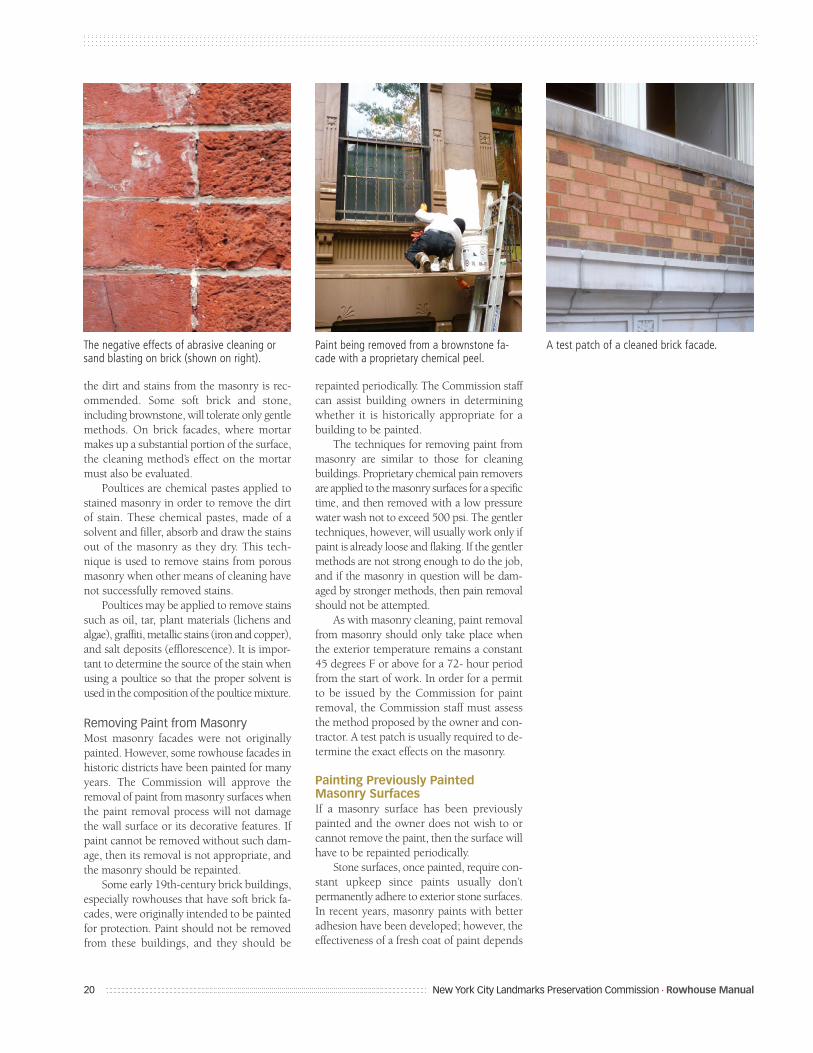
A brownstone facade being partially resurfaced with matching stucco.
Masonry Cleaning Techniques
The following cleaning techniques are grouped in order of harshness, with the gentle methods first:
• Low-pressure water wash that does not exceed 500 psi with bristle (not metal) brush;
• Water sheeting, which soaks thefaçade with water over a period of about a week (this method cancause water to infiltrate the façade,causing damage to the interiorof a building);
• Chemical or detergent cleaning and a low-pressure water wash that does not exceed 500 psi (acidcleaners can dissolve certain typesof stone and mortar or cause stainingas a result of chemical reactions);
• Application of a chemical poultice, especially for staining problemsrather than superficial dirt.
The following methods of masonrycleaning are not allowed:
• High-pressure water washes above 500-600 psi. This method can causewater infiltration and the water itselfcan act as an abrasive, dislodgingold soft mortar, damaging stone andbrick by pitting the surface, remov-ing the outer crust of the stone orbrick, and breaking carved details;
• Abrasive cleaning methods, includingsandblasting or the use of any typeof abrasive grit, as well as the use of these abrasives mixed with water.
See page 44 for Sandstone Patching Repair and Materials
the dirt and stains from the masonry is rec-ommended. Some soft brick and stone, including brownstone, will tolerate only gentlemethods. On brick facades, where mortarmakes up a substantial portion of the surface,the cleaning method’s effect on the mortarmust also be evaluated.
Poultices are chemical pastes applied tostained masonry in order to remove the dirtof stain. These chemical pastes, made of a solvent and filler, absorb and draw the stainsout of the masonry as they dry. This tech-nique is used to remove stains from porousmasonry when other means of cleaning havenot successfully removed stains.
Poultices may be applied to remove stainssuch as oil, tar, plant materials (lichens andalgae), graffiti, metallic stains (iron and copper),and salt deposits (efflorescence). It is impor-tant to determine the source of the stain whenusing a poultice so that the proper solvent isused in the composition of the poultice mixture.
Removing Paint from MasonryMost masonry facades were not originallypainted. However, some rowhouse facades inhistoric districts have been painted for manyyears. The Commission will approve the removal of paint from masonry surfaces whenthe paint removal process will not damagethe wall surface or its decorative features. Ifpaint cannot be removed without such dam-age, then its removal is not appropriate, andthe masonry should be repainted.
Some early 19th-century brick buildings,especially rowhouses that have soft brick fa-cades, were originally intended to be paintedfor protection. Paint should not be removedfrom these buildings, and they should be
repainted periodically. The Commission staffcan assist building owners in determiningwhether it is historically appropriate for abuilding to be painted.
The techniques for removing paint frommasonry are similar to those for cleaningbuildings. Proprietary chemical pain removersare applied to the masonry surfaces for a specifictime, and then removed with a low pressurewater wash not to exceed 500 psi. The gentlertechniques, however, will usually work only ifpaint is already loose and flaking. If the gentlermethods are not strong enough to do the job,and if the masonry in question will be dam-aged by stronger methods, then pain removalshould not be attempted.
As with masonry cleaning, paint removalfrom masonry should only take place whenthe exterior temperature remains a constant45 degrees F or above for a 72- hour periodfrom the start of work. In order for a permitto be issued by the Commission for paint removal, the Commission staff must assessthe method proposed by the owner and con-tractor. A test patch is usually required to de-termine the exact effects on the masonry.
Painting Previously Painted Masonry SurfacesIf a masonry surface has been previouslypainted and the owner does not wish to orcannot remove the paint, then the surface willhave to be repainted periodically.
Stone surfaces, once painted, require con-stant upkeep since paints usually don’t permanently adhere to exterior stone surfaces.In recent years, masonry paints with betteradhesion have been developed; however, theeffectiveness of a fresh coat of paint depends
20
Paint being removed from a brownstone fa-cade with a proprietary chemical peel.
The negative effects of abrasive cleaning orsand blasting on brick (shown on right).
A test patch of a cleaned brick facade.
New York City Landmarks Preservation Commission • Rowhouse Manual
on the effectiveness of the underlying coat,and if that is peeling, a new coat is not likelyto alleviate the problem.
When any masonry is repainted, the sur-face should be scraped or brushed with a softbristle to remove any loose paint. Surfacesshould also be washed, as paint will not adhere well to a dirty surface.
Selection of Paint ColorsA change of paint colors for previouslypainted masonry surfaces requires Commis-sion approval. In most cases, the repainting ofbrick or stone should be done is a color thatmatches the original brick or stone color. Formasonry buildings of certain styles and periods,there may be historic precedents for paintinga variety of colors other than that of the underlying masonry. The determination ofappropriate colors should be done in consul-tation with the Commission staff at the timethe owner applies for a permit to do the work.
When any masonry surface is repainted,it is not appropriate to use any thickly tex-tured or sand-textured paint in order to sealthe surface or hide blemishes.
Painting Unpainted MasonryUnpainted masonry buildings should not bepainted in order to seal a building againstmoisture, protect it from deterioration fromthe atmosphere, or spruce up its appearance.The visual quality of historic masonry build-ing materials can be adversely affected whencoated with paint; furthermore, constant re-painting becomes necessary. It is also, in somecases, an irreversible change; that is, it maybe impossible to remove the paint later.
There are two circumstances in which itmay be desirable to pain unpainted masonry:First, stone façades, especially brownstonethat has been extensively patched may havean appearance that is so uneven and un-sightly that painting is an acceptable remedy.Of course, natural stone has irregularities incolor and texture, and therefore minor un-evenness due to patching does not suggestthe need for a remedy as severe as painting. Ifa building has areas of ornamental stone orbandcourses that are in sound condition aswell as areas of unsightly patching, it is bestto leave ornamental areas or bands unpaintedand paint only the flat surfaces in a color tomatch.
The second condition under which un-painted masonry may be painted is when abrick façade is in such poor condition due toweathering or previous harmful treatmentthat paint can be useful as a preservative to
prevent further deterioration. A permit fromthe Commission is necessary to paint un-painted masonry.
Application of CoatingsA number of colorless masonry coatings orsealers have been developed which are intended to seal masonry against water infiltra-tion and protect it from atmospheric pollutantsand graffiti.
The Commission does not generally recommend the use of these masonry coatings,and will issue permits for their use only inunusual circumstances. While these coatingsmay prevent water from entering masonryfrom its outer surface, they also may trapmoisture that may enter the masonry frombehind. Such moisture can enter from leakyroofs or pipes, or result from general interiorhumidity. This moisture would normallymove toward the outer surface, where itwould evaporate. If a sealer has been applied,however, the moisture collects in the ma-sonry and, due to freezing and thawing ordissolving of salts, can cause spalling and deterioration. Thus, while these sealers mayhelp prevent deterioration from one source,they can attract it from another.
In addition, depending on the charac-teristics of the sealer and the masonry, the application of a sealer may change the appearance of the masonry, affecting its colorand/or surface gloss.
In some cases, the application of a preservative coating is justified by severelydeteriorated masonry. Before issuing a permitfor the application for a sealer, the Commissionstaff will determine whether the condition ofthe masonry justifies such treatment.
Repointing of Joints betweenStones and BricksA problem to be anticipated in any masonrystructure is the eventual deterioration of themortar in the joints between the stones andbricks. In order to retain the stones or bricksin place and to prevent water infiltration,missing mortar should be replaced. The termfor this replacement is “repointing” or “tuck-pointing.” Repointing is the process of removing deteriorated mortar from the jointsof a masonry wall and replacing it with newmortar. A wall’s mortar binds together the individual masonry elements and creates awatertight seal at the joints between the indi-vidual masonry elements.
When properly executed, repointing re-stores both the physical and visual integrity ofthe masonry.
New York City Landmarks Preservation Commission • Rowhouse Manual 21
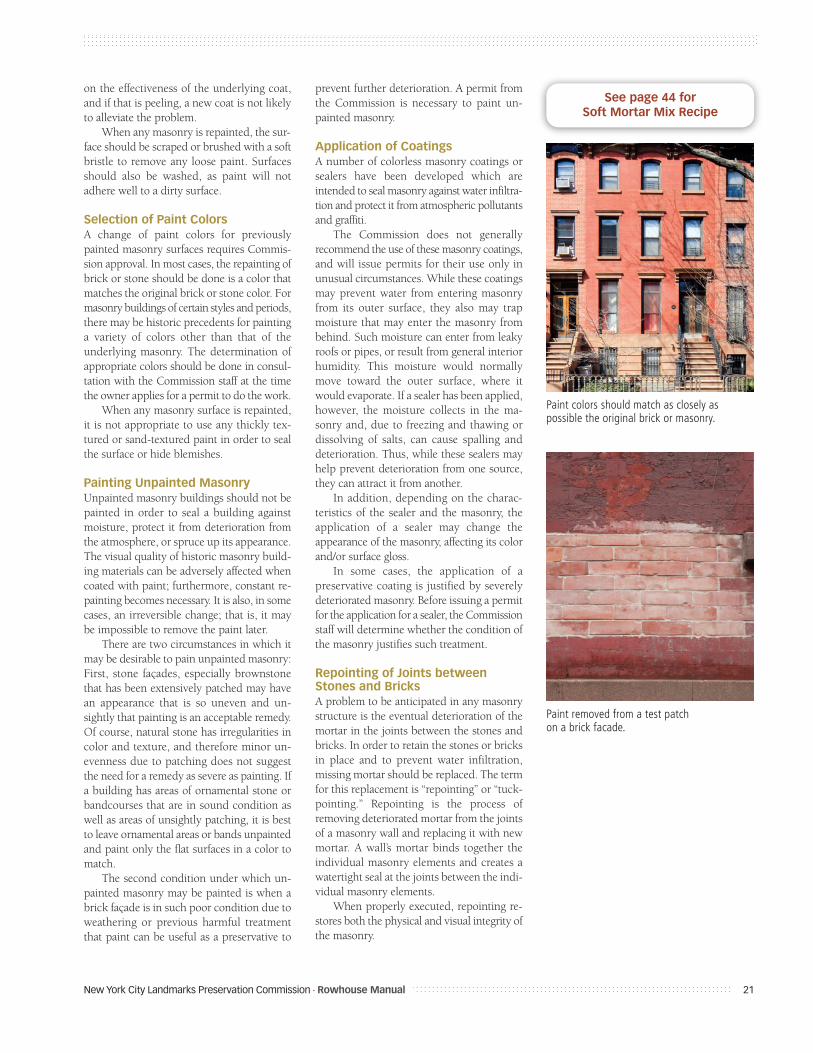
Paint colors should match as closely as possible the original brick or masonry.
Paint removed from a test patch on a brick facade.
See page 44 for Soft Mortar Mix Recipe
The main causes of mortar deteriorationare weathering and erosion due to wind andrain. Although mortar joints are not perma-nent, a good pointing job should last 50 to100 years. Damaged or missing mortar canallow moisture to penetrate into the buildingand cause severe deterioration to the ma-sonry, interior walls and other parts of thebuilding.
Repointing, if not executed properly, canbe disastrous to a building’s function and appearance. A bad repointing job can ruinthe neat, even appearance of a masonry walland cause poor bonding between the mortarand the masonry. Poor bonding occurs be-cause the mortar is not properly mixed, thejoints are not cleaned out effectively or an excessively hard mortar shrinks, allowingwater infiltration.
The mortar used for repointing should beslightly less hard and dense than the brick orstone so that the joints provide areas wherethe wall can breathe and moisture can evap-orate. A dense mortar can accelerate deterio-ration of the masonry and will give a poorbond. It also will shrink when it dries, caus-ing hairline cracks between it and the ma-sonry, and it may break, trapping moisturewhich will expand on freezing and dislodgethe mortar. It may also stain the masonry ifit’s too rich in cement.
General Guidelines:
• Mortar should be specially formulatedfor each job.
• If color additives are needed, chemicallypure synthetic oxide pigments are rec-ommended (which are alkali proof andsun fast).
• Lime and Portland cement should bemixed with the sand in a proportion thtresults in a morar softer than the ma-sonry being repointed.
• Repointing should only take place whenthe exterior temperature remains a con-stant 45 degrees or above for a 72-hourperiod from the commencement of thework, otherwise the mortar will notproperly cure.
• The Commission usually will requirethat a test patch of the repointing be reviewed and approved by the Commis-sion staff prior to the commencement of the work.
Repair of Settlement CracksMost buildings settle on their foundationsover time as the soil or rock on which theyare built is compressed or shifts its position.While this settling does not usually cause anystructural problems, it can sometimes lead tothe formation of settlement cracks in thefaçade. These cracks most often appear alongjoint lines of stone or bricks as they pullslightly away from each other.
If a settlement crack appears in a building,two things should be done: First, an architector engineer should evaluate the condition todetermine whether the crack is getting worsedue to continued settling and whether it hascaused any structural weakening of the build-ing. If a structural problem exists, it will haveto be remedied promptly.
Second, the crack should be filled withmortar according to the guidelines for repointing masonry. Special care must betaken to use a mortar color that will best hidethe evidence of the crack. This color may bethe color of the brick or stone, the existingmortar, or some shade in between. The Com-mission staff will suggest an appropriate colorwhen issuing a permit for this work.
An architect or engineer should be eval-uate the condition to determine whether thecrack is getting worse due to continued set-tling and whether it has caused and structuralweakening of the building. The crack shouldbe filled with mortar according to the guide-lines for repointing masonry.
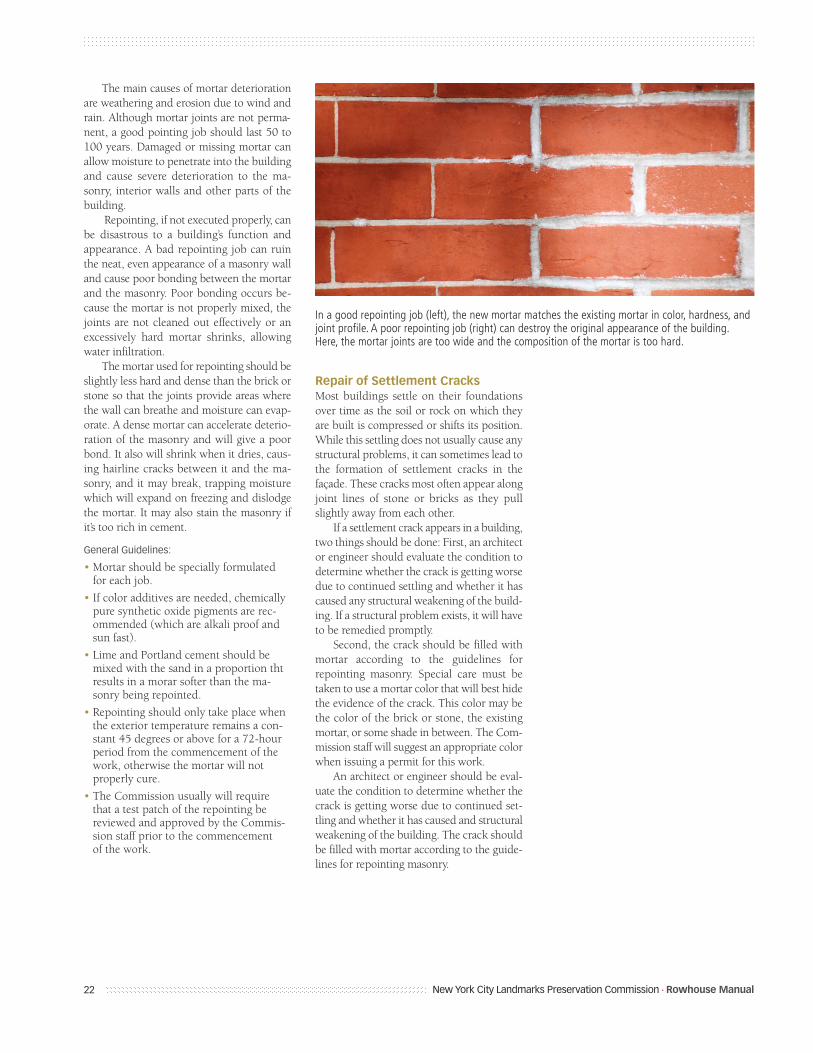
22
In a good repointing job (left), the new mortar matches the existing mortar in color, hardness, andjoint profile. A poor repointing job (right) can destroy the original appearance of the building.Here, the mortar joints are too wide and the composition of the mortar is too hard.
New York City Landmarks Preservation Commission • Rowhouse Manual
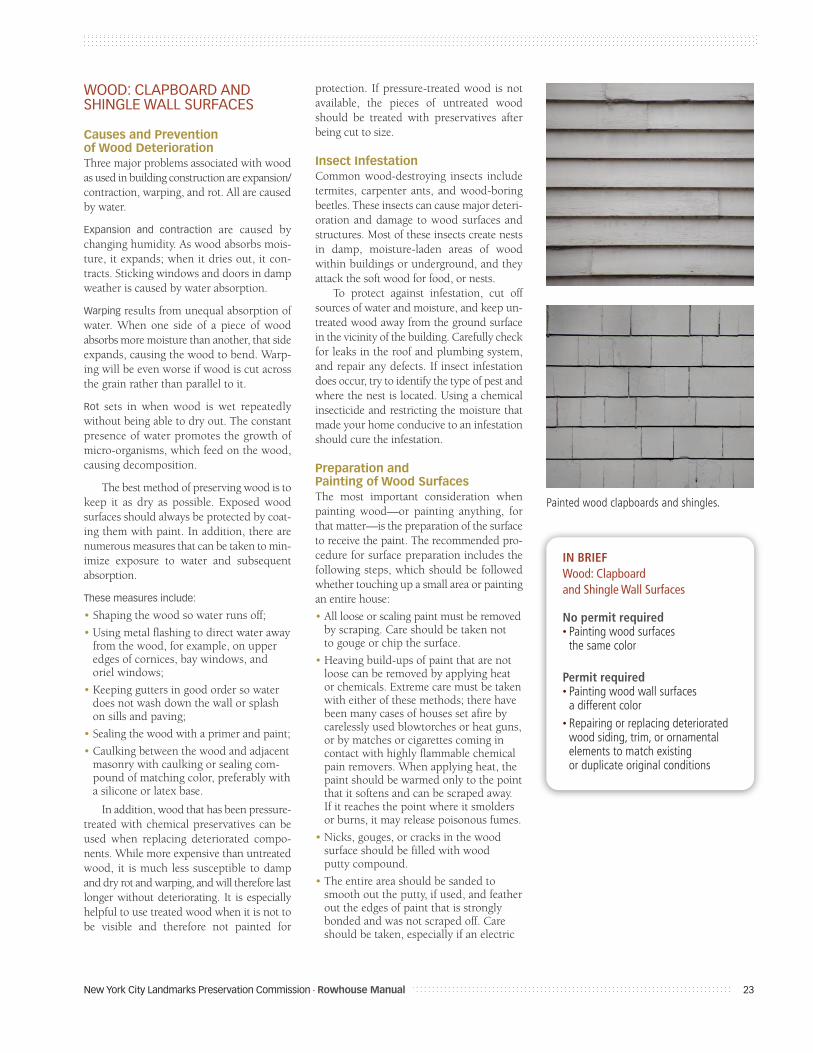
WOOD: CLAPBOARD AND SHINGLE WALL SURFACES
Causes and Prevention of Wood DeteriorationThree major problems associated with woodas used in building construction are expansion/contraction, warping, and rot. All are causedby water.
Expansion and contraction are caused bychanging humidity. As wood absorbs mois-ture, it expands; when it dries out, it con-tracts. Sticking windows and doors in dampweather is caused by water absorption.
Warping results from unequal absorption ofwater. When one side of a piece of wood absorbs more moisture than another, that sideexpands, causing the wood to bend. Warp-ing will be even worse if wood is cut acrossthe grain rather than parallel to it.
Rot sets in when wood is wet repeatedlywithout being able to dry out. The constantpresence of water promotes the growth ofmicro-organisms, which feed on the wood,causing decomposition.
The best method of preserving wood is tokeep it as dry as possible. Exposed wood surfaces should always be protected by coat-ing them with paint. In addition, there arenumerous measures that can be taken to min-imize exposure to water and subsequent absorption.
These measures include:
• Shaping the wood so water runs off;
• Using metal flashing to direct water awayfrom the wood, for example, on upperedges of cornices, bay windows, andoriel windows;
• Keeping gutters in good order so waterdoes not wash down the wall or splashon sills and paving;
• Sealing the wood with a primer and paint;
• Caulking between the wood and adjacentmasonry with caulking or sealing com-pound of matching color, preferably witha silicone or latex base.
In addition, wood that has been pressure-treated with chemical preservatives can beused when replacing deteriorated compo-nents. While more expensive than untreatedwood, it is much less susceptible to dampand dry rot and warping, and will therefore lastlonger without deteriorating. It is especiallyhelpful to use treated wood when it is not tobe visible and therefore not painted for
protection. If pressure-treated wood is notavailable, the pieces of untreated woodshould be treated with preservatives afterbeing cut to size.
Insect InfestationCommon wood-destroying insects includetermites, carpenter ants, and wood-boringbeetles. These insects can cause major deteri-oration and damage to wood surfaces andstructures. Most of these insects create nestsin damp, moisture-laden areas of woodwithin buildings or underground, and theyattack the soft wood for food, or nests.
To protect against infestation, cut offsources of water and moisture, and keep un-treated wood away from the ground surfacein the vicinity of the building. Carefully checkfor leaks in the roof and plumbing system,and repair any defects. If insect infestationdoes occur, try to identify the type of pest andwhere the nest is located. Using a chemicalinsecticide and restricting the moisture thatmade your home conducive to an infestationshould cure the infestation.
Preparation and Painting of Wood SurfacesThe most important consideration whenpainting wood—or painting anything, forthat matter—is the preparation of the surfaceto receive the paint. The recommended pro-cedure for surface preparation includes thefollowing steps, which should be followedwhether touching up a small area or paintingan entire house:
• All loose or scaling paint must be removedby scraping. Care should be taken not to gouge or chip the surface.
• Heaving build-ups of paint that are notloose can be removed by applying heator chemicals. Extreme care must be takenwith either of these methods; there havebeen many cases of houses set afire bycarelessly used blowtorches or heat guns,or by matches or cigarettes coming incontact with highly flammable chemicalpain removers. When applying heat, thepaint should be warmed only to the pointthat it softens and can be scraped away. If it reaches the point where it smoldersor burns, it may release poisonous fumes.
• Nicks, gouges, or cracks in the wood surface should be filled with wood putty compound.
• The entire area should be sanded tosmooth out the putty, if used, and featherout the edges of paint that is stronglybonded and was not scraped off. Careshould be taken, especially if an electric
New York City Landmarks Preservation Commission • Rowhouse Manual 23
IN BRIEFWood: Clapboard and Shingle Wall Surfaces
No permit required• Painting wood surfaces
the same color
Permit required• Painting wood wall surfaces
a different color• Repairing or replacing deteriorated
wood siding, trim, or ornamental elements to match existing or duplicate original conditions
Painted wood clapboards and shingles.
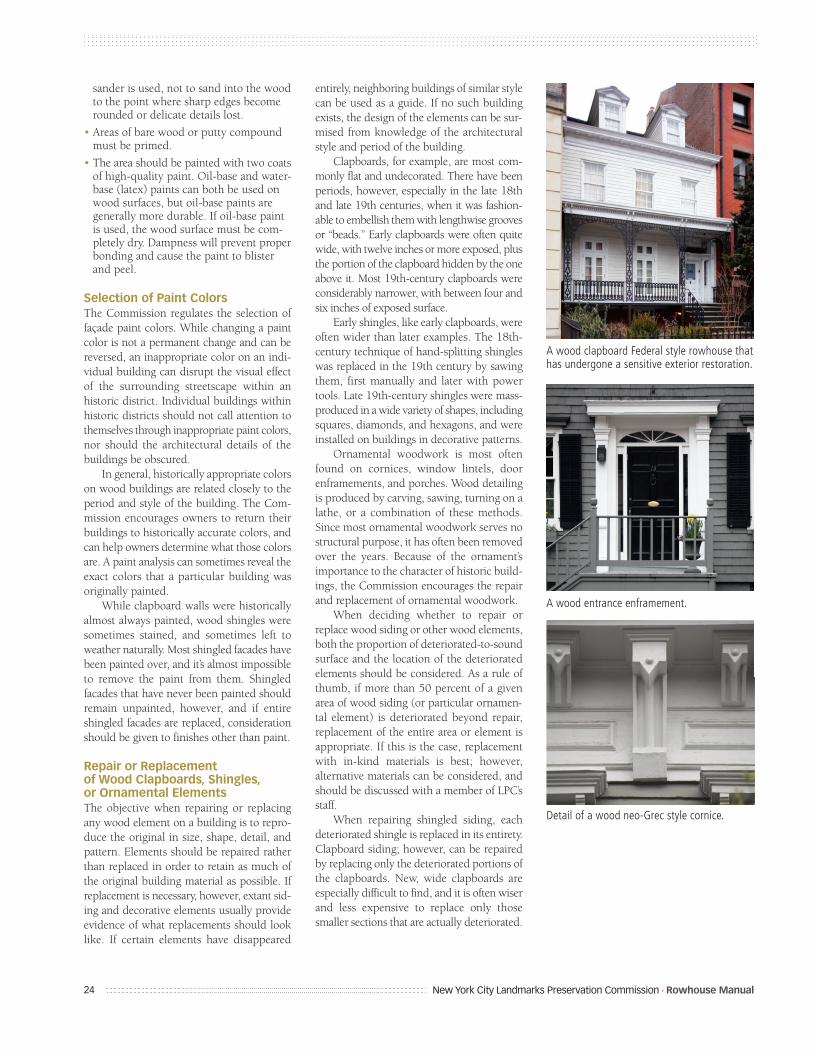
sander is used, not to sand into the woodto the point where sharp edges becomerounded or delicate details lost.
• Areas of bare wood or putty compoundmust be primed.
• The area should be painted with two coatsof high-quality paint. Oil-base and water-base (latex) paints can both be used onwood surfaces, but oil-base paints aregenerally more durable. If oil-base paintis used, the wood surface must be com-pletely dry. Dampness will prevent properbonding and cause the paint to blisterand peel.
Selection of Paint ColorsThe Commission regulates the selection offaçade paint colors. While changing a paintcolor is not a permanent change and can bereversed, an inappropriate color on an indi-vidual building can disrupt the visual effectof the surrounding streetscape within an historic district. Individual buildings withinhistoric districts should not call attention tothemselves through inappropriate paint colors,nor should the architectural details of thebuildings be obscured.
In general, historically appropriate colorson wood buildings are related closely to theperiod and style of the building. The Com-mission encourages owners to return theirbuildings to historically accurate colors, andcan help owners determine what those colorsare. A paint analysis can sometimes reveal theexact colors that a particular building wasoriginally painted.
While clapboard walls were historicallyalmost always painted, wood shingles weresometimes stained, and sometimes left toweather naturally. Most shingled facades havebeen painted over, and it’s almost impossibleto remove the paint from them. Shingled facades that have never been painted shouldremain unpainted, however, and if entireshingled facades are replaced, considerationshould be given to finishes other than paint.
Repair or Replacement of Wood Clapboards, Shingles, or Ornamental ElementsThe objective when repairing or replacingany wood element on a building is to repro-duce the original in size, shape, detail, andpattern. Elements should be repaired ratherthan replaced in order to retain as much ofthe original building material as possible. Ifreplacement is necessary, however, extant sid-ing and decorative elements usually provideevidence of what replacements should looklike. If certain elements have disappeared
entirely, neighboring buildings of similar stylecan be used as a guide. If no such buildingexists, the design of the elements can be sur-mised from knowledge of the architecturalstyle and period of the building.
Clapboards, for example, are most com-monly flat and undecorated. There have beenperiods, however, especially in the late 18thand late 19th centuries, when it was fashion-able to embellish them with lengthwise groovesor “beads.” Early clapboards were often quitewide, with twelve inches or more exposed, plusthe portion of the clapboard hidden by the oneabove it. Most 19th-century clapboards wereconsiderably narrower, with between four andsix inches of exposed surface.
Early shingles, like early clapboards, wereoften wider than later examples. The 18th-century technique of hand-splitting shingleswas replaced in the 19th century by sawingthem, first manually and later with powertools. Late 19th-century shingles were mass-produced in a wide variety of shapes, includingsquares, diamonds, and hexagons, and wereinstalled on buildings in decorative patterns.
Ornamental woodwork is most oftenfound on cornices, window lintels, door enframements, and porches. Wood detailingis produced by carving, sawing, turning on alathe, or a combination of these methods.Since most ornamental woodwork serves nostructural purpose, it has often been removedover the years. Because of the ornament’s importance to the character of historic build-ings, the Commission encourages the repairand replacement of ornamental woodwork.
When deciding whether to repair or replace wood siding or other wood elements,both the proportion of deteriorated-to-soundsurface and the location of the deterioratedelements should be considered. As a rule ofthumb, if more than 50 percent of a givenarea of wood siding (or particular ornamen-tal element) is deteriorated beyond repair, replacement of the entire area or element isappropriate. If this is the case, replacementwith in-kind materials is best; however, alternative materials can be considered, andshould be discussed with a member of LPC’sstaff.
When repairing shingled siding, each deteriorated shingle is replaced in its entirety.Clapboard siding; however, can be repairedby replacing only the deteriorated portions ofthe clapboards. New, wide clapboards are especially difficult to find, and it is often wiserand less expensive to replace only thosesmaller sections that are actually deteriorated.
24
A wood clapboard Federal style rowhouse thathas undergone a sensitive exterior restoration.
A wood entrance enframement.
Detail of a wood neo-Grec style cornice.
New York City Landmarks Preservation Commission • Rowhouse Manual
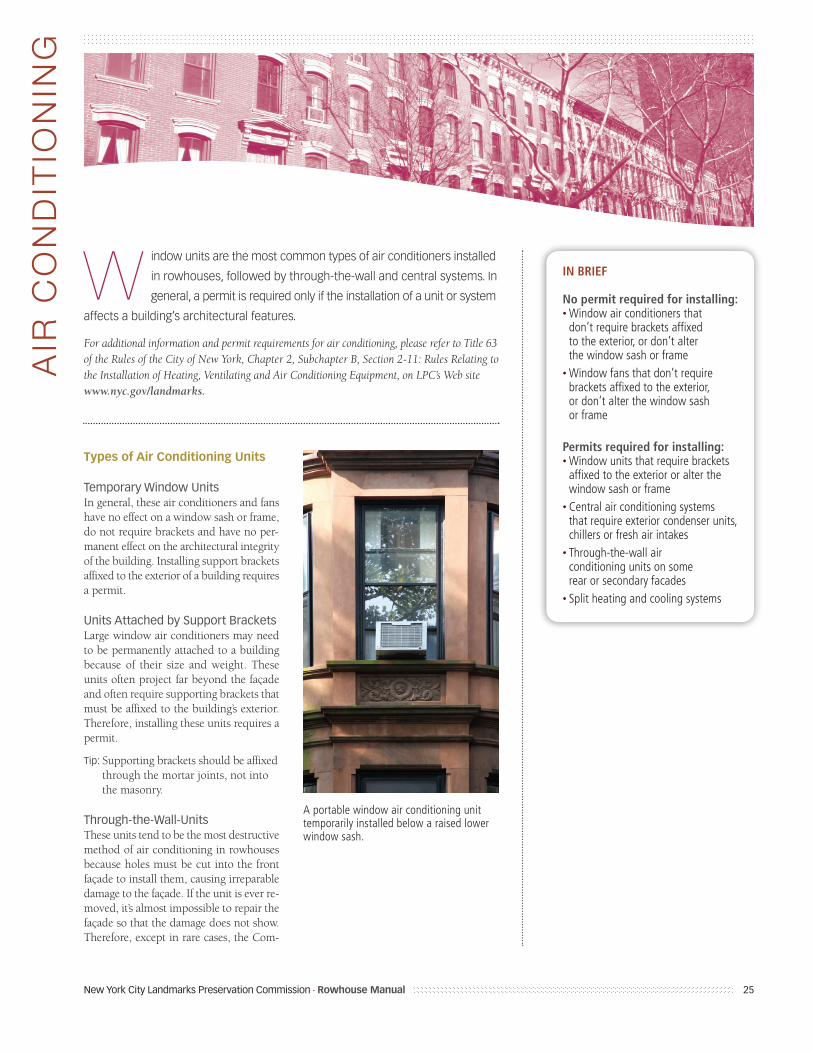
indow units are the most common types of air conditioners installed
in rowhouses, followed by through-the-wall and central systems. In
general, a permit is required only if the installation of a unit or system
affects a building’s architectural features.
For additional information and permit requirements for air conditioning, please refer to Title 63 of the Rules of the City of New York, Chapter 2, Subchapter B, Section 2-11: Rules Relating tothe Installation of Heating, Ventilating and Air Conditioning Equipment, on LPC’s Web sitewww.nyc.gov/landmarks.
AIR
CO
ND
ITIO
NIN
G
New York City Landmarks Preservation Commission • Rowhouse Manual 25
W IN BRIEF
No permit required for installing:• Window air conditioners that
don’t require brackets affixed to the exterior, or don’t alter the window sash or frame
• Window fans that don’t requirebrackets affixed to the exterior, or don’t alter the window sash or frame
Permits required for installing:• Window units that require brackets
affixed to the exterior or alter thewindow sash or frame
• Central air conditioning systems that require exterior condenser units,chillers or fresh air intakes
• Through-the-wall air conditioning units on some rear or secondary facades
• Split heating and cooling systems
Types of Air Conditioning Units
Temporary Window UnitsIn general, these air conditioners and fanshave no effect on a window sash or frame,do not require brackets and have no per-manent effect on the architectural integrityof the building. Installing support bracketsaffixed to the exterior of a building requiresa permit.
Units Attached by Support BracketsLarge window air conditioners may needto be permanently attached to a buildingbecause of their size and weight. Theseunits often project far beyond the façadeand often require supporting brackets thatmust be affixed to the building’s exterior.Therefore, installing these units requires apermit.
Tip: Supporting brackets should be affixedthrough the mortar joints, not intothe masonry.
Through-the-Wall-UnitsThese units tend to be the most destructivemethod of air conditioning in rowhousesbecause holes must be cut into the frontfaçade to install them, causing irreparabledamage to the façade. If the unit is ever re-moved, it’s almost impossible to repair thefaçade so that the damage does not show.Therefore, except in rare cases, the Com-
A portable window air conditioning unittemporarily installed below a raised lowerwindow sash.
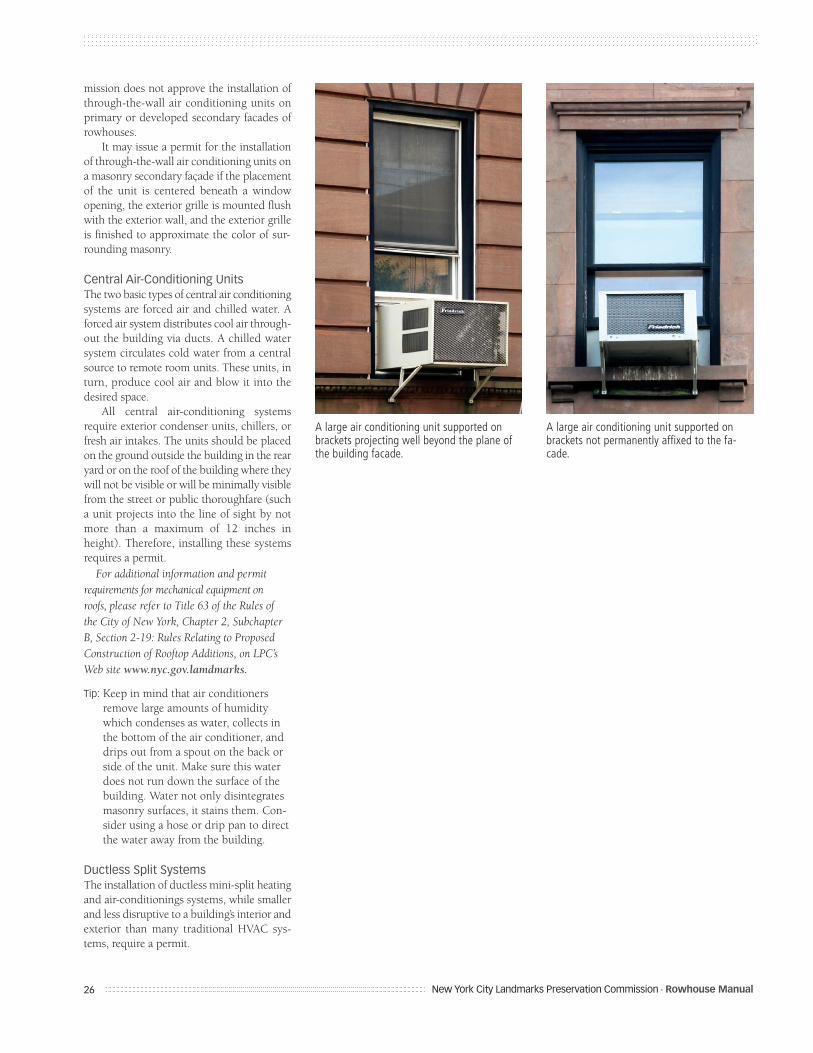
mission does not approve the installation ofthrough-the-wall air conditioning units onprimary or developed secondary facades ofrowhouses.
It may issue a permit for the installationof through-the-wall air conditioning units ona masonry secondary façade if the placementof the unit is centered beneath a windowopening, the exterior grille is mounted flushwith the exterior wall, and the exterior grilleis finished to approximate the color of sur-rounding masonry.
Central Air-Conditioning UnitsThe two basic types of central air conditioningsystems are forced air and chilled water. Aforced air system distributes cool air through-out the building via ducts. A chilled watersystem circulates cold water from a centralsource to remote room units. These units, inturn, produce cool air and blow it into thedesired space.
All central air-conditioning systems require exterior condenser units, chillers, orfresh air intakes. The units should be placedon the ground outside the building in the rearyard or on the roof of the building where theywill not be visible or will be minimally visiblefrom the street or public thoroughfare (sucha unit projects into the line of sight by notmore than a maximum of 12 inches inheight). Therefore, installing these systemsrequires a permit.
For additional information and permit requirements for mechanical equipment on roofs, please refer to Title 63 of the Rules of the City of New York, Chapter 2, SubchapterB, Section 2-19: Rules Relating to ProposedConstruction of Rooftop Additions, on LPC’sWeb site www.nyc.gov.lamdmarks.
Tip: Keep in mind that air conditioners remove large amounts of humiditywhich condenses as water, collects inthe bottom of the air conditioner, anddrips out from a spout on the back orside of the unit. Make sure this waterdoes not run down the surface of thebuilding. Water not only disintegratesmasonry surfaces, it stains them. Con-sider using a hose or drip pan to directthe water away from the building.
Ductless Split SystemsThe installation of ductless mini-split heatingand air-conditionings systems, while smallerand less disruptive to a building’s interior andexterior than many traditional HVAC sys-tems, require a permit.
26
A large air conditioning unit supported onbrackets projecting well beyond the plane ofthe building facade.
A large air conditioning unit supported onbrackets not permanently affixed to the fa-cade.
New York City Landmarks Preservation Commission • Rowhouse Manual
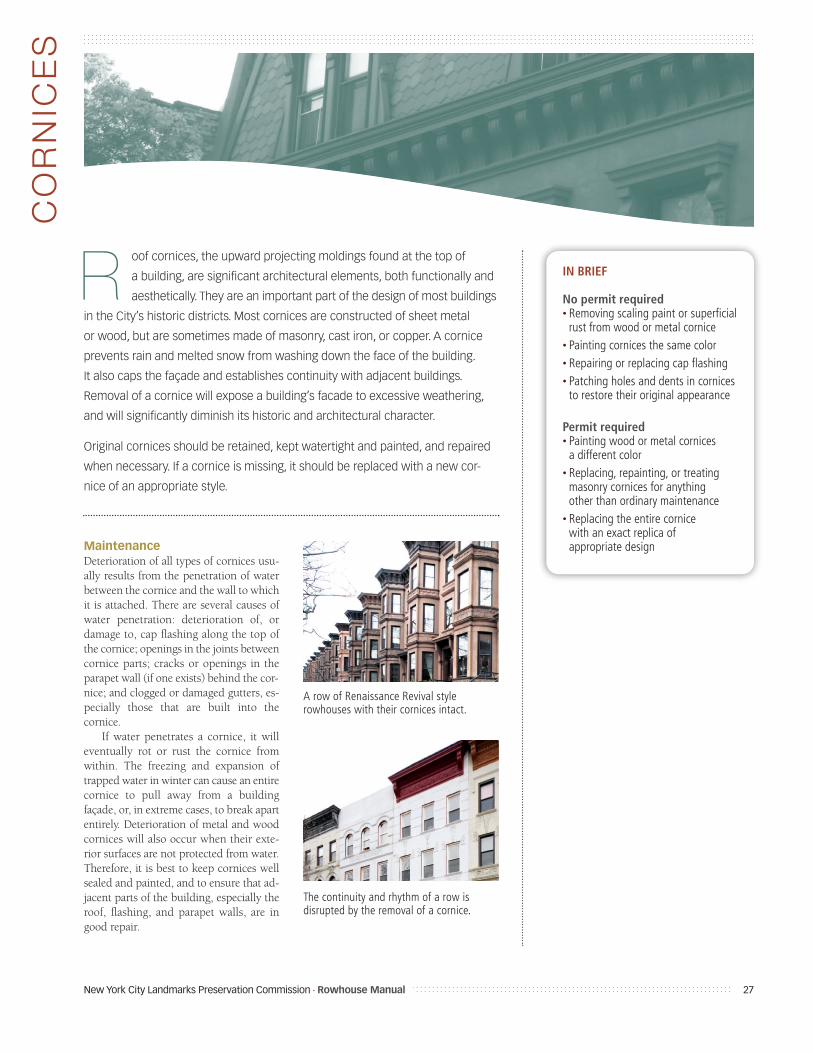
oof cornices, the upward projecting moldings found at the top of
a building, are significant architectural elements, both functionally and
aesthetically. They are an important part of the design of most buildings
in the City’s historic districts. Most cornices are constructed of sheet metal
or wood, but are sometimes made of masonry, cast iron, or copper. A cornice
prevents rain and melted snow from washing down the face of the building.
It also caps the façade and establishes continuity with adjacent buildings.
Removal of a cornice will expose a building’s facade to excessive weathering,
and will significantly diminish its historic and architectural character.
Original cornices should be retained, kept watertight and painted, and repaired
when necessary. If a cornice is missing, it should be replaced with a new cor-
nice of an appropriate style.
CO
RN
ICE
S
New York City Landmarks Preservation Commission • Rowhouse Manual 27
R IN BRIEF
No permit required• Removing scaling paint or superficial
rust from wood or metal cornice• Painting cornices the same color• Repairing or replacing cap flashing• Patching holes and dents in cornices
to restore their original appearance
Permit required• Painting wood or metal cornices
a different color• Replacing, repainting, or treating
masonry cornices for anything other than ordinary maintenance
• Replacing the entire cornice with an exact replica of appropriate designMaintenance
Deterioration of all types of cornices usu-ally results from the penetration of waterbetween the cornice and the wall to whichit is attached. There are several causes ofwater penetration: deterioration of, ordamage to, cap flashing along the top ofthe cornice; openings in the joints betweencornice parts; cracks or openings in theparapet wall (if one exists) behind the cor-nice; and clogged or damaged gutters, es-pecially those that are built into thecornice.
If water penetrates a cornice, it willeventually rot or rust the cornice fromwithin. The freezing and expansion oftrapped water in winter can cause an entirecornice to pull away from a buildingfaçade, or, in extreme cases, to break apartentirely. Deterioration of metal and woodcornices will also occur when their exte-rior surfaces are not protected from water.Therefore, it is best to keep cornices wellsealed and painted, and to ensure that ad-jacent parts of the building, especially theroof, flashing, and parapet walls, are ingood repair.
A row of Renaissance Revival style rowhouses with their cornices intact.
The continuity and rhythm of a row is disrupted by the removal of a cornice.
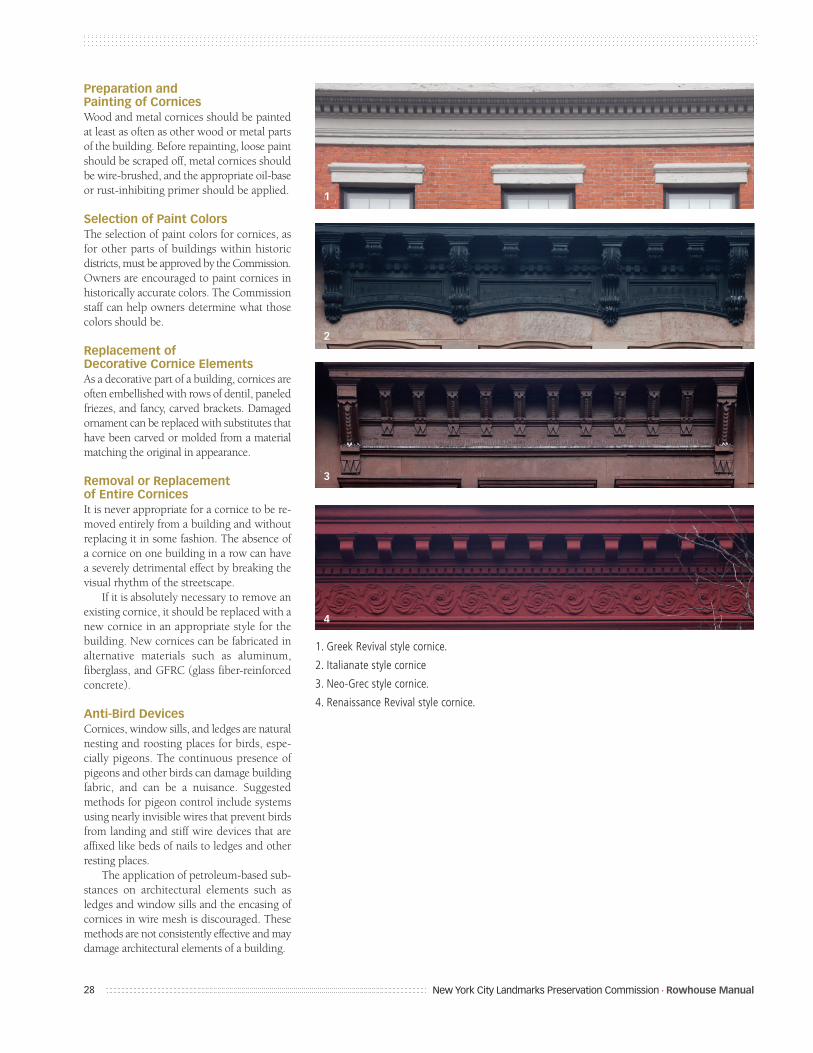
Preparation and Painting of CornicesWood and metal cornices should be paintedat least as often as other wood or metal partsof the building. Before repainting, loose paintshould be scraped off, metal cornices shouldbe wire-brushed, and the appropriate oil-baseor rust-inhibiting primer should be applied.
Selection of Paint ColorsThe selection of paint colors for cornices, asfor other parts of buildings within historicdistricts, must be approved by the Commission.Owners are encouraged to paint cornices inhistorically accurate colors. The Commissionstaff can help owners determine what thosecolors should be.
Replacement of Decorative Cornice ElementsAs a decorative part of a building, cornices areoften embellished with rows of dentil, paneledfriezes, and fancy, carved brackets. Damagedornament can be replaced with substitutes thathave been carved or molded from a materialmatching the original in appearance.
Removal or Replacement of Entire CornicesIt is never appropriate for a cornice to be re-moved entirely from a building and withoutreplacing it in some fashion. The absence ofa cornice on one building in a row can havea severely detrimental effect by breaking thevisual rhythm of the streetscape.
If it is absolutely necessary to remove anexisting cornice, it should be replaced with anew cornice in an appropriate style for thebuilding. New cornices can be fabricated inalternative materials such as aluminum,fiberglass, and GFRC (glass fiber-reinforcedconcrete).
Anti-Bird DevicesCornices, window sills, and ledges are naturalnesting and roosting places for birds, espe-cially pigeons. The continuous presence ofpigeons and other birds can damage buildingfabric, and can be a nuisance. Suggestedmethods for pigeon control include systemsusing nearly invisible wires that prevent birdsfrom landing and stiff wire devices that are affixed like beds of nails to ledges and otherresting places.
The application of petroleum-based sub-stances on architectural elements such asledges and window sills and the encasing ofcornices in wire mesh is discouraged. Thesemethods are not consistently effective and maydamage architectural elements of a building.
28
1
2
3
4
1. Greek Revival style cornice.
2. Italianate style cornice
3. Neo-Grec style cornice.
4. Renaissance Revival style cornice.
New York City Landmarks Preservation Commission • Rowhouse Manual
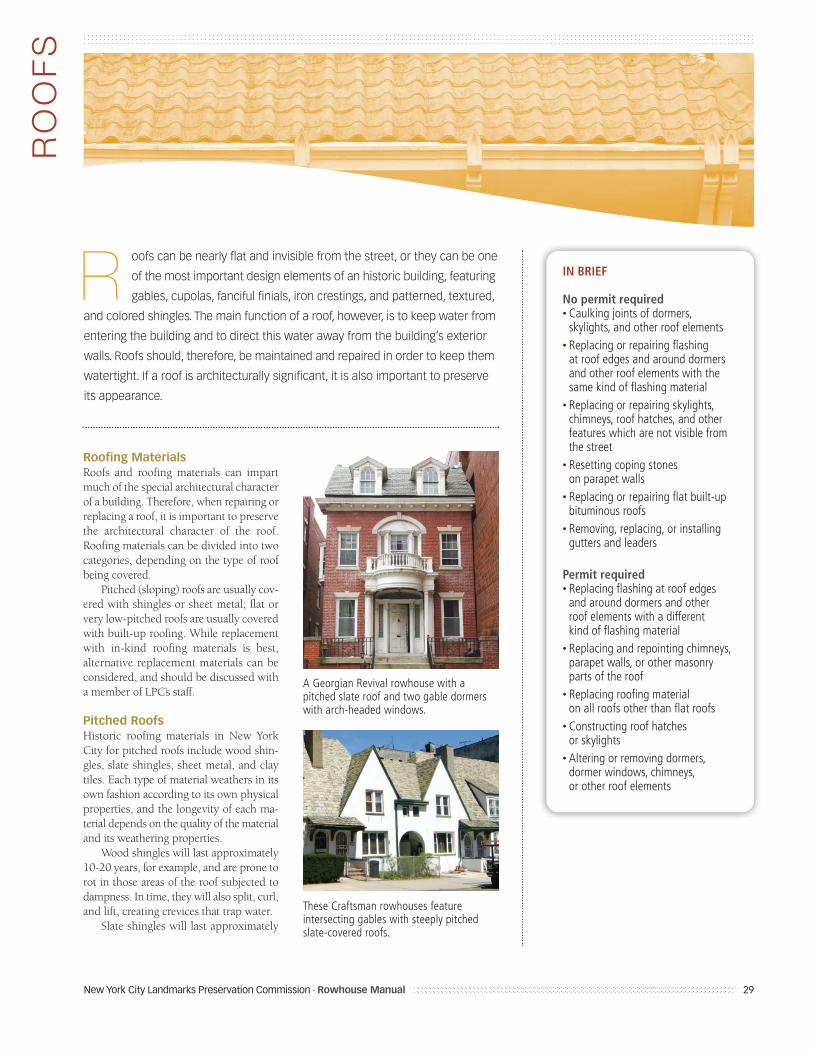
oofs can be nearly flat and invisible from the street, or they can be one
of the most important design elements of an historic building, featuring
gables, cupolas, fanciful finials, iron crestings, and patterned, textured,
and colored shingles. The main function of a roof, however, is to keep water from
entering the building and to direct this water away from the building’s exterior
walls. Roofs should, therefore, be maintained and repaired in order to keep them
watertight. If a roof is architecturally significant, it is also important to preserve
its appearance.
RO
OF
S
New York City Landmarks Preservation Commission • Rowhouse Manual 29
R IN BRIEF
No permit required• Caulking joints of dormers,
skylights, and other roof elements• Replacing or repairing flashing
at roof edges and around dormersand other roof elements with thesame kind of flashing material
• Replacing or repairing skylights,chimneys, roof hatches, and otherfeatures which are not visible fromthe street
• Resetting coping stones on parapet walls
• Replacing or repairing flat built-upbituminous roofs
• Removing, replacing, or installinggutters and leaders
Permit required• Replacing flashing at roof edges
and around dormers and other roof elements with a different kind of flashing material
• Replacing and repointing chimneys,parapet walls, or other masonryparts of the roof
• Replacing roofing material on all roofs other than flat roofs
• Constructing roof hatches or skylights
• Altering or removing dormers,dormer windows, chimneys, or other roof elements
Roofing MaterialsRoofs and roofing materials can impartmuch of the special architectural characterof a building. Therefore, when repairing orreplacing a roof, it is important to preservethe architectural character of the roof.Roofing materials can be divided into twocategories, depending on the type of roofbeing covered.
Pitched (sloping) roofs are usually cov-ered with shingles or sheet metal; flat orvery low-pitched roofs are usually coveredwith built-up roofing. While replacementwith in-kind roofing materials is best, alternative replacement materials can beconsidered, and should be discussed witha member of LPC’s staff.
Pitched RoofsHistoric roofing materials in New YorkCity for pitched roofs include wood shin-gles, slate shingles, sheet metal, and claytiles. Each type of material weathers in itsown fashion according to its own physicalproperties, and the longevity of each ma-terial depends on the quality of the materialand its weathering properties.
Wood shingles will last approximately10-20 years, for example, and are prone torot in those areas of the roof subjected todampness. In time, they will also split, curl,and lift, creating crevices that trap water.
Slate shingles will last approximately
A Georgian Revival rowhouse with apitched slate roof and two gable dormerswith arch-headed windows.
These Craftsman rowhouses feature intersecting gables with steeply pitchedslate-covered roofs.

80-100 years and are extremely resistant toerosion, but can spall or come off in layersafter many years of exposure to the elements.
Clay tiles will last approximately 125years. While they are as resistant to erosionas slate shingles, clay tiles are very brittle andcan crack or shatter.
Asphalt shingles, which are a relativelymodern roofing material, have the shortestlife of any shingle-type roofing material, a maximum of 10 to 15 years. They can deteriorate by splitting, curling, eroding, ordisintegrating from continued exposure tothe weather.
Metal roofs will last approximately 25-50years and are made of parallel strips of sheetmetal, usually about two feet wide, joined byfull-length seams. The metal is usually lead,copper, galvanized sheet-steel, or terne(sheet-iron coated with an alloy of tin andlead). Metal roofs are long-lasting and imper-vious to water. The major causes for their deterioration are punctures from nails, work-ers’ feet, falling or wind-blown objects, orchemical pollutants in the air or rainwater.
All kinds of shingles tend to loosen, androofs should be inspected periodically forslipped or missing shingles.
Flat RoofsThe built-up roofing which usually covers flator very low-pitched roofs consists of alter-nating layers of waterproof membranes andother bituminous materials. Built-up roofsage by blistering, drying out, and cracking.
Repair and Replacement of Roofing MaterialFor reasons of economy, availability, andpreservation, every effort should be made torepair damaged or deteriorated sections oforiginal roofs rather than to replace themcompletely. Wood and slate shingles, clay andterra-cotta roof tiles, and sheet metal are allavailable. If the balance of the roof is sound,the most appropriate way to repair originalroof materials is to locate or have manufacturedduplicate shingles, tiles, or metal sections,replacing only those areas that are actuallydeteriorated.
Great care must be taken when patchingslate, shingle, and clay or terra-cotta tile roofsbecause they cannot be walked on withoutrisk of breaking. In order to carry out repairson these types of roofs, scaffolds and otherdevices must be used to avoid concentratedpressure on the roof surface. Such precau-tionary measures are directly reflected in thecost of the work, but repairs using these ma-
terials will last much longer than repairsusing cheaper materials.
As with slate and tile roofs, when metalroofs are repaired, only damaged portionsshould be patched. The common practice ofapplying a coating of bituminous materials(tar) to the entire roof is discouraged. Such acoating hides the roof’s beauty and damagesthe original historic roofing material. It is alsoineffective as a sealer and will not deter leaks.
Flat, built-up roofs can be repaired byadding layers of waterproof membranes overthe existing roof. Eventually, it will be neces-sary to rip off the old layers to reduce theweight of the roofing material before applyingnew roofing.
If original roofing material has deterio-rated to the point that little or none of it canbe salvaged, the best solution is to replace theentire roof with new material that duplicatesthe original. It should be noted that the existing roof may not be original at all; it mayrepresent a second or third covering. Theoriginal covering should be determined byremoving the later material. If the originalroofing was itself removed, its compositionand appearance can probably be determinedin consultation with the Commission staff.
The replacement of shingles or tiles withtar-paper or other bituminous material is dis-couraged because the smooth, uniform tex-ture and color of a bituminous roof is not atall similar to the appearance of a shingle ortile roof, which is composed of small units. Forthe same reason, it is not appropriate to covera deteriorated roof with bituminous material.
Causes of Roof LeaksA poorly maintained roof with soon sufferwater damage and will eventually leak, dam-aging both the interior of the building and exterior walls and ornament. Most roof leaksare related to one of the flowing problems:clogged or damaged gutters or leaders; de-teriorated or missing flashing and roofing materials on and around the perimeter ofthe roof or other rooftop features; damagedor deteriorated roof dormers, skylights,hatches, or roof ornaments and/or open jointsaround the edges of these objects; deterioratedchimneys or parapet walls; and damaged ordeteriorated roofing materials.
Damaged Roof ElementsPeriodic inspections can help to locate dam-aged or deteriorated roofing materials beforewater can infiltrate a building. When damageis discovered, the roof should be repaired assoon as possible with the appropriate
30
Corbelled brick parapet and chimney on a Romanesque Revival style rowhouse.
Slate roof and dormer on a Queen Anne stylerowhouse.
New York City Landmarks Preservation Commission • Rowhouse Manual
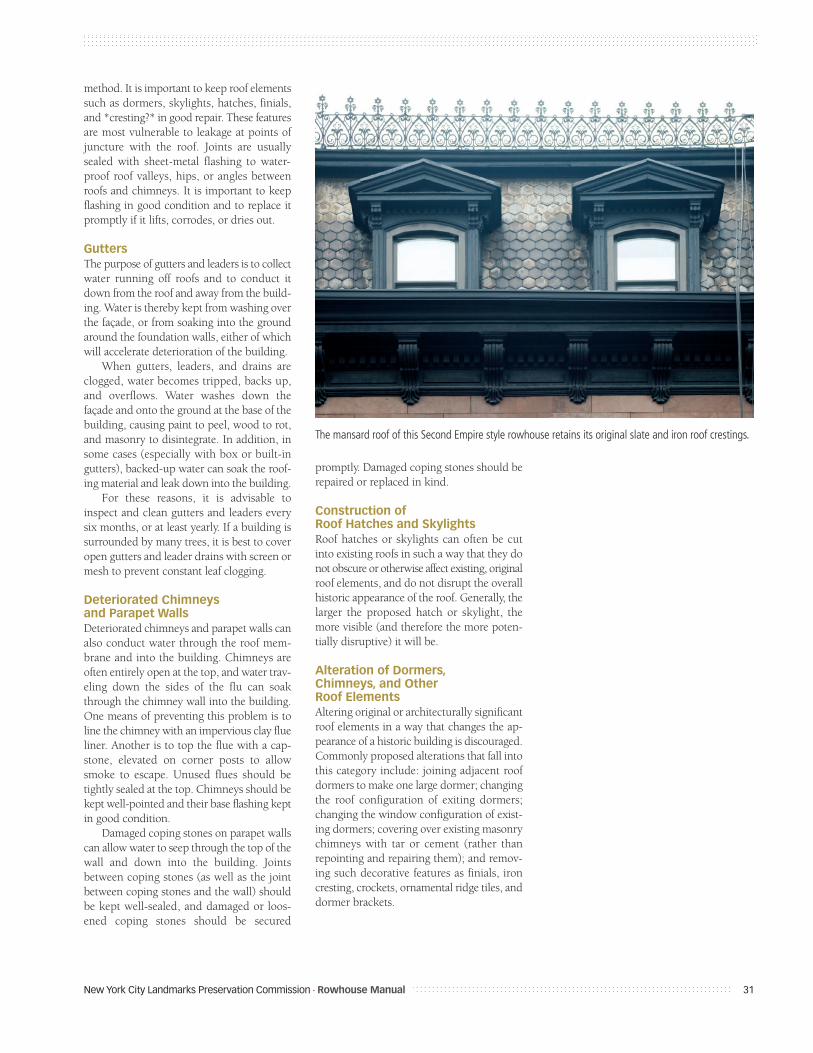
method. It is important to keep roof elementssuch as dormers, skylights, hatches, finials,and *cresting?* in good repair. These featuresare most vulnerable to leakage at points ofjuncture with the roof. Joints are usuallysealed with sheet-metal flashing to water-proof roof valleys, hips, or angles betweenroofs and chimneys. It is important to keepflashing in good condition and to replace itpromptly if it lifts, corrodes, or dries out.
GuttersThe purpose of gutters and leaders is to collectwater running off roofs and to conduct itdown from the roof and away from the build-ing. Water is thereby kept from washing overthe façade, or from soaking into the groundaround the foundation walls, either of whichwill accelerate deterioration of the building.
When gutters, leaders, and drains areclogged, water becomes tripped, backs up,and overflows. Water washes down thefaçade and onto the ground at the base of thebuilding, causing paint to peel, wood to rot,and masonry to disintegrate. In addition, insome cases (especially with box or built-ingutters), backed-up water can soak the roof-ing material and leak down into the building.
For these reasons, it is advisable to inspect and clean gutters and leaders everysix months, or at least yearly. If a building issurrounded by many trees, it is best to coveropen gutters and leader drains with screen ormesh to prevent constant leaf clogging.
Deteriorated Chimneys and Parapet WallsDeteriorated chimneys and parapet walls canalso conduct water through the roof mem-brane and into the building. Chimneys areoften entirely open at the top, and water trav-eling down the sides of the flu can soakthrough the chimney wall into the building.One means of preventing this problem is toline the chimney with an impervious clay flueliner. Another is to top the flue with a cap-stone, elevated on corner posts to allowsmoke to escape. Unused flues should betightly sealed at the top. Chimneys should bekept well-pointed and their base flashing keptin good condition.
Damaged coping stones on parapet wallscan allow water to seep through the top of thewall and down into the building. Joints between coping stones (as well as the jointbetween coping stones and the wall) shouldbe kept well-sealed, and damaged or loos-ened coping stones should be secured
promptly. Damaged coping stones should berepaired or replaced in kind.
Construction of Roof Hatches and SkylightsRoof hatches or skylights can often be cutinto existing roofs in such a way that they donot obscure or otherwise affect existing, originalroof elements, and do not disrupt the overallhistoric appearance of the roof. Generally, thelarger the proposed hatch or skylight, themore visible (and therefore the more poten-tially disruptive) it will be.
Alteration of Dormers, Chimneys, and Other Roof ElementsAltering original or architecturally significantroof elements in a way that changes the ap-pearance of a historic building is discouraged.Commonly proposed alterations that fall intothis category include: joining adjacent roofdormers to make one large dormer; changingthe roof configuration of exiting dormers;changing the window configuration of exist-ing dormers; covering over existing masonrychimneys with tar or cement (rather than repointing and repairing them); and remov-ing such decorative features as finials, ironcresting, crockets, ornamental ridge tiles, anddormer brackets.
New York City Landmarks Preservation Commission • Rowhouse Manual 31
The mansard roof of this Second Empire style rowhouse retains its original slate and iron roof crestings.
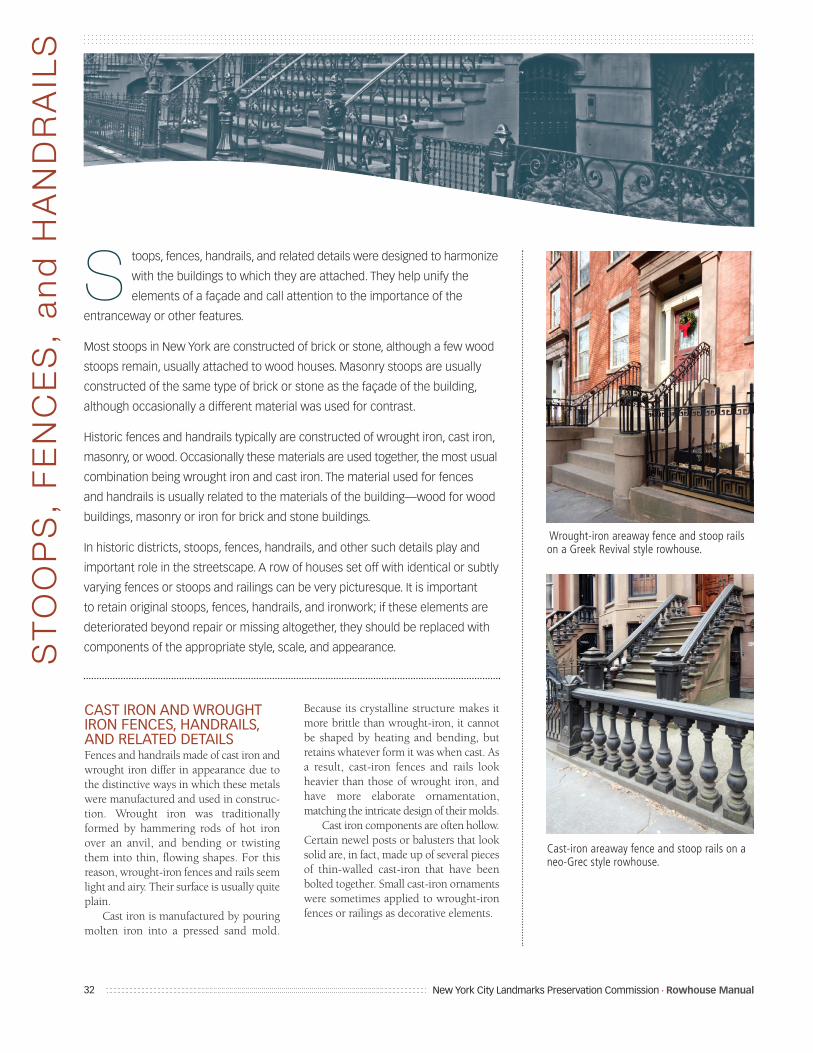
toops, fences, handrails, and related details were designed to harmonize
with the buildings to which they are attached. They help unify the
elements of a façade and call attention to the importance of the
entranceway or other features.
Most stoops in New York are constructed of brick or stone, although a few wood
stoops remain, usually attached to wood houses. Masonry stoops are usually
constructed of the same type of brick or stone as the façade of the building,
although occasionally a different material was used for contrast.
Historic fences and handrails typically are constructed of wrought iron, cast iron,
masonry, or wood. Occasionally these materials are used together, the most usual
combination being wrought iron and cast iron. The material used for fences
and handrails is usually related to the materials of the building—wood for wood
buildings, masonry or iron for brick and stone buildings.
In historic districts, stoops, fences, handrails, and other such details play and
important role in the streetscape. A row of houses set off with identical or subtly
varying fences or stoops and railings can be very picturesque. It is important
to retain original stoops, fences, handrails, and ironwork; if these elements are
deteriorated beyond repair or missing altogether, they should be replaced with
components of the appropriate style, scale, and appearance.ST
OO
PS
, F
EN
CE
S,
an
dH
AN
DR
AIL
S
32
S
CAST IRON AND WROUGHTIRON FENCES, HANDRAILS,AND RELATED DETAILSFences and handrails made of cast iron andwrought iron differ in appearance due tothe distinctive ways in which these metalswere manufactured and used in construc-tion. Wrought iron was traditionallyformed by hammering rods of hot ironover an anvil, and bending or twistingthem into thin, flowing shapes. For thisreason, wrought-iron fences and rails seemlight and airy. Their surface is usually quiteplain.
Cast iron is manufactured by pouringmolten iron into a pressed sand mold.
Because its crystalline structure makes itmore brittle than wrought-iron, it cannotbe shaped by heating and bending, but retains whatever form it was when cast. Asa result, cast-iron fences and rails lookheavier than those of wrought iron, andhave more elaborate ornamentation,matching the intricate design of their molds.
Cast iron components are often hollow.Certain newel posts or balusters that looksolid are, in fact, made up of several piecesof thin-walled cast-iron that have beenbolted together. Small cast-iron ornamentswere sometimes applied to wrought-ironfences or railings as decorative elements.
Wrought-iron areaway fence and stoop railson a Greek Revival style rowhouse.
Cast-iron areaway fence and stoop rails on aneo-Grec style rowhouse.
New York City Landmarks Preservation Commission • Rowhouse Manual
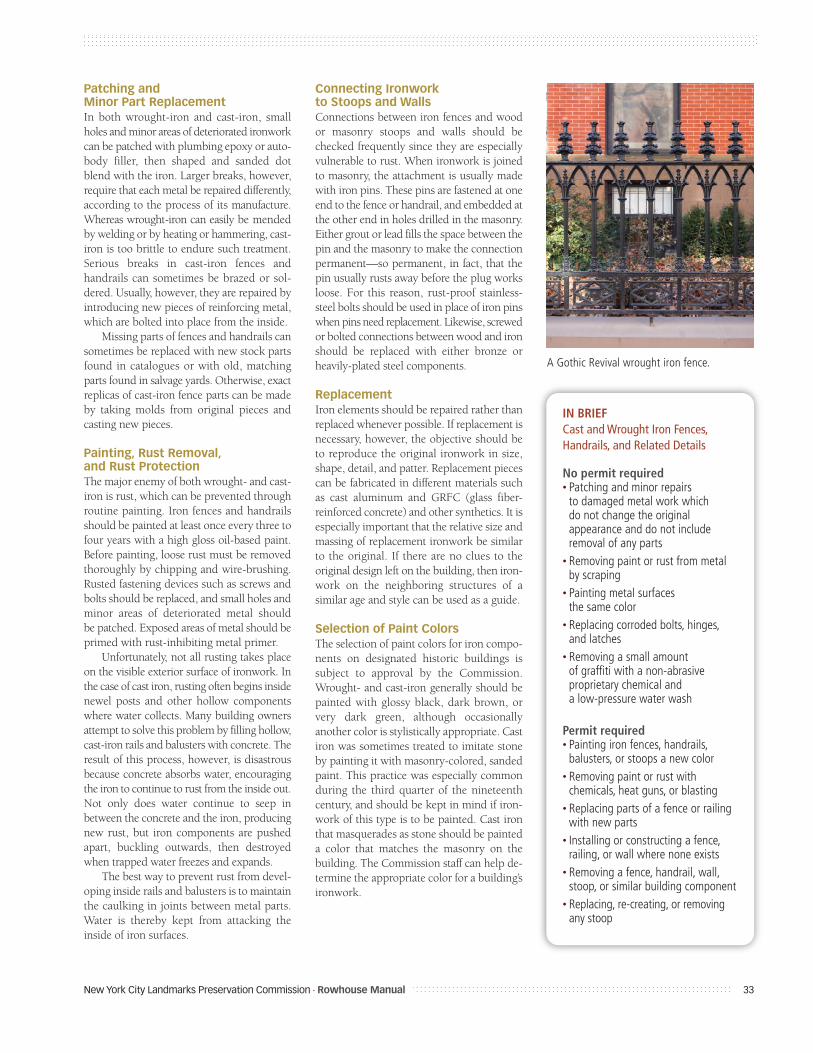
Patching and Minor Part ReplacementIn both wrought-iron and cast-iron, smallholes and minor areas of deteriorated ironworkcan be patched with plumbing epoxy or auto-body filler, then shaped and sanded dotblend with the iron. Larger breaks, however,require that each metal be repaired differently,according to the process of its manufacture.Whereas wrought-iron can easily be mendedby welding or by heating or hammering, cast-iron is too brittle to endure such treatment.Serious breaks in cast-iron fences andhandrails can sometimes be brazed or sol-dered. Usually, however, they are repaired byintroducing new pieces of reinforcing metal,which are bolted into place from the inside.
Missing parts of fences and handrails cansometimes be replaced with new stock partsfound in catalogues or with old, matchingparts found in salvage yards. Otherwise, exactreplicas of cast-iron fence parts can be madeby taking molds from original pieces andcasting new pieces.
Painting, Rust Removal, and Rust ProtectionThe major enemy of both wrought- and cast-iron is rust, which can be prevented throughroutine painting. Iron fences and handrailsshould be painted at least once every three tofour years with a high gloss oil-based paint.Before painting, loose rust must be removedthoroughly by chipping and wire-brushing.Rusted fastening devices such as screws andbolts should be replaced, and small holes andminor areas of deteriorated metal should be patched. Exposed areas of metal should beprimed with rust-inhibiting metal primer.
Unfortunately, not all rusting takes placeon the visible exterior surface of ironwork. Inthe case of cast iron, rusting often begins insidenewel posts and other hollow componentswhere water collects. Many building ownersattempt to solve this problem by filling hollow,cast-iron rails and balusters with concrete. Theresult of this process, however, is disastrousbecause concrete absorbs water, encouragingthe iron to continue to rust from the inside out.Not only does water continue to seep in between the concrete and the iron, producingnew rust, but iron components are pushedapart, buckling outwards, then destroyedwhen trapped water freezes and expands.
The best way to prevent rust from devel-oping inside rails and balusters is to maintainthe caulking in joints between metal parts.Water is thereby kept from attacking the inside of iron surfaces.
Connecting Ironwork to Stoops and WallsConnections between iron fences and woodor masonry stoops and walls should bechecked frequently since they are especiallyvulnerable to rust. When ironwork is joinedto masonry, the attachment is usually madewith iron pins. These pins are fastened at oneend to the fence or handrail, and embedded atthe other end in holes drilled in the masonry.Either grout or lead fills the space between thepin and the masonry to make the connectionpermanent—so permanent, in fact, that thepin usually rusts away before the plug worksloose. For this reason, rust-proof stainless-steel bolts should be used in place of iron pinswhen pins need replacement. Likewise, screwedor bolted connections between wood and ironshould be replaced with either bronze orheavily-plated steel components.
ReplacementIron elements should be repaired rather thanreplaced whenever possible. If replacement isnecessary, however, the objective should beto reproduce the original ironwork in size,shape, detail, and patter. Replacement piecescan be fabricated in different materials suchas cast aluminum and GRFC (glass fiber-reinforced concrete) and other synthetics. It isespecially important that the relative size andmassing of replacement ironwork be similarto the original. If there are no clues to theoriginal design left on the building, then iron-work on the neighboring structures of a similar age and style can be used as a guide.
Selection of Paint ColorsThe selection of paint colors for iron compo-nents on designated historic buildings is subject to approval by the Commission.Wrought- and cast-iron generally should bepainted with glossy black, dark brown, orvery dark green, although occasionally another color is stylistically appropriate. Castiron was sometimes treated to imitate stoneby painting it with masonry-colored, sandedpaint. This practice was especially commonduring the third quarter of the nineteenthcentury, and should be kept in mind if iron-work of this type is to be painted. Cast ironthat masquerades as stone should be painteda color that matches the masonry on thebuilding. The Commission staff can help de-termine the appropriate color for a building’sironwork.
New York City Landmarks Preservation Commission • Rowhouse Manual 33
IN BRIEFCast and Wrought Iron Fences, Handrails, and Related Details
No permit required• Patching and minor repairs
to damaged metal work which do not change the original appearance and do not include removal of any parts
• Removing paint or rust from metal by scraping
• Painting metal surfaces the same color
• Replacing corroded bolts, hinges, and latches
• Removing a small amount of graffiti with a non-abrasive proprietary chemical and a low-pressure water wash
Permit required• Painting iron fences, handrails,
balusters, or stoops a new color• Removing paint or rust with
chemicals, heat guns, or blasting• Replacing parts of a fence or railing
with new parts• Installing or constructing a fence,
railing, or wall where none exists• Removing a fence, handrail, wall,
stoop, or similar building component• Replacing, re-creating, or removing
any stoop
A Gothic Revival wrought iron fence.

WOOD STOOPS, FENCES, AND HANDRAILSIn New York City, wood stoops, fences, andhandrails are far less common than those ofiron or masonry. They appear, in fact, to beconfined to detached wood houses and to thecity’s few remaining wood rowhouses. Gener-ally, wood fences and railings of the late 19thcentury are quite elaborate. Earlier examplesare plain, as are those of turn-of-the-20th-century revival styles. Wood balusters havethree basic shapes: They are square or rectangular posts, turned circular posts, or flatslats that often feature a jig-saw cut-out design. Regardless of style, wood stoops,fences, and railings are always painted, ratherthan varnished, or left unfinished.
General Protection and PaintingAs in the case of iron, wood stoops, fences,and handrails are subject to water damage,which most commonly takes the form of rot.Areas most vulnerable to deterioration arethose where the wood comes in contact withthe earth or where it is constantly soaked byrain and mud.
To protect against deterioration, all woodfences, handrails, and stoops should be keptwell caulked at joints, have cracks filled withwood filler, be scraped and primed, and bepainted periodically.
Selection of Paint ColorsThe selection of paint colors for handrails,fences, stoops, or other wood components ofdesignated buildings is subject to approval bythe Commission. Owners are encouraged topaint wood elements of their buildings in historically accurate colors, and the Com-mission can help owners determine whatthose colors are.
Repair and Replacement of Wood Stoops, Fences, and HandrailsThe objective when replacing or repairingany wood element on a building is to repro-duce the original in size, shape, detail, andpattern. Wood fences and handrails can bemade of components of varying complexity.Simple moldings or round posts can be obtained from lumberyards. More ornamentalwoodwork is produced by carving, jig-sawing,turning on a lathe, or a combination of thesemethods. When replacing deteriorated woodelements, it is important to use a high qual-ity, sturdy wood which has been properlycured and treated.
34
IN BRIEFWood Stoops, Fences, and Handrails
No permit required• Removing paint from wood
by scraping• Painting wood surfaces
the same color• Caulking wood joints• Removing a small amount
of graffiti with a non-abrasive proprietary chemical and a low-pressure water wash
Permit required• Painting wood handrails,
balusters, or stoops a new color• Removing paint with chemicals,
heat guns, or blasting• Replacing parts of a fence
or railing with new parts• Installing or constructing a fence,
railing, or wall where none exists• Removing a fence, handrail,
wall, stoop, or similar building component
• Replacing, re-creating, or removing any stoop
Wood stoop and railing on a Greek Revival style rowhouse. Wood fence, stoop, and railings on a Federal style rowhouse.
New York City Landmarks Preservation Commission • Rowhouse Manual
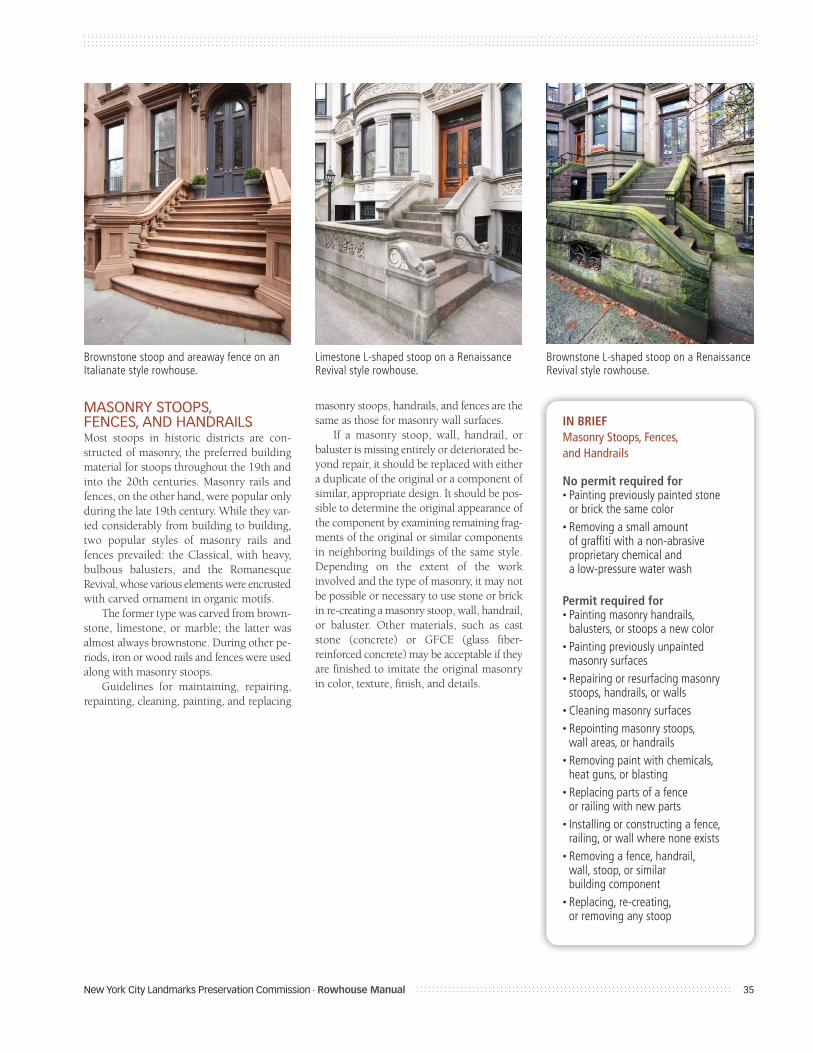
MASONRY STOOPS, FENCES, AND HANDRAILSMost stoops in historic districts are con-structed of masonry, the preferred buildingmaterial for stoops throughout the 19th andinto the 20th centuries. Masonry rails andfences, on the other hand, were popular onlyduring the late 19th century. While they var-ied considerably from building to building,two popular styles of masonry rails andfences prevailed: the Classical, with heavy,bulbous balusters, and the Romanesque Revival, whose various elements were encrustedwith carved ornament in organic motifs.
The former type was carved from brown-stone, limestone, or marble; the latter was almost always brownstone. During other pe-riods, iron or wood rails and fences were usedalong with masonry stoops.
Guidelines for maintaining, repairing, repainting, cleaning, painting, and replacing
masonry stoops, handrails, and fences are thesame as those for masonry wall surfaces.
If a masonry stoop, wall, handrail, orbaluster is missing entirely or deteriorated be-yond repair, it should be replaced with eithera duplicate of the original or a component ofsimilar, appropriate design. It should be pos-sible to determine the original appearance ofthe component by examining remaining frag-ments of the original or similar componentsin neighboring buildings of the same style.Depending on the extent of the work involved and the type of masonry, it may notbe possible or necessary to use stone or brickin re-creating a masonry stoop, wall, handrail,or baluster. Other materials, such as caststone (concrete) or GFCE (glass fiber-reinforced concrete) may be acceptable if theyare finished to imitate the original masonryin color, texture, finish, and details.
New York City Landmarks Preservation Commission • Rowhouse Manual 35
IN BRIEFMasonry Stoops, Fences, and Handrails
No permit required for• Painting previously painted stone
or brick the same color• Removing a small amount
of graffiti with a non-abrasive proprietary chemical and a low-pressure water wash
Permit required for• Painting masonry handrails,
balusters, or stoops a new color• Painting previously unpainted
masonry surfaces• Repairing or resurfacing masonry
stoops, handrails, or walls• Cleaning masonry surfaces• Repointing masonry stoops,
wall areas, or handrails• Removing paint with chemicals,
heat guns, or blasting• Replacing parts of a fence
or railing with new parts• Installing or constructing a fence,
railing, or wall where none exists• Removing a fence, handrail,
wall, stoop, or similar building component
• Replacing, re-creating, or removing any stoop
Brownstone stoop and areaway fence on anItalianate style rowhouse.
Limestone L-shaped stoop on a RenaissanceRevival style rowhouse.
Brownstone L-shaped stoop on a RenaissanceRevival style rowhouse.

(including areaway lighting, garbage enclosures, and plantings)
s a general matter, the Commission regulates “hardscape” features, such
as the installation of sidewalks, paths, areaways, patios, etc., and does
not regulate “landscape” features.
Yards and areaways are incorporated into the private open space in front and on
the side of rowhouses and semi-detached rowhouses. In addition to front and
side yards, the open space may include driveways and walkways of rowhouses
and semi-detached rowhouses. Besides providing private outdoor space, access
to basement doorways, and light wells for basement-level rooms, yards and
areaways have two other important functions: One is to act as a surface for
draining rainwater away from the building, thus preventing water damage to
the building’s façade or interior. The second function, an aesthetic one, is to act
as a base for the building and to separate it from the street or other public space.
Yard or areaway elements such as original paving materials, yard walls, fences,
ornamental iron or stonework, and historic lighting fixtures should be retained
wherever possible. Changes to any of these elements should be made according
to the following recommendations to ensure that the character of the yard or
areaway is maintained.
In general, concrete should be replaced with concrete and tinted to match
surrounding sidewalks. Bluestone should be reset. If it is impossible to reset
bluestone, tinted concrete is acceptable.
YA
RD
S,
AR
EA
WA
YS
, S
IDE
WA
LK
S a
nd
DR
IVE
WA
YS
36
A IN BRIEF
No permit required• Maintaining lawns or shrubs• Planting new lawns or shrubs
in existing unpaved area• Repairing or repainting cellar
access hatch covers the same color• Placing and planting pots,
planter boxes, or window boxes
Permit required• Replacing pavement in yards,
areaways, or sidewalks• Repairing or patching pavement
in a yard or areaway with a different material
• Installing pavement in yard areas previously unpaved
• Removing paving material• Changing paving material
in existing yards or areaways• Altering areaway steps• Installing or removing permanently
installed planters• Painting yard or areaway pavement• Constructing garbage can
enclosures or any other structures in yards or areaways
• Installing new sidewalk tree pits• Installing yard or areaway lighting• Changing the level of yards
or areaways• Creating a curb cut or parking
lot in the yard or areaway
Pavement Materials and Their RepairIn small areaways, yard walkways, andsidewalks in 19th century residential his-toric districts, the most common originalpavement material was bluestone. Row-houses built in the 20th century may haveconcrete paving. When a building is setwell back from the street, the area in frontof the building takes on the aspect of afront yard, rather than simply an entranceto the basement. In these cases, pavementwas probably originally limited to walk-ways or other small areas, while the rest ofthe yard featured a lawn, planting beds,shrubs, and even trees. Brick was not used
as an areaway pavement material in 19thcentury rowhouses in New York City.
Maintenance of the original yard,areaway, or sidewalk pavement is encour-aged. Unfortunately, many of these surfaces have had their original pavementremoved. A concrete surface which replaced bluestone pavers has a harder,plainer, and usually brighter appearancethan historic paving materials. Because itis one of the areaway’s most important visual features, the pavement should be amaterial that complements, rather thancontrast with, the historic visual quality ofthe façade.
If stone paving in yards, areaways, or
New York City Landmarks Preservation Commission • Rowhouse Manual
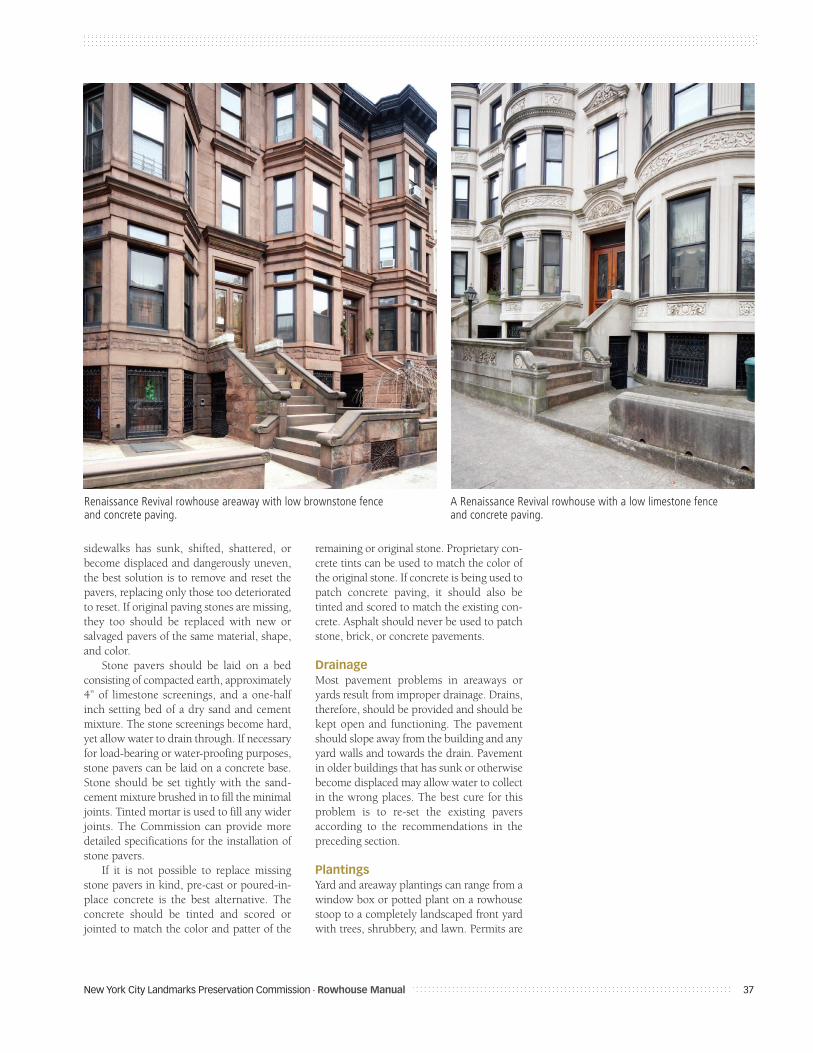
sidewalks has sunk, shifted, shattered, or become displaced and dangerously uneven,the best solution is to remove and reset thepavers, replacing only those too deterioratedto reset. If original paving stones are missing,they too should be replaced with new or salvaged pavers of the same material, shape,and color.
Stone pavers should be laid on a bed consisting of compacted earth, approximately4” of limestone screenings, and a one-halfinch setting bed of a dry sand and cementmixture. The stone screenings become hard,yet allow water to drain through. If necessaryfor load-bearing or water-proofing purposes,stone pavers can be laid on a concrete base.Stone should be set tightly with the sand-cement mixture brushed in to fill the minimaljoints. Tinted mortar is used to fill any widerjoints. The Commission can provide moredetailed specifications for the installation ofstone pavers.
If it is not possible to replace missingstone pavers in kind, pre-cast or poured-in-place concrete is the best alternative. Theconcrete should be tinted and scored orjointed to match the color and patter of the
remaining or original stone. Proprietary con-crete tints can be used to match the color ofthe original stone. If concrete is being used topatch concrete paving, it should also betinted and scored to match the existing con-crete. Asphalt should never be used to patchstone, brick, or concrete pavements.
DrainageMost pavement problems in areaways oryards result from improper drainage. Drains,therefore, should be provided and should bekept open and functioning. The pavementshould slope away from the building and anyyard walls and towards the drain. Pavementin older buildings that has sunk or otherwisebecome displaced may allow water to collectin the wrong places. The best cure for thisproblem is to re-set the existing pavers according to the recommendations in thepreceding section.
PlantingsYard and areaway plantings can range from awindow box or potted plant on a rowhousestoop to a completely landscaped front yardwith trees, shrubbery, and lawn. Permits are
New York City Landmarks Preservation Commission • Rowhouse Manual 37
Renaissance Revival rowhouse areaway with low brownstone fence and concrete paving.
A Renaissance Revival rowhouse with a low limestone fence and concrete paving.
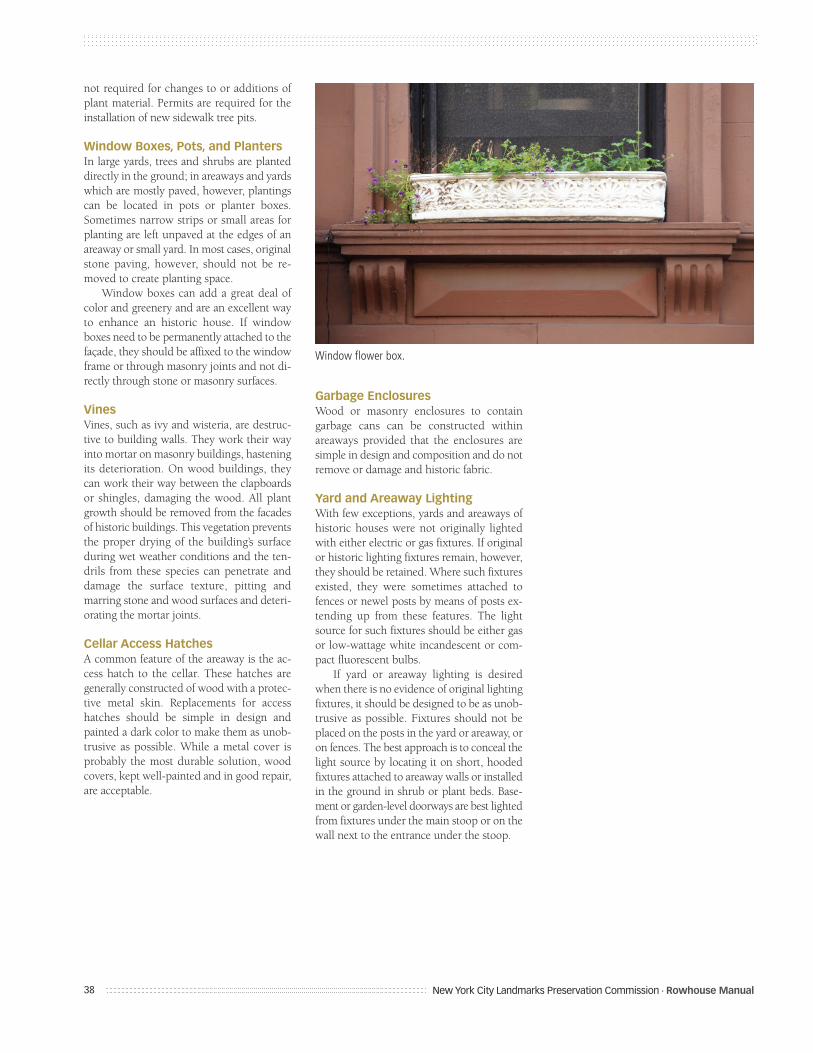
not required for changes to or additions ofplant material. Permits are required for theinstallation of new sidewalk tree pits.
Window Boxes, Pots, and PlantersIn large yards, trees and shrubs are planteddirectly in the ground; in areaways and yardswhich are mostly paved, however, plantingscan be located in pots or planter boxes.Sometimes narrow strips or small areas forplanting are left unpaved at the edges of anareaway or small yard. In most cases, originalstone paving, however, should not be re-moved to create planting space.
Window boxes can add a great deal ofcolor and greenery and are an excellent wayto enhance an historic house. If windowboxes need to be permanently attached to thefaçade, they should be affixed to the windowframe or through masonry joints and not di-rectly through stone or masonry surfaces.
VinesVines, such as ivy and wisteria, are destruc-tive to building walls. They work their wayinto mortar on masonry buildings, hasteningits deterioration. On wood buildings, theycan work their way between the clapboardsor shingles, damaging the wood. All plantgrowth should be removed from the facadesof historic buildings. This vegetation preventsthe proper drying of the building’s surfaceduring wet weather conditions and the ten-drils from these species can penetrate anddamage the surface texture, pitting and marring stone and wood surfaces and deteri-orating the mortar joints.
Cellar Access HatchesA common feature of the areaway is the ac-cess hatch to the cellar. These hatches aregenerally constructed of wood with a protec-tive metal skin. Replacements for accesshatches should be simple in design andpainted a dark color to make them as unob-trusive as possible. While a metal cover isprobably the most durable solution, woodcovers, kept well-painted and in good repair,are acceptable.
Garbage EnclosuresWood or masonry enclosures to containgarbage cans can be constructed withinareaways provided that the enclosures aresimple in design and composition and do notremove or damage and historic fabric.
Yard and Areaway LightingWith few exceptions, yards and areaways ofhistoric houses were not originally lightedwith either electric or gas fixtures. If originalor historic lighting fixtures remain, however,they should be retained. Where such fixturesexisted, they were sometimes attached tofences or newel posts by means of posts ex-tending up from these features. The lightsource for such fixtures should be either gasor low-wattage white incandescent or com-pact fluorescent bulbs.
If yard or areaway lighting is desiredwhen there is no evidence of original lightingfixtures, it should be designed to be as unob-trusive as possible. Fixtures should not beplaced on the posts in the yard or areaway, oron fences. The best approach is to conceal thelight source by locating it on short, hoodedfixtures attached to areaway walls or installedin the ground in shrub or plant beds. Base-ment or garden-level doorways are best lightedfrom fixtures under the main stoop or on thewall next to the entrance under the stoop.
38
Window flower box.
New York City Landmarks Preservation Commission • Rowhouse Manual
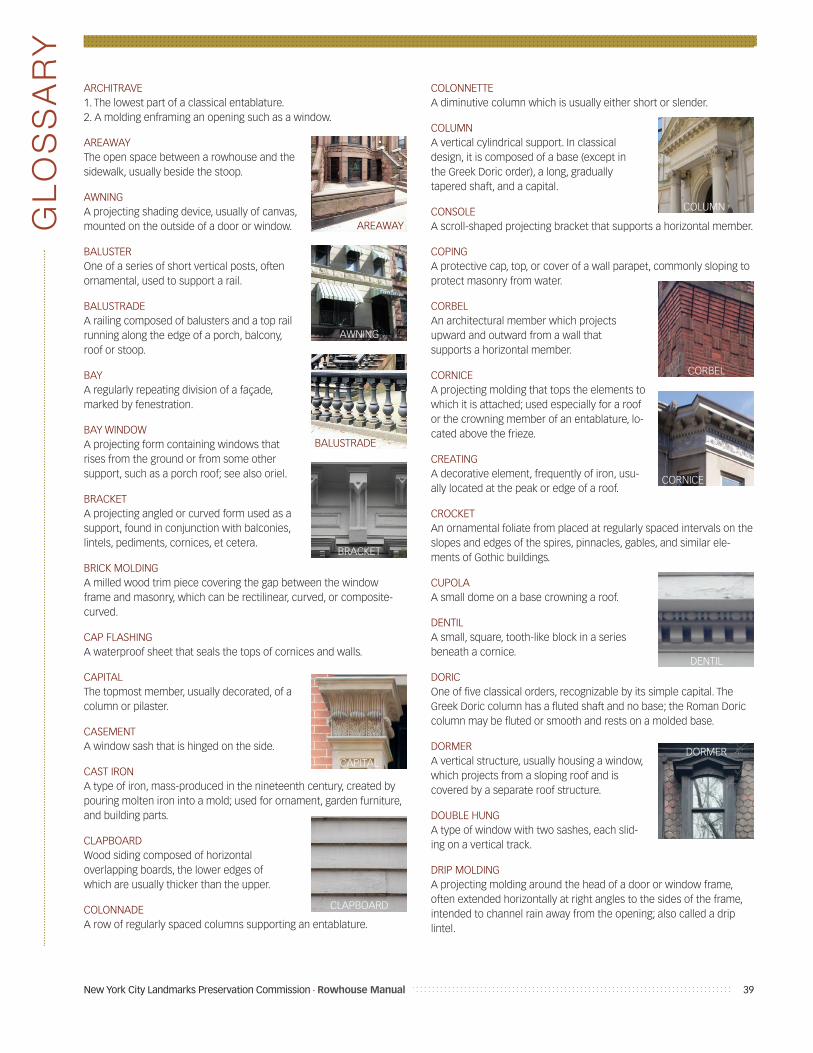
New York City Landmarks Preservation Commission • Rowhouse Manual 39
ARCHITRAVE1. The lowest part of a classical entablature. 2. A molding enframing an opening such as a window.
AREAWAYThe open space between a rowhouse and thesidewalk, usually beside the stoop.
AWNINGA projecting shading device, usually of canvas,mounted on the outside of a door or window.
BALUSTEROne of a series of short vertical posts, oftenornamental, used to support a rail.
BALUSTRADEA railing composed of balusters and a top railrunning along the edge of a porch, balcony,roof or stoop.
BAYA regularly repeating division of a façade,marked by fenestration.
BAY WINDOWA projecting form containing windows thatrises from the ground or from some other support, such as a porch roof; see also oriel.
BRACKETA projecting angled or curved form used as asupport, found in conjunction with balconies,lintels, pediments, cornices, et cetera.
BRICK MOLDINGA milled wood trim piece covering the gap between the windowframe and masonry, which can be rectilinear, curved, or composite-curved.
CAP FLASHINGA waterproof sheet that seals the tops of cornices and walls.
CAPITALThe topmost member, usually decorated, of acolumn or pilaster.
CASEMENTA window sash that is hinged on the side.
CAST IRONA type of iron, mass-produced in the nineteenth century, created bypouring molten iron into a mold; used for ornament, garden furniture,and building parts.
CLAPBOARDWood siding composed of horizontal overlapping boards, the lower edges of which are usually thicker than the upper.
COLONNADEA row of regularly spaced columns supporting an entablature.
COLONNETTEA diminutive column which is usually either short or slender.
COLUMNA vertical cylindrical support. In classical design, it is composed of a base (except in the Greek Doric order), a long, gradually tapered shaft, and a capital.
CONSOLEA scroll-shaped projecting bracket that supports a horizontal member.
COPINGA protective cap, top, or cover of a wall parapet, commonly sloping toprotect masonry from water.
CORBELAn architectural member which projects upward and outward from a wall that supports a horizontal member.
CORNICEA projecting molding that tops the elements towhich it is attached; used especially for a roofor the crowning member of an entablature, lo-cated above the frieze.
CREATINGA decorative element, frequently of iron, usu-ally located at the peak or edge of a roof.
CROCKETAn ornamental foliate from placed at regularly spaced intervals on theslopes and edges of the spires, pinnacles, gables, and similar ele-ments of Gothic buildings.
CUPOLAA small dome on a base crowning a roof.
DENTILA small, square, tooth-like block in a series beneath a cornice.
DORICOne of five classical orders, recognizable by its simple capital. TheGreek Doric column has a fluted shaft and no base; the Roman Doriccolumn may be fluted or smooth and rests on a molded base.
DORMERA vertical structure, usually housing a window,which projects from a sloping roof and is covered by a separate roof structure.
DOUBLE HUNGA type of window with two sashes, each slid-ing on a vertical track.
DRIP MOLDINGA projecting molding around the head of a door or window frame,often extended horizontally at right angles to the sides of the frame,intended to channel rain away from the opening; also called a drip lintel.
GL
OS
SA
RY
AWNING
COLUMN
CAPITAL
DENTIL
BRACKET
CORNICE
BALUSTRADE
CORBEL
AREAWAY
CLAPBOARD
DORMER
EAVEThe overhanging edge of a roof.
EGG AND DARTAn ornamental band molding of egg forms alternating with dart forms.
ELEVATIONAn exterior face of a building; also a drawing thereof.
ENFRAMEMENTA general term referring to any elements surrounding a window or door.
ENGLISH BONDA pattern of brickwork with alternate coursesof headers and stretchers.
ENTABLATUREIn classical, architecture, a major horizontal member carried by a col-umn(s) or pilaster(s); it consists of an architrave, a frieze, and a cor-nice. The proportions and detailing are different for each order, andstrictly prescribed.
EYEBROW DORMERA curved dormer with no sides, covered by a smooth protrusion fromthe sloping roof.
FAÇADEThe main exterior face of a building, sometimes distinguished fromthe other faces by elaboration of architectural or ornamental details.
FANLIGHTA semicircular or semi-elliptical window abovea door, usually inset with radiating glazing bars.
FASCIAA horizontal, flat element often combined witha cornice and architrave.
FENESTRATIONThe organization and design of windows in abuilding.
FESTOONA carved ornament in the form of a band, loop,or wreath, suspended from two points; alsocalled a “garland” or a “swag.”
FINIALThe crowning ornament of a painted element, such as a spire.
FLASHINGStrips of sheet metal bent to fit the angle between any two roof sur-faces, or between the roof and any projection, such as a chimney.
FLEMISH BONDA pattern of brickwork in which each course consists of headers andstretchers laid alternately; each header is centered between thestretcher above and the stretcher below it.
FOLIATEDecorative leafage, often applied to capitals or moldings.
FRENCH DOOR, WINDOWA tall casement window that reaches to the floor, usually arranged in two leaves as a double door.
FRIEZE1. The middle horizontal member of a classical entablature,
above the architrave and below the cornice. 2. A similar decorative band in a stringcourse, or near
the top of an interior wall below the cornice.
GABLEThe upper portion of an end wall formed by the slope of a roof.
GALVANIZED IRONIron that has been coated with zinc to inhibit rusting.
GLAZING BARSee mullion.
GOTHIC SASHA window sash pattern composed of mullions that cross to formpointed arches.
GRILLEA decorate, openwork grating, usually of iron, used to protect a window, door, or other opening.
GUTTERA shallow channel of metal or wood set immediately below and along the eaves of a building to catch and carry off rainwater.
HEADERA masonry wall unit of brick which is laid so that its short end is exposed.
HOODA projection that shelters an element such as a door or window.
IONICOne of the five classical orders, characterized by capitals with spiral elements called “volutes,” a fasciated entablature, continuous frieze,dentils in its cornice, and by its elegant detailing.
JIGSAW CARVINGWooden ornament cut with a thin, narrow saw blade.
JOISTOne of a series of parallel timber beams used to support floor andceiling loads, and supported in turn by larger beams, girders, or bearing walls; the widest dimension is vertically oriented.
KEYA block, often used in a series, which projects beyond the edge of the enframement of an opening and is joined with the surroundingmasonry. A block handled in such a manner is keyed to the masonry:see quoin.
40
FENESTRATION
FANLIGHT
HOOD
ENFRAMEMENT
GRILLE
FOLIATE
New York City Landmarks Preservation Commission • Rowhouse Manual
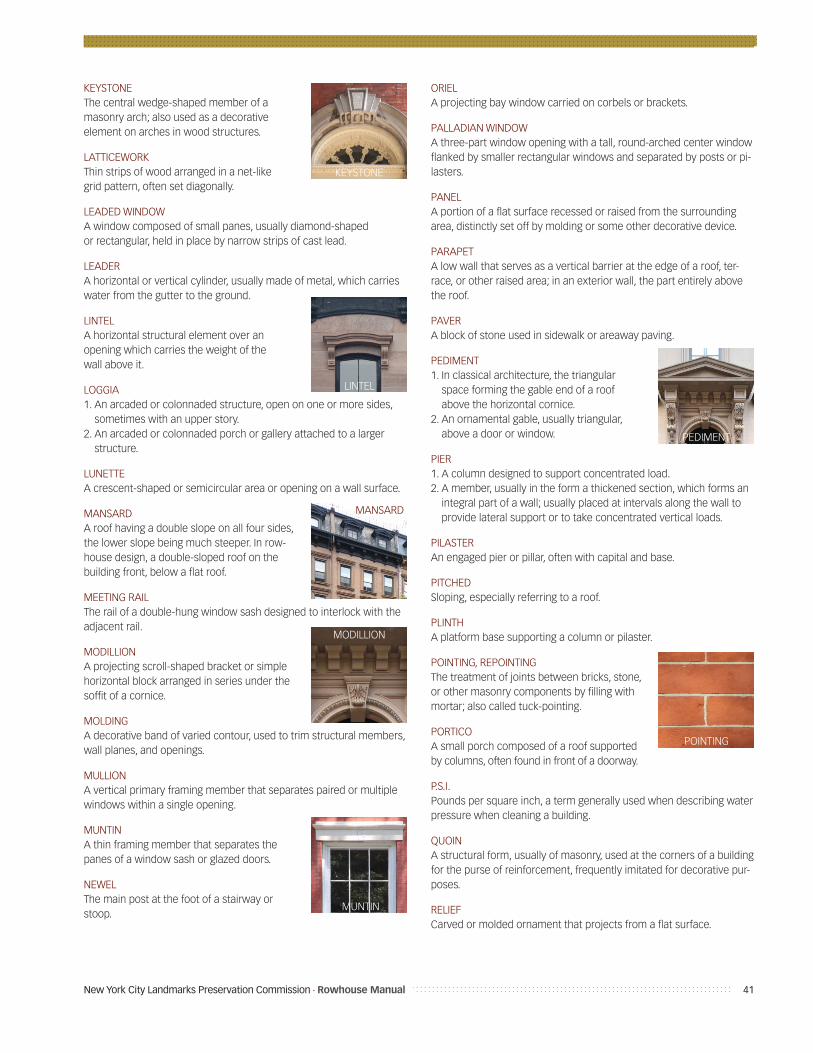
KEYSTONEThe central wedge-shaped member of a masonry arch; also used as a decorative element on arches in wood structures.
LATTICEWORKThin strips of wood arranged in a net-like grid pattern, often set diagonally.
LEADED WINDOWA window composed of small panes, usually diamond-shaped or rectangular, held in place by narrow strips of cast lead.
LEADERA horizontal or vertical cylinder, usually made of metal, which carrieswater from the gutter to the ground.
LINTELA horizontal structural element over an opening which carries the weight of the wall above it.
LOGGIA1. An arcaded or colonnaded structure, open on one or more sides,
sometimes with an upper story. 2. An arcaded or colonnaded porch or gallery attached to a larger
structure.
LUNETTEA crescent-shaped or semicircular area or opening on a wall surface.
MANSARDA roof having a double slope on all four sides,the lower slope being much steeper. In row-house design, a double-sloped roof on thebuilding front, below a flat roof.
MEETING RAILThe rail of a double-hung window sash designed to interlock with theadjacent rail.
MODILLIONA projecting scroll-shaped bracket or simplehorizontal block arranged in series under thesoffit of a cornice.
MOLDINGA decorative band of varied contour, used to trim structural members, wall planes, and openings.
MULLIONA vertical primary framing member that separates paired or multiple windows within a single opening.
MUNTINA thin framing member that separates thepanes of a window sash or glazed doors.
NEWELThe main post at the foot of a stairway orstoop.
ORIELA projecting bay window carried on corbels or brackets.
PALLADIAN WINDOWA three-part window opening with a tall, round-arched center windowflanked by smaller rectangular windows and separated by posts or pi-lasters.
PANELA portion of a flat surface recessed or raised from the surroundingarea, distinctly set off by molding or some other decorative device.
PARAPETA low wall that serves as a vertical barrier at the edge of a roof, ter-race, or other raised area; in an exterior wall, the part entirely abovethe roof.
PAVERA block of stone used in sidewalk or areaway paving.
PEDIMENT1. In classical architecture, the triangular
space forming the gable end of a roof above the horizontal cornice.
2. An ornamental gable, usually triangular,above a door or window.
PIER1. A column designed to support concentrated load. 2. A member, usually in the form a thickened section, which forms an
integral part of a wall; usually placed at intervals along the wall toprovide lateral support or to take concentrated vertical loads.
PILASTERAn engaged pier or pillar, often with capital and base.
PITCHEDSloping, especially referring to a roof.
PLINTHA platform base supporting a column or pilaster.
POINTING, REPOINTINGThe treatment of joints between bricks, stone,or other masonry components by filling withmortar; also called tuck-pointing.
PORTICOA small porch composed of a roof supportedby columns, often found in front of a doorway.
P.S.I.Pounds per square inch, a term generally used when describing waterpressure when cleaning a building.
QUOINA structural form, usually of masonry, used at the corners of a buildingfor the purse of reinforcement, frequently imitated for decorative pur-poses.
RELIEFCarved or molded ornament that projects from a flat surface.
New York City Landmarks Preservation Commission • Rowhouse Manual 41
KEYSTONE
MUNTIN
MODILLION
MANSARD
POINTING
LINTEL
PEDIMENT
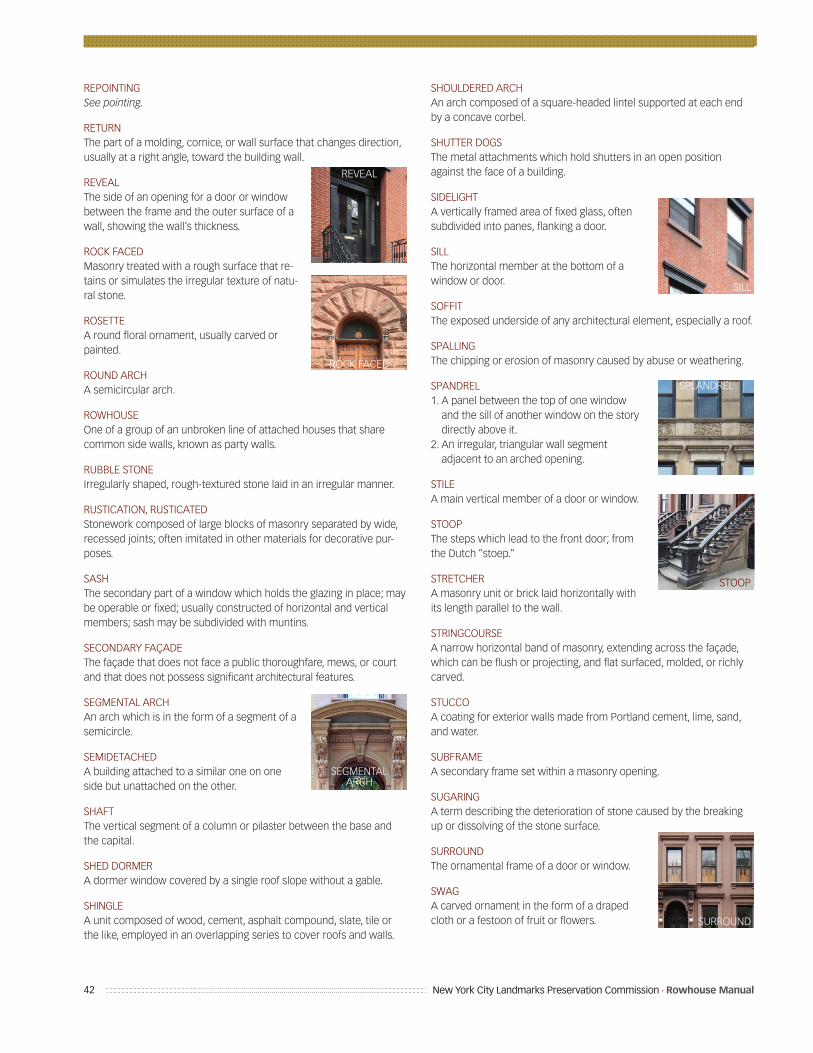
REPOINTINGSee pointing.
RETURNThe part of a molding, cornice, or wall surface that changes direction,usually at a right angle, toward the building wall.
REVEALThe side of an opening for a door or windowbetween the frame and the outer surface of awall, showing the wall’s thickness.
ROCK FACEDMasonry treated with a rough surface that re-tains or simulates the irregular texture of natu-ral stone.
ROSETTEA round floral ornament, usually carved orpainted.
ROUND ARCHA semicircular arch.
ROWHOUSEOne of a group of an unbroken line of attached houses that sharecommon side walls, known as party walls.
RUBBLE STONEIrregularly shaped, rough-textured stone laid in an irregular manner.
RUSTICATION, RUSTICATEDStonework composed of large blocks of masonry separated by wide,recessed joints; often imitated in other materials for decorative pur-poses.
SASHThe secondary part of a window which holds the glazing in place; maybe operable or fixed; usually constructed of horizontal and verticalmembers; sash may be subdivided with muntins.
SECONDARY FAÇADEThe façade that does not face a public thoroughfare, mews, or courtand that does not possess significant architectural features.
SEGMENTAL ARCHAn arch which is in the form of a segment of asemicircle.
SEMIDETACHEDA building attached to a similar one on oneside but unattached on the other.
SHAFTThe vertical segment of a column or pilaster between the base andthe capital.
SHED DORMERA dormer window covered by a single roof slope without a gable.
SHINGLEA unit composed of wood, cement, asphalt compound, slate, tile orthe like, employed in an overlapping series to cover roofs and walls.
SHOULDERED ARCHAn arch composed of a square-headed lintel supported at each endby a concave corbel.
SHUTTER DOGSThe metal attachments which hold shutters in an open positionagainst the face of a building.
SIDELIGHTA vertically framed area of fixed glass, oftensubdivided into panes, flanking a door.
SILLThe horizontal member at the bottom of awindow or door.
SOFFITThe exposed underside of any architectural element, especially a roof.
SPALLINGThe chipping or erosion of masonry caused by abuse or weathering.
SPANDREL1. A panel between the top of one window
and the sill of another window on the storydirectly above it.
2. An irregular, triangular wall segment adjacent to an arched opening.
STILEA main vertical member of a door or window.
STOOPThe steps which lead to the front door; fromthe Dutch “stoep.”
STRETCHERA masonry unit or brick laid horizontally withits length parallel to the wall.
STRINGCOURSEA narrow horizontal band of masonry, extending across the façade,which can be flush or projecting, and flat surfaced, molded, or richlycarved.
STUCCOA coating for exterior walls made from Portland cement, lime, sand,and water.
SUBFRAMEA secondary frame set within a masonry opening.
SUGARINGA term describing the deterioration of stone caused by the breakingup or dissolving of the stone surface.
SURROUNDThe ornamental frame of a door or window.
SWAGA carved ornament in the form of a drapedcloth or a festoon of fruit or flowers.
42
ROCK FACED
STOOP
REVEAL
SPLANDREL
SILL
SEGMENTAL ARCH
SURROUND
New York City Landmarks Preservation Commission • Rowhouse Manual
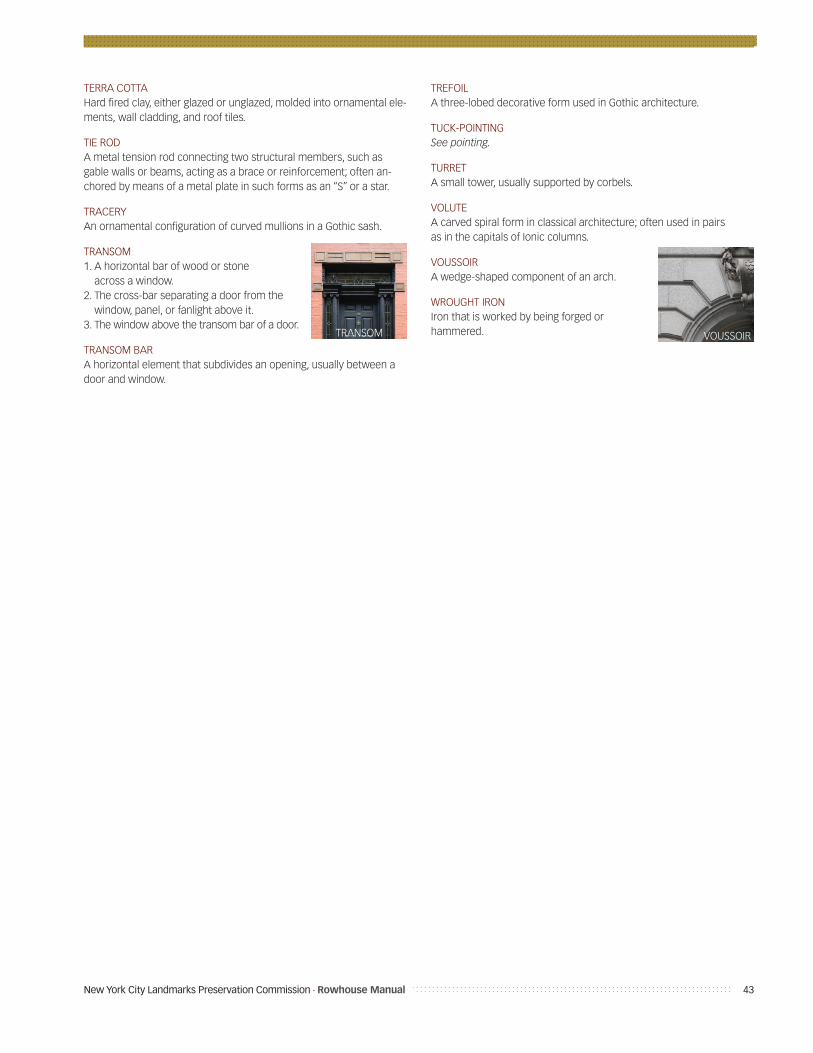
TERRA COTTAHard fired clay, either glazed or unglazed, molded into ornamental ele-ments, wall cladding, and roof tiles.
TIE RODA metal tension rod connecting two structural members, such asgable walls or beams, acting as a brace or reinforcement; often an-chored by means of a metal plate in such forms as an “S” or a star.
TRACERYAn ornamental configuration of curved mullions in a Gothic sash.
TRANSOM1. A horizontal bar of wood or stone
across a window. 2. The cross-bar separating a door from the
window, panel, or fanlight above it. 3. The window above the transom bar of a door.
TRANSOM BARA horizontal element that subdivides an opening, usually between adoor and window.
TREFOILA three-lobed decorative form used in Gothic architecture.
TUCK-POINTINGSee pointing.
TURRETA small tower, usually supported by corbels.
VOLUTEA carved spiral form in classical architecture; often used in pairs as in the capitals of Ionic columns.
VOUSSOIRA wedge-shaped component of an arch.
WROUGHT IRONIron that is worked by being forged or hammered.
New York City Landmarks Preservation Commission • Rowhouse Manual 43
TRANSOM VOUSSOIR
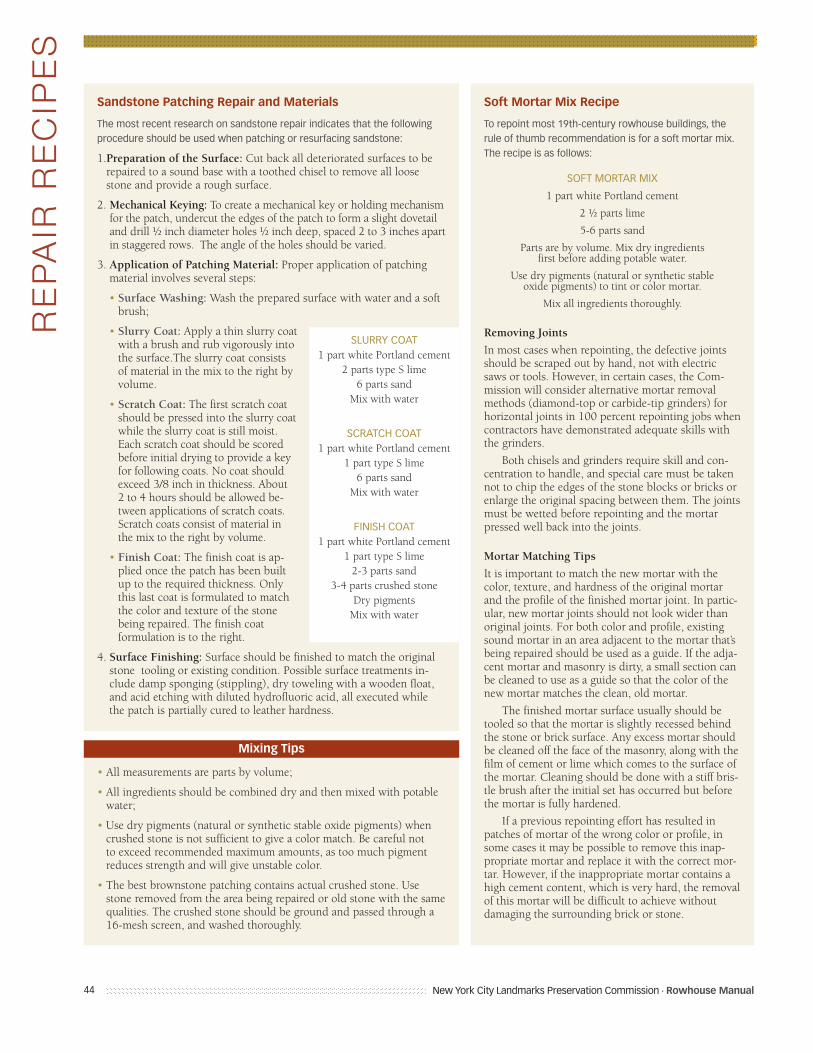
44
RE
PA
IR R
EC
IPE
S
Acknowledgements
Sandstone Patching Repair and Materials
The most recent research on sandstone repair indicates that the followingprocedure should be used when patching or resurfacing sandstone:
1.Preparation of the Surface: Cut back all deteriorated surfaces to berepaired to a sound base with a toothed chisel to remove all loosestone and provide a rough surface.
2. Mechanical Keying: To create a mechanical key or holding mechanismfor the patch, undercut the edges of the patch to form a slight dovetailand drill ½ inch diameter holes ½ inch deep, spaced 2 to 3 inches apartin staggered rows. The angle of the holes should be varied.
3. Application of Patching Material: Proper application of patchingmaterial involves several steps:
• Surface Washing: Wash the prepared surface with water and a softbrush;
• Slurry Coat: Apply a thin slurry coatwith a brush and rub vigorously intothe surface.The slurry coat consistsof material in the mix to the right byvolume.
• Scratch Coat: The first scratch coatshould be pressed into the slurry coatwhile the slurry coat is still moist.Each scratch coat should be scoredbefore initial drying to provide a keyfor following coats. No coat shouldexceed 3/8 inch in thickness. About 2 to 4 hours should be allowed be-tween applications of scratch coats.Scratch coats consist of material inthe mix to the right by volume.
• Finish Coat: The finish coat is ap-plied once the patch has been builtup to the required thickness. Onlythis last coat is formulated to matchthe color and texture of the stonebeing repaired. The finish coat formulation is to the right.
4. Surface Finishing: Surface should be finished to match the originalstone tooling or existing condition. Possible surface treatments in-clude damp sponging (stippling), dry toweling with a wooden float,and acid etching with diluted hydrofluoric acid, all executed whilethe patch is partially cured to leather hardness.
• All measurements are parts by volume;
• All ingredients should be combined dry and then mixed with potablewater;
• Use dry pigments (natural or synthetic stable oxide pigments) whencrushed stone is not sufficient to give a color match. Be careful not to exceed recommended maximum amounts, as too much pigment reduces strength and will give unstable color.
• The best brownstone patching contains actual crushed stone. Usestone removed from the area being repaired or old stone with the samequalities. The crushed stone should be ground and passed through a16-mesh screen, and washed thoroughly.
SLURRY COAT1 part white Portland cement
2 parts type S lime6 parts sand
Mix with water
SCRATCH COAT1 part white Portland cement
1 part type S lime6 parts sand
Mix with water
FINISH COAT1 part white Portland cement
1 part type S lime2-3 parts sand
3-4 parts crushed stoneDry pigments
Mix with water
Soft Mortar Mix Recipe
To repoint most 19th-century rowhouse buildings, therule of thumb recommendation is for a soft mortar mix.The recipe is as follows:
SOFT MORTAR MIX
1 part white Portland cement
2 ½ parts lime
5-6 parts sand
Parts are by volume. Mix dry ingredients first before adding potable water.
Use dry pigments (natural or synthetic stable oxide pigments) to tint or color mortar.
Mix all ingredients thoroughly.
Removing Joints
In most cases when repointing, the defective jointsshould be scraped out by hand, not with electricsaws or tools. However, in certain cases, the Com-mission will consider alternative mortar removalmethods (diamond-top or carbide-tip grinders) forhorizontal joints in 100 percent repointing jobs whencontractors have demonstrated adequate skills withthe grinders.
Both chisels and grinders require skill and con-centration to handle, and special care must be takennot to chip the edges of the stone blocks or bricks orenlarge the original spacing between them. The jointsmust be wetted before repointing and the mortarpressed well back into the joints.
Mortar Matching Tips
It is important to match the new mortar with thecolor, texture, and hardness of the original mortarand the profile of the finished mortar joint. In partic-ular, new mortar joints should not look wider thanoriginal joints. For both color and profile, existingsound mortar in an area adjacent to the mortar that’sbeing repaired should be used as a guide. If the adja-cent mortar and masonry is dirty, a small section canbe cleaned to use as a guide so that the color of thenew mortar matches the clean, old mortar.
The finished mortar surface usually should betooled so that the mortar is slightly recessed behindthe stone or brick surface. Any excess mortar shouldbe cleaned off the face of the masonry, along with thefilm of cement or lime which comes to the surface ofthe mortar. Cleaning should be done with a stiff bris-tle brush after the initial set has occurred but beforethe mortar is fully hardened.
If a previous repointing effort has resulted inpatches of mortar of the wrong color or profile, insome cases it may be possible to remove this inap-propriate mortar and replace it with the correct mor-tar. However, if the inappropriate mortar contains ahigh cement content, which is very hard, the removalof this mortar will be difficult to achieve withoutdamaging the surrounding brick or stone.
Mixing Tips
New York City Landmarks Preservation Commission • Rowhouse Manual
Back cover images:
Row 1Brooklyn Heights Historic District, Crown Heights North Historic District, Crown Heights North Historic District, Jumel Terrace Historic District
Row 2Perry Avenue Historic District, Ocean on the Park Historic District, Manhattan Avenue Historic District, Crown Heights North Historic District
Row 3Park Slope Historic District, Hunter’s Point Historic District, Prospect Heights Historic District, Alice and Agate Courts Historic District,
Row 4Upper East Side Extension Historic District, Horton’s Row, West End-Collegiate Historic District, Ridgewood North Historic District
For more information about each district, please visit www.nyc.gov/landmarks
Compiled and revised by the staff of the New York City Landmarks Preservation Commission
Concept and DesignThe Blank Page, Inc. New York, NY
PhotographyChristopher D. Brazee, LPC StaffTenzing Chadotsang, LPC Staff
PrintingPrinting for Less
Cert no. SGS-COC-004257
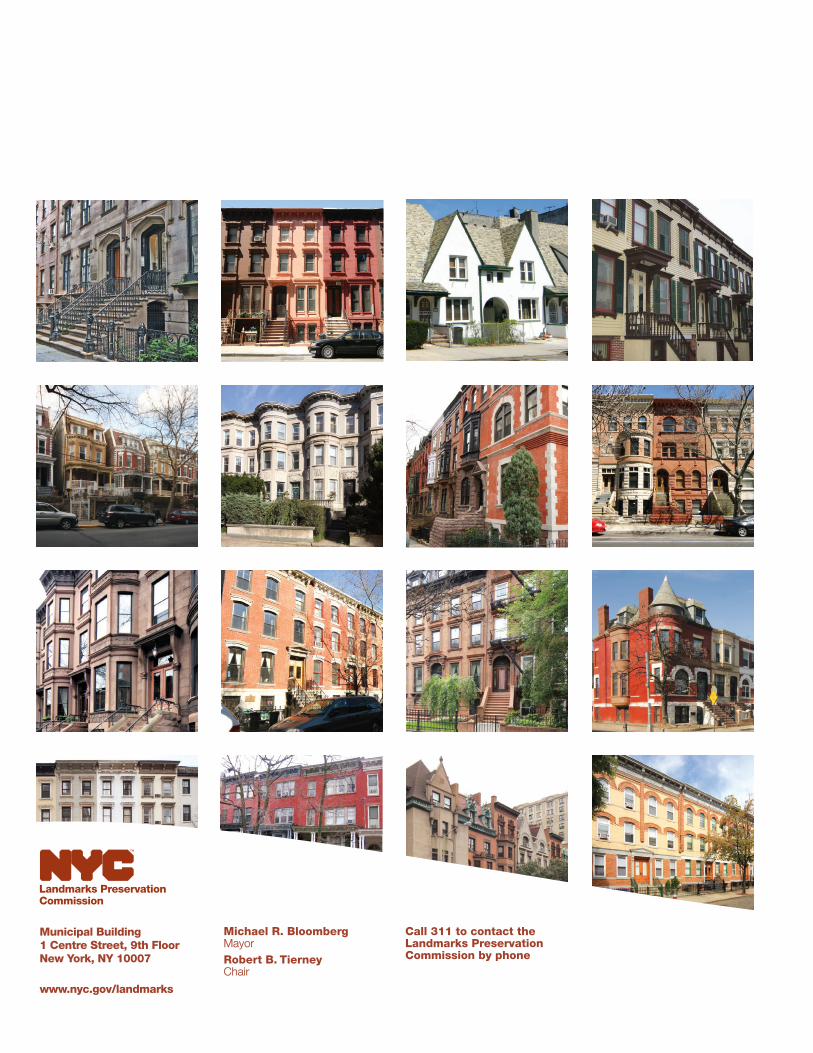
Municipal Building1 Centre Street, 9th FloorNew York, NY 10007
www.nyc.gov/landmarks
Michael R. BloombergMayorRobert B. TierneyChair
Call 311 to contact theLandmarks PreservationCommission by phone