rule book - gmtgames.com · rules sections (as shown in large brown caps font), ... between the...
TRANSCRIPT

[0.0] USING THESE RULES ........................................ 2[1.0] INTRODUCTION ................................................. 2[2.0] GAME EQUIPMENT ........................................... 2[3.0] SETTING UP THE GAME ................................... 4[4.0] SEQUENCE OF PLAY ......................................... 4[5.0] THE CARDS ......................................................... 5[6.0] KEY CONCEPTS ................................................. 7[7.0] STRATEGIC PHASE ............................................ 8[8.0] ORGANIZATION PHASE ................................... 8[9.0] DECLARE OFFENSIVE ...................................... 9
TABLE OF CONTENTS[10.0] DEPLOYMENT .................................................. 10[11.0] SUPPLY ............................................................... 11[12.0] MOVEMENT ...................................................... 12[13.0] COMBAT ............................................................ 14[14.0] TURN CONTINUATION ................................... 20[15.0] HOUSEKEEPING .............................................. 20[16.0] MALTA ................................................................ 25[17.0] HOW TO WIN .................................................... 25[18.0] ADVANCED RULES ......................................... 26[C0.0] INVASION OF CRETE EXCLUSIVE RULES ... 28
GMT Games, LLC • P.O. Box 1308, Hanford, CA 93232-1308www.GMTGames.com
R U L E B O O K
This is the “Living Rules” document for the game. It includes errata and clarifications to the original rules. To aid read-ability, errata is indicated in blue text.
Living Rules May 2015

No Retreat! The North African Front2
© 2013, 2015 GMT Games, LLC
[0.0] USING THESE RULESThe instructions for this game are organized into major rules sections (as shown in large brown CAPS font), and represented by the number to the left of the decimal point (e.g., rule 4.0 is the fourth rule). These rules generally explain the game’s components, procedures for play, the game’s core systems and mechanics, how to set it up, and how to win.With each rule, there can be “Cases” that further explain a general concept or basic procedure. Cases might also restrict the application of a rule by denoting exceptions to it. Cases (and subcases) are an extension of a rule shown in the way that they are numbered. Important information is in bold italics text.
Text in shaded boxes like this provides the voice of the game’s designer, who is addressing you to explain an idea or concept that is not, itself, a Rule or a Case.
Text in shaded boxes like this explains differences be-tween the The Invasion of Crete game and The North African Front game.
[1.0] INTRODUCTIONNo Retreat: The North African Front (or “NR2”, as this is the second game in the No Retreat series) is a two-player operational level wargame depicting the struggle between the Axis and the Allies in North Africa during World War II, from the start of Operation Compass on 8 December 1940 to the drive to evict the Axis from Libya in early 1943.Also included in NR2 is The Invasion of Crete, which depicts the invasion of that Greek island in May 1941, and uses most of the rules from NR2, with a special sec-tion starting on page 28 of this rules manual noting the differences between the two games.
Common AbbreviationsAAC = Advance After CombatCRT = Combat Results TableEZOC = Enemy Zone of ControlMP = Movement PointSP = Supply PointTEC = Terrain Effects ChartZOC = Zone of Control
[2.0] GAME EQUIPMENTParts Inventory:
• One 17" x 22" two-sided map sheet• Two 11" x 17" two-sided map sheets• One two-sided 8.5" x 11" player aid mat• Four 8.5" x 11" player aid cards• One sheet of 88, two-sided square units• One sheet of 112, two-sided round markers• 2 booklets: Rules and Scenarios • 55 Event cards (37 for North Africa, 18 for Crete)• Two 6-sided dice
[2.1] Game Maps and ScaleThe game maps represent the areas in Egypt, Libya, and Crete where the major operations took place. A hexagonal grid is superimposed on the maps to regulate the move-ment and location of the playing pieces. Explanations of the terrain features are found on the Terrain Effects Chart (TEC). Each hexagon, called a hex, equals 10 miles from side to side. Each complete Game Turn represents one or two months of real time.
For Crete, each hex represents an area one mile from side to side, and each complete Game Turn represents eight hours of real time.
[2.2] Game Charts and TablesThese summarize and illustrate certain game functions. They include the CRTs, the TEC, the Game Turn Track, and Strategic Map.
[2.3] The Playing PiecesPieces with one or more large digits along their bottom edge are called units. These represent the actual military formations that fought in this campaign.The Axis player controls the German (gray) and the Italian (green) units. The Allied player controls all British and Commonwealth (light and dark brown) units. Note that some units on each side use both colors.The round pieces without numbers along their bottom edge are called markers. They provide the players with game and unit status information during play.

No Retreat! The North African Front 3
© 2013, 2015 GMT Games, LLC
Unit Size & DesignationGerman and Allied units represent Divisions of 8,000 to 12,000 men (including occasional attached troop forma-tions). Allied Tank and Mechanized Infantry units are brigades or regiments.Most Italian Infantry units are corps of several binary divisions, each having two (instead of three) regiments.
For Crete, most units are battalion-sized and represent about 1000 men.
A unit’s designation is the historical name or number for that unit.
Sample Units
Turn of Entry
Turn Upgrade Allowed
Unit ID (name)
Combat Strength
Front
Front
Front
Front
Back
BackMalta invasion unit (16.0)
Movement Allowance
Special stacking (12.2.1)
Unit Type Symbol
Red oval = heavy tank unit (13.5.3)
Irreplaceableunit dot (8.2.3) (#) = No ZOC
Combat Strength
White print/outline = defense only
Combat Strength measures a unit’s value in battle, ex-pressed in Strength Points.Combat Strengths printed in white—or ones that are white-outlined— indicate that the unit cannot voluntarily attack (see 13.0). Combat Strengths in parenthesis designate a unit that has no Zone of Control (see 12.3). Movement Allowance determines how far a unit can move each turn, spending up to this many MPs to enter map hexes. Mechanized units have red, Anti-tank yellow, and Infantry black, Movement Points to help identify them.
Counter Errata: The British “22nd Tank” unit has an “8” turn entry on both sides of its counter. It should have an “8” turn entry number only on its front side.
Box and Minefield units have no Movement Allowance, as they repre-sent prepared entrenchments, supply dumps, and their garrisons (see 8.5).
They cannot voluntarily attack (see 13.0).
For Crete, round counters repre-sent smaller detachments (one step) and Greek units (two steps).
Most Axis and Allied units, as well as Minefields, have two steps each: Full-Strength on their front (brighter/darker-colored) side, and Reduced-Strength on their reverse side. Smaller formation units have only one step.
Counter 1Front
Counter 2Front
Counter 1Back
Counter 2Back
Three units—the 15th Panzer, 21st Panzer and 90th Light Divisions—have more than two steps each and are repre-sented by two counters that are switched between those strength levels, and have their remaining number of steps indicated in parentheses to the right of their unit type icon.
Only one counter of these 3+ step units can be present on the map at any one time.
For Crete, a unit with a “double” unit type symbol (e.g., the German Sturm/1(+) unit) has three steps—the two sides of the coun-ter—and when destroyed such a unit is
replaced by a spare round Detachment counter taken from its Reserve box.
Unit Type SymbolsInfantry Unit Types
Infantry Anti-tank Airborne Mines Boxes
Glider Airborne Bicycle Irregular Engineer
Mechanized Unit Types
Mechanized Panzer/Tank Infantry
Colored symbol boxes for the Allies represent the Commonwealth nationalities.

No Retreat! The North African Front4
© 2013, 2015 GMT Games, LLC
[3.0] SETTING UP THE GAMERefer to the separate Scenarios booklet, choose a scenario, and follow its Set Up and Special Rules.Place the scenario’s Active Map between the two play-ers. The Axis operates from the map edge with the Gray border, the Allies from the Tan-bordered map edge. The Player Aid Mat is placed between the players, adjacent to the map in contention, in such a way that both players can read it.Both players’ available units are placed conspicuously in front of them, just off the map edge. This group of active units is called that player’s Force Pool.The cards are shuffled and placed face-down to form the Draw pile. Each player also takes his respective CRT player aid card.
[4.0] SEQUENCE OF PLAYHow the Turns Work: Each Game Turn consists primar-ily of the New Turn Housekeeping Phase, an Operational Preparation Phase, and then this is followed by a variable number of Initiative and Non-Initiative Player Turns—depending on the number of Supply Points (SPs) spent. The player who is currently conducting his Player Turn is called the Phasing player. His opponent is called the Non-Phasing player.During each Player Turn, several phases are conducted in strict sequence. All actions in one phase must be com-pleted before the next phase begins. After both players have completed a series of alternat-ing Player Turns, an End of Turn Housekeeping Phase is conducted to organize things for the next Game Turn.
Procedure
I. New Turn Housekeeping PhaseThis phase is skipped on the first turn of the scenario being played.
1. Game Turn Segment: Advance the Turn marker one box on the Game Turn Track (see 15.4). If Game Turn 18 was just completed, the game ends and the winner is determined (see 15.7.4).
2. Malta Interdiction Segment: Note the Axis Supply marker’s maximum strength, depending on Malta’s Status, active or inactive (see 5.1).
3. Adjust Cards/Supply Segment: The Initiative Player may discard and then draw cards to fill his hand up to his maximum (between 5 and 8 cards). The Initiative Player then receives SPs equal to his Supply Capac-ity. Finally, the Non-Initiative Player does the same, discarding and drawing cards, then receiving his SPs (see 5.2, 5.3.5 & 15.5).
4. Note New Game Turn Event Segment: If the new Game Turn has an Event on its box on the Game Turn Track, note it and apply its effects at the appropriate time (see 15.6).
5. Checks Segment: Sudden Death victory, Map Control victory, and Malta Invasion are all checked on turns displaying a “ ” symbol (see 15.7.1, 15.7.2). Impor-tant: On Game Turn 10, the Strategic Advantage shifts at this time (see 15.7.3).
A Check Segment turn symbolWithdrawal game EventGame Turn EventAvailable Blitz! marker(s)Available Shock! marker(s)
II. Operational Preparation1. Strategic Phase: Starting with the Initiative Player,
both players alternate playing one card at a time for his Strategic Phase Event (only) until they both con-secutively pass (see 5.3, 7.0).
2. Organization Phase: Starting with the Initiative Player, both players return shattered units to their Force Pool, receive replacements, reinforcements, entrenchments, and perform withdrawals (see 8.0).
3. Declare Offensive Phase: Starting with the Initiative Player, one side may initiate an Offensive for the cur-rent Game Turn by spending 1 SP; that player becomes the Initiative Player (see 9.0).
4. Deployment Phase: If an Offensive was initiated (above), then both players, starting with the Non-Initiative Player, deploy their units on the Battle Map (see 10.0). If no Offensive was initiated, skip ahead to the End of Turn Housekeeping Phase.
No Retreat! The North African Front 5
© 2013, 2015 GMT Games, LLC
III. Initiative Player Turn1. Supply/Battle-Card Phase: No Supply and Low
Supply markers are placed on units that cannot trace a Supply Line (see 11.0). Both players get back their flipped on-table Battle Cards (see 13.5.7). Purchase Target markers.
2. Movement Phase: The Phasing Player can move his units on the map, off the map to the Shattered Units box, or—beginning on the third Game Turn—onto the map from the Strategic Reserve (see 12.0).
3. Combat Phase: All Voluntary, and then all Involun-tary, Battles are declared and resolved according to the Battle Sequence in any order that the Phasing Player desires (see 13.0).
IV. Non-Initiative Player TurnThe Non-Initiative Player becomes the Phasing Player and repeats the above Player Turn phases (Supply, Movement and Combat; see 11.0, 12.0, 13.0).
V. Turn Continuation1. Continuation/Initiative-Switch Check: Starting
with the Initiative Player, one player (only) may pay 1 SP to conduct another pair of Player Turns for this Offensive (see 14.0). The Game Initiative changes if the Non-Initiative Player was able to pay to continue the Offensive: He now becomes the Initiative Player. Flip the Turn marker to indicate that the Non-Initiative Player is now the Initiative Player (having thus ‘seized the initiative’). He also gets two “free” Target markers (see 11.7).
This means that if he was able to seize the Initiative (the other player declined to pay), the ex-Non-Initiative Player will get to move/attack two turns in a row: last on the previous Player Turn, and then first in the new.
2. Continuation: If the Offensive continues, perform another set of Player Turns. If the Offensive was not continued, proceed with the End of Turn Housekeep-ing Phase.
VI. End of Turn Housekeeping Phase1. Map Control Segment: Check the control status of
the Map (see 15.1).2. Initiative Check Segment: Check to see if the Initia-
tive changes (see 15.2).3. Removal Segment: Remove various markers, cards
and units from the map (see 15.3).
[5.0] THE CARDS Cards are usually drawn during the Adjust Cards Phase from the top of the Draw pile. They are held in their own-ing player’s hand. Cards are a resource that can be played to initiate an Event (and Alternate Event if Advanced Rule 18.4 is used), during an invasion of Malta (see 16.0), or to sometimes buy SPs (see 5.2). Played and discarded cards are placed face-up in a Discard pile next to the Draw pile. Exception: (see 13.5.7 Battle Card Continuation).
The Discard pile cannot be inspected unless allowed by an Event.
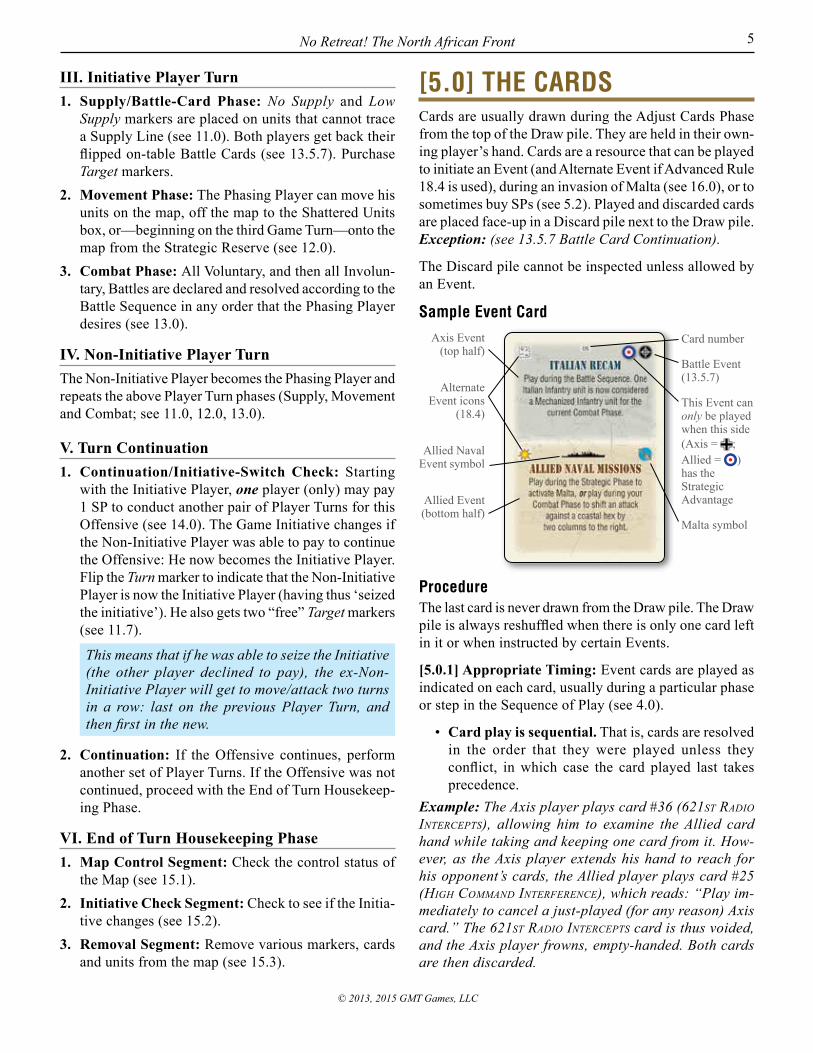
Sample Event Card
Card number
Battle Event (13.5.7)
This Event can only be played when this side (Axis = ; Allied = ) has the Strategic Advantage
Malta symbol
Axis Event (top half)
Alternate Event icons
(18.4)
Allied Naval Event symbol
Allied Event (bottom half)
ProcedureThe last card is never drawn from the Draw pile. The Draw pile is always reshuffled when there is only one card left in it or when instructed by certain Events.
[5.0.1] Appropriate Timing: Event cards are played as indicated on each card, usually during a particular phase or step in the Sequence of Play (see 4.0).
• Card play is sequential. That is, cards are resolved in the order that they were played unless they conflict, in which case the card played last takes precedence.
Example: The Axis player plays card #36 (621st Radio inteRcepts), allowing him to examine the Allied card hand while taking and keeping one card from it. How-ever, as the Axis player extends his hand to reach for his opponent’s cards, the Allied player plays card #25 (HigH command inteRfeRence), which reads: “Play im-mediately to cancel a just-played (for any reason) Axis card.” The 621st Radio inteRcepts card is thus voided, and the Axis player frowns, empty-handed. Both cards are then discarded.
No Retreat! The North African Front6
© 2013, 2015 GMT Games, LLC
• If both players play a card at the same time, the Initiative Player decides the order in which the two cards are resolved.
[5.0.2] Once is Enough: The exact same-named Event cannot occur twice during a single Player Turn (this does not apply to Alternate Events).
Card Errata: Card #06 Allied SNAFU should read: “Play to negate a just-played Shock!, Target or Coun-terblow marker.”
[5.1] The Malta Interdiction Segment
If the Malta marker is in the Malta Status box:
• If Malta is Active, the Axis player cannot flip any Axis Supply marker to its “2” side anymore, under most circumstances (Card Events that give cards bonus SPs allow you to, but not other bonuses; e.g., the +2 bad weather extra SPs).
Allied air and naval assets interdict Axis supply sea convoy routes.
• If Malta is Inactive, the Allied player loses 1 SP immediately (if available).
Axis resources reestablish their convoy routes and contest British Dominance of the Mediter-ranean Sea.
[5.2] The Discard, Draw and Resupply SegmentDuring the New Turn Housekeeping Phase, a player’s Adjust Cards Segment begins by optionally discarding (without any effect) cards from his hand. After discard-ing, that player then draws cards, one at a time, to fill his hand up to the limit of his card hand size (the text on some Event cards might lower this total). Each player’s basic hand size is six cards.
• Each player’s hand size is increased by one (+1) during Fair Weather (see the Game Turn Track).
• The Axis player’s hand size is decreased by one (–1) if Malta is Active.
• The hand size of the player with the Initiative (see 6.1) is increased by one (+1).
• The Allied player’s hand size is increased by one (+1) if the Monty counter is in play and not in the Tobruk Reaction box.
The player then receives a number of SPs (in the form of Supply Point markers) equal to his Supply Capacity.
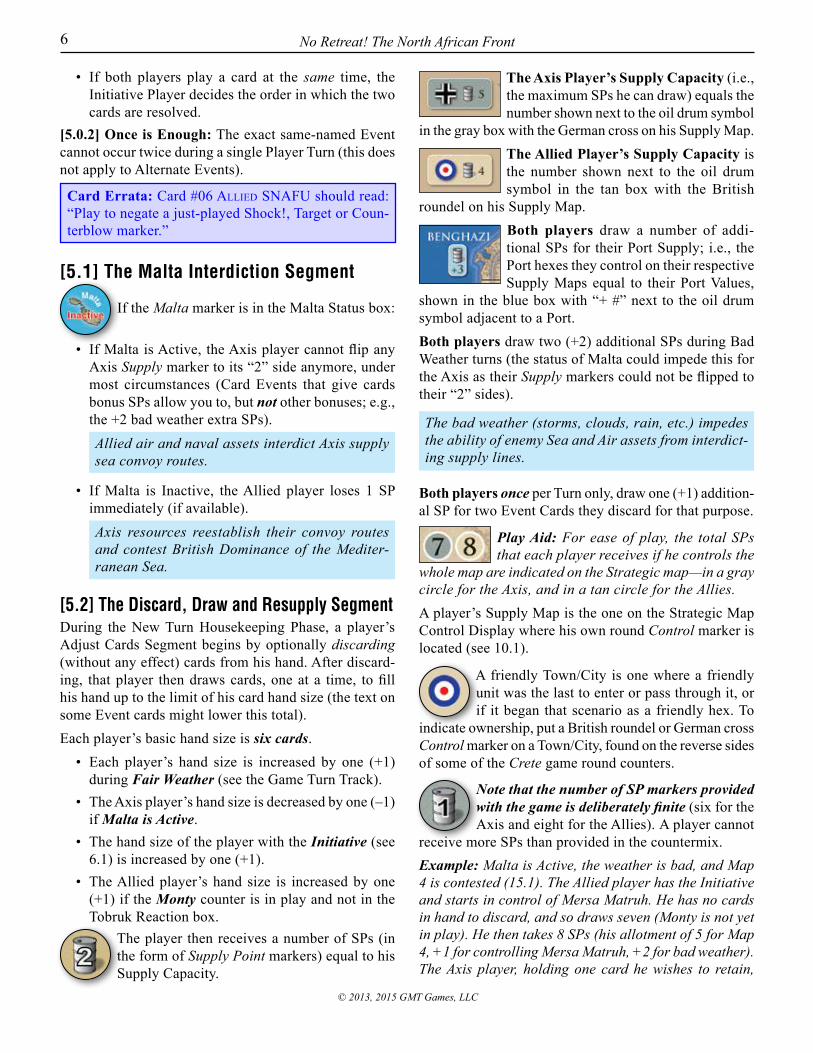
The Axis Player’s Supply Capacity (i.e., the maximum SPs he can draw) equals the number shown next to the oil drum symbol
in the gray box with the German cross on his Supply Map.The Allied Player’s Supply Capacity is the number shown next to the oil drum symbol in the tan box with the British
roundel on his Supply Map.Both players draw a number of addi-tional SPs for their Port Supply; i.e., the Port hexes they control on their respective Supply Maps equal to their Port Values,
shown in the blue box with “+ #” next to the oil drum symbol adjacent to a Port.Both players draw two (+2) additional SPs during Bad Weather turns (the status of Malta could impede this for the Axis as their Supply markers could not be flipped to their “2” sides).
The bad weather (storms, clouds, rain, etc.) impedes the ability of enemy Sea and Air assets from interdict-ing supply lines.
Both players once per Turn only, draw one (+1) addition-al SP for two Event Cards they discard for that purpose.
Play Aid: For ease of play, the total SPs that each player receives if he controls the
whole map are indicated on the Strategic map—in a gray circle for the Axis, and in a tan circle for the Allies.A player’s Supply Map is the one on the Strategic Map Control Display where his own round Control marker is located (see 10.1).
A friendly Town/City is one where a friendly unit was the last to enter or pass through it, or if it began that scenario as a friendly hex. To
indicate ownership, put a British roundel or German cross Control marker on a Town/City, found on the reverse sides of some of the Crete game round counters.
Note that the number of SP markers provided with the game is deliberately finite (six for the Axis and eight for the Allies). A player cannot
receive more SPs than provided in the countermix. Example: Malta is Active, the weather is bad, and Map 4 is contested (15.1). The Allied player has the Initiative and starts in control of Mersa Matruh. He has no cards in hand to discard, and so draws seven (Monty is not yet in play). He then takes 8 SPs (his allotment of 5 for Map 4, +1 for controlling Mersa Matruh, +2 for bad weather). The Axis player, holding one card he wishes to retain,

No Retreat! The North African Front 7
© 2013, 2015 GMT Games, LLC
draws four more (one less as Malta is active) to bring his hand up to six, and takes 5 SPs (his allotment for Map 4, +2 for bad weather). Note that—unlike cards—currently held SPs have no effect on the amount drawn.
[5.3] Named EventsThe text in each card’s two boxes are the named Events. The light green and/or gray boxes on each card’s upper half are the Axis Events (playable only by the Axis player), while the tan-background Events on the bottom half of a card are the Allied Events (playable only by the Allied player). Once played, cards are discarded.
Thus, the effect of each card is different depending on who plays it.
[5.3.1] Named Event Effects: Events describe their exact timing and use on the cards themselves. When not speci-fied, that Event can be performed at any time.
[5.3.2] Event Precedence: If there is a conflict between the Event text and these rules, the Event text takes pre-cedence.
[5.3.3] Strategic Advantage Events: Text Events on a card portion with a German cross can be played only during Game Turns 1-9.
Text Events on a card portion with a British roundel can be played only during Game Turns 10-19.
Text Events without the above cross/roundel symbols can be played throughout the entire game, as can the Alter-nate Events, as denoted by icons located in the upper-left corners of each side’s Event Card portion (see rule 18.4).
Text Events on a card portion with a target sym-bol can be kept active under the right combat
circumstances in succeeding Player Turns after being played (see 13.5.7).
[5.3.4] Malta Events: Regular Card Events (not the Alternate Events) marked with a Malta island
graphic cannot be played for their Event text until and unless the Malta marker is in the Malta Status box (i.e., starting on Game Turn 4 and subject to a Malta Invasion).
You must still obey the red “Must Play” instructions: just discard the card without any Event text taking effect.
[5.3.5] Alternate Events: The small icons found in the upper-left corners of each side’s Event description text area on the Event Cards are only used with Advanced Rule 18.4.
[6.0] KEY CONCEPTSCertain global concepts tie the key systems of this game together. These include:
[6.1] InitiativeInitiative determines which player goes first. This player is called the Initiative Player and that status is
symbolized by having his side (roundel for the Allies, German cross for the Axis) of the Turn marker face-up on the Game Turn Track. His opponent is the Non-Initia-tive Player.
Note that having the Initiative is different from having the Strategic Advantage, which only affects the play of certain Events via the Event Cards (see 5.3.3).
[6.2] MaltaThe island of Malta had great influence over the campaign for North Africa during WW2. Its game status also broadly represents air and sea superiority in the Mediterranean Sea; and is an important condition for a Sudden Death Victory (see 15.7.2), and also affects supply in the game.
Prior to Game Turn 4, the Malta Status box has no Malta marker and, hence, Malta has no status. It is neither Active nor Inactive: Malta Events (see 5.3.4) cannot be played and no Axis Port Supply (see 11.2) can be traced.
The Malta marker is placed in the Malta Status box on Game Turn 4 on its Inactive side. It is flipped during the game by certain Events.
There is a more complex and comprehensive optional rule to cover Malta activation that was published in GMT’s C3i Magazine Issue #28, including a half dozen extra counters.
[6.3] Target/Counterblow Markers These markers are used to declare at-tacks and counterblows; some will be awarded for free by certain combat
results, or by Event Cards. otherwise a player has to buy them using his Supply markers at the start of his player-turn (see 11.7). After being used to initiate combat, the markers are put back in the “Used Supplies/Support/Targets/CBs Box”—and thus must be purchased again for use.

No Retreat! The North African Front8
© 2013, 2015 GMT Games, LLC
[6.4] Supply Point Markers These markers show the resources accumulated by each side. They are received at the start or each game turn
(see 5.2), and are used to pay for Replacements/Rebuilds (see 8.2), Entrenchments (see 8.5), Offensives (see 9.0),Target markers (see11.7). They may be kept from turn to turn (i.e., accumulated) if not used.
[7.0] STRATEGIC PHASEOperational PreparationDuring this phase, perform the following segments in order:
A. Initiative Card Segment: The Initiative Player must either:
1. Play one Event Card for its Event (e.g., one that begins with the text, “Play during the Strategic Phase”), or
2. Pass.B. Non-Initiative Card Segment: The Non-Initiative
Player performs the above segment, making one of those choices.
Ending the Card Segments: Continue to alternate Initia-tive Card Segments until both players consecutively Pass. Example: The Initiative Player plays an Event and the Non-Initiative Player passes. Then the Initiative Player passes, and that means both players have passed con-secutively, so the Card Segment ends immediately.
[8.0] ORGANIZATION PHASEDuring this phase, the Initiative Player performs the fol-lowing segments (A-F) in order, followed by the Non-Initiative Player:
A. Recover Shattered Units: Shattered units are placed back in the Force Pool (see 8.1).
B. Build-Up Segment: Pay 1 SP per eligible unit im-proved to its stronger side (see 8.2).
C. Rebuild Lost Units: Pay 1 SP per Destroyed and 2 SPs per Surrendered unit returned to the Force Pool (see 8.3).
D. Receive Reinforcements: Scheduled reinforcements are placed in the Force Pool (see 8.4).
E. Entrenchment Segment: Pay SPs to purchase or upgrade each Box or Minefield unit, or to increase the Tobruk Fort Level (see 8.5).
F. Withdrawal Segment: Place scheduled withdrawals on the Game Turn Track or Tobruk Reaction box (see 8.6).
[8.1] Recover Shattered UnitsUnits in the Shattered Units box are returned to the owner’s Force Pool on their current strength side (do not flip them).
[8.2] Build Up Segment, Get Markers[8.2.1] Build Up Units: Units in the Force Pool or the Strategic Reserve (but not in Holding boxes or on the Game Turn Track) can be flipped to their higher-strength side for the cost of 1 SP.
• Multi-counter units (i.e., the German 15th, 21st Panzer and 90th Light Divisions) can have more than one Build Up in a single turn. These units can be Built Up to their next-higher counter on its lower-strength side, if available (i.e., that higher-strength side has entered play based on its black Turn of Entry number in a white box).
[8.2.2] Get Markers: Receive the number of Blitz! or Shock! markers as shown on the Game Turn Track for
the current turn. The markers are available for use during this Turn only.Example: At the beginning of Game Turn 9, the Axis player receives one Blitz! marker, and the Allied player receives two Shock! markers.These support markers represent superior training, doctrine, tactics and leadership, plus elements of surprise, airpower, artillery concentrations, logisti-cal support, etc.
[8.2.3] Irreplaceable Unit: A unit with a black Irreplaceable unit dot ( ) next to its unit type symbol cannot be Built Up with SPs in this manner.
Important: These black-dotted units are also placed in the Surrendered Units box when they are Shattered by a combat result (i.e., they’ve “quit”).
Exceptions: The Enhanced (8-6) versions of the two German Panzer divisions have a white dot ( ), this means that they can Build Up only once during the game.
No Retreat! The North African Front 9
© 2013, 2015 GMT Games, LLC
The TANk RecoveRy UNiTS and Give US The ToolS Event cards allow an on-map unit to recover a step (i.e., Build Up). This includes steps with an Irreplaceable Unit dot (e.g., the two German Panzer divisions) even if they have been previously Build Up.
Example: The 15th Panzer Division cannot be upgraded to its 7-6 value until Game Turn 6, as indicated by the white square on its counter.The Enhanced side of a unit is shown by a turn of entry number in a white box. It can only be flipped to its Enhanced side on or after that Game Turn and by also spending
the required 1 SP.
[8.3] Rebuild Lost UnitsUnits in the Destroyed Units or Surrendered Units boxes can be returned to their Force Pool on their lowest strength side at a cost of:
0 SP to Rebuild a Free unit*1 SP to Rebuild a Destroyed unit*2 SP to Rebuild a Surrendered unit*
* Some units with an Irreplaceable Unit dot ( ) can never be brought back into play—such as the 2nd SA Division (see 13.6.3). “Free units” are those with “Free Build” marked on their reverse.
[8.4] Receive ReinforcementsAfter units have been recovered or rebuilt, then any units currently scheduled to arrive this turn are placed in their Force Pool.
[8.5] Entrenchment SegmentUnbuilt Box units can be added to their owner’s Force Pool; the To-bruk Fort Level can also be im-proved (starting on Game Turn 4);
and Box units (1-step) may be upgraded to Minefield (2-step) units (starting on Game Turn 6), for the following costs:
1 SP for each additional Box unit 2 SPs for each Minefield unit (on or after Game Turn 6).1 SP to flip a Box over to its Minefield side. 1 SP for each increase of the Tobruk Fort Level (on
or after Game Turn 4); multiple Levels can be purchased each turn.
The Fort Active marker appears on Game Turn 4 and is placed in the Tobruk Reaction box until either player has his Control marker on the
Map 3 box (see 10.1). Then, it is placed on the “0” box of the Tobruk Fortification Level track, where it remains until additional Fortification Levels are purchased. Right after an active map change (10.1) from Map 3 to 2 or 4, the Tobruk Fort marker is moved back to the “0” Box (unless using Advanced Rule [18.1] Siege of Tobruk and there is a siege).
[8.6] Withdrawal SegmentFriendly units scheduled to withdraw during the current Game Turn (as indicated by the red colored text on the Game Turn Track) are removed from play. These must be taken from that player’s Force Pool, if available, even if they are currently at reduced-strength. If not, they must be taken from the Shattered Units, Destroyed Units, or Surrendered Units box (in that priority order if a choice is possible, and randomly discarding one card per unit as a penalty for their not being in the Force Pool when needed). Withdrawn units are placed, as specified—full-strength side up—on the Game Turn Track, the Tobruk Reaction box, or are set aside as permanently removed from play.
[9.0] DECLARE OFFENSIVEDuring this phase, one player may declare an Offensive. This initiates Player Turns on the Active Map, where units deploy, move, and conduct Battles.
Perform these segments in order:
A. Initiative Player Declaration: The Initiative Player may declare an Offensive for this Game Turn by pay-ing 1 SP and proceeding directly to the Deployment Phase (see 10.0). He also gets two “free” Target mark-ers (see 11.7)
B. Non-Initiative Player Declaration: If the Initiative Player declines to declare an Offensive, then the Non-Initiative Player may do so by paying the required 1 SP.
Flip the Turn marker to indicate that the Non-Initiative Player is now the Initiative Player (having thus “seized the initiative”) and proceed to the Deployment Phase (see 10.0).
If an Offensive is declared, but not on Map 3, the Fort Active marker is placed in the Tobruk Reaction box.
No Retreat! The North African Front10
© 2013, 2015 GMT Games, LLC
If neither player declares an Offensive, all units and some markers are retained in their owner’s Force Pool between Game Turns, while other markers are lost (and the SPs spent to acquire them are wasted); such markers must be repurchased if still desired.
• Square units are always retained.• Entrenchment units, Leader and Supply markers are
retained.• Unused Blitz!, Shock!, Target and Counterblow
markers are always lost.Finally, proceed directly to the End of Turn Housekeeping Phase (see 15.0).
No units will deploy, move, or fight on the Active Map this Game Turn.
[10.0] DEPLOYMENTIf an Offensive has been declared (see 9.0), perform these segments in order:
A. Determine the Battle Map: Determine on which map the Offensive takes place. This becomes the Battle Map.
B. Deploy All Non-Initiative Square Units: All of the Non-Initiative Player’s square pieces in his Force Pool are placed on the Battle Map or in the Strategic Reserve box.
C. Deploy All Initiative Units: All of the Initiative Player’s round and square pieces in his Force Pool and Shattered Units box (if any) are placed on the Battle Map or in the Strategic Reserve box.
D. Deploy All Non-Initiative Round Units: All of the Initiative Player’s round pieces (Boxes and Mines) in his Force Pool are placed on the Battle Map.
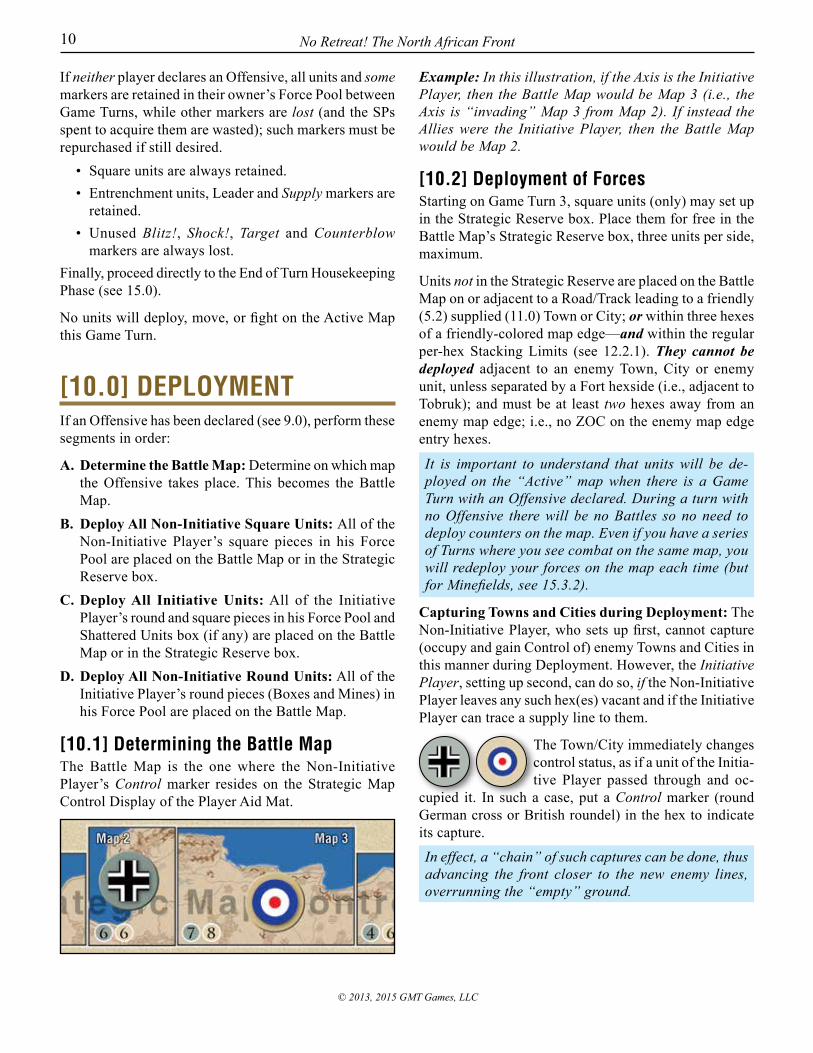
[10.1] Determining the Battle MapThe Battle Map is the one where the Non-Initiative Player’s Control marker resides on the Strategic Map Control Display of the Player Aid Mat.
Example: In this illustration, if the Axis is the Initiative Player, then the Battle Map would be Map 3 (i.e., the Axis is “invading” Map 3 from Map 2). If instead the Allies were the Initiative Player, then the Battle Map would be Map 2.
[10.2] Deployment of ForcesStarting on Game Turn 3, square units (only) may set up in the Strategic Reserve box. Place them for free in the Battle Map’s Strategic Reserve box, three units per side, maximum.
Units not in the Strategic Reserve are placed on the Battle Map on or adjacent to a Road/Track leading to a friendly (5.2) supplied (11.0) Town or City; or within three hexes of a friendly-colored map edge—and within the regular per-hex Stacking Limits (see 12.2.1). They cannot be deployed adjacent to an enemy Town, City or enemy unit, unless separated by a Fort hexside (i.e., adjacent to Tobruk); and must be at least two hexes away from an enemy map edge; i.e., no ZOC on the enemy map edge entry hexes.
It is important to understand that units will be de-ployed on the “Active” map when there is a Game Turn with an Offensive declared. During a turn with no Offensive there will be no Battles so no need to deploy counters on the map. Even if you have a series of Turns where you see combat on the same map, you will redeploy your forces on the map each time (but for Minefields, see 15.3.2).
Capturing Towns and Cities during Deployment: The Non-Initiative Player, who sets up first, cannot capture (occupy and gain Control of) enemy Towns and Cities in this manner during Deployment. However, the Initiative Player, setting up second, can do so, if the Non-Initiative Player leaves any such hex(es) vacant and if the Initiative Player can trace a supply line to them.
The Town/City immediately changes control status, as if a unit of the Initia-tive Player passed through and oc-
cupied it. In such a case, put a Control marker (round German cross or British roundel) in the hex to indicate its capture.
In effect, a “chain” of such captures can be done, thus advancing the front closer to the new enemy lines, overrunning the “empty” ground.

No Retreat! The North African Front 11
© 2013, 2015 GMT Games, LLC
[11.0] SUPPLYDuring the Supply Phase of each Player Turn, the supply status of both sides’ on-map units is checked, the Initiative Player’s units first, and then the Non-Initiative Player’s units. This order is important because unsupplied units lose their Zone of Control (see 12.3) immediately. Units that are not supplied are noted either with Low Supply or No Supply markers (see 11.3, 11.4). Then on-table Battle Cards are flipped back face up.
[11.1] Tracing SupplyA unit is in supply if it can trace a valid Supply Line no more than three hexes in length (i.e., a maximum of two intervening hexes) from the unit tracing supply to a friendly Supply Source (see 11.2).
Blocking Supply Lines: A Supply Line cannot be traced:• Into or through a hex containing enemy units,• Through a hex containing an enemy Zone of Control
(see 12.3) unless there is a friendly unit in that hex; that is, friendly units negate enemy Zones of Control for the purposes of tracing Supply Lines,
• Through Marsh hexes, nor across Escarpment hexsides, except along connected Roads and/or Tracks.
[11.2] Supply SourcesA Supply Line must be traced to a Supply Source, which is:
• A friendly-colored map edge hex, or• A friendly Road or Track that leads off the map at
a friendly colored map edge, and is not blocked by enemy units or their ZOC as described above, or
• An adjacent friendly unit that can itself trace a valid Supply Line; you cannot have a chain of such units to extend a Supply Line, only the first supplied unit counts, or
• A friendly Tobruk hex. A Tobruk city hex can serve as a Supply Source for as many units as its Port Capacity allows. For Tobruk to serve as a Supply Source for the Axis, Malta must be Inactive. The Allies can always use Tobruk as a Supply Source.
Tank/Mechanized multi-step units count as two units each when tracing supply through a Port.
Because of historical and operational reasons, the other Ports in the game were never seriously defended or besieged and did not have an effective capacity to hold out on their own if isolated.
Example: Tobruk, with its Port Capacity of 2, can supply either 1 Armored Division, 2 Italian Corps, 2 Infantry Divisions, or 2 Armored (single-step) Brigades.
Port Capture: Because most ports were also major supply dumps that could be captured and used, when a player cap-tures an enemy Port (but not when a player uses 15.1.3 and yeilds a map), he immediately receives a number of SPs from
the stock (if available) equal to its Port Capacity (2SPs on the picture here). When a Port is captured, place an No Supply marker on its Port Capacity number on the map to indicate that it cannot provide this captured SP bonus again that same Game Turn. Remove the No Supply marker dur-ing the End of Turn Housekeeping Phase.
[11.3] Low Supply SourceInfantry-Type units that don’t have a Supply Source but are stacked with a friendly Minefield or Box are (and stay) in Low Supply.
[11.4] Unsupplied StatusWhen a unit cannot trace a Supply Line (11.1) during the Supply Phase, place a Low Supply marker on it. If the unit
already has a Low Supply marker, flip it to its No Supply (“No ZOC”) side (exception, see 11.3). Units already with a No Supply marker simply continue at that status.
Minefield and Box units can never become Unsupplied (but can become Low Supply).
[11.5] Lack of Supply EffectsA Low Supply marker is primarily a warning state (but see rules 13.6.3 and 15.3.1: end of Turn).
Unsupplied units (in a hex with an No Supply marker) suffer the following ill effects:
[11.5.1] Movement: Its Movement Allowance is reduced, if higher, to 3 MPs.
[11.5.2] No ZOC: It loses its Zone of Control (see 12.3) for all purposes.
[11.5.3] Combat: The following penalties apply during combat:
• It does not receive a Mechanized Bonus (see 13.5.3),
No Retreat! The North African Front12
© 2013, 2015 GMT Games, LLC
• It can not conduct multi-hex Advance After Combat (AAC; see 13.7),
• When all defending square units are Out of Supply in a Battle, the Attacker gets two shifts to the right (24) on the CRT.
Note that you will not lose units “Out-of-Supply” dur-ing the alternating battle Player Turns, but only at the very end of a full Game Turn.
[11.5.4] Events: Certain Events apply only to fully sup-plied units. The unit (or at least one of the units) involved must be in full supply, which means not having any Supply status marker on it.
[11.6] Battle Card RecoveryBoth player’s Battle Cards that are still on the table (played in a previous Player Turn) are flipped back up and go back into their owner’s hand (and thus are avail-able for use again).
[11.7] Target Marker PurchaseThe Phasing Player purchases Target markers.
• Free Markers: If he just paid 1 SP for the Offensive Declaration (see 9.0), or Turn Continuation (see 14.0) the Phasing Player gets up to two markers for free.
• Paid Markers: Each extra pair of Target markers costs 1 SP.
Note that each player has five Target markers maxi-mum, and starts the game with less than that. So it might happen that only one is available for purchase: in that case it will still cost 1SP. Note also that some Counterblows might be awarded by Event Cards: you can use “unpaid” markers for these.
NOTE: The purchased markers can be kept from Player Turn to Player Turn if not spent, and can be placed either as Target markers in their owner’s Player Turn, or flipped and used as Counterblows in their Opponent’s Player Turn (one-use only; so either once as a Target, or once as a Counterblow).In the very first Player Turn of an Offensive, the Non-Initiative Player will not be able to place any “Paid-for markers”, as he has yet to do his own Player Turn Supply Phase to buy Target markers. This represents the initial surprise gained by the attacker (the Initia-tive Player).
[12.0] MOVEMENTA player may move none, some, or all of his mobile units (i.e., those with a Movement Allowance). Each unit may move through any combination of hexes up to the limit of its Movement Allowance, paying the appropriate Move-ment Point (MP) cost to enter each hex.A player may not move his opponent’s units. The oppo-nent’s units are not moved during your Player Turn except as a result of combat or as instructed through the play of certain Event Cards, or Counterblow markers.
ProcedureUnits are moved one at a time, hex by hex, in any direction or combination of directions. A unit may continue moving until it has either spent all of its MPs for that Player Turn, or it moves adjacent to an enemy unit (where it may have to stop; see rule 12.3.3), or the player simply desires to cease moving it.Units cannot save up MPs between Turns, nor can they be transferred between units.
Cases
[12.1] Terrain Effects on MovementThe basic cost to enter an Open (i.e., clear) terrain hex is 1 MP. The cost to enter other hexes can be higher, as shown on the TEC. You must move along a Road path to get the ½ MP rate (also negating hexside MP costs).
Unlike more tactical-scale games, there is no up and down slope along Ridges; it costs +1 MP in either direction.
A unit can enter a hex only if it has sufficient MPs left to pay the cost (for a Marsh it means you have to start adjacent to move or advance in it), with this exception:A unit that has a Movement Allowance greater than zero (0) can always move one hex regardless of MP cost consider-ations. Note that other rules regarding prohibited hexes/hexsides and Infiltration (see 12.3.3) still apply.
[12.2] Stacking Effects on MovementFriendly units can never enter hexes containing enemy units. Friendly units can freely enter and exit hexes containing other friendly units at no additional MP cost to do so.When more than one friendly unit remains in a hex at the end of any phase, segment, or step, it is called stacking.
No Retreat! The North African Front 13
© 2013, 2015 GMT Games, LLC
[12.2.1] Stacking Limit: Both players may stack up to two square units per hex, plus one entrenchment (Box or Minefield) unit.
Exception: One (only) of the six special units that have an asterisk to the right of their unit symbol can be added extra over the regular stacking limits in a hex—but Stacking Color
Restrictions (see 12.2.2) still apply.Both sides’ Leader markers stack for free.[12.2.2] Stacking Color Restriction: German (gray) and Italian (green) units cannot stack together (see 12.2.4). Allied Mechanized (brown) and Infantry (tan) units can-not stack together (see 12.2.4).
Bi-color (gray/green, tan/brown) units may stack with either color type.
[12.2.3] Leaders: Leader markers stack for free and must always be on the same hex as a square unit. At the
beginning of their friendly Movement Phase, they may be transferred to any supplied hex containing a friendly square unit, and must remain stacked with and move with that unit at all times until the next friendly Movement Phase (but see 13.7).
[12.2.4] Forbidden Stacking: You cannot voluntarily overstack units. If any units in a hex are not respecting Stacking Rules 12.2.1 and 12.2.2, the owning player must Retreat the excess units of his choice one or two hexes: if still overstacked they are put in the Destroyed Units box.
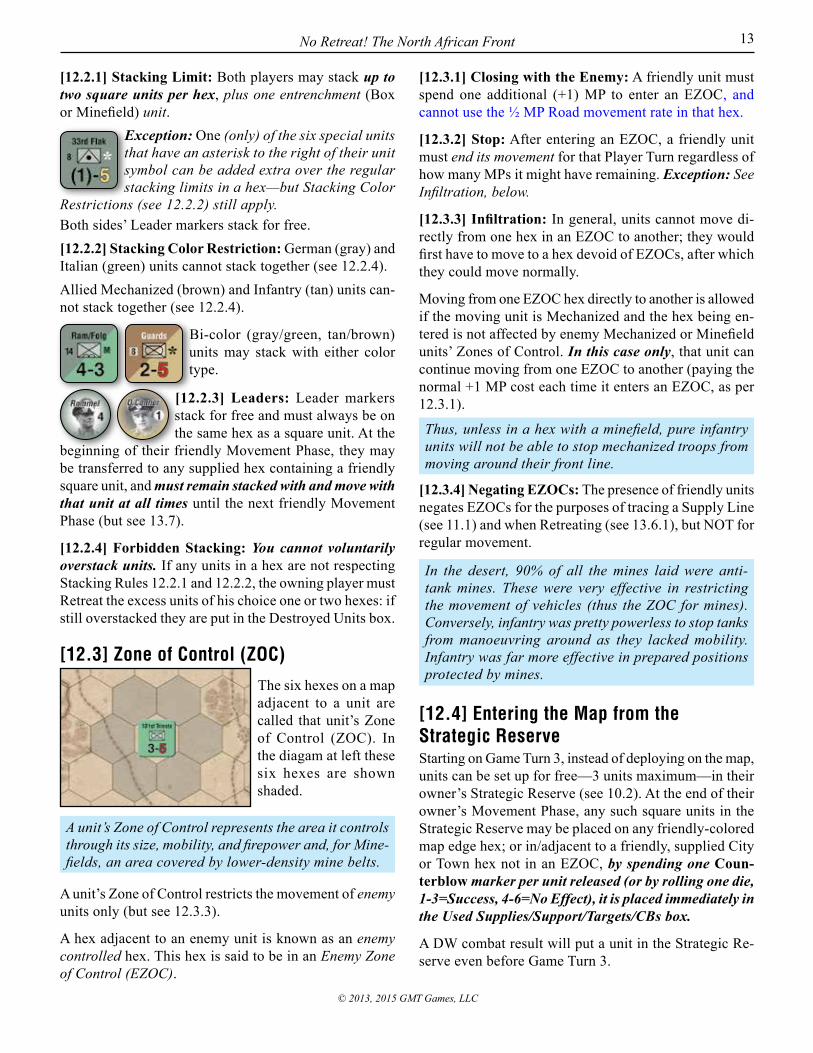
[12.3] Zone of Control (ZOC)
The six hexes on a map adjacent to a unit are called that unit’s Zone of Control (ZOC). In the diagam at left these six hexes are shown shaded.
A unit’s Zone of Control represents the area it controls through its size, mobility, and firepower and, for Mine-fields, an area covered by lower-density mine belts.
A unit’s Zone of Control restricts the movement of enemy units only (but see 12.3.3).
A hex adjacent to an enemy unit is known as an enemy controlled hex. This hex is said to be in an Enemy Zone of Control (EZOC).
[12.3.1] Closing with the Enemy: A friendly unit must spend one additional (+1) MP to enter an EZOC, and cannot use the ½ MP Road movement rate in that hex.
[12.3.2] Stop: After entering an EZOC, a friendly unit must end its movement for that Player Turn regardless of how many MPs it might have remaining. Exception: See Infiltration, below.
[12.3.3] Infiltration: In general, units cannot move di-rectly from one hex in an EZOC to another; they would first have to move to a hex devoid of EZOCs, after which they could move normally.
Moving from one EZOC hex directly to another is allowed if the moving unit is Mechanized and the hex being en-tered is not affected by enemy Mechanized or Minefield units’ Zones of Control. In this case only, that unit can continue moving from one EZOC to another (paying the normal +1 MP cost each time it enters an EZOC, as per 12.3.1).
Thus, unless in a hex with a minefield, pure infantry units will not be able to stop mechanized troops from moving around their front line.
[12.3.4] Negating EZOCs: The presence of friendly units negates EZOCs for the purposes of tracing a Supply Line (see 11.1) and when Retreating (see 13.6.1), but NOT for regular movement.
In the desert, 90% of all the mines laid were anti-tank mines. These were very effective in restricting the movement of vehicles (thus the ZOC for mines). Conversely, infantry was pretty powerless to stop tanks from manoeuvring around as they lacked mobility. Infantry was far more effective in prepared positions protected by mines.
[12.4] Entering the Map from the Strategic ReserveStarting on Game Turn 3, instead of deploying on the map, units can be set up for free—3 units maximum—in their owner’s Strategic Reserve (see 10.2). At the end of their owner’s Movement Phase, any such square units in the Strategic Reserve may be placed on any friendly-colored map edge hex; or in/adjacent to a friendly, supplied City or Town hex not in an EZOC, by spending one Coun-terblow marker per unit released (or by rolling one die, 1-3=Success, 4-6=No Effect), it is placed immediately in the Used Supplies/Support/Targets/CBs box.
A DW combat result will put a unit in the Strategic Re-serve even before Game Turn 3.

No Retreat! The North African Front14
© 2013, 2015 GMT Games, LLC
Minefield and Box units can be put “in reserve” there too, but cannot exit for the duration of the turn. This could be useful if you are attacking
into an enemy map, but have no need for your fortifica-tions.Note that the Counterblow marker is not placed on the released unit, but in the Used Markers box instead, so has no other effect.
[12.5] Exiting the MapSimilarly, units may exit the map during a friendly Move-ment Phase through a friendly-colored map edge. It costs that unit 1 MP to exit the map. Such exited units are placed in the Shattered Units box.
[13.0] COMBATDuring your Combat Phase, your units may participate in Battles against adjacent enemy units.
ProcedureA Combat Phase begins with the Phas-ing Player—and then the Non-Phasing Player—declaring all of the Target
Hexes (i.e., hexes containing Non-Phasing Player units). These are marked by the Phasing Player placing Target markers—and by the Non-Phasing player placing Coun-terblow markers—on Non-Phasing (“defending”) units in hexes adjacent to Phasing Player units that are across non-Prohibited hexsides). All of these Target Hexes must be attacked during that Combat Phase.
After all Target Hexes have been so designated by Target and Counterblow marker placements, each Battle is re-solved by following all of the steps of the Battle Sequence. The Phasing Player determines the order in which each Battle is resolved.
Declaring All BattlesBefore any Battles are resolved, both players must declare all Target Hexes.
First, the Phasing Player declares all of the Target Hexes that he desires to voluntarily attack that Combat Phase, marking each with one of
his five “paid for” Target markers. Units with white—or white-outlined—Combat Strengths (e.g., Minefields and Boxes) cannot participate in these voluntary attacks.
Second, after the Phasing Player completes his declarations, the Non-Phasing Player declares additional Target Hexes that must also be at-
tacked by the Phasing Player if adjacent at the start of this Combat Phase by marking each such hex with one of his Counterblow markers, by flipping an available Target marker paid for in one of his previous Player Turns (see 11.7), or by the play of an Event card allowing such placement.
The number of Target/Counterblow markers is a de-sign limit. Thus players cannot conduct more than five voluntary attacks/Counterblows (total) during a set of Player Turns (unless Event cards or Combat results gives them extra markers); or perhaps even less, depending on the number of markers available for this Turn (some markers arrive later in the game).
Mechanized Response MoveAfter all Counterblow markers have been placed, any Mechanized unit of the Non-Phasing Player which is under a Counter-blow marker and not in an EZOC may move up to two hexes (not MPs; however
Prohibited terrain effects and EZOC restrictions still ap-ply) along with its Counterblow marker.Mechanized units stacked together must remain together if conducting this move, but you can leave some behind in the starting hex. Only one response move for each unit (per Player Turn) is allowed and they Cannot move on a hex containing a Target marker. They lose their Counterblow marker if not ending their move adjacent to an enemy unit.
The Rommel and O’Connor Leader markers may, once each enemy Player Turn, be flipped to their Coun-
terblow marker side at no SP cost, with all of the usual Counterblow effects. They are flipped back (face-up) at the end of that Player Turn.
Counterblow Effects• Units in Counterblow Target Hexes receive no beneficial
terrain combat shift modifiers when attacked by the Phasing Player during that Combat Phase.
This represents the Non-Phasing Player’s forces moving out of their defensive positions and clos-ing on the enemy to force a Battle.
• Units of the Non-Phasing Player with a white—or white-outlined—Combat Strength in the Target Hex cannot participate in the Counterblow (they cannot “move onto the enemy”), whereas units with a black Combat Strength stacked with them must participate.
No Retreat! The North African Front 15
© 2013, 2015 GMT Games, LLC
• Any and all of the Phasing Player’s units can respond to a Counterblow, including those with white—or white-outlined—Combat Strengths.
It is a useful tactic to compel the Phasing Player’s units to attack your units during their Player Turn when they are the only ones that can respond to a Counterblow that you’ve launched. This represents infiltration of the defender’s hex by your troops.
[13.1] Battle PreconditionsEstablishing a BattleThe units that may participate in a given Battle and their strengths are explained below.
[13.1.1] Which Units May Attack: The Phasing Player decides which Phasing units will attack which adjacent Target Hexes (i.e., those with Target or Counterblow markers), in any combination (with the exceptions noted below), as long as all declared Target Hexes are attacked by at least one Phasing unit (not all adjacent Phasing units are required to attack adjacent Target Hexes).Exceptions: Some units are prohibited from attacking based on their color:
• German (gray) and Italian (green) units cannot attack together in the same Battle (they can Counterattack together using the German CRT if the majority of attacking units are German (gray), otherwise the Italian CRT is used; see 13.6.4). Bi-color units can freely attack with and be counted as either color.
• Allied “pure” Tank (brown) and Infantry (tan) type units cannot attack together in the same Battle unless a British Leader marker is on the game map (they can Counterattack together; see 13.6.4). Bi-color units can freely attack with either color.
[13.1.2] Adjacency: Attacking units in two or more hexes may combine their Combat Strengths to conduct a single Battle, attacking one or more hexes. To be resolved as a single Battle, all of the attacking units must be adjacent to all of the Target Hexes in that Battle. [13.1.3] One Battle per Unit: No Phasing unit may attack more than once in any Friendly Combat Phase, and no Target Hex may be attacked more than once per Combat Phase (not including Counterattack results, see 13.6.4). [13.1.4] Unity in Battle: An individual unit’s Combat Strength cannot be divided between different Battles.Units that are stacked together must participate in the same Battle when one of them attacks (or Counterattacks, 13.6.4), if it can attack (i.e., white-strength units may not usually attack, unless responding to a counterblow).
All units in a Target Hex must defend together if attacked.
[13.1.5] Multi-Hex Attacks: Attacking units in a single hex may attack more than one Target/Counterblow hex in a single battle, if they are adjacent to all of them, without penalty. In this case, the defender will decide which one hex to use for that battle’s terrain effects.
[13.2] The Steps in a BattleResolving a BattleBattles are conducted using the Battle Sequence. These steps must be completed for each Battle in the exact order listed below before the next Battle can be conducted.
The Battle Sequence1. Strength Step. Total the Combat Strengths of all of
the participating attacking units, then the defending units.
2. Commitment Step. First, the attacker (only) may an-nounce his commitment of one (maximum) Combat Support marker (Blitz! or Shock!) to the Battle if one is available; then the attacker, followed by the defender, may each play one Battle Event card (see 13.3).
3. Initial Odds Step. Divide the attacking units’ total Combat Strength by the total defending units’ Combat Strength to determine the Initial Odds as found on the CRTs.
4. Final Odds Step. Shift the Initial odds column (step 3) as required by terrain effects, Support markers, Mechanized or Anti-Tank bonuses, and Event cards played for that Battle to determine the Final Odds column to resolve that Battle.
5. Attacker Rolls Step. The attacking player rolls a six-sided die and cross-indexes the result on the Final Battle odds column (see 13.5.6).
6. Apply Results Step. Apply the combat result (see 13.6).
[13.3] Battle Event Card CommitmentEach player’s one Event card that is played during step 2 must read, “Play during the Battle Se-
quence” and is placed, face-up on the mapboard or next to it. Each such played card is later put on the Discard Pile after the Battle is resolved, unless it has a “target” symbol (see 13.5.7).The defender makes his Event card commitment deci-sion after the attacker does, with full knowledge of the attacker’s marker and card commitment decisions.
No Retreat! The North African Front16
© 2013, 2015 GMT Games, LLC
[13.4] Initial OddsWhen computing the initial odds during step 3, always drop fractions so that the ratios are rounded off in the defender’s favor.Example: A total of 14 Combat Strength points attack a total of 5 that are defending. The ratio is 2.8 to 1, which rounds down to a simple 2:1 odds ratio as found on the CRT. If the attacker had one more Strength Point com-mitted, it would be a 3:1.Example 2: 14 strength attacking 9 has an odds ratio of 1.56 to 1, which rounds down to 3:2 on the CRT. Initial Odds ratios greater than 6:1 are first reduced to 6:1 before applying any Final Odds shifts (see 13.5).
Whenever an Initial Odds ratio is less than 1:3, skip steps 4 and 5; the Initial Odds column is not shifted and the result is an automatic CA result. This also applies to Final Odds ratios of less than 1:3.
Example: 24 Axis Strength Points attack an Allied unit worth 2 Strength Points. The Initial odds ratio would be 24:2, or 12:1, which is treated as a 6:1 before shifting.
[13.5] Final Odds ShiftsWhen determining the final Battle Odds column in step 4, the following Subcases apply:
[13.5.1] Terrain Effects: The terrain shifts are based on the defender’s hex, and/or hexside if all of the units in that attack are across a Ridge/Wadi hexside, as listed on the TEC.Note that Mines and Boxes have their own entry in the TEC and have their own combat terrain effect modifiers, which are in addition to the terrain effects in their hex, and that the Tobruk Fort Terrain CRT shift is always active, even if the Fort Marker is in the “0” box.
[13.5.2] Support Markers: When available to a player, a maximum of one Blitz! or Shock! support marker
may be committed to a Battle when that player is the at-tacker (including a Counterattack situation, see 13.6.4). It provides one shift to the right (14).
The Montgomery leader may—once each Allied Player Turn and if adjacent to a Battle—be flipped by the Allied player to its Shock! side at
no SP cost, with all of the usual Shock! marker effects for one adjacent Battle. It is flipped back (face-up) after the Battle is resolved.
Restrictions• Support markers cannot assist attacks made solely
by unsupplied units.• Support markers are not available again for the rest
of the Player Turn after their shift is applied; they do not remain on the map. You might get them back on your next Player Turn (not Game Turn; see 13.5.8).
[13.5.3] Mechanized Combat Bonus: The Mechanized Bonus shift is only applied once per Battle regardless of how many individual qualifying units participate.
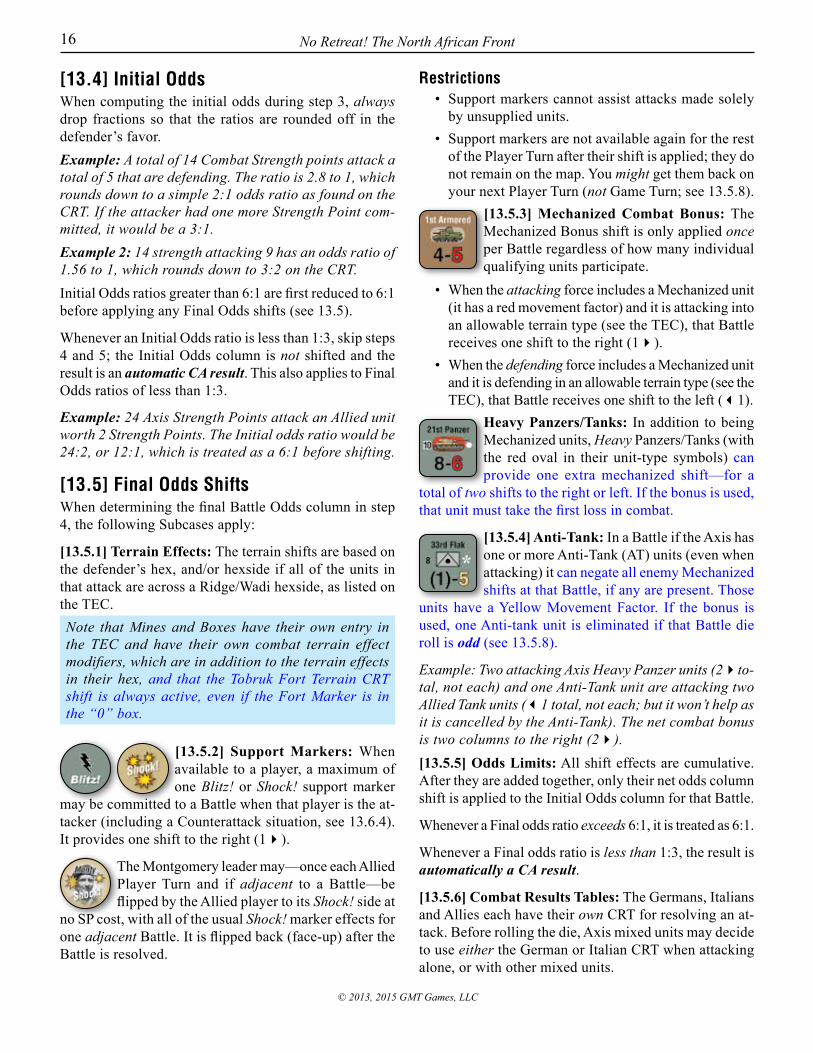
• When the attacking force includes a Mechanized unit (it has a red movement factor) and it is attacking into an allowable terrain type (see the TEC), that Battle receives one shift to the right (14).
• When the defending force includes a Mechanized unit and it is defending in an allowable terrain type (see the TEC), that Battle receives one shift to the left (31).
Heavy Panzers/Tanks: In addition to being Mechanized units, Heavy Panzers/Tanks (with the red oval in their unit-type symbols) can provide one extra mechanized shift—for a
total of two shifts to the right or left. If the bonus is used, that unit must take the first loss in combat.
[13.5.4] Anti-Tank: In a Battle if the Axis has one or more Anti-Tank (AT) units (even when attacking) it can negate all enemy Mechanized shifts at that Battle, if any are present. Those
units have a Yellow Movement Factor. If the bonus is used, one Anti-tank unit is eliminated if that Battle die roll is odd (see 13.5.8).
Example: Two attacking Axis Heavy Panzer units (24to-tal, not each) and one Anti-Tank unit are attacking two Allied Tank units (31 total, not each; but it won’t help as it is cancelled by the Anti-Tank). The net combat bonus is two columns to the right (24).[13.5.5] Odds Limits: All shift effects are cumulative. After they are added together, only their net odds column shift is applied to the Initial Odds column for that Battle.
Whenever a Final odds ratio exceeds 6:1, it is treated as 6:1.
Whenever a Final odds ratio is less than 1:3, the result is automatically a CA result.
[13.5.6] Combat Results Tables: The Germans, Italians and Allies each have their own CRT for resolving an at-tack. Before rolling the die, Axis mixed units may decide to use either the German or Italian CRT when attacking alone, or with other mixed units.
No Retreat! The North African Front 17
© 2013, 2015 GMT Games, LLC
[13.5.7] Battle Card Continuation: Some Battle cards have a target icon. These cards could be used
again in a later Player Turn. They stay on the table, but are still considered part of the players’ card hand.
• The attacker’s Battle card is discarded after use if the Battle die roll is odd; otherwise the card is flipped face-down and put in the sea area of the current map. It cannot be used for now, but will be put back in the owner’s hand at the start of the next Player Turn.
• The defender’s Battle card is discarded after use if the Battle die roll is even; otherwise the card is flipped face-down and put in the sea area of the current map. It cannot be used for now, but will be put back in the owner’s hand at the start of the next Player Turn.
• Note that this rule works only if the card is played as a Battle Event—an Event that must read “Play during the Battle Sequence” and has a target icon above the card’s applicable text box.
[13.5.8] Support Marker & Anti-Tank Units: Each sup-port marker used in a Battle is placed in the Used Supplies/Support/Targets/CBs box if the die roll is odd; otherwise put it aside in the sea area of the map. It will be available again at the start of your next Player Turn. An Anti-tank unit using its ability (13.5.4) is eliminated if the roll is odd. You can cancel the removal/elimination by immediately paying one SP per marker/unit.
[13.6] Applying Battle ResultsThe various combat results are listed under each CRT and explained below.
COMBAT RESULTS:— = Indecisive Battle: No EffectCA = Counterattack: The defender may launch an im-mediate Counterattack (see 13.6.4; recompute the odds; no terrain modifiers apply.CB = Counterblow: Place a Counterblow marker on one of the Phasing Player units’ hexes (only). The marker is not removed during that side’s Marker/Unit Removal Phase, but is instead resolved as usual during the other side’s Combat Phase (i.e., during the next Player Turn; see 13.6.5). The marker can be taken from the Used Marker box or the unused ones—owner’s choice.Player Turns can begin with some Counterblow mark-ers already in place, meaning that either:A) Those enemy units must be attacked if friendly units remain adjacent to them during the Combat Phase; or B) Those friendly units will have to move away during their Movement Phase to avoid those Battles (but if those are enemy armor units, they will get a free Mech-anized Response move). This can be a big decision!
CR = Counterattack Required: The defender must launch an immediate Counterattack, or suffer a DR result.
DR* = Defender Retreat: Defender Retreats all of his involved units three hexes, or—without Retreating—re-duces one of his defending units by 1 step*. Attacking units can Advance if the defending units Retreated, or if no steps remain in that hex after the step loss option is exercised. Treat as No Effect if the Target hex is an active Fortress.
DW* = Defender Withdraw: Apply a DR result, if the Retreating units are not destroyed, place them in the Strategic Reserve box, or lose 1 step. Treat as No Effect if the Target hex is an active Fortress.
DS* = Defender Shattered: Defender Retreats his units 3 hexes and, if not destroyed, places them in the Shattered Box (or the Surrendered Box for (dotted) irreplaceable units), or—without Retreating—each de-fending unit loses 1 step†. Attacking units can Advance if the defending units Retreated or if no steps remain in that hex after the step loss option is exercised. Treat as EX if the Target hex is an active Fortress.
† This represents a hold-at-all-costs option that allows the defender to keep control of the attacked hex as long as surviving steps remain in that hex.
DD* = Defender Destroyed: Defender Retreats his units three hexes and each defending unit loses 1 step. If the Target hex is an active Fortress, the defending units do not Retreat. Attacking units may Advance if the defending units Retreated or the hex is completely vacated by square units after step losses.
EX = Exchange: Both sides lose 1 step. Neither side Retreats or Advances.
EX+CR or EX+DR: When two results are listed on the CRT, resolve the EX result first and then resolve the CR/DR result second.
* A result of DR, DW, DS or DD also results in the loss of one Fortification level.
[13.6.1] Retreating: When required to Retreat, the de-fender must move the Retreating units three hexes toward the nearest friendly Supply Source, if possible (see 11.2). Retreating does not consume MPs—you just move hexes. Units stacked together may be Retreated individually to different hexes, if desired. Units cannot zigzag when Re-treating so that they end up fewer than three hexes away from the Battle hex.

No Retreat! The North African Front18
© 2013, 2015 GMT Games, LLC
Non-Retreating SituationsMinefield and Box units never Re-treat. They remain in their hex when other units Retreat from it. They are removed from the map and placed
among the available pieces only if an enemy unit actu-ally Advances into their hex.
Thus it’s usually always better (but for an “EX” result) to take losses from these units, as they will be lost if the enemy advances in their hex.
If the Tobruk Fortification Level is greater than zero (0), the effects of DR, DW, DS, DD results are modified (see the Combat Result Tables), after which the Fortress Level is reduced by one.
Retreat RestrictionsUnits that must Retreat cannot violate the following re-strictions. If they do so, they are destroyed instead (see 13.6.3):
• A unit cannot Retreat into a hex containing an enemy unit or across a prohibited hexside.
• A unit cannot Retreat off the map except from a hex adjacent to its friendly-colored map edge. In that case, the unit is placed in the Shattered Units box (see 12.5) instead of the Destroyed Units box.
• A unit cannot Retreat into an EZOC, unless a friendly unit occupies that hex. Friendly Mechanized type units can Retreat through enemy ZOCs if the hex being Retreated into is not affected by enemy Mechanized or Minefield units’ Zones of Control.
Pure infantry will thus be hard-pressed to surround and eliminate fast enemy mechanized units in the open desert.
Notes:Stacking: Retreating units may freely pass through and end their Retreat stacked with other friendly units (but see 12.2.4 regarding overstacking).
Shattered Units: Units suffering a DS result must Retreat before being removed to the Shattered Units box. If un-able, they are destroyed instead.
Example 1: A hex with a Box and an Infantry unit suffers a DR. The defender can Retreat the Infantry (Boxes do not Retreat). The Box is eliminated only if an enemy unit then Advances into the hex. Alternatively, the defender could take a step loss from either unit and stay put.Example 2: Tobruk, at Fortification Level 1, is attacked with a DS result. The Retreat part of the result is can-celled and the Fortification Level is reduced to zero. Since the target was in an Active Fortification (greater than 0) when attacked, the result becomes an EX, and both sides take a single step loss.Example 3: A British Tank unit attacks a lone Axis In-fantry unit and the result is a CB. The Phasing (Allied) Player places a Counterblow marker on his Tank unit. During the next Axis Combat Phase, if there is an Axis unit next to that Allied Tank unit, the Axis must attack it (see 13.6.5). If there are no Axis units next to it, it will be able to do a free Mechanized Response move (13.0) as it is under a Counterblow marker and not in an EZOC.[13.6.2] Step Losses: Certain results cause a step loss to be suffered by the defender (DD, DS) or both sides (EX). When there is a choice, the owning player determines which of his units suffers a step loss.
When a step loss occurs:• A full-strength, multi-step unit is either reduced
(flipped over) to its reduced-strength side or—for units with more than two steps—replaced with its next-lower strength unit.
4 4 4
The two Panzer Divisions have a maximum of four steps each (when available), and a 7-6 unit would be replaced by its 5-6 counter when losing a step. Similarly, the 90th Light Division has three steps.
• A unit on its last step, or that has only one step, is destroyed (see 13.6.3).
• Tobruk’s Fortification Levels cannot be taken as step losses.
[13.6.3] Destroyed Units: Place a square destroyed unit in the Destroyed Units box or—if it had a round Supply (either Low or No Supply) marker on it when elimi-nated—it is instead placed in the Surrendered Units box (Exceptions: Counters with an irreplaceable unit dot on their 1-step side are removed from play instead; Boxes and minefields are always placed in the Destroyed Units box, never in the Surrendered Units box).

No Retreat! The North African Front 19
© 2013, 2015 GMT Games, LLC
[13.6.4] Counterattacks: A CA result requires the Defender to choose between treating the Battle as a No Effect or conducting an immedi-
ate Counterattack.
A CR result requires a defender to choose between con-ducting a Counterattack or a Retreat (see 13.6.1).
To conduct a Counterattack: Remove all previously committed Support markers and Event cards for that Battle and begin an entirely new Battle Sequence (see 13.2) starting with step 1. This includes all of the same units from that Battle (only), but now the Counterattack-ing Player is the attacker and no terrain shift modifiers are used. Other terrain effects that affect armor shifts and multi-hex advance, plus the Tobruk Fortress CRT changes, still apply (DR, DW, DS, DD results).
It is possible in a Counterattack Battle that only some units in a particular hex are being Counterattacked while others are not. That is permitted. Only partici-pating units are affected by the combat result losses. Uninvolved units in the defending stack will only suf-fer the same Retreat results. One Counterattack can lead directly to another, and so on until some other outcome occurs.
[13.6.5] Counterblows (Involuntary Counterattacks): The Non-Phasing Player’s Counterblows, designated when all Battles were declared (see 13.0), require the Phasing Player to conduct what amounts to “Involuntary Counterattacks” against those additional Target Hexes.
Remember that a Counterblow called for by the CRT (the CB result) will be resolved during the next Player Turn: you flip the “Target” marker to its Counterblow side, and place it on one of the Phasing Player’s at-tacking hexes, owner’s choice; even if during a Coun-terattack (CA).
A Battle against a Counterblow Target hex is similar to a Counterattack (see 13.6.4) in that the defending units do not receive terrain shift modifiers. However, units with white—or white-outlined—Combat Strengths can participate in these Counterblows, if desired (and must if they’re the only possible units that could), but white-Strength units cannot AAC (see 13.7) if victorious.Counterblows placed by the non-phasing player using his flipped Target markers are “Diversions” made by the defender, forcing the Phasing Player to attack. While those placed by a “CB” result on the Combat Table (thus resolved next turn) are partial advances made by the attacker, that will force the other player to either Retreat, or deal with the threat by attacking it directly.
[13.7] Advance After Combat (AAC)If the Target Hex has only a Minefield, Box and/or Leader remaining behind
due to a CR, DR, DW, DS, or DD combat result—or is completely devoid of defending steps if the defender elected to take a step loss from a DR or DS result—then attacking units may AAC, moving into that hex and possibly beyond.
ProcedureAAC is not movement per se, and does not consume MPs; you just count hexes. Enemy Zones of Control have no effect on AAC. When AAC is allowed (see above), attack-ing units up to the stacking limit (see 12.2.4) may always advance into the defender’s just-vacated Target Hex. Any Box or Minefield unit there is removed to the the Stock at the end of that advance segment, and any Leader marker there is placed on the next Game Turn on the Game Turn Track as a Reinforcement, except for O’Connor who has a white dot ( ) on his counter and is thus eliminated. Also see Port Capture (11.2).
Minefield and Box units can never AAC.Remember, any Minefield or Box markers left in the defending hex are “overrun” and eliminated if the Attackers advance into the hex after combat.
Multi-Hex AACAfter advancing into the vacated Target hex, Mechanized units may advance a second hex with the fol-lowing restrictions:
• They must stop their AAC immediately after entering certain hexes or crossing certain hexsides, as listed on the TEC under the “Stops Advance?” column. This could stop a multi-hex AAC in the first (defender’s vacated) hex, thus completely prohibiting a multi-hex AAC.
• The extra hexes of advance of a multi-hex AAC may not be made into hexes containing an enemy unit (Exception: a Box), adjacent to an enemy Minefield unit, or off the map. Only the first hex of advance can do so.
• Advancing units can end their AAC stacked with friendly units (but see 12.2.1).
After occupying the just-vacated defender’s hex, units making a multi-hex AAC are free to go to any adjacent hex that is not otherwise restricted or prohibited.

No Retreat! The North African Front20
© 2013, 2015 GMT Games, LLC
German Mechanized Bonus: Ger-man Mechanized units whose multi-hex AAC has not been stopped in their second hex due to
the above-mentioned terrain restrictions can continue their AAC into a third hex within the above restrictions.
[14.0] TURN CONTINUATIONAfter both players have completed their turns, the Ini-tiative player may declare that he’s continuing the Of-fensive, thus starting a new Supply/Movement/Combat cycle for both players. If the Initiative player passes, the Non-initiative player may declare his Continuation of the offensive.
1. Continuation/Initiative Switch Check: Starting with the Initiative Player, either side may pay 1 SP to conduct another pair of Player Turns for this Offen-sive. The Game Initiative changes if it was the Non-Initiative Player that paid to continue the Offensive after the other player “passed”: He now becomes the Initiative Player. Flip the Turn marker to indicate that the Non-Initiative Player is now the Initiative Player (having thus ‘seized the initiative’). He also gets two “free” Target markers (see 11.7).
This means that if he seizes Initiative, the ex-Non-Initiative Player will get to move/attack two turns in a row: last during the previous Player Turn, and then first in the upcoming Player Turn.
2. Initiative Switch Counterblow Removal: If the Initiative switches between players, then remove from the map all Counterblow markers.
3. Continuation: If the Offensive continues, perform another set of Player Turns. If the Offensive was not continued, proceed with the End of Turn Housekeep-ing Phase.
[15.0] HOUSEKEEPINGAt the end of every Game Turn and at the beginning of the next, several administrative “Housekeeping” phases are performed.
End of Turn SegmentsAt the end of every Game Turn, each of these segments is performed in order:
[15.1] Map Control SegmentCheck to see if control of the battle map changes.
[15.1.1] Seizing Full Control: A player seizes control of the Battle Map by either controlling the map in play or overwhelming the enemy.
• A player controls the board if all the Towns and Cities on the map are friendly (see 5.2), but the following takes precedence:
• A player overwhelms the enemy if there are no fully supplied (see 11.0) enemy square units (i.e., excluding Minefield and Box) on the map.
• If a map that was not Contested (see 15.1.2) changes Control (i.e., it was completely owned when Player Turns began and completely lost when Player Turns ended during a single Game Turn), the player that lost control of that map loses half (rounded up) of his remaining SPs at this time.
Seizing full control is indicated by putting the controlling player’s Control marker on the Strategic Map Control Display in the box cor-
responding to the Battle Map, and withdrawing the other player’s Control marker one box on the display (i.e., the Axis toward Map 1 and the Allies toward Map 5).
[15.1.2] Contested Control: If both players control Towns or Cities and have one or more fully supplied square units on the Battle Map, then it is contested.
This is indicated by placing both players’ Control mark-ers in the box corresponding to the Active map on the Strategic Map Control Display
[15.1.3] Voluntarily Yielding Control of a Contested Map: Starting with the Non-Initiative Player, a player may declare that he is voluntarily yielding control of a Contested map. Withdraw his Control marker one box on the display (i.e., the Axis toward Map 1 and the Allies toward Map 5).
Thus only one map will be used at any time, with the “front lines” indicated on the Strategic Map on the Turn/TEC chart. The Active map will change over the course of the game depending on the success (or lack of) of both players’ offensive operations.

No Retreat! The North African Front 21
© 2013, 2015 GMT Games, LLC
[15.2] Initiative Check SegmentCheck to see if players switch Initiative at the end of the turn.
[15.2.1] If a player lost or yielded control of a map, he becomes the Non-Initiative Player (6.1).
[15.2.2] If the turn’s original Initiative Player (i.e., the player that declared the First Offensive of the turn; see 9.0) did not lose or yielded control of a map, but failed to capture at least two enemy towns on an enemy-controlled map that turn, the offensive is considered as aborted, he becomes the Non-Initiative Player; then the current Game Turn is repeated, skipping the Housekeeping and Strategic Planning Phases.
[15.2.3] Otherwise, there is no change in Initiative.
Rule 15.2.2 means that if you are an attacker with the initiative, you cannot just do a smallish “spoiling attack” on the adjacent Enemy-Controlled map just to “waste” one Game Turn. So either you must yield initiative at the start of the Game Turn; or if your attack was not serious enough, then the enemy will get the chance to do his own offensive on your controlled map!
[15.3] Removal SegmentBoth players must remove most of their units remaining on the Battle Map as follows:
[15.3.1] Square Units: Units with “No Supply” markers are placed in the Surrendered Units box.
Units with “Low Supply” markers are put in the Shattered Units box. All other units (including those in the Strategic Reserve) and available leader markers are placed in their owner’s Force Pool (use any convenient location outside the map).
[15.3.2] Minefields and Boxes: Minefield and Box units can stay on a Contested map (see 15.1.2) in their pres-ent locations, or Minefields can be flipped to their Box sides, and then any Box units can be put in the owner’s Force Pool.
If the Active map is Fully Controlled (see 15.1.1), Mine-field and Box units on the player’s side that does not have control are removed to the Stock. The player who controls the map flips his Minefield to their Box side, and then places all Box units in his available “built” Force Pool.
[15.3.3] Town/City Control: If the map is Contested (see 15.1.2), note who controls each Town and City hex. Use the national insignias on the backs of the Round “Crete” units, to indicate control.
[15.3.4] Battle Cards: Put all the Battle Cards still on the Table in the discard pile.
[15.3.5] Support Markers: Unused Blitz! and Shock! markers are not returned to their owner’s Force Pool; they go back into the stock instead, unused. Target/Counterblow markers are discarded and go back to their Holding box (so must be purchased again). Unused Sup-ply counters are kept for use next turn.
Beginning of Turn SegmentsThis phase is skipped on the first Game Turn of all sce-narios because these segments are included in that sce-nario’s set up instructions. At the beginning of all other Game Turns, perform these segments in order.
[15.4] Game Turn SegmentAdvance the Game Turn marker one space on the Game Turn Track. If there are reinforcement units, markers, or Events scheduled for that Game Turn, these would take place later in the Sequence of Play.
[15.5] Adjust Cards SegmentFirst, the Initiative Player discards any cards he desires. He then draws his allotted number of cards; this will be somewhere between 5 and 9 (see 5.2). Then, the Non-Initiative Player repeats this procedure.
[15.6] New Game Turn Event SegmentIf the new Game Turn has Event text in its box the events to apply to are explained below by turn number.
Events printed in red on the Game Turn Track can move to another turn by card play; black-printed Game Turn Events are fixed. Use the
round Event Early or Event Late marker to note when a red-printed event is shifted a turn. Example: Axis card #22, stRategic pRessuRe, will moves next Turn’s Allied event to this turn.
Game Turns 1-18: Blue turns have fair weather and are one month long (both players draw one extra card). Grey turns have bad weather and are thus two months long (both players get 2 extra SPs)
Game Turns 1-9, Axis Strategic Advantage: Event cards with a German cross can be played as Events,
and those with a British roundel cannot.
This reflects the early Axis superiority in means and strength in the Mediterranean Theater.
No Retreat! The North African Front22
© 2013, 2015 GMT Games, LLC
1: Surprise Attack: For this turn (only) the Allied player uses the German CRT for all his attacks.This represents the devastating initial Surprise attacks by the British forces at the start of the Campaign against the unprepared Italians.
2a: Ethiopia Campaign: During the Organization Phase, the Allied player must withdraw the 4th Indian Infantry unit, placing it as a Game Turn 5 Reinforcement.
This unit is being sent to Ethiopia to help fight the Italian Army garrisoned there.
2b: German Assistance?: This is an optional non-historical hypothetical Event that could be used by the Axis player. See Advanced rule 18.3 for details about the possible effect. This Event gives the opportunity of the Axis player to lower the amount of German assistance received, and makes for a shorter game, ending on Turn 9.
3: Strategic Reserves: Both players can begin voluntarily adding units in the Strategic Reserves box (see 12.4).
4a: Greece Campaign: During the Organization Phase, the Allied player must withdraw the 7th Armored, the 4th Tank, and one Australian Infantry Division, placing all of them at their reduced strengths as Game Turn 6 Reinforcements, and gets 3 SPs less this turn. Also, the 32nd Tank and Guards units are withdrawn and placed as Game Turn 5 Reinforcements.
Churchill insisted that veteran British units be sent to mainland Greece and, later, Crete to help his Greek allies against the Axis in an abortive campaign.
4b: Malta Enters: Immediately put the round Malta marker on its Inactive side in the Malta Status box on the Player Aid Mat. Card Events
with a Malta graphic behind them are now playable (see 5.3.4).
Malta, dubbed “the unsinkable aircraft carrier,” had tremendous importance in controlling the surrounding Mediterranean waters and impeding Axis convoys to Africa.
4c: Tobruk Fortress Activated: From now on, place the round Fort Active marker on its Inac-tive side in the 0 box of the Tobruk Fortification
Level Track when Map 3 is the Active map.
The control of Tobruk was vital to both sides, so it was heavily fortified.
4d: Rommel: The Rommel marker enters play and the Axis player automatically gains the Initiative this turn if he does not already have
it, plus one extra Target marker for the rest of the game (for a new total of 4).
5a: Syria Invasion: During the Organization Phase, the Allied player must withdraw one Infantry unit, placing it at its reduced strength, as a Game Turn 7 Reinforcement, and gets 2 SPs less this turn.
The Allies invaded Vichy French-controlled Syria to stop Axis influence in the Near East and secure their Eastern flank.
5b: Invasion of Crete: Both players count the number of cards in their hand with a Malta graphic symbol on their half of the card. Compare those counts to determine the invasion’s success.If the Axis player’s count is greater than the Allied player’s, the invasion is an Axis Victory. When received, the Allied Turn 6 Australian and New Zealand infantry reinforcements are put in the Surrendered Units Holding box. Put a German Control marker in the Crete Status box as an outcome reminder. If the Allied player’s count is greater than the Axis player’s, the invasion is an Allied Victory; put an Allied Control marker in the Crete Status box as an outcome reminder. If the count is equal, it is a Stalemate. The Crete Status box stays empty in this case.Both players discard all the “Malta” cards after the Inva-sion is resolved.
The Axis Pyrrhic Victory on Crete convinced Hitler to limit further paratrooper operations in the war.
The historical outcome will affect the Malta Invasion Table (see 16.2). By mutual player agreement, use Advanced rule 18.5: Invasion of Crete, to resolve this Event.
6a: Middle East Garrison: During the Organization Phase, the Allied player must withdraw two British and/or Indian Infantry units, placing them at their full strengths as Game Turn 11 Reinforcements, and gets 1 SP less this turn. The British garrisoned some Arab countries during part of the war.
6b: Minefields: Both players can begin build-ing Minefield units.
No Retreat! The North African Front 23
© 2013, 2015 GMT Games, LLC
The desert lacked natural terrain cover, so mines were critical in building effective defensive positions.
7a: ANZACs: During the Organization Phase, the Allied player must permanently remove one Australian Infantry unit, and place one other Australian Infantry unit in the Tobruk Reaction box on the Player Aid Mat.
After successfully defending Tobruk, the Australian War Cabinet requested that their troops be redeployed for training and rest.
7b – No Offensive: On this game turn, no player can declare an Offensive (9.0), unless discarding card #34 for the Axis player (heeReSGRUppe AFRikA) or #33 for the Allied player (BRiTiSh 8Th ARmy) for the privilege.
Note that if a player does so and declares an offensive, the other will also need to do the same if he wants do to a “Continuation” later in the Turn. Weather and/or War Events outside the theater affect the North African Combat Operations’ tempo.
7-13: Tobruk Reaction Box Activated: This box holds the Allied units that become available as reinforcements the Game Turn following the Axis capture of Tobruk. If Tobruk has already been captured, these units are instead received as normal reinforcements (or simply stay in play).
8: +1 Allied Target: The Allied player gets one extra Tar-get marker for the rest of the game (for a new total of 5).
9: O’Connor: Remove the O’Connor marker if still in the game.
He’s finally replaced by another British Commander (historically he was captured during Rommel’s first offensive on Turn 4).
10a: Pacific Campaign: During the Organization Phase, the Allied player must permanently remove one British, one Indian Infantry and the 4th Tank unit; and put the New Zealand Infantry unit in the Tobruk Reaction box. The British sent numerous units to the Pacific in reac-tion to the Japanese surprise attack.
10b: Deactivate Malta: If the Malta marker is on its “Active” side, flip it over to its Inactive side. The Axis High Command made a very serious effort to neutralize Malta at the start of 1942, employing substantial air forces, and deploying many U-Boats in the Mediterranean sea.
10-18: Allied Strategic Advantage: Starting this turn, Event cards with a British roundel can be played as Events and those with a German cross cannot.
This reflects the later Allied superiority in means and strength in the Mediterranean Theater.
11: +1 Axis Target: The Axis player gets one extra Target marker for the rest of the game. (for a new total of 5).
12: Montgomery: The Monty marker is im-mediately placed in the Tobruk Reaction box.
After the fall of Tobruk, Montgomery was sent to Egypt to take command of the British 8th Army.
13: Activate Malta: If the Malta marker is on its Inactive side, flip it over to its Active side.
Major new Air/Sea assets were re-deployed by the British to hold the Island at that time.
14a: Tobruk: If there are still Allied units in the Tobruk Reaction box, they are now released and enter play this turn as Reinforcements.
14b: No Offensive: On this game turn, no player can declare an Offensive (9.0), unless discarding card #34 for the Axis player (heeReSGRUppe AFRikA) or #33 for the Allied player (BRiTiSh 8Th ARmy) for the privilege. Note that if a player does so and declares an offensive, the other will also need to do the same if he wants do to a “Continuation” later in the Turn.
15: +2 Axis Mines: The Axis player gets two free “Mine-field” markers this turn.
16a: Torch: All Italian and Axis Mixed units cannot receive Replacements for the rest of the game. Also, if Malta has not been successfully invaded, then during the Organization Phase, the Axis player must permanently remove one German Panzer unit, and one German Infantry unit (90th Lt or 164th Lt). The Allied invasion of French North Africa forced Rommel to send major units to defend the Tunisian front.
16b: Activate Malta: If the Malta marker is on its Inactive side, flip it over to its Active side.
With the “Torch” landings in Tunisia, the Axis was losing more and more control over the Mediterranean Sea, and used what was left of their Air/Sea resources to try to interfere with the landings.

No Retreat! The North African Front24
© 2013, 2015 GMT Games, LLC
17a: Diggers: If Malta was not successfully invaded by the Axis, then during the Organization Phase, the Allied player must permanently remove one Australian and one South African Infantry, plus the 10th Armored unit. If Malta had fallen, these units would not have been stripped from this threatened Front.
17b: –2 Axis/Allied Targets: The Axis and Allied play-ers lose two Target markers for the rest of the game (for a new total of 3 each). The front in Tunisia is drawing away war resources.
18: Continuation Not Possible: On this turn, card #34 for the Axis player (heeReSGRUppe AFRikA) and card #33 for the Allied player (BRiTiSh 8Th ARmy) cannot be used to “repeat” the turn.
The last turn of the game represents a time span of less than a month.
[15.7] Checks SegmentCertain critical matters are checked as shown below:
[15.7.1] Map Control Victory: During this segment each turn, the Axis player immediately wins if he controls Map 5 (Alexandria), or the Allied player immediately wins if he controls Map 1.
Map control occurs when friendly units were the last to have passed through or occupied all the Towns and Cities on that Map.
[15.7.2] Sudden Death: During this segment of Sudden Death Game Turns (i.e., those with the “ ” symbol on the Game Turn Track ), one player might immediately win.
ProcedureDetermine if either player exclusively controls Maps 2, 3 or 4:
Malta Invasion Status:• If Map 3 is exclusively Allied controlled, Axis has
the Initiative, and Malta is Inactive, then the Axis Player may conduct an Axis invasion of Malta (see 16.3).
• If Map 3 is exclusively Axis controlled, Axis has the Initiative, and Malta is Inactive, the Axis invasion of Malta is permanently canceled (as per 16.1).
Game Sudden Death Victory:• If Map 2 is exclusively Allied controlled, Allies have
the Initiative, and Malta is Active, then the game ends immediately in an Allied victory (Exception: Advanced rule 18.3).
• If Map 4 is exclusively Axis controlled, Axis have the Initiative, and Malta has been previously invaded successfully (see 16.3, #3), the game ends immediately in an Axis victory.
Thus, for the Axis to win, it is not enough to suc-cessfully invade Malta. They must also exclusively control Map 4 and have the Initiative.
• If Map 3 is Axis Controlled, and Malta has not yet entered play (Turn 3 check), then game ends in Axis victory.
[15.7.3] Shift in Strategic Advantage: The Strategic Advantage belongs to the Axis through Game Turn 9. During this segment of Game Turn 10, the Strategic Advantage belongs to the Allies for the remainder of the game (see 5.3.3).
[15.7.4] End of Game Victory: If Game Turn 18 was just completed, then check the End Game Victory Conditions below to determine the winner.
• Both players score 1 Victory Point (VP) for each map they control (i.e., the map where their Control marker is located, and all the friendly-controlled maps behind it).
• If Malta is Inactive, the Axis score +1 VP • If Malta was successfully invaded (see 16.3), the
Axis score +1 VP (in addition to the Inactive VP award).
The side with the most Victory Points wins. In the case of a tie score, the Allied player wins (but see Advanced rule 18.3).
Example: Both the Axis and Allied Control markers are on Map 2 and Malta was successfully invaded. The Axis score one VP each for Maps 1 and 2, plus two more VPs for conquering Malta and leaving it Inactive, for a total of 4 VPs. The Allies score one VP each for Maps 2, 3, 4 and 5, for a total of 4 VPs. The score is tied, so the Allied player wins.
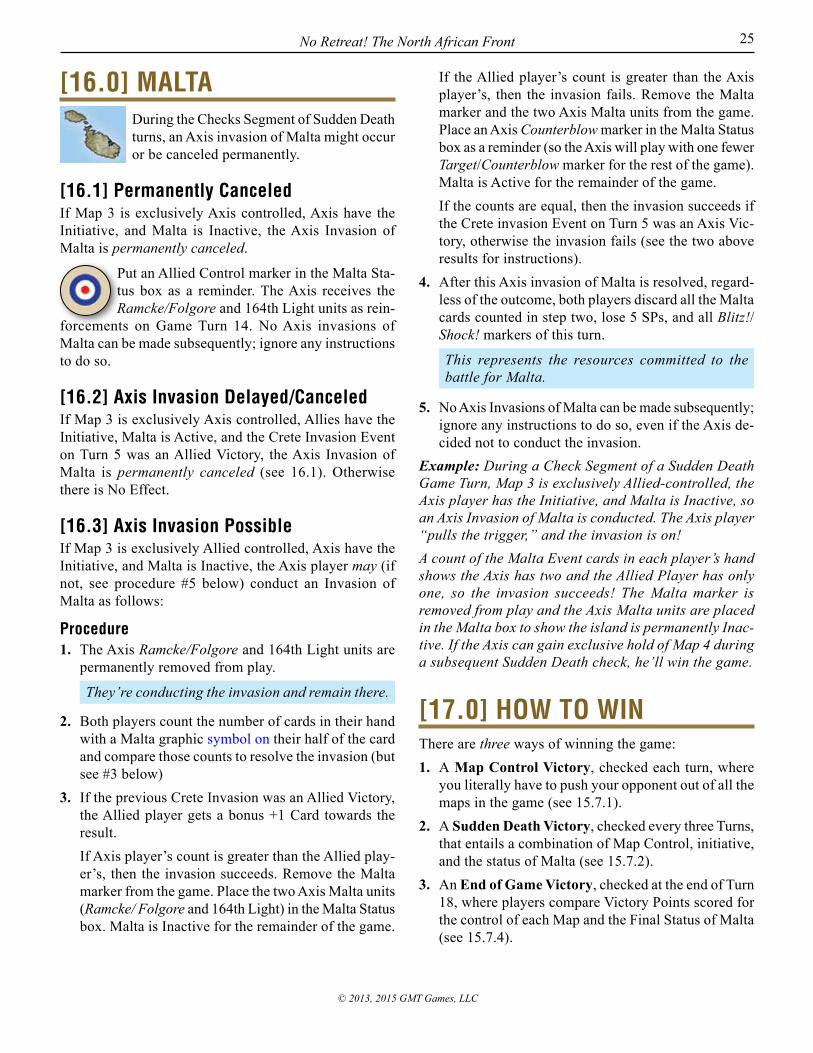
No Retreat! The North African Front 25
© 2013, 2015 GMT Games, LLC
[16.0] MALTADuring the Checks Segment of Sudden Death turns, an Axis invasion of Malta might occur or be canceled permanently.
[16.1] Permanently CanceledIf Map 3 is exclusively Axis controlled, Axis have the Initiative, and Malta is Inactive, the Axis Invasion of Malta is permanently canceled.
Put an Allied Control marker in the Malta Sta-tus box as a reminder. The Axis receives the Ramcke/Folgore and 164th Light units as rein-
forcements on Game Turn 14. No Axis invasions of Malta can be made subsequently; ignore any instructions to do so.
[16.2] Axis Invasion Delayed/CanceledIf Map 3 is exclusively Axis controlled, Allies have the Initiative, Malta is Active, and the Crete Invasion Event on Turn 5 was an Allied Victory, the Axis Invasion of Malta is permanently canceled (see 16.1). Otherwise there is No Effect.
[16.3] Axis Invasion PossibleIf Map 3 is exclusively Allied controlled, Axis have the Initiative, and Malta is Inactive, the Axis player may (if not, see procedure #5 below) conduct an Invasion of Malta as follows:
Procedure1. The Axis Ramcke/Folgore and 164th Light units are
permanently removed from play.
They’re conducting the invasion and remain there.
2. Both players count the number of cards in their hand with a Malta graphic symbol on their half of the card and compare those counts to resolve the invasion (but see #3 below)
3. If the previous Crete Invasion was an Allied Victory, the Allied player gets a bonus +1 Card towards the result.
If Axis player’s count is greater than the Allied play-er’s, then the invasion succeeds. Remove the Malta marker from the game. Place the two Axis Malta units (Ramcke/ Folgore and 164th Light) in the Malta Status box. Malta is Inactive for the remainder of the game.
If the Allied player’s count is greater than the Axis player’s, then the invasion fails. Remove the Malta marker and the two Axis Malta units from the game. Place an Axis Counterblow marker in the Malta Status box as a reminder (so the Axis will play with one fewer Target/Counterblow marker for the rest of the game). Malta is Active for the remainder of the game.
If the counts are equal, then the invasion succeeds if the Crete invasion Event on Turn 5 was an Axis Vic-tory, otherwise the invasion fails (see the two above results for instructions).
4. After this Axis invasion of Malta is resolved, regard-less of the outcome, both players discard all the Malta cards counted in step two, lose 5 SPs, and all Blitz!/Shock! markers of this turn.
This represents the resources committed to the battle for Malta.
5. No Axis Invasions of Malta can be made subsequently; ignore any instructions to do so, even if the Axis de-cided not to conduct the invasion.
Example: During a Check Segment of a Sudden Death Game Turn, Map 3 is exclusively Allied-controlled, the Axis player has the Initiative, and Malta is Inactive, so an Axis Invasion of Malta is conducted. The Axis player “pulls the trigger,” and the invasion is on!A count of the Malta Event cards in each player’s hand shows the Axis has two and the Allied Player has only one, so the invasion succeeds! The Malta marker is removed from play and the Axis Malta units are placed in the Malta box to show the island is permanently Inac-tive. If the Axis can gain exclusive hold of Map 4 during a subsequent Sudden Death check, he’ll win the game.
[17.0] HOW TO WIN There are three ways of winning the game:1. A Map Control Victory, checked each turn, where
you literally have to push your opponent out of all the maps in the game (see 15.7.1).
2. A Sudden Death Victory, checked every three Turns, that entails a combination of Map Control, initiative, and the status of Malta (see 15.7.2).
3. An End of Game Victory, checked at the end of Turn 18, where players compare Victory Points scored for the control of each Map and the Final Status of Malta (see 15.7.4).

No Retreat! The North African Front26
© 2013, 2015 GMT Games, LLC
[18.0] ADVANCED RULES These Advanced Rules add greater detail and realism at the expense of some added complexity. Players are free to use any or all of them by mutual agreement.
[18.1] Siege of TobrukThis represents the Axis or Allies continuing their of-fensive past an enemy-occupied Tobruk. It is something that was not done historically for supply and security concerns, but you might risk it.
Contrary to rule 10.1, if, at the start of a turn, Map 3 is contested but the only enemy-occupied City or Town is Tobruk, then the Initiative player can attack past this Map 3 onto the next map as follows:
At the beginning of the Deployment Phase, before any other Deployment matters are attended to, the player who controls Tobruk must place one or two square units and one Minefield or Box unit on the Strategic Map Control Display in the Map 3 box to stand as the Tobruk Garrison.
Then the other (“Besieging”) player must put more square units and more Minefield or Box units in that same Map 3 box than the Tobruk Garrison (as the Tobruk Besieger). His total strength must exceed that of the Tobruk Gar-rison force. In addition, he must then discard two cards of his choice.
All of this is required to “keep a lid” on Tobruk each turn and maintain its siege.
If the “Besieging” player later wishes to attack Tobruk, his side’s Control marker must be (voluntarily) withdrawn or (involuntarily by his opponent) pushed back to Map 3 where it reverts to Contested Control status.
[18.2] Mechanized Infantry vs. ArmorThese troops were not as able to directly and effectively attack tanks in the barren desert.
When attacking (only, not when defending against) en-emy Tank/Panzer units in Open or Town terrain hexes, Mechanized Infantry units do not receive the Mechanized Combat Bonus (13.5.3).
[18.3] Variable German AssistanceThis Advanced rule allows the Axis player to send less German assisstance to the Italians in North Africa. Italian Troops that were historically sent to Russia will take their places.
At the end of Turn 2, the Axis player can:• Decide to ask for the full German Afrika Korps
historical commitment; in that case the game plays normally.
or• Decide that the Italian Army can fend off the British
by itself, and request only token support from the Germans.
In the latter case, apply the rules below:1. The Axis player will only receive the bi-colored Ger-
man reinforcements, plus Rommel. The other Germans are not used in the game.
2. Each Turn one of those German units was supposed to come in as reinforcements, you get instead, for each of these, one Italian irreplaceable (black-dot; 8.2.2) unit that had been permanently removed from the game previously.
Example: During Game Turn 4, the Axis player will get Rommel and two bi-colored Germans (18 Flak, Aufk), but not the 21st Panzer. Instead of the latter, he will get one permanently eliminated Italian unit of his choice.
3. All irreplaceable Italian Units in the game are now considered replaceable (no black dot), thus can always be rebuilt.
4. The British cannot win by Sudden Death victory any-more (15.7.2).
5. The Axis player wins ties (15.7.4).6. The game will be over at end of Turn 9.
Hitler and the OKW (Oberkommando der Wehrmacht, or Supreme Command of the Armed Forces) will use the freed resources on other fronts, forcing the hand of the British to finish the campaign faster and redeploy to the threatened areas.

No Retreat! The North African Front 27
© 2013, 2015 GMT Games, LLC
[18.4] Alternate EventsThis recommended Advanced rule allows for more Event variety on the cards, mainly for tactical use, and are not Initiative-dependent.
• Each player’s Event box on the cards has an “Alternate Event” symbol in the upper left corner that can be used instead of the regular Event.
Exception: The “play immediately” Events do not have this feature.
• These Alternate Events are not Initiative-dependent and can be played in all the turns of the game (see 5.3.3).
The Alternate Events have the following effects:
ANY: Play for any Event in the list below.
AMBUSH: Play during the Opponent’s Combat phase before a regular battle (not a Counterblow
or Counterattack): you become the attacker in that battle, you also get a positive CRT column shift equal to your own defensive shift terrain bonus (this includes Boxes and Mines), with a minimum of 1 Column Shift.
Thus even in Clear terrain, for example, you will have a 1-column shift.
BOXES: Play at start of Organization Phase, get a free Box counter.
MINES: Play at start of Organization Phase, get a free Mine counter.
MOVE: Play at the end of the Opponent’s Move-ment Phase to move any units in one stack not
in an enemy ZOC up to 2MP. They must move to the same hex.
RAID: Play at the start of your Movement Phase to Move and Attack with one unit (only). No
Combat cards or Blitz!/Shock! markers can be used by either side for that combat. When done continue with your Movement Phase with the rest of your units. The raiding unit will be able to attack again in the regular combat phase.
REFIT: Play at the end of your Movement Phase: Pay one (only) SP to make one unit not
in EZOC gain a step (not valid for Boxes or Mines).
RESERVE: Play during the Opponent’s Combat phase before a battle. Move one unit from the
reserve directly on the defending (fully supplied) hex to participate in that combat.
SUPPLY: Play at the start of your Player Turn to lose one step from one supplied unit or Box
(not Mine), and gain one SP.I very much recommend using this “Alternate Events” Advanced rule, as it gives more variety to the game and lowers the chance of having lots of cards you cannot really use in some game situations.
[18.5] Invasion of CreteBy mutual agreement, the players can, instead of resolving the Invasion of Crete game Event on Turn 5 as described in rule 15.6, use the Invasion of Crete game included in the box to resolve this Event.
[18.5.1] Set up The Invasion of Crete game, play the game to conclusion, or until one side voluntarily gives up and award the other side the win.
[18.5.2] The player playing the Axis in the main game takes the Axis side in The Invasion of Crete game and the Allied player takes the Allied side.
[18.5.3] Invasion Outcome: The outcome of this battle affects the Malta Invasion Table (see 16.2).
• If the Axis player wins, the invasion is an Axis Victory. When received, the Allied Turn 6 Australian and New Zealand infantry reinforcements are put in the Surrendered Units Holding box. Put a German Control marker in the Crete Status box as an outcome reminder.
• If the Allied player wins the game, the invasion is an Allied victory; put an Allied Control marker in the Crete Status box as an outcome reminder.
• If it is a Stalemate, the Crete Status box stays empty.
This Advanced rule will add some extra opera-tional depth to The Invasion of Crete game, itself a simple and fast introductory game to the No Retreat! system.
[18.6] Strategic RetreatStarting with the Non-Initiative Player, a player may declare that he is voluntarily yielding control of a Non-contested map. Withdraw his Control marker one box on the display (i.e., the Axis toward Map 1 and the Allies toward Map 5). The yielding player loses half (rounded up) of his remaining supplies, and half (rounded up) of his irreplaceable “dotted” Units. The attacking player loses two SPs.

No Retreat! The North African Front28
[C0.0] USING THESE RULES[C2.0] Game EquipmentThe Invasion of Crete mini-game has the same general rules framework as the more expansive The North African Front game, but given the time/scale and operational dif-ferences between the two campaigns, some No Retreat 2 (NR2) rules will not be used, some slightly modified, and some added. The following pages explain those differences and exceptions, keeping the same section numbering, but with a “C” added to the rules that are different or new.
[C2.1] Game MapsThere are three small maps in the game, and contrary to NR2 The North African Front they are used simultane-ously, and always active.Hexes displaying red stars are objective hexes, and count for victory if the game does not end in Sudden Death (see C15.7.4).
[C2.2] Game Charts and TablesThere are a different set of charts and tables for the Crete game, including the Combat Results Tables, the Terrain Effects Chart, the Game Turn Track, and some new tables are added: the Paradrop/Convoy and Hidden Box Display.
[C2.3] Special Crete UnitsThere are some unit in the Crete game that have abilities different from the North African game. Here is a list:
Regiment/Brigade Organization: Most square units have a superior unit designation at the top of the counter, to the left of the slash. This is important for some game functions like stacking and night reorganisation,
Example: On the counters above, the German superior unit is the 100 GJ Regiment, and the Allied unit the 14 Brigade; the German 7 Eng(+) unit is not part of a regi-ment/brigade organization.
The “+” designation on some units indicates the unit has some attached smaller sub-units; the “+” designa-tion is only there for historical information purposes.
Greek IrregularsThese counters have no ZOC and no strength or movement values. They can still attack or defend in regular combat if with other “non-
irregular” units and can take one step loss. If alone in battle it uses the “IRC” column of the CRT (see C13.1.3).
Allied Boxes“Box” counters represent trenches and barbed-wire field fortifications, anti-aircraft batteries, artillery etc. Each has one step. Each 2-strength Box can have one Artillery
Support Counter attached to it (see C8.2.1) Both 1- and 2-strength Boxes have an Anti-Aircraft range of 3 hexes vs Paradrops and Air Landings (see C8.6.1), or vs Air Support for 2-strength Boxes (see C13.5.8).
Dummy Boxes have no such abilities.
German EngineersThese counters represent the focal point for the set-up of German Artillery. Each German engineer unit can have up to two Artillery Sup-port Counters attached to it (see C8.2.1).
Three-Step Units/Glider UnitsThe units with a “double” unit type symbol (e.g., the German Sturm/1(+) unit)
has three steps—the two sides of the counter— and when destroyed such a unit is replaced by a spare round Detachment counter taken from its Re-serve box.
DetachmentsThese are smaller units with low battle command & control (thus they have no printed movement factors).
They have only one step, and the back of the counters represent the detachment “reorganizing” and is used when they are put in the reserve box when destroyed, or ab-sorbed as replacement by larger units (by the play of certain event cards or in the Organization phase; see C8.0).
German Air Support MarkersThese markers have four main uses and are generally treated a bit like the Blitz!/Shock! markers in NR2 The North African Front, from
their Zones holding boxes, they are put on:
No Retreat! The North African Front 29
© 2013, 2015 GMT Games, LLC
1. The interdiction roundels on their zone to impede en-emy movement (see C12.3.2) and Artillery fire during the organisation phase (see C8.2.1).
2. On their zone in the Defensive Support phase to lower the enemy attackers CRT attack table column (see C12.8.3).
3. On their zone in the Defensive Support phase to “strafe” enemy Boxes, impeding their Anti-Air and Artillery capabilities (see C12.8.3).
4. On their zone in the Combat phase to increase the friendly attackers CRT attack table column (see C13.5.2).
5. Air Support markers cannot be used during Night Turns.
Artillery & Tank Support MarkersThese markers have two main uses and are generally treated a bit like the Blitz/Shock markers in NR2 The North
African Front, from their Zones holding boxes, they are put on:1. On their zone in the Defensive Support phase to lower
the enemy attackers CRT attack table column (see C12.8.1 and C12.8.2).
2. In their zone in the Combat phase to increase the friendly attackers CRT attack table column (see C13.5.2).
[C3.0] SETTING UP THE GAME* NO CHANGES *
Note that eleven round counters from the NR2 The North African Front game are used in NR2 The In-vasion of Crete: the five Axis and five Allied Target/Counterblow markers, plus the Turn marker.
[C4.0] SEQUENCE OF PLAYHow the Turns Work: There is only one set of initiative and Non-Initiative Player Turns during a game-turn.
The Allied player is the Initiative Player for the first half of the game, then initiative switches to the Ger-man player on turn 10. This is indicated by the British roundel/German cross on the Game Turn Track.
ProcedureI. New Turn Housekeeping PhaseSegments 1 and 2 of this Phase are skipped on the first turn of the scenario.1. Game Turn Segment: Advance the Game Turn
marker one box on the Game Turn Track. If Game Turn 18 was just completed, the game ends and the winner is determined (see C15.7.4).
2. Checks Segment: Sudden Death victory is checked on turns displaying a skull icon. Important: On Game Turn 10, the Strategic Advantage shifts (see C15.7).
3. Note New Game Turn Event Segment: If the new Game Turn has an Event printed in its Game Turn Track box, apply its effects at the appropriate time (see C15.6).
4. Adjust Cards Segment: The Initiative Player may discard and then draw cards to fill his hand up to his maximum (three to five cards).Then the Non-Initiative Player does the same, discarding and drawing cards.
II. Operational Preparation1. Strategic Phase: Starting with the Initiative Player,
both players alternate playing one card at a time for his Strategic Phase Event until each consecutively passes.
2. Organization Phase: The Initiative Player, then Non-initiative Player, does Rebuilds, Reinforcements, Evacuations, Sea Moves and Air Moves (in that order).
III. Initiative Player Turn1. Movement Phase: The Phasing Player can move his
units on the map (see C12.0).2. Defensive Support Phase: The Non-Phasing Player
can use his round Support units (Air/Artillery/Tank) on the map (see C12.8).
3. Combat Phase: All voluntary—and then all invol-untary—Battles are declared and resolved according to the Battle Sequence in any order that the Phasing Player desires (see C13.0).
IV. Non-Initiative Player TurnThe Non-Initiative Player becomes the Phasing Player and the three Player Turn Phases are repeated (Movement, Defensive Support, and Combat; C12.0, C12.8, C13.0).
V. End of Turn Housekeeping Phase1. Removal Segment: Remove Counterblow and Sup-
port counters from the map and put them in the Used Markers Holding box (see C15.3).

No Retreat! The North African Front30
© 2013, 2015 GMT Games, LLC
[C5.0] THE CARDS Note that the cards for The Invasion of Crete are much simpler—they have no special icons whatsoever, and the Battle Event cards (13.5.7) cannot be kept active from one turn to another.
[C5.4] Special Card UsesYou can discard an Event card for two special uses:• You get back—anytime—one used Target/Counter-
blow marker from the marker holding box for each card discarded.
• In the Organization Phase you can flip back to their front sides up to two round detachment markers in the reserve boxes per card discarded (see C8.2.2)
Both players’ basic Hand size is four.• The German player’s Hand Size is increased by one
if he Controls at least one Airfield.• The Allied player’s Hand Size is decreased by one
if he has lost control of one or more Ports.
[C6.0] KEY CONCEPTS[C6.1] InitiativeThe Allied player is the Initiative Player for the first half of the game, and then initiative switches to the German player on Turn 10. This is indicated on the Game Turn Track by the British roundel icon in the Turn 1 box, and German cross icon in the Turn 10 box.
There is no Strategic Advantage, as in the other NR2 The North African Front game. The German will thus play two turns in a row when the switch is made: last on turn 9 and first on turn 10.
[C6.3] Target/Counterblow MarkersEach side gets five Target/Counter-blow markers each turn for free in the Organization Phase (use the NR2 The
North African Front markers). A player can “buy back” used Target/Counterblow markers during a turn by dis-carding Event Cards (see C5.4).
[7.0] STRATEGIC PHASETHIS RULE IS NOT USED
[C8.0] ORGANIZATION PHASEDuring this Phase, the Initiative Player performs the fol-lowing Segments (A-F) in order, followed by the Non-Initiative Player:A. Rebuilds: Get Target & Support markers. Discard cards to flip round Detachment units (in that order). B. Receive Reinforcements: Scheduled reinforce-ments, Aborted Support Markers, and destroyed units reorganized during night turns are placed on the Map or holding boxes. C. Evacuations: The Allied player may move units in a port hex or a south map edge road hex to the “Evacuated Units” Holding box, by using one Target/Counterblow marker for each stack (see C8.4).D. Sea Moves: German Invasions and Allied coastal port moves (night turns) are made and rolled for (see C8.5).F. Air Moves: The German player may land units from the Reserve Box to friendly airfields, and then places scheduled Paratrooper units on the map from their Zone Holding boxes, in that order (see C8.6).
[C8.2] Build Up Units, Get Markers/Supports: [C8.2.1] Get Target/Coun-terblow and Support Markers: Receive back all
your used Target/Counterblow (five markers per player) Support markers from the Used Markers Holding Box and aborted Support markers from the Game Turn Track. Place the Support markers in their assigned Zones on the map:• The Tank marker goes in any Zone’s Holding box.• The Air Support markers go in any Zone`s Holding
Box, or Interdiction Holding Circle.• Each German Artillery marker goes in a Holding box
of a Zone containing a square German Engineer unit of the same color; max two per Engineer.
• Each Allied Artillery marker goes in a Holding box of a Zone containing a 2-strength Box marker; max one per Box.
• Artillery markers that cannot be assigned for lack of an Engineer or Box are returned to the Used Markers Holding Box.
• Note that German Artillery markers have to be suc-cessfully landed before they can be used (see C8.5.2 & C8.6.1).
No Retreat! The North African Front 31
© 2013, 2015 GMT Games, LLC
Each Allied 2-strength Box’s attached guns are represented by an artillery marker; if the Box is eliminated, the Allied player loses the use of the marker next turn. The same basic principle applies to the German Engineers, although each engineer can support two artillery markers.
[C8.2.2] Flip Detachment Counters: Each used detachment marker in a reserve Holding Box (i.e., a marker
with either the Allied roundel or German cross showing) can be flipped back to its normal side at the cost of one card discard for each such marker flipped. Greek round units can never be flipped back this way by discards.
While on its flipped side, a detachment counter is as-sumed to be reorganizing and is not available for use. A player must spend cards to get the unit back into operational shape. Greeks cannot be flipped back this way , and most become “Irregulars” after a step loss.
[C8.3] Get Reinforcements[C8.3.1] Scheduled Reinforcements: Each unit with a Turn Entry number on its counter is put on the map or in the Zone Holding boxes according to the instruction for that Turn Event (see C15.6).[C8.3.3] Night Reorganization: At night, reduced Square units on the map can absorb any same-color round Detach-ment units that are adjacent or stacked with them: Flip the square unit to its front (higher) side and put the used round detachment unit face-down in its Reserve Holding Box. • Once per night turn, and at a cost of two card discards,
each player can place on the map—in the same location as a round detachment marker, and in the same Zone as another unit of the same Brigade/Regiment—one of his square units (lower-strength side up) taken from that side’s Destroyed Units box. The detachment marker is then placed face-down in its Reserve holding box.
Note that square counters that do not have a superior regiment/brigade organization cannot be put back on the board using this process (see C2.3).
• Once per night turn, for free, the German player can put in the Reserves and Air Landing box, one square Mountain Infantry unit (full strength face up) that is currently in the Destroyed Units box.
This simulates the late arrival of the 141st Mountain Regiment. There was not enough space in the counter mix to actually put those three battalions in the game; historically they participated mainly in the last phases of the battle.
[C8.4] Allied EvacuationsStarting on Turn 11, Allied units can move off-map near road hexes or Ports. Evacuations also occur in the “End of Game Allied Evacuation” phase (see C15.7.5).[C8.4.1] Port Evacuations: Allied units on a Port hex can be moved to the Evacuated Units box at a cost of one Counterblow marker per stack. Roll one die for each unit on the Evacuation Table.[C8.4.2] Off-Map Evacuation: During day and night turns Allied units on a south map edge road hex (or a south map edge hex adjacent to such a road hex) can be moved to the Evacuated Units box at a cost of one Coun-terblow marker per stack. Roll one die for each unit on the Evacuation Table (but see C12.6.1). Evacuated units can affect the end-game victory conditions (see C15.7.4)Some players will find Evacuations useful in the regular game scenario, especially for units forced off-map by combat and to lower the eliminated British unit penalty for the end game victory conditions (see C15.7.4). It will be even more important when using the Allied “non-combatant” rules that will be offered as optional rules in an upcoming issue of the C3i magazine.
[C8.5] Sea MovesDuring day and night turns both players have limited sea movement capabilities.
[C8.5.1] Allied Coastal Moves: During night turns, one unit per turn on a Port hex or a Zone Holding Box can move to any other friendly Port hex not in an EZOC. Roll on the Convoy Table for the outcome. If you get the “Re-try next turn” result consider the attempt aborted (since it will be a day turn where such a move is not allowed).
[C8.5.2] German Invasions: During day and night turns German units in the Invasion Convoy box can try to move to a Port or Beach hex not occupied by enemy units (when a round artillery marker is successfully landed, put it in the Used Markers Holding Box) by rolling the outcome on the Convoy table, this is a two-turn process:
1st Turn: Put the units you want to land on that Zone Holding Box.
2nd Turn: Next turn, land those units on the zone Beaches/Port Hexes, rolling on the Convoy Table for the outcome.
Note: In an outcome of “Retry Next Turn” the unit will stay in the same Zone Holding Box.
No Retreat! The North African Front32
© 2013, 2015 GMT Games, LLC
[C8.6] Air MovesDuring day turns (only) the German player does Paradrops and lands units at friendly airfields during the organisa-tion phase.
[C8.6.1] Air Landings: Starting on Turn 5, one square unit per turn can be landed at each friendly airfield that is not in an EZOC (the “1” number of the airfield hex represents that limit). Each round unit counts as half, thus you can instead land two round units of one square unit if desired. If the Airfield is within three hexes of any Allied Box that is not in the ZOC of a German unit, you must roll for possible losses on the Air Landing Table.When a round artillery marker is successfully landed, put it in the Used Markers Holding Box.This represents losses caused by Artillery and Anti-Air-craft fired at the landing troops’ slow transport planes.
[C8.6.2] Paradrops: During each day turn all the para-trooper units scheduled to drop per scenario instructions are put in their target hexes, one unit per hex maximum (square or round), and follow the landing procedure below:1. Turn each Paratroop counter 180° to indicate that its
Drop roll has not yet been made; rotate each 180° after landing.
2. The drop hex chosen must be a terrain type that is al-lowed for Paratroops (refer to the terrain column on the Crete TEC marked by the parachute icon).
3. Roll for each square counter on the Paradrop Table. The drop zone for these is at a vertex of three hexes, unless it lands right on target. If any Allied round, square unit, two (2) Strength Box or water hex is in any of these three hexes, the dropping unit loses one step (never more).
4. After taking the step loss, if any, the German player chooses the final drop hex for the unit amongst those three hexes if on a vertex; It cannot be occupied by an enemy square or round counter, or be in water. Only if no empty hexes are available, it can drop on a Box counter alone in a hex; the Box is then eliminated. If all three hexes are occupied by enemy square/round coun-ters and/or is water hex, the dropped unit is eliminated. If all three hexes are occupied by enemy square/round counters the dropped unit is eliminated. If in full water, take a step loss and roll for the drop location again. If the only empty hex is not allowed for paratroops (Mountain or City), the unit can still drop, but will lose its ZOC, cannot voluntarily attack, and cannot move for the remainder of the turn. Use a round “No ZOC/Out of Supply” marker from NR2 Africa to indicate this fact.
5. If the drop Zone is in a hex (so not a vertex of 3 hexes), and that hex contains an enemy square or round coun-ter, put the Paratroop unit in any empty adjacent hex. If no such hex exists eliminate the dropped unit. It can drop on a Box counter alone in a hex; the box is then eliminated.
6. If you get a “Scattered” result (die roll 9+), reroll again on the table, adding the “Scattered Drop” +3 modifier. If you get another “Scattered” result, the unit takes a step loss and is put in that landing Sector Holding box.
7. Roll for each round counter on the Paradrop table. If the landing hex contains any enemy counter or is in water, the unit is eliminated. If the unit lands in a hex with a lone Box counter, the Box is also eliminated. If it drops into a hex that is not allowed for paratroops (Mountain or City), the unit can still drop, but loses its ZOC, cannot voluntarily attack, and cannot move for the remainder of turn.
Use a round No Supply No ZOC marker from The North African Front to indicate such a unit.
8. If you get a “Scattered” result (die roll 9+), reroll again on the table, adding the “Scattered Drop” +3 modifier. If you get another “Scattered” result put the unit in that landing Sector Holding Box.
9. If any dropped unit ends the phase stacked with another friendly unit, move the just-dropped unit to an empty adjacent hex if possible. If not, it stays in place, and suffers the same effect.
10. Special Note: The German Airborne Artillery “C/G” marker is put on the same hex as the “7 Eng(+)” square unit and drops with it. If the “7 Eng(+)” unit survives the drop, place the Artillery marker in the Used Markers Holding Box; if the unit does not survive, permanently eliminate the “C/G” Artillery from the game.
11. Off the Map: If a counter drifts off the map, put it in that map’s landing Sector Holding Box.
[9.0] DECLARE OFFENSIVETHIS RULE IS NOT USED
Given that one offensive in the main game (The North African Front) lasts many turns in Crete, that rule is not needed. Historically the German player initiates an offensive against the island, but the Allied player holds the Initiative for half the game (the Allies had advance warning from “Ultra” code-breaking intercepts of the Nazi radio messages and were not taken by surprise).
No Retreat! The North African Front 33
© 2013, 2015 GMT Games, LLC
[10.0] DEPLOYMENTTHIS RULE IS NOT USED
The Deployment Phase is done per the scenario in-structions.
[11.0] SUPPLYTHIS RULE IS NOT USED
Given the scale and time frame of this game, both sides have enough supplies on hand to be combat effective, or are considered to be replenished at night (Allies) or by air (Germans). Both sides were operating at degraded supply levels compared to a regular battle, and this is taken into account in the design. Thus you do not need to buy Target/Counterblow markers, but get a full allot-ment of five markers in the Operational phase.
[C12.0] MOVEMENT[C12.2.1] Stacking Limit: Both players may stack up to two square/round units per hex, plus one Box unit.
[C12.2.2] Stacking Color Restriction: German Para-troopers (blue-gray) and German Mountain (gray-green) units cannot stack together. Allied Commonwealth (tan) and Greek round (blue) units cannot stack together. Bi-color (gray/green) units may freely stack with either color type.
[C12.2.5] Stacking Square Counter Restriction: Square counters can only stack together if member to the same regiment/brigade organization (see C2.3).
Example: These three counters are all part of the 19 (Australian) Brigade, and are al-
lowed to stack together (maximum of two per hex).
[C12.3.1] Closing with the Enemy: There is no extra cost for entering an EZOC in The Invasion of Crete game.Scarce heavy weapons and good ammo supplies made long-range firepower projection difficult for most units in the game.
[C12.3.2] Special Crete Movement Restrictions: You cannot enter EZOCs during Night Turns.• The Allied player cannot use road or Counterblow
movement in map Zones where the German player has an Air Support marker in the Zone Interdiction box.
• Most units cannot use regular Movement or Combat during Game Turns 1 and 2 (see C15.6, Event 1 and Event 2).
Air interdiction of a map Zone will make rapid deploy-ment of Allied troops very difficult.
[C12.5] Detachment Counters Round Detachment counters have no movement factors and can only be moved using two ways:
• Using Counterblow movement (see C13.0.1).• When stacked with a square counter at the start of a
Player Turn it can be moved together with that counter (it can be dropped along the way, too).
[C12.6] Exiting a MapOnly Allied units can completely exit a map, using off-map evacuation (C8.4.2). Any other unit forced off a map due to Combat results is usually eliminated, but see below:
[C12.6.1] Exiting a Map by Combat: German or Al-lied units are eliminated if forced off a map by combat retreat, unless:• There is a crossing arrow on that map side, unoccupied
by enemy units. In that case put the retreating unit on the crossing arrow.
• An Allied unit can be forced off-map on a south map edge hex. In such a case roll immediately on the Evacuation Table to check that unit’s fate (C8.4.2).
[C12.7] Moving Between Maps Units can move between the three main maps of the game under certain conditions, and is a three-part process.
[C12.7.1] Exiting a Map by Movement: A unit has to start its Movement phase adjacent to an east or west road map edge hex with a Crossing
Arrow on that map side, or a map edge hex adjacent to one. You must pay one Counterblow marker per stack exited. Put the units on the Crossing arrow touching the mapboard section just exited.
Note: The Allied player cannot use a Counterblow mark-er for movement purposes on a map that is Interdicted.
[C12.7.3] Moving Between Maps: At the start of its Movement Phase, when on a crossing arrow, a unit/stack can be moved once during the Movement Phase to the crossing arrow touching the next board at a cost of one Counterblow marker.
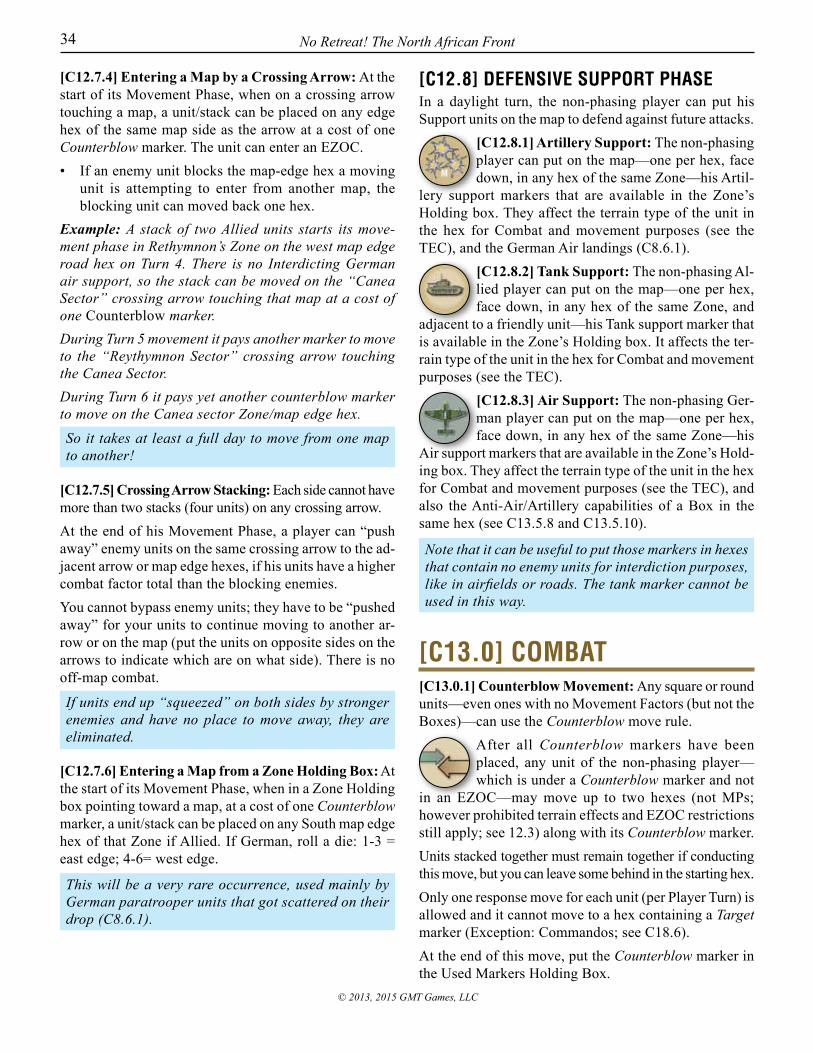
No Retreat! The North African Front34
© 2013, 2015 GMT Games, LLC
[C12.7.4] Entering a Map by a Crossing Arrow: At the start of its Movement Phase, when on a crossing arrow touching a map, a unit/stack can be placed on any edge hex of the same map side as the arrow at a cost of one Counterblow marker. The unit can enter an EZOC.• If an enemy unit blocks the map-edge hex a moving
unit is attempting to enter from another map, the blocking unit can moved back one hex.
Example: A stack of two Allied units starts its move-ment phase in Rethymnon’s Zone on the west map edge road hex on Turn 4. There is no Interdicting German air support, so the stack can be moved on the “Canea Sector” crossing arrow touching that map at a cost of one Counterblow marker. During Turn 5 movement it pays another marker to move to the “Reythymnon Sector” crossing arrow touching the Canea Sector.During Turn 6 it pays yet another counterblow marker to move on the Canea sector Zone/map edge hex.So it takes at least a full day to move from one map to another!
[C12.7.5] Crossing Arrow Stacking: Each side cannot have more than two stacks (four units) on any crossing arrow.At the end of his Movement Phase, a player can “push away” enemy units on the same crossing arrow to the ad-jacent arrow or map edge hexes, if his units have a higher combat factor total than the blocking enemies.You cannot bypass enemy units; they have to be “pushed away” for your units to continue moving to another ar-row or on the map (put the units on opposite sides on the arrows to indicate which are on what side). There is no off-map combat.
If units end up “squeezed” on both sides by stronger enemies and have no place to move away, they are eliminated.
[C12.7.6] Entering a Map from a Zone Holding Box: At the start of its Movement Phase, when in a Zone Holding box pointing toward a map, at a cost of one Counterblow marker, a unit/stack can be placed on any South map edge hex of that Zone if Allied. If German, roll a die: 1-3 = east edge; 4-6= west edge.
This will be a very rare occurrence, used mainly by German paratrooper units that got scattered on their drop (C8.6.1).
[C12.8] DEFENSIVE SUPPORT PHASEIn a daylight turn, the non-phasing player can put his Support units on the map to defend against future attacks.
[C12.8.1] Artillery Support: The non-phasing player can put on the map—one per hex, face down, in any hex of the same Zone—his Artil-
lery support markers that are available in the Zone’s Holding box. They affect the terrain type of the unit in the hex for Combat and movement purposes (see the TEC), and the German Air landings (C8.6.1).
[C12.8.2] Tank Support: The non-phasing Al-lied player can put on the map—one per hex, face down, in any hex of the same Zone, and
adjacent to a friendly unit—his Tank support marker that is available in the Zone’s Holding box. It affects the ter-rain type of the unit in the hex for Combat and movement purposes (see the TEC).
[C12.8.3] Air Support: The non-phasing Ger-man player can put on the map—one per hex, face down, in any hex of the same Zone—his
Air support markers that are available in the Zone’s Hold-ing box. They affect the terrain type of the unit in the hex for Combat and movement purposes (see the TEC), and also the Anti-Air/Artillery capabilities of a Box in the same hex (see C13.5.8 and C13.5.10).
Note that it can be useful to put those markers in hexes that contain no enemy units for interdiction purposes, like in airfields or roads. The tank marker cannot be used in this way.
[C13.0] COMBAT[C13.0.1] Counterblow Movement: Any square or round units—even ones with no Movement Factors (but not the Boxes)—can use the Counterblow move rule.
After all Counterblow markers have been placed, any unit of the non-phasing player—which is under a Counterblow marker and not
in an EZOC—may move up to two hexes (not MPs; however prohibited terrain effects and EZOC restrictions still apply; see 12.3) along with its Counterblow marker.Units stacked together must remain together if conducting this move, but you can leave some behind in the starting hex.Only one response move for each unit (per Player Turn) is allowed and it cannot move to a hex containing a Target marker (Exception: Commandos; see C18.6).At the end of this move, put the Counterblow marker in the Used Markers Holding Box.

No Retreat! The North African Front 35
© 2013, 2015 GMT Games, LLC
[C13.0.2] Counterblow Movement Restrictions: Units in the same hex as a Strafed/Pinned marker, or an Allied unit in a map Sector where the Germans have an Air unit committed to Air Interdiction (see 8.2, C13.5.10), cannot use Counterblow markers for movement. This is the only way to move round unit counters not stacked with square units, since round units do not have regular movement factors. Since these are not mechanized units, they do not conserve their Counter-blow counters during the Combat phase as those units do in The North African Front and you cannot put a new one on top when the move is finished.
[C13.1.1] Attack Exceptions: Some units are prohibited from attacking based on their color:• Allied (tan) and Greek round units (blue icons) cannot
attack together in the same Battle (including artillery support); they can Counterattack together; see 13.6.4. Bi-color units can freely attack with either color.
• You cannot make regular attacks or counterblows during Night Turns, but some Event Cards and the Commando advanced rule (see C18.6) can cause combat to happen.
[C13.1.2] Attached Detachment Counters: A round Detachment counter with a white strength value can participate in a battle when stacked
with a black strength-value unit. It does not add its com-bat strength, but can absorb losses.
The detachment is reinforcing the friendly attackers, but not effectively enough to add its SPs to the battle.
[C13.1.3] Irregular Combat: When Greek Ir-regular troops are the only units involved in battle, defending or attacking, use the “IRC”
column on the CRT. There are no combat shifts modifiers used and no odds.This table represents low intensity skirmishes and anti-partisan sweeps.
[C13.5.2] Support Markers: When available to a player, a maximum of two Combat Support markers (Air, Artil-lery or Tank) may be committed to a Battle when that player is the attacker (including a Counterattack situation, see 13.6.4). Each provides one column shift to the right. Those markers must come from the Zone’s Holding box where the battle is being fought.
[C13.5.8] Anti-Aircraft Artillery: If a German Air Sup-port marker is used in a Battle within three hexes of an Allied 2-strength Box counter that is not Strafed/Pinned, it is aborted by an odd die roll. It is put on the Game Turn
Track, becoming available two turns later in the Reinforce-ment Phase.
Example: It is Turn 4 and a newly placed German Air unit is in a hex that is attacked and in range of an Allied box unit (that is not Straffed/Pinned). An odd die roll places the Air unit on Turn 6 of the Game Turn Track.[C13.5.9] Anti-tank Units: If the Tank marker is used in a Battle, it is eliminated by an even die roll. It is put in the Allied Destroyed Units box (it can be rebuilt with the “C04 TANk SUppoRT” Event card).
[C13.5.10] Air Interdiction: If an Allied Artillery Sup-port marker is used in a battle in a Zone where an Air unit is in the Interdiction holding circle, it is aborted by an even die roll. It is put on the Game Turn Track, becom-ing available two turns later in the Reinforcement Phase.
Only the stronger 2-strength Boxes’ anti-aircraft artil-lery (AAA) has an effect on the German Air Support counters, as fighter/bomber aircraft are much harder to hit than transport planes. Historically Allied AAA had little success downing German bombers and fighters in Crete, but they did have a nuisance effect.
[C13.6] Applying Combat Results: Some combat results are different in The Invasion of Crete game, and are ex-plained here, the ones not mentioned are the same as in The North African Front game:
COMBAT RESULTS:D = Defender Falls Back: Defender Retreats his unit(s) 1 hex, or not retreat and lose 1 step. Attacking units can Advance 1 hex if the defending units Retreated. D2 = Defender Retreats: Defender Retreats his unit(s) 2 hexes, or not retreat and lose 1 step. Attacking units can Advance 1 hex if the defending units Retreated or no defending unit(s) remain there after a step loss.DB = Defender Broken: Defender Retreats his unit(s) 2 hexes and loses 1 step, or not retreat and lose 2 steps. Attacking units can advance 1 or 2 hexes if the defend-ing units Retreated or no defending unit(s) remains there after a step loss.DD = Defender Destroyed: Defender Retreats his unit(s) 3 hexes and each defending unit loses 1 step. Attacking units may Advance 1 or 2 hexes.IRC = Irregular Combat: Use this table when the Al-lied units in the battle are only Greek Irregular troops.CC= Close Combat: Immediately re-roll the combat result using the “CC” combat table column. Same at-tackers and defenders. No modifiers used.
No Retreat! The North African Front36
© 2013, 2015 GMT Games, LLC
[C13.6] Destroyed/Eliminated Units: Put each elimi-nated square unit face-down, in their side’s Destroyed Units box on the TEC card; round units go face-down in their side’s Reserve box (see 8.2.2); hexagonal Box units are removed from the game.
[14.0] TURN CONTINUATIONTHIS RULE IS NOT USED
There are no Continuations in The Invasion of Crete game, only two single player-turns for each Game Turn, as each turn represents a much shorter period of time (eight hours instead of many days).
[C15.0] HOUSEKEEPINGAt the end of every Game Turn and at the beginning of the next, several administrative “Housekeeping” phases are performed.
[15.1] Map Control SegmentTHIS RULE IS NOT USED
[15.2] Initiative Check SegmentTHIS RULE IS NOT USED
Since all units are always on the map and there is only one mapboard used, always in play, these two segments are not in use in The Invasion of Crete game.
[C15.3] Removal SegmentBoth players remove Counterblow and support markers from the map, as follows:
[C15.3.1] Artillery/Tank Removal: Remove both sides’ flipped-over Tank and Artillery support units that are on the map and/or in zone holding boxes and place them in the Used Markers Holding Box front side up.
[C15.3.2] Air Support Removal: Remove the German Air Support markers on the map, Zone holding boxes and “Interdiction” roundels, and place them in the Used Markers Holding box front (airplane) side up.
[C15.3.3] Counterblow Removal: If the next turn is a night turn remove any Counterblow markers on the map, and place each in the Used Markers Holding box front (target) side up.
You will get back these markers and can reassign them in next turn’s Organization Phase.
[C15.6] New Game Turn Event SegmentFollowing are the turn Events for The Invasion of Crete:
Game Turns 1-18: Light-blue turns are day turns, dur-ing which players can use Support markers and declare regular Combat. Dark gray turns are Night Turns, dur-ing which no Support markers can be used, nor regular Combat declared; units cannot enter EZOC.
Turns 1-9, Allied Initiative: The Allied player plays first in a turn.
This reflects the early British preparedness gained from “Ultra” intercepts deciphering Axis radio mes-sage, and bad German intelligence about enemy troop deployments.
Turns 1, 2 & 4, German Paradrops: During the organi-zation Phase the German player drops his troops using the Paradrop Table as per the scenario or event instructions.
Historically, the Germans dropped very close to their objectives and badly underestimated the number of Allied troops in their drop zones.
Turn 1, Limited Moves: Allied units cannot use regular Movement or Target markers (they can use Counter-blows).Note that the only movement possible will be using “Counterblow Movement” (see C13.01), and this will not even be possible in a Zone that is Interdicted.
Turn 2, Limited Moves: Allied units cannot use regular Movement or Target markers (they can use Counter-blows).The Allies were instructed to “Stay Put” in their posi-tions if attacked by Air, and their Commanders were often slow to react. Casualties caused by firefights are simulated by the Paradrop Table.
Turn 3, –2 Target Markers: Each player gets two fewer Target/Counterblow markers at the start of the turn, for a maximum of three.Both sides are reorganizing from the initial battle shock and were not very active that night.

No Retreat! The North African Front 37
© 2013, 2015 GMT Games, LLC
Turn 4, Reserve Wave: The German player can pick up four round detachment markers from his Reserves holding box (if flipped over, flip them back to their front sides) and Paradrop them within two hexes of another German unit (but not one dropped this turn).
These represent some of the reserve companies that were available to reinforce the Germans.
Turn 5, Convoys & Air Landings: The German player can start Air Landing units on captured Airfields (see C8.6.1), and invade with units from the Invasion Convoy box (see C8.5.2). The Allied RF/1A&SH (3-3) unit is now free to move.The Germans used two convoys of small captured Greek ships to transport mountain troops and heavy equipment. Most were either intercepted and destroyed by the Royal Navy or forced to abort. The air landing of Mountain troops was far more successful.
Turn 6, British Reinforcements: The Allied player can freely flip (back to full strength) one non-Greek Allied unit of his choice on the map.Some units were reinforced by ad-hoc troops sent from nearby brigades.
Turn 7, –1 Air Support: The German player gets one less Air support marker this turn. It remains in the Used Markers Holding Box. This represents German aircraft being diverted to combat incursions of the British Royal Navy.
Turn 8, Greek Replacements: The Allied player can freely flip (back to full strength) one Greek unit of his choice on the map.Some Greek units were assisted by the local popula-tion, and by 300 cadet officers from the Hellenic Army Academy who—upon hearing of the invasion—muti-nied and sailed from the Greek mainland to Crete on caiques.
Turn 9, Sudden Death: Check to see if the Allied player wins the game (see C15.7.2). The Airfields and Port facilities on the island were the strategic targets both sides aimed to hold. A Sudden Death victory means the opponent has “called it quits” in face of a perceived desperate situation.
Turns 10-18, Axis Initiative: The Axis players plays First in a turn.
Turn 10, –1 Event Card: Both players get one fewer card draw during the current turn.
Both sides reorganized their command organization and were a bit less effective this day.
Turn 11, Evacuation Allowed: The Allied player can start to evacuate troops in Ports or next to map edge road hexes (see C8.4). The British intended to repulse the invaders and hold the island. Only when the situation was without hope did they start evacuating troops; especially after the Royal Navy could not continue sailing to the island in the face of the German air superiority.
Turn 12, German Replacements: The German player can freely flip (back to full strength) one German unit of his choice on the map.
Some Fallschirmjäger companies and platoons got dropped off-map far from their objectives and took days to get back into action.
Turn 13, British Commandos: The Allied player can land (on any one Port) up to four round detachment markers taken from his Reserves box (if flipped over, flip them back to their front sides). Roll for the outcome on the Convoy Tables’ “Night Attempt”. Also see C18.6 for an Optional rule for these units.Two lightly-equipped commando battalions were sent to reinforce the island, and ended up being deployed as rear-guard units covering the general withdrawal of the Allied troops of “Creteforce”.
Turn 14, Royal Navy Withdraws: Remove card #C12 (RoyAl NAvy) from the game. Reshuffle the deck and Discard Pile together to form a new Draw Pile if the card was found in the deck or Discard pile.
Severe and increasing Allied ship losses due to the Luftwaffe’s air attacks caused the British to withdraw most of their naval assets operating around the island, excepting some vessels evacuating troops.
Turn 15, Sudden Death: Check to see if the German player wins the game (see C15.7.2).
The airfields and port facilities on the island were the strategic targets both sides aimed to hold. A Sudden Death victory means the opponent has “called it quits” in face of a perceived desperate situation.
Turn 16, –3 Air Support: The German player gets three fewer Air Support markers this turn. These stay in the Used Markers Holding Box. Near-continuous operations started to take a toll on the Luftwaffe’s operational availability.
No Retreat! The North African Front38
© 2013, 2015 GMT Games, LLC
Turn 17, Possible End Game: Check to see if the game ends this turn: Roll one die; if it’s equal to or lower than the total number of Airfields and Port hexes the German player holds, the game ends immediately (no Turn 17). Use End of Game Victory (C15.7.4) to determine victor.This way the very last turn of the game will not be a sure thing; the game might continue for two more turns (one day and one night).
Turn 18, End Game: At the end of Turn 18 the game ends and final victory is determined (see C15.7.4).
This event will not be used when playing with the optional longer game to be offered in an upcoming C3i magazine issue.
[C15.7] Checks SegmentCertain critical matters are checked as shown below.
[C15.7.2] Sudden Death: During this segment of Sudden Death Game Turns (i.e., those marked with a skull and crossed bones icon on the Game Turn Track), one player might immediately win.
ProcedureGame Sudden Death Victory:On Turn 9, if the German player does not hold at least one Airfield hex, the game ends immediately in an Allied Victory; unless the Germans hold at least one Port hex, then roll one die:
Sudden Death Victory 1-3 The Allies win 4-6 The game continues
Thus, for the Allies to win, it is probably not enough to successfully protect just the Airfields; they must also keep most of their Ports open.
On Turn 15, If the German player holds one or more Airfields, and the Allied player does not hold at least two Ports, the game ends immediately in a German Victory.Again, the Allies must try to keep some of the Ports open, or evacuation would have been inevitable.
[C15.7.3] Shift in Initiative: The initiative Advantage belongs to the Allies through Game Turn 9. During this Segment of Game Turn 10, the Initiative Advantage belongs to the Germans for the remainder of the game (see C6.1).
[C15.7.4] End of Game Victory: If Game Turn 18 was just completed, check the End of Game Victory conditions Table to determine the winner.
Total the number of objective hexes the Allied player holds (maximum of eleven). Shift victory “down” one level (Allied favor) if six or more German blue-square Paratroop units were destroyed. Shift victory “up” one level (German favor) if six or more Allied square units units were destroyed, minus Allied square units in the Evacuated Units box.
End of Game Victory Conditions Table
≤ 2 Decisive German Victory 3-4 German Victory 5-6 Draw 7-8 British Victory ≥ 9 Decisive British Victory
Shift victory “up” one level (Allied favor) if ≥ 6 Para-troop (blue) square units were destroyed.Shift victory “down” one level (German favor) if ≥ 6 Allied square units were destroyed, minus Allied square units in the Evacuated Units box.
Example: The Allies hold five objective hexes (a draw), but the Germans have had eight Paratroop units elimi-nated. This shifts the victory one level in favor of the Allies. The Allies have also lost eleven units, but they have six units in their “Evacuated Units” box, lowering the total to five eliminated units, so they do not lose a victory step. The game is thus a British victory.
Evacuated square units will be very important for the Allied player—as all square units end up either in the Evacuated Units box or the Eliminated Units box if the game does not end in “Sudden Death” (see C15.75). On the other hand, the German player should moni-tor elite Paratrooper casualties very closely. Let the mountain troops do the fighting (and dying) when at all possible.
[C15.7.5] End of Game Allied Evacuation: The Allied player needs to check the fate of his square units still on the maps at the end of the game. Round units and Boxes are not taken into account.• Each Allied square unit that cannot trace of path of 10
hexes or less on its own map to a south-leading road hex, or the Friendly Port hexes of Suda, Rethymnon or Heraklion, is put in the Destroyed Units box. The
No Retreat! The North African Front 39
© 2013, 2015 GMT Games, LLC
[C18.6] British CommandoesThe four Allied round detachment counters that come in as reinforcements on Turn 13 represent elite lightly-equipped British commandoes. 1. To differentiate these units put Shock! markers from
The North African Front under them.2. They can attack even if they have a white SP.3. Each can make a Counterblow move (see C13.0.1);
no need to pay with a marker. Thus they can do two such moves in a row if you pay, and can also enter a hex containing a target marker.
4. It can declare regular Combat during night turns, get-ting a special one-column shift bonus to the right.
This will make the Commando units more flexible and very useful as rear-guards to protect the retreating Al-lied troops. Some special “Commando”counters will be offered in an upcoming GMT C3i issue.
DEDICATIONThis game is dedicated to the fearless soldiers of the Greek 8th Regiment, and the people of Alikianos, Crete. Poorly equipped and without much training or support, they defended their homeland against Hitler’s best for over a week, greatly impacting the fighting, and aiding the eventual Allied evacuation of the island.
ΑΕΡΑ!!!“Χωρίς νεκρούς η λευτεριά
ζάλο η παντέρμη δεν κάνει γιατί εκείνη βρίσκεταιστου τουφεκιού την κάνη”.
AIR!!! (Freedom Cry)Without fallen soldiers
There cannot be freedom,For it stands at the tip of the gun.
path cannot cross Enemy units or EZOCs (Friendly units do not negate EZOCs for that purpose).
• Roll on the Evacuation Table (found on The Invasion of Crete player aid card) for each Allied unit that can trace such a path to determine its fate.
Note that evacuation by map edge is somewhat easier, as there is a +1 modifier for Port Evacuation during day turns. There is also an extra +1 modifer for units rolling on this table during the end game.
[16.0] MALTATHIS RULE IS NOT USED
[C17.0] HOW TO WIN There are two ways of winning the game:
1. A Sudden Death Victory: Checked twice in the game, once for each side. A Sudden Death victory means the other side has “called it quits” in face of a perceived desperate situation (see C15.7.2).
2. An End of Game Victory: Checked at the beginning of Turn 17 and—if the game continues—at the end of Turn 18, when players compare Victory Points scored for the control of Map objectives and unit casualties (see C15.7.4).
[C18.0] ADVANCED RULES These advanced rules add greater detail and realism at the expense of some added complexity. Players are free to use any or all of them by mutual agreement. These advanced rules are recommended once you are familiar with the basic game.
[C18.5] Tactical InterdictionYou can now put on the map your air, tank and support markers in the enemy turn—not only during the Defensive Support Phase, but also at the start of the enemy Move-ment Phase.
This makes movement interdiction more possible as the enemy will have to pay extra movement factors to cross those hexes.
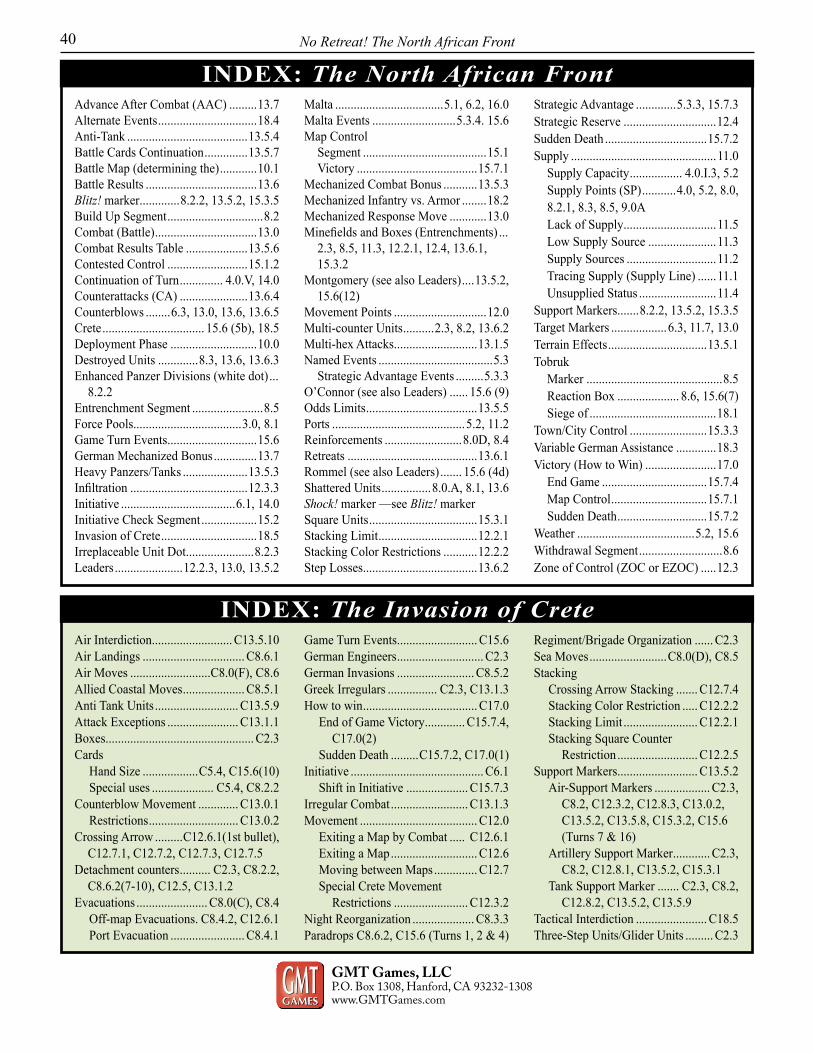
No Retreat! The North African Front40
GMT Games, LLCP.O. Box 1308, Hanford, CA 93232-1308www.GMTGames.com
Advance After Combat (AAC) .........13.7Alternate Events ................................18.4Anti-Tank .......................................13.5.4Battle Cards Continuation ..............13.5.7Battle Map (determining the) ............10.1Battle Results ....................................13.6Blitz! marker .............8.2.2, 13.5.2, 15.3.5Build Up Segment ...............................8.2Combat (Battle) .................................13.0Combat Results Table ....................13.5.6Contested Control ..........................15.1.2Continuation of Turn .............. 4.0.V, 14.0Counterattacks (CA) ......................13.6.4Counterblows ........6.3, 13.0, 13.6, 13.6.5Crete ................................. 15.6 (5b), 18.5Deployment Phase ............................10.0 Destroyed Units .............8.3, 13.6, 13.6.3Enhanced Panzer Divisions (white dot) ...
8.2.2Entrenchment Segment .......................8.5Force Pools...................................3.0, 8.1Game Turn Events .............................15.6German Mechanized Bonus ..............13.7Heavy Panzers/Tanks .....................13.5.3Infiltration ......................................12.3.3Initiative .....................................6.1, 14.0Initiative Check Segment ..................15.2Invasion of Crete ...............................18.5Irreplaceable Unit Dot ......................8.2.3Leaders ......................12.2.3, 13.0, 13.5.2
Malta ...................................5.1, 6.2, 16.0Malta Events ...........................5.3.4. 15.6Map Control Segment ........................................15.1 Victory .......................................15.7.1Mechanized Combat Bonus ...........13.5.3Mechanized Infantry vs. Armor ........18.2Mechanized Response Move ............13.0Minefields and Boxes (Entrenchments) ...
2.3, 8.5, 11.3, 12.2.1, 12.4, 13.6.1, 15.3.2
Montgomery (see also Leaders) ....13.5.2, 15.6(12)
Movement Points ..............................12.0Multi-counter Units ..........2.3, 8.2, 13.6.2Multi-hex Attacks ...........................13.1.5Named Events .....................................5.3 Strategic Advantage Events .........5.3.3O’Connor (see also Leaders) ...... 15.6 (9)Odds Limits ....................................13.5.5Ports ...........................................5.2, 11.2Reinforcements .........................8.0D, 8.4Retreats ..........................................13.6.1Rommel (see also Leaders) ....... 15.6 (4d)Shattered Units ................8.0.A, 8.1, 13.6Shock! marker —see Blitz! markerSquare Units ...................................15.3.1Stacking Limit ................................12.2.1Stacking Color Restrictions ...........12.2.2Step Losses.....................................13.6.2
Strategic Advantage .............5.3.3, 15.7.3Strategic Reserve ..............................12.4Sudden Death .................................15.7.2Supply ...............................................11.0 Supply Capacity ................. 4.0.I.3, 5.2 Supply Points (SP) ...........4.0, 5.2, 8.0, 8.2.1, 8.3, 8.5, 9.0A Lack of Supply ..............................11.5 Low Supply Source ......................11.3 Supply Sources .............................11.2 Tracing Supply (Supply Line) ......11.1 Unsupplied Status .........................11.4Support Markers .......8.2.2, 13.5.2, 15.3.5Target Markers ..................6.3, 11.7, 13.0Terrain Effects ................................13.5.1Tobruk Marker ............................................8.5 Reaction Box .................... 8.6, 15.6(7) Siege of .........................................18.1Town/City Control .........................15.3.3Variable German Assistance .............18.3Victory (How to Win) .......................17.0 End Game ..................................15.7.4 Map Control ...............................15.7.1 Sudden Death .............................15.7.2Weather ......................................5.2, 15.6Withdrawal Segment ...........................8.6Zone of Control (ZOC or EZOC) .....12.3
INDEX: The North African Front
Air Interdiction .......................... C13.5.10Air Landings ................................. C8.6.1Air Moves ..........................C8.0(F), C8.6Allied Coastal Moves .................... C8.5.1Anti Tank Units ........................... C13.5.9Attack Exceptions ....................... C13.1.1Boxes................................................ C2.3Cards
Hand Size ..................C5.4, C15.6(10)Special uses .................... C5.4, C8.2.2
Counterblow Movement ............. C13.0.1Restrictions ............................. C13.0.2
Crossing Arrow .........C12.6.1(1st bullet), C12.7.1, C12.7.2, C12.7.3, C12.7.5
Detachment counters .......... C2.3, C8.2.2, C8.6.2(7-10), C12.5, C13.1.2
Evacuations ....................... C8.0(C), C8.4Off-map Evacuations . C8.4.2, C12.6.1Port Evacuation ........................ C8.4.1
Game Turn Events .......................... C15.6German Engineers ............................ C2.3German Invasions ......................... C8.5.2Greek Irregulars ................ C2.3, C13.1.3How to win ..................................... C17.0
End of Game Victory ............. C15.7.4, C17.0(2)
Sudden Death .........C15.7.2, C17.0(1)Initiative ........................................... C6.1
Shift in Initiative .................... C15.7.3Irregular Combat ......................... C13.1.3Movement ...................................... C12.0
Exiting a Map by Combat ..... C12.6.1Exiting a Map ............................ C12.6Moving between Maps .............. C12.7Special Crete Movement Restrictions ........................ C12.3.2
Night Reorganization .................... C8.3.3Paradrops C8.6.2, C15.6 (Turns 1, 2 & 4)
Regiment/Brigade Organization ...... C2.3Sea Moves .........................C8.0(D), C8.5Stacking
Crossing Arrow Stacking ....... C12.7.4Stacking Color Restriction ..... C12.2.2Stacking Limit ........................ C12.2.1Stacking Square Counter
Restriction .......................... C12.2.5Support Markers .......................... C13.5.2
Air-Support Markers .................. C2.3, C8.2, C12.3.2, C12.8.3, C13.0.2, C13.5.2, C13.5.8, C15.3.2, C15.6 (Turns 7 & 16)
Artillery Support Marker ............ C2.3, C8.2, C12.8.1, C13.5.2, C15.3.1
Tank Support Marker ....... C2.3, C8.2, C12.8.2, C13.5.2, C13.5.9
Tactical Interdiction ....................... C18.5Three-Step Units/Glider Units ......... C2.3
INDEX: The Invasion of Crete