rulebook version 1.3 - pine box...
TRANSCRIPT
2 September 2017
[1]
RULEBOOK VERSION 1.3.1
Contents
Section 1. Game Overview ........................................................................................ 3
Section 2. Key Concepts ............................................................................................ 3
Section 2.1 Golden Rule.............................................................................................................. 3
Section 2.2 Decks, Discards, and Boot Hill ................................................................................ 3
Section 2.3 Card Values and Hands ............................................................................................ 4
Section 2.4 Locations and Adjacency ......................................................................................... 4
Section 2.5 Cheatin’ .................................................................................................................... 5
Section 2.6 Booting Cards ........................................................................................................... 5
Section 3 Card Types ................................................................................................. 5
Section 3.1 Outfit Card................................................................................................................ 6
Section 3.2 Legend Card ............................................................................................................. 7
Section 3.3 Dude Card ................................................................................................................ 8
Section 3.4 Deed Card ................................................................................................................. 9
Section 3.5 Goods Card ............................................................................................................. 10
Section 3.6 Spell Card ............................................................................................................... 11
Section 3.7 Action Card ............................................................................................................ 12
Section 3.8 Joker Card .............................................................................................................. 13
Section 3.9 Owner and controller .............................................................................................. 13
Section 4. Setup ........................................................................................................14
Section 5. Sequence of Play .....................................................................................14
Section 5.1 Gambling Phase ..................................................................................................... 14
Section 5.2 Upkeep Phase ......................................................................................................... 15
Section 5.3 High Noon Phase .................................................................................................... 16
Section 5.3.1 The Five Plays — Actin’ ................................................................................. 16
Section 5.3.2 The Five Plays — Callin’ Out ......................................................................... 17
Section 5.3.3 The Five Plays — Movin’ ............................................................................... 17
2 September 2017
[2]
Section 5.3.5 The Five Plays — Shoppin’............................................................................. 17
Section 5.3.5 The Five Plays — Tradin’ ............................................................................... 18
Section 5.4 Sundown. ............................................................................................................ 19
Section 6 Shootouts and Jobs ...................................................................................19
Section 6.1 Shootouts ................................................................................................................ 19
Step 1. Make Plays ................................................................................................................ 20
Step 2. Pick Yer Shooter........................................................................................................ 21
Step 3. Draw! ......................................................................................................................... 21
Step 4. Reveal and Resolve ................................................................................................... 21
Step 5. Take Yer Lumps ........................................................................................................ 22
Step 6. Run or Gun ................................................................................................................ 23
Step 7. Chamber Another Round ........................................................................................... 23
Section 6.2 Jobs ......................................................................................................................... 23
Step 1. Start the Job ............................................................................................................... 24
Step 2. Choose the Mark........................................................................................................ 24
Step 3. Form Posses ............................................................................................................... 24
Step 4. Saddle Up .................................................................................................................. 25
Step 5. Is the Job Done? ........................................................................................................ 25
Section 7. Other Rules .............................................................................................25
Section 7.1 Reacts ..................................................................................................................... 25
Section 7.2 Skilled Dudes ......................................................................................................... 26
Section 7.2.1 Casting Spells .................................................................................................. 27
Section 7.2.2 Inventing Gadgets ............................................................................................ 27
Section 7.2.3 Planting Totems ............................................................................................... 27
Section 7.3 Kung Fu .................................................................................................................. 28
Section 7.3.1 Kung Fu Techniques ........................................................................................ 28
Section 7.3.2 Kung Fu Tao Techniques and Combos ........................................................... 28
Section 7.4 Hand Ranks ............................................................................................................ 29
Section 8. Deckbuilding ...........................................................................................29
2 September 2017
[3]
Section 1. Game Overview
Doomtown is a game for two or more players, each vying for control of the town. You take
control of the town and win the game if, at the beginning of any Sundown phase, you have more
control points than each other player has influence points.
Generally, you gain control points from the deeds under your control. Other cards will gain you
control points after satisfying certain conditions as well.
You primarily gain influence from the dudes you have in play. There are other cards that may
modify the influence of your dudes.
Section 2. Key Concepts
Section 2.1 Golden Rule
Whenever a card seems to contradict the rules, the card text is always right. However, when one
card says you “can” do something, and another card says you “cannot” do something, the one
that says you “cannot” always takes priority.
In rare circumstances, you might encounter two “cannot” clauses that would both override each
other. In these cases, the Winner decides the order of preference on these conflicting clauses.
Section 2.2 Decks, Discards, and Boot Hill
Each player has their own deck to draw cards from during the game. You must shuffle your deck
before the game begins, as well as any time after you search your deck during play. Be sure to
give the other players a chance to cut your deck after you shuffle. You do not have to shuffle
your deck if you are only looking at "the top [number of] cards" of the deck.
You also have a discard pile. This holds cards you have used, but that you might see again later
in the game. Whenever you are required to discard cards, put those cards face up in your discard
pile. Players are allowed to look through any discard pile at any time, but they are not allowed to
change the order of those cards.
If you need to take a card from your deck for whatever reason, but your deck is empty, shuffle
your discard pile to make a new deck.
You also have a Boot Hill, a separate pile of cards you never shuffle back into your deck. During
play, cards can be aced; whenever a card of yours is aced, put it in your Boot Hill. If the card has
other cards attached to it, those attached cards go to your discard pile instead. Players are
allowed to look through anyone's Boot Hill at any time, but they are not allowed to change the
order of those cards.
2 September 2017
[4]
If an ability lets you take control of an opponent's card, and that card subsequently leaves play
(e.g. is discarded or aced), that card returns to the opponent’s discard pile or Boot Hill, as
appropriate. Regardless of card effects, you can never put an opponent's card into your deck or
play hand.
Section 2.3 Card Values and Hands
Each card in your deck has a suit (♣ clubs, ♦ diamonds, ♥ hearts, and ♠ spades) and a numeric
value. These are used when creating poker hands during the game, but may be referenced at
other times.
A card's value ranges from one to thirteen. Aces count as ones, while jacks, queens, and kings
count as elevens, twelves, and thirteens, respectively.
During the game you'll have a play hand of cards that you can use. In addition, at various times
you'll have a draw hand, which is used during a shootout, as well as during the Gambling phase.
A draw hand is used for its poker hand rank; be careful never to mix or switch your play hand
with your draw hand.
Section 2.4 Locations and Adjacency
When you play Doomtown, your table becomes a map of the town as the players build it up.
There are three types of in-town locations:
1) Each deed in play is an in-town location (unless it has the Out of Town keyword).
2) Each outfit’s home is an in-town location (these have a few special rules).
3) The area in the middle of the table is an in-town location called the town square.
Your street is your row of cards—your home and in-town deeds—that make up the part of the
town that you own.
When you bring in-town deeds into play during a game, you’ll place them at either end of your
street. Thus, at the start of the game, when you play a deed, it goes to the left or right of your
home (your choice). The next deed you play goes next to either your home or the first deed you
played; it can’t go between them. Once deeds are placed on your street, their position is
permanent, meaning you cannot choose to rearrange them.
When two in-town locations are next to each other, they are adjacent. Thus any in-town deed is
adjacent to the locations to its immediate right and left (same goes for your home). Also, all in-
town locations are adjacent to the town square. Locations on your street are not adjacent to
locations on any other player’s street.
Some deeds are Out of Town (they say so in their keywords); each is a location unto itself. Out
of Town deeds are not adjacent to anything, not even other Out of Town deeds.
Sometimes, a deed leaves play (i.e. being discarded or aced). When this happens, any dudes at
that deed go home booted. If there were any cards that were attached to that deed, those cards are
2 September 2017
[5]
discarded from play. Move the locations that were adjacent to that deed together so that they are
adjacent, closing the gap created by the deed leaving play.
Section 2.5 Cheatin’
Draw hands are considered either legal or illegal (the latter also known as Cheatin’). A draw
hand is legal if it does not contain any cards (other than jokers) that share the same suit and
value. A draw hand is Cheatin’ if there are at least two cards in it (other than jokers) that share
the same suit and value. After a player reveals a Cheatin’ draw hand, other players will have the
opportunity to resolve Cheatin’ Resolutions, or other effects.
A joker never causes an otherwise legal draw hand to become a Cheatin’ draw hand, regardless
of the suit and value chosen for the joker. However, if a card effect changes the suit and/or value
of a non-joker card to a card suit and value that already exists in the hand, the draw hand is now
considered Cheatin’.
Section 2.6 Booting Cards
Many times, when you use a card’s ability, the card tells you to boot it. You boot a card by
turning it sideways by 90 degrees. A booted card can’t be booted again until it has been
unbooted, which means turned straight up. Cards come into play unbooted.
Booted cards cannot use an ability that has booting as a cost. In other words, if a card’s ability
says something like, “Noon, Boot: Do this awesome thing” or “Boot a card to do this awesome
thing,” you can’t do that awesome thing if the card is already booted.
Aside from that, unless the rules say otherwise, booted cards are treated the same as unbooted
cards.
Only cards in play can be booted. If a booted card leaves play (to your hand, discard pile, or Boot
Hill) it is no longer booted.
Section 3 Card Types
Continued on the next page, this section includes annotated examples of the different card types
and their layouts.
2 September 2017
[6]
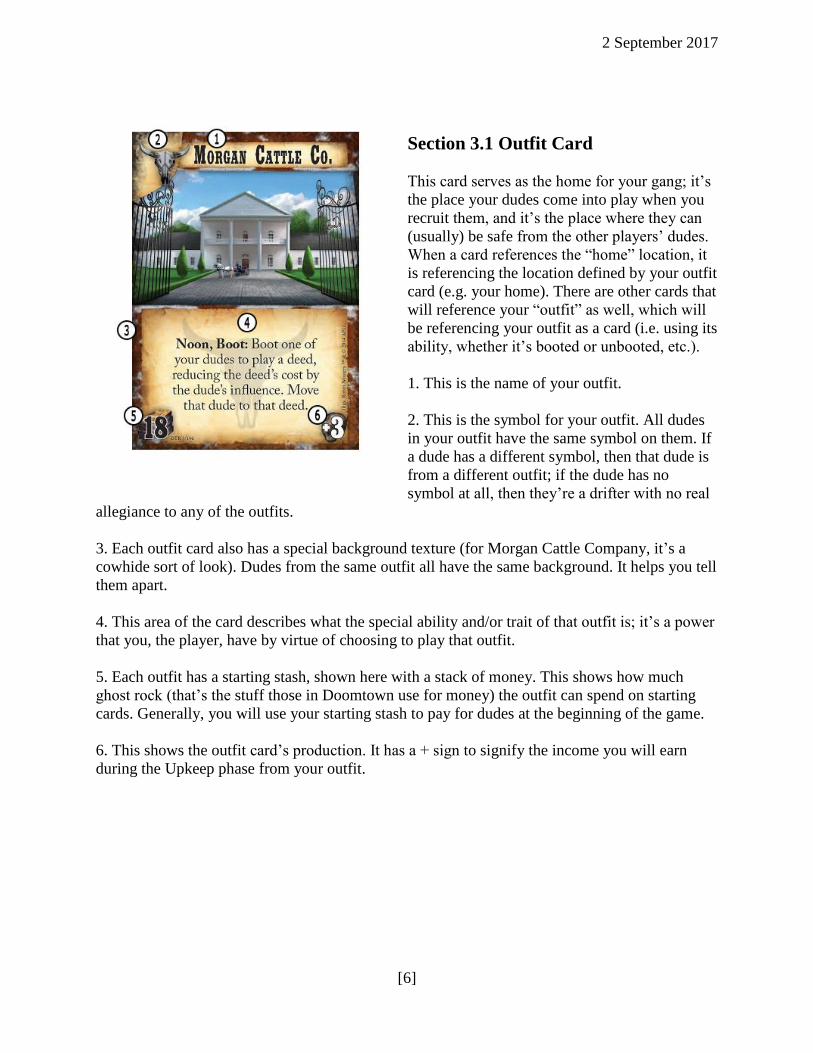
Section 3.1 Outfit Card
This card serves as the home for your gang; it’s
the place your dudes come into play when you
recruit them, and it’s the place where they can
(usually) be safe from the other players’ dudes.
When a card references the “home” location, it
is referencing the location defined by your outfit
card (e.g. your home). There are other cards that
will reference your “outfit” as well, which will
be referencing your outfit as a card (i.e. using its
ability, whether it’s booted or unbooted, etc.).
1. This is the name of your outfit.
2. This is the symbol for your outfit. All dudes
in your outfit have the same symbol on them. If
a dude has a different symbol, then that dude is
from a different outfit; if the dude has no
symbol at all, then they’re a drifter with no real
allegiance to any of the outfits.
3. Each outfit card also has a special background texture (for Morgan Cattle Company, it’s a
cowhide sort of look). Dudes from the same outfit all have the same background. It helps you tell
them apart.
4. This area of the card describes what the special ability and/or trait of that outfit is; it’s a power
that you, the player, have by virtue of choosing to play that outfit.
5. Each outfit has a starting stash, shown here with a stack of money. This shows how much
ghost rock (that’s the stuff those in Doomtown use for money) the outfit can spend on starting
cards. Generally, you will use your starting stash to pay for dudes at the beginning of the game.
6. This shows the outfit card’s production. It has a + sign to signify the income you will earn
during the Upkeep phase from your outfit.

2 September 2017
[7]
Section 3.2 Legend Card
A legend card serves as a guiding force for
your outfit. They often grant powerful abilities
at some cost. Legend cards cannot be affected
by card effects unless a card specifically states
that it can affect a Legend card.
1. This is the name of your legend.
2. This area of the card describes what the
special ability, keywords, or traits of that
legend are; it’s a power that you, the player,
have by virtue of choosing to play that legend.
3. A legend may modify your starting stash. If
it has a + sign, then it increases your starting
stash, or if it has a – sign, it decreases your
starting stash.
4. A legend may also modify your outfit card’s production. If it has a + sign, then it increases
your outfit’s production, or if it has a - sign, it decreases your outfit’s production.

2 September 2017
[8]
Section 3.3 Dude Card
Townsfolk are represented by dude cards.
Dudes are people that owe you their loyalty, and
work to further your goals by their influence,
their innate abilities, or their skills with a
revolver.
1. Each dude card has a specific suit (♠ spades)
and value assigned to it. These are mostly used
to create poker hands during the game, but can
also be used for other effects too, as explained
later. The higher a dude’s value, the harder it is
for bad things to affect them (e.g., getting hit by
a shotgun, getting a spell cast on them).
2. Bullets are a measure of a dude’s capability
to win a shootout. The higher the number, the
better they are at gunning down the other side.
In addition, the color of the cartridge determines
whether the dude is a stud or a draw; a silver cartridge means the dude is a stud (and better),
while a brass cartridge indicates the dude is a draw (less stellar, but still useful).
3. Influence is a representation of how renowned the dude is around town. Well-known,
charismatic dudes have high influence. So do dangerous, infamous killers. The primary use of
influence is to prevent other players from winning, and to control deeds in order to help you win.
4. The outfit symbol shows which outfit the dude primarily works for.
5. This area of the card describes any special skills that the dude can use in the game. At the top,
in bold, are any keywords that the dude may have (e.g., Deputy, Huckster, etc.). These may be
referenced by other cards in the game, or by the rules. Below that are the card’s abilities and
traits. You’ll find out how to use these effects later in the rules.
6. Each dude has a cost, shown on a coin icon. This is how much ghost rock you must pay to
bring the dude into play.
7. Upkeep shows how much the dude costs each turn to keep them in play (some dudes have zero
upkeep). Dudes that belong to other outfits have greater upkeep from day to day.
2 September 2017
[9]
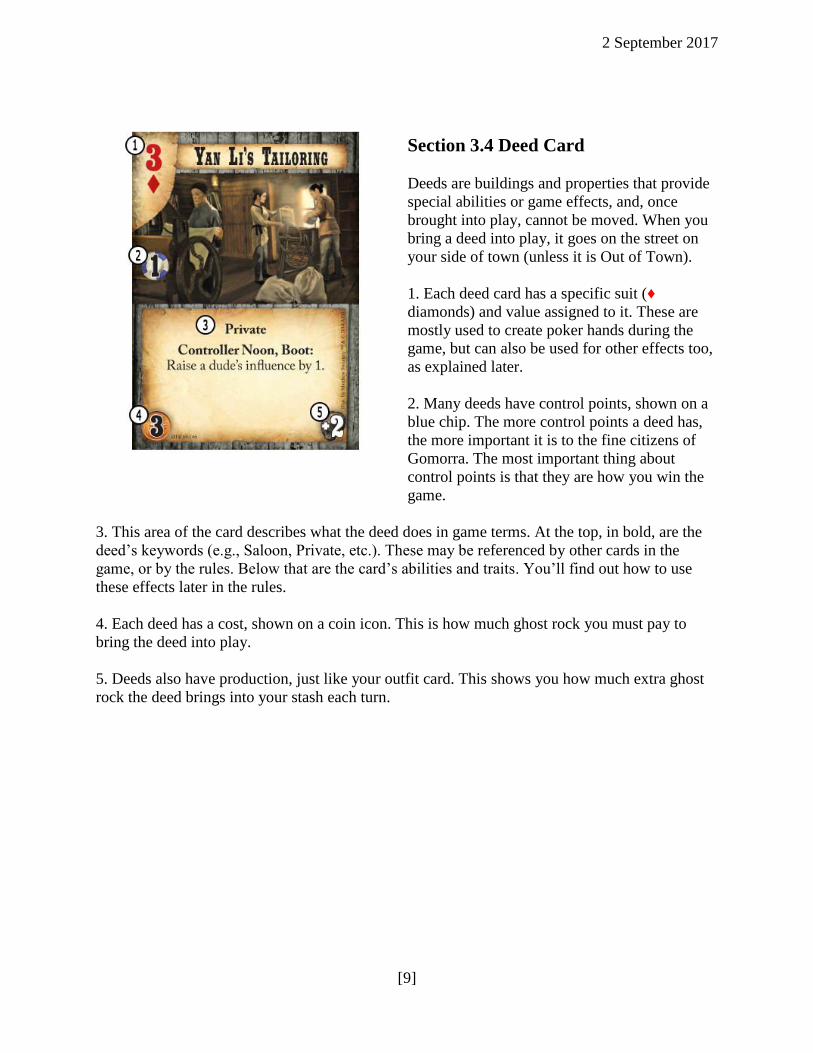
Section 3.4 Deed Card
Deeds are buildings and properties that provide
special abilities or game effects, and, once
brought into play, cannot be moved. When you
bring a deed into play, it goes on the street on
your side of town (unless it is Out of Town).
1. Each deed card has a specific suit (♦
diamonds) and value assigned to it. These are
mostly used to create poker hands during the
game, but can also be used for other effects too,
as explained later.
2. Many deeds have control points, shown on a
blue chip. The more control points a deed has,
the more important it is to the fine citizens of
Gomorra. The most important thing about
control points is that they are how you win the
game.
3. This area of the card describes what the deed does in game terms. At the top, in bold, are the
deed’s keywords (e.g., Saloon, Private, etc.). These may be referenced by other cards in the
game, or by the rules. Below that are the card’s abilities and traits. You’ll find out how to use
these effects later in the rules.
4. Each deed has a cost, shown on a coin icon. This is how much ghost rock you must pay to
bring the deed into play.
5. Deeds also have production, just like your outfit card. This shows you how much extra ghost
rock the deed brings into your stash each turn.
2 September 2017
[10]
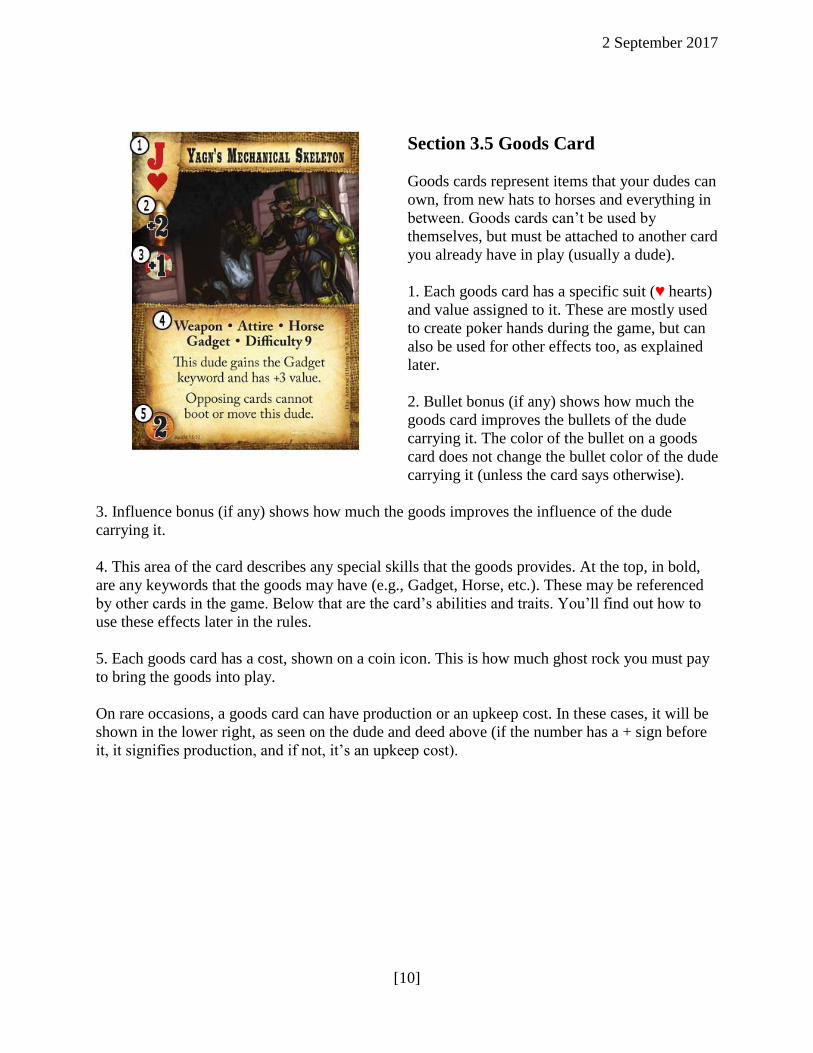
Section 3.5 Goods Card
Goods cards represent items that your dudes can
own, from new hats to horses and everything in
between. Goods cards can’t be used by
themselves, but must be attached to another card
you already have in play (usually a dude).
1. Each goods card has a specific suit (♥ hearts)
and value assigned to it. These are mostly used
to create poker hands during the game, but can
also be used for other effects too, as explained
later.
2. Bullet bonus (if any) shows how much the
goods card improves the bullets of the dude
carrying it. The color of the bullet on a goods
card does not change the bullet color of the dude
carrying it (unless the card says otherwise).
3. Influence bonus (if any) shows how much the goods improves the influence of the dude
carrying it.
4. This area of the card describes any special skills that the goods provides. At the top, in bold,
are any keywords that the goods may have (e.g., Gadget, Horse, etc.). These may be referenced
by other cards in the game. Below that are the card’s abilities and traits. You’ll find out how to
use these effects later in the rules.
5. Each goods card has a cost, shown on a coin icon. This is how much ghost rock you must pay
to bring the goods into play.
On rare occasions, a goods card can have production or an upkeep cost. In these cases, it will be
shown in the lower right, as seen on the dude and deed above (if the number has a + sign before
it, it signifies production, and if not, it’s an upkeep cost).
2 September 2017
[11]
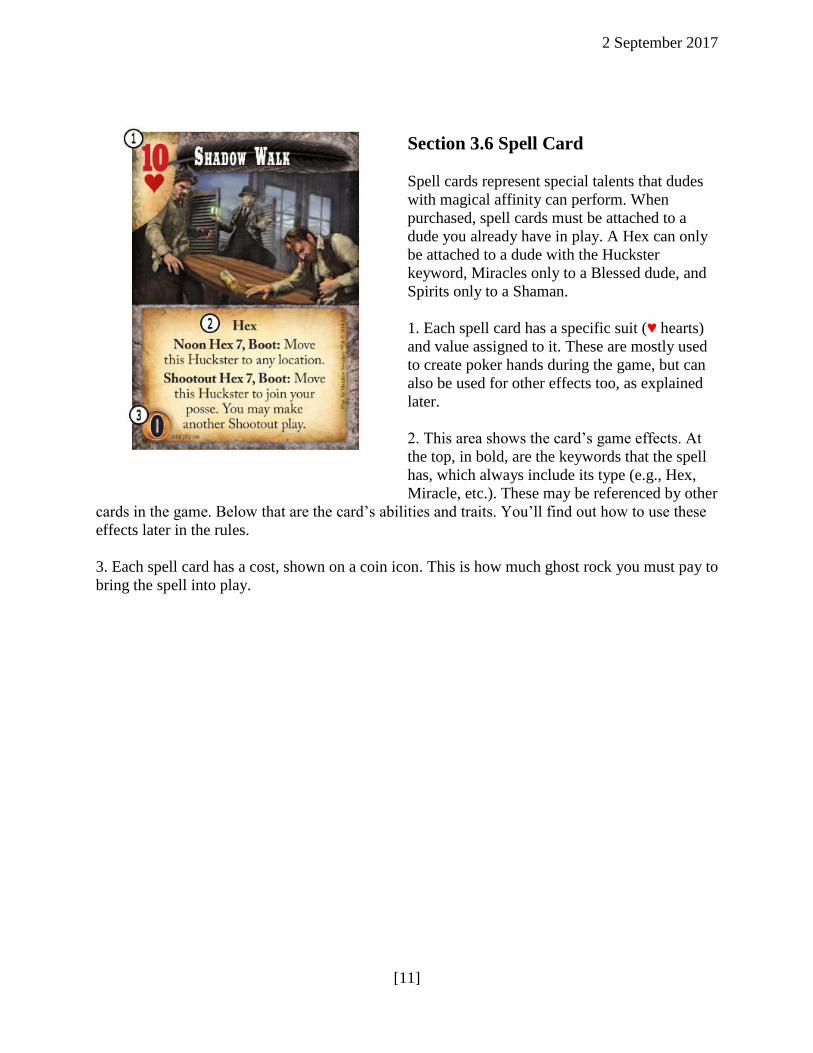
Section 3.6 Spell Card
Spell cards represent special talents that dudes
with magical affinity can perform. When
purchased, spell cards must be attached to a
dude you already have in play. A Hex can only
be attached to a dude with the Huckster
keyword, Miracles only to a Blessed dude, and
Spirits only to a Shaman.
1. Each spell card has a specific suit (♥ hearts)
and value assigned to it. These are mostly used
to create poker hands during the game, but can
also be used for other effects too, as explained
later.
2. This area shows the card’s game effects. At
the top, in bold, are the keywords that the spell
has, which always include its type (e.g., Hex,
Miracle, etc.). These may be referenced by other
cards in the game. Below that are the card’s abilities and traits. You’ll find out how to use these
effects later in the rules.
3. Each spell card has a cost, shown on a coin icon. This is how much ghost rock you must pay to
bring the spell into play.

2 September 2017
[12]
Section 3.7 Action Card
Action cards represent special events, plans, and
tactics that your dudes or your gang use to get
the best of the situation. Unlike other cards in
the game, action cards are generally played
directly from your hand; you do not bring them
into play, but instead resolve their effect, and
then usually discard them once their effect is
complete.
1. Each action card has a specific suit (♣ clubs)
and value assigned to it. These are mostly used
to create poker hands during the game, but can
also be used for other effects too, as explained
later.
2. This area of the card describes the effects the
action has when played. If a card has multiple
abilities listed, choose and declare the one you
wish to use.
3. Each action card has a cost (often zero), shown on a coin icon. This is how much ghost rock
you must pay to play the action.
On rare occasions, an action card can have production or an upkeep cost. In these cases, it will be
shown in the lower right, as seen on the dude and deed above (if the number has a + sign before
it, it signifies production, and if not, it’s an upkeep cost).

2 September 2017
[13]
Section 3.8 Joker Card
Jokers are usually only useful for pulls and draw
hands (including lowball); you can’t play one
from your play hand (unless specified on the
joker itself). When a joker is revealed for a pull
or in a draw hand, its suit and value are chosen
by its owner as soon as the joker is revealed. A
joker by itself will never make a hand illegal;
for example, if you have a legal four-of-a-kind
draw hand with a joker, it becomes a legal five-
of-a-kind draw hand.
Section 3.9 Owner and controller
The owner of a card is the person whose deck the card came from. The owner of a card never
changes.
The controller of a card is the person who gets to make all the decisions about what the card
does. Whenever a card refers to “you,” it is referring to the controller of the card. Most of the
time, the controller is also the owner. However, there are two times when that’s not the case:
1) When someone plays an ability that uses the words “take control.” That means the other
person takes over controlling your card.
2) The much more common method concerns deeds. Whoever has the most influence at a
given deed controls that deed. A deed’s controller can change any number of times per
day. This does not move, boot, or otherwise affect the deed. If there’s a tie for the most
influence (even a 0–0 tie because no one is there), the owner has control, even if the
owner is not part of the tie.
If you control a dude or a deed, you also control all cards attached to that dude or deed (whether
or not you own any of those cards). No one ever owns or controls the town square. Players
always own and control their own home; the influence rule does not apply, because an outfit card
is not a deed.
2 September 2017
[14]
Section 4. Setup
At the start of the game, place your outfit card face up on your side of the table. It is your home
location and the first location on your street. If you choose to play with a legend card, attach this
card to your outfit.
Take ghost rock from the bank equal to your outfit’s starting stash, including any modifiers from
an attached legend.
Once players have revealed their outfits, they each search their deck for up to five dudes with a
combined cost less than or equal to their starting stash. These dudes can only be dudes from your
outfit or drifters—you cannot have a dude from another outfit in play at the start of the game.
You can also only include one dude with the Grifter keyword in your starting gang. All players
simultaneously place those dudes at their home (their outfit card), paying all costs. Starting dudes
do not generate any “entering play” effects.
Shuffle your deck and draw a play hand of five cards.
If you wish to resolve a Grifter ability in your starting posse, do so now. If both players have
Grifters, randomly determine who resolves their ability first (use a coin toss or other convenient
method).
Section 5. Sequence of Play
Doomtown is played over a series of days. Each day in Doomtown moves through four phases:
Gambling, Upkeep, High Noon, and Sundown.
1) The Gambling phase determines who goes first for the day, using a game of lowball
poker.
2) The Upkeep phase is when you collect ghost rock from your deeds, and pay your dudes’
upkeep to keep them in play.
3) The High Noon phase is when most of the action takes place as players bring new dudes
and goods into play, maneuver around town, use Noon abilities, and get into shootouts.
4) The Sundown phase is when victory is determined. If no one has won, then everyone gets
to draw some new cards, unboot their dudes, and get ready for the next day.
Section 5.1 Gambling Phase
At the start of each day, each player antes up 1 ghost rock from their stash and puts it into a pot
in the town square. If your stash is empty, borrow a ghost rock from the bank, but you must
repay it during the Upkeep phase (after you collect your production, but before you pay any
upkeep).
All players set aside their play hands and draw a five-card draw hand from the top of their deck.
All players reveal their draw hands simultaneously.

2 September 2017
[15]
If a player reveals a Cheatin’ draw hand, now is the occasion for using a Cheatin’ Resolution
ability. If a player chooses to do so, starting with the previous day’s Winner (if needed, pull for
lowest value to determine this person on the first turn of the game) and going clockwise, every
player has the chance to use Cheatin’ Resolution abilities, either from an action card in their play
hand or printed on a card they already have in play.
Each player can only have one Cheatin’ Resolution ability used against them per draw hand. You
cannot use a Cheatin’ Resolution ability in response to your own Cheatin’ lowball hand.
This poker hand is played using lowball rules. Unlike other Doomtown draw hands, the lowest
hand rank wins. Players with exactly tied hands (e.g. both players reveal 2♠, 3♦, 4♦, 5♣, 7♣)
draw new five-card lowball hands to break the tie. The rank of your draw hand always equals the
highest possible rank that can be achieved with the cards in that hand. In the event that it is
impossible to determine a winner using re-draws (e.g. if each player only has 5 cards in their
respective decks, and those 5 cards will always result in tied lowball hands), determine the
winner randomly (usually by coin flip).
The player with the lowest rank is called the Winner, and remains the Winner until a new Winner
is determined in the next Gambling phase. The Winner takes all the ghost rock from the pot and
places it in their stash. The Winner goes first during each phase of the day, and wins ties
whenever players want to do something at the same time.
Once done, everyone discards their lowball hands and retrieves their play hands.
Section 5.2 Upkeep Phase
At the start of the Upkeep phase each player simultaneously receives production from each deed
they both own and control, as well as their outfit, and any other non-deed cards they control.
Determine your total production and move that much ghost rock from the bank to your stash.
After collecting production, each player returns to the bank any ghost rock they borrowed for
lowball, and then pays upkeep on any cards that they control and wish to keep in play. Upkeep is
paid in turn order, beginning with the player to the left of the Winner.
Any dudes in your gang that belong to another outfit (that is, the dude’s card has an outfit
symbol that doesn’t match the one on your outfit) have their upkeep increased by their influence.
After all players have paid upkeep on cards that they wish to keep in play, any card whose
upkeep was not paid is discarded. A card with zero upkeep cannot be discarded in this way.
Should card effects result in a situation where a player cannot pay the bank for any borrowed
ghost rock, the debt carries forward into subsequent turns, and must be repaid during the Upkeep
phase as soon as the player is able to do so.
2 September 2017
[16]
Section 5.3 High Noon Phase
Starting with the Winner and going clockwise, players take turns making Noon plays. When it’s
your turn to make a play, you can make one of the five basic plays from the rulebook:
1) Actin’
2) Callin’ Out
3) Movin’
4) Shoppin’
5) Tradin’
Additionally, a player can pass their action. You can make these plays in any order and any
number of times.
Play keeps passing to the left around the table until every player passes consecutively. Once this
happens, the High Noon phase ends.
Section 5.3.1 The Five Plays — Actin’
One play you can make is to use a Noon ability on an action card in your play hand or printed on
one of your cards in play (like a deed, dude, goods, or spell). To do so, declare the ability, pay
any costs, meet any requirements if necessary, and resolve its effects.
The cost of an ability includes booting the card if the ability has the word “boot” in front of the
colon, and paying any ghost rock required to use the ability. Also, if the card says something
like, “do X to achieve Y,” X is considered a requirement.
The first sentence (only) of an ability also includes the requirements that must exist in order to
use the ability. For example, if an ability begins with the sentence, “Choose an opposing dude
with a weapon attached,” there must be an opposing dude in play who has a weapon attached. If
not, you can’t use that ability.
Using a card’s ability does not boot that card unless booting is part of its cost. Even so, you can
only use each ability on a given card in play once per day or once during setup. It’s important to
note that normally, an ability used during setup will not be available during the first turn since
abilities only “refresh” at the end of a turn, and the end of setup is not considered an “end of a
turn.” However, any ability that includes the word “Repeat” before the colon can be used
multiple times per day, without limit.
Most abilities on deeds can only be used by that deed’s controller, whether or not the controller
is also the owner. This is noted by the word “Controller” in front of the deed’s ability.
Unless otherwise noted, the effects of Noon abilities last through the end of the Sundown phase.
When you make a Noon play using an action card, only put the card into your discard pile once
the play is complete and it is the next player’s turn to make a play.

2 September 2017
[17]
Section 5.3.2 The Five Plays — Callin’ Out
As a Noon play, one of your unbooted dudes can call out a dude controlled by another player at
the same location (that is, challenge that dude to a shootout). This doesn’t boot your dude, and so
as long as they stay unbooted, your dude can continue to call out an opposing dude at their
location each and every time it’s your turn to make a play. However, this play cannot be used to
call out an opposing dude at that dude’s home.
If unbooted, the dude you called out can refuse the call out by moving home booted. A booted
dude must accept the call-out.
Some card effects let you call out a dude. When using one of these effects, your dude may call
someone out even while booted, and more importantly, can use it to call out a dude in their
home. If not already booted, dudes at their home can still refuse such a call-out by moving home
booted, even though they are already there. Such a refusal still boots the dude, of course.
If a dude accepts a call out, a shootout starts at their location, and both sides can form posses.
Section 5.3.3 The Five Plays — Movin’
As a Noon play you can move one of your unbooted dudes to any other location in play (a deed,
a home, or the town square), regardless of how far away that location is, or whether or not it’s
adjacent. This movement boots a dude, unless you’re making one of the following two special
moves:
1) A dude can move from their own home to an adjacent location without booting.
Locations adjacent to your home are the town square and the deeds on either side of your
home, but could include other locations as indicated by card effects.
2) A dude can move from the town square to any adjacent location, except their own home,
without booting. This includes all in-town deeds and other players’ homes, but again
could include other locations as indicated by card effects.
Although neither of these special moves boots the dude, the dude must still be unbooted in order
to perform the move.
Some card effects let you move a dude. These are usually Noon abilities, but there are also a few
Shootout and React abilities, too. When using one of these effects, you can use it to move a
booted dude, and the move doesn’t boot your dude. Card effects that move a dude must move
them to a new location; the dude cannot remain at the same location, unless the effect is sending
them home booted.
Section 5.3.5 The Five Plays — Shoppin’
You make this play to bring a dude, deed, spell, or goods card into play from your play hand.
Pay its ghost rock cost to the bank, then put the card on the table unbooted. You can start using
its abilities as soon as it’s your next turn to make a play. The way you bring a card into play
depends on the type of card it is.
2 September 2017
[18]
Dude: A dude starts at your home unbooted.
Deed: Unless they say otherwise, all deeds are in town. Place a new in-town deed at
either end of your street, as the last card in that direction. New deeds can’t be placed
between existing locations on your street. Out of Town deeds are never added to your
street, but instead are placed off to one side.
Goods: Attach the card to one of your unbooted dudes at a location you control (the dude
must be able to attach that card). The card sticks with them. A dude can usually carry any
number of goods, but can only ever have one Horse and one Weapon at a time. After you
attach a new Weapon (or Horse) to a dude that already has one, you must discard the old
one. There are a few goods cards that attach to deeds rather than dudes; these are clearly
noted on the cards themselves.
Spells: All spells have restrictions on who can attach them. Only Hucksters can attach
Hexes, only Blessed can attach Miracles, and only Shamans can attach Spirits. Attach the
card to one of your unbooted dudes at a location you control (the dude must be able to
attach that card). The card sticks with them. A dude can attach any number of spell cards.
Some card effects let you bring another card into play. When using one of these effects, the new
card enters play following these same rules, depending on its type. The costs of the new card
must still be paid, so if you can’t pay those costs, you can’t attempt to bring it into play. If that
new card is a goods or spell, a dude can attach it even when booted and/or in a location you don’t
control. Dudes still can’t take anything that they aren’t allowed to carry.
Gadgets are a special type of goods that can only be brought into play by a Mad Scientist.
See “Section 7.1.2 Inventin’ Gadgets” for details. Once a Mad Scientist has invented a Gadget,
you can use the Tradin’ play later on to give it to another dude.
Section 5.3.5 The Five Plays — Tradin’
If you have two or more of dudes you control together in a location you control (whether or not
you own it), you can swap any number of goods cards between them. All dudes receiving goods
must be unbooted, and can’t receive anything that they aren’t allowed to carry. Booted dudes can
give goods away, but can’t receive them. Once a dude gets a goods card from a trade, that dude
can’t trade it away on that same day.
Dudes with Weapons and Horses are allowed to trade them, although once you are done tradin’,
if a dude has more than one of each, you must discard the extra cards. Dudes cannot trade spells.
Some card effects let you transfer a goods card from one dude to another. When using one of
these effects, a dude can attach the goods card even when booted and/or in a location you don’t
control. Dudes still can’t take anything that they aren’t allowed to carry, and can only ever have
one Weapon or Horse attached at the end of a play.

2 September 2017
[19]
Section 5.4 Sundown.
Once the High Noon phase is over, the Sundown Phase immediately begins. Any traits or effects
that apply continuously during Sundown start.
Now check for victory conditions to see if anybody’s won. If you have more control points than
the highest influence amongst all other players, you win. If two or more players meet this victory
condition, the one with the most control points wins. If that’s also tied, the player with the most
influence wins. If that’s also tied, play another day and check again for victory.
Any effects that require a check or game state change during Sundown are then resolved.
All players may choose to discard one card from their play hand, with the Winner choosing first.
All players then discard down or refill their play hand to their maximum hand size (normally 5
cards).
Next unboot all cards, and then turn and phase effects end in the following order:
1. The active window for Sundown effects now ends (so abilities or requirements based on
Sundown can no longer be triggered).
2. Effects that apply “during Sundown” end.
3. Effects that apply until the end of the turn end.
Abilities now refresh, which means they can be used again and are ready for the next day.
Finally, the day ends, and a new day begins.
Section 6 Shootouts and Jobs
Section 6.1 Shootouts
A shootout usually starts when a dude accepts a call-out. Both the player and dude doing the
callin’ out are known as the leader, while the player and dude being called out are known as the
mark. The shootout takes place at the location of the mark, and does not change for the duration
of the shootout (even if the mark subsequently leaves the shootout).
Both players in the shootout form a group of participating dudes called a posse. The leader
declares their entire posse first. All dudes added to a posse, including the original leader and the
mark (both of whom must be in their respective posses), are said to be joining a posse. Only
dudes in the location of the shootout or in an adjacent location can join a posse. A dude in the
same location can join even while booted, but only unbooted dudes can join the posse from an
adjacent location by booting and moving to the location of the shootout. A dude can’t join a
posse if there are restrictions that prevent him from moving to the mark’s location.
Posse formation occurs in the following manner:
1. First, the player who is the leader has their dude who initiated the call-out join their posse
automatically.
2 September 2017
[20]
2. Then, the player who is the leader sequentially selects additional dudes to join the posse
in the following manner:
a. A dude is declared to join the posse, and any costs associated with the dude
joining the posse are paid.
b. Then, if the dude is unbooted and adjacent to the location of the shootout, the
dude boots and joins the posse.
3. Once the player who is the leader has completed forming his posse, the player who is the
mark follows the same structure, with the dude who is the mark joining his posse first
automatically, and then sequentially having dudes join his posse (following the same
structure).
Players can never have dudes they control in both posses. Players cannot ever make a choice that
would result in that situation, no matter what the cards say.
When a shootout takes place at a Private location, regardless of who started it, all dudes in the
shootout that are not controlled by the owner of that location have their bounty increased by 1. If
this takes them from 0 to 1 bounty, they are now wanted. A deed’s keywords will tell you
whether it’s Public or Private. A player’s home is always Private, and the town square is always
Public.
Each shootout is resolved in a series of rounds, done one at a time until all dudes in one posse are
shot dead or flee. The following explains how you handle a shootout round.
Step 1. Make Plays
Starting with the Winner and proceeding clockwise, each player with a dude in the shootout
makes a Shootout play. Shootout plays include using Shootout abilities, passing, or using any
other text that refers to a Shootout play.
Shootout abilities you use must come from either an action card in your play hand (which is
played and then discarded), a deed, an Improvement (a card with this keyword), your outfit, or a
card in your posse (i.e. a dude or one of their attached cards). You can also use a Shootout ability
on a card that’s not in a posse, but only if that ability would bring a card currently in play into a
posse.
Shootout abilities can also only affect dudes or their attached cards if they are in a posse, unless
that ability would bring a card into a posse.
When you make a Shootout play using an action card, only put the card into your discard pile
once the play is complete and it is the next player’s turn to make a play. Players continue making
Shootout plays until all players pass consecutively.
The effect of a Shootout ability only lasts until the end of the shootout. If an effect ever sends a
dude home, the dude leaves the posse and the shootout, even if they’re already home. If, due to
the use of Shootout abilities, there’s only one posse left in the shootout, the shootout ends
immediately; skip to Step 7.

2 September 2017
[21]
Step 2. Pick Yer Shooter
The leader and mark, in that order, choose and announce their shooter from the dudes in their
posses. This choice only lasts for the current round of the shootout. Any dude in the posse can be
chosen as shooter, including booted dudes. You do not have to choose the leader or the mark as
your shooter.
Step 3. Draw!
This is where you see how well your posse performs in this round of the shootout. You do this by
dealing yourself a draw hand from your deck and making the best poker hand you can from it.
Set aside your play hand, then draw cards from the top of your deck equal to five plus your
posse’s stud bonus. You gain a stud bonus from everyone in your posse that has a stud bullet
rating, which is a number in a silver cartridge. Your bonus equals the full stud rating of your
shooter (if they have one), plus one extra for each other stud in your posse (even dudes that have
a 0-stud bullet rating).
Once you’ve drawn those cards, you can take advantage of your draw bonus. You gain a draw
bonus from everyone in your posse that has a draw bullet rating, which is a number in a brass
cartridge. Your draw bonus equals the full draw bonus of your shooter (if they have one), plus
one extra for each other draw in your posse (even dudes that have a 0-draw bullet rating).
Once you’ve determined your draw bonus, take a look at the cards in your draw hand, and decide
which, if any of them, you’d like to discard (up to a number equal to your draw bonus), discard
them, and replace them with cards drawn from the top of your deck. You must take your draw
bonus all at once, not one card at a time.
After all that, discard cards until you have five left. That’s your final draw hand. It’s perfectly
fine for you to have two or more cards with the same suit and value—two kings of clubs, for
example, but that is a Cheatin’ hand, and so it does open you up to the potential damage of a
Cheatin’ Resolution ability in the next step.
Step 4. Reveal and Resolve
At this point, both players reveal their draw hands, and resolve any effects on cards in play that
refer to draw hands being revealed. A draw hand is only revealed once, so if a player is required
to discard their hand and draw a new one, those effects are not triggered a second time. Next,
each player with a dude in the shootout can make Resolution plays, by using Resolution abilities
or passing.
Starting with the Winner (or the first player with a dude in a posse going clockwise from the
Winner if the Winner has no dudes in the shootout) and proceeding clockwise, each player with a
dude in the shootout either passes or plays a Resolution ability until all players pass
consecutively.

2 September 2017
[22]
Resolution abilities you use must come from either an action card in your play hand (which is
played and then discarded), a deed, an Improvement (a card with this keyword), your outfit, or a
card in your posse (i.e. a dude or one of their attached cards). You can also use a Resolution
ability on a card that’s not in a posse, but only if that ability would bring a card currently in play
into a posse.
Resolution abilities can also only affect dudes or their attached cards if they are in a posse, unless
that ability would bring a card into a posse. Resolution abilities’ effects last until the end of that
round, unless stated otherwise by the card. For example, Hex Slingin’ will increase your hand
rank by 2 only for the round in which it was played.
If a player has a Cheatin’ hand, other players can use a Cheatin’ Resolution ability as a
Resolution play. Each player can only have one Cheatin’ Resolution used against them during
this step. Another player must have a Cheatin’ hand in order for you to play your Cheatin’
Resolution. Your own Cheatin’ draw hand does not allow you to play your own Cheatin’
Resolution (even if you would target yourself with it).
Players who do not have a posse involved in a shootout can play a Cheatin’ Resolution ability on
an action card. However, some Cheatin’ cards have effects that only work if you have a posse in
the shootout (e.g. Magical Distraction). If, due to the use of Resolution abilities, one player loses
all the dudes in their posse (i.e. the posse is aced, discarded, or sent home), the shootout
immediately ends; skip to Step 7.
Step 5. Take Yer Lumps
Players now compare the ranks of their respective draw hands. The rank of a draw hand is
always the highest possible rank that can be achieved with the cards in that hand. The winner of
this round of the shootout is the player with the highest hand rank. If hand ranks are equal but
one player has a better hand (say, three jacks compared to three aces), that player still wins this
round. If both players have the exact same hand (ignoring suits), there is no winner or loser for
this round. See Section 7.3 for the Hand Ranks.
When a card effect increases your hand rank, it is considered to be the worst possible hand of its
new rank unless it is changed to a rank of 11 or above, in which case treat it as rank 11 and equal
to all other rank 11 hands. When a card effect reduces your hand rank, it is considered to be the
best possible hand of its new rank unless it falls below rank 1, in which case it is treated as the
worst possible rank 1 hand.
The difference between the two ranks is the number of casualties the loser takes. If hand ranks
are tied, both players take one casualty. Both players may also be required to take additional
casualties through the use of card effects.
A player takes casualties by discarding or acing dudes in their posse: discarding a dude covers
one casualty (they were either wounded or run out of town, but live to fight another day), and
acing a dude covers two casualties (the dude was shot dead). Any goods with the Sidekick
2 September 2017
[23]
keyword attached to a dude in the posse can also be discarded to cover one casualty. See also
Harrowed dudes, in the Rules Compendium, for more options.
Starting with the loser of the round (or the leader if there was no loser), each player must ace or
discard enough dudes in their posse to match their casualties. They must match the exact number
of casualties if able—they may not voluntarily take more or less casualties than required.
Each player (in the order described above) first assigns their casualties by announcing which of
their dudes and Sidekicks will be aced or discarded in sequential order. Next, that player takes
their casualties, resolving each one at a time in the selected order until they have met their
required casualties (so if a card effect forces a dude to be selected as the first casualty, they must
also be resolved first).
In the event that a player takes zero casualties during a round, they still assign and take
casualties. In this case, the player will assign zero casualties, then take zero casualties. This is
important, as there may be card effects that interact with either assigning or taking casualties.
If a card effect ever forces you to take casualties separately from the difference in hand ranks,
there will still be the process of assigning and taking those casualties.
Note that even if the loser must ace or discard all dudes in their posse, the winner must still take
all their casualties. Remember that while aced dudes go to your Boot Hill, their attached cards
are discarded instead.
Step 6. Run or Gun
Starting with the loser of the shootout round (or the leader if there is no loser), all players decide
which of their dudes flee the shootout. Those that flee leave the posse and move home booted.
Even dudes that are already booted or already home can flee the shootout. Each player decides
for all of their dudes before the next player decides.
Step 7. Chamber Another Round
Both players discard their draw hands. If only one posse remains, that player wins the shootout.
If both posses have been emptied of dudes, neither player wins the shootout. If both posses still
have at least one dude each, go back to Step 1 to start the next shootout round.
Section 6.2 Jobs
Big events in Doomtown are called jobs. Jobs are initiated by ability text like “Noon Job:”. Like
shootouts, jobs are resolved in a specific manner. As with shootouts, both the player and dude
starting the job are known as the leader, while the player and/or the dude (or the deed or
something else) being affected by the job is known as the mark.
2 September 2017
[24]
Step 1. Start the Job
First, choose one of your unbooted dudes to be the leader of the job. If the ability that started the
job came from text on a dude, goods, or spell card, that dude (or the dude the card is attached to)
must be selected as the job’s leader. If the job was started by an ability on a deed or action card,
the controller can choose any eligible dude to lead the job. If a job requires booting as a part of
the cost (e.g. Kidnappin’ says, “Noon Job, Boot:”), the leader is the dude who boots to pay that
cost.
Step 2. Choose the Mark
All jobs intend to do something to someplace or someone. The intended target is called the mark.
The first sentence of the job text tells you what the mark is. The leader doesn’t have to be in the
same location as the mark to start the job; in fact, the leader can even be at an Out of Town
location. Unlike when callin’ out, you can declare your own cards to be the mark of a job. If so,
you then cannot defend against the job (although other players still can).
Step 3. Form Posses
Once the leader’s chosen, it’s time to form posses. Just like in shootouts, the leader forms a posse
first and the dude chosen to lead the job is automatically the first person in the posse.
All dudes other than the leader have to boot to join the posse unless they’re already at the mark’s
location. Dudes at the same location as the mark can join without booting, and can join even if
booted. A dude can’t join a posse if there are restrictions that prevent him from moving to the
mark’s location.
The formation of the leader’s posse follows a special routine for jobs. Note all of these steps
happen sequentially and before any opposing posses are formed.
1. First, unbooted dudes at the location of the leader can join the posse by booting. Once
you’ve selected all of these dudes, you move to the next step.
2. Second, any unbooted dudes adjacent to the location of the leader, may boot to join the
posse (but do not move to the location of the leader). Once you’ve selected all of these
dudes, move to the next step.
3. Third, all dudes currently in the leader’s posse move sequentially to the location of the
mark. Once your current posse is at the mark, you move to the next step.
4. Fourth, any unbooted dudes adjacent to the location of the mark may boot to join the
leader’s posse and move to the location of the mark. Once you’ve selected all of these
dudes, you move to the next step.
5. Fifth, any dudes at the location of the mark may join the leader’s posse (even if booted)
and do not need to boot to join the leader’s posse. Once all of these dudes have been
selected, the leader’s posse is considered to be fully formed.
One way to remember this is the following: The leader gets people at his location to join him
first, then “yells” to dudes adjacent to his location that there is a job to be done and those dudes
join if they can. All these dudes then move to the job location. Next, dudes adjacent to the mark
2 September 2017
[25]
see the commotion and can join in. Finally, dudes at the location of the mark can join right in at
the end.
Once the leader has declared who’s joining their posse, the mark’s controller can also form a
posse. The mark can only use dudes at or adjacent to the mark’s location. Those dudes must boot
to join the posse unless they are already at the mark’s location. Dudes at the same location as the
mark can join even if booted. Just like in shootouts, the members of the posse are formed
sequentially and follow the same rules (see Section 6.1 above). Note that, unlike a call-out, the
mark does not necessarily have to join the posse (although it’s usually a good idea). Players
cannot form a posse containing zero dudes. If the mark’s controller chooses not to (or cannot)
form a posse, the mark’s owner, if different from the controller, can form a posse.
If the mark’s controller does form a posse, the mark’s owner cannot also form a posse. If neither
the controller nor the owner choose to form a posse (this is always the case with jobs that mark
the town square or the leader’s own cards), then any player, starting with the player to the left of
the leader, can form a posse to oppose the job.
If no one forms a posse to oppose the job, the job automatically succeeds; skip to Step 5.
Sometimes a job will place additional requirements on a posse (e.g. Kidnappin’). If those
requirements aren't met after the posse is formed, then it is considered to be an illegal posse. If
the leader has an illegal posse, the job immediately fails. If the mark has an illegal posse, the job
automatically succeeds. In either case, skip to Step 5.
Step 4. Saddle Up
If the leader’s posse and a posse to oppose the job both are at the location of the mark, a shootout
starts (see Section 6.1). If the shootout is at a Private location, any dudes in the shootout not
controlled by the location’s owner become wanted just like in a normal shootout.
Step 5. Is the Job Done?
If the leader’s posse wins the shootout, or no player forms a defending posse, the job succeeds.
Otherwise, the job fails. After the shootout ends, regardless of the outcome, survivors in the
leader’s posse go home booted. Surviving dudes in the defending posse stay where they are.
Now resolve the effects of a successful job as given on the card, assuming the mark is still in
play. If not, the job succeeds anyway but the mark is unaffected. If the job fails, nothing happens.
Finally, the remaining posses are dissolved and the job ends.
Section 7. Other Rules
Section 7.1 Reacts
Some cards have abilities that start with the word "React." These abilities can be played in
response to an event. The text of the React ability will tell you what the event is. When an event
occurs, a react window opens for all players to make React plays.
2 September 2017
[26]
Within each react window, players have the opportunity to play Reacts in turn order beginning
with the Winner. Each React is played and resolved before the next player gets a chance to play
one. The react window closes once all players have consecutively passed, and play resumes.
Should a new event occur within a react window, pause the flow of the game again and resolve
any Reacts to that new event in the same way, before going back to complete the original react
window.
During a game, many events will occur that could potentially trigger Reacts, but players should
not pause the game unless a player clearly declares that they have a React they wish to play.
Some Reacts replace the original event with a new event; these can be identified by the use of the
word “instead” within their text. Once a React of this type is played, the original react window is
closed and the replacement event occurs. Additional Reacts can then be played in response to
that new event.
For example, Arnold McCadish is worded “React, Pull, Boot: When a dude is discarded (not
aced) as a casualty in a shootout, if the pull is higher than the dude's value, send that dude home
booted instead.” Once a player successfully uses Arnold to prevent a dude from being discarded,
no further Reacts can be played in response to that dude being discarded. Instead, Reacts could
be played in response to the dude being sent home booted.
Reacts, unless specified otherwise, last as long as their commensurate counterpart, i.e.:
1. The effects of a react triggered during Noon last until the end of the day.
2. The effects of a react triggered during a shootout last until the end of that shootout.
3. The effects of a react triggered during Upkeep last until the end of that phase.
4. The effects of a react triggered during lowball last until the end of lowball.
5. The effects of a react triggered during Sundown last until the end of that phase.
Section 7.2 Skilled Dudes
The keywords in a dude’s card text tell you of any skills the dude has, including Mad Scientist,
Huckster, Blessed, and Shaman. A number follows the dude’s skill (such as “Mad Scientist 2” or
“Huckster 4”), which is called the dude’s skill rating. Mad Scientists use their skill rating when
creating a Gadget. A Shaman, Blessed, or Huckster uses their skill rating when casting a spell.
Whenever one of your dudes wants to use a skill, that dude must perform a skill test. To make a
skill test, a pull is made.
When you pull, draw the top card of your deck, reveal it, and check its value (ace through king).
Usually, you compare the value to a number indicated in the pull instructions. Remember, aces
are 1, jacks are 11, queens are 12, and kings are 13. If you have no cards left to pull, shuffle up
your discard pile to make a new deck. If your deck is completely out of cards (because they’re all
in Boot Hill or in your play hand), your pull is considered a 1 (ace) of clubs.
After you’ve made the pull, add the value of the pull to the dude’s skill rating. The total is called
the skill check. Once you’ve enacted all results of the pull, discard the pulled card.
2 September 2017
[27]
Section 7.2.1 Casting Spells
Spells can be cast by Hucksters, Blessed, and Shamans. Any card effect that uses the term “cast”
(or similar) is referring to the process of using an ability on a spell card.
Each ability printed on a spell card has a difficulty level. Whenever your dude wants to cast a
spell, perform a skill test. If the resulting skill check equals or exceeds the spell’s difficulty, the
spell succeeds and you use that ability. Otherwise, your dude failed to cast the spell and nothing
happens (the spell ability has still been used, but to no effect), and it’s the next player’s turn to
make a play.
Section 7.2.2 Inventing Gadgets
Whenever you want to bring a card into play that has the Gadget keyword, you need a Mad
Scientist to successfully invent it. Gadgets are usually goods cards, although a handful of dude
and deed Gadgets also exist. Any card effect that uses the term “invent” (or similar) is referring
to the process of bringing a gadget into play.
As a Noon play, your Mad Scientist can try to invent a Gadget you hold in your play hand; it's
just like shoppin’, but not a sure deal. When using an ability to bring a card into play, that card
can be a Gadget, but you'll still need to have a Mad Scientist invent it (e.g. if you use a card such
as General Store or William Specks to play a Gadget at a reduced ghost rock cost, you still have
to pay the cost of inventing it).
The cost of inventing a Gadget is as follows:
1) Boot your Mad Scientist,
2) Pay the Gadget’s ghost rock cost,
3) Then perform a skill test using the dude’s Mad Scientist skill rating.
If the resulting skill check equals or exceeds the Gadget’s difficulty, the invention was a success
and the Gadget enters play. Attach it to the Mad Scientist unless the Gadget says otherwise. If
the skill test fails, the Gadget is placed in your discard pile.
Gadget dudes enter play at the location of the inventing Mad Scientist unless instructed
otherwise, but unlike goods they do not attach to the Mad Scientist. Once in play, they are treated
like any other dude.
Gadget deeds enter play like any other deed, using the normal deed placement rules.
Section 7.2.3 Planting Totems
Totem is a keyword found on some Spirits, representing the charms and fetishes used by
Shamans to focus their tribal spirits and ancestors at a chosen site.
2 September 2017
[28]
Unlike a normal Spirit, when a Totem enters play it must be attached to a location you control, at
which you have an unbooted Shaman. Some Totems may have further restrictions on the
locations to which they can be attached, such as only to deeds, or only to your home.
Any Shaman at the same location may use a Totem, regardless of the Totem's controller. A
Shaman uses such a Totem in exactly the same way (and with the same clauses, costs, and/or
restrictions) as they would a Spirit attached to them.
Section 7.3 Kung Fu
Kung Fu is a keyword found on dudes which represents their training in the martial arts. A dude
with Kung Fu will have a rating (typically between 0 and 4) associated with it, which is added to
that dude’s value while they are in play. Having a Kung Fu rating also allows a dude to perform
Kung Fu tests and utilize Techniques as described below.
When chaining Techniques into a combo, the dude’s Kung Fu rating determines the maximum
number of additional Techniques that can be chained, beyond the initial Technique. Although
Kung Fu may at first seem similar to skills such as Huckster and Blessed, it is not considered a
skill and is not affected by cards referring to skills.
Section 7.3.1 Kung Fu Techniques
A Technique is a special kind of action card that requires you to choose a Kung Fu dude you
control and have them succeed a Kung Fu test in order to play it. To perform a Kung Fu test,
make a pull and compare its value to the value of the dude chosen (including all bonuses such as
his Kung Fu rating). If your pull is a lower value than that of the performing dude, the Technique
succeeds and you use the ability on the Technique. Otherwise, the Technique fails and nothing
happens (the ability has been used to no effect, and it’s the next player’s turn to make a play).
Any reference to “your dude” or “this dude” on a Technique refers to the dude who performed
the Kung Fu test.
Section 7.3.2 Kung Fu Tao Techniques and Combos
Tao Techniques are techniques that are part of a specific school or discipline and can be played
in combination with other Techniques from the same Tao. These techniques will have their Tao
indicated on the card (e.g. Tao of Zhu Bajie, Tao of the Jade Rabbit), and many also include a
combo requirement, indicating that you can quickly follow up with another Technique before
your opponent has a chance to make a play.
After you successfully play a Tao Technique, check to see if you have satisfied the combo
requirement (if any) on the bottom of the card; if so, you may immediately choose and play a
different Technique of the same Tao from your hand or discard pile, choosing the same dude to
perform the Kung Fu test. Note that these Techniques must be different: you can combo from
Rabbit’s Lunar Leap into Rabbit’s Deception back into Rabbit’s Lunar Leap, but you cannot
combo from Rabbit’s Lunar Leap directly into another Rabbit’s Lunar Leap. Not all Tao
Techniques are able to chain into subsequent Techniques, but they can all be used to chain from

2 September 2017
[29]
prior Techniques of the same Tao. The same dude must be chosen to perform the Kung Fu test
for all Techniques in a combo, and the maximum number of additional Techniques that can be
chained is equal to that dude’s Kung Fu rating.
Unlike other action cards, a Tao Technique is not placed in the discard pile after resolving.
Instead, it remains in play until the end of the phase or the appropriate step in a shootout in
which it was played. A Noon Tao Technique is discarded at the end of High Noon, immediately
before you check for victory. A Shootout Tao Technique is discarded at the end of the “Make
Plays” step of the shootout, immediately before either player picks their shooter. This ensures
you will not be able to use the same Tao Technique card twice within a single High Noon phase,
or twice within the same Shootout round.
Section 7.4 Hand Ranks
There are 11 hand ranks in Doomtown, defined in the following manner:
11. Dead Man’s Hand
Exactly A♣, A♠, 8♣, 8♠, J♦
10. Five of a Kind: Five cards of exactly the same value
Example: A♣, A♣, A♦, A♠, A♥
9. Straight Flush: Contains 5 cards in sequential value, all of the same suit
Example: A♦, 2♦, 3♦, 4♦, 5♦
8. Four of a Kind: Contains four cards of exactly the same value
Example: A♣, A♠, A♥, A♦, 7♥
7. Full House: Contains a Three-of-a-Kind of one card value, and a pair of a different value
Example: A♣, A♦, A♠, K♣, K♠
6. Flush: Contains 5 cards of all the same suit, but not in sequence
Example: A♠, 5♠, 7♠, 8♠, 10♠
5. Straight: Contains 5 cards in sequential value, not all of the same suit
Example: A♣, 2♦, 3♠, 4♦, 5♦
4. Three-of-a-Kind: Contains only 3 cards that share the same value
Example: A♣, A♦, A♠, 10♣, K♠
3. Two Pair: Contains 2 different pairs of cards
Example: A♣, A♦, K♠, K♣, 8♠
2. Pair: Contains only 2 cards that share the same value
Example: A♣, A♦, 7♠, J♣, K♠
1. High Card: Contains 5 cards of different values, of mixed suits, that are not sequential in value
Example: A♣, 3♦, 7♠, J♣, K♠
Section 8. Deckbuilding
Deckbuilding in Doomtown follows the following guidelines:
The deck must have exactly one outfit card.
The deck may include one legend card.
The deck must have exactly fifty-two cards with printed values.

2 September 2017
[30]
The deck can have up to two jokers (note that jokers do not have a printed value).
The deck cannot have more than four cards that share the same suit and value.
The deck cannot have more than four cards that share the same title.
There are no restrictions on the number of dudes from other factions you may include
other than the above.