run - m&m modelismo · this high performance model can run very fast. ... 8381-106 diff case...
TRANSCRIPT


This high performance model can run very fast. This model and the 2.4GHz transmitters (Standard and LCD versions) are designed and produced for people of 14+ years of age to operate. Players under that age should be guided by adult supervision. Entry level players should seek guidance and supervision from experienced model players. Players are responsible for any/all accidental occurrences (human or animal injury, damage to property and possessions, breakage of the model itself) due to improper operation of this model.

Optimus GP Maximus GP Length : 19.4in (493mm) : 19.57" (497mm)
Width : 12.1in (307mm) : 15.32" (389mm)
Height : 6.76in (172mm) : 7.13" (181mm, not including body)
Wheelbase : 12.98in (330mm) : 12.98" (330mm)
Front track : 10.23in (260mm) : 12.05" (306mm)
Rear track : 10.43in (265mm) : 12.32" (313mm)
Tires : 4.6in (118mm) : Ф6.2”, 3.3”(Ф158,85mm)
Wheels : 3.2in (81mm) : Ф3.5”, 2.6” (Ф88,66m m)
Ground clearance : 1.36in (34mm) : 1.96" (49.8mm)
Weight : 2,9kgs(6.4LBs) (radio not included) : 3.32kgs (7.4LBs)
Gear ratio : 9.43:1 : 12.51:1
Engine : .21 class 3.5cc : .21 class 3.5cc
Fuel tank : 150cc : 150cc
Steering servo : 9kgs with ball bearing metal gears : 9kgs with ball bearing metal gears
Features : Metal gears, ball bearings Working voltage : 6.0V
Speed (seconds/60Cº) : 0.16sec
Torque : 9kg/cm (88.3Ncm)
Net weight : 60g
Size(LxWxH) : 55x21x43mm


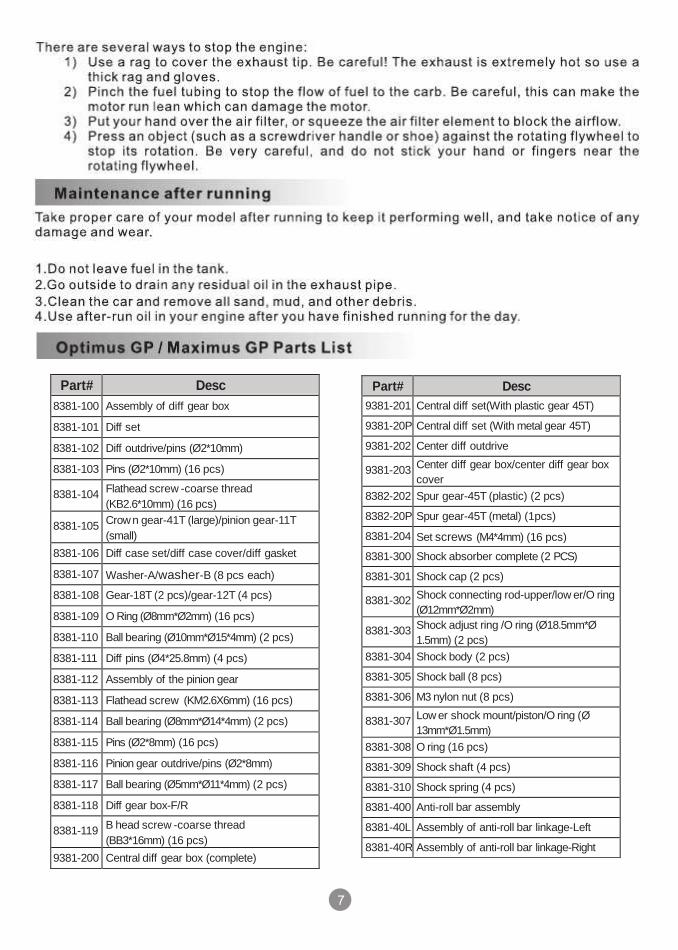
Part# Desc
8381-100 Assembly of diff gear box
8381-101 Diff set
8381-102 Diff outdrive/pins (Ø2*10mm)
8381-103 Pins (Ø2*10mm) (16 pcs)
8381-104 Flathead screw -coarse thread (KB2.6*10mm) (16 pcs)
8381-105 Crow n gear-41T (large)/pinion gear-11T (small)
8381-106 Diff case set/diff case cover/diff gasket
8381-107 Washer-A/washer-B (8 pcs each)
8381-108 Gear-18T (2 pcs)/gear-12T (4 pcs)
8381-109 O Ring (Ø8mm*Ø2mm) (16 pcs)
8381-110 Ball bearing (Ø10mm*Ø15*4mm) (2 pcs)
8381-111 Diff pins (Ø4*25.8mm) (4 pcs)
8381-112 Assembly of the pinion gear
8381-113 Flathead screw (KM2.6X6mm) (16 pcs)
8381-114 Ball bearing (Ø8mm*Ø14*4mm) (2 pcs)
8381-115 Pins (Ø2*8mm) (16 pcs)
8381-116 Pinion gear outdrive/pins (Ø2*8mm)
8381-117 Ball bearing (Ø5mm*Ø11*4mm) (2 pcs)
8381-118 Diff gear box-F/R
8381-119 B head screw -coarse thread (BB3*16mm) (16 pcs)
9381-200 Central diff gear box (complete)
Part# Desc
9381-201 Central diff set(With plastic gear 45T)
9381-20P Central diff set (With metal gear 45T)
9381-202 Center diff outdrive
9381-203 Center diff gear box/center diff gear box cover
8382-202 Spur gear-45T (plastic) (2 pcs)
8382-20P Spur gear-45T (metal) (1pcs)
8381-204 Set screws (M4*4mm) (16 pcs)
8381-300 Shock absorber complete (2 PCS)
8381-301 Shock cap (2 pcs)
8381-302 Shock connecting rod-upper/low er/O ring (Ø12mm*Ø2mm)
8381-303 Shock adjust ring /O ring (Ø18.5mm*Ø 1.5mm) (2 pcs)
8381-304 Shock body (2 pcs)
8381-305 Shock ball (8 pcs)
8381-306 M3 nylon nut (8 pcs)
8381-307 Low er shock mount/piston/O ring (Ø 13mm*Ø1.5mm)
8381-308 O ring (16 pcs)
8381-309 Shock shaft (4 pcs)
8381-310 Shock spring (4 pcs)
8381-400 Anti-roll bar assembly
8381-40L Assembly of anti-roll bar linkage-Left
8381-40R Assembly of anti-roll bar linkage-Right

Part# Desc
8381-401 Anti-roll bar rod end (8 pcs)
8381-402 Anti-roll bar linkage (4 pcs)
8381-403 Anti-roll bar pivot ball-upper/low er (4 sets)
8381-404 Set screws (M3*3mm) (8 pcs)
8381-405 Anti-roll bar (Ø2.2mm) (2 pcs)
8381-50L Assembly of upper sus.arm-Left
8381-50R Assembly of upper sus.arm-Right
8381-501 Upper sus.arm ball (4 pcs)
8381-502 Upper sus.arm/rod end (2 sets)
8381-503 Upper sus.arm linkage (2 pcs)
9381-600 Servo saver assembly-complete
8382-601 Servo saver sus. Arm- upper/low er/steering sus. Arm
8381-601 Brass washer (4 pcs)
8381-602 Servo saver bushing/adjustment ring
8381-603 Servo saver spring (4 pcs)
8381-605 B head screw -coarse thread (BB3*12mm) (16 pcs)
8381-606 Screw bushing (16 pcs)
8381-607 Steering plate
8381-608 Shaft (2 pcs)
8381-6Z0 Assembly of steering linkage (2 pcs)
8381-6Z1 Steering linkage (2 pcs)
8381-6Z2 Plastic rod end (8 pcs)
8381-6Z3 Double w ay ball end (8 pcs)
8381-701 Upper sus.arm mount-rear/suspension mount
8381-702 B head screw -coarse thread (BB3*14mm) (16 pcs)
8381-703 B head screw -coarse thread (BB3*10mm) (16 pcs)
8381-706 Low er sus.arm-front (2 pcs)
8381-707 Drive shaft set/revolving shaft (2 sets)
8381-708 Wheel axle (2 pcs)
8381-709 Steering arm (2 pcs)
8381-710 Ball bearing (Ø6*Ø12*4mm) (2 pcs)
8381-714 C-hub (2 pcs)
8382-705 B head screw (BM3*24mm) (16 pcs)
8381-716 Set screws (M4*12mm) (16 pcs)
8381-717 Shock tow er (2 pcs)
Part# Desc
8381-718 Pivot ball mount (4 pcs)
8381-719 Upper sus.arm shaft (4 pcs)
8381-721 Low er sus.arm plate-front
8381-723 C-hub screw bushing (16 pcs)
8381-724 T head screw (TM4*12mm) (16 pcs)
8381-725 T head screw (TM4*22mm) (16 pcs)
8381-726 B head screw -coarse thread (BB3*18mm) (16 pcs)
8381-727 B head screw (BM3*56mm) (8 pcs)
8381-728 B head screw (BM3*43mm) (8 pcs)
8381-729 Pins (Ø2*14mm) (16 pcs)
8381-801 Lower sus.arm-rear (2 pcs)
8381-802 Rear hub-L/R
8381-803 B head screw (BM3*18mm) (16 pcs)
8381-807 Pin-A (Ø1.5mm) (16 pcs)
9381-801 Rear brace holder (2 pcs)
9381-9B1 Brake arm//brake collar-A/brake collar- B/set screws (M3*3mm)
9381-9B2 Brake pad (2 pcs)/brake disc
9381-9B3 Socket head cap screw (HM3*12) (12 pcs)
9381-9B4 Servo arm-B (2 pcs)
9381-9B5 B head screw (BM2.6*6) (12 pcs)
9381-9B6 Throttle spring (2 pcs)
9381-9B7 Throttle linkage/brake linkage
9381-9B8 Throttle linkage joint/linkage fitting/nut
9381-9B9 Collar-A/Collar-B/O-ring-A/revolving brace
9381-9E1 Engine mount (2 pcs)
9381-9E2 Engile flywheel
9381-9E3 Flywheel nut
9381-9E4 Clutch shoes/clutch spring
9381-9E5 Ball bearing (Ø5mm*Ø10*4mm) (2 pcs)
9381-9E7 Air filter joint pipe
9381-9E8 Air filter set
9381-9S1 Servo mount
9381-9S2 Servo arm-A (2 pcs)
8381-9S3 B head screw (BM3*6mm) (16 pcs)
9381-9T0 Fuel tank 150cc
9381-9T1 Fuel cap (2 pcs)

Parts that are specifically for Maximus GP
Parts that are specifically for Optimus GP
Note: The above parts are common for both
Optimus GP and Maximus GP. Upgrade parts
Part#
2.4GHz LCD transmitter
P124 Steering link(CNC processed)
P125 Lower Suspension
Arm
(2
pcs)(CNC
processed) P126 C-Hub (2 pcs)(CNC processed)
P127 Suspension Mount (2 pcs)(CNC processed)
P128 Left/Right Rear Hub(CNC processed)
P129 Diff Case
set/Diff
Case
Cover(CNC
processed) P130 Front/Rear Diff Gear Box(CNC processed)
Part# Desc
9381-9T2 Fuel tank spring (2 pcs)
9381-9T3 Fuel tank fixture
8381-9Z0 Assembly of steering tie rod
8381-9Z1 Steering tie rod (2 pcs)
9381-001 Chassis
9381-002 Side guard-L/R
9381-003 Battery case upper/lower
9381-004 Front brace support/front brace/support/steering servo mount
9381-005 Rear brace
9381-006 AA battery case (for 4 cells)/switch
9381-007 Body post-F/R/fuel tubing holders
9381-010 Fuel hose (Ø2.5*Ø5*250mm)
8381-008 Antenna tube (3 pcs)
8381-009 Pin-B (Ø1.2mm) (16 pcs)
8381-010 Screw washer (4pcs)
8381-011 Flathead screw (KM3X10mm) (16 pcs)
8381-012 Flathead screw -coarse thread (KB3*10mm) (16 pcs)
8381-015 Flathead screw (KM3X18mm) (16 pcs)
8381-020 Hex driver H17
8381-022 17mm nut (4 pcs)
8382-005 Central drive shaft-C
8382-007 Upper deck-C
8382-008 Upper deck-D
H119 .21 class engine (SG crankshaft)
H120 Manifold/Muffler/Spring/Gasket/Joint
D301 Steering servo (9kg metal gears)
D304 Throttle servo (3kgs plastic gear )
D302T 2.4GHz transmitter
Part# Desc
9381-9E6 Engine gear-17T
8381-711 Hex adapter/M12 17mm nut
8381-720 Front bumper/upper sus. Arm mount
8381-722 Tire complete (white rims) (2 pcs)
8381-804 Wing mount/wing brace-L/R
8381-805 B head screw (BM3*10mm) (16 pcs)
8381-806 Rear wing rod-long/short
8381-808 Rear wing (white)
8131-009 Body post-F/R
9381-008 Painted body (PVC)
9381-008C Clear body (PVC)
9381-009 Painted body (PC)
9381-009C Clear body (PC)
Part# Desc
9382-9E1 Engine gear-13T
8384-701 Hex adapter/M12 17mm nut
8382-702 Bumper/upper sus. arm mount-front
8382-703 Body post holder/body post
8382-704 Tire complete (2 pcs)
9382-001 Painted body (PVC)
9382-001C Clear body (PVC)
9382-002 Painted body (PC)
9382-002C Clear body (PC)

10
ITEM NO DESCRIPTION
B001A FRONT BALL BEARING, 7x19x6
B002 REAR BALL BEARING, 14x24x6
BR2101-1 BURN ROOM(UNDERHEAD)
CH2104 CYLINDER HEAD-BLACK
CK2107E CRANKCASE-SILVER
CM2113B COMPOSITE CARB MAIN BODY
CM2113D-1 COMPOSITE CARB COMPLETE SET
CN2515-1 THROTTLE NEEDLE
CP2104/5A CYLINDER SLEEVE/PISTON
CP2104/5A-1
CYLINDER SLEEVE/PISTON COMPLTE SET
CR2106 CONNECTING ROD
CS2108 CRANKSHAFT SG
DC2111 DRIVE BRASS WASHER
DG2112 DRIVE GEAR
GP01 GLOW PLUG B4 HOT
HW2103 CYLINDER HEAD GASKET
HW009 WASHER
HW010 WASHER
L004 MAIN NEEDLE VALVE "O" RING
L002 CARBURETOR "O" RING
MN2125 MAIN NEEDLE VALVE HOLDER
MN2126 MAIN NEEDLE
OS2124A FUEL NIPPLE
P001 PISTON GUDEON PIN
S022
CYLINDER HEAD SCREW 3x16 - 4pcs
S2521 THROTTLE STOP ADJUST SCREW
SP2110 CARB PINCH BOLT
TC2117 DUST COVER
TD2118 THROTTLE SCREW CAP
TH2514
THROTTLE &COUNTER NEEDLE VALVE
W001 PISTON PIN RETAINER - 2pcs
PULL STARTER ASSEMBLY
A PARTS-4 + B21C RECOIL START UNIT ASSEMBLY
A PARTS-4
PLASTIC A PARTS ASSEMBLY W/ 4PCS SCREWS
B21C
B PARTS ASSEMBLY W/ 4PCS SCREWS
RS12/13C ONE WAY BEARING SET
RS17 STARTING DISK
RS14 CONNECTIVE SEAT
RS18 STARTING PIN
RS19 PRESSURE SPRING
L001 REAR COVER O RING
L006 O RING-CONNECTIVE SEAT
S011 SCREWS 2.6x7 - 4PCS

8381-1
01
8381-1
12
8381-1
13
8381-1
03
8381-1
14
8381-1
07
8381-1
06
8381-1
05
8381-1
17
8381-1
10
8381-1
07 83
81-1
08
8381-1
07
8381-1
08
8381-1
09
8381-1
06
9381-2
03
8381-1
08
8381-1
07
8381-1
08 83
81-1
11
9381-2
03
8381-1
18
8381-1
10
9381-2
01
9381-2
0P
8381-1
10
8381-1
03
8381-1
02
8381-1
07 83
81-1
09
8381-1
06 93
81-2
02
8381-1
03
8381-1
07
8381-1
09
8381-1
08
8381-1
16
8381-1
15
8381-1
06
8382-2
02
8382-2
0P
8381-1
04
9381-2
01
8381-1
02
9381-2
02
8381-1
03 83
81-1
04
8381-1
05
8381-1
10
8381-1
07 83
81-1
08
8381-1
07
8381-1
19
8381-1
18 83
81-1
09
8381-1
08
8381-1
07
8381-1
08 83
81-1
11
8381-1
01
8381-1
12
8381-1
00A
ssem
blyo
fthe
diffg
earb
ox
9381-2
00A
ssem
blyo
fthe
cent
erdi
ffgea
rbox
8381-3
01
8381-4
04
8381-4
03
8381-4
05
8381-5
02
8381-6
01
8381-6
02
8381-5
03
8381-4
0L
8381-4
01
8381-5
01
8381-6
05
8381-5
0L
8381-4
01
8381-4
03
8381-4
01
8381-4
02
8381-5
03
8381-4
02
8381-4
03
8381-5
02
8381-6
02
8381-6
06
8382-6
01
8381-4
0R
8381-4
02
8381-5
02
8381-6
03
8381-6
05
8381-6
01
8382-6
01
8381-6
08
8381-6
07
8381-5
02
8381-6
08
8382-6
01
8381-6
01
8381-6
06
8381-5
0R
8381-5
01
8381-6
01
8381-3
02
8381-3
05
8381-3
06
8381-3
07
8381-3
03
8381-3
08
8381-3
04
8381-3
07
8381-3
09
8381-3
10
8381-3
07
8381-3
02
8381-3
00A
ssem
blyo
fthe
sway
bar
8381-3
05
8381-4
00A
ssem
blyo
fthe
8381-5
0LA
ssem
blyo
fupp
ersu
s.arm-L
eft
8381-5
0LA
ssem
blyo
fupp
ersu
s.arm-R
ight
9381-6
00A
ssem
blyo
fthe
buffe
rset
shoc
ks
11

8381-7
25
8381-3
00
8381-5
0L
8382-7
05
8381-7
23
8381-7
19
8381-7
14
8381-3
06
8381-3
06
8381-7
26
8381-3
06
8381-4
00
8381-7
19
8381-7
18
8381-7
23
8381-8
03
8381-7
16
8381-7
26
8381-7
21
8381-3
06
8381-7
28
8381-1
03 83
81-1
19
8381-7
08
8381-7
08
8381-7
01
8381-7
03
8381-7
07
8381-7
27
8381-7
26
8381-7
06
8381-7
16
8381-1
00
8381-5
0R
8381-7
23
8381-7
26
8382-7
05
8381-7
25
8381-3
00
8381-7
24
8381-7
17
8381-7
18
8381-0
22 83
81-7
29
8381-7
11
8384-7
01 83
81-7
10
8381-7
09
8381-1
10
9381-9
B1
9381-9
B1
8381-7
02
8381-7
01
8381-7
06
8381-1
19
8381-7
27
8381-7
07
8381-7
28
8381-1
03
8381-7
14
8381-7
23
8381-7
24
8381-3
06
9381-9
B5
9381-9
B6
9381-9
B7
9381-9
B4
9381-9
B7
9381-9
B8
8381-7
07
9381-9
B2
9381-9
B3
8381-7
02
8381-9
S3
8381-7
08
8381-8
03 83
81-1
10
8381-7
29
8381-7
03
9381-9
S2
8381-7
03
8381-7
03
8381-7
03
9381-9
B9
8381-7
09
8381-7
10 83
81-7
11
8384-7
01
8381-0
22
D30
1 D
304 93
81-9
S1
9381-9
S1
Ass
embl
yofth
e fr
onts
us.a
rmsy
stem

9381-9
T2
8381-7
29
8381-7
26
9381-9
T1
8381-5
0R
8381-7
19
8381-7
03
8381-1
19
8381-0
22
8381-1
03
8381-7
11
8384-7
01
9381-9
T3
8381-7
10
8381-8
02
8381-7
08
8381-7
07
8381-7
10 83
81-7
27
8381-1
00
8381-7
16
8381-7
02
8381-7
19
9381-8
01
8381-1
19
8381-7
28
8381-1
10
8381-3
06
8381-7
15
9381-9
T3
8381-3
00
8381-7
26
8381-7
27
8381-5
0L
8381-3
06
8381-7
01
8381-7
16
8381-8
01
8381-7
07
8381-7
17
8381-7
26
8381-4
00
8381-3
06 83
81-7
21
8381-1
19
8381-7
08
8382-7
05
8381-7
28 83
81-1
10
8381-7
29
8381-7
18
8381-7
26
8381-1
03
8381-8
02
8381-3
06
8381-7
26
8381-3
00
8381-3
06
8381-7
10 83
81-7
11
8384-7
01
8381-0
22
Ass
embl
yofth
e re
arsu
s.arm
syst
em

9381-0
02
8381-0
08
9381-0
03
8382-0
05
8381-7
03
8381-8
05
8381-0
12
D30
2S
8381-7
02
8382-0
07
8381-0
12
9381-0
06
8381-7
03
8381-8
05
9381-0
07
9381-6
00
8381-0
09
8381-7
03
8381-7
02
9381-0
04
8381-7
13
8382-0
08
8381-7
13
8382-0
05
9381-0
03
8381-7
03
8381-0
12
8381-0
15
8381-0
12
9381-0
04
9381-0
01
8381-0
12
8381-0
12
9381-0
05
8381-7
03
8381-0
15
8381-0
12
8381-0
10
8381-0
12
8381-0
12
8381-0
10
8381-6
Z3
8381-9
Z0
8381-0
10
8381-6
Z3
8381-6
Z2 83
81-6
Z1 83
81-6
Z0
8381-6
Z2
9381-0
02
8381-0
11
8381-6
Z3
8381-0
11
8381-0
12
8381-6
Z2 93
81-9
Z1
8381-6
Z2
8381-6
Z3
8381-0
20

8381-7
20
8381-7
03
8381-8
08
8381-7
20
8381-7
03
8381-0
09
8381-8
07
8381-1
19
8381-0
09
8381-8
04
8381-8
07
8131-0
09
8382-7
03
8381-7
03
8381-7
02
8381-8
06
8381-7
03
8131
1-00
9 83
81-0
09
8382-7
03
8381-8
05
8381-0
09
8381-6
05
8381-8
07
8381-7
03
8381
605
8381-7
26
8381-8
05
8381-8
04
8381-7
26
8381-8
04
8381-7
02
8381-6
05
8381-8
05
8381-7
26
8381-8
04
8381-8
08
8382-7
02
8381-7
03
9381
H
119
8382-7
02
8381-1
19
9382
9381-9
E8
9381-9
B3
8381-3
06
H12
0
9381-9
E1
9381-9
E2
9381-9
E3
9381-9
E4
9381-9
E5
9381-9
E5
9381-9
E7
8381-9
S3
9381-9
E6
9382-9
E1

Engine needles and carburetor
Low-end screw
Carburetor
Crankshaft SG
Idle screw
High-end screw


Upgrade parts

Annex: 2.4GHz Transmitter Manual
Safety Precautions
1. The 2.4GHz transmitter and receiver are pre-bound at the factory. 2. Please always use the same receiver model from the factory to match your 2.4GHz transmitter when you need to replace it. Receivers from other suppliers don't work on DHK HOBBY 2.4GHz transmitter. 3. When you need to replace a receiver, please make sure that it is bound with the transmitter before use. 4. Please operate the transmitter in vast areas where no radio interference exists. It's strongly recommended that no humans, animals or high voltage grid should be nearby. 5. Please do not operate this transmitter during fatigue, sickness, intoxication or in bad mood. 6. Do not operate the transmitter at night time, in the rain and thunderstorm or at low visibility. 7. Always use the same types of batteries in the transmitter. Do not mix old and new batteries in the transmitter. Please check the battery power before use. Replace batteries whenever the power is low to avoid out of control. Ni-Mh or Ni-Cd rechargeable batteries can be used on this transmitter. Please charge the batteries to full before use. 8. Before you operate the transmitter, please check the switch, batteries, servo and ESC for proper connection. 9. ALWAYS switch on the transmitter first, and off last so as to avoid possible radio interference from other sources. Failure to do so may cause out of control of your vehicle. 10. Before operation, check the servo forward and reverse functions, motor range, and neutral position. Modify it when necessary. 11. Please handle the transmitter with care. Store the transmitter in a dry and clean place when it's not in use for some time. Transmitter Specifications

Receiver Functions
1-Antenna: pull up the antenna straight before use. 2-Power switch: slide the switch to turn on or off. 3-Power LED: shows the power strength. Green LED shows full power, Yellow LED flashes when the power is running short. 4-Charging port: charges Ni-Mh or Ni-Cd batteries only. Alkaline batteries are not rechargeable. NEVER charge your alkaline batteries. 5-Throttle trigger: Please refer to the transmitter diagram. 6-Steering wheel: Please refer to the transmitter diagram. 7-ST-D/R trim: adjust the steering servo angle ranging from 0% to 120%. 8-TH-D/R trim: adjust the throttle servo angle ranging from 0% to 120%.
9-ST-TRIM: adjust the steering neutral position, from 0% to 20%. 10-TH-TRIM: adjust the throttle neutral position, from 0% to 20%. 11-ST-NOR/REV: slide to left or right to choose steering mode. 12-TH-NOR/REV: push the trigger or pull it back to choose the throttle mode. 13-Throttle trigger trim screws: use a hex driver to tighten or loosen the screw to a comfortable level. 14-Battery compartment cover: to open the compartment, slide the cover to OPEN direction as indicated, snap it to close the compartment. 15-Battery case: open the battery cover, install 4 pcs AA 1.5V alkaline or rechargeable batteries based on the "+" & "-" poles. If the status LED flashes red, the transmitter batteries may be weak, discharged or possibly installed incorrectly. Replace with new or freshly charged batteries. The power indicator light does not indicate the charge level of the battery pack installed in the model.
Parts Diagrams 3
Frequency range : 2.4GHz 2.4GHz modulation : AFHDS Sensitivity : -100dbm Working voltage : DC4.8-6.0V Working current Size : 5.7*26*15.2mm Weight : 11.2g

1. Antenna: Pull out the antenna completely 2. Connecting ports: receiver power port and channel signal connecting ports > ST/1: Channel 1, steering signal port > TH/2: Channel 2, throttle servo or ESC signal port > AUX/3: Auxiliary signal port > BATT/4: Receiver power port, can be auxiliary signal port 3. Set keys & LED indicators >Bind setup. Switch on the receiver, indicators flash slowly, press the setup key for 2 seconds and release it, LED indicator flash in faster motion, binding starts. When the LED indicator is on in stable status, the binding is complete. Note: To bind it quickly and effectively, please put the receiver 40-50cm away from the transmitter. >Failsafe. Switch on the transmitter and receiver, then you can see the LED indicator on receiver is on. Adjust the throttle servo or ESC to brake or stop status, and keep it that way. Press the setup key, then receiver LED indicator flashes, keep this for 3 seconds. After this, release the setup key. Failsafe setup is complete.
>Disabling failsafe function. Switch on transmitter and receiver, once the signal is connected, LED indicator is on. Press the setup key for 2 seconds, LED indicator flashes quickly, at this point, keep pressing the setup key without release, press it for 2 more seconds, LED indicator flashes slowly. Release the setup key, LED indicator is on. The setup is complete.

Safety Precautions
Please refer to Safety Precautions in PART I Transmitter Specifications
2.4GHz LCD Transmitter Parts and Functions
1. 2.4G transmitter antenna: before use, please pull the antenna straight up. 2. Power switch: Press down to turn on the transmitter, press the switch again to turn it off. 3. LCD display: shows transmitter menus, parameters and operation instructions. 4. Charging port: charging area is positive inside and negative outside. When Ni-Mh or Ni-Cd rechargeable batteries are to be charged, right charger should be selected for re-charging the batteries. 5. Throttle trigger: drag, push or make the throttle trigger to a neutral position to forward, reverse or brake your RC model. 6. Steering wheel: turn the steering wheel counterclockwise to turn the model to left. Turn the steering wheel clockwise to turn the model to right. Release it to neutral for straight driving. 7. Menu keys: Press Left key (<) or Right key (>), move the cursor to LCD display options. 8. DATA change keys: press Left key (+) or Right key (-) to change, adjust and save current parameters. 9. Throttle trigger set screw: use a 2.5mm hex screw driver to move forward or backward to adjust the throttle trigger to a comfortable hand feeling. 10. Battery compartment cover: Press the door to OPEN indicated direction to open the battery compartment cover. Snap the compartment door into the slot to close the battery compartment. 11. Installing batteries: open the battery compartment cover, install 4 pcs “AA” batteries (same type) according to the indicated “+” “-“ orientations. Turn on the transmitter and check the indicator status for a solid green light. Please take out the batteries when the transmitter is not in use. If the status LED flashs red, the transmitter batteries may be weak, discharged or possibly installed incorrectly. Replace with new or freshly charged batteries. The power indicator light does not indicate the charge level of the battery pack installed in the model. Parts Diagrams

LCD Functions and Operations
Key Operations
Menu keys: Press Left key (<) to main command, and Right key (>) for secondary command. DATA keys: Press Left key (+) or Right key (-) to adjust, set up and auto save the current chosen function.
Display Interface
Switch on the transmitter, you will hear “beep” sound (beeps once), and the LCD display mode will read the default parameters pre-set at the factory and BATT status mode (main menu).
BATT: battery status, function reset settings
Battery level display. Battery voltage appears on LCD display. When the voltage is 4.4V, the value flashes and you can hear warning sound. This means the battery voltage is deficient. When battery voltage value shows 4.0V, the value blinks fast and warning sound keeps strong. This indicates battery voltage is too low and batteries cannot be used. Please turn off the transmitter and replace batteries. If rechargeable Ni-Mh or Ni-Cd batteries are used, please charge the batteries with proper charger.
Function reposition. In case the parameters are messed up or if you don't know how to set up, please turn off the power, press and hold MENU Left key (<). Then turn on the power and you will hear “beep” sound after two seconds. Release all keys and all parameters will go back to factory default values.
Frequency duplication setting. When two transmitters are used at the same time, a frequency might be duplicated. In this case, you may choose the auto frequency function. First turn off the power, then press and hold MENU Right key (<), and turn on the power. The display will show hopping data. Release the key and the hopping data will stop. The digit shown on the display is your frequency. Bind the transmitter with the receiver through binding keys.
MOD: Setting up mode and naming
15 group memory data for choice, it's easy to manage and use. At start status, press Left key (+) or Right key (-) of the DATA to choose the necessary module (Screen shows main menu)
For easy control, you may name each module. Press Left key (<) on MENU (6 times on Main Menu) until you see 000 01 on the screen and the first digit must flash, at this moment, you may change the data here. Press Left key (+) or Right key (-) to choose necessary data. Once first change is made, press Right key (>) on MENU to move the cursor to the next position, then press Left key (-) or Right key (+) to choose the needed data. Based on the above, you can change data for the 3
rd
data group. Once all is changed, press Left key (<) on the MENU function to get back to Main Menu and save the setup. (Screen shows 000 01).

TRM: Servo neutral trim setup
L. F. U, R. B. D and percentage values. (Screen shows 00% TRM TH)
REV: Servo forward and reverse setup
Setting up Steering servo direction. Press MENU function Left key (<) or Right key (>) (Press once under MAIN MENU) until you see” ***REV-ST”, then press DATA function Left key (+) or Right key (-) to choose ON/OFF. (Screen shows OFF REV-ST).
Setting up Throttle speed neutral position. Press MENU function Left key (<) (Press once under the MAIN MENU) and then press twice of MENU Right key (>) until you see ***REV-TH. Press DATA function Left key (+) or Right key (-) ON/OFF. (Screen shows OFF REV-TH).
Setting up the 3rd
Channel: Press MENU function Left key (<) (Press once under MAIN MENU), then press twice on Menu function Right key (>) until you see ***REV-3C, press DATA function Left key (+) or Right key (-) to choose ON/OFF. (Screen shows OFF REV-3C).
Setting up steering servo(ST) neutral position parameters. Press MENU function Left key (<) (Press twice under MAIN MENU) until you see **% TRM ST and neutral value. Press DATA function Left key (+) or Right key (-) to change the steering neutral position. On the screen there is steering neutral status L.F. U, R. B. D and percentage values indicating the neutral position at that setup. (Screen shows 00% TRM ST).
Setting up throttle speed (TH) neutral position parameters. Press MENU function Left key (<) (Press twice under MAIN MENU), and press MENU function Right key (<) until you see **% TRM TH and neutral value. At this point, press DATA function Left key (+) or Right key (-) for adjustment. On the screen you will see neutral position status indicator
D/R: Servo angle adjustment setup
Set up Steering servo (ST) angle. Press Menu function Left key (<) (Press 3 times on MAIN MENU) until you see **% D/R ST on the screen, then press DATA function Left key (+) or Right key (-) to choose servo angle parameter. (Screen shows 100% D/R ST).
Set up Throttle servo (TH) forward and reverse angle. Press MENU function Left key (<) (Press 3 times on MAIN MENU), then press MENU function Right key (>) once, the screen shows **% D/R TH, press DATA function Left key (+) or Right key (-) for throttle angle parameters. (Screen shows 100% D/R TH)
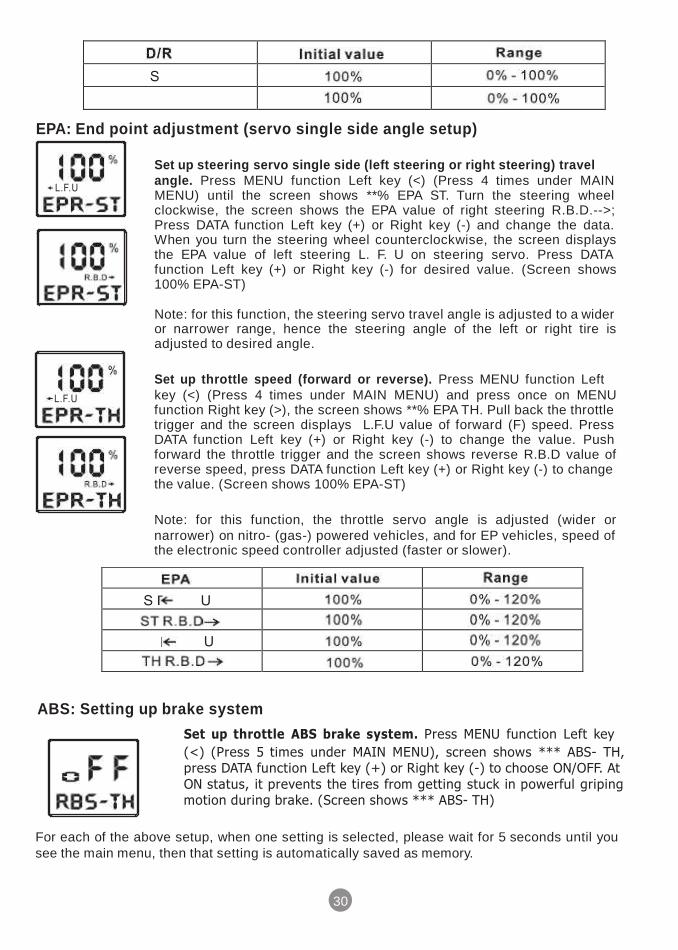
EPA: End point adjustment (servo single side angle setup)
the electronic speed controller adjusted (faster or slower).
Set up steering servo single side (left steering or right steering) travel angle. Press MENU function Left key (<) (Press 4 times under MAIN MENU) until the screen shows **% EPA ST. Turn the steering wheel clockwise, the screen shows the EPA value of right steering R.B.D.-->; Press DATA function Left key (+) or Right key (-) and change the data. When you turn the steering wheel counterclockwise, the screen displays the EPA value of left steering L. F. U on steering servo. Press DATA function Left key (+) or Right key (-) for desired value. (Screen shows 100% EPA-ST) Note: for this function, the steering servo travel angle is adjusted to a wider or narrower range, hence the steering angle of the left or right tire is adjusted to desired angle.
Set up throttle speed (forward or reverse). Press MENU function Left key (<) (Press 4 times under MAIN MENU) and press once on MENU function Right key (>), the screen shows **% EPA TH. Pull back the throttle trigger and the screen displays L.F.U value of forward (F) speed. Press DATA function Left key (+) or Right key (-) to change the value. Push forward the throttle trigger and the screen shows reverse R.B.D value of reverse speed, press DATA function Left key (+) or Right key (-) to change the value. (Screen shows 100% EPA-ST)
Note: for this function, the throttle servo angle is adjusted (wider or narrower) on nitro- (gas-) powered vehicles, and for EP vehicles, speed of
ABS: Setting up brake system
Set up throttle ABS brake system. Press MENU function Left key
(<) (Press 5 times under MAIN MENU), screen shows *** ABS- TH, press DATA function Left key (+) or Right key (-) to choose ON/OFF. At ON status, it prevents the tires from getting stuck in powerful griping motion during brake. (Screen shows *** ABS- TH)
For each of the above setup, when one setting is selected, please wait for 5 seconds until you see the main menu, then that setting is automatically saved as memory.
30

FCC Caution: Any changes or modifications not expressly approved y the party responsible for compliance could void the user ’s authority to operation this equipment. This device complies with Part 15 of the FCC Rules. Operation is subject to the this device must accept any interference received, including interference that may cause undesired operation . This device and its antenna(s) must not be co-located or operating in conjunction with any other antenna or transmitter.