running start absolute beginners - sketcher · running start absolute beginners - sketcher ... need...
TRANSCRIPT
Running Start Absolute Beginners - Sketcher
– with video tutorial
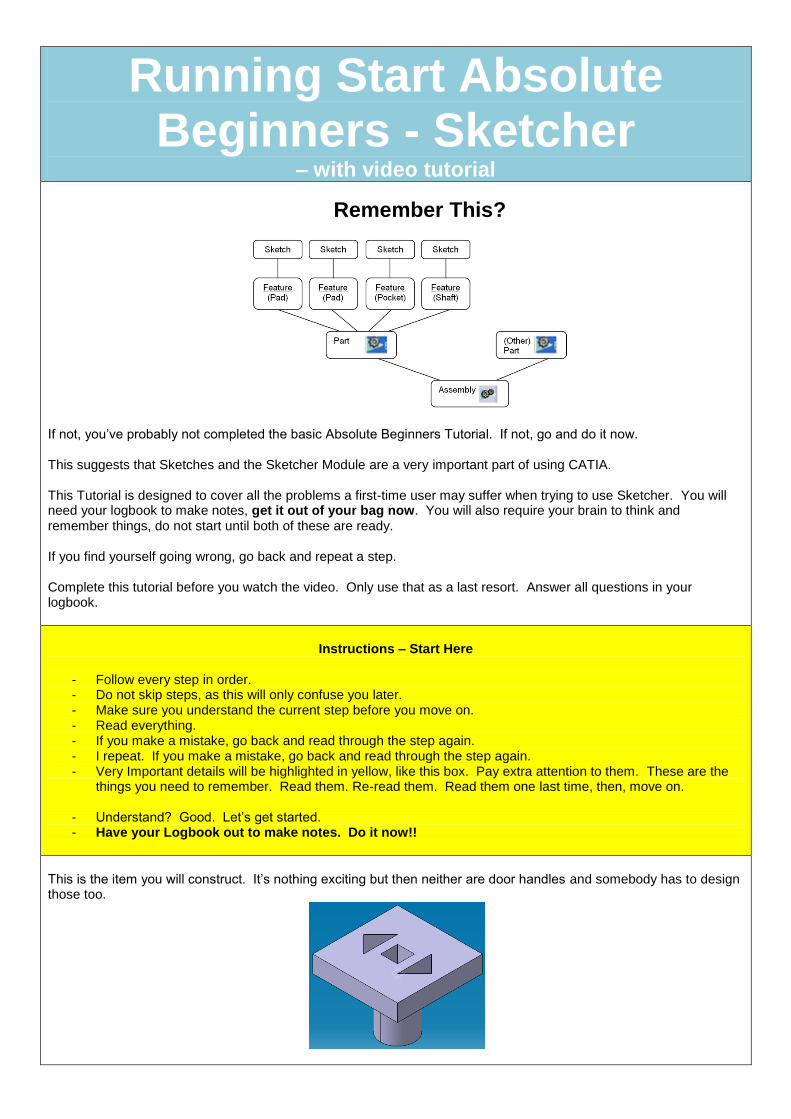
Remember This?
If not, you‟ve probably not completed the basic Absolute Beginners Tutorial. If not, go and do it now. This suggests that Sketches and the Sketcher Module are a very important part of using CATIA. This Tutorial is designed to cover all the problems a first-time user may suffer when trying to use Sketcher. You will need your logbook to make notes, get it out of your bag now. You will also require your brain to think and remember things, do not start until both of these are ready. If you find yourself going wrong, go back and repeat a step. Complete this tutorial before you watch the video. Only use that as a last resort. Answer all questions in your logbook.
Instructions – Start Here
- Follow every step in order. - Do not skip steps, as this will only confuse you later. - Make sure you understand the current step before you move on. - Read everything. - If you make a mistake, go back and read through the step again. - I repeat. If you make a mistake, go back and read through the step again. - Very Important details will be highlighted in yellow, like this box. Pay extra attention to them. These are the
things you need to remember. Read them. Re-read them. Read them one last time, then, move on.
- Understand? Good. Let‟s get started. - Have your Logbook out to make notes. Do it now!!
This is the item you will construct. It‟s nothing exciting but then neither are door handles and somebody has to design those too.
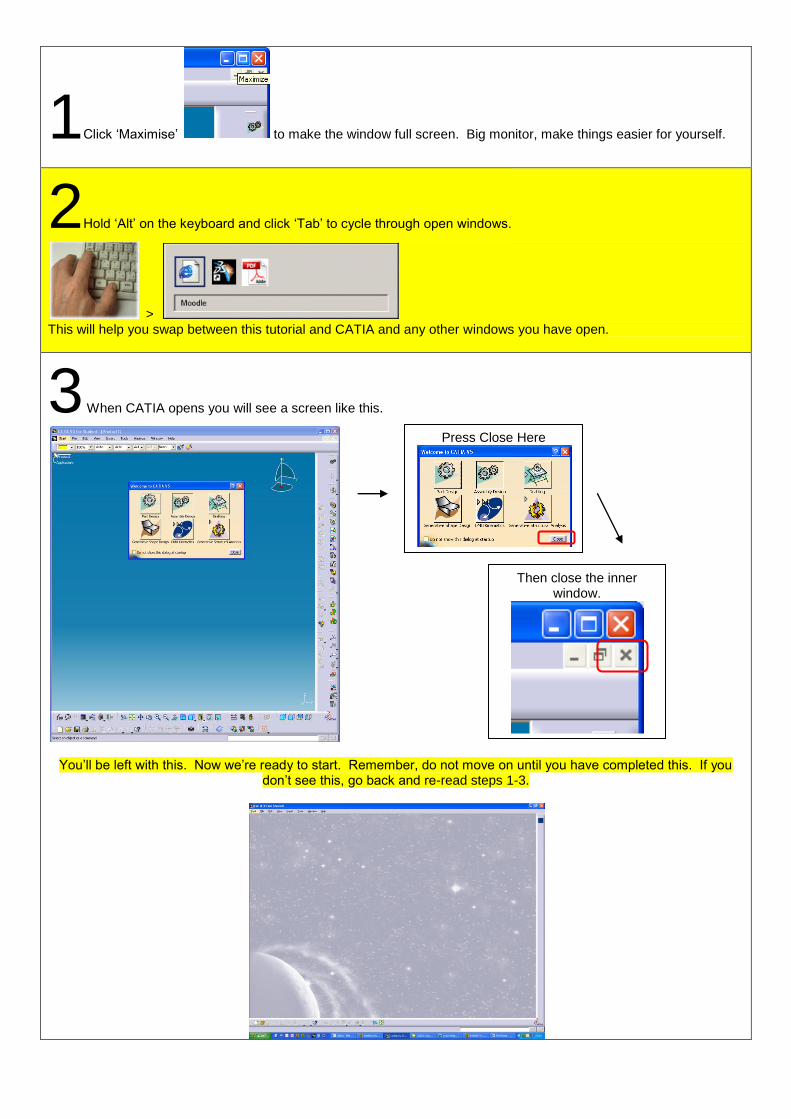
1Click „Maximise‟ to make the window full screen. Big monitor, make things easier for yourself.
2Hold „Alt‟ on the keyboard and click „Tab‟ to cycle through open windows.
> This will help you swap between this tutorial and CATIA and any other windows you have open.
3 When CATIA opens you will see a screen like this.
You‟ll be left with this. Now we‟re ready to start. Remember, do not move on until you have completed this. If you don‟t see this, go back and re-read steps 1-3.
Press Close Here
Then close the inner window.
4
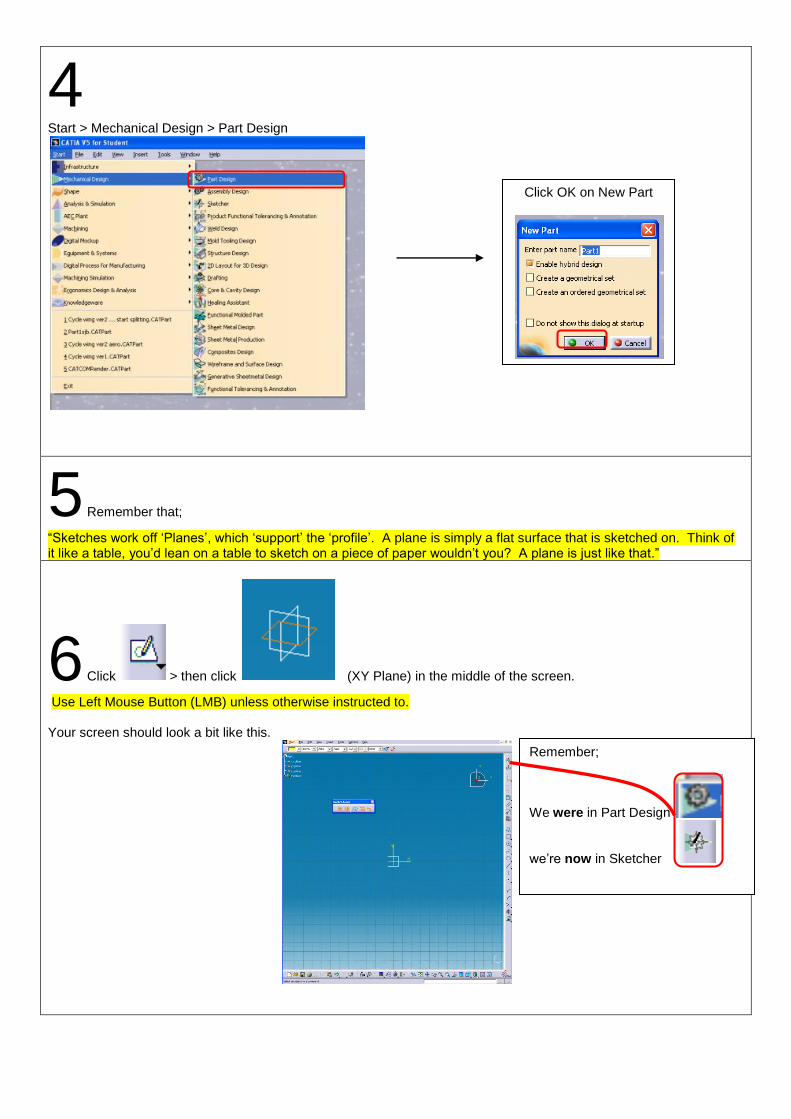
Start > Mechanical Design > Part Design
5 Remember that;
“Sketches work off „Planes‟, which „support‟ the „profile‟. A plane is simply a flat surface that is sketched on. Think of it like a table, you‟d lean on a table to sketch on a piece of paper wouldn‟t you? A plane is just like that.”
6 Click > then click (XY Plane) in the middle of the screen.
Use Left Mouse Button (LMB) unless otherwise instructed to.
Your screen should look a bit like this.
Remember;
We were in Part Design
we‟re now in Sketcher
Click OK on New Part
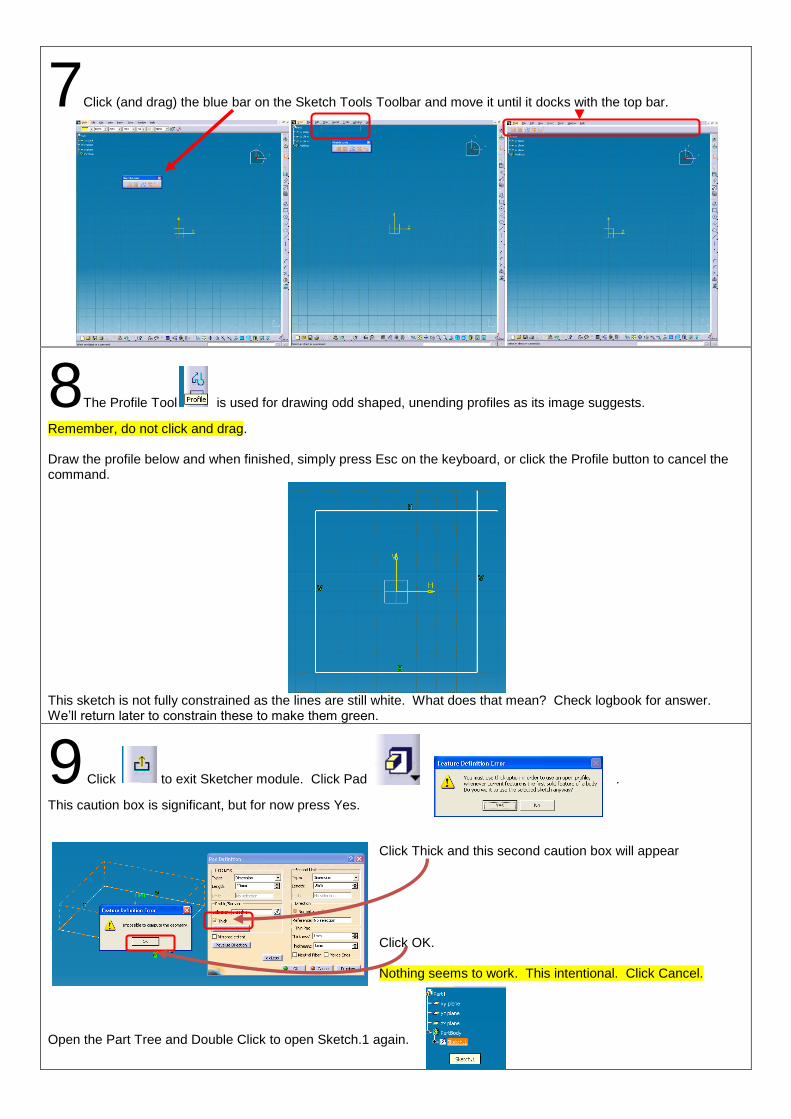
7Click (and drag) the blue bar on the Sketch Tools Toolbar and move it until it docks with the top bar.
8The Profile Tool is used for drawing odd shaped, unending profiles as its image suggests.
Remember, do not click and drag. Draw the profile below and when finished, simply press Esc on the keyboard, or click the Profile button to cancel the command.
This sketch is not fully constrained as the lines are still white. What does that mean? Check logbook for answer. We‟ll return later to constrain these to make them green.
9 Click to exit Sketcher module. Click Pad .
This caution box is significant, but for now press Yes.
Click Thick and this second caution box will appear Click OK. Nothing seems to work. This intentional. Click Cancel.
Open the Part Tree and Double Click to open Sketch.1 again.
Understanding Checkpoint
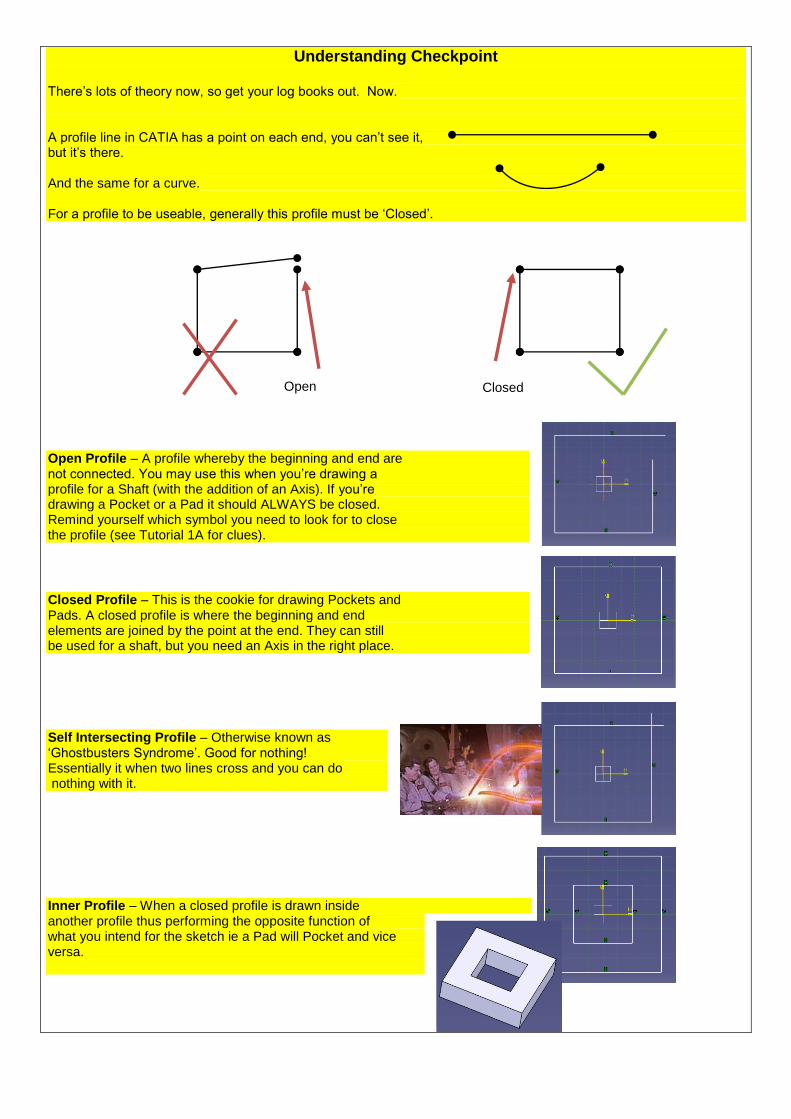
There‟s lots of theory now, so get your log books out. Now. A profile line in CATIA has a point on each end, you can‟t see it, but it‟s there. And the same for a curve. For a profile to be useable, generally this profile must be „Closed‟. Open Profile – A profile whereby the beginning and end are not connected. You may use this when you‟re drawing a profile for a Shaft (with the addition of an Axis). If you‟re drawing a Pocket or a Pad it should ALWAYS be closed. Remind yourself which symbol you need to look for to close the profile (see Tutorial 1A for clues).
Closed Profile – This is the cookie for drawing Pockets and Pads. A closed profile is where the beginning and end elements are joined by the point at the end. They can still be used for a shaft, but you need an Axis in the right place. Self Intersecting Profile – Otherwise known as „Ghostbusters Syndrome‟. Good for nothing! Essentially it when two lines cross and you can do nothing with it. Inner Profile – When a closed profile is drawn inside another profile thus performing the opposite function of what you intend for the sketch ie a Pad will Pocket and vice versa.
Open Closed

Understanding Checkpoint. If you can‟t answer these questions. You must not move on. It‟s vital that you know these points as they‟re the absolute basics. If you can‟t answer them, go back and read steps 1-9 again. Twice if necessary.
- What does and open profile mean?
- What does and closed profile mean?
- What does a self-intersecting mean?
- What does an inner profile mean?
- On the end of every profile line is a _____?
Write these questions and answers in your logbook so you do not forget them.
When you‟ve answered these questions, you may move on.
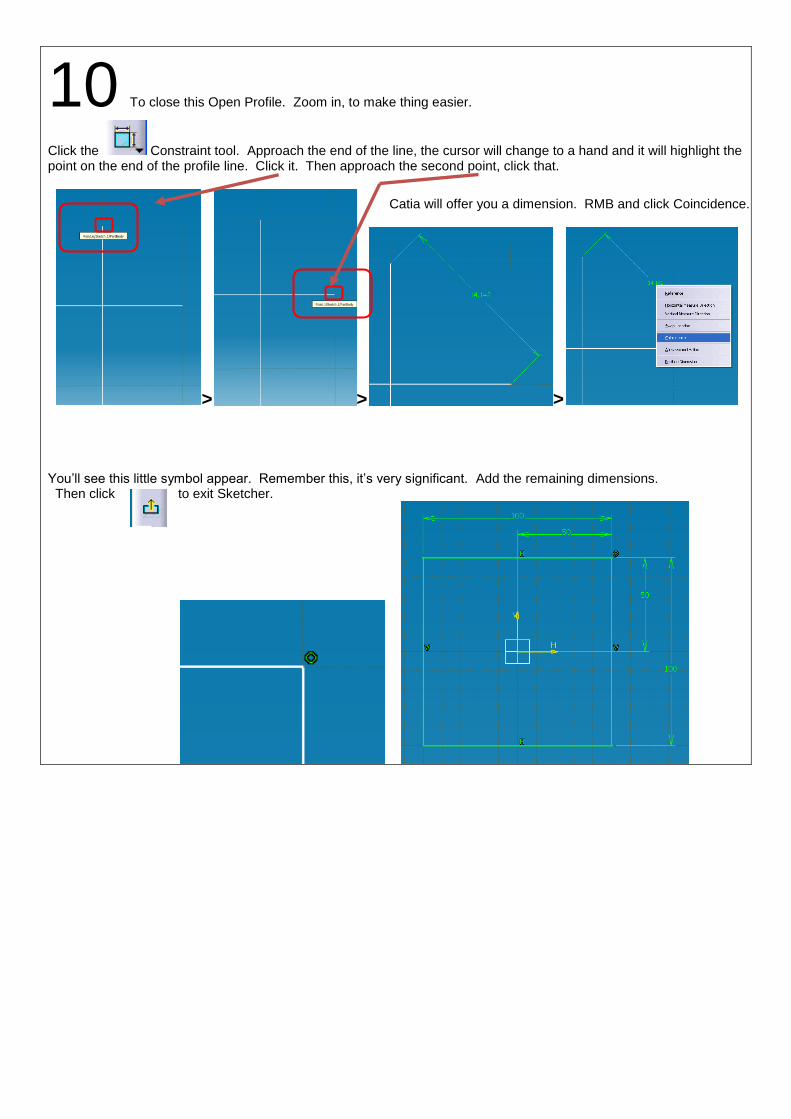
10 To close this Open Profile. Zoom in, to make thing easier.
Click the Constraint tool. Approach the end of the line, the cursor will change to a hand and it will highlight the point on the end of the profile line. Click it. Then approach the second point, click that.
> > >
You‟ll see this little symbol appear. Remember this, it‟s very significant. Add the remaining dimensions. Then click to exit Sketcher.
Catia will offer you a dimension. RMB and click Coincidence.
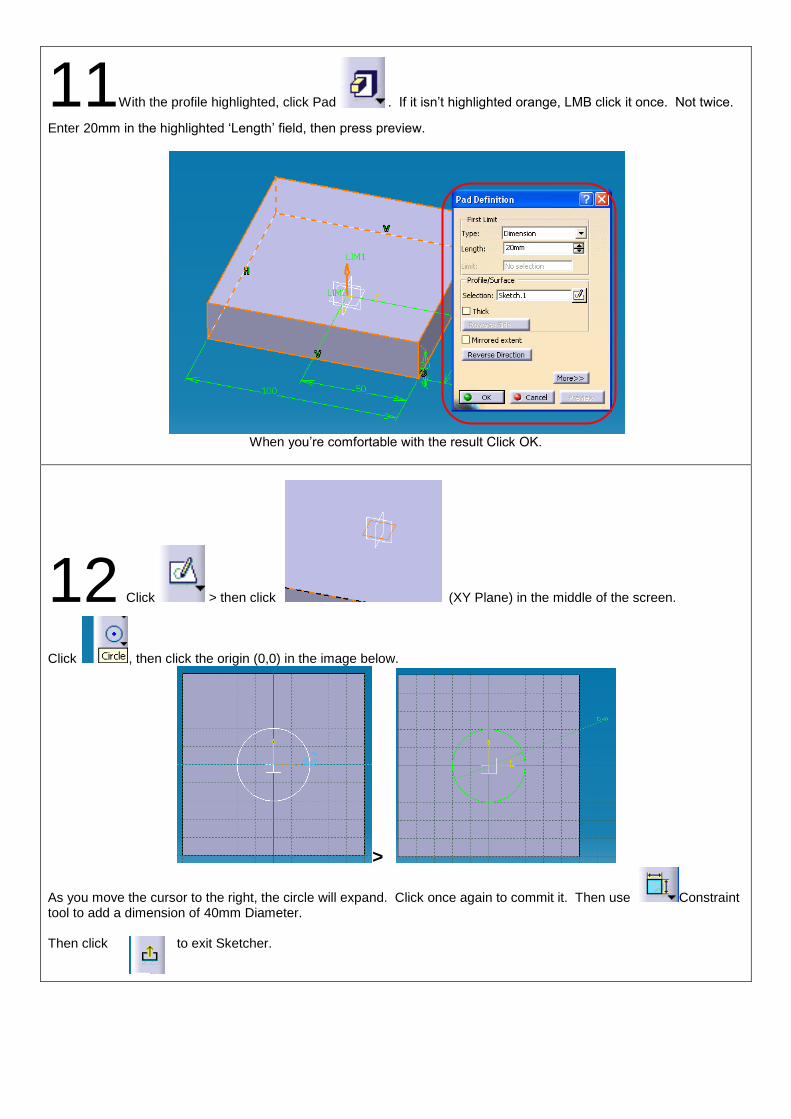
11With the profile highlighted, click Pad . If it isn‟t highlighted orange, LMB click it once. Not twice.
Enter 20mm in the highlighted „Length‟ field, then press preview.
When you‟re comfortable with the result Click OK.
12 Click > then click (XY Plane) in the middle of the screen.
Click , then click the origin (0,0) in the image below.
>
As you move the cursor to the right, the circle will expand. Click once again to commit it. Then use Constraint tool to add a dimension of 40mm Diameter. Then click to exit Sketcher.
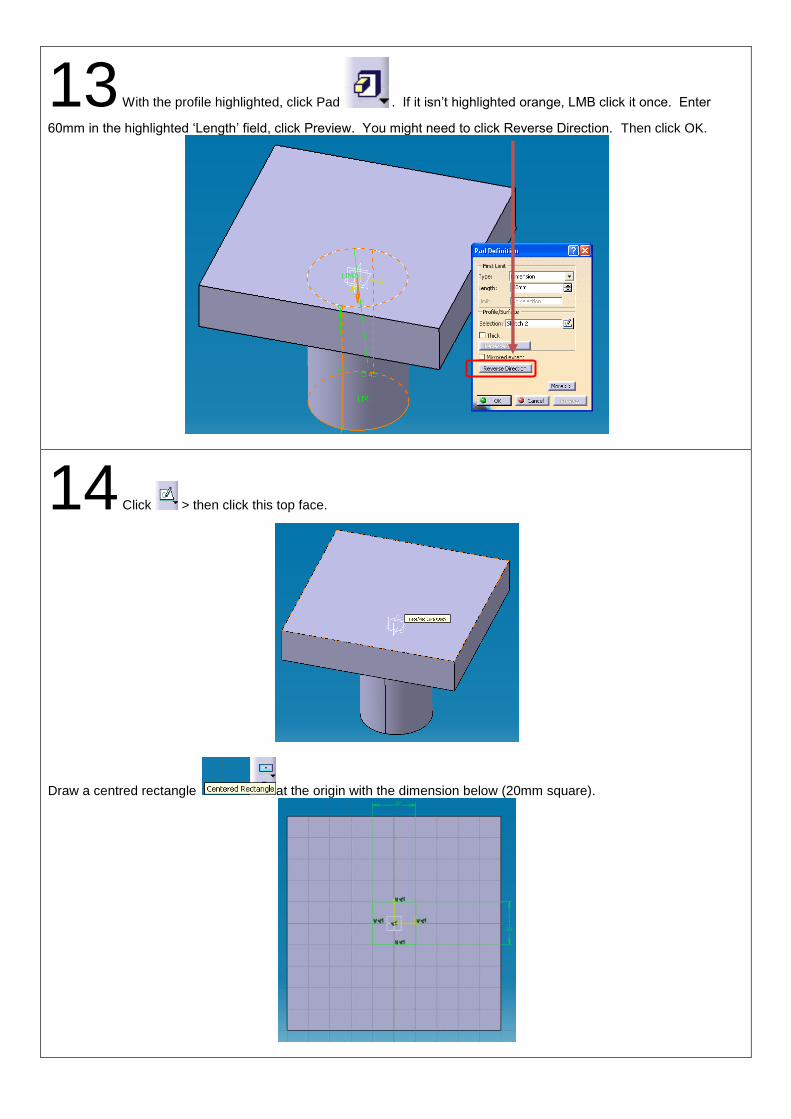
13 With the profile highlighted, click Pad . If it isn‟t highlighted orange, LMB click it once. Enter
60mm in the highlighted „Length‟ field, click Preview. You might need to click Reverse Direction. Then click OK.
14 Click > then click this top face.
Draw a centred rectangle at the origin with the dimension below (20mm square).
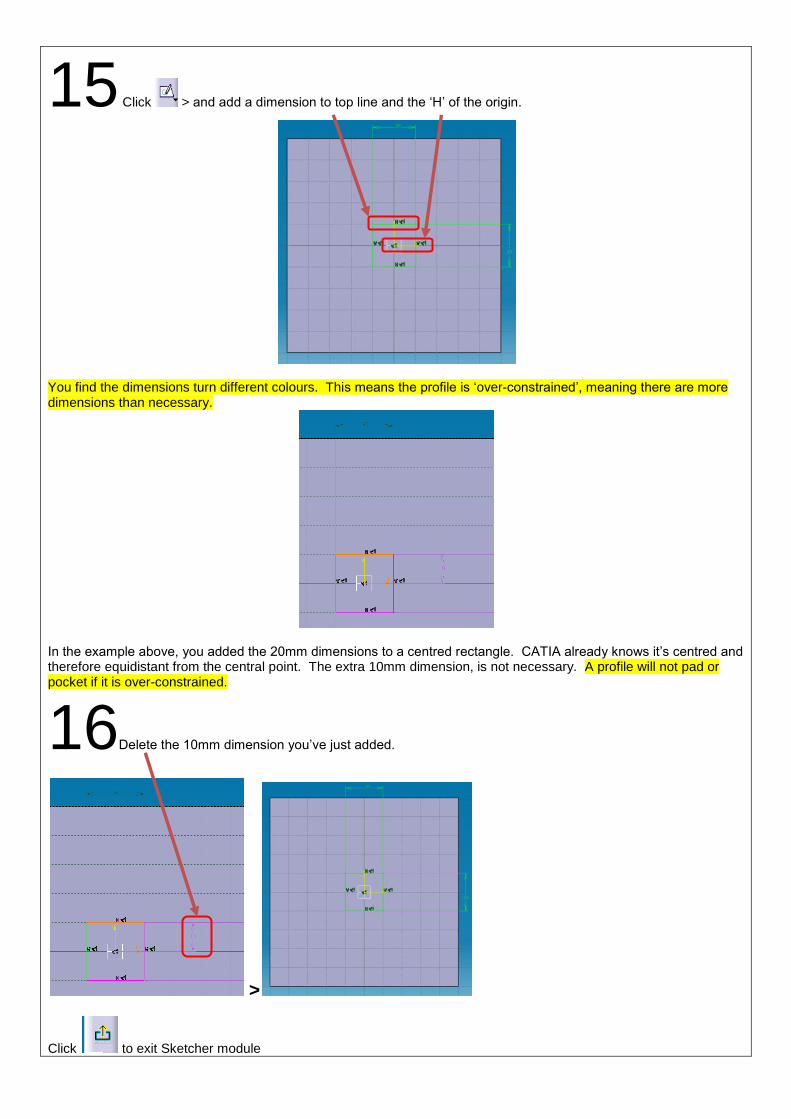
15 Click > and add a dimension to top line and the „H‟ of the origin.
You find the dimensions turn different colours. This means the profile is „over-constrained‟, meaning there are more dimensions than necessary.
In the example above, you added the 20mm dimensions to a centred rectangle. CATIA already knows it‟s centred and therefore equidistant from the central point. The extra 10mm dimension, is not necessary. A profile will not pad or pocket if it is over-constrained.
16Delete the 10mm dimension you‟ve just added.
>
Click to exit Sketcher module
17 With the profile highlighted, click Pocket .
Change the Type to „Up to Last‟, and click Preview. Then click OK.
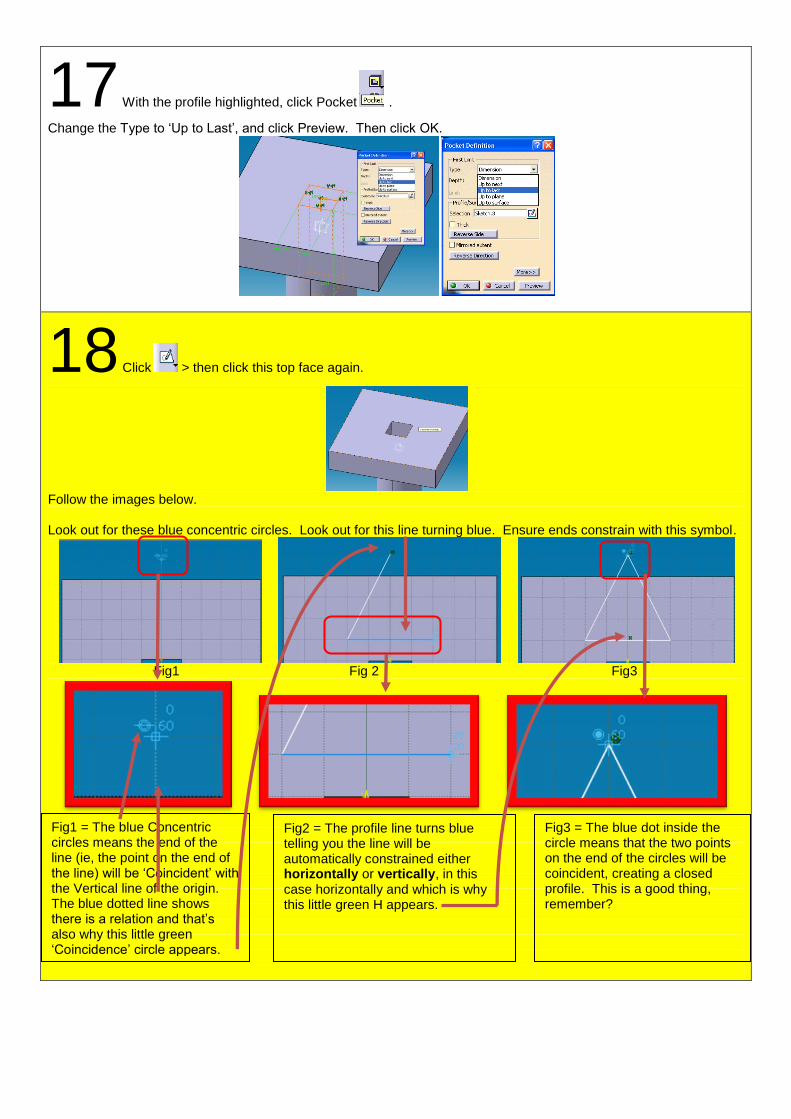
18 Click > then click this top face again.
Follow the images below. Look out for these blue concentric circles. Look out for this line turning blue. Ensure ends constrain with this symbol.
Fig1 Fig 2 Fig3
Fig1 = The blue Concentric circles means the end of the line (ie, the point on the end of the line) will be „Coincident‟ with the Vertical line of the origin. The blue dotted line shows there is a relation and that‟s also why this little green „Coincidence‟ circle appears.
Fig2 = The profile line turns blue telling you the line will be automatically constrained either horizontally or vertically, in this case horizontally and which is why this little green H appears.
Fig3 = The blue dot inside the circle means that the two points on the end of the circles will be coincident, creating a closed profile. This is a good thing, remember?
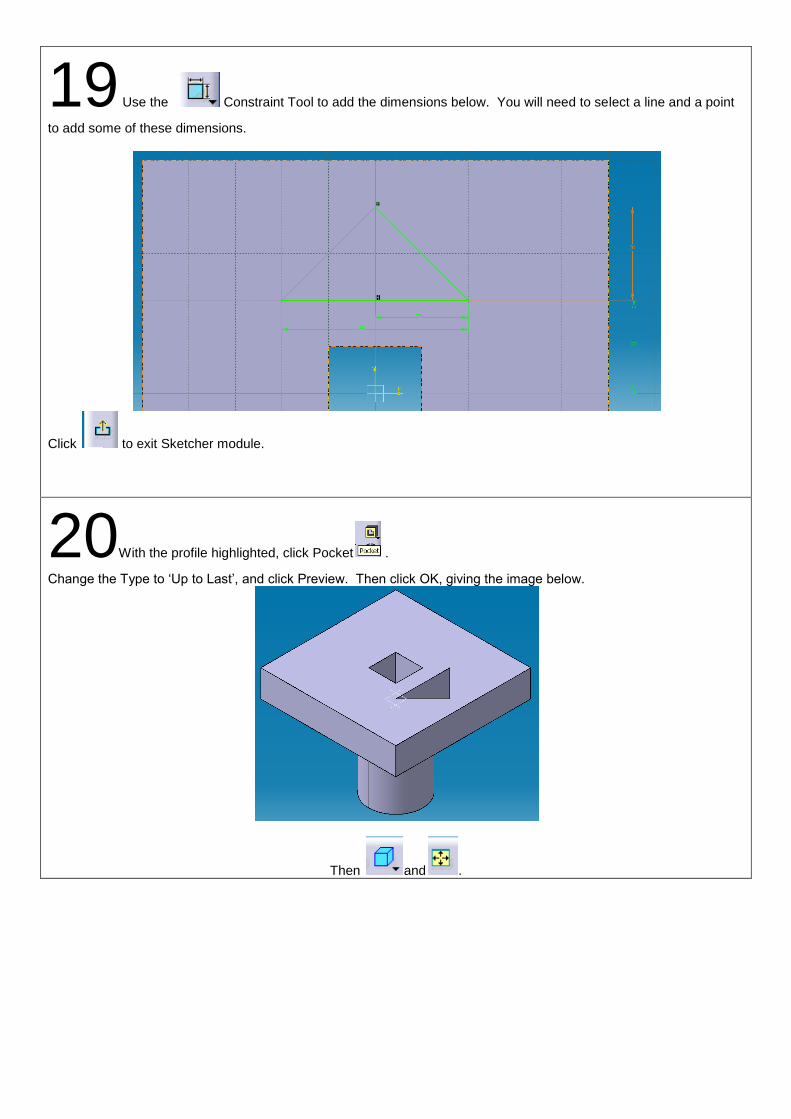
19 Use the Constraint Tool to add the dimensions below. You will need to select a line and a point
to add some of these dimensions.
Click to exit Sketcher module.
20With the profile highlighted, click Pocket .
Change the Type to „Up to Last‟, and click Preview. Then click OK, giving the image below.
Then and .
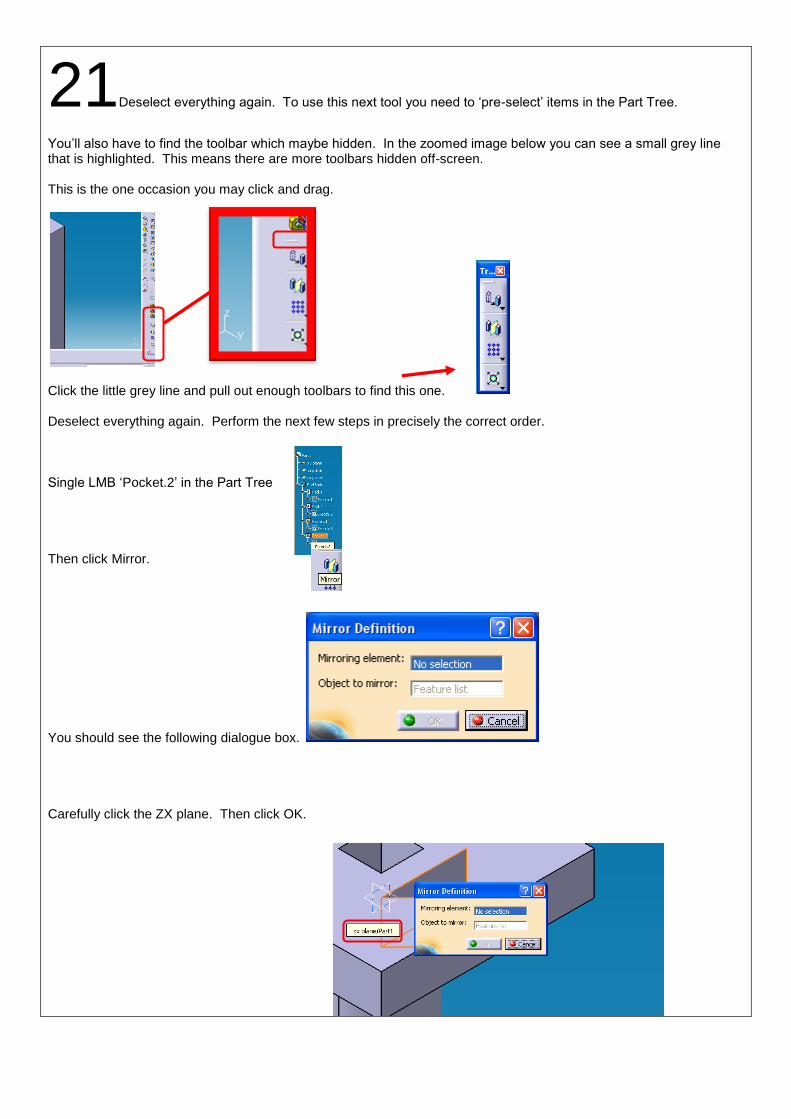
21Deselect everything again. To use this next tool you need to „pre-select‟ items in the Part Tree.
You‟ll also have to find the toolbar which maybe hidden. In the zoomed image below you can see a small grey line that is highlighted. This means there are more toolbars hidden off-screen. This is the one occasion you may click and drag.
Click the little grey line and pull out enough toolbars to find this one. Deselect everything again. Perform the next few steps in precisely the correct order. Single LMB „Pocket.2‟ in the Part Tree Then click Mirror.
You should see the following dialogue box.
Carefully click the ZX plane. Then click OK.
Understanding Checkpoint. Answer these questions.
- Features in CATIA are supported by a ____?
- What does and open profile mean?
- What does and closed profile mean?
- What does a self-intersecting mean?
- What does an inner profile mean?
- On the end of every profile line is a _____?
- A purple line means a profile is ______? If you couldn‟t answer these questions, you obviously didn‟t write these answers in your logbook the first time. Don‟t
say I didn‟t tell you to.
When you’ve answered these questions, you may move on, and not before.
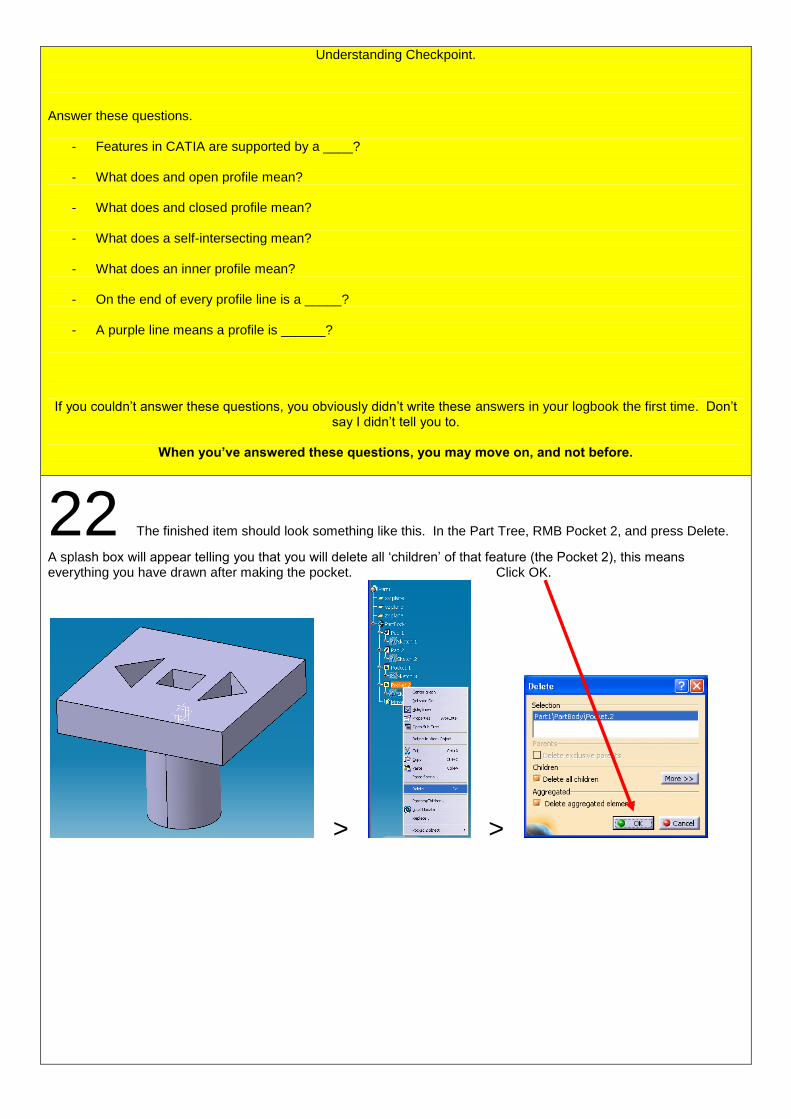
22 The finished item should look something like this. In the Part Tree, RMB Pocket 2, and press Delete.
A splash box will appear telling you that you will delete all „children‟ of that feature (the Pocket 2), this means everything you have drawn after making the pocket. Click OK.
> >
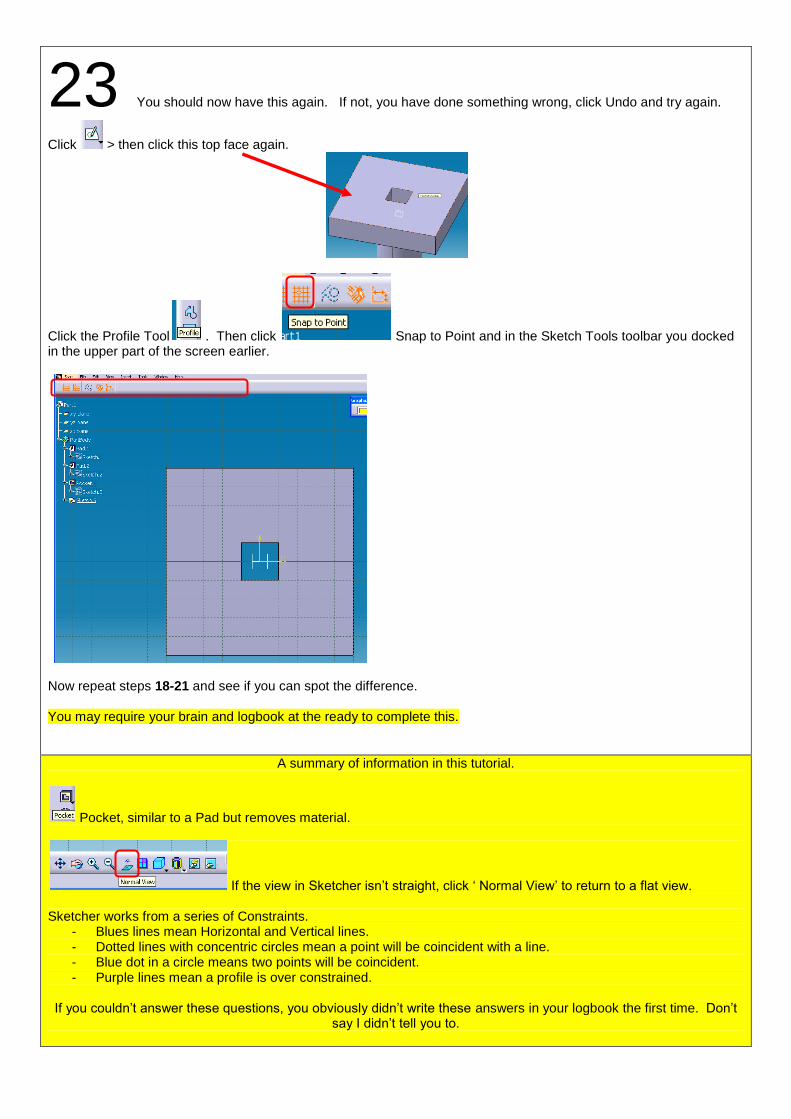
23 You should now have this again. If not, you have done something wrong, click Undo and try again.
Click > then click this top face again.
Click the Profile Tool . Then click Snap to Point and in the Sketch Tools toolbar you docked in the upper part of the screen earlier.
Now repeat steps 18-21 and see if you can spot the difference. You may require your brain and logbook at the ready to complete this.
A summary of information in this tutorial.
Pocket, similar to a Pad but removes material.
If the view in Sketcher isn‟t straight, click „ Normal View‟ to return to a flat view. Sketcher works from a series of Constraints.
- Blues lines mean Horizontal and Vertical lines. - Dotted lines with concentric circles mean a point will be coincident with a line. - Blue dot in a circle means two points will be coincident. - Purple lines mean a profile is over constrained.
If you couldn‟t answer these questions, you obviously didn‟t write these answers in your logbook the first time. Don‟t
say I didn‟t tell you to.