rutgers.jp ru autonomous rutgers university
TRANSCRIPT

Rutgers University
RU AUTONOMOUS
Journal Paper
AUVSI SUAS Student Competition 2014
Team Members
Timothy Beyer, Team Lead
John Kelly
Vinay Panjabi
Conor McCaffrey
Ankur Save
Timothy Pearson
Tatsat Parekh
James Chen
Abstract The AUVSI SUAS student competition presents a number of challenges, including autonomous waypoint
navigation, image capture, target recognition, air drop, and several others. RU Autonomous, from Rutgers
University, has created a system that can accomplish all of these tasks to the specifications set forth in the
official competition rules. We aimed to build upon last year’s successes and further upgrade our system to
create our most robust system yet. A flying wing airframe with a wingspan of seven feet that has been
specially reinforced and modified houses all of the components. The 3DR Pixhawk autopilot flies the
plane through any waypoints and through the search area. A Canon T2i DSLR camera takes images and
passes them to a powerful Intel NUC computer for pre-processing. These images are then passed via
wireless connection to the ground and further analyzed for targets. Air drop and SRIC capabilities are also
on board. Extensive testing has been done for each individual system from the bench to real flight to
ensure proper and safe operation and a full competition run through has been carried out to test overall
readiness. A complete system overview including major design decisions and expected performance are
presented inside along with safety precautions and other relevant data.

1 | P a g eRU AUTONOMOUS RUTGERS UNIVERSITY
Table of Contents Abstract ......................................................................................................................................................... 0
1.0 Systems Engineering Approach .............................................................................................................. 2
1.1 Requirements Analysis ....................................................................................................................... 2
1.2 Design Rationale ................................................................................................................................. 2
1.2.1 Airframe Design Rationale .......................................................................................................... 2
1.2.2 Autopilot System ......................................................................................................................... 3
1.2.3 Payload ......................................................................................................................................... 3
1.3 Expected Performance ........................................................................................................................ 4
2 UAS Design ............................................................................................................................................... 5
2.1 Airframe Design .................................................................................................................................. 5
2.2 Payload Design ................................................................................................................................... 6
2.3 Air Drop Design .................................................................................................................................. 6
2.4 Data Link Design ................................................................................................................................ 6
2.5 Launcher Design ................................................................................................................................. 7
2.6 Ground Station Design ........................................................................................................................ 8
2.7 Data Processing and Target Recognition ............................................................................................ 8
2.7.1 Image Acquisition ........................................................................................................................ 9
2.7.2 Target Analysis ............................................................................................................................ 9
2.7.3 Operator Interaction ................................................................................................................... 12
2.8 Mission Plan ...................................................................................................................................... 12
3.0 Testing and Evaluation ......................................................................................................................... 13
3.1 Airframe Subsystem .......................................................................................................................... 13
3.2 Autopilot Subsystem ......................................................................................................................... 14
3.3 Launcher ........................................................................................................................................... 14
3.4 Imaging Subsystem ........................................................................................................................... 14
3.5 Air Drop Subsystem .......................................................................................................................... 15
3.7 Competition Run Through ................................................................................................................ 15
4.0 Safety .................................................................................................................................................... 16
4.1 Protocol ............................................................................................................................................. 16
4.2 Go, No-Go Criteria and Failure Management ................................................................................... 16
4.3 Chain of Communication .................................................................................................................. 16
4.4 Take Off ............................................................................................................................................ 17
4.5 Failsafe .............................................................................................................................................. 17

2 | P a g eRU AUTONOMOUS RUTGERS UNIVERSITY
5.0 Conclusion ............................................................................................................................................ 17
1.0 Systems Engineering Approach
1.1 Requirements Analysis
The first step of any large scale engineering project is to lay out exactly what is to be achieved
by the system to be built. These goals will then drive each of the individual design decisions
made later and will provide a framework for how to approach the problems. What we hope to
achieve are the tasks outlined in the rules under Section 7 “Description of Mission Tasks”. There
are two types of tasks: primary and secondary, along with two scoring levels for each task,
threshold and objective. The threshold is the minimum action required to score points for the task
while the objective is the action which will gain the most points for the task. The Rutgers team
set out to meet all of the threshold requirements and as many of the objective requirements as
possible. Specifically, this year we aim to achieve the objective level in all parts of the
autonomous flight and search area tasks while obtaining at least threshold level all other events.
We decided to work for the objective requirements in the other tasks only if time allowed later
on in the process. This way we concentrated our efforts on the most important parts of the
competition and allowed ourselves to focus on a specific set of requirements to work to for
competition day.
1.2 Design Rationale
1.2.1 Airframe Design Rationale
One of the most important decisions the team made was the choice of airframe. Without a
versatile and rugged frame, the system would not be able to achieve the requirements that we set
out for it above. Key aspects of any airframe design include versatility, cost, and ease of
transport. The team decided last year that constructing our own airframe from scratch was not an
efficient use of resources and that analysis is still true for this year’s competition since our
knowledge of custom building airframes had not advanced to the point of making this option
viable. The decision to not build our own frame meant that a commercially available solution
was needed. This introduced new requirements into the selection process, most important of
which was ease of modification and assembly. In the end what we needed was a cheap frame that
was easy to build and to maintain that also allowed for a large payload to be flown safely in all
kinds of conditions.
The team had a successful run in the competition last year with the Skywalker X8, which is a
flying wing made of hardened foam. It provided for all of the criteria we set out to for fill and
still left room to add new systems and pieces of hardware. The decision was made to continue
using this platform based on the past experience of the club. We have learned that picking a new
airframe every year, as was done up until now, was not the way to be successful come flight day.
Picking a new airframe would render useless all of the understanding and familiarity that we had
acquired over the past year with our current design and would delay the crucial systems testing
that is needed to be a top contender. By sticking with the same design, we could better build
upon the success of last year and eliminate the need to spend time testing a new frame.

3 | P a g eRU AUTONOMOUS RUTGERS UNIVERSITY
That said, the Skywalker X-8 is the choice for this year’s competition platform for a number of
reasons. It sports a 7-foot swept wing which integrates seamlessly into the body and can be
detached into two sections for easy transport. An enormous amount of lift is provided by this
configuration and helps to make the weight of our systems less of an issue. The foam
construction makes it very simple to build and to maintain, which is very important during
testing, when unforeseen problems can cause extra wear on the frame. The payload bay is very
large and easily accessed, which allows for the convenience of laying out each system in its own
separate area, which also helps to minimize interference. This gives us an edge over copters and
small wooden planes, where weight and space constraints can make seamless integration of
desired components difficult or impossible. The X-8 also flies very quickly in comparison to
other types of planes while still offering a very stable imaging platform. This is capped by a low
cost of purchase, which allows a back up to be kept as necessary.
1.2.2 Autopilot System
The autopilot used in the aircraft is one of the most critical components to meeting the KPPs for
the competition. In previous years, the APM series of autopilot was used to control the aircraft.
This year we have upgraded to the new Pixhawk flight controller. The Pixhawk is a complete
overhaul of the old APM design. It transitions from an older 8-bit microprocessor to 32-bit ARM
processor with a complimentary failsafe co-processor. In addition to the processor improvements
new dual IMU sensors with different sampling times provide redundancy, additional accuracy,
and protection against system errors.
The Pixhawk provides the ability to perform all of the threshold autonomy KPP requirements
and also the objective requirements of autonomous takeoff and landing of the vehicle.
Furthermore the system is based on the same open source code as our previous autopilot systems
making the transition simple. The Pixhawk also shares a very user friendly ground station
software that the team’s operators have become accustomed to over the past several years, which
has allowed for a fairly detailed guide to be made in order to allow any one of the team members
to operate the ground station and autopilot in case the main operator becomes unable to perform
those tasks.
1.2.3 Payload
This year’s payload was influenced heavily by what we learned in competition last year, namely
that many of the components we were using were too unreliable to give us consistent
performance. We had been using legacy components from years past and it showed in
unexpected failures and additional problems, the most important of which happened during our
mission last year. The GPS we had been using for target localization was a relic of many years
past and as such didn’t always perform in ways we expected, to the extent that it stopped
responding midflight last year. This cost us credit for all of the targets that we found except one,
severely hurting our final standing. Our imagining computer was also needed to be changed as
last year we were forced to use our backup Raspberry Pi when the Beagleboard we had originally
used was damaged. Going into the design meetings this year we resolved to not cut corners and
build a better payload than we had in years past.
The most pressing upgrade that needed to be done was to our GPS tagging system. We originally
were using an external separate IMU and GPS hooked up to the camera in order to tag each of
the photos we were receiving with relevant position data. This system had proved to be too
unreliable so the team decided to simplify it by removing the extra IMU entirely. The advantage
this creates is that we no longer have to worry about correctly calibrating and working with two

4 | P a g eRU AUTONOMOUS RUTGERS UNIVERSITY
sets of GPS’s. Instead, we would intercept the GPS data from the autopilot and use that to tag
each of the incoming photos. The autopilot GPS had proven to be very reliable in the past so this
decision helped to remove uncertainty from the process.
Another upgrade that had to be made was too the onboard imaging computer. A Beagleboard had
originally been picked for use in the imaging system due to the familiarity that our members had
with it from use in other projects. With the damage that it sustained however, and after seeing the
weakness of the Raspberry Pi during the competition, the imaging team decided to pick an
entirely new computer that would be more robust and powerful. A number of different small
form factor products were analyzed, with the final choice being the recently released Intel NUC.
The NUC is a complete computer that boasted a full x86 Intel i3 processor and 8 GB of RAM,
which is orders of magnitude more powerful than the previous ARM boards. The biggest
advantage of the NUC is its immense processing capabilities relative to the alternatives which
allow us to do some image processing onboard the aircraft and decreases the number of pictures
that need to be sent to the ground over our limited bandwidth connection.
The last major piece of our payload that needed to be decided on was the camera. Last year we
used a Canon T2i, a high resolution (18MP) DSLR camera as the core of our imaging system.
Since it performed very well during the competition and we already had all of the necessary
software written for it, the team decided to stay with this camera for this year. This helped to free
up budget for other component upgrades and helped to save time during testing.
1.3 Expected Performance Based on the current state of the system and the few remaining improvements that need to be
made, we are confident that the system can meet all of the goals that we originally set for
ourselves by accomplishing every threshold task, with the exception of the infrared target, for
which we do not have the equipment for. At the current time, objective level has been reached
for each task in the autonomous flight, search area, and SRIC categories. Testing and
improvements will continue to be made until competition day, with the goal of accomplishing
more of the objective level tasks.
Parameter Threshold Objective
Autonomous Flight Various Tasks Various Tasks
Search Area Various Tasks Various Tasks
ADLC N/A Various Tasks
Actionable Intelligence N/A Target Location and
Characteristics
Off- Axis Target Identify two target
characteristics
Various Tasks
Emergent Target Search for and image target Various Tasks
SRIC Download message Download and Perform Task
Interoperability N/A Provide Standard Positioning
Reference
Infrared Search Various Tasks Various Tasks
Air Drop Manual Release, < 100ft Autonomous Release, < 50ft
Requirement Met Testing Underway Untested

5 | P a g eRU AUTONOMOUS RUTGERS UNIVERSITY
2 UAS Design
2.1 Airframe Design
Our choice in airframes is crucial and defines the parameters that the rest of the system must
operate under. After our results from the competition last year we have decided to continue use
of our airframe, the Skywalker X8. The incredible efficiency of the blended wing body and large
internal volume have proven to be a perfect match for our requirements. Additionally, the aircraft
is relatively cheap and readily available from multiple sources.
The plane is primarily made of molded EPO foam with carbon tubes embedded through the
wings and fuselage for stiffening and reinforcement. EPO foam is lightweight, durable, and
flexible so even violent landings in harsh winds cause minimal damage to the airframe. In the
event damage does occur, repairs are very simple and can be made in a matter of minutes.
The X8 design sports a long, tapered swept wing with wing tips for excellent roll and pitch
stability. Large elevons, a streamlined fuselage, and the long wing contribute to the plane’s
ability to handle winds near the 15-20 knot limit as specified in the competition rules, which has
been tested in constant winds of around 18 knots. Modifications were made and flat carbon rods
were also embedded vertically in the wings for added stiffness in high wind conditions.
The bay of the airframe is wide and allows all the components to be viewed at one time, so the
system can be rapidly evaluated for flight readiness prior to the start of the mission. Once the
system is set up, each component can be dealt with individually without disturbing other
components, maintaining the integrity of the system.
The UAS flies without landing gear, saving the weight for extra payload carrying capacity and
lowering drag. Further, the airframe uses elevons for pitch and roll control so it can eliminate the
added servo weight of ailerons and tail surfaces common to other airframes. On landing, the
foldable pusher propeller simply conforms to the ground, making for a smooth, controlled
touchdown.
The Canon T2i camera is mounted in the front of the plane. A plexiglass plate is installed under
the camera lens to provide a clear shot of the ground and protect the lens on landing.
Another important design consideration for the airframe is the choice of power system.
Traditionally, the Rutgers team chooses electric motors for their simplicity, reliability, and
reduced electromagnetic interference. This year small changes were made to increase flight
performance and duration. A new 1000 watt electric outrunner motor with a new propellor was
chosen to drive the plane because it provides additional power for a comfortable takeoff and
efficient cruising of this airframe. In addition, two 14.8 volt (4 cell), lithium polymer batteries
are connected in parallel for a 8000 mAh capacity that allows the aircraft to achieve the team’s
desired twenty minutes of minimum flight time.

6 | P a g eRU AUTONOMOUS RUTGERS UNIVERSITY
2.2 Payload Design
2.3 Air Drop Design
The mechanism to hold the egg in the plane and to release it when
the time comes is relatively simple. A box was cut out of light balsa
wood to the size of the air drop canister and a door was attached to
the underside. The door is actuated by a servo attached via a
connecting rod to the side. This allows the door to be opened to
release the egg and to then close to not interfere with landing. As an
added safety measure beyond the required hardware switch, a
physical pin was added that prevents the door from closing until it
is retracted by a second servo mounted to the side of the box. When
the time comes to drop, the safety pin is commanded to release and
then once the plane is within the target area the second servo
quickly opens the door and allows the egg to fall. The door also
prevents any interference of the canister hitting the back mounted prop, as it is mounted so that
the door shields the prop during release of the canister.
2.4 Data Link Design
The system incorporates three different radio frequencies in order to ensure no interference
between the various systems on the plane. Extensive testing was done to determine antenna
design and placement.

7 | P a g eRU AUTONOMOUS RUTGERS UNIVERSITY
The autopilot communicates with the ground station on a 900MHz spectrum using new RFD900
telemetry modems. This modem was designed around the mavlink protocol and is backwards
compatible with our old radios making it easy to integrate. It provides an air data rate of up to
250Kbps with an advertised range of over twenty miles and tested range of over 3 Miles. This
radio offers an increased transmit power, two diversity switched antennas, and greatly improved
filtering. It has been tested in extreme conditions and will duty cycle the transmitter if it
overheats. In the event that the autopilot is no longer able to communicate with the ground
station, it is programmed to use the onboard telemetry to navigate to a predefined "home"
location. Along with this fail-safe, the plane can be controlled using manual R/C controls
The R/C controls are communicated on 2.4 GHz through a HiTec transmitter and receiver
combination which wires the R/C controls through the autopilot. This combination has proven
reliable through years of testing. The 2.4 GHz link is designed for use in RF congested areas and
utilizes adaptive frequency hopping spread spectrum to improve connection reliability. The plane
side receiver features dual diversity switched antennas to further improve connection stability.
The imaging system relays information to the ground station using a 5.8GHz wireless network. A
Ubiquiti Bullet M5 adapter and antenna in the aircraft and a Powerbridge M5 adapter on the
ground provide a high throughput datalink. The power bridge features dual linear polarized
antennas for greater throughput during aircraft banking. The combination is reliable even in
extreme temperatures.
2.5 Launcher Design
The team decided to use a design that many RC plane enthusiasts have used for the X8 airframe.
The main body of the design consists of a frame constructed of PVC pipe which is staked to the
ground. The pipes are constructed so that two long sections form rails for a ramp that slopes
upward, upon which the airframe is placed for launch. The airframe has a small hook on it which
is connected to a nylon rope whose other end is hooked to a Panic Snap quick release, which is
attached to the frame. Also attached to the panic snap is 3/8 inch latex rubber surgical tubing
which is stretched to a stake 20 feet from the front of the launcher frame. Another nylon rope is
attached to the release and extends out several feet from the launcher so that the release can be
triggered at a safe distance. When the release rope is pulled the panic snap lets go off the surgical
tubing, pulling the plane forward and up the ramp. As the airframe accelerates after leaving the
ramp, the nylon rope connecting to the underside falls off the hook and the plane accelerates to
full throttle to clear the ground.
8 | P a g eRU AUTONOMOUS RUTGERS UNIVERSITY
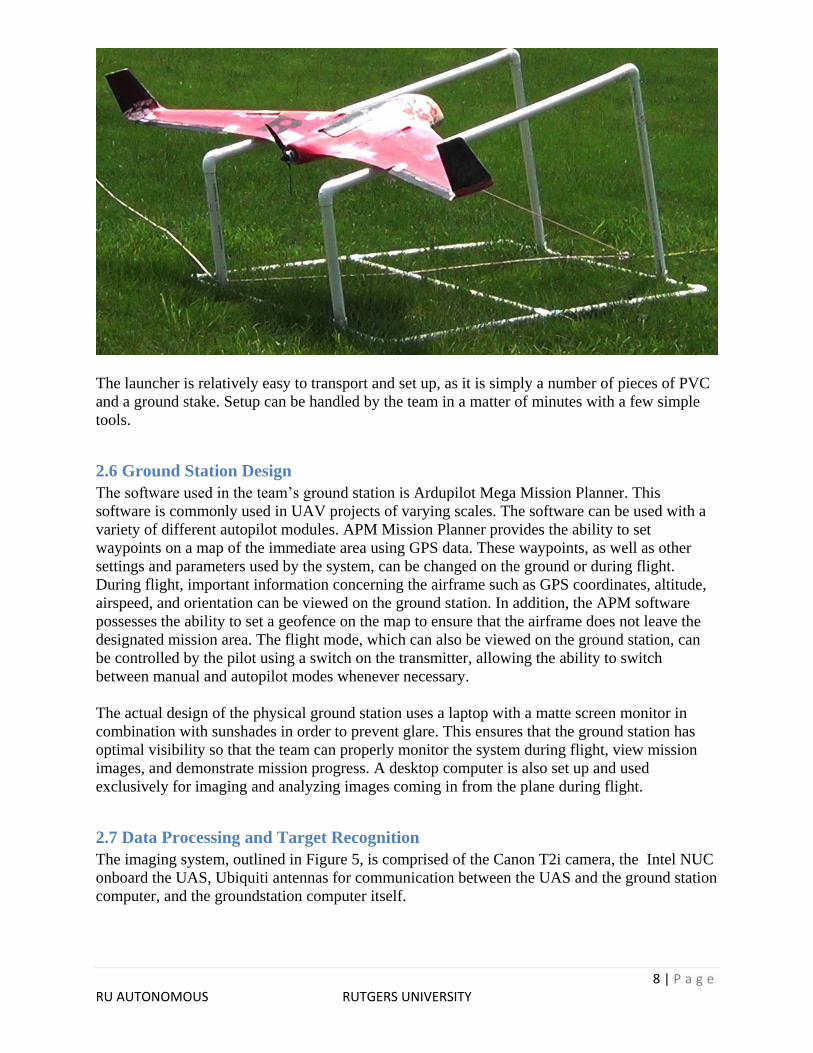
The launcher is relatively easy to transport and set up, as it is simply a number of pieces of PVC
and a ground stake. Setup can be handled by the team in a matter of minutes with a few simple
tools.
2.6 Ground Station Design
The software used in the team’s ground station is Ardupilot Mega Mission Planner. This
software is commonly used in UAV projects of varying scales. The software can be used with a
variety of different autopilot modules. APM Mission Planner provides the ability to set
waypoints on a map of the immediate area using GPS data. These waypoints, as well as other
settings and parameters used by the system, can be changed on the ground or during flight.
During flight, important information concerning the airframe such as GPS coordinates, altitude,
airspeed, and orientation can be viewed on the ground station. In addition, the APM software
possesses the ability to set a geofence on the map to ensure that the airframe does not leave the
designated mission area. The flight mode, which can also be viewed on the ground station, can
be controlled by the pilot using a switch on the transmitter, allowing the ability to switch
between manual and autopilot modes whenever necessary.
The actual design of the physical ground station uses a laptop with a matte screen monitor in
combination with sunshades in order to prevent glare. This ensures that the ground station has
optimal visibility so that the team can properly monitor the system during flight, view mission
images, and demonstrate mission progress. A desktop computer is also set up and used
exclusively for imaging and analyzing images coming in from the plane during flight.
2.7 Data Processing and Target Recognition
The imaging system, outlined in Figure 5, is comprised of the Canon T2i camera, the Intel NUC
onboard the UAS, Ubiquiti antennas for communication between the UAS and the ground station
computer, and the groundstation computer itself.

9 | P a g eRU AUTONOMOUS RUTGERS UNIVERSITY
2.7.1 Image Acquisition
The image acquisition process begins with the Canon T2i camera taking a picture. This is
controlled by an Arduino, which is hooked into the camera's trigger port. The Arduino then
receives the positional data of UAS to associate with a the specific picture. Since there is a non-
deterministic time difference between the time that the camera is triggered, and the time that it
actually takes the picture, the Arduino is also connected to the camera flash. The positional data
is recorded at the time the flash goes off. The onboard computer takes this data, and inserts it into
the EXIF data of the image from the camera. Images are ultimately sent to the ground station via
the Ubiquiti data link. However, depending on the available bandwidth, the onboard computer
does a certain amount of pre-processing. For example, if there is a lot of bandwidth available,
very little processing will be done on the images, and all images will be sent down to the ground
station. However, if there is little bandwidth available, a large amount of processing will be
done, and only the images containing targets will be sent down. The amount of processing lies on
a spectrum, and can be finely adjusted. In either case, able the system analyzes the images,
identifies any targets, and displays all targets and their characteristics to the operator.
The desired frame rate for the camera was calculated to be at least 1 picture per second using the
desired flight altitude (calculated from the desired pixel density of 2 pixels per inch to resolve the
targets in a picture), the known average groundspeed (about 35 knots) of the airframe, and the
camera’s field of view (57 degrees). This calculation helped in the decision process of choosing
the camera and was confirmed during flight testing with the imaging system. These properties of
the camera allow faster and higher flights in order to minimize the time required to cover the
entirety of the search area.
In the event that the imaging system fails, the entire system can be rebooted from the ground,
given that a data connection to the plane still exists. Any combination of the onboard computer,
the camera, and the control Arduino can be reset, depending on what system(s) need resetting. A
reset of all systems takes roughly 25 seconds.
2.7.2 Target Analysis
Once the images are taken from the camera and tagged with positional data, the image analysis
can begin. As this task contains many steps, it can be split very finely between the onboard
computer and the ground station, depending on the computational power needed, and the
bandwidth of the connection to the ground.

10 | P a g eRU AUTONOMOUS RUTGERS UNIVERSITY
Target Recognition And Classification (TRAC):
The TRAC system follows this general outline:
Target Detection
Target Base Classification
◦ Base Outline Isolation
◦ Base Outline Classification
◦ Base Color Recognition
◦ GPS Location
Target Symbol Classification
◦ Symbol Isolation
◦ Symbol Classification / Orientation Detection
◦ Symbol Color Recognition
Target Confirmation
Figure 1: Image detection algorithm

11 | P a g eRU AUTONOMOUS RUTGERS UNIVERSITY
Target Detection
First, likely targets must be identified. To accomplish this, the image is put through several
different filters, and a list of targets is obtained. This list of filters includes:
-Converting to HSV color space
-Greyscaling at several different values
-Blurring the image
Each filtered image is run through Canny edge detection, and closed contours are extracted.
These contours are farther filtered, to find ones that may correspond to targets. The contour
attributes considered are:
-Minimum and maximum area, accounting for the altitude of the UAV
-Regularity of the polygon, so random natural shapes are not counted
-Existence of another contour within the polygon, as each target must have a symbol inside it
Target Base Classification
Base Outline Isolation
For each selected contour, the base of the target is isolated. This is done by finding the outermost
contour in a given area, and removing all the inner contours that may correspond to a symbol.
This is the shape of the target base.
Base Shape Classification
Shape classification is done using a Support Vector Machine (SVM). An SVM is a machine
learning tool used to separate data into discrete classes. Hu Moments are used to classify
contours into different classes of shapes. Hu Moments are combinations of image moments
(weighted averages computed from an image, such as centroid, or average pixel intensity) that
are invariant to rotation, scale, and reflection. This means that when two mathematically similar
contours are compared, they will have the same Hu Moments regardless of their pose or size. We
use 6 Hu Moments that are calculated for each shape. While there normally 7 Hu Moments used,
the last moment is skew invariant, and that is an undesirable feature, as certain shapes can be
skewed to look like other shapes (e.g. a trapezoid looks like a skewed square). To train the SVM,
Hu Moments are computed for a list of pre-generated shapes. For any shape that can have
different proportions (e.g. triangles, but not squares), hundreds of variations are generated by
permuting individual angles and side lengths. The SVM is currently trained on the following
shapes: Triangle, Square, Rhombus, Trapezoid, Pentagon, Hexagon, Octagon, Cross, 3-Point
Star, 5-Point Star, Circle, Semi-Circle, Circle-Sector.
To classify the base shape, the Hu Moments of its contour are computed, and the SVM computes
the most likely shape. The SVM also computes the probability that the contour actually has that
shape, depending on how closely the Hu Moments match. If the probability is too low, we
declare that the shape cannot be classified.
Base Color Recognition
To identify the color of the base, it must be isolated from the rest of the image. The relevant area
is between the outer contour, and the inner contours (which represent the symbol). The average
color in this area is computed, and compared to a list of dozens of colors. The closest match is
reported.
GPS Location

12 | P a g eRU AUTONOMOUS RUTGERS UNIVERSITY
The GPS location of the target is obtained by using the centroid of the outer base contour. The
distance from the centroid to the center of the image is compared to the GPS location of the
UAV at the time the picture was taken, and a GPS location for the target is computed.
Target Symbol Classification
Symbol Isolation
The symbol is isolated by removing everything except the contours inside the outer base.
Symbol Classification / Orientation Detection
To classify the symbol, we use the Optical Character Recognition (OCR) program Tesseract. An
image is created by printing the inner contours in white, on a black background, to maximize
contrast. This image is passed to Tesseract, which classifies symbol, and provides its orientation.
It also computes the probabilities that each of the two properties is actually correct. If the
probability for either is too low, the classification or orientation is respectively declared to be
unknown.
Symbol Color Recognition
To identify the color of the base, it must be isolated from the rest of the image. This is done by
selecting only the area between two inner contours, if there are multiple inner contours. If the
entire inner contour area was used, some of the base color might contaminate the sample, in
cases where the symbol has holes (e.g. 'A', or 'O'). The color for the selected area is computed in
the same way as the base color recognition.
Target Confirmation
If more than 3 properties were classified with a high enough probability, the contour is
considered a valid target. Otherwise, it is assumed that that selected contour was mistakenly
identified as a target.
2.7.3 Operator Interaction
The TRAC system displays images on the monitor as they arrive from the UAV. If any targets
are recognized in the current picture, the program flashes the outline of the target in bright colors
to draw attention to it, and its attributes are listed in a popup nearby. If any attributes are
incorrect, the operator can correct them here. If the operator sees a target that the system has not
identified, he or she can flag the image, and the system will put the image in the “Flagged
Images” queue, and then attempt to perform a more focused search on it. If this search fails, the
operator can manually type in the attribute information. After all the targets have been verified,
they can be written to a disk, in the format specified by the manual.
2.8 Mission Plan
The mission has been split into a number of different phases, each with their own specific set of
attempted tasks. Testing continues to make the transition between each phase seamless and
smooth, while ensuring safety of both the people on the ground and the X-8 in the air. The
phases are as follows:
Phase 1 – Setup and Takeoff: During this phase we will be taken to the flight line with all of our
equipment. Team members will each have a specific job to carry out and will be responsible for
making sure that they are ready for the start of mission time. During this phase the launcher is
13 | P a g eRU AUTONOMOUS RUTGERS UNIVERSITY
assembled and staked into the ground, the plane is set up, and the ground station is assembled.
Mission time will start and the plane and all ground systems will be activated. After connections
have been established and upon receiving approval from the judges, the plane will be taken to the
launcher and launched
Phase 2 – Waypoint Navigation: This phase will activate once the plane has reached the desired
height for the first waypoint and we judge that all systems are functioning normally. The plane
will fly autonomously through all of the waypoints, including the additional waypoint to be
added mid-flight and will attempt to capture photos of any targets along its path. After each
waypoint has been hit in succession, this phase is completed
Phase 3- Area Search: This phase begins once the system enters the target search area through
the designated area. The system will search the entire area using a pattern we have developed
which allows for a very efficient means of covering a large area. The images will be taken by the
camera and fed into the onboard computer, which will do some initial processing and recognition
onboard. Then any images which have been judged to contain targets will be passed down to the
ground to be run through the ground station desktop. During this time the emergent search area
will also be imaged and the emergent target will be found by the system. This phase ends once
we judge that the entire search area has been covered to the best of our ability.
Phase 4- Additional Tasks: This phase begins immediately after the aircraft exits the search area
and only if there is additional time remaining. Any further tasks that we can accomplish will then
be attempted. This will include the air drop task as well as the SRIC to be performed in
whichever order will make the most sense based on the locations of each task on the airfield. The
air drop will only be performed with the consent of the judges and if conditions on the field
allow it. If additional time still remains and there are more objectives that need to be completed,
they will be attempted at this time. Otherwise this phase ends either when our target mission time
is up or when we finish all mission tasks.
Phase 5- Landing and Tear Down: The target for the start of this phase is after the completion of
phase 4, however, this phase can be initiated at any time during the mission if something goes
wrong and the team lead or judges decide it must be terminated. Specific ways to start this phase
early include running low on battery, running low on mission time, having a critical failure of the
control system or of the motor, or any other conditions laid forth by the judges. The plane will be
taken in for a belly landing on the grass next to the runway in a controlled fashion. The motor
will then be disarmed and the battery unplugged. Any post processing will then be carried out by
the team until either processing is finished or time runs out. All systems will then be
disassembled and carried off of the flight line and the mission ends.
3.0 Testing and Evaluation
3.1 Airframe Subsystem
The testing of our airframe was done by incrementally improving its flight characteristics. We
first flew an unmodified X-8 straight out of the box looked at its performance. We then slowly
increased the weight that the plane carried and looked for any problems that developed. One in
particular was flutter of the wings, especially in higher winds. This would cause erratic behavior
and required us to make a number of modifications to the stock design, including increasing the
strength and the stability of the wing joining system and embedding carbon rods in each of the

14 | P a g eRU AUTONOMOUS RUTGERS UNIVERSITY
wings to increase stiffness. This eliminated the problem completely, even at higher weights.
After these problems were figured out we tested a number of different motors to mount instead
of the one from last year, which was not very efficient for its weight. After doing stationary
thrust testing we mounted the new motor on the airframe and tested for things like flight time
and speed. The strength of the motor mount was increased and a larger battery was added, which
gave us an airframe which was stronger and faster than before. All of these changes and tests had
taken a toll on the original airframe, so another X-8 was bought specifically for the competition
and all of the best changes and modifications were carried over. Over 5 hours of total airframe
testing was done this year, which built on last year’s data.
3.2 Autopilot Subsystem
To test our new autopilot, the X-8 was put into the air with minimal weight and no extra
components. We first tested each of the autopilot modes that were not auto, since they allowed us
to change settings and make adjustments incrementally and focus on one area of the system at a
time. Some of the modes that were tested were Fly-By-Wire, a mode that assists with flying by
holding either altitude or roll constant, loiter, which flies the plane in a circle at a constant
altitude and speed, and the failsafe mode, which is explained more later on in the safety section.
Making adjustments in these modes to pitch and roll values, bank angles, and climb rates
allowed us to be more confident when switching to auto mode for the first time. In auto mode,
the plane follows a pre determined series of waypoints and attempts to fly over each one within a
certain radius. More tuning of pitch and banking was required to get the plane hitting waypoints
consistently. After the plane could follow a line of waypoints the geo fence system was tested
and confirmed to work correctly. This many hours were spent finely tuning each of the settings
of the autopilot, which pays off with very steady behavior. In total, 7 hours of autopilot testing
was performed.
3.3 Launcher
The launcher went through several design changes and testing sessions before working correctly.
The team had to ensure that the surgical tubing used would produce enough force to pull the
plane off of the launcher. Testing was performed using a scale to measure the force produced
when the tubing was stretched to various lengths and compared against the calculated estimate
for the amount of force needed. This testing established the needed stretched length of 20 feet.
Early testing with the launcher showed successful takeoff, however the hook attached to the
airframe itself caused problems upon landing, as the relatively large hook was taking a great
amount of impact when the frame hit the ground. This problem introduced the need for a new
hook, one with a lower-profile so that landing impact would be less of an issue. After failing to
find a hook fitting the team’s needs in stores, the team decided to create its own from sheet
metal. After the new hook was completed and attached to the plane, flight testing confirmed that
it had a low enough profile to not interfere with landing and avoid sustaining damage to the
airframe.
3.4 Imaging Subsystem
The imaging system was tested in two parts: the communication infrastructure, and the image
processing algorithms. The communication infrastructure was tested by stressing the system and
insuring that communication did not falter or was able to resume in case of disruption. Some of
the stresses were: interrupting the communication from the camera to the onboard computer,
interrupting the communication to the antennas, stopping the camera sensor and crashing the

15 | P a g eRU AUTONOMOUS RUTGERS UNIVERSITY
imaging ground station. All of these situations can be alleviated by rebooting the relevant
component.
The image processing algorithms were tested by using custom made plywood targets. The targets
were constructed according to the specifications of the rulebook. They ranged from 2 feet to 8
feet wide, and their colors were chosen in a way that would test the limits of the imaging system.
For example, some targets were extremely close in color to the grass or dirt that they were placed
on. This helped make sure that the algorithms used for object recognition were precise enough to
pick up on the minute differences between colors. The targets were a variety of different shapes
to make sure that many different types of shapes were recognized. To test the alphanumeric
recognition, several different fonts were used on the targets. Test flights over objects of similar
size as targets, like puddles of water, were also performed to make sure the system did not report
any false positives. Flights were performed at multiple altitudes to test that changes in relative
size of the targets did not negatively affect the results. These tests have sufficiently demonstrated
that the system is robust enough to accurately identify most, if not all, targets encountered in the
competition. We have tested 25 different targets and have spent 5 hours inflight with the
systemThe following are the percentages of targets and characteristics identified over all the tests
that we performed.
Targets Correctly Identified 80%
In the case that the target was correctly identified:
Shape Correct Identified 90%
Base Color Correctly Identified 90%
GPS Location Correctly Identified 90%
Symbol Correctly Identified 76%
Symbol Color Correctly Identified 90%
Orientation Correctly Identified 72%
3.5 Air Drop Subsystem
Testing of the egg drop was designed to proceed in a number of stages. The first stage was the
initial ground based testing of the release mechanism and the safety, as described previously.
This consisted of building the drop container and the egg and testing to make sure that the door
would stay closed and only release the egg when the safety switch was flipped and the command
to drop the egg was given from the controller. After this was confirmed to work the assembly
was put into the plane for the second stage and the necessary modifications were made to
accommodate it. On the ground a target was laid out and a 200ft and a 100ft radius were marked
out on the ground with stakes. The plane was flown over these stakes and the command was
given to drop the egg when the airframe entered the outer circle. A team member, standing a safe
distance away, observed where the egg landed inside the circle after each attempt. The results
from these tests were positive: the egg would always release into the inner circle after a number
of calibrations were made to the release mechanism. Currently the third stage of testing is
happening, where the release is given to the autopilot and the pilot only okays the plane to drop.
In total there have been 13 successful drops so far.These tests are ongoing.
3.7 Competition Run Through
In order to ensure that the team could accomplish all objectives within the specified time limits
set forth in the rules, two full competition run throughs have been performed. This involved
finding the largest field possible and setting out a waypoint path and target search area, along

16 | P a g eRU AUTONOMOUS RUTGERS UNIVERSITY
with an SRIC point and an air drop location. An unknown number of targets were placed in the
search area by one team member and a no fly zone was established around the perimeter of the
field to fully recreate competition conditions. The results of both practices were good: all of the
required time limits were met and the system was able to accomplish all the tasks set up for it.
We are confident that the team can replicate this during the actual competition and will continue
to practice until competition day, adding in new tasks if we finish them.
4.0 Safety
4.1 Protocol
In order to ensure the safety of our team members and that of all people who come into contact
with our system, a strict set of safety procedures have been put into place. Before anyone is
allowed to do work for the team, they are given a mandatory safety briefing on basic precautions
like staying out of propeller arcs, the safe handling and charging of LiPo batteries, and the safe
handling of tools and equipment that he or she may use. A number of further procedures have
also been developed for use during testing. These procedures have been designed to minimize
the chance of any accident or unexpected events when using our UAS or any of its components.
One member of the team has specifically been tasked with enforcing these safety measures and
all team members have been briefed on the correct methods of operation for all of our
equipment. Hard copies of all specific safety procedures are always with the team when doing
any work or flight testing and are outlined below.
4.2 Go, No-Go Criteria and Failure Management
To provide a constant set of safety standards and system analysis tools, a set of go, no go criteria
have been established. These criteria detail all of the possible failures that could occur both
before the plane has launched and after it is in the air and the action that needs to be taken should
they occur. On the ground, the possible failures include structural damage, servo failure, no
communication with the autopilot system, and imaging computer malfunctions, among many
others. Should one of these failrues occur, the list can then be referenced to determine whether
the launch is in a “go” situation, where the damage or problem can be quickly repaired, or a “no-
go” situation, where the damage cannot be repaired and the launch is terminated. When airborne,
another set of failure management criteria exist to govern the response to any problems that may
arise. These criteria govern the termination of the mission depending on the problem that occurs.
To save space these criteria are not included here in full but full copies will be available during
the team’s presentation for reference.
4.3 Chain of Communication
In order to ensure any problems that arise or any decisions that have to be made are dealt with
quickly and efficiently without compromising other parts of the mission, a chain of
communication has been established between the members of the group based on the job that
they are performing. The team lead is at the top of the chain and passes any information from the
judges to the ground station manager and to the pilot point of contact. The ground station
manager then relays this to the autopilot operator and to the imaging operator. Our safety
observer reports directly to the team lead to ensure any safety issues are fixed promptly.

17 | P a g eRU AUTONOMOUS RUTGERS UNIVERSITY
4.4 Take Off
The launcher system used during takeoff is powerful as it needs to pull the airframe as well as its
entire payload, so a number of safety protocols have been instituted to prevent accidents. As the
launcher system is constructed, structural integrity is checked to make sure the system will
remain together during launch. After the PVC pipe frame is constructed, the panic snap is
attached to the release rope. The frame is then staked into the ground in a number of strategic
positions. After the frame is secure, the stake to which the surgical tubing is attached is placed in
the ground 20 feet from the front of the PVC frame. All crew members are cleared from the area
of the frame while a single member wearing protective eyewear pulls back the tubing and hooks
it into the panic snap on the front of the frame. The airframe is then placed on the ramp on the
frame and then the nylon rope is hooked to the hook on the bottom of the plane. During this time,
two separate throttle locks are in place to prevent any kind of motor movement. The crew
member who loaded the launcher then arms the system from a physical button in the plane while
all other crew members remain clear of the propeller arc. The crew member activating the
launcher then waits for the pilot to be prepared and deactivate his lock, and after receiving the
okay pulls the release rope, launching the plane.
4.5 Failsafe
In the event of a loss in communication with the aircraft mid-flight, the pilot will attempt to
regain control by using manual inputs on the controller. If for any reason this system has also lost
connection, the aircraft will enter a failsafe mode. This state is activated within one second of
losing R/C controls and cannot be changed until connection is re-established. In this mode the
aircraft will cut throttle and at first attempt to circle at altitude regain connection but if after 30
seconds pass and no connection can be established, the control surfaces will force the plane to
spiral into the ground. This prevents the plane from continuing in an unwanted direction in the
event of total controls failure and helps to minimize any damage or danger to the plane’s
surroundings.
5.0 Conclusion
After many months of work designing, building, and testing new and improved systems for your
UAS, the Rutgers team is confident that it will have a strong showing at this year’s competition.
We set out with a specific set of objectives that we wanted to accomplish and have made a
number of important modifications to last year’s system to make them a reality. These
improvements include better power system components, a functional launcher, a more powerful
onboard computer, and an improved autopilot. Each system was tested individually then then
gradually they were all connected together and a full competition test was performed. Testing
will continue to achieve more of the objective level tasks. The team looks forwards to competing
in June.