s5143 - architectural display walls using nvapi
TRANSCRIPT

DOUG TRAILL – SENIOR SOLUTIONS ARCHITECT, NVIDIA
S5143 - ARCHITECTURAL DISPLAY WALLS USING NVAPI
“HOW TO MAKE A FUNKY DISPLAY WALL ;-)”

ARCHITECTURAL DISPLAYS
Image courtesy of Planar – MOSAIC Walls Image courtesy of Christie Digital – Micro Tiles
Non-linear displays – don’t fit into standard MOSAIC GRID

NVAPI WARP + INTENSITY API
Image courtesy of Joachim Tesch
- Max Planck Institute for Biological Cybernetics
Image courtesy of Christie Digital
Projection Blending & Mapping
software available from:

CAN WE USE NVAPI TO CREATE THIS ?

WE CAN SUPPORT UP TO 16 DISPLAYS
This technique allows us to have arbitrary layouts.

NVAPI BASICSPublic & NDA Version
Public – developer.nvidia.com
Most functions available – MOSAIC, WARP etc NO Custom Resolution.
NDA – registered developer with NDA. NVIDIA provides access to partner network for download
All functions available – including custom resolution
More SDK examples
Structure versions
Each structure in NVAPI contains a version field that must be set.
NV_XXX.version = NV_XXX_VER;
displayIds – unique identifier for each display attached. Includes GPU info.

UNDERSTANDING DISPLAY COORDINATES0,0
Windows Primary display
displayid0 displayid1
displayid2
SourceDesktopRect
Sx,Sy = 1920,0
sWidth = 1920
sHeight = 2304
displayid2
SourceViewPortRect
Sx,Sy = 0,1224
sWidth = 1920
sHeight = 1080
displayid1
SourceViewPortRect
Sx,Sy = 0,0
sWidth = 1920
sHeight = 1080
displayid1
SourceViewPortRect
Sx,Sy = 0,0
sWidth = 1920
sHeight = 1080
1920,0
1920,2304
0,1224
MOSAIC 2 rows x 1 col
displayid2
TargetViewPortRect
Sx,Sy = 0,0
sWidth = 1920
sHeight = 1080

TWO STEP PROCESSCreate Custom Windows Desktop
Needs to cover the resolution of the display
SourceDesktopRect – 3984x3984 pixels
Warp the scanout to match the physical location of the monitors
Physical monitor is the targetViewPortRect and we are going to warp the SourceViewRect to match the location of the monitor
Top Left – 2064,2064 Top Left – 3984,3984
Bottom Left – 2064,3144 Bottom Right – 3984,3144For this example need a desktop of 3984x3984 pixels
This is size of two 1920 monitors + bezel correction

CREATE A CUSTOM WINDOWS DESKTOPMOSAIC
Creates a new SourceDesktopRect based on individual displays.
Bezel correction – increase the size of the
Desktop
Overlap decreases it
2x2 MOSAIC
Width = 3840 + 144 bezel = 3984
Height = 2160 + 1824 bezel = 3984
4 x4 GRID – 1920x1080 1 GRID – 7680 x 4320
Extended Desktop MOSAIC
Column overlap
Row Bezel=1824
Unfortunately this does not work – Max bezel = half of display size = 520
Would also limit us to the layout
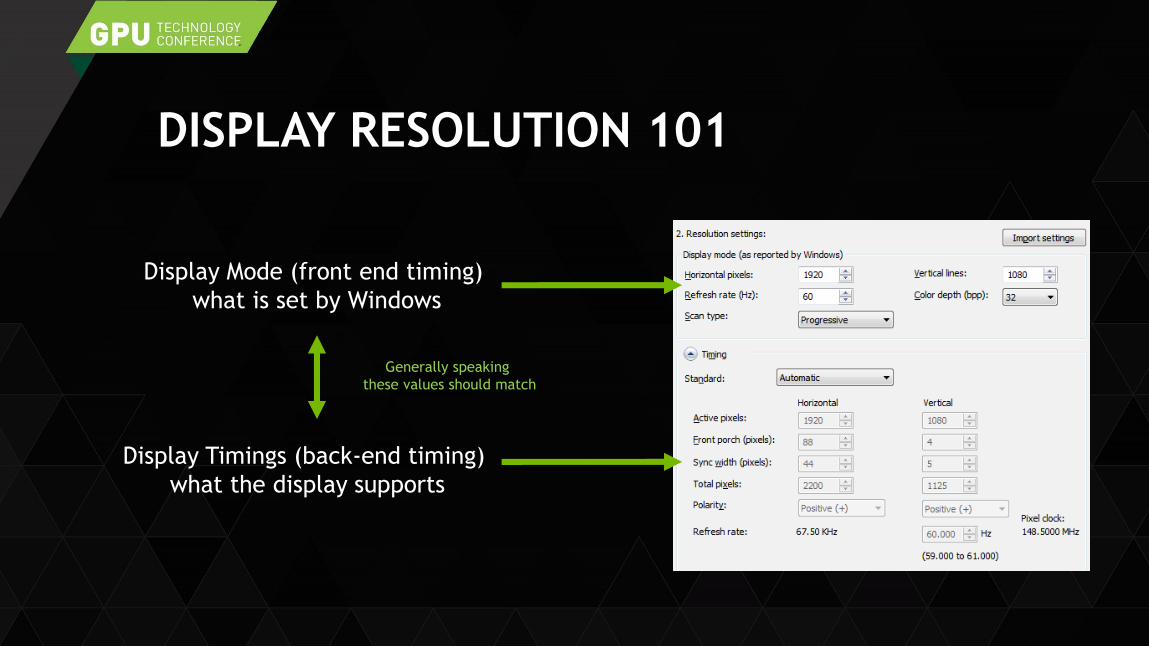
DISPLAY RESOLUTION 101
Display Mode (front end timing)
what is set by Windows
Display Timings (back-end timing)
what the display supports
Generally speaking
these values should match

DISPLAY RESOLUTION 101If you request a timing that is not in the Display EDID + Select Automatic
NVIDIA Driver will create new timing that uses the closest native display timing in the EDID, but with a modified Display mode.
Display Active pixels 1920
Windows Desktop 1600
Monitor reports it is getting 1920x1080

THINKING OUTSIDE OF THE BOX!!
1080x1920 1920x1920
We can create almost any “arbitrary” desktop resolutions
You can do this using the control panel – set 1920x1080 – Automatic first.
Then change to “Manual”
Then modify the scanout – not all desktops will show – depends on your monitor
INSIDE

CREATING CUSTOM DESKTOPMOSAIC
Rows 1 x Columns 4
Custom resolution – 996x3984
Creates SourceDesktopRect – 3984x3984 pixels
SourceViewRect – 4 stripes (this is what we warp)
Width – Height - 996 x 3984
1 – 0,0 2 – 996,0
3 – 1992,0 4 – 2988,0
targetViewPortRect – 4 physical monitors
Want to map the warped desktop to these.
1 2 3 4

WARNING – THE FOLLOWING MAY CONTAIN CODE

SOME PSEUDO CODE[1] Read coordinates from file (physically measure or work out by hand)
This is what we warp the SourceViewPortRect to.
[2] Calculate the co-ordinates
[3] Get all displayIds for attached displays
[4] Find targetViewPortRect displayIds
[5] Enable all displays
[6] Clean up – delete any old custom resolutions, disable warp if still applied
[7] Create custom resolutions
[8] Set MOSAIC
[9] Apply Warp
[10] Clean-up

CONFIG FILE Displays – number in MOSAIC GRID
Resolution – per display
Units – pixels
RFE - add option for “inches” or “cm”
1 +0+840 +Landscape
“1” Match to MOSAIC OSD – when hit identify displays
+Sx+Sy – offset relative to 0,0.
0,0 top left of the Desktop
Landscape/Landscape-flipped/Portrait/Portrait-flipped/rotate=45
Orientation of the display – used to calc all 4 corners.
// Example // (0,0) ----------X2 - (3144,0)// | |// | |// X1---------------| 2 |// | | | // | 1 | |// ---------------X3-X4----------------// | | | // | | 4 |// | 3 |-----------------// | | // | |// -----------// X - marks top left of each monitor// coords are relative to Desktop 0,0
// Grid 1Displays=4 Resolution=1920x1080@60units=pixels1 +0+8402 +3144+0 +Portrait3 +1920+2064 +Landscape 4 +2064+2064 +Portrait
//Grid 0Console=5

HELPER FUNCTIONSThese are in the NVAPI SDK NDA Samples
Info.cpp (EDID Locking sample)
Function: getInfo
Returns a list of all connected DisplayIds, active displays, port names and GPU names etc.
DisplayConfiguration.cpp (Display Configuration sample)
Function: AllocateAndGetDisplayConfig
Returns the current resolution of all active displays. Use DisplayID to match to display you are working on
CustomTiming.cpp (Custom Timing sample)
Shows correct usage to create custom timing.

CUSTOM RESOLUTIONPseudo Code
AllocateAndGetDisplayConfig – gets current timing
Match DisplayIds
Copy current timing into Custom resolution structure
Modify desktop scanout values
TryCustom timing
Save Custom timing
NV_DISPLAYCONFIG_PATH_INFO *pathInfo = NULL;NvU32 pathCount = 0;ret = AllocateAndGetDisplayConfig(&pathCount, &pathInfo);if (ret != NVAPI_OK){printf("AllocateAndGetDisplayConfig failed!\n");getchar();exit(1);}
NV_CUSTOM_DISPLAY cd[NVAPI_MAX_DISPLAYS] = { 0 };copy_nvtiming_custom(&pathInfo, cd[0]);cd[0].width = layout.hCustom;cd[0].height = layout.vCustom;
printf("\nNvAPI_DISP_TryCustomDisplay()");for (int i = 0; i < noDisplays; i++){
ret = NvAPI_DISP_TryCustomDisplay(&displayIds[i], 1, &cd[0]);
printf("NvAPI_DISP_SaveCustomDisplay()");ret = NvAPI_DISP_SaveCustomDisplay(&displayIds[i], 1, true, true);
}

MOSAIC ENUMERATING DISPLAY GRIDSGet Number of Grids
NvU32 gridcount
NvAPI_MOSAIC_EnumDisplayGrids (NULL, &gridcount)
Get Grid TopologyNV_MOSAIC_GRID_TOPO *gridTopo = new NV_MOSAIC_GRID_TOPO[16];
gridTopo->version = NV_MOSAIC_GRID_TOPO_VER;
NvAPI_Mosaic_EnumDisplayGrids(gridTopo, &gridCount);
gridTopo[0]
gridTopo[1]
console MOSAIC 2x1
gridTopo[0].displayCount = 1gridTopo[0].rows=1gridTopo[0].columns =1gridTopo[0].displays ={displayId0}- per display is overlap settings
gridTopo[0].displaysettings = 1920,1200,60, 8bpp
gridTopo[1].displayCount = 2gridTopo[1].rows=2gridTopo[1].columns =1gridTopo[1].displays ={displayId1, displayId2}- per display overlap settingsgridTopo[1].displaysettings = 1920,1080,60, 8bpp
displayId0
displayId1
displayId2
console MOSAIC 2x1
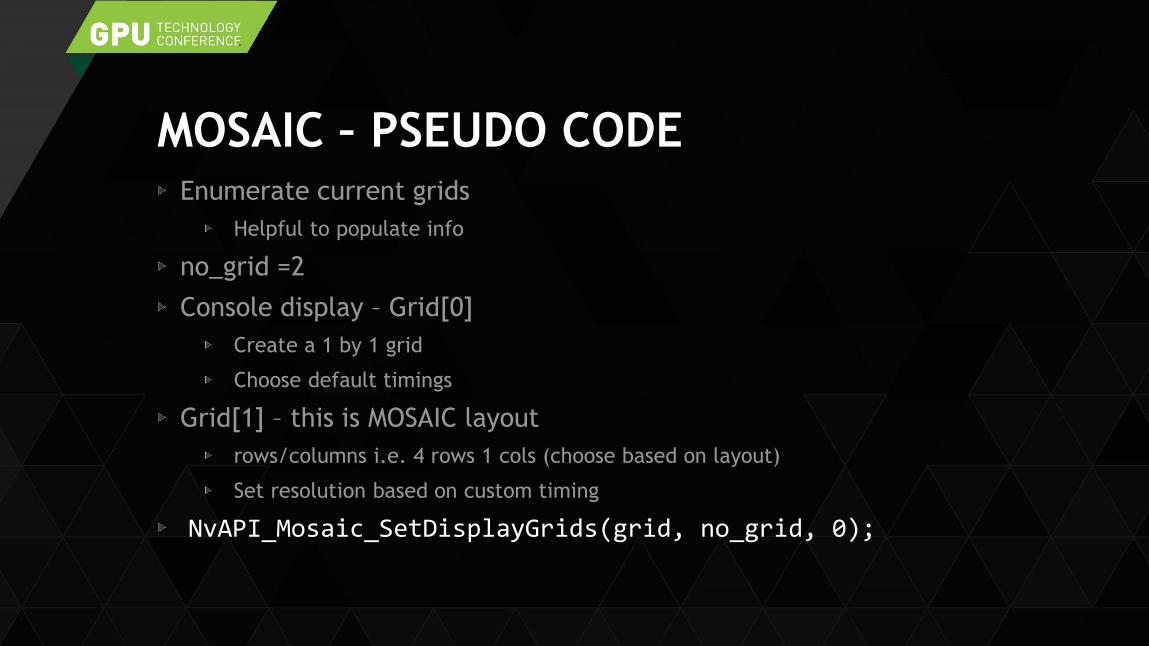
MOSAIC – PSEUDO CODEEnumerate current grids
Helpful to populate info
no_grid =2
Console display – Grid[0]
Create a 1 by 1 grid
Choose default timings
Grid[1] – this is MOSAIC layout
rows/columns i.e. 4 rows 1 cols (choose based on layout)
Set resolution based on custom timing
NvAPI_Mosaic_SetDisplayGrids(grid, no_grid, 0);

MOSAIC TIPSSort the GPUs based on PCIe slot info
Enumeration of the GPUs returned by NVAPI is just a list – doesn’t indicate position.
Enumeration position can change based on configuration.
For PCIe info
NvAPI_GPU_GetBusId & NvAPI_GPU_GetBusSlotId
Validate the display Grid –returns list of failure codes
NvAPI_Mosaic_ValidateDisplayGrids
Check for non-mitigating applications
Apps that are likely to crash when - Multi-GPU MOSAIC is set – general apps running OGL context.
Includes Chrome browser etc.
NvAPI_GPU_QueryActiveApps & NvAPI_QueryNonMigratableApps

UNDERSTANDING DISPLAY COORDINATESNvAPI_GPU_GetScanoutConfigurationEx(displayId, scanInfo)
scanInfo.sourceDesktopRect – Sx, Sy, sWidth, sHeight
All displayId that are part of MOSAIC grid will return same sourceDesktopRect.
scanInfo.sourceViewPortRect – Sx, Sy, sWidth, sHeight
Gives the values related to the Desktop size.
scanInfo.targetViewPortRect – Sx, Sy, sWidth, sHeight
Gives the values related to the physical monitor.

WARPING DATA STRUCTURENV_SCANOUT_WARPING_DATA
VertexFormat : strip or triangle list
Vertices: array of 6 float vertex
x,y : mesh coordinates per-display rectangle
scanInfo.targetViewPortRect
u,v : texture coordinates in desktop space
Co-ordinates from our config file
Plus offset from sourceDesktopRect
r,q : perspective mapping to simulate 3D warp
textureRect
Pass in scanInfo.sourceDesktopRect

MAP 1920X1920 TO HD DISPLAY Sample mapping
targetDesktopRect is the monitor – this is physical co-ordinates relative to the top left of the monitor – i.e we can’t warp the physical hardware.
0,0
1920 x 1920
uv=0,840
0
1
uv=0,1920
uv=1920,840
2
3
uv=1920,1920
//x y u v r q{
0, 0, 0, 840, 0.0f, 1.0f, // 00, 1080, 0, 1920, 0.0f, 1.0f, // 1
1920, 0, 1920, 840, 0.0f, 1.0f, // 21920, 1080, 1920, 1920, 0.0f, 1.0f // 3};
Landscape

MAP 1920X1920 TO HD DISPLAY Sample mapping
targetDesktopRect is the monitor – this is physical co-ordinates relative to the top left of the monitor – i.e we can’t warp the physical hardware.
0,0
1920 x 1920
uv=840,001
uv=840,1920
uv=1920,0
23uv=1920,1920
//x y u v r q{
0, 0, 1920, 0, 0.0f, 1.0f, // 00, 1080, 840, 0, 0.0f, 1.0f, // 1
1920, 0, 1920, 1920, 0.0f, 1.0f, // 21920, 1080, 840, 1920, 0.0f, 1.0f // 3};
Portrait

PSEUDO CODENvAPI_GPU_GetScanoutConfigurationEx
scanInfo.targetViewPortRect
scanInfo.SourceDesktopRect
Set target coordinates
Set Offset
scanInfo.sourceDesktopRect.Sx
scanInfo.sourceDesktopRect.Sy
Apply warp to each display in MOSIAC GRID.
Coordinates are read from file.
for (int i = 0; i < layout.number_displays; i++){topleftSx = layout.displays[i].coords[0].x;topleftSy = layout.displays[i].coords[0].y;
bottomleftSx = layout.displays[i].coords[1].x;bottomleftSy = layout.displays[i].coords[1].y;
topRightSx = layout.displays[i].coords[2].x;topRightSy = layout.displays[i].coords[2].y;
bottomRightSx = layout.displays[i].coords[3].x;bottomRightSy = layout.displays[i].coords[3].y;
float vertices[] =// x y u v r q
{(float)target[0].x, (float)target[0].y, topleftSx + offsetX, topleftSy + offsetY, 0.0f, 1.0f, // 0(float)target[1].x, (float)target[1].y, bottomleftSx + offsetX, bottomleftSy + offsetY, 0.0f, 1.0f, // 1(float)target[2].x, (float)target[2].y, topRightSx + offsetX, topRightSy + offsetY, 0.0f, 1.0f, // 2(float)target[3].x, (float)target[3].y, bottomRightSx + offsetX, bottomRightSy + offsetY, 0.0f, 1.0f, // 3
};
int maxnumvert = 4;warpingData.version = NV_SCANOUT_WARPING_VER;warpingData.numVertices = maxnumvert;warpingData.vertexFormat = NV_GPU_WARPING_VERTICE_FORMAT_TRIANGLESTRIP_XYUVRQ;warpingData.textureRect = &scanInfo.sourceDesktopRect;warpingData.vertices = vertices;// This call does the Warperror = NvAPI_GPU_SetScanoutWarping(layout.displays[i].display_Id, &warpingData, &maxNumVertices, &sticky);

TO DISABLE WARPSet Vertices to NULL
numVertices =0
NvAPI_GPU_SetScanoutWarping

HOW IT LOOKS ON THE DISPLAYS
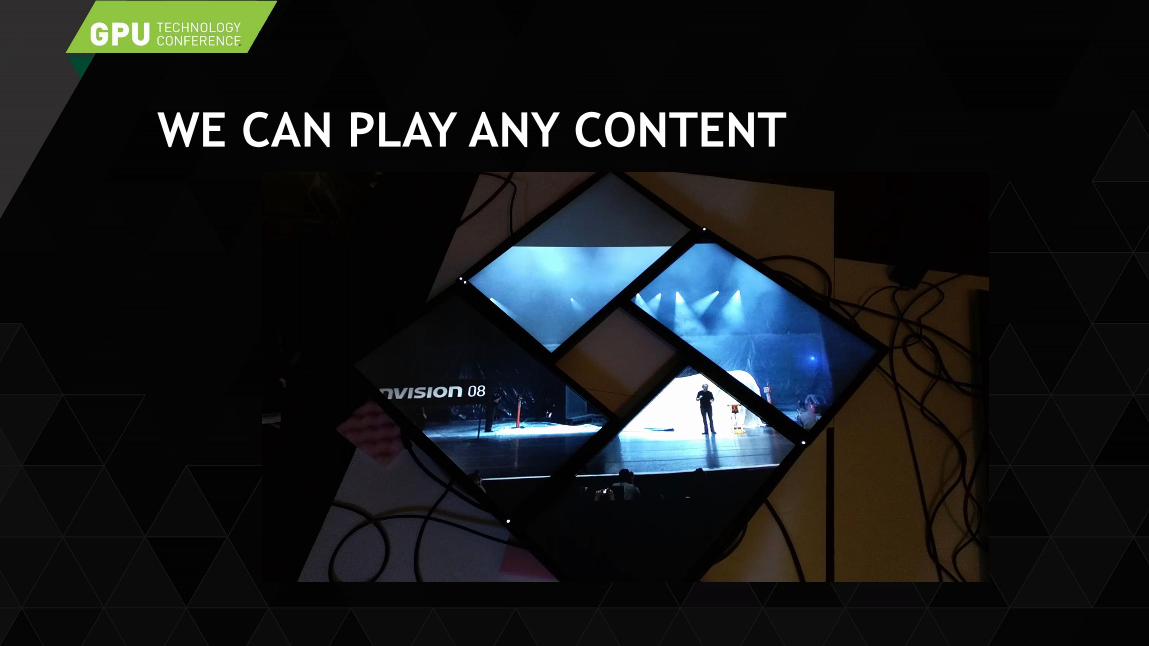
WE CAN PLAY ANY CONTENT

MIXING DISPLAYS OF DIFFERENT SIZES
24” 32” 24”
• Coordinates in cm (from top left)
• ppc – pixels per cm
• Need to select at common ppc for
all displays
• 32” display – 27.42 ppc(this gives 1:1 pixel mapping for 32” display)
All displays are 1920x1080@60
0,0 29,0
29,510,51
33,11.5 103,11.5
103,5133,51
107.5,0 136.5, 0
107.5,51 136.5,51
(~37ppc) (~27ppc) (~37ppc)
0,0 795,0
0,1412795,1398
905,315
905,1398
2824,315
2824,1398
2948,0 3743,0
2948,1398 3743,1398
• Coordinates in pixels
• based on common ppc
• 1398-315 = 1083 (1080)
• 2824-905 = 1919 (1920)

THIS IS WEBGL EXAMPLE APP

SUMMARYMOSAIC + NVAPI WARP
Up to 16 displays across 4 GPUS.
16k by 16k resolution
Mixed display sizes
Future enhancements
Support for mixed display resolutions.
Create a confidence monitor – across multi-GPUS
Some “features”
Hardware cursor was disabled – turn on mouse trails as a workaround.
Some custom resolutions failed to be created.
My test code tested ~700 custom resolutions in 30sec
Compensate with bezel correction.
Contact us at [email protected]
Will make the source code available
Need to have access to NDA NVAPI.

NVIDIA REGISTERED DEVELOPER PROGRAMSEverything you need to develop with NVIDIA products
Membership is your first step in establishing a working relationship with NVIDIA Engineering
Exclusive access to pre-releases
Submit bugs and features requests
Stay informed about latest releases and training opportunities
Access to exclusive downloads
Exclusive activities and special offers
Interact with other developers in the NVIDIA Developer Forums
REGISTER FOR FREE AT: developer.nvidia.com

THANK YOU