salesforce web order entry - epicor customer web … rep training for salesforce web oe ... make...
TRANSCRIPT

ACTIVANT STANPAK SalesFORCE Notification Web Order Entry Version 6.0

2
This manual contains reference information about software products from Activant Solutions Inc. The software described in this manual and the manual itself are furnished under the terms and conditions of a license agreement. The software consists of software options that are separately licensed. It is against the law to copy the software on any medium, or to enable any software options, except as specifically permitted under the license agreement. In addition, no part of this manual may be copied or transmitted in any form or by any means without the prior written permission of Activant Solutions Inc.
From time to time, Activant makes changes to its software products. Therefore, information in this manual is subject to change, and the illustrations and screens that appear in the manual may differ somewhat from the version of the software provided to you.
Created by: Yardley Technical Communication
2006, Activant Solutions Inc. All rights reserved. Activant and the Activant logo are registered trademarks and Activant Prophet 21 is a trademark of Activant Solutions Inc. All other company or product names are the trademarks or registered trademarks of their respective companies.
Activant Solutions Inc. 7683 Southfront Road Livermore, CA 94551
Version 6 Publication Date: 3.20.2006

Stanpak. SalesFORCE Web Tools Page 3
Table of Contents Product Overview......................................................................................................................................... 5
System Requirements ............................................................................................................................. 6
Getting Started With SalesFORCE Web OE............................................................................................. 7
Getting Started with Stanpak SalesFORCE Web OE............................................................................. 8
Web Site Administration ............................................................................................................................. 9
Web Site Administration ........................................................................................................................... 11
Overview .............................................................................................................................................. 11 Log In ............................................................................................................................................... 11 Overview Page.................................................................................................................................. 12
Web Site Setup .......................................................................................................................................... 13
Contact and Password Setup.................................................................................................................... 14 SFWT Contact Settings .................................................................................................................... 15 SFWT Password Settings ................................................................................................................. 15
Office Contacts Setup ............................................................................................................................... 17
Setup: Office Contacts .............................................................................................................................. 17
Maintenance: Office Contacts .................................................................................................................. 19 Sign In (Log In) to Office Contacts Administration............................................................................. 19 Add/Edit/Delete Office Contacts.......................................................................................................... 20
Edit An Existing Contact.................................................................................................................. 20 Add a New Contact .......................................................................................................................... 22
Daily Processing: Office Contacts ........................................................................................................... 23
SalesFORCE Web OE Rules Setup........................................................................................................... 23 Rules................................................................................................................................................. 23 Text................................................................................................................................................... 25
Stanpak Administration Set-up for SalesFORCE Web OE ................................................................... 26
SNPM – Sales Notification Processor Maintenance Program ................................................................ 28
Overview................................................................................................................................................... 28
To Set-up................................................................................................................................................... 29 Main Screen Fields ............................................................................................................................... 30
SNP - The Salesman Notification Processor............................................................................................. 33
Overview................................................................................................................................................... 33
To Run:..................................................................................................................................................... 34
WM- Web Order Planner Maintenance Overview ................................................................................. 36
WebOE Stanpak Components : Maintenance & Daily Processing .......................................................... 37 Web Order Planner Menu (WOP) ........................................................................................................ 37

Stanpak SalesFORCE Web Tools Page 4
WM – Web Order Planner Maintenance ................................................................................................. 39
User Listing Screen .......................................................................................................................... 39 Option A - Adding a Customer......................................................................................................... 40 Option <SEQ> # - View Users for a Customer ................................................................................ 41 Option SO – System Options............................................................................................................ 41 Option DE – Delete Customers ........................................................................................................ 42 Option P – Print ................................................................................................................................ 42 Option PL – Position Listing ............................................................................................................ 42 Option A – Add Users ...................................................................................................................... 42 Option <SEQ> # - Editing a User..................................................................................................... 43 Option DE – Delete User.................................................................................................................. 44 Option PL – Position Listing ............................................................................................................ 44 Option P – Print ................................................................................................................................ 44 Option I – Item Listing ..................................................................................................................... 44 Option P – Print ................................................................................................................................ 45 Option T- Top of Listing ................................................................................................................. 45 Option PL- Position Listing.............................................................................................................. 45 Option U- User Listing .................................................................................................................... 45 Option H - Help ............................................................................................................................... 45
WGEN – Web Order Planner Generator................................................................................................. 46
WP – Web Order Planner Processor ........................................................................................................ 48
Sales Manager & Sales Rep Documentation ............................................................................................ 50
Personalization Settings ............................................................................................................................. 51
Setup: Personalization Settings ................................................................................................................ 52 PC Version of Web-based Mail Form .................................................................................................. 53
Maintenance & Daily Processing: Personalization Settings.................................................................... 54
Sales Rep Training for SalesFORCE Web OE ........................................................................................ 55
Overview................................................................................................................................................... 55
SalesFORCE Web OE................................................................................................................................ 56
Overview................................................................................................................................................... 56
How to Run SFWOE................................................................................................................................. 57 Customer List Access ........................................................................................................................... 57 BCBI Listing ........................................................................................................................................ 57 All Items Listing................................................................................................................................... 59

Stanpak. SalesFORCE Web Tools Page 5
Product Overview
Stanpak’s SalesFORCE Web Tools were designed to improve communication and coordination of effort with your outside sales force. Our tightly integrated Web solutions are both inexpensive and easy to implement. The data is accessible from any Internet connection, using a Personal Computer or a Personal Digital Assistant (PDA- Palm or Pocket PC). There are three separately licensed products:
1. SalesFORCE Notification: extend access to customer information in Stanpak to your sales staff in the field.
2. SalesFORCE Web OE: offer Web order entry services to your sales staff at home or on the road.
3. SalesFORCE Proforma Review: review proformas on-line- approve orders, make changes and/or add notes and then upload it to the your server. (Available Summer 2003)
We have designed a web-based administration control panel to allow you to customize elements within your Stanpak Web Applications. You will use this same Administration Control Panel for all of your Stanpak Web Applications. This manual will focus on SalesFORCE Web OE set-up and daily administration.
Each sales person has his own login and password and sees only his own orders, bakorders, order changes, messages and customer contacts.
SalesFORCE Web Tools advantages include:
• Improve communication and coordination of effort by sharing of information
• Drive cost out of your operation and reduce sales support
o Cuts down time office staff spends answering sales questions
• Free more time for selling
o Cuts down time sales staff spend calling office for information
• More accurate information available to sales reps and customers
• Take full advantage of new technology - Internet, cell phone, digital cell service & PDAs
o Sales reps can pick up messages and get information on the Internet from home on their PC
o Or connect to the Internet via digital or dialup cell service with their PDA on the road.

Stanpak SalesFORCE Web Tools Page 6
System Requirements In order to use the SalesFORCE Web applications, you must have the following tools available:
• Web Data Transfer version 2.1.2 or later • Stanpak version 6.01.15 or later
In addition, your sales representatives must use a web browser from the following group:
• MS Internet Explorer version 5+ running at a minimum screen resolution of 800 x 600 pixels or greater.
• Pocket PC PDA running Pocket Internet Explorer.
Palm PDA running a web browser.
Figure 1- SalesFORCE Web Tools Login

Stanpak. SalesFORCE Web Tools Page 7
Getting Started With SalesFORCE Web OE

Stanpak SalesFORCE Web Tools Page 8
Getting Started with Stanpak SalesFORCE Web OE
1. Place order with your Prophet 21 Inside Sales Representative. 2. Obtain the SalesFORCE Web OE Manual from the Prophet 21 Customer Web Site at
www.p21.com. See the Documentation section of the site. 3. Prepare your Server and Client Computers with the following required software:
a. PC Software: Web Data Transfer version 2.1.2. or later. b. Stanpak Package Release Level: check to ensure that you are on Stanpak Release level
6.01.15 or the later. c. Sales Reps PC or PDA: check that the sales rep web browser is one of the following:
i. MS Internet Explorer version 5+ running at a minimum screen resolution of 800 x 600 pixels or greater.
ii. Pocket PC PDA running Pocket Internet Explorer. iii. Palm PDA running a web browser.
*Note: If you are not running the required level of MS Internet Explorer, please go to Microsoft’s web site (www.microsoft.com/ie) to retrieve the latest version.
4. Administrative Set-up (please refer to manual for more complete instructions) a. Web Administration program: Edit the “Web Administration” settings to customize
SFWOE for your company. Add your company’s point person to office contacts. b. Salesman Notification Processor Maintenance (SNPM) program: Set up Sales Reps
logins, passwords, e-mail addresses, etc on Stanpak using the Salesman Notification Processor Maintenance program (SNPM) on your Stanpak server.
c. BCBI information. Set up Customer BCBI information using WM. (If you have Web Order Maintenance: Run program WM and choose System Options. Select and enter your Distributor Code. Other options in WM are used for Customer Web Order Entry but no further setup is required for the SalesForce Web Order entry product.)
5. Data Transfer:
a. Prepare your Stanpak data for transfer by running both the Salesman Notification Processor program (SNP) and the WGEN program on your Stanpak server
b. Prior to running Web Data Transfer 2.1.2, you must contact Anthony DePinto at IDMI (330/707-0432 x100 or [email protected]) to request that your online database is configured to this new version. Please provide the version of Stanpak and the Web Applications you are using. (See manual- SNP section for more information)
c. Transfer your data from your Stanpak server to your Web server using the Web Data Transfer program 2.1.2.
6. Test: run through a complete test of all SalesFORCE Web OE on the web. 7. Train: train your sales reps on how to access and use SalesFORCE Web OE. (See manual for
handout)

SalesFORCE Web Tools Page 9
Web Site Administration

Web Order Planner Page 57
Web Order Planner Page 49
Web Site Administration
Overview A web-based administration control panel has been created to allow you to customize elements within your Stanpak Web Applications. Administration Control Panel pages are password-protected; they are accessed with the Admin User ID and Password supplied when you set up your first Stanpak Web Application.
You will use this same Administration Control Panel for all of your Stanpak Web Applications including Web OE, Balance of Account, SalesFORCE Notification, SalesFORCE Web OE and SalesFORCE Proforma Review.
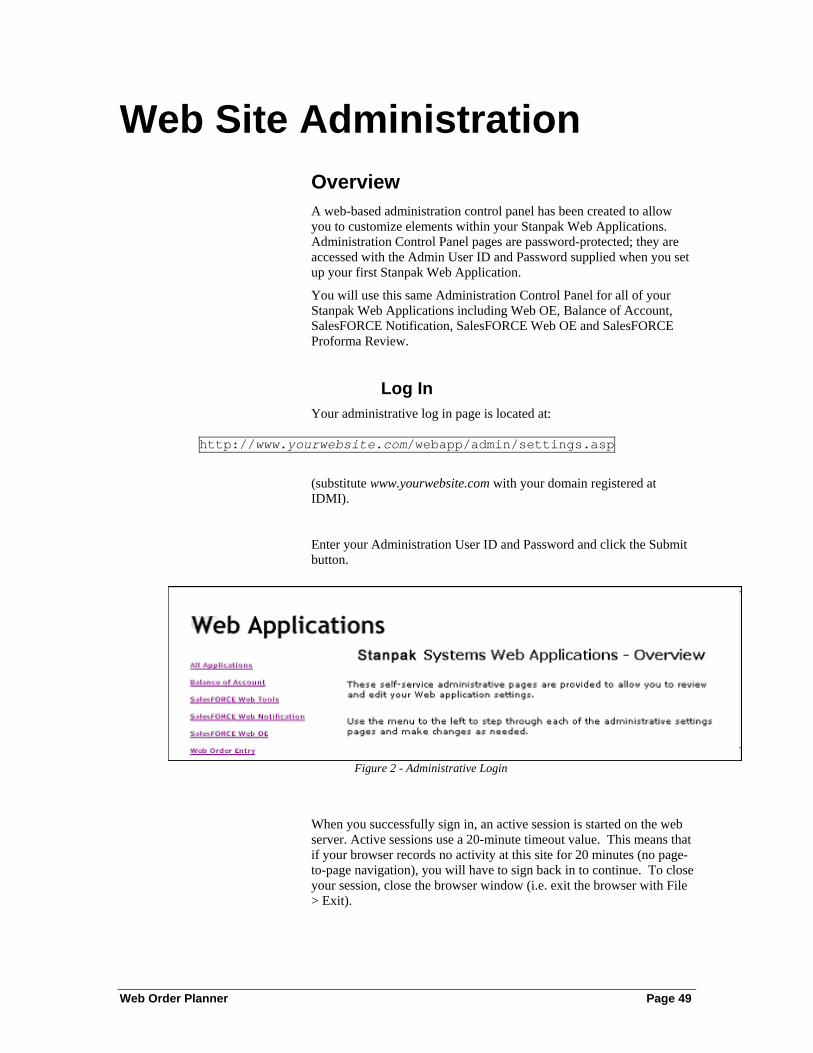
Log In Your administrative log in page is located at:
http://www.yourwebsite.com/webapp/admin/settings.asp
(substitute www.yourwebsite.com with your domain registered at IDMI).
Enter your Administration User ID and Password and click the Submit button.
Figure 2 - Administrative Login
When you successfully sign in, an active session is started on the web server. Active sessions use a 20-minute timeout value. This means that if your browser records no activity at this site for 20 minutes (no page-to-page navigation), you will have to sign back in to continue. To close your session, close the browser window (i.e. exit the browser with File > Exit).

Web Site Administration
Page 46 Sales Staff Notification - Getting Started
Overview Page After successful log in, you will see the Web Applications Overview page as below.
Figure 3- Administration Overview Page
Select (click on the name of) the application you wish to edit settings for.
Web Order Planner Page 57
Web Site Setup
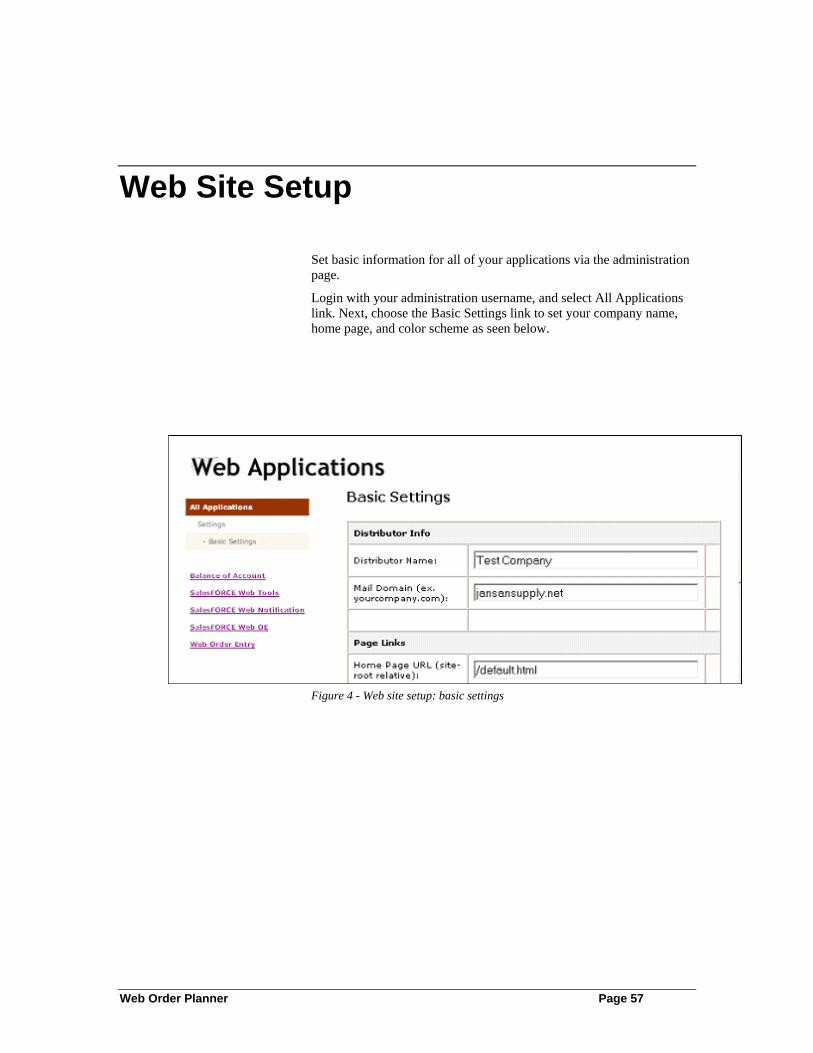
Set basic information for all of your applications via the administration page.
Login with your administration username, and select All Applications link. Next, choose the Basic Settings link to set your company name, home page, and color scheme as seen below.
Figure 4 - Web site setup: basic settings

Web Site Administration
Page 46 Sales Staff Notification - Getting Started
Contact and Password Setup
Select the SalesFORCE Web Tools link on the Administrative overview page to set Contact and password information for the Office Contacts, and Personalization tools.
Next, you will see the following menu: (http://www.yoursite.com/webapp/admin/settings.asp?app=SW)
Figure 5 - SalesFORCE Web Tools Administration Main Page
Setting the contacts and/or password information from the links on this page will ONLY affect your Personalization and Office Contacts features. Please note that SWOE has separate contact information, and SFN has separate password information.

Web Order Planner Page 15
SFWT Contact Settings
Figure 6 - SFWT Contact Information Administration
Select the Contacts link from the SFWT Administration page. Fill in the name of the person from your company who will be the individual that you would like your sales reps to contact with questions (i.e.: Sales Manager).
The contact information will appear in the left frame on your end user site as shown.
Figure 7 - Contact Information on End User site
SFWT Password Settings Select the Password link from the SFWT Administration page (Figure 5 - SalesFORCE Web Tools Administration Main Page) to set the

Web Site Administration
Page 16 Sales Staff Notification - Getting Started
password information that will permit access to the SFWT Office Contacts configuration.
You will be presented with the form below (Figure 8). Fill in the user ID and password that you will use for Administration of Office contacts information.
Figure 8 - Office Contacts Password Settings

Web Order Planner Page 17
Office Contacts Setup
SalesFORCE Web Tools Office Contacts offers the sales rep a quick and easy way to find phone numbers and e-mail addresses of important office contacts. The rep will access the Office Contacts page by clicking the 'Contacts' link in the menu bar at the top of the page.
Figure9 - Menu Bar
The listing will appear as below.
Figure10 - Office Contacts
Setup: Office Contacts
You must enter contact information that you wish to be available via your Office Contacts list. In order to do this, you must have Office Contact Administration privileges. Please see - Office Contacts Administration for details.


Web Order Planner Page 19
Maintenance: Office Contacts
To edit the initial list of contacts, click the 'Edit This List' link below the listing. You will then be prompted for the Administration login information.
Sign In (Log In) to Office Contacts Administration Sign in with your 'Contacts Administration' User ID and Password. This User ID and Password are created and changed through your Web Administration settings. These values are case-sensitive (UPPER/lower case matters).
Figure 11- Office Contacts Administration
A new 'session' is started when you successfully sign in. You can continue editing your contacts list as long as the session is open/active. A session will be closed (and you will have to log back in to continue editing office contacts) after any one of the following occurs: 1. The browser is inactive for 20 minutes. 2. The browser is closed. 3. You select the option to end the session (click 'end your editing
session' on the following page).

Web Site Administration
Page 20 Sales Staff Notification - Getting Started
Add/Edit/Delete Office Contacts Use this page to add contacts, select contacts for editing, delete contacts, and move a contact up or down in the listing.
Figure 12 - Add/Edit/Delete Office Contacts
To add a new contact, click the 'Add New Contact' button. You will be presented with an 'Add Contact' page. (see below)
To edit an existing contact, click the 'Edit' link to the left of the contact to edit. You will be presented with an 'Edit Contact' page. (see below)
To delete an existing contact, click the 'delete' link to the right of the contact. There will be no warning message when deleting contacts; the contact is deleted as soon as you click 'delete'.
To move a contact up the list, click the 'Up' link to the left of the contact. To move a contact down the list, click the 'Down' link to the left of the contact. There will be no confirmation message when moving contacts; the contact is moved as soon as you click 'Up' or 'Down'. Note: You can also change a contact's location in the list by changing the contact's 'Rank'. (see the 'Edit This Contact' page)
Edit An Existing Contact Click on the 'Edit' link to the left of the contact you wish to edit. Contact data is then presented in an editable form. There are no pre-set limits to the length of the data, and no validation of data (ex. we do not verify that the phone number is complete or that the e-mail address is a valid e-mail address).

Web Order Planner Page 21
Figure13 - Edit a Contact
• Rank: This is the relative ranking of this contact on the list. The first contact on the list will have a rank of '1'. The rank is automatically assigned when a new contact is added, and the list might be renumbered by the program to maintain sequencing. The program will save integer (non-decimal) values, but you can type in decimal values. For example, if you want to force a contact to display between the 6th and 7th contact on the list, enter 6.5 (or similar value) as the rank. To make a contact the first item on the list, any value less than 1 will move the contact to the top of the listing.
• Group: The Department or Group for this contact
• Name: Contact First and Last Name
• Phone: Contact Phone Number
• E-mail: E-mail address for this contact. This will become a clickable hyperlink on the Office Contacts page, making it simple for a sales rep to use the page to send e-mail messages.
Make your changes and click 'Submit' to accept your changes and return to the Add/Edit/Delete Office Contacts page. Click 'Reset' to return the form to its default state (as it appeared when the page was loaded). Click 'Back to listing' to return to the Add/Edit/Delete Office Contacts page without accepting your changes.

Web Site Administration
Page 22 Sales Staff Notification - Getting Started
Add a New Contact Click the 'Add New Contact' button on the Add/Edit/Delete Office Contacts page to add a new contact. A form similar to below is presented:
Figure 14 - Add a New Contact
• Group: The Department or Group for this contact
• Name: Contact First and Last Name
• Phone: Contact Phone Number
• E-mail: E-mail address for this contact. This will become a clickable hyperlink on the Office Contacts page, making it simple for a sales rep to use the page to send e-mail messages.
Make your changes and click 'Submit' to accept your changes and return to the Add/Edit/Delete Office Contacts page. Click 'Reset' to clear all form fields (returning the form to its default state). Click 'Back to listing' to return to the Add/Edit/Delete Office Contacts page without adding this contact.

Web Order Planner Page 23
Daily Processing: Office Contacts
You may always access the contacts that have been stored by selecting the ‘Contacts’ option on the blue menu bar at the top of the page. This will provide you with information (group, name, phone, email) for that contact. You may select the email hyperlink in this listing to create a ‘new mail’ draft addressed to that person. The mail program that is launched when you select this link will depend on your personalization settings. (Please see - Email Web Form and - SalesFORCE Web Tools Settings Setup for more information.)
SalesFORCE Web OE Rules Setup
Rules Select the Rules link from the SWOE administration page and fill in the settings. These settings allow you to control how much information is displayed in SWOE queries.

Web Site Administration
Page 24 Sales Staff Notification - Getting Started
Maximum number of items to display on a page at a time ('All Items') when an item category is selected: When a sales rep is creating an order and selects a category from the 'All Items' category list, it is possible that a category has an unusually large number of items associated with that category. This could cause the server to attempt to retrieve and display more rows than can be reasonably handled over the Internet. Enter a value here that represents the maximum number of items you would expect for any one category. The default is 250, but your number might be much smaller. If the number of items in a category exceeds this number, an exception message will appear when the sales rep selects the offending category. NOTE: The application will limit the maximum number of rows to 251 if you enter any number larger than 250.
Maximum number of customers to display on the customer listing page when first displaying the list: Sales reps are able to quickly navigate their list of customers by limiting the list to groups based on the alphabet (#ab, cde, fgh, …). When the customer listing is first displayed, the list in not limited to one of the selectable groups. A performance issue arises for sales reps with a very large number of customers. The larger the list, the slower the retrieval and display on the Internet. To improve the initial load time, enter a number that represents to the maximum number of rows that will display the first time the customer list is loaded, and let the sales rep navigate the customer list using the alpha groups.
Maximum number of (All Items) search results to display on a page at a time:
Enter the maximum number of search results to display on the search page at any one time. The larger the number, the slower the search and display. 'Previous' and 'Next' links will appear if the actual number of items matching the search request exceeds the number you enter here.
Sales Reps are allowed to change prices when placing orders (check for Yes, uncheck for No): Check this box if sales reps are able to change prices when adding items to SWOE orders. Uncheck this box if sales reps are not allowed to change prices when placing orders through SWOE.

Web Order Planner Page 25
Text Select the Text link from the SWOE administration page (http://yourcompany.com/webapp/admin/settings.asp?set=swoe&page=swoeContacts&app=SWOE, See Error! Reference source not found. for example) to enter text settings for your site.
Figure 15 - SWOE Text Settings
Order Alert Pre-Text: The text that appears at the top of Order Notification/Alert E-mails sent to your office. This will also appear at the top of e-mail copies that Sales Reps receive if they select the option to receive copies of orders they place.
Order Alert Post-Text: The text that appears at the bottom of Order Notification/Alert E-mails sent to your office. This will also appear at the top of e-mail copies that Sales Reps receive if they select the option to receive copies of orders they place.

Web Site Administration
Page 26 Sales Staff Notification - Getting Started
Stanpak Administration Set-up for SalesFORCE
Web OE

Web Order Planner Page 27

SNPM – Sales Notification Processor Maintenance Program
Page 28 Sales Staff Notification - Getting Started
SNPM – Sales Notification Processor Maintenance Program
Overview
Please note: This program needs to be set up for both SalesFORCE Notification and SalesFORCE Web OE.
The SNPM program is used to define which information is made available for sales people via the Salesman Notification Processor (SNP) system.
Each salesperson must be individually configured. The SNPM program controls various parameters:
• Web Login ID • Web Login Password • Email Addresses • Control Parameters for various download categories. Each
salesperson can be configured to receive different information.
The SNPM program main screen contains several fields representing the information that sales people may receive permission to view.

Web Order Planner Page 29
REL:6.01.00 6.01 DEVELOPMENT REV:101501 SALESMAN NOTIFICATION MAINTENANCE SALES ID: 01 USER LOGIN ID: 02 USER PASSWORD: 03 STANPAK EMAIL ID: 04 INTERNET EMAIL #1: 05 INTERNET EMAIL #2: 06 NOTIFY METHOD: 07 ITEM PRICE CHANGES (Y/N): SORT METHOD: 08 SALES NOTICES (Y/N): 09 NEW EMAIL DOWNLOAD (Y/N): 10 CUSTOMERS ON CREDIT HOLD (Y/N): 11 CHANGES IN ORDERS (Y/N): 12 STATES OF BACK ORDERS (Y/N): 13 NEW ORDERS (Y/N): 14 CUSTOMER CONTACTS (Y/N): 15 STOCK OUTS (Y/N): 16 CUSTOMER CALL MESSAGES (Y/N):
Figure 20 -SNPM – Main Screen
To Set-up
Enter the program name SNPM at the selection prompt. The SNPM main screen will display, and prompt for a SALES ID.
» Enter a valid Sales ID.
When a valid Sales ID has been accepted, the data fields on the screen will be populated with the stored information corresponding to the ID number.
REL:6.01.12 6.01 DEVELOPMENT 01/01/03
REV:101501 SALESMAN NOTIFICATION MAINTENANCE SNPM SALES ID: 10 PROSPECT ACCTS 01 USER LOGIN ID: SALES 02 USER PASSWORD: STANPAK9 03 STANPAK EMAIL ID: PETER 04 INTERNET EMAIL #1: [email protected] 05 INTERNET EMAIL #2: 06 NOTIFY METHOD: 1 07 ITEM PRICE CHANGES (Y/N): Y SORT METHOD: 1 08 SALES NOTICES (Y/N): Y 09 NEW EMAIL DOWNLOAD (Y/N): Y 10 CUSTOMERS ON CREDIT HOLD (Y/N): Y 11 CHANGES IN ORDERS (Y/N): Y 12 STATES OF BACK ORDERS (Y/N): Y 13 NEW ORDERS (Y/N): Y 14 CUSTOMER CONTACTS (Y/N): Y 15 STOCK OUTS (Y/N): Y 16 CUSTOMER CALL MESSAGES (Y/N): Y
Figure 91 -SNPM – Main Screen with Sales ID

SNPM – Sales Notification Processor Maintenance Program
Page 30 Sales Staff Notification - Getting Started
Enter <FIELD #>, or TAB:
The system will prompt:
Enter <FIELD #>, or TAB: » Enter a field number (#1-16) to change Sales ID information. OR » TAB if the displayed information is accurate for the Sales ID.
Main Screen Fields When setting up the system, please remember to keep a list of all program control parameters to distribute later to your sales reps!
SALES ID:
This field must contain a valid SALES ID from Stanpak. This field corresponds to field #07 (FROM SALESMAN) in the FTM (File Transfer Maintenance) program. This will be a numeric field (ie – 24).
» Enter a valid SALES ID to view stored field data for the sales person.
01 USER LOGIN ID: This field is set by the administrator to any alphanumeric user identification string. This field is similar to the USERID field in the FTM (File Transfer Maintenance) program.
02 USER PASWORD: This field is set by the administrator to any alphanumeric sequence. This field is similar to field #02 (ACCESS PASSWD) in the FTM (File Transfer Maintenance) program.
» Enter the password for this USER LOGIN ID.
03 STANPAK EMAIL ID: » Enter the EMAIL ID from Stanpak, as used in the MAIL program. If
you are not using the E-MAIL in Stanpak, then please skip to 04..
04 INTERNET EMAIL #1: This field is set by the administrator and may contain any valid internet email address that a user has already established. (ie – [email protected])
» Enter a external (non-Stanpak) email account for this ID.

Web Order Planner Page 31
05 INTERNET EMAIL #2: This field is set by the administrator and may contain any valid internet email address that a user has already established. (ie: [email protected])
» Enter a external (non-Stanpak) email account for this ID. 06 NOTIFY METHOD:
You may select one of two methods for field #06 (NOTIFY METHOD). Selecting option 1 for Web Report causes information to be included in the transfer file. You may also select N, causing information to be excluded from the salesman transfer file.
If field # 06 is set to N (do not include information in transfer file), no data will be available for the SALES ID in his/her transfer file regardless of the settings in fields #08-#16. The N setting for NOTIFY METHOD overrides the subsequent field settings if they are set to Y.
»07 ITEM PRICE CHANGES (Y/N): » Enter N to exclude item price changes in the transfer file for this
SALES ID. OR
» Enter Y to display Item Price Changes for this ID in the web transfer file. If you select Y for field #07, the cursor will be placed in the SORT METHOD FIELD.
SORT METHOD: » Enter 1 to sort by category. OR » Enter 2 to sort by vendor.
08 SALES NOTICES (Y/N): » Enter N to exclude Sales Notices in the transfer file for this SALES
ID. OR
» Enter Y to display Sales Notices for this ID in the web transfer file.
09 NEW EMAIL DOWNLOAD: (Y/N) » Enter N to prohibit this SALES ID from viewing new email in the
transfer file. OR
» Enter Y to allow this sales person to view new email in the transfer file.
10 CUSTOMERS ON CREDIT HOLD: » Enter N to exclude information for customers on credit hold in the
transfer file for this SALES ID. OR
» Enter Y to display customers on credit hold for this ID in the web transfer file.

SNPM – Sales Notification Processor Maintenance Program
Page 32 Sales Staff Notification - Getting Started
11 CHANGES IN ORDERS (Y/N): » Enter N to exclude changes in orders from the transfer file for this
SALES ID. OR
» Enter Y to display changes in orders for this ID in the web transfer file.
12 STATES OF BACK ORDERS (Y/N): » Enter N to exclude states of back orders in the transfer file for this
SALES ID. OR
» Enter Y to display states of back orders for this ID in the web transfer file.
13 NEW ORDERS (Y/N): » Enter N to exclude new orders from the transfer file for this SALES
ID. OR
» Enter Y to display new orders for this ID in the web transfer file. 14 CUSTOMER CONTACTS (Y/N): » Enter N to exclude customer contact information in the transfer file
for this SALES ID. OR
» Enter Y to display customer contact information for this ID in the web transfer file.
15 STOCK OUTS (Y/N): » Enter N to exclude stock outs in the transfer file for this SALES ID.
OR » Enter Y to display stock outs for this ID in the web transfer file
16 CUSTOMER CALL MESSAGES (Y/N): » Enter N to exclude customer call messages in the transfer file for this
SALES ID. OR
» Enter Y to display customer call messages for this ID in the web transfer file.
When you are satisfied with the displayed information for this Sales ID,
<TAB> to return to the menu.
You have now completed set-up for the Sales Notification Processor Maintenance Program. You will only edit this program when you are adding, restricting or deleting information for a new or existing sales rep. Please remember that SNPM is used in both SalesFORCE Notification and SalesFORCE Web OE.

Web Order Planner Page 33
SNP - The Salesman Notification Processor
Overview
Please note: this program is used for both SalesFORCE Notification and SalesFORCE Web OE in conjunction with WGEN.
The Salesman Notification Processor program (SNP) is responsible for automatically generating sales information to feed the Sales FORCE Notification system.
Specifically, the data is collected in various Stanpak programs and audit trail files and then placed into various Flat ASCII files for distribution to the web server.
Run the SNP program on a minimum of a daily basis.
Based upon the definitions in the SNPM, the SNP will generate a Salesman Report providing the following basic information:
SNP - The Salesman Notification Processor
Page 34 Sales Staff Notification - Getting Started
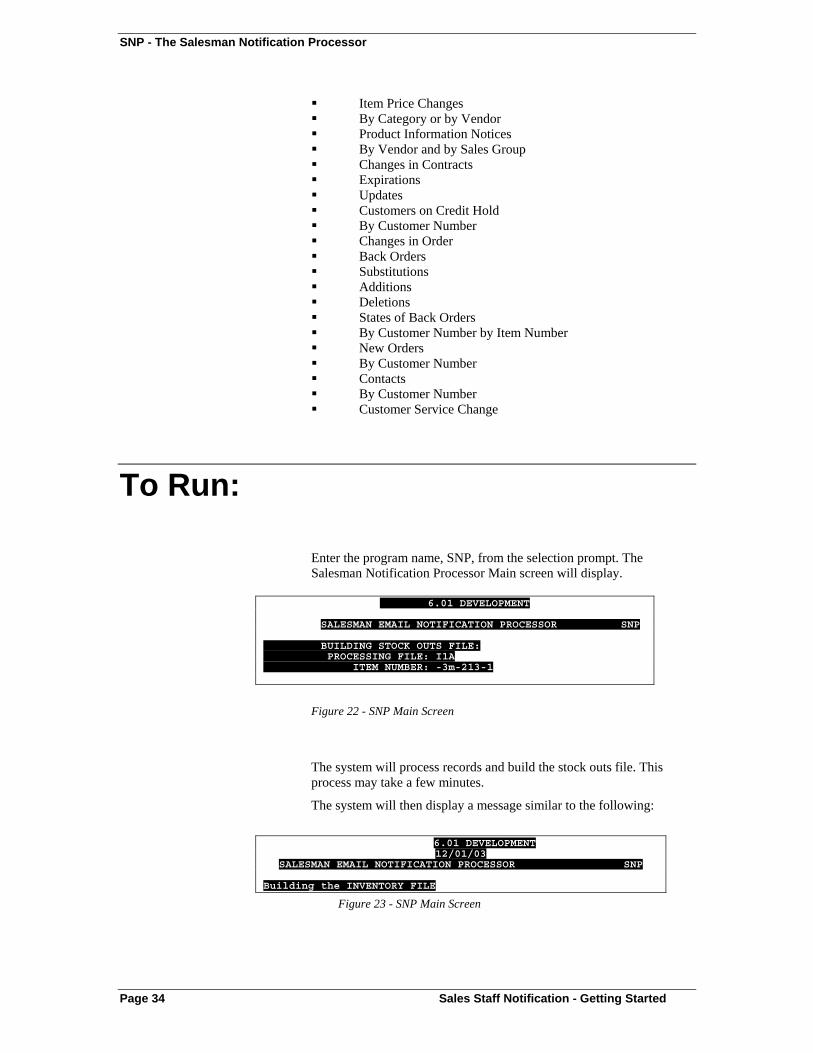
Item Price Changes By Category or by Vendor Product Information Notices By Vendor and by Sales Group Changes in Contracts Expirations Updates Customers on Credit Hold By Customer Number Changes in Order Back Orders Substitutions Additions Deletions States of Back Orders By Customer Number by Item Number New Orders By Customer Number Contacts By Customer Number Customer Service Change
To Run:
Enter the program name, SNP, from the selection prompt. The Salesman Notification Processor Main screen will display.
6.01 DEVELOPMENT
12/01/03 SALESMAN EMAIL NOTIFICATION PROCESSOR SNP BUILDING STOCK OUTS FILE: PROCESSING FILE: I1A ITEM NUMBER: -3m-213-1
Figure 22 - SNP Main Screen
The system will process records and build the stock outs file. This process may take a few minutes.
The system will then display a message similar to the following:
6.01 DEVELOPMENT 12/01/03
SALESMAN EMAIL NOTIFICATION PROCESSOR SNP Building the INVENTORY FILE
Figure 23 - SNP Main Screen

Web Order Planner Page 35
When the program has finished processing items for the stock outs file, you will automatically return to the menu.
Web Data Transfer (2.1.2) introduces a different approach to populating the online database, resulting in much fast transfers for distributors with large sets of data. As a result of this new approach, IDMI, our Web Hosting Provider, will need to set new permissions on your database before WDT version 2.1.2 will succeed. They will also need to change the pointer for the correct transformation spec for the transfer.
Prior to running Web Data Transfer version 2.1.2, you must contact Anthony DePinto at IDMI (330/707-0432 x100 or [email protected]) with a request to set up your online database to use this new version. Please provide the version of Stanpak you are running and the Web Applications you are using

WM- Web Order Planner Maintenance Overview
Page 36 Sales Staff Notification - Getting Started
WM- Web Order Planner Maintenance Overview
Please skip this section if you are only using SalesFORCE Notification or if you have already set up these files using Web OE.
Orders placed on the Internet server will be transferred to your system over the Internet by FTP, and uploaded into Stanpak as orders.
The Web Order Planner subsystem provides the front-end and back-end processing required to build the Web Based Order Entry System, Web Catalog System, and the Web Balance of Accounts System.
The front-end portion of the design is used to build the database necessary to allow an external program to know which customers can be allowed Web Base Order Entry and which items are visible for each of the customers. The front-end portion of the design also builds the files necessary to build the WEB Based Catalog.
The back-end portion of the design provides a data processor that takes an input file coded in XML format. The data processor parses the XML data fields and puts the necessary information in the O6 and O6H database records. Once the information is in the O6 and O6H records, the OE12 program is automatically executed to introduce the new orders into the Stanpak system.
There are five steps to follow when accepting orders from your website.
1. On Stanpak, run the Web Order Planner Maintenance Program (WM) to set up the customers you wish to put on the Web. Each customer you set up will need user names and passwords, and E-mail acknowledgment address.
2. On Stanpak, run Web Order Planner Generator (WGEN) to create the transfer files.
3. On your PC, run the Web Order Transfer program to send BCBI files to your website. Prior to sending and retrieving data the first time, you must enter settings for your system configuration.
4. On your PC, test this application by sending BCBI data, entering test orders, and retrieving Web Orders.
5. ON Stanpak, run Web Order Planner Processor (WP) to process orders retrieved from the Web.

Web Order Planner Page 37
WebOE Stanpak Components :
Maintenance & Daily Processing
Web Order Planner Menu (WOP) The Web Order Planner subsystem provides the front-end and back-end processing required to build a Web based Order Entry and Web Catalog subsystem.
The front-end portion of the design is used to build the database necessary to allow an external program to know which customers can be allowed to use Web Based Order Entry and which items are visible for each of the customers. The back-end portion of the design provides a data processor that takes an input file in XML format that the Stanpak System will understand. The data processor then puts the necessary information into a database and the order entry batch processing program automatically executes to introduce the new orders into Stanpak.
The front-end portion of the design also builds the files necessary to build the Web Based Catalog.
This section includes:
*** WOP MENU ***
WEB ORDER PROCESSING MENU
1)WM.......WEB Order Download Maintenance 3)WGEN.....WEB Order File Generation 5)WCAT.....Web Order Catalog Generation 7)WP.......Web Order Upload Processing 9)WCC......Credit Card Payment Audit Report 11)WIR......Request Invoice Copy Audit


Web Order Planner Page 39
WM – Web Order Planner Maintenance
Program WM is used to enter and maintain a list of customers to take advantage of the Web Order Entry. The customer listing would include a user list and a BCBI item list.
The maintenance program is also used to maintain the catalog.
Enter WM from the Web Order Planner Menu (WOP). The system displays a list of customers available to use the Web Order Entry. Press <Tab> to advance the customer display. The customers are arranged in customer number order.
*** WEB ORDER PLANNER MAINTENANCE *** WM
CUSTOMER LISTING SEQ CUST # NAME PRICING CREDIT DAYS 1 100102 ACCURATE MACHINE & TOOL N N 5 2 100105 JOE'S TEST CUSTOMER N N 30 3 100150 ADVANCE MACHINE N N 4 100260 AIB BASE STORES N N 5 100301 AMERICAN RED CROSS Y N 10 6 111111 CHARLENE SAILS Y Y 7 300103 ACCUPAK Y Y 8 300205 ALA DEPT OF TRANSPORTAION N N 9 301195 CENTURY PRODUCTS N N 10 400300 KAREN'S TEST ACCOUNT N N 20 11 999999 DREW'S GRAPHICS Y Y 15 A ADD CUSTOMERS DE DELETE CUSTOMERS T TOP OF LISTING <SEQ> # TO SELECT PL POSITION LISTING P PRINT SO SYSTEM OPTIONS H HELP
Enter OPTION: Figure 24 -– Customer List (WM) screen example
User Listing Screen
Pricing (Y/N) » Enter "Y" to display PRICING for this customer on the WEB
ORDER PLANNER. OR » Enter "N" to NOT display PRICING for this customer on the WEB
ORDER PLANNER.

WM – Web Order Planner Maintenance
Page 40 Sales Staff Notification - Getting Started
Credit (Y/N) » Enter "Y" to ENABLE this CUSTOMER to make CREDIT CARD
PAYMENTS. OR » Enter "N" to DISABLE this CUSTOMER from making CREDIT
CARD PAYMENTS
Days (####) Enter the NUMBER OF DAYS HISTORY to be exported for this customer to the WEB ORDER PLANNER interface. Leave this field blank to allow the WGEN program to control the history.
The available options are as follows:
» Enter A to add an individual customer to the Web Order Planner database. OR » Enter a customer sequence number to view/maintain the show
pricing, user list or item list. OR » Enter SO to view/maintain system configuration. OR » Enter DE to delete customers from the web order database. Enter the
sequence number you wish to remove. OR » Enter PL to position the list starting with a specific customer
number. OR » Enter H to display the help screen. OR » Press <Tab> to display the next screen of customers if more follow. OR » Enter T to display the customer list from the beginning. OR » Enter P to print a hard copy of the existing customer database. OR » Enter E to exit and return to the Web Order Planner Menu
Option A - Adding a Customer This option adds a customer to the Web Order Planner database.
You will be prompted for individual customer numbers. Add those customers that you require the ability to order goods via the internet.
When A is entered, the system prompts for the customer number:
CUSTOMER NUMBER
» Enter the customer number to add. The customer name is displayed and the cursor will blink in the show pricing field. OR
» Press <Tab> to return to the options list.
SHOW PRICING This flag indicates whether or not the pricing information will be shown on the Web Order Planner.
Web Order Planner Page 41
» Enter Y to show the pricing. OR » Press N not to show the pricing.
Option <SEQ> # - View Users for a Customer Simply enter the SEQ number associated with a customer in order to view the USERS which can enter orders via the internet and the ITEM NUMBERS available for ordering.
» Enter the <SEQ> # to select a customer record, and view valid users for that customer.
OR » Press <TAB> to display the user list options.
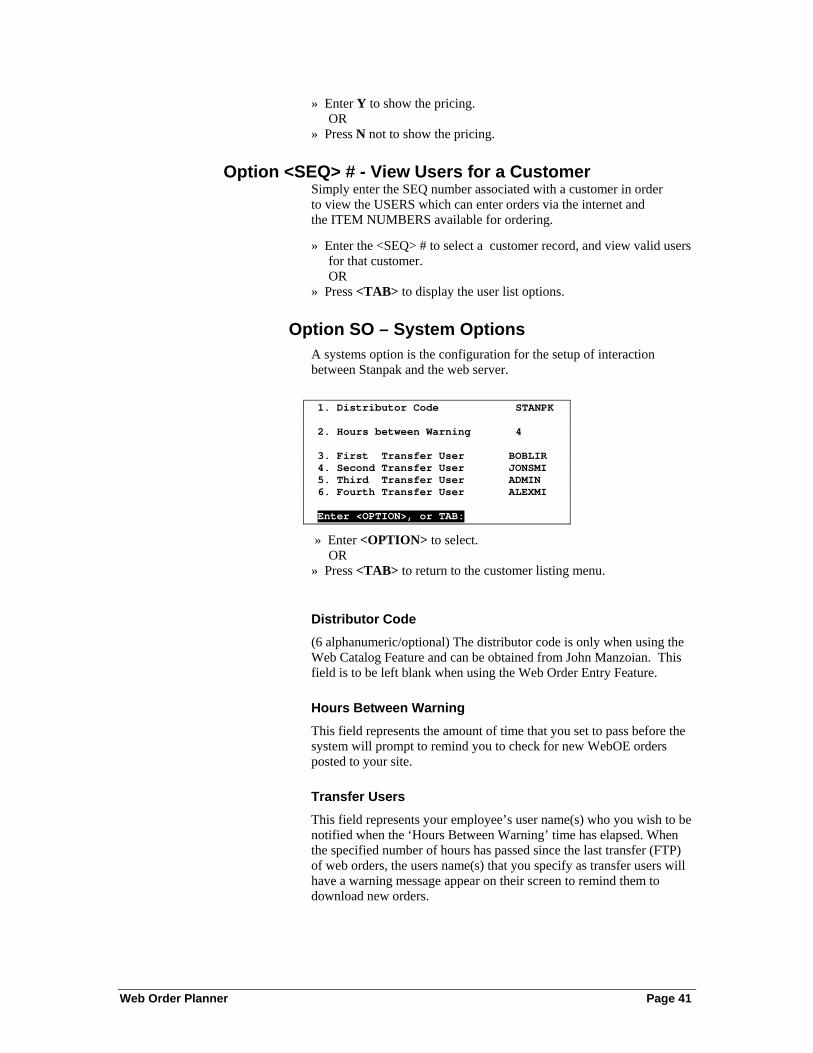
Option SO – System Options A systems option is the configuration for the setup of interaction between Stanpak and the web server.
1. Distributor Code STANPK 2. Hours between Warning 4 3. First Transfer User BOBLIR 4. Second Transfer User JONSMI 5. Third Transfer User ADMIN 6. Fourth Transfer User ALEXMI Enter <OPTION>, or TAB:
» Enter <OPTION> to select. OR » Press <TAB> to return to the customer listing menu.
Distributor Code (6 alphanumeric/optional) The distributor code is only when using the Web Catalog Feature and can be obtained from John Manzoian. This field is to be left blank when using the Web Order Entry Feature.
Hours Between Warning This field represents the amount of time that you set to pass before the system will prompt to remind you to check for new WebOE orders posted to your site.
Transfer Users This field represents your employee’s user name(s) who you wish to be notified when the ‘Hours Between Warning’ time has elapsed. When the specified number of hours has passed since the last transfer (FTP) of web orders, the users name(s) that you specify as transfer users will have a warning message appear on their screen to remind them to download new orders.

WM – Web Order Planner Maintenance
Page 42 Sales Staff Notification - Getting Started
Option DE – Delete Customers The DE command is used to remove customers from the WEB ORDER PLANNER database.
Simply enter the SEQ number for those customers you wish to remove.
Enter the <SEQ#> of the CUSTOMER TO DELETE:
» Enter the sequence number of the customer you wish to remove. Once a customer is deleted that customer no longer has access to the Web Order Planner.
OR » Press <TAB> to return to the customer listing menu.
Are you SURE YOU WISH to DELETE WEB ORDER PLANNER DATA for CUSTOMER XXXXXX (Y)es, (N)o?
» Enter Y to delete existing customer information from the Web Order Planner database.
OR » Enter N to return to the customer listing.
Option P – Print The system will print a hard copy of all customers existing in the Web Order Planner database. The report will print out with the following information: customer number, customer name and the show pricing flag.
The system will prompt for a printer:
PRINTER? (LP-/SP-): [LP1] » Response may be any valid line printer or spooler designation on the system. The default device will be displayed in place of the [LP-]. The default and valid responses vary according to the system on which the program is installed.
Option PL – Position Listing The Position Listing option is used to position the listing starting with a specific CUSTOMER NUMBER.
» Enter PL at the prompt in the Customer Listing Screen.
The system will prompt:
START THE LISTING WITH CUSTOMER NUMBER:
» Enter the CUST # where you wish to begin listing customers.
When a sequence number for a customer has been entered from the customer listing screen (and fields verified), the system will display the user listing screen for that customer.
Option A – Add Users Once the customer is added to the web order database, the system allows you to enter individual user names. The system moves through each field for input, starting with USER NAME.
Web Order Planner Page 43
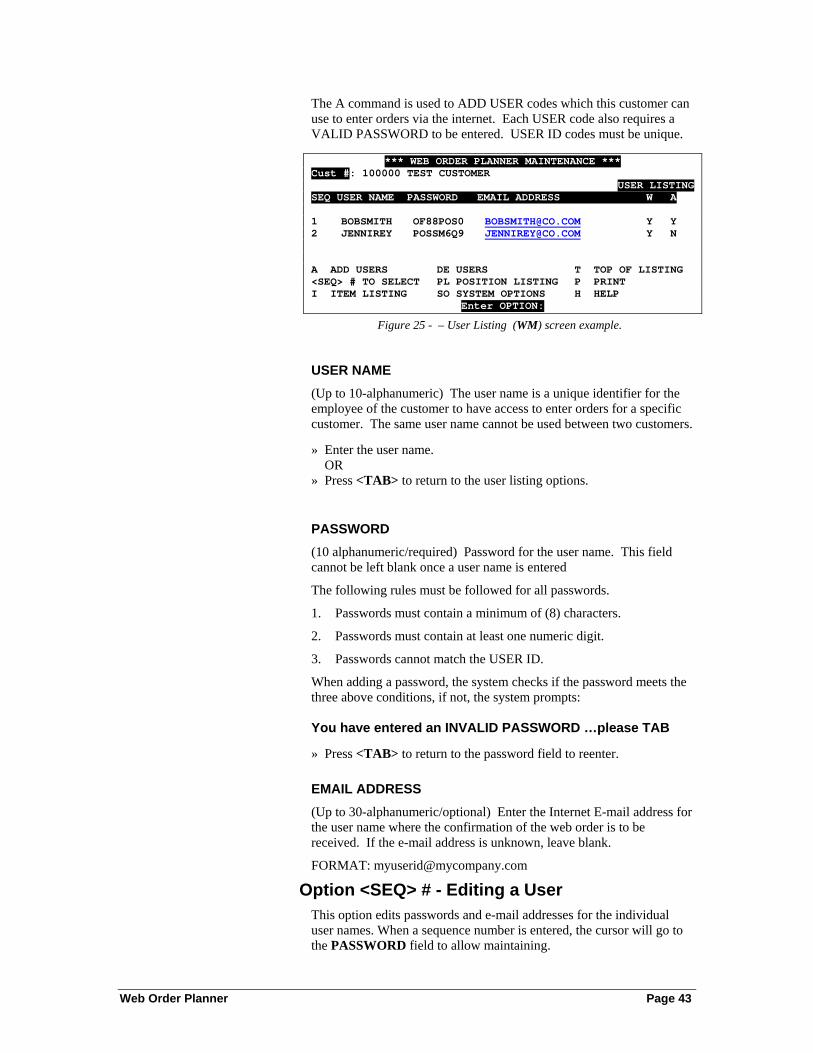
The A command is used to ADD USER codes which this customer can use to enter orders via the internet. Each USER code also requires a VALID PASSWORD to be entered. USER ID codes must be unique.
*** WEB ORDER PLANNER MAINTENANCE *** Cust #: 100000 TEST CUSTOMER
USER LISTING SEQ USER NAME PASSWORD EMAIL ADDRESS W A 1 BOBSMITH OF88POS0 [email protected] Y Y 2 JENNIREY POSSM6Q9 [email protected] Y N A ADD USERS DE USERS T TOP OF LISTING <SEQ> # TO SELECT PL POSITION LISTING P PRINT I ITEM LISTING SO SYSTEM OPTIONS H HELP
Enter OPTION: Figure 25 - – User Listing (WM) screen example.
USER NAME (Up to 10-alphanumeric) The user name is a unique identifier for the employee of the customer to have access to enter orders for a specific customer. The same user name cannot be used between two customers.
» Enter the user name. OR » Press <TAB> to return to the user listing options.
PASSWORD (10 alphanumeric/required) Password for the user name. This field cannot be left blank once a user name is entered
The following rules must be followed for all passwords.
1. Passwords must contain a minimum of (8) characters.
2. Passwords must contain at least one numeric digit.
3. Passwords cannot match the USER ID.
When adding a password, the system checks if the password meets the three above conditions, if not, the system prompts: You have entered an INVALID PASSWORD …please TAB
» Press <TAB> to return to the password field to reenter.
EMAIL ADDRESS (Up to 30-alphanumeric/optional) Enter the Internet E-mail address for the user name where the confirmation of the web order is to be received. If the e-mail address is unknown, leave blank.
FORMAT: [email protected]
Option <SEQ> # - Editing a User This option edits passwords and e-mail addresses for the individual user names. When a sequence number is entered, the cursor will go to the PASSWORD field to allow maintaining.

WM – Web Order Planner Maintenance
Page 44 Sales Staff Notification - Getting Started
» Enter the number of the field to edit a password or e-mail address. OR » Press <TAB> to display the user listing options.
Option DE – Delete User The DE command is used to remove USERS from this list of USERS
which can enter orders via the internet for this customer.
Enter the <SEQ#> of the USER TO DELETE:
» Enter the sequence number of the user you wish to remove. OR » Press <TAB> to return to the user listing options.
Are you SURE YOU WISH to DELETE WEB ORDER PLANNER DATA for USER XXXXXX (Y)es, (N)o?
» Enter Y to delete authorization for the user to access the Web Order Planner.
OR » Enter N to return to the user listing.
Option PL – Position Listing The PL command is used to position the listing starting with
a specific USER.
» Enter PL from the user listing screen.
The system will prompt:
START THE LISTING WITH USER: » Enter the sequence number for the user that you wish to begin your list view of users for this customer.
Option P – Print The system will print a hard copy of all user names, passwords and E-mail addresses for the customer selected. The hard copy will print out in user name order.
The system will prompt for a printer:
PRINTER? (LP-/SP-): [LP1]
» Response may be any valid line printer or spooler designation on the system. The default device will be displayed in place of the [LP-]. The default and valid responses vary according to the system on which the program is installed.
Option I – Item Listing The I command is used to transition to the ITEM LISTING which shows the list of all items which this customer can order via the internet. This screen is known as the Item Listing Screen in WM. From the user listing screen:

Web Order Planner Page 45
» Enter I at the Option prompt.
The system will then display a screen containing information about the items that the customer is allowed to order via the Internet.
*** WEB ORDER PLANNER MAINTENANCE *** Cust #: 301195 CENTURY PRODUCTS ITEM LISTING SEQ CD ITEM NUMBER DESCRIPTION PRICE UM LST QTY YTD QTY 1 2O BX-05X05X05 5X5X5 200# TEST COR B EA 75.000 95.000 2 5Z UNX-DYN-GLS5 DYN GLASS CLEANER 5G EA 1.000 11.000
Figure 26 –User Listing Screen – Option I (Item Listing Screen)
The item listing screen will display BCBI items for the customer, excluding non-stock items. This item listing is rebuilt and regenerated each time the Web Order Planner Generator (WGEN) is executed.
Option P – Print The system will print a hard copy of all BCBI items in the Web Order Planner database. The hard copy will print out category code, item number, item description, pricing unit of measure, last quantity sold and year-to-date quantity sold.
The system will prompt for a printer:
PRINTER? (LP-/SP-): [LP1]
» Response may be any valid line printer or spooler designation on the system. The default device will be displayed in place of the [LP-]. The default and valid responses vary according to the system on which the program is installed.
Option T- Top of Listing The T command is used to return the LISTING to the first item.
Option PL- Position Listing The PL command is used to position the listing starting with a specific BCBI ITEM.
Option U- User Listing The U command is used to transition to the USER LISTING which shows the list of all USERS which for this customer which can enter orders via the internet.
Option H - Help The H command displays this HELP screen.

Web Order Planner Page 46
WGEN – Web Order Planner Generator
Program WGEN builds a file By Customer/By item for all or a range of customers that are set up in Web Order Planner Maintenance (WM). Each time the program WGEN is run, the Web Order Planner BCBI transfer file is erased and recreated. The file contains the customer's sales information that includes the items purchased, the last quantity, last sell price and year-to-date quantity.
There is the ability to set parameters for the BCBI file generation in program BM and in INSTALL.
Program BM can be used to exclude a BCBI for a customer. Set field #12 – Web Exclude to an "X" for a BCBI item not to be included in the Web Order Transfer file.
In the WebOE and External Order Interface configuration of the INSTALL parameters there is an option to control how NON STOCK ITEMS are exported to the Web Order Entry System. The following choices are: X - EXCLUDE all NON STOCK ITEMS from WebOE EXPORT I - INCLUDE all NON STOCK ITEMS in WebOE EXPORT WITHOUT PRICE. P - INCLUDE all NON STOCK ITEMS in WebOE EXPORT WITH PRICE.
The Web Order Planner BCBI file can be viewed through Web Order Planner Maintenance item listing. Use program WM to add, delete or maintain any other BCBI items.
Enter WGEN from any selection prompt, the system will display:
HOST IP ADDRESS: ###.###.###.### Do you want to PREVENT SELECTION of ITEMS LAST SOLD ON OR BEFORE 03/29/01 ? (Y)es, (N)o: Y NOTE: This date is ONLY used for those customers which do not have anything loaded in the DAYS field found in the (WM) WEB ORDER PLANNER MAINTENANCE program.
» Press <Tab> to accept default of N and to select all items from the customers BCBI file. The date displayed defaults to one year prior of the system date.
OR » Enter Y to select items last sold since the date displayed.
If you entered Yes to the previous prompt the system prompts for a cut off date:
Web Order Planner Page 47
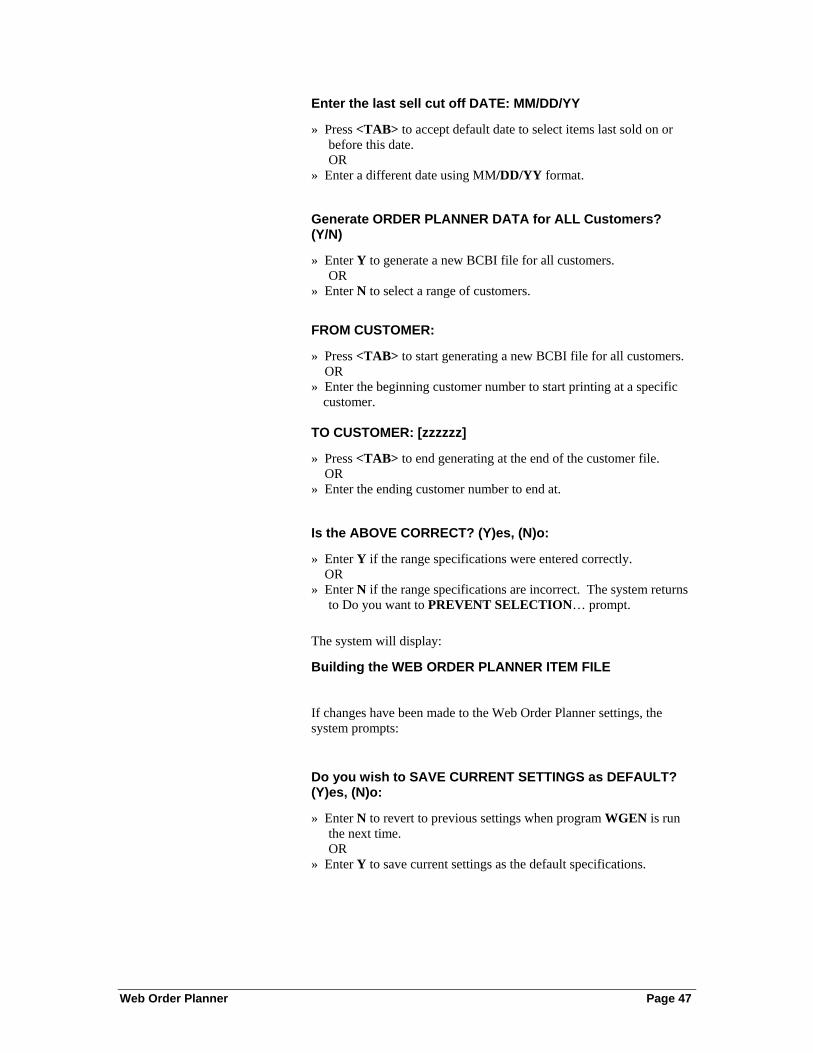
Enter the last sell cut off DATE: MM/DD/YY
» Press <TAB> to accept default date to select items last sold on or before this date.
OR » Enter a different date using MM/DD/YY format.
Generate ORDER PLANNER DATA for ALL Customers? (Y/N)
» Enter Y to generate a new BCBI file for all customers. OR » Enter N to select a range of customers.
FROM CUSTOMER:
» Press <TAB> to start generating a new BCBI file for all customers. OR » Enter the beginning customer number to start printing at a specific
customer. TO CUSTOMER: [zzzzzz]
» Press <TAB> to end generating at the end of the customer file. OR » Enter the ending customer number to end at.
Is the ABOVE CORRECT? (Y)es, (N)o:
» Enter Y if the range specifications were entered correctly. OR » Enter N if the range specifications are incorrect. The system returns
to Do you want to PREVENT SELECTION… prompt.
The system will display:
Building the WEB ORDER PLANNER ITEM FILE
If changes have been made to the Web Order Planner settings, the system prompts:
Do you wish to SAVE CURRENT SETTINGS as DEFAULT? (Y)es, (N)o:
» Enter N to revert to previous settings when program WGEN is run the next time. OR
» Enter Y to save current settings as the default specifications.
Web Order Planner Page 48
WP – Web Order Planner Processor
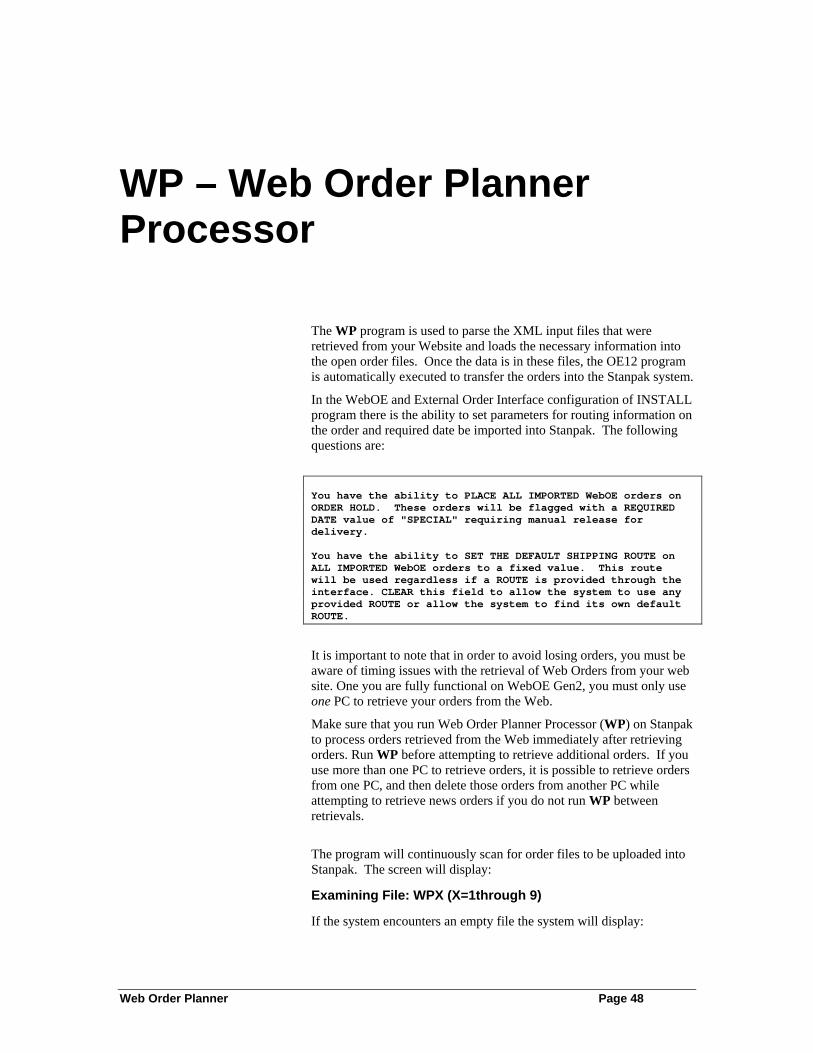
The WP program is used to parse the XML input files that were retrieved from your Website and loads the necessary information into the open order files. Once the data is in these files, the OE12 program is automatically executed to transfer the orders into the Stanpak system.
In the WebOE and External Order Interface configuration of INSTALL program there is the ability to set parameters for routing information on the order and required date be imported into Stanpak. The following questions are:
You have the ability to PLACE ALL IMPORTED WebOE orders on ORDER HOLD. These orders will be flagged with a REQUIRED DATE value of "SPECIAL" requiring manual release for delivery. You have the ability to SET THE DEFAULT SHIPPING ROUTE on ALL IMPORTED WebOE orders to a fixed value. This route will be used regardless if a ROUTE is provided through the interface. CLEAR this field to allow the system to use any provided ROUTE or allow the system to find its own default ROUTE.
It is important to note that in order to avoid losing orders, you must be aware of timing issues with the retrieval of Web Orders from your web site. One you are fully functional on WebOE Gen2, you must only use one PC to retrieve your orders from the Web.
Make sure that you run Web Order Planner Processor (WP) on Stanpak to process orders retrieved from the Web immediately after retrieving orders. Run WP before attempting to retrieve additional orders. If you use more than one PC to retrieve orders, it is possible to retrieve orders from one PC, and then delete those orders from another PC while attempting to retrieve news orders if you do not run WP between retrievals.
The program will continuously scan for order files to be uploaded into Stanpak. The screen will display:
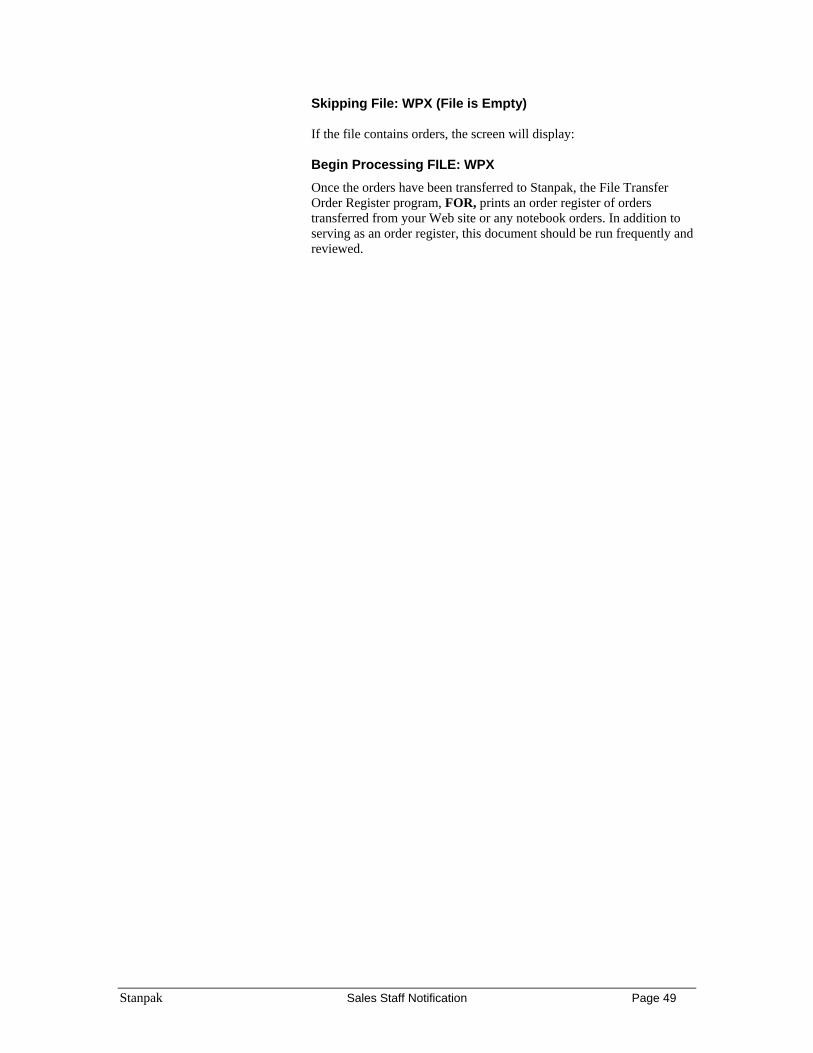
Examining File: WPX (X=1through 9)
If the system encounters an empty file the system will display:
Stanpak Sales Staff Notification Page 49
Skipping File: WPX (File is Empty) If the file contains orders, the screen will display: Begin Processing FILE: WPX Once the orders have been transferred to Stanpak, the File Transfer Order Register program, FOR, prints an order register of orders transferred from your Web site or any notebook orders. In addition to serving as an order register, this document should be run frequently and reviewed.

Web Order Planner Page 50
Sales Manager & Sales Rep Documentation

Web Order Planner Page 51
Personalization Settings
Each sales rep can personalize aspects to the way SalesFORCE Web Tools operates by editing and saving settings that apply only to that sales rep. The sales rep maintains these settings.
Personalization settings are accessible through a link on the Options page (near the bottom of the page). Access the Options page by clicking the 'Options' link in the menu bar at the top of the page.
The Options page will appear similar to the picture below.
Figure 26 - SalesFORCE Web Tools Options

Personalization Settings
Page 52 Sales Staff Notification - Getting Started
Setup: Personalization Settings
If the sales rep has not set up personalization settings for the first time, the following message will appear near the top of the Options page.
Click on the link to edit SalesFORCE Web Tools Personalization settings. The following page will appear.
Figure 27 - SalesFORCE Web Tools Settings Setup
Edit your settings and press the 'Accept' button to save your changes. Press the 'Cancel' button to ignore your changes and return to the

Stanpak Sales Staff Notification Page 53
Options page. If you choose to Accept your changes, a message will display confirming that your settings have being saved.
Start-up page after logging in: Select the page you would like to appear immediately after logging into SalesFORCE Web Tools. The default is 'Application Options'.
E-mail: Web Form vs. Client Program. You can select to use your default e-mail program (such as Microsoft Outlook or Netscape Communicator), or to use a Web-based form to send e-mails to contacts. This option will be applied within SalesFORCE Web Tools applications wherever there is a link to an e-mail address. You can select one option for the PC and a different option for the Pocket PC. NOTE: See the section below to see an example of the PC version of the Web-based Mail Form.
E-mail FROM address when sending Web-based Form E-mails: Enter the e-mail address to be used as the FROM address on any e-mails created with the Web-based e-mail form.
Receive copies of Web-based Form E-mails: Make this box checked if you would like the default to be 'Yes' for receiving copies of the e-mails you send with Web-based E-mail Forms. You still have the option on a message-by-message basis to either receive or not receive copies of the e-mails you send. This box simply indicates what the default should be when the E-mail Form is displayed.
SalesFORCE Web OE - E-mail to receive copies of orders you place with SalesFORCE Web OE: If you would like to receive e-mail copies of customer orders you place through SalesFORCE Web OE, enter the address here. If you do not wish to receive e-mail copies of orders, leave this field blank. Please verify that the e-mail address you enter is accurate; this form does not check the address for validity.
PC Version of Web-based Mail Form The following page is the Web-based Mail Form for the PC. This is the form that will appear every time you click on an e-mail link within SalesFORCE Web applications. This form will be used instead of your e-mail program if you select the Personalization option to use this tool. (see section on SalesFORCE Web Tools Personalization)

Personalization Settings
Page 54 Sales Staff Notification - Getting Started
Figure 28 - Email Web Form
The 'To' address is automatically filled with the link you clicked, and cannot be changed for this e-mail. Type in a Subject and a Message. Check the 'also send (BCC) copy...' box if you wish to receive a copy of this e-mail in your e-mail box. BCC is an abbreviation for 'Blind Carbon Copy', and will not show up as part of the recipient's message (i.e. the recipient is not aware that a copy was sent to your address also).
Click 'Submit' to send the message, and 'Cancel' to not send the message and return to the page from which you came.
Maintenance & Daily Processing:
Personalization Settings
Once you have your personal settings as you require, you should not have to change them unless you wish to change your start page, you need to change email settings (ie – you move from a Pocket PC in the field to a PC in the office), or your email address(es) change.
Should the need arise, you may edit this information as explained in - SalesFORCE Web Tools Settings Setup.

Web Order Planner Page 55
Sales Rep Training for SalesFORCE Web OE
Overview
SalesFORCE Web OE offers Web order entry services to your sales staff at home or on the road. Our tightly integrated Web solution is both inexpensive and easy to implement. This product is designed to improve sales staff productivity and increase sales reps time in the field.
The following steps should serve as a guide for training your sales reps on this powerful new product.
Training: 1. Provide each sales rep with this Sales Rep Training (page 57)
and a copy of the following Product Overview (pages 58-62).
2. Distribute sales rep ID logins(s) and password(s).
a. Each sales rep will access his/her sales data through a login page located at your web site. The page is located at: http://www.yourdomain.com/webapp/sw
3. Have each rep sign in with the assigned user ids and passwords. Please note that User Ids and Passwords are case sensitive (Capital ‘A’ is not the same as lower case ‘a”, ‘Stanpak’ is not the same as ‘sTanpAK’)
4. Remind the sales reps that each sales person will see only his own orders, messages and customer contacts.
Educate the sales reps on what how to enter orders, review BCBI, look up non-stock items, etc. Step by step instruction are outlined in the Product Overview (pages 77-79).
5. Discuss how often your company has decided to update the data and transfer it to the web using the SPN and WGEN programs.
6. Discuss Sales Notices- how to access and how often you plan to update the notice.

SalesFORCE Web OE
Page 56 Sales Staff Notification - Getting Started
SalesFORCE Web OE
Overview
SalesFORCE Web Order Entry offers Web order entry services to your sales staff at home or on the road. Our tightly integrated Web solution is both inexpensive and easy to implement because we developed the Web programs and backend enterprise solution to work together. The Stanpak solution automatically creates a custom web page for each customer, showing the items previously purchased and making it easy for them to place orders. Your salesman selects the customer and enters the order. Each sales person has his own login and password and sees only his own customer information. SalesFORCE WebOE offers your sales staff the following features:
• Multiple Ship-To addresses per customer
• Multiple units of measure per item
• Listing of all the products previously purchased by category with last sell and YTD sell information
• Complete listing of stocked products from your item file
• Ability to find and add new items to orders from the product listing by category
• Ability to see cost and enter or adjust sell prices
Sales orders are transferred from our Web Server to your sever using the same tools as WebOE. Once the order is placed, the customer is automatically sent an e-mail acknowledgement.
Each sales person has his own login and password and sees only his own orders, backorders, order changes, messages and customer contacts.

Stanpak Sales Staff Notification Page 57
How to Run SFWOE
Log onto the main SWT site located at : http://yourcompany.com/webapp/sw/
Select SalesFORCE Web OE from the application from the menu bar, or the links in the center of the page.
Customer List Access The opening page shows your customers and associated customer numbers. Click on one of the numbers to view BCBI items for that customer (See - Figure 29 - Accessing BCBI & Item Information via the Customer List).
Figure 29 - Accessing BCBI & Item Information via the Customer List
BCBI Listing Next, select a Customer Number (See Figure 29 - Accessing BCBI & Item Information via the Customer List for example), and you will be presented with the following screen.

SalesFORCE Web OE
Page 58 Sales Staff Notification - Getting Started
Figure 30 - SFWOE BCBI Listing Screen

Stanpak Sales Staff Notification Page 59
All Items Listing Select the right tab from the frame on the left side of the order detail page to view all items in the current catalog.
From this tab, you may also add a non-stock item to an order, or search the catalog by item number and/or description.
Figure 31- SFWOE All Items Listing
You may click on the category link to view items within that category.
Figure 32 - SFWOE Category Item Listing (All Items)

SalesFORCE Web OE
Page 60 Sales Staff Notification - Getting Started
You may calculate prices and/or margins by clicking on the calculator icon to the right of the item name.
Figure 33 - SFWOE Price/Margin Calculator
From there, you may select an item to add to the current order.
Adding Non-Stock Items: Select the Non-Stock tab in the left frame to add a Non-Stock Item.
Figure 34 - Adding a non stock item to your order

Stanpak Sales Staff Notification Page 61