sample configuration for sip trunking between avaya ip office r8.0
TRANSCRIPT

WHU; Reviewed:
SPOC 2/16/2012
Solution & Interoperability Test Lab Application Notes
©2012 Avaya Inc. All Rights Reserved.
1 of 27
CUCM8IPO8SIPtk
Avaya Solution & Interoperability Test Lab
Sample Configuration for SIP Trunking between Avaya
IP Office R8.0 and Cisco Unified Communications
Manager 8.6.2 – Issue 1.0
Abstract
These Application Notes describe the steps for configuring a SIP trunk between Avaya IP
Office R8.0 and Cisco Unified Communications Manager (CUCM) Release 8.6.2.

WHU; Reviewed:
SPOC 2/16/2012
Solution & Interoperability Test Lab Application Notes
©2012 Avaya Inc. All Rights Reserved.
2 of 27
CUCM8IPO8SIPtk
(This page left blank intentionally)

WHU; Reviewed:
SPOC 2/16/2012
Solution & Interoperability Test Lab Application Notes
©2012 Avaya Inc. All Rights Reserved.
3 of 27
CUCM8IPO8SIPtk
1. Introduction Session Initiation Protocol (SIP) is a standards-based communication protocol capable of
supporting voice, video, instant messaging and other multi-media communication. These
Application Notes will outline a solution for using SIP as a trunking protocol between
Avaya IP Office and Cisco Unified Communications Manager.
2. Interoperability Testing
2.1. Features Tested
Basic calling features are supported including Hold, Transfer, Conference and Fax Pass-
through. Supplemental features such as Call Forward All, Call Park/Unpark are also
supported by this configuration.
2.2. Known Limitations
During interoperability testing, several functional limitations were observed:
1. G.729 Codec is not supported with this solution.
2. The version of IP Office shown in these Application Notes only supports an initial
SIP Invite message that contains SDP information, which is not the default
configuration for CUCM. One way to configure CUCM to include SDP with its
initial SIP Invite message is to enable the Media Terminal Point Required
option as shown in Section 6.3.
3. A number of telephone display anomalies were observed while testing call-
transfer and call-forwarding scenarios. In several test scenarios, it was observed
that phones on both CUCM and IP Office would not update their display with the
‘connected to’ name and/or number.
4. IP Office incorrectly fills in the refer-to header with the user dialed number when
REFER is enabled. The following problems have been observed if ARS short
code is dialed to transfer calls:
a. Avaya SIP phone displays “Transfer Failed” after attended transfer to a
CUCM endpoint. However, the transferred-to phone was successfully
connected and has two-way talk path.
b. The CUCM transferee will remain connected after transferred-to CUCM
phone hangs up the call. This occurred after successfully transfers an
H323 endpoint to another CUCM endpoint.
Note: To work around the transfer failure, user can create a short code to dial the
CUCM extension number as shown in Section 7.6.
5. CUCM sends “500 Internal Server error” to IPO after blind transfers an H323
endpoint to another CUCM endpoint. However, the call transfer is successful.
This problem is under investigation.
6. IP Office SIP phones do not block the calling number when receive an
anonymous call.

WHU; Reviewed:
SPOC 2/16/2012
Solution & Interoperability Test Lab Application Notes
©2012 Avaya Inc. All Rights Reserved.
4 of 27
CUCM8IPO8SIPtk
7. IP Office fails to send T38 fax to CUCM. CUCM rejects the T38 fax after
receives G.711 PCMU in the 200 OK message from IP Office.
3. Overview The sample network shown in Figure 1 consists of two IP PBX systems each belonging
to a different domain with its own dialing plan. The Avaya IP PBX system consists of
Avaya IP Office system capable of supporting a variety of Avaya 1100 Series SIP
Telephones, Avaya 1600 Series IP Telephones along with digital and analog phone/fax
stations. The Cisco IP PBX system consists of Cisco Unified Communications Manager
(CUCM) supporting Cisco SIP and SCCP stations along with analog fax station through
the use of an optional Cisco VG248 gateway (not shown). A SIP trunk is configured
between Avaya IP Office and CUCM to support calling between the Avaya and Cisco IP
PBX systems. With the use of the SIP trunk trans-coding, media and protocol
conversion, calls between any 2 telephones are supported in this sample network
regardless of whether they are between SIP, H.323, digital, SCCP or analog stations.
4. Configuration Figure 1 illustrates the configuration used in these Application Notes. All IP telephones
in the 192.45.2.0/24 IP network are registered with Avaya IP Office and use extension
2xx. All IP telephones in the 10.80.60.0/24 IP network are registered with CUCM and
use extension 720-567-8xxx. A single SIP trunk was configured and connected between
Avaya IP Office and CUCM. All inter-system calls are carried over this SIP trunk.
Figure 1: Sample Network Configuration
WHU; Reviewed:
SPOC 2/16/2012
Solution & Interoperability Test Lab Application Notes
©2012 Avaya Inc. All Rights Reserved.
5 of 27
CUCM8IPO8SIPtk
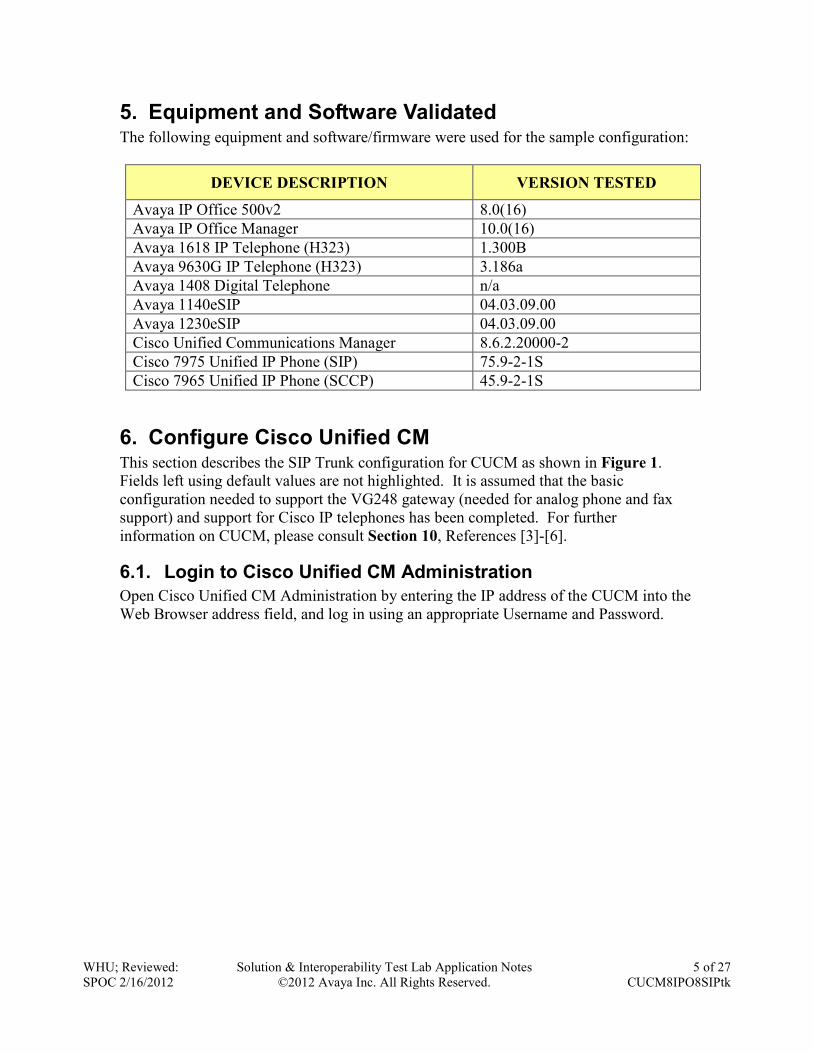
5. Equipment and Software Validated The following equipment and software/firmware were used for the sample configuration:
DEVICE DESCRIPTION VERSION TESTED
Avaya IP Office 500v2 8.0(16)
Avaya IP Office Manager 10.0(16)
Avaya 1618 IP Telephone (H323) 1.300B
Avaya 9630G IP Telephone (H323) 3.186a
Avaya 1408 Digital Telephone n/a
Avaya 1140eSIP 04.03.09.00
Avaya 1230eSIP 04.03.09.00
Cisco Unified Communications Manager 8.6.2.20000-2
Cisco 7975 Unified IP Phone (SIP) 75.9-2-1S
Cisco 7965 Unified IP Phone (SCCP) 45.9-2-1S
6. Configure Cisco Unified CM This section describes the SIP Trunk configuration for CUCM as shown in Figure 1.
Fields left using default values are not highlighted. It is assumed that the basic
configuration needed to support the VG248 gateway (needed for analog phone and fax
support) and support for Cisco IP telephones has been completed. For further
information on CUCM, please consult Section 10, References [3]-[6].
6.1. Login to Cisco Unified CM Administration
Open Cisco Unified CM Administration by entering the IP address of the CUCM into the
Web Browser address field, and log in using an appropriate Username and Password.

WHU; Reviewed:
SPOC 2/16/2012
Solution & Interoperability Test Lab Application Notes
©2012 Avaya Inc. All Rights Reserved.
6 of 27
CUCM8IPO8SIPtk

WHU; Reviewed:
SPOC 2/16/2012
Solution & Interoperability Test Lab Application Notes
©2012 Avaya Inc. All Rights Reserved.
7 of 27
CUCM8IPO8SIPtk
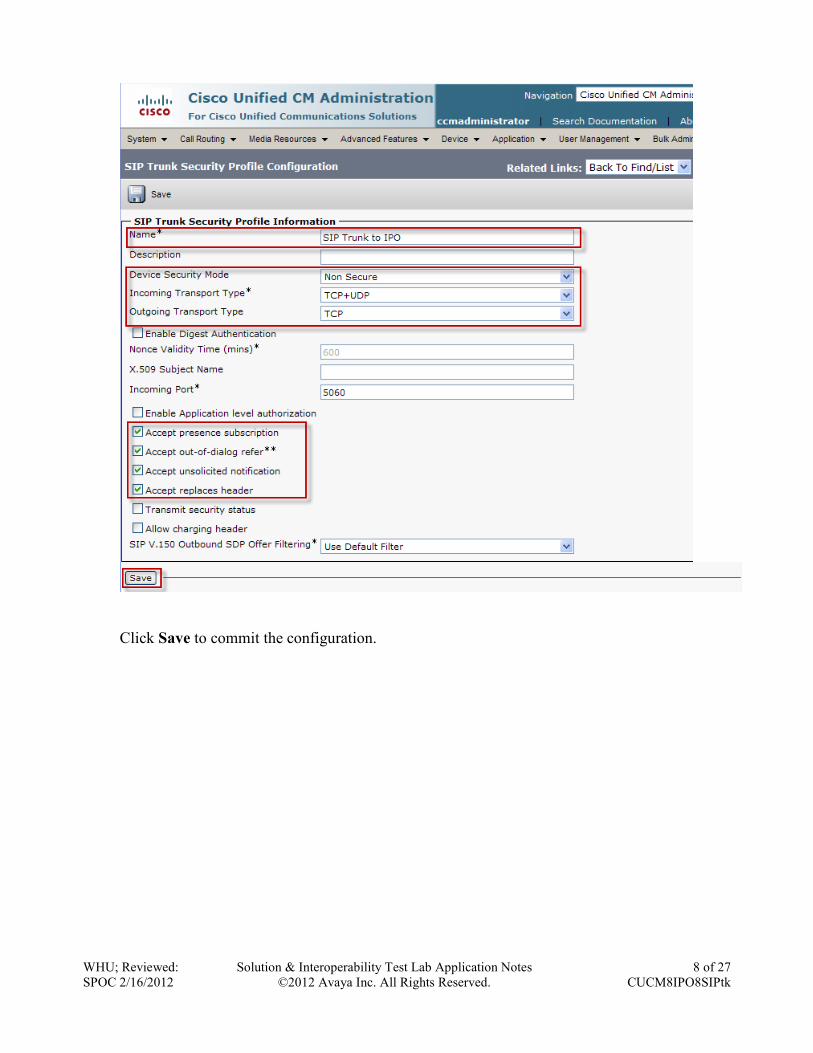
6.2. Add a SIP Trunk Security Profile
Select System � Security Profile � SIP Trunk Security Profile from the top menu
then click Add New to add a new SIP Trunk Security Profile.
The following is a screen capture of the SIP Trunk Security Profile used in the sample
network. The following values were used in the sample configuration:
• Name A descriptive name for the profile
• Device Security Mode “Non Secure” indicates unencrypted SIP signaling
• Incoming Transport Type “TCP+UDP” indicates CUCM will listen for both
protocols
• Outgoing Transport Type “TCP” indicates CUCM will only use TCP to
initiate SIP signaling
• Incoming Port “5060”. Typical value for UDP and TCP SIP
Signaling
• Accept Presence Subscription Enable
• Accept Out-of-Dialog REFER ** Enable
• Accept Unsolicted Notification Enable
• Accept Replaces Header Enable
WHU; Reviewed:
SPOC 2/16/2012
Solution & Interoperability Test Lab Application Notes
©2012 Avaya Inc. All Rights Reserved.
8 of 27
CUCM8IPO8SIPtk
Click Save to commit the configuration.

WHU; Reviewed:
SPOC 2/16/2012
Solution & Interoperability Test Lab Application Notes
©2012 Avaya Inc. All Rights Reserved.
9 of 27
CUCM8IPO8SIPtk
6.3. Create a SIP Trunk
Select Device � Trunk from the top menu then click Add New to begin adding a new
SIP trunk.
Select SIP Trunk as the Trunk Type and the Device Protocol field will automatically
change to SIP. Click Next to continue.

WHU; Reviewed:
SPOC 2/16/2012
Solution & Interoperability Test Lab Application Notes
©2012 Avaya Inc. All Rights Reserved.
10 of 27
CUCM8IPO8SIPtk
Enter the following information for the SIP Trunk.
• Device Name A descriptive name/identifier for the SIP Trunk.
(Make sure there are no spaces in the device name).
• Description Additional descriptive information about the SIP Trunk
• Device Pool Select Default
• Media Termination
Point Required This will cause CUCM to include SDP information in its
initial SIP Invite message.
Scroll down to the section titled SIP Information and fill in the fields as indicated
below.

WHU; Reviewed:
SPOC 2/16/2012
Solution & Interoperability Test Lab Application Notes
©2012 Avaya Inc. All Rights Reserved.
11 of 27
CUCM8IPO8SIPtk
• Destination Address IP Address of IP Office
• Destination Port Port 5060 is typically used for TCP and UDP SIP
signaling
• SIP Trunk Security Profile Use the Security Profile defined in Section 6.2
• DTMF Signaling Method Select RFC2833.
Click Save to complete.
Following screen will appear and click OK.
Follow the instructions from Section 10, Reference 5 and perform a reset for the Cisco
Call Manager.

WHU; Reviewed:
SPOC 2/16/2012
Solution & Interoperability Test Lab Application Notes
©2012 Avaya Inc. All Rights Reserved.
12 of 27
CUCM8IPO8SIPtk
6.4. Create a Route Pattern
Select Call Routing � Route/Hunt � Route Pattern then click Add New to add a new
route pattern for extension 2xx which are for telephones registered with Avaya IP Office.
The following screen shows the route pattern used in the sample network. The route
pattern 2xx will cause all 3-digit calls beginning with “2” to be routed to the SIP Trunk
defined in Section 6.3. Click Save to complete.

WHU; Reviewed:
SPOC 2/16/2012
Solution & Interoperability Test Lab Application Notes
©2012 Avaya Inc. All Rights Reserved.
13 of 27
CUCM8IPO8SIPtk
Following screen will appear and click OK.
Following screen will appear and click OK.
7. Configure Avaya IP Office This section describes the SIP Trunk configuration for Avaya IP Office as shown in
Figure 1. It is assumed that the basic configuration has been completed and Avaya IP
Office is accessible from the network. Begin by connecting to the Avaya IP Office using
the Avaya IP Office Manager and log in using an appropriate User name and Password.
Fields that need to be configured are highlighted, all other fields are left with their default
value. For further information on Avaya IP Office, please consult Section 10: Reference
[1].
7.1. Verify SIP License
Select License ���� SIP Trunk Channels from the left panel menu and verify that there is
a valid SIP Trunk Channel license and the quantity. If a required feature is not enabled
or there is insufficient capacity, contact an authorized Avaya sales representative to make
the appropriate changes.

WHU; Reviewed:
SPOC 2/16/2012
Solution & Interoperability Test Lab Application Notes
©2012 Avaya Inc. All Rights Reserved.
14 of 27
CUCM8IPO8SIPtk
7.2. Obtain LAN2 IP Address
From the configuration tree in the left pane, select System to display the IPO500V2
screen in the right pane. Select the LAN2 tab, followed by the LAN Settings sub-tab in
the right pane. This IP Address is used in Section 6.3 to configure SIP Trunks.
Note: The LAN1 IP Address is used for the LAN port of the IP Office control unit. The
LAN1 interface was used to connect the Avaya IP Office to the enterprise site IP
network. The LAN1 interface configuration is not directly relevant to the interface with
the Cisco Call Manager, and therefore it is not described in these Application Notes.

WHU; Reviewed:
SPOC 2/16/2012
Solution & Interoperability Test Lab Application Notes
©2012 Avaya Inc. All Rights Reserved.
15 of 27
CUCM8IPO8SIPtk
7.3. Configure Network Topology
From the configuration tree in the left pane, select System to display the IPO500V2
screen in the right pane. Select the LAN2 tab, followed by the Network Topology sub-
tab in the right pane. Configure Firewall/NAT Type to “Open Internet”. Configure
Binding Refresh Time to “321”. Click OK.
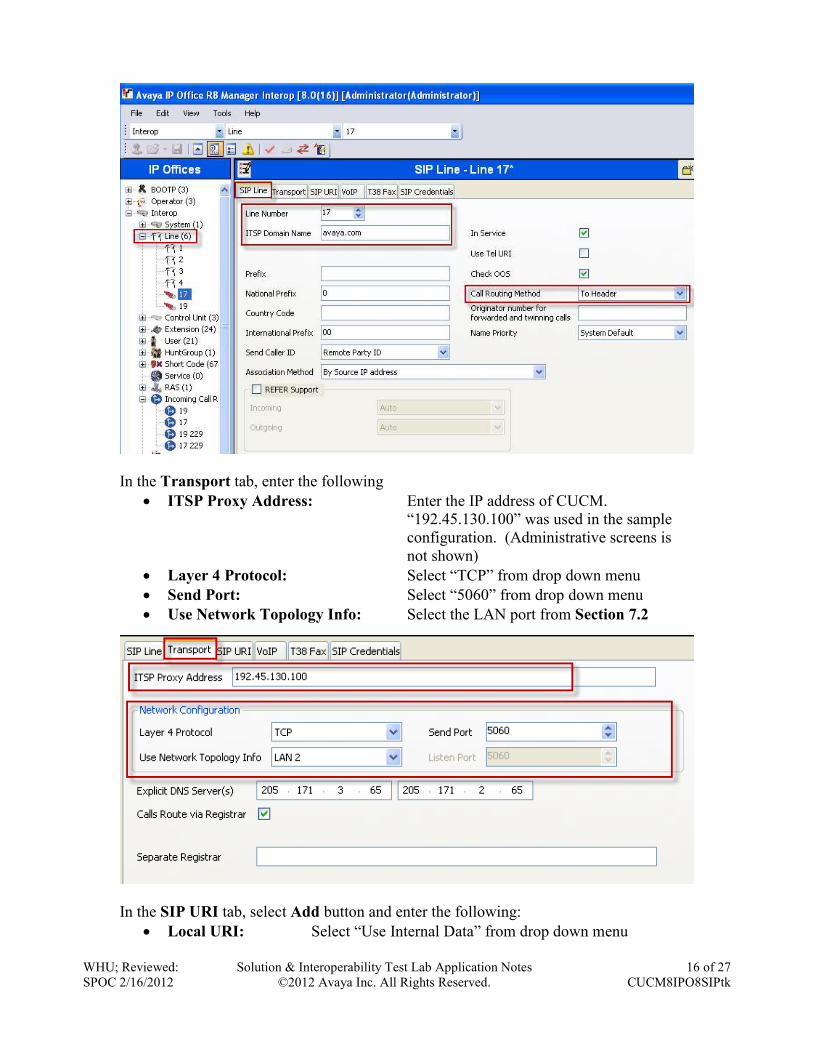
7.4. Create a SIP Line
Select Line from the left panel menu and then right-click and select New � SIP Line to
create an SIP line to CUCM.
In the SIP Line tab, enter the following
• ITSP Domain Name: Select “To Header” from drop down menu
Enter the domain name. “avaya.com” was used in
the sample configuration.
• Call Routing Method: Select “To Header” from drop down menu
WHU; Reviewed:
SPOC 2/16/2012
Solution & Interoperability Test Lab Application Notes
©2012 Avaya Inc. All Rights Reserved.
16 of 27
CUCM8IPO8SIPtk
In the Transport tab, enter the following
• ITSP Proxy Address: Enter the IP address of CUCM.
“192.45.130.100” was used in the sample
configuration. (Administrative screens is
not shown)
• Layer 4 Protocol: Select “TCP” from drop down menu
• Send Port: Select “5060” from drop down menu
• Use Network Topology Info: Select the LAN port from Section 7.2
In the SIP URI tab, select Add button and enter the following:
• Local URI: Select “Use Internal Data” from drop down menu

WHU; Reviewed:
SPOC 2/16/2012
Solution & Interoperability Test Lab Application Notes
©2012 Avaya Inc. All Rights Reserved.
17 of 27
CUCM8IPO8SIPtk
• Contact: Select “Use Internal Data” from drop down menu
• Display Name: Select “Use Internal Data” from drop down menu
• Incoming Group: Enter the line number created above
• Outgoing Group: Enter the line number created above
Select the OK button when done.
In the VoIP tab:
• Select System Default for Codec Selection.
• Select G.711 for Fax Transport Support.
• DTMF Support should be set for RFC2833.
• Check Re-invite Supported
• Select the OK button (not shown) at the bottom of the screen once all changes
have been made.

WHU; Reviewed:
SPOC 2/16/2012
Solution & Interoperability Test Lab Application Notes
©2012 Avaya Inc. All Rights Reserved.
18 of 27
CUCM8IPO8SIPtk
7.5. Create Outgoing Routing Entry for Calls to Cisco UCM
In the left pane, under 9NShort Codes, by default there should be a short code for 9N
that routes calls to a default ARS group called Main. These Application Notes will use
ARS to route call to CUCM. The screen capture below shows the default 9N Short Code.
1. Select ARS � Main from the left panel menu, and then click on Add to create a new
Code entry to route calls to CUCM. Note: 50:Main is the default Line Group Id for
ARS.

WHU; Reviewed:
SPOC 2/16/2012
Solution & Interoperability Test Lab Application Notes
©2012 Avaya Inc. All Rights Reserved.
19 of 27
CUCM8IPO8SIPtk
2. Enter the appropriate information for the Code entry. The following screen capture
shows a portion of the Cisco dialing plan “720567” is being used as part of the Code.
The Telephone Number is composed of the called phone number appended with “@”
and the CUCM IP Address. Line Group ID created in Section 7.4 will be used to
send out the call.

WHU; Reviewed:
SPOC 2/16/2012
Solution & Interoperability Test Lab Application Notes
©2012 Avaya Inc. All Rights Reserved.
20 of 27
CUCM8IPO8SIPtk
7.6. Create Short Code using extension number
When REFER is enabled, dial ARS short code to transfer calls from IP Office to CUCM
will fail. To work around the problem, create a short code using the CUCM extension
numbers.
In the left pane, right click 9X Short Code and then select New (not shown) to create a
new Code entry to route calls to CUCM. In the sample configuration 10-digit extension
numbers (720-567-8xxx) were assigned to CUCM.
7.7. Create Incoming Routing Entry for Calls From Cisco UCM
1. Select Incoming Call Route from the left panel menu and then right-click it and
select New (not shown) to create a new Incoming Call Route. Under the Standard
tab, select the Line Group number created in Section 7.4 in the Line Group Id
field. The following screen shows the setting used in the sample network.

WHU; Reviewed:
SPOC 2/16/2012
Solution & Interoperability Test Lab Application Notes
©2012 Avaya Inc. All Rights Reserved.
21 of 27
CUCM8IPO8SIPtk
2. Under the Destination tab, enter “.” as the Default Value. The “.” indicates the
incoming call can be routed to the extension specified by the caller. The following
screen shows the setting used. Select the OK button when complete.
WHU; Reviewed:
SPOC 2/16/2012
Solution & Interoperability Test Lab Application Notes
©2012 Avaya Inc. All Rights Reserved.
22 of 27
CUCM8IPO8SIPtk
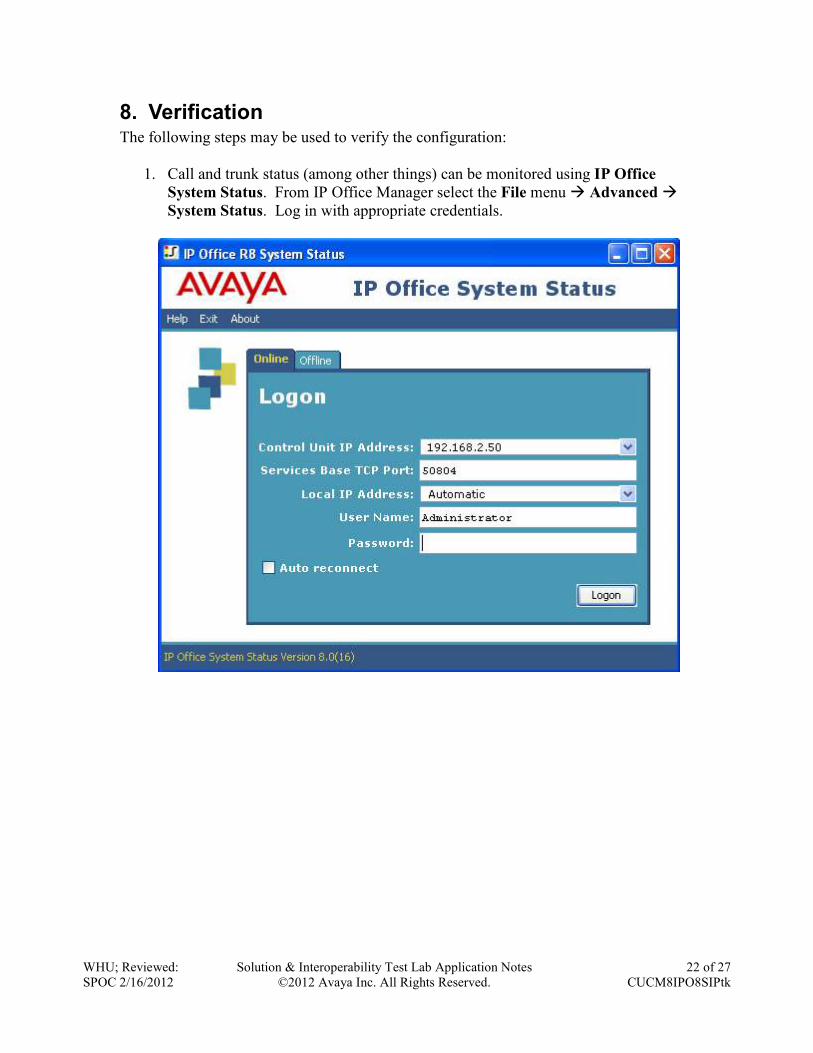
8. Verification The following steps may be used to verify the configuration:
1. Call and trunk status (among other things) can be monitored using IP Office
System Status. From IP Office Manager select the File menu � Advanced �
System Status. Log in with appropriate credentials.

WHU; Reviewed:
SPOC 2/16/2012
Solution & Interoperability Test Lab Application Notes
©2012 Avaya Inc. All Rights Reserved.
23 of 27
CUCM8IPO8SIPtk
Once logged in, in the left-pane expand Trunks and select the appropriate SIP
Trunk. In the sample configuration this is Line 17. The screen below shows 2
active calls and several idle channels on Line 17.

WHU; Reviewed:
SPOC 2/16/2012
Solution & Interoperability Test Lab Application Notes
©2012 Avaya Inc. All Rights Reserved.
24 of 27
CUCM8IPO8SIPtk
2. From the computer where IP Office Manager is installed, select Start �
Programs � IP Office � Monitor to view Avaya IP Office debugging
information. The following is a screen capture of the sysMonitor window.
WHU; Reviewed:
SPOC 2/16/2012
Solution & Interoperability Test Lab Application Notes
©2012 Avaya Inc. All Rights Reserved.
25 of 27
CUCM8IPO8SIPtk
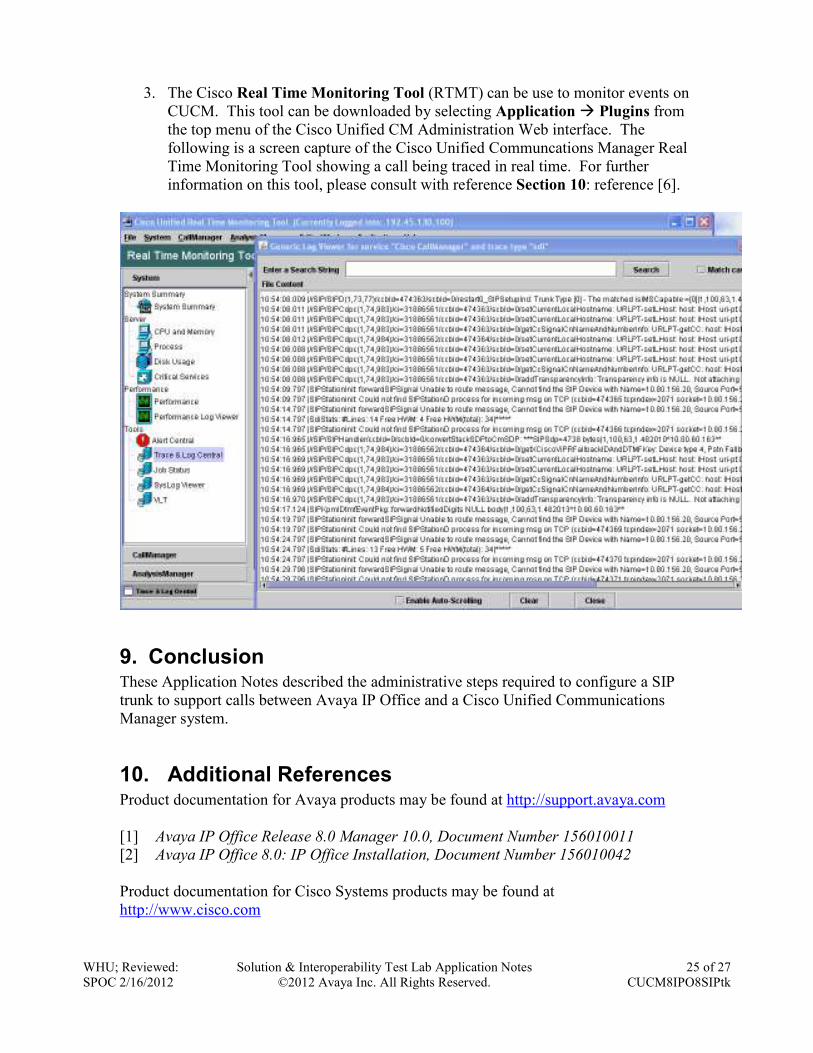
3. The Cisco Real Time Monitoring Tool (RTMT) can be use to monitor events on
CUCM. This tool can be downloaded by selecting Application � Plugins from
the top menu of the Cisco Unified CM Administration Web interface. The
following is a screen capture of the Cisco Unified Communcations Manager Real
Time Monitoring Tool showing a call being traced in real time. For further
information on this tool, please consult with reference Section 10: reference [6].
9. Conclusion These Application Notes described the administrative steps required to configure a SIP
trunk to support calls between Avaya IP Office and a Cisco Unified Communications
Manager system.
10. Additional References Product documentation for Avaya products may be found at http://support.avaya.com
[1] Avaya IP Office Release 8.0 Manager 10.0, Document Number 156010011
[2] Avaya IP Office 8.0: IP Office Installation, Document Number 156010042
Product documentation for Cisco Systems products may be found at
http://www.cisco.com

WHU; Reviewed:
SPOC 2/16/2012
Solution & Interoperability Test Lab Application Notes
©2012 Avaya Inc. All Rights Reserved.
26 of 27
CUCM8IPO8SIPtk
[3] Cisco Unified Communications Manager Documentation Guide for Release 8.6(2)
[4] Cisco Unified IP Phone Administration Guide for Cisco Unified Communications
Manager 8.0 (SCCP and SIP), Part Number: OL-18913-01
[5] Cisco Unified Communications Manager Features and Services Guide, Release
8.6(1), Part Number: OL-24921-01
[6] Cisco Unified Real-Time Monitoring Tool Administration Guide, Release 8.6(1),
Part Number: OL-24544-01
WHU; Reviewed:
SPOC 2/16/2012
Solution & Interoperability Test Lab Application Notes
©2012 Avaya Inc. All Rights Reserved.
27 of 27
CUCM8IPO8SIPtk
©2012 Avaya Inc. All Rights Reserved.
Avaya and the Avaya Logo are trademarks of Avaya Inc. All trademarks identified by ®
and ™ are registered trademarks or trademarks, respectively, of Avaya Inc. All other
trademarks are the property of their respective owners. The information provided in
these Application Notes is subject to change without notice. The configurations,
technical data, and recommendations provided in these Application Notes are believed to
be accurate and dependable, but are presented without express or implied warranty.
Users are responsible for their application of any products specified in these Application
Notes.
Please e-mail any questions or comments pertaining to these Application Notes along
with the full title name and filename, located in the lower right corner, directly to the
Avaya Solution & Interoperability Test Lab at [email protected]