sample of a practical guide to networking and security in ... · pdf filea practical guide to...
TRANSCRIPT

A Practical Guide to
NETWORKING AND SECURITY
IN iOS 8
By Glenn Fleishman$15

1
WelcomeWelcome to an excerpt of A Practical Guide to Networking and Security in iOS 8, published in February 2015 by Aperiodical LLC.
To purchase the complete ebook from our partner, Take Control Books, click here. The purchase price includes PDF, EPUB, and MOBI (Kindle-com-patible) formats of the book, and free upgrades for the iOS 8 edition.
A Practical Guide to Networking and Security in iOS 8 describes how to use your iPhone, iPod touch, or iPad with iOS 8 on Wi-Fi and cellular/mobile networks securely, making connections with ease while protecting your data. It also covers Bluetooth networking, tracking an iOS device, Personal Hotspot, two-step verification with Apple ID, using AirDrop and AirPlay, and solving connection problems.
This book was written by Glenn Fleishman, edited by Jeff Carlson, and copyedited and proofread by Scout Festa. The cover illustration is by Christa Mrgan. (This is an update of a book originally published by Take Control Publishing, and edited by Tonya Engst and Michael Cohen.)
If you have the ebook edition and want to share it with a friend, we ask that you do so as you would with a physical book: “lend” it for a quick look, but ask your friend to buy a copy for careful reading or reference. Aperiodical is a tiny independent publishing company — just Glenn! (A print edition of this book can be ordered at the above link.)
Copyright ©2015 Aperiodical LLC. All rights reserved.

2
IntroductionNetworking should be simple, and security should be automatic. And money should grow on trees. Despite how intuitive it is to pick up and use an iOS device, requiring little thought as to how it connects to a cellular or Wi-Fi network, it becomes quite complex as soon as you drill down to any details. This is especially true when connectivity fails,and you try to troubleshoot.
Security is an even denser area. Apple makes the default choices in iOS reasonably secure, but to ensure real protection for your data— while your bits are traveling through the æther or in the event that your device is stolen—you need to know how it all works.
The book is divided into two major sections, one on networking and one on security, though there is, of course, overlap.
3
TABLE OF CONTENTS
N E T W O R K I N GConnect to a Wi-Fi Network . . . . . . . . . . . . . . . . . . . . . . . . . . . . . . . . . .7
Join a Network . . . . . . . . . . . . . . . . . . . . . . . . . . . . . . . . . . . . . . . . . . . 7Managing Wi-Fi Connections . . . . . . . . . . . . . . . . . . . . . . . . . . . . . . . . 8Drill Down to Network Details . . . . . . . . . . . . . . . . . . . . . . . . . . . . . . .9Turn Wi-Fi Off . . . . . . . . . . . . . . . . . . . . . . . . . . . . . . . . . . . . . . . . . . 12Capture the Page . . . . . . . . . . . . . . . . . . . . . . . . . . . . . . . . . . . . . . . . 13Auto-Join and Auto-Login the Next Time . . . . . . . . . . . . . . . . . . . . . 14
Wi-Fi Troubleshooting . . . . . . . . . . . . . . . . . . . . . . . . . . . . . . . . . . . . . 17Can’t See Wi-Fi Networks . . . . . . . . . . . . . . . . . . . . . . . . . . . . . . . . . 17No Wi-Fi Signal Strength in the Indicator . . . . . . . . . . . . . . . . . . . . . 17Too Many Wi-Fi Networks . . . . . . . . . . . . . . . . . . . . . . . . . . . . . . . . . 18Correct Password Not Accepted . . . . . . . . . . . . . . . . . . . . . . . . . . . . . 19No Internet Service after Connecting . . . . . . . . . . . . . . . . . . . . . . . . . 19Check a Web Page with Safari . . . . . . . . . . . . . . . . . . . . . . . . . . . . . 19Check or Ask about the Base Station . . . . . . . . . . . . . . . . . . . . . . . . 20Check IP Address Settings . . . . . . . . . . . . . . . . . . . . . . . . . . . . . . . . 20
Make a Mobile Hotspot . . . . . . . . . . . . . . . . . . . . . . . . . . . . . . . . . . . . 22Turn On Personal Hotspot . . . . . . . . . . . . . . . . . . . . . . . . . . . . . . . . . 23Turn On in iOS 8 . . . . . . . . . . . . . . . . . . . . . . . . . . . . . . . . . . . . . . . 23Turn On via Another Device . . . . . . . . . . . . . . . . . . . . . . . . . . . . . . 23You Can’t Always Use Cell Data while Talking . . . . . . . . . . . . . . . . . 25Set a Wi-Fi Password . . . . . . . . . . . . . . . . . . . . . . . . . . . . . . . . . . . 27Name Your Wi-Fi Network . . . . . . . . . . . . . . . . . . . . . . . . . . . . . . . 28Consider Turning Off Certain Radios . . . . . . . . . . . . . . . . . . . . . . . . 29
Connect to Personal Hotspot . . . . . . . . . . . . . . . . . . . . . . . . . . . . . . . 30Access via Wi-Fi . . . . . . . . . . . . . . . . . . . . . . . . . . . . . . . . . . . . . . . 32Tether with USB in Mac OS X . . . . . . . . . . . . . . . . . . . . . . . . . . . . . 36

4
Choose to Use Cellular Data or Wi-Fi . . . . . . . . . . . . . . . . . . . . . . . . . .42Which Network Are You On? . . . . . . . . . . . . . . . . . . . . . . . . . . . . . . . 42Select Which Service to Use . . . . . . . . . . . . . . . . . . . . . . . . . . . . . . . . 42
Manage Cell Data Usage . . . . . . . . . . . . . . . . . . . . . . . . . . . . . . . . . . . .45Keep Usage Restrained . . . . . . . . . . . . . . . . . . . . . . . . . . . . . . . . . . . . 45Tracking Cellular Usage on an iPhone . . . . . . . . . . . . . . . . . . . . . . . 45Check Cellular Usage an an iPad . . . . . . . . . . . . . . . . . . . . . . . . . . . 47Turn Cellular Data On Only When You Need It . . . . . . . . . . . . . . . . 48Limit Your Activities on the Cell Network . . . . . . . . . . . . . . . . . . . . 50
Airplane Mode . . . . . . . . . . . . . . . . . . . . . . . . . . . . . . . . . . . . . . . . . . . 52What’s Airplane Mode? . . . . . . . . . . . . . . . . . . . . . . . . . . . . . . . . . . . 52Turning Radios Off Separately . . . . . . . . . . . . . . . . . . . . . . . . . . . . . . 54
Set Up Bluetooth . . . . . . . . . . . . . . . . . . . . . . . . . . . . . . . . . . . . . . . . . . 55Bluetooth Basics. . . . . . . . . . . . . . . . . . . . . . . . . . . . . . . . . . . . . . . . . 55Pairing Any Device . . . . . . . . . . . . . . . . . . . . . . . . . . . . . . . . . . . . . . . 56Hands-Free Profile . . . . . . . . . . . . . . . . . . . . . . . . . . . . . . . . . . . . . . 59Audio Devices . . . . . . . . . . . . . . . . . . . . . . . . . . . . . . . . . . . . . . . . . . . 60
Exchange Files with AirDrop . . . . . . . . . . . . . . . . . . . . . . . . . . . . . . . .62Configure AirDrop . . . . . . . . . . . . . . . . . . . . . . . . . . . . . . . . . . . . . . . 62Share with AirDrop . . . . . . . . . . . . . . . . . . . . . . . . . . . . . . . . . . . . . . 63
Share from Yosemite . . . . . . . . . . . . . . . . . . . . . . . . . . . . . . . . . . . . 64Receive a File in iOS 8 . . . . . . . . . . . . . . . . . . . . . . . . . . . . . . . . . . . 66Receive a File in Yosemite . . . . . . . . . . . . . . . . . . . . . . . . . . . . . . . . 66
Stream Music and Video via AirPlay . . . . . . . . . . . . . . . . . . . . . . . . . . .68Select AirPlay Devices . . . . . . . . . . . . . . . . . . . . . . . . . . . . . . . . . . . . 68Ways to Use AirPlay . . . . . . . . . . . . . . . . . . . . . . . . . . . . . . . . . . . . . . 70Configure AirPlay for an AirPort Express . . . . . . . . . . . . . . . . . . . . . 71Configure an Apple TV for Audio and Video . . . . . . . . . . . . . . . . . . . 72Send Audio with Airfoil . . . . . . . . . . . . . . . . . . . . . . . . . . . . . . . . . . 72Mirror an iOS Screen . . . . . . . . . . . . . . . . . . . . . . . . . . . . . . . . . . . . 73

5
S EC U R I T YConnect to a Secure Wi-Fi Network . . . . . . . . . . . . . . . . . . . . . . . . . . .76Connect to a Small Network . . . . . . . . . . . . . . . . . . . . . . . . . . . . . . . . 77What’s Behind Simple Wireless Security . . . . . . . . . . . . . . . . . . . . . 77Security on a Base Station . . . . . . . . . . . . . . . . . . . . . . . . . . . . . . . . 78
Connect to a Corporate or Academic Network . . . . . . . . . . . . . . . . . . . 78Outdated Methods . . . . . . . . . . . . . . . . . . . . . . . . . . . . . . . . . . . . . . . 80Viewing an Apple Base Station’s Stored Passwords . . . . . . . . . . . . . . 80
Use Two-Step Verification . . . . . . . . . . . . . . . . . . . . . . . . . . . . . . . . . .82Dancing a Two Step . . . . . . . . . . . . . . . . . . . . . . . . . . . . . . . . . . . . . . 82Turn On Two-Step Verification . . . . . . . . . . . . . . . . . . . . . . . . . . . . . 83Log In with Two-Step Verification . . . . . . . . . . . . . . . . . . . . . . . . . . . 85Logins at Other Sites . . . . . . . . . . . . . . . . . . . . . . . . . . . . . . . . . . . . . 88Recovering Account Factors . . . . . . . . . . . . . . . . . . . . . . . . . . . . . . . . 88Lost Your Password . . . . . . . . . . . . . . . . . . . . . . . . . . . . . . . . . . . . . 89Lost One, but Not All, of Your Trusted Devices . . . . . . . . . . . . . . . . 89Lost Your Recovery Key . . . . . . . . . . . . . . . . . . . . . . . . . . . . . . . . . . 89
Transfer Data Securely . . . . . . . . . . . . . . . . . . . . . . . . . . . . . . . . . . . . . 91Protect Particular Services . . . . . . . . . . . . . . . . . . . . . . . . . . . . . . . . . 91Umbrella Protection with a VPN . . . . . . . . . . . . . . . . . . . . . . . . . . . . . 93Find a VPN Service and Install an App . . . . . . . . . . . . . . . . . . . . . . . 93Configure a VPN Manually . . . . . . . . . . . . . . . . . . . . . . . . . . . . . . . 99
Make a VPN Connection . . . . . . . . . . . . . . . . . . . . . . . . . . . . . . . . . . 101
Protect Your Device . . . . . . . . . . . . . . . . . . . . . . . . . . . . . . . . . . . . . . 103Set a Passcode . . . . . . . . . . . . . . . . . . . . . . . . . . . . . . . . . . . . . . . . . 103Use Touch ID . . . . . . . . . . . . . . . . . . . . . . . . . . . . . . . . . . . . . . . . . . 105
When Your Device Goes Missing . . . . . . . . . . . . . . . . . . . . . . . . . . . . 107Find My iPhone (and Other Devices) . . . . . . . . . . . . . . . . . . . . . . . . 107How It Works . . . . . . . . . . . . . . . . . . . . . . . . . . . . . . . . . . . . . . . . 108Enable Find My iPhone . . . . . . . . . . . . . . . . . . . . . . . . . . . . . . . . . 109View Your Device’s Location . . . . . . . . . . . . . . . . . . . . . . . . . . . . . 109Take Remote Action . . . . . . . . . . . . . . . . . . . . . . . . . . . . . . . . . . . 113

22
Make a Mobile HotspotEvery iPhone and every “Wi-Fi + Cellular” iPad has, in addition to a Wi-Fi radio, a built-in data modem that lets the device access high-speed mobile data networks. The logical question in the iPhone’s early years was: why can’t we use that same modem with our laptops (or other devices) when we’re traveling instead of having to buy a separate cellular modem or router and pay a separate monthly service fee?
Fortunately, Apple followed the suit of other smartphone makers and added Personal Hotspot, which lets you use your phone or tablet as a conduit to the mobile Internet. While the name implies a Wi-Fi hotspot connection, which is one component of it, you may also use Bluetooth or USB with desktop computers and other devices to extend access. All three methods may even be used simultaneously.
Personal Hotspot’s availability varies by carrier, although operators around the world offer it: consult this list by Apple to check on yours. In North America, all carriers in America and Canada allow its use except for two tiny ones in Canada.
In America, the four largest carriers all include mobile hotspot use in their current plans, and count bandwidth consumed just as they do any other data used by an iPhone or iPad.
Which models? In previous releases, some models that could install the latest iOS version couldn’t use every Personal Hotspot feature. But every iPhone model and Wi-Fi + Cellular iPad model that can use iOS 8 can use every option.

23
Note: In this chapter, I talk about a mobile hotspot or Personal Hotspot to refer to all the features, but I use the term tethering when the discussion is specifically about Bluetooth or USB.
Turn On Personal HotspotThere are two ways to turn on the Personal Hotspot feature: directly on your iOS device or through another computer or iOS device.
Whenever you use these methods, the device that turns on the Personal Hotspot then automatically connects to it.
WARNING! Devices that connect to a Personal Hotspot typically don’t treat it any differently than a regular Wi-Fi or Ethernet network—which can mean it’s easy to rack up huge amounts of usage. You will want to pause or dis-able sync services, like Dropbox, and online backup systems, like Backblaze or CrashPlan. You may also want to avoid using any streaming video ser-vices or digital media downloads while connected via a Personal Hotspot.
Turn On in iOS 8Enable it in Settings > Cellular Data (iPad) or Settings > Cellular (iPhone).
Tap Personal Hotspot to open the Personal Hotspot screen. Now you can switch the hotspot on and set a Wi-Fi password. The screen is also full of connection information (Figure 5).
After the first time you tap On, Personal Hotspot appears as an option on the Settings app’s left pane (iPad) or main screen (iPhone) so you can ac-cess it quickly.
Turn On via Another DeviceIf you have multiple iOS devices running iOS 8 or the right vintage of Mac and are running Yosemite, you can take advantage of Instant Hotspot, a feature that lets you turn on Personal Hotspot from another device.

24
Figure 5: The Personal Hotspot view lets you turn access on or off as well as set a Wi-Fi password.
Instant Hotspot is part of Continuity, a set of connections between your iOS devices and between iOS and Mac OS X. However, the devices must meet a list of conditions for Continuity to work:
■ You have iOS 8.1 or OS X 10.10 Yosemite installed on the computer or device you’re using to activate the hotspot, and iOS 8.1 on the iOS device you’re using as a hotspot.
■ Your Mac is a model released in mid-2012 (MacBook Air and MacBook Pro) or later (Mac Pro, Mac mini, and iMac).
■ Your iOS device was released in the last 2 to 3 years. (See complete list.)
■ Your iPhone and the other iOS device or Mac are signed in to the same iCloud account.
■ Both devices have Bluetooth enabled and are on the same Wi-Fi network.
On a Mac, select the Wi-Fi menu, and choose the device in the menu under Personal Hotspot (Figure 6).
Figure 6: Instant Hotspot puts an iOS device into your Wi-Fi menu in OS X.

25
On another iOS device, launch Settings, tap Wi-Fi, and choose the device in the Personal Hotspots list (Figure 7).
Figure 7: In iOS, pick a device from the Personal Hotspots list.
Even if you’re not planning to connect, you can see the battery life, signal strength, and connection strength of your iOS device as a compact set of graphics in the menu or list.
You Can’t Always Use Cell Data while TalkingIt can be a little confusing to tell whether an iPhone can continue to have an active cellular data connection while a voice call is underway. On some carrier networks, data is suspended; on others, it slows; and all that is changing right now, with the right iPhone models, too. Wi-Fi data al-ways works during a voice call, but when you’re using Personal Hotspot, you’re always relying on the cellular network for data backhaul.
Because of both the different cell technology employed by AT&T, T-Mobile, and most other networks around the world (called GSM), and that used by Sprint and Verizon (known as CDMA), and the generation of hardware you have, the option to talk and use data at the same point depends on both your carrier and your phone model. (All iOS 8-compat-ible CDMA iPhones can also be activated on GSM networks, typically for roaming or switching carriers.)

26
Digital cell technology is divided up into second-, third-, and fourth-generation (2G, 3G, and 4G) standards, plus some interim ones like EDGE (2.5G) and 3G+ (often called 4G). 2G was the first to carry dig-ital voice, and all forms of it allow either data (at dial-up modem speeds) or voice, but not both at once.
The 3G standard that GSM network operators picked could carry voice and pure data at once, but Sprint and Verizon opted for a flavor of net-work that would carry data only over 3G. Some non-Apple CDMA phones have two radios, to allow a 2G voice call and a 3G data connection at the same time.
LTE is a 4G standard, designed so voice and data would intermingle for all phones and carriers. However, phones and networks were upgraded before the voice part, Voice over LTE (VoLTE), was ready to go. Even to-day, the way that VoLTE was implemented by cell companies, the carriers can’t connect VoLTE calls between their networks.
Data networking today when a call comes inAs a result, you see the following behavior on most iPhones and on most networks when there is an incoming call or you place a call:
■ Verizon, Sprint, and most CDMA networks: Data use, including Personal Hotspot, is immediately suspended.
■ AT&T, T-Mobile, and GSM networks: Data use continues, but is shunted to a 3G, 3G+, or pre-LTE 4G network.
If you don’t answer a call or when you hang up, data use returns to the highest-speed available network.
Data networking with a VoLTE callThe list of requirements to make or receive a VoLTE call is daunting at the time of this writing:
■ Requires an iPhone 6 or 6 Plus. Even though earlier iPhone models seemingly had the circuitry, these two models are the only ones sup-ported at the time of this writing by the four American carriers, and likely worldwide by others.
■ Must be on the same network. VoLTE doesn’t yet work between carrier networks, only for calls that comprise parties on the same network.

27
■ Carrier must have deployed. This sounds obvious, but it’s hard to sort out. AT&T has deployed part of its VoLTE footprint and plans to finish in 2015. Verizon and T-Mobile have upgraded their LTE networks completely. Sprint plans to wait for a future carrier interoperable version of VoLTE.
If you meet these requirements—and the moon is half full and it’s a Tuesday—receiving a call or placing one will happen over VoLTE, vand your Personal Hotspot or other data use will continue at full LTE speeds.
Yes, it’s a mess.
Note: Alongside VoLTE, carriers have been rolling out HD Voice, a higher-quality com-pression algorithm for voice calls. It sounds more like a Skype-to-Skype or FaceTime Audio call than a cellular call. Most VoLTE rollouts are happening alongside HD Voice, which also doesn’t work across different carrier networks. Sprint is rolling out HD Voice alone.
Set a Wi-Fi PasswordWhen you first turn on Personal Hotspot, iOS creates a strong WPA2 password. To connect a device over Wi-Fi to the hotspot, you must enter this password on that device.
The default password created by your phone is sometimes a sequence of recognizable words and numbers; other times, it may appear to be ran-dom. (At one point, the difference seemed to be by carrier, but now it’s impossible to tell.)
You can’t decide not to use a password at all, but you may choose to compose your own. You have to pick one that’s eight characters or more, although you can make that 12345678 if you must. Tap to enter your own password.
For this kind of connection, where it’s not a base station in a fixed lo-cation that someone might try to access, I suggest thinking of an eight- or nine-letter word and adding two punctuation marks to the end, like memorable?%.
28
Extra Security with Personal HotspotUsing USB, Bluetooth, or Wi-Fi to connect to a hotspot device provides a strong layer of security around your connection, which is reassuring if you’re at a location like a coffee shop, where the network may not be well secured. USB is a physical connection and can’t be monitored. Bluetooth has its own strong automatic security. Apple’s required use of WPA2 Personal for Wi-Fi ensures protection there, too. (See Connect to a Small Network.)
Although the backhaul to the mobile broadband network isn’t impregnable, it does require either a dedicated effort to crack your particular communication or a wiretap at the carrier to intercept data. Personal Hotspot lets you secure the local link at a location where you would otherwise use Wi-Fi but where I would recommend using a VPN (virtual private network) to prevent interception by those around you.
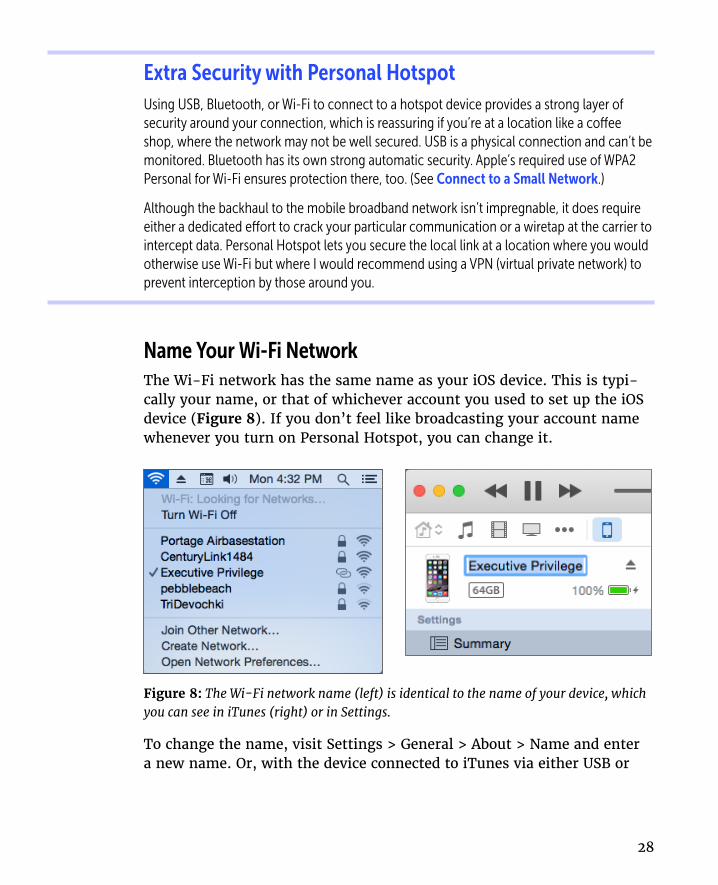
Name Your Wi-Fi NetworkThe Wi-Fi network has the same name as your iOS device. This is typi-cally your name, or that of whichever account you used to set up the iOS device (Figure 8). If you don’t feel like broadcasting your account name whenever you turn on Personal Hotspot, you can change it.
Figure 8: The Wi-Fi network name (left) is identical to the name of your device, which you can see in iTunes (right) or in Settings.
To change the name, visit Settings > General > About > Name and enter a new name. Or, with the device connected to iTunes via either USB or

29
Wi-Fi, click the device’s icon in the top bar in iTunes, then click its name to select it, which highlights the name. Type a new name, and click again or press Return.
You need to turn Personal Hotspot off and back on for the new name to be broadcast.
Consider Turning Off Certain RadiosNow that you’ve turned on Personal Hotspot, you might not want it to be available through Bluetooth or Wi-Fi, because nearby devices of yours might accidentally connect to it. The only way to prevent a connection from a device with the right credentials is to turn off the Bluetooth or Wi-Fi radio.
WARNING! Disabling radios turns off OS X Continuity features.
To turn off Bluetooth, tap Settings > Bluetooth and slide the switch to Off. To disable Wi-Fi, tap Settings > Wi-Fi and slide the switch to Off. With either or both Bluetooth and Wi-Fi turned off, the Personal Hotspot feature pops up a warning when it’s switched on (Figure 9).
Figure 9: If any networking type used with Personal Hotspot is off, iOS prompts to turn it on.
30
You can also change the Personal Hotspot Wi-Fi password to prevent devices that previously connected from gaining access again (see Set a Wi-Fi Password, slightly earlier).
Connect to Personal HotspotWith Personal Hotspot on, you have three choices for how to connect:
■ Wi-Fi: Any Wi-Fi–equipped device can connect just as if the iOS device were a wireless router. Up to five devices can connect via Wi-Fi. (Verizon and Sprint used to limit this to three, but that appears to be lifted.)
■ USB: Plugging your computer into your iPhone or iPad gives you a high-speed data connection that you know works as long as the cable isn’t bad. The downside? Being literally tethered.
■ Bluetooth: This method requires more steps to make a connection ini-tially, but it gives you cable-free flexibility. Most Bluetooth-equipped devices can connect through this method, including iPhones, iPod touches, and iPads. No more than three devices may connect via Blue-tooth at the same time.
Tip: Wi-Fi can use more battery power than Bluetooth, so you might opt for Bluetooth tethering. However, the data rate isn’t stellar: Bluetooth 4.0, found on the iPhone 4S and later and on the 3rd-generation or later iPad, has a raw data rate of 3 Mbps for continuous connections, and an effective throughput of 2.1 Mbps. That’s far below GSM 3G/4G rates and well below LTE rates.
There is a maximum of five total connections across all these methods. If you have five devices connected and try to connect another, the connec-tion will be refused.
I explain how to make a connection shortly; for now, I want to mention that once you make a connection, a blue pulsing banner appears across the top of the iPhone or iPad’s screen (Figure 10). The banner shows the number of devices connected, too.
If the phone or iPad is on standby, a smaller status banner appears on the Lock screen when you wake it (Figure 11).

31
Figure 10: A banner lets you know whenever your device is acting as a cellular modem for a computer via USB, Wi-Fi, or Bluetooth.
Note: Windows computers, Android phones, and other devices can also connect via Wi-Fi; many devices can also connect via Bluetooth; and Windows at least can also tether via USB. The process is identical on those platforms to hooking into a Wi-Fi, Bluetooth, or USB shared network, and it neither needs special software nor displays any special indicators as in iOS and Mac OS X.
Figure 11: The Lock screen also shows whether the hotspot is active, with a tiny superscript numeral revealing how many clients are connected.

32
Access via Wi-FiUsing Wi-Fi to connect to a Personal Hotspot is the easiest case because no special setup is required. You use whatever method you normally employ to connect to a Wi-Fi network from the device, and I provide di-rections for several common operating systems just ahead. The name of your iOS device is the name of the Personal Hotspot network.
Connect via Wi-Fi in Mac OS XIn Mac OS X, you can use the Wi-Fi menu on the menu bar to select the Personal Hotspot network by name:
1. Click the Wi-Fi menu to see a list of available networks.
2. Choose the network’s name.
▸ For an iOS 8.1 or later Personal Hotspot and Yosemite, it appears as it does in Instant Hotspot: an item with the cellular connection type, battery level, and signal strength (Figure 12). (If Personal Hotspot is not active on the device, selecting the hotspot in the OS X menu turns it on.)
Figure 12: Select the hotspot under Personal Hotspot.
▸ For an iOS 8.0 or earlier, or with earlier versions of OS X than Yosemite, Personal Hotspot shows up in the main list of networks with a linked-chain icon just to the left of the signal strength icon (Figure 13).
3. Enter the password, and click Join (Figure 14).

33
Figure 13: In iOS 8.0 and earlier, the Personal Hotspot’s network name appears in the Wi-Fi menu’s networks list.
Figure 14: Enter the network’s password to connect.
Future connections: If you leave Remember This Network checked, you won’t be prompted in the future for the password. The flip side of that ben-efit is that it’s difficult to prevent future automatic connections when the personal hotspot’s Wi-Fi connection is active.

34
You’re now connected. Your Mac will stay connected as long as the Per-sonal Hotspot feature is active. The next time you turn on the Personal Hotspot, your Mac will reconnect if you stored the password and if your Mac isn’t already associated with a Wi-Fi network.
Disconnect from Personal Hotspot Wi-FiTo stop using the Personal Hotspot, hold down the Option key and then select the Wi-Fi menu. Now select Disconnect From Network Name and your link is severed.
Don’t auto-join in the futureIf you want to prevent the Mac from connecting automatically in the future, follow these steps:
1. Launch System Preferences and select the Network pane.
2. Select Wi-Fi in the list at left.
3. Click the Advanced button.
4. From the Wi-Fi pane, select the Personal Hotspot network, then click the minus button to delete it.
5. Click OK and then click Apply.
Connect via iOSIn iOS, you use the Settings app to connect to the Personal Hotspot network:
From and to an iOS 8.1 or later device1. Select Settings > Wi-Fi.
2. Choose the network from the Personal Hotspots list (Figure 15).
3. Enter the password when prompted.
You are now connected. The chain icon appears at the left of the iOS status bar instead of the normal Wi-Fi icon.
To or from an iOS 8.0 or earlier device1. Select Settings > Wi-Fi.

35
Figure 15: Look for the chain icon or in the Personal Hotspots section.
2. Choose the network from the list. Personal Hotspot networks are shown with a special chain icon in iOS 4.3 and later.
3. Enter the password when prompted.
You are now connected. The chain icon appears at the left of the iOS status bar instead of the normal Wi-Fi icon.
Automatic reconnectionAs long as the password is stored for the iOS network and isn’t changed, your iOS device will reconnect automatically whenever it’s in range and the Personal Hotspot Wi-Fi connection is active. To stop using the mobile hotspot right away, choose another network from the list or turn off the Wi-Fi adapter.
If you want to prevent connecting automatically in the future, while the hotspot connection is active, tap the blue info button next to the network name and then tap Forget This Network. This removes the network’s stored setting and disconnects the device from the Per-sonal Hotspot immediately.
Disable Wi-Fi sharing in iOSTo turn off the hotspot on the device that is sharing its connection, just tap Settings > Personal Hotspot and then turn off the Personal Hotspot switch. Or, you can tap Settings > Wi-Fi and turn off Wi-Fi entirely.

36
You can also block all existing connections from client devices by chang-ing the Wi-Fi password on the Personal Hotspot screen. This will also prevent devices with a stored password from reconnecting automatically or manually until you provide the changed password.
Tether with USB in Mac OS XWith Personal Hotspot enabled, connect your hotspot device to your com-puter using a USB cable. The first time you enable Personal Hotspot and plug the device into a Mac via USB, Mac OS X alerts you that the interface is added and the Mac’s Network system preference pane adds an adapter entry (Figure 16).
Figure 16: An entry appears in the adapters list.
Mac OS X automatically activates a tethered link and turns that red dot green.
Not active? If you’re not seeing this, you may need to launch iTunes the first time you tether. iTunes doesn’t seem to have anything to do with USB tethering except initial activation.
To halt the active USB tethering connection, disconnect the USB cable. Alternatively, you can disable the iOS adapter profile. In the Network system preference pane in Mac OS X, select the iPhone USB or iPad USB adapter, and then from the gear pop-up menu, choose Make Service Inactive. Click Apply in the lower-right corner.
Connect with BluetoothOn your hotspot device, make sure Bluetooth is turned on: swipe up from the bottom to show the Control Center and check that the Bluetooth icon is active. If it’s not, tap it. (You can also manage Bluetooth from the Settings app.)

37
Once you’re sure it’s enabled, you can make a Bluetooth connection from Mac OS X or iOS, as I describe next.
Bluetooth uses less power than Wi-Fi, almost nothing in standby mode, so a Bluetooth connection could allow both an iOS device and a paired piece of hardware to work longer without AC power.
Note: I cover Bluetooth in more detail in Set Up Bluetooth if you’d like to learn more.
Bluetooth tethering with Mac OS XFollow these steps to set up a Bluetooth connection between your hotspot device and a Mac running Yosemite or later (instructions are substan-tially different in earlier versions of OS X):
1. Launch System Preferences, and select the Bluetooth pane.
2. Your iPhone or iPad should appear in the list of devices (Figure 17). Click Pair. (If it doesn’t appear, check that Bluetooth is enabled on the iOS device and that it’s within a few dozen feet of your computer.)
Figure 17: Initiate pairing from OS X.
3. A pop-up dialog appears with a 6-digit code. On the iOS device, a similar confirmation dialog pops up (Figure 18).

38
Figure 18: The Mac and iOS device both display the same code.
4. Confirm that the code is identical, which prevents a so-called man- in-the-middle attack with someone nearby trying to intercept the con-nection. (That’s very unlikely, but it could happen.) The additional cue is the name of the device. Click Pair on the hotspot device. On the Mac, your iOS device should now appear in the list (Figure 19).
5. Now, in System Preferences, click Show All, then select Network.
Figure 19: The device is paired in OS X and connected.
6. In the adapters list at left, you’ll notice a new Bluetooth PAN entry; PAN stands for Personal Area Network, and it’s the kind of network that Blue-tooth creates. Your device should be selected in the Device pop-up menu (Figure 20). Click Connect.
7. On the Mac, you’ll see the Status label set to Connected (Figure 20), and if the Bluetooth system menu icon is showing, it will have dots bisect-ing it horizontally. On your hotspot device, the Internet tethering banner will appear.
To disconnect Bluetooth tethering, you can do any of the following:
■ In the Network preference pane, with Bluetooth PAN selected in the adapters list, click the Disconnect button.

39
Figure 20: The Network preference pane lets you manage the connection over USB.
■ On your hotspot device, in Settings > Personal Hotspot, tap the Personal Hotspot switch to Off.
■ Turn off Bluetooth networking. In iOS, tap Settings > Bluetooth; on the Mac, look in the Bluetooth system preference pane or the Bluetooth menu on the menu bar.
Bluetooth tethering with iOSAlthough all iOS devices have Wi-Fi built in, Bluetooth consumes less battery power and may be a more appropriate choice. You can set up a Bluetooth connection between any iOS device running iOS 4.3 or later and a hotspot device quite simply:
1. View Settings > Bluetooth.
2. If Bluetooth is off, tap the switch to turn it on.
3. Tap the Personal Hotspot in the list of Devices (Figure 21).
Both devices show confirmation dialogs (Figure 22).

40
Figure 21: The Personal Hotspot appears in the Devices list; here, it’s “Executive Privilege.”
Figure 22: Tap Pair on both devices to proceed.
4. If the codes match, tap Pair on both devices.
The iOS device is now connected over Bluetooth, and a chain icon appears at the left of the status bar instead of the normal Wi-Fi icon.
To disconnect from the Personal Hotspot, you can do either of the fol-lowing:
■ On the connected device: Slide Bluetooth’s switch to Off.
■ On the hotspot device: Turn off the Personal Hotspot feature or turn off Bluetooth.
To reconnect, open Settings > Bluetooth and then tap the name of the Personal Hotspot in the Devices list.

41
You might want to discard a stored Bluetooth pairing from the Devices list if, for instance, you’re using a friend’s device or you don’t want someone else using your iOS device with the paired connection. To re-move the pairing, tap the info button next to the device name and then tap Forget This Device.
Use Bluetooth Tethering from iOS to a LaptopA side benefit of the capability to tether over Bluetooth is that you can also use your iOS de-vices to grab Internet access from a laptop. For instance, if you’re in a hotel or other location in which you have to pay for each device you connect to a Wi-Fi network, you were previ-ously out of luck in relaying an Internet connection from a laptop to an iPhone, iPod touch, or iPad. Now you can.
Under Mac OS X, use the Sharing system preference pane’s Internet Sharing option to share the Wi-Fi connection via Bluetooth PAN. Choose Wi-Fi from the Share Your Connection From pop-up menu, and check the Bluetooth PAN box in the To Computers Using list (Figure 23). Then check the box next to Internet Sharing in the Service list at left.
Figure 23: You can share your Wi-Fi connection via the Bluetooth PAN to iOS devices.
If you don’t see Bluetooth PAN in the To Computers Using list, open the Network preference pane. Click the plus button at the bottom of the adapters list, and choose Bluetooth PAN from the Interface pop-up menu. Click Create, then click Apply. When you return to the Internet Sharing option in the Sharing preference pane, the Bluetooth PAN will be there.

124
About the AuthorGlenn Fleishman was trained as a type-setter, received a degree in art, and works as a journalist and programmer. Glenn is a regular contributor to the Economist, where he has filed hundreds of online stories, including a four-year stint as one of the lead writers of its Babbage blog, and dozens of print features.
He also appears regularly in Boing Boing, TidBITS, Fast Company, MIT Technology Review, Macworld, and Six Colors. Glenn writes about security, privacy, nanosatellites, copyright, Bitcoin, crowdfunding, and much more. His blog is http://glog.glennf.com, and he overshares on Twitter at @glennf.
In October 2012, he appeared on the Jeopardy! quiz show and managed to win—twice! Alex Trebek seems like a very nice fellow, but you never get to really know him.
125
AcknowledgmentsI dedicate this book to my wife, Lynn, and sons, Ben and Rex. They keep me sane and happy, and keep me from spending my entire day thinking about and using digital devices.
Thanks to editor Jeff Carlson, who made sense of this thorough overhaul of the book for iOS 8. Thanks to Scout Festa for her eagle eye in proof-reading. And many thanks to longtime collaborators Adam and Tonya Engst, along with Michael E. Cohen, who saw this book through earlier editions.

126
Copyright and Fine PrintA Practical Guide to Networking & Security in iOS 8Copyright ©2015, Glenn Fleishman. All rights reserved.
ISBN: 978-0-9914399-4-2 (ebook)ISBN: 978-0-9914399-5-9 (print edition)Aperiodical LLC, 1904 E. McGraw St., Seattle, WA 98112-2629 USA
http://glennf.com/guides
Ebook edition: This electronic book doesn’t use copy protection because copy protection makes life harder for everyone. So we ask a favor of our readers. If you want to share your copy of this ebook with a friend, please do so as you would a physical book, mean-ing that if your friend uses it regularly, he or she should buy a copy. You have our per-mission to make a single print copy of this ebook for personal use. Please reference this page if a print service refuses to print the ebook for copyright reasons.
All editions: Although the author and Aperiodical LLC have made a reasonable effort to ensure the accuracy of the information herein, they assume no responsibility for errors or omissions. The information in this book is distributed “As Is,” without warranty of any kind. Neither Aperiodical LLC nor the author shall be liable to any person or entity for any special, indirect, incidental, or consequential damages, including without limita-tion lost revenues or lost profits, that may result (or that are alleged to result) from the use of these materials. In other words, use this information at your own risk.
Many of the designations used to distinguish products and services are claimed as trade-marks or service marks. Any trademarks, service marks, product names, or named fea-tures that appear in this title are assumed to be the property of their respective owners. All product names and services are used in an editorial fashion only, with no intention of infringement of the trademark. No such use, or the use of any trade name, is meant to convey endorsement or other affiliation with this title.
This title is an independent publication and has not been authorized, sponsored, or oth-erwise approved by Apple Inc. Because of the nature of this title, it uses terms that are the trademarks or that are the registered trademarks of Apple Inc.; to view a complete list of the trademarks and of the registered trademarks of Apple Inc., you can visit
http://www.apple.com/legal/trademark/appletmlist.html