sams teach yourself iphone application development in 24 hours
TRANSCRIPT

ptg
ptg
800 East 96th Street, Indianapolis, Indiana, 46240 USA
John Ray
SamsTeachYourself
24in
Hours
iPhone®
ApplicationDevelopment
Second Edition
ptg
Sams Teach Yourself iPhone Application Development in 24 HoursSecond EditionCopyright © 2011 by Pearson Education, Inc.
All rights reserved. No part of this book shall be reproduced, stored in a retrieval system, ortransmitted by any means, electronic, mechanical, photocopying, recording, or otherwise, withoutwritten permission from the publisher. No patent liability is assumed with respect to the use ofthe information contained herein. Although every precaution has been taken in the preparation ofthis book, the publisher and author assume no responsibility for errors or omissions. Nor is anyliability assumed for damages resulting from the use of the information contained herein.
ISBN-13: 978-0-672-33220-3ISBN-10: 0-672-33220-5
Library of Congress Cataloging-in-Publication Data:
Ray, John, 1971-
Sams teach yourself iPhone application development in 24 hours / John Ray. — 2nd ed.
p. cm.
ISBN 978-0-672-33220-3
1. iPhone (Smartphone)—Programming. 2. Application software—Development. I. Title. II. Title:Teach yourself iPhone application development in 24 hours. III. Title: iPhone application develop-ment in 24 hours.
QA76.8.I64R39 2011
005.26—dc22
2010035798
Printed in the United States of America
First Printing October 2010
TrademarksAll terms mentioned in this book that are known to be trademarks or service marks have beenappropriately capitalized. Sams Publishing cannot attest to the accuracy of this information. Useof a term in this book should not be regarded as affecting the validity of any trademark or servicemark.
Warning and DisclaimerEvery effort has been made to make this book as complete and as accurate as possible, but nowarranty or fitness is implied. The information provided is on an “as is” basis. The author and thepublisher shall have neither liability nor responsibility to any person or entity with respect to anyloss or damages arising from the information contained in this book.
Bulk SalesSams Publishing offers excellent discounts on this book when ordered in quantity for bulk pur-chases or special sales. For more information, please contact
U.S. Corporate and Government [email protected]
For sales outside of the U.S., please contact
International [email protected]
AssociatePublisherGreg Wiegand
Acquisitions EditorLaura Norman
DevelopmentEditorKeith Cline
Managing EditorSandra Schroeder
Senior ProjectEditorTonya Simpson
Copy EditorKeith Cline
IndexerBrad Herriman
ProofreaderLanguage Logistics,LLC
Technical EditorMatthew David
PublishingCoordinatorCindy Teeters
DesignerGary Adair
CompositorTnT Design, Inc.

ptg
Contents at a Glance
Introduction
HOUR 1 Preparing your System and iPhone for Development
2 Introduction to Xcode and the iPhone Simulator
3 Discovering Objective-C: The Language of Apple Platforms
4 Inside Cocoa Touch
5 Exploring Interface Builder
6 Model-View-Controller Application Design
7 Working with Text, Keyboards, and Buttons
8 Handling Images, Animation, and Sliders
9 Using Advanced Interface Objects and Views
10 Getting the User’s Attention
11 Making Multivalue Choices with Pickers
12 Implementing Multiple Views with Toolbars and Tab Bars
13 Displaying and Navigating Data Using Table Views
14 Reading and Writing Application Data
15 Building Rotatable and Resizable User Interfaces
16 Using Advanced Touches and Gestures
17 Sensing Orientation and Motion
18 Working with Rich Media
19 Interacting with Other Applications
20 Implementing Location Services
21 Building Background-aware Applications
22 Building Universal Applications
23 Application Debugging and Optimization
24 Distributing Applications Through the App Store
Index

ptg
Table of Contents
Introduction 1
Who Can Become an iPhone Developer? . ....................................................................................... 1
Who Should Use This Book? . ....................................................................................................................... 2
What Is (and Isn’t) in This Book? . ......................................................................................................... 2
HOUR 1: Preparing Your System and iPhone for Development 3
Welcome to the iOS Platform . .................................................................................................................... 3
Becoming an iOS Developer . ....................................................................................................................... 7
Creating a Development Provisioning Profile. ............................................................................ 12
Developer Technology Overview . ......................................................................................................... 23
Summary . ............................................................................................................................................................... 25
Q&A . ............................................................................................................................................................................. 25
Workshop . ............................................................................................................................................................... 26
HOUR 2: Introduction to Xcode and the iPhone Simulator 27
Using Xcode . ........................................................................................................................................................... 27
Using the iPhone Simulator . .................................................................................................................... 45
Further Exploration . ......................................................................................................................................... 50
Summary . ............................................................................................................................................................... 50
Q&A . ............................................................................................................................................................................. 51
Workshop . ............................................................................................................................................................... 51
HOUR 3: Discovering Objective-C: The Language of Apple Platforms 53
Object-Oriented Programming and Objective-C . ..................................................................... 53
Exploring the Objective-C File Structure . ....................................................................................... 58
Objective-C Programming Basics . ......................................................................................................... 64
Memory Management . .................................................................................................................................. 74
Further Exploration . ......................................................................................................................................... 77
Summary . ............................................................................................................................................................... 77
Q&A . ............................................................................................................................................................................. 78
Workshop . ............................................................................................................................................................... 79

ptg
HOUR 4: Inside Cocoa Touch 81
What Is Cocoa Touch? . .................................................................................................................................. 81
Exploring the iOS Technology Layers . .............................................................................................. 83
Tracing the iPhone Application Life Cycle . ................................................................................... 88
Cocoa Fundamentals. ...................................................................................................................................... 90
Exploring the iOS Frameworks with Xcode . ................................................................................ 98
Summary. ............................................................................................................................................................... 102
Q&A . .......................................................................................................................................................................... 102
Workshop . ........................................................................................................................................................... 103
HOUR 5: Exploring Interface Builder 105
Understanding Interface Builder . ..................................................................................................... 105
Creating User Interfaces . ........................................................................................................................... 110
Customizing Interface Appearance . .............................................................................................. 115
Connecting to Code . ...................................................................................................................................... 119
Further Exploration . ...................................................................................................................................... 126
Summary. ............................................................................................................................................................... 127
Q&A . .......................................................................................................................................................................... 127
Workshop . ........................................................................................................................................................... 128
HOUR 6: Model-View-Controller Application Design 129
Understanding the Model-View-Controller Paradigm. ...................................................... 129
How Xcode and Interface Builder Implement MVC . .......................................................... 131
Using the View-Based Application Template . ........................................................................ 135
Further Exploration . ...................................................................................................................................... 148
Summary. ............................................................................................................................................................... 149
Q&A . .......................................................................................................................................................................... 149
Workshop . ........................................................................................................................................................... 150
HOUR 7: Working with Text, Keyboards, and Buttons 151
Basic User Input and Output . ................................................................................................................ 151
Using Text Fields, Text Views, and Buttons . ................................................................................ 153
Setting Up the Project. .................................................................................................................................. 154
Further Exploration . ...................................................................................................................................... 176

ptg
Summary. ............................................................................................................................................................... 177
Q&A . .......................................................................................................................................................................... 177
Workshop . ........................................................................................................................................................... 178
HOUR 8: Handling Images, Animation, and Sliders 179
User Input and Output . .............................................................................................................................. 179
Creating and Managing Image Animations and Sliders . ............................................ 181
Further Exploration . ...................................................................................................................................... 196
Summary. ............................................................................................................................................................... 197
Q&A . .......................................................................................................................................................................... 197
Workshop . ........................................................................................................................................................... 198
HOUR 9: Using Advanced Interface Objects and Views 199
User Input and Output (Continued) . .............................................................................................. 199
Using Switches, Segmented Controls, and Web Views . ................................................... 204
Using Scrolling Views . .................................................................................................................................. 221
Further Exploration . ...................................................................................................................................... 227
Summary. ............................................................................................................................................................... 227
Q&A . .......................................................................................................................................................................... 228
Workshop . ........................................................................................................................................................... 228
HOUR 10: Getting the User’s Attention 231
Exploring User Alert Methods . ............................................................................................................ 231
Generating Alerts . ......................................................................................................................................... 235
Using Action Sheets . ...................................................................................................................................... 245
Using Alert Sounds and Vibrations . .................................................................................................. 249
Further Exploration . ...................................................................................................................................... 253
Summary. ............................................................................................................................................................... 254
Q&A . .......................................................................................................................................................................... 254
Workshop . ........................................................................................................................................................... 255
HOUR 11: Making Multivalue Choices with Pickers 257
Understanding Pickers . .............................................................................................................................. 257
Using Date Pickers. ......................................................................................................................................... 261
vi
Sams Teach Yourself iPhone Application Development in 24 Hours
ptg
Implementing a Custom Picker View . .......................................................................................... 270
Further Exploration . ...................................................................................................................................... 289
Summary. ............................................................................................................................................................... 290
Q&A . .......................................................................................................................................................................... 290
Workshop . ........................................................................................................................................................... 291
HOUR 12: Implementing Multiple Views with Toolbars and Tab Bars 293
Exploring Single Versus Multi-View Applications . .............................................................. 293
Creating a Multi-View Toolbar Application . ............................................................................ 295
Building a Multi-View Tab Bar Application . ............................................................................ 307
Further Exploration . ...................................................................................................................................... 326
Summary. ............................................................................................................................................................... 327
Q&A . .......................................................................................................................................................................... 327
Workshop . ........................................................................................................................................................... 328
HOUR 13: Displaying and Navigating Data Using Table Views 329
Understanding Table Views and Navigation Controllers . ............................................ 329
Building a Simple Table View Application . ................................................................................ 332
Creating a Navigation-Based Application . ................................................................................ 344
Further Exploration . ...................................................................................................................................... 359
Summary. ............................................................................................................................................................... 359
Q&A . .......................................................................................................................................................................... 360
Workshop . ........................................................................................................................................................... 360
HOUR 14: Reading and Writing Application Data 363
Design Considerations . .............................................................................................................................. 363
Reading and Writing User Defaults . .............................................................................................. 366
Understanding the iPhone File System Sandbox . ................................................................. 381
Implementing File System Storage . .................................................................................................. 384
Further Exploration . ...................................................................................................................................... 404
Summary. ............................................................................................................................................................... 405
Q&A . .......................................................................................................................................................................... 405
Workshop . ........................................................................................................................................................... 406
Table of Contents
vii

ptg
HOUR 15: Building Rotatable and Resizable User Interfaces 407
Rotatable and Resizable Interfaces . .................................................................................................. 407
Creating Rotatable and Resizable Interfaces with Interface Builder . .................. 411
Reframing Controls on Rotation . ..................................................................................................... 416
Swapping Views on Rotation . ................................................................................................................ 423
Further Exploration . ...................................................................................................................................... 429
Summary. ............................................................................................................................................................... 430
Q&A . .......................................................................................................................................................................... 430
Workshop . ........................................................................................................................................................... 431
HOUR 16: Using Advanced Touches and Gestures 433
Multitouch Gesture Recognition. ......................................................................................................... 434
Using Gesture Recognizers . .................................................................................................................... 435
Further Exploration . ...................................................................................................................................... 448
Summary. ............................................................................................................................................................... 449
Q&A . .......................................................................................................................................................................... 449
Workshop . ........................................................................................................................................................... 449
HOUR 17: Sensing Orientation and Motion 451
Understanding iPhone Motion Hardware . ................................................................................ 451
Accessing Orientation and Motion Data . ................................................................................... 454
Sensing Orientation . ...................................................................................................................................... 458
Detecting Tilt and Rotation . .................................................................................................................... 462
Further Exploration . ...................................................................................................................................... 471
Summary. ............................................................................................................................................................... 472
Workshop . ........................................................................................................................................................... 473
HOUR 18: Working with Rich Media 475
Exploring Rich Media . .............................................................................................................................. 475
Preparing the Media Playground Application . ..................................................................... 478
Using the Movie Player . ........................................................................................................................... 482
Creating and Playing Audio Recordings . ................................................................................... 486
Using the Photo Library and Camera . .......................................................................................... 492
viii
Sams Teach Yourself iPhone Application Development in 24 Hours

ptg
Accessing and Playing the iPod Library . ................................................................................... 495
Further Exploration . ...................................................................................................................................... 501
Summary. ............................................................................................................................................................... 502
Q&A . .......................................................................................................................................................................... 502
Workshop . ........................................................................................................................................................... 503
HOUR 19: Interacting with Other Applications 505
Extending Application Integration . .................................................................................................. 505
Using Address Book, Email, and Maps… Oh My! . .............................................................. 509
Further Exploration . ...................................................................................................................................... 526
Summary. ............................................................................................................................................................... 527
Q&A . .......................................................................................................................................................................... 527
Workshop . ........................................................................................................................................................... 527
HOUR 20: Implementing Location Services 529
Understanding Core Location . ............................................................................................................ 529
Creating a Location-Aware Application . ................................................................................... 534
Understanding the Magnetic Compass . ....................................................................................... 541
Further Exploration . ...................................................................................................................................... 549
Summary. ............................................................................................................................................................... 550
Q&A . .......................................................................................................................................................................... 550
Workshop . ........................................................................................................................................................... 551
HOUR 21: Building Background-Aware Applications 553
Understanding iOS 4 Backgrounding . .......................................................................................... 554
Disabling Backgrounding . ....................................................................................................................... 558
Handling Background Suspension . .................................................................................................. 559
Implementing Local Notifications . .................................................................................................. 561
Using Task-Specific Background Processing . ............................................................................ 564
Completing a Long-Running Background Task . ................................................................. 570
Further Exploration . ...................................................................................................................................... 576
Summary. ............................................................................................................................................................... 577
Q&A . .......................................................................................................................................................................... 577
Workshop . ........................................................................................................................................................... 577
Table of Contents
ix
ptg
HOUR 22: Building Universal Applications 579
Universal Application Development . .............................................................................................. 579
Understanding the Universal Window-Based Application Template . .................. 581
Other Universal Application Tools . .................................................................................................. 596
Further Exploration . ...................................................................................................................................... 598
Summary. ............................................................................................................................................................... 599
Q&A . .......................................................................................................................................................................... 599
Workshop . ........................................................................................................................................................... 599
HOUR 23: Application Debugging and Optimization 601
Debugging in Xcode . .................................................................................................................................. 601
Monitoring with Instruments . ............................................................................................................ 614
Profiling with Shark. ...................................................................................................................................... 620
Further Exploration . ...................................................................................................................................... 627
Summary. ............................................................................................................................................................... 627
Q&A . .......................................................................................................................................................................... 627
Workshop . ........................................................................................................................................................... 628
HOUR 24: Distributing Applications Through the App Store 629
Preparing an Application for the App Store . ............................................................................ 630
Submitting an Application for Approval . ................................................................................... 642
Promoting Your Application . ................................................................................................................ 649
Exploring Other Distribution Methods . ....................................................................................... 655
Summary. ............................................................................................................................................................... 657
Q&A . .......................................................................................................................................................................... 657
Workshop . ........................................................................................................................................................... 657
Index 659

ptg
About the Author
John Ray is currently serving as a Senior Business Analyst and Development Team
Manager for the Ohio State University Research Foundation. He has written numerous
books for Macmillan/Sams/Que, including Using TCP/IP: Special Edition, Teach Yourself
Dreamweaver MX in 21 Days, Mac OS X Unleashed, and Teach Yourself iPad Development in 24
Hours. As a Macintosh user since 1984, he strives to ensure that each project presents the
Macintosh with the equality and depth it deserves. Even technical titles such as Using TCP/IP
contain extensive information about the Macintosh and its applications and have garnered
numerous positive reviews for their straightforward approach and accessibility to beginner
and intermediate users.
You can visit his website at http://teachyourselfiphone.com or follow him on Twitter at
#iPhoneIn24.
Dedication
This book is dedicated to everyone who makes me smile, even if only on occasion.Thanks for keeping me stay sane during long nights of typing.
Acknowledgments
Thank you to the group at Sams Publishing—Laura Norman, Sandra Schroeder, Keith Cline,
Matthew David—for providing amazing support during the creation of this book. Your thor-
oughness and attention to detail make the difference between a book that works and one
that bewilders.
Thanks to my friends, family, and pets. Deepest apologies to my fish tank. I swear I’ll get
you working right soon.

ptg
We Want to Hear from You!
As the reader of this book, you are our most important critic and commentator. We value
your opinion and want to know what we’re doing right, what we could do better, what
areas you’d like to see us publish in, and any other words of wisdom you’re willing to pass
our way.
You can email or write me directly to let me know what you did or didn’t like about this
book—as well as what we can do to make our books stronger.
Please note that I cannot help you with technical problems related to the topic of this book, and
that due to the high volume of mail I receive, I might not be able to reply to every message.
When you write, please be sure to include this book’s title and author as well as your name
and phone or email address. I will carefully review your comments and share them with the
author and editors who worked on the book.
E-mail: [email protected]
Mail: Greg Wiegand
Associate Publisher
Sams Publishing
800 East 96th Street
Indianapolis, IN 46240 USA
Reader Services
Visit our website and register this book at informit.com/register for convenient access to any
updates, downloads, or errata that might be available for this book.

ptg
Introduction
Over the past four years, Apple has changed the way we think about mobile computing.The iOS Platform has changed the way that we, the public, think about our mobile comput-ing devices. With full-featured applications and an interface architecture that demonstratesthat small screens can be effective workspaces, the iPhone has become the smartphone ofchoice for users and developers alike.
Part of what makes the iPhone such a success is the combination of an amazing interfaceand an effective software distribution method. With Apple, the user experience is key. TheiOS is designed to be controlled with your fingers rather by using a stylus or keypad. Theapplications are “natural” and fun to use, instead of looking and behaving like a clumsyport of a desktop app. Everything from interface to application performance and battery lifehas been considered. The same cannot be said for the competition.
Through the App Store, Apple has created the ultimate digital distribution system for devel-opers. Programmers of any age or affiliation can submit their applications to the App Storefor just the cost of a modest yearly Developer Membership fee. Games, utilities, and full-fea-ture applications have been built for everything from pre-K education to retirement living.No matter what the content, with a user base as large as the iPhone, an audience exists.
In 2010, Apple introduced the iPad and iPhone 4 platforms—bringing larger, faster, andhigher-resolution capabilities to the iOS. Although these devices will only be a few months“old” by the time you read this, they will already be in the hands of millions of users,eagerly awaiting the next great app.
My hope is that this book will bring iOS development to a new generation of developers.Teach Yourself iPhone Development in 24 Hours provides a clear natural progression of skillsdevelopment, from installing developer tools and registering with Apple, to submitting anapplication to the App Store. It’s everything you need to get started in 24 one-hour lessons.
Who Can Become an iPhone Developer?If you have an interest in learning, time to invest in exploring and practicing with Apple’s
developer tools, and an Intel Macintosh computer running Snow Leopard, you have every-
thing you need to begin developing for the iPhone.
Developing an application for the iPhone won’t happen overnight, but with dedication and
practice, you can be writing your first applications in a matter of days. The more time you
spend working with the Apple developer tools, the more opportunities you’ll discover for
creating new and exciting projects.

ptg
You should approach iPhone application development as creating software that you want touse, not what you think others want. If you’re solely interested in getting rich quick, you’relikely to be disappointed. (The App Store is a crowded marketplace—albeit one with a lot ofroom—and competition for top sales is fierce.) However, if you focus on building apps thatare useful and unique, you’re much more likely to find an appreciative audience.
Who Should Use This Book?This book targets individuals who are new to development for the iPhone and have experi-ence using the Macintosh platform. No previous experience with Objective-C, Cocoa, or theApple developer tools is required. Of course, if you do have development experience, someof the tools and techniques may be easier to master, but the authors do not assume thatyou’ve coded before.
That said, some things are expected of you, the reader. Specifically, you must be willing toinvest in the learning process. If you just read each hour’s lesson without working through thetutorials, you will likely miss some fundamental concepts. In addition, you need to spend timereading the Apple developer documentation and researching the topics presented in this book.There is a vast amount of information on iPhone development available, and only limitedspace in this book. This book covers what you need to forge your own path forward.
What Is (and Isn’t) in This Book?The material in this book specifically targets iOS release 4. Much of what you’ll be learningis common to all the iOS releases, but this book also covers several important advances in4, such as Gestures, embedded video playback, multitasking, universal (iPhone/iPad) appli-cations, and more!
Unfortunately, this is not a complete reference for the iPhone APIs; some topics just requiremuch more space than this book allows. Thankfully, the Apple developer documentation isavailable directly within the free tools you’ll be downloading in Hour 1, “Preparing YourSystem and iPhone for Development.” In many hours, you’ll find a section titled “FurtherExploration.” This will identify additional related topics of interest. Again, a willingness toexplore is an important quality in becoming a successful iPhone developer!
Each coding lesson is accompanied by project files that include everything you need to com-pile and test an example or, preferably, follow along and build the application yourself. Besure to download the project files from the book’s website at http://teachyourselfiphone.com.
In addition to the support website, you can follow along on Twitter! Search for #iPhoneIn24on Twitter to receive official updates and tweets from other readers. Use the hashtag#iPhoneIn24 in your tweets to join the conversation. To send me messages via Twitter, begineach tweet with @johnemeryray.
2
Sams Teach Yourself iPhone Application Development in 24 Hours

ptg
HOUR 1
Preparing Your System andiPhone for Development
What You’ll Learn in This Hour:. What makes an iPhone an iPhone. Where to get the tools you need to develop for the iPhone. How to join the iOS Developer Program. The need for (and use of) provisioning profiles. What to expect during the first few hours of this book
The iPhone opens up a whole realm of possibilities for developers—a multitouch interface,
always-on Internet access, video, and a whole range of built-in sensors can be used to cre-
ate everything from games to serious productivity applications. Believe it or not, as a new
developer, you have an advantage. You will be starting fresh, free from any preconceived
notions of what is possible in a handheld application. Your next big idea may well
become the next big thing on Apple’s App Store.
This hour will get you prepared for iPhone development. You’re about to embark on the
road to becoming an iPhone developer, but ‘you need to do a bit of prep work before you
start coding.
Welcome to the iOS PlatformIf you’re reading this book, you probably already have an iPhone, and that means you
already understand how to interact with its interface. Crisp graphics, amazing responsive-
ness, multitouch, and hundreds of thousands of apps—this just begins to scratch the sur-
face. As a developer, however, you’ll need to get accustomed to dealing with a platform
that, to borrow a phrase from Apple, forces you to “think different.”
ptg
4 HOUR 1: Preparing Your System and iPhone for Development
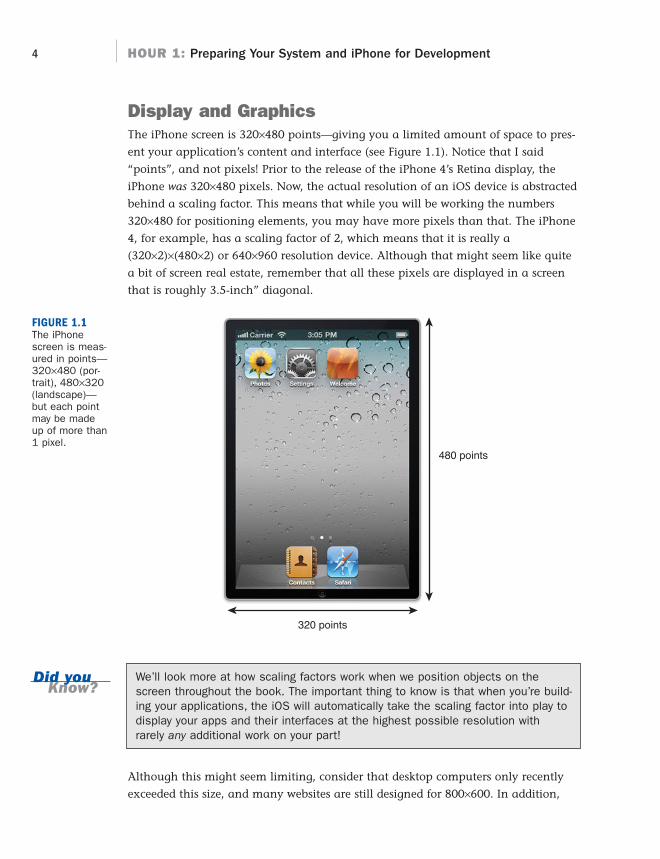
Display and GraphicsThe iPhone screen is 320×480 points—giving you a limited amount of space to pres-
ent your application’s content and interface (see Figure 1.1). Notice that I said
“points”, and not pixels! Prior to the release of the iPhone 4’s Retina display, the
iPhone was 320×480 pixels. Now, the actual resolution of an iOS device is abstracted
behind a scaling factor. This means that while you will be working the numbers
320×480 for positioning elements, you may have more pixels than that. The iPhone
4, for example, has a scaling factor of 2, which means that it is really a
(320×2)×(480×2) or 640×960 resolution device. Although that might seem like quite
a bit of screen real estate, remember that all these pixels are displayed in a screen
that is roughly 3.5-inch” diagonal.
480 points
320 points
FIGURE 1.1The iPhonescreen is meas-ured in points—320×480 (por-trait), 480×320(landscape)—but each pointmay be madeup of more than1 pixel.
Did youKnow?
We’ll look more at how scaling factors work when we position objects on thescreen throughout the book. The important thing to know is that when you’re build-ing your applications, the iOS will automatically take the scaling factor into play todisplay your apps and their interfaces at the highest possible resolution withrarely any additional work on your part!
Although this might seem limiting, consider that desktop computers only recently
exceeded this size, and many websites are still designed for 800×600. In addition,

ptg
Welcome to the iOS Platform 5
By theWay
the iPhone’s display is dedicated to the currently running application. You will have
one window to work in. You can change the content within that window, but the
desktop and multiwindow application metaphors are gone.
The screen limits aren’t a bad thing. As you’ll learn, the iPhone development tools
give you plenty of opportunities to create applications with just as much depth as
your desktop software—albeit with a more structured and efficient interface design.
The graphics that you display on your screen can include complex animated 2D
and 3D displays thanks to the OpenGL ES implementation available on all iPhone
models. OpenGL is an industry standard for defining and manipulating graphic
images that is widely used when creating games. The iPhone 3GS and 4 improve
these capabilities with an updated 3D chipset and more advanced version of
OpenGL (ES 2.0), but all the models have very respectable imaging abilities.
Application Resource ConstraintsAs with the HD displays on our desktops and laptops, we’ve grown accustomed to
processors that can work faster than we can click. The iPhone uses a ~400MHz ARM
in the early models, a ~600MHz version in the 3GS, and a 1GHz A4 in the iPhone 4.
The A4 is a “system on a chip” that provides CPU, GPU, and other capabilities to the
device and is the first Apple-designed CPU to be used in quite a while.
Apple has gone to great lengths to keep the iPhone responsive regardless of what
you’re doing. Unfortunately, that means that unlike the Mac OS, your iPhone’s
capability to multitask is limited. In iOS 4, Apple has created a limited set of multi-
tasking APIs for very specific situations. These enable you to perform some tasks in
the background, but your application can never assume that it will remain running.
The iOS preserves the user experience beyond above all else.
Another constraint that you need to be mindful of is the available memory. In the
original and iPhone 3G devices, 128MB of RAM is available for the entire system,
including your application. There is no virtual memory, so you must carefully manage
the objects that your application creates. In the iPhone 3GS Apple upped the ante to
256MB and, with the iPhone 4, Apple has graciously provided 512MB! This is great
for us, but keep in mind that there are no RAM upgrades for earlier models!
Throughout the book, you’ll see reminders to “release” memory when you’re doneusing it. Even though you might get tired of seeing it, this is a very importantprocess to get used to.
ptg
6 HOUR 1: Preparing Your System and iPhone for Development
ConnectivityThe iPhone has the ability to always be connected to the Internet via a cellular
provider (such as AT&T in the United States). This wide-area access is supplemented
with built-in WiFi and Bluetooth in all iPhone models. WiFi can provide desktop-like
browsing speeds within the range of a wireless hot spot. Bluetooth, on the other
hand, can be used to connect a variety of peripheral devices to your iPhone, includ-
ing a keyboard!
As a developer, you can make use of the Internet connectivity to update the content
in your application, display web pages, and create multiplayer games. The only
drawback is that applications that rely heavily on 3G data usage stand a greater
chance of being rejected from the App Store. These restrictions have been lessened in
recent months, but it is still a point of frustration for developers.
Input and FeedbackThe iPhone shines when it comes to input and feedback mechanisms and your ability
to work with them. You can read the input values from the capacitive multitouch
(five-finger!) screen, sense motion and tilt via the accelerometer and gyroscope (iPhone
4), determine where you are using the GPS (3G/3GS), see which way you’re facing with
the digital compass (3GS and iPhone 4), and understand how the phone is being used
with the proximity and light sensors. The phone itself can provide so much data to
your application about how and where it is being used that the device itself truly
becomes a controller of sorts—much like (but surpassing!) the Nintendo Wii.
The iPhone also supports capturing pictures and video (3GS and iPhone 4) directly
into your applications, opening a realm of possibilities for interacting with the real
world. Already applications are available that identify objects you’ve taken pictures
of and that find references to them online (such as the Amazon Mobile app).
Finally, for each action your user takes when interacting with your application, you
can provide feedback. This, obviously, can be visible feedback on the screen, or it
can be high-quality audio and force feedback via vibration. As a developer, you can
leverage all these capabilities (as you’ll learn in this book).
That wraps up our quick tour of the iOS platform. Never before has a single device
defined and provided so many capabilities for a developer. As long as you think
through the resource limitations and plan accordingly, a wealth of development
opportunities awaits you.

ptg
Becoming an iOS Developer 7
Did youKnow?
Although this book targets the iPhone specifically, nearly all the information car-ries over to development for the iPod Touch and iPad. These systems differ incapabilities, such as support for a camera and GPS, but the development tech-niques are otherwise identical.
Becoming an iOS DeveloperBeing an iPhone developer requires more than just sitting down and writing a pro-
gram. You need a modern Intel Macintosh desktop or laptop running Snow Leopard
and at least 6GB of free space on your hard drive. The more screen space you have
on your development system, the easier it will be to switch between the coding,
design, simulation, and reference tools that you’ll need to be using. That said, I’ve
worked perfectly happily on a 13-inch MacBook Pro, so an ultra-HD multimonitor
setup certainly isn’t necessary.
So assuming you already have a Mac, what else do you need? The good news is that
there isn’t much more, and it won’t cost you a cent to write your first application.
Joining the Apple Developer ProgramDespite somewhat confusing messages on the Apple website, there really is no fee
associated with joining the Apple Developer Program, downloading the iOS SDK
(Software Development Kit), writing iPhone applications, and running them on
Apple’s iPhone Simulator.
Limitations do apply, however, to what you can do for free. If you want to have
early access to beta versions of the iOS and SDK, you must be a paid member. If you
want to load the applications you write on a physical iPhone device or distribute
them via the App Store, you’ll also need to pay the membership fee. Most applica-
tions in this book will work just fine on the simulator provided with the free tools, so
the decision on how to proceed is up to you.
Perhaps you aren’t yet sure whether the paid program is right for you. Don’t worry;you can upgrade at any time. I recommend starting out with the free program andupgrading after you’ve had a chance to write a few sample applications and to runthem in the simulator.
Obviously, things such as motion sensor input and GPS readings can’t be accu-rately presented in the simulator, but these are special cases and aren’t neededuntil later in this book.
Did youKnow?

ptg
By theWay
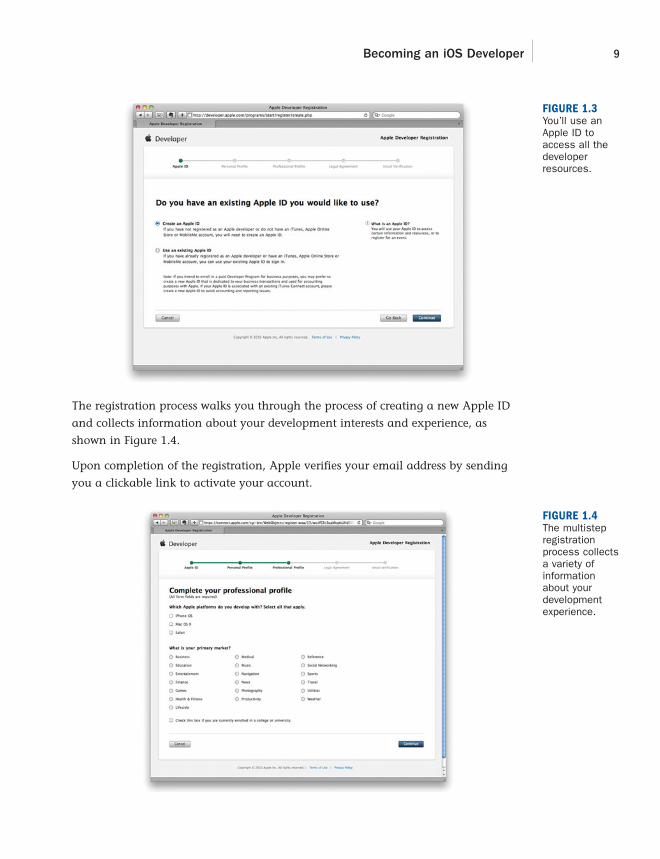
If you don’t yet have an Apple ID, click the Register link, and then click Get Started
on the subsequent page. When the registration starts, choose Create an Apple ID in
the first step, as shown in Figure 1.3.
8 HOUR 1: Preparing Your System and iPhone for Development
If you choose to pay, the paid Developer Program offers two levels: a standard pro-
gram ($99) for those who will be creating applications that they want to distribute
from the App Store, and an enterprise program ($299) for large (500+ employee)
companies that want to develop and distribute applications in-house but not
through the App Store. Chances are, the standard program is what you want.
The standard ($99) program is available for both companies and individuals. In caseyou want to publish to the App Store with a business name, you’ll be given the optionof choosing a standard “individual” or “company” program during the registration.
Registering as a DeveloperBig or small, free or paid, your venture into iPhone development begins on Apple’s
website. To start, visit the Apple iPhone Dev Center (http://developer.apple.com/
iphone), shown in Figure 1.2.
If you already have an Apple ID from using iTunes or other Apple services, congratu-
lations, you’re almost done! Use the Log In button to access your account, agree to
Apple’s developer terms, and provide a few pieces of additional information for your
developer profile. You’ll immediately be granted access to the free developer resources!
FIGURE 1.2Visit the iPhoneDev Center tolog in or startthe enrollmentprocess.
ptg
Becoming an iOS Developer 9
FIGURE 1.3You’ll use anApple ID toaccess all thedeveloperresources.
The registration process walks you through the process of creating a new Apple ID
and collects information about your development interests and experience, as
shown in Figure 1.4.
Upon completion of the registration, Apple verifies your email address by sending
you a clickable link to activate your account.
FIGURE 1.4The multistepregistrationprocess collectsa variety ofinformationabout yourdevelopmentexperience.

ptg
10 HOUR 1: Preparing Your System and iPhone for Development
Joining a Paid Developer ProgramAfter you have a registered and activated Apple ID, you can decide to join a paid pro-
gram or to continue using the free resources. If you choose to join a paid program,
again point your browser to the iPhone Dev Center (http://developer.apple.com/iphone)
and click the Register link. Choose Use an Existing Apple ID for the Developer Program
option, shown in Figure 1.3.
On the page that appears, look for the Join Today link and click it. The registration
tool will now guide you through applying for the paid programs, including choosing
between the standard and company options, as shown in Figure 1.5.
FIGURE 1.5Choose the paidprogram thatyou want toapply for.
Unlike the free Developer Membership, the paid Developer Program does not take
effect immediately. When the App Store first launched, it took months for new devel-
opers to join and be approved into the program. Today, it might take hours or a few
days—just be patient. You can check your current status at any time by logging in
to the iPhone Dev Center and clicking the Check Your Enrollment Status Now link.
Click the Register link to create a new free Developer Membership, or follow the
links in the iOS Developer Program section (currently http://developer.apple.com/
iphone/program) to join a paid program.
Installing the iOS Developer ToolsAfter you’ve registered your Apple ID, you can immediately download the current
release version of the iOS developer tools directly from the iPhone Dev Center

ptg
Did youKnow?
Becoming an iOS Developer 11
(http://developer.apple.com/iphone). Just click the Download link and sit back while
your Mac downloads the massive (~2.5GB) SDK disk image.
If you have the free Developer Membership, you’ll likely see just a single SDK todownload (the current release version of the development tools). If you’ve becomea paid program member, you may see additional links for different versions of theSDK (3.2, 4.0, and so on). The examples in this book are based on the 4.0+series of SDKs, so be sure to choose that option if presented.
When the download completes, open the resulting disk image, and double-click the
Xcode and iPhone SDK for Snow Leopard icon. Doing so launches the Mac OS X
Installer application, which will assist you in the installation. You don’t have to
change any of the defaults for the installer, so just read and agree to the software
license and click Continue to proceed through the steps.
Unlike most applications, the Apple developer tools are installed in a folder called
Developer located at the root of your hard drive. Inside the Developer folder are
dozens of files and folders containing developer frameworks, source code files, exam-
ples, and of course, the developer applications themselves. Nearly all your work in
this book will start with the application Xcode, located in the Developer/Applications
folder (see Figure 1.6).
FIGURE 1.6Most of yourwork with thedeveloper toolswill start in theDeveloper/Applicationsfolder.
Although we won’t get into real development for a few more hours, we will be con-
figuring a few options in Xcode in the next section, so don’t forget where it is!

ptg
12 HOUR 1: Preparing Your System and iPhone for Development
Creating a Development ProvisioningProfileEven after you’ve obtained an Apple Developer Membership, joined a paid
Developer Program, and downloaded and installed the iOS development tools, you
still won’t be able to run on your iPhone any applications that you write! Why?
Because you haven’t created a development provisioning profile yet.
In many development guides, this step isn’t covered until after development begins.
In my mind, once you’ve written an application, you’re going to want to immedi-
ately run it on the iPhone. Why? Because it’s just cool to see your own code running
on your own device!
What’s a Development Provisioning Profile?Like it or not, Apple’s current approach to iOS development is to make absolutely
certain that the development process is controlled—and that groups can’t just dis-
tribute software to anyone they want. The result is a rather confusing process that
ties together information about you, any development team members, and your
application into a “provisioning profile.”
A development provisioning profile identifies the developer who may install an
application, an ID for the application being developed, and the “unique device
identifiers” for each iPhone that will run the application. This is only for the develop-
ment process. When you are ready to distribute an application via the App Store or
to a group of testers (or friends!) via ad hoc means, you’ll need to create a separate
“distribution” profile. Because we’re just starting out, this isn’t something you need
right away. We talk more about distribution profiles in Hour 24, “Distributing
Applications Through the App Store.”
Generating and Installing a DevelopmentProvisioning ProfileCreating a provisioning profile can be frustrating and seem outrageously convoluted.
Apple has streamlined the process tremendously with an online Development
Provisioning Assistant, but we still have to jump through some hoops. Let’s bite the
bullet and get through this!
Getting Your iPhone Unique Device IdentifierTo run your application on a real iPhone, you need the ID that uniquely identifies
your iPhone from the thousands of other iPhones. To find this, first make sure that
your device is connected to your computer, and then launch Xcode from the

ptg
Creating a Development Provisioning Profile 13
Developer/Applications folder. When Xcode first launches, immediately choose
Window, Organizer from the menu. The Organizer utility slightly resembles iTunes
in its layout. You should see your iPhone listed in the far-left column of the
Organizer under the Devices section. Click the icon to select it, and then click the
Use for Development button. Your screen should now resemble Figure 1.7.
FIGURE 1.7First, grab theID of youriPhone.
The Identifier field is the unique device ID that we’re looking for. Go ahead and copy
it to the Clipboard. You’ll need to paste it into the Provisioning Assistant shortly.
Starting the Provisioning AssistantNext, head to the Apple website and the iOS Dev Center (http://developer.apple.
com/ios). Make sure that you’ve logged in to the site, and then click the
Provisioning Portal link, currently located in the upper-right side of the page. The
Provisioning Portal is designed to give you access to the tools you need to create pro-
visioning and distribution profiles. It also includes the Development Provisioning
Assistant, which is the web utility that will make our lives much easier. Click the
Launch Assistant button (see Figure 1.8).
The assistant will launch in your web browser and display a short splash screen.
Click the Continue button to begin.

ptg
14 HOUR 1: Preparing Your System and iPhone for Development
Choosing an App IDYour first step is to choose an App ID. This ID will identify a shared portion of the
keychain that your application will have access to.
Come again?
The keychain is a secure information store on the iPhone that can be used to save
passwords and other critical information. Most apps don’t share a keychain space
(and therefore can’t share protected information). If you use the same App ID for
multiple applications, however, they can share keychain data.
For the purposes of this book, there’s no reason the tutorial apps can’t share a single
App ID, so create a new ID named anything you want. If you have already created
App IDs in the past, you’ll be given the option to choose an existing ID. I’m creating
a new App ID, Tutorials, as shown in Figure 1.9. Enter the ID and click Continue to
move on.
Assigning a Development DeviceNext you are asked to assign a development device, as shown in Figure 1.10. This
device ID identifies which iPhone will be allowed to run the applications you create.
Enter a meaningful description for the device (“Johns iPhone,” for example), and
then paste the string you copied from the Xcode organizer into the Device ID field.
Click Continue to move on.
FIGURE 1.8Head to theProvisioningPortal, and thenlaunch theDevelopmentProvisioningAssistant.

ptg
Creating a Development Provisioning Profile 15
Note that as with the App IDs, if you’ve already used a device ID in the past, you
will be given the option of simply selecting it from a drop-down list.
FIGURE 1.9An App ID canbe used for asingle applica-tion or group ofapplications.
FIGURE 1.10Assign a devicethat can runyour application.

ptg
16 HOUR 1: Preparing Your System and iPhone for Development
Generating a Certificate Signing RequestNow things are getting fun. The next step takes place outside of your browser.
Leaving the Development Provisioning Assistant open, go to the Applications/Utilities
folder on your hard drive and open the Keychain Access utility. Choose Keychain
Access, Certificate Assistant, Request a Certificate from a Certificate Authority from
the menu (see Figure 1.11).
FIGURE 1.11In this step, youcreate a certifi-cate requestthat is uploadedto Apple.
The Keychain Access Certificate Assistant will start. Thankfully, this is a pretty short
process. You just need to enter your email address, name, and highlight the Saved to
Disk option, as shown in Figure 1.12.
FIGURE 1.12Enter the infor-mation neededfor the certifi-cate request.You can leavethe CA EmailAddress fieldempty.
Click Continue to save the certificate to your disk. Make sure you make a note of
where you save the certificate because you’re going to be uploading it to Apple back
in the Development Provisioning Assistant. Once you save it, you can close the
Certificate Assistant window.

ptg
Creating a Development Provisioning Profile 17
Uploading the Certificate Signing RequestReturn to the Development Provisioning Assistant in your web browser. Click
Continue until you are prompted to submit the certificate signing request that you
just generated (see Figure 1.13). Click the Choose File button so that you can select
the request file, and then click Continue to upload it.
FIGURE 1.13Upload the cer-tificate signingrequest toApple.
Naming and Generating the Provisioning ProfileWe’re almost done! After uploading the request, you’ll be prompted to name the
provisioning profile (see Figure 1.14). Because this profile contains information that
can potentially identify individual phones and applications, you should choose
something relevant to how you intend to use it. In this case, I’m only interested in
using it as a generic development profile for all of my apps, so I’m naming it iPhone
Development Profile. Not very creative, but it works.
Click the Generate button to create your provisioning profile. This may take 20 to 60
seconds, so be patient. The screen will eventually refresh to show the final profile
information, as shown in Figure 1.15.
Our final steps will be downloading and installing the profile, and downloading and
installing a security certificate that will be associated with the profile.

ptg
18 HOUR 1: Preparing Your System and iPhone for Development
Downloading the Development Provisioning Profile and CertificateAt this point, your profile has been generated, along with a security certificate that can be
used to uniquely associate your applications with that profile. All that remains is down-
loading and installing them. Click the Continue button to access the provisioning profile
download screen, as shown in Figure 1.16. Click the Download Now button to save the
profile to your Downloads folder (file extension .mobileprovision).
FIGURE 1.14Name the pro-file to reflecthow you intendto use it.
FIGURE 1.15After severalseconds, theprofile is gener-ated.
ptg
Creating a Development Provisioning Profile 19
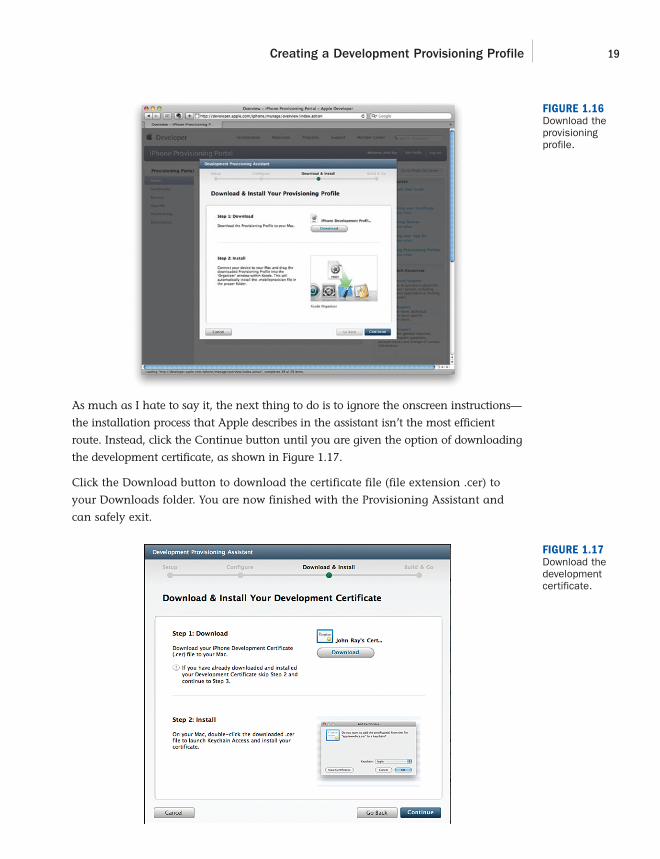
As much as I hate to say it, the next thing to do is to ignore the onscreen instructions—
the installation process that Apple describes in the assistant isn’t the most efficient
route. Instead, click the Continue button until you are given the option of downloading
the development certificate, as shown in Figure 1.17.
Click the Download button to download the certificate file (file extension .cer) to
your Downloads folder. You are now finished with the Provisioning Assistant and
can safely exit.
FIGURE 1.16Download theprovisioning profile.
FIGURE 1.17Download thedevelopmentcertificate.

ptg
20 HOUR 1: Preparing Your System and iPhone for Development
Installing the Development Provisioning Profile and CertificateTo install the profile and certificate, we just need to exercise our double-click skills.
First, install the development certificate by double-clicking it. Doing so opens Keychain
Access and prompts you for the keychain where the certificate should be installed.
Choose the login keychain, and then click Add, as demonstrated in Figure 1.18.
FIGURE 1.18Choose thelogin keychainto hold yourdevelopmentcertificate.
After adding the certificate, you should be able to browse through your login key-
chain for a key labeled with your name that contains the certificate.
To install the development profile, double-click the downloaded .mobileprovision
file. Xcode will launch—if it isn’t already running—and silently install the profile.
You can verify that it has been successfully installed by launching the Organizer
within Xcode (Window, Organizer) and then clicking the Provisioning Profiles item
within the iPhone Development section, as shown in Figure 1.19.
FIGURE 1.19If the profilehas been suc-cessfullyinstalled, itshould be listedin the XcodeOrganizer.

ptg
Did youKnow?
Creating a Development Provisioning Profile 21
After you have a development machine configured, you can easily configure othercomputers using the Developer Profile item in the Xcode organizer. The ExportDeveloper Profile and Import Developer Profile buttons will export (and subse-quently import) all your developer profiles/certificates in a single package.
But Wait… I Have More Than One iOS Device!The Development Provisioning Assistant helps you create a provisioning profile fora single iPhone, iPad, or iPod Touch device. But what if you have multiple devicesthat you want to install onto? No problem. You’ll need to head back to theProvisioning Portal and click the Devices link on the left side of the page. Fromthere, you can add additional devices that will be available to your profile.
Next, click the Provisioning link, also on the left side of the page, and use the Editlink to modify your existing profile to include another iPhone, as demonstrated inFigure 1.20.
Finally, you’ll need to click the Download link to redownload the modified profileand then import it into Xcode so that the additional device is available.
FIGURE 1.20Add additionaldevices to aprovisioning pro-file within theweb portal.Remember toredownload theprofile andinstall it!
Testing the Profile with an iPhone AppIt seems wrong to go through all of that work without some payoff, right? For a real-
world test of your efforts, let’s actually try to run an application on your iPhone. If
you haven’t downloaded the project files to your computer, now is a good time to
visit http://teachyourselfiphone.com and download the archives.

ptg
By theWay
22 HOUR 1: Preparing Your System and iPhone for Development
Within the Hour 1 Projects folder, open the Welcome folder. Double-click
Welcome.xcodeproj to open a simple application in Xcode. After the project opens,
your display should be similar to Figure 1.21.
FIGURE 1.21Open theWelcome.xcode-proj in Xcode.
Next, make sure that your iPhone is plugged into your computer. Using the menu in
the upper-left corner of the Xcode window, choose Device 4.0 (or a later version, if
available). This will tell Xcode that when the project is built it should be installed on
your iPhone. Finally, click Build and Run.
Xcode will install the correct provisioning profile on your device, and, after a few
seconds, the application should be installed and launched on your iPhone, as seen
in Figure 1.22.
You can now exit Xcode and quit the Welcome application on your iPhone.
When you clicked Build and Run, the Welcome application was installed and start-ed on your iPhone. It will remain there until you remove it manually. Just touch andhold the Welcome icon until it starts wiggling, and then delete the application asyou would any other. Applications installed with your development certificate willstop working when the certificate expires (120 days after it was issued).

ptg
Developer Technology Overview 23
Developer Technology OverviewOver the course of the next few hours, you will be introduced to the technologies
that you’ll be using to create iPhone applications. The goal is to get you up to speed
on the tools and technology, and then you can start actively developing. This means
you’re still a few hours away from writing your first app, but when you start coding,
you’ll have the necessary background skills and knowledge to successfully create a
wide variety of applications.
The Apple Developer SuiteIn this hour, you downloaded and worked with the Xcode application. This is just
one piece (albeit an important piece) of the developer suite that you will be using
throughout this book. Xcode, coupled with Interface Builder and the iPhone
Simulator, will make up your development environment. These three applications
are so critical, in fact, that two hours (2 and 4) are devoted to covering them.
It’s worth mentioning that almost every iPhone, iPad, iPod, and Macintosh applica-
tion you run, whether created by a single developer at home or a huge company, is
built using the Apple developer tools. This means that you have everything you
need to create software as powerful as any you’ve ever run.
Later in the book, you’ll be introduced to additional tools in the suite that can help
you debug and optimize your application.
FIGURE 1.22Congratulations,you’ve justinstalled yourfirst home-grown iPhoneapplication!

ptg
By theWay
24 HOUR 1: Preparing Your System and iPhone for Development
During the writing of this book, Apple released a “developer preview” of Xcode 4.Because there is no known release schedule for Xcode 4, and you can’t yet use itto build real applications, we are writing with the tried-and-true Xcode 3.2. Forthose who want to make the transition, we’ll be providing an online introduction toXcode 4 (as soon as it is publicly available) at the book’s support site:http://teachyourselfiphone.com/. Be sure to check it out!
Objective-CObjective-C is the language that you’ll be using to write your applications. It pro-
vides the structure for our applications and is to control the logic and decision mak-
ing that goes on when an application is running.
If you’ve never worked with a programming language before, don’t worry. Hour 3,
“Discovering Objective-C: The Language of Apple Platforms,” covers everything you
need to get started. Developing for the iPhone in Objective-C is a unique programming
experience, even if you’ve used other programming languages in the past. The lan-
guage is unobtrusive and structured in a way that makes it easy to follow. After your
first few projects, Objective-C will fade into the background, letting you concentrate on
the specifics of your application.
Cocoa TouchWhile Objective-C defines the structure for iPhone applications, Cocoa Touch defines
the functional building blocks, called classes, that can make the iPhone do certain
things. Cocoa Touch isn’t a “thing,” per se, but a collection of interface elements, data
storage elements, and other handy tools that you can access from your applications.
As you’ll learn in Hour 4, “Inside Cocoa Touch,” you can access literally hundreds of
different Cocoa Touch classes and do thousands of things with them. This book cov-
ers quite a few of the most useful classes and gives you the pointers you need to
explore even more on your own.
Model-View-ControllerThe iOS platform and Macintosh use a development approach called Model-View-
Controller (MVC) to structure applications. Understanding why MVC is used and the
benefits it provides will help you make good decisions in structuring your most com-
plex applications. Despite the potentially complicated-sounding name, MVC is real-
ly just a way to keep your application projects arranged so that you can easily
update and extend them in the future. You’ll take a more detailed look at MVC in
Hour 6, “Model-View-Controller Application Design.”

ptg
25Q&A
SummaryThis hour introduced you to the iOS platform, its capabilities, and its limitations.
You learned about the iPhone’s graphic features, RAM size, and the various sensors
that you can use in your applications to create uniquely “aware” experiences. We
also discussed the Apple iPhone developer tools, how to download and install them,
and the differences between the varying pay-for developer programs. To prepare you
for actual on-phone development, you explored the process of creating and
installing a Development Provisioning Profile in Xcode and even installed an appli-
cation on your phone.
The hour wrapped up with a quick discussion of the development technologies that
make up the first part of the book and form the basis for all the iPhone develop-
ment you’ll be doing.
Q&AQ. I thought the iPhone had at minimum 16GB of RAM in the low-end model
and 32GB on the high-end model. Doesn’t it?
A. The “memory” capabilities for the iPhone that are advertised to the public are
the storage sizes available for applications, songs, and so forth. It is separate
from the RAM that can be used for executing programs. If Apple implements
virtual memory in a future version of iOS, it is possible that the larger storage
could be used for increasing available RAM.
Q. What platform should I target for development?
A. That depends on your goals. If you want to reach the largest audience, consider
a universal application that works on the iPhone, iPad, and iPod Touch. We
examine this development possibility later in Hour 22, “Building Universal
Applications.” If you want to make use of the most capable hardware, you can
certainly target the unique capabilities of the iPhone 4, but you will potentially
be limiting the size of your customer base.
Q. Why isn’t the iPhone (and iOS platform) open?
A. Great question. Apple has long sought to control the user experience so that it
remains “positive” regardless of how users have set up their device, be it a
Mac, an iPhone, or an iPhone. By ensuring that applications can be tied to a
developer and enforcing an approval process, Apple attempts to limit the
potential for a harmful application to cause damage to data or otherwise neg-
atively impact the user. Whether this is an appropriate approach, however, is
open to debate.

ptg
26 HOUR 1: Preparing Your System and iPhone for Development
Workshop
Quiz1. What is the resolution of the iPhone screen?
2. What is the cost of joining an individual iOS Developer Program?
3. What language will you use when creating iPhone applications?
Answers1. Trick question. The iPhone screen has 320×480 points, but you can’t tell how
many pixels unless you multiply by the scaling factor. The iPhone 4 has a
scaling factor of 2; all other models have a scaling factor of 1.
2. The Developer Program costs $99 a year for the individual option.
3. Objective-C will be used for iPhone development.
Activities1. Establish an Apple Developer Membership and download and install the devel-
oper tools. This is an important activity that, if you didn’t follow along in the
course of the hour, should be completed before starting the next hour’s lesson.
2. Review the resources available in the iOS Dev Center. Apple has published
several introductory videos and tutorials that supplement what you’ll learn in
this book.

ptg
HOUR 2
Introduction to Xcode and theiPhone Simulator
What You’ll Learn in This Hour:. How to create new projects in Xcode. Code editing and navigation features. Where to add classes and resources to a project. How to modify project properties. Compiling for the iPhone and the iPhone Simulator. How to interpret error messages. Features and limitations of the iPhone Simulator
The core of your work in the Apple Developer Suite will be spent in three applications:
Xcode, Interface Builder, and the iPhone Simulator. This trio of apps provides all the tools
that you need to design, program, and test applications for the iPhone. And, unlike other
platforms, the Apple Developer Suite is entirely free!
This hour walks you through the basics you need to work within two of the three components—
Xcode and the iPhone Simulator—and you’ll get some hands-on practice working with each.
We cover the third piece, Interface Builder, in Hour 5, “Exploring Interface Builder.”
Using XcodeWhen you think of coding—actually typing the statements that will make your iPhone meet
Apple’s “magical” mantra—think Xcode. Xcode is the IDE, or integrated development envi-
ronment, that manages your application’s resources and lets you edit the code that ties the
different pieces together.

ptg
28 HOUR 2: Introduction to Xcode and the iPhone Simulator
After you install the developer tools, as described in Hour 1, “Preparing Your System
and iPhone for Development,” you should be able to find Xcode in the
Developer/Applications folder located at the root level of your hard drive. We walk
through the day-to-day use of Xcode in this hour, so if you haven’t installed the
tools yet, do so now!
Launch Xcode from the Developer/Applications folder. After a few moments, the
Welcome to Xcode screen will display, as shown in Figure 2.1.
FIGURE 2.1Explore Apple’sdeveloperresources, rightfrom the XcodeWelcomescreen.
You can choose to disable this screen by unchecking the Show This Window When
Xcode Launches check box, but it does provide a convenient “jumping-off” point for
sample code, tutorials, and documentation. In Hour 4, “Inside Cocoa Touch,” we
take a detailed look at the documentation system included in Xcode, which is quite
extensive. For now, click Cancel to exit the Welcome screen.
Creating and Managing ProjectsMost of your iPhone work will start with an Xcode project. A project is a collection of
all the files associated with an application, along with the settings needed to “build”
a working piece of software from the files. This includes images, source code, and a
file that describes the appearance and objects that make up the interface.
Choosing a Project TypeTo create a new project, choose File, New Project (Shift+Command+N) from the
Xcode menu. Do this now. Xcode will prompt you to choose a template for your
application, as shown in Figure 2.2. The Xcode templates contain the files you need
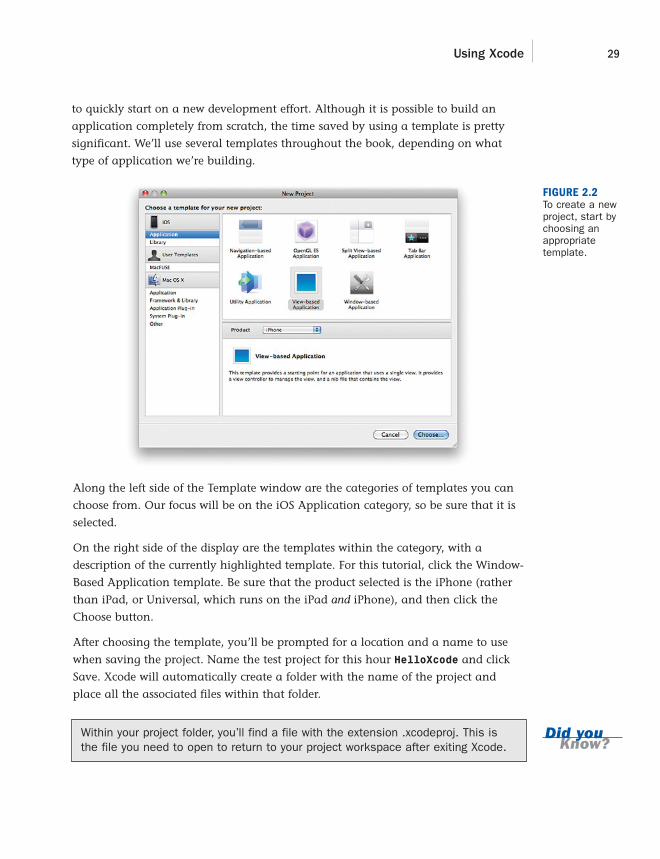
ptg
Did youKnow?
Using Xcode 29
to quickly start on a new development effort. Although it is possible to build an
application completely from scratch, the time saved by using a template is pretty
significant. We’ll use several templates throughout the book, depending on what
type of application we’re building.
FIGURE 2.2To create a newproject, start bychoosing anappropriatetemplate.
Along the left side of the Template window are the categories of templates you can
choose from. Our focus will be on the iOS Application category, so be sure that it is
selected.
On the right side of the display are the templates within the category, with a
description of the currently highlighted template. For this tutorial, click the Window-
Based Application template. Be sure that the product selected is the iPhone (rather
than iPad, or Universal, which runs on the iPad and iPhone), and then click the
Choose button.
After choosing the template, you’ll be prompted for a location and a name to use
when saving the project. Name the test project for this hour HelloXcode and click
Save. Xcode will automatically create a folder with the name of the project and
place all the associated files within that folder.
Within your project folder, you’ll find a file with the extension .xcodeproj. This isthe file you need to open to return to your project workspace after exiting Xcode.

ptg
30 HOUR 2: Introduction to Xcode and the iPhone Simulator
Project GroupsAfter you’ve created or opened a project in Xcode, the interface displays an iTunes-
like window for navigating the project’s files. On the left side of the window, the
Groups & Files list contains a logical grouping of the files within your project.
Clicking the top group, called the “project group” (and named after the project),
updates the list to the right and shows all the files associated with the application,
as shown in Figure 2.3.
Group ContentsGroups and FilesFIGURE 2.3Use the Groups& Files list tonavigatethrough yourprojectresources.
By theWay Keep in mind that these are logical groupings. You won’t find all these files in your
project directory, nor will you find the same folder structure. The Xcode layout isdesigned to help you find what you’re looking for easily—not to mirror a file sys-tem structure.
Within the project group are five subgroups that you may find useful:
Classes: As you’ll learn in the next hour, classes group together application
features that complement one another. Most of your development will be
within a class file.
Other Sources: These are any other source code files associated with the appli-
cation. You’ll rarely need to touch these files.
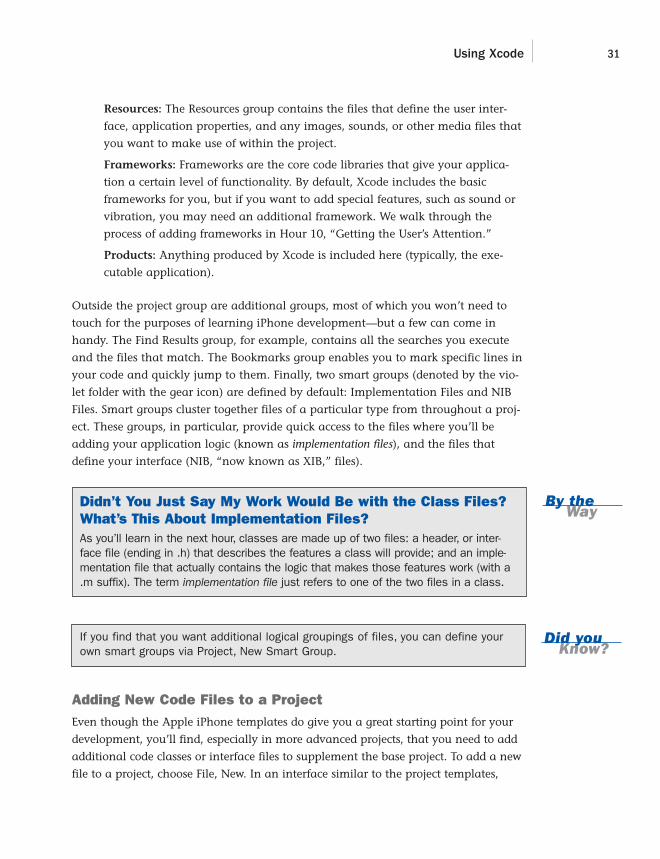
ptg
Using Xcode 31
By theWay
Did youKnow?
Resources: The Resources group contains the files that define the user inter-
face, application properties, and any images, sounds, or other media files that
you want to make use of within the project.
Frameworks: Frameworks are the core code libraries that give your applica-
tion a certain level of functionality. By default, Xcode includes the basic
frameworks for you, but if you want to add special features, such as sound or
vibration, you may need an additional framework. We walk through the
process of adding frameworks in Hour 10, “Getting the User’s Attention.”
Products: Anything produced by Xcode is included here (typically, the exe-
cutable application).
Outside the project group are additional groups, most of which you won’t need to
touch for the purposes of learning iPhone development—but a few can come in
handy. The Find Results group, for example, contains all the searches you execute
and the files that match. The Bookmarks group enables you to mark specific lines in
your code and quickly jump to them. Finally, two smart groups (denoted by the vio-
let folder with the gear icon) are defined by default: Implementation Files and NIB
Files. Smart groups cluster together files of a particular type from throughout a proj-
ect. These groups, in particular, provide quick access to the files where you’ll be
adding your application logic (known as implementation files), and the files that
define your interface (NIB, “now known as XIB,” files).
Didn’t You Just Say My Work Would Be with the Class Files?What’s This About Implementation Files?As you’ll learn in the next hour, classes are made up of two files: a header, or inter-face file (ending in .h) that describes the features a class will provide; and an imple-mentation file that actually contains the logic that makes those features work (with a.m suffix). The term implementation file just refers to one of the two files in a class.
If you find that you want additional logical groupings of files, you can define yourown smart groups via Project, New Smart Group.
Adding New Code Files to a ProjectEven though the Apple iPhone templates do give you a great starting point for your
development, you’ll find, especially in more advanced projects, that you need to add
additional code classes or interface files to supplement the base project. To add a new
file to a project, choose File, New. In an interface similar to the project templates,
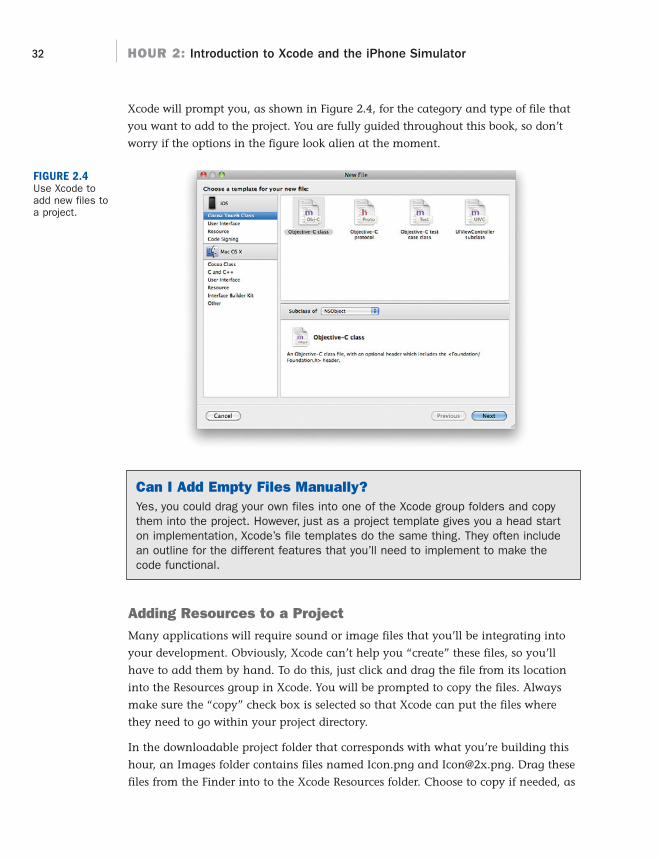
ptg
32 HOUR 2: Introduction to Xcode and the iPhone Simulator
Xcode will prompt you, as shown in Figure 2.4, for the category and type of file that
you want to add to the project. You are fully guided throughout this book, so don’t
worry if the options in the figure look alien at the moment.
FIGURE 2.4Use Xcode toadd new files toa project.
Can I Add Empty Files Manually?Yes, you could drag your own files into one of the Xcode group folders and copythem into the project. However, just as a project template gives you a head starton implementation, Xcode’s file templates do the same thing. They often includean outline for the different features that you’ll need to implement to make thecode functional.
Adding Resources to a ProjectMany applications will require sound or image files that you’ll be integrating into
your development. Obviously, Xcode can’t help you “create” these files, so you’ll
have to add them by hand. To do this, just click and drag the file from its location
into the Resources group in Xcode. You will be prompted to copy the files. Always
make sure the “copy” check box is selected so that Xcode can put the files where
they need to go within your project directory.
In the downloadable project folder that corresponds with what you’re building this
hour, an Images folder contains files named Icon.png and [email protected]. Drag these
files from the Finder into to the Xcode Resources folder. Choose to copy if needed, as

ptg
Using Xcode 33
shown in Figure 2.5. Copying the files ensures that they are correctly placed within
your project and accessible by your code.
FIGURE 2.5Drag theIcon.png filesinto theResources folderand choose tocopy if needed.
These files will ultimately serve as the icon for the HelloXcode app. The reason for
two files? The @2x is the icon for an iOS device with a scaling factor of 2 (that is, the
double the horizontal and vertical resolution)—in other words, the iPhone 4!
Removing Files and ResourcesIf you’ve added something to Xcode that you decide you don’t want, you can delete
it easily. To remove a file or resource from your project, simply select it within one of
the Xcode groups where it appears, and then press the Delete key. Xcode gives you
the option to delete any references to the file from the project and move the file to
the trash or just to delete the references (see Figure 2.6).
If you choose to delete references, the file itself will remain but will no longer be visi-
ble in the project.
If Xcode can’t find a file that it expects to be part of a project, that file will behighlighted in red in the Xcode interface. This might happen if you accidentallydelete a file from the project folder within the Finder. It also occurs when Xcodeknows that an application file will be created by a project, but the application hasn’t been generated yet. In this case, you can safely ignore the red .app filewithin the Xcode groups.
By theWay
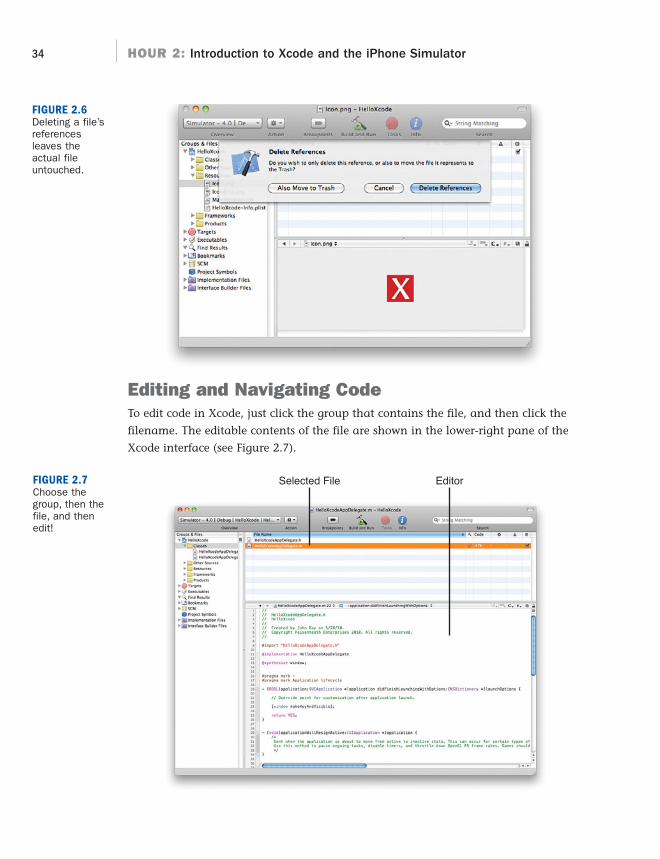
ptg
34 HOUR 2: Introduction to Xcode and the iPhone Simulator
Editing and Navigating CodeTo edit code in Xcode, just click the group that contains the file, and then click the
filename. The editable contents of the file are shown in the lower-right pane of the
Xcode interface (see Figure 2.7).
FIGURE 2.6Deleting a file’sreferencesleaves the actual fileuntouched.
EditorSelected FileFIGURE 2.7Choose thegroup, then thefile, and thenedit!

ptg
Using Xcode 35
The Xcode editor works just like any text editor, with a few nice additions. To get afeel for how it works, click the Classes group within the HelloXcode project, thenHelloXcodeAppDelegate.m to begin editing the source code.
For this project, we’re going to use an interface element called a label to display thetext Hello Xcode on the iPhone screen. This application, like most that you write,will use a method to show our greeting. A method is just a block of code that exe-cutes when something needs to happen. In this sample, we’ll use an existing methodcalled application:didFinishLaunchingWithOptions that runs as soon as theiPhone application starts.
Jumping to Methods with the Symbol MenuThe easiest way to find a method or property within a source code file is to use the
symbol pop-up menu, located above the editing pane. This menu, shown in Figure
2.8, automatically shows all the methods and properties available in the current file
and enables you to jump between them by selecting them.
FIGURE 2.8The symbol pop-up menu is aquick way tojump betweenmethods andproperties.
Find and select application:didFinishLaunchingWithOptions from the pop-upmenu. Xcode will select the line where the method begins. Click the next line, andlet’s start coding!
Code CompletionUsing the Xcode editor, type the following text to implement theapplication:didFinishLaunchingWithOptions method. You should need to enteronly the bolded code lines, as shown in Listing 2.1.

ptg
WatchOut!
36 HOUR 2: Introduction to Xcode and the iPhone Simulator
LISTING 2.1- (BOOL)application:(UIApplication *) application
didFinishLaunchingWithOptions:(NSDictionary *)launchOptions {
// Override point for customization after application launchUILabel *myMessage;
UILabel *myUnusedMessage;
myMessage=[[UILabel alloc]
➥initWithFrame:CGRectMake((25.0,225.0,300.0,50.0,50.0)];
myMessage.text=@”Hello Xcode”;
myMessage.font=[UIFont systemFontOfSize:48];
[window addSubview:myMessage];
[myMessage release];
[window makeKeyAndVisible];
return YES;}
If you decide to skip ahead and run this application, you’ll quickly realize that thecode you entered is not going to work! Some errors have been intentionally includ-ed here that you’ll correct later this hour!
As you type, you should notice something interesting happening. As soon as you get
to a point in each line where Xcode thinks it knows what you intend to type, it dis-
plays an autocompleted version of the code, as demonstrated in Figure 2.9.
Code Completion
FIGURE 2.9Xcode automati-cally completesthe code as youtype.

ptg
Using Xcode 37
To accept an autocompletion suggestion, just press Tab, and the code will be insert-
ed, just as if you typed the whole thing. Xcode will try to complete method names,
variables that you’ve defined, and anything else related to the project that it might
recognize.
After you’ve made your changes, you can save the file by choosing File, Save.
It’s not important to understand exactly what this code does—at this point, youjust need to get experience in the Xcode editor. The “short and sweet” descriptionof this fragment, however, is that it creates a label object roughly in the center ofthe iPhone screen; sets the label’s text, font, and size; and then adds it to theapplication’s window.
Using SnapshotsIf you’re planning to make many changes to your code and you’re not quite sure
you’ll like the outcome, you might want to take advantage of the “snapshot” fea-
ture. A code snapshot is, in essence, a copy of all your source code at a particular
moment in time. If you don’t like changes you’ve made, you can revert to an earlier
snapshot. Snapshots are also helpful because they show what has changed between
multiple versions of an application.
To take a snapshot, choose File, Make Snapshot. That’s all there is to it!
To view the available snapshots, choose File, Snapshots. The snapshot viewer dis-
plays available snapshots. Clicking Show Files displays a list of changed files to the
right, and, if a file is selected, the changes that were made between the selected
snapshot and the preceding one. Figure 2.10 shows all of these elements.
By theWay
FIGURE 2.10Use a snapshotto figure outwhat changesyou’ve madeamong differentversions of yourapplication.

ptg
38 HOUR 2: Introduction to Xcode and the iPhone Simulator
To restore to a specific snapshot, select it in the list, and then click the Restore button.
You can also use the Name and Comments fields at the bottom of the snapshotviewer to provide a meaningful name and relevant comments for any snapshot inthe list.
Adding Bookmarks and Pragma Marks Earlier in the hour, you read about the Bookmarks group, which displays bookmarks
within your project and allows for simple navigation within and between files. To
create a new bookmark, position your cursor in whatever portion of a file you want
to mark, and then choose Add to Bookmarks from the Action menu in the toolbar
(see Figure 2.11).
Did youKnow?
FIGURE 2.11Create your owncode book-marks.
You’ll be prompted for a title for the bookmark, just like in Safari. After you’ve saved
your bookmark, you can access it from the Bookmarks group in the Groups & Files
list.
Not only are the bookmarks Safari-like, but you’ll also notice a History pop-upmenu beside the symbol jump-to menu and, to the left of that, forward and back-ward arrows to take you back and forward in the history.
By theWay
ptg
Using Xcode 39
Another way to mark points in your code is by adding a #pragma mark directive.
Pragma marks do not add any features to your application, but they can be used to
create sections within your code that are displayed within the symbol menu. There
are two types of pragma marks:
#pragma mark -
and
#pragma mark <label name>
The first inserts a horizontal line in the symbol menu; the second inserts an arbi-
trary label name. You can use both together to add a section heading to your code.
For example, to add a section called “Methods that update the display” followed by
a horizontal line, you could type the following:
#pragma mark Methods that update the display#pragma mark -
After the pragma mark has been added to your code and saved, the symbol menu
updates accordingly.
Building ApplicationsAfter you’ve completed your source code, it’s time to build the application. The build
process encompasses several different steps, including compiling and linking.
Compiling translates the instructions you type into something that the iPhone
understands. Linking combines your code with the necessary frameworks the appli-
cation needs to run. During these steps, Xcode displays any errors that it might find.
Before building an application, you must first choose what it is being built to run
on: the iPhone Simulator or a physical iPhone device.
Configuring the Build OutputTo choose how your code will be built, use the Overview pop-up menu at the upper
left of the Xcode window. There are two main settings within this menu that you
may want to change: the Active Device and the Active Configuration, visible in
Figure 2.12.
Use the top setting in the drop-down list (the Active Device) to choose between
Device (your iPhone) and Simulator (the iPhone Simulator, explained shortly). For
most day-to-day development, you’ll want to use the simulator—it is faster than
transferring an application to the iPhone each time you make a simple change.

ptg
40 HOUR 2: Introduction to Xcode and the iPhone Simulator
By default, you have two configurations to choose from: Release and Debug. The
Debug configuration adds additional debugging code to your project to help in the
debugging process. (We take a closer look at this in Hour 23, “Application
Debugging and Optimization.”) The Release configuration leaves debugging code
out and is what you eventually submit to the App Store.
For most development, you can set the SDK to the iPhone Simulator and the Active
Configuration to Debug unless you want to try real-world performance testing.
Choose these options in Xcode now.
Building and Executing the ApplicationTo build and run the application, click the Build and Run button on the Xcode tool-
bar (Command+R). Depending on the speed of your computer, this might take a
minute or two for the process to complete. Once done, the application is transferred
to your iPhone and started (if selected in the build configuration and connected) or
started in the iPhone Simulator.
To just build without running the application (useful for checking for errors), choose
Build from the Build menu. To run the application without building, choose Run
from the Run menu.
Quite a few intermediate files are generated during the build process. These takeup space and aren’t needed for the project itself. To clean out these files, chooseClean All Targets from the Build menu.
FIGURE 2.12Change theactive SDK andconfigurationbefore building.
Did youKnow?

ptg
Using Xcode 41
The HelloXcode application is shown running in the iPhone Simulator in Figure
2.13. Try building and running your version of the application now.
FIGURE 2.13The iPhoneSimulator is aquick and easyway to test yourcode.
If you’ve been following along, your application should… not work! There are two
problems with the code you were asked to type in earlier. Let’s see what they are.
Correcting Errors and WarningsYou may receive two types of feedback from Xcode when you build an application:
errors and warnings. Warnings are potential problems that may cause your applica-
tion to misbehave; they are displayed as yellow caution signs. Errors, on the other
hand, are complete showstoppers. You can’t run your application if you have an
error. The symbol for an error, appropriately enough, is a stop sign. A count of the
warnings and errors is displayed in the lower-right corner of the Xcode window after
the build completes.
If you are viewing the code that contains the error or warning, the error message is
visible directly after the line that caused the problem. If you’re in another file, you
can quickly jump to a list of the errors (with links to the source code in which they
occurred) by clicking the error or warning count in the Xcode window. Figure 2.14
shows an error and a warning you should be receiving in the HelloXcode app.
The warning points out that we have an unused variable, myUnusedMessage, in the
code. Remember, this is just a helpful warning, not necessarily a problem. If we
choose to remove the variable, the message will go away; but even if we don’t, the

ptg
Did youKnow?
42 HOUR 2: Introduction to Xcode and the iPhone Simulator
application will still run. Go ahead and delete the line that reads UILabel
*myUnusedMessage; in HelloXcodeAppDelegate.m. This fixes the warning, but
there’s still an error to correct.
Warning
Error Build Status
FIGURE 2.14You should beexperiencing anerror and awarning inHelloXcode.
The error message reads too many arguments to function ‘CGRectMake’. The
reason for this is that the function takes four numbers and uses them to make a rec-
tangle for the label—we’ve typed in five numbers. Delete the fifth number and pre-
ceding comma from the CGRectMake function.
If you’ve surmised that the numbers used by CGRectMake are for positioning,you’re probably wondering how these numbers could apply to both the originaliPhone screen and the iPhone 4. Remember that the iPhone screen is addressedthrough points, not pixels, and 1 point does not necessarily equal 1 pixel! In fact,on the iPhone 4, 1 point is really 4 pixels: 2 horizontal and 2 vertical!
Click Build and Run. HelloXcode should now start in the iPhone Simulator, just like
what we saw in Figure 2.12.
Project PropertiesBefore finishing our brief tour of the Xcode interface, quickly turn your attention to
a specific project component: the Info property list resource. This file, found in the
Xcode Resources folder, is created automatically when you create a new project, is

ptg
Using Xcode 43
prefixed with the project name, and ends in Info.plist. This file contains settings
that, while you won’t need right away, will be necessary for deploying an applica-
tion to the App Store and configuring some functionality in later hours. Click the
HelloXcode-Info.plist file in Xcode now. Your display should resemble Figure 2.15.
To change a property value, double-click the right column and type your changes.
Disclosure Arrow Add New Value
FIGURE 2.15Project proper-ties control afew importantsettings for yourapplication.
Setting an Application IconIf you look closely at the Info properties for your project, you’ll notice an Icon File
property that is completely blank. To set the property to the icon that you added to
the project earlier this hour, we’ll need to change to this property to Icon Files rather
than the singular Icon File.
Double-click the Icon File property name, and then change the name to Icon Files.
The Icon Files will then display a disclosure arrow to its left (as you can see in Figure
2.15). Expand the Icon Files by clicking the arrow. Initially, there will be a single
item 0 entry present. This is actually all we need to set both the icon for a regular
iPhone and the iPhone 4! Double-click the field to the right of item 0 and type Icon.
By setting just the base filename for the low-res icon, Xcode automatically knows to
look for a similarly named Icon@2x. With a single entry, you’ve just set icons for
both the original iPhone platforms and the iPhone 4!

ptg
By theWay
44 HOUR 2: Introduction to Xcode and the iPhone Simulator
Did youKnow?
If you add multiple items to the Icon Files property, one with the value Icon.pngand one with [email protected], this will also work. The application searches the IconFiles property for icon resources that match what it thinks it needs. If it sees afile with no extension, it will automatically look for an @2x version as well. If, how-ever, you include the extension on the file, the system will not automatically findthe @2x variation!
We’ve included icon files with many of the projects in this book. You’re welcome to
use ours, or create new icons on your own. “Basic” iPhone icons should be 57×57
PNG images with no special rounding or effects applied. The iPhone 4, however,
looks much better with higher-resolution icons. For these devices, you’ll want a sepa-
rate file sized at 114×114.
After designing the icons, there’s nothing else you need to do! The “glossy look” will
automatically be applied to the icons for you. Apple also stresses that you should
not manually add a black background to your icons. In iOS 4, the devices allow cus-
tom backgrounds on the home screens, making it likely that an icon with custom
shadows or black backgrounds will clash with the display.
Setting a Launch ImageYou must also add a “launch image” option to your project that enables you to
choose a splash-screen image that will display as your application loads. To access
this setting, again, add a new row to the Info.plist file, this time choosing Launch
Image (iPhone) in the column on the left. You can then configure the image using
the same technique used for adding an application icon, the only difference being a
launch image should be sized to fit the iPhone’s screen dimensions.
If you do not name your launch images, Xcode will automatically look for imagesnamed Default.png and [email protected] to use as the launch images for your project.
In addition, you can choose from these suffixes (preceded by a hyphen):PortraitUpsideDown, LandscapeLeft, LandscapeRight, Portrait, andLandscape, to configure different launch images to appear in any orientation. Ifyour default launch image, for example, is named myLaunchImage.png, you couldsimply add resources named myLaunchImage-Landscape.png and myLaunchImage-Portrait.png to create unique images for launching in portrait or landscape orienta-tions. As with the icons, you can also create hi-res versions that are automaticallyloaded by adding @2x to the filename; for example, [email protected].

ptg
By theWay
Using the iPhone Simulator 45
Setting the Status Bar DisplayAnother interesting property that you may want to explore controls the status bar
(the thin line with the carrier name, signal strength, and battery status at the top of
the iPhone display). By default, this property isn’t present in the Info.plist file, so
you’ll need to add a new row as described for the application icons.
Once a new row has appeared, click the far-left column to display all the available
properties. You’ll notice that Status Bar Is Initially Hidden is an option. If selected,
this property adds a check box in the far-right column that, if checked, automatical-
ly hides the iPhone status bar for your application.
The property settings we’ve covered here are the ones that relate to how your applooks on the iPhone and in the simulator. We’ll look at a few more in Hour 24,“Distributing Applications Through the Apps Store” that are important for submit-ting apps to Apple for approval.
That’s it for Xcode! There’s plenty more that you’ll find as you work with the soft-
ware, but these should be the foundational skills you need to develop apps for your
iPhone. We’ll round out this hour by looking at the next best thing to your phone:
the Apple iPhone Simulator.
Note that although it isn’t covered here, Xcode includes a wonderful documenta-tion system. You’ll learn more about this as you start to get your feet wet with theCocoa framework in Hour 4.
Using the iPhone SimulatorIn Hour 1, you learned that you don’t even need an iPhone to start developing for
the platform. The reason for this is the iPhone Simulator included with the Apple
developer tools. The iPhone Simulator does a great job of simulating the Apple
iPhone, with the Safari, Contacts, Settings, and Photos apps available for integration
testing, as shown in Figure 2.16.
Targeting the simulator for the early stages of your development can save you a
great deal of time; you won’t need to wait for apps to be installed on your physical
device before seeing the effects of changes in your code. In addition, you don’t need
to buy and install a developer certificate to run code in the simulator.
WatchOut!
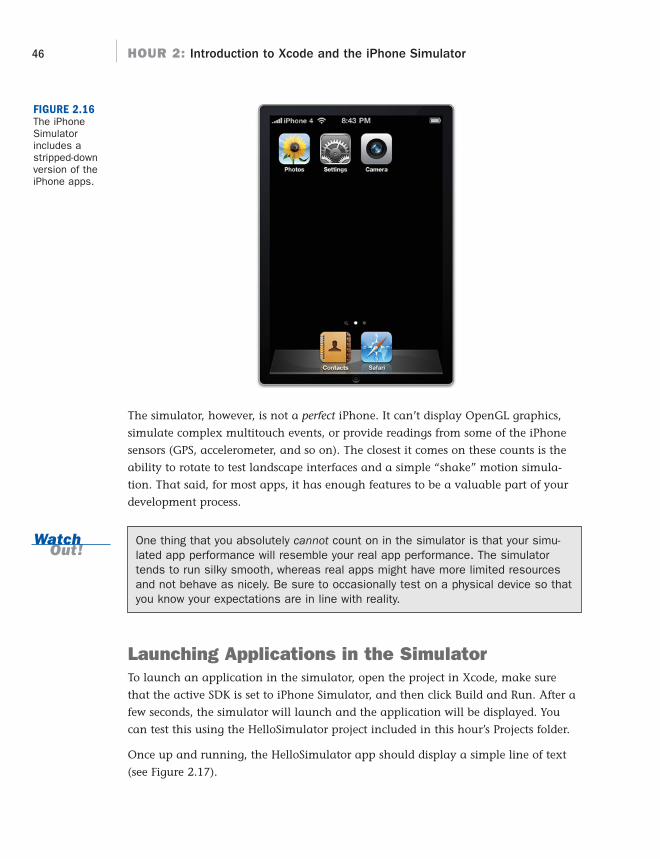
ptg
WatchOut!
46 HOUR 2: Introduction to Xcode and the iPhone Simulator
The simulator, however, is not a perfect iPhone. It can’t display OpenGL graphics,
simulate complex multitouch events, or provide readings from some of the iPhone
sensors (GPS, accelerometer, and so on). The closest it comes on these counts is the
ability to rotate to test landscape interfaces and a simple “shake” motion simula-
tion. That said, for most apps, it has enough features to be a valuable part of your
development process.
One thing that you absolutely cannot count on in the simulator is that your simu-lated app performance will resemble your real app performance. The simulatortends to run silky smooth, whereas real apps might have more limited resourcesand not behave as nicely. Be sure to occasionally test on a physical device so thatyou know your expectations are in line with reality.
Launching Applications in the SimulatorTo launch an application in the simulator, open the project in Xcode, make sure
that the active SDK is set to iPhone Simulator, and then click Build and Run. After a
few seconds, the simulator will launch and the application will be displayed. You
can test this using the HelloSimulator project included in this hour’s Projects folder.
Once up and running, the HelloSimulator app should display a simple line of text
(see Figure 2.17).
FIGURE 2.16The iPhoneSimulatorincludes astripped-downversion of theiPhone apps.

ptg
Did youKnow?
Using the iPhone Simulator 47
When an application is running, you can interact with it using your mouse as if it
were your fingertip. Click buttons, drag sliders, and so on. If you click into a field
where input is expected, the iPhone keyboard will display. You can “type” using
your Mac keyboard or by clicking the keyboard’s buttons onscreen. The iPhone’s
copy and paste services are also simulated by clicking and holding on text until the
familiar loupe magnifier appears.
Clicking the virtual Home button (or choosing Hardware, Home from the menu)
exits the application.
Launching an application in the simulator installs it in the simulator, just likeinstalling an app on the iPhone. When you exit the app, it will still be present onthe simulator until you manually delete it.
To remove an installed application from the simulator, click and hold the icon untilit starts “wiggling,” and then click the X that appears in the upper-left corner. Inother words, remove apps from the simulator in the exact same way as you wouldremove them from a physical iPhone!
To quickly reset the simulator back to a clean slate, choose Reset Content andSettings from the iPhone Simulator menu.
FIGURE 2.17Click Build andRun in Xcode tolaunch and runyour applicationin the Simulator.
Did youKnow?
By default, your application will be displayed on a simulated iPhone 3GS screen.To switch to an iPhone 4 display, choose Hardware, iPhone 4 from the Simulator’sapplication menu.

ptg
48 HOUR 2: Introduction to Xcode and the iPhone Simulator
Generating Multitouch EventsEven though you have only a single mouse, you can simulate simple multitouch
events, such as two-finger pulls and pinches, by holding down Option when your cur-
sor is over the iPhone Simulator “screen.” Two circles, representing fingertips, will be
drawn and can be controlled with the mouse. To simulate a touch event, click and
drag while continuing to hold down Option. Figure 2.18 shows the “pinch” gesture.
FIGURE 2.18Simulate simplemultitouch withthe Option key.
Try this using the HelloSimulator app. You should be able to use the simulator’s
multitouch capabilities to shrink or expand the onscreen text and image.
Rotating the Simulated iPhoneTo simulate a rotation on the iPhone, choose Rotate Right or Rotate Left from the
Hardware menu (see Figure 2.19). You can use this to rotate the simulator window
through all four possible orientations and view the results onscreen.
Again, test this with HelloSimulator. The app will react to the rotation events and
orient the text properly.

ptg
Using the iPhone Simulator 49
Simulating Other ConditionsYou will want to test against a few other esoteric conditions in the simulator. Using
the Hardware menu, you can access these additional features:
Device: Choose from the iPhone, iPhone 4, and iPad devices to simulate your
application on each.
Version: Check to see how your app will behave on earlier versions of the iOS.
This option enables you to choose from many of the recent versions of the iOS.
Shake Gesture: Simulate a quick shake of the iPhone.
Lock: Simulates the condition of a locked iPhone. Because a user can lock an
iPhone while an application is running, some developers choose to have their
programs react uniquely to this situation.
Simulate Memory Warning: Triggers an application’s low-memory event.
Useful for testing to make sure your application exits gracefully if resources
run low.
Toggle In-Call Status Bar: When a call is active and an application is started,
an additional line appears at the top of the screen (Touch to return to call).
This option will simulate that line.
Simulate Hardware Keyboard: Simulates a connected keyboard (just use your
Mac’s keyboard).
TV Out: Displays a window that will show the contents of the iPhone’s TV Out
signal. We will not be using this feature in this book.
FIGURE 2.19Rotate the inter-face through thepossible orien-tations.

ptg
50 HOUR 2: Introduction to Xcode and the iPhone Simulator
Test a few of these out on the HelloSimulator application. Figure 2.20 shows the
application’s reaction to a simulated memory warning.
FIGURE 2.20The iPhoneSimulator cantest for applica-tion handling inseveral uniqueconditions.
Further ExplorationYou’re not quite at the stage yet where I can ask you to go off and read some code-
related tutorials, but if you’re interested, you might want to take some time to look
into more of the features offered in Xcode. This introduction was limited to roughly
a dozen pages, but entire volumes can (and have) been written about this unique
tool. Anything else you need is covered in the lessons in this book, but you should
still review Apple’s Xcode Workspace Guide. You can find this document by choosing
Help, Xcode Help from the menu while in the Xcode application.
SummaryThis hour introduced you to the Xcode development environment and the core set of
tools that you’ll be using to create your applications. You learned how to create proj-
ects using Apple’s iPhone templates and how to supplement those templates with
new files and resources. You also explored the editing and navigation capabilities of
Xcode that you’ll come to depend on every day. To illustrate the concepts, you wrote
and built your first iPhone application—and even corrected a few errors that were
intentionally added to try to trip you up!
ptg
51Workshop
This hour finished with a walkthrough on the use of the iPhone Simulator. This tool
will save wear and tear on your iPhone (and your patience) as it provides a quick
and easy way to test code without having to install applications on your phone.
Q&AQ. What is Interface Builder, and how does it fit in?
A. Interface Builder is a very important tool that gets its own lesson in Hour 5. As
the name implies, Interface Builder is mostly about creating the user interface
for your applications. It is an important part of the development suite, but
your interactions with it will be very different from those in Xcode.
Q. Do I have to worry about constantly saving if I’m switching between filesand making lots of changes in Xcode?
A. No. If you switch between files in the Xcode editor, you won’t lose your
changes. Xcode will even prompt you to save, listing all the changed project
files, if you attempt to close the application.
Q. I notice that there are Mac OS X templates that I can access when creatinga project. Can I create a Mac application?
A. Almost all the coding skills you learn in this book can be transferred to Mac
development. The iPhone, however, is a somewhat different piece of hardware
than the Mac, so you’ll need to learn the Mac model for windowing, UI, and
so on.
Q. Can I run commercial applications on the iPhone Simulator?
A. No. You can only run apps that you have built within Xcode.
Workshop
Quiz1. How do you add an image resource to an iPhone project?
2. Is there a facility in Xcode for easily tracking multiple versions of your project?
3. Can the iPhone Simulator be used to test your application on older versions of
the iOS?
ptg
52 HOUR 2: Introduction to Xcode and the iPhone Simulator
Answers1. You can add resources, including images, to an iPhone project by dragging
from the Finder into the project’s Resources group.
2. Yes. Using the snapshot feature you can create different copies of your project
at specific points in time and even compare the changes.
3. Yes. The Hardware, Versions menu can be used to choose earlier versions of
the iOS for testing.
Activities1. Practice creating projects and navigating the Xcode editor. Try out some of the
common editor features that were not covered in this lesson, such as Find and
Replace. Test the use of pragma marks for creating helpful jump-to points
within your source code.
2. Return to the Apple iOS Dev Center and download a sample application.
Using the techniques described in this hour’s lesson, build and test the applica-
tion in the iPhone Simulator.

ptg
HOUR 3
Discovering Objective-C: TheLanguage of Apple Platforms
What You’ll Learn in This Hour:. How Objective-C will be used in your projects. The basics of object-oriented programming. Simple Objective-C syntax. Common data types. How to manage memory
This hour’s lesson marks the midpoint in our exploration of the Apple iOS development
platform. It will give us a chance to sit back, catch our breath, and get a better idea of what
it means to “code” for the iPhone. Both the Macintosh and the iPhone share a common
development environment and, with them, a common development language: Objective-C.
Objective-C provides the syntax and structure for creating applications on Apple plat-
forms. For many, learning Objective-C can be daunting, but with patience, it may quickly
become the favorite choice for any development project. This hour takes you through the
steps you need to know to be comfortable with Objective-C and starts you down the path
to mastering this unique and powerful language.
Object-Oriented Programming and Objective-CTo better understand the scope of this hour, take a few minutes to search for Objective-C
or object-oriented programming in your favorite online bookstore. You will find quite a
few books—lengthy books—on these topics. In this book, roughly 20 pages cover what
other books teach in hundreds of pages. Although it’s not possible to fully cover Objective-
C and object-oriented development in this single hour, we can make sure that you under-
stand enough to develop fairly complex apps.

ptg
54 HOUR 3: Discovering Objective-C: The Language of Apple Platforms
To provide you with the information you need to be successful in iOS development,
this hour concentrates on fundamentals—the core concepts that are used repeatedly
throughout the examples and tutorials in this book. The approach in this hour is to
introduce you to a programming topic in general terms—then look at how it will be
performed when you sit down to write your application. Before we begin, let’s look a
bit closer at Objective-C and object-oriented programming.
What Is Object-Oriented Programming?Most people have an idea of what programming is and have even written a simple
program. Everything from setting your TiVo to record a show to configuring a cook-
ing cycle for your microwave is a type of programming. You use data (such as times)
and instructions (like “record”) to tell your devices to complete a specific task. This
certainly is a long way from developing for the iPhone, but in a way the biggest dif-
ference is in the amount of data you can provide and manipulate and the number
of different instructions available to you.
Imperative DevelopmentThere are two primary development paradigms. First, imperative programming
(sometimes called procedural programming) implements a sequence of commands
that should be performed. The application follows the sequence and carries out
activities as directed. Although there may be branches in the sequence or movement
back and forth between some of the steps, the flow is from a starting condition to an
ending condition with all the logic to make things “work” sitting in the middle.
The problem with imperative programming is that it lends itself to growing, without
structure, into an amorphous blob. Applications gain features when developers tack
on bits of code here and there. Frequently, instructions that implement a piece of
functionality are repeated over and over wherever something needs to take place.
On the other hand, imperative development is something that many people can
pick up and do with very little planning.
The Object-Oriented ApproachThe other development approach, and what we use in this book, is object-oriented
programming (OOP). OOP uses the same types of instructions as imperative devel-
opment but structures them in a way that makes your applications easy to main-
tain and promotes code reuse whenever possible. In OOP, you create objects that
hold the data that describes something along with the instructions to manipulate
that data. Perhaps an example is in order.
Consider a program that enables you to track reminders. With each reminder, you
want to store information about the event that will be taking place—a name, a time

ptg
Object-Oriented Programming and Objective-C 55
to sound an alarm, a location, and any additional miscellaneous notes that you
may want to store. In addition, you need to be able to reschedule a reminder’s
alarm time or completely cancel an alarm.
In the imperative approach, you have to write the steps necessary to track all the
reminders, all the data in the reminders, check every reminder to see whether an
alarm should sound, and so on. It’s certainly possible, but just trying to wrap your
mind around everything that the application needs to do could cause some serious
headaches. An object-oriented approach brings some sanity to the situation.
In an object-oriented model, you could implement a reminder as a single object. The
reminder object would know how to store the properties such as the name, location,
and so on. It would implement just enough functionality to sound its own alarm
and reschedule or cancel its alarm. Writing the code, in fact, would be very similar
to writing an imperative program that only has to manage a single reminder. By
encapsulating this functionality into an object, however, we can then create multi-
ple copies of the object within an application and have them each fully capable of
handling separate reminders. No fuss and no messy code!
Most of the tutorials in this book make use of one or two objects, so don’t worryabout being overwhelmed with OOP. You’ll see enough to get accustomed to theidea—but we’re not going to go overboard!
Another important facet of OOP is inheritance. Suppose you want to create a special
type of reminder for birthdays that includes a list of birthday presents that a person
has requested. Instead of tacking this onto the reminder object, you could create an
entirely new “birthday reminder” that inherits all of the features and properties of a
reminder and then adds in the list of presents and anything else specific to birthdays.
The Terminology of Object-Oriented DevelopmentOOP brings with it a whole range of terminology that you need to get accustomed
to seeing in this book (and in Apple’s documentation). The more familiar you are
with these terms, the easier it will be to look for solutions to problems and interact
with other developers. Let’s establish some basic vocabulary now:
Class: The code, usually consisting of a header/interface file and implementa-
tion file, which defines an object and what it can do.
Subclass: A class that builds upon another class, adding additional features.
Almost everything you use in iPhone development will be a subclass of some-
thing else, inheriting all the properties and capabilities of its parent class.
By theWay

ptg
56 HOUR 3: Discovering Objective-C: The Language of Apple Platforms
Superclass/parent class: The class that another class inherits from.
Singleton: A class that is instantiated only once during the lifetime of a pro-
gram. For example, a class to read your device’s orientation is implemented as
a singleton because there is only one sensor that returns tilt information.
Object/instance: A class that has been invoked and is active in your code.
Classes are the code that makes an object work, whereas an object is the actu-
al class “in action.” This is also known as an “instance” of a class.
Instantiation: The process of creating an active object from a class.
Instance method: A basic piece of functionality, implemented in a class. For
the reminder class, this might be something like setAlarm to set the alarm for
a given reminder.
Class method: Similar to an instance method, but applicable to all the objects
created from a class. The reminder class, for example, might implement a
method called countReminders that provides a count of all the reminder
objects that have been created.
Message: When you want to use a method in an object, you send the object a
message (the name of the method). This process is also referred to as “calling
the method.”
Instance variable: A storage place for a piece of information specific to a
class. The name of a reminder, for example, might be stored in an instance
variable. All variables in Objective-C have a specific “type” that describes the
contents of what they will be holding.
Variable: A storage location for a piece of information. Unlike instance vari-
ables, a “normal” variable is only accessible in the method where it is defined.
Parameter: A piece of information that is provided to a method when it is
messaged. If you were to send a reminder object the “set alarm” method, you
would presumably need to include the time to set. The time, in this case,
would be a parameter used with the setAlarm method.
Property: An instance variable that has been configured using special direc-
tives to provide easy access to your code.
You might be wondering, if almost everything in iPhone development is a subclassof something else, is there some sort of master class that “starts” this tree ofinheritance? The answer is yes. The NSObject class serves as the starting pointfor most of the classes you’ll be using on the iPhone. This isn’t something you’llreally need to worry about in the book—just a piece of trivia to think about.
Did youKnow?

ptg
WatchOut!
Did youKnow?
Object-Oriented Programming and Objective-C 57
It’s important to know that when you develop on the iPhone, you’re going to be tak-
ing advantage of hundreds of classes that Apple has already written for you!
Everything from creating onscreen buttons to manipulating dates and writing files is
covered by prebuilt classes. You’ll occasionally want to customize some of the func-
tionality in those classes, but you’ll be starting out with a toolbar already overflow-
ing with functionality.
Confused? Don’t worry! This book introduces these concepts slowly, and you’llquickly get a feel for how they apply to your projects as you work through severaltutorials in the upcoming hours.
What Is Objective-C?A few years ago, I would have answered this question with “one of the strangest
looking languages I’ve ever seen.” Today, I love it (and so will you). Objective-C was
created in the 1980s and is an extension of the C language. It adds many additional
features to C and, most important, an OOP structure. Objective-C is primarily used
for developing Mac and iOS applications and has attracted a devoted group of fol-
lowers who appreciate its capabilities and syntax.
Objective-C statements are easier to read than other programming languages and
often can be deciphered just by looking at them. For example, consider the follow-
ing line that compares whether the contents of a variable called myName is equal to
John:
[myName isEqualToString:@”John”]
It doesn’t take a very large mental leap to see what is going on in the code snippet.
In traditional C, this might be written as follows:
strcmp(myName,”John”)
The C statement is a bit shorter but does little to convey what the code is actually
doing.
Objective-C is case sensitive! If a program is failing, make sure you aren’t mixingcase somewhere in the code!
Because Objective-C is implemented as a layer on top of C, it is still fully compatible
with code that is written entirely in C. For the most part, this isn’t something that
you should concern yourself with, but unfortunately, Apple has left a bit of “cruft”

ptg
58 HOUR 3: Discovering Objective-C: The Language of Apple Platforms
in their iOS SDK that relies on C-language syntax. You’ll encounter this infrequently,
and it isn’t difficult to code with when it occurs, but it does take away from the ele-
gance of Objective-C just a little.
Now that you have an idea of what OOP and Objective-C are, let’s take a look at
how you’ll be using them over the course of this book.
Exploring the Objective-C File StructureIn the preceding hour, you learned how to use Xcode to create projects and navigate
their files. As mentioned then, the vast majority of your time will be spent in the
Classes folder of Xcode, shown in Figure 3.1. You’ll be adding methods to class files
that Xcode creates for you when you start a project or, occasionally, creating your
own class files to implement entirely new functionality in your application.
FIGURE 3.1Most of yourcoding will occurwithin the filesin the Classesfolder.
Okay, sounds simple enough, but where will the coding take place? If you create a
project and look in the Classes folder, you’ll see quite a few different files staring
back at you.
Header/Interface FilesCreating a class creates two different files: an interface (or header) file (.h) and an
implementation file (.m). The interface file is used to define a list of all of the meth-
ods and properties that your class will be using. This is useful for other pieces of code,
including Interface Builder (which you’ll learn about in Hour 5, “Exploring Interface
Builder”), to determine how to access information and features in your class.

ptg
Exploring the Objective-C File Structure 59
The implementation file, on the other hand, is where you’ll go to write the code that
makes everything defined in the header file work. Let’s review the structure of the
very short, and entirely made-up, interface file in Listing 3.1.
LISTING 3.11: #import <UIKit/UIKit.h>2:3: @interface myClass : myParent <myProtocol> {4: NSString *myString;5: IBOutlet UILabel *myLabel;6: }7:8: +(NSString)myClassMethod:(NSString)aString;9:10: -(NSDate)myInstanceMethod:(NSString)aString anotherParameter:(NSURL)aURL;11:12: @property (nonatomic, retain) UILabel *myLabel;13:14: @end
The #import Directive1: #import <UIKit/UIKit.h>
First, in line 1, the interface file uses the #import directive to include any other
interface files that our application will need to access. The string <UIKit/UIKit.h>
designates the specific file (in this case, UIKit, which gives us access to a vast major-
ity of the classes). If we need to import a file, we’ll be explaining how and why in
the text. The UIKit example will be included by default when Xcode sets up your
classes and covers most of what you’ll need for this book’s examples.
Wait a Sec, What’s a “Directive?”Directives are commands that are added to your files that help Xcode and itsassociated tools build your application. They don’t implement the logic that makesyour app work, but they are necessary for providing information on how your appli-cations are structured so that Xcode knows how to deal with them.
The @interface Directive and Instance VariablesLine 3 uses the @interface directive to begin a set of lines (enclosed in {} braces) to
describe all the instance variables that your class will be providing:
3: @interface myClass : myParent <myProtocol> {4: NSString *myString;5: IBOutlet UILabel *myLabel;6: }

ptg
Did youKnow?
60 HOUR 3: Discovering Objective-C: The Language of Apple Platforms
In this example, a variable that contains an object of type NSString named
myString is declared, along with an object of type UILabel that will be referenced
by the variable myLabel. An additional keyword IBOutlet is added to the front of
the UILabel declaration to indicate that this is an object that will be defined in
Interface Builder. You’ll learn more about IBOutlet in Hour 5.
All instance variables, method declaration lines, and property declarations mustend with a semicolon (;).
Notice that line 3 includes a few additional items after the @interface directive:
myClass : myParent <myProtocol>. The first of these is the name that we’re giv-
ing the class that we’re working on. Here, we’ve decided the class will be called
myClass. The class name is then followed by a colon (:) and a list of the classes that
this class is inheriting from (that is, the “parent” classes). Finally, the parent classes
are followed by a list of “protocols” enclosed within angle brackets, <>.
The implementation and interface files for a class will usually share the name ofthe class. Here, the interface file would be named myClass.h and the implementa-tion file myClass.m.
Protocols? What’s a Protocol?Protocols are a unique feature of Objective-C that sound complicated but reallyaren’t. Sometimes you will come across features that require you to write meth-ods to support their use—such as providing a list of items to be displayed in atable. The methods that you need to write are grouped together under a commonname—this is known as a “protocol.”
Some protocol methods are required; others are optional—it just depends on thefeatures you need. A class that implements a protocol is said to “conform” to thatprotocol.
Defining MethodsLines 8 and 10 declare two methods that need to be implemented in the class:
8: +(NSString)myClassMethod:(NSString)aString;9:10: -(NSDate)myInstanceMethod:(NSString)aString anotherParameter:(NSURL)aURL;
Method declarations follow a simple structure. They begin with a + or -. The +
denotes a class method, whereas - indicates an instance method. Next, the type of
information the method returns is provided in parentheses, followed by the name of
By theWay

ptg
Did youKnow?
Exploring the Objective-C File Structure 61
the method itself. If the method takes a parameter, the name is followed by a colon,
the type of information the method is expecting, and the variable name that the
method will use to refer to that information. If multiple parameters are needed, a
short descriptive label is added, followed by another colon, data type, and variable
name. This pattern can repeat for as many parameters as needed.
In the example file, line 8 defines a class method named myClassMethod that
returns an NSString object and accepts an NSString object as a parameter. The
input parameter is made available in a variable called aString.
Line 10 defines an instance method named myInstanceMethod that returns an
NSDate object, also takes an NSString as a parameter, and includes a second
parameter of the type NSURL that will be available to the method via the variable
aURL.
You’ll learn more about NSString, NSDate, and NSURL in Hour 4, “Inside CocoaTouch,” but as you might guess, these are objects for storing and manipulatingstrings, dates, and URLs, respectively.
Very frequently you will see methods that accept or return objects of the type id.This is a special type in Objective-C that can reference any kind of object andproves useful if you don’t know exactly what you’ll be passing to a method, or ifyou want to be able to return different types of objects from a single method.
Another popular return type for methods is void. When you see void used, itmeans that the method returns nothing.
The @property DirectiveThe final functional piece of the interface file is the addition of @property direc-
tives, demonstrated in line 12:
12: @property (nonatomic, retain) UILabel *myLabel;
The @property directive is used in conjunction with another command called syn-
thesize in the implementation file to simplify how you interact with the instance
variables that you’ve defined in your interface.
Traditionally, to interact with the objects in your instance variables, you have to use
methods called getters and setters (or accessors and mutators, if you want to sound a
bit more exotic). These methods, as their names suggest, get and set values in your
instance variable objects. For example, a UILabel object, like what we’re referencing
with the myLabel instance variable in line 12, represents an onscreen text label that
By theWay

ptgDid youKnow?
62 HOUR 3: Discovering Objective-C: The Language of Apple Platforms
a user can see. The object, internally, has a variety of instance variables itself, such
as color, font, and the text that is displayed. To set the text, you might write some-
thing like this:
[myLabel setText:@”Hello World”];
And to retrieve the text currently displayed, you use the following:
theCurrentLabel=[myLabel getText];
Not too tough, but it’s not as easy as it could be. If we use @property and synthe-
size to define these as properties, we can simplify the code so that it looks like this:
myLabel.text=@”Hello World”;theCurrentLabel=myLabel.text;
We’ll make use of this feature nearly everywhere that we need easy access to
instance variables. After we’ve given this treatment to an instance variable, we can
refer to it as a property. Because of this, you’ll typically see things referred to as
“properties” rather than instance variables.
The attributes (nonatomic, retain) that are provided to the @property directivetell Xcode how to treat the property it creates. The first, nonatomic, informs thesystem that it doesn’t need to worry about different parts of the application usingthe property at the same time, whereas retain makes sure that the object theproperty refers to will be kept around. These are the attributes you should use innearly all circumstances, so get used to typing them!
Ending the Interface FileTo end the interface file, add @end on its own line. This can be seen on line 14 of our
example file:
14: @end
That’s it for the interface! Although that might seem like quite a bit to digest, it cov-
ers almost everything you’ll see in an interface/header file. Now let’s look at the file
where the actual work gets done: the implementation file.
Implementation FilesAfter you’ve defined your instance variables (or properties!) and methods in your
interface file, you need to do the work of writing code to implement the logic of your
application. The implementation file (.m) holds all of the “stuff” that makes your
class work. Let’s take a look at Listing 3.2, a sample skeleton file myClass.m that
corresponds to the interface file we’ve been reviewing.

ptg
Exploring the Objective-C File Structure 63
Listing 3.21: #import “myClass.h”2:3: @implementation myClass4:5: @synthesize myLabel;6:7: +(NSString)myClassMethod:(NSString)aString {8: // Implement the Class Method Here!9: }10:11: -(NSString)myInstanceMethod:(NSString)aString anotherParameter:(NSURL)aURL {12: // Implement the Instance Method Here!13: }14:15: @end
The #import DirectiveThe #import directive kicks things off in line 1 by importing the interface file associ-
ated with the class:
1: #import “myClass.h”
When you create your projects and classes in Xcode, this will automatically be
added to the code for you. If any additional interface files need to be imported, you
should add them to the top of your interface file rather than here.
The @implementation DirectiveThe implementation directive, shown in line 3, tells Xcode what class the file is
going to be implementing. In this case, the file should contain the code to imple-
ment myClass:
3: @implementation myClass
The @synthesize DirectiveIn line 5, we use the @synthesize directive to, behind the scenes, generate the code
for the getters and setters of an instance variable:
5: @synthesize myLabel;
Used along with the @property directive, this ensures that we have a straightfor-
ward way to access and modify the contents of our instance variables as described
earlier.
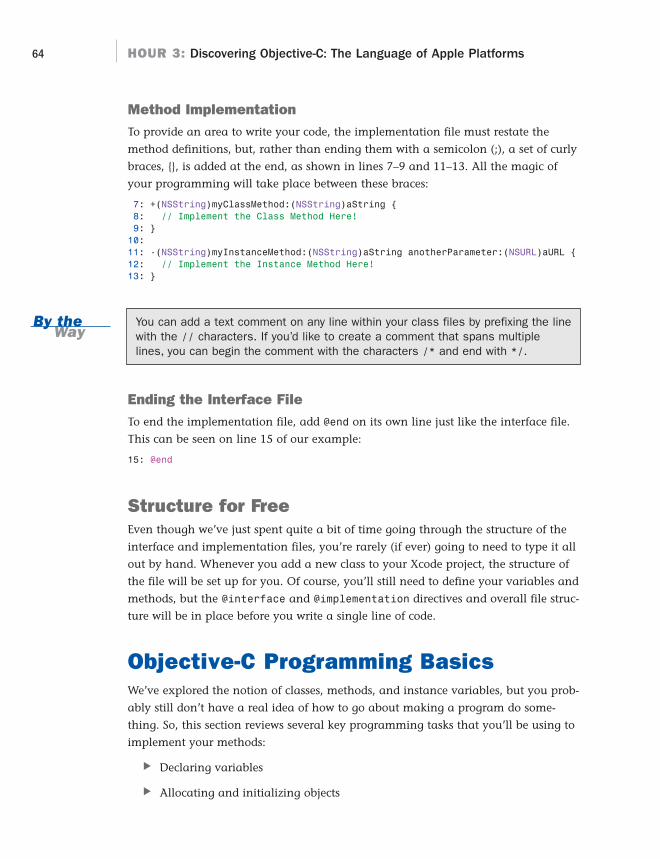
ptg
By theWay
64 HOUR 3: Discovering Objective-C: The Language of Apple Platforms
Method ImplementationTo provide an area to write your code, the implementation file must restate the
method definitions, but, rather than ending them with a semicolon (;), a set of curly
braces, {}, is added at the end, as shown in lines 7–9 and 11–13. All the magic of
your programming will take place between these braces:
7: +(NSString)myClassMethod:(NSString)aString {8: // Implement the Class Method Here!9: }10:11: -(NSString)myInstanceMethod:(NSString)aString anotherParameter:(NSURL)aURL {12: // Implement the Instance Method Here!13: }
You can add a text comment on any line within your class files by prefixing the linewith the // characters. If you’d like to create a comment that spans multiplelines, you can begin the comment with the characters /* and end with */.
Ending the Interface FileTo end the implementation file, add @end on its own line just like the interface file.
This can be seen on line 15 of our example:
15: @end
Structure for FreeEven though we’ve just spent quite a bit of time going through the structure of the
interface and implementation files, you’re rarely (if ever) going to need to type it all
out by hand. Whenever you add a new class to your Xcode project, the structure of
the file will be set up for you. Of course, you’ll still need to define your variables and
methods, but the @interface and @implementation directives and overall file struc-
ture will be in place before you write a single line of code.
Objective-C Programming BasicsWe’ve explored the notion of classes, methods, and instance variables, but you prob-
ably still don’t have a real idea of how to go about making a program do some-
thing. So, this section reviews several key programming tasks that you’ll be using to
implement your methods:
. Declaring variables
. Allocating and initializing objects

ptg
Objective-C Programming Basics 65
. Using an object’s instance methods
. Making decisions with expressions
. Branching and looping
Declaring VariablesEarlier we documented what instance variables in your interface file will look like,
but we didn’t really get into the process of how you declare (or “define”) them (or
use them). Instance variables are also only a small subset of the variables you’ll use
in your projects. Instance variables store information that is available across all the
methods in your class—but they’re not really appropriate for small temporary stor-
age tasks, such as formatting a line of text to output to a user. Most commonly,
you’ll be declaring several variables at the start of your methods, using them for
various calculations, and then getting rid of them when you’ve finished with them.
Whatever the purpose, you’ll declare your variables using this syntax:
<Type> <Variable Name>;
The type is either a primitive data type or the name of a class that you want to
instantiate and use.
Primitive Data TypesPrimitive data types are defined in the C language and are used to hold very basic
values. Common types you’ll encounter include the following:
int: Integers (whole numbers such as 1, 0, and -99)
float: Floating-point numbers (numbers with decimal points in them)
double: Highly precise floating-point numbers that can handle a large num-
ber of digits
For example, to declare an integer variable that will hold a user’s age, you might
enter the following:
int userAge;
After a primitive data type is declared, the variable can be used for assignments and
mathematical operations. The following code, for example, declares two variables,
userAge and userAgeInDays, and then assigns a value to one and calculates the
other:
int userAge;

ptg
By theWay
66 HOUR 3: Discovering Objective-C: The Language of Apple Platforms
int userAgeInDays;userAge=30;userAgeInDays=userAge*365;
Pretty easy, don’t you think? Primitive data types, however, will make up only a very
small number of the variables types that you use. Most variables you declare will be
used to store objects.
Object Data Types and PointersJust about everything that you’ll be working with in your iPhone applications will
be an object. Text strings, for example, will be instances of the class NSString.
Buttons that you display on the screen are objects of the class UIButton. You’ll learn
about several of the common data types in the next hour’s lesson. Apple has literal-
ly provided hundreds of different classes that you can use to store and manipulate
data.
Unfortunately for us, for a computer to work with an object, it can’t just store it like
a primitive data type. Objects have associated instance variables and methods,
making them far more complex. To declare a variable as an object of a specific
class, we must declare the variable as a pointer to an object. A pointer references the
place in memory where the object is stored, rather than a value. To declare a vari-
able as a pointer, prefix the name of the variable with an asterisk. For example, to
declare a variable of type NSString with the intention of holding a user’s name, we
might type this:
NSString *userName;
Once declared, you can use the variable without the asterisk. It is only used in the
declaration to identify the variable as a pointer to the object.
When a variable is a pointer to an object, it is said to reference or point to theobject. This is in contrast to a variable of a primitive data type, which is said tostore the data.
Even after a variable has been declared as a pointer to an object, it still isn’t ready
to be used. Xcode, at this point, only knows what object you intend the variable to
reference. Before the object actually exists, you must manually prepare the memory
it will use and perform any initial setup required. This is handled via the processes
of allocation and initialization—which we review next.

ptg
By theWay
Objective-C Programming Basics 67
Allocating, Initializing, and Releasing ObjectsBefore an object can be used, memory must be allocated and the contents of the
object initialized. This is handled by sending an alloc message to the class that
you’re going to be using, followed by an init message to what is returned by alloc.
The syntax you’ll use is this:
[[<class name> alloc] init];
For example, to declare and create a new instance of UILabel class, you could use
the following code:
UILabel *myLabel;myLabel=[[UILabel alloc] init];
Once allocated and initialized, the object is ready to use.
We haven’t covered the method messaging syntax in Objective-C, but we’ll do soshortly. For now, it’s just important to know the pattern for creating objects.
Convenience MethodsWhen we initialized the UILabel instance, we did create a usable object, but it doesn’t
yet have any of the additional information that makes it useful. Properties such as
what the label should say or where it should be shown on the screen have yet to be
set. We would need to use several of the object’s other methods to really make use of
the object.
These configuration steps are sometimes a necessary evil, but Apple’s classes often
provide a special initialization method called a convenience method. These methods
can be invoked to setup an object with a basic set of properties so that it can be used
almost immediately.
For example, the NSURL class, which you’ll be using later on to work with web
addresses, defines a convenience method called initWithString.
To declare and initialize an NSURL object that points to the website
http://www.teachyourselfiphone.com, we might type the following:
NSURL *iPhoneURL;iPhoneURL=[[NSURL alloc] initWithString:@”http://www.teachyourselfiphone.com/”];
Without any additional work, we’ve allocated and initialized a URL with an actual
web address in a single line of code.

ptg
Did youKnow?
68 HOUR 3: Discovering Objective-C: The Language of Apple Platforms
In this example, we actually created another object, too: an NSString. By typingthe @ symbol followed by characters in quotes, you allocate and initialize a string.This feature exists because strings are so commonly used that having to allocateand initialize them each time you need one would make development quite cum-bersome.
Using Methods and MessagingYou’ve already seen the methods used to allocate and initialize objects, but this is
only a tiny picture of the methods you’ll be using in your apps. Let’s start by review-
ing the syntax of methods and messaging.
Messaging SyntaxTo send an object a message, give the name of the variable that is referencing the
object followed by the name of the method—all within square brackets. If you’re
using a class method, just provide the name of the class rather than a variable
name:
[<object variable or class name> <method name>];
Things start to look a little more complicated when the method has parameters. A
single parameter method call looks like this:
[<object variable> <method name>:<parameter value>];
Multiple parameters look even more bizarre:
[<object variable> <method name>:<parameter value> ➥additionalParameter:<parameter value>];
An actual example of using a multiple parameter method looks like this:
[userName compare:@”John” options:NSCaseInsensitive];
Here an object userName (presumably an NSString) uses the compare:options
method to compare itself to the string “John” in a non-case-sensitive manner. The
result of this particular method is a Boolean value (true or false), which could be
used as part of an expression to make a decision in your application. (We review
expressions and decision making next!)
Throughout the lessons, methods are referred to by name. If the name includes acolon (:), this indicates a required parameter. This is a convention that Apple hasused in their documentation and that has been adopted for this book.
Did youKnow?

ptg
By theWay
Objective-C Programming Basics 69
A useful predefined value in Objective-C is nil. The nil value indicates a lack ofany value at all. You’ll use nil in some methods that call for a parameter that youdon’t have available. A method that receives nil in place of an object can actuallypass messages to nil without creating an error—nil simply returns another nilas the result.
This is used a few times later in the book and should give you a clearer picture ofwhy this behavior is something we’d actually want to happen!
Nested MessagingSomething that you’ll see when looking at Objective-C code is that the result of a
method is sometimes used directly as a parameter within another method. In some
cases, if the result of a method is an object, a developer will send a message directly
to that result.
In both of these cases, using the results directly avoids the need to create a variable
to hold the results. Want an example that puts all of this together? We’ve got one
for you!
Assume you have two NSString variables, userFirstName and userLastName, that
you want to capitalize and concatenate, storing the results in another NSString
called finalString. The NSString instance method capitalizedString returns a
capitalized string, while stringByAppendingString takes a second string as a
parameter and concatenates it onto the string invoking the message. Putting this
together (disregarding the variable declarations), the code looks like this:
tempCapitalizedFirstName=[userFirstName capitalizedString];tempCapitalizedSecondName=[userLastName capitalizedString];finalString=[tempCapitalizedFirstName
stringByAppendingString:tempCapitalizedSecondName];
Instead of using these temporary variables, however, you could just substitute the
method calls into a single combined line:
finalString=[[userFirstName capitalizedString] ➥stringByAppendingString:[userLastName capitalizedString]];
This can be a powerful way to structure your code, but it can also lead to long and
rather confusing statements. Do what makes you comfortable—both approaches are
equally valid and have the same outcome.
A confession. I have a difficult time referring to using a method as sending a“message to an object.” Although this is the preferred terminology for OOP, allwe’re really doing is executing an object’s method by providing the name of theobject and the name of the method.
Did youKnow?

ptg
70 HOUR 3: Discovering Objective-C: The Language of Apple Platforms
BlocksAlthough most of your coding will be within methods, Apple recently introduced
“blocks” to the iOS frameworks. Sometimes referred to as a handler block in the iOS
documentation, these are chunks of code that can be passed as a value when calling
a method. They provide instructions that the method should run when reacting to a
certain event.
For example, imagine a personInformation object with a method called
setDisplayName that would define a format for showing a person’s name. Instead of
just showing the name, however, setDisplayName might use a block to let you
define, programmatically, how the name should be shown:
[personInformation setDisplayName:^(NSString firstName, NSString lastName){
// Implement code here to modify the first name and last name// and display it however you want.
}];
Interesting, isn’t it? Blocks are new to iPhone development and will very rarely be
used in the book. When you start developing motion-sensitive apps, for example,
you will pass a block to a method to describe what to do when a motion occurs.
Where blocks are used, we’ll walk through the process. If you’d like to learn more
about these strange and unusual creatures, read Apple’s “A Short Practical Guide to
Blocks” in the Xcode documentation.
Expressions and Decision MakingFor an application to react to user input and process information, it must be capa-
ble of making decisions. Every decision in an app boils down to a “yes” or “no”
result based on evaluating a set of tests. These can be as simple as comparing two
values, to something as complex as checking the results of a complicated mathe-
matical calculation. The combination of tests used to make a decision is called an
expression.
Using ExpressionsIf you recall your high school algebra, you’ll be right at home with expressions. An
expression can combine arithmetic, comparison, and logical operations.
A simple numeric comparison checking to see whether a variable userAge is greater
than 30 could be written as follows:
userAge>30

ptg
Objective-C Programming Basics 71
When working with objects, we need to use properties within the object and values
returned from methods to create expressions. To check to see whether a string stored
in an object userName is equal to ”John”, we could use this:
[userName compare:@”John”]
Expressions aren’t limited to the evaluation of a single condition. We could easily
combine the previous two expressions to find a user who is over 30 and named
John:
userAge>30 && [userName compare:@”John”]
Common Expression Syntax(): Groups expressions together, forcing evaluation of the innermost group first
==: Tests to see whether two values are equal (e.g., userAge==30)
!= : Tests to see whether two values are not equal (e.g., userAge!=30)
&&: Implements a logical AND condition (e.g., userAge>30 && userAge<40)
||: Implements a logical OR condition (e.g., userAge>30 || userAge<10)
!: Negates the result of an expression, returning the opposite of the originalresult (e.g., !(userAge==30) is the same as userAge!=30)
For a complete list of C expression syntax, you may want to refer tohttp://en.wikipedia.org/wiki/Operators_in_C_and_C%2B%2B.
As mentioned repeatedly, you’re going to be spending lots of time working with
complex objects and using the methods within the objects. You can’t make direct
comparisons between objects as you can with simple primitive data types. To suc-
cessfully create expressions for the myriad objects you’ll be using, you must review
each object’s methods and properties.
Making Decisions with if-then-else and switch StatementsTypically, depending on the outcome of the evaluated expression, different code
statements are executed. The most common way of defining these different execu-
tion paths is with an if-then-else statement:
if (<expression>) {// do this, the expression is true.
} else {// the expression isn’t true, do this instead!
}
For example, consider the comparison we used earlier to check a userName
NSString variable to see whether its contents were set to a specific name. If we want
to react to that comparison, we might write the following:

ptg
72 HOUR 3: Discovering Objective-C: The Language of Apple Platforms
If ([userName compare:@”John”]) {userMessage=@”I like your name”;
} else {userMessage=@”Your name isn’t John, but I still like it!”;
}
Another approach to implementing different code paths when there are potentially
many different outcomes to an expression is to use a switch statement. A switch
statement checks a variable for a value, and then executes different blocks of code
depending on the value that is found:
switch (<numeric value>) {case <numeric option 1>:// The value matches this optionbreak;
case <numeric option 2>:// The value matches this optionbreak;
default:// None of the options match the number.
}
Applying this to a situation where we might want to check a user’s age (stored in
userAge) for some key milestones and then set an appropriate userMessage string if
they are found, the result might look like this:
switch (userAge) {case 18:userMessage=@”Congratulations, you’re an adult!”;break;
case 21:userMessage=@”Congratulations, you can drink champagne!”;break;
case 50:userMessage=@”You’re half a century old!”;break;
default:userMessage=@”Sorry, there’s nothing special about your age.”;
}
Repetition with LoopsSometimes you’ll have a situation where you need to repeat several instructions over
and over in your code. Instead of typing the lines repeatedly, you can loop over
them. A loop defines the start and end of several lines of code. As long as the loop is
running, the program executes the lines from top to bottom, and then restarts again
from the top. The loops you’ll use are of two types: count-based and condition-
based.
In a count-based loop, the statements are repeated a certain number of times. In a
condition-based loop, an expression determines whether a loop should occur.

ptg
Did youKnow?
Objective-C Programming Basics 73
The count-based loop you’ll be using is called a for loop, with this syntax:
for (<initialization>;<test condition>;<count update>) {// Do this, over and over!
}
The three “unknowns” in the for statement syntax are a statement to initialize a
counter to track the number of times the loop has executed, a condition to check to
see whether the loop should continue, and finally, an increment for the counter. An
example of a loop that uses the integer variable count to loop 50 times could be
written as follows:
int count;for (count=0;count<50;count=count+1) {// Do this, 50 times!
}
The for loop starts by setting the count variable to 0. The loop then starts and con-
tinues as long as the condition of count<50 remains true. When the loop hits the
bottom curly brace (}) and starts over, the increment operation is carried out and
count is increased by 1.
In C and C-like languages, like Objective-C, integers are usually incremented byusing ++ at the end of the variable name. In other words, rather than usingcount=count+1, most frequently you’ll encounter count++, which does the samething. Decrementing works the same way, but with —.
In a condition-based loop, the loop continues while an expression remains true.
There are two variables of this loop type that you’ll encounter, while and do-while:
while (<expression>) {// Do this, over and over, while the expression is true!
}
and
do {// Do this, over and over, while the expression is true!
} while (<expression>);
The only difference between these two loops is when the expression is evaluated. In
a standard while loop, the check is done at the beginning of the loop. In the do-
while loop, however, the expression is evaluated at the end of every loop.
For example, suppose you are asking users to input their names and you want to
keep prompting them until they type John. You might format a do-while loop like
this:

ptg
74 HOUR 3: Discovering Objective-C: The Language of Apple Platforms
do {// Get the user’s input in this part of the loop
} while (![userName compare:@”John”]);
The assumption is that the name is stored in a string object called userName.
Because you wouldn’t have requested the user’s input when the loop first starts, you
would use a do-while loop to put the test condition at the end. Also, the value
returned by the string compare method has to been negated with the ! operator
because you want to continue looping as long as the comparison of the userName to
“John” isn’t true.
Loops are a very useful part of programming and, along with the decision state-
ments, will form the basis for structuring the code within your object methods. They
allow code to branch and extend beyond a linear flow.
Although an all-encompassing picture of programming is beyond the scope of this
book, this should give you some sense of what to expect in the rest of the book. Let’s
now close out the hour with a topic that causes quite a bit of confusion for begin-
ning developers: memory management.
Memory ManagementIn the first hour of this book, you learned a bit about the limitations of the iPhone
as a platform. One of the biggies, unfortunately, is the amount of memory that your
programs have available to them. Because of this, you must be extremely judicious
in how you manage memory.
The iPhone doesn’t clean up memory for you. Instead, you must manually keep
track of your memory usage. This is such an important notion, in fact, that it’s bro-
ken out into its own section here.
Releasing ObjectsEach time you allocate memory for an object, you’re using up memory on the
iPhone. If you allocate too many objects, you run out of memory, and your applica-
tion crashes or is forced to quit. To avoid a memory problem, you should keep
objects around long enough to use them only, and then get rid of them. When you
have finished using an object, you can send the release message (or “call the
release method” if you prefer that semantic), like this:
[<variable> release];

ptg
By theWay
Memory Management 75
Consider the earlier example of allocating an instance of NSURL:
NSURL *iPhoneURL;iPhoneURL=[[NSURL alloc] initWithString:@”http://www.teachyourselfiphone/”];
Suppose that after you allocate and initialize the URL, you use it to load a web
page. After the page loads, there’s no sense in having the URL sitting around taking
up memory. To tell Xcode that you no longer have a need for it, you can use the fol-
lowing:
[iPhoneURL release];
Using the autorelease MethodIn some instances, you may allocate an object and then have to pass that object off
to another method to use as it pleases. In a case like this, you can’t directly release
the object because you are no longer in control of it. If you find yourself in a posi-
tion where an object is “out of your hands,” so to speak, you can still indicate that
you are done with it and absolve yourself of the responsibility of releasing it. To do
this, use the autorelease method:
[<variable> autorelease];
The autorelease method shouldn’t be used unless release can’t be. Objectsthat are autoreleased are added to a pool of objects that are occasionally auto-matically released by the system. This isn’t nearly as efficient as taking care of ityourself.
Retaining ObjectsOn some occasions, you may not be directly responsible for creating an object. (It
may be returned from another method, for example.) Depending on the situation,
you might actually need to be worried about it being released before you’re done
using it. To tell the system that an object is still needed, you can use its retain
method:
[<variable> retain];
Again, you want to release the object when you’ve completed using it.

ptg
76 HOUR 3: Discovering Objective-C: The Language of Apple Platforms
Retain and Release, Behind the ScenesBehind the scenes, the iOS maintains a “retain” count to determine when it canget rid of an object. For example, when an object is first allocated, the “retain”count is incremented. Any use of the retain message on the object also increas-es the count.
The release message, on the other hand, decrements the count. As long as theretain count remains above zero, the object will not be removed from memory.When the count reaches zero, the object is considered unused and is removed.
Releasing Instance Methods in deallocInstance variables are unique in that they usually stick around for as long as an
object exists—so, when do they get released? To release instance variables, you add the
appropriate release lines to a method called dealloc that will exist in each of your
classes. By default, this method has a single line that calls its parent class’s dealloc
method. You should add your release messages prior to this. An implementation of
dealloc that releases an instance variable called myLabel would read as follows:
- (void)dealloc {[myLabel release];[super dealloc];
}
Because managing memory is such a critical piece of creating an efficient and
usable iPhone application, I make a point of indicating when you should release
objects throughout the text—both for variables you use in your methods and
instance variables that are defined for your classes.
Rules for ReleasingIf you find yourself looking at your code wondering what you should release and
what you shouldn’t, here are a few simple rules that can help:
. Variables that hold primitive data types do not need to be released.
. If you allocate an object, you are responsible for releasing it.
. If you use retain to keep an object around, you need to send a release when
you’re done with it.
. If you use a method that allocates and returns an object on its own, you are
not responsible for releasing it.
. You are not responsible for releasing strings that are created with the @”text
string” syntax.

ptg
Summary 77
As with everything, practice makes perfect, and you’ll have plenty of opportunities
for applying what you’ve learned in the book’s tutorials.
Keep in mind that a typical book would spend multiple chapters on these topics, so
our goal has been to give you a starting point that future hours will build on, not to
define everything you’ll ever need to know about Objective-C and OOP.
Further ExplorationAlthough you can be successful in learning iPhone programming without spending
hours and hours learning more Objective-C, you will find it easier to create complex
applications if you become more comfortable with the language. Objective-C, as
we’ve said, is not something that can be described in a single hour. It has a far-
reaching feature set that make it a powerful and elegant development platform.
To learn more about Objective-C, check out Programming in Objective-C 2.0, Second
Edition (Addison-Wesley Professional, 2009), Mac OS X Advanced Development
Techniques (Sams, 2003), and Xcode 3 Unleashed (Sams, 2008).
Of course, Apple has its own Objective-C documentation that you can access directly
from within the Xcode documentation tool. (You’ll learn more about this in the next
hour.) I recommend the following documents provided by Apple:
Learning Objective-C: A Primer
Object-Oriented Programming with Objective-C
The Objective-C 2.0 Programming Language
You can read these within Xcode or via the online Apple iOS Reference Library at
http://developer.apple.com/iphone/library. One quick warning: These documents are
several hundred pages in length, so you may want to continue your Objective-C
education in parallel with the iPhone lessons in this book.
SummaryIn this hour, you learned about object-oriented development and the Objective-C
language. Objective-C will form the structure of your applications and give you tools
to collect and react to user input and other changes. After reading this hour’s lesson,
you should understand how to make classes, instantiate objects, call methods, and
use decision and looping statements to create code that implements more complex
logic than a simple top-to-bottom workflow. You should also have an understanding
of memory management on the iPhone and how to free memory used by objects
that you have instantiated.

ptg
78 HOUR 3: Discovering Objective-C: The Language of Apple Platforms
Much of the functionality that you’ll be using in your applications will come from
the hundreds of built-in classes that Apple provides within the iOS SDK, which we
delve into in Hour 4.
Q&AQ. Is Objective-C on the iPhone the same as on Mac OS X?
A. For the most part, yes. One of the big differences, however, is that Mac OS X
implements automatic garbage collection, meaning that much of the memory
management is handled for you, rather than the manual process used on the
iPhone.
Q. Can an if-then-else statement be extended beyond evaluating and acting ona single expression?
A. Yes. The if-then-else statement can be extended by adding another if
statement after the else:
if (<expression>) {// do this, the expression is true.
} else if (<expression>) {// the expression isn’t true, do this instead.
} else {// Neither of the expressions are true, do this anyway!
}
You can continue expanding the statement with as many else-ifs as you
need.
Q. Why are primitive data types used at all? Why aren’t there objects for every-thing?
A. Primitive data types take up much less memory than objects and are much
easier to manipulate. Implementing a simple integer within an object would
add a layer of complexity and inefficiency that just isn’t needed.
Q. Why do I have to release objects that exist for the entire lifetime of myapplication. Won’t they just go away when it quits?
A. It’s good practice. Even if your application is quitting, it is still responsible for
cleaning up after itself.

ptg
79Workshop
Workshop
Quiz1. When creating a subclass, do you have to rewrite all the methods in from the
parent class?
2. What is the basic syntax for allocating and initializing an object?
3. What does the release message do?
Answers1. No. The subclass inherits all the methods of the parent class.
2. To allocate and initialize an object, use the syntax [[<class name> alloc]
init].
3. Sending the release message to an object decrements the object’s retain
count. When the count is zero, the object is removed from memory.
Activities1. Start Xcode and create a new project using the iPhone View-Based Application
template. Review the contents of the classes in the Xcode Classes folder. With
the information you’ve read in this hour, you should now be able to read and
navigate the structure of these files.
2. Return to the Apple iOS Dev Center (http://developer.apple.com/iphone/
library) and begin reviewing the Learning Objective-C: A Primer tutorial.

ptg
This page intentionally left blank

ptg
HOUR 4
Inside Cocoa Touch
What You’ll Learn in This Hour:. What Cocoa Touch is and what makes it unique. The technology layers that make up the iOS Platform. A basic iPhone application life cycle. Common classes and development techniques you’ll be using throughout this
book. How to find help using the Apple developer documentation
When computers first started to appear in households almost 30 years ago, applications
rarely shared common interface elements. It took an instruction manual just to figure out
the key sequence to exit from a piece of software. Today, user interfaces have been stan-
dardized so that moving from application to application doesn’t require starting from
scratch.
What has made this possible? Not faster processors or better graphics, but frameworks that
enforce consistent implementation of the features provided by the devices they’re running on.
In this hour, we take a look at the frameworks you’ll be using in your iPhone applications.
What Is Cocoa Touch?In the preceding hour, you learned about the Objective-C language, the basic syntax, and
what it looks like. Objective-C will form the functional skeleton of your applications. It
will help you structure your applications, make logical decisions during the life cycle of
your application, and enable you to control how and when events will take place. What
Objective-C doesn’t provide, however, is a way to access what makes your iPhone the com-
pelling touch-driven platform that it is.

ptg
82 HOUR 4: Inside Cocoa Touch
Consider the following Hello World application:
int main(int argc, char *argv[]) {printf(“Hello World”);
}
This code is typical of a beginner Hello World application written in C. It will com-
pile and execute on the iPhone, but because the iPhone relies on Cocoa Touch for
creating interfaces and handling user input and output, this version of Hello World
is quite meaningless. Cocoa Touch is the collection of software frameworks that is
used to build iOS applications and the runtime that those applications are executed
within. Cocoa Touch includes hundreds of classes for managing everything from
buttons to URLs.
Cocoa Touch is the highest of several “layers” of services in the iOS and isn’tnecessarily the only layer that you’ll be developing in. That said, there really isn’t aneed to worry too much about where Cocoa Touch begins and ends—the develop-ment will be the same, regardless. Later in this hour, you get a complete overviewof iOS service layers.
Returning to the Hello World example, if we had defined a text label object named
iPhoneOutput within a project, we could set it to read “Hello World” using
Objective-C and the appropriate Cocoa Touch class property like this:
[iPhoneOutput.text=@”Hello World”];
Seems simple enough, as long as we know that the UILabel object has a text prop-
erty, right?
Keeping Your Cool in the Face of OverwhelmingFunctionalityThe questions that should be coming to most beginners right about now include
these: I know there are many different features provided through iPhone applica-
tions; how in the world will this book document all of them? How will I ever find
what I need to use for my own applications?
These are great questions, and probably some of the biggest concerns that I’ve heard
from individuals who want to program for the platform but have no idea where to
start. The bad news is that we can’t document everything. We can cover the funda-
mentals that you need to start building, but even in a multivolume set of “teach
yourself” books, there is so much depth to what is provided by Cocoa Touch that it
isn’t feasible to document a complete how-to reference.
By theWay

ptg
Exploring the iOS Technology Layers 83
The good news is that Cocoa Touch and the Apple developer tools encourage explo-
ration. In Hour 6, “Model-View-Controller Application Design,” you’ll start building
interfaces visually using the Interface Builder application. As you drag objects (but-
tons, text fields, and so on) to your interface, you will be creating instances of Cocoa
Touch classes. The more you “play,” the quicker you will begin to recognize class
names and properties and the role they play in development. Even better, Xcode’s
developer documentation provides a complete reference to Cocoa Touch—allowing
you to search across all available classes, methods, properties, and so on. We take a
look at the documentation tool later this hour.
Young, Yet MatureOne of the most compelling advantages to programming using Cocoa Touch versus
platforms such as Android or the Palm Pre is that while the iOS family is a “young”
platform for Apple, the Cocoa frameworks are amazingly mature. Cocoa was borne
out of the NeXTSTEP platform—the environment that was used by NeXT computers
in the mid-1980s. In the early 90s, NeXTSTEP evolved into the cross-platform
OpenStep. Finally, in 1996, Apple purchased NeXT Computer, and over the next
decade the NeXTSTEP/OpenStep framework became the de facto standard for
Macintosh development and was renamed Cocoa. You’ll notice that there are still
signs of Cocoa’s origins in class names that begin with NS.
What’s the Difference Between Cocoa and Cocoa Touch?Cocoa is the development framework used for most native Mac OS X applications.The iPhone, although based on many of the foundational technologies of Mac OSX, isn’t quite the same. Cocoa Touch is heavily customized for a touch interfaceand working within the constraints of a handheld system. Desktop applicationcomponents that would traditionally require extensive screen real estate havebeen replaced by simpler multiple-view components, mouse clicks with “touch up”and “touch down” events.
The good news is that if you decide to make the transition from iOS developer to Macdeveloper, you’ll follow many of the same development patterns on both platforms—itwon’t be like starting from scratch.
Exploring the iOS Technology LayersApple describes the technologies implemented within the iOS as a series of layers, with
each layer being made up of different frameworks that can be used in your applica-
tions. As you might expect, the Cocoa Touch layer is at the top (see Figure 4.1).

ptg
84 HOUR 4: Inside Cocoa Touch
Let’s review some of the most important frameworks that make up each of the lay-
ers. If you want a comprehensive guide to all frameworks, just search for each layer
by its name in the Apple Xcode documentation.
Apple has included three important frameworks in every iOS application template(CoreGraphics, Foundation, and UIKit). These frameworks are all that is needed forsimple iOS applications and will cover most of what you do in this book. Whenadditional frameworks are needed, I describe how to include them in your projects.
The Cocoa Touch LayerThe Cocoa Touch layer is made up of several frameworks that will provide the core
functionality for your applications—including multitasking and advertising in iOS
4.x. UIKit could be described as the “rock star,” delivering much more than the UI in
its name implies.
UIKitUIKit covers a wide range of functionality. It is responsible for application launching
and termination, controlling the interface and multitouch events, and providing
access to common views of data (including web pages and Word and Excel docu-
ments, among others).
UIKit is also responsible for many intra-iPhone integration features. Accessing the
Media Library, Photo Library, and accelerometer is also accomplished using the
classes and methods within UIKit.
Map KitThe Map Kit framework enables developers to add Google Map views to any appli-
cation, including annotation, location, and event-handling features.
Core OS
Core Services
Media
Cocoa Touch
FIGURE 4.1The technologylayers thatmake up theiOS.
By theWay
ptg
Exploring the iOS Technology Layers 85
Game KitThe Game Kit framework adds network-interactivity to iPhone applications. Game
Kit supplies mechanisms for creating and using peer-to-peer networks, including ses-
sion discovery, mediation, and voice chat. These features can be added to any appli-
cation, game or not!
Message UI/Address Book UIApple is sensitive to the need for integration between iOS applications. The Message
UI and Address Book UI frameworks can be used to enable email composition and
contact access from any application you develop.
iAdThe iAd framework supports the addition of ads to your applications. iAds are inter-
active advertising pieces that can be added to your software with a simple drag and
drop. You do not need to manage iAds interactions in your application—Apple does
this for you.
The Media LayerWhen Apple makes a computing device, you’d better believe that they put some
thought into the media capabilities. The iPhone can create complex graphics, play
back audio and video, and even generate real-time 3D graphics. The Media layer’s
frameworks handle it all.
AV Foundation FrameworkThe AV Foundation Framework can be used to manage complex sound and video
playback and editing. This should be used for implementing advanced features,
such as movie recording, track management, and audio panning.
Core AudioThe Core Audio framework exposes methods for handling basic playback and
recording of audio on the iPhone. It includes the AudioToolbox framework, which
can be used for playing alert sounds or generating short vibrations, and the
AudioUnit.framework for processing sounds.
Core GraphicsUse the Core Graphics framework to add 2D drawing and compositing features to
your applications. Although most of this book will use existing interface classes and
images in its applications, you can use core graphics to programmatically manipu-
late the iPhone’s view.

ptg
86 HOUR 4: Inside Cocoa Touch
Core TextProvides precise positioning and control over text that is displayed on the iPhone
screen. Core Text should be used in mobile text-processing applications and software
that requires high-quality and fast presentation and manipulation of styled text.
Image I/OThe Image I/O framework can be used to import and export both image data and
image metadata for any file format supported by iOS.
Media PlayerThe Media Player framework provides you, the developer, with an easy way to play
back movies with typical onscreen controls. The player can be invoked directly from
your application.
OpenGL ESOpenGL ES is a subset of the popular OpenGL framework for embedded systems (ES).
OpenGL ES can be used to create 2D and 3D animation on the iPhone. Using OpenGL
requires additional development experience beyond Objective-C but can generate
amazing scenes for a handheld device—similar to what is possible on modern game
consoles.
Quartz CoreThe Quartz Core framework is used to create animations that will take advantage of
the hardware capabilities of your iPhone. This includes the feature set known as
Core Animation.
The Core Services LayerThe Core Services layer is used to access lower-level operating system services, such
as file access, networking, and many common data object types. You’ll make use of
core services frequently by way of the Foundation framework.
Address BookThe Address Book framework is used to directly access and manipulate address book
information. This is used to update contact information and/or use it within your
applications.
CFNetworkThe CFNetwork framework provides access to BSD sockets, HTTP and FTP requests,
and Bonjour discovery.

ptg
Exploring the iOS Technology Layers 87
Core DataThe Core Data framework can be used to create the data model of an iOS applica-
tion. Core Data provides a relational data model based on SQLite and can be used
to bind data to interface objects to eliminate the need for complex data manipula-
tions in code.
Core FoundationCore Foundation provides much of the same functionality of the Foundation frame-
work but is a procedural C framework, and therefore requires a different develop-
ment approach that is, arguably, less efficient than Objective-C’s object-oriented
model. You should probably avoid Core Foundation unless you absolutely need it.
FoundationThe Foundation framework provides an Objective-C wrapper around features in
Core Foundation. Manipulation of strings, arrays, and dictionaries is handled
through the Foundation framework, as are other fundamental application necessi-
ties, including managing application preferences, threads, and internationalization.
Event KitThe Event Kit framework is used to access calendar information stored on the iOS
device. It also enables the developer to create new events within a calendar, includ-
ing alarms.
Core LocationThe Core Location framework can be used to obtain latitude and longitude informa-
tion from the iPhone’s GPS (WiFi-based location service in the original iPhone)
along with a measurement of precision.
Core MotionThe Core Motion framework manages most motion-related events on the iOS plat-
form, such as using the accelerometer or the new gyroscope of the iPhone 4. Core
Motion is new to iOS 4, but the features have been available in earlier versions of
the OS.
Quick LookThe Quick Look framework implements file viewing within an application, even if
the application does not “know” how to open a specific file type. This is intended for
viewing files downloaded to the device.

ptg
88 HOUR 4: Inside Cocoa Touch
Store KitThe Store Kit framework enables developers to create in-application transactions for pur-
chasing content without exiting the software. All interactions take place through the App
Store, so no financial data is requested or transmitted through the Store Kit methods.
System ConfigurationUse the System Configuration framework to determine the current state of the
iPhone’s network configuration—what network it is connected to (if any) and what
devices are reachable.
The Core OS LayerThe Core OS layer, as you’d expect, is made up of the lowest-level services in the iOS.
These features include threads, complex math, hardware accessories, and cryptogra-
phy. You should only need to access these frameworks in rare circumstances.
AccelerateThe Accelerate framework simplifies complete calculations and large-number manip-
ulation. This includes digital signal processing capabilities.
External AccessoryThe External Accessory framework is used to develop interfaces to accessories connect-
ed via the dock connector or Bluetooth.
SecurityThe Security framework provides functions for performing cryptographic functions
(encrypting/decrypting data). This includes interacting with the iOS keychain to add,
delete, and modify items.
SystemThe System framework gives developers access to a subset of the typical tools they
would find in an unrestricted UNIX development environment.
Tracing the iPhone Application LifeCycleTo help you get a sense for where your “work” in developing an iPhone application
fits in, it helps to look at the iPhone application life cycle. Figure 4.2 shows Apple’s
simplified diagram of the life cycle.

ptg
Tracing the iPhone Application Life Cycle 89
Let’s try to put some context around what you’re looking at, starting on the left side
of the diagram. As you’ve learned, UIKit is a component of the Cocoa Touch that pro-
vides much of the foundation of iPhone applications—user interface management,
event management, and overall application execution management. When you cre-
ate an application, UIKit handles the setup of the application object via the main
and UIApplicationMain functions—neither of which you should need to touch.
Once the application is started, an event loop begins. This loop receives the events
such as screen touches, and then hands them off to your own methods. The loop
continues until the application is asked to move to the background (usually through
the user pushing the iPhone Home button).
Your code comes into play on the right side of the diagram. Xcode will automatical-
ly set up your iOS projects to include an application delegate class. This class can
implement the methods application:didFinishLaunchingWithOptions and
applicationDidEnterBackground (among others) so that your program can exe-
cute its own custom code when the application launches and when it is suspended
by clicking the Home button.
UIKit
User Taps Application Icon
Your Code
main()
UIApplicationMain()
EventLoop
System Asks Application to Quit Foreground
Application Moves to Background
applicationWillResignActive:
applicationDidEnterBackground:
application:didFinishLaunchingWithOptions:
Handle Event
FIGURE 4.2The life cycle ofa typical iPhoneapplication.

ptg
90 HOUR 4: Inside Cocoa Touch
Wait a second?! When does my application stop running!?Beginning in iOS 4.0, applications no longer terminate when the user presses theHome button. Instead, the application stops where it’s at and sits quietly in thebackground. When the user selects it from the task manager or starts it from thehome screen, it returns to the foreground and continues exactly where it left off—automatically.
To support this process, the application delegate provides the methodapplicationDidEnterBackground, which is called when the application enters thebackground. This method should be used by your code to store any informationthat the application needs, in case it is terminated while it is the background—either by iOS cleaning up resources or by the user manually terminating it in thetask manager.
The previous method, applicationWillTerminate, can still be used if you devel-op an application that does not support backgrounding at all, but this is not thedefault. You’ll learn more about these methods and iOS background processingoptions in Hour 21, “Building Background-Aware Applications.”
After an application finishes launching, the delegate object typically creates a view
controller object and view and adds them to the iPhone “window.” You’ll learn more
about these concepts in the next hour, but for now, think of a view as what is being
displayed on the iPhone screen and the view controller as an object that can be pro-
grammed to respond when it receives an event notification (such as touching a but-
ton) from the event loop.
The majority of your work will take place within the view controller. You’ll receive
events from the Cocoa Touch interface and react to them by writing Objective-C
code that manipulates other objects within the view. Of course, things can get a bit
more complex than a single view and a single view controller, but the same basic
approach can be applied in most cases.
Now that you have a better picture of the iOS service layers and application life
cycle, let’s take a look at some of the classes that you’ll be seeing throughout this
book.
Cocoa FundamentalsThousands of classes are available in the iOS SDK, but most of your applications
will be using a small set of classes to implement 90% of their features. To familiarize
you with the classes and their purposes, let’s review some of the names you’re going
to be seeing very, very frequently over the next few hours. Before we begin, keep
these few key points in mind:

ptg
Cocoa Fundamentals 91
. Apple sets up much of the structure of your application for you in Xcode. This
means that even though you need some of these classes, you won’t have to lift
a finger to use them. Just create a new Xcode project and they’re added for
you.
. You’ll be adding instances of many of these objects to your projects just by
dragging icons in the Interface Builder application. Again, no coding needed!
. When a class is used, I tell you why it is needed, what it does, and how it is
used in the project. I don’t want you to have to jump around digging for refer-
ences in the book, so focus on the concepts, not memorization.
. In the next section of this hour’s lesson, you’ll learn about the Apple docu-
mentation tools. These helpful utilities will enable you to find all the class,
property, and method information that you could ever hope for. If it’s gritty
details you want, you’ll have them at your fingertips!
Core Application ClassesWhen you create a new application with even the most basic user interaction, you’ll
be taking advantage of a collection of common core classes. Many of these you
won’t be touching, but they still perform an important role. Let’s review several of
these classes now.
The Root Class (NSObject)As you learned in Hour 3, “Discovering Objective-C: The Language of Apple
Platforms,” the power of object-oriented programming is that when you create a
subclass of an object, you inherit that object’s functionality. The root class, from
which almost all Objective-C classes inherit, is NSObject. This object defines meth-
ods common to all classes, such as alloc, dealloc, and init. You will not need to
create NSObject instances manually in this book, but you will use methods inherit-
ed from this class to create and manage new objects.
The Application Object (UIApplication)Every application on the iPhone implements a subclass of UIApplication. This
class handles events, such as notification of when an application has finished load-
ing, as well as application configuration, such as controlling the status bar and set-
ting badges (the little red numbers that can appear on application icons). Like
NSObject, you won’t need to create this yourself; just be aware it exists.

ptg
92 HOUR 4: Inside Cocoa Touch
Window Objects (UIWindow)The UIWindow class provides a container for the management and display of views.
In iOS-speak, a view is more like a typical desktop application “window,” whereas
an instance of UIWindow is just a container that holds the view. You will be using
only a single UIWindow instance in this book, and it will be created automatically in
the project templates that Xcode provides for us.
Views (UIView)The UIView class defines a rectangular area and manages all the onscreen display
within that region—what we will refer to as a view. Most of your applications will
start by adding a view to an instance of UIWindow.
Views can be nested to form a hierarchy; they rarely exist as a single object. A top-
level view, for example, may contain a button and field. These controls would be
referred to as subviews and the containing view as the superview. Multiple levels of
views can be nested, creating a complex hierarchy of subviews and superviews.
You’ll be creating almost all of your views visually in Interface Builder, so don’t
worry: Complex doesn’t mean difficult!
Responders (UIResponder)The UIResponder class provides a means for classes that inherit from it to respond
to the touch events produced by the iPhone. UIControl, the superclass for nearly all
onscreen controls, inherits from UIView, and subsequently, UIResponder. An
instance of UIResponder is just called a responder.
Because there can be multiple objects that could potentially respond to an event,
iOS will pass events up what is referred to as a chain of responders. The responder
instance that can handle the event is given the designation first responder. When
you’re editing a field, for example, the field has first responder status because it is
actively handling user input. When you leave the field, it “resigns” first responder
status. For most of your iOS development work, you won’t be directly managing
responders in code.
Onscreen Controls (UIControl)The UIControl class inherits from UIView and is used as the superclass for almost all
onscreen controls, such as buttons, fields, and sliders. This class is responsible for han-
dling the triggering of actions based on touch events, such as “pressing” a button.
As you’ll learn in the next hour, a button defines a handful of events that you can
respond to; Interface Builder enables you to tie those events to actions that you’ve
coded. UIControl is responsible for implementing this behavior behind the scenes.

ptg
Cocoa Fundamentals 93
View Controllers (UIViewController)You’ll be using the UIViewController class in almost all the application projects
throughout this book to manage the contents of your views. You’ll use a
UIViewController subclass, for example, to determine what to do when a user taps
a button. Make a sound? Display an image? However you choose to react, the code
you use to carry out your action will be implemented as part of a view controller
instance. You’ll learn much more about view controllers over the next two hours.
Data Type ClassesAn object can potentially hold data. In fact, most of the classes we’ll be using con-
tain a number of properties that store information about an object. There are, how-
ever, a set of Foundation classes that you’ll be using throughout this book for the
sole purpose of storing and manipulating information.
If you’ve used C or C-like languages before, you might find that these data typeobjects are similar to data types already defined outside of Apple’s frameworks.By using the Foundation framework implementations, you gain access to a widerange of methods and features that go well beyond the C/C++ data types. You willalso be able to work with the objects in Objective-C using the same developmentpatterns as any other object.
Strings (NSString/NSMutableString)Strings are collections of characters—numbers, letters, and symbols. You’ll be using
strings to collect user input and to create and format user output frequently
throughout the book.
As with many of the data type objects you’ll be using, there are two string classes:
NSString and NSMutableString. The difference, as the name describes, is that one
of the classes can be used to create strings that can be changed (mutable). An
NSString instance remains static once it is initialized, whereas an NSMutableString
can be changed (lengthened, shortened, replaced, and so on).
Strings are used so frequently in Cocoa Touch applications that you can create and
initialize an NSString using the notation @”<my string value>”. For example, if
you needed to set the text property of an object called myLabel to a new string that
reads “Hello World!”, you could use the following:
myLabel.text=@”Hello World!”
Strings can also be initialized with the values of other variables, such as integers,
floating-point numbers, and so on.
By theWay

ptg
94 HOUR 4: Inside Cocoa Touch
Arrays (NSArray/NSMutableArray)A useful category of data type is a collection. Collections enable your applications to
store multiple pieces of information in a single object. An NSArray is an example of
a collection data type that can hold multiple objects, accessed by a numeric index.
You might, for instance, create an array that contains all the user feedback strings
you want to display in an application:
myMessages = [[NSArray alloc] initWithObjects: @”Good Job!”,@”Bad job!”,nil]
A nil value is always used to end the list of objects when initializing an array. To
access the strings, you use the index value. This is the number that represents its
position in the list, starting with zero. To return the “Bad job!” message, we would
use the objectAtIndex method:
[myMessages objectAtIndex: 1]
As with strings, there is a mutable NSMutableArray class that creates an array capa-
ble of being changed after it has been created.
Dictionaries (NSDictionary/NSMutableDictionary)Like arrays, dictionaries are another collection data type, but with an important dif-
ference. Whereas the objects in an array are accessed by a numeric index, dictionar-
ies store information as object/key pairs. The key is an arbitrary string, whereas the
object can be anything you want, such as a string. If the previous array were to be
created as an NSDictionary instead, it might look like this:
myMessages = [[NSDictionary alloc] initwithObjectsAndKeys:@”Good ➥Job!”,@”positive”,@”Bad Job!”,@”negative”,nil];
Now, instead of accessing the strings by a numeric index, they can be accessed by
the keys “positive” and “negative” with the objectForKey method, as follows:
[myMessages objectForKey:@”negative”]
Dictionaries are useful because they let you store and access data in abstract ways
rather than in a strict numeric order. Once again, the mutable form of the dictionar-
ies, NSMutableDictionary, can be modified after it has been created.
Numbers (NSNumber/NSDecimalNumber)We can store strings and collections of objects, but what about numbers? Working
with numbers is a bit different. In general, if you need to work with an integer,
you’ll use the C data type int, and for floating-point numbers, float. You won’t
need to worry about classes and methods and object-oriented programming at all.

ptg
Cocoa Fundamentals 95
So, what about the classes that refer to numbers? The purpose of the NSNumber class
is to take a numeric C data type and store it as an NSNumber object. The following
line creates a number object with the value 100:
myNumberObject = [[NSNumber alloc] numberWithInt: 100]
You can then work with the number as an object—adding it to arrays, dictionaries,
and so on. NSDecimalNumber, a subclass of NSNumber, can be used to perform deci-
mal arithmetic on very large numbers, but will be needed only in special cases.
Dates (NSDate)If you’ve ever tried to work with a date manually (interpreting a date string in a pro-
gram, or even just doing date arithmetic by hand), you know it can be a great cause
of headaches. How many days were there in September? Was this a leap year? And
so on. The NSDate class provides a convenient way to work with dates as an object.
For example, assume you have a user-provided date (userDate) and you want to
use it for a calculation, but only if it is earlier than the current date, in which case,
you want to use that date. Typically, this would be a bunch of nasty comparisons
and assignments. With NSDate, you would create a date object with the current date
in it (provided automatically by the init method):
myDate=[[NSDate alloc] init]
And then grab the earlier of the two dates using the earlierDate method:
[myDate earlierDate: userDate]
Obviously, you can perform many other operations, but you can avoid much of the
ugliness of data and time manipulation using NSDate objects.
URLs (NSURL)URLs are certainly a different type of data from what we’re accustomed to thinking
about, but on an Internet-connected device like the iPhone, you’ll find that the abili-
ty to manipulate URLs comes in handy. The NSURL class will enable you to manage
URLs with ease. For example, suppose you have the URL http://www.florapho-
tographs.com/index.html and want to get just the machine name out of the string?
You could create an NSURL object:
MyURL=[[NSURL alloc] initWithString: ➥@”http://www.floraphotographs.com/index.html”]
Then use the host method to automatically parse the URL and grab the text
www.floraphotographs.com:
[MyURL host]

ptg
96 HOUR 4: Inside Cocoa Touch
This will come in handy as you start to create Internet-enabled applications. Of
course, many more data type objects are available, and as mentioned earlier, some
objects store their own data, so you won’t, for example, need to maintain a separate
string object to correspond to the text in labels that you have onscreen.
Speaking of labels, let’s round out our introduction to common classes with a quick
look at some of the UI elements that you’ll be adding to your applications.
Interface ClassesPart of what makes the iPhone such a fun device to use are the onscreen touch
interfaces that you can create. As we explore Interface Builder in the next hour,
you’ll get your first hands-on experience with some of these interface classes.
Something to keep in the back of your head as you read through this section is that
many UI objects can take on very different visual appearance based on how they
are configured—so there is quite a bit of flexibility in your presentation.
Labels (UILabel)You’ll be adding labels to your applications both to present static text onscreen (as a
typical label) and as a controllable block of text that can be changed as needed by
your program (see Figure 4.3).
FIGURE 4.3Labels add textto your applica-tion views.
Buttons (UIButton)Buttons are one of the simplest user input methods that you’ll be using. Buttons can
respond to a variety of touch events and give your users an easy way to make
onscreen choices (see Figure 4.4).
FIGURE 4.4Buttons providea simple formof user input/interaction.
Switches (UISwitch)A switch object can be used to collect “on” and “off” responses from a user. It is dis-
played as a simple toggle and is frequently used to activate or deactivate applica-
tion features (see Figure 4.5).
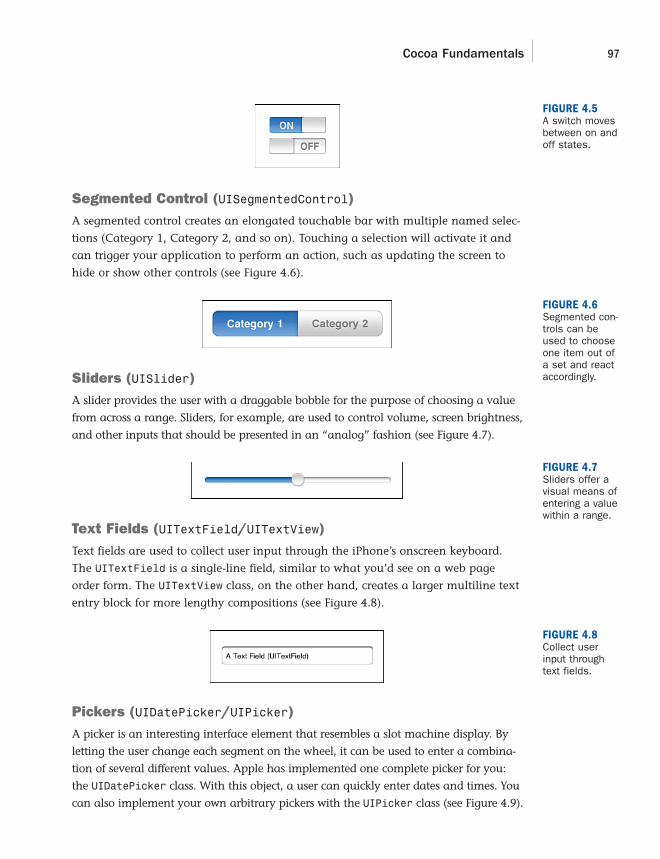
ptg
Cocoa Fundamentals 97
Segmented Control (UISegmentedControl)A segmented control creates an elongated touchable bar with multiple named selec-
tions (Category 1, Category 2, and so on). Touching a selection will activate it and
can trigger your application to perform an action, such as updating the screen to
hide or show other controls (see Figure 4.6).
FIGURE 4.5A switch movesbetween on andoff states.
FIGURE 4.6Segmented con-trols can beused to chooseone item out ofa set and reactaccordingly.Sliders (UISlider)
A slider provides the user with a draggable bobble for the purpose of choosing a value
from across a range. Sliders, for example, are used to control volume, screen brightness,
and other inputs that should be presented in an “analog” fashion (see Figure 4.7).
FIGURE 4.7Sliders offer avisual means ofentering a valuewithin a range.
Text Fields (UITextField/UITextView)Text fields are used to collect user input through the iPhone’s onscreen keyboard.
The UITextField is a single-line field, similar to what you’d see on a web page
order form. The UITextView class, on the other hand, creates a larger multiline text
entry block for more lengthy compositions (see Figure 4.8).
FIGURE 4.8Collect userinput throughtext fields.
Pickers (UIDatePicker/UIPicker)A picker is an interesting interface element that resembles a slot machine display. By
letting the user change each segment on the wheel, it can be used to enter a combina-
tion of several different values. Apple has implemented one complete picker for you:
the UIDatePicker class. With this object, a user can quickly enter dates and times. You
can also implement your own arbitrary pickers with the UIPicker class (see Figure 4.9).
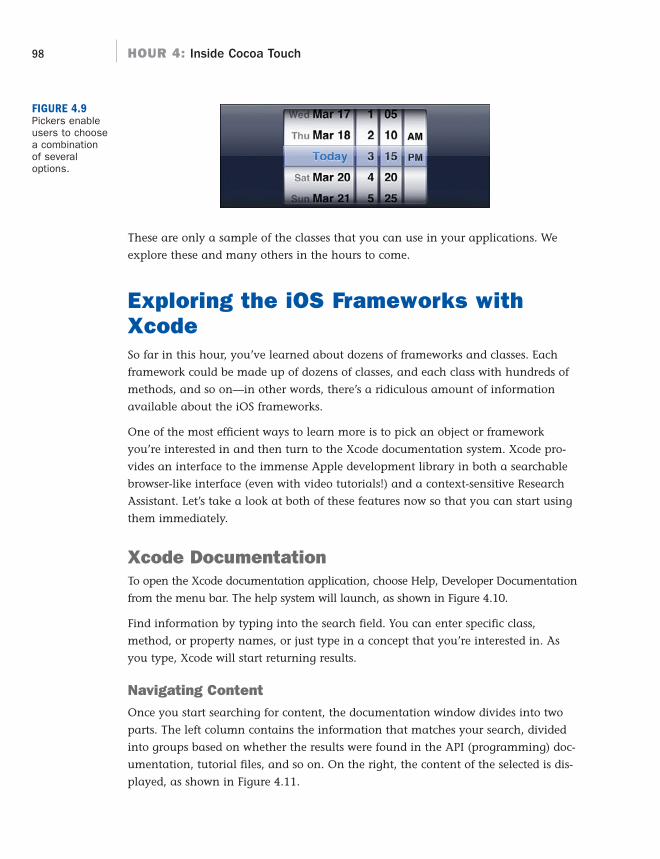
ptg
98 HOUR 4: Inside Cocoa Touch
These are only a sample of the classes that you can use in your applications. We
explore these and many others in the hours to come.
Exploring the iOS Frameworks withXcodeSo far in this hour, you’ve learned about dozens of frameworks and classes. Each
framework could be made up of dozens of classes, and each class with hundreds of
methods, and so on—in other words, there’s a ridiculous amount of information
available about the iOS frameworks.
One of the most efficient ways to learn more is to pick an object or framework
you’re interested in and then turn to the Xcode documentation system. Xcode pro-
vides an interface to the immense Apple development library in both a searchable
browser-like interface (even with video tutorials!) and a context-sensitive Research
Assistant. Let’s take a look at both of these features now so that you can start using
them immediately.
Xcode DocumentationTo open the Xcode documentation application, choose Help, Developer Documentation
from the menu bar. The help system will launch, as shown in Figure 4.10.
Find information by typing into the search field. You can enter specific class,
method, or property names, or just type in a concept that you’re interested in. As
you type, Xcode will start returning results.
Navigating ContentOnce you start searching for content, the documentation window divides into two
parts. The left column contains the information that matches your search, divided
into groups based on whether the results were found in the API (programming) doc-
umentation, tutorial files, and so on. On the right, the content of the selected is dis-
played, as shown in Figure 4.11.
FIGURE 4.9Pickers enableusers to choosea combinationof severaloptions.
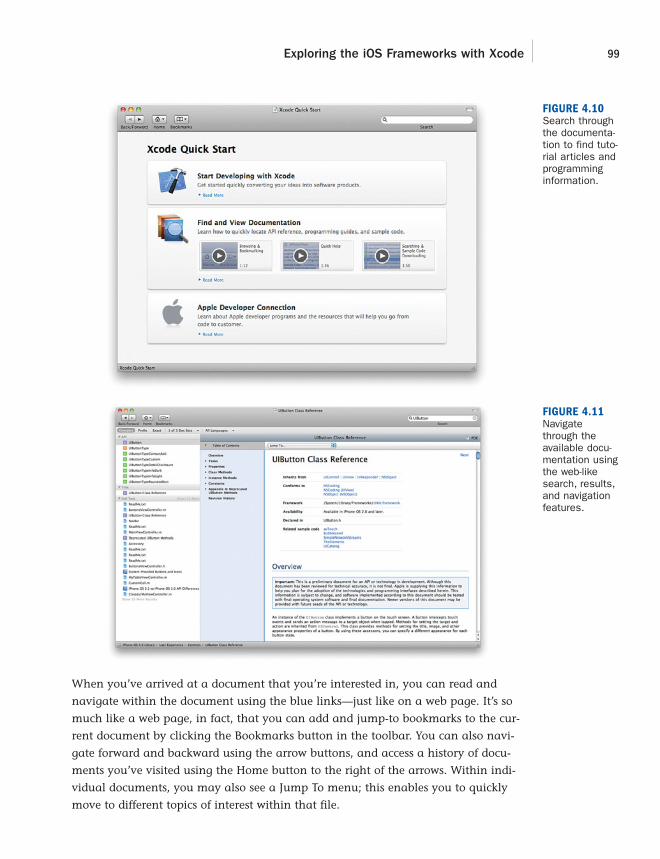
ptg
Exploring the iOS Frameworks with Xcode 99
When you’ve arrived at a document that you’re interested in, you can read and
navigate within the document using the blue links—just like on a web page. It’s so
much like a web page, in fact, that you can add and jump-to bookmarks to the cur-
rent document by clicking the Bookmarks button in the toolbar. You can also navi-
gate forward and backward using the arrow buttons, and access a history of docu-
ments you’ve visited using the Home button to the right of the arrows. Within indi-
vidual documents, you may also see a Jump To menu; this enables you to quickly
move to different topics of interest within that file.
FIGURE 4.10Search throughthe documenta-tion to find tuto-rial articles andprogramminginformation.
FIGURE 4.11Navigatethrough theavailable docu-mentation usingthe web-likesearch, results,and navigationfeatures.

ptg
100 HOUR 4: Inside Cocoa Touch
Limiting the SearchIf you know exactly what you want to find, you can limit the search results using
the button bar that appears directly underneath the toolbar. If you want exact
matches only, for example, you can click the Exact button. You can also use the
Languages button in the toolbar to limit your search to a specific implementation
language, such as Objective-C or C, and the Doc Sets drop-down menu to focus on
specific types of documentation.
Managing Document SetsDocument sets are broad categories of documents that cover development for specif-
ic Mac OS X versions, Xcode itself, and the iOS releases. To download and automati-
cally receive updates to a documentation set, open the Xcode preferences (Xcode,
Preferences) and click the Documentation icon in the Preference pane list.
In the Documentation pane, click the Check For and Install Updates Automatically
check box. Xcode will connect to Apple’s servers and automatically update your
local documentation. You’ll also notice that additional documentation sets may be
listed. Click the Get button beside any of the listed items to download and automati-
cally include it in any future updates.
You can force a manual update of the documentation using the Check and InstallNow button.
Quick HelpOne of the easiest and fastest ways to get help while coding is through the Xcode
Quick Help assistant. To open the assistant, hold down Option and double-click a
symbol in Xcode (for example, a class name or method name) or choose Help,
Quick Help. A small window opens with basic information about the symbol, as
well as links to other documentation resources.
Using Quick HelpConsider the following line that allocates and initializes a string with the contents of
an integer variable:
myString=[[NSString alloc] initWithFormat:@”%d”,myValue]
In this sample, there is a class (NSString) and two methods (alloc and
initWithFormat). To get information about the initWithFormat: method, hold
down Option, and then double-click initWithFormat:. Quick Help window
appears, as shown in Figure 4.12.
Did youKnow?

ptg
Exploring the iOS Frameworks with Xcode 101
To open the full Xcode documentation for the symbol, click the book icon in the
upper-right corner. You can also click any of the hyperlinks in Quick Help results to
jump to a specific piece of documentation or code.
By default, Quick Help will close itself when you click off of the selected symbol.To keep Quick Help open, just drag the assistant window outside of the Xcode win-dow. While open, its contents will automatically update as you click on other sym-bols in your code. It will even update as you type new symbols, providing docu-mentation on-the-fly!
Quick Help will remain open until you click the X close box in the upper-left corner.
Interpreting Quick Help ResultsQuick Help displays context-sensitive information related to your code in up to eight
different sections. What you see depends on the type of symbol (code) you have
selected. A class property, for example, doesn’t have a return type, but a class
method does:
Abstract: A description of the feature that the class, method, or other symbol
provides
Declaration: The structure of a method or definition of a data type
Parameters: The required or option information that can be provided to a
method
FIGURE 4.12Quick Helpupdates as youtype.
Did youKnow?

ptg
102 HOUR 4: Inside Cocoa Touch
Return Value: What information will be returned by a method when it completes
Sample Code: Sample code files that include examples of class/method/
property use
Related Documents: Additional documentation that references the selected
symbol
Related API: Other methods within the same class as your selected method
Availability: The versions of the operating system where the feature is available
Quick Help simplifies the process of finding the right method to use with an object.
Instead of trying to memorize dozens of instance methods, you can learn the basics
and let Quick Help act as an on-demand reference of all an object’s exposed methods.
SummaryIn this hour, you explored the layers that make up the iOS: Cocoa Touch, Media, Core
Services, and Core OS. You learned the structure of a basic application—what objects
it uses, and how iOS manages the application life cycle. We also reviewed the com-
mon classes that you’ll encounter as you begin to work with Cocoa, including data
types and UI controls.
To give you the tools you need to find class and method references on your own, this
hour introduced you to two features in Xcode. The first, the Xcode Documentation
window, offers a browser-like interface to the complete iOS documentation. The sec-
ond, Quick Help, finds help for the class or method you are working with, automati-
cally, as you type. Ultimately, it will be these tools that help you dive deeper into the
Apple development environment.
Q&AQ. Why are the operating system services layered? Doesn’t that add complexity?
A. Using the upper-level frameworks reduces the complexity of your code. By pro-
viding multiple levels of abstraction, Apple has given developers the tools they
need to easily use iOS features and the flexibility to highly customize their
application’s behavior by using lower-level services more closely tied to the OS.
Q. What do I do if I can’t find an interface object I want?
A. Chances are, if you’re writing a “normal” iPhone application, Apple has pro-
vided a UI class to fill your need. If you find that you’d like to do things differ-
ently, you can always subclass an existing control and modify its behavior as
you see fit—or create a completely new control!

ptg
103Workshop
Workshop
Quiz1. How many layers are there in the simplified Apple iOS architecture?
2. How frequently will you be manually creating the UIApplication object in
your applications?
3. What helpful feature can watch your typing and show relevant help articles?
Answers1. Four. Cocoa Touch, Media, Core Services, and Core OS.
2. If you’re building using Apple’s application templates, the initial setup of the
UIApplication object is automatic. You don’t need to do a thing!
3. Quick Help offers interactive help as you code.
Activities1. Using the Apple Xcode Documentation utility, explore the NSString class and
instance methods. Identify the methods you’d use to compare strings, create a
string from a number, and change a string to upper- and lowercase.
2. Open Xcode and create a new window-based application on your desktop.
Expand the Classes folder and click the file that ends in AppDelegate.m.
When the contents of the file appear, open Quick Help by holding Option and
double-clicking inside the class name UIApplication. Review the results. Try
clicking other symbols in the Xcode class file and see what happens!

ptg
This page intentionally left blank

ptg
HOUR 5
Exploring Interface Builder
What You’ll Learn in This Hour:. What Interface Builder does, and what makes it special. How to create user interfaces using the Library. Common attributes that can be used to customize your interface. Ways to make your interface accessible to the visually impaired. How to connect interfaces to code with outlets and actions
Over the past few hours, you’ve become familiar with the core iOS technologies and the
Xcode and iPhone Simulator applications. Although these are certainly important skills
for becoming a successful developer, there’s nothing quite like building your first iPhone
application interface and seeing it come alive on the screen.
This hour introduces you to the third (and flashiest) component of the Apple Developer
Suite: Interface Builder. Interface Builder provides a visual approach to application inter-
face design but, behind the scenes, does much, much more.
Understanding Interface BuilderLet’s get it out of the way up front: Yes, Interface Builder (or IB for short) does help you
create interfaces for your applications, but it isn’t a just a drawing tool for GUIs; it helps
you symbolically build application functionality without writing code. This translates to
fewer bugs, less development time, and easier-to-maintain projects!
Although IB is a standalone application, it is dependent on Xcode and, to some extent,
the iPhone Simulator. In this hour, we focus on navigating through Interface Builder, but
will return in Hour 6, “Model-View-Controller Application Design,” to combine all three
pieces of the Apple Developer Suite for the first time.

ptg
106 HOUR 5: Exploring Interface Builder
At the time this book was being written, Apple began previewing a new version oftheir developer tools—Xcode 4. In Xcode 4, Interface Builder is part of the devel-opment suite, not a standalone application. We are providing an introduction toXcode 4’s tools in a downloadable document at http://teachyourselfiphone.com.
If you are a beginner, I recommend using the Xcode 3.2 toolset for the time being.It is time tested and, at least compared to the early previews of Xcode 4, includescoding features, such as bookmarks, that Xcode 4 does not.
The Interface Builder ApproachUsing Xcode and the Cocoa toolset, you can program iPhone interfaces by hand—
instantiating interface objects, defining where they appear on the screen, setting any
attributes for the object, and, finally, making them visible. For example, in Hour 2,
“Introduction to Xcode and the iPhone Simulator,” you entered this listing into
Xcode to make your iPhone display the text Hello Xcode in the middle of the
screen:
myMessage=[[UILabel alloc] initWithFrame:CGRectMake(25.0,225.0,300.0,50.0)];myMessage.text=@”Hello Xcode”;myMessage.font=[UIFont systemFontOfSize:48];[window addSubview:myMessage];[myMessage release];
Imagine how long it would take to build interfaces with text, buttons, images, and
dozens of other controls—and think of all the code you’d need to wade through just
to make small changes!
Over the years, there have been many different approaches to graphical interface
builders. One of the most common implementations is to enable the user to “draw”
an interface but, behind the scenes, create the code that generates that interface.
Any tweaks require the code to be edited by hand—hardly an acceptable situation.
Another tactic is to maintain the interface definition symbolically but attach the
code that implements functionality directly to interface elements. This, unfortunate-
ly, means that if you want to change your interface or swap functionality from one
UI element to another, you have to move the code as well.
Interface Builder works differently. Instead of autogenerating interface code or tying
source listings directly to interface elements, IB builds live objects that connect to your
application code through simple links called connections. Want to change how a fea-
ture of your app is triggered? Just change the connection. As you’ll learn a bit later,
changing how your application works with the objects you create in Interface Builder
is, quite literally, a matter of connecting or reconnecting the dots as you see fit.
By theWay

ptg
By theWay
Understanding Interface Builder 107
The Anatomy of an Interface Builder XIB FileYour work in Interface Builder results in an XML file called an XIB or (for legacy
reasons) NIB file, containing a hierarchy of objects. The objects could be interface ele-
ments—buttons, toggle switches, and so forth—but might also be other noninterface
objects that you need to use in your app. When the XIB file is loaded by your appli-
cation, the objects described in it are instantiated and can be accessed by your code.
Instantiation, just as a quick refresher, is the process of creating an instance of anobject that you can work with in your program. An instantiated object gains all thefunctionality described by its class. Buttons, for example, automatically highlightwhen clicked, content views scroll, and so on.
The Document WindowWhat do XIB files look like in IB? Open the Hour 5 Projects folder and double-click
the file EmptyView.xib to open Interface Builder and display a barebones XIB file.
The contents of the file are shown in the IB “Document” window (see Figure 5.1).
FIGURE 5.1An XIB file’sobjects are rep-resented byicons.
By theWayIf you do not see a window with icons when opening the XIB file, choose Window,
Document to ensure that the Document window is active and visible on yourscreen.
In this sample file, three icons are initially visible: File’s Owner, First Responder, and
View. The first two are special icons used to represent unique objects in our applica-
tion; these will be present in all XIB files that you work with:
File’s Owner: The File’s Owner icon denotes the object that loads the XIB file
in your running application. This is the object that effectively instantiates all

ptg
108 HOUR 5: Exploring Interface Builder
the other objects described in the XIB file. For example, you may have an
interface defined in myInterface.xib, which is loaded by an object you’ve writ-
ten called myInterfaceController. In this case, the File’s Owner would repre-
sent the myInterfaceController object. You’ll learn more about the relation-
ship between interfaces and code in Hour 6.
First Responder: The first responder icon stands for the object that the user is
currently interacting with. When a user works with an iPhone application,
multiple objects could potentially respond to the various gestures or keystrokes
that the user creates. The first responder is the object currently in control and
interacting with the user. A text field that the user is typing into, for example,
would be the first responder until the user moves to another field or control.
View: The view icon is an instance of the object UIView and represents the
visual layout that will be loaded and displayed on the iPhone’s screen. You
can double-click view icons to open and edit them with the IB tools, as shown
in Figure 5.2.
FIGURE 5.2Double-click theview icon toopen and editthe iPhoneapplication GUI.
Views are hierarchical in nature. This means that as you add controls to your inter-
face, they will be contained within the view. You can even add views within views to
cluster controls or create visual elements that can be shown or hidden as a group.
Because a view can contain many other objects, I recommend using the list or col-
umn view of the Document window to make sure that you can view the full hierar-
chy of objects you’ve created in an XIB file. To change the document view, click the
view mode icon on the Document window toolbar (see Figure 5.3).
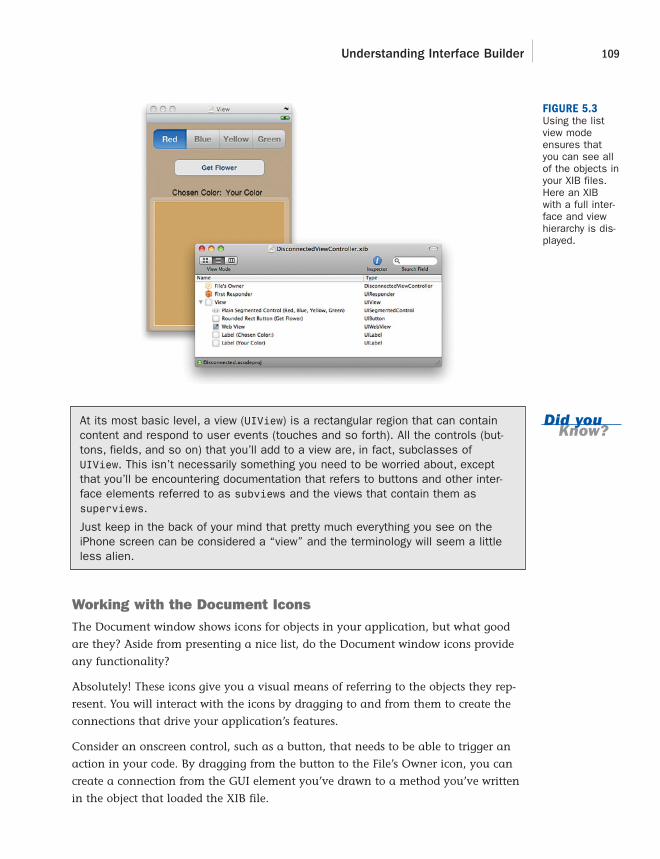
ptgDid youKnow?
Understanding Interface Builder 109
At its most basic level, a view (UIView) is a rectangular region that can containcontent and respond to user events (touches and so forth). All the controls (but-tons, fields, and so on) that you’ll add to a view are, in fact, subclasses ofUIView. This isn’t necessarily something you need to be worried about, exceptthat you’ll be encountering documentation that refers to buttons and other inter-face elements referred to as subviews and the views that contain them assuperviews.
Just keep in the back of your mind that pretty much everything you see on theiPhone screen can be considered a “view” and the terminology will seem a littleless alien.
Working with the Document IconsThe Document window shows icons for objects in your application, but what good
are they? Aside from presenting a nice list, do the Document window icons provide
any functionality?
Absolutely! These icons give you a visual means of referring to the objects they rep-
resent. You will interact with the icons by dragging to and from them to create the
connections that drive your application’s features.
Consider an onscreen control, such as a button, that needs to be able to trigger an
action in your code. By dragging from the button to the File’s Owner icon, you can
create a connection from the GUI element you’ve drawn to a method you’ve written
in the object that loaded the XIB file.
FIGURE 5.3Using the listview modeensures thatyou can see allof the objects inyour XIB files.Here an XIBwith a full inter-face and viewhierarchy is dis-played.

ptg
110 HOUR 5: Exploring Interface Builder
We’ll go through a hands-on example later this hour so that you can get a feel for
how this works. Before we do that, however, let’s take a look at how you go about
turning a blank view into an interface masterpiece.
Creating User InterfacesIn Figures 5.2 and 5.3, you’ve seen an empty view and a fully fleshed-out iPhone
interface—but how do we get from one to the other? In this section, we explore how
interfaces are created with Interface Builder. In other words, it’s time for the fun stuff!
If you haven’t already, open the EmptyView.xib file included in this hour’s Projects
folder. Use the Document window to open the empty view and prepare for adding
content.
The Objects LibraryEverything that you add to a view comes from the IB Objects Library, shown in
Figure 5.4. You can open the Library from the menu bar by choosing Tools, Library
(Command+Shift+L). After the Library palette opens, click the Objects button at the
top of the window to focus on interface objects. When you click an element in the
Library, the bottom of the window refreshes to show a description of how it can be
used in the interface.
FIGURE 5.4The Library pro-vides a paletteof objects thatcan be added toyour views.
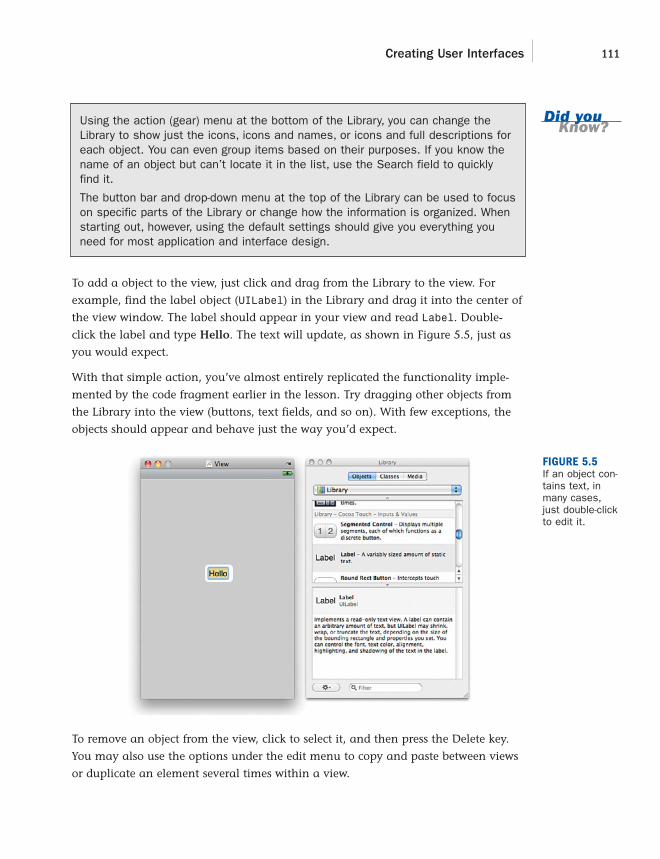
ptg
Did youKnow?
Creating User Interfaces 111
Using the action (gear) menu at the bottom of the Library, you can change theLibrary to show just the icons, icons and names, or icons and full descriptions foreach object. You can even group items based on their purposes. If you know thename of an object but can’t locate it in the list, use the Search field to quicklyfind it.
The button bar and drop-down menu at the top of the Library can be used to focuson specific parts of the Library or change how the information is organized. Whenstarting out, however, using the default settings should give you everything youneed for most application and interface design.
To add a object to the view, just click and drag from the Library to the view. For
example, find the label object (UILabel) in the Library and drag it into the center of
the view window. The label should appear in your view and read Label. Double-
click the label and type Hello. The text will update, as shown in Figure 5.5, just as
you would expect.
With that simple action, you’ve almost entirely replicated the functionality imple-
mented by the code fragment earlier in the lesson. Try dragging other objects from
the Library into the view (buttons, text fields, and so on). With few exceptions, the
objects should appear and behave just the way you’d expect.
FIGURE 5.5If an object con-tains text, inmany cases,just double-clickto edit it.
To remove an object from the view, click to select it, and then press the Delete key.
You may also use the options under the edit menu to copy and paste between views
or duplicate an element several times within a view.

ptg
112 HOUR 5: Exploring Interface Builder
Layout ToolsInstead of relying on your visual acuity to position objects in a view, Apple has
included some useful tools for fine-tuning your layout. If you’ve ever used a drawing
program like OmniGraffle or Adobe Illustrator, you’ll find many of these familiar.
GuidesAs you drag objects in a view, you’ll notice guides (shown in Figure 5.6) appearing
to help with the layout. These blue dotted lines will be displayed to align objects
along the margins of the view, to the centers of other objects in the view, and to the
baseline of the fonts used in the labels and object titles.
FIGURE 5.6Guides helpposition yourobjects within aview.
As an added bonus, guides will automatically appear to indicate the approximate
spacing requirements of Apple’s interface guidelines. If you’re not sure why it’s
showing you a particular margin guide, it’s likely that your object is in a position
that Interface Builder considers “appropriate” for something of that type and size.
You can manually add your own guides by choosing Layout, Add Horizontal Guideor by choosing Layout, Add Vertical Guide.
Selection HandlesIn addition to the layout guides, most objects include selection handles to stretch an
object either horizontally, vertically, or both. Using the small boxes that appear
alongside an object when it is selected, just click and drag to change its size, as
demonstrated using A Button in Figure 5.7.
Note that some objects will constrain how you can resize them; this preserves a level
of consistency within iPhone application interfaces.
Did youKnow?
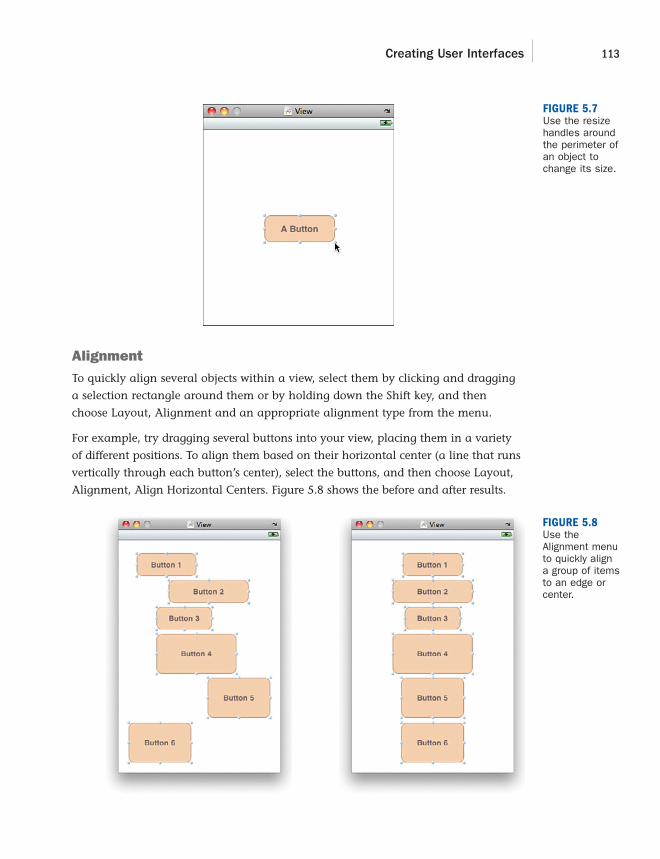
ptg
Creating User Interfaces 113
AlignmentTo quickly align several objects within a view, select them by clicking and dragging
a selection rectangle around them or by holding down the Shift key, and then
choose Layout, Alignment and an appropriate alignment type from the menu.
For example, try dragging several buttons into your view, placing them in a variety
of different positions. To align them based on their horizontal center (a line that runs
vertically through each button’s center), select the buttons, and then choose Layout,
Alignment, Align Horizontal Centers. Figure 5.8 shows the before and after results.
FIGURE 5.7Use the resizehandles aroundthe perimeter ofan object tochange its size.
FIGURE 5.8Use theAlignment menuto quickly aligna group of itemsto an edge orcenter.

ptg
114 HOUR 5: Exploring Interface Builder
Did youKnow?
FIGURE 5.9The SizeInspectorenables you toadjust the sizeand position ofone or moreobjects.
Using the fields at the top of the inspector, you can view or change the size and
position of the object by changing the coordinates in the H/W and X/Y fields. You
can also view the coordinates of a specific portion of an object by clicking one of the
black dots in the size and grid to indicate where the reading should come from.
Within the Size and Position settings, you’ll notice a drop-down menu where youcan choose between Frame and Layout. These two settings will usually be verysimilar, but there is a slight difference. The frame values represent the exact areaan object occupies onscreen, whereas the layout values take into account spacingaround the object.
To fine-tune an object’s position within a view, select it, and then use the arrowkeys to position it left, right, up, or down, 1 pixel at a time.
The Size InspectorAnother tool that you may want to use for controlling your layout is the Size
Inspector. Interface Builder has a number of “inspectors” for examining the attrib-
utes of an object. As the name implies, the Size Inspector provides information
about sizes, but also position and alignment. To open the Size Inspector, first select
the object (or objects) that you want to work with, and then press Command+3 or
choose Tools, Size Inspector (see Figure 5.9).
By theWay

ptg
Customizing Interface Appearance 115
The Autosizing settings of the Size Inspector determine how controls resize/reposition
themselves when the iPhone changes orientation. You’ll learn more about these in
Hour 15, “Building Rotatable and Resizable User Interfaces.”
Finally, the same controls found under Layout, Alignment can be accessed as click-
able icons at the bottom of the inspector. Choose your objects, and then click one of
the icons to align according to the red line.
Customizing Interface AppearanceHow your interface appears to the end user isn’t just a combination of control sizes
and positions. For many kinds of objects, literally dozens of different attributes can
be adjusted. Although you could certainly configure things such as colors and fonts
in your code, it’s easier to just use the tools included in Interface Builder.
Using the Attributes InspectorThe most common place you’ll tweak the way your interface objects appear is
through the Attributes Inspector, available by choosing Tools, Attributes Inspector or
by pressing Command+1. Let’s run through a quick example to see how this works.
Make sure the EmptyView.xib file is still open and that you’ve added a text label to
the view. Select the label, and then press Command+1 to open the Attributes
Inspector, shown in Figure 5.10.
The top portion of the Attributes Inspector will contain attributes for the specific
object. In the case of the text object, this includes settings such as font, size, color,
and alignment—everything you’d expect to find for editing text.
In the lower portion of the inspector are additional inherited attributes. Remember
that onscreen elements are a subclass of a view? This means that all the standard
view attributes are also available for the object and for your tinkering enjoyment. In
many cases, you’ll want to leave these alone, but settings such as background and
transparency can come in handy.
Don’t get hung up on trying to memorize every attribute for every control now—Icover interesting and important attributes when they are needed throughout thebook.
Feel free to explore the many different options available in the Attributes Inspector
to see what can be configured for different types of objects. There is a surprising
amount of flexibility to be found within the tool.
Did youKnow?

ptg
By theWay
116 HOUR 5: Exploring Interface Builder
The attributes you change in Interface Builder are simply properties of the objectsthemselves. To help identify what an attribute does, use the documentation tool inXcode to look up the object’s class and review the descriptions of its properties.
Setting Accessibility Attributes For many years, the “appearance” of an interface meant just how it looks visually.
Today, the technology is available for an interface to vocally describe itself to the
visually impaired. The iPhone includes Apple’s screen reader technology: Voiceover.
Voiceover combines speech synthesis with a customized interface to aid users in nav-
igating applications.
Using Voiceover, a user can touch interface elements and hear a short description of
what they do and how they can be used. Although you gain much of this function-
ality “for free” (the iPhone Voiceover software will read button labels, for example),
you can provide additional assistance by configuring the accessibility attributes in
Interface Builder.
To access the Accessibility settings, you need to open the Identity Inspector by choos-
ing Tools, Identity Inspector or by pressing Command+4. The Accessibility options
have their own section within the Identity Inspector, as shown in Figure 5.11.
FIGURE 5.10To change howan object looksand behaves,select it andthen open theAttributesInspector.

ptg
Did youKnow?
Customizing Interface Appearance 117
You can configure four sets of attributes within this area:
Accessibility: If enabled, the object is considered accessible. If you create any
custom controls that must be seen to be used, this setting should be disabled.
Label: A simple word or two that serves as the label for an item. A text field
that collects the user’s name might use “your name,” for example.
Hint: A short description, if needed, on how to use the control. This is needed
only if the label doesn’t provide enough information on its own.
Traits: This set of check boxes is used to describe the features of the object—
what it does, and what its current state is.
FIGURE 5.11Use theAccessibilitysection in theIdentityInspector toconfigure howthe Voiceoverinteracts withyour application.
For an application to be available to the largest possible audience, you shouldtake advantage of accessibility tools whenever possible. Even objects such as thetext labels you’ve used in this lesson should have their traits configured to indi-cate that they are static text. This helps potential users know that they can’t inter-act with them.
Simulating the InterfaceAt any point in time during the construction of your interface, you can test the con-
trols in the iPhone Simulator. To test the interface, choose File, Simulate Interface
(Command+R). After a few seconds, the iPhone Simulator will start and display your
interface design. You can use all the same gestures and controls that you learned
about in Hour 2.
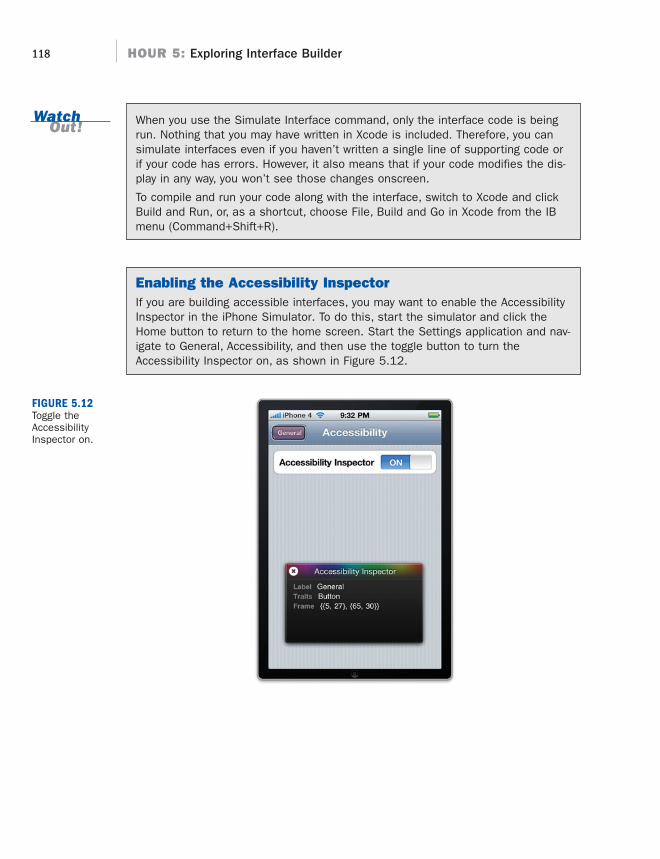
ptg
118 HOUR 5: Exploring Interface Builder
When you use the Simulate Interface command, only the interface code is beingrun. Nothing that you may have written in Xcode is included. Therefore, you cansimulate interfaces even if you haven’t written a single line of supporting code orif your code has errors. However, it also means that if your code modifies the dis-play in any way, you won’t see those changes onscreen.
To compile and run your code along with the interface, switch to Xcode and clickBuild and Run, or, as a shortcut, choose File, Build and Go in Xcode from the IBmenu (Command+Shift+R).
Enabling the Accessibility InspectorIf you are building accessible interfaces, you may want to enable the AccessibilityInspector in the iPhone Simulator. To do this, start the simulator and click theHome button to return to the home screen. Start the Settings application and nav-igate to General, Accessibility, and then use the toggle button to turn theAccessibility Inspector on, as shown in Figure 5.12.
WatchOut!
FIGURE 5.12Toggle theAccessibilityInspector on.

ptg
Connecting to Code 119
The Accessibility Inspector adds an overlay to the simulator workspace that dis-plays the label, hints, and traits that you’ve configured for your interface elements.Note that navigating the iPhone interface is very different when operating in acces-sibility mode.
Using the X button in the upper-left corner of the inspector, you can toggle it onand off. When off, the inspector collapses to a small bar, and the iPhone simula-tor will behave normally. Clicking the X button again turns it back on. To disablethe Accessibility Inspector altogether, just revisit the Accessibility setting in theSettings application.
Connecting to CodeYou know how to make an interface, but how do you make it do something?
Throughout this hour, I’ve been alluding to the idea that connecting an interface to
the code you write is just a matter of “connecting the dots.” In this last part of the
hour, we’ll do just that: take an interface and connect it to the code that makes it
into a functional application.
Launching Interface Builder from XcodeTo get started, we’ll use the project Disconnected contained within this hour’s
Projects folder. Open the folder and double-click the Disconnected.xcodeproj file.
This will open the project in Xcode, as shown in Figure 5.13. Almost all of your work
in Interface Builder will start from inside of Xcode, so we might as well get used to
using it as our launching point for IB.
By theWay
FIGURE 5.13Almost all ofyour work inInterface Builderwill start inXcode.

ptg
120 HOUR 5: Exploring Interface Builder
Once the project is loaded, expand the Resources file group and double-click the
DisconnectedViewController.xib file. This XIB file contains the view that this appli-
cation displays as its interface. After a few seconds, IB will launch and display the
interface Document window and the view, as shown in Figure 5.14.
FIGURE 5.14After launching,Interface Builderwill show theDocument win-dow and viewfrom the XIBfile.
Implementation OverviewThe interface contains four interactive elements: a button bar (called a segmented
control), a push button, an output label, and a web view (an integrated web browser
component). Together, these controls will interface with application code to enable a
user to pick a flower color, touch the Get Flower button, and then display the chosen
color in a text label along with a matching flower photo fetched from the website
http://www.floraphotographs.com. The final result is demonstrated in Figure 5.15.
Unfortunately, right now the application does nothing. The interface isn’t connected
to any application code, so it is hardly more than a pretty picture. To make it work,
we’ll be creating connections to outlets and actions that have been defined in Xcode.
Outlets and ActionsAn outlet is nothing more than a variable by which an object can be referenced. For
example, if you had created a field in Interface Builder intending that it would be
used to collect a user’s name, you might want to create an outlet for it in your code
called userName. Using this outlet, you could then access or change the contents of
the field.

ptg
Connecting to Code 121
An action, on the other hand, is a method within your code that is called when an
event takes place. Certain objects, such as buttons and switches, can trigger actions
when a user interacts with them through an event—such as touching the screen. By
defining actions in your code, Interface Builder can make them available to the
onscreen objects.
Joining an element in Interface Builder to an outlet or action creates what is generi-
cally termed a connection.
For the Disconnected app to function, we need to create connections to these outlets
and actions:
ColorChoice: An outlet created for the button bar to access the color the user
has selected
GetFlower: An action that retrieves a flower from the Web, displays it, and
updates the label with the chosen color
ChosenColor: An outlet for the label that will be updated by getFlower to
show the name of the chosen color
FlowerView: An outlet for the web view that will be updated by getFlower to
show the image
Let’s make the connections now.
FIGURE 5.15The finishedapplication willenable a user tochoose a colorand have aflower imagereturned thatmatches thatcolor.

ptg
122 HOUR 5: Exploring Interface Builder
Creating Connections to OutletsTo create a connection from an interface item to an outlet, Control-drag from the
File’s Owner icon either to the visual representation of the object in the view or to its
icon in the Document window of Interface Builder.
Try this with the button bar (segmented control). Pressing Control, click and drag
from the File’s Owner icon in the Document window to either the onscreen image of
the bar or its icon in the Document window. A line will appear as you drag,
enabling you to easily point to the object that you want to use for the connect.
When you release the mouse button, the available connections will be shown in a
pop-up menu (see Figure 5.16).
FIGURE 5.16Choose fromthe outletsavailable forthat object.

ptg
By theWay
Connecting to Code 123
Interface Builder knows what type of object is allowed to connect to a given outlet,so it will display only the outlets appropriate for the connection you’re trying tomake.
Repeat this process for the label with the text Your Color, connecting it to the
chosenColor outlet, and the web view, connecting to flowerView.
Connecting to ActionsConnecting to actions is a bit different. An object’s events trigger actions (methods)
in your code. So, the connection direction reverses; you connect from the object to
the File’s Owner icon. Although it is possible to Control-drag and create a connec-
tion in the same manner you did with outlets, this isn’t recommended because you
don’t get to specify which event triggers it. Do users have to touch the button?
Release their fingers from a button?
Actions can be triggered by many different events, so you need to make sure that
you’re picking exactly the right one, instead of leaving it up to Interface Builder. To do
this, select the object that will be connecting to the action and open the Connections
Inspector by choosing Tools, Connections Inspector (or by pressing Command+2).
The Connections Inspector, in Figure 5.17, shows a list of the events that the object
supports—in this case, a button. Beside each event is an open circle. To connect an
event to an action in your code, click and drag from one of these circles to the File’s
Owner icon.
FIGURE 5.17The ConnectionsInspector showsall the connec-tions you’vemade to andfrom an object.

ptg
124 HOUR 5: Exploring Interface Builder
For example, to connect the Get Flower button to the getFlower method, select the
button, and then open the Connections Inspector (Command+2). Drag from the cir-
cle beside the Touch Up Inside event to the File’s Owner icon and release, as demon-
strated in Figure 5.18. When prompted, choose the getFlower action.
FIGURE 5.18Drag from theevent to theFile’s OwnerIcon, and thenchoose theaction you wantto use.
After a connection has been made, the inspector will update to show the event and
the action that it calls, as shown in Figure 5.19. If you click other objects, you’ll
notice that the Connections Inspector shows connections to outlets and to actions.
Well done! You’ve just linked an interface to the code that supports it. Switch to Xcode
and choose Build and Run to run and test the application in the iPhone Simulator.

ptg
Connecting to Code 125
Connections Without Code!Although most of your connections in Interface Builder will be between objects andoutlets and actions you’ve defined in your code, certain objects actually imple-ment some built-in actions without you writing a single line of code.
The web view, for example, implements actions, including goForward and goBack.Using these actions, you could add basic navigation functionality to a web view bydragging from a button’s Touch Up Inside event directly to the web view object(rather than the File’s Owner). As described previously, you’ll be prompted for theaction to connect to, but this time, it isn’t an action you had to code yourself!
Object IdentityAs we finish up our introduction to Interface Builder, I’d be remiss if I didn’t intro-
duce one more feature: the Identity Inspector. You’ve already accessed this tool to
view the accessibility attributes for interface objects, but there is another reason why
we’ll need to use the inspector in the future: setting class identities.
As you drag objects into the interface, you’re creating instances of classes that
already exist (buttons, labels, and so on). Throughout this book, however, we’re
going to be building custom subclasses that we’ll also need to be able to reference in
Interface Builder. In these cases, we’ll need to help Interface Builder out by identify-
ing the subclass it should use.
FIGURE 5.19The ConnectionsInspectorupdates to showthe actions andoutlets that anobject refer-ences.

ptg
126 HOUR 5: Exploring Interface Builder
For example, suppose we created a subclass of the standard button class (UIButton)
that we named ourFancyButtonClass. We might drag a button into Interface
Builder to represent our fancy button, but when the XIB file loads, it would just cre-
ate the same old UIButton.
To fix the problem, we select the button we’ve added to the view, open the Identity
Inspector by choosing Tools, Identity Inspector (Command+4), and then use the
drop-down menu/field to enter the class that we really want instantiated at runtime
(see Figure 5.20).
FIGURE 5.20If you’re using acustom class,you’ll need tomanually setthe identity ofyour objects inInterfaceBuilder.
This is something we’ll cover on an as-needed basis, so if it seems confusing, don’t
worry. We come back to it later in the book.
Further ExplorationInterface Builder gives you the opportunity to experiment with many of the different
GUI objects you’ve seen in iPhone applications and read about in the previous
hours. In the next hour, Xcode and Interface Builder will finally come together for
your first full project, from start to finish.
To learn even more about what you can do in Interface Builder, I suggest reading
through the following three Apple publications:
Interface Builder User Guide: Accessed by choosing Help, Interface Builder
Help from the IB menu, this is more than a simple help document. Apple’s user

ptg
127Q&A
guide walks you through all of the intricacies of IB and covers some advanced
topics that will be important as your development experience increases.
iPhone Human Interface Guidelines: Accessible through the Xcode docu-
mentation system, the Apple iPhone HIG document provides a clear set of
rules for building usable interfaces on the iPhone. This document describes
when you should use controls and how they should be displayed, helping you
to create more polished, professional-quality applications.
Accessibility Programming Guide for iPhone OS (accessible through the
Xcode documentation system): If you’re serious about creating accessible
apps, this is a mandatory read. The Accessibility Programming Guide
describes the accessibility features mentioned in this hour’s lesson as well as
ways to improve accessibility programmatically and methods of testing acces-
sibility beyond the tips given in this hour.
As a general note, from here on, you’ll be doing quite a bit of coding in each lesson,
so now would be a great time to review the previous hours if you have any questions.
SummaryIn this hour, you explored Interface Builder and the tools it provides for building rich
graphical interfaces for your iPhone applications. You learned how to navigate the IB
Document window and access the GUI elements from the Objects Library. Using the
various inspector tools within Interface Builder, you customized the look and feel of
the onscreen controls and how they can be made accessible to the visually impaired.
More than just a pretty picture, an IB-created interface uses simple outlets and
actions to connect to functionality in your code. You used Interface Builder’s connec-
tion tools to turn a nonfunctioning interface into a complete application. By main-
taining a separation between the code you write and what is displayed to the user,
you can revise your interface to look however you want, without breaking your
application. In Hour 6, you examine how to create outlets and actions from scratch
in Xcode (and thus gain a full toolset to get started developing).
Q&AQ. Why do I keep seeing things referred to as NIB files?
A. The origins of Interface Builder trace back to the NeXT Computer, which made
use of NIB files. These files, in fact, still bore the same name when Mac OS X
was released. In recent years, however, Apple has renamed the files to have
the .xib extension—unfortunately, documentation hasn’t quite caught up yet.

ptg
128 HOUR 5: Exploring Interface Builder
Q. Some of the objects in the Interface Builder Library can’t be added to myview. What gives?
A. Not all of the Library objects are interface objects. Some represent objects that
provide functionality to your application. In the next hour, we look at the first
object that does this (a view controller).
Q. I’ve seen controls in applications that aren’t available here. Where are they?
A. Keep in mind that the iPhone isn’t an iPad—not all user interface features work
or look the same. In addition, some developers choose to make their own UI
classes or subclasses that can vary tremendously from the stock UI appearance.
Workshop
Quiz1. Simulating an interface from IB also compiles the project’s code in Xcode. True
or false?
2. What tool can you use within the iPhone Simulator to help review accessibilityof objects in your apps?
3. How is Interface Builder typically launched?
Answers1. False. Simulating the interface does not use the project code at all. As a result,
the interface will not perform any actions that may be assigned.
2. The Accessibility Inspector makes it possible to view the accessibility attributesconfigured within Interface Builder.
3. Although Interface Builder is a standalone application, it is typically launchedby opening an XIB file from within Xcode.
Activities1. Practice using the interface layout tools on the EmptyView.xib file. Add each
available interface object to your view, and then review the Attributes Inspectorfor that object. If an attribute doesn’t make sense, remember that you canreview documentation for the class to identify the role of each of its properties.
2. Revise the Disconnected project with an accessible interface. Review the fin-ished design using the Accessibility Inspector in the iPhone Simulator.

ptg
HOUR 6
Model-View-ControllerApplication Design
What You’ll Learn in This Hour: . What the Model-View-Controller design pattern means. Ways in which the Apple Developer Suite implements MVC. Design of a basic view. Implementation of a corresponding view controller
You’ve come a long way in the past few hours: You’ve provisioned a developer profile for
your phone, learned the basics of the Objective-C language, explored Cocoa Touch, and
gotten a feel for Xcode and Interface Builder. Although you’ve already used a few prebuilt
projects, you have yet to build one from scratch. That’s about to change!
In this hour, you learn about the application design pattern known as Model-View-
Controller and create an iPhone application from start to finish.
Understanding the Model-View-ControllerParadigmWhen you start programming, you’ll quickly come to the conclusion that there is more
than one “correct” way to do just about everything. Part of the joy of programming is that
it is a creative process that allows you to be as clever as your imagination allows. This
doesn’t mean, however, that adding structure to the development process is a bad idea.
Having a defined and documented structure means that other developers will be able to
work with your code, projects large and small will be easy to navigate, and you’ll be able
to reuse your best work in multiple applications.

ptg
130 HOUR 6: Model-View-Controller Application Design
The application design approach that you’ll be using on the iPhone is known as Model-
View-Controller (MVC) and will guide you in creating clean, efficient applications.
In Hour 3, “Discovering Objective-C: The Language of Apple Platforms,” youlearned about object-oriented programming and the reusability that it can provide.OO programs, however, can still be poorly structured—thus the need to define anoverall application architecture that can guide the object-oriented implementation.
Making SpaghettiBefore we get into MVC, let’s first talk about the development practice that we want
to avoid, and why. When creating an application that interacts with a user, several
things must be taken into account. First, the user interface. You must present some-
thing that the user interacts with: buttons, fields, and so on. Second, handling and
reacting to the user input. Finally, the application must store the information neces-
sary to correctly react to the user—often in the form of a database.
One approach to incorporating all of these pieces is to combine them into a single
class. The code that displays the interface is mixed with the code that implements
the logic and the code that handles data. This can be a straightforward develop-
ment methodology, but it limits the developer in several ways:
. When code is mixed together, it is difficult for multiple developers to work
together because there is no clear division between any of the functional units.
. The interface, application logic, and data are unlikely to be reusable in other
applications because the combination of the three is too specific to the current
project to be useful elsewhere.
. The application is difficult to extend. Adding features requires working around
existing code. The developer must work around the existing code to include
new features, even if they are unrelated.
In short, mixing code, logic, and data leads to a mess! This is known as “spaghetti
code” and is the exact opposite of what we want for our iPhone applications. MVC
to the rescue!
Structured Application Design with MVCMVC defines a clean separation between the critical components of our apps. As
implied by the name, MVC defines three parts of an application:
By theWay

ptg
How Xcode and Interface Builder Implement MVC 131
. A model provides the underlying data and methods that provide information
to the rest of the application. The model does not define how the application
will look or how it will act.
. One or more views make up the user interface. A view consists of the different
onscreen widgets (buttons, fields, switches, and so forth) that a user can inter-
act with.
. A controller is typically paired with a view. The controller is responsible for receiv-
ing the user’s input and acting accordingly. Controllers may access and update a
view using information from the model and update the model using the results
of user interactions in the view. In short, it bridges the MVC components.
The logical isolation created between the functional parts of an application, illus-
trated in Figure 6.1, means the code becomes more easily maintainable, reusable,
and extendable—the exact opposite of spaghetti code.
FIGURE 6.1MVC design iso-lates the func-tional compo-nents of anapp.
Unfortunately, MVC comes as an afterthought in many application development
environments. A frequent question that I am asked when suggesting MVC design is,
“How do I do that?” This isn’t indicative of a misunderstanding of what MVC is or
how it works, but a lack of a clear means of implementing it.
In the Apple Development Suite, MVC design is natural. As you create new projects and
start coding, you’ll be guided into using MVC design patterns automatically. It actually
becomes more difficult to program poorly than it does to build a well-structured app.
How Xcode and Interface BuilderImplement MVCOver the past few hours, you’ve learned about Xcode and Interface Builder and
have gotten a sense for what the two applications do. In Hour 5, “Exploring
Interface Builder,” you even connected XIB file objects to the corresponding code in
an application. Although we didn’t go into the nitty-gritty details at the time, what
you were doing was binding a view to a controller.

ptg
132 HOUR 6: Model-View-Controller Application Design
ViewsViews, although possible to create programmatically, will most frequently be
designed visually in Interface Builder. Views can consist of many different interface
elements—the most common of which we covered in Hour 4, “Inside Cocoa Touch.”
When loaded at runtime, views create any number of objects that can implement a
basic level of interactivity on their own (such as a text field opening a keyboard
when touched). Even so, a view is entirely independent of any application logic. This
clear separation is one of the core principles of the MVC design approach.
For the objects in a view to interact with application logic, they require a connection
point to be defined. These connections come in two varieties: outlets and actions. An
outlet defines a path between the code and the view that can be used to read and
write values. Second, an action defines a method in your application that can be
triggered via an event within a view, such as a touch or swipe.
So, how do outlets and actions connect to code? In the preceding hour, you learned
to Control-drag in Interface Builder to create a connection, but Interface Builder
“knew” what connections were valid. It certainly can’t “guess” where in your code
you want to create a connection; instead, you must define the outlets and actions in
the code that implement the view’s logic (that is, the controller).
View ControllersA controller, known in Xcode as a view controller, handles the interactions with a
view and establishes the connection points for outlets and actions. To accomplish
this, two special directives, IBAction and IBOutlet, will be added to your project’s
code. Specifically, you add these directives to the header files of your view controller.
IBAction and IBOutlet are markers that Interface Builder recognizes; they serve no
other purpose within Objective-C.
View controllers can hold application logic, but I don’t mean to imply that all yourcode should be within a view controller. Although this is largely the convention forthe tutorials in this book, as you create your own apps, you can certainly defineadditional classes to abstract your application logic as you see fit.
Using IBOutletAn IBOutlet is used to enable your code to talk to objects within views. For exam-
ple, consider a text label (UILabel) that you’ve added to a view. If you want to
access the label under the name myLabel within your view controller, you would
declare it like this in the header file:
IBOutlet UILabel *myLabel;
By theWay

ptg
How Xcode and Interface Builder Implement MVC 133
Once declared, Interface Builder enables you to visually connect the view’s label
object to the myLabel variable. Your code can then fully interact with the label
object—changing its properties, calling its methods, and so on.
Easy Access with property and synthesizeIn Hour 3, you learned about the Objective-C @property and @synthesize directives,but you’re about to start seeing them frequently, so we think a refresher is in order.
The @property directive declares elements in a class that should be exposed via“getters” and “setters” (or accessors and mutators, if you prefer). Properties aredefined with a series of attributes, most frequently nonatomic and are retainedduring iPhone development.
The @synthesize directive creates simplified getters and setters, making retriev-ing and setting values of an object very simple.
Returning to the example of a UILabel instance called myLabel, I would initiallydeclare it as a property in the header file of my view controller:@property (retain, nonatomic) NSString *myLabel;
And then use @synthesize in the implementation file to create simplified gettersand setters:@synthesize myLabel;
Once those lines are added, the current myLabel value could be retrieved fromUILabel’s text property using theCurrentLabel=myLabel.text (the getter) or setto something new with myLabel.text=@”My New Label” (the setter).
Using IBActionAn IBAction is used to “advertise” a method in your code that should be called
when a certain event takes place. For instance, if a button is pushed, or a field
updated, you will probably want your application to take action and react appropri-
ately. When you’ve written a method that implements your event-driven logic, you
can declare it with IBAction in the header file, which subsequently will expose it to
Interface Builder.
For instance, a method doCalculation might be declared like this:
-(IBAction)doCalculation:(id)sender;
Notice that the declaration includes a sender parameter with the type of id. This is
a generic type that can be used when you don’t know (or need to know) the type of
object you’ll be working with. By using id, you can write code that doesn’t tie itself
to a specific class, making it easier to adapt to different situations.
When creating a method that will be used as an action (like our doCalculation
example), you can identify and interact with the object that invoked the action

ptg
134 HOUR 6: Model-View-Controller Application Design
through the sender variable (or whatever you decide to call it in your code). This
will be handy if you decide to design a method that handles multiple different
events, such as button presses from several different buttons.
Data ModelsLet me get this out of the way upfront: For many of the exercises we’ll be doing in
this book, a separate data model is not needed; the data requirements are handled
within the controller. This is one of the trade-offs of small projects like the one you’ll
be working through in a few minutes. Although it would be ideal to represent a
complete MVC application architecture, sometimes it just isn’t possible in the space
and time available. In your own projects, you’ll need to decide whether to imple-
ment a standalone model. In the case of small utility apps, you may find that you
rarely need to consider a data model beyond the logic you code into the controller.
As you grow more experienced with the iOS Software Development Kit (SDK) and
start building data-rich applications, you’ll want to begin exploring Core Data. Core
Data abstracts the interactions between your application and an underlying data-
store. It also includes a modeling tool, like Interface Builder, that helps you design
your application, but rather than visually laying out interfaces, you can use it to
visually map a data structure, as shown in Figure 6.2.
For our beginning tutorials, using Core Data would be like using a sledgehammer to
drive a thumbtack. Right now, let’s get started building your first app with a view
and a view controller!
FIGURE 6.2After youbecome morefamiliar with iOSdevelopment,you might wantto explore theCore Data toolsfor managingyour datamodel.

ptg
Using the View-Based Application Template 135
Using the View-Based ApplicationTemplateThe easiest way to see how Xcode and Interface Builder manage to separate logic
from display is to build an application that follows this approach. Apple has includ-
ed a useful application template in Xcode that quickly sets up an empty view and
an associated view controller. This View-Based Application template will be the
starting point for many of your projects, so we’ll spend the rest of this chapter get-
ting accustomed to using it.
Implementation OverviewThe project we’ll be building is simple: Instead of just writing the typical Hello World
app, we want to be a bit more flexible. The program will present the user with a
field (UITextField) for typing and a button (UIButton). When the user types into
the field and presses the button, the display will update an onscreen label (UILabel)
so that “Hello” is seen, followed by the user’s input. The completed HelloNoun, as
we’ve chosen to call this project, is shown in Figure 6.3.
FIGURE 6.3The app willaccept inputand update thedisplay basedon what theuser types.
Although this won’t be a masterpiece of development, it does contain almost all the dif-
ferent elements we discuss in this hour: a view, a controller, outlets, and actions. Because
this is the first full development cycle that we’ve worked through, we’ll pay close atten-
tion to how all the pieces come together and why things work the way they do.

ptg
136 HOUR 6: Model-View-Controller Application Design
Setting Up the ProjectFirst we want to create the project, which we’ll call HelloNoun, in Xcode:
1. Launch Xcode from the Developer/Applications folder.
2. Choose File, New Project.
3. You’ll be prompted to choose a project type and a template. On the left side of
the New Project window, make sure that Application is selected under the
iPhone OS project type. Next find and select the View-Based Application
option from the list on the right, be sure that iPhone is selected, as shown in
Figure 6.4, and then click Choose.
4. Choose a save location and type HelloNoun when prompted for a file name.
Click Save to generate the project.
FIGURE 6.4Choose theiPhoneView-BasedApplicationtemplate.
This will create a simple application structure consisting of an application delegate,
a window, a view, and a view controller. After a few seconds, your project window
will open (see Figure 6.5).
ClassesClick the Classes folder and review the contents. You should see four files (visible in
Figure 6.5). The HelloNounAppDelegate.h and HelloNounAppDelegate.m files make
up the delegate for the instance of UIApplication that our project will create. In other
words, these files can be edited to include methods that govern how the application

ptg
Using the View-Based Application Template 137
behaves when it is running. By default, the delegate will be responsible for one thing:
adding a view to a window and making that window visible. This occurs in the aptly
named application:DidFinishLaunchingWithOptions method in
HelloNounAppDelegate.m, shown in Listing 6.1.
FIGURE 6.5Your new projectis open andready for cod-ing.
Listing 6.1- (BOOL)application:(UIApplication *)application
didFinishLaunchingWithOptions:(NSDictionary *)launchOptions {
// Override point for customization after app launch [window addSubview:viewController.view];[window makeKeyAndVisible];
return YES;}
You won’t need to edit anything in the application delegate, but keep in mind the
role that it plays in the overall application life cycle.
The second set of files, HelloNounViewController.h and HelloNounViewController.m,
will implement the class that contains the logic for controlling our view—a view
controller (UIViewController). These files are largely empty to begin, with just a
basic structure in place to ensure that we can build and run the project from the
outset. In fact, feel free to click the Build and Run button at the top of the window.
The application will compile and launch, but there won’t be anything to do!

ptg
By theWay
138 HOUR 6: Model-View-Controller Application Design
Notice that when we create a project, Xcode automatically names the classes andresources based on the project name.
To impart some functionality to our app, we need to work on the two areas we dis-
cussed previously: the view and the view controller.
XIB FilesAfter looking through the classes, click the Resources folder to show the XIB files that
are part of the template. You should see MainWindow.xib and
HelloNounViewController.xib files. Recall that these files are used to hold instances
of objects that we can add visually to a project. These objects are automatically
instantiated when the XIB loads. Open the MainWindow.xib file by double-clicking
it in Xcode. Interface Builder should launch and load the file. Within Interface
Builder, choose Window, Document to show the components of the file.
The MainWindow XIB, shown in Figure 6.6, contains icons for the File’s Owner
(UIApplication), the First Responder (an instance of UIResponder), the HelloNoun
App Delegate (HelloNounAppDelegate), the Hello Noun View Controller
(HelloNounViewController), and our application’s Window (UIWindow).
As a result, when the application launches, MainWindow XIB is loaded, a window is
created, along with an instance of the HelloNounViewController class. In turn, the
HelloNounViewController defines its view within the second XIB file,
HelloNounViewController.xib—this is where we’ll visually build our interface.
FIGURE 6.6TheMainWindow.xibfile handles cre-ating the appli-cation’s windowand instantiat-ing our viewcontroller.
Any reasonable person is probably scratching his head right now wondering a few
things. First, why does MainWindow.xib get loaded at all? Where is the code to tell
the application to do this?

ptg
Using the View-Based Application Template 139
The MainWindow.xib file is defined in the HelloNoun-Info.plist file as the property
value for the key Main nib file base name. You can see this yourself by clicking the
Resources folder and then clicking the plist file to show the contents (see Figure 6.7).
FIGURE 6.7The project’splist file definesthe XIB loadedwhen the appli-cation starts.
Second, what about the HelloNounViewController.xib tells the application that it
contains the view we want to use for our user interface? The answer lies in the
MainWindow XIB file. Return to the MainWindow.xib Document window in
Interface Builder.
Click once on Hello Noun View Controller to select it in the list, and then press
Command+1 or choose Attributes Inspector from the Tools menu. A small window
will appear, as shown in Figure 6.8. Expand the View Controller section and you
should see that the NIB Name field is set to HelloNounViewController. This means
that the view controller loads its view from that XIB file.
In short, the application is configured to load MainWindow.xib, which creates an
instance of our view controller class (HelloNounViewController), which subse-
quently loads its view from the HelloNounViewController.xib. If that still doesn’t
make sense, don’t fret; I guide you through this every step of the way.
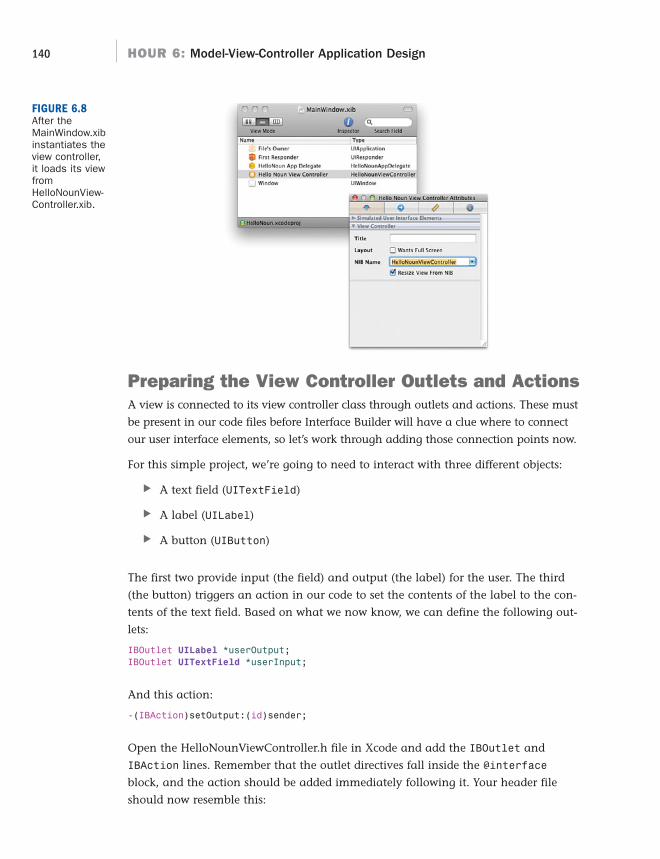
ptg
140 HOUR 6: Model-View-Controller Application Design
Preparing the View Controller Outlets and ActionsA view is connected to its view controller class through outlets and actions. These must
be present in our code files before Interface Builder will have a clue where to connect
our user interface elements, so let’s work through adding those connection points now.
For this simple project, we’re going to need to interact with three different objects:
. A text field (UITextField)
. A label (UILabel)
. A button (UIButton)
The first two provide input (the field) and output (the label) for the user. The third
(the button) triggers an action in our code to set the contents of the label to the con-
tents of the text field. Based on what we now know, we can define the following out-
lets:
IBOutlet UILabel *userOutput;IBOutlet UITextField *userInput;
And this action:
-(IBAction)setOutput:(id)sender;
Open the HelloNounViewController.h file in Xcode and add the IBOutlet and
IBAction lines. Remember that the outlet directives fall inside the @interface
block, and the action should be added immediately following it. Your header file
should now resemble this:
FIGURE 6.8After theMainWindow.xibinstantiates theview controller,it loads its viewfromHelloNounView-Controller.xib.

ptg
Using the View-Based Application Template 141
#import <UIKit/UIKit.h>
@interface HelloNounViewController : UIViewController {IBOutlet UILabel *userOutput;
IBOutlet UITextField *userInput;
}
-(IBAction)setOutput:(id)sender;
@end
Congratulations! You’ve just built the connection points that you’ll need for Interface
Builder to connect to your code. Save the file and get ready to create a user interface!
Creating the ViewInterface Builder makes designing a user interface (UI) as much fun as playing
around in your favorite graphics application. That said, our emphasis will be on the
fundamentals of the development process and the objects we have at our disposal.
Where it isn’t critical, we move quickly through the interface creation.
Adding the ObjectsThe interface for the HelloNoun application is quite simple—it must provide a space
for output, a field for input, and a button to set the output to the same thing as the
input. Follow these steps to create the UI:
1. Open HelloNounViewController.xib by double-clicking it within the Xcode pro-
ject’s Resources folder.
2. If it isn’t already running, Interface Builder will launch and open the XIB file,
displaying the Document window for the XIB file (see Figure 6.9). If you don’t
see the window, choose Window, Document from the menu.
FIGURE 6.9TheHelloNounView-Controller.xibfile’s view willcontain all theUI objects forthe application.
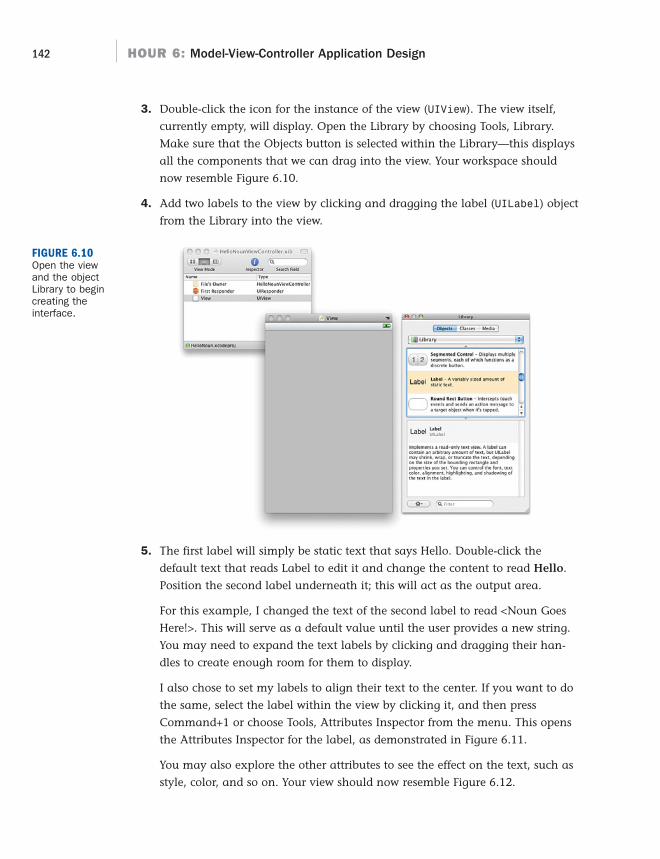
ptg
142 HOUR 6: Model-View-Controller Application Design
3. Double-click the icon for the instance of the view (UIView). The view itself,
currently empty, will display. Open the Library by choosing Tools, Library.
Make sure that the Objects button is selected within the Library—this displays
all the components that we can drag into the view. Your workspace should
now resemble Figure 6.10.
4. Add two labels to the view by clicking and dragging the label (UILabel) object
from the Library into the view.
FIGURE 6.10Open the viewand the objectLibrary to begincreating theinterface.
5. The first label will simply be static text that says Hello. Double-click the
default text that reads Label to edit it and change the content to read Hello.
Position the second label underneath it; this will act as the output area.
For this example, I changed the text of the second label to read <Noun Goes
Here!>. This will serve as a default value until the user provides a new string.
You may need to expand the text labels by clicking and dragging their han-
dles to create enough room for them to display.
I also chose to set my labels to align their text to the center. If you want to do
the same, select the label within the view by clicking it, and then press
Command+1 or choose Tools, Attributes Inspector from the menu. This opens
the Attributes Inspector for the label, as demonstrated in Figure 6.11.
You may also explore the other attributes to see the effect on the text, such as
style, color, and so on. Your view should now resemble Figure 6.12.

ptg
Using the View-Based Application Template 143
FIGURE 6.11Use theAttributesInspector to setthe label to cen-ter itself and toincrease thefont size.
FIGURE 6.12Add two labels,one static, oneto use for out-put, into theview.
6. When you’re happy with the results, it’s time to add the elements that the user
will be interacting with: the text field and button. Find the Text Field object
(UITextField) within the Library and click and drag to position it under your
two labels. Using the handles on the field, stretch it so that it matches the
length of your output label.
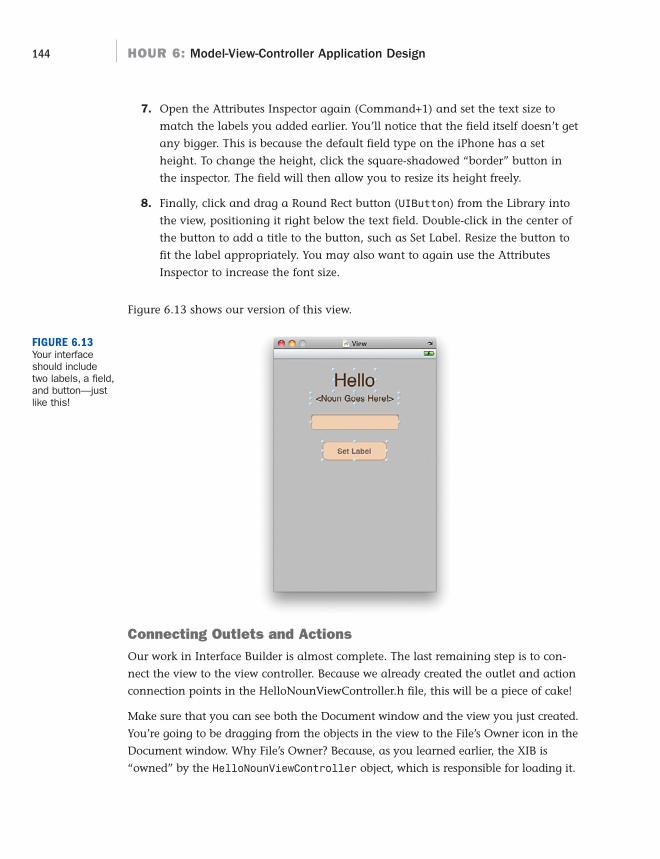
ptg
144 HOUR 6: Model-View-Controller Application Design
7. Open the Attributes Inspector again (Command+1) and set the text size to
match the labels you added earlier. You’ll notice that the field itself doesn’t get
any bigger. This is because the default field type on the iPhone has a set
height. To change the height, click the square-shadowed “border” button in
the inspector. The field will then allow you to resize its height freely.
8. Finally, click and drag a Round Rect button (UIButton) from the Library into
the view, positioning it right below the text field. Double-click in the center of
the button to add a title to the button, such as Set Label. Resize the button to
fit the label appropriately. You may also want to again use the Attributes
Inspector to increase the font size.
Figure 6.13 shows our version of this view.
FIGURE 6.13Your interfaceshould includetwo labels, a field,and button—justlike this!
Connecting Outlets and ActionsOur work in Interface Builder is almost complete. The last remaining step is to con-
nect the view to the view controller. Because we already created the outlet and action
connection points in the HelloNounViewController.h file, this will be a piece of cake!
Make sure that you can see both the Document window and the view you just created.
You’re going to be dragging from the objects in the view to the File’s Owner icon in the
Document window. Why File’s Owner? Because, as you learned earlier, the XIB is
“owned” by the HelloNounViewController object, which is responsible for loading it.

ptg
Using the View-Based Application Template 145
1. Control-drag from the File’s Owner icon to the label that you’ve established for
output (titled <Noun Goes Here!> in the example), and then release the mouse
button. You can use either the visual representation of the label in the view or
the listing of the label object within the Document window.
2. When you release the mouse button, you’ll be prompted to choose the appro-
priate outlet. Pick userOutput from the list that appears (see Figure 6.14).
FIGURE 6.14Connect thelabel that willdisplay output tothe userOutputoutlet.
3. Repeat the process for the text field, this time choosing userInput as the out-
let. The link between the input and output view objects and the view con-
troller is now established.
4. To finish the view, we still need to connect the button to the setOutput action.
Although you could do this by Control-dragging, it isn’t recommended. Objects
may have dozens of different events that can be used as a trigger. To make
sure that you’re using the right event, you must select the object in the view,
and then press Command+3 or choose Tools, Connections Inspector. This
opens the Connections Inspector, which shows all the possible events for the
object. For a button object, the event that you’re most likely to want to use is
Touch Up Inside, meaning that the user had a finger on the button, and then
released the finger while it was still inside the button.
5. Make sure the button is selected, and then drag from the circle beside Touch
Up Inside in the Connections Inspector to the File’s Owner icon. When prompt-
ed for an action, choose setOutput. (It should be the only option.) The

ptg
146 HOUR 6: Model-View-Controller Application Design
Connections Inspector should update to show the completed connection, as
shown in Figure 6.15.
FIGURE 6.15Use theConnectionsInspector to cre-ate a link fromthe event to theaction it shouldtrigger.
Your view is now complete! You can safely exit Interface Builder, saving your changes.
Implementing the View Controller LogicWith the view complete and the connection to the view controller in place, the only
task left is to fill in the view controller logic. Let’s turn our attention back toward the
HelloNounViewController.h and HelloNounViewController.m files. Why do we need to
revisit the interface file (.h)? Because we need to easily access the userOutput and
userInput variables, and to do that, we have to define these as properties, like this:
@property (retain, nonatomic) UITextField *userInput;@property (retain, nonatomic) UILabel *userOutput;
Edit HelloNounViewController.h to include these lines after the @interface block.
The finished file is shown in Listing 6.2.
Listing 6.2#import <UIKit/UIKit.h>
@interface HelloNounViewController : UIViewController {IBOutlet UILabel *userOutput;IBOutlet UITextField *userInput;
}
@property (retain, nonatomic) UITextField *userInput;
@property (retain, nonatomic) UILabel *userOutput;
-(IBAction)setOutput:(id)sender;
@end

ptg
Using the View-Based Application Template 147
To access these properties conveniently, we must use @synthesize to create the getters/
settings for each. Open the HelloNounViewController.m implementation file and add
these lines immediately following the @implementation directive:
@synthesize userInput;
@synthesize userOutput;
This leaves us with the implementation of setOutput. The purpose of this method is
to set the output label to the contents of the field that the user edited. How do we
get/set these values? Simple! Both UILabel and UITextField have a property called
text that contains their contents. By reading and writing to these properties, we can
set userInput to userOutput in one easy step.
Edit HelloNounViewController.m to include this method definition, following the
@synthesize directives:
-(IBAction) setOutput:(id)sender {
userOutput.text=userInput.text;
}
It all boils down to a single line! Thanks to our getters and setters, this single assign-
ment statement does everything we need.
Had we not used @synthesize to create the accessors, we could have implement-ed the setOutput logic like this:[userOutput setText: [userInput text]];
Either way is fine technically, but you should always code for readability and easeof maintenance.
Freeing Up MemoryWhenever we’ve used an object and are done with it, we need to release it so that
the memory can be freed and reused. Even though this application needs the label
and text field objects (userOutput and userInput), as long as it is running, it is still
good practice to release them in the dealloc method of the view controller. The
release method is called like this:
[<my Object> release]
Edit the HelloNounViewController.m file’s dealloc method to release both
userOutput and userInput. The result should look like this:
By theWay

ptg
148 HOUR 6: Model-View-Controller Application Design
- (void)dealloc {[userInput release];
[userOutput release];
[super dealloc];}
Well done! You’ve written your first iPhone application!
Building the ApplicationThe app is ready to build and test. If you’d like to deploy to your iPhone, be sure it is
connected and ready to go, and then choose iPhone Device from the drop-down
menu in the upper left of the Xcode window. Otherwise, choose Simulator. Click
Build and Run.
After a few seconds, the application will start on your iPhone or within the simula-
tor window, as shown in Figure 6.16.
FIGURE 6.16Your finishedapplicationmakes use of aview to handlethe UI and aview controllerto implementthe functionallogic.
Further ExplorationBefore moving on to subsequent hours, you may want to learn more about how
Apple has implemented the MVC design versus other development environments
that you may have used. An excellent document, titled “Cocoa Design Patterns,”
provides an in-depth discussion of MVC as applied to Cocoa. You can find and read
this introduction by searching for the title in the Xcode documentation system,
which we discussed in Hour 4.

ptg
Q&A 149
You might also want to take a breather and use the finished HelloNoun application
as a playground for experimentation. We discussed only a few of the different
Interface Builder attributes that can be set for labels, but there are dozens more that
can customize the way that fields and buttons are displayed. The flexibility of the
view creation in Interface Builder goes well beyond what can fit in one book, so
exploration will be necessary to take full advantage of the tools. This is an excellent
opportunity to play around in the tools and see the results—before we move into
more complex (and easy to break!) applications.
SummaryIn this hour, you learned about the MVC design pattern and how it separates the
display (view), logic (controller), and data (model) components of an application.
You also explored how Apple implements this design within Xcode through the use
Core Data, views, and view controllers. This approach will guide your applications
through much of this book and in your own real-world application design, so learn-
ing the basics now will pay off later.
To reinforce the lesson, we worked through a simple application using the View-
Based Application template. This included creating outlets and actions that linked a
view and view controller via Xcode and Interface Builder. Although not the most
complex app you’ll write, it included the elements of a fully interactive user experi-
ence: input, output, and (very simple) logic.
Q&AQ. Is it possible to have multiple views or view controllers?
A. Yes, absolutely. In Hours 11–14, you’ll create several applications with multi-
ple view controllers.
Q. Why do I drag from the File’s Owner to the Object in Interface Builder,rather than the other way around?
A. Think of the File’s Owner as the code that you’re going to be writing. Your
code needs to reference the Interface Builder object (through an outlet), not
the other way around.

ptg
150 HOUR 6: Model-View-Controller Application Design
Workshop
Quiz1. What event do you use to detect a button tap?
2. What purpose does the @synthesize directive accomplish?
3. Which Apple project template creates a simple view/view controller applica-
tion?
Answers1. The Touch Up Inside event is most commonly used to trigger actions based on
a button press.
2. The @synthesize directive creates the simplified getters and setters for a prop-
erty. In the case of the label and field we used in the tutorial, it enabled us to
access the text property by using <variable name>.text.
3. The View-Based Application template sets up a view and a view controller.
Activities1. Explore the attributes of the interface objects that you added to the tutorial
project in Interface Builder. Try setting different fonts, colors, and layouts. Use
these tools to customize the view beyond the simple layout created this hour.
2. Review the Apple Xcode documentation for the Core Data features of Cocoa.
Although you won’t be using this technology in this book’s tutorials, it is an
important tool that you’ll ultimately want to become more familiar with for
advanced data-driven applications.
ptg
HOUR 7
Working with Text, Keyboards,and Buttons
What You’ll Learn in This Hour:. How to use text fields. Input and output in scrollable text views. How to enable data detectors. A way to spruce up the standard iPhone buttons
In the last hour, you explored views and view controllers and created a simple application
that accepted user input and generated output when a button was pushed. These are the
basic building blocks that we expand on in this hour. In this hour, we create an applica-
tion that uses multiple different input and output techniques. You learn how to implement
and use editable text fields, text views, graphical buttons, and configure the onscreen key-
board.
This is quite a bit of material to cover in an hour, but the concepts are very similar, and
you’ll quickly get the hang of these new elements.
Basic User Input and OutputThe iPhone gives us many different ways of displaying information to a user and collect-
ing feedback. There are so many ways, in fact, that we’re going to be spending the next
several hours working through the tools that the iPhone SDK provides for interacting with
your users—starting with the basics.

ptg
152 HOUR 7: Working with Text, Keyboards, and Buttons
ButtonsOne of the most common interactions you’ll have with your users is detecting and
reacting to the touch of a button (UIButton). Buttons, as you may recall, are ele-
ments of a view that respond to an event that the user triggers in the interface, usu-
ally a Touch Up Inside event to indicate that the user’s finger was on a button and
then released it. Once an event is detected, it can trigger an action (IBAction) with-
in a corresponding view controller.
Buttons are used for everything from providing preset answers to questions to trig-
gering motions within a game. Although we’ve used only a single Rounded Rect
button up to this point, they can take on many different forms through the use of
images. Figure 7.1 shows an example of a fancy button.
FIGURE 7.1Buttons can besimple, fancy(like this one),or set to anyarbitrary image.
Text Fields and ViewsAnother common input mechanism is a text field. Text fields (UITextField) give users
space to enter any information they’d like into a single line in the application—these
are similar to the form fields in a web form. When users enter data into a field, you
can constrain their input to numbers or text by using different iPhone keyboards,
something we do later this hour. Text fields, like buttons, can respond to events but fre-
quently are implemented as passive interface elements, meaning that their contents
(provided through the text property) can be read at any time by the view controller.
Similar to the text field is the text view (UITextView). The difference is a text view
can present a scrollable and editable block of text for the user to either read or mod-
ify. These should be used in cases where more than a few words of input are
required. Figure 7.2 shows examples of a text field and text view.
LabelsThe final interface feature that we’re going to be using here and throughout this
book is the label (UILabel). Labels are used to display strings within a view by set-
ting their text property.

ptg
Using Text Fields, Text Views, and Buttons 153
The text within a label can be controlled via a wide range of label attributes, such as
font and text size, alignment, and color. As you’ll see, labels are useful both for static
text in a view and for presenting dynamic output that you generate in your code.
Now that you have basic insight into the input and output tools we’ll be using in
this hour, let’s go ahead and get started with our project: a simple substitution-style
story generator.
Using Text Fields, Text Views, andButtonsDespite what some people may think, I enjoy entering text on the iPhone. The virtu-
al keyboard is responsive and simple to navigate. What’s more, the input process
can be altered to constrain the user’s input to only numbers, only letters, or other
variations. You can have the iPhone automatically correct simple misspellings or
capitalize letters. This project will review many aspects of the text input process.
Implementation OverviewIn this project, we’ll be creating a Mad Libs––style story creator. Users enter a noun
(place), verb, and number through three text fields (UITextField). They may also enter
or modify a template that contains the outline of the story to be generated. Because the
FIGURE 7.2Text fields andtext views pro-vide a meansfor entering textusing theiPhone’s virtualkeyboard.

ptg
154 HOUR 7: Working with Text, Keyboards, and Buttons
template can be several lines long, we’ll use a text view (UITextView) to present this
information. A button press (UIButton) will trigger an action that generates the story
and outputs the finished text in another text view, demonstrated in Figure 7.3.
Although not directly part of the input or output process, we also investigate how to
implement the now-expected “touch the background to make the keyboard disap-
pear” interface standard, along with a few other important points. In other words,
pay attention!
FIGURE 7.3The tutorial appthis hour willuse two typesof text inputobjects.
We’ll be naming this tutorial project FieldButtonFun. You may certainly use some-
thing more creative if you’d like.
Setting Up the ProjectThis project will use the same View-Based Application template as the previous
hour. If it isn’t already running, launch Xcode (Developer/Applications), and then
choose File, New Project.
Select the iOS Application project type, and then find and select the View-Based
Application option in the Template list. Click Choose to continue, and then enter the
project name, FieldButtonFun, and save the new project.
Xcode will set up a skeleton project for you. As before, we’ll be focusing on the view,
which has been created in FieldButtonFunViewController.xib, and the view con-
troller class FieldButtonFunViewController.

ptg
Setting Up the Project 155
Preparing the Outlets and ActionsThis project contains a total of six input areas: Three text fields will be used to col-
lect the place, verb, and number values. We’ll be calling these thePlace, theVerb,
and theNumber, respectively. The project also requires two text views: one to hold
the editable story template, theTemplate; and the other to contain the output,
theStory. Finally, a single button is used to trigger a method, createStory, which
will create the story text.
Yes, we’ll be using a text view for output as well as input. Text views provide abuilt-in scrolling behavior and can be set to read-only, making them convenient forboth collecting and displaying information. They do not, however, allow for rich textinput or output. A single font style is all you get!
Start by preparing the outlets and actions in the view controller’s header file,
FieldButtonFunViewController.h. Edit the file to contain contain the code shown in
listing 7.1.
Listing 7.11: #import <UIKit/UIKit.h>2:3: @interface FieldButtonFunViewController : UIViewController {4: IBOutlet UITextField *thePlace;
5: IBOutlet UITextField *theVerb;
6: IBOutlet UITextField *theNumber;
7: IBOutlet UITextView *theStory;
8: IBOutlet UITextView *theTemplate;
9: IBOutlet UIButton *generateStory;
10: }11:12: @property (retain,nonatomic) UITextField *thePlace;
13: @property (retain,nonatomic) UITextField *theVerb;
14: @property (retain,nonatomic) UITextField *theNumber;
15: @property (retain,nonatomic) UITextView *theStory;
16: @property (retain,nonatomic) UITextView *theTemplate;
17: @property (retain,nonatomic) UIButton *generateStory;
18:19: -(IBAction)createStory:(id)sender;
20:21: @end
Lines 4–9 create the outlets for each of the input elements, while lines 12–17 estab-
lish them as properties so that we can easily manipulate their contents. Line 19
declares a createStory method where we’ll eventually implement the logic behind
the application.
By theWay
ptg
By theWay
156 HOUR 7: Working with Text, Keyboards, and Buttons
If you’re paying close attention, you may notice that we’ve declared an outlet anda property for the view’s button, generateButton. As we mentioned earlier, typi-cally buttons are used to trigger a method when a certain event takes place, sowe don’t usually need an outlet or property to manipulate them.
In this example, however, we’re going to programmatically alter the visual appear-ance of the button, so we need to be able to access the object, not just receivemessages from it.
After you’ve set up the outlets and actions, save the header file and open
FieldButtonViewController.m. As you’ve learned, properties usually have correspon-
ding @synthesize directives so that they can easily be accessed in code. Add the
appropriate statements for all the properties defined in the header. Your additions
should fall after the @implementation directive and look like this:
@synthesize thePlace;
@synthesize theVerb;
@synthesize theNumber;
@synthesize theStory;
@synthesize theTemplate;
@synthesize generateStory;
That should be all the setup we need for now. Let’s turn our attention to creating theuser interface.
In the previous hour, you learned that the MainWindow.xib is loaded when theapplication launches and that it will instantiate the view controller, which subse-quently loads its view from the second XIB file in the project (in this case,FieldButtonFunViewController.xib). Locate the file in the project’s Resources folder,and then double-click it to launch Interface Builder.
When Interface Builder has started, open the XIB file’s Document window (Window,Document), and then double-click the view icon to open the blank view for editing.
Adding Text FieldsBegin creating the user interface by adding three text fields to the top of the view. Toadd a field, open the Objects Library by choosing Tools, Library, and then locate theText Field object (UITextField) and drag it into the view. Repeat this two moretimes for the other two fields.
Stack the fields on top of one another, leaving enough room so that the user can eas-ily tap a field without hitting all of them. To help the user differentiate between thethree fields, you’ll also want to add labels to the view. Click and drag the Label(UILabel) object from the Library into the view. Align three labels directly acrossfrom the three fields. Double-click the label within the view to set its text. I’ve labeledmy fields Place, Verb, and Number, from top to bottom, as shown in Figure 7.4.

ptg
Setting Up the Project 157
Editing Text Field AttributesThe fields that you’ve created are technically fine as is, but you can adjust their
appearance and behavior to create a better user experience. To view the field attrib-
utes, click a field, and then press Command+1 (Tools, Attributes Inspector) to open
the Attributes Inspector (see Figure 7.5).
FIGURE 7.4Add text fieldsand labels todifferentiatebetween them.
FIGURE 7.5Editing a field’sattributes canhelp create abetter UI.
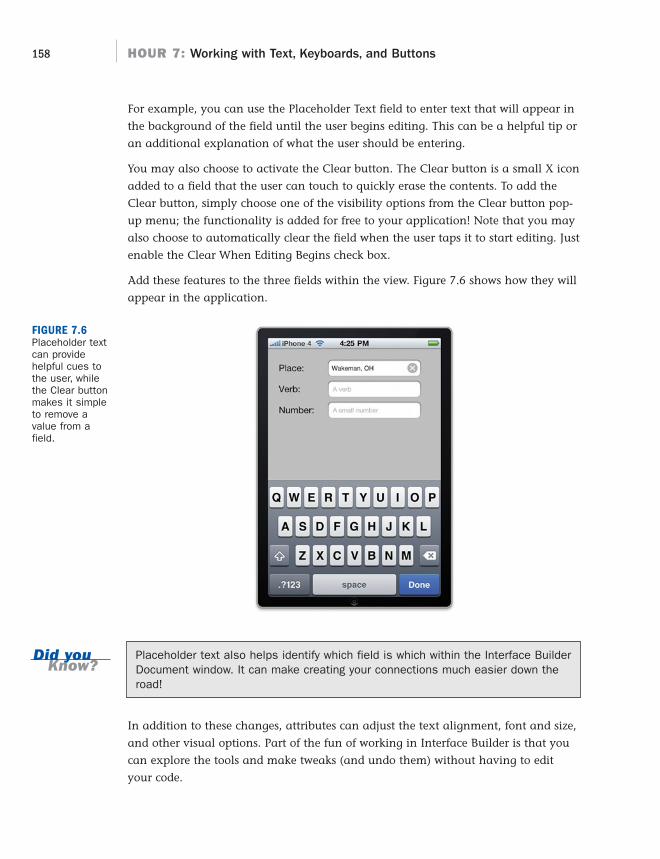
ptg
Did youKnow?
158 HOUR 7: Working with Text, Keyboards, and Buttons
For example, you can use the Placeholder Text field to enter text that will appear in
the background of the field until the user begins editing. This can be a helpful tip or
an additional explanation of what the user should be entering.
You may also choose to activate the Clear button. The Clear button is a small X icon
added to a field that the user can touch to quickly erase the contents. To add the
Clear button, simply choose one of the visibility options from the Clear button pop-
up menu; the functionality is added for free to your application! Note that you may
also choose to automatically clear the field when the user taps it to start editing. Just
enable the Clear When Editing Begins check box.
Add these features to the three fields within the view. Figure 7.6 shows how they will
appear in the application.
FIGURE 7.6Placeholder textcan providehelpful cues tothe user, whilethe Clear buttonmakes it simpleto remove avalue from afield.
Placeholder text also helps identify which field is which within the Interface BuilderDocument window. It can make creating your connections much easier down theroad!
In addition to these changes, attributes can adjust the text alignment, font and size,
and other visual options. Part of the fun of working in Interface Builder is that you
can explore the tools and make tweaks (and undo them) without having to edit
your code.

ptg
Setting Up the Project 159
Customizing the Keyboard Display with Text Input TraitsProbably the most important attributes that you can set for an input field are the
“text input traits,” or, simply, how the keyboard is going to be shown onscreen.
Seven different traits are currently available:
Capitalize: Controls whether the iPhone will automatically capitalize words,
sentences, or all the characters entered into a field.
Correction: If explicitly set to on or off, the input field will correct (on) or
ignore (off) common spelling errors. If left to the defaults, it will inherit the
behavior of the iOS settings.
Keyboard: Sets a predefined keyboard for providing input. By default, the
input keyboard lets you type letters, numbers, and symbols. Choosing the
option Number Pad will only allow numbers to be entered. Similarly, using
Email Address constrains the input to strings that look like email addresses.
Seven different keyboard styles are available.
Appearance: Changes the appearance of the keyboard to look more like an
alert view (which you’ll learn about in a later hour).
Return Key: If the keyboard has a Return key, it is set to this label. Values
include Done, Search, Next, Go, and so on.
Auto-Enable Return Key: Disables the Return key on the keyboard unless the
user has entered at least a single character of input into the field.
Secure: Treats the field as a password, hiding each character as it is typed.
Of the three fields that we’ve added to the view, the Number field can definitely ben-
efit from setting an input trait. With the Attributes Inspector still open, select the
Number field in the view, and then choose the Number Pad option within the
Keyboard pop-up menu (see Figure 7.7).
You may also want to alter the capitalization and correction options on the other
two fields and set the Return key to Done. Again, all of this functionality is gained
“for free.” So, you can return to Interface Builder to experiment all you want later
on.
Connecting to the OutletsThe first three fields of the view are now finished and ready to be connected to their
variables back in Xcode. To connect to the outlets defined earlier, Control-drag from
the File’s Owner icon in the Document window to the first field (“Place”) either in
the view window or within the Document window’s view hierarchy. When prompted,
choose thePlace from the pop-up list of outlets, as shown in Figure 7.8.

ptg
160 HOUR 7: Working with Text, Keyboards, and Buttons
Repeat the process for the Verb and Number fields, connecting them to the theVerb
and theNumber instance variable outlets. The primary input fields are connected.
Now we’re ready to move on to the next element of the user interface: text views.
FIGURE 7.7Choosing a key-board type willhelp constrain auser’s input.
FIGURE 7.8Connect eachfield to its corre-sponding outlet.

ptg
Setting Up the Project 161
FIGURE 7.9Add two textviews with corre-sponding labelsto the view.
Copy and PasteYour text entry areas will automatically gain copy and paste without needing tochange anything in your code. For advanced applications, you can override the pro-tocol methods defined in UIResponderStandardEditActions to customize thecopy, paste, and selection process.
Adding Text ViewsNow that you know the ins and outs of text fields, let’s move on to the two text
views (UITextView) present in this project. Text views, for the most part, can be used
just like text fields. You can access their contents the same way, and they support
many of the same attributes as text fields, including text input traits.
To add a text view, find the Text View object (UITextView) and drag it into the view.
This will add a block to the view, complete with Greeked text (Lorem ipsum…) that
represents the input area. Using the resizing handles on the sizes of the block, you
can shrink or expand the object to best fit the view. Because this project calls for two
text views, drag two into the view and size them to fit underneath the existing three
text fields.
As with the text fields, the views themselves don’t convey much information about
their purpose to the user. To clarify their use, add two text labels above each of the
views, Template for the first, and The Story for the second. Your view should now
resemble Figure 7.9.

ptg
162 HOUR 7: Working with Text, Keyboards, and Buttons
Editing Text View AttributesText view attributes provide many of the same visual controls as text fields. Select a
view, and then open the Attributes Inspector (Command+1) to see the available
options, as shown in Figure 7.10.
FIGURE 7.10Edit the attrib-utes of eachtext view to prepare themfor input andoutput.
To start, we need to update the Text attribute to remove the initial Greeked text and
provide our own content. For the top field, which will act as the template, select the
content within the Text attribute of the Attributes Inspector, and then clear it. Enter
the following text, which will be available within the application as the default:
The iPhone developers descended upon <place>. They vowed to <verb> night andday, until all <number> Palm Pre owners came to their senses. <place> wouldnever be the same again.
When we implement the logic behind this interface, the placeholders (<place>,
<verb>, <number>) will be replaced with the user’s input.
Next, select the “story” text view, and then again use the Attributes Inspector to
clear the contents entirely. Because the contents of this text view will be generated
automatically, we can leave the Text attribute blank. This view will also be a read-
only view, so uncheck the Editable attribute.
In this example, to help provide some additional contrast between these two areas,
I’ve set the background color of the template to a light red and the story to a light
green. To do this in your copy, simply select the text view to stylize, and then click

ptg
Setting Up the Project 163
the Attributes Inspector’s View background attribute to open a color chooser. Figure
7.11 shows our final text views.
FIGURE 7.11When complet-ed, the textviews shoulddiffer in color,editability, andcontent.
Setting Scrolling OptionsWhen editing the text view attributes, you’ll notice that a range of options exist that
are specifically related to its ability to scroll, as shown in Figure 7.12.
FIGURE 7.12Scrolling regionshave a numberof attributesthat can changetheir behavior.

ptg
164 HOUR 7: Working with Text, Keyboards, and Buttons
Using these features, you can set the color of the scroll indicator (black or white),choose whether both horizontal and vertical scrolling are enabled, and evenwhether the scrolling area should have the rubber-band “bounce” effect when itreaches the ends of the scrollable content.
Using Data DetectorsData detectors automatically analyze the content within onscreen controls andprovide helpful links based on what they find. Phone numbers, for example, canbe touched to dial the phone; detected web addresses can be set to launchSafari when tapped by the user. All of this occurs without your application havingto do a thing. No need to parse out strings that look like URLs or phone numbers.In fact, all you need to do is click a button.
To enable data detectors on a text view, select the view and return to theAttributes Inspector (Command+1). Within the Text View Attributes area, click thecheck boxes under Detection: Phone Numbers to identify any sequence of num-bers that looks like a phone number; Addresses for mailing addresses; Events fortext that references a day and/or time; and Links to provide a clickable link forweb and email addresses.
Data detectors are a great convenience for users, but can be overused. If youenable data detectors in your projects, be sure they make sense. For example, ifyou are calculating numbers and outputting them to the user, chances are youdon’t want the digits to be recognized as telephone numbers.
Connecting to the OutletsConnect the text views to the theStory and theTemplate outlets you defined earli-
er. Control-drag from the File’s Owner icon in the Document window to the text view
that contains the template. When prompted, choose theTemplate from the pop-up
list of outlets (see Figure 7.13).
Repeat this for the second text view, this time choosing theStory for the outlet.
You’ve just completed the text input and output features of the application. All that
remains is a button!
Creating Styled ButtonsIn the last hour’s lesson, you created a button (UIButton) and connected it to the
implementation of an action (IBAction) within a view controller. Nothing to it,
right? Working with buttons is relatively straightforward, but what you may have
noticed is that, by default, the buttons you create in Interface Builder are, well, kind
of boring.
WatchOut!

ptg
Setting Up the Project 165
We need a single button in this project, so drag an instance of the Rounded Rect but-
ton (UIButton) from the Objects Library to the bottom of the view. Title the button
Generate Story. The final view, with a default button, can be seen in Figure 7.14.
FIGURE 7.13Connect eachview to its corre-sponding outlet.
FIGURE 7.14The default but-ton styles areless thanappealing.
Although you’re certainly welcome to use the standard buttons, you may want to
explore what visual changes you can make in Interface Builder and ultimately
through code changes.

ptg
166 HOUR 7: Working with Text, Keyboards, and Buttons
Editing Button AttributesTo edit a button’s appearance, your first stop is, once again, the Attributes Inspector
(Command+1). Using the Attributes Inspector, you can dramatically change the
appearance of the button. Use the Type drop-down menu, shown in Figure 7.15, to
choose common button types:
Rounded Rect: The default iPhone button style.
Detail Disclosure: An arrow button used to indicate additional information is
available.
Info Light: An “i” icon, typically used to display additional information about
an application or item. The “Light” version is intended for dark backgrounds.
Info Dark: The dark (light background) version of the Info Light button.
Add Contact: A + button, frequently used to indicate the addition of a contact
to the address book.
Custom: A button that has no default appearance. Usually used with button
images.
FIGURE 7.15The AttributesInspector givesseveral optionsfor common but-ton types, aswell as a cus-tom option.
In addition to choosing a button type, you can make the button interact with user
touches, a concept known as changing state. For instance, by “default,” a button is
displayed unhighlighted within the view. When a user touches a button, it changes
to a highlighted “on” state, showing that it has been touched.

ptg
Setting Up the Project 167
Using the Attributes Inspector, you can use the State Configuration menu to change
the button’s title, background color, or even add a graphic image.
Setting Custom Button ImagesTo create custom iPhone buttons, you’ll need to make custom images, including ver-
sions for the highlighted on state and the default off state. These can be any shape or
size, but PNG format is recommended because of its compression and transparency
features.
After you’ve added these to the project through Xcode, you’ll be able to select the
image from the Image or Background drop-down menus in Interface Builder’s button
attributes. Using the Image menu sets an image that appears inside the button
alongside the button title. This option enables you to decorate a button with an icon.
Using the Background menu sets an image that will be stretched to fill the entire
background of the button. The option lets you create a custom image as the entire
button, but you’ll need to size your button exactly to match the image. If you don’t,
the image will be stretched and pixilated in your interface.
Another way to use custom button images that will correctly size to your text is
through the code. We’ll apply this technique to our project now.
Remember how we created an outlet for a button earlier in the project? We need the
outlet so that we can manipulate the button in Xcode. Control-drag from the File’s
Owner icon in the Document window in Interface Builder to the Generate Story but-
ton. Pick the generateStory outlet when prompted, as demonstrated in Figure 7.16.
FIGURE 7.16We need toaccess the but-ton propertiesfrom our appli-cation to manip-ulate itsimages.
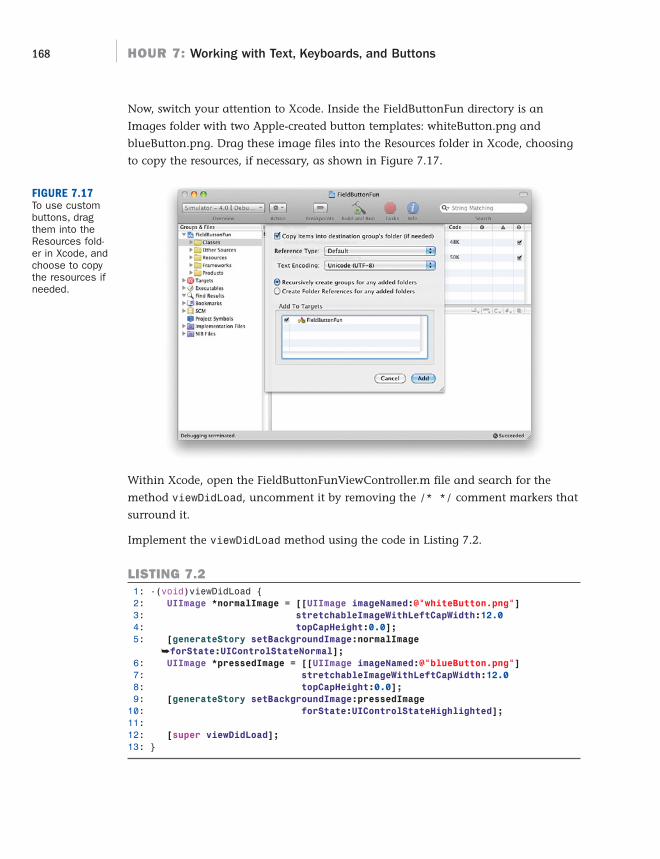
ptg
168 HOUR 7: Working with Text, Keyboards, and Buttons
Now, switch your attention to Xcode. Inside the FieldButtonFun directory is an
Images folder with two Apple-created button templates: whiteButton.png and
blueButton.png. Drag these image files into the Resources folder in Xcode, choosing
to copy the resources, if necessary, as shown in Figure 7.17.
FIGURE 7.17To use custombuttons, dragthem into theResources fold-er in Xcode, andchoose to copythe resources ifneeded.
Within Xcode, open the FieldButtonFunViewController.m file and search for the
method viewDidLoad, uncomment it by removing the /* */ comment markers that
surround it.
Implement the viewDidLoad method using the code in Listing 7.2.
LISTING 7.21: -(void)viewDidLoad {2: UIImage *normalImage = [[UIImage imageNamed:@”whiteButton.png”]
3: stretchableImageWithLeftCapWidth:12.0
4: topCapHeight:0.0];
5: [generateStory setBackgroundImage:normalImage
➥forState:UIControlStateNormal];
6: UIImage *pressedImage = [[UIImage imageNamed:@”blueButton.png”]
7: stretchableImageWithLeftCapWidth:12.0
8: topCapHeight:0.0];
9: [generateStory setBackgroundImage:pressedImage
10: forState:UIControlStateHighlighted];
11:12: [super viewDidLoad];
13: }

ptg
Setting Up the Project 169
In this code block, we’re accomplishing several different things, all focused on pro-
viding the button instance (generateStory) with a reference to an image object
(UIImage) that “knows” how it can be stretched.
Why are we implementing this code in the viewDidLoad method? Because it isautomatically invoked after the view is successfully instantiated from the XIB file.This gives us a convenient hook for making changes (in this case, adding buttongraphics) right as the view is being displayed onscreen.
In lines 2–4 and 6–8, we first return an instance of an image from the image files
that we added to the project resources. Then we define that image as being stretch-
able. Let’s break this down into the individual statements:
To create an instance of an image based on a named resource, we use the UIImage
class method imagenamed, along with a string that contains the filename of the
image resource. For example, this code fragment creates an instance of the
whiteButton.png image:
[UIImage imageNamed:@”whiteButton.png”]
Next, we use the instance method
stretchableImageWithLeftCapWidth:topCapHeight to return another new
instance of the image, but this time with properties that define how it can be
stretched. These properties are the left cap width and top cap width, which describe
how many pixels in from the left or down from the top of the image should be
ignored before reaching a 1-pixel-wide strip that can be stretched. For instance, if
the left cap is set to 12, a vertical column 12 pixels wide is ignored during stretch-
ing, and then the 13th column is repeated however many times is necessary to
stretch to the requested length. The top cap works the same way but repeats a hori-
zontal row to grow the image to the correct size vertically, as illustrated in Figure
7.18. If the left cap is set to zero, the image can’t be stretched horizontally. Similarly,
if the top cap is zero, the image can’t be stretched vertically.
In this example, we use stretchableImageWithLeftCapWidth:12.0
topCapHeight:0.0 to force horizontal stretching to occur at the 13th vertical col-
umn of pixels in and to disable any vertical stretching. The UIImage instance
returned is then assigned to the normalImage and pressedImage variables, corre-
sponding to the default and highlighted button states.
Lines 5 and 9–10 use the setBackgroundImage:forState instance method of our
UIButton object (generateStory) to set the stretchable images normalImage and
pressedImage as the backgrounds for the predefined button states of
UIControlStateNormal (default) and UIControlStateHighlighted (highlighted).
Did youKnow?

ptg
170 HOUR 7: Working with Text, Keyboards, and Buttons
This might seem a bit confusing, and I empathize. Apple has not provided these
same features directly in Interface Builder, despite their usefulness in almost any
application with buttons. The good news is that there is no reason that you can’t
reuse this same code repeatedly in your applications.
Within Xcode, click Build and Run to compile and run your application. The
Generate Story button should take on a new appearance (see Figure 7.19).
FIGURE 7.18The caps definewhere within animage stretch-ing can occur.
Left Cap
Resizable Horizontal Stripe
Resizable Vertical Stripe
Top Cap
Button
FIGURE 7.19The end resultis a shiny newbutton in theapplication.
Remember that despite all of our efforts to make a pretty button, we still haven’t
connected it to an action. Switch back to Interface Builder to make the connection.

ptg
Setting Up the Project 171
Connecting to the ActionTo connect the button to the previously declared createStory action method, select
the button object and open the Connections Inspector (Command+3) or choose
Tools, Connections Inspector. Drag from the circle beside Touch Up Inside to the
File’s Owner icon in the Interface Builder Document window.
When prompted for a method, choose createStory. The Connections Inspector
should update, showing both the outlet that references the button (generateStory)
and the createStory method, similar to Figure 7.20.
FIGURE 7.20The buttonshould now beconnected to anoutlet and anaction.
At long last, our button is done!
Hiding the KeyboardBefore completing the application by implementing the view controller logic to con-
struct the story, we need to look at a “problem” that is inherent to applications with
character entry: keyboards that won’t go away! To see what we mean, switch back into
Xcode and use Build and Run to launch the FieldButtonFun in the iPhone Simulator.
With your app up and running, click in a field. The keyboard appears. Now what?
Click in another field; the keyboard changes to match the text input traits you set
up, but it remains onscreen. Touch the word Done. Nothing happens! And even if it
did, what about the number pad that doesn’t include a Done button? If you try to
use this app, you’ll also find a keyboard that sticks around and that covers up the
Generate Story button, making it impossible to fully utilize the user interface. So,
what’s the problem?

ptg
172 HOUR 7: Working with Text, Keyboards, and Buttons
In Hour 4, “Inside Cocoa Touch,” I described “responders” as an object that processes
input. The “first responder” is the first object that has a shot at handling user input.
In the case of a text field or text view, when it gains first responder status, the key-
board is shown and will remain onscreen until the field gives up or “resigns” first
responder status. What does this look like in code? For the field thePlace, we could
resign first responder status and get rid of the keyboard with this line of code:
[thePlace resignFirstResponder]:
Calling the resignFirstResponder method tells the input object to “give up” its
claim to the input; as a result, the keyboard disappears.
Hiding with the Done ButtonThe most common trigger for hiding the keyboard in iPhone applications is through
the Did End on Exit event of the field. This event occurs when the Done (or similar)
keyboard button is pressed.
To add keyboard hiding to the FieldButtonFun application, switch to Xcode and cre-
ate the action declaration for a method hideKeyboard in
FieldButtonViewController.h by adding the following line after the createStory
IBAction:
-(IBAction)hideKeyboard:(id)sender;
Next, implement the hideKeyboard method within the
FieldButtonFunViewController.m file by adding the method in Listing 7.3,
immediately following the @synthesize directives.
LISTING 7.3-(IBAction) hideKeyboard:(id)sender {
[thePlace resignFirstResponder];
[theVerb resignFirstResponder];
[theNumber resignFirstResponder];
[theTemplate resignFirstResponder];
}
You might be asking yourself, isn’t the sender variable the field that is generatingthe event? Couldn’t we just resign the responder status of the sender? Yes!Absolutely! This would work just fine, but we’re going to also need thehideKeyboard method to work when sender isn’t necessarily the field. I explainthis in a few minutes.
By theWay
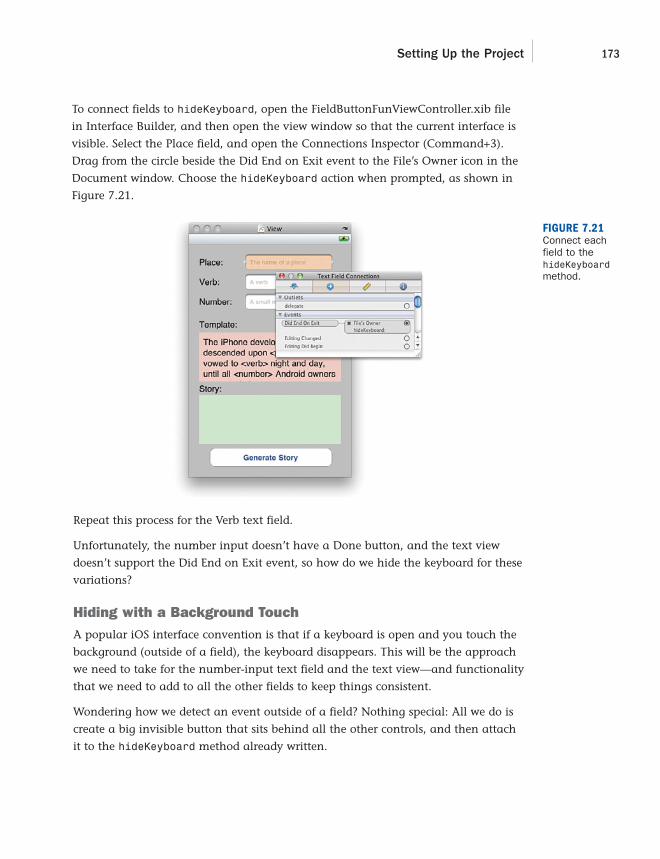
ptg
Setting Up the Project 173
To connect fields to hideKeyboard, open the FieldButtonFunViewController.xib file
in Interface Builder, and then open the view window so that the current interface is
visible. Select the Place field, and open the Connections Inspector (Command+3).
Drag from the circle beside the Did End on Exit event to the File’s Owner icon in the
Document window. Choose the hideKeyboard action when prompted, as shown in
Figure 7.21.
FIGURE 7.21Connect eachfield to thehideKeyboardmethod.
Repeat this process for the Verb text field.
Unfortunately, the number input doesn’t have a Done button, and the text view
doesn’t support the Did End on Exit event, so how do we hide the keyboard for these
variations?
Hiding with a Background TouchA popular iOS interface convention is that if a keyboard is open and you touch the
background (outside of a field), the keyboard disappears. This will be the approach
we need to take for the number-input text field and the text view—and functionality
that we need to add to all the other fields to keep things consistent.
Wondering how we detect an event outside of a field? Nothing special: All we do is
create a big invisible button that sits behind all the other controls, and then attach
it to the hideKeyboard method already written.

ptg
174 HOUR 7: Working with Text, Keyboards, and Buttons
Note that in this case we won’t know exactly which field is going to be the firstresponder when hideKeyboard is called, nor therefore the implementation thatasks each possible input area to resign first responder status. If it isn’t the firstresponder, it has no effect.
Within Interface Builder, access the Library (Tools, Library) and drag a new button
(UIButton) from the Library into the view.
Because this button needs to be invisible, make sure it is selected, and then open the
Attributes Inspector (Command+1) and set the type to Custom. Use the resizing han-
dles to size the button to fill the entire view. With the button selected, choose Layout,
Send to Back to position the button in the back of the interface.
To connect the button to the hideKeyboard method, it’s easiest to use the Interface
Builder Document window. Expand the view hierarchy, select the custom button you
created (it should be at the top of the view hierarchy list), and then Control-drag
from the button to the File’s Owner icon. When prompted, choose the hideKeyboard
method.
Save your work in Interface Builder and Xcode, and then use Build and Run to try
running the application again. This time, when you click outside of a field or the
text view or use the Done button, the keyboard disappears!
Implementing the View Controller LogicTo finish off FieldButtonFun, we need to add the createStory method within the
view controller (FieldButtonFunViewController). This method will search the tem-
plate text for the <place>, <verb>, and <number> placeholders, and then replace
them with the user’s input, storing the results in the text view. We’ll make use of the
NSString instance method stringByReplacingOccurrencesOfString:WithString
to do the heavy lifting. This method performs a search and replace on a given string.
For example, if the variable myString contains Hello town and you wanted to
replace town with world, you might use the following:
myNewString=[myString stringByReplacingOccurrencesOfString:@”town”➥WithString:@”world”];
In this case, our strings are the text properties of the text fields and text views
(thePlace.text, theVerb.text, theNumber.text, theTemplate.text, and
theStory.text).
Add the final method implementation, shown in Listing 7.4, to
FieldButtonFunViewController.m after the @synthesize directives.
By theWay
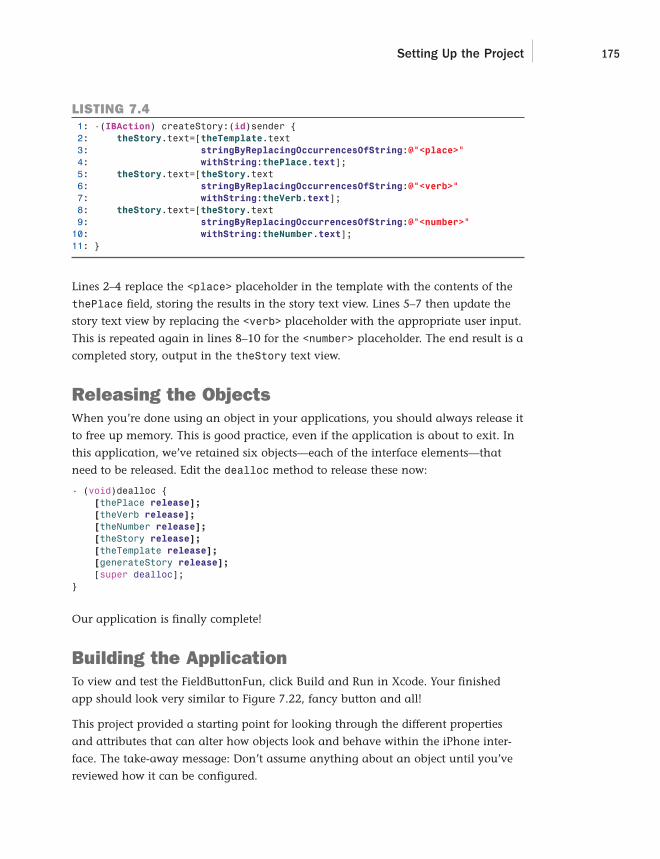
ptg
Setting Up the Project 175
LISTING 7.41: -(IBAction) createStory:(id)sender {2: theStory.text=[theTemplate.text3: stringByReplacingOccurrencesOfString:@”<place>”4: withString:thePlace.text];5: theStory.text=[theStory.text6: stringByReplacingOccurrencesOfString:@”<verb>”7: withString:theVerb.text];8: theStory.text=[theStory.text9: stringByReplacingOccurrencesOfString:@”<number>”
10: withString:theNumber.text];11: }
Lines 2–4 replace the <place> placeholder in the template with the contents of the
thePlace field, storing the results in the story text view. Lines 5–7 then update the
story text view by replacing the <verb> placeholder with the appropriate user input.
This is repeated again in lines 8–10 for the <number> placeholder. The end result is a
completed story, output in the theStory text view.
Releasing the ObjectsWhen you’re done using an object in your applications, you should always release it
to free up memory. This is good practice, even if the application is about to exit. In
this application, we’ve retained six objects—each of the interface elements—that
need to be released. Edit the dealloc method to release these now:
- (void)dealloc {[thePlace release];[theVerb release];[theNumber release];[theStory release];[theTemplate release];[generateStory release];[super dealloc];
}
Our application is finally complete!
Building the ApplicationTo view and test the FieldButtonFun, click Build and Run in Xcode. Your finished
app should look very similar to Figure 7.22, fancy button and all!
This project provided a starting point for looking through the different properties
and attributes that can alter how objects look and behave within the iPhone inter-
face. The take-away message: Don’t assume anything about an object until you’ve
reviewed how it can be configured.

ptg
176 HOUR 7: Working with Text, Keyboards, and Buttons
Further ExplorationThroughout the next few hours, you’ll be exploring a large number of user interface
objects, so your next steps should be to concentrate on the features you’ve learned in
this hour—specifically, the object properties, methods, and events that they respond to.
For text fields and text views, the base object mostly provides for customization of
appearance. However, you may also implement a delegate (UITextFieldDelegate,
UITextViewDelegate) that responds to changes in editing status, such as starting or
ending editing. You’ll learn more about implementing delegates in Hour 11,
“Making Multivalue Choices with Pickers,” but you can start looking ahead to the
additional functionality that can be provided in your applications through the use
of a delegate.
It’s also important to keep in mind that although there are plenty of properties to
explore for these objects, there are additional properties and methods that are inherited
from their superclasses. All UI elements, for example, inherit from UIControl, UIView,
and UIResponder, which bring additional features to the table, such as properties for
manipulating size and location of the object’s onscreen display, as well as customizing
the copy and paste process (through the UIResponderStandardEditActions protocol).
By accessing these lower-level methods, you can customize the object beyond what
might be immediately obvious.
FIGURE 7.22The finishedapplicationincludes scroll-ing views, textediting, and apretty button!What morecould we want?

ptg
Q&A 177
Apple Tutorials
Apple has provided a sample project that includes examples of almost all the
available iPhone user interface controls: UICatalog (accessible via the Xcode
documentation). This project also includes a wide variety of graphic samples,
such as the button images used in this hour’s tutorial. It’s an excellent play-
ground for experimenting with the iPhone UI.
SummaryThis hour described the use of common input features and a few important output
options. You learned that text fields and text views both enable the user to enter
arbitrary input constrained by a variety of different virtual keyboards. Unlike text
fields, however, text views can handle multiline input as well as scrolling, making
them the choice for working with large amounts of text. We also covered the use of
buttons and button states, including how buttons can be manipulated through code.
We’ll continue to use the same techniques you used in this hour throughout the rest
of the book, so don’t be surprised when you see these elements again!
Q&AQ. Why can’t I use a UILabel in place of a UITextView for multiline output?
A. You certainly can! The text view, however, provides scrolling functionality “for
free,” whereas the label will display only the amount of text that fits within its
bounds.
Q. Why doesn’t Apple just handle hiding text input keyboards for us?
A. While I can imagine some circumstances where it would be nice if this were
an automatic action, it isn’t difficult to implement a method to hide the key-
board. This gives you total control over the application interface—something
you’ll grow to appreciate.
Q. Are text views (UITextView) the only way to implement scrolling content onthe iPhone?
A. No! You’ll learn about implementing general scrolling behavior in Hour 9,
“Using Advanced Interface Objects and Views.”

ptg
178 HOUR 7: Working with Text, Keyboards, and Buttons
Workshop
Quiz1. What properties are needed to configure a stretchable image?
2. How do you get rid of an onscreen keyboard?
3. Are text views used for text input or output?
Answers1. The left cap and top cap values define what portion of an image can be
stretched.
2. To clear the onscreen keyboard, you must send the resignFirstResponder
message to the object that currently controls the keyboard (such as a text
field).
3. Text views (UITextView) can be implemented as scrollable output areas or
multiline input fields. It’s entirely up to you!
Activities1. Expand the story creator with additional placeholders and word types. Use the
same string manipulation functions described in this lesson to add the new
functionality.
2. Modify the story creator to use a graphical button of your design. Use either
an entirely graphical button or the stretchable image approach described in
this hour’s tutorial.
ptg
HOUR 8
Handling Images, Animation,and Sliders
What You’ll Learn in This Hour:. The use of sliders for user input. Configuring and manipulating the slider input range. How to add image views to your projects. Ways of creating and controlling simple animations
The text input and output that you learned about in the preceding hour is certainly
important, but the iPhone is known for its attractive graphics and “touchable” UI. This
hour expands our interface toolkit to include images, animation, and the very touchable
slider control.
We’ll be implementing an application to combine these new features along with simple
logic to manipulate input data in a unique way. These new capabilities will help you
build more interesting and interactive applications—and, of course, there’s more to come
in the next hour!
User Input and OutputAlthough application logic is always the most important part of an application, the way the
interface works plays a big part in how well it will be received. For Apple and the iPhone,
providing a fun, smooth, and beautiful user experience has been key to its success; it’s up to
you to bring this experience into your own development. The iPhone SDK’s interface options
give you the tools to express your application’s functionality in fun and unique ways.
This hour introduces two very visual interface features: sliders for input and image views
for output.
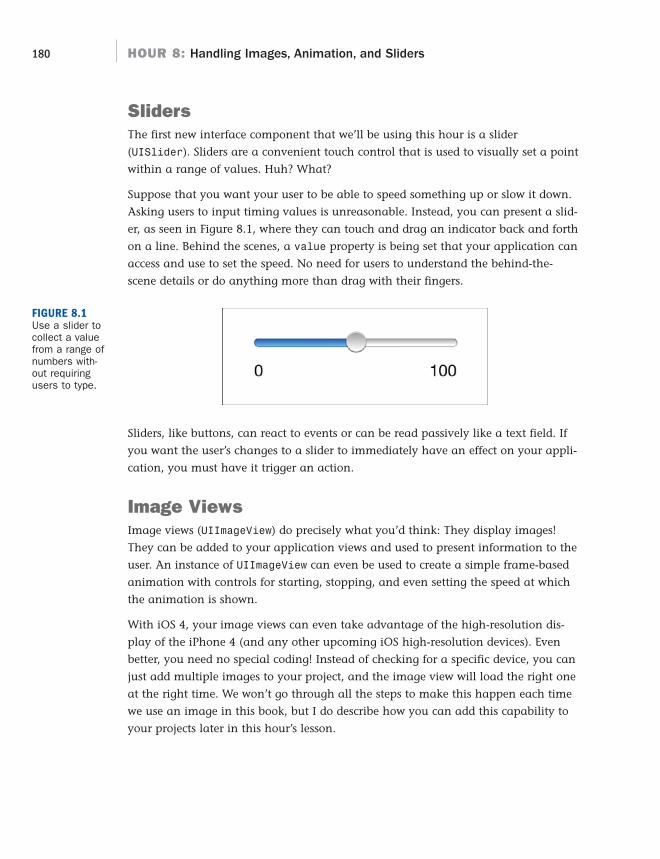
ptg
180 HOUR 8: Handling Images, Animation, and Sliders
SlidersThe first new interface component that we’ll be using this hour is a slider
(UISlider). Sliders are a convenient touch control that is used to visually set a point
within a range of values. Huh? What?
Suppose that you want your user to be able to speed something up or slow it down.
Asking users to input timing values is unreasonable. Instead, you can present a slid-
er, as seen in Figure 8.1, where they can touch and drag an indicator back and forth
on a line. Behind the scenes, a value property is being set that your application can
access and use to set the speed. No need for users to understand the behind-the-
scene details or do anything more than drag with their fingers.
FIGURE 8.1Use a slider tocollect a valuefrom a range ofnumbers with-out requiringusers to type.
Sliders, like buttons, can react to events or can be read passively like a text field. If
you want the user’s changes to a slider to immediately have an effect on your appli-
cation, you must have it trigger an action.
Image ViewsImage views (UIImageView) do precisely what you’d think: They display images!
They can be added to your application views and used to present information to the
user. An instance of UIImageView can even be used to create a simple frame-based
animation with controls for starting, stopping, and even setting the speed at which
the animation is shown.
With iOS 4, your image views can even take advantage of the high-resolution dis-
play of the iPhone 4 (and any other upcoming iOS high-resolution devices). Even
better, you need no special coding! Instead of checking for a specific device, you can
just add multiple images to your project, and the image view will load the right one
at the right time. We won’t go through all the steps to make this happen each time
we use an image in this book, but I do describe how you can add this capability to
your projects later in this hour’s lesson.

ptg
Creating and Managing Image Animations and Sliders 181
Creating and Managing ImageAnimations and SlidersThere’s something about interface components that move that make users take
notice. They’re visually interesting, attract and keep attention, and, on the iPhone’s
touch screen, are fun to play with. In this hour’s project, we take advantage of both
of our new UI elements (and some old friends) to create a user-controlled animation.
Implementation OverviewAs mentioned earlier, image views can be used to display image file resources and
show simple animations, whereas sliders provide a visual way to choose a value
from a range. We’ll combine these in an application we’re calling ImageHop.
In ImageHop, we’ll be creating a looping animation using a series of images and an
image view instance (UIImageView). We’ll allow the user to set the speed of the ani-
mation using a slider (UISlider). What will we be using as an animation? A hop-
ping bunny. What will the user control? Hops per second, of course! The “hops”
value set by the slider will be displayed in a label (UILabel). The user will also be
able to stop or start the animation using a button (UIButton).
Figure 8.2 shows the completed application in use.
FIGURE 8.2ImageHop usesan image viewand a slider tocreate and con-trol a simpleanimation.

ptg
182 HOUR 8: Handling Images, Animation, and Sliders
We should discuss two pieces of this project before getting too far into the
implementation:
. First, image view animations are created using a series of images. I’ve provid-
ed a 20-frame animation with this project, but you’re welcome to use your
own images if you prefer.
. Second, although sliders enable users to visually enter a value from a range,
there isn’t much control over how that is accomplished. For example, the min-
imum value must be smaller than the maximum, and you can’t control
which dragging direction of the slider increases or decreases the result value.
These limitations aren’t show-stoppers; they just mean that there may be a bit
of math (or experimentation) involved to get the behavior you want.
Setting Up the ProjectBegin this project in the same way as the last. Launch Xcode (Developer/
Applications), and then choose File, New Project.
Select the iPhone OS Application project type, and then find and select the View-
Based Application option in the Template list on the right. Click Choose to continue,
enter the project name ImageHop, and save the new project.
Adding the Animation ResourcesThis project makes use of 20 frames of animation stored as PNG files. The frames
are included in the Images folder within the ImageHop project folder.
Because we know up front that we’ll need these images, drag them into the Xcode
project’s Resources folder, being sure to choose the option to copy the resources if
needed.
Preparing the Outlets and ActionsIn this application, we need to provide outlets and actions for several objects.
For outlets, first we need the image view (UIImageView), which will contain the ani-
mation and be referenced through the variable imageView. The slider control
(UISlider) will set the speed and will be connected via animationSpeed, while the
speed value itself will be output in a label named hopsPerSecond (UILabel). A but-
ton (UIButton) will toggle the animation on and off and will be connected to an
outlet toggleButton.

ptg
By theWay
Creating and Managing Image Animations and Sliders 183
Why do we need an outlet for the button? Shouldn’t it just be triggering an actionto toggle the animation? Yes, the button could be implemented without an outlet,but by including an outlet for it, we have a convenient way of setting the button’stitle in the code. We can use this to change the button to read “Stop” when theimage is animating or “Start” when the animation has stopped.
For actions, we need only two: setSpeed will be the method called when the slider
value has changed and the animation speed needs to be reset, and
toggleAnimation will be used to start and stop the animation sequence.
Go ahead and define these outlets and actions as outlets and actions within
ImageHopViewController.h. You’ll also want to declare the four outlet variables as
properties so that we can easily access them in the view controller code. Listing 8.1
shows the resulting header file.
LISTING 8.11: #import <UIKit/UIKit.h>2:3: @interface ImageHopViewController : UIViewController {4: IBOutlet UIImageView *imageView;
5: IBOutlet UIButton *toggleButton;
6: IBOutlet UISlider *animationSpeed;
7: IBOutlet UILabel *hopsPerSecond;
8: }9:
10: @property (retain,nonatomic) UIImageView *imageView;11: @property (retain,nonatomic) UIButton *toggleButton;12: @property (retain,nonatomic) UISlider *animationSpeed;13: @property (retain,nonatomic) UILabel *hopsPerSecond;14:15: -(IBAction)toggleAnimation:(id)sender;16: -(IBAction)setSpeed:(id)sender;17:18: @end
For all the properties you’ve defined in the header file, add an @synthesize direc-
tive in the ImageHopViewController.m implementation file. Your additions should
fall after the @implementation line and look like this:
@synthesize toggleButton;
@synthesize imageView;
@synthesize animationSpeed;
@synthesize hopsPerSecond;
Make sure that both the ImageHopViewController header and implementation files
have been saved, and then launch Interface Builder by double-clicking the
ImageHopViewController.xib file within the project’s Resources folder.

ptg
184 HOUR 8: Handling Images, Animation, and Sliders
After it has loaded, switch to the Document window (Window, Document), and dou-
ble-click the view icon to open it and begin editing.
Adding an Image ViewIn this exercise, our view creation will begin with the most important object of the
project: the image view (UIImageView). Open the Interface Builder Objects Library
and drag an image view into the view window.
Because the view is has no images assigned, it will be represented by a light-gray
rectangle. Use the resize handles on the rectangle to size it to fit in the upper two-
thirds of the interface (see Figure 8.3).
FIGURE 8.3Set the imageview to fill theupper two-thirdsof the iPhoneinterface.
Setting the Default ImageThere are very few attributes for configuring the functionality of an image view. In
fact, there is only one: the image that is going to be displayed. Select the image view
and press Command+1 to open the Attributes Inspector (see Figure 8.4).
Using the Image drop-down menu, choose one of the image resources available.
This will be the image that is shown before the animation runs, so using the first
frame (frame-1.png) is a good choice.

ptg
Creating and Managing Image Animations and Sliders 185
What about the animation? Isn’t this just a frame? Yes, if we don’t do anything else,the image view will show a single static image. To display an animation, we need tocreate an array with all the frames and supply it programmatically to the image viewobject. We do this in a few minutes, so just hang in there!
The image view will update in Interface Builder to show the image resource that
you’ve chosen.
You Said You’d Tell Us About Loading Hi-Res Images for theiPhone 4. How Do We Do It?That’s the best part! There’s really nothing to do that you don’t already know. Toaccommodate the higher scaling factor of the iPhone 4, you just create imageresources that are two times the horizontal and vertical resolution, and then namethem with the same filename as your original low-res images, but with the suffix@2x (for example, Image.png becomes [email protected]). Finally, add them to yourproject resources like any other resource.
Within your projects, just reference the low-res image, and the hi-res image isloaded automatically on the correct devices, as needed!
FIGURE 8.4Set the imagethat will beshown in theview.
By theWay

ptg
186 HOUR 8: Handling Images, Animation, and Sliders
Connecting to the OutletTo display an animation, we need to access the object from the ImageHop view con-
troller. Let’s connect the image view to the imageView outlet that we created earlier.
Within the Document window, Control-drag from the File’s Owner icon to the image
view icon in the Document window or to the graphical representation in the view
window. When prompted for the outlet, choose imageView, as shown in Figure 8.5.
FIGURE 8.5Connect theimage view toan outlet sothat it can beeasily accessedfrom code.
Now that the image view has been added, let’s look at the code we need to add to
change from a static image to an animation.
Animating the Image ViewTo truly customize an image view, we need to write some code. Animating images
requires us to build an array of image objects (UIImage) and pass them to the image
view. Where should we do this? As with the last project, the ViewDidLoad method of
our view controller provides a convenient location for doing additional setup for the
view, so that’s what we’ll use.
Switch back into Xcode, and open the view controller implementation file,
ImageHopViewController.m. Find the ViewDidLoad method and uncomment it, and
then add the following code to the method. Note that we’ve removed lines 7–20 to
save space (they follow the same pattern as lines 4–6 and 21–23), as shown in
Listing 8.2.

ptg
Creating and Managing Image Animations and Sliders 187
LISTING 8.21: - (void)viewDidLoad {2: NSArray *hopAnimation;
3: hopAnimation=[[NSArray alloc] initWithObjects:
4: [UIImage imageNamed:@”frame-1.png”],
5: [UIImage imageNamed:@”frame-2.png”],
6: [UIImage imageNamed:@”frame-3.png”],
…21: [UIImage imageNamed:@”frame-18.png”],
22: [UIImage imageNamed:@”frame-19.png”],
23: [UIImage imageNamed:@”frame-20.png”],
24: nil
25: ];
26: imageView.animationImages=hopAnimation;
27: imageView.animationDuration=1;
28: [hopAnimation release];
29: [super viewDidLoad];30: }
To configure the image view for animation, first an array (NSArray) variable is
declared (line 2) called hopAnimation. Next, in line 3, the array is allocated and ini-
tialized via the NSArray instance method initWithObjects. This method takes a
comma-separated list of objects, ending with nil, and returns an array.
The image objects (UIImage) are initialized and added to the array in lines 4–24.
Remember that you’ll need to fill in lines 7–20 on your own; otherwise, several
frames will be missing from the animation!
Once an array is populated with image objects, it can be used to set up the anima-
tion of an image view. To do this, set the animationImages property of the image
view (imageView) to the array. Line 6 accomplishes this for our example project.
Another image view property that we’ll want to set right away is the
animationDuration. This is the number of seconds it takes for a single cycle of the
animation to be played. If the duration is not set, the playback rate will be 30
frames per second. To start, our animation will be set to play all the frames in 1 sec-
ond, so line 27 sets the imageView.animationDuration to 1.
Finally, in line 28, we’re finished with the hopAnimation array, so it can be released.
Starting and Stopping the AnimationA little later in this tutorial, we’ll be adding controls to change the animation speed
and to start/stop the animation loop. You’ve just learned how the
animationDuration property can change the animation speed, but we’ll need three
more properties/methods to accomplish everything we want:
isAnimating: This property returns true if the image view is currently ani-
mating its contents.

ptg
188 HOUR 8: Handling Images, Animation, and Sliders
startAnimating: Starts the animation.
stopAnimating: Stops the animation if it is running.
If you run the application now, it will work, but only a static image will display. The
image view does not start animating until the startAnimating method is called.
We’ll take care of that when implementing the view controller logic.
Adding a SliderThe next piece that our interface needs is the slider that will control the speed.
Return to Interface Builder and the view, and then navigate to the Objects Library
and drag the slider (UISlider) into the view, just under the image view. Using the
resize handles on the slider, click and drag to size it to about two-thirds of the image
view width and align it with the right side of the image view. This leaves just
enough room for a label to the left of the slider.
Because a slider has no visual indication of its purpose, it’s a good idea to always
label sliders so that your users will understand what they do. Drag a label object
(UILabel) from the Library into your view. Double-click the text and set it to read
Speed:. Position it so that it is aligned with the slider, as shown in Figure 8.6.
FIGURE 8.6Add the sliderand a corre-sponding labelto the view.
Setting the Slider Range AttributesSliders make their current settings available through a value property that we’ll be
accessing in the view controller. To change the range of values that can be returned,

ptg
Creating and Managing Image Animations and Sliders 189
we need to edit the slider attributes. Click to select the slider in the view, and then
open the Attributes Inspector (Command+1), as shown in Figure 8.7.
FIGURE 8.7Edit the slider’sattributes tocontrol therange of valuesit returns.
The Minimum, Maximum, and Initial fields should be changed to contain the
smallest, largest, and starting values for the slider. For this project, use .25, 1.75, and
1.0, respectively.
Where Did These Min, Max, and Initial Values Come From?This is a great question, and one that doesn’t have a clearly defined answer. In thisapplication, the slider represents the speed of the animation, which, as we’ve dis-cussed, is set through the animationDuration property of the image view as thenumber of seconds it takes to show a full cycle of an animation. Unfortunately, thismeans the faster animations would use smaller numbers and slower animationsuse larger numbers, which is the exact opposite of traditional user interfaces where“slow” is on the left and “fast” is on the right. Because of this, we need to reversethe scale. In other words, we want the big number (1.75) to appear when the slideris on the left side and the small number (.25) on the right.
To reverse the scale, we take the combined total of the minimum and maximum(1.75 + 0.25), and subtract the value returned by the slider from that total. Forexample, when the slider returns 1.75 at the top of the scale, we’ll calculate aduration of 2 – 1.75, or 0.25. At the bottom of the scale, the calculation will be 2 – 0.25, or 1.75.
Our initial value will be 1.0, which falls directly in the middle of the scale.

ptg
190 HOUR 8: Handling Images, Animation, and Sliders
Make sure the Continuous check box isn’t checked. This option, when enabled, will
have the control to generate a series of events as the user drags back and forth on
the slider. When it isn’t enabled, events are generated only when the user lifts his or
her finger from the screen. For our application, this makes the most sense and is cer-
tainly the least resource-intensive option.
The slider can also be configured with images at the minimum and maximum slid-
ers of the control. Use the Min Image and Max Image drop-downs to select a project
image resource if you’d like to use this feature. (We’re not using it in this project.)
Connecting to the OutletFor convenient access to the slider, we created an outlet, animationSpeed, that we’ll
be using in the view controller. To connect the slider to the outlet, Control-drag from
the File’s Owner icon to the slider object in the view or the slider icon in the
Document window. When prompted, choose the animationSpeed outlet.
In case you’re wondering, it’s certainly possible to implement this application with-out an outlet for the slider. When the slider triggers an action, we could use thesender variable to reference the slider value property. That said, this approachwill allow us to access the slider properties anywhere in the view controller, notjust when the slider triggers an action.
Connecting to the ActionWhen a user drags the slider and releases his finger, the application should trigger
the action method setSpeed. Create this connection by selecting the slider and then
opening the Connections Inspector (Command+2).
Drag from the circle beside Value Changed to the File’s Owner icon in the Document
window. When prompted, choose to connect to the setSpeed action. Once complete,
Connections Inspector should reflect this change and show both the setSpeed and
animationSpeed connections, as demonstrated in Figure 8.8.
That completes the major parts of the UI, but there’s still some cleanup work to do.
Finishing the InterfaceThe remaining components of the ImageHop application are interface features that
you’ve used before, so we’ve saved them for last. We’ll finish things up by adding a
button to start and stop the animation, along with a readout of the speed of the
animated rabbit in “hops per second.”
By theWay

ptg
Creating and Managing Image Animations and Sliders 191
Adding LabelsStart by dragging two labels (UILabel) to the view. The first label should be set to
read hops per second: and be located below the slider. Add the second label, which
will be used as output of the actual speed value, to the right of the first label.
Change the output label to read 1.00 hps (the speed that the animation will be start-
ing out at). Using the Attributes Inspector (Command+1), set the text of the label to
align right; this will keep the text from jumping around as the user changes the speed.
Finally, Control-drag from the File’s Owner icon to the output label, and choose the
hopsPerSecond outlet, as shown in Figure 8.9.
Adding the Hop ButtonThe last part of the ImageHop interface is the button (UIButton) that starts and
stops the animation. Drag a new button from the Objects Library to the view, posi-
tioning it at the bottom center of the UI. Double-click the button to edit the title, and
set it to Hop!
Like the slider, the hop button needs to be connected to an outlet (toggleButton)
and an action (toggleAnimation). Control-drag from File’s Owner icon in the
Document window to the button and choose the toggleButton outlet when prompted.
Next, select the button and open the Connections Inspector (Command+2). Within
the inspector, click and drag from the circle beside the Touch Up Inside event to the
File’s Owner icon in the Document window. Connect to the toggleAnimation
action. Figure 8.10 shows the completed interface and button connections.
FIGURE 8.8When the userdrags andreleases theslider, thesetSpeedmethod iscalled.

ptg
192 HOUR 8: Handling Images, Animation, and Sliders
The application interface is finished. In the next section, we complete the applica-
tion by writing the code for starting and stopping the animation and setting the
speed.
FIGURE 8.9Connect thelabel that willbe used to dis-play the speed.
FIGURE 8.10Connect thebutton to itsoutlet andaction.
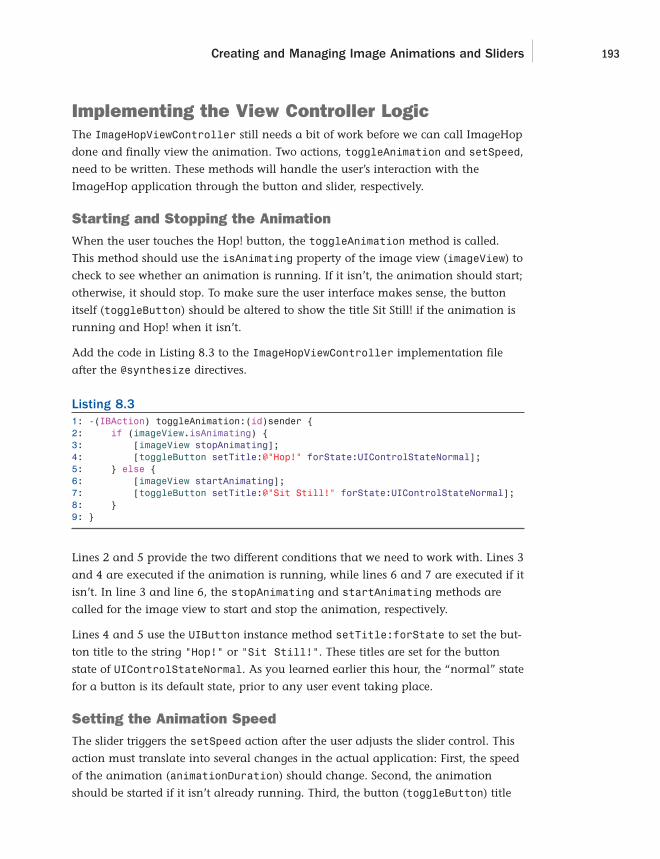
ptg
Creating and Managing Image Animations and Sliders 193
Implementing the View Controller LogicThe ImageHopViewController still needs a bit of work before we can call ImageHop
done and finally view the animation. Two actions, toggleAnimation and setSpeed,
need to be written. These methods will handle the user’s interaction with the
ImageHop application through the button and slider, respectively.
Starting and Stopping the AnimationWhen the user touches the Hop! button, the toggleAnimation method is called.
This method should use the isAnimating property of the image view (imageView) to
check to see whether an animation is running. If it isn’t, the animation should start;
otherwise, it should stop. To make sure the user interface makes sense, the button
itself (toggleButton) should be altered to show the title Sit Still! if the animation is
running and Hop! when it isn’t.
Add the code in Listing 8.3 to the ImageHopViewController implementation file
after the @synthesize directives.
Listing 8.31: -(IBAction) toggleAnimation:(id)sender {2: if (imageView.isAnimating) {3: [imageView stopAnimating];4: [toggleButton setTitle:@”Hop!” forState:UIControlStateNormal];5: } else {6: [imageView startAnimating];7: [toggleButton setTitle:@”Sit Still!” forState:UIControlStateNormal];8: }9: }
Lines 2 and 5 provide the two different conditions that we need to work with. Lines 3
and 4 are executed if the animation is running, while lines 6 and 7 are executed if it
isn’t. In line 3 and line 6, the stopAnimating and startAnimating methods are
called for the image view to start and stop the animation, respectively.
Lines 4 and 5 use the UIButton instance method setTitle:forState to set the but-
ton title to the string “Hop!” or “Sit Still!”. These titles are set for the button
state of UIControlStateNormal. As you learned earlier this hour, the “normal” state
for a button is its default state, prior to any user event taking place.
Setting the Animation SpeedThe slider triggers the setSpeed action after the user adjusts the slider control. This
action must translate into several changes in the actual application: First, the speed
of the animation (animationDuration) should change. Second, the animation
should be started if it isn’t already running. Third, the button (toggleButton) title

ptg
194 HOUR 8: Handling Images, Animation, and Sliders
should be updated to show the animation is running. And finally, the speed should
be displayed in the hopsPerSecond label.
Add the code in Listing 8.4 to the view controller, and then let’s review how it works.
LISTING 8.41: -(IBAction) setSpeed:(id)sender {2: NSString *hopRateString;3: imageView.animationDuration=2-animationSpeed.value;4: [imageView startAnimating];5: [toggleButton setTitle:@”Sit Still!”6: forState:UIControlStateNormal];7: hopRateString=[[NSString alloc]8: initWithFormat:@”%1.2f hps”,1/(2-animationSpeed.value)];9: hopsPerSecond.text=hopRateString;10: [hopRateString release];11: }
Because we’ll need to format a string to display the speed, we kick things off by
declaring an NSString reference, hopRateString, in line 2. In line 3, the image
view’s (imageView) animationDuration property is set to 2 minus the value of the
slider (animationSpeed.value). This, if you recall, is necessary to reverse the scale
so that faster is on the right and slower is on the left.
Line 4 uses the startAnimating method to start the animation running. Note that
it is safe to use this method if the animation is already started, so we don’t really
need to check the state of the image view. Lines 5 and 6 set the button title to the
string “Sit Still!” to reflect the animated state.
Lines 7 and 8 allocate and initialize the hopRateString instance that we declared
in line 2. The string is initialized with a format of “1.2f”, based on the calculation
of 1 / (2 – animationSpeed.value).
Let’s break that down a bit further: Remember that the speed of the animation is meas-
ured in seconds. The fastest speed we can set is 0.25 (a quarter of a second), meaning
that the animation plays 4 times in 1 second (or “4 hops per second”). To calculate this
in the application, we simply divide 1 by the chosen animation duration, or 1 / (2 –
animationSpeed.value). Because this doesn’t necessarily return a whole number, we
use the initWithFormat method to create a string that holds a nicely formatted ver-
sion of the result. The initWithFormat parameter string “1.2f hps” is shorthand for
saying the number being formatted as a string is a floating-point value (f), and that
there should always be one digit on the left of the decimal and two digits on the right
(1.2). The hps portion of the format is just the “hops per second” unit that we want to
append to the end of the string. For example, if the equation returns a value of .5 (half
a hop a second), the string stored in hopRateString is set to “0.50 hps”.

ptg
Creating and Managing Image Animations and Sliders 195
In line 9, the output label (UILabel) in the interface is set to the hopRateString.
Once finished with the string, line 10 releases it, freeing up the memory it was using.
Don’t worry if the math here is a bit befuddling. This is not critical to understand-ing Cocoa or iOS development, it’s just an annoying manipulation we needed toperform to get the values the way we want them. I strongly urge you to play withthe slider values and calculations as much as you’d like so that you can get a bet-ter sense of what is happening here and what steps you might need to take tomake the best use of slider ranges in your own applications.
Releasing the ObjectsOur development efforts have resulted in four objects that should be released when
we’re finished: toggleButton, imageView, hopsPerSecond, and animationSpeed.
Edit the dealloc method to release these now:
- (void)dealloc {[toggleButton release];[imageView release];[hopsPerSecond release];[animationSpeed release];[super dealloc];
}
Well done! You’ve just completed the app!
Building the ApplicationTo try your hand at controlling an out-of-control bunny rabbit, click Build and Run
in Xcode. After a few seconds, the finished ImageHop application will start, as
shown in Figure 8.11.
In my version of the tutorial app, I’ve set the background to a light-green color.Feel free to explore different layouts of the interface within what you’ve built. Youmay be surprised how much variation is possible without writing a single addition-al line of code!
Although ImageHop isn’t an application that you’re likely to keep on your phone
(for long), it did provide you with new tools for your iPhone application toolkit. The
UIImageView class can easily add dynamic images to your programs, while
UISlider offers a uniquely touchable input solution.
By theWay
By theWay

ptg
196 HOUR 8: Handling Images, Animation, and Sliders
Further ExplorationAlthough many hours in this book focus on adding features to the user interface, it
is important to start thinking about the application logic that will bring your user
interface to life. As we experienced with our sample application, sometimes creativi-
ty is required to make things work the way we want.
Review the properties and methods for UISlider class and consider how you might
use a slider in your own apps. Can you think of any situations where the slider val-
ues couldn’t be used directly in your software? How might you apply application
logic to map slider values to usable input? Programming is very much about prob-
lem solving—you’ll rarely write something that doesn’t have at least a few
“gotchas” that need solved.
In addition to UISlider, you may want to review the documentation for UIImage.
Although we focused on UIImageView for displaying our image animation, the
images themselves were objects of type UIImage. Image objects will come in handy
for future interfaces that integrate graphics into the user controls themselves.
Finally, for a complete picture of how your applications will almost automatically
take advantage of the higher-resolution display of the iPhone 4, be sure to read the
section “Supporting High-Resolution Screens” within the iPhone Application
Programming Guide.
FIGURE 8.11Bouncing bun-nies! What morecould we askfor?
ptg
197Q&A
Apple Tutorials
UIImageView, UIImage, UISlider - UICatalog (accessible via the Xcode docu-
mentation). Once again, this project is a great place for exploring any and
everything (including images, image views, and sliders) related to the iPhone
interface.
SummaryUsers of highly visual devices demand highly visual interfaces. In this hour’s lesson,
you learned about the use of two visual elements that you can begin adding to your
applications: image views and sliders. Image views provide a quick means of dis-
playing images that you’ve added to your project—even using a sequence of images
to create animation. Sliders can be used to collect user input from a continuous
range of values. These new input/output methods start our exploration of iPhone
interfaces that go beyond simple text and buttons.
The information you learned in this hour, although not complex, will help pave the
way for mega-rich, touch-centric user interfaces.
Q&AQ. Is the UIImageView the only means of displaying animated movies?
A. No. The iPhone SDK includes a wide range of options for playing back and
even recording video files. The UIImageView is not meant to be used as a
video playback mechanism.
Q. Is there a vertical version of the slider control (UISlider)?
A. Unfortunately, no. Only the horizontal slider is currently available in the
iPhone SDK. If you want to use a vertical slider control, you’ll need to imple-
ment your own.

ptg
198 HOUR 8: Handling Images, Animation, and Sliders
Workshop
Quiz1. What is one of the limitations of the slider control (UISlider)?
2. What is the default playback rate for an animation, prior to the
animationDuration property being set?
3. What is the value of the isAnimating property in an instance of
UIImageView?
Answers1. The slider is limited in that the values must increase from left to right. This
can be overcome, but not without programmatically manipulating the num-
bers.
2. By default, animation frames are shown at a rate of 30 frames per second.
3. The isAnimating property is set to true when the UIImageView instance is dis-
playing an animation. When the animation is stopped (or not configured),
the property is false.
Activities1. Increase the range of speed options for the ImageHop animation example. Be
sure to set the default location for the slider to rest in the middle.
2. Provide an alternative means of editing the speed by enabling the user to
manually enter a number in addition to using the slider. The placeholder text
of the field should default to the current slider value.

ptg
HOUR 9
Using Advanced InterfaceObjects and Views
What You’ll Learn This Hour:. How to use segmented controls (a.k.a. button bars). Ways of inputting Boolean values via switches. How to include web content within your application. The use of scrolling views to overcome iPhone screen limitations
After the last few lessons, you now have a good understanding of the basic iPhone inter-
face elements, but we’ve only just scratched the surface. There are additional user input
features to help a user quickly choose between several predefined options. After all, there’s
no point in typing when a touch will suffice! This hour’s lesson picks up where the last left
off, providing you with hands-on experience with a new set of user input options that go
beyond fields, buttons, and sliders.
In addition, we look at two new ways that you can present data to the user: via web and
scrolling views. These features make it possible to create applications that can extend beyond
the hardware boundaries of the iPhone screen and include content from remote web servers.
User Input and Output (Continued)When I set out to write this book, I originally dedicated one or two hours to the iOS inter-
face “widgets” (fields, buttons, and so on). After we got started, however, it became appar-
ent that for learning to develop on the iPhone, the interface was not something to gloss
over. The iPhone interface options are what makes the device so enjoyable to use and
what gives you, the developer, a truly rich canvas to work with. You’ll still need to come
up with ideas for what your application will do, but the interface can be the deciding fac-
tor in whether your vision “clicks” with its intended audience.

ptg
By theWay
200 HOUR 9: Using Advanced Interface Objects and Views
In the last two hours, you learned about fields, sliders, labels, and images as input
and output options. In this lesson, you explore two new input options for handling
discrete values, along with two new view types that extend the information you can
display to web pages and beyond.
SwitchesIn most traditional desktop applications, the choice between something being
“active” or “inactive” is made by checking or unchecking a check box or by choos-
ing between radio buttons. On the iPhone, Apple has chosen to abandon these
options in favor of switches and segmented controls. Switches (UISwitch) present a
simple on/off UI element that resembles a traditional physical toggle switch, as
shown in Figure 9.1. Switches have very few configurable options and should be
used for handling Boolean values.
FIGURE 9.1Use switches toprovide on/offinput options toyour user.
Check boxes and radio buttons, while not part of the iPhone UI Library, can be cre-ated with the UIButton class using the button states and custom button images.Apple provides the flexibility to customize to your heart’s content—but stickingwith what a user expects to see on the iPhone screen is recommended.
To work with the switch, we’ll make use of its Value Changed event to detect a tog-
gle of the switch and then read its current value via the on property or the isOn
instance method.
The value returned when checking a switch is a Boolean, meaning that we can com-
pare it to TRUE or FALSE (or YES/NO) to determine its state, or evaluate the result
directly in a conditional statement.
For example, to check whether a switch mySwitch is turned on, we can use code sim-
ilar to this:
if ([mySwitch isOn]) { <switch is on> } else { <switch is off> }

ptg
By theWay
User Input and Output (Continued) 201
Segmented ControlsWhen user input needs to extend beyond just a Boolean value, a segmented control
(UISegmentedControl) can be used. Segmented controls present a linear line of but-
tons (sometimes referred to as a button bar) where a single button can be active
within the bar, as demonstrated in Figure 9.2.
FIGURE 9.2Segmented con-trols combinemultiple buttonsinto a singlecontrol.
Segmented controls, when used according to Apple’s guidelines, result in a change
in what the user is seeing onscreen. They are often used to choose between cate-
gories of information or to switch between the display of application screens, such
as configuration and results screens. For simply choosing from a list of values where
no immediate visual change takes place, the Picker object should be used instead.
We look at this feature in Hour 11, “Making Multivalue Choices with Pickers.”
Apple recommends using segmented controls to update the information visible ina view. If the change, however, means altering everything onscreen, you are proba-bly better off switching between multiple independent views using a toolbar or tabbar. We start looking at the multiview approach in Hour 12, “ImplementingMultiple Views with Toolbars and Tab Bars.”
Handling interactions with a segmented control will be very similar to the toggle
button. We’ll be watching for the Value Changed event and determining the current-
ly selected button through the selectedSegmentIndex, which returns the number of
the button chosen (starting with 0, from left to right).
We can combine the index with the object’s instance method
titleForSegmentAtIndex to work directly with the titles assigned to each segment.
To retrieve the name of the currently selected button in a segmented control called
mySegment, we could use the code fragment:
[mySegment titleForSegmentAtIndex: mySegment.selectedSegmentIndex]
We’ll make use of this technique later in the lesson.

ptg
202 HOUR 9: Using Advanced Interface Objects and Views
Web ViewsIn the previous iPhone applications that you’ve built, you’ve used the typical iPhone
view: an instance of UIView to hold your controls, content, and images. This is the
view you’ll use most often in your apps, but it isn’t the only view supported in the
iOS SDK. A web view, or UIWebView, provides advanced features that open up a
whole new range of possibilities in your apps.
In Hour 7, “Working with Text, Keyboards, and Buttons,” you made use of another viewtype, UITextView, which provides basic text input and output, and which straddlesthe line between an input mechanism and what we’ll typically refer to as a “view.”
Think of a web view as a borderless Safari window that you can add to your appli-
cations and control programmatically. You can present HTML, load web pages, and
offer pinching and zooming gestures all “for free” using this class.
Supported Content TypesWeb views can also be used to display a wide range of files, without needing to
know anything about the file formats:
HTML, Images, and CSS
Word documents (.doc/.docx)
Excel spreadsheets (.xls/.xlsx)
Keynote presentations (.key.zip)
Numbers spreadsheets (.numbers.zip)
Pages documents (.pages.zip)
PDF files (.pdf)
PowerPoint presentations (.ppt/.pptx)
You can add these files as resources to your project and display them within a web
view, access them on remote servers, or read them from the iPhone’s sandbox file stor-
age (which you’ll learn about in Hour 14, “Reading and Writing Application Data”).
Loading Remote Content with NSURL, NSURLRequest, andrequestWithURL
Web views implement a method called requestWithURL that you can use to load an
arbitrary URL, but, unfortunately, you can’t just pass it a string and expect it to work.
To load content into a web view, you’ll frequently use NSURL and NSURLRequest.
These two classes provide the ability to manipulate URLs and prepare them to be
By theWay

ptg
User Input and Output (Continued) 203
used as a request for a remote resource. You will first create an instance of an NSURL
object, most often from a string. For example, to create an NSURL that stores the
address for Apple, you could use the following:
NSURL *appleURL;appleURL=[[NSURL alloc] initWithString:@”http://www.apple.com/”];
Once the NSURL object is created, you need to create an NSURLRequest object that
can be passed to a web view and loaded. To return an NSURLRequest from an NSURL
object, we can use the NSURLRequest class method requestWithURL that, given an
NSURL, returns the corresponding request object:
[NSURLRequest requestWithURL: appleURL]
Finally, this value would be passed to the requestWithURL method of the web view,
which then takes over and handles loading the process. Putting all the pieces togeth-
er, loading Apple’s website into a web view called appleView would look like this:
NSURL *appleURL;appleURL=[[NSURL alloc] initWithString:@”http://www.apple.com/”];[appleView loadRequest:[NSURLRequest requestWithURL: appleURL]];
We’ll be implementing web views in this hour’s first project, so you’ll have a chance
to put this to use shortly.
Another way that you get content into your application is by loading HTML directlyinto a web view. For example, if you generate HTML content in a string calledmyHTML, you can use the loadHTMLString:baseURL method of a web view to loadthe HTML content and display it. Assuming a web view called htmlView, thismight be written as follows:
[htmlView loadHTMLString:myHTML baseURL:nil]
Scrolling ViewsYou’ve certainly used iPhone applications that display more information than what
fits on a single screen; in these cases, what happens? Chances are, the application
allows you to scroll to access additional content. Frequently, this is managed through
a scrolling view, or UIScrollView. Scrolling views, as their name suggests, provide
scrolling features and can display more than a single screen’s worth of information.
Unfortunately, Apple has gone about halfway toward making scrolling views some-
thing that you can add to your projects in Interface Builder. You can add the view,
but until you add a line of code to your application, it won’t scroll! We’ll close out
this hour’s lesson with a quick example (a single line of code!) that will enable
UIScrollView instances that you create in Interface Builder to scroll your content.
Did youKnow?

ptg
204 HOUR 9: Using Advanced Interface Objects and Views
Using Switches, Segmented Controls,and Web ViewsAs you’ve probably noticed by now, we prefer to work on examples that do some-
thing. It’s one thing to show a few lines of code in a chapter and say “this will do
<blah>,” but it’s another to take a collection of features and combine them in a way
that results in a working application. In some cases, the former approach is
unavoidable, but this isn’t one of them. Our first hands-on example makes use of
web views, a segmented control, and a toggle switch.
Implementation OverviewIn this project, we create an application that displays flower photographs and flower
information from the website FloraPhotographs.com. The application will enable a
user to touch a flower color within a segmented control (UISegmentedControl),
resulting in a flower of that color being fetched and displayed from the
FloraPhotographs site in a web view (UIWebView). The user can then use a toggle
switch (UISwitch) to show and hide a second web view that contains details about
the flower being displayed. Finally, a standard button (UIButton) will enable the
user to fetch another flower photo of the currently selected color from the site. The
result should look very much like Figure 9.3.
FIGURE 9.3The finishedapplication willmake use of asegmented con-trol, a switch,and two webviews.

ptg
Using Switches, Segmented Controls, and Web Views 205
Setting Up the ProjectThis project will, once again, use the View-Based Application template we’re starting
to love. If it isn’t already running, launch Xcode (Developer/Applications), and then
create a new project called FlowerWeb.
You should now be accustomed to what happens next. Xcode sets up the project and
creates the default view in FlowerWebViewController.xib and a view controller class
in FlowerWebViewController. We’ll start with setting up the outlets and actions we
need in the view controller.
Preparing the Outlets and ActionsTo create the web-based image viewer, we need three outlets and two actions. The
segmented control will be connecting to an outlet called colorChoice because we’ll
be using it to choose which color is displayed. The web view that contains the flower
will be connected to flowerView, and the associated details web view to
flowerDetailView.
For the actions, the application must do two things: get and display a flower image,
which we’ll define as the action method getFlower; and toggle the flower details on
and off, something we’ll handle with a toggleFlowerDetail action.
Why Don’t We Need an Outlet for the Switch?We don’t need to include an outlet for the switch because we will be connectingits Value Changed event to the toggleFlowerDetail method. When the methodis called, the sender parameter sent to the method will reference the switch, sowe can just use sender to determine whether the switch is on or off.
If we have more than one control using toggleFlowerDetail, it would be helpful todefine outlets to differentiate between them, but in this case, sender will suffice.
Open the flowerWebViewController.h file in Xcode and create the IBOutlets for
colorChoice, flowerView, and flowerDetailView. Then add the IBActions for
getFlower and toggleFlowerDetail. Finally, add @property directives for the seg-
mented control and both web views so that we can easily manipulate them in our
code.
The completed header file should look very similar to Listing 9.1.

ptg
206 HOUR 9: Using Advanced Interface Objects and Views
LISTING 9.1#import <UIKit/UIKit.h>
@interface FlowerWebViewController : UIViewController {IBOutlet UISegmentedControl *colorChoice;
IBOutlet UIWebView *flowerView;
IBOutlet UIWebView *flowerDetailView;
}
-(IBAction)getFlower:(id)sender;
-(IBAction)toggleFlowerDetail:(id)sender;
@property (nonatomic, retain) UISegmentedControl *colorChoice;
@property (nonatomic, retain) UIWebView *flowerView;
@property (nonatomic, retain) UIWebView *flowerDetailView;
@end
Save the header file and open the view controller implementation file
(flowerWebViewController.m). Add matching @synthesize directives for each of the
properties you declared in the header. These, as always, should be added after the
@implementation directive:
@synthesize colorChoice;@synthesize flowerDetailView;@synthesize flowerView;
Now, let’s build the user interface. Open the FlowerWebViewController.xib file in
Interface Builder, and make sure that the view is open and visible. We’ll begin by
adding the segmented control.
Adding a Segmented ControlAdd a segmented control to the user interface by opening the Library (Tools, Library),
finding the Segmented Control (UISegmentedControl) object, and dragging it into
the view. Position the control near the top of the view in the center. Because this con-
trol will ultimately be used to choose colors, click and drag a label (UILabel) into the
view as well, position it above the segmented control, and change it to read Choose a
Flower Color:. Your view should now resemble Figure 9.4.
By default, the segmented control will have two segments, titled First and Second.
You can double-click these titles and edit them directly in the view, but that won’t
quite get us what we need.
For this project, we need a control that has four segments, each labeled with a color:
Red, Blue, Yellow, and Green. These are the colors that we can request from the
FloraPhotographs website for displaying. Obviously, we need to add a few more seg-
ments to the control before all the choices can be represented.

ptg
Using Switches, Segmented Controls, and Web Views 207
Adding and Configuring SegmentsThe number of segments displayed in the segmented control is configurable in the
Attributes Inspector for the object. Select the control that you’ve added to the view, and
then press Command+1 to open the Attributes Inspector, demonstrated in Figure 9.5.
FIGURE 9.4The default seg-mented controlhas two but-tons, First andSecond.
FIGURE 9.5Use theAttributesInspector forthe segmentedcontrol toincrease thenumber of seg-ments dis-played.
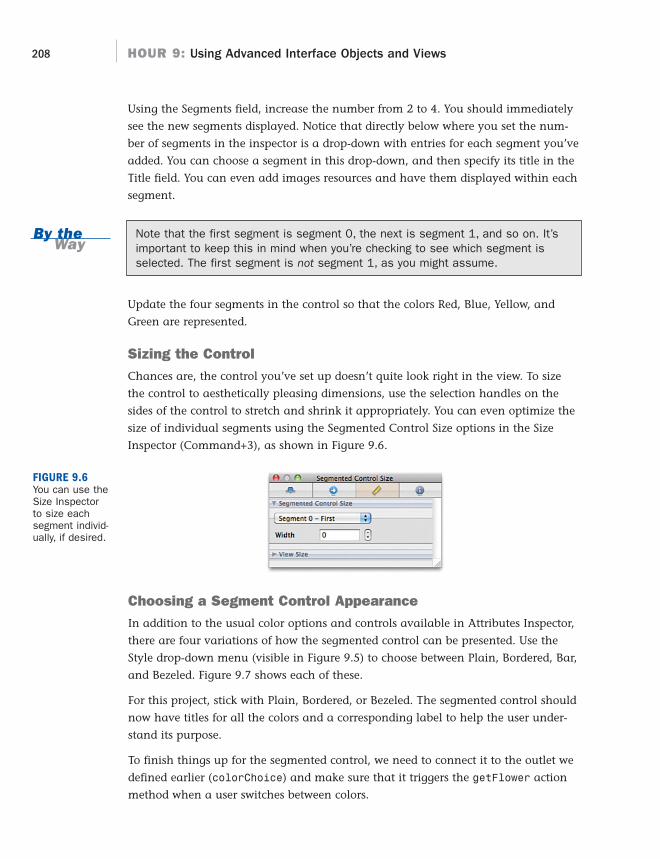
ptg
By theWay
208 HOUR 9: Using Advanced Interface Objects and Views
Using the Segments field, increase the number from 2 to 4. You should immediately
see the new segments displayed. Notice that directly below where you set the num-
ber of segments in the inspector is a drop-down with entries for each segment you’ve
added. You can choose a segment in this drop-down, and then specify its title in the
Title field. You can even add images resources and have them displayed within each
segment.
Note that the first segment is segment 0, the next is segment 1, and so on. It’simportant to keep this in mind when you’re checking to see which segment isselected. The first segment is not segment 1, as you might assume.
Update the four segments in the control so that the colors Red, Blue, Yellow, and
Green are represented.
Sizing the ControlChances are, the control you’ve set up doesn’t quite look right in the view. To size
the control to aesthetically pleasing dimensions, use the selection handles on the
sides of the control to stretch and shrink it appropriately. You can even optimize the
size of individual segments using the Segmented Control Size options in the Size
Inspector (Command+3), as shown in Figure 9.6.
FIGURE 9.6You can use theSize Inspectorto size eachsegment individ-ually, if desired.
Choosing a Segment Control AppearanceIn addition to the usual color options and controls available in Attributes Inspector,
there are four variations of how the segmented control can be presented. Use the
Style drop-down menu (visible in Figure 9.5) to choose between Plain, Bordered, Bar,
and Bezeled. Figure 9.7 shows each of these.
For this project, stick with Plain, Bordered, or Bezeled. The segmented control should
now have titles for all the colors and a corresponding label to help the user under-
stand its purpose.
To finish things up for the segmented control, we need to connect it to the outlet we
defined earlier (colorChoice) and make sure that it triggers the getFlower action
method when a user switches between colors.

ptg
Using Switches, Segmented Controls, and Web Views 209
Connecting to the OutletTo connect the segmented control to the colorChoice outlet, make sure the
Document window is visible, and then Control-drag from the File’s Owner icon to
either the visual representation of the control in the view or to its icon in the
Document window, and then release the mouse button. When prompted, choose the
colorChoice outlet to finish the connection, as shown in Figure 9.8.
Plain
Bordered
Bar
Bezeled
FIGURE 9.7You can choosebetween fourdifferent presen-tation styles foryour segmentedcontrol.
FIGURE 9.8Connect thesegmented con-trol to thecolorChoiceoutlet so thatwe can easilyaccess theselected colorfrom within ourapplication.

ptg
210 HOUR 9: Using Advanced Interface Objects and Views
Connecting to the ActionLike other UI elements, the segmented control can react to many different touch
events. Most frequently, however, you’ll want to carry out an action when the user
clicks a segment and switches to a new value (such as choosing a new color in this
app). Thankfully, Apple has implemented a Value Changed event that does exactly
what we want!
In our application, we want to load a new flower if the user switches colors. To do
this, we need to create a connection from the Value Changed event to the
getFlower action. Open the Connections Inspector by selecting the segmented con-
trol and then pressing Command+2. Drag from the circle beside Value Changed to
the File’s Owner icon in the Document window, and release your mouse button.
When prompted, choose the getFlower action method, as shown in Figure 9.9.
FIGURE 9.9Connect fromthe ValueChanged eventto thegetFloweraction.
The segmented control is now wired into the interface and ready to go. Let’s add our
other interface objects, and then write the code to pull it together.
Adding a SwitchThe switch that we’ll use in our application has one role: to toggle a web view that
displays details about the flower (flowerDetailView) on and off. Add the switch to
the view by dragging the switch (UISwitch) object from the Library into the view.
Position it along the right side of the screen, just under the segmented control.
As with the segmented control, providing some basic user instruction through an
onscreen label can be helpful. Drag a label (UILabel) into the view and position it
to the left of the switch. Change the text to read Show Photo Details:. Your view
should now resemble Figure 9.10, but your switch will likely show up as “on.”

ptg
Using Switches, Segmented Controls, and Web Views 211
Setting the Default StateI know you’re getting used to many of the different configuration options for the
controls we use, but in this case, the switch has only a single option: whether the
default state is on or off. The switch that you added to the view is set to “on;” we
want to change it so that it is “off” by default.
To change the default state, select the switch and open the Attributes Inspector
(Command+1). Using the State pop-up menu, change the default state to off. That
covers just about everything for buttons! We just need to connect it to an action, and
we can move on to the next element.
Connecting to the ActionThe only time we’re really interested in the switch is when its value changes, so, like
the segmented control, we need to take advantage of the event Value Changed and
connect that to the toggleFlowerDetail action method.
With the Document window visible, select the switch, and then open the
Connections Inspector (Command+2). Drag from the circle beside the Value
Changed event to the File’s Owner icon in the Document window. When you release
your mouse button, choose the toggleFlowerDetail action to complete the connec-
tion, as shown in Figure 9.11.
FIGURE 9.10Add a switch totoggle flowerdetails on andoff.

ptg
212 HOUR 9: Using Advanced Interface Objects and Views
We’re cruising now! Let’s wrap this up by adding the web views that will show the
flower and flower details, then the button that will let us load a new image whenev-
er we want.
Adding the Web ViewsThe application that we’re building relies on two different web views. One will dis-
play the flower image itself; the other view (which can be toggled on and off) shows
details about the image. The details view will be overlaid on top of the image itself,
so let’s start by adding the main view, flowerView.
To add a web view (UIWebView) to your application, locate it in the Library, and
then simply drag it into your view. The web view will display a resizable rectangle
that you can drag and position anywhere you’d like. Because this is the view that
the flower image will be shown in, position it to fall about halfway down the screen,
and then resize it so that it is the same width as the iPhone screen and so that it
covers the lower portion of the view entirely.
Repeat this to add a second web view for the flower details (flowerDetailView).
This time, size the view so that it is about one-third the height of the flower view,
and locate it at the very bottom of the screen, over top of the flower view, as shown
in Figure 9.12.
Setting the Web View AttributesWeb views, surprisingly, have very few attributes that you can configure in Interface
Builder, but what is available can be very important! To access the web view attrib-
utes, select one of the views you added, and then press Command+1 to open the
Attributes Inspector (see Figure 9.13).
FIGURE 9.11Connect theValue Changedevent to thetoggleFlower-Detail action.

ptg
Using Switches, Segmented Controls, and Web Views 213
There are two types of options you can select: Scaling and Detection (Phone
Numbers, Addresses, Events, Links). If Scales Page to Fit under Scaling is selected,
large pages will be scaled to fit in the size of the area you’ve defined. If the Detection
options are used, the iPhone’s data detectors go to work and will underline items that
it has decided are phone numbers, addresses, dates, or additional web links.
For the main flower view, we absolutely want the images to be scaled to fit within
the view. Select the web view, and then use the Properties Inspector to choose the
Scales Page to Fit option.
For the second view, we do not want this to be set, so select the web view where the
application will be showing the flower details and use the Attributes Inspector to
ensure that no scaling will take place. You may also want to change the view attrib-
utes for the detail view to have an alpha value of around 0.65. This will create a
nice translucency effect when the details are displayed on top of the photograph.
FIGURE 9.12Add two webviews(UIWebView) toyour screen,and then posi-tion them asshown here.
FIGURE 9.13Configure howthe web viewwill behave.
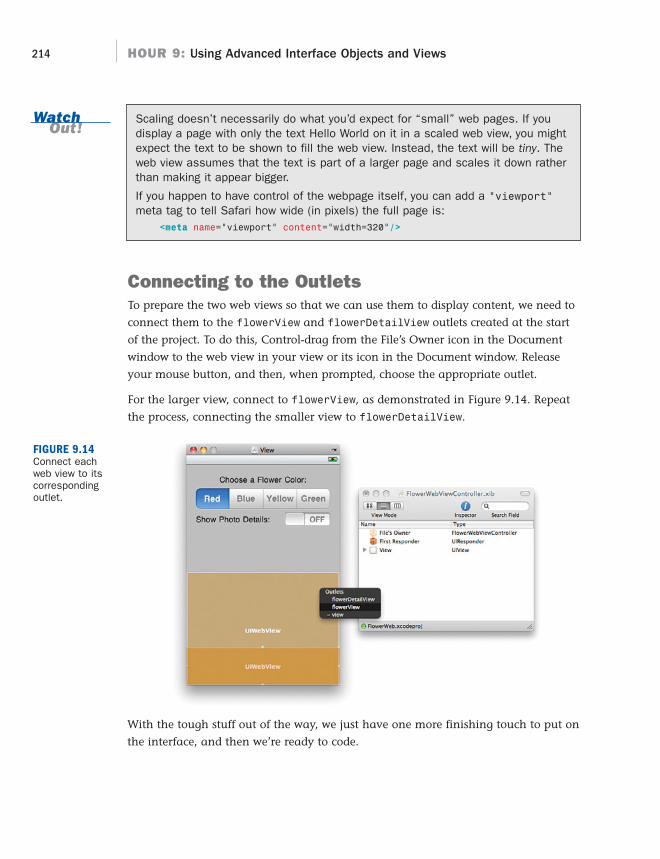
ptg
214 HOUR 9: Using Advanced Interface Objects and Views
WatchOut!
FIGURE 9.14Connect eachweb view to itscorrespondingoutlet.
Scaling doesn’t necessarily do what you’d expect for “small” web pages. If youdisplay a page with only the text Hello World on it in a scaled web view, you mightexpect the text to be shown to fill the web view. Instead, the text will be tiny. Theweb view assumes that the text is part of a larger page and scales it down ratherthan making it appear bigger.
If you happen to have control of the webpage itself, you can add a “viewport”meta tag to tell Safari how wide (in pixels) the full page is:
<meta name=”viewport” content=”width=320”/>
Connecting to the OutletsTo prepare the two web views so that we can use them to display content, we need to
connect them to the flowerView and flowerDetailView outlets created at the start
of the project. To do this, Control-drag from the File’s Owner icon in the Document
window to the web view in your view or its icon in the Document window. Release
your mouse button, and then, when prompted, choose the appropriate outlet.
For the larger view, connect to flowerView, as demonstrated in Figure 9.14. Repeat
the process, connecting the smaller view to flowerDetailView.
With the tough stuff out of the way, we just have one more finishing touch to put on
the interface, and then we’re ready to code.

ptg
Did youKnow?
Using Switches, Segmented Controls, and Web Views 215
Finishing the InterfaceThe only functional piece that is missing from our interface is a button (UIButton)
that we can use to manually trigger the getFlower method anytime we want.
Without the button, we’d have to switch between colors using the segmented control
if we wanted to see a new flower image. This button does nothing more than trigger
an action (getFlower), something you’ve done repeatedly in the past few hours, so
this should be a walk in the park for you by now.
Drag a button into the view, positioning it in the center of the screen above the web
views. Edit the button title to read Get New Photo.
Finally, select the button and open the Connections Inspector (Command+2). Drag
from the Touch Up Inside event to the File’s Owner icon in the Document window.
When prompted choose the getFlower action, as shown in Figure 9.15.
FIGURE 9.15Connect the GetNew Photo but-ton’s Touch UpInside event tothe getFloweraction.
Although your interface may be functionally complete, you may want to select theview itself and set a background color. Keep your interfaces clean and friendly!
The interface, shown in Figure 9.16, is complete! Switch back to Xcode and let’s get
coding!

ptg
216 HOUR 9: Using Advanced Interface Objects and Views
Implementing the View Controller LogicThere are two pieces of functionality that our view controller needs to implement via
two action methods. The first, toggleFlowerDetail, will show and hide the
flowerDetailView web view depending on whether the switch has been flipped on
(show) or off (hide). The second method, getFlower, will load a flower image into
the flowerView web view and details on that photograph into the
flowerDetailView web view. We’ll start with the easier of the two,
toggleFlowerDetail.
Hiding and Showing the Detail Web ViewA useful property of any object that inherits from UIView is that you can easily hide
(or show) it within your iPhone application interfaces. Because almost everything
you see onscreen inherits from this class, this means you can hide and show labels,
buttons, fields, images, and yes, other views. To hide an object, all we need to do is
set its Boolean property hidden to TRUE or YES (both have the same meaning). So, to
hide the flowerDetailView, we write the following:
flowerDetailView.hidden=YES;
To show it again, we just reverse the process, setting the hidden property to FALSE or
NO:
flowerDetailView.hidden=NO;
FIGURE 9.16The finishedinterface of theFlowerWebapplication.

ptg
Using Switches, Segmented Controls, and Web Views 217
To implement the logic for the toggleFlowerDetail: method, we need to figure out
what value the switch is currently set to. As mentioned earlier in the lesson, we can
check the state of a toggle switch through the isOn method that returns a Boolean
value of TRUE/YES if the switch is set to on or FALSE/NO if it is off.
Because we don’t have an outlet specifically set aside for the switch, we’ll use the
sender variable to access it in our method. When the toggleFlowerDetail action
method is called, this variable is set to reference the object that invoked the action
(in other words, the switch). So, to check to see whether the switch is on, we can
write the following:
If ([sender isOn]) { <switch is on> } else { <switch is off> }
Now, here’s where we can get clever (you’re feeling clever, right?). We want to hide
and show the flowerDetailView using a Boolean value and we get a Boolean value
from the switch’s isOn method. This maps to two conditions:
. When [sender isOn] is YES, the view should not be hidden
(flowerDetailView.hidden=NO)
. When [sender isOn] is NO, the view should be hidden
(flowerDetailView.hidden=YES)
In other words, the state of the switch is the exact opposite of what we need to
assign to the hidden property of the view. In C (and therefore Objective-C), to get
the opposite of a Boolean value, we just put an exclamation mark in front (!). So all
we need to do to hide or show flowerDetailView is to set the hidden property to
![sender isOn]. That’s it! A single line of code!
Implement toggleFlowerDetail: in FlowerWeb right after the @synthesize direc-
tives. The full method should look a lot like this:
-(IBAction)toggleFlowerDetail:(id)sender{flowerDetailView.hidden=![sender isOn];
}
Loading and Displaying the Flower Image and DetailsTo fetch our flower images, we’ll be making use of a feature provided by the Flora
Photographs website for specifically this purpose. We’ll be following four steps to
interact with the website:
1. We’ll get the chosen color from the segmented control.
2. We will generate a random number called a session ID so that florapho-
tographs.com can track our request.

ptg
218 HOUR 9: Using Advanced Interface Objects and Views
3. We will request the URL http://www.floraphotographs.com/showrandomi-
phone.php?color=<color>&session=<session ID>, where <color> is the
chosen color and <session ID> is the random number. This URL will return a
flower photo.
4. We will request the URL http://www.floraphotographs.com/detailiphone.
php?session=<session ID>, where <session ID> is the same random num-
ber. This URL will return the details for the previously requested flower photo.
Let’s go ahead and see what this looks like in code, and then discuss details behind
the implementation. Add the getFlower code block, shown in Listing 9.2, following
the toggleFlowerDetail method that you implemented.
LISTING 9.21: -(IBAction)getFlower:(id)sender {2: NSURL *imageURL;3: NSURL *detailURL;4: NSString *imageURLString;5: NSString *detailURLString;6: NSString *color;7: int sessionID;8:9: color=[colorChoice titleForSegmentAtIndex:10: colorChoice.selectedSegmentIndex];11: sessionID=random()%10000;12:13: imageURLString=[[NSString alloc] initWithFormat:14: @”http://www.floraphotographs.com/showrandomiphone.php?
➥color=%@&session=%d”15: ,color,sessionID];16: detailURLString=[[NSString alloc] initWithFormat:17: @”http://www.floraphotographs.com/detailiphone.php?session=%d”18: ,sessionID];19:20: imageURL=[[NSURL alloc] initWithString:imageURLString];21: detailURL=[[NSURL alloc] initWithString:detailURLString];22:23: [flowerView loadRequest:[NSURLRequest requestWithURL:imageURL]];24: [flowerDetailView loadRequest:[NSURLRequest requestWithURL:detailURL]];25:26: flowerDetailView.backgroundColor=[UIColor clearColor];27:28: [imageURLString release];29: [detailURLString release];30: [imageURL release];31: [detailURL release];32: }
This is the most complicated code that you’ve written so far, but it’s broken down
into the individual pieces, so it’s not difficult to understand:

ptg
Using Switches, Segmented Controls, and Web Views 219
Lines 2–7 declare the variables that we need to prepare our requests to the website.
The first variables, imageURL and detailURL, are instances of NSURL that will con-
tain the URLs that will be loaded into the flowerView and flowerDetailView web
views. To create the NSURL objects, we need two strings, imageURLString and
detailURLString, which we’ll format with the special URLs that we presented earli-
er, including the color and sessionID values.
In lines 9–10, we retrieve the title of the selected segment in our instance of the seg-
mented control: colorChoice. To do this, we use the object’s instance method
titleForSegmentAtIndex along with the object’s selectedSegmentIndex property.
The result, [colorChoice titleForSegmentAtIndex: colorChoice.selected
SegmentIndex], is stored in the string color and is ready to be used in the web request.
Line 11 generates a random number between 0 and 9999 and stores it in the integer
sessionID.
Lines 13–18 prepare imageURLString and detailURLString with the URLs that we
will be requesting. The strings are allocated, and then the initWithFormat method
is used to store the website address along with the color and session ID. The color
and session ID are substituted into the string using the formatting placeholders %@
and %d for strings and integers, respectively.
Lines 20–21 allocate and create the imageURL and detailURL NSURL objects using
the initWithString class method and the two strings imageURLString and
detailURLString.
Lines 23–24 use the loadRequest method of the flowerView and flowerDetailView
web views to load the NSURLs imageURL and detailURL, respectively. When these
lines are executed, the display updates the contents of the two views.
Although we mentioned this earlier, remember that UIWebView’s loadRequestmethod doesn’t handle NSURL objects directly; it expects an NSURLRequest objectinstead. To work around this, we create and return NSURLRequest objects usingthe NSURLRequest class method requestWithURL and the imageURL anddetailURL objects as parameters.
Line 26 is an extra nicety that we’ve thrown in. This sets the background of the
flowerDetailView web view to a special color called clearColor. This, combined
with the alpha channel value that you set earlier, will give the appearance of a nice
translucent overlay of the details over the main image. You can comment out or
remove this line to see the difference it creates.
By theWay

ptg
Did youKnow?
220 HOUR 9: Using Advanced Interface Objects and Views
To create web views that blend with the rest of your interface, you’ll want to keepclearColor in mind. By setting this color, you can make the background of yourweb pages translucent, meaning that the content displayed on the page will over-lay any other content that you’ve added to your iPhone view.
Finally, Lines 28–31 release all the objects that we’ve allocated in the method.
Because getFlower will potentially be called over and over, it’s important that we
release any memory that we might be using!
Fixing Up the Interface When the App LoadsNow that the getFlower method is implemented, you can run the application and
everything should work—except that when the application starts, the two web views
will be empty and the detail view will be visible, even though the toggle switch is set
to off.
To fix this, we can start loading an image as soon as the app is up and running and
set flowerDetailView.hidden to YES. Uncomment the viewDidLoad method and
implement it as follows:
- (void)viewDidLoad {flowerDetailView.hidden=YES;
[self getFlower:nil];
[super viewDidLoad];}
As expected, flowerDetailView.hidden=YES will hide the detail view. Using [self
getFlower:nil], we can call the getFlower: method from within our instance of the
view control (referenced as self) and start the process of loading a flower in the web
view. The method getFlower: expects a parameter, so we pass it nil. (This value is
never used in getFlower:, however, so there is no problem with providing nil.)
Releasing the ObjectsAs always, we need to finish things up by releasing the objects that we’ve kept
around. Edit the dealloc method to release the segmented control and two web
views now:
- (void)dealloc {[colorChoice release];
[flowerDetailView release];
[flowerView release];
[super dealloc];}

ptg
Using Scrolling Views 221
Building the ApplicationTest out the final version of the FlowerWeb application by clicking Build and Run in
Xcode.
Notice that you can zoom in and out of the web view, and use your fingers to scroll
around. These are all features that you get without any implementation cost when
using the UIWebView class.
Congratulations! Another app under your belt!
Using Scrolling ViewsAfter working through the projects in the past few hours, you might begin to notice
something: We’re running out of space in our interfaces. Things are starting to get
cluttered.
One possible solution, as you learned earlier this hour, is to use the hidden property
of UI objects to hide and show them in your applications. Unfortunately, when you’re
juggling a few dozen controls, this is pretty impractical. Another approach is to use
multiple different views, something that you’ll start learning about in Hour 12.
There is, however, a third way that we can fit more into a single view—by making it
scroll. Using an instance of the UIScrollView class, you can add controls and
interface elements out beyond the physical boundaries of the iPhone screen.
Unfortunately, Apple provides access to this object in Interface Builder but leaves
out the ability to actually make it work.
Before closing out this hour, I want to show you how to start using simple scrolling
views in a mini-project.
Implementation OverviewWhen I say simple, I mean it. This project will consist of a scroll view
(UIScrollView) with content added in Interface Builder that extends beyond the
physical screen, as shown in Figure 9.17.
To enable scrolling in the view, we need to define a property called contentSize,
which describes how large the content is that needs to be scrolled. That’s it.

ptg
222 HOUR 9: Using Advanced Interface Objects and Views
Setting Up the ProjectBegin by creating another View-Based Application. Name the new project Scroller.
For this example, we’re going to be adding the scroll view (UIScrollView) as a sub-
view to the existing view (UIView) in ScrollerViewController.xib. This is a perfectly
acceptable approach, but as you get more experienced with the tools, you might
want to just replace the default view entirely.
Preparing the OutletThere’s only one thing we need to do programmatically in this project, and that’s set
a property on the scroll view object. To access the object, we need to create an outlet
for it. Open ScrollerViewController.h and add an outlet for a UIScrollView instance
called theScroller, and then declare it as a property. The finished header is shown
in Listing 9.3.
LISTING 9.3#import <UIKit/UIKit.h>@interface ScrollerViewController : UIViewController {
IBOutlet UIScrollView *theScroller;
}@property (nonatomic, retain) UIScrollView *theScroller;
@end
FIGURE 9.17We’re going tomake a view. Itwill scroll.

ptg
Using Scrolling Views 223
Update the ScrollerViewController implementation file (ScrollerViewController.m)
with the corresponding @synthesize directive added after the @implementation
directive:
@synthesize theScroller;
Now that we’ll be able to easily access the scroll view, let’s go ahead and add it in
Interface Builder.
Adding a Scroll ViewOpen the ScrollerViewController.xib file in Interface Builder, making sure that the
Document window is open (Window, Document) and the view is visible. Using the
Object Library (Tools, Library), drag an instance of a scroll view into your view.
Position the view however you’d like it to appear and place a label above it that
reads Scrolling View (just in case you forget what we’re building).
The text view (UITextView) you used in Hour 7, “Working with Text, Keyboards,and Buttons,” is a specialized instance of a scrolling view. The same scrollingattributes that you can set for the text view can be applied for the scroll view, soyou may want to refer to the previous hour for more configuration possibilities. Orjust press Command+1 to bring up the Attributes Inspector and explore!
Adding Objects to the Scroll ViewNow that your scroll view is included in the XIB file, you need to populate it with
something! Objects are often placed in scroll views by writing code that calculates
their position. In Interface Builder, Apple could add the ability to visually position
objects in a larger virtual scroll view canvas, but they haven’t.
So, how do we get our buttons and other widgets onscreen? First, start by dragging
everything that you want to present into the scroll view object. For this example,
I’ve added six labels. You can use buttons, images, or anything else that you’d nor-
mally add to a view.
When the objects are in the view, you have two options. First, you can select the
object, and then use the arrow keys to position the objects outside of the visible area
of the view to “guesstimate” a position. Or second, you can select each object in
turn and use the Size Inspector (Command+3) to set their X and Y coordinates man-
ually, as shown in Figure 9.18.
Did youKnow?

ptg
224 HOUR 9: Using Advanced Interface Objects and Views
The coordinates of objects are relative to the view they are in. In this example, leftcorner of our scrolling view defines 0,0 (called the “origin point”) for everything weadd to it.
To help you out, these are the X,Y coordinates left centers of my six labels:
Label 1 110,45
Label 2 110,125
Label 3 110,205
Label 4 110,290
Label 5 110,375
Label 6 110,460
As you can see from my final view, shown in Figure 9.19, the sixth label isn’t visible,
so we’ll certainly need some scrolling if we’re going to be able to view it!
Connecting to the OutletTo connect the scrolling view to theScroller outlet defined earlier, control-drag
from the File’s Owner icon in the Document window to the scroll view rectangle.
When prompted, choose theScroller as your outlet, as shown in Figure 9.20.
FIGURE 9.18Use the SizeInspector to setthe X and Ypoint coordi-nates for eachobject.
By theWay

ptg
Using Scrolling Views 225
That finishes up our work in Interface Builder. Be sure to save the XIB file, and then
switch back into Xcode.
Implementing Scrolling BehaviorFor fun, try using Build and Run to run the application as it stands. It will compile
and launch, but it doesn’t scroll. In fact, it behaves just like we’d expect a typical non-
scrolling view to behave. The reason for this is because we need to tell it the horizontal
FIGURE 9.19The final scroll-ing view, creat-ed with labelsfor content.
FIGURE 9.20We’ll need toaccess thescroll view sowe can set itscontentSizeattribute. Createthe connectionto thetheScrolleroutlet.

ptg
226 HOUR 9: Using Advanced Interface Objects and Views
and vertical sizes of the region it is going to scroll. To do this, we need to set the
contentSize attribute to a CGSize value. CGSize is just a simple C data structure that
contains a height and a width, and we can easily make one using the
CGSizeMake(<width>,<height>) function. For example, to tell our scroll view
(theScroller) that it can scroll up to 280 points horizontally and 600 points vertical-
ly, we could enter the following:
theScroller.contentSize=CGSizeMake(280.0,600.0);
Guess what? That isn’t just what we could do, it’s what we will do! Edit the
ScrollerViewController.m file’s viewDidLoad method to read as follows:
- (void)viewDidLoad {theScroller.contentSize=CGSizeMake(280.0,600.0);[super viewDidLoad];
}
Where Did You Get the Width and Height Values?The width we used in this example is just the width of the scroll view itself. Why?Because we don’t have any reason to scroll horizontally. The height is just a nicenumber we chose to illustrate that, yes, the view is scrolling. In other words, theseare pretty arbitrary! You’ll need to choose them to fit your own content in the waythat works best for your application.
Releasing the ObjectEdit the dealloc method to release the scroll view, and we’re done:
- (void)dealloc {[theScroller release];[super dealloc];
}
Building the ApplicationThe moment of truth has arrived. Does the single line of code make magic? Choose
Build and Run, and then try scrolling around the view you created. Everything
should work like a charm.
Yes, this was a quick and dirty project, but there seems to be a lack of information
on getting started with UIScrollView, and I thought it was important to run
through a short tutorial. I hope this gives you new ideas on what you can do to cre-
ate more feature-rich iPhone interfaces.

ptg
Summary 227
Further ExplorationAs well as useful, the segmented control (UISegmentedControl) and switch
(UISwitch) classes are pretty easy to get the hang of. The best place to focus your
attention for additional exploration is on the feature set provided by the UIWebView
and UIScrollView classes.
As described at the start of this hour, UIWebView can handle a large variety of con-
tent beyond what might be inferred by the “web” portion of its name. By learning
more about NSURL, such as the initFileURLWithPath:isDirectory method, you’ll
be able to load files directly from your project resources. You can also take advantage
of the web view’s built-in actions, such as goForward and goBack, to add navigation
functionality without a single line of code. One might even use a collection of HTML
files to create a self-contained website within an iPhone application. In short, web
views extend the traditional iPhone interface of your applications by bringing in
HTML markup, JavaScript, and CSS—creating a very potent combination.
The UIScrollView class, on the other hand, gives us an important capability that is
widely used in iPhone applications: touch scrolling. We briefly demonstrated this at
the end of the hour, but there are additional features, such as pinching and zoom-
ing, that can be enabled by implementing the UIScrollViewDelegate protocol.
We’ll have our first look at building a class that conforms to a protocol in the next
hour, so keep this in mind as you get more comfortable with the concepts.
Apple Tutorials
Segmented Controls, Switches, and Web Views—UICatalog (accessible via the
Xcode developer documentation): Mentioned in the last hour’s lesson,
UICatalog shows nearly all the iPhone interface concepts in clearly defined
examples.
Scrolling—ScrollViewSuite (accessible via the Xcode developer documenta-
tion): The ScrollViewSuite provides examples of just about everything you
could ever want to do in a scroll view.
SummaryIn this hour, you learned how to use two controls that enable applications to
respond to user input beyond just a simple button press or a text field. The switch
and segmented control, while limited in the options they can present, give a user a
touch-friendly way of making decisions within your applications.

ptg
228 HOUR 9: Using Advanced Interface Objects and Views
You also explored how to use web views to bring web content directly into your proj-
ects and how to tweak it so that it integrates into the overall iPhone user experience.
This powerful class will quickly become one of your most trusted tools for displaying
content.
Because we’ve reached a point in our development where things are starting to get a
bit cramped, we closed out the hour with a quick introduction to the scroll view. You
learned how, despite appearances, scroll views can be easily added to apps.
Q&AQ. Why can’t I visually lay out my scroll view in Interface Builder?
A. Keep in mind that the iPhone interface development tools in Xcode are still
quite new! Apple has been making steady improvements to Interface Builder
to accommodate iPhone development, and I expect them to add this feature
in the future.
Q. You mentioned the UIWebView includes actions? What does that mean andhow do I use them?
A. This means that the object you drag into your view in Interface Builder is
already capable of responding to actions (such as navigation actions) on its
own—no code required. To use these, you connect from the UI event that
should trigger the action to your instance of the web view (as opposed to the
File’s Owner icon), and then choose the appropriate action from the pop-up
window that appears.
Workshop
Quiz1. What properties need to be set before a scroll view (UIScrollView) will scroll?
2. How do you get the opposite of a Boolean value?
3. What type of object does a web view expect as a parameter when loading a
remote URL?
ptg
229Workshop
Answers1. The contentSize property must be set for a scroll view before it will allow
scrolling.
2. To negate a Boolean value, just prefix it with an exclamation point. !TRUE, for
example, is the same as FALSE.
3. You typically use an NSURLRequest object to initiate a web request within a
web view.
Activities1. Create your own “mini” web browser by combining a text field, buttons, and
a segmented control with a web view. Use the text field for URL entry, buttons
for navigation, and hard-code some shortcuts for your favorite sites into the
segmented control. To make the best use of space, you may want to overlay
the controls on the web view, and then add a switch that hides or shows the
controls when toggled.
2. Practice laying out a user interface within a scrollable view. Use graph paper
to sketch the view and determine coordinates before laying it out in Interface
Builder.

ptg
This page intentionally left blank

ptg
HOUR 10
Getting the User’s Attention
What You’ll Learn in This Hour:. Different types of user notifications. How to create alert views. Methods for collecting input from alerts. How to use action sheets to present options. How to implement short sounds and vibrations
The iPhone presents developers with many opportunities for creating unique user inter-
faces, but certain elements must be consistent across the all applications. When users
needs to be notified of an application event or make a critical decision, it is important
that they be presented with interface elements that immediately make sense. In this chap-
ter, we look at several different ways an application can notify a user that something has
happened. It’s up to you to determine what that “something” is, but these are the tools
you’ll need to keep users of your apps “in the know.”
Exploring User Alert MethodsApplications on the iPhone are user-centered, which means they typically don’t perform
utility functions in the background or operate without an interface. They enable users to
work with data, play games, communicate, or carry out dozens of other activities. Despite
the variation in activities, when an application needs to show a warning, provide feed-
back, or ask the user to make a decision, the iPhone does so in a common way. Cocoa
Touch leverages a variety of objects and methods to gain your attention, including
UIAlertView, UIActionSheet, and System Sound Services.
This hour explains how you can implement these notification features into your application.

ptg
232 HOUR 10: Getting the User’s Attention
Note that I said applications typically don’t operate in the background? That’sbecause, with iOS 4, some do! Applications running in the background have aunique set of capabilities, including additional types of alerts and notifications. You’lllearn more about these in Hour 21, “Building Background-Aware Applications.”
Prepping the Notification Project FilesTo practice using these alert classes and methods, we need to create a new project
with buttons for activating the different styles of notifications. Open Xcode and cre-
ate a new project based on the View-Based Application iPhone template. Name the
project GettingAttention.
Within Xcode, open the GettingAttentionViewController.h file and add the outlets
and actions shown in Listing 10.1
LISTING 10.1#import <UIKit/UIKit.h>
@interface GettingAttentionViewController : UIViewController {IBOutlet UILabel *userOutput;
}
@property (retain, nonatomic) IBOutlet UILabel *userOutput;
- (IBAction)doAlert:(id)sender;
- (IBAction)doMultiButtonAlert:(id)sender;
- (IBAction)doAlertInput:(id)sender;
- (IBAction)doActionSheet:(id)sender;
- (IBAction)doSound:(id)sender;
- (IBAction)doAlertSound:(id)sender;
- (IBAction)doVibration:(id)sender;
@end
The first outlet, userOutput, will be implemented as a text label for providing sim-
ple feedback within the application. The seven actions are methods that correspond
to the different notification methods we’ll be writing throughout the hour.
Next, edit the start of the GettingAttentionViewController.m file and add the follow-
ing code after the existing @implementation line:
@synthesize userOutput;
-(IBAction)doAlert:(id)sender {
}
-(IBAction)doMultiButtonAlert:(id)sender {
}
By theWay

ptg
Exploring User Alert Methods 233
-(IBAction)doAlertInput:(id)sender {
}
-(IBAction)doActionSheet:(id)sender {
}
-(IBAction)doSound:(id)sender {
}
-(IBAction)doAlertSound:(id)sender {
}
-(IBAction)doVibration:(id)sender {
}
The @synthesize directive is used to create the getter/setter for the userOutput text
label. Next, seven stub methods are defined for our actions. Finally, be sure to edit
the dealloc method to release the userOutput object:
- (void)dealloc {[userOutput release];
[super dealloc];}
That completes the code skeleton that we’ll be using throughout this hour. Now let’s
create the interface in Interface Builder and connect the outlets and actions.
Creating the Notification Project InterfaceOpen the GettingAttentionViewController XIB file in Interface Builder. We need to
add seven buttons and a text label to the empty view. You should be getting quite
familiar with this process by now. Just follow these steps:
1. Double-click the View icon in the Document window to open the empty view.
2. Add a button to the view by opening the library (Tools, Library) and dragging
a Round Rect Button (IUButton) to the View window.
3. Add five more buttons, spaced out evenly below the first. Make sure you leave
room at the bottom for a label.
4. Change the button labels to correspond to the different notification types that
we’ll be using. Specifically, name the buttons (top to bottom) Alert Me!, Alert
with Buttons!, I Need Input!, Lights, Camera, Action Sheet, Play Sound,
Play Alert Sound, and Vibrate Phone.
5. Drag a label (UILabel) from the library to the bottom of the view. Remove the
default label text and set the text to align center. The interface should resem-
ble Figure 10.1.

ptg
234 HOUR 10: Getting the User’s Attention
Connecting the Outlets and ActionsThe interface itself is finished, but we still need to make the connection to our prop-
erties and method stubs, as follows:
1. Select the first button (Alert Me!), and then press Command+2 to open the
Connection Inspector.
2. From the Touch Up Inside connection point, click and drag to the File’s Owner
icon in the Document window.
3. When prompted, choose the doAlert method from the list (see Figure 10.2).
4. Repeat this pattern for the other six buttons. Alert with Buttons! connects to
doMultiButtonAlert; I Need Input! should connect to the doAlertInput
method; Lights, Camera, Action Sheet to doActionSheet; Play Sound to
doSound; Play Alert Sound to doAlertSound; and Vibrate Phone to
doVibration.
5. To connect the label, Control-drag from the File’s Owner icon in the Document
window to the label (either in the View window or the View hierarchy in the
Document window). Choose the userOutput outlet to make the final connec-
tion, as demonstrated in Figure 10.3.
The framework for our test of notification is ready. We’ll start by implementing a
simple alert view.
FIGURE 10.1Create an inter-face with sevenbuttons and alabel at the bottom.

ptg
Generating Alerts 235
Generating AlertsSometimes users need to be informed of changes when an application is running.
More than just a change in the current view is required when an internal error event
occurs (such as low-memory condition or a dropped network connection), for exam-
ple, or upon completion of a long-running activity. Enter the UIAlertView class.
The UIAlertView class creates a simple modal alert window that presents a user
with a message and a few option buttons (see Figure 10.4).
FIGURE 10.2Connect thebuttons to themethod stubs.
FIGURE 10.3Connect theuserOutput out-let to the labelin the view.
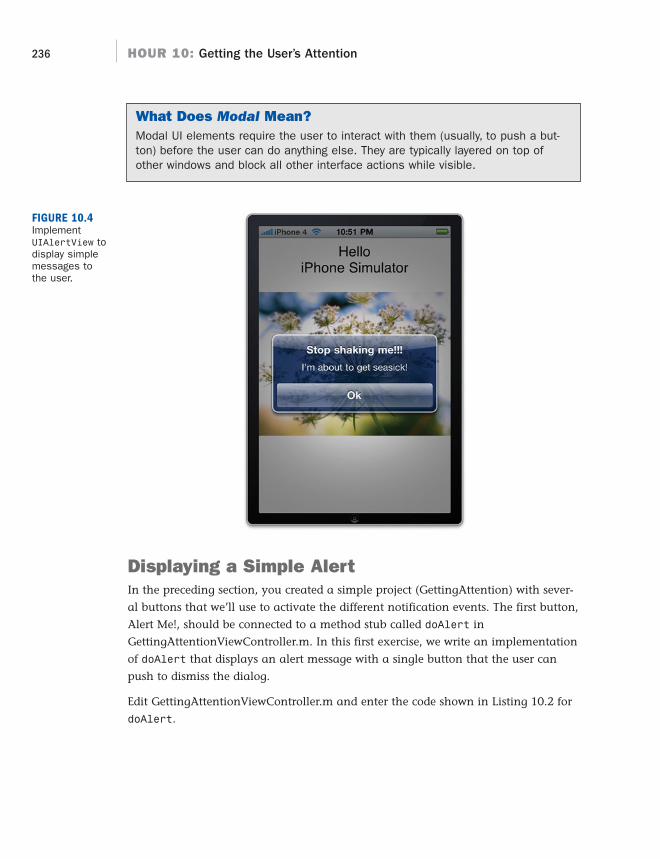
ptg
236 HOUR 10: Getting the User’s Attention
What Does Modal Mean?Modal UI elements require the user to interact with them (usually, to push a but-ton) before the user can do anything else. They are typically layered on top ofother windows and block all other interface actions while visible.
FIGURE 10.4ImplementUIAlertView todisplay simplemessages tothe user.
Displaying a Simple AlertIn the preceding section, you created a simple project (GettingAttention) with sever-
al buttons that we’ll use to activate the different notification events. The first button,
Alert Me!, should be connected to a method stub called doAlert in
GettingAttentionViewController.m. In this first exercise, we write an implementation
of doAlert that displays an alert message with a single button that the user can
push to dismiss the dialog.
Edit GettingAttentionViewController.m and enter the code shown in Listing 10.2 for
doAlert.
ptg
Generating Alerts 237
LISTING 10.21: -(IBAction)doAlert:(id)sender {2: UIAlertView *alertDialog;
3: alertDialog = [[UIAlertView alloc]
4: initWithTitle: @”Alert Button Selected”
5: message:@”I need your attention NOW!”
6: delegate: nil
7: cancelButtonTitle: @”Ok”
8: otherButtonTitles: nil];
9: [alertDialog show];
10: [alertDialog release];
11: }
In lines 2 and 3, we declare and instantiate our instance of UIAlertView with a
variable called alertDialog. As you can see, the convenient initialization method
of the alert view does almost all the work for us. Let’s review the parameters:
initWithTitle: Initializes the view and sets the title that will appear at the
top of the alert dialog box.
message: Sets the string that will appear in the content area of the dialog box.
delegate: Contains the object that will serve as the delegate to the alert.
Initially, we don’t need any actions to be performed after the user dismisses
the alert, so we can set this to nil.
cancelButtonTitle: Sets the string shown in the default button for the alert.
otherButtonTitles: Adds an additional button to the alert. We’re starting
with a single-button alert, so this is set to nil.
After alertDialog has been initialized, the next step is to show it by using (sur-
prise!) the show method, as shown in line 9. Finally, as soon as we’re done with the
alert, we can release it, as seen in line 10.
If you prefer to set the alert message and buttons independent of the initializa-tion, the UIAlertView class includes properties for setting the text labels (mes-sage, title) individually and methods for adding buttons (addButtonWithTitle).
Figure 10.5 shows the outcome of these settings.
An alert doesn’t have to be a single-use object. If you’re going to be using an alertrepeatedly, create an instance when your view is loaded and show it as needed—but remember to release the object when you’re finished using it!
By theWay
By theWay

ptg
238 HOUR 10: Getting the User’s Attention
Creating Multi-Option AlertsAn alert with a single button is easy to implement because there is no additional
logic to program. The user taps the button, the alert is dismissed, and execution con-
tinues as normal. If you need to add additional buttons, however, your application
needs to be able to identify the button pressed and react appropriately.
In addition to the single-button alert that you just created, there are two additional
configurations to learn. The difference between them is how many buttons you’re
asking the alert to display. A two-button alert places buttons side by side. When
more than two buttons are added, the buttons are stacked, as you’ll soon see.
Adding ButtonsCreating an alert with multiple buttons is simple: We just take advantage of the
otherButtonTitles parameter of the initialization convenience method. Instead of
setting to nil, provide a list of strings terminated by nil that should be used as the
additional button names. The cancel button will always be displayed on the left in a
two-button scenario or at the bottom of a longer button list.
At most, an alert view can display five buttons (including the button designated asthe “cancel” button) simultaneously. Attempting to add more may result in somevery unusual onscreen effects, such as display of clipped/partial buttons.
FIGURE 10.5In its simplestform, an alertview displays amessage andbutton to dis-miss it.
Did youKnow?
ptg
Generating Alerts 239
For example, to expand the previous example to include two new buttons, the ini-
tialization can be changed as follows:
alertDialog = [[UIAlertView alloc]initWithTitle: @”Alert Button Selected”message:@”I need your attention NOW!”delegate: nilcancelButtonTitle: @”Ok”otherButtonTitles: @”Maybe Later”, @”Never”, nil];
Write an updated version of the doAlert method within the doMultiButtonAlert
method stub created earlier.Listing 10.3 shows the final code.
LISTING 10.3-(IBAction)doMultiButtonAlert:(id)sender {
UIAlertView *alertDialog;
alertDialog = [[UIAlertView alloc]initWithTitle: @”Alert Button Selected”message:@”I need your attention NOW!”delegate: nilcancelButtonTitle: @”Ok”otherButtonTitles: @”Maybe Later”, @”Never”, nil];
[alertDialog show];[alertDialog release];
}
Pressing the Alert with Buttons! button should now open the alert view displayed in
Figure 10.6.
Try pushing one of the buttons. The alert view is dismissed. Push another? The same
thing happens. All the buttons do exactly the same thing—absolutely nothing.
Although this behavior was fine with a single button, it’s not going to be very useful
with our current configuration.
Responding to a Button Press with the Alert View DelegateProtocolWhen I first started using Objective-C, I found the terminology painful. It seemed
that no matter how easy a concept was to understand, it was surrounded with lan-
guage that made it appear harder than it was. A protocol, in my opinion, is one of
these things.
Protocols define a collection of methods that perform a task. To provide advanced
functionality, some classes, such as UIAlertView, require you to implement meth-
ods defined in a related protocol. Some methods are required and others are option-
al; it just depends on the features you need.

ptg
240 HOUR 10: Getting the User’s Attention
To make the full use of an alert view, an additional protocol method must added to one
of our classes. We’ll be using our main application’s view controller class for this pur-
pose, but in larger projects it may be a completely separate class. The choice is entirely
up to you. A class that implements a protocol is said to “conform” to that protocol.
To identify the button that was pressed in a multi-option alert, for example, our
GettingAttentionViewController should conform to the UIAlertViewDelegate
protocol and implement the alertView:clickedButtonAtIndex: method.
Edit the GettingAttentionViewController.h interface file to declare that the class will be
conforming to the necessary protocol by modifying the @interface line as follows:
@interface GettingAttentionViewController : UIViewController<UIAlertViewDelegate> {
Next, update the initialization code of the alert view in doMultiButtonAlert so
that the delegate is pointed to the object that implements the
UIAlertViewDelegate. Because this is the same object (the view controller) that is
creating the alert, we can just use self:
alertDialog = [[UIAlertView alloc]initWithTitle: @”Alert Button Selected”message:@”I need your attention NOW!”delegate: self
cancelButtonTitle: @”Ok”otherButtonTitles: @”Maybe Later”, @”Never”, nil];
FIGURE 10.6Add additionalbuttons duringinitialization ofthe alert view.

ptg
Generating Alerts 241
The alertView:clickedButtonAtIndex method that we write next will receive the
index of the button that was pushed and give us the opportunity to act on it. To make
this easier, we can take advantage of the UIAlertView instance method
buttonTitleAtIndex. This method will return the string title of a button from its index,
eliminating the need to keep track of which index value corresponds to which button.
Add the code in Listing 10.4 to GettingAttentionViewController.m to display a mes-
sage when a button is pressed.
LISTING 10.41: - (void)alertView:(UIAlertView *)alertView2: clickedButtonAtIndex:(NSInteger)buttonIndex {3: NSString *buttonTitle=[alertView buttonTitleAtIndex:buttonIndex];4: if ([buttonTitle isEqualToString:@”Maybe Later”]) {5: userOutput.text=@”Clicked ‘Maybe Later’”;6: } else if ([buttonTitle isEqualToString:@”Never”]) {7: userOutput.text=@”Clicked ‘Never’”;8: } else {9: userOutput.text=@”Clicked ‘Ok’”;10: }11: }
To start, in line 3, buttonTitle is set to the title of the button that was clicked. Lines
4 through 10 test the value of buttonTitle against the names of the buttons that
we initialized when creating the alert view. If a match is found, the userOutput
label in the view is updated to something appropriate.
This is just one way to implement the button handler for your alert. In some cases
(such as dynamically generated button labels), it may be more appropriate to work
directly with the button index values. You may also want to consider defining con-
stants for button labels.
Don’t assume that application processing stops when the alert window is on thescreen! Your code will continue to execute after you show the alert. You may evenwant to take advantage of this by using the UIAlertView instance methoddismissWithClickedButtonIndex: to remove the alert from the screen if theuser does not respond within a certain length of time.
Adding Fields to AlertsAlthough buttons can be used to generate user input from an alert, you might have
noticed that some applications actually present text fields within an alert box. The
App Store, for example, prompts for your iTunes password before it starts download-
ing a new app.
WatchOut!

ptg
242 HOUR 10: Getting the User’s Attention
To add fields to your alert dialogs, you need to be a bit “sneaky.” There isn’t a simple
“add text field” option, but you can take advantage of the method addSubView to add
one view to another. This method is common to all subclasses of an UIView, which
includes the alert views we need to modify and the text field we need to display. In
short, we will manually create a field and position it within the alert view. Because the
alert view doesn’t “know” it’s going to be there, we can use the alert view’s message
text to create space for the field. Sound bizarre? It is, but it isn’t difficult.
Let’s start by providing a place to store and reference the field.
Adding the Text Field Instance VariableWe don’t have Interface Builder around to drag a field into an alert view, so we need
to declare, allocate, and initialize it manually. Open the
GettingAttentionViewController.h file and modify it to include a UITextField
named userInput. Be sure to include a @property directive for it, too, as shown in
Listing 10.5
LISTING 10.5#import <UIKit/UIKit.h>
@interface GettingAttentionViewController :UIViewController <UIAlertViewDelegate> {
IBOutlet UILabel *userOutput;UITextField *userInput;
}
@property (retain, nonatomic) IBOutlet UILabel *userOutput;@property (retain, nonatomic) UITextField *userInput;
- (IBAction)doAlert:(id)sender;- (IBAction)doMultiButtonAlert:(id)sender;- (IBAction)doAlertInput:(id)sender;- (IBAction)doActionSheet:(id)sender;- (IBAction)doSound:(id)sender;- (IBAction)doAlertSound:(id)sender;- (IBAction)doVibration:(id)sender;
@end
Next, open the implementation file (GettingAttentionViewController.m) and add a
@synthesize line for userInput immediately following the userOutput @synthe-
size line:
@synthesize userInput;
Finally, update the dealloc method to release userInput when the application is
completed:
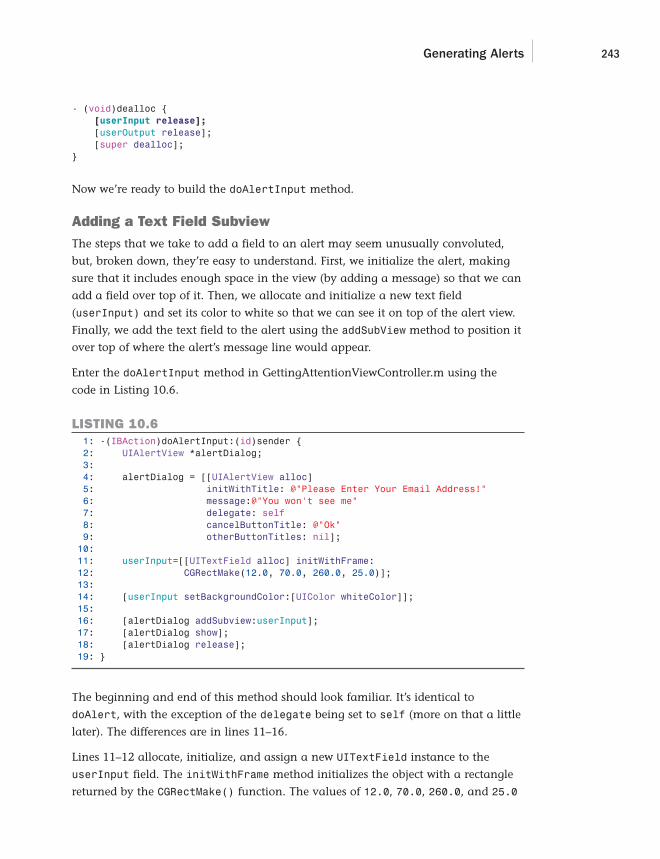
ptg
Generating Alerts 243
- (void)dealloc {[userInput release];
[userOutput release];[super dealloc];
}
Now we’re ready to build the doAlertInput method.
Adding a Text Field SubviewThe steps that we take to add a field to an alert may seem unusually convoluted,
but, broken down, they’re easy to understand. First, we initialize the alert, making
sure that it includes enough space in the view (by adding a message) so that we can
add a field over top of it. Then, we allocate and initialize a new text field
(userInput) and set its color to white so that we can see it on top of the alert view.
Finally, we add the text field to the alert using the addSubView method to position it
over top of where the alert’s message line would appear.
Enter the doAlertInput method in GettingAttentionViewController.m using the
code in Listing 10.6.
LISTING 10.61: -(IBAction)doAlertInput:(id)sender {2: UIAlertView *alertDialog;3:4: alertDialog = [[UIAlertView alloc]5: initWithTitle: @”Please Enter Your Email Address!”6: message:@”You won’t see me”7: delegate: self8: cancelButtonTitle: @”Ok”9: otherButtonTitles: nil];10:11: userInput=[[UITextField alloc] initWithFrame:12: CGRectMake(12.0, 70.0, 260.0, 25.0)];13:14: [userInput setBackgroundColor:[UIColor whiteColor]];15:16: [alertDialog addSubview:userInput];17: [alertDialog show];18: [alertDialog release];19: }
The beginning and end of this method should look familiar. It’s identical to
doAlert, with the exception of the delegate being set to self (more on that a little
later). The differences are in lines 11–16.
Lines 11–12 allocate, initialize, and assign a new UITextField instance to the
userInput field. The initWithFrame method initializes the object with a rectangle
returned by the CGRectMake() function. The values of 12.0, 70.0, 260.0, and 25.0

ptg
244 HOUR 10: Getting the User’s Attention
indicate that the field will be located 12.0 points from the left side of the view it is
placed within and 70.0 points from the top. It will be 260.0 points wide and 25.0
points tall. Where did these values come from? Experimentation! These are the val-
ues that will correctly position the field over top of the message “You won’t see me.”
Line 14 sets the background of the text field to white.
Line 16 adds the field to the alert view using the addSubView method.
You should now be able to Build and Run the GettingAttention application, click the I
Need Input! button, and see an alert with an input field, as demonstrated in Figure 10.7.
FIGURE 10.7Add fields toyour alert viewsusing theaddSubViewmethod.
All that remains is being able to do something with the contents of the field—and
that part is easy!
Accessing the Text FieldTo access the input the user provided in the alert view, we just need to read the text
property of userInput. Where do we do this? In the alert view’s delegate method
alertView:clickedButtonAtIndex.
Ah ha! You say, “But didn’t we already use that method to handle the alert view
from doMultiButtonAlert?” Yes, we did, but if we’re clever, we can tell the differ-
ence between which alert is calling that method and react appropriately.

ptg
Using Action Sheets 245
Because we have access to the view object itself within the
alertView:clickedButtonAtIndex method, why don’t we just check the title of the
view and, if it is equal to the title of our input alert (Please Enter Your Email
Address!), we can set userOutput to the text the user entered in userInput. This is
easily accomplished by a simple string comparison using the title property of the
alert view object passed to alertView:clickedButtonAtIndex.
Add the following code snippet to the end of the
alertView:clickedButtonAtIndex method:
if ([alertView.titleisEqualToString: @”Please Enter Your Email Address!”]) {userOutput.text=userInput.text;
}
Build and run the application with these changes in place. Now, when the alert view
with the text field is dismissed, the delegate method is called and the user output
label is properly set to the text the user entered.
Using these techniques, you can expand the capabilities of alert views beyond the
simple implementation provided in the base iOS SDK.
Using Action SheetsAlert views are used to display messages that indicate a change in state or a condi-
tion within an application that a user should acknowledge. Sometimes, however, a
user should be prompted to make a decision based on the result of an action. For
example, if an application provides the option to share information with a friend,
the user might be prompted for the method of sharing (such as sending an email,
uploading a file, and so on). You can see this behavior when adding a bookmark in
Safari, as shown in Figure 10.8. This interface element is called an action sheet and
is an instance of UIActionSheet.
Action sheets are also used to confirm actions that are potentially destructive to
data. In fact, they provide a separate bright-red button style to help draw a user’s
attention to potential deletion of data.
Displaying an Action SheetAction sheets are very similar to alerts in how they are initialized, modified, and,
ultimately, acted upon. However, unlike alerts, an action sheet can be associated
with a given view, tab bar, or toolbar. When an action sheet appears onscreen, it is
animated to show its relationship to one of these elements.

ptg
246 HOUR 10: Getting the User’s Attention
To create your first action sheet, we’ll use the method stub doActionSheet created
within the GettingAttentionViewController.m file. Recall that this method will be
triggered by pushing the Lights, Camera, Action Sheet button. Add the code in
Listing 10.7 to the doActionSheet method.
LISTING 10.71: - (IBAction)doActionSheet:(id)sender {2: UIActionSheet *actionSheet;3: actionSheet=[[UIActionSheet alloc] initWithTitle:@”Available Actions”4: delegate:nil5: cancelButtonTitle:@”Cancel”6: destructiveButtonTitle:@”Destroy”7: otherButtonTitles:@”Negotiate”,@”Compromise”,nil];8: [actionSheet showInView:self.view];9: }
Lines 2–3 declare and instantiate an instance of UIActionSheet called actionSheet.
Similar to the setup of an alert, the initialization convenience method takes care of
nearly all the setup. The parameters are as follows:
initWithTitle: Initializes the sheet with the specified title string.
delegate: Contains the object that will serve as the delegate to the sheet. If
this is set to nil (which we will do initially), the sheet will be displayed, but
pressing a button will have no effect beyond dismissing the sheet.
FIGURE 10.8An action sheetprovides multi-ple optionsbased on thecontext in whichan action isbeing carriedout.

ptg
By theWay
Using Action Sheets 247
cancelButtonTitle: Set the string shown in the default button for the alert.
destructiveButtonTitle: The title of the option that will result in informa-
tion being lost. This button will be presented in bright red (a sharp contrast to
the rest of the choices). If set to nil, no destructive button will be displayed.
otherButtonTitles: Adds additional buttons to the sheet. In this example,
we have a total of four buttons: the Cancel button, Destroy button, and two
other buttons.
In line 8, the action sheet is displayed in the current view controller’s view (self.view)
using the UIActionSheet showInView: method. Figure 10.9 shows the result.
FIGURE 10.9Action sheetscan include can-cel and destruc-tive buttons, aswell as buttonsfor otheroptions.
Action sheets can take up to seven buttons (including Cancel and the Destroy button) while maintaining the standard layout. If you exceed seven, however, thedisplay will automatically change into a scrolling table. This gives you room to addas many options as you need.
Changing the Action Sheet AppearanceBased on what you’ve learned so far, you might have noticed that an action sheet is
more configurable than an alert view. An action sheet defines three different types

ptg
248 HOUR 10: Getting the User’s Attention
of buttons with three different appearances (cancel, destructive, other). Any of the
button titles can be set to nil, and that button type will not be displayed in the
sheet.
To add buttons to the action sheet outside of the initialization method, use theaddButtonWithTitle: method.
You can also change how the sheet is drawn on the screen. In the example we’re
creating, the showInView: method is used to animate the opening of the sheet from
the current view controller’s view. If you had an instance of a toolbar or a tab bar,
you could use showFromToolbar: or showFromTabBar: to make the sheet appear to
open from either of these user interface elements.
Perhaps more dramatically, an action sheet can take on different appearances if you
set the actionSheetStyle property. For example, try adding the following line to
the doActionSheet method:
actionSheet.actionSheetStyle=UIBarStyleBlackTranslucent;
This code draws the action sheet in a translucent black style. You can also use
UIActionSheetStyleAutomatic to inherit the style of the view’s toolbar (if any is
set) or UIActionSheetStyleBlackOpaque for a shiny solid-black style.
Responding to an Action Sheet Button PressAs you’ve seen, there are more than a few similarities in how alert views and action
sheets are set up. The similarities continue with how an action sheets reacts to a but-
ton press, for which we will follow almost the same steps as we did with an alert view.
First, we need to conform to a new protocol. Modify
GettingAttentionViewController.h to include the UIActionSheetDelegate protocol:
@interface GettingAttentionViewController :UIViewController <UIAlertViewDelegate, UIActionSheetDelegate> {IBOutlet UILabel *userOutput;
}
Next, to capture the click event, we need to implement the actionSheet:
clickedButtonAtIndex method. As with alertView:clickedButtonAtIndex:, this
method provides the button index that was pressed within the action sheet. Add the
code in Listing 10.8 to GettingAttentionViewController.m.
By theWay
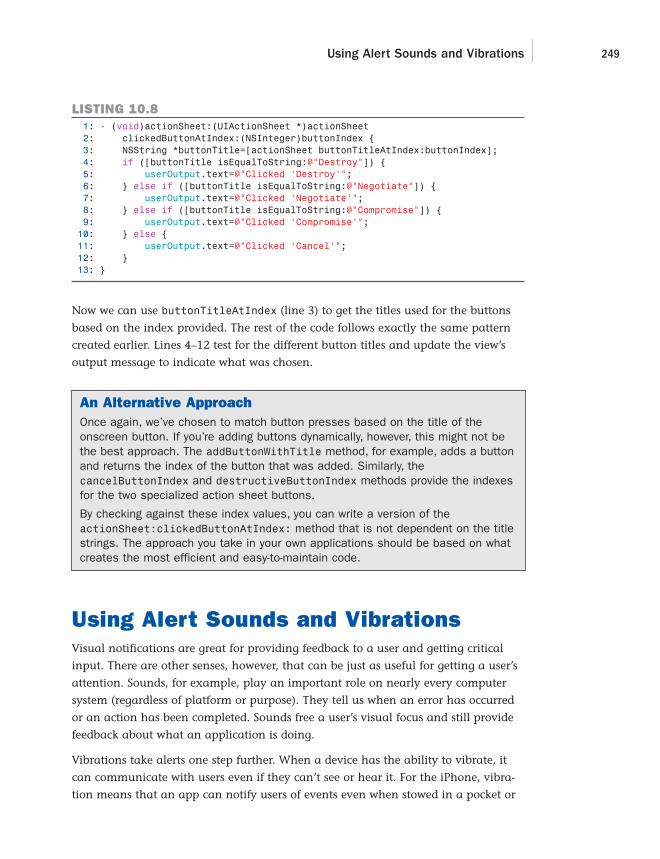
ptg
Using Alert Sounds and Vibrations 249
LISTING 10.81: - (void)actionSheet:(UIActionSheet *)actionSheet2: clickedButtonAtIndex:(NSInteger)buttonIndex {3: NSString *buttonTitle=[actionSheet buttonTitleAtIndex:buttonIndex];4: if ([buttonTitle isEqualToString:@”Destroy”]) {5: userOutput.text=@”Clicked ‘Destroy’”;6: } else if ([buttonTitle isEqualToString:@”Negotiate”]) {7: userOutput.text=@”Clicked ‘Negotiate’”;8: } else if ([buttonTitle isEqualToString:@”Compromise”]) {9: userOutput.text=@”Clicked ‘Compromise’”;10: } else {11: userOutput.text=@”Clicked ‘Cancel’”;12: }13: }
Now we can use buttonTitleAtIndex (line 3) to get the titles used for the buttons
based on the index provided. The rest of the code follows exactly the same pattern
created earlier. Lines 4–12 test for the different button titles and update the view’s
output message to indicate what was chosen.
An Alternative ApproachOnce again, we’ve chosen to match button presses based on the title of theonscreen button. If you’re adding buttons dynamically, however, this might not bethe best approach. The addButtonWithTitle method, for example, adds a buttonand returns the index of the button that was added. Similarly, thecancelButtonIndex and destructiveButtonIndex methods provide the indexesfor the two specialized action sheet buttons.
By checking against these index values, you can write a version of theactionSheet:clickedButtonAtIndex: method that is not dependent on the titlestrings. The approach you take in your own applications should be based on whatcreates the most efficient and easy-to-maintain code.
Using Alert Sounds and VibrationsVisual notifications are great for providing feedback to a user and getting critical
input. There are other senses, however, that can be just as useful for getting a user’s
attention. Sounds, for example, play an important role on nearly every computer
system (regardless of platform or purpose). They tell us when an error has occurred
or an action has been completed. Sounds free a user’s visual focus and still provide
feedback about what an application is doing.
Vibrations take alerts one step further. When a device has the ability to vibrate, it
can communicate with users even if they can’t see or hear it. For the iPhone, vibra-
tion means that an app can notify users of events even when stowed in a pocket or

ptg
250 HOUR 10: Getting the User’s Attention
resting on a nearby table. The best news of all? iPhone sounds and vibrations are
both handled through the same simple code, so you’ll be able to implement them
relatively easily within your applications.
System Sound ServicesTo enable sound playback and vibration, we will take advantage of System Sound
Services. System Sound Services provides an interface for playing back sounds that
are 30 seconds or less in length. It supports a limited number of file formats (specifi-
cally CAF, AIF, and WAV files using PCM or IMA/ADPCM data). The functions pro-
vide no manipulation of the sound, nor control of the volume, so you won’t want to
use System Sound Services to create the soundtrack for your latest and greatest
iPhone game. In Hour 18, “Working with Rich Media,” you’ll be exploring addition-
al media playback features of iOS.
Unlike most of the other development functionality we’ve discussed in this book, the
System Sound Services functionality is not implemented as a class. Instead, you will
be using more traditional C-style function calls to trigger playback.
iOS supports three different notifications using this API:
. Sound: A simple sound file is played back immediately. If the device is muted,
the user will hear nothing.
. Alert: Again, a sound file is played, but if the device is muted and set to
vibrate, the user is alerted through vibration.
. Vibrate: The device is vibrated, regardless of any other settings.
Playing Sounds and AlertsTo play a sound file, you first need to make the file available as a resource to your
application. Let’s continue to expand the GettingAttention project to include sound
playback:
1. With your project open in Xcode, return to the Finder and navigate to the
“sounds” directory within this hour’s project folder.
2. Drag the soundeffect.wav and alertsound.wav files into your Xcode project’s
Resources folder. Choose to copy the files when prompted.
You should see the files listed as resources, as shown in Figure 10.10.

ptg
Using Alert Sounds and Vibrations 251
Adding the AudioToolbox FrameworkThe AudioToolbox framework must be added to our project before we can use any of
the playback functions. To add this framework, complete the following steps:
1. Right-click the Frameworks group in Xcode and choose Add Existing
Framework.
2. Navigate to AudioToolbox.framework and click Add.
3. Open the GettingAttentionViewController.h file and import the interface file
necessary to access the sound functions (AudioToolbox/AudioToolbox.h). This
edit should fall directly after the existing import line:
#import <AudioToolbox/AudioToolbox.h>
Creating and Playing System SoundsWith the prep work out of the way, we’re ready to add some sounds to our project.
The two functions that we’ll need to use are AudioServicesCreateSystemSoundID
and AudioServicesPlaySystemSound. We’ll also need to declare a variable of the
type SystemSoundID. This will represent the sound file that we are working with.
Edit GettingAttentionViewController.m and add the implementation for the doSound
method shown in Listing 10.9.
FIGURE 10.10Add the soundfiles asresources toyour project.

ptg
252 HOUR 10: Getting the User’s Attention
LISTING 10.91: -(IBAction)doSound:(id)sender {2: SystemSoundID soundID;3: NSString *soundFile = [[NSBundle mainBundle]4: pathForResource:@”soundeffect” ofType:@”wav”];5:6: AudioServicesCreateSystemSoundID((CFURLRef)7: [NSURL fileURLWithPath:soundFile]8: , &soundID);9: AudioServicesPlaySystemSound(soundID);10: [soundFile release];11: }
The code to play a system sound might look a bit alien after all the Objective-C
we’ve been using. Let’s take a look at the functional pieces.
Line 2 starts things off by declaring a variable, soundID, that we will use to refer to
the sound file. (Note that this is not declared as a pointer, as pointers begin with a
*!) Next, in line 3, we declare and assign a string (soundFile) to the path of the
sound file “soundeffect.wav.” This works by first using the NSBundle class method
mainBundle to return an NSBundle object that corresponds to the directory contain-
ing the current application’s executable binary. The NSBundle object’s
pathForResource:ofType: method is then used to identify the specific sound file by
name and extension.
Once a path has been identified for the sound file, we must use the
AudioServicesCreateSystemSoundID function in lines 6–8 to create a
SystemSoundID that will represent this file for the functions that will actually play
the sound. This function takes two parameters: a CFURLRef object that points to the
location of the file and a pointer to the SystemSoundID variable that we want to be
set. For the first parameter, we use the NSURL fileURLWithPath class method to
return an NSURL object from the sound file path. We preface this with (CFURLRef) to
cast the NSURL object to the CFURLRef type expected by the system. The second
parameter is satisfied by passing &soundID to the function.
Recall that &<variable> returns a reference (pointer) to the named variable. Thisis rarely needed when working with the Objective-C classes because nearly every-thing is already a pointer!
After soundID has been properly set up, all that remains is playing it. Pass the
soundID variable to the AudioServicesPlaySystemSound function, as shown in line
9, then release the soundFile string, and we’re done.
Build and test the application. Pressing the Play Sound button should now play back
the sound-effect WAV file.
By theWay

ptg
Further Exploration 253
Playing Alert Sounds with VibrationsThe difference between an “alert sound” and a “system sound” is that an alert
sound, if muted, will automatically trigger a phone vibration. The setup and use of
an alert sound is identical to a system sound. In fact, to implement the
doAlertSound method stub in GettingAttentionViewController.m, use the same code
as doSound method in Listing 10.7, substituting the sound file alertsound.wav and
using the function AudioServicesPlayAlertSound rather than
AudioServicesPlaySystemSound:
AudioServicesPlayAlertSound(soundID);
After implementing the new method, build and test the application. Pressing the
Play Alert Sound button will play the sound, and muting the phone will cause the
phone to vibrate when the button is pressed.
Vibrating the iPhoneFor our grand finale, we’ll implement the final method in our GettingAttention
application: doVibration. As you’ve already learned, the same System Sound
Services that enabled us to play sounds and alert sounds will also create vibrations.
The magic we need here is the kSystemSoundID_Vibrate constant. When this value
is substituted for the SystemSoundID and AudioServicesPlaySystemSound is called,
the phone vibrates. It’s as simple as that! Implement the doVibration method as
follows:
-(IBAction)doVibration:(id)sender {AudioServicesPlaySystemSound (kSystemSoundID_Vibrate);
}
That’s all there is to it. You’ve now explored seven different ways of getting a user’s
attention. These are techniques that you can use in any application to make sure
that your user is alerted to changes that may require interaction and can respond if
needed.
Further ExplorationYour next step in making use of the notification methods discussed in this hour is to
use them. These simple, but important, UI elements will help facilitate many of your
critical user interactions. One topic that is beyond the scope of this book is the abili-
ty for a developer to push notifications to the iPhone.
Even without push notifications, you might want to add numeric badges to your
applications. These badges are visible when the application isn’t running and can

ptg
254 HOUR 10: Getting the User’s Attention
display any integer you’d like—most often, a count of items identified as “new”
within the application (such as new news items, messages, events, and so on). To
create application badges, look at the UIApplication class property
applicationIconBadgeNumber. Setting this property to anything other than zero
will create and display the badge.
Another area that you might like to explore is how to work with rich media (Hour
18). The audio playback functions discussed in this hour are intended for alert-type
sounds only. If you’re looking for more complete multimedia features, you’ll need to
tap into the AVFoundation framework, which gives you complete control over
recording and playback features of the iPhone.
SummaryIn this hour, you learned about two types of modal dialogs that can be used to com-
municate information to an application user, as well as enable the user to provide
input at critical points in time. Alerts and action sheets have different appearances
and uses but very similar implementations. Unlike many of the UI components
we’ve used in this book, these cannot be instantiated with a simple drag-and-drop
in Interface Builder.
We also explored two nonvisual means of communicating with a user: sounds and
vibrations. Using the System Sound Services (by way of the AudioToolbox frame-
work), you can easily add short sound effects and vibrate the phone. Again, these
have to be implemented in code, but in less than five lines, you can have your
applications making noises and buzzing in your users’ hands.
Q&AQ. I found an addTextField method for alert views mentioned online. This
looks like an easy way to add text fields to alerts; why aren’t you using it?
A. The addTextField method is a private API call. Although it works (and works
well), your application will be rejected by Apple if you use it.
Q. Can sounds be used in conjunction with alert views?
A. Yes. Because alerts are frequently displayed without warning, there is no guar-
antee that the user is looking at the screen. Using an alert sound provides the
best chance for getting the user’s attention, either through an audible noise or
an automatic vibration if the user’s sound is muted.

ptg
Workshop 255
Q. Why aren’t action sheets and alert views interchangeable?
A. Technically, unless you’re providing a large number of options to the user, you
could use them interchangeably, but you’d be giving the user the wrong cues.
Unlike alerts, action sheets animate and appear as part of the current view.
The idea is that the interface is trying to convey are that the actions that can
be performed relate to what appears onscreen. An alert is not necessarily relat-
ed to anything else on the display.
Workshop
Quiz1. Alert views are tied to a specific UI element. True or false?
2. Adding a text field to an alert automatically shifts the content of the alert
view to make room for it. True or false?
3. System Sound Services supports playing back a wide variety of sound file for-
mats, including MP3s. True or false?
4. Vibrating the iPhone requires extensive and complicated coding. True or false?
Answers1. False. Alert views are displayed outside the context of a view and are not tied
to any other UI element.
2. False. The text field lies on top of existing alert view content. Adding a mes-
sage to the alert view is an easy way to make room for the field.
3. False. System Sound Services supports only AIF, WAV, and CAF formats.
4. False. Once the AudioToolbox Framework is loaded, a single function call is
all it takes to give a phone the shakes.

ptg
256 HOUR 10: Getting the User’s Attention
Activities1. Rewrite either the alert view handler to determine button presses using the
button index values rather than the titles. This will help you prepare for proj-
ects where buttons may be generated and added to the view/sheet dynamical-
ly rather than during initialization.
2. Return to one or more of your earlier projects and add audio cues to the inter-
face actions. Make switches click, buttons bing, and so on. Keep your sounds
short, clear, and complementary to the actions that the users are performing.

ptg
HOUR 11
Making Multivalue Choiceswith Pickers
What You’ll Learn in This Hour:. The types of pickers available in the iOS SDK. How to implement the date picker object. The capabilities offered by custom picker views. The steps to implement the picker view protocols. Ways to customize the display of a picker view
This hour marks a turning point in our lessons. With few exceptions, the past several
hours presented iPhone interface components that you add to your applications. These
typically involved accessing a few properties or trapping an event to execute an action. In
this hour, the formula starts to change. We’ll be exploring pickers—a unique UI element
that both presents information to users and collects their input.
Unlike other components we’ve used, pickers aren’t implemented through a single
method; they require several. This means our example code is becoming a bit more com-
plex, but nothing you can’t handle! To make sure you’re getting the information you
need, we need to work a little faster and deviate from the simple project structure used in
previous, simpler UI lessons.
Understanding PickersBecause we’re dedicating an entire hour to pickers (UIPickerView), you can probably sur-
mise that they’re not quite the same as the other UI objects that we’ve been using. Pickers
are a unique feature of the iPhone. They present a series of multivalue options in a clever
spinning interface—frequently compared to a slot machine. Rather than fruit or numbers,

ptg
258 HOUR 11: Making Multivalue Choices with Pickers
the segments, known as components, display rows of values that the user can choose
from. The closest desktop equivalent is a set of pop-up menus. Figure 11.1 displays
the standard date picker (UIDatePicker).
FIGURE 11.1The pickeroffers a uniqueinterface forchoosing asequence of dif-ferent, but usu-ally related,values.
Pickers should be used when a user needs to make a selection between multiple (usu-
ally related) values. They are frequently used for setting dates and times but can be
customized to handle just about any selection option that you can come up with.
In Hour 9, “Using Advanced Interface Objects and Views,” you learned about thesegmented control, which presents the user with multiple options in a single UI ele-ment. The segmented control, however, returns a single user selection to yourapplication. A picker, on the other hand, can return several values from multipleuser selections—all within a single interface.
Apple recognized that pickers are a great option for choosing dates and times, so
they’ve made them available in two different forms: date pickers, which are easy to
implement and dedicated to handling dates and times; and custom picker views
that can be configured to display as many components as rows as you’d like.
Date PickersThe date picker (UIDatePicker), shown in Figure 11.1, is very similar to the other
objects that we’ve been using over the past few hours. To use it, we’ll add it to a
view, wait for the user to interact with it, and then read its value. Instead of return-
ing a string or integer, however, the date picker returns an NSDate object. The
By theWay

ptg
Understanding Pickers 259
NSDate class is used to store and manipulate what Apple describes as a “single point
in time” (in other words, a date and time).
To access the NSDate represented by a UIDatePicker instance, you’ll make use of
the date method. Pretty straightforward, don’t you think? In our example project,
we’ll implement a date picker, and then retrieve the result, perform some date arith-
metic, and display the results in a custom format.
Picker ViewsPicker views (UIPickerView) are similar in appearance to date pickers but have an
almost entirely different implementation. In a picker view, the only thing that is
defined for you is the overall behavior and general appearance of the control—the
number of components and the content of each component are entirely up to you.
Figure 11.2 demonstrates a picker view that includes two components with images
and text displayed in their rows.
FIGURE 11.2Picker views canbe configured todisplay anythingyou’d like.
Unlike other controls, a picker view’s appearance is not configured in Interface Builder’s
Attributes Inspector or via properties in code. Instead, you need to make sure you have
a class that conforms to two protocols: UIPickerViewDelegate and UIPickerView
DataSource. I know it’s been a while, so let’s take a moment for a quick refresher.
ProtocolsWhen I first started using Objective-C, I found the terminology painful. It seemed that
no matter how easy a concept was to understand, it was surrounded with language that
made it appear harder than it was. A protocol, in my opinion, is one of these things.
ptg
260 HOUR 11: Making Multivalue Choices with Pickers
Protocols define a collection of methods that perform a task. To provide advanced
functionality, some classes, such as UIPickerView, require you to implement meth-
ods defined in the protocol. Some methods are required, others are optional; it just
depends on the features you need.
To make the full use of a UIPickerView, we’ll just add some additional methods to
one of our classes. In our sample application, we’ll be using our view controller class
for this purpose, but in larger projects it may be a completely separate class—the
choice is entirely up to you. A class that implements a protocol is said to “conform”
to that protocol.
We’re going to be using protocols in the upcoming hours, so it’s important that you
get comfortable with the notion now.
The Picker View Data Source ProtocolThere are two protocols required by UIPickerView. The first, the picker view data
source protocol (UIPickerViewDataSource), includes methods that describe how
much information the picker will be displaying:
numberOfComponentsInPickerView: Returns the number of components
(spinning segments) needed in the picker.
pickerView:numberOfRowsInComponent: Given a specific component, this
method is required to return the number of rows (different input values) in the
component.
There’s not much to it. As long as we create these two methods and return a mean-
ingful number from each, we’ll successfully conform to the picker view data source
protocol. That leaves one protocol, the picker view delegate protocol, between us
and a working picker view.
The Picker View Delegate ProtocolThe delegate protocol (UIPickerViewDelegate) takes care of the real work in creat-
ing and using a picker. It is responsible for passing the appropriate data to the pick-
er for display and for determining when the user has made a choice. There are a few
protocol methods we’ll use to make the delegate work the way we want, but again,
only two are required:
pickerView:titleForRow:forComponent: Given a row number, this method
must return the title for the row—that is, the string that should be displayed to
the user.

ptg
Using Date Pickers 261
pickerView:didSelectRow:inComponent: This delegate method will be called
when the user makes a selection in the picker view. The method will be passed
a row number that corresponds to a user’s choice, as well as the component
that the user was last touching.
If you check the documentation for the UIPickerViewDelegate protocol, you’llnotice that really all the delegate methods are optional—but unless we implementat least these two, the picker view isn’t going to be able to display anything orrespond to a user’s selection.
As you can see, implementing protocols isn’t something terribly complicated—it just
means that we need to implement a handful of methods to help a class, in this case
a UIPickerView, work the way we want.
To get started with pickers, we’ll first create a quick date picker example, and then
move on to implementing a custom picker view and its associated protocols.
Using Date PickersUsing the controls you currently know, there are probably half a dozen different
ways that you might imagine creating a date entry screen on the iPhone. Buttons,
segmented controls, text fields—all of these are potential possibilities, but none has
the elegance and the inherent usability of a date picker. Let’s put the picker to use.
Implementation OverviewThis project, which we’ll be calling DateCalc, will make use of a date picker
(UIDatePicker) that, when set, will trigger an action that shows the difference in
days between the chosen date and the current date. This will also make use of an
NSDate object to store the result returned by the date picker, its instance method
timeIntervalSinceDate to perform the calculation, and an NSDateFormatter
object to format a date so that we can display it in a user-friendly manner via a
single UILabel. Figure 11.3 shows the finished application.
Keep in mind that, despite its name, the NSDate class also stores the time. Theapplication we create will take into account the time as well as the date when per-forming its calculation.
By theWay
By theWay

ptg
262 HOUR 11: Making Multivalue Choices with Pickers
Setting Up the ProjectStart Xcode and create a new application based on the iPhone View-Based
Application template. Name the project DateCalc.
Next, open the DateCalcViewController.h file and add an outlet and property decla-
ration for the label (UILabel) that will display the difference between dates—
differenceResult. Next, add an action called showDate. We’ll be calling this when
the user changes the value on the date picker.
The (very simple) interface file is shown in Listing 11.1:
LISTING 11.1#import <UIKit/UIKit.h>
@interface DateCalcViewController : UIViewController {IBOutlet UILabel *differenceResult;
}
@property (nonatomic, retain) UILabel *differenceResult;
-(IBAction)showDate:(id)sender;
@end
FIGURE 11.3The sampleapplication willuse a singledate picker anda label as itsUI.
ptg
Using Date Pickers 263
Switch to the implementation file (DateCalcViewController.m) and add a correspon-
ding @synthesize directive for differenceResult, located after the @implementa-
tion line:
@synthesize differenceResult;
Notice that we don’t have an outlet or property for the date picker itself? As withthe segmented control in the last hour, we’ll just use the sender variable to refer-ence the date picker within the showDate action method. Because nothing else iscalling the method, we know with certainty that sender will always be the picker.
Because we’ve got a pretty good handle on the project setup and you’re probably
sick of hearing me go on about it at the end of each project, let’s take care of some-
thing we’ve done last, first: Make sure we’re properly releasing anything we’ve
retained.
For this project, that’s one object: differenceResult. Edit DateCalcViewController’s
dealloc method to read as follows:
- (void)dealloc {[differenceResult release];
[super dealloc];}
Prior to this hour, we had typically handled the final releases at the end of theproject to make sure that it was a step you thought through before calling a proj-ect “done.” Typically, I like to make sure that as soon as I’ve identified somethingthat needs to be released, the release statement is written and added to thecode. Obviously, you can work through whatever process is best for your codingstyle. Just make sure that you follow through and do it!
Let’s keep up the pace and move on to the UI and our date picker. After you’ve cre-
ated the outlet and the action, save the file, and open DateCalcViewController.xib in
Interface Builder.
Adding a Date PickerOpen the empty view in the DateCalcViewController.xib file, and then open the
object Library (Tools, Library). Find the date picker (UIDatePicker) object and drag
it into the view. You’ll notice immediately that, unlike other UI elements we’ve used,
the date picker takes up a lot of screen real estate.
By theWay
By theWay

ptg
264 HOUR 11: Making Multivalue Choices with Pickers
Typically, you’ll need to hide your pickers when not in use, or use one of the multi-
view techniques we describe in Hour 12, “Implementing Multiple Views with Toolbars
and Tab Bars” and Hour 13, “Displaying and Navigating Data Using Table Views.”
Position the date picker at the top of the screen, as shown in Figure 11.4. We’ll be
displaying the date calculations below it.
FIGURE 11.4Date pickersuse quite a bitof screenspace.
By default, the date picker displays a date and time, as demonstrated in our current
view. As with other controls, the Attributes Inspector can customize how the date
picker appears to the user.
Setting the Date Picker AttributesChoose the date picker within the view, and then open the Attributes Inspector
(Command+1), shown in Figure 11.5.
The picker can be configured to display in one of four different modes:
Date & Time: Shows options for choosing both a date and a time
Time: Shows only times
Date: Shows only dates
Timer: Displays a clock-like interface for choosing a duration
You can also set the locale for the picker, which determines the ordering of the dif-
ferent components; set the default date/time that is displayed; and set date/time
constraints to help limit the user’s choices.

ptg
Did youKnow?
Using Date Pickers 265
For this project, leave the default settings as they are. We want the user to choose a
date and a time that we’ll use in our calculations.
The Date attribute is automatically set to the date and time when you add thecontrol to the view.
Connecting to the ActionWhen the user interacts with the date picker, we want the showDate action method
to be called. To create this connection, select the picker, and then open the
Connections Inspector (Command+2).
Click and drag from the circle beside Value Changed to the File’s Owner icon. When
you release the mouse button, you’ll be prompted for the action. Choose showDate,
as demonstrated in Figure 11.6. This should be almost a reflex action by now!
We’ve been making a point of using the Connections Inspector to create connec-tions from objects that support many different events. This is always the safestway to know what connections you’re creating, but it isn’t the fastest. The picker(along with switches and segmented controls) will default to making connectionsusing the Value Changed event if you Control-drag from the element to the File’sOwner icon. You can use this shortcut if you feel comfortable with the process.
FIGURE 11.5Configure theappearance ofthe date pickerin the AttributesInspector.
By theWay
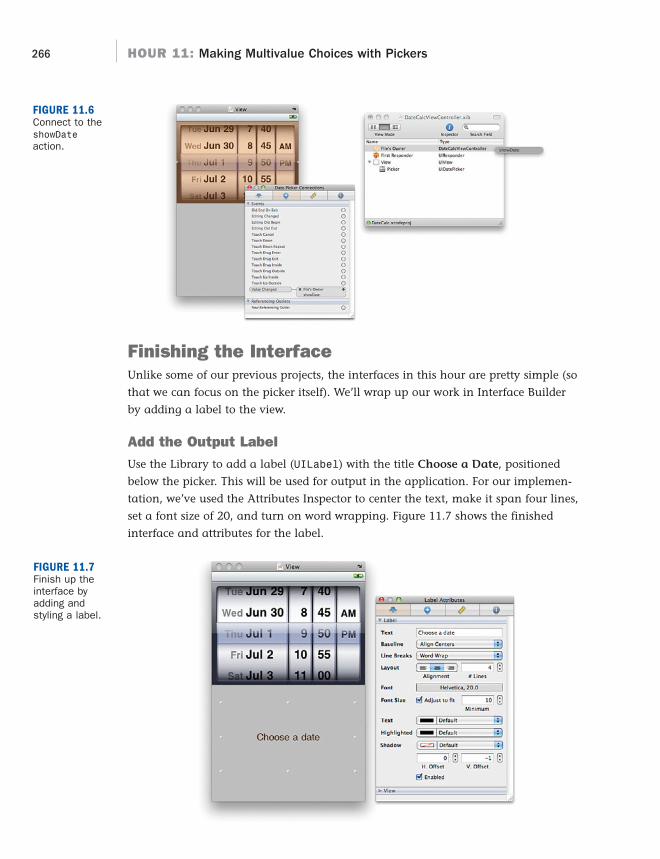
ptg
266 HOUR 11: Making Multivalue Choices with Pickers
Finishing the InterfaceUnlike some of our previous projects, the interfaces in this hour are pretty simple (so
that we can focus on the picker itself). We’ll wrap up our work in Interface Builder
by adding a label to the view.
Add the Output LabelUse the Library to add a label (UILabel) with the title Choose a Date, positioned
below the picker. This will be used for output in the application. For our implemen-
tation, we’ve used the Attributes Inspector to center the text, make it span four lines,
set a font size of 20, and turn on word wrapping. Figure 11.7 shows the finished
interface and attributes for the label.
FIGURE 11.6Connect to theshowDateaction.
FIGURE 11.7Finish up theinterface byadding andstyling a label.

ptg
Using Date Pickers 267
Connecting to the OutletConnect the label to the outlet differenceResult by control dragging from the
File’s Owner icon to the UILabel within your view or in the Document window.
When prompted, choose the differenceResult outlet.
The interface is now complete. Save your work, and then switch back to Xcode for
the implementation.
Implementing the View Controller LogicAs it turns out, the most difficult work that we still have in front of us with the date
picker implementation is writing the showDate logic. To do what we’ve set out to
(show the difference between today’s date and the date in the picker), we need to be
able to do several things:
. Get today’s date
. Display a date and time
. Calculate the difference between two dates
Before writing showDate, let’s look at the different methods and data types that we
need to complete these tasks.
Getting the DateTo get the current date and store it in a NSDate object, all that we need to do is to
allocate and initialize a new NSDate. When initialized, it automatically stores the
current date! This means that a single line takes care of our first hurdle:
todaysDate=[[NSDate alloc] init];
Displaying a Date and TimeUnfortunately, displaying a date and time is a bit more tricky than getting the cur-
rent date. Because we’re going to be displaying the output in a label (UILabel), we
already know how it is going to be shown on the screen, so the question is really,
how do we format a string with a NSDate object?
Interestingly enough, there’s a class to handle this for us! We’ll create and initialize
an NSDateFormatter object. Next, we use the object’s setDateFormat to create a
custom format using a pattern string. Finally, we apply that format to our date
using another method of NSDateFormatter, stringFromDate—which, given an
NSDate, returns a string in the format that we defined.
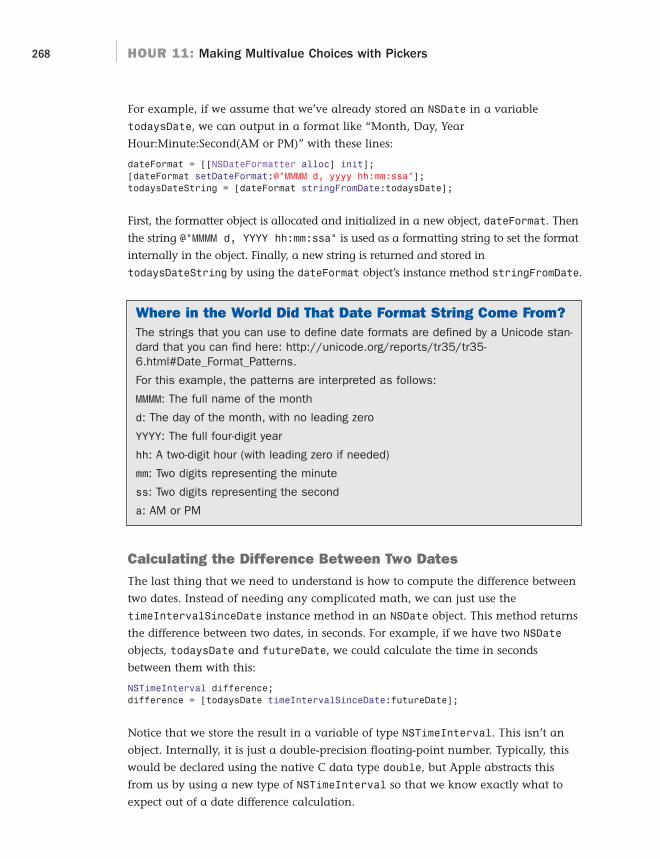
ptg
268 HOUR 11: Making Multivalue Choices with Pickers
For example, if we assume that we’ve already stored an NSDate in a variable
todaysDate, we can output in a format like “Month, Day, Year
Hour:Minute:Second(AM or PM)” with these lines:
dateFormat = [[NSDateFormatter alloc] init];[dateFormat setDateFormat:@”MMMM d, yyyy hh:mm:ssa”];todaysDateString = [dateFormat stringFromDate:todaysDate];
First, the formatter object is allocated and initialized in a new object, dateFormat. Then
the string @”MMMM d, YYYY hh:mm:ssa” is used as a formatting string to set the format
internally in the object. Finally, a new string is returned and stored in
todaysDateString by using the dateFormat object’s instance method stringFromDate.
Where in the World Did That Date Format String Come From?The strings that you can use to define date formats are defined by a Unicode stan-dard that you can find here: http://unicode.org/reports/tr35/tr35-6.html#Date_Format_Patterns.
For this example, the patterns are interpreted as follows:
MMMM: The full name of the month
d: The day of the month, with no leading zero
YYYY: The full four-digit year
hh: A two-digit hour (with leading zero if needed)
mm: Two digits representing the minute
ss: Two digits representing the second
a: AM or PM
Calculating the Difference Between Two DatesThe last thing that we need to understand is how to compute the difference between
two dates. Instead of needing any complicated math, we can just use the
timeIntervalSinceDate instance method in an NSDate object. This method returns
the difference between two dates, in seconds. For example, if we have two NSDate
objects, todaysDate and futureDate, we could calculate the time in seconds
between them with this:
NSTimeInterval difference;difference = [todaysDate timeIntervalSinceDate:futureDate];
Notice that we store the result in a variable of type NSTimeInterval. This isn’t an
object. Internally, it is just a double-precision floating-point number. Typically, this
would be declared using the native C data type double, but Apple abstracts this
from us by using a new type of NSTimeInterval so that we know exactly what to
expect out of a date difference calculation.

ptg
By theWay
Using Date Pickers 269
Note that if the timeIntervalSinceDate: method is given a date before theobject that is invoking the method (that is, if futureDate was before todaysDatein the example), the difference returned is negative; otherwise, it is positive. Toget rid of the negative sign, we’ll be using the C function fabs(<float>) that,given a floating-point number, returns its absolute value.
Implementing the Date Calculation and DisplayPutting together all of these pieces, we should now be able to write the logic for the
showDate method. Open the DateCalcViewController.m file in Xcode and add the
following implementation for showDate method shown in Listing 11.2.
LISTING 11.21: -(IBAction)showDate:(id)sender {2: NSDate *todaysDate;3: NSString *differenceOutput;4: NSString *todaysDateString;5: NSDateFormatter *dateFormat;6: NSTimeInterval difference;7:8:9: todaysDate=[[NSDate alloc] init];10: difference = [todaysDate timeIntervalSinceDate:[sender date]] / 86400;11:12: dateFormat = [[NSDateFormatter alloc] init];13: [dateFormat setDateFormat:@”MMMM d, yyyy hh:mm:ssa”];14: todaysDateString = [dateFormat stringFromDate:todaysDate];15:16: differenceOutput=[[NSString alloc] initWithFormat:17: @”Difference between chosen date and today (%@) in days: %1.2f”,18: todaysDateString,fabs(difference)];19: differenceResult.text=differenceOutput;20:21: [todaysDate release];22: [dateFormat release];23: [differenceOutput release];24: }
Much of this should look pretty familiar based on the preceding examples, but let’s
review the logic. First, in lines 2–6, we declare the variables we’ll be using:
todaysDate will store the current date, differenceOutput will be our final format-
ted string displayed to the user, todaysDateString will contain the formatted ver-
sion of the current day’s date, dateFormat will be our date formatting object, and
difference is the double-precision floating-point number used to store the number
of seconds between two dates.

ptg
270 HOUR 11: Making Multivalue Choices with Pickers
Lines 9 and 10 do most of the work we set out to accomplish! In line 9, we allocate
and initialize todaysDate as a new NSDate object. The init automatically stores
the current date and time in the object.
In line 10, we use timeIntervalSinceDate to calculate the time, in seconds,
between todaysDate and [sender date]. Remember that sender will be the date
picker object, and the date method tells an instance of UIDatePicker to return its
current date and time in an NSDate object, so this gives our method everything it
needs to work with. The result is divided by 86400 and stored in the difference
variable. Why 86400? This is the number of seconds in a day, so we will be able to
display the number of days between dates, rather than seconds.
In lines 12–14, we create a new date formatter object (NSDateFormatter) and use it
to format todaysDate, storing the results in the string todaysDateString.
Lines 16–18 format the final output string by allocating a new string
(differenceOutput), and then initializing it with initWithFormat. The format
string provided includes the message to be displayed to the user as well as the place-
holders %@ and %1.2f—representing a string and a floating-point number with a
leading zero and two decimal places. These placeholders are replaced with the
todaysDateString and the absolute value of the difference between the dates,
fabs(difference).
In line 19, the label we added to the view, differenceResult, is updated to display
differenceOutput.
The last step is to clean up anything that we allocated in the method, which is
accomplished in lines 21–23, where the strings and formatter object are released.
That’s it! Use Build and Run to run and test your application. You’ve just imple-
mented a date picker, learned how to perform some basic date arithmetic, and even
formatted dates for output using date formatting strings. What could be better?
Creating your own custom picker with your own data, of course!
Implementing a Custom Picker ViewIn the lead-up to this project, we made it pretty clear that implementing your own
picker view (UIPickerView) is going to be a bit different from other UI features
you’ve added previously—including the date picker you just finished. This doesn’t
mean it will be difficult, just different. Because a picker view starts out empty and
can contain anything we want, we need to provide it with data to display and
describe how it should be displayed.

ptg
Implementing a Custom Picker View 271
Implementation OverviewThis project, named MatchPicker, will implement an instance of UIPickerView that
presents two scrolling wheels of information: animal names and animal sounds.
We’ll use some simple logic to identify whether an animal matches the correct
sound and display a positive or negative response to the user. In short, a very easy
matching game. After we have the basics in place, we’ll spruce things up by chang-
ing the animal names to actual pictures of the names. The final result that we’re
aiming for is shown in Figure 11.8.
FIGURE 11.8We’ll use a pick-er view to cre-ate a simplematching game.
Setting Up the ProjectBecause this is a picker view that must conform to the UIPickerViewDataSource
and UIPickerViewDelegate protocols, the setup we need to complete is just a teen-
sy bit different from earlier projects. Get started by opening Xcode and creating a
View-Based Application named MatchPicker.
Conforming to a ProtocolTo tell Xcode that one of our classes is going to conform to a protocol (or, in this
case, multiple protocols), we need to edit the header file for the class and include the
protocols in the @interface line.
For this project, we want our view controller (MatchPickerViewController) to con-
form to the UIPickerViewDataSource and UIPickerViewDelegate protocols. Open
MatchPickerViewController.h and edit the @interface line to read as follows:
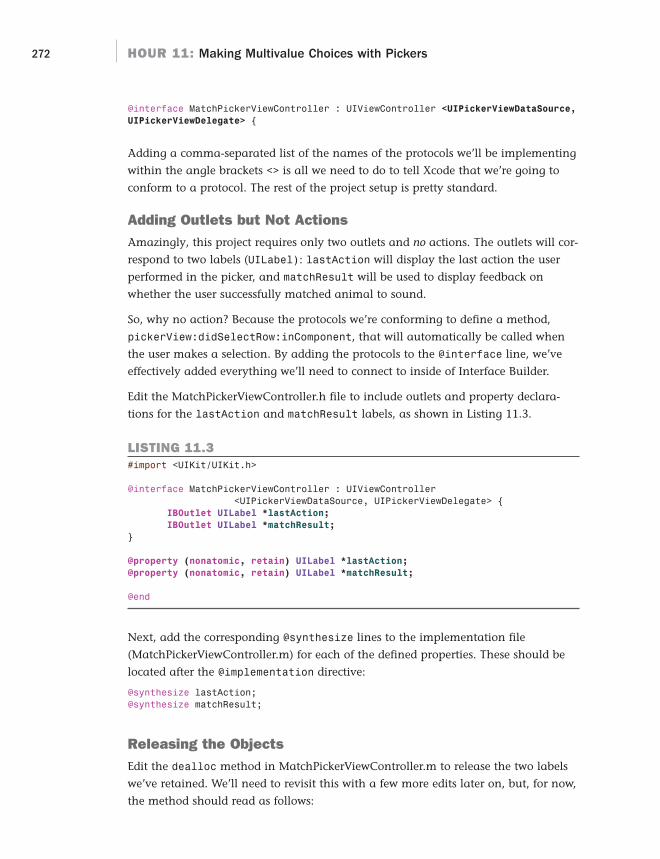
ptg
272 HOUR 11: Making Multivalue Choices with Pickers
@interface MatchPickerViewController : UIViewController <UIPickerViewDataSource,UIPickerViewDelegate> {
Adding a comma-separated list of the names of the protocols we’ll be implementing
within the angle brackets <> is all we need to do to tell Xcode that we’re going to
conform to a protocol. The rest of the project setup is pretty standard.
Adding Outlets but Not ActionsAmazingly, this project requires only two outlets and no actions. The outlets will cor-
respond to two labels (UILabel): lastAction will display the last action the user
performed in the picker, and matchResult will be used to display feedback on
whether the user successfully matched animal to sound.
So, why no action? Because the protocols we’re conforming to define a method,
pickerView:didSelectRow:inComponent, that will automatically be called when
the user makes a selection. By adding the protocols to the @interface line, we’ve
effectively added everything we’ll need to connect to inside of Interface Builder.
Edit the MatchPickerViewController.h file to include outlets and property declara-
tions for the lastAction and matchResult labels, as shown in Listing 11.3.
LISTING 11.3#import <UIKit/UIKit.h>
@interface MatchPickerViewController : UIViewController<UIPickerViewDataSource, UIPickerViewDelegate> {
IBOutlet UILabel *lastAction;
IBOutlet UILabel *matchResult;
}
@property (nonatomic, retain) UILabel *lastAction;
@property (nonatomic, retain) UILabel *matchResult;
@end
Next, add the corresponding @synthesize lines to the implementation file
(MatchPickerViewController.m) for each of the defined properties. These should be
located after the @implementation directive:
@synthesize lastAction;@synthesize matchResult;
Releasing the ObjectsEdit the dealloc method in MatchPickerViewController.m to release the two labels
we’ve retained. We’ll need to revisit this with a few more edits later on, but, for now,
the method should read as follows:

ptg
Implementing a Custom Picker View 273
- (void)dealloc {[lastAction release];
[matchResult release];
[super dealloc];}
Make sure you’ve saved the view controller header and implementation files, and
then let’s turn our attention to hammering out the picker view interface with
Interface Builder.
Adding a Picker ViewBecause the picker view is controlled mostly by the protocols we’ll be
implementing, there’s surprisingly little to do in Interface Builder. Open the
MatchPickerViewController.xib file, and make sure the view it contains is also open.
Using the Objects Library (Tools, Library), click and drag an instance of
UIPickerView to the view, positioning it at the top of the iPhone interface. That’s
really all there is to it. If you open up the Attributes Inspector (Command+1), you’ll
notice that there is only a single attribute for the picker view—whether or not the
selection indicator is present. You can turn this on or off, depending on how you feel
it works with the aesthetics of your application. Figure 11.9 shows the picker added
to the view, along with its available attributes.
FIGURE 11.9There’s notmuch more todo be done witha picker view inInterface Builderbeyond adding itto your view.
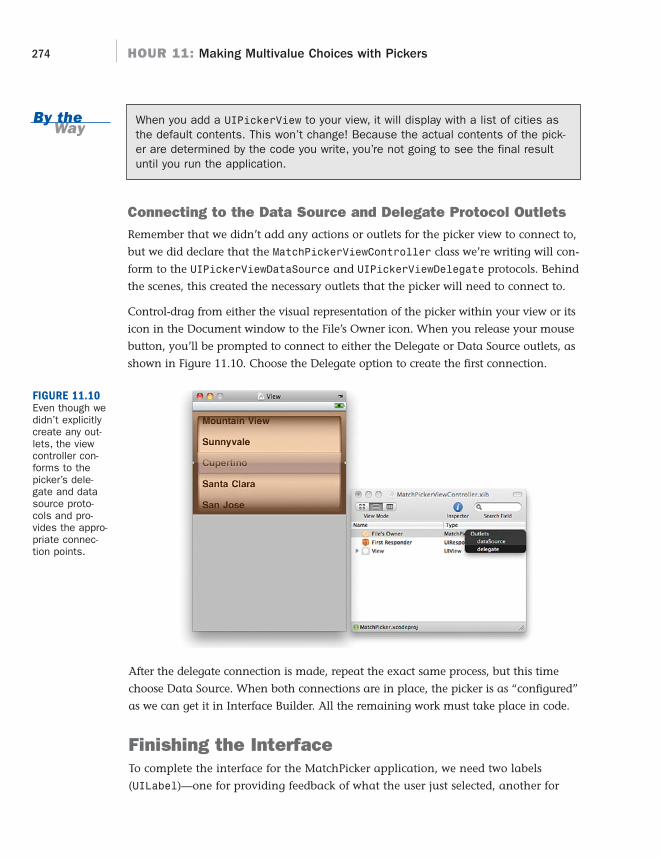
ptg
274 HOUR 11: Making Multivalue Choices with Pickers
When you add a UIPickerView to your view, it will display with a list of cities asthe default contents. This won’t change! Because the actual contents of the pick-er are determined by the code you write, you’re not going to see the final resultuntil you run the application.
Connecting to the Data Source and Delegate Protocol OutletsRemember that we didn’t add any actions or outlets for the picker view to connect to,
but we did declare that the MatchPickerViewController class we’re writing will con-
form to the UIPickerViewDataSource and UIPickerViewDelegate protocols. Behind
the scenes, this created the necessary outlets that the picker will need to connect to.
Control-drag from either the visual representation of the picker within your view or its
icon in the Document window to the File’s Owner icon. When you release your mouse
button, you’ll be prompted to connect to either the Delegate or Data Source outlets, as
shown in Figure 11.10. Choose the Delegate option to create the first connection.
By theWay
FIGURE 11.10Even though wedidn’t explicitlycreate any out-lets, the viewcontroller con-forms to thepicker’s dele-gate and datasource proto-cols and pro-vides the appro-priate connec-tion points.
After the delegate connection is made, repeat the exact same process, but this time
choose Data Source. When both connections are in place, the picker is as “configured”
as we can get it in Interface Builder. All the remaining work must take place in code.
Finishing the InterfaceTo complete the interface for the MatchPicker application, we need two labels
(UILabel)—one for providing feedback of what the user just selected, another for

ptg
Implementing a Custom Picker View 275
showing whether the user successfully made a match. These labels will, in turn, con-
nect to the lastAction and matchResult outlets, respectively.
Adding the Output LabelsDrag two labels into the view, positioning one above the other. Change the title of
the top label to read Last Action and the bottom label to read Match Feedback. In
our sample project, we’ve also chosen to set the attributes so that both labels are
centered and the Match Feedback label is larger (24 pt) than the Last Action label,
as shown in Figure 11.11.
FIGURE 11.11Add two labelsto the view tohandle outputto the user.
Connecting the OutletsConnect each of the labels to their corresponding outlets by Control-dragging from
the File’s Owner icon to each label and then choosing the lastAction and
matchResult outlets, as appropriate. Figure 11.12 demonstrates the connection from
the Match Feedback label to its matchResult outlet.
With that simple step, we’re done with Interface Builder. All the work of actually
customizing the appearance of the picker view must take place in Xcode.
Providing Data to the PickerA big difference between the UIPickerView we’re using now and other controls,
such as the UISegmentedControl, is that what the control displays is determined
entirely by the code we write. There is no “point and click” to edit the different com-
ponents and values within Interface Builder. WYSIWYG isn’t an option.
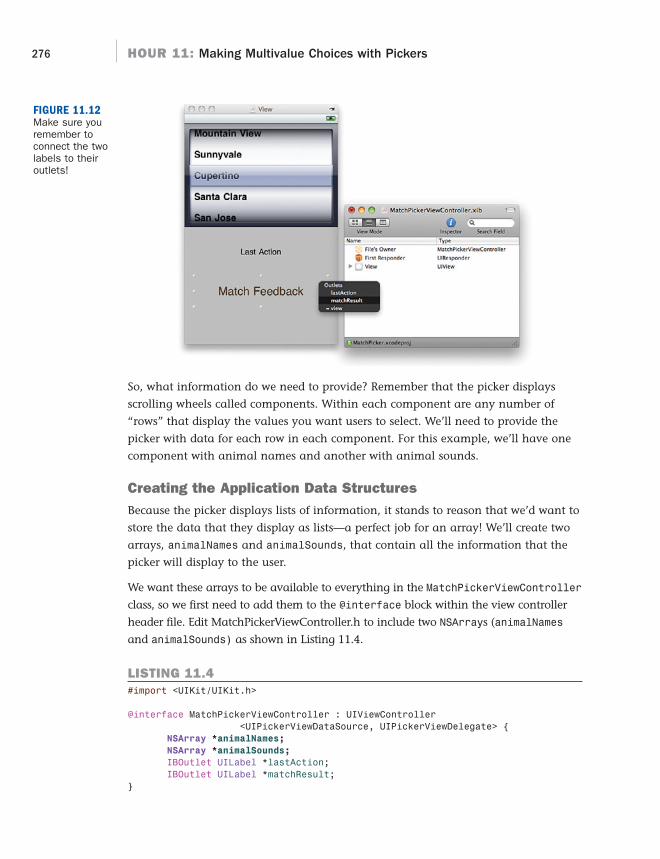
ptg
276 HOUR 11: Making Multivalue Choices with Pickers
So, what information do we need to provide? Remember that the picker displays
scrolling wheels called components. Within each component are any number of
“rows” that display the values you want users to select. We’ll need to provide the
picker with data for each row in each component. For this example, we’ll have one
component with animal names and another with animal sounds.
Creating the Application Data StructuresBecause the picker displays lists of information, it stands to reason that we’d want to
store the data that they display as lists—a perfect job for an array! We’ll create two
arrays, animalNames and animalSounds, that contain all the information that the
picker will display to the user.
We want these arrays to be available to everything in the MatchPickerViewController
class, so we first need to add them to the @interface block within the view controller
header file. Edit MatchPickerViewController.h to include two NSArrays (animalNames
and animalSounds) as shown in Listing 11.4.
LISTING 11.4#import <UIKit/UIKit.h>
@interface MatchPickerViewController : UIViewController<UIPickerViewDataSource, UIPickerViewDelegate> {
NSArray *animalNames;
NSArray *animalSounds;
IBOutlet UILabel *lastAction;IBOutlet UILabel *matchResult;
}
FIGURE 11.12Make sure youremember toconnect the twolabels to theiroutlets!

ptg
Implementing a Custom Picker View 277
@property (nonatomic, retain) UILabel *lastAction;@property (nonatomic, retain) UILabel *matchResult;
@end
These two arrays correspond to the components that we’ll be displaying in the pick-
er. Components are numbered starting at zero, left to right, so, assuming we want
the names of the animals to be on the left and sounds on the right, component 0
will correspond to the animalNames array and component 1 to animalSounds.
Before going any further, take a few seconds to add the appropriate releases for
these arrays within the dealloc method. The current version of the method should
read as follows:
- (void)dealloc {[animalNames release];
[animalSounds release];
[lastAction release];[matchResult release];[super dealloc];
}
Populating the Data StructuresAfter the arrays have been declared, they need to be filled with data. The easiest
place to do this is in the viewDidLoad method of the view controller
(MatchPickerViewController.m). Edit MatchPickerViewController.m by uncomment-
ing the viewDidLoad method and adding the lines, as shown in Listing 11.5, to allo-
cate and initialize the arrays with a list of animals and sounds.
LISTING 11.5- (void)viewDidLoad {
animalNames=[[NSArray alloc]initWithObjects:@”Mouse”,@”Goose”,@”Cat”,@”Dog”,@”Snake”,@”Bear”,@”Pig”,nil];
animalSounds=[[NSArray alloc]initWithObjects:@”Oink”,@”Rawr”,@”Ssss”,@”Roof”,@”Meow”,@”Honk”,@”Squeak”,nil];
}
nil is needed to denote the end of the array initialization list, so if it’s missing,your application will almost certainly crash!
The arrays are initialized with a series of strings, but if you look closely, the strings
don’t match up! This is intentional. It wouldn’t make sense to display the strings so
that the animal name immediately matches the animal sound. Instead, element 0
WatchOut!

ptg
278 HOUR 11: Making Multivalue Choices with Pickers
of animalNames matches element 6 of animalSounds, animalNames element 1
matches animalSounds element 5, 2 matches 4, and so on. When it gets time to
handle checking for a match between the components, we’ll use this logic:
The total number of sounds, minus 1, minus the sound the user has chosen must be
the same as the chosen animal.
So, for a total of 7 sounds, where element 5 is chosen, we get 7 – 1 – 5 = 1 (exactly
the number we want). You’re welcome to implement your own display and match-
ing logic. This is just a quick way of “mixing things up” a bit for the purposes of this
project.
To help simplify the application a bit, it would be nice if we could symbolically refer
to “component 0” as the “animalComponent” and “component 1” as the
“soundComponent.” By defining a few constants at the start of our implementation
file, we can do just that! Edit MatchPickerViewController.m and add these lines so
that they precede the #import line:
#define componentCount 2#define animalComponent 0#define soundComponent 1
The first constant componentCount is just the number of components that we want
to display in the picker, whereas the other two constants, animalComponent and
soundComponent, can be used to refer to the different components in the picker
without resorting to using their actual numbers.
What’s Wrong with Referring to Something by its Number?Absolutely nothing. The reason that it is helpful to use constants, however, is thatif your design changes and you decide to change the order of the components oradd another component, you can just change the numbering within the constantsrather than each place they’re used in the code. This will make a bit more sensein a few minutes as we start implementing the delegate and data source protocolmethods.
Our application has everything it requires data-wise—it just needs the methods to
get the data into the picker view.
Implementing the Picker Data Source MethodsDespite a promising sounding name, the picker data source methods (described by
the UIPickerViewDataSource protocol) really only provide a small amount of infor-
mation to the picker via these methods:

ptg
Implementing a Custom Picker View 279
numberOfComponentsInPickerView: Returns the number of components the
picker should display
pickerView:numberOfRowsInComponent: Returns the number of rows that the
picker will be displaying within a given component
Let’s start with component count. Edit MatchPickerViewController.m and add the fol-
lowing method to the file:
- (NSInteger)numberOfComponentsInPickerView:(UIPickerView *)pickerView {return componentCount;
}
We already defined a constant, componentCount, with the number of components
we want to display (2), so the entire implementation of this method is just the line
return componentCount.
The second method, pickerView:numberOfRowsInComponent, is expected to return
the number of rows contained within a given component. We’ll make use of the
NSArray method count to return the number of items within the array that is going
to make up the component. For example, to get back the number of names in the
animalNames array, we can use this:
[animalNames count]
Implement it using the code in Listing 11.6.
LISTING 11.6- (NSInteger)pickerView:(UIPickerView *)pickerView
numberOfRowsInComponent:(NSInteger)component {if (component==animalComponent) {
return [animalNames count];} else {
return [animalSounds count];}
}
Here, we just compare the component variable provided when the picker calls the
method to the animalComponent constant we declared earlier. If they are equal, we
return a count of the names in animalNames. Otherwise, we return a count of the
number of sounds in animalSounds.
Congratulations, you’ve just completed the methods required for conforming to the
UIPickerViewDataSource protocol!
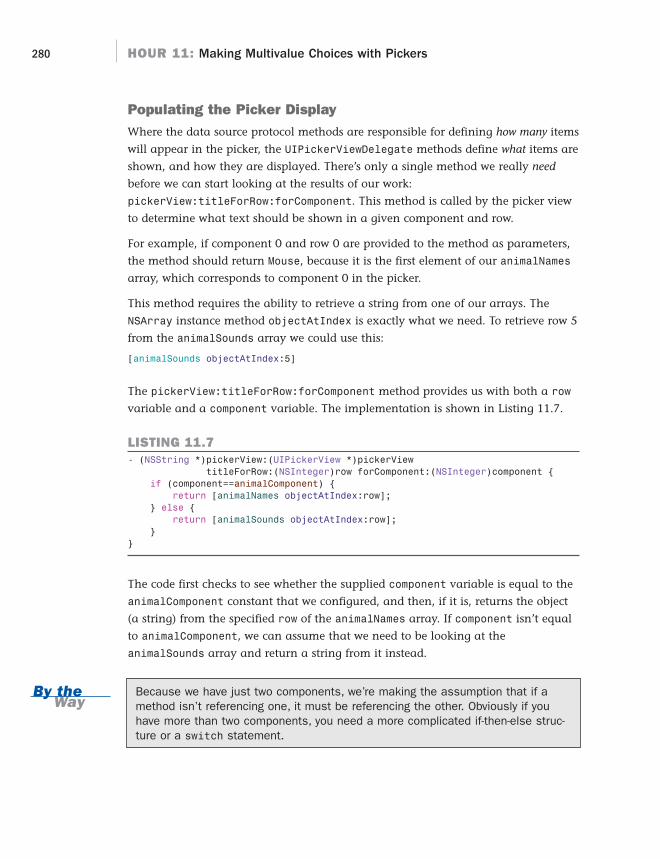
ptg
280 HOUR 11: Making Multivalue Choices with Pickers
Populating the Picker DisplayWhere the data source protocol methods are responsible for defining how many items
will appear in the picker, the UIPickerViewDelegate methods define what items are
shown, and how they are displayed. There’s only a single method we really need
before we can start looking at the results of our work:
pickerView:titleForRow:forComponent. This method is called by the picker view
to determine what text should be shown in a given component and row.
For example, if component 0 and row 0 are provided to the method as parameters,
the method should return Mouse, because it is the first element of our animalNames
array, which corresponds to component 0 in the picker.
This method requires the ability to retrieve a string from one of our arrays. The
NSArray instance method objectAtIndex is exactly what we need. To retrieve row 5
from the animalSounds array we could use this:
[animalSounds objectAtIndex:5]
The pickerView:titleForRow:forComponent method provides us with both a row
variable and a component variable. The implementation is shown in Listing 11.7.
LISTING 11.7- (NSString *)pickerView:(UIPickerView *)pickerView
titleForRow:(NSInteger)row forComponent:(NSInteger)component {if (component==animalComponent) {
return [animalNames objectAtIndex:row];} else {
return [animalSounds objectAtIndex:row];}
}
The code first checks to see whether the supplied component variable is equal to the
animalComponent constant that we configured, and then, if it is, returns the object
(a string) from the specified row of the animalNames array. If component isn’t equal
to animalComponent, we can assume that we need to be looking at the
animalSounds array and return a string from it instead.
Because we have just two components, we’re making the assumption that if amethod isn’t referencing one, it must be referencing the other. Obviously if youhave more than two components, you need a more complicated if-then-else struc-ture or a switch statement.
By theWay
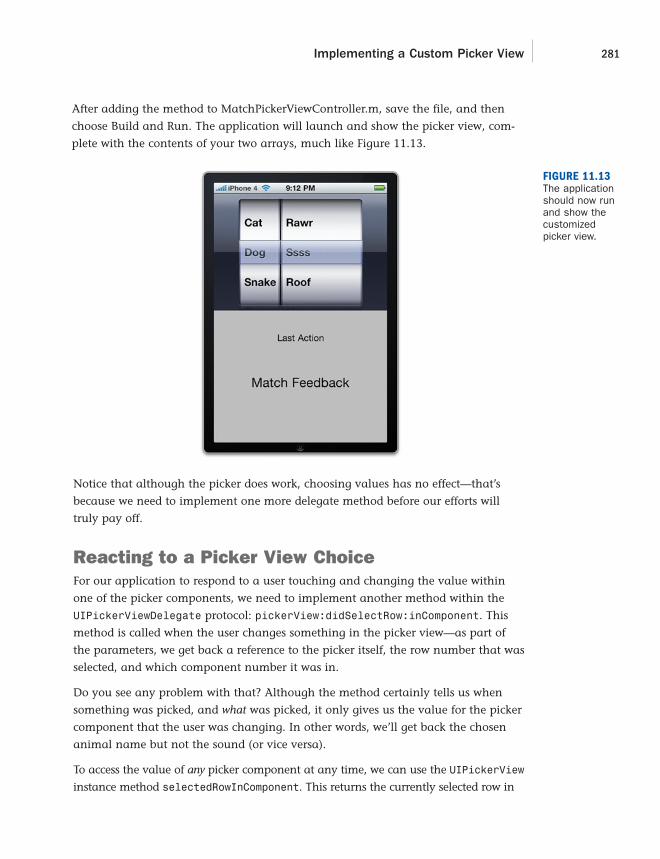
ptg
Implementing a Custom Picker View 281
After adding the method to MatchPickerViewController.m, save the file, and then
choose Build and Run. The application will launch and show the picker view, com-
plete with the contents of your two arrays, much like Figure 11.13.
FIGURE 11.13The applicationshould now runand show thecustomizedpicker view.
Notice that although the picker does work, choosing values has no effect—that’s
because we need to implement one more delegate method before our efforts will
truly pay off.
Reacting to a Picker View ChoiceFor our application to respond to a user touching and changing the value within
one of the picker components, we need to implement another method within the
UIPickerViewDelegate protocol: pickerView:didSelectRow:inComponent. This
method is called when the user changes something in the picker view—as part of
the parameters, we get back a reference to the picker itself, the row number that was
selected, and which component number it was in.
Do you see any problem with that? Although the method certainly tells us when
something was picked, and what was picked, it only gives us the value for the picker
component that the user was changing. In other words, we’ll get back the chosen
animal name but not the sound (or vice versa).
To access the value of any picker component at any time, we can use the UIPickerView
instance method selectedRowInComponent. This returns the currently selected row in
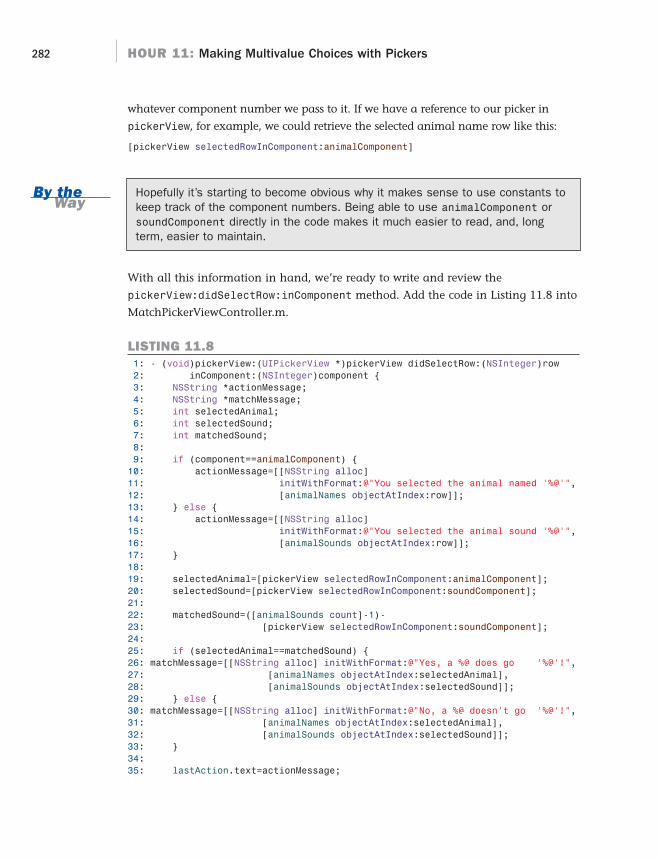
ptg
282 HOUR 11: Making Multivalue Choices with Pickers
whatever component number we pass to it. If we have a reference to our picker in
pickerView, for example, we could retrieve the selected animal name row like this:
[pickerView selectedRowInComponent:animalComponent]
Hopefully it’s starting to become obvious why it makes sense to use constants tokeep track of the component numbers. Being able to use animalComponent orsoundComponent directly in the code makes it much easier to read, and, longterm, easier to maintain.
With all this information in hand, we’re ready to write and review the
pickerView:didSelectRow:inComponent method. Add the code in Listing 11.8 into
MatchPickerViewController.m.
LISTING 11.81: - (void)pickerView:(UIPickerView *)pickerView didSelectRow:(NSInteger)row2: inComponent:(NSInteger)component {3: NSString *actionMessage;4: NSString *matchMessage;5: int selectedAnimal;6: int selectedSound;7: int matchedSound;8:9: if (component==animalComponent) {10: actionMessage=[[NSString alloc]11: initWithFormat:@”You selected the animal named ‘%@’”,12: [animalNames objectAtIndex:row]];13: } else {14: actionMessage=[[NSString alloc]15: initWithFormat:@”You selected the animal sound ‘%@’”,16: [animalSounds objectAtIndex:row]];17: }18:19: selectedAnimal=[pickerView selectedRowInComponent:animalComponent];20: selectedSound=[pickerView selectedRowInComponent:soundComponent];21:22: matchedSound=([animalSounds count]-1)-23: [pickerView selectedRowInComponent:soundComponent];24:25: if (selectedAnimal==matchedSound) {26: matchMessage=[[NSString alloc] initWithFormat:@”Yes, a %@ does go ‘%@’!”,27: [animalNames objectAtIndex:selectedAnimal],28: [animalSounds objectAtIndex:selectedSound]];29: } else {30: matchMessage=[[NSString alloc] initWithFormat:@”No, a %@ doesn’t go ‘%@’!”,31: [animalNames objectAtIndex:selectedAnimal],32: [animalSounds objectAtIndex:selectedSound]];33: }34:35: lastAction.text=actionMessage;
By theWay

ptg
Implementing a Custom Picker View 283
36: matchResult.text=matchMessage;37:38: [matchMessage release];39: [actionMessage release];40:41: }
Lines 3–4 kick off the implementation by declaring two strings, actionMessage and
matchMessage, which will be used to hold the contents of the messages that we’ll be
displaying to the user to view the labels in the interface.
Lines 5–7 define three integers (selectedAnimal, selectedSound, and
matchedSound) that we’ll be using to hold the currently selected animal and sound
and the “fixed” number of the currently selected sound. Recall that the sound and
animal rows don’t match up numerically? We’ll use the matchSound variable to
hold the results of the calculation that determines whether the sound the user has
chosen matches the correct animal.
Lines 9–17 allocate and initialize a string, actionMessage, which describes what the
user has done. If the component provided to the method is the animalComponent,
the string will contain a message stating that they chose an animal. It will also
identify the animal via the row variable and the animalNames array. If they choose
a sound, the message and logic will be appropriate to that action instead. We’re
using the same techniques implemented earlier to populate the picker’s display.
Lines 19–20 use the selectedRowInComponent method to retrieve the currently
selected rows in the animal and sound components. The results are stored in the
selectedAnimal and selectedSound variables, respectively.
Lines 22–23 work the magic of calculating if the chosen sound matches the chosen
animal. The matchedSound value will equal the selectedAnimal value if the user
has picked a match. You can refer to the earlier section “Populating the Data
Structures” for help understanding the math—it isn’t critical in understanding the
picker view itself.
Lines 25–33 compare selectedAnimal to matchedSound. If they are equal, the user
has chosen correctly, and an appropriately congratulatory message is created and
stored in the string matchMessage. If users make an incorrect choice, they’re
informed of the error with a slightly different message. In either case, the
matchMessage string includes both the name of the animal and the sound so that
users complete feedback about what they’ve selected.
Lines 35–36 output the actionMessage and matchMessage to the user by setting the
text properties of the lastAction and matchResult labels.

ptg
284 HOUR 11: Making Multivalue Choices with Pickers
Lines 38–39 release the two strings, matchMessage and actionMessage, allocated
and initialized in the method.
Save your updated implementation file, and choose Build and Run. Scroll through
the animals and sounds and make your choices. As you change the selection in the
picker view, the messages should update accordingly, as Figure 11.14 shows.
FIGURE 11.14Your applicationnow reacts tochanges in thepicker view!
Done? Not just yet! When we started out, I promised that we’d be able to display
images in the picker view, and I’m not going to go back on my word!
Tweaking the Picker UIOnce you’ve got a working picker view, you can start using some of the optional
UIPickerViewDelegate methods to dramatically alter its appearance. To close out
this hour, for example, we’ll change the picker to display icons of the animals rather
than the animal names.
Adding the Image Resources and DataI’ve supplied seven animal image PNG files inside the Animals folder of the
MatchPicker project folder. Start by finding and dragging the image files into the
Resources folder of your project in Xcode. When prompted, choose to copy the items
if needed, as shown in Figure 11.15.

ptg
Implementing a Custom Picker View 285
The UIPickerView can display any UIView or subclass of UIView within its compo-
nents. To display an image, we’ll need to add it to a view and make it available to
the picker. Despite this sounding a bit daunting, we can create a new UIImageView
instance and populate it with an image from our project resources using a single
line:
[[UIImageView alloc] initWithImage:[UIImage imageNamed:<image name>]]
So, what do we do with these UIImageViews once we create them? The same thing
we did with the animal names and animal sounds—we put them in an array. That
way, we can simply pass the appropriate image view to the picker in the exact same
way we were passing strings!
Remember, if you want to address the ultra-high resolution display of the iPhone4, you can add image resources with twice the vertical and horizontal resolutionand a suffix of @2x to your projects. They’ll automatically be displayed without anyadditional coding!
Start by updating the MatchPickerViewController.h file to declare an NSArray called
animalImages. The final (for real!) interface file is displayed in Listing 11.9.
FIGURE 11.15Copy the imagesto the project ifneeded.
By theWay
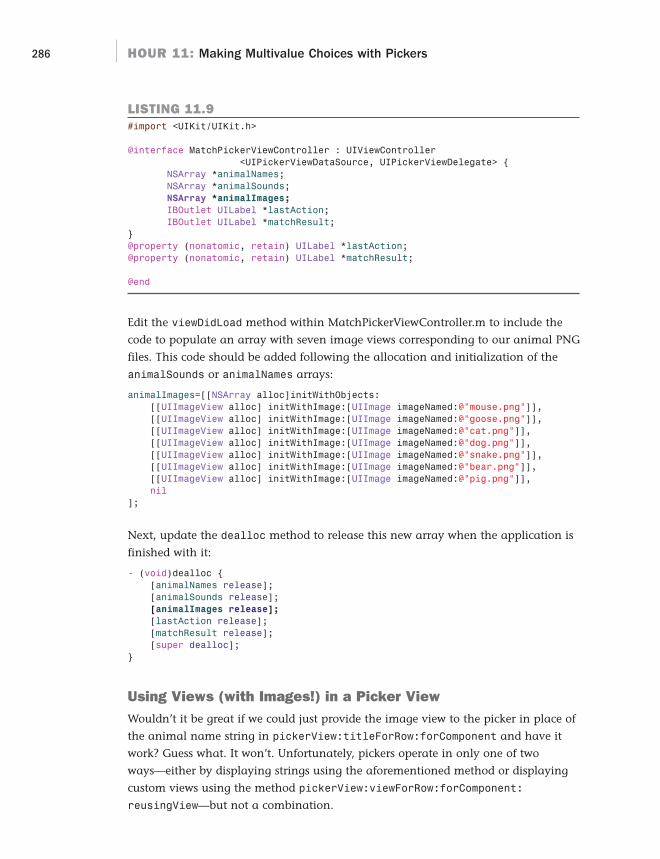
ptg
286 HOUR 11: Making Multivalue Choices with Pickers
LISTING 11.9#import <UIKit/UIKit.h>
@interface MatchPickerViewController : UIViewController<UIPickerViewDataSource, UIPickerViewDelegate> {
NSArray *animalNames;NSArray *animalSounds;NSArray *animalImages;
IBOutlet UILabel *lastAction;IBOutlet UILabel *matchResult;
}@property (nonatomic, retain) UILabel *lastAction;@property (nonatomic, retain) UILabel *matchResult;
@end
Edit the viewDidLoad method within MatchPickerViewController.m to include the
code to populate an array with seven image views corresponding to our animal PNG
files. This code should be added following the allocation and initialization of the
animalSounds or animalNames arrays:
animalImages=[[NSArray alloc]initWithObjects:[[UIImageView alloc] initWithImage:[UIImage imageNamed:@”mouse.png”]],[[UIImageView alloc] initWithImage:[UIImage imageNamed:@”goose.png”]],[[UIImageView alloc] initWithImage:[UIImage imageNamed:@”cat.png”]],[[UIImageView alloc] initWithImage:[UIImage imageNamed:@”dog.png”]],[[UIImageView alloc] initWithImage:[UIImage imageNamed:@”snake.png”]],[[UIImageView alloc] initWithImage:[UIImage imageNamed:@”bear.png”]],[[UIImageView alloc] initWithImage:[UIImage imageNamed:@”pig.png”]],nil
];
Next, update the dealloc method to release this new array when the application is
finished with it:
- (void)dealloc {[animalNames release];[animalSounds release];[animalImages release];
[lastAction release];[matchResult release];[super dealloc];
}
Using Views (with Images!) in a Picker ViewWouldn’t it be great if we could just provide the image view to the picker in place of
the animal name string in pickerView:titleForRow:forComponent and have it
work? Guess what. It won’t. Unfortunately, pickers operate in only one of two
ways—either by displaying strings using the aforementioned method or displaying
custom views using the method pickerView:viewForRow:forComponent:
reusingView—but not a combination.

ptg
Implementing a Custom Picker View 287
What this means for us is that if we want to display image views in the picker,
everything else we want to show will have to be a subclass of UIView as well. The
animal sounds are strings, so to display them, we need to create something that is a
subclass of UIView that contains the necessary text. That “something” is a UILabel.
By creating UILabels from the strings in the animalSounds array, we can successful-
ly populate the picker with both images and text.
Begin by commenting out the pickerView:titleForRow:forComponent in
MatchPickerViewController.m, by placing /* before the start, and */ after the end of
the method. Alternatively, you can just delete the entire method (because we won’t
really need it again in this project).
Now, enter the following implementation of
pickerView:viewForRow:forComponent:reusingView from Listing 11.10.
LISTING 11.101: - (UIView *)pickerView:(UIPickerView *)pickerView viewForRow:(NSInteger)row2: forComponent:(NSInteger)component reusingView:(UIView *)view {3: if (component==animalComponent) {4: return [animalImages objectAtIndex:row];5: } else {6: UILabel *soundLabel;7: soundLabel=[[UILabel alloc] initWithFrame:CGRectMake(0,0,100,32)];8: [soundLabel autorelease];9: soundLabel.backgroundColor=[UIColor clearColor];10: soundLabel.text=[animalSounds objectAtIndex:row];11: return soundLabel;12: }13: }
In lines 3–4, we check to see whether the component requested is the animal compo-
nent, and if it is, we use the row parameter to return the appropriate UIImageView
stored in the animalImages array. This is nearly identical to how we dealt with the
strings earlier.
If the component parameter isn’t referring to the animal component, then we need
to return a UILabel with the appropriate referenced row from the animalSounds
array. This is handled in lines 6–11.
In line 6, we declare a UILabel named soundLabel.
Line 7 allocates and initializes soundLabel with a frame using the initWithFrame
method. Remember from earlier hours that views define a rectangular area for the
content that is displayed on the iPhone screen. To create the label, we need to define
the rectangle of its frame. The CGRectMake function takes starting x,y values and

ptg
288 HOUR 11: Making Multivalue Choices with Pickers
ending x,y values to define the height and width of a rectangle. In this example,
we’ve defined a rectangle that spans 0 to 100 points horizontally and 0 to 32 points
vertically.
Line 8 calls autorelease on the soundLabel object. This is a bit different from what
we’ve done elsewhere. Why can’t we just release soundLabel at the end of the
method like everything else? The answer is that we have to return soundLabel so
the picker can use it—so we can’t just get rid of it. By using autorelease, we can
hand off the object to the picker and relieve ourselves of the responsibility of releas-
ing it.
Line 9 sets the background color attribute of the label to be transparent. As you
learned with web views, [UIColor clearColor] returns a color object configured as
transparent. If we leave this line out, the rectangle will not blend in with the back-
ground of the picker view.
Line 10 sets the text of the label to the string in of the specified row in
animalSounds.
Finally, line 11 returns the UILabel—ready for display.
You can use Build and Run to run the application, but there’s still going to be a
slight issue: The rows aren’t quite the right size to accommodate the images.
Changing Row SizesTo control the width and height of the rows in the picker components, two addition-
al delegate methods can be implemented:
pickerView:rowHeightForComponent: Given a component number, this
method should return the height, in points, of the row being displayed.
pickerView:widthForComponent: Given a component number, this method
returns the width of that component, in points.
For this sample application, some trial and error led me to determine that the ani-
mal component should be 75 points wide, while the sound component looks best at
around 150 points.
Both components should use a constant row height of 55 points.
Translating this into code, implement pickerView:rowHeightForComponent as fol-
lows:
- (CGFloat)pickerView:(UIPickerView *)pickerViewrowHeightForComponent:(NSInteger)component {
return 55.0;}

ptg
Further Exploration 289
Similarly, pickerView:widthForComponent becomes this:
- (CGFloat)pickerView:(UIPickerView *)pickerViewwidthForComponent:(NSInteger)component {
if (component==animalComponent) {return 75.0;
} else {return 150.0;
}}
With those small additions to MatchPickerViewController.m, the UIPickerView proj-
ect is complete! You should now have a good understanding of how to create and
customize pickers and how to manage a user’s interaction with them.
Further ExplorationAs you learned in this lesson, UIDatePicker and UIPickerView objects are reason-
ably easy to use and quite flexible in what they can do. There are a few interesting
aspects of using these controls that we haven’t looked at that you may want to
explore on your own. First, both classes implement a means of programmatically
selecting a value and animating the picker components so that they “spin” to reach
the values you’re selecting: setDate:animated and selectRow:inComponent:ani-
mated. If you’ve used applications that implement pickers, chances are, you’ve seen
this in action.
Another popular approach to implementing pickers is creating components that
appear to spin continuously (instead of reaching a start or stopping point). You may
be surprised to learn that this is really just a programming trick. The most common
way to implement this functionality is to use a picker view that simply repeats the
same component rows over and over (thousands of times). This requires you to write
the necessary logic in the delegate and data source protocol methods, but the over-
all effect is that the component rotates continuously.
Although these are certainly areas for exploration to expand your knowledge of
pickers, you may also want to take a closer look at the documentation for the
NSDate class. The ability to manipulate dates can be a powerful capability in your
applications.
Apple Tutorials
UIDatePicker, UIPickerView – UICatalog (accessible via the Xcode developer
documentation): This great example code package includes samples of both
the simple UIDatePicker and a full UIPickerView implementation.
ptg
290 HOUR 11: Making Multivalue Choices with Pickers
Dates, Times, and Calendars – Date and Time Programming Guide for Cocoa (acces-
sible via the Xcode developer documentation): This guide provides information on
just about everything you could ever want to do with dates and times.
SummaryIn this hour’s lesson, you explored two classes, UIDatePicker and UIPickerView,
that present the user with a list of choices ranging from dates to images. Despite
being based on the same underlying technology, the implementation of these fea-
tures is very different. The date picker works just like the other UI elements you’ve
been using over the past few hours. The picker view, on the other hand, requires us
to write methods that conform to the UIPickerViewDelegate and
UIPickerViewDataSource protocols.
In writing the sample picker applications, you also had a chance to make use of
NSDate methods for calculating the interval between dates, as well as
NSDateFormatter for creating user-friendly strings from an instance of NSDate.
Although not the topic of this lesson, these are powerful tools for working with dates
and times and interacting with your users.
Q&AQ. Why didn’t you cover the timer mode of the UIDatePicker?
A. The timer mode doesn’t actually implement a timer; it’s just a view that can
display timer information. To implement a timer, you’ll actually need to track
the time and update the view accordingly—not something we can easily cover
in the span of an hour.
Q. Where did you get the method names and parameters for the UIPickerViewprotocols?
A. The protocol methods that we implemented were taken directly from the
Apple Xcode documentation for UIPickerViewDelegate and
UIPickerViewDataSource. If you check the documentation, you can just copy
and paste from the method definitions into your code.
Q. If we had to create a rectangle to define the frame of a UILabel, why didn’twe do the same when creating the UIImageView objects?
A. When a UIImageView is initialized with an NSImage, its frame is set to the
dimensions of the image.

ptg
Workshop 291
Workshop
Quiz1. An NSDate instance stores only a date. True or false?
2. Why doesn’t a UIPickerView need to have an action defined for it?
3. Picker views can display images using the
pickerView:titleForRow:forComponent method. True or false?
Answers1. False. An instance of NSDate stores an “instant in time”—meaning a date and
time.
2. By implementing the UIPickerViewDelegate methods and connecting the
picker to the delegate, you gain the functionality of an action method auto-
matically.
3. False. The pickerView:viewForRow:forComponent:reusingView method
must be implemented to display images within a picker.
Activities1. Update the dateCalc project so that the program automatically sets the picker
to the current date when it is loaded. You’ll need to use the setDate:animated
method to implement this change.
2. Extend the MatchPicker project to give the appearance of the continuously
scrolling/rotating components. You’ll need to return a very large number of
rows for each component, and then repeat the same rows over and over when
they are requested. Rather than adding redundant data to the array, the best
approach is to use a single array and map the row requests into the existing
data in the array.

ptg
This page intentionally left blank

ptg
HOUR 12
Implementing Multiple Viewswith Toolbars and Tab Bars
What You’ll Learn in This Hour:. Why applications use multiple views and view controllers. What interface elements typically remain static as views change. How to create a multi-view application from scratch. How to quickly build a multi-view application using a tab bar and tab bar
controller.. How to enable inter-view communication
The iOS gives us plenty of capabilities for creating amazing applications with user inter-
faces that rival (and frequently surpass) desktop counterparts. The problem? The iPhone
needs to fit in our pockets! Until there are foldable screens, iPhone applications must be
conservative about what they display, showing only the tools needed at a given point in
time. To that end, your applications may require multiple views and view controllers. Each
view can contain its own information and interface, and, with a bit of programming, you
can enable the user to easily switch between each view. This hour explains the use of mul-
tiple views and introduces the use of toolbars and tab bars.
Exploring Single Versus Multi-ViewApplicationsIn the previous hours, the application frameworks that we’ve built have followed the
approach of “one app, one view.” We’ve presented a screen with some controls, accepted
input, and produced output. These single-view applications use one view and one view
controller. Sure, we can use a second or third view/view controller to show a small overlay,
or show a task-oriented modal view, but the majority of the user’s interactions have been

ptg
294 HOUR 12: Implementing Multiple Views with Toolbars and Tab Bars
confined to a single visible view. This is perfectly fine if that’s all your application
needs to do, but the iPhone sports several interface elements that make it possible
for complex applications to be presented across multiple views.
The Multi-View BenefitThe iOS gives developers the opportunity to segment their applications into multiple
different views and view controllers. This keeps the UI clean, not overloaded, and
helps prevent the creation of “God classes” that attempt to perform every action
under the sun. In our previous examples, we’ve dealt with one view and one con-
troller. By introducing multiple view controllers, we can create the mobile equivalent
of a multi-window desktop application. Information can be organized into logical
groupings, and the user can easily switch between them.
In this hour, we explore multi-view applications with “parallel” views. This means
that the content of one view isn’t directly dependent on another—there isn’t any set
order in which they should be displayed.
Additional functionality usually implies additional complexity, and this isn’t an
exception. There won’t be any real surprises in the code itself, but you’ll need to
start thinking a bit more about the application architecture and begin taking into
consideration the additional outlets and connections you’ll need to build if your
view controllers need to communicate with one another.
Static Interface ElementsWith multiple views comes a rather specific UI need: the ability to present options to
the user, even as the content on the screen is changing. iOS offers two elements—
toolbars and tab bars—that can provide users with controls that remain static
onscreen, while content changes underneath them.
ToolbarsToolbars (UIToolbar) are, comparatively speaking, one of the simpler user interface
elements that you have at your disposal. A toolbar is implemented as a solid bar,
either at the top or bottom of the display, with buttons/icons (UIBarButtonItem)
that correspond to actions that can be performed in the current view. The email
application, for example, uses a toolbar to provide a user with the option of moving
between messages, forwarding messages, deleting them, and so on.
The buttons have a single selector action, which works nearly identically to the typi-
cal Touch Up Inside event that you’ve encountered before. They can be implemented
almost entirely visually within Interface Builder.
ptg
Creating a Multi-View Toolbar Application 295
Tab BarsFor many applications, an even easier and more user-friendly approach will be imple-
menting a tab bar (UITabBar) and tab bar controller (UITabBarController). Tab
bars, like toolbars, present a range of touchable choices on the bottom of the display
but always use icons in their presentations. Tab bars are also dedicated to switching
between multiple different views in an application, making them the obvious choice
for applications that offer more features than can fit on a single iPhone screen.
In this hour’s tutorials, we use both toolbars and tab bars to switch views andview controllers. In a real-world application, you’d choose a toolbar if you wantedto see the onscreen buttons to perform actions on a specific piece or type of con-tent (such as a document). A tab bar, on the other hand, is the right choice toswitch between completely independent and unrelated views—not tied together bya common piece of content.
Creating a Multi-View Toolbar ApplicationThe first project that we’ll be building in this chapter will create and manage multi-
ple views from scratch. This will serve as an exercise to familiarize you with an
approach to dealing with multiple views and introduce you to some new methods
and properties, as well as the toolbar interface element.
Implementation OverviewMuch as a single-view application uses a view controller to direct the interactions of
its interface elements, a multi-view application needs a controller to help it switch
between different views. In this implementation, we’ll be creating a typical view-
based application but will be using the default view controller (UIViewController)
to swap in and out three additional views—each with its own controller. The default
controller will need to implement methods for clearing the current view and loading
any of the other views—in any order, at any time.
In addition, our default view will be setting up a toolbar. We’ll use the toolbar to
provide quick access to view switching via a row of buttons at the bottom of the
screen, as shown in Figure 12.1.
One interesting challenge that we need to overcome with this implementation isthat while our main view will include the toolbar, it must be visible in all of theother views as well. We’ll need to display the views “under” the toolbar so that itisn’t hidden as new views are shown or removed.
Did youKnow?
By theWay

ptg
296 HOUR 12: Implementing Multiple Views with Toolbars and Tab Bars
FIGURE 12.1The final appli-cation willswitch betweenviews with atoolbar.
Setting Up the ProjectTo begin, start Xcode and create a new application called MultipleViews using the
View-Based Application template. The layout of this template should be getting very
familiar by now. The MainWindow.xib includes a view controller that loads its view
from a second XIB file, MultipleViewsViewController.xib. This XIB file will hold the
toolbar that serves as our interface for switching between views, as well as instances
of three new view controllers that will ultimately manage three new views.
Adding Views and View ControllersEach of the views that we will be switching between needs its own view controller
and XIB file. Create three new UIViewController subclasses (File, New File, Cocoa
Touch Class, UIViewController subclass) and name them as follows:
. FirstViewController
. SecondViewController
. ThirdViewController
Be sure to check the With XIB for User Interface checkbox for each of the new classes
that you create. After you’ve created the files, drag the XIB files to the Resources
group. Your Xcode Classes and Resources groups should resemble Figure 12.2.

ptg
Creating a Multi-View Toolbar Application 297
FIGURE 12.2Our first multi-view applicationwill use a totalof four viewsand view con-trollers.
By theWay
The goal of this project is to create a simple application that switches betweenindependently controlled views. It is certainly possible that each of the viewscould share a view controller, but structurally it is a good practice to use separatecontrollers for views that do not serve the same function.
Prepping the View ContentTo make sure that we know (visually) which view is which, open each of the three
XIB files that correspond to the view controller classes in Interface Builder. For each
view, drag a text label (UILabel) from the Library (Tools, Library) into the view.
Change the text of the label to 1 in FirstViewController.xib, 2 in
SecondViewController.xib, and 3 in the ThirdViewController.xib file. In the sample
files, for this project, we’ve also set the font size to 288 points for each label by using
the Attributes Inspector (Command+1), as shown in Figure 12.3.
Remember that we’re going to be overlaying a toolbar on each of these views, so
you don’t have the entire screen real estate to work with. Although we can’t see the
toolbar just yet, we can simulate it for the purposes of laying out the view. To add a
simulated toolbar to the view, select the view itself within the Interface Builder
Document window and then press Command+1 to open the View Attributes
Inspector. Choose Toolbar from the Bottom Bar Simulated User Interface Elements
pop-up menu, demonstrated in Figure 12.4.

ptg
298 HOUR 12: Implementing Multiple Views with Toolbars and Tab Bars
Instantiating the View ControllersYour project should now contain content for each of the views and all the view con-
troller classes it needs to function. The classes, however, still need to be instantiated
so that we have actual view controllers and view objects to use in the application.
FIGURE 12.3Add labels toeach view sothey can be eas-ily identified.
FIGURE 12.4Adding a simu-lated toolbar tothe view canhelp with layoutsince the actualtoolbar isn’t visible.

ptg
Creating a Multi-View Toolbar Application 299
Open MultipleViewsViewController.xib in Interface Builder. This file contains the
parent view that we will be using to for the toolbar interface element, and it is also
a logical place to add our other view controller instances.
Using the Library (Tools, Library), drag a view controller (UIViewController) into
the Document window. We want this view controller to be an instance of our
FirstViewController class. With the controller selected, press Command+4 to open
the Identity Inspector. Use the drop-down menu to choose FirstViewController, as
shown in Figure 12.5.
FIGURE 12.5Update the viewcontrollers topoint to theclasses you created earlier.
Next, the view controller must be updated to point to the correct XIB file
(FileViewController.xib) for its view. Select the controller in the Document window
and press Command+1 to open the Attributes Inspector. Within the NIB Name drop-
down menu, choose FirstViewController, as shown in Figure 12.6.
Repeat these steps for the SecondViewController and ThirdViewController class-
es. (That is, add a new view controller instance, set the class, and associate the
view.) When finished, your MultipleViewsViewController.xib should look very similar
to Figure 12.7.
With these changes, our project will build and instantiate the controllers, but there
is still no way of displaying the different views. It’s time to add the toolbar controls
and code to make that happen!

ptg
300 HOUR 12: Implementing Multiple Views with Toolbars and Tab Bars
Adding Toolbar ControlsThe MultipleViews application that we’re building now requires a single toolbar
with buttons for each of the three views that we want to display. The toolbar itself
will be added as a subview of the view in the MultipleViewsViewController.xib file.
If you haven’t already, open the MultipleViewsViewController.xib file in Interface
Builder. The view contained in this XIB file, as you know from previous view-based
applications, is what will be added to the application’s window when it first launch-
es. Instead of providing all of the onscreen content, however, we just want this view
and its view controller to manage the toolbar and the user’s interactions with it.
FIGURE 12.6Associate everyview controllerwith the appro-priate XIB file.
FIGURE 12.7Add three viewcontrollerinstances to theXIB file.
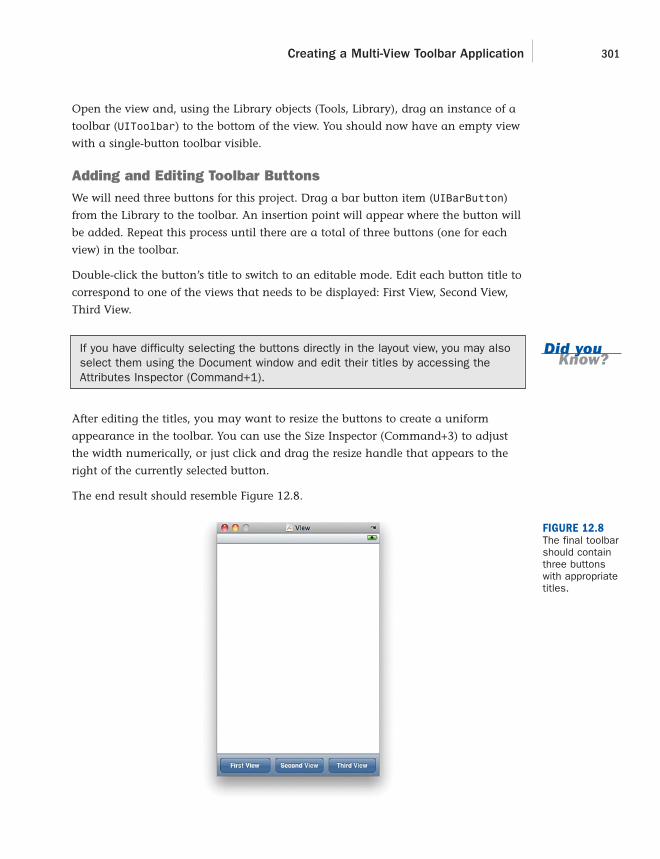
ptg
Creating a Multi-View Toolbar Application 301
Open the view and, using the Library objects (Tools, Library), drag an instance of a
toolbar (UIToolbar) to the bottom of the view. You should now have an empty view
with a single-button toolbar visible.
Adding and Editing Toolbar ButtonsWe will need three buttons for this project. Drag a bar button item (UIBarButton)
from the Library to the toolbar. An insertion point will appear where the button will
be added. Repeat this process until there are a total of three buttons (one for each
view) in the toolbar.
Double-click the button’s title to switch to an editable mode. Edit each button title to
correspond to one of the views that needs to be displayed: First View, Second View,
Third View.
If you have difficulty selecting the buttons directly in the layout view, you may alsoselect them using the Document window and edit their titles by accessing theAttributes Inspector (Command+1).
After editing the titles, you may want to resize the buttons to create a uniform
appearance in the toolbar. You can use the Size Inspector (Command+3) to adjust
the width numerically, or just click and drag the resize handle that appears to the
right of the currently selected button.
The end result should resemble Figure 12.8.
Did youKnow?
FIGURE 12.8The final toolbarshould containthree buttonswith appropriatetitles.

ptg
By theWay
302 HOUR 12: Implementing Multiple Views with Toolbars and Tab Bars
Bar button items do not have to be text-labeled buttons. Alternatively, you can setan image file to be used as the button representation in the Attributes Inspector.We will be using this feature of the tab bar UI element in the next project.
Adding Outlets and ActionsNow that all the interface elements are in place for the MultiViews application, we
need to connect them to code. The MultiViewsViewController object will handle
the switching of the views, so we need to edit the class to include outlets for each of
the view controllers, as well as actions for each of the toolbar buttons, and a new
method clearView that we’ll use to clear the contents of the view as we switch
between them.
Edit MultipleViewsViewController.h to reflect the code in Listing 12.1.
LISTING 12.11: #import <UIKit/UIKit.h>2:3: @class FirstViewController;
4: @class SecondViewController;
5: @class ThirdViewController;
6:7: @interface MultipleViewsViewController : UIViewController {8: IBOutlet FirstViewController *firstViewController;
9: IBOutlet SecondViewController *secondViewController;
10: IBOutlet ThirdViewController *thirdViewController;
11: }12:13: @property (retain, nonatomic) FirstViewController *firstViewController;
14: @property (retain, nonatomic) SecondViewController *secondViewController;
15: @property (retain, nonatomic) ThirdViewController *thirdViewController;
16:17: -(IBAction) loadSecondView:(id)sender;
18: -(IBAction) loadThirdView:(id)sender;
19: -(IBAction) loadFirstView:(id)sender;
20:
21: -(void) clearView;
22:23: @end
Let’s quickly run through what we’ve done here. Because this class needs to be
aware of our other view controller classes, we first declare the view controller classes
in lines 3–5.
Lines 8–10 create IBOutlets for each of our view controller instances
(firstViewController, secondViewController, and thirdViewController);
we’ll need to access them to switch between views.

ptg
Creating a Multi-View Toolbar Application 303
In lines 13–15, we declare these three instances as properties.
Lines 17–19 declare three methods for switching views and expose them as IBActions
for Interface Builder (loadFirstView, loadSecondView, and loadFirstView).
Finally, on line 21, a new method, clearView, is declared. It will be used to remove
the old content from our view when we switch to a new view.
Connecting Outlets and ActionsSave the changes you’ve made to MultiViewsViewController.h, and jump back into
the MultiViewsViewController.xib file in Interface Builder. We can now make our
final connections before writing the view switching code.
From the Document window, Control-drag from the File’s Owner icon to the instance of
FirstViewController. When prompted for an outlet, choose firstViewController,
as shown in Figure 12.9.
FIGURE 12.9Connect eachview controllerto its outlet with-in theMultipleViewsViewControllerclass.
Repeat this process for the secondViewController and thirdViewController
instances, choosing the appropriate outlet when prompted.
Next, expand the view and toolbar hierarchy to show the three bar button items
that we added earlier. Control-drag from the First View button to the File’s Owner
icon. When prompted, choose the loadFirstView sent action.
Do the same for the two other buttons, connecting the Second View button to
loadSecondView and the third to loadThirdView. The interface connections are now
complete, and we can finish up the implementation of the view loading methods.
Implementing the View Switch MethodsTo implement the view switching, we’ll be making use of a UIView instance method
called insertSubview:atIndex:. This method inserts a view as a subview of anoth-
er view—just like creating a hierarchy of views within Interface Builder. By inserting
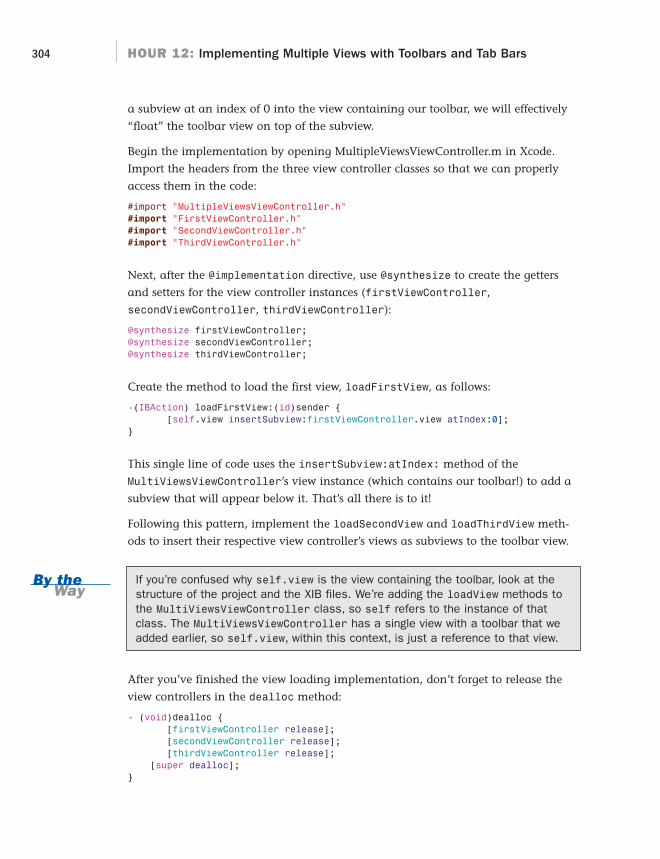
ptg
304 HOUR 12: Implementing Multiple Views with Toolbars and Tab Bars
a subview at an index of 0 into the view containing our toolbar, we will effectively
“float” the toolbar view on top of the subview.
Begin the implementation by opening MultipleViewsViewController.m in Xcode.
Import the headers from the three view controller classes so that we can properly
access them in the code:
#import “MultipleViewsViewController.h”#import “FirstViewController.h”#import “SecondViewController.h”#import “ThirdViewController.h”
Next, after the @implementation directive, use @synthesize to create the getters
and setters for the view controller instances (firstViewController,
secondViewController, thirdViewController):
@synthesize firstViewController;@synthesize secondViewController;@synthesize thirdViewController;
Create the method to load the first view, loadFirstView, as follows:
-(IBAction) loadFirstView:(id)sender {[self.view insertSubview:firstViewController.view atIndex:0];
}
This single line of code uses the insertSubview:atIndex: method of the
MultiViewsViewController’s view instance (which contains our toolbar!) to add a
subview that will appear below it. That’s all there is to it!
Following this pattern, implement the loadSecondView and loadThirdView meth-
ods to insert their respective view controller’s views as subviews to the toolbar view.
If you’re confused why self.view is the view containing the toolbar, look at thestructure of the project and the XIB files. We’re adding the loadView methods tothe MultiViewsViewController class, so self refers to the instance of thatclass. The MultiViewsViewController has a single view with a toolbar that weadded earlier, so self.view, within this context, is just a reference to that view.
After you’ve finished the view loading implementation, don’t forget to release the
view controllers in the dealloc method:
- (void)dealloc {[firstViewController release];[secondViewController release];[thirdViewController release];
[super dealloc];}
By theWay

ptg
Creating a Multi-View Toolbar Application 305
Setting a View When the Application StartsIf you try to run the application now, it should work, but it probably won’t do quite
what you may expect. When the application first starts, it loads the initial view con-
taining the toolbar but nothing else. Until a toolbar button is pressed, none of our
three content views are visible. A much more user-friendly approach is to automati-
cally load content as soon as the application starts.
To automatically switch to one of the views, we can simply use one of the loadView
methods that we just defined.
Editing MultipleViewsViewController.m, implement the viewDidLoad method as follows:
- (void)viewDidLoad {[self loadFirstView:nil];[super viewDidLoad];
}
By calling the loadFirstView: method upon successful loading of the view contain-
ing the toolbar, we ensure that some initial content is available for users without
them first having to press any buttons.
Because loadFirstView is defined as requiring a parameter in its implementa-tion, we must pass a parameter when using it here. Because the parameter(sender) is not used in the function, we can safely pass nil with no ill effects.
Clearing the Current ViewTry building and executing the application again. This time, an initial view should
load, but the application still won’t perform correctly. You’ll likely see sporadic
behavior as you try to navigate between views or the views will overlay on top of
one another, creating an onscreen mess. The problem is that while we’re adding sub-
views as the toolbar button is pressed, we’re never removing them again! What we
need to do to stabilize the application’s behavior is to identify and remove the cur-
rent subview each time the toolbar button is pressed.
When a view is added to another as a subview (its superview), a property called super-
view is set appropriately. In other words, when firstViewController.view is added as
a subview to our toolbar view, its superview property is set to the toolbar view. If a view
hasn’t been added as a subview, the property is nil. So, how can this help us? Easy: By
testing to see whether the superview property is set, we can identify which view has
been made active and then remove it when it’s time to switch views. To remove a view
from its superview, we can use the removeFromSuperview instance method.
Add the clearView method shown in Listing 12.2 to MultipleViewsViewController.m.
By theWay

ptg
306 HOUR 12: Implementing Multiple Views with Toolbars and Tab Bars
LISTING 12.2-(void) clearView {
if (firstViewController.view.superview) {[firstViewController.view removeFromSuperview];
} else if (secondViewController.view.superview) {[secondViewController.view removeFromSuperview];
} else {[thirdViewController.view removeFromSuperview];
}}
In this implementation, we test for the existence of the superview property in all of
the view controller’s views and, if we find it, we use removeFromSuperview to
remove the view.
All that remains is to add clearView so that it is called before any view is loaded. A
completed version of the loadFirstView method is shown in Listing 12.3.
LISTING 12.3-(IBAction) loadFirstView:(id)sender {
[self clearView];
[self.view insertSubview:firstViewController.view atIndex:0];}
Make the same change to loadSecondView and loadThirdView, and then retest
your application. It should now cleanly switch between the different views by touch-
ing the toolbar buttons, as shown in Figure 12.10.
FIGURE 12.10Switch betweenviews using thetoolbar buttons.
ptg
Building a Multi-View Tab Bar Application 307
In our next project, we’ll implement multiple views along with another new UI ele-
ment: the tab bar. In this second application, however, we’ll be gaining a lot of
“free” functionality that simplifies the process of switching views.
Building a Multi-View Tab Bar ApplicationAs you’ve seen, it isn’t difficult to manage multiple view controllers, but you’ll need to
overcome some peculiarities if you choose to implement the view switching yourself.
Frequently, a more expeditious approach is to use a tab bar (UITabBar) and tab bar
controller (UITabBarController). This combination handles the view switching
process almost entirely on its own. You supply the views and define the interface,
and it makes the magic. Tab bars are similar in appearance to toolbars but are
intended solely for switching views rather than executing arbitrary commands.
Implementation OverviewEarlier this hour, you built a simple multi-view application that required us to man-
ually insert subviews, clear the view, and deal with other “overhead” activities that
would ideally be performed automatically. In this project, you’ll be creating another
application with three views, but this time a tab bar controller will handle switching
the views for us. This frees us up to add some real functionality!
If you follow along, you’ll create an application for calculating areas and volumes.
It will also provide a Summary view to show how many times the user has per-
formed a calculation. This will help you understand how views, which are imple-
mented largely independently, might exchange data.
The implementation itself will require you to create an instance of a tab bar and tab
bar controller and, within that, instances of each of the three view controllers that
we will be using for the calculations. You’ll also add icons to the tab bar, giving it a
professionally designed appearance. The views themselves will be in separate XIB
files and will include a number of inputs and outputs. Figure 12.11 shows the appli-
cation with tab bar that we’ll be implementing in this example.
Setting Up the ProjectAs your applications become more complex, you’ll want to start using more mean-
ingful names for the classes and XIB files that you use in your projects. In this
example, we’re going to be implementing a tab bar controller, but we’re not going
to be using Apple’s default tab bar template.

ptg
308 HOUR 12: Implementing Multiple Views with Toolbars and Tab Bars
Apple’s tab bar project template creates a two-view button bar with a view controller
class called FirstViewController. The first view is contained in the
MainWindow.xib and the second in SecondView.xib. The MainView.xib also con-
tains view controllers instances for both views.
This, frankly, doesn’t make much sense. If you’re going to separate your content
views into multiple XIB files, it should be consistent. This template gives us a tab bar
implementation that is scattered and difficult to use. Instead, we’re going to start
from scratch with a simple Window-Based Application template.
Begin by creating a new project and choosing the window-based iPhone application
template. Name the project TabbedCalculation.
Adding Additional View Controllers and ViewsOur new application will provide three views, each corresponding to a different
functional area: calculating area, calculating volume, and displaying a calculation
summary. We’ll name our view controller classes and corresponding XIB files based
on the following functions:
. AreaViewController/AreaView.xib
. VolumeViewController/VolumeView.xib
. SummaryViewController/SummaryView.xib
FIGURE 12.11This applicationwill use a tabbar to enableeasy switchingbetween calcu-lations.
ptg
Building a Multi-View Tab Bar Application 309
Add the three new view controller classes (UIViewController) to the project. Make
sure that you’ve chosen to also add the XIB files for the new controllers.
Rename the newly created XIB files that will contain the view layouts to AreaView,
VolumeView, and SummaryView. This will finish our initial setup for the view con-
troller classes and XIBs, but we still need a tab bar controller object and instances of
the three view controllers that will be managed by the tab bar.
Preparing the Application Delegate for the Tab Bar ControllerOpen the TabbedCalculationAppDelegate.h header in Xcode. Within the @inter-
face directive, include an instance variable (tabBarController) and IBOutlet for
a tab bar controller (UITabBarController), as well as a declaration that we will
conform to the UITabBarControllerDelegate protocol. (All the methods in this
protocol are optional, meaning that we can have a fully functional tab bar without
doing any additional coding!) Finally, declare tabBarController as a property. The
final header should resemble Listing 12.4.
LISTING 12.4#import <UIKit/UIKit.h>
@interface TabbedCalculationAppDelegate : NSObject<UIApplicationDelegate, UITabBarControllerDelegate> {
UIWindow *window;IBOutlet UITabBarController *tabBarController;
}
@property (nonatomic, retain) IBOutlet UIWindow *window;@property (nonatomic, retain) IBOutlet UITabBarController *tabBarController;
@end
Next, open TabbedCalculationAppDelegate.m, and add the @synthesize directive
for tabBarController to prepare our getters/setters for the property:
@synthesize tabBarController;
Update the application:DidFinishLaunchingWithOptions method to add the
view of the tabBarViewController instance to the window:
- (BOOL)application:(UIApplication *)applicationdidFinishLaunchingWithOptions:(NSDictionary *)launchOptions {
// Override point for customization after application launch[window addSubview:tabBarController.view];
[window makeKeyAndVisible];
return YES;}

ptg
310 HOUR 12: Implementing Multiple Views with Toolbars and Tab Bars
Finally, make sure the tab bar controller is released in the dealloc method:
- (void)dealloc {[tabBarController release];
[window release];[super dealloc];
}
This completes all the code additions that we need to make a tab bar controller
function and switch views! Our next step is to instantiate an instance of the con-
troller in the MainWindow.xib file along with the view controllers it will manage.
Adding a Tab Bar ControllerOpen the MainWindow.xib file in Interface Builder. Because we started with a win-
dow-based application, the file should be looking a bit sparse. We can fix that pretty
quickly! Open the Library (Tools, Library) and drag a tab bar controller
(UITabBarController) into the Document window.
Before doing anything else, Control-drag from the Tabbed Calculation App Delegate
icon to the new tab bar controller. Connect the controller instance to the
tabBarController outlet, as demonstrated in Figure 12.12.
FIGURE 12.12Connect thecontroller to itsoutlet.
Now, double-click the tab bar controller in the Document window to preview what
we’re creating, and then expand the controller and the objects it contains. As you
can see in Figure 12.12, Apple provides us with an initial setup for the tab bar con-
troller. Nested in the controller is the tab bar itself (UITabBar), within which are two
view controllers (UIViewController) and, within them, are Tab Bar Items
(UITabBarItem). In our project, we need a total of three view controllers: one for the
area calculator, another for the volume calculations, and a third for a simple sum-
mary. In other words, the default controller is one view short from the three we need.
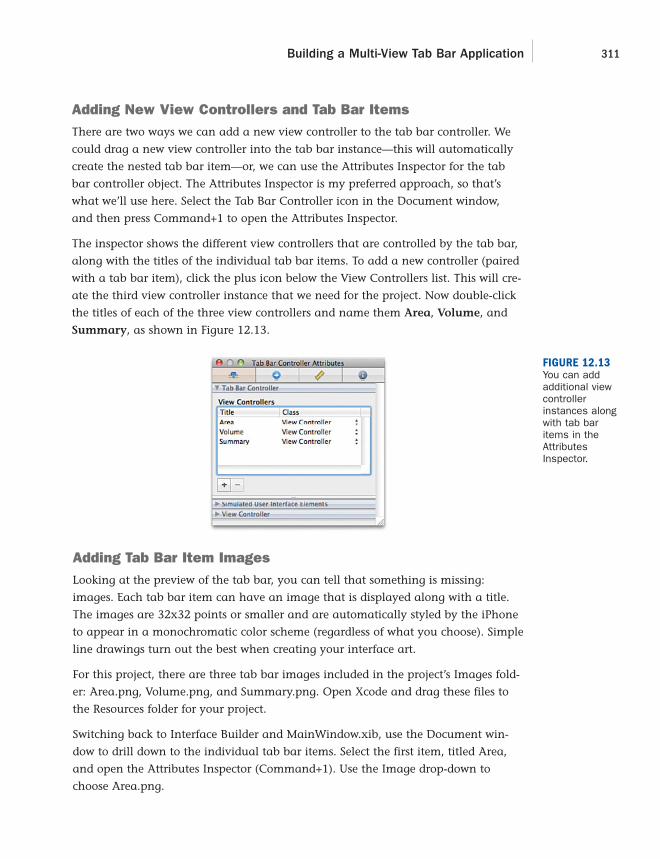
ptg
Building a Multi-View Tab Bar Application 311
Adding New View Controllers and Tab Bar ItemsThere are two ways we can add a new view controller to the tab bar controller. We
could drag a new view controller into the tab bar instance—this will automatically
create the nested tab bar item—or, we can use the Attributes Inspector for the tab
bar controller object. The Attributes Inspector is my preferred approach, so that’s
what we’ll use here. Select the Tab Bar Controller icon in the Document window,
and then press Command+1 to open the Attributes Inspector.
The inspector shows the different view controllers that are controlled by the tab bar,
along with the titles of the individual tab bar items. To add a new controller (paired
with a tab bar item), click the plus icon below the View Controllers list. This will cre-
ate the third view controller instance that we need for the project. Now double-click
the titles of each of the three view controllers and name them Area, Volume, and
Summary, as shown in Figure 12.13.
FIGURE 12.13You can addadditional viewcontrollerinstances alongwith tab baritems in theAttributesInspector.
Adding Tab Bar Item ImagesLooking at the preview of the tab bar, you can tell that something is missing:
images. Each tab bar item can have an image that is displayed along with a title.
The images are 32x32 points or smaller and are automatically styled by the iPhone
to appear in a monochromatic color scheme (regardless of what you choose). Simple
line drawings turn out the best when creating your interface art.
For this project, there are three tab bar images included in the project’s Images fold-
er: Area.png, Volume.png, and Summary.png. Open Xcode and drag these files to
the Resources folder for your project.
Switching back to Interface Builder and MainWindow.xib, use the Document win-
dow to drill down to the individual tab bar items. Select the first item, titled Area,
and open the Attributes Inspector (Command+1). Use the Image drop-down to
choose Area.png.
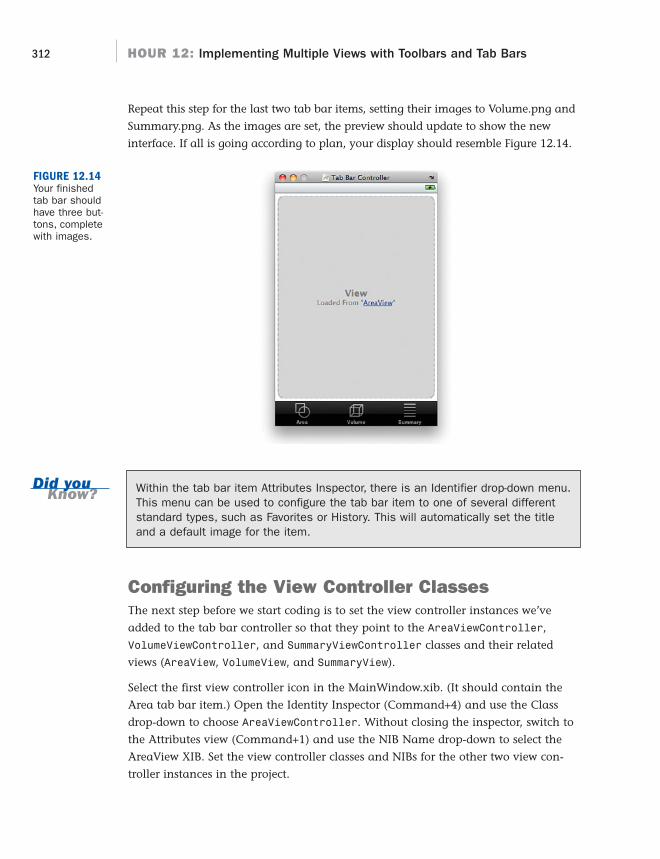
ptg
312 HOUR 12: Implementing Multiple Views with Toolbars and Tab Bars
Repeat this step for the last two tab bar items, setting their images to Volume.png and
Summary.png. As the images are set, the preview should update to show the new
interface. If all is going according to plan, your display should resemble Figure 12.14.
FIGURE 12.14Your finishedtab bar shouldhave three but-tons, completewith images.
Did youKnow? Within the tab bar item Attributes Inspector, there is an Identifier drop-down menu.
This menu can be used to configure the tab bar item to one of several differentstandard types, such as Favorites or History. This will automatically set the titleand a default image for the item.
Configuring the View Controller ClassesThe next step before we start coding is to set the view controller instances we’ve
added to the tab bar controller so that they point to the AreaViewController,
VolumeViewController, and SummaryViewController classes and their related
views (AreaView, VolumeView, and SummaryView).
Select the first view controller icon in the MainWindow.xib. (It should contain the
Area tab bar item.) Open the Identity Inspector (Command+4) and use the Class
drop-down to choose AreaViewController. Without closing the inspector, switch to
the Attributes view (Command+1) and use the NIB Name drop-down to select the
AreaView XIB. Set the view controller classes and NIBs for the other two view con-
troller instances in the project.
ptg
Building a Multi-View Tab Bar Application 313
Implementing the Area ViewAlthough we haven’t really written any code specific to switching views or manag-
ing view controllers, the TabbedCalculation application can be built and executed
and will happily switch views using the tab bar. No need for inserting subviews or
clearing views. It just works!
We can now work with our view controller classes just as we would in any other
application. The tab bar controller instance will take care of swapping the views
when needed. We’ll start with the area calculation view.
Adding Outlets and ActionsIn the area view, the application will calculate the area of a rectangle given the
length and width, and the area of a circle, given the radius. We’ll need UITextFields
for each of these values, and two UILabel instances for the calculation results.
The view controller will need to access the instance of the SummaryViewController
to increment a count of the calculations performed. It will provide calculate and
hideKeyboard methods to perform the calculation and hide the input keyboard
when the background is tapped, respectively. All told, we’ll need six IBOutlets and
two IBActions. These are the naming conventions we’ve used in the sample project:
rectWidth (UITextField): Field for entering the width of a rectangle
rectLength (UITextField): Field for entering the length of a rectangle
circleRadius (UITextField): Field for entering the radius of a circle
rectResult (UILabel): The calculated area of the rectangle
circleResult (UILabel): The calculated area of the circle
summaryViewController (SummaryViewController): The instance of the
Summary view
calculate (method): Performs the area calculation
hideKeyboard (method): Hides the onscreen keyboard
Got all that? Good! Within Xcode, open the AreaViewController.h header file and
edit the contents to read as shown in Listing 12.5.
LISTING 12.51: #import <UIKit/UIKit.h>2: #import “SummaryViewController.h”3:4: @interface AreaViewController : UIViewController {5: IBOutlet UITextField *rectWidth;
6: IBOutlet UITextField *rectLength;
7: IBOutlet UITextField *circleRadius;

ptg
314 HOUR 12: Implementing Multiple Views with Toolbars and Tab Bars
8: IBOutlet UILabel *rectResult;
9: IBOutlet UILabel *circleResult;
10: IBOutlet SummaryViewController *summaryViewController;
11: }12:13: @property (retain, nonatomic) UITextField *rectWidth;
14: @property (retain, nonatomic) UITextField *rectLength;
15: @property (retain, nonatomic) UITextField *circleRadius;
16: @property (retain, nonatomic) UILabel *rectResult;
17: @property (retain, nonatomic) UILabel *circleResult;
18:19: -(IBAction)calculate:(id)sender;
20: -(IBAction)hideKeyboard:(id)sender;
21:22: @end
We’ll need to access a method within the SummaryViewController instance, so, in
line 2, we import the header for the summary class. Lines 5–10 declare the outlets
for the fields, labels, and Summary view controller. Lines 13–17 then declare these
as properties. Finally, lines 19–20 declare two IBActions that we’ll be triggering
based on Touch Up events in the interface.
Creating the ViewBased solely on the code, you should be able to get a pretty good sense for what the
view is going to look like. The finished version of our sample AreaView is shown in
Figure 12.15.
LISTING 12.5 continued
FIGURE 12.15Create inputs,outputs, and aCalculate button!

ptg
Building a Multi-View Tab Bar Application 315
Notice that we’ve included two images (UIImageView) in sample application view.
These serve as cues for users so that they understand what is meant by length,
width, radius, and so on (hey, you never know!). If you want to add these to your
version of the application, drag the CircleArea.png and RectArea.png files to your
Xcode Resources folder. You can also add the SphereVolume.png and
BoxVolume.png images, which are used in the volume view.
Now it’s your turn to build the view. Open AreaView.xib, and begin by dragging
three instances of UITextField to the view. Two should be grouped together for the
length and width entry for a rectangle; the third will be for the radius. After you’ve
added the fields to the view, select each and open the Attributes Inspector
(Command+1). Set the text field traits so that the keyboard is set to a number pad,
as shown in Figure 12.16.
FIGURE 12.16Because weneed onlynumeric input,set the key-board to be anumber pad.
Drag instances of UILabel to the view and use them to label each of the fields.
The results of the area calculations need to be displayed near the entry fields, so add
two additional UILabel instances to the view—one located near the fields for the
rectangle, the other near the radius field. Double-click to edit and clear their con-
tents, or set them to 0 as the default. Use two more UILabels to create Area labels.
Visit all the labels and fields with the Attributes Inspector (Command+1) and set a
size that is appropriate for the iPhone screen.
If you’d like to add the images to the view, add two image views from the library,
positioning one beside the rectangle fields, the other beside the radius fields. Open

ptg
By theWay
316 HOUR 12: Implementing Multiple Views with Toolbars and Tab Bars
the Attributes Inspector (Command+1) for each image view and choose the
RectArea.png or CircleArea.png images.
To finish the view, we need two buttons. Add the first button to the bottom of the
view and name it Calculate. The second button traps background touches and trig-
gers the hideKeyboard method. Add a button that spans the entire background. Use
the Layout menu to send it to the back, or drag its icon into the Interface Builder
Document window so that it falls at the top of the View hierarchy. Open the
Attributes Inspector (Command+1) for the button and choose Custom for the button
type to make the button invisible, as demonstrated in Figure 12.17.
FIGURE 12.17Set a Custombutton type forthe large back-ground button.
For a quick refresher on hiding the keyboard, see Hour 7, “Working with Text,Keyboards, and Buttons.”
When you’ve finished with the view layout, you’ll have quite a few objects in the
hierarchy. If you expand the Document window, it should resemble what we’ve cre-
ated in Figure 12.18.
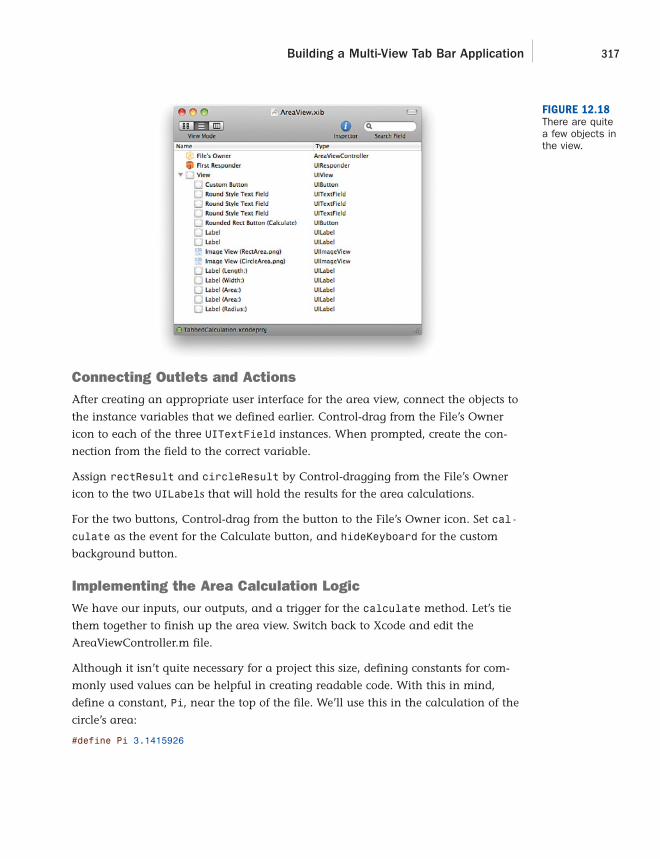
ptg
Building a Multi-View Tab Bar Application 317
Connecting Outlets and ActionsAfter creating an appropriate user interface for the area view, connect the objects to
the instance variables that we defined earlier. Control-drag from the File’s Owner
icon to each of the three UITextField instances. When prompted, create the con-
nection from the field to the correct variable.
Assign rectResult and circleResult by Control-dragging from the File’s Owner
icon to the two UILabels that will hold the results for the area calculations.
For the two buttons, Control-drag from the button to the File’s Owner icon. Set cal-
culate as the event for the Calculate button, and hideKeyboard for the custom
background button.
Implementing the Area Calculation LogicWe have our inputs, our outputs, and a trigger for the calculate method. Let’s tie
them together to finish up the area view. Switch back to Xcode and edit the
AreaViewController.m file.
Although it isn’t quite necessary for a project this size, defining constants for com-
monly used values can be helpful in creating readable code. With this in mind,
define a constant, Pi, near the top of the file. We’ll use this in the calculation of the
circle’s area:
#define Pi 3.1415926
FIGURE 12.18There are quitea few objects inthe view.

ptg
318 HOUR 12: Implementing Multiple Views with Toolbars and Tab Bars
Next, after the @implementation directive, synthesize the getters/setters for all of the
properties defined in the header file:
@synthesize rectWidth;@synthesize rectLength;@synthesize rectResult;@synthesize circleRadius;@synthesize circleResult;
Now for the real work—implementing the calculate method. Add the method defi-
nition shown in Listing 12.6 to the class.
LISTING 12.61: -(IBAction)calculate:(id)sender {2: float floatRectResult=[rectWidth.text floatValue]*3: [rectLength.text floatValue];4: float floatCircleResult=[circleRadius.text floatValue]*5: [circleRadius.text floatValue]*Pi;6: NSString *stringRectResult=[[NSString alloc]7: initWithFormat:@”%1.2f”,floatRectResult];8: NSString *stringCircleResult=[[NSString alloc]9: initWithFormat:@”%1.2f”,floatCircleResult];10: rectResult.text=stringRectResult;11: circleResult.text=stringCircleResult;12: [stringRectResult release];13: [stringCircleResult release];14:15: [summaryViewController updateTotal];16: }
We’re working with the assumption that you’re comfortable with the equations for
calculating the area of a rectangle (l*w) and a circle (Pi*r^2), but a few pieces of the
code might be unfamiliar. Lines 2–3 and 4–5 calculate the area for the rectangle
and circle, respectively, and store the results in two new floating point variables
(floatRectResult, floatCircleResult). The calculations take advantage of the
NSString class method floatValue to provide a floating-point number from the
user’s input.
The floatValue method will return 0.0 if the user types in gibberish. This means we always have a valid calculation to perform, even if the user enters bad information.
Lines 6–7 and 8–9 allocate and initialize two strings to hold the formatted results.
Using initWithFormat: and the format “%1.2f” to create the strings, we ensure
that there will always have at least one digit before the decimal and two decimal
places in the result.
By theWay

ptg
Building a Multi-View Tab Bar Application 319
Lines 10–13 set the results within the view and then release the temporary strings.
The last step, in line 15, uses an instance method of the SummaryViewController,
updateTotal, to update the total number of calculations performed. Defining this
method will be one of the last things we do this hour.
All in all, the calculation logic isn’t difficult to understand. The only pieces missing
are the implementation of hideKeyboard and releasing our objects in dealloc. Go
ahead and define hideKeyboard as follows:
-(IBAction)hideKeyboard:(id)sender {[rectWidth resignFirstResponder];[rectLength resignFirstResponder];[circleRadius resignFirstResponder];
}
Wrap up the implementation of the area view controller by editing dealloc to
release the objects we used:
- (void)dealloc {[rectWidth release];
[rectLength release];
[circleRadius release];
[rectResult release];
[circleResult release];
[super dealloc];}
AreaViewController and AreaView are complete. Building the volume view and
view controller will follow a very similar process, so we’ll move quickly through the
next section.
Implementing the Volume ViewIn the volume view, the application will accept input for the dimensions of a box
(length, width, height) and a sphere (radius) and calculate the volume of the object
based on these values. The interface elements will be largely identical to the area
view but will require an additional field (height) for the box calculation. Begin the
implementation by editing the VolumeViewController header.
Adding Outlets and ActionsWith the exception of some terminology changes required by our switch from 2D to
3D, the outlets and actions that will be required in the volume view should be very
familiar:
boxWidth (UITextField): Field for entering the width of a box
boxLength (UITextField): Field for entering the length of a box

ptg
320 HOUR 12: Implementing Multiple Views with Toolbars and Tab Bars
boxHeight (UITextField): Field for entering the height of a box
sphereRadius (UITextField): Field for entering the radius of a sphere
boxResult (UILabel): The calculated area of the rectangle
sphereResult (UILabel): The calculated area of the circle
summaryViewController (SummaryViewController): The instance of the sum-
mary view
calculate (method): Performs the area calculation
hideKeyboard (method): Hides the onscreen keyboard
Edit the VolumeViewController.h file to include the necessary outlets and actions for
the view. When finished, your code should look like Listing 12.7.
LISTING 12.71: #import <UIKit/UIKit.h>2: #import “SummaryViewController.h”
3:4: @interface VolumeViewController : UIViewController {5: IBOutlet UITextField *boxWidth;
6: IBOutlet UITextField *boxHeight;
7: IBOutlet UITextField *boxLength;
8: IBOutlet UITextField *sphereRadius;
9: IBOutlet UILabel *boxResult;
10: IBOutlet UILabel *sphereResult;
11: IBOutlet SummaryViewController *summaryViewController;
12: }13:14: @property (retain, nonatomic) UITextField *boxWidth;
15: @property (retain, nonatomic) UITextField *boxHeight;
16: @property (retain, nonatomic) UITextField *boxLength;
17: @property (retain, nonatomic) UITextField *sphereRadius;
18: @property (retain, nonatomic) UILabel *boxResult;
19: @property (retain, nonatomic) UILabel *sphereResult;
20:21: -(IBAction)calculate:(id)sender;
22: -(IBAction)hideKeyboard:(id)sender;
23:24: @end
Because of the similarity to the area view, we won’t go into detail on the individual
lines. Let’s move on to the volume view itself.
Creating the ViewLike the layout of the area view, the volume view will collect data, provide the user
with a Calculate button and, of course, display the results. Figure 12.19 shows a fin-
ished version of the view.

ptgBy theWay
Building a Multi-View Tab Bar Application 321
The volume view includes images to help users identify the values that they willneed to enter. If you didn’t drag the SphereVolume.png and BoxVolume.pngimages to your Xcode resources when building the area view, this is a good timeto add them!
Open VolumeView.xib in Interface Builder and drag four text fields to the view. For
the volume calculations, three fields should be grouped for length, width, and
height of the box. A single field is all that is required for the sphere. Be sure to set
the field attributes so that the keyboard displayed is a number pad. Add labels to
the view to identify each of the fields for the user.
Position two additional UILabel instances below the box/sphere input fields—these
will be used for the output of the calculations. Be sure to clear the default contents
of these labels, or set them to 0. Using the Attributes Inspector (Command+1), size
all the labels and fields appropriately.
To add the images, drag image views from the Library to the view. Set the contents
of the image views by opening the Attributes Inspector (Command+1) for each view
and choosing the BoxVolume.png or SphereVolume.png images.
Finish the view by adding two buttons: the Calculate button at the bottom of the
view and the invisible button used to hide the keyboard. Remember to expand the
“hide keyboard” button to fill the view and send it to the back. Open the Attributes
Inspector (Command+1) for the button, and choose Custom for the button type to
make the button invisible.
FIGURE 12.19Once again,collect data,calculate, andprovide theresults!

ptg
322 HOUR 12: Implementing Multiple Views with Toolbars and Tab Bars
Connecting Outlets and ActionsConnect the fields, labels, and buttons in Interface Builder to the appropriate outlets
that you created in the VolumeViewController.h file. Control-drag from the File’s
Owner icon in the Document window to each of the input fields and output labels;
choose the appropriate outlet when prompted.
To connect the button controls to the actions, Control-drag from the two UIButton
instances to the File’s Owner, choosing the fitting calculate and hideKeyboard
method when prompted.
Implementing the Volume Calculation LogicSwitch back to Xcode and edit the VolumeViewController.m file. As before, define the
Pi constant at the top of the file:
#define Pi 3.1415926
Next, use the @synthesize directive to create the getters and setters after the
@implementation directive:
@synthesize boxWidth;@synthesize boxHeight;@synthesize boxLength;@synthesize sphereRadius;@synthesize boxResult;@synthesize sphereResult;
Create and edit the calculate method to determine the volume of the two shapes.
For the box, this is length×width×height, and for the sphere, 4/3×Pi×R^3. Use the
results to populate the boxResult and sphereResult labels in the view. Our imple-
mentation of this method is provided in Listing 12.8.
LISTING 12.8-(IBAction)calculate:(id)sender {
float floatBoxResult=[boxWidth.text floatValue]*[boxLength.text floatValue]*[boxHeight.text floatValue];
float floatSphereResult=(4/3)*Pi*[sphereRadius.text floatValue]*[sphereRadius.text floatValue]*[sphereRadius.text floatValue];
NSString *stringBoxResult=[[NSString alloc]initWithFormat:@”%1.2f”,floatBoxResult];
NSString *stringSphereResult=[[NSString alloc]initWithFormat:@”%1.2f”,floatSphereResult];
boxResult.text=stringBoxResult;sphereResult.text=stringSphereResult;[stringBoxResult release];[stringSphereResult release];
[summaryViewController updateTotal];}

ptg
By theWay
Building a Multi-View Tab Bar Application 323
Because only the logic for the calculations has changed, you should refer to thearea view calculation for a detailed description of the methods used here.
Add the hideKeyboard method so that the user can dismiss the onscreen keyboard
by touching the background of the view:
-(IBAction)hideKeyboard:(id)sender {[boxWidth resignFirstResponder];[boxLength resignFirstResponder];[boxHeight resignFirstResponder];[sphereRadius resignFirstResponder];
}
Finally, release the objects in the dealloc method:
- (void)dealloc {[boxWidth release];[boxHeight release];[boxLength release];[sphereRadius release];[boxResult release];[sphereResult release];[super dealloc];
}
Implementing the Summary ViewOf all the views, the summary view is the easiest to implement. This view will pro-
vide a single count of the number of calculations performed (as determined by the
number of times the Calculate button is pressed). Just a single outlet and a single
counter—no problem!
Adding the IBOutlet, Instance Variable, and MethodThe SummaryViewController class will need a single outlet, totalCalculations,
that will be connected to a UILabel in the summary view and used to display the
calculation summary to the user. It will also use a single integer value, calcCount,
to internally track the number of calculations performed.
Finally, the class will implement an instance method updateTotal that will update
the calcCount value. Edit the SummaryViewController.h file to include these
requirements, as demonstrated in Listing 12.9.
LISTING 12.9#import <UIKit/UIKit.h>
@interface SummaryViewController : UIViewController {IBOutlet UILabel *totalCalculations;
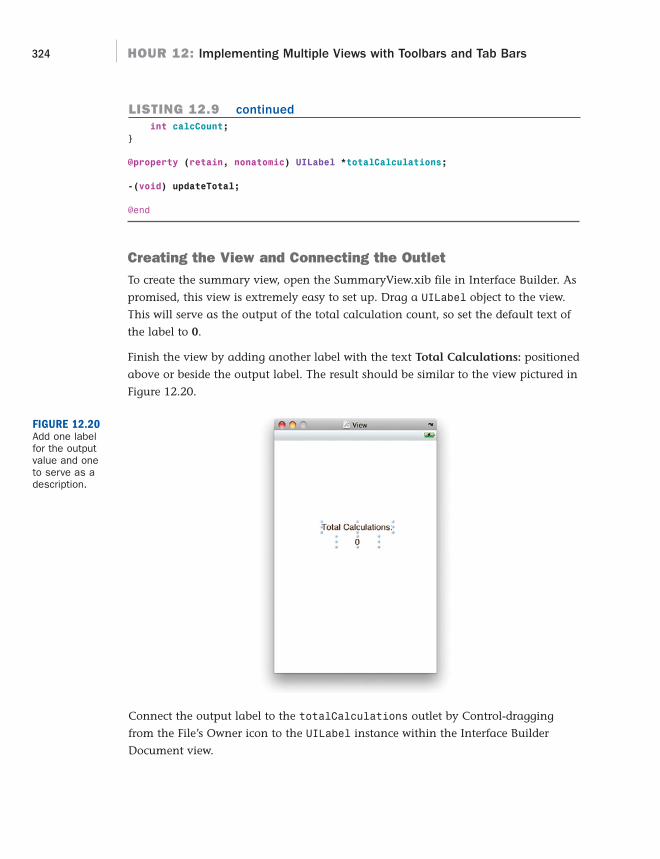
ptg
324 HOUR 12: Implementing Multiple Views with Toolbars and Tab Bars
int calcCount;
}
@property (retain, nonatomic) UILabel *totalCalculations;
-(void) updateTotal;
@end
Creating the View and Connecting the OutletTo create the summary view, open the SummaryView.xib file in Interface Builder. As
promised, this view is extremely easy to set up. Drag a UILabel object to the view.
This will serve as the output of the total calculation count, so set the default text of
the label to 0.
Finish the view by adding another label with the text Total Calculations: positioned
above or beside the output label. The result should be similar to the view pictured in
Figure 12.20.
LISTING 12.9 continued
FIGURE 12.20Add one labelfor the outputvalue and oneto serve as adescription.
Connect the output label to the totalCalculations outlet by Control-dragging
from the File’s Owner icon to the UILabel instance within the Interface Builder
Document view.

ptg
Building a Multi-View Tab Bar Application 325
Connecting the Area, Volume, and Summary ViewsIf you recall, the previous two views call the updateTotal method of the summary
view. For these views to have access to the summaryViewController instance variable,
we must create two additional connections—this time in the MainWindow.xib file.
Open the MainWindow.xib Document window and expand the tab bar controller
hierarchy. Control-drag from the area view controller instance to the summary view.
Choose the summaryViewController outlet, as demonstrated in Figure 12.21.
FIGURE 12.21Connect thesummary viewcontroller to thearea and vol-ume view con-trollers.
Repeat this for the volume view controller. The area and volume view controllers
can now successfully call the updateTotal method.
Implementing the Volume Calculation LogicAll that remains for the TabbedCalculation project is to implement the logic to track
the calculation total and update the summary view. Let’s open the SummaryView
Controller.m file and wrap this up! First use the @synthesize directive to create the
getter/setter for the totalCalculations UILabel:
@synthesize totalCalculations;
Next, add the updateTotal method so that it will increment the calcCount variable
when invoked:
-(void) updateTotal {calcCount++;
}
Now the tough part. Notice that we don’t display the new total in the updateTotal
method? The reason for this is that until the view is displayed, there aren’t any
UILabel values to update, so if we try to update before the view is shown, the count
will be wrong. Subsequent views would work, but initially the displayed result would
be incorrect.

ptg
326 HOUR 12: Implementing Multiple Views with Toolbars and Tab Bars
So how do we get around this? The easiest way is to update the view before it is dis-
played onscreen. At that point in time, we have access to all the objects, so every-
thing will be copacetic. Overriding the viewWillAppear: method will provide us
with the right hook into the display process. Implement the viewWillAppear:
method as follows:
- (void)viewWillAppear:(BOOL)animated {NSString *calcResult=[[NSString alloc] initWithFormat:@”%d”,calcCount];totalCalculations.text=calcResult;[calcResult release];[super viewWillAppear:animated];
}
Nothing here should be a surprise. We format a temporary string using the
calcCount variable, set the totalCalcuations (UILabel) “text” property to the
string, release the string, and pass the method invocation up the chain.
The code isn’t finished until the objects are released, so edit the dealloc method to
release totalCalculations:
- (void)dealloc {[totalCalculations release];
[super dealloc];}
Congratulations! You just completed a tab bar-based multi-view application with
basic inter-view communication! Your experience working with multiple views will
open up a whole new range of applications that you can develop.
Further ExplorationBy now, you should have a good idea of how to implement multiple views and switch
between them either manually or through a tab bar controller. There was quite a bit
of information covered in this past hour, so I recommend reviewing the topics that
we covered and spending some time in the Apple documentation reviewing the class-
es, the properties, and their methods. Inspecting the UI elements in Interface Builder
will give you additional insight into how they can be integrated into your apps.
The toolbar (UIToolbar), for example, can be customized with image-based buttons
rather than the round rectangles we used in the example. Apple provides a wide
range of standard toolbar images/buttons covering everything from audio/video
playback controls to a camera button for starting the built-in camera. If you have a
set of actions that the user should be able to choose from within a view, implement-
ing these with a toolbar will keep your screen free from clutter and provide a con-
venient UI anchor that can be updated from view to view or used across multiple
views (as demonstrated in the first example).
ptg
327Q&A
The tab bar controller (UITabBarController) also offers additional features beyond
what we were able to cover here. If there are too many buttons to be displayed in a
single tab bar, for example, the tab bar controller provides its own “more” view in
the form of a navigation controller (which you’ll learn about in the next hour). This
enables you to expand the user’s options beyond the buttons immediately visible
onscreen. The UITabBarControllerDelegate protocol, which we conformed to, and
the UITabBarDelegate can even implement optional methods to enable the user to
customize the tab bar within the application. You can see this level of functionality
within Apple’s iPod application.
Another area that you will eventually want to review is the loading of multiple
views/view controllers. In these projects, the view controllers were instantiated when
the application was loaded. In small apps, this is fine, but in larger projects with
more complex views, this can add to the load time and potentially uses memory for
views that a user may never select. To get around this, we can programmatically
instantiate a view controller.
Apple Tutorials
MoviePlayer (accessible via the Xcode developer documentation): This exam-
ple demonstrates a complex mult-view interface including a tab bar controller.
AccelerometerGraph (accessible via the Xcode developer documentation): A sim-
ple example that uses a toolbar to choose among multiple functions within an
application.
SummaryIn this hour, you learned how to create applications that extend beyond a single view
and view controller. This will ultimately enable you to create more involved and
meaningful user experiences. You also made use of the toolbar UI element
(UIToolbar) to provide a simple button bar for common user activities within a view.
After creating a multi-view application from scratch, we examined how a tab bar con-
troller (UITabBarController) can handle much of the behind-the-scenes work of
switching between parallel views automatically. With so much time freed up by the tab
bar, we were able to implement a multi-view calculator application that included a tab
bar with images, multiple independent user interfaces, and inter-view communications.
Q&AQ. Why can’t a single view (with appropriate hiding and showing of elements)
do the same thing as multiple views?

ptg
328 HOUR 12: Implementing Multiple Views with Toolbars and Tab Bars
A. Technically, you could accomplish the same thing within a single view, but the com-plexity of maintaining your views, even with the drag-and-drop capabilities ofInterface Builder will quickly become overwhelming in more advanced applications.
Q. Can tab bar be used for the same purpose as a toolbar?
A. No. A tab bar should always be used to switch between similar views. This is itsintended purpose within the Apple UI guidelines. A toolbar, however, can serve amore general role and be used to trigger any number of events that are relevantto the current state of the application.
Workshop
Quiz1. How many methods of the UITabBarControllerDelegate protocol are required
to implement to gain the view-switching functionality?
2. What image should you use in a toolbar for a “rewind” control?
3. What is one way that you can implement communications between multiple
view controllers?
Answers1. None! All the UITabBarControllerDelegate protocol methods are optional.
2. Apple provides preset buttons for many common application activities. Just add abutton bar item (UIButtonBarItem) and use the Interface Builder AttributesInspector to set the identifier.
3. View controllers, like any other objects, can communicate if you add the appro-priate IBOutlets and define the connections in Interface Builder.
Activities1. Update the TabbedCalculation application so that the area and volume views share
user input data. In other words, when a user enters length, width, or radius in thearea view, the corresponding fields should be updated in the volume view.
2. Create a new tab bar application using the provided Apple template. As men-tioned earlier, this template seems to be at odds with itself in terms of the intend-ed development direction. Even so, you can probably save yourself a few key-strokes if you learn to work around the initial configuration.
ptg
HOUR 13
Displaying and NavigatingData Using Table Views
What You’ll Learn in This Hour:. The types of table views available in iOS. How to implement a simple table view and controller. Ways of adding more structure and impact to a table with sections and cell
images. How to use a Navigation-Based Application template to create a hierarchy of
views
So far, our explanation of iPhone development has included typical interface elements:
fields, buttons, dialog boxes, views, and of course, a variety of output mechanisms.
However, what’s missing is the ability to present categorized information in a structured
manner. Everywhere you look (websites, books, applications on your computer), you see
methods for displaying information in an attractive and orderly manner. The iPhone,
given the limited screen real estate, has its own convention to display this type of informa-
tion. To display structured information on the iPhone, you will use a table view. This UI
element, coupled with a navigation controller, gives a clean, easy-to-understand toolset for
building applications that display information by categories and subcategories.
Understanding Table Views and NavigationControllersLet’s begin by understanding what table views are, how they are used, and how they
apply to the Navigation-Based Application template. This hour introduces new informa-
tion and builds upon the past few hour’s lessons.

ptg
330 HOUR 13: Displaying and Navigating Data Using Table Views
TablesLike the other views you’ve seen in this book, a table view (UITable) holds informa-
tion. A table view’s appearance, however, is slightly counterintuitive. Instead of
showing up as a true table (like an Excel worksheet), a table view displays a single
list of cells onscreen. Each cell can be structured to contain multiple pieces of infor-
mation but is still a single unit. In addition, the cells can be broken into sections so
that the clusters of information can be communicated visually. You might, for
example, list computer models by manufacturers or models of the Macintosh by
year. Table views respond to touch events and allow the user to easily scroll up and
down through long lists of information and select individual cells through the help
of a table view controller (UITableViewController).
Types of TablesThere are two basic styles of table views: plain and grouped, demonstrated in
Figures 13.1 and 13.2, respectively. Plain tables lack the clear visual separation of
sections of the grouped tables but are frequently implemented with a touchable
index (like the iPhone contact list). Because of this, they are sometimes called
indexed tables. We will continue to refer to them by the names (plain/grouped)
designated in Interface Builder.
FIGURE 13.1Plain tableslook like simplelists.

ptg
Understanding Table Views and Navigation Controllers 331
Navigation ControllersTables are a great tool for displaying information in lists and enabling a user to
choose from the list. However, tables are rarely used on their own in an iPhone
application. More frequently, they are used in conjunction with a navigation con-
troller (UINavigationController). Navigation controllers provide a simple means
for users to drill down through multiple views of data, as well as to return to where
they started.
You might recognize navigation controllers from many other applications on the
iPhone, such as the Contacts application, where a group of individuals can be cho-
sen, then a specific person, and finally, individual contact details. At any time, the
user can click a button at the top of the view (the UINavigationBar) to return to the
previous level of detail, as demonstrated in Figure 13.3.
FIGURE 13.2Grouped tableshave empha-sized sections.

ptg
332 HOUR 13: Displaying and Navigating Data Using Table Views
Building a Simple Table ViewApplicationTo begin this hour’s tutorials, we’ll create a table that lists the names of flowers
under a heading that describes their colors. When the user touches an entry in the
table, an alert will appear showing the chosen flower name and color. The final
application will look similar to Figure 13.4.
FIGURE 13.3Navigation con-trollers enablesimple drill-down interfaceswithin an appli-cation.
FIGURE 13.4In our first appli-cation, we’ll cre-ate a table thatcan react to auser’s interac-tions.
ptg
Building a Simple Table View Application 333
Implementation OverviewThe skills needed to add table views to your projects are very similar to what you
learned when working with pickers in Hour 11, “Making Multivalue Choices with
Pickers.” A table view is created by an instance of UITableView and classes that
implement the UITableViewDataSource and UITableViewDelegate protocols to
provide the data that the table will display. Specifically, the data source needs to
supply information on the number of sections in the table and the number of rows
in each section. The delegate handles creating the cells within the table and reacting
to the user’s selection.
Unlike the picker, where we implemented the required protocols within a standard
UIViewController, we’ll be creating an instance of UITableViewController, which
conforms to both of the needed protocols. This simplifies our development and keeps
things as streamlined as possible. In a large project with complex data needs, you
may want to create one or more new classes specifically for handling the data.
Preparing the ProjectBegin by creating a new Xcode project named FlowerColorTable using the Window-
Based iPhone Application template.
We will need a new subclass of the UITableViewController class to handle interac-
tions with our table view. To add the new class, complete the following steps:
1. Create a new file in Xcode (File, New File).
2. Within the New File dialog box, select Cocoa Touch Class, UIViewController
subclass, and then check the UITableViewController subclass, as seen in
Figure 13.5. Note that we don’t need a separate XIB file because we’ll be gen-
erating the content of table view programmatically.
3. Click Next.
4. Type FlowerColorTableViewController.m as the filename, and be sure that
Also Create FlowerColorTableViewController.h is selected.
5. Finally, click the Finish button. The new subclass will be added to your project.
The FlowerColorTableViewController.m will include all the method stubs you need to
get your table up and running quickly. In a few minutes, we’ll add an instance of
this new table view controller subclass to the MainWindow.xib file. This will create
an instance of the FlowerColorTableViewController when the application
launches.

ptg
334 HOUR 13: Displaying and Navigating Data Using Table Views
Adding OutletsBefore we can make our connections in Interface Builder, we need to create an outlet
for the application delegate to access the FlowerColorTableViewController that
we’re adding to the system.
Edit FlowerColorTableAppDelegate.h and add a line that imports the FlowerColor
TableViewController interface file and an outlet for the instance of FlowerView
Controller that we will be creating; we’ll call it flowerColorTableViewController for
consistency.
Why do we import the FlowerColorTableViewController.h file? If we didn’t, Xcodewouldn’t “know” what a FlowerColorTableViewController is, and we wouldn’tbe able to declare an instance of it.
The FlowerColorTableAppDelegate.h code should read as shown in Listing 13.1.
LISTING 13.11: #import <UIKit/UIKit.h>2: #import “FlowerColorTableViewController.h”;3:4: @interface FlowerColorTableAppDelegate : NSObject <UIApplicationDelegate> {5: IBOutlet FlowerColorTableViewController *flowerColorTableViewController;
6: UIWindow *window;7: }8:9: @property (nonatomic, retain) IBOutlet UIWindow *window;10:11: @end
FIGURE 13.5Create the filesfor implement-ing a new sub-class ofUITableView-Controller.
Did youKnow?

ptg
Building a Simple Table View Application 335
Lines 2 and 5 are the only additions to the app delegate interface file.
Adding the ViewAfter the view controller has been instantiated, it will need to add its subview to the
application window. Make these implementation changes within the
FlowerColorTableAppDelegate class.
Start by editing application:didFinishLaunchingWithOptions, using the
addSubview method to add the add the flowerColorTableViewController’s view
as a subview to the window:
- (BOOL)application:(UIApplication *)applicationdidFinishLaunchingWithOptions:(NSDictionary *)launchOptions {
// Override point for customization after application launch[window addSubview:flowerColorTableViewController.view];
[window makeKeyAndVisible];
return YES;}
Next, release the table view controller (flowerColorTableViewController) when
the application is finished. Edit the dealloc method to read as follows:
- (void)dealloc {[flowerColorTableViewController release];
[window release];[super dealloc];
}
Although we’ve already added references to a table view controller
(flowerColorTableViewController) in our code, we haven’t created the object yet.
It’s time to open Interface Builder and add an instance of our class.
Adding a Table View and Table View Controller InstanceDouble-click the MainWindow.xib file to open it within Interface Builder. Open the
Library, and drag the Table View Controller icon into the MainWindow.xib file.
Double-click the table view controller within the Interface Builder Document window
(Window, Documents) to show what a sample UITable looks like in Interface
Builder, as shown in Figure 13.6.
Okay, so we’ve added an instance of UITableViewController to the project, but
that’s not quite what we need! The FlowerColorTableViewController class is our
subclass of UITableViewController, so that’s what we want to instantiate and use
in the application.

ptg
336 HOUR 13: Displaying and Navigating Data Using Table Views
FIGURE 13.6The sampleUITable shownby InterfaceBuilder.
By theWay
The UITableViewController instance that you just added includes an instance ofa table view (UITableView), so this is the only object needed in Interface Builder.
Select the Table View Controller icon in the XIB file, and open the Identity Inspector
(Command+4). Edit the class identity to read FlowerColorTableViewController, as
shown in Figure 13.7.
FIGURE 13.7Update theclass identity toFlowerColor-TableView-Controllerwithin theIdentityInspector.

ptg
Building a Simple Table View Application 337
The application will now instantiate our table view controller when it launches, but
the controller still isn’t connected to anything. To connect to the flowerColor
TableViewController outlet created earlier, Control-drag from Flower Color Table
App Delegate to the Flower Color Table View Controller icon. When the Outlets pop-
up window appears, choose flowerColorTableViewController (see Figure 13.8).
FIGURE 13.8Connect theapplicationdelegate to theflowerColor-TableView-Controller.
All the connections are in place for the table view controller and a table view. Switch
back to Xcode, and click Build and Go to test the application. An empty table will
appear. It’s empty, but it’s a table! Next step? Data!
Providing Data to the Table ViewWith all the structural work out of the way, the table is ready to display something. As
mentioned earlier, implementing the required methods for the UITableViewDataSource
and UITableViewDelegate protocols is very similar to creating a picker. For this exam-
ple, we create a table that lists flowers divided into sections by color.
Creating Sample DataTo keep things simple, we’ll only consider two colors: red and blue. We’ll populate
two arrays (redFlowers, blueFlowers) with a few appropriate flower names.
Begin by updating FlowerColorTableViewController.h to include the two
NSMutableArrays we’ll be using:
@interface FlowerColorTableViewController : UITableViewController {NSMutableArray *redFlowers;
NSMutableArray *blueFlowers;
}
Turning to the implementation in FlowerColorTableViewController.m, find the
viewDidLoad method and uncomment it. We will implement this method so that we
have a convenient place to populate the arrays. Add the code in Listing 13.2 to ini-
tialize of the redFlowers and blueFlowers arrays with several flowers in each.

ptg
338 HOUR 13: Displaying and Navigating Data Using Table Views
LISTING 13.2- (void)viewDidLoad {
[super viewDidLoad];redFlowers = [[NSMutableArray alloc]
initWithObjects:@”Gerbera”,@”Peony”,@”Rose”,@”Poppy”,@”Tulip”,@”Anthurium”,@”Anemone”,nil];
blueFlowers = [[NSMutableArray alloc]initWithObjects:@”Hyacinth”,@”Hydrangea”,@”Sea Holly”,@”Phlox”,@”Iris”,@”Bluebell”,@”Cyanus”,nil];
}
As always, make sure that you release the two arrays when finished. Edit the
dealloc method to read as follows:
- (void)dealloc {[redFlowers release];
[blueFlowers release];
[super dealloc];}
As a last step, add constants that we can use to refer to our color sections. At the top
of FlowerColorTableViewController.m, enter the following constant definitions:
#define sectionCount 2#define redSection 0#define blueSection 1
The first constant, sectionCount, is the number of sections that will be displayed in
the table. Because we’re implementing red and blue flower lists, this value is 2. The
next constant, redSection, denotes that the listing of red flowers in the table will be
shown first (section 0), while the third and final constant, blueSection, identifies
that the blue section of flowers will appear second (section 1).
Implementing the Table View Controller Data Source MethodsOur application now has the data it needs to create a table, but it doesn’t yet
“understand” how to get that data into the table view itself. Thankfully, the meth-
ods that a table requires to display information are easy to understand and, more
important, easy to implement. Because this example includes sections (red and
blue), we need to include these three methods in FlowerColorViewController.m as
part of the UITableViewDataSource protocol:
numberofSectionsInTableView: Returns the number of sections within a
given table
tableView:tableViewnumberOfRowsInSection: Returns the number of rows
in a section
ptg
Building a Simple Table View Application 339
tableView:titleForHeaderInSection: Returns a string to be used as the title
for a given section number
The number of sections has already been defined in the constant sectionCount, so
implementing the first method requires nothing more than returning this constant.
Add this code to FlowerColorViewController.m:
- (NSInteger)numberOfSectionsInTableView:(UITableView *)tableView{
return sectionCount;}
The second method requires us to return the number of rows (cells) that will be dis-
played in a given section. Because the rows in each section will be filled with the
strings in the redFlowers and blueFlowers arrays, we can return the count of ele-
ments in each array using the array count method.
Use a switch statement along with the redSection and blueSection constants
that were defined earlier to return the appropriate counts for each of the two arrays.
The final implementation is shown in Listing 13.3. Be sure to add this to
FlowerColorViewController.m.
LISTING 13.3- (NSInteger)tableView:(UITableView *)tableView
numberOfRowsInSection:(NSInteger)section{
switch (section) {case redSection:
return [redFlowers count];case blueSection:
return [blueFlowers count];default:
return 0;}
}
Even though it is impossible for our application to reach a section other than redor blue, it is still good practice to provide a default case to the switch statement.This ensures that even if we haven’t properly identified all of our potential cases,it will still be caught by the default case.
For the third data source method, tableView:titleForHeaderInSection, you can
turn again to the defined constants and a switch statement to very easily return an
appropriate string for a given section number. Implement the method as shown in
Listing 13.4.
By theWay
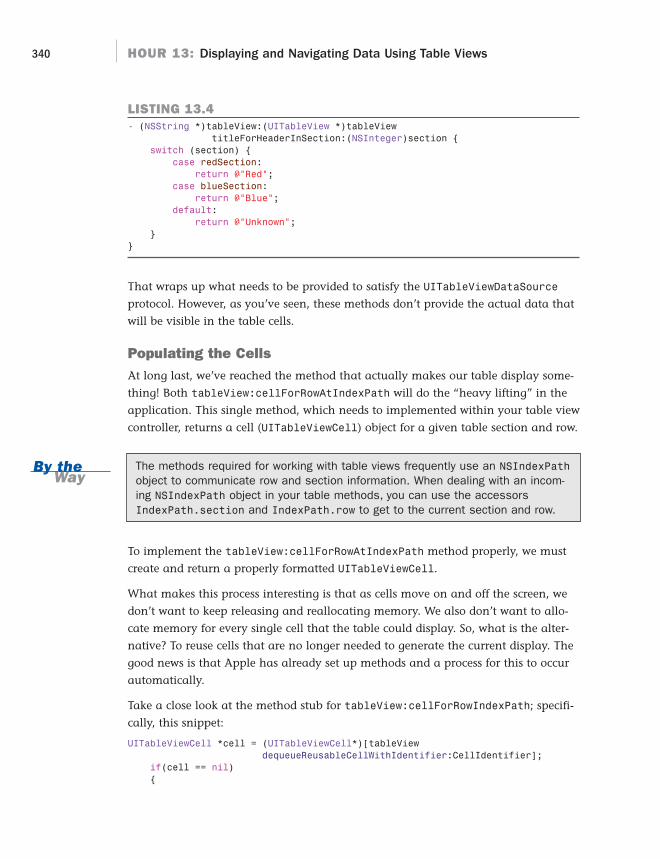
ptg
340 HOUR 13: Displaying and Navigating Data Using Table Views
LISTING 13.4- (NSString *)tableView:(UITableView *)tableView
titleForHeaderInSection:(NSInteger)section {switch (section) {
case redSection:return @”Red”;
case blueSection:return @”Blue”;
default:return @”Unknown”;
}}
That wraps up what needs to be provided to satisfy the UITableViewDataSource
protocol. However, as you’ve seen, these methods don’t provide the actual data that
will be visible in the table cells.
Populating the CellsAt long last, we’ve reached the method that actually makes our table display some-
thing! Both tableView:cellForRowAtIndexPath will do the “heavy lifting” in the
application. This single method, which needs to implemented within your table view
controller, returns a cell (UITableViewCell) object for a given table section and row.
The methods required for working with table views frequently use an NSIndexPathobject to communicate row and section information. When dealing with an incom-ing NSIndexPath object in your table methods, you can use the accessorsIndexPath.section and IndexPath.row to get to the current section and row.
To implement the tableView:cellForRowAtIndexPath method properly, we must
create and return a properly formatted UITableViewCell.
What makes this process interesting is that as cells move on and off the screen, we
don’t want to keep releasing and reallocating memory. We also don’t want to allo-
cate memory for every single cell that the table could display. So, what is the alter-
native? To reuse cells that are no longer needed to generate the current display. The
good news is that Apple has already set up methods and a process for this to occur
automatically.
Take a close look at the method stub for tableView:cellForRowIndexPath; specifi-
cally, this snippet:
UITableViewCell *cell = (UITableViewCell*)[tableViewdequeueReusableCellWithIdentifier:CellIdentifier];
if(cell == nil){
By theWay

ptg
Building a Simple Table View Application 341
cell = [[[UITableViewCell alloc]initWithFrame:CGRectZeroreuseIdentifier:CellIdentifier] autorelease];
}
This code attempts to use the dequeueReusableCellWithIdentifier UITableView
method to find a cell that has already been allocated but that is ready to be reused.
In the event that an appropriate cell can’t be found (such as the first time the table
view loads its cells), a new cell is allocated and initialized. You shouldn’t have any
reason to change this prewritten logic for most table-based applications.
After a cell object has been appropriately allocated, the method must format the cell
for the indexPath object provided. In other words, we must make sure that for
whatever section is specified in indexPath.section and whatever row is passed in
indexPath.row, the cell object is given the necessary label.
To set a cell’s label to a given string, first use textLabel to return the UILabel object
for the cell, then the setText method to update the label. For example:
[[cell textLabel]setText: @”My Cell Label”]
Because we don’t want to set a static string for the cell labels and our labels are
stored in arrays, we need to retrieve the appropriate label string from the array, and
then pass it to setText. Remember that the individual cell row that we need to
return will be provided by indexPath.row, so we can use that to index into our
array. To retrieve the current text label for a member of the redFlowers array, we
can use the following:
[redFlowers objectAtIndex:indexPath.row]
These two lines can be combined into a single statement that sets the cell label text
to the current row of the redFlowers array:
[[cell textLabel] setText:[redFlowers objectAtIndex:indexPath.row]]
This is good, but not quite the solution to all our problems. We need to account for
both the redFlowers and blueFlowers arrays and display each within the appro-
priate section. Once again, we’ll turn to the switch statement to make this happen,
this time using indexPath.section to determine whether the cell should be set to a
member of the redFlowers array or the blueFlowers array.
Your final code, shown in Listing 13.5, should be an addition to the existing
tableView:cellForRowAtIndexPath method stub.

ptg
342 HOUR 13: Displaying and Navigating Data Using Table Views
LISTING 13.51: - (UITableViewCell *)tableView:(UITableView *)tableView2: cellForRowAtIndexPath:(NSIndexPath *)indexPath3: {4: static NSString *CellIdentifier = @”Cell”;5:6: UITableViewCell *cell = (UITableViewCell*)[tableView7: dequeueReusableCellWithIdentifier:CellIdentifier];8: if(cell == nil)9: {10: cell = [[[UITableViewCell alloc]11: initWithFrame:CGRectZero12: reuseIdentifier:CellIdentifier] autorelease];13: }14:15: switch (indexPath.section) {
16: case redSection:
17: [[cell textLabel]
18: setText:[redFlowers objectAtIndex:indexPath.row]];
19: break;
20: case blueSection:
21: [[cell textLabel]
22: setText:[blueFlowers objectAtIndex:indexPath.row]];
23: break;
24: default:
25: [[cell textLabel]
26: setText:@”Unknown”];
27: }
28: return cell;29: }
The moment you’ve been waiting for has arrived! You should now be able to launch
your application and view the result. Congratulations, you’ve just implemented a
table view from scratch!
Reacting to a Row Touch EventA table that displays information is all fine and dandy, but it would be nice if the
user had a means of interacting with it. Unlike other UI elements where we’d need
to define an action and make connections in Interface Builders, we can add some
basic interactivity to the FlowerColorTable application by implementing a method
from the UITableViewDelegate: tableView:didSelectRowAtIndexPath. This
method is called when a table row has been touched by the user. The key to identify-
ing the specific row and section that was selected is indexPath, an instance of
NSIndexPath.
How you react to a row selection event is up to you. For the sake of this example,
we’re going to use UIAlertView to display a message. The implementation, shown
in Listing 13.6, should look very familiar by this point. Add this delegate method to
the FlowerColorTableViewController.m file:
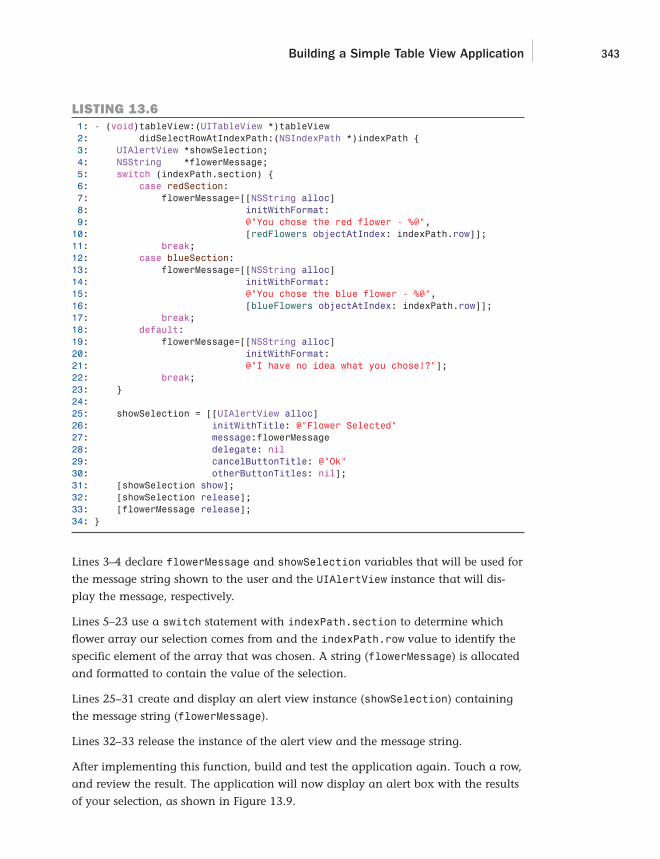
ptg
Building a Simple Table View Application 343
LISTING 13.61: - (void)tableView:(UITableView *)tableView2: didSelectRowAtIndexPath:(NSIndexPath *)indexPath {3: UIAlertView *showSelection;4: NSString *flowerMessage;5: switch (indexPath.section) {6: case redSection:7: flowerMessage=[[NSString alloc]8: initWithFormat:9: @”You chose the red flower - %@”,10: [redFlowers objectAtIndex: indexPath.row]];11: break;12: case blueSection:13: flowerMessage=[[NSString alloc]14: initWithFormat:15: @”You chose the blue flower - %@”,16: [blueFlowers objectAtIndex: indexPath.row]];17: break;18: default:19: flowerMessage=[[NSString alloc]20: initWithFormat:21: @”I have no idea what you chose!?”];22: break;23: }24:25: showSelection = [[UIAlertView alloc]26: initWithTitle: @”Flower Selected”27: message:flowerMessage28: delegate: nil29: cancelButtonTitle: @”Ok”30: otherButtonTitles: nil];31: [showSelection show];32: [showSelection release];33: [flowerMessage release];34: }
Lines 3–4 declare flowerMessage and showSelection variables that will be used for
the message string shown to the user and the UIAlertView instance that will dis-
play the message, respectively.
Lines 5–23 use a switch statement with indexPath.section to determine which
flower array our selection comes from and the indexPath.row value to identify the
specific element of the array that was chosen. A string (flowerMessage) is allocated
and formatted to contain the value of the selection.
Lines 25–31 create and display an alert view instance (showSelection) containing
the message string (flowerMessage).
Lines 32–33 release the instance of the alert view and the message string.
After implementing this function, build and test the application again. Touch a row,
and review the result. The application will now display an alert box with the results
of your selection, as shown in Figure 13.9.

ptg
344 HOUR 13: Displaying and Navigating Data Using Table Views
Creating a Navigation-Based ApplicationWith a basic understanding of table controllers under our belt, we can move on tobuilding an application that combines a table view with a navigation controller. Inthe last example, we created a table view controller and went through all the stepsof adding its view to the Window-Based Application template. This time, we’re goingto take a shortcut and use a handy Apple-created template.
This tutorial will implement an app that displays a list of flowers by color, includingimages for each row. It will also enable the user to touch a specific flower and showa detail view. The detail view will load the content of a Wikipedia article for theselected flower. The finished application will resemble Figure 13.10.
Implementation OverviewThe implementation of a navigation-based application is refreshingly simple. As adeveloper, the navigation controller (UINavigationController) frees you up to focuson writing application functionality. When you want a new view to appear, you sim-ply “push” its view controller onto the navigation controller’s stack. The new controlleris instantiated and added to the stack, and the previous controller gets pushed furtherdown the stack. When (and if) it is time to go back, the navigation controller “pops”the current view off the stack, unloading it. The previous view controller then moves tothe top of the stack, becomes active again, and the user can navigate to another item.
FIGURE 13.9The applicationnow reacts torow selectionand identifiesthe item thatwas selected.

ptg
Creating a Navigation-Based Application 345
To manage the data, we’ll use a combination of NSMutableDictionaries and
NSMutableArrays to store our data in a more easy-to-maintain format. In Hour 14,
“Reading and Writing Application Data,” you’ll learn about persistent data storage,
which will simplify the use of data even more in your future projects.
Time to code!
If you haven’t encountered stacks before, don’t worry; you’ll catch on quickly.Imagine creating a stack of papers on your desk. To add a page to the stack, you“push” it onto the stack. You may only remove the top page at any time, by “pop-ping” it off. The more pages you push onto the stack of paper, the more you’ll have to “pop” off to get back to the first page.
A navigation controller does exactly this but with view controllers/views rather than pieces of paper.
Preparing the ProjectInstead of starting with the Window-Based Application template, start Xcode and cre-
ate a new project using the Navigation-Based Application template. If you want to fol-
low along exactly with what we’re doing, name the project FlowerInfoNavigator.
The Navigation-Based Application template does all the hard work of setting up a navi-
gation controller and an initial table-based view. This is the “heart and soul” of many
navigation-based applications and gives us a great starting point for adding functionality.
FIGURE 13.10Our navigation-based applica-tion will displayflowers, includ-ing thumbnailsand detailsabout specificflower types.
By theWay
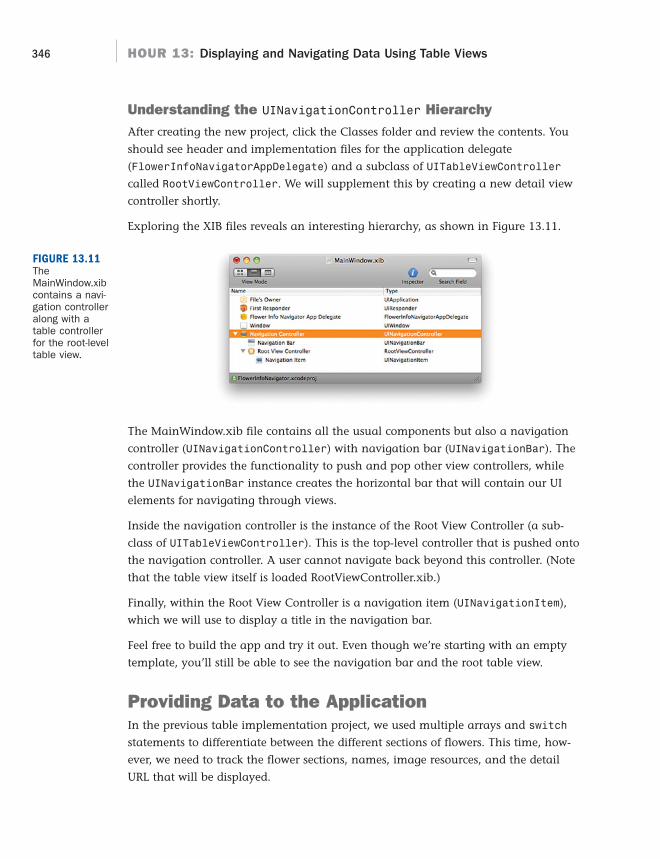
ptg
346 HOUR 13: Displaying and Navigating Data Using Table Views
Understanding the UINavigationController HierarchyAfter creating the new project, click the Classes folder and review the contents. You
should see header and implementation files for the application delegate
(FlowerInfoNavigatorAppDelegate) and a subclass of UITableViewController
called RootViewController. We will supplement this by creating a new detail view
controller shortly.
Exploring the XIB files reveals an interesting hierarchy, as shown in Figure 13.11.
FIGURE 13.11TheMainWindow.xibcontains a navi-gation controlleralong with atable controllerfor the root-leveltable view.
The MainWindow.xib file contains all the usual components but also a navigation
controller (UINavigationController) with navigation bar (UINavigationBar). The
controller provides the functionality to push and pop other view controllers, while
the UINavigationBar instance creates the horizontal bar that will contain our UI
elements for navigating through views.
Inside the navigation controller is the instance of the Root View Controller (a sub-
class of UITableViewController). This is the top-level controller that is pushed onto
the navigation controller. A user cannot navigate back beyond this controller. (Note
that the table view itself is loaded RootViewController.xib.)
Finally, within the Root View Controller is a navigation item (UINavigationItem),
which we will use to display a title in the navigation bar.
Feel free to build the app and try it out. Even though we’re starting with an empty
template, you’ll still be able to see the navigation bar and the root table view.
Providing Data to the ApplicationIn the previous table implementation project, we used multiple arrays and switch
statements to differentiate between the different sections of flowers. This time, how-
ever, we need to track the flower sections, names, image resources, and the detail
URL that will be displayed.

ptg
Creating a Navigation-Based Application 347
Creating the Application Data StructuresWhat the application needs to store is quite a bit of data for simple arrays. Instead,
we’ll make use of an NSMutableArray of NSMutableDictionaries to hold the spe-
cific attributes of each flower and a separate array to hold the names of each sec-
tion. We’ll index into each based on the current section/row being displayed, so no
more switch statements!
To begin, edit RootViewController.h to read as seen in Listing 13.7.
LISTING 13.7#import <UIKit/UIKit.h>
@class DetailViewController;
@interface RootViewController : UITableViewController {DetailViewController *detailViewController;NSMutableArray *flowerData;
NSMutableArray *flowerSections;
}
-(void) createFlowerData;
@end
We’ve added two NSMutableArrays: flowerData and flowerSection. These will
hold our flower and section information, respectively. We’ve also declared a method
createFlowerData, which will be used to add the data to the arrays.
Next, open the RootViewController.m implementation file and add the
createFlowerData method shown in Listing 13.8.
LISTING 13.81: - (void)createFlowerData {2:3: NSMutableArray *redFlowers;4: NSMutableArray *blueFlowers;5:6: flowerSections=[[NSMutableArray alloc] initWithObjects:7: @”Red Flowers”,@”Blue Flowers”,nil];8:9: redFlowers=[[NSMutableArray alloc] init];10: blueFlowers=[[NSMutableArray alloc] init];11:12: [redFlowers addObject:[[NSMutableDictionary alloc]13: initWithObjectsAndKeys:@”Poppy”,@”name”,14: @”poppy.png”,@”picture”,15: @”http://en.wikipedia.org/wiki/Poppy”,@”url”,nil]];16: [redFlowers addObject:[[NSMutableDictionary alloc]17: initWithObjectsAndKeys:@”Tulip”,@”name”,18: @”tulip.png”,@”picture”,
ptg
348 HOUR 13: Displaying and Navigating Data Using Table Views
19: @”http://en.wikipedia.org/wiki/Tulip”,@”url”,nil]];20:21: [blueFlowers addObject:[[NSMutableDictionary alloc]22: initWithObjectsAndKeys:@”Hyacinth”,@”name”,23: @”hyacinth.png”,@”picture”,24: @”http://en.wikipedia.org/wiki/Hyacinth_(flower)”,25: @”url”,nil]];26: [blueFlowers addObject:[[NSMutableDictionary alloc]27: initWithObjectsAndKeys:@”Hydrangea”,@”name”,28: @”hydrangea.png”,@”picture”,29: @”http://en.wikipedia.org/wiki/Hydrangea”,30: @”url”,nil]];31:32: flowerData=[[NSMutableArray alloc] initWithObjects:33: redFlowers,blueFlowers,nil];34:35: [redFlowers release];36: [blueFlowers release];37: }
Don’t worry if you don’t understand what you’re seeing; an explanation is definitelyin order! The createFlowerData method creates two arrays: flowerData andflowerSections.
The flowerSections array is allocated and initialized in lines 6–7. The sectionnames are added to the array so that their indexes can be referenced by sectionnumber. For example, Red Flowers is added first, so it is accessed by index (andsection number!) 0, Blue Flowers is added second and will be accessed throughindex 1. When we want to get the label for a section, we can just reference it as[flowerSections objectAtIndex:section].
The flowerData structure is a bit more complicated. As with the flowerSectionsarray, we want to be able to access information by section. We also want to be ableto store multiple flowers per section and multiple pieces of data per flower. So howcan we get this done?
First, let’s concentrate on the individual flower data within each section. Lines 3–4define two NSMutableArrays: redFlowers and blueFlowers. These need to be popu-lated with each flower. Lines 12–30 do just that; the code allocates and initializes anNSMutableDictionary with key/value pairs for the flower’s name (name), image file(picture), and Wikipedia reference (url) and inserts it into each of the two arrays.
Wait a second, doesn’t this leave us with two arrays when we wanted to consolidateall of the data into one? Yes, but we’re not done. Lines 32–33 create the finalflowerData NSMutableArray using the redFlowers and blueFlowers arrays. Whatthis means for our application is that we can reference the red flower array as[flowerData objectAtIndex:0] and [flowerData objectAtIndex:1] (corre-sponding, as we wanted, to the appropriate table sections).
LISTING 13.8 continued
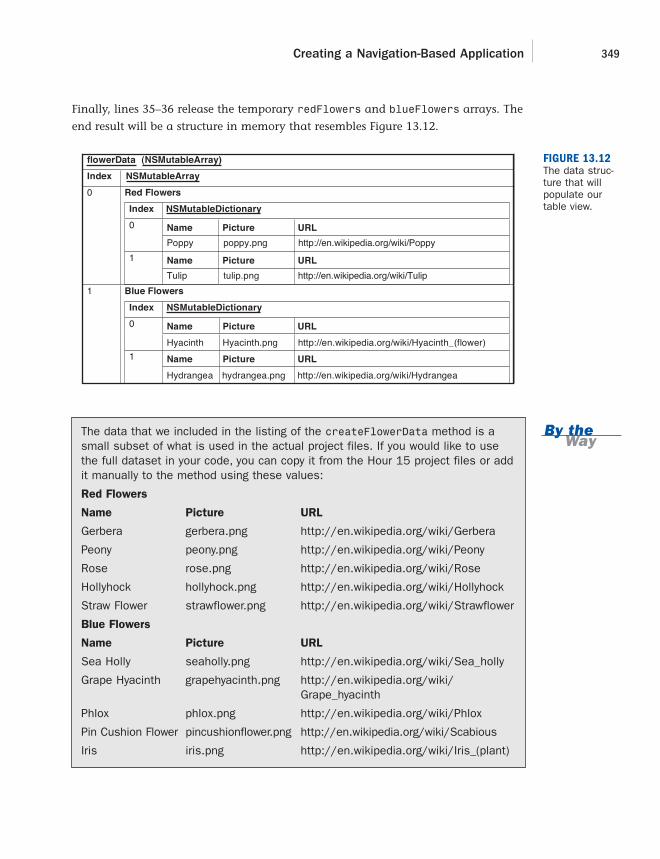
ptg
Creating a Navigation-Based Application 349
Finally, lines 35–36 release the temporary redFlowers and blueFlowers arrays. The
end result will be a structure in memory that resembles Figure 13.12.
flowerData (NSMutableArray)
Index NSMutableArray
0 Red Flowers
Index NSMutableDictionary
Name Picture URL 0
Poppy poppy.png http://en.wikipedia.org/wiki/Poppy
Name Picture URL 1
Tulip tulip.png http://en.wikipedia.org/wiki/Tulip
1 Blue Flowers
Index NSMutableDictionary
Name Picture URL 0
Hyacinth Hyacinth.png http://en.wikipedia.org/wiki/Hyacinth_(flower)
Name Picture URL 1
Hydrangea hydrangea.png http://en.wikipedia.org/wiki/Hydrangea
FIGURE 13.12The data struc-ture that willpopulate ourtable view.
By theWay
The data that we included in the listing of the createFlowerData method is asmall subset of what is used in the actual project files. If you would like to usethe full dataset in your code, you can copy it from the Hour 15 project files or addit manually to the method using these values:
Red Flowers
Name Picture URL
Gerbera gerbera.png http://en.wikipedia.org/wiki/Gerbera
Peony peony.png http://en.wikipedia.org/wiki/Peony
Rose rose.png http://en.wikipedia.org/wiki/Rose
Hollyhock hollyhock.png http://en.wikipedia.org/wiki/Hollyhock
Straw Flower strawflower.png http://en.wikipedia.org/wiki/Strawflower
Blue Flowers
Name Picture URL
Sea Holly seaholly.png http://en.wikipedia.org/wiki/Sea_holly
Grape Hyacinth grapehyacinth.png http://en.wikipedia.org/wiki/Grape_hyacinth
Phlox phlox.png http://en.wikipedia.org/wiki/Phlox
Pin Cushion Flower pincushionflower.png http://en.wikipedia.org/wiki/Scabious
Iris iris.png http://en.wikipedia.org/wiki/Iris_(plant)
ptg
350 HOUR 13: Displaying and Navigating Data Using Table Views
Populating the Data StructuresThe createFlowerData method is now ready for use. We can call it from within the
RootViewController’s viewDidLoad method. Because an instance of the
RootViewController class is calling one of its own methods, it is invoked as [self
createFlowerData]:
- (void)viewDidLoad {[self createFlowerData];[super viewDidLoad];
}
Remember, we need to release the flowerData and flowerSections when we’re
done with them. Be sure to add the appropriate releases to the dealloc method:
- (void)dealloc {[flowerData release];
[flowerSections release];
[super dealloc];}
Adding the Image ResourcesAs you probably noticed when entering the data structures, the application refer-
ences images that will be placed alongside the flower names in the table. In the proj-
ect files provided online, find the Flowers folder, select all the images, and drag them
into your Xcode resources folder for the project. If you want to use your own graph-
ics, size them at 100x75 pixels (and 200x150 for @2x iPhone 4 images), and make
sure the names of the images stored with the picture NSMutableDictionary key
match what you add to your project.
Creating the Detail ViewThe next task in developing the application is building the detail view and view con-
troller. This view has a very simple purpose: It displays a URL in an instance of a
UIWebView. We automatically gain the ability to navigate back to the previous view
through the project’s navigation controller, so we can focus solely on designing this view.
Creating a New View ControllerBegin by creating a new view controller called FlowerDetailViewController using
the UIViewController subclass, as follows:
1. In Xcode, choose File, New File, Cocoa Touch Class, and then the
UIViewController subclass.
2. Be sure to click the With XIB for user interface check box.

ptg
Creating a Navigation-Based Application 351
3. Click Next.
4. Make sure that Also Create FlowerDetailViewController.m is selected.
5. Click Finish.
The implementation, header, and associated XIB for the new view controller will be
added to the project.
Adding Outlets and PropertiesThe objects that we’ll need to manipulate within the new detail view are very simple.
There will need to be an outlet for accessing the UIWebView instance that we’ll add to
the XIB in a bit, as well as a place for storing and accessing the URL that the web
view will display. We’ll call these detailWebView and detailURL, respectively. Edit
the FlowerDetailViewController header to read as shown in Listing 13.9.
LISTING 13.9#import <UIKit/UIKit.h>
@interface FlowerDetailViewController : UIViewController {IBOutlet UIWebView *detailWebView;
NSURL *detailURL;
}
@property (nonatomic, retain) NSURL *detailURL;
@property (nonatomic, retain) UIWebView *detailWebView;
@end
Remember to clean up by releasing the detailWebView and detailURL objects in
the FlowerDetailViewController.m implementation file’s dealloc method:
- (void)dealloc {[detailWebView release];
[detailURL release];
[super dealloc];}
With this work out of the way, we can now implement the logic of the
FlowerDetailViewController itself.
Implementing the Detail View Controller LogicSurprisingly, the implementation of FlowerDetailViewController is perhaps the
easiest undertaking we have in this hour. When the view is loaded, the UIWebView
instance (detailWebView) should be instructed to load the web address stored within
the NSURL object (detailURL).

ptg
352 HOUR 13: Displaying and Navigating Data Using Table Views
You might remember from Hour 9, “Using Advanced Interface Objects and Views,”
that loading a web page in a web view is accomplished with the loadRequest
method. This method takes an NSURLRequest object as its input parameter. Because
we only have an NSURL (detailURL), we also need to use the NSURLRequest class
method requestWithURL to return the appropriate object type. A single line of code
takes care of all of this:
[detailWebView loadRequest:[NSURLRequest requestWithURL:detailURL]]
Add this to the viewDidLoad method in FlowerDetailViewController.m:
- (void)viewDidLoad {[detailWebView loadRequest:[NSURLRequest requestWithURL:detailURL]];
[super viewDidLoad];}
Adding the Web View in Interface BuilderOpen the FlowerDetailViewController.xib in Interface Builder. You should see a sin-
gle view in the Document window. We could replace this view entirely with a web
view, but by implementing the web view as a subview, we leave ourselves a canvas
for expanding the view’s interface elements in the future.
Add a web view by opening the library (Tools, Library) and dragging a web view
(UIWebView) onto the existing View icon. It should now appear as a subview within
the view (see Figure 13.13).
FIGURE 13.13Add a web viewobject as a sub-view of theexisting view.

ptg
Creating a Navigation-Based Application 353
If you drag the web view into the view window itself, rather than onto the icon, itwill not expand to take up the full size of the view. You’re certainly welcome to dothis, but you’ll need to resize the web view manually.
Connect the web view to the detailWebView outlet by Control-dragging from the
File’s Owner icon to the Web View icon in the Document window. When prompted,
choose the detailWebView outlet, as demonstrated in Figure 13.14.
Did youKnow?
FIGURE 13.14Connect thefile’s owner tothe detailWebView outlet.
Congratulations, the detail view is now finished! All that remains is providing data
to the root view table controller and invoking the detail view through the naviga-
tion controller.
By default, the web view does not scale pages to fit the iPhone screen. You canquickly change this behavior by selecting the web view instance in InterfaceBuilder, then opening the web view Attributes Inspector (Command+1). Check theScale Page to Fit option in the Web View Settings group.
Implementing the Root View Table ControllerIn the project template we’re working with, Apple has provided a table view con-
troller called RootViewController for us to build from.
Even though we’re using a navigation controller, very little changes between how we
implemented our initial table view controller and how we will be building this one.
Once again, we need to satisfy the appropriate data source and delegate protocols to
provide an interface to our data. We also need to react to a row touch to drill down
to our detail view.
Did youKnow?
ptg
354 HOUR 13: Displaying and Navigating Data Using Table Views
The biggest change to the implementation will be how we access our data. Because
we’ve built a somewhat complex structure of arrays of dictionaries, we need to make
absolutely sure we’re referencing the data that we intend to.
Creating the Table View Data Source MethodsInstead of completely rehashing the implementation details, let’s just review how we
can return the needed information to the various methods.
As with the previous example, start by implementing the data source methods with-
in RootViewController.m. Remember, these methods
(numberOfSectionsInTableView, tableView:numberOfRowsInSection, and
tableView:titleforHeaderInSection) must return the number of sections, the
rows within each section, and the titles for the sections, respectively.
To return the number of sections, we just need the count of the elements in the
flowerSections array:
[flowerSections count]
Retrieving the number of rows within a given section is only slightly more difficult.
Because the flowerData array contains an array for each section, we must first
access the appropriate array for the section, and then return its count:
[[flowerData objectAtIndex:section] count]
Finally, to provide the label for a given section via the tableView:
titleforHeaderInSection method, the application should index into the
flowerSections array by the section value and return the string at that location:
[flowerSections objectAtIndex:section]
Edit the appropriate methods in RootViewController.m so that they return these
values.
Populating the Cells with Text and ImagesThe final mind-bending hurdle that we need to deal with is how to provide actual
content to the table cells. As before, this is handled through the
tableView:cellForRowAtIndexPath, but unlike the previous example, we need to
dig down into our data structures to retrieve the correct results.
Recall that we will be setting the cell’s label using an approach like this:
[[cell textLabel]setText:@”My Cell Label”]

ptg
Creating a Navigation-Based Application 355
In addition to the label, however, we also need to set an image that will be dis-
played alongside the label in the cell. Doing this is very similar to setting the label:
[[cell imageView] setImage:[UIImage imageNamed:@”MyPicture.png”]]
To use our own labels and images, however, things get a bit more complicated. Let’s
quickly review the three-level hierarchy of our flowerData structure:
flowerData(NSMutableArray)? → NSMutableArray → NSMutableDictionary
The first level, the top flowerData array, corresponds to the sections within the
table. The second level, another array contained within the flowerData array, corre-
sponds to the rows within the section, and, finally, the NSMutableDictionary pro-
vides the individual pieces of information about each row. Refer to Figure 13.12 if
you’re still having trouble picturing how information is organized.
So, how do we get to the individual pieces of data that are three layers deep? By first
using the section value to return the right array, and then, from that, using the row
value to return the right dictionary, and then finally, using a key to return the cor-
rect value from the dictionary.
For example, to get the value that corresponds to the “name” key for a given section
and row, we can write the following:
[[[flowerData objectAtIndex:indexPath.section] objectAtIndex: indexPath.row] ➥objectForKey:@”name”]
Likewise, we can return the image file with this:
[[[flowerData objectAtIndex:indexPath.section] objectAtIndex: indexPath.row] ➥objectForKey:@”picture”]
Substituting these values into the statements needed to set the cell label and image,
we get the following:
[[cell textLabel] setText:[[[flowerData objectAtIndex:indexPath.section] ➥objectAtIndex: indexPath.row] objectForKey:@”name”]]
and
[[cell imageView] setImage:[UIImage imageNamed:[[[flowerData➥objectAtIndex:indexPath.section] objectAtIndex: indexPath.row] ➥objectForKey:@”picture”]]]
Add these lines to the tableView:cellForRowAtIndexPath method before the
statement that returns the cell.
As a final decoration, the cell can display an arrow on the right side to show that it

ptg
356 HOUR 13: Displaying and Navigating Data Using Table Views
can be touched to drill down to a detail view. This UI element is called a “disclosure
indicator” and can be added simply by setting the accessoryType property for the
cell object:
cell.accessoryType=UITableViewCellAccessoryDisclosureIndicator
Add this line after your code to set the cell text and image. The table display setup is
now complete.
The full method implementations are left out of this section because, with theexception of how values are accessed, the code is nearly identical to the previousexample. Remember that you can always review the full implementations in thehour’s project files.
Of course, the detail view doesn’t yet know how to respond to the selection of a
flower in the root table view, but we’ll get there shortly.
Handling Navigation EventsIn the previous example application, we handled a touch event with the
tableView:didSelectRowAtIndexPath method and displayed an alert to the user.
This time, our implementation will need to create an instance of the
FlowerDetailViewController and set its detailURL property to the URL that we
want the view to display. Finally, the new view controller must be pushed onto the
navigation controller stack.
Putting all these pieces together, the result is shown in Listing 13.10.
LISTING 13.101: - (void)tableView:(UITableView *)tableView2: didSelectRowAtIndexPath:(NSIndexPath *)indexPath {3:4: FlowerDetailViewController *flowerDetailViewController =5: [[FlowerDetailViewController alloc] initWithNibName:6: @”FlowerDetailViewController” bundle:nil];7: flowerDetailViewController.detailURL=8: [[NSURL alloc] initWithString:9: [[[flowerData objectAtIndex:indexPath.section] objectAtIndex:10: indexPath.row] objectForKey:@”url”]];11: flowerDetailViewController.title=12: [[[flowerData objectAtIndex:indexPath.section] objectAtIndex:13: indexPath.row] objectForKey:@”name”];14: [self.navigationController pushViewController:15: flowerDetailViewController animated:YES];16: [flowerDetailViewController release];17: }
By theWay
ptg
Creating a Navigation-Based Application 357
The navigationController instance that we’re using in this code was created bythe application template and is defined in the MainWindow.xib and application del-egate files. You don’t need to write any code at all to initialize or allocate it.
Lines 4–6 allocate an instance of the FlowerDetailViewController and load the
FlowerDetailViewController.xib file. Lines 7–8 set the detailURL property of the new
detail view controller to the value of the dictionary key for the selected cell’s section
and row.
The detail view controller instance, flowerDetailViewController, is now prepped
and ready to be displayed. In lines 11–13, it is pushed on the navigation controller
stack. Setting the animated parameter to “YES” implements a smooth sliding action
onscreen.
You might be wondering: If we push a view controller onto the stack, shouldn’t wehave to pop it back off somewhere? The answer is no. Although there are meth-ods available within the UINavigationController class that can be used to popthe view controllers off the stack, you get this basic functionality for free. As youpush view controllers onto the navigation controller, the controller will automatical-ly update the navigation bar to display a back button that is set to the title of theprevious view controller. When the user touches this button, the top view controlleris automatically popped off.
Tweaking the Table UIBefore we can call this application “done,” we need to make a few tweaks to the inter-
face. First, if you’ve run the app already, you know that the table view row just isn’t
large enough to accommodate the images that were provided. Second, we need to set
a title to be displayed in the navigation bar for the initial table view. This title will
then be used to create the label in the “back” button on the subsequent detail view.
Changing the Row SizeTo update the height of the rows in the table, open the XIB file that defines the table
view (RootViewController.xib) in Interface Builder. Open the Document window and
make sure that the Table View icon is selected. Press Command+3 to open the Size
Inspector window. Update the row height size to at least 100 points, as shown in
Figure 13.15.
By theWay
By theWay

ptg
358 HOUR 13: Displaying and Navigating Data Using Table Views
Setting the Table StyleSo far, both tables we’ve created use the “plain” style. To change to the more round-
ed “grouped” style, within the RootViewController.xib, select the Table View icon,
and open the Attributes Inspector. Use the Style drop-down menu to switch between
the Plain and Grouped options.
If you set sizing information for one style of table, and then change the style, yourprevious size selections will be lost.
Setting a Navigation Bar TitleThe title that appears in the navigation bar usually comes from a few different
places. If a UINavigationItem object exists in a view controller, the title property of
that object will appear as the label in the center of the navigation bar. If no
UINavigationItem exists within the view controller, the controller’s title property
is used as the navigation bar’s center label.
In this example application, the MainWindow.xib contains an instance of the table
view controller (RootViewController) and a UINavigationItem. To set a title that
will appear in the navigation bar when the table view is present (and also in the back
button of the detail view), open the MainWindow.xib and select the Navigation Item
from the Document window. With the item selected, press Command+1 to open the
Attributes Inspector. Enter an appropriate title into the Title field, such as Flower List.
Make sure you save all of your files because you are finished! Build and run the
FlowerInfoNavigator application—try tapping through a few flowers. With a reason-
ably minor amount of coding, we’ve created what feels like a very complex iPhone
application!
FIGURE 13.15Update the rowheight to fit thesize of theimages that willbe displayed.
By theWay

ptg
Summary 359
Further ExplorationTable views are useful but substantially complex beasts. In the span of an hour,
you’ve learned how to create a table view from scratch within an application and
how to use a table view alongside a navigation controller. These are important first
steps, but they’re not the “whole story.”
To continue your experience in working with tables, I suggest focusing on a few
important enhancements.
The first is expanding what you can do with table cells. Review the property list for
UITableViewCell. In addition to the TextLabel and ImageView properties, you can
make numerous other customizations—including setting backgrounds, detail labels,
and much, much more. In fact, if the default table cell options do not provide every-
thing you need, Interface Builder supports visual customization of table cells by cre-
ating a customized instance of UITableViewCell.
Once you have a handle on the presentation of the table views, you can increase
their functionality by implementing a few additional methods in your table view
controller. Read the reference for UITableViewController, UITableViewDataSource,
and UITableViewDelegate. You can quickly enable editing functionality for your
table by implementing a handful of additional methods. You’ll need to spend some
time thinking of what editing controls you want to use and what the intended result
will be, but the basic functionality of deleting, reordering, and inserting rows (along
with the associated graphic controls you’re used to seeing in iPhone applications) will
come along “for free” as you implement the methods.
Apple Tutorials
Customizing table cells and views – TableViewSuite (accessible via the Xcode
developer documentation): The TableViewSuite tutorial is an excellent look at
how table views can be customized to suit a particular application.
Editing table cells – EditableDetailView (accessible via the Xcode developer
documentation): The EditableDetailView tutorial implements row editing,
including inserting, reordering, and deleting, within a table view.
SummaryThis hour introduced one of the most important iPhone interface elements—the
table view—along with the associated table view controller. Table views enable users
to sort through large amounts of information in an orderly manner. We covered
how table cells are populated, including text and images, as well as the mechanism
by which cell selection occurs.

ptg
360 HOUR 13: Displaying and Navigating Data Using Table Views
We also explored the role of navigation controllers in managing a hierarchy of dif-
ferent views, making drill-down functionality simple.
Coming away from this chapter, you should feel comfortable working with tables in
your applications and building basic drill-down apps using a navigation controller.
Q&AQ. What is the most efficient way to provide data to a table?
A. You’ve almost certainly come to the conclusion that there has got to be a bet-
ter way to provide data to complex views rather than manually defining all
the data within the application itself. Starting in Hour 14, you’ll learn about
persistent data and how it can be used within applications. This will become
the preferred way of working with large amounts of information as you move
forward.
Q. Can a table row have more than a single cell?
A. No, but a customized cell can be defined that presents information in a more
flexible manner than the default cell. As described in the “Further
Exploration” section, custom cells can be defined in Interface Builder through
the UITableViewCell class.
Q. Do navigation controllers have to be used with tables?
A. No. A navigation controller can push and pop any view controller and associ-
ated view. Tables, however, are commonly associated with navigation con-
trollers because of the drill-down functionality that can be created.
Workshop
Quiz1. When working with the NSIndexPath object in the table view controller meth-
ods, which two properties will come in handy?
2. Which two protocols, both conformed to by the UITableViewController
class, are required for a table view to be displayed?
3. Where does the title for a navigation bar come from?

ptg
Workshop 361
Answers1. The section property will identify the section within the table, while the row
property refers to the specific cell inside of that section.
2. A table view requires methods defined within the UITableViewDataSource
and UITableViewDelegate protocols in order to display information.
3. If a view controller contains a navigation item (UINavigationItem), the title
property of the navigation item will be used. If it doesn’t, the view controller’s
title property will be substituted instead.
Activities1. In the navigation-based application, the navigation bar does not display a
title on the detail view. Update the application so that the detail view shows
the name of the selected flower in the navigation bar of the detail view. You
can use code very similar to what sets the detailURL property of the view.
2. A navigation controller can handle much more than two views in its stack.
Use what you’ve learned about navigation controllers to create a three-level
(or more) hierarchy of views.
3. Use Interface Builder to create and customize an instance of the
UITableViewCell class.

ptg
This page intentionally left blank

ptg
HOUR 14
Reading and WritingApplication Data
What You’ll Learn in This Hour:. Good design principles for using application preferences. How to store application preferences and read them later. How to expose your application’s preferences to the Settings application. How to store data from your applications
Most substantial applications, whether on the computer or the iPhone, allow users to cus-
tomize their operation to their own needs and desires. You have probably cursed an appli-
cation before, only to later find a setting that removes the unholy annoyance, and you
probably have a favorite application that you’ve customized to your exact needs so that it
fits like a well-worn glove. In this hour, you’ll learn how your application can use applica-
tion preferences to allow the user to customize its behavior and how, in general, applica-
tions can store data on the iPhone.
Application preferences is Apple’s chosen term, but you may be morefamiliar with other terms such as settings, user defaults, user prefer-ences, or options. These are all essentially the same concept.
Design ConsiderationsThe dominant design aesthetic of iOS applications is for simple, single-purpose applica-
tions that start fast and do one task quickly and efficiently. Being fun, clever, and beauti-
ful is an expected bonus. How do application preferences fit into this design view?
By theWay

ptg
364 HOUR 14: Reading and Writing Application Data
You want to limit the number of application preferences by creating opinionated
software. There might be three valid ways to accomplish a task, but your applica-
tion should have an opinion on the one best way to accomplish it, and then should
implement this one approach in such a polished and intuitive fashion that your
users instantly agree it’s the best way. Leave the other two approaches for someone
else’s application. It may seem counterintuitive, but there is a much bigger market
for opinionated software than for applications that try to please everyone.
This might seem like odd advice to find in a chapter about application preferences,
but I’m not suggesting that you avoid preferences altogether. There are some very
important roles for application preferences. Use preferences for the choices your
users must make, rather than for all the choices they could possibly make. For
example, if you are connecting to the application programming interface (API) of a
third-party web application on behalf of your user, and the user must provide cre-
dentials to access the service, this is something the user must do, not just something
users might want to do differently, so it is a perfect case for storing as an application
preference.
Another strong consideration for creating an application preference is when a pref-
erence can streamline the use of your application; for example, when users can
record their default inputs or interests so that they don’t have to make the same
selections repeatedly. You want user preferences that reduce the amount of onscreen
typing and taps that it takes to achieve the user’s goal for using your application.
After you decide a preference is warranted, you have an additional decision to
make. How will you expose the preference to the user? One option is to make the
preference implicit based on what the user does while using the application. An
example of an implicitly set preference is returning to the last state of the applica-
tion. For example, suppose a user flips a toggle to see details. When the user next
uses the application, the same toggle should be flipped and showing details.
Another option is to expose your application’s preference in Apple’s Settings applica-
tion, shown in Figure 14.1. Settings is an application built in to the iPhone. It pro-
vides a single place to customize the iPhone. Everything from the hardware, built-in
applications from Apple, and third-party applications can be customized from the
Settings application.
A settings bundle lets you declare the user preferences of your application so that
the Settings application can provide the user interface for editing those preferences.
There is less coding for you to do if you let Settings handle your application’s prefer-
ences, but less coding is not always the dominant consideration. A preference that is
set once and rarely changes, such as the username and password for a web service,
is ideal for configuring in Settings. In contrast, an option that the user might change

ptg
WatchOut!
WatchOut!
Design Considerations 365
with each use of your application, such as the difficulty level in a game, is not
appropriate for Settings.
FIGURE 14.1The Settingsapplication.
Users will be annoyed if they have to repeatedly exit your application, launchSettings to change the preference, and then relaunch your application. Decidewhether each preference belongs in the Settings application or in your own appli-cation, but it’s generally not a good idea to put them in both.
Also keep in mind that the user interface that Settings can provide for editing your
application preferences is limited. If a preference requires a custom interface compo-
nent or custom validation code, it can’t be set in Settings, and it must be set from
within your application.
We don’t strictly heed every aspect of this design advice because we are creatingan application whose main purpose is to teach us about application preferencesrather than to be an example of excellent product design.

ptg
366 HOUR 14: Reading and Writing Application Data
Reading and Writing User DefaultsApplication preferences is Apple’s name for the overall preference system by which
applications can customize themselves for the user. The application preferences sys-
tem takes care of the low-level tasks of persisting preferences to the device, keeping
each application’s preferences separate from other applications’ preferences, and
backing up application preferences to the computer via iTunes so that users won’t
lose their preferences in case the device needs to be restored. Your interaction with
the application preferences system is through an easy-to-use API that consists main-
ly of the NSUserDefaults singleton class.
The NSUserDefaults class works similarly to the NSDictionary class. The main dif-
ferences are that NSUserDefaults is a singleton and is more limited in the types of
objects it can store. All the preferences for your application are stored as key/value
pairs in the NSUserDefaults singleton.
A singleton is just an instance of the Singleton pattern, and a pattern in program-ming is just a common way of doing something. The Singleton pattern is fairlycommon in iOS, and it is a technique used to ensure that there is only oneinstance (object) of a particular class. Most often it is used to represent a serviceprovided to your program by the hardware or operating system.
Creating Implicit PreferencesIn our first example, we will create a (admittedly ridiculous) flashlight application.
The application will have an on/off switch and will shine a light from the screen
when it is on. A slider will control the brightness level of the light. We will use pref-
erences to return the flashlight to the last state the user left it in.
Setting Up the ProjectCreate a new View-Based iPhone Application in Xcode and call it Flashlight. Click the
FlashlightViewController.h file in the Classes group and add outlets for our on/off
switch, brightness slider, and light source. Add an action called setLightSourceAlpha
that will respond when toggling the switch or sliding the brightness control. The
FlashlightViewController.h file should read as shown in Listing 14.1.
LISTING 14.1#import <UIKit/UIKit.h>
@interface FlashlightViewController : UIViewController {
IBOutlet UIView *lightSource;
Did youKnow?

ptg
Reading and Writing User Defaults 367
IBOutlet UISwitch *toggleSwitch;
IBOutlet UISlider *brightnessSlider;
}
@property (nonatomic, retain) UIView *lightSource;
@property (nonatomic, retain) UISwitch *toggleSwitch;
@property (nonatomic, retain) UISlider *brightnessSlider;
-(IBAction) setLightSourceAlphaValue;
@end
Next, edit the FlashlightViewController.m implementation file and add correspon-
ding @synthesize directives for each property, following the @implementation line:
@synthesize lightSource;@synthesize toggleSwitch;@synthesize brightnessSlider;
To make sure we don’t forget to clean up the retained objects later, edit the dealloc
method to release the lightSource, toggleSwitch, and brightnessSlider objects:
- (void)dealloc {[lightSource release];
[toggleSwitch release];
[brightnessSlider release];
[super dealloc];}
Now, let’s lay out the UI for the flashlight.
Creating the InterfaceOpen Interface Builder by double-clicking the FlashlightViewController.xib file in the
Resources group.
1. In Interface Builder, click the empty view and open the Attributes Inspector
(Command+1).
2. Set the background color of the view to black. (We want our flashlight to have
a black background.)
3. Drag a UISwitch from the Library onto the bottom left of the view.
4. Drag a UISlider to the bottom right of the view. Size the slider to take up all
the horizontal space not used by the switch.
5. Finally, add a UIView to the top portion of the view. Size it so that it is full
width and takes up all the vertical space above the switch and slider. Your
view should now look like Figure 14.2.

ptg
368 HOUR 14: Reading and Writing Application Data
Connect the Outlets and ActionThe code we will write to operate the flashlight and deal with the application prefer-
ences will need access to the switch, slider, and light source. Control-drag from the
File’s Owner icon and connect the lightSource IBOutlet to the new UIView, the
toggleSwitch IBOutlet to the UISwitch, and the brightnessSlider IBOutlet to
the UISlider.
In addition to being able to access the three controls, our code needs to respond to
changes in the toggle state of the switch and changes in the position of the slider. Select
the UISwitch and open the Connections Inspector (Command+2). Connect the
UISwitch to the setLightSourceAlphaValue method by dragging from the circle
beside the Value Changed event to the File’s Owner icon. Choose setLightSource
AlphaValue when prompted to make the connection, as seen in Figure 14.3.
Repeat this process for the UISlider, having its Value Changed event also call the
setLightSourceAlphaValue method. This ensures immediate feedback when the
user adjusts the slider value.
Save your work, and then switch back to Xcode.
FIGURE 14.2The FlashlightUI in InterfaceBuilder.

ptg
Reading and Writing User Defaults 369
Implementing the Application LogicWhat can I say? Flashlights don’t have much logic!
When the user toggles the flashlight on or off and adjusts the brightness level, the
application will respond by adjusting the alpha property of the lightSource view.
The alpha property of a view controls the transparency of the view, with 0.0 being
completely transparent and 1.0 being completely translucent. The lightSource
view is white and is on top of the black background. When the lightSource view is
more transparent, more of the black will be showing through and the flashlight will
be darker. When we want to turn the light off, we just set the alpha property to 0.0
so that none of the white background of the lightSource view will be showing.
To make the flashlight work, we can add this method in Listing 14.2 to
FlashlightViewController.m.
LISTING 14.2-(IBAction) setLightSourceAlphaValue {
if (toggleSwitch.on) {lightSource.alpha = brightnessSlider.value;
} else {lightSource.alpha = 0.0;
}}
FIGURE 14.3Connect theswitch and slid-er to thesetLight-SourceAlpha-Value method.
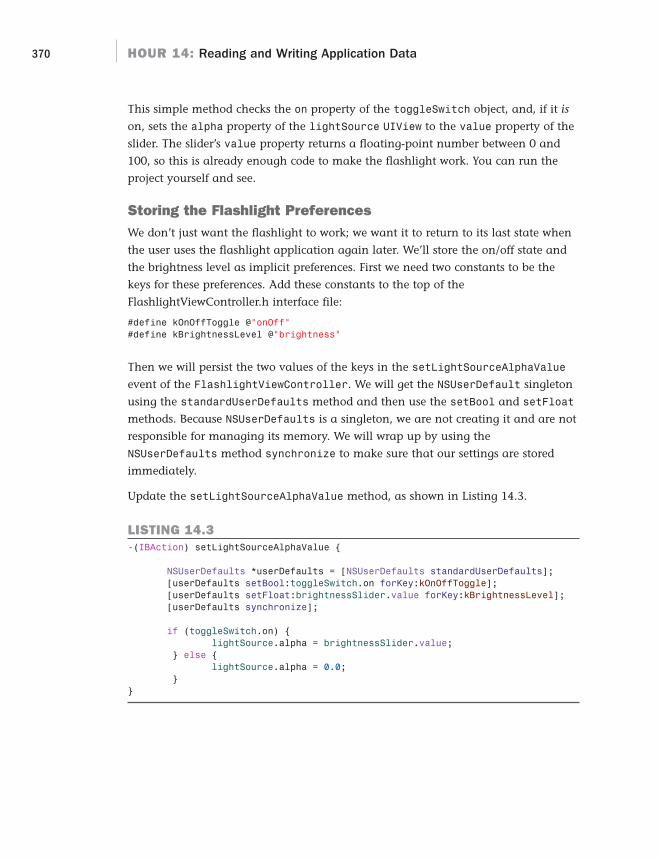
ptg
370 HOUR 14: Reading and Writing Application Data
This simple method checks the on property of the toggleSwitch object, and, if it is
on, sets the alpha property of the lightSource UIView to the value property of the
slider. The slider’s value property returns a floating-point number between 0 and
100, so this is already enough code to make the flashlight work. You can run the
project yourself and see.
Storing the Flashlight PreferencesWe don’t just want the flashlight to work; we want it to return to its last state when
the user uses the flashlight application again later. We’ll store the on/off state and
the brightness level as implicit preferences. First we need two constants to be the
keys for these preferences. Add these constants to the top of the
FlashlightViewController.h interface file:
#define kOnOffToggle @”onOff”#define kBrightnessLevel @”brightness”
Then we will persist the two values of the keys in the setLightSourceAlphaValue
event of the FlashlightViewController. We will get the NSUserDefault singleton
using the standardUserDefaults method and then use the setBool and setFloat
methods. Because NSUserDefaults is a singleton, we are not creating it and are not
responsible for managing its memory. We will wrap up by using the
NSUserDefaults method synchronize to make sure that our settings are stored
immediately.
Update the setLightSourceAlphaValue method, as shown in Listing 14.3.
LISTING 14.3-(IBAction) setLightSourceAlphaValue {
NSUserDefaults *userDefaults = [NSUserDefaults standardUserDefaults];[userDefaults setBool:toggleSwitch.on forKey:kOnOffToggle];[userDefaults setFloat:brightnessSlider.value forKey:kBrightnessLevel];[userDefaults synchronize];
if (toggleSwitch.on) {lightSource.alpha = brightnessSlider.value;
} else {lightSource.alpha = 0.0;
}}

ptg
Reading and Writing User Defaults 371
Our code now saves the values for our two keys, but where do they go? The ideahere is that we don’t have to know because we are using the NSUserDefaults APIto shield us from this level of detail and to allow Apple to change how defaultsare handled in future versions of the iOS.
It can still be useful to know, however, and the answer is that our preferences arestored in a plist file. If you are an experienced Mac user you may already be famil-iar with plists, which are used for Mac applications, too. When running on adevice, the plist will be local to the device, but when we run our application in theiPhone Simulator, the simulator uses our computer’s hard drive for storage, mak-ing it easy for us to peek inside the plist.
Run the Flashlight application in the iPhone Simulator, and then use Finder to navi-gate to /Users/<your username>/Library/Application Support/iPhoneSimulator/<Device OS Version>/Applications. The directories inApplications are generated globally unique IDs, but it should be easy to find thedirectory for Flashlight by looking for the most recent Data Modified. You’ll seeFlashlight.app in the most recently modified directory, and you’ll see the com.your-company.Flashlight.plist inside the ./Library/Preferences subdirectory. This is aregular Mac plist file, so when you double-click it, it will open with the Property ListEditor application and show you the two preferences for Flashlight.
Reading the Flashlight PreferencesNow our application is writing out the state of the two controls anytime the user
changes the flashlight settings. So, to complete the desired behavior, we need to read
in and use the preferences for the state of the two controls anytime our application
launches. For this, we will use the viewDidLoad method, which is provided for us by
Xcode as a commented-out stub, and the floatForKey and boolForKey methods of
NSUserDefaults. Uncomment viewDidLoad and get the NSUserDefaults singleton
in the same way as before, but this time we will set the value of the controls from
the value returned from the preference rather than the other way around.
In the FlashlightViewController.m file in the Classes group, implement
viewDidLoad, as shown in Listing 14.4
LISTING 14.4- (void)viewDidLoad {
NSUserDefaults *userDefaults = [NSUserDefaults standardUserDefaults];brightnessSlider.value = [userDefaults floatForKey:kBrightnessLevel];toggleSwitch.on = [userDefaults boolForKey:kOnOffToggle];if ([userDefaults boolForKey: kOnOffToggle]) {
lightSource.alpha = [userDefaults floatForKey:kBrightnessLevel];} else {
lightSource.alpha = 0.0;}
[super viewDidLoad];}
By theWay

ptg
372 HOUR 14: Reading and Writing Application Data
That’s all there is to it. All we need now is a snazzy application icon, and we, too,
can make millions in the App Store with our Flashlight application (see Figure 14.4).
FIGURE 14.4Flashlight appli-cation in action.
Did youKnow?
If you’re running iOS 4 and press the Home button, be aware that your applicationwon’t quit; it will be suspended in the background. To fully test the flashlight app,be sure to use the iOS Task Manager to force the application completely closed,and then verify that your settings are restored when it relaunches fresh.
While we are waiting for the cash to pour in (it may be awhile), let’s look at an
application where the user takes more direct control of the application’s preferences.
Implementing System SettingsOne option to consider for providing application preferences is to use the Settings
application. You do this by creating and editing a settings bundle for your applica-
tion in Xcode rather than by writing code and designing a UI, so this is a very fast
and easy option.
For our second application of the hour, we’ll create ReturnMe, an application that
tells someone who finds a lost device how to return it to its owner. The Settings
application will be used to edit the contact information of the owner and to select a
picture to evoke the finder’s sympathy.

ptg
Reading and Writing User Defaults 373
Setting Up the ProjectAs we frequently do, begin by creating a new View-based iPhone application in
Xcode called ReturnMe.
We want to provide the finder of the lost device with a sympathy-invoking picture
and the owner’s name, email address, and phone number. Each of these items will
be configurable as an application preference, so we’ll need outlets to set the values
of a UIImageView and three UILabels.
Open the ReturnMeViewController.h file in the Classes group and add outlets and
properties for each control. The completed ReturnMeViewController.h file should
look like Listing 14.5.
LISTING 14.5#import <UIKit/UIKit.h>
@interface ReturnMeViewController : UIViewController {IBOutlet UIImageView *picture;IBOutlet UILabel *name;IBOutlet UILabel *email;IBOutlet UILabel *phone;
}
@property (nonatomic, retain) UIImageView *picture;@property (nonatomic, retain) UILabel *name;@property (nonatomic, retain) UILabel *email;@property (nonatomic, retain) UILabel *phone;
@end
After updating the interface file, add corresponding @synthesize lines within the
ReturnMeViewController.m file for each property:
@synthesize picture;@synthesize name;@synthesize email;@synthesize phone;
And, of course, release all these objects in the dealloc method:
- (void)dealloc {[picture release];[name release];[email release];[phone release];[super dealloc];
}
We want a few images that will help goad our Good Samaritan into returning the
lost device rather than selling it to Gizmodo. Drag the dog1.png, dog2.png, and

ptg
374 HOUR 14: Reading and Writing Application Data
coral.png files from the project’s Images folder into the Resources group. When you
drag the images into Xcode, make sure you click the option to copy them into the
destination group’s folder so that copies of the images will be placed in your Xcode
project’s directory.
Remember, to support the higher resolution display of the iPhone 4, all you needto do is create images with twice the horizontal and vertical resolution as yourstandard iPhone image resources, include a @2x suffix on the filename, and addthem to your project. The developer tools and iOS take care of the rest!
I’ve included @2x image resources with many of the projects in this book.
Creating the InterfaceNow let’s lay out the ReturnMe application’s UI. Open Interface Builder by double-
clicking the ReturnMeViewController.xib file in the Resources group:
1. Open the XIB file’s view.
2. Drag three UILabels onto the view. Click each label and open the Attributes
Inspector (Command+1), and set the text to a default value of your choosing
for name, email, and phone number.
3. Drag a UIImageView to the view. Size the image view to take up the majority
of the iPhone’s display area.
4. With the image view selected, open the Attributes Inspector (Command+1). Set
the mode to be Aspect Fill, and pick one of the animal images you added to
the Xcode project from the Image drop-down.
5. Add some additional UILabels to explain the purpose of the application and
labels that explain each preference value (name, email, and phone number).
As long as you have the three labels and the image view in your UI, as seen in
Figure 14.5, you can design the rest as you see fit. Have fun with it!
When you’re finished building the interface, connect the UIImageView and three
UILabels to their corresponding outlets—picture, name, email, and phone. There
aren’t any actions to connect, so just Control-drag from the File’s Owner icon to
each of these interface items, choosing the appropriate outlet when prompted.
Now that the interface is built, we’ll create the Settings Bundle, which will enable us
to integrate with the iPhone’s Settings application.
Did youKnow?

ptg
Reading and Writing User Defaults 375
Creating the Settings BundleCreate a new settings bundle in Xcode by selecting File, New File from the menu and
selecting Settings Bundle from the iOS Resource group in the sidebar, as shown in
Figure 14.6.
FIGURE 14.5Create an inter-face with animage, labels,and anythingelse you’d like!
FIGURE 14.6Settings bundlein Xcode’s NewFile dialog.

ptg
376 HOUR 14: Reading and Writing Application Data
Keep the default name of Settings.bundle when you create it. Drag the newly created
settings bundle into the Resources group if it does not get created there.
The file that controls how our ReturnMe application will appear in the Settings
application is the Root.plist file in the settings bundle. We can edit this file with the
Property List Editor that is built in to Xcode. We will add preference types to it (see
Table 14.1) that will be read and interpreted by the Settings application to provide
the UI to set our application’s preferences.
TABLE 14.1 Preference Types
Type Key Description
Text field PSTextFieldSpecifier Editable text string
Toggle switch PSToggleSwitchSpecifier On/off toggle button
Slider PSSliderSpecifier Slider across a range of values
Multivalue PSMultiValueSpecifier Drop-down value picker
Title PSTitleValueSpecifier Read-only text string
Group PSGroupSpecifier Title for a logical group of preferences
Child pane PSChildPaneSpecifier Child preferences page
The ReturnMe preferences will be grouped into three groups: Sympathy Image, Contact
Information, and About. The Sympathy Image group will contain a multivalue prefer-
ence to pick one of the images, the Contact Information group will contain three text
fields, and the About group will link to a child page with three read-only titles.
Expand the Settings.bundle in Xcode and click the Root.plist file. You’ll see a table of
three columns: Key, Type, and Value. Expand the PreferencesSpecifiers property
in the table, and you’ll see a series of four dictionary properties. These are provided
by Xcode as samples, and each of them will be interpreted by Settings as a prefer-
ence. You will follow the simple schema in the Settings Application Schema Reference
in the iOS Reference Library to set all the required properties, and some of the
optional properties, of each preference.
Expand the first dictionary property under PreferenceSpecifiers called Item 0,
and you’ll see that its Type is PSGroupSpecifier. This is the correct Type to define a
preference group, but change the Title property’s value to Sympathy Image by
clicking it and typing the new title. Expand the second item (Item 1) and you’ll see
that its Type is PSTextFieldSpecifier. Our Sympathy Image will be selected as a
multivalue, not a text field, so change the Type to PSMultiValueSpecifier. Change
the Title to Image Name, the Key to picture, and the DefaultValue to Dog. The
remaining four keys under Item 1 apply to text fields only, so delete them by select-
ing them and pressing the Delete key.

ptg
Reading and Writing User Defaults 377
The values for a multivalue picker come from two arrays, an array of item names
and an array of item values. In our case, the name and value arrays will be the
same, but we still must provide both of them. To add another property under
DefaultValue, click the plus sign at the end of the row (see Figure 14.7) to add
another property at the same level.
FIGURE 14.7Add anotherproperty inXcode’sProperty ListEditor.
The new item will have the default name of New Item, so change that to Values.
The Type column defaults to String, so change it to Array. Each of the three possi-
ble image names needs a property under the Values property. Expand the Values
item’s disclosure triangle, and notice that the plus sign at the end of the row
changes to an icon with three lines (see Figure 14.8). This icon adds child properties,
rather than properties at the same level. Click the icon three times to add properties
that’ll be called Item 0, Item 1, and Item 2.
FIGURE 14.8Add child itemsin Xcode’sProperty ListEditor.

ptg
378 HOUR 14: Reading and Writing Application Data
Change the Value of the three new child properties to Dog, Mean Dog, and Coral.
Repeat this step to add a peer of Values called Titles. Titles is also an Array type
and has the same three String type children with the same values, as shown in
Figure 14.9.
FIGURE 14.9The completedimage selectorpreference inXcode’sProperty ListEditor.
The third property (Item 2) in our plist PreferenceSpecifiers should be a
PSGroupSpecifier with a title of Contact Information. Change the Type and Title
of Item 2 and remove the extra items.
The fourth property (Item 3) is the name preference. Change the Type to
PSTextFieldSpecifier, the Key to name, and the DefaultValue to Your Name with
a Type of String. Add three more keys to Item 3. These should be String types and
are optional parameters that set up the keyboard for text entry. Set the keys to
KeyboardType, AutocapitalizationType, and AutocorrectionType, and the values
to Alphabet, Words, and No, respectively.
You can test your settings so far by saving the plist, building and running the
ReadMe application in the iPhone Simulator, exiting the application with the Home
button, and then running the Settings application in the simulator. You should see a
Settings selection for the ReturnMe application and settings for the Sympathy Image
and Name.
Add two more PSTextFieldSpecifier preferences to the plist; mirror what you set
up for the Name preference: one for email and one for phone number. Use the keys
of email and phone, and change the KeyboardType to EmailAddress and
NumberPad, respectively.
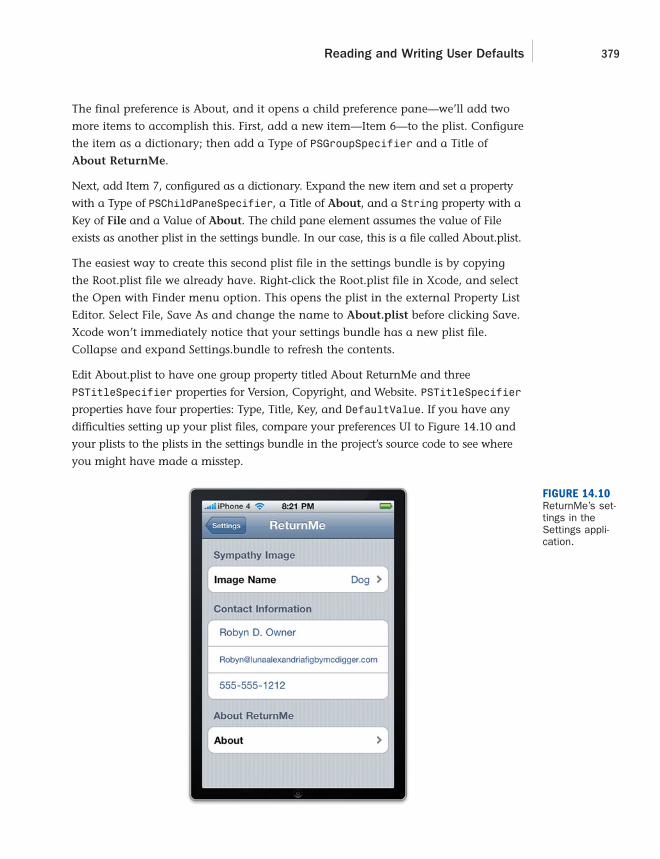
ptg
Reading and Writing User Defaults 379
The final preference is About, and it opens a child preference pane—we’ll add two
more items to accomplish this. First, add a new item—Item 6—to the plist. Configure
the item as a dictionary; then add a Type of PSGroupSpecifier and a Title of
About ReturnMe.
Next, add Item 7, configured as a dictionary. Expand the new item and set a property
with a Type of PSChildPaneSpecifier, a Title of About, and a String property with a
Key of File and a Value of About. The child pane element assumes the value of File
exists as another plist in the settings bundle. In our case, this is a file called About.plist.
The easiest way to create this second plist file in the settings bundle is by copying
the Root.plist file we already have. Right-click the Root.plist file in Xcode, and select
the Open with Finder menu option. This opens the plist in the external Property List
Editor. Select File, Save As and change the name to About.plist before clicking Save.
Xcode won’t immediately notice that your settings bundle has a new plist file.
Collapse and expand Settings.bundle to refresh the contents.
Edit About.plist to have one group property titled About ReturnMe and three
PSTitleSpecifier properties for Version, Copyright, and Website. PSTitleSpecifier
properties have four properties: Type, Title, Key, and DefaultValue. If you have any
difficulties setting up your plist files, compare your preferences UI to Figure 14.10 and
your plists to the plists in the settings bundle in the project’s source code to see where
you might have made a misstep.
FIGURE 14.10ReturnMe’s set-tings in theSettings appli-cation.
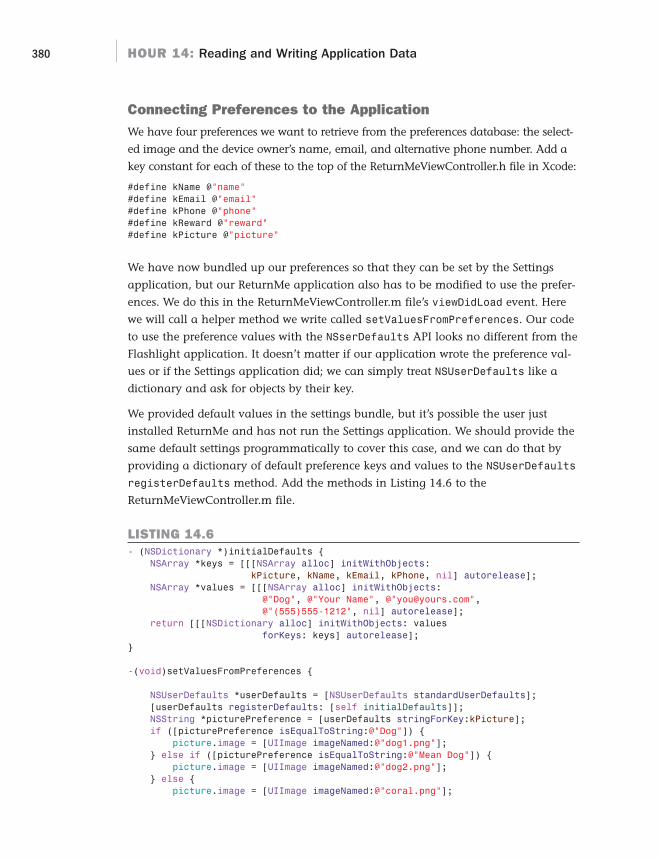
ptg
380 HOUR 14: Reading and Writing Application Data
Connecting Preferences to the ApplicationWe have four preferences we want to retrieve from the preferences database: the select-
ed image and the device owner’s name, email, and alternative phone number. Add a
key constant for each of these to the top of the ReturnMeViewController.h file in Xcode:
#define kName @”name”#define kEmail @”email”#define kPhone @”phone”#define kReward @”reward”#define kPicture @”picture”
We have now bundled up our preferences so that they can be set by the Settings
application, but our ReturnMe application also has to be modified to use the prefer-
ences. We do this in the ReturnMeViewController.m file’s viewDidLoad event. Here
we will call a helper method we write called setValuesFromPreferences. Our code
to use the preference values with the NSserDefaults API looks no different from the
Flashlight application. It doesn’t matter if our application wrote the preference val-
ues or if the Settings application did; we can simply treat NSUserDefaults like a
dictionary and ask for objects by their key.
We provided default values in the settings bundle, but it’s possible the user just
installed ReturnMe and has not run the Settings application. We should provide the
same default settings programmatically to cover this case, and we can do that by
providing a dictionary of default preference keys and values to the NSUserDefaults
registerDefaults method. Add the methods in Listing 14.6 to the
ReturnMeViewController.m file.
LISTING 14.6- (NSDictionary *)initialDefaults {
NSArray *keys = [[[NSArray alloc] initWithObjects:kPicture, kName, kEmail, kPhone, nil] autorelease];
NSArray *values = [[[NSArray alloc] initWithObjects:@”Dog”, @”Your Name”, @”[email protected]”,@”(555)555-1212”, nil] autorelease];
return [[[NSDictionary alloc] initWithObjects: valuesforKeys: keys] autorelease];
}
-(void)setValuesFromPreferences {
NSUserDefaults *userDefaults = [NSUserDefaults standardUserDefaults];[userDefaults registerDefaults: [self initialDefaults]];NSString *picturePreference = [userDefaults stringForKey:kPicture];if ([picturePreference isEqualToString:@”Dog”]) {
picture.image = [UIImage imageNamed:@”dog1.png”];} else if ([picturePreference isEqualToString:@”Mean Dog”]) {
picture.image = [UIImage imageNamed:@”dog2.png”];} else {
picture.image = [UIImage imageNamed:@”coral.png”];
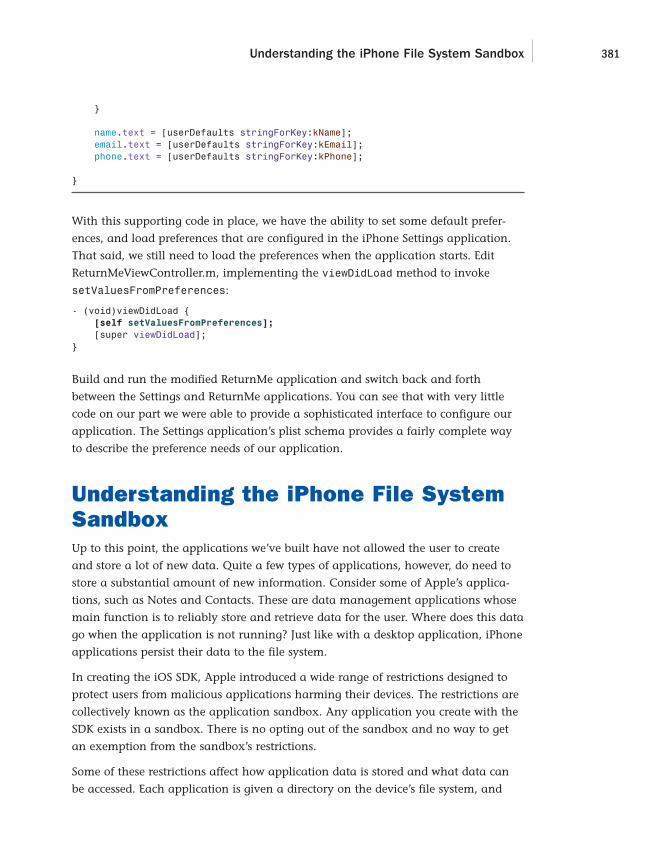
ptg
Understanding the iPhone File System Sandbox 381
}
name.text = [userDefaults stringForKey:kName];email.text = [userDefaults stringForKey:kEmail];phone.text = [userDefaults stringForKey:kPhone];
}
With this supporting code in place, we have the ability to set some default prefer-
ences, and load preferences that are configured in the iPhone Settings application.
That said, we still need to load the preferences when the application starts. Edit
ReturnMeViewController.m, implementing the viewDidLoad method to invoke
setValuesFromPreferences:
- (void)viewDidLoad {[self setValuesFromPreferences];
[super viewDidLoad];}
Build and run the modified ReturnMe application and switch back and forth
between the Settings and ReturnMe applications. You can see that with very little
code on our part we were able to provide a sophisticated interface to configure our
application. The Settings application’s plist schema provides a fairly complete way
to describe the preference needs of our application.
Understanding the iPhone File SystemSandboxUp to this point, the applications we’ve built have not allowed the user to create
and store a lot of new data. Quite a few types of applications, however, do need to
store a substantial amount of new information. Consider some of Apple’s applica-
tions, such as Notes and Contacts. These are data management applications whose
main function is to reliably store and retrieve data for the user. Where does this data
go when the application is not running? Just like with a desktop application, iPhone
applications persist their data to the file system.
In creating the iOS SDK, Apple introduced a wide range of restrictions designed to
protect users from malicious applications harming their devices. The restrictions are
collectively known as the application sandbox. Any application you create with the
SDK exists in a sandbox. There is no opting out of the sandbox and no way to get
an exemption from the sandbox’s restrictions.
Some of these restrictions affect how application data is stored and what data can
be accessed. Each application is given a directory on the device’s file system, and

ptg
By theWay
WatchOut!
382 HOUR 14: Reading and Writing Application Data
applications are restricted to reading and writing files in their own directory. This
means a poorly behaved application can, at worst, wipe out its own data but not
the data of any other application.
It also turns out that this restriction is not terribly limiting. The information from
Apple’s applications, such as contacts, calendars, and the photo and music libraries,
is for the most part already exposed through APIs in the iOS SDK. (For more infor-
mation, see Hour 18, “Working with Rich Media,” and Hour 19, “Interacting with
Other Applications.”)
With each version of the iOS SDK, Apple has been steadily ramping up what youcan’t do because of the application sandbox, but parts of the sandbox are stillenforced via policy rather than as technical restrictions. Just because you find alocation on the file system where it is possible to read or write files outside theapplication sandbox doesn’t mean you should. Violating the application sandboxis one of the surest ways to get your application rejected from the iTunes Store.
Storage Locations for Application DataWithin an application’s directory, four locations are provided specifically for storing
the application’s data: the Library/Preferences, Library/Caches, Documents, and tmp
directories.
When you run an application in the iPhone Simulator, the application’s directoryexists on your Mac in /Users/<your user>/Library/Applications Support/iPhoneSimulator/<Device OS Version>/Applications. There are any number of applica-tions in this directory, each with a directory named after a unique application ID (aseries of characters with dashes) that is provided by Xcode. The easiest way tofind the directory of the current application you are running in the iPhoneSimulator is to look for the most recently modified application directory. Take afew minutes now to look through the directory of a couple applications from previ-ous hours.
You encountered the Library/Preferences directory earlier this hour. It’s not typical to
read and write to the Preferences directory directly. Instead, you use the
NSUserDefaults API. The Library/Caches, Documents, and tmp directories are, how-
ever, intended for direct file manipulation. The main difference between them is the
intended lifetime of the files in each directory.
The Documents directory is the main location for storing application data. It is
backed up to the computer when the device is synced with iTunes, so it is important
to store any data users would be upset to lose in the Documents directory.

ptg
WatchOut!
Understanding the iPhone File System Sandbox 383
The Library/Caches directory is used to cache data retrieved from the network or from
any computationally expensive calculation. Files in Library/Caches persist between
launches of the application, and caching data in the Library/Caches directory can be
an important technique used to improve the performance of an application.
Lastly, any data you want to store outside of the device’s limited volatile memory,
but that you do not need to persist between launches of the application, belongs in
the tmp directory. The tmp directory is a more transient version of Library/Caches;
think of it as a scratch pad for the application.
Applications are responsible for cleaning up all the files they write, even thosewritten to Library/Caches or tmp. Applications are sharing the limited file systemspace (typically 4GB to 32GB) on the device. The space an application’s files takeup is not available for music, podcasts, photos, and other applications. Be judi-cious in what you choose to persistently store, and be sure to clean up any tem-porary files created during the lifetime of the application.
File PathsEvery file in an iPhone file system has a path, which is the name of its exact loca-
tion on the file system. For an application to read or write a file in its sandbox, it
needs to specify the full path of the file.
Core Foundation provides a C function called NSSearchPathForDirectories
InDomains that returns the path to the application’s Documents or Library/Caches
directory. Asking for other directories from this function can return multiple directories,
so the result of the function call is an NSArray object. When this function is used to get
the path to the Documents or Library/Caches directory, it returns exactly one NSString
in the array, and the NSString of the path is extracted from the array using NSArray’s
objectAtIndex method with an index of 0.
NSString provides a method for joining two path fragments together called
stringByAppendingPathComponent. By putting the result of a call to
NSSearchPathForDirectoriesInDomains together with a specific filename, it is
possible to get a string that represents a full path to a file in the application’s
Documents or Library/Caches directory.
Suppose, for example, your next blockbuster iPhone application calculates the first
100,000 digits of pi, and you want the application to write the digits out to a cache
file so that they won’t need to be calculated again. To get the full path to this file’s
location, you need to first get the path to the Library/Caches directory and then
append the specific filename to it:

ptg
384 HOUR 14: Reading and Writing Application Data
NSString *cacheDir =[NSSearchPathForDirectoriesInDomains(NSCachesDirectory,NSUserDomainMask, YES) objectAtIndex: 0];
NSString *piFile = [cacheDir stringByAppendingPathComponent:@”American.pi”];
To get a path to a file in the Documents directory, use the same approach but with
NSDocumentDirectory as the first argument to
NSSearchPathForDirectoriesInDomains:
NSString *docDir =[NSSearchPathForDirectoriesInDomains(NSDocumentDirectory,NSUserDomainMask, YES) objectAtIndex: 0];
NSString *scoreFile = [docDir stringByAppendingPathComponent:@”HighScores.txt”];
Core Foundation provides another C function called NSTemporaryDirectory that
returns the path of the application’s tmp directory. As before, this can be used to get
a full path to a file:
NSString *scratchFile =[NSTemporaryDirectory() stringByAppendingPathComponent:@”Scratch.data”];
Implementing File System StorageIn our final example for this hour, we’ll be creating a flash card application. The
application shows the user one card at a time, initially hiding the answer, and then
lets users indicate whether they got the answer right. It keeps track of how many
times users answer each card right or wrong, and users can create new flash cards
and delete existing flash cards. Initially, we’ll put the UI and mechanics of the game
together without any data persistence. Each time you run the application, you’ll
need to create the cards all over again. Then we’ll look at how to persist the user-
created flash cards between application launches using object archiving.
Setting Up the ProjectCreate a new view-based iPhone application in Xcode and call it FlashCards. As
you’d suspect with an object-oriented flash card application, the first thing that’s
needed is a class that represents flash cards. Create a new class by selecting File,
New File and then the Objective-C class template (NSObject subclass) from the iOS
Cocoa Touch Class category. Name the new file FlashCard.m, and be sure the Also
Create FlashCard.h check box is selected.
Creating the FlashCard Class InterfaceA flash card object needs to keep track of four distinct pieces of information: the
question, the correct answer, how often the user knew the correct answer, and how

ptg
Implementing File System Storage 385
often the user got it wrong. Create NSString properties for the question and answer,
NSUInteger properties for the right and wrong counters, and a custom initializer
that accepts the question and answer as arguments (see Listing 14.7).
LISTING 14.7#import <Foundation/Foundation.h>
@interface FlashCard : NSObject {NSString *question;NSString *answer;NSUInteger rightCount;NSUInteger wrongCount;
}
@property (nonatomic, retain) NSString *question;@property (nonatomic, retain) NSString *answer;@property (nonatomic, assign) NSUInteger rightCount;@property (nonatomic, assign) NSUInteger wrongCount;
- (id)initWithQuestion:(NSString *)thisQuestionanswer:(NSString *)thisAnswer;
@end
Implementing the FlashCard Class LogicOur next step is to implement the FlashCard class. To do this, we’ll synthesize the
four properties and write the initWithQuestion:answer method. The FlashCard.m
implementation file is shown in Listing 14.8.
LISTING 14.8#import “FlashCard.h”
@implementation FlashCard
@synthesize question, answer, rightCount, wrongCount;
- (id)initWithQuestion:(NSString *)thisQuestion answer:(NSString *)thisAnswer {
if (self = [super init]) {self.question = thisQuestion;self.answer = thisAnswer;
self.rightCount = 0;self.wrongCount = 0;
}return self;
}
@end
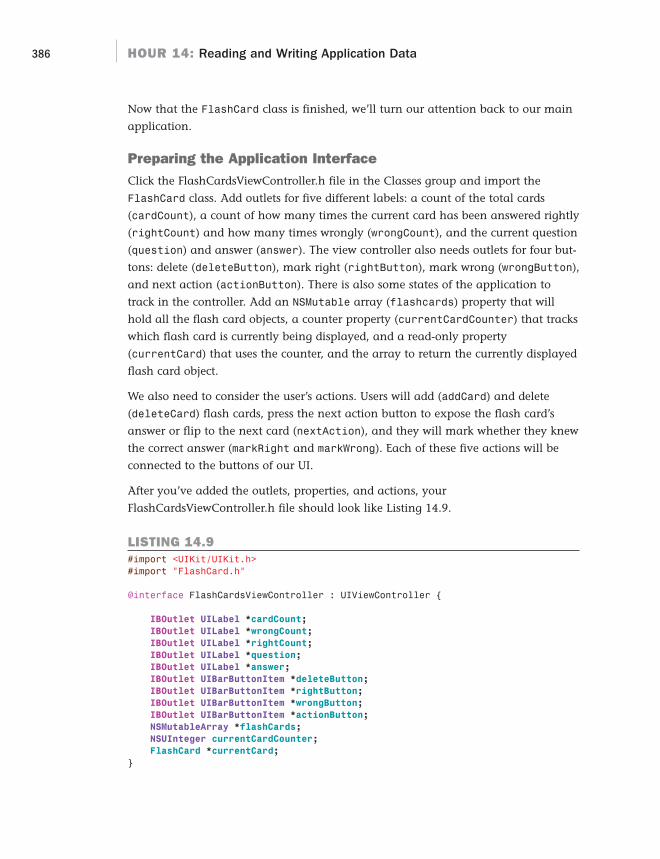
ptg
386 HOUR 14: Reading and Writing Application Data
Now that the FlashCard class is finished, we’ll turn our attention back to our main
application.
Preparing the Application InterfaceClick the FlashCardsViewController.h file in the Classes group and import the
FlashCard class. Add outlets for five different labels: a count of the total cards
(cardCount), a count of how many times the current card has been answered rightly
(rightCount) and how many times wrongly (wrongCount), and the current question
(question) and answer (answer). The view controller also needs outlets for four but-
tons: delete (deleteButton), mark right (rightButton), mark wrong (wrongButton),
and next action (actionButton). There is also some states of the application to
track in the controller. Add an NSMutable array (flashcards) property that will
hold all the flash card objects, a counter property (currentCardCounter) that tracks
which flash card is currently being displayed, and a read-only property
(currentCard) that uses the counter, and the array to return the currently displayed
flash card object.
We also need to consider the user’s actions. Users will add (addCard) and delete
(deleteCard) flash cards, press the next action button to expose the flash card’s
answer or flip to the next card (nextAction), and they will mark whether they knew
the correct answer (markRight and markWrong). Each of these five actions will be
connected to the buttons of our UI.
After you’ve added the outlets, properties, and actions, your
FlashCardsViewController.h file should look like Listing 14.9.
LISTING 14.9#import <UIKit/UIKit.h>#import “FlashCard.h”
@interface FlashCardsViewController : UIViewController {
IBOutlet UILabel *cardCount;
IBOutlet UILabel *wrongCount;
IBOutlet UILabel *rightCount;
IBOutlet UILabel *question;
IBOutlet UILabel *answer;
IBOutlet UIBarButtonItem *deleteButton;
IBOutlet UIBarButtonItem *rightButton;
IBOutlet UIBarButtonItem *wrongButton;
IBOutlet UIBarButtonItem *actionButton;
NSMutableArray *flashCards;
NSUInteger currentCardCounter;
FlashCard *currentCard;
}
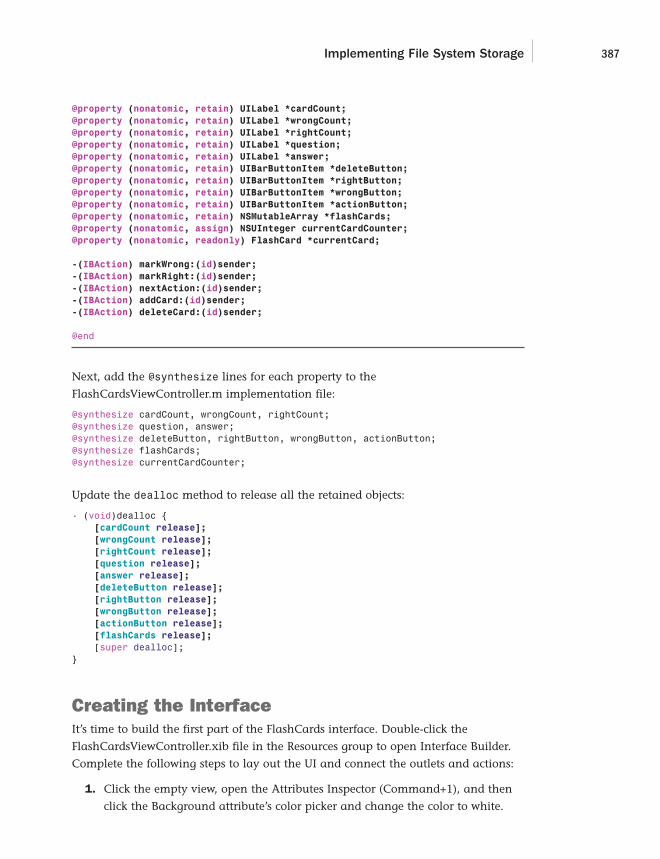
ptg
Implementing File System Storage 387
@property (nonatomic, retain) UILabel *cardCount;
@property (nonatomic, retain) UILabel *wrongCount;
@property (nonatomic, retain) UILabel *rightCount;
@property (nonatomic, retain) UILabel *question;
@property (nonatomic, retain) UILabel *answer;
@property (nonatomic, retain) UIBarButtonItem *deleteButton;
@property (nonatomic, retain) UIBarButtonItem *rightButton;
@property (nonatomic, retain) UIBarButtonItem *wrongButton;
@property (nonatomic, retain) UIBarButtonItem *actionButton;
@property (nonatomic, retain) NSMutableArray *flashCards;
@property (nonatomic, assign) NSUInteger currentCardCounter;
@property (nonatomic, readonly) FlashCard *currentCard;
-(IBAction) markWrong:(id)sender;
-(IBAction) markRight:(id)sender;
-(IBAction) nextAction:(id)sender;
-(IBAction) addCard:(id)sender;
-(IBAction) deleteCard:(id)sender;
@end
Next, add the @synthesize lines for each property to the
FlashCardsViewController.m implementation file:
@synthesize cardCount, wrongCount, rightCount;@synthesize question, answer;@synthesize deleteButton, rightButton, wrongButton, actionButton;@synthesize flashCards;@synthesize currentCardCounter;
Update the dealloc method to release all the retained objects:
- (void)dealloc {[cardCount release];
[wrongCount release];
[rightCount release];
[question release];
[answer release];
[deleteButton release];
[rightButton release];
[wrongButton release];
[actionButton release];
[flashCards release];
[super dealloc];}
Creating the InterfaceIt’s time to build the first part of the FlashCards interface. Double-click the
FlashCardsViewController.xib file in the Resources group to open Interface Builder.
Complete the following steps to lay out the UI and connect the outlets and actions:
1. Click the empty view, open the Attributes Inspector (Command+1), and then
click the Background attribute’s color picker and change the color to white.

ptg
388 HOUR 14: Reading and Writing Application Data
2. Open the Library (Shift+Command+L) and drag a toolbar to the top of the
view and another to the bottom of the view.
3. Click the Item button until just the button is selected, open the Attributes
Inspector (Command+1), and choose Add from the Identifier Properties drop-
down list.
4. Click the Item button in the bottom toolbar until just the button is selected, open
the Attributes Inspector (Command+1), and change the Title attribute to Right.
5. From the Library (Shift+Command+L), drag one Bar Button item to the top
toolbar and two bar button items to the bottom toolbar.
6. Click the new button until just the button is selected, open the Attributes
Inspector (Command+1), and choose Trash from the Identifier Properties drop-
down list.
7. Click the middle button in the bottom toolbar until it is selected, open the
Attributes Inspector (Command+1), and change the Title attribute to Wrong.
8. Click the rightmost button in the bottom toolbar three times until just the but-
ton is selected, open the Attributes Inspector (Command+1), and choose
Action from the Identifier Properties drop-down list. The view should now look
like Figure 14.11.
FIGURE 14.11Add the tool-bars to the UI.
9. Within the Library (Shift+Command+L) search for “space.” Drag a Flexible
Space Bar Button item from the library search results to the leftmost position
in the top toolbar.
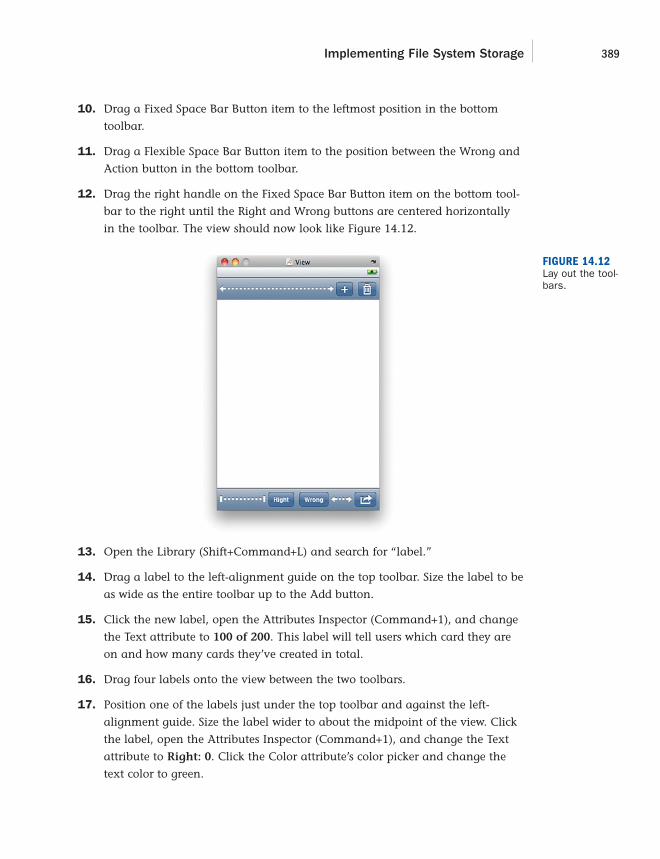
ptg
Implementing File System Storage 389
10. Drag a Fixed Space Bar Button item to the leftmost position in the bottom
toolbar.
11. Drag a Flexible Space Bar Button item to the position between the Wrong and
Action button in the bottom toolbar.
12. Drag the right handle on the Fixed Space Bar Button item on the bottom tool-
bar to the right until the Right and Wrong buttons are centered horizontally
in the toolbar. The view should now look like Figure 14.12.
FIGURE 14.12Lay out the tool-bars.
13. Open the Library (Shift+Command+L) and search for “label.”
14. Drag a label to the left-alignment guide on the top toolbar. Size the label to be
as wide as the entire toolbar up to the Add button.
15. Click the new label, open the Attributes Inspector (Command+1), and change
the Text attribute to 100 of 200. This label will tell users which card they are
on and how many cards they’ve created in total.
16. Drag four labels onto the view between the two toolbars.
17. Position one of the labels just under the top toolbar and against the left-
alignment guide. Size the label wider to about the midpoint of the view. Click
the label, open the Attributes Inspector (Command+1), and change the Text
attribute to Right: 0. Click the Color attribute’s color picker and change the
text color to green.

ptg
390 HOUR 14: Reading and Writing Application Data
18. Position another one of the labels just under the top toolbar and against the
right-alignment guide. Size the label wider to about the midpoint of the view.
Click the label, open the Attributes Inspector (Command+1), change the
Layout attribute to Right Alignment, and change the Text attribute to Wrong:
0. Click the Color attribute’s color picker and change the text color to red.
19. Position the third label just under the right and wrong labels and against the
left-alignment guide. Size the label wider to reach all the way to the right-
alignment guide. Size the label taller to reach about the midpoint of the view.
Click the label, open the Attributes Inspector (Command+1), change the Layout
attribute to center alignment, and change the Text attribute to Question?
20. Position the final label just under the question label and against the left-
alignment guide. Size the label wider to reach all the way to the right-align-
ment guide. Size the label taller to reach the bottom toolbar. Click the label,
open the Attributes Inspector (Command+1), change the Layout attribute to
Center Alignment, and change the Text attribute to Answer. The view should
now look like Figure 14.13.
FIGURE 14.13Lay out thelabels.
21. Open Document window. Connect the four button outlets (delete, right, wrong,
and action) to the respective buttons in the view. Connect the five actions
(addCard, deleteCard, markRight, markWrong, and nextAction) to the
respective buttons in the view.
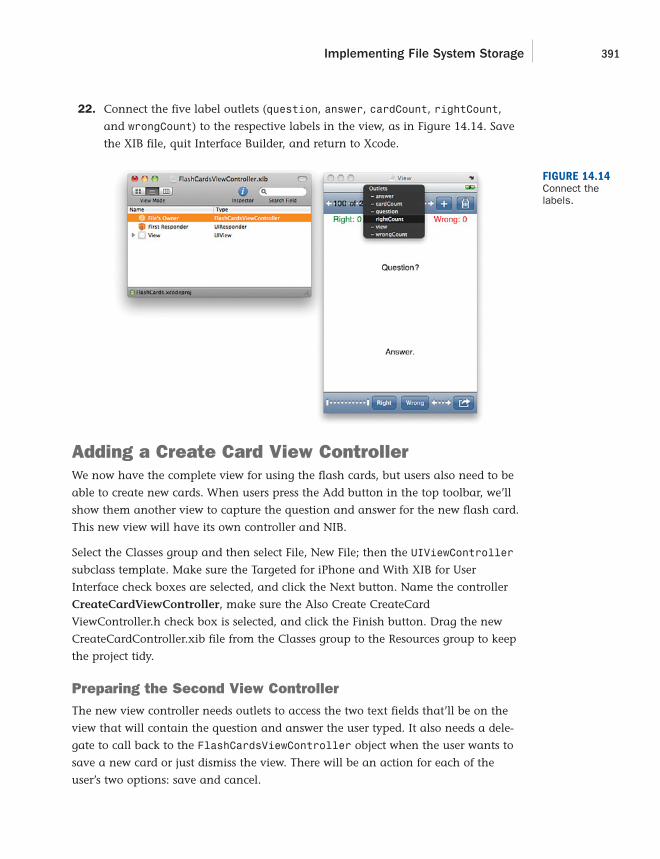
ptg
Implementing File System Storage 391
22. Connect the five label outlets (question, answer, cardCount, rightCount,
and wrongCount) to the respective labels in the view, as in Figure 14.14. Save
the XIB file, quit Interface Builder, and return to Xcode.
FIGURE 14.14Connect thelabels.
Adding a Create Card View ControllerWe now have the complete view for using the flash cards, but users also need to be
able to create new cards. When users press the Add button in the top toolbar, we’ll
show them another view to capture the question and answer for the new flash card.
This new view will have its own controller and NIB.
Select the Classes group and then select File, New File; then the UIViewController
subclass template. Make sure the Targeted for iPhone and With XIB for User
Interface check boxes are selected, and click the Next button. Name the controller
CreateCardViewController, make sure the Also Create CreateCard
ViewController.h check box is selected, and click the Finish button. Drag the new
CreateCardController.xib file from the Classes group to the Resources group to keep
the project tidy.
Preparing the Second View ControllerThe new view controller needs outlets to access the two text fields that’ll be on the
view that will contain the question and answer the user typed. It also needs a dele-
gate to call back to the FlashCardsViewController object when the user wants to
save a new card or just dismiss the view. There will be an action for each of the
user’s two options: save and cancel.

ptg
392 HOUR 14: Reading and Writing Application Data
Click the CreateCardViewController.h file in the Classes group. Add a
CreateCardDelegate protocol with two methods: didCancelCardCreation and
didCreateCardWithQuestion:answer. Both arguments to the second method are
NSString objects. Add the save and cancel actions and add an outlet and property
for the question and answer text fields and a property for the CreateCardDelegate.
After you’ve added the delegate, outlets, actions, and properties, your
CreateCardViewController.h file should look like Listing 14.10.
LISTING 14.10#import <UIKit/UIKit.h>
@protocol CreateCardDelegate <NSObject>
-(void) didCancelCardCreation;-(void) didCreateCardWithQuestion:(NSString *)question
answer:(NSString *)answer;
@end
@interface CreateCardViewController : UIViewController {
IBOutlet UITextField *question;IBOutlet UITextField *answer;id cardDelegate;
}
@property (nonatomic, retain) UITextField *question;@property (nonatomic, retain) UITextField *answer;@property (nonatomic, assign) id<CreateCardDelegate> cardDelegate;
-(IBAction) save;-(IBAction) cancel;
@end
Sorry to bug you about this, but you know what to do. Edit the
CreateCardViewController.m file to include the necessary @synthesize lines for the
properties:
@synthesize cardDelegate;@synthesize question;@synthesize answer;
Modify dealloc to include the objects that were retained:
- (void)dealloc {[question release];
[answer release];
[super dealloc];}
Now, the user interface for creating cards.

ptg
Implementing File System Storage 393
Creating the User InterfaceOpen Interface Builder by double-clicking the CreateCardViewController.xib file in
the Resources group. Then complete the following steps to lay out the UI and con-
nect the outlets and actions:
1. Open the Library (Shift+Command+L) and drag a toolbar to the very top of
the view.
2. Click the Item button until just the button is selected, open the Attributes
Inspector (Command+1), and choose Save from the Identifier Properties drop-
down list.
3. From the Library, drag one Bar Button item to the top toolbar.
4. Click the new button until just the button is selected, open the Attributes
Inspector (Command+1), and choose Cancel from the Identifier Properties
drop-down list.
5. Within the Library, search for “space.” Drag a Flexible Space Bar Button item
to the leftmost position in the top toolbar.
6. Drag two text fields onto the view below the toolbar.
7. Position one of the text fields under the top toolbar and against the left-
alignment guide. Size the label wider to the right- and left-alignment guides
and about one-third of the view. Click the text field, open the Attributes
Inspector (Command+1), and change the Text attribute to Question?; change
the alignment to centered, change the Border attribute to the leftmost style,
and change the Correction Text Input Traits attribute to No.
8. Position the second text field under the first and against the left-alignment
guide. Size the label wider to the left and right-alignment guides and about
one-third of the view. Click the text field, open the Attributes Inspector
(Command+1), and change the Text attribute to Answer.; change the align-
ment to centered, change the Border attribute to the leftmost style, and
change the Correction Text Input Traits attribute to No. Your UI should now
look like Figure 14.15.
9. Connect the two label outlets, question and answer, to the respective labels.
10. Connect the two actions, cancel and save, to the respective buttons in the
view. Save the XIB file, quit Interface Builder, and return to Xcode.

ptg
394 HOUR 14: Reading and Writing Application Data
Implementing the Application LogicAt this point, we’ve defined a flash card model and two complete views, one for cre-
ating flash cards and one for using them. All that remains to have a basic flash
card application is to implement the two controllers.
Show Cards and Capture ResultsThe class header for the FlashCardsViewController provides a roadmap for the
implementation. It tells us we have to synthesize 11 properties and implement
5 actions. You may have noticed that we defined 12 properties in the class definition
but we synthesized only 11. That’s because we need to manually implement the get-
ter for the read-only currentCard property. To implement this property and get the
current flash card, we use the currentCardCounter as the index into the
flashCards array, checking to be sure the array isn’t empty. Add the currentCard
method, shown in Listing 14.11, to the FlashCardsViewController.m file.
LISTING 14.11-(FlashCard *) currentCard {
if (self.currentCardCounter < 0) {return nil;
}FlashCard *flashCard = [self.flashCards
objectAtIndex:self.currentCardCounter];return flashCard;
}
FIGURE 14.15The create cardUI.

ptg
Implementing File System Storage 395
We’ve now created all 12 properties of our view controller, so let’s start using them to
implement the controller. When the view is first loaded, we won’t have any flash
cards yet, so we need to make sure the UI behaves properly with no flash cards.
Consider for a moment that it’s possible to get back to this same state of having no
cards when the user deletes the last flash card. So it’s best to handle the case of no
flash cards in the normal flow of the application. Add a method to view controller
called showNextCard, and make it able to handle populating the UI in each of the
three interesting cases: when there are no flash cards, when there is a next flash
card in the array, and when there is not a next flash card in the array and so we
need to loop back to the beginning of the array of flash cards. Implement
showNextCard as shown in Listing 14.12.
LISTING 14.12-(void)showNextCard {
self.rightButton.enabled = NO;self.wrongButton.enabled = NO;
NSUInteger numberOfCards = [self.flashCards count];
if (numberOfCards == 0) {// UI State for no cardsself.question.text = @””;self.answer.text = @””;self.cardCount.text = @”Add a flash card to get started”;self.wrongCount.text = @””;self.rightCount.text = @””;self.deleteButton.enabled = NO;self.actionButton.enabled = NO;
} else {self.currentCardCounter += 1;if (self.currentCardCounter >= numberOfCards) {
// Loop back to the first cardself.currentCardCounter = 0;
}self.cardCount.text =[NSString stringWithFormat:@”%i of %i”,(self.currentCardCounter + 1), numberOfCards];self.question.text = self.currentCard.question;self.answer.hidden = YES;self.answer.text = self.currentCard.answer;[self updateRightWrongCounters];self.deleteButton.enabled = YES;self.actionButton.enabled = YES;
}}
Because the showNextCard method can set up the UI, even when we have no cards,
handling the initial load of the view is straightforward. We just need to create and

ptg
396 HOUR 14: Reading and Writing Application Data
initialize the array that will hold the flash cards and then call the showNextCard
method. Uncomment the viewDidLoad method and implement it, as shown in
Listing 14.13.
LISTING 14.13- (void)viewDidLoad {
self.flashCards = [NSKeyedUnarchiverunarchiveObjectWithFile:[self archivePath]];
self.currentCardCounter = -1;if (self.flashCards == nil) {
self.flashCards = [[NSMutableArray alloc] init];}[self showNextCard];[super viewDidLoad];
}
The showNextCard method uses outlets to set values on the labels in the UI and to
enable and disable the buttons as appropriate. Careful readers will have noticed
that it also called a method we haven’t written yet, updateRightWrongCounters.
This method should provide the right text to the labels based on the counters in the
current flash card. Add the method in Listing 14.14 to the view controller.
LISTING 14.14- (void) updateRightWrongCounters {
self.wrongCount.text =[NSString stringWithFormat:@”Wrong: %i”,self.currentCard.wrongCount];self.rightCount.text =[NSString stringWithFormat:@”Right: %i”,self.currentCard.rightCount];
}
Update the FlashCardViewsController.h file in the Classes group with the two meth-
ods we just defined:
-(void)showNextCard;-(void)updateRightWrongCounters;
There are three user actions for progressing through the set of flash cards:
nextAction, markWrong, and markRight. nextAction first reveals the answer and
enables the Right and Wrong buttons, and the second time nextAction is used on a
card, it advances to the next card. Implement nextAction as in Listing 14.15.
LISTING 14.15- (IBAction) nextAction {
if (self.answer.hidden) {self.answer.hidden = NO;

ptg
Implementing File System Storage 397
self.rightButton.enabled = YES;self.wrongButton.enabled = YES;
} else {[self showNextCard];
}}
The markWrong and markRight actions increment the counter for the flash card by
one. They also handle disabling the button that was pressed so that the user doesn’t
increment twice for the same card, and they allow the user to change his mind by
decrementing the previously incremented counter. Add the two methods in Listing
14.16 to the FlashCardsViewController.m file:
LISTING 14.16- (IBAction) markWrong {
// Update the flash cardself.currentCard.wrongCount += 1;if (!self.rightButton.enabled) {
// They had previously marked the card rightself.currentCard.rightCount -= 1;
}// Update the UIself.wrongButton.enabled = NO;self.rightButton.enabled = YES;[self updateRightWrongCounters];
}
- (IBAction) markRight {
// Update the flash cardself.currentCard.rightCount += 1;if (!self.wrongButton.enabled) {
// They had previously marked the card rightself.currentCard.wrongCount -= 1;
}// Update the UIself.wrongButton.enabled = YES;self.rightButton.enabled = NO;[self updateRightWrongCounters];
}
Creating New CardsWe previously created a separate view and view controller to interact with the user
and create a new card. Add a statement to the FlashCardsViewController.h file to
import the second view controller:
#import “CreateCardViewController.h”

ptg
398 HOUR 14: Reading and Writing Application Data
The addCard action that is called when the user touches the Add button instantiates
an instance of our CreateCardViewController and turns control over to it with
UIView’s presentModalViewController:animated method. Add the action to the
FlashCardsViewController.m file as follows in Listing 14.17.
LISTING 14.17- (IBAction) addCard {
// Show the create card viewCreateCardViewController *cardCreator =
[[CreateCardViewController alloc] init];cardCreator.cardDelegate = self;
[self presentModalViewController:cardCreator animated:YES];[cardCreator release];
}
The addCard IBAction will now show our second view, but we still need to
implement the controller for this view. The class header we created for
CreateCardViewController tells us we have to synthesize three properties
and implement the two actions. The actions simply need to call back to the
CardCreateDelegate when the user presses the Save or Cancel buttons. Click the
CreateCardViewController.m file in the Classes group and update the file as in
Listing 14.18.
LISTING 14.18-(IBAction) save {
[self.cardDelegate didCreateCardWithQuestion: question.textanswer: answer.text];
}
-(IBAction) cancel {[self.cardDelegate didCancelCardCreation];
}
Now we need to implement the card delegate in the FlashCardsViewController. If
the callback indicates the user canceled, then we need to dismiss only the modal
view. When the delegate indicates a new card needs to be saved, we also must create
a new FlashCard instance. After we create it, we need to insert the new flash card
into the array of cards at the current spot or at the end of the array if we are on the
last card. Then we show the next card in the array (which will always be the new
card we just added). Click the FlashCardsViewController.m file in the Classes group,
and add the two methods shown in Listing 14.19 to implement the
CreateCardDelegate protocol.
ptg
Implementing File System Storage 399
LISTING 14.19-(void) didCancelCardCreation {
[self dismissModalViewControllerAnimated:YES];}
-(void) didCreateCardWithQuestion:(NSString *)thisQuestionanswer:(NSString *)thisAnswer {
// Add the new card as the next cardFlashCard *newCard = [[FlashCard alloc]initWithQuestion: thisQuestion
answer:thisAnswer];if (self.currentCardCounter >= [self.flashCards count]) {
[self.flashCards addObject:newCard];} else {
[self.flashCards insertObject:newCardatIndex:(self.currentCardCounter + 1)];
}
// Show the new card[self showNextCard];[self dismissModalViewControllerAnimated:YES];
}
Click the FlashCardsViewController.h file in the Classes group. To import the
CreateCardViewController interface file, modify the class’s @interface to indicate
that we’ve implemented the CreateCardDelegate protocol.
#import <UIKit/UIKit.h>#import “FlashCard.h”#import “CreateCardViewController.h”
@interface FlashCardsViewController : UIViewController <CreateCardDelegate> {
Delete CardsBecause we wrote our showNextCard method to be flexible, deleting a card is just a
matter of deleting the current card from the array and showing the next card with
showNextCard. showNextCard can handle any of the circumstances that may result
from this, such as there being no cards in the array or needing to loop back to the
beginning of the array:
- (IBAction) deleteCard {[self.flashCards removeObjectAtIndex:currentCardCounter];[self showNextCard];
}
We’ve now put together a working flash card application that is not too shabby (see
Figure 14.6). At this point, the FlashCards application does have one fatal flaw:
When the application moves to the background (the iOS equivalent of “quitting”),
all the flash cards the user painstakingly created are gone! In the next section, we
rectify this using object archiving for data persistence.

ptg
400 HOUR 14: Reading and Writing Application Data
Implementing Object ArchivingA running iPhone application has a vast number of objects in memory. These
objects are interlinked to one another with references in such a way that if you were
to visualize the relationships, they would appear like a tangled spider web. This web
of all the objects in an application and all the references between the objects is
called an object graph.
A running iPhone application is not much more than the program itself (which is
always the same, at least until the user installs an update) and the unique object
graph that is the result of all the activity that has occurred in the running of the
application up to that point. One approach to storing an application’s data (so that
it is available when the application is launched again in the future) is to take the
object graph, or a subset of it, and store the object graph on the file system. The
next time the program runs, it can read the graph of objects from the file system
back into memory and pick up where it left off, executing the same program with
the same object graph.
Most object-oriented development environments have a serialization mechanism
that is used to stream a graph of objects out of memory and onto a file system and
then back into memory again at a later time. Object archiving is the Cocoa version
FIGURE 14.16The FlashCardsapplication inaction.
ptg
Implementing File System Storage 401
of this process. There are two main parts to object archiving: NSCoder and
NSCoding. An NSCoder object can archive (encode and decode) any object that con-
forms to the NSCoding protocol. Apple supplies NSCoder for most data types, and
any custom objects we want to archive implement the NSCoding protocol. We are in
luck because the NSCoding protocol consists of just two methods: initWithCoder
and encodeWithCoder.
Let’s start with encodeWithCoder. The purpose of encodeWithCoder is to encode all
the instance variables of an object that should be stored during archival. To imple-
ment encodeWithCoder, decide which instance variables will be encoded and which
instance variables, if any, will be transient (not encoded). Each instance variable
you encode must be a scalar type (a number) or must be an object that implements
NSCoding. This means all the instance variables you’re likely to have in your cus-
tom objects can be encoded because the vast majority of Cocoa Touch and Core
Foundation objects implement NSCoding. On the iPhone, NSCoder uses keyed encod-
ing, so you provide a key for each instance variable you encode. The encoding for
our FlashCard class is shown in Listing 14.20.
LISTING 14.20- (void)encodeWithCoder:(NSCoder *)encoder {
[encoder encodeObject:self.question forKey:kQuestion];[encoder encodeObject:self.answer forKey:kAnswer];[encoder encodeInt:self.rightCount forKey:kRightCount];[encoder encodeInt:self.wrongCount forKey:kWrongCount];
}
Notice that we used the encodeObject:forKey method for NSStrings and you’d
use the same for any other objects. For integers, we used encodeInt:forKey. You
can check the API reference documentation of NSCoder for the complete list, but a
few others you should be familiar with are encodeBool:forKey and
encodeDouble:forKey and encodeBytes:forKey. You’ll need these for dealing with
Booleans, floating-point numbers, and data.
The opposite of encoding is decoding, and for that part of the protocol there is the
initWithCoder method. Like encodeWithCoder, initWithCoder is keyed, but rather
than providing NSCoder an instance variable for a key, you provide a key and are
returned an instance variable. For our FlashCard class, decoding should be imple-
mented, as in Listing 14.21.
ptg
402 HOUR 14: Reading and Writing Application Data
LISTING 14.21- (id)initWithCoder:(NSCoder *)decoder {
if (self = [super init]) {self.question = [decoder decodeObjectForKey:kQuestion];self.answer = [decoder decodeObjectForKey:kAnswer];self.rightCount = [decoder decodeIntForKey:kRightCount];self.wrongCount = [decoder decodeIntForKey:kWrongCount];
}return self;
}
The four keys we used should be defined as constants in the FlashCard.h header file.
Add them now:
#define kQuestion @”Question”#define kAnswer @”Answer”#define kRightCount @”RightCount”#define kWrongCount @”WrongCount”
The last step is to update the class definition in the FlashCard.h header file to indi-
cate that FlashCard implements the NSCoding protocol:
@interface FlashCard : NSObject <NSCoding> {
Our FlashCard class is now archivable, and an object graph that includes
FlashCard object instances can be persisted to and from the file system using object
archiving.
Archiving in the Flash CardsTo fix the fatal flaw in the FlashCards application, we need to store all the flash
cards on the file system. Now, because FlashCard implements the NSCoding proto-
col, each individual flash card is archivable. Remember that object archiving is
based on the notion of storing an object graph and we are not looking to store each
flash card in an individual file (although we certainly could if we wanted to). We
want one object graph with references to all of our flash cards so that we can
archive it into a single file.
It turns out that the FlashCards application already has such an object graph in
memory in the form of the FlashCardsViewController’s NSMuteableArray proper-
ty called flashCards. The flashCards array has a reference to every flash card the
user has defined, so it forms the root of an object graph that contains all the flash
cards. An NSMuteableArray, like all the Cocoa data structures, implements
NSCoding, so we have a ready-made solution for archiving an object graph contain-
ing all the flash cards.

ptg
Implementing File System Storage 403
We need a location for the file that’ll store the flash cards. We’d like the flash cards to
be safely backed up each time the user syncs her device with iTunes, so we’ll put the
file in the application’s Documents directory. We can call the file anything; object
archiving doesn’t put any restrictions on the filename or extension. Let’s call it
FlashCards.dat. We’ll need the full path to this file both when we store the flash cards
to the file system and when we read them from the file system, so let’s write a simple
helper function that returns the path to the file. Open the FlashCardsViewController.m
file in the Classes group, and add the method in Listing 14.22.
LISTING 14.22-(NSString *)archivePath {
NSString *docDir =[NSSearchPathForDirectoriesInDomains(NSDocumentDirectory,NSUserDomainMask, YES) objectAtIndex: 0];
return [docDir stringByAppendingPathComponent:@”FlashCards.dat”];}
We need to archive the array of flash cards to the file before the application moves
to the background and then unarchive the array of flash cards from the file when
the application is loaded. To write an archive to a file, use the
archiveRootObject:toFile method of NSKeyedArchiver. We’ll want to do this
when the FlashCardsAppDelegate receives the applicationDidEnterBackground
event, so define a method in the FlashCardsViewController.m file that
FlashCardsAppDelegate can call to archive the flash cards:
-(void)archiveFlashCards {[NSKeyedArchiver archiveRootObject:flashCards toFile:[self archivePath]];
}
Add the new method to the FlashCardsViewController.h file:
-(void)archiveFlashCards;
Open the FlashCardsAppDelegate.m file and update
applicationDidEnterBackground so it will call the archiveFlashCards method of
the FlashCardsViewController:
- (void)applicationDidEnterBackground:(UIApplication *)application {[viewController archiveFlashCards];
}
Each time our application enters the background, whatever flash cards are in the
array will be written out to the FlashCards.dat file in the Documents directory. On
startup, we need to read the archive of the array from the file. To unarchive an
object graph, use the unarchiveObjectWithFile method of NSKeyedUnarchiver.
It’s possible this is the first time the application has ever been run, and there won’t

ptgDid youKnow?
404 HOUR 14: Reading and Writing Application Data
yet be a FlashCards.dat file. In this case, unarchiveObjectWithFile returns nil
and we can simply create a new, empty array like we did before the FlashCards
application had data persistence. Update the viewDidLoad method of the
FlashCardsViewController.m file as follows:
- (void)viewDidLoad {self.flashCards = [NSKeyedUnarchiver
unarchiveObjectWithFile:[self archivePath]];
self.currentCardCounter = -1;
if (self.flashCards == nil) {
self.flashCards = [[NSMutableArray alloc] init];}
[self showNextCard];[super viewDidLoad];
}
That’s all there is to it. When the model objects of an application all implement
NSCoding, object archiving is a simple and easy process. With just a few lines of
code, we were able to persist the flash cards to the file system. Run the application
and give it a try!
You may notice that, if you’re running under iOS 4.x or later, you’ll need to forcethe application to quit using the iOS Task Manager before you can fully test thatdata archiving is working. This is because iOS 4 doesn’t quit your application; itsuspends it and moves it to the background!
You’ll learn more about application backgrounding in Hour 21. For now, think ofthe applicationDidEnterBackground method as the location where you’ll needto put any application cleanup before it quits.
Further ExplorationThere is not much about preferences that you have not been exposed to at this point.
My main advice is to gain some more experience in working with preferences by
going back to previous hours and adding sensible preferences to some of the example
applications you have already worked on. The Application Preferences system is well
documented by Apple, and you should take some time to read through it.
If you’d like to go further exploring object archiving, your next stop should be
Apple’s Archives and Serializations Programming Guide for Cocoa, but for more complex
data needs, you should begin reviewing the documentation on Core Data.
Core Data is a framework that provides management and persistence for in-memory
application object graphs. Core Data attempts to solve many of the challenges that
face other, simpler forms of object persistence such as object archiving. Some of the

ptg
Q&A 405
challenging areas Core Data focuses on are multilevel undo management, data val-
idation, data consistency across independent data assessors, efficient (that is,
indexed) filtering, sorting and searching of object graphs, and persistence to a vari-
ety of data repositories.
Apple Tutorials
Application Preferences in the iPhone Application Programming is a tutorial-style
guide to the various parts of the Application Preference system.
Setting Application Schema References in the iPhone Reference Library is an indis-
pensable guide to the required and optional properties for the preferences in
your plist files that will be edited by the Settings application.
Core Data Tutorial for iOS is an Apple tutorial for learning the basics of Core
Data. This is a good place to start for an exploration of Core Data.
SummaryIn this hour, you’ve developed three iPhone applications, and along the way you’ve
learned three different ways of storing the application’s data. You captured the user’s
implicit preferences with the Flashlight application, allowed the ReturnMe applica-
tion to be explicitly configured from the Settings application, and stored the
FlashCards application’s data through object archiving. You also learned some
important design principles that should keep you from getting carried away with too
many preferences and should guide you in putting preferences in the right location.
This hour explored a lot of ground, and you have covered the topic of application
data storage fairly exhaustively. At this point, you should be ready for most storage
needs you encounter while developing your own applications.
Q&AQ. What about games? How should game preferences be handled?
A. Games are about providing the player with an immersive experience. Leaving
that experience to go to the Settings application or to interact with a stodgy
table view is not going to keep the player immersed. You want users to set up
the game to their liking while still remaining in the game’s world, with the
music and graphical style of the game as part of the customization experi-
ence. For games, feel free to use the NSUserDefaults API but provide a custom,
in-game experience for the UI.

ptg
406 HOUR 14: Reading and Writing Application Data
Q. I have more complex data requirements. Is there a database I can use?
A. Although the techniques discussed in this hour’s lesson are suitable for most
applications, larger apps may want to utilize Core Data. Core Data imple-
ments a high-level data model and helps developers manage complex data
requirements.
Workshop
Quiz1. What is object archiving?
2. What is a plist file?
Answers1. Object archiving is the ability to save complex objects to files through the
process of serialization—then to read them back into memory at a later time.
2. A plist file is an XML property list file used to store the user’s settings for a
given application. Plist files can be edited from within Xcode and externally to
Xcode with the Property List Editor application.
Activities1. If you think through the life cycle of the Flashlight application, you may real-
ize there is a circumstance we didn’t account for. It’s possible that the
Flashlight application has never been run before and has no stored user pref-
erences. To try this scenario, select Reset Content and Settings from the iPhone
Simulator menu, and then build and launch the Flashlight application in the
simulator. With no prior settings, it defaults to off, with the brightness turned
all the way down. This is the exact opposite of what we would like to default
to the first time Flashlight is run. Apply the technique we used in the
RememberMe application to fix this, and default the flashlight’s initial state to
on and 100% brightness.
2. Return to an earlier application, such as ImageHop, and use implicit prefer-
ences to save the state of the program before it exits. When the user relaunches
the application, restore the application to its original state. This is a key part of
the user experience on the iPhone and something you should strive for.

ptg
HOUR 15
Building Rotatable andResizable User Interfaces
What You’ll Learn in This Hour:. How to make an application “rotation aware”. Ways of laying out an interface to enable automatic rotation. Methods of tweaking interface elements’ frames to fine-tune a layout. How to swap views for landscape and portrait viewing
You can use almost every iPhone interface widget available, you can create multiple views and
view controllers, add sounds and alerts, write files, and even manage application preferences,
but until now, your applications have been missing a very important feature—rotatable inter-
faces. The ability to create interfaces that “look right” regardless of the iPhone’s orientation is
one of the key features that users expect in an application.
This hour’s lesson explores three different ways of adding rotatable and resizable inter-
faces to your apps. You might be surprised to learn that all the apps you’ve built to-date
can begin handling rotation with a single line of code!
Rotatable and Resizable InterfacesYears ago, when I had my first Windows Mobile smartphone, I longed for an easy way to
look at web content in landscape mode. There was a method for triggering a landscape
view, but it was glitchy and cumbersome to use. The iPhone introduced the first consumer
phone with on-the-fly interface rotation that feels natural and doesn’t get in the way of
what you’re trying to do.
As you build your iPhone applications, consider how the user will be interfacing with the
app. Does it make sense to force a portrait-only view? Should the view rotate to accommo-
date any of the possible orientations the phone may assume? The more flexibility you
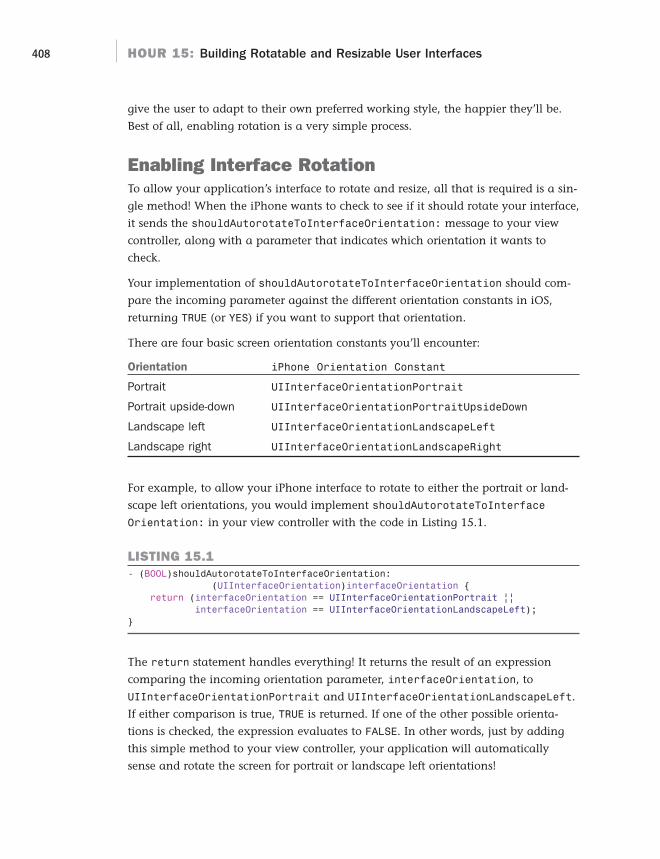
ptg
408 HOUR 15: Building Rotatable and Resizable User Interfaces
give the user to adapt to their own preferred working style, the happier they’ll be.
Best of all, enabling rotation is a very simple process.
Enabling Interface RotationTo allow your application’s interface to rotate and resize, all that is required is a sin-
gle method! When the iPhone wants to check to see if it should rotate your interface,
it sends the shouldAutorotateToInterfaceOrientation: message to your view
controller, along with a parameter that indicates which orientation it wants to
check.
Your implementation of shouldAutorotateToInterfaceOrientation should com-
pare the incoming parameter against the different orientation constants in iOS,
returning TRUE (or YES) if you want to support that orientation.
There are four basic screen orientation constants you’ll encounter:
Orientation iPhone Orientation Constant
Portrait UIInterfaceOrientationPortrait
Portrait upside-down UIInterfaceOrientationPortraitUpsideDown
Landscape left UIInterfaceOrientationLandscapeLeft
Landscape right UIInterfaceOrientationLandscapeRight
For example, to allow your iPhone interface to rotate to either the portrait or land-
scape left orientations, you would implement shouldAutorotateToInterface
Orientation: in your view controller with the code in Listing 15.1.
LISTING 15.1- (BOOL)shouldAutorotateToInterfaceOrientation:
(UIInterfaceOrientation)interfaceOrientation {return (interfaceOrientation == UIInterfaceOrientationPortrait ||
interfaceOrientation == UIInterfaceOrientationLandscapeLeft);}
The return statement handles everything! It returns the result of an expression
comparing the incoming orientation parameter, interfaceOrientation, to
UIInterfaceOrientationPortrait and UIInterfaceOrientationLandscapeLeft.
If either comparison is true, TRUE is returned. If one of the other possible orienta-
tions is checked, the expression evaluates to FALSE. In other words, just by adding
this simple method to your view controller, your application will automatically
sense and rotate the screen for portrait or landscape left orientations!
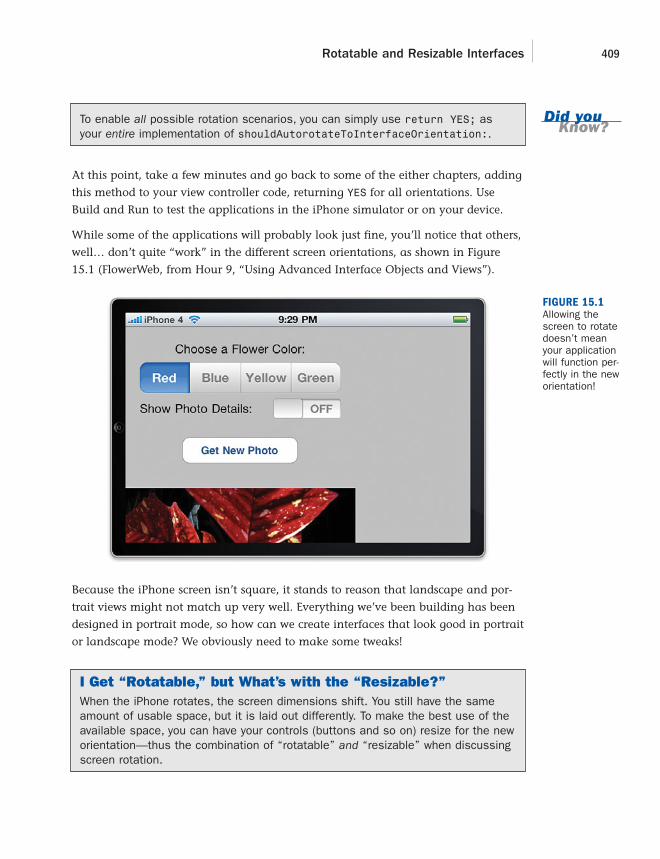
ptg
Rotatable and Resizable Interfaces 409
To enable all possible rotation scenarios, you can simply use return YES; asyour entire implementation of shouldAutorotateToInterfaceOrientation:.
At this point, take a few minutes and go back to some of the either chapters, adding
this method to your view controller code, returning YES for all orientations. Use
Build and Run to test the applications in the iPhone simulator or on your device.
While some of the applications will probably look just fine, you’ll notice that others,
well… don’t quite “work” in the different screen orientations, as shown in Figure
15.1 (FlowerWeb, from Hour 9, “Using Advanced Interface Objects and Views”).
Did youKnow?
FIGURE 15.1Allowing thescreen to rotatedoesn’t meanyour applicationwill function per-fectly in the neworientation!
Because the iPhone screen isn’t square, it stands to reason that landscape and por-
trait views might not match up very well. Everything we’ve been building has been
designed in portrait mode, so how can we create interfaces that look good in portrait
or landscape mode? We obviously need to make some tweaks!
I Get “Rotatable,” but What’s with the “Resizable?”When the iPhone rotates, the screen dimensions shift. You still have the sameamount of usable space, but it is laid out differently. To make the best use of theavailable space, you can have your controls (buttons and so on) resize for the neworientation—thus the combination of “rotatable” and “resizable” when discussingscreen rotation.

ptg
410 HOUR 15: Building Rotatable and Resizable User Interfaces
Designing Rotatable and Resizable InterfacesIn the remainder of this hour, we explore three different techniques for building
interfaces that rotate and resize themselves appropriately when the user changes the
iPhone’s screen orientation. Before we get started, let’s quickly review the different
approaches and when you’d want to use them.
Autorotation and AutoresizingInterface Builder provides tools for describing how your interface should react when
it is rotated. It is possible to define a single view in interface builder that positions
and sizes itself appropriately when rotated without writing a single line of code!
This should be the starting point for all interfaces. If you can successfully define por-
trait and landscape modes in single view in Interface Builder, your work is done.
Unfortunately, autorotation/autoresizing doesn’t work well when there are many
irregularly positioned interface elements. A single row of buttons? No problem! Half
a dozen fields, switches, and images all mixed together? Probably not going to work.
ReframingAs you’ve learned, each UI element is defined by a rectangular area on the screen—
its frame property.
To change the size or location of something in the view, you can redefine the frame
using the Core Graphics C function CGRectMake(x,y,width,height). CGRectMake
accepts an x and y point coordinate, along with a width and height in points, and
returns a new frame value.
By defining new frames for everything in your view, you have complete control of
each object’s placement and size. Unfortunately, you’ll need to keep track of the
coordinate positions for each object. This isn’t difficult, per se, but it can be frustrat-
ing when you want to shift an object up or down by a few points and suddenly find
yourself needing to adjust the coordinates of every other object above or below it.
Swapping ViewsA more dramatic approach to changing your view to accommodate different screen
orientations is to use entirely different views for landscape and portrait layouts!
When the user rotates the device, the current view is replaced by another view that
is laid out properly for the orientation.
This means that you can define two views in Interface Builder that look exactly the
way you want—but it also means that you’ll need to keep track of separate
IBOutlets for each view! Although it is certainly possible for elements in the views
ptg
Did youKnow?
By theWay
Creating Rotatable and Resizable Interfaces with Interface Builder 411
to invoke the same IBActions, they cannot share the same outlets, so you’ll poten-
tially need to keep track of twice as many UI widgets within a single view controller.
To know when to change frames or swap views, you will be implementing themethod willRotateToInterfaceOrientation:toInterfaceOrientation:dura-tion: in your view controller. This method is called by the iPhone when it is aboutto change orientation.
Apple has implemented a screen-locking function in iOS 4 so that users can lockthe screen in portrait orientation without it changing if the device rotates. (Thiscan be useful for reading while lying on your side.) When the screen lock isenabled, your application will not receive notifications about a change in orienta-tion. In other words, to support the screen lock, you don’t need to do a thing!
Creating Rotatable and ResizableInterfaces with Interface BuilderIn the first of our three tutorial projects, we’ll look at ways you can use the built-in
tools in Interface Builder to control how your views “adapt” to being rotated. For
simple views, these features provide everything you need to create orientation-aware
apps.
We’ll be using a label (UILabel) and a few buttons (UIButton) as our “study sub-
jects” for this tutorial. Feel free to swap them out with other interface elements to see
how rotation and resizing is handled across the iPhone object library.
Setting Up the ProjectBegin by starting Xcode and creating a new application, SimpleSpin, using the
Apple View-Based iPhone Application template. Although all our UI work will take
place in Interface Builder, we’ll still need to enable interface rotation with the
shouldAutorotateToInterfaceOrientation: method.
Open the implementation file for the view controller (SimpleSpinViewController.m),
and then find and uncomment shouldAutorotateToInterfaceOrientation:.
Because we’re not controlling the view programmatically at all, we’ll go ahead and
enable all possible iPhone screen orientations by returning YES from this method.
The finished method implementation should resemble Listing 15.2.

ptg
412 HOUR 15: Building Rotatable and Resizable User Interfaces
LISTING 15.2- (BOOL)shouldAutorotateToInterfaceOrientation:
(UIInterfaceOrientation)interfaceOrientation {return YES;
}
Save the implementation file and switch to Interface Builder by opening the XIB file
that defines the application’s view—SimpleSpinViewController.xib. All the rest of our
work for this example will take place in this file.
Building a Flexible InterfaceCreating a rotatable and resizable interface starts out like building any other iPhone
interface—just drag and drop!
Using the Library (Tools, Library), drag a label (UILabel) and four buttons
(UIButton) to the SimpleSpin view. Center the label at the top of the view and title it
SimpleSpin. Name the buttons so you can tell them apart—Button 1, Button 2,
Button 3, and Button 4. Position them below the label, as shown in Figure 15.2.
FIGURE 15.2Build your rotat-able applicationinterface thesame way youwould any otherapplication.
Testing RotationYou’ve now built a simple application interface, just as you have in earlier lessons. To
get an idea of what the interface looks like when rotated, click the curved arrow in the
upper-right corner of the Interface Builder’s view window, as shown in Figure 15.3.

ptg
Creating Rotatable and Resizable Interfaces with Interface Builder 413
As you might expect, the reoriented view does not look “quite right.” The reason is
that objects you add to the view are, by default, “anchored” by their upper-left cor-
ners. This means that no matter what the screen orientation is, they’ll keep the
same distance from the top of the view to their top and from left of the view to their
left side. Objects also, by default, are not allowed to resize within the view. As a
result all elements have the exact same size in portrait or landscape orientations—
even if they won’t fit in the view.
To fix our problem and create an iPhone-worthy interface, we need to use the Size
Inspector.
Understanding Autosizing in the Size InspectorAs you’ve grown more experienced building iPhone applications, you’ve gotten
accustomed to using the Interface Builder Inspectors. The Attributes and
Connections Inspectors have been extremely valuable in configuring the appear-
ance and functionality of your application. The Size Inspector (Command+3), on the
other hand, has remained largely on the sidelines, occasionally called on to set the
coordinates of a control but never used to enable functionality—until now.
The magic of autorotating and autoresizing views is managed entirely through the
Size Inspector’s Autosizing settings, shown in Figure 15.4. This deceptively simple
“square in a square” interface provides everything you need to tell Interface Builder
where to anchor your controls and in which directions (horizontally or vertically)
they can stretch.
To understand how this works, imagine that the inner square represents one of your
interface elements and the outer square is the view that contains the element. The
lines between the inner and outer square are the anchors. When clicked, they toggle
between solid and dashed lines. Solid lines are anchors that are set. This means that
those distances will be maintained when the interface rotates.
FIGURE 15.3Use InterfaceBuilder to imme-diately test theeffects of rotat-ing the view.
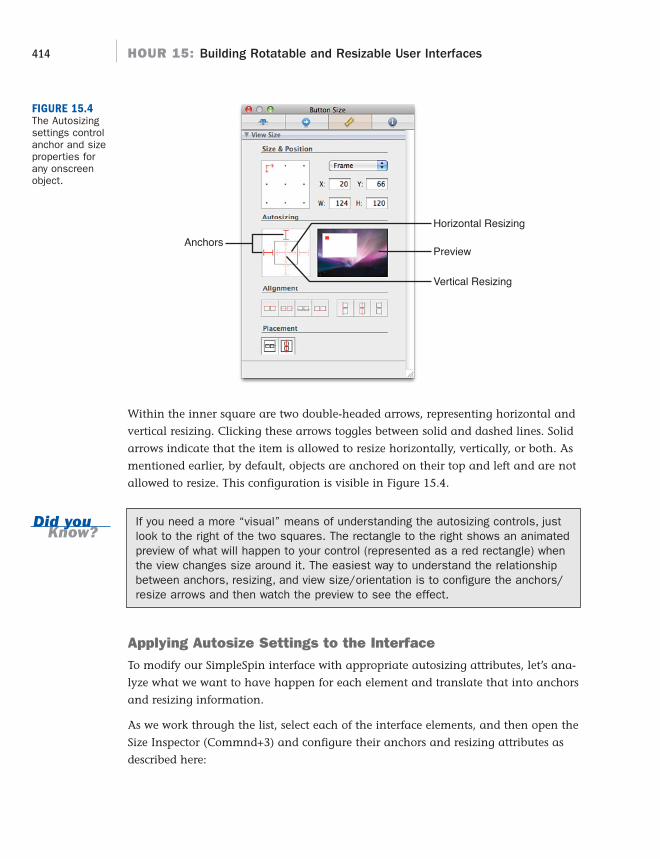
ptg
Did youKnow?
414 HOUR 15: Building Rotatable and Resizable User Interfaces
Within the inner square are two double-headed arrows, representing horizontal and
vertical resizing. Clicking these arrows toggles between solid and dashed lines. Solid
arrows indicate that the item is allowed to resize horizontally, vertically, or both. As
mentioned earlier, by default, objects are anchored on their top and left and are not
allowed to resize. This configuration is visible in Figure 15.4.
If you need a more “visual” means of understanding the autosizing controls, justlook to the right of the two squares. The rectangle to the right shows an animatedpreview of what will happen to your control (represented as a red rectangle) whenthe view changes size around it. The easiest way to understand the relationshipbetween anchors, resizing, and view size/orientation is to configure the anchors/resize arrows and then watch the preview to see the effect.
Applying Autosize Settings to the InterfaceTo modify our SimpleSpin interface with appropriate autosizing attributes, let’s ana-
lyze what we want to have happen for each element and translate that into anchors
and resizing information.
As we work through the list, select each of the interface elements, and then open the
Size Inspector (Commnd+3) and configure their anchors and resizing attributes as
described here:
Anchors
Horizontal Resizing
Vertical Resizing
Preview
FIGURE 15.4The Autosizingsettings controlanchor and sizeproperties forany onscreenobject.

ptg
Creating Rotatable and Resizable Interfaces with Interface Builder 415
. The SimpleSpin label: The label should float at the top center of the view.
The distance between the top of the view and the label should be maintained.
The size of the label should be maintained (Anchor:Top, Resizing: None).
. Button 1: The button should maintain the same distance between its left side
and the left side of the view, but it should be allowed to float up and down as
needed. It can resize horizontally to better fit a larger horizontal space
(Anchor: Left, Resizing: Horizontal).
. Button 2: The button should maintain the same distance between its right
side and the right side of the view, but it should be allowed to float up and
down as needed. It can resize horizontally to better fit a larger horizontal
space (Anchor: Right, Resizing: Horizontal).
. Button 3: The button should maintain the same distance between its left side
and the left side of the view, as well as its bottom and the bottom of the view.
It can resize horizontally to better fit a larger horizontal space (Anchor: Left
and Bottom, Resizing: Horizontal).
. Button 4: The button should maintain the same distance between its right
side and the right side of the view, as well as its bottom and the bottom of the
view. It can resize horizontally to better fit a larger horizontal space (Anchor:
Right and Bottom, Resizing: Horizontal).
After you’ve worked through one or two of the UI objects, you’ll realize that it took
longer to describe what we needed to do than it did to do it! Once the anchors and
resize settings are in place, the application is ready for rotation! Click the rotate
arrow in the Interface Builder’s view window and review the result. Your view should
now resize and resemble Figure 15.5.
FIGURE 15.5The finishedview now prop-erly positionsitself whenrotated into alandscapeorientation.

ptg
416 HOUR 15: Building Rotatable and Resizable User Interfaces
You can, if you choose, save the SimpleSpinViewController.xib changes, and then
return to Xcode and click Build and Run to test the application in the iPhone Simulator
or on your device. Because we haven’t modified anything programmatically in the
view, it should behave exactly the same as what you’ve seen in Interface Builder.
Reframing Controls on RotationIn the previous example, you learned how Interface Builder can help quickly create
interface layouts that look as good horizontally as they do vertically. Unfortunately,
there are plenty of situations that Interface Builder can’t quite accommodate.
Irregularly spaced controls and tightly packed layouts will rarely work out the way
you expect. You may also find yourself wanting to tweak the interface to look com-
pletely different—positioning objects that were at the top of the view down by the
bottom, and so on.
In either of these cases, you’ll likely want to consider reframing the controls to
accommodate a rotated iPhone screen. The logic is simple—when the phone inter-
face rotates, we’ll identify which orientation it will be rotating to, and then set new
frame properties for everything in the UI that we want to reposition or resize. You’ll
learn how to do this now.
Setting Up the ProjectUnlike the previous example, we can’t rely on Interface Builder for everything, so
there is a small amount of code in this tutorial. Once again, create a new view-
based iPhone application project and name it Reframe.
Adding Outlets and PropertiesIn this exercise, you’ll manually resize and reposition three UI elements: two buttons
(UIButton) and one label (UILabel). Because we’ll need to access these program-
matically, we’ll first edit the interface and implementation files to include outlets
and properties for each of these objects.
Open the ReframeViewController.h file, and edit it to include IBOutlet declarations
and @property directives for buttonOne, buttonTwo, and viewLabel, as shown in
Listing 15.3.
LISTING 15.3#import <UIKit/UIKit.h>
@interface ReframeViewController : UIViewController {IBOutlet UIButton *buttonOne;

ptg
Reframing Controls on Rotation 417
IBOutlet UIButton *buttonTwo;
IBOutlet UILabel *viewLabel;
}
@property (nonatomic,retain) UIButton *buttonOne;
@property (nonatomic,retain) UIButton *buttonTwo;
@property (nonatomic,retain) UILabel *viewLabel;
@end
Save your changes, then edit ReframeViewController.m, adding the appropriate
@synthesize directives for buttonOne, buttonTwo, and viewLabel, immediately fol-
lowing the @implementation line:
@synthesize buttonOne;@synthesize buttonTwo;@synthesize viewLabel;
Releasing the ObjectsEdit the dealloc method in ReframeViewController.m to release the label and button
we’ve retained:
- (void)dealloc {[buttonOne release];
[buttonTwo release];
[viewLabel release];
[super dealloc];}
Enabling RotationEven when you aren’t going to be taking advantage of the autoresizing/autorotation
capabilities in Interface Builder, you must still enable rotation in the shouldAutorotate
ToInterfaceOrientation: method. Update ReframeViewController.m to include the
implementation you added in the earlier lesson:
- (BOOL)shouldAutorotateToInterfaceOrientation:(UIInterfaceOrientation)interfaceOrientation {
return YES;}
With the exception of the logic to detect and handle the reframing of our interface
elements, that finishes the setup of our application. Now, let’s create the default view
that will be displayed when the application first loads.
Creating the InterfaceWe’ve now reached the point in the project where the one big caveat of reframing
becomes apparent—keeping track of interface coordinates and sizes. Although we have

ptg
418 HOUR 15: Building Rotatable and Resizable User Interfaces
the opportunity to lay out the interface in Interface Builder, we’ll need to make note of
where all of the different elements are. Why? Because each time the screen changes
rotation, we’ll be resetting their positions in the view. There is no “return to default
positions” method, so even the initial layout we create will have to be coded using x,y
coordinates and sizes so that we can call it back up when needed. Let’s begin.
Open the ReframeViewController.xib file and its view in Interface Builder.
Disabling AutosizingBefore doing anything else, click within the view to select it, and then open the
Attributes Inspector (Command+1). Within the View settings section, uncheck the
Autoresize Subviews check box, as shown in Figure 15.6.
Uncheck AutoresizeSubviews
FIGURE 15.6Disablingautoresizingwhen manuallyresizing andpositioningcontrols.
If you forget to disable the autoresize attribute in the view, your application code
will manually resize/reposition the UI elements at the same time the iOS tries to do
it for you. The result can be a jumbled mess and several minutes of head scratching!
Laying Out the View… OnceYour next step is to lay out the view exactly as you would in any other app. Recall
that we added outlets for two buttons and a label; using the Library, click and drag
those elements into your view now. Title the label Reframing and position it at the
top of the view. Set the button titles to Button 1 and Button 2 and place them
under the label. Your final layout should resemble Figure 15.7.

ptg
Reframing Controls on Rotation 419
When you have the layout you want, you’ll need to determine what the current
frame attributes are for each of your objects. You can get this information from the
Size Inspector.
Start by selecting the label and opening the Size Inspector (Command+3). Click the
dot in the upper-right corner of the Size & Position settings to set it as the origin
point for measuring coordinates. Next, make sure that the drop-down menu is set to
Frame, as shown in Figure 15.8.
FIGURE 15.7Start by layingout the view likea normal appli-cation.
FIGURE 15.8Configure theSize & Positionsettings toshow the infor-mation youneed to collect.

ptg
420 HOUR 15: Building Rotatable and Resizable User Interfaces
Now, write down the X, Y, W (width), and H (height) attributes for the label. This
represents the frame property of the object within your view. Repeat this process for
the two buttons. You should end up with a list of four values for each of your
objects. Our frame values are listed here for comparison:
. Label: X: 95.0, Y: 15.0, W: 130.0, H: 20.0
. Button 1: X: 20.0, Y: 50.0, W: 280.0, H: 190.0
. Button 2: X: 20.0, Y: 250.0, W: 280.0, H: 190.0
Before doing anything else, save your view! We’ll be making some changes in the
next section that you’ll want to undo.
If you want to follow our example exactly, feel free to enter the X, Y, W, and H pointvalues we’ve provided for the values of your objects in the Size Inspector. Doingthis will resize and reposition your view elements to match the one here!
Laying Out the View… AgainYour next step is to lay out the view exactly as you would in any other app. Wait a
sec; this sounds very familiar. Why do we want to lay out the view again? The answer
is simple. We’ve collected all of the frame properties that we’ll need to configure the
portrait view, but we haven’t yet defined where the label and buttons will be in the
landscape view. To get this information, we’ll lay the view out again in landscape
mode, collect all the location and size attributes, and then discard those changes.
The process is identical to what you’ve already done—the only difference is that you
need to click the rotate arrow in Interface Builder to rotate the view. Once rotated,
resize and reposition all the existing elements so that they look the way you want
them to appear when in landscape orientation on your iPhone. Because we’ll be set-
ting the positions and sizes programmatically, the sky is the limit for how you
arrange the display. To follow our example, stretch Button 1 across the top of the
view and Button 2 across the button. Position the Reframing label in the middle, as
shown in Figure 15.9.
As before, when the view is exactly as you want it to appear, use the Size Inspector
(Command+3) to collect the x,y coordinates and height and width of all of the UI
elements. Our landscape frame values are provided here for comparison:
. Label: X: 175.0, Y: 140.0, W: 130.0, H: 20.0
. Button 1: X: 20.0, Y: 20.0, W: 440.0, H: 100.0
. Button 2: X: 20.0, Y: 180.0, W: 440.0, H: 100.0
Did youKnow?

ptg
Reframing Controls on Rotation 421
When you’ve collected the landscape frame attributes, undo the changes by using Edit,
Undo (Command+Z), or close ReframeViewController.xib (not saving the changes).
Connecting the OutletsBefore jumping back into Xcode to finish the implementation, we still need to con-
nect the label and buttons to the outlets (viewLabel, buttonOne, and buttonTwo)
that we added at the start of the project. Open ReframeViewController.xib again (if
you closed it in the last step), and make sure that the view window and Document
window are both visible onscreen.
Next, Control-drag from the File’s Owner icon to the label and two buttons, choos-
ing viewLabel, buttonOne, and buttonTwo as appropriate. Figure 15.10 demon-
strates the connection from the Reframing label to the viewLabel outlet.
FIGURE 15.9Lay the view outas you’d like itto appear inlandscapemode.
FIGURE 15.10Finish up theinterface by con-necting thelabel and but-tons to theircorrespondingoutlets.
ptg
422 HOUR 15: Building Rotatable and Resizable User Interfaces
Save the XIB file and return to Xcode to finish up the project!
Implementing the Reframing LogicNow that you’ve built the view and captured the values for the label and button
frames in both portrait and landscape views, the only thing that remains is detect-
ing when the iPhone is ready to rotate and reframing appropriately.
The willRotateToInterfaceOrientation:toInterfaceOrientation:duration:
method is invoked automatically whenever the iPhone interface needs to rotate.
We’ll compare toInterfaceOrientation parameter to the different iPhone orienta-
tion constants to identify whether we should be using the frames for a landscape or
portrait view.
Open the ReframeViewController.m file in Xcode and add the method shown in
Listing 15.4.
LISTING 15.41: -(void)willRotateToInterfaceOrientation:2: (UIInterfaceOrientation)toInterfaceOrientation3: duration:(NSTimeInterval)duration {4:5: [super willRotateToInterfaceOrientation:toInterfaceOrientation6: duration:duration];7:8: if (toInterfaceOrientation == UIInterfaceOrientationLandscapeRight ||9: toInterfaceOrientation == UIInterfaceOrientationLandscapeLeft) {10: viewLabel.frame=CGRectMake(175.0,140.0,130.0,20.0);11: buttonOne.frame=CGRectMake(20.0,20.0,440.0,100.0);12: buttonTwo.frame=CGRectMake(20.0,180.0,440.0,100.0);13: } else {14: viewLabel.frame=CGRectMake(95.0,15.0,130.0,20.0);15: buttonOne.frame=CGRectMake(20.0,50.0,280.0,190.0);16: buttonTwo.frame=CGRectMake(20.0,250.0,280.0,190.0);17: }18: }
The logic is straightforward. To start, we need to make sure that any parent objects
are notified that the view is about to rotate. So, in lines 5–6, we pass the same
willRotateToInterfaceOrientation:toInterfaceOrientation:duration: mes-
sage to the parent object super.
In lines 8–12 we compare the incoming parameter toInterfaceOrientation to the
landscape orientation constants. If either of these match, we reframe the label and
buttons to their landscape layouts by assigning the frame property to the output of
the CGRectMake() function. The input to CGRectMake() is nothing more than the X,
Y, W, and H values we collected earlier in Interface Builder.
ptg
Swapping Views on Rotation 423
Lines 13–16 handle the “other” orientation: portrait orientation. If the iPhone isn’t
rotated into a landscape orientation, the only other possibility is portrait. Again, the
frame values that we assign are nothing more than the values identified using the
Size Inspector in Interface Builder.
And with this simple method, the Reframe project is now complete! You now have
the capability of creating interfaces that rearrange themselves when users rotate
their phones.
We still have one more approach to cover. In this final project, instead of rearrang-
ing a view in landscape orientation, we’ll replace the view altogether!
Swapping Views on RotationSome applications display entirely different user interfaces depending on the
iPhone’s orientation. The iPod application, for example, displays a scrolling list of
songs in portrait mode and a “flickable” Cover Flow view of albums when held in
landscape. You, too, can create applications that dramatically alter their appear-
ance by simply switching between views when the phone is rotated. Our last tutorial
this hour will be short, sweet, and give you the flexibility to manage your landscape
and portrait views all within the comfort of Interface Builder.
Setting Up the ProjectCreate a new project named Swapper using the View-Based iPhone Application
template. Although this includes a single view already (which we’ll use for the
default portrait display), we need to supplement it with a second landscape view.
Adding Outlets and PropertiesThis application won’t implement any real user interface elements, but we will need
to access two UIView instances programmatically.
Open the SwapperViewController.h file and edit it to include IBOutlet declara-
tions and @property directives for portraitView, and landscapeView. The result
should match Listing 15.5.
LISTING 15.5#import <UIKit/UIKit.h>
@interface ReframeViewController : UIViewController {IBOutlet UIView *portraitView;
IBOutlet UIView *landscapeView;
}

ptg
424 HOUR 15: Building Rotatable and Resizable User Interfaces
@property (nonatomic,retain) UIView *portraitView;
@property (nonatomic,retain) UIView *landscapeView;
@end
You know the routine. Save your changes, then edit SwapperViewController.m
implementation file, adding the appropriate @synthesize directives immediately
following the @implementation line:
@synthesize portraitView;@synthesize landscapeView;
Releasing the ObjectsEdit the dealloc method in ReframeViewController.m to release the two views
we’ve retained.
- (void)dealloc {[landscapeView release];
[portraitView release];
[super dealloc];}
Enabling RotationOnce more, we need to enable rotation in order for the iPhone to properly react
when it changes orientation. Unlike the previous two implementations of
shouldAutorotateToInterfaceOrientation:, this time, we’ll only allow rotate
between the two landscape modes and upright portrait.
Update ReframeViewController.m to include the implementation in Listing 15.6.
LISTING 15.6- (BOOL)shouldAutorotateToInterfaceOrientation:
(UIInterfaceOrientation)interfaceOrientation {return (interfaceOrientation == UIInterfaceOrientationPortrait ||
interfaceOrientation == UIInterfaceOrientationLandscapeRight ||interfaceOrientation == UIInterfaceOrientationLandscapeLeft);
}
The incoming interfaceOrientation parameter is compared to the
UIInterfaceOrientationPortrait, UIInterfaceOrientationLandscapeRight,
and UIInterfaceOrientationLandscapeLeft. If it matches, rotation is allowed. As
you might surmise, this covers all of the possible orientations except upside-down
portrait (UIInterfaceOrientationPortraitUpsideDown)—which we’ll disable this
time around.
LISTING 15.5 continued#
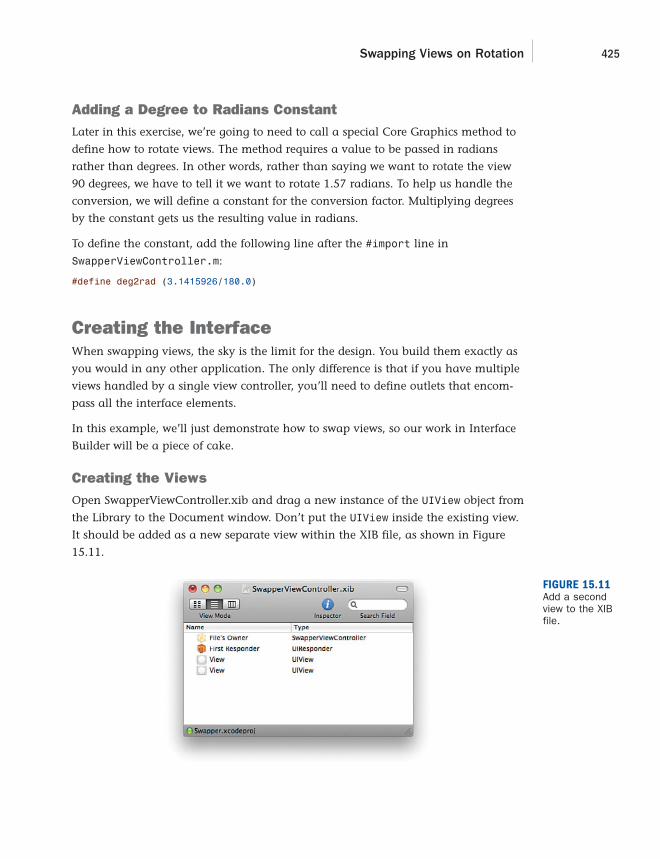
ptg
Swapping Views on Rotation 425
Adding a Degree to Radians ConstantLater in this exercise, we’re going to need to call a special Core Graphics method to
define how to rotate views. The method requires a value to be passed in radians
rather than degrees. In other words, rather than saying we want to rotate the view
90 degrees, we have to tell it we want to rotate 1.57 radians. To help us handle the
conversion, we will define a constant for the conversion factor. Multiplying degrees
by the constant gets us the resulting value in radians.
To define the constant, add the following line after the #import line in
SwapperViewController.m:
#define deg2rad (3.1415926/180.0)
Creating the InterfaceWhen swapping views, the sky is the limit for the design. You build them exactly as
you would in any other application. The only difference is that if you have multiple
views handled by a single view controller, you’ll need to define outlets that encom-
pass all the interface elements.
In this example, we’ll just demonstrate how to swap views, so our work in Interface
Builder will be a piece of cake.
Creating the ViewsOpen SwapperViewController.xib and drag a new instance of the UIView object from
the Library to the Document window. Don’t put the UIView inside the existing view.
It should be added as a new separate view within the XIB file, as shown in Figure
15.11.
FIGURE 15.11Add a secondview to the XIBfile.

ptg
426 HOUR 15: Building Rotatable and Resizable User Interfaces
Now, open each of the views and add a label to tell them apart. We’ve set the back-
ground color of each view to be different as well. You’re welcome to add other con-
trols and design the view as you see fit. Our finished landscape and portrait views
are seen in Figure 15.12.
FIGURE 15.12Edit the twoviews so thatyou can tellthem apart.
To differentiate between the two views within the Interface Builder Document win-dow, you can edit the name of each view just like you would edit a filename in theFinder!
Connecting the OutletsTo finish up in Interface Builder, Control-drag from the File’s Owner icon to each of
the views. Connect the portrait view to the portraitView outlet, as shown in Figure
15.13, and the landscape view to landscapeView.
Save the XIB file and return to Xcode to finish up the Swapper implementation.
Implementing the View-Swapping LogicFor the most part, swapping views is actually easier than the reframing logic we
implemented in the last project—with one small exception. Even though we
designed one of the views to be in landscape view, it doesn’t “know” that it is sup-
posed to be displayed in a landscape orientation. Before we can display it, we need
to rotate it and define how big it is.
Did youKnow?

ptg
Swapping Views on Rotation 427
Understanding the View-Rotation LogicEach time we change orientation, we’ll go through three steps—swapping the view,
rotating the view to the proper orientation through the transform property, and set-
ting the view’s origin and size via the bounds property.
For example, assume we’re rotating to landscape right orientation:
1. First, we swap out the view by assigning self.view, which contains the cur-
rent view of the view controller, to the landscapeView instance variable. If we
left things at that, the view would properly switch, but it wouldn’t be rotated
into the landscape orientation. A landscape view displayed in a portrait orien-
tation isn’t a pretty thing! For example:
self.view=landscapeView;
2. Next, to deal with the rotation, we define the transform property of the view.
This property determines how the view will be altered before it is displayed.
To meet our needs, we’ll have to rotate the view 90 degrees to the right (for
landscape right), –90 degrees to the left (for landscape left), and 0 degrees
for portrait. As luck would have it, the Core Graphics C function,
CGAffineTransformMakeRotation(), accepts a rotation value in radians,
and provides an appropriate structure to the transform property handle
the rotation. For example:
self.view.transform=CGAffineTransformMakeRotation(deg2rad*(90));
FIGURE 15.13Connect theviews to theircorrespondingoutlets.

ptg
428 HOUR 15: Building Rotatable and Resizable User Interfaces
Note that we multiply the rotation in degrees (90, –90, and 0) by the constantdeg2rad that we defined earlier so that CGAffineTransformMakeRotation() hasthe radian value it expects.
3. The final step is to set the bounds property of the view. The bounds define the
origin point and size of the view after it undergoes the transformation. A por-
trait iPhone view has an original point of 0,0 and a width and height of 320.0
and 460.0. A landscape view has the same origin point (0,0) but a width of
480.0, and a height of 300.0. As with the frame property, we can set bounds
using the results of CGRectMake(). For example:
self.view.bounds=CGRectMake(0.0,0.0,480.0,320.0);
What Happened to 320×480? Where Are the Missing 20Points?The missing 20 points are taken up by the iPhone status bar. When the phone isin portrait mode, the points come off of the large (480) dimension. In landscapeorientation, however, the status bar eats up the space on the smaller (320)dimension.
Now that you understand the steps, let’s take a look at the actual implementation.
Writing the View-Rotation LogicAs with the Reframing project, all this magic happens within a single method:
willRotateToInterfaceOrientation:toInterfaceOrientation:duration:.
Open the SwapperViewController.m implementation file and implement the method
as shown in Listing 15.7.
LISTING 15.71: -(void)willRotateToInterfaceOrientation:2: (UIInterfaceOrientation)toInterfaceOrientation3: duration:(NSTimeInterval)duration {4:5: [super willRotateToInterfaceOrientation:toInterfaceOrientation6: duration:duration];7:8: if (toInterfaceOrientation == UIInterfaceOrientationLandscapeRight) {9: self.view=landscapeView;10: self.view.transform=CGAffineTransformMakeRotation(deg2rad*(90));11: self.view.bounds=CGRectMake(0.0,0.0,480.0,320.0);12: } else if (toInterfaceOrientation ==
➥UIInterfaceOrientationLandscapeLeft) {
By theWay
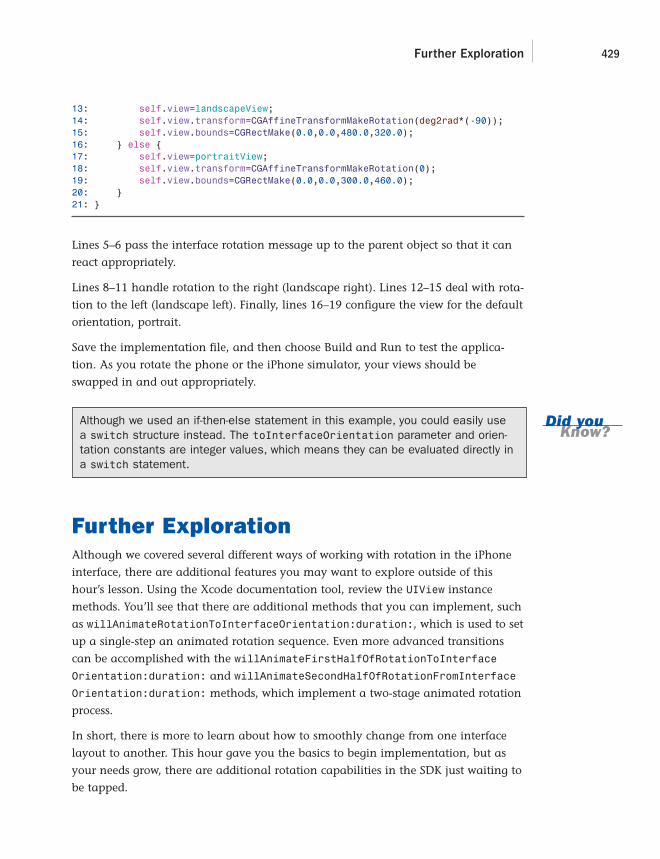
ptg
Further Exploration 429
13: self.view=landscapeView;14: self.view.transform=CGAffineTransformMakeRotation(deg2rad*(-90));15: self.view.bounds=CGRectMake(0.0,0.0,480.0,320.0);16: } else {17: self.view=portraitView;18: self.view.transform=CGAffineTransformMakeRotation(0);19: self.view.bounds=CGRectMake(0.0,0.0,300.0,460.0);20: }21: }
Lines 5–6 pass the interface rotation message up to the parent object so that it can
react appropriately.
Lines 8–11 handle rotation to the right (landscape right). Lines 12–15 deal with rota-
tion to the left (landscape left). Finally, lines 16–19 configure the view for the default
orientation, portrait.
Save the implementation file, and then choose Build and Run to test the applica-
tion. As you rotate the phone or the iPhone simulator, your views should be
swapped in and out appropriately.
Although we used an if-then-else statement in this example, you could easily usea switch structure instead. The toInterfaceOrientation parameter and orien-tation constants are integer values, which means they can be evaluated directly ina switch statement.
Further ExplorationAlthough we covered several different ways of working with rotation in the iPhone
interface, there are additional features you may want to explore outside of this
hour’s lesson. Using the Xcode documentation tool, review the UIView instance
methods. You’ll see that there are additional methods that you can implement, such
as willAnimateRotationToInterfaceOrientation:duration:, which is used to set
up a single-step an animated rotation sequence. Even more advanced transitions
can be accomplished with the willAnimateFirstHalfOfRotationToInterface
Orientation:duration: and willAnimateSecondHalfOfRotationFromInterface
Orientation:duration: methods, which implement a two-stage animated rotation
process.
In short, there is more to learn about how to smoothly change from one interface
layout to another. This hour gave you the basics to begin implementation, but as
your needs grow, there are additional rotation capabilities in the SDK just waiting to
be tapped.
Did youKnow?

ptg
430 HOUR 15: Building Rotatable and Resizable User Interfaces
SummaryThe iPhone is all about the user experience—a touchable display, intuitive controls,
and now, rotatable and resizable interfaces. Using the techniques described in this
hour’s lesson, you can adapt to almost any type of rotation scenario. To handle sim-
ple interface size changes, for example, you can take advantage of the autosizing
attributes in Interface Builder. For more complex changes, however, you might want
to redefine the frame properties for your onscreen elements, giving you complete
control over their size and placement. Finally, for the ultimate in flexibility, you can
create multiple different views and swap them as the phone rotates.
By implementing rotation-aware applications, you give your users the ability to use
their devices in the way that feels most comfortable to them.
Q&AQ. Why don’t many applications implement the upside-down portrait mode?
A. Although there is no problem implementing the upside-down portrait orienta-
tion using the approaches described in this hour, it isn’t recommended. When
the iPhone is upside-down, the Home button and sensors are not in the “nor-
mal” location. If a call comes in or the user needs to interact with the phone’s
controls, the user will need to rotate the phone 180 degrees—a somewhat com-
plicated action to perform with one hand.
Q. I implemented the first exercise, but the buttons overlapped one another.What did I do wrong?
A. Probably nothing! Make sure that your anchors are set correctly, and then try
shifting the buttons up or down a bit in the view. Nothing in Interface Builder
prevents elements from overlapping. Chances are, you just need to tweak the
positions and try again.

ptg
Workshop 431
Workshop
Quiz1. The iPhone interface can rotate through three different orientations. True or
false?
2. How does an application communicate which rotation orientations it
supports?
3. What was the purpose of the deg2rad constant that we defined in the final
exercise?
Answers1. False. There are four primary interface orientations: landscape right, land-
scape left, portrait, and upside-down portrait.
2. By implementing the shouldAutorotateToInterfaceOrientation: method
in the view controller, the application identifies which of the four orientations
it will operate in.
3. We defined the deg2rad constant to give us an easy way of converting degrees
to radians for the Core Graphics C function
CGAffineTransformMakeRotation().
Activities1. Edit the Swapper example so that each view presents and processes user input.
Keep in mind that because both views are handled by a single view controller,
you’ll need to add all the outlets and actions for both views to the view con-
troller interface and implementation files.
2. Return to an earlier lesson and revise the interface to support multiple differ-
ent orientations. Use any of the techniques described in this hour’s exercises
for the implementation.

ptg
This page intentionally left blank

ptg
HOUR 16
Using Advanced Touches andGestures
What You’ll Learn in This Hour:. The multitouch gesture-recognition architecture. How to detect taps. How to detect swipes. How to detect pinches. How to detect rotations. How to use the built-in shake gesture
A multitouch screen allows applications to use a wide variety of natural finger gestures for
operations that would otherwise be hidden behind layers of menus, buttons, and text.
From the very first time you use a pinch to zoom in and out on a photo, map, or web
page, you realize that’s exactly the right interface for zooming. Nothing is more human
than manipulating the environment with your fingers.
The iOS provides advanced gesture-recognition capabilities that you can easily implement
within your applications. This hour shows you how!
For most applications in this book, using the iPhone Simulator is per-fectly acceptable, but the simulator cannot re-create all the gesturesyou can create with your fingers. For this hour, be sure to have a physi-cal device provisioned for development. To run this hour’s applicationson your device, follow the steps in Hour 1, “Preparing Your System andiPhone for Development.”
WatchOut!

ptg
434 HOUR 16: Using Advanced Touches and Gestures
Multitouch Gesture RecognitionAs you’ve been working through the book’s examples, you’ve gotten used to
responding to events, such as Touch Up Inside, for onscreen buttons. Gesture recog-
nition is a bit different. Consider a “simple” swipe. The swipe has direction, it has
velocity, and it has a certain number of touch points (fingers) that are engaged. It
would be impractical for Apple to implement events for every combination of these
variables, and at the same time, it would be extremely taxing on the system to just
detect a “generic” swipe event and force you, the developer, to check the number of
fingers, direction, and so on each time the event was triggered.
To make life simple, Apple has created “gesture recognizer” classes for almost all the
common gestures that you will want to implement in your applications, as follows:
Tapping (UITapGestureRecognizer): Tapping one or more fingers on the
screen.
Pressing (UILongPressGestureRecognizer): Pressing one or more fingers to
the screen.
“Long” Pressing (UILongPressGestureRecognizer): Pressing one or more
fingers to the screen for a specific period of time.
Pinching (UIPinchGestureRecognizer): Pinching to close or expand some-
thing.
Rotating (UIRotationGestureRecognizer): Sliding two fingers in a circular
motion.
Swiping (UISwipeGestureRecognizer): Swiping with one or more fingers in a
specific direction.
Panning (UIPanGestureRecognizer): Touching and dragging.
Shaking: Physically shaking the iOS device.
In earlier versions of the iOS, developers had to read and recognize low-level touch
events to determine whether, for example, a pinch was happening: Are there two
points represented on the screen? Are they moving toward each other?
In iOS 4 and later, you define what type of recognizer you’re looking for, add the
recognizer to a view (UIView), and you automatically receive any multitouch events
that are triggered. You even receive values such as velocity and scale for gestures
such as “pinch.”
Shaking is not a multitouch gesture and will require a slightly different approach.Note that it doesn’t have its own recognizer class.
Did youKnow?

ptg
Using Gesture Recognizers 435
Using Gesture RecognizersIn this hour’s tutorial, you will implement five gesture recognizers (tap, swipe, pinch,
rotate, and shake), along with the feedback those gestures prompt. Each gesture will
update a text label with information about the gesture that has been detected.
Pinch, rotate, and shake will take things a step further by scaling, rotating, or reset-
ting an image view in response to the gestures.
Perhaps the most surprising element of what you’re about to do is just how easy it is.
I know I say that frequently throughout the book, but gesture recognizers are one of
those rare features that “just works.” Follow along and find out what I mean!
Implementation OverviewThis application, which we’ll name Gestures, will display a screen with four embed-
ded views (UIView), each assigned a different gesture recognizer within the
viewDidLoad method. When you perform an action within one of the views, it will
call a corresponding method in our view controller to update a label with feedback
about the gesture, and depending on the gesture type, update an onscreen image
view (UIImageView), too.
The final application is shown in Figure 16.1.
FIGURE 16.1The applicationwill detect andact upon a vari-ety of gestures.
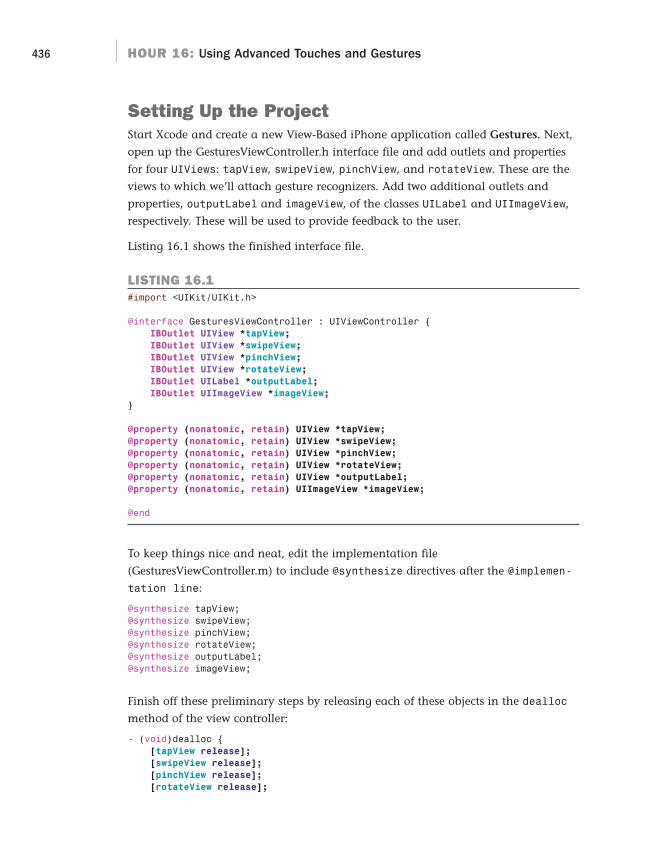
ptg
436 HOUR 16: Using Advanced Touches and Gestures
Setting Up the ProjectStart Xcode and create a new View-Based iPhone application called Gestures. Next,
open up the GesturesViewController.h interface file and add outlets and properties
for four UIViews: tapView, swipeView, pinchView, and rotateView. These are the
views to which we’ll attach gesture recognizers. Add two additional outlets and
properties, outputLabel and imageView, of the classes UILabel and UIImageView,
respectively. These will be used to provide feedback to the user.
Listing 16.1 shows the finished interface file.
LISTING 16.1#import <UIKit/UIKit.h>
@interface GesturesViewController : UIViewController {IBOutlet UIView *tapView;
IBOutlet UIView *swipeView;
IBOutlet UIView *pinchView;
IBOutlet UIView *rotateView;
IBOutlet UILabel *outputLabel;
IBOutlet UIImageView *imageView;
}
@property (nonatomic, retain) UIView *tapView;
@property (nonatomic, retain) UIView *swipeView;
@property (nonatomic, retain) UIView *pinchView;
@property (nonatomic, retain) UIView *rotateView;
@property (nonatomic, retain) UIView *outputLabel;
@property (nonatomic, retain) UIImageView *imageView;
@end
To keep things nice and neat, edit the implementation file
(GesturesViewController.m) to include @synthesize directives after the @implemen-
tation line:
@synthesize tapView;@synthesize swipeView;@synthesize pinchView;@synthesize rotateView;@synthesize outputLabel;@synthesize imageView;
Finish off these preliminary steps by releasing each of these objects in the dealloc
method of the view controller:
- (void)dealloc {[tapView release];
[swipeView release];
[pinchView release];
[rotateView release];

ptg
Using Gesture Recognizers 437
[outputLabel release];
[imageView release];
[super dealloc];}
Adding the Image ResourceBefore you can create your application’s gesture-aware interface, you need to add an
image to the project. We will use this to provide visual feedback to the user. Included
in this hour’s project’s Images folder is flower.png. Drag this file onto the Resources
group for your project, choosing to copy it to the project, if needed,as shown in
Figure 16.2.
FIGURE 16.2Copy theflower.pngimage resourceto the project.This will providevisual feedbackto users.
Creating the InterfaceOpen the GesturesViewController.xib file in Interface Builder. It’s time to create our UI.
As I mentioned when we started, we don’t have to concern ourselves with any of the
typical actions or events in this project. We’ll add some objects, and then connect
their outlets.
To build the interface, start by dragging four UIView instances to the main view. Size
the first to a small rectangle in the upper-right portion of the screen; it will capture
taps. Make the second a long rectangle beside the first (for detecting swipes). Size the
other two views as large rectangles below the first two (for pinches and rotations).
Use the Attributes Inspector (Command+1) to set the background of each view to be
something unique.

ptg
Did youKnow?
Did youKnow?
438 HOUR 16: Using Advanced Touches and Gestures
The views you are adding are convenient objects that we can attach gestures to.In your own applications, you can attach gesture recognizers to your main applica-tion view or the view of any onscreen object.
Gesture recognizers work based on the starting point of the gesture, not where itends. In other words, if a user uses a rotation gesture that starts in a view butends outside the view, it will work fine. The gesture won’t “stop” just because itcrosses a view’s boundary.
For you, the developer, this is a big help for making multitouch applications thatwork well on a small screen.
Next, drag labels into each of the four views. The first label should read Tap Me!.
The second should read Swipe Me!. The third label should read Pinch Me!. The
fourth label should read Rotate Me!.
Drag a fifth UILabel instance to the main view, and center it at the top of the screen.
Use the Attributes Inspector to set it to align center. This will be the label we use to
provide feedback to the user. Change the label’s default text to Do something!.
Finally, add a UIImageView to the bottom center of the screen. Use the Attributes
Inspector (Command+1) and Size Inspector (Command+3) to set the image to
flower.png and the size and location to X: 98.0, Y:328.0, W:123.0, H:112.0, as shown
in Figure 16.3.
FIGURE 16.3Size and posi-tion theUIImageView asshown here.

ptg
Using Gesture Recognizers 439
The finished view should resemble Figure 16.4.
FIGURE 16.4Your final viewshould look likethis.
Connecting the OutletsTo access our gesture views and feedback objects from the main application, we
need to connect the outlets defined earlier. Starting with the top-left view, Control-
drag from the File’s Owner icon to the view. Choose the tapView outlet when
prompted, as shown in Figure 16.5.
Repeat this process, connecting the top-right view to the swipeView outlet, the bot-
tom-left view to pinchView, and the bottom-right view to rotateView. Connect the
top UILabel to outputLabel and the bottom UIImageView to imageView.
We can now close the XIB file and exit Interface Builder. It’s time to connect our ges-
ture recognizers.
Implementing the Tap Gesture RecognizerWe’re going to start implementing the gesture recognizer logic by implementing the
“tap” recognizer. What you’ll quickly discover is that after you’ve added one recog-
nizer, the pattern is very, very similar for the others.

ptg
440 HOUR 16: Using Advanced Touches and Gestures
Creating the RecognizerThe first thing to consider is this: Where do we want to instantiate a gesture recog-
nizer? For this project, it makes sense that the user can start inputting gestures as
soon as the application starts and the views are visible. So the viewDidLoad method
is a good spot. Update the GestureViewController.m file so that the viewDidLoad
reads as displayed in Listing 16.2.
LISTING 16.21: - (void)viewDidLoad {2: [super viewDidLoad];3:4: //Taps5: UITapGestureRecognizer *tapRecognizer;6: tapRecognizer=[[UITapGestureRecognizer alloc]7: initWithTarget:self8: action:@selector(foundTap:)];9: tapRecognizer.numberOfTapsRequired=1;10: tapRecognizer.numberOfTouchesRequired=1;11: [tapView addGestureRecognizer:tapRecognizer];12: [tapRecognizer release];13: }
Line 5 kicks things off by declaring an instance of the UITapGestureRecognizer
object, tapRecognizer. In line 6, tapRecognizer is allocated and initialized with
initWithTarget:action. Working backward, the action is the method that will be
called when the tap occurs. Using @selector(foundTap:), we tell the recognizer
FIGURE 16.5Connect thefour views,labels, andimage views totheir outlets.

ptg
Using Gesture Recognizers 441
that we want to use a method called foundTap to handle our taps. The target we
specify, self, is the object where foundTap lives. In this case, it will be our view con-
troller (GestureViewController) object, or self.
Lines 9–10 set two properties of the tap gesture recognizer:
NumberOfTapsRequired: The number of times the object needs to be tapped
before the gesture is recognized
NumberOfTouchesRequired: The number of fingers that need to be down on
the screen before the gesture is recognized
In this example, we’re defining a “tap” as one finger tapping the screen once. Feel
free to play with these properties as much as you like!
In Line 11, we use the UIView method addGestureRecognizer to add the
tapRecognizer to the tapView. Our view is now tap-aware, and we can release
tapRecognizer in line 12.
The next step is to add the code to respond to a tap event.
Responding to the RecognizerResponding to the tap gesture recognizer is just a matter of implementing the
foundTap method. Add this new method to the GestureViewController.m file, as fol-
lows:
- (void)foundTap:(UITapGestureRecognizer *)recognizer {outputLabel.text=@”Tapped”;
}
Ta da! Your first gesture recognizer is done! We’ll repeat this process for the other
four, and we’ll be finished before you know it!
If you want to get the coordinate where a tap gesture (or a swipe) takes place, youadd code like this to the gesture handler (replacing <the view> with the name ofthe recognizer’s view):
CGPoint location = [recognizer locationInView:<the view>];
This will create a simple structure named location, with members x and y,accessible as location.x and location.y.
Implementing the Swipe Gesture RecognizerThe swipe gesture recognizer will be implemented in almost the same manner as the
tap recognizer. Instead of being able to choose the number of taps, however, you
Did youKnow?

ptg
442 HOUR 16: Using Advanced Touches and Gestures
can determine in which direction the swipes can be made. There are a total of four
direction constants that you can specify:
UISwipeGestureRecognizerDirectionLeft: Swipe to the left
UISwipeGestureRecognizerDirectionRight: Swipe to the right
UISwipeGestureRecognizerDirectionUp: Swipe Up
UISwipeGestureRecognizerDirectionDown: Swipe down
By using a bitwise OR between the constants (that is,
UISwipeGestureRecognizerDirectionLeft |
UISwipeGestureRecognizerDirectionRight), you can create a recognizer that
detects swipes in multiple directions. Let’s do that now.
Add the following code fragment to viewDidLoad method (immediately following
the tap gesture recognizer is fine):
1: UISwipeGestureRecognizer *swipeRecognizer;2: swipeRecognizer=[[UISwipeGestureRecognizer alloc]3: initWithTarget:self4: action:@selector(foundSwipe:)];5: swipeRecognizer.direction=UISwipeGestureRecognizerDirectionLeft |6: UISwipeGestureRecognizerDirectionRight;7: swipeRecognizer.numberOfTouchesRequired=1;8: [swipeView addGestureRecognizer:swipeRecognizer];9: [swipeRecognizer release];
The exact same pattern is followed, this time using the UISwipeGestureRecognizer
class. Lines 1–2 declare, initialize, and allocate the swipeRecognizer
UISwipeGestureRecognizer instance and identify the method foundSwipe to be
invoked when the gesture is recognized.
Lines 5–6 set the direction property to the allowed swipe directions—either left or
right, in this example.
Line 7 sets the number of finger touches that need to be “seen” for the gesture to be
detected.
Lines 8–9 add the gesture recognizer to the swipeView object and then release the
recognizer.
Responding to the RecognizerWe’ll respond to the swipe recognizer in the same way we did with the tap recog-
nizer. Implement the foundSwipe method as follows:
- (void)foundSwipe:(UISwipeGestureRecognizer *)recognizer {outputLabel.text=@”Swiped”;
}

ptg
By theWay
Using Gesture Recognizers 443
If you want to differentiate between different swipe directions, you must imple-ment multiple swipe gesture recognizers. By adding a recognizer with multipleallowed directions, you’re saying that all the directions are equivalent, that theyaren’t differentiated as separate gestures.
So far, so good! Next up, the pinch gesture. You should really start seeing the pattern
now, so we won’t spend too much time on the setup.
Implementing the Pinch Gesture RecognizerTaps and swipes are simple gestures; they either happen or they don’t. Pinches and
rotations are slightly more complex, returning additional values to give you greater
control over the user interface. A pinch, for example, includes a velocity property
(how quickly the pinch happened) and scale (a fraction that is proportional to
change in distance between your fingers). If you move your fingers 50% closer
together, the scale is .5, for example. If you move them twice as far apart, it is 2.
To better show what this means visually, we’re going to be scaling imageView
(UIImageView). We’ll want to reset this to the original size/location later, so before
we do anything else, add these lines after the #import line in
GesturesViewController:
#define originWidth 330.0#define originHeight 310.0#define originX 218.0#define originY 679.0
These are the original width, height, and x and y locations of the UIImageView that
was added to the interface in the initial project setup.
Now add the pinch gesture recognizer code fragment to viewDidLoad method (plac-
ing it after the swipe recognizer is fine):
UIPinchGestureRecognizer *pinchRecognizer;pinchRecognizer=[[UIPinchGestureRecognizer alloc]
initWithTarget:selfaction:@selector(foundPinch:)];
[pinchView addGestureRecognizer:pinchRecognizer];[pinchRecognizer release];
As you can see, there’s even less going on than with tapping and swiping because
we aren’t worried about direction or the number of fingers touching the screen. The
code sets foundPinch as the method that will handle the gesture and then adds the
recognizer to pinchView.

ptg
444 HOUR 16: Using Advanced Touches and Gestures
Responding to the RecognizerYou’ve made it to the most complex piece of code in this hour’s lesson! The foundPinch
method will accomplish several things. It will reset the UIImageView’s rotation (just in
case it gets out of whack when we set up the rotation gesture), create a feedback string
with the scale and velocity values returned by the recognizer, and actually scale the
image view so that there is immediate visual feedback for the user.
Enter the foundPinch method as shown in Listing 16.3.
LISTING 16.31: - (void)foundPinch:(UIPinchGestureRecognizer *)recognizer {2: NSString *feedback;3: double scale;4: scale=recognizer.scale;5: imageView.transform = CGAffineTransformMakeRotation(0.0);6: feedback=[[NSString alloc]7: initWithFormat:@”Pinched, Scale:%1.2f, Velocity:%1.2f”,8: recognizer.scale,recognizer.velocity];9: outputLabel.text=feedback;10: imageView.frame=CGRectMake(originX,11: originY,12: originWidth*scale,13: originHeight*scale);14: [feedback release];15: }
Let’s walk through this method to make sure we understand what’s going on. Lines
2–3 declare a string object, feedback, and a floating-point value scale. These are
used to store a feedback string to the user and the scaling value returned by the
pinch gesture recognizer, respectively.
Line 4 sets scale to the recognizer’s scale property.
Line 5 resets the imageView object to a rotation of 0.0 (no rotation at all) by setting
its transform property to the transformation returned by the Core Graphics
CGAffineTransformMakeRotation function. This function, when passed a value in
radians, will return the necessary transformation to rotate a view.
Lines 6–8 allocate and initialize the feedback string to show that a pinch has taken
place, and output the values of the recognizer’s scale and velocity properties. Line
9 sets the outputLabel in the UI to the feedback string.
For the scaling of the image view itself, lines 10–13 do the work. All that needs to
happen is for the imageView object’s frame to be redefined to the new size. To do
this, we can use CGRectMake to return a new frame rectangle. The top-left coordi-
nates (originx, originy) stay the same, but we multiply originWidth and

ptg
Using Gesture Recognizers 445
originHeight by the scale factor to increase or decrease the size of the frame
according to the user’s pinch.
Line 14 cleans up by releasing the feedback string.
Building and running the application will now let you enlarge (even beyond the
boundaries of the screen) or shrink the image using the pinch gesture within the
pinchView object, as shown in Figure 16.6.
FIGURE 16.6Enlarge orshrink theimage in apinch (ha ha).
Implementing the Rotation Gesture RecognizerThe last multitouch gesture recognizer that we’ll add is the rotation gesture recogniz-
er. Like the pinch gesture, rotation returns some useful information that we can
apply visually to our onscreen objects, notably velocity and rotation. The rotation
returned is the number of radians that the user has rotated his or her fingers, clock-
wise or counterclockwise.
Most of us are comfortable talking about rotation in “degrees,” but the Cocoaclasses usually use radians. Don’t worry. It’s not a difficult translation to make. Ifyou’d like, you can calculate degrees from radians using the following formula:
Degrees = Radians × 180 / Pi
There’s not really any reason we need to do this in this project, but in your ownapplications, you may want to provide a degree reading to your users.
Did youKnow?

ptg
446 HOUR 16: Using Advanced Touches and Gestures
One last time, edit the viewDidLoad method and add the following code fragment
for the rotation recognizer:
UIRotationGestureRecognizer *rotationRecognizer;rotationRecognizer=[[UIRotationGestureRecognizer alloc]
initWithTarget:selfaction:@selector(foundRotation:)];
[rotateView addGestureRecognizer:rotationRecognizer];[rotationRecognizer release];
The rotation gesture recognizer is added to the rotateView and set to trigger
foundRotation when a gesture is detected.
Responding to the RecognizerI’d love to tell you how difficult it is to rotate a view and about all the complex
math involved, but I pretty much gave away the trick to rotation in the foundPinch
method earlier. A single line of code will set the UIImageView’s transform property
to a rotation transformation and visually rotate the view. Of course, we will also
need to provide a feedback string to the user, but that’s not nearly as exciting, is it?
Add the foundRotation method in Listing 16.5 to your GesturesViewController.m file.
LISTING 16.41: - (void)foundRotation:(UIRotationGestureRecognizer *)recognizer {2: NSString *feedback;3: double rotation;4: rotation=recognizer.rotation;5: feedback=[[NSString alloc]6: initWithFormat:@”Rotated, Radians:%1.2f, Velocity:%1.2f”,7: recognizer.rotation,recognizer.velocity];8: outputLabel.text=feedback;9: imageView.transform = CGAffineTransformMakeRotation(rotation);10: [feedback release];11: }
Again, we declare a feedback string and a floating-point value, this time rotation,
in lines 2–3. Line 4 sets the rotation value to the recognizer’s rotation property.
This is the rotation in radians detected in the user’s gesture.
Line 5 creates the feedback string showing the radians rotated and the velocity of
the rotation, while line 8 sets the output label to the string.
Line 9 handles the rotation itself, creating a rotation transformation and applying it
to the imageView object’s transform property.
Line 10 finishes up by releasing the feedback string.
Build and Run to test your application now. You should be able to freely spin the
image view using a rotation gesture in the rotate view, as shown in Figure 16.7.
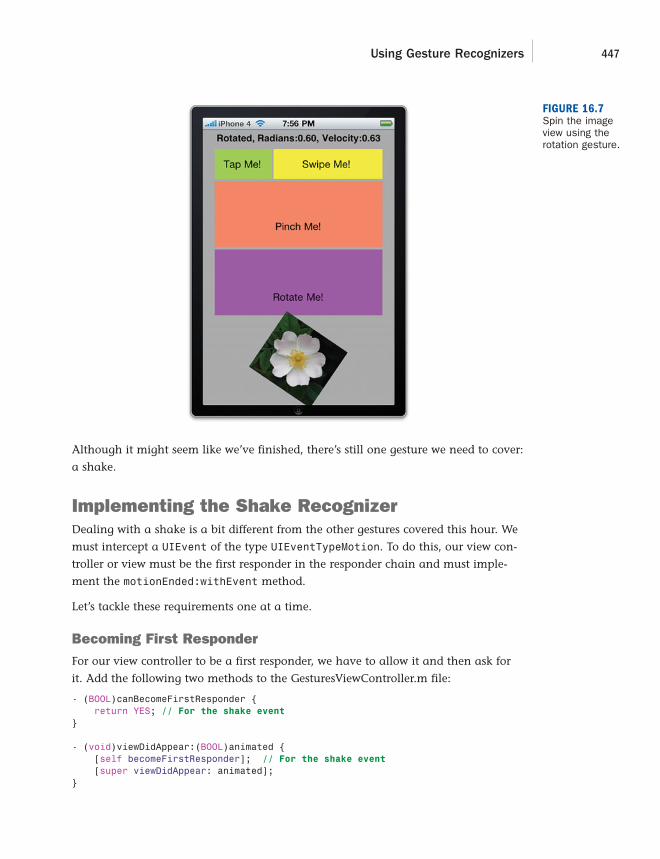
ptg
Using Gesture Recognizers 447
Although it might seem like we’ve finished, there’s still one gesture we need to cover:
a shake.
Implementing the Shake RecognizerDealing with a shake is a bit different from the other gestures covered this hour. We
must intercept a UIEvent of the type UIEventTypeMotion. To do this, our view con-
troller or view must be the first responder in the responder chain and must imple-
ment the motionEnded:withEvent method.
Let’s tackle these requirements one at a time.
Becoming First ResponderFor our view controller to be a first responder, we have to allow it and then ask for
it. Add the following two methods to the GesturesViewController.m file:
- (BOOL)canBecomeFirstResponder {return YES; // For the shake event
}
- (void)viewDidAppear:(BOOL)animated {[self becomeFirstResponder]; // For the shake event[super viewDidAppear: animated];
}
FIGURE 16.7Spin the imageview using therotation gesture.

ptg
448 HOUR 16: Using Advanced Touches and Gestures
Our view controller is now prepared to become the first responder and receive the
shake event. All we need to do now is implement motionEnded:withEvent to trap
and react to the shake itself.
Reacting to a ShakeTo react to a shake, implement the motionEnded:withEvent method as shown in
Listing 16.5.
LISTING 16.51: - (void)motionEnded:(UIEventSubtype)motion withEvent:(UIEvent *)event {2: if (motion==UIEventSubtypeMotionShake) {3: outputLabel.text=@”Shaking things up!”;4: imageView.transform = CGAffineTransformMakeRotation(0.0);5: imageView.frame=CGRectMake(originX,originY,originWidth,originHeight);6: }7: }
First things first: In line 2, we check to make sure that the motion value we received
(an object of type UIEventSubtype) is, indeed, a motion event. To do this, we just
compare it to the constant UIEventSubtypeMotionShake. If they match, the user
just finished shaking the device!
Lines 3–4 react to the shake by setting the output label, rotating the image view
back to its default orientation, and setting the image view’s frame back to the origi-
nal size. In other words, shaking the iPhone will reset the image to its default state.
Pretty nifty, huh?
You can now run the application and use all the gestures that we implemented this
hour. Although not a useful app in and of itself, it does illustrate many techniques
that you can use in your own applications.
Further ExplorationIn addition to the four gestures discussed this hour, there are two other recognizers that
you should be able to immediately add to your apps: UIPressGestureRecognizer and
UIPanGestureRecognizer. The UIGestureRecognizer class is the parent to all the ges-
ture recognizers that you’ve learned about in this lesson and offers additional base
functionality for customizing gesture recognition.
We humans do a lot with our fingers, such as draw, write, play music, and more.
Each of these possible gestures has been exploited to great effect in third-party appli-
cations. Explore the App Store to get a sense of what’s been done with the iPhone’s
multitouch screen.

ptg
Workshop 449
You also might want to learn more about the lower-level handling of touches on
iOS. See the “Event Handling” section of the iPhone Application Programming Guide for
more information.
Finally, for another set of gesture examples, be sure to look at the SimpleGesture
Recognizers tutorial project, found within the Xcode documentation. This project pro-
vides many additional examples of implementing gestures on the iOS platform.
SummaryIn this hour, we’ve given the gesture recognizer architecture a good workout. Using
the gesture recognizers provided through iOS, you can easily recognize and respond
to taps, swipes, pinches, rotations, and more—without any complex math or pro-
gramming logic.
You also learned how to make your applications respond to shaking: Just make
them first responders and implement the motionEnded:withEvent method. Your
ability to present your users with interactive interfaces just increased dramatically!
Q&AQ. Why don’t the rotation/pinch gestures include configuration options for the
number of touches?
A. The gesture recognizers are meant to recognize common gestures. Although it
is possible that you could manually implement a rotation or pinch gesture
with multiple fingers, it wouldn’t be consistent with how users expect their
applications to work, and isn’t included as an option with these recognizers.
Workshop
Quiz1. What gesture recognizer detects the user briefly touching the screen?
2. How can you respond to multiple swipe directions in a single gesture
recognizer?
3. The rotation recognizer returns a rotation in degrees. True or false?
4. Adding shake sensing to your application is as simple as adding any other
gesture recognizer.

ptg
450 HOUR 16: Using Advanced Touches and Gestures
Answers1. The UITapGestureRecognizer is used to trap and react to one or more fingers
tapping the screen.
2. You can’t. You can trap multiple swipe directions in a single recognizer, but
you should consider those directions to be single gestures. To react differently
to different swipes, they should be implemented as different recognizers.
3. False. Most Cocoa classes dealing with rotation (including the rotation gesture
recognizer) work with radians.
4. False. The shake gesture requires that your view or view controller become the
first responder and trap motion UIEvents.
Activities1. Expand the Gestures application to include panning and pressing gestures.
These are configured almost identically to the gestures you used in this hour’s
tutorial.
2. Improve upon the user experience by adding the pinch and rotation gesture
recognizers to the UIImageView object itself, enabling users to interact directly
with the image rather than another view.

ptg
HOUR 17
Sensing Orientation and Motion
What You’ll Learn in This Hour. How to determine the iPhone’s orientation. How to measure tilt and acceleration. How to measure rotation
The Nintendo Wii introduced motion sensing as an effective input technique for main-
stream consumer electronics. Apple applied this technology with great success to the
iPhone, iPod Touch, and the iPad. Apple’s devices are equipped with an accelerometer that
can be used to determine the orientation, movement, and tilt of the device. With the
iPhone’s accelerometer, a user can control applications by simply adjusting the physical
orientation of the device and moving it in space. In addition, Apple has introduced a
gyroscope in the iPhone 4. This enables the device to sense rotation motions that aren’t
against the force of gravity. In short, if a user moves an iPhone 4, there are ways that your
applications can detect and react to that movement.
The motion-input mechanism is exposed to third-party applications in iOS through a
framework called Core Motion. In Hour 16, “Using Advanced Touches and Gestures,” you
saw how the accelerometer provides the shake gesture. Now you will learn how to take
direct readings from iOS for determining orientation, acceleration, and rotation. For all
the magic that a motion-enabled application appears to exhibit, you will see that using
these features is surprisingly simple.
Understanding iPhone Motion HardwareAll iOS devices, to date, can sense motion through the use of the accelerometer hardware.
This capability was supplemented with a gyroscope in the iPhone 4 and presumably will be
expanded to other hardware in the future. To get a better sense for what this means to your
applications, let’s review what information each of these pieces of hardware can provide.
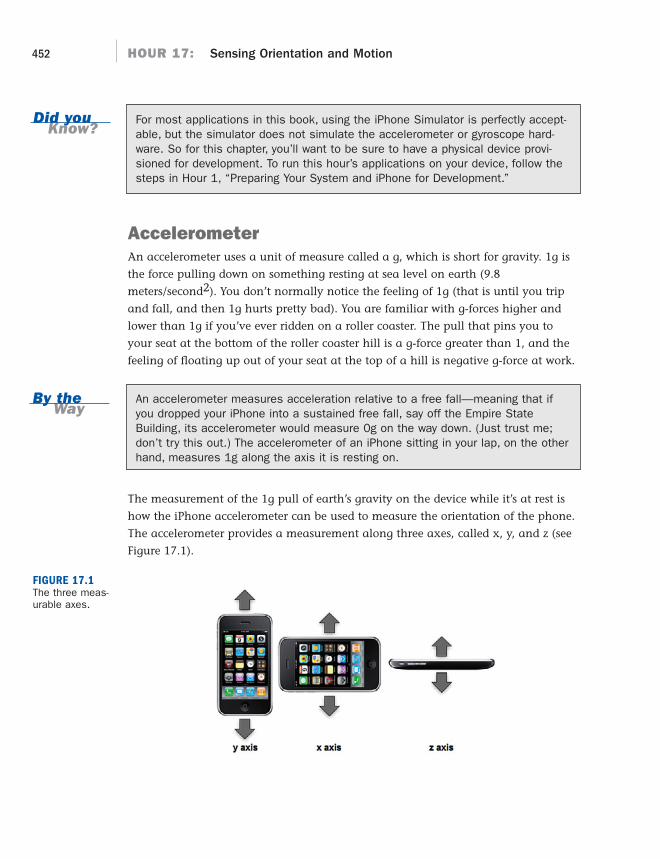
ptg
Did youKnow?
452 HOUR 17: Sensing Orientation and Motion
For most applications in this book, using the iPhone Simulator is perfectly accept-able, but the simulator does not simulate the accelerometer or gyroscope hard-ware. So for this chapter, you’ll want to be sure to have a physical device provi-sioned for development. To run this hour’s applications on your device, follow thesteps in Hour 1, “Preparing Your System and iPhone for Development.”
AccelerometerAn accelerometer uses a unit of measure called a g, which is short for gravity. 1g is
the force pulling down on something resting at sea level on earth (9.8
meters/second2). You don’t normally notice the feeling of 1g (that is until you trip
and fall, and then 1g hurts pretty bad). You are familiar with g-forces higher and
lower than 1g if you’ve ever ridden on a roller coaster. The pull that pins you to
your seat at the bottom of the roller coaster hill is a g-force greater than 1, and the
feeling of floating up out of your seat at the top of a hill is negative g-force at work.
An accelerometer measures acceleration relative to a free fall—meaning that ifyou dropped your iPhone into a sustained free fall, say off the Empire StateBuilding, its accelerometer would measure 0g on the way down. (Just trust me;don’t try this out.) The accelerometer of an iPhone sitting in your lap, on the otherhand, measures 1g along the axis it is resting on.
The measurement of the 1g pull of earth’s gravity on the device while it’s at rest is
how the iPhone accelerometer can be used to measure the orientation of the phone.
The accelerometer provides a measurement along three axes, called x, y, and z (see
Figure 17.1).
By theWay
FIGURE 17.1The three meas-urable axes.

ptg
Understanding iPhone Motion Hardware 453
Depending on how your iPhone is resting, the 1g of gravity will be pulling differently
on the three possible axes. If your device is standing straight up on one of its edges or
is flat on its back or on its screen, the entire 1g will be measured on one axis. If the
device is tilted at an angle, the 1g will be spread across multiple axes (see Figure 17.2).
FIGURE 17.2The 1g of forceon an iPhone atrest.
GyroscopeThink about what we’ve just learned about the accelerometer hardware. Is thereanything it can’t do? It might seem, at first, that using the measurements from theaccelerometer we can make a good guess as to what the user is doing, no matterwhat. Unfortunately, that’s not quite the case.
The accelerometer measures the force of gravity distributed across your iPhone.Imagine, however, that your iPhone is lying face up on a table. We can detect thiswith the accelerometer, but what we can’t detect is if you start spinning the iPhonearound in a rousing game of “spin the bottle… err… iPhone.” The accelerometerwill still register the same value regardless of how the phone is spinning.
The same goes for if the iPhone is standing on one of its edges and rotates. Theaccelerometer can be used only if the iPhone is changing orientation with respect togravity, but the gyroscope can determine if, in any given orientation, the iPhone isalso rotating.

ptg
454 HOUR 17: Sensing Orientation and Motion
When querying the iPhone’s gyroscope, the hardware will report back with a rota-
tion value along x, y, and z axes. The value is a measurement, in radians, of the
speed of rotation along that axis. If you don’t remember your geometry, rotating 2
radians is a complete circle, so a reading of 2 on any of the gyroscope’s 3 axes
would indicate that the device is spinning once per second, along that axis, as
shown in Figure 17.3.
Gravity
Rotation
FIGURE 17.3A reading of 2.0from the gyro-scope indicatesthat the iPhone isrotating (spinningin a complete cir-cle) at a rate ofone revolutionper second.
Accessing Orientation and Motion DataTo access orientation and motion information, we use two different approaches.
First, to determine and react to distinct changes in orientation, we can request that
our iOS device send notifications to our code as the orientation changes. We’ll be
able to compare the messages we receive to constants representing all possible
device orientations—including face up and face down—and determine what the user
has done. Second, we’ll take advantage of a framework called Core Motion to direct-
ly access the accelerometer and gyroscope data on scheduled intervals. Let’s take a
closer look before starting this hour’s projects.

ptg
Accessing Orientation and Motion Data 455
Requesting Orientation Notifications ThroughUIDeviceAlthough it is possible to read the accelerometer and use the values it returns to
determine a device’s orientation, Apple has made the process much simpler for
developers. The singleton instance UIDevice (representing our device) includes a
method beginGeneratingDeviceOrientationNotifications that will tell the iOS
to begin sending orientation notifications to the notification center
(NSNotificationCenter). Once the notifications start, we can register with an
NSNotificationCenter instance to have a method of our choosing automatically
be invoked with the device’s orientation changes.
Besides just knowing that an orientation event occurred, we need some reading of
what the orientation is. We get this via the UIDevice orientation property. This
property, of type UIDeviceOrientation, can be one of six predefined values:
UIDeviceOrientationFaceUp: The device is laying on its back, facing up.
UIDeviceOrientationFaceDown: The device is laying on its front, with the
back facing up.
UIDeviceOrientationPortrait: The device is in the “normal” orientation,
with the home button at the bottom.
UIDeviceOrientationPortraitUpsideDown: The device is in portrait orienta-
tion with the home button at the top.
UIDeviceOrientationLandscapeLeft: The device is lying on its left side.
UIDeviceOrientationLandscapeRight: The device is lying on its right side.
By comparing the property to each of these values, we can determine the orienta-
tion and react accordingly.
How Is This Different from Adapting to Interface RotationEvents?The interface-related events that you learned about in Hour 15, “BuildingRotatable and Resizable User Interfaces,” are just that: interface related. We firsttell the device what orientations our interface supports, and then we can program-matically tell it what to do when the interface needs to change. The method weare using now is for getting instantaneous orientation changes regardless of whatthe interface supports. The constants UIDeviceOrientationFaceUp andUIDeviceOrientationFaceDown are also meaningless with regard to the inter-face-managing methods we covered.

ptg
456 HOUR 17: Sensing Orientation and Motion
Reading the Accelerometer and Gyroscope withCore MotionYou work with the accelerometer and gyroscope a bit differently. First, you’ll need to
add the Core Motion framework to your project.
Within your code, you’ll create an instance of the Core Motion motion manager:
CMMotionManager. The motion manager should be treated as a singleton—one
instance can provide accelerometer and gyroscope motion services for your entire
application.
Recall that a singleton is a class that is instantiated once in the lifetime of yourapplication. The services of the iPhone’s hardware provided to your application areoften provided as singletons. Because there is only one accelerometer and gyro-scope in the device, it makes sense that they are accessed via a singleton.Multiple instances of the CMMotionManager objects existing in your applicationwouldn’t add any extra value and would have the added complexity of managingtheir memory and lifetime, both of which are avoided with a singleton.
Unlike orientation notifications, the Core Motion motion manager enables you to
determine how frequently you receive updates (in seconds) from the accelerometer
and gyroscope and allows you to directly define a handler block that executes each
time an update is ready.
You need to decide how often your application can benefit from receiving motionupdates. You should decide this by experimenting with different update valuesuntil you come up with an optimal frequency. Receiving more updates than yourapplication can benefit from can have some negative consequences. Your applica-tion will use more system resources, which might negatively impact the perform-ance of the other parts of your application and can certainly affect the battery lifeof the device. Because you’ll probably want fairly frequent updates so that yourapplication responds smoothly, you should take some time to optimize the per-formance of your CMMotionManager-related code.
Setting up your application to use CMMotionManager is a simple three-step process of
initializing and allocating the motion manager, setting an updating interval, and
then requesting that updates begin and be sent to a handler block via
startAccelerometerUpdatesToQueue:withHandler.
Consider the following code snippet:
1: motionManager = [[CMMotionManager alloc] init];2: motionManager.accelerometerUpdateInterval = .01;3: [motionManager startAccelerometerUpdatesToQueue:[NSOperationQueue
➥currentQueue]
By theWay
Did youKnow?
ptg
Accessing Orientation and Motion Data 457
4: withHandler:^(CMAccelerometerData *accelData, NSError *error) {5: //Do something with the acceleration data here!6: }];
In line 1, the motion manager is allocated and initialized—you’ve seen code like
this dozens of times.
Line 2 requests that the accelerometer send updates every .01 seconds—or 100 times
per second.
Lines 3–6 start the accelerometer updates and define a handler block that is called
for each update.
The handler block can be confusing looking, so I urge you to look at the
CMMotionManager documentation to better understand the format. In essence, it’s
like a new method being defined within the
startAccelerometerUpdatesToQueue:withHandler invocation.
The accelerometer handler is passed two parameters: accelData, an object of type
CMAccelerometerData; and error, of type NSError. The accelData object includes
an acceleration property of the type CMAcceleration. This will be the informa-
tion we are interested in reading and includes acceleration values along x, y, and z
axes. It is up to the code defined within the handler (currently just a comment in
this snippet) to do something with this incoming data.
Gyroscope updates work almost exactly the same way but require you to define a
gyroUpdateInterval for the Core Motion motion manager and begin receiving
updates with startGyroUpdatesToQueue:withHandler. The gyroscope’s handler
receives an object, gyroData of type CMGyroData and, like the accelerometer han-
dler, an NSError object. We’re interested in the rotation property of gyroData—
data of the type CMRotationRate. The rotation property provides rotation rates
along the x, y, and z axes.
Because only the iPhone 4 (and latest iPods) currently support the gyroscope, youcan check for its presence using the CMMotionManager Boolean propertygyroAvailable. If YES, it exists and can be used.
When we are done processing accelerometer and gyroscope updates, we can stop
receiving them with the CMMotionManager methods stopAccelerometerUpdates
and stopGyroUpdates, respectively.
Feeling confused? Not to worry—it makes much more sense seeing the pieces come
together in code.
Did youKnow?
ptg
By theWay
458 HOUR 17: Sensing Orientation and Motion
We’ve skipped over an explanation of the chunk of code that refers to theNSOperationQueue. An operations queue maintains list of operations that need tobe dealt with (such as accelerometer and gyroscope readings). The queue youneed to use already exists, and we can access it with the code fragment[NSOperationQueue currentQueue]. As long as you follow along, there’s noneed to worry about managing operation queues manually.
Sensing OrientationAs our first introduction to detecting motion, we’ll create the Orientation applica-
tion. Orientation won’t be wowing users, it’s simply going to say which of six possi-
ble orientations the iPhone is currently in. The Orientation application will detect
standing-up, upside-down, left-side, right-side, face-down, and face-up orientations.
Setting Up the ProjectCreate a new view-based iPhone application in Xcode and call it Orientation. Click
the OrientationViewController.h file in the Classes group and add an outlet property
(orientationLabel) for an orientation label. The OrientationViewController.h file
should read as shown in Listing 17.1.
LISTING 17.1#import <UIKit/UIKit.h>
@interface OrientationViewController : UIViewController {IBOutlet UILabel *orientationLabel;
}
@property (nonatomic, retain) UILabel *orientationLabel;
@end
Add the appropriate @synthesize directive following the @implementation line:
@synthesize orientationLabel;
Finally, release the label in the implementation file’s dealloc method:
- (void)dealloc {[orientation release];
[super dealloc];}

ptg
Did youKnow?
Sensing Orientation 459
Preparing the InterfaceOrientation’s UI is simple (and very stylish), just a yellow text label in a field of
black, which we’ll construct as follows:
1. Open Interface Builder by double-clicking the OrientationViewController.xib
file in the Resources group.
2. Click the empty view and open the Attributes Inspector (Command+1).
3. Click the Background attribute and change the view’s background to black.
4. Open the Library (Shift+Command+L) and drag a label (UILabel) to the cen-
ter of the view; expand the size the label to the edge sizing guidelines on each
side of the view. Set the label’s text to read Face Up.
5. With the label selected, open the Attributes Inspector (Command+1).
6. Click the Color attribute and change the label’s text color to yellow, use the
Alignment attribute to center the label’s text, and then update the Font attrib-
ute to change the font size to 36 points.
Now would be good time to put into practice the techniques you learned in Hour15, to keep the text centered on screen while the iPhone rotates. It isn’t neces-sary for the completion of the project, but it is good practice!
The finished view should look like Figure 17.4.
FIGURE 17.4The Orientationapplication’s UIin InterfaceBuilder.

ptg
460 HOUR 17: Sensing Orientation and Motion
Our application will need to be able to change the text of the label when the
accelerometer indicates that the orientation of the device has changed. To do this,
we’ll need to connect the outlet we created earlier to the label.
Control-drag from the File’s Owner icon in the Document window to the label in the
view. Choose the orientationLabel outlet when prompted. Save the XIB file and
return to Xcode.
Reacting to Changes in OrientationWhen our custom view is shown, we need to register a method in our application to
receive UIDeviceOrientationDidChangeNotification notifications from iOS. We
also need to tell the device itself that it should begin generating these notifications
so that we can react to them. All of this setup work can be accomplished in the
Orientation.m viewDidLoad method. Let’s implement that now. Uncomment and
edit the viewDidLoad method to read as shown in Listing 17.2.
LISTING 17.21: - (void)viewDidLoad {2:3: [[UIDevice currentDevice]beginGeneratingDeviceOrientationNotifications];4:5: [[NSNotificationCenter defaultCenter]6: addObserver:self selector:@selector(orientationChanged:)7: name:@”UIDeviceOrientationDidChangeNotification”8: object:nil];9:10: [super viewDidLoad];11: }
In line 3, we use the method [UIDevice currentDevice] to return an instance of
UIDevice that refers to the iPhone our application is running on. We then use the
beginGeneratingDeviceOrientationNotifications to tell the device that we’re
interested in hearing about it if the user changes the orientation of his or her phone.
Lines 5–8 tell the NSNotificationCenter object that we are interested in subscribing
to any notifications with the name UIDeviceOrientationDidChangeNotification
that it may receive. We also tell that the class that is interested in the notifications is
OrientationViewController by way of the addObserver:self message, and, final-
ly, we use @selector(orientationChanged:) to say that we will be implementing a
method called orientationChanged. In fact, coding up orientationChanged is the
only thing left to do!

ptg
Sensing Orientation 461
Determining OrientationTo determine the orientation of the device, we’ll use the UIDevice property orien-
tation. Unlike other values we’ve dealt with in the book, the orientation property
is of the type UIDeviceOrientation (simple constant, not an object). This means
that we can check each possible orientation via a simple switch statement and
update the orientationLabel in the interface as needed.
Implement the orientationChanged method as shown in Listing 17.3.
LISTING 17.31: - (void)orientationChanged:(NSNotification *)notification {2:3: UIDeviceOrientation orientation;4: orientation = [[UIDevice currentDevice] orientation];5:6: switch (orientation) {7: case UIDeviceOrientationFaceUp:8: orientationLabel.text=@”Face Up”;9: break;10: case UIDeviceOrientationFaceDown:11: orientationLabel.text=@”Face Down”;12: break;13: case UIDeviceOrientationPortrait:14: orientationLabel.text=@”Standing Up”;15: break;16: case UIDeviceOrientationPortraitUpsideDown:17: orientationLabel.text=@”Upside Down”;18: break;19: case UIDeviceOrientationLandscapeLeft:20: orientationLabel.text=@”Left Side”;21: break;22: case UIDeviceOrientationLandscapeRight:23: orientationLabel.text=@”Right Side”;24: break;25: default:26: orientationLabel.text=@”Unknown”;27: break;28: }29: }
Run the application when complete. Your results should resemble Figure 17.5.

ptg
462 HOUR 17: Sensing Orientation and Motion
Detecting Tilt and RotationIn the Orientation application, we ignored the precise values coming from the
accelerometer and instead just allowed iOS to make an all-or-nothing orientation deci-
sion. The gradations between these orientations, such as the device being somewhere
between its left side and straight up and down, are often interesting to an application.
Imagine you are going to create a car racing game where the device acts as the steer-
ing wheel when tilted left and right and the gas and brake pedals when tilted forward
and back. It is very helpful to know how far the player has turned the wheel and how
hard the user is pushing the pedals to know how to make the game respond.
Likewise, consider the possibilities offered by the gyroscope’s rotation measurements.
Applications can now tell if the iPhone is rotating, even if there is no change in tilt.
Imagine a turn-based game that switches between players just by rotating the
iPhone around while it is lying on a table or sitting in an iPhone charging dock.
Setting Up the ProjectIn our next example application, ColorTilt, we take a solid color and make it pro-
gressively more transparent as the user tilts the device left or right or as they rotate
the iPhone faster. We’ll add two toggle switches (UISwitch) to the view to enable/
disable the accelerometer and gyroscope.
It’s not as exciting as a car racing game, but it is something we can accomplish in
an hour, and everything learned here will apply when you get down to writing a
great iPhone motion-enabled application.
Begin by creating a new View-Based iPhone Application in Xcode and calling it
ColorTilt.
FIGURE 17.5Orientation inaction.

ptg
Detecting Tilt and Rotation 463
Adding the Core Motion FrameworkBecause this project relies directly on Core Motion, we’ll need to add the Core
Motion framework for our code to work. Right-click the Frameworks group in Xcode,
and choose Add, Existing Frameworks.
Choose CoreMotion.framework from the list that appears, and then click the Add
button, as shown in Figure 17.6.
FIGURE 17.6Add the CoreMotion frame-work to thegroup.
Adding Outlets, Actions, and PropertiesOur next step is to update the ColorTiltViewController.h file with the appropriate
outlets and actions that we’ll need for the application.
Specifically, you should add an outlet for a UIView that will change colors—
colorView, as well as two UISwitch instances—toggleAccelerometer and
toggleGyroscope. We’ll also need an instance variable for our CMMotionManager
object, which we’ll call motionManager.
Create corresponding @property declarations for each of these so we can access
them easily from our application. As a final step, add an IBAction called
controlHardware that will be used to enable or disable accelerometer and gyro-
scope readings.
The ColorTiltViewController.h file should read as shown in Listing 17.4.
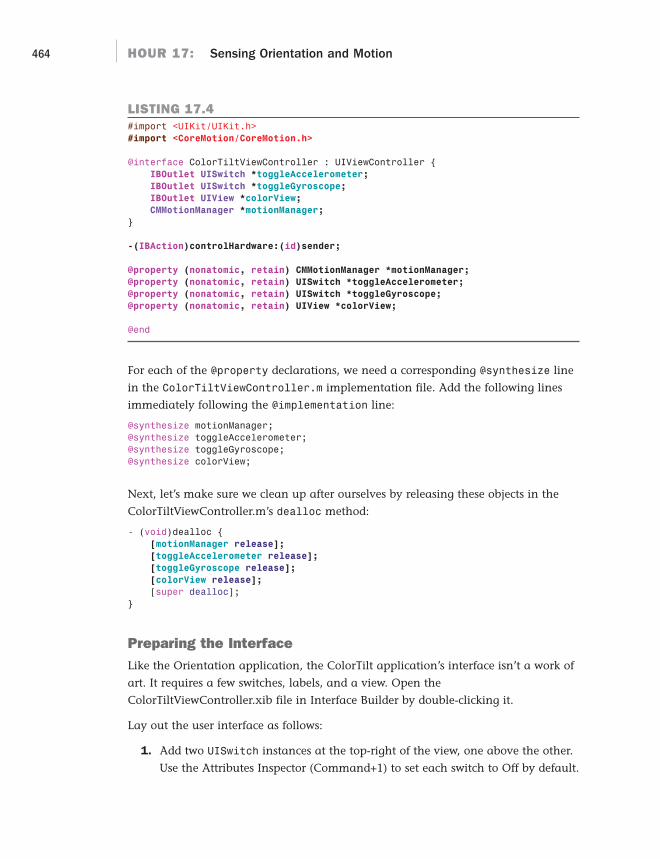
ptg
464 HOUR 17: Sensing Orientation and Motion
LISTING 17.4#import <UIKit/UIKit.h>#import <CoreMotion/CoreMotion.h>
@interface ColorTiltViewController : UIViewController {IBOutlet UISwitch *toggleAccelerometer;
IBOutlet UISwitch *toggleGyroscope;
IBOutlet UIView *colorView;
CMMotionManager *motionManager;
}
-(IBAction)controlHardware:(id)sender;
@property (nonatomic, retain) CMMotionManager *motionManager;
@property (nonatomic, retain) UISwitch *toggleAccelerometer;
@property (nonatomic, retain) UISwitch *toggleGyroscope;
@property (nonatomic, retain) UIView *colorView;
@end
For each of the @property declarations, we need a corresponding @synthesize line
in the ColorTiltViewController.m implementation file. Add the following lines
immediately following the @implementation line:
@synthesize motionManager;@synthesize toggleAccelerometer;@synthesize toggleGyroscope;@synthesize colorView;
Next, let’s make sure we clean up after ourselves by releasing these objects in the
ColorTiltViewController.m’s dealloc method:
- (void)dealloc {[motionManager release];
[toggleAccelerometer release];
[toggleGyroscope release];
[colorView release];
[super dealloc];}
Preparing the InterfaceLike the Orientation application, the ColorTilt application’s interface isn’t a work of
art. It requires a few switches, labels, and a view. Open the
ColorTiltViewController.xib file in Interface Builder by double-clicking it.
Lay out the user interface as follows:
1. Add two UISwitch instances at the top-right of the view, one above the other.
Use the Attributes Inspector (Command+1) to set each switch to Off by default.
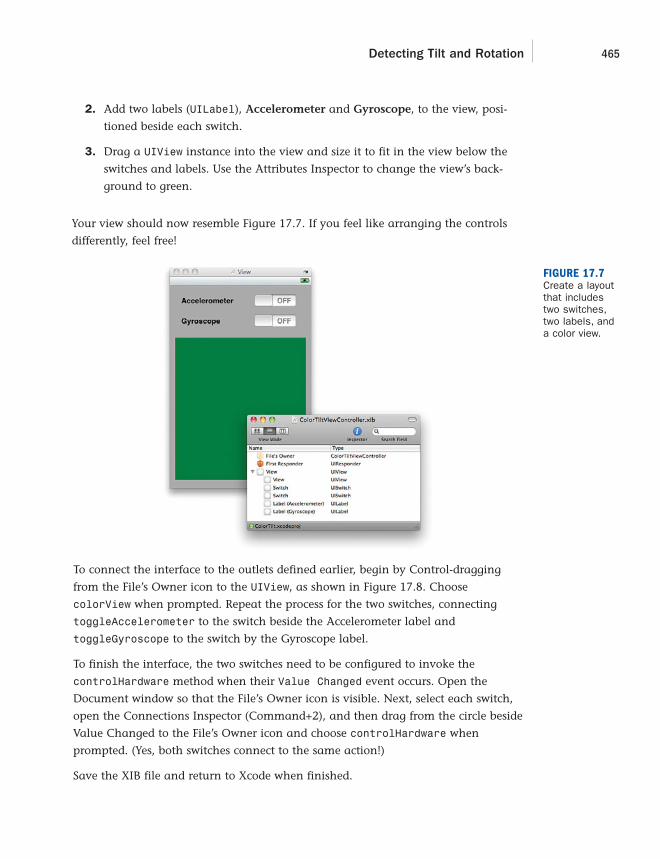
ptg
Detecting Tilt and Rotation 465
2. Add two labels (UILabel), Accelerometer and Gyroscope, to the view, posi-
tioned beside each switch.
3. Drag a UIView instance into the view and size it to fit in the view below the
switches and labels. Use the Attributes Inspector to change the view’s back-
ground to green.
Your view should now resemble Figure 17.7. If you feel like arranging the controls
differently, feel free!
FIGURE 17.7Create a layoutthat includestwo switches,two labels, anda color view.
To connect the interface to the outlets defined earlier, begin by Control-dragging
from the File’s Owner icon to the UIView, as shown in Figure 17.8. Choose
colorView when prompted. Repeat the process for the two switches, connecting
toggleAccelerometer to the switch beside the Accelerometer label and
toggleGyroscope to the switch by the Gyroscope label.
To finish the interface, the two switches need to be configured to invoke the
controlHardware method when their Value Changed event occurs. Open the
Document window so that the File’s Owner icon is visible. Next, select each switch,
open the Connections Inspector (Command+2), and then drag from the circle beside
Value Changed to the File’s Owner icon and choose controlHardware when
prompted. (Yes, both switches connect to the same action!)
Save the XIB file and return to Xcode when finished.

ptg
466 HOUR 17: Sensing Orientation and Motion
Implementing Motion EventsThere are a few different things that we’ll need to take care of to see our application
work:
1. Initialize and configure the Core Motion motion manager (CMMotionManager).
2. Manage events to toggle the accelerometer/gyroscope on and off
(toggleHardware), registering a handler block when the hardware is turned on.
3. React to the accelerometer/gyroscope readings, updating the background color
and alpha transparency values appropriately.
Let’s work our way through these different pieces of code now.
Initializing the Core Motion Motion ManagerWhen the ColorTilt application launches, we need to allocate and initialize the Core
Motion motion manager (CMMotionManager) instance, motionManager. Next, we’ll
set two properties of the motion manager, accelerometerUpdateInterval and
gyroUpdateInterval to match the frequency (in seconds) with which we want to
get updates from the hardware. We’ll update at 100 times a second, or an update
value of .01.
FIGURE 17.8Connect theobjects to out-lets youdefined.
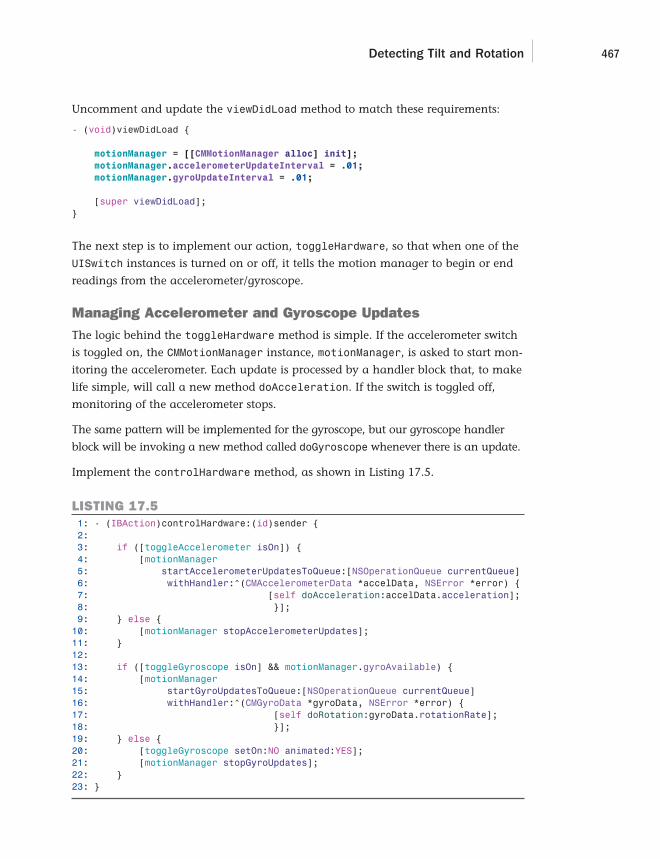
ptg
Detecting Tilt and Rotation 467
Uncomment and update the viewDidLoad method to match these requirements:
- (void)viewDidLoad {
motionManager = [[CMMotionManager alloc] init];
motionManager.accelerometerUpdateInterval = .01;
motionManager.gyroUpdateInterval = .01;
[super viewDidLoad];}
The next step is to implement our action, toggleHardware, so that when one of the
UISwitch instances is turned on or off, it tells the motion manager to begin or end
readings from the accelerometer/gyroscope.
Managing Accelerometer and Gyroscope UpdatesThe logic behind the toggleHardware method is simple. If the accelerometer switch
is toggled on, the CMMotionManager instance, motionManager, is asked to start mon-
itoring the accelerometer. Each update is processed by a handler block that, to make
life simple, will call a new method doAcceleration. If the switch is toggled off,
monitoring of the accelerometer stops.
The same pattern will be implemented for the gyroscope, but our gyroscope handler
block will be invoking a new method called doGyroscope whenever there is an update.
Implement the controlHardware method, as shown in Listing 17.5.
LISTING 17.51: - (IBAction)controlHardware:(id)sender {2:3: if ([toggleAccelerometer isOn]) {4: [motionManager5: startAccelerometerUpdatesToQueue:[NSOperationQueue currentQueue]6: withHandler:^(CMAccelerometerData *accelData, NSError *error) {7: [self doAcceleration:accelData.acceleration];8: }];9: } else {10: [motionManager stopAccelerometerUpdates];11: }12:13: if ([toggleGyroscope isOn] && motionManager.gyroAvailable) {14: [motionManager15: startGyroUpdatesToQueue:[NSOperationQueue currentQueue]16: withHandler:^(CMGyroData *gyroData, NSError *error) {17: [self doRotation:gyroData.rotationRate];18: }];19: } else {20: [toggleGyroscope setOn:NO animated:YES];21: [motionManager stopGyroUpdates];22: }23: }

ptg
468 HOUR 17: Sensing Orientation and Motion
Let’s step through this method to make sure we’re all still on the same page.
Line 3 checks to see whether the toggle switch (UISwitch) is set to On for the
accelerometer. If it is, lines 4–8 tell the motion manager to start sending updates for
the accelerometer and define a code block to handle each update. The code block
consists of a single line (line 7) that will call the doAcceleration method and send
it the acceleration property of the CMAccelerometerData object received by the
handler. This is a simple structure with x, y, z components, each containing a read-
ing of the acceleration on that axis.
Lines 9–11 handle the case of the accelerometer being toggled Off, using the motion
manager’s stopAccelerometerUpdates method to end accelerometer readings.
In line 13, this exact same process begins for the gyroscope, with minor exceptions.
In the conditional statement in line 13, we also check the motionManager
(CMMotionManager) gyroAvailable property. This is a Boolean to indicate whether
the device has a gyroscope at all. If it doesn’t, we shouldn’t try to read it—so we tog-
gle the switch back off in line 20.
Another difference from the accelerometer code is that when handling updates from
the gyroscope (line 17) we will call a method, doRotation, with the gyroscope’s
rotation data; available in a simple structure, rotationRate with x, y, z compo-
nents that indicate the rotation rate, in radians, along each axis.
Finally, when the gyroscope is toggle off, the motion manager’s stopGyroUpdates
method is called (line 21).
We now have the code in place to prepare our motion manager, start and stop
updates, and invoke the doAccelerometer and doGyroscope methods with the
appropriate data from our iPhone hardware. The last step? Actually implementing
doAccelerometer and doGyroscope.
Reacting to Accelerometer UpdatesWe’ll start with doAccelerometer because it is the more complicated of the two.
This method should do two things. First, it should change the color of colorView if
the user moves the phone suddenly. Next, if the user gently tilts the phone along the
x-axis, it should progressively make the current color more solid.
To change colors, we need to sense motion. One way to do this is to look for g-forces
greater than 1g along each of our x, y, and z axes. This is good for detecting quick,
strong movements. A more subtle approach is to implement a filter to calculate the
difference between gravity and the force the accelerometer is measuring. We’ll go
with the former for our implementation.
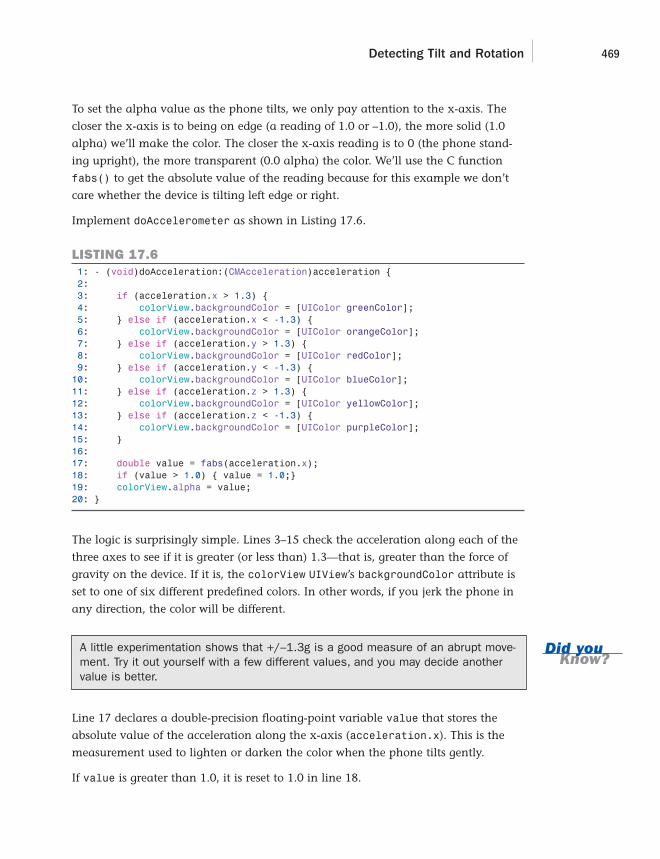
ptg
Detecting Tilt and Rotation 469
To set the alpha value as the phone tilts, we only pay attention to the x-axis. The
closer the x-axis is to being on edge (a reading of 1.0 or –1.0), the more solid (1.0
alpha) we’ll make the color. The closer the x-axis reading is to 0 (the phone stand-
ing upright), the more transparent (0.0 alpha) the color. We’ll use the C function
fabs() to get the absolute value of the reading because for this example we don’t
care whether the device is tilting left edge or right.
Implement doAccelerometer as shown in Listing 17.6.
LISTING 17.61: - (void)doAcceleration:(CMAcceleration)acceleration {2:3: if (acceleration.x > 1.3) {4: colorView.backgroundColor = [UIColor greenColor];5: } else if (acceleration.x < -1.3) {6: colorView.backgroundColor = [UIColor orangeColor];7: } else if (acceleration.y > 1.3) {8: colorView.backgroundColor = [UIColor redColor];9: } else if (acceleration.y < -1.3) {10: colorView.backgroundColor = [UIColor blueColor];11: } else if (acceleration.z > 1.3) {12: colorView.backgroundColor = [UIColor yellowColor];13: } else if (acceleration.z < -1.3) {14: colorView.backgroundColor = [UIColor purpleColor];15: }16:17: double value = fabs(acceleration.x);18: if (value > 1.0) { value = 1.0;}19: colorView.alpha = value;20: }
The logic is surprisingly simple. Lines 3–15 check the acceleration along each of the
three axes to see if it is greater (or less than) 1.3—that is, greater than the force of
gravity on the device. If it is, the colorView UIView’s backgroundColor attribute is
set to one of six different predefined colors. In other words, if you jerk the phone in
any direction, the color will be different.
A little experimentation shows that +/–1.3g is a good measure of an abrupt move-ment. Try it out yourself with a few different values, and you may decide anothervalue is better.
Line 17 declares a double-precision floating-point variable value that stores the
absolute value of the acceleration along the x-axis (acceleration.x). This is the
measurement used to lighten or darken the color when the phone tilts gently.
If value is greater than 1.0, it is reset to 1.0 in line 18.
Did youKnow?

ptg
By theWay
470 HOUR 17: Sensing Orientation and Motion
Line 19 sets the alpha property of colorView to value to finish the implementation.
Not that bad, right? The gyroscope implementation is even easier.
Reacting to Gyroscope UpdatesThe gyroscope handling is even easier than the accelerometer because we don’t need
to change colors—only alter the alpha property of colorView as the user spins the
phone. Instead of forcing the user to rotate the phone in one direction to get the
alpha channel to change, we’ll combine the rotation rates along all three axes.
Implement doRotation as shown in Listing 17.7.
LISTING 17.71: - (void)doRotation:(CMRotationRate)rotation {2:3: double value = (fabs(rotation.x)+fabs(rotation.y)+fabs(rotation.z))/8.0;4: if (value > 1.0) { value = 1.0;}5: colorView.alpha = value;6:7: }
Line 3 declares value as a double-precision floating-point number and sets it to the
sum of the absolute values of the three axis rotation rates (rotation.x,
rotation.y, and rotation.z), divided by eight.
Why are we dividing by 8.0? Because an alpha value of 1.0 is a solid color, and arotation rate of 1 (1 radian) means that the device is rotating at one-half of a rota-tion a second. In practice, this just seems too slow a rotation rate to get a goodeffect; barely turning the phone at all gives us a solid color.
By dividing by 8.0, the rotation rate would have to be four revolutions a second (8radians) for value to reach 1, meaning it takes much more effort to make theview’s background color solid.
In line 4, if value is greater than 1.0, it is set back to 1.0 because that is the maxi-
mum value the alpha property can accept.
Finally, in line 5, the alpha property of the colorView UIView is set to the calculat-
ed value.
You’ve just finished the application. Plug your iPhone in (this won’t work in the sim-
ulator!) and choose Build and Run in Xcode. Experiment with the sudden motion,
tilt, and rotation, as shown in Figure 17.9. Be sure to try activating both the
accelerometer and gyroscope at once, then one at a time.
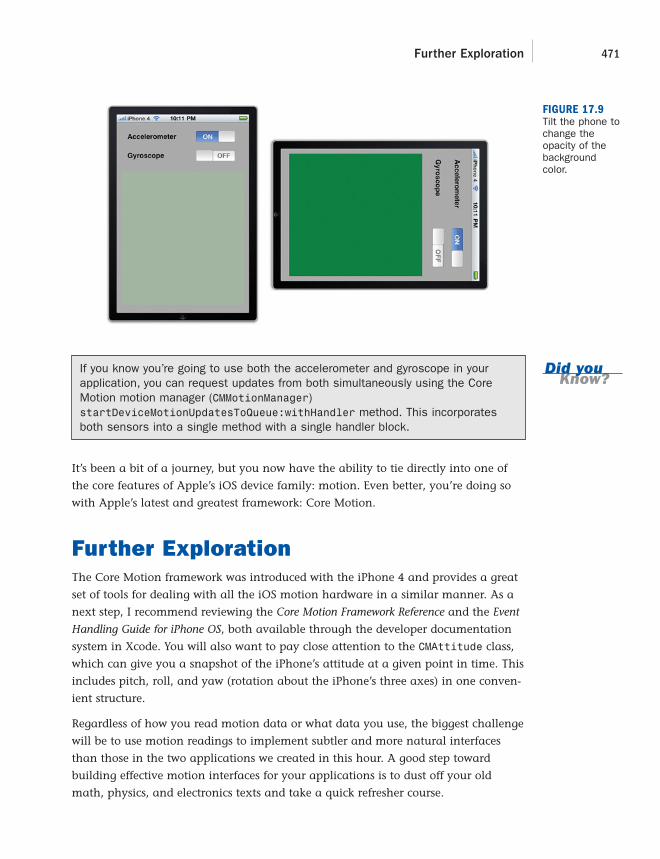
ptg
Further Exploration 471
FIGURE 17.9Tilt the phone tochange theopacity of thebackgroundcolor.
Did youKnow?
If you know you’re going to use both the accelerometer and gyroscope in yourapplication, you can request updates from both simultaneously using the CoreMotion motion manager (CMMotionManager)startDeviceMotionUpdatesToQueue:withHandler method. This incorporatesboth sensors into a single method with a single handler block.
It’s been a bit of a journey, but you now have the ability to tie directly into one of
the core features of Apple’s iOS device family: motion. Even better, you’re doing so
with Apple’s latest and greatest framework: Core Motion.
Further ExplorationThe Core Motion framework was introduced with the iPhone 4 and provides a great
set of tools for dealing with all the iOS motion hardware in a similar manner. As a
next step, I recommend reviewing the Core Motion Framework Reference and the Event
Handling Guide for iPhone OS, both available through the developer documentation
system in Xcode. You will also want to pay close attention to the CMAttitude class,
which can give you a snapshot of the iPhone’s attitude at a given point in time. This
includes pitch, roll, and yaw (rotation about the iPhone’s three axes) in one conven-
ient structure.
Regardless of how you read motion data or what data you use, the biggest challenge
will be to use motion readings to implement subtler and more natural interfaces
than those in the two applications we created in this hour. A good step toward
building effective motion interfaces for your applications is to dust off your old
math, physics, and electronics texts and take a quick refresher course.

ptg
472 HOUR 17: Sensing Orientation and Motion
The simplest and most basic equations from electronics and Newtonian physics are
all that is needed to create compelling interfaces. In electronics, a low-pass filter
removes abrupt signals over a cutoff value, providing smooth changes in the base-
line signal. This is useful for detecting smooth movements and tilts of the device and
ignoring bumps and the occasional odd, spiked reading from the accelerometer and
gyroscope. A high-pass filter does the opposite and detects only abrupt changes; this
can help in removing the effect of gravity and detecting only purposeful move-
ments, even when they occur along the axes that gravity is acting upon.
When you have the right signal interpretation in place, there is one more require-
ment for your interface to feel natural to your users: It must react like the physical
and analog world of mass, force, and momentum, and not like the digital and bina-
ry world of 1s and 0s. The key to simulating the physical world in the digital is just
some basic seventeenth-century physics.
Wikipedia Entries
Low-pass filter: http://en.wikipedia.org/wiki/Low-pass_filter
High-pass filter: http://en.wikipedia.org/wiki/High-pass_filter
Momentum: http://en.wikipedia.org/wiki/Momentum
Newton’s laws of motion: http://en.wikipedia.org/wiki/
Newton’s_laws_of_motion
SummaryAt this point, you know all the mechanics of working with orientation, as well as
the accelerometer and gyroscope via Core Motion. You should understand how to
use the Core Motion motion manager (CMMotionManager) to take direct readings
from the iPhone sensors to interpret orientation, tilt, movement, and rotation of the
device. You understand how to create an instance of CMMotionManager, how to tell
the manager to start sending motion updates, and how to interpret the measure-
ments that are provided.

ptg
473Workshop
Workshop
Quiz1. What type of motion can’t the iPhone accelerometer detect?
2. Should you drop your iPhone off the Empire State Building to test the
accelerometer?
Answers1. The accelerometer can only detect changes in how gravity is affecting the
device. It cannot, for example, detect that a device is lying on a table and
spinning because the force of gravity doesn’t change. To detect rotation, a
gyroscope is needed.
2. I don’t recommend it.
Activities1. When the Orientation application is in use, the label stays put and the text
changes. This means that for three of the six orientations (upside down, left
side, and right side) the text itself is also upside down or on its side. Fix this by
changing not just the label text but also the orientation of the label so that
the text always reads normally for the user looking at the screen. Be sure to
adjust the label back to its original orientation when the orientation is stand-
ing up, face down, or face up.
2. In the final version of the ColorTilt application, sudden movement is used to
change the view’s color. You may have noticed that it can sometimes be diffi-
cult to get the desired color. This is because the accelerometer provides a read-
ing for the deceleration of the device after your sudden movement. So, what
often happens is that ColorTilt switches the color from the force of the deceler-
ation immediately after switching it to the desired color from the force of the
acceleration. Add a delay to the ColorTilt application so that the color can be
switched at most once every second. This will make switching to the desired
color easier because the acceleration will change the color but the deceleration
will be ignored.

ptg
This page intentionally left blank

ptg
HOUR 18
Working with Rich Media
What You’ll Learn in This Hour:. How to play full-motion video from local or remote (streaming) files. Ways of recording and playing back audio files on your iPhone. How to access the built-in iPod library from within your applications. How to display and access images from the built-in photo library or camera. Methods of retrieving and displaying information about currently playing
media items
Each year, a new iPhone comes out, and each year I find myself standing in line to snatch
one up. Is it the new amazing features? Not so much. In fact, my primary motivation is to
keep expanding my storage space to keep up with an ever-growing media library. Sounds,
podcasts, movies, TV shows—I keep them all on my iPhone. When the original 8GB
iPhone came out, I assumed that I’d never run out of space. Today, I’ve just started having
to cut back on my sync list to fit everything under 32GB.
There’s no denying that the iPhone is a compelling platform for rich media playback. To
make things even better, Apple provides a dizzying array of Cocoa classes that will help
you add media to your own applications—everything from video, to photos, and audio
recording. This hour’s lesson walks you through a few different features that you may
want to consider including in your development efforts.
Exploring Rich MediaIn Hour 10, “Getting the User’s Attention,” we introduced you to System Sound Services for
playing back short (30 second) sound files. This is great for alert sounds and similar applica-
tions but hardly taps the potential of the iPhone. This hour takes things a bit further, giving
you full playback capabilities, and even audio recording within your own applications.

ptg
476 HOUR 18: Working with Rich Media
In this hour, we’ll be using two new frameworks: Media Player and AV Foundation.
These two frameworks encompass more than a dozen new classes. Although we
won’t be able to cover everything in this hour, we’ll give you a good idea of what’s
possible and how to get started.
In addition to these frameworks, we’ll introduce the UIImagePickerController
class. This simple object can be added to your applications to allow access to the
iPhone’s photo library or Camera from within your application.
Media Player FrameworkThe Media Player framework is used for playing back video and audio from either
local or remote resources. It can be used to call up a modal iPod interface from your
application, select songs, and manage playback. This is the framework that provides
integration with all the built-in media features that your phone has to offer. We’ll be
making use of five different classes in our sample code:
MPMoviePlayerController: Allows playback of a piece of media, either locat-
ed on the iPhone file system or through a remote URL. The player controller
can provide a GUI for scrubbing through video, pausing, fast forwarding, or
rewinding.
MPMediaPickerController: Presents the user with an interface for choosing
media to play. You can filter the files displayed by the media picker or allow
selection of any file from the media library.
MPMediaItem: A single piece of media, such as a song.
MPMediaItemCollection: Represents a collection of media items that will be
used for playback. An instance of MPMediaPickerController returns an
instance of MPMediaItemCollection that can be used directly with the next
class—the music player controller.
MPMusicPlayerController: Handles the playback of media items and media
item collections. Unlike the movie player controller, the music player works
“behind the scenes”—allowing playback from anywhere in your application,
regardless of what is displayed on the screen.
Of course, many dozens of methods are available in each of these classes. We’ll be
using a few simple features for starting and stopping playback, but there is an
amazing amount of additional functionality that can be added to your applications
with only a limited amount of coding involved.

ptg
By theWay
Exploring Rich Media 477
Just as a reminder, a modal view is one that the user must interact with before atask can be completed. Modal views, such as the Media Player’s iPod interface, areadded on top of your existing views using a view’s presentModalViewControllermethod. They are dismissed with dismissModalViewControllerAnimated.
AV Foundation FrameworkAlthough the Media Player framework is great for all your general media playback
needs, Apple recommends the AV Foundation framework for most audio playback
functions that exceed the 30 seconds allowed by System Sound Services. In addition,
the AV Foundation framework offers audio recording features, making it possible to
record new sound files directly in your application. This might sound like a complex
programming task, but we’ll do exactly that in our sample application.
You need just two new classes to add audio playback and recording to your apps:
AVAudioRecorder: Records audio (in a variety of different formats) to memory
or a local file on the iPhone. The recording process can even continue while
other functions are running in your application.
AVAudioPlayer: Plays back audio files of any length. Using this class, you can
implement game soundtracks or other complex audio applications. You have
complete control over the playback, including the ability to layer multiple
sounds on top of one another.
The Image PickerThe Image Picker (UIImagePickerController) works similarly to the
MPMediaPickerController, but instead of presenting a view where songs can be
selected, the user’s photo library is displayed instead. When the user chooses a
photo, the image picker will hand us a UIImage object based on the user’s selection.
Like the MPMediaPickerController, the image picker is presented within your
application modally. The good news is that both of these objects implement their
own view and view controller, so there’s very little work that we need to do to get
them to display other than a quick call to presentModalViewController.
As you can see, there’s quite a few things to cover, so let’s get started using these fea-
tures in a real iPhone application.

ptg
478 HOUR 18: Working with Rich Media
Preparing the Media PlaygroundApplicationThis hour’s exercise will be less about creating a real-world application and more
about building a sandbox for testing out the rich media classes. The finished appli-
cation will show embedded or fullscreen video, record and play audio, browse and
display images from the photo library or camera, and browse and select iPod music
for playback.
Implementation OverviewBecause there is so much going on in this application, we’ll take a similar approach to
what we did in Hour 10. We’ll start by creating an application skeleton with outlets
and actions, and then fill them in to implement the features we’ve been discussing.
There will be four main components to the application. First, a video player that
plays an MPEG-4 video file when a button is pressed; fullscreen presentation will be
controlled by a toggle switch. Second, we’ll create an audio recorder with playback
features. Third, we’ll add a button that shows the iPhone photo library or camera
and a UIImageView that displays the chosen photo. A toggle switch will control the
image source. Finally, we’ll provide the user the ability to choose songs from the
iPod library and start or pause playback. The title of the currently playing song will
also be displayed onscreen in a UILabel.
Setting Up the Project FilesBegin by creating a new View-based iPhone Application project in Xcode. Name the
new project MediaPlayground.
Within Xcode, open the MediaPlaygroundViewController.h file and update the file to
contain the #import directives, outlets, actions, and properties shown in Listing 18.1.
LISTING 18.1#import <UIKit/UIKit.h>#import <MediaPlayer/MediaPlayer.h>
#import <AVFoundation/AVFoundation.h>
#import <CoreAudio/CoreAudioTypes.h>
@interface MediaPlaygroundViewController : UIViewController
<MPMediaPickerControllerDelegate,AVAudioPlayerDelegate,
UIImagePickerControllerDelegate,UINavigationControllerDelegate> {
IBOutlet UISwitch *toggleFullscreen;
IBOutlet UISwitch *toggleCamera;
IBOutlet UIButton *recordButton;
IBOutlet UIButton *ipodPlayButton;
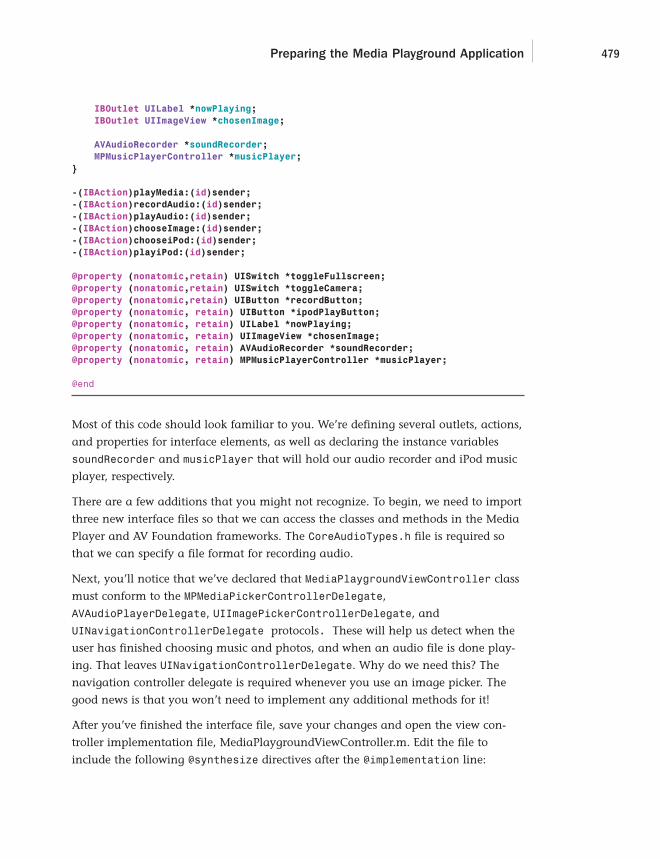
ptg
Preparing the Media Playground Application 479
IBOutlet UILabel *nowPlaying;
IBOutlet UIImageView *chosenImage;
AVAudioRecorder *soundRecorder;
MPMusicPlayerController *musicPlayer;
}
-(IBAction)playMedia:(id)sender;
-(IBAction)recordAudio:(id)sender;
-(IBAction)playAudio:(id)sender;
-(IBAction)chooseImage:(id)sender;
-(IBAction)chooseiPod:(id)sender;
-(IBAction)playiPod:(id)sender;
@property (nonatomic,retain) UISwitch *toggleFullscreen;
@property (nonatomic,retain) UISwitch *toggleCamera;
@property (nonatomic,retain) UIButton *recordButton;
@property (nonatomic, retain) UIButton *ipodPlayButton;
@property (nonatomic, retain) UILabel *nowPlaying;
@property (nonatomic, retain) UIImageView *chosenImage;
@property (nonatomic, retain) AVAudioRecorder *soundRecorder;
@property (nonatomic, retain) MPMusicPlayerController *musicPlayer;
@end
Most of this code should look familiar to you. We’re defining several outlets, actions,
and properties for interface elements, as well as declaring the instance variables
soundRecorder and musicPlayer that will hold our audio recorder and iPod music
player, respectively.
There are a few additions that you might not recognize. To begin, we need to import
three new interface files so that we can access the classes and methods in the Media
Player and AV Foundation frameworks. The CoreAudioTypes.h file is required so
that we can specify a file format for recording audio.
Next, you’ll notice that we’ve declared that MediaPlaygroundViewController class
must conform to the MPMediaPickerControllerDelegate,
AVAudioPlayerDelegate, UIImagePickerControllerDelegate, and
UINavigationControllerDelegate protocols. These will help us detect when the
user has finished choosing music and photos, and when an audio file is done play-
ing. That leaves UINavigationControllerDelegate. Why do we need this? The
navigation controller delegate is required whenever you use an image picker. The
good news is that you won’t need to implement any additional methods for it!
After you’ve finished the interface file, save your changes and open the view con-
troller implementation file, MediaPlaygroundViewController.m. Edit the file to
include the following @synthesize directives after the @implementation line:

ptg
480 HOUR 18: Working with Rich Media
@synthesize toggleFullscreen;@synthesize toggleCamera;@synthesize soundRecorder;@synthesize recordButton;@synthesize musicPlayer;@synthesize ipodPlayButton;@synthesize nowPlaying;@synthesize chosenImage;
Finally, for everything that we’ve retained, be sure to add an appropriate release
line within the view controller’s dealloc method:
- (void)dealloc {[toggleFullscreen release];[toggleCamera release];[soundRecorder release];[recordButton release];[musicPlayer release];[ipodPlayButton release];[nowPlaying release];[chosenImage release];[super dealloc];
}
Now, we’ll take a few minutes to configure the interface XIB file, and then we’ll
explore the classes and methods that can (literally) make our apps sing.
Creating the Media Playground InterfaceOpen the MediaPlaygroundViewController.xib file in Interface Builder and begin lay-ing out the view. This application will have a total of six buttons (UIButton), twoswitches (UISwitch), three labels (UILabel), and a UIImageView. In addition, we needto leave room for an embedded video player that will be added programmatically.
Figure 18.1 represents a potential design for the application. Feel free to use thisapproach with your layout, or modify it to suit your fancy.
You might want to consider using the Attributes Inspector to set the UIImageViewmode to Aspect Fill or Aspect Scale to make sure your photos look right within theview.
Connecting the Outlets and ActionsFinish up the interface work by connecting the buttons and label to the correspon-ding outlets and actions that were defined earlier.
For reference, the connections that you will be creating are listed in Table 18.1. Beaware that some UI elements need to connect to both an action and an outlet sothat we can easily modify their properties in the application.
Did youKnow?

ptg
Preparing the Media Playground Application 481
TABLE 18.1 Interface Elements and Actions
Element Name (Type) Outlet/Action Purpose
Play Movie Action: playMedia: Initiates playback in an embedded (UIButton) movie player, displaying a video file
Fullscreen On/Off Outlet: Toggles a property of the movie player,Switch (UISwitch) toggleFullscreen embedding it or presenting the video
fullscreen
Record Audio Action: recordAudio: Starts and stops audio recording(UIButton) Outlet: recordButton:
Play Audio Action: playAudio: Plays the currently recorded audio sample(UIButton)
Pick Image Action: chooseImage Opens a pop-over displaying the user’s photo library
Camera On/Off Outlet: toggleCamera Toggles a property of the image selector,Switch (UISwitch) presenting either the photo library or camera
UIImageView Outlet: chosenImage The image view that will be used for displaying a photo from the user’s photo library
Choose iPod Action: chooseiPod: Opens a pop-over displaying the user’s Music (UIButton) music library for creating a playlist.
Play iPod Music Action: playiPod: Plays or pauses the current playlist(UIButton) Outlet: ipodPlayButton
No Song Playing Outlet: nowPlaying Displays the title of the currently (UILabel) playing song (if any)
FIGURE 18.1Create an inter-face for the dif-ferent functionswe’ll be imple-menting.

ptg
482 HOUR 18: Working with Rich Media
After creating all the connections to and from the File Owner’s icon, save and close
the XIB file. We’ve now created the basic skeleton for all the media capabilities we’ll
be adding in the rest of the exercise.
Using the Movie PlayerThe Media Player framework provides access to the built-in media playback capabil-
ities of the iPhone. Everything you typically see when playing video or audio—the
scrubber control, fast forward/rewind, play, pause—all of these features come “for
free” within the classes provided by the Media Player.
In this exercise, we’ll use the MPMoviePlayerController class. There are only three
methods between us and movie-playback bliss:
initWithContentURL: Provided with an NSURL object, this method initializes
the movie player and prepares it for playback.
play: Begins playing the selected movie file.
setFullscreen:animated: Sets the movie playback to fullscreen.
Because the movie controller itself implements controls for controlling playback, we
don’t need to implement additional features ourselves. If we wanted to, however,
there are many other methods, including stop, that we could call on to control
playback.
These are only a few of the dozens of methods and properties available for themovie player. You can get pointers to additional resources in the “FurtherExploration” section at the end of this hour.
Adding the Media Player FrameworkTo use the MPMoviePlayerController class (and the MPMusicPlayerController
we’ll be implementing a bit later), we must first add the Media Player framework to
the project. To do this, right-click the Frameworks folder icon in Xcode, and choose
Add, Existing Frameworks. Select MediaPlayer.framework in the list that appears,
and then click Add.
Typically, you also need to add a corresponding import line in your header file(#import <MediaPlayer/MediaPlayer.h>), but because we already added thisduring the application setup, you should be good to go!
Did youKnow?
WatchOut!

ptg
Using the Movie Player 483
Adding Media FilesAs you might have noticed earlier when we listed the methods we would be using,
initializing an instance of MPMoviePlayerController is performed by passing in an
NSURL object. This means that if you pass in a URL for a media file hosted on a web
server, as long as it is a supported format, it will work!
What Are the Supported Formats?Officially, Apple supports the following codecs: H.264 Baseline Profile 3, MPEG-4Part 2 video in .mov, .m4v, .mpv, or .mp4 containers. On the audio side, AAC-LC,and MP3 formats are supported.
This is the complete list of audio formats supported by the iPhone:
AAC (16 to 320Kbps)
AIFF
AAC Protected (MP4 from iTunes Store)
MP3 (16 to 320Kbps)
MP3 VBR
Audible (formats 2–4)
Apple Lossless
WAV
For this example, however, we’ve chosen to include a local media file so that we can
easily test the functionality. Locate the movie.m4v file included in the
MediaPlayground project folder, and drag it into your Xcode resources group so that
we can access it directly in the application. Be sure to choose to copy the file to the
project, when prompted.
Implementing Movie PlaybackFor movie playback in the MediaPlayground application to work, we need to imple-
ment the playMedia: method. This is invoked by the Play Movie button we built in
to the interface earlier. Let’s add the method, and then walk through how it works.
Add the code from Listing 18.2 to the MediaPlaygroundViewController.m file.
LISTING 18.21: -(IBAction)playMedia:(id)sender {2: NSString *movieFile;3: MPMoviePlayerController *moviePlayer;4:5: movieFile = [[NSBundle mainBundle]6: pathForResource:@”movie” ofType:@”m4v”];

ptg
484 HOUR 18: Working with Rich Media
7: moviePlayer = [[MPMoviePlayerController alloc]8: initWithContentURL: [NSURL fileURLWithPath: movieFile]];9:10: [moviePlayer.view setFrame:CGRectMake(145.0, 20.0, 155.0 , 100.0)];11: [self.view addSubview:moviePlayer.view ];12:13:14: [[NSNotificationCenter defaultCenter] addObserver:self15: selector:@selector(playMediaFinished:)16: name:MPMoviePlayerPlaybackDidFinishNotification17: object:moviePlayer];18:19: [moviePlayer play];20:21: if ([toggleFullscreen isOn]) {22: [moviePlayer setFullscreen:YES animated:YES];23: }24:25: }
Things start off simple enough. Line 2 declares a string movieFile that will hold the
path to the movie file we added in the previous step. Next, in line 3, we declare the
moviePlayer, a reference to an instance of MPMoviePlayerController.
Next, lines 5–6 grab and store the path of the movie.m4v file in the movieFile
variable.
Lines 7–8 allocate and initialize the moviePlayer itself using an NSURL instance that
contains the path from movieFile. Believe it or not, this is most of the “heavy lift-
ing” of the movie playback method! After we’ve completed this line, we could (if we
wanted) immediately call the play method on the moviePlayer object and see the
movie play! We’ve chosen to add an additional feature instead.
Lines 10–11 set the frame dimensions of the movie player that we want to embed in
the view, and then adds the moviePlayer view to the main application view. If this
seems familiar, it’s because it’s the same technique we used to add a field to an alert
in Hour 10.
Playback is started using the play method in line 19.
Finally, lines 21–23 check to see whether the toggle switch (toggleFullscreen) is
turned “on” using the UISwitch instance method isOn. If the switch is on, we use
the method setFullscreen:animated to expand the movie to fill the iPhone’s
screen. If the switch is off, we do nothing, and the movie plays back within the con-
fines of the frame we defined.
Notice anything missing? We’ve conveniently skipped over lines 14–17. These lines
add a notification for the movie player that will help us identify when the movie
LISTING 18.2 continued

ptg
Using the Movie Player 485
has stopped playing. Because this is the first time you’ve worked with a notification,
we’ll address it separately.
Receiving a NotificationThere is a teensy-weensy problem with implementing the MPMoviePlayerController
as we’ve done here. If we attempt to release the movie player after the play line,
the application will crash. If we attempt to autorelease the player, the same thing
happens! So, how in the world can we get rid of the player?
The key is that we need to wait until the movie is no longer playing. To do that, we
use the NSNotificationCenter class to register an “observer” that will watch for a
specific notification message from the mediaPlayer object, and then call a method
of our choosing when it receives the notification.
The MPMoviePlayerController sends the MPMoviePlayerPlaybackDidFinish
Notification when it has finished playing a piece of media. In lines 16–19 we regis-
ter that notification for our mediaPlayer object and ask the notification center to
invoke the playMediaFinished: method when it receives the notification. Put simply,
when the movie player is finished playing the movie (or the user stops playback), the
playMediaFinished: method is called.
Implementing the playMediaFinished: method allows us to clean up when we’re
done with the movie player!
Handling CleanupTo clean up after the movie playback has finished, we need to release the
mediaPlayer object. Add the playMediaFinished: method to the
MPMoviePlayerController.m file, as shown in Listing 18.3.
LISTING 18.31: -(void)playMediaFinished:(NSNotification*)theNotification2: {3: MPMoviePlayerController *moviePlayer=[theNotification object];4:5: [[NSNotificationCenter defaultCenter] removeObserver:self6: name:MPMoviePlayerPlaybackDidFinishNotification7: object:moviePlayer];8:9: [moviePlayer.view removeFromSuperview];10: [moviePlayer release];11: }
Three things need to happen in this method. First, in line 3, we assign the local
moviePlayer variable to the object that is passed in from the notification. This is

ptg
486 HOUR 18: Working with Rich Media
the same object that we were using when we initiated the play method in
playMedia; it just arrived in this method by way of a notification, so we need to call
the object method on the notification to access it again.
In lines 5–7, we tell the notification center that it can stop looking for the
MPMoviePlayerPlaybackDidFinishNotification notification. Because we’re going
to be releasing the movie player object, there’s no point in keeping it around.
Line 9 removes the embedded movie player view from the main application view.
Finally, in line 9, we can release the movie player!
Movie playback is now available in the application, as demonstrated in Figure 18.2.
Choose Build and Run in Xcode, press the Play Movie button, and sit back and
enjoy the show!
FIGURE 18.2The applicationwill now play thevideo file whenPlay Movie istouched.
Creating and Playing Audio RecordingsIn the second part of the tutorial, we’ll be adding audio recording and playback to
the application. Unlike the movie player, we’ll be using classes within the AV
Foundation framework to implement these features. As you’ll learn, very little cod-
ing needs to be done to make this work!
ptg
Creating and Playing Audio Recordings 487
For the recorder, we’ll use the AVAudioRecorder class and these methods:
initWithURL:settings:error: Provided with an NSURL instance pointing to
a local file and NSDictionary containing a few settings, this method returns
an instance of a recorder, ready to use.
record: Begins recording.
stop: Ends the recording session.
Not coincidentally, the playback feature, an instance of AVAudioPlayer, uses some
very similar methods:
initWithContentsOfURL:error: Creates an audio player object that can be
used to play back the contents of the file pointed to by an NSURL object
play: Plays back the audio
When you were entering the contents of the MediaPlayground.h file a bit earlier,
you may have noticed that we slipped in a protocol: AVAudioPlayerDelegate. By
conforming to this protocol, we can implement the method
audioPlayerDidFinishPlaying:successfully:, which will automatically be
invoked when our audio player finishes playing back the recording. No notifications
needed this time around!
Adding the AV Foundation FrameworkTo use the AVAudioPlayer and AVAudioRecorder classes, we must add the AV
Foundation framework to the project. Right-click the Frameworks folder icon in the
Xcode project, and choose Add, Existing Frameworks. Select the AVFoundation.
framework, and then click Add.
Remember, the framework also requires a corresponding import line in your head-er file (#import <AVFoundation/AVFoundation.h>) to access the classes andmethods. We added this earlier when setting up the project.
Implementing Audio RecordingTo add audio recording, we need to create the recordAudio: method, but before we
do, let’s think through this a bit. What happens when we initiate a recording? In
this application, recording will continue until we press the button again.
To implement this functionality, the “recorder” object itself must persist between
calls to the recordAudio: method. We’ll make sure this happens by using the
WatchOut!

ptg
488 HOUR 18: Working with Rich Media
soundRecorder instance variable in the MediaPlaygroundViewController class
(declared in the project setup) to hold the AVAudioRecorder object. By setting the
object up in the viewDidLoad method, it will be available anywhere and anytime
we need it. Edit MediaPlaygroundViewController.m and add the code in Listing 18.4
to viewDidLoad.
LISTING 18.41: - (void)viewDidLoad {2: NSString *tempDir;3: NSURL *soundFile;4: NSDictionary *soundSetting;5:6: tempDir=NSTemporaryDirectory();7: soundFile=[NSURL fileURLWithPath:8: [tempDir stringByAppendingString:@”sound.caf”]];9:10: soundSetting = [NSDictionary dictionaryWithObjectsAndKeys:11: [NSNumber numberWithFloat: 44100.0],AVSampleRateKey,12: [NSNumber numberWithInt: kAudioFormatMPEG4AAC],AVFormatIDKey,13: [NSNumber numberWithInt: 2],AVNumberOfChannelsKey,14: [NSNumber numberWithInt: AVAudioQualityHigh],AVEncoderAudioQualityKey,15: nil];16:17: soundRecorder = [[AVAudioRecorder alloc] initWithURL: soundFile18: settings: soundSetting19: error: nil];20:21: [super viewDidLoad];22: }
Beginning with the basics, lines 2–3 declare a string, tempDir, that will hold the
iPhone temporary directory (which we’ll need to store a sound recording), a URL,
soundFile, which will point to the sound file itself, and soundSetting, a dictionary
that will hold several settings needed to tell the recorder how it should be recording.
In line 6, we use NSTemporaryDirectory() to grab and store the temporary directo-
ry path where your application can store its sound find.
Lines 7–8 concatenate “sound.caf” onto the end of the temporary directory. This
string is then used to initialize a new instance of NSURL, which is stored in the
soundFile variable.
Lines 10–15 create an NSDictionary object that contains keys and values for config-
uring the format of the sound being recorded. Unless you’re familiar with audio
recording, many of these might be pretty foreign sounding. Here’s the 30-second
summary:

ptg
Creating and Playing Audio Recordings 489
AVSampleRateKey: The number of audio samples the recorder will take per
second.
AVFormatIDKey: The recording format for the audio.
AVNumberofChannelsKey: The number of audio channels in the recording.
Stereo audio, for example, has two channels.
AVEncoderAudioQualityKey: A quality setting for the encoder.
To learn more about the different settings, what they mean, and what the possibleoptions are, read the AVAudioRecorder Class Reference (scroll to the “Constants”section) in the Xcode developer documentation utility.
The audio format specified in the settings is defined in the CoreAudioTypes.h file.Because the settings reference an audio type by name, you must import this file:(#import <CoreAudio/CoreAudioTypes.h>).
Again, this was completed in the initial project setup, so no need to make anychanges now.
In lines 17–19, the audio recorder, soundRecorder, is initialized with the soundFile
URL and the settings stored in the soundSettings dictionary. We pass nil to the
error parameter because we don’t (for this example) care whether an error occurs. If
we did experience an error, it would be returned in a value passed to this parameter.
Controlling RecordingWith the soundRecorder allocated and initialized, all that we need to do is imple-
ment recordAudio: so that the record and stop methods are invoked as needed.
To make things interesting, we’ll have the recordButton change its title between
Record Audio and Stop Recording when pressed.
Add the following code in Listing 18.5 to MediaPlaygroundViewController.m.
LISTING 18.51: -(IBAction)recordAudio:(id)sender {2: if ([recordButton.titleLabel.text isEqualToString:@”Record Audio”]) {3: [soundRecorder record];4: [recordButton setTitle:@”Stop Recording”5: forState:UIControlStateNormal];6: } else {7: [soundRecorder stop];8: [recordButton setTitle:@”Record Audio”9: forState:UIControlStateNormal];10: }11: }
By theWay
WatchOut!

ptg
490 HOUR 18: Working with Rich Media
In line 2, the method checks the title of the recordButton variable. If it is set to
Record Audio, the method uses [soundRecorder record] to start recording (line 3),
and then, in lines 4–5, sets the recordButton title to Stop Recording. If the title does-
n’t read Record Audio, then we’re already in the process of making a recording. In
this case, we use [soundRecorder stop] in line 7 to end the recording and set the
button title back to Record Audio in lines 8–9.
That’s it for recording! Let’s implement playback so that we can actually hear what
we’ve recorded!
Controlling Audio PlaybackTo play back the audio that we recorded, we’ll create an instance of the
AVAudioPlayer class, point it at the sound file we created with the recorder, and
then call the play method. We’ll also add the method
audioPlayerDidFinishPlaying:successfully: defined by the
AVAudioPlayerDelegate protocol so that we’ve got a convenient place to release
the audio player object.
Start by adding the playAudio: method, in Listing 18.6, to
MediaPlaygroundViewController.m.
LISTING 18.61: -(IBAction)playAudio:(id)sender {2: NSURL *soundFile;3: NSString *tempDir;4: AVAudioPlayer *audioPlayer;5:6: tempDir=NSTemporaryDirectory();7: soundFile=[NSURL fileURLWithPath:8: [tempDir stringByAppendingString:@”sound.caf”]];9:10: audioPlayer = [[AVAudioPlayer alloc]11: initWithContentsOfURL:soundFile error:nil];12:13: [audioPlayer setDelegate:self];14: [audioPlayer play];15: }
In lines 2–3, we define variables for holding the iPhone application’s temporary
directory and a URL for the sound file—exactly the same as the record.
Line 4 declares the audioPlayer instance of AVAudioPlayer.
Lines 6–8 should look familiar because once again, they grab and store the tempo-
rary directory and use it to initialize an NSURL object, soundFile, that points to the
sound.caf file we’ve recorded.
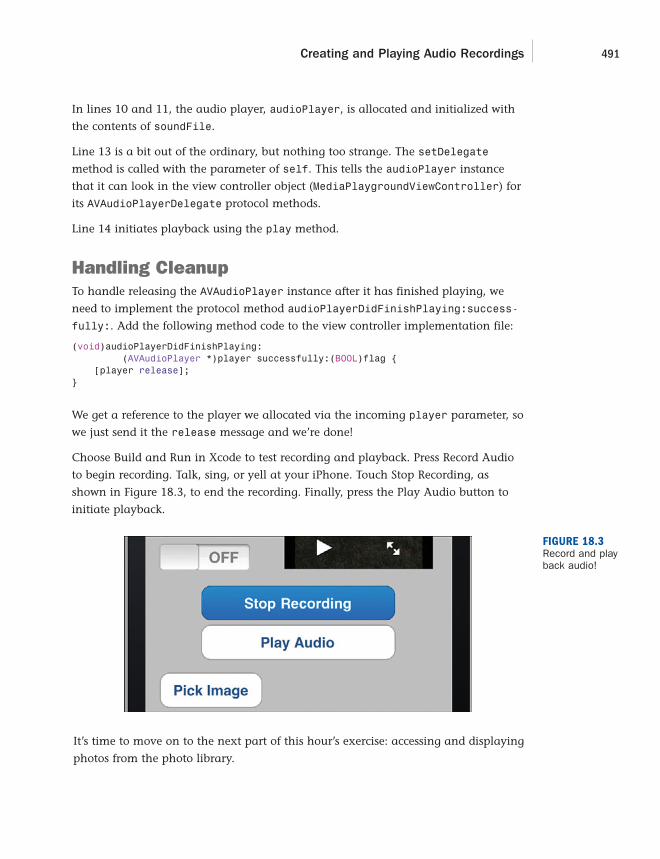
ptg
Creating and Playing Audio Recordings 491
In lines 10 and 11, the audio player, audioPlayer, is allocated and initialized with
the contents of soundFile.
Line 13 is a bit out of the ordinary, but nothing too strange. The setDelegate
method is called with the parameter of self. This tells the audioPlayer instance
that it can look in the view controller object (MediaPlaygroundViewController) for
its AVAudioPlayerDelegate protocol methods.
Line 14 initiates playback using the play method.
Handling CleanupTo handle releasing the AVAudioPlayer instance after it has finished playing, we
need to implement the protocol method audioPlayerDidFinishPlaying:success-
fully:. Add the following method code to the view controller implementation file:
(void)audioPlayerDidFinishPlaying:(AVAudioPlayer *)player successfully:(BOOL)flag {
[player release];}
We get a reference to the player we allocated via the incoming player parameter, so
we just send it the release message and we’re done!
Choose Build and Run in Xcode to test recording and playback. Press Record Audio
to begin recording. Talk, sing, or yell at your iPhone. Touch Stop Recording, as
shown in Figure 18.3, to end the recording. Finally, press the Play Audio button to
initiate playback.
FIGURE 18.3Record and playback audio!
It’s time to move on to the next part of this hour’s exercise: accessing and displaying
photos from the photo library.
ptg
492 HOUR 18: Working with Rich Media
Using the Photo Library and CameraThe iPhone is great for storing pictures and, with the new high-quality camera in
the iPhone 4, great for taking pictures, too. By integrating the photo library with
your apps, you can directly access any image stored on the device or take a new pic-
ture and use it within your application. In this hour’s tutorial, we’re going to display
the library, allow the user to take a photo either from the camera or library, and dis-
play it within a UIImageView in the application interface.
The magic that makes this possible is the UIImagePickerController class. This
class will give us a view controller and view where the user can navigate their pho-
tos and videos and access the camera. We’ll add this to our main application view
as a modal view using the method presentModalViewController within our main
MediaPlaygroundViewController instance.
We will need to implement the UIImagePickerControllerDelegate protocol’s
imagePickerController:didFinishPickingMediaWithInfo to detect when an
image has been chosen and to properly dismiss the image picker.
Implementing the Image PickerWhen a user touches the Pick Image button, our application triggers the method
chooseImage. Within this method we will allocate the UIImagePickerController,
configure the type of media (camera or library) that it will be browsing, set its dele-
gate, and then display it.
Enter the chooseImage method shown in Listing 18.7.
LISTING 18.71: -(IBAction)chooseImage:(id)sender {2: UIImagePickerController *imagePicker;3: imagePicker = [[UIImagePickerController alloc] init];4:5: if ([toggleCamera isOn]) {6: imagePicker.sourceType=UIImagePickerControllerSourceTypeCamera;7: } else {8: imagePicker.sourceType=UIImagePickerControllerSourceTypePhotoLibrary;9: }10: imagePicker.delegate=self;11: [[UIApplication sharedApplication] setStatusBarHidden:YES];12: [self presentModalViewController:imagePicker animated:YES];13: [imagePicker release];14: }
In lines 2–3, imagePicker is allocated and initialized as an instance of
UIImagePickerController.

ptg
Using the Photo Library and Camera 493
Lines 5–9 sets the sourceType property of the image picker to
UIImagePickerControllerSourceTypeCamera if the toggleCamera switch is set to on
or UIImagePickerControllerSourceTypePhotoLibrary if it isn’t. In other words, the
user can use the toggle switch to choose from photo library images or the camera.
There is another possible source you may want to use: UIImagePickerControllerSourceTypeSavedPhotosAlbum. This is used to view the cameraphoto roll.
If you’d like to determine exactly what sort of camera devices are available onyour system, you can test using the UIImagePickerController methodisCameraDeviceAvailable, which returns a Boolean value:
[UIImagePickerController isCameraDeviceAvailable:<camera type>]
Where the camera type is
UIImagePickerControllerCameraDeviceRear
or
UIImagePickerControllerCameraDeviceFront
Line 10 sets the image picker delegate to be the MediaPlayerViewController class.
This means we will need to implement some supporting methods to handle when
the user is finished choosing a photo.
In Line 11, we hide the application’s status bar. This is necessary because the photo
library and camera interfaces are meant to be viewed fullscreen. First we use
[UIApplication sharedApplication] to grab our application object, and then use
the application’s setStatusBarHidden method to hide the bar.
Line 12 adds the imagePicker view controller over the top of our existing view.
In line 13, the imagePicker is released. The object, however, will not be released
from memory until the modal view that contains it is dismissed.
Displaying the Chosen ImageWith what we’ve written so far, the user can now touch the Pick Image button, but
not much is going to happen when they navigate to an image. To react to an image
selection, we will implement the delegate method imagePickerController:
didFinishPickingMediaWithInfo.
This method will automatically be called when the user makes a selection in the
image picker. The method is passed an NSDictionary object that can contain sever-
al things: the image itself, an edited version of the image (if cropping/scaling is
Did youKnow?
Did youKnow?

ptg
Did youKnow?
494 HOUR 18: Working with Rich Media
allowed), or information about the image. We must provide the key value to retrieve
the value we want. For this application, we will be accessing the object returned by
the UIImagePickerControllerOriginalImage key, a UIImage. This UIImage will
then be displayed within the chosenImage UIImageView in our interface.
To learn more about the data that can be returned by the image picker, read theUIImagePickerControllerDelegate Protocol reference within the Apple develop-er documentation.
Add the imagePickerController:didFinishPickingMediaWithInfo delegate
method shown in Listing 18.8 to the MediaPlaygroundViewController.m file.
LISTING 18.81: - (void)imagePickerController:(UIImagePickerController *)picker2: didFinishPickingMediaWithInfo:(NSDictionary *)info {3: [[UIApplication sharedApplication] setStatusBarHidden:NO];4: [self dismissModalViewControllerAnimated:YES];5: chosenImage.image=[info objectForKey:6: UIImagePickerControllerOriginalImage];7: }
After the image is chosen, we can redisplay the status bar in line 3, and then dis-
miss the image picker using dismissModalViewControllerAnimated in line 4.
Lines 5–6 do all the remaining work! We access the UIImage that the user has cho-
sen by grabbing the object in the info dictionary that is referenced by the
UIImagePickerControllerOriginalImage key. This is assigned to the image prop-
erty of chosenImage, displaying the image, in all its glory, in the application’s view.
Cleaning Up After the Image PickerThere is still a scenario that must be accounted for before we can call the image-
picking portion of our MediaPlayground application complete. A user can click a
“cancel” button within the image picker, leaving the picker without choosing any-
thing! The imagePickerControllerDidCancel delegate method was made for
exactly this situation. Implement this method to reshow the status bar, and then
dismiss the image picker by calling dismissModalViewControllerAnimated: as
follows:
- (void)imagePickerControllerDidCancel:(UIImagePickerController *)picker {
[[UIApplication sharedApplication] setStatusBarHidden:NO];[self dismissModalViewControllerAnimated:YES];
}

ptg
Accessing and Playing the iPod Library 495
You should now be able to use the Pick Image button and display photos from the
photo library and camera, as shown in Figure 18.4.
FIGURE 18.4Choose (or capture) anddisplay photosin your applica-tion!
Our final step in this hour’s lesson is accessing the iPod library and playing content.
You’ll notice quite a few similarities to using the photo library in this implementation.
Accessing and Playing the iPod LibraryWhen Apple opened iOS for development, they didn’t initially provide a method for
accessing the iPod library. This led to applications implementing their own libraries
for background music and a less-than-ideal experience for the end user.
Thankfully, developers can now directly access the iPod library and play any of the
available music files. Best of all, this is amazingly simple to implement!
First, you’ll be using the MPMediaPickerController class to choose the music to
play. There’s only a single method we’ll be calling from this class:
initWithMediaTypes: Initializes the media picker and filters the files that are
available in the picker
We’ll configure its behavior with a handful of properties that can be set on the object:
prompt: A string that is displayed to the user when choosing songs
allowsPickingMultipleItems: Configures whether the user can choose one
or more sound files
ptgWatch
Out!
496 HOUR 18: Working with Rich Media
Like the AVAudioPlayer, we’re going to conform to the
MPMediaPickerControllerDelegate protocol so that we can react when the user
chooses a playlist. The method that we’ll be adding as part of the protocol is
mediaPicker:didPickMediaItems:.
To play back the audio, we’ll take advantage of the MPMusicPlayerController
class, which can use the playlist returned by the media picker. To control starting
and pausing the playback, we’ll use four methods:
iPodMusicPlayer: This class method initializes the music player as an “iPod”
music player, capable of accessing the iPod music library.
setQueueWithItemCollection: Sets the playback queue using a playlist
(MPMediaItemCollection) object returned by the media picker.
play: Starts playing music.
pause: Pauses the music playback.
As you can see, when you get the hang of one of the media classes, the others start
to seem very “familiar,” using similar initialization and playback control methods.
The iPod music playback features require the same Media Player framework weadded previously for the MPMoviePlayerController class. If you skipped that sec-tion, return to the “Adding the Media Player Framework” section, earlier in this hour.
Implementing the Media PickerTo use a media picker, we’ll follow steps similar to the Image Picker: We’ll initialize
and configure the behavior of the picker, and then add the picker as a modal view.
When the user is done with the picker, we’ll add the playlist it returns to the music
player and dismiss the picker view controller. If the user decides they don’t want to
pick anything, we’ll simply dismiss the picker and move on.
For all of these steps to fall into place, we must already have an instance of the
music player so that we can hand off the playlist. Recall that we declared an instance
variable musicPlayer for the MediaPlaygroundViewController class. We’ll go
ahead and initialize this variable in the MediaPlaygroundViewController.m
viewDidLoad method. Add the following line to the method now (the location isn’t
important):
musicPlayer=[MPMusicPlayerController iPodMusicPlayer];
With that small addition, our instance of the music player is ready, so we can pro-
ceed with coding the chooseiPod: method to display the media picker.

ptg
Accessing and Playing the iPod Library 497
Update the MediaPlaygroundViewController implementation file with the new
method in Listing 18.9.
LISTING 18.91: -(IBAction)chooseiPod:(id)sender {2: MPMediaPickerController *musicPicker;3:4: [musicPlayer stop];5: nowPlaying.text=@”No Song Playing”;6: [ipodPlayButton setTitle:@”Play iPod Music”7: forState:UIControlStateNormal];8:9: musicPicker = [[MPMediaPickerController alloc]10: initWithMediaTypes: MPMediaTypeMusic];11:12: musicPicker.prompt = @”Choose Songs to Play” ;13: musicPicker.allowsPickingMultipleItems = YES;14: musicPicker.delegate = self;15:16: [self presentModalViewController:musicPicker animated:YES];17: [musicPicker release];18: }
First, line 2 declares the instance of MPMediaPickerController, musicPicker.
Next, lines 4–7 make sure that when the picker is called, the music player will stop
playing its current song, the nowPlaying label in the interface is set to the default
string “No Song Playing”, and the playback button is set to read “Play iPod Music”.
These lines aren’t necessary, but they keep our interface from being out of sync with
what is actually going on in the application.
Lines 9–10 allocate and initialize the media picker controller instance. It is initial-
ized with a constant, MPMediaTypeMusic, that defines the type of files the user will
be allowed to choose with the picker. You can provide any of five values listed here:
MPMediaTypeMusic Music files
MPMediaTypePodcast Podcasts
MPMediaTypeAudioBook Audio books
MPMediaTypeAnyAudio Any audio type
MPMediaTypeAny Any media type
Line 12 sets a message that will be displayed at the top of the music picker.
In line 13, we set the allowsPickingMultipleItems property to a Boolean value
(YES or NO) to configure whether the user can select one or more media files.

ptg
498 HOUR 18: Working with Rich Media
Line 14 sets the delegate music picker’s delegate. In other words, it tells the
musicPicker object to look in the MediaPlaygroundViewController for the
MPMediaPickerControllerDelegate protocol methods.
Line 16 uses the musicPicker view controller to display the iPod music library over
the top of our application’s view.
Finally, line 17 releases the musicPicker.
If you find it confusing that you release the musicPicker in this method, I don’tblame you. After the music picker is added to the modal view, its retain count isincremented, so releasing it essentially means that we aren’t responsible for itanymore. When the modal view controller is dismissed later, the music picker willbe autoreleased.
What’s frustrating is that although this init, alloc, release pattern works well here,you may find yourself thinking that some other object can be managed similarlyand end up releasing when you shouldn’t. Only a thorough read of the correspon-ding Apple documentation will tell you with certainty how something will behave.
Getting the PlaylistTo get the playlist that is returned by media picker (an object called MPMediaItem
Collection) and clean up after ourselves, we’ll add the mediaPicker:didPick
MediaItems: protocol method from Listing 18.10 to our growing implementation.
LISTING 18.101: - (void)mediaPicker: (MPMediaPickerController *)mediaPicker2: didPickMediaItems:(MPMediaItemCollection *)mediaItemCollection {3: [musicPlayer setQueueWithItemCollection: mediaItemCollection];4: [self dismissModalViewControllerAnimated:YES];5: }
When the user is finished picking songs in the media picker, this method is called and
passed the chosen items in a MPMediaItemCollection object, mediaItemCollection.
In line 3, the music player instance, musicPlayer, is subsequently configured with
the playlist via the setQueueWithItemCollection: method.
To clean things up, the modal view is dismissed in line 4.
Cleaning Up After the Media PickerWe’ve got one more situation to account for before we can wrap up the media pick-
er: the possibility of a user exiting the media picker without choosing anything
(touching Done without picking any tracks). To cover this event, we’ll add the dele-
gate protocol method mediaPickerDidCancel. As with the image picker, we just
WatchOut!

ptg
Accessing and Playing the iPod Library 499
need to dismiss the modal view controller. Add this method to the
MediaPlaygroundViewController.m file:
- (void)mediaPickerDidCancel:(MPMediaPickerController *)mediaPicker {[self dismissModalViewControllerAnimated:YES];
}
Congratulations! You’re almost finished! The media picker feature is now imple-
mented, so our only remaining task is to add the music player and make sure the
corresponding song titles are displayed.
Implementing the Music PlayerBecause the musicPlayer object was created in the viewDidLoad method of the view
controller (see the start of “Implementing the Media Picker”) and the music player’s
playlist was set in mediaPicker:didPickMediaItems:, the only real work that the
playiPod: method must handle is starting and pausing playback.
To spice things up a bit, we’ll try to be a bit clever—toggling the ipodPlayButton
title between Play iPod Music (the default) and Pause iPod Music as needed. As a
final touch, we’ll access a property of musicPlayer MPMusicPlayerController
object called nowPlayingItem. This property is an object of type MPMediaItem,
which contains a string property called MPMediaItemPropertyTitle set to the name
of the currently playing media file, if available.
To grab the title from musicPlayer.nowPlayingItem, we’ll use a MPMediaIteminstance method valueForProperty.
For example: [musicPlayer.nowPlayingItem valueForProperty:MPMediaItemPropertyTitle]
If you attempt to use musicPlayer.nowPlayingItem.MPMediaItemPropertyTitle, it will fail. You must use the valueForProperty:method to retrieve the title or other MPMediaItem properties.
Putting this all together, we get the implementation of playiPod in Listing 18.11.
LISTING 18.111: -(IBAction)playiPod:(id)sender {2: if ([ipodPlayButton.titleLabel.text isEqualToString:@”Play iPod Music”]) {3: [musicPlayer play];4: [ipodPlayButton setTitle:@”Pause iPod Music”5: forState:UIControlStateNormal];6: nowPlaying.text=[musicPlayer.nowPlayingItem7: valueForProperty:MPMediaItemPropertyTitle];8: } else {
WatchOut!

ptg
500 HOUR 18: Working with Rich Media
9: [musicPlayer pause];10: [ipodPlayButton setTitle:@”Play iPod Music”11: forState:UIControlStateNormal];12: nowPlaying.text=@”No Song Playing”;13: }14: }
Line 2 checks to see whether the ipodPlayButton title is set to Play iPod Music. If it
is, line 3 starts playback, lines 4–5 reset the button to read “Pause iPod Music”, and
lines 6–7 set the nowPlaying label to the title of the current audio track.
If the ipodPlayButton title is not Play iPod Music (line 8), the music is paused, the
button title is reset to Play iPod Music, and the onscreen label is changed to display
No Song Playing.
After completing the method implementation, save the MediaPlayground
ViewController.m file, and choose Build and Run to test the application. Pressing the
Choose iPod Music button will open a media picker, as shown in Figure 18.5.
LISTING 18.11 continued
FIGURE 18.5The media pick-er enablesbrowsing theiPhone’s iPodmusic library.
After you’ve created a playlist, press the Done button in the media picker, and then
touch Play iPod Music to begin playing the sounds you’ve chosen. The title of the
current song is displayed at the bottom of the interface.

ptg
Further Exploration 501
There was quite a bit covered in this hour’s lesson, but consider the capabilities
you’ve uncovered. Your projects can now tie into the same media capabilities that
Apple uses in its iPhone apps—delivering rich multimedia to your users with a rela-
tively minimal amount of coding.
Further ExplorationWe touched on only a few of the configuration options available for the
MPMoviePlayerController, MPMusicPlayerController, AVAudioPlayer,
UIImagePickerController, and MPMediaPickerController classes—but far more
customization is possible if you dig through the documentation.
The MPMoviePlayerController class, for example, offers the movieControlMode
property for configuring the onscreen controls for when the movie is playing. You
can also programmatically “scrub” through the movie by setting the playback start-
ing point with the initialPlaybackTime property. As mentioned (but not demon-
strated) in this lesson, this class can even play back a media file hosted on a remote
URL—including streaming media.
Custom settings on AVAudioPlayer can help you create background sounds and music
with properties such as numberOfLoops to set looping of the audio playback and
volume for controlling volume dynamically. You can even enable and control advanced
audio metering, monitoring the audio power in decibels for a given sound channel.
On the image side of things, the UIImagePickerController includes properties
such as allowsEditing to enable the user to trim video clips or scale and crop
images directly within the image picker. You’ll want to check out the capability of
this class to further control the iPhone’s cameras (rear and front!) and record video.
For those interested in going a step further, you may also want to review the docu-
ments “OpenGL ES Programming Guide for iPhone,” “Introduction to Core Animation
Programming Guide,” and “Core Audio Overview.” These Apple tutorials will intro-
duce you to the 3D, animation, and advanced audio capabilities available in iOS.
As always, the Apple Xcode documentation utility provides an excellent place for
exploring classes and finding associated sample code.
Apple Tutorials
Getting Started with Audio & Video (accessible through the Xcode docu-
mentation): This introduction to the iOS A/V capabilities will help you under-
stand what classes to use for what purposes. It also links to a variety of sam-
ple applications demonstrating the media features.

ptg
502 HOUR 18: Working with Rich Media
AddMusic (accessible through the Xcode documentation): Demonstrates
the use of the MPMediaPickerController and the MPMediaPickerController
Delegate protocol and playback via the MPMusicPlayerController class.
MoviePlayer (accessible through the Xcode documentation): Explores the
full range of features in the MPMoviePlayerController class, including cus-
tom overlaps, control customization, and loading movies over a network URL.
SummaryIt’s hard to believe, but in the span of an hour, you’ve learned about eight new
media classes, three protocols, and a handful of class methods and properties. These
will provide much of the functionality you need to create applications that handle
rich media. The AV Foundation framework gives us a simple method for recording
and playing back high-quality audio streams. The Media Player framework, on the
other hand, handles streaming audio and video and can even tap into the existing
resources stored in the iPod library. Finally, the easy-to-use
UIImagePickerController class gives us surprisingly straightforward access to visu-
al media and cameras on the device.
Because there are many more methods available in the Media Player framework, I
recommend spending additional time reviewing the Xcode documentation if you are
at all interested in building multimedia applications.
Q&AQ. How do I make the decision between using MPMusicPlayerController versus
AVAudioPlayer for sound playback in my applications?
A. Use the AVAudioPlayer for audio that you include in your application bundle.
Use the MPMusicPlayerController for playing files from the iPod library.
Although the MPMusicPlayerController is capable of playing back local
files, its primary purpose is integrating with the existing iPod media.
Q. I want to specifically control what camera the iPhone is using to take a pic-ture. How can I do this?
A. You’ll want to take a look at the cameraDevice property of the
UIImagePickerController class. Setting this property to
UIImagePickerControllerCameraDeviceFront will use the iPhone 4’s front-
facing camera, for example.

ptg
503Workshop
Workshop
Quiz1. What class can be used to implement a high-quality audio recorder?
2. What property and associated class represent the current piece of media being
played by an instance of MPMusicPlayerController?
3. What do we take advantage of to determine whether a
MPMoviePlayerController object has finished playing a file?
Answers1. The AVAudioRecorder class enables developers to quickly and easily add
audio recording capabilities to their applications.
2. The nowPlaying property of the MPMusicPlayerController is an instance of
the MPMediaItem class. This class contains a number of read-only properties,
including title, artist, and even album artwork.
3. To determine when a movie has finished playback, the
MPMoviePlayerPlaybackDidFinishNotification notification can be regis-
tered and a custom method called. We use this approach to release the media
player object cleanly in our example code.
Activities1. Return to an earlier application, adding an instance of AVAudioPlayer that
plays a looping background soundtrack. You’ll need to use the same classes
and methods described in this hour’s lesson, as well as the numberOfLoops
property.
2. Implement image editing with the UIImagePickerController object. To do
this, you’ll need to set the allowsImageEditing property and use the
UIImagePickerControllerEditedImage key to access the edited image when
it is returned by the UIImagePickerControllerDelegate protocol.

ptg
This page intentionally left blank

ptg
HOUR 19
Interacting with OtherApplications
What You’ll Learn in This Hour:. How to create and send email with the Mail application. How to access the Address Book. How to display and manipulate map views. How to add simple map annotations
In previous hours, you learned how your applications can interact with various parts of
the iPhone hardware and software. In the preceding hour, for example, you accessed the
iPod Music Library. In Hour 17, “Sensing Orientation and Motion,” you used the iPhone’s
accelerometer and gyroscope. It is typical of a full-featured application to leverage these
unique capabilities of the iPhone hardware and software that Apple has made accessible
through iOS. Beyond what you have learned already, the iOS applications you develop
can take advantage of some additional built-in capabilities.
Extending Application IntegrationIn the previous hours, you’ve learned how to display photos that are stored on your
iPhone, take camera pictures, play iPod music, and even add web views (essentially mini
Safari windows) to your apps. In this hour, you’ll take your apps to the next level of inte-
gration by adding access to the iPhone’s address book, email, and mapping capabilities.
Address BookThe address book is a shared database of contact information that is available to any
iPhone application. Having a common, shared set of contact information provides a better
experience for the user than if every application manages its own separate list of contacts.

ptg
506 HOUR 19: Interacting with Other Applications
With the shared address book, there is no need to add contacts multiple times for dif-
ferent applications, and updating a contact in one application makes the update
available instantly in all the other applications.
iOS provides comprehensive access to the address book database through two frame-
works: the Address Book and the Address Book UI frameworks. With the Address
Book framework, your application can access the address book and retrieve and
update contact data and create new contacts. The Address Book framework is an
older framework based on Core Foundation, which means the APIs and data struc-
tures of the Address Book framework are C rather than Objective-C. Don’t let this
scare you. As you’ll see, the Address Book framework is still clean, simple, and easy
to use, despite its C roots.
The Address Book UI framework is a newer set of user interfaces that wrap around
the Address Book framework and provide a standard way for users to work with
their contacts, as shown in Figure 19.1. You can use the Address Book UI frame-
work’s interfaces to allow users to browse, search, and select contacts from the
address book, display and edit a selected contact’s information, and create new con-
tacts. As with the iPod and Photo controls in the previous hour, the address book
will be displayed over top of your existing views in a modal view.
FIGURE 19.1Access addressbook detailsfrom any appli-cation.

ptg
Extending Application Integration 507
EmailIn the previous hour, you learned how to show a modal view supplied by the iOS to
allow a user to use Apple’s image picker interfaces to select a photo for your application.
Showing a system-supplied modal view controller is a common pattern in iOS, and the
same approach is used in the Message UI framework to provide an interface for sending
email, as demonstrated when sending a link from Mobile Safari (see Figure 19.2.)
FIGURE 19.2Present anemail composi-tion view to yourusers.
Your application will provide the initial values for the email and then act as a dele-
gate while temporarily stepping out of the way and letting the user interact with the
system-supplied interface for sending email. This is the same interface users use in
the Mail application to send email, and so it will be familiar to them.
Similar to how the previous hour’s app did not include any of the details of work-ing with the iPhone’s database of photos or music, you do not need to include anyof the details about the email server your user is using or how to interact with itto send an email. iOS takes care of the details of sending email at the expense ofsome lower-level control of the process. The trade-off makes it very easy to sendemail from your application.
By theWay
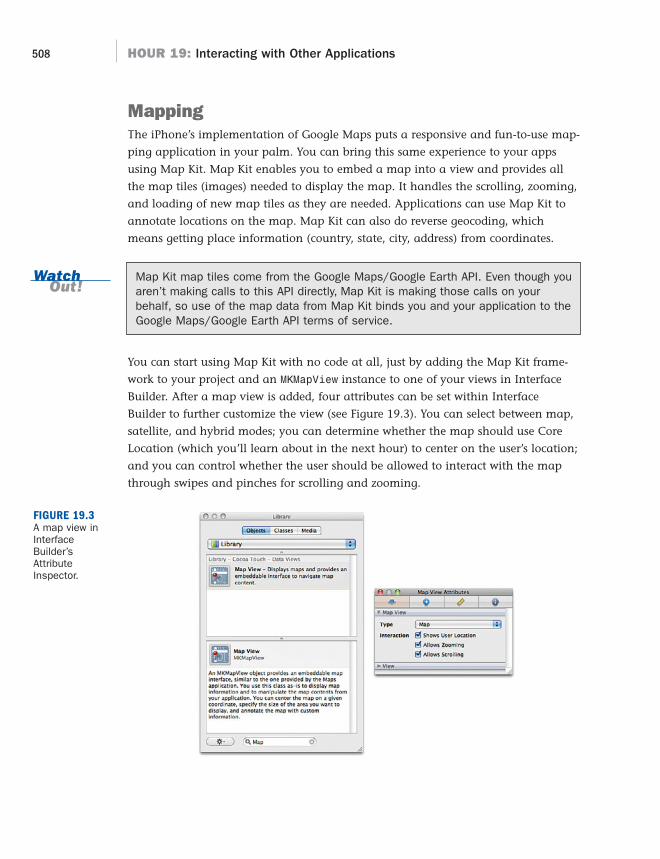
ptg
508 HOUR 19: Interacting with Other Applications
MappingThe iPhone’s implementation of Google Maps puts a responsive and fun-to-use map-
ping application in your palm. You can bring this same experience to your apps
using Map Kit. Map Kit enables you to embed a map into a view and provides all
the map tiles (images) needed to display the map. It handles the scrolling, zooming,
and loading of new map tiles as they are needed. Applications can use Map Kit to
annotate locations on the map. Map Kit can also do reverse geocoding, which
means getting place information (country, state, city, address) from coordinates.
Map Kit map tiles come from the Google Maps/Google Earth API. Even though youaren’t making calls to this API directly, Map Kit is making those calls on yourbehalf, so use of the map data from Map Kit binds you and your application to theGoogle Maps/Google Earth API terms of service.
You can start using Map Kit with no code at all, just by adding the Map Kit frame-
work to your project and an MKMapView instance to one of your views in Interface
Builder. After a map view is added, four attributes can be set within Interface
Builder to further customize the view (see Figure 19.3). You can select between map,
satellite, and hybrid modes; you can determine whether the map should use Core
Location (which you’ll learn about in the next hour) to center on the user’s location;
and you can control whether the user should be allowed to interact with the map
through swipes and pinches for scrolling and zooming.
WatchOut!
FIGURE 19.3A map view inInterfaceBuilder’sAttributeInspector.

ptg
Using Address Book, Email, and Maps…Oh My! 509
AnnotationsAnnotations can be added to maps within your applications, just like they can in
Google Maps online. Using annotations usually involves implementing a new sub-
class of MKAnnotationView that describes how the annotation should appear and
what information should be displayed.
To make our lives a little easier, Apple has implemented a subclass of the
MKAnnotationView called MKPinAnnotationView that displays a pushpin on the
map, along with a simple callout. We’ll take advantage of this class in our tutorial,
displaying a pin based on a location the user selects. This will require implementing
an MKMapView delegate method, called mapView:viewForAnnotation, that will allo-
cate and configure an instance of MKPinAnnotationView.
For each annotation that we add to a map, we need a “place mark,” MKPlaceMark,
object that describes its location. For the tutorial this hour, we’re only going to need
one—to show the center of a chosen ZIP code.
If you’re interested in doing more with location than just mapping, we’ll be taking aclose look at Core Location in Hour 20, “Implementing Location Services.” CoreLocation gives you direct access to the GPS and compass capabilities of yourphone!
Using Address Book, Email, and Maps…Oh My!In this hour’s example, we will allow users to pick a contact as their best friend from
their address book. After they have picked their best friend, we will retrieve informa-
tion from the address book about their friend and display it nicely on the screen—
including their name, photo, and email address. We will also give the user the abili-
ty to show their friend’s home city in an interactive map and send them an email—
all within a single app screen.
Implementation OverviewThis project covers quite a bit of area, but you don’t have to enter an extensive
amount of code. We’ll start by creating the interface, and then add address book,
map, and, finally, email features. Each of these will require frameworks to be added
and modifications to the #import lines in our view controller’s interface file. In other
words, if something doesn’t seem to be working, make sure you didn’t skip any steps
on adding the frameworks!
Did youKnow?

ptg
510 HOUR 19: Interacting with Other Applications
Setting Up the ProjectStart Xcode and create a new View-based iPhone application called BestFriend, then
open the BestFriendViewController.h interface file and add two outlets for UILabels
named name and email, an outlet for a UIImageView named photo, an outlet for a
MKMapView object named map, and an instance variable of the type MKPlacemark,
called zipAnnotation.
The application will also implement two actions: newBFF, which will be called to
enable the user to choose a new friend from the address book; and sendEmail to
send an email to your buddy.
Add these to your interface file, including the appropriate @property directives for
each of the outlet variables. Your interface file should now resemble Listing 19.1.
LISTING 19.1#import <UIKit/UIKit.h>
@interface BestFriendViewController : UIViewController {IBOutlet UILabel *name;IBOutlet UILabel *email;IBOutlet UIImageView *photo;IBOutlet MKMapView *map;MKPlacemark *zipAnnotation;
}
@property (nonatomic, retain) UILabel *name;@property (nonatomic, retain) UILabel *email;@property (nonatomic, retain) UIImageView *photo;@property (nonatomic, retain) MKMapView *map;
- (IBAction)newBFF:(id)sender;- (IBAction)sendEmail:(id)sender;
@end
Next, add the corresponding @synthesize lines to the BestFriendViewController.m
file following the @implementation line:
@synthesize name;@synthesize photo;@synthesize email;@synthesize map;
Finally, release these in the dealloc method:
- (void)dealloc {[name release];[email release];[photo release];[map release];[super dealloc];
}

ptg
By theWay
Using Address Book, Email, and Maps…Oh My! 511
If you’re questioning why zipAnnotation isn’t added as a property, it’s becausewe only need to access the instance variable throughout theBestFriendViewController class. It wouldn’t hurt to define it as such, but wewon’t be manipulating it as we do with the other interface elements.
Next, let’s open the BestFriendViewController.xib interface file and build the applica-
tion UI.
Creating the Application’s UIWith all the appropriate outlets and actions in place, we can quickly build the
application’s user interface. Instead of trying to describe where everything goes, take
a look at Figure 19.4 to see my approach.
FIGURE 19.4Create theapplicationinterface toresemble this,or use your owndesign!
Follow these steps to build the application’s UI:
1. Add two labels (UILabel) one (larger) for your friend’s name, the other for his orher email address. In my UI, I’ve chosen to clear the contents of the email label.
2. Add a UIImageView that will hold your buddy’s photograph from the AddressBook. Use the Attributes Inspector to change the image scaling to Aspect Fit.
3. Drag a new instance of MKMapView into the interface. This is the map viewthat will ultimately display your location and the city your buddy is in.
4. Finally, add two buttons (UIButton)—one to choose a buddy and another toemail your buddy.

ptg
512 HOUR 19: Interacting with Other Applications
Configuring the Map ViewAfter adding the map view, select it and open the Attributes Inspector. Use the Type
drop-down menu to pick which type of map to display (satellite, hybrid, and so on),
and then activate all the interaction options. This will make the map show the
user’s current location and enable the user to pan and zoom within the map view
(just like in the map application!).
Connecting the Outlets and ActionsYou’ve done this a thousand times (okay, maybe a few dozen), so this should be
pretty familiar. Within Interface Builder, Control-drag from the File’s Owner icon to
the labels, image view, and map view choosing name, email, photo, and map as nec-
essary.
Next, use the Connection Inspector for the two buttons to connect the Touch Up
Inside events to the newBFF and sendEmail actions.
Finally, use the Connection Inspector on the map view to connect its delegate out-
let to the File’s Owner icon. This will tell the map that, when it’s time to display an
annotation, it should be looking to the BestFriendViewController class to find the
mapView:viewForAnnotation method.
With those connections, you’re done with the interface! Even though we will be pre-
senting an email and address book interface—these elements are going to be gener-
ated entirely in code.
Accessing the Address BookThere are two parts to accessing the address book: displaying a view that allows the
user to choose a contact (an instance of the class
ABPeoplePickerNavigationController) and reading the data that corresponds to
that contact. Two steps…two frameworks that we need to add. Let’s do that now.
Adding the Address Book Frameworks and DelegateRight-click the Frameworks group in your BestFriend project and choose Add,
Existing Frameworks from the contextual menu. When prompted, find and add the
AddressBook.framework and AddressBookUI.framework (as shown in Figure 19.5).
If the frameworks don’t show up in the Frameworks group, drag them there to keep
things tidy.

ptg
Using Address Book, Email, and Maps…Oh My! 513
We also need to import the headers for the Address Book and Address Book UI
frameworks and indicate that we implement the ABPeoplePickerNavigation-
ControllerDelegate protocol because our BestFriendViewController will be the
delegate for our Address Book People Picker, and this protocol is required of its dele-
gate.
Modify the BestFriendViewController.h file, adding these lines to after the existing
#import line:
#import <AddressBook/AddressBook.h>
#import <AddressBookUI/AddressBookUI.h>
Next, update the @interface line, adding
<ABPeoplePickerNavigationControllerDelegate> to show that we are conform-
ing to the ABPeoplePickerNavigationControllerDelegate protocol:
@interface BestFriendViewController : UIViewController<ABPeoplePickerNavigationControllerDelegate> {
Displaying the Address BookWhen the user presses the button to choose a buddy, we want to show the Address
Book Person Picker modal view controller, which will provide the user with the
familiar interface from the Contacts application.
Add the IBAction method shown in Listing 19.2 to the Best_FriendViewController.m
file.
FIGURE 19.5Add the AddressBook andAddress BookUI frameworksto your project.

ptg
514 HOUR 19: Interacting with Other Applications
LISTING 19.21: - (IBAction)newBFF:(id)sender {2: ABPeoplePickerNavigationController *picker;3:4: picker=[[ABPeoplePickerNavigationController alloc] init];5: picker.peoplePickerDelegate = self;6:7: [self presentModalViewController:picker animated:YES];8:9: [picker release];10: }
In line 2, we declare picker as an instance of ABPeoplePickerNavigation-
Controller—a GUI object that displays the system’s address book. Lines 4 and 5
allocate the object and set its delegate to our BestFriendViewController (self).
Line 7 displays the people picker as a modal view over top of our existing user inter-
face.
After the view is displayed, the picker object is released in line 9.
Handling Other Address Book InteractionsFor the BestFriend application, we need to know only the friend the user has select-
ed; we don’t want the user to go on and select or edit the contact’s properties. So we
will need to implement the delegate method peoplePickerNavigationContoller:
peoplePicker:shouldContinueAfterSelectingPerson to return NO when it is
called—this will be our “workhorse” method. We also need our delegate methods to
dismiss the person picker modal view and return control of the UI back to our
BestFriendViewController.
Add the two ABPersonPickerViewControllerDelegate protocol methods in Listing
19.3 to the Best_FriendViewController.m file. We need to include these to handle the
conditions of the user cancelling without picking someone (peoplePickerNavigation
ControllerDidCancel) and the user drilling down further than a “person” to a specific
attribute (peoplePickerNavigationController:shouldContinueAfterSelecting
Person:property:identifier). Because we’re going to capture the user’s selection
before he or she even can drill down, the second method can just return NO—it’s never
going to get called anyway.
LISTING 19.3// Called after the user has pressed cancel// The delegate is responsible for dismissing the peoplePicker- (void)peoplePickerNavigationControllerDidCancel:
(ABPeoplePickerNavigationController *)peoplePicker {

ptg
Using Address Book, Email, and Maps…Oh My! 515
[self dismissModalViewControllerAnimated:YES];}
// Called after a value has been selected by the user.// Return YES if you want default action to be performed.// Return NO to do nothing (the delegate is responsible for dismissing thepeoplePicker).- (BOOL)peoplePickerNavigationController:
(ABPeoplePickerNavigationController *)peoplePickershouldContinueAfterSelectingPerson:(ABRecordRef)person
property:(ABPropertyID)propertyidentifier:(ABMultiValueIdentifier)identifier {
//We won’t get to this delegate methodreturn NO;
}
Choosing, Accessing, and Displaying Contact InformationIf the user doesn’t cancel the selection, the peoplePickerNavigationContoller:
shouldContinueAfterSelectingPerson: delegate method will be called, and with
it we are passed the selected person as an ABRecordRef. An ABRecordRef is part of
the Address Book framework that we imported earlier.
We can use the C functions of the Address Book framework to read the data about
this person from the address book. For this example, we read four things: the per-
son’s first name, picture, email address, and ZIP code. We will check whether the
person record has a picture before attempting to read it.
Notice that we don’t access the person’s attributes as the native Cocoa objects you
might expect (namely, NSString and UIImage, respectively). Instead, the name
string and the photo are returned as Core Foundation C data, and we convert it
using the handy ABRecordCopyValue function from the Address Book framework
and the imageWithData method of UIImage.
For the email address and ZIP code, we must deal with the possibility of multiple
values being returned. For these pieces of data, we’ll again use ABRecordCopyValue
to grab a reference to the set of data, and the functions ABMultiValueGetCount to
make sure that we actually have an email address or ZIP code stored with the con-
tact, and ABMultiValueCopyValueAtIndex to copy the first value that we find.
Sounds complicated? It’s not the prettiest code, but it’s not difficult to understand.
Add the final delegate method peoplePickerNavigationController:
shouldContinueAfterSelectingPerson to the BestFriendViewController.m file, as
shown in Listing 19.4.

ptg
516 HOUR 19: Interacting with Other Applications
LISTING 19.41: - (BOOL)peoplePickerNavigationController:2: (ABPeoplePickerNavigationController *)peoplePicker3: shouldContinueAfterSelectingPerson:(ABRecordRef)person {4:5: // Declare variables for temporarily handling the string data6: NSString *friendName;7: NSString *friendEmail;8: NSString *friendZip;9:
10: friendName=(NSString *)11: ABRecordCopyValue(person, kABPersonFirstNameProperty);12: name.text = friendName;13: [friendName release];14:15:16: ABMultiValueRef friendAddressSet;17: NSDictionary *friendFirstAddress;18: friendAddressSet = ABRecordCopyValue(person, kABPersonAddressProperty);19:20: if (ABMultiValueGetCount(friendAddressSet)>0) {21: friendFirstAddress = (NSDictionary *)22: ABMultiValueCopyValueAtIndex(friendAddressSet,0);23: friendZip = [friendFirstAddress objectForKey:@”ZIP”];24: [friendFirstAddress release];25: }26:27: ABMultiValueRef friendEmailAddresses;28: friendEmailAddresses = ABRecordCopyValue(person, kABPersonEmailProperty);29:30: if (ABMultiValueGetCount(friendEmailAddresses)>0) {31: friendEmail=(NSString *)32: ABMultiValueCopyValueAtIndex(friendEmailAddresses, 0);33: email.text = friendEmail;34: [friendEmail release];35: }36:37: if (ABPersonHasImageData(person)) {38: photo.image = [UIImage imageWithData:39: (NSData *)ABPersonCopyImageData(person)];40: }41:42: [self presentModalViewController:picker animated:YES];43: return NO;44: }
Let’s walk through the logic we’ve implemented here. First, note that when the
method is called, it is passed a person variable of the type ABRecordRef—this is a
reference to the person who was chosen and will be used throughout the method.
Lines 6–8 declare variables that we’ll be using to temporarily store the name, email,
and ZIP code strings that we retrieve from the address book.
ptg
Using Address Book, Email, and Maps…Oh My! 517
Lines 10–11 use the ABRecordCopyVal method to copy the
kABPersonFirstNameProperty property, as a string, to the friendName variable.
Lines 12–13 set the name UILabel to this string, and then friendName is released.
Accessing an address is a bit more complicated. We must first get the set of addresses
(each a dictionary) stored for the person, access the first address, then access a spe-
cific field within that set. Within address book, anything with multiple values is rep-
resented by a variable of type ABMultiValueRef. We declare a variable,
friendAddressSet, of this type in line 16. This will reference all addresses of the
person. Next, in line 17, we declare an NSDictionary called friendFirstAddress.
We will store the first address from the friendAddressSet in this dictionary, where
we can easily access its different fields (such as city, state, ZIP, and so on). In Line
18, we populate friendAddressSet by again using the ABRecordCopyVal function
on the kABPersonAddressProperty of person.
Lines 20–25 execute only if ABMultiValueGetCount returns a copy of greater than
zero on the friendAddressSet. If it is zero, there are no addresses associated with
the person, and we should move on. If there are addresses, we store the first address
in friendFirstAddress by copying it from the friendAddressSet using the
ABMultiValueCopyValueAtIndex method in lines 21–22. The index we use with this
function is 0—which is the first address in the set. The second address would be 1,
third 2, and so on.
Line 23 uses the NSDictionary method objectForKey to grab the ZIP code string.
The key for the ZIP code is simply the string “ZIP”. Review the address book docu-
mentation to find all the possible keys you may want to access. Finally, Line 24
releases the friendFirstAddress dictionary.
In case you’re wondering, the code here is not yet complete! We don’t actually doanything with the ZIP code just yet. This ties into the map function we use later,so, for now, we just get the value and ignore it.
This entire process is implemented again in lines 27–35 to grab the person’s first
email address. The only difference is that rather than email addresses being a set of
dictionaries, they’re simple a set of strings. This means that once we verify that there
are email addresses stored for the contact (line 30), we can just copy the first one in
the set and use it immediately as a string (lines 31 and 32). Line 33 sets the email
UILabel to the user’s email address.
After all of that, you must be thinking to yourself, “Ugh, it’s got to be a pain to
deal with a person’s photo.” Wrong! That’s actually the easy part! Using the
ABPersonHasImageData function in line 37, we verify that person has an image
WatchOut!

ptg
518 HOUR 19: Interacting with Other Applications
stored. If he or she does, we copy it out of the address book using
ABPersonCopyImageData and use that data along with the UIImage method
imageWithData to return an image object and set the photo image within the inter-
face. All of this occurs in lines 38–39.
As a final step, the modal view is dismissed in line 42.
Whew! A few new functions were introduced here, but once you get the pattern
down, moving data out of address book becomes almost simple.
So, what about that ZIP code? What are we going to do with it? Let’s find out now
by implementing our interactive map!
Using a Map ObjectEarlier in the hour, you added a MKMapView to your user interface and configured it
to show the current location of the device. If you attempted to build and run the
app, however, you’ll have noticed that it fails immediately. The reason for this is
that as soon as you add the map view, you need to add a framework to support it.
For our example application, we also need to add two frameworks to the project:
Core Location, which deals with locations; and Map Kit, which displays the embed-
ded Google Map.
Adding the Location and Map FrameworksIn the Xcode project window, right-click the Frameworks group and choose Add,
Existing Frameworks from the menu. In the scrolling list that appears, choose the
MapKit.framework and CoreLocation.framework items, and then click Add.
Drag the frameworks into the Frameworks group if they don’t appear there auto-
matically.
Next, edit the BestFriendViewController.h interface file so that we have access to the
classes and methods in these frameworks. Add these lines after the existing #import
lines:
#import <CoreLocation/CoreLocation.h>#import <MapKit/MapKit.h>
We can now display the MKMapView, work with locations and programmatically
control the map.
Controlling the Map DisplayBecause we already get the display of the map and the user’s current location for
“free” with the MKMapView, the only thing we really need to do in this application is

ptg
Using Address Book, Email, and Maps…Oh My! 519
take the user’s ZIP code, determine a latitude and longitude for it, and then center
and zoom the map on that location.
Unfortunately, neither Map Kit nor Core Location provides the ability to turn an
address into a set of coordinates, but Google offers a service that does. By requesting
the URL http://maps.google.com/maps/geo?output=csv&q=<address> we get
back a comma-separated list where the third and fourth values are latitude and lon-
gitude, respectively. The address that we send to Google is very flexible—it can be
city, state, ZIP, street—whatever information we provide, Google will try to translate
it to coordinates. In the case of a ZIP code, it displays the center of the ZIP code’s
region on the map—exactly what we want.
Once we have the location, we need to use center and zoom the map. We do this by
defining a map “region,” and then using the setRegion:animated method. A region
is a simple structure (not an object) called a MKCoordinateRegion. It has members
called center, which is another structure called a CLLocationCoordinate2D (con-
taining latitude and longitude); and span, which denotes note many degrees to
the east, west, north, and south of the center are displayed. A degree of latitude is 69
miles. A degree of longitude, at the equator, is 69 miles. By choosing small values for
the span within the region (like 0.2), we narrow our display down to a few miles
around the center point. For example, if we wanted to define a region centered at
40.0 degrees latitude and 40.0 degrees longitude with a span of 0.2 degrees in each
direction, we could write the following:
MKCoordinateRegion mapRegion;mapRegion.center.latitude=40.0;mapRegion.center.longitude=40.0;mapRegion.span.latitudeDelta=0.2;mapRegion.span.longitudeDelta=0.2;
To center and zoom in on this region in a map object called map, we’d use the fol-
lowing:
[map setRegion:mapRegion animated:YES];
To keep things nice and neat in our application, we’re going to implement all of this
functionality in a nice new method called centerMap:showAddress.
centerMap:showAddress will take a two inputs: a string, zipCode, (a ZIP code), and
a dictionary, fullAddress (an address dictionary returned from the Address Book).
The ZIP code will be used to retrieve the latitude and longitude from Google, and
then adjust our map object to display it. The address dictionary will be used by the
annotation view to show a callout from the annotation pushpin.
Enter the new centerMap method shown in Listing 19.5 within the
BestFriendViewController implementation file.

ptg
520 HOUR 19: Interacting with Other Applications
LISTING 19.51: - (void)centerMap:(NSString*)zipCode showAddress:(NSDictionary*)fullAddress {2: NSString *queryURL;3: NSString *queryResults;4: NSArray *queryData;5: double latitude;6: double longitude;7: MKCoordinateRegion mapRegion;8:9: queryURL = [[NSString alloc]10: initWithFormat:11: @”http://maps.google.com/maps/geo?output=csv&q=%@”,12: zipCode];13:14: queryResults = [[NSString alloc] initWithContentsOfURL:15: [NSURL URLWithString:queryURL]16: encoding: NSUTF8StringEncoding17: error: nil];18: // Autoreleased19: queryData = [queryResults componentsSeparatedByString:@”,”];20:21: if([queryData count]==4) {22: latitude=[[queryData objectAtIndex:2] doubleValue];23: longitude=[[queryData objectAtIndex:3] doubleValue];24: // CLLocationCoordinate2D;25: mapRegion.center.latitude=latitude;26: mapRegion.center.longitude=longitude;27: mapRegion.span.latitudeDelta=0.2;28: mapRegion.span.longitudeDelta=0.2;29: [map setRegion:mapRegion animated:YES];30:31: if (zipAnnotation!=nil) {32: [map removeAnnotation: zipAnnotation];33: }34: zipAnnotation = [[MKPlacemark alloc]35: initWithCoordinate:mapRegion.center addressDictionary:fullAddress];36: [map addAnnotation:zipAnnotation];37: [zipAnnotation release];38: }39:40: [queryURL release];41: [queryResults release];42:43: }
Let’s explore how this works. We kick things off in lines 2–7 by declaring several
variables we’ll be needing: queryURL, queryResults, and queryData will hold the
Google URL we need to request, the raw results of the request, and the parsed data,
respectively. The latitude and longitude variables are double-precision floating-point
numbers that will be used to store the coordinate information gleaned from
queryData. The last variable, mapRegion, will be the properly formatted region that
the map should display.

ptg
By theWay
Using Address Book, Email, and Maps…Oh My! 521
Lines 9–12 allocate and initialize queryURL with the Google URL, substituting in the
zipCode string that was passed to the method. Lines 14–17 use the NSString
method initWithContentsOfURL:encoding:error to create a new string that con-
tains the data located at the location defined in queryURL. We also make use of the
NSURL method URLWithString: to turn the queryURL string into a proper URL
object. Any errors are disregarded.
The initWithContentsOfURL:encoding:error method expects an encodingtype. The encoding is the manner in which the string passed to the remote serveris formatted. For almost all web services, you’ll want to useNSUTF8StringEncoding.
Line 19 uses the NSString method componentsSeparatedByString, which takes a
string, a delimiter character, and returns an NSArray that breaks apart the string
based on the delimiter. Google is going to hand back data that looks like this: <num-
ber>,<number>,<latitude>,<longitude>. By invoking this method on the data using a
comma delimiter (,), we get an array, queryData, where the third element contains
the latitude and the fourth, the longitude.
Line 21 does a very basic sanity check on the information we receive. If there are
exactly four pieces of information found, we can assume the results are valid and
lines 22–29 are executed.
Lines 22 and 23 retrieve the strings at indices 2 and 3 of the queryData array and
convert them to double-precision floating-point values, storing them in the lati-
tude and longitude variables.
Remember, an array’s index starts at 0. We use an index of 2 to access the thirdpiece of data in the array and an index of 3 to access the fourth.
Lines 25–29 define the region of the map to display and then uses setRegion:ani-
mated to redraw the map accordingly.
Finally, lines 31–38 handle the annotation. In lines 31–33, we check to see whether
an annotation has already been allocated. (This will happen if the person using the
app chooses multiple addresses, resulting in the map being redrawn.) If
zipAnnotation has already been used, we can call the MKMapView method
removeAnnotation to remove the existing annotation. Once removed, we are free to
add a new annotation to the map. Lines 34–35 allocate a new place mark,
MKPlaceMark, using the point defined by the map object’s center property and
described by the address dictionary passed to the method, fullAddress.
Did youKnow?

ptg
522 HOUR 19: Interacting with Other Applications
With the zipAnnotation placemark defined, we can add it to the map using
addAnnotation method in line 36, and then release the placemark object in line 37.
Creating a Pin Annotation ViewAs it stands now, your map implementation will work, but it really shouldn’t! For the
annotation to be displayed, we need to create an instance of an MKAnnotationView.
As mentioned earlier, Apple provides a subclass of the MKAnnotationView called
MKPinAnnotationView. When you call addAnnotation on the map view object, iOS
is automatically creating an instance of the MKPinAnnotationView for you.
Technically, however, we’re supposed to do this ourselves in map view’s delegate
method mapView:viewForAnnotation. To keep things legit, add the following
method to the BestFriendViewController.m implementation file:
1: - (MKAnnotationView *)mapView:(MKMapView *)mapView2: viewForAnnotation:(id <MKAnnotation>)annotation {3: MKPinAnnotationView *pinDrop=[[MKPinAnnotationView alloc]4: initWithAnnotation:annotation reuseIdentifier:@”citycenter”];5: pinDrop.animatesDrop=YES;6: pinDrop.canShowCallout=YES;7: pinDrop.pinColor=MKPinAnnotationColorPurple;8: return pinDrop;9: }
Lines 1–2 define the mapView:viewForAnnotation method as provided by Apple;
this code shouldn’t change. Line 3 declares, allocates, and initializes an instance of
MKPinAnnotationView using the annotation parameter that iOS sends to the
mapView:viewForAnnotation method, along with a reuseIdentifier string. This
reuse identifier is a unique identifying string that allows an allocated annotation to
be reused in other places. For our purposes, this could be any string you want.
The new pin annotation view, pinDrop, is configured through three properties in
lines 5–7. The animatesDrop Boolean property, when true, animates the pin drop-
ping onto the map. The canShowCallout property sets the pin so that it will display
additional information in a callout when touched, and, finally, the pinColor, sets
the color of the onscreen pin graphic.
Once properly configured, the new pin annotation view is returned to the map view
in line 8.
Tying the Map Display to the Address Book SelectionCongratulations! Your code now has the smarts needed to locate a ZIP code on the
map, zoom in, and add a pin annotation view! The last piece of magic we need to
finish the mapping is to hook it into the address book selection so that the map is
centered when a user picks a contact with an address.

ptg
Using Address Book, Email, and Maps…Oh My! 523
Edit the peoplePickerNavigationController:shouldContinueAfterSelecting
Person method, adding the following line
[self centerMap:friendZip showAddress:friendFirstAddress];
immediately following this line:
friendZip = [friendFirstAddress objectForKey:@”ZIP”];
Our application is nearing completion. All that remains is adding the ability to send
email to our chosen buddy. Let the implementation begin!
Using the Message UIIn our example of using the Message UI framework, we allow users to email a
buddy by pressing the Send Mail button. We will populate the To field of the email
with the address that we located in the address book. The user can then use the
interface provided by the MFMailComposeViewController to edit the email and
send it. As with the other features discussed this hour, we need to add the Message
UI framework before a message will work.
We also need to conform to the MFMailComposeViewControllerDelegate, which
includes a method mailComposeController:didFinishWithResult that is called
after the user is finished sending a message.
Adding the Message UI FrameworkAgain, in the Xcode project window, right-click the Frameworks group and choose
Add, Existing Frameworks from the menu. In the scrolling list, choose
MessageUI.framework, and then click Add.
Open the BestFriendViewController.h interface file and add one more #import state-
ment for <MessageUI/MessageUI.h>. Add MFMailComposeViewControllerDelegate
to the list of protocols that we’re conforming to.
The final version of the interface is displayed in Listing 19.6.
LISTING 19.6#import #import <AddressBook/AddressBook.h>#import <AddressBookUI/AddressBookUI.h>#import <MessageUI/MessageUI.h>#import <CoreLocation/CoreLocation.h>#import <MapKit/MapKit.h>
@interface BestFriendViewController : UIViewController<ABPeoplePickerNavigationControllerDelegate,MFMailComposeViewControllerDelegate>{

ptg
524 HOUR 19: Interacting with Other Applications
IBOutlet UILabel *name;IBOutlet UILabel *email;IBOutlet UIImageView *photo;IBOutlet MKMapView *map;
}
@property (nonatomic, retain) UILabel *name;@property (nonatomic, retain) UILabel *email;@property (nonatomic, retain) UIImageView *photo;@property (nonatomic, retain) MKMapView *map;
- (IBAction)newBFF:(id)sender;- (IBAction)sendEmail:(id)sender;
@end
Displaying the Message ComposerTo compose a message, we need to allocate an initialize an instance of
MFMailComposeViewController. This modal view is then added to our view with
presentModalViewController:animated. To set the To recipients, we use the
appropriately named MFMailComposeViewController method setToRecipients.
One item of interest is that the method expects an array, so we need to take the
email address for our buddy and create an array with a single element in it so that
we can use the method.
Speaking of the email address, where we will access it? Simple! Earlier we set the
email UILabel to the address, so we’ll just use email.text to get the address of our
buddy.
Create the sendEmail method using Listing 19.7 as your guide.
LISTING 19.71: - (IBAction)sendEmail:(id)sender {2: MFMailComposeViewController *mailComposer;3: NSArray *emailAddresses;4: emailAddresses=[[NSArray alloc]initWithObjects: email.text,nil];5:6: mailComposer=[[MFMailComposeViewController alloc] init];7: mailComposer.mailComposeDelegate=self;8: [mailComposer setToRecipients:emailAddresses];9: [self presentModalViewController:mailComposer animated:YES];10:11: [emailAddresses release];12: [mailComposer release];13: }
LISTING 19.6 continued

ptg
Using Address Book, Email, and Maps…Oh My! 525
Unlike some of the other methods we’ve written this hour, there are few surprises here.
Line 2 declares mailComposer as an instance of MFMailComposeViewController—the
object that displays and handles message composition. Lines 3–4 define an array,
emailAddresses, that contains a single element grabbed from the email UILabel.
Lines 6–8 allocate and initialize the MFMailComposeViewController object, setting
its delegate to self (BestFriendViewController) and the recipient list to the
emailAddresses array. Line 9 presents the message composition window onscreen.
Finally, lines 11–12 release the array of email addresses and the mailComposer
MFMailComposeViewController object.
Handling Message CompletionWhen a user is finished composing/sending a message, the modal composition win-
dow should be dismissed and the MFMailComposeViewController object released. To
do this, we need to implement the mailComposeController:didFinishWithResult
method defined in the MFMailComposeViewControllerDelegate protocol.
Add this final method to the BestFriendViewController.m file:
- (void)mailComposeController:(MFMailComposeViewController*)controllerdidFinishWithResult:(MFMailComposeResult)result
error:(NSError*)error {[self dismissModalViewControllerAnimated:YES];
}
All that is needed is the single line to dismiss the modal view, and with that, we’re
done!
Use Build and Run to test the application. Select a contact and watch as the map
finds your friend's home location, zooms in, then sets an annotation. Use the Email
button to compose and send an email. Fun and excitement for all!
In this project, shown in Figure 19.6, we’ve combined mapping, email, and address
book features in a single, integrated application. You should now have some ideas
about what is possible when you integrate existing iPhone application features into
your software.

ptg
526 HOUR 19: Interacting with Other Applications
Further ExplorationOver the past few hours, you’ve learned much of what there is to know about
accessing images, music, and sending email, but we haven’t even scratched the sur-
face of the Address Book and Address Book UI frameworks. In fact, the Address Book
UI framework contains three additional modal view controllers. You can use the
lower-level Address Book framework to create new contacts, set properties, and edit
and delete contacts. Anything the Contacts application can do, you can do with the
Address Book framework. For more detailed information about the use of these APIs,
refer to the excellent guide from Apple iOS Dev Center called the Address Book
Programming Guide for iPhone OS.
In addition, review the Apple guide for Map Kit and complete the Core Location
exercises in the next hour. Using these two frameworks, you can create complex
map annotation views (MKAnnotationView) well beyond the simple pushpin anno-
tations presented here. These features can be deployed in virtually any application
that works with addresses or locations.
FIGURE 19.6Mapping, email,and address bookintegration—all inone app.

ptg
527Workshop
Finally, be sure to check out the Event Kit and Event Kit UI Frameworks. Similar in
design and function to the Address Book frameworks, these provide access to the iOS
calendar information, including the ability to create new events directly in your
application.
SummaryIn this hour, you learned how to allow the user to interact with contacts from the
address book, how to send email messages, and how to interact with the Map Kit
and Core Location frameworks. Altough there are some challenges to working with
address book data (older C functions, for example), after you’ve established the pat-
terns to follow, it becomes much easier. The same goes for the Map Kit and Core
Location features. The more you experiment with the coordinates and mapping
functions, the more intuitive it will be to integrate them into your own applications.
As for email, there’s not much to say—it’s easy to implement anywhere!
Q&AQ. Can I use the MKMapView when my iPhone is offline?
A. No, the map view requires an Internet connection to fetch its data.
Q. Is there a way to differentiate between address (mailing or email) types inthe address book data?
A. Yes. Although we did not use these features in our code, you can identify spe-
cific types (home, work, and so on) of addresses when reading address book
data. Refer to the address book programming guide for a full description of
working with address book data.
Workshop
Quiz1. Map Kit implements discrete zoom levels for MKMapViews that you display.
True or false?
2. You can avoid the older Address Book framework and use the new Address
Book UI framework instead. True or false?

ptg
528 HOUR 19: Interacting with Other Applications
Answers1. False. Map Kit requires you to define regions within your map that consist of a
center point and a span. The scale of the map display is determined by the
size of the span.
2. False. Although the Address Book UI framework provides user interfaces that
save you a lot of time and provide familiarity to your users, you must still
work with C functions and data structures from the Address Book framework
when using the interfaces in your application.
Activities1. Apply what you learned in Hour 14, “Reading and Writing Application Data,”
and make the BestFriend application persist the name and photo of the select-
ed friend so that the user doesn’t need to repeat the selection each time the
application is run.
2. Enhance the BestFriend application to pinpoint your friend’s address rather
than just a ZIP code. Explore the annotation features of Map Kit to add a
pushpin directly on your friend’s home location.
ptg
HOUR 20
Implementing LocationServices
What You’ll Learn in This Hour:. The available iPhone location-sensing hardware. How to read and display location information. Detecting orientation with the compass
In the previous hour’s lesson, we looked briefly at the use of Map Kit to display map infor-
mation on the iPhone’s screen. In this lesson, we take the GPS capabilities of our favorite
handheld a step further—we tie into the hardware capabilities of the phone to accurately
read location data and compass information.
In this hour, we work with Core Location and the electromagnetic compass. With location-
enabled apps enhancing user’s experiences in areas such as Internet searches, gaming,
and even productivity, you can add value and interest to your own offerings with these
tools.
Understanding Core LocationCore Location is a framework in the iOS SDK that provides the location of the device.
Depending on the iPhone and its current state (within cell service, inside a building, and
so forth), any of three technologies can be used: GPS, cellular, or WiFi. GPS is the most
accurate of these technologies and will be used first by Core Location if GPS hardware is
present. If the device does not have GPS hardware, or if obtaining the current location
with GPS fails, Core Location falls back to cellular and then to WiFi.

ptg
530 HOUR 20: Implementing Location Services
Location ManagerCore Location is simple to understand and to use despite the powerful array of tech-
nologies behind it. (Some of it had to be launched into space on rockets!) Most of
the functionality of Core Location is available from the Location Manager, which is
an instance of the CLLocationManager class. You use the Location Manager to spec-
ify the frequency and accuracy of the location updates you are looking for, and to
turn on and off receiving those updates.
To use a location manager, you create an instance of the manager, specify a loca-
tion manager delegate that will receive location updates, and start the updating,
like this:
CLLocationManager *locManager = [[CLLocationManager alloc] init];locManager.delegate = self;[locManager startUpdatingLocation];
When the application is done receiving updates (a single update is often sufficient),
stop location updates with location manager’s stopUpdatingLocation method.
Location Manager DelegateThe location manager delegate protocol defines the methods for receiving location
updates. There are two methods in the delegate relating to location: locationManager:
didUpdateToLocation:fromLocation and locationManager:didFailWithError.
The locationManager:didUpdateToLocation:fromLocation method’s arguments
are the location manager object instance and two CLLocation objects, one for the
new location, and one for the previous location. The CLLocation instances provide
a coordinate property that is a structure containing longitude and latitude
expressed in CLLocationDegrees. CLLocationDegrees is just an alias for a floating-
point number of type double.
We’ve already mentioned that different approaches to geolocating have different
inherit accuracies and that each approach may be more or less accurate depending
on the number of points (satellites, cell towers, WiFi hotspots) it has available to use
in its calculations. CLLocation passes this confidence measure along in the
horizontalAccuracy property.
The location’s accuracy is provided as a circle, and the true location could lie any-
where within that circle. The circle is defined by the coordinate property as the cen-
ter of the circle, and the horizontalAccuracy property as the radius of the circle in
meters. The larger the horizontalAccuracy property, the larger the circle defined by
it will be, so the less confidence there is in the accuracy of the location. If the
horizontalAccuracy property is negative, it is an indication that the coordinate is
completely invalid and should be ignored.

ptg
WatchOut!
Understanding Core Location 531
In addition to longitude and latitude, each CLLocation provides altitude above or
below sea level in meters. The altitude property is a CLLocationDistance, which
is also just an alias for a floating-point number of type double. A positive number is
an altitude above sea level, and a negative number is below sea level. There is
another confidence factor, this one called verticalAccuracy, that indicates how
accurate the altitude is. A positive verticalAccuracy indicates that the altitude
could be off, plus or minus, by that many meters. A negative verticalAccuracy
means the altitude is invalid.
An implementation of the location manager delegate’s
locationManager:didUpdateToLocation:fromLocation method that logs the lon-
gitude, latitude, and altitude is shown in Listing 20.1.
LISTING 20.1- (void)locationManager:(CLLocationManager *)manager
didUpdateToLocation:(CLLocation *)newLocationfromLocation:(CLLocation *)oldLocation {
NSString *coordinateDesc = @”Not Available”;NSString *altitudeDesc = @”Not Available”;
if (newLocation.horizontalAccuracy >= 0) {coordinateDesc = [NSString stringWithFormat:@”%f, %f +/- %f meters”,
newLocation.coordinate.latitude,newLocation.coordinate.longitude,newLocation.horizontalAccuracy];
}
if (newLocation.verticalAccuracy >= 0) {altitudeDesc = [NSString stringWithFormat:@”%f +/- %f meters”,
newLocation.altitude, newLocation.verticalAccuracy];}
NSLog(@”Latitude/Longitude: %@ Altitude: %@”, coordinateDesc,altitudeDesc);
}
The resulting log output looks like this:
Latitude/Longitude: 35.904392, -79.055735 +/- 76.356886 meters Altitude: ➥28.000000 +/- 113.175757 meters
CLLocation also provides a property speed, which is based on comparing the cur-rent location with the prior location and comparing the time and distance variancebetween them. Given the rate at which Core Location updates, the speed propertyis not very accurate unless the rate of travel is fairly constant.

ptg
532 HOUR 20: Implementing Location Services
Handling Location ErrorsWhen your application begins tracking the user’s location, a warning will be dis-
played on the user’s screen, as shown in Figure 20.1.
FIGURE 20.1Core Locationasks permissionto provide anapplication withlocation data.
If the user chooses to disallow location services, iOS will not prevent your applica-
tion from running but will generate errors from the location manager.
When an error occurs, the location manager delegate’s
locationManager:didFailWithError is called, letting you know the device cannot
return location updates. A distinction is made as to the cause of the failure. If the
user denies permission to the application, the error argument is kCLErrorDenied; if
Core Location tries but cannot determine the location, the error is
kCLErrorLocationUnknown; and if no source of trying to retrieve the location is
available, the error is kCLErrorNetwork. Usually Core Location will continue to try
to determine the location after an error, but after a user denial, it won’t, and it is
good form to stop the location manager with location manager’s
stopUpdatingLocation method and release the instance. An implementation of
locationManager:didFailWithError is shown in Listing 20.2.
LISTING 20.2- (void)locationManager:(CLLocationManager *)manager
didFailWithError:(NSError *)error {
if (error.code == kCLErrorLocationUnknown) {NSLog(@”Currently unable to retrieve location.”);
} else if (error.code == kCLErrorNetwork) {NSLog(@”Network used to retrieve location is unavailable.”);
} else if (error.code == kCLErrorDenied) {NSLog(@”Permission to retrieve location is denied.”);[locMan stopUpdatingLocation];[locMan release];locMan = nil;
}
}

ptg
WatchOut!
Understanding Core Location 533
It is important to keep in mind that the location manager delegate will not imme-diately receive a location; it usually takes a number of seconds for the device topinpoint the location, and the first time it is used by an application, Core Locationfirst asks the user’s permission. You should have a design in place for what theapplication will do while waiting for an initial location, and what to do if locationinformation is unavailable because the user didn’t grant permission or the geolo-cation process failed. A common strategy that works for many applications is tofall back to a user-entered ZIP code.
Location Accuracy and Update FilterIt is possible to tailor the accuracy of the location to the needs of the application. An
application that needs only the user’s country, for example, does not need 10-meter
accuracy from Core Location and will get a much faster answer by asking for a more
approximate location. This is done before you start the location updates by setting the
location manager’s desiredAccuracy property. desiredAccuracy is an enumerated
type, CLLocationAccuracy. Five constants are available with varying levels of preci-
sion (with current consumer technology, the first two are the same): kCLLocation
AccuracyBest, kCLLocationAccuracyNearestTenMeters, kCLLocationNearest
HundredMeters, kCLLocationKilometer, kCLLocationAccuracyThreeKilometers.
After updates on a location manager are started, updates continue to come into the
location manager delegate until they are stopped. You cannot control the frequency
of these updates directly, but you can control it indirectly with location manager’s
distanceFilter property. The distanceFilter property is set before starting
updates and specifies the distance in meters the device must travel (horizontally, not
vertically) before another update is sent to the delegate.
For example, starting the location manager with settings suitable for following a
walker’s progress on a long hike might look like this:
CLLocationManager *locManager = [[CLLocationManager alloc] init];locManager.delegate = self;locManager.desiredAccuracy = kCLLocationAccuracyHundredMeters;locManager.distanceFilter = 200;[locManager startUpdatingLocation];
Each of the three methods of locating the device (GPS, cellular, and WiFi) can puta serious drain on the device’s battery. The more accurate an application asks thedevice to be in determining location, and the shorter the distance filter, the morebattery the application will use. Be aware of the device’s battery life and onlyrequest location updates as accurately and as frequently as the application needsthem. Stop location manager updates whenever possible to preserve the batterylife of the device.
WatchOut!

ptg
534 HOUR 20: Implementing Location Services
The iPhone Simulator can provide just one location update: Apple HQ in Cupertino,California.
Creating a Location-Aware ApplicationMany iPhone and Mac users have a, shall we say, “heightened” interest in Apple
Computer; visiting Apple’s campus in Cupertino, California, can be a life-changing
experience. For these special users, we’re going to create a Core Location-powered
application that keeps you informed of just how far away you are.
The application will be created in two parts: The first introduces Core Location and
displays the number of miles from the current location to Cupertino. In the second
section, we use the iPhone’s compass to display an arrow that points users in the
right direction, should they get off track.
Setting Up the ProjectFor the rest of this hour, we’ll be working on a new application that uses the Core
Location framework. Create a new view-based iPhone application in Xcode and call
it Cupertino.
Adding the Core Location FrameworkThe Core Location framework isn’t linked into our project by default, so we need to
add it. Open the Targets group in Xcode, and right-click the Cupertino target. Right-
click the Frameworks group in the Cupertino project, and then choose Add, Existing
Frameworks from the contextual menu. Scroll through the Framework list that
appears and find CoreLocation.framework. Select it, and then click Add to add it to
the project, as shown in Figure 20.2. If it doesn’t add directly to the Frameworks
group, drag the CoreLocation.framework icon into the group to keep the project tidy.
Adding Background Image ResourcesTo make sure the user remembers where we’re going, we have a nice picture of an
apple as the application’s background image. Locate apple.png within the project’s
Images folder in the Finder, and drag it into the Resources group within the Xcode
project group. Be sure to check the Copy Items into Destination Group’s Folder check
box in the Copy dialog. (You can also include the [email protected] file if you want a
higher-resolution version for the iPhone 4’s display.)
By theWay

ptg
Creating a Location-Aware Application 535
Adding Outlets, Properties, and ProtocolsThe CupertinoViewController will serve as the location manager delegate, receiv-
ing location updates and updating the user interface to reflect the new locations.
Click the CupertinoViewController.h file in the Classes group. Update the file by
importing the Core Location header file, indicating that we’ll be conforming to the
CLLocationManagerDelegate protocol, and adding properties for the location man-
ager (locMan), a label with the distance to Cupertino (distanceLabel), and two
subviews (distanceView and waitView), as demonstrated in Listing 20.3.
LISTING 20.3#import <UIKit/UIKit.h>#import <CoreLocation/CoreLocation.h>
@interface CupertinoViewController : UIViewController<CLLocationManagerDelegate> {
CLLocationManager *locMan;
IBOutlet UILabel *distanceLabel;
IBOutlet UIView *distanceView;
IBOutlet UIView *waitView;
}
@property (assign, nonatomic) CLLocationManager *locMan;
@property (retain, nonatomic) UILabel *distanceLabel;
@property (retain, nonatomic) UIView *distanceView;
@property (retain, nonatomic) UIView *waitView;
@end
FIGURE 20.2Add the CoreLocation frame-work to the project.

ptg
536 HOUR 20: Implementing Location Services
For each of the properties, add a corresponding @synthesize line to the
CupertinoViewController.m implementation file, following the @implementation
directive:
@synthesize locMan;@synthesize distanceLabel;@synthesize distanceView;@synthesize waitView;
Finally, add a release for each of these objects to the implementation file’s dealloc
method:
- (void)dealloc {[locMan release];
[distanceLabel release];
[distanceView release];
[waitView release];
[super dealloc];}
Creating the User InterfaceThe user interface for this hour’s lesson is simple: We can’t perform any actions to
change our location (teleportation isn’t yet possible), so all we need to do is update
the screen to show information about where we are.
Double-click the CupertinoViewController.xib file in the Resources group to open
Interface Builder, and then complete the following steps:
1. Start by adding a UIImageView onto the view and center it so that it covers
the entire view. This will serve as the background image for the application.
2. With the image view selected, open the Attributes Inspector (Command+1).
Select apple.png from the Image drop-down list.
3. Next, drag a UIView on top of the image view. Size it to about 80 points high
and up to the left, right, and bottom edge guidelines. This view will serve as
our primary information readout.
4. Select the UIView and open the Attributes Inspector (Command+1). Click the
Background color and set the background to black. Change the Alpha to 0.75
and check the Hidden check box.
5. Add a UILabel to the UIView. Size the label up to all four edge guidelines and
change the text to read Lots of miles to the Mothership.
6. Select the label and open the Attributes Inspector (Command+1). Click the center
Layout button, uncheck the Adjust to Fit check box for the Font Size attribute,
and change the text color to white. The view should now look like Figure 20.3

ptg
Creating a Location-Aware Application 537
7. Create a second semitransparent UIView with the same attributes as the first,
but not hidden, and with a height of 77 points. Drag the second view to verti-
cally center it on the background.
8. Add a new label to the second view that reads Checking the Distance. Resize
the label so that it takes up approximately the right two-thirds of the semi-
transparent view.
9. From the library, drag a UIActivityIndicatorView to the new semitranspar-
ent view. Follow the guides to neatly align the activity indicator to the left of
the label.
10. With the activity indicator selected, open the Attributes Inspector
(Command+1). Check the check box on the Animated attribute.
11. Open the Document window. Control-drag from the File’s Owner icon to the
Lots of Miles label, choosing the distanceLabel output when prompted. Do
the same for the two views, connecting the view with the activity indicator to
the waitView outlet and the view that contains the distance estimate to the
distanceView outlet.
The final view should resemble Figure 20.4. When satisfied with your results, save
the XIB file and return to Xcode.
FIGURE 20.3The beginningsof the CupertinoLocator UI.

ptg
538 HOUR 20: Implementing Location Services
Implementing the Location Manager DelegateBased on the XIB we just laid out, the application starts up with a message and a
spinner that let the user know we are waiting on the initial location reading from
Core Location. We’ll request this reading as soon as the view loads in the view con-
troller’s viewDidLoad method. When the location manager delegate gets a reading,
we’ll calculate the distance to Cupertino, update the label, hide the activity indica-
tor view, and unhide the distance view.
Click the CupertinoViewController.m file in the Classes group. Synthesize the four
properties we added to the CupertinoViewController header file and release them
in the dealloc method.
Uncomment the viewDidLoad method, and instantiate a location manager with the
view controller itself as the delegate and a desiredAccuracy of
kCLLocationAccuracyThreeKilometers and a distanceFilter of 1,609 meters
(1 mile). Start the updates with the startUpdatingLocation method. The imple-
mentation should resemble Listing 20.4.
LISTING 20.4- (void)viewDidLoad {
[super viewDidLoad];
locMan = [[CLLocationManager alloc] init];locMan.delegate = self;locMan.desiredAccuracy = kCLLocationAccuracyThreeKilometers;locMan.distanceFilter = 1609; // a mile [locMan startUpdatingLocation];
}
FIGURE 20.4The finalCupertinoLocator UI.
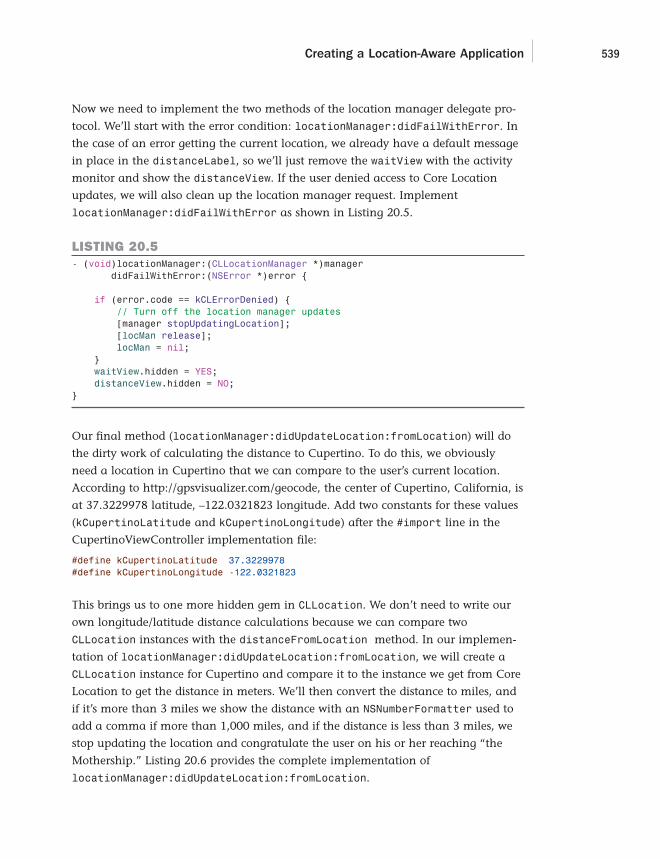
ptg
Creating a Location-Aware Application 539
Now we need to implement the two methods of the location manager delegate pro-
tocol. We’ll start with the error condition: locationManager:didFailWithError. In
the case of an error getting the current location, we already have a default message
in place in the distanceLabel, so we’ll just remove the waitView with the activity
monitor and show the distanceView. If the user denied access to Core Location
updates, we will also clean up the location manager request. Implement
locationManager:didFailWithError as shown in Listing 20.5.
LISTING 20.5- (void)locationManager:(CLLocationManager *)manager
didFailWithError:(NSError *)error {
if (error.code == kCLErrorDenied) {// Turn off the location manager updates[manager stopUpdatingLocation];[locMan release];locMan = nil;
}waitView.hidden = YES;distanceView.hidden = NO;
}
Our final method (locationManager:didUpdateLocation:fromLocation) will do
the dirty work of calculating the distance to Cupertino. To do this, we obviously
need a location in Cupertino that we can compare to the user’s current location.
According to http://gpsvisualizer.com/geocode, the center of Cupertino, California, is
at 37.3229978 latitude, –122.0321823 longitude. Add two constants for these values
(kCupertinoLatitude and kCupertinoLongitude) after the #import line in the
CupertinoViewController implementation file:
#define kCupertinoLatitude 37.3229978#define kCupertinoLongitude -122.0321823
This brings us to one more hidden gem in CLLocation. We don’t need to write our
own longitude/latitude distance calculations because we can compare two
CLLocation instances with the distanceFromLocation method. In our implemen-
tation of locationManager:didUpdateLocation:fromLocation, we will create a
CLLocation instance for Cupertino and compare it to the instance we get from Core
Location to get the distance in meters. We’ll then convert the distance to miles, and
if it’s more than 3 miles we show the distance with an NSNumberFormatter used to
add a comma if more than 1,000 miles, and if the distance is less than 3 miles, we
stop updating the location and congratulate the user on his or her reaching “the
Mothership.” Listing 20.6 provides the complete implementation of
locationManager:didUpdateLocation:fromLocation.

ptg
Did youKnow?
540 HOUR 20: Implementing Location Services
LISTING 20.6- (void)locationManager:(CLLocationManager *)manager
didUpdateToLocation:(CLLocation *)newLocationfromLocation:(CLLocation *)oldLocation {
if (newLocation.horizontalAccuracy >= 0) {
CLLocation *Cupertino = [[[CLLocation alloc]initWithLatitude:kCupertinoLatitudelongitude:kCupertinoLongitude] autorelease];
CLLocationDistance delta = [Cupertino distanceFromLocation: newLocation];long miles = (delta * 0.000621371) + 0.5; // meters to rounded milesif (miles < 3) {
// Stop updating the location[manager stopUpdatingLocation];// Congratulate the userdistanceLabel.text = @”Enjoy the\nMothership!”;
} else {NSNumberFormatter *commaDelimited = [[[NSNumberFormatter alloc]
init] autorelease];[commaDelimited setNumberStyle:NSNumberFormatterDecimalStyle];distanceLabel.text = [NSString stringWithFormat:
@”%@ miles to the\nMothership”,[commaDelimited stringFromNumber:[NSNumber numberWithLong:miles]]];
}waitView.hidden = YES;distanceView.hidden = NO;
} }
Choose Build and Run and take a look at the result. Your application should, after
determining your location, display the distance to Cupertino, California, as shown
in Figure 20.5.
Location services work in the iOS 4 iPhone Simulator! The simulator uses SnowLeopard’s location services to determine where your computer is sitting and thenpasses that information to your applications.

ptg
Understanding the Magnetic Compass 541
Understanding the Magnetic CompassThe iPhone 3GS was the first iOS device to include a magnetic compass. Since its
introduction, the compass has been added to the iPad and the iPhone 4. It is used in
Apple’s Compass application and in the Maps application (to orient the map to the
direction you are facing). The compass can also be accessed programmatically with-
in iOS, which is what we’ll take a look at now.
Location Manager HeadingsThe location manager includes a headingAvailable property that indicates
whether the device is equipped with a magnetic compass. If the value is YES, you
can use Core Location to retrieve heading information. Receiving heading events
works similarly to receiving location update events. To start receiving heading
events, assign a location manager delegate, assign a filter for how frequently you
want to receive updates (measured in degrees of change in heading), and call the
startUpdatingHeading method on the location manager.
FIGURE 20.5The Cupertinoapplication inaction showingthe distance toCupertino,California.

ptg
WatchOut!
542 HOUR 20: Implementing Location Services
There isn’t one true north. Geographic north is fixed at the North Pole, and mag-netic north is located hundreds of miles away and moves every day. A magneticcompass always points to magnetic north, but some electronic compasses, likethe one in the iPhone, can be programmed to point to geographic north instead.Usually, when we deal with maps and compasses together, geographic north ismore useful. Make sure you understand the difference between geographic andmagnetic north and know which one you need for your application. If you are goingto use the heading relative to geographic north (the trueHeading property),request location updates as well as heading updates from the location manageror the trueHeading property won’t be properly set.
The location manager delegate protocol defines the methods for receiving heading
updates. There are two methods in the delegate relating to headings: location
Manager:didUpdateHeading and locationManager:ShouldDisplayHeading
Calibration.
The locationManager:didUpdateHeading method’s argument is a CLHeading
object. The CLHeading object makes the heading reading available with a set of
properties: the magneticHeading, the trueHeading (see the Watch Out above), a
headingAccuracy confidence measure, a timestamp of when the reading occurred,
and an English language description that is more suitable for logging than show-
ing to a user.
The locationManager:ShouldDisplayHeadingCalibration has the delegate return
a YES or NO indicating if the location manager can display a calibration prompt to
the user. The prompt asks the user to step away from any source of interference and
to rotate the phone 360 degrees. The compass is always self-calibrating, and this
prompt is just to help that process along after the compass receives wildly fluctuat-
ing readings. It’s reasonable to implement this method to return NO if the calibration
prompt would be annoying or distracting to the user at that point in the applica-
tion, in the middle of data entry or game play for example.
The iPhone Simulator reports that headings are available and it provides just oneheading update.
Implementing Compass HeadingsAs an example of using the compass, we are going to enhance the Cupertino appli-
cation and provide the users with a left, right, or straight-ahead arrow to get them
pointed toward Cupertino. As with the distance indicator, this is a limited look at
the potential applications for the digital compass. As you work through these steps,
By theWay

ptg
Understanding the Magnetic Compass 543
keep in mind that the compass provides information far more accurate that what
we’re indicating with three arrows!
Setting Up the ProjectDepending on your comfort level with the project steps we’ve already completed this
hour, you can continue building this directly off the existing Cupertino application
or create a copy. You’ll find a copy of Cupertino Compass in this hour’s projects fold-
er that includes the additional compass functionality for comparison.
Open the Cupertino application project, and let’s begin by making some additions
to support the use of the compass.
Adding the Direction Image ResourcesThe Images folder in the Cupertino project contains three arrow images:
arrow_up.png, arrow_right.png, and arrow_left.png. Drag these three images into
the Resources group and be sure to check the Copy Items into Destination Group’s
Folder check box in the Copy dialog.
Adding Outlets and PropertiesTo implement our new visual direction indicator, the CupertinoViewController
needs an outlet to a UIImageView to show the appropriate arrow and needs a prop-
erty to store the most recent location. We need to store the most recent location
because we’ll be doing a calculation on each heading update that uses the current
location. During a header update, the location manager delegate receives only the
new CLHeading and not a CLLocation. Click the CupertinoViewController.h file in
the Classes group and add an IBOutlet to a UIImageView (directionArrow), a
property for the most recent CLLocation the controller received from location
updates (recentLocation), and the method prototype we will implement to calcu-
late the heading to Cupertino called headingToLocation:current. Listing 20.7
indicates the additions to the CupertinoViewController.h file.
LISTING 20.7#import <UIKit/UIKit.h>#import <CoreLocation/CoreLocation.h>
@interface CupertinoViewController : UIViewController<CLLocationManagerDelegate> {
CLLocationManager *locMan;CLLocation *recentLocation;
IBOutlet UILabel *distanceLabel;IBOutlet UIView *distanceView;IBOutlet UIView *waitView;
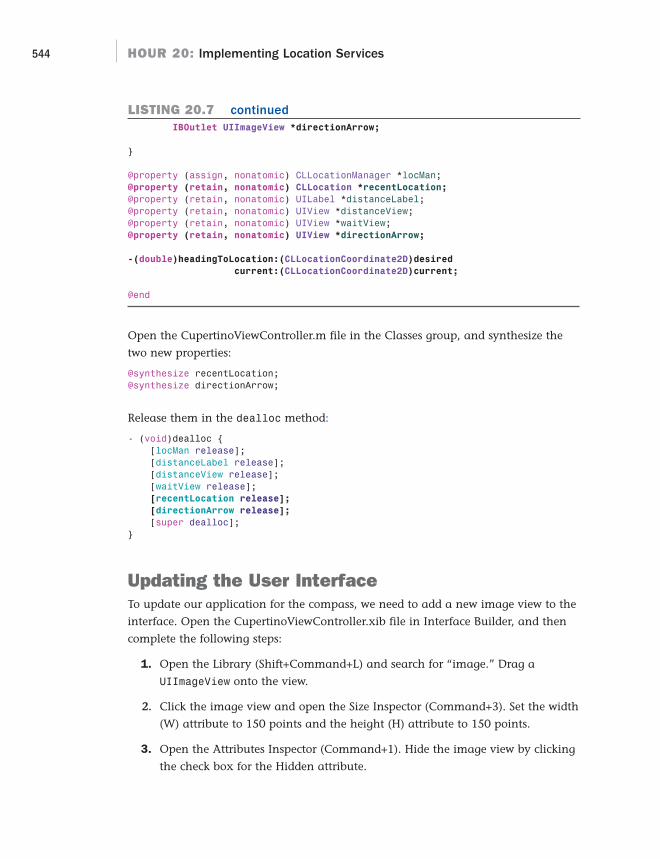
ptg
544 HOUR 20: Implementing Location Services
IBOutlet UIImageView *directionArrow;
}
@property (assign, nonatomic) CLLocationManager *locMan;@property (retain, nonatomic) CLLocation *recentLocation;
@property (retain, nonatomic) UILabel *distanceLabel;@property (retain, nonatomic) UIView *distanceView;@property (retain, nonatomic) UIView *waitView;@property (retain, nonatomic) UIView *directionArrow;
-(double)headingToLocation:(CLLocationCoordinate2D)desired
current:(CLLocationCoordinate2D)current;
@end
Open the CupertinoViewController.m file in the Classes group, and synthesize the
two new properties:
@synthesize recentLocation;@synthesize directionArrow;
Release them in the dealloc method:
- (void)dealloc {[locMan release];[distanceLabel release];[distanceView release];[waitView release];[recentLocation release];
[directionArrow release];
[super dealloc];}
Updating the User InterfaceTo update our application for the compass, we need to add a new image view to the
interface. Open the CupertinoViewController.xib file in Interface Builder, and then
complete the following steps:
1. Open the Library (Shift+Command+L) and search for “image.” Drag a
UIImageView onto the view.
2. Click the image view and open the Size Inspector (Command+3). Set the width
(W) attribute to 150 points and the height (H) attribute to 150 points.
3. Open the Attributes Inspector (Command+1). Hide the image view by clicking
the check box for the Hidden attribute.
LISTING 20.7 continued

ptg
Understanding the Magnetic Compass 545
4. Click the image view in the view, drag it to the top sizing guide, and then cen-
ter it horizontally. The image view should now be just above the view that
contains the activity indicator. If these two views overlap, drag the view with
the activity indicator down. The UI should now look like Figure 20.6.
5. Open the Document window. Control-drag from the File’s Owner icon to the
image view, choosing the directionArrow outlet when prompted.
When satisfied with your interface, save the XIB file and return to Xcode.
FIGURE 20.6The updatedCupertino appli-cation UI.
Requesting and Using Heading Updates Before asking for heading updates, we should check with the location manager to
see whether heading updates are available via the class method headingAvailable.
If heading updates aren’t available, the arrow images will never be shown, and the
Cupertino application works just as before. If headingAvailable returns YES, set the
heading filter to 10 degrees of precision and start the updates with
startUpdatingHeading. Update the viewDidLoad method of the
CupertinoViewController.m file, as shown in Listing 20.8.
LISTING 20.8- (void)viewDidLoad {
[super viewDidLoad];
locMan = [[CLLocationManager alloc] init];locMan.delegate = self;locMan.desiredAccuracy = kCLLocationAccuracyThreeKilometers;locMan.distanceFilter = 1609; // a mile
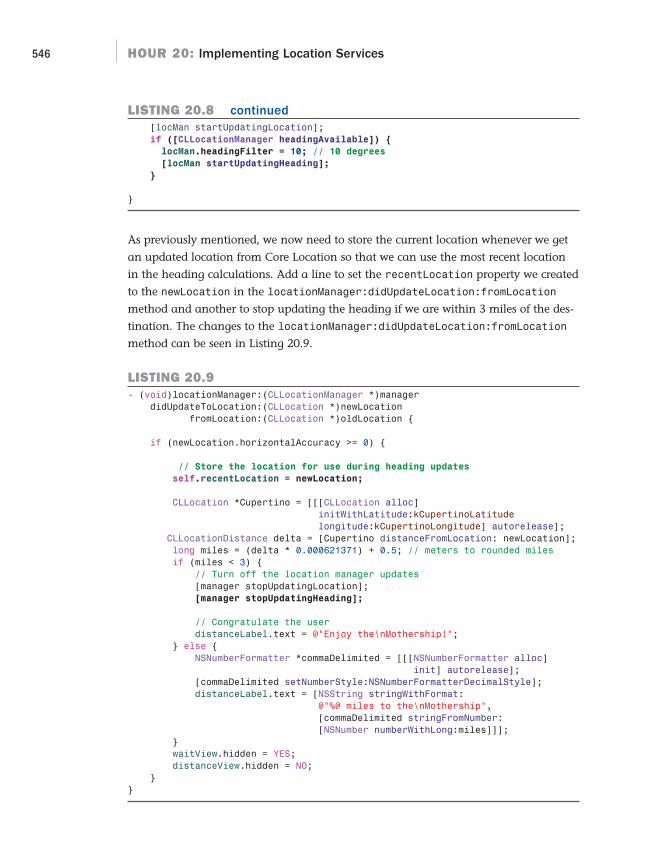
ptg
546 HOUR 20: Implementing Location Services
[locMan startUpdatingLocation];if ([CLLocationManager headingAvailable]) {
locMan.headingFilter = 10; // 10 degrees
[locMan startUpdatingHeading];
}
}
As previously mentioned, we now need to store the current location whenever we get
an updated location from Core Location so that we can use the most recent location
in the heading calculations. Add a line to set the recentLocation property we created
to the newLocation in the locationManager:didUpdateLocation:fromLocation
method and another to stop updating the heading if we are within 3 miles of the des-
tination. The changes to the locationManager:didUpdateLocation:fromLocation
method can be seen in Listing 20.9.
LISTING 20.9- (void)locationManager:(CLLocationManager *)manager
didUpdateToLocation:(CLLocation *)newLocationfromLocation:(CLLocation *)oldLocation {
if (newLocation.horizontalAccuracy >= 0) {
// Store the location for use during heading updates
self.recentLocation = newLocation;
CLLocation *Cupertino = [[[CLLocation alloc]initWithLatitude:kCupertinoLatitudelongitude:kCupertinoLongitude] autorelease];
CLLocationDistance delta = [Cupertino distanceFromLocation: newLocation];long miles = (delta * 0.000621371) + 0.5; // meters to rounded milesif (miles < 3) {
// Turn off the location manager updates[manager stopUpdatingLocation];[manager stopUpdatingHeading];
// Congratulate the userdistanceLabel.text = @”Enjoy the\nMothership!”;
} else {NSNumberFormatter *commaDelimited = [[[NSNumberFormatter alloc]
init] autorelease];[commaDelimited setNumberStyle:NSNumberFormatterDecimalStyle];distanceLabel.text = [NSString stringWithFormat:
@”%@ miles to the\nMothership”,[commaDelimited stringFromNumber:[NSNumber numberWithLong:miles]]];
}waitView.hidden = YES;distanceView.hidden = NO;
} }
LISTING 20.8 continued

ptg
Understanding the Magnetic Compass 547
Calculate the Heading to CupertinoIn the previous two sections, we avoided doing calculations with latitude and longi-tude. This time, it requires just a bit of computation on our part to get a heading toCupertino, and then to decide whether that heading is straight ahead or requires theuser to spin to the right or to the left.
Given two locations such as the user’s current location and the location of Cupertino,it is possible to use some basic geometry of the sphere to calculate the initial headingthe user would need to use to reach Cupertino. A search of the Internet quickly findsthe formula in JavaScript (copied here in the comment), and from that, we can easilyimplement the algorithm in Objective-C and provide the heading.
First, add two constants to CupertinoViewController.m, following the latitude andlongitude for Cupertino. Multiplying by these constants will allow us to easily con-vert from radians to degrees and vice versa:
#define deg2rad 0.0174532925#define rad2deg 57.2957795
Next, add the headingToLocation:current method in the CupertinoViewController.m
file as in Listing 20.10.
LISTING 20.10/** According to Movable Type Scripts* http://mathforum.org/library/drmath/view/55417.html** Javascript:** var y = Math.sin(dLon) * Math.cos(lat2);* var x = Math.cos(lat1)*Math.sin(lat2) -* Math.sin(lat1)*Math.cos(lat2)*Math.cos(dLon);* var brng = Math.atan2(y, x).toDeg();*/-(double)headingToLocation:(CLLocationCoordinate2D)desired
current:(CLLocationCoordinate2D)current {
// Gather the variables needed by the heading algorithmdouble lat1 = current.latitude*deg2rad;double lat2 = desired.latitude*deg2rad;double lon1 = current.longitude;double lon2 = desired.longitude;double dlon = (lon2-lon1)*deg2rad;
double y = sin(dlon)*cos(lat2);double x = cos(lat1)*sin(lat2) - sin(lat1)*cos(lat2)*cos(dlon);
double heading=atan2(y,x);heading=heading*rad2deg;heading=heading+360.0;heading=fmod(heading,360.0);return heading;
}

ptg
548 HOUR 20: Implementing Location Services
Handling Heading UpdatesThe CupertinoViewController class implements the CLLocationManagerDelegateprotocol, and as you learned earlier, one of the optional methods of this protocol,locationManager:didUpdateHeading, provides heading updates anytime the head-ing changes by more degrees than the headingFilter amount.
For each heading update our delegate receives, use the user’s current location to calcu-late the heading to Cupertino, then compare the desired heading to the user’s currentheading, and finally display the correct arrow image: left, right, or straight ahead.
For these heading calculations to be meaningful, we need to have the current loca-tion and some confidence in the accuracy of the reading of the user’s current head-ing. Check these two conditions in an if statement before performing the headingcalculations. If this sanity check does not pass, just hide the directionArrow.
Because this heading feature is more of a novelty than a true source of directions(unless you happen to be a bird or in an airplane), there is no need to be overly pre-cise. Use +/–10 degrees from the true heading to Cupertino as close enough to dis-play the straight-ahead arrow. If the difference is greater than 10 degrees, displaythe left or right arrow based on whichever way would result in a shorter turn to getto the desired heading. Implement the locationManager:didUpdateHeadingmethod in the CupertinoViewController.m file, as shown in Listing 20.11.
LISTING 20.11- (void)locationManager:(CLLocationManager *)manager
didUpdateHeading:(CLHeading *)newHeading {
if (self.recentLocation != nil && newHeading.headingAccuracy >= 0) {CLLocation *cupertino = [[[CLLocation alloc]
initWithLatitude:kCupertinoLatitudelongitude:kCupertinoLongitude] autorelease];
double course = [self headingToLocation:cupertino.coordinatecurrent:recentLocation.coordinate];
double delta = newHeading.trueHeading - course;if (abs(delta) <= 10) {
directionArrow.image = [UIImage imageNamed:@”up_arrow.png”];} else {
if (delta > 180) directionArrow.image = [UIImage imageNamed:@”right_arrow.png”];
else if (delta > 0) directionArrow.image = [UIImage imageNamed:@”left_arrow.png”];
else if (delta > -180) directionArrow.image = [UIImage imageNamed:@”right_arrow.png”];
else directionArrow.image = [UIImage imageNamed:@”left_arrow.png”];}directionArrow.hidden = NO;
} else {directionArrow.hidden = YES;
}
}

ptg
Further Exploration 549
Build and run the project. If you have a device equipped with an electromagnetic
compass, you can now spin around in your office chair and see the arrow images
change to show you the heading to Cupertino. If you run the updated Cupertino
application in the iPhone Simulator, you will have an arrow pointing to the right as
a result of the simulator’s one simulated heading update (see Figure 20.7).
FIGURE 20.7The completedCupertino appli-cation runningin the iPhoneSimulator.
Further ExplorationIn the span of an hour, you covered a great deal of what Core Location has to offer.
I recommend that you spend time reviewing the Core Location framework reference
as well as the guide Making Your Application Location-Aware, both of which are acces-
sible through the Xcode documentation.
In addition, I greatly recommend reviewing Movable Type Scripts documentation on
latitude and longitude functions (http://www.movable-type.co.uk/scripts/
latlong.html). Although Core Location provides a great deal of functionality, there
are things (such as calculate a heading/bearing) that it can’t currently do. The
Movable Type Scripts library should give you the base equations for many common
location-related activities.

ptg
550 HOUR 20: Implementing Location Services
Apple Tutorials
LocateMe (accessible through the Xcode documentation interface): A simple
Xcode project to demonstrate the primary functions of Core Location.
SummaryIn this hour, you worked with the powerful Core Location toolkit. As you saw in the
sample application, this framework can provide detailed information from the
iPhone’s GPS and magnetic compass systems. Many modern iPhone applications use
this information to provide data about the world around the user or to store infor-
mation about where the user was physically located when an event took place.
You can combine these techniques with the Map Kit from the previous hour to cre-
ate detailed mapping and touring applications.
Q&AQ. Should I start receiving heading and location updates as soon as my appli-
cation launches?
A. You can, as we did in the tutorial, but be mindful that the GPS features of the
iPhone consume quite a bit of battery life. After you establish your location,
turn off the location/heading updates.
Q. Why do I need that ugly equation to calculate a heading? It seems overlycomplicated.
A. If you imagine two locations as two points on a flat grid, the math is easier.
Unfortunately, the earth is not flat but a sphere. Because of this difference,
you must calculate distances and headings using the great circle (that is, the
shortest distance between two points on a curved surface).
Q. Can I use Core Location and Map Kit to provide turn-by-turn directions in myapplication?
A. Yes and no. You can use Core Location and Map Kit as part of a solution for
turn-by-turn directions, and many developers do this, but they are not suffi-
ciently functional on their own, and there are terms of services conditions that
prohibit you from using the Google-provided map tiles in an application that
provides turn-by-turn directions. In short, you’ll need to license some addition-
al data to provide this type of capability.

ptg
551Workshop
Workshop
Quiz1. True north and magnetic north are the same thing. True or false?
2. What can be done to limit the drain on battery life when using Core Location?
3. Explain the role of these important classes: CLLocationManager,
CLLocationManagerDelegate, CLLocation.
Answers1. False. Magnetic fields vary and are not exactly aligned with true (geographic)
north. The error between the two is called declination.
2. Use the distanceFilter and headingFilter properties of
CLLocationManager to get updates only as frequently as your application
can benefit from them. Use the stopUpdatingLocation and
stopUpdatingHeading methods of CLLocationManager to stop receiving the
updates as soon as you no longer need them.
3. A CLLocationManager instance provides the basis of the interaction with Core
Location services. A location manager delegate, implementing the
CLLocationManegerDelegate protocol, is set on the CLLocationManager
instance, and that delegate receives location/heading updates. Location
updates come in the form of a pair of CLLocation objects, one providing the
coordinates of the previous location, and the other providing the coordinates
of the new location.
Activities1. Adopt the Cupertino application to be a guide for your favorite spot in the
world. Add a map to the view that displays your current location.
2. Identify opportunities to use the location features of core location. How can
you enhance games, utilities, or other applications with location-aware fea-
tures?

ptg
This page intentionally left blank

ptg
HOUR 21
Building Background-AwareApplications
What You’ll Learn in This Hour:. How iOS 4 supports background tasks. What types of background tasks are supported. How to disable backgrounding. How to suspend applications. How to execute code in the background
“The ability to run multiple applications in the background” mocks the Verizon commer-
cial. “Why can’t a modern operating system run multiple programs at once?” question the
discussion groups. As a developer and a fan of the iPhone, I’ve found these threads amus-
ing in their naiveté and somewhat confusing. The iPhone has always run multiple appli-
cations simultaneously in the background, but they were limited to Apple’s applications.
This restriction has been to preserve the user experience of the device as a phone. Rather
than an “anything goes” approach, Apple has taken steps to ensure that the phone
remains responsive at all times.
With the release of iOS 4.x, Apple answers the call from the competition by opening up
background processing to third-party applications. Unlike the competitors, however, Apple
has been cautious in how it approached backgrounding—opening it up to a specific set of
tasks that users commonly encounter. In this hour’s lesson, you learn several of the multi-
tasking techniques that you can implement in iOS 4.
ptg
554 HOUR 21: Building Background-Aware Applications
Understanding iOS 4 BackgroundingIf you’ve been working in iOS 4.x or later as you’ve built the tutorials in this book,
you may have noticed that when you quit the applications on your phone or in the
iPhone Simulator, they still show up in the iOS task manager, and, unless you man-
ually stop them, they tend to pick up right where they left off. The reason for this is
that projects created in iOS 4.x are background-ready as soon as you click the Build
and Run button. That doesn’t mean that they will run in the background, just that
they’re aware of the new iOS 4 background features and will take advantage with a
little bit of help.
Before we examine how to enable backgrounding (also called multitasking) in our
projects, let’s first identify exactly what it means to be a background-aware applica-
tion, starting with the types of backgrounding supported, then the application life
cycle methods.
Types of BackgroundingWe explore four primary types of backgrounding in iOS 4.x: application suspension,
local notifications, task-specific background processing, and task completion.
SuspensionWhen an application is suspended, it will cease executing code but be preserved
exactly as the user left it. When the user returns to the application, it appears to
have been running the whole time. In reality, all tasks will be stopped, keeping the
app from using up your iPhone’s resources. Any application that you compile
against iOS 4.x will, by default, support background suspension. You should still
handle cleanup in the application if it is about to be suspended (see “The
Background-Aware Application Life Cycle” section, later in this chapter), but beyond
that, it “just works.”
In addition to performing cleanup as an application is being suspended, it will be
your responsibility to recover from a background suspended state and update any-
thing in the application that should have changed while it was suspended
(time/date changes and so on).
Local NotificationsThe second type of background processing is the scheduling of local notifications
(UILocalNotification). If you’ve ever experienced a push notification, local notifi-
cations are the same but are generated by the applications that you write. An appli-
cation, while running, can schedule notifications to appear onscreen at a point in

ptg
Understanding iOS 4 Backgrounding 555
time in the future. For example, the following code initializes a notification
(UILocationNotification) configures it to appear in five minutes, and then uses
the application’s scheduleLocalNotification method to complete the scheduling:
UILocalNotification *futureAlert;futureAlert = [[[UILocalNotification alloc] init] autorelease];futureAlert.fireDate = [NSDatedateWithTimeIntervalSinceNow:300];futureAlert.timeZone = [NSTimeZonedefaultTimeZone];[[UIApplication sharedApplication] scheduleLocalNotification:futureAlert];
These notifications, when invoked by iOS, can show a message, play a sound, and
even update your application’s notification badge. They cannot, however, execute
arbitrary application code. In fact, it is likely that you will simply allow iOS to sus-
pend your application after registering your local notifications. A user who receives
a notification can click View button in the notification window to return to your
application.
Task-Specific Background ProcessingBefore Apple decided to implement background processing, they did some research
on how users worked with their handhelds. What they found was that there were spe-
cific types of background processing that people needed. First, they needed audio to
continue playing in the background; this is necessary for applications like Pandora.
Next, location-aware software needed to update itself in the background so that users
continued to receive navigation feedback. Finally, VoIP applications like Skype need-
ed to operate in the background to handle incoming calls.
These three types of tasks are handled uniquely and elegantly in iOS 4.x. By declar-
ing that your application requires one of these types of background processing, you
can, in many cases, enable your application to continue running with little alter-
ation. To declare your application capable of supporting any (or all) of these tasks,
you will add the Required Background Modes (UIBackgroundModes) key to the pro-
ject’s plist file, and then add values of App Plays Audio (Audio), App Registers for
Location Updates (Location), or App Provides Voice over IP Services (VoIP).
Task Completion for Long-Running TasksThe fourth type of backgrounding that we’ll be using in iOS 4.x is task completion.
Using task-completion methods, you can “mark” the tasks in your application that
will need to finish before it can be safely suspended (file upload/downloads, massive
calculations, and so on).
For example, to mark the beginning of a long running task, first declare an identifi-
er for the specific task:
UIBackgroundTaskIdentifier myLongTask;

ptg
556 HOUR 21: Building Background-Aware Applications
Then use the application’s beginBackgroundTaskWithExpirationHandler method
to tell iOS that you’re starting a piece of code that can continue to run in the back-
ground:
myLongTask = [[UIApplicationsharedApplication]beginBackgroundTaskWithExpirationHandler:^{
// If you’re worried about exceeding 10 minutes, handle it here}];
And, finally, mark the end of the long-running task with the application
endBackgroundTask method:
[[UIApplication sharedApplication] endBackgroundTask:myLongTask];
Each task you mark will have roughly 10 minutes (total) to complete its actions,
plenty of time for most common uses. After the time completes, the application is
suspended and treated like any other suspended application.
The Background-Aware Application Life CycleMethodsIn Hour 4, “Inside Cocoa Touch,” you started learning about the application life
cycle, as shown in Figure 21.1. You learned that, in iOS 4.x, applications should
clean up after themselves in the applicationDidEnterBackground delegate
method. This replaces applicationWillTerminate in earlier versions of the OS, or
as you’ll learn shortly, in applications that you’ve specifically marked as not capa-
ble (or necessary) to run in the background.
FIGURE 21.1The iOS 4.xapplication lifecycle.

ptg
WatchOut!
Understanding iOS 4 Backgrounding 557
In addition to applicationDidEnterBackground, there are several other methods
that you should implement to be a proper background-aware iOS citizen. For many
small applications, you won’t need to do anything with these, other than leave
them as is in the application delegate. As your projects increase in complexity, how-
ever, you’ll want to make sure that your apps move cleanly from the foreground to
background (and vice versa), avoiding potential data corruption and creating a
seamless user experience.
It is important to understand that iOS can terminate your applications, even ifthey’re backgrounded, if it decides that the device is running low on resources.You can expect that your applications will be fine, but plan for a scenario wherethey are forced to quit unexpectedly.
The methods that Apple expects to see in your background-aware apps are as fol-
lows:
. application:didFinishLaunchingWithOptions: Called when your applica-
tion first launches. If your application is terminated while suspended, or
purged from memory, needs to restore its previous state manually. (You did
save it your user’s preferences, right?)
. applicationDidBecomeActive: Called when an application launches or
returns to the foreground from the background. This method can be used to
restart processes and update the user interface, if needed.
. applicationWillResignActive: Invoked when the application is requested to
move to the background or to quit. This method should be used to prepare the
application for moving into a background state, if needed.
. applicationDidEnterBackground: Called when the application has become
a background application. This replaces applicationWillTerminate in
iOS 4.x. You should handle all final cleanup work in this method. You may
also use it to start long-running tasks and use task-completion backgrounding
to finish them.
. applicationWillEnterForeground: Called when an application returns to an
active state after being backgrounded.
. applicationWillTerminate: Invoked when an application on a nonmultitask-
ing version of iOS is asked to quit, or when iOS determines that it needs to
shut down an actively running background application.
ptg
WatchOut!
558 HOUR 21: Building Background-Aware Applications
Method stubs for all of these exist in your iOS 4.x application delegate implementa-
tion files. If your application needs additional setup or teardown work, just add the
code to the existing methods. As you’ll see shortly, many applications, such as the
majority of those in this book, require few changes.
The assumption in this hour’s lesson is that you are using iOS 4.x or later. If youare not, using background-related methods and properties on earlier versions ofthe OS will result in errors. To successfully target both iOS 4.x and earlier devices,check to see whether backgrounding is available, and then react accordingly inyour apps.
Apple provides the following code snippet in the iPhone Application ProgrammingGuide for checking to see (regardless of OS version) whether multitasking supportis available:
UIDevice* device = [UIDevice currentDevice];BOOL backgroundSupported = NO;if ([device respondsToSelector:@selector(isMultitaskingSupported)])
backgroundSupported = device.multitaskingSupported;
If the resulting backgroundSupported Boolean is YES, you’re safe to use back-ground-specific code.
Now that you have an understanding of the background-related methods and types
of background processing available to you, let’s look at how they can be implement-
ed. To do this, we’ll reuse tutorials that we’ve built throughout the book (with one
exception). We won’t be covering how these tutorials were built, so be sure to refer to
the earlier hours if you have questions on the core functionality of the applications.
Disabling BackgroundingWe start with the exact opposite of enabling backgrounding: disabling it. If you
think about it, there are many different “diversion” apps that don’t need to support
background suspension or processing. These are apps that you use and then quit.
They don’t need to hang around in your task manager afterward.
For example, consider the HelloNoun application in Hour 6, “Model-View-Controller
Application Design.” There’s no reason that the user experience would be negatively
affected if the application started from scratch each time you ran it. To implement
this change in the project, follow these steps:
1. Open the project in which you want to disable backgrounding (such as
HelloNoun).
2. Open the project’s plist file in the resources group (HelloNoun-Info.plist).

ptg
Handling Background Suspension 559
3. Add an additional key to the property list, selecting Application Does Not Run
in Background (UIApplicationExitsOnSuspend) from the Key pop-up menu.
4. Click the check box beside the key, as shown in Figure 21.2.
5. Save the changes to the plist file.
FIGURE 21.2Add theApplication DoesNot run inBackground(UIApplication-ExitsOnSuspend)key to the proj-ect.
Build and run the application on your iPhone or in the iPhone simulator. When you
exit the application with the Home button, it will not be suspended, nor will not
show in the task manager, and it will restart fresh when you launch it the next time.
Handling Background SuspensionIn the second tutorial, we handle background suspension. As previously noted, youdon’t have to do anything to support this other than build your project with the iOS4.x development tools. That said, we use this example as an opportunity to promptusers when they return to the application after it was backgrounded.
For this example, we update the ImageHop application from Hour 8, “HandlingImages, Animation, and Sliders.” It is conceivable (work with me here, folks!) that auser will want to start the bunny hopping, exit the application, and then return toexactly where it was at some time in the future.
To alert the user when the application returns from suspension, we’ll edit the appli-cation delegate method applicationWillEnterForeground. Recall that this methodis invoked only when an application is returning from a backgrounded state. OpenImageHopAppDelegate.m and implement the method, as shown in Listing 21.1.

ptg
560 HOUR 21: Building Background-Aware Applications
LISTING 21.1- (void)applicationWillEnterForeground:(UIApplication *)application {
UIAlertView *alertDialog;
alertDialog = [[UIAlertView alloc]
initWithTitle: @”Yawn!”
message:@”Was I asleep?”
delegate: nil
cancelButtonTitle: @”Welcome Back”
otherButtonTitles: nil];
[alertDialog show];
[alertDialog release];
}
Within the method, we declare, initialize, show, and release an alert view, exactly as
we did in the “Getting Attention” tutorial in Hour 10, “Getting the User’s Attention.”
After updating the code, build and run the application. Start the ImageHop anima-
tion, and then use the Home button to background the app.
After waiting a few seconds (just for good measure), open ImageHop again using
the task manager or its application icon (not Build and Run!). When the application
returns to the foreground, it should pick up exactly where it left off and present you
with the alert shown in Figure 21.3.
FIGURE 21.3The applicationWillEnterFore-ground methodis used to displayan alert uponreturning fromthe background.

ptg
Implementing Local Notifications 561
Implementing Local NotificationsEarlier in this lesson, you saw a short snippet of the code necessary to generate a
local notification (UILocalNotification). As it turns out, there’s not much more
you’ll need beyond those few lines! To demonstrate the use of local notifications,
we’ll be updating Hour 10’s “Getting the User’s Attention” doAlert method. Instead
of just displaying an alert, it will also show a notification 5 minutes later and then
schedule local notifications to occur every day thereafter.
Common Notification PropertiesYou want to configure several properties when creating notifications. A few of the
more interesting of these include the following:
. applicationIconBadgeNumber: An integer that is displayed on the applica-
tion icon when the notification is triggered
. fireDate: An NSDate object that provides a time in the future for the notifica-
tion to be triggered
. timeZone: The time zone to use for scheduling the notification
. repeatInterval: How frequently, if ever, the notification should be repeated
. soundName: A string (NSString) containing the name of a sound resource to
play when the notification is triggered
. alertBody: A string (NSString) containing the message to be displayed to the
user
Creating and Scheduling a NotificationOpen the GettingAttention application and edit the doAlert method so that it
resembles Listing 21.2. (Bolded lines are additions to the existing method.) Once the
code is in place, we’ll walk through it together.
LISTING 21.21: -(IBAction)doAlert:(id)sender {2: UIAlertView *alertDialog;3: UILocalNotification *scheduledAlert;4:5: alertDialog = [[UIAlertView alloc]6: initWithTitle: @”Alert Button Selected”7: message:@”I need your attention NOW (and in alittle bit)!”8: delegate: nil9: cancelButtonTitle: @”Ok”

ptg
562 HOUR 21: Building Background-Aware Applications
10: otherButtonTitles: nil];11:12: [alertDialog show];13: [alertDialog release];14:15:16: [[UIApplication sharedApplication] cancelAllLocalNotifications];
17: scheduledAlert = [[[UILocalNotification alloc] init] autorelease];
18: scheduledAlert.applicationIconBadgeNumber=1;
19: scheduledAlert.fireDate = [NSDate dateWithTimeIntervalSinceNow:300];
20: scheduledAlert.timeZone = [NSTimeZone defaultTimeZone];
21: scheduledAlert.repeatInterval = NSDayCalendarUnit;
22: scheduledAlert.soundName=@”soundeffect.wav”;
23: scheduledAlert.alertBody = @”I’d like to get your attention again!”;
24:25: [[UIApplication sharedApplication]
➥scheduleLocalNotification:scheduledAlert];
26:27: }
First, in line 3, we declare scheduledAlert as an object of type
UILocalNotification. This local notification object is what we set up with our
desired message, sound, and so on, and then pass off to the application to display
sometime in the future.
In Line 16, we use [UIApplication sharedApplication] to grab our application
object, and then call the UIApplication method cancelAllLocalNotifications.
This cancels any previously scheduled notifications that this application may have
made, giving us a clean slate.
Line 17 allocates and initializes the local notification object scheduledAlert.
Because the notification is going to be handled by iOS rather than our
GettingAttention application, we can use autorelease to release it.
In line 18, we configure the notification’s applicationIconBadgeNumber property so
that when the notification is triggered, the application’s badge number is set to 1 to
show that a notification has occurred.
Line 19 uses the fireDate property along with the NSDate class method
dateWithTimeIntervalSinceNow to set the notification to be triggered 300 seconds
in the future.
Line 20 sets the timeZone for the notification. This should almost always be set to
the local time zone, as returned by [NSTimeZone defaultTimeZone].
Line 21 sets the repeatInterval property for the notification. This can be chosen
from a variety of constants, such as NSDayCalendarUnit (daily), NSHourCalendarUnit
LISTING 21.2 continued

ptg
Implementing Local Notifications 563
(hourly), and NSMinuteCalendarUnit (every minute). The full list can be found in the
NSCalendar class reference in the Xcode developer documentation.
In Line 22, we set a sound to be played along with the notification. The soundName
property is configured with a string (NSString) with the name of a sound resource.
Because we already have soundeffect.wav available in the project, we can use that
without any further additions.
Line 23 finishes the notification configuration by setting the alertBody of the notifi-
cation to the message we want the user to see.
When the notification object is fully configured, we schedule it using the
UIApplication method scheduleLocalNotification (line 25). This finishes the
implementation!
Choose Build and Run to compile and start the application on your iPhone or in the
iPhone Simulator. After GettingAttention is up and running, click the Alert Me! but-
ton. After the initial alert is displayed, click the Home button to exit the application.
Go get a drink, and come back in about 4 minutes and 59 seconds. At exactly 5
minutes later, you’ll receive a local notification, as shown in Figure 21.4.
FIGURE 21.4Local notifica-tions are dis-played onscreeneven when theapplication isn’trunning.
ptg
564 HOUR 21: Building Background-Aware Applications
Using Task-Specific BackgroundProcessingSo far, we haven’t actually done any real background processing! We’ve suspended
an application and generated local notifications, but, in each of these cases, the
application hasn’t been doing any processing. Let’s change that! In our final two
examples, we’ll execute real code behind the scenes while the application is in the
background. Although it is well beyond the scope of this book to generate a VoIP
application, we can use our Cupertino application from last hour’s lesson, with
some minor modifications, to show background processing of location and audio!
Preparing the Cupertino Application for AudioWhen we finished off the Cupertino application in the last hour, it told us how far
away Cupertino was, and presented straight, left, and right arrows on the screen to
indicate the direction the user should be traveling to reach the Mothership. We can
update the application to audio using SystemSoundServices, just as we did in Hour
10’s GettingAttention application.
The only tricky thing about our changes is that we won’t want to hear a sound
repeated if it was the same as the last sound we heard. To handle this requirement,
we’ll use a constant for each sound: 1 for straight, 2 for right, and 3 for left, and
store this in a variable called lastSound each time a sound is played. We can then
use this as a point of comparison to make sure that what we’re about to play isn’t
the same thing we did just play!
Adding the AudioToolbox FrameworkTo use System Sound Services, we need to first add the AudioToolbox framework.
Open the Cupertino (with Compass implementation) project in Xcode. Right-click
the Frameworks group and choose Add, Existing Frameworks. Choose
AudioToolbox.framework from the list that appears, and then click Add, as shown
in Figure 21.5.
Adding the Audio FilesWithin the Cupertino Audio Compass - Navigation and Audio folder included with
this hour’s lesson, you’ll find an Audio folder. Drag the files from the audio folder
(straight.wav, right.wav, and left.wav) to the Resources group within the Xcode project.
Choose to copy the files into the application when prompted, as shown in Figure 21.6.

ptg
Using Task-Specific Background Processing 565
Updating the CupertinoViewController.h Interface FileNow that the necessary files are added to the project, we need to update the
CupertinoViewController interface file. Add an #import directive to import the
AudioToolbox interface file, and then declare instance variables for three
SystemSoundIDs (soundStraight, soundLeft, and soundRight) and an integer
FIGURE 21.5Add the Audio-Toolbox.frame-work to the proj-ect.
FIGURE 21.6Add the neces-sary soundresources to theproject.

ptg
566 HOUR 21: Building Background-Aware Applications
lastSound to hold the last sound we played. Remember that these aren’t objects, so
there’s no need to declare the variables as pointers to objects, add properties for
them, or release them!
The updated CupertinoViewController.h file should resemble Listing 21.3.
LISTING 21.3#import <UIKit/UIKit.h>#import <CoreLocation/CoreLocation.h>#import <AudioToolbox/AudioToolbox.h>
@interface CupertinoViewController : UIViewController<CLLocationManagerDelegate> {
CLLocationManager *locMan;CLLocation *recentLocation;IBOutlet UILabel *distanceLabel;IBOutlet UIView *distanceView;IBOutlet UIView *waitView;IBOutlet UIImageView *directionArrow;SystemSoundID soundStraight;
SystemSoundID soundRight;
SystemSoundID soundLeft;
int lastSound;
}
@property (assign, nonatomic) CLLocationManager *locMan;@property (retain, nonatomic) CLLocation *recentLocation;@property (retain, nonatomic) UILabel *distanceLabel;@property (retain, nonatomic) UIView *distanceView;@property (retain, nonatomic) UIView *waitView;@property (retain, nonatomic) UIView *directionArrow;
-(double)headingToLocation:(CLLocationCoordinate2D)desiredcurrent:(CLLocationCoordinate2D)current;
@end
Adding Sound ConstantsTo help keep track of which sound we last played, we declared the lastSound
instance variable. Our intention is to use this to hold an integer representing each of
our three possible sounds. Rather than remembering that 2 = right, and 3 = left, and
so on, let’s add some constants to the CupertinoViewController.m implementation
file to keep these straight.
Insert these three lines following the existing constants we defined for the project:
#define straight 1#define right 2#define left 3
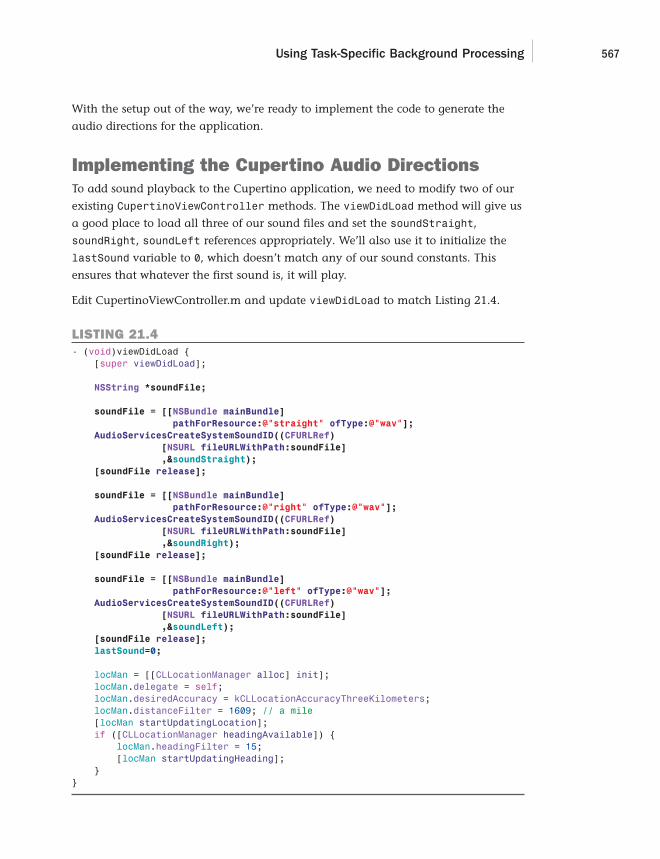
ptg
Using Task-Specific Background Processing 567
With the setup out of the way, we’re ready to implement the code to generate the
audio directions for the application.
Implementing the Cupertino Audio DirectionsTo add sound playback to the Cupertino application, we need to modify two of our
existing CupertinoViewController methods. The viewDidLoad method will give us
a good place to load all three of our sound files and set the soundStraight,
soundRight, soundLeft references appropriately. We’ll also use it to initialize the
lastSound variable to 0, which doesn’t match any of our sound constants. This
ensures that whatever the first sound is, it will play.
Edit CupertinoViewController.m and update viewDidLoad to match Listing 21.4.
LISTING 21.4- (void)viewDidLoad {
[super viewDidLoad];
NSString *soundFile;
soundFile = [[NSBundle mainBundle]
pathForResource:@”straight” ofType:@”wav”];
AudioServicesCreateSystemSoundID((CFURLRef)
[NSURL fileURLWithPath:soundFile]
,&soundStraight);
[soundFile release];
soundFile = [[NSBundle mainBundle]
pathForResource:@”right” ofType:@”wav”];
AudioServicesCreateSystemSoundID((CFURLRef)
[NSURL fileURLWithPath:soundFile]
,&soundRight);
[soundFile release];
soundFile = [[NSBundle mainBundle]
pathForResource:@”left” ofType:@”wav”];
AudioServicesCreateSystemSoundID((CFURLRef)
[NSURL fileURLWithPath:soundFile]
,&soundLeft);
[soundFile release];
lastSound=0;
locMan = [[CLLocationManager alloc] init];locMan.delegate = self;locMan.desiredAccuracy = kCLLocationAccuracyThreeKilometers;locMan.distanceFilter = 1609; // a mile[locMan startUpdatingLocation];if ([CLLocationManager headingAvailable]) {
locMan.headingFilter = 15;[locMan startUpdatingHeading];
}}

ptg
568 HOUR 21: Building Background-Aware Applications
Remember, this is all code we’ve used before! If you are having difficulties under-standing the sound playback process, refer back to the Hour 10 tutorial.
The final logic that we need to implement is to play each sound when there is a head-
ing update. The CupertinoViewController.m method that implements this is
locationManager:didUpdateHeading. Each time the arrow graphic is updated in this
method, we’ll prepare to play the corresponding sound with the AudioServicesPlay
SystemSound function. Before we do that, however, we’ll check to make sure it isn’t the
same sound as lastSound; this will help prevent a Max Headroom stuttering effect as
one sound file is played repeatedly over top of itself. If lastSound doesn’t match the
current sound, we’ll play it and update lastSound with a new value.
Edit the locationManager:didUpdateHeading method as described. Your final
result should look similar to Listing 21.5.
LISTING 21.5- (void)locationManager:(CLLocationManager *)manager
didUpdateHeading:(CLHeading *)newHeading {
if (self.recentLocation != nil && newHeading.headingAccuracy >= 0) {CLLocation *cupertino = [[[CLLocation alloc]
initWithLatitude:kCupertinoLatitudelongitude:kCupertinoLongitude] autorelease];
double course = [self headingToLocation:cupertino.coordinatecurrent:recentLocation.coordinate];
double delta = newHeading.trueHeading - course;if (abs(delta) <= 10) {
directionArrow.image = [UIImage imageNamed:@”up_arrow.png”];
if (lastSound!=straight) AudioServicesPlaySystemSound(soundStraight);
lastSound=straight;
} else {
if (delta > 180) {
directionArrow.image = [UIImage imageNamed:@”right_arrow.png”];
if (lastSound!=right) AudioServicesPlaySystemSound(soundRight);
lastSound=right;
} else if (delta > 0) {
directionArrow.image = [UIImage imageNamed:@”left_arrow.png”];
if (lastSound!=left) AudioServicesPlaySystemSound(soundLeft);
lastSound=left;
} else if (delta > -180) {
directionArrow.image = [UIImage imageNamed:@”right_arrow.png”];
if (lastSound!=right) AudioServicesPlaySystemSound(soundRight);
lastSound=right;
} else {
directionArrow.image = [UIImage imageNamed:@”left_arrow.png”];
if (lastSound!=left) AudioServicesPlaySystemSound(soundLeft);
lastSound=left;
}
Did youKnow?
ptg
Using Task-Specific Background Processing 569
}
directionArrow.hidden = NO;} else {
directionArrow.hidden = YES;}
}
The application is now ready for testing. Use Build and Run to install the updated
Cupertino application on your iPhone, and then try moving around. As you move,
it will speak “Right,” “Left,” and “Straight” to correspond to the onscreen arrows. Try
exiting the applications and see what happens. Surprise! It won’t work! That’s
because we haven’t yet updated the project’s plist file to contain the Required
Background Modes (UIBackgroundModes) key.
If, while you’re testing the application, it still seems a bit “chatty” (playing thesounds too often), you may want to update the locMan.headingFilter to a larg-er value (like 15 or 20) in the viewDidLoad method. This will help cut down onthe number of heading updates.
Adding the Background Modes KeyOur application performs two tasks that should remain active when in a back-
ground state. First, it tracks our location. Second, it plays audio to give us a general
heading. We need to add both audio and location background mode designations to
the application for it to work properly. Update the Cupertino project plist by follow-
ing these steps:
1. Click to open the project’s plist file in the resources group (Cupertino-
Info.plist).
2. Add an additional key to the property list, selecting Required Background
Modes (UIBackgroundModes) from the Key pop-up menu.
3. Expand the key and add two values within it: App Plays Audio (Audio) and
App Registers for Location Updates (Location), as shown in Figure 21.7. Both
values will be selectable from the pop-up menu in the Value field.
4. Save the changes to the plist file.
Did youKnow?

ptg
By theWay
570 HOUR 21: Building Background-Aware Applications
After updating the plist, install the updated application on your iPhone and try
again. This time, when you exit the application, it will continue to run! As you
move around, you’ll hear spoken directions as Cupertino continues to track your
position behind the scenes.
By declaring the location and audio background modes, your application is able touse the full services of Location Manager and the iOS’s many audio playbackmechanisms when it is in the background.
Completing a Long-Running BackgroundTaskIn our final tutorial of the hour, we need to create a project from scratch. Our book
isn’t about building applications that require a great deal of background processing.
Sure, we could demonstrate how to add code to an existing project and allow a
method to run in the background, but we don’t have any long running methods
that could make use of it.
To demonstrate how we can tell iOS to allow something to run in the background,
we’ll create a new application, SlowCount, that does nothing but count to 1,000—
slowly. We’ll use the task-completion method of background to make sure that, even
when the application is in the background, it continues to count until it reaches
1,000—as shown in Figure 21.8.
FIGURE 21.7Add the back-ground modesthat arerequired by yourapplication.

ptg
By theWay
Completing a Long-Running Background Task 571
Preparing the ProjectCreate a new view-based iPhone application named SlowCount. We’ll move
through development fairly quickly because, as you can imagine, this application is
pretty simple.
The application will have a single outlet, a UILabel named theCount, which we’ll
use to present the counter onscreen. In addition, it will need a an integer to use as a
counter (count), an NSTimer object that will trigger the counting at a steady inter-
val (theTimer), and a UIBackgroundTaskIdentifier variable (not an object!) that
we’ll use to reference the task we have running in the background (counterTask).
Every task that you want to enable for background task completion will need itsown UIBackgroundTaskIdentifier. This is used along with the UIApplicationmethod endBackgroundTask to identify which background task has just ended.
Open the SlowCountViewController.h file and implement it as shown in Listing 21.6.
FIGURE 21.8To simulate along-runningtask, our appli-cation willcount. Slowly.

ptg
By theWay
572 HOUR 21: Building Background-Aware Applications
LISTING 21.6#import <UIKit/UIKit.h>
@interface SlowCountViewController : UIViewController {int count;NSTimer *theTimer;UIBackgroundTaskIdentifier counterTask;IBOutlet UILabel *theCount;
}
@property (nonatomic,retain) UILabel *theCount;
@end
The UILabel theCount is the only object we’ll be accessing and modifying proper-ties of in the application; therefore, it is the only thing that needs a @propertydeclaration.
Next, clean up after the UILabel object in the SlowCountViewController.m dealloc
method. The other instance variables either aren’t objects (count, counterTask) or
will be allocated and released elsewhere in the application (NSTimer):
- (void)dealloc {[theCount release];[super dealloc];
}
Creating the User InterfaceIt’s a bit of a stretch to claim that this application has a “user interface,” but we still
need to prepare the SlowCountViewController.xib to show the theCount label on the
screen.
Open the XIB file in Interface Builder, and drag a UILabel into the center of the
view. Set the label’s text to read 0. With the label selected, use the Attributes
Inspector (Command+1) to set the label alignment to center and the font size to 36.
Finally, align the right and left sides of the label with the right and left sizing
guides. You’ve just created a UI masterpiece, as shown in Figure 21.9.
Finish the view by Control-dragging from the File’s Owner icon in the Document
window to the UILabel in the view. Choose theCount when prompted to make the
connection.
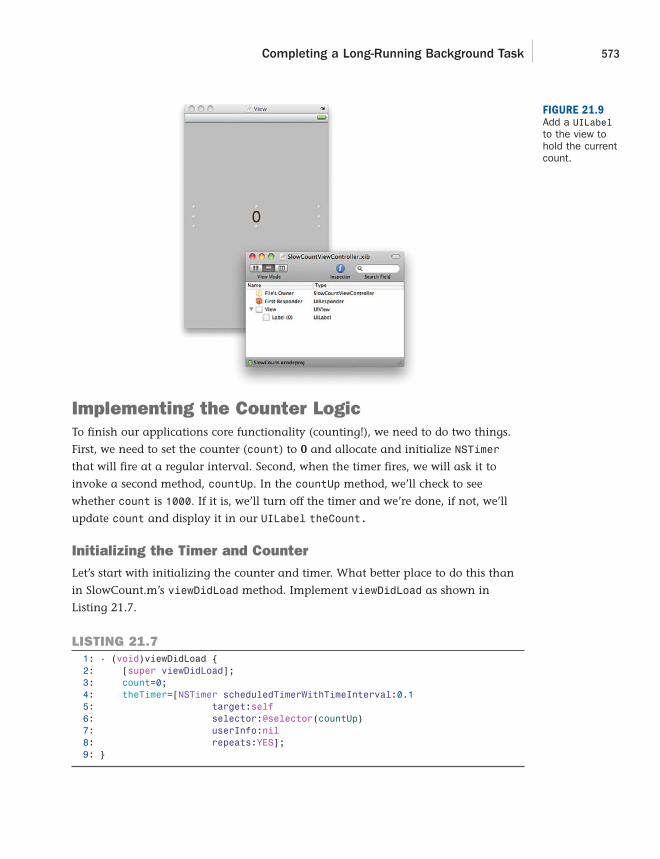
ptg
Completing a Long-Running Background Task 573
Implementing the Counter LogicTo finish our applications core functionality (counting!), we need to do two things.
First, we need to set the counter (count) to 0 and allocate and initialize NSTimer
that will fire at a regular interval. Second, when the timer fires, we will ask it to
invoke a second method, countUp. In the countUp method, we’ll check to see
whether count is 1000. If it is, we’ll turn off the timer and we’re done, if not, we’ll
update count and display it in our UILabel theCount.
Initializing the Timer and CounterLet’s start with initializing the counter and timer. What better place to do this than
in SlowCount.m’s viewDidLoad method. Implement viewDidLoad as shown in
Listing 21.7.
LISTING 21.71: - (void)viewDidLoad {2: [super viewDidLoad];3: count=0;4: theTimer=[NSTimer scheduledTimerWithTimeInterval:0.15: target:self6: selector:@selector(countUp)7: userInfo:nil8: repeats:YES];9: }
FIGURE 21.9Add a UILabelto the view tohold the currentcount.

ptg
574 HOUR 21: Building Background-Aware Applications
Line 3 initializes our integer counter, count, to 0.
Lines 4–8 initialize and allocate the theTimer NSTimer object with an interval of
0.1 seconds. The selector is set to use the method countUp, which we’ll be writing
next. The timer is set to keep repeating with repeats:YES.
All that remains is to implement countUp so that it increments the counter and dis-
plays the result.
Updating the Counter and DisplayAdd the countUp method, as shown in Listing 21.8, before the viewDidLoad method
in SlowCountViewController.m. This should be quite straightforward—if the count
equals 1000, we’re done and it’s time to clean up—otherwise, we count!
LISTING 21.81: - (void)countUp {2: if (count==1000) {3: [theTimer invalidate];4: [theTimer release];5: } else {6: count++;7: NSString *currentCount;8: currentCount=[[NSString alloc] initWithFormat:@”%d”,count];9: theCount.text=currentCount;10: [currentCount release];11: }12: }
Lines 2–4 handle the case that we’ve reached the limit of our counting
(count==1000). If it has, we use the timer’s invalidate method to stop it, and then
release it.
Lines 5–11 handle the actual counting and display. Line 5 updates the count vari-
able. Line 7 declares the currentCount string, which is then allocated and populat-
ed in line 8. Line 9 updates our theCount label with the currentCount string. Line
10 releases the string object.
Build and Run the application—it should do exactly what you expect—count slowly
until it reaches 1,000. Unfortunately, if you background the application, it will sus-
pend. The counting will cease until the application returns to the foreground.
Enabling the Background Task ProcessingTo enable the counter to run in the background, we need to mark it as a back-
ground task. We’ll use this code snippet to mark the beginning of the code we want
to execute in the background:

ptg
Completing a Long-Running Background Task 575
counterTask = [[UIApplication sharedApplication]beginBackgroundTaskWithExpirationHandler:^{
// If you’re worried about exceeding 10 minutes, handle it here}];
And we’ll use this code snippet to mark the end:
[[UIApplication sharedApplication] endBackgroundTask:counterTask];
If we were worried about the application not finishing the background task beforeit was forced to end (roughly 10 minutes), we could implement the optional codein the beginBackgroundTaskWithExpirationHandler block. You can alwayscheck to see how much time is remaining by checking the UIApplicationproperty backgroundTimeRemaining.
Let’s update our viewDidLoad and countUp methods to include these code additions.
In viewDidLoad, we’ll start the background task right before we initialize the count-
er. In countUp, we end the background task after count==1000 and the timer is
invalidated and released.
Update viewDidLoad as shown in Listing 21.9.
LISTING 21.9- (void)viewDidLoad {
[super viewDidLoad];
counterTask = [[UIApplication sharedApplication]
beginBackgroundTaskWithExpirationHandler:^{
// If you’re worried about exceeding 10 minutes, handle it here
}];
count=0;theTimer=[NSTimer scheduledTimerWithTimeInterval:0.1
target:selfselector:@selector(countUp)userInfo:nilrepeats:YES];
}
Then make the corresponding additions to countUp, demonstrated in Listing 21.10.
LISTING 21.10- (void)countUp {
if (count==1000) {[theTimer invalidate];[theTimer release];[[UIApplication sharedApplication] endBackgroundTask:counterTask];
} else {count++;
By theWay

ptg
576 HOUR 21: Building Background-Aware Applications
NSString *currentCount;currentCount=[[NSString alloc] initWithFormat:@”%d”,count];theCount.text=currentCount;[currentCount release];
}}
Save your project files, then Build and Run the application on your iPhone or in the
simulator. After the counter starts counting, pressing the Home button to move the
application to the background. Wait a minute or so, and then re-open the applica-
tion through the task manager or the application icon. The counter will have con-
tinued to run in the background!
Obviously, this isn’t a very compelling project itself, but the implications for what
can be achieved in real-world apps is definitely exciting!
Further ExplorationWhen I sat down to write this lesson, I was torn. Background tasks/multitasking is
definitely the “must have” feature of iOS 4.0, but it’s a challenge to demonstrate
anything meaningful in the span of a dozen or two pages. What I hope we’ve
achieved is a better understanding of how iOS multitasking works and how you
might implement it in your own applications. Keep in mind that this is not a com-
prehensive guide to background processing—there are many more features avail-
able, and many ways that you can optimize your background-enabled apps to max-
imize iPhone battery life and speed.
As a next step, you should read the following sections in Apple’s iPhone Application
Programming Guide (available through the Xcode documentation): “Executing Code
in the Background,” “Preparing Your Application to Execute in the Background,”
and “Initiating Background Tasks.”
As you review Apple’s documentation, pay close attention to the tasks that your
application should be completing as it enters the background. There are implica-
tions for games and graphic-intensive applications that are well beyond the scope of
what we can discuss here. How well you adhere to these guidelines will determine
whether Apple accepts your application or kicks it back to you for optimization.
LISTING 21.10 continued

ptg
577Workshop
SummaryBackground applications on iOS devices are not the same as background applica-
tions on your Macintosh. There are a well-defined set of rules that iOS background-
enabled applications you must follow to be considered “good citizens” of iOS 4.x. In
this hour’s lesson, you learned about the different types of backgrounding available
in iOS and the methods available to support background tasks. Over the course of
five tutorial applications, you put these techniques to the test, creating everything
from notifications triggered when an application isn’t running to a simple naviga-
tion app that provides background voice prompting.
You should now be well prepared to create your own background-aware apps and
take full advantage of the latest and greatest feature of iOS 4.0.
Q&AQ. Why can’t I run any code I want in the background?
A. Someday, I suspect you will, but for now the platform is constrained to the
specific types of background processing we discussed. The security and per-
formance implications of running anything and everything on a device that is
always connected to the Internet is enormous. Remember that the iPhone is a
phone. Apple intends to ensure that when your iPhone needs to be used as a
phone, it functions as one!
Q. What about timeline-based background processing, like IM clients?
A. Timeline-based processing (reacting to events that occur over time) is currently
not allowed in iOS. This is a disappointment but ensures that there aren’t
dozens of apps sitting on your phone, eating up resources, waiting for some-
thing to happen.
Workshop
Quiz1. Background tasks can be anything you want in iOS 4.0. True or false?
2. Any application you compile for iOS 4.0 will continue to run when the user
exits it. True or false?
3. Only a single long-running background task can be marked background com-
pletion. True or false?

ptg
578 HOUR 21: Building Background-Aware Applications
Answers1. False. Apple has a well-defined set of rules for implementing background pro-
cessing in iOS 4.0.
2. False. Applications will suspend in the background by default. To continue
processing, you must implement background tasks as described in this hour’s
lesson.
3. False. You can mark as many long-running tasks as you’d like, but they must
all complete within a set period of time (around 10 minutes).
Activities1. Return to a project in an earlier hour and properly enable it for background
processing.

ptg
HOUR 22
Building UniversalApplications
What You’ll Learn in This Hour:. What makes a universal application “universal”. How to use the universal application template. Ways of designing universal applications. How to detect the device an application is running on. Tools for migrating to a universal architecture
The iPhone and iPod Touch represent Apple’s entry into touch-based computing but aren’t
the only devices that your users may have in-hand. The venerable iPad has been an unde-
niable success and extends the iOS platform to a much larger screen. Even better, now
that you know how iPhone development works, you can easily transition over to the iPad
and create universal applications.
In this hour’s lesson, you’ll be learning how to create an application that runs on both the
iPhone and the iPad—termed a universal application by Apple. You’ll also learn, firsthand,
some of the problems that come with supporting an application that works on both plat-
forms, and some tips for overcoming them. You’re an iPhone developer now, but there’s no
reason why you can’t be an iPhone and iPad developer!
Universal Application DevelopmentCongratulations are in order! You’ve reached the point in the book where you should have
a good handle on iPhone development, so we’ll spend the next 3 hours looking at ways
that you can optimize and expand the reach of your projects, as well as ultimately deploy
them to the app store. This hour focuses on developing “universal” applications.

ptg
580 HOUR 22: Building Universal Applications
A universal application is one that contains the necessary resources to run on the
iPhone and the iPad. Although the iPad already supports running iPhone applica-
tions, they don’t look that great! To build a truly unique iPad experience, you’ll like-
ly need different XIB files, images, and maybe even completely different classes.
Your code may even need to make decisions on-the-fly about the type of device it is
running on.
If this is starting to sound like a bit of a pain, that’s because it can be! The iPhone
and iPad are not the same device. Users expect a different experience from each of
them; so, although an app may have the same functionality, it will likely need to
look and work differently depending on where it is running. Depending on how you
approach a universal application design, you might end up with duplicate classes,
methods, resources, and so on that you will need to support for each device. The
good news is that, from your user’s perspective, they get a single application that
they can run on either their iPhone, iPad, or both; and you get to reach a much
larger audience than targeting a single device.
Keep in mind that not all capabilities (such as cameras and GPS) are sharedacross your development platforms (iPhone/iPad/iPod Touch). Be sure that youplan your universal apps appropriately!
Not all developers have decided that a universal application is the best approach for
their projects. Many have created separate HD or XL versions of their apps that are
sold at a slightly higher price than the iPhone version. If your application is going
to be substantially different on the two platforms, this might be the route you want
to take, too. Even if it is, you can consolidate development into a single project that
builds two different executables, called targets. Later in the hour, we look at the tool
available in Xcode that can set this up for you.
There isn’t a “right” or “wrong” when deciding how to deal with a project thatspans the iPhone and iPad devices. As a developer, you will need to evaluate whatmakes the most sense for your code, your marketing plans, and your users.
If you know upfront that you want to create an application that works on any
device, you’ll likely begin development with the Universal Window-based
Application template.
By theWay
By theWay

ptg
Understanding the Universal Window-Based Application Template 581
Understanding the Universal Window-Based Application TemplateTo aid you in creating a universal application, Apple has included a helpful tem-
plate. When creating a new project in Xcode, you can choose the iOS Window-based
Application template and set the Product drop-down to Universal, as shown in
Figure 22.1.
FIGURE 22.1Begin your uni-versal applica-tions with theuniversal tem-plate.
The universal template is just like a typical window-based application but with a
key difference. Rather than a single Classes group, there are iPad and iPhone
groups. Each group contains a separate app delegate and separate MainWindow.xib
files, named MainWindow_iPad.xib and MainWindow_iPhone.xib, demonstrated in
Figure 22.2. As the names suggest, the files with the suffix Pad are used when the
application executes on the iPad and Phone when it is running on the iPhone.
Universal Plist ChangesA universal project’s plist file is also slightly different, showing the same differentia-
tion between platforms. This is where the actual “magic” takes place. The keys: Main
nib file base name and Main nib file base name (iPad) are defined, along
with values that point to the previously mentioned platform-specific XIB files. When
the application is launched, the XIB files referenced in the plist are opened, and
every object in them is instantiated. The rest of the application branches out from
these important starting points, a fact we put to the test shortly.

ptg
582 HOUR 22: Building Universal Applications
Icon FilesOne interesting note is that the current universal application template does not pro-
vide for multiple application icons. iPhone application icons are 57x57 pixels,
iPhone 4 icons are 114x114 pixels, but iPad icons are 72x72. To update the template
to support all the different icons, you must update the Icon File key in the plist to
Icon Files (as described in Hour 2’s “Project Properties” section) to enable multiple
icon files to be referenced by the project. This is done by just renaming the Icon File
key to Icon Files, as shown in Figure 22.3.
FIGURE 22.2A universalapplicationincludes distinctproject files forthe iPad andiPhone plat-forms.
FIGURE 22.3Add the IconFiles key, oftype Array, toreference twodistinct iconsfiles.

ptg
Did youKnow?
Understanding the Universal Window-Based Application Template 583
Within the Icon Files array, add two items: Icon for the 57x57 iPhone file
([email protected] for the 114x114 iPhone 4 is located automatically) and Icon-
iPad.png for the iPad’s 72x72 icon. Be sure that you also add corresponding
resources to your project! Even though we gave recommended names, technically
you don’t even need to say which is which. Because the icons are different dimen-
sions, the devices themselves can identify the correct icon and display it to the user.
Launch ImagesAnother key, or rather, set of keys, that you need to use with your application is
Launch image and Launch image (iPad). Recall that the launch image is the pic-
ture that is displayed as an application loads on your device. Because the iPhone
and iPad have different screen sizes, they require multiple types of launch images.
Use the Launch image key to set an image for the iPhone (a file with a @2x suffix
will be automatically loaded for the iPhone 4, if available), and the Launch image
(iPad) key to configure an image for the iPad.
Remember that orientation-specific launch images can be added by appending a “-”
followed by PortraitUpsideDown, LandscapeLeft, LandscapeRight, Portrait, and
Landscape to the base launch image filenames. These files do not need to be explic-
itly listed within the plist values.
On the iPhone, launch images should be created with the dimensions 320×480pixels (or 640×960 for the iPhone 4). If the device operates in landscape modeonly, those numbers are flipped to 480×320 and 960×640. If you are leaving thestatus bar visible, subtract 20 pixels from the vertical resolution. Because theiPad’s status bar is never supposed to be hidden, it’s launch images shouldalways have 20 pixels removed from the vertical dimension—that is, 768×1024pixels (portrait) or 1024×748 (landscape).
Beyond those minor tweaks, the universal application template is very much
“ready” to go. I could, at this point, just say “use it,” but this chapter wouldn’t be
very useful if I did. Let’s go ahead and take the Universal Window-based Application
template to a place where it becomes useful. We’ll build out an application that
launches and displays different views and executes a simple line of code on both the
iPad and iPhone platforms.
Creating a Universal Application (Take 1)We’re going to go through the process of building two universal applications. Either
approach is valid, but the first application will help demonstrate some of the ineffi-
ciencies that you should try to avoid when coding a single app for two platforms.

ptg
584 HOUR 22: Building Universal Applications
Both examples have the same purpose: to launch, instantiate a view controller, load
a device specific view, and then display a string that identifies the type of device the
code is running on. It’s not the most exciting thing we’ve done in the book, but it
should give you the background you need to build your apps for all of Apples “i”
devices. Figure 22.4 demonstrates the outcome we hope to achieve.
FIGURE 22.4We will createan applicationthat runs anddisplays infor-mation oniPhone and iPaddevices.
Preparing the ProjectBegin by creating a new window-based application with a Product setting ofUniversal. Name the application Universal, in case there’s any question of what we’retrying to do. As we discussed, this template provides us with someMainWindow_<platform>.xib files and an application delegate class, but there reallyisn’t any “meat” to the template. We’re used to building things out using view con-trollers, so adding view controllers for the iPad and iPhone seems like a good first step.
Adding Device-Specific View Controllers and ViewsWe’ll start by adding an iPad-specific view controller, as follows:
1. Choose File, New File from the Xcode menu.
2. When prompted, choose the Cocoa Touch Class category and theUIViewController subclass.
3. Be sure that the Targeted for iPad is unchecked, but that With XIB for UserInterface is checked.
4. Name the new class iPhoneViewController, and be sure that an interface (.h)file is created, too.

ptg
Understanding the Universal Window-Based Application Template 585
5. After the files are added to your project, drag them into the iPhone groupwithin the Groups and Files list.
Now we need to repeat the process for the iPad. Again, Choose File, New File from
the Xcode menu and follow the same steps. This time, however, check the Targeted
For iPad check box (leave the XIB check box checked), and name the class
iPadViewController. Drag the resulting files into the iPad group.
Adding the View Controllers to the Application DelegatesOur universal application now has view controllers for both our platforms, but they
aren’t connected to anything. To be useful, we need to instantiate them and add
their views to our windows within AppDelegate_iPhone and AppDelegate_iPad.
Concentrating again on the iPhone version of the files, open the AppDelegate_
iPhone.h file, and add an outlet named phoneViewController for an instance of
our iPhoneViewController class. Because we’re referencing a new class, we also
need to import the iPhoneViewController.h interface file. Lastly, be sure to add a
@property declaration for the view controller. The final AppDelegate_iPhone.h file
is shown in Listing 22.1.
LISTING 22.1#import #import “iPhoneViewController.h”
@interface AppDelegate_iPhone : NSObject {UIWindow *window;IBOutlet iPadViewController *phoneViewController;
}
@property (nonatomic, retain) IBOutlet UIWindow *window;@property (nonatomic, retain) iPhoneViewController *phoneViewController;
@end
Within the AppDelegate_iPhone.h file, add a corresponding @synthesize line after
the @implementation line:
@synthesize phoneViewController;
Then, as we’ve done so many times in the past, release the phoneViewController
within the AppDelegate_iPhone.m’s dealloc method:
- (void)dealloc {[phoneViewController release];
[window release];[super dealloc];
}
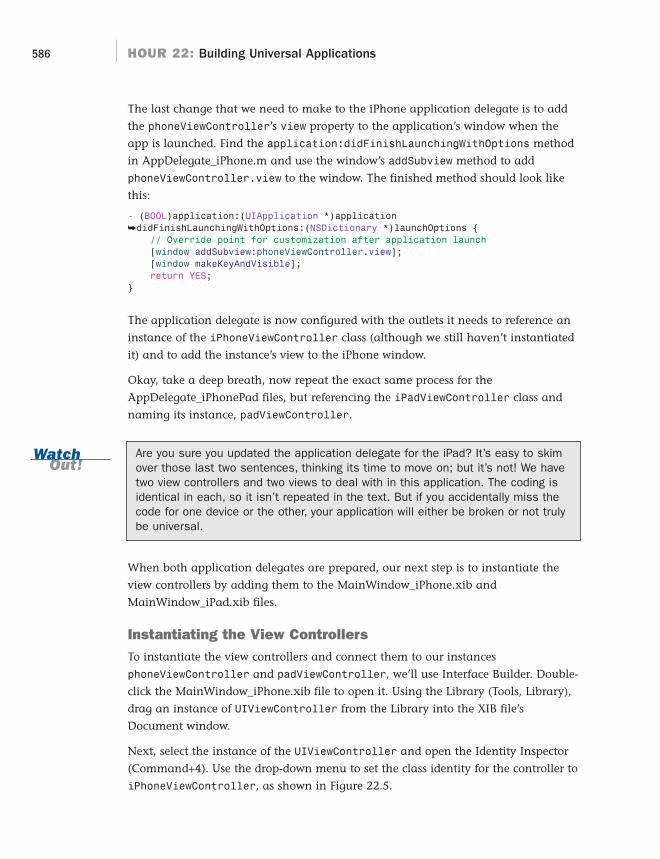
ptg
586 HOUR 22: Building Universal Applications
The last change that we need to make to the iPhone application delegate is to add
the phoneViewController’s view property to the application’s window when the
app is launched. Find the application:didFinishLaunchingWithOptions method
in AppDelegate_iPhone.m and use the window’s addSubview method to add
phoneViewController.view to the window. The finished method should look like
this:
- (BOOL)application:(UIApplication *)application ➥didFinishLaunchingWithOptions:(NSDictionary *)launchOptions {
// Override point for customization after application launch[window addSubview:phoneViewController.view];[window makeKeyAndVisible];return YES;
}
The application delegate is now configured with the outlets it needs to reference an
instance of the iPhoneViewController class (although we still haven’t instantiated
it) and to add the instance’s view to the iPhone window.
Okay, take a deep breath, now repeat the exact same process for the
AppDelegate_iPhonePad files, but referencing the iPadViewController class and
naming its instance, padViewController.
Are you sure you updated the application delegate for the iPad? It’s easy to skimover those last two sentences, thinking its time to move on; but it’s not! We havetwo view controllers and two views to deal with in this application. The coding isidentical in each, so it isn’t repeated in the text. But if you accidentally miss thecode for one device or the other, your application will either be broken or not trulybe universal.
When both application delegates are prepared, our next step is to instantiate the
view controllers by adding them to the MainWindow_iPhone.xib and
MainWindow_iPad.xib files.
Instantiating the View ControllersTo instantiate the view controllers and connect them to our instances
phoneViewController and padViewController, we’ll use Interface Builder. Double-
click the MainWindow_iPhone.xib file to open it. Using the Library (Tools, Library),
drag an instance of UIViewController from the Library into the XIB file’s
Document window.
Next, select the instance of the UIViewController and open the Identity Inspector
(Command+4). Use the drop-down menu to set the class identity for the controller to
iPhoneViewController, as shown in Figure 22.5.
WatchOut!

ptg
Understanding the Universal Window-Based Application Template 587
Switch to the Attributes Inspector (Command+1) and be sure that the NIB file attrib-
ute is set to use iPhoneViewController.xib for its view contents.
Finally, connect the view controller instance to the phoneViewController outlet added
earlier. Control-drag from the AppDelegate_iPhone object to the view controller instance,
choosing phoneViewController when prompted. This is demonstrated in Figure 22.6.
FIGURE 22.5Set theUIViewControl-ler object tothe specificdevice-targetedview controllerclass.
FIGURE 22.6Connect theview controllerinstance to thephoneView-Controlleroutlet.
Save the XIB file. You’ve just finished the setup of the view controller for the iPhone.
Guess what? The process needs to be repeated for the MainWindow_iPad.xib file.
Follow the same steps, but using the iPadViewController class and connecting the
AppDelegate_iPad to the padViewController outlet.

ptg
WatchOut!
588 HOUR 22: Building Universal Applications
Hold up! I just want to make sure that you did indeed repeat the instructions forthe iPad side of the application. If you skipped over the last paragraph, bad thingscould happen. (Most likely, your application will crash spectacularly!)
At this point, you should have a working universal application that instantiates two
separate view controllers and loads two different views, depending on what device it
is running on. This, however, isn’t readily apparent because the views don’t actually
do anything. We’ll finish this project up by editing the iPhoneViewController and
iPadViewController to add a teensy bit of functionality to the app.
Detecting and Displaying the Active DeviceOur goal for our application is to get and display the name of the device that it is
running on. To do this, we’ll use a UIDevice class method currentDevice to get an
object that refers to the active device, and then model to return an NSString that
describes the device (such as iPhone, iPhone Simulator, and so on). The code frag-
ment to return this string is just this:
[[UIDevice currentDevice] model]
To get this displayed in our views, we’ll first concentrate on the iPhone. Open the
iPhoneViewController.h file and add a UILabel reference called deviceType, along
with the @property declaration, as shown in Listing 22.2.
LISTING 22.2#import
@interface iPhoneViewController : UIViewController {IBOutlet UILabel *deviceType;
}
@property (nonatomic,retain) UILabel *deviceType;
@end
Open the iPhoneViewController.m implementation file and add a corresponding
@synthesize directive after the @implementation line:
@synthesize deviceType;
Keep things clean by releasing deviceType in the dealloc method:
- (void)dealloc {[deviceType release];
[super dealloc];}

ptg
Understanding the Universal Window-Based Application Template 589
While we’re at it, we might as well add the code to set the deviceType label when
the view is loaded. Uncomment the viewDidLoad method and implement it like this:
- (void)viewDidLoad {deviceType.text=[[UIDevice currentDevice] model];
[super viewDidLoad];}
The last step is to open the iPhoneViewController.xib file itself and design the view.
In mine, I’ve added a big label that reads I’m an iPhone App!, and then a Device
label beneath it, as shown in Figure 22.7.
FIGURE 22.7Build the viewto look howeveryou want; justmake surethere’s a label(Device here) toconnect back tothe deviceTypeoutlet.
When your design is done, Control-drag from the File’s Owner icon to the label you
want to use to display the device type. Choose deviceType from the pop-up window
when prompted. You can now save and close the iPhoneViewController.xib file. The
iPhone view/view controller is complete.
You know what I’m going to say next. You’re not done. You need to repeat all of
these steps for the iPadViewController class, too. Add the deviceType outlet,
implement the viewDidLoad method, design the view, connect the outlet…whew…
and after you’ve made it through all of that, then you’re done.
Just checking in to make sure you’re still awake! The steps outlined in the textcover the iPhone view controller and view. Make sure you also complete theiPadViewController implementation!
WatchOut!

ptg
590 HOUR 22: Building Universal Applications
At this point, you can choose Build and Run and finally see the results on the
iPhone or iPad. So what have you learned? Hopefully, that universal applications
are not necessarily easy to maintain and that if you structure the application so
that no classes are shared, you’ll end up repeating yourself a lot.
Our next example shows a variation of this project. It will do the exact same thing,
but instead of using two different view controllers, we use one that can load two dif-
ferent views. It isn’t perfect, but sharing code between the platforms is a good habit
to get into.
To target a specific platform in the simulator, the easiest way is to use theOverview menu in Xcode. For example, choose iPad Simulator 3.2 to force theapplication to run on the iPad, or iPhone Simulator 4.0 to force it to the iPhone.
Creating a Universal Application (Take 2)Our second pass at building a universal application will work similarly to what we
just built, but with one distinct difference. Instead of creating iPhoneViewController
and iPadViewController classes, we’ll create a view controller class called
GenericViewController that loads one of two views: an iPhone view when instanti-
ated by the iPhone application delegate and an iPad view when instantiated by the
iPad delegate.
Preparing the ProjectStart the second tutorial the same way as the first: Create a new window-based
application with a Product setting of Universal. Name the new application
UniversalToo. Next, we need to create the generic view controller class that will
work with both the iPhone and iPad views.
Adding a Generic View Controller and Device-Specific Views1. Choose File, New File from the Xcode menu.
2. When prompted, choose the Cocoa Touch Class category and the
UIViewController subclass.
3. Uncheck all the check boxes. (This is a first!)
4. Name the new class GenericViewController, and be sure that an interface
(.h) file is created, too.
5. After the files are added to your project, drag them into the Shared group
within the Groups and Files list.
Did youKnow?

ptg
Understanding the Universal Window-Based Application Template 591
Next, we need to create the XIB files that will contain the interfaces for the iPhone
and iPad:
1. Choose File, New File from the Xcode menu.
2. Select the User Interface category, and then pick the View XIB icon.
3. Set the product to iPhone and click Next.
4. Name the new XIB file iPhoneView.xib.
5. Drag the file into the iPhone group after it is created.
6. Repeat steps 1–5, creating a View XIB file targeted to the iPad, but in this case
name the view iPadView.xib.
7. Drag it to the iPad group so that things stay organized.
We now have a single view controller class and two views. Let’s see how they get
connected to the app.
Adding the View Controller to the Application DelegatesUnlike the previous tutorial, we have only a single view controller to deal with. That
said, there is still a bit of duplicate setup work that we need to complete, starting
with adding the view controller to both of the application delegates.
Open the AppDelegate_iPhone.h file, add an outlet named viewController for an
instance of GenericViewController class, import the GenericViewController.h
interface file, and add a @property declaration for the view controller. Listing 22.3
shows a completed AppDelegate_iPhone.h file.
LISTING 22.3#import <UIKit/UIKit.h>#import “GenericViewController.h”
@interface AppDelegate_iPhone : NSObject {IBOutlet GenericViewController *viewController;UIWindow *window;
}
@property (nonatomic, retain) IBOutlet UIWindow *window;@property (nonatomic, retain) IBOutlet GenericViewController *viewController;
@end
Within the AppDelegate_iPhone.h file, add a corresponding @synthesize line after
the @implementation line:
@synthesize viewController;

ptg
592 HOUR 22: Building Universal Applications
Next, release the phoneViewController within the AppDelegate_iPhone.m’s deal-
loc method:
- (void)dealloc {[viewController release];
[window release];[super dealloc];
}
As in the previous tutorial, the last step is to add the view controller’s view to the
window. Find the application:didFinishLaunchingWithOptions method in
AppDelegate_iPhone.m and use the window’s addSubview method to add
viewController.view to the window. The finished method should look like this:
- (BOOL)application:(UIApplication *)application ➥didFinishLaunchingWithOptions:(NSDictionary *)launchOptions {
// Override point for customization after application launch[window addSubview:viewController.view];[window makeKeyAndVisible];return YES;
}
Repeat the process for the AppDelegate_iPad class. Unlike last time, however, the
view controller class is not unique for the iPad. The code you add to the application
delegate will be absolutely identical to what was built for AppDelegate_iPhone.
This is one of those rinse-and-repeat moments. Make sure that you’ve finishedbuilding out both AppDelegate_iPhone and AppDelegate_iPad before continuing.
The next step is to instantiate the view controllers by adding it to the
MainWindow_iPhone.xib and MainWindow_iPad.xib files.
Instantiating the View ControllersDouble-click the MainWindow_iPhone.xib file to open it. Using the Library (Tools,
Library), drag an instance of UIViewController from the Library into the XIB file’s
Document window.
Select the instance of the UIViewController and open the Identity Inspector
(Command+4). Use the drop-down menu to set the class identity for the controller to
GenericViewController, as shown in Figure 22.8.
Next, use the Attributes Inspector (Command+1) to set the NIB file attribute to
iPhoneView.xib.
Finish up by connecting the view controller instance to the viewController outlet
added earlier. Control-drag from the AppDelegate_iPhone object to the view con-
troller instance, choosing viewController when prompted, as shown in Figure 22.9.
WatchOut!

ptg
Understanding the Universal Window-Based Application Template 593
Save the XIB file. Open the MainWindow_iPad.xib file and repeat the setup of the
GenericViewController instance and the connection to the viewController out-
put. The only change is that you should select the iPadView.xib for the interface NIB
file, rather than iPhoneView.xib.
Be sure that you’ve completed setup of the MainWindow xib files for both theiPhone and iPad before continuing; otherwise, only one platform will work.
Setting Up the XIB filesBy creating the XIB files without a corresponding view controller, we lose a little bit
of configuration that normally we get for free. Specifically, the File’s Owner is not set
to the appropriate class, nor is the view itself connected to the File’s Owner.
FIGURE 22.8Set the UIViewControllerobject to theGenericViewControllerclass.
FIGURE 22.9Connect theview controllerinstance to theviewControlleroutlet.
WatchOut!
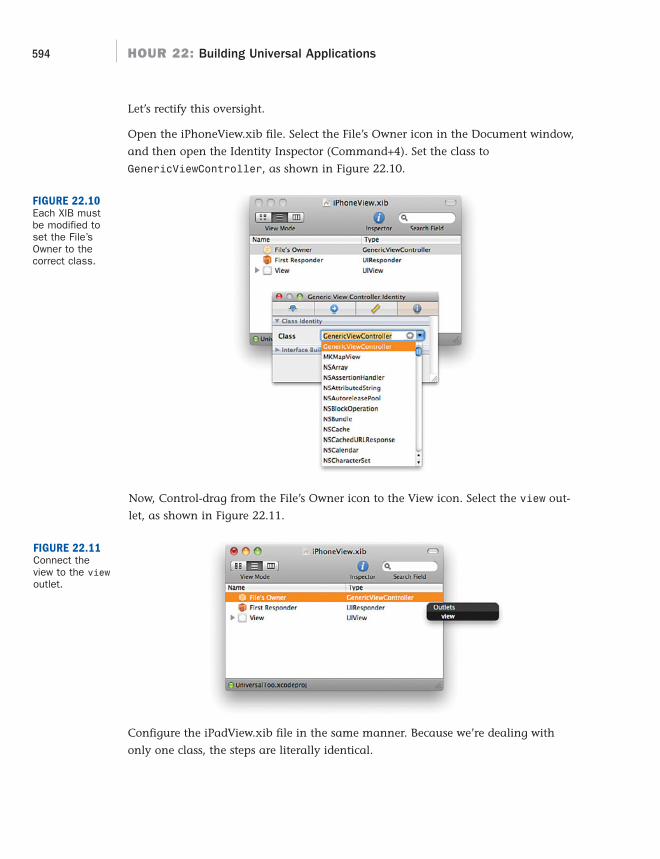
ptg
594 HOUR 22: Building Universal Applications
Let’s rectify this oversight.
Open the iPhoneView.xib file. Select the File’s Owner icon in the Document window,
and then open the Identity Inspector (Command+4). Set the class to
GenericViewController, as shown in Figure 22.10.
FIGURE 22.10Each XIB mustbe modified toset the File’sOwner to thecorrect class.
Now, Control-drag from the File’s Owner icon to the View icon. Select the view out-
let, as shown in Figure 22.11.
FIGURE 22.11Connect theview to the viewoutlet.
Configure the iPadView.xib file in the same manner. Because we’re dealing with
only one class, the steps are literally identical.

ptg
WatchOut!
Understanding the Universal Window-Based Application Template 595
Before continuing, be sure that you’ve configured both the iPadView.xib andiPhoneView.xib files as described.
The application skeleton is now complete. To finish the functionality, we need to
implement the logic in GenericViewController, including defining the
deviceType outlet, and connect to the outlet from the iPhoneView.xib and
iPadView.xib views.
Implementing the Generic View ControllerOpen the GenericViewController.h file and add a UILabel reference called
deviceType, along with the @property declaration, as shown in Listing 22.4.
LISTING 22.4#import <UIKit/UIKit.h>
@interface GenericViewController : UIViewController {IBOutlet UILabel *deviceType;
}
@property (nonatomic,retain) UILabel *deviceType;
@end
Open GenericViewController.m, and add a @synthesize directive for deviceType
after the @implementation line:
@synthesize deviceType;
Clean up by releasing deviceType in the dealloc method:
- (void)dealloc {[deviceType release];
[super dealloc];}
Complete the class by implementing the viewDidLoad method just as we did in the
last tutorial:
- (void)viewDidLoad {deviceType.text=[[UIDevice currentDevice] model];
[super viewDidLoad];}
Implementing the iPhone and iPad ViewsFinish this second project by opening and implementing the iPhoneView.xib and
iPadView.xib files exactly as you did in the first project. Add a UILabel, if you want,

ptg
596 HOUR 22: Building Universal Applications
that states what type of device the view is for, and then a second label that will be
connected to the deviceType outlet.
Control-drag from the File’s Owner icon to the device type label you want to use to dis-
play the device type. Choose deviceType from the pop-up window when prompted.
Last time I’ll say this: Make sure that you’ve built the views for both iPadView.xiband iPhoneView.xib!
If you Build and Run the UniversalToo application, it should appear exactly thesame as the first application. There is, however, one very important difference. Thisapplication shares a view controller between the iPhone and the iPad. Any logicthat is implemented in the view controller (such as the display of the device type inthe deviceType label) needs to be implemented only once!
The TakeawayGranted, both Universal and UniversalToo required work. Although UniversalToorequired more time setting up the XIB files, those configuration changes never needto change once put into place.
Imagine what would happen if the application we were building included thou-sands of lines in the view controller. In UniversalToo, the code has to be maintainedonly in one place. In the Universal app, however, any changes to the iPad view con-troller would have to be copied into the iPhone view controller, and vice versa.Extend this approach across multiple classes and you’ll quickly see how the mainte-nance of an application like Universal could spiral out of control.
In short, look for opportunities to consolidate classes and share code within youriPad and iPhone applications. You’ll almost always need to create multiple XIB files,but there’s a big difference between keeping and maintaining different interface filesand maintaining the same methods repeated over and over and over.
Other Universal Application ToolsYou’ll want to take advantage of a few additional tools within Interface Builder and
Xcode. Within Xcode, for example, you can quickly prepare a universal applica-
tion—or automate the conversion of an iPhone application to the iPad.
Upgrading an iPhone TargetTo do this, open your project file in Xcode, expand the Targets group, selecting the
enclosed target. Next, choose Upgrade Current Target for iPad from the Project
menu. The upgrade dialog will appear, as shown in Figure 22.12.
WatchOut!

ptg
Other Universal Application Tools 597
You can choose between One Universal Application and Two Device-Specific
Applications. The first choice will create iPad resources, including views, with the
same split delegate approach that we used earlier this hour. The second option
again creates iPad resources, but they are segregated from the iPhone application.
Although you can share resources and classes, you will choose between an iPhone
and iPad target when building, thus creating distinct executables for both platforms.
Click OK to complete the conversion and upgrade your iPhone project for the iPad.
Converting InterfacesAnother helpful tool is Interface Builder’s Create iPhone/iPod Touch Version and
Create iPad Version features. When viewing an interface for the iPhone or iPad, you
can convert to the other device type using these options, found under the File menu.
A new copy of the XIB will be created with an auto “magically” generated view, as
shown in Figure 22.13.
You’ll notice that there are two variations of interface conversion function: onethat uses autosizing masks and one that doesn’t. Autosizing masks will attemptto resize objects within the view in a way that “makes sense” for the variousscreen sizes. Try each option, view the results, and choose the one that comesclosest to what you want.
FIGURE 22.12Xcode can helpyou upgradeyour iPhoneapps to run onthe iPad.
Did youKnow?

ptg
598 HOUR 22: Building Universal Applications
Further ExplorationThe best way to learn more about universal applications is to start building them.
Apple’s developer documentation, “iPad Human Interface Guidelines” and “iPhone
Human Interface Guidelines,” will help you understand how your application’s
interface can be presented on each device.
These documents are also important because what is “acceptable” on one platform
(according to Apple) might not be acceptable on the other. iPhone UI classes such as
UIPickerView and UIActionSheet, for example, cannot be displayed directly within a
view on the iPad. These features require the use of a popover (UIPopoverController)
to meet Apple’s guidelines. In fact, this UI feature is probably one of the largest differ-
ences between developing interfaces for the platforms. Be sure to read up on
UIPopoverController before simply converting your interface to the iPad.
FIGURE 22.13Create iPad ver-sions of aninterface froman iPhone viewor vice versa.

ptg
599Workshop
SummaryThis hour’s lesson covered the process of building universal applications on the
iPhone and iPad platforms. Using the Universal Window-based Application tem-
plate, you can quickly create an application that is customized to the device that it
is running on. As you (somewhat painfully) learned, one of the problems in devel-
oping a universal application is avoiding duplicating code. In the first example,
multiple view controllers were used, resulting in essentially two different applica-
tions within a single executable. The second tutorial, however, combined the appli-
cation logic into a single view controller that displayed either a iPhone or iPad view.
The lesson ended with a quick look at a few tools built in to Xcode and Interface
Builder that can help convert your existing applications and views so that they can
target both iPhone and iPad platforms.
Q&AQ. Why isn’t everyone building universal applications?
A. Surprisingly, many people are creating versions of their iPhone applications
that run only on the iPad. In my opinion, this is being driven by two things.
First, many applications, when expanded for the iPad, are “different” enough
that a separate application is warranted. Second, I think that many develop-
ers see the potential for higher profits by selling multiple copies of their apps!
Q. I want to share code, but my views are too different to share a controller.What do I do?
A. Look for opportunities to create other shared classes. View controllers aren’t
the only opportunity for shared code. Any application logic that is shared
between the iPhone and iPad could potentially be placed in its own class.
Workshop
Quiz1. Universal apps run on the Mac, iPhone, and iPad. True or false?
2. Apple requires that any app available for both the iPhone and iPad be sub-
mitted as a universal application. True or false?
3. Only a single icon is required for universal applications. True or false?
ptg
600 HOUR 22: Building Universal Applications
Answers1. False. Universal apps run only on the iPhone and iPad platforms (not includ-
ing the iPhone simulator on the Mac).
2. False. You can create separate applications for iPad and iPhone platforms, or
a universal app. Apple does not take this into account during evaluation.
3. False. You must add a CFBundleIconFiles array to the project’s plist file con-
taining icons for both the iPad and iPhone.
Activities1. Return to a project in an earlier hour and create an iPad-ready version!

ptg
HOUR 23
Application Debugging andOptimization
What You’ll Learn in this Hour:. Debugging in Xcode. Monitoring with Instruments. Profiling with Shark
Despite our best efforts, no application is ever bug-free. The ability to find and eliminate
bugs quickly is an essential skill.
This hour covers the debugging, tracing, and profiling tools included in the iOS SDK. You
learn how to use Xcode’s debugger to find and correct errors. We also delve into the
Instruments and Shark tools to profile an application’s resource usage and performance.
This potent combination of tools can help you deliver applications that run more efficient-
ly and with fewer bugs.
With the term debugging, it is assumed your project builds with noerrors but then encounters an error or otherwise fails to work asdesigned when it’s executed. If there is an error in your code that pre-vents it from building, you are still coding, not debugging. The tools inthis hour are for improving applications that build but then have errorsor resource-utilization problems.
Debugging in XcodeXcode brings together the five basic tools of the software developer’s trade into a single
application: the text editor, compiler, linker, debugger, and reference documentation.
Xcode has debugging tools integrated within it, and so all your debugging activities can
take place from within the now-familiar confines of Xcode.
By theWay
ptg
602 HOUR 23: Application Debugging and Optimization
Debugging with NSLogThe first, and most primitive, debugging tool in your Xcode arsenal is the humble
NSLog function. Many a gnarly bug has been slain with just this function alone. At
any point in your application, you can embed a call to NSLog to confirm the flow of
your application into and out of methods or to check the current value of a vari-
able. Any statement you log with NSLog is echoed to Xcode’s Debugger Console.
To show the Debugger Console, choose Run, Console from the Xcode menu bar orpress Command+Shift+R.
The NSLog function takes an NSString argument that can optionally contain string
format specifiers. NSLog then takes a variable number of arguments that are insert-
ed into the string at the location of the specifiers. This is colloquially known as
“printf style” from the C printf function.
A string format specifier is nothing more than a percent sign (%) followed by one or
two characters. The characters after the % sign indicate the type of the variable that
will be displayed. You can get the full list of string format specifiers from the “String
Format Specifier” section of the String Programming Guide for Cocoa in Xcode’s Help.
Three string format specifiers to learn and know are %i for integers (often used to
debug loop counters and array offsets), %f for floats, and %@ for any Objective-C
object, including NSString objects. Here are a few examples of typical NSLog func-
tion calls:
NSLog(@”Entering method”);
int foo = 42;float bar = 99.9;NSLog(@”Value of foo: %i, Value of bar: %f”, foo, bar);
NSString *name = [[NSString alloc]initWithString: @”Prince”];NSDate *date = [NSDate distantPast];NSLog(@”Value of name: %@, Value of date: %@”, name, date);[name release];
And here is what the output from these calls looks like in the Debugger Console:
[Session started at 2010-07-25 14:18:56 -0400.]2010-07-25 14:19:29.289 TestLogger[15755:207] Entering method
2010-07-25 14:19:29.291 TestLogger [15755:207] Value of foo: 42, Value of bar:
➥99.900002
2010-07-25 14:19:29.356 TestLogger [15755:207] Value of name: Prince, Value of
➥date: 0001-12-31 19:00:00 -0500
Did youKnow?

ptg
By theWay
Debugging in Xcode 603
When the %@ string format specifier is used with an Objective-C object, the object’sdescription method is called—this can provide additional information about theobject within the debugging output. Many of Apple’s classes include an implemen-tation of description that is useful for debugging. If you need to debug your ownobjects with NSLog, you can implement description, which returns an NSStringvariable.
As its name implies, the NSLog function is actually intended for logging, notdebugging. In addition to printing the statements to Xcode’s console, the state-ments are written out to a file on the file system. Logging to the file system is notwhat you’re intending, it’s just a side effect of using NSLog for debugging. It’s easyto accidentally leave old NSLog statements in your code after you’ve finisheddebugging, which means your application is taking time to write out statements tothe file system and is wasting space on the user’s device. Search through yourproject and remove or comment old NSLog statements in your application beforeyou build a release to distribute.
Building a Project for DebuggingNSLog is a good quick-and-dirty approach to debugging, but it is not the best tool for
debugging more complex issues. It’s often more productive to use a debugger, which
is a tool that lets you examine a running program and inspect its state. It’s been
said that what separates true software development professionals from weekend
hackers is the ability to proficiently use a debugger. If this statement is true, you are
in luck, because using Xcode’s debugger is not hard.
Normally an application executes at computer speeds, which on an iPhone is mil-
lions of instructions per second. A debugger acts like the developer’s brake, slowing
the progress of the application down to human speeds and letting the developer
control the progress of the program from one instruction to the next. At each step in
the program, the developer can use the debugger to examine the values of the vari-
ables in the program to help determine what’s gone wrong.
Debuggers work on the machine instructions that are compiled from an applica-
tion’s source code. With a source-level debugger, however, the compiler provides
data to the debugger about which lines of source code generated which instructions.
Using this data, the source-level debugger insulates the developer from the machine
instructions generated by the compiler and lets the developer work with the source
code he has written.
Xcode’s debugger, called gdb (GNU Debugger), is a source-level debugger. The com-
piler doesn’t always generate the data needed for source-level debugging. It can
WatchOut!

ptg
By theWay
604 HOUR 23: Application Debugging and Optimization
amount to a lot of data, and it provides no benefit to an application’s users, so the
data is not generated in a release build configuration. Before you can benefit from
source-level debugging, you need to build your application in a debug build config-
uration that will generate the debug symbols.
By default, a new Xcode project comes with two build configurations, Debug and
Release. The Debug build configuration includes debug symbols, whereas the Release
build configuration does not. Whenever you are working on developing your applica-
tion, use the Debug configuration so that you can drop into the debugger whenever
you need to. Because Debug is usually the build configuration you want to work
with, it’s the default configuration, too. To switch back and forth between the Debug
and Release configurations, use the Overview drop-down menu, demonstrated in
Figure 23.1, or choose Project, Set Active Build Configuration, Debug from the menu.
FIGURE 23.1Set theConfiguration inthe Overviewdrop-downmenu.
Make sure you remember to use the Release build configuration when you createa version of your application for distribution. See Hour 24, “DistributingApplications Through the App Store,” for details on preparing your application fordistribution.
Setting Breakpoints and Stepping Through CodeCreate a new Xcode project with the View-Based Application template and call it
DebuggerPractice. Many of Xcode’s debugging features are located on the left side
of the content area, called the “gutter,” shown in Figure 23.2.

ptg
Debugging in Xcode 605
The debugger frequently references source code line numbers, and it is helpful to
have these displayed in the gutter.
If you don’t see the gutter or if your gutter is not displaying line numbers, openthe Xcode, Preferences menu, and check the Show Gutter and Show LineNumbers check boxes in the Text Editing tab.
Open the DebugPracticeViewController.m file in the Classes group and uncomment
the viewDidLoad method. Add a for loop that uses NSLog to display the numbers
between 1 and 10 in Xcode’s debugger console. Next, add a describeInteger
method with a conditional to return a string that describes the number as odd or
even, as shown in Listing 23.1.
LISTING 23.1-(NSString *)describeInteger:(int)i {
if (i % 2 == 0) {return @”even”;
} else {return0 @”odd”;
}
}
- (void)viewDidLoad {[super viewDidLoad];
NSString *description;
NSLog(@”Start”);for (int i = 1;i <= 10;i++) {
Gutter
FIGURE 23.2Xcode’s guttercontains usefulfeatures fordebugging.
Did youKnow?

ptg
606 HOUR 23: Application Debugging and Optimization
description = [self describeInteger:i];NSLog(@”Variables: i - %i and description - %@”, i, description);
}NSLog(@”Done”);
}
Click the Breakpoints button in the Xcode toolbar, and then choose Run, Debug
from the menu. The program starts up and brings us to our application’s empty
view. The output from our NSLog statements are in the Debugger Console. As shown
in Figure 23.3, there is some extra, unbolded output from gdb, and a gdb prompt,
but nothing else indicates that we are running in the debugger.
LISTING 23.1 continued
FIGURE 23.3The debugger iswaiting….
The gdb debugger is running; we just haven’t told it that we want it to do anything.
The most common way to start interacting with the debugger is to set a breakpoint
in your application’s source code.
Setting a BreakpointA breakpoint is an instruction to the debugger letting it know you want the program
execution to pause at that point. To set a breakpoint, click once in the gutter next to
the line where you want the application to pause. A breakpoint will appear as a
blue arrow, demonstrated in Figure 23.4. Click the blue arrow to toggle the break-
point off and on. When the breakpoint is on, it is displayed as dark blue. When it is
off, it is light blue, and the debugger ignores it. To remove a breakpoint, right-click it
and select Remove Breakpoint from the contextual menu, or simply drag it out of
the Xcode gutter and it will disappear.

ptg
Debugging in Xcode 607
Let’s create and use a breakpoint. Quit the execution of the application and click the
gutter to set a breakpoint next to this line:
NSLog(@”Variables: i - %i and description - %@”, i, description);
Make sure the Breakpoints icon is highlighted in the toolbar (this enables/disables
debugging breakpoints), and then click the Build and Debug icon. Notice that the
application stops after printing just one log statements to the Debugger Console:
2010-07-29 21:28:13.115 DebugPractice[1257:207]
The debugger has paused the execution of the application at our breakpoint and is
awaiting further direction, as shown in Figure 23.5.
FIGURE 23.4Set a break-point by clickingin the gutter.
FIGURE 23.5The debuggerpauses atbreakpoints.
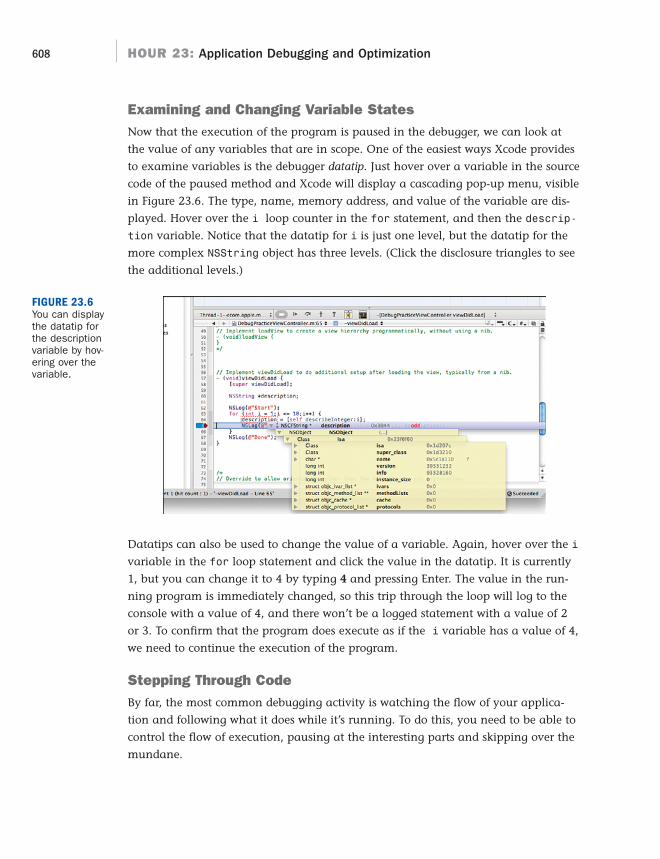
ptg
608 HOUR 23: Application Debugging and Optimization
Examining and Changing Variable StatesNow that the execution of the program is paused in the debugger, we can look at
the value of any variables that are in scope. One of the easiest ways Xcode provides
to examine variables is the debugger datatip. Just hover over a variable in the source
code of the paused method and Xcode will display a cascading pop-up menu, visible
in Figure 23.6. The type, name, memory address, and value of the variable are dis-
played. Hover over the i loop counter in the for statement, and then the descrip-
tion variable. Notice that the datatip for i is just one level, but the datatip for the
more complex NSString object has three levels. (Click the disclosure triangles to see
the additional levels.)
FIGURE 23.6You can displaythe datatip forthe descriptionvariable by hov-ering over thevariable.
Datatips can also be used to change the value of a variable. Again, hover over the i
variable in the for loop statement and click the value in the datatip. It is currently
1, but you can change it to 4 by typing 4 and pressing Enter. The value in the run-
ning program is immediately changed, so this trip through the loop will log to the
console with a value of 4, and there won’t be a logged statement with a value of 2
or 3. To confirm that the program does execute as if the i variable has a value of 4,
we need to continue the execution of the program.
Stepping Through CodeBy far, the most common debugging activity is watching the flow of your applica-
tion and following what it does while it’s running. To do this, you need to be able to
control the flow of execution, pausing at the interesting parts and skipping over the
mundane.

ptg
Debugging in Xcode 609
The debugger provides four icons for controlling program execution (see Figure 23.7):
. Continue: Resumes execution of the paused program, pausing again at the
next error or active breakpoint.
. Step Over: Steps to the next line of code in the same method.
. Step Into: Steps into the method that is being called. If a method isn’t being
called on the current line of code, it acts like Step Over.
. Step Out: Steps out of the current method back to the caller of the current
method.
Continue Step Out
Step Over Step Into FIGURE 23.7Program execu-tion controlicons.
Whereas the global breakpoint control is obvious (and useful!), the other options
might not be so clear. Let’s take a look at how each of these works to control the
flow of our application. First click the Continue icon a couple of times. Control
returns back to the same breakpoint each time you continue, but if you hover over
the i and description variables, you’ll see that i is incrementing and description is
switching between even and odd.
Add a breakpoint to this line of code by clicking the gutter:
description = [self describeInteger:i];
Click the Continue icon again, and this time you’ll see the program stops at the new
breakpoint because it’s the next breakpoint the program encounters. This break-
point is on a line of source where we are calling the describeInteger method. If
we want to see what’s going on inside that method, we need to step into it. Click the
Step Into icon, and the program stops on the first line of the describeInteger
method, demonstrated in Figure 23.8.
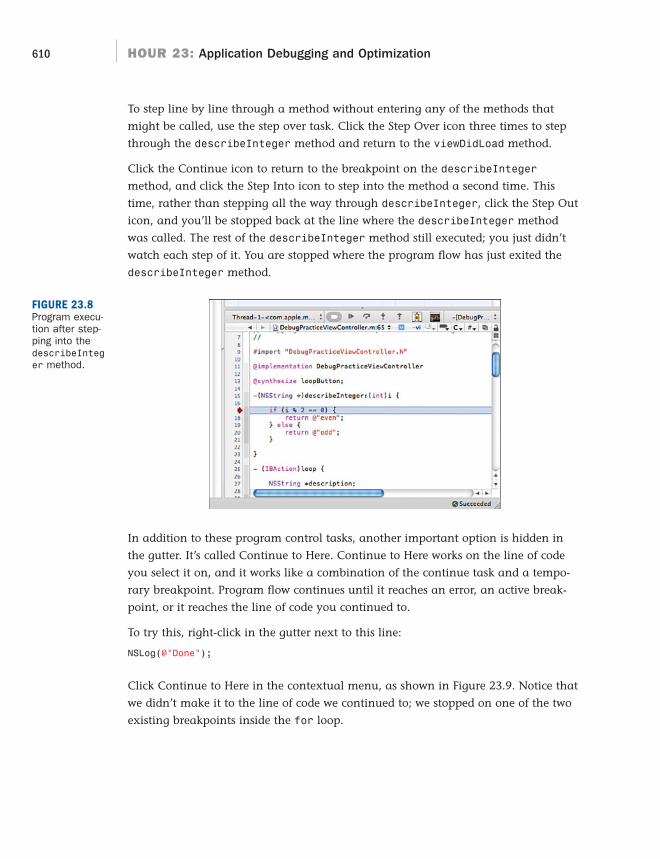
ptg
610 HOUR 23: Application Debugging and Optimization
To step line by line through a method without entering any of the methods that
might be called, use the step over task. Click the Step Over icon three times to step
through the describeInteger method and return to the viewDidLoad method.
Click the Continue icon to return to the breakpoint on the describeInteger
method, and click the Step Into icon to step into the method a second time. This
time, rather than stepping all the way through describeInteger, click the Step Out
icon, and you’ll be stopped back at the line where the describeInteger method
was called. The rest of the describeInteger method still executed; you just didn’t
watch each step of it. You are stopped where the program flow has just exited the
describeInteger method.
FIGURE 23.8Program execu-tion after step-ping into thedescribeInteger method.
In addition to these program control tasks, another important option is hidden in
the gutter. It’s called Continue to Here. Continue to Here works on the line of code
you select it on, and it works like a combination of the continue task and a tempo-
rary breakpoint. Program flow continues until it reaches an error, an active break-
point, or it reaches the line of code you continued to.
To try this, right-click in the gutter next to this line:
NSLog(@”Done”);
Click Continue to Here in the contextual menu, as shown in Figure 23.9. Notice that
we didn’t make it to the line of code we continued to; we stopped on one of the two
existing breakpoints inside the for loop.

ptg
Debugging in Xcode 611
Click each breakpoint once to make it inactive, and click Continue to Here on the
gutter next to the final line of the method one more time. This time we make it to
the end of the method. Inspect the i and description variables with the hover
datatip and notice that description’s value is even, but i is no longer in scope and
can’t be inspected. The i variable was scoped only to the for loop, and now that
we have exited the for loop, it no longer exists. You can now quit the application.
Setting a WatchpointLet’s suppose now that there is a tricky bug in your application that only occurs on
the 1,000th time through the loop. You wouldn’t want to put a breakpoint in the
loop and have to click the continue icon 1,000 times! That’s where a watchpoint
comes in handy. A watchpoint is a conditional breakpoint; it doesn’t stop execution
every time, it stops only when a condition you define is true.
To test this out, update the for loop to execute 2,000 times rather than 10 times.
Your viewDidLoad method should now resemble Listing 23.2.
LISTING 23.2- (void)viewDidLoad {
[super viewDidLoad];
NSString *description;
NSLog(@”Start”);for (int i = 1;i <= 2000;i++) {
description = [self describeInteger:i];NSLog(@”Variables: i - %i and description - %@”, i, description);
}NSLog(@”Done”);
}
FIGURE 23.9The Continue toHere option ofthe gutter con-text menu.

ptg
612 HOUR 23: Application Debugging and Optimization
Now let’s set a watchpoint that’ll stop execution when the loop counter is equal to
1,000. First, right-click the two existing breakpoints and remove them with the
Remove Breakpoint option in the context menu. Add a normal breakpoint by click-
ing in the gutter next to this line:
NSLog(@”Start”);
Right-click the gutter next to this line to add a watchpoint:
NSLog(@”Variables: i - %i and description - %@”, i, description);
To add the watchpoint, click the Add & Edit Breakpoint menu option in the context
menu. The Breakpoints window will open and you’ll see a table containing two break-
points in the viewDidLoad method. There is a column called Condition. Click in the
cell for this column in the second row and type i == 1000 (as shown in Figure 23.10).
FIGURE 23.10Program execu-tion stops onthe 1,000thiteration.
Click the Build and Debug icon to execute the application. The program will stop at
the first breakpoint. Click the Continue icon, and the application will go through the
loop 999 times before stopping on the watchpoint on the 1,000th trip through the
loop when the loop counter i is equal to 1,000. You can confirm this by looking at
the 999 log messages in the Debugger Console or by hovering over the i variable in
the source and looking at its value in the datatip.
Debugging in the Debugger ViewWe first looked at the debugger in the Debugger Console and since then we’ve been
debugging in the Text Editor window. There is also a window dedicated to debugging
that has some helpful benefits. With the application still paused on the 1,000th trip

ptg
Debugging in Xcode 613
through the loop, open the Debugger window by choosing Run, Debugger from the
menu (Shift+Command+Y) or by clicking the Show Debugger icon immediately fol-
lowing the Step Out icon.
Flow controls, just as you’ve been using, are present in this window, as shown in
Figure 23.11. The window is divided into three panels. The lower-middle panel is the
same view we’ve been working with in the Editor and so should be familiar. The
upper-left panel is the application’s call stack listed by thread. A call stack is the list
of all the subroutines (methods and functions) currently being executed.
Each method in the call stack has been called by the method below it. Notice that
the viewDidLoad method of our view controller is at the top of the stack and was
called by the superclass’s (UIViewController) view method. Also notice that two of
the methods, viewDidLoad and the app delegate’s
application:DidFinishLaunchingWithOptions, are listed in bold. The bold listing
indicates the debugger has source code symbols for those methods and can display
them as source. Click the row for the app delegate’s
application:DidFinishLaunchingWithOptions method; you’ll see that program
execution is waiting for this line of code to return from executing:
[window addSubview:viewController.view];
Stack Trace Variables
Source
FIGURE 23.11The Debuggerwindow.

ptg
614 HOUR 23: Application Debugging and Optimization
The rows in the call stack that are not in bold are for methods where the debugger
only has assembly language available. Click the row for the UIViewController’s
view method to see some assembly code. (Doesn’t that make you thankful that we
have the gdb source-level debugger?)
The upper-right panel contains the variable list. This is a list of all the variables that
are in scope in the current method. Click back on the row in the call stack for the
viewDidLoad method, and you’ll see that both the i and description variables
we’ve been inspecting with datatips are listed in the variable list under the Locals
disclosure, as shown in Figure 23.11. The Locals designation means these variables
are declared locally in the method. The other disclosure in the variable list that
you’ll be most interested in is the Arguments scope for variables that have been
passed into the current method as arguments.
You’ve done enough now to start getting the hang of using the debugger. With just
these few simple steps for controlling program flow and inspecting and changing
program state, you can debug many of the issues you may run into.
Monitoring with InstrumentsThe next tool we’ll look at is called Instruments. Instruments is used for profiling
various aspects of an application and helps you to understand the runtime behavior
of the application and the iOS.
Instruments is a flexible container for plug-ins (also known as instruments) that
each record and display a different aspect of an application’s behavior. You choose
the instruments you want to use to capture the particular aspects of the application
you want to examine. The user interface is modeled after timeline editors such as
Apple’s GarageBand and iMovie, with the different instruments forming a vertical
list and the time expanding horizontally left to right demonstrated in Figure 23.13.
Each execution of an application that is monitored by Instruments is called a run
and contains all the traces collected by the various instruments. A trace document
can contain the traces from multiple instruments across multiple runs. Typically
you’ll work with traces immediately, but you can also save trace documents and
open them again later.
Tracing an ApplicationLet’s take one common use for Instruments, memory-leak detection, and walk
through a scenario.

ptg
Monitoring with Instruments 615
By theWay
By theWay
As a quick reminder, a memory leak occurs when memory is allocated by an appli-
cation but never released. One of the instruments available in Instruments is a leak
detector called Leaks. How does Leaks know when an application has leaked memo-
ry? It tracks all memory allocation by the application, and it tracks the pointers to
that memory. At the point where an application no longer has a valid pointer to
memory it has allocated, Leaks knows the application can never free the memory,
and therefore a leak has occurred.
An application can simply use too much memory by never freeing the memory itallocates, even after it no longer needs it, but as long as a pointer to the memoryexists in the application then there is at least the possibility that the applicationwill free the memory, and so a leak does not yet exist. You’d use the ObjectAllocations instrument to detect this scenario of using too much memory withoutevery actually leaking any. It’s typical, when debugging memory issues, to usethese two instruments together.
To test the Leaks instrument, we are going to purposely leak memory. Let’s first trace
the application as is to confirm there are no leaks yet. There are many ways to start
a trace session with Instruments: You can run Instruments and have it launch the
application on the iPhone or in the simulator, or you can have Instruments attach
to an already running application on the device or in the simulator.
Instruments is located in Developer/Applications. You can launch it from thereusing Finder, or you can drag it to the Dock for quicker access.
For this scenario, we use a third and more straightforward method: launching
Instruments from within Xcode. When launching Instruments from Xcode, we need
to decide whether we want to trace the application on the device or in the simulator.
The device provides a much more accurate picture of how our application is going
to perform and should be your default choice in most cases, but for the purposes of
detecting leaks, the simulator works just fine, so let’s trace from there.
Open the Debugger window with the Run, Debugger menu option (Shift+Command+Y)
and use the Active SDK drop-down to target the iPhone Simulator. To launch the
DebugPractice application in Instruments from Xcode, select Run, Run with
Performance Tool, Leaks from the Xcode menu, as shown in Figure 23.12.
The Instruments application will launch, and it will start the DebugPractice applica-
tion in the iPhone Simulator. Our (very sparse) application will launch in the simu-
lator, and after the initial object allocations involved in getting the application start-
ed, displaying the UI, and iterating through our odd/even loop, there is no other
activity for Instruments to trace.

ptg
616 HOUR 23: Application Debugging and Optimization
When you are convinced of this, click the Stop button. Notice that this also stops the
application in the simulator. We’ve now completed one run in Instruments. Click
the row for the Leaks instrument and you can see, as in Figure 23.13, that it has no
leaks to report.
FIGURE 23.12Launching theapplication withInstrumentstracing.
FIGURE 23.13No leaks duringthe first run.

ptg
By theWay
Monitoring with Instruments 617
Now let’s be nefarious and introduce a memory leak into the application. Allocate
memory for a new string each time through the loop and let the pointer to the
string go out of scope at the end of each loop iteration. Update the viewDidLoad
method of the DebugPracticeViewController.m file, as shown in Listing 23.3.
LISTING 23.3- (void)viewDidLoad {
[super viewDidLoad];
NSString *description;
NSLog(@”Start”);for (int i = 1;i <= 2000;i++) {
description = [self describeInteger:i];
// Don’t try this at home!
NSString *status = [[NSString alloc]initWithUTF8String:”leaking”];
NSLog(@”Variables: i - %i and description - %@ and status - %@”,
i, description, status);
}NSLog(@”Done”);
}
Now we are ready to give the application a second run. Because we last ran the
application with Instruments, Xcode keeps that as the default. This time we can
start the application with the Build and Run icon.
You can’t use Xcode’s gdb debugger and Instruments at the same time. Their useis mutually exclusive. When we run the DebugPractice application withInstruments tracing, breakpoints are ignored, and there is no output to theDebugger Console. Whereas Xcode’s first option in the Run menu had been calledRun, Go (Debug), after running with Instruments tracing, the default optionbecomes Run, Go (Leaks). To stop running with Instruments tracing and to goback to running in the debugger, use the Run, Debugger menu option.
After about 10 seconds you’ll see a red spike in the output of the leaks application.
You can see this effect in Figure 23.14. The spike represents our leaking of 2,000
strings. After you see the spike, you can stop the application with the iPhone
Simulator’s Home button.
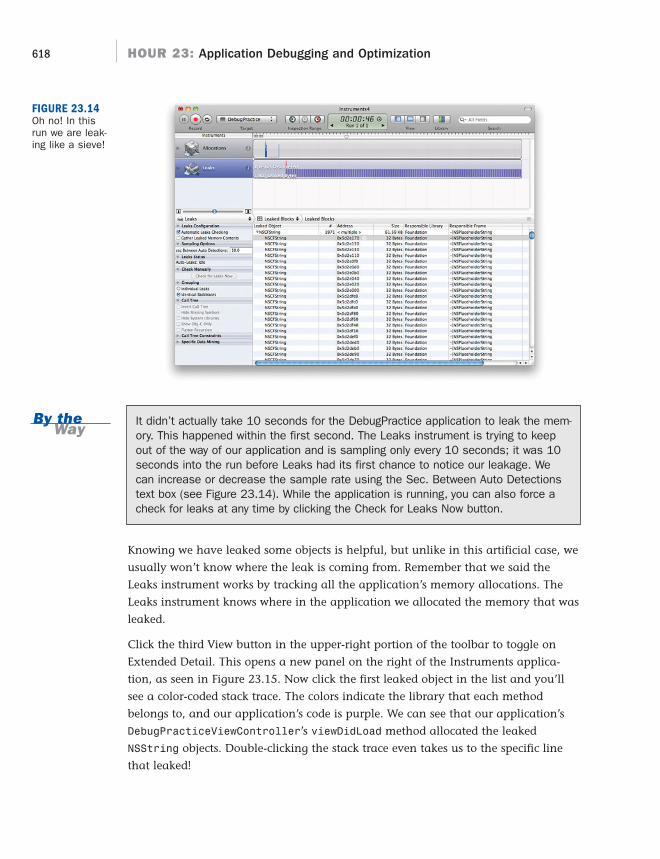
ptgBy theWay
618 HOUR 23: Application Debugging and Optimization
It didn’t actually take 10 seconds for the DebugPractice application to leak the mem-ory. This happened within the first second. The Leaks instrument is trying to keepout of the way of our application and is sampling only every 10 seconds; it was 10seconds into the run before Leaks had its first chance to notice our leakage. Wecan increase or decrease the sample rate using the Sec. Between Auto Detectionstext box (see Figure 23.14). While the application is running, you can also force acheck for leaks at any time by clicking the Check for Leaks Now button.
Knowing we have leaked some objects is helpful, but unlike in this artificial case, we
usually won’t know where the leak is coming from. Remember that we said the
Leaks instrument works by tracking all the application’s memory allocations. The
Leaks instrument knows where in the application we allocated the memory that was
leaked.
Click the third View button in the upper-right portion of the toolbar to toggle on
Extended Detail. This opens a new panel on the right of the Instruments applica-
tion, as seen in Figure 23.15. Now click the first leaked object in the list and you’ll
see a color-coded stack trace. The colors indicate the library that each method
belongs to, and our application’s code is purple. We can see that our application’s
DebugPracticeViewController’s viewDidLoad method allocated the leaked
NSString objects. Double-clicking the stack trace even takes us to the specific line
that leaked!
FIGURE 23.14Oh no! In thisrun we are leak-ing like a sieve!
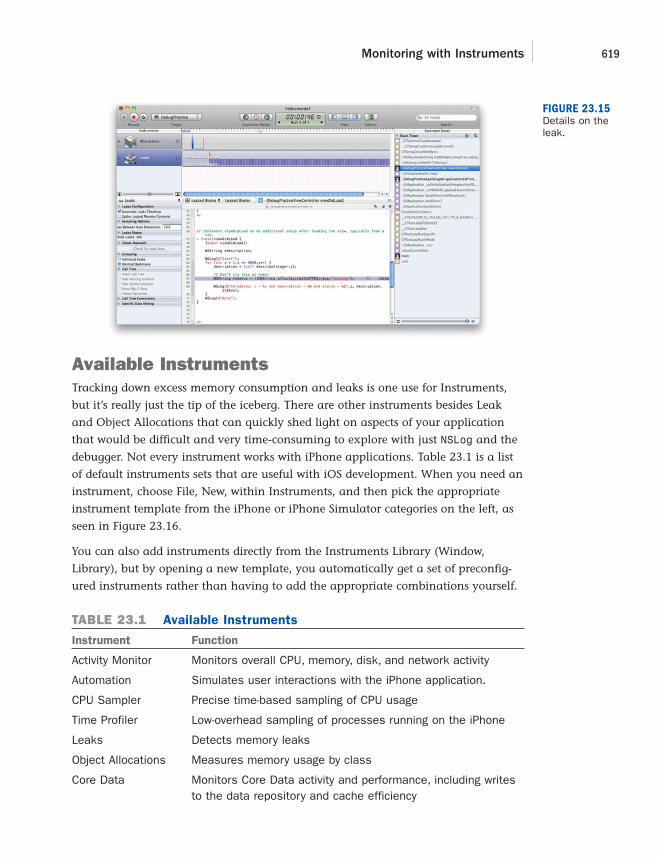
ptg
Monitoring with Instruments 619
Available InstrumentsTracking down excess memory consumption and leaks is one use for Instruments,
but it’s really just the tip of the iceberg. There are other instruments besides Leak
and Object Allocations that can quickly shed light on aspects of your application
that would be difficult and very time-consuming to explore with just NSLog and the
debugger. Not every instrument works with iPhone applications. Table 23.1 is a list
of default instruments sets that are useful with iOS development. When you need an
instrument, choose File, New, within Instruments, and then pick the appropriate
instrument template from the iPhone or iPhone Simulator categories on the left, as
seen in Figure 23.16.
You can also add instruments directly from the Instruments Library (Window,
Library), but by opening a new template, you automatically get a set of preconfig-
ured instruments rather than having to add the appropriate combinations yourself.
TABLE 23.1 Available Instruments
Instrument Function
Activity Monitor Monitors overall CPU, memory, disk, and network activity
Automation Simulates user interactions with the iPhone application.
CPU Sampler Precise time-based sampling of CPU usage
Time Profiler Low-overhead sampling of processes running on the iPhone
Leaks Detects memory leaks
Object Allocations Measures memory usage by class
Core Data Monitors Core Data activity and performance, including writesto the data repository and cache efficiency
FIGURE 23.15Details on theleak.

ptg
620 HOUR 23: Application Debugging and Optimization
File Activity Monitors an application’s interaction with the file system
Core Animation Measures Core Animation graphics performance and theresulting CPU load
Open GL ES Measures Open GL ES graphics performance and the resultingCPU load
Energy Diagnostics Monitor power usage and the power state (on/off) of systemcomponents
System Usage Monitors file, network, and memory I/O use and duration foreach method
TABLE 23.1 continued
I
FIGURE 23.16InstrumentsLibrary.
Profiling with SharkThe last tool we’ll look at in this hour is the Shark profiler. A profiler is a tool for
better understanding application performance so that you know where to make tar-
geted optimizations in the application. A profiler like Shark polls the application
while it’s running to see where it is spending time. The result of a profiling session
with Shark is a report on which methods and lines of code your application is
spending its time on. These lines of code and methods where you application is
spending the bulk of its time are referred to as hot spots and are where you should
direct your optimization efforts.

ptg
Profiling with Shark 621
Many applications spend the bulk of their time waiting on user input or a networkresponse and will not benefit at all from optimization or from using a profiler. Aclassic sin of application development is premature optimization. Premature opti-mization is spending time improving the performance of your code before youknow a particular section of code has a real and significant impact on the user’sexperience. A profiler can be a dangerous tool in this regard, because it tells youwhere your application is spending its time, and there can be temptation to blindlyoptimize according to the profiler’s results. Don’t profile your application lookingfor slow spots. This is a mistake. Instead, find the slow spots by using your appli-cation as the user will use it, and then profile those slow spots to determinewhat’s causing the slow down.
Attaching to Your ApplicationUsing Shark for iPhone applications is a little tricky because to get data that has
any value, you need to remotely profile the application running on the device.
Profiling your application in the simulator usually doesn’t make sense because the
performance characteristics will be completely different.
Also, it can be especially tricky to use Shark to profile application startup time
because Shark must attach to an already running application. To avoid this prob-
lem, let’s go ahead and make a small adjustment to the DebugPractice application
so that there will be something interesting happening after startup for Shark to pro-
file. Add an IBOutlet called loopButton and an IBAction called loop to the
DebugPracticeViewController.h file in the Classes group, as shown in Listing 23.4.
LISTING 23.4#import <UIKit/UIKit.h>
@interface DebugPracticeViewController : UIViewController {IBOutlet UIButton *loopButton;
}
@property (nonatomic, retain) UIButton *loopButton;-(IBAction)loop;
@end
In the DebugPracticeViewController.m file in the Classes group, synthesize the
loopButton property and add a loop method that does the same thing as the nonleak-
ing version of the loop from the viewDidLoad. Remove the for loop from
viewDidLoad. The methods, following the @implementation line in the DebugPractice
ViewController implementation file should now be similar to Listing 23.5.
By theWay

ptg
622 HOUR 23: Application Debugging and Optimization
LISTING 23.5@synthesize loopButton;
- (void)viewDidLoad {[super viewDidLoad];
}
- (IBAction)loop {
NSString *description;
for (int i = 1;i <= 2000;i++) {
description = [self describeInteger:i];
NSLog(@”Variables: i - %i and description - %@”, i, description);
}
[loopButton setTitleColor:[UIColor redColor]
forState:UIControlStateNormal];
}
Perform the following steps to add the button to the view and connect the outlet and
action for the button:
1. Double-click the DebugPracticeViewController.xib file in the Resources group
to launch Interface Builder.
2. Open the Library and drag a UIButton to the center of the view.
3. Click the new button and open the Attributes Inspector (Command+1). Click
the Title field and type Loop. Change the color of the text to green.
4. Switch to the Connections Inspector for the button, and drag-click from the cir-
cle beside Touch Up Inside to the File’s Owner icon. Choose loop when
prompted for the action.
5. Press Control; then click and drag from the File’s Owner icon to the button
within the view. Connect to the loopButton outlet when prompted.
6. Your view should now look like Figure 23.17. Save the XIB file and return to
Xcode.
To use Shark to profile the modified DebugPractice application, follow these steps:
1. Set the Active SDK to Device with the Overview menu.
2. Click the Build and Run icon to build the application and install it on the
device. We want to run without gdb attached, so when the application starts,
terminate it either on the iPhone or using the Tasks (stop sign) icon in Xcode.
Find the application on the device (it will have a completely white icon) and
start it back up again. This time, leave it running on the device.

ptg
Profiling with Shark 623
3. Use Finder to navigate to Developer/Applications/Performance Tools, and
double-click the Shark application.
4. After Shark starts up, make sure iPhone profiling is enabled by selecting the
Sampling, Network/iPhone Profiling menu option (Shift+Command+N).
5. Select the Control Network Profiling of Shared Computers radio button, and
the devices you have connected to your Mac will appear.
6. Click the Use check box beside the mobile device where the DebugPractice appli-
cation is running. After a small delay, the Target column will populate with a list
of the processes running on the device. The initially selected value is Everything.
Profiling everything running on the iPhone will result in a lot of data, and it
will take a long time to gather and analyze it. We are just interested in data
for the DebugPractice application, and so that’s the only process we’ll profile.
7. Click the Target drop-down menu for the device, and select DebugPractice
from the list, as seen in Figure 23.18.
8. Press the Start button in the upper-left corner of the Shark UI, and Shark will
start sampling where DebugPractice is spending its time.
9. Click the Loop button in the DebugPractice application on the device and wait
until the button text turns red to let you know the loop is complete (a few sec-
onds). Press the Stop button in the upper-left corner of the Shark UI. Shark will
spend a couple of minutes or more analyzing the samples.
FIGURE 23.17The DebugPractice view inInterfaceBuilder.
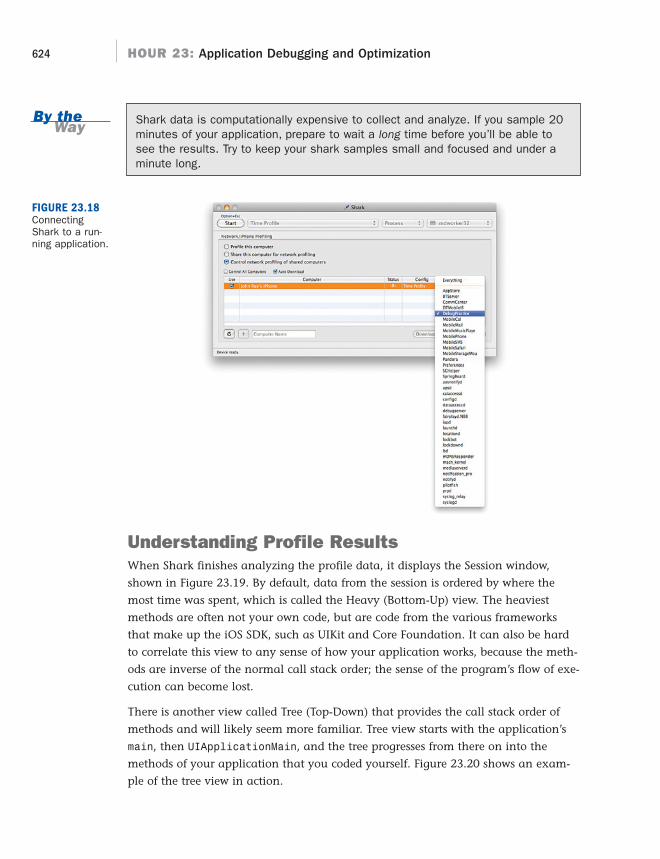
ptg
624 HOUR 23: Application Debugging and Optimization
By theWay
FIGURE 23.18ConnectingShark to a run-ning application.
Understanding Profile ResultsWhen Shark finishes analyzing the profile data, it displays the Session window,
shown in Figure 23.19. By default, data from the session is ordered by where the
most time was spent, which is called the Heavy (Bottom-Up) view. The heaviest
methods are often not your own code, but are code from the various frameworks
that make up the iOS SDK, such as UIKit and Core Foundation. It can also be hard
to correlate this view to any sense of how your application works, because the meth-
ods are inverse of the normal call stack order; the sense of the program’s flow of exe-
cution can become lost.
There is another view called Tree (Top-Down) that provides the call stack order of
methods and will likely seem more familiar. Tree view starts with the application’s
main, then UIApplicationMain, and the tree progresses from there on into the
methods of your application that you coded yourself. Figure 23.20 shows an exam-
ple of the tree view in action.
Shark data is computationally expensive to collect and analyze. If you sample 20minutes of your application, prepare to wait a long time before you’ll be able tosee the results. Try to keep your shark samples small and focused and under aminute long.
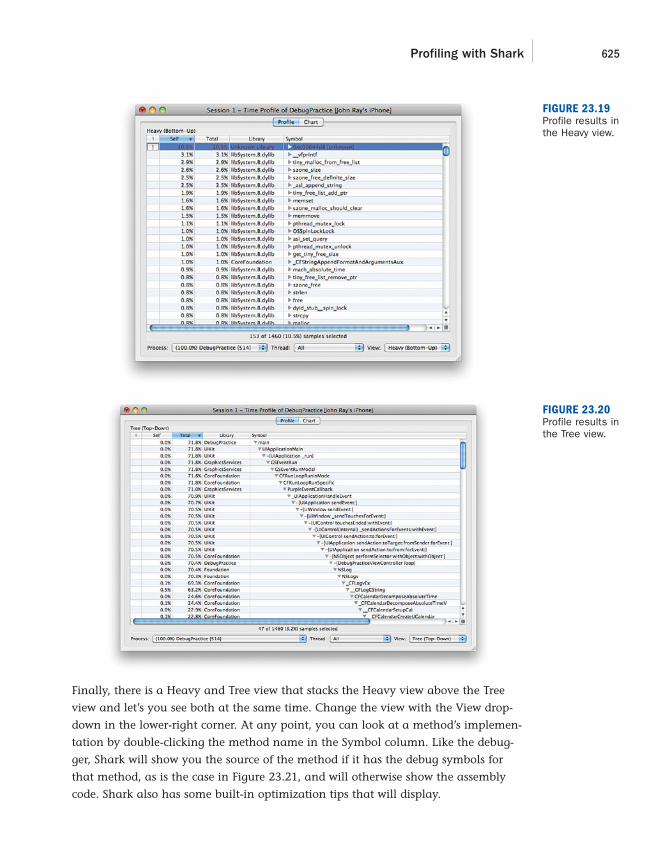
ptg
Profiling with Shark 625
Finally, there is a Heavy and Tree view that stacks the Heavy view above the Tree
view and let’s you see both at the same time. Change the view with the View drop-
down in the lower-right corner. At any point, you can look at a method’s implemen-
tation by double-clicking the method name in the Symbol column. Like the debug-
ger, Shark will show you the source of the method if it has the debug symbols for
that method, as is the case in Figure 23.21, and will otherwise show the assembly
code. Shark also has some built-in optimization tips that will display.
FIGURE 23.19Profile results inthe Heavy view.
FIGURE 23.20Profile results inthe Tree view.

ptg
626 HOUR 23: Application Debugging and Optimization
The key data point to consider in the Shark profile data is the total and self percent-
ages for each of your methods. The Total column tells you approximately how much
of the application’s time (during the window of time that was profiled) was spent in
that method, and the Self column tells you how much of the time was spent in the
method itself rather than in the other methods that were called by the method.
The majority of the time, the methods you write yourself will have fairly small self
percentages, because often the heavy computation in your application is done by
the iPhone SDK frameworks on your behalf. Consider how a single line of your code
can dismiss a complex model view with a flip transition and return to displaying
the parent view. A huge amount of code in Core Animation and Quartz must then
execute to make this one line of your code happen. Optimizing iPhone applications
usually means changing your application to make a more informed use of the SDK
when you understand the expense of the operations you’re asking be performed.
FIGURE 23.21An optimizationhint from Shark.
There is more art than science in profiling and optimizing, and I can’t begin to tell
you the exact way to proceed. The overall approach is to look through the Shark
data for the things that surprise you the most. When writing your application, you
have some sense of how it is going to perform. You expect certain operations you
are calling to be expensive and others to be computationally cheap. When you find
something in the data that breaks your mental model and surprises you, follow your
nose and get to the bottom of it.
Remain patient and resist the urge to jump into optimizing. It’s usually best to try a
little test first to fake any optimization you are contemplating making. Make sure
that if you succeeded in the optimization, there is a noticeable impact in the user
experience of the application before you invest the time in implementing the opti-
mization.

ptg
627Workshop
Further ExplorationInvesting some time into becoming proficient with Xcode debugging, Instruments,
and Shark can really pay off toward the end of a development project when you are
trying to get a product release out the door, or when you are trying to quickly turn
around a fix to an embarrassing bug or performance problem. In these cases, time
is short and the stress level is high, so it’s not the ideal circumstances to be learning
these applications for the first time. Become comfortable with these tools now, and
they’ll provide a significant productivity boost when you need it the most.
To begin mastering the iOS toolset, and to delve deeper into debugging, Instruments,
and Shark, you should read Fritz Anderson’s excellent book Xcode 3 Unleashed. If
instead you want to focus in on just one of these tools, you can find Apple’s Xcode
Debugging Guide, Shark User Guide in the iOS Reference Library.
If you want to start interacting with the debugger directly, I recommend Richard
Stallman’s Debugging with GDB: The GNU Source-Level Debugger and Arnold Robbin’s
GDB Pocket Reference.
SummaryIn this hour, we used three important tools of the iOS SDK: Xcode’s gdb debugger,
the Instruments tracing tool, and the Shark profiler. It takes much longer than an
hour to understand everything these powerful tools can do for you, but the goal has
been to give you enough exposure to them that you recognize when you need the
benefits of each of these tools. You also know enough to start using each tool and
exploring further what it can do for you.
Q&AQ. Why is using a debugger easier or better than just using NSLog?
A. NSLog is a great place for beginning developers to start. It gives a degree of
insight into what is going on in the code, without having to change the devel-
opment process. Using the full-blown Xcode debugger, however, will enable
you to view and modify values in your code as it is running. In addition, it
doesn’t require any changes directly to your code, so there isn’t a need to
remove debugger statements when the code is clean. Using a debugger takes
awhile to get used to, but for large projects, it is a must.

ptg
628 HOUR 23: Application Debugging and Optimization
Workshop
Quiz1. What is a breakpoint? What is a watchpoint?
2. Name some useful things you can monitor with Instruments.
3. Shark helps track down application performance problems when running in
the iPhone Simulator. True or false?
Answers1. A breakpoint tells the debugger to stop execution at the start of a particular
line of source code so that the developer can inspect and possibly change the
state of the running application and control and monitor the application’s
progress. A watchpoint is a conditional breakpoint that stops execution only if
a specified condition is true.
2. Answers will vary. In this hour, we used Instruments to look at memory allo-
cation and leakage. Read through Table 23.1 again if you couldn’t remember
any other uses.
3. False. You’re really interested in using Shark to see how an application per-
forms on the targeted device hardware. In some cases, applications will per-
form better in the simulator than on the actual device.
Activities1. Use the tools discussed in this chapter to analyze the implementation of other
hours’ projects. What did you find? Does any of your analysis identify poten-
tial optimizations that could be made to improve performance or memory
usage?

ptg
HOUR 24
Distributing ApplicationsThrough the App Store
What You’ll Learn in This Hour:. How to prepare and build a version of your application for distribution. The different ways an application can be distributed. How to market your application
You’ve done it! Your application is built, tested, and ready for prime time. Now you need
to decide how to deploy and market it. More than 100,000 applications are available for
download via Apple’s iTunes App Store. The trick to success is to stand out from the crowd.
This hour provides step-by-step instructions on how to submit your application and exam-
ines how to most effectively get your application to those who need it.
Keep a close eye on how your app is managed in the App Store. IfApple makes changes, such as requiring support for the latest OS,ensure that you application supports the latest requirements.(Otherwise, you risk your application being dropped from the AppStore.) Also, give Apple plenty of time to evaluate your updates.Typically, Apple takes about a week to evaluate an update or new sub-mission before posting it to the App Store. Apple does continue totweak and evaluate their process, but it is still far from perfect. Partof the problem is the massive number of new applications posted tothe App Store each day. So, if Apple mandates specific changes, getto them fast.
By theWay

ptg
By theWay
630 HOUR 24: Distributing Applications Through the App Store
Preparing an Application for the AppStoreYou’re almost there: Your application has been developed and tested, and now you
want to share it. However, before you can sell on the App Store, you must complete
a few finishing touches.
Creating ArtworkRemember that admonition to never judge a book by its cover? Unfortunately, that
sage advice doesn’t apply to iPhone applications. Artwork for your application is
important. People browsing the iTunes App Store are presented with thousands of
applications. You need to have artwork that stands out from the crowd.
You have tight control over three important, and required, pieces of artwork: the art-
work used to present your application in your iTunes Applications library (generally
a large icon), the icon used to present your application on your iPhone, and the
application launch image.
Let’s quickly review the steps needed to add these resources to your projects.
Adding the iTunes ArtworkOpen the Applications library in your copy of iTunes to see how iTunes artwork is
used to visually identify applications (see Figure 24.1). Many companies extend
their company brand to the colors, images, and treatment of their artwork used by
their applications.
The artwork used in the iTunes Applications library is 512×512 pixels in size. You
upload this file during the application submission process, but if you are also plan-
ning to distribute your application via ad-hoc means (during testing, for example),
you will need to store a copy of the artwork directly in your project.
We use a simple Welcome project here to demonstrate how to add artwork to your
application. You can follow these same steps for your own application:
1. Create and save the 512×512 PNG image as iTunesArtwork with no file exten-
sion. (Included in the Images folder within the Hour 1 Welcome project is a
sample iTunesArtwork file.)
You can use any of the dozens of available image-editing tools to create the iconsand iTunes artwork for your application. The PNG file format is a noncommercialfile format that most popular tools support.

ptg
Preparing an Application for the App Store 631
2. Open the iOS project in Xcode.
3. Drag the iTunesArtwork file into the Resources group of the project. Choose to
copy the resources to the project when prompted.
You’ve successfully added the iTunesArtwork resource! The next step is to set the
application icons.
Adding Application IconsIncluded in the Welcome project are two icon files that can serve as the standard
resolution icon (57×57 pixels) for your application and the iPhone 4 icon
(@2x—114×114 pixels):
1. Open the Welcome project in Xcode.
2. Drag the icon files (Icon.png and [email protected]) in the Images folder into the
Resources group of the project. Choose to copy the resources to the project
when prompted.
3. Open Welcome-Info.plist. Double-click the Icon File property name, and then
change the name to Icon Files. The Icon Files will then display a disclosure
arrow to its left.
4. Expand the Icon Files by clicking the disclosure arrow. There will be a single
item 0 entry present.
FIGURE 24.1You can seeiTunes artworkused by everyapplication inyourApplicationslibrary in yourcopy of iTunes.

ptg
632 HOUR 24: Distributing Applications Through the App Store
5. Double-click the field to the right of item 0 and type Icon, leaving off the
extension. Your screen should look similar to Figure 24.2.
6. Xcode will automatically know to look for a file named [email protected]. If you
had included the extension on the first icon filename, you would have to add
both filenames to the Icon Files property.
FIGURE 24.2Add the applica-tion icons toyour project.
Did youKnow? I’ve covered the icons that are required for your project, but there might be a few
more that you need to add depending on your application and target platform:
Settings/Search icon: Displayed in the settings application and in the Spotlightsearch results (29×29 pixels for the low-res iPhone and iPad, 58x58 pixels for thehi-res iPhone 4).
Search Results icon: Displayed in the search results for the iPad Spotlight search(50×50 pixels).
Remember, you don’t need to do anything special to differentiate between the icontypes. Just add them to the plist, and iOS will automatically select the icon clos-est to the size it needs.
If you want, you can override Apple’s effects on your icon image by using a specialkey added to the plist called UIPrerenderedIcon.
Just create a new key and enter UIPrerenderedIcon as the key value. The namewill change to Icon Already Includes Gloss and Bevel Effects. Check the box toactivate the feature. Save all your work.
Did youKnow?

ptg
WatchOut!
Preparing an Application for the App Store 633
Almost there! The project will now correctly display icons for both available iPhone
screen resolutions. Now we just need the last resource: launch images.
Adding Launch ImagesThe final artwork requirement is the inclusion of launch images. All applications
must have at least one launch image. The launch image should be sized to match
the screen resolution of your device, typically 320×480 on the iPhone 3GS or earlier
and 640×960 on the iPhone 4. Let’s add one to the Welcome application:
1. Open the Welcome project in Xcode.
2. Drag the launch image files (launchImage.png and [email protected]) in
the Images folder into the Resources group of the project. Choose to copy the
resources to the project when prompted.
3. Open Welcome-Info.plist. With the Information Property List key selected, click
the icon to the far right of the line containing the key. A new row will be
added to the plist file.
4. Change the key for the new row to Launch image (iPhone).
5. Double-click the field to the right of the key and type launchImage, leaving off
the extension, just as you did with the icons.
6. Xcode will automatically know to look for a file named [email protected]
for hi-res displays.
Remember, you can choose from these suffixes (preceded by a hyphen) to config-ure different launch images to appear in any orientation: PortraitUpsideDown,LandscapeLeft, LandscapeRight, Portrait, and Landscape.
The rules for icons and launch images change a little if you are building a univer-sal application. Be sure to read Hour 22, “Building Universal Applications,” formore details on the resource requirements for applications that run on both theiPhone and iPad platforms.
That’s it for images! You’ll want to take some screenshots of the app for later, but
they won’t be needed within the project itself. Save the project and we’ll move on to
application device capabilities.
By theWay

ptg
634 HOUR 24: Distributing Applications Through the App Store
Defining Device Capability RequirementsiOS hardware devices are a moving target. For developers and consumers, this is a
good thing: We both get more toys to play with each year! The side effect, however,
is that not all iOS devices have exactly the same capabilities. There’s no point, for
example, in trying to run a camera application on the first-generation iPad or
attempting to use the iPhone 4’s gyroscope on the iPhone 3GS.
To help define where your application will run, you can add a new key to your pro-
ject’s plist file: required device capabilities (UIRequiredDeviceCapabilities). This
is a multivalue property that you can use to store values such as front-facing-
camera, camera-flash, gyroscope, sms, and so on. A full list of the device capabili-
ties can be found in the developer document “Build-Time Configuration Details,”
accessible through the Xcode documentation tools.
To define the capabilities required by your application, follow these steps:
1. Open your project’s plist file. With the Information Property List key selected,
click the icon to the far right of the line containing the key. A new row will be
added to the plist file.
2. Change the key for the new row to Required device capabilities.
3. Expand the Required Device Capabilities property by clicking the disclosure
arrow. A single item 0 entry will be present.
4. Double-click the field to the right of item 0 and type one of the capability key-
words, as shown in Figure 24.3.
5. Click the + button to the right of the field to add additional items to the prop-
erty for more device capability requirements.
6. Save the plist file when finished.
Our next steps will take place outside of Xcode but are absolutely critical for a suc-
cessful app submission.
Creating an iPhone Distribution CertificateThe person responsible for submitting final applications to the iTunes store is called
the team agent. For the team agent to submit any solutions, he must have an
approved Distribution Certificate. This section discusses how to obtain this certifi-
cate.
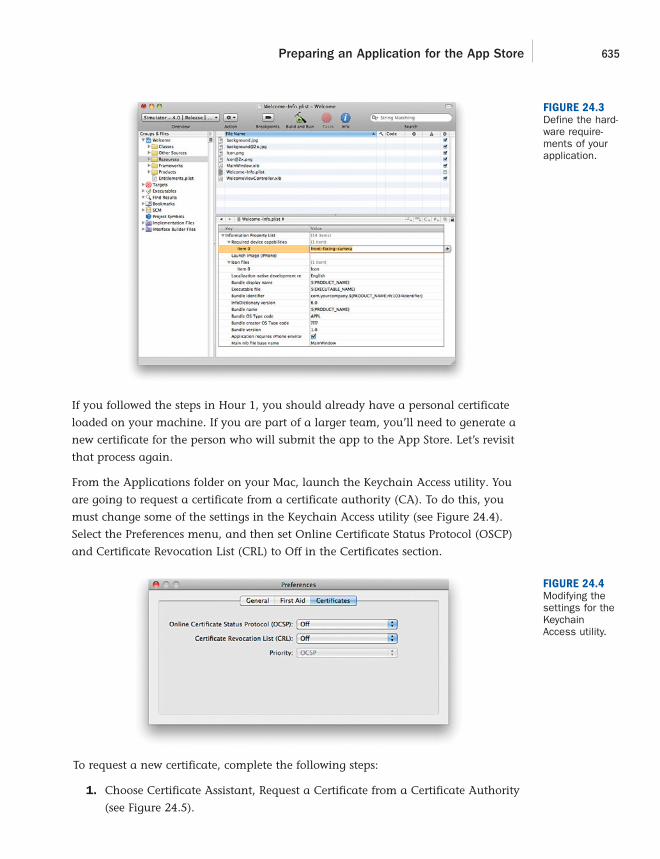
ptg
Preparing an Application for the App Store 635
If you followed the steps in Hour 1, you should already have a personal certificate
loaded on your machine. If you are part of a larger team, you’ll need to generate a
new certificate for the person who will submit the app to the App Store. Let’s revisit
that process again.
From the Applications folder on your Mac, launch the Keychain Access utility. You
are going to request a certificate from a certificate authority (CA). To do this, you
must change some of the settings in the Keychain Access utility (see Figure 24.4).
Select the Preferences menu, and then set Online Certificate Status Protocol (OSCP)
and Certificate Revocation List (CRL) to Off in the Certificates section.
FIGURE 24.3Define the hard-ware require-ments of yourapplication.
FIGURE 24.4Modifying thesettings for theKeychainAccess utility.
To request a new certificate, complete the following steps:
1. Choose Certificate Assistant, Request a Certificate from a Certificate Authority
(see Figure 24.5).

ptg
636 HOUR 24: Distributing Applications Through the App Store
2. Enter the team agent’s email address and the name of your company as it
appears in the iPhone Developer Program. You do not need a CA email
address.
3. Save the data to disk and select Let Me Specify Key Pair Information. Click
Continue.
4. Choose Key Size and Algorithm. Select 2048 bits and RSA for the algorithm.
Save the certificate as a CSR file to your desktop.
5. Navigate to the Provisioning Portal (http://developer.apple.com/iphone/man-
age/overview/index.action). Click the Certificates category (left side), and then
the Distribution tab. All active certificates you have will be listed in the
Distribution window. To obtain a certificate, select Request Certificate and
upload the CSR file you just created.
6. After your certificate has been approved, you can download a CER file to your
computer. The CER file is the Distribution Certificate associated with your com-
puter. Double-click the CER file to add it to your keychain.
Save your Distribution Certificate somewhere safe. The certificate ties your develop-
ment environment directly to your solutions. Without the Distribution Certificate,
you cannot deploy your applications. Best practice is to burn the certificate to a CD
and store that CD somewhere safe.
Setting an App ID (Bundle Identifier)When you distribute an app, you’ll need to provide a unique identifier for it; this is
known as the App ID or a Bundle Identifier. The App ID is necessary for providing
FIGURE 24.5Requesting anew certificatefrom a CA.
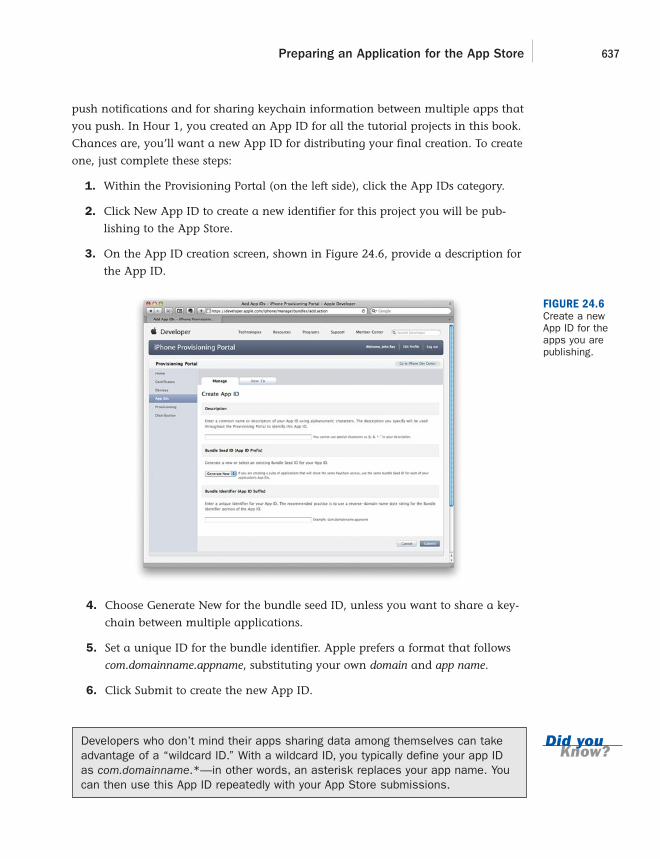
ptg
Did youKnow?
Preparing an Application for the App Store 637
push notifications and for sharing keychain information between multiple apps that
you push. In Hour 1, you created an App ID for all the tutorial projects in this book.
Chances are, you’ll want a new App ID for distributing your final creation. To create
one, just complete these steps:
1. Within the Provisioning Portal (on the left side), click the App IDs category.
2. Click New App ID to create a new identifier for this project you will be pub-
lishing to the App Store.
3. On the App ID creation screen, shown in Figure 24.6, provide a description for
the App ID.
FIGURE 24.6Create a newApp ID for theapps you arepublishing.
4. Choose Generate New for the bundle seed ID, unless you want to share a key-
chain between multiple applications.
5. Set a unique ID for the bundle identifier. Apple prefers a format that follows
com.domainname.appname, substituting your own domain and app name.
6. Click Submit to create the new App ID.
Developers who don’t mind their apps sharing data among themselves can takeadvantage of a “wildcard ID.” With a wildcard ID, you typically define your app IDas com.domainname.*—in other words, an asterisk replaces your app name. Youcan then use this App ID repeatedly with your App Store submissions.

ptg
638 HOUR 24: Distributing Applications Through the App Store
Creating a Distribution Provisioning ProfileYou next need to create a Distribution Provisioning Profile, which will associate your
distribution certificate, App ID, and distribution method within Xcode:
1. In the Provisioning Portal, choose Provisioning, Distribution (http://develop-
er.apple.com/iphone/manage/provisioningprofiles/viewDistributionProfiles.act
ion). Then click the New Profile button.
2. Choose whether the application will be uploaded to the App Store or will be
deployed ad hoc, as shown in Figure 24.7. We discuss ad hoc distribution a bit
later.
FIGURE 24.7Create a provi-sioning profilethat describeshow your appwill be distrib-uted.
3. Give your profile a meaningful name.
4. Double-check that the certificate and App ID is correct, and then select
Submit. The profile is generated and, after a few moments, can be down-
loaded. The file you will download has the extension .mobileprovision.
5. To install the profile, double-click or drag the .mobileprovision file onto either
iTunes or Xcode in your dock.
Configuring a Project for DistributionThe final thing you need to do is to create a version of your application that you
can submit to the App Store. Follow these steps to prepare your app:

ptg
Preparing an Application for the App Store 639
1. Open the project in Xcode. Double-click the main project file within the Xcode
Groups & Files pane to open the Information panel, and then click the
Configurations button (see Figure 24.8).
FIGURE 24.8Create a newDistributionconfiguration.
2. Select the Release configuration option, click the Duplicate button in the
lower-left corner, and rename the new copy Distribution.
3. Close the Info window, and then choose Edit Active Target from the Project
menu. The Target Info window appears.
4. Click the Build button and select Distribution from the Configuration menu
options.
5. You now need to associate your distribution certificate and provisioning profile
with the build. Within the Code Signing section, shown in Figure 24.9, under
Code Signing Identity, select Any iPhone Device, and choose your certificate
from the drop-down list. Within the list, your certificate will be in bold, with
your provisioning profile in gray. Without a valid certificate, you cannot
upload your applications to the App Store.
6. Display the Properties tab so that you can enter the bundle identifier for your
application (see Figure 24.10). The bundle identifier is the same as your App
ID, without the unique string at the beginning. (For example, if your App ID
is 123456789.com.yourcompany.yourappname, you would enter com.your-
company.yourappname.) Close the Target Info window.

ptg
640 HOUR 24: Distributing Applications Through the App Store
7. Next, you create an entitlement plist, a file that provides the code signing for
the app, as shown in Figure 24.11. Choose New File, iPhone OS, Code Signing,
Entitlements.
FIGURE 24.9Choose yourteam agent certificate.
FIGURE 24.10Set the bundleidentifier foryour application.

ptg
Preparing an Application for the App Store 641
8. Name the entitlement file Entitlements.plist. The file is saved to the root of
your application. The Entitlements.plist has two properties that you shouldn’t
change, and one you need to add called get-task-allow.
9. Click the icon at the far right of the Root line to add a new key. Name the key
get-task-allow, and then set the type to Boolean. Make sure the check box is
unchecked, as shown in Figure 24.12.
FIGURE 24.11Create an enti-tlement plist.
FIGURE 24.12The entitle-ment’s get-task-allowproperty mustbe added andunchecked.

ptg
642 HOUR 24: Distributing Applications Through the App Store
10. Open the Target Info panel for your application again (Project, Edit Target).
Click the Build button and select Code Signing Entitlements from the Code
Signing section. Type Entitlements.plist and save your work.
11. Now change the application’s active configuration to Distribution, and choose
Build and Archive from the Xcode Build menu. The application is now ready
for submission to the App Store.
Submitting an Application for ApprovalThe Apple iTunes App Store is a dazzling success. Now duplicated by RIM, Nokia,
Google, and Microsoft, the iTunes App Store boasts more than 225,000 unique appli-
cations, 3 billion (that’s with a b, not an m) downloads, and an audience of more
than 75 million users.
The success of the App Store is built on making the user experience easy. For many
people, the hardest part of running an application is installing it. With the App
Store, Apple has introduced a one-click installation process that makes it easy to
install any solution. Users just click an application’s price button to start the buying
and installing process. The application’s price display is red. Click that button and
the wording on the button changes to Purchase. To actually purchase the applica-
tion, you must click the button again and then enter your account password. That’s
it. After that, iOS does the rest.
This simple process enables every developer to easily deploy a solution and know
that it will be installed correctly. In addition, the customer can apply updates to
your application via a one-click download from the App Store app.
Apple is also upfront about the charges. Apple charges just one rate: 30% of the
price of your application (or nothing if the app is given away for free). So, if you are
selling an application for $2.99, 30% goes to Apple and 70% to you. In this case,
you get $2.00 for each sale.
At first it might seem that Apple is gouging you of your profits; but if you have
developed content for the Nintendo DS, Microsoft Xbox 360, or Sony PlayStation,
you know that Apple’s fee is reasonable. After all, it is Apple that is hosting the
applications on its own server farms, managing the 40 million accounts, and giving
you access to tools to effectively control how you sell your applications. Yes, the 30%
cost is very reasonable.

ptg
Submitting an Application for Approval 643
Preparing Your Application Profile When you have your accounts set up, you will want to start uploading your applica-
tions to the store through the http://itunesconnect.apple.com website. Only a release
version of your application can be uploaded. In iTunes Connect, click the Manage
Your Applications link, and then start the process by clicking the Add New
Application link, shown in Figure 24.13.
FIGURE 24.13Upload an appli-cation to theApp Store.
If this is the first app you’ve uploaded, you’ll be prompted to select your language
and company name and verify that you aren’t exporting encryption software.
Answer the questions and click Continue until you reach the App Information
screen, as shown in Figure 24.14.
Enter the basics about your submission:
. Application Name.
. SKU number (a unique identifier that you create). A simple way to create an
SKU is to insert the date, such 07302010 for July 30, 2010. When you update
the application, just apply a new date.
. Bundle ID. The bundle ID that you created for your application.
. Bundle ID Suffix. Typically, the name of the application, which is appended to
the bundle ID.
Click Continue when finished entering your information.

ptg
644 HOUR 24: Distributing Applications Through the App Store
You’ll now be prompted for Rights and Pricing information, where you can choose the
locations where your app will be sold, when it will go on sale, and what it will cost.
Make your selections, as shown in Figure 24.15. Click Continue when ready.
FIGURE 24.14Accuratelydescribe yourapplicationbefore submit-ting it.
FIGURE 24.15Manage whenyour app goeson sale andhow much it willcost.

ptg
Submitting an Application for Approval 645
If you’re staring at the pricing screen wondering where the tiers are actuallydefined, all you need to do is select a tier other than Free. After you’ve picked atier, the pricing will appear along with a link to a full pricing tier matrix.
Sell Abroad with App Localization!App localization is the process of adding support for multiple languages. We didn’thave an opportunity to discuss this in this book, but Apple provides a great guidein the developer document “Introduction to Internationalization ProgrammingTopics.” Apps that are available in multiple languages are more easily marketedthan those that are locked to a specific language or country.
On the final screen, you’ll address all the application details. Start at the top of the
form, shown in Figure 24.16, and provide the following information:
. Version Number. You can use your own schema for version number.
. Description (limit 4,000 characters).
. Primary Category. There are 20 primary categories, including Games,
Entertainment, Business, Books, and News. Some categories, such as Games,
have subcategories to help organize the content more effectively.
. Secondary Category. You can choose a second category for your application.
. Keywords. Keywords are used to help return results when a customer is search-
ing for an application.
. Copyright (the person who owns the code).
. Contact Email Address.
. Support URL. The support URL links to the support site for the application.
. Application URL. The application URL links to the application’s website, if
any.
. Review Notes. If the app accesses any online services, this input area gives you a
place to provide testing accounts that Apple can use to validate your software.
Next, you need to rate your application so that parental controls can be applied.
Scroll down the form to see the Rating settings (see Figure 24.17). The age limit will
change depending on how you rate your application. Make sure you enter informa-
tion correctly. During an audit process, Apple reviews how you score your application.
Did youKnow?
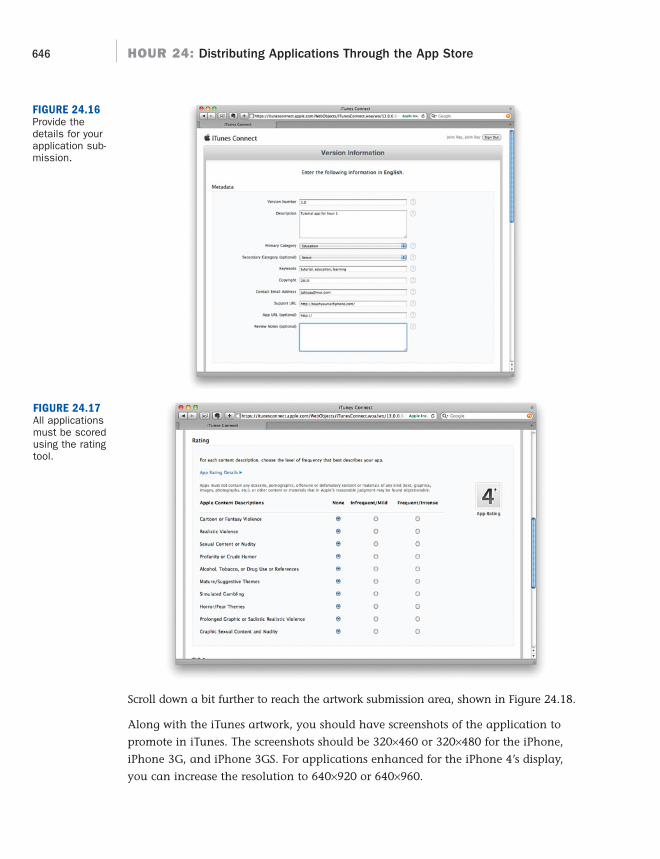
ptg
646 HOUR 24: Distributing Applications Through the App Store
Scroll down a bit further to reach the artwork submission area, shown in Figure 24.18.
Along with the iTunes artwork, you should have screenshots of the application to
promote in iTunes. The screenshots should be 320×460 or 320×480 for the iPhone,
iPhone 3G, and iPhone 3GS. For applications enhanced for the iPhone 4’s display,
you can increase the resolution to 640×920 or 640×960.
FIGURE 24.16Provide thedetails for yourapplication sub-mission.
FIGURE 24.17All applicationsmust be scoredusing the ratingtool.

ptg
Submitting an Application for Approval 647
Click Choose File and then Upload File for each file section within the Upload screen.
Click Save Changes when you’re finished uploading all the application resources.
You’ve just completed your application submission profile! You will see a summary
screen where you can double-check everything about your application before you
submit it for Apple’s approval. Review the information and then click Done. You’ll
be taken back to the main iTunes Connect page, where you can view the status of
your application submission. Because no application binary has been submitted yet,
your application status will indicate that an upload is pending.
Uploading an Application BinaryAfter you’ve configured an application profile in iTunes Connect, you can return to
the comfort of Xcode to complete the upload. Open the application project in Xcode,
and then switch to the Organizer (Window, Organizer).
Click the Archived Applications category to show the applications that are ready to
be uploaded. You’ll need to expand the disclosure arrow in front of the application
to show the different binaries (listed by date) that you can upload.
Select the date that corresponds to the version you want to submit, and then click the
Submit Application to iTunes Connect button at the bottom of the window. You will
be prompted for your iTunes Connect login information, as shown in Figure 24.19.
FIGURE 24.18You can easilyadd artwork foryour application.

ptg
648 HOUR 24: Distributing Applications Through the App Store
After you enter your information and click OK, Xcode will chug away for a little
while and then show a screen where you can choose your distribution signing identi-
ty (you can choose Don’t Re-sign because you already picked the correct information
prior to building) and the application profiles awaiting upload. Choose the applica-
tion for which you entered information, and then click Submit to iTunesConnect, as
shown in Figure 24.20. Your application will be uploaded to Apple’s servers.
FIGURE 24.19Enter youriTunes Connectlogin creden-tials.
FIGURE 24.20Choose theapplication pro-file that youentered iniTunes Connect.

ptg
Promoting Your Application 649
If you want to make sure that everything is in order with your application prior to sub-mitting, you can use the Validate Application button in the organizer. The applicationwill also be validated during submission, and Xcode will display any errors that occur.
After submitting the app, you can track its progress via the Manage Your
Applications link within iTunes Connect (http://itunesconnect.apple.com/).
Promoting Your ApplicationYou’ve done it. Your application is installed in the App Store. You have heard all the
“rags to riches” stories of developers who have made tens of thousands from sales of
apps, and now you are waiting for your pot of gold to arrive. But, you might be
waiting for a while. Although you can make a lot of money from selling your appli-
cation, you must be willing to expend a bit of effort.
To sell any piece of software, take advantage of all the traditional ways software has
been sold in the past. In addition, we now have some seriously focused tools (and
tactics) that can really help your sales, including the following:
. Use Apple’s iTunes Connect to monitor/manage sales.
. Exploit websites and social networks.
. Update your application.
. Change your price.
Any or all of the “tools” listed here can help build interest and drive sales of your
application.
Using iTunes Connect to Monitor/Manage SalesAs you’ve learned, iTunes Connect provides tools for managing and uploading
applications, but it also can help you monitor your sales. Via iTunes Connect, you
can do the following:
. Assess sales/trends.
. Review your contracts, tax, and banking information.
. Download financial reports.
. Request promotional codes.
. Contact Apple support with any questions you may have.
Did youKnow?

ptg
650 HOUR 24: Distributing Applications Through the App Store
When you log in to iTunes Connect, ensure that your banking information is cor-
rect. After all, if you are selling something, you want to make sure that you are
being paid.
Then, set up accounts for those persons in your company who need access to iTunes
Connect. Three user types can access the iTunes Connect account in addition to the
original person who set up the account (called the Legal account), as follows:
. The Admin account has the right to view, add, and delete additional accounts
and manage the whole iTunes Connect environment.
. The Finance account gives the user access to financial reports and contracts,
tax and banking information, and sales/trend reports modules.
. The Technical account allows the user to manage applications and manage
users’ modules.
Generally, you will add multiple accounts only if you have a large organization that
requires different levels of access to the iTunes Connect service.
A feature that you will want to use to promote your applications is Request
Promotional Codes. This feature, located on iTunes Connect (in the Request
Promotional Codes section), allows you to send promo codes to users who can then
download and use your application for free. The promotional code cannot be shared
after it has been used.
Arguably, the most important feature in iTunes Connect is Sales Trends Analysis.
This tool tells you how your sales are going (by date and by country).
If you have a lot of applications for sale in a lot of countries, managing all theApple-provided data can get confusing. Thankfully, Apple has introduced an iTunesConnect app available for developers from the App Store. This app will help youtrack your sales from anywhere using your iPhone!
In addition, a number of companies provide tools to sift through all the iTunesConnect data. Check out the Developer Tools section of Apple’s website for thelatest solutions (http://www.apple.com/downloads/macosx/development_tools/).
Exploiting Websites and Social NetworksIt might seem very turn of the millennium, but websites work well to advertise your
applications. A website can be built quickly using tools such as Adobe
Dreamweaver, WordPress, Joomla, or even iWeb if you are pressed for resources.
By theWay

ptg
Promoting Your Application 651
As mentioned earlier, you must associate a website with your application during the
submission process. Therefore, every application available via the App Store has a
web address. Customers should be able to use Mobile Safari, the iPhone’s own web
browser, to view your application’s website.
Mobile Safari is one of the most advanced web browsers available, and therefore
you can add many of the latest HTML tricks to your website. For instance, Mobile
Safari supports HTML 5, so you can add rich transition and animation effects to
your website.
From your website, you can advertise and link back to applications you are selling
in the App Store. You can find the URL for any application in the App Store by right-
clicking the link inside of iTunes. The cryptic URL you are given will look something
like this:
http://itunes.apple.com/WebObjects/MZStore.woa/wa/viewSoftware?id=306220440&mt=8
Add this link to your web page. When potential customers click it, they will be taken
directly to the page in iTunes where they can purchase your application. Similarly, if
a potential customer is using Mobile Safari and clicks a link to your app, Mobile
Safari will close, and the App Store app will open and go directly to your application.
The really long URL link is great to add to your own website, but it doesn’t work if
you want to use social networking sites such as Twitter and Facebook. Twitter, in
particular, limits the number of characters you can type to 140 and thus prevents
long URLs from being entered. To resolve this problem, use URL-shortening services
such as bit.ly so that you can post a URL that has fewer than a dozen characters.
You can also build social networking directly into your application. Many social net-
working sites have their own API. For example, with Facebook’s API, you can post the
latest high score or challenge your Facebook friends to a game. Freeverse’s Postman
enables you to send custom postcards directly to Facebook, Twitter, or Tumblr.
In addition to social networks, you will also want to contact the editors of websites
that cover iOS applications. You can often get a boost in sales by working with these
editors and getting a link to your app from their website. Good sites to contact and
work with include the following:
. AppStoreApps.com
. AppAdvice.com
. iLounge.com
. 148apps.com
. AppCraver.com

ptg
652 HOUR 24: Distributing Applications Through the App Store
. AppSafari.com
. AppleiPhoneApps.com
. iPhoneApplicationList.com
. NativeiPhoneApps.com
. iPhoneApps.co.uk
. Apptism.com
. AppShopper.com
. Apprater.com
When you contact these sites, be courteous and give the editors a promotional code
for your application so that they can test it and write a review.
As you build your website, think about how web search engines such as Google and
Bing see your site. There are lots of great websites that lay out the search engine
optimization techniques. Adding search engine optimization to your site can
increase the number of times the site is presented on a search engine results page.
In addition to relying on organic placement on a search engine results page, you
can purchase paid advertising. The goal of paid advertising is to appear alongside
results similar to your product. Google’s paid advertising allows your results to show
on both their Google.com website and through their affiliate sites.
Finally, add analytical tools such as Google Analytics to your website. These tools
provide information about how people are using your website, how often they
return, and how they came to your site.
Updating Your ApplicationUnlike traditional computer-based software, applying updates to iOS applications is
easy, and you will find that your customers will have few problems updating their
apps. There is a tactical benefit to releasing updates to an application on a regular,
scheduled basis:
. The first benefit is that customers perceive that they are getting something for
free. The update is a bonus.
. The second benefit is that the update brings the user’s attention back to the
app. An update is an opportunity to rediscover an application.
. The final benefit is each update gets separate reviews in the App Store.

ptg
Promoting Your Application 653
A final thought as you update your apps: Add good, descriptive explanations for the
update. Frequently, developers list “bug fixes” as the only reason for the update.
Although this is important to the developer and the users experiencing problems
with the application, for the rest of your users it is not a very exciting update. A dif-
ferent approach is to add one or two new features with the bug fixes. This way a
customer can get excited about installing the update and trying out a new feature.
Changing Your PriceHow much should you charge for your application? This is a tough question for all
developers and companies selling applications on the App Store. With hundreds of
new applications being added each week, you can easily become lost in the melee.
An approach that many developers adopt is to start selling at $4.99 and then, short-
ly after release, temporarily dropping the price by a couple of dollars for a specified
period. The effect is to create a fire sale and thus drive urgency to purchase.
Dropping your price can also increase the number of sales in the iTunes App Store.
Your goal is to break into the Top 100. Often referred to as racing to the bottom, the
result of dropping your price as far you can go is to devalue your product just to get
to number 1. Companies such as Electronic Arts and 2K Games, however, recognize
that you can make more profit by keeping your price higher and not hitting number
1. For instance, EA’s Scrabble spent several weeks in the Top 10 without changing its
price of $4.99. The Scrabble app did not sell as many units as the number 1 app,
but at 5x the price, it most likely made more profit.
Ultimately, how you choose and manage the price for your application depends on
your marketing plan.
Adopting iAdsA topic that I’ve specifically avoided in the first 23 hours of this book is iAds, Apple’s
new iOS 4 framework for adding highly interactive advertising to your applications.
The goal of this book is to teach you development, and using banner ads isn’t some-
thing that really advances your programming skillset. That said, it does get you one
important thing: money! Using iAds, you can either reduce or eliminate your appli-
cation’s cost.
Joining the iAds program requires two steps: adding iAds to your application, and
enabling iAds on your iTunes Connect account. Both of these are extremely simple.
To add iAds to your applications, you just drag the Ad BannerView (ADBannerView)
object into your application’s interface, as shown in Figure 24.21.

ptg
654 HOUR 24: Distributing Applications Through the App Store
Use the Attributes Inspector to configure the size that the banner can be. (It is sized
for portrait display, landscape display, or both.) All interaction with iAds is handled
internally in iOS, so there’s nothing else you need to do to make the ads functional.
The next step is to enable iAds when you submit your application. On the summary
screen of the submission process, shown in Figure 24.22, you’ll notice the Set Up iAd
Network button.
FIGURE 24.21Add the AdBannerViewobject to yourinterface.
FIGURE 24.22Enable iAds foryour applica-tions.

ptg
Exploring Other Distribution Methods 655
Click this button to provision your account for using iAds. You’ll have to answer
some questions about your business, but the process is mostly painless. When fin-
ished and your application is approved, iAds will appear in the ADBannerView, and
you will begin earning click-through revenues from your apps.
Exploring Other Distribution MethodsIn addition to the App Store, Apple provides two other ways to distribute your appli-
cation: ad hoc deployment and enterprise delivery.
Ad Hoc DeploymentSometimes you do not want to deploy an application immediately to the App Store.
Sometimes you just want to send it directly to some friends and coworkers to get
feedback.
Ad hoc deployment allows you to package a release version of your application into a
zip file and give it to whomever you want to via email, website download, or USB drive.
Packaging an application for ad hoc deployment is easy. After you have created a
release build of your application in Xcode, using Build and Archive, find the version
that you want to distribute within the Archived Applications section of the Xcode
organizer.
Select the build you want to distribute, and then click Share. You will be prompted
for an ad hoc provisioning profile to associate with the build and then given the
option of emailing the application or saving it to disk, as shown in Figure 24.23.
The setup for an ad hoc version of the Distribution Provisioning Profile is thesame one for an app that will be deployed to the iTunes store. The only differenceis that you choose Ad Hoc as the distribution type.
To load the application, all your friend/co-worker/tester needs to do is double-click
the file she receives to load it into iTunes and begin using it.
Regarding the ad hoc process, be aware of the following caveats:
. Apple states that you are limited to only 100 people per release version of an
app when you want to share the app ad hoc. Of course, there are ways around
this limitation. You can change the version number each time you want to cre-
ate an ad hoc deployment or even change the name of the application.
Did youKnow?
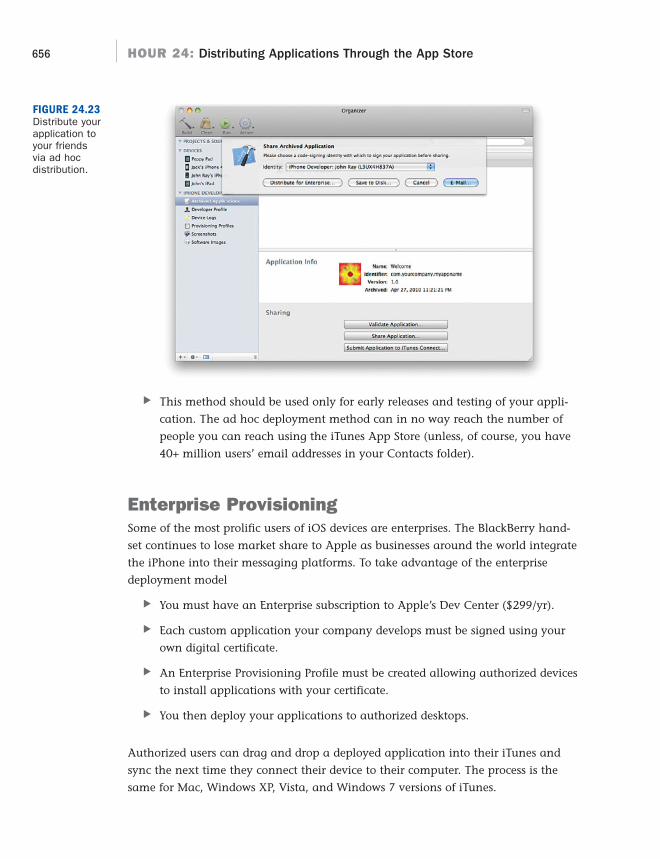
ptg
656 HOUR 24: Distributing Applications Through the App Store
. This method should be used only for early releases and testing of your appli-
cation. The ad hoc deployment method can in no way reach the number of
people you can reach using the iTunes App Store (unless, of course, you have
40+ million users’ email addresses in your Contacts folder).
Enterprise ProvisioningSome of the most prolific users of iOS devices are enterprises. The BlackBerry hand-
set continues to lose market share to Apple as businesses around the world integrate
the iPhone into their messaging platforms. To take advantage of the enterprise
deployment model
. You must have an Enterprise subscription to Apple’s Dev Center ($299/yr).
. Each custom application your company develops must be signed using your
own digital certificate.
. An Enterprise Provisioning Profile must be created allowing authorized devices
to install applications with your certificate.
. You then deploy your applications to authorized desktops.
Authorized users can drag and drop a deployed application into their iTunes and
sync the next time they connect their device to their computer. The process is the
same for Mac, Windows XP, Vista, and Windows 7 versions of iTunes.
FIGURE 24.23Distribute yourapplication toyour friends via ad hoc distribution.

ptg
Workshop 657
SummaryOver this past hour, you have learned how to prepare and submit your iPhone
application to the App Store for publication. Although waiting for your application
to be approved can be nerve wracking, marketing the final product can be the
biggest challenge you face. When this book hits the shelves, there will likely be
200,000 apps available in the app store. You need to work to make yours stand out!
Q&AQ. What type of applications are the most popular in the iTunes App Store?
A. Games. You can choose to write a game for this popular group or review the
other categories in the App Store and look for areas where there appears to be
missing applications. Ultimately, a great solution will always sell as long as
your customers know that it exists.
Q. Should I develop solutions only for the iPhone?
A. If your application is meant to be a mobile experience, then yes, concentrate
on the iPhone. If you can offer a compelling experience across the iOS plat-
forms, do so! A bigger audience will result in larger sales.
Workshop
Quiz1. What does an App ID/Bundle ID do?
2. Where can you modify the settings for icons?
3. What is iTunes Connect?
Answers1. An App ID uniquely identifies an application or suite of applications that
you’re building. Applications that share App IDs can also share keychain
information.
2. The icon settings can be modified in the application’s plist file.
3. iTunes Connect is Apple’s online site for managing your application submis-
sions and sales.
ptg
658 HOUR 24: Distributing Applications Through the App Store
Activities1. Build a deployable version of your application and send it to some friends and
have them test it on their devices. When you are sure the application is ready
to be published, submit it to the iTunes App Store.
2. Develop a marketing strategy and start letting people know that your applica-
tion exists. Easy ways to promote your application include contacting iOS fan
sites and asking whether they can review your app, posting to forums, and
updating your Facebook and Twitter accounts.

ptg
#import directive
implementation files, 63
interface files, 59
#pragma mark directive, 39
%@ string format specifier, 602
%f string format specifier, 602-603
%i string format specifier, 602
148apps.com, 651
@implementation directive, imple-mentation files, 63
@interface directive, interface files,59-60
@property directive, 133
interface files, 61-62
@synthesize directive, 133
implementation files, 63
AABPeoplePickerNavigation-
ControllerDelegate protocol, 513
ABPersonHasImageData function, 517
ABRecordCopyVal method, 517
ABRecordCopyValue function, 515
Accelerate framework, Core OSlayer, 88
accelerometer, 452-453, 472
API, 456
gravity unit, 452
measurable axes, 452
orientation, sensing, 458-461
reading, 456-458
sensing movement, 469
tilt, detecting, 462-471
updates
managing, 467-468
reacting to, 468-469
Accessibility Inspector, 118-119
Accessibility Programming Guidefor iPhone OS, 127
Accessibility settings (InterfaceBuilder), 116-117
accessing text fields, alerts,244-245
action sheets, 245, 255
button presses, responses,248-249
buttons, 247
changing appearance,247-248
displaying, 245-247
actions
BestFriend application,connecting, 512
buttons, connecting, 171
ColorTilt application, adding,463-464
Index
connecting, 190
GettingAttentionapplication, 234
date pickers, connecting to, 265
FieldButtonFun application,155-156
Flashlight application,connecting, 368
FlowerWeb application,preparing, 205-206
GetFlower, 121
ImageHop application
connecting outlets, 190
preparing, 182-184
Internet Builder application,120-121
connections, 123-124
MediaPlayground application,connecting, 480-482
MultiViews application
adding to, 302-303
connecting to, 303
newBFF, 510
segmented controls,connecting, 210
sendEmail, 510
switches, connecting to,211-212

ptg
TabbedCalculation application
adding, 313-314
connecting, 317
view controllers, 140-141
connection points,144-146
Active Configuration setting, build-ing applications, 40
active device, universal applica-tions, detecting and displaying,588-590
Activity Monitor instrument, 619
ad hoc deployment, applications,655-656
Add Contact button, 166
Add Horizontal Guide command(Layout menu), 112
Add Vertical Guide command(Layout menu), 112
Address Book framework, 505-506
Core Services layer, 86
Address Book Programming Guidefor iPhone OS, 526
Address Book UI framework,505-506
BestFriend application, access-ing, 512-518
Cocoa Touch layer, 85
addTextField method, 254
advertising applications, 649-655
iAds, 653-655
pricing, 653
social networks, 650-652
updates, 652-653
websites, 650-652
alertBody notification property, 561
alertDialog variable, 237
alerts, 231-232, 249
action sheets, 245
button press responses,248-249
changing appearance,247-248
displaying, 245-247
buttons, adding, 238-241
displaying, 236-237
fields, adding, 241-245
generating, 235-245
multi-option alerts, creating,238-241
notification interfaces, creat-ing, 233
playing sounds, 250-253
prepping notification files,232-233
sounds, 254
System Sound Services, 250
vibrations, 253
AlertViewDelegate protocol,240-241
alignment (IB layout tool),113-114
Alignment command (Layoutmenu), 113
allocation, objects, 67-68
Anderson, Fritz, 627
animation resources, adding, 182
animation speed, setting, 193-195
animationDuration property, 189
animations
image views, 186-187
startAnimating, 188
starting, 187-188
stopping, 187-188
API (application programminginterface), accelerometer, 456
App IDs
choosing, DevelopmentProvisioning Assistant, 14
setting, 636-637
App Store, 629
App IDs, setting, 636-637
applications
distributing, 629, 655-656
preparing for, 630-639, 642
promoting, 649-655
submitting for approval,642-649
uploading, 647-649
distribution certificates, creat-ing, 634-636
unique applications, 642
AppAdvice.com, 651
AppCraver.com, 651
appearance
action sheets, changing,247-248
segmented controls,choosing, 208
Appearance text input trait, 159
Apple Developer Program, 7-10
costs, 8
registration, 8-9
Apple Developer Suite, 23-24
Interface Builder, 105-106
connecting interfaces tocode, 119-124
Identity Inspector, 125-126
user interfaces, 110-117
XIB files, 107-110
iPhone Simulator, 45
esoteric conditions, 49-50
generating multitouchevents, 48
launching applications,46-47
rotation simulation, 48
Xcode, 27-28
building applications,39-42
editing code, 34-39
modifying project proper-ties, 42, 45
navigating code, 34-39
project management,28-32
removal of files andresources, 33-34
Apple IDs, 8
Apple iPhone Dev Center, 8-10
Apple tutorials, 177
Apple website, 8
AppleiPhoneApps.com, 652
application icons, adding, 631-633
660
actions

ptg
application logic, FlashCards appli-cation, implementing, 394-399
application objects, UIApplicationclass, 91
Application Preferences in theiPhone Application Programmingtutorial, 405
application resource constraints,iOS platform, 5
application:didFinishLaunching-WithOptions method, 586, 592
applicationIconBadgeNumber noti-fication property, 561
applications
App IDs, setting, 636-637
App Store
preparing for, 630-639, 642
submitting for approval,642-649
art work, creating for, 630-633
attaching Shark profiler,621-624
background-aware applica-tions, 553-556, 576-577
background suspension,559-560
disabling backgrounding,558-559
implementing local notifica-tions, 561-563
life cycle methods,556-558
long-running backgroundtasks, 570-576
task-specific backgroundprocessing, 564-570
BestFriend, 509
Address Book framework,512-518
connecting actions and out-lets, 512
creating UI, 511-512
map objects, 518-523
Message UI, 523-525
setting up, 510-511
built-in capabilities, 505
Core Location framework, 529
ColorTilt, 462
adding actions and outlets,463-464
CoreMotion framework, 463
motion events, 466-471
preparing interface,464-465
setting up, 462-465
Contacts, 381
Cupertino, 534
audio directions, 567-569
background imageresources, 534
background modes key,569-570
Core Location framework,534
creating UI, 536-537
location manager, 538-540
outlets, 535-536
preparing for audio,564-567
properties, 535-536
protocols, 535-536
task-specific backgroundprocessing, 564-570
Cupertino Compass, 541-549
calculating heading, 547
direction image resources, 543
heading updates, 545-549
location manager head-ings, 541-542
outlets, 543-544
properties, 543-544
setting up, 543-544
updating UI, 544-545
data, storage locations,382-383
DateCalc, 261
adding date pickers,263-265
finishing interface, 266-267
setting up, 262-263
view controller logic,267-270
DebuggerPractice, 604-606,612-614
Instruments, 614-620
profiling, 620-626
setting breakpoints,606-607
setting watchpoints,611-612
stepping through code,608-611
variable states, 608
decision making, 70
expressions, 70-71
if-then-else statements, 71
repetition with loops, 72-74
switch statements, 72
design, 363-365
MVC structure, 130-131
device capability requirements,defining, 634
distributing, 629, 655-656
distribution, configuring for,638-639, 642
distribution certificates,creating, 634-636
distribution provisioning profiles, creating, 638
FieldButtonFun
actions, 155-156
adding text fields, 156-161
adding text views, 161-164
creating styled buttons,164-171
hiding keyboard, 171-174
outlets, 155-156
setting up, 154
file cleanup, 383
FlashCards, 384
application logic, 394-399
archiving flash cards,402-404
How can we make this index more useful? Email us at [email protected]
applications
661

ptg
class logic, 385-386
CreateCardViewContoller,391-393
creating interface, 384,387-391
object archiving, 400-402
preparing interface,386-387
Flashlight, 366-372
connecting actions and outlets, 368
creating interface, 367
logic, 369-370
reading preferences,371-372
setting up, 366-367
storing preferences,370-371
FlowerColorTable, 332-333
adding outlets, 334
adding table views, 335-337
data source methods,338-340
populating cells, 340-342
providing data to, 337-342
row touch events, 342-343
setting up, 333-337
FlowerInfoNavigator, 344-345
adding outlets and properties, 351
adding web view, 352-353
detail view, 350-353
detail view controller logic,351-352
navigation events, 356-357
providing data to, 346-350
root view table controllers,353-356
setting up, 345-346
table data source methods, 354
UI, 357-358
FlowerWeb, 204
finishing interface, 215
preparing actions and out-lets, 205-206
releasing objects, 220-221
segmented controls,206-210
setting up, 205
switches, 210-212
view controller logic,216-220
web views, 212-214
Gestures, 435
connecting outlets, 439
creating interface, 437-439
pinch recognizer, 443-445
rotation recognizer,445-447
setting up, 436-437
shake recognizer, 447-448
swipe recognizer, 441-443
tap recognizer, 439-443
GettingAttention, 249
action sheets, 245-249
connecting actions, 234
connecting outlets, 234
creating notification interface, 233
generating alerts, 235-245
local notifications, 561-563
playing sounds, 250-253
prepping notification files,232-233
System Sound Services, 250
vibrations, 253
ImageHop, 181-182
actions, 182-184
adding animation resources, 182
adding hop button, 191-192
adding image views,184-188
adding labels, 191
adding sliders, 188-190
background suspension,559-560
connecting actions, 190
connecting outlets, 190
finishing interface, 190-192
outlets, 182-184
releasing objects, 195
setting up, 182
view controller logic,193-195
integration, 505, 526-527
Address Book frameworks,505-506
Map Kit framework, 508
mapping, 508-509
Message UI framework, 507
launch images, adding, 633
life cycle, 88-90
location-aware applications,creating, 534-540
Mac OS X Installer application,launching, 11
MatchPicker, 271
adding picker views,273-274
configuring UI, 284-289
connecting outlets, 275
data structures, 276-278
finishing interface,274-275
outlets, 272
output labels, 275
protocols, 271
providing data to, 275-281
reacting to choices,281-284
releasing objects, 272-273
setting up, 271-273
MediaPlayground, 478
adding media files, 483
adding Media Player framework, 482
connecting actions and outlets, 480-482
creating audio recordings,486-490
creating interface, 480
handling cleanup, 485-486
Image Picker, 492-495
662
applications

ptg
Media Picker, 495-501
movie playback, 483-485
movie player, 482-486
music player, 499-501
playing audio recordings,490-491
receiving notifications, 485
setting up, 478-480
memory usage, 615
multi-view applications,293-295
benefits, 294
static interface elements,294-295
MultipleViews, 295
adding actions and outlets,302-303
adding toolbar controls,300-302
adding view controllers,296-297
adding views, 296-297
connecting actions and outlets, 303
instantiating view controllers, 298-299
setting up, 296-297
view switch methods,303-305
multitouch gesture recognition,434, 448-449
Notes, 381
Orientation
determining orientation, 461
orientation changes, 460
preparing interface,459-460
setting up, 458
preferences, 363, 366-372
setting up, 366-367
profiles, preparing, 643-647
profiling, Shark profiler,620-626
promoting, 649-655
iAds, 653-655
pricing, 653
social networks, 650-652
updates, 652-653
websites, 650-652
Reframe, 416
adding outlets and proper-ties, 416-417
connecting outlets,421-422
creating interface, 417-422
disabling Autosizing, 418
laying out, 418-421
reframing logic, 422-423
releasing objects, 417
setting up, 416-417
ReturnMe, 372
creating interface, 374
setting up, 373-374
settings bundles, 375-381
sales, monitoring, 649-650
sandbox, 381-384
Scroller, 221
adding scroll views,223-225
preparing outlets, 222-223
releasing objects, 226
scrolling behavior, 225-226
setting up, 222
SimpleSpin, 411-416
Autosizing, 413-416
setting up, 411-412
testing, 412-413
single-view applications,293-295
SlowCount
counter logic, 573-574
creating UI, 572
long-running backgroundtasks, 570-576
Swapper, 423
adding outlets and proper-ties, 423-424
connecting outlets, 426
creating interface, 425-426
enabling rotation, 424
releasing objects, 424
setting up, 423-425
view-swapping logic,426-429
TabbedCalculation, 307
adding actions and outlets,313-314
adding tab bar controller,310-312
adding view controllers,308-309
area calculation logic,317-319
area view, 313-319
connecting actions, 317
connecting outlets, 317
setting up, 307-310
summary view, 323-326
volume calculation logic,325-326
volume view, 319-323
testing
Interface Builder, 117
iPhone Simulator, 45-50
View-Based Applicationtemplate, 148
tracing, Instruments tool,614-619
Universal, 583
active devices, 588-590
device-specific view con-trollers, 584-588
setting up, 584
universal applications,579-580, 590, 598-599
converting interfaces, 597
GenericViewController viewcontroller class, 591-596
upgrading iPhone target,596-597
Window-based template,581-590
UniversalToo, 590, 596
GenericViewController,590-592, 595
instantiating view con-trollers, 592-593
How can we make this index more useful? Email us at [email protected]
applications
663

ptg
setting up, 590
views, 595-596
XIB files, 593-595
updating, 653
uploading, 647-649
Xcode, 27-28
building applications, 39,41-42
editing code, 34-39
modifying project proper-ties, 42, 45
navigating code, 34-39
project management,28-32
removal of files andresources, 33-34
applicationWillEnterForegroundmethod, 560
Apprater.com, 652
approvals, applications, submittingfor, 642-649
AppSafari.com, 652
AppShopper.com, 652
AppStoreApps.com, 651
Apptism.com, 652
Archives and SerializationsProgramming Guide for Cocoa, 404
area calculation logic,TabbedCalculation application,317-319
area view, multi-view applications,implementing, 313-319
arrays, 94
artwork, applications, creating for,630-633
attributes, 116
Accessibility settings, 116-117
buttons, editing, 166-167
date pickers, setting, 264-265
nonatomic, 62
retain, 62
text views, editing, 162
web views, setting, 212-213
Attributes Inspector, 115-116
Autosizing, disabling, 418
button attributes, editing,166-167
Attributes Inspector command(Tools menu), 115
audio, Cupertino application
audio directions, 567-569
background modes key,569-570
preparing for, 564-567
audio formats, Apple, 483
audio recordings
creating, 486-490
playing, 490-491
AudioToolbox framework, adding,251, 564
Auto-Enable Return Key text inputtrait, 159
autocompletion, Xcode editor,35-37
Automation instrument, 619
autorelease method, releasingobjects, 75
Autosizing (Size Inspector), 115,413-416
disabling, 418
masks, 597
AV Foundation framework, 477
Media layer, 85
availability, Quick Help results, 102
AVAudioPlayer versusMPMusicPlayerController, 502
axes, accelerometer, 452
Bbackground image resources,
adding, 534
background modes key, Cupertinoapplication, adding, 569-570
background touch, keyboard, hid-ing, 173-174
background-aware applications,553-556, 576-577
background suspension,559-560
backgrounding, disabling,558-559
life cycle methods, 556-558
local notifications, implement-ing, 561-563
long-running background tasks,completing, 570-576
task-specific background pro-cessing, 564-570
backgrounding, 554-556, 576-577
disabling, 558-559
local notifications, 554-555
implementing, 561-563
long-running background tasks
completing, 570-576
task completion, 555-556
suspension, 554
handling, 559-560
task-specific background pro-cessing, 555, 564-570
BestFriend application, 509
actions, connecting, 512
Address Book framework,512-518
map objects, 518-523
Message UI, 523-525
outlets, connecting, 512
setting up, 510-511
UI, creating, 511-512
blocks, 70
handler blocks, 456
Bluetooth, supplementation, 6
bookmarks, 38
breakpoints, 604, 606-607
Build and Run button, 40-41
Build command (Build menu), 40
build configurations (Xcode), 604
Build menu commands, Build, 40
building applications, 39-42
Active Configuration setting, 40
Build and Run button, 40-41
errors and warnings, 41-42
built-in capabilities, 505
Address Book frameworks,505-506
664
applications

ptg
Core Location framework, 529
Map Kit framework, 508
Message UI framework, 507
Bundle Identifiers, setting, 636-637
button bars, 120
buttons, 96, 152-154
action sheets, 247
actions, connecting, 171
Add Contact, 166
alerts, adding to, 238-241
attributes, editing, 166-167
Build and Run, 40-41
Check for Leaks Now, 618
Custom, 166
Detail Disclosure, 166
Done, 171
hiding keyboard, 172-173
Export Developer Profile, 21
images, setting custom,167-170
Import Developer Profile, 21
Info Dark, 166
Info Light, 166
outlets, 183
overlap, 430
radio buttons, 200
Rounded Rect, 166
styled buttons, creating,164-171
toolbars, adding and editing,301-302
CCA (certificate authority), 635-636
calculate method, 318, 322
calculating headings, CupertinoCompass application, 547
camera
controlling, 502
Image Picker, 492-495
cancelButtonTitle parameter(actionSheet), 247
cancelButtonTitle parameter(alertDialog), 237
capability requirements, applica-tions, defining, 634
Capitalize text input trait, 159
cells
images, populating, 354-356
rows, 360
table view controllers,populating, 340-342
text, populating, 354-356
cellular technology, 529
centerMap method, 519
Certificate Assistant, 16-17
Certificate Assistant (DevelopmentProvisioning Assistant), 16-17
certificate authority (CA), 635-636
Certificate Revocation List (CRL), 635
certificate signing requests, gener-ating and uploading, 16-17
CFNetwork framework, CoreServices layer, 86
changes, orientation, reacting to, 460
check boxes, 200
Check for Leaks Now button, 618
child plane preference type, 376
chooseImage method, 492
ChosenColor outlet, 121
class files, text comments,adding, 64
class logic, FlashCards application,385-386
class methods, definition, 56
classes. see also objects
core, 91-93
NSObject, 91
UIApplication, 91
UIControl, 92
UIResponder, 92
UIView, 92
UIViewController, 93
UIWindow, 92
data type, 93-96
NSArray, 94
NSDate, 95
NSDecimalNumber, 94-95
NSDictionary, 94
NSMutableArray, 94
NSMutableDictionary, 94
NSMutableString, 93
NSNumber, 94-95
NSString, 93
NSURL, 95-96
definition, 55
files, 31
interface, 96-98
UIButton, 96
UIDatePicker, 97
UILabel, 96
UIPicker, 97
UISegmentedControl, 97
UISlider, 97
UISwitch, 96
UITextField, 97
UITextView, 97
iPadViewController, 584
iPhoneViewController, 585
NSObject, 56
single, limitations, 130
singletons, 456
UIDevice, 588
View-Based Application tem-plate, 136, 138
classes subgroup (project groups), 30
cleanup, handling, 485-486
clearColor, web views, 220
clearView method, 305
CLLocation, 531
Cocoa, Cocoa Touch, compared, 83
Cocoa Touch, 24, 81-82, 90
Cocoa, compared, 83
core classes, 91-93
NSObject, 91
UIApplication, 91
UIControl, 92
UIResponder, 92
UIView, 92
UIViewController, 93
UIWindow, 92
How can we make this index more useful? Email us at [email protected]
Cocoa Touch
665

ptg
data type classes, 93-96
NSArray, 94
NSDate, 95
NSDecimalNumber, 94-95
NSDictionary, 94
NSMutableArray, 94
NSMutableDictionary, 94
NSMutableString, 93
NSNumber, 94-95
NSString, 93
NSURL, 95-96
functionality, 82-83
interface classes, 96-98
UIButton, 96
UIDatePicker, 97
UILabel, 96
UIPicker, 97
UISegmentedControl, 97
UISlider, 97
UISwitch, 96
UITextField, 97
UITextView, 97
origins, 83
Cocoa Touch layer frameworks
Address Book UI, 85
Game Kit, 85
Map Kit, 84
Message UI, 85
UIKit, 84
code
adding to projects, 31-32
connection to user interfaces, 119
actions, 120-124
implementation, 120
launching IB from Xcode,119-120
outlets, 120-123
spaghetti code, 130
stepping through, 608-611
code snapshots, 37-38
codecs, Apple support, 483
ColorChoice outlet, 121
ColorTilt application, 462
actions, adding, 463-464
CoreMotion framework,adding, 463
interface, preparing, 464-465
motion events, implementing,466-471
outlets, adding, 463-464
properties, adding, 463-464
setting up, 462-465
commands
Build menu, Build, 40
File menu
Make Snapshot, 37
New Project, 28
Simulate Interface, 117-118
Snapshots, 37
Help menu
Developer Documentation, 98
Quick Help, 100
Layout menu
Add Horizontal Guide, 112
Add Vertical Guide, 112
Alignment, 113
project menu, New SmartGroup, 31
Project menu, Set Active BuildConfiguration, Debug, 604
Run menu, Run, 40
Tools menu
Attributes Inspector, 115
Identity Inspector, 126
Library, 110
Size Inspector, 114
Xcode menu, Preferences, 100
comments, class files, adding to, 64
component numbers, constants, 282
componentsSeparatedByStringmethod, 521
condition-based loops, 73
configuration
BestFriend application,510-511
ColorTilt application, 462-465
Cupertino Compass applica-tion, 543-544
DateCalc application, 262-263
distribution, 638-639, 642
FieldButtonFun, 154
Flashlight application, 366-367
FlowerColorTable application,333-337
FlowerInfoNavigator applica-tion, 345-346
FlowerWeb application, 205
Gestures application, 436-437
ImageHop, 182
MatchPicker application,271-273
MediaPlayground application,478-480
MultipleViews application,296-297
Orientation application, 458
Reframe application, 416-417
ReturnMe application,373-374
Scroller application, 222
segmented controls, 207-208
SimpleSpin application,411-412
Swapper application, 423-425
TabbedCalculation application,307-310
Universal application, 584
UniversalToo application, 590
view controller classes, 312
connections
actions, 190
BestFriend application, 512
buttons, 171
date pickers, 265
Flashlight application, 368
GettingAttention applica-tion, 234
MediaPlayground applica-tion, 480-482
switches, 211-212
666
Cocoa Touch

ptg
outlets, 190
BestFriend application, 512
Flashlight application, 368
Gestures application, 439
GettingAttention applica-tion, 234
MatchPicker application, 275
MediaPlayground applica-tion, 480-482
Reframe application,421-422
Swapper application, 426
text views, outlets, 164, 214
Connections Inspector, 123, 265
connectivity, iOS platform, 6
constants, component numbers, 282
contacts, Address Book frame-works, 513
Contacts application, 381
content types, web views, 202
Continue icon (debugger), control-ling program execution, 609
Continue to Here option (guttercontext menu), 610
controlHardware method, 467
controllers
multiple views, 149
MVC structure, 131-132
IBAction directive, 133-134
IBOutlet directive, 132
view, UIControl class, 93
controls
rotatable applications,reframing, 416-423
segmented, 201, 258
FlowerWeb application,204-210
UISegmentedControlclass, 97
segmented controls
choosing appearance, 208
configuring, 207-208
connecting to actions, 210
connecting to outlets, 209
sizing, 208
toolbars, adding to, 300-307
UIControl class, 92
convenience methods, 67-68
converting interfaces, universalapplications, 597
copy and paste, text entry areas, 161
Core Animation instrument, 620
Core Audio framework, Medialayer, 85
core classes, 91-93
NSObject, 91
UIApplication, 91
UIControl, 92
UIResponder, 92
UIView, 92
UIViewController, 93
UIWindow, 92
Core Data framework, 404-406
Core Services layer, 87
Core Data instrument, 619
Core Data Tutorial for iOS tutorial, 405
Core Foundation framework, CoreServices layer, 87
Core Graphics framework, Medialayer, 85
Core Location, 529, 550
Cupertino application, addingframework, 534
location manager, 530
Compass, 541-542
delegate protocol, 530-533
handling location errors,532-533
location accuracy, 533-534
update filter, 533
location-aware applications,creating, 534-540
Core Location framework, CoreServices layer, 87
Core Motion framework
accelerometer, reading,456-458
ColorTilt application, frame-work, 463
Core Services layer, 87
gyroscope, reading, 456-458
motion manager, initializing,466-467
Core Motion FrameworkReference, 471
Core OS layer, frameworks, 88
Core Services layer, frameworks,86-88
Core Text framework, Media layer, 86
CoreGraphics framework, 84
Correction text input trait, 159
costs, Apple Developer Program, 8
count-based loops, 72
counter logic, SlowCount applica-tion, implementing, 573-574
countUp method, 574-575
CPU Sampler instrument, 619
Create iPhone/iPod Touch Version(Interface Builder), 597
CreateCardDelegate protocol, 398
CreateCardViewContoller,FlashCards application, addingto, 391-393
CRL (Certificate Revocation List), 635
Cupertino application, 534
audio
directions, 567-569
preparing for, 564-567
background image resources,adding, 534
background modes key,569-570
Core Location framework,adding, 534
location manager delegate,implementing, 538-540
outlets, adding, 535-536
properties, adding, 535-536
protocols, adding, 535-536
task-specific background pro-cessing, 564-570
UI, creating, 536-537
How can we make this index more useful? Email us at [email protected]
Cupertino application
667

ptg
Cupertino Compass application,541-549
calculating heading, 547
direction image resources, 543
heading updates, 545-549
location manager headings,541-542
outlets, adding, 543-544
properties, adding, 543-544
setting up, 543-544
UI, updating, 544-545
currentDevice method, 588
Custom button, 166
custom images, buttons, setting,167-170
customization, user interfaces, 115
Accessibility settings, 116-117
Attributes Inspector, 115-116
Ddata detectors, 164
data models, MVC structure, 134
data source methods
pickers, 278-279
table view controllers, 338-340
data source protocol, picker views, 260
data structures, MatchPicker application, 276-278
data type classes, 93-96
NSArray, 94
NSDate, 95
NSDecimalNumber, 94-95
NSDictionary, 94
NSMutableArray, 94
NSMutableDictionary, 94
NSMutableString, 93
NSNumber, 94-95
NSString, 93
NSURL, 95-96
data type objects, C language, 93
data types, 93
primitive data types, 78
datatip, variable examination, 608
date formats, strings, 268
date pickers, 258-263, 266-270
actions, connecting to, 265
adding, 263-265
attributes, setting, 264-265
calculating difference betweentwo dates, 268
displaying date and time,267-268
getting date, 267
DateCalc application, 261
adding date pickers, 263-265
interface, finishing, 266-267
setting up, 262-263
view controller logic, 267-270
dates, 95
dealloc method, 76, 147,417, 424
Debug build configuration, 604
Debugger Console, 602
Debugger view (GNU Debugger),612-614
DebuggerPractice application,604-606, 612-614
breakpoints, setting, 606-607
Instruments, monitoring with,614-620
profiling, Shark profiler,620-626
stepping through code,608-611
variable states, 608
watchpoints, setting, 611-612
debugging, 627
Xcode, 601
GNU Debugger, 603-614
Instruments tool, 614-619
NSLog function, 602-603
Shark profiler, 620-626
debugging tools, 601
Debugging with GDB: The GNUSource-Level Debugger, 627
DebugPractice application, 615
decision making, 70
expressions, 70-71
if-then-else statements, 71
repetition with loops, 72-74
switch statements, 72
declaration
Quick Help results, 101
variables, 65
object data types, 66
primitive data types, 65-66
declination, 551
default state, switches, setting, 211
degrees, radians and rotation, 445
delegate parameter(actionSheet), 246
delegate parameter (alertDialog), 237
delegate protocol
location manager, 530-533
picker views, 260-261
describeInteger method, 605, 609
design
applications, 363-365
interfaces, 410-411
MVC structure, 130-131
destructiveButtonTitle parameter(actionSheet), 247
Detail Disclosure button, 166
detail view controller logic,FlowerInfoNavigator application,350-353
detecting tilt, 462-471
Dev Center, 13
Developer Documentation com-mand (Help menu), 98
Developer Program (Apple), 7-10
costs, 8
registration, 8-9
Developer Suite, 23-24
Interface Builder, 105-106
connecting interfaces tocode, 119-124
Identity Inspector, 125-126
user interfaces, 110-117
XIB files, 107-110
iPhone Simulator, 45
esoteric conditions, 49-50
generating multitouchevents, 48
668
Cupertino Compass application

ptg
launching applications,46-47
rotation simulation, 48
Xcode, 27-28
building applications, 39,41-42
editing code, 34-39
modifying project proper-ties, 42, 45
navigating code, 34-39
project management,28-32
removal of files andresources, 33-34
developer tools, installing, 10-11
Developer/Applications folder, 11
developers, 7
Apple Developer Program, 7-10
costs, 8
registration, 8-9
development provisioning profiles, 12
iOS developer tools, installing,10-11
paid developer programs,joining, 10
technologies, 23-24
development devices, assigning,14-15
development paradigms
imperative development, 54
OOP (object-oriented program-ming), 54-55
terminology, 55-57
Development ProvisioningAssistant, 12-21
App ID, choosing, 14
Certificate Assistant, 16-17
certificate signing requests
generating, 16
uploading, 17
development devices, assign-ing, 14-15
installing provisioning profile, 20
launching, 13
multiple devices, 21
provisioning profiles
downloading, 18-19
installing, 20-21
naming and generating, 17
unique device identifiers,12-13
development provisioning profiles
generation and installation,12-21
testing, 21-22
device capability requirements,applications, defining, 634
Device feature (iPhone Simulator), 49
device identifiers, 12-13
device IDs, 14-15
device-specific view controllers,Universal application, adding,584-588
deviceType outlet, 589
dictionaries, 94
dimensions, launch images, 583
direction image resources,Cupertino Compass application,adding, 543
directives, 59
#import
implementation files, 63
interface files, 59
@implementation, implementa-tion files, 63
@interface, interface files, 59
@property, 133
interface files, 61-62
@synthesize, 133
implementation files, 63
IBAction, 133-134
IBOutlet, 132
display, iOS platform, 4-5
displaying
action sheets, 245-247
alerts, 236-237
images, 493-494
distribution, applications, 655-656
configuring for, 638-639, 642
distribution certificates, creating,634-636
distribution profiles, 12
distribution provisioning profiles,creating, 638
doAccelerometer method, 469
doActionSheet method, 246
doAlert method, 561
Document icons (XIB files),109-110
document sets, 100
Document window (XIB file),107-109
documentation system
Cocoa Touch, 81, 90
core classes, 91-93
data type classes, 93-96
functionality, 82-83
interface classes, 96-98
origins, 83
Xcode, 45
documentation window, 98-99
doMultiButtonAlert method, 239
Done button, 171
hiding keyboard, 172-173
doRotation method, 470
doSound method, 251
double primitive data type, 65
downloading provisioning profiles,18-19
Eediting
button attributes, 166-167
code, 34-39
text views, attributes, 162
toolbar buttons, 301-302
editor, Xcode, autocompletion,35-37
electromagnetic compass, 529
email, built-in capabilities,523-525
Message UI framework, 507
How can we make this index more useful? Email us at [email protected]
email, built-in capabilities
669

ptg
ending
implementation files, 64
interface files, 62
Energy Diagnostics instrument, 620
enterprise program (AppleDeveloper Program), 8
Enterprise provisioning, 656
errors
building applications, 41-42
definition, 41
Event Handling Guide for iPhoneOS, 471
Event Kit framework, CoreServices layer, 87
events, motion events, implement-ing, 466-471
existing resources, adding to pro-jects, 32
Export Developer Profile button, 21
expressions, 70-71
External Accessory framework,Core OS layer, 88
FFacebook, applications,
promoting, 651
feedback
iOS platform, 6
Xcode, errors and warnings,41-42
fees, Apple Developer Program, 8
FieldButtonFun, 154
actions, 155-156
keyboard, hiding, 171-174
objects, releasing, 175
outlets, 155-156
setting up, 154
styled buttons, creating,164-171
text fields, adding, 156-161
text views, adding, 161-164
view controller logic, imple-menting, 174-175
fields, alerts, adding to, 241-245
File Activity instrument, 620
File menu commands
Make Snapshot, 37
New Project, 28
Simulate Interface, 117-118
Snapshots, 37
file paths, 383-384
file structure, Objective-C, 58
file system
file paths, 383-384
sandbox, 381-384
storage, 384-399
archiving flash cards,402-404
object archiving, 400-402
File’s Owner icon (XIB files), 107
files
adding to projects, 32
header, 31
#import directive, 59
@interface directive, 59-60
@property directive, 61-62
ending, 62
method declaration, 60-61
implementation, 31, 62
#import directive, 63
@implementationdirective, 63
@synthesize directive, 63
ending, 64
method implementation, 64
locating methods and proper-ties, 35
project management, 28
adding existing resourcesto files, 32
adding new code files,31-32
editing/navigating code,34-39
identifying project type,28-29
project groups, 30-31
removal of files from pro-ject, 33-34
removal from projects, 34
XIB (Interface Builder), 107
Document icons, 109-110
Document window,107-109
View-Based Applicationtemplate, 138-139
fireDate notification property, 561
first responder icon (XIB files), 108
FlashCards application, 384, 405
application logic, implement-ing, 394-399
class logic, implementing,385-386
CreateCardViewContoller,adding, 391-393
flash cards, archiving,402-404
interface, creating, 384-391
object archiving, implementing,400-402
Flashlight application, 366-372
actions, connecting, 368
creating interface, 367
logic, 369-370
outlets, connecting, 368
preferences, 370-372
setting up, 366-367
float primitive data type, 65
floatValue method, 318
flow of program execution, GNUDebugger, 608-611
FlowerColorTable application,332-333
adding outlets, 334
data source methods,338-340
populating cells, 340-342
providing data to, 337-342
row touch events, 342-343
setting up, 333-337
table views, adding, 335-337
FlowerInfoNavigator application,344-345
adding outlets, 351
adding properties, 351
670
ending

ptg
adding web view, 352-353
detail view, 350-353
detail view controller logic,351-352
navigation events, 356-357
providing data to, 346-350
root view table controllers,353-356
setting up, 345-346
table data source methods, 354
UI, 357-358
FlowerView outlet, 121
FlowerWeb application, 204
actions, preparing, 205-206
adding segmented controls,206-210
adding switches, 210-212
adding web views, 212-214
finishing interface, 215
outlets, preparing, 205-206
releasing objects, 220-221
setting up, 205
view controller logic, 216-220
format specifiers (strings), 602
Foundation framework, 84
Core Services layer, 87
foundPinch method, 444
foundRotation method, 446
frameworks
Address Book UI, 505-506
AudioToolbox, 251
adding, 564
AV Foundation, 477
Core Location, 518-523, 529
Map Kit, 508, 518-523
Media Player, 476-477
adding, 482
Message UI, 507, 523-525
technology layers
Cocoa Touch layer, 84-85
Core OS layer, 88
Core Services layer, 86-88
CoreGraphics, 84
Foundation, 84
Media layer, 85
UIKit, 84
Xcode documentation, 98-100
Quick Help, 100-101
frameworks subgroup (projectgroups), 31
functionality, Cocoa Touch, 82-83
functions. see also methods
ABPersonHasImageData, 517
ABRecordCopyValue, 515
NSLog, 603, 627
Gg (gravity) unit, accelerometer, 452
Game Kit framework, Cocoa Touchlayer, 85
games, preferences, 405
gdb (GNU Debugger), 603-604
breakpoints, 604-607
Debugger view, 612-614
flow of program execution,608-611
variable states, datatip, 608
watchpoints, 611-612
GDB Pocket Reference, 627
generating provisioning profiles,12-21
GenericViewController view con-troller class
creating universal applications,591-596
adding device-specificviews, 591
adding to application dele-gates, 591-592
implementation, 595
instantiating view con-troller, 592-593
iPhone and iPad views,595-596
XIB files, 593, 595
UniversalToo application,adding to, 590-592
gesture recognizers, 434-439
pinch recognizer, 443-445
rotation recognizer, 445-447
shake recognizer, 447-448
swipe recognizer, 441-443
tap recognizer, 439-443
gestures, 434
gesture recognizers, 435-439
pinch recognizer, 443-445
rotation recognizer,445-447
shake recognizer, 447-448
swipe recognizer, 441-443
tap recognizer, 439-443
multitouch gesture recognition,434, 448-449
Gestures application, 435
interface, creating, 437-439
outlets, connecting, 439
pinch recognizer, implement-ing, 443-445
rotation recognizer, implement-ing, 445-447
setting up, 436-437
shake recognizer, implement-ing, 447-448
swipe recognizer, implement-ing, 441-443
tap recognizer, implementing,439-443
GetFlower action, 121
getter methods, 61
GettingAttention application, 249
action sheets, 245
button press responses,248-249
changing appearance,247-248
displaying, 245-247
alerts
generating, 235-245
playing sounds, 250-253
System Sound Services, 250
vibrations, 253
How can we make this index more useful? Email us at [email protected]
GettingAttention application
671

ptg
connecting actions, 234
connecting outlets, 234
local notifications, implement-ing, 561-563
notification files, prepping,232-233
notification interfaces, creat-ing, 233
GNU Debugger (gdb), 603-604
breakpoints, 604-607
Debugger view, 612-614
flow of program execution,608-611
variable states, datatip, 608
watchpoints, 611-612
Google Analytics, 652
Google Maps/Google Earth API,Map Kit map tiles, 508
GPS technology, 529
graphics, iOS platform, 4-5
gravity (g) unit, accelerometer, 452
group preference type, 376
grouped tables, 330-331
groups (projects), Xcode, 30-31
guides (IB layout tool), 112
gutter (Xcode), 604
gyroscope, 453-454, 472
reading, 456-458
updates
managing, 467-468
reacting to, 470-471
Hhandler blocks, 70, 456
handling
background suspension,559-560
location errors, location man-ager, 532-533
navigation events, 356-357
hardware
motion hardware, 451
accelerometer, 452-453
gyroscope, 453-458
requirements, 7
header files, 31, 58
#import directive, 59
@interface directive, 59-60
@property directive, 61-62
ending, 62
method declaration, 60-61
heading updates, CupertinoCompass application, 545-549
headings, Cupertino Compassapplication
calculating, 547
location manager, 541-542
updates, 545
Heavy view, Shark profiler results, 624
HelloNoun
object release, 147-148
setting up, 136
classes, 136-138
XIB files, 138-139
testing, 148
view controller
outlets and actions,140-141
implementing, 146-147
Help menu commands
Developer Documentation, 98
Quick Help, 100
hideKeyboard method, 172-174
hiding keyboard, 171-174
hop button, ImageHop applica-tions, adding, 191-192
IiAD framework, 653
applications, 654-655
Cocoa Touch layer, 85
IBAction directive, 133-134
IBAction method, 513
IBOutlet directive, 132
icon files, universal applications,582-583
Icon Files property, adding multi-ple items to, 44
icons, application icons, adding,631-633
id return type (methods), 61
IDE (integrated development envi-ronment). See Xcode
Identity Inspector, 125-126
Identity Inspector command (Toolsmenu), 126
if-then-else statement, 71, 78
iLounge.com, 651
Image I/O framework, Media layer, 86
Image Picker, 477, 492-495
image views
animating, 186-187
sliders, 180
ImageHop application, 181-182
actions, 182-184
connecting, 190
animation resources,adding, 182
background suspension, han-dling, 559-560
hop button, adding, 191-192
image views, adding, 184-188
labels, adding, 191
outlets, 182-184
connecting, 190
releasing objects, 195
setting up, 182
sliders, adding, 188-190
user interface, finishing,190-192
view controller logic, 193-195
images
buttons, setting, 167-170
cells, populating, 354-356
displaying, 493-494
imageWithData method, 515
imperative development, 54
implementation
GenericViewController class, 595
methods
convenience methods,67-68
672
GettingAttention application

ptg
declaration of variables,65-66
expressions and decisionmaking, 70-74
messaging syntax, 68-70
object allocation and initial-ization, 67
view controller logic, 146-147
View-Based Application tem-plate, 135
implementation files, 31, 62
#import directive, 63
@implementation directive, 63
@synthesize directive, 63
ending, 64
method implementation, 64
implicit preferences, creating,366-372
Import Developer Profile button, 21
Info Dark button, 166
Info Light button, 166
Info property list resource, 42
inheritance, OOP and, 55
initialization, objects, 67-68
initWithContentsOfURL:encoding:error method, 521
initWithQuestion:answer method, 385
initWithTitle parameter(actionSheet), 246
initWithTitle parameter(alertDialog), 237
input, 151, 179, 199-200
buttons, 152-154
iOS platform, 6-7
keyboard, hiding, 171-174
labels, 152-153
scrolling views, 203
segmented controls, 201
FlowerWeb application, 204
sliders, 180
adding, 188-190
image views, 180
styled buttons, creating,164-171
switches, 200
FlowerWeb application, 204
text fields, 152-156
text views, 153-154, 161-164
views, 152
web views, 202-204
installation
development provisioning profile, 12-21
iOS developer tools, 10-11
provisioning profile, 20
provisioning profiles, 20-21
instance methods, definition, 56
instance variables, 59-60
declaration, 65
object data types, 66
primitive data types, 65-66
definition, 56
releasing, 76
text fields, alerts, 242-243
instances
definition, 56
MKMapView, 508
navigationController, 357
instantiation
definition, 56, 107
view controllers, 298-299
GenericViewControllerclass, 592-593
universal applications,586-588
Instruments Library, 619
Instruments tool, 614
available instruments, 619
leak detector, 614-618
int primitive data type, 65
integers, 73
integrated development environ-ment (IDE). See Xcode
integration, 505, 526-527
Address Book frameworks,505-506
BestFriend application, 509
Address Book framework,512-518
connecting actions and out-lets, 512
creating UI, 511-512
map objects, 518-523
Message UI, 523-525
setting up, 510-511
Core Location framework, 529
Map Kit framework, 508
mapping, 508-509
Message UI framework, 507
Interface Builder, 23, 51, 105-106
connecting interfaces to code, 119
actions, 120-124
implementation, 120
launching IB from Xcode,119-120
outlets, 120-123
Create iPhone/iPod TouchVersion, 597
Identity Inspector, 125-126
rotatable interfaces
Autosizing, 413-416
creating, 411-416
reframing controls,416-423
setting up, 411-412
swapping views, 423-429
testing, 412-413
scrolling views, 228
user interfaces, 110
customization, 115-117
layout tools, 112-115
Objects Library, 110-111
simulation, 117
Xcode 4, 106
XIB files, 107-110
Interface Builder User Guide, 126
interface classes, 96-98
UIButton, 96
UIDatePicker, 97
UILabel, 96
UIPicker, 97
UISegmentedControl, 97
UISlider, 97
How can we make this index more useful? Email us at [email protected]
interface classes
673

ptg
UISwitch, 96
UITextField, 97
UITextView, 97
interface files, 58
#import directive, 59
@interface directive, 59-60
@property directive, 61-62
ending, 62
method declaration, 60-61
interfaces
BestFriend application, creat-ing, 511-512
ColorTilt application, preparing,464-465
connection to code, 119
actions, 120-124
implementation, 120
launching IB from Xcode,119-120
outlets, 120-123
converting (universal applica-tions), 597
creating with Interface Builder, 110
layout tools, 112-115
Objects Library, 110-111
Cupertino application, creat-ing, 536-537
Cupertino Compass applica-tion, updating, 544-545
customization, 115
Accessibility settings,116-117
Attributes Inspector,115-116
DateCalc application, finishing,266-267
FlashCards application
creating, 384, 387-391
preparing, 386-387
Flashlight application,creating, 367
FlowerInfoNavigator applica-tion, finishing, 357-358
FlowerWeb application, finish-ing, 215
Gestures application, creating,437-439
MatchPicker application, finish-ing, 274-275, 284-289
MediaPlayground application,creating, 480
notification interfaces, creat-ing, 233
Orientation application, prepar-ing, 459-460
Reframe application
creating, 417-422
reframing logic, 422-423
resizable, 407-408, 429-430
Autosizing, 413-416
creating, 411-416
designing, 410-411
setting up, 411-412
ReturnMe application,creating, 374
rotatable, 407-408, 429-430
Autosizing, 413-416
creating, 411-416
designing, 410-411
enabling, 408-409
reframing controls, 416-423
setting up, 411-412
swapping views, 423-429
testing, 412-413
simulation, 117
SlowCount application,creating, 572
static interface elements,294-295
Swapper application, creating,425-426
IOS developer tools
installing, 10-11
iOS platform, 3
application resource con-straints, 5
backgrounding, 554-556
connectivity, 6
display and graphics, 4-5
feedback, 6
frameworks, Xcode documen-tation, 98-102
input, 6-7
“retain” count, 76
iOS SDK (Software DevelopmentKit), 7
iPad Human Interface Guidelines, 127
iPad view, GenericViewControllerclass, 595-596
iPadViewController class, 584
iPhone Application ProgrammingGuide, 449, 558, 576
iPhone Dev Center, 8, 10, 13
iPhone distribution certificates,creating, 634-636
iPhone OS
frameworks, Xcode documen-tation, 100
technology layers, 83
Cocoa Touch, 84-85
Core OS, 88
Core Services, 86-88
Media, 85
iPhone Provisioning Portal link, 13
iPhone Simulator, 23, 51, 433
Accessibility Inspector, 118
running applications in, 382
testing applications, 45, 148
esoteric conditions, 49-50
generating multitouchevents, 48
Interface Builder, 117
launching applications,46-47
rotation simulation, 48
iPhone target, upgrading, 596-597
iPhone view, GenericViewControllerclass, 595-596
iPhoneApplicationList.com, 652
iPhoneApps.co.uk, 652
iPhoneViewController class, 585
iPod library, Media Picker, 495-501
iTunes. see also App Store
artwork, adding to applica-tions, 630-631
iTunes Connect, sales, monitoring,649-650
674
interface classes

ptg
Kkeyboard, hiding, 171-174
keyboard displays, customizing,text input traits, 159
Keyboard text input trait, 159
Keychain Access CertificateAssistant (DevelopmentProvisioning Assistant), 16-17
Keychain Access utility, 635
keychains, 14
keys, Launch image (iPad), 583
Llabels, 96, 152-153
ImageHop applications,adding, 191
lastAction, 272
matchResult, 272
landscape orientation, 408
lastAction label, 272
Launch image (iPad) key, 583
modifying project properties,44-45
launch images
adding, 633
dimensions, 583
universal applications, 583
launching
applications in iPhoneSimulator, 46-47
Development ProvisioningAssistant, 13
Mac OS X Installer application, 11
layers, iPhone OS, 83
Cocoa Touch, 84-85
Core OS, 88
Core Services, 86-88
Media, 85
laying out Reframe application,418-421
Layout menu commands
Add Horizontal Guide, 112
Add Vertical Guide, 112
Alignment, 113
layout tools, Interface Builder, 112
alignment, 113-114
guides, 112
selection handles, 112
Size Inspector, 114-115
leak detector (Instruments tool),614-618
Leaks instrument, 619
“Learning Objective-C: A Primer”document, 77
Library command (Tools menu), 110
life cycle (applications), 88-90
life cycle methods, background-aware applications, 556-558
limitations, iOS platform, 5
loadFirstView method, 305-306
loading remote content, NSURLand requestWithURL, 202-203
loadView methods, 304
local notification, creating, 561-563
local notifications
backgrounding, 554-555
implementing, 561-563
scheduling, 561-563
location accuracy, location manag-er, 533-534
location errors, location manager,handling, 532-533
location manager (Core Location), 530
Cupertino application, imple-menting, 538-540
delegate protocol, 530-533
headings, Compass, 541-542
location accuracy, 533-534
location errors, handling,532-533
update filter, 533
location services
Core Location framework,518-523, 529
Map Kit framework, 508,518-523
location-aware applications, creat-ing, 534-540
locationManager:didUpdate-Heading method, 568
locationManager:didUpdateTo-Location:fromLocationmethod, 531
Lock feature (iPhone Simulator), 49
logic
Flashlight application, 369-370
view controllers, 146-147
implementing, 174-175
long pressing (gesture), 434
long-running background tasks,completing, 555-556, 570-576
loops, 72-74
MMac OS templates, 51
Mac OS X Advanced DevelopmentTechniques, 77
Mac OS X Installer application,launching, 11
magnetic compass, 541-549
location manager headings,541-542
Make Snapshot command (Filemenu), 37
Making Your Application Location-Aware, 549
map display, 518, 522
Map Kit framework, 508, 518-523
Cocoa Touch layer, 84
Google Maps/Google EarthAPI, 508
map objects, BestFriend applica-tion, accessing, 518-523
map views, configuring, 512
mapping, 508-509
marketing applications, 649-655
iAds, 653-655
pricing, 653
social networks, 650-652
updates, 652-653
websites, 650-652
masks, autosizing, 597
How can we make this index more useful? Email us at [email protected]
masks, autosizing
675

ptg
MatchPicker application, 271
connecting outlets, 275
data structures, 276-278
finishing interface, 274-275
outlets, adding, 272
output labels, 275
picker views
adding, 273-274
providing data to, 275-281
reacting to choices,281-284
protocols, conforming to, 271
releasing objects, 272-273
setting up, 271-273
UI, configuring, 284-289
matchResult label, 272
measurable axes,accelerometer, 452
media, rich media, 475-476,501-502
AV Foundation framework, 477
Image Picker, 477
Media Player framework,476-477
MediaPlayground application,478-482
media files, MediaPlaygroundapplication, adding to, 483
Media layer frameworks, 85-86
Media Picker, 495-501
music player, 499-501
Media Player
framework, 476-477
adding, 482
movie player, 482-486
Media Player framework, Medialayer, 86
MediaPlayground application, 478
actions, connecting, 480-482
audio recordings
creating, 486-490
playing, 490-491
cleanup, handling, 485-486
Image Picker, 492-495
interface, creating, 480
media files, adding, 483
Media Picker, 495-501
Media Player framework,adding, 482
movie playback, implementing,483-485
movie player, 482-486
music player, 499-501
notifications, receiving, 485
outlets, connecting, 480-482
setting up, 478-480
memory, object release, 147-148
memory management
releasing instance variables, 76
releasing objects, 74-75
releasing rules, 76-77
retaining objects, 75-76
memory usage, applications, 615
menus, Overview drop-down, 604
message parameter (alertDialog), 237
Message UI framework, 507
BestFriend application,accessing, 523-525
Cocoa Touch layer, 85
messages, 56
messaging syntax, objects, 68-70
methods. see also functions
ABRecordCopyVal, 517
addTextField, 254
application:didFinishLaunching-WithOptions, 586, 592
applicationWillEnter-Foreground, 560
autorelease, 75
calculate, 318, 322
centerMap, 519
chooseImage, 492
clearView, 305
componentsSeparatedBy-String, 521
controlHardware, 467
countUp, 574-575
currentDevice, 588
data source methods, pickers,278-279
dealloc, 76, 147, 417, 424
declaration in interface files,60-61
definition, 35
describeInteger, 605, 609
doAccelerometer, 469
doActionSheet, 246
doAlert, 561
doMultiButtonAlert, 239
doRotation, 470
doSound, 251
floatValue, 318
foundPinch, 444
foundRotation, 446
getters, 61
hideKeyboard, 172-174
IBAction, 513
imageWithData, 515
implementation
convenience methods,67-68
declaration of variables,65-66
expressions and decisionmaking, 70-74
messaging syntax, 68-70
object allocation and initialization, 67
implementation files, 64
initWithContentsOfURL:encod-ing:error, 521
initWithQuestion:answer, 385
loadFirstView, 305-306
loadView, 304
locating, 35
locationManager:didUpdate-Heading, 568
locationManager:didUpdateTo-Location:fromLocation, 531
motionEnded:withEvent, 448
orientationChanged, 461
pickerView:didSelectRow:inComponent, 282
pickerView:numberOfRowsIn-Component, 279
676
MatchPicker application

ptg
pickerView:titleForRow:forCom-ponent, 280
presentModalViewController:animated, 398
recordAudio:, 487
release, object release,147-148
return types
id, 61
void, 61
sendEmail, 524
setLightSourceAlphaValue, 370
setRegion:animated, 519
setters, 61
setToRecipients, 524
showDate, 265, 269
showNextCard, 396
startUpdatingLocation, 538
stopUpdatingLocation, 532
tableView:cellForRowAtIndex-Path, 341
tableView:didSelectRowAt-IndexPath method, 356
tableView:titleForHeaderIn-Section, 339
timeIntervalSinceDate:, 269
toggleFlowerDetail, 205, 218
updateRightWrong-Counters, 396
viewDidLoad, 168-169, 186,396, 440, 460, 488, 545,567, 573-575, 605, 611,617, 621
missing 20 points, orientation, 428
MKMapView instance, 508, 527
Mobile Safari, 651
Model-View-Controller (MVC), 24
models, MVC structure, 131
data models, 134
modifying project properties
launch image, 44-45
setting application icon, 43
status bar display, 45
motion data, accessing, 454-458
motion events, ColorTilt applica-tion, 466-471
motion hardware, 451
accelerometer, 452-453
gravity unit, 452
measurable axes, 452
reading, 456-458
gyroscope, 453-454
reading, 456-458
motion manager, Core Motion, ini-tializing, 466-467
motion updates, receiving, 456
motionEnded:withEventmethod, 448
movement, sensing, 469
movie playback, implementing,483-485
movie player, 482-486
MPMusicPlayerController versusAVAudioPlayer, 502
multi-option alerts, creating,238-241
multi-view applications
benefits, 294
static interface elements,294-295
tab bars, 307
adding to, 310-312
adding view controllers,308-309
area view, 313-319
setting up, 307-310
summary view, 323-326
volume view, 319-323
toolbars, 295-307
versus single-view applica-tions, 293-295
multiple views, view controllers, 149
MultipleViews application, 295
actions, adding, 302-303
actions, connecting, 303
adding view controllers,296-297
adding views, 296-297
outlets, adding, 302-303
outlets, connecting, 303
setting up, 296-297
toolbar controls, adding,300-307
view controllers, instantiating,298-299
view switch methods, 303-305
multitouch events, iPhoneSimulator, 48
multitouch gesture recognition,434, 448-449
gesture recognizers
pinch recognizer, 443-445
rotation recognizer,445-447
shake recognizer, 447-448
swipe recognizer, 441-443
tap recognizer, 439-443
multivalue options, pickers, 257
multivalue preference type, 376
MVC (Model-View-Controller), 24,129-131
application design, 130-131
controllers, 131-132
data models, 134
models, 131
View-Based Application tem-plate, 135
creating views, 141-146
implementation, 135
implementation of viewcontroller logic, 146-147
object release, 147-148
project setup, 136-139
testing application, 148
view controller outlets andactions, 140-141
views, 131-132
Nnaming provisioning profiles, 17
NativeiPhoneApps.com, 652
navigating code, 34-39
navigation controllers,329-331, 360
navigation events,FlowerInfoNavigator application,handling, 356-357
How can we make this index more useful? Email us at [email protected]
navigation events, FlowerInfoNavigator application, handling
677

ptg
navigation-based applications,344-345. see alsoFlowerInfoNavigator application
navigationController instance, 357
nested messaging, 69
New project command (File menu), 28
New Smart Group command(Project menu), 31
newBFF action, 510
NeXTSTEP platform, 83
nil value, 69
nonatomic attribute, 62
Notes application, 381
notification files, prepping,232-233
notification interfaces, creating, 233
notification properties, 561
notifications, 231-232
alerts, 249
action sheets, 245-248
button press responses,248-249
generating, 235-245
playing sounds, 250-253
System Sound Services, 250
vibrations, 253
creating, 561-563
local notifications
backgrounding, 554-555
implementing, 561-563
notification interfaces,creating, 233
prepping notification files,232-233
receiving, 485
scheduling, 561-563
NSArray class, 94
NSDate class, 95
NSDecimalNumber class, 94-95
NSDictionary class, 94
NSLog function (debugging tool),602-603, 627
NSMutableArray class, 94
NSMutableDictionary class, 94
NSMutableString class, 93
NSNumber class, 94-95
NSObject class, 56, 91
NSString class, 93
NSUInteger properties, 385
NSURL class, 95-96
remote content, loading,202-203
NSUserDefaults API, 371
numbers, 94-95
OObject Allocations instrument, 619
object archiving, implementing,400-402
object data types, declaration ofvariables, 66
“Object-Oriented Programmingwith Objective-C” document, 77
object-oriented programming(OOP). See OOP (object-orientedprogramming)
Objective-C, 24, 53, 57-58, 64, 78
decision-making
expressions, 70-71
if-then-else statements, 71
repetition with loops,72-74
switch statements, 72
file structure, 58
header files, 58-62
implementation files,62-64
integers, 73
memory management
releasing instance vari-ables, 76
releasing objects, 74-75
releasing rules, 76-77
retaining objects, 75-76
messaging syntax, 68-69
blocks, 70
nested messaging, 69
method implementation, decla-ration of variables, 65-66
object allocation and initializa-tion, convenience methods,67-68
statements, 57
“Objective-C 2.0 ProgrammingLanguage” document, 77
objects. see also classes
adding to views, 141-144
allocation and initialization,67-68
application, UIApplicationclass, 91
definition, 56
instantiation, 107
messaging syntax, 68-70
Reframe application,releasing, 417
releasing, 67, 78, 147-148
convenience methods,67-68
FieldButtonFun, 175
FlowerWeb application,220-221
ImageHop application, 195
MatchPicker application,272-273
memory management,74-75
retaining, 75-76
Scroller application,releasing, 226
scrolling views, adding,223-224
Swapper application,releasing, 424
switch, UISwitch class, 96
window, UIWindow class, 92
Objects Library (Interface Builder),110-111
Online Certificate Status Protocol(OSCP), 635
onscreen controls, UIControl class, 92
OO programs, 130
678
navigation-based applications

ptg
OOP (object-oriented program-ming), 53-55, 130
Objective-C, 24, 53, 57-58, 64
blocks, 70
decision-making, 70-74
declaration of variables,65-66
file structure, 58-64
memory management,74-77
messaging syntax, 68-69
object allocation and initial-ization, 67-68
terminology, 55-57
Open GL ES instrument, 620
OpenGL ES framework, Medialayer, 86
OpenStep platform, 83
orientation
accessing data, 454-458
changes, reacting to, 460
determining, 461
sensing, 458-461
tilt, detecting, 462-471
Orientation application
changes, reacting to, 460
interface, preparing, 459-460
orientation, determining, 461
setting up, 458
orientation notifications, request-ing, UIDevice, 455
orientationChanged method, 461
orientations (screens), 408
origins, Cocoa Touch, 83
OSCP (Online Certificate StatusProtocol), 635
other sources subgroup (projectgroups), 30
otherButtonTitles parameter(actionSheet), 247
otherButtonTitles parameter(alertDialog), 237
outlets, 121
BestFriend, connecting, 512
buttons, 183
ChosenColor, 121
ColorTilt, adding, 463-464
connecting, 190
GettingAttention applica-tion, 234
MatchPicker application, 275
Cupertino, adding, 535-536
Cupertino Compass, adding,543-544
deviceType, 589
FieldButtonFun, 155-156
Flashlight, connecting, 368
FlowerColorTable, adding to, 334
FlowerInfoNavigator, adding, 351
FlowerView, 121
FlowerWeb, preparing, 205-206
Gestures, connecting, 439
ImageHop
adding hop button,191-192
adding image views,184-188
adding labels, 191
adding sliders, 188-190
connecting outlets, 190
finishing interface, 190-192
preparing, 182-184
Internet Builder, 120-121
connections, 122-123
MatchPicker, adding to, 272
MediaPlayground, connecting,480, 482
MultiViews, adding to, 302-303
padViewController, 585
Reframe application
adding, 416-417
adding properties, 416-417
connecting, 421-422
laying out, 418-421
Scroller, preparing, 222-223
segmented controls,connecting, 209
Swapper application
adding, 423-424
connecting, 426
switches, 205
TabbedCalculation application
adding, 313-314
connecting, 317
text views, connecting, 164
view controllers, 140-141
connection points,144-146
web views, connecting to, 214
output, 151, 179, 199-200
buttons, 152-154
image views, adding, 184-188
keyboard, hiding, 171-174
labels, 152-153
scrolling views, 203
segmented controls, 201
FlowerWeb application, 204
styled buttons, creating,164-171
switches, 200
FlowerWeb application, 204
text fields, 152-154
actions, 155-156
adding, 156-161
outlets, 155-156
text views, 153-154
adding, 161-164
views, 152
web views, 202-203
FlowerWeb application, 204
output labels, 120
MatchPicker application, 275
overlap, buttons, 430
Overview drop-down menu, 604
PpadViewController outlet, 585
paid developer programs,joining, 10
panning (gesture), 434
parameters
definition, 56
Quick Help results, 101
parent classes, 56
How can we make this index more useful? Email us at [email protected]
parent classes
679

ptg
patterns, 366
photo library, Image Picker,492-495
photographs, displaying, 493-494
picker views, 259, 270-275,284-289
adding, 273-274
choices, reactions, 281-284
outlets, 272
output labels, 275
protocols, 259-260, 271
data source protocol, 260
delegate protocol, 260-261
providing data to, 275-281
pickers, 257-258, 289-290
data source methods,278-279
date pickers, 258-259,261-263, 266-270
adding, 263-265
calculating differencebetween two dates, 268
connecting to actions, 265
displaying date and time,267-268
getting date, 267
setting attributes, 264-265
multivalue options, 257
picker views, 259, 270-275,284-289
adding, 273-274
outlets, 272
output labels, 275
protocols, 259-261, 271
providing data to, 275-281
reacting to choices,281-284
UIDatePicker/UIPicker class, 97
pickerView:didSelectRow:inCompo-nent method, 282
pickerView:numberOfRowsInCompo-nent method, 279
pickerView:titleForRow:forCompo-nent method, 280
pin annotation view, creating, 522
pinch gesture recognizer, imple-menting, 443-445
pinching (gesture), 434
placeholder text, 158
plain tables, 330
playback, movie, implementing,483-485
playing alerts, 250-253
sounds with vibrations, 253
system sounds, 251-252
plist files, 371
universal applications, 581
icon files, 582-583
launch images, 583
pointers, 66
populating data structures,277-278
portrait orientation, 408
portrait upside-down orientation,408
Position setting (Size Inspector), 114
pragma marks, adding, 39
preferences, 363
applications, 366-372
games, 405
implicit preferences, creating,366-372
reading, 371-372
storing, 370-371
system settings, 372-374
settings bundles, 375-381
Preferences command (Xcodemenu), 100
premature optimization, 621
presentModalViewController:ani-mated method, 398
pressing (gesture), 434
pricing applications, 653
primitive data types, 78
declaration of variables, 65-66
procedural programming, 54
products subgroup (projectgroups), 31
profiles
applications, preparing,643-647
development provisioning
generation and installation,12-21
testing, 21-22
development provisioning pro-files, 12
“distribution” profiles, 12
profiling applications, Shark profiler, 620-626
program execution, GNU Debugger,608-611
Programming in Objective-C 2.0,Second Edition, 77
programs. See applications
project groups, subgroups, 30
project management, Xcode, 28
adding existing resources, 32
adding new code files, 31-32
creating a new project, 28-29
project groups, 30-31
Project menu commands, NewSmart Group, 31
projects. see also applications
BestFriend application, 509
Address Book framework,512-518
connecting actions and out-lets, 512
creating UI, 511-512
map objects, 518-523
Message UI, 523-525
setting up, 510-511
ColorTilt, 462
adding actions and outlets,463-464
CoreMotion framework, 463
motion events, 466-471
preparing interface,464-465
setting up, 462-465
680
patterns

ptg
Cupertino, 534
audio directions, 567-569
background imageresources, 534
background modes key,569-570
Core Location framework, 534
creating UI, 536-537
location manager, 538-540
outlets, 535-536
preparing for audio,564-567
properties, 535-536
protocols, 535-536
task-specific backgroundprocessing, 564-570
Cupertino Compass
calculating heading, 547
direction image resources, 543
heading updates, 545-549
outlets, 543-544
properties, 543-544
setting up, 543-544
updating UI, 544-545
DateCalc, 261
adding date pickers,263-265
finishing interface,266-267
setting up, 262-263
view controller logic,267-270
Debugger Practice, 604-606,612-614
Instruments, 614-620
profiling, 620-626
setting breakpoints,606-607
setting watchpoints,611-612
stepping through code,608-611
variable states, 608
distribution, configuring for,638-639, 642
FieldButtonFun
actions, 155-156
adding text fields, 156-161
adding text views, 161-164
creating styled buttons,164-171
hiding keyboard, 171-174
outlets, 155-156
releasing objects, 175
setting up, 154
view controller logic,174-175
FlashCards, 384
application logic, 394-399
archiving flash cards,402-404
class logic, 385-386
CreateCardViewContoller,391-393
creating interface, 384,387-391
object archiving, 400-402
preparing interface,386-387
Flashlight, 366-372
connecting actions and out-lets, 368
creating interface, 367
logic, 369-370
reading preferences,371-372
setting up, 366-367
storing preferences,370-371
FlowerColorTable, 332-333
adding outlets, 334
adding table views,335-337
data source methods,338-340
populating cells, 340-342
providing data to, 337-342
row touch events, 342-343
setting up, 333-337
FlowerInfoNavigator, 344-345
adding outlets and properties, 351
adding web view, 352-353
detail view, 350-353
detail view controller logic,351-352
navigation events, 356-357
providing data to, 346-350
root view table controllers,353-356
setting up, 345-346
table data source meth-ods, 354
UI, 357-358
FlowerWeb, 204
finishing interface, 215
preparing actions outlets,205-206
releasing objects, 220-221
segmented controls,206-210
setting up, 205
switches, 210-212
view controller logic,216-220
web views, 212-214
Gestures, 435
connecting outlets, 439
creating interface, 437-439
pinch recognizer, 443-445
rotation recognizer,445-447
setting up, 436-437
shake recognizer, 447-448
swipe recognizer, 441-443
tap recognizer, 439-443
GettingAttention, 249
action sheets, 245-249
connecting actions and outlets, 234
creating notification inter-face, 233
generating alerts, 235-245
local notifications, 561-563
How can we make this index more useful? Email us at [email protected]
projects
681

ptg
playing sounds, 250-253
prepping notification files,232-233
System Sound Services, 250
vibrations, 253
HelloNoun
creating views, 141-146
object release, 147-148
setting up, 136-139
testing, 148
view controller logic,146-147
view controller outlets andactions, 140-141
ImageHop, 181-182
actions, 182-184
adding animationresources, 182
adding hop button,191-192
adding image views,184-188
adding labels, 191
adding sliders, 188-190
background suspension,559-560
connecting actions, 190
connecting outlets, 190
finishing interface,190-192
outlets, 182-184
releasing objects, 195
setting up, 182
view controller logic,193-195
MatchPicker, 271
adding picker views,273-274
configuring UI, 284-289
connecting outlets, 275
data structures, 276-278
finishing interface, 274-275
outlets, 272
output labels, 275
protocols, 271
providing data to, 275-281
reacting to choices,281-284
releasing objects, 272-273
setting up, 271-273
MediaPlayground, 478
adding media files, 483
adding Media Player framework, 482
connecting actions and out-lets, 480-482
creating audio recordings,486-490
creating interface, 480
handling cleanup, 485-486
Image Picker, 492-495
Media Picker, 495-501
movie playback, 483-485
movie player, 482-486
music player, 499-501
playing audio recordings,490-491
receiving notifications, 485
setting up, 478-480
MultipleViews, 295
adding actions and outlets,302-303
adding toolbar controls,300-307
adding view controllers,296-297
adding views, 296-297
connecting actions, 303
connecting outlets, 303
instantiating view con-trollers, 298-299
setting up, 296-297
view switch methods,303-305
Orientation
determining orientation, 461
orientation changes, 460
preparing interface,459-460
setting up, 458
Reframe, 416
adding outlets and proper-ties, 416-417
connecting outlets,421-422
creating interface, 417-422
disabling Autosizing, 418
laying out, 418-421
reframing logic, 422-423
releasing objects, 417
setting up, 416-417
ReturnMe, 372
creating interface, 374
setting up, 373-374
settings bundles, 375-381
Scroller, 221
adding scroll views,223-225
preparing outlets, 222-223
releasing objects, 226
scrolling behavior, 225-226
setting up, 222
SimpleSpin, 411-416
setting up, 411-412
testing, 412-413
SlowCount
counter logic, 573-574
creating UI, 572
long-running backgroundtasks, 570-576
Swapper, 423
adding outlets and proper-ties, 423-424
connecting outlets, 426
creating interface, 425-426
enabling rotation, 424
releasing objects, 424
setting up, 423-425
view-swapping logic,426-429
TabbedCalculation, 307
adding actions and outlets,313-314
adding tab bar controller,310-312
adding view controllers,308-309
682
projects

ptg
area calculation logic,317-319
area view, 313-319
connecting actions, 317
connecting outlets, 317
setting up, 307-310
summary view, 323-326
volume calculation logic,325-326
volume view, 319-323
Universal application, 583
active devices, 588-590
device-specific view con-trollers, 584-588
setting up, 584
UniversalToo application,590, 596
GenericViewController,590-592, 595
setting up, 590
view controllers, 592-593
views, 595-596
XIB files, 593-595
View-Based Application tem-plate, 135
promoting applications, 649-655
iAds, 653-655
pricing, 653
social networks, 650-652
updates, 652-653
websites, 650-652
properties
animationDuration, 189
ColorTilt application, adding,463-464
Cupertino application, adding,535-536
Cupertino Compass applica-tion, adding, 543-544
definition, 56
FlowerInfoNavigator applica-tion, adding, 351
locating, 35
modifying, 42, 45
launch image, 44-45
setting application icon, 43
status bar display, 45
NSUInteger, 385
Swapper application, adding,423-424
Property List Editor, 371
protocols
ABPeoplePickerNavigation-ControllerDelegate, 513
CreateCardDelegate, 398
Cupertino application, adding,535-536
definition, 60
MatchPicker application, con-forming to, 271
picker views, 259-261
UIPickerView, 290
Provisioning Portal link, 13
provisioning profiles, 12
Development ProvisioningAssistant
downloading, 18-19
installing, 20-21
naming and generating, 17
generation and installation,12-21
testing, 21-22
push buttons, 120
QQuartz Core framework, Media
layer, 86
Quick Help (Xcode), 100-101
Quick Look framework, CoreServices layer, 87
Rradians, degrees, 445
radio buttons, 200
reactions, orientation changes, 460
reading
accelerometer, 456-458
gyroscope, 456-458
preferences, 371-372
recordAudio: method, 487
recordings (audio)
creating, 486-490
playing, 490-491
Reframe application, 416
Autosizing, disabling, 418
Interface, creating, 417-422
laying out, 418-421
objects, releasing, 417
outlets
adding, 416-417
connecting, 421-422
properties, adding, 416-417
reframing logic, 422-423
setting up, 416-417
reframing
controls, rotatable applica-tions, 416-423
interfaces, 410
reframing logic, implementing,422-423
registration, Apple DeveloperProgram, 8-9
related API, Quick Help results, 102
related documents, Quick Helpresults, 102
Release build configuration, 604
release method, object release,147-148
release of objects, 67
convenience methods, 67-68
memory management, 74-75
releasing objects, 78
FieldButtonFun application, 175
ImageHop application, 195
instance variables, memorymanagement, 76
MatchPicker application,272-273
objects, FlowerWeb applica-tion, 220-221
Reframe application, 417
rules, 76-77
Scroller application, 226
Swapper application, 424
How can we make this index more useful? Email us at [email protected]
releasing objects
683

ptg
remote content, loading, NSURLand requestWithURL, 202-203
removing breakpoints, 606
repeatInterval notification property, 561
repetition, loops, 72-74
requesting orientation notifica-tions, UIDevice, 455
requestWithURL, remote content,loading, 202-203
requirements, hardware, 7
resources
adding to projects, 32
removal from projects, 33-34
Resources subgroup (projectgroups), 31
responders, UIResponder class, 92
responses, action sheets, buttonpresses, 248-249
results, Shark profiler, 624-626
retain attribute, 62
“retain” count, 76
retaining objects, memory man-agement, 75-76
Return Key text input trait, 159
return types (methods), 61
return value, Quick Help results, 102
ReturnMe application, 372, 405
interface, creating, 374
setting up, 373-374
settings bundles, creating,375-381
reverse geocoding, 508
rich media, 475-476, 501-502
AV Foundation, framework, 477
Image Picker, 477
Media Player, framework,476-477
MediaPlayground application, 478
adding media files, 483
adding Media Player framework, 482
cleanup, 485-486
connecting outlets,480, 482
creating audio recordings,486-490
creating interface, 480
Image Picker, 492-495
Media Picker, 495-501
movie playback, 483-485
movie player, 482-486
music player, 499-501
playing audio recordings,490-491
receiving notifications, 485
setting up, 478-480
Robbin, Arnold, 627
root class, NSObject, 91
root view table controllers,FlowerInfoNavigator application,implementing, 353-356
rotatable interfaces, 407-408,429-430
Autosizing, 413-416
controls, reframing, 416-423
creating, 411-416
designing, 410-411
enabling, 408-409
setting up, 411-412
swapping views, 423-429
testing, 412-413
rotating (gesture), 434
rotation
degrees, 445
testing with iPhone Simulator, 48
rotation gesture recognizer, imple-menting, 445-447
Rounded Rect buttons, 166
row touch events, FlowerColorTableapplication, 342-343
rows, cells, 360
rules, releasing, 76-77
Run command (Run menu), 40
Ssales, monitoring, iTunes Connect,
649-650
sample code, Quick Help results, 102
sandbox (Apple), 381-384
scaling factors, 4
scaling web pages, 214
scheduling notifications, 561-563
screen orientations, 408
Scrolling application, 221
adding scroll views, 223-225
preparing outlets, 222-223
releasing objects, 226
scrolling behavior, implement-ing, 225-226
setting up, 222
scrolling behavior, Scroller applica-tion, 225-226
scrolling options, text views, set-ting up, 163-164
scrolling views, 203, 221
Interface Builder, 228
objects, adding, 223-224
Scroller application, 221
adding, 223-225
preparing outlets, 222-223
setting up, 222
width, 226
SDK (Software Development Kit), 7
search results, Xcode documentation, 100
Secure text input trait, 159
Security framework, Core OS layer, 88
segmented controls, 120, 201, 258
choosing appearance, 208
configuring, 207-208
connecting to actions, 210
connecting to outlet, 209
FlowerWeb application, 204
adding, 206-210
sizing, 208
UISegmentedControl class, 97
selection handles (IB layout tool), 112
self.view, 304
sendEmail action, 510
sendEmail method, 524
sender variable, 172
sensing movement, 469
684
remote content, loading, NSURL and requestWithURL

ptg
Set Active Build Configuration,Debug command (Project menu), 604
setLightSourceAlphaValue method, 370
setRegion:animated method, 519
setter methods, 61
setting
animation speed, 193-195
default state, switches, 211
images, buttons, 167-170
web view attributes, 212-213
Setting Application SchemaReferences in the iPhoneReference Library tutorial, 405
settings bundles, creating,375-381
setToRecipients method, 524
Shake Gesture feature (iPhoneSimulator), 49
shake gesture recognizer, imple-menting, 447-448
shaking (gesture), 434
Shark profiler, 620
attaching to an application,621-624
interpretation of results,624-626
showDate action method, 265
showDate method, 269
showNextCard controller, 395
showNextCard method, 396
SimpleSpin application, 411-416
Autosizing, 413-416
setting up, 411-412
testing, 412-413
Simulate Hardware Keyboard fea-ture (iPhone Simulator), 49
Simulate Interface command (Filemenu), 117-118
Simulate Memory Warning feature(iPhone Simulator), 49
simulation, user interfaces, 117
Simulator, testing applications, 148
simulators, 46, 148
single classes, limitations, 130
single-view applications versusmulti-view applications, 293-295
singletons, 56, 366, 456
sizable interfaces, 407-408,429-430
Autosizing, 413-416
creating, 411-416
designing, 410-411
setting up, 411-412
Size Inspector (IB layout tool),114-115
Autosizing, 413-416
Size Inspector command (Toolsmenu), 114
Size setting (Size Inspector), 114
sizing segmented controls, 208
slider preference type, 376
sliders, 180
image views, 180
UISlider class, 97
vertical, 197
SlowCount application
counter logic, implementing,573-574
long-running background tasks,completing, 570-576
UI, creating, 572
smart groups, 31
snapshots, 37-38
Snapshots command (File menu), 37
social networks, applications, pro-moting, 650-652
Software Development Kit (SDK), 7
sound constants, Cupertino appli-cation, adding, 566-567
soundName notification property, 561
sounds
alerts, playing, 250-253
system sounds, creating andplaying, 251-252
vibrations, playing with, 253
spaghetti code, 130
speed, animations, setting,193-195
Stallman, Richard, 627
standard program (DeveloperProgram), 8
startAnimating method, 188
starting animations, 187-188
startUpdatingLocation method, 538
statements
if-then-else, 71, 78
Objective-C, 57
switch, 72, 339
static interface elements, 294-295
status bar, 428
status bar display, modifying pro-ject properties, 45
Step Into icon (debugger), control-ling program execution, 609
Step Out icon (debugger), control-ling program execution, 609
Step Over icon (debugger), control-ling program execution, 609
stepping through code, 608-611
stopping animations, 187-188
stopUpdatingLocation method, 532
storage
application data, 382-383
file system, 384-399
flash cards, 402-404
object archiving, 400-402
preferences, 370-371
Store Kit framework, Core Serviceslayer, 88
String Programming Guide forCocoa, 602
strings, 93
date formats, 268
format specifiers, 602
structure, MVC, 130-131
styled buttons, creating, 164-171
subclasses, 55
subgroups, project groups, 30
submissions, applications,642-649
subviews, text fields, alerts,243-244
summary view, multi-view applica-tions, implementing, 323-326
How can we make this index more useful? Email us at [email protected]
summary view, multi-view applications, implementing
685

ptg
superclasses, 56
supplementation, WiFi, 6
supported content types, webviews, 202
suspension backgrounding, 554
Swapper application, 423
interface, creating, 425-426
objects, releasing, 424
outlets
adding, 423-424
connecting, 426
properties, adding, 423-424
rotation, enabling, 424
setting up, 423-425
view-swapping logic, imple-menting, 426-429
swapping views, 410
rotatable applications, 423-429
Swapper application, 426-429
swipe gesture recognizer, imple-menting, 441-443
swiping (gesture), 434
switch objects, UISwitch class, 96
switch statements, 72, 339
switches, 200
actions, connecting to, 211-212
default state, setting, 211
FlowerWeb application, 204
adding, 210-212
outlets, 205
syntax, expressions, 71
System Configuration framework,Core Services layer, 88
System framework, Core OS layer, 88
system settings, 372-374
settings bundles, creating,375-381
System Sound Services, 250
system sounds, creating and play-ing, 251-252
System Usage instrument, 620
Ttab bars, 295, 326-327
multi-view applications, 307
adding to, 310-312
adding view controllers,308-309
area view, 313-319
setting up, 307-310
summary view, 323-326
volume view, 319-323
versus toolbars, 328
TabbedCalculation application, 307
actions
adding, 313-314
connecting, 317
area calculation logic, 317-319
area view, 313-319
outlets
adding, 313-314
connecting, 317
setting up, 307-310
summary view, 323-326
tab bar controllers, adding,310-312
view controllers, adding,308-309
volume calculation logic,325-326
volume view, 319-323
table data source methods,FlowerInfoNavigator application, 354
table views, 329-330
FlowerColorTable application,332-333
adding outlets, 334
adding table views,335-337
adding to, 335-337
data source methods,338-340
populating cells, 340-342
providing data to, 337-342
row touch events, 342-343
setting up, 333-337
tables, 330
grouped, 330-331
plain, 330
providing data to, 360
rows, cells, 360
tableView:cellForRowAtIndexPathmethod, 341
tableView:didSelectRowAtIndex-Path method, 356
tableView:titleForHeaderInSectionmethod, 339
tap gesture recognizer,implementing, 439-443
tapping (gesture), 434
targets, 580
task completion, long-runningtasks, 555-556
task-specific background processing, 555, 564-570
technologies
Apple Developer Suite, 23-24
Interface Builder, 105-126
iPhone Simulator, 45-50
Xcode, 27-42, 45
Cocoa Touch, 81, 90
core classes, 91-93
data type classes, 93-96
functionality, 82-83
interface classes, 96-98
origins, 83
developers, 23-24
MVC structure, 129-131
application design,130-131
controllers, 132-134
data models, 134
View-Based Applicationtemplate, 135-148
views, 132
Objective-C, 53, 57-58, 64
blocks, 70
decision-making, 70-74
declaration of variables,65-66
file structure, 58-64
686
superclasses

ptg
memory management,74-77
messaging syntax, 68-69
object allocation and initial-ization, 67-68
technology layers, iPhone OS, 83
Cocoa Touch, 84-85
Core OS, 88
Core Services, 86, 88
Media, 85
templates
Mac OS, 51
View-Based Application tem-plate, 135
creating views, 141-146
implementation, 135
implementation of viewcontroller logic, 146-147
object release, 147-148
project setup, 136-139
testing application, 148
view controller outlets andactions, 140-141
Xcode, 28
testing
development provisioning pro-file, 21-22
SimpleSpin application,412-413
testing applications
iPhone Simulator, 45
esoteric conditions, 49-50
generating multitouchevents, 48
interface simulation, 117
launching applications,46-47
rotation simulation, 48
View-Based Application tem-plate, 148
text, cells, populating, 354-356
text comments, class files,adding to, 64
text entry areas, copy and paste, 161
text field preference type, 376
text fields, 152-154
alerts
accessing, 244-245
instance variables,242-243
subviews, 243-244
FieldButtonFun application
actions, 155-156
adding, 156-161
outlets, 155-156
setting up, 154
UITextField/UITextView class, 97
text input traits, keyboard displays,customizing, 159
text views, 152-154, 177
attributes, editing, 162
FieldButtonFun, adding,161-164
outlets, connecting, 164
scrolling options, setting up,163-164
tilt, detecting, 462-471
Time Profiler instrument, 619
timeIntervalSinceDate: method, 269
timer mode, UIDatePicker, 290
timeZone notification property, 561
title preference type, 376
Toggle In-Call Status Bar feature(iPhone Simulator), 49
toggle switch preference type, 376
toggleFlowerDetail, 205
toggleFlowerDetail method,205, 218
toolbars, 294, 326-327
buttons, adding and editing,301-302
multi-view applications,295-307
MultipleViews application
adding actions, 302-303
adding controls, 300-307
adding outlets, 302-303
connecting actions, 303
connecting outlets, 303
view switch methods,303-305
versus tab bars, 328
tools
Apple Developer Suite, 23-24
Interface Builder, 105-126
iPhone Simulator, 45-50
Xcode, 27-42, 45
Cocoa Touch, 24, 81, 90
core classes, 91-93
data type classes, 93-96
functionality, 82-83
interface classes, 96-98
origins, 83
debugging, 601
Instruments, 614-619
MVC (Model-View-Controller),24, 129-131
application design,130-131
controllers, 132-134
data models, 134
View-Based Applicationtemplate, 135-148
views, 132
Objective-C, 24, 53, 57-58, 64
blocks, 70
decision-making, 70-74
declaration of variables,65-66
file structure, 58-64
memory management,74-77
messaging syntax, 68-69
object allocation and initial-ization, 67-68
universal applications,596-597
Tools menu commands
Attributes Inspector, 115
Identity Inspector, 126
Library, 110
Size Inspector, 114
How can we make this index more useful? Email us at [email protected]
Tools menu commands
687

ptg
tracing applications, Instrumentstool, 614-619
Tree view, Shark profiler results, 624
tutorials (Apple), 177
TV Out feature (iPhone Simulator), 49
Twitter, applications, promoting, 651
UUIAlertView class, 237
UIApplication class, 91
UIButton class, 96, 152-154
UICatalog class, 177, 197
UIControl class, 92
UIDatePicker class, 97
timer mode, 290
UIDevice class, 588
orientation notifications,requesting, 455
UIImage class, 197
UIImageView class, 197, 290
UIKit framework, 84
UILabel class, 96, 152, 156, 177
UIPicker class, 97
UIPickerView class, protocols, 290
UIResponder class, 92
UIs (user interfaces). see alsointerfaces
Address Book framework,512-518
BestFriend application, creat-ing, 511-512
ColorTilt application, preparing,464-465
Cupertino application, creat-ing, 536-537
Cupertino Compass applica-tion, updating, 544-545
FlashCards application
creating, 384, 387-391
preparing, 386-387
Flashlight application,creating, 367
FlowerInfoNavigator applica-tion, 357-358
FlowerWeb application,finishing, 215
Gestures application, creating,437-439
ImageHop applications, finish-ing, 190-192
MediaPlayground application,creating, 480
Message UI, BestFriend appli-cation, 523-525
Orientation application,preparing, 459-460
Reframe application
creating, 417-422
reframing logic, 422-423
resizable, 407-408, 429-430
Autosizing, 413-416
creating, 411-416
designing, 410-411
setting up, 411-412
ReturnMe application,creating, 374
rotatable, 407-408, 429-430
Autosizing, 413-416
creating, 411-416
designing, 410-411
enabling, 408-409
reframing controls,416-423
setting up, 411-412
swapping views, 423-429
testing, 412-413
sliders, 180
SlowCount application, creat-ing, 572
Swapper application, creating,425-426
UISegmentedControl class, 97
UISlider class, 97, 197
UISwitch class, 96
UITextField class, 97, 152-153, 156
UITextView class, 97, 152-154,161, 177
UIView class, 92
UIViewController class, 93
UIWebView class, 228
UIWindow class, 92
unique device identifiers, 12-13
Universal application, 583
active devices, detecting anddisplaying, 588-590
device-specific view con-trollers, adding, 584-588
setting up, 584
universal applications, 579-580,590, 598-599
GenericViewController viewcontroller class, 591-596
adding device-specificviews, 591
adding to application dele-gates, 591-592
implementation, 595
instantiating view con-troller, 592-593
iPhone and iPad views,595-596
XIB files, 593, 595
tools
converting interfaces, 597
upgrading iPhone target,596-597
Window-based template,581, 583
adding view controllers toapplication delegates,585-586
detecting and displayingactive device, 588-590
device-specific view con-trollers and views, 584
instantiating view con-trollers, 586, 588
plist files, 581-583
project preparation, 584
UniversalToo application, 590, 596
GenericViewController
adding, 590-592
implementing, 595
setting up, 590
688
tracing applications, Instruments tool

ptg
view controllers, instantiating,592-593
views, 595-596
XIB files, setting up, 593-595
update filter, location manager, 533
updateRightWrongCountersmethod, 396
updates
accelerometer
managing, 467-468
reacting to, 468-469
gyroscope
managing, 467-468
reacting to, 470-471
headings, Cupertino Compassapplication, 545-549
motion updates, receiving, 456
updating
applications, 652-653
UI, Cupertino Compass appli-cation, 544-545
upgrading iPhone target, 596-597
uploading
applications, 647-649
Certificate Assistant, 17
upside-down portrait mode, 430
URLs (uniform resource locators),95-96
user alerts, 231-232, 249
action sheets, 245
button press responses,248-249
changing appearance,247-248
displaying, 245-247
buttons, adding, 238-241
displaying, 236-237
fields, adding, 241-245
generating, 235-245
multi-option alerts, creating,238-241
notification interfaces,creating, 233
playing sounds, 250-253
prepping notification files,232-233
System Sound Services, 250
vibrations, 253
user defaults, 366-372
games, 405
implicit preferences, creating,366-372
reading, 371-372
setting up, 366-367
storing, 370-371
system settings, 372-374
settings bundles, 375-381
user input, 179, 199-200
scrolling views, 203
segmented controls, 201
FlowerWeb application, 204
sliders, 180
adding, 188-190
image views, 180
switches, 200
FlowerWeb application, 204
web views, 202-203
FlowerWeb application, 204
user interfaces
connection to code, 119
actions, 120-121, 123-124
implementation, 120
launching IB from Xcode,119-120
outlets, 120-123
creating with Interface Builder, 110
layout tools, 112-115
Objects Library, 110-111
customization, 115
Accessibility settings,116-117
Attributes Inspector,115-116
simulation, 117
user output, 179, 199-200
scrolling views, 203
segmented controls, 201
FlowerWeb application, 204
switches, 200
FlowerWeb application, 204
web views, 202-203
FlowerWeb application, 204
Vvariables
alertDialog, 237
declaration, 65
object data types, 66
primitive data types, 65-66
definition, 56
GNU Debugger, datatip, 608
instance variables, 59-60
sender, 172
versions, testing with iPhoneSimulator, 49
vibrations, alerts, 253
view controller logic
DateCalc application, imple-menting, 267-270
FlowerWeb application, imple-menting, 216-220
ImageHop application,193-195
view controllers
configuring, 312
creating universal applicationswith Window-based template,585-586
FieldButtonFun
actions, 155-156
adding text fields, 156-161
adding text views, 161-164
outlets, 155-156
setting up, 154
instantiating, 592-593
logic implementation,146-147, 174-175
multiple views, 149
MultipleViews application
adding, 296-297
instantiating, 298-299
How can we make this index more useful? Email us at [email protected]
view controllers
689

ptg
MVC structure, 132
IBAction directive, 133-134
IBOutlet directive, 132
outlets and actions, 140-141
TabbedCalculation application,adding, 308-309
UIViewController class, 93
Universal application, adding,584-588
universal applications,GenericViewController,591-596
view icon (XIB files), 108
view switch methods, MultiViewsapplication, implementing,303-305
View-Based Application template, 135
creating views, 141
addition of objects,141-144
outlet and action connection, 144-146
FieldButtonFun
actions, 155-156
adding text fields, 156-161
adding text views, 161-164
creating styled buttons,164-171
hiding keyboard, 171-174
outlets, 155-156
releasing objects, 175
setting up, 154
view controller logic,174-175
FlowerWeb, 204
finishing interface, 215
preparing actions, 205-206
preparing outlets, 205-206
releasing objects, 220-221
segmented controls,206-210
setting up, 205
switches, 210-212
view controller logic,216-220
web views, 212-214
implementation, 135
implementation of view controller logic, 146-147
object release, 147-148
project setup, 136
classes, 136-138
XIB files, 138-139
Scroller, 221
adding scroll views,223-225
preparing outlets, 222-223
releasing objects, 226
scrolling behavior, 225-226
setting up, 222
testing application, 148
view controllers, outlets andactions, 140-141
viewDidLoad method, 168-169, 186,396, 440, 460, 488, 545, 567,573-575, 605, 611, 617, 621
views, 109. see also table views
Debugger (GNU Debugger),612-614
map, configuring, 512
MultipleViews application,adding views, 296-297
MVC structure, 131-132
picker views, 259, 270-275,284-289
adding, 273-274
outlets, 272
output labels, 275
protocols, 259-261, 271
providing data to, 275-281
reacting to choices,281-284
pin annotation view,creating, 522
scrolling, 203, 221
Scroller, 221-222
Scroller application,223-226
width, 226
swapping, 410
rotatable applications,423-429
Swapper application,426-429
table views, 329-330
text views, 152-154
UIView class, 92
UniversalToo application,595-596
view controllers, multiple controllers, 149
View-Based Application template
creating views, 141-146
implementation of viewcontroller logic, 146-147
object release, 147-148
web views, 202-203
FlowerWeb application, 204
void return type (methods), 61
volume view, multi-view applica-tions, implementing, 319-323
Wwarnings, building applications,
41-42
watchpoints, GNU Debugger,611-612
web pages, scaling, 214
web views, 120, 202-203
attributes, setting, 212-213
clearColor, 220
FlowerInfoNavigator applica-tion, adding, 352-353
FlowerWeb application, 204,212-214
outlets, connecting to, 214
supported content types, 202
websites
Apple, 8
applications, promoting,650-652
width, scroll views, 226
690
view controllers

ptg
WiFi technology, 529
supplementation, 6
wildcard IDs, 637
window objects, UIWindow class, 92
Window-based templates, univer-sal applications, 581-583
adding view controllers toapplication delegates,585-586
detecting and displaying activedevice, 588-590
device-specific view controllersand views, 584
instantiating view controllers,586-588
plist files, 581-583
project preparation, 584
XXcode, 23, 27-28, 50
build configurations, 604
building applications, 39-42
Active Configuration set-ting, 40
Build and Run button,40-41
errors and warnings, 41-42
debugging, 601
GNU Debugger, 603-614
Instruments tool, 614-619
NSLog function, 602-603
Shark profiler, 620-626
documentation system, 45
Cocoa Touch, 81-83, 90-98
exploration of frameworks,98-101
editing, 34-39
editor, autocompletion, 35-37
gutter, 604
launching IB from, 119-120
modifying project properties,42, 45
launch image, 44-45
setting application icon, 43
status bar display, 45
navigating, 34-39
project management, 28
adding existing resources, 32
adding new code files,31-32
creating a new project,28-29
project groups, 30-31
removal of files and resources,33-34
Xcode editor, 51
Xcode 3 Unleashed, 77, 627
Xcode 4
Interface Builder, 106
preview, 24
Xcode Debugging Guide, SharkUser Guide, 627
Xcode editor, 51
Xcode menu commands,Preferences, 100
Xcode Workspace Guide, 50
XIB (Interface Builder) files, 107
Document icons, 109-110
Document window, 107-109
universal applications,593-595
UniversalToo application,setting up, 593-595
View-Based Application template, 138-139
How can we make this index more useful? Email us at [email protected]
XIB (Interface Builder) files
691