sanako study v. 5.10 technical guide - ch.jensen oy study v. 5.10... · system components 3 system...
TRANSCRIPT

Sanako Study
TECHNICAL GUIDE

Copyright 2010 Sanako Corporation. All rights reserved. Microsoft is a registered trademark. Microsoft Windows® XP, Windows® Vista and Windows® 7 are trademarks of Microsoft Corporation. This document covers Sanako Study v. 5.10 Document date 28.10.2010 1871740-10301
Sanako Corporation
Eurocity, Joukahaisenkatu 1, 20520 Turku, Finland Tel: (0)20 7939 500, Fax: (0)22 363 440 [email protected], [email protected], http://www.sanako.com

Contents i
CONTENTS
System Components 3
Main System components ....................................................................................... 3 Sanako Study Tutor application ................................................................. 3 Sanako Study Student application ............................................................. 3 Sanako Study Server ................................................................................. 3
Requirements 4
As per the requirements for the Microsoft® Windows® XP, Windows® Vista or Windows® 7 operating system ............................................................................... 4 Network Requirements ........................................................................................... 5 Firewall settings ...................................................................................................... 6 Notes on disk space ................................................................................................ 6
Installation 7
Software components ............................................................................................. 7 Recommended installation order ............................................................................ 7 Installation Instructions ........................................................................................... 8
Study Server Software installation ............................................................. 8 Study Tutor software installation .............................................................. 10 Study Student Software installation ......................................................... 13 Editing Classroom names after installation .............................................. 16
Starting Study Tutor .............................................................................................. 17 Entering License Information ................................................................................ 17 Sound Card Line Selections for Study .................................................................. 17
Notes on sound card configuration in Windows XP ................................. 18 Notes on sound card configuration in Windows Vista and Windows 7 .... 19
Selecting Tutor and Classroom ............................................................................. 19
Configuring Study System 20
Configuring folders ................................................................................................ 20 Class Files and Tutor Configuration Files ............................................................. 21
Starting study 500/700/1200 for the first time .......................................... 22 Adding a new tutor ................................................................................... 22 Class files ................................................................................................. 24 Tutor configuration files ............................................................................ 25 Disabling Tutor login ................................................................................ 26 Configuring Tutor specific settings ........................................................... 27 Application language ................................................................................ 27 Autoscan .................................................................................................. 27 Thumbnail size ......................................................................................... 27
Default student names .......................................................................................... 28 Identifying student computers ............................................................................... 29
Study general settings 30
General settings .................................................................................................... 30 Activity ...................................................................................................... 31 Audio ........................................................................................................ 31 File distribution ......................................................................................... 31 Internet ..................................................................................................... 32 Screen Transfer ....................................................................................... 32
ii Sanako Study v. 5.10 Technical Guide
Thumbnail / Snapshot.............................................................................. 32 WLAN ...................................................................................................... 32
Study system logs ................................................................................................ 32 Changing licensing type ....................................................................................... 33 Changing classroom ............................................................................................. 34
Audio Settings 35
Using a media player as source .............................................................. 35 Windows Vista specific settings .............................................................. 35 Testing sound hardware compatibility ..................................................... 35 Setting data properties for saved audio files ........................................... 36 Editing sound card line associations ....................................................... 36
Preparing Study classroom 38
Starting Study Tutor .............................................................................................. 38 Creating a default class ........................................................................... 38
Starting Study Student .......................................................................................... 39 Student icons ........................................................................................................ 39
Class view ............................................................................................... 39 Adding students ....................................................................................... 40 Moving and arranging student icons ....................................................... 41 Removing students .................................................................................. 42
Viewing product information ................................................................................. 42
Extension modules 43
Extension modules ............................................................................................... 43 Adding extension modules ................................................................................... 43
Dynamic licensing 45
What is dynamic licensing? ..................................................................... 45 Components related to dynamic licensing............................................... 45
Installation instructions for dynamic licensing ...................................................... 46 Recommended installation order when dynamic licensing will be used . 47 License Service Database installation ..................................................... 47 Entering license information for dynamic licensing ................................. 47 Editing License Service and License Manager information .................... 51 Starting Sanako License Service ............................................................ 51
Installing from MSI packages 53
Pre-requisites for MSI installation ......................................................................... 53
Additional information 54
Index 55
System Components 3
SYSTEM COMPONENTS
MAIN SYSTEM COMPONENTS
SANAKO STUDY TUTOR APPLICATION
Teachers use the Study Tutor application, which is the main interface to the Study 500/700/1200 system. The Tutor application allows teachers to instruct with the Study 500/700/1200 system and to control the classroom computers.
SANAKO STUDY STUDENT APPLICATION
The Study Student application is installed onto all student computers. Study Student connects to Study Server at system startup and runs in the background listening for commands from Study Tutor. Students can open the student interface to work independently, however, teachers are able to control student computers, regardless of whether the Student application is visible on student screens or not.
SANAKO STUDY SERVER
The Study Server application is the information center of the Sanako Study system and both the Tutor and Student components automatically connect to it. All system data is passed through Study Server and it allows communication between the Tutor and Student components.
If there is only one Study classroom in an institution, we recommend that Study Server be installed onto the teacher computer. If there are multiple Study classrooms, Study Server may be installed onto a separate server computer or onto each teacher computer with individual classroom names in each instance.
4 Sanako Study v. 5.10 Technical Guide
REQUIREMENTS
AS PER THE REQUIREMENTS FOR THE MICROSOFT® WINDOWS® XP, WINDOWS® VISTA OR WINDOWS® 7 OPERATING SYSTEM
Microsoft® Windows® XP, Windows® Vista or Windows® 7 operating system
Microsoft .NET Framework® 2.0 SP 2, Microsoft .NET Framework 3.5, or Microsoft .NET Framework 3.5 SP 1
DirectX 9.0c or higher
1 GHz processor
512 MB of system memory, 2 GB recommended for Tutor PC
100 MB of free disk space for installation *
1024*768 display resolution with 16-bit colors
AC97 or HDA compatible sound card
Network Adapter, TCP/IP support required
PC Headset – recommended Sanako models to ensure high quality audio
QuickTime® 7.0.3 or later is required for displaying certain file types and for the Sanako Study Video Live Module
*) The amount of free disk space required during the use of Study 1200 varies primarily according to the use of the recording functionality - longer recording times require more disk space.
Note: In order to use the OneNote feature, Microsoft OneNote must be installed on the student computers before installing Study Student. Otherwise Study will be unable to connect to OneNote and tutor notes cannot be sent to students’ OneNote applications.

Requirements 5
Note: Actual requirements may vary based on your system configuration. It is essential to make sure that the operating system runs smoothly on each computer where a Study Tutor or Student application will be installed.
NETWORK REQUIREMENTS The following requirements should be met by the network.
Multicast must be enabled in the network. Note: In many WLAN access points multicast is disabled by default
All computers must be in the same TCP/IP sub-net in order to allow multicast transfer of screen and audio to students
It is recommended that all workstations within a room are connected to the same network switch with support for multicast transmission
Student and teacher workstations need to be able to PING each other and the Study Server with TCP/IP packets
If the computers have multiple network adapters, the adapter used by Sanako Study must be bound first, because Windows operating systems send multicast data to the first adapter
Minimum of 100B bandwidth or greater dedicated to each workstation.
Study classrooms require a file server where e.g. media files and collected student recordings are stored
o Teacher and students should have unrestricted access to the server
o Schools may use an existing server with Linux, Windows NT or Windows Server operating system
o A NAS (Network Attached Storage) server may also be used
o Note: Windows XP, Windows Vista and Windows 7 operating systems do not support sharing a folder for over 10 simultaneous users and therefore cannot be recommended as file servers

6 Sanako Study v. 5.10 Technical Guide
FIREWALL SETTINGS Sanako Study adds required Windows firewall exceptions automatically during installation.
If a non-Windows firewall is used please verify that the following programs have been added to the firewall exceptions list.
Tutor.exe (Tutor computer)
Student.exe (Student computers)
StudyServer.exe (on computer with Study Server software)
The default TCP ports used by Sanako are:
Port 5060 for audio packets
Port 6121 for screen monitoring packets
Port 6131 for screen multicast packets
Ports 6310, 6311 and 6312 for Study Server operations
NOTES ON DISK SPACE The amount of hard disk space required for the storage of digitized files depends on how much material will be made available to the students at any one time and how much work the students are likely to save to their own area. Disk quota sizes usually vary between 20 and 50MB per student. However, students using Study 1200 typically require a disk quota of 100MB minimum to allow them to save work during class for self-study reinforcement.
A typical MP3 audio file size (default setting in Study 1200) is approximately 1MB per minute.
Therefore, a typical 160GB hard disk drive would allow for the saving of approximately 2600 hours of audio.
In order to ensure that this information can be delivered to all the student desktops simultaneously (i.e. smooth video and audio playback) Sanako strongly recommends the use of hardware RAID controllers on the server or the use of Network Attached Storage (NAS) devices.
Sanako also recommends that you take regular data back-ups. The use of a CD/DVD writer is also recommended to save student oral recordings and/or source material that are infrequently used. When this material is required it can be copied to the server from the CD archive.
Installation 7
INSTALLATION
At the time of installation, the installer needs to have Local Administrator user rights. Please note that in some configurations, Domain Administrator rights are not enough to install applications.
Computers where Study is installed must have a suitable way to access Sanako installation media. This can be e.g. a DVD-drive, a USB port which supports USB memory keys or access to a network location where Study installation files are placed.
SOFTWARE COMPONENTS The following software components are always installed in all Study installations:
Sanako Study Tutor software Installed on teacher computer
Sanako Study Server software Installed on either server or teacher computer
Sanako Study Student software Installed on student computers
If you will have only one Study classroom, we recommend that Study Server be installed onto the teacher computer. If you will have multiple Study classrooms, Study Server may be installed onto a separate server computer or onto each teacher computer with individual classroom names in each instance.
RECOMMENDED INSTALLATION ORDER We recommend that the different components are installed in the following order:
1. Sanako Study Server software (on server or tutor computer)
2. Sanako Study Tutor software (on tutor computer)
8 Sanako Study v. 5.10 Technical Guide
3. Sanako Study Student software (on student computers)
INSTALLATION INSTRUCTIONS
STUDY SERVER SOFTWARE INSTALLATION
Follow the installation instructions below to install the Study Server software.
1. Select Sanako Study Server software in the Installation CD menu to start the installation program.
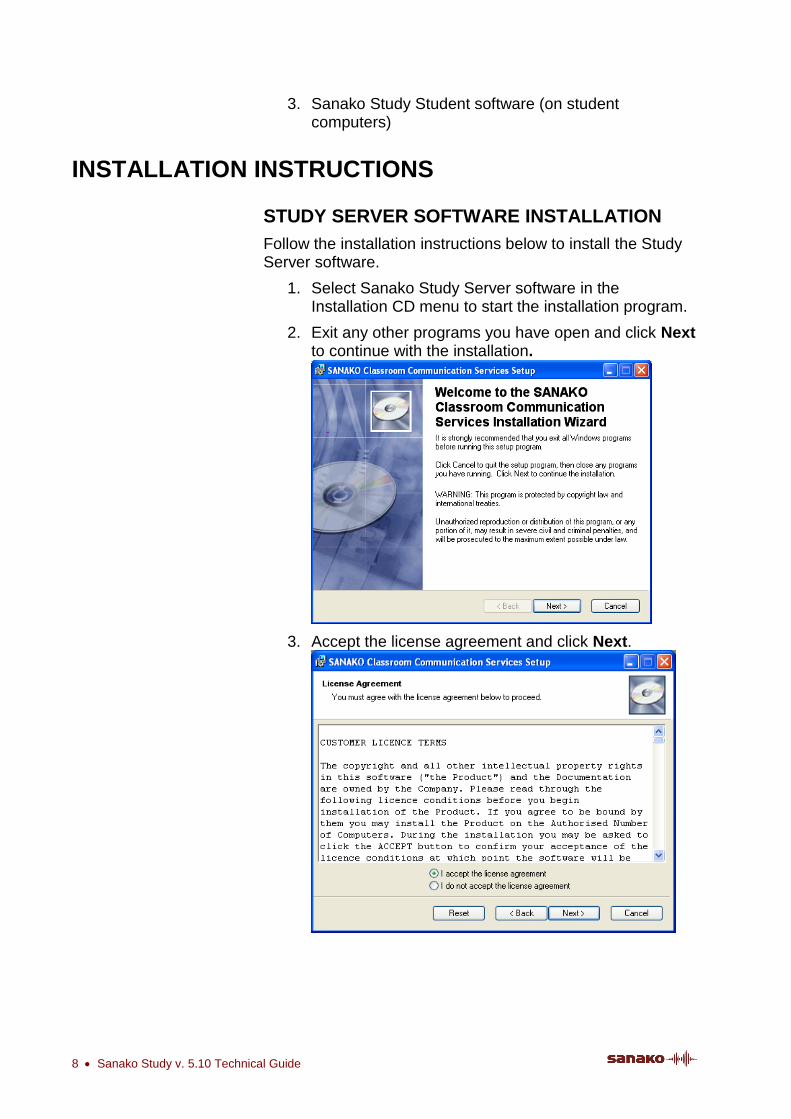
2. Exit any other programs you have open and click Next to continue with the installation.
3. Accept the license agreement and click Next.

Installation 9
4. Select a suitable installation folder and click Next.
5. Select a classroom name. If you will have only one Study classroom, select Yes to use the default classroom name. If you will have multiple Study classrooms, select No and then enter a classroom name for the classroom in question. Note: Classroom does not refer to a physical space here, but instead to a collection of computers in the school network that may be used in the same Study learning session.
10 Sanako Study v. 5.10 Technical Guide
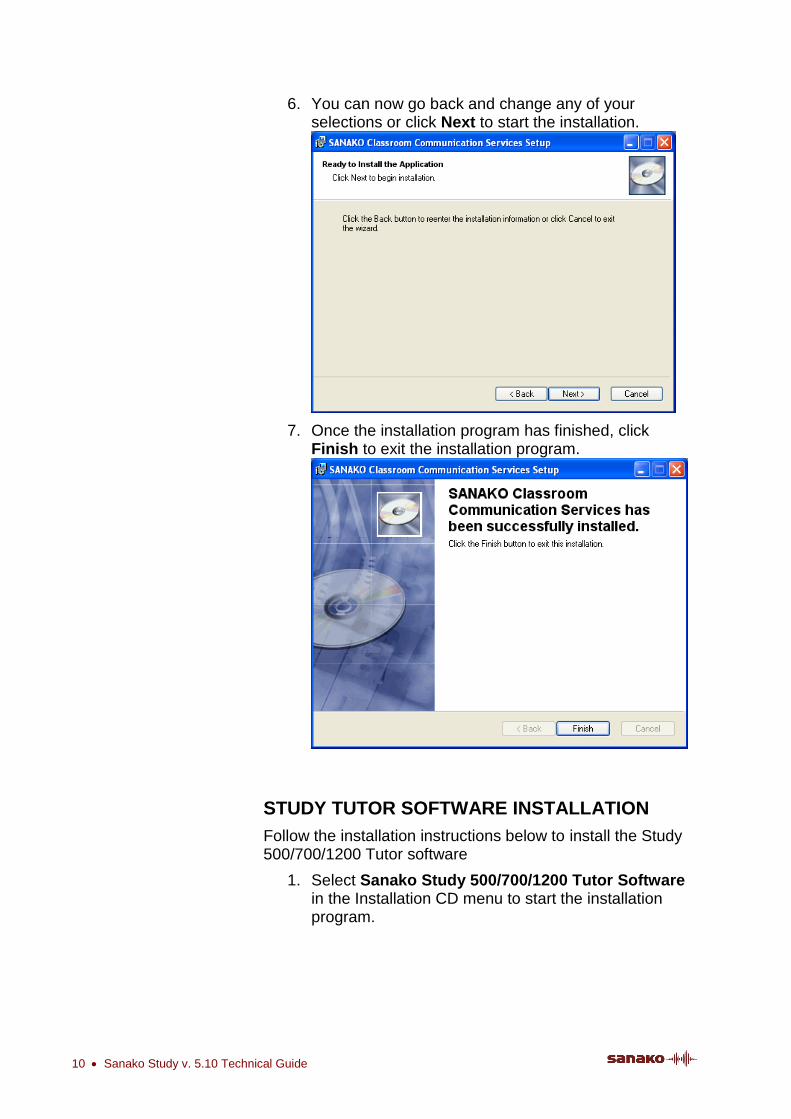
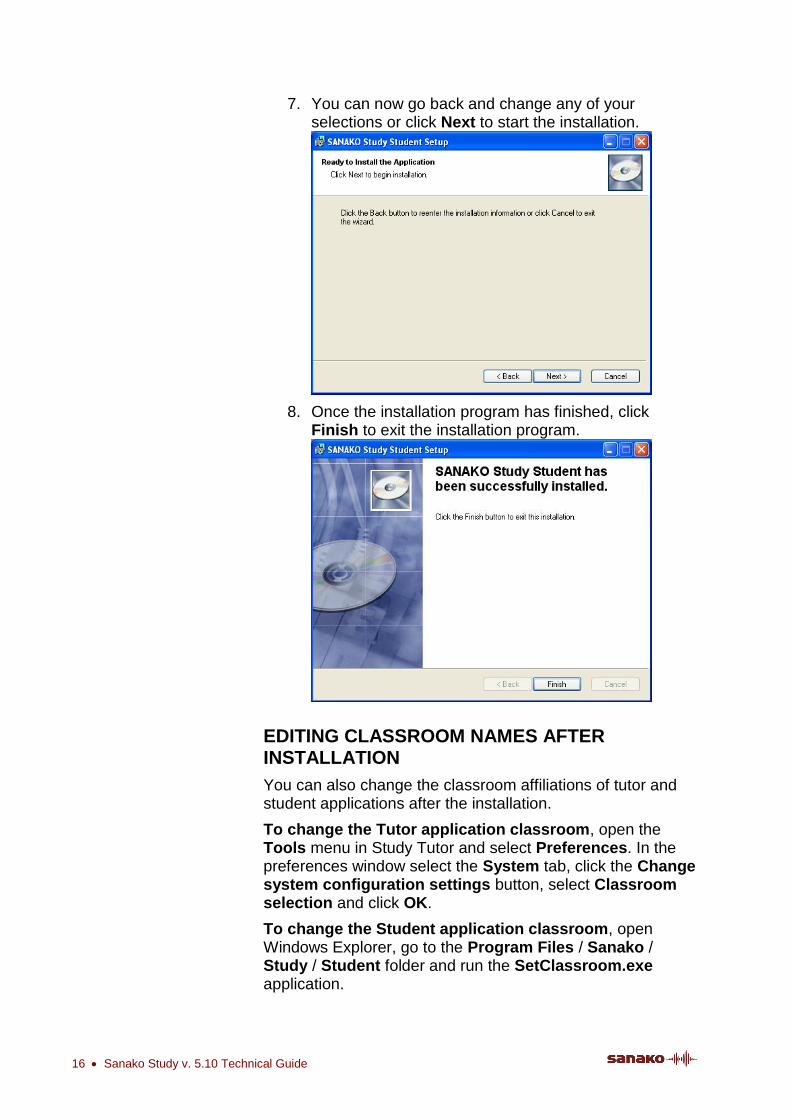
6. You can now go back and change any of your selections or click Next to start the installation.
7. Once the installation program has finished, click Finish to exit the installation program.
STUDY TUTOR SOFTWARE INSTALLATION
Follow the installation instructions below to install the Study 500/700/1200 Tutor software
1. Select Sanako Study 500/700/1200 Tutor Software in the Installation CD menu to start the installation program.

Installation 11
2. Exit any other programs you have open and click Next to continue with the installation.
3. Accept the license agreement and click Next.
4. Under User Information, enter the name of the system administrator and the school or institution. Check the Anyone who uses this computer option to make the Study application available to all users who log in.

12 Sanako Study v. 5.10 Technical Guide
5. Select a suitable installation folder and click Next.
6. Select a classroom name. If you will have only one Study classroom, select Yes to use the default classroom name. If you will have multiple Study classrooms, select No and then enter the same classroom name that was used during the Study Server software installation for the classroom in question. Note: Classroom does not refer to a physical space here, but instead to a collection of computers in the school network that may be used in the same Study learning session.
Installation 13
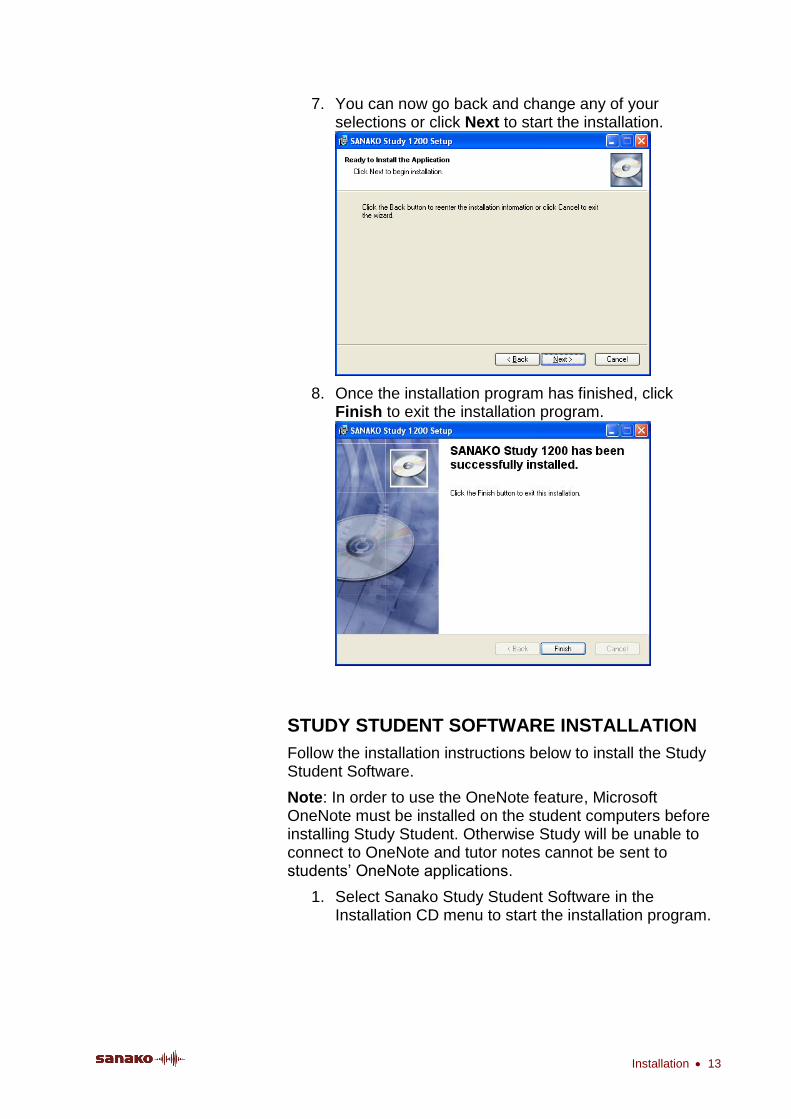
7. You can now go back and change any of your selections or click Next to start the installation.
8. Once the installation program has finished, click Finish to exit the installation program.
STUDY STUDENT SOFTWARE INSTALLATION
Follow the installation instructions below to install the Study Student Software.
Note: In order to use the OneNote feature, Microsoft OneNote must be installed on the student computers before installing Study Student. Otherwise Study will be unable to connect to OneNote and tutor notes cannot be sent to students’ OneNote applications.
1. Select Sanako Study Student Software in the Installation CD menu to start the installation program.
14 Sanako Study v. 5.10 Technical Guide
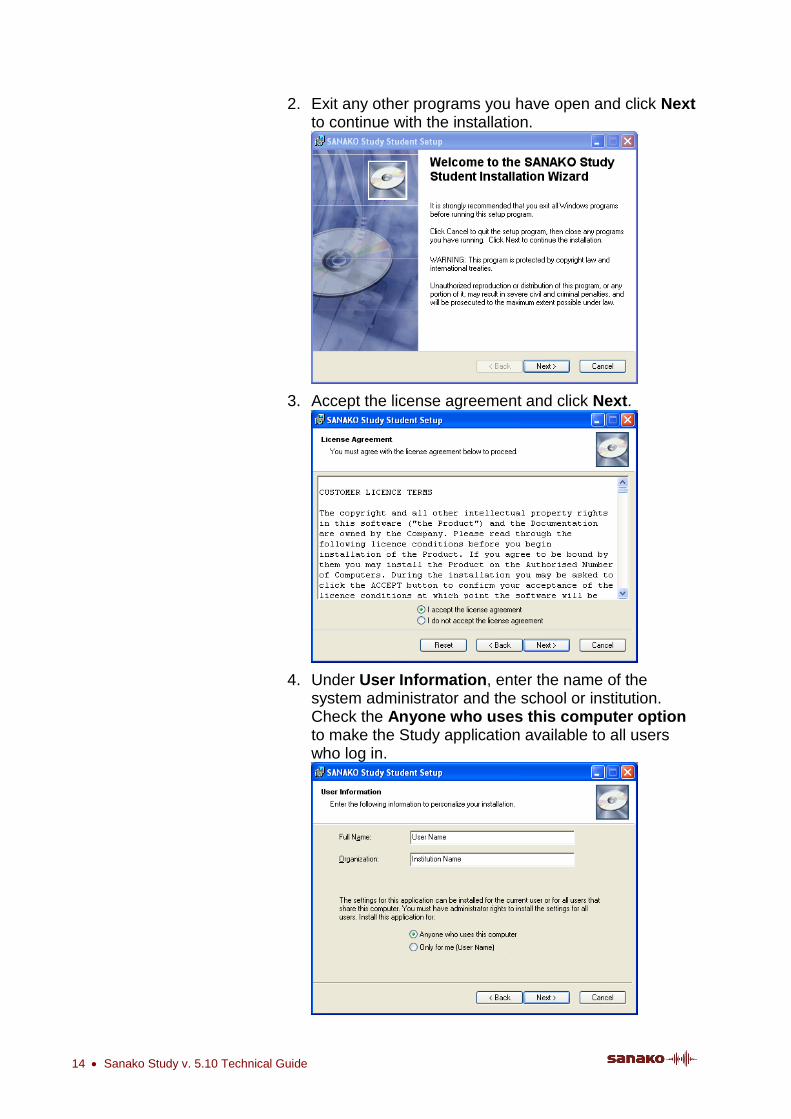
2. Exit any other programs you have open and click Next to continue with the installation.
3. Accept the license agreement and click Next.
4. Under User Information, enter the name of the system administrator and the school or institution. Check the Anyone who uses this computer option to make the Study application available to all users who log in.

Installation 15
5. Select a suitable installation folder and click Next.
6. Select a classroom name. If you will have only one Study classroom, select Yes to use the default classroom name. If you will have multiple Study classrooms, select No and then enter the same classroom name that was used during the Study Server software installation for the classroom in question. Note: Classroom does not refer to a physical space here, but instead to a collection of computers in the school network that may be used in the same Study learning session.
16 Sanako Study v. 5.10 Technical Guide
7. You can now go back and change any of your selections or click Next to start the installation.
8. Once the installation program has finished, click Finish to exit the installation program.
EDITING CLASSROOM NAMES AFTER INSTALLATION
You can also change the classroom affiliations of tutor and student applications after the installation.
To change the Tutor application classroom, open the Tools menu in Study Tutor and select Preferences. In the preferences window select the System tab, click the Change system configuration settings button, select Classroom selection and click OK.
To change the Student application classroom, open Windows Explorer, go to the Program Files / Sanako / Study / Student folder and run the SetClassroom.exe application.

Installation 17
STARTING STUDY TUTOR After the installation, you are ready to start Study. To start Study Tutor, open the Windows Start menu (lower left corner on your screen) and select Programs > Sanako > Study 500/700/1200 > Tutor, or double-click the Study Tutor icon on the teacher computer desktop.
ENTERING LICENSE INFORMATION When you start Sanako Study for the first time, the program asks you to enter your license information before the actual Study application is started.
1. Click on Enter license to enter your license information. This opens a License Check window.
Enter your license information and click Continue. Please note that the license information fields are case-sensitive.
2. Once you have entered the license information, close the Study configuration window.
SOUND CARD LINE SELECTIONS FOR STUDY After entering the license information, the program will ask you if you want to set sound card line associations. If you choose to set them a Sound Device Wizard opens where audio devices can be defined.

18 Sanako Study v. 5.10 Technical Guide
Select an appropriate sound card line or audio device for each Study student and tutor audio device in the drop-down menus. When finished, click Save & Quit to save your settings.
Note: Sound Device Wizard is slightly different in Windows XP environments compared to Windows Vista and Windows 7 environments. In Windows XP environments Sound Device Wizard will also have selections for audio line volumes.
You can also set sound devices later at any time by selecting Sound settings in the Tools menu.
NOTES ON SOUND CARD CONFIGURATION IN WINDOWS XP
Sanako Study uses a Mixer.xml file to control sound card volume settings and line selections. This file is edited in the Sound Device Wizard above. Mixer.xml includes preset names for all the different sound card mixer lines and consists of separate playback and recording sections. Study controls the sound card volume and mixer line selections according to these mixer line names.
However, the mixer line names used by the sound card can vary depending on the sound card, the operating system language and the sound card drivers. Checking the sound

Installation 19
card audio line associations is particularly important on computers running a non-English language operating system, which may cause confusion between the designations of the sound lines.
NOTES ON SOUND CARD CONFIGURATION IN WINDOWS VISTA AND WINDOWS 7
In Windows Vista and Windows 7 environments sound card line information is saved into the Windows registry instead of Mixer.xml. Sound Device Wizard is also different in Windows Vista and Windows 7 environments compared to Windows XP environments. Instead of sound card lines, you need to define sound devices used for the different audio functions, since some sound card lines, e.g. Microphone, are handled as their own sound devices.
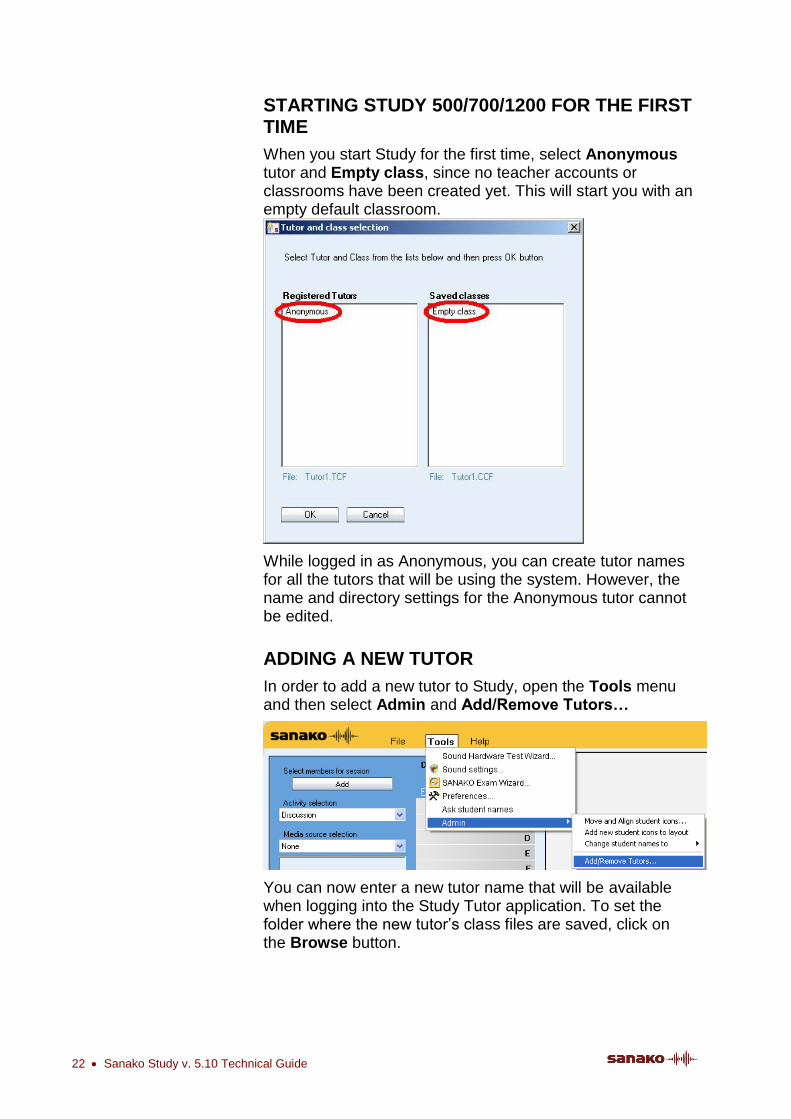
SELECTING TUTOR AND CLASSROOM When you start Study for the first time, select Anonymous tutor and Empty class, since no teacher accounts or classrooms have been created yet. This will start you with an empty default classroom.
For instructions on how to create teacher accounts and class files, see Class Files and Tutor Configuration Files later in this guide.
20 Sanako Study v. 5.10 Technical Guide
CONFIGURING STUDY SYSTEM
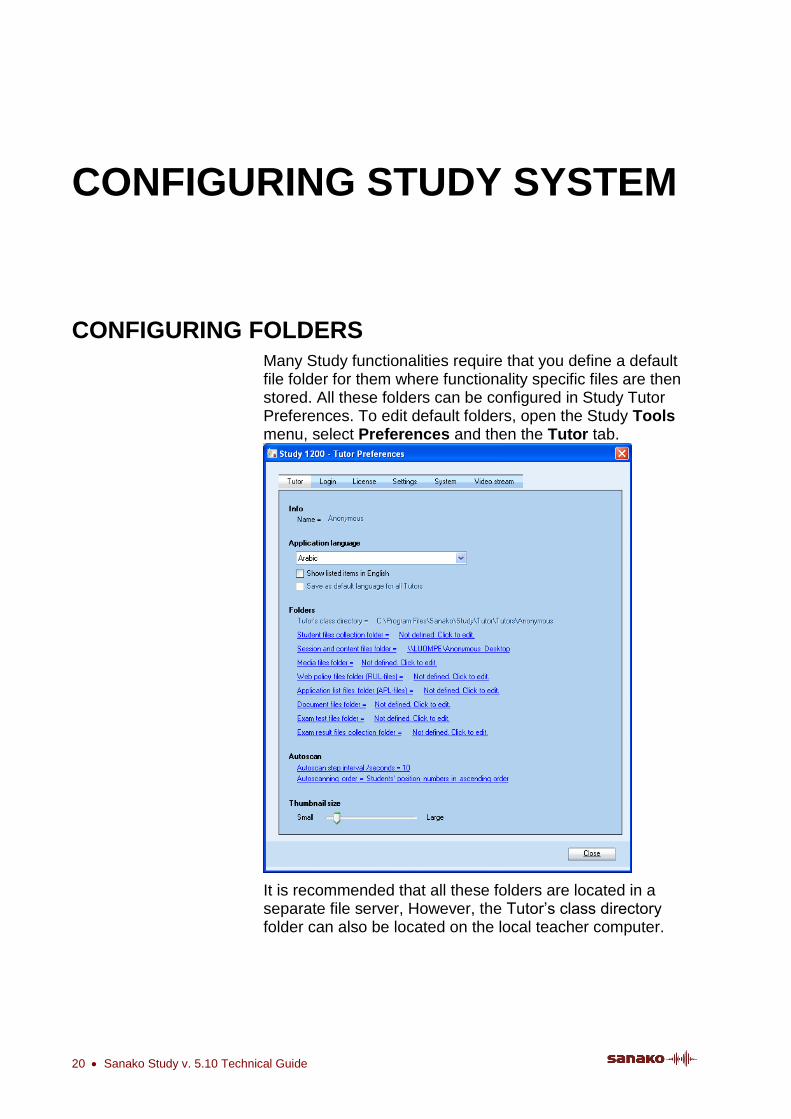
CONFIGURING FOLDERS Many Study functionalities require that you define a default file folder for them where functionality specific files are then stored. All these folders can be configured in Study Tutor Preferences. To edit default folders, open the Study Tools menu, select Preferences and then the Tutor tab.
It is recommended that all these folders are located in a separate file server, However, the Tutor’s class directory folder can also be located on the local teacher computer.

Configuring Study System 21
The table below provides information on the folders and their access rights:
Folder Purpose Of The Folder Teacher Access Required
Student Access Required
Tutor’s class directory Storage area for teacher’s class files
Read/Write/Modify No Access Required
Student files collection folder
Collecting student recordings
Read/Modify Hidden Write
Session and content files folder
Sharing teaching content. Subfolders for sessions A,B,C,D,E,F and Tutor will be created under this folder
Read/Write/Modify Read
Media files folder Storage area for different media source files, which can be used during teaching activities
Read/Write/Modify Read
Web policy files folder Saving Web policy files, which are used during the Web browsing activity
Read/Write/Modify No Access Required
Application list files folder
Storage area for lists of denied and allowed applications which are used in the Block applications function
Read/Write/Modify No Access Required
Document files folder Storage area for document files which are used during the reading practice activity
Read/Write/Modify Read
Exam test files folder* Storage area for exam files, which are used during the Exam activity
Read/Write/Modify Read
Exam result files collection folder*
Collecting exam result files from students during the Exam activity
Read/Modify Hidden Write
*These folders are needed only if Sanako Study Examination Module has been installed
CLASS FILES AND TUTOR CONFIGURATION FILES The purpose of Class Files and Tutor Configuration Files is to store tutor and classroom specific information in Study. Each tutor has their own personal Tutor Configuration File, but can have multiple Class Files. When tutors open the Study Tutor application they need to select their own tutor name and the class file that they want to use.
22 Sanako Study v. 5.10 Technical Guide
STARTING STUDY 500/700/1200 FOR THE FIRST TIME
When you start Study for the first time, select Anonymous tutor and Empty class, since no teacher accounts or classrooms have been created yet. This will start you with an empty default classroom.
While logged in as Anonymous, you can create tutor names for all the tutors that will be using the system. However, the name and directory settings for the Anonymous tutor cannot be edited.
ADDING A NEW TUTOR
In order to add a new tutor to Study, open the Tools menu and then select Admin and Add/Remove Tutors…
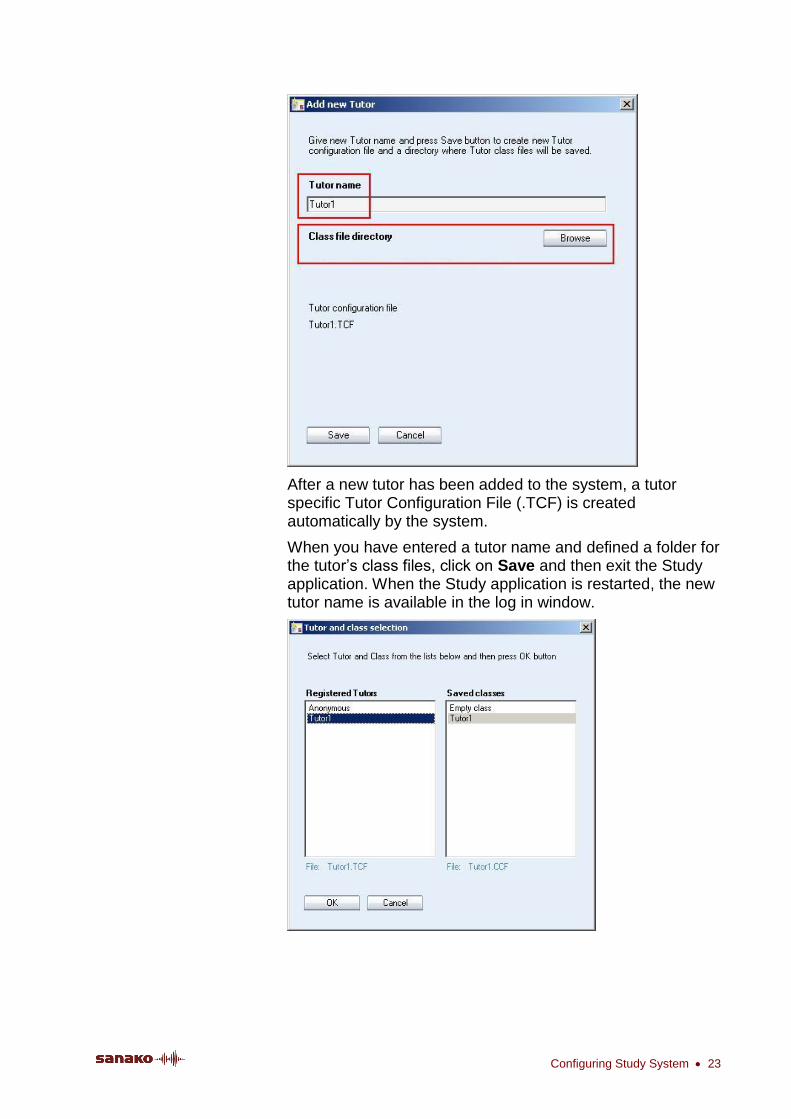
You can now enter a new tutor name that will be available when logging into the Study Tutor application. To set the folder where the new tutor’s class files are saved, click on the Browse button.
Configuring Study System 23
After a new tutor has been added to the system, a tutor specific Tutor Configuration File (.TCF) is created automatically by the system.
When you have entered a tutor name and defined a folder for the tutor’s class files, click on Save and then exit the Study application. When the Study application is restarted, the new tutor name is available in the log in window.
24 Sanako Study v. 5.10 Technical Guide
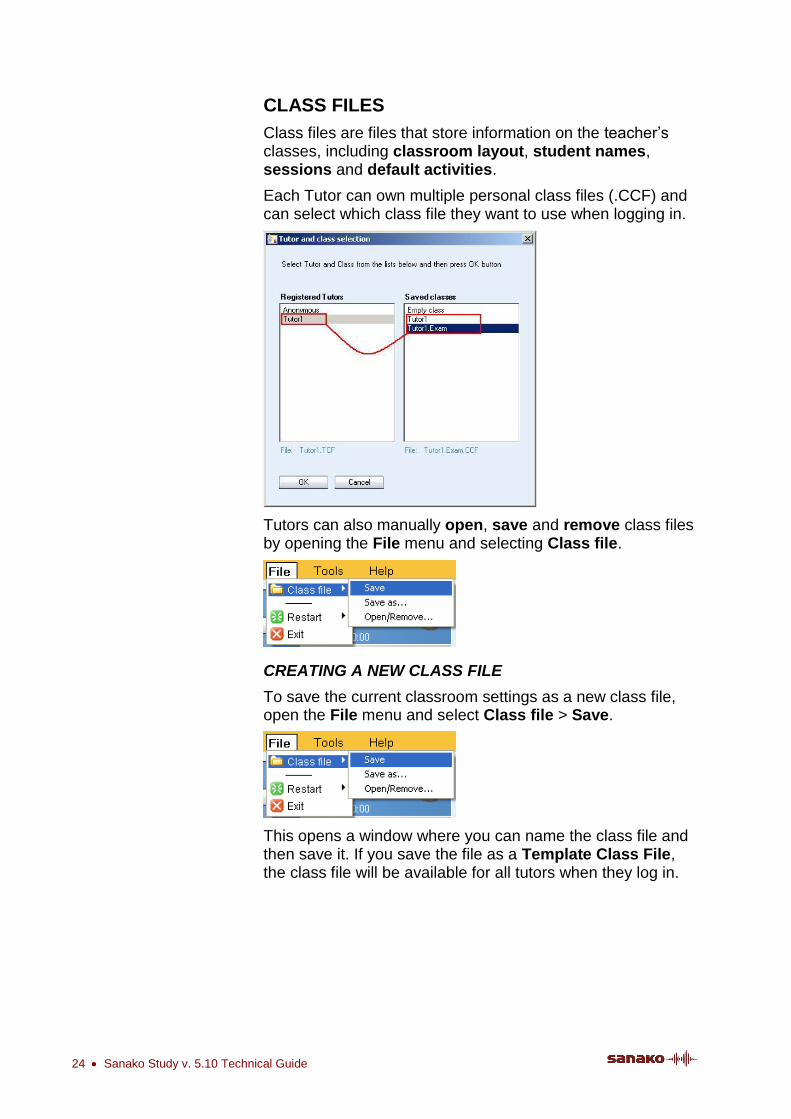
CLASS FILES
Class files are files that store information on the teacher’s classes, including classroom layout, student names, sessions and default activities.
Each Tutor can own multiple personal class files (.CCF) and can select which class file they want to use when logging in.
Tutors can also manually open, save and remove class files by opening the File menu and selecting Class file.
CREATING A NEW CLASS FILE
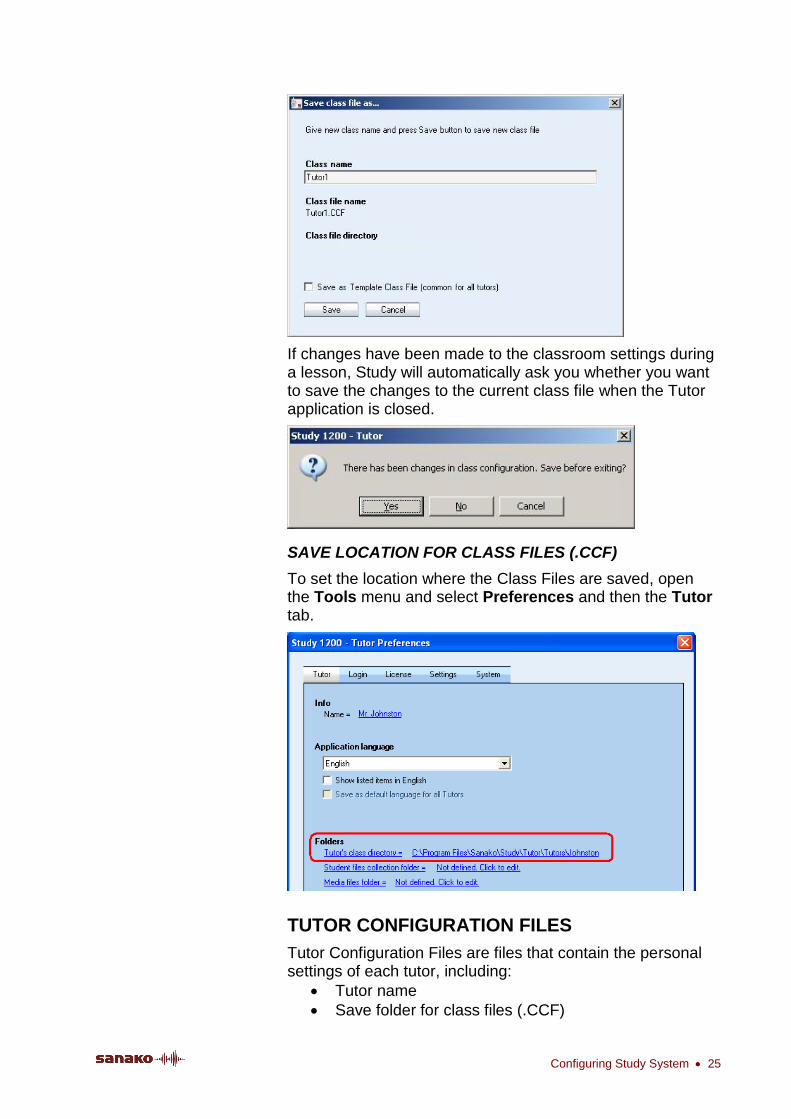
To save the current classroom settings as a new class file, open the File menu and select Class file > Save.
This opens a window where you can name the class file and then save it. If you save the file as a Template Class File, the class file will be available for all tutors when they log in.
Configuring Study System 25
If changes have been made to the classroom settings during a lesson, Study will automatically ask you whether you want to save the changes to the current class file when the Tutor application is closed.
SAVE LOCATION FOR CLASS FILES (.CCF)
To set the location where the Class Files are saved, open the Tools menu and select Preferences and then the Tutor tab.
TUTOR CONFIGURATION FILES
Tutor Configuration Files are files that contain the personal settings of each tutor, including:
Tutor name
Save folder for class files (.CCF)

26 Sanako Study v. 5.10 Technical Guide
Interface language selection
Session file folder
Student file collection folder
Program shortcuts for application launch
Last used class file
Auto scan interval
Auto scan order
Thumbnail size
Each tutor has their own Tutor Configuration File (.TCF) which is created when a new tutor is added into Study 500/700/1200.
DISABLING TUTOR LOGIN
If you do not want to use personal tutor accounts, you can disable tutor login. This means that Study will simply be opened with the default classroom layout and tutor settings every time.
To disable Tutor login, go to Tools > Preferences > Login tab and uncheck the Request Tutor login at start-up option.

Configuring Study System 27
CONFIGURING TUTOR SPECIFIC SETTINGS
Most Tutor specific settings are available under the Tutor tab in the Tutor application Preferences. To open the Preferences window, start the Tutor application and then open the Tools menu and select Preferences.
All the information in the Tutor tab is saved in a .TCF file (Tutor Configuration File).
APPLICATION LANGUAGE
Determine the Tutor interface language. The default selection for the interface language is English. Additional interface languages can be selected in the drop down menu.
AUTOSCAN
Set the default time that each student screen is displayed during the autoscan function and select the order in which the student screens will be shown.
THUMBNAIL SIZE
Use the slider to determine the size of thumbnail images of student screens.
28 Sanako Study v. 5.10 Technical Guide
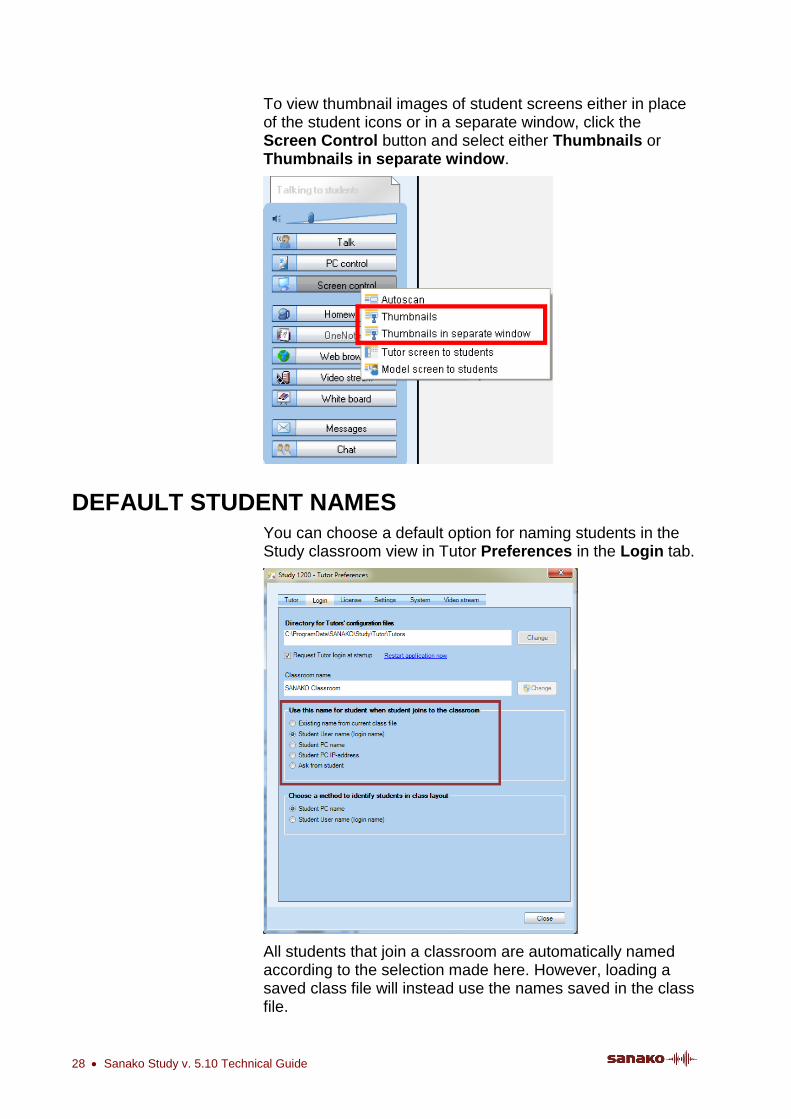
To view thumbnail images of student screens either in place of the student icons or in a separate window, click the Screen Control button and select either Thumbnails or Thumbnails in separate window.
DEFAULT STUDENT NAMES You can choose a default option for naming students in the Study classroom view in Tutor Preferences in the Login tab.
All students that join a classroom are automatically named according to the selection made here. However, loading a saved class file will instead use the names saved in the class file.

Configuring Study System 29
IDENTIFYING STUDENT COMPUTERS You can choose a default option for identifying individual student computers that join the Study classroom in Tutor Preferences in the Login tab.
There are two options for identifying student computers that will be added into a Study classroom.
Student PC name (default option) will identify all computers with a different computer name as individual students and add a new student icon for each student computer. This is the recommended setting in all environments where students operate individual student computers.
Student User name will add a student icon for each different student login name that enters the Study classroom. This setting is usually only used in settings where multiple students share a workstation.
30 Sanako Study v. 5.10 Technical Guide
STUDY GENERAL SETTINGS
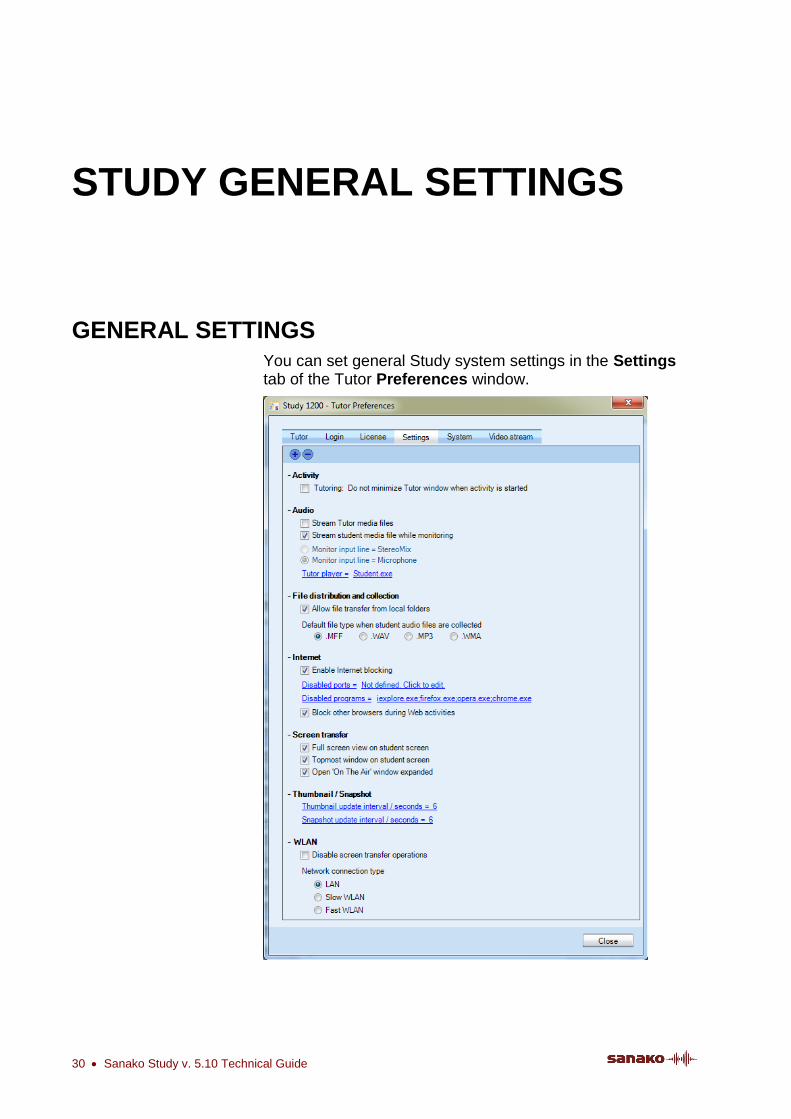
GENERAL SETTINGS You can set general Study system settings in the Settings tab of the Tutor Preferences window.
Study general settings 31
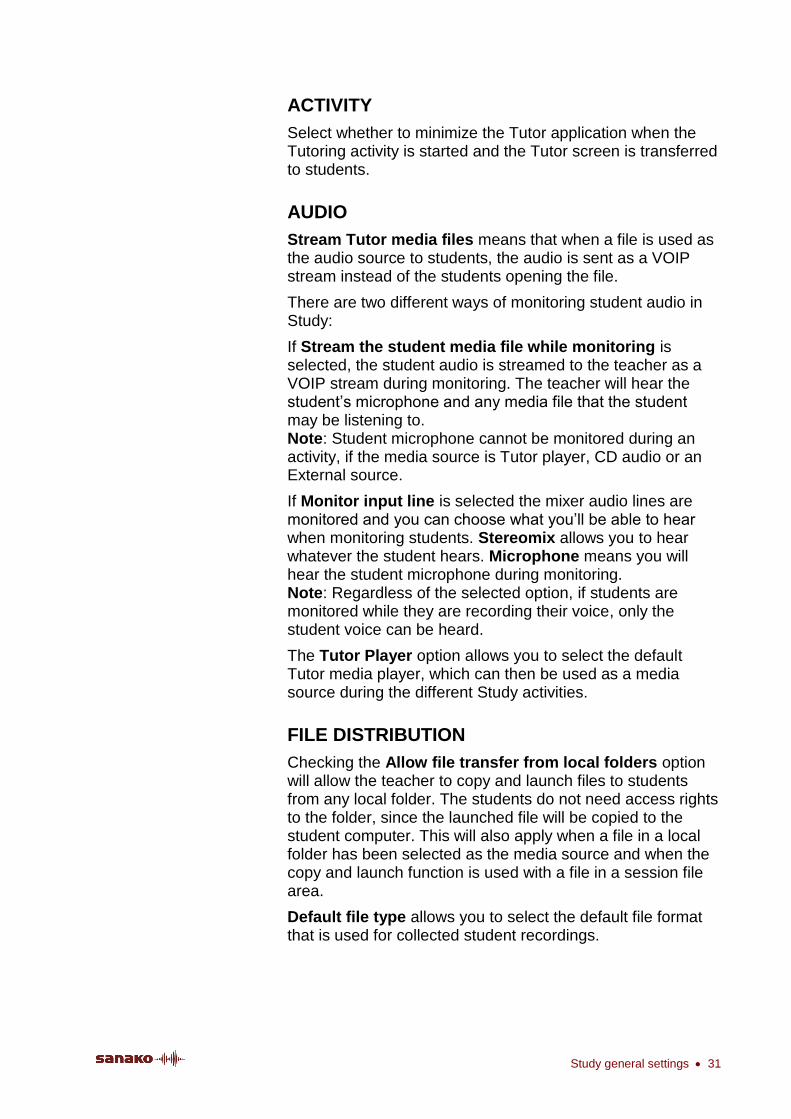
ACTIVITY
Select whether to minimize the Tutor application when the Tutoring activity is started and the Tutor screen is transferred to students.
AUDIO
Stream Tutor media files means that when a file is used as the audio source to students, the audio is sent as a VOIP stream instead of the students opening the file.
There are two different ways of monitoring student audio in Study:
If Stream the student media file while monitoring is selected, the student audio is streamed to the teacher as a VOIP stream during monitoring. The teacher will hear the student’s microphone and any media file that the student may be listening to. Note: Student microphone cannot be monitored during an activity, if the media source is Tutor player, CD audio or an External source.
If Monitor input line is selected the mixer audio lines are monitored and you can choose what you’ll be able to hear when monitoring students. Stereomix allows you to hear whatever the student hears. Microphone means you will hear the student microphone during monitoring. Note: Regardless of the selected option, if students are monitored while they are recording their voice, only the student voice can be heard.
The Tutor Player option allows you to select the default Tutor media player, which can then be used as a media source during the different Study activities.
FILE DISTRIBUTION
Checking the Allow file transfer from local folders option will allow the teacher to copy and launch files to students from any local folder. The students do not need access rights to the folder, since the launched file will be copied to the student computer. This will also apply when a file in a local folder has been selected as the media source and when the copy and launch function is used with a file in a session file area.
Default file type allows you to select the default file format that is used for collected student recordings.

32 Sanako Study v. 5.10 Technical Guide
INTERNET
The Internet options allow you to block Internet ports and Web browsers.
Enable internet blocking allows the teacher to use the Disable Internet function in the Tutor application PC Control features to disable all Internet traffic on student computers.
Block other browsers during Web activities allows the Web browser applications opened by the teacher, but prevents students from opening any other browser applications.
SCREEN TRANSFER
The Screen Transfer settings apply when a Tutor or Student screen is shared to others.
THUMBNAIL / SNAPSHOT
Set the default time for updating thumbnails and snapshots of student screens.
WLAN
Disabling screen transfer operations will deactivate all screen transfer features in Study. This is beneficial in wireless environments where using the screen transfer operations could slow the system down.
Network connection type allows you to define the type of network Study is used in. This helps the program configure itself for optimal performance.
STUDY SYSTEM LOGS The System tab in Study Preferences allows you to access log files in which Sanako Study automatically makes a record of the activity in the system.
Study general settings 33
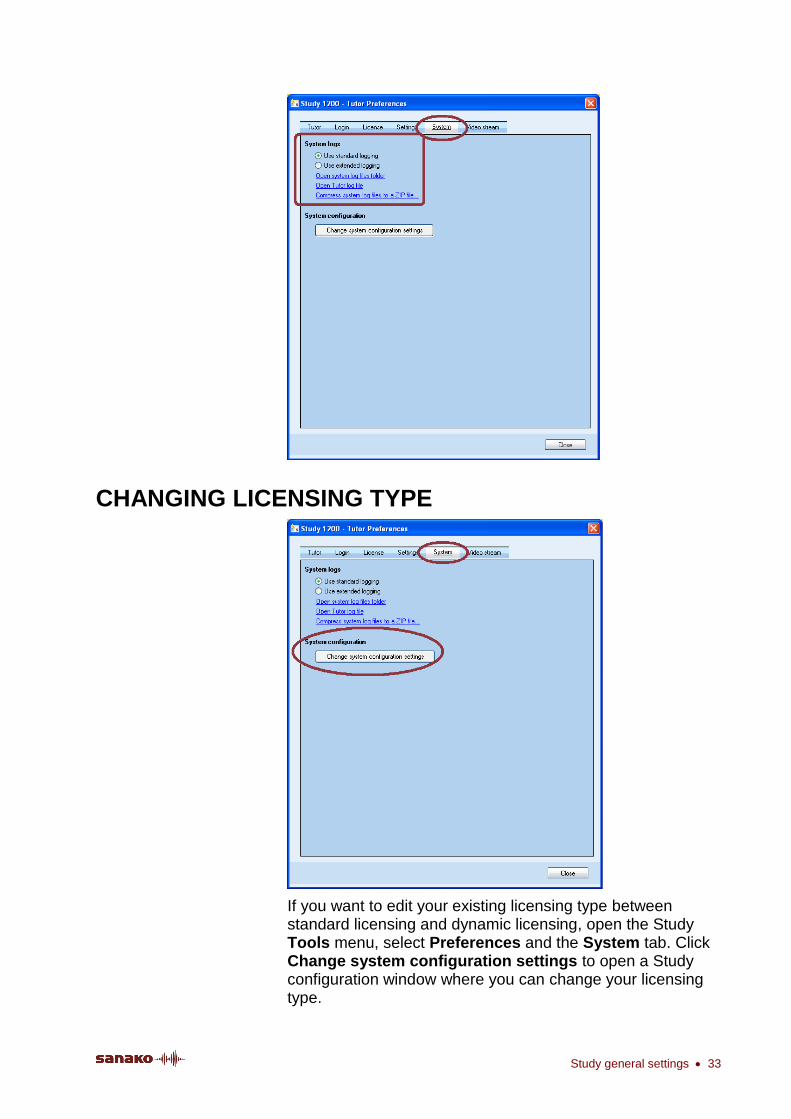
CHANGING LICENSING TYPE
If you want to edit your existing licensing type between standard licensing and dynamic licensing, open the Study Tools menu, select Preferences and the System tab. Click Change system configuration settings to open a Study configuration window where you can change your licensing type.

34 Sanako Study v. 5.10 Technical Guide
CHANGING CLASSROOM The classroom that Study computers belong to is set during the installation. To change computers to another classroom, run the SetClassroom.exe application.
SetClassroom.exe can be found in the following folder on teacher and student computers: C:\Program Files\Sanako\Study\Tutor or Student
Running SetClassroom.exe opens a dialog where you can select a new classroom in a drop-down menu.

Audio Settings 35
AUDIO SETTINGS
USING A MEDIA PLAYER AS SOURCE
If a Media Player application is used as the media source in Study, ‘overlays’ need to be disabled in the media player.
To disable overlays in Windows Media Player, select More Options under Library. In the Options window, select the Performance tab and click Advanced under Video Acceleration. In the Video Acceleration Settings window unselect the Use overlays option.
WINDOWS VISTA SPECIFIC SETTINGS
In Windows Vista environments, Stereo Mix needs to be displayed and enabled in the Vista Recording Devices in order to use CD audio and the Tutor player.
To do this, right-click the speaker icon in the lower-right corner of the Windows Vista toolbar and select Recording Devices. In the Sound dialog, select the Recording tab, right-click the devices list and select Show Disabled Devices. Enable the Stereo Mix device that appears on the list.
TESTING SOUND HARDWARE COMPATIBILITY
Sanako Study includes an inbuilt application for testing whether the sound hardware on a given computer is compatible with Study. To test your sound hardware compatibility, open the Tutor or Student Tools menu and select Sound Hardware Test Wizard.
36 Sanako Study v. 5.10 Technical Guide
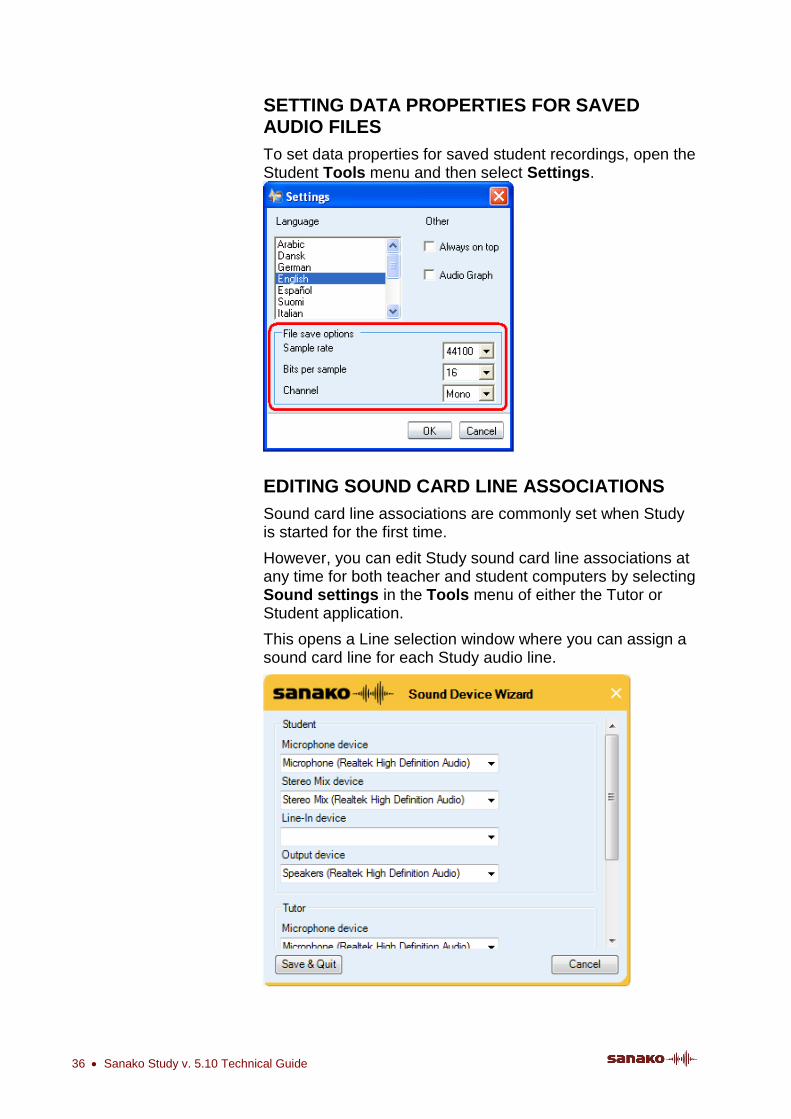
SETTING DATA PROPERTIES FOR SAVED AUDIO FILES
To set data properties for saved student recordings, open the Student Tools menu and then select Settings.
EDITING SOUND CARD LINE ASSOCIATIONS
Sound card line associations are commonly set when Study is started for the first time.
However, you can edit Study sound card line associations at any time for both teacher and student computers by selecting Sound settings in the Tools menu of either the Tutor or Student application.
This opens a Line selection window where you can assign a sound card line for each Study audio line.
Audio Settings 37
Select an appropriate sound card line or audio device for each Study student and tutor audio device in the drop-down menus. When finished, click Save & Quit to save your settings.

38 Sanako Study v. 5.10 Technical Guide
PREPARING STUDY CLASSROOM
STARTING STUDY TUTOR After the installation, you are ready to start Study. To start Study Tutor, open the Windows Start menu (lower left corner on your screen) and select Programs – Sanako – Study 500/700/1200 – Tutor.
CREATING A DEFAULT CLASS
When you start the Tutor application for the first time, the main window of Study opens without any student icons. You can now add students to the classroom and create a default class layout.
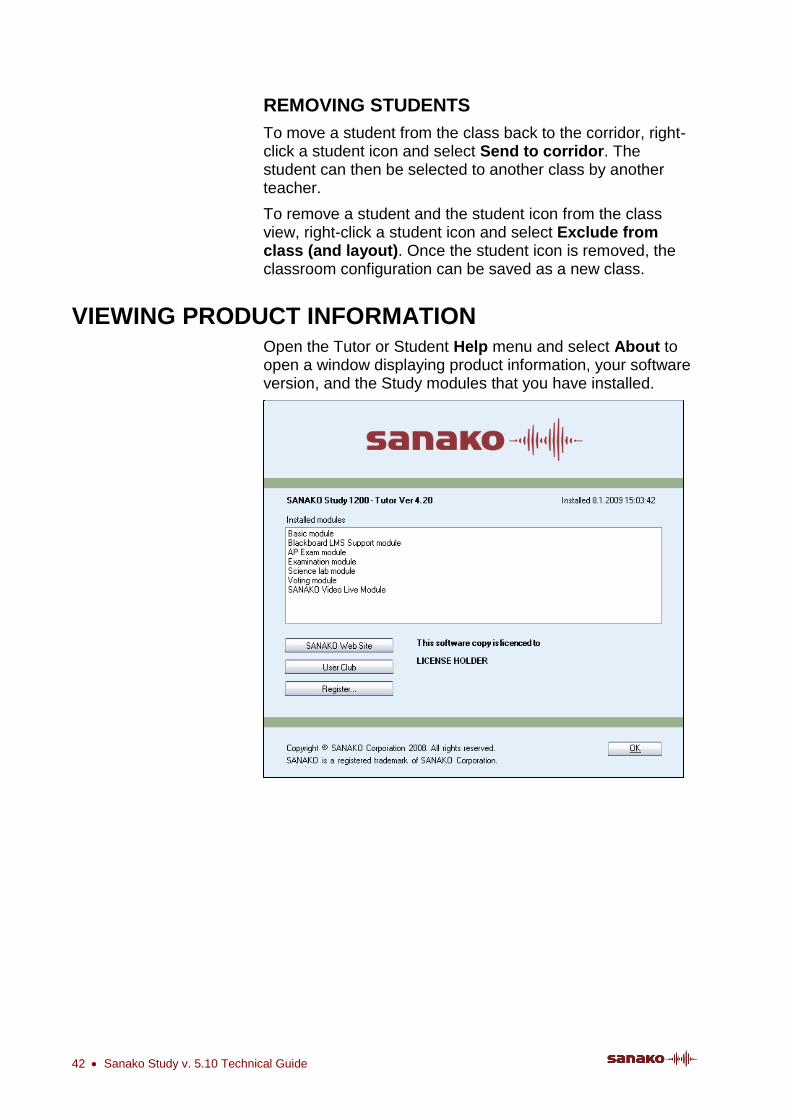
To add student computers to the classroom, click on Show Corridor at the bottom of the Tutor application. This opens a dialog displaying all the student computers in the classroom that are switched on.
You can now select the students you want to include in the class. To add all the students to the classroom, click Select

Preparing Study classroom 39
All and then Add to session A. The student icons are now added to the classroom.
To save the current classroom layout as the default class, open the File menu and then select Class file and Save.
STARTING STUDY STUDENT To open the Study Student interface, click the Windows Start menu and select Programs – Sanako – Study Student – Student. The teacher can also at any time display the Student applications on student workstations by clicking on the Student Applications button on the Tutor interface.
Even if the Study Student application is not open on the student screen, it is always running in the background listening to commands from Study Tutor when the workstation is on.
STUDENT ICONS
CLASS VIEW
The Study class view is a graphical layout of your class. Your students are displayed as student icons that reflect their current status.
40 Sanako Study v. 5.10 Technical Guide
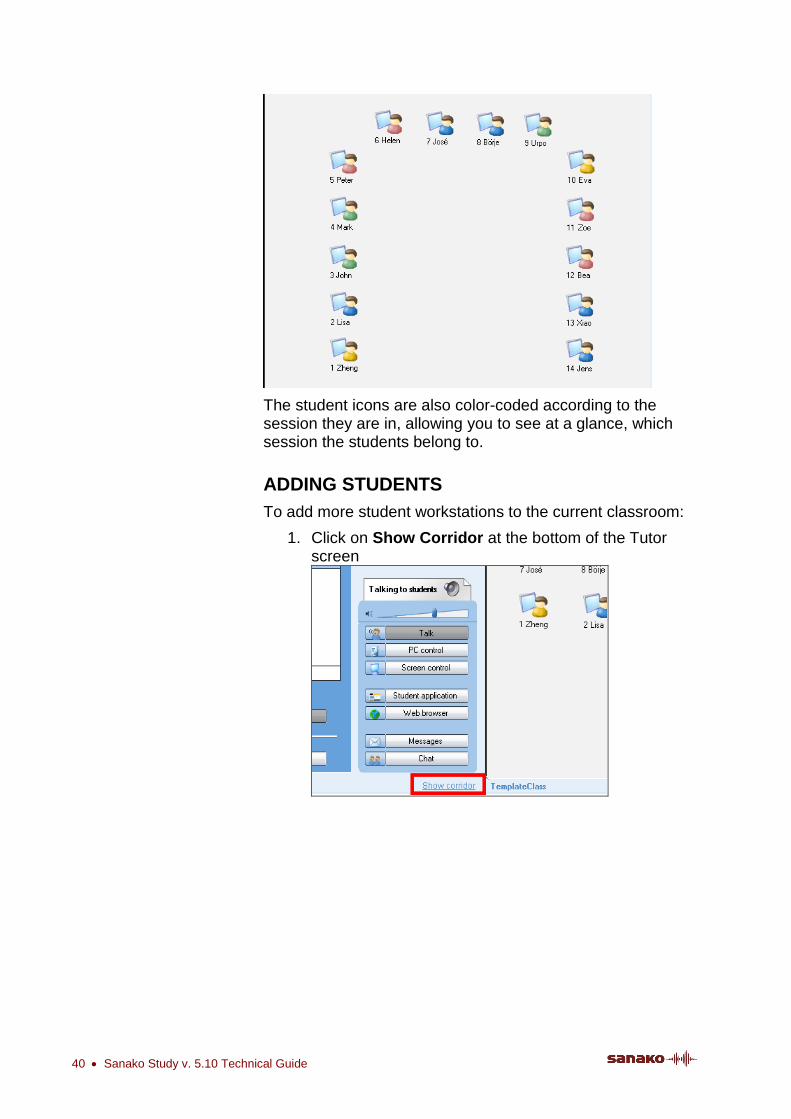
The student icons are also color-coded according to the session they are in, allowing you to see at a glance, which session the students belong to.
ADDING STUDENTS
To add more student workstations to the current classroom:
1. Click on Show Corridor at the bottom of the Tutor screen

Preparing Study classroom 41
2. This opens a dialog displaying all the student computers in the classroom that are switched on.
3. Select the students you want to add and click Add to session A, or if you want to assign them to specific sessions, click Add selected students to session…
4. The added students are now displayed on the classroom view.
MOVING AND ARRANGING STUDENT ICONS
You can rearrange the student icons on the layout to correspond with your actual classroom. Open the Tools menu and select Admin – Move and align student icons… to open a panel with commands for moving and arranging student icons.
To move a student icon, select Move and hold your mouse button down over the student icon.
To align student icons, select one of the alignment options, hold your mouse button down and drag the mouse pointer over the student icons that you want to align.
You can also move student icons at any time by holding down the Ctrl and Shift buttons on your keyboard and holding your left mouse button down over a student icon.
42 Sanako Study v. 5.10 Technical Guide
REMOVING STUDENTS
To move a student from the class back to the corridor, right-click a student icon and select Send to corridor. The student can then be selected to another class by another teacher.
To remove a student and the student icon from the class view, right-click a student icon and select Exclude from class (and layout). Once the student icon is removed, the classroom configuration can be saved as a new class.
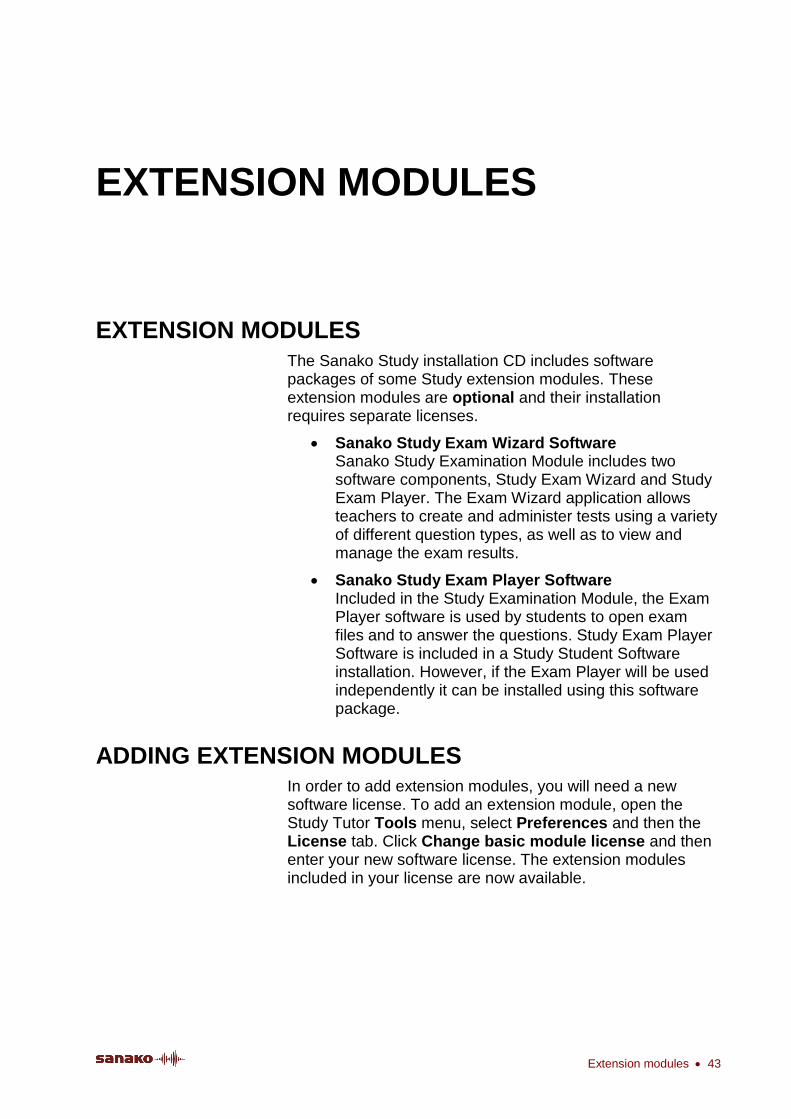
VIEWING PRODUCT INFORMATION Open the Tutor or Student Help menu and select About to open a window displaying product information, your software version, and the Study modules that you have installed.
Extension modules 43
EXTENSION MODULES
EXTENSION MODULES The Sanako Study installation CD includes software packages of some Study extension modules. These extension modules are optional and their installation requires separate licenses.
Sanako Study Exam Wizard Software Sanako Study Examination Module includes two software components, Study Exam Wizard and Study Exam Player. The Exam Wizard application allows teachers to create and administer tests using a variety of different question types, as well as to view and manage the exam results.
Sanako Study Exam Player Software Included in the Study Examination Module, the Exam Player software is used by students to open exam files and to answer the questions. Study Exam Player Software is included in a Study Student Software installation. However, if the Exam Player will be used independently it can be installed using this software package.
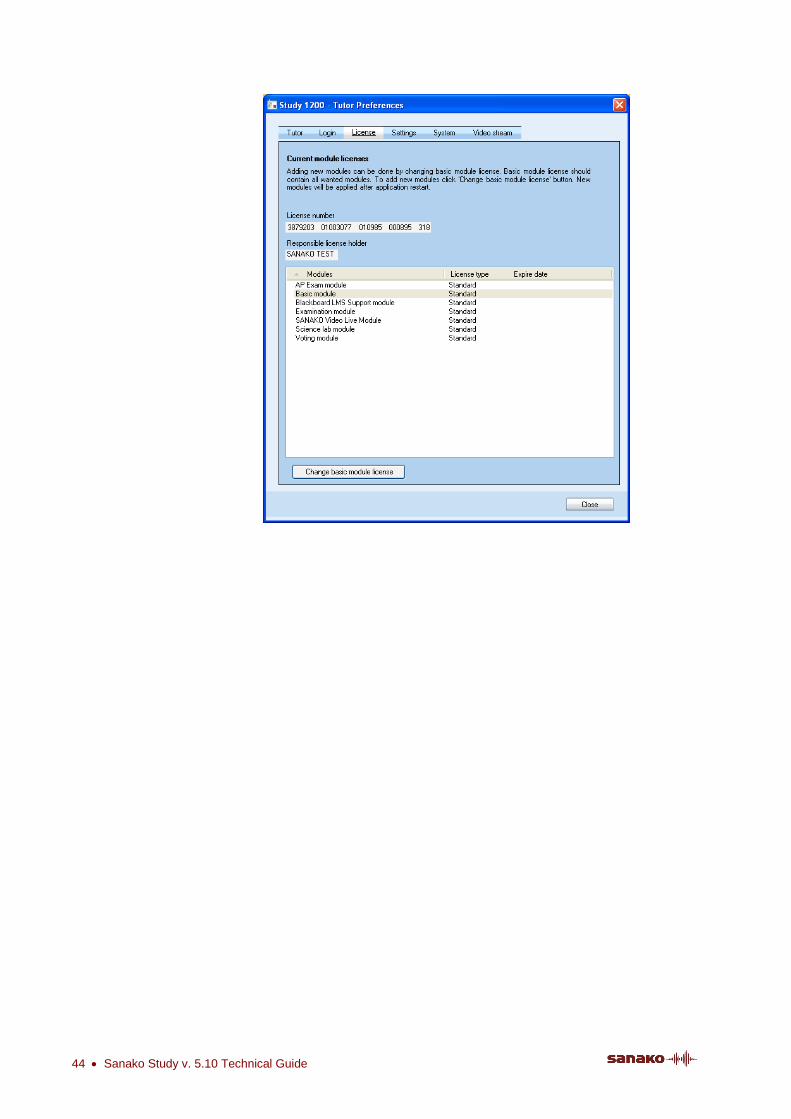
ADDING EXTENSION MODULES In order to add extension modules, you will need a new software license. To add an extension module, open the Study Tutor Tools menu, select Preferences and then the License tab. Click Change basic module license and then enter your new software license. The extension modules included in your license are now available.
44 Sanako Study v. 5.10 Technical Guide
Dynamic licensing 45
DYNAMIC LICENSING
In addition to standard licensing, from Sanako Study 500/700/1200 v.3.0 onwards you can also select to use dynamic licensing, if necessary. The licensing method is selected after the installation when the Study system is started for the first time. You can use the same license infromation for both standard and dynamic licensing.
WHAT IS DYNAMIC LICENSING?
Dynamic licensing means that all licenses are stored in a shared license database. Whenever a Study application is started anywhere in an institution, the computer reserves a license from the database for the period of time that Study is used.
For example, if you have a license for 30 computers, you can install a Study application onto as many computers within the institution as you like, but only 30 of them can participate onto a lesson with Study simultaneously.
Dynamic licensing is commonly used when an institution has several computer-equipped classrooms and the Study system is used for instruction in different classrooms at different times.
Note: Dynamic licensing cannot be selected for lease and site licenses.
COMPONENTS RELATED TO DYNAMIC LICENSING
SANAKO LICENSE SERVICE
Sanako License Service is a server module (Windows service) that handles license reservation requests from student or tutor applications. It is also responsible for handling automatic procedures related to license lease expiration in servers.
46 Sanako Study v. 5.10 Technical Guide
SANAKO LICENSE MANAGER
Sanako License Manager handles general license administration tasks; adding and removing licenses to and from the database and editing existing licenses.
SANAKO LICENSE DATABASE – LICENSE POOL
Sanako License Database stores the license data handled by the License Service according to license use requests in the network
Note: These components are automatically included when the Sanako License Service Database software is installed. They are only used with dynamic licensing.
INSTALLATION INSTRUCTIONS FOR DYNAMIC LICENSING
If you decide to use dynamic licensing, the Sanako License Service Database software component needs to be installed in addition to the Study Server, Tutor and Student software.
Sanako License Service Database is installed on the same computer as the Server software.
Dynamic licensing 47
RECOMMENDED INSTALLATION ORDER WHEN DYNAMIC LICENSING WILL BE USED
When dynamic licensing is used, we recommend that the different components are installed in the following order:
1. Sanako License Service Database (on server / tutor computer)
2. Sanako Study Server software (on server or tutor computer)
3. Sanako Study Tutor software (on tutor computer)
4. Sanako Study Student software (on student computers)
LICENSE SERVICE DATABASE INSTALLATION
Follow the installation instructions below to install License Service Database and License Manager
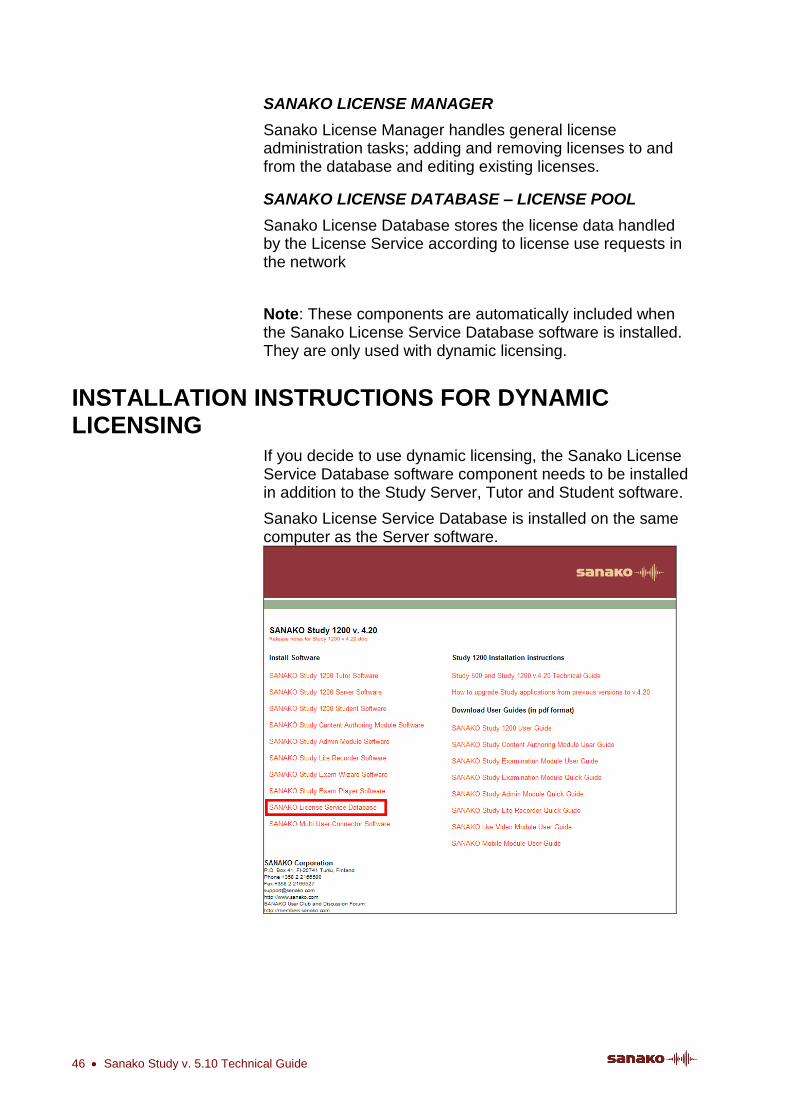
1. Select Sanako License Service Database in the Installation CD menu to start the installation program
2. Click Accept the license terms to start Setup Program
3. It is recommended to exit all Windows programs before running the Setup Program. Click Next to continue.
4. Select a destination location for the License Service Database installation. Click Next to continue with the default destination folder or click Browse… to change the default destination folder.
5. Setup Program is ready to begin the installation. Click Next to start the installation.
6. Setup program has begun installing License Service Database. It may take a few minutes to finish.
7. The License Service Database installation is now complete. Click Finish to exit Setup Program. Continue system setup by adding Study 500, 700 and 1200 licenses to the License Service Database.
For Study Server, Tutor and Student installation instructions, see Installation earlier in this guide.
ENTERING LICENSE INFORMATION FOR DYNAMIC LICENSING
1. Open the Tools menu in Study Tutor and select Preferences. In the preferences window select the System tab, click the Change system configuration settings button and click OK.
48 Sanako Study v. 5.10 Technical Guide
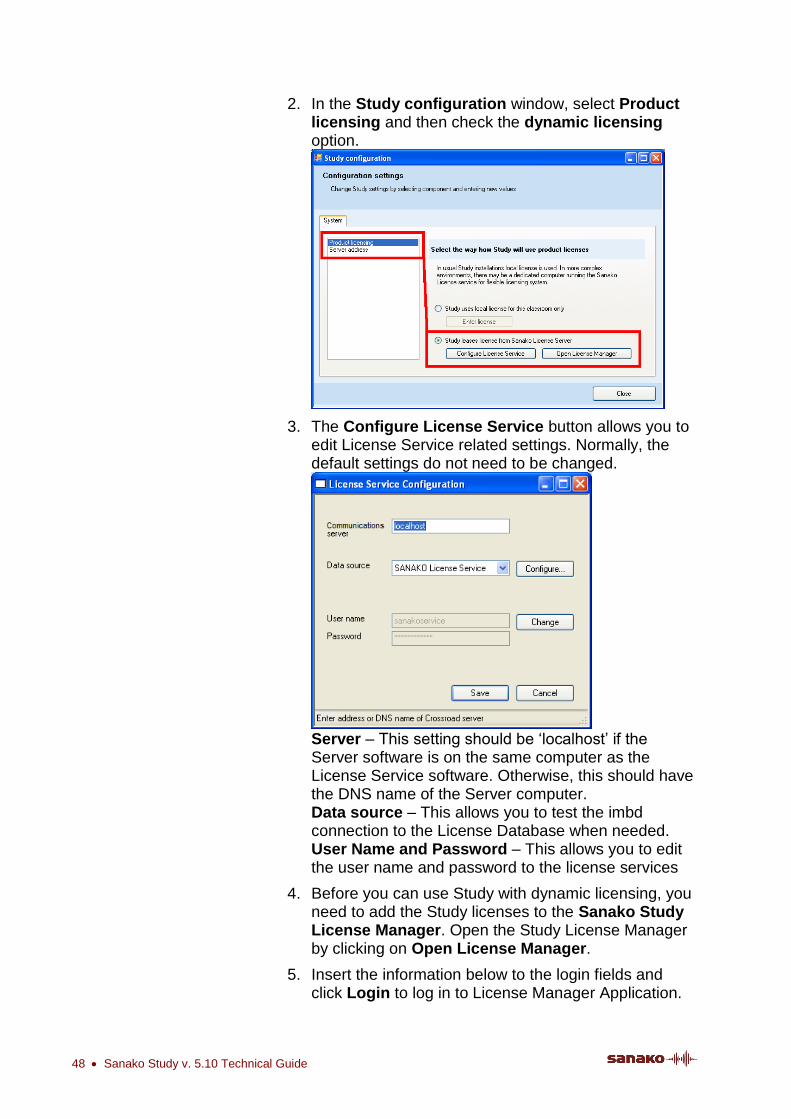
2. In the Study configuration window, select Product licensing and then check the dynamic licensing option.
3. The Configure License Service button allows you to edit License Service related settings. Normally, the default settings do not need to be changed.
Server – This setting should be ‘localhost’ if the Server software is on the same computer as the License Service software. Otherwise, this should have the DNS name of the Server computer. Data source – This allows you to test the imbd connection to the License Database when needed. User Name and Password – This allows you to edit the user name and password to the license services
4. Before you can use Study with dynamic licensing, you need to add the Study licenses to the Sanako Study License Manager. Open the Study License Manager by clicking on Open License Manager.
5. Insert the information below to the login fields and click Login to log in to License Manager Application.
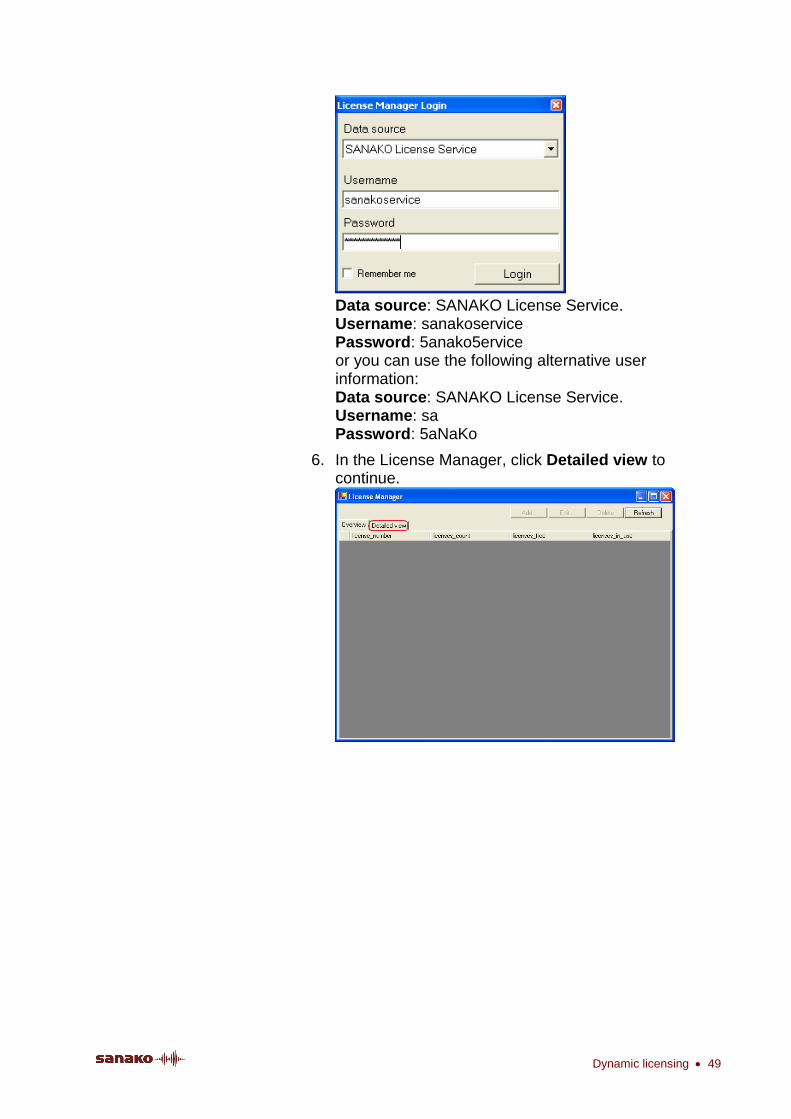
Dynamic licensing 49
Data source: SANAKO License Service. Username: sanakoservice Password: 5anako5ervice or you can use the following alternative user information: Data source: SANAKO License Service. Username: sa Password: 5aNaKo
6. In the License Manager, click Detailed view to continue.
50 Sanako Study v. 5.10 Technical Guide
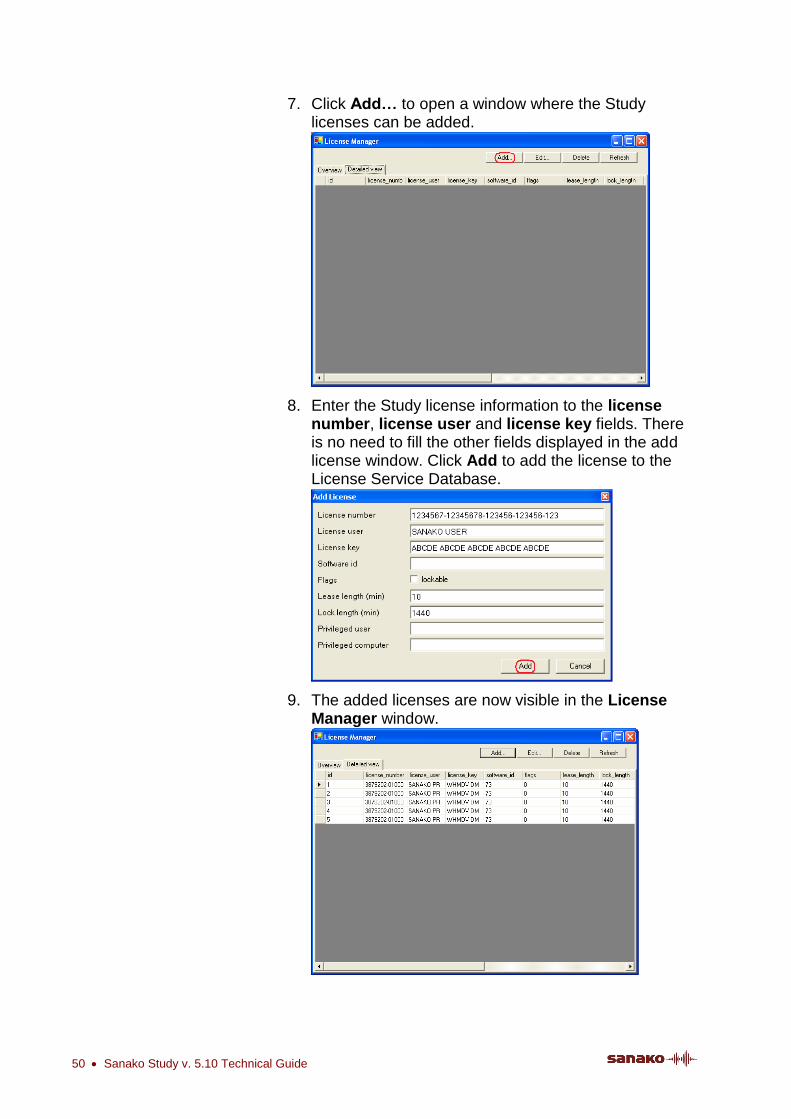
7. Click Add… to open a window where the Study licenses can be added.
8. Enter the Study license information to the license number, license user and license key fields. There is no need to fill the other fields displayed in the add license window. Click Add to add the license to the License Service Database.
9. The added licenses are now visible in the License Manager window.
Dynamic licensing 51
10. After all Study licenses have been added to the License Service database, close the window and you are ready to start the Study application
EDITING LICENSE SERVICE AND LICENSE MANAGER INFORMATION
After the initial configuration you can access and edit the information in the License Service Configuration and License Manager applications through the Windows Start menu. Click Start and select Programs – Sanako – Server Components and then either License Manager or License Service Configuration.
STARTING SANAKO LICENSE SERVICE
Dynamic licensing requires that Sanako License Service is running. You can start the service before or after selecting dynamic licensing.
To start Sanako License Service:
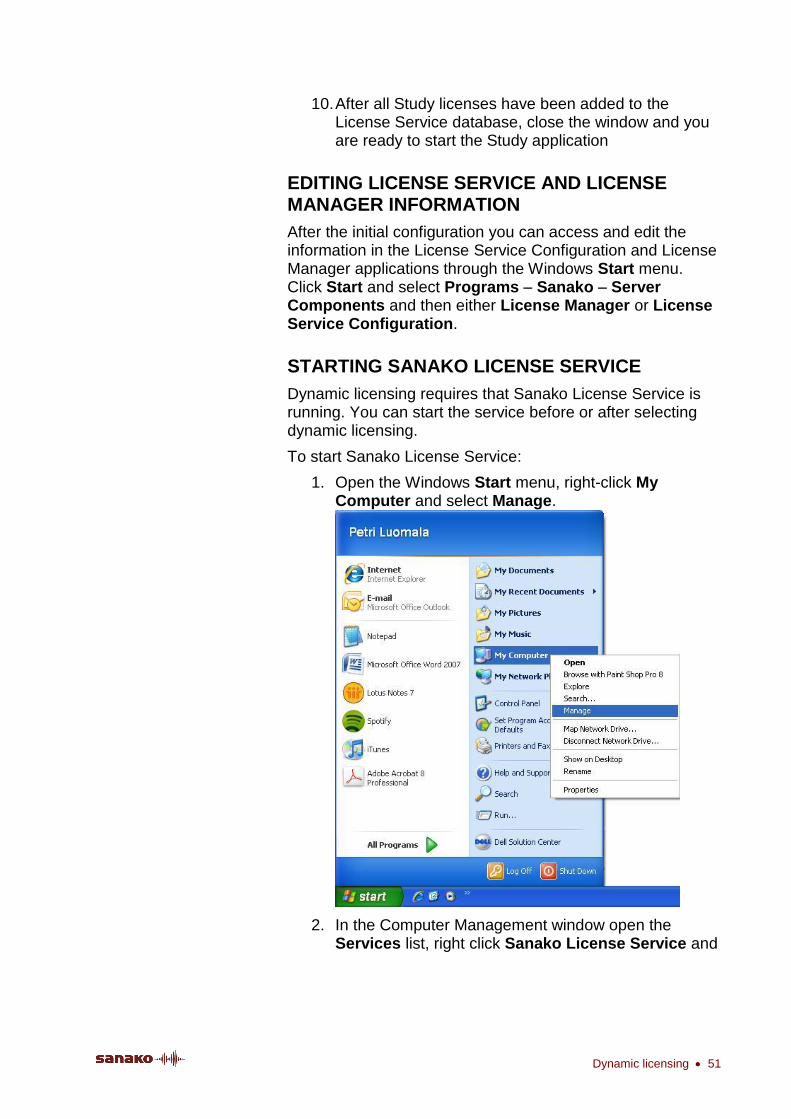
1. Open the Windows Start menu, right-click My Computer and select Manage.
2. In the Computer Management window open the Services list, right click Sanako License Service and

52 Sanako Study v. 5.10 Technical Guide
select Properties.
3. Change the state of the service to Automatic and then start the service.
Sanako License Service is now automatically started at start-up and dynamic licensing can be used.

Installing from MSI packages 53
INSTALLING FROM MSI PACKAGES
PRE-REQUISITES FOR MSI INSTALLATION If you want to install Sanako Study using MSI packages, please check that the following requirements are met to ensure a succesful installation.
Installing Study with MSI packages requires that DirectX 9.0c and Microsoft .NET Framework 2.0 or later have been installed onto the computer before installing any of the MSI packages.
Additionally, the following packages must also be installed onto the computer to ensure successful execution of the programs:
mdxredist.msi – Installs DirectX managed extensions
jsredist.msi – Installs J# version 1.1 runtimes (for XP, Microsoft .NET Framework 1.1 required)
vjredist.exe – Installs J# version 2 runtimes (for Vista)
The .exe Study installation package includes the above components. If the .exe Study installer is used, only .NET Framework needs to be installed beforehand.

54 Sanako Study v. 5.10 Technical Guide
ADDITIONAL INFORMATION
You can find additional information on the installation and configuring of Sanako Study in the Sanako Study 500, 700 and 1200 Knowledge Bases. These are available in the Support section of the Sanako Web site.
http://www.sanako.com/Support.iw3
The Study 500, 700 and 1200 Knowledge Bases include at least the following technical documents that may be useful when installing and configuring your Study system:
Network ports for Study 500 and Study 1200
What to do if file distribution does not work in Study 500
Multicast transmission and Sanako Study solutions
Study 500 with Microsoft OneNote 2007 - Best Practices v.1.5
Installing Study License Service Database and Server software on separate computers
How to change Server addresses in Tutor and Student PCs
What to do if students and tutor are not able to connect to Server
Index 55
INDEX
A
About Study 42 Adding students 40 Adding tutors 22 Additional information 54 Audio hardware
compatibility 35 Audio settings 35
data properties for saving 36 hardware compatibility 35 mixer line selections 17
Autoscan order 27 step interval 27
B
Blocking Internet 32
C
Class adding students 40 default 38 moving and arranging students 41 removing students 42
Class files 21, 24 creating new 24 save location 25
Class view 39 Classroom
changing 34 Classroom name
editing after installation 16 server 9 student 15 tutor 12
Component order in installation 7 Components 3 Computer
identifying 29 Configuration
adding tutors 22 class files 21, 24 folders 20 tutor configuration files 21, 25 tutor settings 27
D
Default class 38 Default folders 20 Directory structure 20 Disk space 6 Dynamic licensing 45
components 45 editing license manager 51 editing license service 51 installation 46 installation order 47 license information 47 license service database installation 47 starting Sanako license service 51 what is 45
E
Entering license 17 Extension modules 43
F
File transfer local folders 31
Files transfer from local folders 31
Firewall settings 6 Folders 20
G
General settings 30
I
Identifying computers 29 students 28
Installation 7 extension modules 43 instructions 8 order of components 7 software components 7
Installation instructions 8 server software 8 student software 13 tutor software 10
Internet blocking 32
K
Knowledge base 54
L
Language 27 License
changing type 33
56 Sanako Study v. 5.10 Technical Guide
License Database 46 License Manager 46
editing 51 License service
starting 51 License Service 45
editing 51 License Service Database
installation 47 Licenses
dynamic licensing 45 entering license information 17
Log files 32
M
Media player tutor 31
Media player as source 35 Minimizing tutor screen 31 Mixer line selections 17 Monitor input line 31 MSI packages 53
installation 53 pre-requisites 53
N
Name student 28
Network directory structure 20 requirements 5
O
OneNote 13
P
Player tutor 31
Product information 42
R
Removing students 42 Requirements 4
disk space 6 firewall 6 network 5 teacher and student computers 4
S
Screen transfer functions disabling 32
Screen transfer settings 32 Server application 3 Server software
installation instructions 8
Settings audio 31, 35 autoscan 27 default tutor player 31 disabling screen transfer 32 general 30 internet 32 monitor input line 31 screen transfer 32 streaming tutor and student media files 31 thumbnails 32 tutor 27 WLAN 32
Snapshot update interval 32 Sound card lines 17 Starting Study 17
entering license 17 selecting tutor and classroom 19 sound card lines 17
Starting Study Student 39 Starting Study Tutor 38 Streaming tutor and student media files 31 Student
default name 28 Student application 3
starting 39 Student computer
identifying 29 Student icons 39 Student software
installation instructions 13 Students
adding 40 moving and arranging 41 removing 42
System components 3 System logs 32
T
Technical documents 54 Thumbnail update interval 32 Thumbnails
in separate window 27 size 27
Tutor adding 22 disabling login 26 settings 27
Tutor application 3 starting 38
Tutor Configuration Files 21, 25 Tutor login
disabling 26 Tutor player 31 Tutor settings 27 Tutor software
installation instructions 10 Tutoring
minimizing tutor screen 31

Index 57
V,W
Viewing product information 42 Wireless environments 32 Vista environments 35