sap business warehouse 3 - rashed's …way2sapbasis.com/upload/installation bw_35 sr1.pdfsap...
TRANSCRIPT
SAP NetWeaver ‘04 SR1 Installation Guide
SAP Business Warehouse 3.5
Document Version 1.2– April 26, 2005
Including:
− SAP BW Java Components
− SAP BW Precalculation Service 3500.0.0.1
© Copyright 2004 SAP AG. All rights reserved. No part of this publication may be reproduced or transmitted in any form or for any purpose without the express permission of SAP AG. The information contained herein may be changed without prior notice. Some software products marketed by SAP AG and its distributors contain proprietary software components of other software vendors. Microsoft®, WINDOWS®, NT®, EXCEL®, Word®, PowerPoint® and SQL Server® are registered trademarks of Microsoft Corporation. IBM®, DB2®, DB2 Universal Database, OS/2®, Parallel Sysplex®, MVS/ESA, AIX®, S/390®, AS/400®, OS/390®, OS/400®, iSeries, pSeries, xSeries, zSeries, z/OS, AFP, Intelligent Miner, WebSphere®, Netfinity®, Tivoli®, Informix and Informix® Dynamic Server
TM are
trademarks of IBM Corp. in USA and/or other countries. ORACLE® is a registered trademark of ORACLE Corporation. UNIX®, X/Open®, OSF/1®, and Motif ® are registered trademarks of the Open Group. Citrix®, the Citrix logo, ICA®, Program Neighborhood ®, MetaFrame®, WinFrame®, VideoFrame®, MultiWin® and other Citrix product names referenced herein are trademarks of Citrix Systems, Inc. HTML, DHTML, XML, XHTML are trademarks or registered trademarks of W3C®, World Wide Web Consortium, Massachusetts Institute of Technology. Java®
is a registered trademark of Sun Microsystems, Inc. J2EE™ is a registered trademark of Sun Microsystems, Inc.
JavaScript® is a registered trademark of Sun Microsystems, Inc., used under license for technology invented and implemented by Netscape. MarketSet and Enterprise Buyer are jointly owned trademarks of SAP AG and Commerce One. MaxDB™ is a trademark of MySQL AB, Sweden SAP, R/3, mySAP, mySAP.com, SAP NetWeaver, xApps, xApp, and other SAP products and services mentioned herein as well as their respective logos are trademarks or registered trademarks of SAP AG in Germany and in several other countries all over the world. All other product and service names mentioned are the trademarks of their respective companies. Data contained in this document serves information purposes only. National product specifications may vary. Disclaimer Some components of this product are based on Java™. Any code change in these components may cause unpredictable and severe malfunctions and is therefore expressively prohibited, as is any decompilation of these components. Any Java™ Source Code delivered with this product is only to be used by SAP’s Support Services and may not be modified or altered in any way. Documentation in the SAP Service Marketplace You can find this documentation at the following Internet address: service.sap.com/instguidesNW04
SAP AG Neurottstraße 16 69190 Walldorf Germany T +49/18 05/34 34 24 F +49/18 05/34 34 20 www.sap.com
Terms for Included Open Source Software This SAP software contains also the third party open source software products listed below. Please note that for these third party products the following special terms and conditions shall apply.
SAP License Agreement for STLport SAP License Agreement for STLport
between
SAP Aktiengesellschaft Systems, Applications, Products in Data Processing
Neurottstrasse 16 69190 Walldorf
Germany ( hereinafter: SAP )
and
you
( hereinafter: Customer ) 1. Subject Matter of the Agreement
a. SAP grants Customer a non-exclusive, non-transferable, royalty-free license to use the STLport.org C++ library (STLport) and its documentation without fee.
b. By downloading, using, or copying STLport or any portion thereof Customer agrees to abide by the intellectual property laws, and to all of the terms and conditions of this Agreement.
c. The Customer may distribute binaries compiled with STLport (whether original or modified) without any royalties or restrictions.
d. Customer shall maintain the following copyright and permission notices on STLport sources and its documentation unchanged: Copyright 2001 SAP AG
e. The Customer may distribute original or modified STLport sources, provided that: • The conditions indicated in the above permission notice
are met; • The following copyright notices are retained when
present, and conditions provided in accompanying permission notices are met:
Copyright 1994 Hewlett-Packard Company Copyright 1996,97 Silicon Graphics Computer Systems, Inc. Copyright 1997 Moscow Center for SPARC Technology. Copyright 1999,2000 Boris Fomitchev Copyright 2001 SAP AG Permission to use, copy, modify, distribute and sell this software and its documentation for any purpose is hereby granted without fee, provided that the above copyright notice appear in all copies and that both that copyright notice and this permission notice appear in supporting documentation. Hewlett-Packard Company makes no representations about the suitability of this software for any purpose. It is provided "as is" without express or implied warranty. Permission to use, copy, modify, distribute and sell this software and its documentation for any purpose is hereby granted without fee, provided that the above copyright notice appear in all copies and that both that copyright notice and this permission notice appear in supporting documentation. Silicon Graphics makes no representations about the suitability of this software for any purpose. It is provided "as is" without express or implied warranty. Permission to use, copy, modify, distribute and sell this software and its documentation for any purpose is hereby granted without fee, provided that the above copyright notice appear in all copies and that both that copyright notice and this permission notice appear in supporting documentation. Moscow Center for SPARC
Technology makes no representations about the suitability of this software for any purpose. It is provided "as is" without express or implied warranty. Boris Fomitchev makes no representations about the suitability of this software for any purpose. This material is provided "as is", with absolutely no warranty expressed or implied. Any use is at your own risk. Permission to use or copy this software for any purpose is hereby granted without fee, provided the above notices are retained on all copies. Permission to modify the code and to distribute modified code is granted, provided the above notices are retained, and a notice that the code was modified is included with the above copyright notice. Permission to use, copy, modify, distribute and sell this software and its documentation for any purpose is hereby granted without fee, provided that the above copyright notice appear in all copies and that both that copyright notice and this permission notice appear in supporting documentation. SAP makes no representations about the suitability of this software for any purpose. It is provided with a limited warranty and liability as set forth in the License Agreement distributed with this copy. SAP offers this liability and warranty obligations only towards its customers and only referring to its modifications.
2. Support and Maintenance
SAP does not provide software maintenance for the STLport. Software maintenance of the STLport therefore shall be not included. All other services shall be charged according to the rates for services quoted in the SAP List of Prices and Conditions and shall be subject to a separate contract.
3. Exclusion of warranty As the STLport is transferred to the Customer on a loan basis and free of charge, SAP cannot guarantee that the STLport is error-free, without material defects or suitable for a specific application under third-party rights. Technical data, sales brochures, advertising text and quality descriptions produced by SAP do not indicate any assurance of particular attributes.
4. Limited Liability a. Irrespective of the legal reasons, SAP shall only be liable for
damage, including unauthorized operation, if this (i) can be compensated under the Product Liability Act or (ii) if caused due to gross negligence or intent by SAP or (iii) if based on the failure of a guaranteed attribute.
b. If SAP is liable for gross negligence or intent caused by employees who are neither agents or managerial employees of SAP, the total liability for such damage and a maximum limit on the scope of any such damage shall depend on the extent to which its occurrence ought to have anticipated by SAP when concluding the contract, due to the circumstances known to it at that point in time representing a typical transfer of the software.
c. In the case of Art. 4.2 above, SAP shall not be liable for indirect damage, consequential damage caused by a defect or lost profit.
d. SAP and the Customer agree that the typical foreseeable extent of damage shall under no circumstances exceed EUR 5,000.
e. The Customer shall take adequate measures for the protection of data and programs, in particular by making backup copies at the minimum intervals recommended by SAP. SAP shall not be liable for the loss of data and its recovery, notwithstanding the other limitations of the present Art. 4 if this loss could have been avoided by observing this obligation.
f. The exclusion or the limitation of claims in accordance with the present Art. 4 includes claims against employees or agents of SAP.

SAP Business Warehouse Installation 3.5
General Information About SAP BW
__________________________________________________________________________ 6 April 05
Contents
A SAP BUSINESS WAREHOUSE 3.5 INSTALLATION OVERVIEW.................................. 8
1 General Information About SAP BW...........................................................................................8
2 Installation of Components Used for SAP BW ............................................................................9 2.1 Components Used for SAP BW ...............................................................................................9 2.2 Installation Guides for the Components Used for SAP BW...................................................12
B SAP BW JAVA COMPONENTS INSTALLATION.......................................................... 13
1 Implementation Considerations ..................................................................................................14
2 SAP BW Java Components Installation – Step by Step............................................................15 Planning..........................................................................................................................................15 Preparation......................................................................................................................................15 Installation ......................................................................................................................................15 Post-Installation..............................................................................................................................15
3 Installation Planning ....................................................................................................................16 Check Documentation ....................................................................................................................16
4 Installation Preparation ...............................................................................................................16 Prepare the SAP Web AS ...............................................................................................................16 Preparing the System for SAPinst GUI ..........................................................................................17 Preparing Required DVD ...............................................................................................................18
5 Installing Business Warehouse Java Components.....................................................................19 5.1 Input Parameter.......................................................................................................................19 5.2 Installing Business Warehouse Java Components with SAPinst ............................................20
6 Post-Installation Activities ...........................................................................................................25 Configuring and Checking the BI Java Connectors........................................................................25 Checking the Connectors Implementation......................................................................................31 Checking the Installation Status .....................................................................................................32
7 Appendix: SAPinst - Installation Tool-specific Information ....................................................33 7.1 Controlling a SAPinst Installation from a Remote Machine ..................................................33
Starting SAPinst on the Remote Host.............................................................................................34 Starting SAPinst GUI on the Local Host ........................................................................................35
7.2 Continuing an Interrupted Installation....................................................................................36 7.3 Using the DVD/CD Browser Dialog ......................................................................................38
8 Appendix: J2EE Engine Specific Information...........................................................................39 8.1 How to start the J2EE Administration Tool............................................................................39 8.2 Starting and Stopping the J2EE Engine..................................................................................40
C SAP BW PRECALCULATION SERVICE 3500.0.0.1...................................................... 41
1 Implementation Considerations ..................................................................................................41
2 Installation – Step by Step ...........................................................................................................41 Planning..........................................................................................................................................41

SAP Business Warehouse Installation 3.5
General Information About SAP BW
__________________________________________________________________________ April 05 7
Preparation......................................................................................................................................41 Installation ......................................................................................................................................41 Post-Installation..............................................................................................................................41
3 Planning the Installation ..............................................................................................................42 3.1 Hardware and Software Requirements ...................................................................................42
4 Preparing the Installation ............................................................................................................42
5 Installing the SAP BW Precalculation Service...........................................................................42
6 Post-Installation............................................................................................................................43 Create and Start Precalculation Server ...........................................................................................43
7 Installation Check.........................................................................................................................44
8 Additional Information ................................................................................................................44 8.1 Upgrading the Service ............................................................................................................44 8.2 Removing the Service.............................................................................................................45
SAP Business Warehouse Installation 3.5
General Information About SAP BW
__________________________________________________________________________ 8 April 05
A SAP Business Warehouse 3.5 Installation Overview
1 General Information About SAP BW SAP Business Warehouse (SAP BW) provides data warehousing functionality, a business intelligence platform, and a suite of business intelligence tools that enable businesses to attain these goals.
SAP BW allows you to analyze data from operative SAP applications as well as all other business applications and external data sources such as databases, online services, and the Internet.
SAP BW enables Online Analytical Processing (OLAP). This processes information from large amounts of operative and historical data. OLAP technology enables multi-dimensional analyses from various business perspectives. The Business Warehouse Server for core areas and processes, pre-configured with Business Content, ensures that you can look at information within the entire enterprise.
The Administrator Workbench is the tool for controlling, monitoring, and maintaining all of the processes connected to data staging and processing in the SAP BW system. The term Data Staging includes all data retrieval processes.
The Business Explorer is the SAP BW component that provides flexible reporting and analysis tools for strategic analysis and decision-making support within a company. These tools include query, reporting and OLAP functions. With the Business Explorer you can evaluate old and current data to varying degrees of detail and from different perspectives either on the Web or in Microsoft Excel. The Business Explorer gives a large spectrum of users access to the information in SAP BW using the Enterprise Portal, the Intranet (Web application design) or mobile technologies (mobile telephones with WAP or I-mode capabilities, and personal digital assistants). As an analysis and presentation tool, the Business Explorer is responsible for all Reporting. With the Business Explorer Information Broadcasting capability, insights can be shared and disseminated to support the decision-making processes.
As part of the SAP NetWeaver architecture, SAP BW draws from and utilizes the capabilities of the other components for business intelligence usage. The sum of the functionality of SAP BW and the contribution of other SAP NetWeaver components form a platform that represents the next major step in the evolution of business intelligence.
SAP Business Warehouse Installation 3.5
Installation of Components Used for SAP BW
__________________________________________________________________________ April 05 9
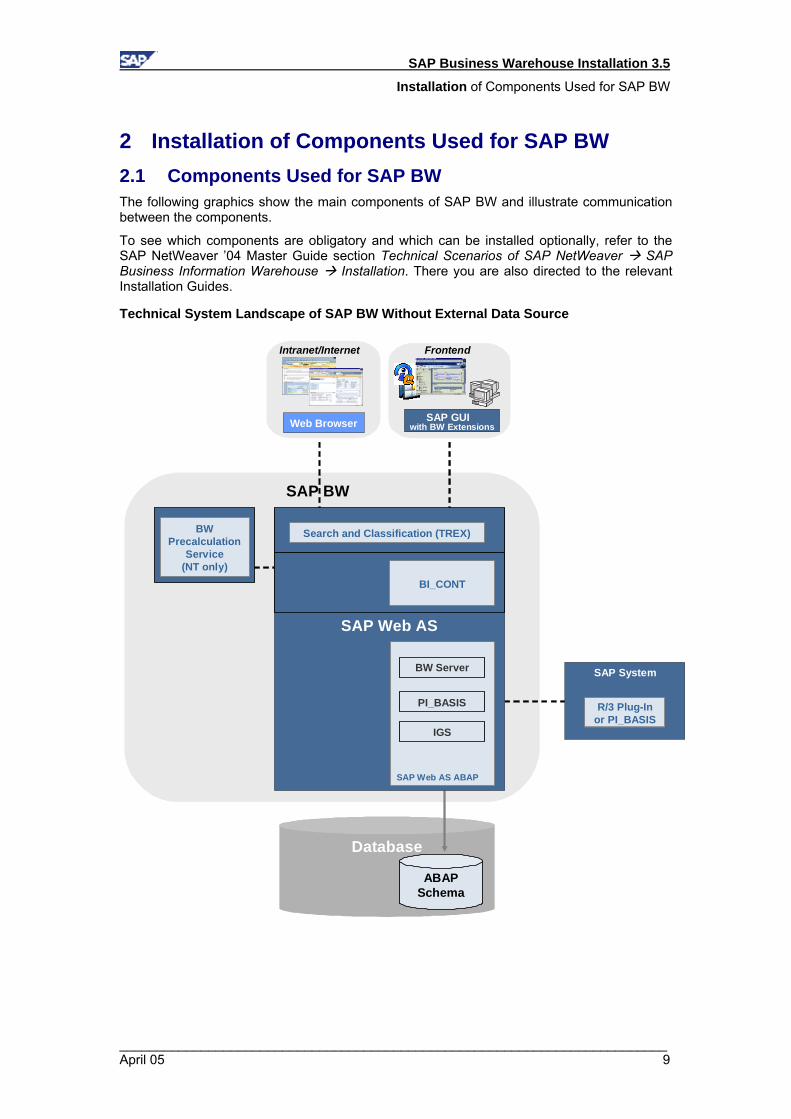
2 Installation of Components Used for SAP BW 2.1 Components Used for SAP BW The following graphics show the main components of SAP BW and illustrate communication between the components.
To see which components are obligatory and which can be installed optionally, refer to the SAP NetWeaver ’04 Master Guide section Technical Scenarios of SAP NetWeaver SAP Business Information Warehouse Installation. There you are also directed to the relevant Installation Guides.
Technical System Landscape of SAP BW Without External Data Source
Frontend
SAP GUIwith BW Extensions
Intranet/Internet
Web Browser
Database
ABAPSchema
SAP System
R/3 Plug-In or PI_BASIS
SAP BW
BW Precalculation
Service(NT only)
SAP Web AS
BI_CONT
Search and Classification (TREX)
SAP Web AS ABAP
IGS
PI_BASIS
BW Server
SAP Business Warehouse Installation 3.5
Installation of Components Used for SAP BW
__________________________________________________________________________ 10 April 05
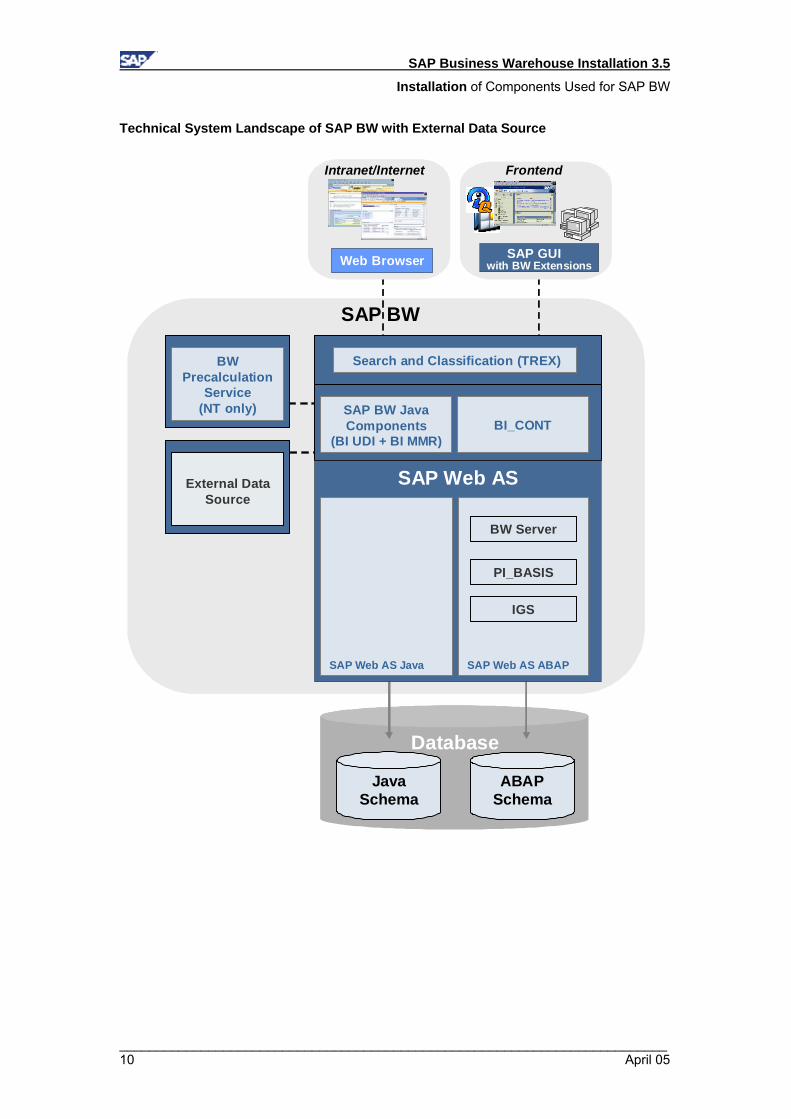
Technical System Landscape of SAP BW with External Data Source
Database
JavaSchema
ABAPSchema
Frontend
SAP GUIwith BW Extensions
Intranet/Internet
Web Browser
SAP BW
BW Precalculation
Service(NT only)
External Data Source
Search and Classification (TREX)
SAP Web AS
SAP Web AS ABAPSAP Web AS Java
IGS
PI_BASIS
BW Server
SAP BW Java Components
(BI UDI + BI MMR)BI_CONT
SAP Business Warehouse Installation 3.5
Installation of Components Used for SAP BW
__________________________________________________________________________ April 05 11
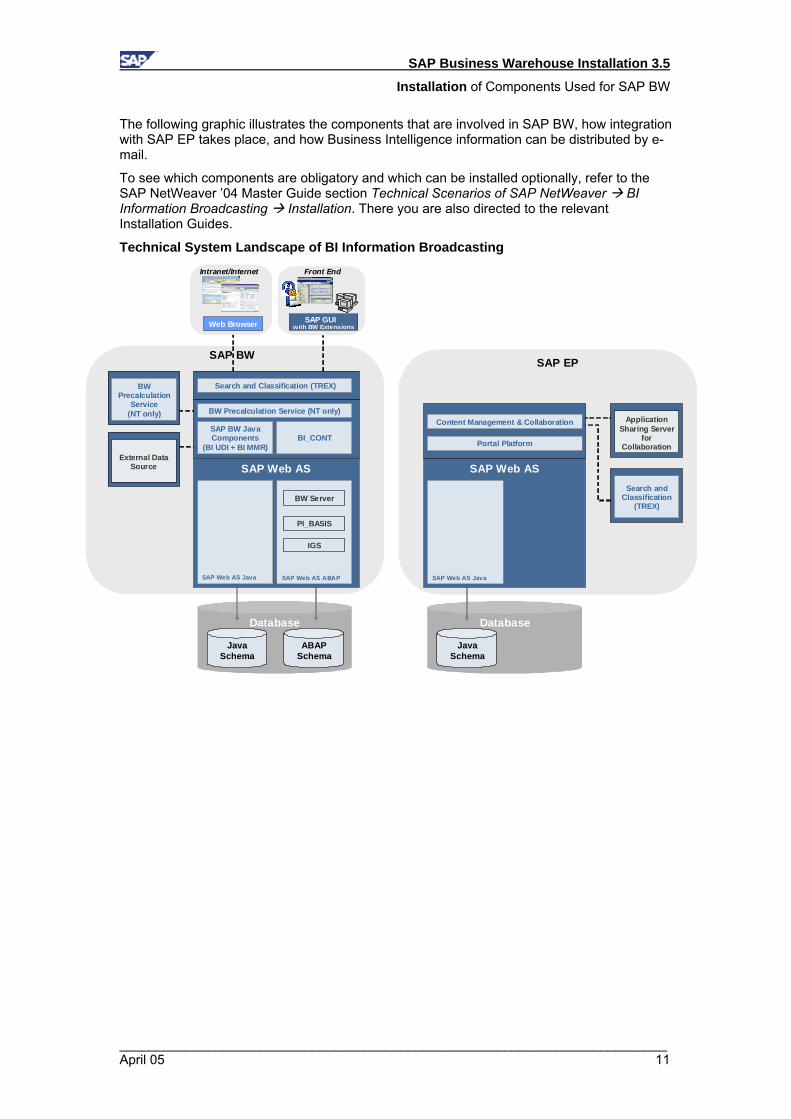
The following graphic illustrates the components that are involved in SAP BW, how integration with SAP EP takes place, and how Business Intelligence information can be distributed by e-mail.
To see which components are obligatory and which can be installed optionally, refer to the SAP NetWeaver ’04 Master Guide section Technical Scenarios of SAP NetWeaver BI Information Broadcasting Installation. There you are also directed to the relevant Installation Guides.
Technical System Landscape of BI Information Broadcasting
Database
JavaSchema
SAP EP
Application Sharing Server
for Collaboration
SAP Web AS
SAP Web AS Java
Portal Platform
Content Management & Collaboration
Search and Classification
(TREX)
Database
JavaSchema
ABAPSchema
Front End
SAP GUIwith BW Extensions
Intranet/Internet
Web Browser
SAP BW
BW Precalculation
Service(NT only)
External Data Source
Search and Classification (TREX)
BW Precalculation Service (NT only)
SAP Web AS
SAP Web AS ABAPSAP Web AS Java
IGS
PI_BASIS
BW Server
SAP BW Java Components
(BI UDI + BI MMR)BI_CONT
SAP Business Warehouse Installation 3.5
Installation of Components Used for SAP BW
__________________________________________________________________________ 12 April 05
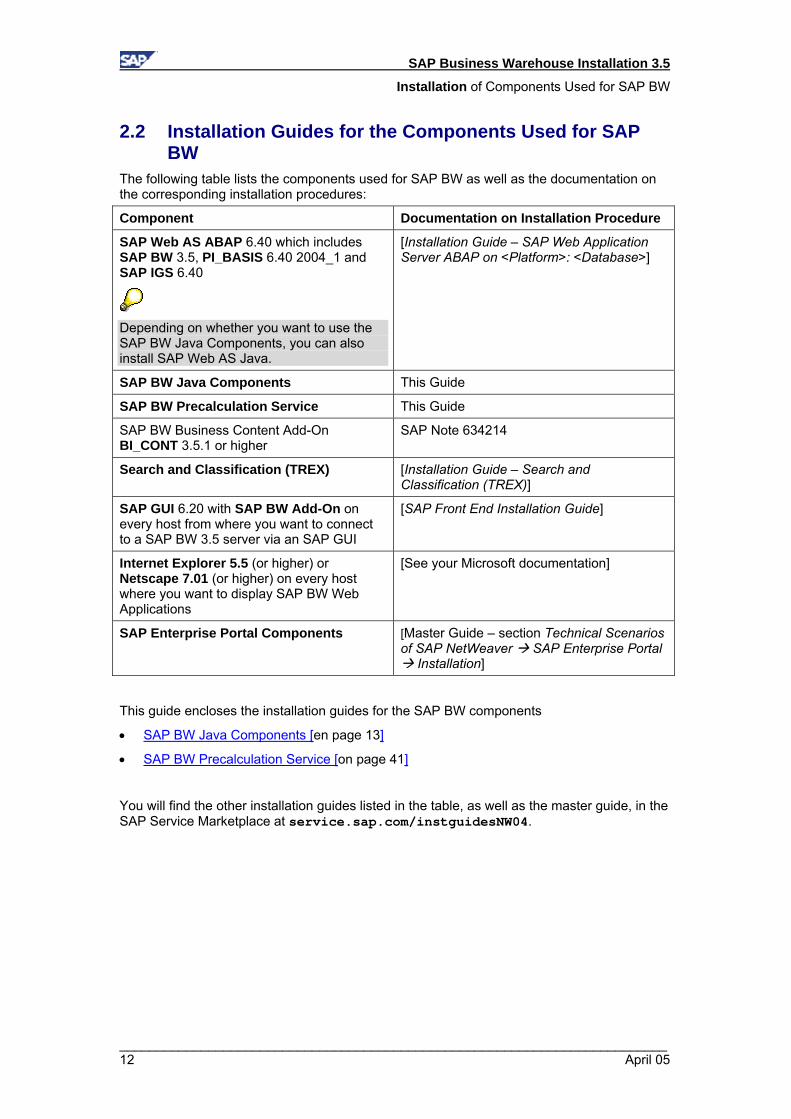
2.2 Installation Guides for the Components Used for SAP BW
The following table lists the components used for SAP BW as well as the documentation on the corresponding installation procedures:
Component Documentation on Installation Procedure
SAP Web AS ABAP 6.40 which includes SAP BW 3.5, PI_BASIS 6.40 2004_1 and SAP IGS 6.40
Depending on whether you want to use the SAP BW Java Components, you can also install SAP Web AS Java.
[Installation Guide – SAP Web Application Server ABAP on <Platform>: <Database>]
SAP BW Java Components This Guide
SAP BW Precalculation Service This Guide
SAP BW Business Content Add-On BI_CONT 3.5.1 or higher
SAP Note 634214
Search and Classification (TREX) [Installation Guide – Search and Classification (TREX)]
SAP GUI 6.20 with SAP BW Add-On on every host from where you want to connect to a SAP BW 3.5 server via an SAP GUI
[SAP Front End Installation Guide]
Internet Explorer 5.5 (or higher) or Netscape 7.01 (or higher) on every host where you want to display SAP BW Web Applications
[See your Microsoft documentation]
SAP Enterprise Portal Components [Master Guide – section Technical Scenarios of SAP NetWeaver SAP Enterprise Portal
Installation]
This guide encloses the installation guides for the SAP BW components
• SAP BW Java Components [en page 13]
• SAP BW Precalculation Service [on page 41]
You will find the other installation guides listed in the table, as well as the master guide, in the SAP Service Marketplace at service.sap.com/instguidesNW04.
SAP Business Warehouse Installation 3.5
Installation of Components Used for SAP BW
__________________________________________________________________________ April 05 13
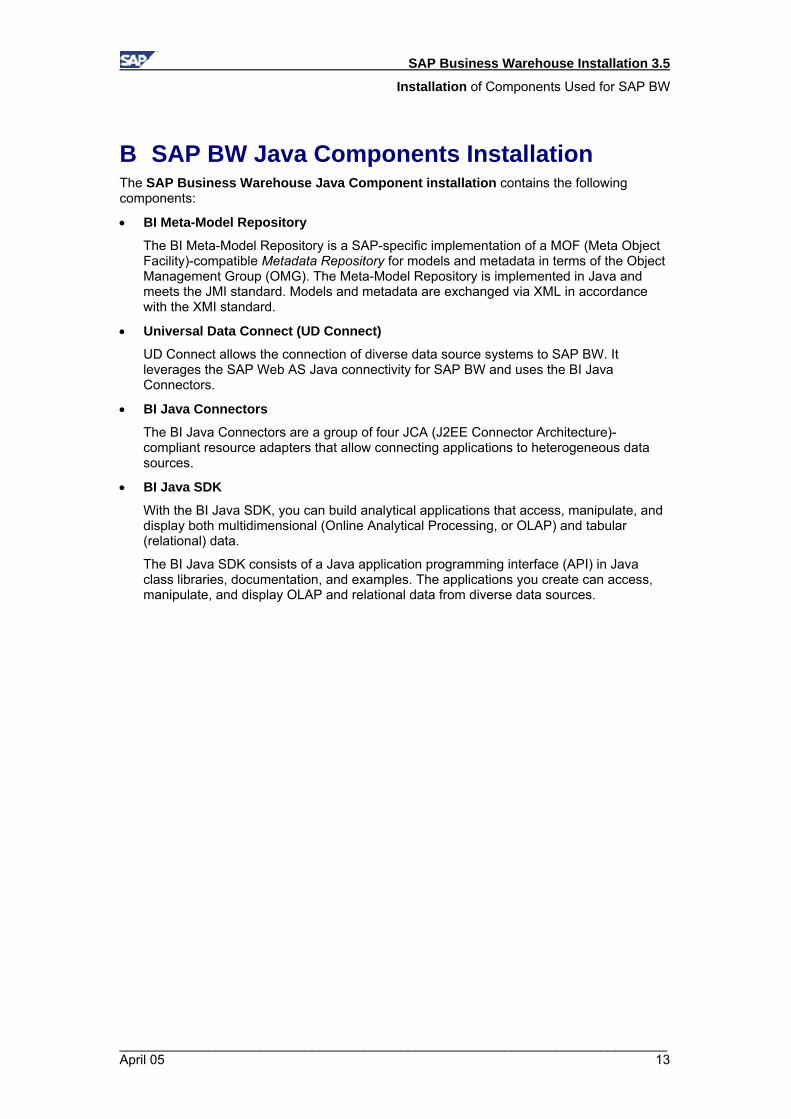
B SAP BW Java Components Installation The SAP Business Warehouse Java Component installation contains the following components:
• BI Meta-Model Repository
The BI Meta-Model Repository is a SAP-specific implementation of a MOF (Meta Object Facility)-compatible Metadata Repository for models and metadata in terms of the Object Management Group (OMG). The Meta-Model Repository is implemented in Java and meets the JMI standard. Models and metadata are exchanged via XML in accordance with the XMI standard.
• Universal Data Connect (UD Connect)
UD Connect allows the connection of diverse data source systems to SAP BW. It leverages the SAP Web AS Java connectivity for SAP BW and uses the BI Java Connectors.
• BI Java Connectors
The BI Java Connectors are a group of four JCA (J2EE Connector Architecture)-compliant resource adapters that allow connecting applications to heterogeneous data sources.
• BI Java SDK
With the BI Java SDK, you can build analytical applications that access, manipulate, and display both multidimensional (Online Analytical Processing, or OLAP) and tabular (relational) data.
The BI Java SDK consists of a Java application programming interface (API) in Java class libraries, documentation, and examples. The applications you create can access, manipulate, and display OLAP and relational data from diverse data sources.

SAP Business Warehouse Installation 3.5
Implementation Considerations
__________________________________________________________________________ 14 April 05
1 Implementation Considerations The Business Warehouse Java Components is an additional service that runs on the SAP Web Application Server Java 6.40.
You can use it in one of the following SAP Web AS Java 6.40 variants:
• SAP Web AS Java system Comprising the SAP J2EE Engine in addition to auxiliary services but not the ABAP Engine
• SAP Web AS ABAP + Java system Comprising both the SAP J2EE Engine and the ABAP Engine
Overview of the SAP Web AS Java variants for SAP BW Java Components
ABAP + Java systemJava system
Services InstanceHost
Central Instance
ABAP
Database InstanceHost
SAP J2EE engine
J2EE Schema
ABAP Schema
Database
Java Schema
ABAP Schema
CentralServicesInstance
Database InstanceHost
J2EE Schema
ABAP Schema
Database
Java Schema
Central Instance + Central
SAP BW 3.5 Runtime
BW Java Components
BI Meta-Model Repository
UDConnect
BI Java Connectors
BI Java SDK
Services InstanceHost
Central InstanceSAP J2EE engine
CentralServicesInstance
Central Instance + Central
BW Java Components
BI Meta-Model Repository
UDConnect
BI Java Connectors
BI Java SDK
SAP Business Warehouse Installation 3.5
SAP BW Java Components Installation – Step by Step
__________________________________________________________________________ April 05 15
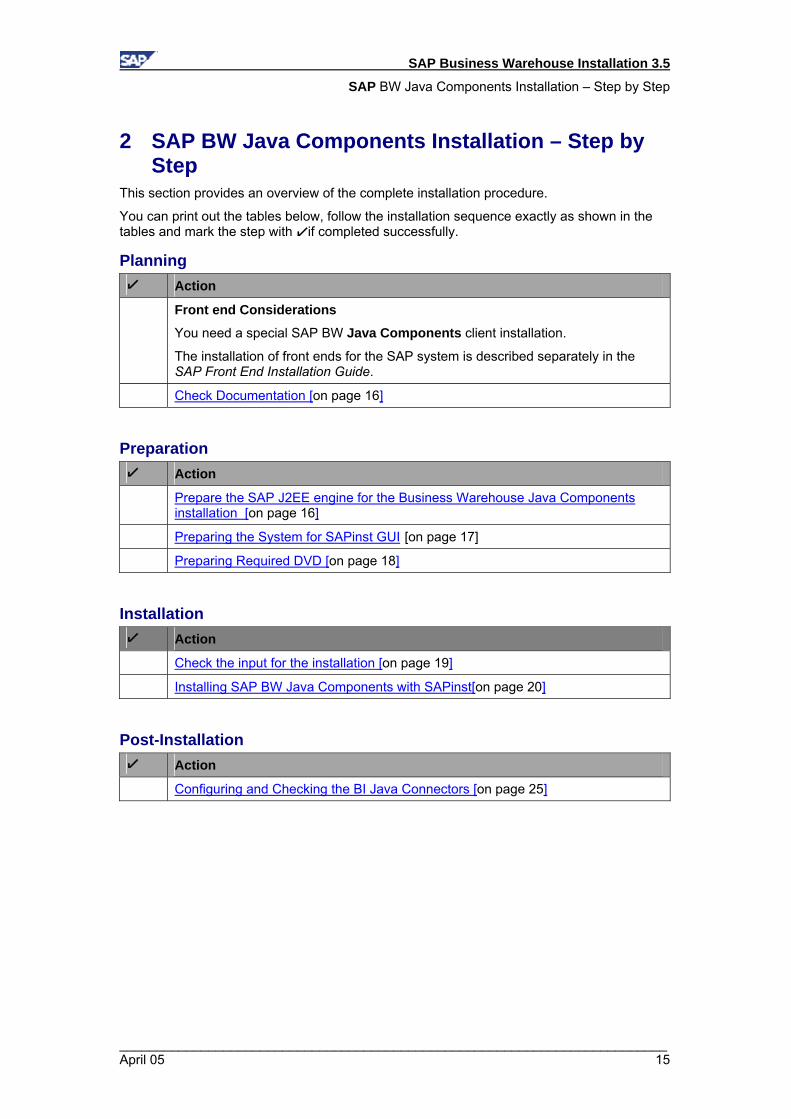
2 SAP BW Java Components Installation – Step by Step
This section provides an overview of the complete installation procedure.
You can print out the tables below, follow the installation sequence exactly as shown in the tables and mark the step with ! if completed successfully.
Planning ! Action
Front end Considerations
You need a special SAP BW Java Components client installation.
The installation of front ends for the SAP system is described separately in the SAP Front End Installation Guide.
Check Documentation [on page 16]
Preparation ! Action
Prepare the SAP J2EE engine for the Business Warehouse Java Components installation [on page 16]
Preparing the System for SAPinst GUI [on page 17]
Preparing Required DVD [on page 18]
Installation ! Action
Check the input for the installation [on page 19]
Installing SAP BW Java Components with SAPinst[on page 20]
Post-Installation ! Action
Configuring and Checking the BI Java Connectors [on page 25]
SAP Business Warehouse Installation 3.5
Installation Planning
__________________________________________________________________________ 16 April 05
3 Installation Planning Check Documentation • Read SAP Note 673140 Business Warehouse Java Components Installation
(service.sap.com/notes)
• For SAP BW Java client installation: Front End Installation Guide located on the SAP Presentation CD.
4 Installation Preparation Prepare the SAP Web AS A J2EE Engine is the basis for the Business Warehouse Java Components. Therefore, before you begin with the installation, make sure that one of the following prerequisites are met:
• SAP Web AS Java 6.40 SR1 system is installed
The following installation types are supported:
− Central System (Central Instance and Database Instance on one host)
− Distributed System (Central Instance and Database Instance on separate hosts)
− Dialog Instances
• SAP Web AS ABAP + Java 6.40 SR1 system is installed
The following installation types are supported:
− Central System (Central Instance and Database Instance on one host)
− Distributed System (Central Instance and Database Instance on separate hosts)
− Dialog Instances (ABAP + Java)
SAP Business Warehouse Installation 3.5
Installation Preparation
__________________________________________________________________________ April 05 17
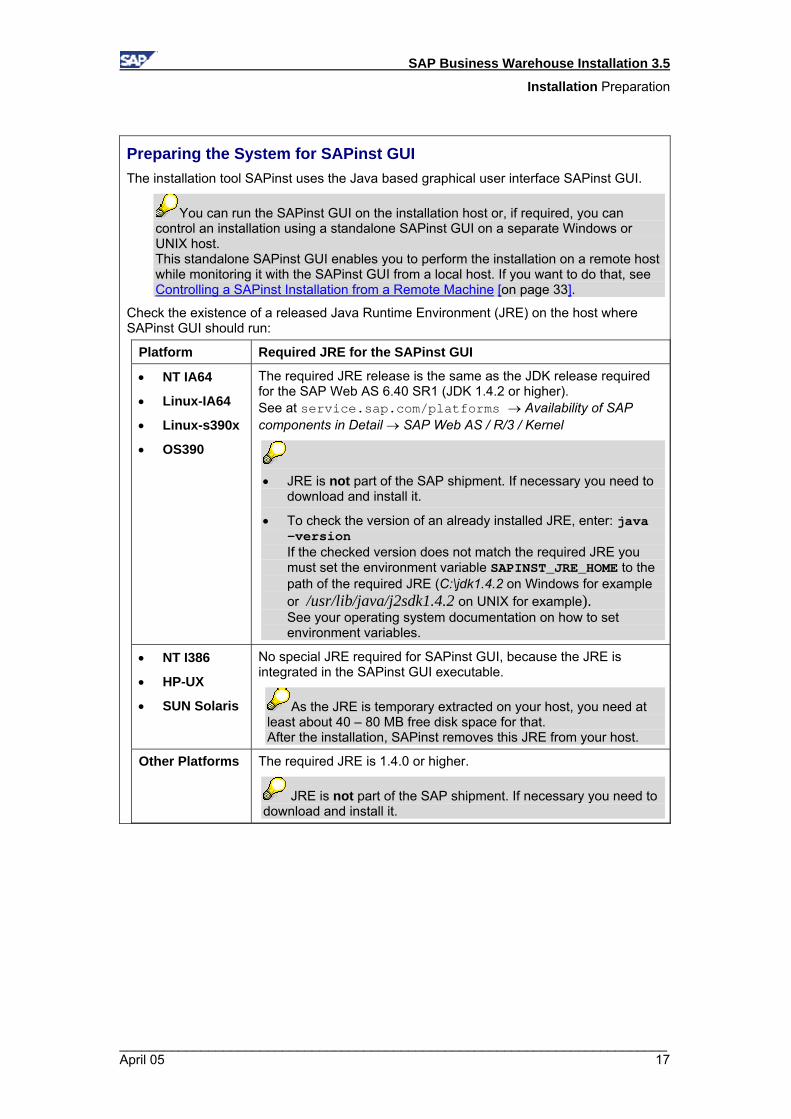
Preparing the System for SAPinst GUI The installation tool SAPinst uses the Java based graphical user interface SAPinst GUI.
You can run the SAPinst GUI on the installation host or, if required, you can control an installation using a standalone SAPinst GUI on a separate Windows or UNIX host. This standalone SAPinst GUI enables you to perform the installation on a remote host while monitoring it with the SAPinst GUI from a local host. If you want to do that, see Controlling a SAPinst Installation from a Remote Machine [on page 33].
Check the existence of a released Java Runtime Environment (JRE) on the host where SAPinst GUI should run:
Platform Required JRE for the SAPinst GUI
• NT IA64
• Linux-IA64
• Linux-s390x
• OS390
The required JRE release is the same as the JDK release required for the SAP Web AS 6.40 SR1 (JDK 1.4.2 or higher). See at service.sap.com/platforms → Availability of SAP components in Detail → SAP Web AS / R/3 / Kernel
• JRE is not part of the SAP shipment. If necessary you need to
download and install it.
• To check the version of an already installed JRE, enter: java –version If the checked version does not match the required JRE you must set the environment variable SAPINST_JRE_HOME to the path of the required JRE (C:\jdk1.4.2 on Windows for example or /usr/lib/java/j2sdk1.4.2 on UNIX for example). See your operating system documentation on how to set environment variables.
• NT I386
• HP-UX
• SUN Solaris
No special JRE required for SAPinst GUI, because the JRE is integrated in the SAPinst GUI executable.
As the JRE is temporary extracted on your host, you need at least about 40 – 80 MB free disk space for that. After the installation, SAPinst removes this JRE from your host.
Other Platforms The required JRE is 1.4.0 or higher.
JRE is not part of the SAP shipment. If necessary you need to download and install it.

SAP Business Warehouse Installation 3.5
Installation Preparation
__________________________________________________________________________ 18 April 05
Preparing Required DVD
We recommend that you make all required DVDs available in parallel.
These are the required DVDs:
• SAP NetWeaver ’04 Installation Master DVD
• SAP NetWeaver '04 COMPONENTS DVD
Use one of the following methods to make DVDs available in parallel:
• Before the installation:
− Have sufficient DVD drives
− Copy DVDs manually to local hard disks
• During the installation:
Use the SAPinst DVD/CD Browser dialog [on page 38]. That is, you can check the entered location and then copy the entire DVD to the path you entered in column Copy Package to.

SAP Business Warehouse Installation 3.5
Installing Business Warehouse Java Components
__________________________________________________________________________ April 05 19
5 Installing Business Warehouse Java Components 5.1 Input Parameter As of now there is a new F1-field-help displaying information about the input parameter fields of the SAPinst screens. This new field help replaces the former “What’s this”-help on the SAPinst screens and the former input parameter tables in the installation guides.
SAP Business Warehouse Installation 3.5
Installing Business Warehouse Java Components
__________________________________________________________________________ 20 April 05
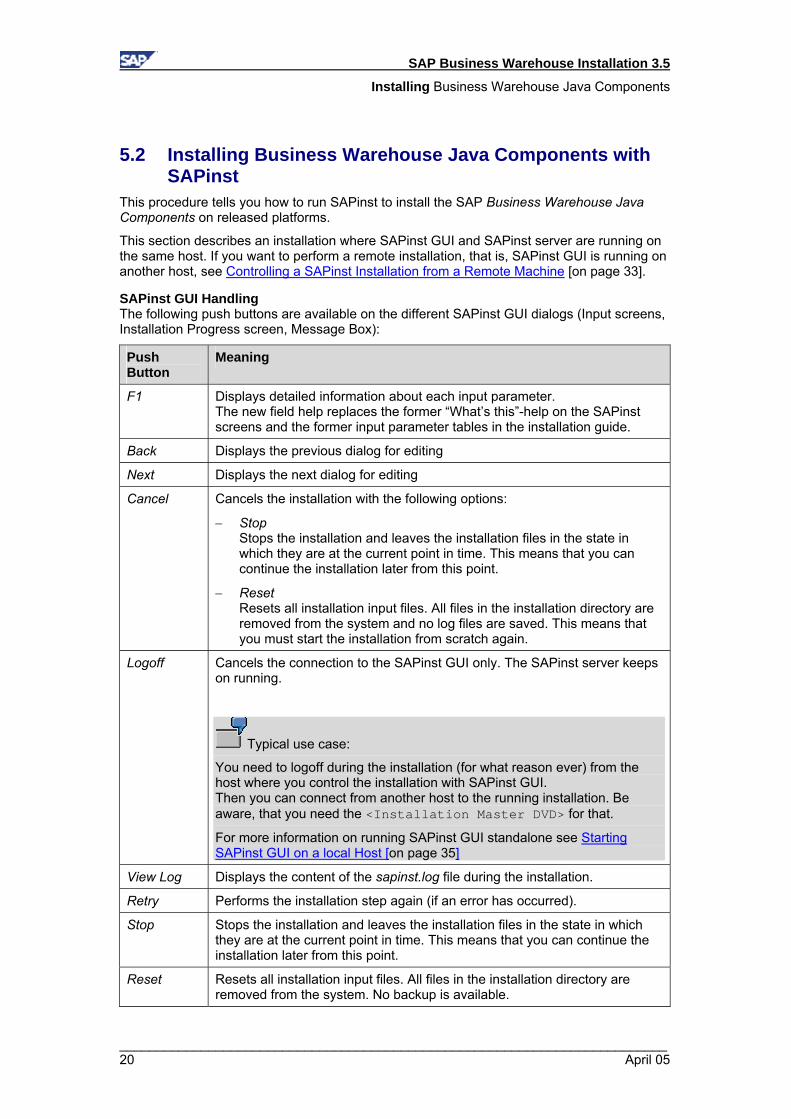
5.2 Installing Business Warehouse Java Components with SAPinst
This procedure tells you how to run SAPinst to install the SAP Business Warehouse Java Components on released platforms.
This section describes an installation where SAPinst GUI and SAPinst server are running on the same host. If you want to perform a remote installation, that is, SAPinst GUI is running on another host, see Controlling a SAPinst Installation from a Remote Machine [on page 33].
SAPinst GUI Handling The following push buttons are available on the different SAPinst GUI dialogs (Input screens, Installation Progress screen, Message Box):
Push Button
Meaning
F1 Displays detailed information about each input parameter. The new field help replaces the former “What’s this”-help on the SAPinst screens and the former input parameter tables in the installation guide.
Back Displays the previous dialog for editing
Next Displays the next dialog for editing
Cancel Cancels the installation with the following options:
− Stop Stops the installation and leaves the installation files in the state in which they are at the current point in time. This means that you can continue the installation later from this point.
− Reset Resets all installation input files. All files in the installation directory are removed from the system and no log files are saved. This means that you must start the installation from scratch again.
Logoff Cancels the connection to the SAPinst GUI only. The SAPinst server keeps on running.
Typical use case:
You need to logoff during the installation (for what reason ever) from the host where you control the installation with SAPinst GUI. Then you can connect from another host to the running installation. Be aware, that you need the <Installation Master DVD> for that.
For more information on running SAPinst GUI standalone see Starting SAPinst GUI on a local Host [on page 35]
View Log Displays the content of the sapinst.log file during the installation.
Retry Performs the installation step again (if an error has occurred).
Stop Stops the installation and leaves the installation files in the state in which they are at the current point in time. This means that you can continue the installation later from this point.
Reset Resets all installation input files. All files in the installation directory are removed from the system. No backup is available.
SAP Business Warehouse Installation 3.5
Installing Business Warehouse Java Components
__________________________________________________________________________ April 05 21
This means that you must start the installation from the beginning again.
SAP Business Warehouse Installation 3.5
Installing Business Warehouse Java Components
__________________________________________________________________________ 22 April 05
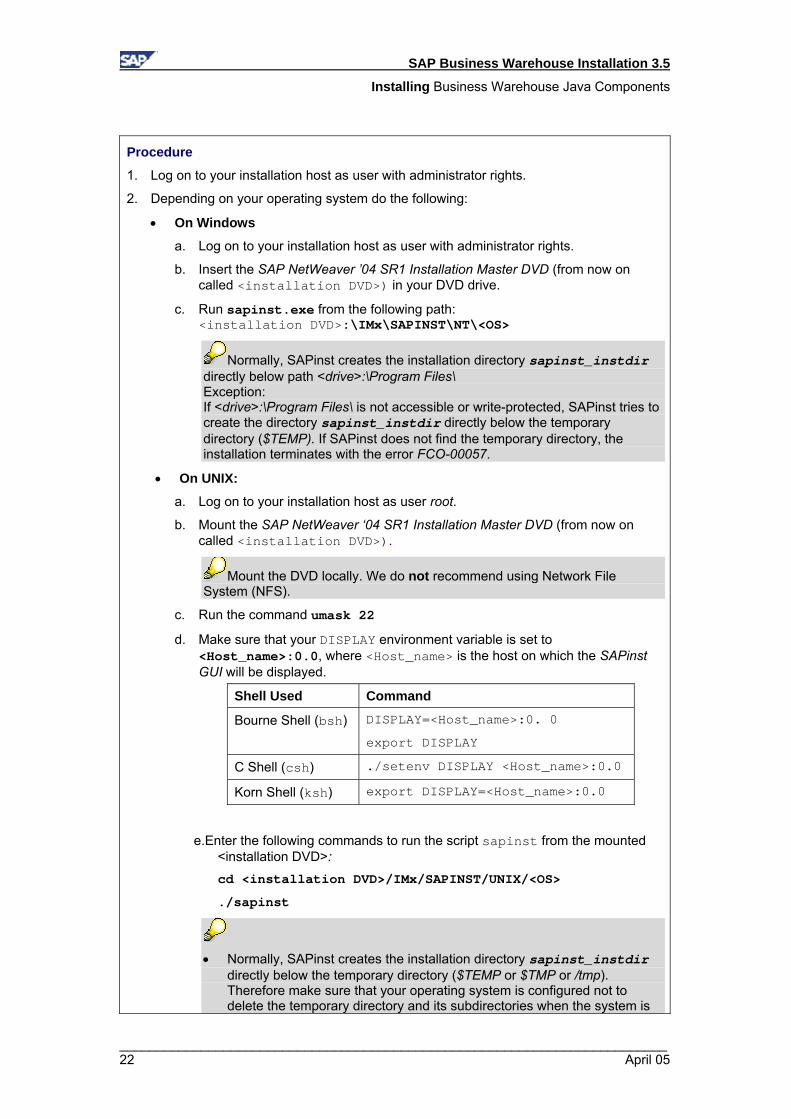
Procedure
1. Log on to your installation host as user with administrator rights.
2. Depending on your operating system do the following:
• On Windows
a. Log on to your installation host as user with administrator rights.
b. Insert the SAP NetWeaver ’04 SR1 Installation Master DVD (from now on called <installation DVD>) in your DVD drive.
c. Run sapinst.exe from the following path: <installation DVD>:\IMx\SAPINST\NT\<OS>
Normally, SAPinst creates the installation directory sapinst_instdir directly below path <drive>:\Program Files\ Exception: If <drive>:\Program Files\ is not accessible or write-protected, SAPinst tries to create the directory sapinst_instdir directly below the temporary directory ($TEMP). If SAPinst does not find the temporary directory, the installation terminates with the error FCO-00057.
• On UNIX:
a. Log on to your installation host as user root.
b. Mount the SAP NetWeaver ‘04 SR1 Installation Master DVD (from now on called <installation DVD>).
Mount the DVD locally. We do not recommend using Network File System (NFS).
c. Run the command umask 22
d. Make sure that your DISPLAY environment variable is set to <Host_name>:0.0, where <Host_name> is the host on which the SAPinst GUI will be displayed.
Shell Used Command
Bourne Shell (bsh) DISPLAY=<Host_name>:0. 0
export DISPLAY
C Shell (csh) ./setenv DISPLAY <Host_name>:0.0
Korn Shell (ksh) export DISPLAY=<Host_name>:0.0
e.Enter the following commands to run the script sapinst from the mounted <installation DVD>: cd <installation DVD>/IMx/SAPINST/UNIX/<OS>
./sapinst
• Normally, SAPinst creates the installation directory sapinst_instdir
directly below the temporary directory ($TEMP or $TMP or /tmp). Therefore make sure that your operating system is configured not to delete the temporary directory and its subdirectories when the system is
SAP Business Warehouse Installation 3.5
Installing Business Warehouse Java Components
__________________________________________________________________________ April 05 23
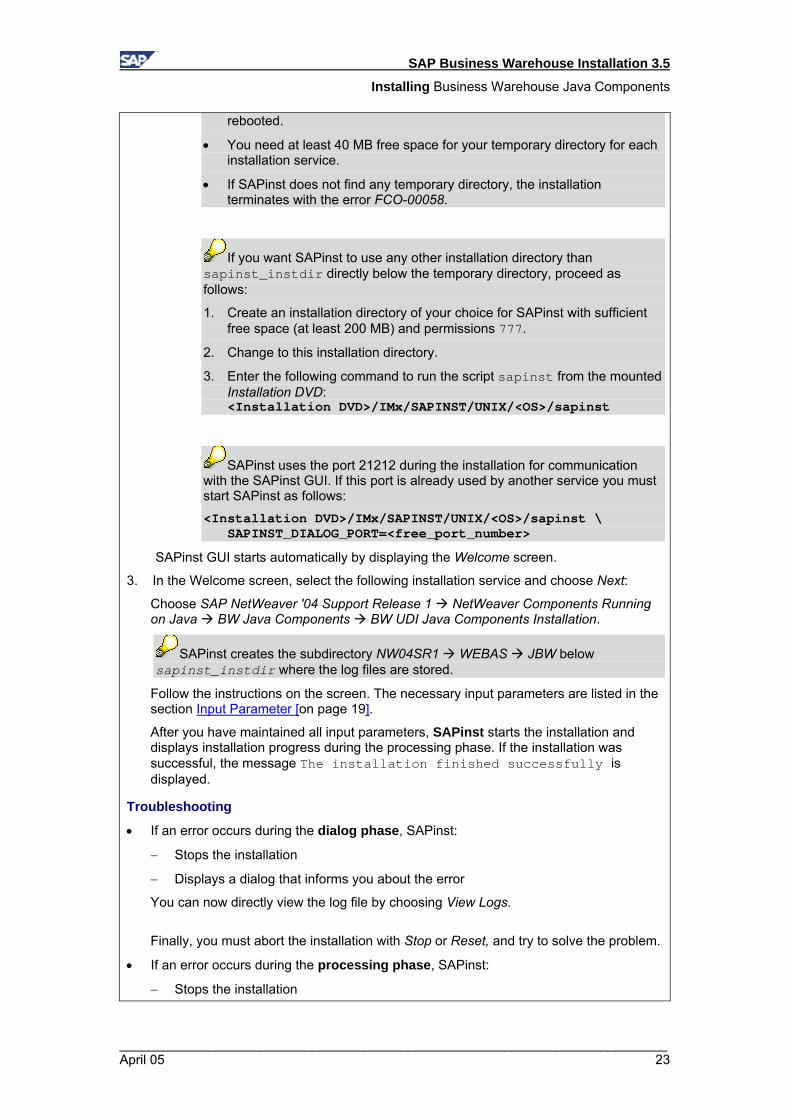
rebooted.
• You need at least 40 MB free space for your temporary directory for each installation service.
• If SAPinst does not find any temporary directory, the installation terminates with the error FCO-00058.
If you want SAPinst to use any other installation directory than sapinst_instdir directly below the temporary directory, proceed as follows:
1. Create an installation directory of your choice for SAPinst with sufficient free space (at least 200 MB) and permissions 777.
2. Change to this installation directory.
3. Enter the following command to run the script sapinst from the mounted Installation DVD: <Installation DVD>/IMx/SAPINST/UNIX/<OS>/sapinst
SAPinst uses the port 21212 during the installation for communication with the SAPinst GUI. If this port is already used by another service you must start SAPinst as follows: <Installation DVD>/IMx/SAPINST/UNIX/<OS>/sapinst \ SAPINST_DIALOG_PORT=<free_port_number>
SAPinst GUI starts automatically by displaying the Welcome screen.
3. In the Welcome screen, select the following installation service and choose Next:
Choose SAP NetWeaver '04 Support Release 1 NetWeaver Components Running on Java BW Java Components BW UDI Java Components Installation.
SAPinst creates the subdirectory NW04SR1 WEBAS JBW below sapinst_instdir where the log files are stored.
Follow the instructions on the screen. The necessary input parameters are listed in the section Input Parameter [on page 19].
After you have maintained all input parameters, SAPinst starts the installation and displays installation progress during the processing phase. If the installation was successful, the message The installation finished successfully is displayed.
Troubleshooting
• If an error occurs during the dialog phase, SAPinst:
− Stops the installation
− Displays a dialog that informs you about the error
You can now directly view the log file by choosing View Logs.
Finally, you must abort the installation with Stop or Reset, and try to solve the problem.
• If an error occurs during the processing phase, SAPinst:
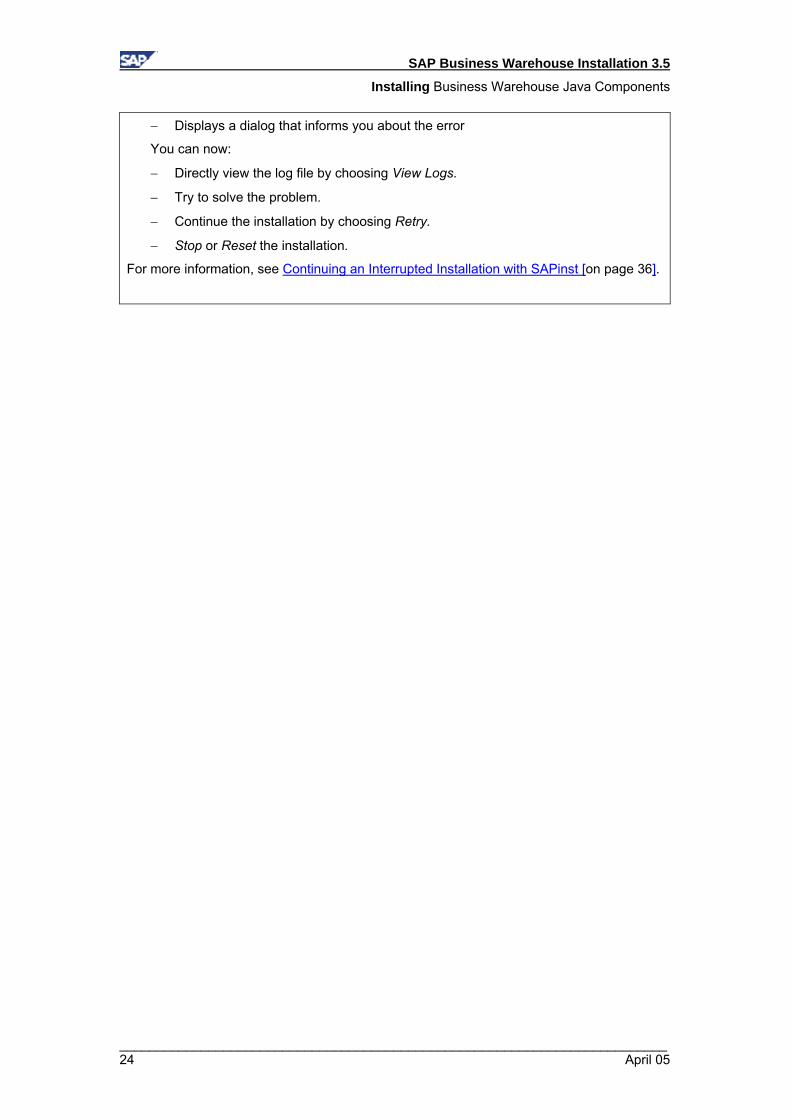
− Stops the installation
SAP Business Warehouse Installation 3.5
Installing Business Warehouse Java Components
__________________________________________________________________________ 24 April 05
− Displays a dialog that informs you about the error
You can now:
− Directly view the log file by choosing View Logs.
− Try to solve the problem.
− Continue the installation by choosing Retry.
− Stop or Reset the installation.
For more information, see Continuing an Interrupted Installation with SAPinst [on page 36].
SAP Business Warehouse Installation 3.5
Post-Installation Activities
__________________________________________________________________________ April 05 25
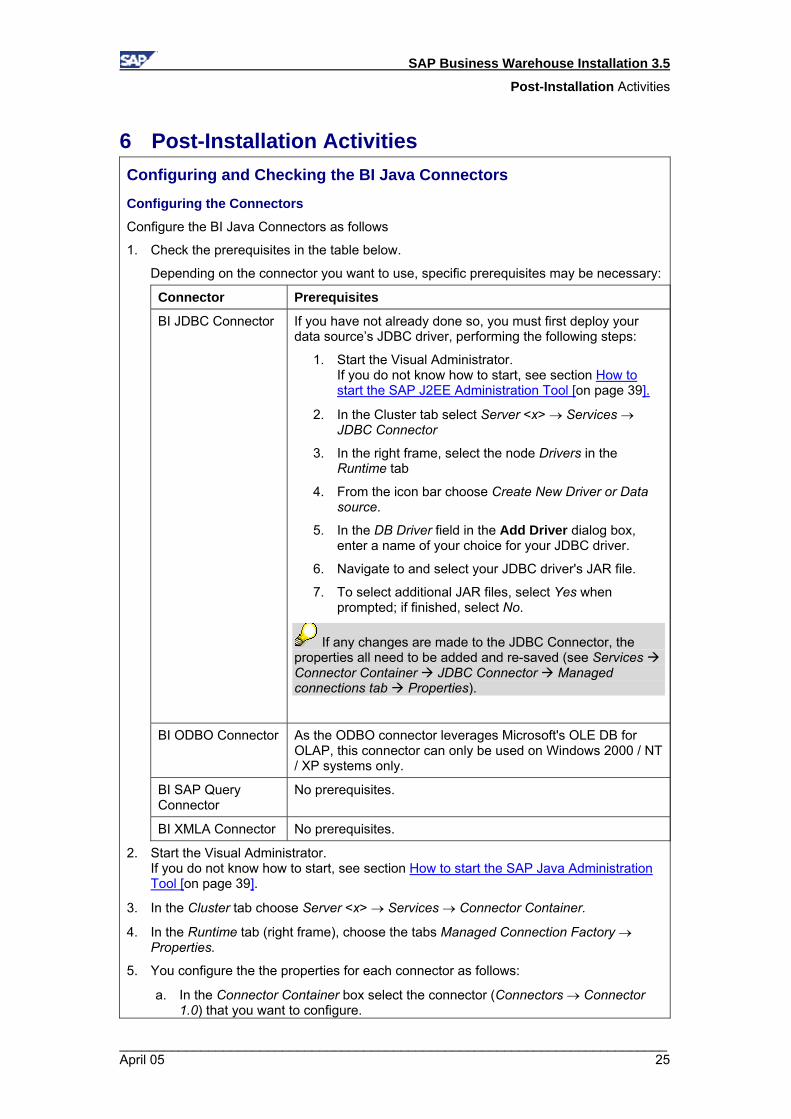
6 Post-Installation Activities Configuring and Checking the BI Java Connectors
Configuring the Connectors
Configure the BI Java Connectors as follows
1. Check the prerequisites in the table below.
Depending on the connector you want to use, specific prerequisites may be necessary:
Connector Prerequisites
BI JDBC Connector If you have not already done so, you must first deploy your data source’s JDBC driver, performing the following steps:
1. Start the Visual Administrator. If you do not know how to start, see section How to start the SAP J2EE Administration Tool [on page 39].
2. In the Cluster tab select Server <x> → Services → JDBC Connector
3. In the right frame, select the node Drivers in the Runtime tab
4. From the icon bar choose Create New Driver or Data source.
5. In the DB Driver field in the Add Driver dialog box, enter a name of your choice for your JDBC driver.
6. Navigate to and select your JDBC driver's JAR file.
7. To select additional JAR files, select Yes when prompted; if finished, select No.
If any changes are made to the JDBC Connector, the properties all need to be added and re-saved (see Services Connector Container JDBC Connector Managed connections tab Properties).
BI ODBO Connector As the ODBO connector leverages Microsoft's OLE DB for OLAP, this connector can only be used on Windows 2000 / NT / XP systems only.
BI SAP Query Connector
No prerequisites.
BI XMLA Connector No prerequisites.
2. Start the Visual Administrator. If you do not know how to start, see section How to start the SAP Java Administration Tool [on page 39].
3. In the Cluster tab choose Server <x> → Services → Connector Container.
4. In the Runtime tab (right frame), choose the tabs Managed Connection Factory → Properties.
5. You configure the the properties for each connector as follows:
a. In the Connector Container box select the connector (Connectors → Connector 1.0) that you want to configure.
SAP Business Warehouse Installation 3.5
Post-Installation Activities
__________________________________________________________________________ 26 April 05
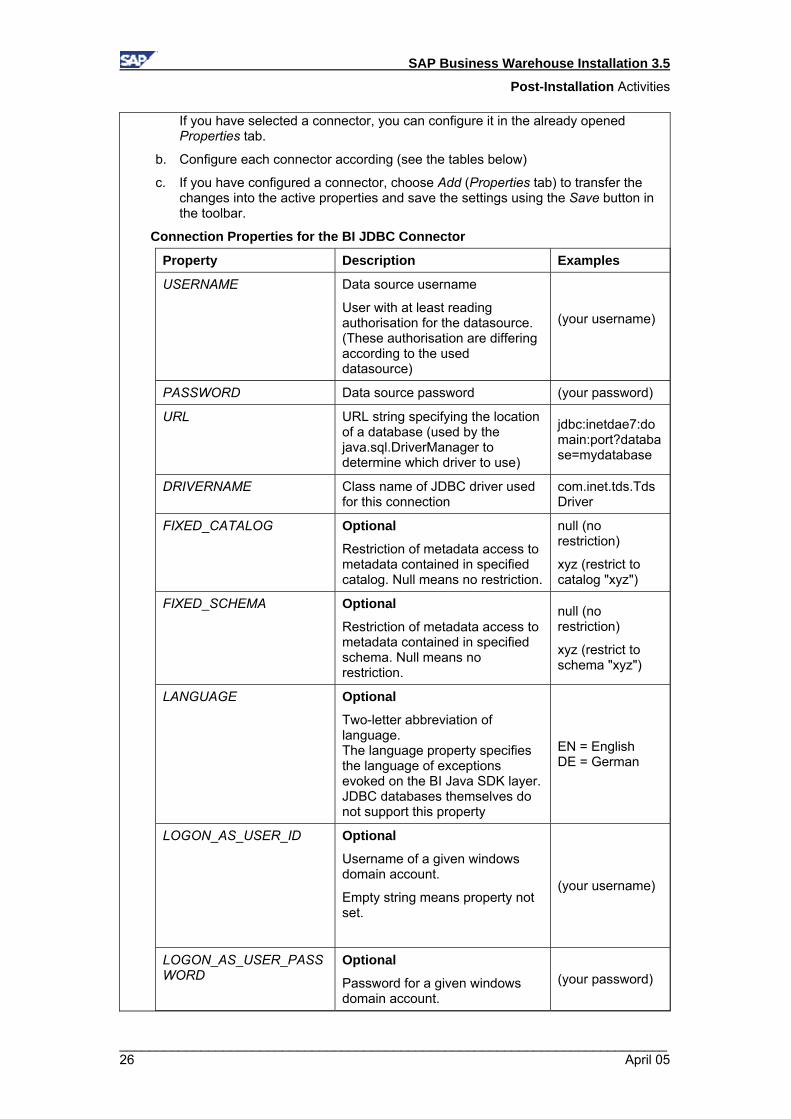
If you have selected a connector, you can configure it in the already opened Properties tab.
b. Configure each connector according (see the tables below)
c. If you have configured a connector, choose Add (Properties tab) to transfer the changes into the active properties and save the settings using the Save button in the toolbar.
Connection Properties for the BI JDBC Connector
Property Description Examples
USERNAME Data source username
User with at least reading authorisation for the datasource. (These authorisation are differing according to the used datasource)
(your username)
PASSWORD Data source password (your password)
URL URL string specifying the location of a database (used by the java.sql.DriverManager to determine which driver to use)
jdbc:inetdae7:domain:port?database=mydatabase
DRIVERNAME Class name of JDBC driver used for this connection
com.inet.tds.TdsDriver
FIXED_CATALOG Optional
Restriction of metadata access to metadata contained in specified catalog. Null means no restriction.
null (no restriction)
xyz (restrict to catalog "xyz")
FIXED_SCHEMA Optional
Restriction of metadata access to metadata contained in specified schema. Null means no restriction.
null (no restriction)
xyz (restrict to schema "xyz")
LANGUAGE Optional
Two-letter abbreviation of language. The language property specifies the language of exceptions evoked on the BI Java SDK layer. JDBC databases themselves do not support this property
EN = English DE = German
LOGON_AS_USER_ID Optional
Username of a given windows domain account.
Empty string means property not set.
(your username)
LOGON_AS_USER_PASSWORD
Optional
Password for a given windows domain account.
(your password)
SAP Business Warehouse Installation 3.5
Post-Installation Activities
__________________________________________________________________________ April 05 27
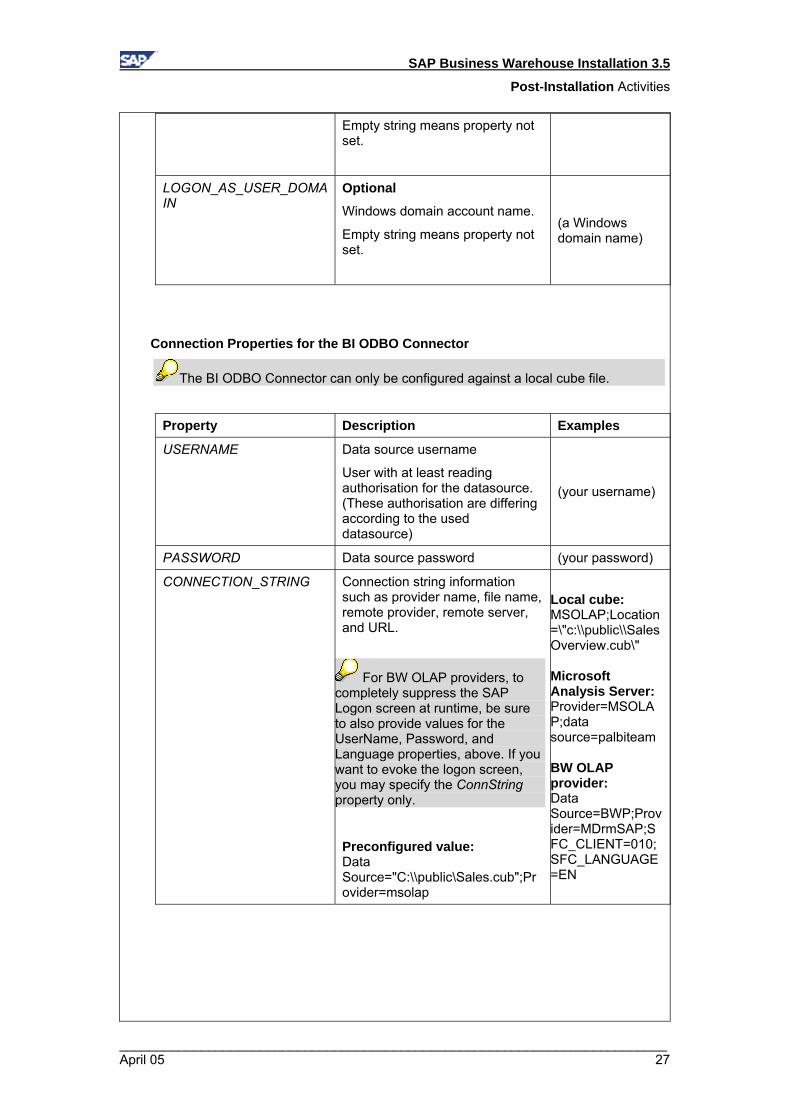
Empty string means property not set.
LOGON_AS_USER_DOMAIN
Optional
Windows domain account name.
Empty string means property not set.
(a Windows domain name)
Connection Properties for the BI ODBO Connector
The BI ODBO Connector can only be configured against a local cube file.
Property Description Examples
USERNAME Data source username
User with at least reading authorisation for the datasource. (These authorisation are differing according to the used datasource)
(your username)
PASSWORD Data source password (your password)
CONNECTION_STRING Connection string information such as provider name, file name, remote provider, remote server, and URL.
For BW OLAP providers, to completely suppress the SAP Logon screen at runtime, be sure to also provide values for the UserName, Password, and Language properties, above. If you want to evoke the logon screen, you may specify the ConnString property only.
Preconfigured value: Data Source="C:\\public\Sales.cub";Provider=msolap
Local cube: MSOLAP;Location=\"c:\\public\\SalesOverview.cub\"
Microsoft Analysis Server: Provider=MSOLAP;data source=palbiteam
BW OLAP provider: Data Source=BWP;Provider=MDrmSAP;SFC_CLIENT=010;SFC_LANGUAGE=EN

SAP Business Warehouse Installation 3.5
Post-Installation Activities
__________________________________________________________________________ 28 April 05
Connection Properties for the BI SAP Query Connector
For the set of connection properties relevant for your system, refer to the JCo documentation in your JCo download.
If you have trouble establishing a connection to a server that does not have a PUBLIC logon group, try removing the properties for R3Name and ServerGroup. See the JCo documentation on the SAP Service Marketplace (service.sap.com/connectors) for more connection troubleshooting information.
Property Description Examples
USERNAME Data source username
User with at least reading authorisation for the datasource. (These authorisation are differing according to the used datasource)
(your username)
PASSWORD Data source password (your password)
LANGUAGE Two-letter abbreviation of language
The language property sets the logon language for your system, and also specifies the language of exceptions evoked on the BI Java SDK layer
EN = English DE = German
CLIENT Client specified as three-digit integer 000
MESSAGESERVER Hostname for message server server1.mydomain.com
APPLICATIONSERVER Hostname for application server server1.mydomain.com
SYSTEMNUMBER Two-digit integer identifying the R/3 instance 00
SERVERGROUP Logon group for load balancing a string, such as PUBLIC or SPACE
R3NAME R/3 name OSS
Connection Properties for the BI XMLA Connector
Property Description Examples
USERNAME Data source username
User with at least reading authorisation for the datasource. (These authorisation are differing according to the used datasource)
(your username)
PASSWORD Data source password (your password)
SAP Business Warehouse Installation 3.5
Post-Installation Activities
__________________________________________________________________________ April 05 29
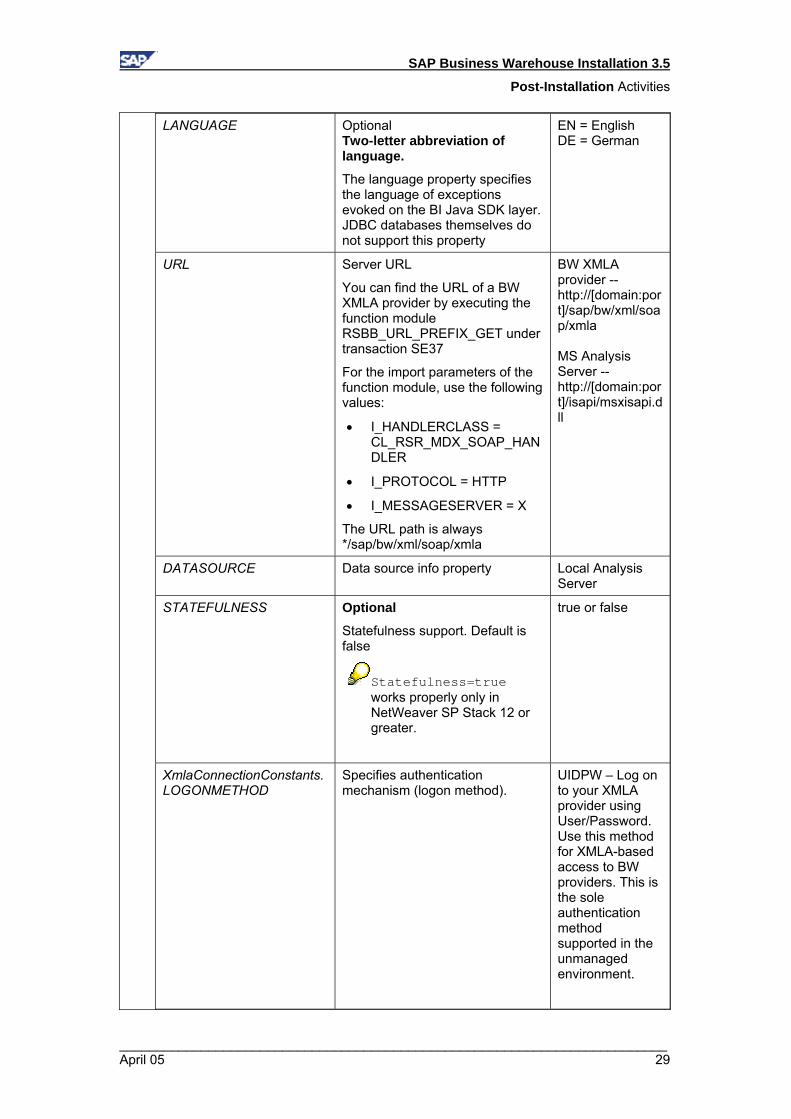
LANGUAGE Optional Two-letter abbreviation of language.
The language property specifies the language of exceptions evoked on the BI Java SDK layer. JDBC databases themselves do not support this property
EN = English DE = German
URL Server URL
You can find the URL of a BW XMLA provider by executing the function module RSBB_URL_PREFIX_GET under transaction SE37
For the import parameters of the function module, use the following values:
• I_HANDLERCLASS = CL_RSR_MDX_SOAP_HANDLER
• I_PROTOCOL = HTTP
• I_MESSAGESERVER = X
The URL path is always */sap/bw/xml/soap/xmla
BW XMLA provider -- http://[domain:port]/sap/bw/xml/soap/xmla MS Analysis Server -- http://[domain:port]/isapi/msxisapi.dll
DATASOURCE Data source info property Local Analysis Server
STATEFULNESS Optional
Statefulness support. Default is false
Statefulness=true works properly only in NetWeaver SP Stack 12 or greater.
true or false
XmlaConnectionConstants.LOGONMETHOD
Specifies authentication mechanism (logon method).
UIDPW – Log on to your XMLA provider using User/Password. Use this method for XMLA-based access to BW providers. This is the sole authentication method supported in the unmanaged environment.
SAP Business Warehouse Installation 3.5
Post-Installation Activities
__________________________________________________________________________ 30 April 05
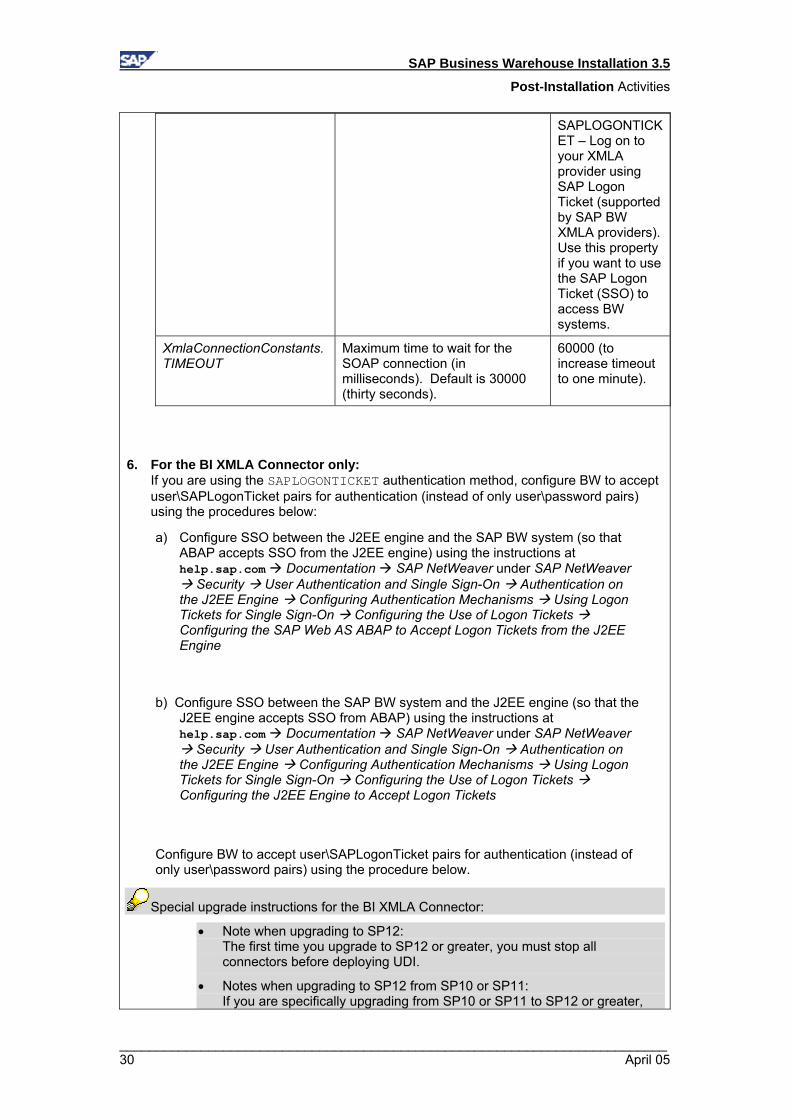
SAPLOGONTICKET – Log on to your XMLA provider using SAP Logon Ticket (supported by SAP BW XMLA providers). Use this property if you want to use the SAP Logon Ticket (SSO) to access BW systems.
XmlaConnectionConstants. TIMEOUT
Maximum time to wait for the SOAP connection (in milliseconds). Default is 30000 (thirty seconds).
60000 (to increase timeout to one minute).
6. For the BI XMLA Connector only: If you are using the SAPLOGONTICKET authentication method, configure BW to accept user\SAPLogonTicket pairs for authentication (instead of only user\password pairs) using the procedures below:
a) Configure SSO between the J2EE engine and the SAP BW system (so that ABAP accepts SSO from the J2EE engine) using the instructions at help.sap.com Documentation SAP NetWeaver under SAP NetWeaver
Security User Authentication and Single Sign-On Authentication on the J2EE Engine Configuring Authentication Mechanisms Using Logon Tickets for Single Sign-On Configuring the Use of Logon Tickets Configuring the SAP Web AS ABAP to Accept Logon Tickets from the J2EE Engine
b) Configure SSO between the SAP BW system and the J2EE engine (so that the J2EE engine accepts SSO from ABAP) using the instructions at help.sap.com Documentation SAP NetWeaver under SAP NetWeaver
Security User Authentication and Single Sign-On Authentication on the J2EE Engine Configuring Authentication Mechanisms Using Logon Tickets for Single Sign-On Configuring the Use of Logon Tickets Configuring the J2EE Engine to Accept Logon Tickets
Configure BW to accept user\SAPLogonTicket pairs for authentication (instead of only user\password pairs) using the procedure below.
Special upgrade instructions for the BI XMLA Connector:
• Note when upgrading to SP12: The first time you upgrade to SP12 or greater, you must stop all connectors before deploying UDI.
• Notes when upgrading to SP12 from SP10 or SP11: If you are specifically upgrading from SP10 or SP11 to SP12 or greater,
SAP Business Warehouse Installation 3.5
Post-Installation Activities
__________________________________________________________________________ April 05 31
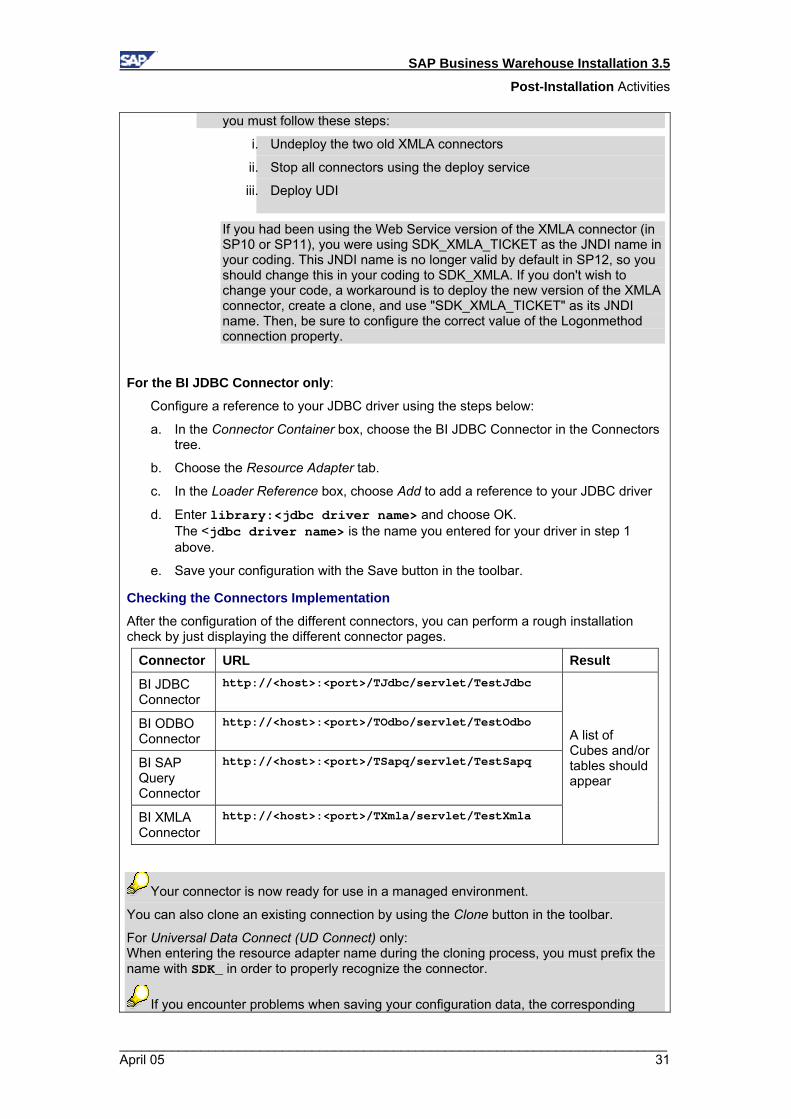
you must follow these steps:
i. Undeploy the two old XMLA connectors
ii. Stop all connectors using the deploy service
iii. Deploy UDI
If you had been using the Web Service version of the XMLA connector (in SP10 or SP11), you were using SDK_XMLA_TICKET as the JNDI name in your coding. This JNDI name is no longer valid by default in SP12, so you should change this in your coding to SDK_XMLA. If you don't wish to change your code, a workaround is to deploy the new version of the XMLA connector, create a clone, and use "SDK_XMLA_TICKET" as its JNDI name. Then, be sure to configure the correct value of the Logonmethod connection property.
For the BI JDBC Connector only:
Configure a reference to your JDBC driver using the steps below:
a. In the Connector Container box, choose the BI JDBC Connector in the Connectors tree.
b. Choose the Resource Adapter tab.
c. In the Loader Reference box, choose Add to add a reference to your JDBC driver
d. Enter library:<jdbc driver name> and choose OK. The <jdbc driver name> is the name you entered for your driver in step 1 above.
e. Save your configuration with the Save button in the toolbar.
Checking the Connectors Implementation
After the configuration of the different connectors, you can perform a rough installation check by just displaying the different connector pages.
Connector URL Result
BI JDBC Connector
http://<host>:<port>/TJdbc/servlet/TestJdbc
BI ODBO Connector
http://<host>:<port>/TOdbo/servlet/TestOdbo
BI SAP Query Connector
http://<host>:<port>/TSapq/servlet/TestSapq
BI XMLA Connector
http://<host>:<port>/TXmla/servlet/TestXmla
A list of Cubes and/or tables should appear
Your connector is now ready for use in a managed environment.
You can also clone an existing connection by using the Clone button in the toolbar.
For Universal Data Connect (UD Connect) only: When entering the resource adapter name during the cloning process, you must prefix the name with SDK_ in order to properly recognize the connector.
If you encounter problems when saving your configuration data, the corresponding
SAP Business Warehouse Installation 3.5
Post-Installation Activities
__________________________________________________________________________ 32 April 05
connector might be not up and running. You have to stop and restart the application again in the deploy service of the Visual Administrator.
Checking the Installation Status Check the installation status by calling transaction RSTCO_ADMIN or see SAP Note 834280.
SAP Business Warehouse Installation 3.5
Appendix: SAPinst - Installation Tool-specific Information
__________________________________________________________________________ April 05 33
7 Appendix: SAPinst - Installation Tool-specific Information
7.1 Controlling a SAPinst Installation from a Remote Machine
Purpose
You can run the SAPinst GUI in standalone mode to perform a remote installation.
This enables you to install an SAP system on another host (the remote host) while monitoring the installation with the SAPinst GUI on your local Windows or UNIX computer (the local host).
Prerequisites
• Make sure that you have performed the preparation activities for your local host (SAPinst GUI host) and your remote host.
For more information, see Installation Preparations [on page 16].
• Both computers are on the LAN and can ping each other.
To test this:
− Log on to your remote host and enter the command ping <local host>.
− Log on to the local host and enter the command ping <remote host>.
Process Flow
1. Starting SAPinst on the Remote Host [on page 34]
2. Starting SAPinst GUI on the Local Host [on page 35]
SAP Business Warehouse Installation 3.5
Appendix: SAPinst - Installation Tool-specific Information
__________________________________________________________________________ 34 April 05
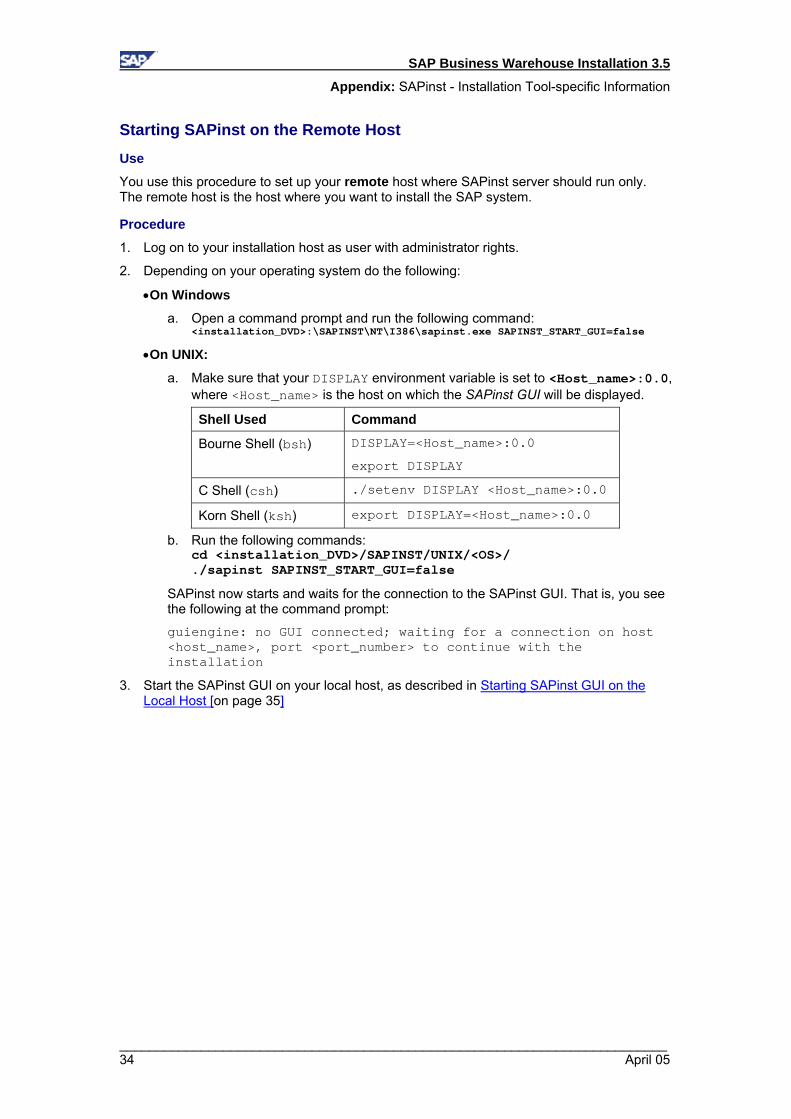
Starting SAPinst on the Remote Host
Use
You use this procedure to set up your remote host where SAPinst server should run only. The remote host is the host where you want to install the SAP system.
Procedure
1. Log on to your installation host as user with administrator rights.
2. Depending on your operating system do the following:
•On Windows
a. Open a command prompt and run the following command: <installation_DVD>:\SAPINST\NT\I386\sapinst.exe SAPINST_START_GUI=false
•On UNIX:
a. Make sure that your DISPLAY environment variable is set to <Host_name>:0.0, where <Host_name> is the host on which the SAPinst GUI will be displayed.
Shell Used Command
Bourne Shell (bsh) DISPLAY=<Host_name>:0.0
export DISPLAY
C Shell (csh) ./setenv DISPLAY <Host_name>:0.0
Korn Shell (ksh) export DISPLAY=<Host_name>:0.0
b. Run the following commands: cd <installation_DVD>/SAPINST/UNIX/<OS>/ ./sapinst SAPINST_START_GUI=false
SAPinst now starts and waits for the connection to the SAPinst GUI. That is, you see the following at the command prompt:
guiengine: no GUI connected; waiting for a connection on host <host_name>, port <port_number> to continue with the installation
3. Start the SAPinst GUI on your local host, as described in Starting SAPinst GUI on the Local Host [on page 35]
SAP Business Warehouse Installation 3.5
Appendix: SAPinst - Installation Tool-specific Information
__________________________________________________________________________ April 05 35
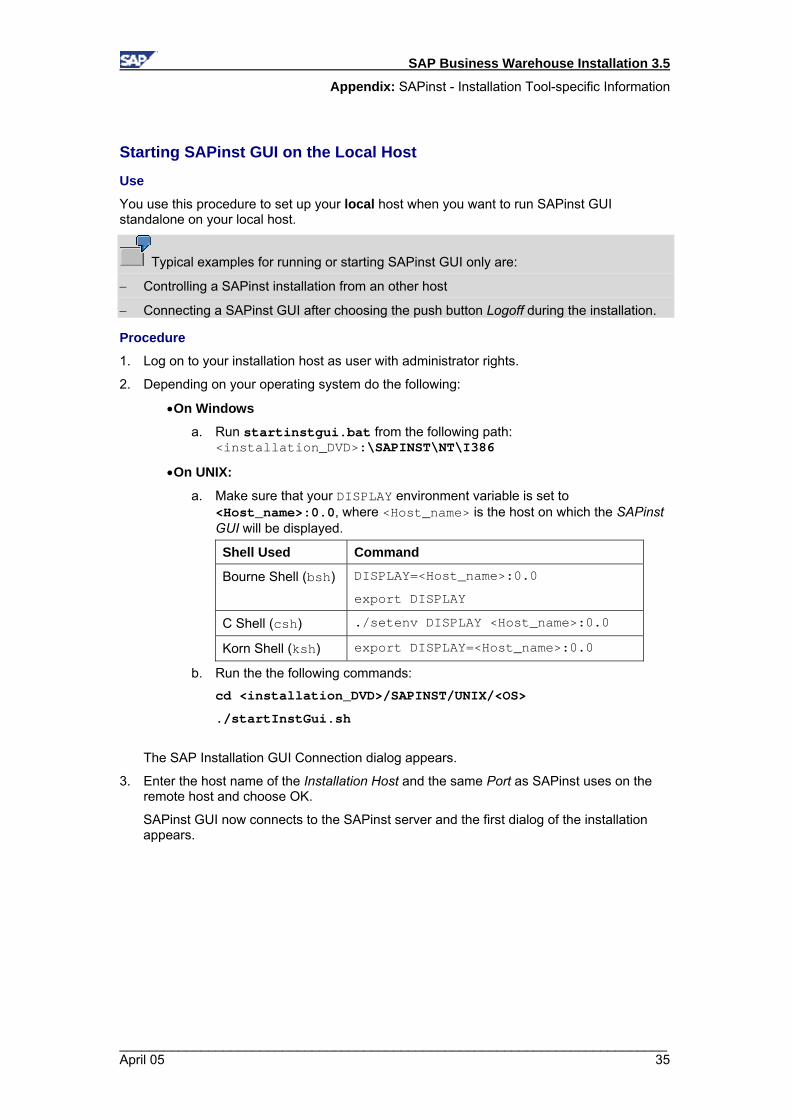
Starting SAPinst GUI on the Local Host
Use
You use this procedure to set up your local host when you want to run SAPinst GUI standalone on your local host.
Typical examples for running or starting SAPinst GUI only are:
− Controlling a SAPinst installation from an other host
− Connecting a SAPinst GUI after choosing the push button Logoff during the installation.
Procedure
1. Log on to your installation host as user with administrator rights.
2. Depending on your operating system do the following:
•On Windows
a. Run startinstgui.bat from the following path: <installation_DVD>:\SAPINST\NT\I386
•On UNIX:
a. Make sure that your DISPLAY environment variable is set to <Host_name>:0.0, where <Host_name> is the host on which the SAPinst GUI will be displayed.
Shell Used Command
Bourne Shell (bsh) DISPLAY=<Host_name>:0.0
export DISPLAY
C Shell (csh) ./setenv DISPLAY <Host_name>:0.0
Korn Shell (ksh) export DISPLAY=<Host_name>:0.0
b. Run the the following commands: cd <installation_DVD>/SAPINST/UNIX/<OS>
./startInstGui.sh
The SAP Installation GUI Connection dialog appears.
3. Enter the host name of the Installation Host and the same Port as SAPinst uses on the remote host and choose OK.
SAPinst GUI now connects to the SAPinst server and the first dialog of the installation appears.
SAP Business Warehouse Installation 3.5
Appendix: SAPinst - Installation Tool-specific Information
__________________________________________________________________________ 36 April 05
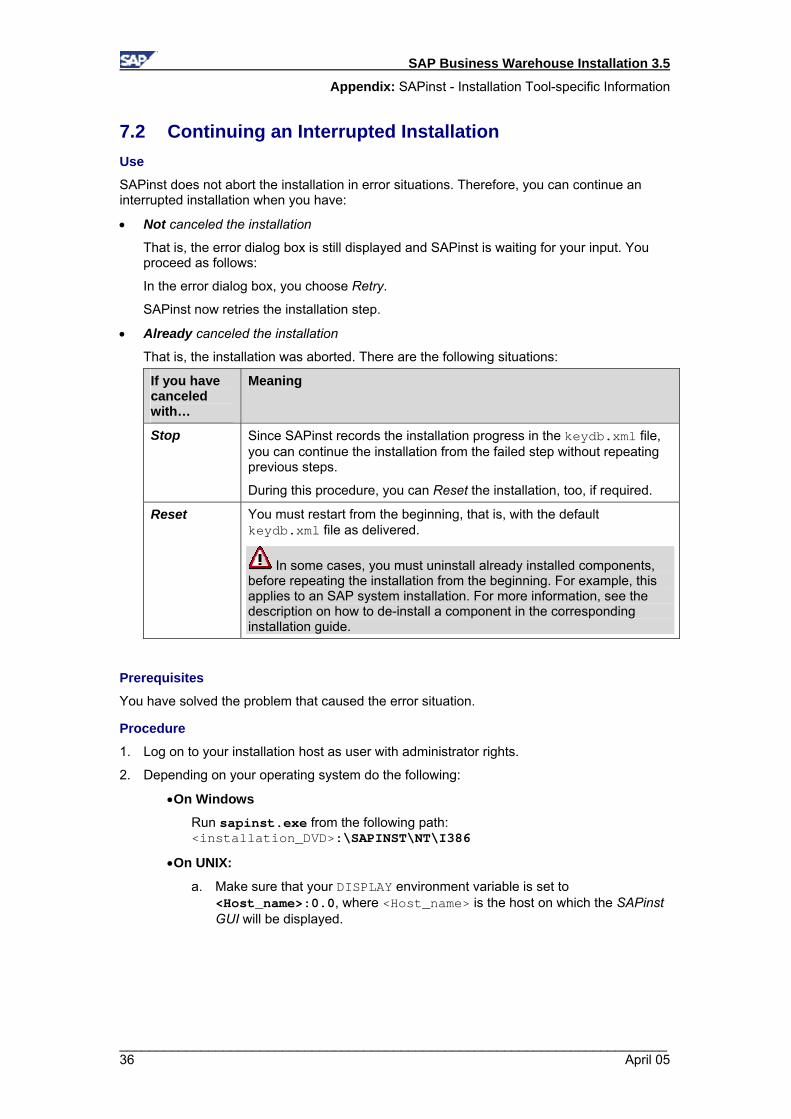
7.2 Continuing an Interrupted Installation Use
SAPinst does not abort the installation in error situations. Therefore, you can continue an interrupted installation when you have:
• Not canceled the installation
That is, the error dialog box is still displayed and SAPinst is waiting for your input. You proceed as follows:
In the error dialog box, you choose Retry.
SAPinst now retries the installation step.
• Already canceled the installation
That is, the installation was aborted. There are the following situations:
If you have canceled with…
Meaning
Stop Since SAPinst records the installation progress in the keydb.xml file, you can continue the installation from the failed step without repeating previous steps.
During this procedure, you can Reset the installation, too, if required.
Reset You must restart from the beginning, that is, with the default keydb.xml file as delivered.
In some cases, you must uninstall already installed components, before repeating the installation from the beginning. For example, this applies to an SAP system installation. For more information, see the description on how to de-install a component in the corresponding installation guide.
Prerequisites
You have solved the problem that caused the error situation.
Procedure
1. Log on to your installation host as user with administrator rights.
2. Depending on your operating system do the following:
•On Windows
Run sapinst.exe from the following path: <installation_DVD>:\SAPINST\NT\I386
•On UNIX:
a. Make sure that your DISPLAY environment variable is set to <Host_name>:0.0, where <Host_name> is the host on which the SAPinst GUI will be displayed.

SAP Business Warehouse Installation 3.5
Appendix: SAPinst - Installation Tool-specific Information
__________________________________________________________________________ April 05 37
Shell Used Command
Bourne Shell (bsh) DISPLAY=<Host_name>:0.0
export DISPLAY
C Shell (csh) ./setenv DISPLAY <Host_name>:0.0
Korn Shell (ksh) export DISPLAY=<Host_name>:0.0
b. Run the following commands: cd <installation_DVD>/SAPINST/UNIX/<OS>
./sapinst
4. From the tree structure in the Welcome screen, select the installation service that you want to continue and choose Next.
If there is only one component to install, SAPinst directly displays the dialog What do you want to do? without presenting the Welcome screen.
The What do you want to do? screen appears.
5. In the What do you want to do? screen, decide between the following alternatives and choose OK.
Alternative Behavior
Run a new Installation
The installation will not be continued.
Instead, SAPinst deletes the mentioned installation directory for the chosen installation service and starts the installation from the beginning.
The log files from the old installation are put into a backup directory with the following naming convention: <log_day_month_year_hours_minutes_seconds > (log_01_Oct_2003_13_47_56, for example).
Continue old installation
The installation of the mentioned installation service will be continued from the point of failure.

SAP Business Warehouse Installation 3.5
Appendix: SAPinst - Installation Tool-specific Information
__________________________________________________________________________ 38 April 05
7.3 Using the DVD/CD Browser Dialog During the installation procedure SAPinst first checks and finally verifies the availability and location of the required installation_DVD. SAPinst does this by displaying a SAPinst DVD/CD Browser dialog, asking for the file LABEL.ASC that contains the information of the software package to be installed.
SAPinst displays the SAPinst DVD/CD Browser dialog in the following situations:
• SAPinst wants to check the availability of the software package.
You can recognize this situation by the flag Check Location displayed in the SAPinst DVD/CD Browser window. Choose one of the following actions:
Action Result
Do not enter any Package Location and leave the flag Check Location deselected.
SAPinst skips the check and you can continue the installation procedure. However, SAPinst asks later for the missing LABEL.ASC (see final bullet point below).
Enter the path of the Package Location and leave the flag Check Location deselected.
SAPinst skips checking the label location, but your entered package locations are used later for the installation. SAPinst only asks again for a missing LABEL.ASC if the package location is incorrect (see final bullet point below).
Enter the path of the Package Location and select the flag Check Location
SAPinst checks the label location and displays an error message if the location is incorrect.
If all locations are correct, SAPinst does not ask again for the LABEL.ASC files.
• SAPinst cannot find the correct LABEL.ASC but needs the location of the software to process the installation now.
You can recognize this situation because Check Location in the SAPinst DVD/CD Browser window is empty. You now have to enter the path to the correct LABEL.ASC. Otherwise, the installation cannot continue.
Additionally, you can copy the installation package by entering a location in the column Copy Package to.
SAP Business Warehouse Installation 3.5
Appendix: J2EE Engine Specific Information
__________________________________________________________________________ April 05 39
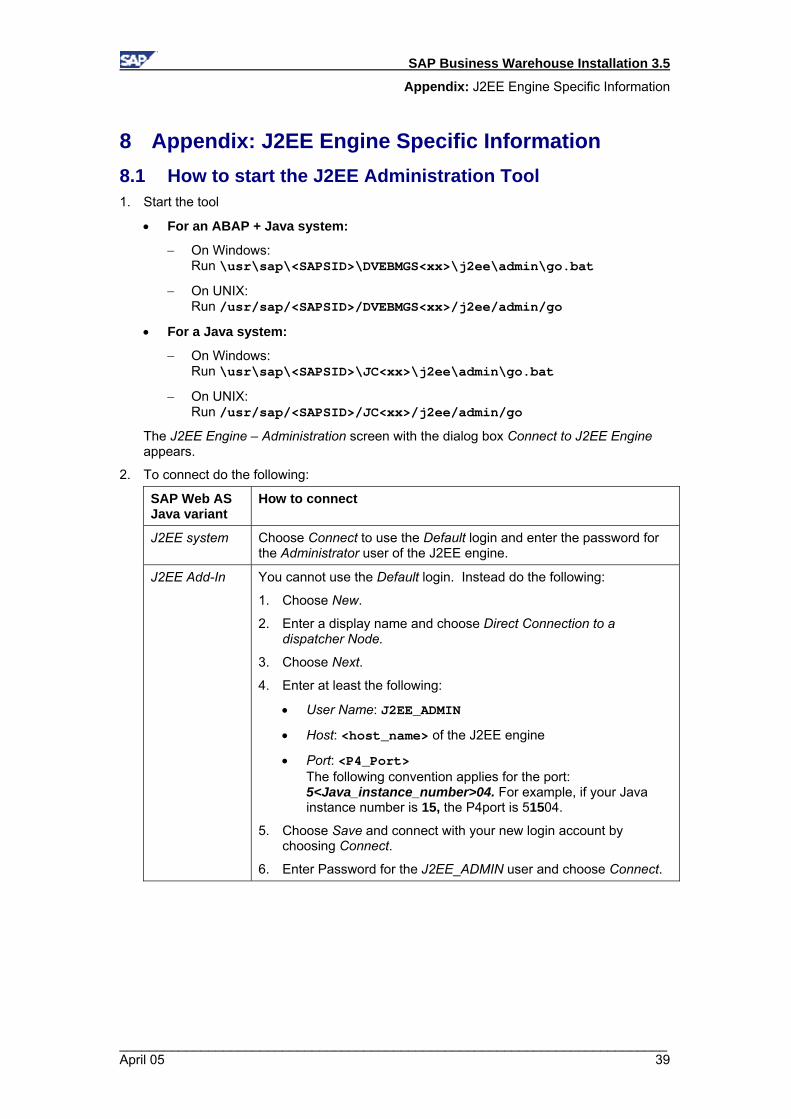
8 Appendix: J2EE Engine Specific Information 8.1 How to start the J2EE Administration Tool 1. Start the tool
• For an ABAP + Java system:
− On Windows: Run \usr\sap\<SAPSID>\DVEBMGS<xx>\j2ee\admin\go.bat
− On UNIX: Run /usr/sap/<SAPSID>/DVEBMGS<xx>/j2ee/admin/go
• For a Java system:
− On Windows: Run \usr\sap\<SAPSID>\JC<xx>\j2ee\admin\go.bat
− On UNIX: Run /usr/sap/<SAPSID>/JC<xx>/j2ee/admin/go
The J2EE Engine – Administration screen with the dialog box Connect to J2EE Engine appears.
2. To connect do the following:
SAP Web AS Java variant
How to connect
J2EE system Choose Connect to use the Default login and enter the password for the Administrator user of the J2EE engine.
J2EE Add-In You cannot use the Default login. Instead do the following:
1. Choose New.
2. Enter a display name and choose Direct Connection to a dispatcher Node.
3. Choose Next.
4. Enter at least the following:
• User Name: J2EE_ADMIN
• Host: <host_name> of the J2EE engine
• Port: <P4_Port> The following convention applies for the port: 5<Java_instance_number>04. For example, if your Java instance number is 15, the P4port is 51504.
5. Choose Save and connect with your new login account by choosing Connect.
6. Enter Password for the J2EE_ADMIN user and choose Connect.
SAP Business Warehouse Installation 3.5
Appendix: J2EE Engine Specific Information
__________________________________________________________________________ 40 April 05
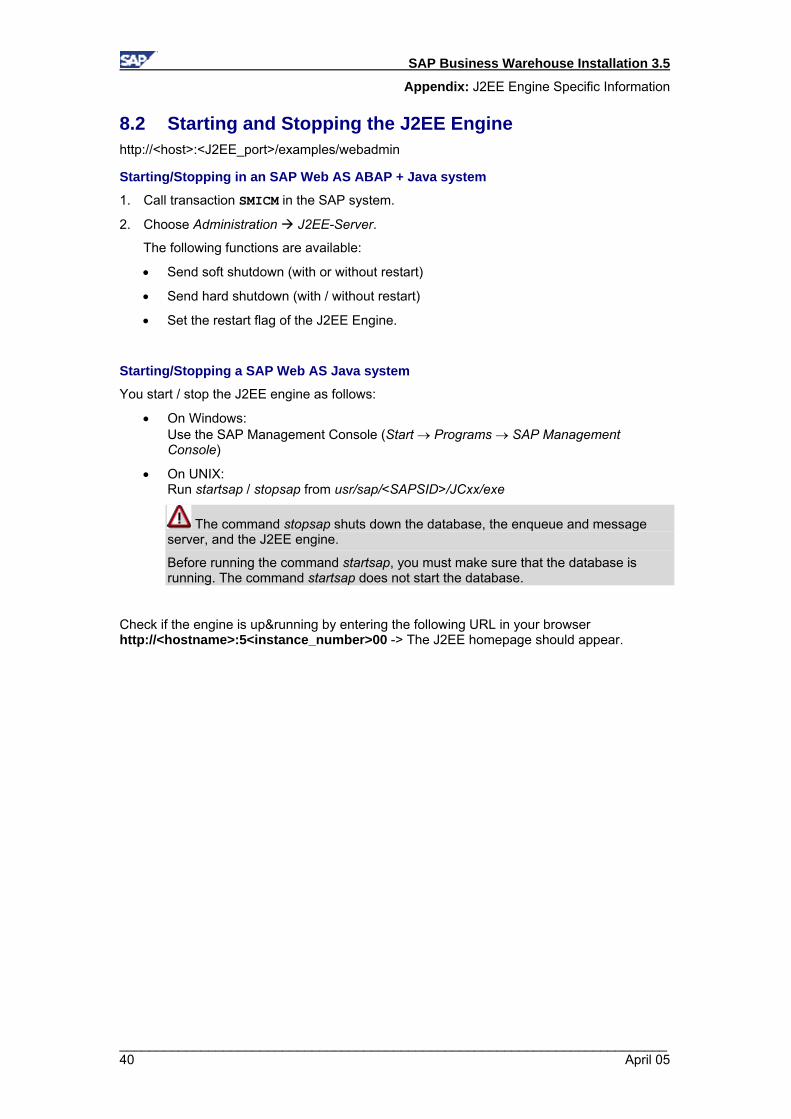
8.2 Starting and Stopping the J2EE Engine http://<host>:<J2EE_port>/examples/webadmin
Starting/Stopping in an SAP Web AS ABAP + Java system
1. Call transaction SMICM in the SAP system.
2. Choose Administration J2EE-Server.
The following functions are available:
• Send soft shutdown (with or without restart)
• Send hard shutdown (with / without restart)
• Set the restart flag of the J2EE Engine.
Starting/Stopping a SAP Web AS Java system
You start / stop the J2EE engine as follows:
• On Windows: Use the SAP Management Console (Start → Programs → SAP Management Console)
• On UNIX: Run startsap / stopsap from usr/sap/<SAPSID>/JCxx/exe
The command stopsap shuts down the database, the enqueue and message server, and the J2EE engine.
Before running the command startsap, you must make sure that the database is running. The command startsap does not start the database.
Check if the engine is up&running by entering the following URL in your browser http://<hostname>:5<instance_number>00 -> The J2EE homepage should appear.
SAP Business Warehouse Installation 3.5
Implementation Considerations
__________________________________________________________________________ April 05 41
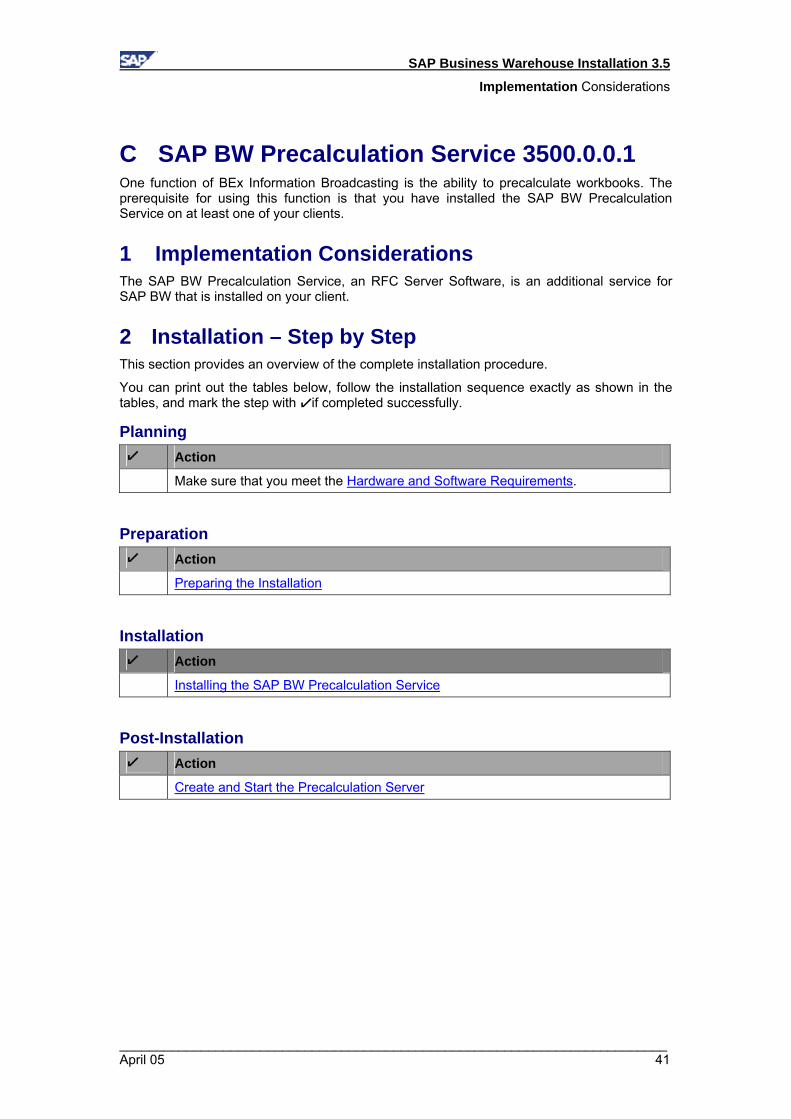
C SAP BW Precalculation Service 3500.0.0.1 One function of BEx Information Broadcasting is the ability to precalculate workbooks. The prerequisite for using this function is that you have installed the SAP BW Precalculation Service on at least one of your clients.
1 Implementation Considerations The SAP BW Precalculation Service, an RFC Server Software, is an additional service for SAP BW that is installed on your client.
2 Installation – Step by Step This section provides an overview of the complete installation procedure.
You can print out the tables below, follow the installation sequence exactly as shown in the tables, and mark the step with ! if completed successfully.
Planning ! Action
Make sure that you meet the Hardware and Software Requirements.
Preparation ! Action
Preparing the Installation
Installation ! Action
Installing the SAP BW Precalculation Service
Post-Installation ! Action
Create and Start the Precalculation Server

SAP Business Warehouse Installation 3.5
Planning the Installation
__________________________________________________________________________ 42 April 05
3 Planning the Installation Make sure that you read Installation – Step by Step [on page 41] before you start
installation planning.
3.1 Hardware and Software Requirements The following table lists the requirements:
Requirement Type Requirement
Hardware requirements • Your system should fulfill all requirements for Microsoft Excel and Windows 2000
Software requirements • Windows 2000 or higher
• Microsoft .Net Framework 1.1
• Microsoft Excel 2000 or higher
Make sure that the installation source is available at the first precalculation because Excel must be configured for the system user. More information is available in Microsoft Knowledge Base Article 257757.
• SAP GUI 6.20
4 Preparing the Installation You can install the precalculation software from the installation DVD SAP NetWeaver 04 COMPONENTS DVD (path on the DVD: BW_INS / BW_UPG → BWAnalyzerPrecalcService → NT → I386).
5 Installing the SAP BW Precalculation Service This procedure tells you how to install the SAP BW Precalculation Service on your client.
1. Log on to your host as a user with administration rights.
2. Start the setup program from the DVD.
The welcome screen of the SAP BW Excel Precalculation Setup wizard appears.
3. Confirm with Next.
The screen Select Installation Folder appears.
4. Enter the folder where the component should be installed and choose Next.
The installation starts.
The screen Installation Complete appears after successful installation.
5. Choose Close.
More information is available in SAP Note 744127.

SAP Business Warehouse Installation 3.5
Post-Installation
__________________________________________________________________________ April 05 43
6 Post-Installation Create and Start Precalculation Server
Activities in the client management console
After installation, the following Microsoft Windows service appears in the management console of the operating system (Start → Settings → Control Panel → Administrative Tools → Computer Management) under Services and Applications → Services: SAP BW Precalculation Service.
1. Double click on the service.
2. In the next window (SAP BW Precalculation Service Properties (Local Computer) ) select Allow service to interact with desktop on tab page Log On under Log On As: Local System Account.
Activities in the SAP BW system
Before you are able to start the service you must first determine which precalculation server is available to the BW system. You do this in SAP BW Customizing.
1. Log on to the BW system on the PC on which the SAP BW Precalculation Service is installed and open Customizing (transaction SPRO): SAP Reference IMG → SAP NetWeaver → SAP Business Warehouse → Reporting -Relevant Settings → General Reporting Setings in the Business Explorer → Manage Precalculation Server.
2. Choose Create Precalculation Server.
3. Enter the technical name of server (max. 10 characters) and a description.
The precalculation server appears in the list.
Activities in the client management console
1. Start the Windows Sevice SAP BW Precalculation Service in the management console of your operating system.
Activities in the SAP BW system
1. After you refresh the view ( ) the status display for the precalculation server in administration in SAP BW displays a green traffic light.
The precalculation server is now ready for use.
By double clicking on the server you will come to the test execution screen.
More information is available in the SAP library at the Internet address help.sap.com/nw04 → SAP NetWeaver → Information Broadcasting → System Administration Tasks → Administration of the Precalculation Server.
SAP Business Warehouse Installation 3.5
Installation Check
__________________________________________________________________________ 44 April 05
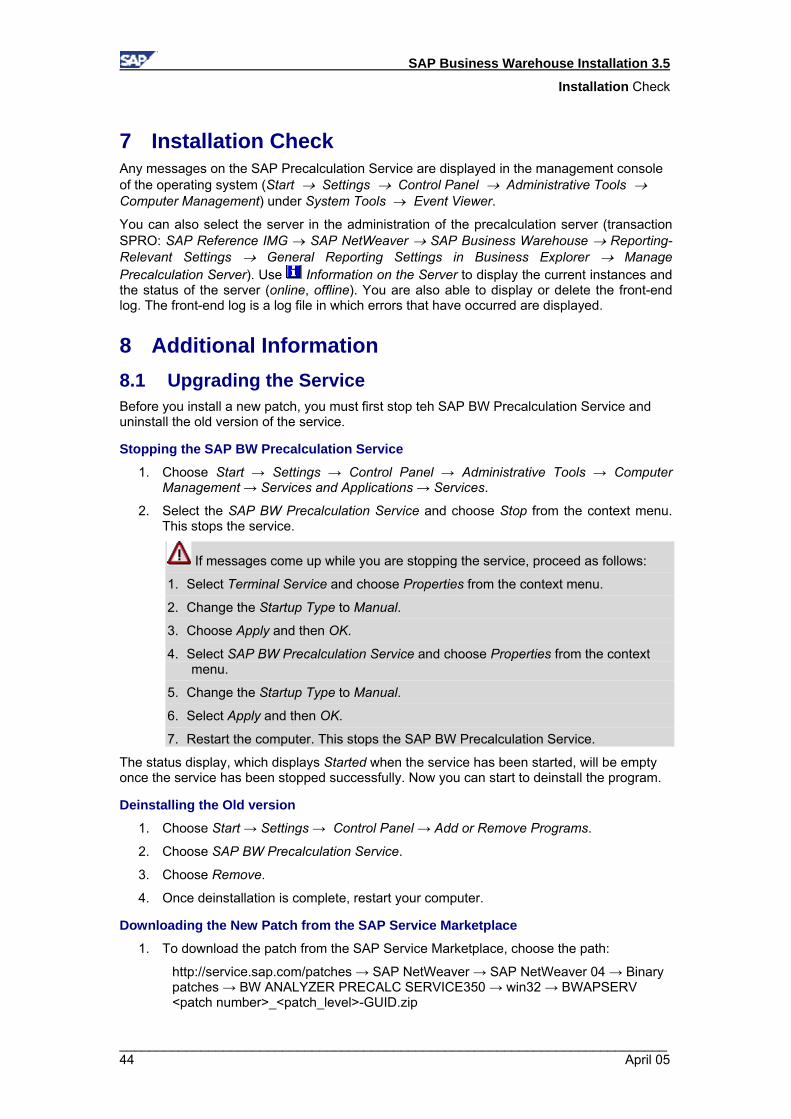
7 Installation Check Any messages on the SAP Precalculation Service are displayed in the management console of the operating system (Start → Settings → Control Panel → Administrative Tools → Computer Management) under System Tools → Event Viewer.
You can also select the server in the administration of the precalculation server (transaction SPRO: SAP Reference IMG → SAP NetWeaver → SAP Business Warehouse → Reporting-Relevant Settings → General Reporting Settings in Business Explorer → Manage Precalculation Server). Use Information on the Server to display the current instances and the status of the server (online, offline). You are also able to display or delete the front-end log. The front-end log is a log file in which errors that have occurred are displayed.
8 Additional Information 8.1 Upgrading the Service Before you install a new patch, you must first stop teh SAP BW Precalculation Service and uninstall the old version of the service.
Stopping the SAP BW Precalculation Service
1. Choose Start → Settings → Control Panel → Administrative Tools → Computer Management → Services and Applications → Services.
2. Select the SAP BW Precalculation Service and choose Stop from the context menu. This stops the service.
If messages come up while you are stopping the service, proceed as follows:
1. Select Terminal Service and choose Properties from the context menu.
2. Change the Startup Type to Manual.
3. Choose Apply and then OK.
4. Select SAP BW Precalculation Service and choose Properties from the context menu.
5. Change the Startup Type to Manual.
6. Select Apply and then OK.
7. Restart the computer. This stops the SAP BW Precalculation Service.
The status display, which displays Started when the service has been started, will be empty once the service has been stopped successfully. Now you can start to deinstall the program.
Deinstalling the Old version
1. Choose Start → Settings → Control Panel → Add or Remove Programs.
2. Choose SAP BW Precalculation Service.
3. Choose Remove.
4. Once deinstallation is complete, restart your computer.
Downloading the New Patch from the SAP Service Marketplace
1. To download the patch from the SAP Service Marketplace, choose the path:
http://service.sap.com/patches → SAP NetWeaver → SAP NetWeaver 04 → Binary patches → BW ANALYZER PRECALC SERVICE350 → win32 → BWAPSERV <patch number>_<patch_level>-GUID.zip
SAP Business Warehouse Installation 3.5
Additional Information
__________________________________________________________________________ April 05 45
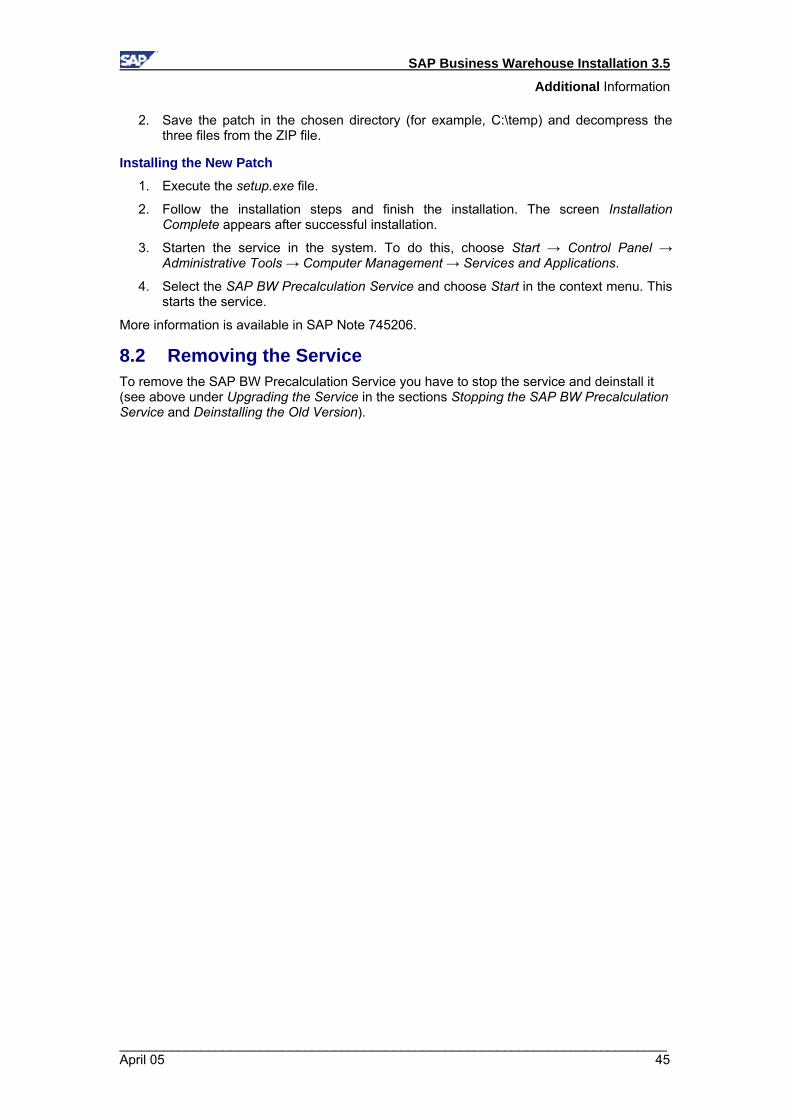
2. Save the patch in the chosen directory (for example, C:\temp) and decompress the three files from the ZIP file.
Installing the New Patch
1. Execute the setup.exe file.
2. Follow the installation steps and finish the installation. The screen Installation Complete appears after successful installation.
3. Starten the service in the system. To do this, choose Start → Control Panel → Administrative Tools → Computer Management → Services and Applications.
4. Select the SAP BW Precalculation Service and choose Start in the context menu. This starts the service.
More information is available in SAP Note 745206.
8.2 Removing the Service To remove the SAP BW Precalculation Service you have to stop the service and deinstall it (see above under Upgrading the Service in the sections Stopping the SAP BW Precalculation Service and Deinstalling the Old Version).