sap successfactors is branded as connectu at the
TRANSCRIPT
SAP SuccessFactors is branded as connectU at The University of Mississippi.
Additional modules will be introduced in this portal, including Performance Management.
1
2

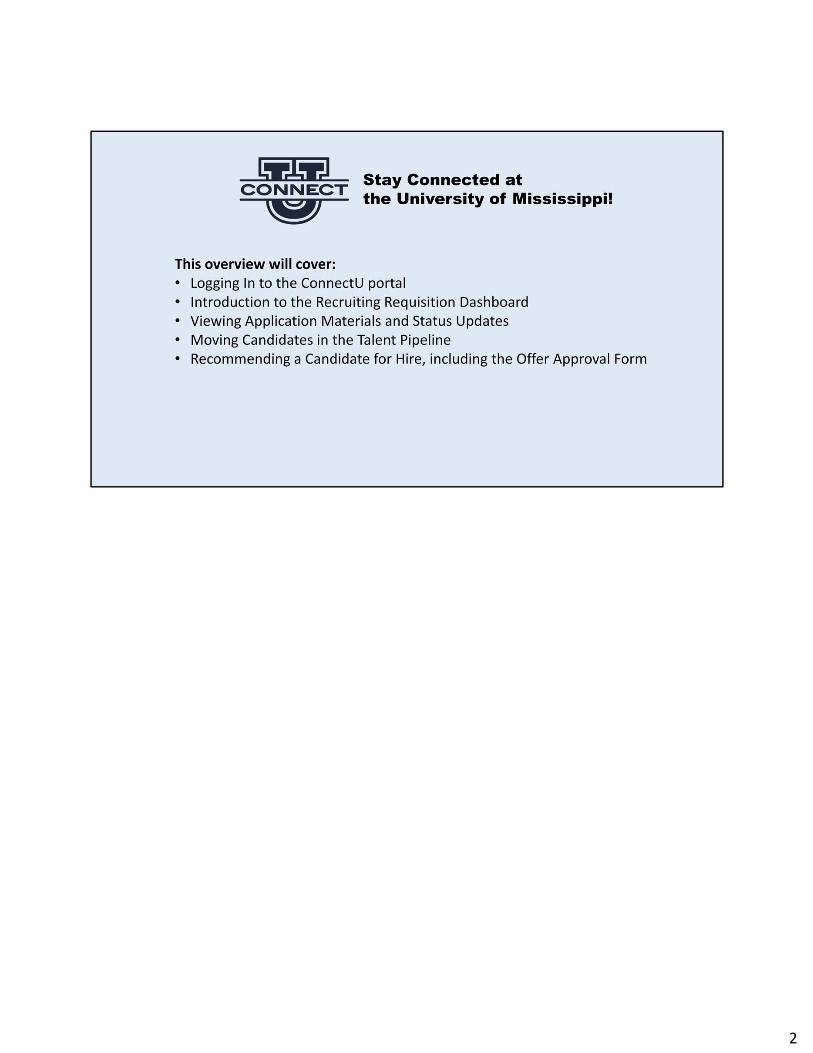
Recruiting Management – Refers to requisitions, applications offer approval form, and integrated background check.
Recruiting Marketing – Refers to career site (careers.olemiss.edu), search engine optimization, and analytics.
Onboarding – Refers to the “New Employee Wizard” (online new hire paperwork) and orientation materials.
Performance Management ‐ Coming Fall 2018, Performance Management, including probationary reviews, progressive discipline action notice, exit interviews, and quarterly check‐ins/annual performance reviews.
3
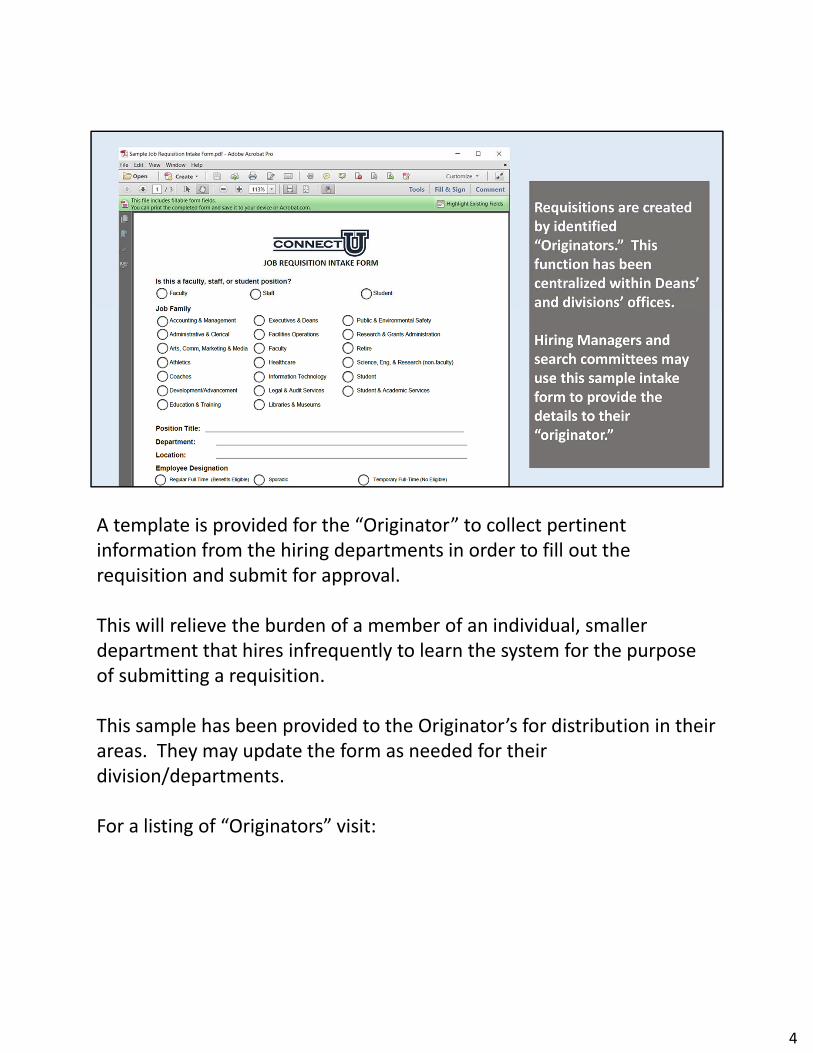
A template is provided for the “Originator” to collect pertinent information from the hiring departments in order to fill out the requisition and submit for approval.
This will relieve the burden of a member of an individual, smaller department that hires infrequently to learn the system for the purpose of submitting a requisition.
This sample has been provided to the Originator’s for distribution in their areas. They may update the form as needed for their division/departments.
For a listing of “Originators” visit:
4

Web Address:
The address for the portal for internal users (current regular, eligible University employees) is connectu.olemiss.edu.
5
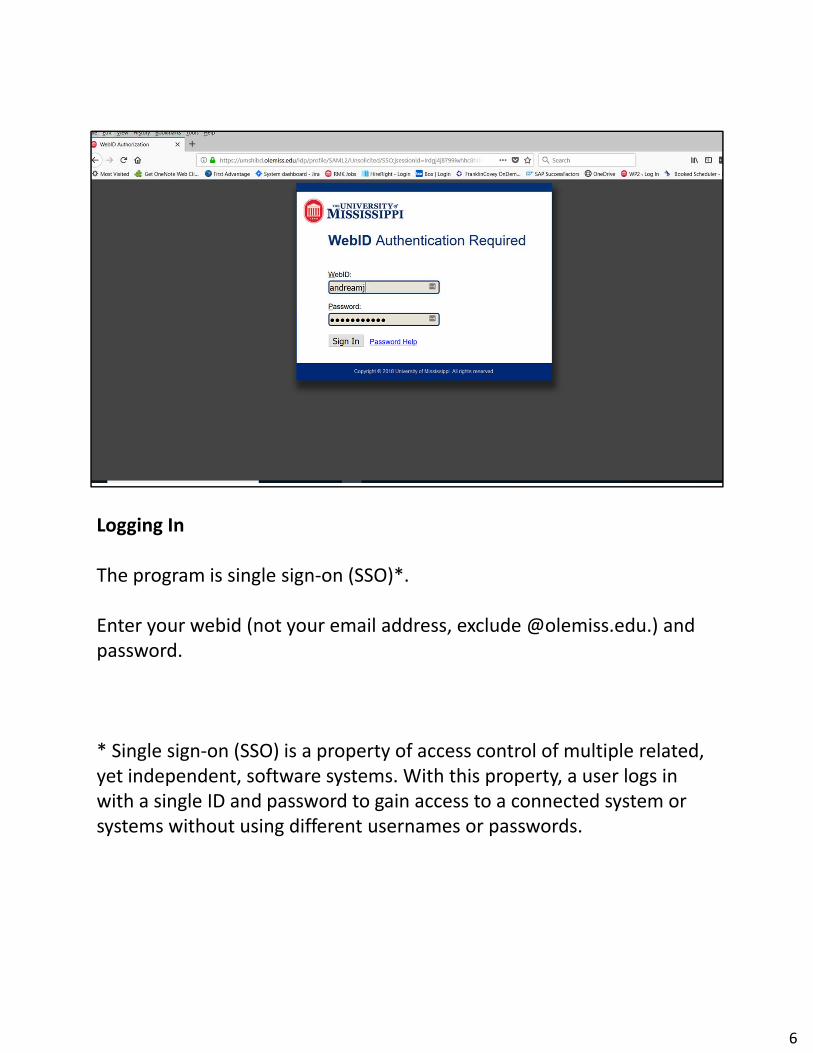
Logging In
The program is single sign‐on (SSO)*.
Enter your webid (not your email address, exclude @olemiss.edu.) and password.
* Single sign‐on (SSO) is a property of access control of multiple related, yet independent, software systems. With this property, a user logs in with a single ID and password to gain access to a connected system or systems without using different usernames or passwords.
6
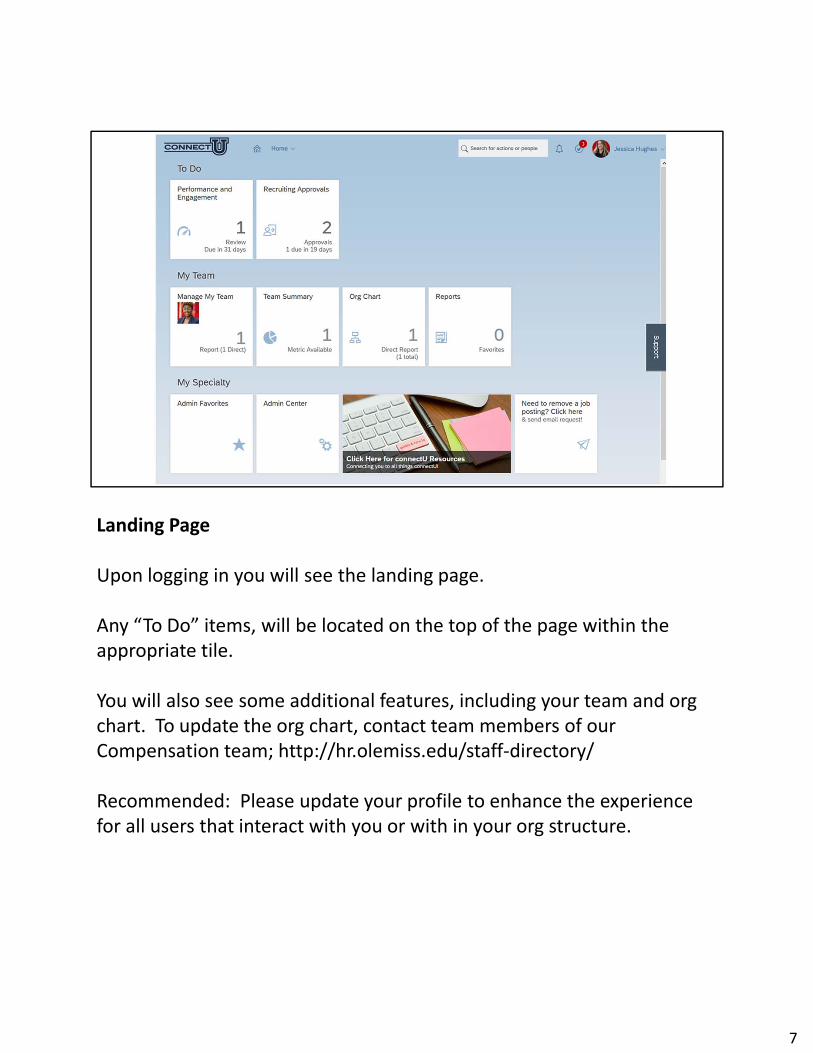
Landing Page
Upon logging in you will see the landing page.
Any “To Do” items, will be located on the top of the page within the appropriate tile.
You will also see some additional features, including your team and org chart. To update the org chart, contact team members of our Compensation team; http://hr.olemiss.edu/staff‐directory/
Recommended: Please update your profile to enhance the experience for all users that interact with you or with in your org structure.
7
Requisition Dashboard
We will now look at viewing requisitions on the requisition dashboard.
8

RecruitingYou will only have “Recruiting” as an option IF and WHEN you are listed as the position supervisor, department contact, and/or a search committee member for an active search.
If you are not participating on an active search, you will not have the “Recruiting” option.
If you provide administrative support to your department, make sure you are included in the requisition details either as the department contact or list with the search committee and include for “access only.”
The administrative support contact will need to be provided access on the specific requisition and for each requisition if the administrative support will be responsible for processing the hiring form, offer approval form.
9
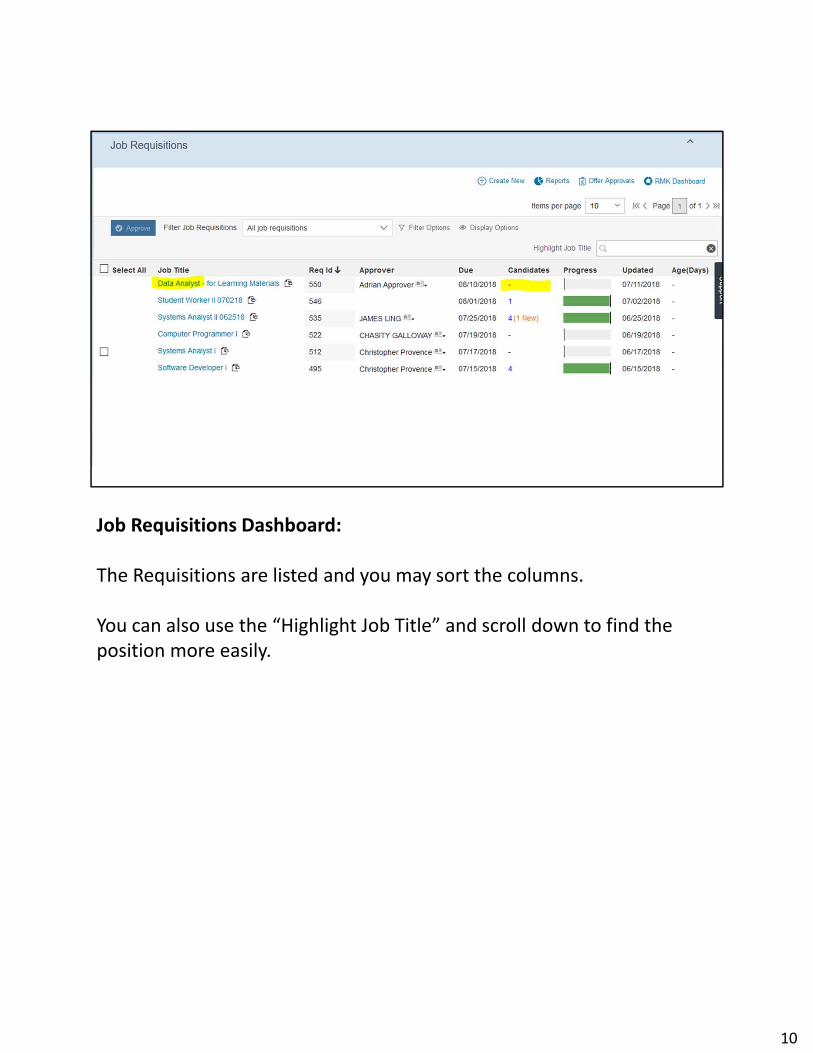
Job Requisitions Dashboard:
The Requisitions are listed and you may sort the columns.
You can also use the “Highlight Job Title” and scroll down to find the position more easily.
10
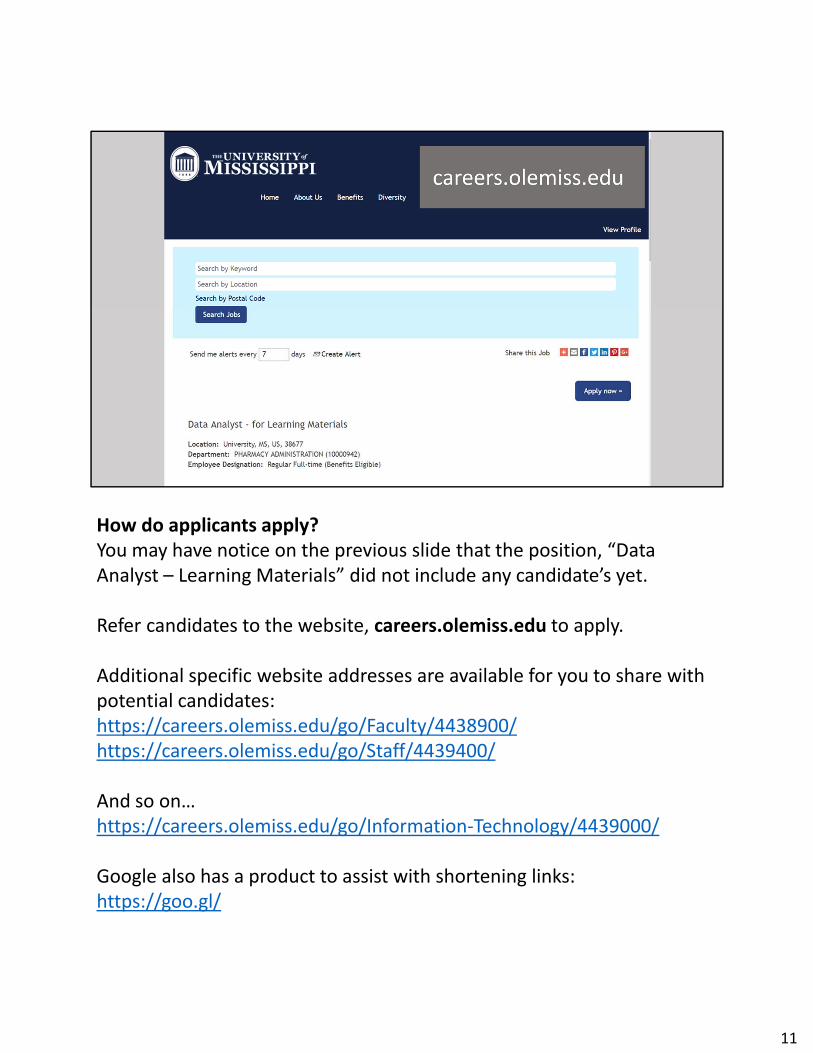
How do applicants apply?You may have notice on the previous slide that the position, “Data Analyst – Learning Materials” did not include any candidate’s yet.
Refer candidates to the website, careers.olemiss.edu to apply.
Additional specific website addresses are available for you to share with potential candidates:https://careers.olemiss.edu/go/Faculty/4438900/https://careers.olemiss.edu/go/Staff/4439400/
And so on…https://careers.olemiss.edu/go/Information‐Technology/4439000/
Google also has a product to assist with shortening links:https://goo.gl/
11

Viewing Applications
We will now look at viewing applications for candidates.
12
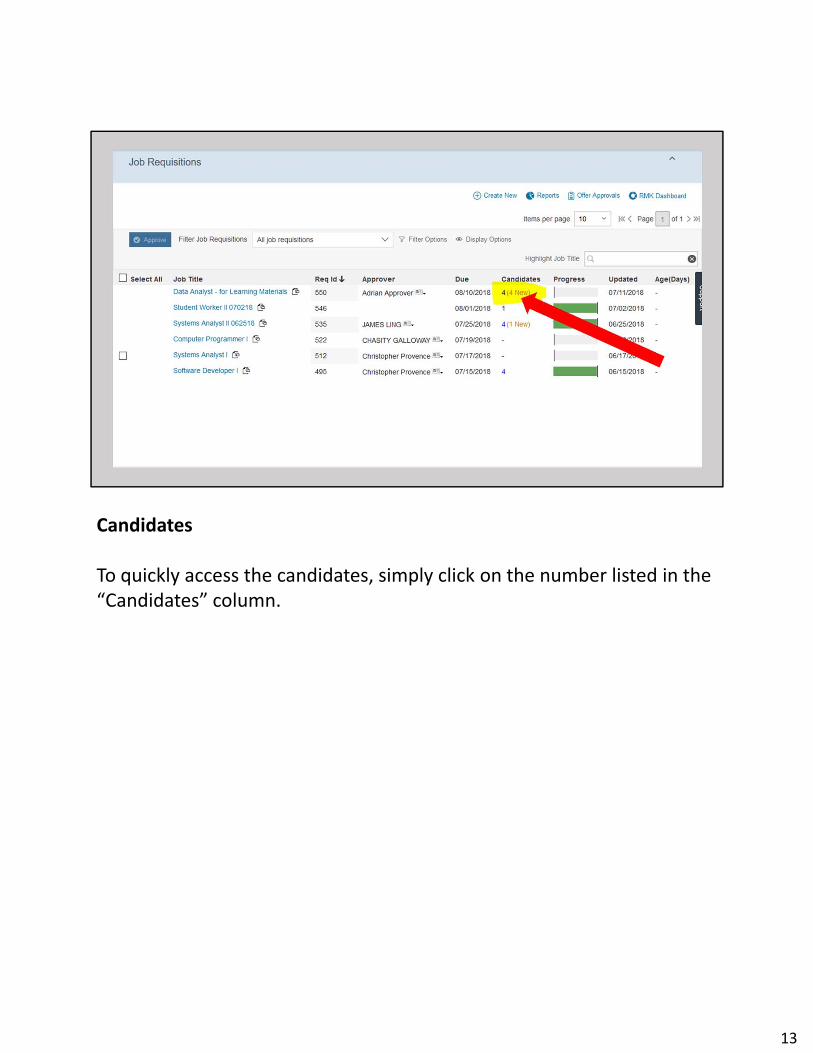
Candidates
To quickly access the candidates, simply click on the number listed in the “Candidates” column.
13
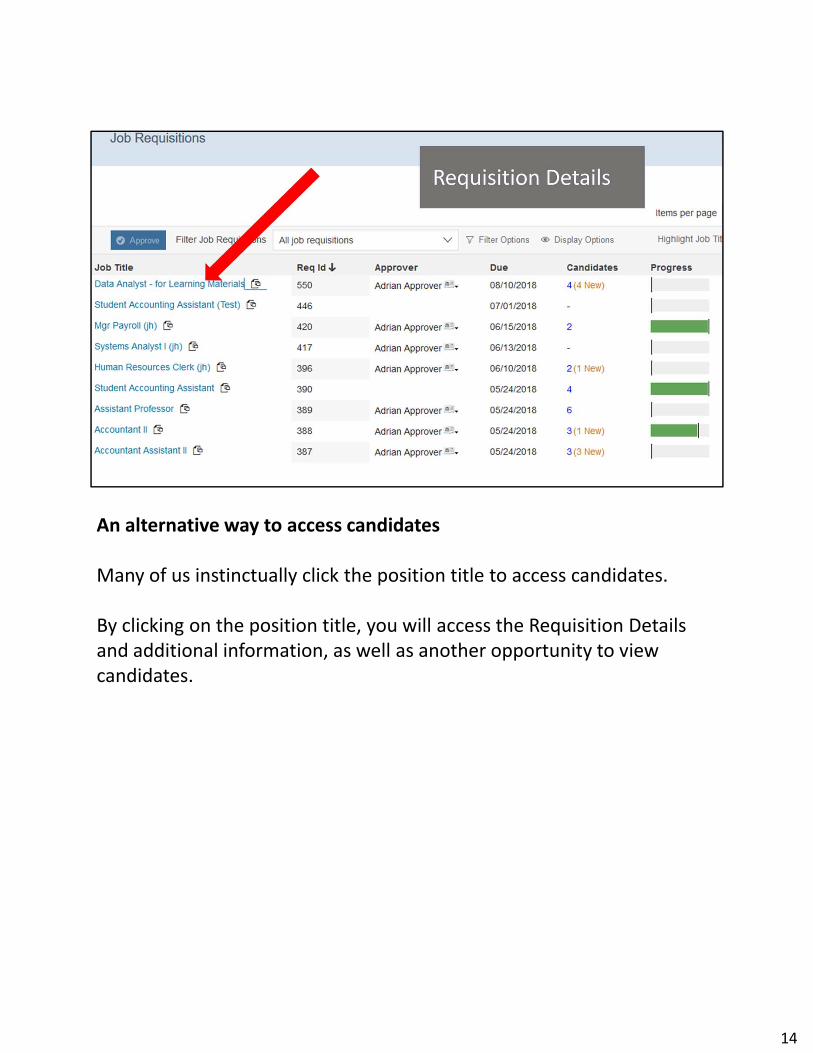
An alternative way to access candidates
Many of us instinctually click the position title to access candidates.
By clicking on the position title, you will access the Requisition Details and additional information, as well as another opportunity to view candidates.
14
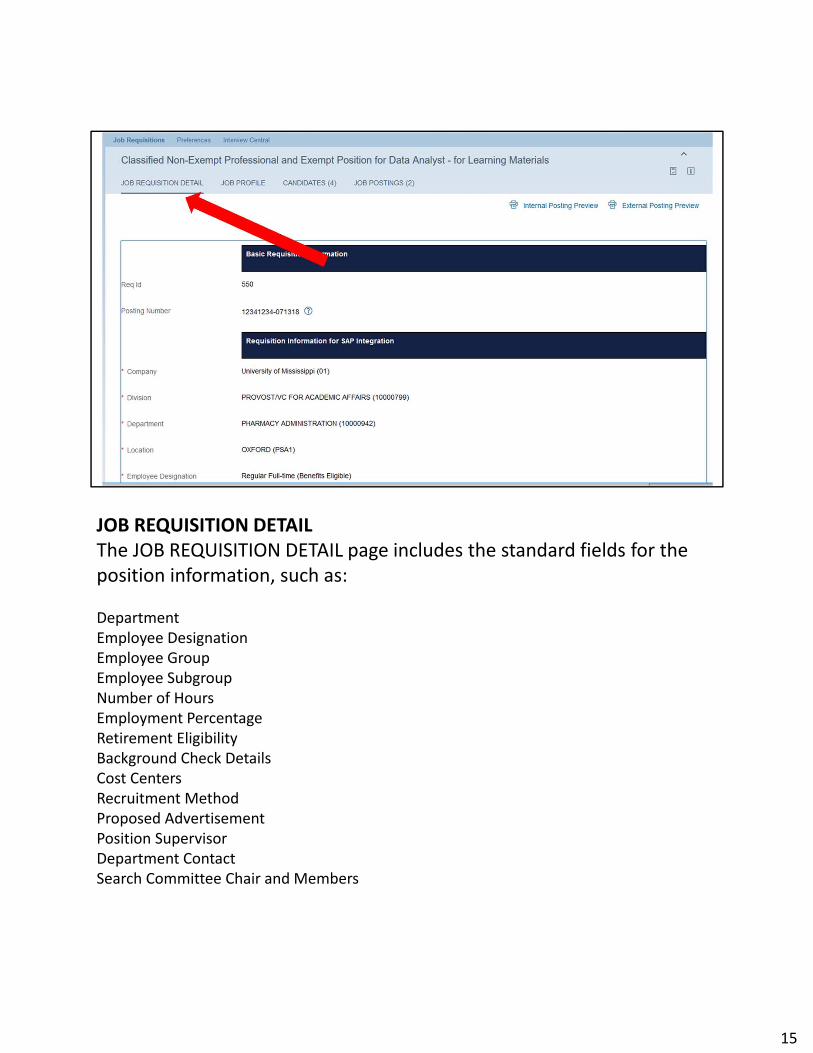
JOB REQUISITION DETAILThe JOB REQUISITION DETAIL page includes the standard fields for the position information, such as:
DepartmentEmployee DesignationEmployee GroupEmployee SubgroupNumber of HoursEmployment PercentageRetirement EligibilityBackground Check DetailsCost CentersRecruitment MethodProposed AdvertisementPosition SupervisorDepartment ContactSearch Committee Chair and Members
15

JOB PROFILE
If you move to the next tab to the right, JOB PROFILE, you will be able to view the imported job description for Classified positions.
16

JOB PROFILE
When the Originator created the requisition for a classified position, the approved job description populated based on position title.
For unclassified positions, an HR Recruiting team member entered the details provided by the department via the Originator.
17
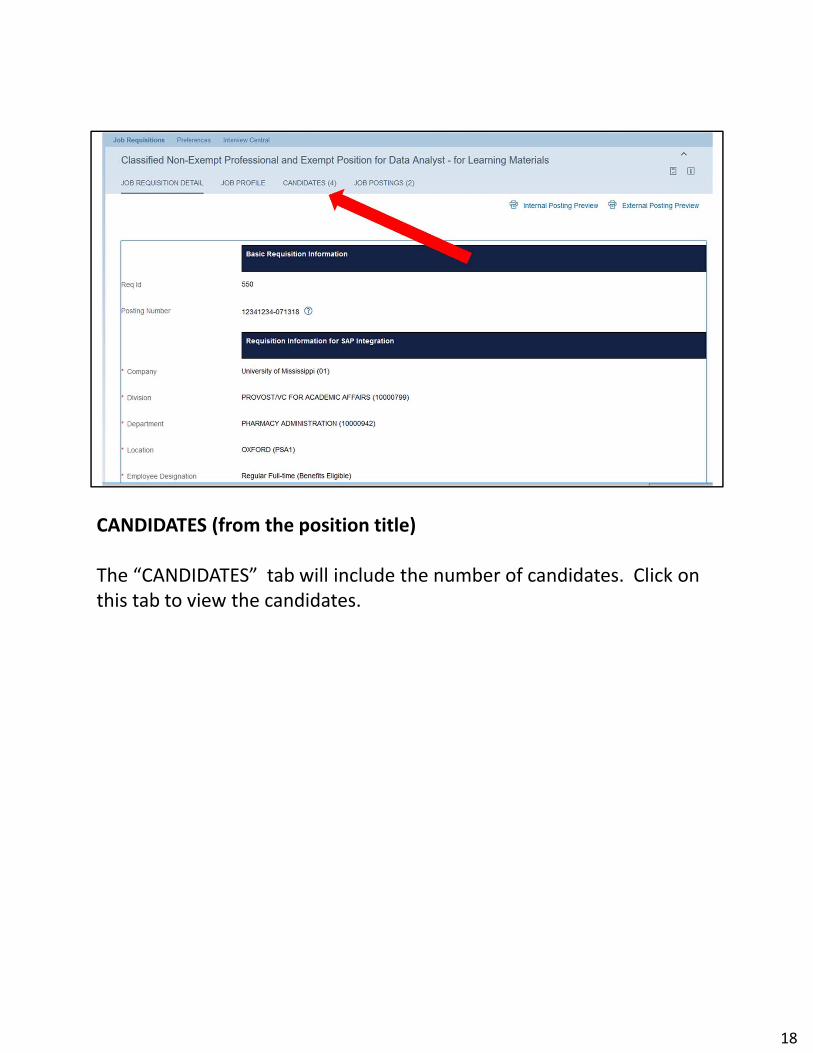
CANDIDATES (from the position title)
The “CANDIDATES” tab will include the number of candidates. Click on this tab to view the candidates.
18

CANDIDATE
Once you clicked on the CANDIDATES link, the dashboard of candidates will display.
19
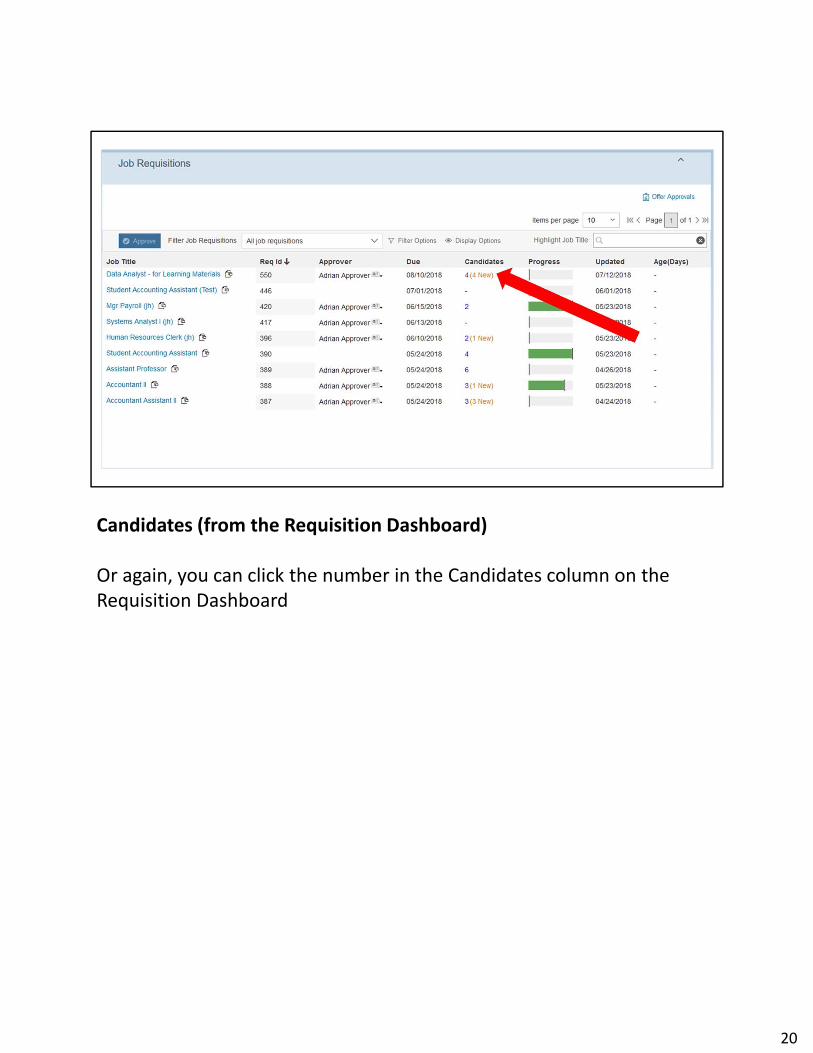
Candidates (from the Requisition Dashboard)
Or again, you can click the number in the Candidates column on the Requisition Dashboard
20
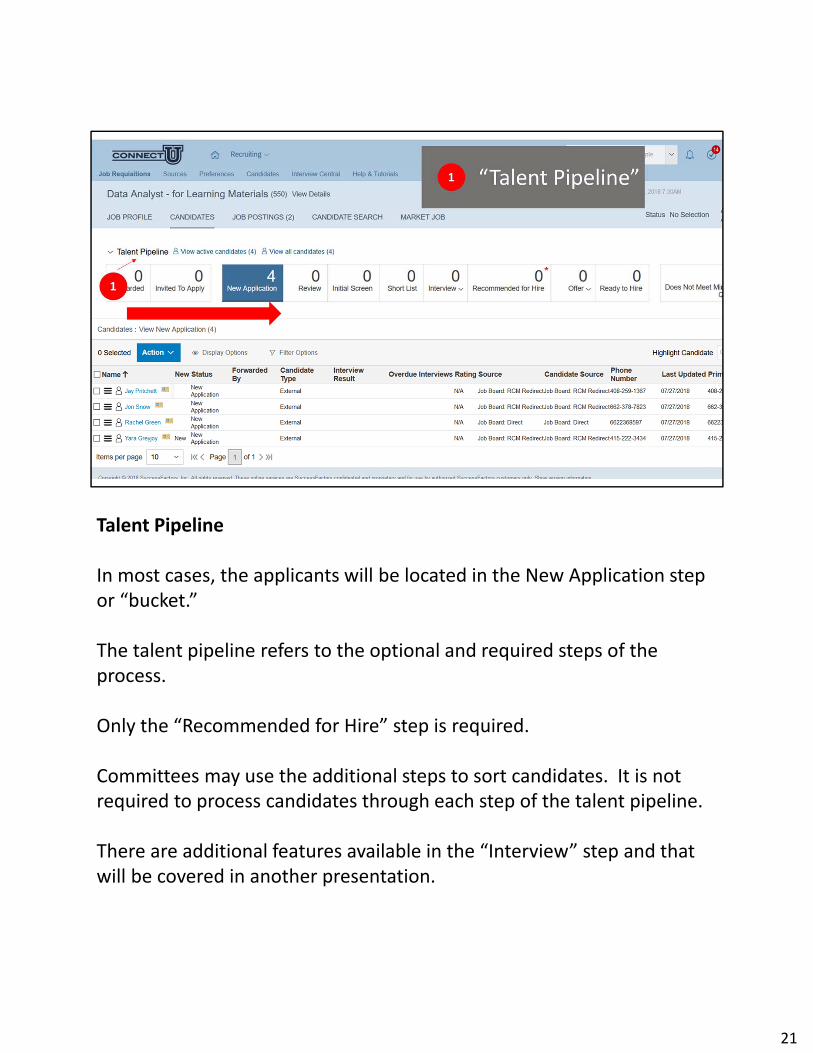
Talent Pipeline
In most cases, the applicants will be located in the New Application step or “bucket.”
The talent pipeline refers to the optional and required steps of the process.
Only the “Recommended for Hire” step is required.
Committees may use the additional steps to sort candidates. It is not required to process candidates through each step of the talent pipeline.
There are additional features available in the “Interview” step and that will be covered in another presentation.
21
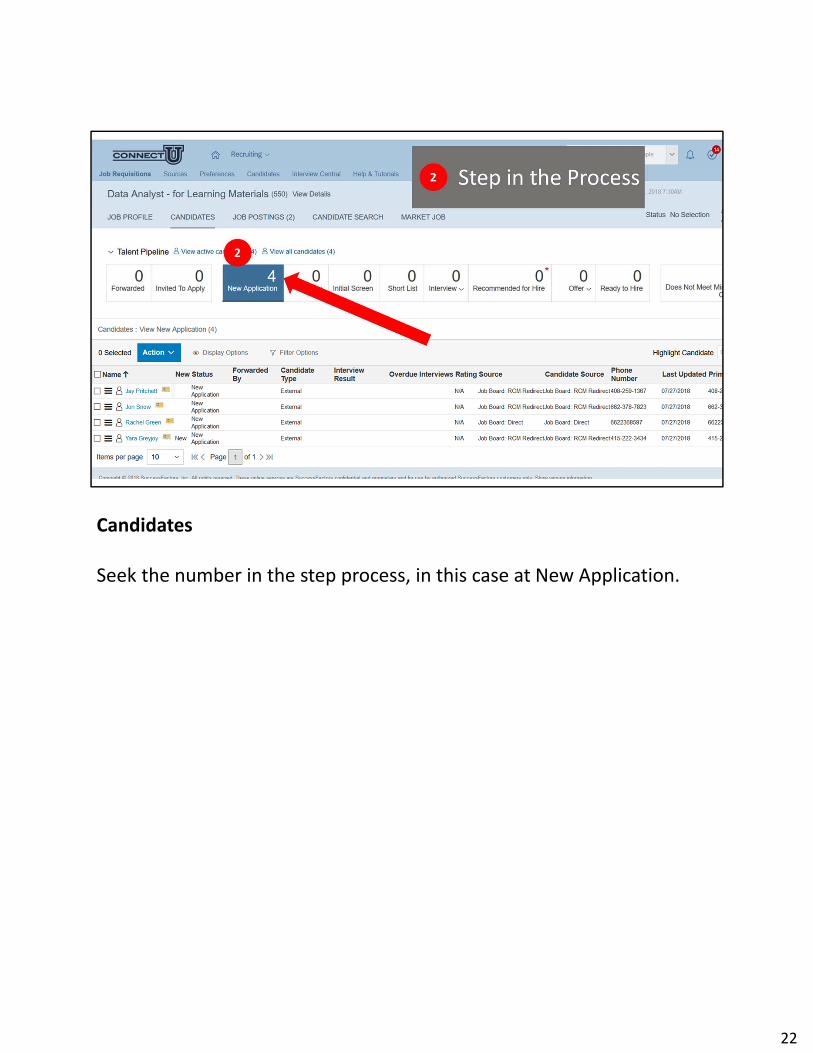
Candidates
Seek the number in the step process, in this case at New Application.
22
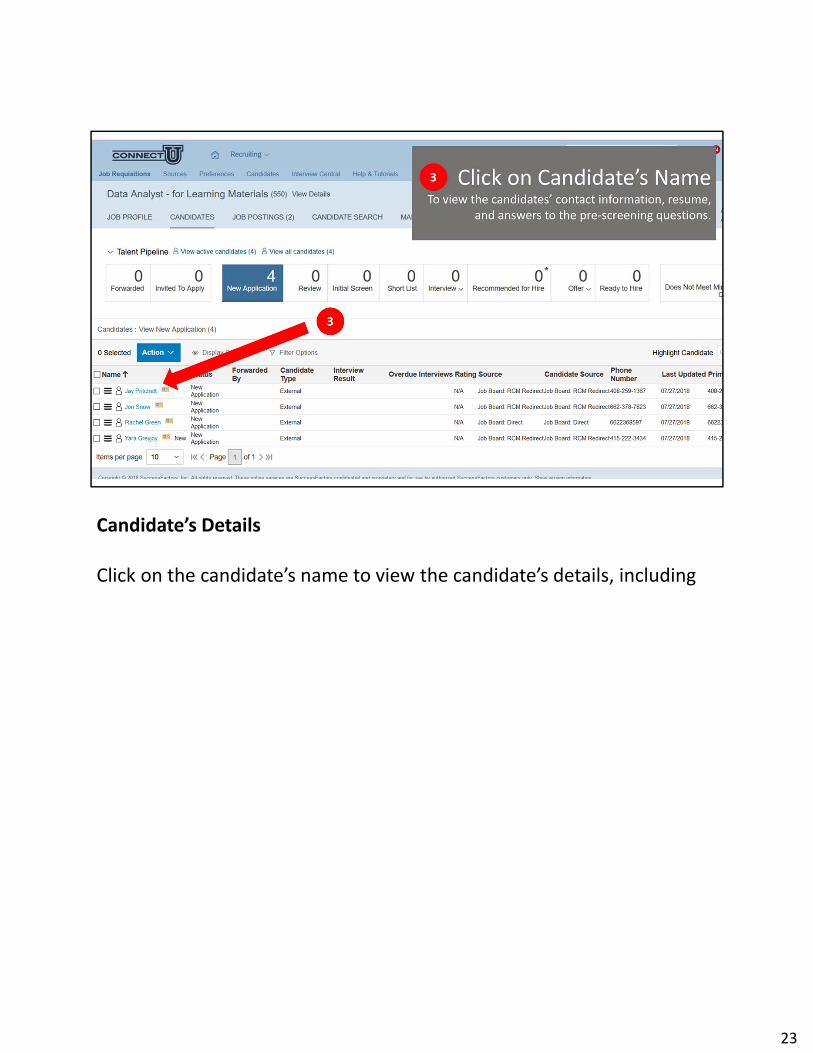
Candidate’s Details
Click on the candidate’s name to view the candidate’s details, including the candidates’ contact information, resume, and answers to the pre‐screening questions.
23

Candidate’s Application
The candidate’s employment application is displayed in the middle of the page. To view the entire application use the scroll bar on the right hand side of the screen.
24
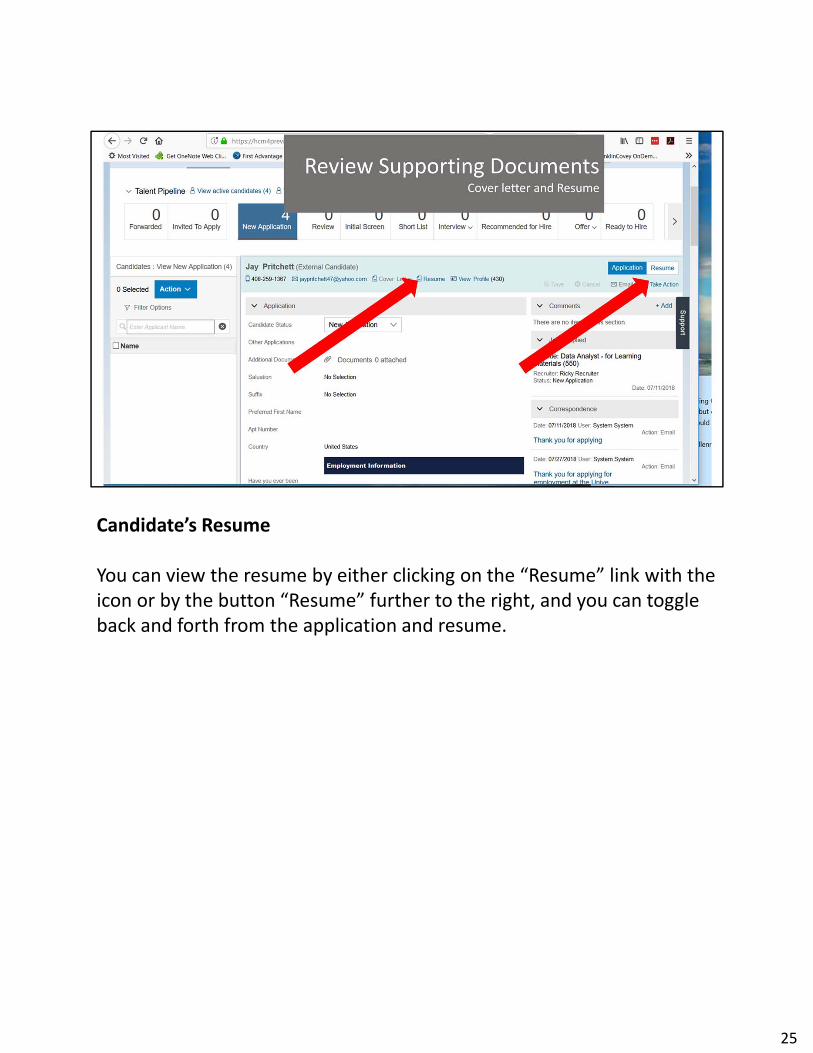
Candidate’s Resume
You can view the resume by either clicking on the “Resume” link with the icon or by the button “Resume” further to the right, and you can toggle back and forth from the application and resume.
25
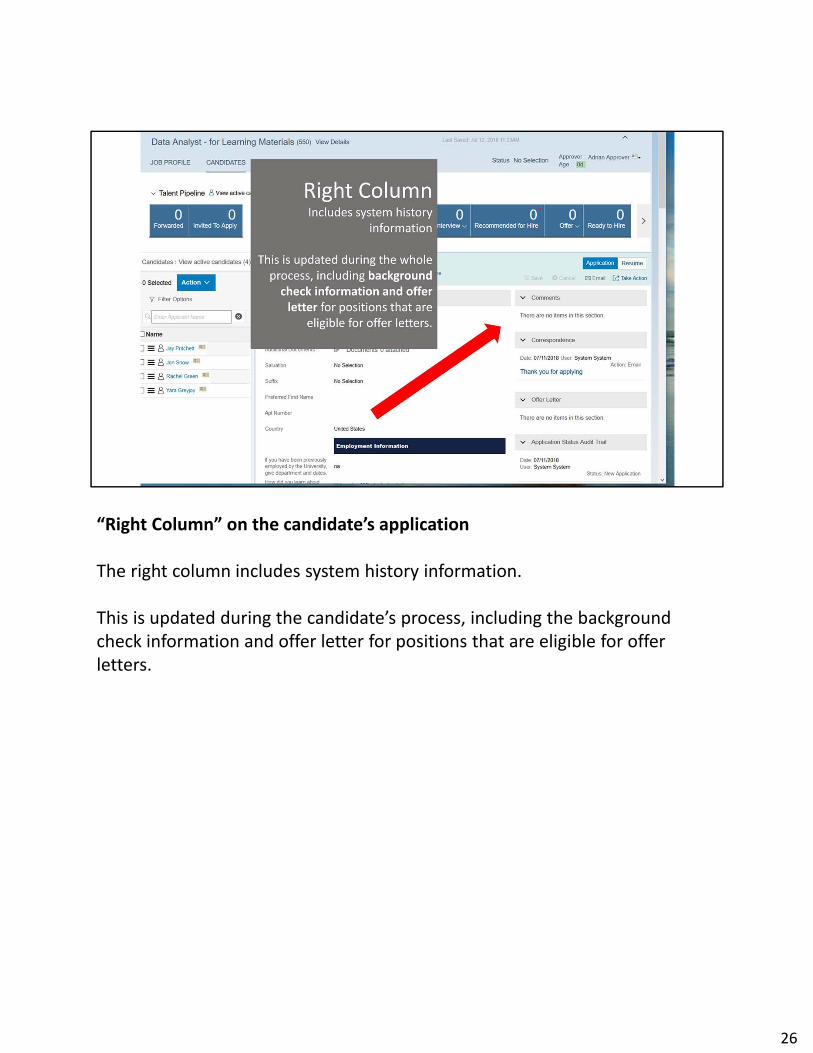
“Right Column” on the candidate’s application
The right column includes system history information.
This is updated during the candidate’s process, including the background check information and offer letter for positions that are eligible for offer letters.
26

View Resume
You may also utilize the “Action” drop down menu to view all of the resumes.
Click the button next to “Name” to select all.
Click on “Action” to open the menu and select, “View Resume” to view the resumes in the Resume Viewer mode.
27

Resume Viewer mode
1. Use the arrow button to scroll through the resumes.
2. Click on the “X” to escape from the Resume Viewer.
28
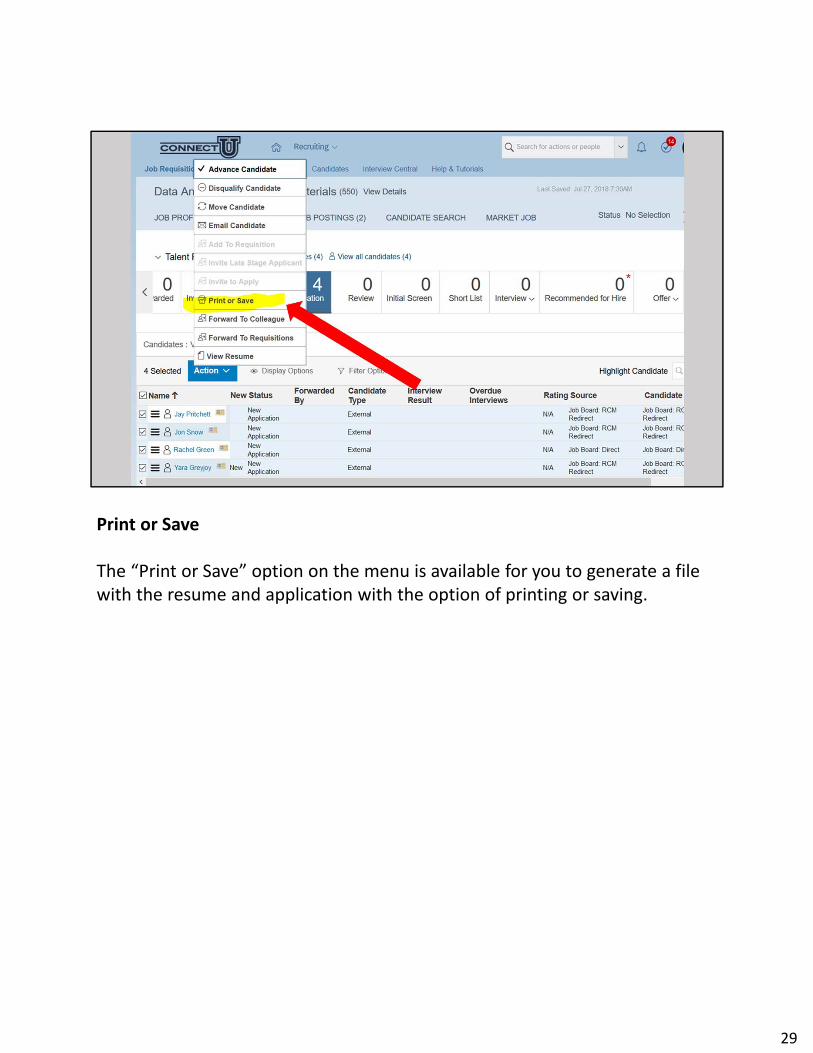
Print or Save
The “Print or Save” option on the menu is available for you to generate a file with the resume and application with the option of printing or saving.
29
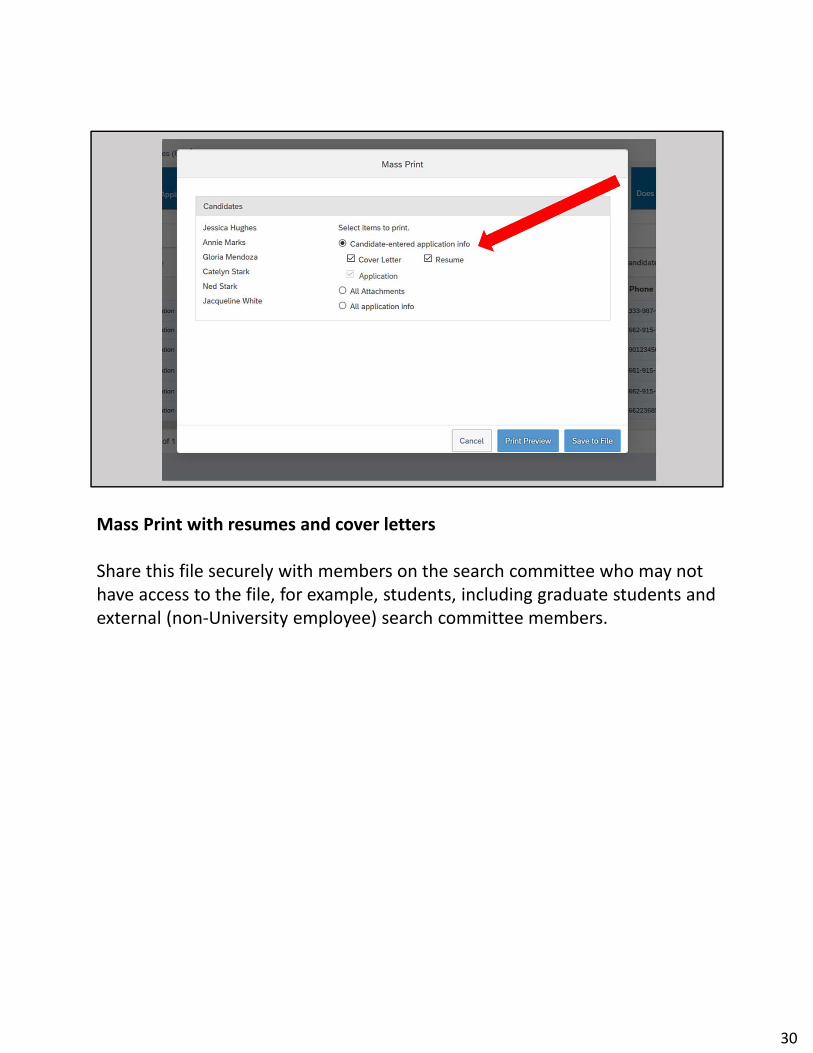
Mass Print with resumes and cover letters
Share this file securely with members on the search committee who may not have access to the file, for example, students, including graduate students and external (non‐University employee) search committee members.
30

Mass Print for Unclassified jobs (faculty, researchers, coaches, executives)Share this file securely with members on the search committee who may not have access to the file, for example, students, including graduate students and external (non‐University employee) search committee members.
31
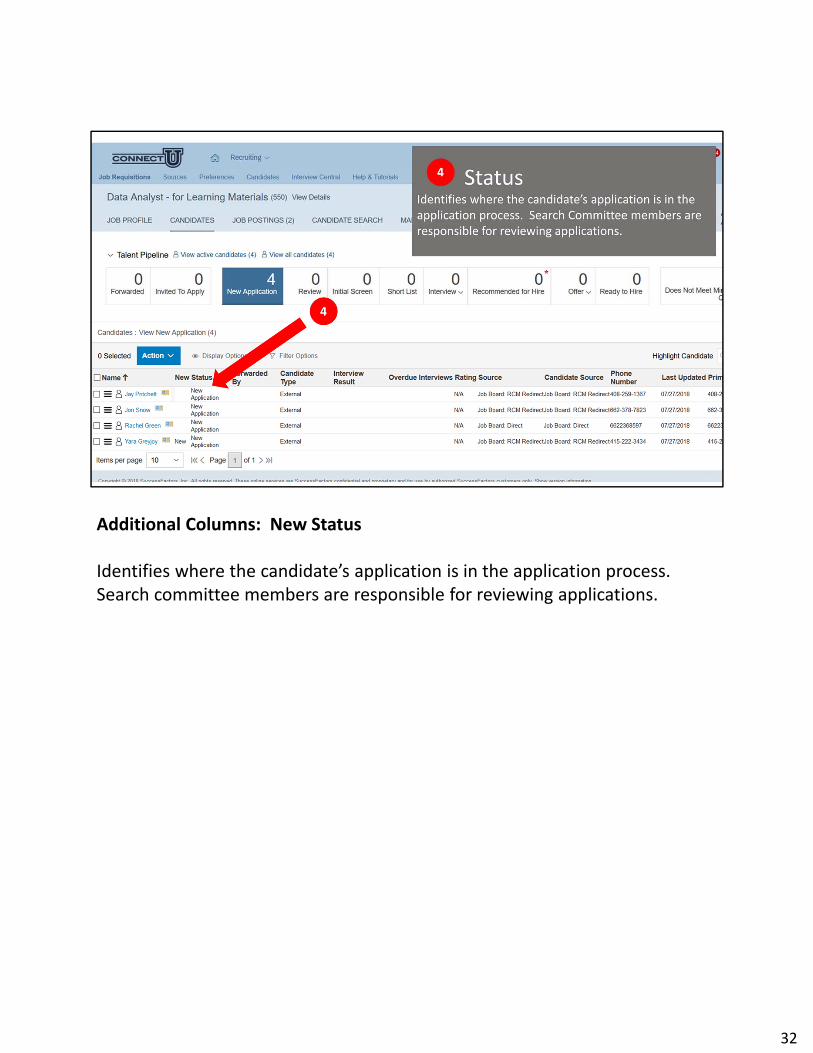
Additional Columns: New Status
Identifies where the candidate’s application is in the application process. Search committee members are responsible for reviewing applications.
32

Additional Columns: Source
Identifies how the candidate’s application was submitted.
This will help determine where the candidate found the job advertisement and how the candidate was directed to the career site.
33
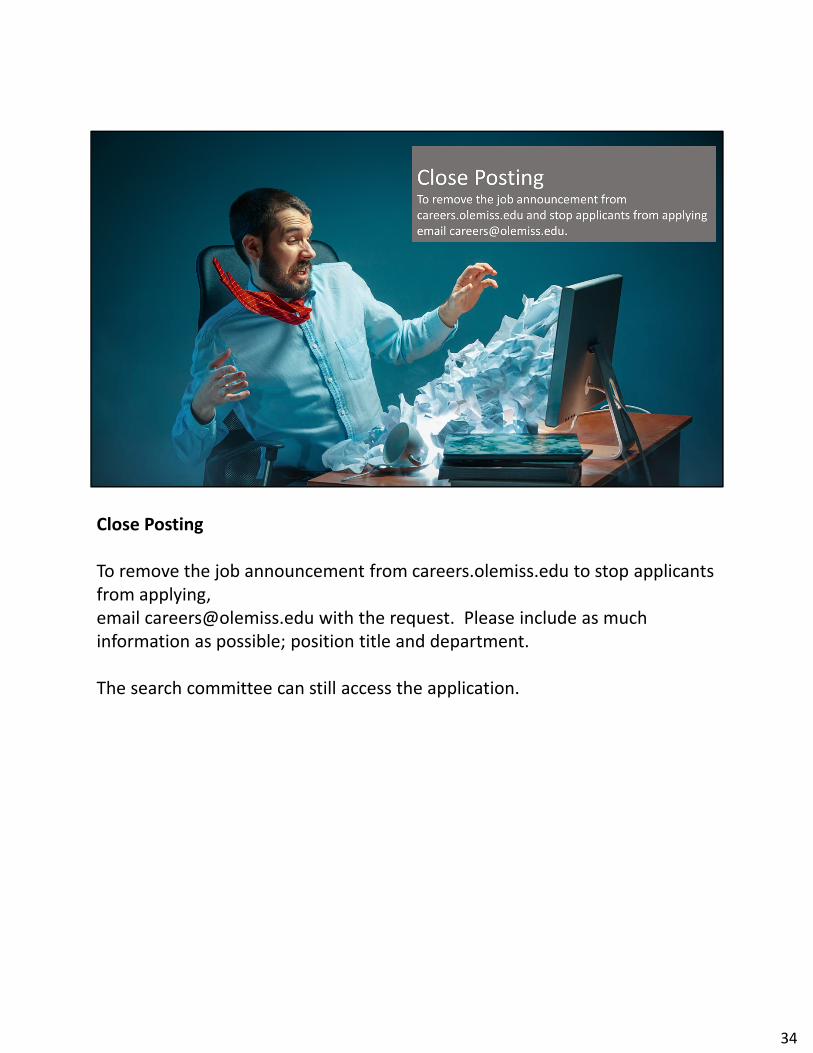
Close Posting
To remove the job announcement from careers.olemiss.edu to stop applicants from applying,email [email protected] with the request. Please include as much information as possible; position title and department.
The search committee can still access the application.
34

Moving the Candidate Through the Talent Pipeline
Committees may use the talent pipeline to keep track of the candidate’s progress.
35
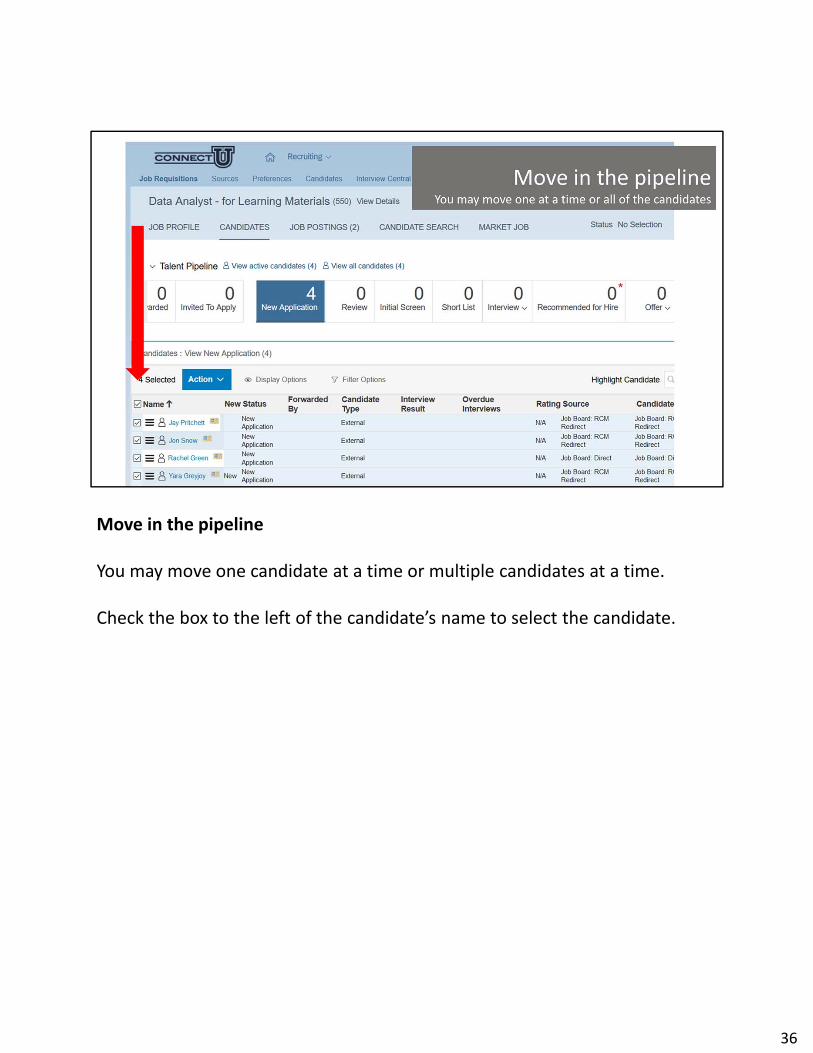
Move in the pipeline
You may move one candidate at a time or multiple candidates at a time.
Check the box to the left of the candidate’s name to select the candidate.
36
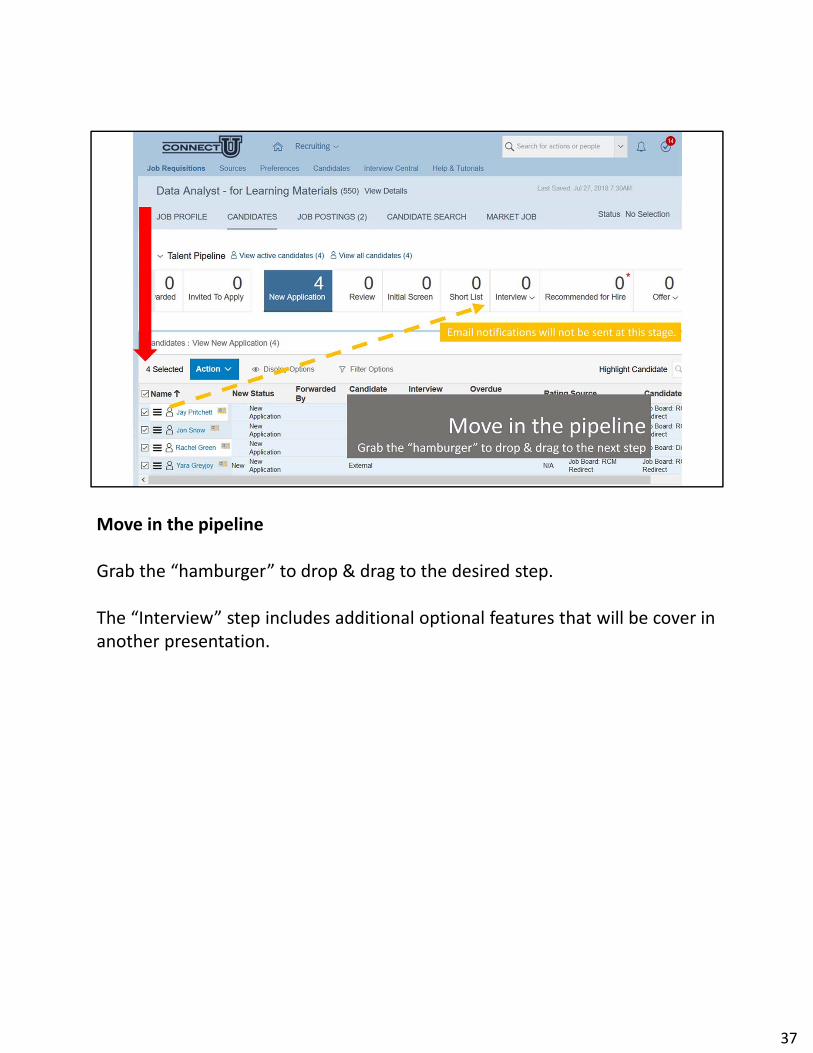
Move in the pipeline
Grab the “hamburger” to drop & drag to the desired step.
The “Interview” step includes additional optional features that will be cover in another presentation.
37
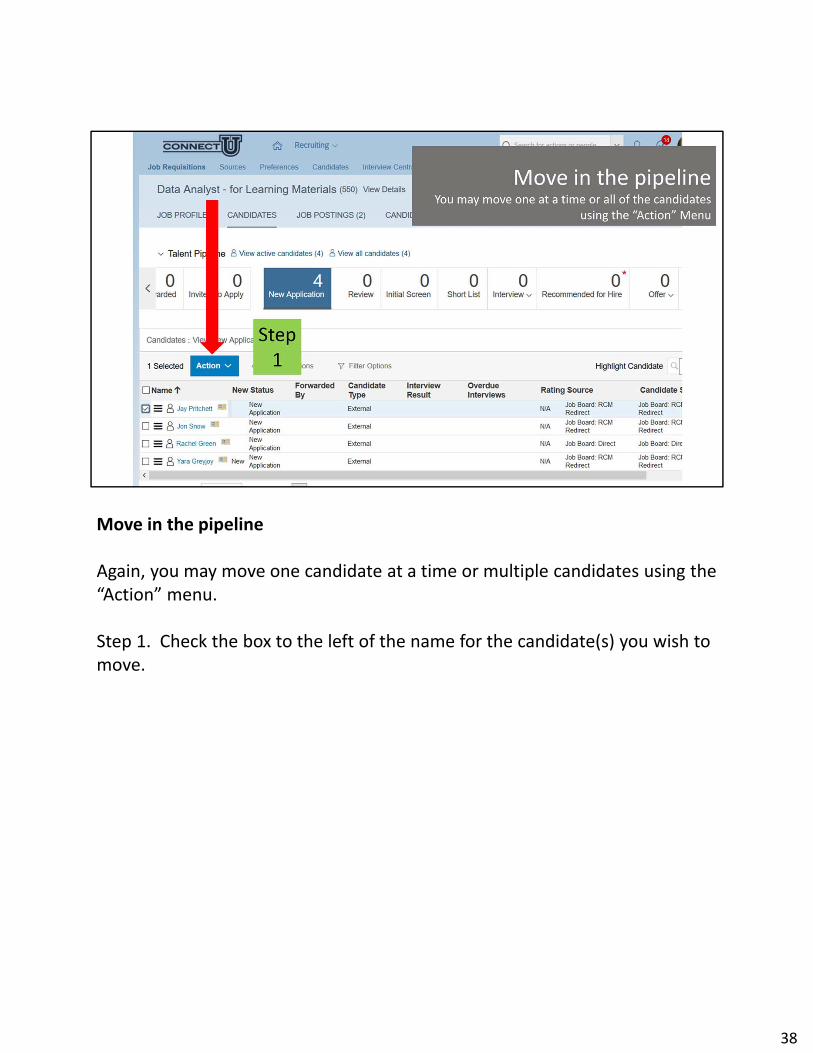
Move in the pipeline
Again, you may move one candidate at a time or multiple candidates using the “Action” menu.
Step 1. Check the box to the left of the name for the candidate(s) you wish to move.
38

Move in the pipeline
Step 2. Select the desired step and click “Apply Updates.”
39

Disqualifying the Candidates
CAUTION!This activity is reserved for the department contact, position supervisor and search committee chair.
Non‐selection emails will be sent to the applicant after 24 hours of moving in the pipeline!
40

Move in the pipeline
Grab the “hamburger” to drop & drag to the next step.
C‐A‐U‐T‐I‐O‐N!This activity is reserved for the department contact, position supervisor and search committee chair.
41

Viewing the Disqualification Reasons
Scroll further to the right using the arrow on the right of the talent pipeline.
42
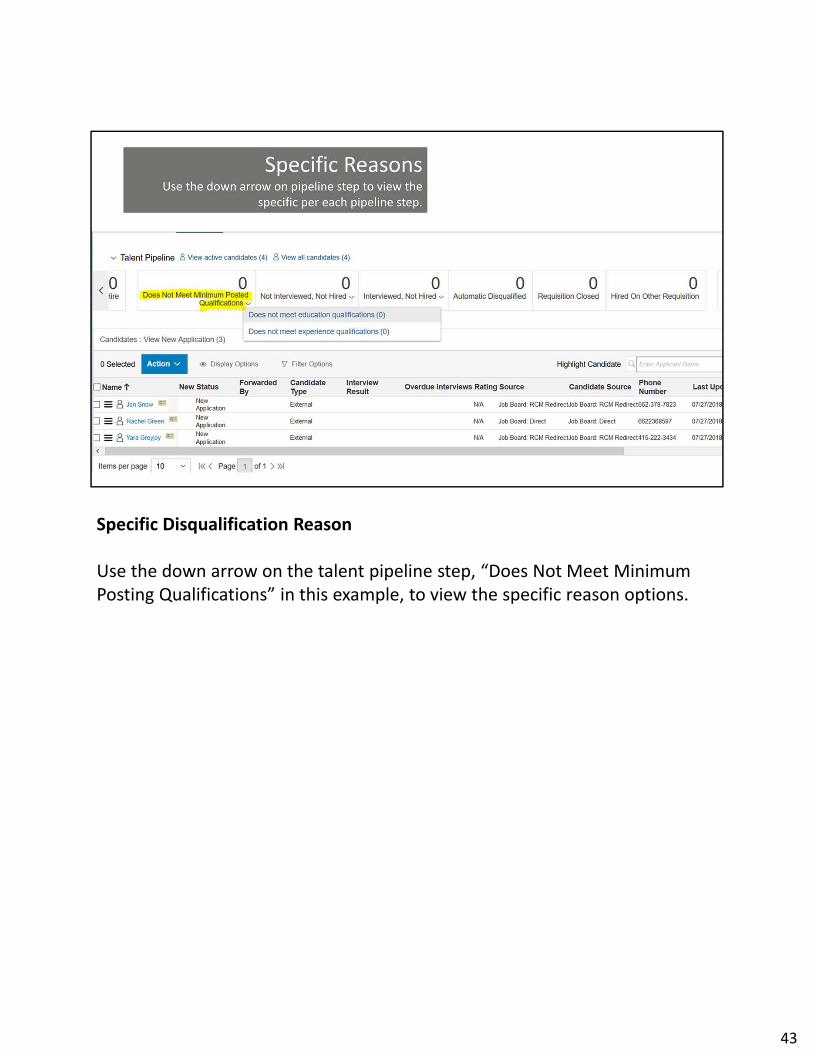
Specific Disqualification Reason
Use the down arrow on the talent pipeline step, “Does Not Meet Minimum Posting Qualifications” in this example, to view the specific reason options.
43

Specific Disqualification Reason
Use the down arrow on the talent pipeline step, “Not Interviewed, Not Hired,” in this example, to view the specific reason options.
44
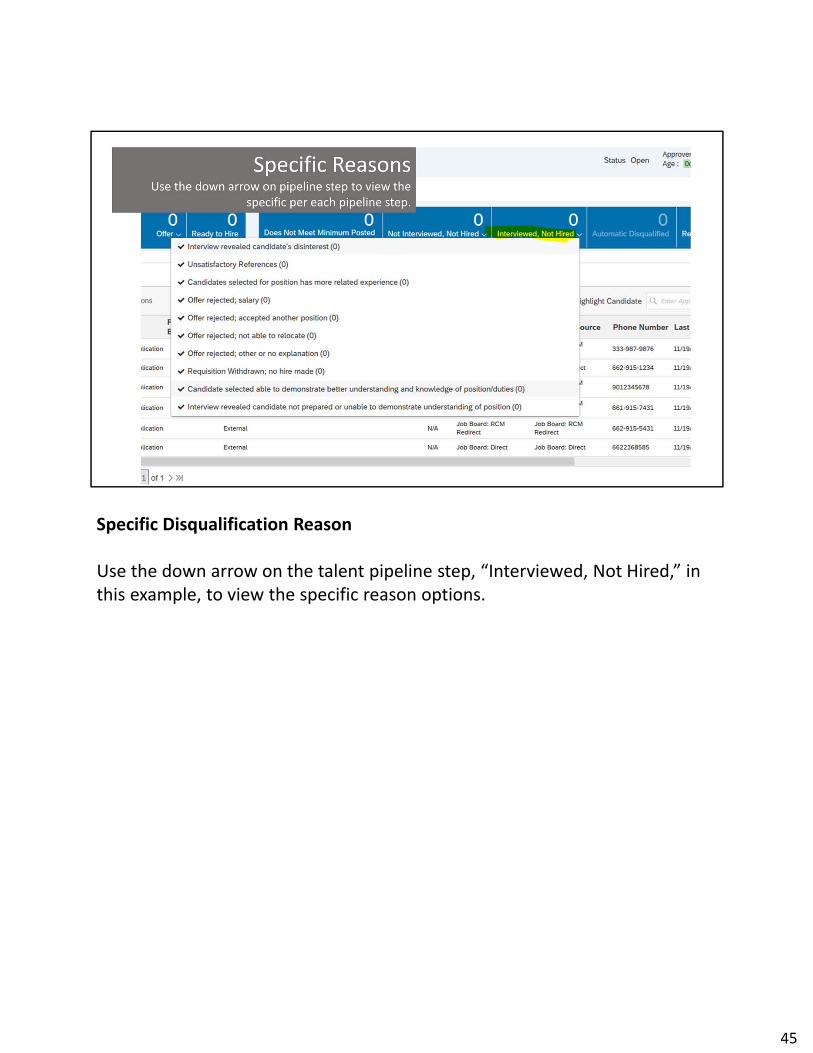
Specific Disqualification Reason
Use the down arrow on the talent pipeline step, “Interviewed, Not Hired,” in this example, to view the specific reason options.
45

Moving Candidates to Disqualified (Inactive) Stage
Step 1. Grab the “hamburger” to drop & drag to the appropriate step.
46

Moving Candidates to Disqualified (Inactive) Stage
Step 2. Select the specific status within the category, in this example, “Interviewed, Not Hired” and click “Apply Updates.”
At this point, the candidates’ status is updated and the email is sent to the candidate.
47

Move Candidate (Disqualify)
Another way to move a candidate through the pipeline and is through the “Resume Viewer.”
48

Move Candidate (Disqualify)
This option allows for comments.
Comments should provide further details, if needed, and must be work‐related and appropriate.
49
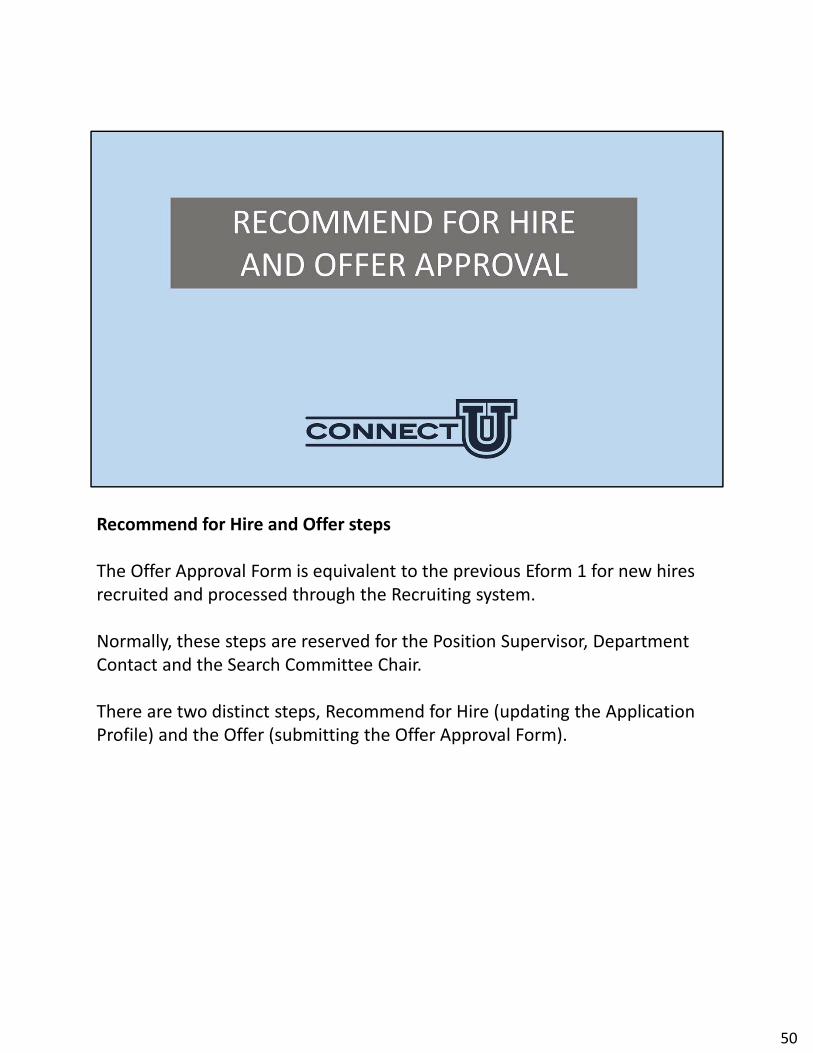
Recommend for Hire and Offer steps
The Offer Approval Form is equivalent to the previous Eform 1 for new hires recruited and processed through the Recruiting system.
Normally, these steps are reserved for the Position Supervisor, Department Contact and the Search Committee Chair.
There are two distinct steps, Recommend for Hire (updating the Application Profile) and the Offer (submitting the Offer Approval Form).
50
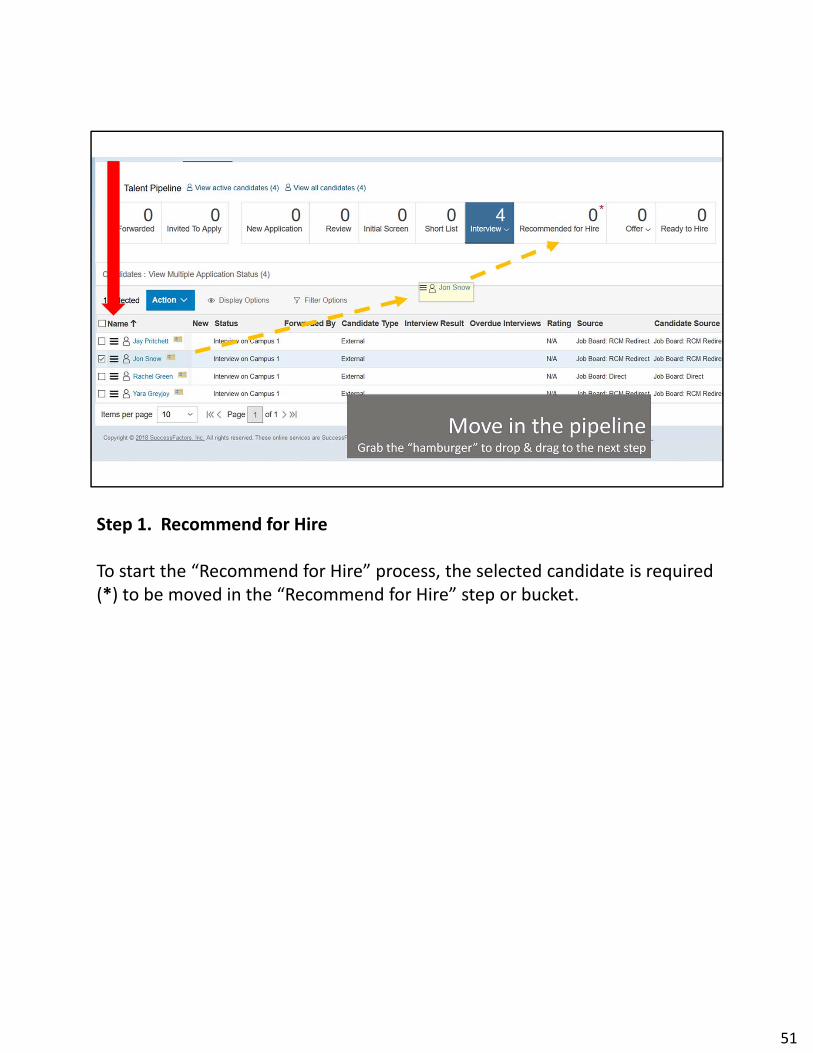
Step 1. Recommend for Hire
To start the “Recommend for Hire” process, the selected candidate is required (*) to be moved in the “Recommend for Hire” step or bucket.
51
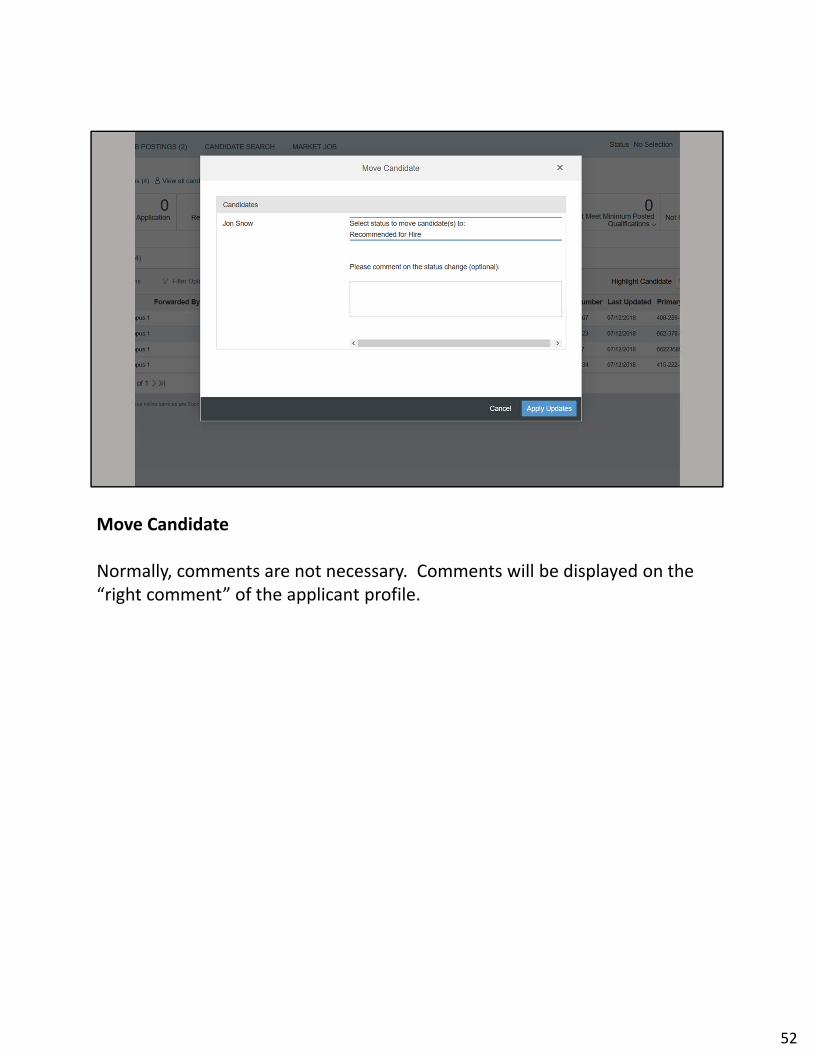
Move Candidate
Normally, comments are not necessary. Comments will be displayed on the “right comment” of the applicant profile.
52
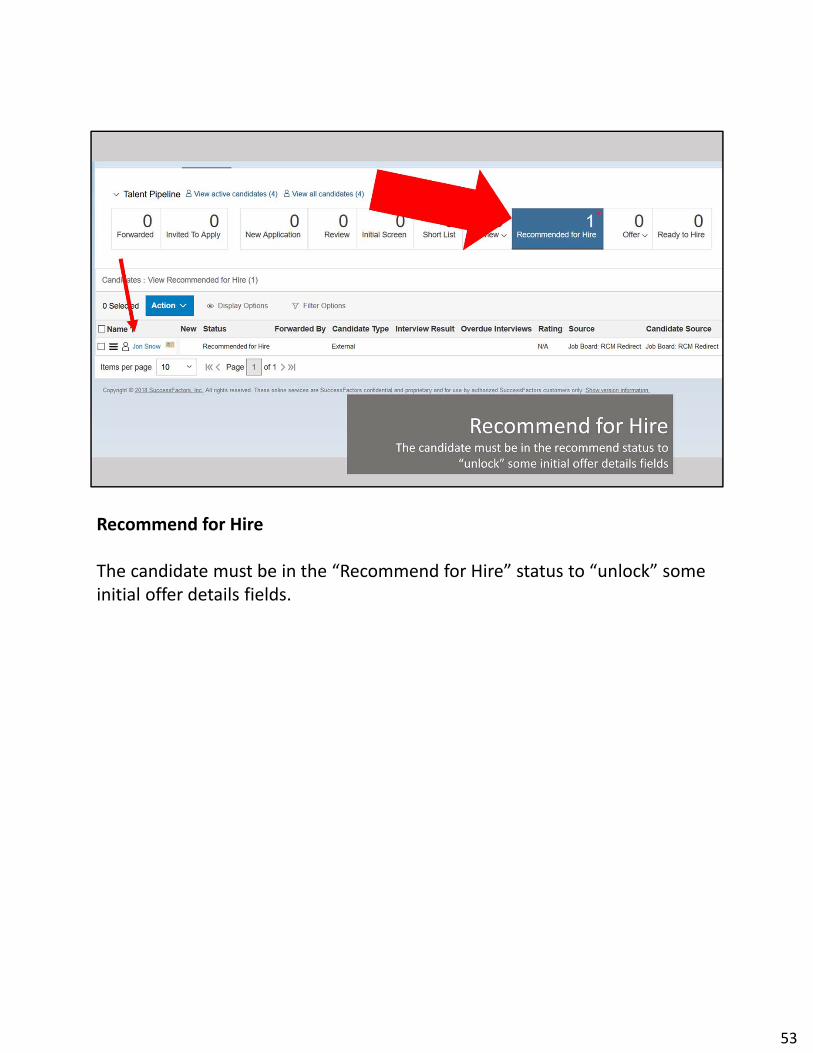
Recommend for Hire
The candidate must be in the “Recommend for Hire” status to “unlock” some initial offer details fields.
53

Step 1. Recommend for Hire and Candidate’s Application Profile
Once in the “Recommend for Hire” status, details of the offer can be added to the candidate’s application profile.
This is part of the candidate’s application, not the offer approval form just yet
Note, the header still indicates that this screen is still the “Application.”
54
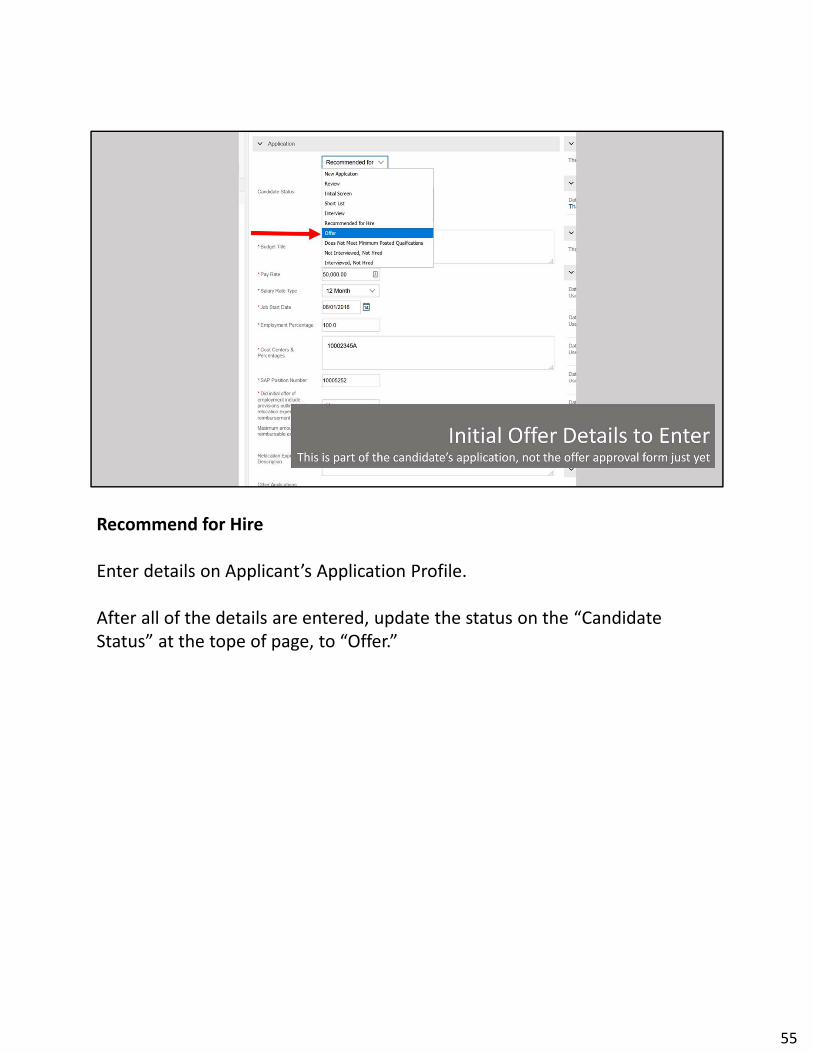
Recommend for Hire
Enter details on Applicant’s Application Profile.
After all of the details are entered, update the status on the “Candidate Status” at the tope of page, to “Offer.”
55
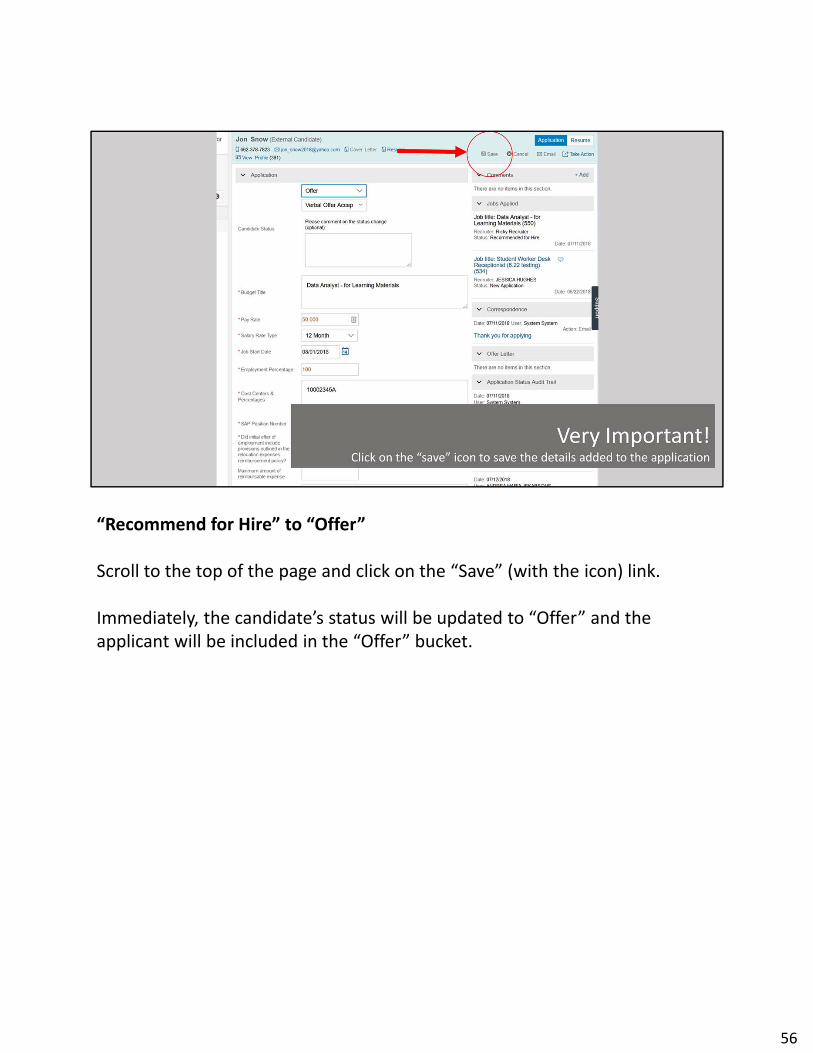
“Recommend for Hire” to “Offer”
Scroll to the top of the page and click on the “Save” (with the icon) link.
Immediately, the candidate’s status will be updated to “Offer” and the applicant will be included in the “Offer” bucket.
56

Step 2. Offer
The candidate must be in the “offer” status to have access to the “Offer Approval” form
57
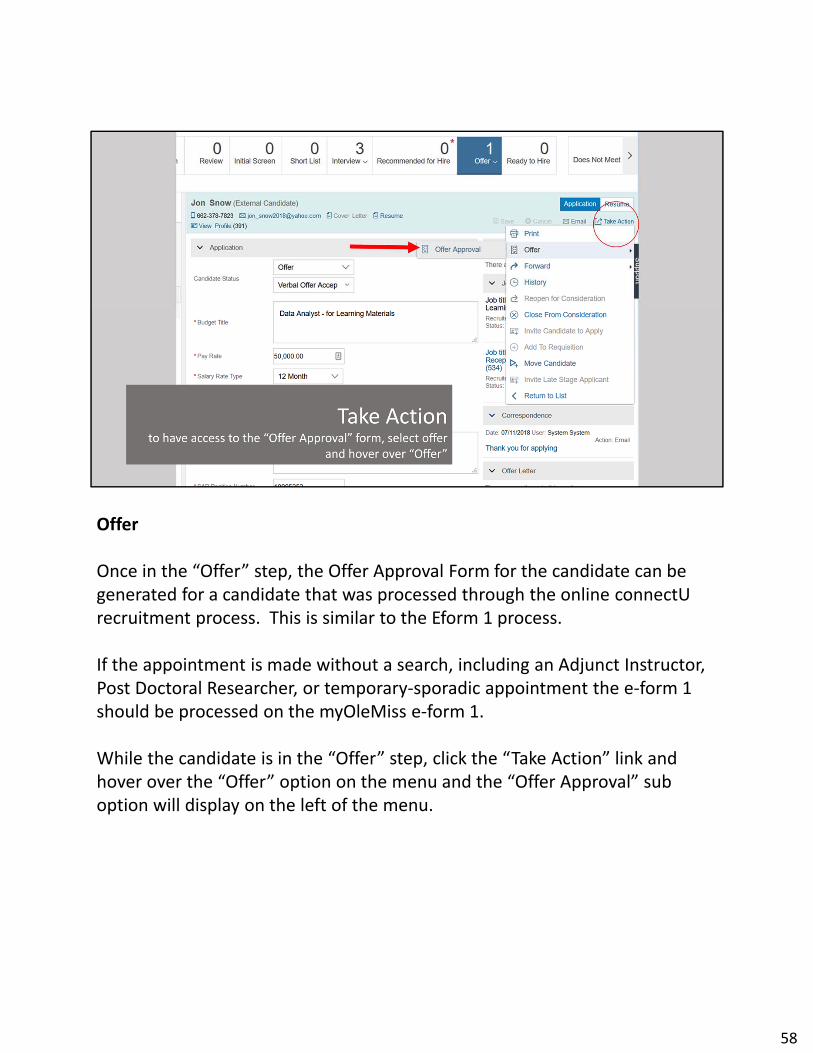
Offer
Once in the “Offer” step, the Offer Approval Form for the candidate can be generated for a candidate that was processed through the online connectU recruitment process. This is similar to the Eform 1 process.
If the appointment is made without a search, including an Adjunct Instructor, Post Doctoral Researcher, or temporary‐sporadic appointment the e‐form 1 should be processed on the myOleMiss e‐form 1.
While the candidate is in the “Offer” step, click the “Take Action” link and hover over the “Offer” option on the menu and the “Offer Approval” sub option will display on the left of the menu.
58
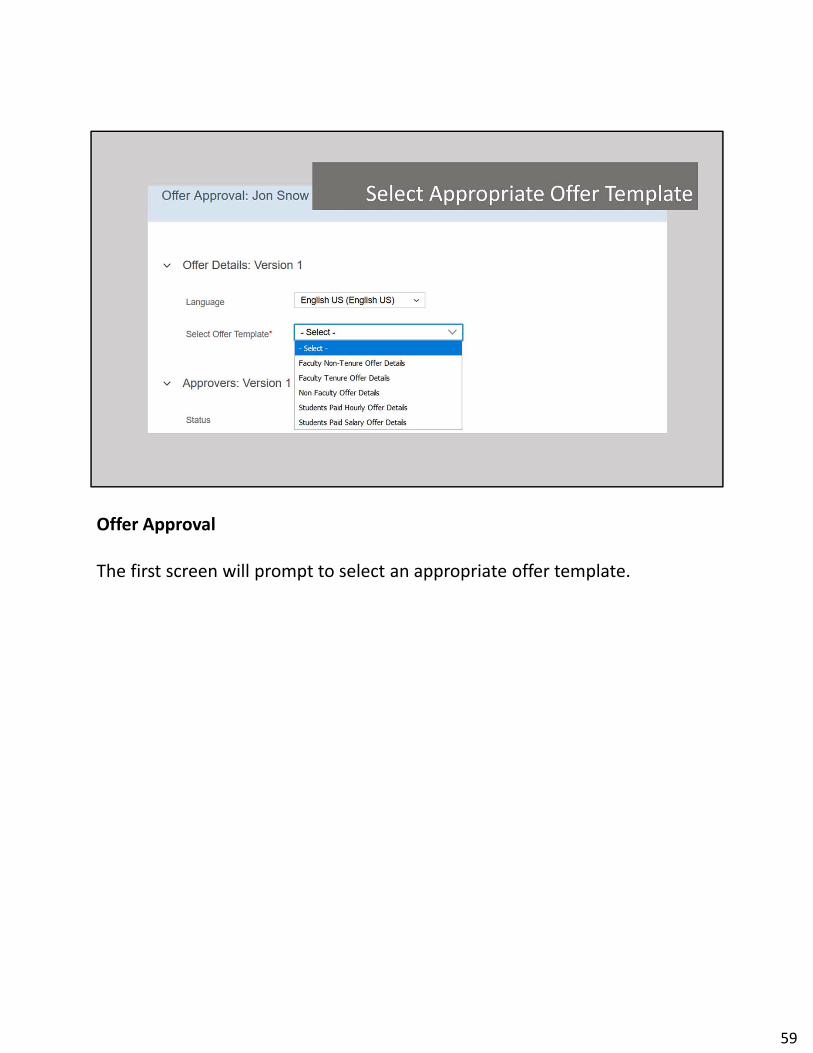
Offer Approval
The first screen will prompt to select an appropriate offer template.
59
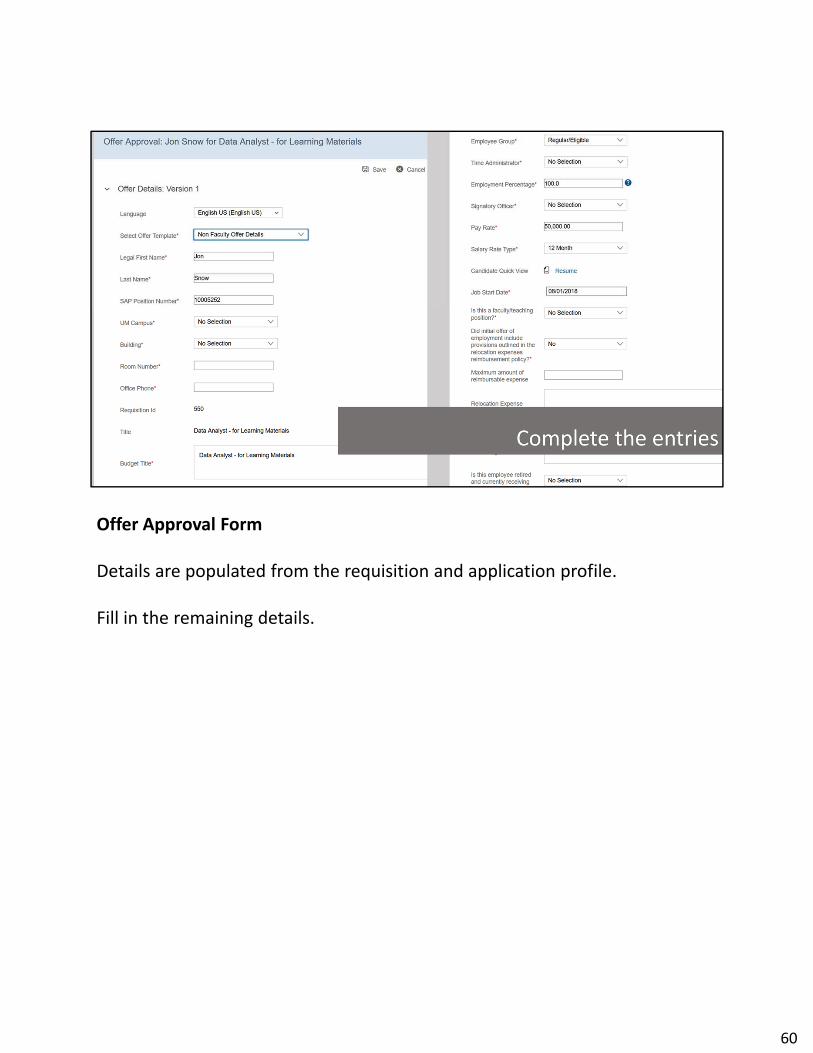
Offer Approval Form
Details are populated from the requisition and application profile.
Fill in the remaining details.
60

Approvals
All levels of the approval must be entered aka “programmed” by name.
61
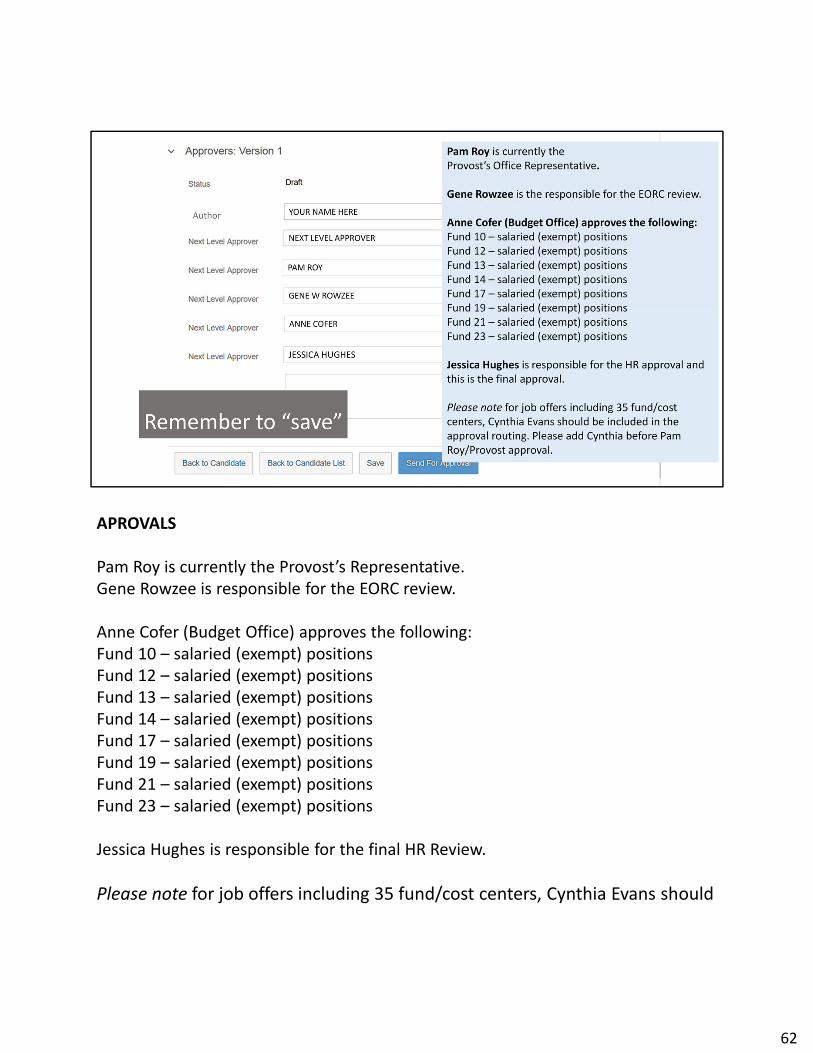
APROVALS
Pam Roy is currently the Provost’s Representative.Gene Rowzee is responsible for the EORC review.
Anne Cofer (Budget Office) approves the following:Fund 10 – salaried (exempt) positionsFund 12 – salaried (exempt) positionsFund 13 – salaried (exempt) positionsFund 14 – salaried (exempt) positionsFund 17 – salaried (exempt) positionsFund 19 – salaried (exempt) positionsFund 21 – salaried (exempt) positionsFund 23 – salaried (exempt) positions
Jessica Hughes is responsible for the final HR Review.
Please note for job offers including 35 fund/cost centers, Cynthia Evans should
62

be included in the approval routing. Please add Cynthia before Pam Roy/Provost approval.
62

CAUTION!
Triple Check the Offer Approval Form and Approval Names prior to submitting the form.
The Offer Approval Form cannot be edited or routed back.
It can only be approved as‐is or declined and the person responsible for the form MUST start over.
63
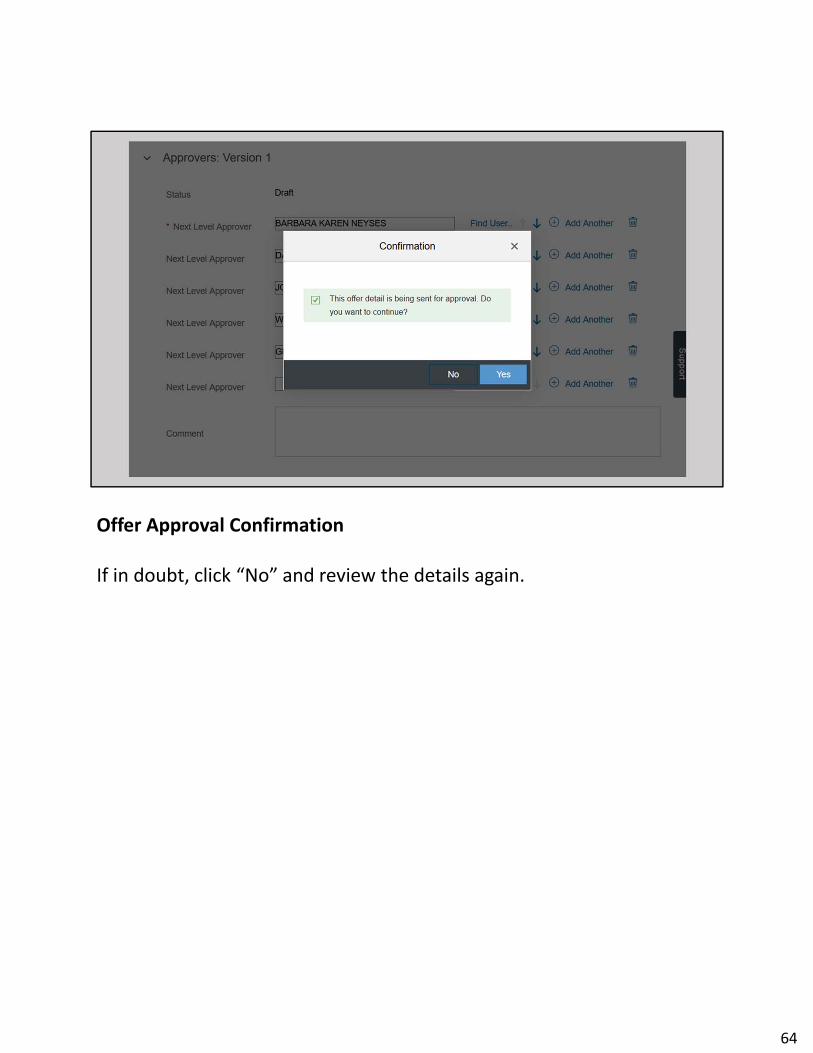
Offer Approval Confirmation
If in doubt, click “No” and review the details again.
64
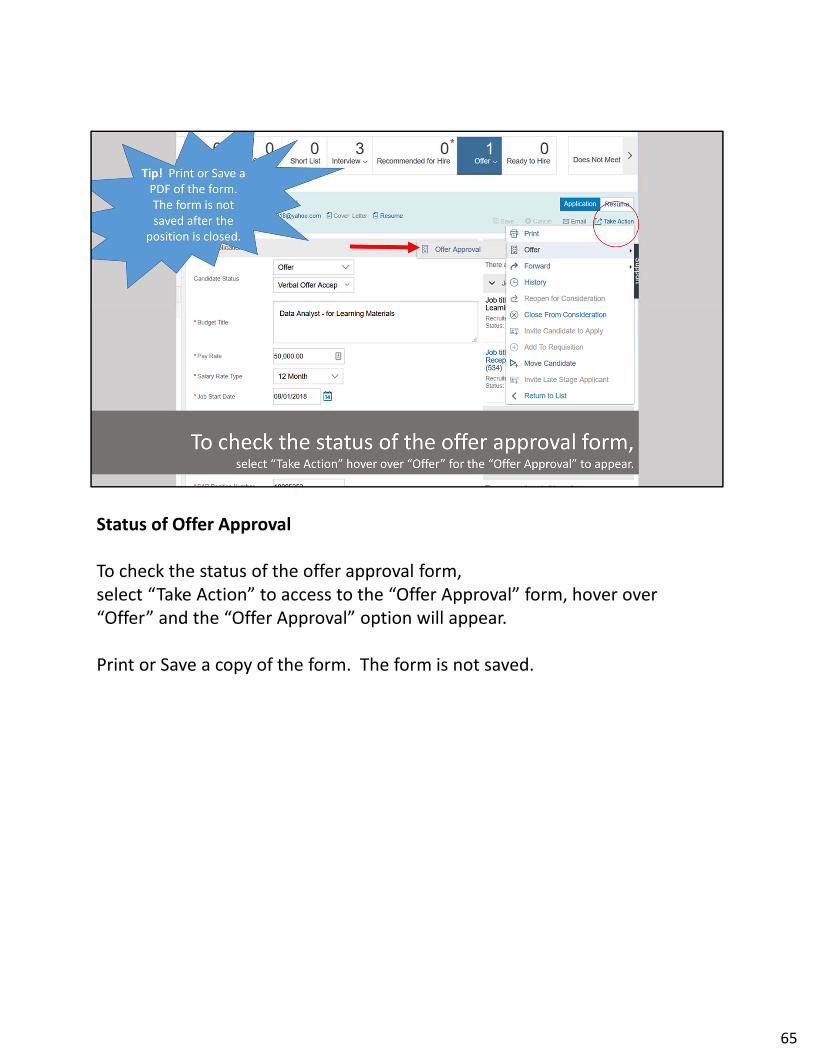
Status of Offer Approval
To check the status of the offer approval form, select “Take Action” to access to the “Offer Approval” form, hover over “Offer” and the “Offer Approval” option will appear.
Print or Save a copy of the form. The form is not saved.
65
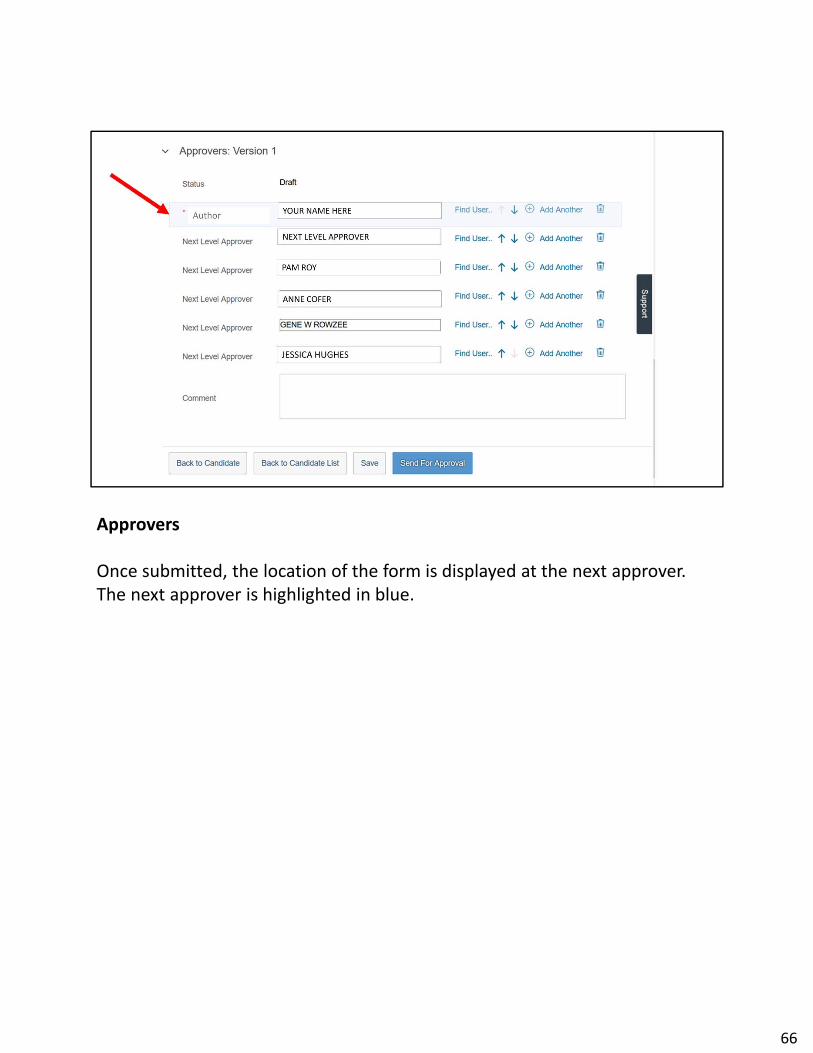
Approvers
Once submitted, the location of the form is displayed at the next approver.The next approver is highlighted in blue.
66

What happens next?
67

What happens next?
For offer eligible positions, an offer letter is generated and sent securely through email and DocuSign.The candidate returns it securely through DocuSign.
68

What happens next?
The background check is integrated and the background check process is initiated. The candidate only consents to the background check, confirms the details already entered on the employment application, and submits.
The candidate receives an invitation to complete the paperwork online using a “wizard.” All of the New Hire Paperwork is completed using a wizard that prompts the candidate through the panel.
69

Background Check Status available on the “Right Column” in the Ready to Hire bucket
The right column includes system history information, including the status of the background check.
The background check status is available for the department contact and position supervisor.
Click the “Refresh Information” link to update to the most current status.
Only members of Human Resources have access to view the background check report.
70

What happens next?
The candidate receives an invitation to complete the paperwork online using a “wizard.” All of the New Hire Paperwork is completed using a wizard that prompts the candidate through the process.
71

The integrated online practices allow for employees to get onboard more efficiently!
Welcome to the family! Welcome Home!
72