sas functions to drive source control with git · 3/27/2019 · git is a widely used distributed...
TRANSCRIPT
1
SAS3057-2019
SAS® FUNCTIONS TO DRIVE SOURCE CONTROL WITH GIT
Danny Zimmerman, SAS Institute Inc. Cary, NC
ABSTRACT
Whether you work with Java, C#, or web development technologies, source control plays an
important role in software development. SAS® is no different. These days, the front runner
in the source control world is Git. Git is a widely used distributed source control system with
one remote repository hosted on a website such as GitHub and local repositories on your
computer.
This paper provides a look at the Git functions in SAS 9.4M6. Highlights include an
introduction to the functions and why they were developed; a quick overview of what Git is;
a series of workflow scenarios that cover the functions; a functions section that describes
each function; and an overview of the Git interface in SAS® Studio 3.8.
GIT AND THE SAS GIT FUNCTIONS SAS Studio is all about programming in SAS, so it was not surprising that one of the most
requested features over the years has been, “How does my team share code and keep track
of versions?” With SAS Studio being a hosted solution, we had to figure out how to version
control the files on a server rather than files on each user's computer. We were also getting
requests for many different types of version control systems. With Git being the most widely
used modern version control system, we decided to investigate how to implement it with
SAS Studio.
Because of networking obstacles, permissions issues, and security problems with the user’s
file system when the SAS Studio middle tier is not on the same server as the workspace
server, Git support had to be built into the SAS® platform. This paper focuses on the Git
functions themselves and how to use them via SAS code in SAS Studio.
WHAT IS GIT? Have you ever worked on a shared document only to discover that you were working on it
at the same time as someone else? What happens? Often, you override each other’s
changes, download conflicting copies, or simply lose your work. Git helps alleviate all these
issues.
Git allows groups of developers to collaborate on the same documents (often source code)
simultaneously and without overriding each other’s work. Git also tracks the history of any
changes, including what specifically has been changed and who has changed what and
when. This is referred to as version control. Version control is a system that records
changes to a file or set of files which allows you to obtain specific versions later. Even when
developers work on each other’s files at the same time, the version control system in Git
will inform them that they’re about to overwrite someone else’s work.
Git has two types of repositories: a local repository and a remote repository. The local
repository is located on your computer for your direct use. The shared files that your team
uses are typically not located on your machine. Git refers to this as the ‘remote repository.’
The team “pushes” commits from the local repository to the remote repository when ready
to share with the team.

2
The local repository is on your computer and has all the files and their commit history,
enabling full diffs, history review, and committing. This is the advantage of Git - the full
repository history is on your local repository.
Figure 1: Git Overview
HOW TO GET AN INITIAL COPY OF AN EXISTING GIT REPOSITORY TO YOUR COMPUTER Perhaps your team or company has moved to using Git as a centralized place to store all
projects. Or you’ve been using Git for a while and want to use SAS code and SAS Studio to
be your interface to Git. The first step is to get the project from the remote repository onto
your server or computer.
To get a copy of an existing Git repository, you’ll need to clone it (typically you do this only
once) to your server or computer. The Git clone command creates a local repository on your
computer and pulls down all the data and history for that repository. If you go into the
directory you specified, you’ll see the project files, ready to be worked on or used.
Git uses two network protocols to transfer data from the remote repository:
• Secure Shell (SSH)
• HTTPS
The following scenario uses HTTPS. See the “Working with SSH” section later in this paper
for information and examples using SSH.
GITFN_CLONE
The GITFN_CLONE function clones the remote repository to the target location on a SAS
server. The function has two required parameters:
• remote repository URL
3
• target location on your server where you want to clone the remote repository
If you are using the SSH remote repository URL, GITFN_CLONE requires four additional
parameters for authentication:
• user name
• password
• public SSH key path
• private SSH key path
If you are using an HTTPS remote repository URL and authentication is required,
GITFN_CLONE requires these two additional parameters for authentication:
• user name
• password
Note: Credentials are not required to clone from GitHub unless you are using an SSH URL or
are cloning a private GitHub repository.
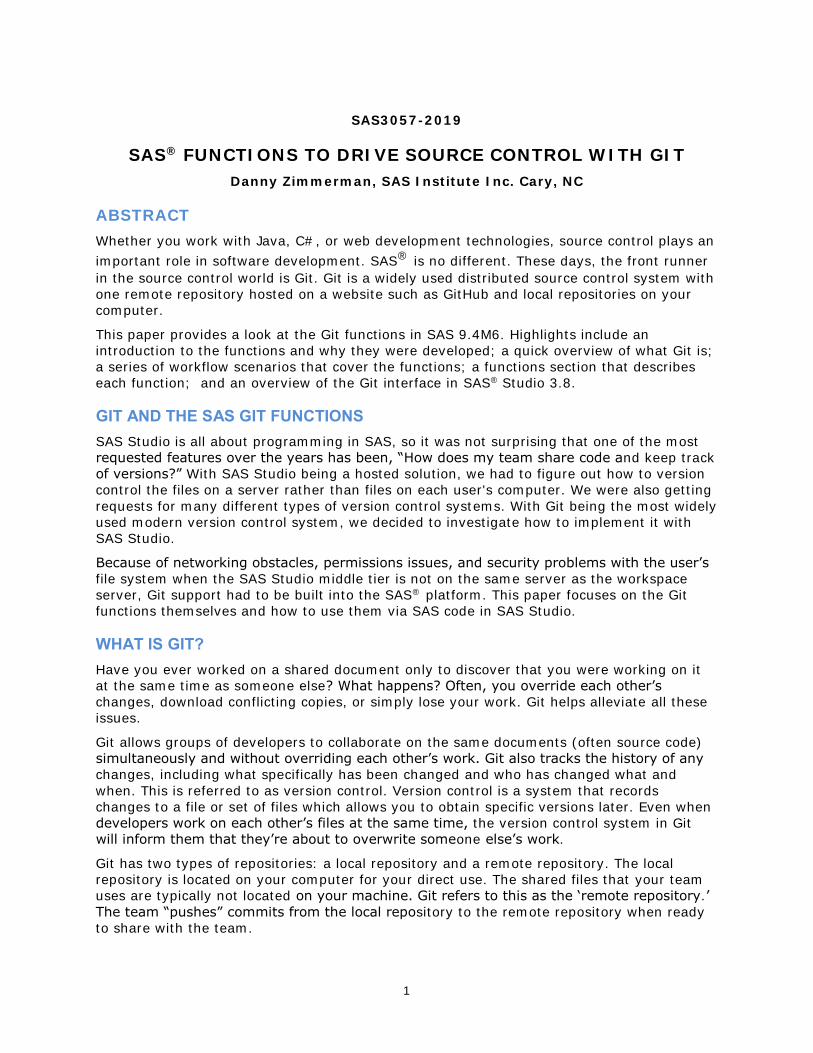
The examples in this paper will use a demo repository called SGF2019 that has been set up
on GitHub. The following example code will clone the SGF2019 remote repository to the
target location C:\MyLocalGitRepo on the SAS server using the HTTPS transfer protocol:
data _null_;
RC = GITFN_CLONE("https://github.com/sasdazimm/SGF2019.git",
"C:\MyLocalGitRepo");
run;
Submit the program and navigate to the C: drive to find the newly created local repository
called MyLocalGitRepo. This new local repository contains a .git directory and some .sas
files. The GITFN_CLONE function has successfully copied the remote repository located on
GitHub to your new local repository.
Figure 2: Creation of the Local Repository
4
Now that you have a local repository, you can start coding, fixing bugs, and sharing files
with team members.
COMMITTING IS A MULTI-STEP PROCESS When you first clone a repository, all your files are tracked by Git. At this point, the status
of all the files is “unmodified” because you haven’t edited anything.
Git has three main file states: committed, modified, and staged. Committed means that the
data is safely stored in your local repository. Modified means that you have changed a file in
your development workspace but have not committed it to your local repository yet. Staged
means that you have marked a modified file to be committed.
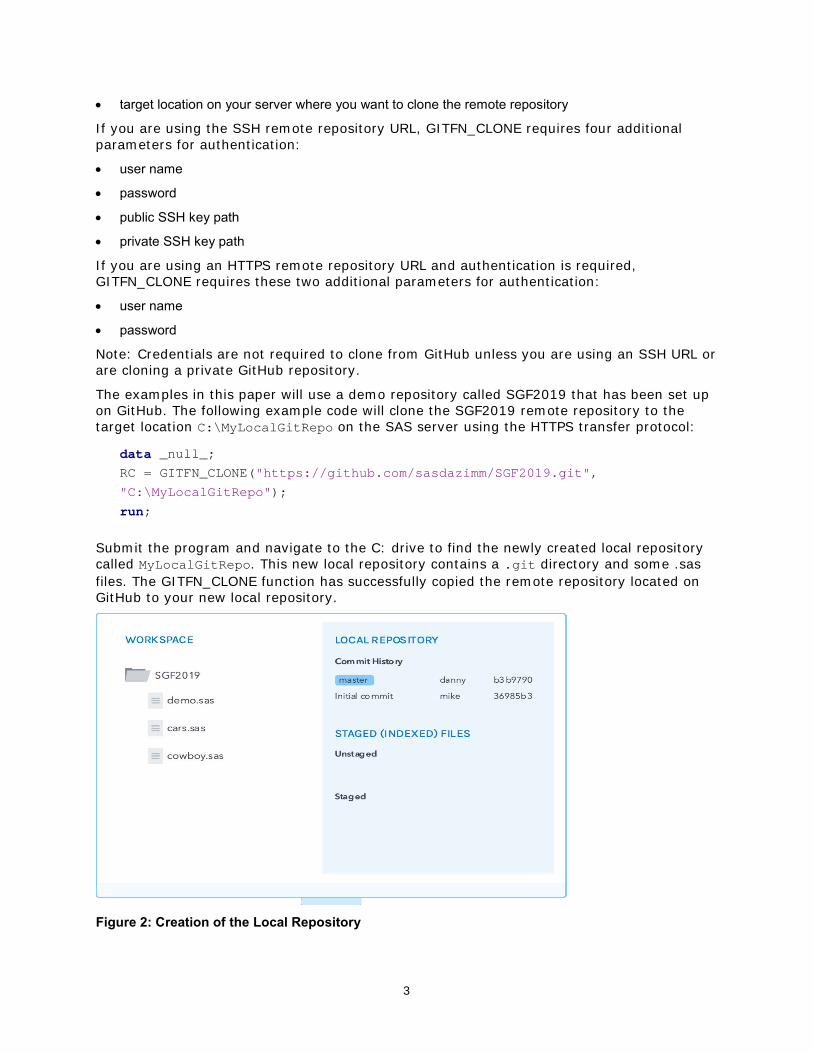
Suppose you need to fix two files (for example, cars.sas and cowboy.sas) and delete one file
(demo.sas). In your development workspace, you make the changes and test them. As you
edit files, Git sees them as “modified,” because you’ve changed them since your last
commit. They are still in your development workspace as you have not marked them as
‘staged.’ You can’t commit files until they are staged.
Figure 3: Modifying Files
CHECKING THE STATUS OF YOUR FILES First, you might want to get the status of your local repository to verify that your files have
indeed been modified. This step is not required for staging, committing, or pushing files to
the remote repository, but it’s useful for informational purposes. Here are the SAS Git
functions to use.
GITFN_STATUS
The GITFN_STATUS function constructs a data structure of status objects for any new,
renamed, deleted, modified, or type-changed files in the local repository and loads them
into memory. The function has one required parameter: location of the local repository.
The function returns the number of status objects that are in memory and available to be
accessed using the GITFN_STATUS_GET function.

5
GITFN_STATUS_GET
The GITFN_STATUS_GET function is used to obtain information stored in the status objects
loaded into memory by the GITFN_STATUS function. The function takes four parameters:
• an integer used for iterating the data structure of status objects
• location of the local repository
• requested attribute
• an out variable to which the requested attribute value gets assigned, so it can be used in the SAS program
Each status object has three attributes that can be obtained using this function:
• path of the file relative to the root of the local repository
• status of the file
• whether the file is staged
GITFN_STATUSFREE
Once you’re finished with the status objects, they need to be freed from memory. This
function requires one parameter: location of the local repository.
Here is an example that uses all three status functions:
data _null_;
LENGTH PATH $ 1024;
LENGTH STATUS $ 64;
LENGTH STAGED $ 32;
N=GITFN_STATUS("C:\MyLocalGitRepo");
DO I=1 TO N;
RC=GITFN_STATUS_GET(I,"C:\MyLocalGitRepo", "Path",Path);
RC=GITFN_STATUS_GET(I,"C:\MyLocalGitRepo", "Status",Status);
RC=GITFN_STATUS_GET(I,"C:\MyLocalGitRepo", "Staged",Staged);
END;
RC = GITFN_STATUSFREE("C:\MyLocalGitRepo"); run;
After running this code, you’ll see in the SAS log that you have three unstaged files:
NOTE: Entry: cars.sas. Staged: False. Status: Modified.
NOTE: Entry: cowboy.sas. Staged: False. Status: Modified.
NOTE: Entry: demo.sas. Staged: False. Status: Deleted.
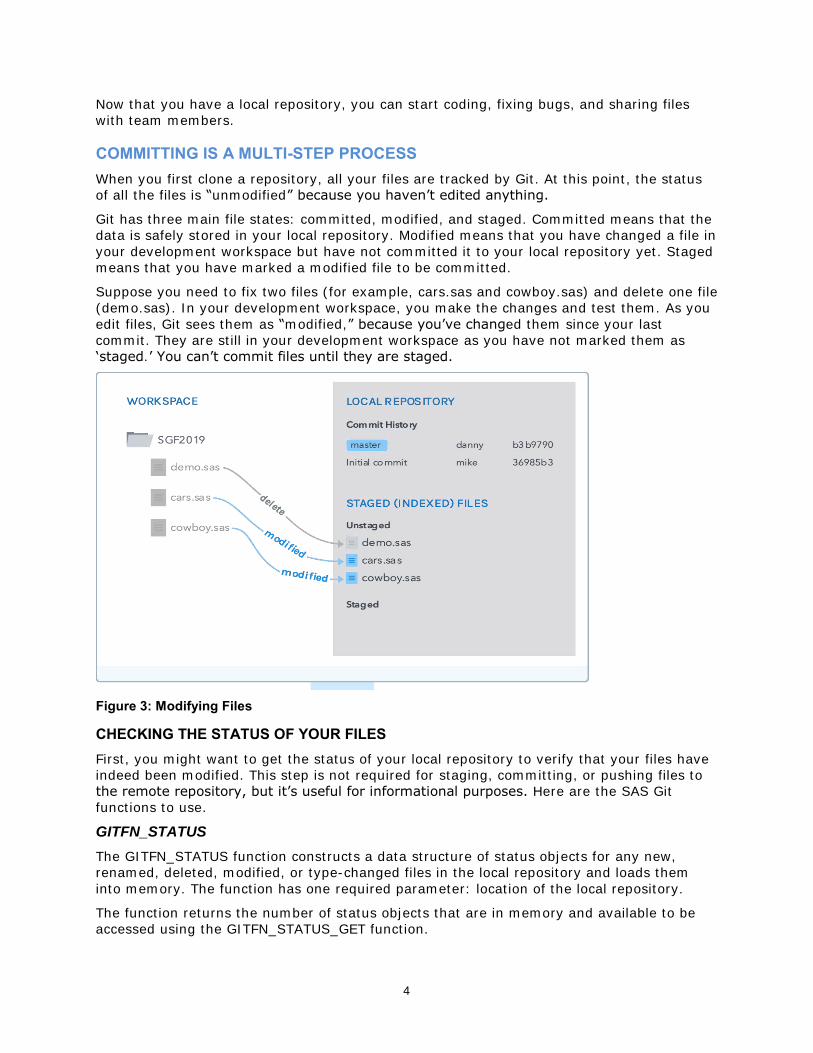
STAGE (INDEX) FILES TO COMMIT Now in your development workspace, you have a list of unstaged files that have been
modified: cars.sas, cowboy.sas, and demo.sas. Git commits only files in the “staged files”
list. These are also referred to as “indexed files.” The next step is to indicate which of these
modified files you want to include in your next commit. To put files into the Git stage area,
use the add function (stage is a synonym for add). Not all unstaged files need to go into the
same commit.
6
Figure 4: Staging Files
In this example, we’ll stage all three files.
GITFN_IDX_ADD
This function stages 1 to n number of files in preparation for committing. This function has
three required parameters and an n number of extra parameters depending on how many
files you want to stage at once:
• location of the local repository
• the path of the file that you want to stage relative to the root of the local repository
• status of the file
data _null_;
rc = GITFN_IDX_ADD(“C:\MyLocalGitRepo”, “cars.sas”, “modified”,
“cowboy.sas”, “modified”, “demo.sas”, “deleted”);
run;
After running GITFN_IDX_ADD, run the status code again, you’ll notice all three files are
now staged and ready for committing as displayed in the SAS log:
NOTE: Entry: cars.sas. Staged: True. Status: Modified.
NOTE: Entry: cowboy.sas. Staged: True. Status: Modified.
NOTE: Entry: demo.sas. Staged: True. Status: Deleted.
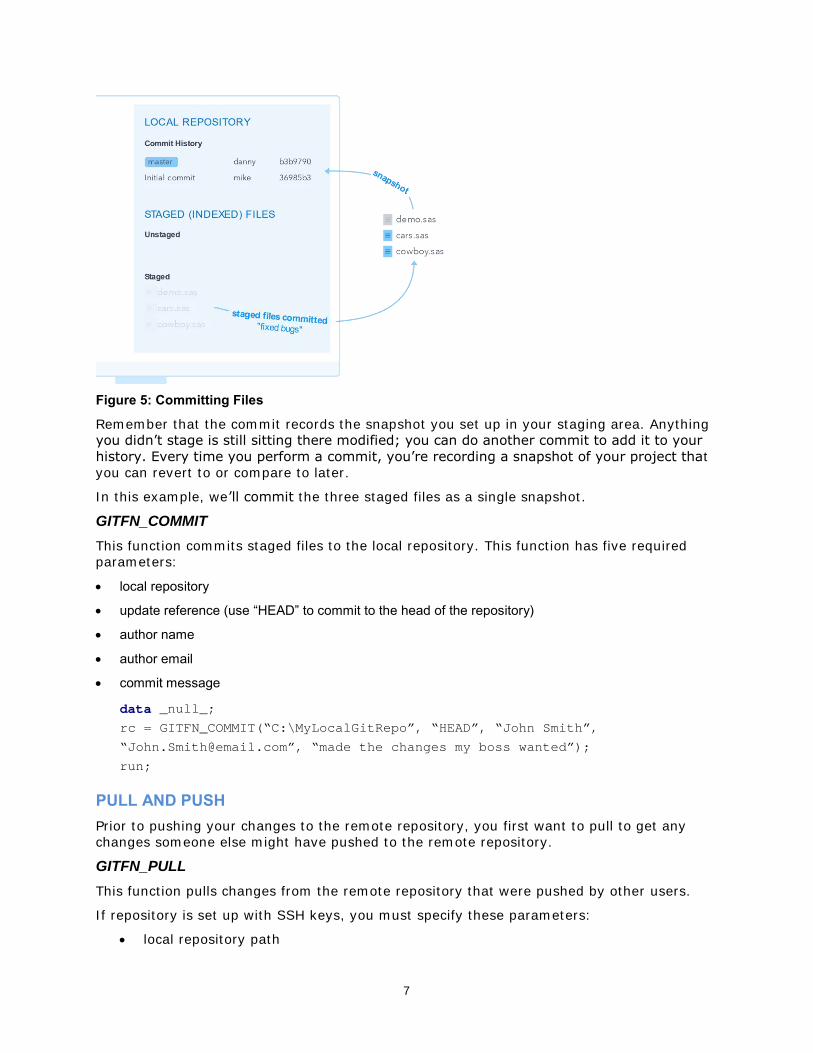
COMMIT STAGED FILES Git commits all staged files together as a single commit to the local repository. Each commit
gets a timestamp, an author name and email address (which comes from a configuration
file), a commit message, and an automatically generated hash. The hash is how Git keeps
track of its commits and references them. A typical hash looks like
27b6b79fca466af4648f9f8042e1f159b392293d.
7
Figure 5: Committing Files
Remember that the commit records the snapshot you set up in your staging area. Anything
you didn’t stage is still sitting there modified; you can do another commit to add it to your
history. Every time you perform a commit, you’re recording a snapshot of your project that
you can revert to or compare to later.
In this example, we’ll commit the three staged files as a single snapshot.
GITFN_COMMIT
This function commits staged files to the local repository. This function has five required
parameters:
• local repository
• update reference (use “HEAD” to commit to the head of the repository)
• author name
• author email
• commit message
data _null_;
rc = GITFN_COMMIT(“C:\MyLocalGitRepo”, “HEAD”, “John Smith”,
“[email protected]”, “made the changes my boss wanted”);
run;
PULL AND PUSH Prior to pushing your changes to the remote repository, you first want to pull to get any
changes someone else might have pushed to the remote repository.
GITFN_PULL
This function pulls changes from the remote repository that were pushed by other users.
If repository is set up with SSH keys, you must specify these parameters:
• local repository path

8
• user name
• password
• public SSH key path
• private SSH key path
If repository is set up to use HTTPS and authentication is not required to pull, you’ll need
only one parameter: local repository path.
When the example SGF2019 repository was cloned, we used a public GitHub HTTPS URL, so
only the path of the local repository is required.
data _null_;
rc = GITFN_PULL("C:\MyLocalGitRepo");
run;
The GITFN_PULL function returns four possible values depending on the outcome of the
pull:
0 - Successful pull with successful merge or fast-forward.
1 - Repository already up-to-date.
-1 - An error occurred. Check the SAS log for more details.
-2 - Conflicts occurred when merging the files pulled from the remote repository.
GITFN_PUSH
The GITFN_PUSH function publishes the local repository commits to the remote repository.
Without any arguments, push uses the configured remote repository for the current branch.
After committing changes, you are ready to push your commits to the remote repository.
The main difference between the “push” and “pull” functions is push changes the remote
repository and almost always requires credentials.
If repository is set up with SSH keys, these parameters are required:
• local repository path
• user name
• password
• public SSH key path
• private SSH key path
If repository is set up to use HTTPS, these parameters are required:
• local repository path
• GitHub user name
• GitHub password
9
Since we cloned the example repository with an HTTPS URL, we’ll need the local repository
path, the GitHub user name, and GitHub password as shown in this example:
data _null_;
rc = GITFN_PUSH("C:\MyLocalGitRepo",
"<Github_username>", "<Github password>");
run;
The GITFN_PUSH function returns a 0 for a successful push as well as displays a Note
statement in the SAS log.
COMMIT HISTORY To verify your commits, you’ll want to check the commit log for the local repository.
GITFN_COMMIT_LOG
This function constructs a data structure of commit objects in memory and returns the
count of commit objects. A commit object will track file modifications, file additions, and file
removals within the repository and the associated commit ID, commit message, commit
author, author email, parent commit IDs and commit time. In addition to creating commit
objects, you can access each commit object with the GITFN_COMMIT_GET function.
GITFN_COMMIT_GET
This function iterates through the data structure of commit objects and returns the
requested attribute of each object. It requires four parameters:
• integer used for iterating the data structure of commit objects
• path of the local repository
• requested attribute
• an out variable to which the value gets assigned, so it can be used in the SAS program.
Each commit object has six attributes that can be obtained using this function:
• Commit_ID – Git Commit ID
• Author_name – author of the commit
• Author_email – author’s email
• Message – commit message
• Parent_ids – comma-separated string of parent commit IDs
• Time – the number of seconds since January 1st, 1970
After you’re finished using the commit objects, they need to be freed from memory.
GITFN_COMMITFREE
This function frees the commit objects associated with a repository that were generated
with the GITFN_COMMIT_LOG function. This function requires one parameter: location of
the local repository.
This example uses all three commit log functions:
data work.x;
LENGTH COMMIT_ID $ 1024;

10
LENGTH AUTHOR_NAME $ 1024;
LENGTH AUTHOR_EMAIL $ 1024;
LENGTH MESSAGE $ 1024;
LENGTH PARENT_IDS $ 1024;
LENGTH TIME $ 1024;
N = GITFN_COMMIT_LOG("C:\MyLocalGitRepo");
DO I=1 TO N;
RC = GITFN_COMMIT_GET(I,RC = GITFN_COMMIT_GET(I,RC =
GITFN_COMMIT_GET(I,"C:\MyLocalGitRepo", "id", COMMIT_ID);
RC = GITFN_COMMIT_GET(I,RC = GITFN_COMMIT_GET(I,RC =
GITFN_COMMIT_GET(I,"C:\MyLocalGitRepo", "author", AUTHOR_NAME);
RC = GITFN_COMMIT_GET(I,RC = GITFN_COMMIT_GET(I,RC =
GITFN_COMMIT_GET(I,"C:\MyLocalGitRepo", "email", AUTHOR_EMAIL);
RC = GITFN_COMMIT_GET(I,RC = GITFN_COMMIT_GET(I,RC =
GITFN_COMMIT_GET(I,"C:\MyLocalGitRepo", "message", MESSAGE);
RC = GITFN_COMMIT_GET(I,RC = GITFN_COMMIT_GET(I,RC =
GITFN_COMMIT_GET(I,"C:\MyLocalGitRepo", "parent_ids", PARENT_IDS);
RC = GITFN_COMMIT_GET(I,RC = GITFN_COMMIT_GET(I,RC =
GITFN_COMMIT_GET(I,"C:\MyLocalGitRepo", "time", TIME);
output;
END;
RC = GITFN_COMMITFREE("C:\MyLocalGitRepo");
proc print data=work.x; run;
After this code runs, you will see an output table with all the requested attributes.
Figure 6: Commit Log Output
At the top of the output table, you can verify that your commit was made. You can now see
all the data you requested with the GITFN_COMMIT_GET function. Some of this information
is needed to be able run a diff between commits.
FILE DIFFERENCES IN WORKSPACE, STAGE, AND REPO
Files can exist in three locations with Git, and the same file can have different content in
each location. So it is useful to be able to view differences between files in the various
locations:

11
1. Committed in the repo: the HEAD version, the contents as the file was last committed.
2. Staged: edits made, deleted files, added to the index, ready to commit.
3. Workspace: files that have been modified but not staged for commit.
COMPARE TWO COMMITS IN THE LOCAL REPOSITORY To view the diffs between two commits, you need to have the commit ID for each commit.
Figure 7: Diff Committed Files
These commit IDs are passed to the GITFN_DIFF function to generate a data structure of
diff objects in memory. Diffing commits follows the same code pattern as obtaining the
status and the commit history of the repository.
GITFN_DIFF
This function requires these three parameters:
• local repository path
• the commit ID of the older commit
• the commit ID of the newer commit
This function returns the amount of diff objects generated. The diff objects and the
attributes of each object can be accessed using GITFN_DIFF_GET function.
GITFN_DIFF_GET
This function gets the attribute of a diff object that was obtained from the GITFN_DIFF
function on the local repository and between two commit IDs. This function is like its status
and commit counterparts but takes two additional parameters. Here are the required
parameters:
• integer used for iterating the data structure of diff objects
• path of the local repository
• the older commit ID
• the newer commit ID
• the requested attribute
• an out variable to which the value gets assigned, so it can be used in the SAS program.
After you’re done with the diff objects, they need to be freed from memory. To do this, use
the GITFN_DIFF_FREE function. Below is example of all three diff functions working together
with the actual commit IDs of the first two commits in the repository:
data work.diff;
LENGTH FILE_PATH $ 1024;
LENGTH DIFF_CONTENT $ 32767;
D D
E D

12
LENGTH DIFF_TYPE $ 1024;
FILE_PATH="";
DIFF_CONTENT="";
DIFF_TYPE="";
N = GITFN_DIFF("C:\MyLocalGitRepo",
"36985b37c6202a99714904bd109db548803a03b1",
"b3b979040ddc4b23a508bc91f030d5eed2ae9391");
PUT N=;
DO I=1 TO N;
RC = GITFN_DIFF_GET(I,"C:\MyLocalGitRepo", "
36985b37c6202a99714904bd109db548803a03b1",
"b3b979040ddc4b23a508bc91f030d5eed2ae9391", "file", FILE_PATH);RC =
GITFN_DIFF_GET(I,"C:\MyLocalGitRepo", "
36985b37c6202a99714904bd109db548803a03b1",
"b3b979040ddc4b23a508bc91f030d5eed2ae9391", "file", FILE_PATH);RC =
GITFN_DIFF_GET(I,"C:\MyLocalGitRepo", "
36985b37c6202a99714904bd109db548803a03b1",
"b3b979040ddc4b23a508bc91f030d5eed2ae9391", "file", FILE_PATH);
RC = GITFN_DIFF_GET(I,"C:\MyLocalGitRepo",
"36985b37c6202a99714904bd109db548803a03b1",
"b3b979040ddc4b23a508bc91f030d5eed2ae9391", "diff_content",
DIFF_CONTENT);RC = GITFN_DIFF_GET(I,"C:\MyLocalGitRepo",
"36985b37c6202a99714904bd109db548803a03b1",
"b3b979040ddc4b23a508bc91f030d5eed2ae9391", "diff_content",
DIFF_CONTENT);RC = GITFN_DIFF_GET(I,"C:\MyLocalGitRepo",
"36985b37c6202a99714904bd109db548803a03b1",
"b3b979040ddc4b23a508bc91f030d5eed2ae9391", "diff_content", DIFF_CONTENT);
RC = GITFN_DIFF_GET(I,"C:\MyLocalGitRepo ",
"36985b37c6202a99714904bd109db548803a03b1",
"b3b979040ddc4b23a508bc91f030d5eed2ae9391", "diff_type", DIFF_TYPE);RC =
GITFN_DIFF_GET(I,"C:\MyLocalGitRepo ",
"36985b37c6202a99714904bd109db548803a03b1",
"b3b979040ddc4b23a508bc91f030d5eed2ae9391", "diff_type", DIFF_TYPE);RC =
GITFN_DIFF_GET(I,"C:\MyLocalGitRepo ",
"36985b37c6202a99714904bd109db548803a03b1",
"b3b979040ddc4b23a508bc91f030d5eed2ae9391", "diff_type", DIFF_TYPE);
PUT FILE_PATH=;
PUT DIFF_CONTENT=;
PUT DIFF_TYPE=;
output;output;output;
END;
RC = GITFN_DIFF_FREE("C:\MyLocalGitRepo",
"36985b37c6202a99714904bd109db548803a03b1",
"b3b979040ddc4b23a508bc91f030d5eed2ae9391");
13
run;
proc print data=work.diff;
run;
After the code runs, you will see information about each commit. The DIFF_CONTENT is
returned in JSON format. The DIFF_CONTENT output contains multiple diff lines. Each diff
line has a type attribute and a value attribute. Here is an example of JSON output of the
“file_header” line of a diff:
{"type":"file_header", "value":"diff --git a/cowboy.sas b/cowboy.sas index
fccddb3..8
b16bce 100644--- a/cowboy.sas+++ b/cowboy.sas"}
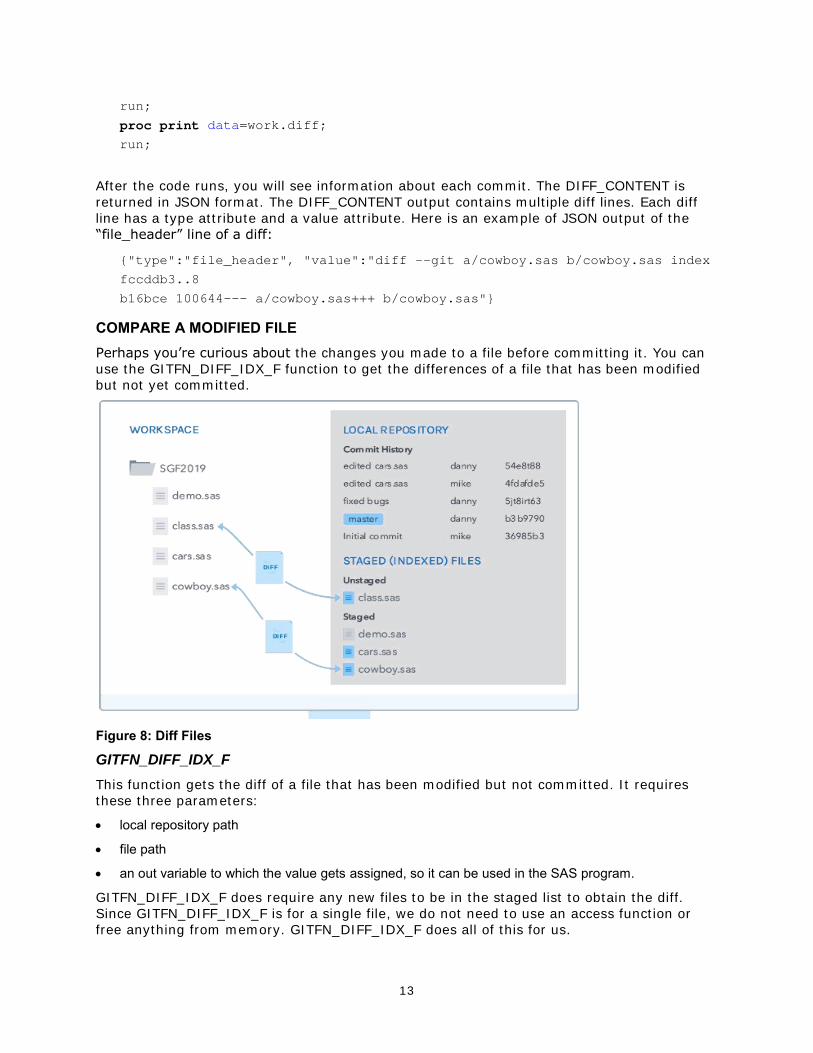
COMPARE A MODIFIED FILE Perhaps you’re curious about the changes you made to a file before committing it. You can
use the GITFN_DIFF_IDX_F function to get the differences of a file that has been modified
but not yet committed.
Figure 8: Diff Files
GITFN_DIFF_IDX_F
This function gets the diff of a file that has been modified but not committed. It requires
these three parameters:
• local repository path
• file path
• an out variable to which the value gets assigned, so it can be used in the SAS program.
GITFN_DIFF_IDX_F does require any new files to be in the staged list to obtain the diff.
Since GITFN_DIFF_IDX_F is for a single file, we do not need to use an access function or
free anything from memory. GITFN_DIFF_IDX_F does all of this for us.
14
Navigate to your local repository and make a small change to cowboy.sas. Then save it and
stage it. Now run the following code:
data _null_;
LENGTH DIFF_CONTENT $ 32767;
DIFF_CONTENT="";
rc=GITFN_DIFF_IDX_F("C:\MyLocalGitRepo", "cowboy.sas", DIFF_CONTENT);
PUT DIFF_CONTENT=;
output;
run;
The DIFF_CONTENT values appears the SAS log. Note: In SAS9.4M6, both diff functions are
limited to 32,767 characters for the DIFF_CONTENT output. This can lead to partial diff
output. In the next release of SAS, you will be able to write the diff to a file to get the entire
diff for diffs larger than 32,767 characters.
WORKING WITH BRANCHES A branch is a way to diverge from the main line of development so that you can continue
working without messing up the main development line. For example, as a developer, you
might be working on multiple tasks at once and branching enables you to accomplish a
specific task without having to worry about pushing code from another task that might not
be finished. After your task is complete, you can merge your branch back into the master or
production branch, resolve any conflicts that might occur during the merge, and push your
changes to the remote repository. If multiple developers are collaborating on a specific task,
the task branch can be pushed to the remote repository as well. When you create a branch,
it will exist only in your local repository until you want to share it with others.
Let’s create a branch on the local repository we were using in the previous scenarios using
the GITFN_NEW_BRANCH function.
GITFN_NEW_BRANCH
This function creates a new Git branch. This function takes four parameters:
• local repository path
• commit ID to create the branch on
• branch name
• integer to force the creation of the branch -- 0 for false or 1 for true. The force parameter is optional. When it’s not included, the default is 0 or do not override the existing branch.
This code snippet creates a branch called SGF2019:
data _null_;
rc = GITFN_NEW_BRANCH("C:\MyLocalGitRepo",
"b3b979040ddc4b23a508bc91f030d5eed2ae9391", "SGF2019");
run;
This function returns 0 for success and -1 when an error occurs. Let’s assume we received a
return value of 0.
15
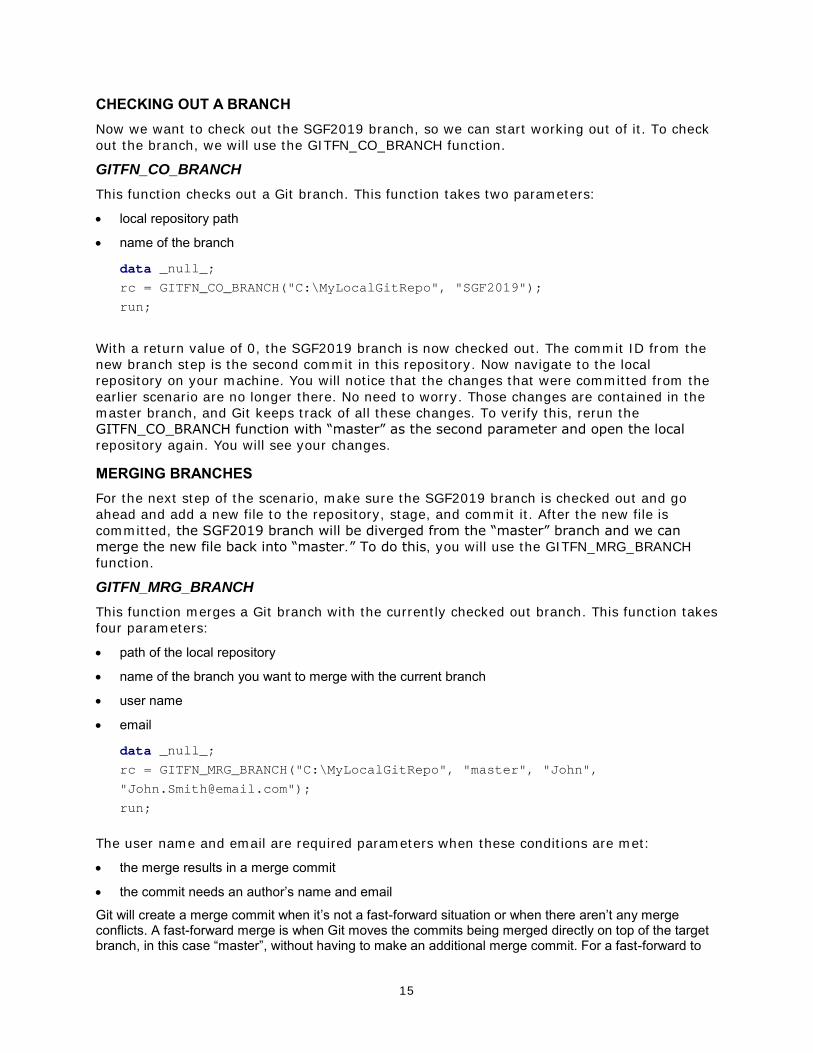
CHECKING OUT A BRANCH Now we want to check out the SGF2019 branch, so we can start working out of it. To check
out the branch, we will use the GITFN_CO_BRANCH function.
GITFN_CO_BRANCH
This function checks out a Git branch. This function takes two parameters:
• local repository path
• name of the branch
data _null_;
rc = GITFN_CO_BRANCH("C:\MyLocalGitRepo", "SGF2019");
run;
With a return value of 0, the SGF2019 branch is now checked out. The commit ID from the
new branch step is the second commit in this repository. Now navigate to the local
repository on your machine. You will notice that the changes that were committed from the
earlier scenario are no longer there. No need to worry. Those changes are contained in the
master branch, and Git keeps track of all these changes. To verify this, rerun the
GITFN_CO_BRANCH function with “master” as the second parameter and open the local
repository again. You will see your changes.
MERGING BRANCHES For the next step of the scenario, make sure the SGF2019 branch is checked out and go
ahead and add a new file to the repository, stage, and commit it. After the new file is
committed, the SGF2019 branch will be diverged from the “master” branch and we can
merge the new file back into “master.” To do this, you will use the GITFN_MRG_BRANCH
function.
GITFN_MRG_BRANCH
This function merges a Git branch with the currently checked out branch. This function takes
four parameters:
• path of the local repository
• name of the branch you want to merge with the current branch
• user name
data _null_;
rc = GITFN_MRG_BRANCH("C:\MyLocalGitRepo", "master", "John",
run;
The user name and email are required parameters when these conditions are met:
• the merge results in a merge commit
• the commit needs an author’s name and email
Git will create a merge commit when it’s not a fast-forward situation or when there aren’t any merge conflicts. A fast-forward merge is when Git moves the commits being merged directly on top of the target branch, in this case “master”, without having to make an additional merge commit. For a fast-forward to
16
occur, both branches would need to have the same history of commits up to the point of divergence and the target branch, “master”, have no additional commits after the feature branch, “SGF2019”, diverged.
The GITFN_MRG_BRANCH code snippet (above) will result in a normal merge commit. This
is because we created the “SGF2019” branch below the head of the master branch.
So, the merge commit takes the commits from the “Working with the remote repository”
scenario that are only in the “master” branch and the new commit that is in the “SGF2019”
branch. These changes are included in one commit that happens on both branches. After
this commit is complete, both branches will be at the same level in the commit history and
have the same content in the working directory. To verify this, you can navigate to the
directory for the local repository and see that your commits made in the earlier scenario
are there. Then you can check out “master” branch and see that your commits from this
scenario are still there.
WORKING WITH SSH In the previous scenarios, we used an HTTPS URL to access the remote repository. As
mentioned earlier, Git can use two network protocols to communicate with the remote
repository. SSH or Secure Shell is the other option. SSH is more secure than HTTPS and
because of that, SSH has some upfront configuration.
SSH requires two key files, a public key and a private key, and they need to be generated
on your computer. GitHub has a tutorial on how to generate these keys. See the “Links”
section at the end of this paper for a link to the tutorial.
You will need to download and install Git Bash on your computer to generate the keys. The
only part of the tutorial that needs to be completed is the “Generating a new SSH key”
section. In step 2, provide the email that is associated with your GitHub account. In step 3,
you can provide a path including the file name id_rsa to save the keys or press Enter to
save to the default location. On Windows, it’s usually C:\Users\<you>\.ssh\id_rsa. In
step 4, do not provide a password for your SSH key. Just press Enter. Once generated, the
directory you chose to save your keys to will have two files: id_rsa and id_rsa.pub. These
are your SSH keys.
17
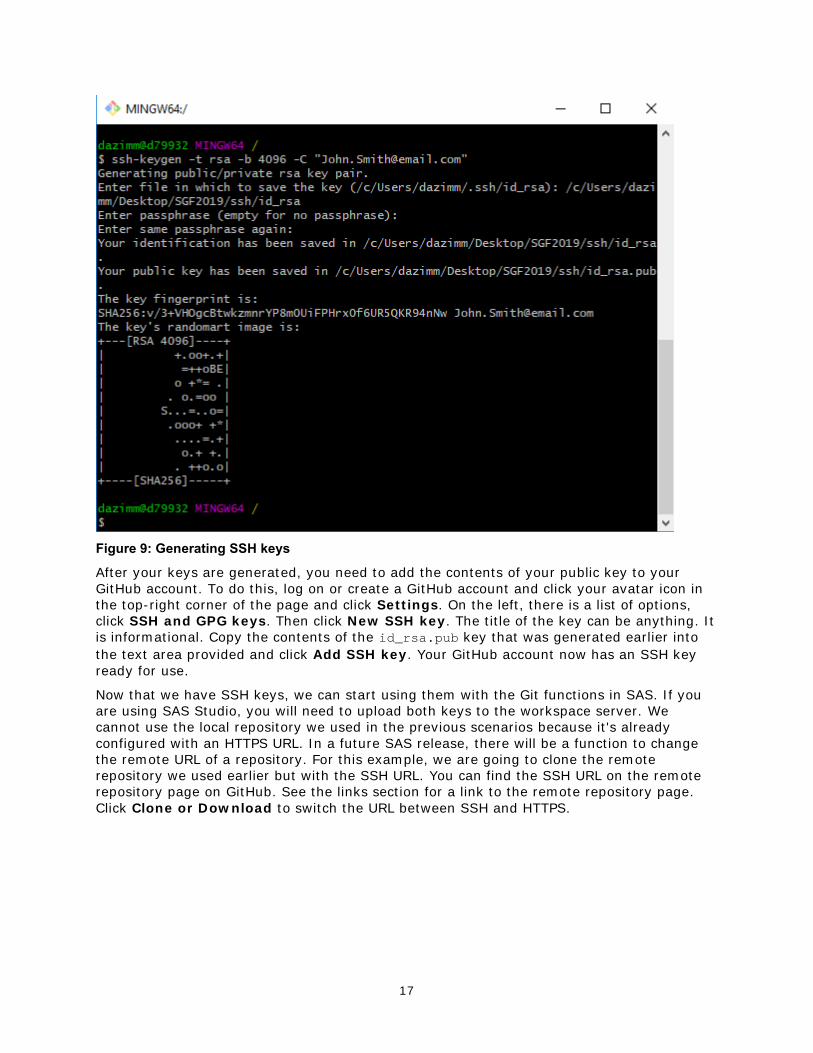
Figure 9: Generating SSH keys
After your keys are generated, you need to add the contents of your public key to your
GitHub account. To do this, log on or create a GitHub account and click your avatar icon in
the top-right corner of the page and click Settings. On the left, there is a list of options,
click SSH and GPG keys. Then click New SSH key. The title of the key can be anything. It
is informational. Copy the contents of the id_rsa.pub key that was generated earlier into
the text area provided and click Add SSH key. Your GitHub account now has an SSH key
ready for use.
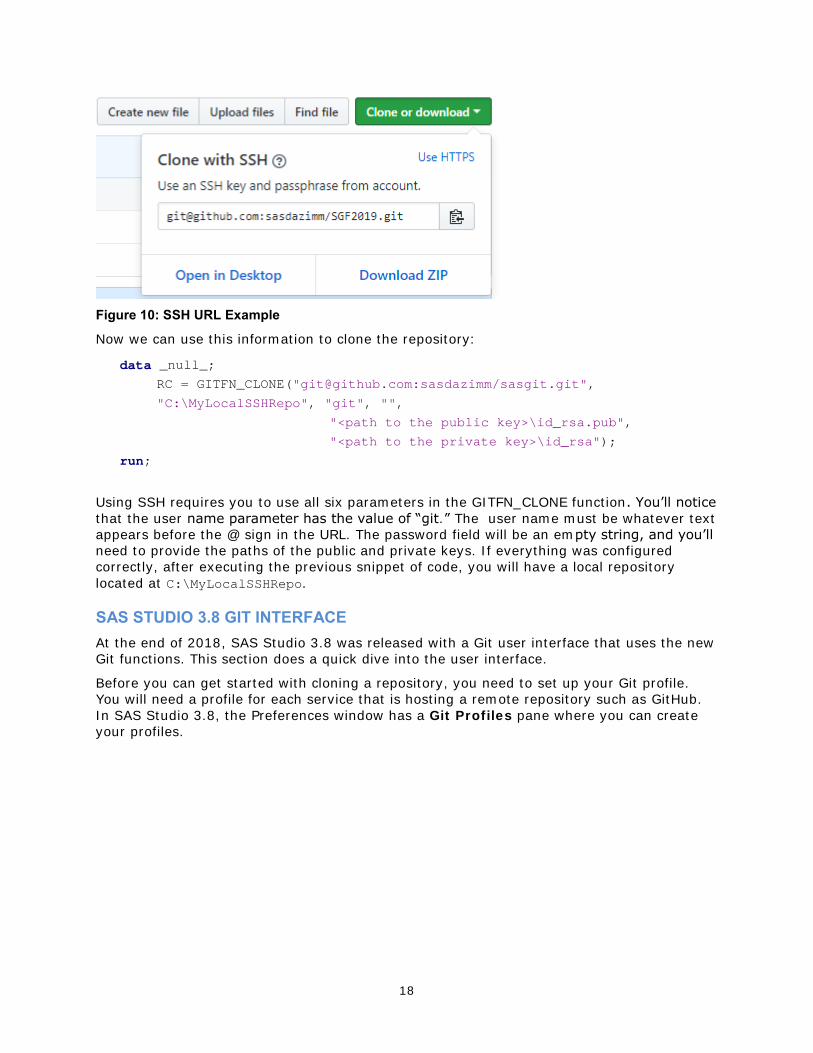
Now that we have SSH keys, we can start using them with the Git functions in SAS. If you
are using SAS Studio, you will need to upload both keys to the workspace server. We
cannot use the local repository we used in the previous scenarios because it's already
configured with an HTTPS URL. In a future SAS release, there will be a function to change
the remote URL of a repository. For this example, we are going to clone the remote
repository we used earlier but with the SSH URL. You can find the SSH URL on the remote
repository page on GitHub. See the links section for a link to the remote repository page.
Click Clone or Download to switch the URL between SSH and HTTPS.
18
Figure 10: SSH URL Example
Now we can use this information to clone the repository:
data _null_;
RC = GITFN_CLONE("[email protected]:sasdazimm/sasgit.git",
"C:\MyLocalSSHRepo", "git", "",
"<path to the public key>\id_rsa.pub",
"<path to the private key>\id_rsa");
run;
Using SSH requires you to use all six parameters in the GITFN_CLONE function. You’ll notice
that the user name parameter has the value of “git.” The user name must be whatever text
appears before the @ sign in the URL. The password field will be an empty string, and you’ll
need to provide the paths of the public and private keys. If everything was configured
correctly, after executing the previous snippet of code, you will have a local repository
located at C:\MyLocalSSHRepo.
SAS STUDIO 3.8 GIT INTERFACE At the end of 2018, SAS Studio 3.8 was released with a Git user interface that uses the new
Git functions. This section does a quick dive into the user interface.
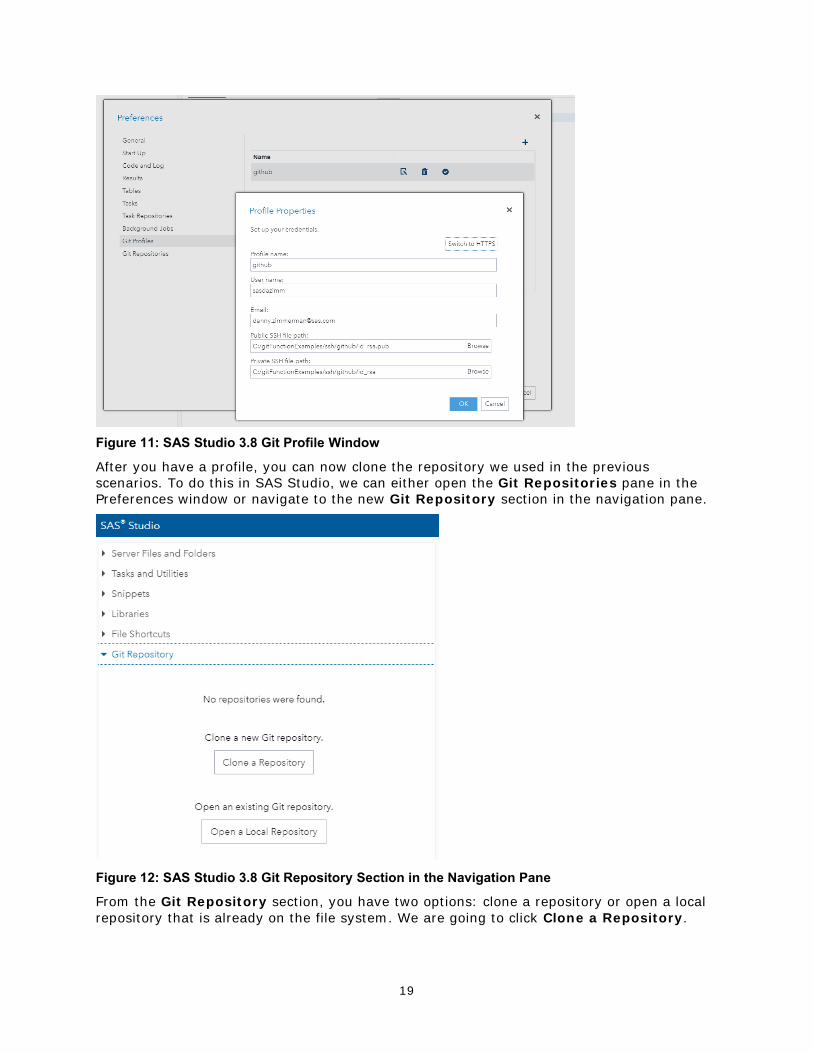
Before you can get started with cloning a repository, you need to set up your Git profile.
You will need a profile for each service that is hosting a remote repository such as GitHub.
In SAS Studio 3.8, the Preferences window has a Git Profiles pane where you can create
your profiles.
19
Figure 11: SAS Studio 3.8 Git Profile Window
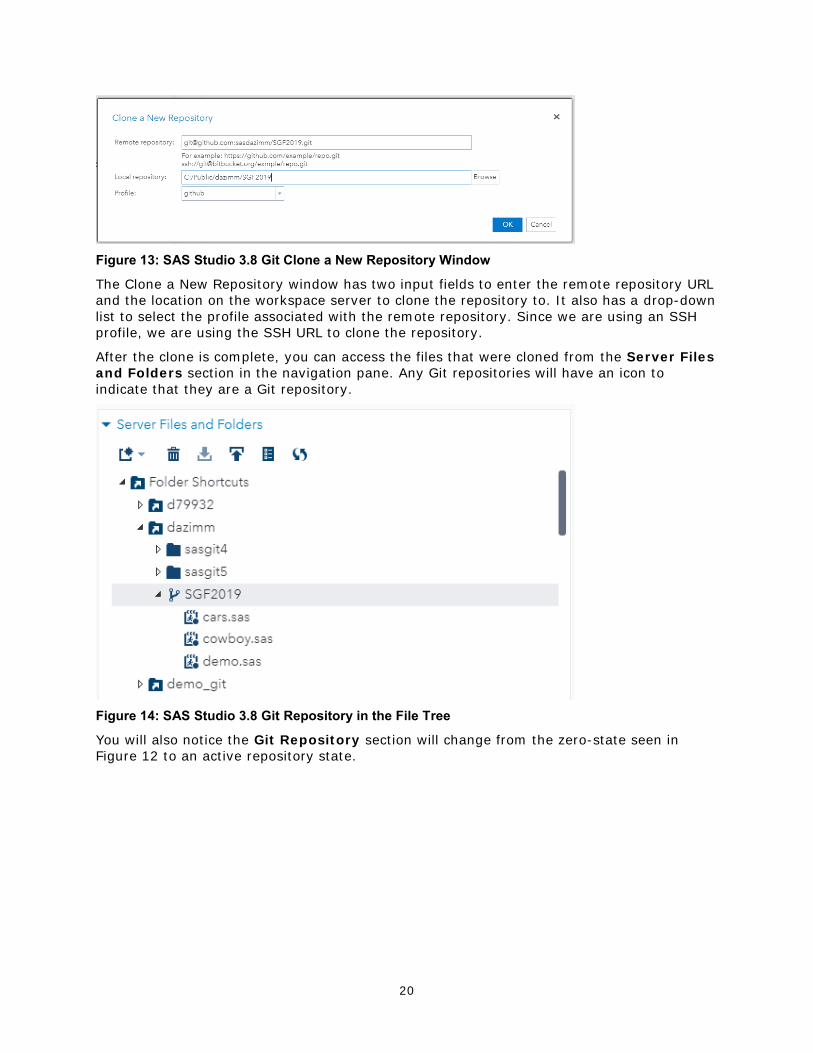
After you have a profile, you can now clone the repository we used in the previous
scenarios. To do this in SAS Studio, we can either open the Git Repositories pane in the
Preferences window or navigate to the new Git Repository section in the navigation pane.
Figure 12: SAS Studio 3.8 Git Repository Section in the Navigation Pane
From the Git Repository section, you have two options: clone a repository or open a local
repository that is already on the file system. We are going to click Clone a Repository.
20
Figure 13: SAS Studio 3.8 Git Clone a New Repository Window
The Clone a New Repository window has two input fields to enter the remote repository URL
and the location on the workspace server to clone the repository to. It also has a drop-down
list to select the profile associated with the remote repository. Since we are using an SSH
profile, we are using the SSH URL to clone the repository.
After the clone is complete, you can access the files that were cloned from the Server Files
and Folders section in the navigation pane. Any Git repositories will have an icon to
indicate that they are a Git repository.
Figure 14: SAS Studio 3.8 Git Repository in the File Tree
You will also notice the Git Repository section will change from the zero-state seen in
Figure 12 to an active repository state.

21
Figure 15: SAS Studio 3.8 Active Git Repository Local and Commit Tabs
This active state has two tabs: a Local tab and a Commit Tab. The Local tab has a drop-
down list with the list of opened or cloned repositories; pull, push, and history buttons; and
the name of the current local repository and the active branch of the repository.
The Commit tab is where you would stage and unstage files for commits, provide a commit
message, and execute the commit. As you can see, cars.sas is in the unstaged area with an
icon to indicate that it has been modified.
To see the history of the repository, click the History icon on the Local tab. This will open
the commit history of the local repository in a tab to the right of the navigation pane.
22
Figure 16: SAS Studio 3.8 Commit History Tab with Details
The history log contains the same information that was displayed in Figure 6. You can see
the commit message, an abbreviated commit ID, the author, and the commit time. You will
also notice two boxes to the left of the top two commits. The maroon one is the local master
branch, and the light blue one is the remote master branch. These are indicators to let you
know where the “head” of the branch is. The remote master branch will be updated when
you push or pull.
Below the commit history you’ll see two tabs, Details and Files. The Details tab contains
more information including the full commit ID as well as the parent IDs. The Files tab
allows you to see the diffs. The diffs are generated between multiple commits. If you have a
commit selected in the history log, it will generate the diffs between itself and its parents.
You can also select two commits in the log to generate the diffs between those commits.

23
Figure 17: SAS Studio 3.8 Commit History Log with File Diffs
The Files tab contains a list of files that were committed in the selected commit, and when
you click on them, you see the diff output on the right.
MORE SAS GIT FUNCTIONS AND EXAMPLES GITFN_IDX_REMOVE
This function unstages 1 to n number of files. This function is the opposite of
GITFN_IDX_ADD. The GITFN_IDX_REMOVE function does not require the status of each file
to be unstaged. The GITFN_IDX_REMOVE requires these two parameters:
• location of the local repository
• the filename and path for 1-to-n number of files to remove from index (unstage)
Here is an example code snippet:
RC = GITFN_IDX_REMOVE("C:\MyLocalGitRepo", "aSASFile.sas", "cowboy.sas",
"anotherSASFile.sas");
GITFN_VERSION
The GITFN_VERSION function validates that the 'libgit2' library is available and returns the
version that is being used. Here are the possible return values:
• -1: the libgit2 library is not available for use; no Git operations can be performed
• Version: the major or minor version number of the libgit2 library (for example, 0.27)
Here is an example code snippet:
data _null_;
version=GITFN_VERSION();
put version=;
24
run;
GITFN_RESET
The GITFN_RESET function resets the local repository to a specific commit state. This
function takes these three parameters:
• location of the local repository
• commit ID to which the repository will be reset
• type of reset
Here are values for the type of reset:
• HARD - reset working directory and index discard all local changes including uncommitted changes
• SOFT - leave working directory and index untouched
• MIXED - leave working directory untouched, reset index
Here is an example code snippet:
data _null_;
reset = GITFN_RESET("<path of local repository>",
"20ffdf112a1e6c13f435b6357d35281d5a9e1288", "HARD");
run;
When successful, this function returns a value of 0.
GITFN_RESET_FILE
The GITFN_RESET_FILE function discards changes of a file that is in the staging area. The
function takes these two parameters:
• location of the local repository
• file path relative to the local repository location
Here is an example code snippet:
data _null_;
reset = GITFN_RESET_FILE("<path of local repository>", "cowboy.sas");
run;
Here are the possible return values:
• 0 – success
• -1 – error occurs
One thing to note regarding the reset functions: Any new files that have not been staged
will not be reset because these files are “untracked,” which means Git does not know about
them. Once the new files are staged, they are now tracked files and can be reset.
GITFN_DEL_REPO
The GITFN_DEL_REPO function deletes the local repository and all its content. The function
takes one parameter: location of the local repository
25
Here is an example code snippet:
data _null_;
RC = GITFN_DEL_REPO("<path of local repository>");
run;
Here are the possible return values:
• 0 – success
• -1 – error errors
• -2 – location does not exist
CONCLUSION In conclusion, we are excited here at SAS to provide this
functionality to our users. We are continuously developing new
functionality as well as enhancing and refining the functions
released with SAS 9.4M6. In the future, expect to see new
functions for rebasing, fetching and stashing as well as user
interfaces built on top of these functions in SAS Studio and
SAS® Enterprise Guide®.
LINKS SAS Institute Inc. 2019. GitHub sample repository. Accessed
March 19, 2019. Available
https://github.com/sasdazimm/SGF2019
SAS Institute Inc. 2019. “Using Git Function in SAS”. SAS 9.4
Functions and Call Routines. SAS Institute Inc., Cary, NC.
Available
https://documentation.sas.com/?docsetId=lefunctionsref&docsetTarget=n1mlc3f9w9zh9fn1
3qswiq6hrta0.htm&docsetVersion=9.4&locale=en
GitHub Help. 2019. “Generating a new SSH key and adding it to the ssh-agent.” GitHub Inc.
Accessed March 19, 2019. Available
https://help.github.com/en/articles/generating-a-new-ssh-key-and-adding-it-to-the-ssh-
agent
CONTACT INFORMATION Your comments and questions are valued and encouraged. Contact the authors at:
Danny Zimmerman
SAS Institute Inc.
SAS Campus Drive
Cary, NC 27513
919-677-8000
http://www.sas.com

26
SAS and all other SAS Institute Inc. product or service names are registered trademarks or
trademarks of SAS Institute Inc. in the USA and other countries. ® indicates USA
registration.
Other brand and product names are trademarks of their respective companies.