sas solutions services 5.2: data administration guide
TRANSCRIPT
SAS® Solutions Services 5.2Data Administration Guide
SAS® Documentation
The correct bibliographic citation for this manual is as follows: SAS Insitute Inc. 2010. SAS® Solutions Services 5.2: Data Administration Guide.Cary, NC: SAS Institute Inc.
SAS® Solutions Services 5.2: Data Administration Guide
All rights reserved. Produced in the United States of America.
For a hardcopy book: No part of this publication may be reproduced, stored in a retrieval system, or transmitted, in any form or by any means,electronic, mechanical, photocopying, or otherwise, without the prior written permission of the publisher, SAS Institute Inc.
For a Web download or e-book:Your use of this publication shall be governed by the terms established by the vendor at the time you acquire thispublication.
U.S. Government Restricted Rights Notice: Use, duplication, or disclosure of this software and related documentation by the U.S. government issubject to the Agreement with SAS Institute and the restrictions set forth in FAR 52.227–19 Commercial Computer Software-Restricted Rights (June1987).
SAS Institute Inc., SAS Campus Drive, Cary, North Carolina 27513.
1st electronic book, November 2010
SAS® Publishing provides a complete selection of books and electronic products to help customers use SAS software to its fullest potential. For moreinformation about our e-books, e-learning products, CDs, and hard-copy books, visit the SAS Publishing Web site at support.sas.com/publishing or call 1-800-727-3228.
Other brand and product names are registered trademarks or trademarks of their respective companies.
Contents
PART 1 Data Administration Across Solutions 1
Chapter 1 • Introduction to Data Administration . . . . . . . . . . . . . . . . . . . . . . . . . . . . . . . . . . . . . . . 3The Mission of Data Administration . . . . . . . . . . . . . . . . . . . . . . . . . . . . . . . . . . . . . . . . 3New Data Administration Features in SAS Solutions Services . . . . . . . . . . . . . . . . . . . . 4Survey of Tasks . . . . . . . . . . . . . . . . . . . . . . . . . . . . . . . . . . . . . . . . . . . . . . . . . . . . . . . . 6Server Configuration . . . . . . . . . . . . . . . . . . . . . . . . . . . . . . . . . . . . . . . . . . . . . . . . . . . . 9Documentation Conventions . . . . . . . . . . . . . . . . . . . . . . . . . . . . . . . . . . . . . . . . . . . . . . 9Related Documentation . . . . . . . . . . . . . . . . . . . . . . . . . . . . . . . . . . . . . . . . . . . . . . . . . 10
Chapter 2 • Setting Up the SAS Data Integration Studio Environment . . . . . . . . . . . . . . . . . . . . 11Overview of Setup Tasks . . . . . . . . . . . . . . . . . . . . . . . . . . . . . . . . . . . . . . . . . . . . . . . . 11Access Settings for the Data-Tier Server . . . . . . . . . . . . . . . . . . . . . . . . . . . . . . . . . . . . 11Copy Jobs . . . . . . . . . . . . . . . . . . . . . . . . . . . . . . . . . . . . . . . . . . . . . . . . . . . . . . . . . . . . 12Send Notifications from Jobs . . . . . . . . . . . . . . . . . . . . . . . . . . . . . . . . . . . . . . . . . . . . . 12
Chapter 3 • Using SAS Data Integration Studio to Supply Data to Solutions . . . . . . . . . . . . . . . 13Overview of the Main Data Pathway . . . . . . . . . . . . . . . . . . . . . . . . . . . . . . . . . . . . . . . 13Data Encodings . . . . . . . . . . . . . . . . . . . . . . . . . . . . . . . . . . . . . . . . . . . . . . . . . . . . . . . . 15Moving Data from Its Source to the Staging Tables . . . . . . . . . . . . . . . . . . . . . . . . . . . 15Loading the Detail Data Store Tables from the Staging Tables . . . . . . . . . . . . . . . . . . . 16Moving Data from the Detail Data Store to the SDM . . . . . . . . . . . . . . . . . . . . . . . . . . 19Moving Data from the Detail Data Store to the HCM Data Mart . . . . . . . . . . . . . . . . . 20Overview of Other Data Pathways . . . . . . . . . . . . . . . . . . . . . . . . . . . . . . . . . . . . . . . . . 20Extending the Detail Data Store . . . . . . . . . . . . . . . . . . . . . . . . . . . . . . . . . . . . . . . . . . . 21
Chapter 4 • Loading Language Codes and Data Locale Codes . . . . . . . . . . . . . . . . . . . . . . . . . . 23Overview of Languages and Data Locales . . . . . . . . . . . . . . . . . . . . . . . . . . . . . . . . . . 23Loading the Staging Table for Language and Locale Data . . . . . . . . . . . . . . . . . . . . . . 23Data Locales with Predefined Text . . . . . . . . . . . . . . . . . . . . . . . . . . . . . . . . . . . . . . . . . 24Loading the Detail Data Store Table . . . . . . . . . . . . . . . . . . . . . . . . . . . . . . . . . . . . . . . 25Loading Data Locale Codes into the SDM . . . . . . . . . . . . . . . . . . . . . . . . . . . . . . . . . . . 25
Chapter 5 • Loading Users and User Groups . . . . . . . . . . . . . . . . . . . . . . . . . . . . . . . . . . . . . . . . 27Overview of Users and Groups . . . . . . . . . . . . . . . . . . . . . . . . . . . . . . . . . . . . . . . . . . . . 27Ways to Load User and Group Data . . . . . . . . . . . . . . . . . . . . . . . . . . . . . . . . . . . . . . . . 27
Chapter 6 • Creating a Dimension . . . . . . . . . . . . . . . . . . . . . . . . . . . . . . . . . . . . . . . . . . . . . . . . . . 29Dimension Types, Dimensions, Hierarchies, and Members . . . . . . . . . . . . . . . . . . . . . . 29Ways to Create a Dimension . . . . . . . . . . . . . . . . . . . . . . . . . . . . . . . . . . . . . . . . . . . . . 30Using the Create Dimension Transformation . . . . . . . . . . . . . . . . . . . . . . . . . . . . . . . . . 30Starting from a Staging Table . . . . . . . . . . . . . . . . . . . . . . . . . . . . . . . . . . . . . . . . . . . . . 32
Chapter 7 • Loading Members and Hierarchies into a Dimension . . . . . . . . . . . . . . . . . . . . . . . . 35Ways to Modify the Content of a Dimension . . . . . . . . . . . . . . . . . . . . . . . . . . . . . . . . . 35Moving Member and Hierarchy Data from Its Source to the Staging Tables . . . . . . . . 36Loading Members and Hierarchies from the Staging Tables to the Detail Data Store . 49Moving Member and Hierarchy Data from the Detail Data Store to the SDM . . . . . . . 50
Chapter 8 • Registering Member Properties So That They Are Loaded into the SDM . . . . . . . . 53Overview of Member Properties . . . . . . . . . . . . . . . . . . . . . . . . . . . . . . . . . . . . . . . . . . 53Member Properties That Are Preregistered . . . . . . . . . . . . . . . . . . . . . . . . . . . . . . . . . . 53Defining New Member Properties . . . . . . . . . . . . . . . . . . . . . . . . . . . . . . . . . . . . . . . . . 54Registering Member Properties . . . . . . . . . . . . . . . . . . . . . . . . . . . . . . . . . . . . . . . . . . . 54Using Member Properties That You Have Registered . . . . . . . . . . . . . . . . . . . . . . . . . . 56
Chapter 9 • Exporting and Promoting Members and Hierarchies . . . . . . . . . . . . . . . . . . . . . . . . 57Overview of Exporting Members and Hierarchies . . . . . . . . . . . . . . . . . . . . . . . . . . . . . 57Using a Job to Export Members and Hierarchies . . . . . . . . . . . . . . . . . . . . . . . . . . . . . 58Using the Export Dimension Wizard to Export Members and Hierarchies . . . . . . . . . 60Details of the Result . . . . . . . . . . . . . . . . . . . . . . . . . . . . . . . . . . . . . . . . . . . . . . . . . . . . 60Possible Obstacles to Exporting a Dimension . . . . . . . . . . . . . . . . . . . . . . . . . . . . . . . . 61
Chapter 10 • Adding a Dimension Type . . . . . . . . . . . . . . . . . . . . . . . . . . . . . . . . . . . . . . . . . . . . . 63Overview of Adding a Dimension Type . . . . . . . . . . . . . . . . . . . . . . . . . . . . . . . . . . . . . 63Run the Job That Creates a New Dimension Type in the Staging Tables . . . . . . . . . . . 64Run the Job That Loads a Dimension Type . . . . . . . . . . . . . . . . . . . . . . . . . . . . . . . . . . 68Write Jobs to Load the New Staging Tables . . . . . . . . . . . . . . . . . . . . . . . . . . . . . . . . . 69Create the Jobs That Load the New Detail Data Store Tables . . . . . . . . . . . . . . . . . . . . 69Customize the Job That Loads the Detail Data Store Primary Member Table . . . . . . . 70Customize the Job That Loads the Detail Data Store Hierarchy Identification Table . . 77Customize the Job That Loads the Detail Data Store Hierarchy Structure Table . . . . . 86Customize the Job That Loads the Detail Data Store Secondary Member Table . . . . . 97Customize the Job That Loads the GL_TRANSACTION_SUM Table . . . . . . . . . . . 100Customize the Job That Loads the GL_JRNL_DETAILS Table . . . . . . . . . . . . . . . . . 104Loading New Dimension Types into the SDM . . . . . . . . . . . . . . . . . . . . . . . . . . . . . . 104Creating Dimensions in a New Dimension Type . . . . . . . . . . . . . . . . . . . . . . . . . . . . . 104Loading Members and Hierarchies into a Dimension That Belongs
to a New Dimension Type . . . . . . . . . . . . . . . . . . . . . . . . . . . . . . . . . . . . . . . . . . . 104
Chapter 11 • Loading Measures . . . . . . . . . . . . . . . . . . . . . . . . . . . . . . . . . . . . . . . . . . . . . . . . . . 105Overview: Measures and Metrics . . . . . . . . . . . . . . . . . . . . . . . . . . . . . . . . . . . . . . . . . 105Moving Measure Data from Its Source to the Detail Data Store . . . . . . . . . . . . . . . . . 105Moving Measure Data from the Detail Data Store to the SDM . . . . . . . . . . . . . . . . . . 107
Chapter 12 • Loading Metrics . . . . . . . . . . . . . . . . . . . . . . . . . . . . . . . . . . . . . . . . . . . . . . . . . . . . 109Overview: Measures and Metrics . . . . . . . . . . . . . . . . . . . . . . . . . . . . . . . . . . . . . . . . . 109Data Pathways for Metrics . . . . . . . . . . . . . . . . . . . . . . . . . . . . . . . . . . . . . . . . . . . . . . 109Preparing a Source Table of Metric Data . . . . . . . . . . . . . . . . . . . . . . . . . . . . . . . . . . . 110Preparing Jobs to Load Metric Data . . . . . . . . . . . . . . . . . . . . . . . . . . . . . . . . . . . . . . . 111
Chapter 13 • Creating a Stored Process from a SAS Data Integration Studio Job . . . . . . . . . 115Creating a Stored Process from a SAS Data Integration Studio Job . . . . . . . . . . . . . . 115
PART 2 Data Administration Specific to SAS FinancialManagement 117
Chapter 14 • Loading Exchange Rates into a SAS Financial Management Exchange Rate Set 119Exchange Rate Types . . . . . . . . . . . . . . . . . . . . . . . . . . . . . . . . . . . . . . . . . . . . . . . . . . 119Exchange Rate Sets . . . . . . . . . . . . . . . . . . . . . . . . . . . . . . . . . . . . . . . . . . . . . . . . . . . . 120Exchange Rate Sources . . . . . . . . . . . . . . . . . . . . . . . . . . . . . . . . . . . . . . . . . . . . . . . . . 121Loading Exchange Rates into Their Staging Tables . . . . . . . . . . . . . . . . . . . . . . . . . . . 121
iv Contents

Loading Exchange Rates from Their Staging Tables to Their Detail Data Store Tables 123Loading Exchange Rates from the Detail Data Store to the SDM . . . . . . . . . . . . . . . . 123
Chapter 15 • Loading Driver Rates into a SAS Financial Management Driver Rate Set . . . . . 127Driver Rate Types . . . . . . . . . . . . . . . . . . . . . . . . . . . . . . . . . . . . . . . . . . . . . . . . . . . . . 127Driver Rate Sets . . . . . . . . . . . . . . . . . . . . . . . . . . . . . . . . . . . . . . . . . . . . . . . . . . . . . . 128Loading Driver Rates into Their Staging Table . . . . . . . . . . . . . . . . . . . . . . . . . . . . . . 128Loading Driver Rates from Their Staging Table to Their Detail Data Store Table . . . 129Loading Driver Rates from the Detail Data Store to the SDM . . . . . . . . . . . . . . . . . . . 130
Chapter 16 • Loading Cell Protection Rules for a Model . . . . . . . . . . . . . . . . . . . . . . . . . . . . . . 133About Cell Protection Rules . . . . . . . . . . . . . . . . . . . . . . . . . . . . . . . . . . . . . . . . . . . . . 133Loading Cell Protection Rules for a Model . . . . . . . . . . . . . . . . . . . . . . . . . . . . . . . . . 134Loading Cell Protection Rules into Their Staging Tables . . . . . . . . . . . . . . . . . . . . . . 134Loading Cell Protection Rules from the Staging Tables to the SDM . . . . . . . . . . . . . . 136
Chapter 17 • Loading Base Data into a Financial Cycle . . . . . . . . . . . . . . . . . . . . . . . . . . . . . . . 139Overview of Loading Base Financial Data . . . . . . . . . . . . . . . . . . . . . . . . . . . . . . . . . . 139Moving Base Financial Data from Its Source to the Staging Tables . . . . . . . . . . . . . . 139Moving Base Financial Data from the Staging Tables to the Detail Data Store . . . . . 144Moving Base Financial Data from the Detail Data Store to the SDM . . . . . . . . . . . . . 144
Chapter 18 • Loading Base Data into an Operational Cycle . . . . . . . . . . . . . . . . . . . . . . . . . . . . 149Overview of Loading Base Operational Data . . . . . . . . . . . . . . . . . . . . . . . . . . . . . . . . 149Moving Base Operational Data from Its Source to Its Staging Table . . . . . . . . . . . . . 149Moving Base Operational Data from the Staging Table to the Detail Data Store . . . . 152Moving Base Operational Data from the Detail Data Store to the SDM . . . . . . . . . . . 152
Chapter 19 • Exporting Financial Accounting Data . . . . . . . . . . . . . . . . . . . . . . . . . . . . . . . . . . . 157Overview of Exporting Accounting Data . . . . . . . . . . . . . . . . . . . . . . . . . . . . . . . . . . . 157Using the Export Data Records Wizard to Export Accounting Data . . . . . . . . . . . . . . 158Using the Export Model Data Job to Export Accounting Data . . . . . . . . . . . . . . . . . . 158Using a SAS Macro to Export Accounting Data . . . . . . . . . . . . . . . . . . . . . . . . . . . . . 159Details of the Result . . . . . . . . . . . . . . . . . . . . . . . . . . . . . . . . . . . . . . . . . . . . . . . . . . . 159Possible Obstacles to Exporting Accounting Data . . . . . . . . . . . . . . . . . . . . . . . . . . . . 160Checking for Errors . . . . . . . . . . . . . . . . . . . . . . . . . . . . . . . . . . . . . . . . . . . . . . . . . . . 161
Chapter 20 • Loading a System Filter for the SAS Financial Management Add-In for Microsoft Excel . . . . . . . . . . . . . . . . . . . . . . . . . . . . . . . . . . . . . . . . . . . . . . . . . . . . . . . . 163
Viewing Data with the SAS Financial Management Add-In for Microsoft Excel . . . . 163Loading System Filter Specifications into the Staging Tables . . . . . . . . . . . . . . . . . . . 164Moving System Filter Specifications from the Staging Tables to the Detail Data Store 166Moving System Filter Specifications from the Detail Data Store to the SDM . . . . . . 166
PART 3 Data Administration Specific to SAS Human CapitalManagement 169
Chapter 21 • Loading Data for SAS Human Capital Management . . . . . . . . . . . . . . . . . . . . . . . 171Overview of Data Needs for SAS Human Capital Management . . . . . . . . . . . . . . . . . 172The Locale for SAS Human Capital Management . . . . . . . . . . . . . . . . . . . . . . . . . . . . 172Competency Tables . . . . . . . . . . . . . . . . . . . . . . . . . . . . . . . . . . . . . . . . . . . . . . . . . . . 172Moving SAS Human Capital Management Data from Its Source to the Staging Tables 173Loading HCM Data from the Staging Tables to the Detail Data Store . . . . . . . . . . . . 177
Contents v
Moving Data from the Detail Data Store to the SDM . . . . . . . . . . . . . . . . . . . . . . . . . 179Auxiliary Files and Information Sources . . . . . . . . . . . . . . . . . . . . . . . . . . . . . . . . . . . 180Moving Data from the Detail Data Store to the HCM Data Mart . . . . . . . . . . . . . . . . 185Loading HCM Metrics into a Metric Table . . . . . . . . . . . . . . . . . . . . . . . . . . . . . . . . . 197Creating the HCM Information Maps . . . . . . . . . . . . . . . . . . . . . . . . . . . . . . . . . . . . . . 199
Chapter 22 • Modifying the Data Model for SAS Human Capital Management . . . . . . . . . . . . . 201Overview of Modifying the HCM Data Model . . . . . . . . . . . . . . . . . . . . . . . . . . . . . . 201Adding a Column . . . . . . . . . . . . . . . . . . . . . . . . . . . . . . . . . . . . . . . . . . . . . . . . . . . . . 201Changing the Character Length of a Column . . . . . . . . . . . . . . . . . . . . . . . . . . . . . . . . 204Adding a Table . . . . . . . . . . . . . . . . . . . . . . . . . . . . . . . . . . . . . . . . . . . . . . . . . . . . . . . 205Adding a Cube . . . . . . . . . . . . . . . . . . . . . . . . . . . . . . . . . . . . . . . . . . . . . . . . . . . . . . . 206
Chapter 23 • Macro Variables in the PREBUILD.SAS Macro File . . . . . . . . . . . . . . . . . . . . . . . . 209Overview of SAS Human Capital Management Macro Variables . . . . . . . . . . . . . . . . 210Families of Table-Acronym Macro Variables . . . . . . . . . . . . . . . . . . . . . . . . . . . . . . . 210Individual Macro Variables . . . . . . . . . . . . . . . . . . . . . . . . . . . . . . . . . . . . . . . . . . . . . 219
Chapter 24 • Internal Formats . . . . . . . . . . . . . . . . . . . . . . . . . . . . . . . . . . . . . . . . . . . . . . . . . . . . 235Introduction . . . . . . . . . . . . . . . . . . . . . . . . . . . . . . . . . . . . . . . . . . . . . . . . . . . . . . . . . . 235IACTION . . . . . . . . . . . . . . . . . . . . . . . . . . . . . . . . . . . . . . . . . . . . . . . . . . . . . . . . . . . 235ICHURN . . . . . . . . . . . . . . . . . . . . . . . . . . . . . . . . . . . . . . . . . . . . . . . . . . . . . . . . . . . . 236IEEOCL . . . . . . . . . . . . . . . . . . . . . . . . . . . . . . . . . . . . . . . . . . . . . . . . . . . . . . . . . . . . 236IEMPSTA . . . . . . . . . . . . . . . . . . . . . . . . . . . . . . . . . . . . . . . . . . . . . . . . . . . . . . . . . . . 237IEXEMPT . . . . . . . . . . . . . . . . . . . . . . . . . . . . . . . . . . . . . . . . . . . . . . . . . . . . . . . . . . . 237IONPAYRL . . . . . . . . . . . . . . . . . . . . . . . . . . . . . . . . . . . . . . . . . . . . . . . . . . . . . . . . . 237IPAYPER . . . . . . . . . . . . . . . . . . . . . . . . . . . . . . . . . . . . . . . . . . . . . . . . . . . . . . . . . . . 238IREGTMP . . . . . . . . . . . . . . . . . . . . . . . . . . . . . . . . . . . . . . . . . . . . . . . . . . . . . . . . . . . 238ISTECLS . . . . . . . . . . . . . . . . . . . . . . . . . . . . . . . . . . . . . . . . . . . . . . . . . . . . . . . . . . . . 238ITERM . . . . . . . . . . . . . . . . . . . . . . . . . . . . . . . . . . . . . . . . . . . . . . . . . . . . . . . . . . . . . 239
PART 4 Appendixes 241
Appendix 1 • MySQL Reserved Words . . . . . . . . . . . . . . . . . . . . . . . . . . . . . . . . . . . . . . . . . . . . . 243
Appendix 2 • The Conform Area . . . . . . . . . . . . . . . . . . . . . . . . . . . . . . . . . . . . . . . . . . . . . . . . . . 245Overview of the Conform Area . . . . . . . . . . . . . . . . . . . . . . . . . . . . . . . . . . . . . . . . . . 245Copying Tables to the Conform Area . . . . . . . . . . . . . . . . . . . . . . . . . . . . . . . . . . . . . . 245Index . . . . . . . . . . . . . . . . . . . . . . . . . . . . . . . . . . . . . . . . . . . . . . . . . . . . . . . . 247
vi Contents
Part 1
Data Administration AcrossSolutions
Chapter 1Introduction to Data Administration . . . . . . . . . . . . . . . . . . . . . . . . . . . . . . . 3
Chapter 2Setting Up the SAS Data Integration Studio Environment . . . . . . . . . 11
Chapter 3Using SAS Data Integration Studio to Supply Data to Solutions . . . 13
Chapter 4Loading Language Codes and Data Locale Codes . . . . . . . . . . . . . . . . 23
Chapter 5Loading Users and User Groups . . . . . . . . . . . . . . . . . . . . . . . . . . . . . . . . . 27
Chapter 6Creating a Dimension . . . . . . . . . . . . . . . . . . . . . . . . . . . . . . . . . . . . . . . . . . . . 29
Chapter 7Loading Members and Hierarchies into a Dimension . . . . . . . . . . . . . . 35
Chapter 8Registering Member Properties So That They Are Loaded into the SDM. . . . . . . . . . . . . . . . . . . . . . . . . . . . . . . . . . . . . . . . . . . . . . . . . . . . . . . . . . . . . . . . . . 53
Chapter 9Exporting and Promoting Members and Hierarchies . . . . . . . . . . . . . . 57
Chapter 10Adding a Dimension Type . . . . . . . . . . . . . . . . . . . . . . . . . . . . . . . . . . . . . . . . 63
Chapter 11Loading Measures . . . . . . . . . . . . . . . . . . . . . . . . . . . . . . . . . . . . . . . . . . . . . . 105
Chapter 12Loading Metrics . . . . . . . . . . . . . . . . . . . . . . . . . . . . . . . . . . . . . . . . . . . . . . . . 109
1

Chapter 13Creating a Stored Process from a SAS Data Integration Studio Job 115
2

Chapter 1
Introduction to DataAdministration
The Mission of Data Administration . . . . . . . . . . . . . . . . . . . . . . . . . . . . . . . . . . . . . . . 3
New Data Administration Features in SAS Solutions Services . . . . . . . . . . . . . . . . . 4Metadata Structure . . . . . . . . . . . . . . . . . . . . . . . . . . . . . . . . . . . . . . . . . . . . . . . . . . . 4Security . . . . . . . . . . . . . . . . . . . . . . . . . . . . . . . . . . . . . . . . . . . . . . . . . . . . . . . . . . . . 4SAS Human Capital Management . . . . . . . . . . . . . . . . . . . . . . . . . . . . . . . . . . . . . . . 5
Survey of Tasks . . . . . . . . . . . . . . . . . . . . . . . . . . . . . . . . . . . . . . . . . . . . . . . . . . . . . . . . 6Preparatory Tasks for All Sites . . . . . . . . . . . . . . . . . . . . . . . . . . . . . . . . . . . . . . . . . . 6Tasks to Consider for Any Site . . . . . . . . . . . . . . . . . . . . . . . . . . . . . . . . . . . . . . . . . . 6Tasks to Support Scorecards . . . . . . . . . . . . . . . . . . . . . . . . . . . . . . . . . . . . . . . . . . . . 7Tasks to Support SAS Financial Management . . . . . . . . . . . . . . . . . . . . . . . . . . . . . . 8Tasks to Support SAS Human Capital Management . . . . . . . . . . . . . . . . . . . . . . . . . 8
Server Configuration . . . . . . . . . . . . . . . . . . . . . . . . . . . . . . . . . . . . . . . . . . . . . . . . . . . 9
Documentation Conventions . . . . . . . . . . . . . . . . . . . . . . . . . . . . . . . . . . . . . . . . . . . . . 9
Related Documentation . . . . . . . . . . . . . . . . . . . . . . . . . . . . . . . . . . . . . . . . . . . . . . . . 10
The Mission of Data AdministrationYour main mission as a SAS Solutions Services data administrator is to supply data to theSAS solution software. The relevant data spans a variety of content categories. Thesecategories differ in the roles that they play and the times when they are needed:
• Data that belongs to certain content categories must be supplied initially in order to getthe software working.
• Data that belongs to other content categories must be supplied periodically so that thesoftware can produce timely output.
• Data that belongs to still other content categories might not be needed at all, dependingon which solutions you are running and how you are using them.
Each content category involves unique considerations. However, there are some generalthemes:
• The ultimate destination of all the data that you supply is MySQL tables to which thesolution software has access. These MySQL tables are grouped into three distinct areas—the Solutions Data Mart (SDM), the HCM Data Mart, and the SPM database.
• The main way of moving data from one table to another is by running SAS DataIntegration Studio jobs.
3
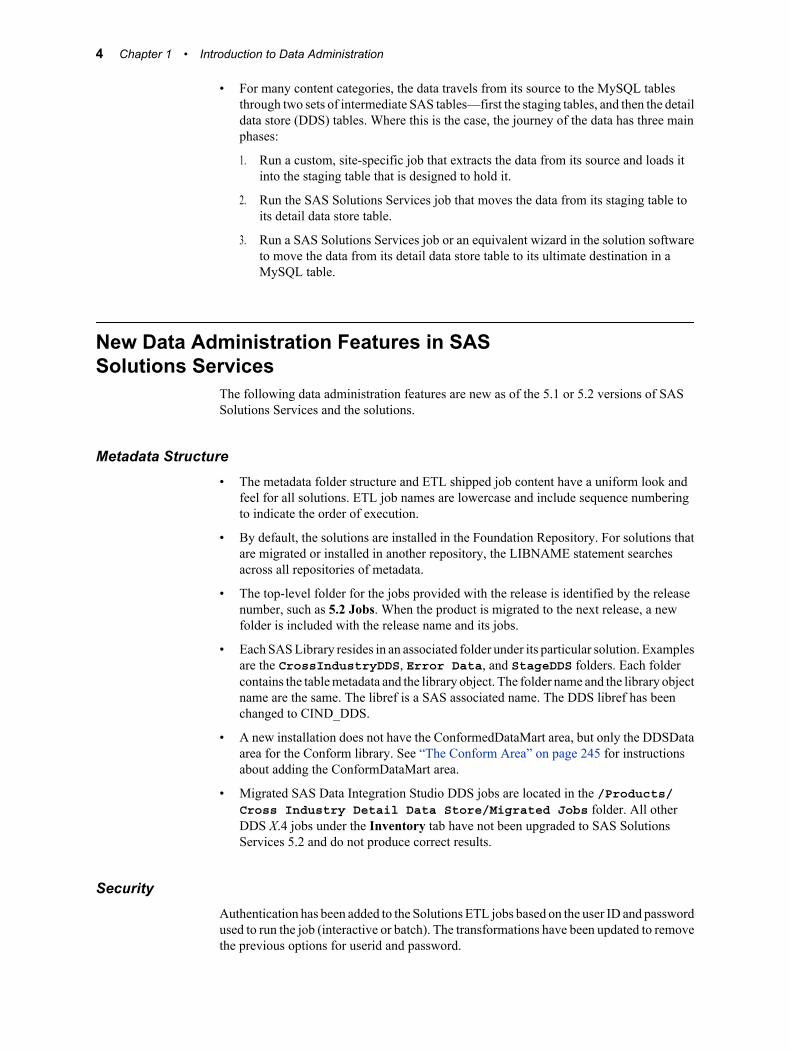
• For many content categories, the data travels from its source to the MySQL tablesthrough two sets of intermediate SAS tables—first the staging tables, and then the detaildata store (DDS) tables. Where this is the case, the journey of the data has three mainphases:
1. Run a custom, site-specific job that extracts the data from its source and loads itinto the staging table that is designed to hold it.
2. Run the SAS Solutions Services job that moves the data from its staging table toits detail data store table.
3. Run a SAS Solutions Services job or an equivalent wizard in the solution softwareto move the data from its detail data store table to its ultimate destination in aMySQL table.
New Data Administration Features in SASSolutions Services
The following data administration features are new as of the 5.1 or 5.2 versions of SASSolutions Services and the solutions.
Metadata Structure• The metadata folder structure and ETL shipped job content have a uniform look and
feel for all solutions. ETL job names are lowercase and include sequence numberingto indicate the order of execution.
• By default, the solutions are installed in the Foundation Repository. For solutions thatare migrated or installed in another repository, the LIBNAME statement searchesacross all repositories of metadata.
• The top-level folder for the jobs provided with the release is identified by the releasenumber, such as 5.2 Jobs. When the product is migrated to the next release, a newfolder is included with the release name and its jobs.
• Each SAS Library resides in an associated folder under its particular solution. Examplesare the CrossIndustryDDS, Error Data, and StageDDS folders. Each foldercontains the table metadata and the library object. The folder name and the library objectname are the same. The libref is a SAS associated name. The DDS libref has beenchanged to CIND_DDS.
• A new installation does not have the ConformedDataMart area, but only the DDSDataarea for the Conform library. See “The Conform Area” on page 245 for instructionsabout adding the ConformDataMart area.
• Migrated SAS Data Integration Studio DDS jobs are located in the /Products/Cross Industry Detail Data Store/Migrated Jobs folder. All otherDDS X.4 jobs under the Inventory tab have not been upgraded to SAS SolutionsServices 5.2 and do not produce correct results.
SecurityAuthentication has been added to the Solutions ETL jobs based on the user ID and passwordused to run the job (interactive or batch). The transformations have been updated to removethe previous options for userid and password.
4 Chapter 1 • Introduction to Data Administration
SAS Human Capital ManagementThe following changes are of interest primarily to users of SAS Human CapitalManagement:
• These are the default metadata folder paths for SAS Human Capital Management:
Tables/Products/SAS Human Capital Management/Data Sources/HCMData
Information Maps/Products/SAS Human Capital Management/Data Sources/Information Maps
OLAP Cubes/Products/SAS Human Capital Management/Data Sources/Cubes
Jobs/Products/SAS Human Capital Management/5.2 Jobs
Reports/Products/SAS Human Capital Management/5.2 Reports
• The names of HCM jobs have been changed to include sequence numbers.
• Three new forecasting jobs have been added to build three new forecasting tables:
• hcm_126050_run_month_forecast (HCMMONTHFORECAST)
• hcm_126100_run_quarter_forecast (HCMQTRFORECAST)
• hcm_126150_run_year_forecast (HCMYEARFORECAST)
• By default, the hcm_126050_run_month_forecast job forecasts New Hires, Churn,and Change in Headcount. The hcm_126100_run_quarter_forecast job forecastsVoluntary Terminations and Headcount. The hcm_126150_run_year_forecast jobforecasts Involuntary Terminations.
• The Metrics process has been modified to store all metrics in the new tableSAS_MEASURES. There are two new jobs to load these metrics:
• hcm_128050_load_sas_measures_table
• hcm_128100_load_sas_measures_table_with_org
If a site has SAS Strategy Management, the site can load the metrics to the SDM usingthe following jobs:
• hcm_128900_load_sdm_metric_table
• hcm_128901_load_sdm_metric_table_with_org
• The HRVANLY2, MODELSCORES and EMPSCORES retention analysis data tableshave been added. HRVANLY2 is a utility table that is not registered in SAS HumanCapital Management. There are three new jobs to build these tables:
• hcm_140050_load_hrvanly2_table
• hcm_140100_load_modelscores_table
• hcm_140150_load_empscores_table
• Default formats are now loaded at installation directly into the newSAS_HCM_FORMATS table. The DDS formats and Organizational Hierarchyformats are loaded into SAS_HCM_FORMATS during the build. The formats in
New Data Administration Features in SAS Solutions Services 5
SAS_HCM_FORMATS are maintained via a Web user interface. The FORMATScatalog is updated from the formats in the SAS_HCM_FORMATS table.
• The data locales available for SAS Human Capital Management are restricted to thelocales that are loaded into the detail data store CODE_LANGUAGE table. The jobthat loads the formats table, hcm_110050_load_formats_table, is modified so that itflags the detail data store CODE_LANGUAGE locales in the SAS_LOCALE_LISTtable.
• For stored process reports, the column labels and report titles can now be displayedusing the user’s SAS Portal language preference if the corresponding locale propertiesfiles are available. If the properties files aren’t available, the locale set for SAS HumanCapital Management will be used.
• A number of macros have been deleted or modified.
• A new job has been added to load the SAS_USER_EMPLOYEE table:hcm_110450_load_sas_user_employee_table. All active employee users that aremembers of the metadata group designated for SAS Human Capital Management usersare loaded into the table.
• Two new Education Detail tables have been added, along with the jobs to buildthem:
EDUHISTThis education history detail table contains the employee’s education history.
EDUVALThis education assessment detail table contains the employee’s educational metrics.
• A new job to refresh the SAS Human Capital Management cache,hcm_900000_refresh_cache, runs at the end of the build.
• The Education Enrollment jobs have been removed.
Survey of Tasks
Preparatory Tasks for All SitesThe set of relevant data administration tasks depends on your site-specific circumstances.At any site, perform the following tasks in the specified order before you begin to loaddata:
1. Complete the installation of SAS Solutions Services.
2. Prepare the SAS Data Integration Studio environment, following the instructions inChapter 2, “Setting Up the SAS Data Integration Studio Environment,” on page 11.
Tasks to Consider for Any SiteTasks that are not specific to a single solution are grouped together in Part 1. Here is asummary of the most important cross-solution tasks:
• To support any solution, you must load user and user group data into the Solutions DataMart (SDM). You must also take steps to ensure that the user and group data in theSDM always matches the user and group data in the metadata repository. For details,see Chapter 5, “Loading Users and User Groups,” on page 27.
6 Chapter 1 • Introduction to Data Administration
• To support any solution, you must load measures, as described in Chapter 11, “LoadingMeasures,” on page 105.
• If the set of predefined dimension types is not adequate for your purposes, then youmust define additional dimension types, as explained in Chapter 10, “Adding aDimension Type,” on page 63.
• You must define dimensions, members, and hierarchies for the dimension types thatyou are using. To do this with SAS Data Integration Studio, see Chapter 6, “Creatinga Dimension,” on page 29 and Chapter 7, “Loading Members and Hierarchies into aDimension,” on page 35.
• At your discretion, you can widen the availability of any SAS Data Integration Studiojob by converting it into a stored process. See Chapter 13, “Creating a Stored Processfrom a SAS Data Integration Studio Job,” on page 115.
• In order for a job to send a Data Modified notification, you must edit the transformationand specify the condition that generates the notification and the action to be taken.See“Send Notifications from Jobs” on page 12.
Tasks to Support ScorecardsTo support the use of scorecards in SAS Strategy Management or the KPI viewer, considerall of the following:
• If the set of predefined measures is not adequate for your purposes, then you must defineand load additional measures. To review the set of predefined measures, view the datain the SAS_MEASURE table. For details, see Chapter 11, “Loading Measures,” onpage 105.
• For each dimension type that is used in scorecards, you must make sure that it is properlystocked with dimensions, members, and hierarchies. For details, see Chapter 6,“Creating a Dimension,” on page 29 and Chapter 7, “Loading Members andHierarchies into a Dimension,” on page 35.
Every scorecard must use the TIME dimension type to indicate the time periods thatnumeric values apply to. The ANALYSIS dimension type can be used to distinguishresults from forecasts and budgets. All other dimension types are also available for usein scorecards.
• The numeric values that are displayed in scorecards can be supplied in any of thefollowing ways:
• You can use SAS Data Integration Studio to load numeric values from an externalsource to a metric table, which scorecards can point to. For details, see Chapter 12,“Loading Metrics,” on page 109.
• If you have SAS Human Capital Management installed, you can use SAS DataIntegration Studio to load numeric values from the HCM Data Mart to a metrictable, which scorecards can point to. For details, see “Loading HCM Metrics intoa Metric Table” on page 197.
• Users of the SAS Financial Management Add-in for Microsoft Excel can postnumeric values from financial reports to a metric table, which scorecards can pointto.
• You can use the Batch Model Facility (BMF) within SAS Strategy Management toload numeric values into the SPM database, which scorecards can access directly.For details, see the SAS Strategy Management online Help or talk to your SASconsultant.
Survey of Tasks 7
• You might want to load user-member associations that determine default read accessto scorecards. See “Users Tab Data” on page 48.
Tasks to Support SAS Financial ManagementTo support the use of SAS Financial Management, consider all of the following:
• To adequately describe your financial accounting data, you might need to defineadditional dimension types, as explained in Chapter 10, “Adding a Dimension Type,”on page 63.
• For each dimension type that is used to describe financial accounting data, you mustmake sure that it is properly stocked with dimensions, members, and hierarchies. Fordetails, see Chapter 6, “Creating a Dimension,” on page 29 and Chapter 7, “LoadingMembers and Hierarchies into a Dimension,” on page 35.
The following dimension types must be used to describe financial accounting data:
• ACCOUNT
• ANALYSIS
• CURRENCY
• INTORG
• TIME
All other dimension types are also available for use in describing financial accountingdata.
• You must take steps to load fresh financial accounting data on a periodic basis. SeeChapter 17, “Loading Base Data into a Financial Cycle,” on page 139.
• It is likely that you will want to load fresh currency exchange rates on a periodic basis.See Chapter 14, “Loading Exchange Rates into a SAS Financial Management ExchangeRate Set,” on page 119.
• You might want to load a system filter that users of the SAS Financial ManagementAdd-in for Microsoft Excel can apply to read-only tables and data-entry tables. SeeChapter 20, “Loading a System Filter for the SAS Financial Management Add-In forMicrosoft Excel,” on page 163.
• You might want to load Users tab user-member associations, which control write accessto planning forms). See “Users Tab Data” on page 48.
• You might want to load Security tab user-member and group-member associations.These associations control Read access to reports in the SAS Financial ManagementAdd-in for Microsoft Excel. See “Security Tab Data” on page 48.
• If you are managing two related SAS Financial Management systems (a developmentsystem and a production system, for example), then you might want to promotedimension members and hierarchies from one system to another. See Chapter 9,“Exporting and Promoting Members and Hierarchies,” on page 57.
Tasks to Support SAS Human Capital ManagementSee Chapter 21, “Loading Data for SAS Human Capital Management,” on page 171.
8 Chapter 1 • Introduction to Data Administration
Server ConfigurationThere are three types of servers that you might work with:
• The Metadata Server is the server machine on which the SAS Metadata Server softwareis running. SAS must be available on this same machine.
• The Data Tier Server is the server machine on which SAS runs data-handling programs(including the logical servers for Workspace and Stored Process servers).Transformations, error tables, and jobs are installed on the Data Tier Server.
The same machine is often used as both the Data Tier Server and the Metadata Server.
• The Middle Tier Server is the server machine on which the managed servers and SASRemote Services run. Certain activities require you to start or stop the managed serversand SAS Remote Services, as explained in SAS Solutions Services: SystemAdministration Guide.
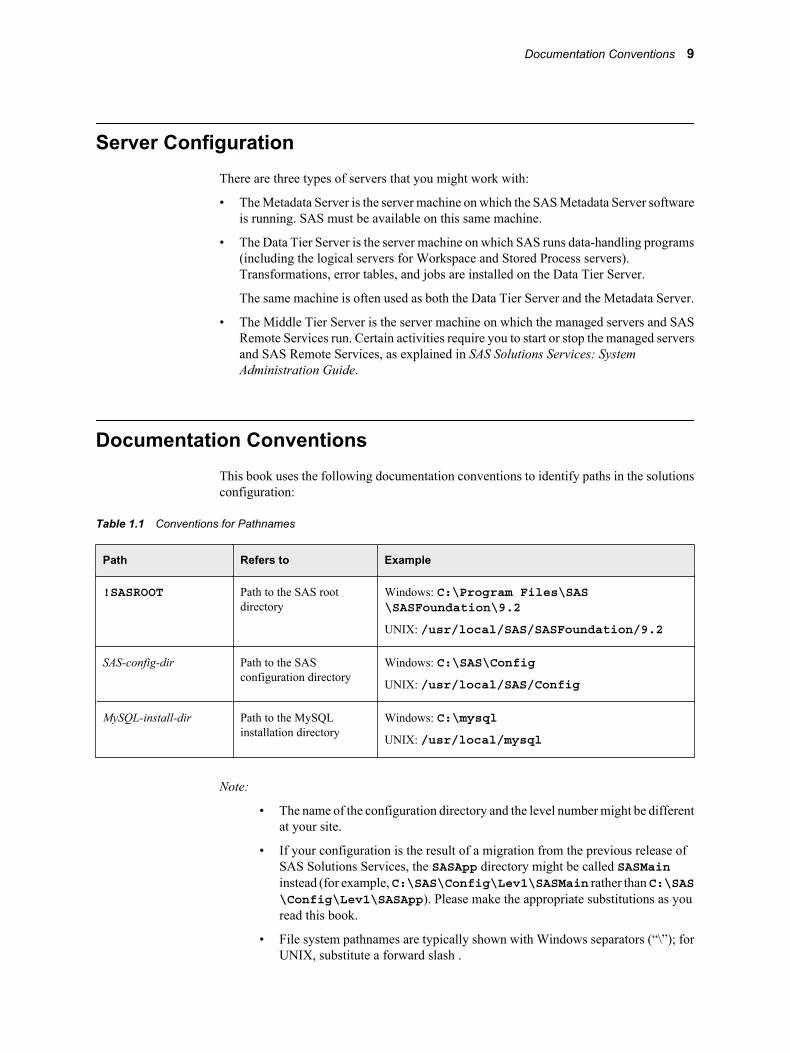
Documentation ConventionsThis book uses the following documentation conventions to identify paths in the solutionsconfiguration:
Table 1.1 Conventions for Pathnames
Path Refers to Example
!SASROOT Path to the SAS rootdirectory
Windows: C:\Program Files\SAS\SASFoundation\9.2
UNIX: /usr/local/SAS/SASFoundation/9.2
SAS-config-dir Path to the SASconfiguration directory
Windows: C:\SAS\Config
UNIX: /usr/local/SAS/Config
MySQL-install-dir Path to the MySQLinstallation directory
Windows: C:\mysql
UNIX: /usr/local/mysql
Note:
• The name of the configuration directory and the level number might be differentat your site.
• If your configuration is the result of a migration from the previous release ofSAS Solutions Services, the SASApp directory might be called SASMaininstead (for example, C:\SAS\Config\Lev1\SASMain rather than C:\SAS\Config\Lev1\SASApp). Please make the appropriate substitutions as youread this book.
• File system pathnames are typically shown with Windows separators (“\”); forUNIX, substitute a forward slash .
Documentation Conventions 9
The Data Tier Server can be either a Windows server or a UNIX server. For a Windowsserver, this book assumes that the installation drive is the C drive.
This book uses the following abbreviations:
• DDS—Detail Data Store
• HCM—SAS Human Capital Management
• SDM—Solutions Data Mart
• StM—SAS Strategy Management
Related Documentation• SAS Solutions Services: Data Model Reference contains column-by-column
descriptions of all the tables in the Detail Data Store that is installed with SAS SolutionsServices.
• SAS Solutions Services: System Administration Guide discusses configuration andadministration tasks for SAS Solutions Services and the related solutions. Topicsinclude security, content administration, portal administration, applicationadministration, and J2EE application server configuration.
• SAS Solutions Adapter for SAP: User's Guide explains how to extract data from SAPfor use in SAS Financial Management and SAS Human Capital Management.
These books are available at the following sites:
• SAS Financial Management: http://support.sas.com/documentation/onlinedoc/fm
• SAS Strategy Management: http://support.sas.com/documentation/onlinedoc/stm
• SAS Human Capital Management: http://support.sas.com/documentation/onlinedoc/hcm
These sites are password-restricted. You can find the user name and password in thepreinstallation checklist or by calling Technical Support.
10 Chapter 1 • Introduction to Data Administration
Chapter 2
Setting Up the SAS DataIntegration Studio Environment
Overview of Setup Tasks . . . . . . . . . . . . . . . . . . . . . . . . . . . . . . . . . . . . . . . . . . . . . . . 11
Access Settings for the Data-Tier Server . . . . . . . . . . . . . . . . . . . . . . . . . . . . . . . . . . 11Protecting Data Directories . . . . . . . . . . . . . . . . . . . . . . . . . . . . . . . . . . . . . . . . . . . . 11Giving Server Access to Users of SAS Data Integration Studio . . . . . . . . . . . . . . . 11Groups and Roles for Data Administrators . . . . . . . . . . . . . . . . . . . . . . . . . . . . . . . 12
Copy Jobs . . . . . . . . . . . . . . . . . . . . . . . . . . . . . . . . . . . . . . . . . . . . . . . . . . . . . . . . . . . 12
Send Notifications from Jobs . . . . . . . . . . . . . . . . . . . . . . . . . . . . . . . . . . . . . . . . . . . . 12
Overview of Setup TasksThis chapter describes setup tasks that you must perform after you install SAS SolutionsServices and before you start using SAS Data Integration Studio to load data. These setuptasks consist of establishing access settings for the Data-Tier Server,
Access Settings for the Data-Tier Server
Protecting Data DirectoriesFor information about operating-system protection for files and folders, see “Post-Configuration Steps” in the SAS Solutions Services: System Administration Guide.
Giving Server Access to Users of SAS Data Integration Studio
OverviewEach user of SAS Data Integration Studio must have a user ID and password for the DataTier Server.
This user must not be the unrestricted user. If you log on as the unrestricted user, then youcannot attach the libraries that are necessary to run SAS Data Integration Studio.
The user must have the following rights and permissions:
• the Log on as a batch job right.
11
The recommended way to grant this right to a user is to place the user in the SAS ServerUsers group and grant the right to this group. For more information, see “WindowsPrivileges” in the SAS Intelligence Platform: Security Administration Guide,
• read/write/update access to the SAS-config-dir\Lev1\Data directory and all itssubdirectories.
Groups and Roles for Data AdministratorsFor information about group and role requirements for data administrators, see “AssigningGroups and Roles” in the SAS Solutions Services: System Administration Guide.
Copy JobsThere are some jobs that you might need many copies of so that you can customize thecopies in different ways. There are two ways to obtain another copy of a job:
• Use Copy and Paste: select the job, select Copy from the pop-up menu, select the folderin which you want to place the copy, select Paste from the pop-up menu.
• For a very simple job that consists only of a single transformation, you can create ablank job and then drag and drop the required transformation onto the job’s processdiagram.
Send Notifications from JobsWhen a job is run, no notifications are sent automatically. In order for a job to send a DataModified notification, you must edit the transformation and specify the condition thatgenerates the notification and the action to be taken. For example, a site might want to sendnotifications for the Table Loader and SCD Type 2 Loader transformations. An actionmight be an e-mail message or a custom action that is defined at a site.
For more information, see “Managing the Status of Jobs and Transformations” in the SASData Integration Studio User's Guide (available at support.sas.com/documentation/).
12 Chapter 2 • Setting Up the SAS Data Integration Studio Environment
Chapter 3
Using SAS Data IntegrationStudio to Supply Data to Solutions
Overview of the Main Data Pathway . . . . . . . . . . . . . . . . . . . . . . . . . . . . . . . . . . . . . 13
Data Encodings . . . . . . . . . . . . . . . . . . . . . . . . . . . . . . . . . . . . . . . . . . . . . . . . . . . . . . . 15
Moving Data from Its Source to the Staging Tables . . . . . . . . . . . . . . . . . . . . . . . . . 15
Loading the Detail Data Store Tables from the Staging Tables . . . . . . . . . . . . . . . . 16Survey of the Detail Data Store Jobs . . . . . . . . . . . . . . . . . . . . . . . . . . . . . . . . . . . . 16Setting a Valid Time Range for Data Records . . . . . . . . . . . . . . . . . . . . . . . . . . . . . 17Modifying the Jobs That Load the Detail Data Store Tables . . . . . . . . . . . . . . . . . . 18Testing a Detail Data Store Job . . . . . . . . . . . . . . . . . . . . . . . . . . . . . . . . . . . . . . . . 19Scheduling a Detail Data Store Job . . . . . . . . . . . . . . . . . . . . . . . . . . . . . . . . . . . . . 19
Moving Data from the Detail Data Store to the SDM . . . . . . . . . . . . . . . . . . . . . . . . 19Overview of Moving Data from the Detail Data Store to the SDM . . . . . . . . . . . . . 19Testing a Job That Loads Data into the SDM . . . . . . . . . . . . . . . . . . . . . . . . . . . . . . 20Scheduling an SDM Job . . . . . . . . . . . . . . . . . . . . . . . . . . . . . . . . . . . . . . . . . . . . . . 20
Moving Data from the Detail Data Store to the HCM Data Mart . . . . . . . . . . . . . . 20
Overview of Other Data Pathways . . . . . . . . . . . . . . . . . . . . . . . . . . . . . . . . . . . . . . . 20
Extending the Detail Data Store . . . . . . . . . . . . . . . . . . . . . . . . . . . . . . . . . . . . . . . . . 21
Overview of the Main Data PathwayMost data moves from its source, through the detail data store staging area and the detaildata store (DDS), to a destination data mart.
In general, the sources of data are transactional systems or databases that are outside theSAS environment. However, there are some source tables of predefined data that areinstalled with the SAS Solutions Services software. The predefined source tables are theSAS_ tables in the Products ð Cross Industry Detail Data Store ð SAS Supplied folderon the Folders tab of SAS Data Integration Studio.
13

There are two destination data marts:
• Solutions Data Mart (SDM)
• HCM Data Mart
Each destination data mart is a MySQL database. The predefined source tables, the stagingtables, and the detail data store tables are all SAS tables.
The complete path that the data follows consists of the following main steps:
1. Using jobs that you write, extract data from your source systems and load it into theappropriate staging tables.
For example, in order to supply base accounting data to SAS Financial Management,you must run a job that extracts data from your financial accounting system and loadsit into the STAGE_GL_TRANSACTION_SUM table.
This step does not apply to the predefined source tables.
2. For each staging table, run the job that loads data from it into the corresponding detaildata store table. The jobs that move data from the staging tables to the detail data storetables do some standard processing, including providing retained keys and time stampsfor all the records.
For example, in order to supply base accounting data to SAS Financial Management,you run the cind_dds_108000_load_gl_transaction_sum_table job. This job movesdata from the STAGE_GL_TRANSACTION_SUM table to theGL_TRANSACTION_SUM table.
For each predefined source table, a single job moves the data from the predefined sourcetable to the staging table and then from the staging table to the detail data store table.
3. Load the data from the detail data store into the appropriate data mart.
You can always perform this step by running the appropriate job in SAS DataIntegration Studio. For some categories of data that are used by SAS FinancialManagement, you can also perform this step inside SAS Financial Management Studio.For example, to load base accounting data into the SDM, you can do either of thefollowing:
• In SAS Data Integration Studio, run a job that uses the Load Base Datatransformation.
14 Chapter 3 • Using SAS Data Integration Studio to Supply Data to Solutions
• In the Periods workspace of SAS Financial Management Studio, run the Load NewData wizard.
Data EncodingsThe MySQL databases that hold solution data must be set up at installation time to use theUTF-8 encoding.
Unless you are using double-byte SAS with a UTF-8 SAS session encoding, jobs that loaddata from the detail data store to the SDM must transcode the data from the SAS sessionencoding to UTF-8. Conversely, jobs that export data from the SDM to staging tables musttranscode the data from UTF-8 to the SAS session encoding. To facilitate this transcoding,your SAS session encoding must be specified at installation time.
Moving Data from Its Source to the Staging TablesThe trip from source to staging table has one form when the source is outside the SASenvironment and another form when the source is a SAS_ table of predefined data:
• If the data source is outside the SAS environment, then you can load the appropriatestaging table from the data source in any way that you want. For example, you can writea separate job to load each staging table or you can write jobs that load groups of relatedstaging tables. You can run the jobs in any order. You can store the jobs in any folder.The one requirement is that your jobs must place the right data in the right columns ofthe right staging tables. If they achieve that result, then the jobs that load the detail datastore tables from the staging tables can perform the next step.
If one of your data sources is SAP, then you can use the SAS Solutions Adapter forSAP. See SAS Solutions Adapter for SAP: User's Guide.
If you are running SAS under 64-bit Windows and the source files are on a machinerunning 32-bit Windows, then you must use SAS PC Files Server to configure the datasources. For instructions, see “Post-Configuration Steps” in the SAS Solutions Services:System Administration Guide.
• If the data source is a SAS_ table of predefined data, then the job that loads thecorresponding detail data store table does all the work. The job first moves the datafrom the SAS_ source table to the corresponding staging table, and then moves the datafrom the staging table to the corresponding detail data store table. Most of the jobs thatload a detail data store table begin at the staging table, but the jobs that handle predefineddata begin at the SAS_ source table, as illustrated here by the job that loads dimensiontypes:
Moving Data from Its Source to the Staging Tables 15
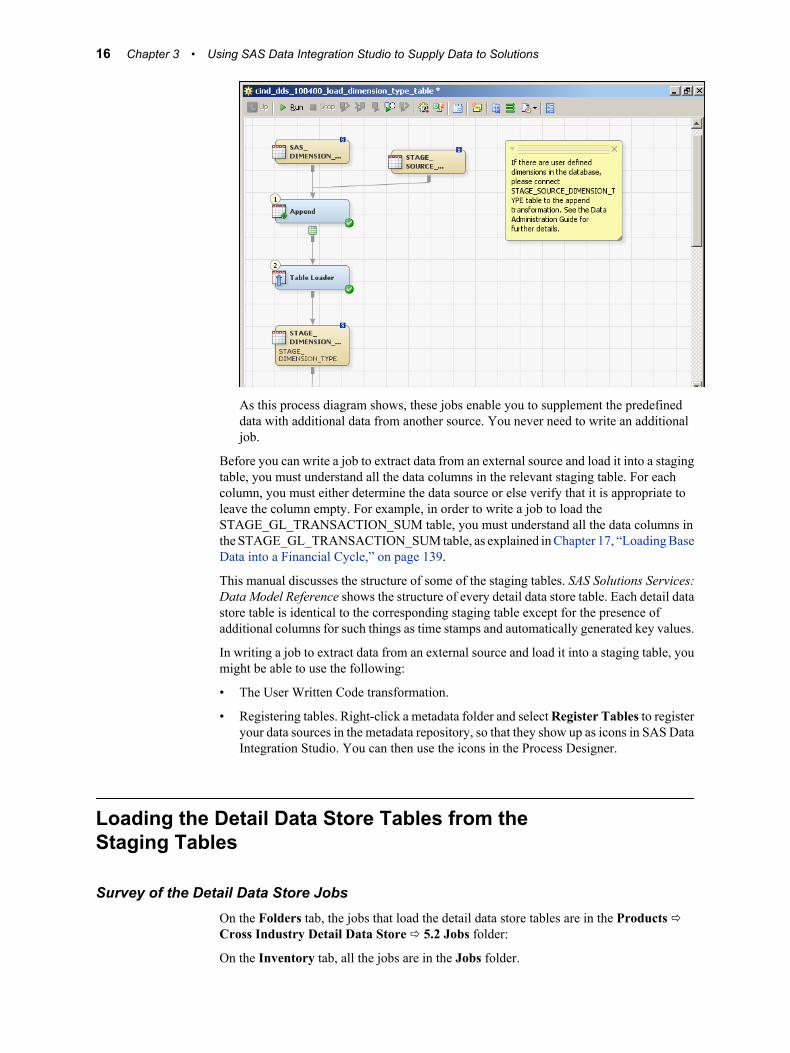
As this process diagram shows, these jobs enable you to supplement the predefineddata with additional data from another source. You never need to write an additionaljob.
Before you can write a job to extract data from an external source and load it into a stagingtable, you must understand all the data columns in the relevant staging table. For eachcolumn, you must either determine the data source or else verify that it is appropriate toleave the column empty. For example, in order to write a job to load theSTAGE_GL_TRANSACTION_SUM table, you must understand all the data columns inthe STAGE_GL_TRANSACTION_SUM table, as explained in Chapter 17, “Loading BaseData into a Financial Cycle,” on page 139.
This manual discusses the structure of some of the staging tables. SAS Solutions Services:Data Model Reference shows the structure of every detail data store table. Each detail datastore table is identical to the corresponding staging table except for the presence ofadditional columns for such things as time stamps and automatically generated key values.
In writing a job to extract data from an external source and load it into a staging table, youmight be able to use the following:
• The User Written Code transformation.
• Registering tables. Right-click a metadata folder and select Register Tables to registeryour data sources in the metadata repository, so that they show up as icons in SAS DataIntegration Studio. You can then use the icons in the Process Designer.
Loading the Detail Data Store Tables from theStaging Tables
Survey of the Detail Data Store JobsOn the Folders tab, the jobs that load the detail data store tables are in the Products ðCross Industry Detail Data Store ð 5.2 Jobs folder:
On the Inventory tab, all the jobs are in the Jobs folder.
16 Chapter 3 • Using SAS Data Integration Studio to Supply Data to Solutions
The names of most jobs contain a six-digit sequence number. The purpose of these sequencenumbers is to indicate the order in which you should run the jobs. You can load the stagingtables in any order, but you must load the detail data store tables in an order that enableseach job to validate the values that it loads against other already-loaded tables. Certainvariations on the order that is indicated by the sequence numbers can also work, but thesafe course is to follow the sequence numbers.
Jobs that define additional dimension types do not have sequence numbers,as explained inChapter 10, “Adding a Dimension Type,” on page 63. You need a separate copy of thesejobs for each additional dimension type that you define. When you rename these copies,you can include appropriate sequence numbers along with the name of the relevantdimension type.
More basic than the question of job order is the question of which jobs you need to run.You should first determine which jobs you need to run, and then run those jobs in the orderthat is indicated by their sequence numbers. For example, if you are supplying data to onesolution but not to another, then you should ignore the jobs that are specific to the othersolution. If you are doing a specific maintenance task such as updating the members andhierarchies of a certain dimension, then you should run only the jobs that contribute to thattask.
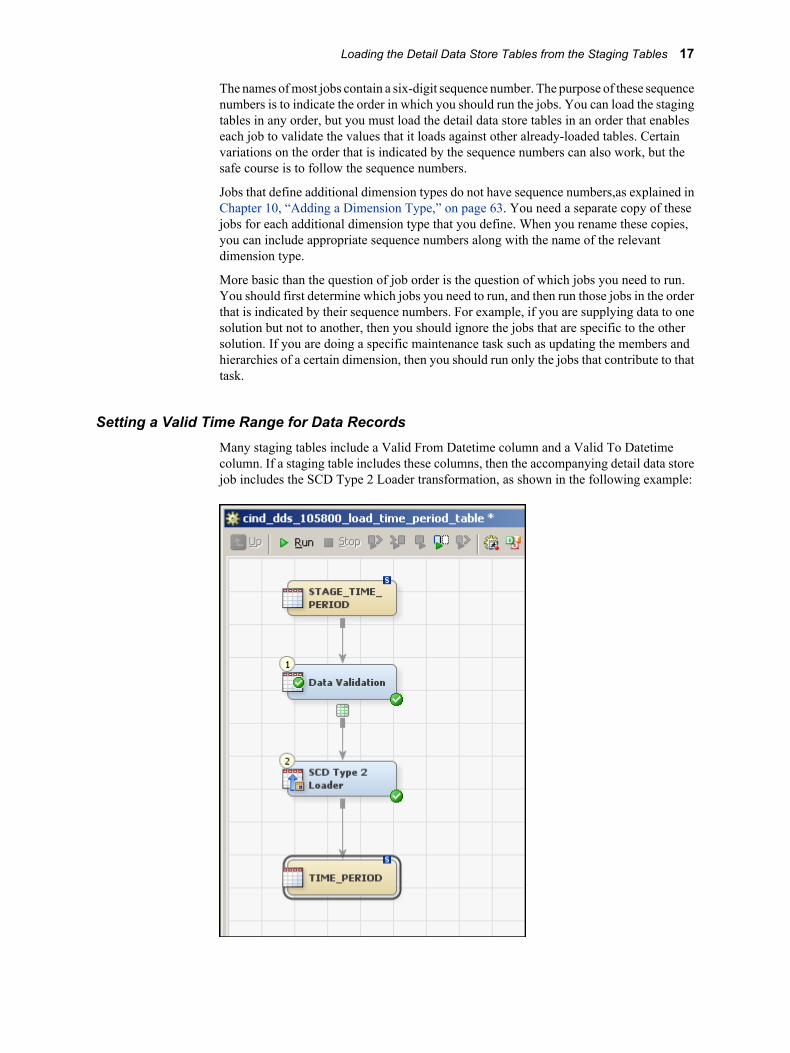
Setting a Valid Time Range for Data RecordsMany staging tables include a Valid From Datetime column and a Valid To Datetimecolumn. If a staging table includes these columns, then the accompanying detail data storejob includes the SCD Type 2 Loader transformation, as shown in the following example:
Loading the Detail Data Store Tables from the Staging Tables 17
The Valid From Datetime and Valid To Datetime columns are the basis of the so-calledSlowly Changing Dimension (SCD) capability. Each record is recognized as valid by thesolution software only during the time range that begins with its Valid From Datetime valueand ends with its Valid To Datetime value. This enables the software to maintain bundlesof two or more records that have different times of validity but otherwise identical keyvalues. The records in such a bundle represent different time-dependent versions of thesame entity.
There is a very simple way to manage these two columns that is likely to meet your needs:do nothing. If you load nothing into these columns in the staging tables, then the job thatloads the corresponding detail data store table automatically generates the following valuesfor the corresponding columns in the detail data store table:
• Valid From Datetime—the second at which the job begins to load records into the detaildata store
• Valid To Datetime—January 1, 5999:00:00:00
When a record is loaded from the detail data store into a data mart, it might encounter apre-existing record that has the following set of characteristics:
• the same key value, apart from its time of validity, as the record being loaded
• a Valid From Datetime that is earlier than the Valid From Datetime of the record beingloaded
• a Valid To Datetime of January 1, 5999:00:00:00
In this case, the Valid To Datetime of the pre-existing record is changed to be one secondearlier than the Valid From Datetime of the new record.
If these automatically generated values do not meet your needs, then you can load anyvalues that you want into the Valid From Datetime and Valid To Datetime columns of astaging table. You can use either of the two ways in which SAS data sets can represent timevalues:
• A count of seconds, starting with January 1, 1960:00:00:00 as the first second.
If you load numbers that count seconds, then make sure that the Format Type for Datesoption of the job's SCD Type 2 Loader transformation has the default value, Sourcebegin and end column values are to flow to the target without change:
This causes the counts of seconds in the staging table to be copied without change tothe corresponding detail data store table.
• A count of days, starting with January 1, 1960 as day 1.
If you load numbers that count days, then make sure that the Format Type for Dateoption of the job's SCD Type 2 Loader transformation has the value DATE. This causesthe counts of days in the staging table to be converted to counts of seconds in thecorresponding detail data store table.
If you do not load values into the Valid From Datetime and Valid To Datetime columns ofthe staging table, then the value of the Format Type for Date option has no effect. The jobautomatically generates counts of seconds no matter what the value of the Format Type forDate option is.
Modifying the Jobs That Load the Detail Data Store TablesIn most cases, the jobs that load the detail data store tables do not need to be modified. Ifyou load the correct input into the staging table that feeds a job and then run the job, thejob loads the correct output into the corresponding detail data store table. However, thereare a couple of modifications that you might want to make in certain cases.
18 Chapter 3 • Using SAS Data Integration Studio to Supply Data to Solutions
The first processing step in most detail data store jobs is a Data Validation transformation,which validates certain columns of data. To see which columns this transformationvalidates and how it validates them:
1. In the process diagram, select the Data Validation transformation.
2. Right-click and select Properties from the pop-up menu. The Data ValidationProperties window appears.
3. In the Data Validation Properties window, select the Invalid Values tab. This tab liststhe validated columns and shows which column of which other table each validatedcolumn is validated against.
On the Invalid Values tab, pay special attention to the Blanks are valid column. The valuein this column must be YES for any row that represents a column that you are not loadingwith data.
In some jobs the last processing step is an SCD Type 2 Loader transformation. In otherjobs the last processing step is a Table Loader transformation. For any Table Loadertransformation, you can use the Load Style field on the Load Technique tab to select oneof the following load styles:
• Append to Existing—Leave all existing records in place and load all new records.
• Replace—Delete all existing records, and then load all new records.
• Update/Insert—Overwrite records that have matching keys, leave in place records thatare not overwritten, and add records with new keys.
The Replace load style is the default. In certain cases, you might want to make a differentselection.
Testing a Detail Data Store JobAfter you modify a detail data store job, test it by running the job and checking the log tomake sure that the job ran cleanly and produced the desired results.
Scheduling a Detail Data Store JobFor some categories of data, you might want to run the relevant detail data store jobregularly according to a defined schedule. For example, you might want to extract and loadbase accounting data for use in SAS Financial Management once per month.
After you complete and successfully test a detail data store job, you can deploy it forscheduling. This generates the code for the job and stores the resulting code files on a server,ready for scheduling. Use the scheduling tool of your choice to schedule the job to run ona regular basis.
Moving Data from the Detail Data Store to the SDM
Overview of Moving Data from the Detail Data Store to the SDMThe jobs that load data into the SDM from tables in the detail data store require minormodifications. They use transformations that are in the Solutions Transforms folder onthe Transformations tab.
Moving Data from the Detail Data Store to the SDM 19
Testing a Job That Loads Data into the SDMAfter you modify an SDM job, test it by running the job and checking the log to make surethat the job ran cleanly and produced the desired results.
Scheduling an SDM JobFor some categories of data, you might want to run the relevant SDM job regularlyaccording to a defined schedule. For example, you might want to load base accounting datafor use in SAS Financial Management once a month.
After you complete and successfully test an SDM job, you can deploy it for scheduling.This generates the code for the job and stores the resulting code files on a server, ready forscheduling. Use the scheduling tool of your choice to schedule the job to run on a regularbasis.
Moving Data from the Detail Data Store to the HCMData Mart
See “Moving Data from the Detail Data Store to the HCM Data Mart” on page 185 for adetailed discussion.
Overview of Other Data PathwaysThe following categories of data travel over pathways that do not involve the detail datastore:
• User and user group data travels instead through the metadata repository. It is loadedfirst into the metadata repository, and then into the SDM from the metadata repository.The jobs that load this data into the SDM are in the Products ð SAS Solutions Servicesð 5.2 Jobs folder on the Folders tab of SAS Data Integration Studio. There are threeof these jobs:
• solnsvc_1300_load_users loads the user definitions.
• solnsvc_1400_load_groups loads the group definitions.
• solnsvc_1500_load_user_x_group loads the information about which users belongto which groups.
For details, see Chapter 5, “Loading Users and User Groups,” on page 27.
• Metrics are loaded directly into the SDM metric tables from source tables that youbuild. For details, see Chapter 12, “Loading Metrics,” on page 109.
• Numeric values are loaded directly into the SPM database using the Batch ModelFacility (BMF) in SAS Strategy Management. For details, see the SAS StrategyManagement online Help or talk to your SAS consultant.
• Cell protection rules are loaded from the staging tables to the SDM. See Chapter 16,“Loading Cell Protection Rules for a Model,” on page 133.
20 Chapter 3 • Using SAS Data Integration Studio to Supply Data to Solutions

• Dimensions can be created in the detail data store or directly in the SDM. For details,see Chapter 6, “Creating a Dimension,” on page 29.
• Certain tables in the HCM Data Mart must be loaded directly, using jobs that you write.For details, see “Loading Certain HCM Data Mart Tables Directly” on page 191.
The following categories of data travel through the detail data store, but give you a choiceof two ways to load them from the detail data store into the SDM:
• Driver rates. See Chapter 15, “Loading Driver Rates into a SAS Financial ManagementDriver Rate Set,” on page 127.
• Members and hierarchies for an existing dimension. See Chapter 7, “Loading Membersand Hierarchies into a Dimension,” on page 35.
• Exchange rates. See Chapter 14, “Loading Exchange Rates into a SAS FinancialManagement Exchange Rate Set,” on page 119.
• Base accounting data. See Chapter 17, “Loading Base Data into a Financial Cycle,” onpage 139.
Extending the Detail Data StoreYou can extend the detail data store in two general ways:
• Add more detail data store tables to the detail data store tables that are installed as partof SAS Solutions Services.
• Add columns to installed tables.
In general, if you extend the detail data store, the additional data cannot be loaded into apredefined data mart; in order to make use of the additional data, you must load it intotables in a separate location that is accessible by an appropriate application. There are threeimportant exceptions:
• You can extend the HCM Data Mart by adding new tables or adding columns to existingtables. The HCM Data Mart is used by SAS Human Capital Management. For details,see Chapter 22, “Modifying the Data Model for SAS Human Capital Management,”on page 201.
• You can add custom dimension types whose members can be used to qualify financialaccounting data for SAS Financial Management or metric values that can be displayedin a SAS Strategy Management scorecard. Each custom dimension type is supportedby a set of four additional detail data store tables, four corresponding staging tables,and four corresponding jobs. The data in these additional tables can be loaded into theSDM in the same way as data for the basic dimension types. For a detailed discussionof the process of adding a dimension type, see Chapter 10, “Adding a Dimension Type,”on page 63.
• You can add a column that represents a custom property to the primary member tableof any dimension type. You can load the values of a custom member property into theSDM by following the procedure that is described in Chapter 8, “Registering MemberProperties So That They Are Loaded into the SDM,” on page 53.
If you add detail data store tables that are to be used to load non-data-mart tables, be sureto do all of the following:
1. Create the detail data store tables.
2. Create corresponding staging tables.
Extending the Detail Data Store 21
3. Create the non-data-mart target tables if they do not already exist.
Note: Do not write an application that accesses detail data store tables.
4. Right-click a metadata folder and select Register Tables to register the metadata of allthe new tables, including the staging tables, the detail data store tables, and the targettables.
5. Create jobs that load the staging tables.
6. Create jobs that load the detail data store tables from the staging tables.
7. Create jobs that load the non-data-mart target tables from the detail data store tables.
The result of the preceding set of steps is a data pathway to the non-data-mart target tablesthat is analogous to the main data pathway to the data marts. The main data pathway isdescribed in “Overview of the Main Data Pathway” on page 13.
If you add columns to existing detail data store tables that are to be used to load non-data-mart target tables, be sure to do all of the following:
1. Add the columns to the detail data store tables.
2. Add corresponding columns to the corresponding staging tables.
3. Use Tools ð Update Table Metadata to register the metadata of all the modifiedtables, including the staging tables and the detail data store tables.
4. Modify the jobs that load the staging tables.
5. Modify the jobs that load the detail data store tables from the staging tables.
6. Create the non-data-mart target tables, if they do not already exist.
Note: Do not write an application that accesses detail data store tables.
7. Right-click a metadata folder and select Register Tables to register the metadata ofthe new non-data-mart target tables.
8. Create jobs that load the non-data-mart target tables from the detail data store tables.
If you add a column to a member table for the purpose of loading an additional memberproperty into the SDM, do the first five of the preceding steps in order to provide for thetrip into the detail data store, and then provide for the trip from the detail data store to theSDM as described in Chapter 8, “Registering Member Properties So That They Are Loadedinto the SDM,” on page 53.
22 Chapter 3 • Using SAS Data Integration Studio to Supply Data to Solutions
Chapter 4
Loading Language Codes andData Locale Codes
Overview of Languages and Data Locales . . . . . . . . . . . . . . . . . . . . . . . . . . . . . . . . . 23
Loading the Staging Table for Language and Locale Data . . . . . . . . . . . . . . . . . . . 23
Data Locales with Predefined Text . . . . . . . . . . . . . . . . . . . . . . . . . . . . . . . . . . . . . . . 24
Loading the Detail Data Store Table . . . . . . . . . . . . . . . . . . . . . . . . . . . . . . . . . . . . . 25
Loading Data Locale Codes into the SDM . . . . . . . . . . . . . . . . . . . . . . . . . . . . . . . . . 25
Overview of Languages and Data LocalesLanguage codes and data locale codes are used to identify the language in which associatedtextual data is expressed. The language codes are used in the staging tables and the detaildata store tables. The data locale codes are used in the SDM. You can view them byselecting Tools ð Data Locales in the SAS Solutions Dimension Editor or the Dimensionsworkspace of SAS Financial Management Studio.
Loading the Staging Table for Language andLocale Data
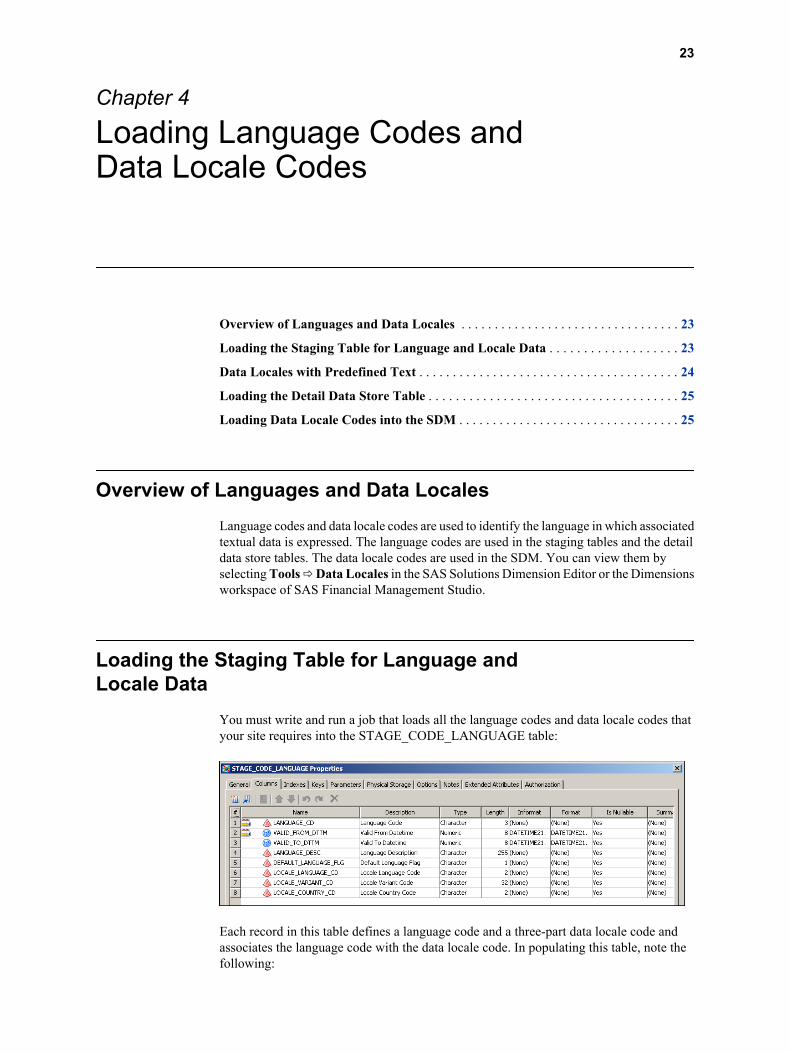
You must write and run a job that loads all the language codes and data locale codes thatyour site requires into the STAGE_CODE_LANGUAGE table:
Each record in this table defines a language code and a three-part data locale code andassociates the language code with the data locale code. In populating this table, note thefollowing:
23
• Load only those languages and data locales that are used by your data. If all your datais in a single data locale, then you need to load only one record into this table.
SAS Human Capital Management always uses only one data locale. SAS FinancialManagement can use many data locales.
• Language Code is the language code that is used in staging tables and detail data storetables.
In general, this language code should be one of the two-character codes in theISO0639_LANGUAGE_CD column of the SAS_LANGUAGE_ISO0639 table. Youneed to make an exception only if you need two or more records that represent variantsof the same language. For example, if you have a record for French as used in Franceand another record for French as used in Canada, then you might use language codesfrf and frc, respectively.
Do not use the same language code in two records.
• Language Description is a description of the language or language variant thatLanguage Code designates.
For example, you might specify French or Canadian French.
• Default Language Flag must be Y for exactly one record and N for all other records. Ymarks the language code for the language that is used in all the primary member tables.Be careful to coordinate the language that you mark here as the default language withthe language that you use in the primary member tables. For a detailed discussion ofprimary and secondary member tables, see “Moving Member and Hierarchy Data fromIts Source to the Staging Tables” on page 36.
• Locale Language Code and Locale Country Code work together to identify the SDMdata locale that is associated with the detail data store language code.
• Locale Language Code must be one of the two-character codes in theISO0639_LANGUAGE_CD column of the SAS_LANGUAGE_ISO0639 table.
• Locale Country Code must be one of the two-character codes in theISO3166_COUNTRY_CD column of the SAS_COUNTRY_ISO3166 table.
In many cases, Locale Language Code can be the same two-character code as LanguageCode, and the other locale columns can remain empty.
In general, the SDM data locale in the record that has a Default Language Flag of Yshould be the data locale that is set in the SDM by the SAS Solutions Servicesinstallation.
Do not use the same combination of locale language code and locale country code intwo records.
• Valid From Datetime and Valid To Datetime define the lifespan of the record. See“Setting a Valid Time Range for Data Records” on page 17.
Data Locales with Predefined TextThe installed software includes the names and descriptions of the predefined dimensiontypes and predefined dimensions in all the following data locales:
• da (Danish)
• de (German)
• en (English)
24 Chapter 4 • Loading Language Codes and Data Locale Codes

• es (Spanish)
• fr (French)
• it (Italian)
• ja (Japanese)
• ko (Korean)
• pl (Polish)
• ru (Russian)
• zh_CN (simplified Chinese)
• zh_TW (traditional Chinese)
If you load any of these data locales into STAGE_CODE_LANGUAGE and carry themthrough into the SDM, then the associated predefined text will be available in SAS FinancialManagement Studio and the SAS Solutions Dimension Editor.
Loading the Detail Data Store TableTo load the CODE_LANGUAGE table from the STAGE_CODE_LANGUAGE table, runthe cind_dds_100200_load_code_language_table job. On the Folders tab, this job is in theProducts ð Cross Industry Detail Data Store ð 5.2 Jobs folder.
Loading Data Locale Codes into the SDMTo load data locale codes from the CODE_LANGUAGE table into the SDM, run thesolnsvc_1200_import_locales job. On the Folders tab, this job is in the Products ð SASSolutions Services ð 5.2 Jobs folder. On the Inventory tab, it is in the Jobs folder.
Run the job and then review the log.
The job can run only if SAS Remote Services and the managed servers are running on theMiddle Tier Server. See SAS Solutions Services: System Administration Guide.
Loading Data Locale Codes into the SDM 25

26 Chapter 4 • Loading Language Codes and Data Locale Codes
Chapter 5
Loading Users and User Groups
Overview of Users and Groups . . . . . . . . . . . . . . . . . . . . . . . . . . . . . . . . . . . . . . . . . . 27
Ways to Load User and Group Data . . . . . . . . . . . . . . . . . . . . . . . . . . . . . . . . . . . . . . 27
Overview of Users and GroupsDefinitions of users and groups are maintained in the metadata repository.
The SAS Solutions Services installation procedure defines a number of default users,groups, and roles (see the SAS Solutions Services: System Administration Guide). You mustdefine all the users at your site as well as their group and role memberships. You can providethis information through a bulk-load process or interactively though SAS ManagementConsole.
Whenever a user logs in to the solution software, the authentication process consults theuser data in the metadata repository. However, there are other uses of the user data thatrequire it to be present in the SDM. Whenever changes are made to the user data in themetadata repository, the user data in the SDM must be updated to reflect those samechanges.
Ways to Load User and Group DataThe following jobs load data from the metadata repository to the SDM:
• solnsvc_1300_load_users
• solnsvc_1400_load_groups
• solnsvc_1500_load_user_x_group
These jobs are on the Folders tab in the Products ð SAS Solutions Services ð 5.2Jobs folder of SAS Data Integration Studio.
Best practice is to run these three jobs according to a regular schedule. For example, youmight schedule a batch job to run each night. The job can run only if SAS Remote Servicesand the managed servers are running on the Middle Tier Server. See SAS Solutions Services:System Administration Guide.
The user account in which these jobs run must have read and write permissions to the SAS-config-dir\Lev1 directory on the Metadata Server.
27

There is a stored process that includes all three of these jobs. For information about runningthe Import Users and Groups stored process, see “Assigning Groups and Roles” in the SASSolutions Services: System Administration Guide.
28 Chapter 5 • Loading Users and User Groups
Chapter 6
Creating a Dimension
Dimension Types, Dimensions, Hierarchies, and Members . . . . . . . . . . . . . . . . . . . 29
Ways to Create a Dimension . . . . . . . . . . . . . . . . . . . . . . . . . . . . . . . . . . . . . . . . . . . . 30
Using the Create Dimension Transformation . . . . . . . . . . . . . . . . . . . . . . . . . . . . . . 30
Starting from a Staging Table . . . . . . . . . . . . . . . . . . . . . . . . . . . . . . . . . . . . . . . . . . . 32
Dimension Types, Dimensions, Hierarchies, andMembers
Before you perform any task that involves dimension types, dimensions, hierarchies, ormembers, make sure that you understand how these four concepts are related.
A dimension type represents a category of information. Examples are ACCOUNT,CURRENCY, and TIME—three of the predefined dimension types.
Each dimension type can contain many dimensions. Each dimension contains membersand at least one hierarchy that is built from some or all of its members. The dimensionswithin a dimension type are like folders that enable you to separate the hierarchies andmembers into different groups.
Two dimension types—CURRENCY and ANALYSIS—can have only flat, single-levelhierarchies. All other dimension types can and typically do have multi-level hierarchies.Here are two examples:
• The members of an ACCOUNT dimension are the accounts from a general ledger chartof accounts. In a typical account hierarchy, Liabilities, Current Liabilities, andAccounts Payable are on different levels, as are Assets, Current Assets, and Inventory.
• The members of a TIME dimension are time periods of different lengths. In a typicaltime hierarchy, years, quarters, and months are on different levels.
This chapter is about creating a new, empty dimension. You create a dimension within adimension type, which must already exist. If you need to create a dimension type, seeChapter 10, “Adding a Dimension Type,” on page 63. After you create a dimension, youmust place members and hierarchies in it. Chapter 7, “Loading Members and Hierarchiesinto a Dimension,” on page 35 explains how to do that.
29

Ways to Create a DimensionA dimension is defined by a single dimension code, but it can have names and descriptionsin any number of data locales. There are three ways to create a dimension:
• In the SAS Solutions Dimension Editor or the Dimensions workspace of SAS FinancialManagement Studio, select New Dimension and use the New Dimension wizard. Dothis for each dimension that you need to create.
If you are using several data locales, use the Identification tab of the dimensionproperties window in the SAS Solutions Dimension Editor or the Dimensionsworkspace of SAS Financial Management Studio to add names and descriptions in datalocales other than the current data locale.
• In SAS Data Integration Studio, run the solnsvc_2200_create_dimension job or a jobthat you create that uses the create_dimension transformation. Do this for eachdimension that you need to create.
If you are using several data locales, use the Identification tab of the dimensionproperties window in the SAS Solutions Dimension Editor or the Dimensionsworkspace of SAS Financial Management Studio to add names and descriptions in datalocales other than the current data locale.
• In SAS Data Integration Studio, define the dimension in theSTAGE_APP_DIMENSION staging table. Move the dimension definition from thestaging area to the SDM through the standard series of steps.
With this method, you can define any number of dimensions in any number of datalocales all at once by placing all the necessary specifications in theSTAGE_APP_DIMENSION table.
The relative convenience of these three methods can vary with the number of dimensionsthat you are creating and the number of data locales for each dimension.
Using the Create Dimension TransformationMake a copy of the solnsvc_2200_create_dimension job, using one of the methods in “CopyJobs” on page 12.
Continue as follows:
1. Double-click the job to display its process diagram.
2. In the process diagram, select the Create Dimension transformation, and then selectProperties from the pop-up menu.
3. In the Properties window, select the Options tab:
30 Chapter 6 • Creating a Dimension
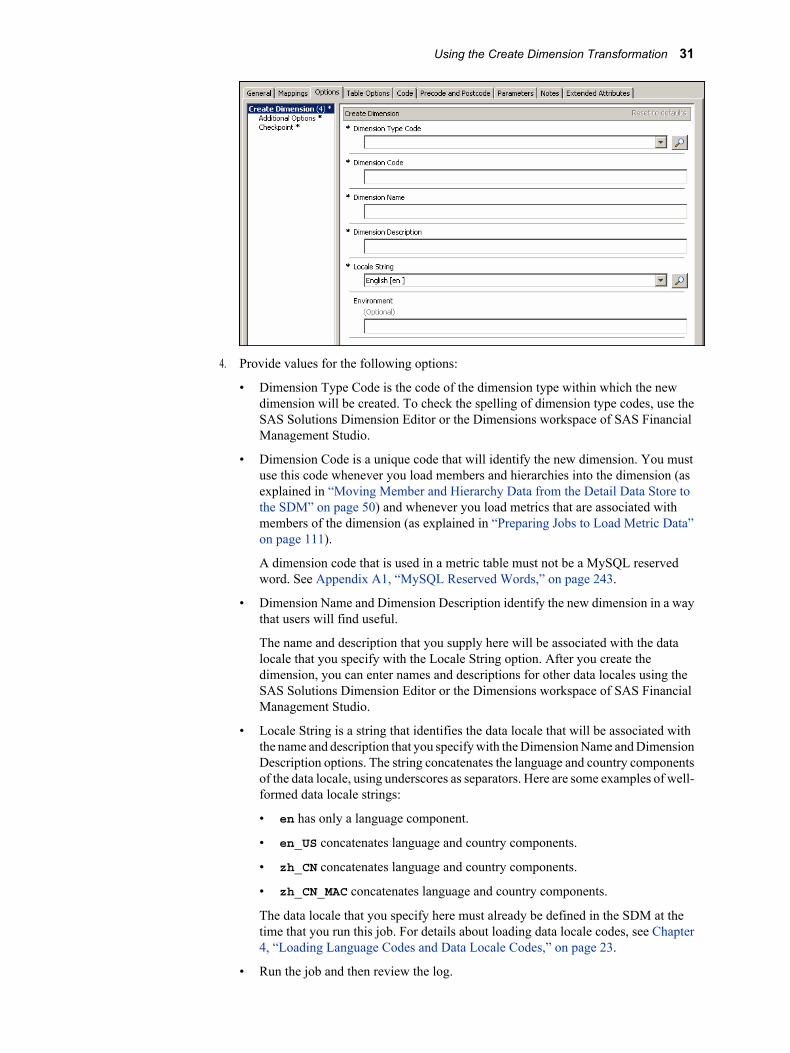
4. Provide values for the following options:
• Dimension Type Code is the code of the dimension type within which the newdimension will be created. To check the spelling of dimension type codes, use theSAS Solutions Dimension Editor or the Dimensions workspace of SAS FinancialManagement Studio.
• Dimension Code is a unique code that will identify the new dimension. You mustuse this code whenever you load members and hierarchies into the dimension (asexplained in “Moving Member and Hierarchy Data from the Detail Data Store tothe SDM” on page 50) and whenever you load metrics that are associated withmembers of the dimension (as explained in “Preparing Jobs to Load Metric Data”on page 111).
A dimension code that is used in a metric table must not be a MySQL reservedword. See Appendix A1, “MySQL Reserved Words,” on page 243.
• Dimension Name and Dimension Description identify the new dimension in a waythat users will find useful.
The name and description that you supply here will be associated with the datalocale that you specify with the Locale String option. After you create thedimension, you can enter names and descriptions for other data locales using theSAS Solutions Dimension Editor or the Dimensions workspace of SAS FinancialManagement Studio.
• Locale String is a string that identifies the data locale that will be associated withthe name and description that you specify with the Dimension Name and DimensionDescription options. The string concatenates the language and country componentsof the data locale, using underscores as separators. Here are some examples of well-formed data locale strings:
• en has only a language component.
• en_US concatenates language and country components.
• zh_CN concatenates language and country components.
• zh_CN_MAC concatenates language and country components.
The data locale that you specify here must already be defined in the SDM at thetime that you run this job. For details about loading data locale codes, see Chapter4, “Loading Language Codes and Data Locale Codes,” on page 23.
• Run the job and then review the log.
Using the Create Dimension Transformation 31
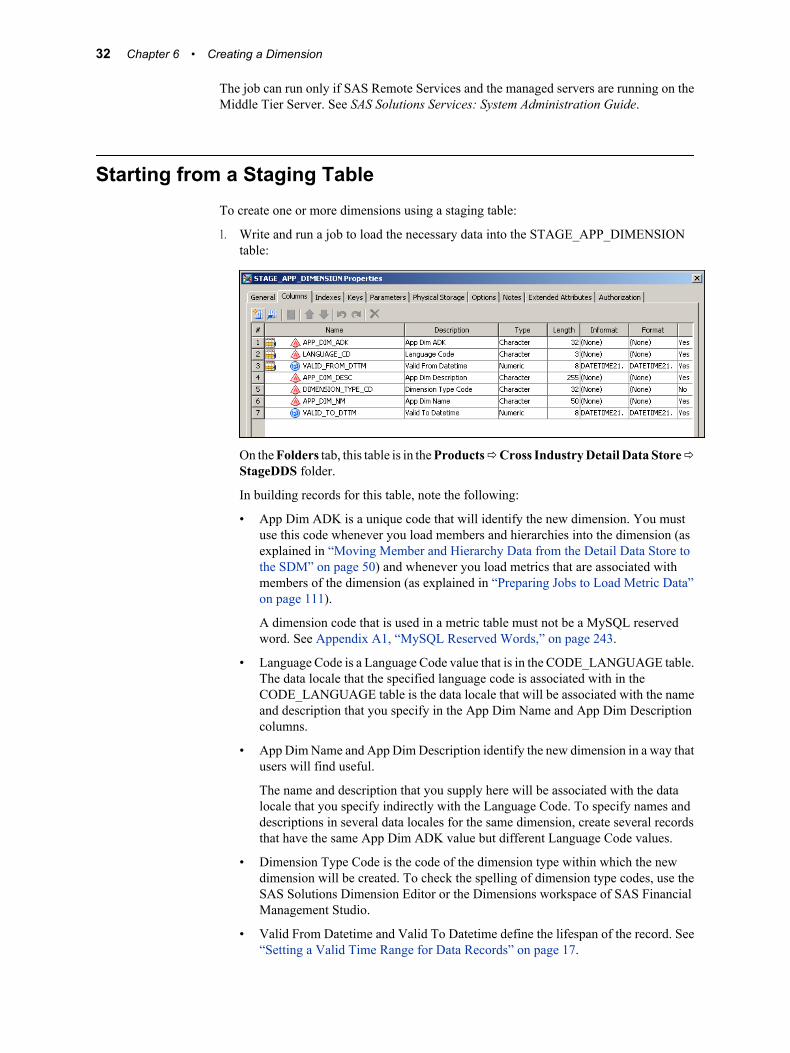
The job can run only if SAS Remote Services and the managed servers are running on theMiddle Tier Server. See SAS Solutions Services: System Administration Guide.
Starting from a Staging TableTo create one or more dimensions using a staging table:
1. Write and run a job to load the necessary data into the STAGE_APP_DIMENSIONtable:
On the Folders tab, this table is in the Products ð Cross Industry Detail Data Store ðStageDDS folder.
In building records for this table, note the following:
• App Dim ADK is a unique code that will identify the new dimension. You mustuse this code whenever you load members and hierarchies into the dimension (asexplained in “Moving Member and Hierarchy Data from the Detail Data Store tothe SDM” on page 50) and whenever you load metrics that are associated withmembers of the dimension (as explained in “Preparing Jobs to Load Metric Data”on page 111).
A dimension code that is used in a metric table must not be a MySQL reservedword. See Appendix A1, “MySQL Reserved Words,” on page 243.
• Language Code is a Language Code value that is in the CODE_LANGUAGE table.The data locale that the specified language code is associated with in theCODE_LANGUAGE table is the data locale that will be associated with the nameand description that you specify in the App Dim Name and App Dim Descriptioncolumns.
• App Dim Name and App Dim Description identify the new dimension in a way thatusers will find useful.
The name and description that you supply here will be associated with the datalocale that you specify indirectly with the Language Code. To specify names anddescriptions in several data locales for the same dimension, create several recordsthat have the same App Dim ADK value but different Language Code values.
• Dimension Type Code is the code of the dimension type within which the newdimension will be created. To check the spelling of dimension type codes, use theSAS Solutions Dimension Editor or the Dimensions workspace of SAS FinancialManagement Studio.
• Valid From Datetime and Valid To Datetime define the lifespan of the record. See“Setting a Valid Time Range for Data Records” on page 17.
32 Chapter 6 • Creating a Dimension
2. Run the cind_dds_101200_load_app_dimension_table job to move the data into thedetail data store.
3. Run the solnsvc_2100_create_application_dimension job to load the dimensiondefinitions into the SDM.
On the Folders tab, this job is located in the Products ð SAS Solutions Services ð5.2 Jobs folder.
The data locales for which you are loading dimension names and descriptions mustalready be defined in the SDM at the time that you run this job. For details about loadingdata locale codes, see Chapter 4, “Loading Language Codes and Data Locale Codes,”on page 23.
4. Run the job and then review the log.
The job can run only if SAS Remote Services and the managed servers are running onthe Middle Tier Server. See SAS Solutions Services: System Administration Guide.
Starting from a Staging Table 33

34 Chapter 6 • Creating a Dimension
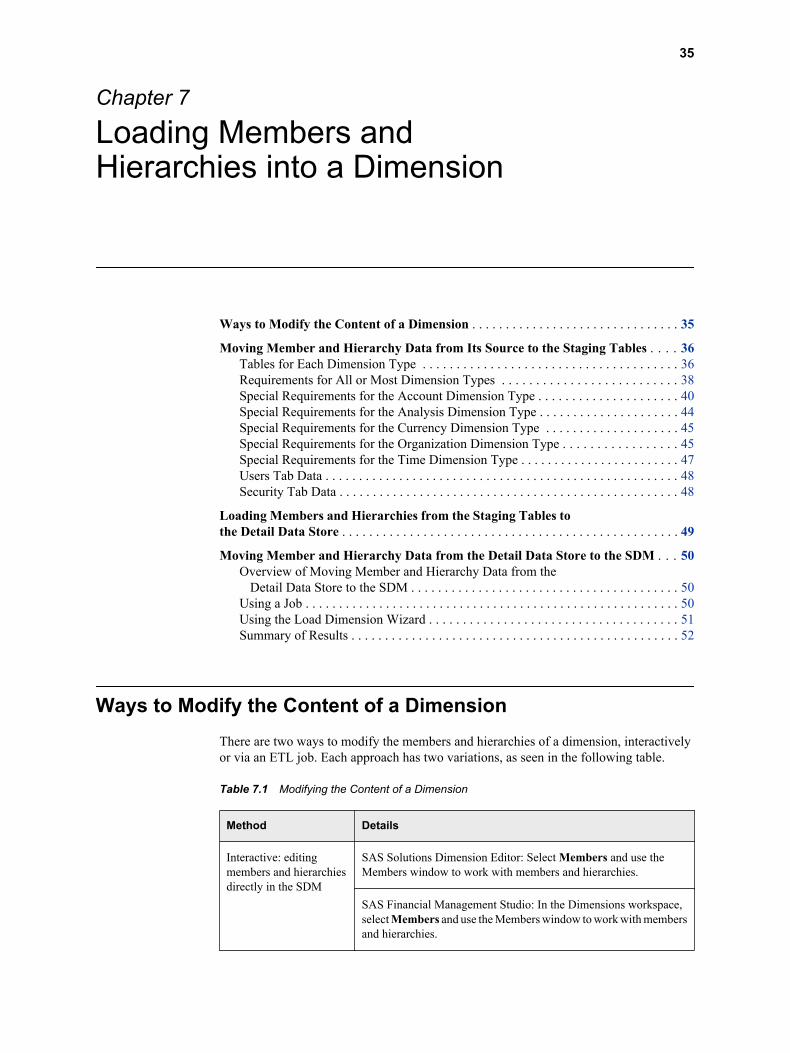
Chapter 7
Loading Members andHierarchies into a Dimension
Ways to Modify the Content of a Dimension . . . . . . . . . . . . . . . . . . . . . . . . . . . . . . . 35
Moving Member and Hierarchy Data from Its Source to the Staging Tables . . . . 36Tables for Each Dimension Type . . . . . . . . . . . . . . . . . . . . . . . . . . . . . . . . . . . . . . 36Requirements for All or Most Dimension Types . . . . . . . . . . . . . . . . . . . . . . . . . . 38Special Requirements for the Account Dimension Type . . . . . . . . . . . . . . . . . . . . . 40Special Requirements for the Analysis Dimension Type . . . . . . . . . . . . . . . . . . . . . 44Special Requirements for the Currency Dimension Type . . . . . . . . . . . . . . . . . . . . 45Special Requirements for the Organization Dimension Type . . . . . . . . . . . . . . . . . 45Special Requirements for the Time Dimension Type . . . . . . . . . . . . . . . . . . . . . . . . 47Users Tab Data . . . . . . . . . . . . . . . . . . . . . . . . . . . . . . . . . . . . . . . . . . . . . . . . . . . . . 48Security Tab Data . . . . . . . . . . . . . . . . . . . . . . . . . . . . . . . . . . . . . . . . . . . . . . . . . . . 48
Loading Members and Hierarchies from the Staging Tables tothe Detail Data Store . . . . . . . . . . . . . . . . . . . . . . . . . . . . . . . . . . . . . . . . . . . . . . . . . . 49
Moving Member and Hierarchy Data from the Detail Data Store to the SDM . . . 50Overview of Moving Member and Hierarchy Data from the
Detail Data Store to the SDM . . . . . . . . . . . . . . . . . . . . . . . . . . . . . . . . . . . . . . . . 50Using a Job . . . . . . . . . . . . . . . . . . . . . . . . . . . . . . . . . . . . . . . . . . . . . . . . . . . . . . . . 50Using the Load Dimension Wizard . . . . . . . . . . . . . . . . . . . . . . . . . . . . . . . . . . . . . 51Summary of Results . . . . . . . . . . . . . . . . . . . . . . . . . . . . . . . . . . . . . . . . . . . . . . . . . 52
Ways to Modify the Content of a DimensionThere are two ways to modify the members and hierarchies of a dimension, interactivelyor via an ETL job. Each approach has two variations, as seen in the following table.
Table 7.1 Modifying the Content of a Dimension
Method Details
Interactive: editingmembers and hierarchiesdirectly in the SDM
SAS Solutions Dimension Editor: Select Members and use theMembers window to work with members and hierarchies.
SAS Financial Management Studio: In the Dimensions workspace,select Members and use the Members window to work with membersand hierarchies.
35

Method Details
In SAS Data IntegrationStudio, using the detaildata store
Load the members and hierarchies into the detail data store from athird-party software product or another external source.
Load the detail data store with members and hierarchies that youexported from a SAS Financial Management system.
This approach is part of the content promotion facility for SASFinancial Management. You can copy the members and hierarchiesof a dimension from a development system to a test system, or froma test system to a production system, by exporting them from thesource system as explained in Chapter 9, “Exporting and PromotingMembers and Hierarchies,” on page 57 and then loading them intothe target system as explained in this chapter.
This chapter discusses the process of loading members and hierarchies through the detaildata store. You can use this method for only one dimension per dimension type. Therefore,for any dimension type that includes more than one dimension, you must choose whichdimension to supply with members and hierarchies through the detail data store. All otherdimensions that belong to the same dimension type must be supplied with members andhierarchies interactively, using either the SAS Solutions Dimension Editor or SASFinancial Management Studio.
Note: If only SAS Human Capital Management is installed, loading to the SDM is notrequired. The only dimension that Human Capital Management requires to be populatedin the Stage and detail data store tables is the INTERNAL_ORG dimension.
If you are using the GL_TRANSACTION_SUM table to supply financial accounting datato SAS Financial Management (as described in Chapter 17, “Loading Base Data into aFinancial Cycle,” on page 139), then every member that is used in theGL_TRANSACTION_SUM table must belong to a dimension that you load through thedetail data store. This criterion can help you to determine which dimensions to supply withmembers and hierarchies through the detail data store and which dimensions to supply withmembers and hierarchies interactively.
For any dimension type that you are not using to describe financial accounting data in theGL_TRANSACTION_SUM table, you can choose to supply the most complex dimensionwith members and hierarchies through the detail data store and populate the simplerdimensions interactively.
Moving Member and Hierarchy Data from ItsSource to the Staging Tables
Tables for Each Dimension TypeTo load members and hierarchies into a given dimension, use the set of tables for thedimension type to which that dimension belongs. You can use the detail data store to loadmembers and hierarchies into only one dimension per dimension type.
On the Folders tab, the staging tables that you must use to load members and hierarchiesinto a dimension are in the Products ð Cross Industry Detail Data Store ðStageDDS folder. This folder contains a set of tables for each dimension type. For mostdimension types, there are four tables. For the currency and item category dimension types,
36 Chapter 7 • Loading Members and Hierarchies into a Dimension
there are only three tables. The set of staging tables for a dimension type includes thefollowing:
• The primary member table is the table that has the shortest name. For example, theprimary member table for the organization dimension type isSTAGE_INTERNAL_ORG.
For most dimension types, the primary member table must contain a row for eachmember that you are loading, with text in the detail data store default language. For thecurrency and item category dimension types, the primary member table must containall the member records that you are loading, regardless of language. The currency anditem category primary member tables have a Language Code column. This columnidentifies the language used in each record. The primary member tables for otherdimension types do not have a Language Code column. Therefore, all their recordsmust use the detail data store default language.
The columns of the primary member tables differ from one dimension type to another,because the members of different dimension types are characterized by differentproperties. The sections of this chapter on the account dimension type, the organizationdimension type, and the time dimension type include illustrations of the primarymember tables for those dimension types.
You can add other columns that represent custom properties to any primary membertable, as explained in “Overview of Member Properties ” on page 53.
• The secondary member table is the table whose name ends with NLS. For example, thesecondary member table for the organization dimension type isSTAGE_INTERNAL_ORG_NLS.
For most dimension types, the secondary member table is the table in which to placeany member records that use languages other than the default detail data store language.For the currency and item category dimension types, there is no secondary membertable because their primary member tables can accommodate records in all languages.
If you are loading member records in only one language, then you can ignore thesecondary member table. If you use a secondary member table, then any member thatyou place in it must also be in the associated primary member table.
• The hierarchy identification table is the table whose name ends with ASSOC_TYPE.For example, the hierarchy identification table for the organization dimension isSTAGE_INTERNAL_ORG_ASSOC_TYPE.
The hierarchy identification table must contain a row for each hierarchy that you areloading into the target dimension. If you are loading hierarchy descriptions in morethan one language, then this table must contain additional rows that describe thehierarchies in the other languages.
The hierarchy identification tables have the same column structure for all dimensiontypes, because identifying a hierarchy involves the same considerations regardless ofdimension type. Some of the column names differ from table to table to reflect thedifferent dimension types, but the number, order, and characteristics of the columnsare the same. Here are the columns of the STAGE_INTERNAL_ORG_ASSOC_TYPEtable:
Moving Member and Hierarchy Data from Its Source to the Staging Tables 37

• The hierarchy structure table is the table whose name ends with ASSOC. For example,the hierarchy structure table for the organization dimension isSTAGE_INTERNAL_ORG_ASSOC.
The hierarchy structure table must contain a row for each parent-child relationshipwithin each hierarchy that you are loading into the target dimension. Each row of thistable identifies a member, its parent member, and the hierarchy that the relationship isa part of. It also specifies the display position of the member in a fully expanded displayof the hierarchy in either the SAS Solutions Dimension Editor or the Dimensionsworkspace of SAS Financial Management Studio.
The hierarchy structure tables have the same column structure for all dimension typesbecause detailing a hierarchical structure involves the same considerations regardlessof dimension type. Some of the column names differ from table to table to reflect thedifferent dimension types, but the number, order, and characteristics of the columnsare the same. Here are the columns of the STAGE_INTERNAL_ORG_ASSOC table:
In loading these tables, there are many points to keep in mind. Points that apply across allor most dimension types are discussed in “Requirements for All or Most Dimension Types ”on page 38. Points that are specific to a particular dimension type are discussed insubsequent sections.
Requirements for All or Most Dimension TypesFor any dimension type, the data that goes into the member tables, the hierarchyidentification table, and the hierarchy structure table must meet the following conditions:
• If the primary member table has a Roll Up to Parent Flag column, then this columnmust have a value of either Y or N. In SAS Financial Management Studio, Ycorresponds to selecting the This member rolls up into its parent check box on theGeneral tab of the properties window for a selected member. N corresponds to notselecting this check box. If you do not specify a value, the software provides the defaultvalue of Y when the data is loaded into the SDM.
• The hierarchy identification table must contain at least one record.
38 Chapter 7 • Loading Members and Hierarchies into a Dimension

• In the hierarchy identification table, you can either specify a default member in eachrecord or leave this column blank. If you leave the column blank, then a default memberis designated automatically for each hierarchy when the hierarchies are loaded into theSDM. The automatically designated default member is the member in the first recordof the hierarchy structure table that describes the relevant hierarchy and that makes amember its own parent.
All the default members that you specify must also be in the primary member table. Ifyou have several records for the same hierarchy in different languages, then eitherspecify the same default member in all of them or leave them all blank.
• A member can be used in a hierarchy only if it is in the dimension to which the hierarchybelongs. In other words, any member that is in a parent-child record in the hierarchystructure table must also be in the primary member table.
• In the subset of the hierarchy structure table that describes a given hierarchy as of agiven moment, each member that occurs as either a parent or a child must occur as achild in exactly one record:
• If the member has a parent in that hierarchy at that moment, then that one recordindicates which member is its parent.
• If the member has no parent in that hierarchy at that moment, then that one recordnames the member as its own parent. This is how top-level members are identified.
• The Order Number column of the hierarchy structure table holds integers that determinethe top-to-bottom display order of each parent's children in SAS Financial Managementand the SAS Solutions Dimension Editor. Among each parent's children, the child withthe lowest order number is displayed first, the child with the next lowest order numberis displayed second, and so on.
One approach to assigning order numbers is to assign a unique order number to everyrecord in the table. Another approach is to start a fresh count for the children of eachparent. The first approach gives the software more information than it needs, becausethe hierarchical structure already determines that each member will be displayed assubordinate to its parent. However, you might find that a table with unique ordernumbers is easier to maintain than a table that reuses the same low numbers many times.
With either approach, it is not necessary to use consecutive integers. For example, bynumbering initially with multiples of ten you can provide room to insert new memberswithout having to renumber old members.
If you leave this column blank in all the records of a hierarchy structure table, then thesoftware assigns default order numbers that reflect the order of the records in the table.
Note: The Order Number column does not affect the display of organizationhierarchies in SAS Human Capital Management.
• The records of the hierarchy structure table can occur in any order, but it is a good ideato load this table so that the records are grouped by hierarchy.
• Each table includes a Valid From Datetime column and a Valid To Datetime column,which define the lifespans of its records. See “Setting a Valid Time Range for DataRecords” on page 17.
As indicated by the sequence numbers of the jobs, the tables must be loaded in the followingorder:
1. The primary member table must be loaded first. This is because the members in it areused to validate the default members that are specified in the hierarchy identificationtable and all the members that are specified in parent-child relations in the hierarchystructure table.
Moving Member and Hierarchy Data from Its Source to the Staging Tables 39
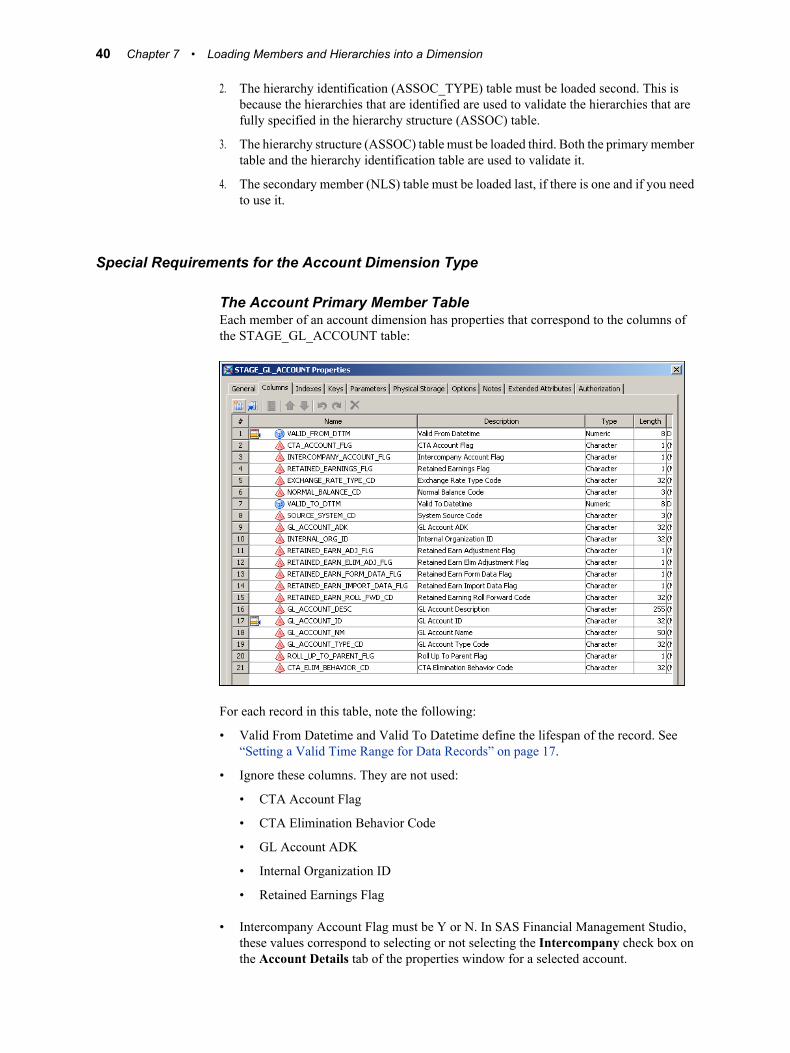
2. The hierarchy identification (ASSOC_TYPE) table must be loaded second. This isbecause the hierarchies that are identified are used to validate the hierarchies that arefully specified in the hierarchy structure (ASSOC) table.
3. The hierarchy structure (ASSOC) table must be loaded third. Both the primary membertable and the hierarchy identification table are used to validate it.
4. The secondary member (NLS) table must be loaded last, if there is one and if you needto use it.
Special Requirements for the Account Dimension Type
The Account Primary Member TableEach member of an account dimension has properties that correspond to the columns ofthe STAGE_GL_ACCOUNT table:
For each record in this table, note the following:
• Valid From Datetime and Valid To Datetime define the lifespan of the record. See“Setting a Valid Time Range for Data Records” on page 17.
• Ignore these columns. They are not used:
• CTA Account Flag
• CTA Elimination Behavior Code
• GL Account ADK
• Internal Organization ID
• Retained Earnings Flag
• Intercompany Account Flag must be Y or N. In SAS Financial Management Studio,these values correspond to selecting or not selecting the Intercompany check box onthe Account Details tab of the properties window for a selected account.
40 Chapter 7 • Loading Members and Hierarchies into a Dimension
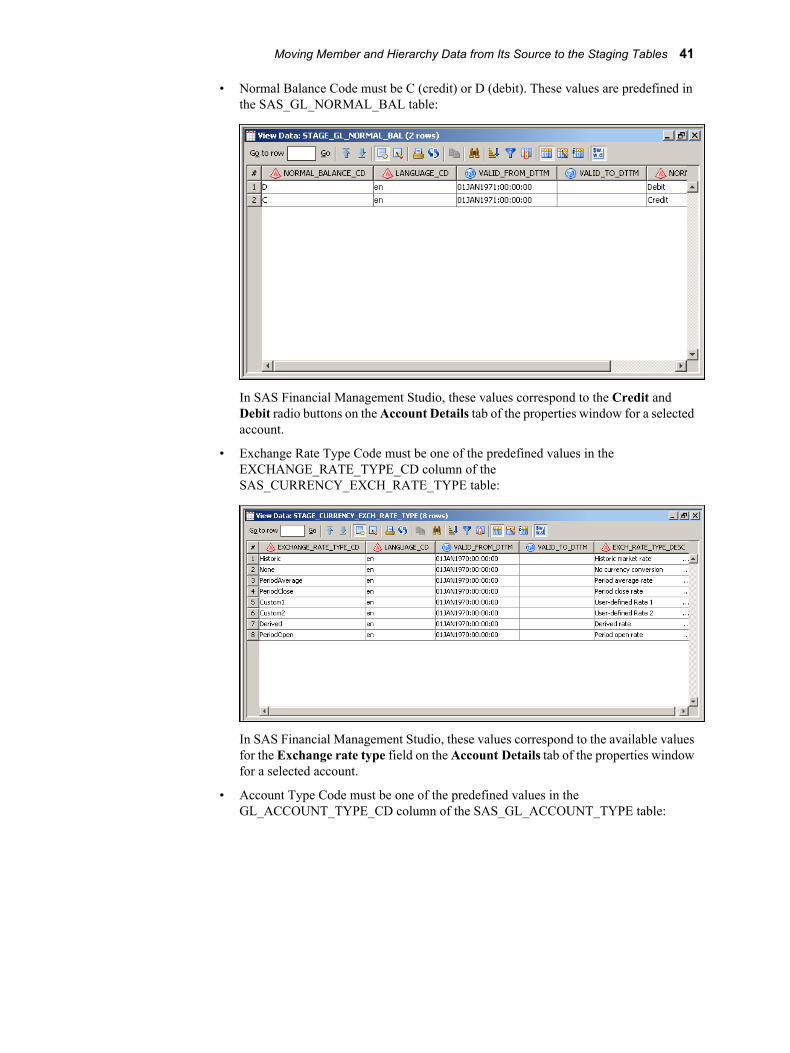
• Normal Balance Code must be C (credit) or D (debit). These values are predefined inthe SAS_GL_NORMAL_BAL table:
In SAS Financial Management Studio, these values correspond to the Credit andDebit radio buttons on the Account Details tab of the properties window for a selectedaccount.
• Exchange Rate Type Code must be one of the predefined values in theEXCHANGE_RATE_TYPE_CD column of theSAS_CURRENCY_EXCH_RATE_TYPE table:
In SAS Financial Management Studio, these values correspond to the available valuesfor the Exchange rate type field on the Account Details tab of the properties windowfor a selected account.
• Account Type Code must be one of the predefined values in theGL_ACCOUNT_TYPE_CD column of the SAS_GL_ACCOUNT_TYPE table:
Moving Member and Hierarchy Data from Its Source to the Staging Tables 41
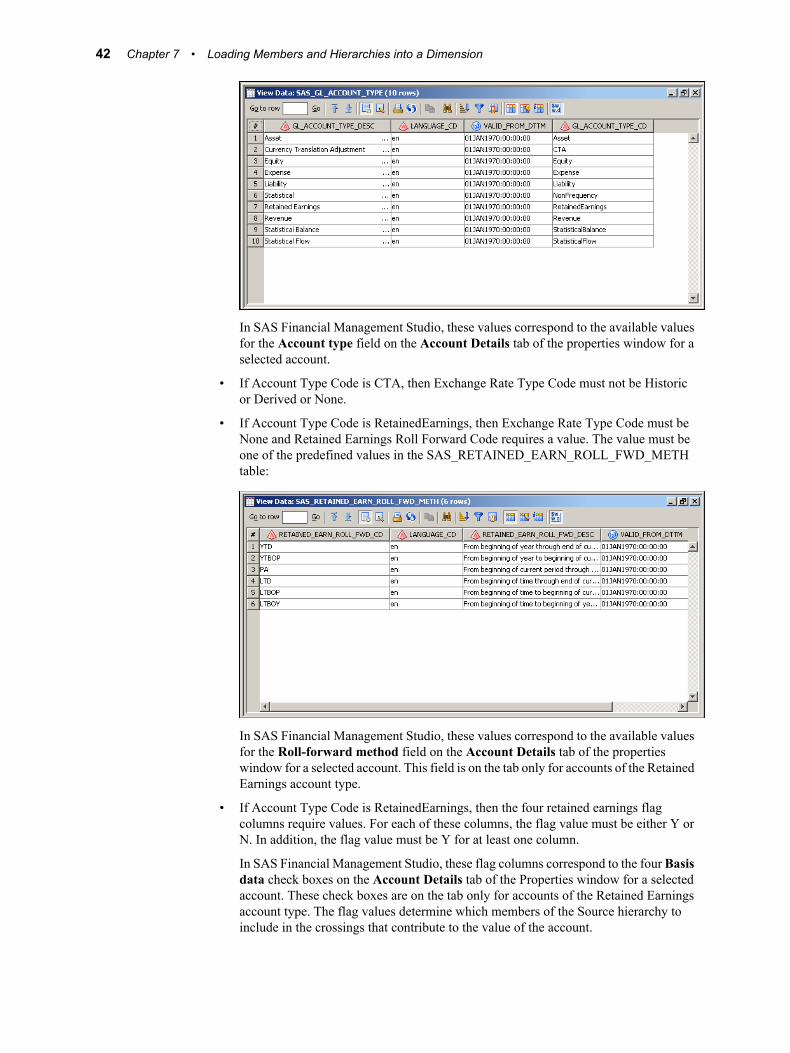
In SAS Financial Management Studio, these values correspond to the available valuesfor the Account type field on the Account Details tab of the properties window for aselected account.
• If Account Type Code is CTA, then Exchange Rate Type Code must not be Historicor Derived or None.
• If Account Type Code is RetainedEarnings, then Exchange Rate Type Code must beNone and Retained Earnings Roll Forward Code requires a value. The value must beone of the predefined values in the SAS_RETAINED_EARN_ROLL_FWD_METHtable:
In SAS Financial Management Studio, these values correspond to the available valuesfor the Roll-forward method field on the Account Details tab of the propertieswindow for a selected account. This field is on the tab only for accounts of the RetainedEarnings account type.
• If Account Type Code is RetainedEarnings, then the four retained earnings flagcolumns require values. For each of these columns, the flag value must be either Y orN. In addition, the flag value must be Y for at least one column.
In SAS Financial Management Studio, these flag columns correspond to the four Basisdata check boxes on the Account Details tab of the Properties window for a selectedaccount. These check boxes are on the tab only for accounts of the Retained Earningsaccount type. The flag values determine which members of the Source hierarchy toinclude in the crossings that contribute to the value of the account.
42 Chapter 7 • Loading Members and Hierarchies into a Dimension
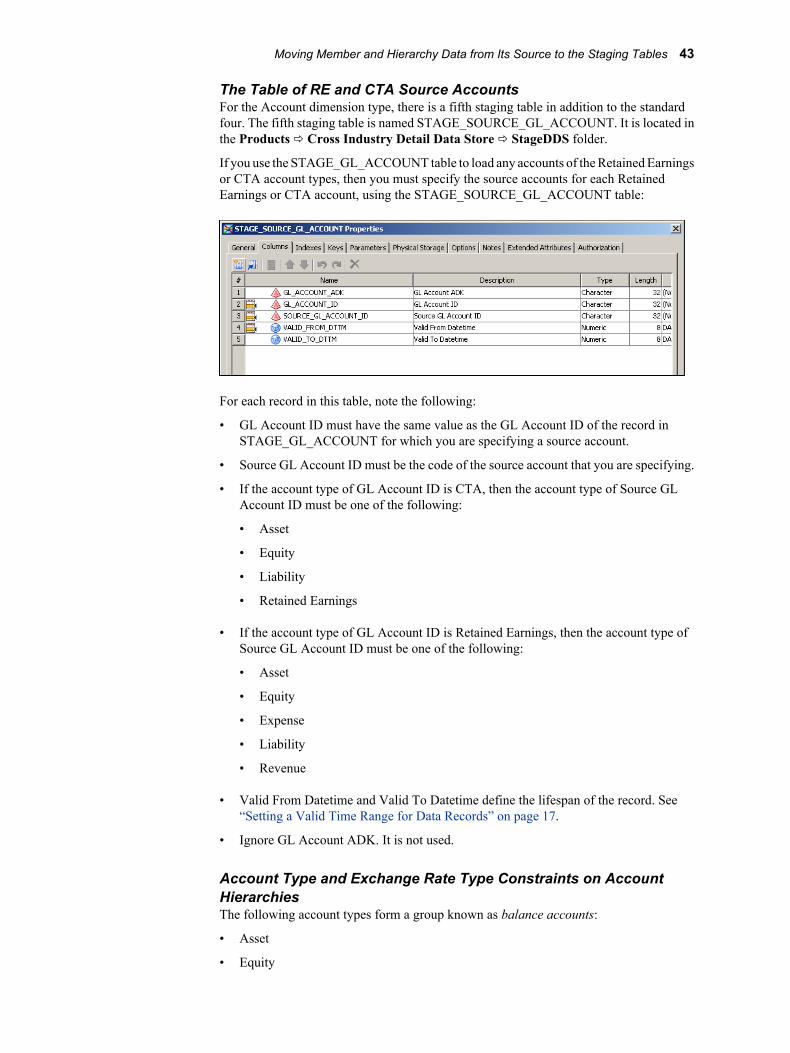
The Table of RE and CTA Source AccountsFor the Account dimension type, there is a fifth staging table in addition to the standardfour. The fifth staging table is named STAGE_SOURCE_GL_ACCOUNT. It is located inthe Products ð Cross Industry Detail Data Store ð StageDDS folder.
If you use the STAGE_GL_ACCOUNT table to load any accounts of the Retained Earningsor CTA account types, then you must specify the source accounts for each RetainedEarnings or CTA account, using the STAGE_SOURCE_GL_ACCOUNT table:
For each record in this table, note the following:
• GL Account ID must have the same value as the GL Account ID of the record inSTAGE_GL_ACCOUNT for which you are specifying a source account.
• Source GL Account ID must be the code of the source account that you are specifying.
• If the account type of GL Account ID is CTA, then the account type of Source GLAccount ID must be one of the following:
• Asset
• Equity
• Liability
• Retained Earnings
• If the account type of GL Account ID is Retained Earnings, then the account type ofSource GL Account ID must be one of the following:
• Asset
• Equity
• Expense
• Liability
• Revenue
• Valid From Datetime and Valid To Datetime define the lifespan of the record. See“Setting a Valid Time Range for Data Records” on page 17.
• Ignore GL Account ADK. It is not used.
Account Type and Exchange Rate Type Constraints on AccountHierarchiesThe following account types form a group known as balance accounts:
• Asset
• Equity
Moving Member and Hierarchy Data from Its Source to the Staging Tables 43
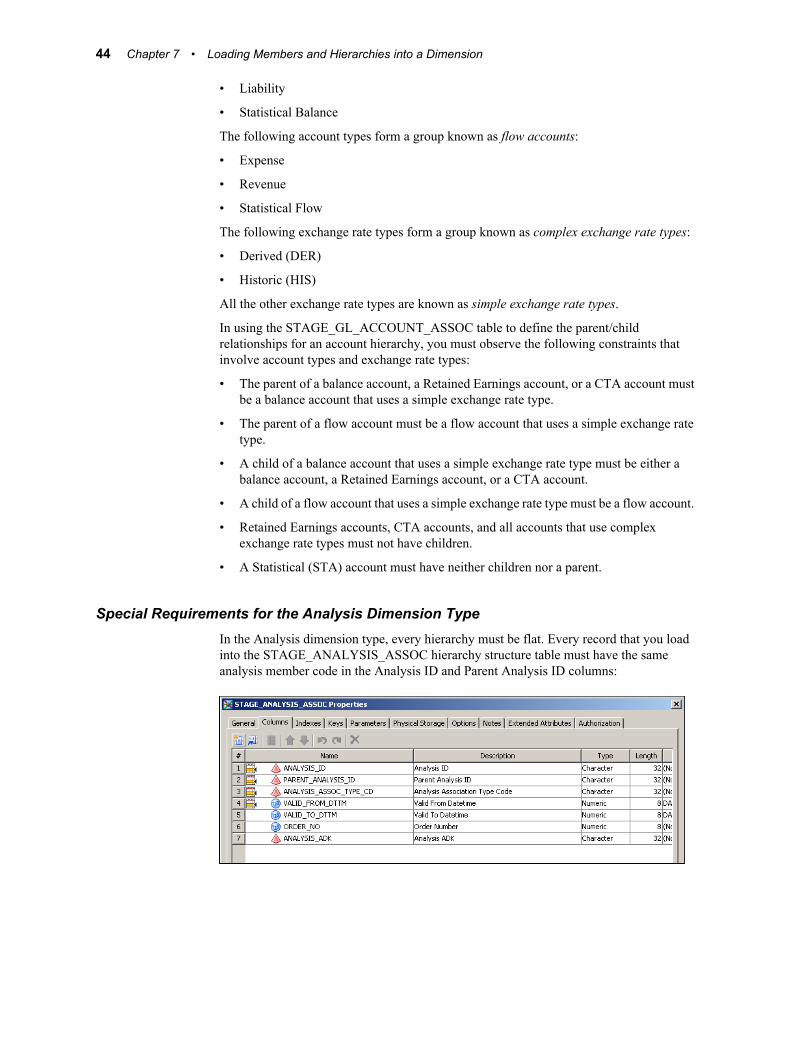
• Liability
• Statistical Balance
The following account types form a group known as flow accounts:
• Expense
• Revenue
• Statistical Flow
The following exchange rate types form a group known as complex exchange rate types:
• Derived (DER)
• Historic (HIS)
All the other exchange rate types are known as simple exchange rate types.
In using the STAGE_GL_ACCOUNT_ASSOC table to define the parent/childrelationships for an account hierarchy, you must observe the following constraints thatinvolve account types and exchange rate types:
• The parent of a balance account, a Retained Earnings account, or a CTA account mustbe a balance account that uses a simple exchange rate type.
• The parent of a flow account must be a flow account that uses a simple exchange ratetype.
• A child of a balance account that uses a simple exchange rate type must be either abalance account, a Retained Earnings account, or a CTA account.
• A child of a flow account that uses a simple exchange rate type must be a flow account.
• Retained Earnings accounts, CTA accounts, and all accounts that use complexexchange rate types must not have children.
• A Statistical (STA) account must have neither children nor a parent.
Special Requirements for the Analysis Dimension TypeIn the Analysis dimension type, every hierarchy must be flat. Every record that you loadinto the STAGE_ANALYSIS_ASSOC hierarchy structure table must have the sameanalysis member code in the Analysis ID and Parent Analysis ID columns:
44 Chapter 7 • Loading Members and Hierarchies into a Dimension
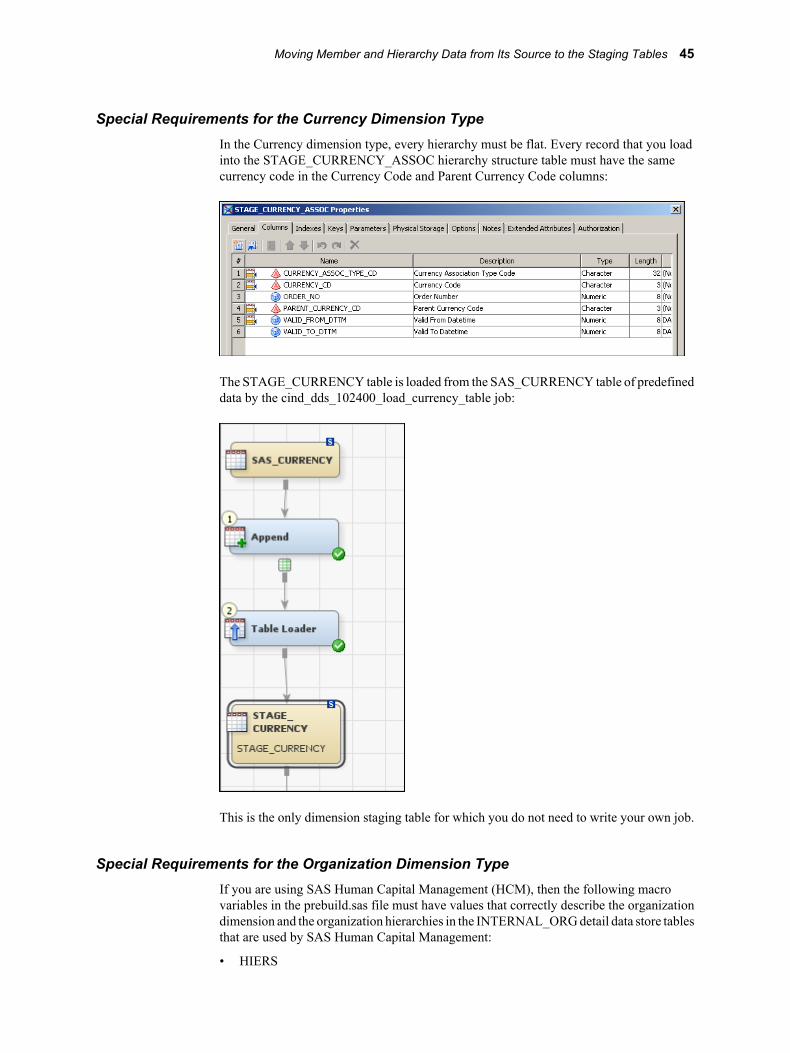
Special Requirements for the Currency Dimension TypeIn the Currency dimension type, every hierarchy must be flat. Every record that you loadinto the STAGE_CURRENCY_ASSOC hierarchy structure table must have the samecurrency code in the Currency Code and Parent Currency Code columns:
The STAGE_CURRENCY table is loaded from the SAS_CURRENCY table of predefineddata by the cind_dds_102400_load_currency_table job:
This is the only dimension staging table for which you do not need to write your own job.
Special Requirements for the Organization Dimension TypeIf you are using SAS Human Capital Management (HCM), then the following macrovariables in the prebuild.sas file must have values that correctly describe the organizationdimension and the organization hierarchies in the INTERNAL_ORG detail data store tablesthat are used by SAS Human Capital Management:
• HIERS
Moving Member and Hierarchy Data from Its Source to the Staging Tables 45

• NUMBER_OF_HIERS
For details about these HCM macro variables, see Chapter 23, “Macro Variables in thePREBUILD.SAS Macro File,” on page 209.
The rest of this section is relevant no matter what solution or combination of solutions youare using.
The STAGE_INTERNAL_ORG table must contain two special members, which are notvisible in the solution software. One special member is defined by an Internal OrganizationID of ALL. The other special member is defined by an Internal Organization ID of EXT.
The ALL and EXT members must be part of every hierarchy that is defined in theSTAGE_INTERNAL_ORG_ASSOC table. In every organization hierarchy, ALL must bethe unique top member, and EXT must be a leaf that is directly under ALL. The formalconstraints are as follows:
• ALL must not have a parent. This is indicated by a record in which ALL is its ownparent.
• ALL must be the only member of the hierarchy that does not have a parent.
• ALL must be the parent of EXT.
• EXT must not be the parent of any member.
Each member of an internal organization dimension has properties that correspond to thecolumns of the STAGE_INTERNAL_ORG table:
In building records for this table, note the following:
• Valid From Datetime and Valid To Datetime define the lifespan of the record. See“Setting a Valid Time Range for Data Records” on page 17.
• Employee ID must have a value if you are using SAS Human Capital Management.Otherwise, leave this column blank. Each value that you use must be defined in theDDS EMPLOYEE table.
46 Chapter 7 • Loading Members and Hierarchies into a Dimension
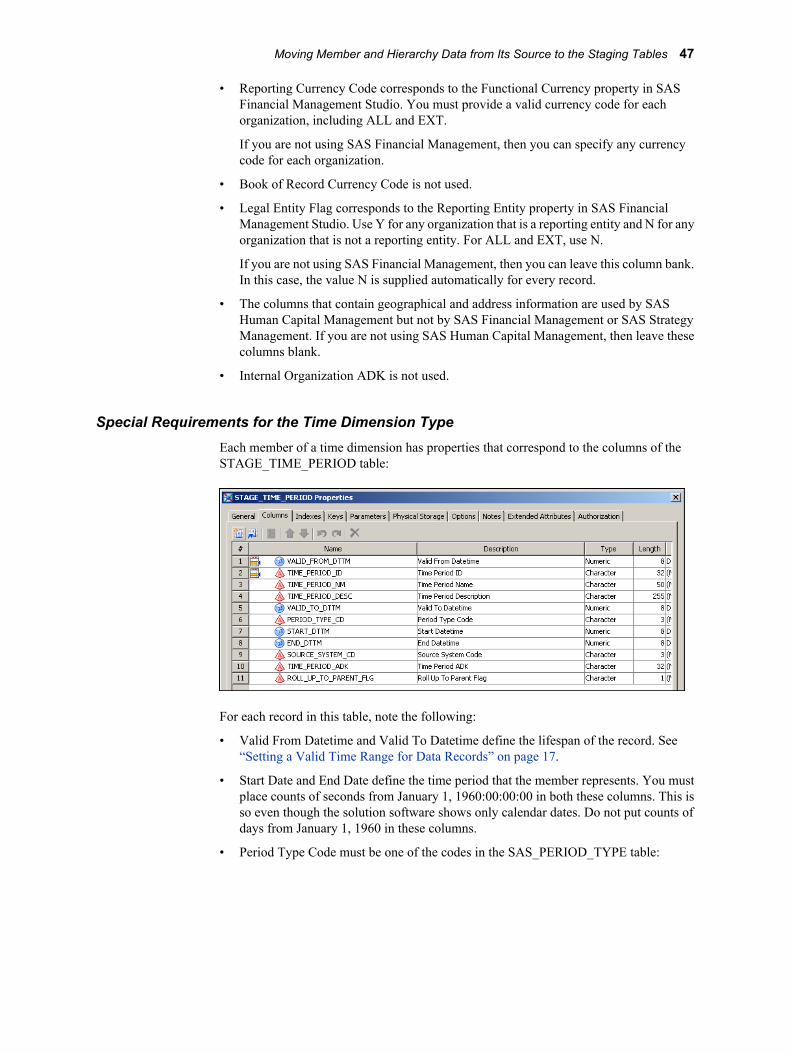
• Reporting Currency Code corresponds to the Functional Currency property in SASFinancial Management Studio. You must provide a valid currency code for eachorganization, including ALL and EXT.
If you are not using SAS Financial Management, then you can specify any currencycode for each organization.
• Book of Record Currency Code is not used.
• Legal Entity Flag corresponds to the Reporting Entity property in SAS FinancialManagement Studio. Use Y for any organization that is a reporting entity and N for anyorganization that is not a reporting entity. For ALL and EXT, use N.
If you are not using SAS Financial Management, then you can leave this column bank.In this case, the value N is supplied automatically for every record.
• The columns that contain geographical and address information are used by SASHuman Capital Management but not by SAS Financial Management or SAS StrategyManagement. If you are not using SAS Human Capital Management, then leave thesecolumns blank.
• Internal Organization ADK is not used.
Special Requirements for the Time Dimension TypeEach member of a time dimension has properties that correspond to the columns of theSTAGE_TIME_PERIOD table:
For each record in this table, note the following:
• Valid From Datetime and Valid To Datetime define the lifespan of the record. See“Setting a Valid Time Range for Data Records” on page 17.
• Start Date and End Date define the time period that the member represents. You mustplace counts of seconds from January 1, 1960:00:00:00 in both these columns. This isso even though the solution software shows only calendar dates. Do not put counts ofdays from January 1, 1960 in these columns.
• Period Type Code must be one of the codes in the SAS_PERIOD_TYPE table:
Moving Member and Hierarchy Data from Its Source to the Staging Tables 47
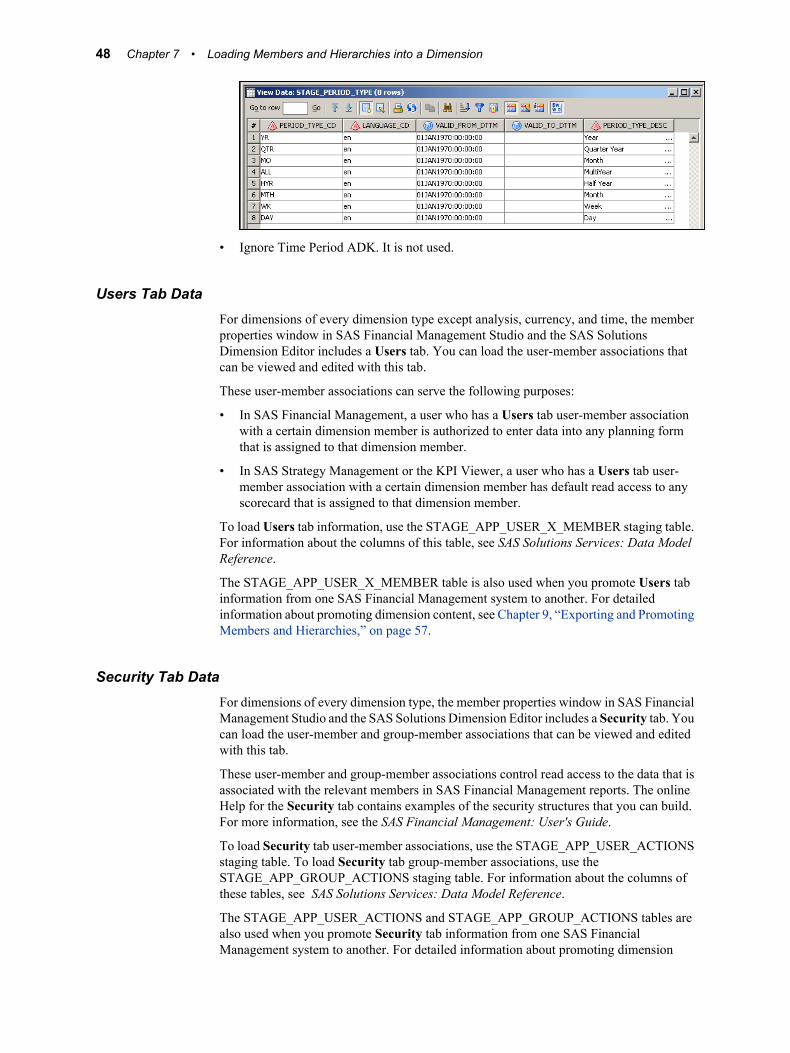
• Ignore Time Period ADK. It is not used.
Users Tab DataFor dimensions of every dimension type except analysis, currency, and time, the memberproperties window in SAS Financial Management Studio and the SAS SolutionsDimension Editor includes a Users tab. You can load the user-member associations thatcan be viewed and edited with this tab.
These user-member associations can serve the following purposes:
• In SAS Financial Management, a user who has a Users tab user-member associationwith a certain dimension member is authorized to enter data into any planning formthat is assigned to that dimension member.
• In SAS Strategy Management or the KPI Viewer, a user who has a Users tab user-member association with a certain dimension member has default read access to anyscorecard that is assigned to that dimension member.
To load Users tab information, use the STAGE_APP_USER_X_MEMBER staging table.For information about the columns of this table, see SAS Solutions Services: Data ModelReference.
The STAGE_APP_USER_X_MEMBER table is also used when you promote Users tabinformation from one SAS Financial Management system to another. For detailedinformation about promoting dimension content, see Chapter 9, “Exporting and PromotingMembers and Hierarchies,” on page 57.
Security Tab DataFor dimensions of every dimension type, the member properties window in SAS FinancialManagement Studio and the SAS Solutions Dimension Editor includes a Security tab. Youcan load the user-member and group-member associations that can be viewed and editedwith this tab.
These user-member and group-member associations control read access to the data that isassociated with the relevant members in SAS Financial Management reports. The onlineHelp for the Security tab contains examples of the security structures that you can build.For more information, see the SAS Financial Management: User's Guide.
To load Security tab user-member associations, use the STAGE_APP_USER_ACTIONSstaging table. To load Security tab group-member associations, use theSTAGE_APP_GROUP_ACTIONS staging table. For information about the columns ofthese tables, see SAS Solutions Services: Data Model Reference.
The STAGE_APP_USER_ACTIONS and STAGE_APP_GROUP_ACTIONS tables arealso used when you promote Security tab information from one SAS FinancialManagement system to another. For detailed information about promoting dimension
48 Chapter 7 • Loading Members and Hierarchies into a Dimension

content, see Chapter 9, “Exporting and Promoting Members and Hierarchies,” on page57.
Loading Members and Hierarchies from theStaging Tables to the Detail Data Store
On the Folders tab, the jobs for loading members and hierarchies into the detail data storeare in the Products ð Cross Industry Detail Data Store ð 5.2 Jobs folder. There is aseparate job for loading each detail data store table from the corresponding staging table.For example, loading members and hierarchies into an organization dimension involvesthe following four jobs:
• cind_dds_106200_load_internal_org_table (all members in the detail data store defaultlanguage)
• cind_dds_106230_load_internal_org_nls_table (members in other supportedlanguages)
• cind_dds_106210_load_internal_org_assoc_type_table (identities of all hierarchies)
• cind_dds_106220_load_internal_org_assoc_table (parent-child structure of allhierarchies)
You will need to run jobs that handle specific types of member properties across dimensiontypes if you meet one of the following conditions:
• You are loading member and hierarchy data that was exported from one SAS FinancialManagement system in order to promote it to another SAS Financial Managementsystem.
• You are loading original Users tab data as described in “Users Tab Data” on page 48.
• You are loading original Security tab data as described in “Security Tab Data” on page48.
To load exported information about formulas for any dimension type that supportsformulas, run the following jobs:
• cind_dds_108200_load_app_formula_target_table
• cind_dds_108210_load_app_formula_table
• cind_dds_108220_load_app_formula_write_member_table
• cind_dds_108230_load_app_formula_read_member_table
To load exported or original Users tab information for any dimension type except analysis,currency, and time, run the following job:
• cind_dds_108300_load_app_user_x_member_table
To load exported or original Security tab information for any dimension type, run thefollowing jobs:
• cind_dds_108310_load_app_user_actions_table
• cind_dds_108320_load_app_group_actions_table
On the Folders tab, these cross-dimension-type jobs are in the Products ð Cross IndustryDetail Data Store ð 5.2 Jobs folder.
For detailed information about exporting and promoting dimension content, see Chapter9, “Exporting and Promoting Members and Hierarchies,” on page 57.
Loading Members and Hierarchies from the Staging Tables to the Detail Data Store 49
Moving Member and Hierarchy Data from the DetailData Store to the SDM
Overview of Moving Member and Hierarchy Data from the Detail DataStore to the SDM
You can load members and hierarchies into a dimension in the SDM using either one ofthe following:
• a SAS Data Integration Studio job that uses the Import Dimension transformation
• the Load Dimension wizard in either the SAS Solutions Dimension Editor or theDimensions workspace of SAS Financial Management Studio
Note: You do not need to load members and hierarchies into a dimension in the SDM ifonly SAS Human Capital Management is installed at your site. If your site has SASFinancial Management or SAS Strategy Management, and you want to view HCMmetrics in SAS Strategy Management, you can load members and hierarchies.
Typically, you can handle your dimensions in any order. The only exception is that youmust load currencies into a currency dimension before you load organizations into anorganization dimension.
The data locales for which you are loading member and hierarchy names and descriptionsmust be defined in the SDM before you load the member and hierarchy data. For detailsabout loading data locales, see Chapter 4, “Loading Language Codes and Data LocaleCodes,” on page 23.
Using a JobTo use a SAS Data Integration Studio job, first prepare the job in the following way:
1. In the Products ð SAS Solutions Services ð 5.2 Jobs folder on the Folders tab, makea copy of the solnsvc_3200_load_dimension job, using one of the methods describedin “Copy Jobs” on page 12.
2. In the process diagram, select the Import Dimension transformation, and then selectProperties from the pop-up menu.
3. Select the Options tab:
50 Chapter 7 • Loading Members and Hierarchies into a Dimension
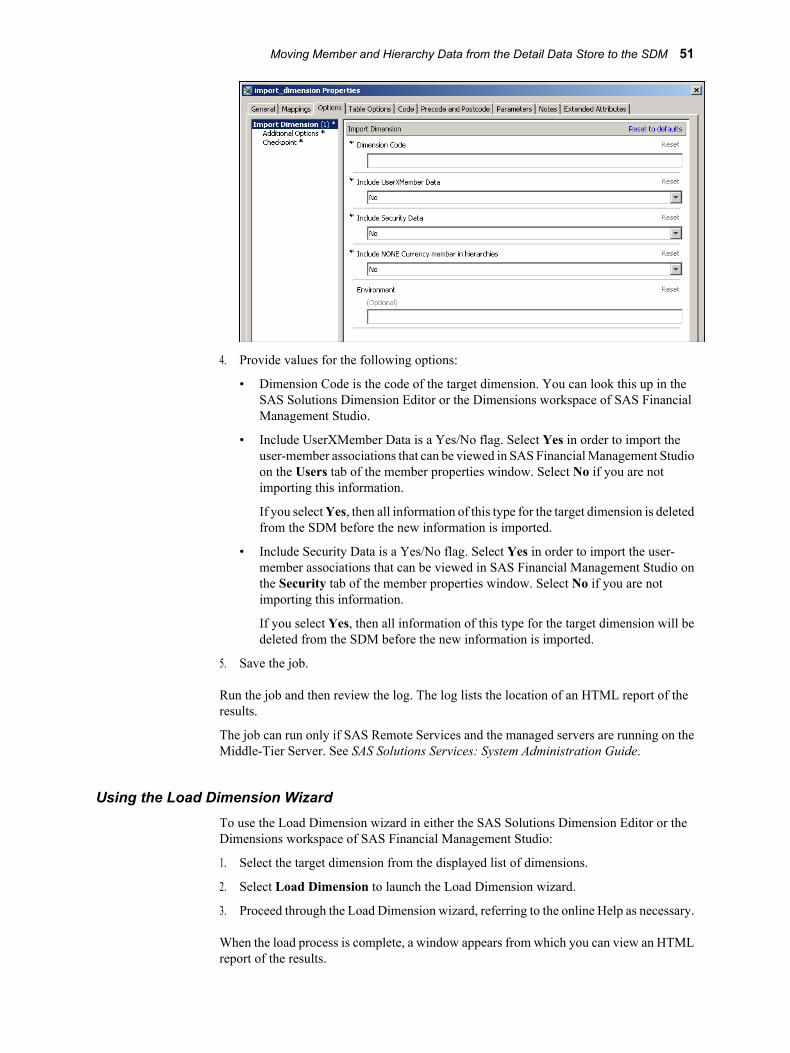
4. Provide values for the following options:
• Dimension Code is the code of the target dimension. You can look this up in theSAS Solutions Dimension Editor or the Dimensions workspace of SAS FinancialManagement Studio.
• Include UserXMember Data is a Yes/No flag. Select Yes in order to import theuser-member associations that can be viewed in SAS Financial Management Studioon the Users tab of the member properties window. Select No if you are notimporting this information.
If you select Yes, then all information of this type for the target dimension is deletedfrom the SDM before the new information is imported.
• Include Security Data is a Yes/No flag. Select Yes in order to import the user-member associations that can be viewed in SAS Financial Management Studio onthe Security tab of the member properties window. Select No if you are notimporting this information.
If you select Yes, then all information of this type for the target dimension will bedeleted from the SDM before the new information is imported.
5. Save the job.
Run the job and then review the log. The log lists the location of an HTML report of theresults.
The job can run only if SAS Remote Services and the managed servers are running on theMiddle-Tier Server. See SAS Solutions Services: System Administration Guide.
Using the Load Dimension WizardTo use the Load Dimension wizard in either the SAS Solutions Dimension Editor or theDimensions workspace of SAS Financial Management Studio:
1. Select the target dimension from the displayed list of dimensions.
2. Select Load Dimension to launch the Load Dimension wizard.
3. Proceed through the Load Dimension wizard, referring to the online Help as necessary.
When the load process is complete, a window appears from which you can view an HTMLreport of the results.
Moving Member and Hierarchy Data from the Detail Data Store to the SDM 51

Summary of ResultsWhether you load members and hierarchies using a job or using the Load Dimensionwizard, the results are the same:
• All the detail data store data in the dimension-type-specific tables for the relevantdimension type is loaded. This includes the data in the primary and secondary membertables, the hierarchy identification table, and the hierarchy structure table. For anaccount dimension, it also includes the data in the SOURCE_GL_ACCOUNT table.
• Each member that you load replaces the existing member that has the same code, ifthere is one. Any existing member that is not replaced by a newly loaded memberremains in the target dimension.
• For each member that you load, any associated formula data is also loaded. AssociatedSecurity tab data and User tab data is loaded only if you set the relevant flags to Y.Any dimension that is used in a formula must be loaded before the dimension withwhich the formula is associated.
• Each hierarchy that you load replaces the entire existing hierarchy that has the samecode, if there is one. Any existing hierarchy that is not replaced by a newly loadedhierarchy remains in the target dimension.
52 Chapter 7 • Loading Members and Hierarchies into a Dimension
Chapter 8
Registering Member PropertiesSo That They Are Loaded into theSDM
Overview of Member Properties . . . . . . . . . . . . . . . . . . . . . . . . . . . . . . . . . . . . . . . . 53
Member Properties That Are Preregistered . . . . . . . . . . . . . . . . . . . . . . . . . . . . . . . 53
Defining New Member Properties . . . . . . . . . . . . . . . . . . . . . . . . . . . . . . . . . . . . . . . . 54
Registering Member Properties . . . . . . . . . . . . . . . . . . . . . . . . . . . . . . . . . . . . . . . . . 54
Using Member Properties That You Have Registered . . . . . . . . . . . . . . . . . . . . . . . 56
Overview of Member PropertiesSome of the columns in a primary member table contain information that is common acrossall or most dimension types, while other columns contain information that is specific to thedimension type in question. The columns that contain dimension-type-specific informationrepresent member properties. Examples are Account Type for the account dimension typeand Functional Currency for the organization dimension type. The generic columnsrepresent member attributes that are not classified as member properties. Examples areCode, Name, Description, Valid from Datetime, Valid to Datetime, and Roll Up to ParentFlag.
When you load members into a dimension in the SDM, the information that is loadedincludes all the generic columns and the values of those member properties that areregistered to be loaded. Many but not all member properties are preregistered in thesoftware. You can register more member properties, including member properties that youadd to the detail data store and member properties that are predefined in the detail datastore but not preregistered.
Member Properties That Are PreregisteredFor the account and time dimension types, all predefined member properties arepreregistered.
For the organization dimension type, the following predefined member properties arepreregistered:
• Reporting Currency Code
• Legal Entity Flag
53
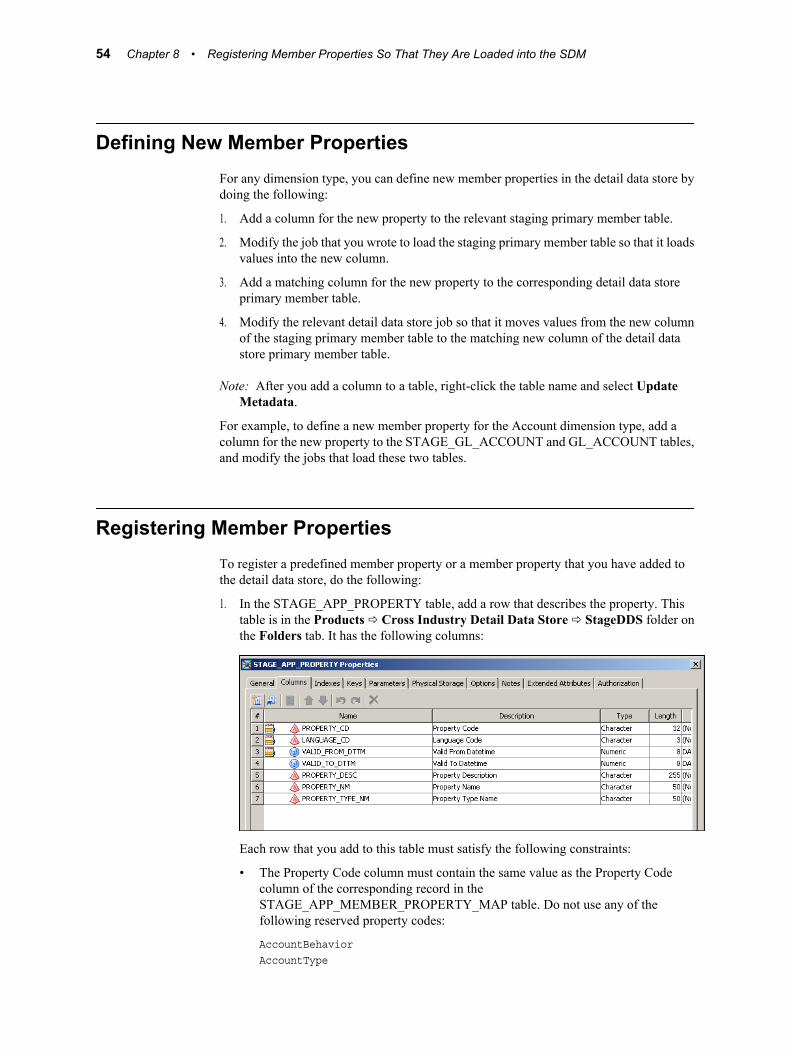
Defining New Member PropertiesFor any dimension type, you can define new member properties in the detail data store bydoing the following:
1. Add a column for the new property to the relevant staging primary member table.
2. Modify the job that you wrote to load the staging primary member table so that it loadsvalues into the new column.
3. Add a matching column for the new property to the corresponding detail data storeprimary member table.
4. Modify the relevant detail data store job so that it moves values from the new columnof the staging primary member table to the matching new column of the detail datastore primary member table.
Note: After you add a column to a table, right-click the table name and select UpdateMetadata.
For example, to define a new member property for the Account dimension type, add acolumn for the new property to the STAGE_GL_ACCOUNT and GL_ACCOUNT tables,and modify the jobs that load these two tables.
Registering Member PropertiesTo register a predefined member property or a member property that you have added tothe detail data store, do the following:
1. In the STAGE_APP_PROPERTY table, add a row that describes the property. Thistable is in the Products ð Cross Industry Detail Data Store ð StageDDS folder onthe Folders tab. It has the following columns:
Each row that you add to this table must satisfy the following constraints:
• The Property Code column must contain the same value as the Property Codecolumn of the corresponding record in theSTAGE_APP_MEMBER_PROPERTY_MAP table. Do not use any of thefollowing reserved property codes:
AccountBehaviorAccountType
54 Chapter 8 • Registering Member Properties So That They Are Loaded into the SDM
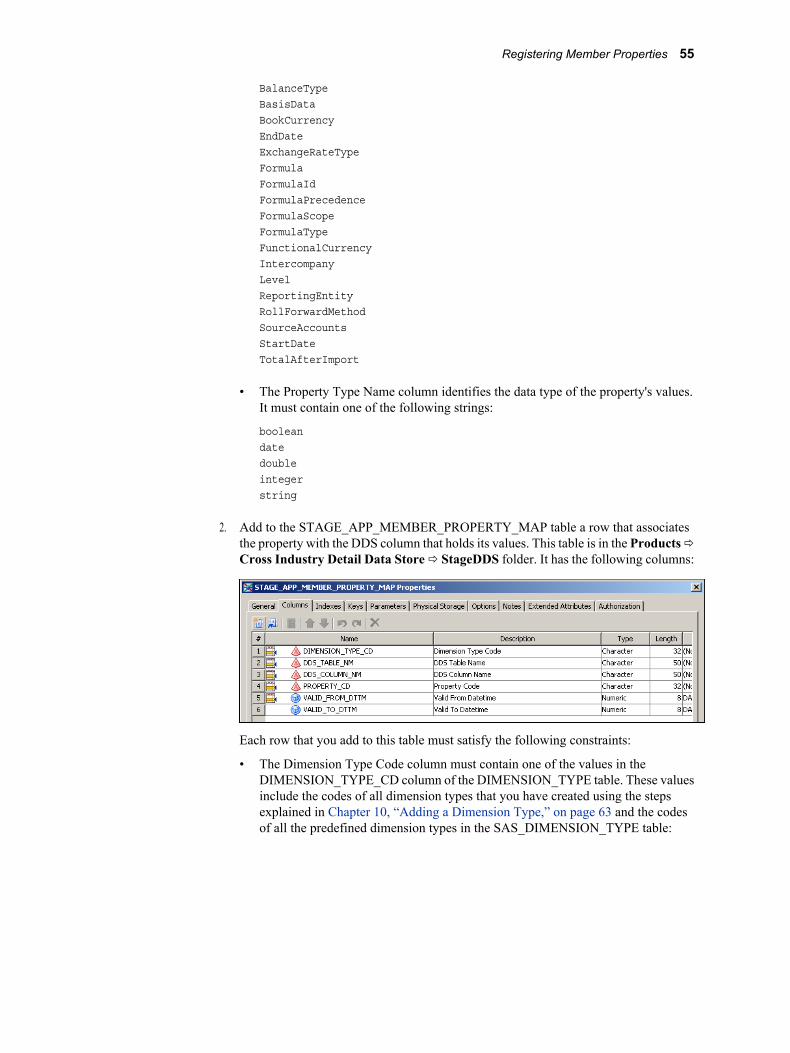
BalanceTypeBasisDataBookCurrencyEndDateExchangeRateTypeFormulaFormulaIdFormulaPrecedenceFormulaScopeFormulaTypeFunctionalCurrencyIntercompanyLevelReportingEntityRollForwardMethodSourceAccountsStartDateTotalAfterImport
• The Property Type Name column identifies the data type of the property's values.It must contain one of the following strings:
booleandatedoubleintegerstring
2. Add to the STAGE_APP_MEMBER_PROPERTY_MAP table a row that associatesthe property with the DDS column that holds its values. This table is in the Products ðCross Industry Detail Data Store ð StageDDS folder. It has the following columns:
Each row that you add to this table must satisfy the following constraints:
• The Dimension Type Code column must contain one of the values in theDIMENSION_TYPE_CD column of the DIMENSION_TYPE table. These valuesinclude the codes of all dimension types that you have created using the stepsexplained in Chapter 10, “Adding a Dimension Type,” on page 63 and the codesof all the predefined dimension types in the SAS_DIMENSION_TYPE table:
Registering Member Properties 55
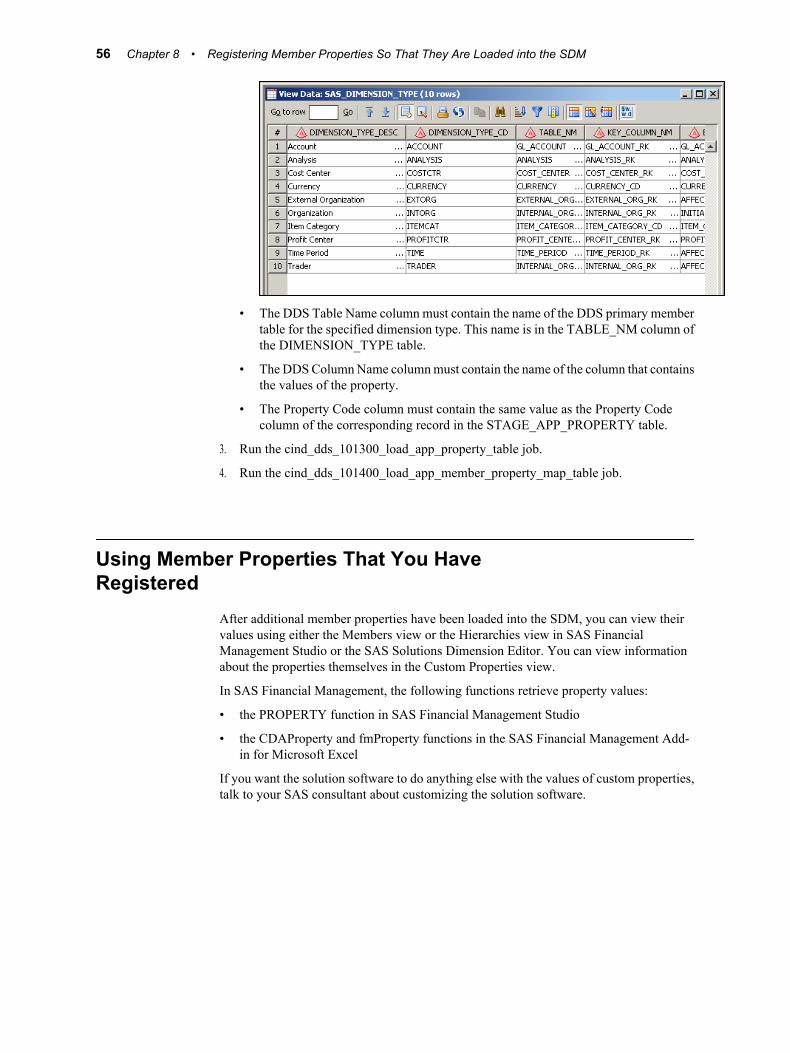
• The DDS Table Name column must contain the name of the DDS primary membertable for the specified dimension type. This name is in the TABLE_NM column ofthe DIMENSION_TYPE table.
• The DDS Column Name column must contain the name of the column that containsthe values of the property.
• The Property Code column must contain the same value as the Property Codecolumn of the corresponding record in the STAGE_APP_PROPERTY table.
3. Run the cind_dds_101300_load_app_property_table job.
4. Run the cind_dds_101400_load_app_member_property_map_table job.
Using Member Properties That You HaveRegistered
After additional member properties have been loaded into the SDM, you can view theirvalues using either the Members view or the Hierarchies view in SAS FinancialManagement Studio or the SAS Solutions Dimension Editor. You can view informationabout the properties themselves in the Custom Properties view.
In SAS Financial Management, the following functions retrieve property values:
• the PROPERTY function in SAS Financial Management Studio
• the CDAProperty and fmProperty functions in the SAS Financial Management Add-in for Microsoft Excel
If you want the solution software to do anything else with the values of custom properties,talk to your SAS consultant about customizing the solution software.
56 Chapter 8 • Registering Member Properties So That They Are Loaded into the SDM
Chapter 9
Exporting and PromotingMembers and Hierarchies
Overview of Exporting Members and Hierarchies . . . . . . . . . . . . . . . . . . . . . . . . . . 57
Using a Job to Export Members and Hierarchies . . . . . . . . . . . . . . . . . . . . . . . . . . 58
Using the Export Dimension Wizard to Export Members and Hierarchies . . . . . 60
Details of the Result . . . . . . . . . . . . . . . . . . . . . . . . . . . . . . . . . . . . . . . . . . . . . . . . . . . 60
Possible Obstacles to Exporting a Dimension . . . . . . . . . . . . . . . . . . . . . . . . . . . . . . 61
Overview of Exporting Members and HierarchiesThe need to export members and hierarchies from the SDM is most likely to arise for usersof SAS Financial Management. It can arise for either of two reasons.
When you export members and hierarchies, you can choose the export destination. Youcan also choose whether to export Users tab information and Security tab information forthe exported members. Your reason for performing the export operation has implicationsfor both choices.
Here are the two reasons and their implications:
• You have created members using the Dimensions workspace of SAS FinancialManagement Studio. You now want to use these members in base accounting facts tobe loaded through the GL_TRANSACTION_SUM and GL_JRNL_DETAILS tablesof the detail data store. This requires that the members be in the appropriate detail datastore dimension tables.
In this case, the appropriate export destination is the staging area that serves the SDMthat you are exporting from. From that staging area, you load the information into thedetail data store dimension tables, as explained in “Loading Members and Hierarchiesfrom the Staging Tables to the Detail Data Store” on page 49.
There is no need to export Users tab and Security tab information, because thisinformation is not used in the process of loading base accounting facts.
• You have created or modified members and hierarchies using the Dimensionsworkspace of SAS Financial Management Studio. You now want to promote thesemembers and hierarchies to a test system or to a production system.
In this case, the appropriate export destination is a Base SAS library other than thestaging area that serves the SDM that you are exporting from. After you export themembers and hierarchies to this library, you must move them to the staging area thatserves the system that is your promotion target. From that staging area, you load the
57
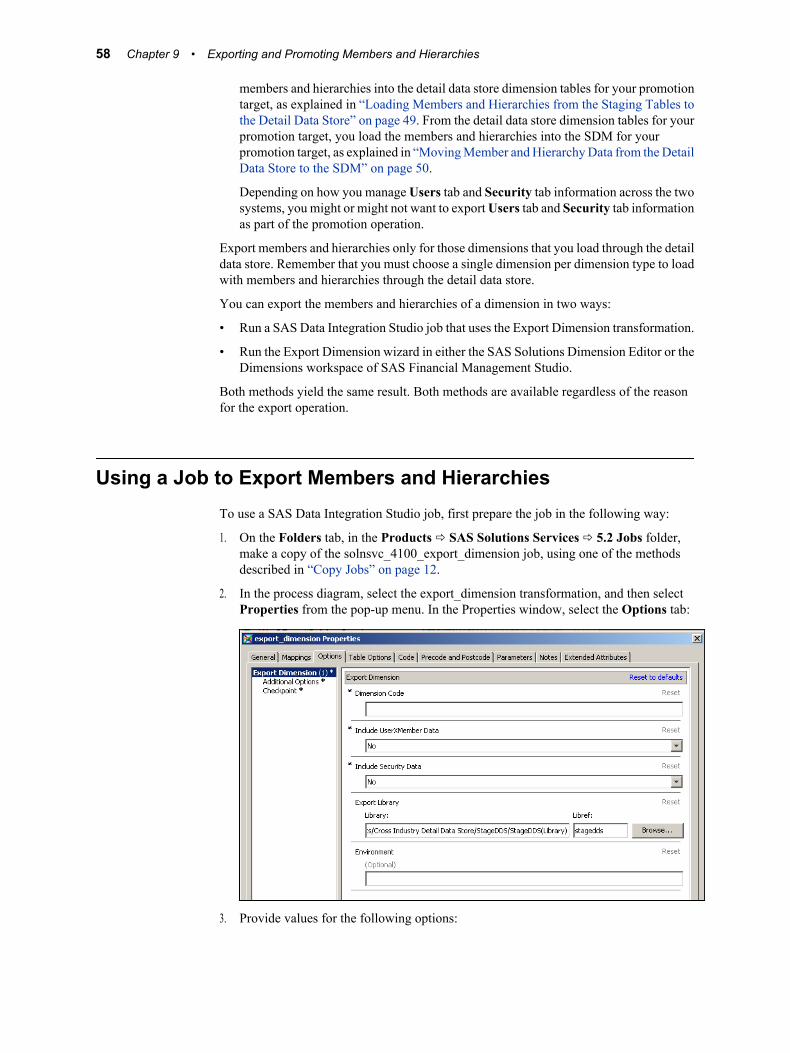
members and hierarchies into the detail data store dimension tables for your promotiontarget, as explained in “Loading Members and Hierarchies from the Staging Tables tothe Detail Data Store” on page 49. From the detail data store dimension tables for yourpromotion target, you load the members and hierarchies into the SDM for yourpromotion target, as explained in “Moving Member and Hierarchy Data from the DetailData Store to the SDM” on page 50.
Depending on how you manage Users tab and Security tab information across the twosystems, you might or might not want to export Users tab and Security tab informationas part of the promotion operation.
Export members and hierarchies only for those dimensions that you load through the detaildata store. Remember that you must choose a single dimension per dimension type to loadwith members and hierarchies through the detail data store.
You can export the members and hierarchies of a dimension in two ways:
• Run a SAS Data Integration Studio job that uses the Export Dimension transformation.
• Run the Export Dimension wizard in either the SAS Solutions Dimension Editor or theDimensions workspace of SAS Financial Management Studio.
Both methods yield the same result. Both methods are available regardless of the reasonfor the export operation.
Using a Job to Export Members and HierarchiesTo use a SAS Data Integration Studio job, first prepare the job in the following way:
1. On the Folders tab, in the Products ð SAS Solutions Services ð 5.2 Jobs folder,make a copy of the solnsvc_4100_export_dimension job, using one of the methodsdescribed in “Copy Jobs” on page 12.
2. In the process diagram, select the export_dimension transformation, and then selectProperties from the pop-up menu. In the Properties window, select the Options tab:
3. Provide values for the following options:
58 Chapter 9 • Exporting and Promoting Members and Hierarchies
• Dimension Code is the code of the source dimension. You can look this up in theSAS Solutions Dimension Editor or the Dimensions workspace of SAS FinancialManagement Studio.
• Include UserXMember Data is a Yes/No flag. Select Yes in order to export theuser-member associations that can be viewed in SAS Financial Management Studioon the Users tab of the member properties window. Select No in order to withholdthese user-member associations from the exported information. Yes is appropriateonly if you are exporting members and hierarchies in order to promote them toanother system.
• Include Security Data is a Yes/No flag. Select Yes to export the user-memberassociations that can be viewed in SAS Financial Management Studio on theSecurity tab of the member properties window. Select No to withhold these user-member associations from the exported information. Yes is appropriate only if youare exporting members and hierarchies in order to promote them to another system.
• Export Library is the name of the Base SAS data library that you are exportingthe data to. Click Browse to select a library. For example, select stagedds if youare exporting members and hierarchies to the staging area. If you specify a targetlibrary other than stagedds, then make sure that the target library satisfies thefollowing conditions:
Note: Do not export data to the CrossIndustryDDS library.
• It is on a machine that uses the same operating system as the machine that holdsthe source SDM.
• The Solutions Host User has operating system read and write access to it.
• It contains copies of all the staging tables that are needed to receive the exporteddata. These include the following:
• dimension-type-specific tables for each dimension type that you areworking with. For the account dimension type, you need copies of thefollowing five tables: STAGE_GL_ACCOUNT,STAGE_GL_ACCOUNT_ASSOC_TYPE,STAGE_GL_ACCOUNT_ASSOC, STAGE_GL_ACCOUNT_NLS,STAGE_SOURCE_GL_ACCOUNT. For most other dimension types, youneed the counterparts of the first four of these tables. For the currency anditem category dimension types, you need the counterparts of the first three.
• tables that contain formula information across all dimension types thatsupport formulas: STAGE_APP_FORMULA,STAGE_APP_FORMULA_TARGET,STAGE_APP_FORMULA_READ_MEMBER,STAGE_APP_FORMULA_WRITE_MEMBER.
• tables that contain Security tab data across all dimension types:STAGE_APP_GROUP_ACTIONS, STAGE_APP_USER_ACTIONS.
• the table that contains User tab data across all dimension types exceptanalysis, currency, and time (which do not support User tab data):STAGE_APP_USER_X_MEMBER.
Note: To define additional Base SAS data libraries, use SAS ManagementConsole.
4. Save the job.
5. Run the job and then review the log.
Using a Job to Export Members and Hierarchies 59
The job can run only if SAS Remote Services and the managed servers are running on theMiddle Tier Server. See SAS Solutions Services: System Administration Guide.
Using the Export Dimension Wizard to ExportMembers and Hierarchies
To export the members and hierarchies of a selected dimension using the Export Dimensionwizard:
1. In the SAS Solutions Dimension Editor or the Dimensions workspace of SAS FinancialManagement Studio, select the source dimension.
2. Select Export this dimension to launch the Export Dimension wizard.
3. Proceed through the wizard, referring to the online Help as necessary.
If you specify an export library other than stagedds, then the export library mustsatisfy all the conditions that are listed in “Using a Job to Export Members andHierarchies ” on page 58.
Details of the ResultThe two methods of exporting members and hierarchies produce the same result.Characteristics of this result include the following:
• All the data in the target dimension-type-specific tables is deleted, and then the datathat you are exporting is placed in them. At the end of the process, these tables containonly the data that you have just exported.
If the SDM contains member or hierarchy names and descriptions in more than onedata locale, then the export includes names and descriptions in each data locale that isdefined in the Detail Data Store CODE_LANGUAGE table. For a detailed discussionof this table, see Chapter 4, “Loading Language Codes and Data Locale Codes,” onpage 23. The names and descriptions for the data locale that is associated with the detaildata store default language are exported to the primary member table. The names anddescriptions for all other data locales are exported to the secondary member table. Fora detailed discussion of these tables, see “Tables for Each Dimension Type ” on page36.
• All the data in the target formula tables for the dimension type that you are workingwith is deleted, and then the formula data that you are exporting is placed in them. Atthe end of the process, these tables contain only the freshly exported formula data forthe dimension type that you are working with plus the previously present formula datafor all other dimension types.
• If you choose to export Security tab data, all the data in the target Security tab tablesfor the dimension type that you are working with is deleted, and then the Security tabdata that you are exporting is placed in them. In this case, at the end of the process,these tables contain only the freshly exported Security tab data for the dimension typethat you are working with plus the previously present Security tab data for all otherdimension types.
If you choose to not export Security tab data, then the export operation does not changethe target Security tab tables in any way.
60 Chapter 9 • Exporting and Promoting Members and Hierarchies
• If you choose to export User tab data, all the data in the target User tab table for thedimension type that you are working with is deleted. The User tab data that you areexporting is placed in the table. At the end of the process, this table contains only thefreshly exported User tab data for the dimension type that you are working with, plusthe previously present User tab data for all other dimension types.
If you choose to not export User tab data, then the export operation does not changethe target User tab table in any way.
Possible Obstacles to Exporting a DimensionThe solnsvc_4100_export_dimension job and the Export Dimension wizard can encountervarious obstacles that prevent them from successfully exporting the members andhierarchies of the selected dimension. Possible obstacles include the following:
• The Solutions Host User does not have operating system read and write access to thetarget data library.
• A target table does not exist. If the target data library is the staging area, this can happenif a table was accidentally deleted or if the staging tables for the relevant dimensiontype were never created. For a detailed discussion of the process of creating a dimensiontype, see Chapter 10, “Adding a Dimension Type,” on page 63.
For a target data library other than the staging area, this can happen if you neglected tocopy one of the necessary tables into the target library.
• A column is either misnamed or missing from a target table. This can happen if thetarget tables were not created correctly.
• The record for the relevant dimension type in the DIMENSION_TYPE table containsan error. This can happen if an incorrect value was placed in the record when it wascreated.
• One of the target tables is open and locked. This can happen if someone is workingwith the table.
• The CODE_LANGUAGE table in the detail data store does not have one and only onerecord marked with a Default Language Flag value of Y. For a detailed discussion ofthis table, see Chapter 4, “Loading Language Codes and Data Locale Codes,” on page23.
• The CODE_LANGUAGE table in the detail data store does not have a record for oneof the languages that is used in the member and hierarchy data that you want to export.
If the job or the wizard encounters any of these obstacles, an appropriate message isdisplayed.
Possible Obstacles to Exporting a Dimension 61

62 Chapter 9 • Exporting and Promoting Members and Hierarchies
Chapter 10
Adding a Dimension Type
Overview of Adding a Dimension Type . . . . . . . . . . . . . . . . . . . . . . . . . . . . . . . . . . . 63
Run the Job That Creates a New Dimension Type in the Staging Tables . . . . . . . . 64
Run the Job That Loads a Dimension Type . . . . . . . . . . . . . . . . . . . . . . . . . . . . . . . . 68
Write Jobs to Load the New Staging Tables . . . . . . . . . . . . . . . . . . . . . . . . . . . . . . . 69
Create the Jobs That Load the New Detail Data Store Tables . . . . . . . . . . . . . . . . . 69
Customize the Job That Loads the Detail Data Store Primary Member Table . . . 70
Customize the Job That Loads the Detail Data Store HierarchyIdentification Table . . . . . . . . . . . . . . . . . . . . . . . . . . . . . . . . . . . . . . . . . . . . . . . . . . . 77
Customize the Job That Loads the Detail Data Store Hierarchy Structure Table 86
Customize the Job That Loads the Detail Data Store Secondary Member Table . 97
Customize the Job That Loads the GL_TRANSACTION_SUM Table . . . . . . . . 100
Customize the Job That Loads the GL_JRNL_DETAILS Table . . . . . . . . . . . . . 104
Loading New Dimension Types into the SDM . . . . . . . . . . . . . . . . . . . . . . . . . . . . . 104
Creating Dimensions in a New Dimension Type . . . . . . . . . . . . . . . . . . . . . . . . . . . 104
Loading Members and Hierarchies into a Dimension ThatBelongs to a New Dimension Type . . . . . . . . . . . . . . . . . . . . . . . . . . . . . . . . . . . . . . 104
Overview of Adding a Dimension TypeThe installed SAS Solutions Services software includes the dimension types that aredefined in the SAS_DIMENSION_TYPE table:
63
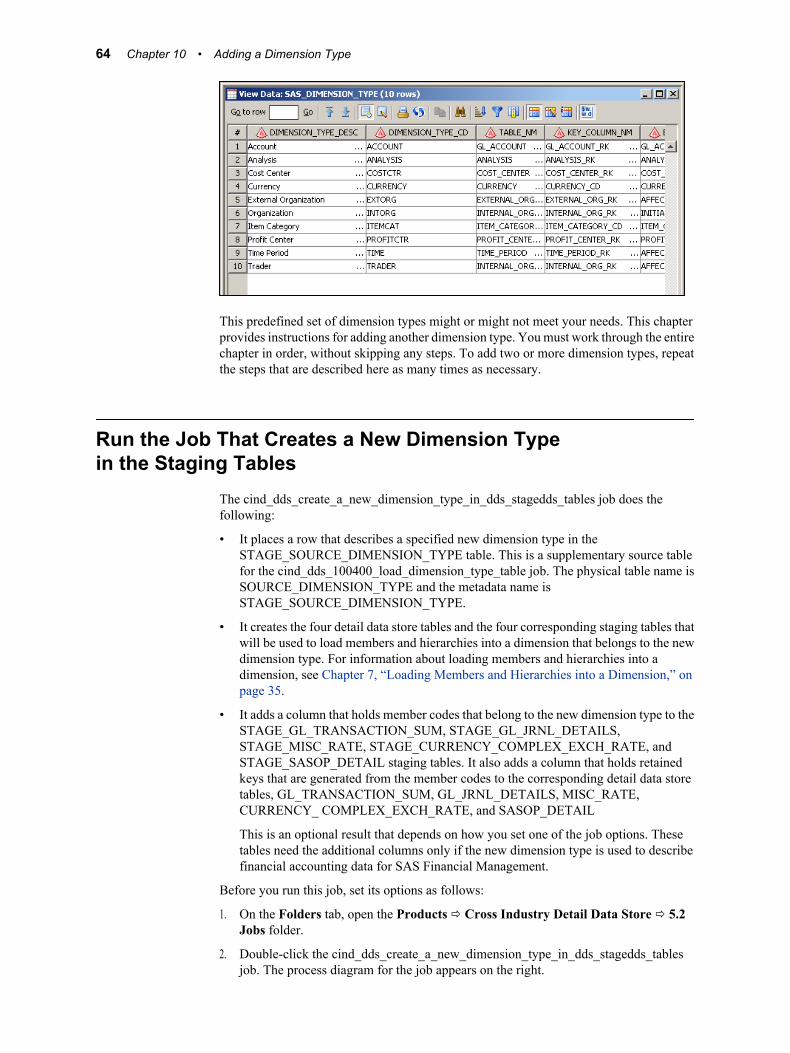
This predefined set of dimension types might or might not meet your needs. This chapterprovides instructions for adding another dimension type. You must work through the entirechapter in order, without skipping any steps. To add two or more dimension types, repeatthe steps that are described here as many times as necessary.
Run the Job That Creates a New Dimension Typein the Staging Tables
The cind_dds_create_a_new_dimension_type_in_dds_stagedds_tables job does thefollowing:
• It places a row that describes a specified new dimension type in theSTAGE_SOURCE_DIMENSION_TYPE table. This is a supplementary source tablefor the cind_dds_100400_load_dimension_type_table job. The physical table name isSOURCE_DIMENSION_TYPE and the metadata name isSTAGE_SOURCE_DIMENSION_TYPE.
• It creates the four detail data store tables and the four corresponding staging tables thatwill be used to load members and hierarchies into a dimension that belongs to the newdimension type. For information about loading members and hierarchies into adimension, see Chapter 7, “Loading Members and Hierarchies into a Dimension,” onpage 35.
• It adds a column that holds member codes that belong to the new dimension type to theSTAGE_GL_TRANSACTION_SUM, STAGE_GL_JRNL_DETAILS,STAGE_MISC_RATE, STAGE_CURRENCY_COMPLEX_EXCH_RATE, andSTAGE_SASOP_DETAIL staging tables. It also adds a column that holds retainedkeys that are generated from the member codes to the corresponding detail data storetables, GL_TRANSACTION_SUM, GL_JRNL_DETAILS, MISC_RATE,CURRENCY_ COMPLEX_EXCH_RATE, and SASOP_DETAIL
This is an optional result that depends on how you set one of the job options. Thesetables need the additional columns only if the new dimension type is used to describefinancial accounting data for SAS Financial Management.
Before you run this job, set its options as follows:
1. On the Folders tab, open the Products ð Cross Industry Detail Data Store ð 5.2Jobs folder.
2. Double-click the cind_dds_create_a_new_dimension_type_in_dds_stagedds_tablesjob. The process diagram for the job appears on the right.
64 Chapter 10 • Adding a Dimension Type
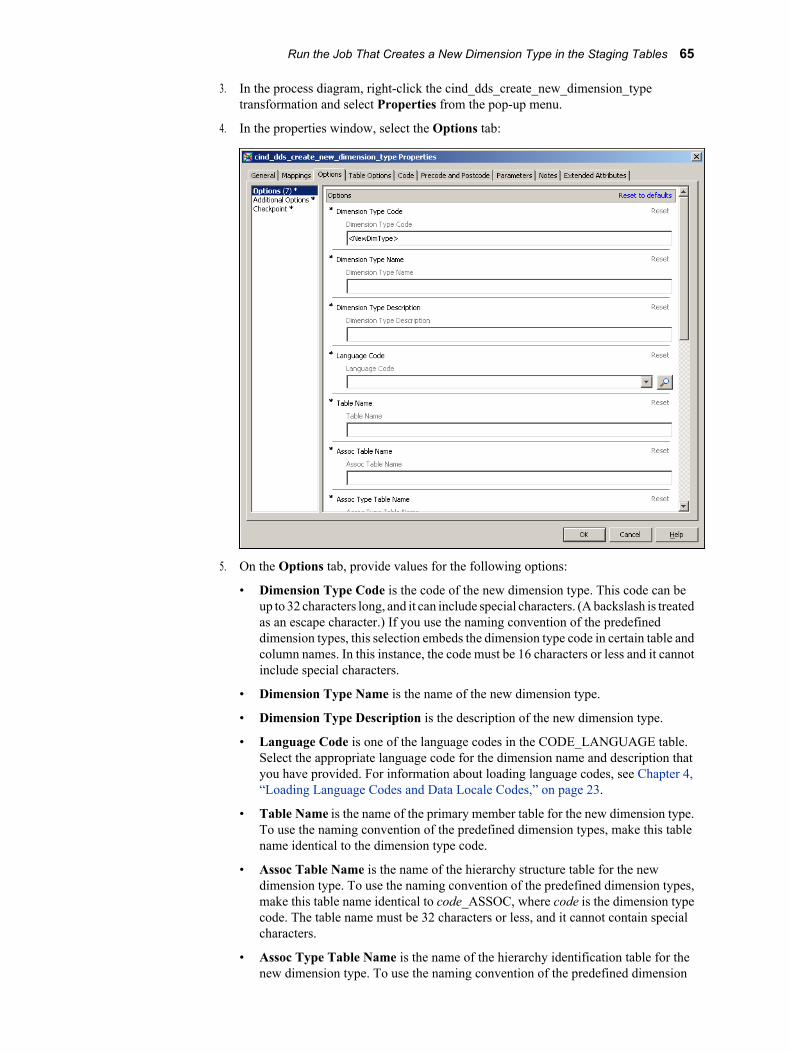
3. In the process diagram, right-click the cind_dds_create_new_dimension_typetransformation and select Properties from the pop-up menu.
4. In the properties window, select the Options tab:
5. On the Options tab, provide values for the following options:
• Dimension Type Code is the code of the new dimension type. This code can beup to 32 characters long, and it can include special characters. (A backslash is treatedas an escape character.) If you use the naming convention of the predefineddimension types, this selection embeds the dimension type code in certain table andcolumn names. In this instance, the code must be 16 characters or less and it cannotinclude special characters.
• Dimension Type Name is the name of the new dimension type.
• Dimension Type Description is the description of the new dimension type.
• Language Code is one of the language codes in the CODE_LANGUAGE table.Select the appropriate language code for the dimension name and description thatyou have provided. For information about loading language codes, see Chapter 4,“Loading Language Codes and Data Locale Codes,” on page 23.
• Table Name is the name of the primary member table for the new dimension type.To use the naming convention of the predefined dimension types, make this tablename identical to the dimension type code.
• Assoc Table Name is the name of the hierarchy structure table for the newdimension type. To use the naming convention of the predefined dimension types,make this table name identical to code_ASSOC, where code is the dimension typecode. The table name must be 32 characters or less, and it cannot contain specialcharacters.
• Assoc Type Table Name is the name of the hierarchy identification table for thenew dimension type. To use the naming convention of the predefined dimension
Run the Job That Creates a New Dimension Type in the Staging Tables 65
types, make this table name identical to code_ASSOC_TYPE, where code is thedimension type code. The table name must be 32 characters or less, and it cannotcontain special characters.
• NLS Table Name is the name of the secondary member table for the new dimensiontype. To use the naming convention of the predefined dimension types, make thistable name identical to code_NLS, where code is the dimension type code. Thetable name must be 32 characters or less, and it cannot contain special characters.
• Business ID Column Name is the name of the column that will be added to theSTAGE_GL_TRANSACTION_SUM, STAGE_GL_JRNL_DETAILS, ,STAGE_MISC_RATE, STAGE_CURRENCY_COMPLEX_EXCH_RATE, andSTAGE_SASOP_DETAIL staging tables to hold member codes that belong to thenew dimension type. To use the naming convention of the predefined dimensiontypes, make this table name identical to code_ID, where code is the dimension typecode. The column name must be 32 characters or less, and it cannot contain specialcharacters.
If you select No for the Add Dimension Type to Fact Tables option, then leavethis option blank.
• Base Fact Column Name is the name of the column that will be added to theGL_TRANSACTION_SUM, GL_JRNL_DETAILS, MISC_RATE,CURRENCY_ COMPLEX_EXCH_RATE, and SASOP_DETAIL tables to holdthe retained keys that are generated from member codes in the staging tables. Touse the naming convention of the predefined dimension types, make this table nameidentical to code_RK, where code is the dimension type code. The column namemust be 32 characters or less, and it cannot contain special characters.
If you select No for the Add Dimension Type to Fact Tables option, then leavethis option blank.
• Source Location is the physical location on the Data Tier Server of theSTAGE_SOURCE_DIMENSION_TYPE table. The physical table name isSOURCE_DIMENSION_TYPE and the metadata name isSTAGE_SOURCE_DIMENSION_TYPE.
If the STAGE_SOURCE_DIMENSION_TYPE table already exists, then the jobadds a row of data to it. If this table does not exist, then the job creates the tableand places a row of data in it. If you create more than one dimension type, youshould always specify the same physical location here, so that all the source datais kept in a single source table.
The default location STAGEDDS is a good choice. You can specify any alternativelocation that you have defined.
• Source Tree is the location in the tree of folders on the Folders tab where theSTAGE_SOURCE_DIMENSION_TYPE table is displayed.
If you select Staging Tables or Source Tables, theSTAGE_SOURCE_DIMENSION_TYPE table is displayed in the Products ðCross Industry Detail Data Store ð StageDDS folder.
The first time you create a dimension type, this option establishes a permanentdisplay location. If you create additional dimension types, the display location forthe STAGE_SOURCE_DIMENSION_TYPE table remains the same, and thisoption is ignored.
• Add Dimension Type to Fact Tables is a Yes/No flag. If you select Yes, then acolumn for the new dimension type is added to the GL_TRANSACTION_SUMand GL_JRNL_DETAILS tables and their corresponding staging tables. In thiscase, you must specify names for these columns using the Base Fact Column Name
66 Chapter 10 • Adding a Dimension Type
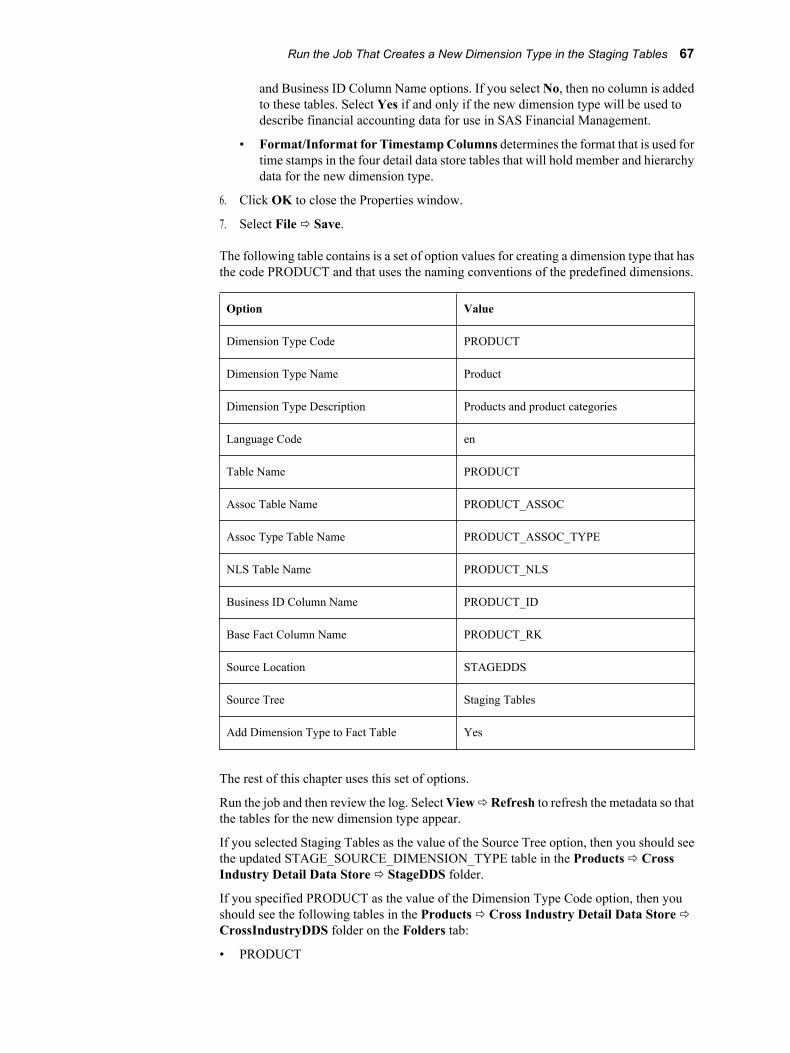
and Business ID Column Name options. If you select No, then no column is addedto these tables. Select Yes if and only if the new dimension type will be used todescribe financial accounting data for use in SAS Financial Management.
• Format/Informat for Timestamp Columns determines the format that is used fortime stamps in the four detail data store tables that will hold member and hierarchydata for the new dimension type.
6. Click OK to close the Properties window.
7. Select File ð Save.
The following table contains is a set of option values for creating a dimension type that hasthe code PRODUCT and that uses the naming conventions of the predefined dimensions.
Option Value
Dimension Type Code PRODUCT
Dimension Type Name Product
Dimension Type Description Products and product categories
Language Code en
Table Name PRODUCT
Assoc Table Name PRODUCT_ASSOC
Assoc Type Table Name PRODUCT_ASSOC_TYPE
NLS Table Name PRODUCT_NLS
Business ID Column Name PRODUCT_ID
Base Fact Column Name PRODUCT_RK
Source Location STAGEDDS
Source Tree Staging Tables
Add Dimension Type to Fact Table Yes
The rest of this chapter uses this set of options.
Run the job and then review the log. Select View ð Refresh to refresh the metadata so thatthe tables for the new dimension type appear.
If you selected Staging Tables as the value of the Source Tree option, then you should seethe updated STAGE_SOURCE_DIMENSION_TYPE table in the Products ð CrossIndustry Detail Data Store ð StageDDS folder.
If you specified PRODUCT as the value of the Dimension Type Code option, then youshould see the following tables in the Products ð Cross Industry Detail Data Store ðCrossIndustryDDS folder on the Folders tab:
• PRODUCT
Run the Job That Creates a New Dimension Type in the Staging Tables 67
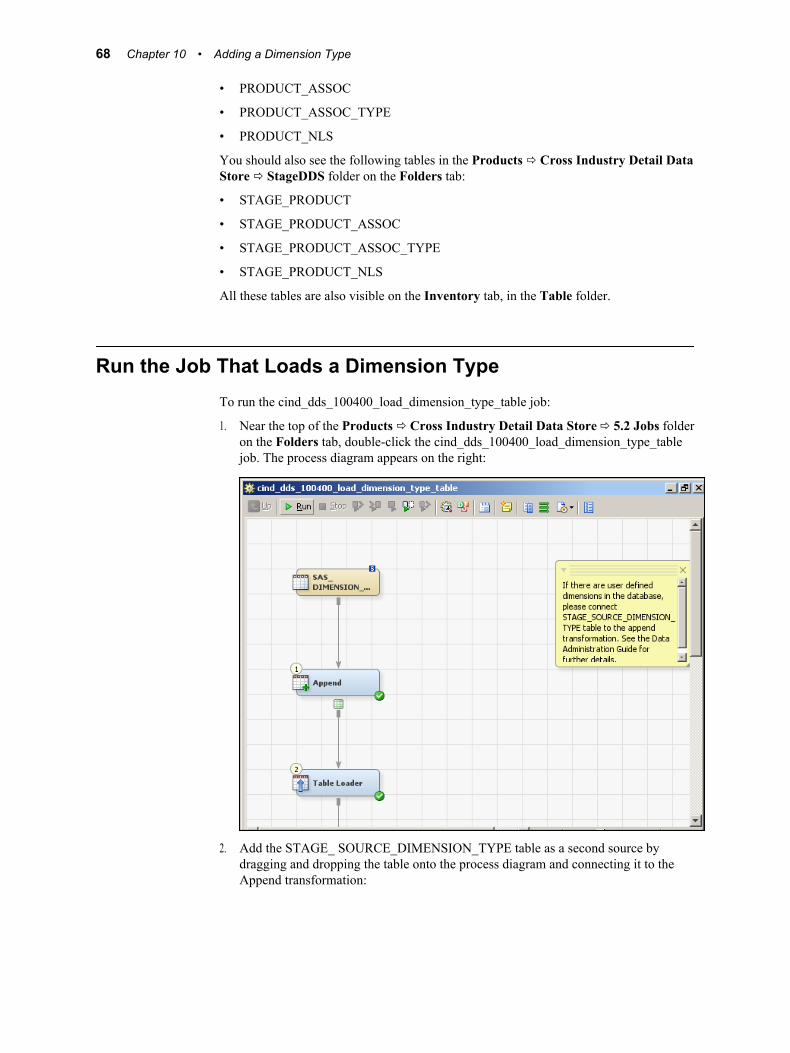
• PRODUCT_ASSOC
• PRODUCT_ASSOC_TYPE
• PRODUCT_NLS
You should also see the following tables in the Products ð Cross Industry Detail DataStore ð StageDDS folder on the Folders tab:
• STAGE_PRODUCT
• STAGE_PRODUCT_ASSOC
• STAGE_PRODUCT_ASSOC_TYPE
• STAGE_PRODUCT_NLS
All these tables are also visible on the Inventory tab, in the Table folder.
Run the Job That Loads a Dimension TypeTo run the cind_dds_100400_load_dimension_type_table job:
1. Near the top of the Products ð Cross Industry Detail Data Store ð 5.2 Jobs folderon the Folders tab, double-click the cind_dds_100400_load_dimension_type_tablejob. The process diagram appears on the right:
2. Add the STAGE_ SOURCE_DIMENSION_TYPE table as a second source bydragging and dropping the table onto the process diagram and connecting it to theAppend transformation:
68 Chapter 10 • Adding a Dimension Type
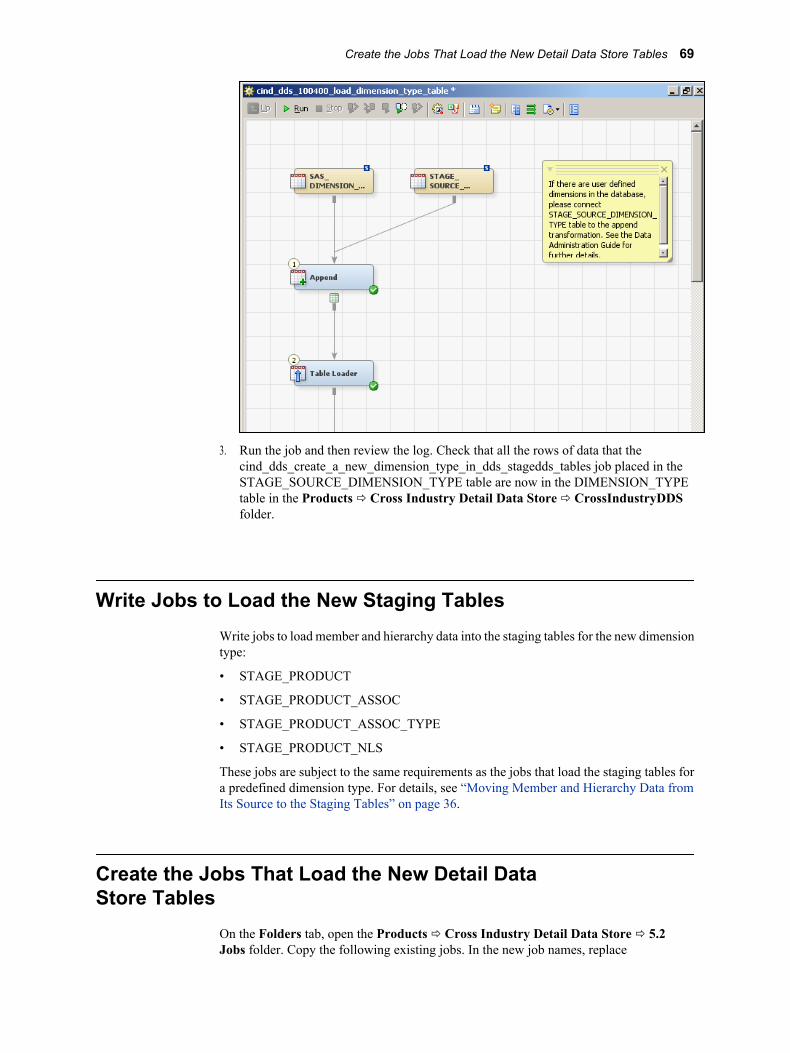
3. Run the job and then review the log. Check that all the rows of data that thecind_dds_create_a_new_dimension_type_in_dds_stagedds_tables job placed in theSTAGE_SOURCE_DIMENSION_TYPE table are now in the DIMENSION_TYPEtable in the Products ð Cross Industry Detail Data Store ð CrossIndustryDDSfolder.
Write Jobs to Load the New Staging TablesWrite jobs to load member and hierarchy data into the staging tables for the new dimensiontype:
• STAGE_PRODUCT
• STAGE_PRODUCT_ASSOC
• STAGE_PRODUCT_ASSOC_TYPE
• STAGE_PRODUCT_NLS
These jobs are subject to the same requirements as the jobs that load the staging tables fora predefined dimension type. For details, see “Moving Member and Hierarchy Data fromIts Source to the Staging Tables” on page 36.
Create the Jobs That Load the New Detail DataStore Tables
On the Folders tab, open the Products ð Cross Industry Detail Data Store ð 5.2Jobs folder. Copy the following existing jobs. In the new job names, replace
Create the Jobs That Load the New Detail Data Store Tables 69
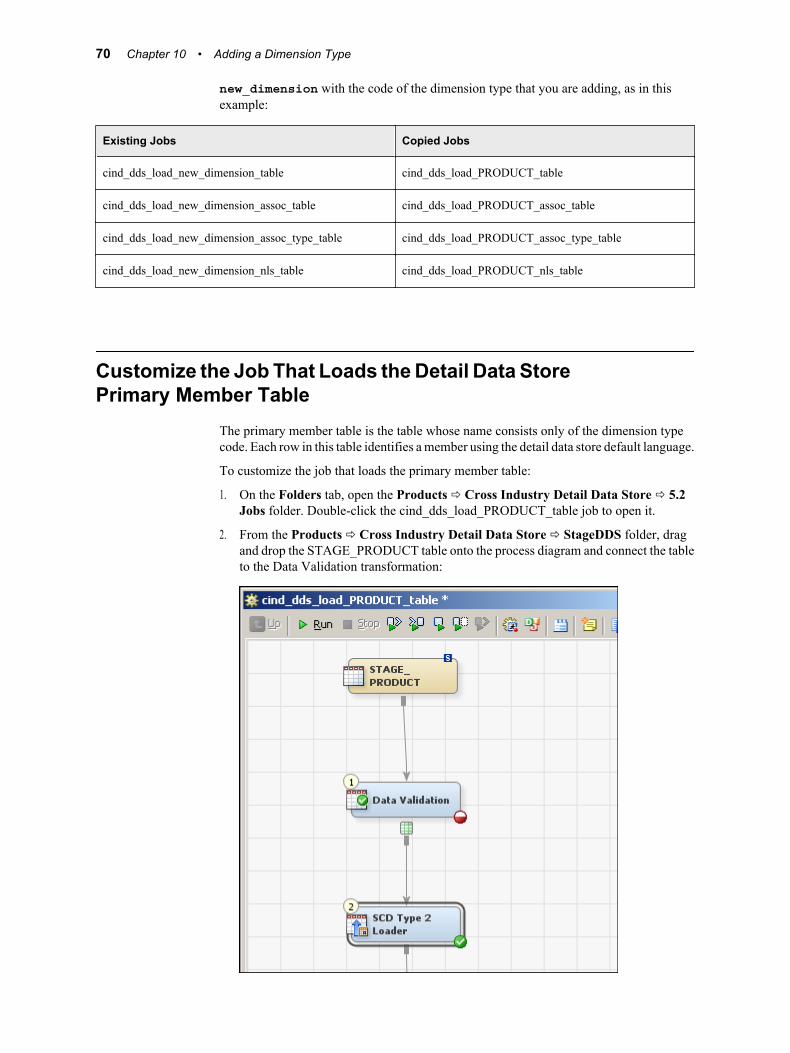
new_dimension with the code of the dimension type that you are adding, as in thisexample:
Existing Jobs Copied Jobs
cind_dds_load_new_dimension_table cind_dds_load_PRODUCT_table
cind_dds_load_new_dimension_assoc_table cind_dds_load_PRODUCT_assoc_table
cind_dds_load_new_dimension_assoc_type_table cind_dds_load_PRODUCT_assoc_type_table
cind_dds_load_new_dimension_nls_table cind_dds_load_PRODUCT_nls_table
Customize the Job That Loads the Detail Data StorePrimary Member Table
The primary member table is the table whose name consists only of the dimension typecode. Each row in this table identifies a member using the detail data store default language.
To customize the job that loads the primary member table:
1. On the Folders tab, open the Products ð Cross Industry Detail Data Store ð 5.2Jobs folder. Double-click the cind_dds_load_PRODUCT_table job to open it.
2. From the Products ð Cross Industry Detail Data Store ð StageDDS folder, dragand drop the STAGE_PRODUCT table onto the process diagram and connect the tableto the Data Validation transformation:
70 Chapter 10 • Adding a Dimension Type
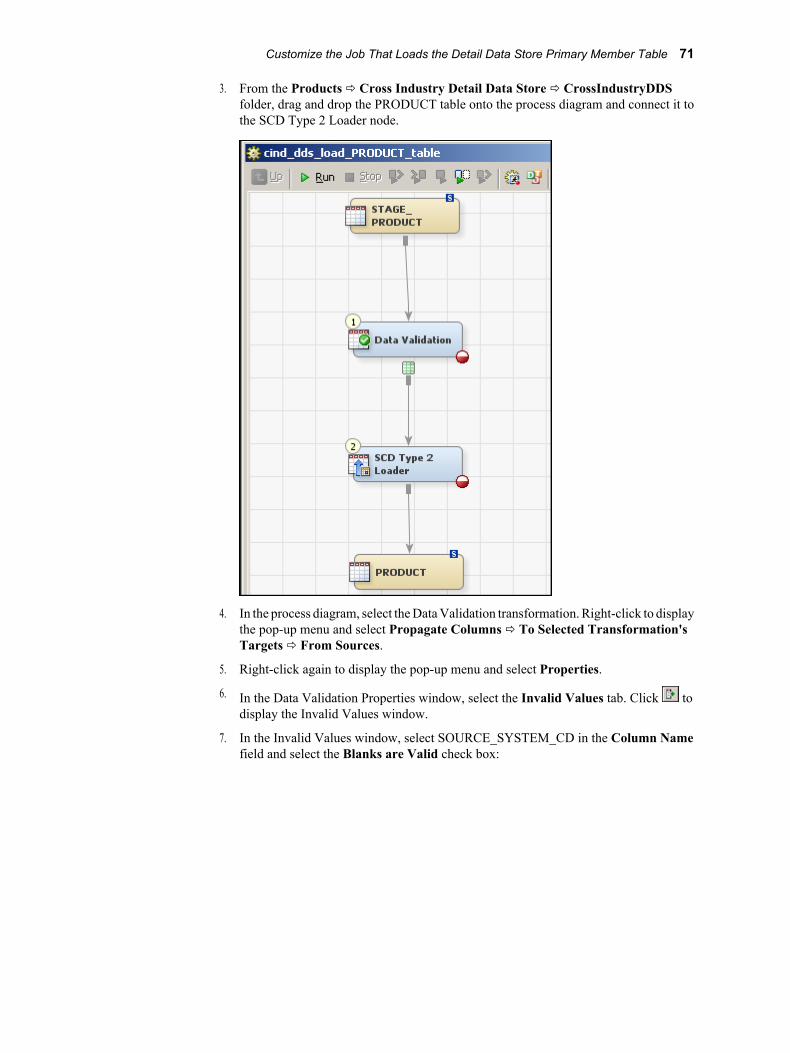
3. From the Products ð Cross Industry Detail Data Store ð CrossIndustryDDSfolder, drag and drop the PRODUCT table onto the process diagram and connect it tothe SCD Type 2 Loader node.
4. In the process diagram, select the Data Validation transformation. Right-click to displaythe pop-up menu and select Propagate Columns ð To Selected Transformation'sTargets ð From Sources.
5. Right-click again to display the pop-up menu and select Properties.
6. In the Data Validation Properties window, select the Invalid Values tab. Click todisplay the Invalid Values window.
7. In the Invalid Values window, select SOURCE_SYSTEM_CD in the Column Namefield and select the Blanks are Valid check box:
Customize the Job That Loads the Detail Data Store Primary Member Table 71
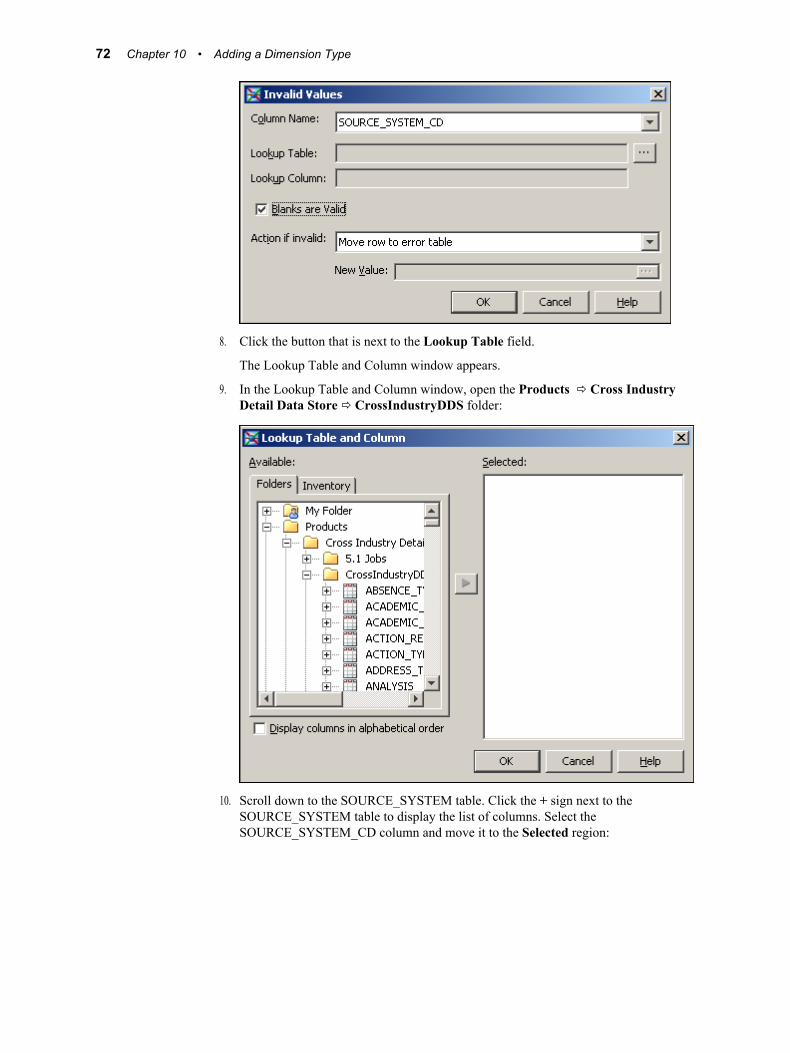
8. Click the button that is next to the Lookup Table field.
The Lookup Table and Column window appears.
9. In the Lookup Table and Column window, open the Products ð Cross IndustryDetail Data Store ð CrossIndustryDDS folder:
10. Scroll down to the SOURCE_SYSTEM table. Click the + sign next to theSOURCE_SYSTEM table to display the list of columns. Select theSOURCE_SYSTEM_CD column and move it to the Selected region:
72 Chapter 10 • Adding a Dimension Type
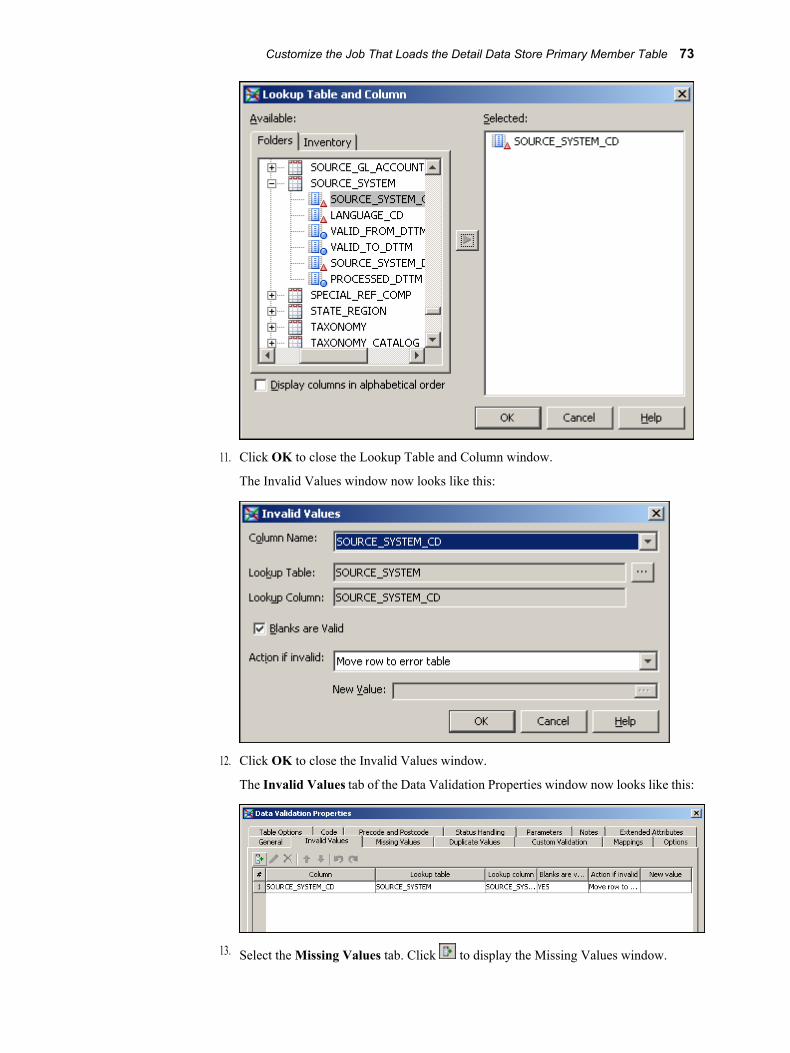
11. Click OK to close the Lookup Table and Column window.
The Invalid Values window now looks like this:
12. Click OK to close the Invalid Values window.
The Invalid Values tab of the Data Validation Properties window now looks like this:
13. Select the Missing Values tab. Click to display the Missing Values window.
Customize the Job That Loads the Detail Data Store Primary Member Table 73

14. Use the Missing Values window to add these checks for missing values:
• If MEMBER_ID is missing, then move the record to the error table:
• If MEMBER_NM is missing, then give it the same value as MEMBER_ID:
You can either type the column name in the New Value field or click the buttonthat is next to the New Value field and use the Expression Builder window to selectthe column name. In the Expression Builder window, the column names areavailable on the Data Sources tab.
• If MEMBER_DESC is missing, then give it the same value as MEMBER_NM:
You can either type the column name in the New Value field or click the buttonthat is next to the New Value field and use the Expression Builder window to selectthe column name. In the Expression Builder window, the column names areavailable on the Data Sources tab.
• If SOURCE_SYSTEM_CD is missing, then change the value to “ETL”. This stringmust be in quotation marks and all uppercase:
74 Chapter 10 • Adding a Dimension Type
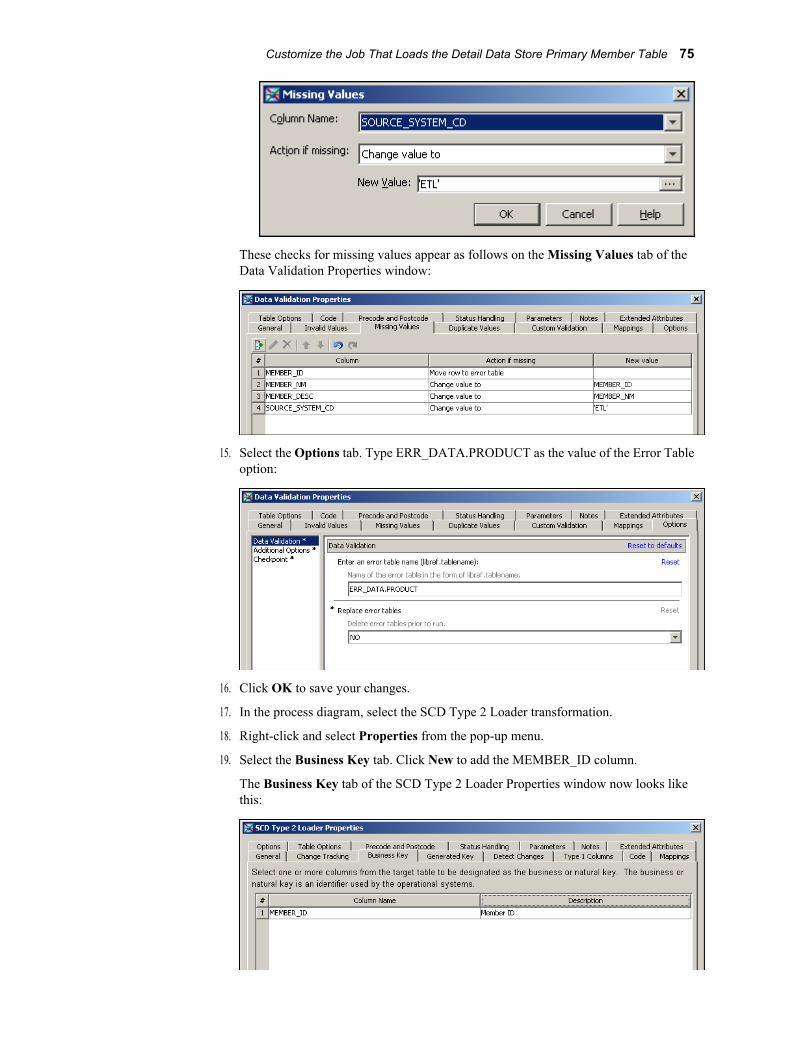
These checks for missing values appear as follows on the Missing Values tab of theData Validation Properties window:
15. Select the Options tab. Type ERR_DATA.PRODUCT as the value of the Error Tableoption:
16. Click OK to save your changes.
17. In the process diagram, select the SCD Type 2 Loader transformation.
18. Right-click and select Properties from the pop-up menu.
19. Select the Business Key tab. Click New to add the MEMBER_ID column.
The Business Key tab of the SCD Type 2 Loader Properties window now looks likethis:
Customize the Job That Loads the Detail Data Store Primary Member Table 75
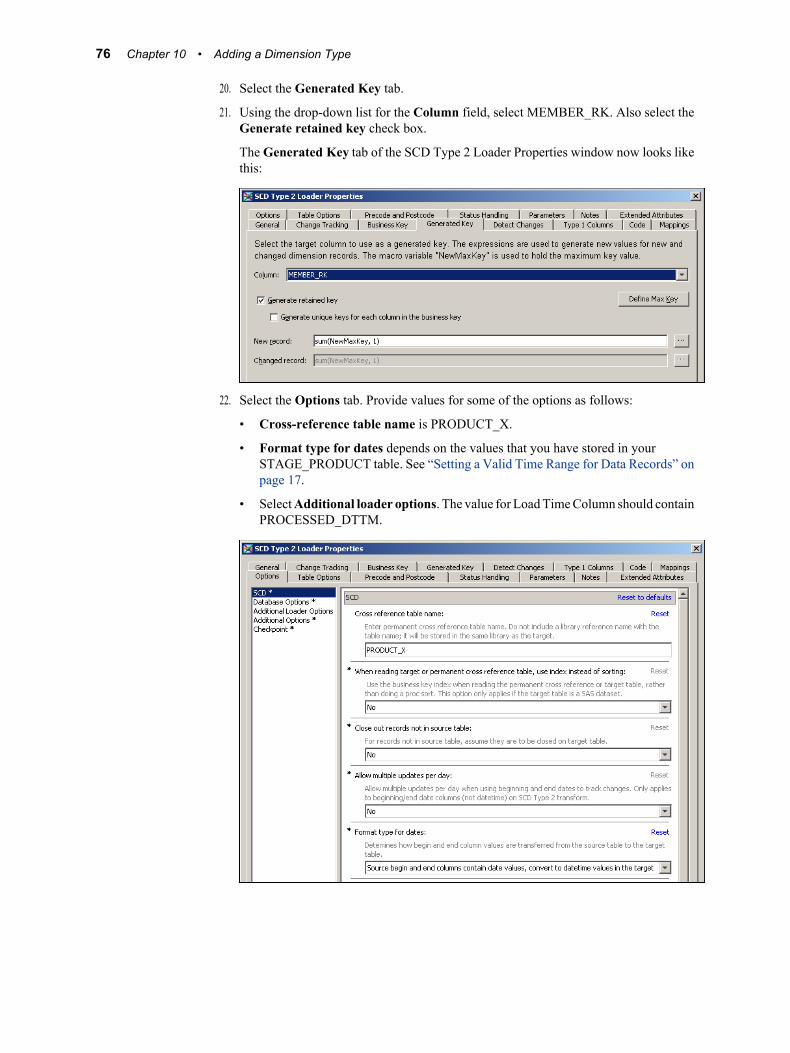
20. Select the Generated Key tab.
21. Using the drop-down list for the Column field, select MEMBER_RK. Also select theGenerate retained key check box.
The Generated Key tab of the SCD Type 2 Loader Properties window now looks likethis:
22. Select the Options tab. Provide values for some of the options as follows:
• Cross-reference table name is PRODUCT_X.
• Format type for dates depends on the values that you have stored in yourSTAGE_PRODUCT table. See “Setting a Valid Time Range for Data Records” onpage 17.
• Select Additional loader options. The value for Load Time Column should containPROCESSED_DTTM.
76 Chapter 10 • Adding a Dimension Type
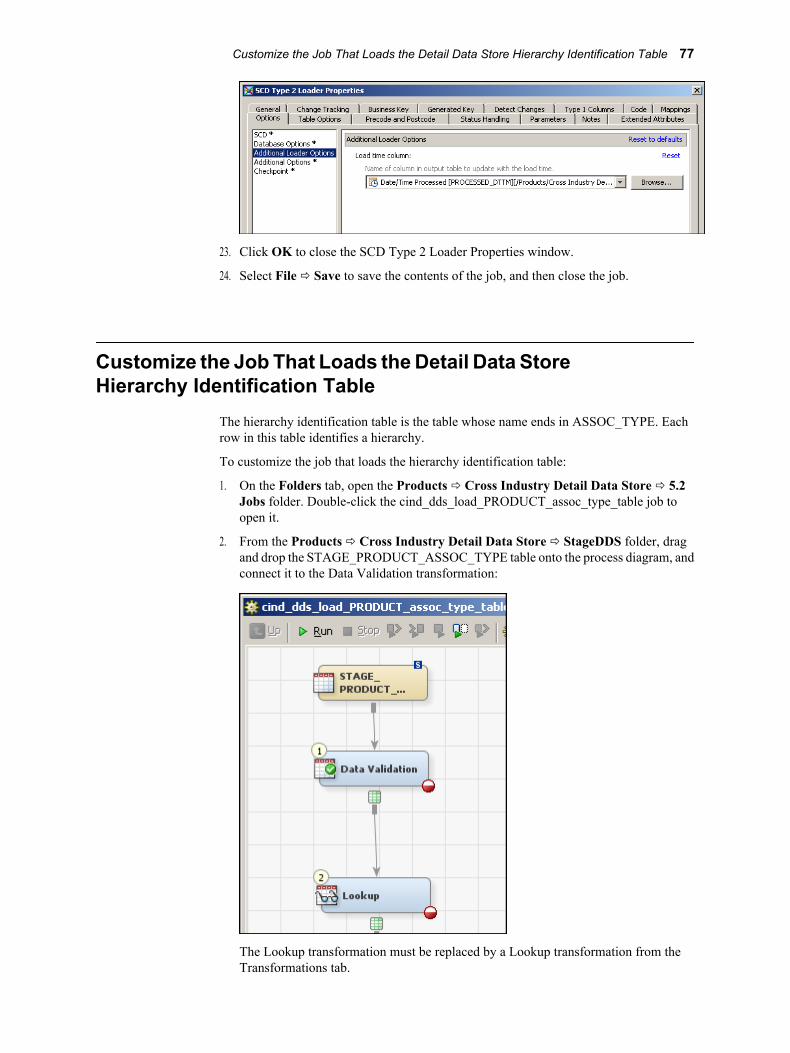
23. Click OK to close the SCD Type 2 Loader Properties window.
24. Select File ð Save to save the contents of the job, and then close the job.
Customize the Job That Loads the Detail Data StoreHierarchy Identification Table
The hierarchy identification table is the table whose name ends in ASSOC_TYPE. Eachrow in this table identifies a hierarchy.
To customize the job that loads the hierarchy identification table:
1. On the Folders tab, open the Products ð Cross Industry Detail Data Store ð 5.2Jobs folder. Double-click the cind_dds_load_PRODUCT_assoc_type_table job toopen it.
2. From the Products ð Cross Industry Detail Data Store ð StageDDS folder, dragand drop the STAGE_PRODUCT_ASSOC_TYPE table onto the process diagram, andconnect it to the Data Validation transformation:
The Lookup transformation must be replaced by a Lookup transformation from theTransformations tab.
Customize the Job That Loads the Detail Data Store Hierarchy Identification Table 77
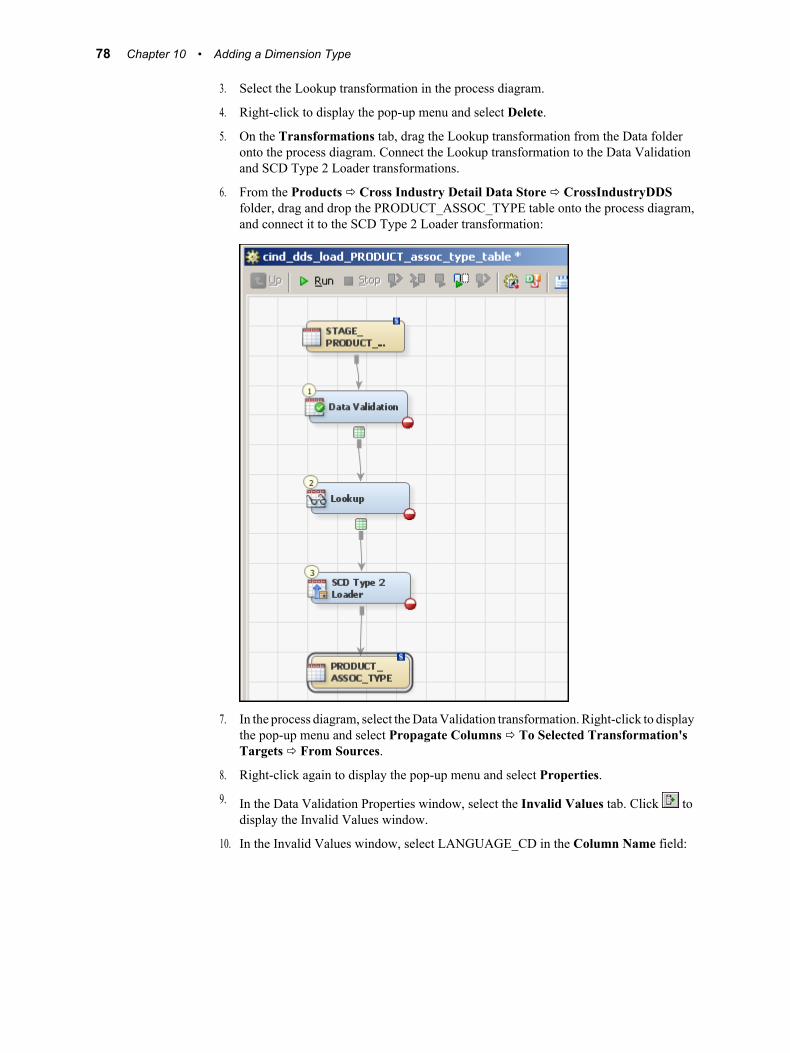
3. Select the Lookup transformation in the process diagram.
4. Right-click to display the pop-up menu and select Delete.
5. On the Transformations tab, drag the Lookup transformation from the Data folderonto the process diagram. Connect the Lookup transformation to the Data Validationand SCD Type 2 Loader transformations.
6. From the Products ð Cross Industry Detail Data Store ð CrossIndustryDDSfolder, drag and drop the PRODUCT_ASSOC_TYPE table onto the process diagram,and connect it to the SCD Type 2 Loader transformation:
7. In the process diagram, select the Data Validation transformation. Right-click to displaythe pop-up menu and select Propagate Columns ð To Selected Transformation'sTargets ð From Sources.
8. Right-click again to display the pop-up menu and select Properties.
9. In the Data Validation Properties window, select the Invalid Values tab. Click todisplay the Invalid Values window.
10. In the Invalid Values window, select LANGUAGE_CD in the Column Name field:
78 Chapter 10 • Adding a Dimension Type
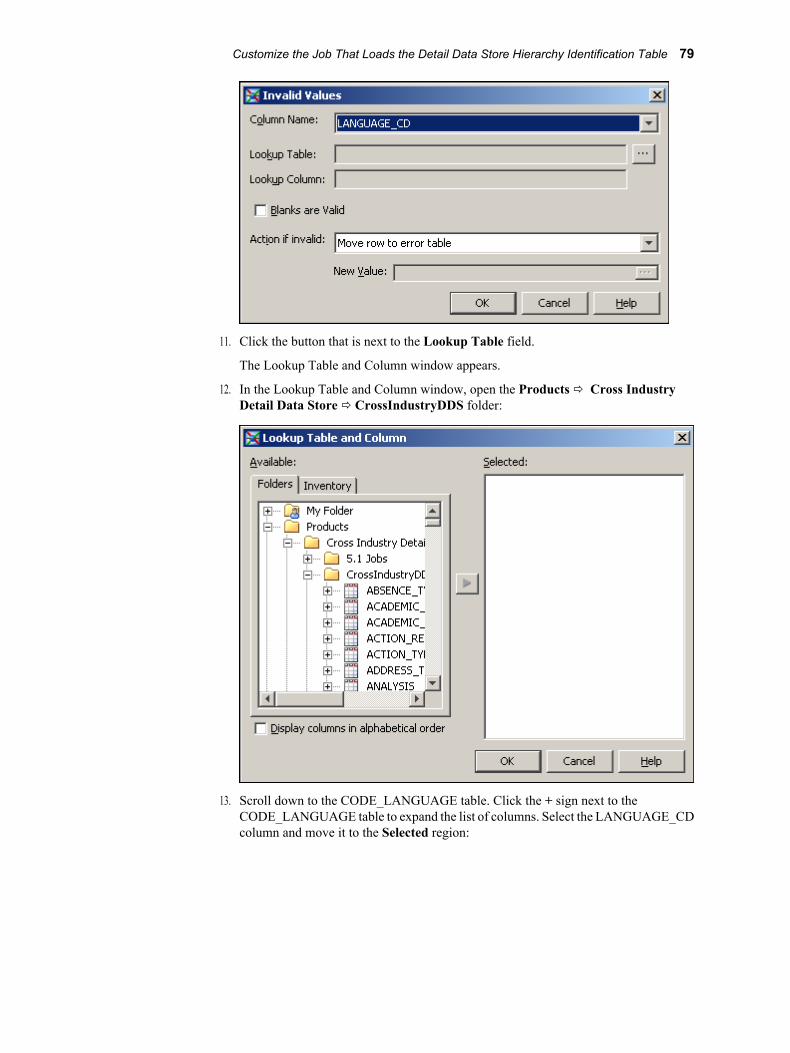
11. Click the button that is next to the Lookup Table field.
The Lookup Table and Column window appears.
12. In the Lookup Table and Column window, open the Products ð Cross IndustryDetail Data Store ð CrossIndustryDDS folder:
13. Scroll down to the CODE_LANGUAGE table. Click the + sign next to theCODE_LANGUAGE table to expand the list of columns. Select the LANGUAGE_CDcolumn and move it to the Selected region:
Customize the Job That Loads the Detail Data Store Hierarchy Identification Table 79
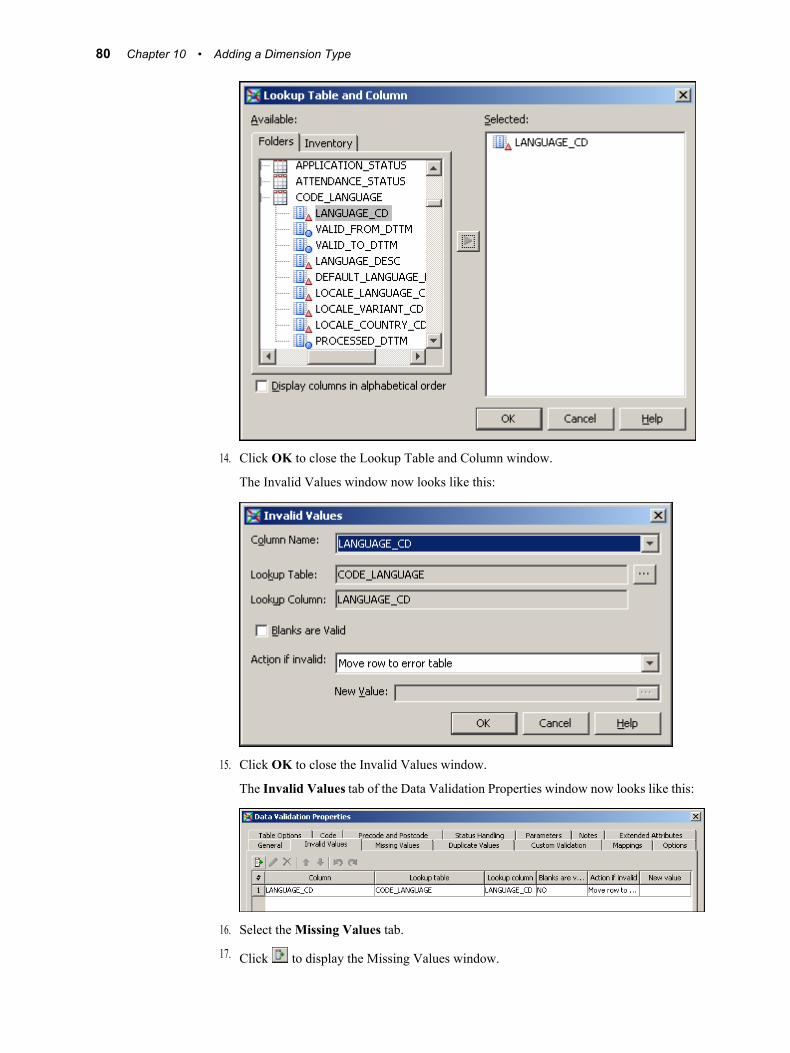
14. Click OK to close the Lookup Table and Column window.
The Invalid Values window now looks like this:
15. Click OK to close the Invalid Values window.
The Invalid Values tab of the Data Validation Properties window now looks like this:
16. Select the Missing Values tab.
17. Click to display the Missing Values window.
80 Chapter 10 • Adding a Dimension Type
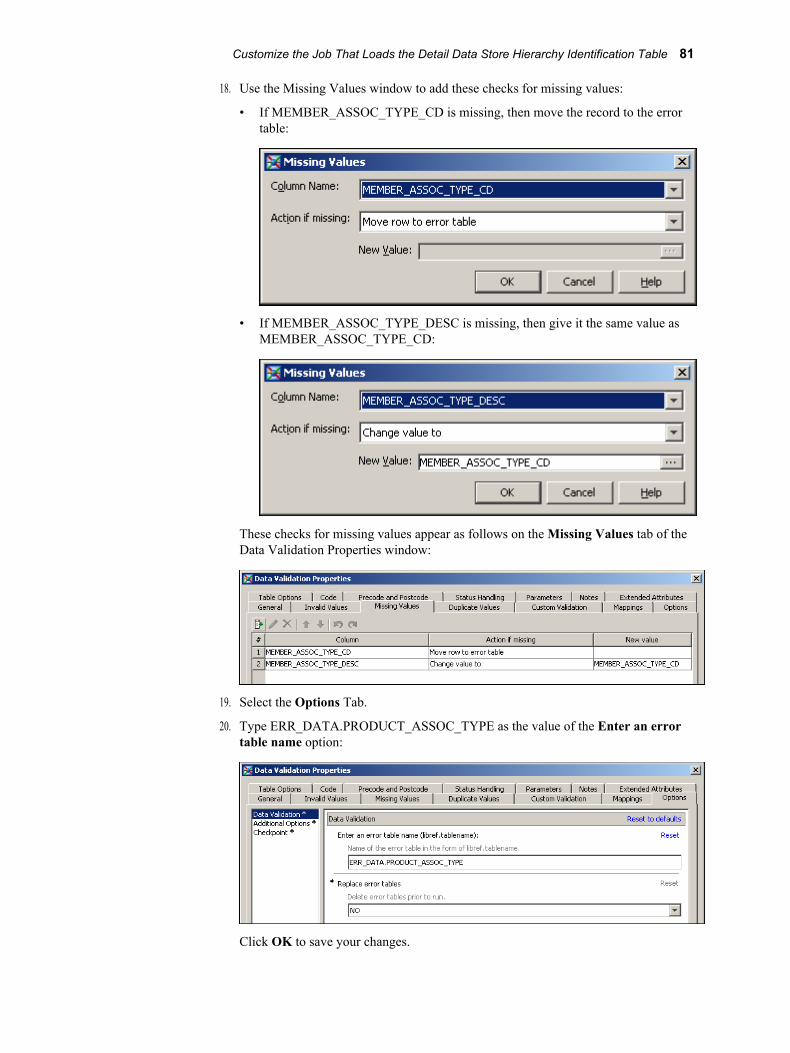
18. Use the Missing Values window to add these checks for missing values:
• If MEMBER_ASSOC_TYPE_CD is missing, then move the record to the errortable:
• If MEMBER_ASSOC_TYPE_DESC is missing, then give it the same value asMEMBER_ASSOC_TYPE_CD:
These checks for missing values appear as follows on the Missing Values tab of theData Validation Properties window:
19. Select the Options Tab.
20. Type ERR_DATA.PRODUCT_ASSOC_TYPE as the value of the Enter an errortable name option:
Click OK to save your changes.
Customize the Job That Loads the Detail Data Store Hierarchy Identification Table 81
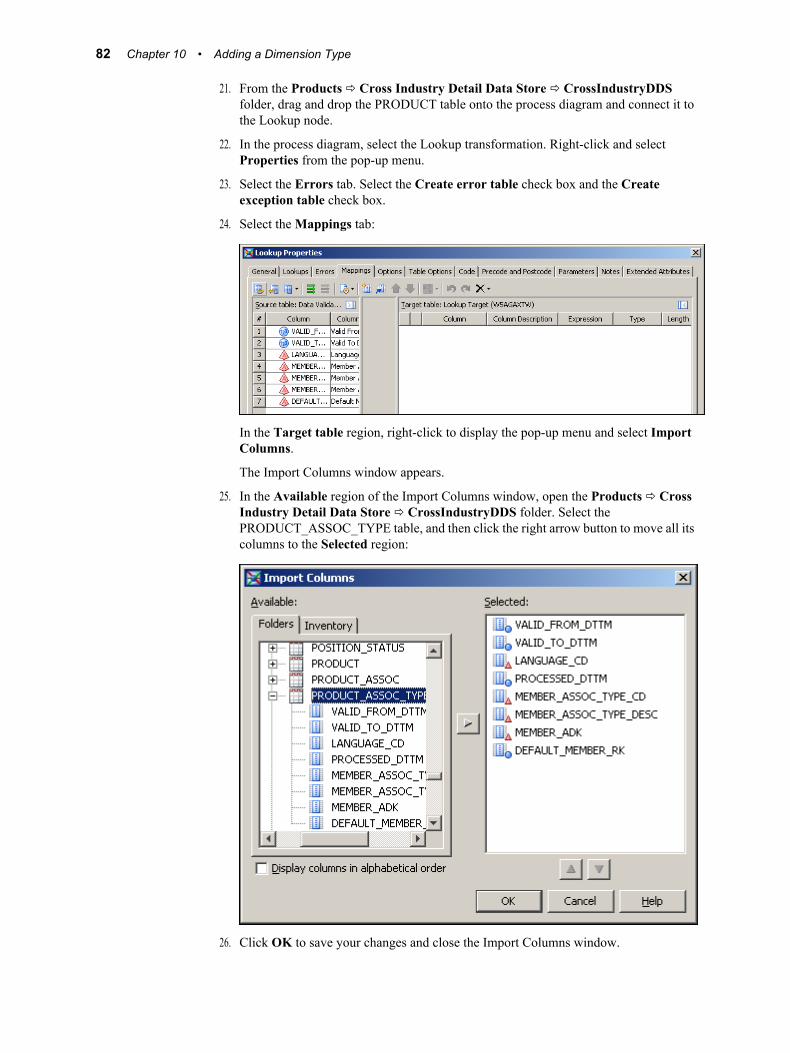
21. From the Products ð Cross Industry Detail Data Store ð CrossIndustryDDSfolder, drag and drop the PRODUCT table onto the process diagram and connect it tothe Lookup node.
22. In the process diagram, select the Lookup transformation. Right-click and selectProperties from the pop-up menu.
23. Select the Errors tab. Select the Create error table check box and the Createexception table check box.
24. Select the Mappings tab:
In the Target table region, right-click to display the pop-up menu and select ImportColumns.
The Import Columns window appears.
25. In the Available region of the Import Columns window, open the Products ð CrossIndustry Detail Data Store ð CrossIndustryDDS folder. Select thePRODUCT_ASSOC_TYPE table, and then click the right arrow button to move all itscolumns to the Selected region:
26. Click OK to save your changes and close the Import Columns window.
82 Chapter 10 • Adding a Dimension Type
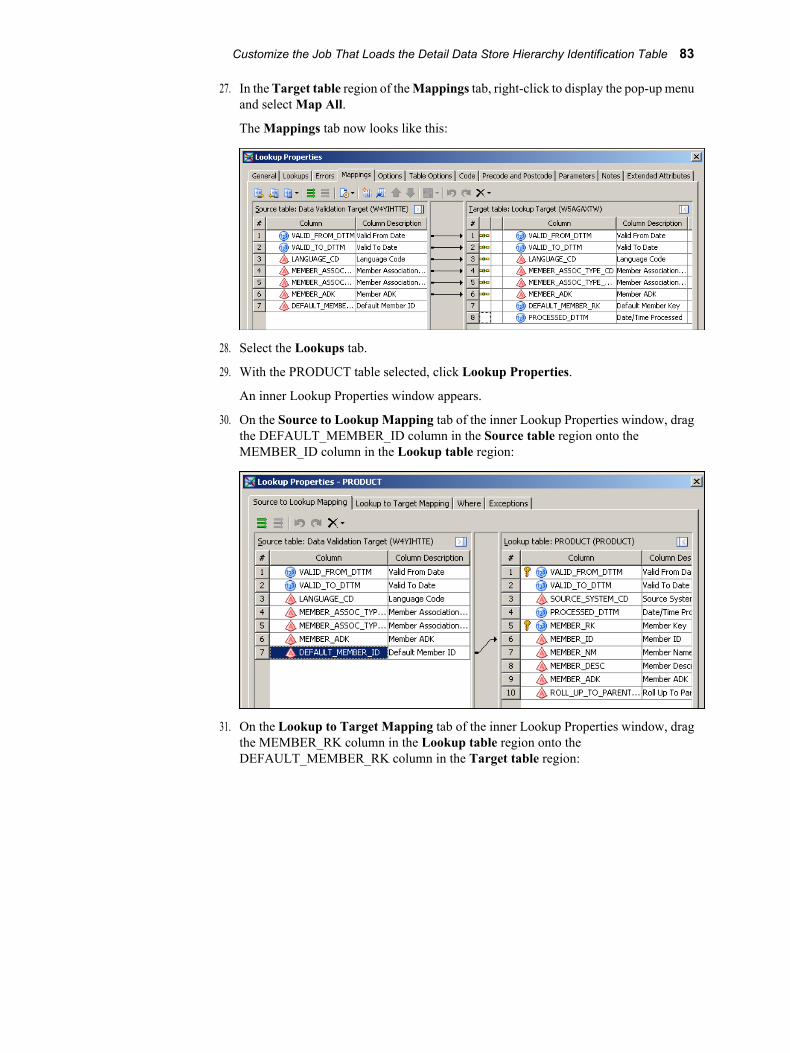
27. In the Target table region of the Mappings tab, right-click to display the pop-up menuand select Map All.
The Mappings tab now looks like this:
28. Select the Lookups tab.
29. With the PRODUCT table selected, click Lookup Properties.
An inner Lookup Properties window appears.
30. On the Source to Lookup Mapping tab of the inner Lookup Properties window, dragthe DEFAULT_MEMBER_ID column in the Source table region onto theMEMBER_ID column in the Lookup table region:
31. On the Lookup to Target Mapping tab of the inner Lookup Properties window, dragthe MEMBER_RK column in the Lookup table region onto theDEFAULT_MEMBER_RK column in the Target table region:
Customize the Job That Loads the Detail Data Store Hierarchy Identification Table 83
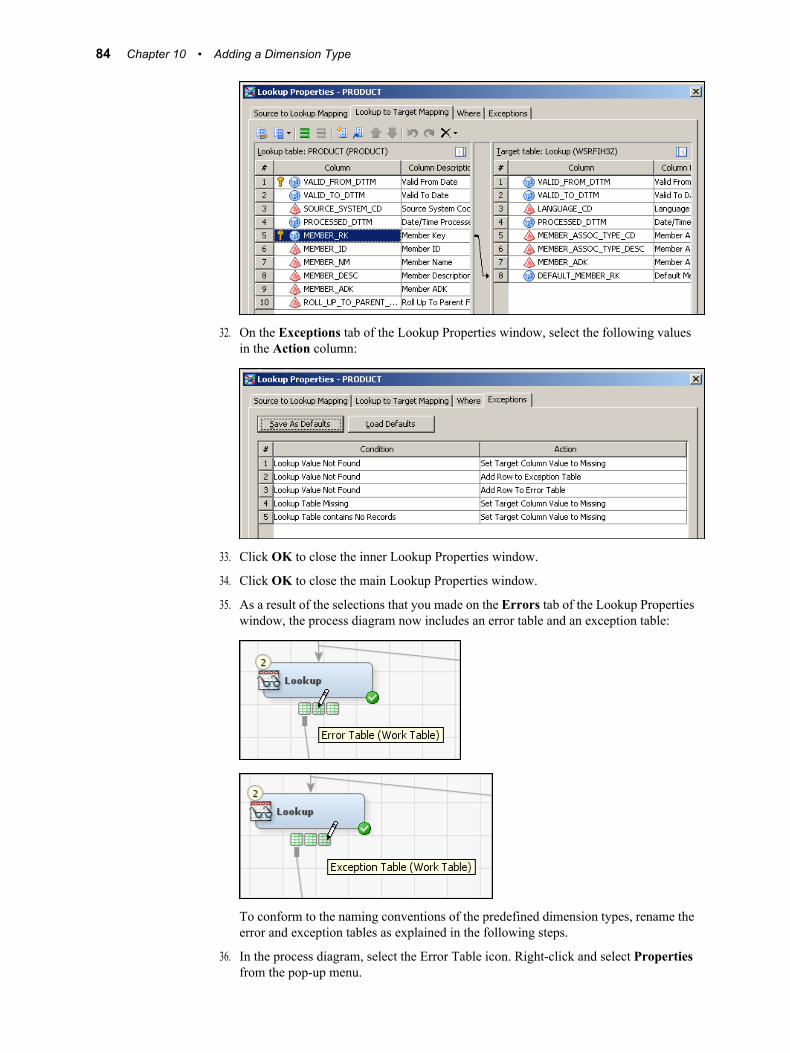
32. On the Exceptions tab of the Lookup Properties window, select the following valuesin the Action column:
33. Click OK to close the inner Lookup Properties window.
34. Click OK to close the main Lookup Properties window.
35. As a result of the selections that you made on the Errors tab of the Lookup Propertieswindow, the process diagram now includes an error table and an exception table:
To conform to the naming conventions of the predefined dimension types, rename theerror and exception tables as explained in the following steps.
36. In the process diagram, select the Error Table icon. Right-click and select Propertiesfrom the pop-up menu.
84 Chapter 10 • Adding a Dimension Type
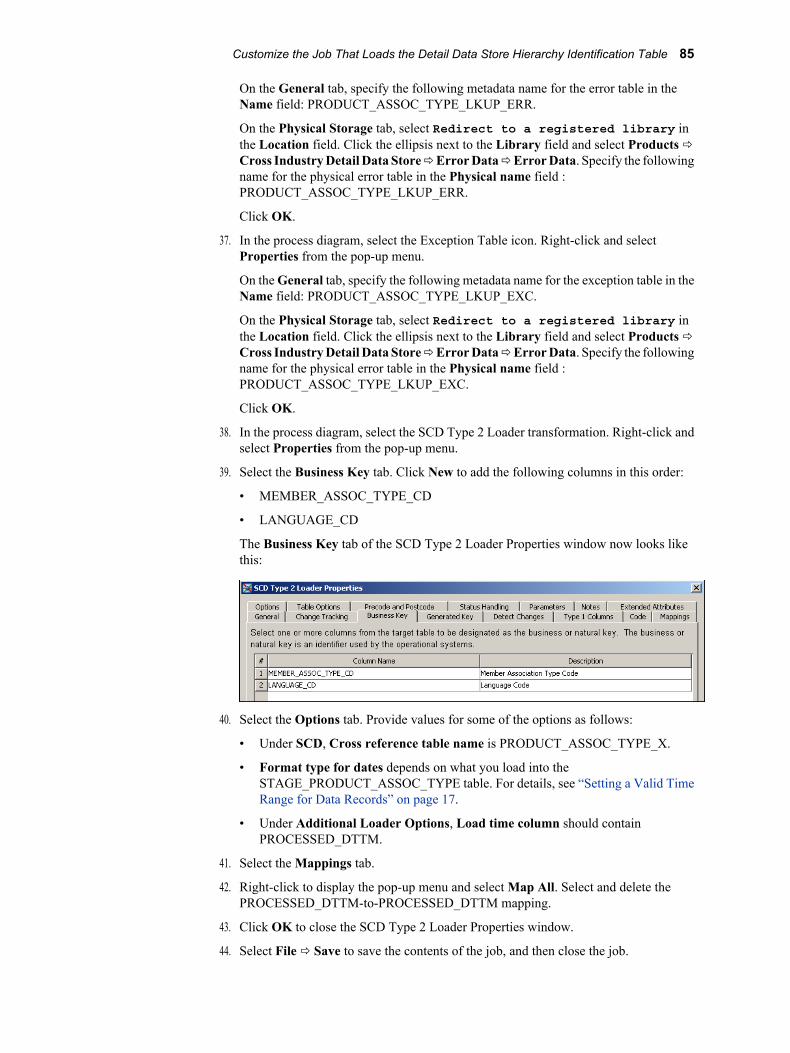
On the General tab, specify the following metadata name for the error table in theName field: PRODUCT_ASSOC_TYPE_LKUP_ERR.
On the Physical Storage tab, select Redirect to a registered library inthe Location field. Click the ellipsis next to the Library field and select Products ðCross Industry Detail Data Store ð Error Data ð Error Data. Specify the followingname for the physical error table in the Physical name field :PRODUCT_ASSOC_TYPE_LKUP_ERR.
Click OK.
37. In the process diagram, select the Exception Table icon. Right-click and selectProperties from the pop-up menu.
On the General tab, specify the following metadata name for the exception table in theName field: PRODUCT_ASSOC_TYPE_LKUP_EXC.
On the Physical Storage tab, select Redirect to a registered library inthe Location field. Click the ellipsis next to the Library field and select Products ðCross Industry Detail Data Store ð Error Data ð Error Data. Specify the followingname for the physical error table in the Physical name field :PRODUCT_ASSOC_TYPE_LKUP_EXC.
Click OK.
38. In the process diagram, select the SCD Type 2 Loader transformation. Right-click andselect Properties from the pop-up menu.
39. Select the Business Key tab. Click New to add the following columns in this order:
• MEMBER_ASSOC_TYPE_CD
• LANGUAGE_CD
The Business Key tab of the SCD Type 2 Loader Properties window now looks likethis:
40. Select the Options tab. Provide values for some of the options as follows:
• Under SCD, Cross reference table name is PRODUCT_ASSOC_TYPE_X.
• Format type for dates depends on what you load into theSTAGE_PRODUCT_ASSOC_TYPE table. For details, see “Setting a Valid TimeRange for Data Records” on page 17.
• Under Additional Loader Options, Load time column should containPROCESSED_DTTM.
41. Select the Mappings tab.
42. Right-click to display the pop-up menu and select Map All. Select and delete thePROCESSED_DTTM-to-PROCESSED_DTTM mapping.
43. Click OK to close the SCD Type 2 Loader Properties window.
44. Select File ð Save to save the contents of the job, and then close the job.
Customize the Job That Loads the Detail Data Store Hierarchy Identification Table 85
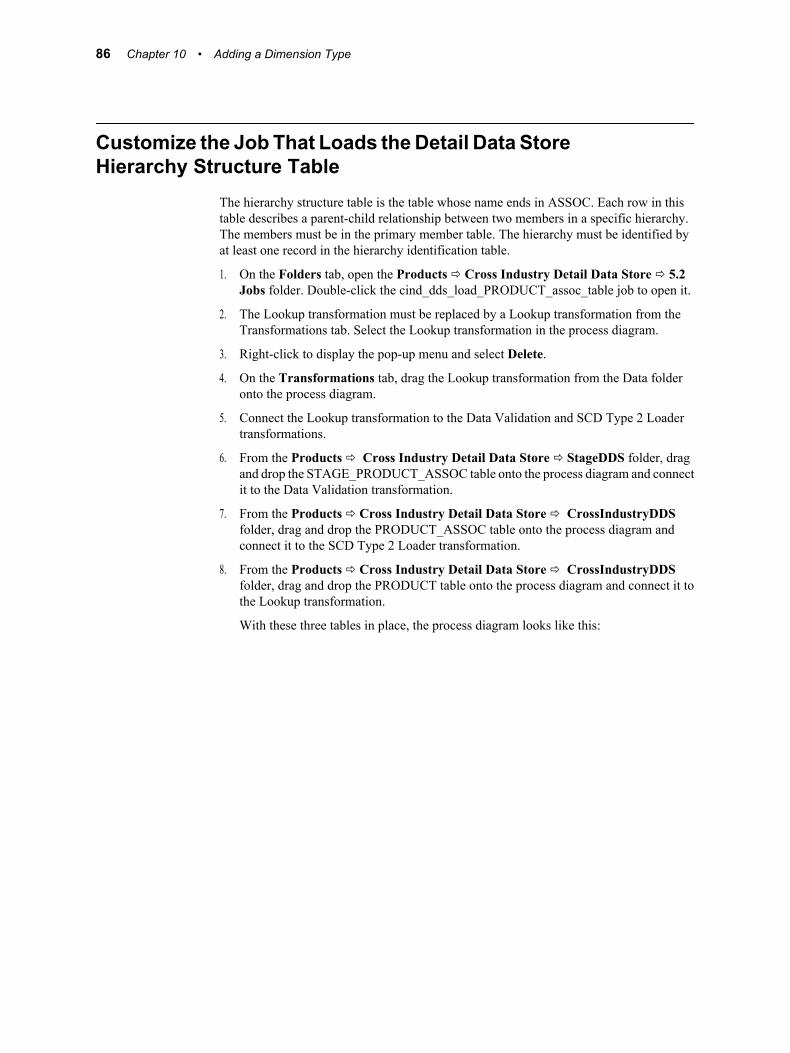
Customize the Job That Loads the Detail Data StoreHierarchy Structure Table
The hierarchy structure table is the table whose name ends in ASSOC. Each row in thistable describes a parent-child relationship between two members in a specific hierarchy.The members must be in the primary member table. The hierarchy must be identified byat least one record in the hierarchy identification table.
1. On the Folders tab, open the Products ð Cross Industry Detail Data Store ð 5.2Jobs folder. Double-click the cind_dds_load_PRODUCT_assoc_table job to open it.
2. The Lookup transformation must be replaced by a Lookup transformation from theTransformations tab. Select the Lookup transformation in the process diagram.
3. Right-click to display the pop-up menu and select Delete.
4. On the Transformations tab, drag the Lookup transformation from the Data folderonto the process diagram.
5. Connect the Lookup transformation to the Data Validation and SCD Type 2 Loadertransformations.
6. From the Products ð Cross Industry Detail Data Store ð StageDDS folder, dragand drop the STAGE_PRODUCT_ASSOC table onto the process diagram and connectit to the Data Validation transformation.
7. From the Products ð Cross Industry Detail Data Store ð CrossIndustryDDSfolder, drag and drop the PRODUCT_ASSOC table onto the process diagram andconnect it to the SCD Type 2 Loader transformation.
8. From the Products ð Cross Industry Detail Data Store ð CrossIndustryDDSfolder, drag and drop the PRODUCT table onto the process diagram and connect it tothe Lookup transformation.
With these three tables in place, the process diagram looks like this:
86 Chapter 10 • Adding a Dimension Type
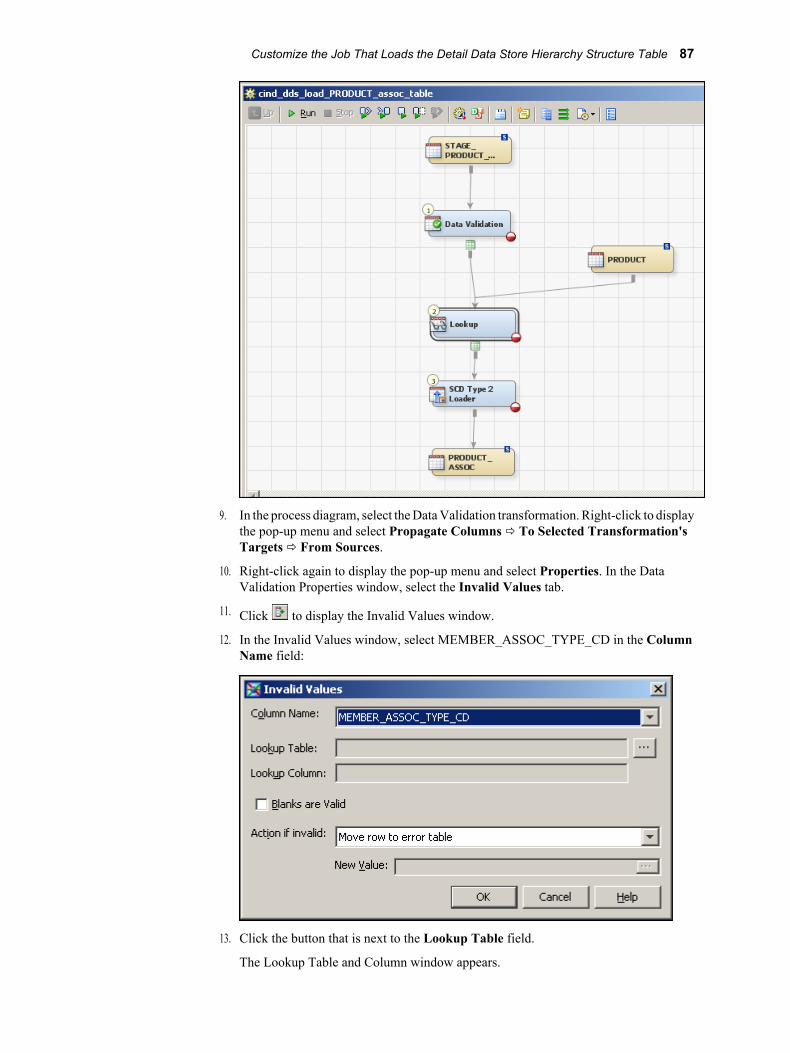
9. In the process diagram, select the Data Validation transformation. Right-click to displaythe pop-up menu and select Propagate Columns ð To Selected Transformation'sTargets ð From Sources.
10. Right-click again to display the pop-up menu and select Properties. In the DataValidation Properties window, select the Invalid Values tab.
11. Click to display the Invalid Values window.
12. In the Invalid Values window, select MEMBER_ASSOC_TYPE_CD in the ColumnName field:
13. Click the button that is next to the Lookup Table field.
The Lookup Table and Column window appears.
Customize the Job That Loads the Detail Data Store Hierarchy Structure Table 87
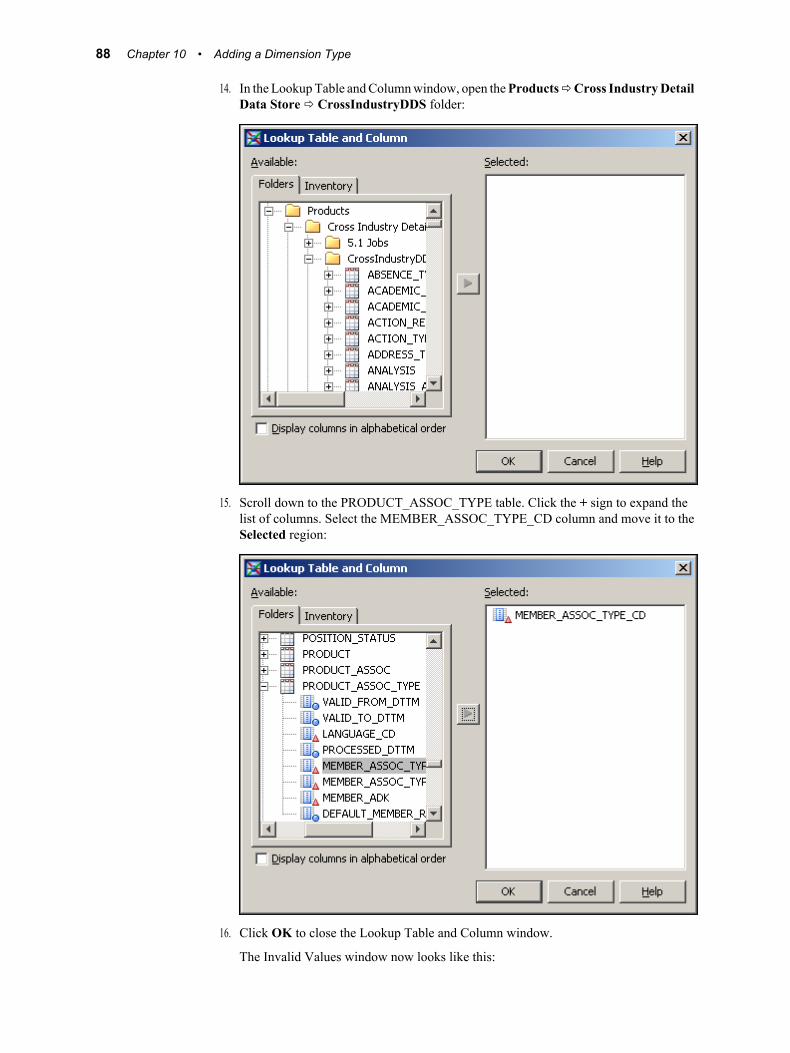
14. In the Lookup Table and Column window, open the Products ð Cross Industry DetailData Store ð CrossIndustryDDS folder:
15. Scroll down to the PRODUCT_ASSOC_TYPE table. Click the + sign to expand thelist of columns. Select the MEMBER_ASSOC_TYPE_CD column and move it to theSelected region:
16. Click OK to close the Lookup Table and Column window.
The Invalid Values window now looks like this:
88 Chapter 10 • Adding a Dimension Type
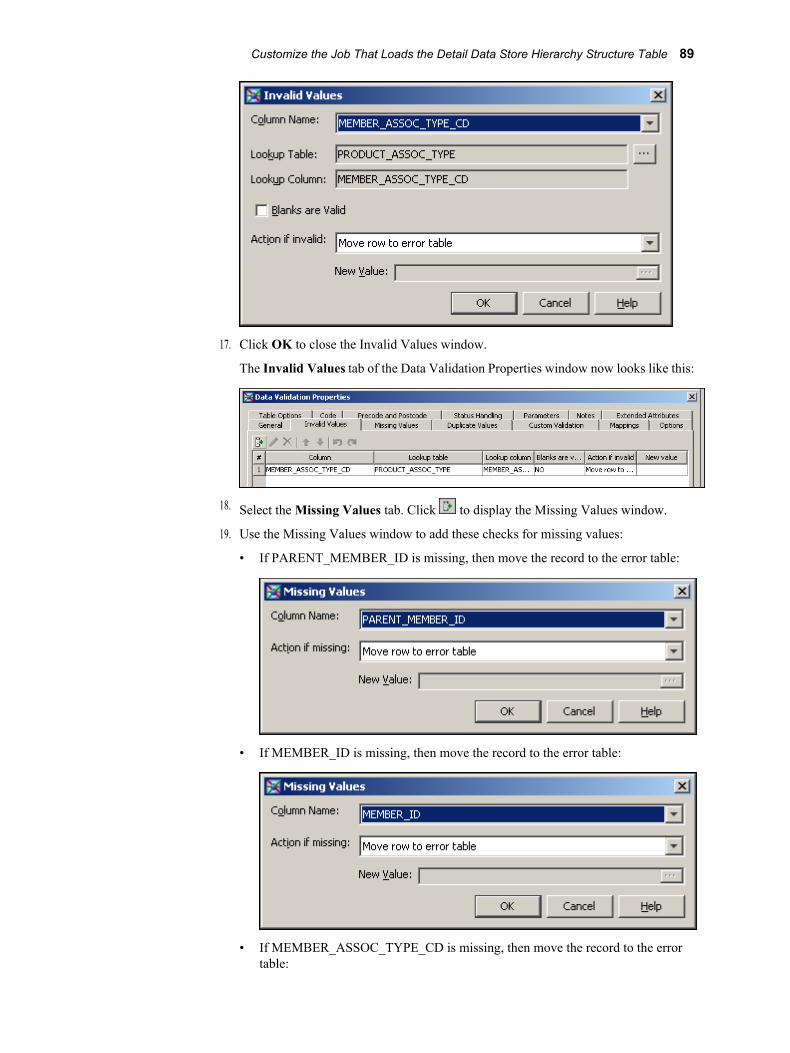
17. Click OK to close the Invalid Values window.
The Invalid Values tab of the Data Validation Properties window now looks like this:
18. Select the Missing Values tab. Click to display the Missing Values window.
19. Use the Missing Values window to add these checks for missing values:
• If PARENT_MEMBER_ID is missing, then move the record to the error table:
• If MEMBER_ID is missing, then move the record to the error table:
• If MEMBER_ASSOC_TYPE_CD is missing, then move the record to the errortable:
Customize the Job That Loads the Detail Data Store Hierarchy Structure Table 89
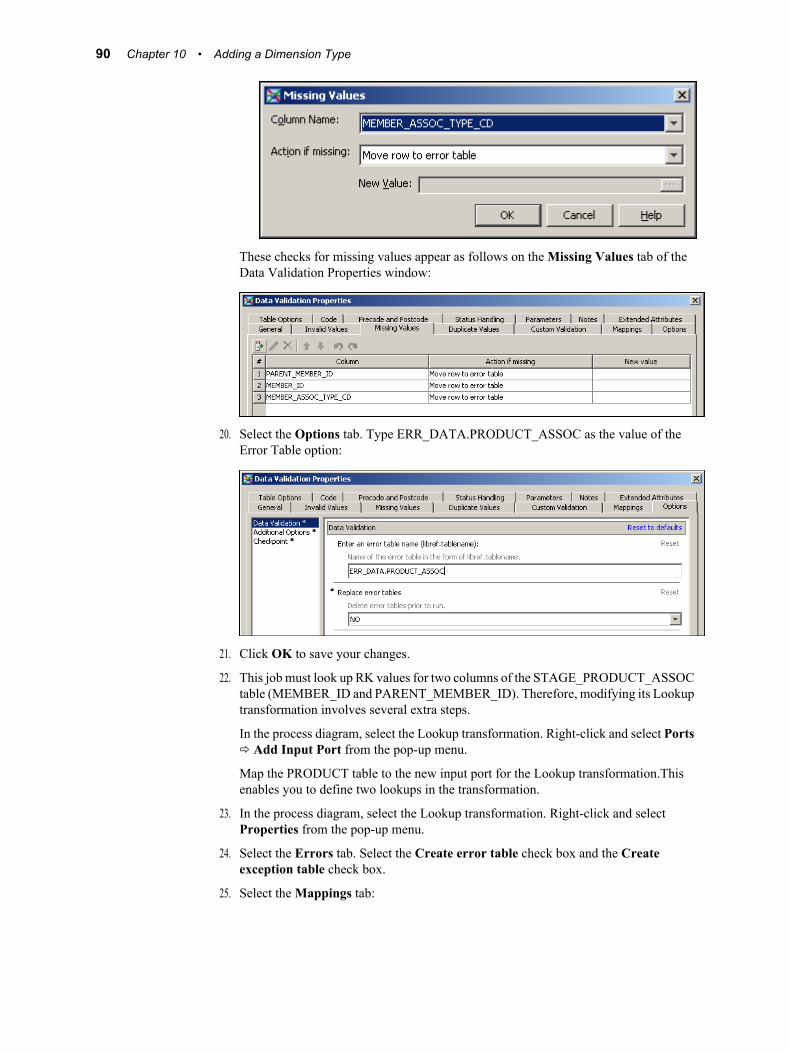
These checks for missing values appear as follows on the Missing Values tab of theData Validation Properties window:
20. Select the Options tab. Type ERR_DATA.PRODUCT_ASSOC as the value of theError Table option:
21. Click OK to save your changes.
22. This job must look up RK values for two columns of the STAGE_PRODUCT_ASSOCtable (MEMBER_ID and PARENT_MEMBER_ID). Therefore, modifying its Lookuptransformation involves several extra steps.
In the process diagram, select the Lookup transformation. Right-click and select Portsð Add Input Port from the pop-up menu.
Map the PRODUCT table to the new input port for the Lookup transformation.Thisenables you to define two lookups in the transformation.
23. In the process diagram, select the Lookup transformation. Right-click and selectProperties from the pop-up menu.
24. Select the Errors tab. Select the Create error table check box and the Createexception table check box.
25. Select the Mappings tab:
90 Chapter 10 • Adding a Dimension Type

In the Target table region, right-click to display the pop-up menu and select ImportColumns.
The Import Columns window appears.
26. In the Available Columns region of the Import Columns window, open the Products ðCross Industry Detail Data Store ð CrossIndustryDDS folder.
27. In that folder, select the PRODUCT_ASSOC table, and then click the right arrow buttonto move all its columns to the Selected region:
28. Click OK to save your changes and close the Import Columns window.
29. In the Target table region of the Mapping tab, right-click to display the pop-up menuand select Map All.
The Mapping tab now looks like this:
Customize the Job That Loads the Detail Data Store Hierarchy Structure Table 91
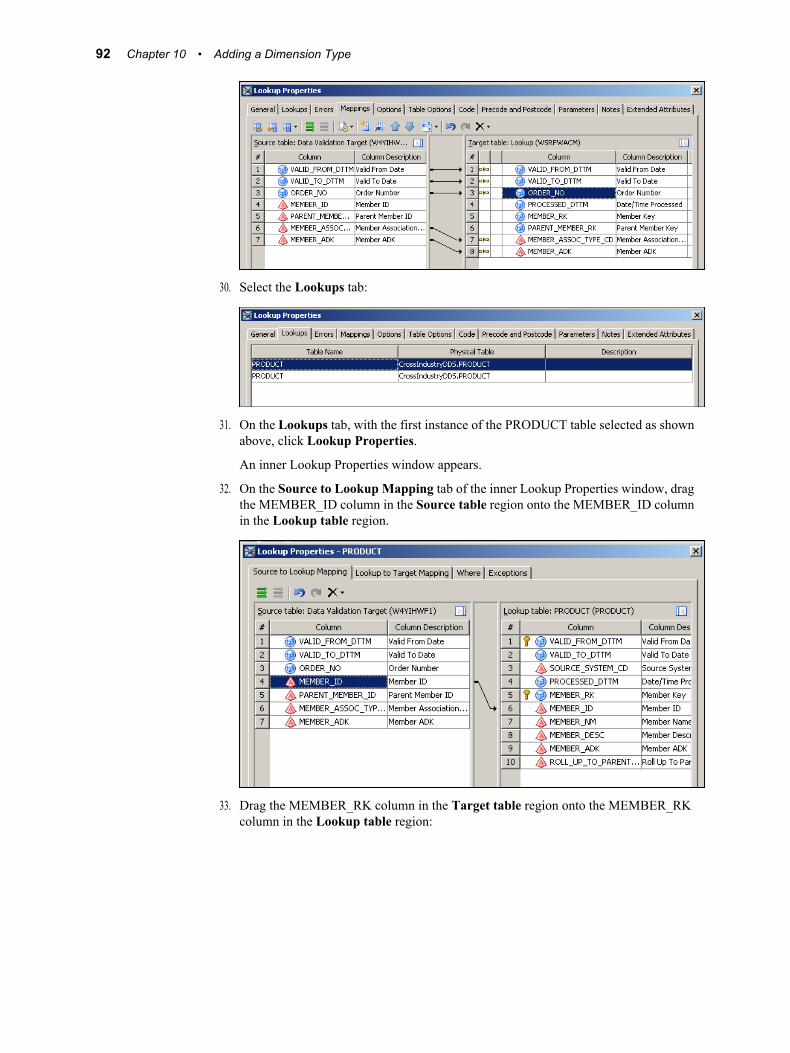
30. Select the Lookups tab:
31. On the Lookups tab, with the first instance of the PRODUCT table selected as shownabove, click Lookup Properties.
An inner Lookup Properties window appears.
32. On the Source to Lookup Mapping tab of the inner Lookup Properties window, dragthe MEMBER_ID column in the Source table region onto the MEMBER_ID columnin the Lookup table region.
33. Drag the MEMBER_RK column in the Target table region onto the MEMBER_RKcolumn in the Lookup table region:
92 Chapter 10 • Adding a Dimension Type
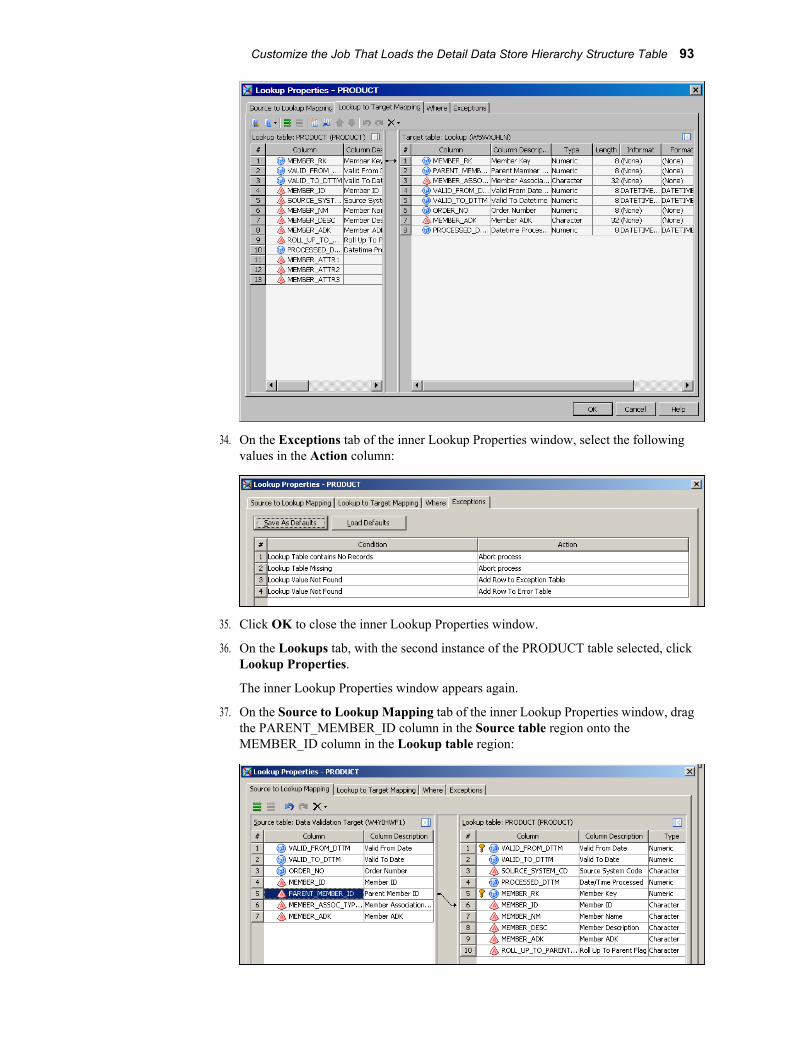
34. On the Exceptions tab of the inner Lookup Properties window, select the followingvalues in the Action column:
35. Click OK to close the inner Lookup Properties window.
36. On the Lookups tab, with the second instance of the PRODUCT table selected, clickLookup Properties.
The inner Lookup Properties window appears again.
37. On the Source to Lookup Mapping tab of the inner Lookup Properties window, dragthe PARENT_MEMBER_ID column in the Source table region onto theMEMBER_ID column in the Lookup table region:
Customize the Job That Loads the Detail Data Store Hierarchy Structure Table 93
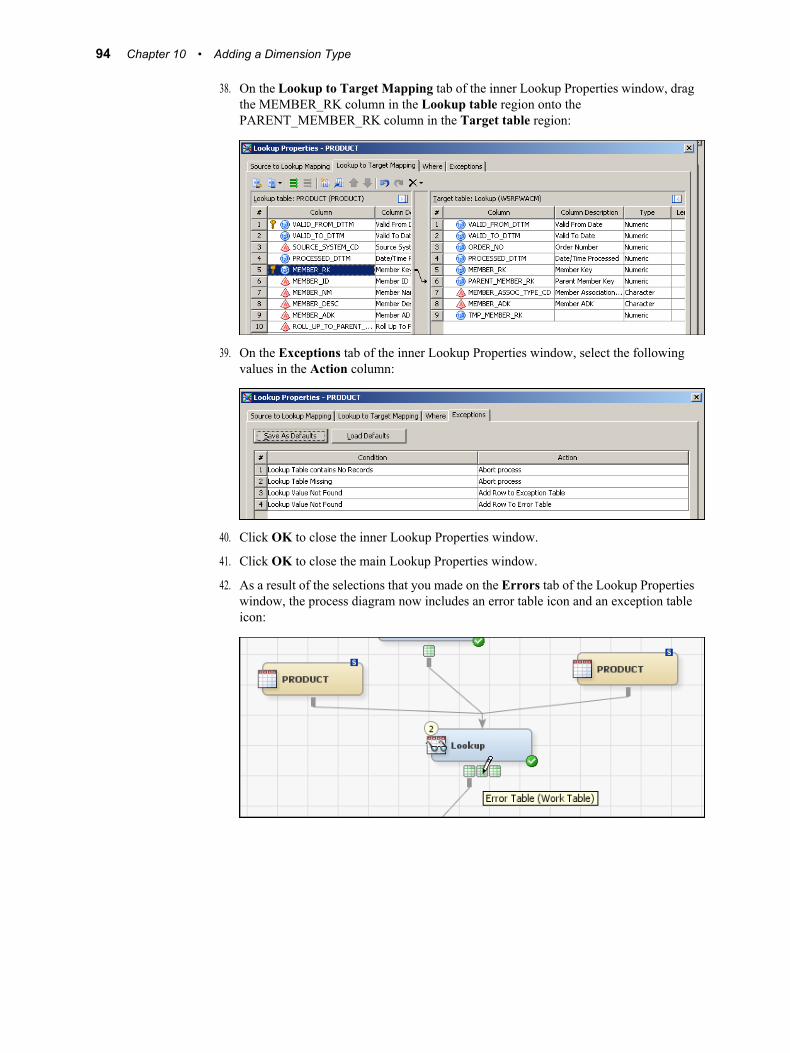
38. On the Lookup to Target Mapping tab of the inner Lookup Properties window, dragthe MEMBER_RK column in the Lookup table region onto thePARENT_MEMBER_RK column in the Target table region:
39. On the Exceptions tab of the inner Lookup Properties window, select the followingvalues in the Action column:
40. Click OK to close the inner Lookup Properties window.
41. Click OK to close the main Lookup Properties window.
42. As a result of the selections that you made on the Errors tab of the Lookup Propertieswindow, the process diagram now includes an error table icon and an exception tableicon:
94 Chapter 10 • Adding a Dimension Type
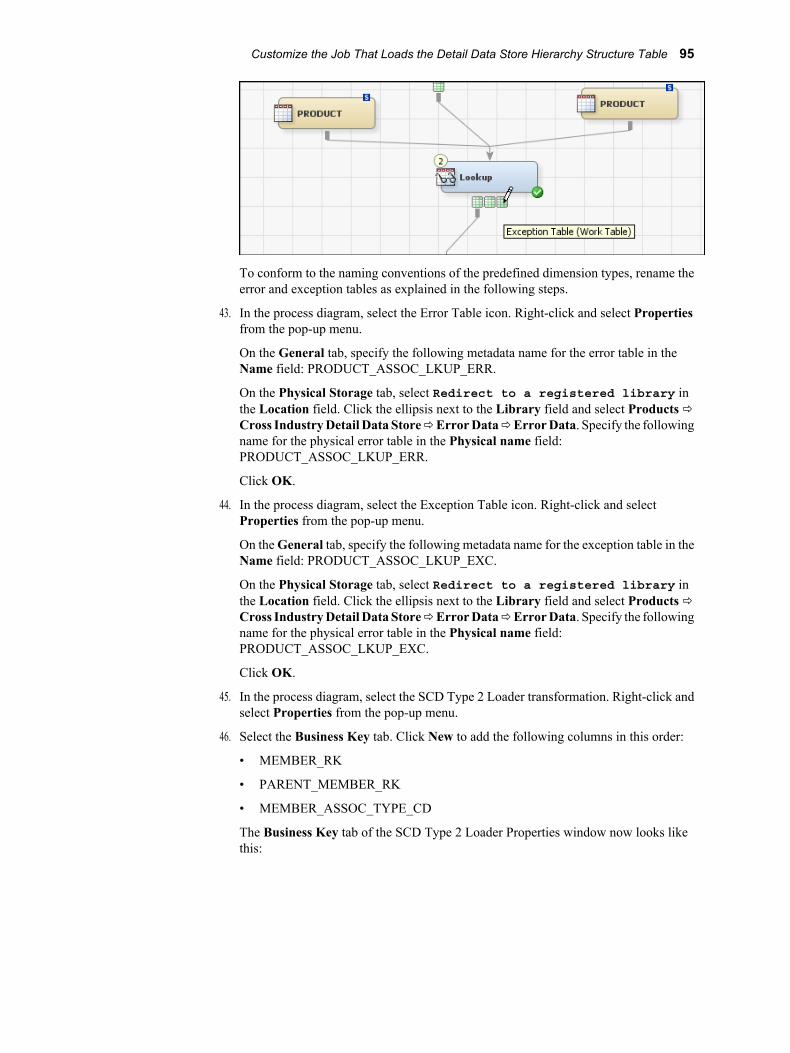
To conform to the naming conventions of the predefined dimension types, rename theerror and exception tables as explained in the following steps.
43. In the process diagram, select the Error Table icon. Right-click and select Propertiesfrom the pop-up menu.
On the General tab, specify the following metadata name for the error table in theName field: PRODUCT_ASSOC_LKUP_ERR.
On the Physical Storage tab, select Redirect to a registered library inthe Location field. Click the ellipsis next to the Library field and select Products ðCross Industry Detail Data Store ð Error Data ð Error Data. Specify the followingname for the physical error table in the Physical name field:PRODUCT_ASSOC_LKUP_ERR.
Click OK.
44. In the process diagram, select the Exception Table icon. Right-click and selectProperties from the pop-up menu.
On the General tab, specify the following metadata name for the exception table in theName field: PRODUCT_ASSOC_LKUP_EXC.
On the Physical Storage tab, select Redirect to a registered library inthe Location field. Click the ellipsis next to the Library field and select Products ðCross Industry Detail Data Store ð Error Data ð Error Data. Specify the followingname for the physical error table in the Physical name field:PRODUCT_ASSOC_LKUP_EXC.
Click OK.
45. In the process diagram, select the SCD Type 2 Loader transformation. Right-click andselect Properties from the pop-up menu.
46. Select the Business Key tab. Click New to add the following columns in this order:
• MEMBER_RK
• PARENT_MEMBER_RK
• MEMBER_ASSOC_TYPE_CD
The Business Key tab of the SCD Type 2 Loader Properties window now looks likethis:
Customize the Job That Loads the Detail Data Store Hierarchy Structure Table 95
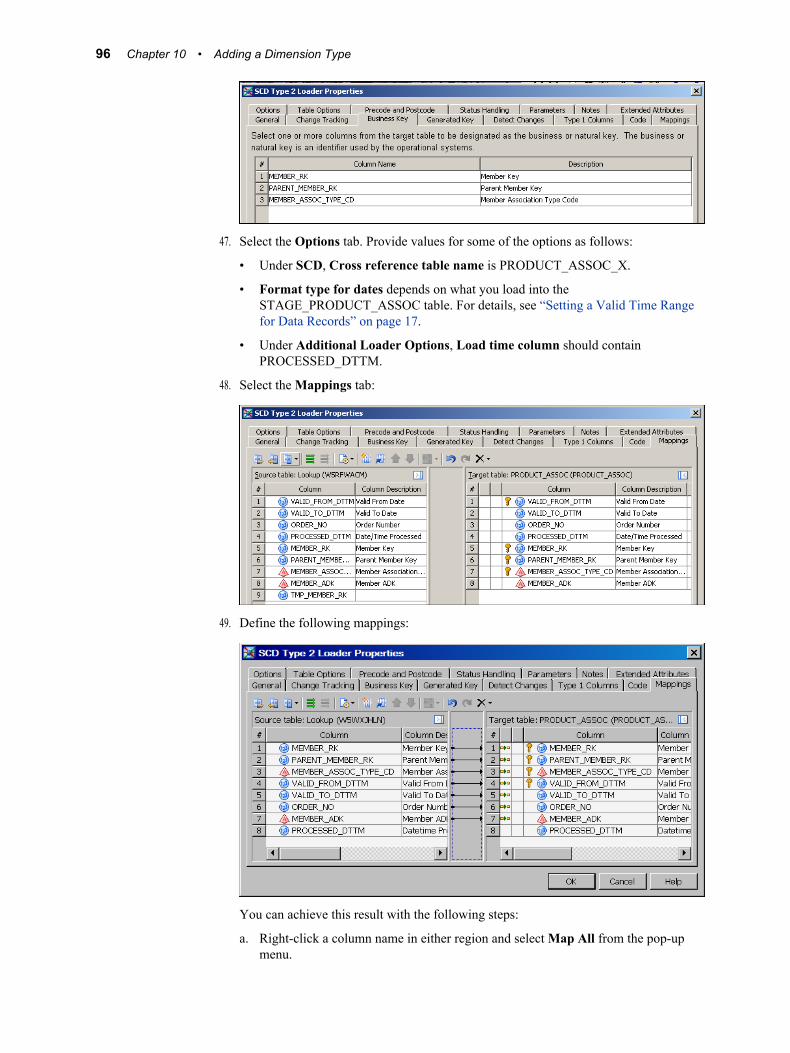
47. Select the Options tab. Provide values for some of the options as follows:
• Under SCD, Cross reference table name is PRODUCT_ASSOC_X.
• Format type for dates depends on what you load into theSTAGE_PRODUCT_ASSOC table. For details, see “Setting a Valid Time Rangefor Data Records” on page 17.
• Under Additional Loader Options, Load time column should containPROCESSED_DTTM.
48. Select the Mappings tab:
49. Define the following mappings:
You can achieve this result with the following steps:
a. Right-click a column name in either region and select Map All from the pop-upmenu.
96 Chapter 10 • Adding a Dimension Type

b. Select and delete the PROCESSED_DTTM-to-PROCESSED_DTTM mapping.
50. Click OK to save your changes and close the SCD Type 2 Loader Properties window.
51. Select File ð Save to save the contents of the job, and then close the job.
Customize the Job That Loads the Detail Data StoreSecondary Member Table
The secondary member table holds member names and descriptions in languages other thanthe default language. If your site uses names and descriptions in only one language, thenyou have no use for the secondary member table and you can ignore the job that loads it.
The steps that are required to customize this job are very similar to the steps that are requiredto customize the other jobs. Here is an outline of the required steps:
1. Display the process diagram. Replace the Lookup transformation and drag the input,output, and lookup tables into place:
2. In the process diagram, select the Data Validation transformation. Right-click to displaythe pop-up menu and select Propagate Columns ð To Selected Transformation'sTargets ð From Sources.
Customize the Job That Loads the Detail Data Store Secondary Member Table 97
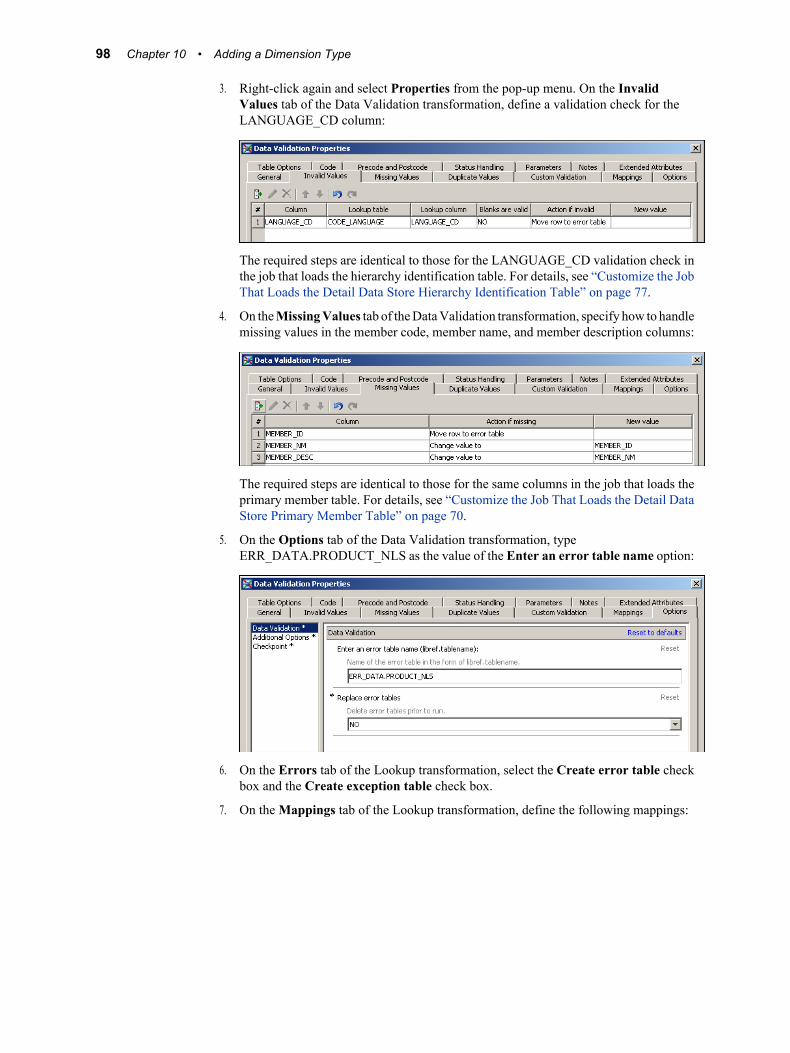
3. Right-click again and select Properties from the pop-up menu. On the InvalidValues tab of the Data Validation transformation, define a validation check for theLANGUAGE_CD column:
The required steps are identical to those for the LANGUAGE_CD validation check inthe job that loads the hierarchy identification table. For details, see “Customize the JobThat Loads the Detail Data Store Hierarchy Identification Table” on page 77.
4. On the Missing Values tab of the Data Validation transformation, specify how to handlemissing values in the member code, member name, and member description columns:
The required steps are identical to those for the same columns in the job that loads theprimary member table. For details, see “Customize the Job That Loads the Detail DataStore Primary Member Table” on page 70.
5. On the Options tab of the Data Validation transformation, typeERR_DATA.PRODUCT_NLS as the value of the Enter an error table name option:
6. On the Errors tab of the Lookup transformation, select the Create error table checkbox and the Create exception table check box.
7. On the Mappings tab of the Lookup transformation, define the following mappings:
98 Chapter 10 • Adding a Dimension Type
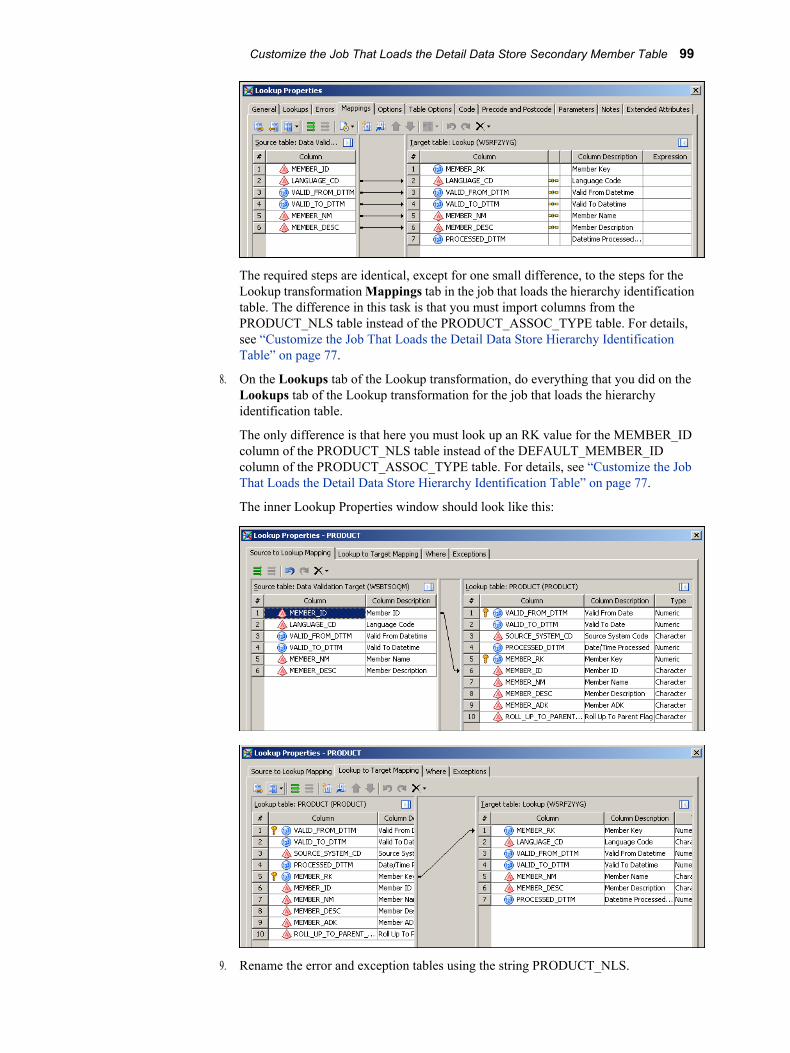
The required steps are identical, except for one small difference, to the steps for theLookup transformation Mappings tab in the job that loads the hierarchy identificationtable. The difference in this task is that you must import columns from thePRODUCT_NLS table instead of the PRODUCT_ASSOC_TYPE table. For details,see “Customize the Job That Loads the Detail Data Store Hierarchy IdentificationTable” on page 77.
8. On the Lookups tab of the Lookup transformation, do everything that you did on theLookups tab of the Lookup transformation for the job that loads the hierarchyidentification table.
The only difference is that here you must look up an RK value for the MEMBER_IDcolumn of the PRODUCT_NLS table instead of the DEFAULT_MEMBER_IDcolumn of the PRODUCT_ASSOC_TYPE table. For details, see “Customize the JobThat Loads the Detail Data Store Hierarchy Identification Table” on page 77.
The inner Lookup Properties window should look like this:
9. Rename the error and exception tables using the string PRODUCT_NLS.
Customize the Job That Loads the Detail Data Store Secondary Member Table 99

The required steps are identical to the other jobs. For details, see either “Customize theJob That Loads the Detail Data Store Hierarchy Identification Table” on page 77 or“Customize the Job That Loads the Detail Data Store Hierarchy Structure Table” onpage 86.
10. On the Business Key tab of the SCD Type 2 Loader transformation, click New to addthe following columns in this order:
• MEMBER_RK
• LANGUAGE_CD
11. On the Options tab of the SCD Type 2 Loader transformation, provide values for someof the options as follows:
• Under SCD, Cross reference table name is PRODUCT_NLS_X.
• Format type for dates depends on what you load into theSTAGE_PRODUCT_ASSOC table. For details, see “Setting a Valid Time Rangefor Data Records” on page 17.
• Under Additional Loader Options, Load time column should containPROCESSED_DTTM.
12. On the Mappings tab of the SCD Type 2 Loader transformation, right-click to displaythe pop-up menu and select Map All. Select and delete the PROCESSED_DTTM-to-PROCESSED_DTTM mapping.
13. Select File ð Save to save the contents of the job, and then close the job.
Customize the Job That Loads theGL_TRANSACTION_SUM Table
If members from the new dimension type will be used to describe financial accounting datathat is loaded into SAS Financial Management, then you must make appropriate changesto the job that loads the accounting data into the detail data store.
To make these changes:
1. On the Folders tab, open the Cross Industry Detail Data Store ð 5.2 Jobs folder.
2. Double-click the cind_dds_108000_load_gl_transaction_sum_table job to display itsprocess diagram.
3. Select Actions ð Propagate Columns ð For Job ð To End.
4. In the process diagram, select the Lookup transformation. Right-click and select Portsð Add Input Port from the pop-up menu.
100 Chapter 10 • Adding a Dimension Type
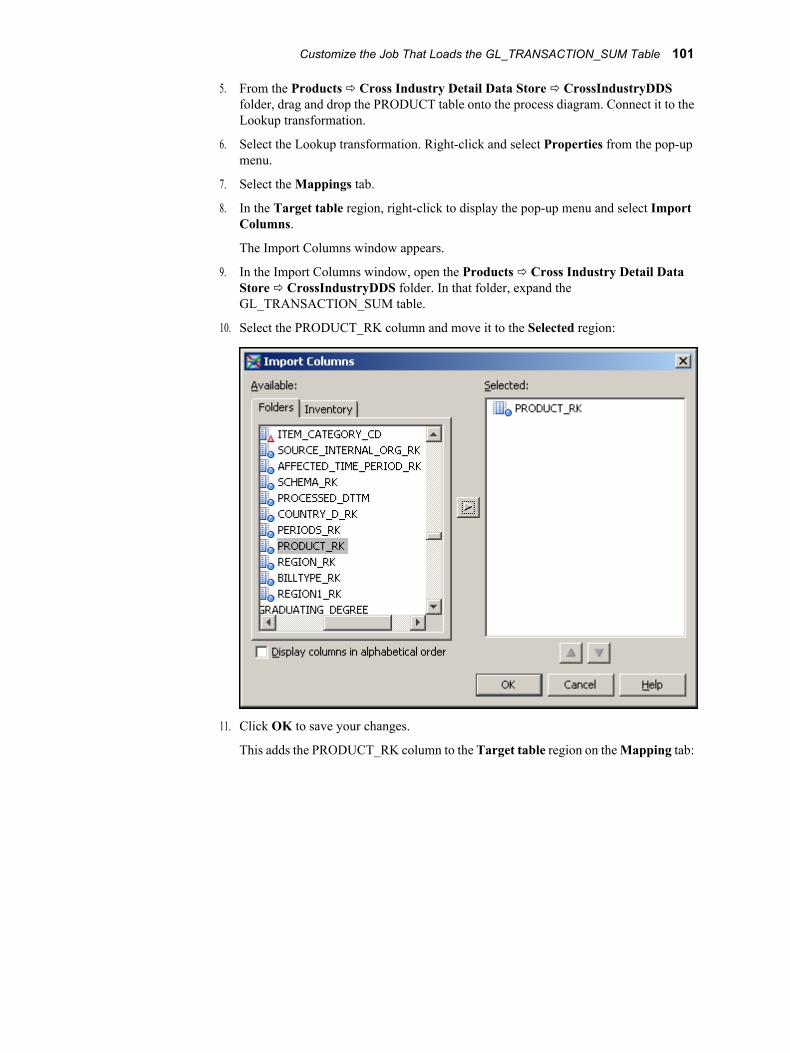
5. From the Products ð Cross Industry Detail Data Store ð CrossIndustryDDSfolder, drag and drop the PRODUCT table onto the process diagram. Connect it to theLookup transformation.
6. Select the Lookup transformation. Right-click and select Properties from the pop-upmenu.
7. Select the Mappings tab.
8. In the Target table region, right-click to display the pop-up menu and select ImportColumns.
The Import Columns window appears.
9. In the Import Columns window, open the Products ð Cross Industry Detail DataStore ð CrossIndustryDDS folder. In that folder, expand theGL_TRANSACTION_SUM table.
10. Select the PRODUCT_RK column and move it to the Selected region:
11. Click OK to save your changes.
This adds the PRODUCT_RK column to the Target table region on the Mapping tab:
Customize the Job That Loads the GL_TRANSACTION_SUM Table 101

12. Select the Lookups tab:
With the PRODUCT table selected, click Lookup Properties.
The inner Lookup Properties window appears.
13. On the Source to Lookup Mapping tab of the inner Lookup Properties window, mapPRODUCT_ID to MEMBER_ID:
102 Chapter 10 • Adding a Dimension Type

14. On the Lookup to Target Mapping tab of the inner Lookup Properties window, mapMEMBER_RK to PRODUCT_RK:
15. On the Exceptions tab of the inner Lookup Properties window, specify an appropriateset of code conditions and consequent actions. Use the other dimension types as models.
16. Click OK to close the inner Lookup Properties window.
17. Click OK to close the main Lookup Properties window.
18. In the process diagram, select each Table Loader transformation.
19. Right-click and select Properties from the pop-up menu.
20. Select the Mappings tab. Right-click to display the pop-up menu and select Map All.
This step adds the new dimension type to the map.
21. Click OK to close the Table Loader Properties window.
22. Select File ð Save to save all the changes to the job.
Customize the Job That Loads the GL_TRANSACTION_SUM Table 103
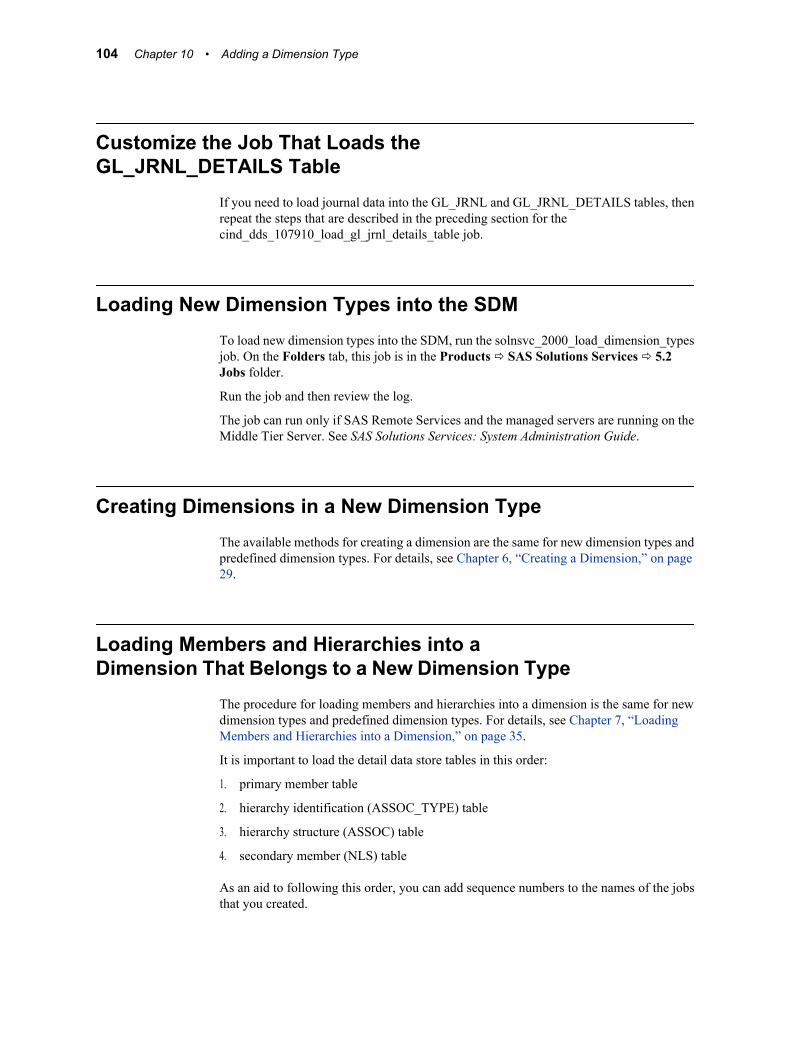
Customize the Job That Loads theGL_JRNL_DETAILS Table
If you need to load journal data into the GL_JRNL and GL_JRNL_DETAILS tables, thenrepeat the steps that are described in the preceding section for thecind_dds_107910_load_gl_jrnl_details_table job.
Loading New Dimension Types into the SDMTo load new dimension types into the SDM, run the solnsvc_2000_load_dimension_typesjob. On the Folders tab, this job is in the Products ð SAS Solutions Services ð 5.2Jobs folder.
Run the job and then review the log.
The job can run only if SAS Remote Services and the managed servers are running on theMiddle Tier Server. See SAS Solutions Services: System Administration Guide.
Creating Dimensions in a New Dimension TypeThe available methods for creating a dimension are the same for new dimension types andpredefined dimension types. For details, see Chapter 6, “Creating a Dimension,” on page29.
Loading Members and Hierarchies into aDimension That Belongs to a New Dimension Type
The procedure for loading members and hierarchies into a dimension is the same for newdimension types and predefined dimension types. For details, see Chapter 7, “LoadingMembers and Hierarchies into a Dimension,” on page 35.
It is important to load the detail data store tables in this order:
1. primary member table
2. hierarchy identification (ASSOC_TYPE) table
3. hierarchy structure (ASSOC) table
4. secondary member (NLS) table
As an aid to following this order, you can add sequence numbers to the names of the jobsthat you created.
104 Chapter 10 • Adding a Dimension Type

Chapter 11
Loading Measures
Overview: Measures and Metrics . . . . . . . . . . . . . . . . . . . . . . . . . . . . . . . . . . . . . . . 105
Moving Measure Data from Its Source to the Detail Data Store . . . . . . . . . . . . . . 105
Moving Measure Data from the Detail Data Store to the SDM . . . . . . . . . . . . . . . 107
Overview: Measures and MetricsMeasure and metric, as SAS solutions use these terms, have different but related meanings:
• A measure is a variable that is subject to numeric measurement. Examples are profitmargin, number of employees, and number of complaints.
• A metric is a numeric value of a measure. Examples are 5% profit margin, 950employees, and 400 complaints.
A measure typically has many metrics associated with it. The metrics also depend on othervariables, such as the time period or the relevant organization. These other variables arerepresented by dimensions—a time dimension and an organization dimension, for example.
This chapter focuses on measures. Chapter 12, “Loading Metrics,” on page 109 focuseson metrics.
Moving Measure Data from Its Source to the DetailData Store
SAS supplies several hundred measures in the predefined SAS_MEASURE source table.On the Folders tab, this table is in the Products ð Cross Industry Detail Data Store ðSAS Supplied folder.
If the measures in the SAS_MEASURE table are the only measures that you need, thenyou should simply load the measures from this table into the detail data store.
If you need additional measures, then load the additional measures along with thepredefined measures into the detail data store and from the detail data store to the SDM.To load additional measures into the detail data store:
1. Create a second source table of measures. Your source table of measures must have thesame eight-column layout as the SAS_MEASURE table:
105
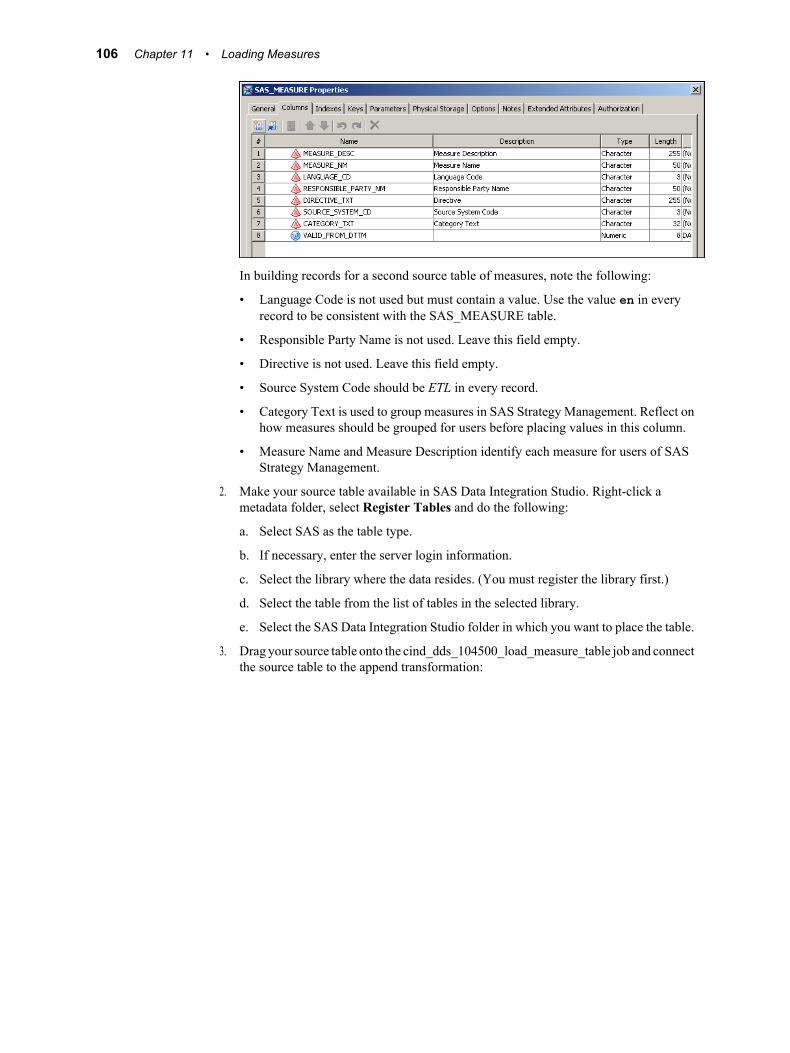
In building records for a second source table of measures, note the following:
• Language Code is not used but must contain a value. Use the value en in everyrecord to be consistent with the SAS_MEASURE table.
• Responsible Party Name is not used. Leave this field empty.
• Directive is not used. Leave this field empty.
• Source System Code should be ETL in every record.
• Category Text is used to group measures in SAS Strategy Management. Reflect onhow measures should be grouped for users before placing values in this column.
• Measure Name and Measure Description identify each measure for users of SASStrategy Management.
2. Make your source table available in SAS Data Integration Studio. Right-click ametadata folder, select Register Tables and do the following:
a. Select SAS as the table type.
b. If necessary, enter the server login information.
c. Select the library where the data resides. (You must register the library first.)
d. Select the table from the list of tables in the selected library.
e. Select the SAS Data Integration Studio folder in which you want to place the table.
3. Drag your source table onto the cind_dds_104500_load_measure_table job and connectthe source table to the append transformation:
106 Chapter 11 • Loading Measures
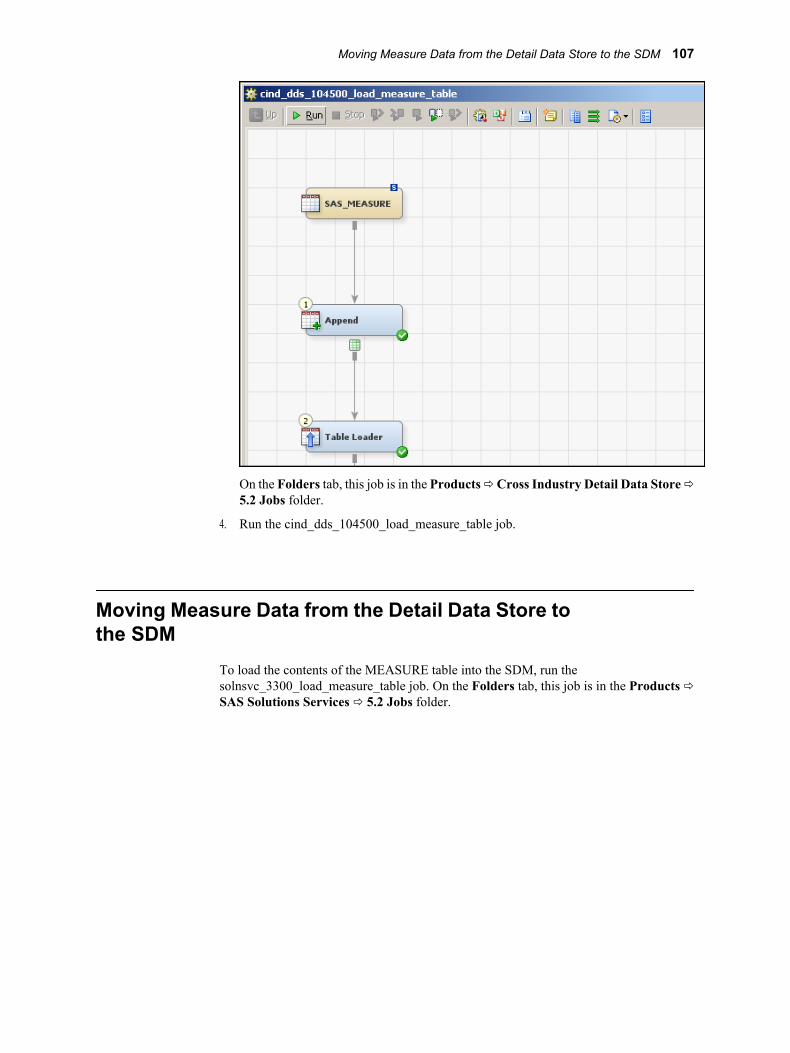
On the Folders tab, this job is in the Products ð Cross Industry Detail Data Store ð5.2 Jobs folder.
4. Run the cind_dds_104500_load_measure_table job.
Moving Measure Data from the Detail Data Store tothe SDM
To load the contents of the MEASURE table into the SDM, run thesolnsvc_3300_load_measure_table job. On the Folders tab, this job is in the Products ðSAS Solutions Services ð 5.2 Jobs folder.
Moving Measure Data from the Detail Data Store to the SDM 107

108 Chapter 11 • Loading Measures

Chapter 12
Loading Metrics
Overview: Measures and Metrics . . . . . . . . . . . . . . . . . . . . . . . . . . . . . . . . . . . . . . . 109
Data Pathways for Metrics . . . . . . . . . . . . . . . . . . . . . . . . . . . . . . . . . . . . . . . . . . . . 109
Preparing a Source Table of Metric Data . . . . . . . . . . . . . . . . . . . . . . . . . . . . . . . . 110
Preparing Jobs to Load Metric Data . . . . . . . . . . . . . . . . . . . . . . . . . . . . . . . . . . . . 111
Overview: Measures and MetricsMeasure and metric, as SAS solutions use these terms, have different but related meanings:
• A measure is a variable that is subject to numeric measurement. Examples are profitmargin, number of employees, and number of complaints.
• A metric is a numeric value of a measure. Examples are 5% profit margin, 950employees, and 400 complaints.
A measure typically has many metrics associated with it. The metrics also depend on othervariables, such as the time period or the relevant organization. These other variables arerepresented by dimensions—a time dimension and an organization dimension, for example.
This chapter focuses on metrics. Chapter 11, “Loading Measures,” on page 105 focuses onmeasures.
Data Pathways for MetricsIn the SDM, the software maintains a separate metric table for each combination ofhierarchies that characterizes the metric data. For example, metrics that are associated withtime hierarchy A will be in one table, metrics that are associated with time hierarchy B willbe in another table, and metrics that are associated with both time hierarchy A andorganization hierarchy Z will be in a third table. The software creates a new metric tableeach time data that is associated with a given combination of hierarchies arrives for thefirst time. If data arrives for a combination of hierarchies that has been used before, thenthat data is appended to an existing metric table.
Each metric table in the SDM has a name that enables users of SAS Strategy Managementor the KPI Viewer to select it for use.
Metric data can enter the SDM metric tables in three different ways:
109
• Users of the SAS Financial Management Add-in for Microsoft Excel can export datato SDM metric tables.
• A SAS Human Capital Management job can compute metrics from data in the HCMData Mart. An optional job can then load the computed HCM metrics into SDM metrictables. For details, see “Loading HCM Metrics into a Metric Table” on page 197.
• A SAS Solutions Services job can load data into SDM metric tables from source tablesthat you build. This data pathway is the subject of the rest of this chapter.
Preparing a Source Table of Metric DataPrepare a separate source table for each distinct metric table in the SDM. Name each sourcetable in a way that indicates which metric table it is the source for.
Each source table of metric data must have the following columns:
• A column named MEASURE_NM with format $100. For each row of the table, thiscolumn must contain the name of an existing measure.
• A column named SOURCE_SYSTEM_CD with format $3. For each row of the table,this column must contain the code ETL.
• One or more columns that represent dimension types. A column that represents the timedimension type is required. Columns for all other dimension types are optional. Eachdimension type column must have a format of $32. and must have a name that endswith the three characters _ID. For each row of the table, each dimension type columnmust contain a member code of a member that belongs to the hierarchy within thatdimension type that is specified in the job that loads the data into the SDM.
• One or more columns with a NUMERIC format to hold the numeric values of metrics.For example, a source table could have a single numeric column named VALUE ortwo numeric columns named VALUE1 and VALUE2, or ACTUAL and BUDGET.Having numeric columns named ACTUAL and BUDGET is an alternative to havingan ANALYSIS_ID dimension type column, which can contain ACTUAL andBUDGET member codes.
• A column named DIRECTIVE_TXT with format $255. For each row of the table, eitherleave this column empty or use it to specify the directive that you want to associatewith the metric in any scorecard that displays the metric. A user who views a scorecardcan click a directive to produce an appropriate action.
You can specify any predefined directive or any custom directive that has been definedat your site. The following predefined directives are most likely to be useful in thiscontext:
Launch a URLDisplays a specified Web page.
Place the following in the DIRECTIVE_TXTcolumn:URL_Redirect&url=target_url
For example:URL_Redirect&url=http://www.sas.com/
Open a DocumentOpens a specified document in the Document Manager.
Place the following in the DIRECTIVE_TXTcolumn:OpenDocument&Document=GUID_of_document
110 Chapter 12 • Loading Metrics
For example:OpenDocument&Document=fedb550b-0a0b-0b93-01a7-401ccccec5c5
Here is one way to obtain the GUID of a document:
1. In the Document Manager, place the cursor on the name of the document.
2. Select Copy Shortcut from the pop-up menu.
3. Paste the shortcut any place where you can access it. The shortcut includes the GUID.
You create a source table of metric data on the server, and then import it to a folder in SASData Integration Studio. You might want to create a folder that is dedicated to source tablesof metric data.
To import a source table:
1. Right-click a metadata folder and select Register Tables.
2. Select SAS, and then click Next.
3. If necessary, enter the server login information.
4. Select the SAS library where the source table resides. If necessary, you can define theSAS library first.
5. Select the desired source table from the list of tables in the library.
Preparing Jobs to Load Metric DataPrepare a separate job for each distinct metric table in the SDM.
To prepare a job:
1. In the Products ð SAS Solutions Services ð 5.2 Jobs folder on the Folders tab, createa copy of the solnsvc_3400_load_metric_table job, using one of the methods describedin “Copy Jobs” on page 12.
2. Name the job in a way that indicates which metric table it loads.
3. Open the process diagram for the job by double-clicking the job title.
4. Drag the appropriate source table onto the diagram and connect it to thecreate_update_metrics transformation:
Preparing Jobs to Load Metric Data 111

5. Right-click the create_update_metrics icon and select Properties from the pop-upmenu.
6. In the Properties window, select the Options tab:
7. Supply appropriate option values as explained below.
8. Click OK to close the Properties window.
9. Select File ð Save.
For each source table column that represents a dimension type, the Dimensions option mustcontain a four-item colon-delimited list: field:dim_cd:dim_type_cd:hierarchy_cd
The four items in this list are the following:
• field is the name of the column in the source table.
• dim_cd is the code of the dimension to which all the members in this column belong.
A dimension code that is used in a metric table must not be a MySQL reserved word.See Appendix A1, “MySQL Reserved Words,” on page 243.
• dim_type_cd is the code of the dimension type to which all the members in this columnbelong.
• hierarchy_cd is the code of the hierarchy to which all the members in this columnbelong.
For a source table that has two or more columns that represent dimension types, separatethe colon-delimited lists with the vertical bar symbol: |.
For a source table that uses only the Time dimension type, for example, the Dimensionsoption value might look like this:
112 Chapter 12 • Loading Metrics

PERIOD_ID:TIME_DIM1:TIME:TIME_HIER1
For a source table that uses both Time and Analysis, the Dimensions option value mightlook like this:
PERIOD_ID:TIME_DIM1:TIME:TIME_HIER1| ANALYSIS_ID:ANALYSIS_DIM1:ANALYSIS:ANALYSIS_HIER1
For a source table that uses Time and Analysis and Internal Organization, the Dimensionsoption value might look like this:
PERIOD_ID:TIME_DIM1:TIME:TIME_HIER1| ANALYSIS_ID:ANALYSIS_DIM1:ANALYSIS:ANALYSIS_HIER1| ORG_ID:ORG_DIM1:INTORG:ORG_HIER1
To obtain the necessary codes for dimension types, dimensions, and hierarchies, use eitherthe SAS Solutions Dimension Editor or the Dimensions workspace of SAS FinancialManagement Studio.
The Metric Values option value must be a space-delimited list of the names of the columnsthat contain numeric values.
For example, for a source table that has a single column of numeric values named VALUE,the Metric Values option value must be:
VALUE
For a source table that has two columns of numeric values named ACTUAL and BUDGET,the Metric Values option value must be:
ACTUALBUDGET
The Metric Table Description option value is the name that is given to the metric table inthe SDM, which users of SAS Strategy Management and the KPI Viewer can use to selectit. This name is used only if the job creates a metric table. If a metric table with the specifiedcombination of hierarchies already exists, then that table keeps the name that it already has,no matter what you specify here.
Be careful not to use the same value for the Metric Table Description option with differentvalues for the Dimensions option. If you accidentally do this, then users of SAS StrategyManagement and the KPI Viewer will see multiple metric tables that have the same name.
If a metric table with the specified combination of hierarchies already exists, then the jobupdates the existing metric table according to the following rules:
• Any record that contains a new combination of measure name and dimension membersis added to the existing table.
• Any record that contains a combination of measure name and dimension members thatis already represented by a record in the existing table replaces the record that itmatches. The result is to update the numeric value or values in the existing record.
• Any record in the existing table for which no matching record is loaded remains in thetable unchanged.
Preparing Jobs to Load Metric Data 113

114 Chapter 12 • Loading Metrics
Chapter 13
Creating a Stored Process from aSAS Data Integration Studio Job
Creating a Stored Process from a SAS Data Integration Studio Job . . . . . . . . . . 115
Creating a Stored Process from a SAS DataIntegration Studio Job
You can make any SAS Data Integration Studio job available as a stored process that canbe run from the Document Manager. This gives a larger set of users the ability to run thecode, which might be appropriate in some cases.
Before you create a stored process from a SAS Data Integration Studio job, make sure thatyou have made all appropriate modifications to the job. This includes specifyingappropriate values for any job options.
To create a stored process from a SAS Data Integration Studio job, first do the followingin SAS Data Integration Studio:
1. Select the job, and then select Open.
The process diagram appears in the Process Designer.
2. In the Process Designer, select the Code tab.
The code for the job is displayed.
3. Select File ð Save to File ð Local.
The Save File window appears.
4. Use the Save File window to specify the target location and name for the file that willcontain the code, and then click Save.
Save the file in a location such as the following: SAS-config-dir\lev1\SASApp\SASEnvironment\[Solutions Services, Financial Management,HumanCapitalManagement, StrategyManagement]\UserDefined.(Create the UserDefined directory if it does not already exist.)
Next, use an appropriate editor to do the following:
1. Open the saved file.
2. At the beginning of the file, add the following statement:
%rptinit;
3. At the end of the file, add the following statements:
115

%includesasautos(etlstatus.sas);%stpend;
The %INCLUDE statement will create a job status report, which lets you see the statusof your job.
4. Save these changes and close the editor.
Register the stored process in SAS Management Console. For instructions, see “Workingwith Stored Processes” in the SAS Solutions Services: Customization Guide.
116 Chapter 13 • Creating a Stored Process from a SAS Data Integration Studio Job
Part 2
Data Administration Specific toSAS Financial Management
Chapter 14Loading Exchange Rates into a SAS Financial Management ExchangeRate Set . . . . . . . . . . . . . . . . . . . . . . . . . . . . . . . . . . . . . . . . . . . . . . . . . . . . . . . . 119
Chapter 15Loading Driver Rates into a SAS Financial Management Driver RateSet . . . . . . . . . . . . . . . . . . . . . . . . . . . . . . . . . . . . . . . . . . . . . . . . . . . . . . . . . . . . . 127
Chapter 16Loading Cell Protection Rules for a Model . . . . . . . . . . . . . . . . . . . . . . . 133
Chapter 17Loading Base Data into a Financial Cycle . . . . . . . . . . . . . . . . . . . . . . . 139
Chapter 18Loading Base Data into an Operational Cycle . . . . . . . . . . . . . . . . . . . . 149
Chapter 19Exporting Financial Accounting Data . . . . . . . . . . . . . . . . . . . . . . . . . . . . 157
Chapter 20Loading a System Filter for the SAS Financial Management Add-In forMicrosoft Excel . . . . . . . . . . . . . . . . . . . . . . . . . . . . . . . . . . . . . . . . . . . . . . . . . 163
117

118
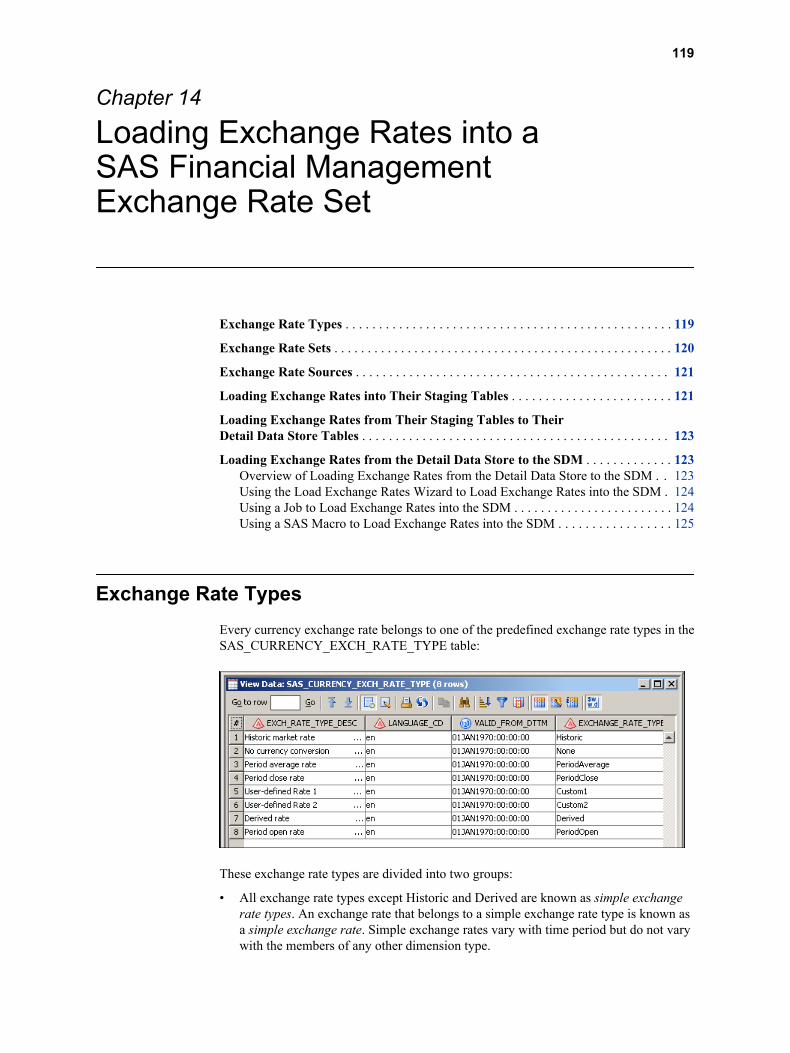
Chapter 14
Loading Exchange Rates into aSAS Financial ManagementExchange Rate Set
Exchange Rate Types . . . . . . . . . . . . . . . . . . . . . . . . . . . . . . . . . . . . . . . . . . . . . . . . . 119
Exchange Rate Sets . . . . . . . . . . . . . . . . . . . . . . . . . . . . . . . . . . . . . . . . . . . . . . . . . . . 120
Exchange Rate Sources . . . . . . . . . . . . . . . . . . . . . . . . . . . . . . . . . . . . . . . . . . . . . . . 121
Loading Exchange Rates into Their Staging Tables . . . . . . . . . . . . . . . . . . . . . . . . 121
Loading Exchange Rates from Their Staging Tables to TheirDetail Data Store Tables . . . . . . . . . . . . . . . . . . . . . . . . . . . . . . . . . . . . . . . . . . . . . . 123
Loading Exchange Rates from the Detail Data Store to the SDM . . . . . . . . . . . . . 123Overview of Loading Exchange Rates from the Detail Data Store to the SDM . . 123Using the Load Exchange Rates Wizard to Load Exchange Rates into the SDM . 124Using a Job to Load Exchange Rates into the SDM . . . . . . . . . . . . . . . . . . . . . . . . 124Using a SAS Macro to Load Exchange Rates into the SDM . . . . . . . . . . . . . . . . . 125
Exchange Rate TypesEvery currency exchange rate belongs to one of the predefined exchange rate types in theSAS_CURRENCY_EXCH_RATE_TYPE table:
These exchange rate types are divided into two groups:
• All exchange rate types except Historic and Derived are known as simple exchangerate types. An exchange rate that belongs to a simple exchange rate type is known asa simple exchange rate. Simple exchange rates vary with time period but do not varywith the members of any other dimension type.
119
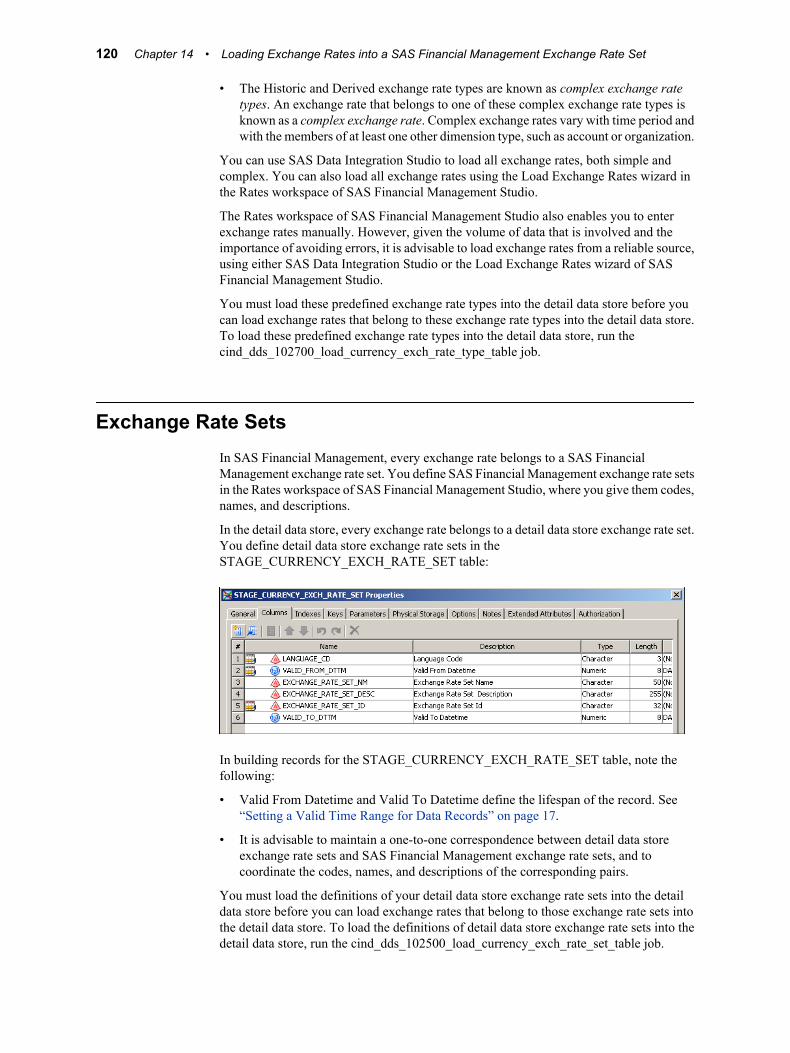
• The Historic and Derived exchange rate types are known as complex exchange ratetypes. An exchange rate that belongs to one of these complex exchange rate types isknown as a complex exchange rate. Complex exchange rates vary with time period andwith the members of at least one other dimension type, such as account or organization.
You can use SAS Data Integration Studio to load all exchange rates, both simple andcomplex. You can also load all exchange rates using the Load Exchange Rates wizard inthe Rates workspace of SAS Financial Management Studio.
The Rates workspace of SAS Financial Management Studio also enables you to enterexchange rates manually. However, given the volume of data that is involved and theimportance of avoiding errors, it is advisable to load exchange rates from a reliable source,using either SAS Data Integration Studio or the Load Exchange Rates wizard of SASFinancial Management Studio.
You must load these predefined exchange rate types into the detail data store before youcan load exchange rates that belong to these exchange rate types into the detail data store.To load these predefined exchange rate types into the detail data store, run thecind_dds_102700_load_currency_exch_rate_type_table job.
Exchange Rate SetsIn SAS Financial Management, every exchange rate belongs to a SAS FinancialManagement exchange rate set. You define SAS Financial Management exchange rate setsin the Rates workspace of SAS Financial Management Studio, where you give them codes,names, and descriptions.
In the detail data store, every exchange rate belongs to a detail data store exchange rate set.You define detail data store exchange rate sets in theSTAGE_CURRENCY_EXCH_RATE_SET table:
In building records for the STAGE_CURRENCY_EXCH_RATE_SET table, note thefollowing:
• Valid From Datetime and Valid To Datetime define the lifespan of the record. See“Setting a Valid Time Range for Data Records” on page 17.
• It is advisable to maintain a one-to-one correspondence between detail data storeexchange rate sets and SAS Financial Management exchange rate sets, and tocoordinate the codes, names, and descriptions of the corresponding pairs.
You must load the definitions of your detail data store exchange rate sets into the detaildata store before you can load exchange rates that belong to those exchange rate sets intothe detail data store. To load the definitions of detail data store exchange rate sets into thedetail data store, run the cind_dds_102500_load_currency_exch_rate_set_table job.
120 Chapter 14 • Loading Exchange Rates into a SAS Financial Management Exchange Rate Set

Exchange Rate SourcesEach exchange rate that you load is extracted from a certain source. You must define codesfor the sources from which you extract exchange rates and load these codes into theSTAGE_CURRENCY_EXCH_RATE_SRC table:
If all your exchange rates are extracted from a single source, or if you are not interested intracking source information for exchange rates, then this table can contain a single record.
You must load the definitions of your exchange rate sources into the detail data store beforeyou can load exchange rates that belong to those exchange rate sources into the detail datastore. To load the definitions of exchange rate sources into the detail data store, run thecind_dds_102600_load_currency_exch_rate_src_table job.
Loading Exchange Rates into Their Staging TablesThere are two staging tables for exchange rates.
The STAGE_CURRENCY_EXCH_RATE table is for simple exchange rates:
The STAGE_CURRENCY_COMPLEX_EXCH_RATE table is for complex exchangerates:
Loading Exchange Rates into Their Staging Tables 121

For each of these tables that you need to use, write a job that extracts exchange rates fromappropriate sources and loads them into the staging table.
In building records for these two exchange rate staging tables, note the following:
• To Currency Code should be the same for all records that belong to a given detail datastore exchange rate set, as indicated in the Exchange Rate Set ID column. When youload the data into a SAS Financial Management exchange rate set in the SDM, recordswhose To Currency Code does not match the base currency of the target exchange rateset are ignored.
• From Currency Code must be the code of the other currency that is involved in theexchange rate.
• In the STAGE_CURRENCY_EXCH_RATE table, Exchange Rate Type Code mustbe one of the simple exchange rate type codes in theSAS_CURRENCY_EXCH_RATE_TYPE table. In theSTAGE_CURRENCY_COMPLEX_EXCH_RATE table, Exchange Rate Type Codemust be one of the complex exchange rate type codes in theSAS_CURRENCY_EXCH_RATE_TYPE table. See “Exchange Rate Types” on page119.
• Exchange Rate Set ID indicates which detail data store exchange rate set the exchangerate belongs to. It must be one of the values in theSTAGE_CURRENCY_EXCH_RATE_SET table. See “Exchange Rate Sets” on page120.
• Exchange Rate Source Code indicates where the exchange rate was extracted from. Itmust be one of the values in the STAGE_CURRENCY_EXCH_RATE_SRC table. See“Exchange Rate Sources” on page 121.
• Exchange Rate is the numeric exchange rate. This must be the number by which youmultiply a value expressed in the From Currency to yield the equivalent value expressedin the To Currency. For example, if the From Currency is U.S. dollars and the ToCurrency is Japanese yen, then the numeric exchange rate is in the neighborhood of100, but if the From Currency is Japanese yen and the To Currency is U.S. dollars, thenthe numeric exchange rate is in the neighborhood of 0.01.
• Time Period ID is the code of the time period that the exchange rate applies to. TheSTAGE_CURRENCY_COMPLEX_EXCH_RATE table has columns for membercodes from other dimension types that the exchange rates depend on.
122 Chapter 14 • Loading Exchange Rates into a SAS Financial Management Exchange Rate Set
• Effective From Date is a key field that must contain a distinct date for each time period.For example, you can use the first day of each time period.
• Effective To Date is not used and should be left blank.
Loading Exchange Rates from Their StagingTables to Their Detail Data Store Tables
Before you load exchange rates into the detail data store, you must run the following jobsin order to load all the supporting codes for exchange rate types, sets, and sources:
• cind_dds_102700_load_currency_exch_rate_type_table
• cind_dds_102500_load_currency_exch_rate_set_table
• cind_dds_102600_load_currency_exch_rate_src_table
After these supporting codes are in the detail data store, you can run the jobs that loadexchange rates:
• Run the cind_dds_107000_load_currency_exch_rate_table job to load simpleexchange rates from STAGE_CURRENCY_EXCH_RATE toCURRENCY_EXCH_RATE.
• Run the cind_dds_107050_load_currency_complex_exch_rate_table job to loadcomplex exchange rates from STAGE_CURRENCY_COMPLEX_EXCH_RATE toCURRENCY_COMPLEX_EXCH_RATE.
You can run these jobs repeatedly without reloading the supporting codes, unless you needto add more exchange rate sets or exchange rate sources.
Loading Exchange Rates from the Detail Data Storeto the SDM
Overview of Loading Exchange Rates from the Detail Data Store tothe SDM
There are three ways to load exchange rates from the detail data store into a SAS FinancialManagement exchange rate set in the SDM:
• Use the Load Exchange Rates wizard in SAS Financial Management Studio.
• Use a SAS Data Integration Studio job.
• Use a SAS macro.
Each time you run the SAS Data Integration Studio job, it loads exchange rates for onlyone combination of an exchange rate type and a time period. The Load Exchange Rateswizard and the SAS macro can handle many combinations of exchange rate types and timeperiods in a single run. Because there is substantial overhead associated with each run, thewizard and the SAS macro become increasingly advantageous as the number ofcombinations of exchange rate types and time periods increases.
When you load exchange rates into a SAS Financial Management exchange rate set by anymethod, all the exchange rates currently in the target exchange rate set for the specifiedtime periods and exchange rate types are deleted before the new exchange rates are loaded.
Loading Exchange Rates from the Detail Data Store to the SDM 123
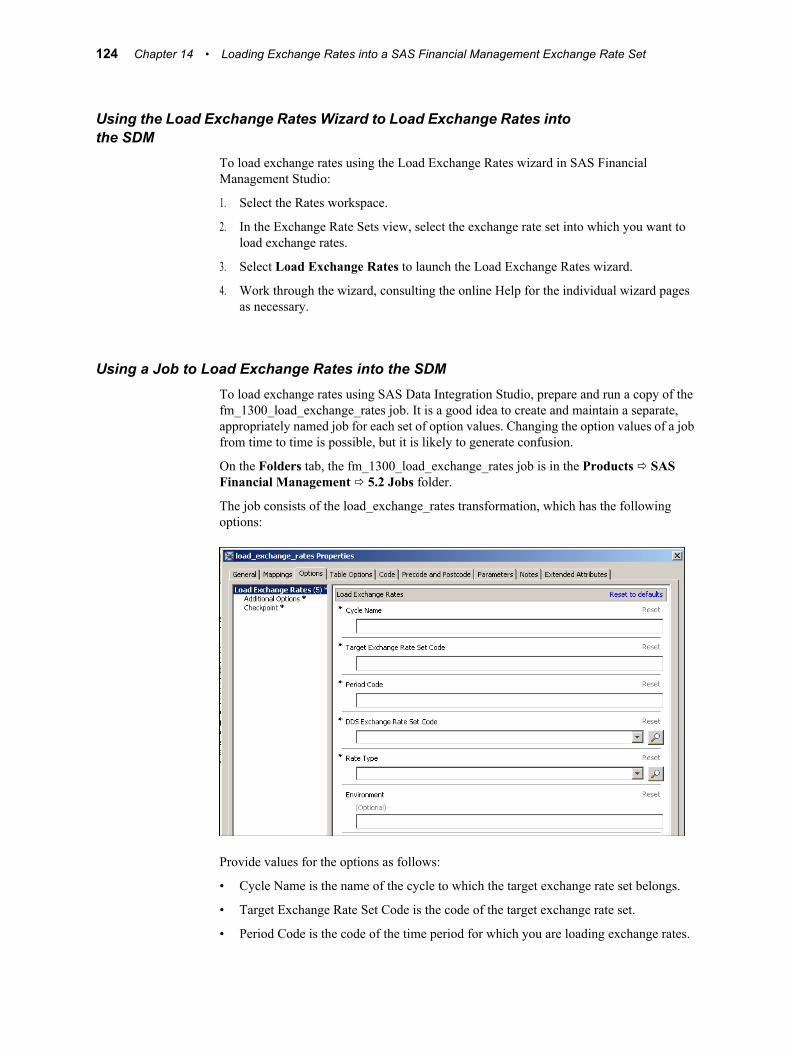
Using the Load Exchange Rates Wizard to Load Exchange Rates intothe SDM
To load exchange rates using the Load Exchange Rates wizard in SAS FinancialManagement Studio:
1. Select the Rates workspace.
2. In the Exchange Rate Sets view, select the exchange rate set into which you want toload exchange rates.
3. Select Load Exchange Rates to launch the Load Exchange Rates wizard.
4. Work through the wizard, consulting the online Help for the individual wizard pagesas necessary.
Using a Job to Load Exchange Rates into the SDMTo load exchange rates using SAS Data Integration Studio, prepare and run a copy of thefm_1300_load_exchange_rates job. It is a good idea to create and maintain a separate,appropriately named job for each set of option values. Changing the option values of a jobfrom time to time is possible, but it is likely to generate confusion.
On the Folders tab, the fm_1300_load_exchange_rates job is in the Products ð SASFinancial Management ð 5.2 Jobs folder.
The job consists of the load_exchange_rates transformation, which has the followingoptions:
Provide values for the options as follows:
• Cycle Name is the name of the cycle to which the target exchange rate set belongs.
• Target Exchange Rate Set Code is the code of the target exchange rate set.
• Period Code is the code of the time period for which you are loading exchange rates.
124 Chapter 14 • Loading Exchange Rates into a SAS Financial Management Exchange Rate Set
• DDS Exchange Rate Set Code is the code of the source exchange rate set in the detaildata store. Use the drop-down list to select a valid code.
• Rate Type is the exchange rate type for which you are loading exchange rates. Use thedrop-down list to select a valid exchange rate type.
If you select a simple exchange rate type, then the job gets the exchange rates from theCURRENCY_EXCH_RATE table. If you select a complex exchange rate type, thenthe job gets the exchange rates from the CURRENCY_COMPLEX_ EXCH_RATEtable.
• Environment can be any environment that is defined in your EnvironmentFactory.xmlfile. If you leave this field empty, then the environment “default” is used.
Run the job and then review the log. If there were errors, the log lists the location of anHTML error report.
The job can run only if SAS Remote Services and the managed servers are running on theMiddle Tier Server. See SAS Solutions Services: System Administration Guide.
Using a SAS Macro to Load Exchange Rates into the SDMTo load exchange rates using a SAS macro:
1. Create a SAS data set that specifies the combinations of exchange rate types and timeperiods for which you want to load exchange rates.
2. Run the etlxrteb.sas macro file.
Detailed instructions are inside the macro file, which is on the Data-Tier Server.
On a Windows server, the etlxrteb.sas macro file is at the following location:!SASROOT\finance\sasmacro. On a UNIX server, the etlxrteb.sas macro file is at the followinglocation:!SASROOT/sasautos.
The macro can run only if SAS Remote Services and the managed servers are running onthe Middle Tier Server. See SAS Solutions Services: System Administration Guide.
Loading Exchange Rates from the Detail Data Store to the SDM 125

126 Chapter 14 • Loading Exchange Rates into a SAS Financial Management Exchange Rate Set
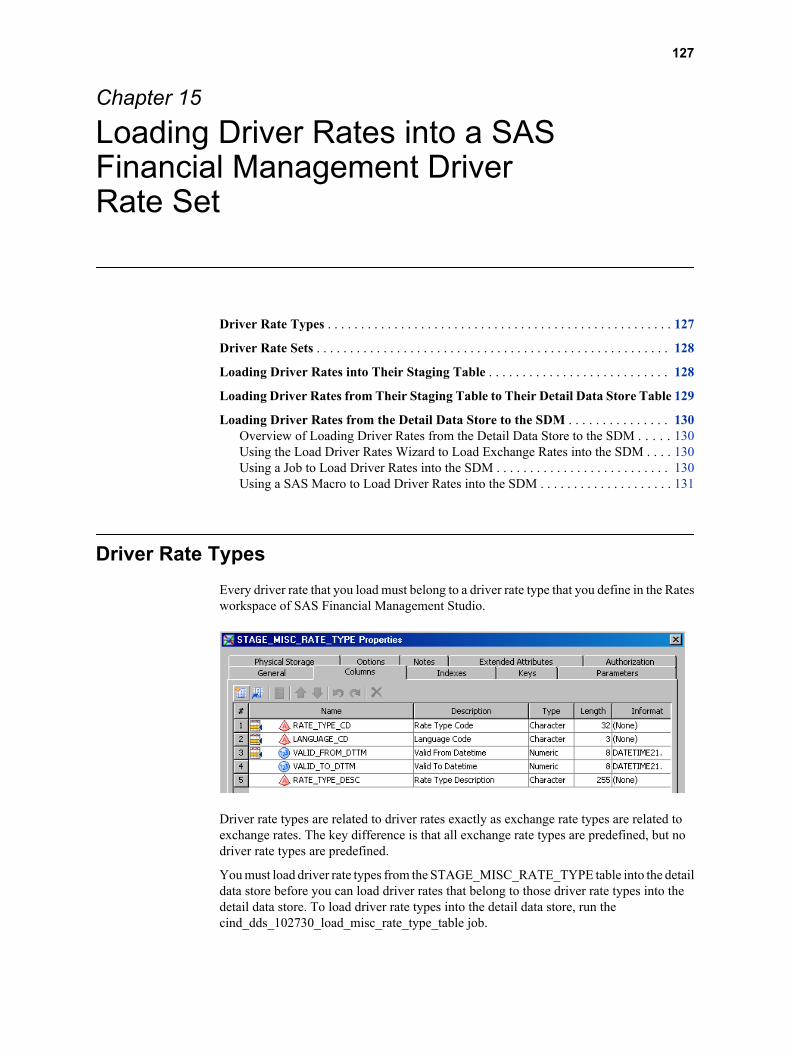
Chapter 15
Loading Driver Rates into a SASFinancial Management DriverRate Set
Driver Rate Types . . . . . . . . . . . . . . . . . . . . . . . . . . . . . . . . . . . . . . . . . . . . . . . . . . . . 127
Driver Rate Sets . . . . . . . . . . . . . . . . . . . . . . . . . . . . . . . . . . . . . . . . . . . . . . . . . . . . . 128
Loading Driver Rates into Their Staging Table . . . . . . . . . . . . . . . . . . . . . . . . . . . 128
Loading Driver Rates from Their Staging Table to Their Detail Data Store Table 129
Loading Driver Rates from the Detail Data Store to the SDM . . . . . . . . . . . . . . . 130Overview of Loading Driver Rates from the Detail Data Store to the SDM . . . . . 130Using the Load Driver Rates Wizard to Load Exchange Rates into the SDM . . . . 130Using a Job to Load Driver Rates into the SDM . . . . . . . . . . . . . . . . . . . . . . . . . . 130Using a SAS Macro to Load Driver Rates into the SDM . . . . . . . . . . . . . . . . . . . . 131
Driver Rate TypesEvery driver rate that you load must belong to a driver rate type that you define in the Ratesworkspace of SAS Financial Management Studio.
Driver rate types are related to driver rates exactly as exchange rate types are related toexchange rates. The key difference is that all exchange rate types are predefined, but nodriver rate types are predefined.
You must load driver rate types from the STAGE_MISC_RATE_TYPE table into the detaildata store before you can load driver rates that belong to those driver rate types into thedetail data store. To load driver rate types into the detail data store, run thecind_dds_102730_load_misc_rate_type_table job.
127
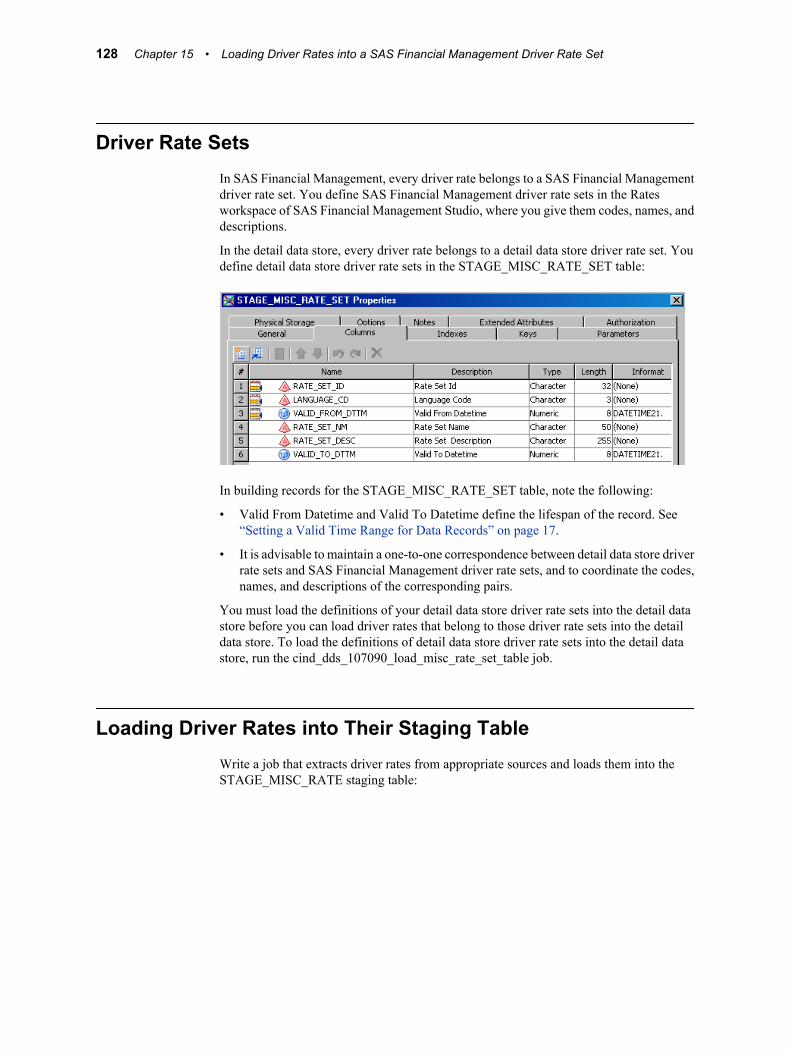
Driver Rate SetsIn SAS Financial Management, every driver rate belongs to a SAS Financial Managementdriver rate set. You define SAS Financial Management driver rate sets in the Ratesworkspace of SAS Financial Management Studio, where you give them codes, names, anddescriptions.
In the detail data store, every driver rate belongs to a detail data store driver rate set. Youdefine detail data store driver rate sets in the STAGE_MISC_RATE_SET table:
In building records for the STAGE_MISC_RATE_SET table, note the following:
• Valid From Datetime and Valid To Datetime define the lifespan of the record. See“Setting a Valid Time Range for Data Records” on page 17.
• It is advisable to maintain a one-to-one correspondence between detail data store driverrate sets and SAS Financial Management driver rate sets, and to coordinate the codes,names, and descriptions of the corresponding pairs.
You must load the definitions of your detail data store driver rate sets into the detail datastore before you can load driver rates that belong to those driver rate sets into the detaildata store. To load the definitions of detail data store driver rate sets into the detail datastore, run the cind_dds_107090_load_misc_rate_set_table job.
Loading Driver Rates into Their Staging TableWrite a job that extracts driver rates from appropriate sources and loads them into theSTAGE_MISC_RATE staging table:
128 Chapter 15 • Loading Driver Rates into a SAS Financial Management Driver Rate Set
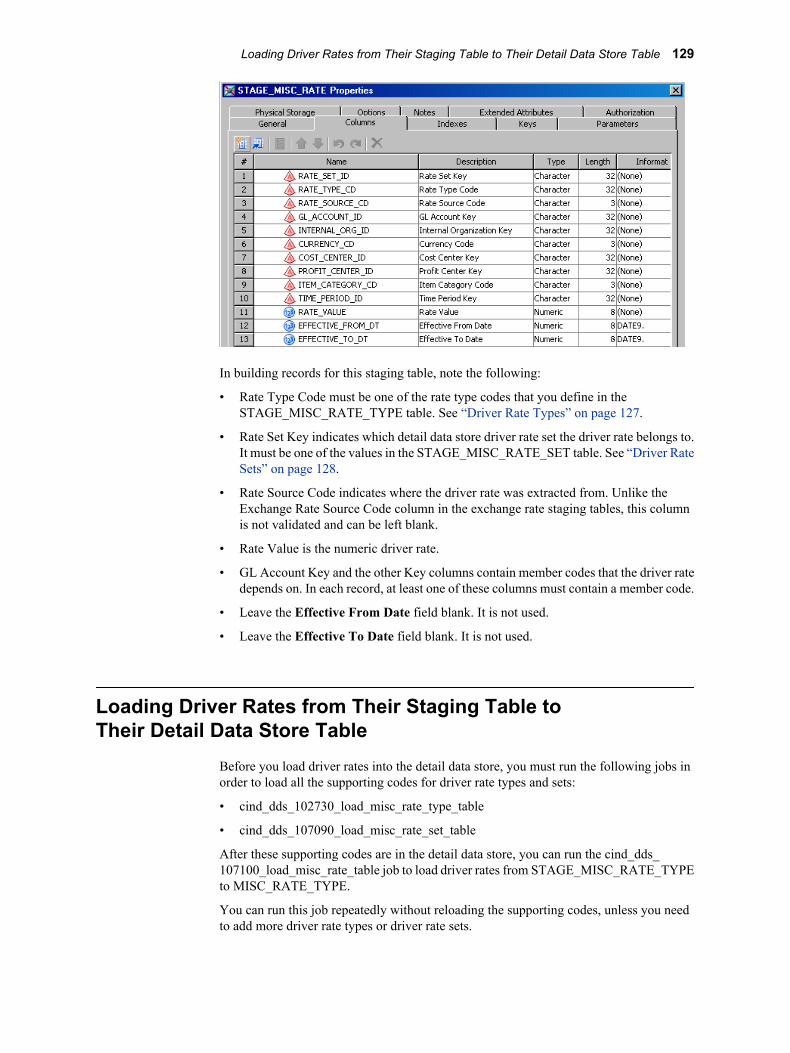
In building records for this staging table, note the following:
• Rate Type Code must be one of the rate type codes that you define in theSTAGE_MISC_RATE_TYPE table. See “Driver Rate Types” on page 127.
• Rate Set Key indicates which detail data store driver rate set the driver rate belongs to.It must be one of the values in the STAGE_MISC_RATE_SET table. See “Driver RateSets” on page 128.
• Rate Source Code indicates where the driver rate was extracted from. Unlike theExchange Rate Source Code column in the exchange rate staging tables, this columnis not validated and can be left blank.
• Rate Value is the numeric driver rate.
• GL Account Key and the other Key columns contain member codes that the driver ratedepends on. In each record, at least one of these columns must contain a member code.
• Leave the Effective From Date field blank. It is not used.
• Leave the Effective To Date field blank. It is not used.
Loading Driver Rates from Their Staging Table toTheir Detail Data Store Table
Before you load driver rates into the detail data store, you must run the following jobs inorder to load all the supporting codes for driver rate types and sets:
• cind_dds_102730_load_misc_rate_type_table
• cind_dds_107090_load_misc_rate_set_table
After these supporting codes are in the detail data store, you can run the cind_dds_107100_load_misc_rate_table job to load driver rates from STAGE_MISC_RATE_TYPEto MISC_RATE_TYPE.
You can run this job repeatedly without reloading the supporting codes, unless you needto add more driver rate types or driver rate sets.
Loading Driver Rates from Their Staging Table to Their Detail Data Store Table 129
Loading Driver Rates from the Detail Data Store tothe SDM
Overview of Loading Driver Rates from the Detail Data Store to theSDM
There are three ways to load driver rates from the detail data store into a SAS FinancialManagement driver rate set in the SDM:
• Use the Load Driver Rates wizard in SAS Financial Management Studio.
• Use a SAS Data Integration Studio job.
• Use a SAS macro.
Each time you run the SAS Data Integration Studio job, it loads driver rates for only onedriver rate type. The Load Driver Rates wizard and the SAS macro can handle many driverrate types in a single run. Because there is substantial overhead associated with each run,the wizard and the SAS macro become increasingly advantageous as the number of driverrate types increases.
When you load driver rates into a SAS Financial Management driver rate set by any method,all the driver rates currently in the target driver rate set for the specified driver rate typesare deleted before the new driver rates are loaded.
Using the Load Driver Rates Wizard to Load Exchange Rates into theSDM
To load driver rates using the Load Driver Rates wizard in SAS Financial ManagementStudio:
1. Select the Rates workspace.
2. In the Driver Rate Sets view, select the driver rate set into which you want to load driverrates.
3. Select Load Driver Rates to launch the Load Driver Rates wizard.
4. Work through the wizard, consulting the online Help for the individual wizard pagesas necessary.
Using a Job to Load Driver Rates into the SDMTo load driver rates using SAS Data Integration Studio, prepare and run a copy of thefm_1500_load_driver_rates job. It is a good idea to create and maintain a separate,appropriately named job for each set of option values. Changing the option values of a jobfrom time to time is possible, but it is likely to generate confusion.
On the Folders tab, the fm_1500_load_driver_rates job is in the Products ð SASFinancial Management ð 5.2 Jobs folder.
The job consists of the load_driver_rates transformation, which has the following options:
130 Chapter 15 • Loading Driver Rates into a SAS Financial Management Driver Rate Set

Provide values for the options as follows:
• Cycle Name is the name of the cycle to which the target driver rate set belongs.
• Target Driver Rate Set Code is the code of the target driver rate set.
• DDS Driver Rate Set Code is the code of the source driver rate set in the detail datastore. Use the drop-down list to select a valid code.
• Rate Type is the driver rate type for which you are loading driver rates. Use the drop-down list to select a valid driver rate type.
• Environment can be any environment that is defined in your EnvironmentFactory.xmlfile. If you leave this field empty, then the environment “default” is used.
Run the job and then review the log. If there were errors, the log lists the location of anHTML error report.
The job can run only if SAS Remote Services and the managed servers are running on theMiddle Tier Server. See SAS Solutions Services: System Administration Guide.
Using a SAS Macro to Load Driver Rates into the SDMTo load driver rates using a SAS macro:
1. Create a SAS data set that specifies the driver rate types for which you want to loaddriver rates.
2. Run the etldrteb.sas macro file.
Detailed instructions are inside the macro file, which is on the Data Tier Server.
On a Windows server, the etldrteb.sas macro file is at the following location:!SASROOT\finance\sasmacro. On a UNIX server, the etldrteb.sas macro file is at the followinglocation:!SASROOT/sasautos.
The macro can run only if SAS Remote Services and the managed servers are running onthe Middle Tier Server. See SAS Solutions Services: System Administration Guide.
Loading Driver Rates from the Detail Data Store to the SDM 131
132 Chapter 15 • Loading Driver Rates into a SAS Financial Management Driver Rate Set

Chapter 16
Loading Cell Protection Rules fora Model
About Cell Protection Rules . . . . . . . . . . . . . . . . . . . . . . . . . . . . . . . . . . . . . . . . . . . 133
Loading Cell Protection Rules for a Model . . . . . . . . . . . . . . . . . . . . . . . . . . . . . . . 134
Loading Cell Protection Rules into Their Staging Tables . . . . . . . . . . . . . . . . . . . 134
Loading Cell Protection Rules from the Staging Tables to the SDM . . . . . . . . . . 136Overview . . . . . . . . . . . . . . . . . . . . . . . . . . . . . . . . . . . . . . . . . . . . . . . . . . . . . . . . . 136Using a Job to Load Cell Protection Rules . . . . . . . . . . . . . . . . . . . . . . . . . . . . . . . 136Using a SAS Macro to Load Cell Protection Rules . . . . . . . . . . . . . . . . . . . . . . . . 137
About Cell Protection RulesYou can protect cell crossings in a data-entry form by creating one or more rules that applyto the dimensions in the data-entry table.
Cells are protected against the following actions:
• manual data entry
• spread
• automatic allocation (applies only to financial forms in a bottom-up workflow)
However, the values of these protected cells can still change as the result of indirect actions,including the following:
• calculations
• changes in the values of descendants that roll up to the protected cell
• changes in cell protection rules
• changes in previous periods when frequency is To Date (for example, Year To Date orQuarter To Date)
• data that is loaded via SAS Data Integration Studio jobs
• data that was seeded from other models
• rules-based adjustments and allocations
• manual adjustments
Cell protection is applied in the following order:
1. Rules that are defined in a model. These rules are inherited by every form set that usesthe model.
133
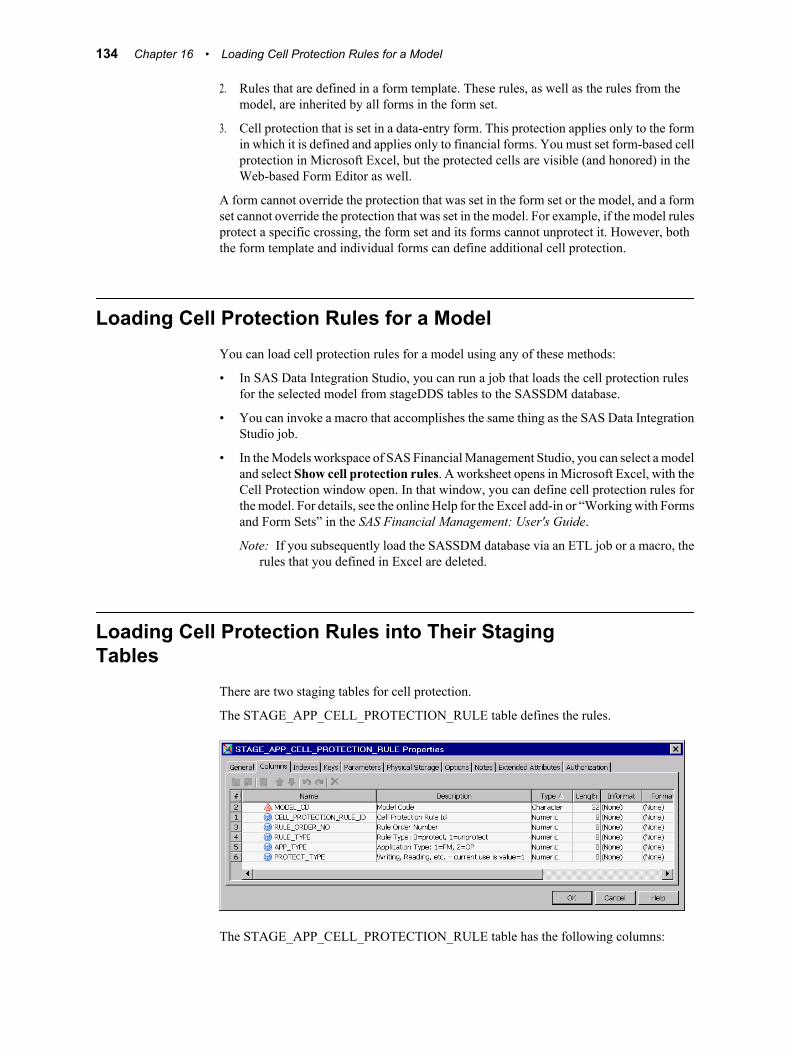
2. Rules that are defined in a form template. These rules, as well as the rules from themodel, are inherited by all forms in the form set.
3. Cell protection that is set in a data-entry form. This protection applies only to the formin which it is defined and applies only to financial forms. You must set form-based cellprotection in Microsoft Excel, but the protected cells are visible (and honored) in theWeb-based Form Editor as well.
A form cannot override the protection that was set in the form set or the model, and a formset cannot override the protection that was set in the model. For example, if the model rulesprotect a specific crossing, the form set and its forms cannot unprotect it. However, boththe form template and individual forms can define additional cell protection.
Loading Cell Protection Rules for a ModelYou can load cell protection rules for a model using any of these methods:
• In SAS Data Integration Studio, you can run a job that loads the cell protection rulesfor the selected model from stageDDS tables to the SASSDM database.
• You can invoke a macro that accomplishes the same thing as the SAS Data IntegrationStudio job.
• In the Models workspace of SAS Financial Management Studio, you can select a modeland select Show cell protection rules. A worksheet opens in Microsoft Excel, with theCell Protection window open. In that window, you can define cell protection rules forthe model. For details, see the online Help for the Excel add-in or “Working with Formsand Form Sets” in the SAS Financial Management: User's Guide.
Note: If you subsequently load the SASSDM database via an ETL job or a macro, therules that you defined in Excel are deleted.
Loading Cell Protection Rules into Their StagingTables
There are two staging tables for cell protection.
The STAGE_APP_CELL_PROTECTION_RULE table defines the rules.
The STAGE_APP_CELL_PROTECTION_RULE table has the following columns:
134 Chapter 16 • Loading Cell Protection Rules for a Model
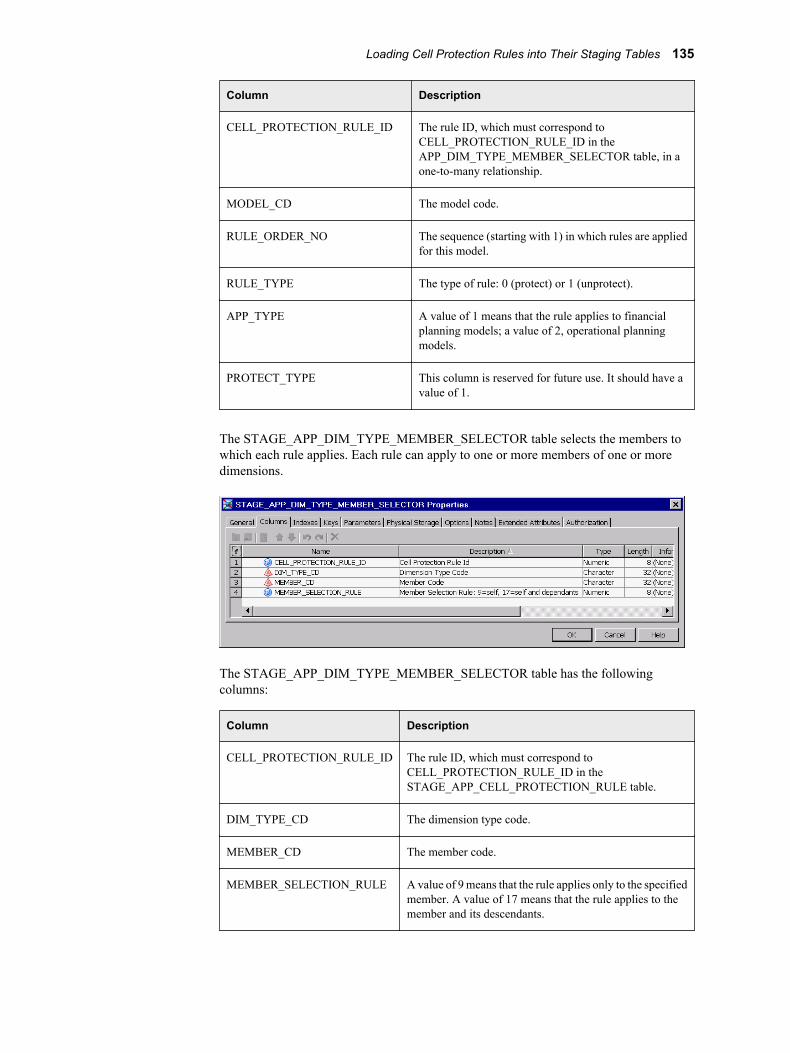
Column Description
CELL_PROTECTION_RULE_ID The rule ID, which must correspond toCELL_PROTECTION_RULE_ID in theAPP_DIM_TYPE_MEMBER_SELECTOR table, in aone-to-many relationship.
MODEL_CD The model code.
RULE_ORDER_NO The sequence (starting with 1) in which rules are appliedfor this model.
RULE_TYPE The type of rule: 0 (protect) or 1 (unprotect).
APP_TYPE A value of 1 means that the rule applies to financialplanning models; a value of 2, operational planningmodels.
PROTECT_TYPE This column is reserved for future use. It should have avalue of 1.
The STAGE_APP_DIM_TYPE_MEMBER_SELECTOR table selects the members towhich each rule applies. Each rule can apply to one or more members of one or moredimensions.
The STAGE_APP_DIM_TYPE_MEMBER_SELECTOR table has the followingcolumns:
Column Description
CELL_PROTECTION_RULE_ID The rule ID, which must correspond toCELL_PROTECTION_RULE_ID in theSTAGE_APP_CELL_PROTECTION_RULE table.
DIM_TYPE_CD The dimension type code.
MEMBER_CD The member code.
MEMBER_SELECTION_RULE A value of 9 means that the rule applies only to the specifiedmember. A value of 17 means that the rule applies to themember and its descendants.
Loading Cell Protection Rules into Their Staging Tables 135
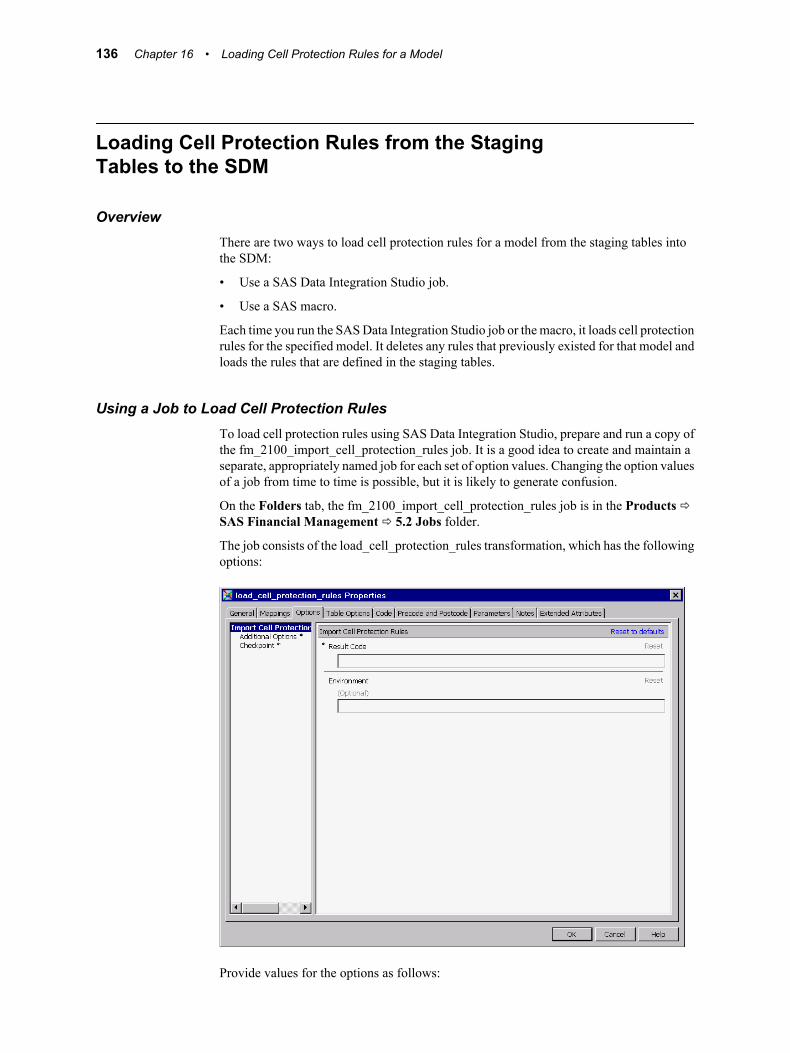
Loading Cell Protection Rules from the StagingTables to the SDM
OverviewThere are two ways to load cell protection rules for a model from the staging tables intothe SDM:
• Use a SAS Data Integration Studio job.
• Use a SAS macro.
Each time you run the SAS Data Integration Studio job or the macro, it loads cell protectionrules for the specified model. It deletes any rules that previously existed for that model andloads the rules that are defined in the staging tables.
Using a Job to Load Cell Protection RulesTo load cell protection rules using SAS Data Integration Studio, prepare and run a copy ofthe fm_2100_import_cell_protection_rules job. It is a good idea to create and maintain aseparate, appropriately named job for each set of option values. Changing the option valuesof a job from time to time is possible, but it is likely to generate confusion.
On the Folders tab, the fm_2100_import_cell_protection_rules job is in the Products ðSAS Financial Management ð 5.2 Jobs folder.
The job consists of the load_cell_protection_rules transformation, which has the followingoptions:
Provide values for the options as follows:
136 Chapter 16 • Loading Cell Protection Rules for a Model
• Result Code: the code for the model whose rules you are loading.
• (Optional) Environment: the name of the middle-tier environment (for authenticationpurposes). The default value is default.
Run the job and then review the log. If there were errors, the log lists the location of anHTML error report.
The job can run only if SAS Remote Services and the managed servers are running on theMiddle Tier Server. See SAS Solutions Services: System Administration Guide.
Using a SAS Macro to Load Cell Protection RulesThe %ETLLDCPR macro loads cell protection rules for a specified model from the stagingtables to the SDM. After loading the staging tables, run the macro, which has the followingsyntax:
ETLLDCPR(resultCode, <environment>)
resultCodeis the model code. Only rules for the specified model are loaded.
environmentis the name of the middle-tier environment (for authentication purposes). If you do notspecify an environment, a value of default is used.
You can invoke the macro from an interactive SAS session, or you can write a stored processthat calls the macro. In either case, SAS Remote Services and the managed servers mustbe running on the Middle Tier Server. See SAS Solutions Services: System AdministrationGuide.
Loading Cell Protection Rules from the Staging Tables to the SDM 137

138 Chapter 16 • Loading Cell Protection Rules for a Model

Chapter 17
Loading Base Data into aFinancial Cycle
Overview of Loading Base Financial Data . . . . . . . . . . . . . . . . . . . . . . . . . . . . . . . . 139
Moving Base Financial Data from Its Source to the Staging Tables . . . . . . . . . . . 139Overview of the Base Financial Data Staging Tables . . . . . . . . . . . . . . . . . . . . . . 139Columns That Hold Members . . . . . . . . . . . . . . . . . . . . . . . . . . . . . . . . . . . . . . . . 141Columns That Specify the Numeric Values . . . . . . . . . . . . . . . . . . . . . . . . . . . . . . 142
Moving Base Financial Data from the Staging Tables to the Detail Data Store . . 144
Moving Base Financial Data from the Detail Data Store to the SDM . . . . . . . . . . 144Overview of Moving Base Financial Data from the Detail Data Store to the SDM 144Using the Load New Data Wizard to Load Base Financial Data into the SDM . . 144Using a Job to Load Base Financial Data into the SDM . . . . . . . . . . . . . . . . . . . . 145Using a SAS Macro to Load Base Financial Data into the SDM . . . . . . . . . . . . . . 146Which Records Are Loaded? . . . . . . . . . . . . . . . . . . . . . . . . . . . . . . . . . . . . . . . . . 147Checking for Errors . . . . . . . . . . . . . . . . . . . . . . . . . . . . . . . . . . . . . . . . . . . . . . . . 147
Overview of Loading Base Financial DataBase financial data is loaded into a financial cycle in SAS Financial Management. Themain source of base financial data is general ledger account balances. A secondary andoptional source is journal data.
If you load both general ledger data and journal data, be careful to avoid loading journaldata that is also reflected in the general ledger data that you are loading. That would leadto double-counting of the same financial transactions.
Moving Base Financial Data from Its Source to theStaging Tables
Overview of the Base Financial Data Staging TablesFor general ledger data, write a job to extract the data from its source and load it into theSTAGE_GL_TRANSACTION_SUM table:
139
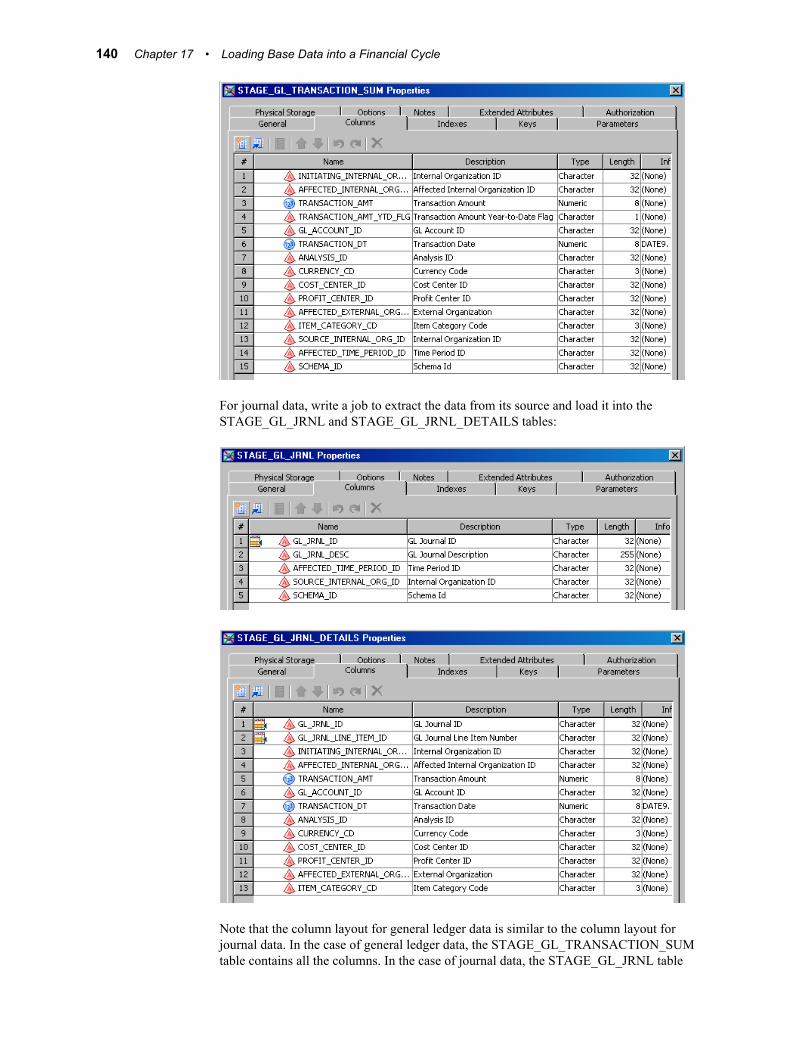
For journal data, write a job to extract the data from its source and load it into theSTAGE_GL_JRNL and STAGE_GL_JRNL_DETAILS tables:
Note that the column layout for general ledger data is similar to the column layout forjournal data. In the case of general ledger data, the STAGE_GL_TRANSACTION_SUMtable contains all the columns. In the case of journal data, the STAGE_GL_JRNL table
140 Chapter 17 • Loading Base Data into a Financial Cycle
identifies journal entries, each of which can include several data records in theSTAGE_GL_JRNL_DETAILS table. STAGE_GL_JRNL contains the columns that musthave the same value for all the data records that belong to a given journal entry.
GL Journal ID must have a unique value for each record in STAGE_GL_JRNL. You cangenerate the unique values in any way that you find convenient. InSTAGE_GL_JRNL_DETAILS, the combination of GL Journal ID and GL Journal LineItem Number must be unique for each record.
The Schema ID column in STAGE_GL_TRANSACTION_SUM and STAGE_GL_JRNLis not used. Leave this column blank.
Columns That Hold MembersThe following columns must contain a valid member code in every record because theyrepresent dimension types that are automatically included in every financial cycle:
• Initiating Internal Organization ID (Organization)
• Affected Internal Organization ID (Trader)
• GL Account ID
• Analysis ID
• Currency Code
• Time Period ID
The SOURCE_INTERNAL_ORG_ID column must contain a valid member code in everyrecord. This column indicates the organization that is the source of the data record. In manycases, this is the same organization that you place in theINITIATING_INTERNAL_ORG_ID column, which indicates the organization that therecord describes.
The member codes in a record must satisfy the following constraints:
• The Organization code must not be ALL or EXT.
• The Organization code and the Trader code must be different.
• If the account that is specified in the GL Account ID column has a value of N for itsIntercompany Account Flag, then the value of Affected Internal Organization ID(Trader) must be EXT. (This constraint applies only if you load the data into a cyclefor which the "Non-intercompany accounts must be associated with the external tradingmember" property is set.)
• If the specified account has a value of Y for its Intercompany Account Flag, then thevalue of Affected Internal Organization ID (Trader) must not be EXT. (This constraintapplies only if you load the data into a cycle for which the "Intercompany accountsmust be associated with an intercompany trading partner" property is set.)
Leave the following columns empty if these dimension types are not used to describe thedata that you are loading:
• Cost Center ID
• Profit Center ID
• External Organization
• Item Category Code
If you add other dimension types to your data model, then they will be represented byadditional columns in STAGE_GL_TRANSACTION_SUM and
Moving Base Financial Data from Its Source to the Staging Tables 141
STAGE_GL_JRNL_DETAILS that are not shown here. You must provide valid membercodes for any dimension type that is included in the cycle that is the destination of the data.For a discussion of adding dimension types, see Chapter 10, “Adding a Dimension Type,”on page 63.
Columns That Specify the Numeric Values
Overview of Columns That Specify the Numeric ValuesIn both STAGE_GL_TRANSACTION_SUM and STAGE_GL_JRNL_DETAILS, theTransaction Amount column holds the base numeric values.
In STAGE_GL_TRANSACTION_SUM, the interpretation of the Transaction Amountvalues is affected by the Transaction Amount Year-to-Date Flag column. For each record,you must load this column with either a Y or an N. If you leave the Transaction AmountYear-to-Date Flag column empty, then the record is ignored.
STAGE_GL_JRNL_DETAILS does not have a Transaction Amount Year-to-Date Flagcolumn. Every record in that table is processed in the same manner as an N record inSTAGE_GL_TRANSACTION_SUM.
The explanation of the Y/N choice for the Transaction Amount Year-to-Date Flag columnfollows.
Setting the Year-To-Date FlagFor a Revenue or Expense account, the value that is stored in the SDM must represent therevenue received or expense incurred during the designated time period. For an Asset,Liability, or Equity account, the value that is stored in the SDM must represent the changein the value of the asset, liability, or equity item from the previous time period to thedesignated time period. SAS Financial Management computes the values of Asset,Liability, and Equity accounts by summing up a history of stored changes in value. All thenumeric values that are stored in the SDM are called period activity values.
For each record of STAGE_GL_TRANSACTION_SUM, if you load the period activityvalue that is required by the SDM into the Transaction Amount column, then you shouldplace N in the Transaction Amount Year-to-Date Flag column. Thus, use N for the flag inthe following cases:
• The record concerns a Revenue account and the Transaction Amount is the revenuereceived during the designated time period.
• The record concerns an Expense account and the Transaction Amount is the expenseincurred during the designated time period.
• The record concerns an Asset, Liability, or Equity account and the Transaction Amountis the change in the value of the asset, liability, or equity item from the previous timeperiod to the designated time period.
You should use Y for the flag in the following cases:
• The record concerns a Revenue account and the Transaction Amount is the cumulativeyear-to-date revenue through the designated time period.
• The record concerns an Expense account and the Transaction Amount is the cumulativeyear-to-date expense through the designated time period.
• The record concerns an Asset, Liability, or Equity account and the Transaction Amountis the value of the asset, liability, or equity item in the designated time period.
For Statistical accounts, the Year-to-Date Flag is ignored, but still you must specify eitherY or N.
142 Chapter 17 • Loading Base Data into a Financial Cycle
How Year-To-Date Transaction Amounts Are ProcessedFor Statistical accounts, transaction amounts are always loaded without change into theSDM, whether the Year-to-Date Flag is Y or N.
For all other account types, if the year-to-date flag is Y, then the period activity value thatis placed in the SDM is generally calculated as the Transaction Amount inSTAGE_GL_TRANSACTION_SUM for the same time period minus the TransactionAmount in STAGE_GL_TRANSACTION_SUM for the previous time period. Forexample, a March year-to-date transaction amount of 100 and a February year-to-datetransaction amount of 94 will together yield a March period activity value of 6 in the SDM.
There are two important exceptions to this rule. A year-to-date Transaction Amount inSTAGE_GL_TRANSACTION_SUM is carried forward without change to the SDM ifeither of the following conditions is true:
• STAGE_GL_TRANSACTION_SUM does not contain a corresponding record for theprevious time period.
• The record concerns a Revenue or Expense account and the designated time period isthe first period of a fiscal year, as determined by the relevant time hierarchy.
Note that the difference between the year-to-date values for two consecutive time periodscan be calculated only if the table contains records for both time periods. This is so evenif the year-to-date value for one of the time periods is zero. If you set the year-to-date flagto Y, then be sure to include records for an unbroken sequence of time periods, includingrecords with a Transaction Amount of zero where necessary.
How Multiple Records for the Same Combination of Members AreProcessedIt is likely that your staging tables will contain at most one record for a given combinationof members. However, this is not a requirement. You can create as many data records asyou want for the same combination of members. You can even create a mix of year-to-dateand non-year-to-date data records for the same combination of members. That would bepointless and confusing in most cases, but the software will handle it.
Suppose that you create many data records for the same combination of members, possiblyincluding a mix of year-to-date and non-year-to-date records. The period activity valuesthat are loaded into the SDM are computed as follows:
1. All year-to-date transaction amounts for a given combination of members are summed,yielding a net year-to-date amount for that combination of members.
2. The net year-to-date amount for one time period is subtracted from the net year-to-dateamount for the following time period, yielding a period activity value that is basedsolely on the year-to-date amounts.
3. All non-year-to-date transaction amounts for a given combination of members aresummed, yielding a period activity value for that combination of members that is basedsolely on non-year-to-date amounts.
4. For each combination of members, the period activity value that is based solely on year-to-date amounts is added to the period activity value that is based solely on non-year-to-date amounts. This yields the final period activity value that is loaded into the SDM.
Moving Base Financial Data from Its Source to the Staging Tables 143
Moving Base Financial Data from the StagingTables to the Detail Data Store
To move base financial data from the staging tables to the detail data store, run the followingjobs:
• cind_dds_107900_load_gl_jrnl_table
• cind_dds_107910_load_gl_jrnl_details_table
• cind_dds_108000_load_gl_transaction_sum_table
On the Folders tab, these jobs are located in the Products ð Cross Industry Detail DataStore ð 5.2 Jobs folder. On the Inventory tab, they are in the Jobs folder.
If you are not loading journal data, then you need to run only thecind_dds_108000_load_gl_transaction_sum_table job.
Moving Base Financial Data from the Detail DataStore to the SDM
Overview of Moving Base Financial Data from the Detail Data Store tothe SDM
When you load base financial data from the detail data store into a financial cycle in theSDM, the three relevant detail data store tables (GL_TRANSACTION_SUM, GL_JRNL,and GL_JRNL_DETAILS) always participate. You cannot load only general ledger dataor only journal data unless one of the tables contains no relevant records.
There are three ways to load base financial data from the detail data store into a financialcycle in the SDM:
• Use the Load New Data wizard in SAS Financial Management Studio.
• Use a SAS Data Integration Studio job.
• Use a SAS macro.
Using the Load New Data Wizard to Load Base Financial Data into theSDM
To load base financial data using SAS Financial Management Studio:
1. Open the financial cycle into which you want to load the data.
2. Select the Periods workspace.
3. In the Periods view, select the period or periods for which you want to load data.
4. Select Load New Data to launch the Load New Data wizard.
5. Work through the wizard, consulting the online Help for the individual wizard pagesas necessary.
144 Chapter 17 • Loading Base Data into a Financial Cycle
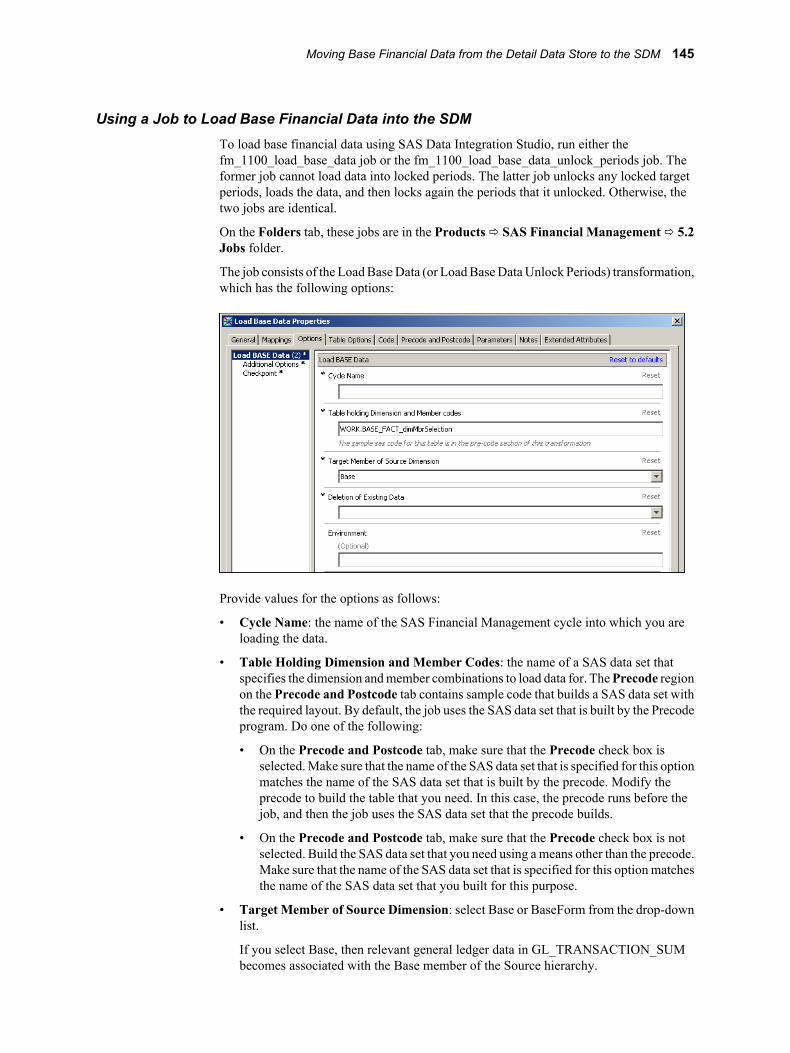
Using a Job to Load Base Financial Data into the SDMTo load base financial data using SAS Data Integration Studio, run either thefm_1100_load_base_data job or the fm_1100_load_base_data_unlock_periods job. Theformer job cannot load data into locked periods. The latter job unlocks any locked targetperiods, loads the data, and then locks again the periods that it unlocked. Otherwise, thetwo jobs are identical.
On the Folders tab, these jobs are in the Products ð SAS Financial Management ð 5.2Jobs folder.
The job consists of the Load Base Data (or Load Base Data Unlock Periods) transformation,which has the following options:
Provide values for the options as follows:
• Cycle Name: the name of the SAS Financial Management cycle into which you areloading the data.
• Table Holding Dimension and Member Codes: the name of a SAS data set thatspecifies the dimension and member combinations to load data for. The Precode regionon the Precode and Postcode tab contains sample code that builds a SAS data set withthe required layout. By default, the job uses the SAS data set that is built by the Precodeprogram. Do one of the following:
• On the Precode and Postcode tab, make sure that the Precode check box isselected. Make sure that the name of the SAS data set that is specified for this optionmatches the name of the SAS data set that is built by the precode. Modify theprecode to build the table that you need. In this case, the precode runs before thejob, and then the job uses the SAS data set that the precode builds.
• On the Precode and Postcode tab, make sure that the Precode check box is notselected. Build the SAS data set that you need using a means other than the precode.Make sure that the name of the SAS data set that is specified for this option matchesthe name of the SAS data set that you built for this purpose.
• Target Member of Source Dimension: select Base or BaseForm from the drop-downlist.
If you select Base, then relevant general ledger data in GL_TRANSACTION_SUMbecomes associated with the Base member of the Source hierarchy.
Moving Base Financial Data from the Detail Data Store to the SDM 145
If you select BaseForm, then relevant general ledger data inGL_TRANSACTION_SUM becomes associated with the BaseForm member of theSource hierarchy.
Relevant journal data in GL_JRNL and GL_JRNL_DETAILS becomes associated withthe BaseJourn member of the Source hierarchy, no matter what you select here.
• Deletion of Existing Data: select Replace All or Replace Matching from the drop-down list.
If you select Replace All, then you must select either Yes or No for Preserve DataEntered via Web Form.
If you select Replace Matching, then you must select either Yes or No for IgnoreCurrency Dimension. The four possible combinations specify the four availabledeletion policies:
• Replace all, preserve form data — Data is deleted from all the crossings that youhave specified as eligible to receive data, but not including data that was enteredthrough forms or stored computed values of driver formulas. In each case wheredata is loaded to a crossing that already has form-entered data or stored driver-formula values, the result is additive. It is possible that data will be deleted fromsome crossings that do not receive data in the load operation.
• Replace all, do not preserve form data — Data is deleted from all the crossings thatyou have specified as eligible to receive data, without exception. Data that wasloaded previously, data that was entered through forms, and stored computed valuesof driver formulas are all deleted. It is possible that data will be deleted from somecrossings that do not receive data in the load operation.
• Replace matching, ignore currency dimension — Data is deleted only fromcrossings that match a crossing in the data that you are loading. A crossing in thenew data matches a crossing in the existing data if the two records match member-for-member in every dimension except Source and Currency. The Source andCurrency members can match or not.
• Replace matching, do not ignore currency dimension — Data is deleted only fromcrossings that match a crossing in the data that you are loading. A crossing in thenew data matches a crossing in the existing data if either of the following conditionsis satisfied:
• The two crossings match member-for-member in every dimension exceptSource. The Source member can match or not.
• The existing record was created through form data entry and the two crossingsmatch member-for-member in every dimension except Source and Currency.The Source and Currency members can match or not.
• Environment can be any environment that is defined in your EnvironmentFactory.xmlfile. If you leave this field empty, then the environment “default” is used.
The job can run only if SAS Remote Services and the managed servers are running on theMiddle-Tier Server. See SAS Solutions Services: System Administration Guide.
Using a SAS Macro to Load Base Financial Data into the SDMTo load base financial data using a SAS macro:
1. Create a SAS data set that specifies the member combinations to load data for.
2. Run the etlldfct.sas macro file.
146 Chapter 17 • Loading Base Data into a Financial Cycle
Detailed instructions are inside the macro file, which is on the Data Tier Server.
On a Windows server, the etlldfct.sas macro file is at the following location:!SASROOT\finance\sasmacro. On a UNIX server, the etlldfct.sas macro file is at the followinglocation:!SASROOT/sasautos.
The macro can run only if SAS Remote Services and the managed servers are running onthe Middle-Tier Server. See SAS Solutions Services: System Administration Guide.
Which Records Are Loaded?A detail data store record that contains base financial data is loaded only if the followingconditions are met:
• The record contains a member for each dimension type (except Source) that is used bythe target cycle.
• The record contains a member for no dimension type that is not used by the target cycle.
• Within each dimension type that is used by the record and the target cycle, the memberin the record belongs to the dimension that is used by the target cycle.
• The record belongs to the subset of records that is defined in the wizard, job, or SASmacro that loads the data. In other words, for each dimension type for which one ormore members are specified in the wizard, job, or SAS macro, one of those membersis in the record.
Checking for ErrorsAfter you run a job that uses the Load Base Data transformation, review the log. If therewere errors, then the job is terminated and the log lists the location of an HTML error report.If the SAS macro is terminated, then the log lists the location of an HTML error report.Error reports for the job, the macro, and the Load New Data wizard are all available in SASFinancial Management Studio from the History page of the Properties window for thetarget cycle.
An error report is produced if any record violates any one of the following constraints:
• In the STAGE_GL_TRANSACTION_SUM table,INITIATING_INTERNAL_ORG_ID must not be ALL or EXT.
• In the STAGE_GL_TRANSACTION_SUM table,INITIATING_INTERNAL_ORG_ID and AFFECTED_INTERNAL_ORG_ID(Trader) must be different.
• If the account that is specified in the GL Account ID column ofSTAGE_GL_TRANSACTION_SUM has a value of N for Intercompany Account Flagin the GL_ACCOUNT table, then the value of AFFECTED_INTERNAL_ORG_ID(Trader) in STAGE_GL_TRANSACTION_SUM must be EXT. (This constraintapplies only if you load the data into a SAS Financial Management cycle for which the"Non-intercompany accounts must be associated with the external trading member"property is set.)
• If the account that is specified in the GL Account ID column ofSTAGE_GL_TRANSACTION_SUM has a value of Y for Intercompany Account Flagin the GL_ACCOUNT table, then the value of AFFECTED_INTERNAL_ORG_ID(Trader) in STAGE_GL_TRANSACTION_SUM must not be EXT. (This constraintapplies only if you load the data into a SAS Financial Management cycle for which the"Intercompany accounts must be associated with an intercompany trading partner"property is set.)
Moving Base Financial Data from the Detail Data Store to the SDM 147

• In the GL_TRANSACTION_SUM table, each retained key value in a member columnmust also exist in the corresponding detail data store member table. For example, theretained key value in the Time Period Key column must exist in the TIME_PERIODtable. This is important because the job uses the detail data store retained key values tolook up the original member codes in the detail data store member tables, and thengenerates SDM retained key values from those original member codes.
In the normal course of events, this condition is automatically satisfied. However, thereare various ways to cut the required connections between tables, such as reloading adetail data store member table with a different set of members after you have loadedfinancial accounting data into GL_TRANSACTION_SUM.
A data record that has a retained key value that does not also exist in the correspondingmember table appears in the error report as follows:
148 Chapter 17 • Loading Base Data into a Financial Cycle
Chapter 18
Loading Base Data into anOperational Cycle
Overview of Loading Base Operational Data . . . . . . . . . . . . . . . . . . . . . . . . . . . . . 149
Moving Base Operational Data from Its Source to Its Staging Table . . . . . . . . . . 149Overview of the Base Operational Data Staging Table . . . . . . . . . . . . . . . . . . . . . 149Columns That Hold Members . . . . . . . . . . . . . . . . . . . . . . . . . . . . . . . . . . . . . . . . 150Columns That Specify the Numeric Values . . . . . . . . . . . . . . . . . . . . . . . . . . . . . . 150
Moving Base Operational Data from the Staging Table to the Detail Data Store 152
Moving Base Operational Data from the Detail Data Store to the SDM . . . . . . . 152Overview of Moving Base Operational Data from the Detail Data Store to the SDM 152Using the Load Operational Data Wizard to Load Base
Operational Data into the SDM . . . . . . . . . . . . . . . . . . . . . . . . . . . . . . . . . . . . . . 153Using a Job to Load Base Operational Data into the SDM . . . . . . . . . . . . . . . . . . 153Using a SAS Macro to Load Base Operational Data into the SDM . . . . . . . . . . . . 154Which Records Are Loaded? . . . . . . . . . . . . . . . . . . . . . . . . . . . . . . . . . . . . . . . . . 154Checking for Errors . . . . . . . . . . . . . . . . . . . . . . . . . . . . . . . . . . . . . . . . . . . . . . . . 155
Overview of Loading Base Operational DataBase operational data is loaded into an operational cycle in SAS Financial Management.Base operational data can come from a variety of transactional systems. Two typicalexamples of operational data are sales by product and employee salary history.
Moving Base Operational Data from Its Source toIts Staging Table
Overview of the Base Operational Data Staging TableWrite a job to extract the data from its source and load it into the STAGE_SASOP_DETAILtable:
149
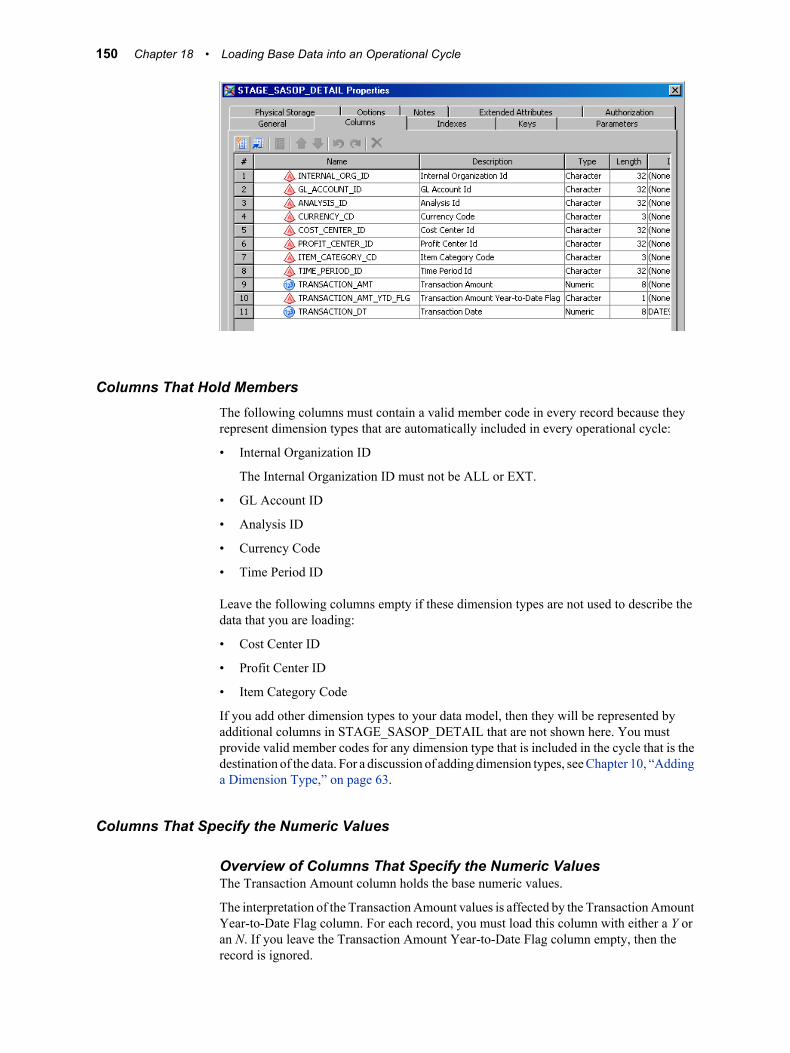
Columns That Hold MembersThe following columns must contain a valid member code in every record because theyrepresent dimension types that are automatically included in every operational cycle:
• Internal Organization ID
The Internal Organization ID must not be ALL or EXT.
• GL Account ID
• Analysis ID
• Currency Code
• Time Period ID
Leave the following columns empty if these dimension types are not used to describe thedata that you are loading:
• Cost Center ID
• Profit Center ID
• Item Category Code
If you add other dimension types to your data model, then they will be represented byadditional columns in STAGE_SASOP_DETAIL that are not shown here. You mustprovide valid member codes for any dimension type that is included in the cycle that is thedestination of the data. For a discussion of adding dimension types, see Chapter 10, “Addinga Dimension Type,” on page 63.
Columns That Specify the Numeric Values
Overview of Columns That Specify the Numeric ValuesThe Transaction Amount column holds the base numeric values.
The interpretation of the Transaction Amount values is affected by the Transaction AmountYear-to-Date Flag column. For each record, you must load this column with either a Y oran N. If you leave the Transaction Amount Year-to-Date Flag column empty, then therecord is ignored.
150 Chapter 18 • Loading Base Data into an Operational Cycle
The explanation of the Y/N choice for the Transaction Amount Year-to-Date Flag columnfollows.
Setting the Year-To-Date FlagFor a Revenue or Expense account, the value that is stored in the SDM must represent therevenue received or expense incurred during the designated time period. For an Asset,Liability, or Equity account, the value that is stored in the SDM must represent the changein the value of the asset, liability, or equity item from the previous time period to thedesignated time period. SAS Financial Management computes the values of Asset,Liability, and Equity accounts by summing up a history of stored changes in value. All thenumeric values that are stored in the SDM are called period activity values.
For each record of STAGE_SASOP_DETAIL, if you load the period activity value that isrequired by the SDM into the Transaction Amount column, then you should place N in theTransaction Amount Year-to-Date Flag column. Thus, use N for the flag in the followingcases:
• The record concerns a Revenue account, and the Transaction Amount is the revenuereceived during the designated time period.
• The record concerns an Expense account and the Transaction Amount is the expenseincurred during the designated time period.
• The record concerns an Asset, Liability, or Equity account and the Transaction Amountis the change in the value of the asset, liability, or equity item from the previous timeperiod to the designated time period.
You should use Y for the flag in the following cases:
• The record concerns a Revenue account and the Transaction Amount is the cumulativeyear-to-date revenue through the designated time period.
• The record concerns an Expense account and the Transaction Amount is the cumulativeyear-to-date expense through the designated time period.
• The record concerns an Asset, Liability, or Equity account, and the Transaction Amountis the value of the asset, liability, or equity item in the designated time period.
For Statistical accounts, the Year-to-Date Flag is ignored, but still you must specify eitherY or N.
How Year-To-Date Transaction Amounts Are ProcessedFor Statistical accounts, transaction amounts are always loaded without change into theSDM, whether the Year-to-Date Flag is Y or N.
For all other account types, if the year-to-date flag is Y, then the period activity value thatis placed in the SDM is generally calculated as the Transaction Amount inSTAGE_SASOP_DETAIL for the same time period minus the Transaction Amount inSTAGE_SASOP_DETAIL for the previous time period. For example, a March year-to-date transaction amount of 100 and a February year-to-date transaction amount of 94together yield a March period activity value of 6 in the SDM.
There are two important exceptions to this rule. A year-to-date Transaction Amount inSTAGE_SASOP_DETAIL is carried forward without change to the SDM if either of thefollowing conditions is true:
• STAGE_SASOP_DETAIL does not contain a corresponding record for the previoustime period.
• The record concerns a Revenue or Expense account, and the designated time period isthe first period of a fiscal year, as determined by the relevant time hierarchy.
Moving Base Operational Data from Its Source to Its Staging Table 151

Note that the difference between the year-to-date values for two consecutive time periodscan be calculated only if the table contains records for both time periods. This is so evenif the year-to-date value for one of the time periods is zero. If you set the year-to-date flagto Y, then be sure to include records for an unbroken sequence of time periods, includingrecords with a Transaction Amount of zero where necessary.
How Multiple Records for the Same Combination of Members AreProcessedIt is likely that your staging tables will contain at most one record for a given combinationof members. However, this is not a requirement. You can create as many data records asyou want for the same combination of members. You can even create a mix of year-to-dateand non-year-to-date data records for the same combination of members. That would bepointless and confusing in most cases, but the software will handle it.
Suppose that you create many data records for the same combination of members, possiblyincluding a mix of year-to-date and non-year-to-date records. The period activity valuesthat are loaded into the SDM are computed in this sequence:
1. All year-to-date transaction amounts for a given combination of members are summed.The sum is a net year-to-date amount for that combination of members.
2. The net year-to-date amount for one time period is subtracted from the net year-to-dateamount for the following time period. This computation yields a period activity valuethat is based solely on the year-to-date amounts.
3. All non-year-to-date transaction amounts for a given combination of members aresummed, yielding a period activity value for that combination of members that is basedsolely on non-year-to-date amounts.
4. For each combination of members, the period activity value that is based solely on year-to-date amounts is added to the period activity value that is based solely on non-year-to-date amounts. This yields the final period activity value that is loaded into the SDM.
Moving Base Operational Data from the StagingTable to the Detail Data Store
To move base operational data from the staging table to the detail data store, run thecind_dds_111010_load_sasop_detail_table job.
On the Folders tab, this job is located in the Products ð Cross Industry Detail Data Storeð 5.2 Jobs folder. On the Inventory tab, it is in the Jobs folder.
Moving Base Operational Data from the Detail DataStore to the SDM
Overview of Moving Base Operational Data from the Detail Data Storeto the SDM
There are three ways to load base operational data from the detail data store into anoperational cycle in the SDM:
152 Chapter 18 • Loading Base Data into an Operational Cycle
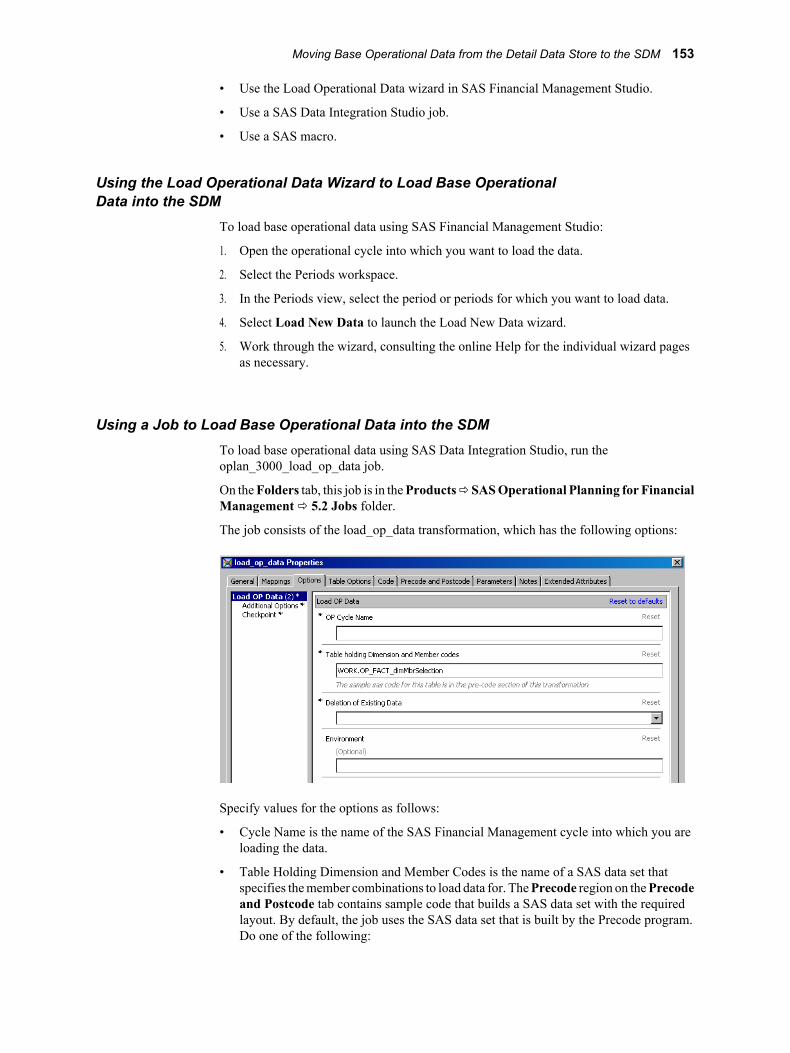
• Use the Load Operational Data wizard in SAS Financial Management Studio.
• Use a SAS Data Integration Studio job.
• Use a SAS macro.
Using the Load Operational Data Wizard to Load Base OperationalData into the SDM
To load base operational data using SAS Financial Management Studio:
1. Open the operational cycle into which you want to load the data.
2. Select the Periods workspace.
3. In the Periods view, select the period or periods for which you want to load data.
4. Select Load New Data to launch the Load New Data wizard.
5. Work through the wizard, consulting the online Help for the individual wizard pagesas necessary.
Using a Job to Load Base Operational Data into the SDMTo load base operational data using SAS Data Integration Studio, run theoplan_3000_load_op_data job.
On the Folders tab, this job is in the Products ð SAS Operational Planning for FinancialManagement ð 5.2 Jobs folder.
The job consists of the load_op_data transformation, which has the following options:
Specify values for the options as follows:
• Cycle Name is the name of the SAS Financial Management cycle into which you areloading the data.
• Table Holding Dimension and Member Codes is the name of a SAS data set thatspecifies the member combinations to load data for. The Precode region on the Precodeand Postcode tab contains sample code that builds a SAS data set with the requiredlayout. By default, the job uses the SAS data set that is built by the Precode program.Do one of the following:
Moving Base Operational Data from the Detail Data Store to the SDM 153

• On the Precode and Postcode tab, make sure that the Precode check box isselected. Make sure that the name of the SAS data set that is specified for this optionmatches the name of the SAS data set that is built by the precode. Modify theprecode to build the table that you need. In this case, the precode runs before thejob, and then the job uses the SAS data set that the precode builds.
• On the Precode and Postcode tab, make sure that the Precode check box is notselected. Build the SAS data set that you need using a means other than the precode.Make sure that the name of the SAS data set that is specified for this option matchesthe name of the SAS data set that you built for this purpose.
• Deletion of Existing Data is either Replace All or Append – No Delete. Select thecorrect value from the drop-down list.
If you select Replace All, then data is deleted from all the crossings that you havespecified as eligible to receive data. It is possible that data will be deleted from somecrossings that do not receive data in the load operation.
If you select Append – No Delete, then no data is deleted. In each case where data isloaded to a crossing that already has data, the result is additive.
• Environment can be any environment that is defined in your EnvironmentFactory.xmlfile. If you leave this field empty, then the environment “default” is used.
The job can run only if SAS Remote Services and the managed servers are running on theMiddle-Tier Server. See SAS Solutions Services: System Administration Guide.
Using a SAS Macro to Load Base Operational Data into the SDMTo load base operational data using a SAS macro:
1. Create a SAS data set that specifies the member combinations to load data for.
2. Run the etlldopf.sas macro file.
Detailed instructions are inside the macro file, which is on the Data-Tier Server.
On a Windows server, the etlldopf.sas macro file is at the following location:!SASROOT\finance\sasmacro. On a UNIX server, the etlldopf.sas macro file is at the followinglocation:!SASROOT/sasautos.
The macro can run only if SAS Remote Services and the managed servers are running onthe Middle Tier Server. See SAS Solutions Services: System Administration Guide.
Which Records Are Loaded?A detail data store record that contains base operational data is loaded only if the followingconditions are met:
• The record contains a member for each dimension type (except Source) that is used bythe target cycle.
• The record contains a member for no dimension type that is not used by the target cycle.
• Within each dimension type that is used by the record and the target cycle, the memberin the record belongs to the dimension that is used by the target cycle.
• The record belongs to the subset of records that is defined in the wizard, job, or SASmacro that loads the data. In other words, for each dimension type for which one ormore members are specified in the wizard, job, or SAS macro, one of those membersis in the record.
154 Chapter 18 • Loading Base Data into an Operational Cycle
Checking for ErrorsAfter you run a job that uses the load_op_data transformation, review the log. If there wereerrors, then the job is terminated and the log lists the location of an HTML error report. Ifthe SAS macro is terminated, then the log lists the location of an HTML error report. Errorreports for the job, the macro, and the Load New Data wizard are all available in SASFinancial Management Studio from the History page of the Properties window for thetarget cycle.
An error report is produced if any record violates any one of the following constraints:
• In the STAGE_SASOP_DETAIL table, Internal Organization ID must not be ALL orEXT.
• In the SASOP_DETAIL table, each retained key value in a member column must alsoexist in the corresponding detail data store member table. For example, the retainedkey value in the Time Period Key column must exist in the TIME_PERIOD table. Thisis important because the job uses the detail data store retained key values to look upthe original member codes in the detail data store member tables, and then generatesSDM retained key values from those original member codes.
In the normal course of events, this condition is automatically satisfied. However, thereare various ways to cut the required connections between tables, such as reloading adetail data store member table with a different set of members after you have loadeddata into SASOP_DETAIL.
Moving Base Operational Data from the Detail Data Store to the SDM 155

156 Chapter 18 • Loading Base Data into an Operational Cycle
Chapter 19
Exporting Financial AccountingData
Overview of Exporting Accounting Data . . . . . . . . . . . . . . . . . . . . . . . . . . . . . . . . . 157
Using the Export Data Records Wizard to Export Accounting Data . . . . . . . . . . 158
Using the Export Model Data Job to Export Accounting Data . . . . . . . . . . . . . . . 158
Using a SAS Macro to Export Accounting Data . . . . . . . . . . . . . . . . . . . . . . . . . . . 159
Details of the Result . . . . . . . . . . . . . . . . . . . . . . . . . . . . . . . . . . . . . . . . . . . . . . . . . . 159
Possible Obstacles to Exporting Accounting Data . . . . . . . . . . . . . . . . . . . . . . . . . . 160
Checking for Errors . . . . . . . . . . . . . . . . . . . . . . . . . . . . . . . . . . . . . . . . . . . . . . . . . . 161
Overview of Exporting Accounting DataYou can export data from a selected financial model in SAS Financial Management to adesignated SAS library. The target library can be the stagedds library of staging tables orany other library that you set up to receive exported data.
Note: Do not export data to the CrossIndustryDDS library.
If the target library is stagedds, then the exported data is placed in the following stagingtables:
• STAGE_GL_TRANSACTION_SUM
• STAGE_GL_JRNL
• STAGE_GL_JRNL_DETAILS
If you use any other target library, then the exported data is placed in copies of these stagingtables that have been put in the target library.
From the target library, you can make the exported accounting data available to otherproducts, such as SAS Web Report Studio.
In general, you should not export data from a financial model to the staging tables and thenload it into a financial cycle. That procedure will work, but you can achieve the same resultmore easily with the Load Model Data wizard in SAS Financial Management Studio.
There are three ways to export data from a selected financial model:
• Use the Export Data Records wizard in SAS Financial Management Studio.
• Use the fm_2000_export_model_data job.
• Use a SAS macro.
157
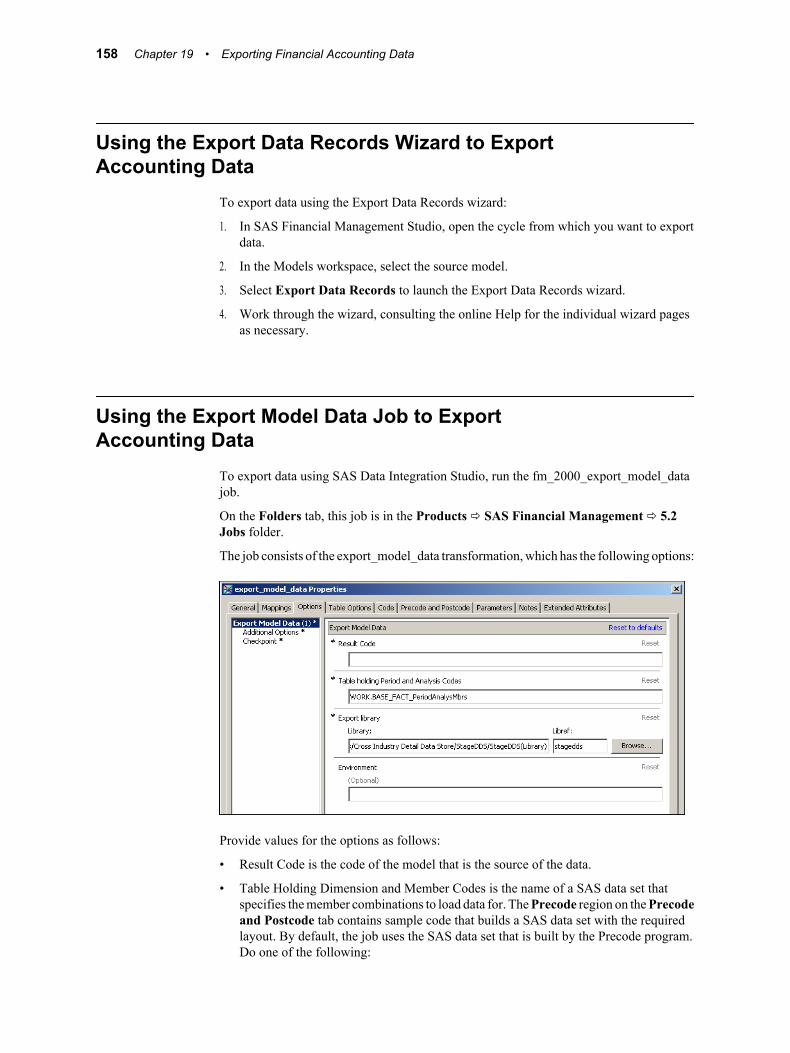
Using the Export Data Records Wizard to ExportAccounting Data
To export data using the Export Data Records wizard:
1. In SAS Financial Management Studio, open the cycle from which you want to exportdata.
2. In the Models workspace, select the source model.
3. Select Export Data Records to launch the Export Data Records wizard.
4. Work through the wizard, consulting the online Help for the individual wizard pagesas necessary.
Using the Export Model Data Job to ExportAccounting Data
To export data using SAS Data Integration Studio, run the fm_2000_export_model_datajob.
On the Folders tab, this job is in the Products ð SAS Financial Management ð 5.2Jobs folder.
The job consists of the export_model_data transformation, which has the following options:
Provide values for the options as follows:
• Result Code is the code of the model that is the source of the data.
• Table Holding Dimension and Member Codes is the name of a SAS data set thatspecifies the member combinations to load data for. The Precode region on the Precodeand Postcode tab contains sample code that builds a SAS data set with the requiredlayout. By default, the job uses the SAS data set that is built by the Precode program.Do one of the following:
158 Chapter 19 • Exporting Financial Accounting Data
• On the Precode and Postcode tab, make sure that the Precode check box isselected. Make sure that the name of the SAS data set that is specified for this optionmatches the name of the SAS data set that is built by the precode. Modify theprecode to build the table that you need. In this case, the precode runs before thejob, and then the job uses the SAS data set that the precode builds.
• On the Precode and Postcode tab, make sure that the Precode check box is notselected. Build the SAS data set that you need using a means other than the precode.Make sure that the name of the SAS data set that is specified for this option matchesthe name of the SAS data set that you built for this purpose.
• Export Library is the SAS library that you are exporting the data to. Click Browse toselect the target library. If you select a library other than stagedds, then make surethat the selected library satisfies the following conditions:
• It contains copies of the STAGE_GL_TRANSACTION_SUM,STAGE_GL_JRNL, and STAGE_GL_JRNL_DETAILS staging tables.
• The Solutions Host User has operating system read and write access to it.
• Environment can be any environment that is defined in your EnvironmentFactory.xmlfile. If you leave this field empty, then the environment “default” is used.
The job can run only if SAS Remote Services and the managed servers are running on theMiddle Tier Server. See SAS Solutions Services: System Administration Guide.
Using a SAS Macro to Export Accounting DataTo export accounting data using a SAS macro:
1. Create a SAS data set that specifies the combinations of analysis members and timeperiods for which you want to export accounting data.
2. Run the etlfctxb.sas macro file.
Detailed instructions are inside the macro file, which is on the Data-Tier Server.
On a Windows server, the etlfctxb.sas macro file is at the following location:!SASROOT\finance\sasmacro. On a UNIX server, the etlfctxb.sas macro file is at the followinglocation:!SASROOT/sasautos.
The macro can run only if SAS Remote Services and the managed servers are running onthe Middle Tier Server. See SAS Solutions Services: System Administration Guide.
Details of the ResultThe exported data is appended to whatever data is already in the target tables. If the targettables contain data that you do not want to mix with the data that you are going to export,then you must delete that data from the target tables before you begin the export operation.To delete data from the target tables, write and run a suitable SAS program.
For each specified combination of a time period and an analysis member, the followingdata is exported:
• All data that is stored in the cycle that the model belongs to. This includes data that isassociated with the following members of the Source hierarchy:
Details of the Result 159

• Base
• BaseJourn
• BaseForm
• All manual adjustments and all adjustments that are generated by adjustment rules thatare part of the model. This includes data that is associated with the following membersof the Source hierarchy:
• Manual
• Bal
• Alloc
• Reclass
• CPO
Data that is associated with the BaseJourn member of the Source hierarchy is exported tothe STAGE_GL_JRNL and STAGE_GL_JRNL_DETAILS staging tables or to the copiesof these tables that you place in another target library. All other exported data is exportedto the STAGE_GL_TRANSACTION_SUM staging table or to the copy of this table thatyou place in another target library.
Many numbers that you might see in a SAS Financial Management report that is based onthe selected model are not exported. Numbers that are not exported include the following:
• elimination adjustments
• the computed values of accounts that belong to the Retained Earnings and CTA accounttypes
• the computed values of hierarchical roll-ups
• the computed values of formulas
Possible Obstacles to Exporting Accounting DataThe Export Data Records wizard, the fm_2000_export_model_data job, and the etlfctxb.sasmacro file can encounter various obstacles that prevent them from successfully exportingdata. Possible obstacles include the following:
• The Solutions Host User does not have operating system read and write access to thetarget data library.
• A target table does not exist. If the target data library is the staging area, this can happenif a table was accidentally deleted. For a target data library other than the staging area,this can happen if you neglected to copy one of the necessary tables into the targetlibrary.
• A column that represents a dimension type that is used by the data is either misnamedor missing from a target table. This can happen if the column was not added correctlywhen the dimension type was created.
• The DIMENSION_TYPE table contains an incorrect record for one of the dimensiontypes that is used by the data. This can happen if an incorrect value was placed in therecord when it was created.
• One of the target tables is open and locked. This can happen if someone is workingwith the table.
160 Chapter 19 • Exporting Financial Accounting Data

If any one of these obstacles is encountered, an appropriate message is displayed.
Checking for ErrorsAfter you run a job that uses the export_model_data transformation, review the log. If therewere errors, then the job is terminated and the log lists the location of an HTML error report.If the SAS macro is terminated, then the log lists the location of an HTML error report.Error reports for the job, the macro, and the Export Data Records wizard are all availablein SAS Financial Management Studio from the History page of the Properties window forthe source model.
Checking for Errors 161

162 Chapter 19 • Exporting Financial Accounting Data
Chapter 20
Loading a System Filter for theSAS Financial Management Add-In for Microsoft Excel
Viewing Data with the SAS Financial Management Add-In for Microsoft Excel 163
Loading System Filter Specifications into the Staging Tables . . . . . . . . . . . . . . . . 164
Moving System Filter Specifications from the Staging Tables tothe Detail Data Store . . . . . . . . . . . . . . . . . . . . . . . . . . . . . . . . . . . . . . . . . . . . . . . . . 166
Moving System Filter Specifications from the Detail Data Store to the SDM . . . 166
Viewing Data with the SAS Financial ManagementAdd-In for Microsoft Excel
A user who works with a read-only table or a data-entry table in the SAS FinancialManagement Add-in for Microsoft Excel has many ways to manipulate the table in orderto provide different views of the underlying data. For example, a user can do any of thefollowing:
• Pivot the table, turning a row dimension into a column dimension, an unused dimensioninto a slicer dimension, and so on.
• Change the scope of the displayed slice of data by expanding and collapsing thehierarchies for the row and column dimensions.
• Display a different slice of data by selecting a different member of a slicer dimension.
• Remove certain rows or columns from the display.
Another option that a user might have is to apply or remove a system filter that is loadedthrough the detail data store. To see the details of the available system filter, a user of theSAS Financial Management Add-in for Microsoft Excel selects Filters. If a system filteris available, it is displayed on the System tab of the Filters window. By selecting ordeselecting the Enable system filters check box on that tab, a user can apply or removethe available system filter.
Users of the SAS Financial Management Add-in for Microsoft Excel have a system filteravailable only if a system filter is loaded through the detail data store as explained in thischapter.
163
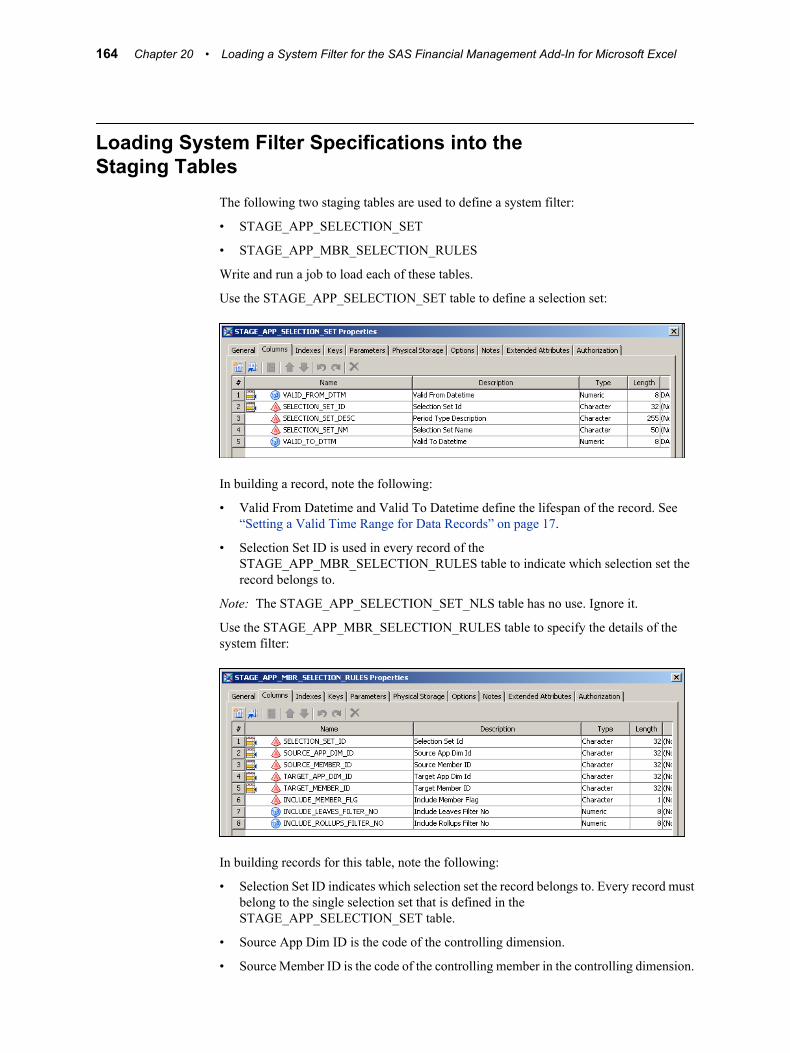
Loading System Filter Specifications into theStaging Tables
The following two staging tables are used to define a system filter:
• STAGE_APP_SELECTION_SET
• STAGE_APP_MBR_SELECTION_RULES
Write and run a job to load each of these tables.
Use the STAGE_APP_SELECTION_SET table to define a selection set:
In building a record, note the following:
• Valid From Datetime and Valid To Datetime define the lifespan of the record. See“Setting a Valid Time Range for Data Records” on page 17.
• Selection Set ID is used in every record of theSTAGE_APP_MBR_SELECTION_RULES table to indicate which selection set therecord belongs to.
Note: The STAGE_APP_SELECTION_SET_NLS table has no use. Ignore it.
Use the STAGE_APP_MBR_SELECTION_RULES table to specify the details of thesystem filter:
In building records for this table, note the following:
• Selection Set ID indicates which selection set the record belongs to. Every record mustbelong to the single selection set that is defined in theSTAGE_APP_SELECTION_SET table.
• Source App Dim ID is the code of the controlling dimension.
• Source Member ID is the code of the controlling member in the controlling dimension.
164 Chapter 20 • Loading a System Filter for the SAS Financial Management Add-In for Microsoft Excel
• Target App Dim ID is the code of the controlled dimension.
• Target Member ID is the code of the controlled member in the controlled dimension.
• For each record, its control condition is satisfied by a read-only table or a data-entrytable whenever one of the following is true:
• The controlling dimension is a slicer dimension, the controlling member is selectedin that slicer dimension, and the controlled dimension is either a slicer, column, orrow dimension.
• The controlling dimension is a column dimension, the controlling member isdisplayed in the table, and the controlled dimension is also a column dimension.
• The controlling dimension is a row dimension, the controlling member is displayedin the table, and the controlled dimension is also a row dimension.
If a read-only table or a data-entry table does not satisfy a record's control condition,then the record has no effect on the table.
• Include Member Flag must contain either N or Y, or a character 0 or 1. These valueshave the following significance:
• N or 0—If a read-only table or a data-entry table satisfies the record's controlcondition, then the system filter removes the controlled member from the table.
• Y or 1—If a read-only table or a data-entry table satisfies the record's controlcondition, then the system filter does not remove the controlled member from thetable. (A user can still remove this member in other ways.)
• Include Leaves Filter No must contain a numeric 0, 1, or 2. These values have thefollowing significance:
• 0—If a read-only table or a data-entry table satisfies the record's control condition,then the system filter removes from the table all leaf members that are descendantsof the controlled member (children, grandchildren, and so on).
• 1—If a read-only table or a data-entry table satisfies the record's control condition,then the system filter removes from the table all leaf members that are remotedescendants of the controlled member (grandchildren and beyond, but not children).
• 2—If a read-only table or a data-entry table satisfies the record's control condition,then the system filter does not remove from the table any leaf members that aredescendants of the controlled member.
• Include Rollups Filter No must contain a numeric 0, 1, or 2. These values have thefollowing significance:
• 0—If a read-only table or a data-entry table satisfies the record's control condition,then the system filter removes from the table all non-leaf members that aredescendants of the controlled member (children, grandchildren, and so on).
• 1—If a read-only table or a data-entry table satisfies the record's control condition,then the system filter removes from the table all non-leaf members that are remotedescendants of the controlled member (grandchildren and beyond, but not children).
• 2—If a read-only table or a data-entry table satisfies the record's control condition,then the system filter does not remove from the table any non-leaf members thatare descendants of the controlled member.
• There are many ways in which a member of a controlled dimension can be subject toconflicting filter specifications. For example, a record with a 0 in the Include MemberFlag column can specify that the member should be removed from a read-only table ora data-entry table while another record with a 1 or 2 in one of the Filter No columnscan specify that the same member should not be removed from the table.
Loading System Filter Specifications into the Staging Tables 165
All such conflicts are resolved according to the following simple rule. The behavior ofa given member is determined by the record whose controlled member is closest to thegiven member in the relevant hierarchy. A record in which the given member is thecontrolled member always prevails, if it exists. If there is no record in which the givenmember is the controlled member, then a record in which the immediate parent of thegiven member is the controlled member always prevails, if it exists. And so on, up thehierarchy.
This method of conflict resolution enables you to define complex filter patterns bylayering a sequence of specifications. You can specify one filter condition for a certainsubhierarchy, partially override it with a different filter condition for a lowersubhierarchy, and partially override the override with yet another filter condition foran even lower subhierarchy.
• The order of the records in the STAGE_APP_MBR_SELECTION_RULES table doesnot affect the behavior of the resulting system filter. However, you can make the tableeasier to maintain by grouping the records in a logical way. For example, if you aredefining a filter that has more than one pair of controlling and controlled dimensions,then it makes sense to group all the records for a given pair of dimensions together.
Moving System Filter Specifications from theStaging Tables to the Detail Data Store
Run the following two jobs in this order:
1. cind_dds_101500_load_app_selection_set_table
2. cind_dds_101700_load_app_mbr_selection_rules_table
On the Folders tab, these jobs are in the Products ð Cross Industry Detail Data Store ð5.2 Jobs folder. On the Inventory tab, they are in the Jobs folder.
Moving System Filter Specifications from the DetailData Store to the SDM
To load system filter specifications into the SDM, run thefm_1400_load_member_selection_rules job.
On the Folders tab, this job is in the Products ð SAS Financial Management ð 5.2Jobs folder.
The job consists of the load_member_selection_rules transformation, which has thefollowing options:
166 Chapter 20 • Loading a System Filter for the SAS Financial Management Add-In for Microsoft Excel

Provide values for the options as follows:
• Action Type is either Replace All Records or Delete All Records. Select the correctvalue from the drop-down list:
• Replace All Records—Delete all the system filter records that are currently in theSDM, and then load into the SDM all the system filter records that are currently inthe detail data store. You must use this value if you are loading filter records.
• Delete All Records—Delete all system filter records that are currently in the SDM,but do not load any new records. This value enables you to get rid of a previouslyloaded set of filter records, leaving the SAS Financial Management Add-in forMicrosoft Excel without a system filter.
• Environment can be any environment that is defined in your EnvironmentFactory.xmlfile. If you leave this field empty, then the environment “default” is used.
The job can run only if SAS Remote Services and the managed servers are running on theMiddle-Tier Server. See SAS Solutions Services: System Administration Guide.
Moving System Filter Specifications from the Detail Data Store to the SDM 167

168 Chapter 20 • Loading a System Filter for the SAS Financial Management Add-In for Microsoft Excel
Part 3
Data Administration Specific toSAS Human Capital Management
Chapter 21Loading Data for SAS Human Capital Management . . . . . . . . . . . . . . 171
Chapter 22Modifying the Data Model for SAS Human Capital Management . . 201
Chapter 23Macro Variables in the PREBUILD.SAS Macro File . . . . . . . . . . . . . . . 209
Chapter 24Internal Formats . . . . . . . . . . . . . . . . . . . . . . . . . . . . . . . . . . . . . . . . . . . . . . . . 235
169

170
Chapter 21
Loading Data for SAS HumanCapital Management
Overview of Data Needs for SAS Human Capital Management . . . . . . . . . . . . . . 172
The Locale for SAS Human Capital Management . . . . . . . . . . . . . . . . . . . . . . . . . 172
Competency Tables . . . . . . . . . . . . . . . . . . . . . . . . . . . . . . . . . . . . . . . . . . . . . . . . . . . 172
Moving SAS Human Capital Management Data from ItsSource to the Staging Tables . . . . . . . . . . . . . . . . . . . . . . . . . . . . . . . . . . . . . . . . . . . 173
Overview of Moving SAS Human Capital Management Datafrom Its Source to the Staging Tables . . . . . . . . . . . . . . . . . . . . . . . . . . . . . . . . . 173
Loading Organization Dimension Staging Tables . . . . . . . . . . . . . . . . . . . . . . . . . 174Loading Time Dimension Staging Tables . . . . . . . . . . . . . . . . . . . . . . . . . . . . . . . 174Loading Staging Tables . . . . . . . . . . . . . . . . . . . . . . . . . . . . . . . . . . . . . . . . . . . . . 175
Loading HCM Data from the Staging Tables to the Detail Data Store . . . . . . . . . 177
Moving Data from the Detail Data Store to the SDM . . . . . . . . . . . . . . . . . . . . . . . 179
Auxiliary Files and Information Sources . . . . . . . . . . . . . . . . . . . . . . . . . . . . . . . . . 180Overview of Auxiliary Files . . . . . . . . . . . . . . . . . . . . . . . . . . . . . . . . . . . . . . . . . . 180Editing the Properties Files . . . . . . . . . . . . . . . . . . . . . . . . . . . . . . . . . . . . . . . . . . . 180Editing the SAS Macro Files . . . . . . . . . . . . . . . . . . . . . . . . . . . . . . . . . . . . . . . . . 180SAS_DEFAULT_PROPERTIES MySQL Table . . . . . . . . . . . . . . . . . . . . . . . . . . 181Editing the HCM Formats . . . . . . . . . . . . . . . . . . . . . . . . . . . . . . . . . . . . . . . . . . . 181Editing the PREBUILD.SAS Macro File . . . . . . . . . . . . . . . . . . . . . . . . . . . . . . . . 184Editing HCM Measures . . . . . . . . . . . . . . . . . . . . . . . . . . . . . . . . . . . . . . . . . . . . . 184
Moving Data from the Detail Data Store to the HCM Data Mart . . . . . . . . . . . . . 185Overview of Moving Data from the Detail Data Store to the HCM Data Mart . . . 185Loading the HCM Data Mart by Running One Job at a Time . . . . . . . . . . . . . . . . 187Loading the HCM Data Mart by Running the Umbrella Job . . . . . . . . . . . . . . . . . 188Loading Certain HCM Data Mart Tables Directly . . . . . . . . . . . . . . . . . . . . . . . . . 191Summary of Data Flow into HCM Data Mart Tables . . . . . . . . . . . . . . . . . . . . . . 195Loading SAS Human Capital Management Users . . . . . . . . . . . . . . . . . . . . . . . . . 196
Loading HCM Metrics into a Metric Table . . . . . . . . . . . . . . . . . . . . . . . . . . . . . . . 197
Creating the HCM Information Maps . . . . . . . . . . . . . . . . . . . . . . . . . . . . . . . . . . . 199
171

Overview of Data Needs for SAS Human CapitalManagement
This chapter guides you through the entire process of loading data for SAS Human CapitalManagement. However, it is not self-contained. It contains many references to otherchapters. Some of these other chapters focus on specific aspects of SAS Human CapitalManagement, while others cover topics that apply across all solutions.
Before you can load any data for SAS Human Capital Management, you must set up yourSAS Data Integration Studio environment,as described in Chapter 2, “Setting Up the SASData Integration Studio Environment,” on page 11.
To obtain a general understanding of how the SAS Data Integration Studio environmentenables you to supply data to solutions, read Chapter 3, “Using SAS Data Integration Studioto Supply Data to Solutions,” on page 13.
The Locale for SAS Human Capital ManagementThe language in which data is displayed to HCM users depends on the following settings:
• The HCM Data Mart is governed by the locale that is set by the SAS Solutions Servicesinstallation. The locale cannot be changed after installation. If your locale is incorrect,contact Technical Support.
The locale code in the SAS_DEFAULT_PROPERTIES table is used to select the labelsand titles for a particular language. For information about modifying these labels andtitles, see the SAS Human Capital Management Administrator’s Guide.
• In all the staging tables that hold data for SAS Human Capital Management, theLanguage Code column must contain the values from the languages in theCODE_LANGUAGE table. For a detailed discussion of loading language codes, seeChapter 4, “Loading Language Codes and Data Locale Codes,” on page 23.
Competency TablesThere are detail data store tables and corresponding staging tables for competency data.However, SAS Solutions Services does not include HCM Data Mart tables for this data orjobs for loading this data into the HCM Data Mart.
If you want to load competency data using SAS Solutions Services, discuss your needswith your SAS consultant. This chapter's discussion of steps for loading HCM data doesnot apply to competency data.
The following detail data store competency tables are in the Products ð Cross IndustryDetail Data Store ð CrossIndustryDDS metadata folder on the Folders tab:
• COMPETENCY
• COMPETENCY_ASSOC
• COMPETENCY_ASSOC_TYPE
172 Chapter 21 • Loading Data for SAS Human Capital Management
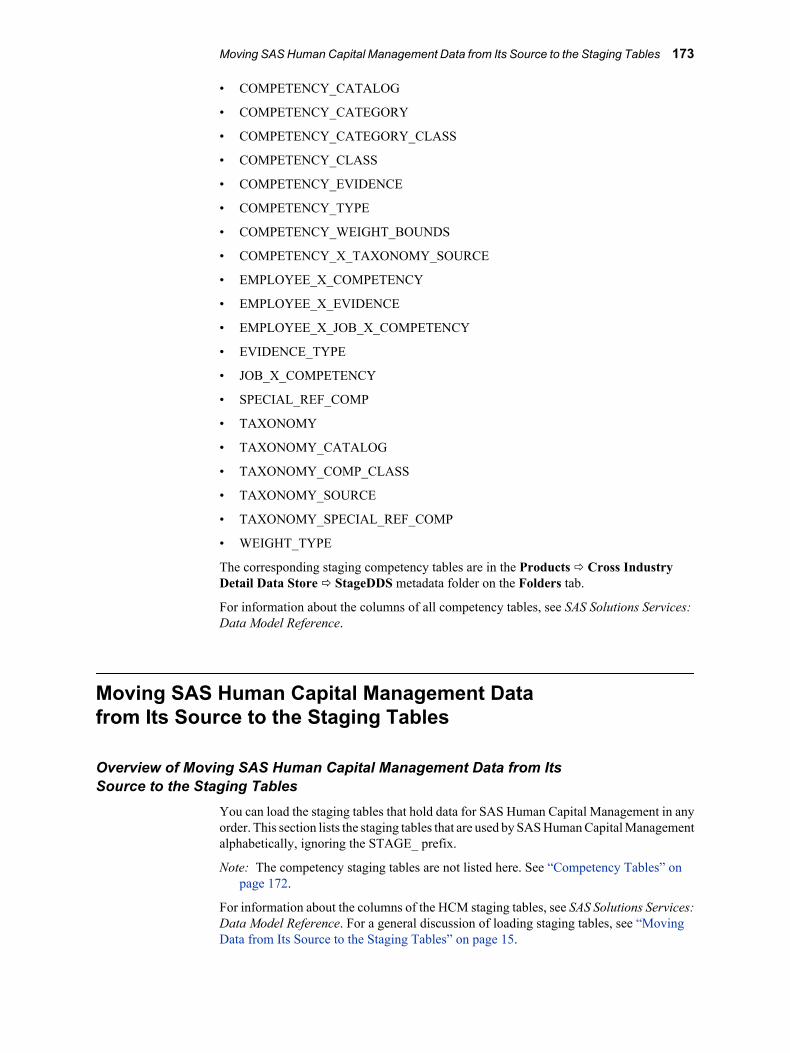
• COMPETENCY_CATALOG
• COMPETENCY_CATEGORY
• COMPETENCY_CATEGORY_CLASS
• COMPETENCY_CLASS
• COMPETENCY_EVIDENCE
• COMPETENCY_TYPE
• COMPETENCY_WEIGHT_BOUNDS
• COMPETENCY_X_TAXONOMY_SOURCE
• EMPLOYEE_X_COMPETENCY
• EMPLOYEE_X_EVIDENCE
• EMPLOYEE_X_JOB_X_COMPETENCY
• EVIDENCE_TYPE
• JOB_X_COMPETENCY
• SPECIAL_REF_COMP
• TAXONOMY
• TAXONOMY_CATALOG
• TAXONOMY_COMP_CLASS
• TAXONOMY_SOURCE
• TAXONOMY_SPECIAL_REF_COMP
• WEIGHT_TYPE
The corresponding staging competency tables are in the Products ð Cross IndustryDetail Data Store ð StageDDS metadata folder on the Folders tab.
For information about the columns of all competency tables, see SAS Solutions Services:Data Model Reference.
Moving SAS Human Capital Management Datafrom Its Source to the Staging Tables
Overview of Moving SAS Human Capital Management Data from ItsSource to the Staging Tables
You can load the staging tables that hold data for SAS Human Capital Management in anyorder. This section lists the staging tables that are used by SAS Human Capital Managementalphabetically, ignoring the STAGE_ prefix.
Note: The competency staging tables are not listed here. See “Competency Tables” onpage 172.
For information about the columns of the HCM staging tables, see SAS Solutions Services:Data Model Reference. For a general discussion of loading staging tables, see “MovingData from Its Source to the Staging Tables” on page 15.
Moving SAS Human Capital Management Data from Its Source to the Staging Tables 173
The staging tables that receive predefined data from the SAS_ tables are loaded by the samejobs that load the predefined data into the detail data store tables. You do not load thesestaging tables as a separate prior step. See “Loading HCM Data from the Staging Tablesto the Detail Data Store” on page 177.
Loading Organization Dimension Staging TablesYou must load the following staging tables for the organization dimension type in thefollowing order:
1. INTERNAL_ORG
2. INTERNAL_ORG_ASSOC
3. INTERNAL_ORG_ASSOC_TYPE
4. INTERNAL_ORG_NLS, if multiple languages are loaded into the detail data store
For a detailed discussion of these tables, see the following sections:
• “Tables for Each Dimension Type ” on page 36
• “Requirements for All or Most Dimension Types ” on page 38
• “Special Requirements for the Organization Dimension Type” on page 45
The following macro variables in the prebuild.sas file must have values that correctlydesignate the organization dimension and the organization hierarchies that SAS HumanCapital Management uses:
• INTORG_DIMENSION_CD
• HIERS
• NUMBER_OF_HIERS
Note: INTORG_DIMENSION_CD is used for display purposes only, and is accurate onlyif the INTERNAL_ORG dimension is loaded to the SDM, and the value of this macrovariable is updated with the corresponding SDM Dimension Code.
For details about these HCM macro variables, see Chapter 23, “Macro Variables in thePREBUILD.SAS Macro File,” on page 209.
Loading Time Dimension Staging TablesIf SAS Strategy Management is installed and you would like to view HCM metrics in SASStrategic Management, load the following staging tables for the time dimension type in thefollowing order:
1. TIME_PERIOD
2. TIME_PERIOD_ASSOC_TYPE
3. TIME_PERIOD_ASSOC
4. TIME_PERIOD_NLS, if multiple languages are loaded into the detail data store
For a detailed discussion of these tables, see the following sections:
• “Tables for Each Dimension Type ” on page 36
• “Requirements for All or Most Dimension Types ” on page 38
• “Special Requirements for the Time Dimension Type” on page 47
174 Chapter 21 • Loading Data for SAS Human Capital Management
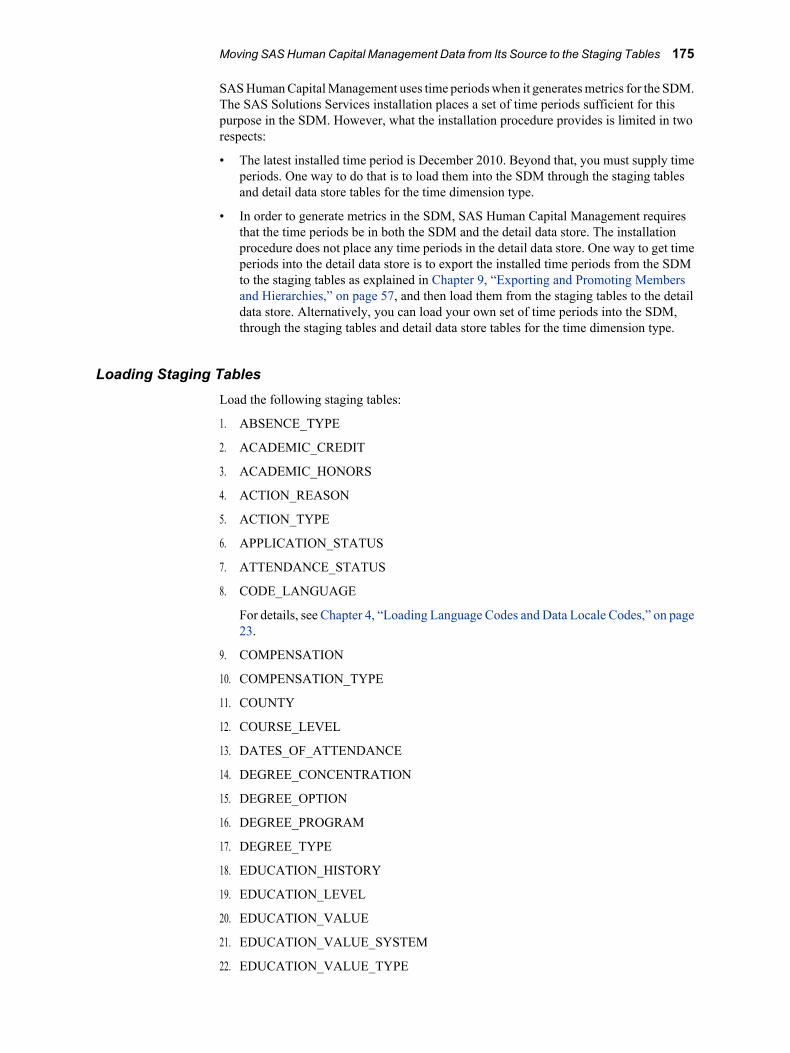
SAS Human Capital Management uses time periods when it generates metrics for the SDM.The SAS Solutions Services installation places a set of time periods sufficient for thispurpose in the SDM. However, what the installation procedure provides is limited in tworespects:
• The latest installed time period is December 2010. Beyond that, you must supply timeperiods. One way to do that is to load them into the SDM through the staging tablesand detail data store tables for the time dimension type.
• In order to generate metrics in the SDM, SAS Human Capital Management requiresthat the time periods be in both the SDM and the detail data store. The installationprocedure does not place any time periods in the detail data store. One way to get timeperiods into the detail data store is to export the installed time periods from the SDMto the staging tables as explained in Chapter 9, “Exporting and Promoting Membersand Hierarchies,” on page 57, and then load them from the staging tables to the detaildata store. Alternatively, you can load your own set of time periods into the SDM,through the staging tables and detail data store tables for the time dimension type.
Loading Staging TablesLoad the following staging tables:
1. ABSENCE_TYPE
2. ACADEMIC_CREDIT
3. ACADEMIC_HONORS
4. ACTION_REASON
5. ACTION_TYPE
6. APPLICATION_STATUS
7. ATTENDANCE_STATUS
8. CODE_LANGUAGE
For details, see Chapter 4, “Loading Language Codes and Data Locale Codes,” on page23.
9. COMPENSATION
10. COMPENSATION_TYPE
11. COUNTY
12. COURSE_LEVEL
13. DATES_OF_ATTENDANCE
14. DEGREE_CONCENTRATION
15. DEGREE_OPTION
16. DEGREE_PROGRAM
17. DEGREE_TYPE
18. EDUCATION_HISTORY
19. EDUCATION_LEVEL
20. EDUCATION_VALUE
21. EDUCATION_VALUE_SYSTEM
22. EDUCATION_VALUE_TYPE
Moving SAS Human Capital Management Data from Its Source to the Staging Tables 175
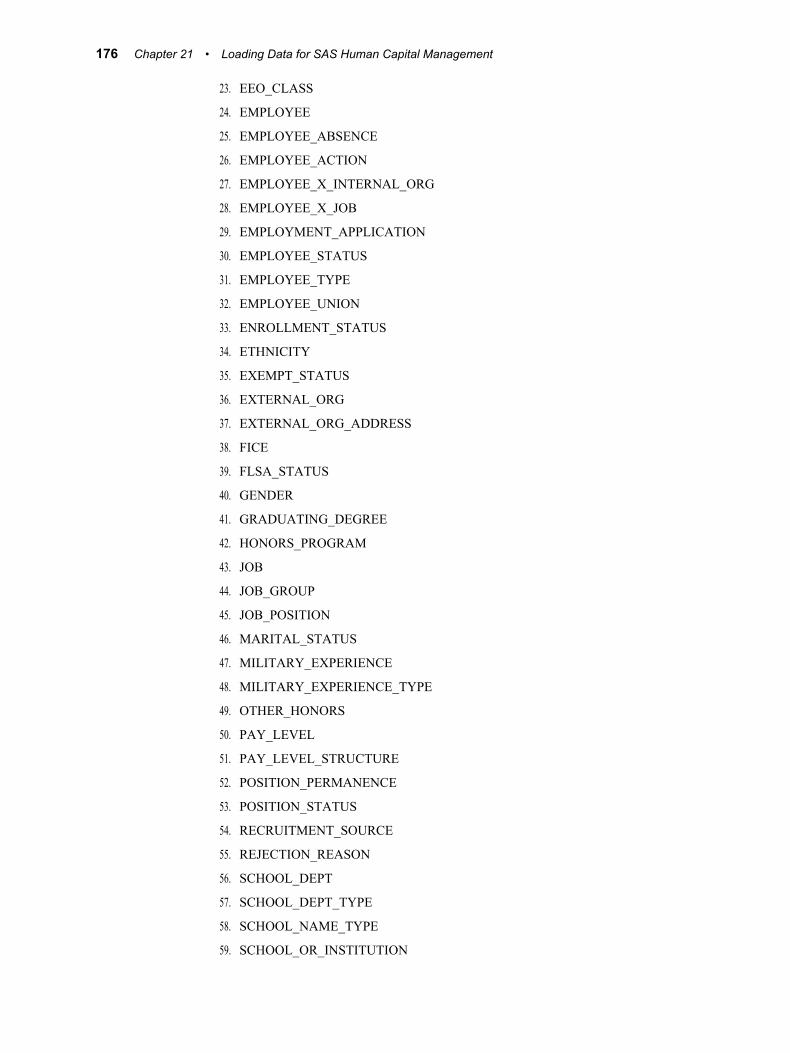
23. EEO_CLASS
24. EMPLOYEE
25. EMPLOYEE_ABSENCE
26. EMPLOYEE_ACTION
27. EMPLOYEE_X_INTERNAL_ORG
28. EMPLOYEE_X_JOB
29. EMPLOYMENT_APPLICATION
30. EMPLOYEE_STATUS
31. EMPLOYEE_TYPE
32. EMPLOYEE_UNION
33. ENROLLMENT_STATUS
34. ETHNICITY
35. EXEMPT_STATUS
36. EXTERNAL_ORG
37. EXTERNAL_ORG_ADDRESS
38. FICE
39. FLSA_STATUS
40. GENDER
41. GRADUATING_DEGREE
42. HONORS_PROGRAM
43. JOB
44. JOB_GROUP
45. JOB_POSITION
46. MARITAL_STATUS
47. MILITARY_EXPERIENCE
48. MILITARY_EXPERIENCE_TYPE
49. OTHER_HONORS
50. PAY_LEVEL
51. PAY_LEVEL_STRUCTURE
52. POSITION_PERMANENCE
53. POSITION_STATUS
54. RECRUITMENT_SOURCE
55. REJECTION_REASON
56. SCHOOL_DEPT
57. SCHOOL_DEPT_TYPE
58. SCHOOL_NAME_TYPE
59. SCHOOL_OR_INSTITUTION
176 Chapter 21 • Loading Data for SAS Human Capital Management
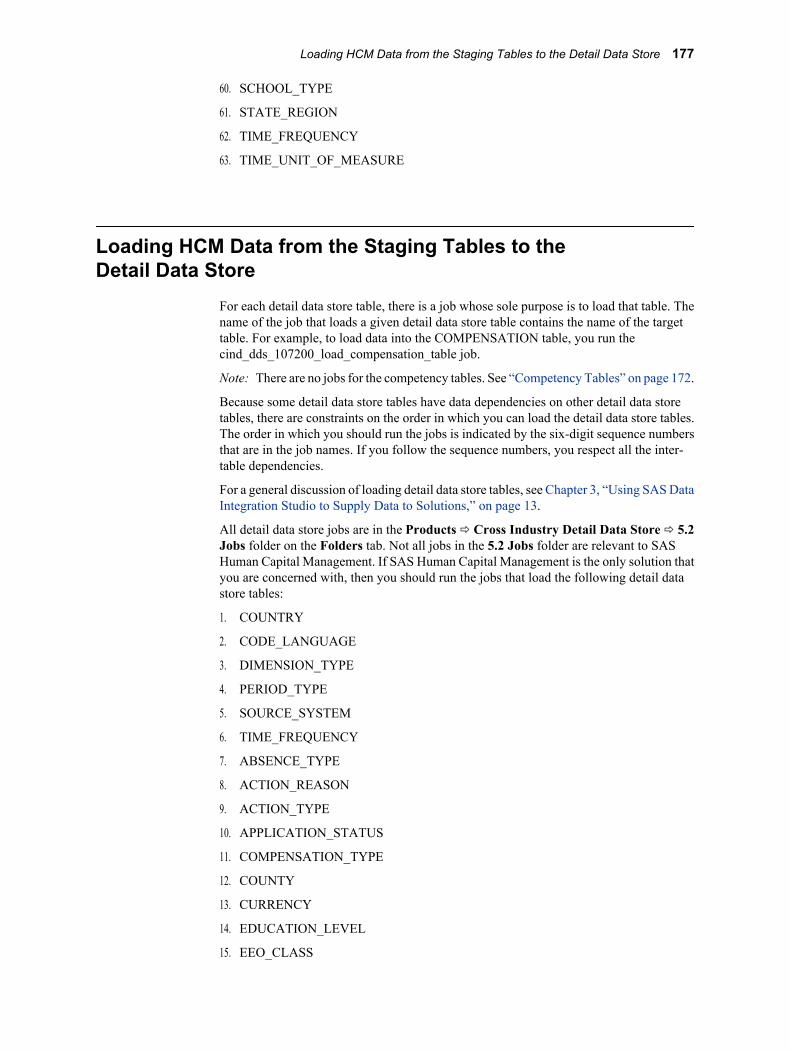
60. SCHOOL_TYPE
61. STATE_REGION
62. TIME_FREQUENCY
63. TIME_UNIT_OF_MEASURE
Loading HCM Data from the Staging Tables to theDetail Data Store
For each detail data store table, there is a job whose sole purpose is to load that table. Thename of the job that loads a given detail data store table contains the name of the targettable. For example, to load data into the COMPENSATION table, you run thecind_dds_107200_load_compensation_table job.
Note: There are no jobs for the competency tables. See “Competency Tables” on page 172.
Because some detail data store tables have data dependencies on other detail data storetables, there are constraints on the order in which you can load the detail data store tables.The order in which you should run the jobs is indicated by the six-digit sequence numbersthat are in the job names. If you follow the sequence numbers, you respect all the inter-table dependencies.
For a general discussion of loading detail data store tables, see Chapter 3, “Using SAS DataIntegration Studio to Supply Data to Solutions,” on page 13.
All detail data store jobs are in the Products ð Cross Industry Detail Data Store ð 5.2Jobs folder on the Folders tab. Not all jobs in the 5.2 Jobs folder are relevant to SASHuman Capital Management. If SAS Human Capital Management is the only solution thatyou are concerned with, then you should run the jobs that load the following detail datastore tables:
1. COUNTRY
2. CODE_LANGUAGE
3. DIMENSION_TYPE
4. PERIOD_TYPE
5. SOURCE_SYSTEM
6. TIME_FREQUENCY
7. ABSENCE_TYPE
8. ACTION_REASON
9. ACTION_TYPE
10. APPLICATION_STATUS
11. COMPENSATION_TYPE
12. COUNTY
13. CURRENCY
14. EDUCATION_LEVEL
15. EEO_CLASS
Loading HCM Data from the Staging Tables to the Detail Data Store 177

16. EMPLOYEE_STATUS
17. EMPLOYEE_TYPE
18. EMPLOYEE_UNION
19. ETHNICITY
20. EXEMPT_STATUS
21. FLSA_STATUS
22. GENDER
23. JOB_GROUP
24. JOB
25. MARITAL_STATUS
26. MILITARY_EXPERIENCE_TYPE
27. MEASURE
For a discussion of loading measures, see Chapter 11, “Loading Measures,” on page105.
28. PAY_LEVEL_STRUCTURE
29. PAY_LEVEL
30. POSITION_PERMANENCE
31. POSITION_STATUS
32. RECRUITMENT_SOURCE
33. REJECTION_REASON
34. STATE_REGION
35. TIME_UNIT_OF_MEASURE
36. TIME_PERIOD
The TIME_PERIOD table and the two tables that follow are subject to specialconsiderations. For details, see “Loading Time Dimension Staging Tables” on page174.
37. TIME_PERIOD_ASSOC_TYPE
38. TIME_PERIOD_ASSOC
39. EMPLOYEE
40. INTERNAL_ORG
41. INTERNAL_ORG_ASSOC_TYPE
42. INTERNAL_ORG_ASSOC
43. JOB_POSITION
44. EXTERNAL_ORG
45. EXTERNAL_ORG_ADDRESS
The EXTERNAL_ORG and EXTERNAL_ORG_ADDRESS tables are needed if theeducation tables are being loaded.
46. COMPENSATION
47. EMPLOYEE_X_INTERNAL_ORG
178 Chapter 21 • Loading Data for SAS Human Capital Management
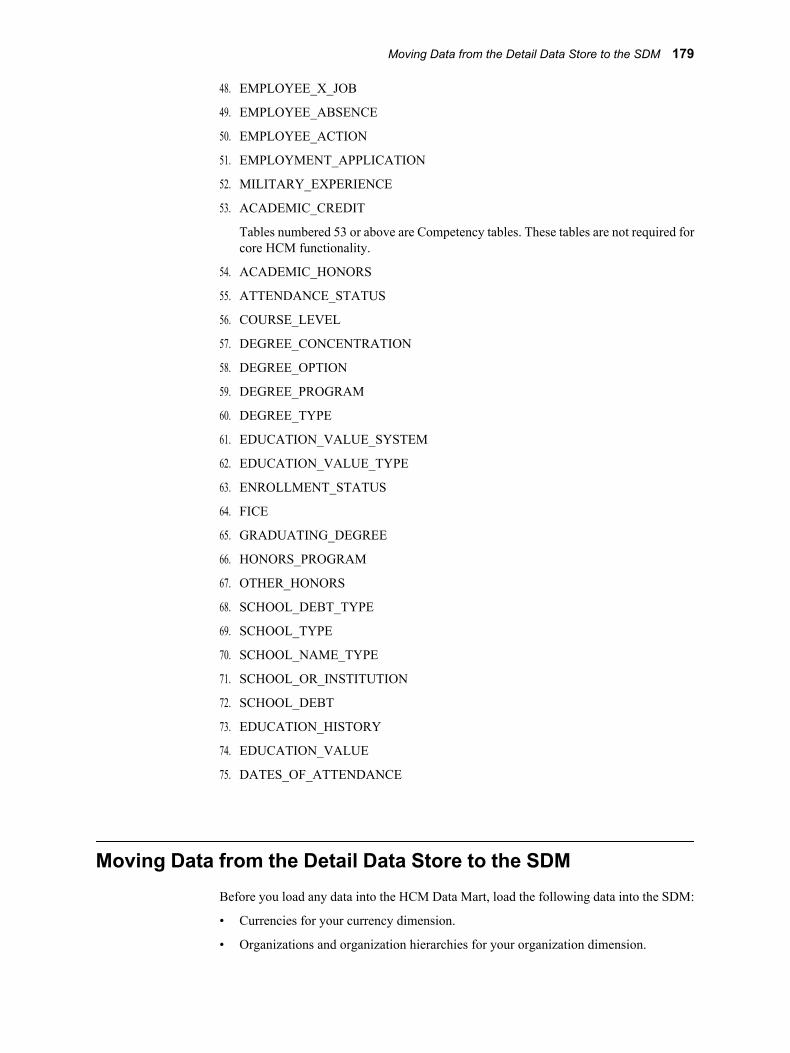
48. EMPLOYEE_X_JOB
49. EMPLOYEE_ABSENCE
50. EMPLOYEE_ACTION
51. EMPLOYMENT_APPLICATION
52. MILITARY_EXPERIENCE
53. ACADEMIC_CREDIT
Tables numbered 53 or above are Competency tables. These tables are not required forcore HCM functionality.
54. ACADEMIC_HONORS
55. ATTENDANCE_STATUS
56. COURSE_LEVEL
57. DEGREE_CONCENTRATION
58. DEGREE_OPTION
59. DEGREE_PROGRAM
60. DEGREE_TYPE
61. EDUCATION_VALUE_SYSTEM
62. EDUCATION_VALUE_TYPE
63. ENROLLMENT_STATUS
64. FICE
65. GRADUATING_DEGREE
66. HONORS_PROGRAM
67. OTHER_HONORS
68. SCHOOL_DEBT_TYPE
69. SCHOOL_TYPE
70. SCHOOL_NAME_TYPE
71. SCHOOL_OR_INSTITUTION
72. SCHOOL_DEBT
73. EDUCATION_HISTORY
74. EDUCATION_VALUE
75. DATES_OF_ATTENDANCE
Moving Data from the Detail Data Store to the SDMBefore you load any data into the HCM Data Mart, load the following data into the SDM:
• Currencies for your currency dimension.
• Organizations and organization hierarchies for your organization dimension.
Moving Data from the Detail Data Store to the SDM 179
• Time periods and time hierarchies for your time dimension, if appropriate. For adiscussion of the issues concerning time, see “Loading Time Dimension StagingTables” on page 174.
• Measures. For details, see Chapter 11, “Loading Measures,” on page 105.
For a detailed discussion of loading the members and hierarchies of any dimension into theSDM, see “Moving Member and Hierarchy Data from the Detail Data Store to the SDM”on page 50.
If any of these jobs run with errors, then correct those errors and load the SDM datasuccessfully before you load any data into the HCM Data Mart.
Auxiliary Files and Information Sources
Overview of Auxiliary FilesIn addition to getting their main input from detail data store tables, some of the jobs thatload data into the HCM Data Mart get key pieces of information from certain auxiliary filesand information sources. These include the properties files, the prebuild.sas macro, and thefollowing information sources:
• SAS_DEFAULT_PROPERTIES MySQL table
• HCM Formats
• HCM Measures
Before you run any jobs that load data into the HCM Data Mart, make sure that all theseauxiliary files and sources contain the correct information.
Editing the Properties FilesThere is a pair of properties files for each supported locale. One member of each paircontains column labels. The other member contains report and table titles. You might wantto edit some of the text in the pair of files that corresponds to your site's designated locale(see “The Locale for SAS Human Capital Management” on page 172).
To edit properties files:
1. Find the files.
The properties files reside at the following location:!SASROOT\hrds\sasmisc(Windows) or !SASROOT\misc\hrds (UNIX).
2. Make a backup copy of any properties file that you plan to edit, giving the copy adifferent name.
3. Edit the file with any text editor.
Editing the SAS Macro FilesTo edit any one of the SAS macro files for SAS Human Capital Management:
1. Find the file.
The SAS macro files reside at the following location: !SASROOT\hrds\sasmacro(Windows) or !SASROOT\sasautos (UNIX).
180 Chapter 21 • Loading Data for SAS Human Capital Management
2. Copy the file to the designated override location. SAS Human Capital Managementwill use that copy instead of the file at the original location.
The HCM designated override location for the SAS macro files is typically:SAS-config-dir\Lev1\SASApp\SASEnvironment\HumanCapitalManagement\SASMacro.
3. Edit the copy of the file at the override location with any text editor.
SAS_DEFAULT_PROPERTIES MySQL TableThe SAS_DEFAULT_PROPERTIES table in the HCM Data Mart contains properties suchas the locale code and graph settings. For more information, see the SAS Human CapitalManagement: Administrator's Guide.
Editing the HCM Formats
Overview of Editing FormatsTo edit the formats, take the following steps:
1. Log on to SAS Human Capital Management as an HCM Administrator.
2. Select the Administration link in the Manage category.
3. On the Data tab, select the Formats folder.
4. Follow the instructions in the online Help to edit formats or create new formats.
Internal FormatsMake sure that all the internal formats are appropriate for your site. The list of internalformats follows:
• IETHNIC
• ICHURN
• IEEOCL
• IACTION
• IEMPSTA
• IEMPTYP
• IEXEMPT
• IGENDER
• IMNSTAT
• IONPYRL
• IPAYPER
• IREGTMP
• ISTECLS
• ITERM
Each format entry has a Label as well as a range that is represented by Start and Endvalues. If the range consists of a single value, the Start and End values are the same.
Auxiliary Files and Information Sources 181

The Label value corresponds to a keyword in the SAS Human Capital Managementsoftware. Here is an example of the IACTION format:
The ITERM label represents involuntary termination. By default it has a value of ITER. Ifyour site's data uses the value XYZ to signify involuntary terminations, then you mustchange the ITERM range so that both the Start and End values contain XYZ.
Note: Remember to change the Start and End values for internal formats. Do not changethe Label values; these are the keywords that are understood by the SAS Human CapitalManagement software.
Chapter 24, “Internal Formats,” on page 235 lists the internal formats and their keywords.
Display FormatsIn addition to adjusting the internal formats, modify display formats as appropriate for yourdata.
The following formats are used in the HCM Build or are used for display. They can bemodified based on the site's requirements:
• AGERNG
• LOS
• RNGEFMT
• EVALRES
• YESNO
Most of the display formats are maintained via detail data store ETL jobs or SAS HumanCapital Management ETL jobs. Do not modify those formats, which are listed below.
Note: Some of the listed formats might not exist in SAS Human Capital Management,depending on the ETL jobs that have been run.
• ACADEMICCREDIT
• ACADEMICHONORS
• ACTION
• ACTRSN
• APPST
• ATTENDANCESTATUS
• AYN
182 Chapter 21 • Loading Data for SAS Human Capital Management
• COMPCATALOG
• COMPCATEGORY
• COMPCLASS
• COMPETENCYTYPE
• COMPHIER
• COMPSPREF
• COMPTYP
• COUNTRY
• COURSELEVEL
• DEGREECONCENTRATION
• DEGREEOPTION
• DEGREEPROGRAM
• DEGREETYPE
• EDUVALUESYSTEM
• EDUVALUETYPE
• EEOCL
• EMPSTAT
• EMPTYPE
• ENROLLSTATUS
• ETHNIC
• EVIDENCETYPE
• EXEMPT
• FICE
• FLSA
• GENDER
• GRADUATINGDEGREE
• GRECTYP
• GRPnnFM format (for example, GRP11FM)
• HONORSPROGRAM
• INTORG
• IORGS
• JOBGRP
• LANG
• LVCODE
• MARITAL
• MONEY
• OTHERHONORS
Auxiliary Files and Information Sources 183

• PAYPER
• POSTY
• PSTAT
• RECSRC
• REGTEMP
• REJRSN
• SCHOOLDEPTTYPE
• SCHOOLNAMETYPE
• SCHOOLTYPE
• STATE
• TAXCOMPCLASS
• TAXCOMPSPREF
• TAXONOMY
• TAXONOMYCATALOG
• UNION
• VETERAN
• VTGROUP
• WEIGHTTYPE
Any other formats that are in SAS Human Capital Management, but are not listed here,should not be modified.
Editing the PREBUILD.SAS Macro FileTo edit this file, follow the procedure described in “Editing the SAS Macro Files” on page180.
In the prebuild.sas macro file, make sure that all the macro variables are assigned valuesthat are appropriate for your site. You can edit the assignment statements that you find inthis file. This is a better approach:
1. Create a section near the end of the file that contains copies of the code segments thatyou want to change.
2. Edit the assignment statements that you have copied into this new section.
The value that is assigned to a macro variable in the new section overrides the value thatis assigned to it earlier in the file. By keeping all the edited assignment statements in oneplace, you make it easier to review them as necessary and to transfer them to a new versionof the prebuild.sas file after you install a new version of the software.
For descriptions of all the macro variables in the prebuild.sas macro file, see Chapter 23,“Macro Variables in the PREBUILD.SAS Macro File,” on page 209.
Editing HCM MeasuresPredefined measure formulas can be modified, or new site-defined measures can be addedto SAS Human Capital Management. To modify or add a measure, take the following steps:
184 Chapter 21 • Loading Data for SAS Human Capital Management
1. Log on to SAS Human Capital Management as an HCM Administrator.
2. Click Administration .
3. Select the HR Measures folder.
4. Read the online Help for instructions on modifying an existing measure or adding anew measure.
Predefined factors, site-defined factors, and other measures can be used to define a newmeasure or modify an existing measure. Site factors are defined in the FACTORSITE table.
For a discussion of the FACTORSITE table, see “The FACTORSITE Table” on page191.
Moving Data from the Detail Data Store to the HCMData Mart
Overview of Moving Data from the Detail Data Store to the HCM DataMart
Before you load any data into the HCM Data Mart, you might need to do the following:
• Load certain data into the SDM, as described in “Moving Data from the Detail DataStore to the SDM” on page 179.
• Edit certain auxiliary files and information sources, as described in “Auxiliary Filesand Information Sources” on page 180.
The HCM Data Mart contains four types of tables:
• Detail tables contain all the data that is in the HCM-specific detail data store tables,but it is organized in a different way. Data from the HCM-specific detail data storetables flows into the detail tables first.
• Master tables combine the data from the detail tables in various ways and also includeadditional columns that contain calculated values. These tables are optimized forreporting and querying.
• Summary tables contain summarized data from the master tables, with less historicaldetail.
• Cubes contain data from the master and summary tables that is reorganized into amultidimensional structure. HCM cubes can be viewed by means of information maps,using SAS Web OLAP Viewer or SAS Web Report Studio.
Typically, all of the SAS Data Integration Studio jobs that have either output or input inthe HCM Data Mart are located in Products ð SAS Human Capital Management ð 5.2Jobs metadata folder on the Folders tab.
Moving Data from the Detail Data Store to the HCM Data Mart 185
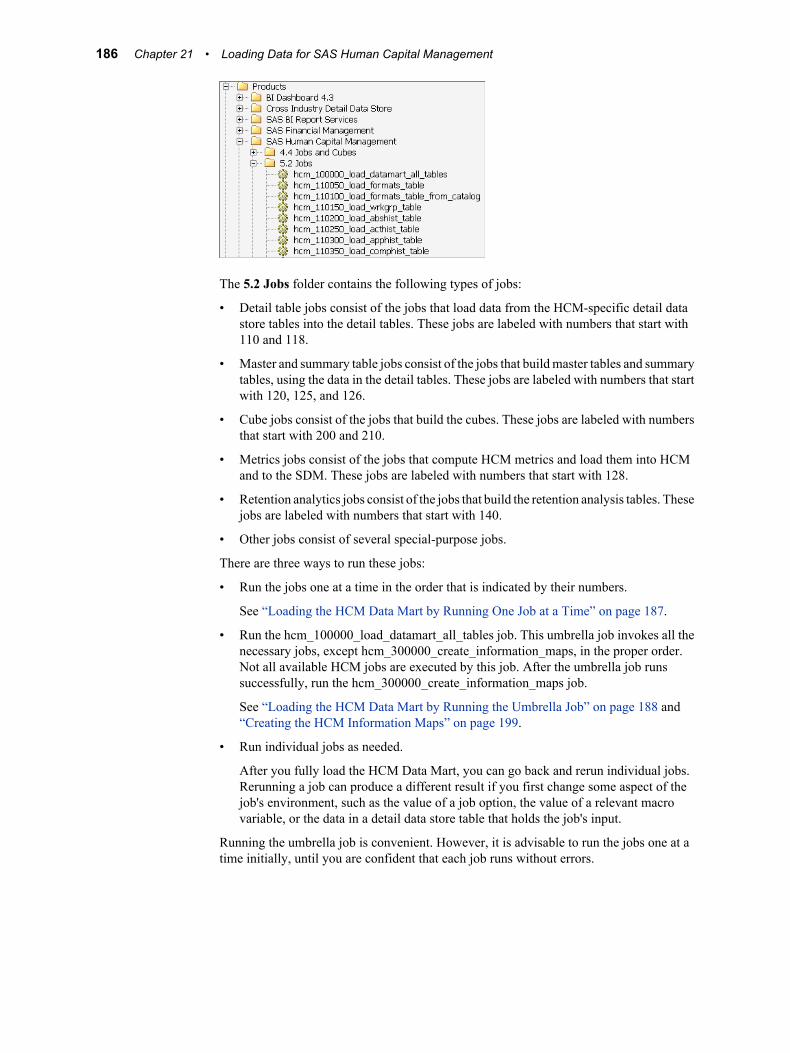
The 5.2 Jobs folder contains the following types of jobs:
• Detail table jobs consist of the jobs that load data from the HCM-specific detail datastore tables into the detail tables. These jobs are labeled with numbers that start with110 and 118.
• Master and summary table jobs consist of the jobs that build master tables and summarytables, using the data in the detail tables. These jobs are labeled with numbers that startwith 120, 125, and 126.
• Cube jobs consist of the jobs that build the cubes. These jobs are labeled with numbersthat start with 200 and 210.
• Metrics jobs consist of the jobs that compute HCM metrics and load them into HCMand to the SDM. These jobs are labeled with numbers that start with 128.
• Retention analytics jobs consist of the jobs that build the retention analysis tables. Thesejobs are labeled with numbers that start with 140.
• Other jobs consist of several special-purpose jobs.
There are three ways to run these jobs:
• Run the jobs one at a time in the order that is indicated by their numbers.
See “Loading the HCM Data Mart by Running One Job at a Time” on page 187.
• Run the hcm_100000_load_datamart_all_tables job. This umbrella job invokes all thenecessary jobs, except hcm_300000_create_information_maps, in the proper order.Not all available HCM jobs are executed by this job. After the umbrella job runssuccessfully, run the hcm_300000_create_information_maps job.
See “Loading the HCM Data Mart by Running the Umbrella Job” on page 188 and“Creating the HCM Information Maps” on page 199.
• Run individual jobs as needed.
After you fully load the HCM Data Mart, you can go back and rerun individual jobs.Rerunning a job can produce a different result if you first change some aspect of thejob's environment, such as the value of a job option, the value of a relevant macrovariable, or the data in a detail data store table that holds the job's input.
Running the umbrella job is convenient. However, it is advisable to run the jobs one at atime initially, until you are confident that each job runs without errors.
186 Chapter 21 • Loading Data for SAS Human Capital Management
Loading the HCM Data Mart by Running One Job at a Time
Run the Detail, Master, and Summary Table JobsTo load the HCM Data Mart by running one job at a time, run the jobs in the order that isspecified by these topics. Run the jobs specified in the following topics in the Detail TableJobs folder in the order that is indicated by their numbers. Run jobs 110xxx through126xxx. A job should be run only if there is data available to load the target table for thatjob.
Create HCM Measures and MetricsRun one or more of the jobs whose numbers begin with 128. For a detailed discussion ofHCM metrics, see “Loading HCM Metrics into a Metric Table” on page 197.
Run the hcm_129990_load_sas_hierarchy_mapping_table JobRun the hcm_129990_load_sas_hierarchy_mapping_table job.
Run the Cube JobsCube jobs process the data in the master and summary tables and use it to create the cubes.Run the jobs with numbers that begin with 200 or 210. The hcm_200000_create_all_cubesjob can be run in the place of the individual cube jobs after the individual cube jobs havebeen successfully run. The individual cube jobs can be run in any order.
The first time you run the cube jobs, edit the %PREBUILD macro to set this option:
%let cube_delete_type=DELETE
After you run the cube jobs for the first time, edit the macro again and set the delete typeto the default value:
%let cube_delete_type=DELETE_PHYSICAL
For more information about the %PREBUILD macro, see “Editing the PREBUILD.SASMacro File” on page 184.
Run the Retention Analysis JobsRetention Analysis Jobs are the jobs whose numbers start with 140. These are optional jobsfor the Retention Analysis, which is a separately available analysis for SAS Human CapitalManagement.
Create HCM Information MapsAfter you load all the HCM data, you must create the HCM information maps. For details,see “Creating the HCM Information Maps” on page 199.
Refresh the CacheRun the job hcm_900000_refresh_cache. This job refreshes the HCM Cache, which isassociated with HCM Web Application. The job should be run any time that one or moreother jobs have been run.
Moving Data from the Detail Data Store to the HCM Data Mart 187

Loading the HCM Data Mart by Running the Umbrella Job
Overview of Loading the HCM Data Mart by Running the Umbrella JobIf you run the hcm_100000_load_datamart_all_tables umbrella job, then there is anadditional preparatory step: you must deploy for scheduling all the jobs that are under theumbrella.
Set Up a Deployment DirectoryBefore you can deploy the jobs for scheduling, a deployment directory must be set up. Toensure that you have a suitable deployment directory, do the following:
1. Launch SAS Management Console.
2. Under Environment Management, right-click Schedule Manager and selectDeployment Directories from the pop-up menu.
The Deployment Directories window appears.
3. In the Application Server field of the Deployment Directories window, selectSASApp or SASMain. Only one of these application servers will be listed.
4. Check for the existence of a directory named HCM Jobs. If the HCM Jobs directorydoes not exist, click New. In the New Directory window, name the directory HCMJobs. For the directory path, click Browse to select the following path:SAS–config-dir\Lev1\Applications\SASHumanCapitalManagement5.2\SASCode\Jobs\Deploy. This is the default directory path for deploying HCM jobs. If adifferent path is used, change the path that is specified in the Umbrella Job to this path.
5. Give the SAS Server Users group full access to this directory.
To view or change the path that is specified in the hcm_100000_load_datamart_all_tablesjob:
1. On the Folders tab, double-click the hcm_100000_load_datamart_all_tables umbrellajob in the Products ð SAS Human Capital Management ð 5.2 Jobs folder.
2. In the job window, double-click the transformation. The transformation propertieswindow appears.
3. In the transformation properties window, select the Code tab to display the path.
188 Chapter 21 • Loading Data for SAS Human Capital Management
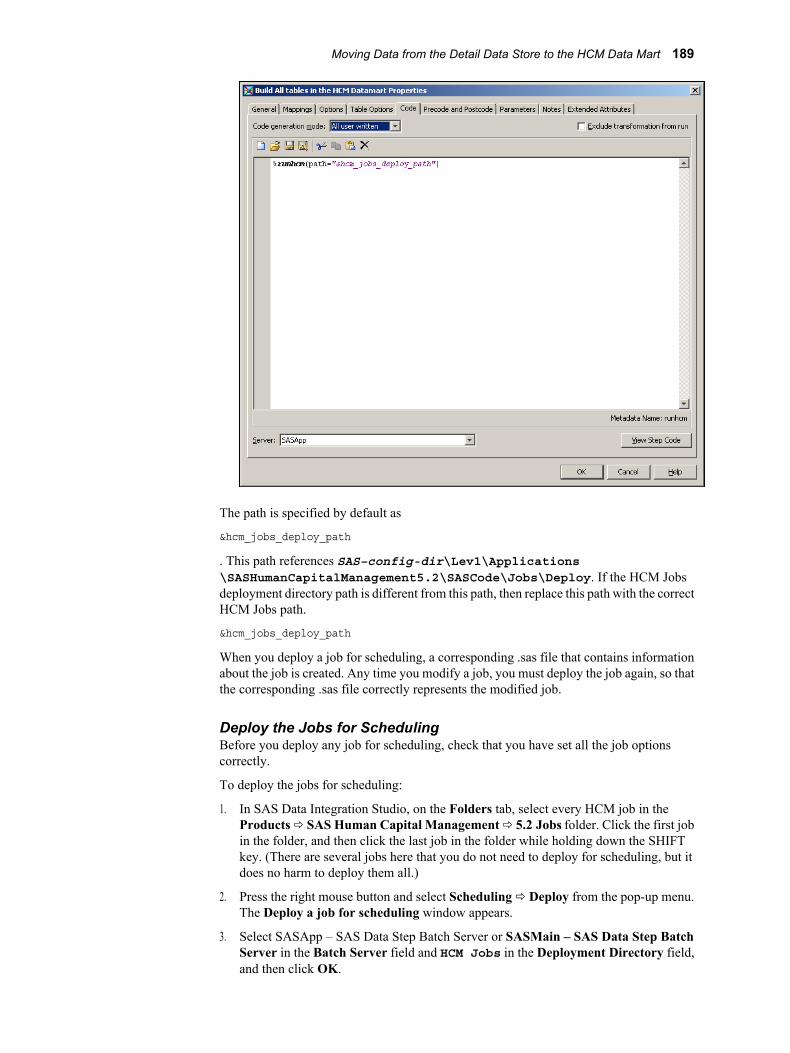
The path is specified by default as
&hcm_jobs_deploy_path
. This path references SAS–config-dir\Lev1\Applications\SASHumanCapitalManagement5.2\SASCode\Jobs\Deploy. If the HCM Jobsdeployment directory path is different from this path, then replace this path with the correctHCM Jobs path.
&hcm_jobs_deploy_path
When you deploy a job for scheduling, a corresponding .sas file that contains informationabout the job is created. Any time you modify a job, you must deploy the job again, so thatthe corresponding .sas file correctly represents the modified job.
Deploy the Jobs for SchedulingBefore you deploy any job for scheduling, check that you have set all the job optionscorrectly.
To deploy the jobs for scheduling:
1. In SAS Data Integration Studio, on the Folders tab, select every HCM job in theProducts ð SAS Human Capital Management ð 5.2 Jobs folder. Click the first jobin the folder, and then click the last job in the folder while holding down the SHIFTkey. (There are several jobs here that you do not need to deploy for scheduling, but itdoes no harm to deploy them all.)
2. Press the right mouse button and select Scheduling ð Deploy from the pop-up menu.The Deploy a job for scheduling window appears.
3. Select SASApp – SAS Data Step Batch Server or SASMain – SAS Data Step BatchServer in the Batch Server field and HCM Jobs in the Deployment Directory field,and then click OK.
Moving Data from the Detail Data Store to the HCM Data Mart 189
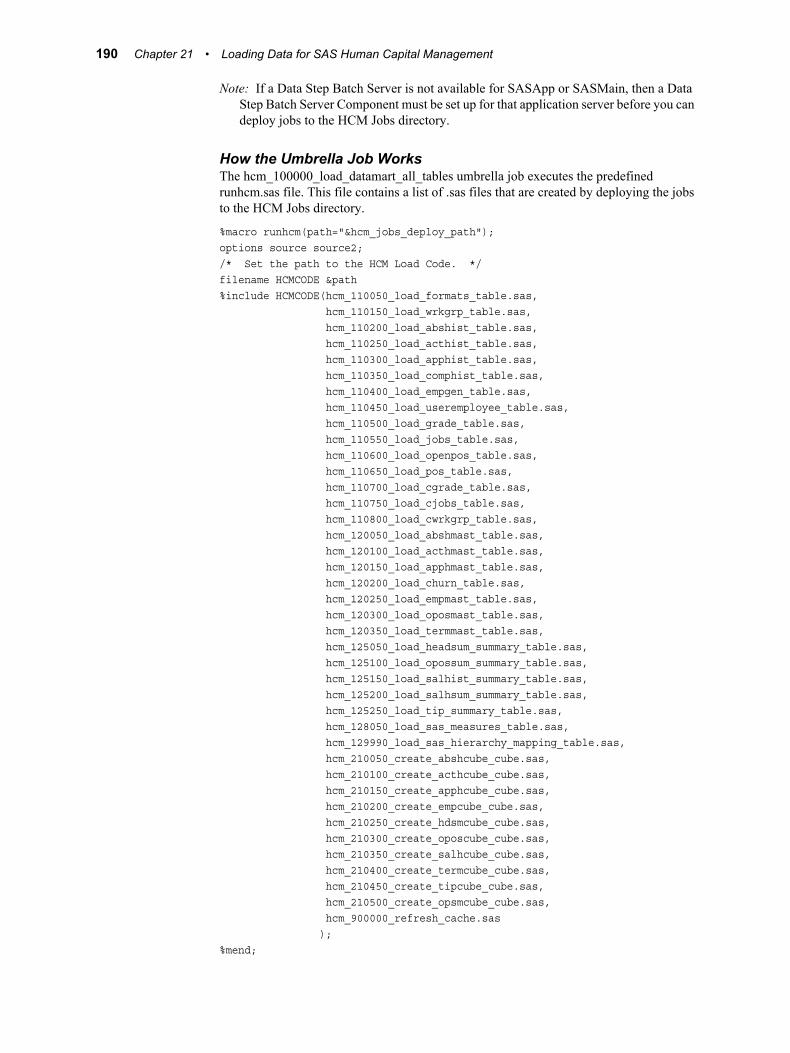
Note: If a Data Step Batch Server is not available for SASApp or SASMain, then a DataStep Batch Server Component must be set up for that application server before you candeploy jobs to the HCM Jobs directory.
How the Umbrella Job WorksThe hcm_100000_load_datamart_all_tables umbrella job executes the predefinedrunhcm.sas file. This file contains a list of .sas files that are created by deploying the jobsto the HCM Jobs directory.
%macro runhcm(path="&hcm_jobs_deploy_path");options source source2;/* Set the path to the HCM Load Code. */filename HCMCODE &path%include HCMCODE(hcm_110050_load_formats_table.sas, hcm_110150_load_wrkgrp_table.sas, hcm_110200_load_abshist_table.sas, hcm_110250_load_acthist_table.sas, hcm_110300_load_apphist_table.sas, hcm_110350_load_comphist_table.sas, hcm_110400_load_empgen_table.sas, hcm_110450_load_useremployee_table.sas, hcm_110500_load_grade_table.sas, hcm_110550_load_jobs_table.sas, hcm_110600_load_openpos_table.sas, hcm_110650_load_pos_table.sas, hcm_110700_load_cgrade_table.sas, hcm_110750_load_cjobs_table.sas, hcm_110800_load_cwrkgrp_table.sas, hcm_120050_load_abshmast_table.sas, hcm_120100_load_acthmast_table.sas, hcm_120150_load_apphmast_table.sas, hcm_120200_load_churn_table.sas, hcm_120250_load_empmast_table.sas, hcm_120300_load_oposmast_table.sas, hcm_120350_load_termmast_table.sas, hcm_125050_load_headsum_summary_table.sas, hcm_125100_load_opossum_summary_table.sas, hcm_125150_load_salhist_summary_table.sas, hcm_125200_load_salhsum_summary_table.sas, hcm_125250_load_tip_summary_table.sas, hcm_128050_load_sas_measures_table.sas, hcm_129990_load_sas_hierarchy_mapping_table.sas, hcm_210050_create_abshcube_cube.sas, hcm_210100_create_acthcube_cube.sas, hcm_210150_create_apphcube_cube.sas, hcm_210200_create_empcube_cube.sas, hcm_210250_create_hdsmcube_cube.sas, hcm_210300_create_oposcube_cube.sas, hcm_210350_create_salhcube_cube.sas, hcm_210400_create_termcube_cube.sas, hcm_210450_create_tipcube_cube.sas, hcm_210500_create_opsmcube_cube.sas, hcm_900000_refresh_cache.sas );%mend;
190 Chapter 21 • Loading Data for SAS Human Capital Management
To run the hcm_100000_load_datamart_all_tables job is to execute all the jobs that arerepresented in this list, in the listed order. You can edit the runhcm.sas macro and modifythis list to change the jobs that are executed when running thehcm_100000_load_datamart_all_tables job.
After you load all HCM data, you must create the HCM information maps. For details, see“Creating the HCM Information Maps” on page 199.
Loading Certain HCM Data Mart Tables Directly
Overview of Loading Certain HCM Data Mart Tables DirectlyThe following tables in the HCM Data Mart must be loaded directly, by means of jobs thatyou write:
• FACTORSITE
• HCBNCHMRK
There is no route to these tables through the detail data store, and there are no predefinedjobs for loading them.
The FACTORSITE TableThe FACTORSITE table is designed to contain values of certain factors that occur in theformulas that are used to calculate HCM metrics.
Typically, the following factors are extracted and populated from the HCM Data Mart whenthe HCM metrics are calculated or recalculated:
• Comp
• CompCont
• CompExec
• CompMgr
• CompReg
• CompStaff
• CompVar
• CompWFOnP
• FTE
• FTECont
• FTEContWFOffP
• FTEContWFOnP
• FTEEx
• FTENonex
• FTEReg
• FTERegWFOffP
• FTERegWFOnP
• FTEWFOffP
• FTEWFOnP
Moving Data from the Detail Data Store to the HCM Data Mart 191
• HC
• HCCont
• HCContEx
• HCContNonex
• HCContWFOffP
• HCContWFOnP
• HCReg
• HCRegEx
• HCRegNonex
• HCRegWFOffP
• HCRegWFOnP
• HCWFOffP
• HCWFOnP
• Hires
• HiresEx
• HiresExec
• HiresMgr
• HiresNonex
• HiresStaff
• Seps
• SepsEx
• SepsInvol
• SepsInvolEx
• SepsInvolNonex
• SepsNonex
• SepsVol
• SepsVol0to1
• SepsVol10plus
• SepsVol1to3
• SepsVol3to5
• SepsVol5to10
• SepsVolEx
• SepsVolEx0to1
• SepsVolEx10plus
• SepsVolEx1to3
• SepsVolEx3to5
• SepsVolEx5to10
192 Chapter 21 • Loading Data for SAS Human Capital Management
• SepsVolNonex
• SepsVolNonex0to1
• SepsVolNonex10plus
• SepsVolNonex1to3
• SepsVolNonex3to5
• SepsVolNonex5to10
• Tenure
• TenureEx
• TenureNonex
• Xfrs
• XfrsEx
• XfrsNonex
Depending on the jobs that are run and the data that is available, not all these factors mightbe populated. Because these factors are extracted and populated from the HCM Data Mart,they should not be added to the FACTORSITE table. However, many factors that are usedby the predefined metric formulas are not populated from the HCM Data Mart. In addition,a site can create new metrics that reference these factors. To populate these factors, thefactors must be loaded directly into the FACTORSITE table. In addition, new factors canbe loaded, as required, that are not referenced by existing metrics, and then new measurescan be created to incorporate those factors in their metric formulas.
You can use SAS Human Capital Management without loading any data into this table. Ifthe FACTORSITE table is empty, then any formula that contains a factor whose value isnot populated is ignored. In that case, the metric that depends on the factor is not computed.This is the only consequence of leaving the FACTORSITE table empty.
The FACTORSITE table has the following columns:
1. VALID_DT contains the date. The date format can vary based on the MySQL installedenvironment.
2. MEASURE_NM, with format varchar(100), contains the names of parameters, orfactors, that are used in formulas for computing metrics. The names in this table mustfollow SAS naming conventions, and they must match exactly the names of the factorsthat are used in metric formulas, predefined or site-defined, that are populated from theHCM Data Mart. Include any factor names that occur in formulas.
3. MEASURE_VALUE_NO, with format decimal(15,2), contains the numeric values offactors to two decimal places.
4. MEASURE_DESC, with format varchar(100), contains descriptions of the parameters.The information in this column is not used by the software.
In each row of the FACTORSITE table, the VALID_DT value designates the first day ofthe time period to which the MEASURE_VALUE_NO value applies. Pairs of successiveVALID_DT values from pairs of records that have the same MEASURE_NM value areused to correctly associate the MEASURE_VALUE_NO values with other time-dependentdata values.
For any site-defined factors that are added to the FACTORSITE table, a factor with thesame name must exist in the SAS_MEASURE_FORMULAS table, so that MetricFormulas can reference those factors. If SAS_MEASURE_FORMULAS does not containa factor that has been added to FACTORSITE, then the factor must be added. Run the
Moving Data from the Detail Data Store to the HCM Data Mart 193
following SQL code for each factor that needs to be added toSAS_MEASURE_FORMULAS:
Insert into hcm.SAS_MEASURE_FORMULAS (VARIABLE, SAS_LABEL, DESCRIPTION, SAS_FORMAT) Values ('FactorName1','Factor1 Label','Factor1 Description','');
Replace FactorName1 with the factor name. Replace Factor1 Label with the factor label.Replace Factor1 Description with the factor description.
The HCBNCHMRK TableThe HCBNCHMRK table contains Saratoga benchmark data that is available from theSaratoga Institute.
You can use SAS Human Capital Management without loading any data into this table. Ifthe HCBNCHMRK table is empty, then the metric tables that you load from SAS HumanCapital Management will not contain any Saratoga benchmark values. The metric tablecolumns whose purpose is to hold Saratoga benchmark values will be empty. This is theonly consequence of leaving the HCBNCHMRK table empty.
The column names of the HCBNCHMRK table are identical to the names of correspondingcolumns in the table of benchmark data that the Saratoga Institute delivers. Write a job thatloads each of the following columns from the identically named column in the Saratogafile:
1. ELEMENT_BOOK_NM, with format varchar(255), contains measure names, in theterminology of SAS Solutions Services. Every name that is used by the Saratogainstitute is provided in the SAS_MEASURE table.
2. ELEMENT_ID, with format varchar(11), contains Saratoga IDs.
3. FORMAT_DS, with format decimal(10,2), contains Saratoga formats.
4. MEAN_VAL, with format decimal(10,2), contains mean values.
5. MEDIAN_VAL, with format decimal(10,2), contains median values.
6. P10_VAL, with format decimal(10,2), contains tenth percentile values.
7. P25_VAL, with format decimal(10,2), contains twenty-fifth percentile values.
8. P75_VAL, with format decimal(10,2), contains seventy-fifth percentile values.
9. P90_VAL, with format decimal(10,2), contains ninetieth percentile values.
10. PERIOD_DS, with format varchar(100), contains period descriptions.
11. PERIOD_YEAR_NUM, with format decimal(10,0), contains 4-digit year values.
12. SECTION_DS, with format varchar(100), contains measure categories as defined bythe Saratoga Institute.
13. STAT_DS, with format varchar(100), contains industry types as defined by theSaratoga Institute. These industry types are the possible values of the STGACUT macrovariable. See Chapter 23, “Macro Variables in the PREBUILD.SAS Macro File,” onpage 209.
14. STAT_TYPE_DS, with format varchar(30), contains demographic cuts as defined bythe Saratoga Institute. These demographic cuts are the possible values of theSTGACUTA macro variable. See Chapter 23, “Macro Variables in thePREBUILD.SAS Macro File,” on page 209.
194 Chapter 21 • Loading Data for SAS Human Capital Management
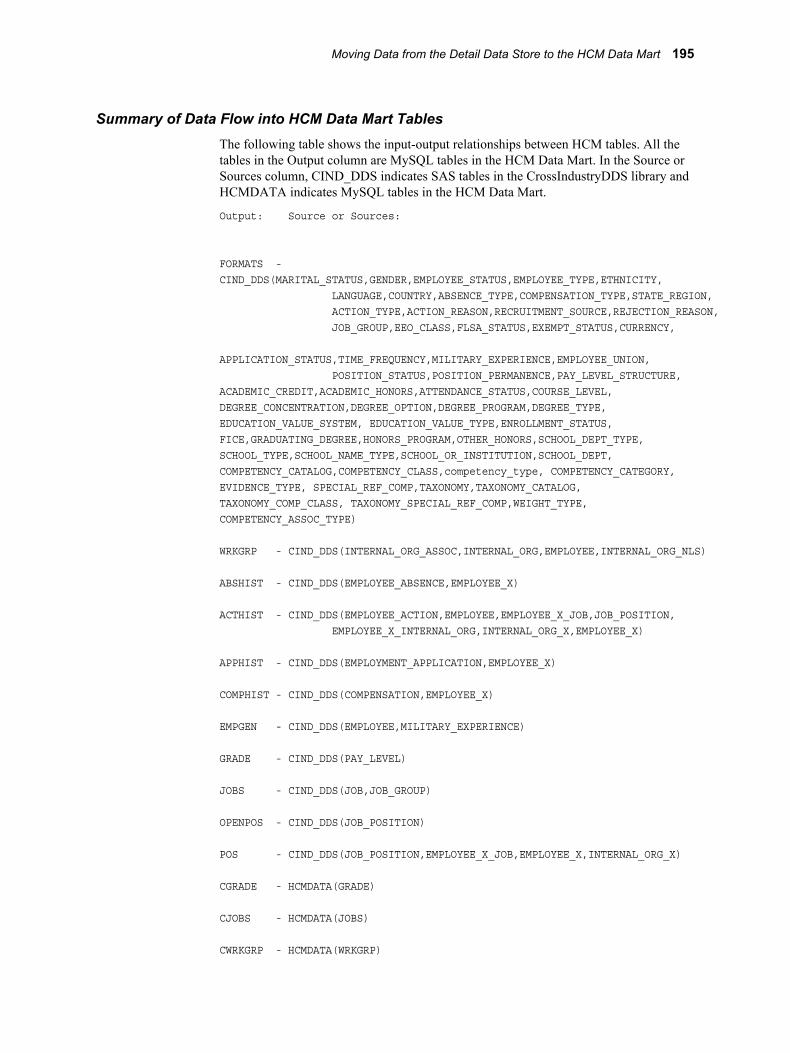
Summary of Data Flow into HCM Data Mart TablesThe following table shows the input-output relationships between HCM tables. All thetables in the Output column are MySQL tables in the HCM Data Mart. In the Source orSources column, CIND_DDS indicates SAS tables in the CrossIndustryDDS library andHCMDATA indicates MySQL tables in the HCM Data Mart.
Output: Source or Sources:
FORMATS -CIND_DDS(MARITAL_STATUS,GENDER,EMPLOYEE_STATUS,EMPLOYEE_TYPE,ETHNICITY, LANGUAGE,COUNTRY,ABSENCE_TYPE,COMPENSATION_TYPE,STATE_REGION, ACTION_TYPE,ACTION_REASON,RECRUITMENT_SOURCE,REJECTION_REASON, JOB_GROUP,EEO_CLASS,FLSA_STATUS,EXEMPT_STATUS,CURRENCY, APPLICATION_STATUS,TIME_FREQUENCY,MILITARY_EXPERIENCE,EMPLOYEE_UNION, POSITION_STATUS,POSITION_PERMANENCE,PAY_LEVEL_STRUCTURE,ACADEMIC_CREDIT,ACADEMIC_HONORS,ATTENDANCE_STATUS,COURSE_LEVEL,DEGREE_CONCENTRATION,DEGREE_OPTION,DEGREE_PROGRAM,DEGREE_TYPE,EDUCATION_VALUE_SYSTEM, EDUCATION_VALUE_TYPE,ENROLLMENT_STATUS,FICE,GRADUATING_DEGREE,HONORS_PROGRAM,OTHER_HONORS,SCHOOL_DEPT_TYPE,SCHOOL_TYPE,SCHOOL_NAME_TYPE,SCHOOL_OR_INSTITUTION,SCHOOL_DEPT,COMPETENCY_CATALOG,COMPETENCY_CLASS,competency_type, COMPETENCY_CATEGORY, EVIDENCE_TYPE, SPECIAL_REF_COMP,TAXONOMY,TAXONOMY_CATALOG,TAXONOMY_COMP_CLASS, TAXONOMY_SPECIAL_REF_COMP,WEIGHT_TYPE, COMPETENCY_ASSOC_TYPE)
WRKGRP - CIND_DDS(INTERNAL_ORG_ASSOC,INTERNAL_ORG,EMPLOYEE,INTERNAL_ORG_NLS)
ABSHIST - CIND_DDS(EMPLOYEE_ABSENCE,EMPLOYEE_X)
ACTHIST - CIND_DDS(EMPLOYEE_ACTION,EMPLOYEE,EMPLOYEE_X_JOB,JOB_POSITION, EMPLOYEE_X_INTERNAL_ORG,INTERNAL_ORG_X,EMPLOYEE_X)
APPHIST - CIND_DDS(EMPLOYMENT_APPLICATION,EMPLOYEE_X)
COMPHIST - CIND_DDS(COMPENSATION,EMPLOYEE_X)
EMPGEN - CIND_DDS(EMPLOYEE,MILITARY_EXPERIENCE)
GRADE - CIND_DDS(PAY_LEVEL)
JOBS - CIND_DDS(JOB,JOB_GROUP)
OPENPOS - CIND_DDS(JOB_POSITION)
POS - CIND_DDS(JOB_POSITION,EMPLOYEE_X_JOB,EMPLOYEE_X,INTERNAL_ORG_X)
CGRADE - HCMDATA(GRADE)
CJOBS - HCMDATA(JOBS)
CWRKGRP - HCMDATA(WRKGRP)
Moving Data from the Detail Data Store to the HCM Data Mart 195
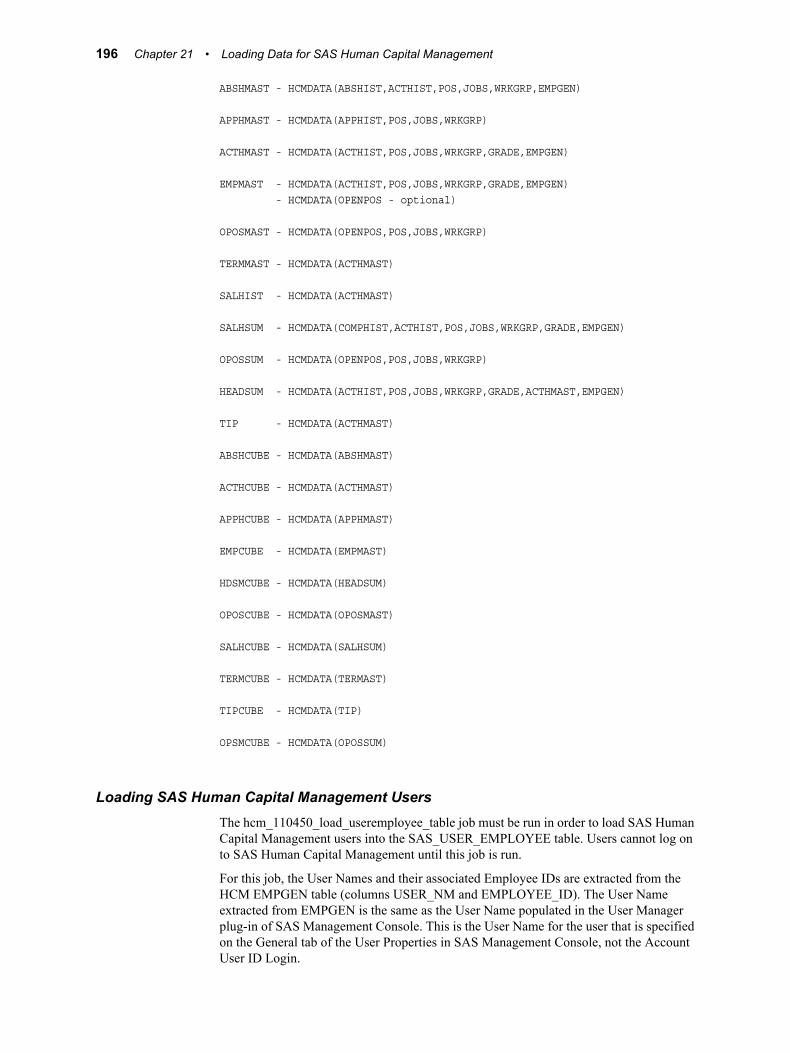
ABSHMAST - HCMDATA(ABSHIST,ACTHIST,POS,JOBS,WRKGRP,EMPGEN)
APPHMAST - HCMDATA(APPHIST,POS,JOBS,WRKGRP)
ACTHMAST - HCMDATA(ACTHIST,POS,JOBS,WRKGRP,GRADE,EMPGEN)
EMPMAST - HCMDATA(ACTHIST,POS,JOBS,WRKGRP,GRADE,EMPGEN) - HCMDATA(OPENPOS - optional)
OPOSMAST - HCMDATA(OPENPOS,POS,JOBS,WRKGRP)
TERMMAST - HCMDATA(ACTHMAST)
SALHIST - HCMDATA(ACTHMAST)
SALHSUM - HCMDATA(COMPHIST,ACTHIST,POS,JOBS,WRKGRP,GRADE,EMPGEN)
OPOSSUM - HCMDATA(OPENPOS,POS,JOBS,WRKGRP)
HEADSUM - HCMDATA(ACTHIST,POS,JOBS,WRKGRP,GRADE,ACTHMAST,EMPGEN)
TIP - HCMDATA(ACTHMAST)
ABSHCUBE - HCMDATA(ABSHMAST)
ACTHCUBE - HCMDATA(ACTHMAST)
APPHCUBE - HCMDATA(APPHMAST)
EMPCUBE - HCMDATA(EMPMAST)
HDSMCUBE - HCMDATA(HEADSUM)
OPOSCUBE - HCMDATA(OPOSMAST)
SALHCUBE - HCMDATA(SALHSUM)
TERMCUBE - HCMDATA(TERMAST)
TIPCUBE - HCMDATA(TIP)
OPSMCUBE - HCMDATA(OPOSSUM)
Loading SAS Human Capital Management UsersThe hcm_110450_load_useremployee_table job must be run in order to load SAS HumanCapital Management users into the SAS_USER_EMPLOYEE table. Users cannot log onto SAS Human Capital Management until this job is run.
For this job, the User Names and their associated Employee IDs are extracted from theHCM EMPGEN table (columns USER_NM and EMPLOYEE_ID). The User Nameextracted from EMPGEN is the same as the User Name populated in the User Managerplug-in of SAS Management Console. This is the User Name for the user that is specifiedon the General tab of the User Properties in SAS Management Console, not the AccountUser ID Login.
196 Chapter 21 • Loading Data for SAS Human Capital Management
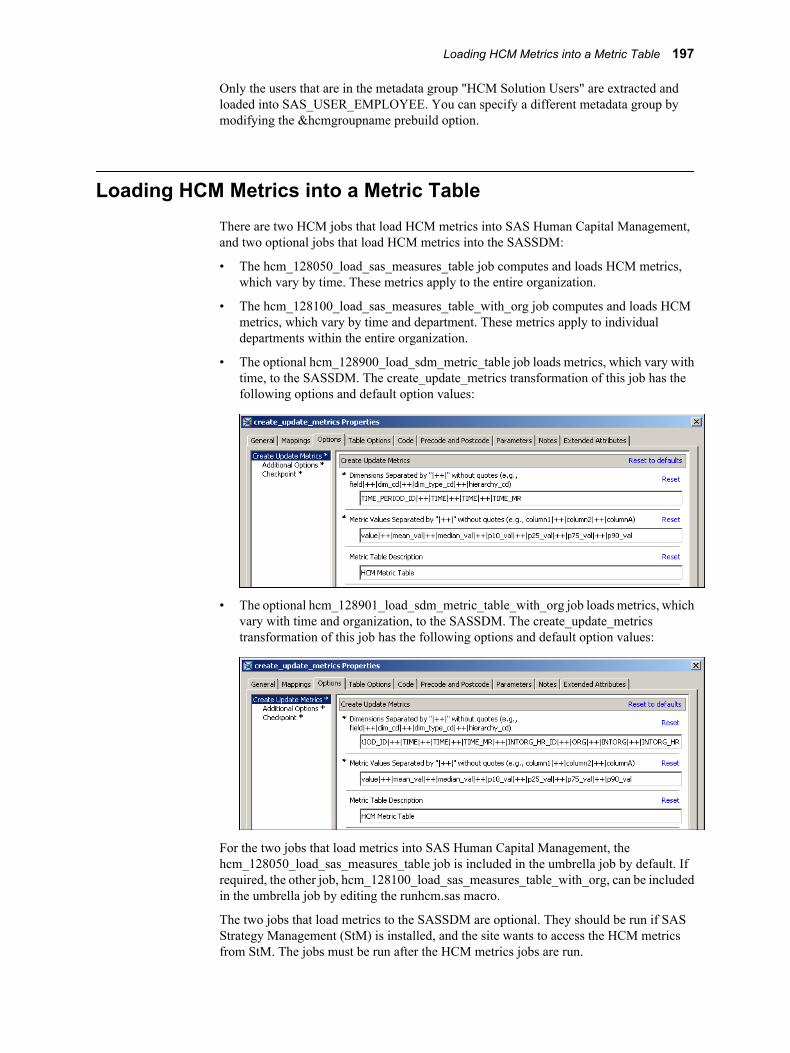
Only the users that are in the metadata group "HCM Solution Users" are extracted andloaded into SAS_USER_EMPLOYEE. You can specify a different metadata group bymodifying the &hcmgroupname prebuild option.
Loading HCM Metrics into a Metric TableThere are two HCM jobs that load HCM metrics into SAS Human Capital Management,and two optional jobs that load HCM metrics into the SASSDM:
• The hcm_128050_load_sas_measures_table job computes and loads HCM metrics,which vary by time. These metrics apply to the entire organization.
• The hcm_128100_load_sas_measures_table_with_org job computes and loads HCMmetrics, which vary by time and department. These metrics apply to individualdepartments within the entire organization.
• The optional hcm_128900_load_sdm_metric_table job loads metrics, which vary withtime, to the SASSDM. The create_update_metrics transformation of this job has thefollowing options and default option values:
• The optional hcm_128901_load_sdm_metric_table_with_org job loads metrics, whichvary with time and organization, to the SASSDM. The create_update_metricstransformation of this job has the following options and default option values:
For the two jobs that load metrics into SAS Human Capital Management, thehcm_128050_load_sas_measures_table job is included in the umbrella job by default. Ifrequired, the other job, hcm_128100_load_sas_measures_table_with_org, can be includedin the umbrella job by editing the runhcm.sas macro.
The two jobs that load metrics to the SASSDM are optional. They should be run if SASStrategy Management (StM) is installed, and the site wants to access the HCM metricsfrom StM. The jobs must be run after the HCM metrics jobs are run.
Loading HCM Metrics into a Metric Table 197
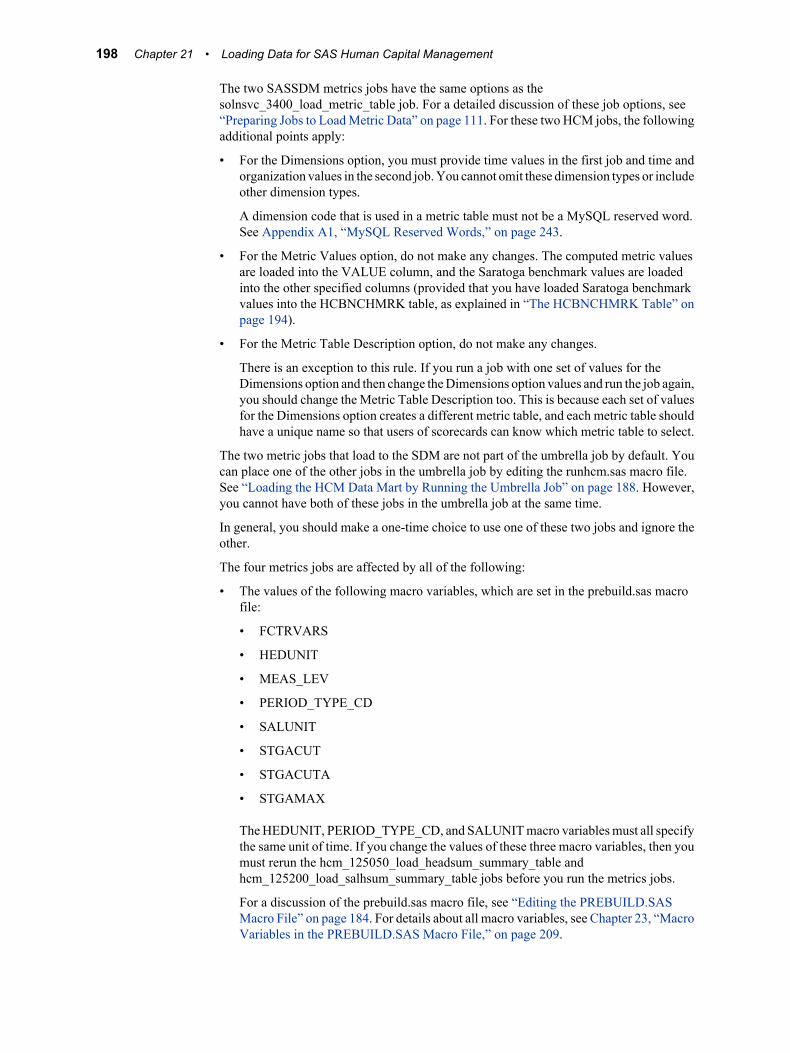
The two SASSDM metrics jobs have the same options as thesolnsvc_3400_load_metric_table job. For a detailed discussion of these job options, see“Preparing Jobs to Load Metric Data” on page 111. For these two HCM jobs, the followingadditional points apply:
• For the Dimensions option, you must provide time values in the first job and time andorganization values in the second job. You cannot omit these dimension types or includeother dimension types.
A dimension code that is used in a metric table must not be a MySQL reserved word.See Appendix A1, “MySQL Reserved Words,” on page 243.
• For the Metric Values option, do not make any changes. The computed metric valuesare loaded into the VALUE column, and the Saratoga benchmark values are loadedinto the other specified columns (provided that you have loaded Saratoga benchmarkvalues into the HCBNCHMRK table, as explained in “The HCBNCHMRK Table” onpage 194).
• For the Metric Table Description option, do not make any changes.
There is an exception to this rule. If you run a job with one set of values for theDimensions option and then change the Dimensions option values and run the job again,you should change the Metric Table Description too. This is because each set of valuesfor the Dimensions option creates a different metric table, and each metric table shouldhave a unique name so that users of scorecards can know which metric table to select.
The two metric jobs that load to the SDM are not part of the umbrella job by default. Youcan place one of the other jobs in the umbrella job by editing the runhcm.sas macro file.See “Loading the HCM Data Mart by Running the Umbrella Job” on page 188. However,you cannot have both of these jobs in the umbrella job at the same time.
In general, you should make a one-time choice to use one of these two jobs and ignore theother.
The four metrics jobs are affected by all of the following:
• The values of the following macro variables, which are set in the prebuild.sas macrofile:
• FCTRVARS
• HEDUNIT
• MEAS_LEV
• PERIOD_TYPE_CD
• SALUNIT
• STGACUT
• STGACUTA
• STGAMAX
The HEDUNIT, PERIOD_TYPE_CD, and SALUNIT macro variables must all specifythe same unit of time. If you change the values of these three macro variables, then youmust rerun the hcm_125050_load_headsum_summary_table andhcm_125200_load_salhsum_summary_table jobs before you run the metrics jobs.
For a discussion of the prebuild.sas macro file, see “Editing the PREBUILD.SASMacro File” on page 184. For details about all macro variables, see Chapter 23, “MacroVariables in the PREBUILD.SAS Macro File,” on page 209.
198 Chapter 21 • Loading Data for SAS Human Capital Management
• The metric formulas defined in SAS Human Capital Management. For a list of all HCMmeasures and their metric formulas, log on to SAS Human Capital Management as anadministrator.
Note: A list of all measures is displayed, whether or not they are populated with data.These measures can be modified, and new measures can be added.
• The FACTORSITE table, which contains the numeric values of certain parameters thatare used in metrics formulas. See “The FACTORSITE Table” on page 191.
Creating the HCM Information MapsThe HCM information maps enable users to view the data in the SAS Human CapitalManagement master tables and cubes using SAS Web Report Studio or SAS Web OLAPViewer. There is an information map for each master table and each cube.
To create the HCM information maps, run the hcm_300000_create_information_maps job.
Creating the HCM Information Maps 199

200 Chapter 21 • Loading Data for SAS Human Capital Management

Chapter 22
Modifying the Data Model for SASHuman Capital Management
Overview of Modifying the HCM Data Model . . . . . . . . . . . . . . . . . . . . . . . . . . . . . 201
Adding a Column . . . . . . . . . . . . . . . . . . . . . . . . . . . . . . . . . . . . . . . . . . . . . . . . . . . . 201Overview of Adding a Column . . . . . . . . . . . . . . . . . . . . . . . . . . . . . . . . . . . . . . . . 201Adding Columns to Physical Tables . . . . . . . . . . . . . . . . . . . . . . . . . . . . . . . . . . . . 202Updating Table Metadata . . . . . . . . . . . . . . . . . . . . . . . . . . . . . . . . . . . . . . . . . . . . 203Modifying Jobs . . . . . . . . . . . . . . . . . . . . . . . . . . . . . . . . . . . . . . . . . . . . . . . . . . . . 204
Changing the Character Length of a Column . . . . . . . . . . . . . . . . . . . . . . . . . . . . . 204
Adding a Table . . . . . . . . . . . . . . . . . . . . . . . . . . . . . . . . . . . . . . . . . . . . . . . . . . . . . . 205
Adding a Cube . . . . . . . . . . . . . . . . . . . . . . . . . . . . . . . . . . . . . . . . . . . . . . . . . . . . . . . 206
Overview of Modifying the HCM Data ModelYou can modify the HCM data model in three main ways:
• Adding columns to existing tables
• Increasing the character length of existing columns
• Adding whole new tables
Adding a Column
Overview of Adding a ColumnAdding a column to the data model involves three primary activities:
1. adding columns to the physical tables that will hold the additional data
2. updating table metadata for those tables
3. modifying the relevant jobs to handle the additional data
You can accomplish these tasks in more than one way. Moreover, the details of what youmust do can vary from case to case. Here is an outline of the process of adding a column.
201
Adding Columns to Physical TablesIn every case, you must add an appropriate column to the physical staging table and to thecorresponding physical detail data store table. You can add these columns using SAS codethat you write. Before you modify any physical table, make a backup copy.
Staging tables and detail data store tables are in the following locations:SAS-config-dir\Lev1\SASApp\Data\SolutionsServices\stagedds and SAS-config-dir:\SAS\Config\Lev1\SASApp\Data\SolutionsServices\DDSData.
If there are corresponding detail data store tables in the ConformedDataMart folder, thenany columns that have been added to detail data store tables must be added to theircorresponding tables in the ConformedDataMart folder. The location for this folder is SAS-config-dir\Lev1\SASApp\Data\SolutionsServices\ConformedDataMart.
For some detail data store tables, the DDSData directory also contains a table whose nameis the name of the detail data store table followed by the characters _X. For example, theEMPLOYEE table is accompanied by the EMPLOYEE_X table. If you are adding aprimary key column to such a detail data store table, then you must also add the column tothe accompanying _X table.
In addition, you might need to add an appropriate column to the HCM Data Mart detailtable (or tables) that the detail data store table feeds. This step is required for a given detailtable if and only if the job that loads the table does not call user-written code. If the jobthat loads a given detail table calls user-written code, then the job automatically recreatesthat detail table to reflect all the columns in all the detail data store tables that feed it. Forexample, if you add columns that map into the ACTHIST detail table, then you do not haveto add a column to ACTHIST because the job that loads ACTHIST calls user-written code:
202 Chapter 22 • Modifying the Data Model for SAS Human Capital Management
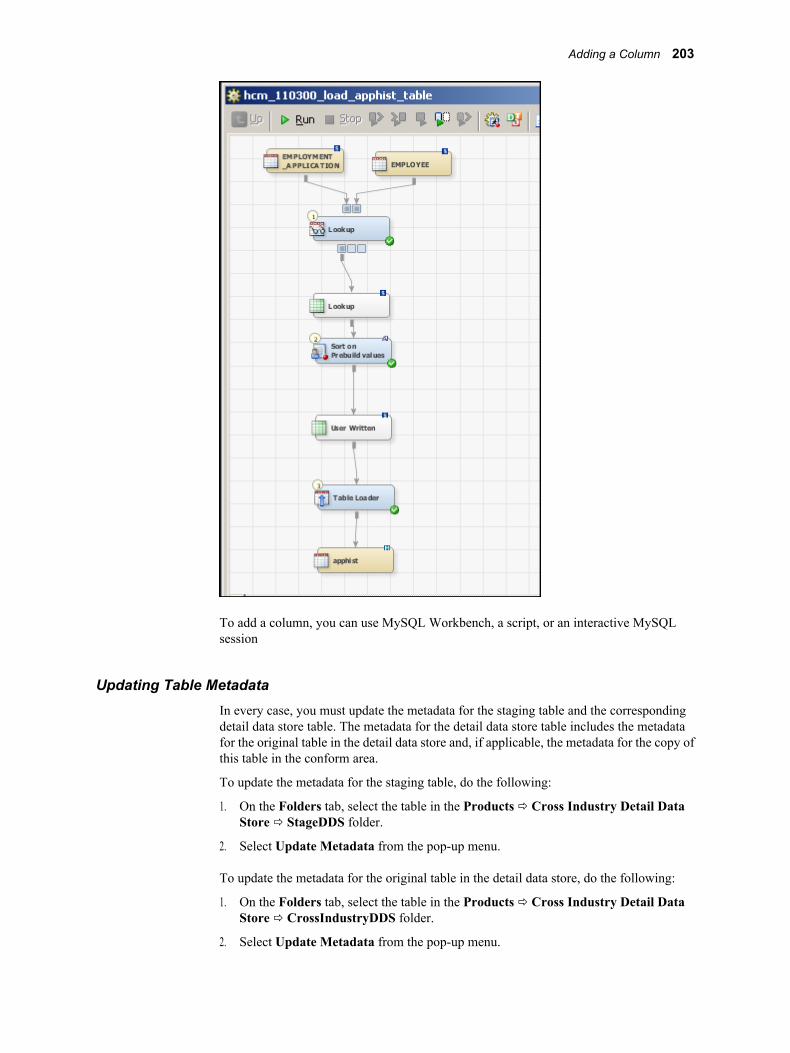
To add a column, you can use MySQL Workbench, a script, or an interactive MySQLsession
Updating Table MetadataIn every case, you must update the metadata for the staging table and the correspondingdetail data store table. The metadata for the detail data store table includes the metadatafor the original table in the detail data store and, if applicable, the metadata for the copy ofthis table in the conform area.
To update the metadata for the staging table, do the following:
1. On the Folders tab, select the table in the Products ð Cross Industry Detail DataStore ð StageDDS folder.
2. Select Update Metadata from the pop-up menu.
To update the metadata for the original table in the detail data store, do the following:
1. On the Folders tab, select the table in the Products ð Cross Industry Detail DataStore ð CrossIndustryDDS folder.
2. Select Update Metadata from the pop-up menu.
Adding a Column 203
If the Conform version of the detail data store table is in the metadata folder Products ðSAS Solutions Services ð Conform, do the following:
1. Select the table in the Conform folder.
2. Select Update Metadata from the pop-up menu.
In addition, you might have to update the metadata for the HCM Data Mart detail table (ortables) that the detail data store table feeds. This step is required for a given detail table ifand only if the job that loads the table does not call user-written code. If the job that loadsa given detail table calls user-written code, then the job automatically updates the metadatafor that detail table. See the examples of jobs that do and do not call user-written code in“Adding Columns to Physical Tables” on page 202.
To update the metadata for an HCM Data Mart detail table, do the following:
1. On the Folders tab, select the table in the Products ð SAS Human CapitalManagement ð Data Sources ð HCMData folder.
2. Select Update Metadata from the pop-up menu.
Modifying JobsWhenever you add a column to a staging table and the corresponding detail data store table,there are several jobs that require attention:
• In the job that loads the staging table, you must add code to extract the data for the newcolumn from the appropriate source system and load that data into the new column ofthe staging table.
• In the job that loads the detail data store table from the staging table, you must updatethe mappings in all transformations to handle the new column.
• In any job that loads an HCM Data Mart detail table that the detail data store table feeds,you might have to update the mappings in all transformations to handle the new column.This step is required for a given job if and only if the job does not call user-writtencode. If the job that loads a given detail table calls user-written code, then this job doesnot need to be modified. The user-written code has the flexibility to handle additionalcolumns of data. See the examples of jobs that do and do not call user-written code in“Adding Columns to Physical Tables” on page 202.
Changing the Character Length of a ColumnThe task of changing the character length of a column closely parallels the task of addinga column, which is outlined in “Adding a Column” on page 201. The differences are asfollows:
• Instead of adding a column to each relevant physical table, you change the characterlength of an existing column in each relevant physical table.
• If you are changing the character length of a primary key column and the detail datastore table has an accompanying _X table, then you must also change the characterlength of the corresponding column in the _X table.
• In the job that loads the detail data store table, you do not need to write code to extractnew data from your source system.
204 Chapter 22 • Modifying the Data Model for SAS Human Capital Management
• Instead of updating the mappings in transformations to include a new column, you mustuse the Mapping tab of each transformation to correctly specify the new column length.
Adding a TableYou can add a table to the HCM Data Mart via the Administration application of SASHuman Capital Management. You can also use the Administration application to registera table that already exists in the HCM Data Mart. Follow these steps:
1. Log on to SAS Human Capital Management as an administrator. On the Data tab inthe Administration application, select Add Table.
Follow the online Help instructions for importing a table and registering a new tableor an existing table. Be sure to select the option to register the table in metadata. Donot select the option to build the information map.
2. Modify the column attributes for the table:
a. On the Data tab, select Tables ð table-name to display the Column Attributes pagefor the table.
b. Modify or define all column labels and all necessary formats. Follow the onlineHelp instructions for this page for information about all column attributes.
3. Create the information map for the new table:
a. On the Data tab, click Tables.
b. Click the action menu to the left of the table name and select Build Info Map inthe pop-up menu. You receive a message when the information map has been built.
4. After the changes are complete, click Refresh Cache in the menu bar.
If you want to load the newly added HCM Data Mart table through the detail data store,perform these tasks to create the channel for the data to flow through:
• Create a physical staging table and register its metadata in SAS Data Integration Studio.
• Create a physical detail data store table and register its metadata in SAS Data IntegrationStudio.
• Register metadata to support a copy of the detail data store table in the conform area.
• Create a job to load the staging table.
• Create a job to load the detail data store table.
• Create a job to load the HCM Data Mart detail table from the detail data store table.Place a call to %PREBUILD in the precode for the job, and place a call to%UPDATEDD in the postcode for the job. Use other HCM jobs for an example ofthese precode and postcode changes.
Note: Some new tables in the HCM Data Mart might be populated only by data fromexisting detail data store tables. In that case, there is no need to create a new stagingtable or detail data store table.
Adding a Table 205
Adding a CubeIf you add a table to the HCM Data Mart as described in “Adding a Table” on page 205,then you might want to use that new table as a source table for a new cube. To add a newcube that receives data from a new table, do the following:
1. Make sure that you have defined all formats and column labels for the source table.
This is done in the SAS Human Capital Management Administration application.
2. Log in to SAS Human Capital Management as an administrator.
3. On the Data tab in the Administration application, click New Cube in the menu bar.
The New Cube wizard page is displayed. Follow the steps in the wizard, and clickFinish to build the cube.
The cube name can be up to 32 characters in length, and can contain only letters,numbers, and underscores. If you want to run an ETL job to refresh the cube, then thecube name must be uppercase. On the Dimensions page, the ORGDIM, MGRDIM, andGEODIM dimensions display whether those dimensions are available in the sourcetable or not. Selecting them does not cause an error for a source table that doesn't havethem. When you create a new dimension, multiple columns that are selected for thedimension provide a drillable hierarchy for that dimension.
4. Build an information map for the newly created cube.
5. On the Data tab in the Administration application, click the Cubes folder.
6. Click the menu icon for the new cube and select Build Information Maps from thepop-up menu.
You will receive a message when the information map has been built.
If you want to create an ETL job so that the cube can be refreshed on a regular basis, thenyou must do the following:
1. Open SAS Data Integration Studio.
2. On the Folders tab, in the Products ð SAS Human Capital Management ð 5.2Jobs folder, create a job that loads data into the new cube from its source table.
You can use the cube jobs that are already in this folder as a model by copying andrenaming an existing cube job. For example, copy and rename the jobhcm_210050_create_abshcube_cube. The cube jobs consist entirely of a User WrittenCode transformation, which is available on the Transformations tab in the Data group.
3. Open up the new job and double-click on the transformation in the job.
4. On the Code tab in the Properties window for the job, delete the existing code and addthe following code
In this example, the cube is named MYCUBE, and the source table is namedMYTABLE:
%cubegen(cubename=MYCUBE, baseds=&hcmlib..MYTABLE)
5. Click OK and close the job to save your changes.
6. Right-click the job and select Properties.
206 Chapter 22 • Modifying the Data Model for SAS Human Capital Management
On the Precode and Postcode tab, make sure that the Precode box contains thefollowing code:
%hcmlibol %prebuild
7. Click OK to save any changes.
The above steps to add a cube to SAS Human Capital Management need to be followedbefore you can run a job in Data Integration Studio to refresh the cube. Run this newjob to refresh the cube. You can rerun this job whenever you need to load fresh datainto the new cube. If you add a line for the new job to the umbrella job, then the newjob runs whenever the umbrella job runs. For a detailed discussion of the umbrella job,see “Loading the HCM Data Mart by Running the Umbrella Job” on page 188.
If you run the hcm_300000_create_information_maps job, the information map for the newcube is rebuilt, along with all the other information maps in SAS Human CapitalManagement.
Adding a Cube 207

208 Chapter 22 • Modifying the Data Model for SAS Human Capital Management
Chapter 23
Macro Variables in thePREBUILD.SAS Macro File
Overview of SAS Human Capital Management Macro Variables . . . . . . . . . . . . 210
Families of Table-Acronym Macro Variables . . . . . . . . . . . . . . . . . . . . . . . . . . . . . 210ANAL Family . . . . . . . . . . . . . . . . . . . . . . . . . . . . . . . . . . . . . . . . . . . . . . . . . . . . . 210CUBED Family . . . . . . . . . . . . . . . . . . . . . . . . . . . . . . . . . . . . . . . . . . . . . . . . . . . 211CUBEV Family . . . . . . . . . . . . . . . . . . . . . . . . . . . . . . . . . . . . . . . . . . . . . . . . . . . 212CUTOFF Family . . . . . . . . . . . . . . . . . . . . . . . . . . . . . . . . . . . . . . . . . . . . . . . . . . . 213M Family . . . . . . . . . . . . . . . . . . . . . . . . . . . . . . . . . . . . . . . . . . . . . . . . . . . . . . . . 213SORT Family . . . . . . . . . . . . . . . . . . . . . . . . . . . . . . . . . . . . . . . . . . . . . . . . . . . . . 214START Family . . . . . . . . . . . . . . . . . . . . . . . . . . . . . . . . . . . . . . . . . . . . . . . . . . . . 215STAT Family . . . . . . . . . . . . . . . . . . . . . . . . . . . . . . . . . . . . . . . . . . . . . . . . . . . . . 215_UH Family . . . . . . . . . . . . . . . . . . . . . . . . . . . . . . . . . . . . . . . . . . . . . . . . . . . . . . 216UNIT Family . . . . . . . . . . . . . . . . . . . . . . . . . . . . . . . . . . . . . . . . . . . . . . . . . . . . . 217V Family . . . . . . . . . . . . . . . . . . . . . . . . . . . . . . . . . . . . . . . . . . . . . . . . . . . . . . . . . 217VARS Family . . . . . . . . . . . . . . . . . . . . . . . . . . . . . . . . . . . . . . . . . . . . . . . . . . . . . 218
Individual Macro Variables . . . . . . . . . . . . . . . . . . . . . . . . . . . . . . . . . . . . . . . . . . . . 219AGEFRACT . . . . . . . . . . . . . . . . . . . . . . . . . . . . . . . . . . . . . . . . . . . . . . . . . . . . . . 219CHRNDROP . . . . . . . . . . . . . . . . . . . . . . . . . . . . . . . . . . . . . . . . . . . . . . . . . . . . . . 219CHRNINDS . . . . . . . . . . . . . . . . . . . . . . . . . . . . . . . . . . . . . . . . . . . . . . . . . . . . . . 219CHRNVARS . . . . . . . . . . . . . . . . . . . . . . . . . . . . . . . . . . . . . . . . . . . . . . . . . . . . . . 220CUBE_DELETE_TYPE . . . . . . . . . . . . . . . . . . . . . . . . . . . . . . . . . . . . . . . . . . . . . 220CUBE_DRILL . . . . . . . . . . . . . . . . . . . . . . . . . . . . . . . . . . . . . . . . . . . . . . . . . . . . 220CUBE_META_PATH . . . . . . . . . . . . . . . . . . . . . . . . . . . . . . . . . . . . . . . . . . . . . . 221CUBEPATH . . . . . . . . . . . . . . . . . . . . . . . . . . . . . . . . . . . . . . . . . . . . . . . . . . . . . . 221DEBUG . . . . . . . . . . . . . . . . . . . . . . . . . . . . . . . . . . . . . . . . . . . . . . . . . . . . . . . . . . 221DIRECT . . . . . . . . . . . . . . . . . . . . . . . . . . . . . . . . . . . . . . . . . . . . . . . . . . . . . . . . . 221EDU . . . . . . . . . . . . . . . . . . . . . . . . . . . . . . . . . . . . . . . . . . . . . . . . . . . . . . . . . . . . 222EMPPOP . . . . . . . . . . . . . . . . . . . . . . . . . . . . . . . . . . . . . . . . . . . . . . . . . . . . . . . . . 222FCTRVARS . . . . . . . . . . . . . . . . . . . . . . . . . . . . . . . . . . . . . . . . . . . . . . . . . . . . . . 223FMT_UPDATE . . . . . . . . . . . . . . . . . . . . . . . . . . . . . . . . . . . . . . . . . . . . . . . . . . . 223HCMGROUPNAME . . . . . . . . . . . . . . . . . . . . . . . . . . . . . . . . . . . . . . . . . . . . . . . 223HCMLIB . . . . . . . . . . . . . . . . . . . . . . . . . . . . . . . . . . . . . . . . . . . . . . . . . . . . . . . . . 223HIERORDS . . . . . . . . . . . . . . . . . . . . . . . . . . . . . . . . . . . . . . . . . . . . . . . . . . . . . . 224HIERS . . . . . . . . . . . . . . . . . . . . . . . . . . . . . . . . . . . . . . . . . . . . . . . . . . . . . . . . . . . 224INCOPEN . . . . . . . . . . . . . . . . . . . . . . . . . . . . . . . . . . . . . . . . . . . . . . . . . . . . . . . . 224INTORG_DIMENSION_CD . . . . . . . . . . . . . . . . . . . . . . . . . . . . . . . . . . . . . . . . . 225MAXLEVL . . . . . . . . . . . . . . . . . . . . . . . . . . . . . . . . . . . . . . . . . . . . . . . . . . . . . . . 225MEAS_LEV . . . . . . . . . . . . . . . . . . . . . . . . . . . . . . . . . . . . . . . . . . . . . . . . . . . . . . 225MPRINT . . . . . . . . . . . . . . . . . . . . . . . . . . . . . . . . . . . . . . . . . . . . . . . . . . . . . . . . . 226NOTES . . . . . . . . . . . . . . . . . . . . . . . . . . . . . . . . . . . . . . . . . . . . . . . . . . . . . . . . . . 226NUMBER_OF_HIERS . . . . . . . . . . . . . . . . . . . . . . . . . . . . . . . . . . . . . . . . . . . . . . 227
209
ONPAYRL . . . . . . . . . . . . . . . . . . . . . . . . . . . . . . . . . . . . . . . . . . . . . . . . . . . . . . . 227ORGMEMBER_EXCLUDES . . . . . . . . . . . . . . . . . . . . . . . . . . . . . . . . . . . . . . . . 227PERIOD_TYPE_CD . . . . . . . . . . . . . . . . . . . . . . . . . . . . . . . . . . . . . . . . . . . . . . . 228POSDIR . . . . . . . . . . . . . . . . . . . . . . . . . . . . . . . . . . . . . . . . . . . . . . . . . . . . . . . . . 228POSVAR . . . . . . . . . . . . . . . . . . . . . . . . . . . . . . . . . . . . . . . . . . . . . . . . . . . . . . . . . 228POSVDIR . . . . . . . . . . . . . . . . . . . . . . . . . . . . . . . . . . . . . . . . . . . . . . . . . . . . . . . . 229SALCVAR . . . . . . . . . . . . . . . . . . . . . . . . . . . . . . . . . . . . . . . . . . . . . . . . . . . . . . . 229SOURCE . . . . . . . . . . . . . . . . . . . . . . . . . . . . . . . . . . . . . . . . . . . . . . . . . . . . . . . . . 230SRVFRACT . . . . . . . . . . . . . . . . . . . . . . . . . . . . . . . . . . . . . . . . . . . . . . . . . . . . . . 230STGACUT and STGACUTA . . . . . . . . . . . . . . . . . . . . . . . . . . . . . . . . . . . . . . . . . 230STGAMAX . . . . . . . . . . . . . . . . . . . . . . . . . . . . . . . . . . . . . . . . . . . . . . . . . . . . . . . 232
Overview of SAS Human Capital ManagementMacro Variables
This chapter contains detailed information about the macro variables that you can use inthe prebuild.sas macro file to configure the SAS Human Capital Management build process.These macro variables are presented in two groups:
• Families of macro variables whose names begin with table acronyms are in “Familiesof Table-Acronym Macro Variables” on page 210. They are alphabetized by the suffixthat follows the table acronym.
• Individual macro variables are presented alphabetically in “Individual MacroVariables” on page 219.
Families of Table-Acronym Macro Variables
ANAL Family
DescriptionUse the <TABLEACR>ANAL macro variables to specify additional analysis columns toinclude in a designated cube. An analysis column is a numeric column that provides inputto statistical computations. For each cube, there is one analysis column that is included bydefault. The <TABLEACR>ANAL macro variables enable you to include others. Theanalysis columns that you specify must be present in the corresponding master table.
Compare the CUBEV family, which concerns non-analysis columns.
Syntax%LET macro-variable=column-1 < ... column-n>;
macro-variable is one of the following:
• ABSANAL: refers to the columns in the ABSHMAST table to be included in theABSHCUBE
• ACTANAL: refers to the columns in the ACTHMAST table to be included in theACTHCUBE
• APPANAL: refers to the columns in the APPHMAST table to be included in theAPPHCUBE
210 Chapter 23 • Macro Variables in the PREBUILD.SAS Macro File
• EMPANAL: refers to the columns in the EMPMAST table to be included in theEMPCUBE
• HDSMANAL: refers to the columns in the HEADSUM table to be included in theHDSMCUBE
• OPOSANAL: refers to the columns in the OPOSMAST table to be included in theOPOSCUBE
• OPMANAL: refers to the columns in the OPOSSUM table to be included in theOPSMCUBE
• SALHANAL: refers to the columns in the SALHSUM table to be included in theSALHCUBE
• TERMANAL: refers to the columns in the TERMMAST table to be included in theTERMCUBE
• TIPANAL: refers to the columns in the TIP table to be included in the TIPCUBE
column-1 <... column-n> are one or more analysis columns to include in the cube.
ExampleInclude the SALARY column with the other analysis columns in the ACTHCUBE table:
%LET actanal=salary;
CUBED Family
DescriptionUse the <TABLEACR>CUBED macro variables to specify cube dimensions whose valuesshould be displayed in descending order.
Do not specify the same column with a CUBED macro variable and the correspondingCUBEV macro variable.
Syntax%LET macro-variable=column-1 < ... column-n>;
macro-variable is one of the following:
• ABSCUBED: refers to the columns in the ABSHMAST table to be included in theABSHCUBE
• ACTCUBED: refers to the columns in the ACTHMAST table to be included in theACTHCUBE
• APPCUBED: refers to the columns in the APPHMAST table to be included in theAPPHCUBE
• EMPCUBED: refers to the columns in the EMPMAST table to be included in theEMPCUBE
• HDSMCUBED: refers to the columns in the HEADSUM table to be included in theHDSMCUBE
• OPOSCUBED: refers to the columns in the OPOSMAST table to be included in theOPOSCUBE
• OPMCUBED: refers to the columns in the OPOSSUM table to be included in theOPSMCUBE
Families of Table-Acronym Macro Variables 211
• SALHCUBED: to the columns in the SALHSUM table to be included in theSALHCUBE
• TERMCUBED: refers to the columns in the TERMMAST table to be included in theTERMCUBE
• TIPCUBED: refers to the columns in the TIP table to be included in the TIPCUBE
column-1 <... column-n> are one or more columns to base the sort on.
ExampleIn the ACTHCUBE, sort the SALARY dimension in descending order:
%LET actcubed=salary;
CUBEV Family
DescriptionUse the <TABLEACR>CUBEV macro variables to specify non-analysis columns toinclude in a designated cube and display with the default ascending sort order. The columnsthat you specify are included in the designated cube, but they are not included in anyhierarchy. These columns must be present in the corresponding master table.
Do not specify the same column with a CUBEV macro variable and the correspondingCUBED macro variable.
Syntax%LET macro-variable=column-1 < ... column-n>;
macro-variable is one of the following:
• ABSCUBEV: refers to the columns in the ABSHMAST table to be included in theABSHCUBE.
• ACTCUBEV: refers to the columns in the ACTHMAST table to be included in theACTHCUBE.
• APPCUBEV: refers to the columns in the APPHMAST table to be included in theAPPHCUBE
• EMPCUBEV: refers to the columns in the EMPMAST table to be included in theEMPCUBE
• HDSMCUBEV: refers to the columns in the HEADSUM table to be included in theHDSMCUBE
• OPOSCUBEV: refers to the columns in the OPOSMAST table to be included in theOPOSCUBE
• OPMCUBEV: refers to the columns in the OPOSSUM table to be included in theOPSMCUBE
• SALHCUBEV: refers to the columns in the SALHSUM table to be included in theSALHCUBE
• TERMCUBEV: refers to the columns in the TERMMAST table to be included in theTERMCUBE
column-1 <... column-n> are one or more table columns that are to be included inthe cube.
212 Chapter 23 • Macro Variables in the PREBUILD.SAS Macro File

ExampleInclude the AGE column from the ACTHMAST table in the ACTHCUBE column list:
%LET actcubev=age;
CUTOFF Family
DescriptionUse the <TABLEACR>CUTOFF macro variables to restrict the data in certain tables torecords whose effective dates are later than the cutoff date that you specify.
Syntax%LET macro-variable=date;
macro-variable is one of the following:
• HDCUTOFF: refers to the HEADSUM table
• OPCUTOFF: refers to the OPOSSUM table
• PDCUTOFF: used for the Retention Analysis data extraction
• SLCUTOFF: refers to the SALHIST table
date is a past date in the format DDMMMYYYY, where DD is the number of the day ofthe month, MMM is the first three letters of the month, and YYYY is the year. This datecannot be February 29 of a leap year.
ExampleRestrict the HEADSUM table to records whose effective dates are later than January 1,1995:
%LET hdcutoff=01JAN1995;
M Family
DescriptionUse the <TABLEACR>M macro variables to exclude specified detail table columns fromthe master tables that they would otherwise be included in. For each master table, there isa base detail table. The master table is formed by merging its base detail table with one ormore other detail tables. You cannot exclude columns that come from the base detail table,but you can exclude columns that come from any other detail table that participates in themerge.
Syntax%LET macro-variable=DROP=column-1 < ... column-n>;
macro-variable is one of the following:
• ACTHISTM: refers to columns in the ACTHIST detail table
• EMPEDUCM: refers to columns in the EMPEDUC detail table
• EMPGENM: refers to columns in the EMPGEN detail table
• GRADEM: refers to columns in the GRADES detail table
• JOBSM: refers to columns in the JOBS detail table
Families of Table-Acronym Macro Variables 213
• POSM: refers to columns in the POS detail table
• WRKGRPM: refers to columns in the WRKGRP detail table
column-1 <... column-n> are one or more columns to exclude from the mastertables.
ExamplePrevent the HOURLY_SALARY and MONTHLY_SALARY columns from theACTHIST table from being included in any master tables that use ACTHIST as input(except the ACTHMAST table, where ACTHIST is the base table):
%LET acthistm=drop=hourly_salary monthly_salary;
SORT Family
DescriptionUse the <TABLEACR>SORT macro variables to specify columns that are used todetermine the order of the records in the table.
Syntax%LET macro-variable=column-1 < ... column-n>;
macro-variable is one of the following:
• ABSHSORT: refers to the ABSHIST table
• ABSMSORT: refers to the ABSHMAST table
• ACTHSORT: refers to the ACTHIST table
• ACTMSORT: refers to the ACTHMAST table
• APPHSORT: refers to the APPHIST table
• APPMSORT: refers to the APPHMAST table
• CMPSORT: refers to the COMPHIST table
• GRADSORT: refers to the GRADE table
• JOBSORT: refers to the JOBS table
• OPOSSORT: refers to the OPOSHIST table
• OPSMSORT: refers to the OPOSMAST table
• POSSORT: refers to the POS table
column-1 <... column-n> are one or more columns to sort on.
ExampleSpecify that the ABSHIST table should be sorted by the EMPLOYEE_ID andABSENCE_START_DT columns:
%LET abshsort=employee_id absence_start_dt;
The keyword DESCENDING can be placed in front of any column to specify a descendingsort order for that column.
214 Chapter 23 • Macro Variables in the PREBUILD.SAS Macro File
START Family
DescriptionUse the <TABLEACR>START macro variables to specify the position in time from whichto begin summarizing certain tables.
Syntax%LET macro-variable=time-position;
macro-variable is one of the following:
• HEDSTART: refers to the HEADSUM table
• OPSSTART: refers to the OPOSSUM table
• SALSTART: refers to the SALHIST table
time-position is one of the following:
• BEGIN
• MIDDLE
• END
ExampleSummarize the HEADSUM table from the beginning of the time unit that is specified withthe HEDUNIT macro variable:
%LET hedstart=begin;
STAT Family
DescriptionUse the <TABLEACR>STAT macro variables to specify additional statistical columns toinclude in a cube. A statistical column holds the output of statistical computations. For eachcube, there is one statistical column that is included by default. The <TABLEACR>STATmacro variables enable you to include others.
Syntax%LET macro-variable=column-1 < ... column-n>;
macro-variable is one of the following:
• ABSSTAT - refers to the columns in the ABSHMAST table to be included in theABSHCUBE.
• ACTSTAT - refers to the columns in the ACTHMAST table to be included in theACTHCUBE.
• APPSTAT - refers to the columns in the APPHMAST table to be included in theAPPHCUBE.
• EMPSTAT - refers to the columns in the EMPMAST table to be included in theEMPCUBE.
• HDSMSTAT - refers to the columns in the HEADSUM table to be included in theHDSMCUBE.
Families of Table-Acronym Macro Variables 215
• OPOSSTAT - refers to the columns in the OPOSMAST table to be included in theOPOSCUBE.
• OPMSTAT - refers to the columns in the OPOSSUM table to be included in theOPSMCUBE.
• SALHSTAT - refers to the columns in the SALHSUM table to be included in theSALHCUBE.
• TERMSTAT - refers to the columns in the TERMMAST table to be included in theTERMCUBE.
• TIPSTAT - refers to the columns in the TIP table to be included in the TIPCUBE.
column-1 <... column-n> are one or more statistical columns to include in the cube.
ExampleInclude the N and NMISS statistical columns in the ACTHCUBE table:
%LET actstat=n nmiss;
_UH Family
DescriptionUse the <TABLEACR>_UH macro variables to specify user-defined hierarchy columnsthat you can include in a cube. You can number hierarchies sequentially. For example,ACT_UH, ACT_UH1, ACT_UH2.
Syntax%LET macro-variable=column-1<... column-n>/name="name-of-hierarchy";
macro-variable is one of the following:
• ABS_UH: refers to the columns in the ABSHMAST table to be included in theABSHCUBE
• ACT_UH: refers to the columns in the ACTHMAST table to be included in theACTHCUBE
• APP_UH: refers to the columns in the APPHMAST table to be included in theAPPHCUBE
• EMP_UH: refers to the columns in the APPHMAST table to be included in theAPPHCUBE
• HED_UH: refers to the columns in the HEADSUM table to be included in theHDSMCUBE
• OPS_UH: refers to the columns in the OPOSMAST table to be included in theOPOSCUBE
• OPM_UH: refers to the columns in the OPOSSUM table to be included in theOPSMCUBE
• SALH_UH: refers to the columns in the SALHSUM table to be included in theSALHCUBE
• TERM_UH: refers to the columns in the TERMMAST table to be included in theTERMCUBE
• TIP_UH: refers to the columns in the TIP table to be included in the TIPCUBE
216 Chapter 23 • Macro Variables in the PREBUILD.SAS Macro File
column-1 <... column-n> are one or more visual hierarchy columns to include inthe cube.
name-of-hierarchy is the user-defined name for the hierarchy.
ExampleUse the columns ACTCODE1, ACTCODE2, and ACTCODE3 to create a visual hierarchynamed Action Codes in the ACTHCUBE cube:
%LET act_uh1=actcode1 actcode2 actcode3 / name="Action Codes";
UNIT Family
DescriptionUse the <TABLEACR>UNIT macro variables to specify the unit of time that issummarized in certain tables.
Syntax%LET macro-variable=time-unit;
macro-variable is one of the following:
• HEDUNIT: refers to the HEADSUM table
• OPSUNIT: refers to the OPOSSUM table
• PDUNIT: used for the Retention Analysis data extraction
• SALUNIT: refers to the SALHIST table
time-unit is one of the following:
• DAY
• WEEK
• MONTH
• QTR
• YEAR
HEDUNIT and SALUNIT must be given the same value. In addition, the time period lengththat you specify with HEDUNIT and SALUNIT must be the same as the time period lengththat you specify with PERIOD_TYPE_CD, although the character strings that you use aredifferent. See “PERIOD_TYPE_CD” on page 228.
ExampleSummarize the HEADSUM table by month:
%LET hedunit=month;
V Family
DescriptionUse the <TABLEACR>V macro variables to exclude specified columns from specifiedmaster and summary tables.
Families of Table-Acronym Macro Variables 217

Syntax%LET macro-variable=column-1 < ... column-n>;
macro-variable is one of the following:
• ABSHMSTV: refers to the ABSHMAST table
• ACTHMSTV: refers to the ACTHMAST table
• APPHMSTV: refers to the APPHMAST table
• EMPMSTV: refers to the EMPMAST table
• HEADSUMV: refers to the HEADSUM table
• OPOSMSTV: refers to the OPOSMAST table
• OPSSUMV: refers to the OPOSSUM table
• PDSUMV: used for the Retention Analysis data extraction
• SALHISTV: refers to the SALHIST table
• SALHSUMV: refers to the SALHSUM table
• TERMNATV: refers to the TERMINAT table
column-1 <... column-n> are one or more columns to exclude from a master orsummary table.
ExampleExclude the CITY and STATE columns from the ACTHMAST table:
%LET acthmstv=city state;
VARS Family
DescriptionUse the <TABLEACR>VARS macro variables to specify columns that you want to add toa specified summary table.
Syntax%LET macro-variable=column-1 < ... column-n>;
macro-variable is one of the following:
• HEDVARS: refers to the HEADSUM table
• OPSVARS: refers to the OPOSSUM table
• SALVARS: refers to the SALHIST table
• TERMVARS: refers to the TERMINAT table
• TIPVARS: refers to the TIP table
column-1 <... column-n> are one or more columns to add to the summary table.
ExampleAdd the AGE and GENDER columns to the SALHSUM summary table:
%LET salvars=age gender;
218 Chapter 23 • Macro Variables in the PREBUILD.SAS Macro File
Individual Macro Variables
AGEFRACT
DescriptionUse the AGEFRACT macro variable to specify whether to include decimal places in theAGE column.
Syntax%LET AGEFRACT = option;
option is either Y (to include decimal places in the AGE column) or blank (for no decimalplaces).
ExampleInclude decimal places in the AGE column:
%LET AGEFRACT = Y;
CHRNDROP
DescriptionUse the CHRNDROP macro variable to specify columns to be dropped when the CHURNtable is built from the base table that is designated by the CHRNINDS macro variable.
Syntax%LET CHRNDROP = column-1<...column-n>;
Example%LET CHRNDROP = JOB_CD;
CHRNINDS
DescriptionUse the CHRNINDS macro variable to designate the base table for the CHURN table.
Syntax%LET CHRNINDS = table_name;
table_name is an existing SAS Human Capital Management table.
Example%LET CHRNINDS = ACTHMAST;
Individual Macro Variables 219
CHRNVARS
DescriptionUse the CHRNVARS macro variable to specify the columns that are used to indicate achurn.
Syntax%LET CHRNVARS = column-1 <...column-n>;
Example%LET CHRNVARS = INTORG_HR;
CUBE_DELETE_TYPE
DescriptionUse the CUBE_DELETE_TYPE macro variable to specify the delete type for the cubes.
Syntax%LET CUBE_DELETE_TYPE = DELETE_PHYSICAL|DELETE;
DELETE_PHYSICAL prevents the metadata and permissions from being erased when thecube job is run.
DELETE deletes the cube and its metadata; it should be used when the cube structurechanges.
Example%LET CUBE_DELETE_TYPE = DELETE_PHYSICAL;
CUBE_DRILL
DescriptionUse the CUBE_DRILL macro variable to indicate whether cubes should be built with thedrill-to-detail feature. To give the drill-to-detail feature to some cubes but not others, buildthe cubes individually, with CUBE_DRILL set appropriately for each.
Note: SAS Human Capital Management row-level security is not applied for the drill todetail feature, meaning users can see all source detail rows for a cube.
Syntax%LET CUBE_DRILL = N|Y;
The default value is N.
ExampleEnable drill-to-detail:
%LET CUBE_DRILL = Y;
220 Chapter 23 • Macro Variables in the PREBUILD.SAS Macro File
CUBE_META_PATH
DescriptionUse the CUBE_META_PATH macro variable to specify the metadata path for the OLAPcubes.
Example%LET CUBE_META_PATH= C:\SAS\Config\Lev1\AppData\SASHumanCapitalManagement5.2\Cubes;
CUBEPATH
DescriptionUse the CUBEPATH macro variable to specify the physical path to the OLAP cubes onthe file system. The default physical path (referenced by &hcmdefault_cubepath) isset when SAS Human Capital Management is installed. The default path is SAS-config-dir\Lev1\AppData\SASHumanCapitalManagement5.2\Cubes.
Example%LET CUBEPATH=C:\SAS\Config\Lev1\AppData\SASHumanCapitalManagement5.2\Cubes;
DEBUG
DescriptionUse the DEBUG macro variable to specify whether to turn on the DEBUG option. Whenthis macro variable is set to Y, additional output is written to the SAS Human CapitalManagement build log for debugging purposes.
Syntax%LET DEBUG = option;
option is either Y (for additional output) or blank (to exclude additional output).
ExampleWrite additional output to the SAS Human Capital Management build log for debuggingpurposes:
%LET DEBUG = Y;
DIRECT
DescriptionDIRECT is an optional macro variable that specifies the text to display whenever anemployee record in the HCM Data Mart has no value in a hierarchy column. This canhappen if an employee is located at the lowest level of a certain branch of the organizationhierarchy, but not at the lowest level of the entire hierarchy.
Individual Macro Variables 221
Syntax%LET DIRECT = text;
text is the text that will be displayed.
ExampleSpecify that the phrase “Direct Report” should be displayed whenever an employee recordin the HCM Data Mart has no value in a hierarchy column:
%LET DIRECT = Direct Report;
EDU
DescriptionUse the EDU macro variable to specify the site-specific path to the National Center forEducation Statistics (NCES) data files that hold the input for the Education Enrollmentcube. To create the Education Enrollment cube in the HCM Data Mart, first set the valueof EDU appropriately, and then run the following jobs in SAS Data Integration Studio:
1. Load HCM Education Enrollment Table
2. Create HCM Education Enrollment Cube
Syntax%LET EDU = valid_path;
ExampleFor a Windows server:
%LET EDU=C:\sas\Config\Lev1\Data\HCMData\NCES;
For a UNIX server:
%LET EDU=/usr/local/SAS/Config/Lev1/Data/HCMData/NCES;
EMPPOP
DescriptionUse the EMPPOP macro variable to specify whether the EMPMAST table and theEMPCUBE cube should include all employees or only active employees.
Syntax%LET EMPPOP = <option>;
option is either ACTIVE or blank. Specify ACTIVE if only active employees are to beincluded in the tables. If the tables are to include all employees, then leave this option blank.In both cases, these tables contain the most recent record for each included employee.
ExamplePopulate the EMPMAST and EMPCUBE tables with active employees only:
%LET EMPPOP = ACTIVE;
Populate the tables with all employees:
%LET EMPPOP =;
222 Chapter 23 • Macro Variables in the PREBUILD.SAS Macro File
FCTRVARS
DescriptionUse the FCTRVARS macro variable to specify any additional columns to include as metricfactors that are not found in the headcount summary table. These columns are brought infrom the ACTHMAST table. If ONPAYRL and STECLASS are not in the HCM DataMart, then remove them from the value of this macro variable.
Syntax%LET FCTRVARS = column-1 < ... column-n>;
Example%LET FCTRVARS = onpayrl steclass service_start_dt;
FMT_UPDATE
DescriptionUse the FMT_UPDATE macro variable to indicate whether the Load HCM Formats Tablejob should replace the HCMFORMATS table or update it.
Syntax%LET FMT_UPDATE = N|Y;
N causes the table to be replaced. Y causes the table to be updated.
Example%LET FMT_UPDATE = N;
HCMGROUPNAME
DescriptionUse the HCMGROUPNAME macro variable to specify the name of the Metadata Usersgroup to which SAS Human Capital Management users are assigned. The default groupname is HCM Solution Users.
Example%LET HCMGROUPNAME=HCM Solution Users;
HCMLIB
DescriptionUse the HCMLIB macro variable to specify the name of the SAS libref that is allocatedfor the HCM library. The default value is HCMData.
Example%LET HCMLIB=HCMData;
Individual Macro Variables 223
HIERORDS
DescriptionUse the HIERORDS macro variable to specify the respective sort orders for the hierarchiesin the cubes.
Syntax%LET HIERORDS = ASCENDING|DESCENDING|ASCFORMATTED|DESFORMATTED|DSORDER;
ExampleSuppose that the HIERS macro variable is set as follows:
%LET HIERS = INTORG_HR INTORG_MGR;
Then the following line would sort the INTORG_HR hierarchy in ASCENDING order andthe INTORG_MGR hierarchy in ASCFORMATTED order:
%LETHIERORDS = ASCENDING ASCFORMATTED;
HIERS
DescriptionUse the HIERS macro variable to specify the names of the organization hierarchies thatwill be used to build the HCM tables. The first hierarchy that is listed is the defaulthierarchy. The default hierarchy is used to build tables that contain only one hierarchy. Thenumber of hierarchies in the list must be specified by the NUMBER_OF_HIERS macrovariable.
These hierarchies must be defined in the INTERNAL_ORG_ASSOC_TYPE Detail DataStore table. For a detailed discussion of defining and loading organization hierarchies, seeChapter 7, “Loading Members and Hierarchies into a Dimension,” on page 35.
Syntax%LET HIERS = variable-1 < ... variable-n>;
Example%LET HIERS = INTORG_HR INTORG_MGR;
INCOPEN
DescriptionUse the INCOPEN macro variable to specify whether to include open positions in theEMPMAST table.
Syntax%LET INCOPEN = option;
option is either Y (to include open positions) or blank (to exclude open positions).
224 Chapter 23 • Macro Variables in the PREBUILD.SAS Macro File
ExampleInclude open positions in the EMPMAST table:
%LET INCOPEN = Y;
INTORG_DIMENSION_CD
DescriptionUse the INTORG_DIMENSION_CD macro variable to specify the code of theorganization dimension that contains the organization hierarchies that are specified by theHIERS macro variable.
Syntax%LET INTORG_DIMENSION_CD = code;
code is the code of the appropriate organization dimension.
Example%LET INTORG_DIMENSION_CD = ORG;
MAXLEVL
DescriptionUse the MAXLEVL macro variable to specify the maximum number of hierarchy levelsthat are allowed. This number should be slightly greater than the known number ofhierarchy levels in the organization. If you set this number too low, the build process willnot create the WRKGRP table correctly. If you set this number too high, the build processwill use more resources than necessary when it creates the WRKGRP table.
Syntax%LET MAXLEVL = number;
number is the number of hierarchy levels allowed.
ExampleEnsure that no more than 15 hierarchical levels are created:
%LET MAXLEVL = 15;
MEAS_LEV
DescriptionIf you use the Create HCM Metric Table with Org and Load to the SDM job to computeHCM metrics, then you must use the MEAS_LEV macro variable to name the additionalcolumns from ACTHMAST that are used to control summarization for the computation ofthe metrics.
Do not assign a value to MEAS_LEV if you compute HCM metrics with the Create HCMMetric Table and Load to the SDM job.
Individual Macro Variables 225
Syntax%LET MEAS_LEV = column-1 < ... column-n>;
ExampleIf you are running the Create HCM Metric Table with Org and Load to the SDM job, whichsummarizes by time and organization, then specify the organization column:
%LET MEAS_LEV = INTORG_HR;
If you are running the Create HCM Metric Table and Load to the SDM job, whichsummarizes only by time, then do not assign a value to MEAS_LEV.
MPRINT
DescriptionUse the MPRINT macro variable to determine whether the SAS statements that aregenerated by the execution of the macros in the HCM build code are displayed in the HCMbuild log.
Syntax%LET MPRINT = MPRINT | NOMPRINT;
MPRINT displays the generated statements in the log.
NOMPRINT does not display the generated statements in the log.
ExampleDisplay the statements generated by the execution of macros in the log:
%LET MPRINT = MPRINT;
NOTES
DescriptionUse the NOTES macro variable to determine whether notes and warnings are displayed inthe HCM build log.
Syntax%LET NOTES = NOTES | NONOTES;
NOTES writes notes and warnings to the log.
NONOTES does not write notes and warnings to the log.
ExampleWrite notes and warnings to the log:
%LET NOTES = NOTES;
226 Chapter 23 • Macro Variables in the PREBUILD.SAS Macro File
NUMBER_OF_HIERS
DescriptionUse the NUMBER_OF_HIERS macro variable to specify the number of organizationhierarchies that will be used in building the HCM tables. This number must equal thenumber of hierarchies that are listed in the value of the HIERS macro variable. It must beequal to or less than the number of organization hierarchies that you load into the SDM.
Syntax%LET NUMBER_OF_HIERS = number;
Example%LET NUMBER_OF_HIERS = 2;
ONPAYRL
DescriptionUse the ONPAYRL macro variable to specify whether a given employee is on or off thepayroll for the purpose of computing certain metrics for which Saratoga benchmarks exist.
Syntax%LET ONPAYRL = Y|N;
Exampleif EMPLOYEE_STATUS_CD='A' then ONPAYRL='Y'; else ONPAYRL='N';
Here the value of ONPAYRL is set based on the value of EMPLOYEE_STATUS_CD.
ORGMEMBER_EXCLUDES
DescriptionUse the ORGMEMBER_EXCLUDES macro variable to specify organization members inthe Detail Data Store INTERNAL_ORG table that are to be excluded from the WRKGRPtable.
Syntax%LET ORGMEMBER_EXCLUDES = member-code-1<...member-code-n>;
Example%LET ORGMEMBER_EXCLUDES = ALL EXT;
ALL and EXT are required members of every organization hierarchy. They play anessential role in SAS Financial Management, but SAS Human Capital Management doesnot use them.
Individual Macro Variables 227
PERIOD_TYPE_CD
DescriptionUse the PERIOD_TYPE_CD macro variable to specify the length of the time periods forwhich HCM metrics are computed.
Syntax%LET PERIOD_TYPE_CD = code;
code is one of the following codes in the predefined SAS_PERIOD_TYPE table:
• DAY
• WK
• MO or MTH
• QTR
• YR
The time period length that you specify with PERIOD_TYPE_CD must be the same as thetime period length that you specify with HEDUNIT and SALUNIT, although the characterstrings that you use are different.
Example %LET PERIOD_TYPE_CD = YR;
POSDIR
DescriptionUse the POSDIR macro variable to specify whether the organizational hierarchy levels arebuilt in ascending or descending order.
Syntax%LET POSDIR = A | D;
A represents ascending order.
D represents descending order.
ExampleSpecify that the hierarchy levels are to be built in descending order:
%LET POSDIR = D;
POSVAR
DescriptionUse the POSVAR macro variable to specify the name of the column in the WRKGRP table,if any, which contains the hierarchy level of the reporting group in the record that iscurrently being read. If this value is blank, then SAS Human Capital Managementdetermines the hierarchy levels dynamically while it creates the WRKGRP table.
228 Chapter 23 • Macro Variables in the PREBUILD.SAS Macro File

Syntax%LET POSVAR = column
column is the name of a column that contains a hierarchy level.
ExampleSpecify the column HIERLEV as the indicator of the hierarchy level:
%LET POSVAR = HIERLEV;
POSVDIR
DescriptionUse the POSVDIR macro variable to specify whether the values in the POSVAR indicatorrepresent ascending or descending values. This direction is based on the transactional datastructure.
Syntax%LET POSVDIR = A | D;
A represents ascending order.
D represents descending order.
ExampleThe transactional data (HIERLEV) that is identified as POSVAR specifies the order of thetransactional hierarchy. For example, if the organization has the four levels identifiedbelow, the 4, 3, 2, 1 order has a POSVDIR value of A, although ascending and descendingappear to be reversed. Furthermore, a department might report directly to a company. Inthis case, by using the POSVAR and POSVDIR variables, the hierarchy represents thisskip in levels.
• Corp (top most level) transactional hierlev 4
• Company (second level) transactional hierlev 3
• Group (third level) transactional hierlev 2
• Department (fourth level) transactional hierlev 1
%LET POSVDIR = A;
SALCVAR
DescriptionUse the SALCVAR macro variable to specify which columns in the ACTHMAST tableindicate whether a given record signals a change in the employee's pay. The HCM buildcode looks for changes in the value of the specified column. When a change is found, therecord is written to the salary history table.
Syntax%LET SALCVAR = column-1 < ... column-n>;
column-1 <... column-n> are one or more columns that indicate a salary change.
Individual Macro Variables 229
ExampleWhen the value of SALARY changes for an employee, write the record to the salary historytable:
%LET SALCVAR = salary;
SOURCE
DescriptionUse the SOURCE macro variable to determine whether the HCM build code is displayedin the HCM build log.
Syntax%LET SOURCE = SOURCE | NOSOURCE;
SOURCE writes the source code to the log.
NOSOURCE does not write the source code to the log.
ExampleWrite the source code to the log:
%LET SOURCE = SOURCE;
SRVFRACT
DescriptionUse the SRVFRACT macro variable to specify whether to include decimal places in theSRVYRS column.
Syntax%LET SRVFRACT = option;
option is either Y (to include decimal places in the SRVYRS column) or blank (for nodecimal places).
ExampleInclude decimal places in the SRVYRS column:
%LET SRVFRACT = Y;
STGACUT and STGACUTA
DescriptionUse STGACUT and STGACUTA to specify the demographic segments for the Saratogabenchmark data to include in metric tables that are loaded with HCM metrics.
Syntax%LET STGACUT = demographic segment;%LET STGACUTA = demographic segment;
230 Chapter 23 • Macro Variables in the PREBUILD.SAS Macro File
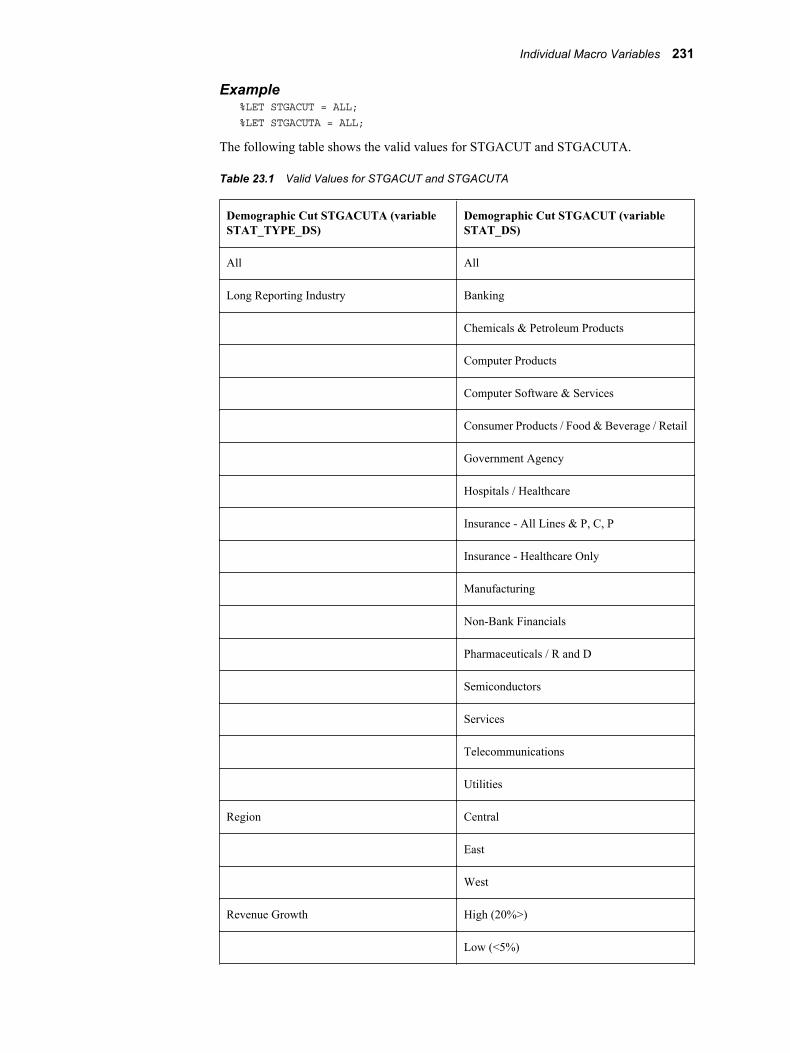
Example%LET STGACUT = ALL;%LET STGACUTA = ALL;
The following table shows the valid values for STGACUT and STGACUTA.
Table 23.1 Valid Values for STGACUT and STGACUTA
Demographic Cut STGACUTA (variableSTAT_TYPE_DS)
Demographic Cut STGACUT (variableSTAT_DS)
All All
Long Reporting Industry Banking
Chemicals & Petroleum Products
Computer Products
Computer Software & Services
Consumer Products / Food & Beverage / Retail
Government Agency
Hospitals / Healthcare
Insurance - All Lines & P, C, P
Insurance - Healthcare Only
Manufacturing
Non-Bank Financials
Pharmaceuticals / R and D
Semiconductors
Services
Telecommunications
Utilities
Region Central
East
West
Revenue Growth High (20%>)
Low (<5%)
Individual Macro Variables 231
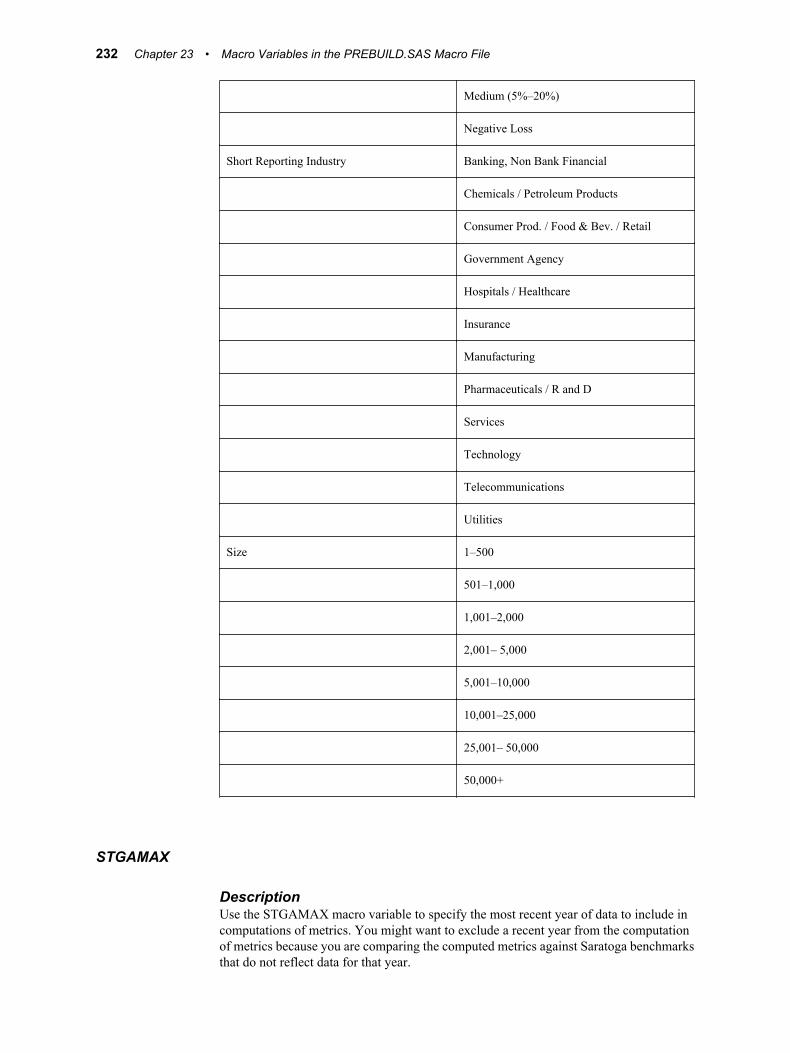
Medium (5%–20%)
Negative Loss
Short Reporting Industry Banking, Non Bank Financial
Chemicals / Petroleum Products
Consumer Prod. / Food & Bev. / Retail
Government Agency
Hospitals / Healthcare
Insurance
Manufacturing
Pharmaceuticals / R and D
Services
Technology
Telecommunications
Utilities
Size 1–500
501–1,000
1,001–2,000
2,001– 5,000
5,001–10,000
10,001–25,000
25,001– 50,000
50,000+
STGAMAX
DescriptionUse the STGAMAX macro variable to specify the most recent year of data to include incomputations of metrics. You might want to exclude a recent year from the computationof metrics because you are comparing the computed metrics against Saratoga benchmarksthat do not reflect data for that year.
232 Chapter 23 • Macro Variables in the PREBUILD.SAS Macro File

Syntax%LET STGAMAX = number|ALL;
ExampleTo exclude data for 2006 and subsequent years from the computation of metrics:
%LET SGTAMAX = 2005;
To base metric computations on all the data in the HCM Data Mart:
%LET SGTAMAX = ALL;
Individual Macro Variables 233

234 Chapter 23 • Macro Variables in the PREBUILD.SAS Macro File
Chapter 24
Internal Formats
Introduction . . . . . . . . . . . . . . . . . . . . . . . . . . . . . . . . . . . . . . . . . . . . . . . . . . . . . . . . . 235
IACTION . . . . . . . . . . . . . . . . . . . . . . . . . . . . . . . . . . . . . . . . . . . . . . . . . . . . . . . . . . . 235
ICHURN . . . . . . . . . . . . . . . . . . . . . . . . . . . . . . . . . . . . . . . . . . . . . . . . . . . . . . . . . . . 236
IEEOCL . . . . . . . . . . . . . . . . . . . . . . . . . . . . . . . . . . . . . . . . . . . . . . . . . . . . . . . . . . . . 236
IEMPSTA . . . . . . . . . . . . . . . . . . . . . . . . . . . . . . . . . . . . . . . . . . . . . . . . . . . . . . . . . . 237
IEXEMPT . . . . . . . . . . . . . . . . . . . . . . . . . . . . . . . . . . . . . . . . . . . . . . . . . . . . . . . . . . 237
IONPAYRL . . . . . . . . . . . . . . . . . . . . . . . . . . . . . . . . . . . . . . . . . . . . . . . . . . . . . . . . . 237
IPAYPER . . . . . . . . . . . . . . . . . . . . . . . . . . . . . . . . . . . . . . . . . . . . . . . . . . . . . . . . . . . 238
IREGTMP . . . . . . . . . . . . . . . . . . . . . . . . . . . . . . . . . . . . . . . . . . . . . . . . . . . . . . . . . . 238
ISTECLS . . . . . . . . . . . . . . . . . . . . . . . . . . . . . . . . . . . . . . . . . . . . . . . . . . . . . . . . . . . 238
ITERM . . . . . . . . . . . . . . . . . . . . . . . . . . . . . . . . . . . . . . . . . . . . . . . . . . . . . . . . . . . . . 239
IntroductionThis chapter describes the internal formats that are used by SAS Human CapitalManagement. These internal formats map values in your site's data to keywords in the SASHuman Capital Management software. The tables below describe each format and itsmappings.
Modify the Start and End values of the internal formats so that they correspond to the dataat your site. (Do not modify the format labels.) For information about editing internalformats, see “Auxiliary Files and Information Sources” on page 180.
IACTIONIACTION imaps certain personnel actions. If necessary, there can be more than one entrymapping to the same format label. This format is applied to the ACTION_TYPE_CDcolumn.
Here are the format mappings from loaded data values to internal format labels. Additionalformat labels can be added, with their own mappings, for other site-defined personnelactions.
235
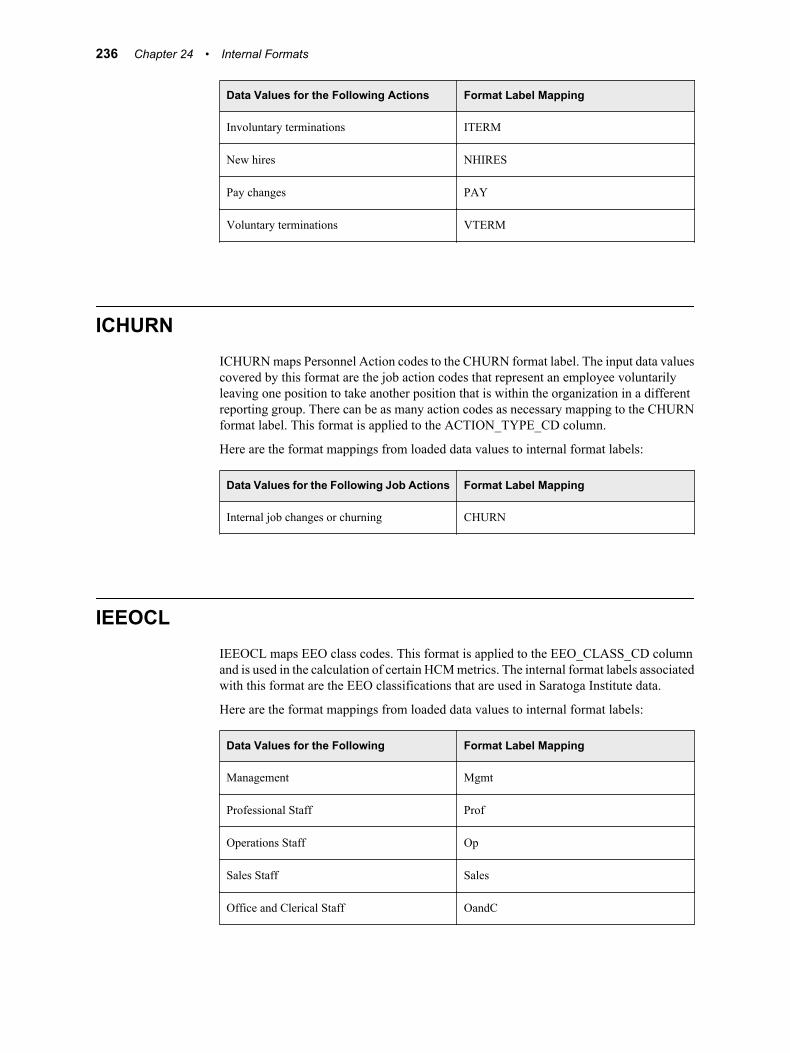
Data Values for the Following Actions Format Label Mapping
Involuntary terminations ITERM
New hires NHIRES
Pay changes PAY
Voluntary terminations VTERM
ICHURNICHURN maps Personnel Action codes to the CHURN format label. The input data valuescovered by this format are the job action codes that represent an employee voluntarilyleaving one position to take another position that is within the organization in a differentreporting group. There can be as many action codes as necessary mapping to the CHURNformat label. This format is applied to the ACTION_TYPE_CD column.
Here are the format mappings from loaded data values to internal format labels:
Data Values for the Following Job Actions Format Label Mapping
Internal job changes or churning CHURN
IEEOCLIEEOCL maps EEO class codes. This format is applied to the EEO_CLASS_CD columnand is used in the calculation of certain HCM metrics. The internal format labels associatedwith this format are the EEO classifications that are used in Saratoga Institute data.
Here are the format mappings from loaded data values to internal format labels:
Data Values for the Following Format Label Mapping
Management Mgmt
Professional Staff Prof
Operations Staff Op
Sales Staff Sales
Office and Clerical Staff OandC
236 Chapter 24 • Internal Formats
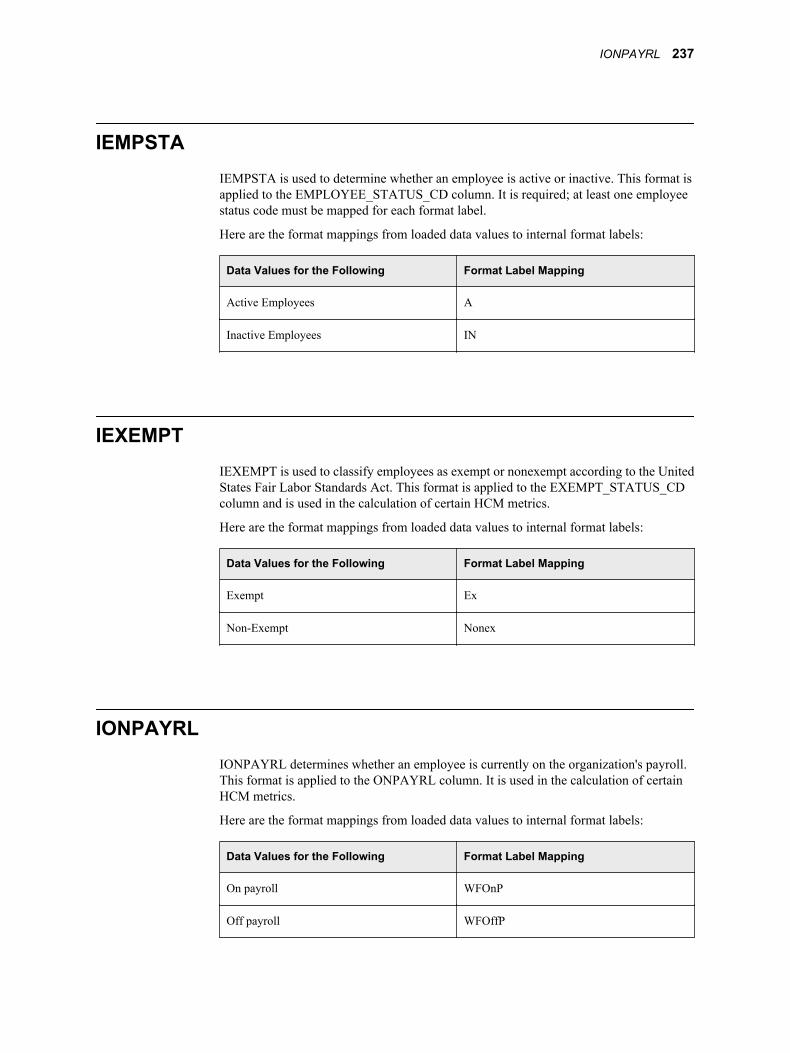
IEMPSTAIEMPSTA is used to determine whether an employee is active or inactive. This format isapplied to the EMPLOYEE_STATUS_CD column. It is required; at least one employeestatus code must be mapped for each format label.
Here are the format mappings from loaded data values to internal format labels:
Data Values for the Following Format Label Mapping
Active Employees A
Inactive Employees IN
IEXEMPTIEXEMPT is used to classify employees as exempt or nonexempt according to the UnitedStates Fair Labor Standards Act. This format is applied to the EXEMPT_STATUS_CDcolumn and is used in the calculation of certain HCM metrics.
Here are the format mappings from loaded data values to internal format labels:
Data Values for the Following Format Label Mapping
Exempt Ex
Non-Exempt Nonex
IONPAYRLIONPAYRL determines whether an employee is currently on the organization's payroll.This format is applied to the ONPAYRL column. It is used in the calculation of certainHCM metrics.
Here are the format mappings from loaded data values to internal format labels:
Data Values for the Following Format Label Mapping
On payroll WFOnP
Off payroll WFOffP
IONPAYRL 237
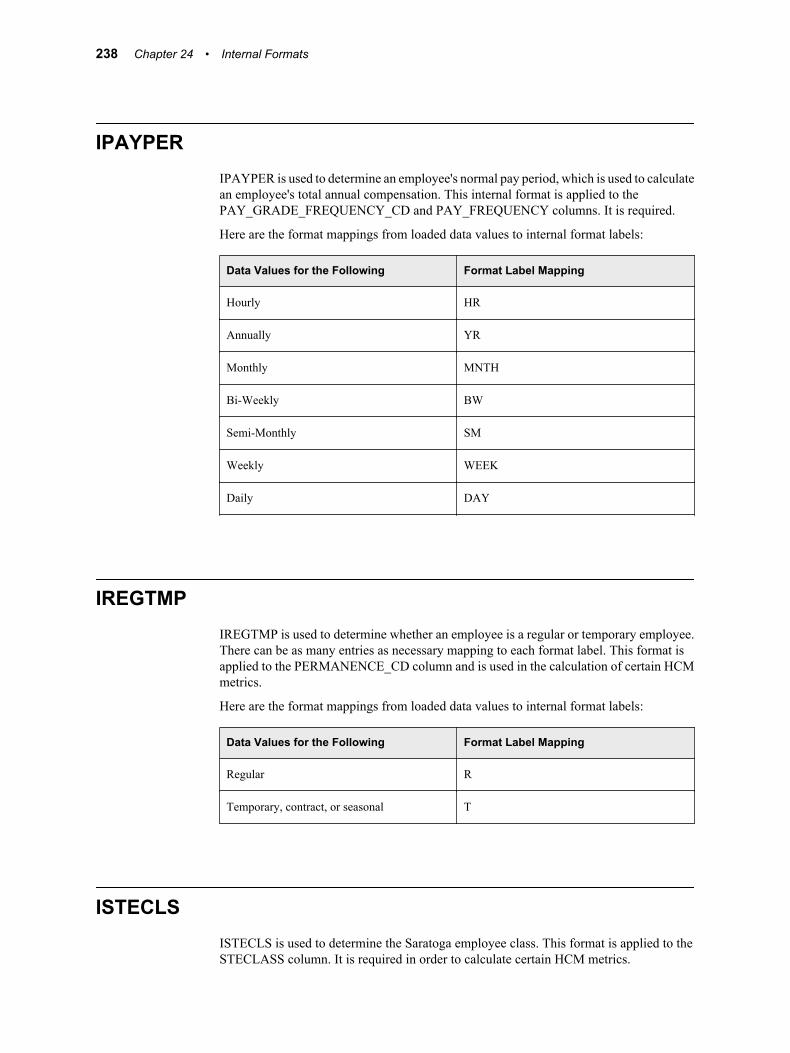
IPAYPERIPAYPER is used to determine an employee's normal pay period, which is used to calculatean employee's total annual compensation. This internal format is applied to thePAY_GRADE_FREQUENCY_CD and PAY_FREQUENCY columns. It is required.
Here are the format mappings from loaded data values to internal format labels:
Data Values for the Following Format Label Mapping
Hourly HR
Annually YR
Monthly MNTH
Bi-Weekly BW
Semi-Monthly SM
Weekly WEEK
Daily DAY
IREGTMPIREGTMP is used to determine whether an employee is a regular or temporary employee.There can be as many entries as necessary mapping to each format label. This format isapplied to the PERMANENCE_CD column and is used in the calculation of certain HCMmetrics.
Here are the format mappings from loaded data values to internal format labels:
Data Values for the Following Format Label Mapping
Regular R
Temporary, contract, or seasonal T
ISTECLSISTECLS is used to determine the Saratoga employee class. This format is applied to theSTECLASS column. It is required in order to calculate certain HCM metrics.
238 Chapter 24 • Internal Formats
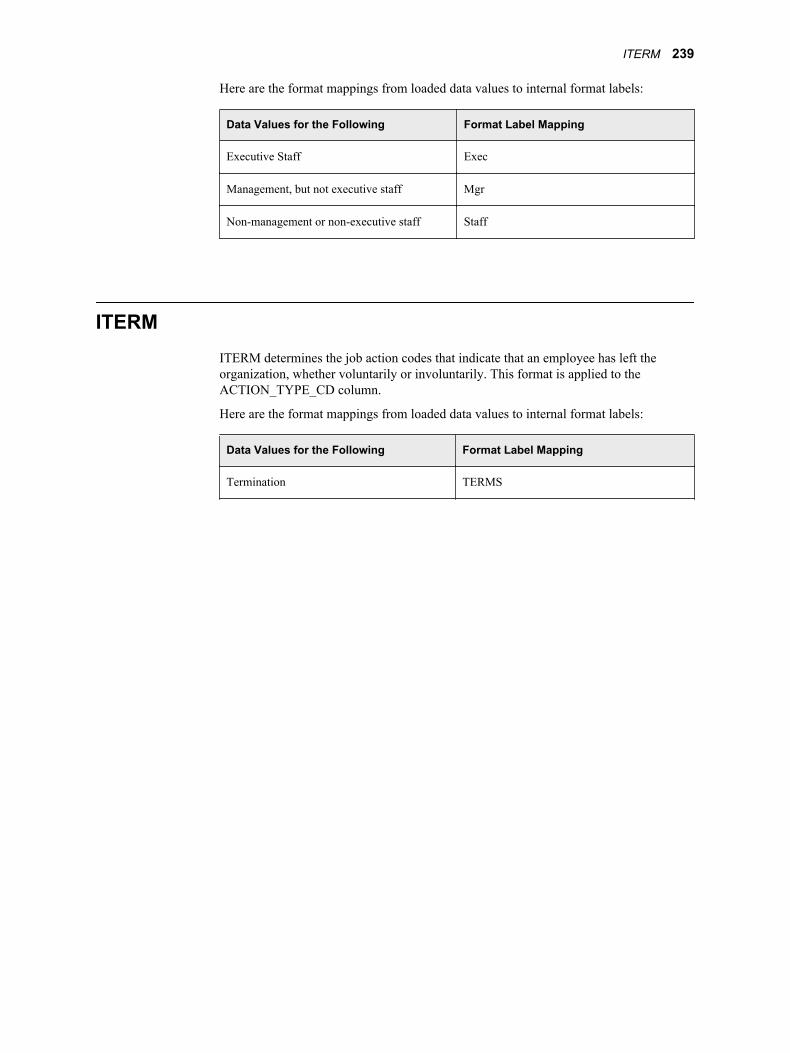
Here are the format mappings from loaded data values to internal format labels:
Data Values for the Following Format Label Mapping
Executive Staff Exec
Management, but not executive staff Mgr
Non-management or non-executive staff Staff
ITERMITERM determines the job action codes that indicate that an employee has left theorganization, whether voluntarily or involuntarily. This format is applied to theACTION_TYPE_CD column.
Here are the format mappings from loaded data values to internal format labels:
Data Values for the Following Format Label Mapping
Termination TERMS
ITERM 239

240 Chapter 24 • Internal Formats
Part 4
Appendixes
Appendix 1MySQL Reserved Words . . . . . . . . . . . . . . . . . . . . . . . . . . . . . . . . . . . . . . . . 243
Appendix 2The Conform Area . . . . . . . . . . . . . . . . . . . . . . . . . . . . . . . . . . . . . . . . . . . . . . 245
241

242
Appendix 1
MySQL Reserved Words
MySQL reserved words cannot be used as column names of MySQL tables. Therefore, youmust not use any MySQL reserved word as a dimension code for a dimension that will berepresented by a column in a metric table. The safest approach is to avoid defining anydimension code that is identical to a MySQL reserved word.
There is a complete list of MySQL reserved words at the following Web location:
http://dev.mysql.com/doc/refman/5.0/en/reserved-words.html
For a discussion of the process of loading metric tables from an external source, see Chapter12, “Loading Metrics,” on page 109.
For a discussion of the process of loading metric tables from the HCM Data Mart, see“Loading HCM Metrics into a Metric Table” on page 197.
For a discussion of dimension codes, see Chapter 6, “Creating a Dimension,” on page 29.
243

244 Appendix 1 • MySQL Reserved Words
Appendix 2
The Conform Area
Overview of the Conform Area . . . . . . . . . . . . . . . . . . . . . . . . . . . . . . . . . . . . . . . . . 245
Copying Tables to the Conform Area . . . . . . . . . . . . . . . . . . . . . . . . . . . . . . . . . . . . 245
Overview of the Conform AreaData that passes through the detail data store can go from the detail data store to a data marteither directly or by way of an intermediate location known as the conform area. Theconform area and the detail data store are concatenated to constitute the CONFORM library.Jobs that load data into a data mart refer to input tables in the CONFORM library. Bydefault, the conform area points to the same location as the Cross Industry Detail Data Storefolder:
..\Lev1\SASApp\Data\SolutionsServices\DDSData
To create a separate conform area, prepend the following path in the LIBNAME statement:
..\Lev1\SASApp\Data\SolutionsServices\ConformedDataMart
The ConformedDataMart folder path must be prepended to the DDSData folder path. Donot be misled by the name of the conform area directory. The conform area is not adestination data mart.
The following LIBNAME statement is an example of creating a separate conform area:
LIBNAME Conform BASE ("C:\SAS\Config\Lev1\SASApp\Data\SolutionsServices\ConformedDataMart" "C:\SAS\Config\Lev1\SASApp\Data\SolutionsServices\DDSData");
Copying Tables to the Conform AreaUsing the copy_all_dds_tables_to_conform_library andcopy_dds_table_to_conform_library transformations in the Solutions Transformationsfolder on the Transformations tab, you can create jobs that copy tables to the conformarea. You can recopy the tables at any time. Once you copy these tables to the conformarea, the SDM is loaded from the most recently copied versions of these tables. If you nevercopy these tables to the conform area, then the SDM is loaded from the tables in the detaildata store.
245

246 Appendix 2 • The Conform Area
Index
Aaccount dimension tables 40account hierarchies
structure of 43Account Type Code column 40account types 43accounting data
exporting 157adding columns to tables 21, 201adding HCM cubes 206adding tables to the data model 21, 205AGEFRACT macro variable for SAS
Human Capital Management 219ALL organization member 45ANAL family of macro variables for SAS
Human Capital Management 210analysis hierarchies
structure of 44APP_DIMENSION table 32APP_FORMULA_READ_MEMBER
table 49, 58APP_FORMULA_TARGET table 49, 58APP_FORMULA_WRITE_MEMBER
table 49, 58APP_FORMULA table 49, 58APP_GROUP_ACTIONS table 48APP_MBR_SELECTION_RULES table
164APP_MEMBER_PROPERTY_MAP table
54APP_PROPERTY table 54APP_SELECTION_SET table 164APP_USER_ACTIONS table 48APP_USER_X_MEMBER table 48ASSOC_TYPE tables 36ASSOC tables 36
Bbalance accounts 43base accounting data
exporting 157base financial data
loading 139base operational data
loading 149Batch Model Facility (BMF) 20Batch Model Facility for StM 7Book of Record Currency Code column 45
Ccell protection rules
about 133for a model 134loading 134loading from staging tables 136loading to staging tables 134loading via a macro 137loading via an ETL job 136
child-parent tables 36, 86CHRNDROP macro variable for SAS
Human Capital Management 219CHRNINDS macro variable for SAS
Human Capital Management 219CHRNVARS macro variable for SAS
Human Capital Management 220CODE_LANGUAGE table 23columns
adding to tables 21, 201increasing character length of 204
competency tables for SAS Human CapitalManagement 172
complex exchange rate types 43complex exchange rates 119configuration directory 9conventions 9Create Application Dimension job 32Create Dimension transformation 30CTA Account Flag column 40CTA account type 43
247
CTA Elimination Behavior Code column40
CUBE_DELETE_TYPE macro variablefor SAS Human Capital Management220
CUBE_DRILL macro variable for SASHuman Capital Management 220
cube jobs for SAS Human CapitalManagement 187
CUBED family of macro variables for SASHuman Capital Management 211
cubesadding to HCM Data Mart 206
CUBEV family of macro variables for SASHuman Capital Management 212
CURRENCY_COMPLEX_EXCH_RATEtable 121, 123
CURRENCY_EXCH_RATE_SET table120
CURRENCY_EXCH_RATE_SRC table121
CURRENCY_EXCH_RATE table 121,123
currency hierarchiesstructure of 45
custom properties of members 53CUTOFF family of macro variables for
SAS Human Capital Management 213
Ddata encodings 15data locales 23data marts 13data pathways 13, 20Data Tier Server
definition 9security 11
Data Validation transformation 18DEBUG macro variable for SAS Human
Capital Management 221default language flag 23default member of a hierarchy 38detail data store (DDS) jobs
load techniques in 18modifying 18role and context 13scheduling 19testing 19validation in 18
detail table jobs for SAS Human CapitalManagement 187
DIMENSION_TYPE table 64dimension tables 36dimension types
adding 63
definition 29dimensions
creating 30, 104definition 29loading members and hierarchies into
35, 104DIRECT macro variable for SAS Human
Capital Management 221Document Manager
running stored processes from 115documentation 10documentation conventions 9driver rate sets 128driver rate types 127driver rates 127
EEDU macro variable for SAS Human
Capital Management 222Employee ID column 45EMPPOP macro variable for SAS Human
Capital Management 222encodings of data 15End Date column 47etldrteb.sas macro file 131etlfctxb.sas macro file 159etlldcpr.sas macro file 137etlldfct.sas macro file 146etlldopf.sas macro file 154etlxrteb.sas macro file 125exchange rate sets 120Exchange Rate Source Code column 121exchange rate sources 121Exchange Rate Type Code column 40, 121exchange rate types 43, 119exchange rates 119exporting
accounting data 157hierarchies 57members 57
EXT organization member 45extracting data from source systems 15
FFACTORSITE table in HCM Data Mart
191, 197FCTRVARS macro variable for SAS
Human Capital Management 197, 223filter for Microsoft Excel tables 163financial accounting data
exporting 157financial data
loading 139flow accounts 43
248 Index
FMT_UPDATE macro variable for SASHuman Capital Management 223
formats for SAS Human CapitalManagement 181
formula tables 49From Currency Code column 121
Ggeneral ledger data 139GL_ACCOUNT table 40GL_JRNL_DETAILS table 104, 139GL_TRANSACTION_SUM table 100,
139GL Account ADK column 40group data
loading 27
HHCBNCHMRK table in HCM Data Mart
194, 197HCM data flow 172HCM Data Mart 13, 185, 191hcmmetacolumn table for SAS Human
Capital Management 205hcmmetatable table for SAS Human
Capital Management 205HEDUNIT macro variable for SAS Human
Capital Management 197hierarchies
definition 29exporting to staging tables 57loading into a dimension 35, 104promoting 49structure of 43
hierarchy identification tables 36, 77hierarchy structure tables 36, 86HIERORDS macro variable for SAS
Human Capital Management 224HIERS macro variable for SAS Human
Capital Management 174, 224
IIACTION internal formats for SAS Human
Capital Management 235ICHURN internal formats for SAS Human
Capital Management 236IEEOCL internal formats for SAS Human
Capital Management 236IEMPSTA internal formats for SAS Human
Capital Management 237IEXEMPT internal formats for SAS
Human Capital Management 237Import Users and Groups stored process 27
INCOPEN macro variable for SAS HumanCapital Management 224
information maps for SAS Human CapitalManagement 199
Intercompany Account Flag column 40INTERNAL_ORG table 45internal formats for SAS Human Capital
Management 235Internal Organization ADK column 45INTORG_DIMENSION_CD macro
variable for SAS Human CapitalManagement 174, 225
IONPAYRL internal formats for SASHuman Capital Management 237
IPAYPER internal formats for SAS HumanCapital Management 238
IREGTMP internal formats for SASHuman Capital Management 238
ISTECLS internal formats for SAS HumanCapital Management 238
ITERM internal formats for SAS HumanCapital Management 239
Jjournal data 139
KKPI Viewer 7
Llabels for SAS Human Capital
Management 172, 180languages 23Legal Entity Flag column 45load techniques in detail data store jobs
in detail data store jobs 18locales 23
MM family of macro variables for SAS
Human Capital Management 213macro files for SAS Financial Management
etldrteb.sas 131etlfctxb.sas 159etlldcpr.sas 137etlldfct.sas 146etlldopf.sas 154etlxrteb.sas 125
macro files that affect HCM data 180macro variables for SAS Human Capital
Management 210
Index 249

marts 13MAXLEVL macro variable for SAS
Human Capital Management 225MEAS_LEV macro variable for SAS
Human Capital Management 197, 225measures 105member tables 36, 70, 97members
custom properties of 53definition 29exporting to staging tables 57loading into a dimension 35, 104promoting 49
metadata repository 6Metadata Server 9metrics
exporting from SAS FinancialManagement 109
loading from an external source 109loading from the HCM Data Mart 197
Middle Tier Server 9MISC_RATE_SET table 128MISC_RATE_TYPE table 127, 129MISC_RATE table 128models
cell protection rules 134MPRINT macro variable for SAS Human
Capital Management 226MySQL
installation directory 9MySQL reserved words 243
NNLS member tables 36, 97Normal Balance Code column 40NOTES macro variable for SAS Human
Capital Management 226NUMBER_OF_HIERS macro variable for
SAS Human Capital Management 174,227
OONPAYRL macro variable for SAS
Human Capital Management 227operational data
loading 149order number in a hierarchy 38organization hierarchies
for SAS Human Capital Management174
structure of 45ORGMEMBER_EXCLUDES macro
variable for SAS Human CapitalManagement 227
Pparent-child tables 36, 86PERIOD_TYPE_CD macro variable for
SAS Human Capital Management 197,228
Period Type Code column 47planning form security 48POSDIR macro variable for SAS Human
Capital Management 228POSVAR macro variable for SAS Human
Capital Management 228POSVDIR macro variable for SAS Human
Capital Management 229prebuild.sas macro file for SAS Human
Capital Management 174, 184, 210predefined data 13primary member tables 36, 70promoting members and hierarchies 49, 57properties files for SAS Human Capital
Management 172, 180properties of members 53
RRate Source Code column 128Rate Type Code column 128Rates workspace of SAS Financial
Management Studio 119, 127related documentation 10Reporting Currency Code column 45reserved words in MySQL 243Retained Earnings account type 43Retained Earnings Flag column 40Retained Earnings Roll Forward Code
column 40Roll Up to Parent Flag column 38runhcm.sas macro file for SAS Human
Capital Management 190
SSALCVAR macro variable for SAS Human
Capital Management 229SALUNIT macro variable for SAS Human
Capital Management 197Saratoga benchmarks for HCM metrics
194SAS_CURRENCY_EXCH_RATE_TYP
E table 40, 119SAS_CURRENCY table 45SAS_DIMENSION_TYPE table 63SAS_GL_ACCOUNT_TYPE table 40SAS_GL_NORMAL_BAL table 40SAS_MEASURE table 105SAS_PERIOD_TYPE table 47
250 Index
SAS_RETAINED_EARN_ROLL_FWD_METH table 40
SAS Web OLAP Viewer and SAS HumanCapital Management 199
SAS Web Report Studio and SAS HumanCapital Management 199
SASOP_DETAIL table 149SCD Type 2 Loader transformation 18scheduling
detail data store jobs 19SDM jobs 20
scorecards 7secondary member tables 36, 97security
Data Tier Server 11planning forms 48Security tab data 48user data 27
servers 9simple exchange rate types 43simple exchange rates 119slowly changing dimensions 17Solutions Data Mart (SDM) jobs
introduction 13scheduling 20testing 20
SORT family of macro variables for SASHuman Capital Management 214
SOURCE_DIMENSION_TYPE table 64SOURCE_GL_ACCOUNT table 43SOURCE macro variable for SAS Human
Capital Management 230source systems
extracting data from 15SRVFRACT macro variable for SAS
Human Capital Management 230staging tables
introduction 13loading 15
Start Date column 47START family of macro variables for SAS
Human Capital Management 215STAT family of macro variables for SAS
Human Capital Management 215STGACUT macro variable for SAS Human
Capital Management 194, 197, 230STGACUTA macro variable for SAS
Human Capital Management 194, 197,230
STGAMAX macro variable for SASHuman Capital Management 197, 232
stgamets.sas macro file for SAS HumanCapital Management 191
stored processescreating from SAS Data Integration
Studio jobs 115
system filter for Microsoft Excel tables163
TTable Loader transformation 18testing
detail data store jobs 19SDM jobs 20
TIME_PERIOD table 47time hierarchies
for SAS Human Capital Management174
structure of 47titles for SAS Human Capital Management
172, 180To Currency Code column 121Transaction Amount column
financial data 142operational data 150
Transaction Amount Year-to-Date Flagcolumn
financial data 142operational data 150
UUH family of macro variables for SAS
Human Capital Management 216umbrella job for SAS Human Capital
Management 188UNIT family of macro variables for SAS
Human Capital Management 217user data 27user IDs for data administrators 11Users tab data 48UTF-8 encoding 15
VV family of macro variables for SAS
Human Capital Management 217Valid From Datetime column 17Valid To Datetime column 17validation in detail data store jobs 18VARS family of macro variables for SAS
Human Capital Management 218
Yyear-to-date flag
financial data 142operational data 150
Index 251

252 Index
Your Turn
We welcome your feedback.
• If you have comments about this book, please send them to [email protected] the full title and page numbers (if applicable).
• If you have comments about the software, please send them to [email protected].