satellite user's guide - century equip 8000 satellite users guide.pdfsatellite user's...
TRANSCRIPT

S A T E L L I T EU s e r ' s G u i d e

Table of Contents
Programming the Satellite ......................................................................................................................................... 1Introduction ................................................................................................................................................................ 1Features ...................................................................................................................................................................... 1Control Panel Operation ........................................................................................................................................ 2–4CONFIG and WATER Menus ................................................................................................................................... 3Master Control Knob ................................................................................................................................................. 5
PART 1 Setting-up (Configuring) the Satellite ............................................................................... 6–1512/24 HR. ................................................................................................................................................................... 7PROG. LMT. .............................................................................................................................................................. 8DAYS CHNG. ........................................................................................................................................................... 9DAYS/CYC. ............................................................................................................................................................ 10METRIC .................................................................................................................................................................. 11CENT. START ......................................................................................................................................................... 12STA. DLY. ................................................................................................................................................................ 13FLOW STD. ............................................................................................................................................................ 14TRI. AMPS .............................................................................................................................................................. 15
PART 2 Setting-up Watering Programs ....................................................................................... 16–28PROGRAM .............................................................................................................................................................. 18ACT. DAY ............................................................................................................................................................... 19START TM. ............................................................................................................................................................. 20P.P. SYR. .................................................................................................................................................................. 21REPEATS ................................................................................................................................................................ 22SOAK ...................................................................................................................................................................... 23STA. ADJ. ................................................................................................................................................................ 24STA. RPT. ................................................................................................................................................................ 25GBL. ADJ. ............................................................................................................................................................... 26CLOCK .................................................................................................................................................................... 27CALENDAR ............................................................................................................................................................ 28
PART 3 Reviewing Satellite Configuration ................................................................................... 29–34SAT. ADDR. ............................................................................................................................................................ 3012/24 HR. ................................................................................................................................................................. 31DAY CHNG. ............................................................................................................................................................ 32DAYS/CYC. ............................................................................................................................................................ 33PROG. LMT. ............................................................................................................................................................ 34
PART 3 Reviewing Satellite Configuration (condensed) .............................................................. 35–37PROG. LMT. ............................................................................................................................................................ 35METRAIC ............................................................................................................................................................... 35TRI. AMPS .............................................................................................................................................................. 36RF TEST .................................................................................................................................................................. 36CAL. AMPS ............................................................................................................................................................ 37CAL. VOLT ............................................................................................................................................................. 37LINK MON. ............................................................................................................................................................ 37
Page i 6/91

Table of Contents
PART 4 Reviewing Satellite Watering Programs .......................................................................... 38–47STATUS ................................................................................................................................................................... 38PROGRAM .............................................................................................................................................................. 38START TM. ............................................................................................................................................................. 39ACT. DAY ............................................................................................................................................................... 40P.P. SYR. .................................................................................................................................................................. 40REPEATS ................................................................................................................................................................ 41SOAK ...................................................................................................................................................................... 41STA. ADJ. ................................................................................................................................................................ 42STA. RPT. ................................................................................................................................................................ 42GBL. ADJ. ................................................................................................................................................................43CLOCK .................................................................................................................................................................... 43CALENDAR ............................................................................................................................................................ 44TOT. TIM. AS. ........................................................................................................................................................ 44VLV. COM. A. ......................................................................................................................................................... 45AMB. TEMP. ........................................................................................................................................................... 45PRESSURE .............................................................................................................................................................. 46SENSORS ................................................................................................................................................................ 46SENS. DISP. ............................................................................................................................................................ 47
PART 5 Manually Controlled Watering Functions ...................................................................... 48–58PAUSE ..................................................................................................................................................................... 49PROG. NO. .............................................................................................................................................................. 50PROG. RPT. ............................................................................................................................................................. 51STA. NO. ................................................................................................................................................................. 52MULTI. MAN. ......................................................................................................................................................... 53SYRINGE ................................................................................................................................................................ 54CANCEL ................................................................................................................................................................. 55STA. DSABL. .......................................................................................................................................................... 56EMERGENCY STOP .............................................................................................................................................. 57CAN. ALL ............................................................................................................................................................... 58
DIAGNOSTICS ................................................................................................................................ 59–60TRIACS ................................................................................................................................................................... 59PILL CHK. .............................................................................................................................................................. 59CTRL. REQ. ............................................................................................................................................................ 60
6/91 Page ii

NOTE: The following procedure must be performed as a part of the initial installation ofthe Network 8000 system. It need not be performed again unless physical system changesrequire it.
Initializing the Satellites
After installing your Toro Network 8000 Satellites, the first thing you need to do is set some switches thatare located under the Control Panel. These two sets of switches will set the Satellite Address and the CSGAddress. The CSG Address, or the Central Satellite Group, will identify to which CSG group this Satellitebelongs. The Satellite Address identifies which Satellite it is. The latter is a unique number. The CSGAddress may be likened to a street name and the Satellite Address may be likened to the house number.
To set these switches, you must first remove the Control Panel by removing the four (4) mounting screwsthat attach the Control Panel to the top of the Satellite. Then carefully remove the Control Panel bylifting it up. DO NOT YANK IT OUT as it is connected by several cables. The upper-left corner of theControl Panel contains the Toro logo. Under this edge you will find the two (2) DIP Switches. Whenfacing the front panel TORO LOGO, the switch directly beneath it and to the left sets that SatelliteAddress and the one on the right sets the CSG Address (refer to Figure 2).
These switches use binary coding so that the rightmost switch of either switch block (the one marked asnumber “8”) represents a one. Moving from right to the left, the numbers increase and we get::
The top row indicates the switch number and the bottom row indicates the value when that switch is“ON”. If s6 and s8 are “ON” then we get 4 + 1 which is 5. Thus, 5 is the address set by that DIP switch.If only s4 is “ON” then the address is 16. If s5, s6 and s8 are “ON” then we get 8 + 4 + 1 = 13 thus 13 isthe selected address.
Page iii 6/91
1 2 3 4 5 786 1 2 3 4 5 7864 1
CSG ADDRESS
4 18
SATELLITE ADDRESS
= 13 5+ =+ +
S2 S3 S4 S5 S6 S7 S8
64 32 16 8 4 2 1
FIGURE 2

Initializing the Satellites (continued)
Once you have chosen CSG and Satellite address values for each Satellite (making sure that theSATELLITE ADDRESSES are all unique within a CSG ADDRESS; the CSG ADDRESS may be thesame for all Satellites if you wish) you must then INITIALIZE each Satellite.
1. Disable the power to the Satellite be removing the leftmost 3 amp fuse that is located on the box thatyou removed in order to make the power connection.
2. Depress the DOWN ARROW and hold it down.
3. Apply power to the Satellite again by replacing said 3 amp power fuse. This fuse is the leftmost fuselocated at the bottom left of the Satellite. It is labelled “3 AMP FUSE”.
4. Release the DOWN ARROW.
After this the following will occur:
1. The satellite will sound two (2) short beeps and then one (1) long beep.
2. A date will be displayed in the FUNCTION window. This is called the REV.CODE.
3. The following will be displayed in the two INFORMATION windows.
ALL PARAMETERSARE INITIALIZED
4. The INFORMATION windows will then go blank.
5. The power line frequency will be displayed in top Information Window (e.g., 60 Hertz) for a fewmoments and then go blank.
6. The display will then change to the normal AUTO mode and the CLOCK window will indicate that itis Sunday and 12:00 AM.
6/91 Page iv
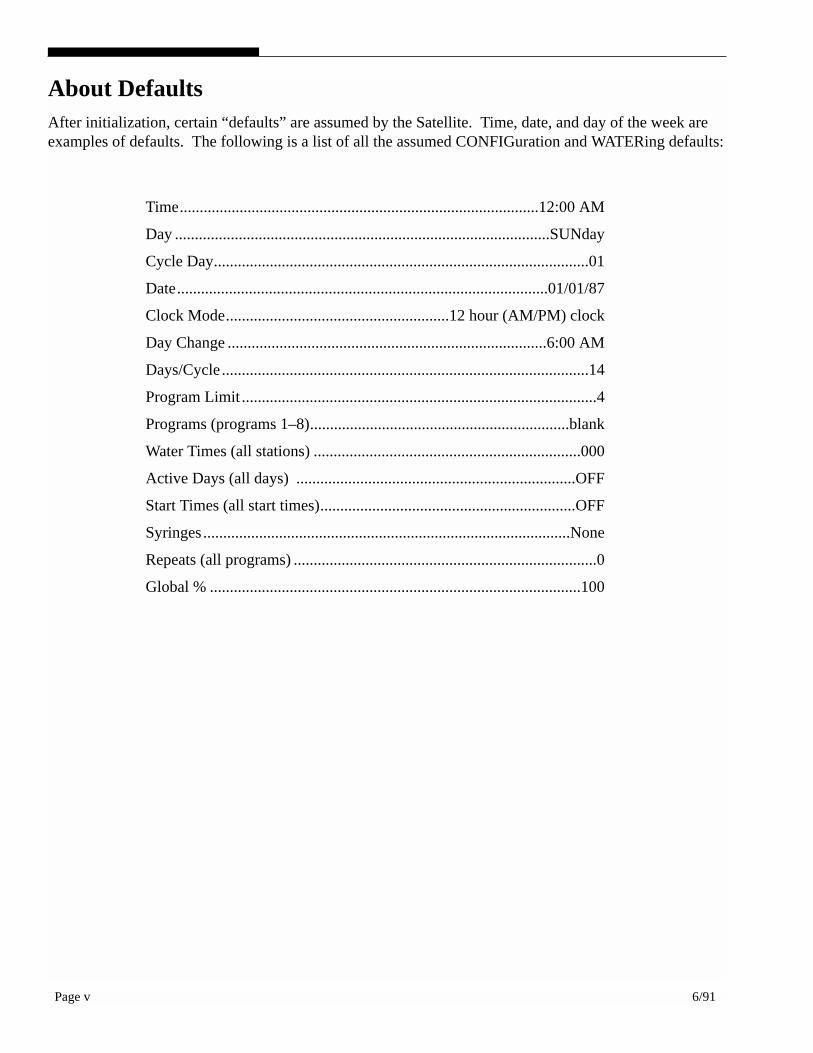
About DefaultsAfter initialization, certain “defaults” are assumed by the Satellite. Time, date, and day of the week areexamples of defaults. The following is a list of all the assumed CONFIGuration and WATERing defaults:
Time..........................................................................................12:00 AM
Day ..............................................................................................SUNday
Cycle Day..............................................................................................01
Date.............................................................................................01/01/87
Clock Mode........................................................12 hour (AM/PM) clock
Day Change ................................................................................6:00 AM
Days/Cycle ............................................................................................14
Program Limit .........................................................................................4
Programs (programs 1–8).................................................................blank
Water Times (all stations) ...................................................................000
Active Days (all days) ......................................................................OFF
Start Times (all start times)................................................................OFF
Syringes ............................................................................................None
Repeats (all programs) ............................................................................0
Global % .............................................................................................100
Page v 6/91

FeaturesThe TORO NETWORK 8000 Satellites provide for automated control of up to 32 watering Stations. Foradded versatility, you may use your Satellites in one of two different modes: CENTRAL (remote) controlor SATELLITE (field) control.
When the Satellites are under remote control, your TORO NETWORK 8000 Central directs the wateringschedules of the Stations connected to the Satellite. Programming is then done through the Central andthe TORO NETWORK 8000 program.
Under SATELLITE mode (field control), watering schedules are programmed from the Control Panel byyou (the operator). You may also manually override any program that has been downloaded by theCentral.
SATELLITE mode programming is the subject of this section. For a discussion of Central controlprogramming, see the section titled “Programming the NETWORK 8000 Central.”
Depending on what model type the Satellite is, the location of the CONTROL PANEL is either under thehinged cover at the top or behind the hinged door at the front of the Satellite. In either model type there isno change in the way the Satellite operates or in the way it is programmed by you. And also, there are nochanges in the CONTROL PANEL design in either model type.
NOTE: This Operator's Manual is the same for both Satellite models.
6/91 Page 1

Control Panel Operation
SATELLITE (field) programming is accomplished at the Control Panel by you. The Control Panelwhether located under the hinged cover at the top or behind the hinged door at the front of the Satellite isidentical to the pictorial below (see Figure 1).
This Control Panel is divided into several sections. The upper left portion of the panel (A) contains thethree MODE LEGEND DISPLAYS: SATELLITE, AUTO, and CENTRAL.
When lighted, these MODE LEGENDS indicate the operational mode of the Satellite. Its mode will beselected automatically by the Satellite itself.
If it is receiving instructions from the Central, then the CENTRAL legend will be illuminated.
If the Satellite is under self-control the SATELLITE legend will be illuminated and the CENTRALlegend will be illuminated.
If communication with the Central is not detected for a period of 15 minutes, the Satellite will illuminatethe SATELLITE legend.
Page 2 6/91
MENU
ESCAPE
I
I I I I I I
I
8000
SATELLITE AUTO CENTRAL
CONFIG WATER
RUNREVIEWSET
GOSTOP
AM
SAT
DAY 04 07/27/91
FIGURE 1
A
B
E
C
D
F1
H
F
F2
GDAY 04 07/27/91

In either SATELLITE mode or CENTRAL mode the AUTO legend will be illuminated. The AUTOlegend will extinguish when you take control of the Satellite by accessing the Control Panel through theCURSOR KEYS (the arrow keys at the bottom left of the panel; E). The AUTO legend willautomatically illuminate again after 15 minutes of inactivity from you.
Located directly below the MODE LEGENDS are the two MAIN MENU legends: CONFIG andWATER (B).
Below the MAIN MENU legends are three more Legends called the SUB MENU legends: SET,REVIEW, and RUN (C).
Below the SUB MENU legends is the FUNCTIONS Display Window (D). This window houses an eight(8) character ALPHANUMERIC DISPLAY and displays for you a choice of functions. You make yourchoice by dialing the MASTER CONTROL KNOB located in the lower right portion of the panel (F).
The following summarizes where each Function is with regard to menus and sub-menus:
CONFIG (Main Menu)
WATER (Main Menu)
6/91 Page 3
SET (Sub-Menu)
12/24 HR.DAY CHNG.DAYS/CYC.PROG. LMT.METRICTRI.AMPSCENT.STARTSTA. DLY.FLOW STD.
REVIEW (Sub-Menu)
SAT. ADDR.12/24 HR.DAY CHNG.DAYS/CYC.PROG. LMT.METRICTRI.AMPSREV. CODERF TESTCAL. AMPSCAL. VOLTSLINK MON.
SET (Sub-Menu)
PROGRAMACT DAYSTART TM.P.P.SYR.REPEATSSOAKSTA. ADJ.SAT. RPT.GBL.ADJ.CLOCKCALENDAR
REVIEW (Sub-Menu)
STATUSPROGRAMACT DAYSTART TM.P.P.SYR.REPEATSSOAKSTA. ADJ.STA. RPT.GBL. ADJ.CLOCKCALENDARTOT.TIM.AS.T.TIMEGBL.VLV.COM.A.AMB. TEMP.PRESSURESENSORSFLOWRATESENS.DISP.
RUN (Sub-Menu)
PAUSEPROG. NO.PROG. RPT.STA. NO.MULT. MAN.SYRINGECANCELCAN ALLTRIACS
PILL CHK.CTRL. REQ.STA. DSABL.

Control Panel Operation (continued)
Below the FUNCTIONS Display Window are the four CURSOR KEYS (directional Arrow Keys; E).These arrow keys are known by the direction they face: Up, Down, Left, and Right. You move throughthe MAIN MENU and SUB-MENU by pressing the appropriate CURSOR KEYS. The first time youwish to SET or REVIEW the CONFIGuration you must first press the Down Arrow key. The AUTOlegend will extinguish and the WATER legend will illuminate. By pressing the Down arrow again, youwill have selected WATER as the main menu choice (the WATER legend will remain lighted) and willnow be able to choose which one of the three SUB-MENU legends you desire.
To continue with SETting or REVIEWing the CONFIGuration...
Once the WATER legend has been illuminated, you may select it as your MAIN MENU choice (bypressing the Down arrow again) or you may press the Left arrow key causing the CONFIG legend toilluminate and the WATER legend to extinguish.
The CONFIG menu choice is selected by pressing the Down arrow key. The REVIEW legend thenbecomes illuminated. You may then “toggle” between SET and REVIEW (by pressing alternately the Leftthen Right arrow keys) and select which function you wish by pressing the Down arrow key for a thirdtime.
At this time we should note the following:
❏ movement through the menu is only downward, however you may press the key marked STOP torestart with an illuminated AUTO legend.
❏ you select an item (e.g., CONFIG) by pressing the DOWN arrow key.
❏ You may “toggle” through options which are on the same line by pressing the RIGHT and LEFT arrowkeys.
❏ the MASTER CONTROL KNOB is rotated (dialed) to “scroll” between selections that are displayedon the FUNCTIONS Display Window.
❏ when the desired function appears in the FUNCTIONS Display Window, you may select it bypressing the RIGHT arrow key.
Page 4 6/91

Master Control Knob
In the upper right portion of the Control Panel (H) is the CLOCK Window. This window shows the timeof day (also AM or PM if the 12 hour clock mode has been selected when the Satellite was initialized) aswell as day of the week information.
Below the CLOCK Window are two INFORMATION WINDOWS (G). These 16 character alphanumericwindow displays show system status and program information. Actual programming will take place hereby setting options using the MASTER CONTROL KNOB and CURSOR KEYS (directional arrow keys).
Below the Information Windows, is the MASTER CONTROL KNOB, the STOP (escape) KEY and theGO (execute, enter, or program) KEY. The MASTER CONTROL KNOB is used to select functions in theFunction Display Window and to change programming information in the two Information Windows. Bypressing the STOP KEY, you can abort (escape) any entry operation that you are doing and return it to theilluminated AUTO legend.
After the menu has been traversed and options have been selected by turning the Master Control Knob,pressing the GO KEY will cause the selections to be permanent. It’s like pressing the “enter” key on acalculator, you are telling the Satellite to accept the new setting. After pressing the GO KEY, all legendsand displays will resume their normal state. The AUTO legend will illuminate once again and you mayreview a different setting or make another program change.
6/91 Page 5
MENU
ESCAPE
I
I I I I I I
I
8000
SATELLITE AUTO CENTRAL
CONFIG WATER
RUNREVIEWSET
GOSTOP
AM
SATA
B
E
C
D
F1
H
F
F2
GOKey
G
Master Control Knob
DAY 04 07/27/91

PART 1 Setting-Up (Configuring) the Satellite ■
The following procedure will be used to set each function in the CONFIG.SET Menu:
Press – this extinguishes the AUTO legend and illuminates the WATER legend
Press – this extinguishes the WATER legend and illuminates the CONFIG legend
Press – this illuminates the REVIEW legend.
Press – the REVIEW legend is extinguished and the SET legend is illuminated.
Press – the FUNCTION Display Window displays the first function in the Menu. (12/24 HR. is the first function in the CONFIG.SET Menu.)
Page 6 6/91

Setting the 12 or 24 Hour Timekeeping Option ■
CONFIGSET12/24 HR. (Configure for 12 or 24 Hour Timekeeping)OPTION:
You may choose how you wish the Satellite to track time; using either a 12 hour clock listing AM andPM, or a 24 hour clock where 1:00 PM becomes 13:00. This affects the Clock Displays as well as the wayyou will later enter time for programming.
Procedure to set function:
Press – this locks in the function. The INFORMATION WINDOWS display no options (in lower window) and the HOUR MODE to be selected (in upper window).
Dial to choose between a 12 hour Mode or a 24 Hour Mode.
Press – this enters the choice you selected.
What You Will See On The Front Panelwhen you are setting the 12 or 24 Hour Timekeeping Option
GO
I
I I I I I I
I
6/91 Page 7
MENU
ESCAPE
I
I I I I I I
I
8000
SATELLITE AUTO CENTRAL
CONFIG WATER
RUNREVIEWSET
GOSTOP
AM
SAT
12/24 HR.
12 HOUR MODE

Establishing the Maximum Number of Simultaneous Programs ■
CONFIGSETPROG.LMT. (Set the maximum number of simultaneous program to run.)OPTION:
This function is for setting the number of programs that may run at one time. There are 12 separateprograms per Satellite, with a maximum of 6 allowed to run simultaneously. You, the operator, specifythe number of programs (1–6) to run simultaneously or it can be downloaded from the Central.
Procedure to set function:
Dial until PROG.LMT. appears in the Function Display Window.
Press – this locks in your function while the INFORMATION WINDOWS display the option PROGRAM LIMIT (in lower window) and the choice you select (in upper window).
Dial to desired number of programs.
Press to enter your selection.GO
I
I I I I I I
I
I
I I I I I I
I
Page 8 6/91
MENU
ESCAPE
I
I I I I I I
I
8000
SATELLITE AUTO CENTRAL
CONFIG WATER
RUNREVIEWSET
GOSTOP
AM
SAT
PROG. LMT. PROGRAM LIMIT
6

Defining When It is Time To Start A New Day-Change ■
CONFIGSETDAY CHNG. (Time to start a new day)OPTION:
A specified time must be set for the Satellite to know what time during the day should be used to advancethe CURRENT CYCLE to the next day. The two most common settings would be midnight or 6:00 AM.You may, however, choose any time you like for stand-alone operation. The CENTRAL (in remotecontrol mode) will use either midnight or noon.
Procedure to set function:
Dial until DAY CHNG. appears in the Function Display Window.
Press – this locks in the selected function. The INFORMATION WINDOWS are displayed with the option DAY CHANGE TIME (in lower window) and the clock time to be selected (in upper window).
Dial to select a desired time setting.
Press – this enters the time you selected.GO
I
I I I I I I
I
I
I I I I I I
I
6/91 Page 9
MENU
ESCAPE
I
I I I I I I
I
8000
SATELLITE AUTO CENTRAL
CONFIG WATER
RUNREVIEWSET
GOSTOP
AM
SAT
DAY CHNG. DAY CHANGE TIME
12:00 A

Establishing Number of Days In A Watering Cycle ■
CONFIGSETDAYS/CYC (The number of days in a cycle.)OPTION: [DAY] [CYCLE]
You set the desired number of days (14-day, 12-day, 7-day, 6-day, MONTHLY) a CYCLE is to consist of.Then you choose which DAY (1–14) of that cycle is today. 14-day and 7-day are the most commonsettings for the cycle length. If, however, you wish to water only every third day, you would want toselect a 6- or 12-day cycle and your cycle will repeat every third day regardless of the calendar. UnderCENTRAL Station control, 14-day cycles will be standard.
Procedure to set function:
Dial until DAYS/CYC. appears in the Function Display Window.
Press – this locks in your function while the INFORMATION WINDOWS display the options DAYand CYCLE (in lower window) and the choice you select for each (in upper window).
Press and to toggle between both options.
Dial to the desired setting.
Press to enter your selection.GO
I
I I I I I I
I
I
I I I I I I
I
Page 10 6/91
MENU
ESCAPE
I
I I I I I I
I
8000
SATELLITE AUTO CENTRAL
CONFIG WATER
RUNREVIEWSET
GOSTOP
AM
SAT
DAYS / CYC DAY CYCLE
1 14 DAY
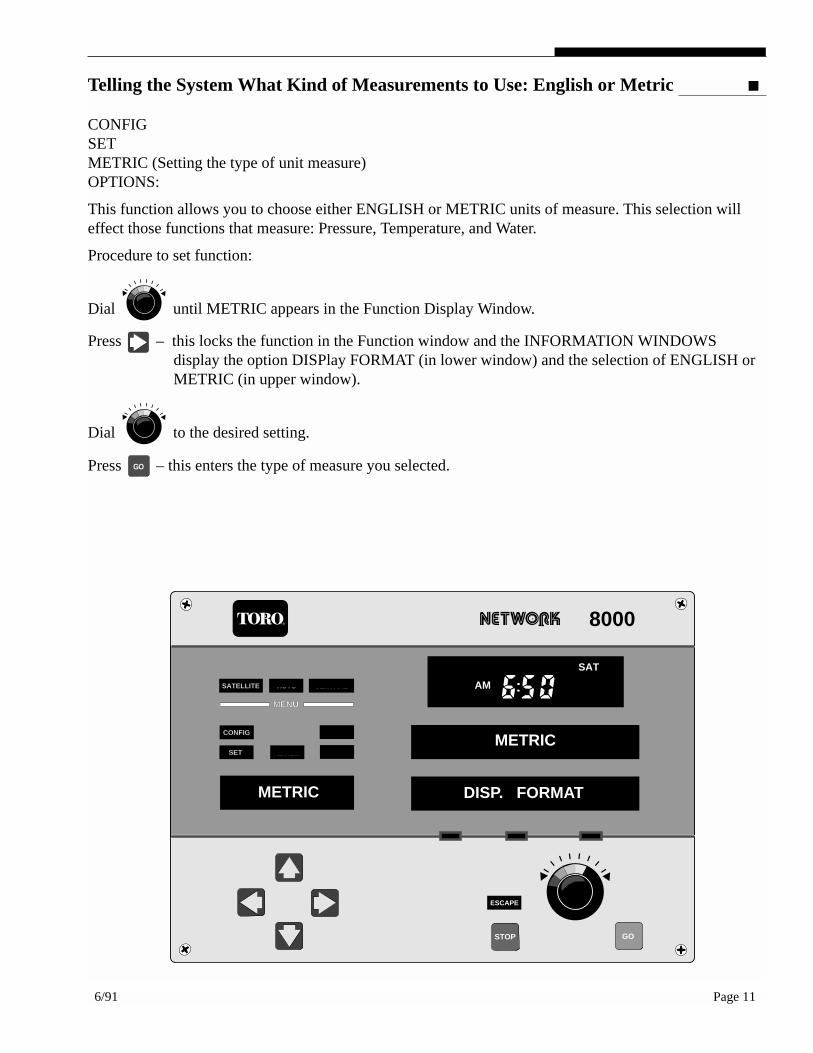
Telling the System What Kind of Measurements to Use: English or Metric ■
CONFIGSETMETRIC (Setting the type of unit measure)OPTIONS:
This function allows you to choose either ENGLISH or METRIC units of measure. This selection willeffect those functions that measure: Pressure, Temperature, and Water.
Procedure to set function:
Dial until METRIC appears in the Function Display Window.
Press – this locks the function in the Function window and the INFORMATION WINDOWS display the option DISPlay FORMAT (in lower window) and the selection of ENGLISH or METRIC (in upper window).
Dial to the desired setting.
Press – this enters the type of measure you selected.GO
I
I I I I I I
I
I
I I I I I I
I
6/91 Page 11
MENU
ESCAPE
I
I I I I I I
I
8000
SATELLITE AUTO CENTRAL
CONFIG WATER
RUNREVIEWSET
GOSTOP
AM
SAT
METRIC DISP. FORMAT
METRIC

Enabling Or Disabling Extended Starts Downloaded From The Central ■
CONFIGSETCENT.START (Enable or disable the extended starts)OPTIONS:
This function allows you to select either an ENABLE or DISABLE of the extended starts from Central.
Procedure to set function:
Dial until CENT.START appears in the Function Display Window.
Press – this locks the function into the Function Window while the INFORMATION WINDOWSdisplay the option EXTENDED STARTS (in lower window) and the choice of ENABLED or DISABLED (in upper window).
Press or to select ENABLE or DISABLE.
Press to enter your selection.GO
I
I I I I I I
I
6/91 Page 12
MENU
ESCAPE
I
I I I I I I
I
8000
SATELLITE AUTO CENTRAL
CONFIG WATER
RUNREVIEWSET
GOSTOP
AM
SAT
CENT. START EXTENDED STARTS
ENABLED

Setting The Interstation Delay ■
CONFIGSETSTA.DLY. (InterStation Delay)BARS:
You are to set a single delay time in seconds (1–99) between all station run tines. This is to allow forclosing of one valve prior to the opening of the next, which minimizes flow spikes. This delay is alsodownloadable from the Central.
Procedure to set function:
Dial until STA. DLY. appears in the Function Display Window.
Press – this locks in your function while the INFORMATION WINDOWS display the option STATION DELAY (in lower window) and the choice you select (in upper window).
Dial to desired time.
Press to enter your selection.GO
I
I I I I I I
I
I
I I I I I I
I
6/91 Page 13
MENU
ESCAPE
I
I I I I I I
I
8000
SATELLITE AUTO CENTRAL
CONFIG WATER
RUNREVIEWSET
GOSTOP
AM
SAT
STA. DLY. STATION DELAY
10
Establishing The Automatic Flow Standard Function ■
CONFIG.SETFLOW STD. (Flow Standard)OPTIONS:
This function when selected and upon pressing “GO” (green key) to start, the Satellite will initiate theautomatic turn on of stations and store in memory their associated flow.
The “Flow Standard” sequentially measures the flow data input to the Satellite sensor input PCB andrecords each station’s flow. (This is for systems designed with flow measurement of total flow used by aSatellite.) Actual flow is compared to the individual station’s flow standard during run of programs. Ifactual flow exceeds the standard by the specified percentage downloaded from the Central, a high flowstatus alarm is caused. This alarm is sent to the Central at next polling. These alarms won’t exist unless“FLOW STD.” was run after initialization.
Procedure to set function:
Dial until FLOW STD. appears in the Function Display Window.
Press – this locks in your function while the INFORMATION WINDOWS display CHANnel (in lower window) and the choice you select (in upper window).
Dial to select the Flow Channel which is installed for monitoring Total Satellite Flow.
Press to enter your selection.GO
I
I I I I I I
I
I
I I I I I I
I
Page 14 6/91
MENU
ESCAPE
I
I I I I I I
I
8000
SATELLITE AUTO CENTRAL
CONFIG WATER
RUNREVIEWSET
GOSTOP
AM
SAT
DAY 04 07/27/91
FLOW STD. CHAN
1

The TRIAC Voltage And Current Limits ■
The Information Windows will display the AMPS and VOLTS with a visual 7-second count for eachStation.
NOTE: All Station mode switches and the pump mode switch on TRIAC modules should be set to the AUTO position before activating the next function.
CONFIG.SETTRI.AMPS (Monitoring TRIAC Current)OPTIONS: [STA. AMPS] [STA. VOLTS]
This function does not require you to set anything. The Satellite will step through each station and turn iton (begins watering) and it will record the amperage and the voltage level for each station. Thisinformation is particularly necessary if your Satellites will be controlled by the TORO Network 8000Central. This also allows you to be sure that each station is functioning by noting an amperage greaterthan 0.0 for that station. When this function terminates, the satellite will beep then clear the InformationWindows. You do not have to press the GO KEY.
Procedure to set function:
Press – this locks in your function while the INFORMATION WINDOWS display the STA., AMPS, and VOLTS (in lower window) and their values (in upper window).
Dial until TRI.AMPS appears in Function Window.
I
I I I I I I
I
6/91 Page 15
MENU
ESCAPE
I
I I I I I I
I
8000
SATELLITE AUTO CENTRAL
CONFIG WATER
RUNREVIEWSET
GOSTOP
AM
SAT
TRI. AMPS

PART 2 Setting-Up Watering Programs ■
Each Satellite provides you with 12 separate programs that are known by their program number (i.e.,program #1 – #12). You may choose which Stations (of the 32 possible stations) will be activated when aspecific program begins. With each program number you may set up to 12 separate Start Times. A singlewatering time is set for each program so that at each Start Time, during the day, those stations will waterfor the same period of time. Each program is associated with an Active Day or Days. This is the Dayduring the cycle (6, 7, 12, or 14 days, or monthly, depending on how you configured it) that watering willtake place. From 0 to 3 Repeats may also be set for the program. A Repeat will cause all Stations,associated with that program, to water one additional time in sequence immediately after it has finishedwith its regular watering. This will happen for each Start Time during each Active Day and will water forthe same duration.
When controlled by the CENTRAL, repeats divide total watering time into cycles, providing timebetween irrigation cycles and thereby increasing the infiltration rate of the turf. In SATELLITE mode,repeats increase watering times and could be used, for example, in hotter weather or periods without anyrain. By setting a Repeat for a program, you do not have to re-program Start Times or Watering Times(i.e., durations) and you can “turn off” the Repeats just as easily.
And finally, you may make a Global Percent adjustment to watering times. Normally the GlobalPercentage is 100% meaning that a watering time of 60 minutes is actually 60 minutes. If the GlobalPercentage is set at 50% then the actual watering time would become 30 minutes. If set at 200% thenactual time becomes 2 hours. This is highly useful for temporarily lengthening the watering times duringa drought and temporarily shortening them during a heavy rain.
Under WATER / SET, there are several functions that allow you to set more than one thing at a time. Thethree lights under the Information Windows (lower window) indicates which function is being affected bythe Master Control Knob. You may toggle left and right using the Left and Right Arrow keys to makeactive the one that you wish. If one of these lights will not light, it indicates that there is nothing there foryou to modify.
Page 16 6/91

Setting Watering Programs ■
Follow this procedure to set each function in the WATER SET Menu:
Press – this extinguishes the AUTO legend and illuminates the WATER legend.
Press – this illuminates the REVIEW legend.
Press – the REVIEW legend is extinguished and the SET legend is illuminated.
Press – the FUNCTION Display Window displays the first function in the Menu. (PROGRAM isthe first function in the WATER SET Menu.)
Press – OPTIONS:
6/91 Page 17
MENU
ESCAPE
I
I I I I I I
I
8000
SATELLITE AUTO CENTRAL
CONFIG WATER
RUNREVIEWSET
GOSTOP
AM
SAT

Page 18 6/91
Assigning Program, Station, and Watering Times ■
WATERSETPROGRAM (Program, Station and Watering Time Assignments)OPTIONS: PROG., STA., W–TIME
Select a PROGram number (1–12). Next select a STAtion number (1–32). Then select the Watering TIME(duration; 0.00 –4.15) for the station. You may then select more Station numbers and Watering TIMES.When you have identified all the Stations that you want for this program, select a new PROGram numberand repeat the above for each program that you wish. Depressing GO enters the settings once you havefinished.
Procedure to set function:
Since PROGRAM is the first function in the WATER SET Menu, it’s not necessary to dial the MASTERCONTROL KNOB.
Press – this locks in the selected function. The INFORMATION WINDOWS are displayed with the options PROGram, STAtion, and Watering TIME (in lower window) and the choices you select for each (in upper window).
Press and to toggle between options.
Dial to select your choice for each option.
Press – this enters your selection.GO
I
I I I I I I
I
MENU
ESCAPE
I
I I I I I I
I
8000
SATELLITE AUTO CENTRAL
CONFIG WATER
RUNREVIEWSET
GOSTOP
AM
SAT
PROGRAM PROG. STA. W-TIME
1 1 0.42

Assigning Active Days ■
WATERSETACT DAYOPTIONS: PROG. DAY
Select a PROGram number. You may then move through the active DAY number and turn it ON or OFFby pressing the Down Arrow (OFF) or the Up Arrow (ON). You can make any PROGram activate for anyor all DAYs during the cycle.
Procedure to set function:
Dial until ACT.DAY appears in the Function Display Window.
Press – this locks in the function. The INFORMATION WINDOWS are displayed with the options Program and Day (in lower window) and the choices you select for each (in upper window).
Press and to toggle between the options.
Dial to select your choice for each option.
Press to enter your selection.GO
I
I I I I I I
I
I
I I I I I I
I
6/91 Page 19
MENU
ESCAPE
I
I I I I I I
I
8000
SATELLITE AUTO CENTRAL
CONFIG WATER
RUNREVIEWSET
GOSTOP
AM
SAT
ACT DAY PROG. DAY
1 10 OFF

Assigning Start Times ■
WATERSETSTART TM. (Assigning start times)OPTIONS: PROG., START, TIME
Select a PROGram number. Then select which START time this will be. (You may have from 1 to 8START times during an active day.) Then select the actual TIME (OFF, or 12:00A–11:59P). If there is aPreprogrammed syringe associated with a given program and start time, then an ‘S’ will appear next tothe TIME.
Procedure to set function:
Dial until START TM. appears in the Function Display Window.
Press – this locks in the function. The INFORMATION WINDOWS are displayed with the options Program, Start, and Time (in lower window) and the choices you select for each (in upper window).
Press and to toggle between the options.
Dial to select your choice for each option.
Press to enter your selection.GO
I
I I I I I I
I
I
I I I I I I
I
Page 20 6/91
MENU
ESCAPE
I
I I I I I I
I
8000
SATELLITE AUTO CENTRAL
CONFIG WATER
RUNREVIEWSET
GOSTOP
AM
SAT
START TM. PROG. START TIME
1 1 OFF

Assigning Syringe Program Start Times ■
WATERSETP.P.SYR. (Assigning syringe programs and start times)OPTIONS: PROG., START, SYRTM
A SYRINGE is a short watering period (1 to 30 minutes) that may be used to lower the temperature of theturf, wash dew from the turf, or water in fertilizer. Select a PROGRam number and then select which ofthe eight (8) START times you wish to use as a SYRinge. Next, set the SYRinge TiMe (1 to 30 minutes).During an Active Day, this PROGram will now have a uniform (shorter) watering time for each Station atthis START time.
Procedure to set function:
Dial until P.P.SYR. appears in the Function Display Window.
Press – this locks in the function. The INFORMATION WINDOWS are displayed with the options Program, Start, and Syringe Time (in lower window) and the choices you select for each (in upper window).
Press and to toggle between each of the options.
Dial to select your choice for each option.
Press to enter your selection.GO
I
I I I I I I
I
I
I I I I I I
I
6/91 Page 21
MENU
ESCAPE
I
I I I I I I
I
8000
SATELLITE AUTO CENTRAL
CONFIG WATER
RUNREVIEWSET
GOSTOP
AM
SAT
P.P. SYR. PROG. START SYRTM
1 1 0
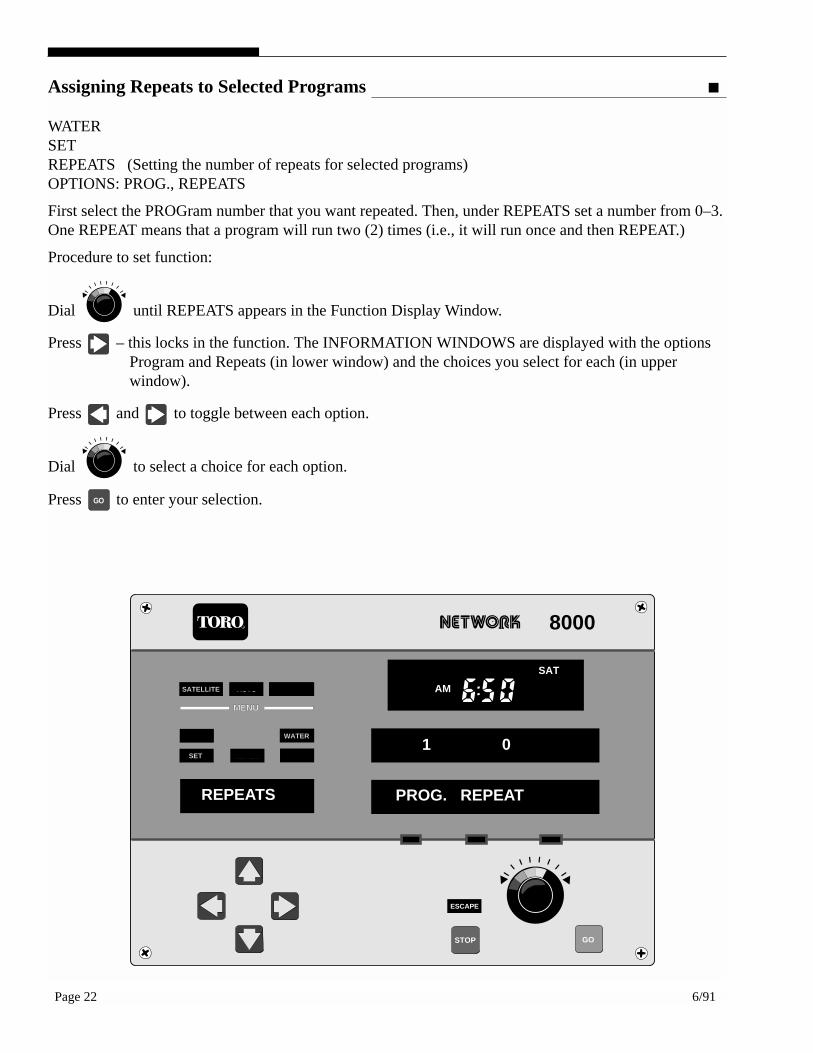
Assigning Repeats to Selected Programs ■
WATERSETREPEATS (Setting the number of repeats for selected programs)OPTIONS: PROG., REPEATS
First select the PROGram number that you want repeated. Then, under REPEATS set a number from 0–3.One REPEAT means that a program will run two (2) times (i.e., it will run once and then REPEAT.)
Procedure to set function:
Dial until REPEATS appears in the Function Display Window.
Press – this locks in the function. The INFORMATION WINDOWS are displayed with the options Program and Repeats (in lower window) and the choices you select for each (in upper window).
Press and to toggle between each option.
Dial to select a choice for each option.
Press to enter your selection.GO
I
I I I I I I
I
I
I I I I I I
I
Page 22 6/91
MENU
ESCAPE
I
I I I I I I
I
8000
SATELLITE AUTO CENTRAL
CONFIG WATER
RUNREVIEWSET
GOSTOP
AM
SAT
REPEATS PROG. REPEAT
1 0

Assigning Soak Times ■
WATERSETSOAK OPTIONS: PROG., TIME
This function allows you to select a program number and to specify a desired soak time (soak time forthose stations within a program having “Station Repeats” assigned). The left and right arrows togglebetween the Program and the Time (in lower window). The Master Control Knob changes the programnumber and the amount of time (in upper window).
Procedure to set function:
Dial until SOAK appears in the Function Display Window.
Press – this locks in the function. The INFORMATION WINDOWS are displayed with the options PROGram and TIME (in lower window) and the choices you select for each (in upper window).
Press and to toggle between the options.
Dial to select your choice for each option.
Press to enter your selection.GO
I
I I I I I I
I
I
I I I I I I
I
6/91 Page 23
MENU
ESCAPE
I
I I I I I I
I
8000
SATELLITE AUTO CENTRAL
CONFIG WATER
RUNREVIEWSET
GOSTOP
AM
SAT
SOAK PROG. TIME
1 00:00

Adjusting Station Percentages ■
WATERSETSTA.ADJ. (Percentage adjust by station)OPTIONS: PGM., STA., PCNT.
The “STATION ADJUST” provides you with the capability to set the percentage (1-900%) for adjustmentof individual stations. You enter the PGM (Program numbers), the STA. (stations), and the PCNT.(percentages) by toggling the left / right arrows and use the Master Control Knob to set the program andstation numbers (in upper window). The percentages are up/down loadable to/from Central.
Procedure to set function:
Dial until STA.ADJ. appears in the Function Display Window.
Press – this locks in the function. The INFORMATION WINDOWS are displayed with the options Program, Station, and Percentage (in lower window) and the choices you select for each (in upper window).
Press and to toggle between the options.
Dial to select your choice for each option.
Press to enter your selection.GO
I
I I I I I I
I
I
I I I I I I
I
Page 24 6/91
MENU
ESCAPE
I
I I I I I I
I
8000
SATELLITE AUTO CENTRAL
CONFIG WATER
RUNREVIEWSET
GOSTOP
AM
SAT
STA. ADJ. PGM. STA. PCNT.
1 1 100

Assigning Individual Station Repeats ■
WATERSETSTA.RPT. (Individual station repeats)OPTIONS: STA., REPEATS
This function provides you with the capability to program station repeats (0–3) within a program. Therepeats are downloadable from Central. The individual station repeats automatically divide up andallocate the specified run time amongst the repeats to retain the total specified run time. Stations whichare assigned repeats will run their first cycle in station number order and then run subsequent cycles at theearliest time possible (after intervening stations complete their respective cycle). This satisfies the stationsoak time associated with the irrigation program being run.
Procedure to set function:
Dial until STA.RPT. appears in the Function Display Window.
Press – this locks in the function. The INFORMATION WINDOWS are displayed with the options STAtion and RePeaTs (in lower window) and the choices you select for each (in upper window).
Press and to toggle between the options.
Dial to select your choice for each option.
Press to enter your selection.GO
I
I I I I I I
I
I
I I I I I I
I
6/91 Page 25
MENU
ESCAPE
I
I I I I I I
I
8000
SATELLITE AUTO CENTRAL
CONFIG WATER
RUNREVIEWSET
GOSTOP
AM
SAT
STA. RPT. STA. REPEATS
1 0

Adjusting the Global (All 32 Stations) Watering Time Percentage ■
WATERSETGBL.ADJ. (Globally adjust all 32 stations at the same time)OPTIONS:
This function allows you to set a single value so there are no options to toggle through. With the MasterControl Knob, you can GloBaLly ADJust (i.e., “adjust for all 32 Stations”) the programmed wateringtimes. This does not affect the Start Times, only the duration of watering. You may choose a number from2–900% of programmed watering time. The percentage is UP/DN loadable to /from the Central.
Procedure to set function:
Dial until GBL.ADJ. appears in the Function Window.
Press – this locks in the function. The INFORMATION WINDOWS are displayed with no options (in lower window) and the choice you select for the watering time percentage value (in upper window).
Dial to select a desired setting.
Press to enter your selected value.GO
I
I I I I I I
I
I
I I I I I I
I
Page 26 6/91
MENU
ESCAPE
I
I I I I I I
I
8000
SATELLITE AUTO CENTRAL
CONFIG WATER
RUNREVIEWSET
GOSTOP
AM
SAT
GBL. ADJ.
100%

Setting the Time and Day ■
WATERSETCLOCK (Set the time and day)OPTIONS: TIME, WKDAY, DAY
By turning the Master Control Knob, you can set the actual TIME and the current WeeKDAY asdisplayed in the Clock Window. This function also sets the DAY number of the current watering cycle(i.e., 1st, 2nd, 3rd etc.)
Procedure to set function:
Dial until CLOCK appears in the Function Window.
Press – this locks in the function. The INFORMATION WINDOWS are displayed (in lower window) and your choice of selection for each (in upper window).
Press to enter your selection.GO
I
I I I I I I
I
6/91 Page 27
MENU
ESCAPE
I
I I I I I I
I
8000
SATELLITE AUTO CENTRAL
CONFIG WATER
RUNREVIEWSET
GOSTOP
AM
SAT
CLOCK TIME WKDAY DAY
10

Setting the Calendar ■
WATERSETCALENDAR (Set the day, month, and year)OPTIONS: MONTH, DAY, YEAR
Like setting the clock, you may set the MONTH, DAY, and YEAR on the Satellite by selecting MONTHand adjusting it with the Master Control Knob and then proceeding to DAY and YEAR. Remember thatpressing GO will cause the Satellite to accept your entry and that pressing STOP will cause the Satelliteto maintain its Previous setting.
Procedure to set function:
Dial until CALENDAR appears in the Function Window.
Press – this locks in the function. The INFORMATION WINDOWS are displayed with the options MONTH, DAY, and YEAR (in lower window) and the choices you select for each (in upper window).
Press and to select Month, Day or Year.
Dial to set Month, Day or Year number.
Press to enter your selection. GO
I
I I I I I I
I
I
I I I I I I
I
Page 28 6/91
MENU
ESCAPE
I
I I I I I I
I
8000
SATELLITE AUTO CENTRAL
CONFIG WATER
RUNREVIEWSET
GOSTOP
AM
SAT
CALENDAR MONTH DAY YEAR
8 2 91
PART 3 Reviewing Satellite Configuration ■
Introduction
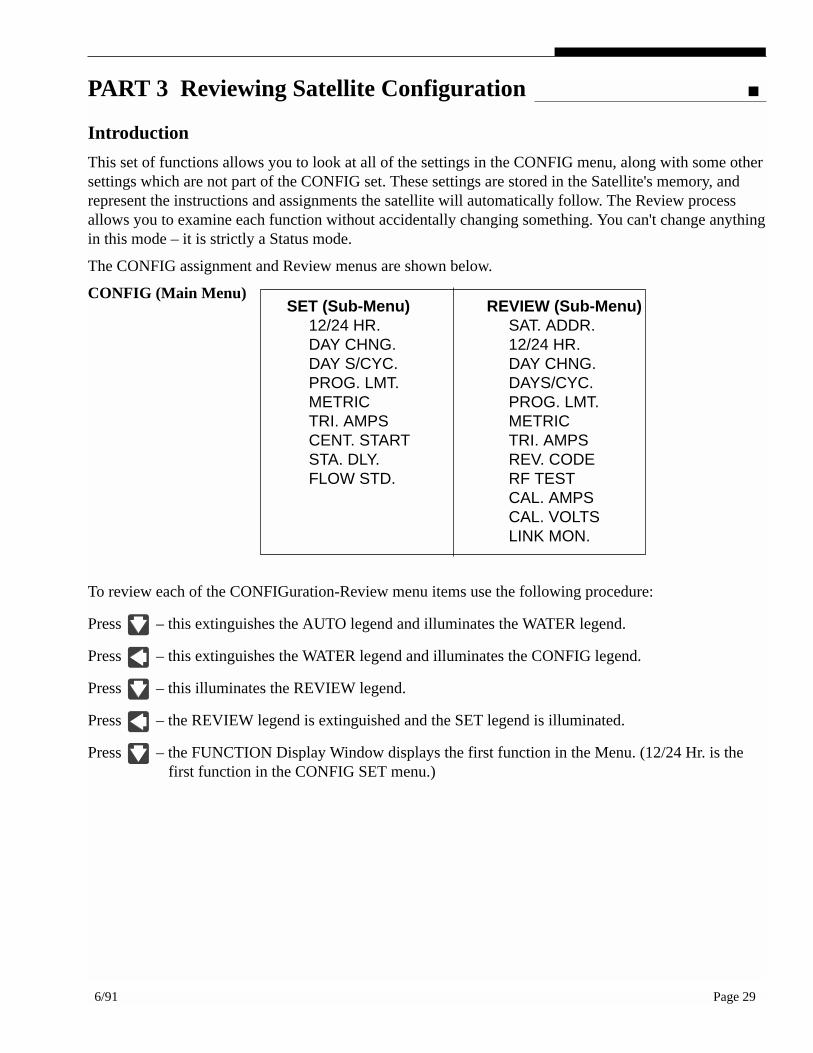
This set of functions allows you to look at all of the settings in the CONFIG menu, along with some othersettings which are not part of the CONFIG set. These settings are stored in the Satellite's memory, andrepresent the instructions and assignments the satellite will automatically follow. The Review processallows you to examine each function without accidentally changing something. You can't change anythingin this mode – it is strictly a Status mode.
The CONFIG assignment and Review menus are shown below.
CONFIG (Main Menu)
To review each of the CONFIGuration-Review menu items use the following procedure:
Press – this extinguishes the AUTO legend and illuminates the WATER legend.
Press – this extinguishes the WATER legend and illuminates the CONFIG legend.
Press – this illuminates the REVIEW legend.
Press – the REVIEW legend is extinguished and the SET legend is illuminated.
Press – the FUNCTION Display Window displays the first function in the Menu. (12/24 Hr. is the first function in the CONFIG SET menu.)
6/91 Page 29
SET (Sub-Menu)12/24 HR.DAY CHNG.DAY S/CYC.PROG. LMT.METRICTRI. AMPSCENT. STARTSTA. DLY.FLOW STD.
REVIEW (Sub-Menu)SAT. ADDR.12/24 HR.DAY CHNG.DAYS/CYC.PROG. LMT.METRICTRI. AMPSREV. CODERF TESTCAL. AMPSCAL. VOLTSLINK MON.

Satellite Address Status ■
CONFIGREVIEWSAT ADDR (Satellite Address)
This tells you what address this satellite has been assigned when the system was installed (or latermodified). Each Satellite has a unique address to allow Central to communicate with it. (See Page IV).This display shows the Satellite (CSG and SAT.) Address as selected on the “Satellite Address Switches”(DIP switches behind the front panel).
Procedure to review function:
The Satellite Address is the first function on the Menu. You don't need to use the dial.
Press – this locks your function while the INFORMATION WINDOWS display the data you wish toReview.
Press to leave this review operation, and return to the start of the menu.STOP
Page 30 6/91
MENU
ESCAPE
I
I I I I I I
I
8000
SATELLITE AUTO CENTRAL
CONFIG WATER
RUNREVIEWSET
GOSTOP
AM
SAT
SAT. ADDR. CSG SAT. ADDRESS
1 1 6

12 or 24 Hour Timekeeping ■
CONFIGREVIEW12/24 HR. (Tells you if Timekeeping is 12 or 24 HOUR MODE)
You may choose how you wish the Satellite to track time; using either a 12-hour clock listing AM andPM,, or a 24-hour clock where 1:00 PM becomes 13:00.
Procedure to review function:
Dial to select the function to be reviewed.
Press – the INFORMATION WINDOWS display the data you wish to review.
Press to leave this review operation and return to the start of the menu.STOP
I
I I I I I I
I
6/91 Page 31
MENU
ESCAPE
I
I I I I I I
I
8000
SATELLITE AUTO CENTRAL
CONFIG WATER
RUNREVIEWSET
GOSTOP
AM
SAT
12/24 HR.
12 HOUR MODE

Defining When It Is Time To Start A New Day Change ■
CONFIGREVIEWDAY CHNG. (Time to start a new day.)OPTIONS: DAY CHANGE TIME
A specified time must be set for the Satellite to know what time during the day should be used to advancethe CURRENT CYCLE to the next day. The two most common settings would be midnight or 6:00 AM.You may however, choose any time you like for stand-alone operation. The CENTRAL (in remotecontrol mode) will use either midnight or noon.
Procedure to review function:
Dial until DAY CHNG. appears in the Function Display Window.
Press – the INFORMATION WINDOWS display the data you wish to review.
Press to leave this review operation and return to the start of the menu.STOP
I
I I I I I I
I
Page 32 6/91
MENU
ESCAPE
I
I I I I I I
I
8000
SATELLITE AUTO CENTRAL
CONFIG WATER
RUNREVIEWSET
GOSTOP
AM
SAT
DAY CHNG. DAY CHANGE TIME
12:00 A

Establishing The Number Of Days In A Watering Cycle ■
CONFIGREVIEWDAYS/CYC (Displays cycle length)OPTIONS: [DAY] [CYCLE]
You set the desired number of days (14-day, 12-day, 7-day, 6-day, MONTHLY) a CYCLE is to consist of.Then you choose which DAY (1–14) of that cycle is today. 14-day and 7-day are the most commonsettings for cycle length. If, however, you wish to water only every third day, you would want to select a6- or 12-day cycle and your cycle will repeat every third day regardless of the calendar. UnderCENTRAL Station control, 14-day cycles will be standard.
Procedure to review function:
Dial until DAYS/CYC. appears in the Function Display Window.
Press – the INFORMATION WINDOWS display the data you wish to review.
Press to leave this review operation and return to the start of the menu.STOP
I
I I I I I I
I
6/91 Page 33
MENU
ESCAPE
I
I I I I I I
I
8000
SATELLITE AUTO CENTRAL
CONFIG WATER
RUNREVIEWSET
GOSTOP
AM
SAT
DAYS/CYC DAY CYCLE
1 14 DAY

Establishing the Maximum Number of Simultaneous Programs ■
CONFIGREVIEWPROG.LMT. (Display the number of simultaneous programs)OPTIONS: PROGRAM LIMIT
This function is for setting the number of programs that may run at one time. There are 12 separateprograms per Satellite, with a maximum of six (6) allowed to run simultaneously. You, the operator,specify the number of programs (1–6) to run simultaneously or it can be downloaded from the Central.
Procedure to review function:
Dial until PROG. LMT. appears in the Function Display Window.
Press – the INFORMATION WINDOWS display the data you wish to review.
Press to leave this review operation and return to the start of the menu.STOP
I
I I I I I I
I
Page 34 6/91
MENU
ESCAPE
I
I I I I I I
I
8000
SATELLITE AUTO CENTRAL
CONFIG WATER
RUNREVIEWSET
GOSTOP
AM
SAT
PROG. LMT. PROGRAM LIMIT
6

PART 3 Reviewing Satellite Configurations (Condensed) ■
Now that you have seen how the review process works, we will continue with a more condensed format,to make it quicker to find the function you wish to review.
The Number Of Simultaneous Programs ■
CONFIGREVIEWPROG.LMT. (Display the number of simultaneous programs)OPTIONS: PROGRAM LIMIT
This displays a number which is the PROGram LiMiT. This number will be between 1 and 6 and is thenumber of programs that may run at a time.
Procedure to review function:
Dial PROG. LMT.
Press
Metric or English Measuring Units ■
CONFIGREVIEWMETRIC (Displays type of unit measure selected.)OPTIONS
The upper INFORMATION WINDOW displays your selection of either ENGLISH or METRIC.
Procedure to review function:
Dial METRIC
Press
I
I I I I I I
I
I
I I I I I I
I
6/91 Page 35

Display Triac Currents ■
CONFIGREVIEWTRI.AMPS (Displays TRIAC currents)OPTIONS: STA., MEM.
The light under STA. (station) illuminates indicating that you may change the station number with theMASTER CONTROL KNOB. The value shown above MEM. is the amperage registered when you SETthe TRI.AMPS under CONFIG/SET. A zero indicates no station was connected when you ran TRI.AMPSunder CONFIG/SET.
Procedure to review function:
Dial TRI.AMPS
Press
Dial STA. (station)
The Test Signal Mode ■
CONFIGREVIEWRF TEST (Displays the selected mode test signal)OPTIONS:
This function provides you with the test signals from the Satellite modem. And it also provides you aselection of Modes (Mark, Space, and Square wave outputs or Off) which appear in the upperINFORMATION WINDOW one at a time and obtained with the Master Control Knob. Each selectionoutput will remain for about 15 seconds after initiated and then will turn off automatically. These signalsare to facilitate calibration of RF link/radio equipment at Satellite location.
Procedure to review function:
Dial RF TEST
Press
Dial MODE
I
I I I I I I
I
I
I I I I I I
I
I
I I I I I I
I
I
I I I I I I
I
Page 36 6/91

The Total Field Transformer Current ■
CONFIGREVIEWCAL.AMPS (Displays total field transformer current)OPTIONS:
This function displays the current flowing through the field transformer circuit. This is normally 0.080with no stations on. Each solenoid valve connected will increase this valve by approximately 0.220 amps.
Procedure to review function:
Dial CAL.AMPS
Press
The Field Transformer Voltage ■
CONFIGREVIEWCAL.VOLT (Displays field transformer voltage)OPTIONS:
This function displays the voltage output from the 200 VA field transformer. This value will increaseslightly as the loading is increased. It will change with changes in line voltage.
Procedure to review function:
Dial CAL.VOLT
Press
The Communication Signals from Central ■
CONFIGREVIEWLINK MON. (Displays communication signals from Central)OPTIONS:
This function displays messages sent from Central. It will display the CSG number, Satellite number, andMessage Type.
Procedure to review function:
Dial LINK MON.
Press
I
I I I I I I
I
I
I I I I I I
I
I
I I I I I I
I
6/91 Page 37
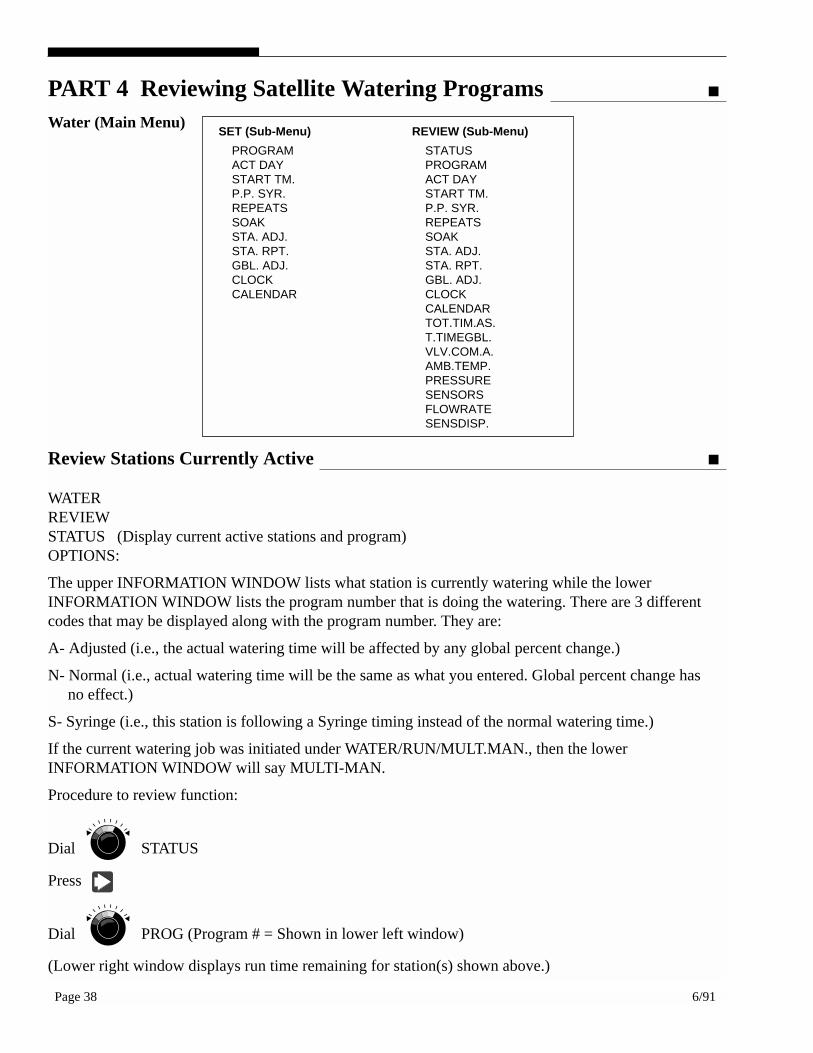
PART 4 Reviewing Satellite Watering Programs ■
Water (Main Menu)
Review Stations Currently Active ■
WATERREVIEWSTATUS (Display current active stations and program)OPTIONS:
The upper INFORMATION WINDOW lists what station is currently watering while the lowerINFORMATION WINDOW lists the program number that is doing the watering. There are 3 differentcodes that may be displayed along with the program number. They are:
A- Adjusted (i.e., the actual watering time will be affected by any global percent change.)
N- Normal (i.e., actual watering time will be the same as what you entered. Global percent change has no effect.)
S- Syringe (i.e., this station is following a Syringe timing instead of the normal watering time.)
If the current watering job was initiated under WATER/RUN/MULT.MAN., then the lowerINFORMATION WINDOW will say MULTI-MAN.
Procedure to review function:
Dial STATUS
Press
Dial PROG (Program # = Shown in lower left window)
(Lower right window displays run time remaining for station(s) shown above.)
I
I I I I I I
I
I
I I I I I I
I
Page 38 6/91
SET (Sub-Menu)
PROGRAMACT DAYSTART TM.P.P. SYR.REPEATSSOAKSTA. ADJ.STA. RPT.GBL. ADJ.CLOCKCALENDAR
REVIEW (Sub-Menu)
STATUSPROGRAMACT DAYSTART TM.P.P. SYR.REPEATSSOAKSTA. ADJ.STA. RPT.GBL. ADJ.CLOCKCALENDARTOT.TIM.AS.T.TIMEGBL.VLV.COM.A.AMB.TEMP.PRESSURESENSORSFLOWRATESENSDISP.

Review Watering Time for Selected Program ■
WATERREVIEWPROGRAM ( Displays Watering Time for selected Program)OPTIONS: PROG., STA., W-TIME
Select a PROGram number and then the STAtion number. Scroll through the station numbers and theassociated station watering times will be displayed on the right side.
Dial PROG
Press
Dial PROG (Program #1)
Press STA
Dial STA (Station #)
Review Start Times for Selected Program ■
WATERREVIEWSTART TM (Review start times for any program)OPTIONS: PROG., START, TIME
You may review the START TIMEs for any program. You first select the PROGram number then theSTART number. You may scroll through the 1st eight (8) “Normal” starts (normal starts are for single dayuse and are entered only at the satellite) and then the display label changes to Day and you may continueto scroll through the “Extended” starts. Extended starts are created only at the Central and are attached todays of the cycle. This allows various combinations of active programs to be concatenated (linkedtogether) for each of the (14) days of the watering cycle.
Procedure to review function:
Dial START TM
Press PROG
Dial PROG (Program #1)
Press START
Dial START (Start Number)
I
I I I I I I
I
I
I I I I I I
I
I
I I I I I I
I
I
I I I I I I
I
I
I I I I I I
I
I
I I I I I I
I
6/91 Page 39

Review Active Days ■
WATERREVIEWACT DAYOPTIONS: PROG. DAY
Select a PROGram number then scroll through the DAY number (the Cycle number of the day) to see ifthat program is ACTive (i.e., ON or OFF) or not. If the cycle is 14 days, then the Clock Window willeven display what day of the week the selected DAY number applies to.
Procedure to review function:
Dial ACT.DAY
Press
Dial PROG Number
Press DAY
Dial DAY Number
Syringe Programs ■
WATERREVIEWP.P. SYR. (Review syringe programs and start times)OPTIONS: PROG., START, SYRTM
Select a PROGram number and then select which of the eight (8) START times you wish to view.
Procedure to review function:
Dial P.P.SYR.
Press PROG
Dial PROG (Number)
Press START
Dial Start (Number)
I
I I I I I I
I
I
I I I I I I
I
I
I I I I I I
I
I
I I I I I I
I
I
I I I I I I
I
I
I I I I I I
I
Page 40 6/91

Reviewing Program Repeats ■
WATERREVIEWREPEATS (Reviewing the number of repeats for selected programs)OPTIONS: PROG., REPEATS
Procedure to review function:
Dial REPEATS
Press
Dial PROG (Number)
Program Soak Time ■
WATERREVIEWSOAK (Program soak time)OPTIONS: PROG., TIME
This function allows you to review the programmed station repeat soak time for each program number.
Procedure to review function:
Dial SOAK
Press
Dial PROG (Number)
I
I I I I I II
I
I I I I I I
I
I
I I I I I I
I
I
I I I I I I
I
6/91 Page 41

Station Percentage Adjustment ■
WATERREVIEWSTA.ADJ. (Percentage adjust by station)OPTIONS: PGM., STA., PCNT.
The “STATION ADJUST” provides you with the capability to view the percentage (1–900%) adjustmentof individual stations. The percentages are up/down loadable to/from Central.
Procedure to review function:
Dial STA.ADJ.
Press
Dial PGM (Program #)
Press
Dial STA. (Station #1)
Reviewing Individual Station Repeats ■
WATERREVIEWSTA.RPT. (Individual station repeats)OPTIONS: STA., REPEATS
This function allows you to review station repeats (0–3) within a program. The repeats are up/downloadable to/from Central.
Procedure to review function:
Dial STA. RPT.
Press
Dial STA. (Station #)
I
I I I I I I
I
I
I I I I I I
I
I
I I I I I I
I
I
I I I I I I
I
I
I I I I I I
I
Page 42 6/91

Global Percentage Adjust Status ■
WATERREVIEWGBL.ADJ. (Review global adjustment of all 32 stations)OPTIONS:
This function allows you to view a single value indicating the Percentage adjustment for all 32 satellites.
Procedure to review function:
Dial GBL.ADJ.
Press
Reviewing The Clock Status ■
WATERREVIEWCLOCK (Time and Day)OPTIONS: TIME,WKDAY, DAY
In addition to what is normally visible in the clock window, you can also view the number of the currentday in the cycle.
Procedure to review function:
Dial CLOCK
Press
Review The Calendar Status ■
WATERREVIEWCALENDAR (View the day, month and year)OPTIONS: MONTH, DAY, YEAR
Procedure to review function:
Dial CALENDAR
Press
I
I I I I I I
I
I
I I I I I I
I
I
I I I I I I
I
6/91 Page 43

Review Total Program Watering Times ■
WATERREVIEWTOT.TM.AS. (Review total program watering times assigned)OPTIONS: PROG., (VIEW, HRS., and MIN.)
This function allows you to review the total watering time for each PROGram. If the Global Adjust is100%, the watering time you see here will be the actual watering time for each station.
Procedure to review function:
Dial TOT.TIM.AS.
Press
Dial PROG. (Number)
Review the Effect of Global Adjustment on Watering Time ■
WATERREVIEWT.TIMEGBL (The effect of Global Adjustments on Watering Times)OPTIONS: PROG., STA., VIEW ACTUAL TOTAL PGM, W-TIME
This function displays the actual watering time as it is affected by Global Percentage adjustment. If youhave set a Global Adjustment value other than 100%, you can scroll through the program numbers to seethe effect on watering times. This saves you from having to make any calculations yourself.
Procedure to review function:
Dial T.TIMEGBL
Press
Dial PROG. (Program Number)
I
I I I I I I
I
I
I I I I I I
I
I
I I I I I I
I
I
I I I I I I
I
Page 44 6/91

Review Total Valve Current ■
WATERREVIEWVLV.COM.A OPTIONS: (Valve), (Current)
Review total current (in amps) delivered to valves that are turned ON.
Procedure to review function:
Dial VLV.COM.A
Press
Display Ambient Temperature ■
WATERREVIEWAMB.TEMP.
This function displays the current ambient temperature.
Procedure to review function:
Dial AMB.TEMP.
Press
Display the Water Pressure ■
WATERREVIEWPRESSURE
This function displays the water pressure if an optional pressure sensor is installed.
Procedure to review function:
Dial PRESSURE
Press
I
I I I I I I
I
I
I I I I I I
I
I
I I I I I I
I
6/91 Page 45

Review Rain and Flow Sensor Status ■
WATERREVIEWSENSORSOPTIONS: CHAN., (PREV), (NOW)
This function displays Rain and FLOW channel inputs. This function requires an optional interface PCBfor the Satellite and sensors.
Procedure to review function:
Dial SENSORS
Press
Dial CHAN (FLOW/RAIN)
Review Flow Sensor Channels ■
WATERREVIEWFLOWRATEOPTIONS: (FLOW), (RAIN)
This function allows you to examine the FLOW derived from installed flow sensors An optional interfacePCb and sensors are required. The RAIN channel (Sensor) displays current RAIN as well as past HRRain.
Procedure to review function:
Dial FLOWRATE
Press
Dial CHAN (Flow or Rain)
I
I I I I I I
I
I
I I I I I I
I
I
I I I I I I
I
I
I I I I I I
I
Page 46 6/91

Review Sensor Input PCB Status ■
WATERREVIEWSENS.DISP. (Sensor Input PCB status)Each Sensor Input PCB has LED status (activity) indicators. These indicators turn on when the channel isactive, and will turn on and off (blinking) when data states are changing.
Because these status indicators are not conveniently visible, this function allows you to tell which of thechannel LED's are on (and which are off) without having to see them. The display shows 6 numberedchannels. A 1 (one) above a channel number indicates that the LED for that channel is illuminated. A 0(zero) above the number indicates that the LED is dark. Alternating 1's and 0's indicate changing data inthe indicated channel.
Procedure to review function:
Dial SENS.DISP.
Press
Dial CARD Select card 1 (normal) or card 2 to view channel status.
I
I I I I I I
I
I
I I I I I I
I
6/91 Page 47

PART 5 Manual Watering ■
Should you decide that it is necessary to water outside the schedule you have entered, you may manuallyinitiate an irrigation cycle. You may choose a program number and cause it to begin immediatelyregardless of whether or not today is an active watering day for this program. You also have the option toselect specific stations and set a watering time. This will not affect the programmed time for the Station.
You may also select a program as a syringe. This will allow you to use an existing watering program andto replace the normal watering time with a syringe time (i.e., from 1 to 30 minutes.) You are also giventhe option of causing up to 6 Stations to water simultaneously through the MULTI-MANual function.This will not affect the programmed time for each Station. You may select up to 6 Stations and set awatering time that each will run. Only by pressing GO will any of these “manual” options initiate anirrigation cycle.You are of course provided with the option to cancel watering cycles.
To set each function in the WATER RUN this same procedure will be followed:
Press – this extinguishes the AUTO legend and illuminates the WATER legend.
Press – this illuminates the REVIEW legend.
Press – this extinguishes the REVIEW legend and illuminates the RUN legend.
Press – the FUNCTION Display Window displays the first function in the Menu. (PAUSE is the first function in the WATER RUN Menu.)
Page 48 6/91
SET (Sub-Menu)
PAUSEPROG. NO.PROG. RPT.STA. NO.MULT. MAN.SYRINGECANCELCAN ALLTRAICS
PILL CHK.CTRL. REQ.STA.DSABL

Initiating Pause ■
WATERRUNPAUSE (Pause prior to start)OPTIONS: PROG., TIME
This function allows you to select a Program number (1–12, All, MM, SS) and the amount of Time (inminutes). This provides capability at the Satellite to pause before execution of a manual start. After therun function selection, by pressing the “GO” button once does not start the function until a15 secondpause has timed out. During this 15 second pause you may dial adjust a longer pause (go to execute). Bypressing the “GO” button a second time immediate starting begins. This function is particularly useful ifthe sprinkler about to be turned on is pointed at you or others that may wish to get out of the way. TheProgram and Time are toggled with the Left/Right arrows. The Master Control Knob is used to select theProgram number and the amount of time.
Procedure to set this function:
Press – this locks in the function. The Information Windows are displayed with the options PROGram and TIME (in lower window) and the choices you select (in upper window).
Press and – this allows you to toggle between the options.
Dial to set the options.
Press to enter your selection.GO
I
I I I I I I
I
6/91 Page 49

Run Program (Number) ■
WATERRUNPROG.NO. (Start a program with the GO key)OPTIONS: PROG., MODE, INDX.
This function allows you to select a PROGram (including station repeats) that you have already created(under WATER/SET) and cause it to begin as soon as you press the GO key. You may choose whichMODE you wish it to run under: NORMAL (i.e., for the actual watering time) or ADJUSTED (i.e., actualwatering time multiplied by Global Adjust which you set under WATER/SET.)
Procedure to set function:
Dial until PROG.NO. appears in the FUNCTION WINDOW.
Press – this locks in the function. The Information Windows are displayed with the options PROGram, MODE, INDeX (in lower window) and the choices you select for each (in upper window). The Index Window may be used to review the station numbers in a program and toselect the starting point (Station Index) at which to begin watering. Lower number stations (less than the index) will not be watered.
Press and to toggle between the options.
Dial to select your choice for each option.
Press to enter your selection.GO
I
I I I I I I
I
I
I I I I I I
I
Page 50 6/91

Run Program With Repeat ■
WATER RUNPROG.RPT. (Manual run program with repeats)OPTIONS: PROG., MODE, INDX.
This function provides you with additional Satellite menu selections which use the previous specifiednumber of program repeats and station repeats to run (and repeat) your selected program. This sectionalso allows “indexed” starting (at a station other than the first) and for repeating only those latter stationsspecified by “index” as the first station and including those stations higher in number.
Procedure to set function:
Dial until PROG.RPT. appears in the function window.
Press – this locks in the function. The Information Windows are displayed with the options PROGram, MODE, and INDeX (in lower window) and the choice you select for each (in upper window).
Press and to toggle between the options.
Dial to select your choice for each option.
Press to enter your selection.GO
I
I I I I I I
I
I
I I I I I I
I
6/91 Page 51

Station Number ■
WATERRUNSTA.NO. (Start a station with a GO key)OPTIONS: STA., TIME
This function allows you to single out a particular STAtion for watering. Select the STAtion number youwish to run and then set the length of TIME you want it to run. Press GO and the Station will beginwatering. This will not change the programmed run time of the Station.
Procedure to set function:
Dial STA. NO.
Press STA.
Press and TIME
Dial to set the options.
Press and the station will begin watering.GO
I
I I I I I I
I
I
I I I I I I
I
Page 52 6/91

Multimanual ■
WATERSETMULT.MAN. (Start several stations simultaneously)OPTIONS: STA., TIME
This function allows you to select up to 6 STAtions to water simultaneously for the TIME that you select.Choose a Station number, press the Up Arrow key to select it. Pressing the Down Arrow key will deselecta Station (clear it from being one of the group selected). ON or OFF will be displayed next to the Stationnumber and the far right of the upper Information Window will list a number telling you how manyStations you have selected. Repeat the selection process for each Station you wish to activate (up to 6).After selecting the group of Stations you wish to turn on, select the amount of TIME you wish to water,and begin the actual watering by pressing the GO key.
Procedure to set function:
Dial MULT.MAN.
Press
Dial STAtion number
Press
Dial next STA.
Press
Press TIME
Dial TIME
Press to Start.GO
I
I I I I I I
I
I
I I I I I I
I
I
I I I I I I
I
I
I I I I I I
I
6/91 Page 53

Syringe ■
WATERRUNSYRINGE (Start a syringe program with the GO key)OPTIONS: PROG., TIME
This function allows you to choose a PROGram and override the normal watering time by selecting asyringe TIME (up to 30 minutes.) Pressing GO will cause each Station in the PROGRAM to run for theTIME you have selected.
Procedure to set function:
Dial SYRINGE
Press
Press and to toggle between the options.
Dial PROGram number
Dial TIME
Dial INDeX to select the beginning station for syringe sequence.
Press to Start syringe program.GO
I
I I I I I I
I
I
I I I I I I
I
I
I I I I I I
I
I
I I I I I I
I
Page 54 6/91

Cancel ■
WATERRUNCANCEL (Cancel a program with the GO key)OPTIONS: MODE, PROG., STAT.
This function allows you to CANCEL any PROGram in one of three MODEs.The three MODEs are:CYCLE (i.e., cancel the selected program that is currently running), DAY (i.e., cancel all start times forthe selected program for the rest of the current day) and PERM. (i.e., cancel all start times). Afterselecting the PROGram you wish to cancel and the MODE in which you wish it canceled, press the UPArrow key to CANCEL. By pressing the Down Arrow key you un-CANCEL (reactivate) a cancelledprogram, even one that has been PERManently cancelled. Canceling a program permanently does notremove the settings from memory, it only prevents the Satellite from initiating the cancelled program. Asusual, CANCELling only goes into effect the moment you press the GO key.
Procedure to set function:
Dial CANCEL
Press
Dial DAY-CYCLE-PERM.
Press
Dial to select program number (1–16 plus multi-single)
Press to lock cancel instruction. Press to remove cancel.
(The Cancel status is shown above the STAT. Window).
Press – immediate CANCEL is in effect.GO
I
I I I I I I
I
I
I I I I I I
I
I
I I I I I I
I
6/91 Page 55

Station Disable ■
This function disables the selected Station by turning Off the signal to the Triac that controls its associatedsprinkler valve. The program runs normally, but when it sends a signal to turn on a disabled station, theTriac does not respond, and no water is actually delivered by the disabled Station. If the Up-arrow ispressed, a YES appears in the window above the word DISABLE, indicating the station is disabled. Pressingthe Down-arrow causes a NO to appear in the window, indicating the Station has been Enabled again.
Procedure to set function:
Dial STA.DSABL
Press
Dial STA. (Station Number)
Press to Disable Station Press to Reactivate Station
Press to enter the Disable command.GO
I
I I I I I I
I
I
I I I I I I
I
Page 56 6/91

Emergency ■
When watering is in process, pressing the button “pauses all watering”.
It is intended to allow quick intervention to prevent someone from getting wet. The clock is put in thePause All Immediate Mode for one minute. The user may dial (select) Cancel, cancel or extend thepause.
To extend the pause:
Press twice to TIME.
Dial to change pause time.
I
I I I I I I
I
STOP
STOP
6/91 Page 57

Cancel All ■
WATERRUNCAN ALL (Cancel all programs)OPTIONS: MODE
This function allows you to CANcel ALL programs. As in CANCEL, you may select the MODE youwish. Cancel ALL programs for the current watering CYCLE; Cancel All programs for the rest of theDAY; Cancel All programs PERManently; or to CLEAR all CANCELs from memory. If you Cancel Allprograms PERManently, you may reinstate them individually by uncanceling (reactivating) them underWATER/RUN/CANCEL.
Procedure to set function:
Dial CAN ALL
Press to select MODE-DAY, CYCle, or PERmanent
Press ALL stations are now Cancelled.GO
I
I I I I I I
I
Page 58 6/91

Diagnostics ■
These last two functions under WATER/RUN are used for Satellite diagnostics.
Triacs ■
WATER RUNTRIACS (Comparing the memory stored and actual triac currents)OPTIONS: STA., AMPS, MEM.
Triacs allow radio manual sequential turn-on of station triacs for test or other user needs.
As you select a STAtion, that STAtion is turned on and the current (AMPS) is displayed. Also the currentthat was MEMorized when you ran the CONFIG/SET/TRI. AMPS function is displayed along side thecurrent reading. A discrepancy between the MEMorized value and the present value will indicate that theSTAtion, or the link to the STAtion, may be in need of maintenance.
Procedure to set function:
Dial TRIACS
Press
Dial Desired STAtion
Compare current values.
Pill Check ■
WATERRUNPILL CHK. (Check individual station output circuit)OPTIONS: PREVIOUS, NEXT
This function will turn each station on for about 10 seconds as it CHecKs each PILL (Triac output circuit)for a short to ground due to lightning. When a station's PILL is declared good, the station number and theword “OK” is displayed above PREVIOUS. The NEXT station then begins its CHecK. Remember thatthis function will turn on each station momentarily and therefore turn the sprinklers on also. (When thePILL CHK. is completed the words “TEST FINISHED” will appear in upper Information Window.)
Procedure to set function:
Dial PILL CHECK
Press wait for OK for each PILL
I
I I I I I I
I
I
I I I I I I
I
I
I I I I I I
I
6/91 Page 59

Central Control Request ■
WATERRUNCTRL.REQ. (Control request)OPTIONS: CODE
This function allows you to initiate certain Central controlled programs from the Satellite. The programsrun exactly as they would if they were initiated by Central. In order for this function to work, theprograms must have been set-up and assigned a control code number on the Satellite Control Code screenat Central. Once that has been done you can send the proper control code from the Satellite and Centralwill respond to your request. See the replica screen below and refer to Page 5-5 in the CentralProgramming Manual (Form No. 367-0086) for more details.
Procedure to set this function:
Dial CTRL.REQ
Press
Dial to select the proper Control Code.
Press to initiate the Central Program.GO
I
I I I I I I
I
I
I I I I I I
I
Page 60 6/91
STARTS MANUAL REPORTS UTILITY
© The TORO Co
H E L PTORO
SATELLITE CONTROL CODE ASSIGNMENT
Mon. Control Mon.Status Prog.Status Sat.Stat.II
S T A T U S
Op-Sel. Code
Ref.Code Function
Op-Sel. Code
Ref.Code Function
1 2 3 4 5 6 7 8 9101112131415
161718192021222324252627282930
HIJK-
PQRST
G
CD
Down-Load to Sat.
Multi Man.MstrGp# 1Multi Man.MstrGp# 2Multi Man.MstrGp# 3Multi Man.MstrGp# 4Multi Man.MstrGp# 5
Message AcknowledgeCancel- CSG
Multi Man.Gp# 1Multi Man.Gp# 2Multi Man.Gp# 3Multi Man.Gp# 4

Notes ■
6/91 Page 61

PRINTING DATEJUNE 1993 — REV. A
FORM NO.367-0087
© 1993 THE TORO COMPANYIrrigation Division
P.O. Box 489Riverside, CA 92502
Printed in U.S.A.