scarecrow amigurumi - make · pdf filecrochet pattern craftzine.com scarecrow amigurumi by...
TRANSCRIPT
craftzine.comCrochet Pattern
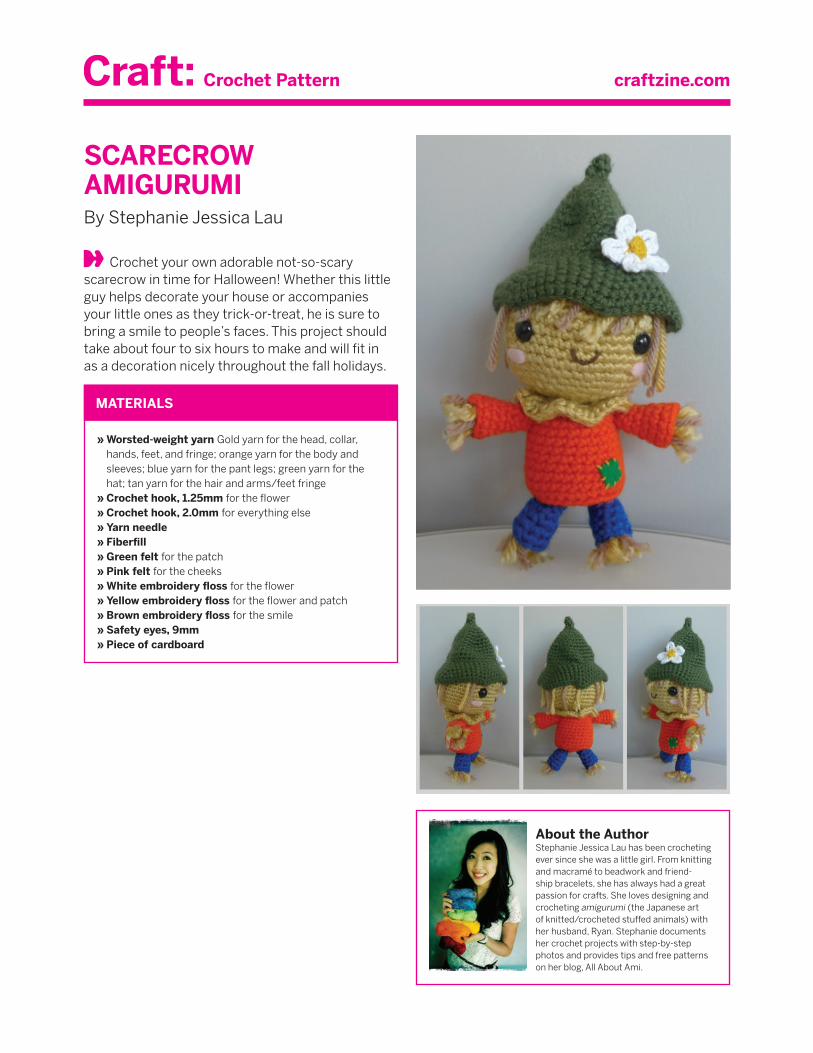
SCARECROW AMIGURUMIBy Stephanie Jessica Lau
Crochet your own adorable not-so-scary scarecrow in time for Halloween! Whether this little guy helps decorate your house or accompanies your little ones as they trick-or-treat, he is sure to bring a smile to people’s faces. This project should take about four to six hours to make and will fit in as a decoration nicely throughout the fall holidays.
» Worsted-weight yarn Gold yarn for the head, collar, hands, feet, and fringe; orange yarn for the body and sleeves; blue yarn for the pant legs; green yarn for the hat; tan yarn for the hair and arms/feet fringe » Crochet hook, 1.25mm for the flower » Crochet hook, 2.0mm for everything else » Yarn needle » Fiberfill » Green felt for the patch » Pink felt for the cheeks » White embroidery floss for the flower » Yellow embroidery floss for the flower and patch » Brown embroidery floss for the smile » Safety eyes, 9mm » Piece of cardboard
MATERIALS
About the AuthorStephanie Jessica Lau has been crocheting ever since she was a little girl. From knitting and macramé to beadwork and friend-ship bracelets, she has always had a great passion for crafts. She loves designing and crocheting amigurumi (the Japanese art of knitted/crocheted stuffed animals) with her husband, Ryan. Stephanie documents her crochet projects with step-by-step photos and provides tips and free patterns on her blog, All About Ami.
craftzine.comCrochet Pattern
STEP 2
STEP 3
Pattern
STEP 1
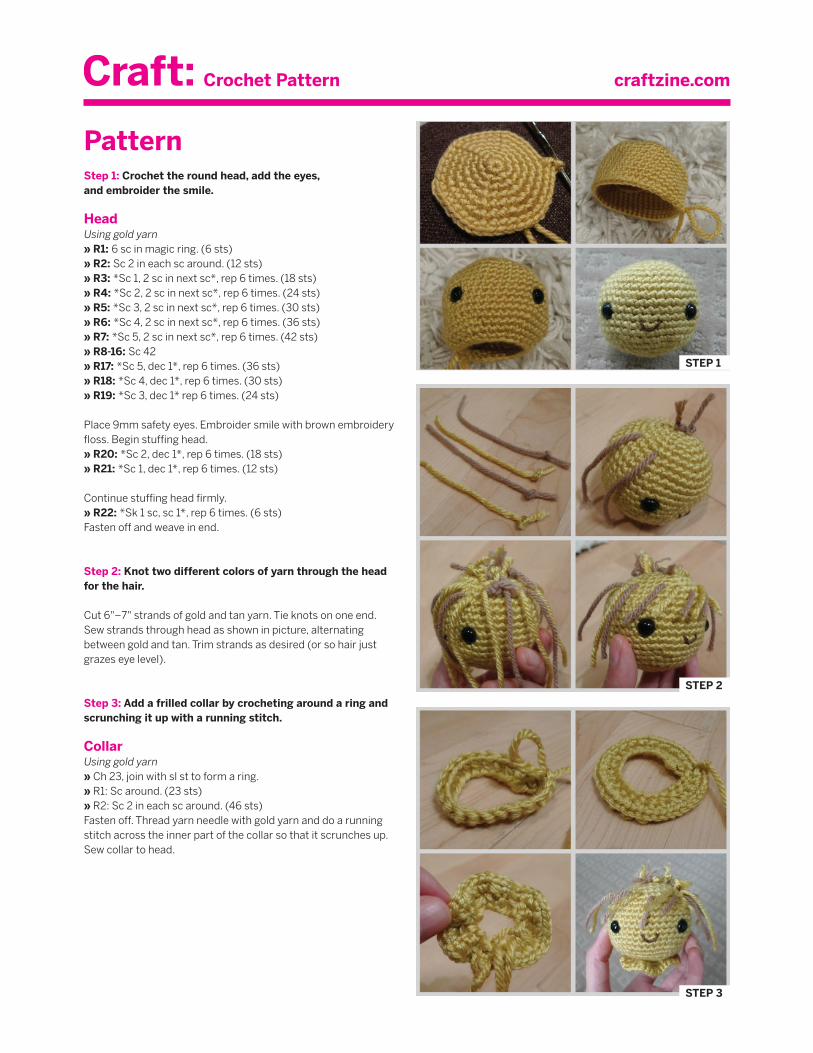
Step 1: Crochet the round head, add the eyes, and embroider the smile.
HeadUsing gold yarn
» R1: 6 sc in magic ring. (6 sts) » R2: Sc 2 in each sc around. (12 sts) » R3: *Sc 1, 2 sc in next sc*, rep 6 times. (18 sts) » R4: *Sc 2, 2 sc in next sc*, rep 6 times. (24 sts) » R5: *Sc 3, 2 sc in next sc*, rep 6 times. (30 sts) » R6: *Sc 4, 2 sc in next sc*, rep 6 times. (36 sts) » R7: *Sc 5, 2 sc in next sc*, rep 6 times. (42 sts) » R8-16: Sc 42 » R17: *Sc 5, dec 1*, rep 6 times. (36 sts) » R18: *Sc 4, dec 1*, rep 6 times. (30 sts) » R19: *Sc 3, dec 1* rep 6 times. (24 sts)
Place 9mm safety eyes. Embroider smile with brown embroidery floss. Begin stuffing head.
» R20: *Sc 2, dec 1*, rep 6 times. (18 sts) » R21: *Sc 1, dec 1*, rep 6 times. (12 sts)
Continue stuffing head firmly. » R22: *Sk 1 sc, sc 1*, rep 6 times. (6 sts)
Fasten off and weave in end.
Step 2: Knot two different colors of yarn through the head for the hair.
Cut 6"–7" strands of gold and tan yarn. Tie knots on one end. Sew strands through head as shown in picture, alternating between gold and tan. Trim strands as desired (or so hair just grazes eye level).
Step 3: Add a frilled collar by crocheting around a ring and scrunching it up with a running stitch.
CollarUsing gold yarn
» Ch 23, join with sl st to form a ring. » R1: Sc around. (23 sts) » R2: Sc 2 in each sc around. (46 sts)
Fasten off. Thread yarn needle with gold yarn and do a running stitch across the inner part of the collar so that it scrunches up. Sew collar to head.
craftzine.comCrochet Pattern
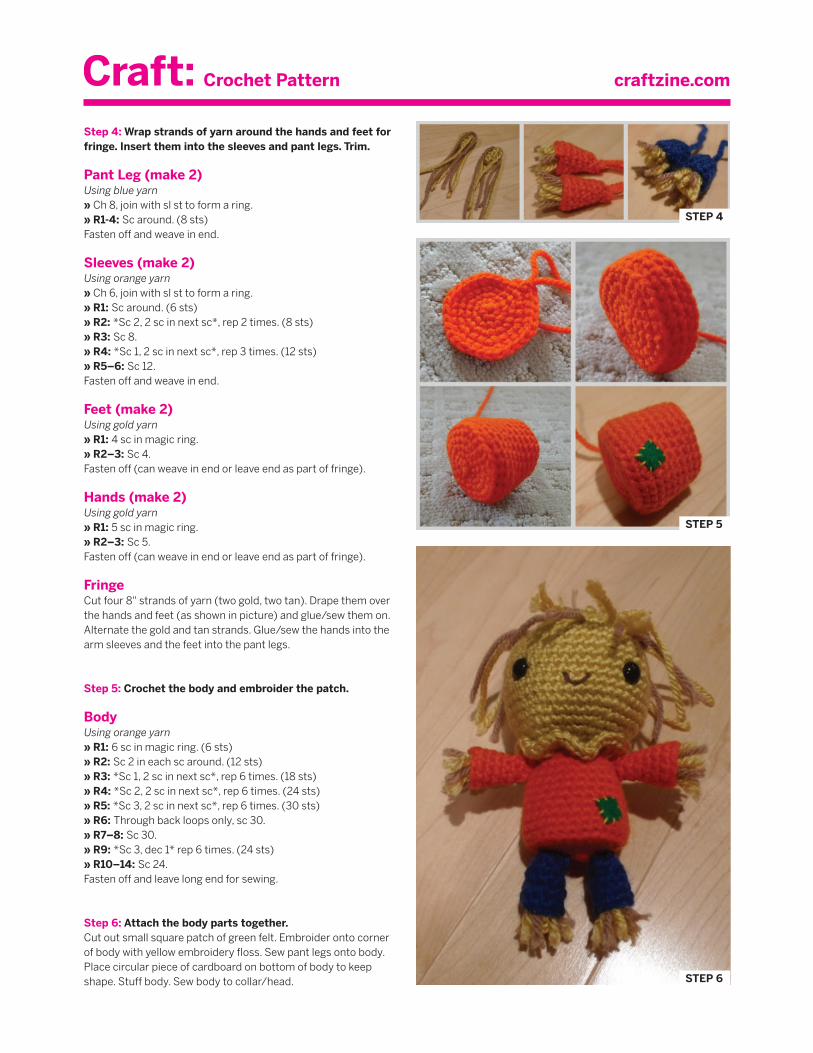
Step 4: Wrap strands of yarn around the hands and feet for fringe. Insert them into the sleeves and pant legs. Trim.
Pant Leg (make 2)Using blue yarn
» Ch 8, join with sl st to form a ring. » R1-4: Sc around. (8 sts)
Fasten off and weave in end.
Sleeves (make 2)Using orange yarn
» Ch 6, join with sl st to form a ring. » R1: Sc around. (6 sts) » R2: *Sc 2, 2 sc in next sc*, rep 2 times. (8 sts) » R3: Sc 8. » R4: *Sc 1, 2 sc in next sc*, rep 3 times. (12 sts) » R5–6: Sc 12.
Fasten off and weave in end.
Feet (make 2)Using gold yarn
» R1: 4 sc in magic ring. » R2–3: Sc 4.
Fasten off (can weave in end or leave end as part of fringe).
Hands (make 2)Using gold yarn
» R1: 5 sc in magic ring. » R2–3: Sc 5.
Fasten off (can weave in end or leave end as part of fringe).
FringeCut four 8" strands of yarn (two gold, two tan). Drape them over the hands and feet (as shown in picture) and glue/sew them on. Alternate the gold and tan strands. Glue/sew the hands into the arm sleeves and the feet into the pant legs.
Step 5: Crochet the body and embroider the patch.
BodyUsing orange yarn
» R1: 6 sc in magic ring. (6 sts) » R2: Sc 2 in each sc around. (12 sts) » R3: *Sc 1, 2 sc in next sc*, rep 6 times. (18 sts) » R4: *Sc 2, 2 sc in next sc*, rep 6 times. (24 sts) » R5: *Sc 3, 2 sc in next sc*, rep 6 times. (30 sts) » R6: Through back loops only, sc 30. » R7–8: Sc 30. » R9: *Sc 3, dec 1* rep 6 times. (24 sts) » R10–14: Sc 24.
Fasten off and leave long end for sewing.
Step 6: Attach the body parts together.Cut out small square patch of green felt. Embroider onto corner of body with yellow embroidery floss. Sew pant legs onto body. Place circular piece of cardboard on bottom of body to keep shape. Stuff body. Sew body to collar/head.
STEP 4
STEP 5
STEP 6

craftzine.comCrochet Pattern
Step 7: Crochet the green pointy hat.
Hat Using green yarn
» R1: 3 sc in magic ring. » R2: 3 sc. » R3: Sc 2 in each sc around. (6 sts) » R4: *Sc 1, 2 sc in next sc*, rep 3 times. (9 sts) » R5: *Sc 2, 2 sc in next sc*, rep 3 times. (12 sts) » R6: *Sc 1, 2 sc in next sc*, rep 6 times. (18 sts) » R7: Sc 18. » R8: *Sc 2, 2 sc in next sc *, rep 6 times. (24 sts) » R9: Sc 24. » R10: *Sc 3, 2 sc in next sc*, rep 6 times. (30 sts) » R11: Sc 30. » R12: *Sc 4, 2 sc in next sc*, rep 6 times. (36 sts) » R13–16: Sc 36.
Fasten off.
Holding hat upside-down, join in any sc with sl stitch. Chain 1 and begin working counterclockwise,
» R17: Sc 35 (36 sts). » R18: *Sc 5, 2 sc in next sc*, rep 6 times. (42 sts) » R19: *Sc 6, 2 sc in next sc*, rep 6 times. (48 sts) » R20: *Sc 7, 2 sc in next sc*, rep 6 times. (54 sts) » R21: *Sc 8, 2 sc in next sc*, rep 6 times. (60 sts) » R22: *Sc 9, 2 sc in next sc*, rep 6 times. (66 sts)
Fasten off and weave in end.
Step 8: Add a daisy to the hat.
DaisyFlower base:Using yellow embroidery floss
» R1: 5 sc in magic ring, sl st to first sc to join circle. Fasten off.Using white embroidery floss
» R2: Sl st to any sc. *Ch 3, Tr in same sc. Ch 3, sl st in next sc*, rep 5 times around. Fasten off.
Center Circle:Using yellow embroidery floss
» R1: 5 sc in magic ring, sl st to first sc to join circle. Fasten off. Sew/glue yellow circle onto flower base to give a more three-dimensional effect.
STEP 7
STEP 8