schematic diagram of physical and chemical steps to...
TRANSCRIPT
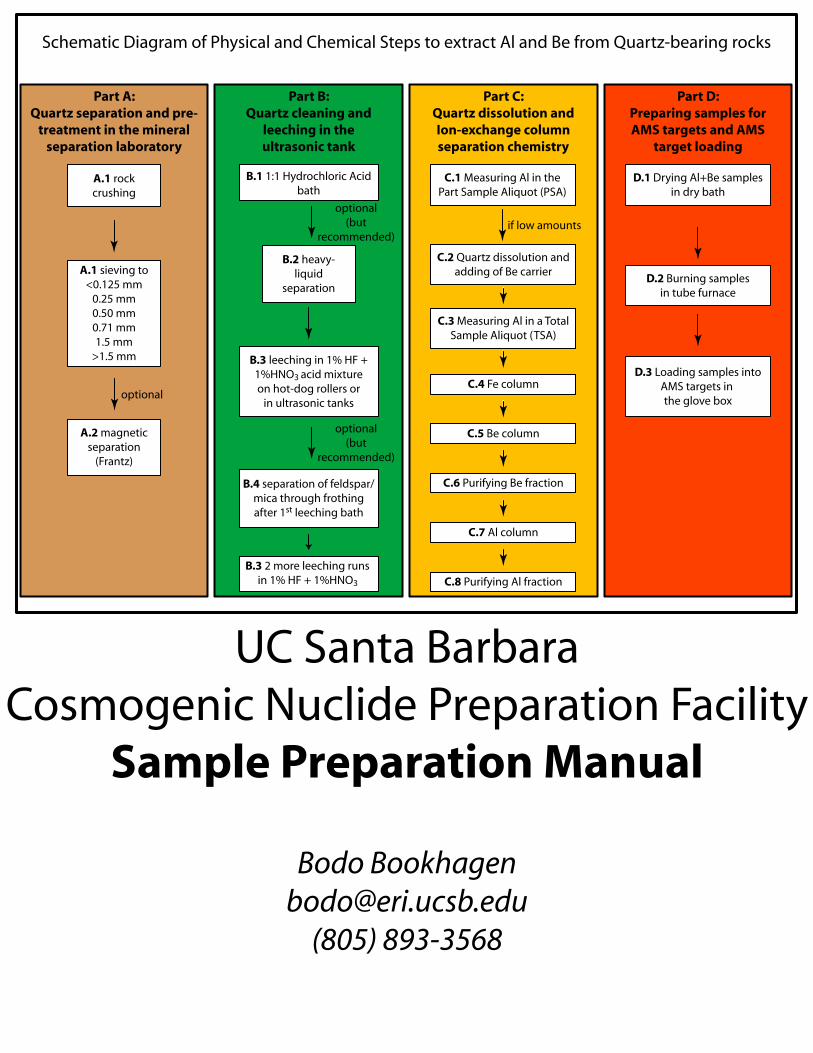
Schematic Diagram of Physical and Chemical Steps to extract Al and Be from Quartz-bearing rocks
Part A:Quartz separation and pre-
treatment in the mineralseparation laboratory
optional
A.1 rockcrushing
A.1 sieving to<0.125 mm
0.25 mm0.50 mm0.71 mm1.5 mm
>1.5 mm
A.2 magneticseparation
(Frantz)
optional(but
recommended)
Part B:Quartz cleaning and
leeching in theultrasonic tank
B.3 leeching in 1% HF +1%HNO3 acid mixtureon hot-dog rollers or
in ultrasonic tanks
B.2 heavy-liquid
separation
optional(but
recommended)
B.4 separation of feldspar/mica through frothingafter 1st leeching bath
B.3 2 more leeching runs in 1% HF + 1%HNO3
B.1 1:1 Hydrochloric Acidbath
UC Santa BarbaraCosmogenic Nuclide Preparation Facility
Sample Preparation Manual
Bodo [email protected]
(805) 893-3568
if low amounts
Part C:Quartz dissolution andIon-exchange columnseparation chemistry
C.1 Measuring Al in thePart Sample Aliquot (PSA)
C.2 Quartz dissolution andadding of Be carrier
C.3 Measuring Al in a TotalSample Aliquot (TSA)
C.4 Fe column
C.5 Be column
C.6 Purifying Be fraction
C.7 Al column
C.8 Purifying Al fraction
Part D:Preparing samples forAMS targets and AMS
target loading
D.1 Drying Al+Be samplesin dry bath
D.3 Loading samples intoAMS targets in the glove box
D.2 Burning samplesin tube furnace
Chemical Separation of Al and Be from Quartz-bearing rocks Bodo Bookhagen, UC Santa Barbara
1/91
Cosmogenic Isotopes Lab
The following guidelines describe how to extract 26Al and 10Be from quartz-bearing rocks to create sample targets for Accelerator Mass Spectrometry (AMS). This manual describes the “Bookhagen processing method” in a step-by-step fashion; however, some samples with abnormal behavior may be treated differently. Throughout the manual, I give suggestions what to do if a certain step produces aberrant results.
I would like to point out that this manual combines several people’s work that has been improved and streamlined. If you use these methods, please cite the original work. We are currently working on a new separation method with a new resin and will change our procedures in the near future.
Kohl, C.P., and Nishiizumi, K., (1992): Chemical isolation of quartz for measurement of in situproduced cosmogenic nuclides: Geochimica et Cosmochimica Acta, v. 56, p. 3583–3587.
von Blanckenburg F., Hewawasam T., and Kubik P. (2004): Cosmogenic nuclide evidence for low weathering and denudation in the wet tropical Highlands of Sri Lanka. J. Geoph. Res., 109, F03008, doi10.1029/2003JF000049
Bookhagen, B., and Strecker, M.R. (2012): Spatiotemporal trends in erosion rates across a pronounced rainfall gradient: examples from the southern Central Andes, Earth and Planetary Science Letters, doi: 10.1016/j.epsl.2012.02.005
Other interesting sources of information include, but are not exhaustively represented in, the following references. Note that these chemical separation methods are different than those described here:
John Stone’s Cosmogenic Isotope Laboratory at the University of Washington: http://depts.washington.edu/cosmolab/index.html
Arjun Heimsath’s web page at Arizona State University: http://www.public.asu.edu/~aheimsat/
Paul Bierman’s web page at the University of Vermont: http://www.uvm.edu/cosmolab/
John Gosse’s Dalhousie Cosmogenic Nuclide Exposure Dating Facility: http://cnef.earthsciences.dal.ca/index.html
Tibor Dunai’s Cosmogenic Nuclide Laboratory at The University of Edinburgh: http://www.geos.ed.ac.uk/facilities/cosmolab/
Chemical Separation of Al and Be from Quartz-bearing rocks Bodo Bookhagen, UC Santa Barbara
2/91
PRIME Lab of Purdue University: http://www.physics.purdue.edu/primelab/
This manual consists of five parts that detail the rock-processing procedure. In summary, the rock/sand is first cleaned, crushed, and washed in the sieving and mineral separation laboratory. Second, the pre-treated sand is leeched in a low concentrated Hydrofluoric-Nitric acid mixture on hot-dog rollers or in ultrasonic tanks. Third, Aluminum and Beryllium is extracted from pure Quartz using ion-exchange column chemistry. Fourth, the Accelerated Mass Spectrometry (AMS) target loading of the pure Beryllium and Aluminum.
The ‘bottleneck’ of these operations is the first two steps. The chemical separation is fairly straightforward and several samples can be processed simultaneously (e.g., in batches of 10). The fourth step is also straightforward, but must be performed in a glove box due to the carcinogenic nature of Beryllium oxide. In an additional fifth step, I outline cleaning procedures for regular glassware, teflonware, edging steps for Boron-free quartz vials and the microwave digestion unit.
Where appropriate, I give links to an Excel spreadsheet that will help calculate certain concentrations or will guide you through certain steps. As it is with every scientific method: Work as carefully as possible and take notes at every step! Also, record any abnormal behavior or observation while you process your samples. This will be a tremendous help later during processing steps and will aid in the interpretation of cosmogenic abundances.
I thank Dirk Scherler, Ryan Perroy, Brian Clarke, Burch Fisher, Taylor Schildgen, Jean Dixon, and Vincent Godard for their help and suggestions for this manual.
Any comments and suggestions to this manual are highly appreciated. Please send them to Bodo Bookhagen ([email protected]).
This version is from Thursday, February 21, 2013.
Chemical Separation of Al and Be from Quartz-bearing rocks Bodo Bookhagen, UC Santa Barbara
3/91
Table of Contents
PART A: QUARTZ SEPARATION AND PRE-TREATMENT IN THE MINERAL SEPARATION LABORATORY (ROCK CRUSHING, MAGNETIC SEPARATION) 9
HEALTH AND SAFETY ADVISORY 9 A.1: Rock crushing and sieving 10 A.2: Magnetic Separation in the Frantz 12
PART B: FURTHER QUARTZ CLEANING AND LEECHING IN THE ULTRASONIC TANK USING A LOW-CONCENTRATED HYDROFLUORIC-NITRIC ACID MIXTURE 13
HEALTH AND SAFETY ADVISORY 13 B.1.1: 1:1 Hydrochloric Acid bath (glass beakers) 15 B.1.2: 1:1 Hydrochloric Acid bath – Ultrasonic bath (2 and 4L canisters) 18 B.1.3: 1:1 Hydrochloric Acid bath – Hot-dog rollers (2 and 4L canisters) 21 B.2: Heavy-Liquid separation 24 B.3: Leeching in a 1% Hydrofluoric-Nitric Acid mixture 27 B.3.1: Preparing a 20L 1% HF and 1% HNO3 acid mixture 28 B.3.2: Filling 4L canisters with a 1% HF and 1% HNO3 acid mixture 31 B.3.3: Emptying 4L canisters filled with 1% HF and 1% HNO3 35 B.3.4: Neutralizing the 1%HF/HNO3 acid mixture in the 55gl drum 39 B.4: Frothing – separation of feldspars from quartz 43
PART C: QUARTZ DISSOLUTION AND ION-EXCHANGE COLUMN SEPARATION CHEMISTRY 44
HEALTH AND SAFETY ADVISORY 45 C.1: Measuring Al and other elements in the Part Sample Aliquot (PSA) 47 C.2.2.1: Quartz dissolution in the microwave and adding of Be carrier 49 C.2.2.2: Cleaning of microwave equipment and microwave Teflon beakers 55 C.2.2.3: Quartz dissolution on the hot plate and adding of Be carrier 57 C.2.2.4: Additional step to convert sample to Chloride form 59 C.2.2.5: Water-leeching step (optional and only valid for Beryllium-only samples) 60 C.3: Measuring Al in a Total Sample Aliquot (TSA) 62 C.3.1: Hydroxide co-precipitation (optional) 64 C.4: Fe column 65 C.5: Be column 69 C.6: Purifying Be fraction 73 C.7: Extracting Al from the Al fraction [after the Be column (C.5)] 74 C.8: Purifying Al fraction 77
PART D: PREPARING SAMPLES FOR AMS TARGETS AND AMS TARGET LOADING 79
HEALTH AND SAFETY ADVISORY 79 D.1+2: Drying Al and Be Hydroxide in dry bath and burning (oxidizing) in tube furnace 81 D.2B: Cleaning boron-free quartz vials 83 D.3: Loading samples into AMS targets in the glove box 85
Chemical Separation of Al and Be from Quartz-bearing rocks Bodo Bookhagen, UC Santa Barbara
4/91
PART E: GLASS- AND TEFLONWARE CLEANING INSTRUCTIONS AND ACID-MIXING PROCEDURES 87
HEALTH AND SAFETY ADVISORY 87 E.1: Cleaning and acid-boiling of glass and Teflonware 88 E.2: Mixing acids and creating concentrations for sample processing 90
Chemical Separation of Al and Be from Quartz-bearing rocks Bodo Bookhagen, UC Santa Barbara
5/91
List of Figures Figure 1: Schematic diagram of physical and chemical extraction steps. It describes
extraction of Al and Be from quartz-bearing rocks. The numbering refers to the different sections in this manual. ........................................................................................... 8
Figure 2: Photographs of the horizontal Frantz (magnetic separator). This equipment is located at Webb Hall (Dept. of Earth Science). .............................................................. 12
Figure 3: Hot-dog roller setup. Here, the 2 and 4L canisters are heated and rotated. The acrylic-glass shield helps to warm up the canisters more quickly and retains the heat more efficiently. ............................................................................................................ 26
Figure 4: Heavy-Liquid separation setup. Here, quartz grains are separated from denser and lighter minerals. Denser minerals settle at the bottom of the flask, while quartz and lighter minerals are floating. ............................................................................ 26
Figure 5: Hydrochloric Acid waste canister. We fill the used 1:1 Hydrochloric Acid (HCl) into the 5gl container in the fume hood. Use a funnel and pour the acids only within the fume hood and with proper protective equipment. ................................... 27
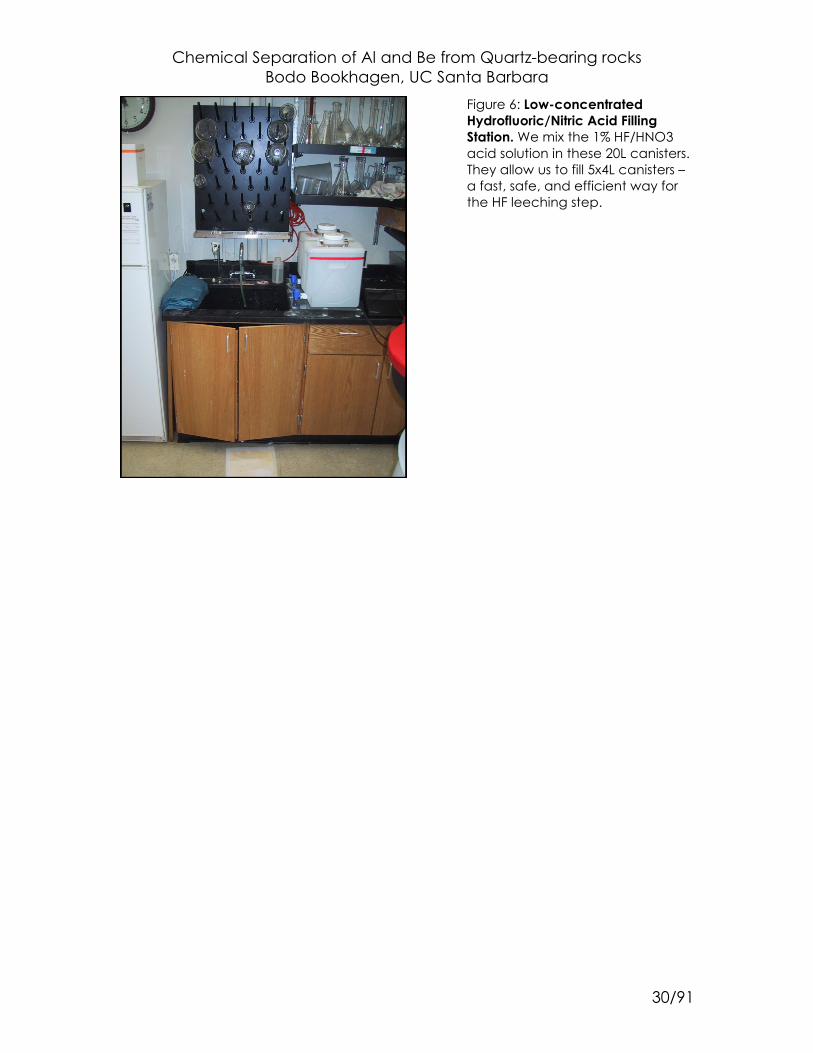
Figure 6: Low-concentrated Hydrofluoric/Nitric Acid Filling Station. We mix the 1% HF/HNO3 acid solution in these 20L canisters. They allow us to fill 5x4L canisters – a fast, safe, and efficient way for the HF leeching step. ................................................... 30
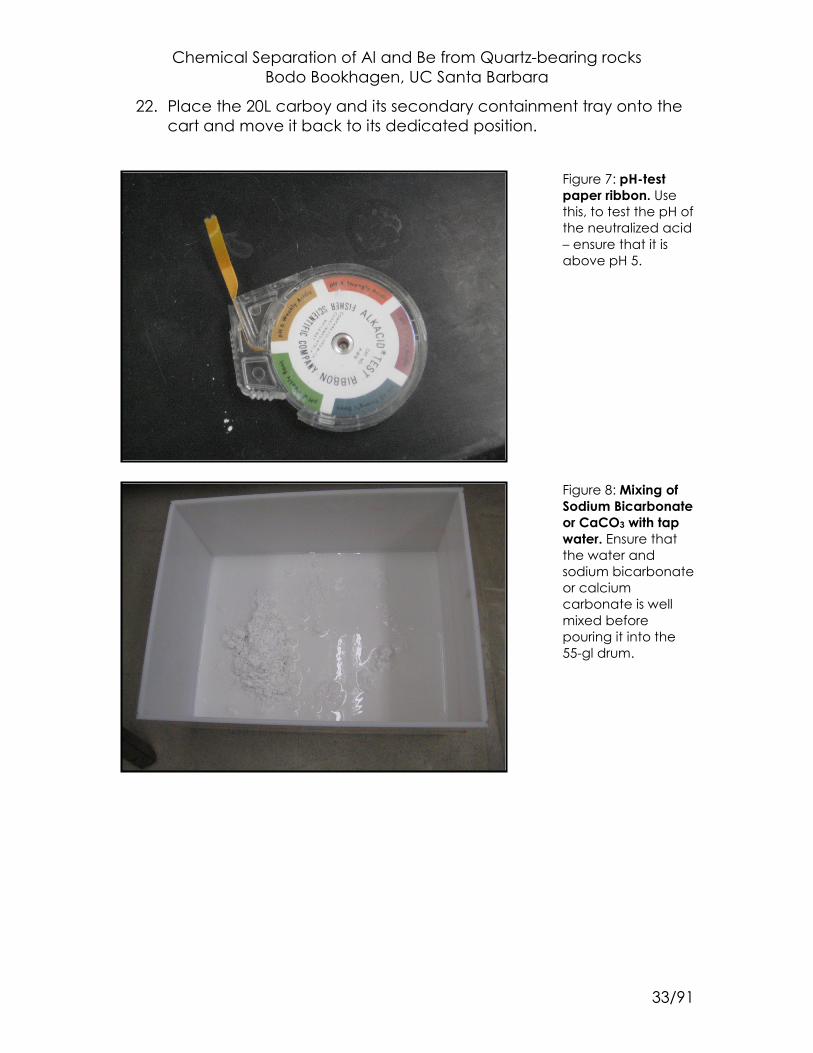
Figure 7: pH-test paper ribbon. Use this, to test the pH of the neutralized acid – ensure that it is above pH 5. .............................................................................................................. 33
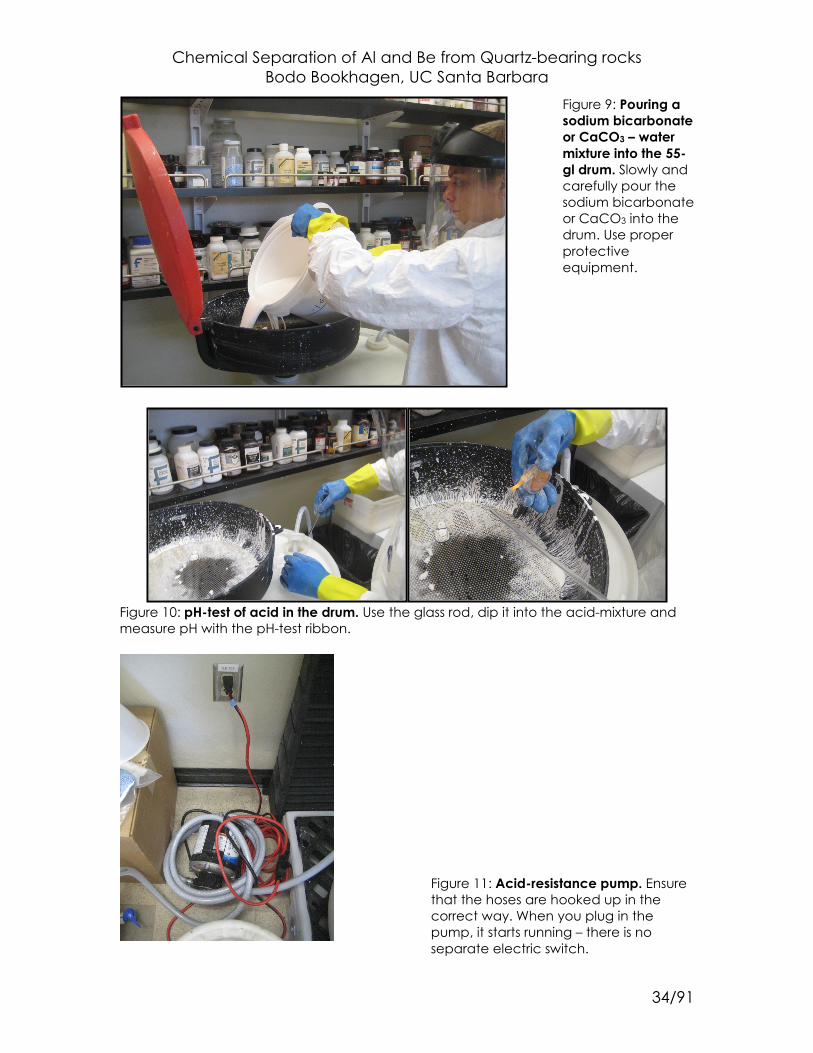
Figure 8: Mixing of Sodium Bicarbonate or CaCO3 with tap water. Ensure that the water and sodium bicarbonate or calcium carbonate is well mixed before pouring it into the 55-gl drum. ........................................................................................................................ 33
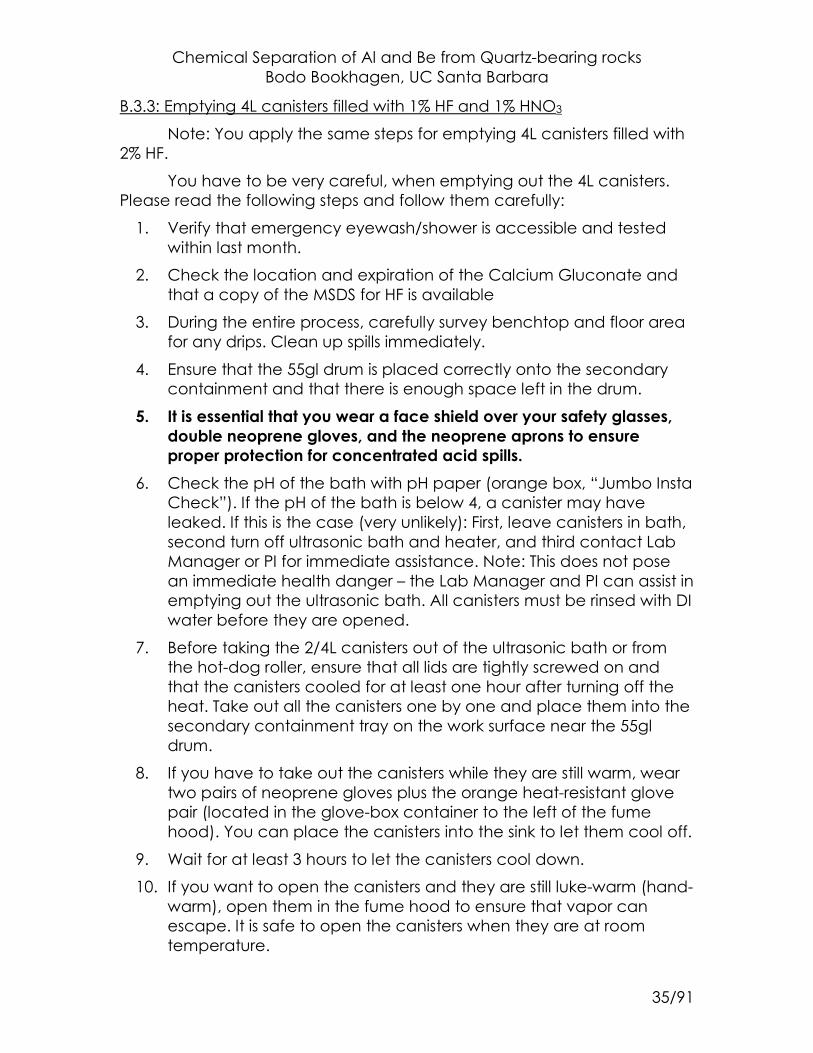
Figure 9: Pouring a sodium bicarbonate or CaCO3 – water mixture into the 55gl drum. Slowly and carefully pour the sodium bicarbonate or CaCO3 into the drum. Use proper protective equipment. ............................................................................................. 34
Figure 10: pH-test of acid in the drum. Use the glass rod, dip it into the acid-mixture and measure pH with the pH-test ribbon. ......................................................................... 34
Figure 11: Acid-resistance pump. Ensure that the hoses are hooked up in the correct way. When you plug in the pump, it starts running – there is no separate electric switch. ....................................................................................................................................... 34
Figure 12: Ultrasonic bath enclosure. It is located below the hot-dog rollers. This is a custom-made unit that can hold 38L in 8x4L and 3x2L canisters. Note the doors that will be closed during the 10 to 12-hour long runs and thus keep the noise level low. The mating unit on the right hand side controls the ultrasonic frequency. An additional controller is for the temperature. ..................................................................... 36
Figure 13: The digestion microwave and neutralization unit (right). We use the microwave to heat up and digest samples fast and efficiently. All acid condensates during these processes are collected in a properly labeled acid-waste container. All vapors from this container are neutralized. ................................. 37
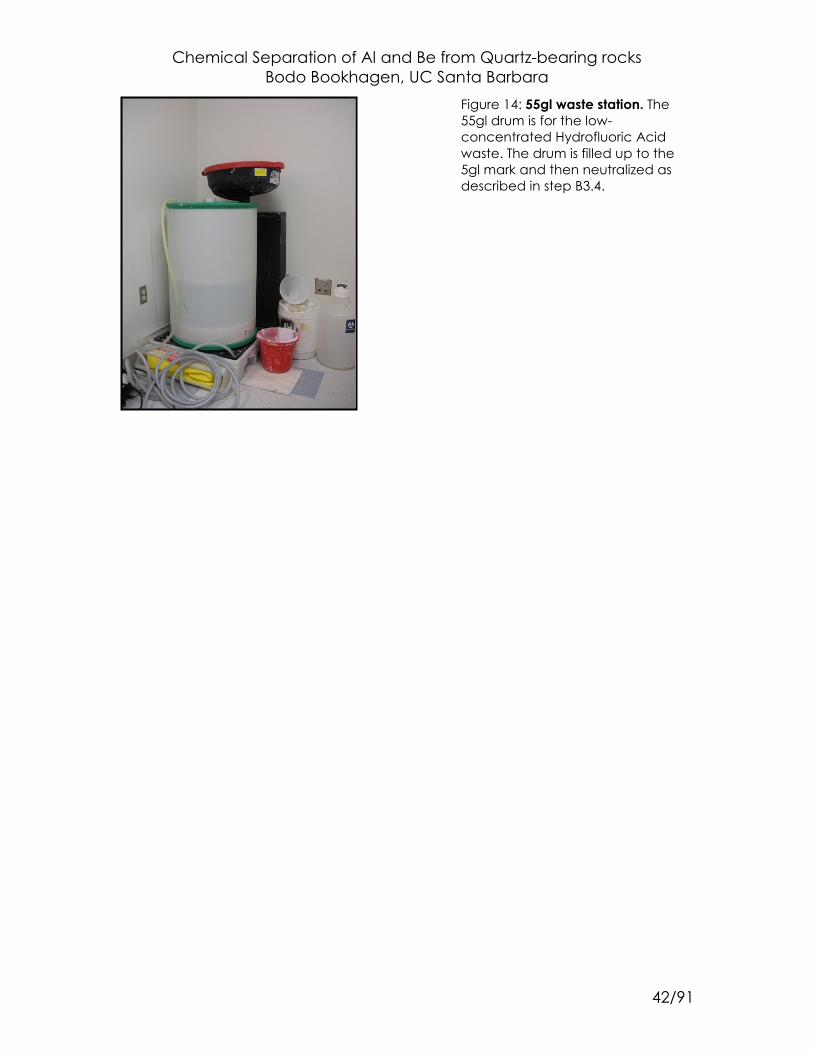
Figure 14: 55gl waste station. The 55gl drum is for the low-concentrated Hydrofluoric Acid waste. The drum is filled up to the 5gl mark and then neutralized as described in step B3.4. .............................................................................................................................. 42
Figure 15: Dry-bath incubator. Note the various sizes for 50ml Falcon Tubes (top), 15mL Falcon Tube (bottom left), and a custom-made block for holding quartz crucibles
Chemical Separation of Al and Be from Quartz-bearing rocks Bodo Bookhagen, UC Santa Barbara
6/91
used for oxidizing Berylliumhydroxide (bottom right). There is one Boron-free quartz crucible in the upper right corner. ...................................................................................... 78
Figure 16: Close-up view of the custom-made dry bath incubator. Note the quartz crucible sticking out on the top left. ................................................................................... 78
Figure 17: Backside of glove box used for loading the targets. Note the HEPA filter unit on top of the glove box. There is a stainless-steel plate for holding the targets (cathodes) and a hammer inside the glove box. ........................................................... 80
Figure 18: Stainless steel plate with target (cathode). The plate provides extra stability while the sample is loaded and hammered into the target. ........................................ 80
Figure 19: Front view of glove box. Note the attached gloves and HEPA-filter unit....... 84 Figure 20: Low Boron quartz glass holder. We use this custom-made design to ignite
our samples in the tube furnace. ........................................................................................ 84 Figure 21: Example sheet for glass-washing procedure. ..................................................... 89
Chemical Separation of Al and Be from Quartz-bearing rocks Bodo Bookhagen, UC Santa Barbara
7/91
List of Tables Table 1: Example program for sample material with < 20g. ..................................................... 51 Table 2: Example program for sample material with 20 to 50g. .............................................. 52 Table 3: Example program for sample material with ~100g – first microwave digestion.... 53 Table 4: Example program for sample material with ~100g – second microwave digestion
........................................................................................................................................................ 53 Table 5: Example program for Teflon-beaker cleaning procedure. Repeat three times.
Use 15mL of concentrated HNO3. .......................................................................................... 56 Table 6: Example Spreadsheet for Fe Column processing. Fill in sample names into top
column. ......................................................................................................................................... 67 Table 7: Example Spreadsheet for Be Column processing (2mL Be Column). Fill in sample
names into top column. To be used for samples with less than 10mg Al. ....................... 71 Table 8: Example Spreadsheet for Be Column processing (10mL Be Column). Fill in sample
names into top column. To be used for samples with less than 50mg Al. ....................... 72 Table 9: Example Spreadsheet for Al Column processing (5mL Al Column). Fill in sample
names into top column. ............................................................................................................ 76
Chemical Separation of Al and Be from Quartz-bearing rocks Bodo Bookhagen, UC Santa Barbara
8/91
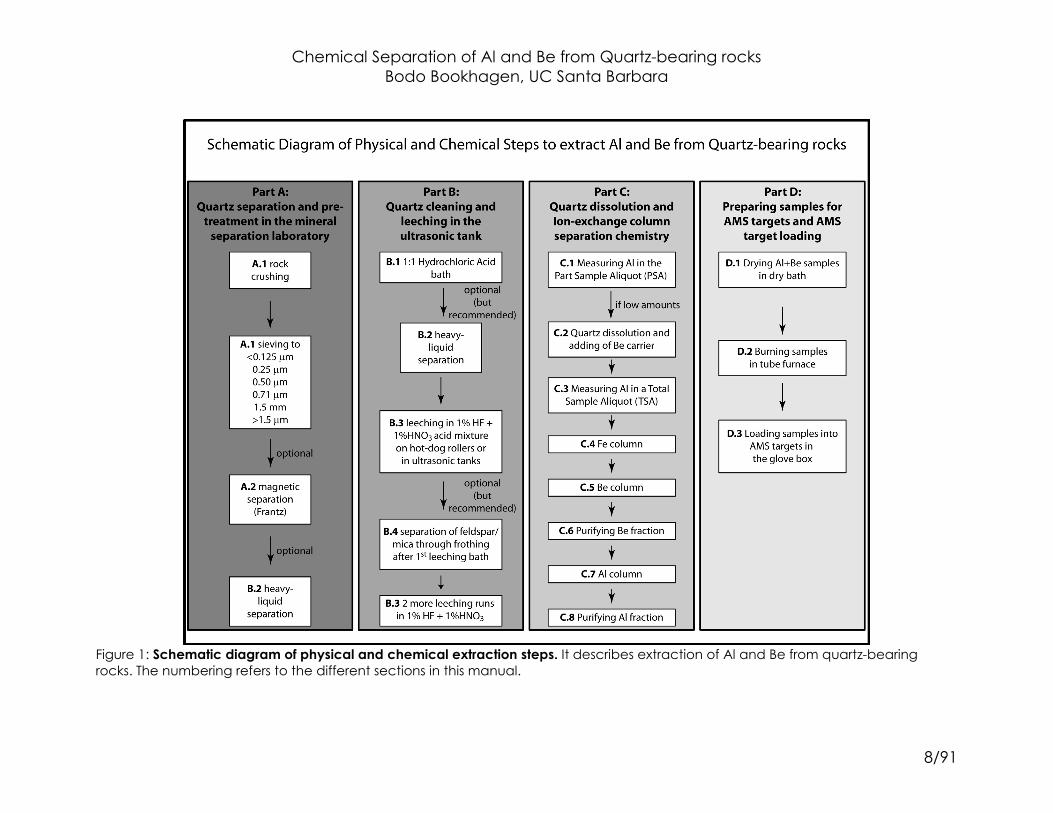
Figure 1: Schematic diagram of physical and chemical extraction steps. It describes extraction of Al and Be from quartz-bearing rocks. The numbering refers to the different sections in this manual.
Chemical Separation of Al and Be from Quartz-bearing rocks Bodo Bookhagen, UC Santa Barbara
9/91
Part A: Quartz separation and pre-treatment in the mineral separation laboratory (rock crushing, magnetic separation)
General Introduction and Objectives This step reduces the bulk field sample (bedrock surface, riversand, or amalgamated sample), into well-sorted sand fractions, which will be used in the leeching phase of the sample preparation.
The cleaning, crushing, and sieving in this step is performed in the basement of the Geology (Earth Science) building. Please contact me or the TA of the mineral separation facility to schedule an introduction. Do not use the rooms without prior training!
HEALTH AND SAFETY ADVISORY This work produces relatively high amounts of dust compared to
typical lab work. You must wear proper protective equipment, including a dust mask (NIOSH N95), safety glasses, and gloves. Face shields and goggles are also available in the room. You have to clean up the lab after every sample that you processed! Please follow the general safety and lab procedure as described to you by the mineral-separation TA [The following steps given here are thus only a rudimentary description].
Contact Bodo Bookhagen if you cannot find the mineral-separation TAs – an introduction to the rock crushing room is mandatory as it contains heavy machinery that can cause serious health damage if not operated properly.
Chemical Separation of Al and Be from Quartz-bearing rocks Bodo Bookhagen, UC Santa Barbara
10/91
A.1: Rock crushing and sieving
1. Start your lab notebook and lab data sheet. This should always be your first step!
2. Ensure that the work area is clean, before working with your sample.
3. Clean the rock sample with a brush and scraper. Do not wet the samples (or if you clean them under tap water, let them dry before continuing). If you work with sand samples (e.g. for basin-wide erosion rates of river catchments), proceed to step 9.
4. If the sample has a diameter larger than 3 cm, use the hammer and chisel to crush the rock. If your sample has a diameter larger than 4 cm, chip off pieces within 4 cm depth of the exposure surface.
5. Use the mechanical jaw crusher in the far left of the room to gravel size small enough to fit through the feed chute of the radial crusher. Don’t forget to turn on the vacuum cleaner.
6. Before inserting the contact plates of the radial crusher, ensure that they are clean. Clean with a wire brush.
7. Adjust the gap between the plates to about 2.5 mm. This produces coarse sand sized grains. Turn on the vacuum cleaner. Close the plate cover and turn on the motor. Be sure that the collection box is in place under the crushing plates! Feed one or two small sample pieces through the crusher chute. Sieve your entire sample.
8. Narrow the gap between the plates to 1 mm. This produces sand sized grains.
9. Set up your sieves using the following sizes [Note, we have a clean set of sieves in the cosmogenic nuclide lab, ask Bodo for more information]: 0.125 – 0.250 – 0.500 – 0.710 – 1 – 1.5 – 2 [all units are in mm]. It is very helpful to use the mechanical shaker, but vigorous shaking by hand will also work. You may have to add a few ‘empty’ sieves to make it fit in the shaker. Shake for approximately 5 – 10 minutes (depending on volume of material). You may have to watch the shaking process, as the pile on the shaker tends to get loose.
10. You are aiming for the grain size 0.250 to 0.500 mm (or to 0.710 mm). If you end up with a lot of material larger than 0.710 mm, rerun this part of your sample through the radial crusher with 1 mm plate distance. Re-sieve. [Note: The grain sizes produced for a given plate distance depend on the material and rock type. Most of the quartz-bearing rocks have similar strength and thus the given description will work. Use your own judgment and experience to produce the
Chemical Separation of Al and Be from Quartz-bearing rocks Bodo Bookhagen, UC Santa Barbara
11/91
appropriate grain size. Always use larger plate distance – once your grain size becomes too small, the material may not be very suitable anymore.]
11. If you have not sufficient amount of material in the 0.250 to 0.500 mm fraction, consider using the 0.710 mm fraction as well.
12. Pour the different size fractions into separate labeled plastic zip-loc bags. Put away the > 0.5 mm and < 0.25 mm fractions into storage.
13. Clean the work area thoroughly! You are responsible for a clean working environment.
After sieving the samples, have a close look at the material. Are there micas, feldspar, garnets, zircons, pyroxenes, or other non-quartz minerals in the samples? If you have a high content of non-quartz minerals, you should treat your samples with at least one of the following steps: Magnetic separation, heavy-liquid separation, and/or frothing to remove feldspar and micas. The magnetic separation (Frantz) equipment is located in the Geology building, all other procedure can be done in the cosmogenic nuclide laboratory. Note: The material for the heavy-liquid separation is slightly poisonous and an introduction is mandatory! Also, the frothing requires a carbonator – both separation methods are subject to introduction and training. Before using any equipment, you must sign up!
Chemical Separation of Al and Be from Quartz-bearing rocks Bodo Bookhagen, UC Santa Barbara
12/91
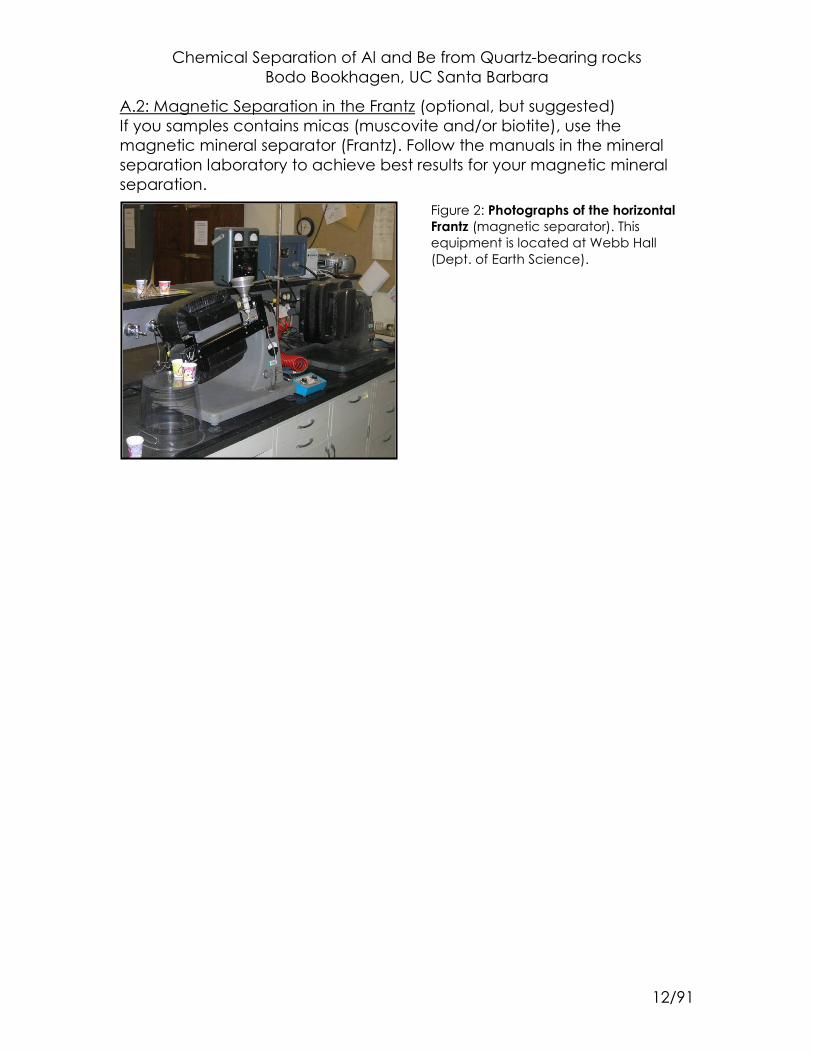
A.2: Magnetic Separation in the Frantz (optional, but suggested) If you samples contains micas (muscovite and/or biotite), use the magnetic mineral separator (Frantz). Follow the manuals in the mineral separation laboratory to achieve best results for your magnetic mineral separation.
Figure 2: Photographs of the horizontal Frantz (magnetic separator). This equipment is located at Webb Hall (Dept. of Earth Science).
Chemical Separation of Al and Be from Quartz-bearing rocks Bodo Bookhagen, UC Santa Barbara
13/91
Part B: Further Quartz cleaning and leeching in the ultrasonic tank using a low-concentrated hydrofluoric-nitric acid mixture
General Introduction and Objectives After the mineral separation laboratory you should have a pretty clean sample that you will clean even more during the next few steps. First, you want to remove all carbonates, organic material, and dirt from the sample in a 1:1 Hydrochloric Acid solution. Second, you will leech the quartz in a low concentration hydrofluoric-nitric acid mixture.
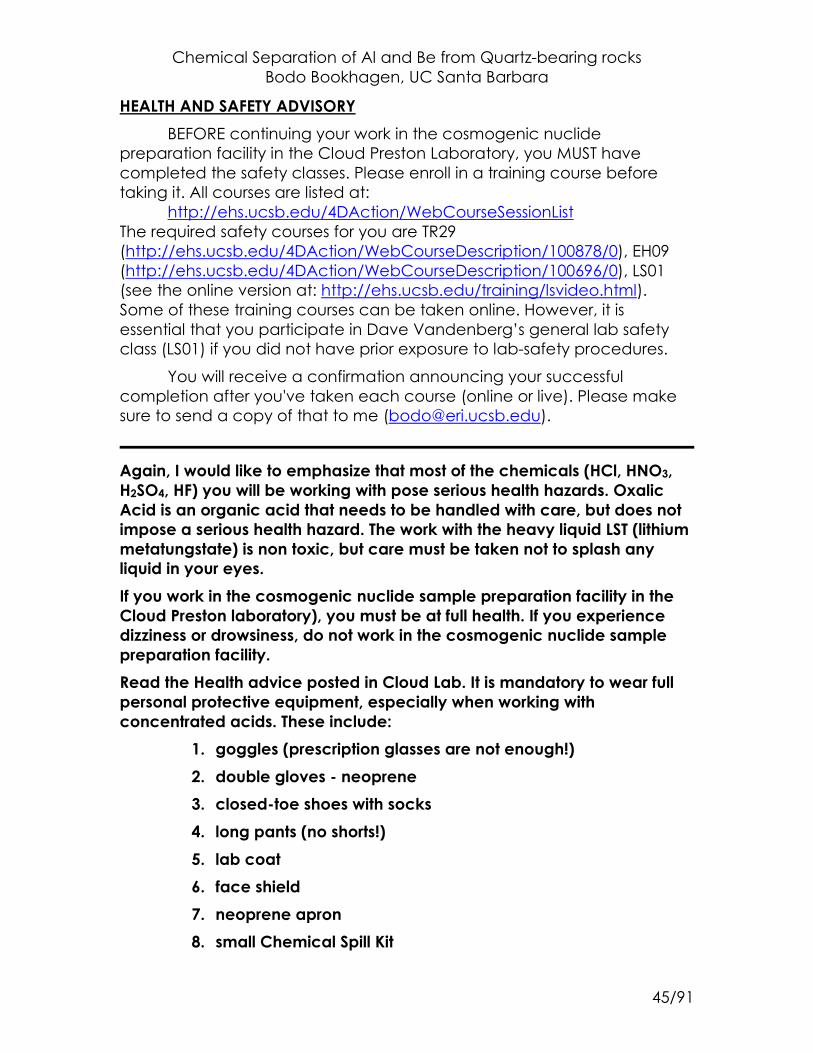
HEALTH AND SAFETY ADVISORY BEFORE continuing your work in the cosmogenic nuclide
preparation facility in the Cloud Lab, you MUST have completed the safety classes. Please enroll in a training course before taking it. All courses are listed at:
http://ehs.ucsb.edu/4DAction/WebCourseSessionList The required safety courses for you are TR29 (http://ehs.ucsb.edu/4DAction/WebCourseDescription/100878/0), EH09 (http://ehs.ucsb.edu/4DAction/WebCourseDescription/100696/0), LS01 (see the online version at: http://ehs.ucsb.edu/training/lsvideo.html). Some of these training courses can be taken online. However, it is essential that you participate in Dave Vandenberg’s general lab safety class (LS01) if you did not have prior exposure to lab-safety procedures.
You will receive a confirmation announcing your successful completion after you've taken each course (online or live). Please make sure to send a copy of that to me ([email protected]).
Again, I would like to emphasize that most of the chemicals (HCl, HNO3, H2SO4, HF) you will be working with pose serious health hazards. Oxalic Acid is an organic acid that needs to be handled with care, but does not impose a serious health hazard. The work with the heavy liquid LST (lithium metatungstate) is non toxic, but care must be taken not to splash any liquid in your eyes. If you work in the cosmogenic nuclide sample preparation facility in the Cloud-Preston laboratory, you must be at full health. If you experience dizziness or drowsiness, do not work in the cosmogenic nuclide sample preparation facility. Read the Health advice posted in the Cloud Preston Laboratory. It is mandatory to wear full personal protective equipment, especially when working with concentrated acids. These include:
Chemical Separation of Al and Be from Quartz-bearing rocks Bodo Bookhagen, UC Santa Barbara
14/91
1. goggles (prescription glasses are not enough!) 2. double gloves - neoprene 3. closed-toe shoes with socks 4. long pants (no shorts!) 5. lab coat 6. face shield 7. neoprene apron 8. small Chemical Spill Kit
In addition, you will have to read, understand, agree, and sign a declaration that you have been trained in all necessary UC Santa Barbara Operating Procedures (SOPs). A copy of it will be stored in the cosmogenic nuclide lab. If you are unsure about any step, please contact the PI Bodo Bookhagen ([email protected] or x-3568) and clarify these issues.

Chemical Separation of Al and Be from Quartz-bearing rocks Bodo Bookhagen, UC Santa Barbara
15/91
B.1.1: 1:1 Hydrochloric Acid bath (glass beakers)
This steps describes the Hydrochloric Acid bath in glass beakers, see B.1.2 to do this step in 4L canisters in the ultrasonic bath or see B.1.3 to do this step in 4L canisters on the hot-dog roller.
Work carefully and only in the fume hood!
1. Verify that emergency eyewash/shower is accessible and tested within the last month.
2. Verify that fume hoods are currently certified.
3. Check the integrity of all containers and any connections prior to any filling.
4. During the entire process, carefully survey benchtop and floor area for any drips form the hose. Clean up spills immediately.
5. Check if all 4L glass beakers are properly labeled and no label has been wiped off. Especially, the “1:1 Hydrochloric Acid” and unique canister number must be clearly readable.
6. It is essential that you wear a face shield over your safety glasses, double neoprene gloves, and the neoprene aprons to ensure proper protection for concentrated acid spills.
7. Weigh your sample and record the sample mass.
8. Wash the samples with DI water. The rinsewater can go down the drain. You may repeat this step as many times until the rinse water is clear.
9. Dry sample in the gravity-convection oven at setting 2-4 or under a heat lamp [Note: this may take several hours].
10. Weigh your sample and record the weight. Use appropriate sample amount for your acid solution.
11. Place a large secondary containment made out of polypropylene (or similar acid-resistant material) into the fume hood. Take one of the 4L beakers (only use the one, labeled ‘1:1 Hydrochloric Acid’), label with sample name, and fill with milliQ water first. Then move to the fume hood and onto the secondary containment.
12. In the FUME HOOD: In the 4L glass beaker, fill in concentrated Hydrochloric Acid (36%). You always use half water, half acid. For ~125 g of sample, you will need 1 L of solution (0.5L milliQ + 0.5L
Chemical Separation of Al and Be from Quartz-bearing rocks Bodo Bookhagen, UC Santa Barbara
16/91
Hydrochloric Acid). Do not use more than 3L of acid mixture in a 4L glass beaker. Add a few mL conc. H2O2 to the solution.
13. In the FUME HOOD: Ensure that 4L beaker stands on secondary containment. Fill the sample material SLOWLY into the glass beaker labeled ‘1:1 Hydrochloric Acid mixture’. NOTE: If you sample contains large amounts of carbonate it will foam. Wait a few minutes before adding more sample material. If your sample foamed during this period, you will need to watch it closely, as it may foam more during the heating period.
14. In the FUME HOOD: All heating processes and heated objects are to remain in the fume hood. Ensure that there are no combustible materials near the hot plate. Observe the sample for 30 minutes. If no foaming or bubbles can be observed, cover with watch glass, move the 4L container onto a hot plate and start heating. Watch closely for the next hour. If it starts foaming, remove from hot plate and wait 30 minutes. Repeat until you can heat the sample without foaming.
15. In the FUME HOOD: If everything remains calm for one hour, stir sample with long glass stirrer. Cover with watch glass and heat overnight (use timer). Ensure that the temperature is below boiling at ~75°C (setting 175 on the FisherScience hotplate in the Cloud Preston Laboratory).
16. In the FUME HOOD: After heating, let acid solution cool for 4 hours before emptying into a waste canister. Place large secondary containment into fume hood. Move properly labeled (with UCSB Hazardous Waste Tag) hydrochloric acid waste canister into fume hood onto the secondary containment. Empty beaker into waste container.
17. In the FUME HOOD: Rinse thoroughly with DI water (at least 4 times). The first rinse also goes into the hydrochloric acid waste tank. Fill in water into a 4L glass beaker labeled with ‘DI water’ and transfer to the fume hood. After the first rinse, you can transfer the sample out of the fume hood and rinse them next to the sink. There is a large container labeled ‘Rinsing samples’ with an orange tape designed for this purpose. If there are traces of yellow or orange colors left in the sample, rinse more.
18. If solution is very dirty (dark brown colors), you may have to repeat the 1:1 Hydrochloric acid step.
19. Fill sample with squirt bottle (labeled ‘milliQ water’) into a pre-weighted crystallizing dish/glass beaker and dry in oven and/or under heat lamp. When dried, record weight.
Chemical Separation of Al and Be from Quartz-bearing rocks Bodo Bookhagen, UC Santa Barbara
17/91
20. All 4L beakers will be washed with soap, rinsed with DI, and can then be used again.
Chemical Separation of Al and Be from Quartz-bearing rocks Bodo Bookhagen, UC Santa Barbara
18/91
B.1.2: 1:1 Hydrochloric Acid bath – Ultrasonic bath (2 and 4L canisters)
As an alternative to B.1.1 and B.1.3, you may use the 4L containers and heat the sample in the large ultrasonic tanks. This allows you to processes several samples in one step and is very efficient. Here is a step-wise description:
1. Verify that emergency eyewash/shower is accessible and tested within last month.
2. Verify that fume hoods are currently certified.
3. Check the integrity of all containers and any connections prior to any filling.
4. During the entire process, carefully survey benchtop and floor area for any drips from the hose or the spigot. Clean up spills immediately with sponge pillows (yellow color) or blue wipes. Heavily acid saturated pillows or wipes are put into a plastic bag with properly marked EH&S safety label. Use proper personal protective equipment.
5. Ensure that you are only using the heavy-duty 2L or 4L beakers. The hydrochloric acid mixture is more volatile than the hydrofluoric/nitric acid mixture.
6. Check if all 4L canister are properly labeled and no label has been wiped off. Especially, the “1:1 Hydrochloric Acid” and unique canister number must be clearly readable.
7. Check if the 4L canisters you intend to use are clean, healthy, and do not show any signs of cracking. If you push in the outside wall of a canister with your hands and the canister shows cracks, it is time to replace this canister.
8. It is essential that you wear a face shield over your safety glasses, double neoprene gloves, and the neoprene aprons to ensure proper protection for concentrated acid spills.
9. Before using the ultrasonic bath, ensure that they are both properly installed. There should be a pH buffer in the ultrasonic bath.
10. Weigh your sample and record the sample mass.
11. Wash the samples with DI water. The rinsewater can go down the drain. Rinse until water is clear.
12. Dry sample in the oven or under a heat lamp [Note: this may take several hours].
Chemical Separation of Al and Be from Quartz-bearing rocks Bodo Bookhagen, UC Santa Barbara
19/91
13. Weigh your sample and record the weight. Use appropriate sample amount for your acid solution.
14. Place a large secondary containment made out of polypropylene (or similar acid-resistant material) into the fume hood. Take one of the 4L canisters (only use the one, labeled ‘1:1 Hydrochloric Acid’), label with sample name, and fill with milliQ water first. Then move to the fume hood and place onto the secondary containment.
15. In the FUME HOOD: Into the 4L canister fill in concentrated Hydrochloric Acid (36%). You always use half water, half acid. Water is always added first, the add acid. For ~125 g of sample, you will need 1 L of solution (0.5L milliQ + 0.5L Hydrochloric Acid). Do not use more than 3L of acid mixture in a 4L canister. Add a few mL conc. H2O2 to the solution.
16. In the FUME HOOD: If you have emptied out a 2.5L HCl container, cross out the label several times and leave it without cap (open) in the fume hood. Let dry out for 24h and rinse with tap water four times. The empty, rinsed bottle can go into the recycle bin or trash.
17. In the FUME HOOD: Ensure that secondary containment is placed below the 4L canister. Fill the sample material SLOWLY into the 4L canister labeled ‘1:1 Hydrochloric Acid’. NOTE: If you sample contains large amounts of carbonate it will foam. Wait a few minutes before adding more sample material. If your sample foamed during this period, you will need to watch it closely, as it may foam more during the heating period.
18. In the FUME HOOD: Observe the sample for 30 minutes. If no foaming or bubbles can be observed, close the lid tightly, and swirl beaker to get sample into suspension. Wait until sample has settled and open lid. Watch for another 30 minutes.
19. If no foaming occurs, close the lid.
20. Place all the canisters into the bath. You can put up to 8 x 4L canisters and 3 x 2L canisters into the ultrasonic bath. If you don’t need all 8x4L and 3x2Lcanisters, you still have to put 8+3 canisters into the bath to ensure they are not sliding around. You can fill the remaining canisters without sample material with DI water.
21. Once all the canisters are in the ultrasonic bath, check the water level. Fill in DI water up to ~4cm (~1.5 inches) from the top of the bath. The exact amount is not really important; however, ensure that there is enough water in the bath to cover the bottom of the canisters. Never run the Ultrasonic bath without water, as it will shorten the lifetime of the unit.
Chemical Separation of Al and Be from Quartz-bearing rocks Bodo Bookhagen, UC Santa Barbara
20/91
22. Turn on the heat for the ultrasonic bath. The ultrasonic bath is automatically set to 70°C and it will take about 1hr to warm it up.
23. Watch the samples for the next hour – if a sample starts to foam, remove sample from ultrasonic tank and place into the fume hood. Open lid and let cool for 30 minutes. Move the sample back to the ultrasonic tank. Repeat until the sample does not foam anymore.
24. If needed, set the timer to the right of the bath. You run the ultrasonic bath and heater for 12 to 24 hours.
25. Turn on the ultrasonic unit and close the soundproofed enclosure.
26. After the Ultrasonic tank run, let samples cool for 6 hours. Remove samples from bath and move into the fume hood.
27. In the FUME HOOD: Pour of acid into properly labeled Hydrochloric acid-waste tank. Use funnel to pour in samples.
28. In the FUME HOOD: Rinse thoroughly with DI water (at least 4 times). The first rinse (~200mL) also goes into the hydrochloric acid waste tank. Fill in water into a 4L glass beaker labeled with ‘DI water’ (or an empty 4L canister) and transfer to the fume hood. After the first rinse, you can transfer the sample out of the fume hood and rinse them next to the sink. There is a large container designed for this purpose. If there are traces of yellow or orange colors left, rinse more. Ensure that the sample has been properly rinsed before putting into the convection oven. If there is still acid on the sample, it will heavily corrode the oven.
29. If solution is very dirty (dark brown colors), you may have to repeat the 1:1 Hydrochloric acid step.
30. Pour sample out of the 4L canisters into a large polypropylene tray and rinse thoroughly with DI. Use the squirt bottle (labeled ‘milliQ water’) to transfer sample into a pre-weighted crystallizing dish/glass beaker. Label twice with your sample number and date using a water-resistant marker (e.g., Sharpie). Place in convection oven (setting three) and/or under heat lamp. When dried, record weight.
31. All 4L canisters will be washed with soap, rinsed with DI, and can then be used again.
Chemical Separation of Al and Be from Quartz-bearing rocks Bodo Bookhagen, UC Santa Barbara
21/91
B.1.3: 1:1 Hydrochloric Acid bath – Hot-dog rollers (2 and 4L canisters)
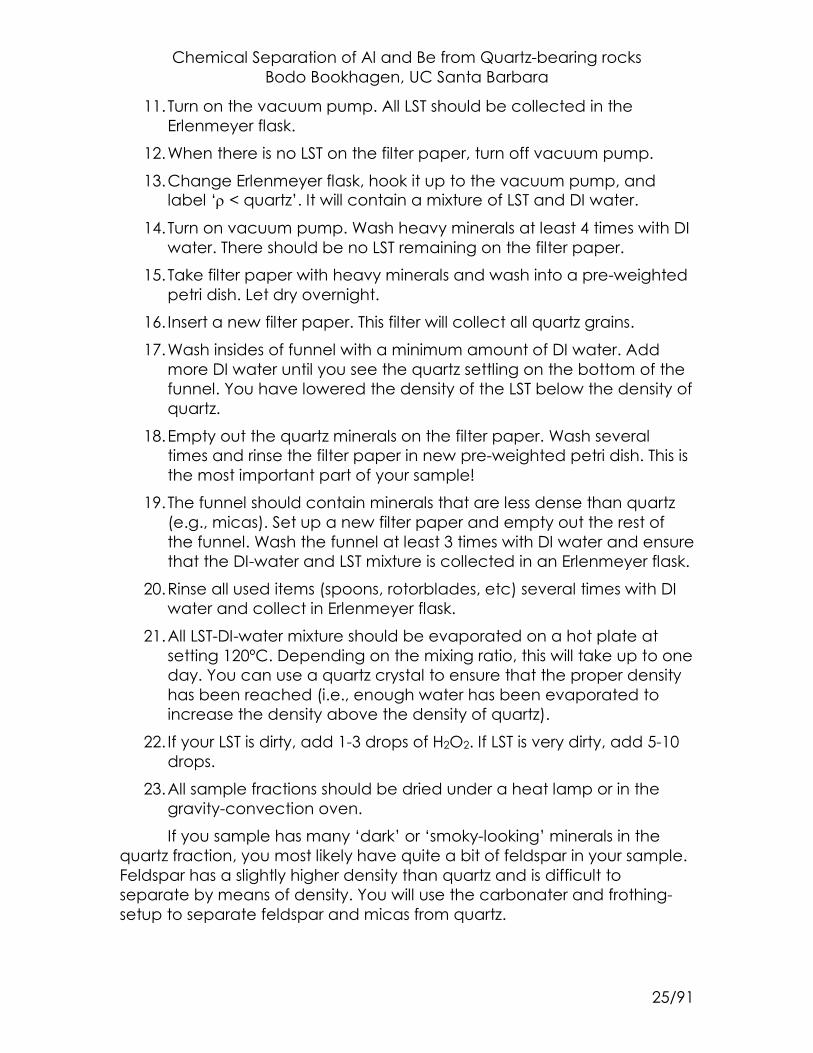
As an alternative to B.1.1 and B.1.2, you may use the 2 and 4L containers and heat the sample on the hot-dog roller. You should only use the 2L containers as they close tighter than the 4L canisters. If you use 4L containers, you will need to watch the hot-dog rollers very closely. This allows you to processes several samples in one step and is very efficient. For a picture of the hot-dog roller setup, see Figure 3. Here is a step-wise description:
1. Verify that emergency eyewash/shower is accessible and tested within last month.
2. Verify that fume hoods are currently certified.
3. Check the integrity of all containers and any connections prior to any filling.
4. During the entire process, carefully survey benchtop and floor area for any drips from the hose or the spigot. Clean up spills immediately with sponge pillows (yellow color) or blue wipes. Heavily acid saturated pillows or wipes are put into a plastic bag with properly marked EH&S safety label. Use proper personal protective equipment.
5. Ensure that you are only using the heavy-duty 2 and 4L beakers. The hydrochloric acid mixture is more volatile than the hydrofluoric/nitric acid mixture.
6. Check if all 2 and 4L canister are properly labeled and no label has been wiped off. Especially, the “1:1 Hydrochloric Acid” and unique canister number must be clearly readable.
7. Check if the 2 and 4L canisters you intend to use are clean, healthy, and do not show any signs of cracking. If you push in the outside wall of a canister with your hands and the canister shows cracks, it is time to replace this canister.
8. It is essential that you wear a face shield over your safety glasses, double neoprene gloves, and the neoprene aprons to ensure proper protection for concentrated acid spills.
9. Before using the hot-dog roller, ensure that they are both properly installed. The hot-dog roller should be adjusted in a way that prevents the bottles from touching the surrounding epoxy glass. Use the white rings on the roller. Ensure that bottles are oriented with caps to the right as you look at the front roller (i.e., caps pointing to the side where temperature-control dials are located).
10. Weigh your sample and record the sample mass.
Chemical Separation of Al and Be from Quartz-bearing rocks Bodo Bookhagen, UC Santa Barbara
22/91
11. Wash the samples with DI water. The rinsewater can go down the drain. Rinse until water is clear.
12. Dry sample in the oven or under a heat lamp [Note: this may take several hours].
13. Weigh your sample and record the weight. Use appropriate sample amount for your acid solution.
14. Place a large secondary containment made out of polypropylene (or similar acid-resistant material) into the fume hood. Take one of the 4L canisters (only use the one, labeled ‘1:1 Hydrochloric Acid’), label with sample name, and fill with milliQ water first. Then move to the fume hood and place onto the secondary containment.
15. In the FUME HOOD: Into the 4L canister fill in concentrated Hydrochloric Acid (36%). You always use half water, half acid. Water is always added first, the add acid. For ~125 g of sample, you will need 1 L of solution (0.5L milliQ + 0.5L Hydrochloric Acid). Do not use more than 3L of acid mixture in a 4L canister or more than 1.5L acid mixture in a 2L container. Add a few mL conc. H2O2 to the solution.
16. In the FUME HOOD: If you have emptied out a 2.5L HCl container, cross out the label several times and leave it without cap (open) in the fume hood. Let dry out for 24h and rinse with tap water four times. The empty, rinsed bottle can go into the recycle bin or trash.
17. In the FUME HOOD: Ensure that secondary containment is placed below the 4L canister. Fill the sample material SLOWLY into the 4L canister labeled ‘1:1 Hydrochloric Acid’. NOTE: If you sample contains large amounts of carbonate it will foam. Wait a few minutes before adding more sample material. If your sample foamed during this period, you will need to watch it closely, as it may foam more during the heating period.
18. In the FUME HOOD: Observe the sample for 30 minutes. If no foaming or bubbles can be observed, close the lid tightly, and swirl beaker to get sample into suspension. Wait until sample has settled and open lid. Watch for another 30 minutes.
19. If no foaming occurs, close the lid.
20. Place all the canisters onto the hot-dog roller. You can put up to 8 x 4L canisters and 3 x 2L canisters onto the ultrasonic bath.
21. Put bottles onto hot-dog rollers with caps to the right. Up to 6x4L and 3x2L bottles can be on one hot-dog roller. You will need to
Chemical Separation of Al and Be from Quartz-bearing rocks Bodo Bookhagen, UC Santa Barbara
23/91
watch and monitor the hot-dog roller every 1-2 hours to make sure the bottles don’t rotate.
22. Turn on the hot-dog roller. The heat for hot-dog roller should not be turned higher than half-way.
23. Watch the samples for the next hour – if a sample starts to foam, remove sample from the hot-dog roller and place into the fume hood. Open lid and let cool for 30 minutes. Move the sample back to the hot-dog roller. Repeat until the sample does not foam anymore.
24. If needed, set the timer to the right of the hot-dog roller. You run the hot-dog roller and heater for 12 to 24 hours.
25. Start the hot-dog roller.
26. After the hot-dog roller run, let samples cool for 2-3 hours. Remove samples from the roller and move into the fume hood.
27. In the FUME HOOD: Pour of acid into properly labeled Hydrochloric acid-waste tank. Use funnel to pour in samples.
28. In the FUME HOOD: Rinse thoroughly with DI water (at least 4 times). The first rinse (~200mL) also goes into the hydrochloric acid waste tank. Fill in water into a 4L glass beaker labeled with ‘DI water’ (or an empty 4L canister) and transfer to the fume hood. After the first rinse, you can transfer the sample out of the fume hood and rinse them next to the sink. There is a large container designed for this purpose. If there are traces of yellow or orange colors left, rinse more. Ensure that the sample has been properly rinsed before putting into the convection oven. If there is still acid on the sample, it will heavily corrode the oven.
29. If solution is very dirty (dark brown colors), you may have to repeat the 1:1 Hydrochloric acid step.
30. Pour sample out of the 2 or 4L canisters into a large polypropylene tray and rinse thoroughly with DI. Use the squirt bottle (labeled ‘milliQ water’) to transfer sample into a pre-weighted crystallizing dish/glass beaker. Label twice with your sample number and date using a water-resistant marker (e.g., Sharpie). Place in convection oven (setting three) and/or under heat lamp. When dried, record weight.
31. All 2 and 4L canisters will be washed with soap, rinsed with DI, and can then be used again.
Chemical Separation of Al and Be from Quartz-bearing rocks Bodo Bookhagen, UC Santa Barbara
24/91
B.2: Heavy-Liquid separation (optional, but highly recommended)
If your sample contains many heavy minerals (zircons, garnet, pyroxene), I suggest using the heavy-liquid separation first. While this step involves a little more ‘active’ work, you can ‘clean’ a 500g sample in as little as ~30 minutes.
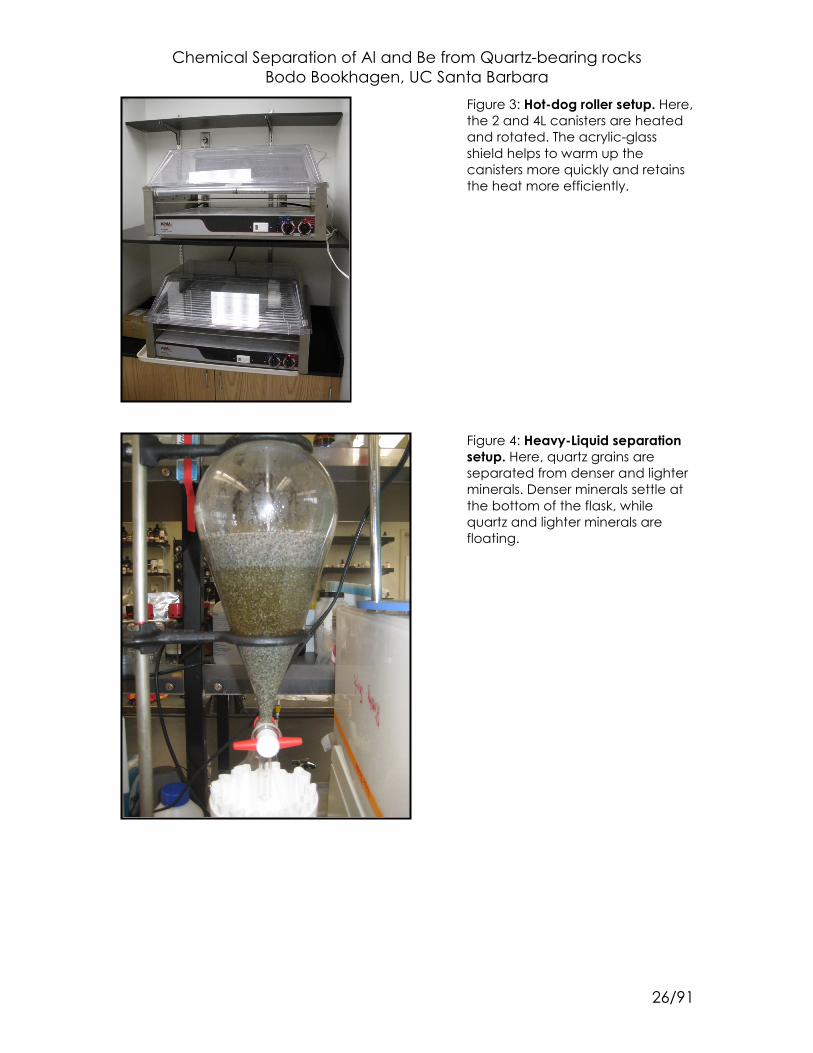
Use only the LST (lithium metatungstate) – it is safe to be used outside the fume hood. However, ensure that you wear proper protective equipment. Key in these steps is to be very careful with the LST. It is expensive and you want to collect every drop of it. For an example photo of the heavy-liquid setup, see Figure 4. Here is a step-wise description:
1. Verify that emergency eyewash/shower is accessible and tested within last month.
2. Check the integrity of all containers and any connections prior to any filling.
3. During the entire process, carefully survey benchtop and floor area for any drips form the hose. Clean up spills immediately.
4. It is essential that you wear your safety glasses, neoprene gloves to ensure proper protection for LST spills.
5. Install the 1L funnels (or 500mL for smaller samples) on the monkey rack or within the appropriate setup. Ensure that all outlets are tight and closed. In case of doubt, use DI water first (you can empty out the DI water into a separate funnel – the funnel you are using for the LST doesn’t need to be dry, but it should be empty).
6. Put the 1L Erlenmeyer flask below the funnel and hook it up to the vacuum pump. The flask should be labeled ‘ρ > quartz’, because it contains pure and undiluted LST. Add the polypropylene filter and ensure that it is tightly closed. Insert clean and dry filter paper (standard coffee-filter paper will work).
7. Fill in half way with LST and add dry sample slowly. You may have to add more LST.
8. Adjust the rotating motor to let the upper third of the sample-LST mixture rotate. There should be at least 2/3 room in the funnel to allow proper settling of heavy-liquid minerals.
9. Rotate the samples for at least 15 minutes. Observe settling of heavy liquids.
10. Open funnel and empty out all heavy minerals onto the filter paper.
Chemical Separation of Al and Be from Quartz-bearing rocks Bodo Bookhagen, UC Santa Barbara
25/91
11. Turn on the vacuum pump. All LST should be collected in the Erlenmeyer flask.
12. When there is no LST on the filter paper, turn off vacuum pump.
13. Change Erlenmeyer flask, hook it up to the vacuum pump, and label ‘ρ < quartz’. It will contain a mixture of LST and DI water.
14. Turn on vacuum pump. Wash heavy minerals at least 4 times with DI water. There should be no LST remaining on the filter paper.
15. Take filter paper with heavy minerals and wash into a pre-weighted petri dish. Let dry overnight.
16. Insert a new filter paper. This filter will collect all quartz grains.
17. Wash insides of funnel with a minimum amount of DI water. Add more DI water until you see the quartz settling on the bottom of the funnel. You have lowered the density of the LST below the density of quartz.
18. Empty out the quartz minerals on the filter paper. Wash several times and rinse the filter paper in new pre-weighted petri dish. This is the most important part of your sample!
19. The funnel should contain minerals that are less dense than quartz (e.g., micas). Set up a new filter paper and empty out the rest of the funnel. Wash the funnel at least 3 times with DI water and ensure that the DI-water and LST mixture is collected in an Erlenmeyer flask.
20. Rinse all used items (spoons, rotorblades, etc) several times with DI water and collect in Erlenmeyer flask.
21. All LST-DI-water mixture should be evaporated on a hot plate at setting 120ºC. Depending on the mixing ratio, this will take up to one day. You can use a quartz crystal to ensure that the proper density has been reached (i.e., enough water has been evaporated to increase the density above the density of quartz).
22. If your LST is dirty, add 1-3 drops of H2O2. If LST is very dirty, add 5-10 drops.
23. All sample fractions should be dried under a heat lamp or in the gravity-convection oven.
If you sample has many ‘dark’ or ‘smoky-looking’ minerals in the quartz fraction, you most likely have quite a bit of feldspar in your sample. Feldspar has a slightly higher density than quartz and is difficult to separate by means of density. You will use the carbonater and frothing-setup to separate feldspar and micas from quartz.
Chemical Separation of Al and Be from Quartz-bearing rocks Bodo Bookhagen, UC Santa Barbara
26/91
Figure 3: Hot-dog roller setup. Here, the 2 and 4L canisters are heated and rotated. The acrylic-glass shield helps to warm up the canisters more quickly and retains the heat more efficiently.
Figure 4: Heavy-Liquid separation setup. Here, quartz grains are separated from denser and lighter minerals. Denser minerals settle at the bottom of the flask, while quartz and lighter minerals are floating.
Chemical Separation of Al and Be from Quartz-bearing rocks Bodo Bookhagen, UC Santa Barbara
27/91
B.3: Leeching in a 1% Hydrofluoric-Nitric Acid mixture
You are only interested in the cosmogenic nuclides produced in-situ in the quartz minerals. In order to prevent any contamination from garden variety cosmogenic nuclides that are located in the outer rims of the quartz grains, we will leech (or etch) away the outer rims. In order to achieve this (and to not dissolve the entire quartz grain), we use a combination of hydrofluoric and nitric acid in a very low concentration (1%). Alternatively, you can use a slightly higher acid concentration – but beware: You will dissolve more of your sample! (Not suggested for low-weight samples).
This part of the operation is divided into two parts: First, making a 20L solution and second filling the 4L containers with the low-concentrated solution.
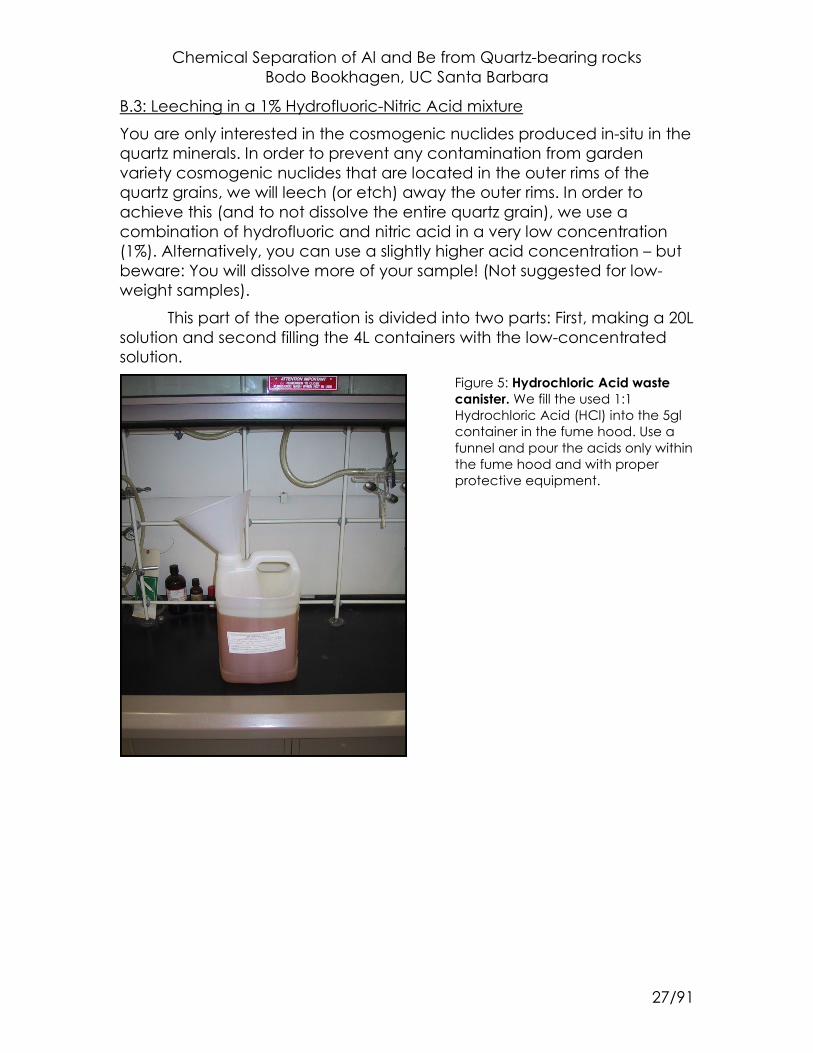
Figure 5: Hydrochloric Acid waste canister. We fill the used 1:1 Hydrochloric Acid (HCl) into the 5gl container in the fume hood. Use a funnel and pour the acids only within the fume hood and with proper protective equipment.
Chemical Separation of Al and Be from Quartz-bearing rocks Bodo Bookhagen, UC Santa Barbara
28/91
B.3.1: Preparing a 20L 1% HF and 1% HNO3 acid mixture
In order to make the 20L solution, you must closely follow the Standard Operating Procedure (SOP) – Preparing a 20L 1%HF and 1% HNO3 acid mixture. Instead of mixing every canister separately, we make a solution in a 20L tank that is then filled into the 4L canister. This is much more time efficient and safer as you need to handle the concentrated acid only once. In addition to the 1%HF and 1% HNO3 acid mixtures, you can use a 2%HF and 1% HNO3 axid mixture. In order to prepare these, you double the amount of HF used in the 20L container (from 400mL to 800mL).
Note: I have changed the procedure to allow a better mixing of the DI (or milliQ) water with the HF and HNO3 acids. That is, you first pour in the acids into the empty 20L container and then add 19L of DI water in the fumehood from a previously filled 20L container. This ensures that the acids and water are properly mixed. All steps have to be carried out in the fume hood. [Note that you usually first add water to an empty container, before adding the acids]. Additional Note: In the past years (2010-2012), we have mostly used 1 or 2% HF and not HNO3 in the acid mixture. We have obtain excellent results and I suggest not to add HNO3, unless you have very dirty samples or high Fe concentrations.
The SOP contains the following steps:
1. Verify that emergency eyewash/shower is accessible and tested within last month.
2. Verify that fume hoods are currently certified.
3. Check the location and expiration of the Calcium Gluconate and that a copy of the MSDS for HF is available
4. Ensure that the spigot of the 20L carboy is tightly screwed on and that the carboy is emptied completely.
5. Turn on the milliQ filter machine and fill the carboy labeled DI water with milliQ water up to the 19L mark.
6. Put container (heavy!) onto the elevated surface in the fume hood. The spigot should be right above the empty 20L container that will contain the acid-milliQ water mixture.
7. It is essential that you wear a face shield over your safety glasses, double neoprene gloves, and the neoprene aprons to ensure proper protection for concentrated acid spills.
Chemical Separation of Al and Be from Quartz-bearing rocks Bodo Bookhagen, UC Santa Barbara
29/91
8. FUME HOOD: Place the carboy in its large, secondary containment tray.
9. FUME HOOD: Place a medium, secondary containment tray in the fume hood and add 400mL hydrofluoric acid (HF) using the polypropylene 500mL measuring cylinder while working over the secondary containment tray. [NOTE: Use 800mL hydrofluoric acid for a 2% HF mixture.]
10. FUME HOOD: Add 300mL Nitric Acid (HNO3) using the glass measuring cylinder. (This step has been omitted.)
11. FUME HOOD: Add 300mL milliQ water with the glass measuring cylinder to rinse out the remaining Nitric Acid. (This step has been omitted.)
12. FUME HOOD: Open the spigot of the 19L milliQ water container and empty it completely into the container below. You know have a 20L 1%HF/1% HNO3 solution.
13. FUME HOOD: Close the carboy and ensure that all spigots are closed. Gently swirl and shake several times to extensively mix the acids and water. Ensure that no inverting of container occurs.
14. Place the carboy and its secondary containment tray onto the cart or move it back to its dedicated position.
15. Wash the measuring cylinders, rinse them 3 x with milliQ water, and collect first wash as hazardous waste.
Now you are ready to put parts of your sample into the filled 4L containers. For the first ultrasonic leech, you may use 7.5 g per 1L 1% HF/HNO3 acid solution. These are 30g per 4L container. Split the sample over several canisters. For the second and each successive leech, use 60g per 4L container (15 g per 1L acid solution).
Chemical Separation of Al and Be from Quartz-bearing rocks Bodo Bookhagen, UC Santa Barbara
30/91
Figure 6: Low-concentrated Hydrofluoric/Nitric Acid Filling Station. We mix the 1% HF/HNO3 acid solution in these 20L canisters. They allow us to fill 5x4L canisters – a fast, safe, and efficient way for the HF leeching step.
Chemical Separation of Al and Be from Quartz-bearing rocks Bodo Bookhagen, UC Santa Barbara
31/91
B.3.2: Filling 4L canisters with a 1% HF and 1% HNO3 acid mixture
After making a 20L canister with a 1% Hydrofluoric-Nitric Acid solution, you can start filling the 4L canisters. Figure 6 shows the location and setup of the filling station. Please read the following steps carefully and follow them precisely:
1. Verify that emergency eyewash/shower is accessible and tested within last month.
2. Verify that fume hoods are currently certified.
3. Check the location and expiration of the Calcium Gluconate and that a copy of the MSDS for HF is available
4. Ensure that the spigot of the 20L carboy is tightly screwed on and that the carboy is emptied completely.
5. Check the integrity of all containers and any connections prior to any filling.
6. During the entire process, carefully survey benchtop and floor area for any drips form the hose. Clean up spills immediately.
7. Check if all 4L canister are properly labeled and no label has been wiped off. Especially, the “1% Hydrofluoric Acid”, “1% Nitric Acid”, unique canister number must be clearly readable. If not, renew labeling. Do not use tape for labeling beakers that go on the hot-dog roller.
8. Check if the 4L canisters you intend to use are clean, healthy, and do not show any signs of cracking. If you push in the outside wall of a canister with your hands and the canister shows cracks, it is time to replace this canister.
9. It is essential that you wear a face shield over your safety glasses, double neoprene gloves, and the neoprene aprons to ensure proper protection for concentrated acid spills.
10. FUME HOOD: Take the 20L carboy from its large, secondary containment tray and put it on the elevated surface.
11. FUME HOOD: Place a medium, secondary containment tray in the fume hood below the 4L canister that will be filled with the low-concentrated acid mixture.
12. FUME HOOD: Fill the 4L canister up to its 4L mark.
13. FUME HOOD: After filling the 4L canisters, close the carboy and ensure that all spigots are closed. When the 20L carboy is empty, it is ready to be filled with a 1% HF/HNO3 acid mixture, following the
Chemical Separation of Al and Be from Quartz-bearing rocks Bodo Bookhagen, UC Santa Barbara
32/91
‘SOP for preparing a 20L (5gl) 1% Hydrofluoric (HF) and 1% Nitric (HNO3) acid mixture for use in canisters in the Ultrasonic bath’.
14. FUME HOOD: Transfer the sample into the filled 4L canisters while they are still in the fume hood. Use a plastic spoon or a Pyrex beaker with pre-weighted sample material. You can use 7.5g sample for 1L 1%HF/HNO3 solution for the first ultrasonic-bath run. That is ~30g for 4L 1% HF/HNO3. For the second and third ultrasonic-bath run, you can use 10-15g sample material for 1L 1% HF/HNO3 (~60g for 4L 1%HF/HNO3).
15. FUME HOOD: Close the lid of the 4L canister tightly.
16. Once you have filled all 4L canisters with your sample material, ensure all lids are tightly closed. Open the door to the ultrasonic bath and place the canister into the cold ultrasonic bath – one at a time. Alternatively, place the 4L canister onto the hot-dog roller. Remove immediately, if you are observing dripping (Note: The canisters may be wet and DI water is dripping from them).
17. Place all the canisters into the bath or onto the hot-dog roller. You can put up to 8 4L canisters and 3 2L canisters into the ultrasonic bath. Similarly, you can place 6 4L canister and 3 2 L canisters onto the hot-dog roller. If you don’t need all 8x4L and 3x2Lcanisters, you still have to put 8+3 canisters into the bath to ensure they are not sliding around. You can fill the remaining canisters without sample material with DI water.
18. [Ultasonic bath only] Once all the canisters are in the ultrasonic bath, check the water level. Fill in DI water up to ~4cm (~1.5 inches) from the top of the bath. The exact amount is not really important; however, ensure that there is enough water in the bath to cover the bottom of the canisters. Never run the Ultrasonic bath without water, as it will shorten the lifetime of the unit.
19. Turn on the heat for the ultrasonic bath or for the hot-dog roller. It is automatically set to 70°C and it will take about 1hr to warm up the bath. It will take ~30 minutes to warm up the canisters on the hot-dog rollers. Do not set the heater higher than the 6 c’clock setting on the hot-dog roller.
20. If needed, set the timer to the left of the bath. You run the ultrasonic bath and hot-dog roller for 8 to 12 hours. Note that the hot-dog rollers are more efficient in mixing the samples as the rotating bottles turn the entire sample around.
21. Turn on the ultrasonic unit and close the door. Turn on the hot-dog roller and lower the lid.
Chemical Separation of Al and Be from Quartz-bearing rocks Bodo Bookhagen, UC Santa Barbara
33/91
22. Place the 20L carboy and its secondary containment tray onto the cart and move it back to its dedicated position.
Figure 7: pH-test paper ribbon. Use this, to test the pH of the neutralized acid – ensure that it is above pH 5.
Figure 8: Mixing of Sodium Bicarbonate or CaCO3 with tap water. Ensure that the water and sodium bicarbonate or calcium carbonate is well mixed before pouring it into the 55-gl drum.
Chemical Separation of Al and Be from Quartz-bearing rocks Bodo Bookhagen, UC Santa Barbara
34/91
Figure 9: Pouring a sodium bicarbonate or CaCO3 – water mixture into the 55-gl drum. Slowly and carefully pour the sodium bicarbonate or CaCO3 into the drum. Use proper protective equipment.
Figure 10: pH-test of acid in the drum. Use the glass rod, dip it into the acid-mixture and measure pH with the pH-test ribbon.
Figure 11: Acid-resistance pump. Ensure that the hoses are hooked up in the correct way. When you plug in the pump, it starts running – there is no separate electric switch.
Chemical Separation of Al and Be from Quartz-bearing rocks Bodo Bookhagen, UC Santa Barbara
35/91
B.3.3: Emptying 4L canisters filled with 1% HF and 1% HNO3
Note: You apply the same steps for emptying 4L canisters filled with 2% HF.
You have to be very careful, when emptying out the 4L canisters. Please read the following steps and follow them carefully:
1. Verify that emergency eyewash/shower is accessible and tested within last month.
2. Check the location and expiration of the Calcium Gluconate and that a copy of the MSDS for HF is available
3. During the entire process, carefully survey benchtop and floor area for any drips. Clean up spills immediately.
4. Ensure that the 55gl drum is placed correctly onto the secondary containment and that there is enough space left in the drum.
5. It is essential that you wear a face shield over your safety glasses, double neoprene gloves, and the neoprene aprons to ensure proper protection for concentrated acid spills.
6. Check the pH of the bath with pH paper (orange box, “Jumbo Insta Check”). If the pH of the bath is below 4, a canister may have leaked. If this is the case (very unlikely): First, leave canisters in bath, second turn off ultrasonic bath and heater, and third contact Lab Manager or PI for immediate assistance. Note: This does not pose an immediate health danger – the Lab Manager and PI can assist in emptying out the ultrasonic bath. All canisters must be rinsed with DI water before they are opened.
7. Before taking the 2/4L canisters out of the ultrasonic bath or from the hot-dog roller, ensure that all lids are tightly screwed on and that the canisters cooled for at least one hour after turning off the heat. Take out all the canisters one by one and place them into the secondary containment tray on the work surface near the 55gl drum.
8. If you have to take out the canisters while they are still warm, wear two pairs of neoprene gloves plus the orange heat-resistant glove pair (located in the glove-box container to the left of the fume hood). You can place the canisters into the sink to let them cool off.
9. Wait for at least 3 hours to let the canisters cool down.
10. If you want to open the canisters and they are still luke-warm (hand-warm), open them in the fume hood to ensure that vapor can escape. It is safe to open the canisters when they are at room temperature.
Chemical Separation of Al and Be from Quartz-bearing rocks Bodo Bookhagen, UC Santa Barbara
36/91
11. Before pouring any acid into the 55gl drum, ensure that the funnel is securely screwed on the lid and that there is enough space left in the drum. Do not fill in more than 5 x 1-gl beakers into the drum. Check the red level monitor that is inserted in the small opening in the drum.
12. Work with one canister at a time: Carefully unscrew the lid and screw the special pouring lid onto the canister. Use only the special pouring lid for emptying out the canisters.
13. Carefully pour out all low-concentrated acid into the 55gl drum.
14. Ensure that you only work with 5 gl at a time.
15. Unscrew the special pouring lid and put the original lid back onto the canister. Close tightly. Place the special pouring lid into the secondary containment tray right next to the 55gl drum.
16. Repeat until all canisters are emptied.
17. Carry all closed canisters to the sink. Fill about 100mL DI water into each canister and close the canister again.
18. Carry all closed canisters back to the designated work area near the 55gl drum. Empty out all canisters with the special pouring lid as described above.
19. Wash the sample two more times with milliQ water in the sink just below the water purification system. The rinseates can go down the drain, if pH is above 5.5.
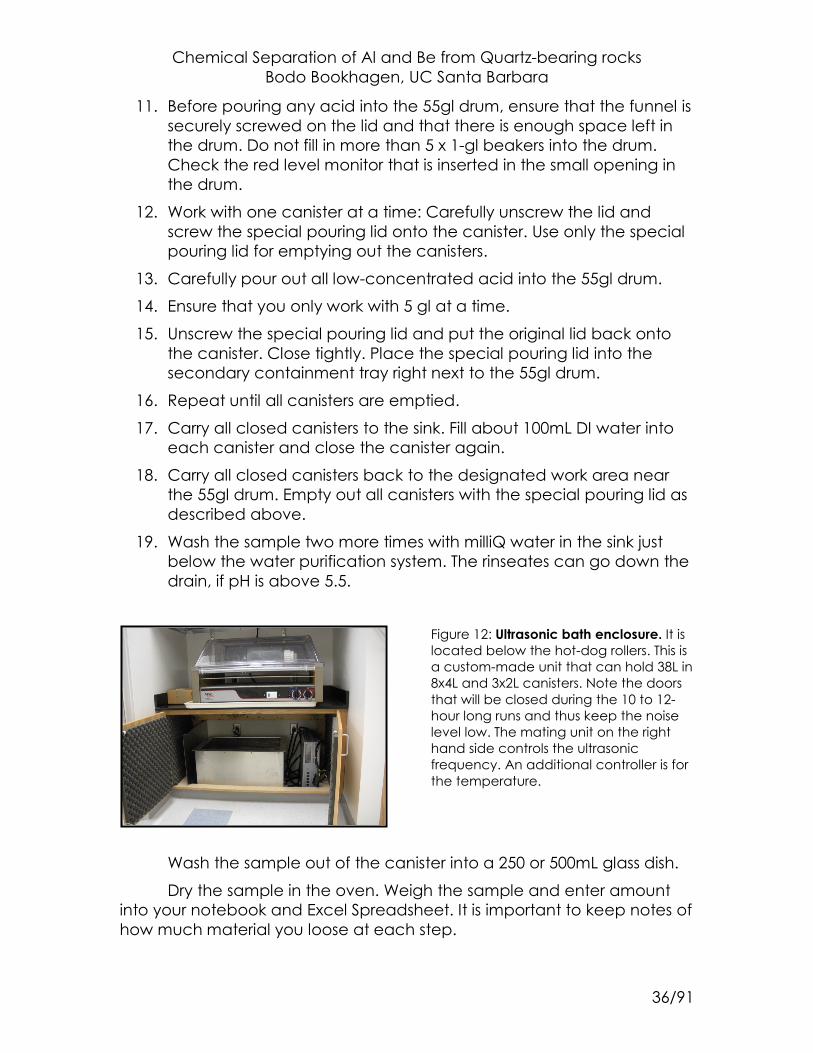
Figure 12: Ultrasonic bath enclosure. It is located below the hot-dog rollers. This is a custom-made unit that can hold 38L in 8x4L and 3x2L canisters. Note the doors that will be closed during the 10 to 12-hour long runs and thus keep the noise level low. The mating unit on the right hand side controls the ultrasonic frequency. An additional controller is for the temperature.
Wash the sample out of the canister into a 250 or 500mL glass dish.
Dry the sample in the oven. Weigh the sample and enter amount into your notebook and Excel Spreadsheet. It is important to keep notes of how much material you loose at each step.
Chemical Separation of Al and Be from Quartz-bearing rocks Bodo Bookhagen, UC Santa Barbara
37/91
It has proven to be effective to use a 2% HF acid mixture for the first leaching step at 80-100g/4L. Run this for 24h (12hx2) on the hot-dog roller or within the ultrasonic bath. For granite or quartz-rich samples, you may use 100-150g/4L 2%HF beaker.
Also, it has been shown to be effective to empty out the 2% acid after 24h and re-use the same beaker with a new acid mixture (without washing out the leached Qtz-sand).
Alternatively, if you have a very dirty sample, you may use a 5% Hydrofluoric/Nitric Acid solution with 20 to 25g sample material/liter (100 to 150g per 4L container). This will significantly reduce the sample amount, but will clean your samples very rapidly. Ask Bodo Bookhagen for more information.
Furthermore, if you have large amounts of micas in your sample, you can use the frothing apparatus. However, after the Frantz or heavy-liquid separation, there shouldn’t be any mica in your sample.
It usually takes 3 leeches to get pure, clean quartz, sometimes more. The cleaner you start, the better your final result will be. The amount of quartz needed for your specific question is dependent on your sample location, age, and scientific question you are asking. Use the Excel spreadsheet named ‘CosmoLab_guidesheet.xls’ and go to worksheet ‘Surface Ages’ or ‘Qtz-Erosion Rates’ to roughly calculate how much pure quartz you will need to get sufficient accurate results. In this spreadsheet, you can also make assumptions about the amount of material you have to collect to obtain measurable results.
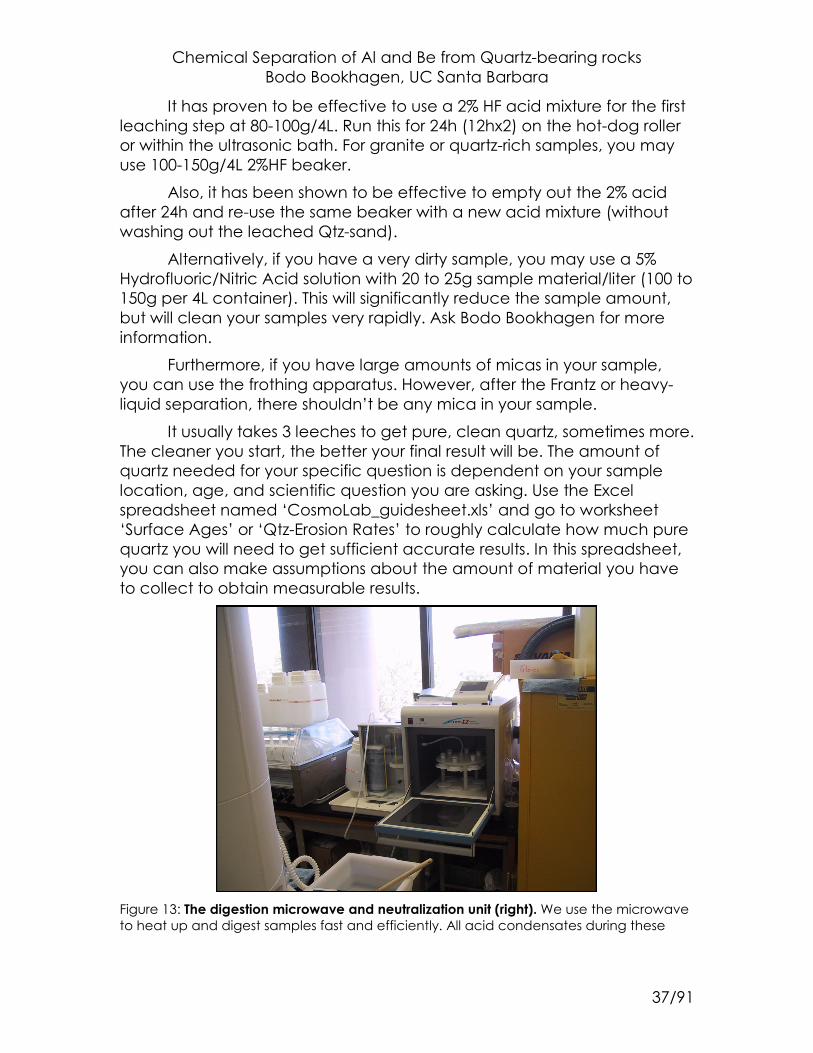
Figure 13: The digestion microwave and neutralization unit (right). We use the microwave to heat up and digest samples fast and efficiently. All acid condensates during these
Chemical Separation of Al and Be from Quartz-bearing rocks Bodo Bookhagen, UC Santa Barbara
38/91
processes are collected in a properly labeled acid-waste container. All vapors from this container are neutralized.
Chemical Separation of Al and Be from Quartz-bearing rocks Bodo Bookhagen, UC Santa Barbara
39/91
B.3.4: Neutralizing the 1%HF/HNO3 acid mixture in the 55gl drum
After you have filled 5gl of the low-concentrated HF/HNO3 mixture into the 55gl drum, you will have to neutralize the acid. You will neutralize the 5-gl acid mixture by adding 0.5gl of a water-CaCO3 or a water-sodium bicarbonate mixture. Before draining the neutralized acid, you will need to measure the Fluoride concentration. This is an essential step for this procedure. Furthermore, it is essential that you record all activity in the ‘Hydrofluoric (HF) Acid Neutralization Spreadsheet’.
1. Verify that emergency eyewash/shower is accessible and tested within last month.
2. Check the location and expiration of the Calcium Gluconate and that a copy of the MSDS for HF is available
3. During the entire process, carefully survey benchtop and floor area for any drips. Clean up spills immediately.
4. Ensure that the 55gl drum is placed correctly onto the secondary containment. Only work with 5 gl at a time!
5. It is essential that you wear a face shield over your safety glasses, double neoprene gloves, and the neoprene aprons to ensure proper protection for concentrated acid spills.
6. When using CaCO3: For each liter of 1%HF/HNO3 acid mixture, you will need 40g of CaCO3. That is, 5 gl are ~20L of 1%HF/HNO3, thus 20 * 40g = 0.8 kg of CaCO3. Use less CaCO3 if you have less acid waste. If you have used a 2%HF/HNO3 solution, you will have to add 80g of CaCO3 per 1L.
7. Ensure that you have enough CaCO3 or Sodium Bicabonate before starting the neutralization process. You always want to neutralize the acid in one step (or within ~1 hour).
8. Weigh about 0.8kg of CaCO3 into a glass beaker using the large-range scale.
9. Dissolve the CaCO3 in about 1gl of tap water. Use the white bucket designed for mixing water with CaCO3. Add the CaCO3 slowly and stir the water in the bucket continuously. Make sure that the entire CaCO3 is properly dissolved. This may take several minutes of constant, non vigorous stirring.
10. Once all of the CaCO3 has been dissolved, add the solution (“slurry”) to the 50 gl drum. Pour very slowly. Add 1gl of CaCO3 slurry in ~1 minute. Even when you pour slowly you may get some splashes.
Chemical Separation of Al and Be from Quartz-bearing rocks Bodo Bookhagen, UC Santa Barbara
40/91
11. Repeat the last 3 steps four times, until you have added 0.8kg of CaCO3 or the equivalent Sodium Bicarbonate to the drum. This will take about 20 minutes.
12. When using Sodium Bicarbonate for 1%HF: Use ~2 filled 500mL disposable plastic cups in a 5 gallon bucket and fill with 2 to 3 gallons of water for a 1%HF solution. Alternatively, you can use ~4 filled 250mL plastic cups. Mix well. Pour sodium bicarbonate-water mixture slowly into the drum in small steps (each ~500mL). Instead of pouring, you can use a 250 or 500mL cup. This process may take up to 20 minutes. Do not empty the entire sodium bicarbonate mixture at once into the drum – this will result in heavy foaming and may lead to an explosion due to rapid CO2 release.
13. When using Sodium Bicarbonate: Once you have added the sodium bicarbonate, check the pH. A good indicator of a neutralized drum is that the added sodium bicarbonate-water mixture does not cause foaming (use pH paper as an additional indicator, too).
14. When using Sodium Bicarbonate for 2%HF: Use ~5-6 filled 500mL disposable plastic cups in a 5 gallon bucket and fill with 2 to 3 gallons of water for a 2%HF solution. Mix well. Pour sodium bicarbonate-water mixture slowly into the drum in small steps (each ~500mL). Instead of pouring, you can use a 250 or 500mL cup. This process may take up to 30 minutes. Do not empty the entire sodium bicarbonate mixture at once into the drum – this will result in heavy foaming and may lead to an explosion due to rapid CO2 release.
15. Check the pH of the 55gl drum with a rod (there are previously used glass rods for this purpose) and put a drop on a small piece of pH paper (orange box, “Jumbo Insta Check” or similar). If the pH of the bath is below 5, wait 10 more minutes and test again. If the pH is still below 5, add 1 filled 500mL disposable plastic cup of CaCO3 or Sodium Bicarbonate and test again. Keep adding one filled cup of CaCO3 or Sodium Bicarbonate until you pH is above 5.
16. Measure Fluoride concentration using the Fluoride Electrode. First calibrate the Electrode using semi-logarithmic paper or a spreadsheet program. Second, take a 20mL sample from the drum measure F- concentration.
17. Record pH and Fluoride concentration in the Hydrofluoric (HF) Acid Neutralization Spreadsheet.
18. If the pH is above 5, you can start the pumping processes. Ensure that all hoses are connected properly to the pump. Slightly stir the 55gl drum with the hose hanging in the drum and make certain that
Chemical Separation of Al and Be from Quartz-bearing rocks Bodo Bookhagen, UC Santa Barbara
41/91
it is not stuck and completely covered with the neutralized acid mixture. That is, the hose should be on the bottom of the 55gl drum.
19. Make sure that the outlet of the pump is in the sink and well stabilized.
20. Have several small pieces of pH paper available that you will use to continuously test the neutralized acid.
21. Start the Jabsco pump by plugging it in the power outlet. There is no additional switch – as soon as you plug the pump in, it will start.
22. While the pump is running, test the neutralized acid every minute. If the pH is below 5 stop the pump immediately an add 2 cups of filled 500mL plastic beakers of CaCO3 or Sodium Bicarbonate to the drum.
23. When there is 1 gl left in the drum, start moving the hose that is hanging in the drum. Ensure that it is pumping the neutralized acid at all times. DO NOT LET THE PUMP RUN DRY (i.e., without liquid). This will significantly shorten the pump’s lifetime.
24. Add about 1-3gl of tap water to the drum with the attached hose. Rinse the sides of the drum as well as the funnel several times.
25. Pump the ~1-3gl into the sink.
26. Rinse off the hose from the sink and store near the pump. Put the pump back to its storage place next to the drum. Clean all equipment.
27. The 55gl drum is now ready to be filled with an acid mixture again.
Chemical Separation of Al and Be from Quartz-bearing rocks Bodo Bookhagen, UC Santa Barbara
42/91
Figure 14: 55gl waste station. The 55gl drum is for the low-concentrated Hydrofluoric Acid waste. The drum is filled up to the 5gl mark and then neutralized as described in step B3.4.
Chemical Separation of Al and Be from Quartz-bearing rocks Bodo Bookhagen, UC Santa Barbara
43/91
B.4: Frothing – separation of feldspars from quartz
This procedure describes how to separate feldspar from quartz with a frothing setup (carbonator).
Please contact Bodo Bookhagen at [email protected] if you want to hear more about this procedure.
Chemical Separation of Al and Be from Quartz-bearing rocks Bodo Bookhagen, UC Santa Barbara
44/91
Part C: Quartz dissolution and Ion-exchange column separation chemistry
General Introduction and Objectives This part of the procedure describes how to isolate the elements Beryllium and Aluminum from the other elements in quartz. The Be and Al fractions are loaded in targets which are analyzed by AMS [for example at Lawrence Livermore National Lab (Bob Finkel, Susan Zimmerman) or at PRIME Lab]. The accelerator only uses a fraction of the sample loaded in the target – it measures a ratio of cosmogenic to non-cosmogenic isotopes. For the case of Beryllium, it is assumed that Beryllium is not present as a mineral phase in the sample and a known amount of non-cosmogenic Beryllium is added to the sample (‘Beryllium carrier’).
Before starting with the chemical steps, I suggest looking at the PDF Cosmolab_acid_mixtures.pdf or at the end of this manual (section E.2) that briefly describes how the acids are mixed that we use in the CRN Target Preparation Facility.
An excerpt from the document:
Acid Normality Mixture to make a 2000mL solution HCl 0.5N 83mL of conc. HCl (36%) + 1917mL of milliQ water HCl 1N 167mL of conc. HCl (36%) + 1833mL of milliQ water HCl 6N 1000mL of conc. HCl (36%) + 1000mL of milliQ water HCl 8N 1333mL of conc. HCl (36%) + 667mL of milliQ water
Mixing of 0.4M Oxalic acid (COOH)2 Molar weight of Oxalic acid, M = 126.07 g/mol Mixing a 2 liter 0.4M oxalic acid solution: 126.07 g/mol x 0.4 mol/l x 2 = 100.9 g Mixing a 1 liter 0.4M oxalic acid solution: 126.07 g/mol x 0.4 mol/l = 50.5 g Put the weight of 100.9 g into the 2L LDPE bottle and add 2L of water. Close lid, shake well – it may take up to several hours until all crystals are dissolved.
Chemical Separation of Al and Be from Quartz-bearing rocks Bodo Bookhagen, UC Santa Barbara
45/91
HEALTH AND SAFETY ADVISORY BEFORE continuing your work in the cosmogenic nuclide
preparation facility in the Cloud Preston Laboratory, you MUST have completed the safety classes. Please enroll in a training course before taking it. All courses are listed at:
http://ehs.ucsb.edu/4DAction/WebCourseSessionList The required safety courses for you are TR29 (http://ehs.ucsb.edu/4DAction/WebCourseDescription/100878/0), EH09 (http://ehs.ucsb.edu/4DAction/WebCourseDescription/100696/0), LS01 (see the online version at: http://ehs.ucsb.edu/training/lsvideo.html). Some of these training courses can be taken online. However, it is essential that you participate in Dave Vandenberg’s general lab safety class (LS01) if you did not have prior exposure to lab-safety procedures.
You will receive a confirmation announcing your successful completion after you've taken each course (online or live). Please make sure to send a copy of that to me ([email protected]).
Again, I would like to emphasize that most of the chemicals (HCl, HNO3, H2SO4, HF) you will be working with pose serious health hazards. Oxalic Acid is an organic acid that needs to be handled with care, but does not impose a serious health hazard. The work with the heavy liquid LST (lithium metatungstate) is non toxic, but care must be taken not to splash any liquid in your eyes. If you work in the cosmogenic nuclide sample preparation facility in the Cloud Preston laboratory), you must be at full health. If you experience dizziness or drowsiness, do not work in the cosmogenic nuclide sample preparation facility. Read the Health advice posted in Cloud Lab. It is mandatory to wear full personal protective equipment, especially when working with concentrated acids. These include:
1. goggles (prescription glasses are not enough!) 2. double gloves - neoprene 3. closed-toe shoes with socks 4. long pants (no shorts!) 5. lab coat 6. face shield 7. neoprene apron 8. small Chemical Spill Kit
Chemical Separation of Al and Be from Quartz-bearing rocks Bodo Bookhagen, UC Santa Barbara
46/91
In addition, you will have to read, understand, agree, and sign a declaration that you have been trained in all necessary UC Santa Barbara Operating Procedures (SOPs). A copy of it will be stored in the cosmogenic nuclide lab. If you are unsure about any step, please contact the PI Bodo Bookhagen ([email protected] or x-3568) and clarify these issues.
Chemical Separation of Al and Be from Quartz-bearing rocks Bodo Bookhagen, UC Santa Barbara
47/91
C.1: Measuring Al and other elements in the Part Sample Aliquot (PSA)
After the leeching step, you have to determine a preliminary Aluminum concentration of your sample. This will tell you how ‘clean’ you sample really is. Note that while your sample may look clean, there might be feldspar present that has a higher Al concentration. You may also be interested in knowing how much Titanium contains the sample as high Ti amounts can complicate the chemical processing.
For the purpose of your initial element measurement, it is sufficient to take a 0.5 g aliquot. I refer to this as the Part Sample Aliquot (PSA). This can be used to determine if your sample is clean enough and can be processed further. If your Al concentration of your sample is above ~250 ppm, it may be an indication that non-quartz minerals (e.g., feldspar) are present. You can then either run more ultrasonic baths or decide to do a heavy-liquid separation.
In a few cases of very low Al amounts, you will need to add an Aluminum carrier of a known concentration. You are aiming for 2-4 mg of Al in your sample.
If you are running several samples from a similar source region, one 0.5 g aliquot measurement may be enough. You will measure a more precise Al and element concentration of your sample after digesting.
1. Weigh ~0.5 g quartz into a 25mL Teflon beaker. Use highest precision and record weigh in Excel Spreadsheet (Worksheet C – Chemical Separation, section C.1, column ‘Qtz Mass used for PSA analyses (g)’).
2. Carefully add ~10mL Hydrofluoric Acid. Heat on a hot plate with Teflon watch glass for several hours (or overnight).
3. Remove watch glass and evaporate HF. This may take several hours.
4. If quartz is not completely dissolved, repeat HF dissolution.
5. Add a few mL ‘aqua regia’ (3:1 HCl:HNO3) [You have to wait for ~0.5 hours until the 3:1 Hydrochloric:Nitric Acid mixture turns red and starts bubbling]. Dry down. Repeat 3 times.
6. Add 5mL Hydrochloric Acid and dry down.
7. Allow beaker to cool until warm to touch.
8. Add a minimum amount of concentrated Hydrochloric Acid to dissolve cake. Preferable, you add 3mL conc. HCl. Add 2mL milliQ water and make sure sample is in contact with the acid-milliQ mixture.
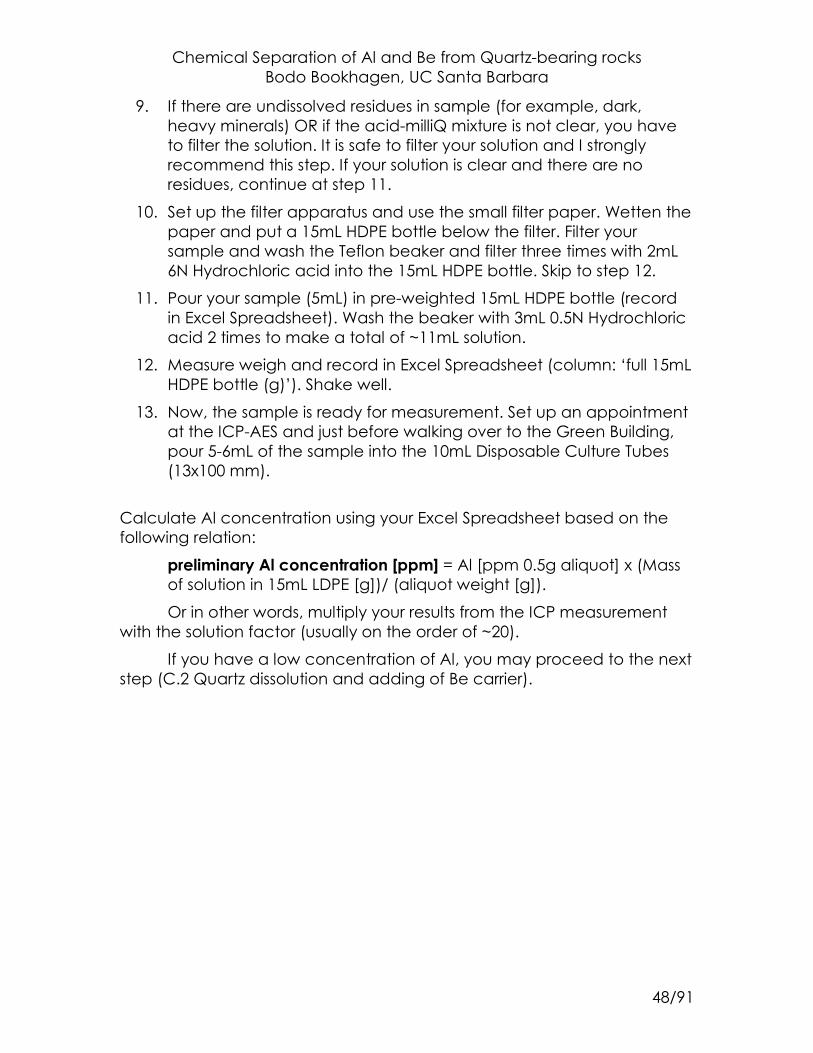
Chemical Separation of Al and Be from Quartz-bearing rocks Bodo Bookhagen, UC Santa Barbara
48/91
9. If there are undissolved residues in sample (for example, dark, heavy minerals) OR if the acid-milliQ mixture is not clear, you have to filter the solution. It is safe to filter your solution and I strongly recommend this step. If your solution is clear and there are no residues, continue at step 11.
10. Set up the filter apparatus and use the small filter paper. Wetten the paper and put a 15mL HDPE bottle below the filter. Filter your sample and wash the Teflon beaker and filter three times with 2mL 6N Hydrochloric acid into the 15mL HDPE bottle. Skip to step 12.
11. Pour your sample (5mL) in pre-weighted 15mL HDPE bottle (record in Excel Spreadsheet). Wash the beaker with 3mL 0.5N Hydrochloric acid 2 times to make a total of ~11mL solution.
12. Measure weigh and record in Excel Spreadsheet (column: ‘full 15mL HDPE bottle (g)’). Shake well.
13. Now, the sample is ready for measurement. Set up an appointment at the ICP-AES and just before walking over to the Green Building, pour 5-6mL of the sample into the 10mL Disposable Culture Tubes (13x100 mm).
Calculate Al concentration using your Excel Spreadsheet based on the following relation:
preliminary Al concentration [ppm] = Al [ppm 0.5g aliquot] x (Mass of solution in 15mL LDPE [g])/ (aliquot weight [g]).
Or in other words, multiply your results from the ICP measurement with the solution factor (usually on the order of ~20).
If you have a low concentration of Al, you may proceed to the next step (C.2 Quartz dissolution and adding of Be carrier).

Chemical Separation of Al and Be from Quartz-bearing rocks Bodo Bookhagen, UC Santa Barbara
49/91
C.2.2.1: Quartz dissolution in the microwave and adding of Be carrier
The digestion microwave allows digesting up to 100g of quartz within 1 to 1.5 day (including evaporation of acids). It is a very convenient and fast way to dissolve your quartz sample with HF. The digestion microwave can handle 6 samples at a time. Follow instructions closely, if you are unsure about something ask Bodo Bookhagen ([email protected]). Most importantly, do not let the microwave run by itself – always observe the temperature and vacuum pump to ensure normal operation. Keep in mind that you must clean all equipment after using it – this is an essential step in the procedure.
1. Verify that emergency eyewash/shower is accessible and tested within last month.
2. Check the location and expiration of the Calcium Gluconate and that a copy of the MSDS for HF is available
3. During the entire process, carefully survey benchtop and floor area for any drips. Clean up spills immediately.
4. It is essential that you wear a face shield over your safety glasses, double neoprene gloves, and the neoprene aprons to ensure proper protection for concentrated acid spills.
5. While preparing the samples for the microwave, no other work is allowed in the fume hood and in the room! This is for your own and other’s safety and to avoid any contamination of your samples.
6. Take the Teflon beakers that fit into the rotor of the microwave. Label beaker twice with sample name.
7. Weigh sample precisely on the Fisher 225D scale (record in Excel Spreadsheet Cosmolab_guidesheet, worksheet C – Chemical Separation, C.2 and C.3: column ‘Qtz Mass used for analyses (g)’). Pour in Teflon beaker and wetten thoroughly with milliQ water. Use approximately half the amount of milliQ as your sample mass. For example, if you have a 25g sample, add ~12mL milliQ. This step prevents the sample from splashing when the Hydrofluoric Acid is added. It also reduces an aggressive reaction and foaming when the sample is heated.
8. Add known amount of Be carrier. In most instances, these are 0.3 to 0.5 mg of Beryllium. Note: These are Beryllium amounts, you need to correct for your sample concentration. For example: If the carrier solution concentration is 500 µg/mL, add 1mL (or 1mg). Sometimes you may want to use less. Chemistry is generally easier with 0.5 mg of Be carrier, however, it reduces your Be ratio. Precisely record
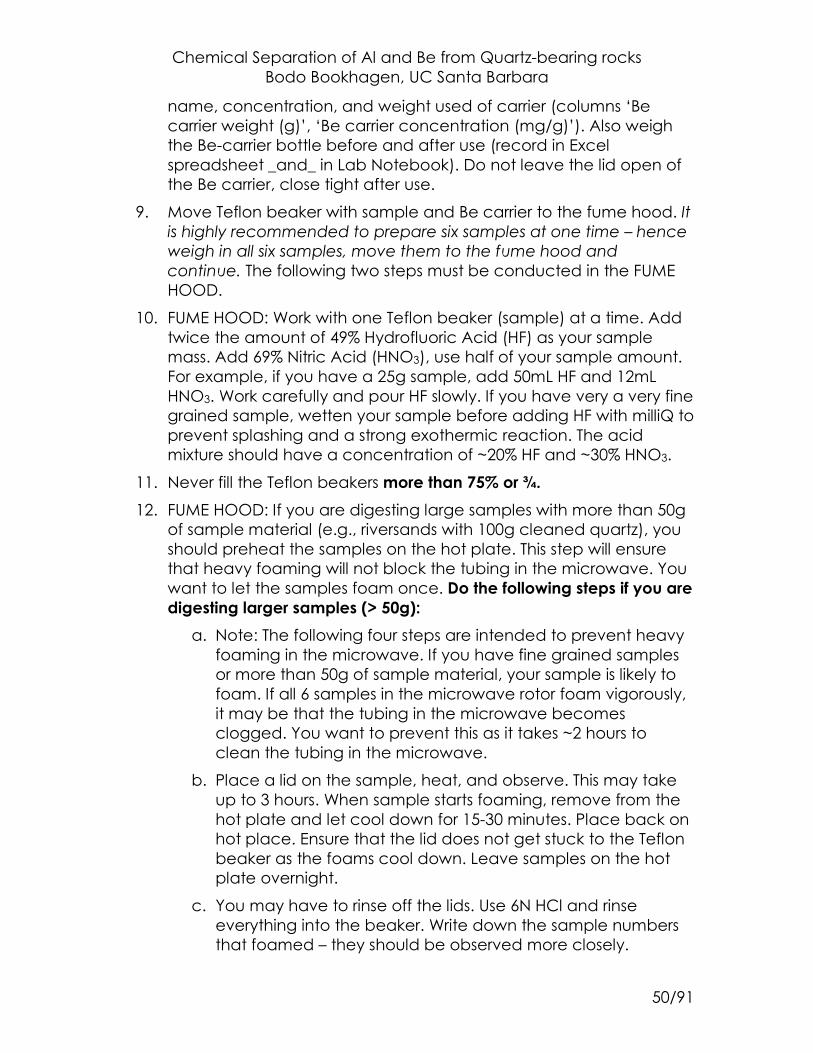
Chemical Separation of Al and Be from Quartz-bearing rocks Bodo Bookhagen, UC Santa Barbara
50/91
name, concentration, and weight used of carrier (columns ‘Be carrier weight (g)’, ‘Be carrier concentration (mg/g)’). Also weigh the Be-carrier bottle before and after use (record in Excel spreadsheet _and_ in Lab Notebook). Do not leave the lid open of the Be carrier, close tight after use.
9. Move Teflon beaker with sample and Be carrier to the fume hood. It is highly recommended to prepare six samples at one time – hence weigh in all six samples, move them to the fume hood and continue. The following two steps must be conducted in the FUME HOOD.
10. FUME HOOD: Work with one Teflon beaker (sample) at a time. Add twice the amount of 49% Hydrofluoric Acid (HF) as your sample mass. Add 69% Nitric Acid (HNO3), use half of your sample amount. For example, if you have a 25g sample, add 50mL HF and 12mL HNO3. Work carefully and pour HF slowly. If you have very a very fine grained sample, wetten your sample before adding HF with milliQ to prevent splashing and a strong exothermic reaction. The acid mixture should have a concentration of ~20% HF and ~30% HNO3.
11. Never fill the Teflon beakers more than 75% or ¾. 12. FUME HOOD: If you are digesting large samples with more than 50g
of sample material (e.g., riversands with 100g cleaned quartz), you should preheat the samples on the hot plate. This step will ensure that heavy foaming will not block the tubing in the microwave. You want to let the samples foam once. Do the following steps if you are digesting larger samples (> 50g):
a. Note: The following four steps are intended to prevent heavy foaming in the microwave. If you have fine grained samples or more than 50g of sample material, your sample is likely to foam. If all 6 samples in the microwave rotor foam vigorously, it may be that the tubing in the microwave becomes clogged. You want to prevent this as it takes ~2 hours to clean the tubing in the microwave.
b. Place a lid on the sample, heat, and observe. This may take up to 3 hours. When sample starts foaming, remove from the hot plate and let cool down for 15-30 minutes. Place back on hot place. Ensure that the lid does not get stuck to the Teflon beaker as the foams cool down. Leave samples on the hot plate overnight.
c. You may have to rinse off the lids. Use 6N HCl and rinse everything into the beaker. Write down the sample numbers that foamed – they should be observed more closely.
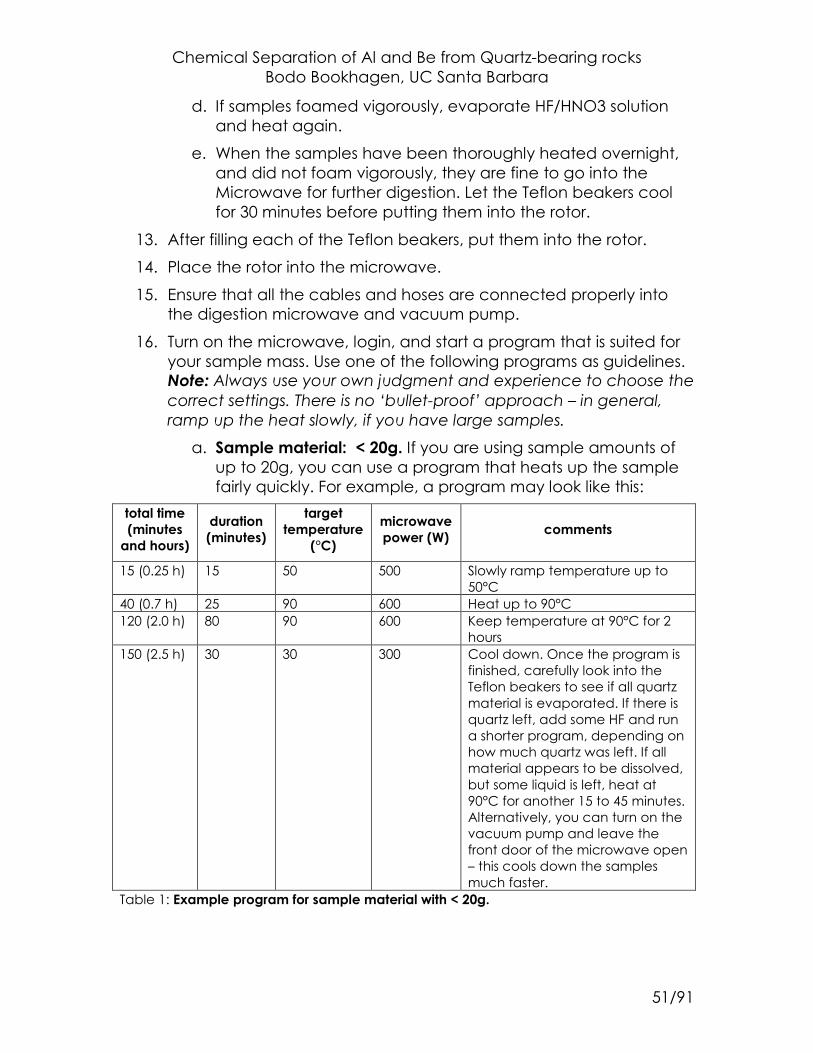
Chemical Separation of Al and Be from Quartz-bearing rocks Bodo Bookhagen, UC Santa Barbara
51/91
d. If samples foamed vigorously, evaporate HF/HNO3 solution and heat again.
e. When the samples have been thoroughly heated overnight, and did not foam vigorously, they are fine to go into the Microwave for further digestion. Let the Teflon beakers cool for 30 minutes before putting them into the rotor.
13. After filling each of the Teflon beakers, put them into the rotor.
14. Place the rotor into the microwave.
15. Ensure that all the cables and hoses are connected properly into the digestion microwave and vacuum pump.
16. Turn on the microwave, login, and start a program that is suited for your sample mass. Use one of the following programs as guidelines. Note: Always use your own judgment and experience to choose the correct settings. There is no ‘bullet-proof’ approach – in general, ramp up the heat slowly, if you have large samples.
a. Sample material: < 20g. If you are using sample amounts of up to 20g, you can use a program that heats up the sample fairly quickly. For example, a program may look like this:
total time (minutes
and hours)
duration (minutes)
target temperature
(°C)
microwave power (W) comments
15 (0.25 h) 15 50 500 Slowly ramp temperature up to 50°C
40 (0.7 h) 25 90 600 Heat up to 90°C 120 (2.0 h) 80 90 600 Keep temperature at 90°C for 2
hours 150 (2.5 h) 30 30 300 Cool down. Once the program is
finished, carefully look into the Teflon beakers to see if all quartz material is evaporated. If there is quartz left, add some HF and run a shorter program, depending on how much quartz was left. If all material appears to be dissolved, but some liquid is left, heat at 90°C for another 15 to 45 minutes. Alternatively, you can turn on the vacuum pump and leave the front door of the microwave open – this cools down the samples much faster.
Table 1: Example program for sample material with < 20g.
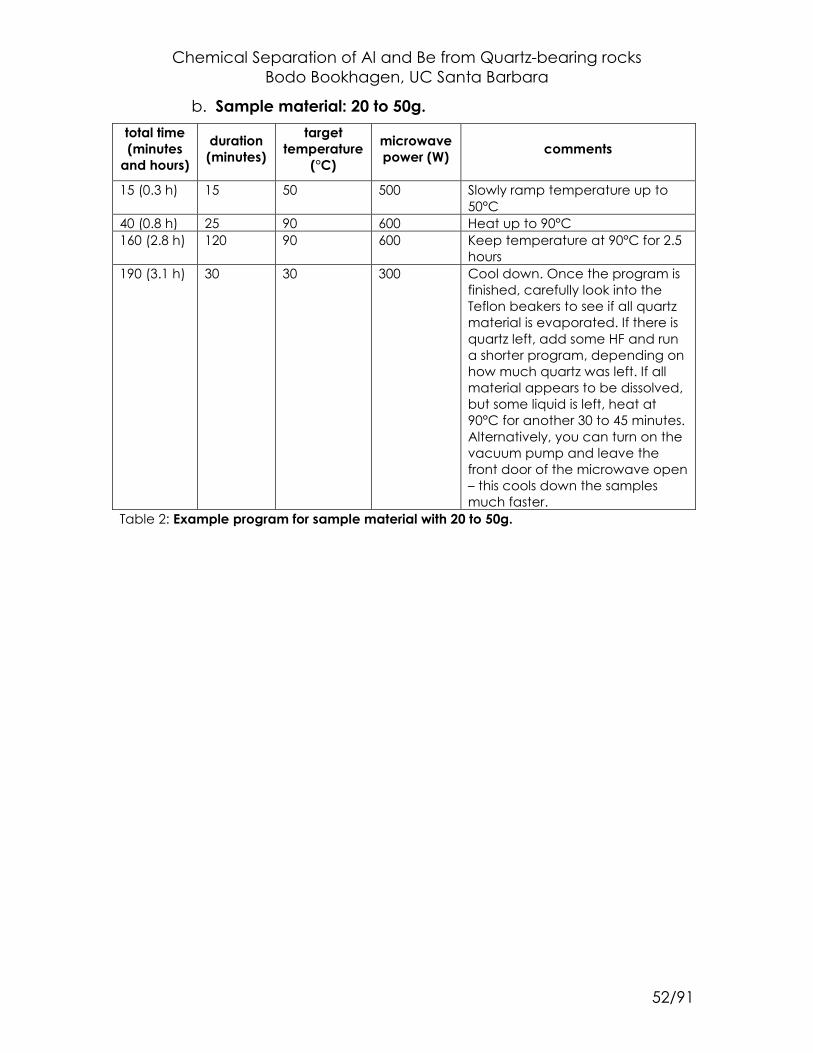
Chemical Separation of Al and Be from Quartz-bearing rocks Bodo Bookhagen, UC Santa Barbara
52/91
b. Sample material: 20 to 50g. total time (minutes
and hours)
duration (minutes)
target temperature
(°C)
microwave power (W) comments
15 (0.3 h) 15 50 500 Slowly ramp temperature up to 50°C
40 (0.8 h) 25 90 600 Heat up to 90°C 160 (2.8 h) 120 90 600 Keep temperature at 90°C for 2.5
hours 190 (3.1 h) 30 30 300 Cool down. Once the program is
finished, carefully look into the Teflon beakers to see if all quartz material is evaporated. If there is quartz left, add some HF and run a shorter program, depending on how much quartz was left. If all material appears to be dissolved, but some liquid is left, heat at 90°C for another 30 to 45 minutes. Alternatively, you can turn on the vacuum pump and leave the front door of the microwave open – this cools down the samples much faster.
Table 2: Example program for sample material with 20 to 50g.
Chemical Separation of Al and Be from Quartz-bearing rocks Bodo Bookhagen, UC Santa Barbara
53/91
c. Sample material: ~100g. You will have to use two digestion steps. That is, in the first run, you ramp up the temperature slowly and will digest about ½ of the sample with all acid evaporated.
total time (minutes
and hours)
duration (minutes)
target temperature
(°C)
microwave power (W) comments
15 (0.3 h) 15 50 500 Slowly ramp temperature up to 50°C
75 (1.3 h) 60 90 600 Heat up to 90°C 195 (3.3 h) 150 90 600 Keep temperature at 90°C for 2.5
hours 190 (3.1 h) 30 30 300 Cool down. Once the program is
finished, carefully look into the Teflon beakers and add some HF and HNO3. Start program below. Alternatively, you can turn on the vacuum pump and leave the front door of the microwave open – this cools down the samples much faster.
Table 3: Example program for sample material with ~100g – first microwave digestion. total time (minutes
and hours)
duration (minutes)
target temperature
(°C)
microwave power (W) comments
15 (0.3 h) 15 50 500 Slowly ramp temperature up to 50°C
75 (1.3 h) 60 90 600 Heat up to 90°C 195 (3.2 h) 150 90 600 Keep temperature at 90°C for 2.5
hours 225 (3.4 h) 30 30 300 Cool down. Once the program is
finished, carefully look into the Teflon beakers to see if all quartz material is evaporated. If there is quartz left, add some HF and run a shorter program, depending on how much quartz was left. If all material appears to be dissolved, but some liquid is left, heat at 90°C for another 30 to 45 minutes. Alternatively, you can turn on the vacuum pump and leave the front door of the microwave open – this cools down the samples much faster.
Table 4: Example program for sample material with ~100g – second microwave digestion
Chemical Separation of Al and Be from Quartz-bearing rocks Bodo Bookhagen, UC Santa Barbara
54/91
17. Once all your sample material has been dissolved using the digestion microwave, you will add aqua regia’ 3 times to remove all F-. Add 10 to 20mL ‘aqua regia’ (3:1 HCl:HNO3) [You have to wait for ~0.5 hours until the 3:1 Hydrochloric:Nitric Acid mixture turns red and starts bubbling]. Evaporate in microwave at 90°C for ~30 minutes.
18. Repeat 3 times. Let sample cool down in between.
19. Dissolve in 10mL concentrated HCl and dry down in microwave (@50 to 60°C for ~15 minutes).
20. The sample is now digested and the residue can be dissolved for further chemical processing.
Chemical Separation of Al and Be from Quartz-bearing rocks Bodo Bookhagen, UC Santa Barbara
55/91
C.2.2.2: Cleaning of microwave equipment and microwave Teflon beakers
Cleaning the microwave oven and the rotor parts is an essential step in the cleaning procedure. You always must clean all parts before moving on to the next step. Follow instructions closely, if you are unsure about something ask Bodo Bookhagen ([email protected]). Most importantly, do not let the microwave run by itself – always observe the temperature and vacuum pump to ensure normal operation.
1. Verify that emergency eyewash/shower is accessible and tested within last month.
2. Check the location and expiration of the Calcium Gluconate and that a copy of the MSDS for HF is available
3. During the entire process, carefully survey benchtop and floor area for any drips. Clean up spills immediately.
4. It is essential that you wear a face shield over your safety glasses, double neoprene gloves, and the neoprene aprons to ensure proper protection for concentrated acid spills.
5. Ensure that the sample has been removed from the Teflon beakers and stored in a safe environment.
6. Take apart the rotor and remove all screws and tubing.
7. Take all Teflon parts (Teflon beaker, screws, tubing) and soak them in soap water for several hours.
8. Rinse thoroughly with milliQ water.
9. Place all solid Teflon parts in a 1:1 HNO3:milliQ mixture on a hot plate overnight. Do not boil, but keep warm at 80°C. Do not place soft parts into the hot acid mixture – instead place it in a 20°C 1:1 HNO3:milliQ mixture over night. You can use the 400mL or 1L Teflon beakers for this step (use two – one for the ‘hard’ Teflon parts and one for the ‘soft’ Teflon parts).
10. Rinse with milliQ water and fully assemble rotor.
11. Fill in 15mL of concentrated HNO3 in the Teflon beakers and place in the rotor and move to microwave.
12. Use the following microwave digestion program to clean the Teflon beakers.
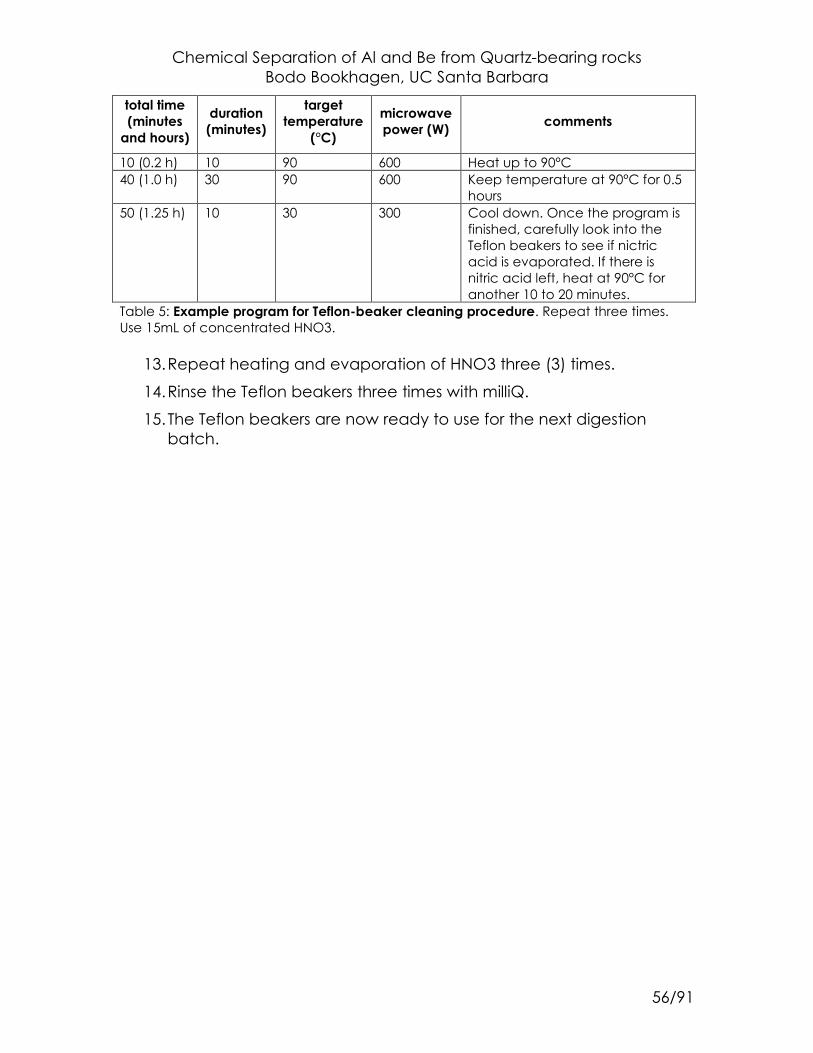
Chemical Separation of Al and Be from Quartz-bearing rocks Bodo Bookhagen, UC Santa Barbara
56/91
total time (minutes
and hours)
duration (minutes)
target temperature
(°C)
microwave power (W) comments
10 (0.2 h) 10 90 600 Heat up to 90°C 40 (1.0 h) 30 90 600 Keep temperature at 90°C for 0.5
hours 50 (1.25 h) 10 30 300 Cool down. Once the program is
finished, carefully look into the Teflon beakers to see if nictric acid is evaporated. If there is nitric acid left, heat at 90°C for another 10 to 20 minutes.
Table 5: Example program for Teflon-beaker cleaning procedure. Repeat three times. Use 15mL of concentrated HNO3.
13. Repeat heating and evaporation of HNO3 three (3) times.
14. Rinse the Teflon beakers three times with milliQ.
15. The Teflon beakers are now ready to use for the next digestion batch.
Chemical Separation of Al and Be from Quartz-bearing rocks Bodo Bookhagen, UC Santa Barbara
57/91
C.2.2.3: Quartz dissolution on the hot plate and adding of Be carrier
This is an alternative step to C.2.1A. All work has to be done in the fume hood. While handling the Hydrofluoric acid you have to be extra careful. Work slowly. Do not rush.
Before the dissolution process, you must know the sample size. Use the Excel Spreadsheet to determine the amount of sample material based on age, production rate, and Be carrier.
21. Verify that emergency eyewash/shower is accessible and tested within last month.
22. Check the location and expiration of the Calcium Gluconate and that a copy of the MSDS for HF is available
23. During the entire process, carefully survey benchtop and floor area for any drips. Clean up spills immediately.
24. It is essential that you wear a face shield over your safety glasses, double neoprene gloves, and the neoprene aprons to ensure proper protection for concentrated acid spills.
25. While digestion the samples, no other work is allowed in the fume hood!
26. Take Teflon beaker of appropriate size for your sample (100, 250, 400, or 1000mL). Weigh sample precisely on the Fisher 225D scale (record in Excel Spreadsheet Cosmolab_guidesheet, worksheet C – Chemical Separation, C.2 and C.3: column ‘Qtz Mass used for analyses (g)’). Pour in Teflon beaker and wetten thoroughly with milliQ water. Use approximately half the amount of milliQ as your sample mass. For example, if you have a 25g sample, add ~12mL milliQ. This step prevents the sample from splashing when the Hydrofluoric Acid is added. It also reduces an aggressive reaction and foaming when the sample is heated.
27. Add known amount of Be carrier. In most instances, these are 0.3 to 0.5 mg. Sometimes you may want to use less. Chemistry is generally easier with 0.5 mg of Be carrier. Precisely record name, concentration, and weight used of carrier (columns ‘Be carrier weight (g)’, ‘Be carrier concentration (mg/g)’). Also weigh the Be-carrier bottle before and after use (record in Excel spreadsheet _and_ in Lab Notebook). Do not leave the lid open of the Be carrier, close tight after use. For example: If the carrier solution concentration is 500 µg/mL, add 1mL.
28. Move Teflon beaker with sample and Be carrier to the fume hood. All of the following steps are conducted in the FUME HOOD.
Chemical Separation of Al and Be from Quartz-bearing rocks Bodo Bookhagen, UC Santa Barbara
58/91
29. Work with one Teflon beaker (sample) at a time. Add the same amount of 49% Hydrofluoric Acid (HF) as your sample mass. Add 69% Nitric Acid (HNO3), use half of your sample amount. For example, if you have a 25g sample, add 25mL HF and 12mL HNO3. Work carefully and pour HF slowly. Wetten your sample in the first steps prevents splashing and a strong exothermic reaction. Now, the acid mixture has a concentration of ~20% HF and ~30% HNO3.
30. Place Teflon lid on the Teflon beaker and let sit for 1 hour.
31. The next steps involve heating the Teflon beaker on a hot plate. Ensure that all flammable and combustible materials are not kept near the hot plate.
32. Move Teflon beaker without lid to hot plate and heat to 65°C. This corresponds to setting 150 on the hot plates used in the Preston-Cloud laboratory. Evaporate to dryness. This may take up to 6 hours, depending on sample mass and volume of acid mixture used. While heating, lower the hood sash down as feasible. Note: This setting prevents the sample from boiling. Under no circumstances, you want to boil your sample at this step.
33. After placing the Teflon beakers on the hot plate, watch them closely for the first two hours, as a chemical reaction may occur.
34. Remove from hot plate and allow cooling for one hour.
35. Wetten your sample with a few mL milliQ water. Add 2x the sample mass HF to your Teflon beaker. For example, for a 25g sample, add 50mL HF.
36. Place Teflon beaker on the hot plate and increase temperature setting to 200. This corresponds to a temperature of ~75°C. Observe closely for the next 2 hours. If foaming occurs, remove beaker from the hot plate and allow cooling for 5 minutes. Place back on the hot plate. If sample is thoroughly heated and no foaming occurs, put lid on the Teflon beaker and heat for 24hrs.
37. Remove lid and evaporate to dryness. While heating and evaporating, lower the hood sash down as feasible.
38. If quartz is not completely dissolved, repeat HF dissolution from step 15.
Chemical Separation of Al and Be from Quartz-bearing rocks Bodo Bookhagen, UC Santa Barbara
59/91
C.2.2.4: Additional step to convert sample to Chloride form
If you are not preparing a water leech, you will convert your sample from Fluoride to Chloride form with the following steps. You can directly perform these steps after all quartz has been completely dissolved.
1. Add a 10mL ‘aqua regia’ (3:1 HCl:HNO3) [You have to wait for ~0.5 hours until the 3:1 Hydrochloric:Nitric Acid mixture turns red and starts bubbling]. Dry down.
2. Repeat 3 times.
3. Dissolve in 10mL concentrated HCl and dry down.
4. The sample is now digested and the residue can be dissolved for further chemical processing.
Chemical Separation of Al and Be from Quartz-bearing rocks Bodo Bookhagen, UC Santa Barbara
60/91
C.2.2.5: Water-leeching step (optional and only valid for Beryllium-only samples)
When you are interested in only processing Beryllium samples (i.e., no Aluminum), then you may want to perform a water-leeching step. Our tests have shown that this step does not remove Ti, but generally helps to keep samples clean. The procedure is not saving you time, but you may end up with a slightly cleaner samples in the end. The water-leaching step has been shown to remove Magnesium (Mg) very efficiently from your samples. But neither Ti nor Mn is effectively removed.
Note: This protocol has been adopted from Jean Dixon’s protocol. After samples have been digested and dried down, make sure there are no drops of remaining HF on the beaker walls, since this will cause some of the Al-flouride (and possibly other elements as well) to go into solution. Do not add any ‘aqua regia’ or HCl to the sample beakers. The purpose of this step is to isolate Be-flouride, which is much more soluble in water compared to Al-flouride and Ti-flouride. If any HCl is added to the samples, this won’t work (Al-chloride and Ti-chloride are soluble in water).
1. Pipette 5mL milliQ water into each sample beaker. Be careful of static when handling beakers. You may use 10mL milliQ if you have large samples
2. Cover beakers with Teflon watchglass and place on heat (80-90° C) for 2 hours.
3. Remove beakers from heat.
4. Gently swirl beaker until all liquid and solids are together and none sticks to the sides or the bottom. If you have really dirty samples, not all solids are in solution. It is important to have all sample material in contact with milliQ water, though. If you have large and dirty samples, you may want to use more milliQ and heat the samples for a longer time (i.e., a few hours).
5. Weigh empty 15mL falcon tube and label with sample name + “water leech”.
6. Using transfer pipette, transfer the 5mL of liquid in the sample beaker to the appropriate 15mL falcon tube. You may want to use a 50-ml falcon tube, if you have use more milliQ in the first step.
7. Repeat steps 4-7 for each sample.
8. Pipette 5mL additional milliQ water to each sample beaker to wash the sample beaker.
Chemical Separation of Al and Be from Quartz-bearing rocks Bodo Bookhagen, UC Santa Barbara
61/91
9. Swirl sample, and use the transfer pipette to gently scrape any remaining solid material from the bottom of the beaker. This may not be easy for very dirty samples. After all (or most) of the solid material has been scraped, use the transfer pipette to transfer the 5mL wash from the sample beaker into the appropriate 15-mL falcon tube.
10. Add 1mL milliQ water for a final wash, and transfer the liquid into the 15mL falcon tube (or 50mL falcon tube, if large and dirty sample).
11. After repeating the two washes (steps 8-11) for each sample, you should have ~11mL of liquid in each 15mL centrifuge tube.
12. Centrifuge the samples for 8 minutes at 3000 rpm (program #1).
13. Label a 50mL centrifuge with the sample name and “Main bottle”. (This bottle can later be used to also store the Fe fraction as well).
14. Weight the empty tube on the analytical balance.
15. Using a new transfer pipette, pipette 10mL of liquid from the 15mL “water leech” tube to the 50mL “Main bottle” tube. DO NOT pipette solids and do not disturb them. This is easiest to do by leaving ~1mL of liquid at the bottom of the tube.
16. Repeat steps 12-14 for each sample.
17. Add 10mL of milliQ water to the 15mL falcon tube to wash the sample. Recentrifuge before transferring 10mL of liquid (leave ~1mL at bottom) into the 50mL falcon tube.
18. For a second wash, add another 5mL of milliQ water to the 15mL falcon tube to wash the sample. Re-centrifuge, and transfer ~5mL of liquid (leave ~1mL at bottom) into 50-mL falcon tube.
19. Repeat steps 16 and 17 for all samples.
20. The remaining insolubles in the “water leech” 15mL falcon tube can be dried down and weighted, then subtracted from the original sample weight.
21. Next, you can collect the total sample aliquot from the 50-mL falcon tube from the post-water leech step (see section C2.3).
22. After taking the aliquot, add HCl to the 50mL falcon tube and put the sample into the Fe column (see section C2.4).
Chemical Separation of Al and Be from Quartz-bearing rocks Bodo Bookhagen, UC Santa Barbara
62/91
C.3: Measuring Al in a Total Sample Aliquot (TSA)
This step measures the Al content in your entire sample that you dissolved in the previous step. It may be skipped if you are only interested in processing Be. Still, I suggest measuring the Al and Ti content.
1. Dissolve in 10mL concentrated HCl. Heat for several minutes on the hot plate until everything is dissolved.
2. Pre weigh a 15/50mL Falcon tube and write down the precise weight (column ‘15/50mL Falcon Tube weight (g)’). Pour sample into Falcon tube and centrifuge for 8 minutes at 3000rpm (setting 1).
3. Pour supernate into a pre-weighted 60mL bottle (column ‘60mL LDPE Tare (g) 225D’). Wash Teflon beaker with 10mL 6N HCl. Repeat 3 times. Keep Teflon beaker with lid in the fume hood.
4. Pour 5mL 6N HCl into 15/50mL Falcon Tube, vortex, and centrifuge. This step cleans the residue in the Falcon Tube. Pour supernate into 60mL bottle. Repeat this step 3 times.
5. You should now have ~55mL of acid solution in your 60mL bottle. Take precise weight of bottle (column ‘Full 60mL LDPE (g)’).
6. Dry the undissolved material in the Falcon tube in a rack under the heat lamp in the fume hood. When dry, allow to cool, and record weight (column ‘15/50mL Falcon Tb. w/ undiss. material (g)’). The difference of the pre-weighted 15/50mL falcon tube and this weight is the weight of your residue. This will be subtracted from your total sample weight and stored in the column ‘corrected Qtz Mass used for analyses (g)’. If your sample was very clean, you may not have any residue.
7. Pre-weigh 15mL HDPE bottle (column ‘empty 15mL w/ lid LDPE Rate (g)’). Label on two sides.
8. Depending on your first ICP PSA (Part Sample Aliquot) concentration measurement, you take a Total Sample Aliquot (TSA). This is usually between 0.5 or 1mL. A suggestion is given in column ‘sugg. aliq. based on PSA for 8mL milliQ (g)’. This suggestion assumes that you are diluting the aliquot with 8mL milliQ. You are aiming for an Al concentration of ~10 ppm. Use the Excel Spreadsheet to determine your amount.
9. Add ~8mL of 0.5N HCl or 8mL milliQ. You should now have about 8.5 to 9mL in your 15mL HDPE bottle.
10. Measure weigh and record in Excel Spreadsheet in ‘total mass in 15mL LDPE (g)’. Shake well. Weigh 60mL bottle after you have taken the TSA as well and record in ‘Mass 60mL LDPE (g) > Aliquot 225D’.
Chemical Separation of Al and Be from Quartz-bearing rocks Bodo Bookhagen, UC Santa Barbara
63/91
11. Now, the sample is ready for ICP measurement. Set up an appointment at the ICP-AES and just before walking over to the Green Building, pour 5-6mL of the sample into the 10mL Disposable Culture Tubes (13x100 mm). Cover with Parafilm when walking to the Green building.
12. Pour the reminder of the dissolved sample from your 60mL bottle back into the Teflon beaker. Wash 60mL HDPE bottle 3 times with 10mL 6N HCl and pour wash into the Teflon beaker.
13. Evaporate to dryness.
14. If your Al concentration is above 5mg, I suggest using 5mL column in step C.5 (Be column) and C.7 (Al column). If it is above 10mg, I suggest using 10mL columns. If it is above 25mg, you may not be able to store all Al in the 10mL column and you may have a sample size that is too large or a dirty sample (e.g. contaminated by Feldspar).

Chemical Separation of Al and Be from Quartz-bearing rocks Bodo Bookhagen, UC Santa Barbara
64/91
C.3.1: Hydroxide co-precipitation (optional)
This step is optional and only necessary for very dirty samples.
1. Dissolve sample in 3mL 6N HCl
2. Add 1:1 NH4OH until pH is between 7 and 8.5
3. Vertex and set in heating block for several hours at ‘high heat’, level 1.
4. Be, Al, Fe, Cr, Cu, Ni, Zn, Co, Pb, U and REE hydroxides precipitate
5. Centrifuge and discard supernate into separate bottle (containing K, Na, Ca, Mg, Mn), label ‘Mg’.
6. Wash precipitate with milliQ water (+0.01% NH4OH), centrifuge, supernate goes into Mg-bottle. Use Brinkman Bottletop dispenser with prepared milliQ (+0.01% NH4OH).
7. Be careful when pouring wash into separate beaker – it is easy to loose some sample material by pouring of some precipitate.
8. Do last step 3 times
9. Dissolve precipitate with 6N HCl
10. Evaporate on a hot plate
11. Ready to load into Fe Column
Chemical Separation of Al and Be from Quartz-bearing rocks Bodo Bookhagen, UC Santa Barbara
65/91
C.4: Fe column
This step is the first separation step in which you separate iron and similar elements from Al and Beryllium. Usually, the 5mL column works for every sample – if you have a very large or dirty sample with a high Fe and Ti content, you may want to use the 10mL columns. Volumes are given in column volumes (CV) – use the right amount for your column. Print out the worksheet from the Excel Spreadsheet called ‘Fe-column.xls’.
The spreadsheet will serve as a guideline for processing 10 samples at a time. Enter the sample names and mark every step that you have processed. I usually use a ‘/’ if I have filled in the solution in the column and I add a ‘\’ (making it an ‘X’), when the solution was filtered through the column. Also, it helps having the spreadsheet right next to the column or taped to the front of the fume hood.
1. Take a 5mL Biorad AG1-X8 (100-200 mesh) anion resin packed in a 10mL Kontes Borosilicate column. This column is stored in 0.5N HCl. There are 10mL columns available, too (for very large samples).
2. If you are preparing a new column:
a. Mark 5mL on the column by measuring with milliQ water b. Make a slurry from the Biorad resin and milliQ water c. Load carefully up to 5mL mark with a pipette d. Wash with 2CV 0.5N HCl and ensure that resin is evenly
packed and no air bubbles are within the column e. Condition resin with conc. HCl (2CV) f. Wash with 10CV 0.5N HCl g. The column is now ready to use
3. Condition resin with 8N HCl (2CV, i.e. 2*5mL)
4. Dissolve sample in a minimum amount of conc. HCl (=4mL)
5. Place 50mL PFA beaker below the column and label ‘Be+Al’, you will collect ~10mL (2CV).
6. Load ~2mL at a time (total of ~4mL) and wait until sample is completely loaded into the column
7. Wash sidewalls of the beaker 2x with 3mL 8N HCl and load into column to make up a total of ~10mL (2CV)
8. Place new 100mL beaker below column and label ‘Fe’.
9. There should be a thin yellow/orange rim at the top of the column – that is the iron that will be washed out
10. Collect 10CV (50mL) of 0.5N HCl. This fraction contains (Mn, Mg, Co, Fe)
Chemical Separation of Al and Be from Quartz-bearing rocks Bodo Bookhagen, UC Santa Barbara
66/91
11. Evaporate all fractions on a hot plate (with heat lamp).
12. Dissolve Fe fraction in 6N HCl and fill into 60mL HDPE bottle, labeled with sample name + ‘Main Bottle’.
13. When ‘Be+Al’ fraction is evaporated add ~4mL of 0.4M oxalic acid and boil at ~60C for about 2 hrs with lid
14. If 0.4M oxalic acid-sample mix is not clear, centrifuge for 8 min at 3000 rpm (program 1 on accuSpin 400). Load supernate only to column.
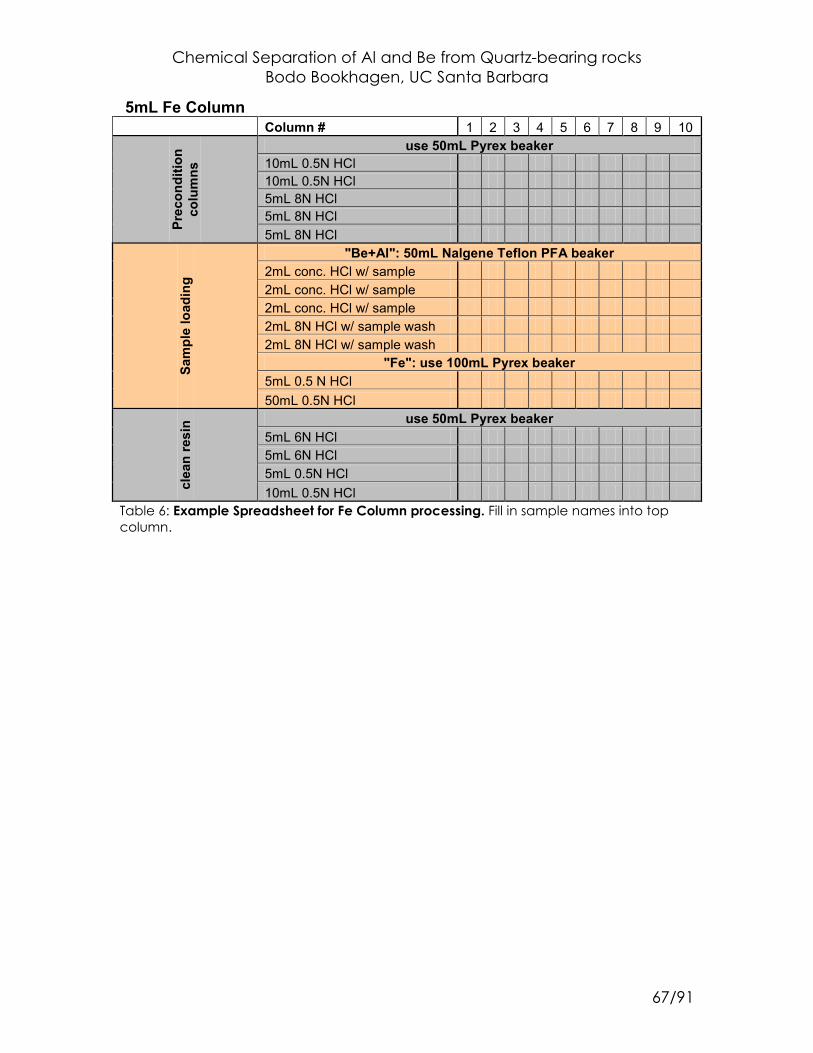
Chemical Separation of Al and Be from Quartz-bearing rocks Bodo Bookhagen, UC Santa Barbara
67/91
5mL Fe Column Column # 1 2 3 4 5 6 7 8 9 10
Prec
ondi
tion
colu
mns
use 50mL Pyrex beaker 10mL 0.5N HCl 10mL 0.5N HCl 5mL 8N HCl 5mL 8N HCl 5mL 8N HCl
Sam
ple
load
ing
"Be+Al": 50mL Nalgene Teflon PFA beaker 2mL conc. HCl w/ sample 2mL conc. HCl w/ sample 2mL conc. HCl w/ sample 2mL 8N HCl w/ sample wash 2mL 8N HCl w/ sample wash
"Fe": use 100mL Pyrex beaker 5mL 0.5 N HCl 50mL 0.5N HCl
clea
n re
sin use 50mL Pyrex beaker
5mL 6N HCl 5mL 6N HCl 5mL 0.5N HCl 10mL 0.5N HCl
Table 6: Example Spreadsheet for Fe Column processing. Fill in sample names into top column.
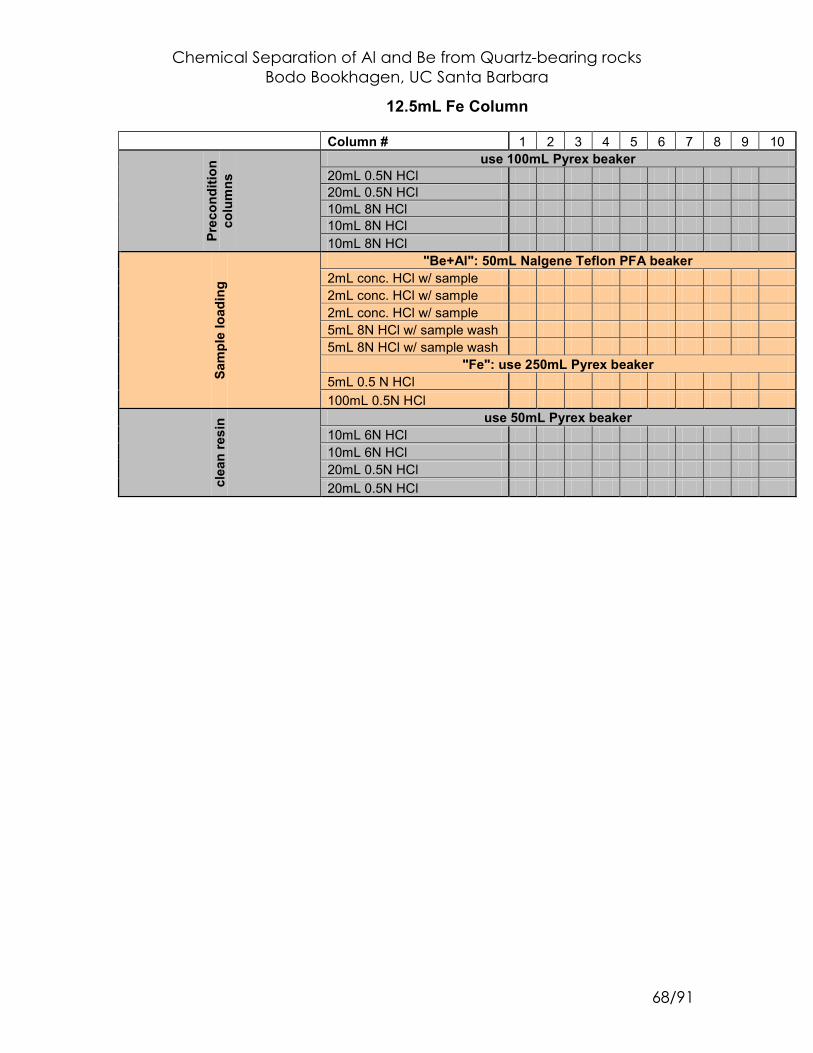
Chemical Separation of Al and Be from Quartz-bearing rocks Bodo Bookhagen, UC Santa Barbara
68/91
12.5mL Fe Column Column # 1 2 3 4 5 6 7 8 9 10
Prec
ondi
tion
colu
mns
use 100mL Pyrex beaker 20mL 0.5N HCl 20mL 0.5N HCl 10mL 8N HCl 10mL 8N HCl 10mL 8N HCl
Sam
ple
load
ing
"Be+Al": 50mL Nalgene Teflon PFA beaker 2mL conc. HCl w/ sample 2mL conc. HCl w/ sample 2mL conc. HCl w/ sample 5mL 8N HCl w/ sample wash 5mL 8N HCl w/ sample wash
"Fe": use 250mL Pyrex beaker 5mL 0.5 N HCl 100mL 0.5N HCl
clea
n re
sin use 50mL Pyrex beaker
10mL 6N HCl 10mL 6N HCl 20mL 0.5N HCl 20mL 0.5N HCl
Chemical Separation of Al and Be from Quartz-bearing rocks Bodo Bookhagen, UC Santa Barbara
69/91
C.5: Be column
Depending on the amount of Al in your sample, you will have to choose 2, 5, or 10mL columns. For small, clean samples, 2mL will mostly work, for large samples (i.e., riversand samples, very dirty samples), you may want to use the 10mL column. Print out the corresponding worksheet (2mL, 5mL, or 10mL) from the Excel Spreadsheet called ‘Be-column.xls’. Again, follow the signs as marks as explained in the Fe column.
Here, I give the amounts for the 2mL column – you have to adjust the volumes accordingly, depending on what column size you are using and what amount of Aluminum is in your sample. Note: Make sure you are using a titrated 1N HCl solution. It is essential that you determine the HCl concentration as exact as possible when eluting the Be in the end of the column run.
1. Prepare 7.5mL Spectrum 104704 polypropylene column with 2mL Biorad AG50-X8 cation resin (200-400 mesh). This column is stored in milliQ water.
2. If you are preparing a new column:
a. Mark 2mL (1CV) on the column by measuring with milliQ water
b. Make a slurry from the Biorad resin and milliQ water c. Load carefully up to 2mL mark with a pipette d. Wash with 2CV 0.5N HCl and ensure that resin is evenly
packed and no air bubbles are within the column e. Condition resin with conc. HCl (2CV) f. Wash with 10CV 0.5N HCl g. Wash with 5CV milliQ water h. The column is now ready to use
3. 4mL (2CV) + 6mL (3CV) 6N HCl: clean resin
4. 4mL (3CV) + 6mL (3CV) milliQ water: remove HCl from resin
5. 4mL (2CV) + 6mL (2CV) 0.4M oxalic acid: condition resin
6. Place Teflon PFA beaker (100mL) under the column and label ‘Al+Ti’ (ensure that PFA beaker is clean – rinse with 6N HCl and 3x milliQ if unsure).
7. Load sample with narrow transfer pipette from PFA beaker – 4mL (2CV) oxalic acid – into column (oxalic acid complexes all trivalent cations which are therefore not retained on a cation resin)
8. 2mL (1CV) 0.4M oxalic acid: wash sidewalls of beaker and load into column
Chemical Separation of Al and Be from Quartz-bearing rocks Bodo Bookhagen, UC Santa Barbara
70/91
9. 2mL (1CV) 0.4M oxalic acid: wash sidewalls of beaker and load into column
10. 20mL (10CV) 0.4M oxalic acid [you can put 5mL at a time into the column]: elute Al, Ti
11. 2mL (1CV) + 4mL (2CV) milliQ: remove oxalic acid from resin
12. 2mL (1CV) + 6mL (3CV) 0.5N HCl: elute Na
13. Place new PFA beaker labeled ‘Be’ under the column
14. 2mL (1CV) + 2mL (1CV) + 10mL (5CV) 1M HCl: collect Be
15. Clean resin with 20mL (10CV) 6N HCl
16. 10mL (5CV) milliQ: remove HCl
17. Seal and store column in milliQ
18. Both fractions (Al+Be) are evaporated under a heat lamp and on a hot plate on low settings.
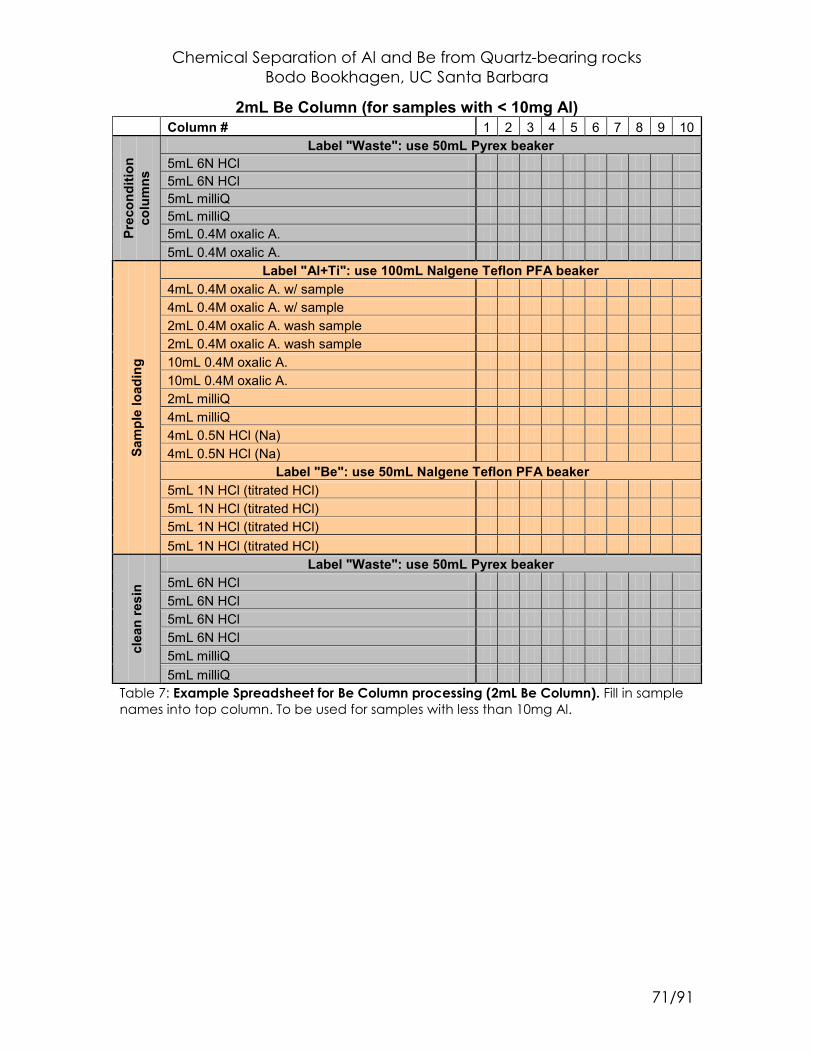
Chemical Separation of Al and Be from Quartz-bearing rocks Bodo Bookhagen, UC Santa Barbara
71/91
2mL Be Column (for samples with < 10mg Al) Column # 1 2 3 4 5 6 7 8 9 10
Prec
ondi
tion
colu
mns
Label "Waste": use 50mL Pyrex beaker
5mL 6N HCl 5mL 6N HCl 5mL milliQ 5mL milliQ 5mL 0.4M oxalic A. 5mL 0.4M oxalic A.
Sam
ple
load
ing
Label "Al+Ti": use 100mL Nalgene Teflon PFA beaker 4mL 0.4M oxalic A. w/ sample 4mL 0.4M oxalic A. w/ sample 2mL 0.4M oxalic A. wash sample 2mL 0.4M oxalic A. wash sample 10mL 0.4M oxalic A. 10mL 0.4M oxalic A. 2mL milliQ 4mL milliQ 4mL 0.5N HCl (Na) 4mL 0.5N HCl (Na)
Label "Be": use 50mL Nalgene Teflon PFA beaker 5mL 1N HCl (titrated HCl) 5mL 1N HCl (titrated HCl) 5mL 1N HCl (titrated HCl) 5mL 1N HCl (titrated HCl)
clea
n re
sin
Label "Waste": use 50mL Pyrex beaker 5mL 6N HCl 5mL 6N HCl 5mL 6N HCl 5mL 6N HCl 5mL milliQ 5mL milliQ
Table 7: Example Spreadsheet for Be Column processing (2mL Be Column). Fill in sample names into top column. To be used for samples with less than 10mg Al.
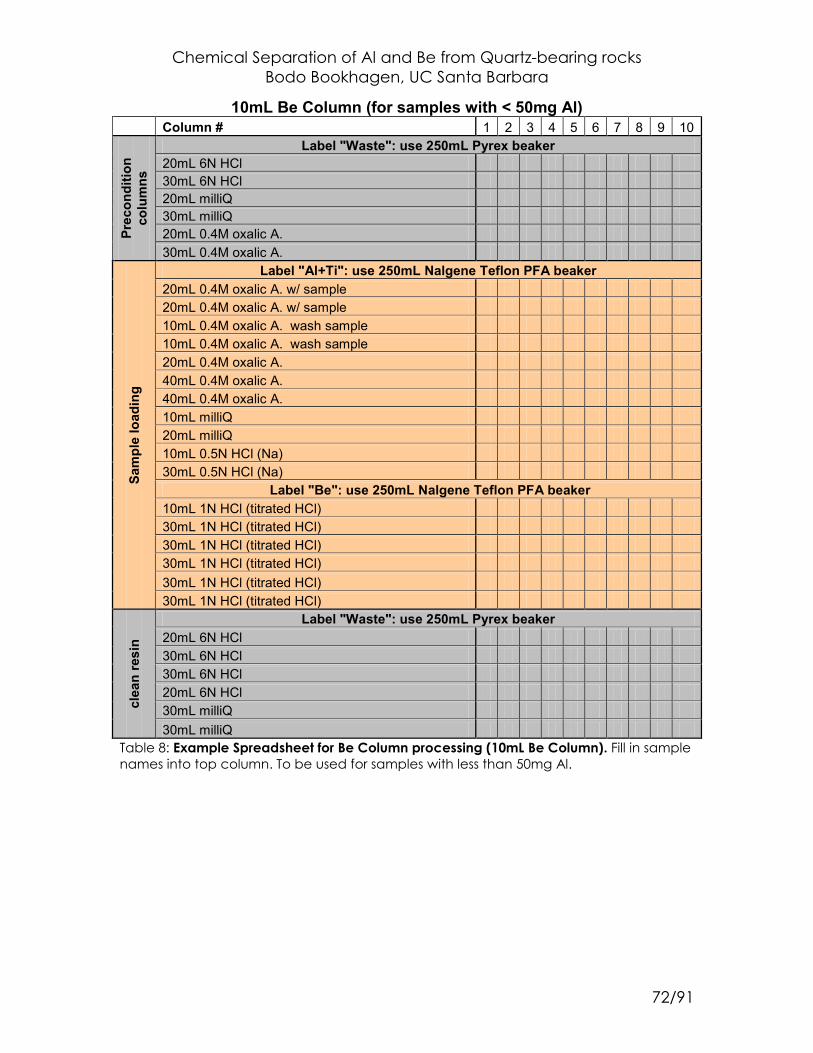
Chemical Separation of Al and Be from Quartz-bearing rocks Bodo Bookhagen, UC Santa Barbara
72/91
10mL Be Column (for samples with < 50mg Al) Column # 1 2 3 4 5 6 7 8 9 10
Prec
ondi
tion
colu
mns
Label "Waste": use 250mL Pyrex beaker
20mL 6N HCl 30mL 6N HCl 20mL milliQ 30mL milliQ 20mL 0.4M oxalic A. 30mL 0.4M oxalic A.
Sam
ple
load
ing
Label "Al+Ti": use 250mL Nalgene Teflon PFA beaker 20mL 0.4M oxalic A. w/ sample 20mL 0.4M oxalic A. w/ sample 10mL 0.4M oxalic A. wash sample 10mL 0.4M oxalic A. wash sample 20mL 0.4M oxalic A. 40mL 0.4M oxalic A. 40mL 0.4M oxalic A. 10mL milliQ 20mL milliQ 10mL 0.5N HCl (Na) 30mL 0.5N HCl (Na)
Label "Be": use 250mL Nalgene Teflon PFA beaker 10mL 1N HCl (titrated HCl) 30mL 1N HCl (titrated HCl) 30mL 1N HCl (titrated HCl) 30mL 1N HCl (titrated HCl) 30mL 1N HCl (titrated HCl) 30mL 1N HCl (titrated HCl)
clea
n re
sin
Label "Waste": use 250mL Pyrex beaker 20mL 6N HCl 30mL 6N HCl 30mL 6N HCl 20mL 6N HCl 30mL milliQ 30mL milliQ
Table 8: Example Spreadsheet for Be Column processing (10mL Be Column). Fill in sample names into top column. To be used for samples with less than 50mg Al.
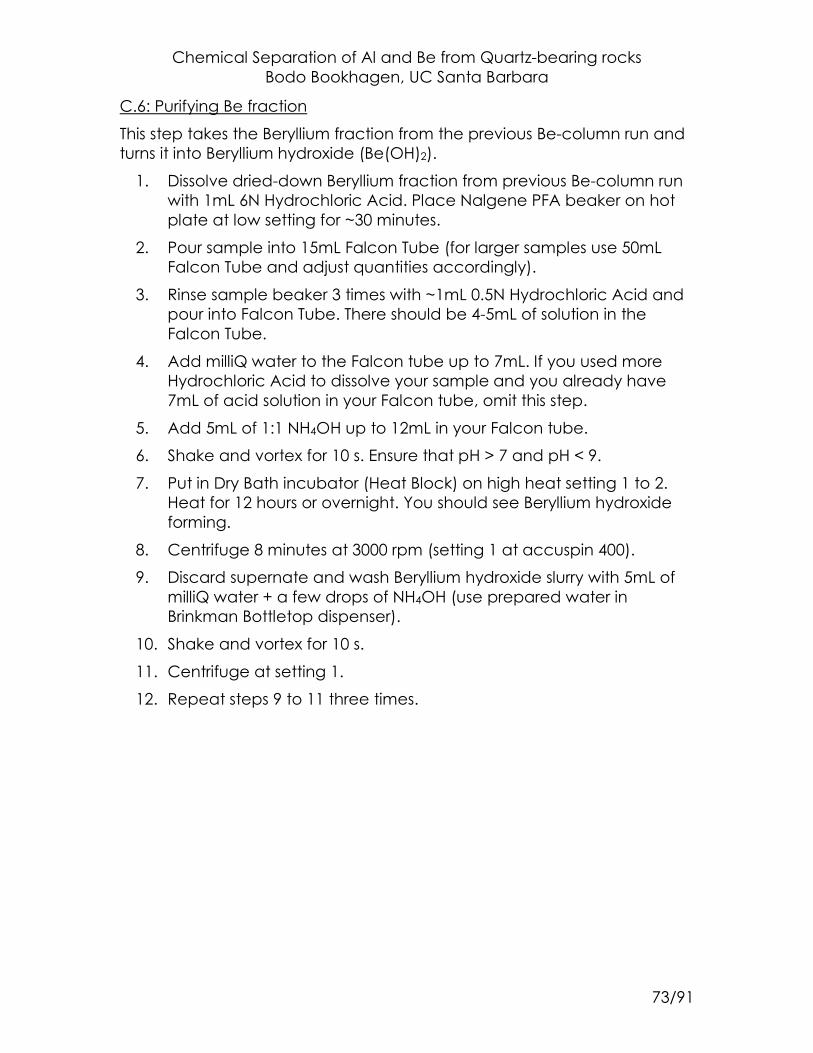
Chemical Separation of Al and Be from Quartz-bearing rocks Bodo Bookhagen, UC Santa Barbara
73/91
C.6: Purifying Be fraction
This step takes the Beryllium fraction from the previous Be-column run and turns it into Beryllium hydroxide (Be(OH)2).
1. Dissolve dried-down Beryllium fraction from previous Be-column run with 1mL 6N Hydrochloric Acid. Place Nalgene PFA beaker on hot plate at low setting for ~30 minutes.
2. Pour sample into 15mL Falcon Tube (for larger samples use 50mL Falcon Tube and adjust quantities accordingly).
3. Rinse sample beaker 3 times with ~1mL 0.5N Hydrochloric Acid and pour into Falcon Tube. There should be 4-5mL of solution in the Falcon Tube.
4. Add milliQ water to the Falcon tube up to 7mL. If you used more Hydrochloric Acid to dissolve your sample and you already have 7mL of acid solution in your Falcon tube, omit this step.
5. Add 5mL of 1:1 NH4OH up to 12mL in your Falcon tube.
6. Shake and vortex for 10 s. Ensure that pH > 7 and pH < 9.
7. Put in Dry Bath incubator (Heat Block) on high heat setting 1 to 2. Heat for 12 hours or overnight. You should see Beryllium hydroxide forming.
8. Centrifuge 8 minutes at 3000 rpm (setting 1 at accuspin 400).
9. Discard supernate and wash Beryllium hydroxide slurry with 5mL of milliQ water + a few drops of NH4OH (use prepared water in Brinkman Bottletop dispenser).
10. Shake and vortex for 10 s.
11. Centrifuge at setting 1.
12. Repeat steps 9 to 11 three times.
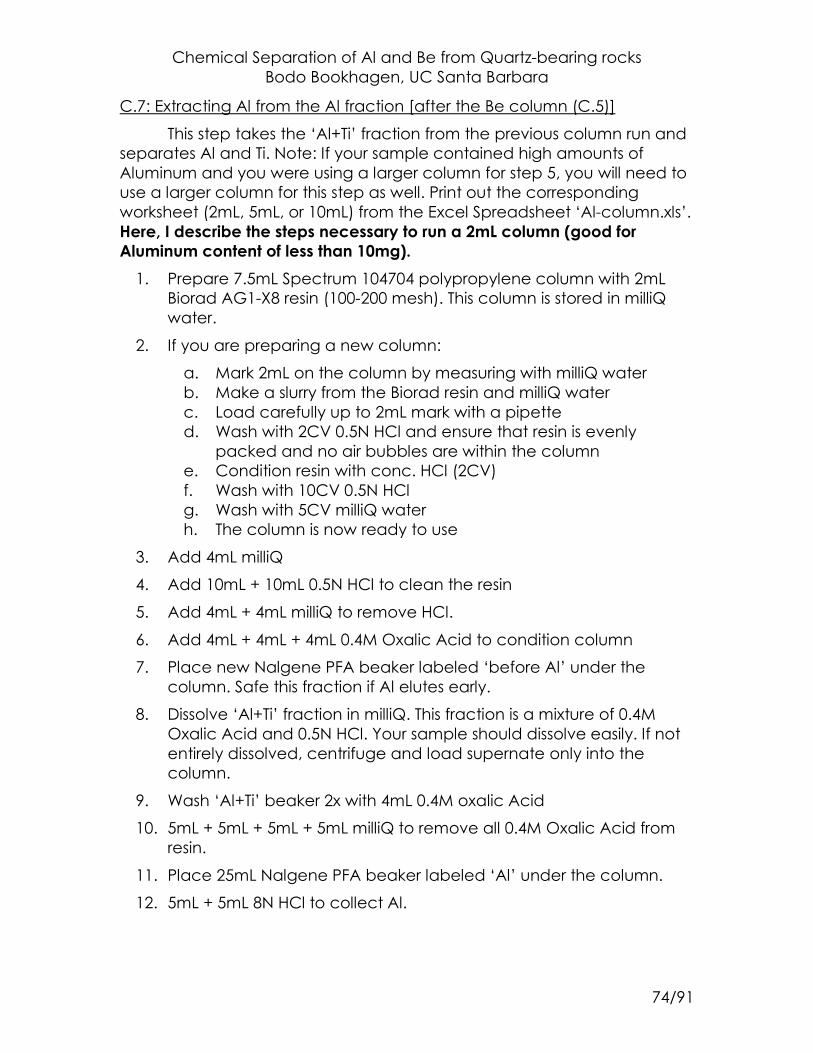
Chemical Separation of Al and Be from Quartz-bearing rocks Bodo Bookhagen, UC Santa Barbara
74/91
C.7: Extracting Al from the Al fraction [after the Be column (C.5)]
This step takes the ‘Al+Ti’ fraction from the previous column run and separates Al and Ti. Note: If your sample contained high amounts of Aluminum and you were using a larger column for step 5, you will need to use a larger column for this step as well. Print out the corresponding worksheet (2mL, 5mL, or 10mL) from the Excel Spreadsheet ‘Al-column.xls’. Here, I describe the steps necessary to run a 2mL column (good for Aluminum content of less than 10mg).
1. Prepare 7.5mL Spectrum 104704 polypropylene column with 2mL Biorad AG1-X8 resin (100-200 mesh). This column is stored in milliQ water.
2. If you are preparing a new column:
a. Mark 2mL on the column by measuring with milliQ water b. Make a slurry from the Biorad resin and milliQ water c. Load carefully up to 2mL mark with a pipette d. Wash with 2CV 0.5N HCl and ensure that resin is evenly
packed and no air bubbles are within the column e. Condition resin with conc. HCl (2CV) f. Wash with 10CV 0.5N HCl g. Wash with 5CV milliQ water h. The column is now ready to use
3. Add 4mL milliQ
4. Add 10mL + 10mL 0.5N HCl to clean the resin
5. Add 4mL + 4mL milliQ to remove HCl.
6. Add 4mL + 4mL + 4mL 0.4M Oxalic Acid to condition column
7. Place new Nalgene PFA beaker labeled ‘before Al’ under the column. Safe this fraction if Al elutes early.
8. Dissolve ‘Al+Ti’ fraction in milliQ. This fraction is a mixture of 0.4M Oxalic Acid and 0.5N HCl. Your sample should dissolve easily. If not entirely dissolved, centrifuge and load supernate only into the column.
9. Wash ‘Al+Ti’ beaker 2x with 4mL 0.4M oxalic Acid
10. 5mL + 5mL + 5mL + 5mL milliQ to remove all 0.4M Oxalic Acid from resin.
11. Place 25mL Nalgene PFA beaker labeled ‘Al’ under the column.
12. 5mL + 5mL 8N HCl to collect Al.
Chemical Separation of Al and Be from Quartz-bearing rocks Bodo Bookhagen, UC Santa Barbara
75/91
13. Place new Nalgene PFA beaker labeled ‘Ti’ under the column (save in case Al elutes late).
14. 5 x 4mL 0.5N HCl.
15. Remove Nalgene PFA beaker and clean resin with 4mL + 4mL + 4mL milliQ.
16. Evaporate all fractions under the heat lamp.
17. Dissolve ‘Ti’ fraction in 6N HCl and fill into 60mL HDPE ‘Main bottle’.
18. Dissolve ‘before Al’ fraction in ‘aqua regia’ (3:1 HCl:HNO3) [You have to wait for ~0.5 hours until the 3:1 Hydrochloric:Nitric Acid mixture turns red and starts bubbling]. Dry down. Repeat 3 times.
19. Dissolve ‘before Al’ fraction in 6N HCl and fill into 60mL HDPE ‘Main bottle’.
20. ‘Al’ fraction is ready to be purified in the next step.
Chemical Separation of Al and Be from Quartz-bearing rocks Bodo Bookhagen, UC Santa Barbara
76/91
2mL Al Column Column # 1 2 3 4 5 6 7 8 9 10
Prec
ondi
tion
colu
mns
use 50mL Pyrex beaker 4mL milliQ 10mL 0.5N HCl 10mL 0.5N HCl 4mL milliQ 4mL milliQ 4mL 0.4M oxalic A. 4mL 0.4M oxalic A. 4mL 0.4M oxalic A.
Sam
ple
load
ing
"before Al": use 100mL Nalgene Teflon PFA beaker 8mL 0.4M oxalic A. from 'Al+Ti' fraction 4mL 0.4M oxalic A. sample wash 4mL 0.4M oxalic A. sample wash 5mL milliQ 5mL milliQ 5mL millIQ 5mL milliQ
"Al": use 25mL Nalgene Teflon PFA beaker
5mL 8N HCl
5mL 8N HCl
"Ti": remove Ti (save in case Al elutes late): use 50mL Nalgene Teflon PFA beaker
4mL 0.5N HCl
4mL 0.5N HCl
4mL 0.5N HCl
4mL 0.5N HCl
4mL 0.5N HCl
clea
n re
sin use 50mL Pyrex beaker
4mL milliQ 4mL milliQ 4mL milliQ
Table 9: Example Spreadsheet for Al Column processing (5mL Al Column). Fill in sample names into top column.
Chemical Separation of Al and Be from Quartz-bearing rocks Bodo Bookhagen, UC Santa Barbara
77/91
C.8: Purifying Al fraction
This step takes the Aluminum fraction from the previous Al-column run and turns it into Aluminum hydroxide (Al(OH)3).
1. Dissolve dried-down Al fraction from previous Al-column run with 1mL 6N Hydrochloric Acid. Place Nalgene PFA beaker on hot plate at low setting for ~30 minutes.
2. Pour sample into 15mL Falcon Tube.
3. Rinse sample beaker 3 times with ~1mL 0.5N Hydrochloric Acid and pour into Falcon Tube. There should be 4-5mL of solution in the Falcon Tube.
4. Add milliQ water to the Falcon tube up to 7mL. If you used more Hydrochloric Acid to dissolve your sample and you already have 7mL of acid solution in your Falcon tube, omit this step.
5. Add 5mL of 1:1 NH4OH up to 12mL in your Falcon tube.
6. Shake and vortex for 10 sec. Ensure that pH > 7 and pH < 9.
7. Put in Dry Bath incubator (Heat Block) on high heat setting 1 to 2. Heat for 12 hours or overnight. You should see Aluminum hydroxide forming.
8. Centrifuge 8 minutes at 3000 rpm (setting 1 at accuspin 400).
9. Discard supernate and wash Aluminum hydroxide slurry with 5mL of milliQ water + a few drops of NH4OH (use prepared water in Brinkman Bottletop dispenser).
10. Shake and vortex for 10 sec.
11. Centrifuge at setting 1.
12. Repeat steps 9 to 11 three times.
Chemical Separation of Al and Be from Quartz-bearing rocks Bodo Bookhagen, UC Santa Barbara
78/91
Figure 15: Dry-bath incubator. Note the various sizes for 50ml Falcon Tubes (top), 15mL Falcon Tube (bottom left), and a custom-made block for holding quartz crucibles used for oxidizing Berylliumhydroxide (bottom right). There is one Boron-free quartz crucible in the upper right corner.
Figure 16: Close-up view of the custom-made dry bath incubator. Note the quartz crucible sticking out on the top left.

Chemical Separation of Al and Be from Quartz-bearing rocks Bodo Bookhagen, UC Santa Barbara
79/91
Part D: Preparing samples for AMS targets and AMS target loading
In this part, I describe how to load the targets. While this step is the very last before the actual AMS measurements it is very tedious as all work has to be conducted in a glove box.
It is a white crystalline oxide and formed in the tube furnace. Beryllium oxide formed at high temperatures (>800°C) is inert but may be easily dissolved in hot aqueous ammonium bifluoride (NH4HF2) or a hot solution of concentrated sulfuric acid (H2SO4) and ammonium sulfate ((NH4)2SO4). BeO is carcinogenic if the powder is ingested or inhaled and may cause chronic beryllium disease. For additional information see for example: http://www.nationaljewish.org/healthinfo/conditions/beryllium-disease/index.aspx and http://www.nationaljewish.org/healthinfo/conditions/beryllium-disease/about-beryllium.aspx.
HEALTH AND SAFETY ADVISORY
Again, I would like to emphasize that Beryllium Oxide (BeO) is a very dangerous substance. If you work in the cosmogenic nuclide laboratory, you must be at full health. If you experience dizziness or drowsiness, do not work in the cosmogenic nuclide preparation facility. Read the Health advice posted in the laboratory. It is mandatory to wear full personal protective equipment, especially when working with concentrated acids. These include:
1. goggles (prescription glasses are not enough!) 2. double gloves - neoprene 3. closed-toe shoes with socks 4. long pants (no shorts!) 5. lab coat 6. face shield 7. neoprene apron 8. small Chemical Spill Kit
In addition, you will have to read, understand, agree, and sign a declaration that you have been trained in all necessary Standard Operating Procedures (SOPs). A copy of it will be stored in the cosmogenic nuclide lab. If you are unsure about any step, please contact PI (Prof. Bodo Bookhagen) and clarify these issues.
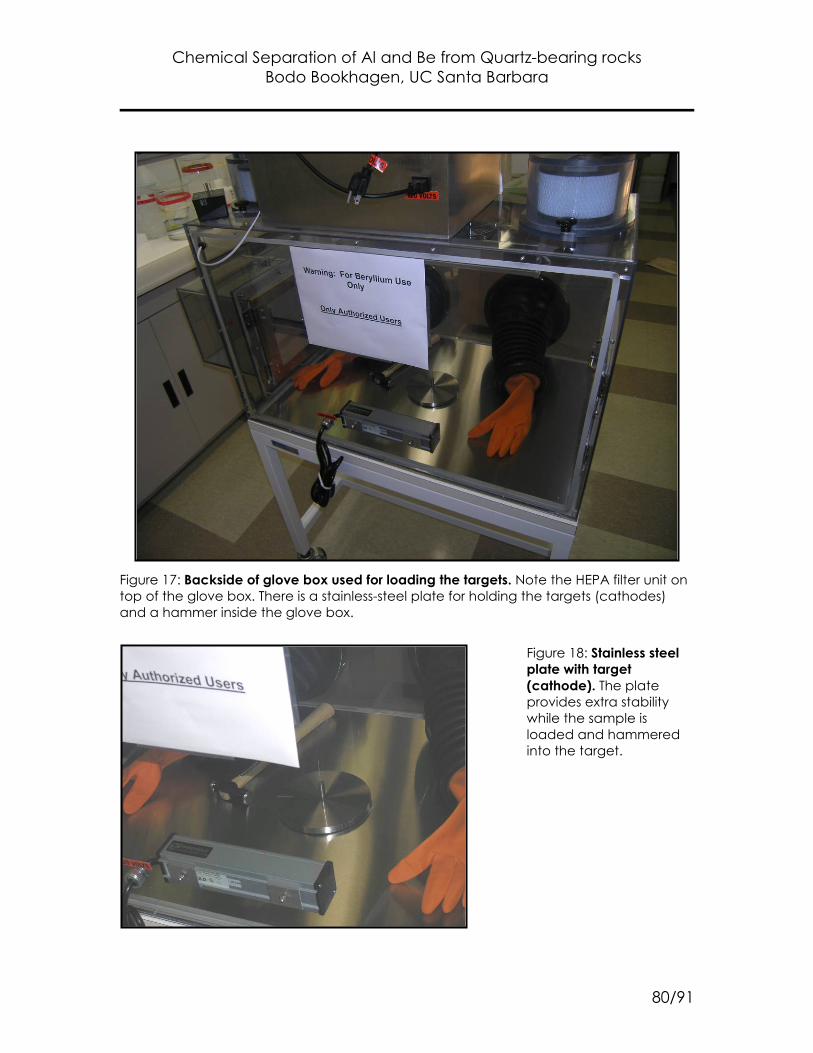
Chemical Separation of Al and Be from Quartz-bearing rocks Bodo Bookhagen, UC Santa Barbara
80/91
Figure 17: Backside of glove box used for loading the targets. Note the HEPA filter unit on top of the glove box. There is a stainless-steel plate for holding the targets (cathodes) and a hammer inside the glove box.
Figure 18: Stainless steel plate with target (cathode). The plate provides extra stability while the sample is loaded and hammered into the target.
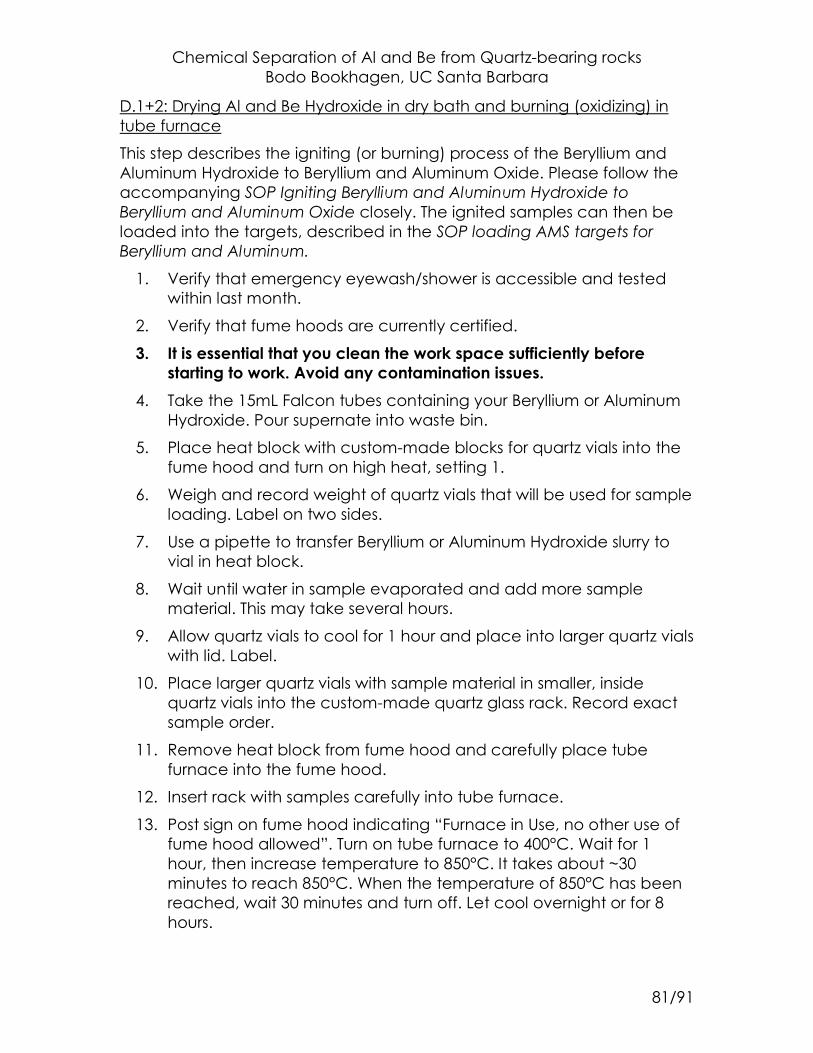
Chemical Separation of Al and Be from Quartz-bearing rocks Bodo Bookhagen, UC Santa Barbara
81/91
D.1+2: Drying Al and Be Hydroxide in dry bath and burning (oxidizing) in tube furnace
This step describes the igniting (or burning) process of the Beryllium and Aluminum Hydroxide to Beryllium and Aluminum Oxide. Please follow the accompanying SOP Igniting Beryllium and Aluminum Hydroxide to Beryllium and Aluminum Oxide closely. The ignited samples can then be loaded into the targets, described in the SOP loading AMS targets for Beryllium and Aluminum.
1. Verify that emergency eyewash/shower is accessible and tested within last month.
2. Verify that fume hoods are currently certified.
3. It is essential that you clean the work space sufficiently before starting to work. Avoid any contamination issues.
4. Take the 15mL Falcon tubes containing your Beryllium or Aluminum Hydroxide. Pour supernate into waste bin.
5. Place heat block with custom-made blocks for quartz vials into the fume hood and turn on high heat, setting 1.
6. Weigh and record weight of quartz vials that will be used for sample loading. Label on two sides.
7. Use a pipette to transfer Beryllium or Aluminum Hydroxide slurry to vial in heat block.
8. Wait until water in sample evaporated and add more sample material. This may take several hours.
9. Allow quartz vials to cool for 1 hour and place into larger quartz vials with lid. Label.
10. Place larger quartz vials with sample material in smaller, inside quartz vials into the custom-made quartz glass rack. Record exact sample order.
11. Remove heat block from fume hood and carefully place tube furnace into the fume hood.
12. Insert rack with samples carefully into tube furnace.
13. Post sign on fume hood indicating “Furnace in Use, no other use of fume hood allowed”. Turn on tube furnace to 400°C. Wait for 1 hour, then increase temperature to 850°C. It takes about ~30 minutes to reach 850°C. When the temperature of 850°C has been reached, wait 30 minutes and turn off. Let cool overnight or for 8 hours.

Chemical Separation of Al and Be from Quartz-bearing rocks Bodo Bookhagen, UC Santa Barbara
82/91
14. Ignite Al samples up to 1150°C for ~20 minutes. Ramp up the temperature step-wise as describe in the previous step. After having had the sample at 850°C for 10 minutes, increase temperature to 1150°C.
15. Inside the fume hood, carefully remove the rack with vials and label the beakers again. All labels are removed at temperature above 400°C.
16. Inside the fume hood, weigh the quartz vials and record weight in notebook.
17. Decontaminate furnace surface and hood surfaces with Acetone and Kimwipes. All Kimwipes used inside the glove box will go into the plastic bag labeled ‘BeO waste’ (with a UCSB Hazardous Waste tag). Initiate a pick up from EH&S at http://www.ehs.ucsb.edu/units/hw/hw.html.
18. Place sample back into rack and move to glove box. The samples are now ready to be loaded into the AMS targets.
19. Remove the tube furnace from the fume hood and place it in its dedicated place.
Chemical Separation of Al and Be from Quartz-bearing rocks Bodo Bookhagen, UC Santa Barbara
83/91
D.2B: Cleaning boron-free quartz vials
Before you can use the low Boron quartz crucibles, you will have to clean them. Follow these steps to get clean quartz vials:
1. Count 100 vials into a 1000mL clean Nalgene PFA beaker.
2. Rinse vials several times with milliQ water
3. Wash the vials in 1:8 Nitric acid (~8.5 %). Soak overnight.
4. Rinse vials several times with milliQ to remove Nitric acid
5. Make a 1:3 Hydrofluoric Acid solution (~49% concentrated HF, diluted with 3 times milliQ makes a ~16% solution).
6. Use 1L Teflon beaker, fill in all quartz vials. Cover quartz vials with ~16% HF solution by about 1-2 cm, and turn up hotplate.
7. Heat for 30 minutes. For the hotplates in use in cosmogenic nuclide laboratory, set the temperature to 200°C and allow 15 minutes to heat up the solution. The beakers will be a total of 45 minutes on the hot plate.
8. Turn off hotplate and allow beakers to cool. Drain acid to waste. Wash with milliQ water several times.
9. Add 1:1 Nitric acid to cover vials by 1-2 cm.
10. Return beaker to hotplate and heat for 30 minutes.
11. Allow beakers to cool; drain acid to waste.
12. Rinse vials several times in milliQ water, then rinse each vial individually and try to shake off all excess water.
13. If you intend to use the vials for Beryllium, you leech them a second time in the ~16% HF solution. Repeat step 5-12, but heat only for 15 minutes in step 7.
14. Dry under heat lamp in fume hood. Place in washed zip lock bags in batches of 25. Label bags to indicate who and when they were cleaned. Place Beryllium vials in a separate bags.
15. Place all bags in a second zip lock bag. Check all vials for holes in the bottom before using them. Discard any with holes.
Now you are ready to run the drying procedure. Note: You will have to clean the inner crucibles only once, they are discarded after each use. You clean the outer quartz crucibles after every use – they can be reused several times.
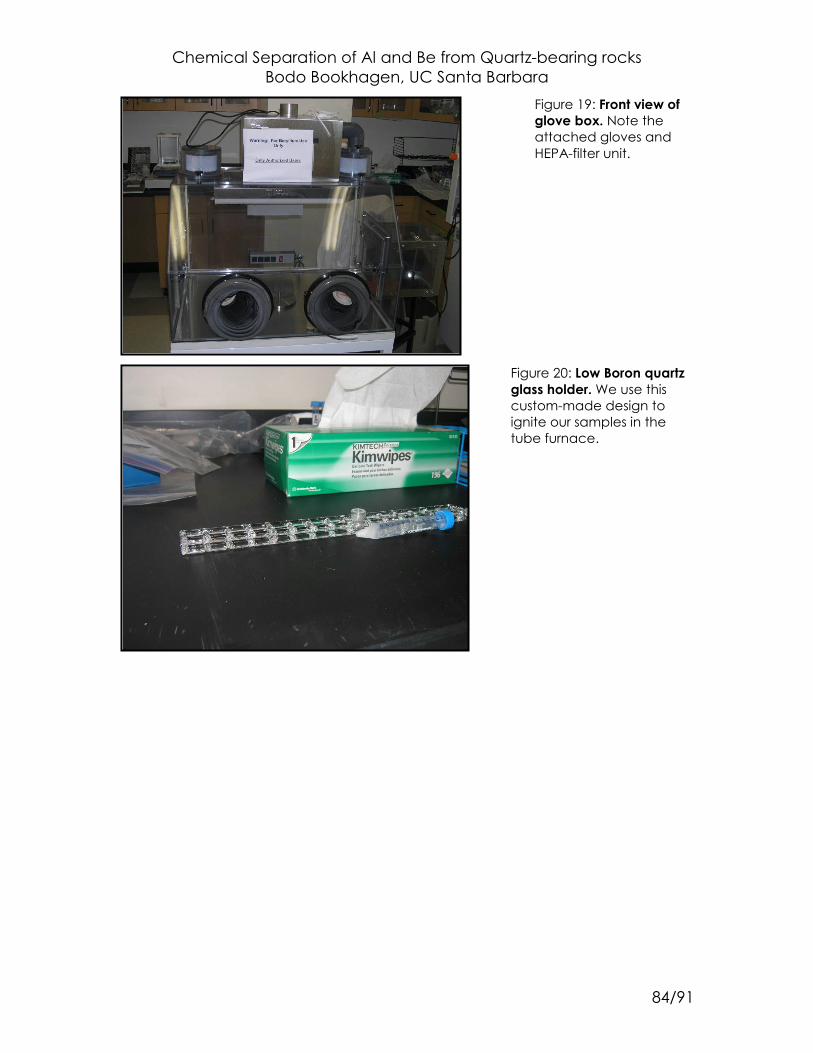
Chemical Separation of Al and Be from Quartz-bearing rocks Bodo Bookhagen, UC Santa Barbara
84/91
Figure 19: Front view of glove box. Note the attached gloves and HEPA-filter unit.
Figure 20: Low Boron quartz glass holder. We use this custom-made design to ignite our samples in the tube furnace.
Chemical Separation of Al and Be from Quartz-bearing rocks Bodo Bookhagen, UC Santa Barbara
85/91
D.3: Loading samples into AMS targets in the glove box
This step describes the handling and loading of targets that will be sent to an AMS. All work has to be done in the glove box!
Please follow the SOP Loading AMS targets for Beryllium and Aluminum closely!
1. Verify that emergency eyewash/shower is accessible and tested within last month.
2. Check the integrity of all connections and gloves of the glove box prior to any work in the glove box. Check glove box owner’s manual for guidance on proper use and inspection.
3. It is essential that all grinding and loading work is done within the glove box.
4. Take the BeO in its holding rack and place it inside the glove box through the air lock. Make sure that you have precisely weighted and recorded the weight of all vials (done in the previous step).
5. Remove the outer quartz vial and place in the plastic bucket within the glove box. Use tweezers to remove the inner vial. The outer quartz vials will be cleaned in Nitric Acid and may be reused.
6. The inner vial contains the BeO/Al2O3. Put it in the Aluminum holding block and grind with the drill gauge for several minutes (5 to 10 minutes).
7. Grind BeO/Al2O3 until in a fine-grained state. Note: Al2O3 is much harder than BeO and may need longer grinding.
8. Add Silver powder to the grinded Al2O3 and Niobium powder to BeO. Add by weight. Grind for several more minutes until well mixed.
9. Grind all samples and mix with Silver/Niobium. Put back into the holding block and weigh all vials. Record weight and determine Oxide to Metal ratios.
10. Clean working space carefully after every grinded sample with Kimwipes and Acetone. All Kimwipes used inside the glove box will go into the plastic bag labeled ‘BeO waste’ (with a UCSB Hazardous Waste tag).
11. Carefully pour a part of the BeO-Niobium/Al2O3-Silver mixture into the AMS target. Use the drill gauge and hammer to put material fully into the AMS target. You will need only a fraction of the material.
Chemical Separation of Al and Be from Quartz-bearing rocks Bodo Bookhagen, UC Santa Barbara
86/91
12. The rest of the BeO-Niobium/Al2O3-Silver mixture goes into a labeled plastic vial. Save this material in case more measurements are needed.
13. Put target into its plastic container. The target is now sealed and can be transported to the AMS measuring facility.
14. When all samples have been loaded, wipe all items in the glove box with Acetone and Kimwipes. All Kimwipes used inside the glove box will go into the plastic bag labeled ‘BeO waste’ (with a UCSB Hazardous Waste tag).
15. Remove all items from the glove through the air lock.
16. Clean the glove box with Acetone and Kimwipes. All Kimwipes used inside the glove box will go into the plastic bag labeled ‘BeO waste’ (with a UCSB Hazardous Waste tag). Initiate a pick up from EH&S at http://www.ehs.ucsb.edu/units/hw/hw.html.
17. Turn on the vacuum system of the glove box. This helps to remove Berylliumoxid particles that are airborne inside the glove box – IMPORTANT: This does not ensure complete decontamination of glove box interior.

Chemical Separation of Al and Be from Quartz-bearing rocks Bodo Bookhagen, UC Santa Barbara
87/91
Part E: Glass- and Teflonware cleaning instructions and Acid-mixing procedures
In this part, I describe how to clean and acid-boil the regularly used glass and Teflonware. This is a 3 step process that requires some time but is easy to perform.
HEALTH AND SAFETY ADVISORY
If you work in the cosmogenic nuclide laboratory, you must be at full health. If you experience dizziness or drowsiness, do not work in the cosmogenic nuclide preparation facility. Read the Health advice posted in the laboratory. It is mandatory to wear full personal protective equipment, especially when working with concentrated acids. These include:
1. goggles (prescription glasses are not enough!) 2. double gloves - neoprene 3. closed-toe shoes with socks 4. long pants (no shorts!) 5. lab coat 6. face shield 7. neoprene apron 8. small Chemical Spill Kit
In addition, you will have to read, understand, agree, and sign a declaration that you have been trained in all necessary Standard Operating Procedures (SOPs). A copy of it will be stored in the cosmogenic nuclide lab. If you are unsure about any step, please contact PI (Prof. Bodo Bookhagen) and clarify these issues.
Chemical Separation of Al and Be from Quartz-bearing rocks Bodo Bookhagen, UC Santa Barbara
88/91
E.1: Cleaning and acid-boiling of glass and Teflonware
This step describes the handling and cleaning of glass and Teflonware after sample processing. All acid work has to be done in the fume hood.
1. After you have used the glass or Teflonware, soak them for 12h (overnight) in a soap bath. Soap baths are located right next to the sinks and should be renewed 2-3 times every week (or when necessary). Squirt a few drops of soap into the container and fill with tap water.
2. After soaking, manually scrub the glasses and Teflonware with a brush. The Teflon beakers that have been used for digesting samples need to be scrubbed intensely and several times.
3. Rinse with DI water several times.
4. Place glass and Teflonware into 1:8 HNO3 bath (1 part HNO3, 8 parts H2O). There is one large container in the fumehood. Soak for 12h (or overnight).
5. Transfer dishes into 1:1 HNO3 solution (50% DI and 50% conc. HNO3), usually in a 4L glass beaker. Heat on a hot plate at setting 280°C for 4 h (set timer). Let cool down for 2h before moving the glass beaker.
6. Transfer all acid-boiled dishes into a plastic container (without acid) and rinse the dishes several times with milliQ water.
7. Let dry.
8. Place the acid-boiled dishes into zip-loc bags labeled ‘clean’ or ‘acid-boiled’. They are now ready for a new sample.
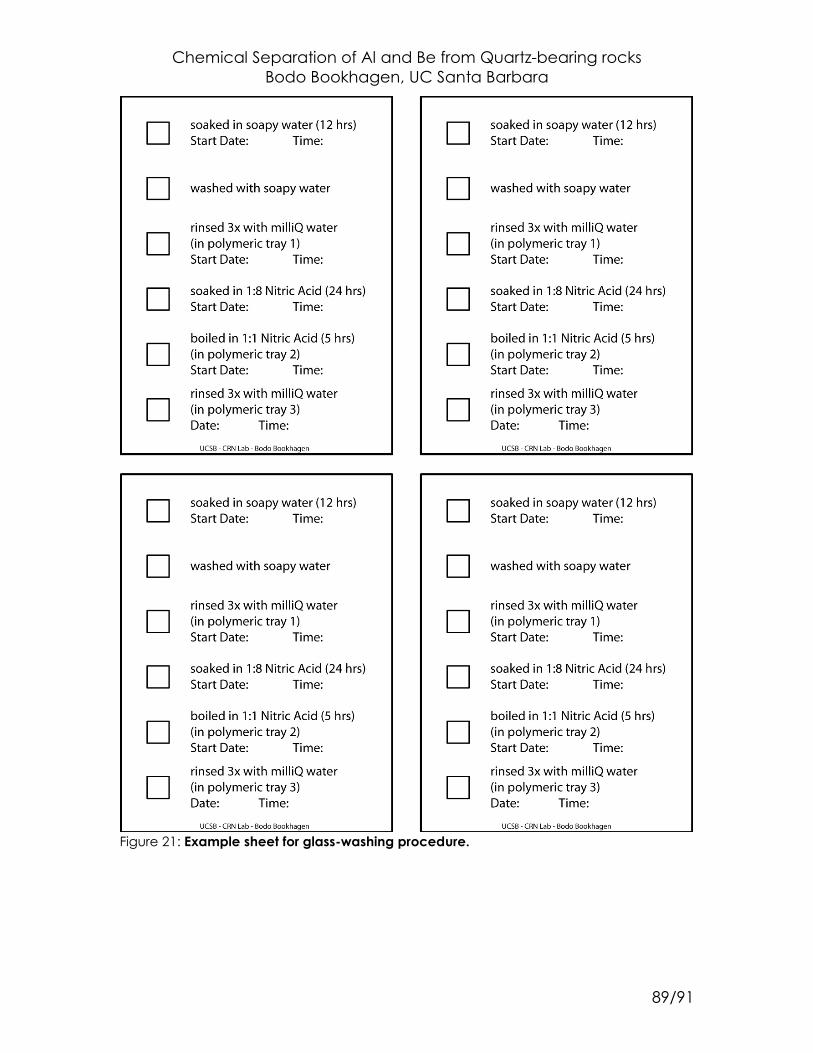
Chemical Separation of Al and Be from Quartz-bearing rocks Bodo Bookhagen, UC Santa Barbara
89/91
Figure 21: Example sheet for glass-washing procedure.
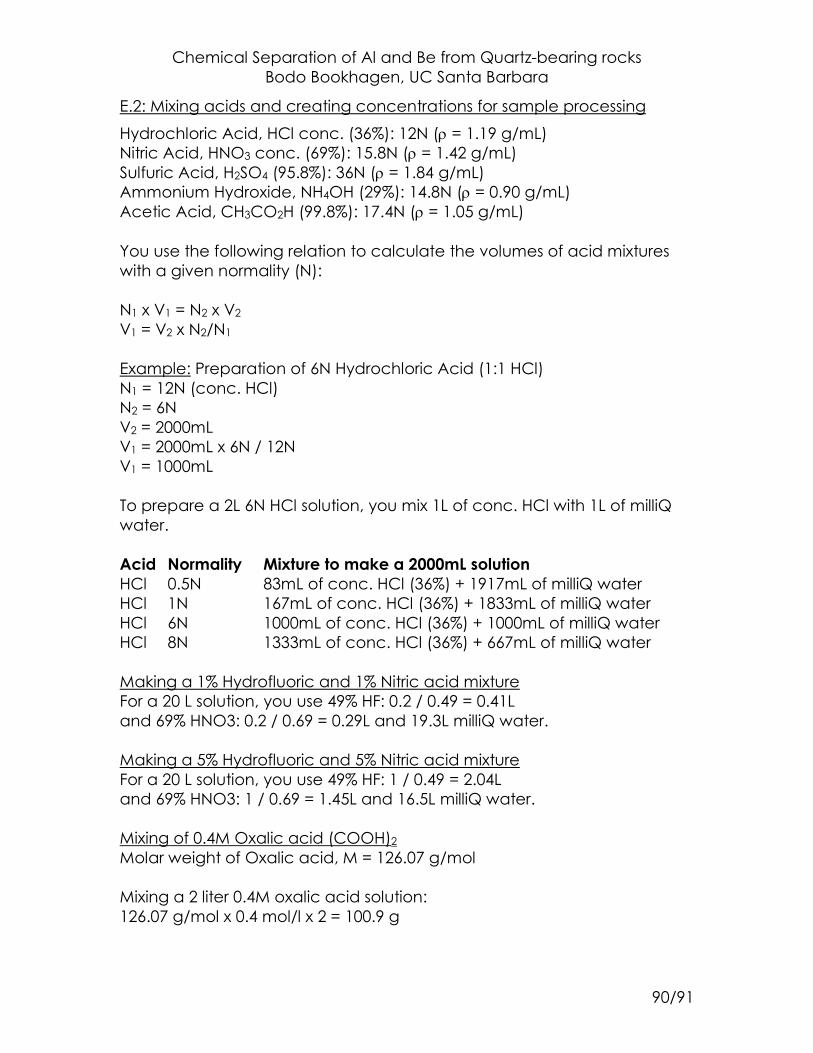
Chemical Separation of Al and Be from Quartz-bearing rocks Bodo Bookhagen, UC Santa Barbara
90/91
E.2: Mixing acids and creating concentrations for sample processing
Hydrochloric Acid, HCl conc. (36%): 12N (ρ = 1.19 g/mL) Nitric Acid, HNO3 conc. (69%): 15.8N (ρ = 1.42 g/mL) Sulfuric Acid, H2SO4 (95.8%): 36N (ρ = 1.84 g/mL) Ammonium Hydroxide, NH4OH (29%): 14.8N (ρ = 0.90 g/mL) Acetic Acid, CH3CO2H (99.8%): 17.4N (ρ = 1.05 g/mL) You use the following relation to calculate the volumes of acid mixtures with a given normality (N): N1 x V1 = N2 x V2 V1 = V2 x N2/N1 Example: Preparation of 6N Hydrochloric Acid (1:1 HCl) N1 = 12N (conc. HCl) N2 = 6N V2 = 2000mL V1 = 2000mL x 6N / 12N V1 = 1000mL To prepare a 2L 6N HCl solution, you mix 1L of conc. HCl with 1L of milliQ water. Acid Normality Mixture to make a 2000mL solution HCl 0.5N 83mL of conc. HCl (36%) + 1917mL of milliQ water HCl 1N 167mL of conc. HCl (36%) + 1833mL of milliQ water HCl 6N 1000mL of conc. HCl (36%) + 1000mL of milliQ water HCl 8N 1333mL of conc. HCl (36%) + 667mL of milliQ water Making a 1% Hydrofluoric and 1% Nitric acid mixture For a 20 L solution, you use 49% HF: 0.2 / 0.49 = 0.41L and 69% HNO3: 0.2 / 0.69 = 0.29L and 19.3L milliQ water. Making a 5% Hydrofluoric and 5% Nitric acid mixture For a 20 L solution, you use 49% HF: 1 / 0.49 = 2.04L and 69% HNO3: 1 / 0.69 = 1.45L and 16.5L milliQ water. Mixing of 0.4M Oxalic acid (COOH)2 Molar weight of Oxalic acid, M = 126.07 g/mol Mixing a 2 liter 0.4M oxalic acid solution: 126.07 g/mol x 0.4 mol/l x 2 = 100.9 g
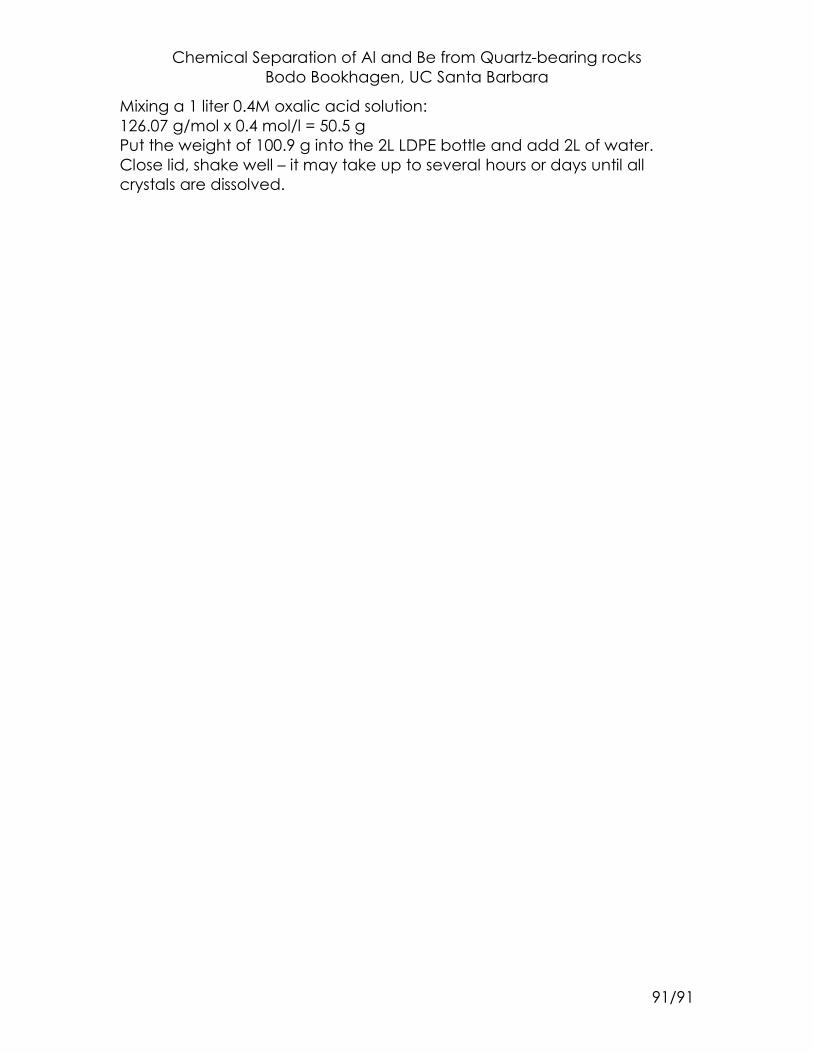
Chemical Separation of Al and Be from Quartz-bearing rocks Bodo Bookhagen, UC Santa Barbara
91/91
Mixing a 1 liter 0.4M oxalic acid solution: 126.07 g/mol x 0.4 mol/l = 50.5 g Put the weight of 100.9 g into the 2L LDPE bottle and add 2L of water. Close lid, shake well – it may take up to several hours or days until all crystals are dissolved.