scilab module
DESCRIPTION
how to add a module in scilabTRANSCRIPT

Architecture of a Scilab Module (Scilab 5.x and 6.X)A module can be Scilab macros, java,Tcl/Tk, C, C++ and/or Fortran code. A module can (and should) contains other things like demos, help, unitary tests... This applies to Scilab 5.X. Scilab 4.X is completely different.
Description
A Scilab module should be composed like this :
Scilab module description
demosDemos of the module which show features of the module
etcConfiguration of the module (initialization and configuration)
examples examples (readme.txt)
helpHelp of the module (Scilab help description)
includesHeader files which can be used externaly (other Scilab modules or third party programs)
locales localization
macros Scilab macros of the module
sci_gateway Sources to plug the module into Scilab.Sources should be splited into subdirs (src/c/ src/fortran/...).
src Core sources of the module.Sources should be splited into subdirs (src/c/ src/fortran/...). Local header (.h) should be put here
tests/unit_testsUnitary tests which will be launched in order to test this module
tests/nonreg_testsNon regression tests which will be launched in order to test this module
tests/benchmarksBenchmarks which will be launched in order to test this module
Mandatory files:

changelog.txt licence.txt Makefile.am Makefile.in (generated from Makefile.am by automake) xxxx.vcproj version.xml readme.txt etc/<module>.start
etc/<module>.quit
includes/gw_<module>.h
sci_gateway/xxx/gw_<module>.c
sci_gateway/<module>_gateway.xml
Optional files:
locales/en_US/<module>.po (this file is usually generated by SCI/tools/localization/updateLocalizationModule.sh)
Conception
The name of the module itself is quite important. It is must be composed only by letters, numbers and a just two special characters (_ or -). In the examples below, the module will be called <my_module_name>.
Guidelines
Function profiles should be declared in a .h in src/<language/ if they are local to the module. If the function can be used from an other modules, the header file should be put into includes/
extern should be avoid. Prefer header file instead (.h) When a C function is created and can be called by fortran, don't forget to add the macros
C2F around the name of the function. No warning in debug mode (-Wall) should be reached.
Rules for function profile & header declarations
if the function is only used in the current file, put the declaration only in the C file if the function is used in the module only, create an header file (.h) with the same name as
the C/C++ file into the <module>/src/c/ directory
if the function is used (or will be) elsewhere in Scilab, create an header file (.h) with the same name as the C/C++ file into the <module>/includes/ directory
How to develop a new internal module Step by Step

Create directory SCI/modules/<my_module_name>
Create directory SCI/modules/<my_module_name>/etc : It will contain starting and stoping files
o Create a <my_module_name>.start file
o Create a <my_module_name>.quit file
Create a VERSION file
Create a readme.txt file
Create a license.txt file
Create a changelog.txt file
edit SCI/modules.xml and add a new line with the information of your module in the list.
Create the Makefile.am file (you can copy it from an other module)
Edit the SCI/configure.ac file, look for AC_CONFIG_FILES and add modules/<my_module_name>/Makefile into the list
Edit the SCI/modules/Makefile.am and add to SUBDIRS <my_module_name>
Edit the SCI/modules/core/includes/callinterf.h and add #include "../../<my_module_name>/includes/gw_<my_module_name>.h" to the list
Edit the SCI/modules/core/src/c/callinterf.c and add {gw_<my_module_name>} to the list. Update INTERFACES_MAX++
In SCI, launch autoreconf (you will need at least the version 2.68 of autoconf and 1.11 of automake)
If you need your library to be added into Scilab dynamic library, into SCI/modules/Makefile.am, add \$(top_builddir)/modules/<my_module_name>/lib<my_module_name>.la to the variable libscilab_la_LIBADD
In SCI/modules/<my_module_name>/sci_gateway/c/, create a gw_<my_module_name>.c, this file should contain the match between the Scilab function and the C/C++/Fortran function. For example :
static OptimTable Tab[]={{C2F(sci_optim),"optim"},{C2F(sci_semidef),"semidef"},{C2F(sci_fsolve),"fsolve"}};
In SCI/modules/<my_module_name>/includes/, create a gw_<my_module_name>.h, this file should contain the Scilab connector (copy/paste from an other) and also the list of all functions used in the Table defined in gw_<my_module_name>.c. '
Matching to the list of functions, create the file SCI/modules/<my_module_name>/sci_gateway/<my_module_name>_gateway.xml to list all the function which will be available in Scilab
TODO : create a skeleton for this

Macro module
Create directory SCI/modules/<my_module_name>/macros'
edit buildmacros.sce and change genlib arguments
genlib(<21 characters of module's name> + 'lib','SCI/modules/elementaries_functions/macros');
example : elementaries_functions module
genlib('elementaries_functionlib','SCI/modules/elementaries_functions/macros');
Add a help chapter
Create a directory SCI/modules/<my_module_name>/help/en_US'
Add .xml files Add a file addchapter.sce Modify the file SCI/modules/helptools/etc/MAIN_CHAPTERS to add the module
public: Scilab Module Architecture (last edited 2012-05-30 15:13:23 by [email protected])

ATOMSConten ts
1. ATOMS 1. Supported platforms 2. How to use ATOMS? 1. Use ATOMS GUI 2. Search of a module 3. Install a module 4. Install a module for all users or for a single user 5. Remove a module 6. Configure the network proxy 2. ATOMS for developers 1. How can I have my module included to ATOMS? 2. What are the technical expectations ? 3. What kind of restrictions is there? 4. Will you modify my module? 5. I have just a Scilab function/macro and I would like to have it into ATOMS 6. I have some modules/toolboxes on the toolboxes center, what will happen to them? 7. ATOMS admin created a new version of my module 8. From 5.3 to 5.4 family 9. Preparing for Scilab 6 10. Guidelines while submitting a module
ATOMS is the packaging system of Scilab external modules. Through this tool, it is trivial to install prebuilt Scilab modules.
The idea is similar to the one developed by most of the Linux/BSD distributions. With just one function, a module can be installed including its dependencies.
Supported platforms
ATOMS modules are available for all supported Scilab platforms. That means Microsoft Windows, GNU/Linux & Mac OS X.
However, modules which only contains Scilab macros are available on non-supported operating system.
How to use ATOMS?
Use ATOMS GUI
Scilab includes a GUI to facilitate the use of ATOMS. This GUI is also available through the Scilab menu "Applications".
atomsGui();


Search of a module
The function atomsSearch("keywords") allows the search of available modules.
For example:
-->atomsSearch("network") ans =
!lolimot A fast neural network - LOcal LInear MOdel Tree !! !!metanet Graph and Network toolbox !
The first column is the name of the module.
Install a module
The function atomsInstall("name_of_the_module") allows to install a Scilab module packaged in ATOMS.
For example:
-->atomsInstall("metanet");
On the next start of Scilab, the module will be loaded automatically. To load it manually, call:
atomsLoad("metanet");
For more details, please read atomsInstall
Install a module for all users or for a single user
In some corporate environments, a typical user has no admin rights. But it is still possible to install modules, because Scilab can install them without admin rights.
It is possible to install a module in "user" mode, with the "user" option of the atomsInstall function. The module is then available only for the current user, and not for others.
-->atomsInstall("NISP","user") NISP (2.4.1-1) will be installed in the 'user' section specfun (0.4.1-1) will be installed in the 'user' section apifun (0.4.1-1) will be installed in the 'user' section helptbx (0.4-1) will be installed in the 'user' section Installing NISP (2.4.1-1) ... success Installing specfun (0.4.1-1) ... success Installing apifun (0.4.1-1) ... success Installing helptbx (0.4-1) ... success ans =!NISP 2.4.1-1 user SCIHOME\atoms\NISP\2.4.1-1 I !!specfun 0.4.1-1 user SCIHOME\atoms\specfun\0.4.1-1 A !!apifun 0.4.1-1 user SCIHOME\atoms\apifun\0.4.1-1 A !!helptbx 0.4-1 user SCIHOME\atoms\helptbx\0.4-1 A !
It is also possible to run Scilab in administrator mode, so that we can install Scilab for all the users of the computer. This way, any user who logs on the computer will have the external Scilab module installed. In order to run Scilab in admin mode on Windows, we Shift-Right Click on Scilab's icon, and, if necessary, enter the admin login and password.

In the following session, we have launched Scilab in admin mode and installed the NISP module for Scilab. This corresponds to the "allusers" option of atomsInstall.
-->atomsInstall("NISP") NISP (2.4.1-1) will be installed in the 'allusers' section specfun (0.4.1-1) will be installed in the 'allusers' section apifun (0.4.1-1) will be installed in the 'allusers' section helptbx (0.4-1) will be installed in the 'allusers' section Installing NISP (2.4.1-1) ... success Installing specfun (0.4.1-1) ... success Installing apifun (0.4.1-1) ... success Installing helptbx (0.4-1) ... success ans = !NISP 2.4.1-1 allusers SCI\contrib\NISP\2.4.1-1 I !!specfun 0.4.1-1 allusers SCI\contrib\specfun\0.4.1-1 A !!apifun 0.4.1-1 allusers SCI\contrib\apifun\0.4.1-1 A !!helptbx 0.4-1 allusers SCI\contrib\helptbx\0.4-1 A !
Remove a module
The function atomsRemove("name_of_the_module") allows to uninstall a Scilab module packaged in ATOMS.
For example:
atomsRemove("metanet");
For more details, please read atomsRemove
Configure the network proxy
If your internet configuration uses a proxy, it might be necessary to configure the proxy settings, so that Scilab can download the required files. For example, we may use the following settings, with customized values :
atomsSetConfig("Verbose","True")atomsSetConfig("useProxy","True")atomsSetConfig("proxyHost","myProxyHost")atomsSetConfig("proxyPort","myProxyPort")atomsSetConfig("proxyUser","myUserName")atomsSetConfig("proxyPassword","myPassword")
For more details, see the Scilab documentation on atomsSetConfig
ATOMS for developers
How can I have my module included to ATOMS?
Your steps are:
1. Develop your toolbox following the example of toolbox_skeleton
2. Register on http://atoms.scilab.org/login
3. Fill the form on http://atoms.scilab.org/add/
Once it is done, we will process your module shortly (generation of binary versions for available platforms, ...).

Note : if you are posting your sources, don't forget to set its class as "sources of a valid Scilab package".
When you receive a feedback from us, your module will be available for all users.
Once it has been validated, to take this change into account in your local Scilab, update your package list by running:
atomsSystemUpdate()
For more details, please read Voir atomsSystemUpdate
What are the technical expectations ?
To make an ATOMS module from a contribution, we need several things:
follow the module structure of toolbox_skeleton. If your module only contains macros, sci_gateway and src folders are not necessary. However, a .start and a .quit are mandatory in etc folder (to load the module), as well as a builder.sce (to build the module) and DESCRIPTION/DESCRIPTION-FUNCTIONS files (formatted in the same way as toolbox_skeleton).
it is not mandatory but help pages and tests are most welcome (and may become mandatory in the next releases, so please do not skip them, you will also help your users this way).
features must be available as functions (.sci with a function in it and not .sce calling straight the feature)
Scilab distribution is providing a skeleton/template for Scilab modules: SCI/contrib/toolbox_skeleton or on the ATOMS website
If you work depends on a third party native library, let us know and please provide as much as information as possible. If you don't want your module to be packaged under a certain OS, pleaselet us know after posting it.
What kind of restrictions is there?
There is no restriction on the kind of modules which are accepted into ATOMS as long as they provide a new Scilab feature (whatever it is).
Since we need to build the module, sources must be available. However, there is no restriction on the license of a module (even if we prefer free licenses).
In any case, do not submit binary files, as they are often not working on different OS or configurations.
Will you modify my module?
Sometimes, we have to patch to make sure that the module builds and runs perfectly. We usually send back the patches for upstream incorporation. Those change are usually :
wrapping your module in a folder named "yourmodulename" adding a yourmodulename.quit in etc folder fixing typo/case sensitive problems for building/loading the module (mostly in builder.sce, yourmodulename.start,
yourmodulename.quit)
Consider those points before submitting a module, as they are quickly fixed by you and often make us lose a lot of time, which could be used improving ATOMS and fixing its bugs!
I have just a Scilab function/macro and I would like to have it into ATOMS
No problem, just submit it.
I have some modules/toolboxes on the toolboxes center, what will happen to them?
If your work is available on Scilab Toolboxes Center , please migrate it to ATOMS website. Even if you do not want to have your module available in Scilab through ATOMS, please migrate it.
Note : the contribution website ("Scilab Toolboxes Center" not ATOMS website) is now deprecated and is only kept for historic reasons.
ATOMS admin created a new version of my module
This is usually because you set your module as available for Scilab greater or equal to 5.3.0. In order to package it for Scilab 5.4, we need to create a new module, with the same archive and the same code, but in a different version number than 5.3 (you can notice it is set as greater or equal to 5.4). This is mainly due to some change we will bring in Scilab 5.4 way of managing ATOMS modules, in order to make it more precise. Another change like this may appear for Scilab 6.0.
If you package your modules on your own, please note that a working compiled module for 5.3.0 may not be functional for 5.4.x, especially if you are not only dealing with macros but also with C, C++ or Fortran.
From 5.3 to 5.4 family
Due to a change in the compilers for the 5.4 family on windows, modules indicated as available for Scilab >= 5.3 or >= 5.2 might not be available in 5.4. Packagers should make another version of their module setting it as available for >= 5.4.
Preparing for Scilab 6
In Scilab 6, stack-c.h won't be available anymore. It is currently set as deprecated, and should be replaced by api_scilab.h.
Guidelines while submitting a module
clean your package : do not include binary files (.bin, .lib, .dif, .o, .obj files). create tests for your package : this way, using atomsTest, we can check much quickier if it works on every platform.
name you .zip or .tar.gz as nameoftoolbox-x.x-src.zip or nameoftoolbox-x.x-src.tar.gz, where x.x represent the version number.
create a folder, in the zip/tar.gz file, named nameoftoolbox, in which you put everything. while submitting, declare it as sources of a package, not as simple file, if you want it to be compiled by our compilation
chain. make it coherent : if you named it with special uppercases on atoms, name it with special uppercases in the folders
names and in the builders files, at least. be sure to have a yourtoolbox.start AND yourtoolbox.quit, and that they respect the uppercases of your module. It should
match the url of your module, for example http://atoms.scilab.org/toolboxes/Cardiovascular will have a Cardiovascular.start, Cardiovascular.quit, and a TOOLBOX_NAME Cardiovascular, and not CardioVascular.
Toolbox Skeleton(478/1655 downloads)Skeleton of a valid atoms package
DetailsVersion
5.4.0-1

AuthorSimon Gareste
CategoriesTestsTechnical
LicenseCeCILL
Supported Scilab Versions>= 5.4
Creation Date25th of October 2012
Description
Skeleton of a valid atoms package
Files (6)
[35.20 Ko] toolbox_skeleton-5.4.0-1-src.zip
[45.43 Ko] toolbox_skeleton_5.4.0-1.bin.i686.linux.tar.gzLinux version (i686)Automatically generated by the ATOMS compilation chain
[58.30 Ko] toolbox_skeleton_5.4.0-1.bin.x86_64.linux.tar.gzLinux version (x86_64)Automatically generated by the ATOMS compilation chain
[102.55 Ko] toolbox_skeleton_5.4.0-1.bin.windows.zipWindows version (i686)Automatically generated by the ATOMS compilation chain
[103.37 Ko] toolbox_skeleton_5.4.0-1.bin.x64.windows.zipWindows version (x64)Automatically generated by the ATOMS compilation chain
[42.50 Ko] toolbox_skeleton_5.4.0-1.bin.x86_64.darwin.tar.gzMacOSX versionAutomatically generated by the ATOMS compilation chain
Guidelines To Design a Module

Abstract
In this page, we give some general principles which can be used when we design a Scilab module. We do not focus on technical details to actually create a toolbox. Instead, we give general methods on the design of a public module. These rules are based on day-to-day experiences from ourselves and our contact with other Scilab users. The core idea in this page is to present simple proposals which are often neglected when we do not think from the point of view of other users.
Contents
1. Guidelines To Design a Module 1. Abstract 2. Introduction 3. Avoid function name conflicts 4. Provide help pages 5. Provide examples 1. Examples are self-contained 2. Only valid statements 3. Provide scripts, not sessions 4. A good example 5. All functions must have one (or more) example 6. Designing the API 1. Optional input arguments 2. A correct order for optional input arguments 3. A correct order for optional output arguments 4. Argument checking 5. Localization of messages 6. Outputs messages within functions 7. Orthogonality between modules 8. A check-list 7. Do not stay alone : communicate! 8. Conclusion 9. See Also 10. Bibliography
Introduction
The first step when we learn how to create a module is to read the "Toolbox skeleton", a complete example module which is available in SCI/contrib/toolbox_skeleton. Beginners may also consider the "How to create a toolbox":
http://wiki.scilab.org/howto/Create_a_toolbox
In order to manage the sources of the module, we can use the Scilab Forge :
http://forge.scilab.org/
The Scilab Forge is a plateform to host the sources and share the work in a team of developers, sometimes not located in the same country. It provides both SubVersion (SVN) and GIT source code systems. The Forge also allows to manage the Downloads of the module and the Tickets (Bug Reports).
Once done, we can use ATOMS to distribute our work. This is describe in
http://wiki.scilab.org/ATOMS.
Creating a toolbox for our personal use or distributing a module for a public use is sometimes completely different and, most of the times, brings new issues and requires a different point of view. All in all, writing a public set of functions requires that we think in terms of Application Programming Interface (API): what public functions this module should provide ?

In this document, we analyse methods that we can use to solve practical issues with the design of a toolbox. Indeed, not all problems are caused by technical bugs. They are some problems which are generated by the design of the toolbox, and which do not appear so clearly. These issues are parts of the toolbox which are missing, which makes them not so easy to identify.
Avoid function name conflicts
We should avoid to name our functions with short names such as "euler" or "dt". This is because it may cause name conflicts between our module and other modules.
For example, we may design your module with Scilab v5.2.2. But, in Scilab v5.2.3, we introduce a new function named "euler". Then our module will not work anymore.
For example, we may design your module with Scilab v5.2.2. But, there is another module, say "MyExtraModule", that we have never used or even heard of, which also provide an "euler" function. Then, the users who both use our module and the "MyExtraModule" module will have trouble with the "euler" function.
It may happen that users of our module call a function, say "foo1", where "dt" is a variable. In this case, we may see a warning message about the overwriting of the "dt" function.
There is one simple way to solve this issue. Assume that the name of our module is "scifoo". A good naming rule is to use underscores to separate the name of the module and the name of the functions. For example, we may name our functions with as "scifoo_euler", "scifoo_dt", etc... The naming rule "scifooEuler", "scifooDt" would also work.
An additionnal advantage of this naming convention is that the auto-completion in the console will work. That is, if we interactively type "scifoo" in the console, then type the "TAB" key, then the list of all functions begining with "scifoo" will be automatically displayed graphically by Scilab.
Provide help pages
In general, all the public functions should be associated with an help page.
The content of the .xml file associated with the help page may be automatically produced from the .sci macro, based on the help_from_sci function:
help help_from_sci
The help_from_sci function generates the .xml file depending on the comments in the .sci file.
Simply call the help_from_sci function, and this will open the editor with a template to be filled.
help_from_sci()
For example, the following mystery function contains comments which give a description of the function.
function y = mystery ( x ) // Randomly performs a mysterious computation. // // Calling Sequence // y = mystery ( x ) // // Parameters
// x : a m-by-n, matrix of doubles // y : a m-by-n, matrix of doubles, the randomly computed values. // // Description // Randomly computes results. // // Examples // x = mystery ([1 2 4 5]) // // Authors // Bill Smith, 2010
x = x(:) y = grand(1,"prm",x)endfunction
In the previous function, the words "Calling Sequence", "Parameters", "Description", "Examples" and "Authors" are automatically recognized by the help_from_sci() function, which creates the associated sections in the .xml file. In this case, the following statement would automatically generate the associated help/en_US/mystery.xml file, based on the macros/mystery.sci macro.
help_from_sci("macros","help/en_US")
Another solution is to use the helptbx module to automate the process of updating the .xml files of a toolbox based on the .sci files. This script sequentially uses the "help_from_sci" function to automatically generate the .xml from the .sci files in one given directory. Moreover, the .xml files can be automatically updated depending on the time stamp of the .sci files. This is convenient in the cases where we update the comments in the .sci file.
As an example, we can analyse how the help pages of the "number" module (http://forge.scilab.org/index.php/p/number) were created. In the help/en_US directory of the module, the update_help.sce is a script which updates the help pages (.xml) from the macros (.sci). The helptbx_helpupdate function takes as input argument a matrix of strings defining the functions to update, the help directory and the macros directory.
helpdir = get_absolute_file_path("update_help.sce");funmat = [ "number_carmichael" "number_coprime" "number_extendedeuclid" "number_factor" "number_fermat" ];macrosdir = cwd +"../../macros";demosdir = [];modulename = "number";helptbx_helpupdate ( funmat , helpdir , macrosdir , demosdir , modulename , %t );
In the case where we have to create the help pages of functions based on gateways (in the C language, for example), then the previous method cannot be used directly. In this case, a possible solution is to create pseudo-macros as .sci files, which only contain the comments necessary for the helptbx module.
For example, the "accsum" module is partly based on gateways. The help/en_US/pseudomacros directory
http://forge.scilab.org/index.php/p/accsum/source/tree/HEAD/help/en_US/pseudomacros

contains a set of .sci files which only contains comments: the body of the function is empty, since the actual implementation is done in the C gateways. These .sci files are used in the associated update_help.sce script, which automatically generates the .xml files.
More informations on this topic are available in the help of the helptbx module :
http://atoms.scilab.org/toolboxes/helptbx
Provide examples
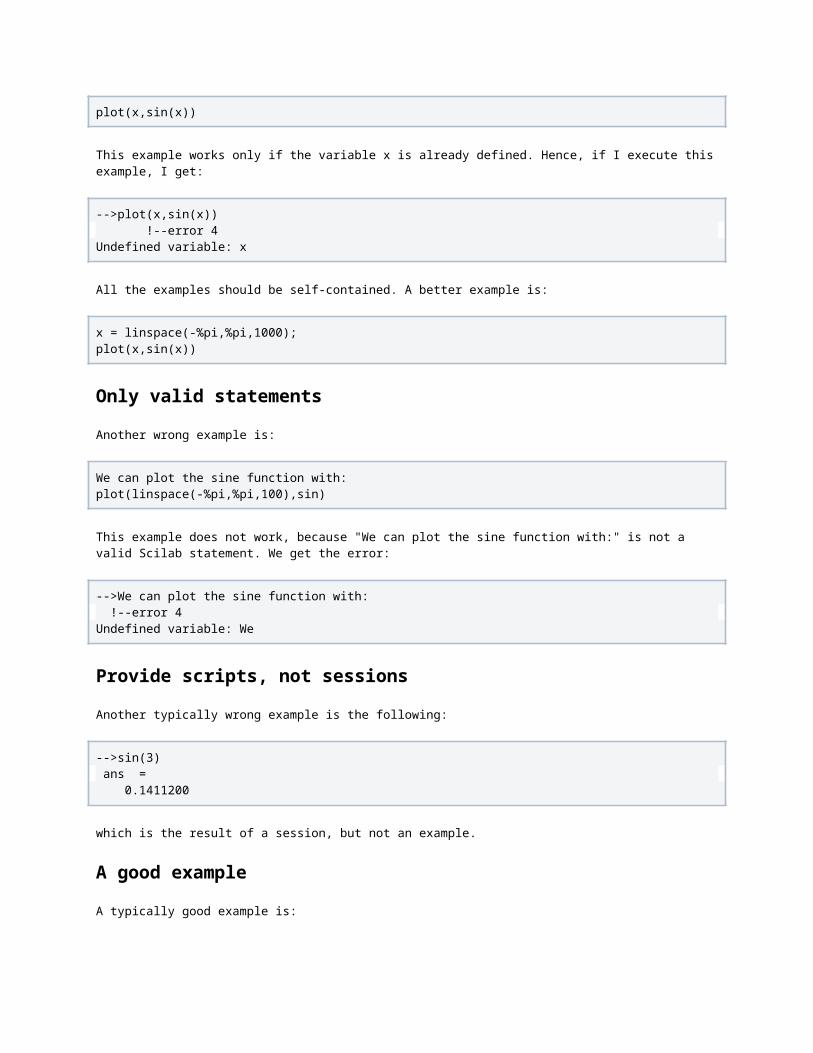
In the help page of your module, we should consistently provide an example for each function. This example should work, whatever the context of the user may be, that is, we should not assume that some variable already exist or some function is defined.
Examples are self-contained
A typically wrong example is:
plot(x,sin(x))
This example works only if the variable x is already defined. Hence, if I execute this example, I get:
-->plot(x,sin(x)) !--error 4 Undefined variable: x
All the examples should be self-contained. A better example is:
x = linspace(-%pi,%pi,1000);plot(x,sin(x))
Only valid statements
Another wrong example is:
We can plot the sine function with:plot(linspace(-%pi,%pi,100),sin)
This example does not work, because "We can plot the sine function with:" is not a valid Scilab statement. We get the error:
-->We can plot the sine function with: !--error 4 Undefined variable: We
Provide scripts, not sessions
Another typically wrong example is the following:

-->sin(3) ans = 0.1411200
which is the result of a session, but not an example.
A good example
A typically good example is:
x=linspace(-%pi,%pi,200);scf();plot(x,sin(x))
This example can be copied by the user and pasted into the console: it directly works.
All functions must have one (or more) example
All the functions in a module should be associated with an example, without exception.
Including output produces in a typical test case is a good idea, since it gives the user the typical result that should be produced, without even running the example. In all cases, these sessions should be separate from the example: both have a value.
Designing the API
In this section, we provide practical advices on the design of the functions of the module. This is commonly called the Application Programming Interface (A.P.I.)
We generally use our function in a specific application. But, when we provide our module as a public module, we have to think differently, so that the function can work in a different context, probably a context that we are not used to.
In this section, we presents common problems or errors when we design a module.
Optional input arguments
In this section, we analyze and compare several methods to manage optional input arguments.
This section requires that we know sufficiently how to write a flexible function. More details on this topic are presented in [1], in the section "Management of functions".
The most common methods to manage optional input arguments are:
1. using varargin,2. using varargin and the empty matrix,3. using the key=value syntax and the exists function.
One of the problems to solve is to be able to "skip" an input argument, that is, to set the optional argument #3, while using the default value of the optional argument #2. Hence, we must also compare the methods with respect to this criteria.

Here is a list of drawbacks and advantages for the previous methods.
Using the varargin variable is an interesting method and works very well in practice. But it does not allow to "skip" an argument.
The key=value syntax is a simple method to provide optional arguments to a function. It allows to "skip" an argument. Still, it has several drawbacks which make it a difficult programming method. These drawback lead to development problems and bugs. More details on this topic are presented in Why using key=value syntax to manage input arguments is not a good idea.
The method based on varargin and the empty matrix is a safe programming practice. It allows to "skip" and argument safely.
A correct order for optional input arguments
In some cases, the function we are designing have optional input arguments. If this case, an optional argument which is not provided by the user is replaced by its default value. In this section, we discuss the way to order the optional arguments, so that they best fit the user's need.
Assume that we have a function f with the following calling sequence:
y = f(x)y = f(x,a)y = f(x,a,b)
where x is a mandatory input argument, y is a mandatory output argument and a and b are optional input arguments.
The choice that we have to make is: should we choose :
y = f(x,a)y = f(x,a,b)
or
y = f(x,b)y = f(x,b,a)
In other words, how order the optional input arguments ?
In practice, the optional arguments are probably not all at the same rank of practical use. For example, the option b may be much more frequent to use than the option a. In this case, the optionb should come before in the calling sequence of the optional arguments.
A correct order for optional output arguments
In this section, we discuss how to order the optional output arguments of a function.
Assume that we have a function f where x is a mandatory input argument, y is a mandatory output argument and z is an optional output argument.
The choice that we have to make is: should we choose the calling sequence
y = f(x)
[y,z] = f(x)
or
z = f(x)[z,y] = f(x)
In other words, how order the optional output arguments ?
The problem is that, if the user wants to get only z, then the calling sequence [y,z] = f(x) forces to compute y, even if y is unnecessary.
In order to choose, we might think in terms of computational cost: which argument cost the most of CPU time ?
It might happen that the cost of y is much larger than the cost of z. The output argument z comes for "free". In this case, the calling sequence [y,z] = f(x) is fine.
Instead, if the cost of z is much lighter than the cost of y, choosing [y,z] = f(x) is a bad idea. Indeed, if we are in the particular situation where y is unnecessary, we must compute y. In this case, the calling sequence [z,y] = f(x) is a better choice.
We might also think in terms of practical uses. For example, it might happen that, if z is required, then y is also required. In this case, the calling sequence [y,z] = f(x) is a good choice.
For example, the derivative function, which computes numerical derivatives, has the calling sequence [J,H]=derivative(f,x), where f is a function, x is the current point, J is the Jacobian and His the Hessian matrix. In practice, when we need the Hessian matrix, we also need the Jacobian matrix. Moreover, the cost of H is much larger than the cost of J. This is why the calling sequence [J,H]=derivative(f,x) is a good choice. On the other hand, in the cases where only H is required, then the derivative function requires to compute J, so that useless function evaluations are done. In this case, we should create two separate functions derivativeJacobian and derivativeHessian functions.
Argument checking
Functions should be designed so that they are robust against wrong uses. The warning and error functions are the basis of robust functions.
For example, a user may set an input argument as a string instead of a function. This might generate an unexpected error. Or the user switch two input arguments: this might not generate an error, but may produce a completely wrong result.
This is why we often check the input arguments of functions so that the error message generated to the user is as clear as possible. In general, we should consider the following checks:
number of input/output arguments, type of input arguments, size of input arguments, content of input arguments.
More details on this topic are presented in [1], in the section "Robust functions".
Localization of messages

The gettext function manages the messages which are produced by Scilab in various languages. In general, we should write functions which can be localized. In order to make this localization easier, we should use the standard error messages which are presented at:
Localization in English - Standard messages
Indeed, if we use these standard messages, our function is automatically localized, without any work from the developper.
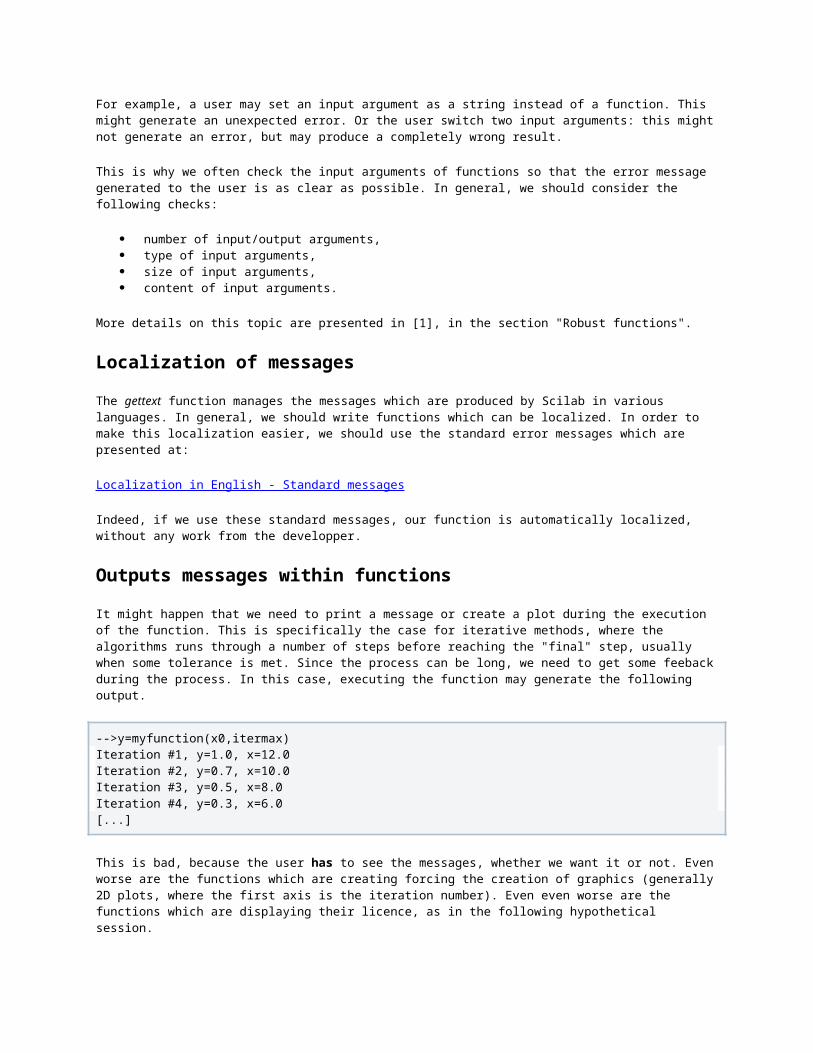
Outputs messages within functions
It might happen that we need to print a message or create a plot during the execution of the function. This is specifically the case for iterative methods, where the algorithms runs through a number of steps before reaching the "final" step, usually when some tolerance is met. Since the process can be long, we need to get some feeback during the process. In this case, executing the function may generate the following output.
-->y=myfunction(x0,itermax)Iteration #1, y=1.0, x=12.0Iteration #2, y=0.7, x=10.0Iteration #3, y=0.5, x=8.0Iteration #4, y=0.3, x=6.0[...]
This is bad, because the user has to see the messages, whether we want it or not. Even worse are the functions which are creating forcing the creation of graphics (generally 2D plots, where the first axis is the iteration number). Even even worse are the functions which are displaying their licence, as in the following hypothetical session.
-->y=myfunction(x0,itermax) Copyright (C) 2011 - foo ([email protected]) This function is provided under the FOO licence. Use at your own risks. Commercial use is permitted, within the limits of this licence. Please contact the support if needed. Please mention the authors of the function in any publication making use of this module.[...]
Indeed, in most cases, we do not need these messages. Would we be happy if Scilab produced messages when we compute the sine function, as in the following hypothetical session:
-->y=sin(2)I am hereI am thereI should go hereBut I go there[...]
By default, a computational function should stay quiet. To provide messages, we can provide verbose option, which is false by default, but can be enabled if necessary. The header of the function would then be
y=myfunction(x0,itermax)y=myfunction(x0,itermax,verbose)

where the first calling sequence is associated with the default false value of the verbose variable.
Orthogonality between modules
Your particular module should contain the functions which make your module "special", and only these functions. This allows to reduce the development time, increase the testing, the quality, and the chances of having back-compatibility issues.
One common issue is to put all your functions into the same module, even if the functions are completely independent. This is the "all-in-one" pitfall: we have one single module, and we put everything we need into it. After all, if functions are completely independent, we should create two (or more) separate modules.
Assume, for example, that we design a module to model a car: this would be an "Automotive Toolbox". In this module, we should not include a general-purpose optimization algorithm, or statistical functions, or Finite Elements functions, for example. Indeed, even if the practical use of the module requires an optimization algorithm, this is not the purpose of the current module. Here is a short list of reasons.
Another module may provide the feature. If not, we can create another module to provide the optimization feature that we are needing. This allows to separate the dependencies of the project. It additionally allows other users to use and test the optimization algorithms that we created, without requiring them to use the whole "Automotive module".
As a module developer and maintainer, if users actually use this optimization algorithm, we will have to maintain this function thoughout the version. In the end, some other module, or even Scilab itself may provide the feature, so that all our work may be lost. Removing the feature may create back-compatibility issues.
Bugs, help and testing issues will have to be performed for this support function, even if this is not the goal of the module. Therefore, developing the module will take more time and will slow down the release process.
It may still happen that an algorithm is necessary, but not in the "core scope". In this case, we may provide it, but do not provide an associated help page. This particular function is then not part of the "public API", but still used in the "private API". This way, it allows to change the internal detail of the module without breaking the back-compatibility.
A check-list
The following table is a check-list that we may use to check that a function is ready for release.
Optional input arguments Can we "skip" arguments safely ?
A correct order for optional input arguments
Is the order of input arguments correct ?
A correct order for optional output arguments
Is the order of output arguments correct ?
Argument checkingAre the argument checked for "number/type/size/content"
Localization of messages Are the standards messages used ?
Outputs messages within functions Can the messages be controlled ?
Orthogonality between modules Are the functions complementary ?
Do not stay alone : communicate!

Most of the previous errors can be avoided by communicating sufficiently with the Scilab community. Indeed, being able to discuss these technical topics with other users is one of the many advantages of using Scilab.
There are many ways to communicate with other users and developers. Some of these ways are described at :
http://www.scilab.org/support/technical_support http://www.scilab.org/communities/developer_zone/tools/mailing_list
At any stage of the development of the toolbox, a user should communicate with the community. For example, we may not be aware of similar tools which are independently developed by other users.
In this context, one of the common steps are the following.
We begin by writing simple scripts, later gathered in a module. Several months later, this collection of scripts begins a bigger module, finally ending as a public project. Several months later, this becomes a public module. We communicate on the "new module". A user tells us that another module has (partly or completely) the same feature.
Hence, a simple mail such as : "We are starting to work on a module to compute this and that." can generate a lot of interesting connections with other projects and can save us a lot of time.
Conclusion
Readers who want to read more about the creation of Scilab modules might be interested by [2]. The following is the abstract of the document.
"In the first part, we focus on the use of external modules. We describe their general organization and how to install a module from ATOMS. Then we describe how to build a module from the sources. In the second part, we present the management of a toolbox, and the purpose of each directory. We emphasize the use of simple methods to automatically create the help pages and to manage the unit tests. Then we present the creation of interfaces, which allows to connect Scilab to a compiled C, C++ or Fortran library. We consider the example of a simple function in the C language and explore several ways to make this function available to Scilab. We consider a simple method based on exchanging data by file. We then present a method based on the call function. Finally, we present the classical, but more advanced, method to create a gateway and how to use the Scilab API. The two last sections focus on designing issues, such as managing the optional input or output arguments or designing examples."
See Also
How to create a module (from a developer's point of view) Scilab Module Architecture Scilab Forge
Bibliography
[1] "Programming in Scilab", Michael Baudin, 2011, http://forge.scilab.org/index.php/p/docprogscilab/downloads/
[2] "Writing Scilab extensions", Michael Baudin, 2012, http://forge.scilab.org/index.php/p/docsciextensions/downloads/
How to create a moduleThis article describes a standard method to create a Scilab module. The main objective is to help the contributors to build a module easily. This allows the uers to install the module just by executing a single builder. From there, using the module only requires to execute a single loader script.
In the first part, we show how to structure the module by creating directories, sub-directories and files at the right place. Then we customize the templates to create the builder(s), the loader(s), and the Scilab help files. In the last section, we present how to upload the module on the Scilab website.
Contents
1. How to create a module 1. Introduction 2. Definitions 1. Script 2. Macros 3. Primitive 4. Builder 5. Loader 3. Module structure 4. Sub-builders and sub-loaders 1. The macros directory 1. The macros builder 2. The macros loader 2. src and sci_gateway directories 1. C/Scilab Interface 2. Example of interface program 1. First example: C function 2. Second example: fortran function 3. Primitives builder 3. The help directory 1. Creation of .xml files 2. The help builder 5. The main builder 6. Upload your module 7. See also
Introduction
The examples in this document are provided in the module skeleton provided with Scilab. This module is a template of module that is located in SCI/contrib/toolbox_skeleton/ (or on the website). To get this example on Windows, you must install "A toolbox skeleton (to extend Scilab)" component when we install Scilab.
Definitions
Script
Scilab scripts are text files with the extension .sce (see example). They are used to store Scilab code which can be executed using the exec function.
Macros
Scilab macros are Scilab functions written in Scilab code and stored in a file with the extension .sci (see example).

Primitive
Scilab primitives are Scilab functions which call a function written in C, C++ or fortran code, using an interface (gateway) program. So for each Scilab primitive we must create the corresponding interface program (see an example code and interface).
Builder
A builder file is a Scilab script used to build the module i.e. to create a binary version which Scilab can load from a source version. This file is called builder*.sce (Examples: builder.sce, buildhelp.sce, ...).
Loader
A loader file is a Scilab script used to load the module in Scilab. This file is called loader*.sce (Examples: loader.sce, loadhelp.sce, ...). This file is usually generated by the corresponding builder file.
Module structureThe root directory has the generic name of the module (here toolbox_skeleton), it contains 8 sub-directories:
macros: module macros (.sci files), buildmacros.sce and loadmacros.sce scripts src: source code (c, cpp, fortran sub-directories) sci_gateway: gateway files (c, cpp, ... sub-directories) help: english (respectively french, ...) help sub-directory named en_US (respectively fr_FR, ...) which
contains all the .xml help files, buildhelp.sce script etc: files used to initialize the module when it is loaded (toolbox_skeleton.start) and when you exit Scilab
(toolbox_skeleton.quit) tests: .tst files (scripts to test your module) demos: some examples to illustrate your module (.sce files) includes: .h files that you want to publish with your module
and 4 files:
readme.txt: module description and installation guide builder.sce: the main builder file loader.sce: the main loader file (generated by builder.sce) license.txt
To build this module, you have to run this command in Scilab:
exec builder.sce
And then run the loader to load/launch the module:
exec loader.sce
Then you can launch Scilab help browser to see the help pages about toolbox_skeleton:

help
Sub-builders and sub-loadersThe main builder and main loader scripts launch respectively the sub-builders and sub-loaders included in the sub-directories (macros, src, help, ...), to generate and load needed libraries and Scilab help files.
The macros directory
By convention the builder included in the macros directory is named buildmacros.sce.
In this example, we consider that the macros directory of the toolbox_skeleton module contains just only one macro, the function scilab_sum (see above script). This function returns s the sum of A + B (A and B are the inputs of the function).
Example of Scilab macro: scilab_sum.sci
function s = scilab_sum(A, B) s = A + B;endfunction
The macros builder
The builder (see below script) creates a library variable from macros stored in the directory macros, and saves it in the file calledlib. The builder file contents is generic, it is executed in two steps:
first step locates buildmacros.sce script (see get_absolute_file_path function help page) second step builds macros (see tbx_build_macros function help page).
The library generated is called: toolbox_skeletonlib i.e. yourtoolboxnamelib (yourtoolboxname must be 21-characters long max).
Contents of buildmacros.sce file:
tbx_build_macros(TOOLBOX_NAME, get_absolute_file_path('buildmacros.sce'));
clear tbx_build_macros;
The macros loader
The loader loads the library generated by the builder in the directory macros.
src and sci_gateway directories
As said before, a Scilab primitive is a Scilab function which calls a function written in C/C++ or fortran code through an interface. So for each Scilab primitive we must create the corresponding interface program stored in the sci_gateway directory. The source code of the function is stored in the src directory and its sub-directories (c, cpp, fortran, ...).

C/Scilab Interface
When a Scilab primitive is called, the interface program checks that the number, the type and the size of inputs/outputs arguments is correct (using functions such as CheckRhs and CheckLhs), and gets the input argument addresses which are in Scilab internal stack to give this information to the interfaced function.
We won't describe here all the possibilities of interface programs, for more explanations see the directory SCI/dynamic_link/examples.
Example of interface program
These examples (written in C code) are described step by step. They explain how to write interfaces, so it's important to understand them to know how to customize them for your modules.
First example: C function
We consider a C function csum which returns the sum of two scalars. We suppose that the name of the corresponding primitive in Scilab is c_sum and the associated interface program name is sci_csum. By convention all interface program names begin with "sci_". The both following scripts represent the C code of csum and sci_csum.
The primitive c_sum can be called in Scilab as follows:
--> Y = c_sum(A,B)
Source code of csum.c:
int csum(double *a, double *b, double *c){ *c = *a + *b; return 0;}
Source code of sci_csum.c:
#include "stack-c.h"#include "api_scilab.h"
/* ==================================================================== */extern int csum(double *a,double *b,double *c);/* ==================================================================== */int sci_csum(char *fname){ /* error management*/ SciErr sciErr; int iRet = 0;
/* Variables for first input argument*/ int* piAddr1 = NULL; double dblVal1 = 0;
/* Variables for second input argument*/ int* piAddr2 = NULL; double dblVal2 = 0;

/* Variable for return value */ double dblRetVal = 0;
/* check that we have only 2 input parameters */ CheckRhs(2,2);
/* check that we have only 1 output parameter */ CheckLhs(1,1);
/* get first parameter and put in 'dblVal1' */ sciErr = getVarAddressFromPosition(pvApiCtx, 1, &piAddr1); if(sciErr.iErr) { printError(&sciErr, 0); /* No return variable */ LhsVar(1) = 0; return 0; } iRet = getScalarDouble(pvApiCtx, piAddr1, &dblVal1); if(iRet) { /* No return variable */ LhsVar(1) = 0; return 0; }
/* get second parameter and put in 'dblVal2' */ sciErr = getVarAddressFromPosition(pvApiCtx, 2, &piAddr2); if(sciErr.iErr) { printError(&sciErr, 0); /* No return variable */ LhsVar(1) = 0; return 1; } iRet = getScalarDouble(pvApiCtx, piAddr2, &dblVal2); if(iRet) { /* No return variable */ LhsVar(1) = 0; return 1; }
/* call csum subroutine */ csum(&dblVal1, &dblVal2, &dblRetVal);
/* create a variable on scilab's memory */ iRet = createScalarDouble(pvApiCtx, Rhs + 1, dblRetVal); if(iRet) { /* No return variable */ LhsVar(1) = 0; return 1; }
/* assign new variable to return value*/ LhsVar(1) = Rhs + 1; return 0;}

Step 1: CheckRhs(minrhs,maxrhs) and CheckLhs(minlhs,maxlhs) instructions
CheckRhs function uses the arguments minrhs and maxrhs to check that:
minrhs <= number of input arguments <= maxrhs
The number of inputs and outputs arguments (respectively 2 and 1) of csum are constant, so minrhs=maxrhs=2 and minlhs=maxlhs=1, but for other functions they can be variable, in this case the variables minrhs/minlhs and maxrhs/maxlhs are different.
We can use directly the defined variables Rhs (number of inputs) and Lhs (number of outputs) instead of the functions CheckRhs and CheckLhs to check the number of inputs/outputs.
Step 2: getVarAddressFromPosition(pvApiCtx, 1, &piAddr1) instruction
getVarAddressFromPosition function get address of a variable from input parameter number.
pvApiCtx : Api context provided by api_scilab.h. 1 : First input argument of csum piAddr1 : returned variable address
Step 3: getScalarDouble(pvApiCtx, piAddr1, &dblVal1) instruction
getScalarDouble get scalar double data from variable address, check dimension (1x1), type and complexity.
pvApiCtx : Api context provided by api_scilab.h. piAddr1 : Address of the variable dblVal1 : return double value
Step 4: getVarAddressFromPosition(pvApiCtx, 2, &piAddr2) instruction getVarAddressFromPosition function get address of a variable from input parameter number.
pvApiCtx : Api context provided by api_scilab.h. 2 : Second input argument of csum piAddr2 : returned variable address
Step 5: getScalarDouble(pvApiCtx, piAddr2, &dblVal2) instruction getScalarDouble get scalar double data from variable address, check dimension (1x1), type and complexity.
pvApiCtx : Api context provided by api_scilab.h. piAddr2 : Address of the variable dblVal2 : return double value
Step 6: csum(&dblVal1, &dblVal2, &dblRetVal) instruction
Call to the C function csum which returns in dblRetVal the sum of dblVal1 and dblVal2.
Step 7: createScalarDouble(pvApiCtx, Rhs + 1, dblRetVal) instruction
createScalarDouble function creates a new variable in Scilab's memory at the (Rhs + 1)th position
pvApiCtx : Api context provided by api_scilab.h. Rhs+1: Position of the created variable in Scilab's memory. This position (here 3) must follows the position
of the last input argument (here 2) of c_sum dblRetVal: Value to add in variable

Step 8: LhsVar(1) = Rhs + 1 instruction
The first output argument (here Y) of c_sum takes the value of the variable placed in the (Rhs + 1)th position.
Second example: fortran function
We consider an fortran subroutine fsum which returns the sum of two scalars. We suppose that the name of the corresponding primitive in Scilab is fortran_sum and the associated interface program name is sci_fsum. By convention all interface program names begin by "sci_". The both following scripts represent the fortran code of fsum and sci_fsum.
The primitive fortran_sum in can be called in Scilab as follows:
--> Y = fortran_sum(A,B)
Source code of fsum.f:
c ================================= subroutine fsum(a,b,c)c ================================= double precision a,b,c c = a + b endc =================================
Source code of sci_fsum.c (we call a fortran subroutine from a C gateway):
#include "stack-c.h"/* ==================================================================== */extern int F2C(fsum)(double *a,double *b,double *c);/* ==================================================================== */int sci_fsum(char *fname){ /* error management*/ SciErr sciErr; int iRet = 0;
/* Variables for first input argument*/ int* piAddr1 = NULL; double dblVal1 = 0;
/* Variables for second input argument*/ int* piAddr2 = NULL; double dblVal2 = 0;
/* Variable for return value */ double dblRetVal = 0;
/* check that we have only 2 input parameters */ CheckRhs(2,2);
/* check that we have only 1 output parameter */ CheckLhs(1,1);
/* get first parameter and put in 'dblVal1' */ sciErr = getVarAddressFromPosition(pvApiCtx, 1, &piAddr1);

if(sciErr.iErr) { printError(&sciErr, 0); /* No return variable */ LhsVar(1) = 0; return 0; } iRet = getScalarDouble(pvApiCtx, piAddr1, &dblVal1); if(iRet) { /* No return variable */ LhsVar(1) = 0; return 0; }
/* get second parameter and put in 'dblVal2' */ sciErr = getVarAddressFromPosition(pvApiCtx, 2, &piAddr2); if(sciErr.iErr) { printError(&sciErr, 0); /* No return variable */ LhsVar(1) = 0; return 1; } iRet = getScalarDouble(pvApiCtx, piAddr2, &dblVal2); if(iRet) { /* No return variable */ LhsVar(1) = 0; return 1; }
/* call fortran fsum subroutine */ F2C(fsum)(&dblVal1, &dblVal2, &dblRetVal);
/* create a variable on scilab's memory */ iRet = createScalarDouble(pvApiCtx, Rhs + 1, dblRetVal); if(iRet) { /* No return variable */ LhsVar(1) = 0; return 1; }
/* assign new variable to return value*/ LhsVar(1) = Rhs + 1; return 0;}
This function is very similar to sci_csum.c
Primitives builder
Now the src and the sci_gateway directories contain all necessary files to create the builder (see template below) for the primitive c_sum.
We need to write two builders:

On one hand, in the src/c/ directory, this builder (named builder_c.sce) creates a shared library (see ilib_for_link function help page) corresponding to the C function.
And the other hand, in the sci_gateway/c/ directory, this builder (named builder_gateway_c.sce) creates the new shared libraries to link the compiled C or Fortran new Scilab interface routines and generates a loader (see ilib_build function help page). This loader file calls the addinter function to load dynamically the shared library (See addinter function help page).
Contents of builder_c.sce file:
tbx_build_src(['csum','csub'], ['csum.o','csub.o'], 'c', .. get_absolute_file_path('builder_c.sce'));
clear tbx_build_src;
Contents of buildsci_gateway.sce file:
tbx_build_gateway('skeleton_c', ['c_sum','sci_csum';'c_sub','sci_csub'], ['sci_csum.o','sci_csub.o'], .. get_absolute_file_path('builder_gateway_c.sce'), .. ['../../src/c/libcsum']);
clear tbx_build_gateway;
The help directory
This directory contains .xml files and a builder_help.sce script.
Creation of .xml files
Here is a template which shows you how to write the .xml help files. You should just fill the different items for your functions and put them in the help directory.
See http://wiki.scilab.org/howto/scilab_documentation_kit for more information about documentation.
Example of Scilab help file, c_sum.xml:
<?xml version="1.0" encoding="UTF-8"?><refentry version="5.0-subset Scilab" xml:id="c_sum" xml:lang="en" xmlns="http://docbook.org/ns/docbook" xmlns:xlink="http://www.w3.org/1999/xlink" xmlns:svg="http://www.w3.org/2000/svg" xmlns:ns3="http://www.w3.org/1999/xhtml" xmlns:mml="http://www.w3.org/1998/Math/MathML" xmlns:db="http://docbook.org/ns/docbook"> <info> <pubdate>$LastChangedDate: 2008-03-26 09:50:39 +0100 (mer., 26 mars 2008)$</pubdate> </info>
<refnamediv> <refname>c_sum</refname>
<refpurpose>sum from C</refpurpose> </refnamediv>

<refsynopsisdiv> <title>Calling Sequence</title>
<synopsis>a = c_sum(b,c)</synopsis> </refsynopsisdiv>
<refsection> <title>Description</title>
<para>Do a sum.</para>
<para>Add here a paragraph of the function description </para> </refsection>
<refsection> <title>Examples</title>
<programlisting role="example">c_sum(3,4)</programlisting> </refsection>
<refsection> <title>Authors</title>
<simplelist type="vert"> <member>YOUR NAME</member> </simplelist> </refsection></refentry>
The help builder
This file creates a file containing all your module documentation so that it can be loaded in Scilab help browser.
Contents of build_help.sce:
help_lang_dir = get_absolute_file_path('build_help.sce');
tbx_build_help(TOOLBOX_TITLE, help_lang_dir);
clear help_lang_dir;
The main builderThis builder is generic, it executes all sub-builder(s), here is its contents:
mode(-1);lines(0);try getversion('scilab');catch error(gettext('Scilab 5.0 or more is required.'));end;// ====================================================================if ~with_module('development_tools') then

error(msprintf(gettext('%s module not installed.'),'development_tools'));end// ====================================================================TOOLBOX_NAME = 'toolbox_skeleton';TOOLBOX_TITLE = 'Toolbox Skeleton';// ====================================================================toolbox_dir = get_absolute_file_path('builder.sce');
tbx_builder_macros(toolbox_dir);tbx_builder_src(toolbox_dir);tbx_builder_gateway(toolbox_dir);tbx_builder_help(toolbox_dir);tbx_build_loader(TOOLBOX_NAME, toolbox_dir);
clear toolbox_dir TOOLBOX_NAME TOOLBOX_TITLE;// ====================================================================
Upload your moduleNow your module can be compiled and loaded, you can:
Read the instructions about how to contribute to Scilab with your work, see http://atoms.scilab.org/ & http://wiki.scilab.org/ATOMS
Archive and Compress your module
Complete the submission form document and upload your package (here toolbox_skeleton.tar.gz and toolbox_skeleton.zip), see http://atoms.scilab.org/add
See also Guidelines To Design a Module Scilab Module Architecture