scor-pal basics mar 17 final copy for upload
TRANSCRIPT

Scor-Pal Basics
Envelopes
Nugget Boxes
Pointed Flap Envelopes
Making Boxes
Making Boxes cont’d
Copic Marker Tutorial
Glitter Illusions
Glitter Insets
Instructions • Place Scor-Pal on a flat surface with ruler at the top. • Place cardstock on the scoring surface. The sides and the top act as fences to properly align your paper for accurate scoring. Align with the top and either side fence depending on the size of your cardstock. • There are notches at the beginning of each score line to show you where the groove begins. With one hand holding the cardstock, hold the scoring tool as you would a pen or pencil (45 degree angle). When working with double sided Designer paper that has a white core, lower the angle of the tool ( 30 degrees). Carefully draw the scoring tool down the paper, using an even pressure. • The first time you use Scor-Pal® practice on a piece of scrap cardstock to determine the amount of pressure needed for your “hand”. • To clean your Scor-Pal®, wipe with a damp cloth. Dry thoroughly before using.
Card Making Tips and Paper information • One of the key benefits of Scor-Pal® is the ability to score multiple score lines at the same time, without moving the paper. This is invaluable when making grid, reverse grid cards, gate fold, accordion folds, brochure/flyer scoring, box making, origami, iris folding and BOXES galore! • When possible, always score with the grain of the paper. Cup the paper in your hands bringing the sides together. If it bends easily this is the grain of the paper. Turn the paper in the other direction. Repeat same action. The paper will not bend as easily. You will feel a slight resistance as it is bending “against the grain”. On a piece of cardstock 8 ½" x 11” the grain of the paper is usually down the 11” length. In most cases the grain of the paper is with the longest side, “grain long”. The paper fibers run in this direction. For a 12” x 12” paper do the “grain of paper” test explained previously. • Another easy way to test for the grain is by tearing the paper. With the grain will give you a straighter
tear.
Print Complete “Basics”
Basics

• It is best to fold your card so that the score line is to the OUTSIDE of the fold. The bump goes
to the inside. This gives a neater appearance to the inside of the fold.. • When you make the score line you are spreading the paper fibres ready for the fold. If you fold so the
score line is to the inside you are squashing the fibres you just spread apart. If you check a package of 3" x 3" folded cards from Stampin Up you will see that the indentation is on the textured side of the cardstock. This reinforces,you fold so the score line is to the outside of the fold with textured side out.
• When making accordion folds score at intervals, then turn the paper over and score in between the
previous scores i.e. a one inch accordion along an 11” length, score at 1”, 3”, 5”, 7” and 9”. Turn the paper over, score at 2”, 4”, 6”, 8” and 10”. The indentation is the mountain fold.
• If you are making the standard A2 card, 4 1/4” x 5 1/2”, score the full eleven inch length at 4 1/4” then cut the cardstock at 5 1/2”. This way you are saving time by only scoring once to make two cards.
. Brochure Fold - Dividing an eleven inch length into thirds • To divide an 11” length into thirds use the grooves marked with the inverted triangles • These are perfect grooves for brochure and letter folding or accordion booklets • The grooves are 3.666” and 7.333” from the left fence. • Further flatten the edges with the Scor-Tool to have the folded paper or cardstock lie flat. Gate Fold Cards • Use the grooves marked with a small dot. They are at 2 1/8” and 6 3/8” from the left fence. Diagonal Scoring • For diagonal scoring ensure that both corners are aligned to the same groove. The ruler markings along each side fence will help with scoring a 12” piece of paper on the diagonal. Align the page with the 6” groove using the side measurements as a reference for centering.

Eighths Sixteenths
Scor-Pal produces a score line similar to a letterpress score. Letterpress scoring A letterpress is basically the same type of machine used to foil-stamp and emboss. It is a press that uses pressure to create a pattern. A letterpress operates with a "male" scoring rule, in our case the Scor-Tool, a "female" channel, the groove and the paper in between. When the rule is pressed into the channel, it raises a ridge on the inside of the fold. The ridge acts as a hinge, making the paper easier to fold and ensuring a clean, straight, and durable result. A letterpress score affords the cleanest and most accurate fold possible. Although you can score in any direction, it's harder and riskier to go against the grain or across areas with heavy ink coverage. The need for scoring depends on the particular grade, finish and basis weight of your paper. http://www.wausaupapers.com/Resources/Tips.aspx?TypeID=5&ID=26
Non - Standard Scores • You are not limited to half inch measurements. • Eighth inch markings are between 0 -1" and 11½". By aligning the left side of your paper to eighth inch markings 1/8” and 1/16” etc scores are possible. • In the diagrams below you will see how to measure for 1/8th and 1/16th inch increments.

Scor-Pal Basics
Envelopes
Nugget Boxes
Pointed Flap Envelopes
Making Boxes
Making Boxes cont’d
Copic Marker Tutorial
Glitter Illusions
Glitter Insets
Customizing your own envelopes By Lauren Meader © Copyright 2008 All Rights Reserved
Making your own envelopes is often a task most won't attempt for many reasons. When you take the time to make a gorgeous card, doesn't it deserve its own gorgeous wrapper? With Scor-Pal, making your own envelopes is now a super easy task. The Scor-Pal when paired with these simple key measurements will make the task easy. My technique for these envelopes can be applied to ANY card size card. Just a few key points you need to remember and you are well on your way! Envelope Paper Size Formula 1. Measure size of your finished card 2. Length of card plus 1 1/4" = Width of Paper 3. Width of Card x 2 plus 1/2 of the width = Length of paper
For example 1. An A2 card is 51/2" long x 4 1/4” wide 2. 51/2” + 1 1/4 “ = 6 3/4" 3. 4/14 x 2 = 8 1/2" + half of 4¼ which is 2 1/8 is 8 1/2” + 2 1/8 = 10 5/8” round up to 10 3/4” Paper size is 6 ¾" wide x 10 3/4" long for an A2 Card.

Instructions for the most popular size, an A2 card
Step 1: Cut paper to measure 6 ¾” wide x 10 ¾" long.
Step 2: Align paper so the 6 ¾" width is to the top and right fence. Score at 11 ½".
Turn the paper and score the other side at 11 ½".
Repeat on opposite edge.
Step 3: Turn paper so the 10 ¾" length is aligned with the top and left fence. Score at 3" and 7 ½".
3" 7½"
NOTE: Paper is patterned side up for scoring. . When using decorator paper it is important to lower the angle of the Scor-Tool. (See Scor-Pal Basics). Fold so the score line is to the outside of the fold.
Here is an excel file that figures out the size of paper and where to score. This was created by Dina Griff. Envelope Sizing Tutorial Excel file
Scoring Formula Card is A2 size as above but this works with any size card • Score 1/2" in from each side of paper. • Subtract 1 1/4" from width, this is the first score line across the width of the paper for
example 4¼”- 1 ¼” = 3” First score is at 3” • Second Score- add card width to first score line plus 1/4” for example 3” ( first score) + 4
¼" (card width) + ¼" = 7 ½” Next score line is at 7 ½”. Score at 3” and 7 1/2” with the length of the paper along the top fence for A2 card. See below.

Step 5: OPTIONAL use corner rounder to round top corners of flap closure and envelopes side flaps. Note the guard has been taken off the punch so you can snip the side corners. You can also choose to do a scalloped border for the top flap.
Wrong side of paper
Step 4: Snip excess from top and bottom panel as shown in photo.
Step 6: Add Terrific Tape ( sold in online store) adhesive to BOTTOM FLAP edge ( red line shown) Bottom flap is smaller than your side panels so the adhesive will not show.
Step 7: Fold in side panels, remove adhesive backing and fold up bottom panel.

Step 8: Insert card. You may choose to add a removable adhesive for the closure or tie closed with ribbon.
Voilà a gorgeous custom "Envelope"
Scor-Pal Basics
Envelopes
Nugget Boxes
Pointed Flap Envelopes
Making Boxes
Making Boxes cont’d
Copic Marker Tutorial
Glitter Illusions
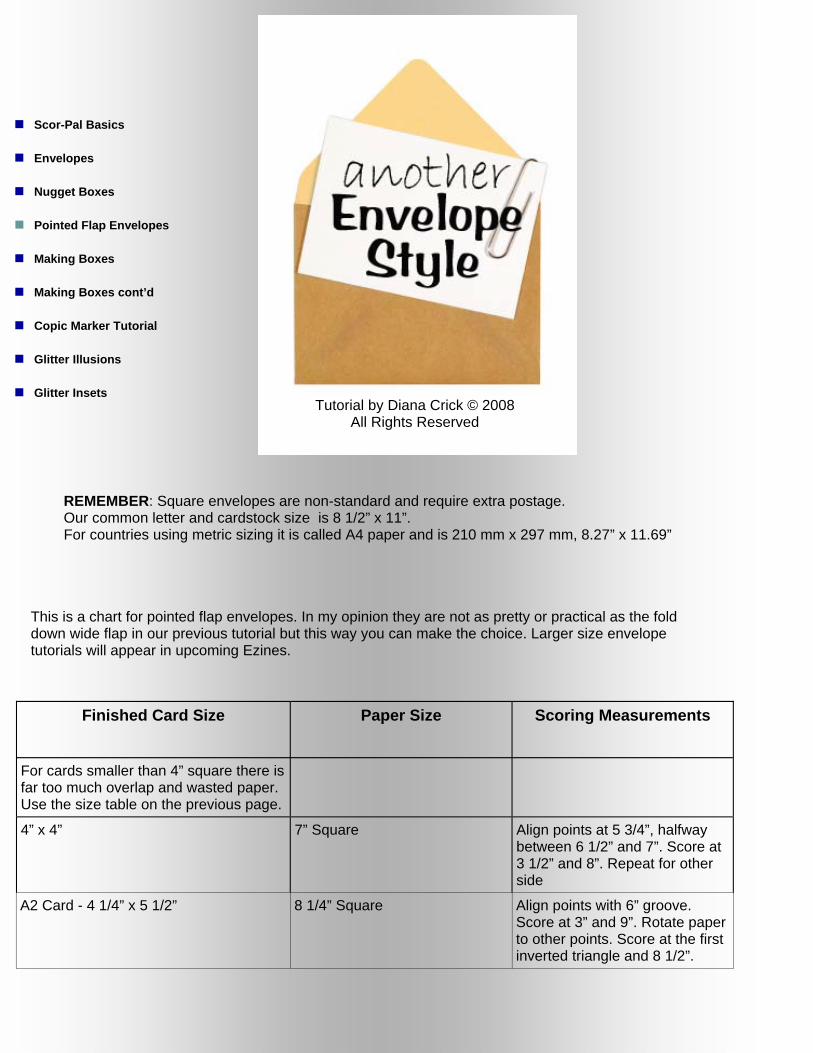
Glitter Insets Tutorial by Diana Crick © 2008
All Rights Reserved
This is a chart for pointed flap envelopes. In my opinion they are not as pretty or practical as the fold down wide flap in our previous tutorial but this way you can make the choice. Larger size envelope tutorials will appear in upcoming Ezines.
Finished Card Size Paper Size Scoring Measurements
For cards smaller than 4” square there is far too much overlap and wasted paper. Use the size table on the previous page.
4” x 4” 7” Square Align points at 5 3/4”, halfway between 6 1/2” and 7”. Score at 3 1/2” and 8”. Repeat for other side
A2 Card - 4 1/4” x 5 1/2” 8 1/4” Square Align points with 6” groove. Score at 3” and 9”. Rotate paper to other points. Score at the first inverted triangle and 8 1/2”.
REMEMBER: Square envelopes are non-standard and require extra postage. Our common letter and cardstock size is 8 1/2” x 11”. For countries using metric sizing it is called A4 paper and is 210 mm x 297 mm, 8.27” x 11.69”

“Envelobox” for A2 Card Perfect for bulky cards
Valerie Stangle © Copyright 2008 All Rights Reserved
In each step pay attention to the orientation (points) of your paper.
Step One: Paper size is 8 1/4"square. Align top point at 6” score line. Ensure bottom point is also in the same groove. Score at 3” and 9.”
Step Two: Move point to 6 ¼.” Visually line up between 6” and 6 ½” as there isn’t a marking at 6 ¼,” and score at 3.”
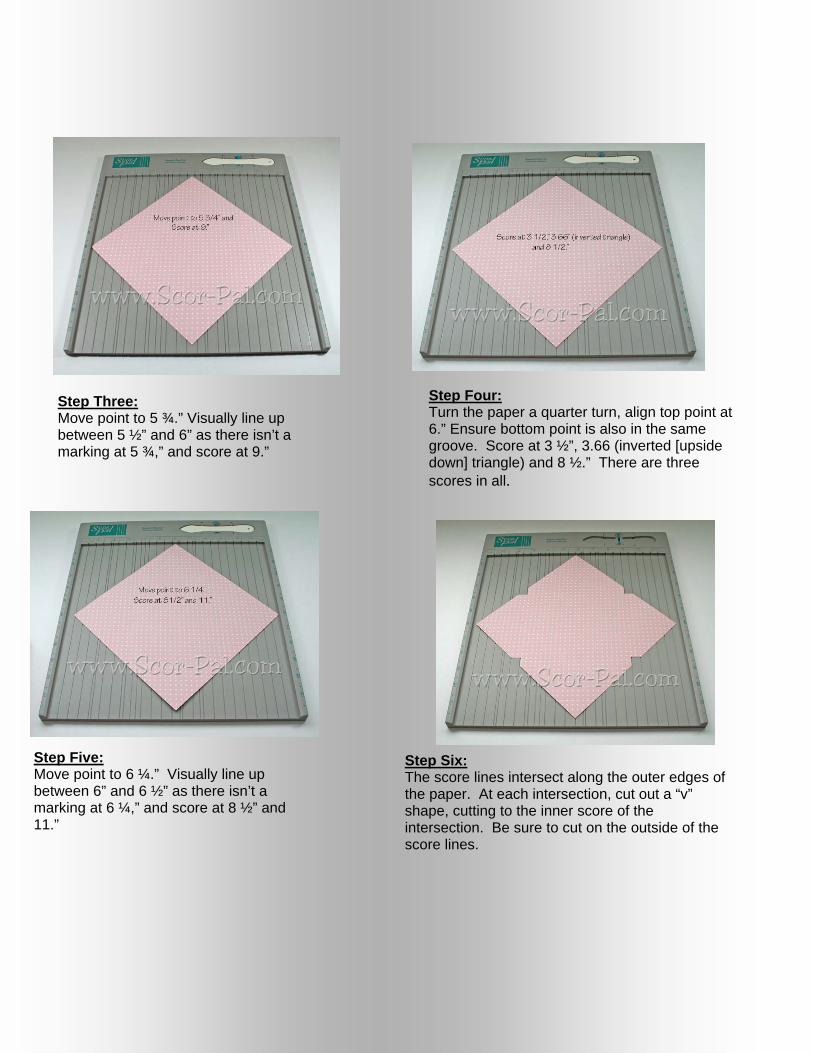
Step Four: Turn the paper a quarter turn, align top point at 6.” Ensure bottom point is also in the same groove. Score at 3 ½”, 3.66 (inverted [upside down] triangle) and 8 ½.” There are three scores in all.
Step Six: The score lines intersect along the outer edges of the paper. At each intersection, cut out a “v” shape, cutting to the inner score of the intersection. Be sure to cut on the outside of the score lines.
Step Three: Move point to 5 ¾.” Visually line up between 5 ½” and 6” as there isn’t a marking at 5 ¾,” and score at 9.”
Step Five: Move point to 6 ¼.” Visually line up between 6” and 6 ½” as there isn’t a marking at 6 ¼,” and score at 8 ½” and 11.”

Step Seven:Now, to complete your Envelobox, carefully fold score lines on one side, you are forming the edges of the box. Fold the remaining sides in the same manner. Fold and form box.
Step Eight: Place Scor-Tape on as illustrated.
Glue down the little flap.
Step Nine: Remove backing and adhere box together. Create matching cards with the remainder of your patterned paper. Seal your Envelobox with envelope glue, stickers, ribbons, etc.
Watch for other size “Enveloboxes” in upcoming Ezines.


Scor-Pal Basics
Envelopes
Nugget Boxes
Pointed Flap Envelopes
Making Boxes
Making Boxes cont’d
Copic Marker Tutorial
Glitter Illusions
Glitter Insets
Candy Nugget Boxes Revamped for Scor-Pal®
Our Guest Instructor is Sue Reynolds © 2008 All Rights Reserved
www.HotPawsCreations.blogspot.com
Sue resides in sunny, Orange County, California with her 3 adopted doggie fur babies. Sue has been crafting since she was a child. Her mother taught her many things about sewing, knitting, crocheting and cooking. Her father taught her all about woodworking and electronics. Rubber stamps were beginning to come out with more that just your name. When Creative Memories and Mrs. Grossman’s stickers first came out, she was hooked. The dining room table was not for eating anymore, it was for the new hobby of scrapbooking. Now, being a lucky lady and retiring early from working as an Ultrasound Technologist to being able to stay home with her fur babies has been a crafters dream. She built her own 6 ft. light table to be used for fabric cutting and the hope of friends sitting around it crafting as well. Becoming a Stampin’ Up demonstrator opened up a whole new world of card making, paper crafting and meeting new people. Then one day finding the Scor-Pal mentioned on another crafter’s blog, her curiosity guided her to this new fun tool. Having the time to work with paper patterns and modify them to work with the Scor-Pal is how the newly revamped “Nugget Box” tutorial came to be. Enjoy and don’t eat all the chocolate before you give them away!

Three Candy Box Single Row 4 ½ x 6 in bottom 5 1/8 x 3 ¼ in lid
Seven Candy Box Single Row 4 ½ x 10 in bottom 5 1/8 x 7 ¼ in lid
Four Candy Box Single Row 4 ½ x 7 in bottom 5 1/8 x 4 ¼ in lid
Six Candy Box Double Row 3 + 3 5 ¾ x 6 in bottom 8 3/8 x 3¼ in lid
Five Candy Box Single Row 4 ½ x 8 in bottom 5 1/8 x 5 ¼ in lid
Eight Candy Box Double Row 4 + 4 5 ¾ x 7 in bottom 8 3/8 x 4 1/4 lid
Six Candy Box Single Row 4 ½ x 9 in bottom 5 1/8 x 6 ¼ in lid
Ten Candy Box Double Row 5 +5 5 ¾ x 8 in bottom 8 3/8 x 5 ¼ in lid
Bottoms of the above boxes are made by scoring ¾" from edge then ¾" from that score line (1 ½ from edge) on each side. Align the left edge of the paper to the middle of the 3 1/2” groove. Score at 4 1/4” and 5”. Repeat on all four sides. Then cut according to Diagram 1. Fold tabs and glue. Then fold in double walls and glue. See Diagram 2.
Bottom of Nugget Box
4 1/4"
5"

Diagram 1 Diagram 2
Single row sleeve lids are scored 1 in from edge then ¾ from that score line (1 ¾ ) 1.Align paper to the middle of the 2 1/2” groove. Score at 3 1/2" and at 4 1/4". Repeat on other side. You will have 4 scores in all. Form a sleeve around filled nugget box and tape closed. Using a filled box will loosen the sleeve so it can be opened and slid easily for recipient! See diagram 3 Note: *Make sure you do not score the 5 1/8 side for single row boxes.
Nugget Box Sleeve
5 1/8”
4 1/4"
3 1/2"
Single Row Sleeve Lid

Double row sleeve lids are scored 2 in from edge then ¾ from that score line (2 ¾ ) 1. Align paper to the middle of the 1 1/2" groove. Score at 3 1/2" and 4 1/4". Repeat on other side. You will have 4 scores in all. Form a sleeve around filled nugget box and tape closed. Using a filled box will loosen the sleeve so it can be opened and slid easily for recipient! Note: *Make sure you do not score the 8 3/8 side for double row boxes. I would recommend making one out of scrap paper 1st and keep that as your model for the future. Also I would use Sticky Tape/Terrifically Tacky Tape/or Scor-Tape for holding box together.
4 1/4"
3 1/2"
8 3/8”
Double Row Sleeve Lid

Scor-Pal Basics
Envelopes
Nugget Boxes
Pointed Flap Envelopes
Making Boxes
Making Boxes cont’d
Copic Marker Tutorial
Glitter Illusions
Glitter Insets
Making Boxes!
Have you ever needed a box but couldn’t find the right size? Make one! You need card stock, tape, a Scor-Pal and just a little bit of time. By following a few simple rules, you can make boxes to fit just about anything! This tutorial will cover three basic types of boxes, a flat square box, a tall square box and a rectangle box.
Basic Rules for Square Boxes
Bottom paper measurements = size of box + 2 times the height of the sides. For example, a 3” box with 1” sides 3” + 1” + 1”= 5” square All four sides of the paper will be scored at 1” Lid paper measurements = size of box + 2 times the height of the lid + 1/8” For example, a lid for a 3” box with 1” sides 3” + 1” + 1” + 1/8”= 5 1/8” square
Our Guest Instructor is Tracy Harp © 2008 All Rights Reserved
www.inky-doodles.blogspot.com
Tracy, her husband and 2 boys, 9 and 11 live in Ransomville, NY, a small town outside of Niagara Falls. Much of Tracy’s time is spent looking after her boys and helping her husband who is a pastor.
Stamping it her therapy and brings her great joy. Tracy is a Stampin' Up demo, an alumni of the Splitcoaststampers Dirty Dozen team and has been a featured stamper for Whipper Snapper.

Flat Square Boxes (the bottom and lid are the same height) The following instructions are for a 3” box with lid where the sides are 1 1/2” tall.
Step 1: Cut your bottom paper to 6” square (3” + 1 1/2” + 1 1/2”= 6”) Step 2: Score all 4 sides at 1 1/2”
Step 3: Cut along the score lines on two opposing sides, just up to the first vertical score line. See photo. Step 4: Place paper so the outside of the box is face up. Apply two strips of Scor Tape to each of the 4 corners, parallel to the cuts. Step 5: Assemble bottom with taped corners inside of box.
Step 6: Cut the lid paper to 6 1/8” square (3” + 1 1/2” + 1 1/2” + 1/8”= 6 1/8”) Step 7: Assemble the lid in the same manner as the bottom. Step 8: To make it easier to remove the lid, use a circle punch to cut 2 semi circles on opposing sides.

Flat Box Measurement Table
Box Box Height Cut Bottom Score Bottom At Cut Lid Score Lid At
3” Square 1 1/2” 6” by 6” 1 1/2” on all 4 sides 6 1/8” by 6 1/8” 1 1/2” on all 4 sides
3 1/2” Square 1 1/2” 6 1/2” by 6 1/2” 1 1/2” on all 4 sides 6 5/8” by 6 5/8” 1 1/2” on all 4 sides
4” Square 1 1/2” 7” by 7” 1 1/2” on all 4 sides 7 1/8” by 7 1/8” 1 1/2” on all 4 sides
4 1/2” Square 1 1/2” 7 1/2” by 7 1/2” 1 1/2” on all 4 sides 7 5/8” by 7 5/8” 1 1/2” on all 4 sides
5” Square 1 1/2” 8” by 8” 1 1/2” on all 4 sides 8 1/8” by 8 1/8” 1 1/2” on all 4 sides
Tall square boxes are made in the same way as the flat boxes, adjusting your dimensions for a taller bottom. Taller boxes may also require cutting “tabs” for assembly. General Rule: if the sides of your box are more than half the width of your box, you will need to cut tabs before assembling your box. The following instructions are for a 3” square box with 4” sides and a lid with 1 1/2” sides.
Tall Square Boxes

Step 1: Cut the bottom paper 11” square. (3” + 4” + 4” = 11”) Step 2: Score all 4 sides at 4”.
Step 3: Cut the score lines on opposing sides up to the first vertical score line. Step 4: Measure for 1” tabs; cut away excess on all 4 corners.
Step 5: Turn your paper so the outside of the box is face up. Step 6: Trim the corners of the tabs as shown in the photo. Step 7: Apply Scor Tape to the tabs. Step 8: Assemble box with tabs on the inside. Step 9: Cut lid paper to 6 1/8” square. (3” + 1 1/2” + 1 1/2” + 1/8”)

Step 10: Cut score lines on opposing sides up to first vertical score line. Step 11: Apply Scor-Tape and assemble lid.

Scor-Pal Basics
Envelopes
Nugget Boxes
Pointed Flap Envelopes
Making Boxes
Making Boxes cont’d
Copic Marker Tutorial
Glitter Illusions
Glitter Insets
Rectangle boxes are similar in construction to square boxes but there are two different measurements for the sides. Basic measuring rules for rectangle boxes Bottom paper measurements = width of box + 2 times the height by length of box + 2 times the height. For example a box that measures 3” by 4” with a height of 2” 3” + 2” + 2” by 4” + 2” + 2” 7” by 8” Scored on all 4 sides at 2”. Lid measurements = width of box + 2 times height of lid + 1/8” by length of box + 2 times height of lid + 1/8” For example a lid to fit a 3” by 4” box with 1” sides. 3” + 1” + 1” + 1/8” by 4” + 1” + 1” + 1/8” 7 1/8” by 8 1/8” Scored on all 4 sides at 1”.
Rectangle Boxes

Step 1: Cut bottom paper 7” by 8” (3” + 2” + 2” by 4” + 2” + 2”) Step 2: Score all 4 sides at 2”. Step 3: Cut the score lines of the shorter sides up to the first vertical score line. Step 4: Turn paper so outside of box is face up, apply Scor Tape to the corners and assemble box with taped sides inside the box.
The following instructions are for a rectangle box 3” by 4” with 2” sides and a lid with 1” sides.
Step 5: Cut lid paper to 5 1/8” by 6 1/8” (3” + 1” + 1” + 1/8” by 4” + 1” + 1” + 1/8”) I punched an opening in the lid ( see Helpful Hints and Ideas) Step 6: Score all 4 sides at 1”. Step 7: Cut score lines on shorter side up to the first vertical score line. Step 8: Turn paper so outside of box is face up, apply Scor-Tape to corners and assemble with taped corners inside the box.

Helpful Hints and Ideas • Use heavier card stock or designer paper for sturdier
construction. • Double sided designer paper can add additional interest to
your boxes. • Before assembling your lids consider cutting a circle or oval
in the lid and adhering acetate to the underside. This will create a fun peek into the contents of your box. Add rub-ons or stamping to the acetate.
• Add ribbon pull tabs to your lids for easy removal. • Embellish your boxes and lids with scallops, ribbon, buttons,
etc • Stack several square flat boxes of varying sizes to make a
“cake”. • Use the bottom box measurements to create a holder for a
goodie bag.

Scor-Pal Basics
Envelopes
Nugget Boxes
Pointed Flap Envelopes
Making Boxes
Making Boxes cont’d
Copic Marker Tutorial
Glitter Illusions
Glitter Insets Our Guest Instructor is Tobi Crawford © 2008 All Rights Reserved
http://tobicrawford.blogspot.com/
Colouring with Copic Markers
Stamp image using dye/pigment/hybrid ink that won’t react to alcohol markers. I use either Palette ink (Black Noir) or Nick Bantock for Ranger ink (Lamp Black). DO NOT USE water based inks as the ink will smear when you start to color.
Tobi is a high school music teacher by day (choral specialist), a jazz singer and pianist by night. She also teaches classes weekly at her LSS and enjoys the challenge. Being a versatile paper-crafter she just about does it all (card-making, altered items, scrapbooking) and her style can shift with her moods: eclectic, simple, elegant, fun, cute, intricate. Tobi’s been featured in a number of Papercrafts publications (and future ones too!) and hopes to be featured in much more to come.

I choose my color palette by spreading out the papers I will be using for my project and choosing markers that match/compliment my paper choices. When choosing colors you in general want to keep the first letter/s of the marker the same (BG, G, R, etc) and the first number the same. The second number is what you want to pay attention to when choosing colors to blend with each other. Ideally you want to stay within 3 numbers to get a good digression of color. (BG40, BG43, BG46 for example), BUT having said that I’m a rule-breaker, and I frequently test the boundaries and rules, and I have found that if the colors look good, and if you blend RIGHT AWAY, you can get a pretty good effect with pretty much any color choice, you just have to work at it and practice.
Remember this rule: LIGHT-DARK-LIGHT. First you apply the lightest colour of your choice to the desired area. (I will show you the step-by-step method for the green area, but the blue area was done in the same manner)
When the light ink is still wet apply the darker colour where you want some shading. This is complete personal preference as to where you place the shading, but I always seem to start with the upper left side of the image. (I have no idea why, I guess I’m always standing at the same angle to the sun, who knows…)

Then RIGHT AWAY take that first color and blend the line between dark/light so the line disappears. With colors that are more than 3 numbers away (as I have used here) you might have to press a little harder, but I promise, it will work. Again, you just have to practice. Add additional shadows if you wish to finish of the area.
Add some contrasting color to make the image POP and give it a little depth. I chose the reds because there is a touch of red in the paper, and I also thought the image needed more color.
I have used Copic Ciaos with the airbrush system. I used a foam pencil-holder. PUSH it onto the Copic Ciao, and viola, it fit in the airbrush holder.

I pushed the pen into the holder, moved the position of the tip until I got a nice spray, and using a mask for the butterfly I airbrushed a blue background.
Using the Scor-Pal, score the cardstock base, decorate your card-front as desired, and apply any embellishments. Keep airbrushed cards out of direct/indirect sunlight as they will fade quickly.

Scor-Pal Basics
Envelopes
Nugget Boxes
Pointed Flap Envelopes
Making Boxes
Making Boxes cont’d
Copic Marker Tutorial
Glitter Illusions
Glitter Insets
Card 1 Card 2
For the card on the right I punched out shapes from a piece of cardstock narrower than my piece of Scor-Tape™. I lay down a strip of Scor-Tape™, removed the backing and applied the piece of the punched out cardstock down the middle. Then I glittered with Copper.
For the card on the left I used the punched out cardstock pieces out shapes from a piece of cardstock and lay them on my exposed tape. I added two cardstock strips down either side. Then I glittered with Copper. Don’t forget to burnish,
Now for the sticky adhesive piece of cardstock that we first made, apply glitter all over. Burnish. Apply a piece of Scor-Tape™ to the reverse side. You can now cut strips of this “Glitter” piece. It is best to use Teflon Scisors to cut this as you are cutting through adhesive. You can also emboss on top of glitter, words for example. Be sure that you have burnished well. Go over it again with the blush brush. Stamp your image or words with Versamark. Emboss with embossing powder. If you want a raised effect, while your embossing is still warm, cover again with embossing powder and re-heat.
Glitter techniques with double sided tape are based on ideas developed by Haroldine Wingfield and Deanna Pannell.

1. When placing the Positive Mask deliberately line it up to leave a border of exposed sticky tape. Press firmly into place a tape backing.
2. Glitter (Copper) - BURNISH!!! 3. Remove Mask – Glitter (Blue Teal) - BURNISH!!! 4. You may be thinking why didn't I lay down a piece of 1/4” tape instead to create the border..
Unfortunately when you butt two pieces of Scor-Tape™ together it can leave a seam mark.
Offset Technique
Exposed Sticky Tape
Here are samples of other cards I have made. I will share more “Glitter Illusions” in later issues, such as “On Top of the World”.

Overhang Technique Exposed Tape
1. Apply Scor-Tape™ and remove tape backing. 2. Use Tweezers place the negative masks overhanging the exposed tape. Press firmly into
place with the tape backing. 3. Glitter ( Blue Teal) - BURNISH!!! 4. Using the tweezers remove fern masks, gently brush away any Blue Teal that might of
gotten underneath the overhang - Glitter (Copper) - BURNISH!!! 5. Using the tweezers remove large leaf masks, gently brush away any Blue Teal that might of
gotten underneath the overhang - Glitter (Champagne) - BURNISH!!! 6. Using the tweezers remove small leaf masks, gently brush away any Blue Teal that might of
gotten underneath the overhang - Glitter (Grasshopper) - BURNISH!!! This method has a very “artsy” feel to it. .
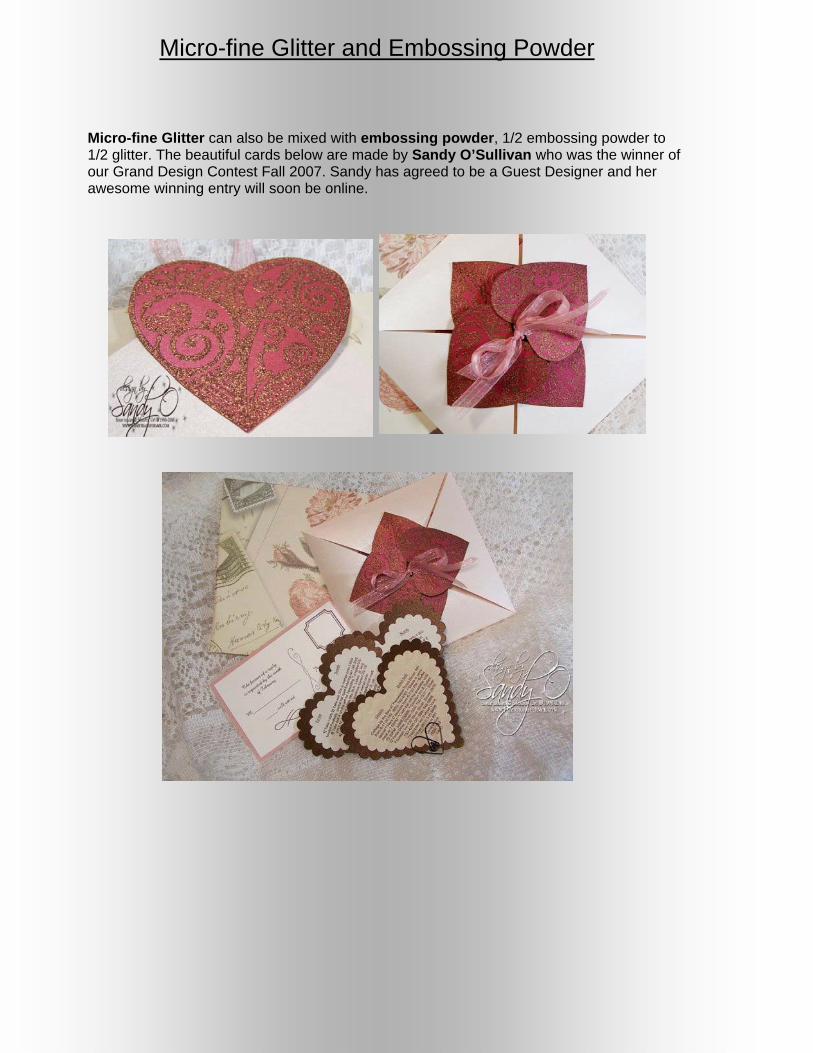
Micro-fine Glitter can also be mixed with embossing powder, 1/2 embossing powder to 1/2 glitter. The beautiful cards below are made by Sandy O’Sullivan who was the winner of our Grand Design Contest Fall 2007. Sandy has agreed to be a Guest Designer and her awesome winning entry will soon be online.
Micro-fine Glitter and Embossing Powder

These are very special indeed. Thank you Sandy for sharing.

Scor-Pal Basics
Envelopes
Nugget Boxes
Pointed Flap Envelopes
Making Boxes
Making Boxes cont’d
Copic Marker Tutorial
Glitter Illusions
Glitter Insets
Inset Glitter Illusions Inset techniques are done by combining different width Scor-Tape™. Step 1: Lay down the widest piece of tape. Remove the backing being careful not to touch the adhesive with your finger tips. The point of a craft knife works well for this. Step 2: Lay down a narrower piece of Scor-Tape™ exactly in the middle. DO NOT REMOVE THE BACKING. Step 3: Glitter the exposed stickiness. BURNISH! Step 4. Remove the backing of the narrow width Scor-Tape™ and glitter in a different color. Burnish. If you want to use 3 widths. Step 4 would read : Remove the backing of the narrow tape EXPOSING THE STICKINESS. Lay down yet a narrower piece of Scor-Tape. DO NOT REMOVE THE COVERING. Step 5: Glitter exposed stickiness. BURNISH! Step 6: Remove backing on this third tape and glitter in a third color. BURNISH!
HINT: When laying down the narrower tape do not try to lay it down all in one go. Anchor one end and then slowly align as you move down the length. I usually affix one end and then the other end. The middle seems to take care of itself as long as I have both ends centered. The scans do not do justice to the beautiful velvet like sheen. Glitter used, Grasshopper, Regal Red and Moss Green on gold brushed cardstock
1/4” with 1/8” inset 1/2” with 1/4” inset 1/2” with 1/8” inset
All 3 sizes of tape
are used.
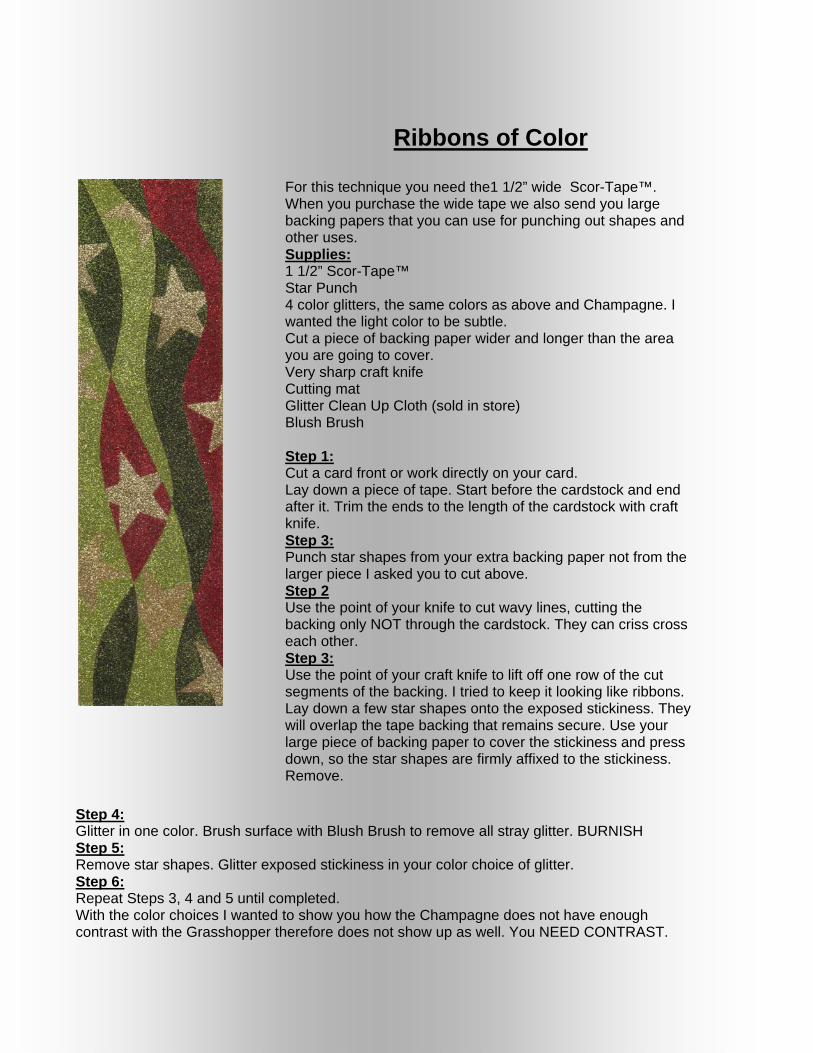
Ribbons of Color
For this technique you need the1 1/2” wide Scor-Tape™. When you purchase the wide tape we also send you large backing papers that you can use for punching out shapes and other uses. Supplies: 1 1/2” Scor-Tape™ Star Punch 4 color glitters, the same colors as above and Champagne. I wanted the light color to be subtle. Cut a piece of backing paper wider and longer than the area you are going to cover. Very sharp craft knife Cutting mat Glitter Clean Up Cloth (sold in store) Blush Brush Step 1: Cut a card front or work directly on your card. Lay down a piece of tape. Start before the cardstock and end after it. Trim the ends to the length of the cardstock with craft knife. Step 3: Punch star shapes from your extra backing paper not from the larger piece I asked you to cut above. Step 2 Use the point of your knife to cut wavy lines, cutting the backing only NOT through the cardstock. They can criss cross each other. Step 3: Use the point of your craft knife to lift off one row of the cut segments of the backing. I tried to keep it looking like ribbons. Lay down a few star shapes onto the exposed stickiness. They will overlap the tape backing that remains secure. Use your large piece of backing paper to cover the stickiness and press down, so the star shapes are firmly affixed to the stickiness. Remove.
Step 4: Glitter in one color. Brush surface with Blush Brush to remove all stray glitter. BURNISH Step 5: Remove star shapes. Glitter exposed stickiness in your color choice of glitter. Step 6: Repeat Steps 3, 4 and 5 until completed. With the color choices I wanted to show you how the Champagne does not have enough contrast with the Grasshopper therefore does not show up as well. You NEED CONTRAST.
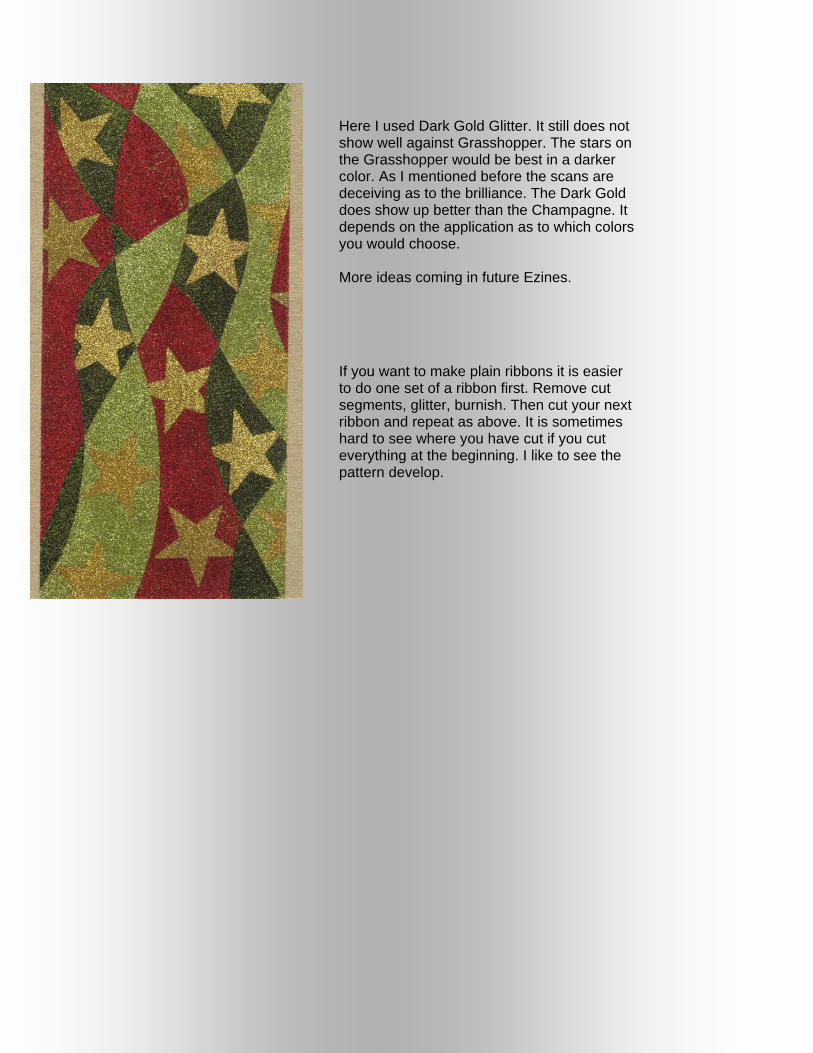
Here I used Dark Gold Glitter. It still does not show well against Grasshopper. The stars on the Grasshopper would be best in a darker color. As I mentioned before the scans are deceiving as to the brilliance. The Dark Gold does show up better than the Champagne. It depends on the application as to which colors you would choose. More ideas coming in future Ezines.
If you want to make plain ribbons it is easier to do one set of a ribbon first. Remove cut segments, glitter, burnish. Then cut your next ribbon and repeat as above. It is sometimes hard to see where you have cut if you cut everything at the beginning. I like to see the pattern develop.