scrndig-a basic program for digitizing from a screen image ... · scrndig-a basic program for...
TRANSCRIPT
U.S. DEPARTMENT OF THE INTERIOR U. S. GEOLOGICAL SURVEY
SCRNDIG-A BASIC program for digitizing from a screen image on a DOS-based computer
by
Philip Powers1 and Giovanni Crosta2
Open-File Report 92-522
Although this program has been extensively tested, the U. S. Geological Survey cannot guarantee that it will give accurate results for all applications nor that it will work on all computer systems. Any use of trade, product, or firm names is for descriptive purposes only and does not imply endorsement by the U. S. Government.
J Denver, Colorado 2University of MilanoMilano, Italy
1992
CONTENTS
Page
Acknowledgments ................................ iiDiskette contents ................................. iiAbstract ...................................... 1Introduction .................................... 1Advantages and disadvantages of using SCRNDIG ............ 2Running SCRNDIG ............................... 3Summary .................................... 14References .................................... 14Appendix BASIC program listings .................... 15
SCRNDIG.BAS .............................. 15MOUSE.BAS ................................ 36
ILLUSTRATIONS
Figure 1. Sample VGA graphics image that can beused in SCRNDIG for test digitizing .................. 8
ACKNOWLEDGMENTS
SCRNDIG was written using Microsoft BASIC Professional Development System version 7.1 (Microsoft Corp., 1991). The program consists of two modules, SCRNDIG.BAS and MOUSE.BAS. These two modules are linked together by SCRNDIG.MAK. The elementary mouse-control routines were written by Microsoft. Permission to use and distribute these routines is included in the documentation within the subroutines (p. 36). The MOUSEPOLL subroutine was modified considerably for use with the SCRNDIG program.
The ability to display a PCX image was added to the BASIC program by linking the source code to a library of routines that were originally developed in assembly language by Genus Microprogramming, Inc. The PCX import portions of this program are copyright protected by Genus Microprogramming, Inc. 1988- 1990 (Genus Microprogramming, 1991). This acknowledgement is a requirement condition for distribution of programs that include modified or unmodified portions of the software.
DISKETTE CONTENTS
The source code, executable code, and sample graphics image are included on the program disk. The files on the disk are:
SCRNDIG.BAS (main code module), MOUSE.BAS (support code module),SCRNDIG.MAK (make file that combines main and support code), SCRNDIG.EXE (executable code), andIMAGEGRY.PCX (sample graphics file of 640 X 480 resolution). README (Title page of this report)
n
ABSTRACT
SCRNDIG.EXE is a computer program that allows the user to locate an origin, set the X and Y scales, and pick points from an imported graphics image. The program imports a 640 by 480 pixel PC Paintbrush format file (.PCX). This is one of the oldest and most common raster file formats. The points digitized from the screen are stored in an ASCII data file for later use in a spreadsheet or a graphing program.
SCRNDIG.EXE will run on any PC-DOS (IBM) or MS-DOS (Microsoft Corp.) based system running DOS 3.0 or higher and equipped with the following hardware: a video graphics adapter (VGA) graphics display, a mouse, and 640 kilobytes of memory. This program documentation was written for someone with experience in DOS based microcomputing.
This program simplified the digitizing of experimental landslide/debris data that was recorded with a video camera and transferred into a microcomputer using a video digitizer card.
INTRODUCTION
The need for a better method of gathering and storing experimental data from a landslide/debris modeling project led to the development of SCRNDIG. SCRNDIG is a screen digitizing program that converts screen coordinates from a graph or image to user (useful) units. User units are produced from a linear scaling of the screen coordinates. The user units are stored in a data file with one X-Y pair, separated by a comma, on each line. These data can then be imported and used with other data analysis programs.
Several methods of recording experimental data were considered (using 35 mm slides, prints, movie cameras, video cameras, etc.). The method that met most of our needs was recording the landslide/debris modeling experiment with a video camera. This method provided continuous records of the experiment with a time stamp on each recorded frame. Images taken at selected time intervals could then be played back from the video camera into a microcomputer equipped with a video graphics capture board. The image file on the disk and the figure in this report are actual landslide/debris modeling images that were captured with a video digitizing board.
Using SCRNDIG, measurements were made on screen using the captured image and stored in a file for importing into a spreadsheet program for conversion and graphing.
ADVANTAGES AND DISADVANTAGES OF USING SCRNDIG
Prior to using the SCRNDIG program, we used both a digitizing board and hand measurements to obtain data from graphs and illustrations. Based on this experience we compiled a list of advantages and disadvantages.
The main advantage of using SCRNDIG is that a digitizing tablet is not needed. In addition, several advantages stem from the interactive nature of SCRNDIG. Digitizing from the screen is faster than making hand measurements, and in most cases is faster than using a tablet. Because the digitized points are highlighted on the screen for reference, interruptions are less likely to cause you to lose your place. Digitizing from a screen is less fatiguing then bending over a digitizing tablet. Finally, SCRNDIG allows gridlines to be superimposed on the image for visual reference.
The main disadvantage of using SCRNDIG is that special hardware is required. SCRNDIG requires a video camera and video capture board, or a scanner to rasterize the image so it can be displayed on a computer screen. The image is required by SCRNDIG to be a 640 X 480 pixel PCX-format image. PCX images not meeting this size requirement will be rejected. Screen digitizing may result in less accuracy then what can be obtained with a high resolution digitizing tablet. An invisible rectangular block around the screen cursor might obscure the reference marks on the screen. In addition, the mouse cursor needs to be moved at least 5 screen pixels you digitize another point. The number of data pairs is limited by SCRNDIG to 4000. If more points are required, it is necessary to stop and store the first 4000 data pairs and then open a new file for additional data pairs.
The problem of the screen cursor concealing the reference points has been partially eliminated by highlighting the previously digitized point only after the current point is selected. This usually moves the cursor block far enough away from the last point to prevent an overlap. The order of digitizing can be conducted in a manner to reduce the number of concealed reference points. The best order is to digitize from left to right and from top to bottom.
Rasterizing an image into the proper VGA resolution is best handled using a scanner or video capture board that outputs the image in the needed resolution of 640 by 480 pixels. The video capture board that we use is the Professional Series Color Video Digitizer by Computereyes.
RUNNING SCRNDIG
To set apart the information that is entered from the keyboard from the text of this report, the keyboard input is in bold italics. Single function keystrokes like [BREAK], [ENTER], and [ESC] are capitalized and enclosed in brackets. Screen messages are boxed in with double lines, and are shaded to appear like a computer display. Reference to color in this report only applies to color images.
This is a sample of a screen message or prompt
The first step in getting started is to insert the program/data disk into the computers drive. The A: drive is generally a 5.25" drive, and the B: drive a 3.5" drive. To run the program from a floppy drive, change the working drive to the floppy drive by typing the appropriate drive letter followed by a colon (i.e. A:). If you wish to run the program from the hard drive, copy the floppy disk files to the hard disk with the DOS copy command (i.e. copy A:\*.* C:\*.*).
Now start the program by typing SCRNDIG. An introductory screen appears with the following title page information.
U.S. GEOLOGICAL SURVEY SCRNDIG-A BASIC? program for dij
from a screen Image on a DOS-based computer
by
Philip S, Powers and Gipvanni Cipsta
TO'continue PRESS ANY KEY.
Press ANY KEY to proceed to the next screen. The next screen informs the user how to perform an abnormal exit from the program in case of a problem. If

you encounter a problem while running SCRNDIG you may exit the program by pressing and holding [CTRL], and then pressing the [BREAK] key. This aborts the program and returns you to DOS.
* * * IMPORTANT * * *
to stop the program at any time.rou find it press [CTRL]
To cxMtifiue S^ith the program PRESS ANY KEY,
Press ANY KEY to proceed.
The next screen asks if this digitizing session is a continuation of an earlier digitizing session. If you answer (Y)es to this prompt, SCRNDIG will use information in two support files that were saved when the image was digitized in a prior session. This allows the user to append more digitized points to the file. The default file name for the first support file will have the same first name as the original graphics image file but will have an extension of .DAT. This file contains the data pairs. The second file also has the same first name but has an extension of .PAR. This file contains the parameters for the number of previously digitized points, and the coordinates of the registration points. If this digitizing session is new and is not related to another session, enter (AOo. For a brief HELP screen enter (//)elp. The screen appears as follows:

if this is the continuation of a plot, and you would like to digitize more data points where you stopped^
enter (Y)es, if not, press (N)o,
For HEliP press (H)elp.
For this sample session press (H) for help.
The following is the display of the HELP screen:
A continuation means that you have already digitized data from ascreen imaie during a prior digitizing session and you would liketo continue at the point where you left the program during the priorsession. The additional information needed for continuationwas saved in two auxiliary files. These files have a defaultextension of *DAT and *.PAR.You will be requested to enter the proper filenames if you select(Y)es for a continuation.Tlie first requested input is the graphics file,Tfie second requested input is the parameter fjle.tne third requested input is the ASCII data file.
the continuation of a plot and you would like to digitize more data points where you stopped,
enter (Y)es, if not? press (I^)Ov For HELP press (H)elp.
For this session press N for

The next screen prompt asks for the location of your image/data files in case your files are not in the default directory.
To assist in finding the correct grapjiie input fife, eioter the drive and path of the image/data files,
(ie, A:\temp)
[ENTER) on an empty line means your files are in the current directory.
For this session, press [ENTER].The next prompt gives you the opportunity to enter a wild card file filter
combination to display a subset of files. This can be useful if you have too many files in the default directory to display on the screen at one time. Some examples of valid entries are *.DAT, *.BIN, A*.*, A*.A*. An entry of *AB.* is treated the same as *.*. The entries are not case sensitive (i.e. *.bin is the same as *.Bin). Check your DOS manual for additional wild card conventions.
To assist in jBMing the correct graphics input file* enter a wild card file filter to display a subset of the directory's files. (i.e, *,dat or * bin), [ENTERJ^*.*

For this session press [ENTER]. A list of files appears on the screen, with a request to Enter (F) to try another file filter, (C) to change the drive and path, or (P) to proceed. For example:
The selected drive and path: * tile default working directory: < GLENWOOD.DAT JEM AGE L DAT BS AVETST. BA$ DUM ,DAT
§78592 Bytes free
Enter (P) to try another file filter, press (G) to CHANGE Drive and Path, jpress (P) to proceed.
[MAGEGRCT»
For this session, press P, to proceed to the next screen.
The next screen prompt requests the input graphics file name. This is the name of the PCX graphics file. The screen appears as follows:
Enter the graphics inptit filename with suffix (Le, file.PGX).
For demonstration purposes, a PCX graphics file named IMAGEGRY.PCX has been included with the program. Enter the sample graphics filename at this point (IMAGEGRY.PCX).
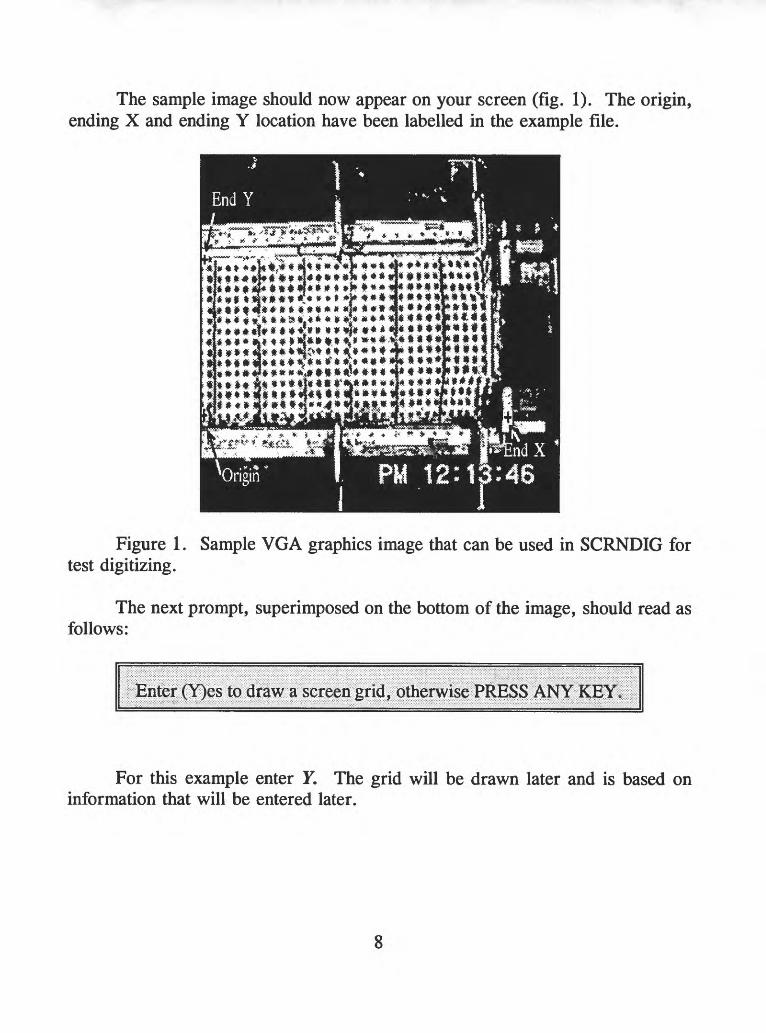
The sample image should now appear on your screen (fig. 1). The origin, ending X and ending Y location have been labelled in the example file.
***** «*,** *« «*********# t* **»***» ***fcf*»fi»*M****** :* #**«!«*»»******
*********** * c» ********** A *
**»** ***««*****§**
Figure 1. Sample VGA graphics image that can be used in SCRNDIG for test digitizing.
The next prompt, superimposed on the bottom of the image, should read as follows:
EriterOQes to draw a screen grid, otherwise PRESS ANY KE3fv
For this example enter Y. The grid will be drawn later and is based on information that will be entered later.
8

The next prompt below the displayed image is:
For this session enter 0, 22 for the X-axis information. These are in user units, and for the image in figure 1, represent inches. These units can be anything (cm, mm, volts). Note: the program will not allow the starting value to be greater than the ending value. At this point, if you should enter only a single point and press [ENTER], the program will return the message:
Control of this warning prompt cannot be prevented, and will cause the screen image to roll up 1 text line. On a 25 line screen, this means that l/25th of the image will roll off the top of the screen. If you can still see your registration points, you can proceed and enter the second X value. If you proceed after the screen has rolled up 1 line, the correct X and Y values will be saved, however, the parameter file contains incorrect axis reference information. If you need to use the continuation option, be sure to answer (N)o to the following continuation option:
The new registration information will be applied to all newly digitized values, and a correction for X and Y (based on the starting X and Y values) will be applied to the coordinates digitized during the earlier session. If you wish to start over press [CTRL] and [BREAK].

The next prompt is:
Be sure to input both starting and ending values on the same line, and separate them with a comma. Failure to do so will cause the screen image to roll up another 1/25 of the screen height. If you can still see all your comer registration points, you may proceed in the same manner described earlier. If not, press [CTRL] and [Break] and start over.
For this example enter 0, 11.
The next prompt is:
The mouse pointer is a white arrow that points upwards and to the left. The image has a black 4- with an arrow pointing to it and is labelled "Origin". Move the pointer down to the beginning of your X axis and press the left mouse button. The point will be stored, and a beep sounded. This point is the origin of your data system (lower left registration point). The origin is the frame of reference for the conversion of screen units to user units. The origin need not be at X = 0, Y = 0.
The next prompt is:
10

Position the mouse cursor over the black + with the label "End X" and press the left mouse button. A cyan colored line is drawn between the points. You will next be prompted to enter the upper Y axis registration point.
Position the cursor over the black + near the label "End Y", and press the left mouse button.
The next line that appears at the bottom of the image might look like the following:
The first item, "X-axis CW 0.10°", informs us that the line defined by the end points is rotated clockwise 0.10° from the horizontal. The next item, "Y- axis CW 0.28°", informs us the Y-axis is 0.28° from the vertical in a clockwise direction. CCW stands for counter clockwise, and CW for clockwise. The program mathematically corrects for a rotated image, but does not correct for an image that is skewed from normal (angles are not right angles). The third item, "PRESS ANY KEY to proceed.", means press any key to proceed with the program.
Earlier in this example you selected to display a grid over the image. The grid is drawn and is colored cyan to make it stand out on the black and white image. The grid can be used as a reference to show how regular the data image is. If the data image is out of square with the computer screen by more than 0.5°, the grid will be drawn, but it may appear distorted. This is because there is no correction built into drawing the grid on a severely skewed image.
11

If the axes are skewed more than 0.5° from being normal to each other the following prompt will appear at the bottom of the screen:
After reading this prompt and pressing any key the next prompt appears.
If "Y" is selected the grid is left on the image. If "N" is selected the screen image is cleared and the image redrawn.
The next prompt is:
To start digitizing, press the left cursor button on the mouse while it is positioned over the point to be digitized. A beep is sounded, and the values are shown in yellow at the bottom right hand side of the screen. The first item is the number of digitized points, the second is the scaled X value, and the last is the scaled Y value. Move the mouse over the next point to be digitized, and press the left mouse button again. After the next point is digitized, the previously digitized point will be marked on the screen with a small magenta circle. The marked points will always be one point behind the current digitized location. If you make a mistake, or just change your mind about a recording a digitized point, press the [ESC] key. The point counter will be reduced by one, and the removed point will
12
be indicated in red (black if your image is a B/W PCX file). All but the first point digitized may be removed in this manner. After you have digitized the last point, press the right mouse key to stop digitizing.
The graphic image is cleared from the screen, and a list of files in the selected directory is displayed.
Following the directory display is a prompt requesting the output file name for the X-Y data.
Enter up to an eight-character filename, a decimal point, and a 3 character extension. Follow standard DOS filename conventions.
The next prompt is:
Pressing any key other than the space bar will exit the program and display
The space bar loops back to the start of the program and allows for the entry of more X-Y data.
13
SUMMARY
This program was written to be used as a tool to increase the ease of digitizing screen images and has worked well for several applications. One feature that would be useful to add at a future date would be a logarithmic scaling routine.
REFERENCES
Genus Microcomputing, 1991, PCX Programmer's Toolkit, United States. International Business Machines Corporation, 1987, Reference Disk
Operating System Version 3.30, Boca Raton, Florida.Microsoft Corporation, 1987, Microsoft BASIC Programmer's Guide
Version 7.0 For IBM Personal Computers and Compatibles, United States and Canada.
Microsoft Corporation, 1991, Microsoft MS-DOS Users Guide and reference for the MS-DOS Operating System version 5.0, United States.
14
APPENDIX BASIC program listings SCRNDIG.BAS
DECLARE SUB wdir (d$)DECLARE SUB DrawGrid (startx!, starty!, endx!, endy!, kbstartx, kbstarty!, kbendx, kbendy!, phi!)DECLARE SUB screenmode (smode%)DECLARE SUB namechange (filein$, fileout$)'This screen displaying and digitizing program was developed by:'Philip S. Powers (USGS) and Giovanni Crosta (University of Milano)'to meet a small void in the vast world of programs.'There are several restrictions to the program.'1. The input image format is VGA (640X480) PCX format.'2. The mouse cursor is a block that sometime wipes out the digitized points.'3. The array dimension is set for 4000 points.'4. The digitized points are not painted until the next point is picked.
DEFINT B-D, F-J, L-0, Q-R, T-Z '$INCLUDE: 'general.bi' '$INCLUDE: 'mousel.bi' '$INCLUDE: 'gxlib.bas' '$INCLUDE: 'pcxlib.bas'
COMMON SHARED arrayXO, arrayYOCOMMON /blockl/ phi!, point!, startx, starty, startxy, startyy, endx, endy, endxy, endyyCOMMON /block2/ UserX!, UserY!, grid%, kbstarty, kbendy, oldpointi%, SX%, SY%, es%dimx% = 4000dimy% = 4000DIM arrayX(dimx%), arrayY(dimy%), x%(dimx%), y%(dimy%)oldpointi% = 0
Select graphics adapterThe default is set to VGA (12)
ON ERROR GOTO wrongscrn:
IFsmode% <> 12 THENCALL screenmode(smode%)
END IF
ON ERROR GOTO 0
CLS
Print a title on the screen
15

PRINT " DEPARTMENT OF THE INTERIOR"PRINT " U.S. GEOLOGICAL SURVEY"PRINTPRINTPRINTPRINT " SCRNDIG--A BASIC program for digitizing"PRINT " from a screen image on a DOS-based computer"PRINT "PRINTPRINTPRINT " by"PRINTPRINTPRINTPRINT " Philip S. Powers and Giovanni Crosta"LOCATE 25, 1COLOR 0, 7PRINT "To continue, PRESS ANY KEY.";COLOR 7, 0
DO WHILE INKEY$ = "" LOOP
CLSPRINT " * * * IMPORTANT * * * "
PRINTPRINT "If you find it necessary to stop the program at any time,"PRINT "press ";COLOR 0, 7PRINT "[CTRL] [Break]. ";PRINTPRINTCOLOR 7, 0PRINT "To continue with the program ";COLOR 0, 7PRINT " PRESS ANY KEY. "COLOR 7, 0DO WHILE INKEY$ = ""LOOP
CLS
Radian to degree conversion
DEF FNdeg! (phi!) STATIC tmp! pi! = 3.141593 tmp! = 180 /pi! * phi!
16
FNdeg! = tmp! END DEF
' Loop back label for a continuation of prior plot.
runplotagn:CLSdoagn:kpress$ = ""PRINT "If this is the continuation of a plot, and you would like to "PRINT "digitize more data points where you stopped,"PRINT ""
PRINT " enter (";COLOR 0, 7PRINT " Y ";COLOR 7, 0PRINT ")es,"PRINT " if not, press (";COLOR 0, 7PRINT " N ";COLOR 7, 0PRINT ")o. "PRINT " For HELP press (";COLOR 0, 7PRINT " H ";COLOR 7, 0PRINT ")elp. "
DO WHILE kpress$ = ""kpress$ = INKEY$
LOOP
cont$ = UCASE$(kpress$)
IF cont$ < > "Y" AND cont$ < > "N" AND cont$ < > "H" THENPRINT "Please enter Y, N, or H."GOTO doagn:
END IF
IF cont$ = "Y" THEN CLSGOSUB filter:INPUT "Enter the graphics input file name with suffix, (i.e. filename.PCX) ", pcximage$ CALL namechange(pcximage$, fileout$) PRINT "The Default input parameter file name is: "; COLOR 0, 7 PRINT fileout$ + ".par" COLOR 7, 0
17

LINE INPUT "Press [ENTER] for default, else enter input parameter file name. ", parm$
IF LEN(parm$) = 0 THENparmfilename$ = fileout$ + ".par"
ELSEparmfilename$ = parm$
END IF
PRINT "The Default X,Y data file name is: ";COLOR 0, 7PRINT fileout$ + ".dat"COLOR 7, 0INPUT "Press [ENTER] for default, else enter X,Y data file name *.DAT. ", data$
IF LEN(data$) = 0 THENdatafilename$ = fileout$ + ".dat"
ELSEdatafilename$ = data$
END IF GOTO arnd:
END IF
IF cont$ CLS PRINT PRINT PRINT PRINT PRINT PRINT PRINT PRINT PRINT PRINT PRINT PRINT PRINT PRINT PRINT GOTO
END IF
= "H" THEN
'A continuation means that you have already digitizing data from a "'SCREEN image during a prior digitizing session and you would like"'to continue at the point where you left the program during the prior'session. The additional information needed for continuation"'was saved in two auxiliary files. These files have a default"'extension of *.DAT and *.PAR. "'You will be requested to enter the proper filenames if you select"'(Y)es for a continuation. "'The first requested input is the graphics file."'The second requested input is the parameter file."'The third requested input is the ASCII data file."
doagn:
CLS
' Return point from error trapping routine "error2".i
retry:SCREEN 0 LOCATE 3, 1 PRINT "
LOCATE 3, 1
18
PRINT "To assist in finding the correct graphics input file,"GOSUB drivesetup:GOSUB filter:INPUT "Enter the graphics input filename with suffix (i.e. file.PCX). ", pcximage$CALL namechange(pcximage$, fileout$) i
' If cont$ ="Y" then program skips around image conversion statements above.' and ends up at label "arnd:"./
arnd: CLS
IF samereg% = 1 THEN GOTO arndrpt:IF cont$ = "Y" THEN
repeat2:PRINT "Do you wish to use the same axis registration points? "PRINT "Enter (";COLOR 0, 7PRINT " Y ";COLOR 7, 0PRINT ")es or (";COLOR 0, 7PRINT " N ";COLOR 7, 0PRINT ")o."ans$ = ""
DO WHILE ans$ = ""ans$ = INKEY$
LOOP
ans$ = LEFT$(UCASE$(ans$), 1)
SELECT CASE ans$ CASE"Y"
samereg% = 1 CASE "N"
samereg% = 0 CASE ELSE
GOTO repeat2: END SELECT
END IF i
' If flag "samereg" = 1 then this is where program jumps to. i
arndrpt:
CLSpcxtype% = pcxGetFileType%(path$ + pcximage$)
19

IF (pcxtype% > = gsMINDISP) THENretcode% = gxVerifyDisplayType(pcxtype%) IF (retcode% = gxSUCCESS) THEN
'We can ... END IF
ELSEPRINT "PCX file header is not recognized. Punt. 1 STOP
END IF
'Change from text screen mode to graphics screen mode.'Load in and display the graphics image using assembly language'library routines.
SCREEN smode%
' Globals' Set up to display the correct resolution image.i
SELECT CASE pcxtype% CASED
pcxtype% = gxCGA.4PRINT "Image not a VGA image. Punt."STOP
CASE 1pcxtype% = gxCGA.6PRINT "Image not a VGA image. Punt."STOPCASE 2pcxtype% = gxEGA.DPRINT "Image not a VGA image. Punt."STOP
CASE 3pcxtype% = gxEGA.EPRINT "Image not a VGA image. Punt."STOP
CASE 4pcxtype% = gxEGA.FPRINT "Image not a VGA image. Punt."STOP
CASE 5pcxtype% = gxEGA.10PRINT "Image not a VGA image. Punt."STOP
CASE 6pcxtype% = gxVGA.11
CASE 7pcxtype% = gxVGA.12
20

CASESpcxtype% = gxVGA.13PRINT "Image is 320X200 pixels by 256 colors.' PRINT "Image not to 640 X 480 specifications." STOP
END SELECT
retcode% = gxSUCCESS tempret% = gxSUCCESS
' Display program header
' Set the display type and mode we will be using retcode% = gxSetDisplay%(pcxtype%)
' Now enter graphics moderetcode% = gxSetMode%(gxGRAPHICS)
' Now display the image file
IF (retcode% = gxSUCCESS) THENretcode% = pcxFileDisplay%(path$ + pcximage$, 0, 0, 0)
END IF
' Check if everything went OKIF (retcode% < > gxSUCCESS) THEN
PRINTPRINT "An error occurred: ["; retcode%; "]"PRINTPRINT "You may not have a CGA, EGA, or VGA / the image may not'PRINT "be in the current directory ..."PRINT
END IF
'If this is a continuation, read in the previously digitized points.
IF cont$ = "Y" THENparmfilename$ = path$ + parmfilename$OPEN parmfilename$ FOR INPUT AS #10INPUT #10, oldpointi%, phi!, startx, starty, endx, endy, endxy, endyyINPUT #10, kbstartx, kbendx, kbstarty, kbendyoldstartx = startx 'Save for deriving correction factor for x.oldstarty = starty 'Save for deriving correction factor for y.
21
lenX! = ((endx - startx)) / COS(phil) lenY! = ABSKendyy - starty)) / COS(phil) UserX! = lenX! / (kbendx - kbstartx) UserY! = lenY! / (kbendy - kbstarty)
' Read in previous digitized points.
FOR 1% = 1 TO oldpointi%INPUT #10, x%(l%), y%(l%)
NEXT l% CLOSE #10
END IF
cont:CALL Mouselnit CALL MouseShow
LOCATE 29, 1PRINT" ";LOCATE 29, 1PRINT "Enter (Y)es to draw a screen grid, otherwise PRESS ANY KEY to proceed. ";
kpress$
DO WHILE kpress$ = "" kpress$ = INKEY$
LOOP
IF UCASE$(kpress$) = "Y" THEN
IF cont$ = "Y" AND samereg% = 1 THENCALL DrawGrid(startx, starty, endx, endy, kbstartx, kbstarty, kbendx, kbendy, phi!)LINE (startx, startyHendx, endy), 3LINE (startx, startyHendxy, endyy), 3grid% = 0
END IF
grid% = 1 ELSE
grid% = 0 END IF
'If this is a continuation skip around the inputs that follow
IF samereg% = 1 THEN GOTO skip: stx:
LOCATE 29, 1PRINT " "; LOCATE 29, 1 ON ERROR GOTO stx:
22

INPUT ; "Enter the starting X, then ending X value (ex. 0, 22). ", kbstartx, kbendxON ERROR GOTO 0IF kbstartx > kbendx THEN
LOCATE 29, 1PRINT" ";LOCATE 29, 1PRINT "The starting X must be smaller than the ending X. Press Any Key. ";kpress$ = ""DO WHILE kpress$ = ""
kpress$ = INKEY$LOOPGOTO stx:
END IF
xrange = ABS(kbendx - kbstartx) sty:
LOCATE 29, 1PRINT" "; LOCATE 29, 1 INPUT ; "Enter the starting Y, then ending Y value (ex. 0, 11). ", kbstarty, kbendy
IF kbstarty > kbendy THENLOCATE 29, 1PRINT" ";LOCATE 29, 1PRINT "The starting Y must be smaller than the ending Y. Press Any Key. ";kpress$ = ""DO WHILE kpress$ = ""
kpress$ = INKEY$LOOPGOTO sty:
END IF
redo: 'Redo input if angle between axes is too extreme. (>0.5°)regx = 1LOCATE 29, 1PRINT "Using the mouse pointer, click on the lower left registration point.";
Ip1:CALL MousePolKrow, col, I Button, rButton, done%, regx, regy, kbstarty, kbendy, kbstartx, kbendx)IF regx = 0 THEN GOTO Ip11:GOTOIpl:
Ip11: regx = 2
LOCATE 29, 1PRINT" ";LOCATE 29, 1PRINT "Using the mouse pointer click on the lower right registration point.";
Ip2:CALL MousePolKrow, col, (Button, rButton, done%, regx, regy, kbstarty, kbendy, kbstartx, kbendx) IF regx = 0 THEN GOTO Ip22: GOTO Ip2:
23

Ip22: regy = 2LOCATE 29, 1PRINT" ";LOCATE 29, 1PRINT "Using the mouse pointer click on the upper left registration point.";
Ip3:CALL MousePolKrow, col, (Button, rButton, done%, regx, regy, kbstarty, kbendy, kbstartx, kbendx)IF regy = 0 THEN GOTO Ip33:GOTO Ip3:
Ip33: 'Angle of rotation (If Phi is positive then image is rotated counter clockwise).
phi! = ATN((starty - endy) / (endx - startx))yrange = ABS(kbendy - kbstarty)
'Length of X line in screen unitsLx! = endx - startx
'Calculate angle between X and Y axes on the basis of the markers.phi2! = ATN(ABS(endxy - startx) / ABS(endyy - starty))
IF endxy > startx THENphi2! = -phi2
rotation $ = "CW" ELSE
rotation$ = "CCW" END IF
phi2deg! = FNdeg!(phi2!)phi2deltadeg! = phi2deg!LOCATE 29, 1PRINT " ";LOCATE 29, 1phideg! = FNdegKphi!)
IF phideg! < 0 THENPRINT USING "X-axis CW ###.##° "; ABS(phidegJ);
ELSEPRINT USING "X-axis CCW ###.##° "; ABS(phideg!);
END IF
LOCATE 29, 25PRINT" ";LOCATE 29, 25
PRINT USING " Y-axis " + rotation$ + " ###.##° \ \"; ABS(phi2deltadeg!);lenX! = ((endx - startx)) / COS(phi!)lenY! = ABS((endyy - starty)) / COS(phi!)
'Inches per screen unitUserX! - lenX! / (kbendx - kbstartx)UserY! = lenY! / (kbendy - kbstarty)
PRINT " PRESS ANY KEY to proceed.";
DO WHILE INKEY$ = ""LOOPIF ABS(phi2deltadeg! - phideg!) > .5 THEN
24
LOCATE 29, 1PRINT" ";LOCATE 29, 1PRINT "The axes are skewed by more then 0.5°. PRESS ANY KEY to proceed.";
DO WHILE INKEY$ = "" LOOP
Iback:LOCATE 29, 1PRINT" ";LOCATE 29, 1PRINT "Display the grid anyway? (Y)es or (N)o. ";ans$ = ""
DO WHILE ans$ = ""ans$ = INKEY$ans$ = UCASE$(ans$)
LOOP
IF ans$ = "Y" THENGOTO skip:
END IF
IF ans$ = "N" THENCLSretcode% = pcxFileDisplay%(path$ + pcximage$, 0, 0, 0)
END IF
IF ans$ < > "Y" AND ans$ < > "N" THEN LOCATE 29, 1PRINT" "; PRINT "Please Enter (Y)es or (N)o. Press any key." kpress$ = ""
DO WHILE kpress$ = ""kpress$ = INKEY$
LOOPGOTO Iback:
END IF
END IF
skip:
'Redraw the origin and axis registration points.
IF samereg% = 1 THEN
25

CIRCLE (startx, starty), 3, 10 PAINT (startx, starty), 13, 10 CIRCLE (endx, endy), 3, 10 PAINT (endx, endy), 13, 10 CIRCLE (endxy, endyy), 3, 10 PAINT (endxy, endyy), 13, 10
END IF
START DIGITIZING
IF cont$ = "Y" THEN
IF samereg% = 0 THEN 'Correct for shift of shreen corstartx = startx - oldstartx corstarty = starty - oldstarty FOR l% = 1 TO oldpointi%
x(l%) = x(l%) + corstartx y(l%) = y(l%) + corstarty
NEXT l% samereg% = 0 END IF
FOR l% = 1 TO oldpointi%CIRCLE (x%(l%), y%(l%)), 3, 10PAINT (x%(l%), y%(l%)), 13, 10
NEXT I %
END IF
LOCATE 29, 1PRINT " ";LOCATE 29, 1PRINT" ";LOCATE 29, 1PRINT "Mouse keys (LEFT = Store pt. RIGHT = Stop).";
DO
CALL MousePolKrow, col, (Button, rButton, done%, regx, regy, kbstarty, kbendy, kbstartx, kbendx)
IF pointi 00 AND es% = 0 THENx% (point! + oldpointi%) = coly%(pointi + oldpointi%) = row
END IF
er$ = INKEY$IF er$ = "" THEN GOTO arndASCstmt:
26

IF ASC(er$) = 27 THEN 'Escape key pressed. Decrement pointer
IF point! > 1 THENCIRCLE (x%(pointi + oldpointi%), y%(pointi + oldpointi%)), 2, 4PAINT (x%(pointi + oldpointi%), y%(pointi + oldpointi%)), 4, 4point! = point! - 1BEEPLOCATE 29, 45PRINT" ";COLOR 14LOCATE 29, 45PRINT USING " ## ####.### ####.### "; point! + oldpointi%; arrayX(pointi);
array Y(pointi);COLOR 15es% = 1
END IF
er$ = ""
END IF
arndASCstmt:
IF done% = 1 THEN GOTO done: LOOP
Do the file work next.Save the actual X,Y data in a file.Select the default file name or enter a new name.If file name already exists, give options
' The right mouse button has been pushed. Finish up with' saving the data in files. i
done:
'Change screen display back to a text screen from graphics screen.
SCREEN 0
PRINT "Enter the name of the X-Y data output file."PRINT "(Enter up to 8 characters for the file name, a decimal point,'PRINT "and then up to a 3 character extension)."CALL namechange(pcximage$, fileout$)PRINT "The current default file name is: ";COLOR 0, 7PRINT fileout$ + ".dat"
27

COLOR 7, 0LINE INPUT "To accept the default name press [ENTER], else enter new name. "; filename$
IF LEN(filename$) = 0 THENdatafilename$ = path$ + fileout$ + ".DAT"
ELSEdatafilename$ = path$ + filename$
END IF
CLSPRINT "The values are comma separated, with a X, Y pair on each line."PRINT "The output format is free format."ON ERROR GOTO erroM:OPEN datafilename$ FOR INPUT AS #2ON ERROR GOTO 0CLOSE #2PRINT
'File already existed, make selection to overwrite, append or select new name.
IF UCASE$(LEFT$(cont$, 1)) <> "Y" THEN COLOR 0, 7PRINT datafilename$; " already exits." COLOR 7, 0 ans$ = ""
DO WHILE ans$ < > "Y" AND ans$ < > "A" AND ans$ < > "N"PRINT "Enter Y = Overwrite, A = Append, or else N to enter a different name. "; kpress$ = ""
DO WHILE kpress$ = ""kpress$ = INKEY$
LOOP
ans$ = UCASE$(kpress$) LOOP
IF ans$ = "Y" THENKILL datafilename$GOTO proceed:
END IF
IF ans$ = "A" THENappend$ = "A"GOTO proceed:
END IF
datafilename$ = "" GOTO done:
END IF
proceed:
28
ON ERROR GOTO 0
IF append$ = "A" OR cont$ = "Y" THENCLOSE #3OPEN datafilename$ FOR APPEND AS #3append$ = ""
ELSEOPEN datafilename$ FOR OUTPUT AS #3
END IF
FOR l% = 1 TO pointiPRINT #3, USING " ####.###_, ####.###"; arrayX(l%); arrayY(l%)
NEXT l% CLOSE #3
CALL namechange(pcximage$, fileout$)CLOSE #10parmfileout$ = fileout$ + ".par"parmfileout$ = path$ + parmfileout$'Write out the file digitizing parameters.OPEN parmfileout$ FOR OUTPUT AS #10PRINT #10, pointi + oldpointi%, phi!, startx, starty, endx, endy, endxy, endyyPRINT #10, kbstartx, kbendx, kbstarty, kbendy
FOR l% = 1 TO pointi + oldpointi%PRINT #10, x%(l%), y%(l%)
NEXT l%
CLOSE #10CLSPRINT "Press Space bar to RUN program again, else any other key EXIT."PRINT "";s$ = ""
DO WHILE s$ = ""s$ = INKEY$
LOOP
' ASCII character 32 is the space bar. /
IF s$ = CHR$(32) THENCLOSE #2CLScont$ = ""done% = 0pointi = 0GOTO runplotagn:
ELSECLSGOTO donel:
END IF
29
donel:CISPRINT " ALL DONE."BEEPBEEPCLOSE #1GOTO terminate:
'Display all files in the selected drive and path.filter:PRINT "To assist in finding the correct graphics input file,"PRINT "enter a wild card file filter to display a subset of the*PRINT "directory's files."PRINT "(i.e. *.dat or *.bin). [ENTER] = *.* "LINE INPUT filter$CLSIFfilter$ = "" THEN filter $ = "*.*"
IF LEFT$(filter$, 1) = CHR$(34) THEN'Strip off and quotation marks from the beginning and end.
I = LEN(filter$)filter$ = MID$(filter$, 2, I- 1)
IF RIGHT$(filter$, 1) = CHR$(34) THENfilter$ = MID$(filter$, 1, I-2)
END IF
END IF
dpath$ = path$ + filter$filter2:PRINT "The selected drive and path: "; dpath$ON ERROR GOTO er1:PRINT "The default working directory: ";FILES dpath$ON ERROR GOTO 0PRINTPRINT "Enter (";COLOR 0, 7PRINT " F ";COLOR 7, 0PRINT ") to try another file filter, "PRINT "press (";COLOR 0, 7PRINT " C ";COLOR 7, 0PRINT ") to CHANGE Drive and Path."PRINT "press (";COLOR 0, 7PRINT " P ";COLOR 7, 0PRINT ") to proceed. "; ""
30

ans$ = ""
DO WHILE ans$ = ""ans$ = INKEY$ans$ = UCASE$(ans$)
LOOP
IF ans$ = "F" THENGOTO filter:
END IF
IF ans$ = "C" THENGOSUB drivesetup:GOTO filter2:
END IF
IFans$ = "P"THENRETURN
END IF
IF ans$ < > "F" AND ans$ < > "P" AND ans$ < > "C" THENCLSPRINT "Please enter F, C, or P."GOTO filter2:
END IF
RETURN
drivesetup:
' Set up the drive and path for the batch files and programs."iCOLOR 23PRINT "Enter the drive and path of the image/data files."COLOR 7PRINTPRINT " (i.e. A:\temp)"PRINTPRINT "[ENTER] on an empty line means your files are in the"INPUT "current directory. ", path$CLS
IF LEN(path$) = 0 THENpath$ = ""RETURN
END IF
agn3:
IF LEN(path$) < 2 THEN PRINT "Enter ("; COLOR 0, 7
31

PRINT " Y ";COLOR 7, 0PRINT ")es if ";COLOR 0, 7PRINT path$;COLOR 7, 0PRINT " is a drive letter, else press (";COLOR 0, 7PRINT " N ";COLOR 7, 0PRINT ") if a path."ans$ = ""kpress$ = ""
DO WHILE kpress$ = ""kpress$ = INKEY$
LOOP
ans$ = UCASE$(kpress$)
IF ans$ < > "Y" AND ans$ < > "N" THEN PRINT "Please respond with Y or N." GOTO agn3:
END IF
IF ans$ = "Y" THENpath$ = path$ + ":"
END IF
END IF
IF RIGHT$(path$, 1) <> "\" THENpath$ = path$ + "\"
END IF
dpath$ = path$ + filter$
RETURN
' This is the end of the program /
terminate: END
' End of the Program and start of the error trapping routines.
er1: CLS
32
IF ERR = 53 THEN PRINTPRINT " No match." PRINTPRINT "Press ("; COLOR 0, 7 PRINT " C "; COLOR 7, 0PRINT ") to Change the Drive and Path," PRINT "Press "; COLOR 0, 7PRINT " ANY OTHER KEY "; COLOR 7, 0PRINT "to change file filter." kpress$ = "" DO WHILE kpress$ = ""
kpress$ = INKEY$cont$ = UCASE$(kpress$)
LOOP
IF cont$ = "C" THEN GOSUB drivesetup:
END IF
RESUME filter2: END IF
PRINT "ERROR DETECTED. "; ERR PRINT "LINE DETECTED. "; ERL
IF ERR = 71 THENpath$ = ""PRINTCOLOR 23PRINT "* * NO disk in drive or drive door OPEN * *."COLOR 7PRINT "Close drive door or select the correct drive, and then restart program.'GOTO terminate:
END IF
PRINT "Debug and restart program." GOTO terminate:
error 1:
IF ERR = 53 THEN CLOSE #2
IF UCASE$(LEFT$(cont$, 1)) = "Y" THEN PRINT "Cannot continue with this file name selection." PRINT "Select another file name." PRINT "Press ANY KEY to proceed."
33

DO WHILE INKEY$ = "" LOOP
RESUME done: END IF
RESUME proceed: END IF
PRINT "ERROR DETECTED. "; ERR PRINT "LINE DETECTED. "; ERL PRINT "Debug and restart program. 1 GOTO terminate:
'Unable to set the screen mode to 12 (VGA is required.)/
wrongscrn:PRINT "This program requires a VGA adapter. Please run the program onPRINT "a system with a VGA adapter. "GOTO terminate:
' Trap for file not found error. /
error2:IF ERR = 53 THEN
PRINT "Graphics input file not found. Please retry with a new name.FILES "*.bin"RESUME retry:
END IF
PRINT "ERROR DETECTED. "; ERR PRINT "LINE DETECTED. "; ERL PRINT "Debug and restart program." GOTO terminate:
' Trap for file not found error with a different outcome.
error3:
PRINT "ERROR DETECTED. "; ERR PRINT "LINE DETECTED. "; ERL PRINT "Debug and restart program. 1 GOTO terminate:
' Routine finds the first name of a file name.
34
SUB namechange (filein$, firstname$) STATIC 'Determine the first part of the input file name. I = LEN(filein$) FOR 1% = 1 TO I
char$ = MID$(filein$, l%, 1)IFchar$ = "." THEN
EXIT FOREND IF
NEXT l%'Handle condition where file input name does not have an extension. i
IF l% > I THEN' Reached end of file name with no decimal point found.' No file name extension. Assume .PCX and affix to filename.
firstname$ = filein$filein$ = filein$ + ".PCX"EXIT SUB
END IF
firstname$ = LEFT$(filein$, l% - 1)
END SUB
Sets the screen mode to VGA (12)
SUB screenmode (smode%)smode% = 12
END SUB
Selects the drive and directory for location of files.
SUB wdir (d$)LOCATE 1, 1PRINT "LOCATE 1, 1d1$ = ""
IFd$ 0 ""THENPRINT "Press [ENTER] to select "; d$; " as disk and directory " INPUT "or enter the drive and subdirectory (i.e. C:\SUB1 \). ", d1 $
ELSEPRINT " There is no previous selection of drive or directory." INPUT " Enter the drive and subdirectory (i.e. C:\SUB1 \). ", d1 $
END IF
IFd1$ = "" THEN EXIT SUB d$ = d1$
END SUB
35

MOUSE.BAS
DECLARE SUB DrawGrid (startx!, starty!, endx!, endy!, kbstartx!, kbstarty!, kbendx!, kbendy!, phi!) DECLARE SUB SvPoint (row%, col%, pointi%)COMMON SHARED /blockl/ phi!, pointi, startx, starty, startxy, startyy, endx, endy, endxy, endyy COMMON SHARED /block2/ UserX!, UserY!, grid%, kbstarty, kbendy, oldpointi%, SX%, SY%, es%
MOUSE.BAS - Mouse Support Routines for the User Interface Toolbox in Microsoft BASIC 7.1, Professional Development System
Copyright (C) 1987-1990, Microsoft Corporation
NOTE: This sample source code toolbox is intended to demonstrate some of the extended capabilities of Microsoft BASIC 7.1 Professional Development system that can help to leverage the professional developer's time more effectively. While you are free to use, modify, or distribute the routines in this module in any way you find useful, it should be noted that these are examples only and should not be relied upon as a fully-tested "add-on" library.
PURPOSE: These routines are required for mouse support in the user interface toolbox, but they may be used independently as well.
For information on creating a library and QuickLib from the routines contained in this file, read the comment header of GENERAL.BAS.
DEFINT B-D, F-J, L-0, Q-R, T-Z '$INCLUDE: 'general.bi' '$INCLUDE: 'mousel.bi' '$INCLUDE: 'menu.bi' COMMON SHARED arrayXO, arrayYO COMMON SHARED /uitools/ GloMenu COMMON SHARED /uitools/ GloTitleO COMMON SHARED /uitools/ GloltemO
AS MenuMiscType AS MenuTitleType AS MenultemType
SUB DrawGrid (startx, starty, endx, endy, kbstartx, kbstarty, kbendx, kbendy, phi) phi = ATN((starty - endy) / (endx - startx)) IF phi < .0176 THEN 'Do not draw if angle > 1 degree
pixinX = endx - startxpixperunitX = pixinX / (kbendx - kbstartx)pixinY = starty - endyypixperunitY = pixinY / (kbstarty - kbendy)numYlines = ABS(ABS(kbendy) - kbstarty)FOR i% = 1 TO numYlines
LINE (startx, starty + pixperunitY * i%)-(endx, endy + pixperunitY * i%), 3NEXT i%numXIines = ABS(ABS(kbendx) - kbstartx)
36

FOR i% = 1 TO numXIinesLINE (startx + pixperunitX * i%, startyHendxy + pixperunitX * i%, endyy), 3
NEXT i% ELSE
LOCATE 29, 1PRINT" ";LOCATE 29, 1PRINT "Correction angle too large. Grid not drawn! PRESS ANY KEY. ";DO WHILE INKEY$ = ""LOOP
END IF
END SUB
SUB MouseBorder (rowl, coM, row2, co!2) STATIC
' Sets max and min bounds on mouse movement both vertically, and ' horizontally
MouseDriver 7, 0, (col! - 1) * 8, (co!2 - 1) * 8 MouseDriver 8, 0, (rowl - 1) * 8, (row2 - 1) * 8
END SUB
SUB MouseDriver (mO, ml, m2, m3) STATIC
DIM regs AS RegType
IF MouseChecked = FALSE THEN DEF SEG = 0
MouseSegment& = 256& * PEEK(207) + PEEKI206) MouseOffset& = 256& * PEEK(205) + PEEK(204)
DEF SEG = MouseSegment&
IF (MouseSegment& = 0 AND MouseOffset& = 0) OR PEEK(MouseOffset&) = 207 THENMousePresent = FALSEMouseChecked = TRUEDEF SEG
END IF END IF
IF MousePresent = FALSE AND MouseChecked = TRUE THENEXIT SUB
END IF
37

' Calls interrupt 51 to invoke mouse functions in the MS Mouse Driver.
regs.ax = mO regs.bx = ml regs.cx = m2 regs.dx = m3
Interrupt 51, regs, regs
mO = regs.ax ml = regs.bx m2 = regs.cx m3 = regs.dx
IF MouseChecked THEN EXIT SUB
' Check for successful mouse initialization
IF mO AND NOT MouseChecked THENMousePresent = TRUEDEF SEG
END IF
MouseChecked = TRUE
END SUB
SUB MouseHide
' Decrements internal cursor flag
MouseDriver 2, 0, 0, 0
END SUB
SUB Mouselnit
38
' Mouse driver's initialization routine
MouseDriver 0, 0, 0, 0
END SUB
SUB MousePoll (SY%, SX%, IButton, rButton, done%, regx, regy, kbstarty, kbendy, kbstartx, kbendx!) STATIC
' Polls mouse driver, then sets parms correctlyi
' This routine has been extensively modified for use with SCRNDIG.BAS' The mouse is checked for movement of more than 5 pixels in either' X or Y.' The end point registration and origin are selected here.' Rotation of the X-Y system is corrected here.' and the data points are displayed on the screen here.
SHARED arrayX(), arrayYO, pointi, startx, starty, startxy, startyy, endx, endy, endxy, endyy SHARED phi!, UserX!, UserY!, grid%, oldpointi%, es%
MouseDriver 3, button, col, row
' The left mouse button was pushed. IF button AND 1 THEN
IButton = TRUE ELSE
IButton = FALSE END IF
' The right mouse button was pushed. IF button AND 2 THEN
rButton = TRUE ELSE
rButton = FALSE END IF IF rButton = -1 THEN
done% = 1 END IF
'The cursor has moved at least five pixels from the last point and 'the button has been pressed to save another point.
IF IButton = -1 AND ((ABS(SX% - col) > 5) OR &fcBS(SY% - row) > 5)) THEN

' The origin of the X-Y system.
IF regx = 1 THENstartx = colstarty = rowstartxy = colstartyy = rowregx = 0SX% = colSY% = rowBEEPEXIT SUB
END IF
' The end of the X line.
IF regx = 2 THENendx = colendy = rowregx = 0SX% = colSY% = rowBEEPLINE (startx, startyHendx, endy), 3EXIT SUB
END IF
' The end of the Y line.
IF regy = 2 THEN endxy = col endyy = row regy = 0LINE (startx, startyHendxy, endyy), 3 SX% = col SY% = row
' Draw the grid.
IF grid% = 1 THENCALL DrawG rid (startx, starty, endx, endy, kbstartx, kbstarty, kbendx, kbendy, phi!)
END IF
BEEP EXIT SUB
END IF inside:
' Mark the previously digitized point.
IF pointi = 0 THEN GOTO Id2:
40

IF es% = 0 THEN CIRCLE (SX%, SY%), 2, 13 PAINT (SX%, SY%), 13, 13
END IF
es% = 0 Id2: point! = point! + 1
'Correct for skewness with simple conversion routine. 'Assumption is that there is only a rotation about the origin 'A! and B! are the X,Y values minus the origin X,Y
A! = (col - startx) B! = (starty - row)
IF A! <> 0 THEN 'Not on the Y axisphi3! = ATN(B! /A!)
ELSEphi3! = 3.14159 12
END IF
IF phi3! < > phi! THEN IF phi3! = 0 THEN
BB! = A! GOTO arnd2:
END IFBB! = B! / SIN(phi3!)
ELSEBB! = A! 'On the X axis and they are equal.
END IF
arnd2: corrX! = BB! * COS(phi3! - phi!)corrY! = BB! * SIN(phi3! - phi!)arrayX(pointi) = kbstartx + (corrX! / UserX!)arrayY(pointi) = kbstarty + (corrY! / UserY!)BEEPLOCATE 29, 45PRINT " ";COLOR 14LOCATE 29, 45PRINT USING " ## ####.### ####.### "; point! + oldpointi%; arrayX(pointi);
arrayY(pointi);COLOR 15SX% = colSY% = row
END IF
END SUB
41

SUB MouseShow
' Increments mouse's internal cursor flag
MouseDriver 1, 0, 0, 0
END SUB
42