sda8300 sda4600 amplifier - jblsynthesis.com · conversión digital a analógica (hasta 20 canales,...
TRANSCRIPT

JBL SYNTHESIS SDA8300 / SDA4600 QUICKSTART
1 | J B L S y n t h e s i s S D A A m p l i f i e r Q u i c k S t a r t G u i d e
JBL SYNTHESIS®
SDA8300
SDA4600
AMPLIFIER
QUICK-START INSTALLATION GUIDE
June, 2014
PN# 5044062
JBL SYNTHESIS SDA8300 / SDA4600 QUICKSTART
2 | J B L S y n t h e s i s S D A A m p l i f i e r Q u i c k S t a r t G u i d e
General Information
IF YOU READ NOTHING ELSE IN THIS GUIDE READ THIS INFORMATION:
WARNING: Before you start to set up your amplifier, read and observe the Important Safety Instructions found at the beginning of this manual.
The SDA amplifiers come pre-configured to work with the SDEC4500P using the BLU-LINK digital audio signal over Cat5e Ethernet cables. The amplifiers should not be connected to the home network. Analog audio input comes IN on the SDEC4500P (up to 12 channels) and OUT on the SDA8300 and/or SDA4600 without going through any Digital to Analog conversions (up to 20 Channels as standard, expandable to 128 channels).
Two alternate configurations are selected by using the included selection trigger that plugs into the GPIO input on the rear panel.
The SDA8300 amplifier ships configured for a simple 7-channel system. The SDA8300 can access two (2) additional configurations. Using combinations of these configurations allows the system to output from a simple 7 x 300 Watt system to up to 16 x 300 Watts with discrete DSP for each channel with active bi-amp outputs on the Left-Center-Right.
The SDA4600 ships configured for a 4-channel subwoofer (4x600 Watts). Up to two (2) additional configurations can be accessed for bridged high power subwoofers outputs (2x1200 Watts) with discrete channel DSP for each output. These are used with the Harman Patented “Sound Field Management” in the SDEC4500P.
The SDEC-4500P controls all DSP and BI-AMP speaker crossover settings and must be configured with either “JBL Synthesis ARCOS” software or “SDEC Control Panel Software v1.5”. Go to www.jblsynthesis.com to download the correct software.
CAUTION: Before you begin, make sure your amplifier is disconnected from the power source and that all level controls are set to INF.
Ensure Proper Cooling
When using an equipment rack, mount units directly on top of each other. Close any open spaces in the rack with blank panels.(Open spaces will reduce cooling efficiency.) DO NOT block front or rear air vents. (The rack should be a minimum of two inches (5.1 cm) away from the amplifier, and the back of the rack should be a minimum of four inches (10.2 cm) from the amplifier back panel.
Air flow is front to back.
WARNING: The third prong of this connector (ground) is an important safety feature. Do not attempt to disable this ground connection by using an adapter or other methods.
Fuse
A fuse (F1) located near the IEC power inlet protects the amplifier from excessive AC current draw. The fuse is field replaceable. Replace with same type fuse; LittelFuse 314 Series F20AH 250V. Please contact JBL Service department for more information.
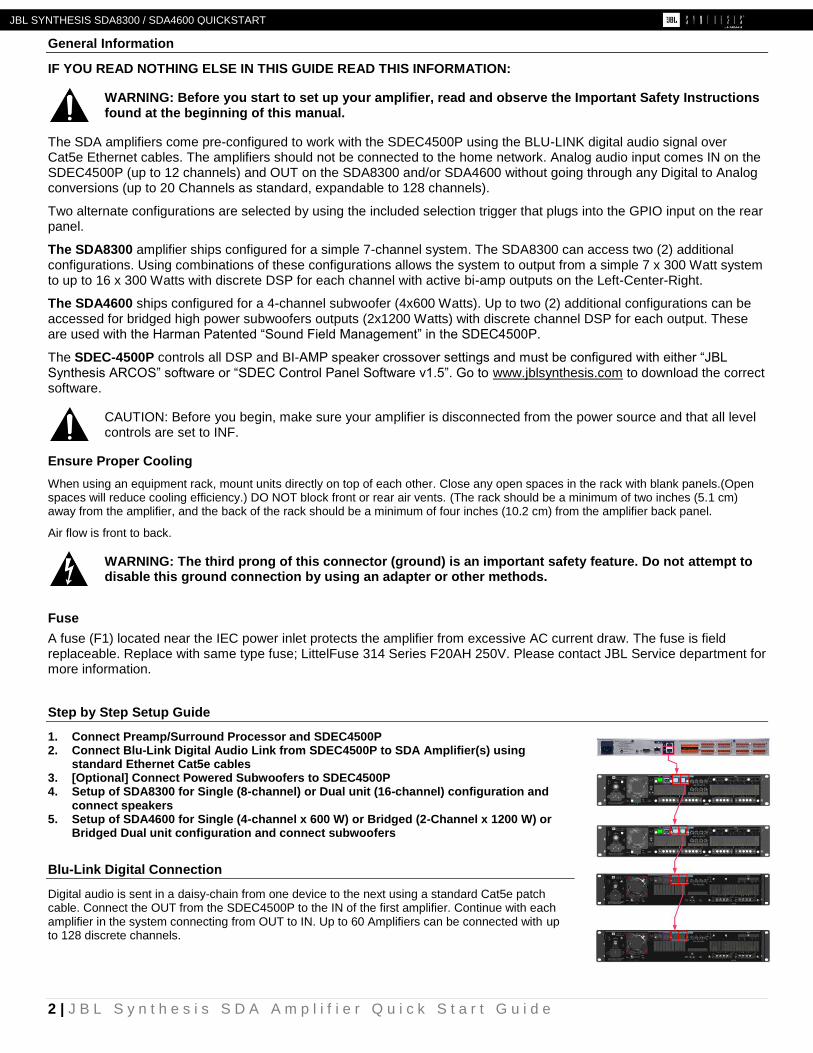
Step by Step Setup Guide
1. Connect Preamp/Surround Processor and SDEC4500P 2. Connect Blu-Link Digital Audio Link from SDEC4500P to SDA Amplifier(s) using
standard Ethernet Cat5e cables 3. [Optional] Connect Powered Subwoofers to SDEC4500P 4. Setup of SDA8300 for Single (8-channel) or Dual unit (16-channel) configuration and
connect speakers 5. Setup of SDA4600 for Single (4-channel x 600 W) or Bridged (2-Channel x 1200 W) or
Bridged Dual unit configuration and connect subwoofers
Blu-Link Digital Connection
Digital audio is sent in a daisy-chain from one device to the next using a standard Cat5e patch cable. Connect the OUT from the SDEC4500P to the IN of the first amplifier. Continue with each amplifier in the system connecting from OUT to IN. Up to 60 Amplifiers can be connected with up to 128 discrete channels.

JBL SYNTHESIS SDA8300 / SDA4600 QUICKSTART
3 | J B L S y n t h e s i s S D A A m p l i f i e r Q u i c k S t a r t G u i d e
Amplifier Configuration
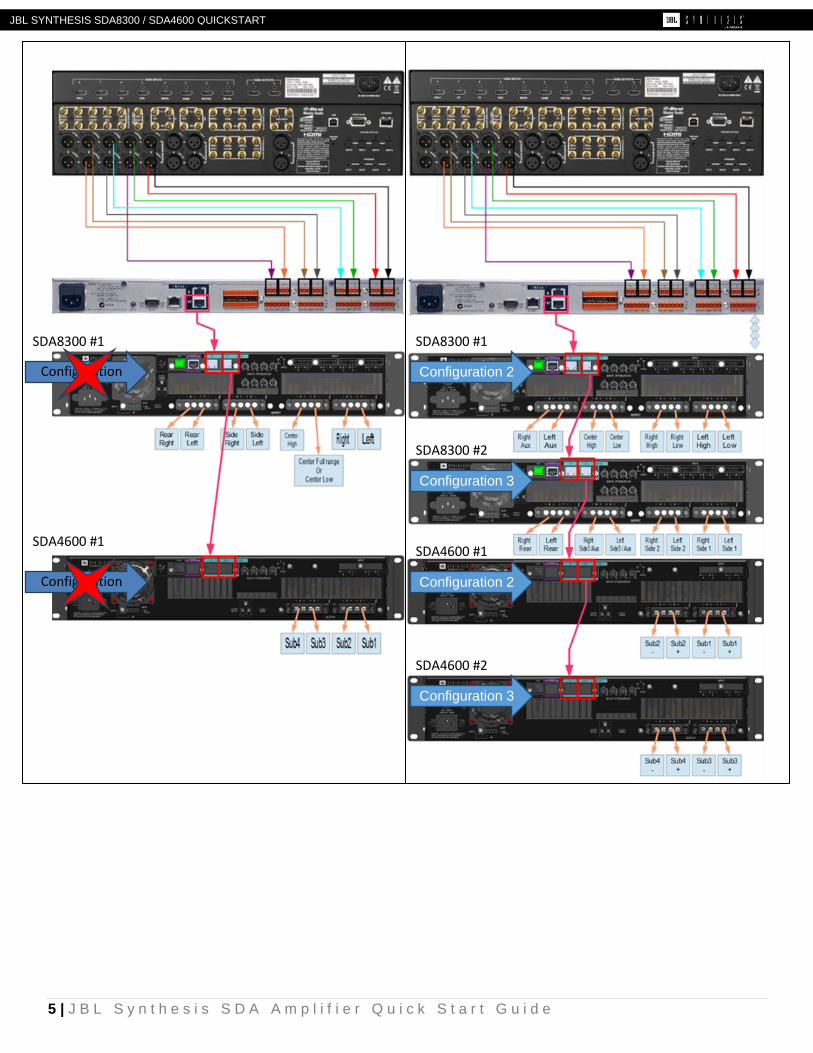
Each amplifier can be configured for different operational modes by using the included jumper plugs and the GPIO port on the rear panel. The plugs are labeled “Configuration 2” and “Configuration 3”. Do not connect anything else into the GPIO port.
Configuration 1 would be typical of an standard 7.1 system and combination of Configuration 2 + Configuration 3 would be typical of an expanded 9.4 or active bi-amplified system.
Speaker Connection
Each output of the SDA amplifiers is assigned a specific speaker channel. This is based on the Configuration and the setup of the SDEC4500P for the correct speakers. Use the chart and pictures on the next pages to connect the speakers correctly. Use Category 2 speaker cable.
Never connect the output to a power supply, battery or power main. Electrical shock may result.
SDA8300 Factory Default Configuration 1
CONFIGURATION 1 AMP
CHANNEL
LEFT 1
RIGHT 2
CENTER FULL RANGE (CENTER LOW) 3
CENTER HIGH (BI-AMP ONLY) 4
SIDE LEFT 5
SIDE RIGHT 6
REAR LEFT 7
REAR RIGHT 8
SDA8300 Configuration 2
CONFIGURATION 2 AMP
CHANNEL
LEFT FULL RANGE / LEFT LOW 1
LEFT HIGH 2
RIGHT FULL RANGE / RIGHT LOW 3
RIGHT HIGH 4
CENTER FULL RANGE / CENTER LOW 5
CENTER HIGH 6
AUX 1 LEFT / HEIGHT LEFT FRONT 7
AUX 1 RIGHT / HEIGHT RIGHT FRONT 8
SDA8300 Configuration 3
CONFIGURATION 3 AMP
CHANNEL
SIDE LEFT 1 1
SIDE RIGHT 1 2
SIDE LEFT 2 3
SIDE RIGHT 2 4
SIDE LEFT 3 / HEIGHT LEFT REAR 5
SIDE RIGHT 3 / HEIGHT RIGHT REAR 6
REAR LEFT 7
REAR RIGHT 8
Configuration
Configuration 2
Configuration 3
8 channel main speaker system
16 channel main speaker system (ch1 - ch8)
16 channel main speaker system (ch9 – ch16)

JBL SYNTHESIS SDA8300 / SDA4600 QUICKSTART
4 | J B L S y n t h e s i s S D A A m p l i f i e r Q u i c k S t a r t G u i d e
SDA4600 Factory Default Configuration 1 (600 x 4)
CONFIGURATION 1 AMP CHANNEL
SUBWOOFER 1 1
SUBWOOFER 2 2
SUBWOOFER 3 3
SUBWOOFER 4 4
SDA4600 Configuration 2 (1200 x 2)
CONFIGURATION 2 AMP CHANNEL
SUBWOOFER 1 1 + [POSITIVE]
2 + [NEGATIVE]
SUBWOOFER 2 3 + [POSITIVE]
4 + [NEGATIVE]
SDA4600 Configuration 3 (1200 x 2)
CONFIGURATION 3 AMP CHANNEL
SUBWOOFER 3 1 + [POSITIVE]
2 + [NEGATIVE]
SUBWOOFER 4 3 + [POSITIVE]
4 + [NEGATIVE]
For low impedance loads, select the appropriate size of wire based on
the distance from amplifier to speaker
Distance Wire Size
UP to 25 ft. (7.6 m) 16 AWG
26-40 ft. (7.9-12.2 m) 14 AWG
41-60 ft. (12.5-18.3 m) 12 AWG
> 60 ft. (18.3 m) 10 AWG
CAUTION: Never use shielded cable for output wiring.
CAUTION: Never connect the speaker return to the chassis of the amplifier, or damage to the amplifier may result.
NOTE: Custom wiring should only be performed by qualified personnel. Class 2 output wiring is required.
CAUTION: To prevent electric shock, do not remove covers. No user serviceable parts inside. Refer servicing to a qualified technician.
Configuration
Configuration 2
4 channel subwoofer speaker system
Bridged Subwoofer speaker system (ch1 - ch2)
Configuration 3
Bridged Subwoofer speaker system (ch3 - ch4)
JBL SYNTHESIS SDA8300 / SDA4600 QUICKSTART
5 | J B L S y n t h e s i s S D A A m p l i f i e r Q u i c k S t a r t G u i d e
Configuration
SDA8300 #1
SDA4600 #1
Configuration
SDA8300 #1
SDA8300 #2
SDA4600 #1
SDA4600 #2
Configuration 2
Configuration 3
Configuration 2
Configuration 3

JBL SYNTHESIS SDA8300 / SDA4600 QUICKSTART
6 | J B L S y n t h e s i s S D A A m p l i f i e r Q u i c k S t a r t G u i d e
Información General
SI NO VA A LEER ESTA GUÍA, LEA ESTA INFORMACIÓN:
ADVERTENCIA: Antes de empezar al montar el amplificador, consulte y observe las instrucciones de seguridad importantes que se encuentran al principio de este manual.
Los amplificadores de SDA vienen preconfigurados para trabajar con el SDEC4500P utilizando la señal de audio digital BLU-LINK a través de cables Ethernet Cat 5e. Los amplificadores no se deben conectar a la red doméstica. La entrada de audio analógica procede del SDEC4500P (hasta 12 canales) y sale del SDA8300 y/o SDA4600 sin sufrir ninguna conversión digital a analógica (hasta 20 canales, expandible hasta 128 canales).
Se pueden seleccionar dos configuraciones alternativas mediante el selector incluido que se conecta a la entrada GPIO en el panel posterior.
El SDA8300 se suministra configurado para un sistema simple de 7 canales. El SDA8300 puede acceder a dos (2) configuraciones adicionales. Usando combinanciones de estas configuraciones permite desde un sistema dé salida simple de 7 x 300 W hasta 16 x 300 W con DSP independiente para cada canal con salidas activas biamplificadas para el izquierdo, central y derecho.
El SDA4600 se suministra configurado para un subwoofer de 4 canales (4 x 600 W). Se puede acceder hasta dos (2) configuraciones adicionales con salidas puenteadas de subwoofer de alta potencia (2x 1200 W) con DSP separado/independiente para cada salida. Estos se utilizan con el sistema patentado "Sound Field Management" de Harman en el SDEC4500P.
El SDEC - 4500P Controla todos los parametros de DSP, incluyendo BI-AMP y la separacion de frecuencia de los altavoces los cuales se deben configurar con el software "JBL Synthesis ARCOS" o "Software v1.5 Panel de control SDEC". Accese www.jblsynthesis.com para descargar el software adecuado.
Fusible
Un fusible (F1) situado cerca de la entrada de alimentación IEC protege el amplificador de una entrada excesiva de corriente CA. El fusible se puede sustituir. Sustitúyalo por otro del mismo tipo, LittelFuse 314 Serie F20 AH 250 V. Póngase en contacto con el departamento de servicio técnico JBL para obtener más información.
Paso a Paso Guía de Configuración
1. Conecte el preamplificador/procesador Surround y SDEC4500P 2. Conecte el enlace de audio digital Blu-Link desde SDEC4500P al amplificador o los amplificadores SDA con cables
estándar Ethernet Cat 5e 3. [Opcional] Conecte los subwoofers activos al SDEC4500P 4. Configuración del SDA8300 modo individual (8 canales) o configuracion de dos unidades (16 canales) y conecte los
altavoces 5. Configuración del SDA4600 para (4 canales x 600 W) o en modo puente (2 canales x 1200 W) o configuración de dos
unidades modo puente y conecte los subwoofers
ConexiónBlu-Link digital
El audio digital se envía en una conexión en cadena de un dispositivo a otro mediante un cable de conexión Cat 5e estándar. Conecte la salida OUT del SDEC4500P a la entrada IN del primer amplificador. Continúe con cada amplificador del sistema de conexión OUT a IN. Es posible conectar hasta 60 amplificadores con hasta 128 canales.
Configuración de los amplificadores
Cada amplificador se puede configurar para diferentes modos de funcionamiento mediante el uso de puentes y el puerto GPIO en el panel posterior. Los puentes están etiquetados como "Configuración 2" y "Configuración 3". No conecte ninguna otra cosa en el puerto GPIO.
Asegurar un enfriamiento adecuado
Si utiliza un bastidor para equipos, monte las unidades directamente una encima de la otra. Cierre los espacios

JBL SYNTHESIS SDA8300 / SDA4600 QUICKSTART
7 | J B L S y n t h e s i s S D A A m p l i f i e r Q u i c k S t a r t G u i d e
abiertos del bastidor con tapas. (Los huecos abiertos reducen la eficiencia de enfriamiento). NO BLOQUEE las aberturas de circulación de aire delanteras ni traseras.
(El bastidor debe estar por lo menos a 5,1 cm del amplificador y la parte posterior del bastidor debe estar por lo menos a 10,2 cm del panel posterior del amplificador.
El aire circula de la parte frontal hacia atrás.
ADVERTENCIA: La tercera terminal del conector (toma de tierra) es una característica de seguridad importante. No intente inhabilitar esta conexión a tierra con adaptadores ni otros métodos.
PRECAUCIÓN: Antes de empezar, compruebe que el amplificador esté desconectado de la alimentación eléctrica y que todos los controles de nivel estén en la posición INF.
Conexión de altavoces
No conecte nunca la salida a una fuente de alimentación, batería ni red eléctrica. Puede provocar una descarga eléctrica.
A cada salida de los amplificadores de SDA se le asigna un canal de altavoz específico. Esto se basa en la configuración y la configuración del SDEC4500P para los altavoces correctos. Utilice el gráfico y las imágenes en las páginas siguientes para conectar los altavoces correctamente. Utilice cable para altavoces de Categoría 2.
SDA8300 Factory Default Configuration 1
CONFIGURATION 1 AMP
CHANNEL
/ IZQUIERDA / 1
/ DERECHO / 2
CENTRO GAMA COMPLETA (BAJO) 3
CENTRO ALTO (SOLO BIAMPLIFICADOR) 4
/ LADO IZQUIERDO / 5
/ LADO DERECHO / 6
POSTERIOR IZQUIERDO/ 7
POSTERIOR DERECHO / 8
SDA8300 Configuration 2
CONFIGURATION 2 AMP
CHANNEL
IZQUIERDA GAMA COMPLETA/IZQUIERDA BAJA 1
LEFT HIGH 2
GAMA COMPLETA DERECHA/DERECHA BAJA 3
DERECHAALTA 4
CENTRO DE GAMA COMPLETA/CENTRO BAJO 5
CENTRO ALTO 6
AUX 1 IZQUIERDA/ALTURA DELANTERO IZQUIERDO 7
AUX 1 DERECHO/ALTURA DELANTERO DERECHO 8
SDA8300 Configuration 3
CONFIGURATION 3 AMP
CHANNEL
LATERAL IZQUIERDO1 1
LADO DERECHO 1 2
LADO IZQUIERDO2 3
LADO DERECHO 2 4
LADO IZQUIERDO 3/ALTURA POSTERIOR IZQUIERDA 5
LADO DERECHO 3/ALTURA POSTERIOR DERECHA 6
POSTERIOR IZQUIERDO 7
POSTERIOR DERECHO 8
Configuration
Configuration 2
Configuration 3
Sistema principal de altavoces de 8 canales.
Sistema principal de altavoces de 16 canales (ch 1- ch 8)
Sistema principal de altavoces de 16 canales (ch 9- ch 16)
JBL SYNTHESIS SDA8300 / SDA4600 QUICKSTART
8 | J B L S y n t h e s i s S D A A m p l i f i e r Q u i c k S t a r t G u i d e
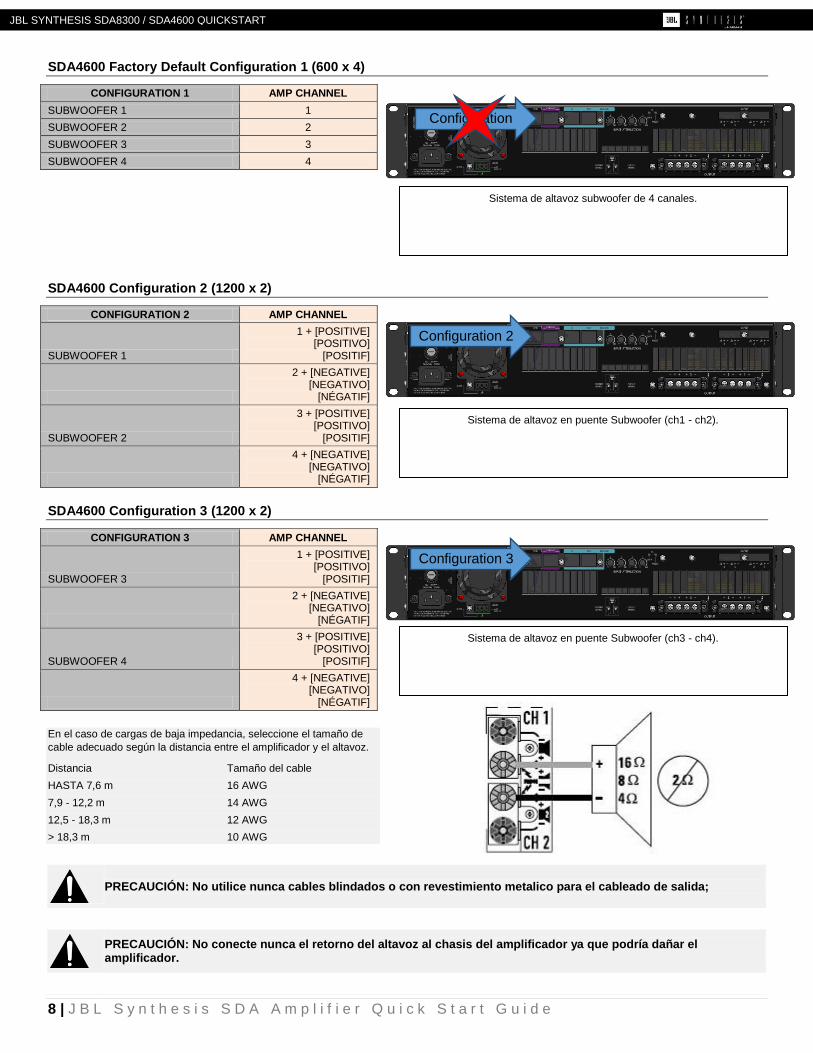
SDA4600 Factory Default Configuration 1 (600 x 4)
CONFIGURATION 1 AMP CHANNEL
SUBWOOFER 1 1
SUBWOOFER 2 2
SUBWOOFER 3 3
SUBWOOFER 4 4
SDA4600 Configuration 2 (1200 x 2)
CONFIGURATION 2 AMP CHANNEL
SUBWOOFER 1
1 + [POSITIVE] [POSITIVO]
[POSITIF]
2 + [NEGATIVE] [NEGATIVO]
[NÉGATIF]
SUBWOOFER 2
3 + [POSITIVE] [POSITIVO]
[POSITIF]
4 + [NEGATIVE] [NEGATIVO]
[NÉGATIF]
SDA4600 Configuration 3 (1200 x 2)
CONFIGURATION 3 AMP CHANNEL
SUBWOOFER 3
1 + [POSITIVE] [POSITIVO]
[POSITIF]
2 + [NEGATIVE] [NEGATIVO]
[NÉGATIF]
SUBWOOFER 4
3 + [POSITIVE] [POSITIVO]
[POSITIF]
4 + [NEGATIVE] [NEGATIVO]
[NÉGATIF]
En el caso de cargas de baja impedancia, seleccione el tamaño de
cable adecuado según la distancia entre el amplificador y el altavoz.
Distancia Tamaño del cable
HASTA 7,6 m 16 AWG
7,9 - 12,2 m 14 AWG
12,5 - 18,3 m 12 AWG
> 18,3 m 10 AWG
PRECAUCIÓN: No utilice nunca cables blindados o con revestimiento metalico para el cableado de salida;
PRECAUCIÓN: No conecte nunca el retorno del altavoz al chasis del amplificador ya que podría dañar el amplificador.
Configuration
Configuration 2
Sistema de altavoz subwoofer de 4 canales.
Sistema de altavoz en puente Subwoofer (ch1 - ch2).
Configuration 3
Sistema de altavoz en puente Subwoofer (ch3 - ch4).
JBL SYNTHESIS SDA8300 / SDA4600 QUICKSTART
9 | J B L S y n t h e s i s S D A A m p l i f i e r Q u i c k S t a r t G u i d e
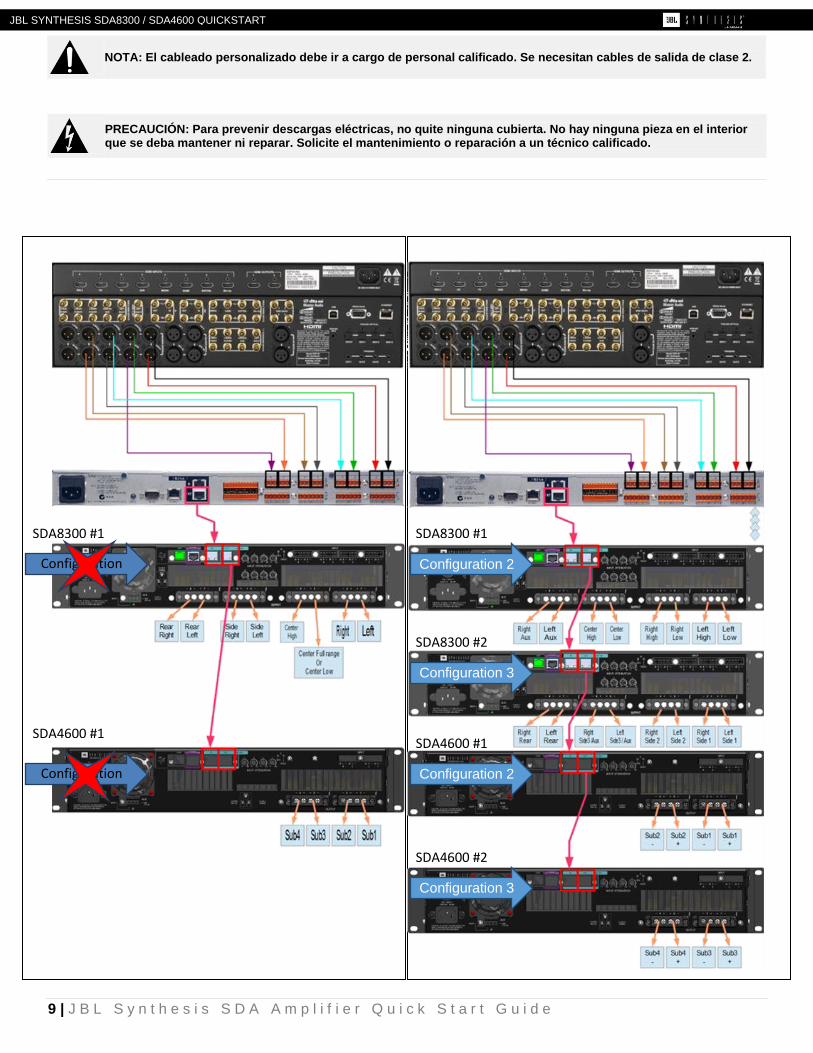
NOTA: El cableado personalizado debe ir a cargo de personal calificado. Se necesitan cables de salida de clase 2.
PRECAUCIÓN: Para prevenir descargas eléctricas, no quite ninguna cubierta. No hay ninguna pieza en el interior que se deba mantener ni reparar. Solicite el mantenimiento o reparación a un técnico calificado.
Configuration
SDA8300 #1
SDA4600 #1
Configuration
SDA8300 #1
SDA8300 #2
SDA4600 #1
SDA4600 #2
Configuration 2
Configuration 3
Configuration 2
Configuration 3

JBL SYNTHESIS SDA8300 / SDA4600 QUICKSTART
10 | J B L S y n t h e s i s S D A A m p l i f i e r Q u i c k S t a r t G u i d e
Informations Générales
SI VOUS NE LISEZ RIEN D'AUTRE DANS CE GUIDE, LISEZ CES INFORMATIONS :
AVERTISSEMENT : Avant de commencer l'installation de votre amplificateur, lisez et observez les Consignes de sécurité importantes du début de ce manuel.
Les amplificateurs SDA sont préconfigurés pour fonctionner avec le SDEC4500P en utilisant un signal audio numérique BLU-LINK sur des câbles Ethernet Cat5e. Les amplificateurs ne doivent pas être connectés au réseau domestique. L’entrée audio analogique arrive sur l’entrée IN du SDEC4500P (jusqu'à 12 canaux) et sur OUT sur les SDA8300 et / ou SDA4600 sans subir de conversion numérique / analogique (jusqu'à 20 canaux en standard, extensibles jusqu’à 128 canaux).
Deux autres configurations peuvent être sélectionnées à l'aide d’un sélecteur de configuration inclus qui se branche sur l'entrée GPIO du panneau arrière.
L'amplificateur SDA8300 est livré configuré pour un système simple 7 canaux. Le SDA8300 peut être paramétré en deux (2) autres configurations. L’utilisation des combinaisons de configurations permet au système d’obtenir une configuration simple pour un système 7 x 300 watts jusqu'à un système 16 x 300 watts avec DSP discret pour chaque canal et sorties bi-amplification actives pour les canaux gauche, centre et droit.
Le SDA4600 est livré configuré pour un système à 4 caissons de graves (4 x 600 watts). Deux (2) autres configurations sont accessibles pour des sorties de caissons de graves pontées de forte puissance (2 x 1200 watts) avec DSP discret pour chaque sortie. Elles sont utilisées avec le traitement numérique breveté de Harman « Sound Field Management » du SDEC4500P.
Le SDEC-4500P contrôle tous les paramètres de filtrage des enceintes BI-AMP et de DSP, il doit être configuré avec les logiciels « JBL Synthesis ARCOS » ou « SDEC Control Panel Software v1.5 ». Rendez-vous sur www.jblsynthesis.com pour télécharger le logiciel approprié.
Fusible
Un fusible (F1) qui se trouve près de l'entrée d'alimentation IEC protège l'amplificateur d'un appel de courant CA excessif. Le fusible peut se remplacer sur site par un fusible du même type, LittelFuse 314 série F20AH 250 V. Les 8|600 et 4|250 utilisent un disjoncteur réarmable au lieu d'un fusible. Veuillez contactez le département de service de JBL pour plus d'informations.
Guide étape par étape de configuration
1. Connectez le préampli / processeur Surround et le SDEC4500P. 2. Connectez la liaison audio numérique Blu-Link du SDEC4500P à un ou plusieurs amplificateurs SDA au moyen de câbles
Ethernet Cat5e standard. 3. [Facultatif] Connectez les caissons de graves amplifiés au SDEC4500P. 4. Configurez le SDA8300 pour une configuration simple (8 canaux) ou double (16 canaux) et connectez les enceintes. 5. Configurez le SDA4600 pour une configuration simple (4 canaux x 600 W) ou pontée (2 canaux x 1 200 W) ou une
configuration double pontée et connectez les caissons de graves.
Connexion de la liaison Blu-Digital
Le signal audio numérique est transmis en cascade d’un appareil à l’autre au moyen d’un câble Ethernet Cat5e standard. Connectez la sortie OUT du SDEC4500P à l’entrée IN du premier amplificateur. Procédez de même avec chaque amplificateur du système en raccordant OUT à IN. Vous pouvez brancher jusqu’à 60 amplificateurs avec jusqu’à 128 canaux différents.
Configuration des amplificateurs
ATTENTION Avant de commencer, veillez à ce que votre amplificateur soit débranché de l'alimentation et que toutes les commandes de niveau soient réglées sur INF.
Prévoyez un refroidissement adapté
Si vous utilisez un rack d'équipements, montez les appareils directement l'un au-dessus de l'autre. Comblez tous espaces ouverts du rack avec des obturateurs. (Les espaces ouverts réduisent

JBL SYNTHESIS SDA8300 / SDA4600 QUICKSTART
11 | J B L S y n t h e s i s S D A A m p l i f i e r Q u i c k S t a r t G u i d e
l'efficacité du refroidissement.) NE MASQUEZ PAS les ouvertures d'air avant et arrière.
(Le rack doit être au minimum à 5,1 cm (2 pouces) de l'amplificateur et le dos du rack doit être au minimum à 10,2 cm (4 pouces) du panneau arrière de l'amplificateur.
Le flux d'air va de l'avant à l'arrière.
AVERTISSEMENT : la troisième broche de ce connecteur (terre) est une caractéristique de sécurité importante. Ne tentez pas de désactiver cette connexion à la terre par l'utilisation d'un adaptateur ou par d'autres méthodes.
Chaque amplificateur peut être configuré pour différents modes de fonctionnement en utilisant les bouchons cavaliers inclus et la prise GPIO du panneau arrière. Les bouchons sont étiquetés Configuration 2 et Configuration 3. Ne branchez rien d’autre sur la prise GPIO.
Connexion des enceintes
Ne branchez jamais la sortie à une alimentation, une batterie ou une alimentation secteur. Ceci peut produire une électrocution.
Chaque sortie des amplificateurs SDA est affectée à un canal d'enceinte spécifique. Il est basé sur la configuration et l'installation du SDEC4500P pour les enceintes appropriées. Utilisez le tableau et les images des pages suivantes pour brancher les enceintes correctement. Utilisez un câble pour enceinte de catégorie 2.
SDA8300 Factory Default Configuration 1
CONFIGURATION 1 AMP
CHANNEL
LEFT / IZQUIERDA / GAUCHE 1
RIGHT / DERECHO / DROIT 2
LARGE BANDE (CENTRE PASSE BAS) 3
CENTRE PASSE HAUT (BI-AMP. SEUL) 4
LATERAL GAUCHE 5
LATERAL DROIT 6
ARRIÈRE GAUCHE 7
ARRIÈRE DROIT 8
SDA8300 Configuration 2
CONFIGURATION 2 AMP
CHANNEL
GAUCHE LARGE BANDE / GAUCHE PASSE BAS 1
GAUCHE PASSE HAUT 2
DROIT LARGE BANDE / DROIT PASSE BAS 3
DROIT PASSE HAUT 4
CENTRE LARGE BANDE / CENTRE PASSE BAS 5
CENTRE PASSE HAUT 6
AUX 1 GAUCHE / HAUTEUR AVANT GAUCHE 7
AUX 1 DROIT / HAUTEUR AVANT DROIT 8
SDA8300 Configuration 3
CONFIGURATION 3 AMP
CHANNEL
LATERAL GAUCHE 1 1
LATERAL DROIT 1 2
LATERAL GAUCHE 2 3
LATERAL DROIT 2 4
LATERAL GAUCHE 3 / HAUTEUR ARRIERE GAUCHE 5
LATERAL DROIT 3 / HAUTEUR ARRIERE DROIT 6
ARRIÈRE GAUCHE 7
ARRIÈRE DROIT 8
Configuration
Configuration 2
Configuration 3
Système d’enceintes principales 8 canaux.
Système d’enceintes principales 16 canaux (c1- c8)
Systèmes d’enceintes principales 16 canaux (c9-c16)
JBL SYNTHESIS SDA8300 / SDA4600 QUICKSTART
12 | J B L S y n t h e s i s S D A A m p l i f i e r Q u i c k S t a r t G u i d e
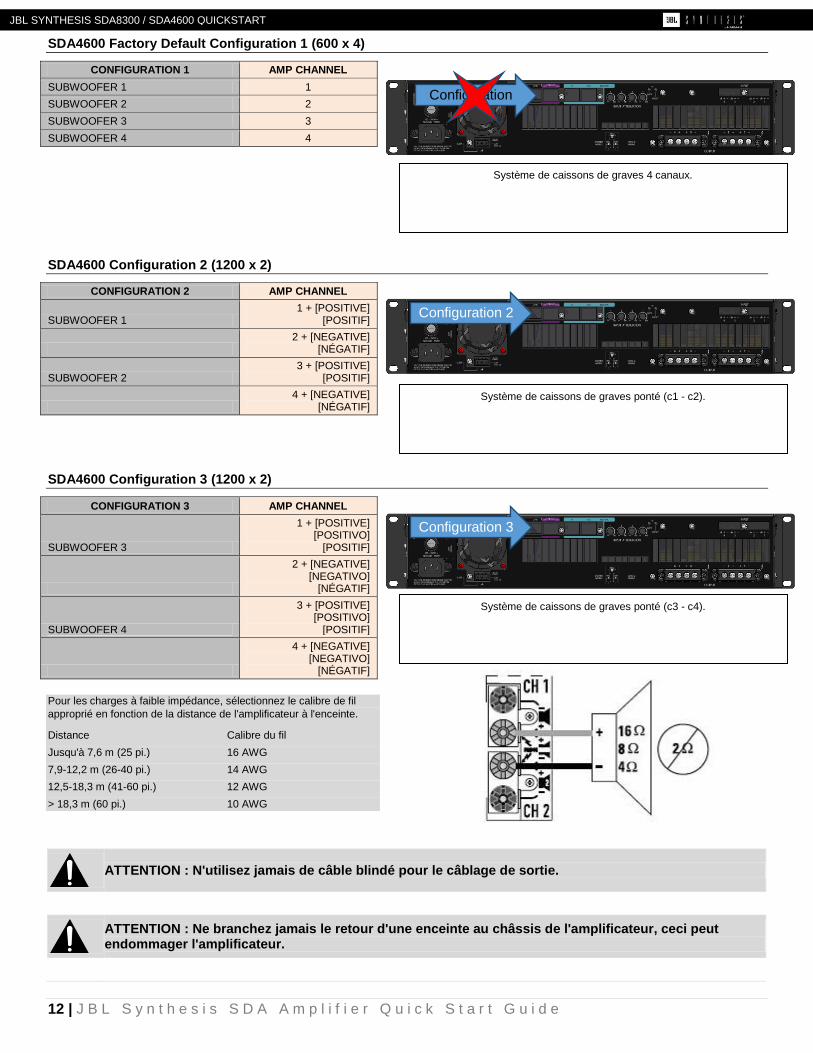
SDA4600 Factory Default Configuration 1 (600 x 4)
CONFIGURATION 1 AMP CHANNEL
SUBWOOFER 1 1
SUBWOOFER 2 2
SUBWOOFER 3 3
SUBWOOFER 4 4
SDA4600 Configuration 2 (1200 x 2)
CONFIGURATION 2 AMP CHANNEL
SUBWOOFER 1 1 + [POSITIVE]
[POSITIF]
2 + [NEGATIVE]
[NÉGATIF]
SUBWOOFER 2 3 + [POSITIVE]
[POSITIF]
4 + [NEGATIVE]
[NÉGATIF]
SDA4600 Configuration 3 (1200 x 2)
CONFIGURATION 3 AMP CHANNEL
SUBWOOFER 3
1 + [POSITIVE] [POSITIVO]
[POSITIF]
2 + [NEGATIVE] [NEGATIVO]
[NÉGATIF]
SUBWOOFER 4
3 + [POSITIVE] [POSITIVO]
[POSITIF]
4 + [NEGATIVE] [NEGATIVO]
[NÉGATIF]
Pour les charges à faible impédance, sélectionnez le calibre de fil
approprié en fonction de la distance de l'amplificateur à l'enceinte.
Distance Calibre du fil
Jusqu'à 7,6 m (25 pi.) 16 AWG
7,9-12,2 m (26-40 pi.) 14 AWG
12,5-18,3 m (41-60 pi.) 12 AWG
> 18,3 m (60 pi.) 10 AWG
ATTENTION : N'utilisez jamais de câble blindé pour le câblage de sortie.
ATTENTION : Ne branchez jamais le retour d'une enceinte au châssis de l'amplificateur, ceci peut endommager l'amplificateur.
Configuration
Configuration 2
Configuration 3
Système de caissons de graves 4 canaux.
Système de caissons de graves ponté (c1 - c2).
Système de caissons de graves ponté (c3 - c4).
JBL SYNTHESIS SDA8300 / SDA4600 QUICKSTART
13 | J B L S y n t h e s i s S D A A m p l i f i e r Q u i c k S t a r t G u i d e
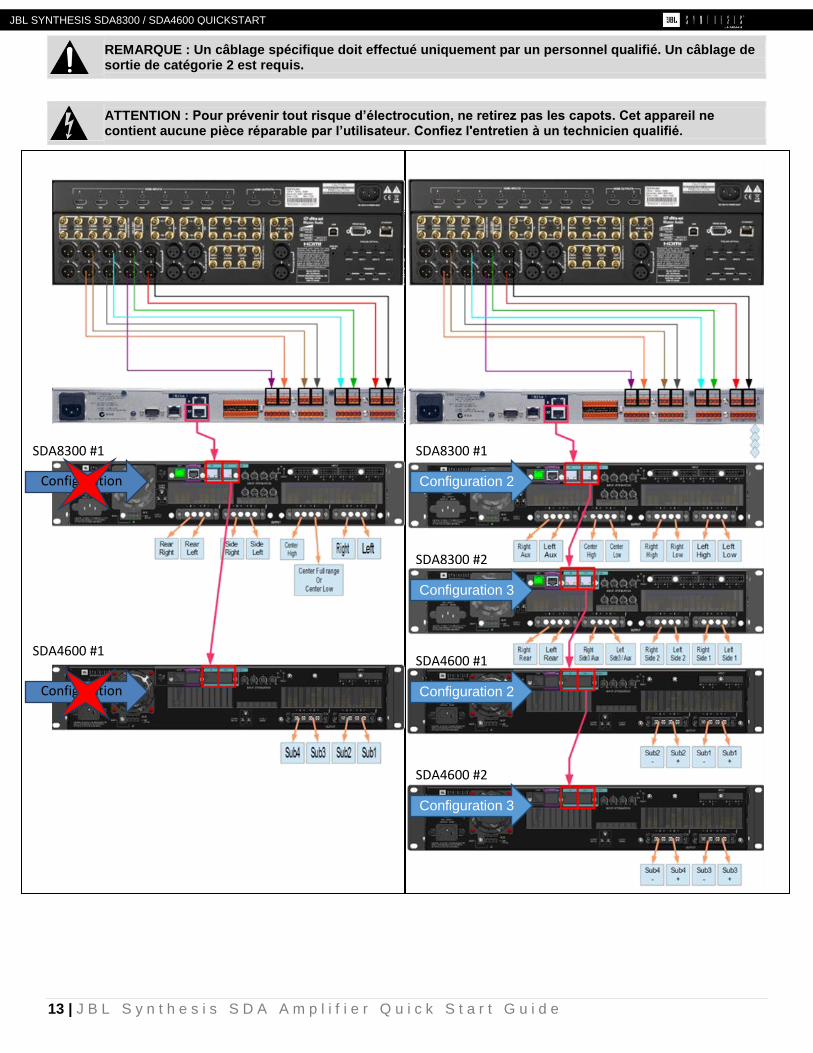
REMARQUE : Un câblage spécifique doit effectué uniquement par un personnel qualifié. Un câblage de sortie de catégorie 2 est requis.
ATTENTION : Pour prévenir tout risque d’électrocution, ne retirez pas les capots. Cet appareil ne contient aucune pièce réparable par l’utilisateur. Confiez l'entretien à un technicien qualifié.
Configuration
SDA8300 #1
SDA4600 #1
Configuration
SDA8300 #1
SDA8300 #2
SDA4600 #1
SDA4600 #2
Configuration 2
Configuration 3
Configuration 2
Configuration 3

JBL SYNTHESIS SDA8300 / SDA4600 QUICKSTART
14 | J B L S y n t h e s i s S D A A m p l i f i e r Q u i c k S t a r t G u i d e
General Information / 일반 정보
이 가이드에서 최소한 이 정보는 읽어 보십시오.
경고: 앰프 설치를 시작하기 전에 본 설명서의 시작 부분에 있는 중요한 안전 지침을 읽고 반드시 준수하십시오.
SDA 앰프는 Cat5e 이더넷 케이블을 통해 BLU-LINK 디지털 오디오 신호를 사용하여 SDEC4500P와 작동하도록 사전
구성되어 있습니다. 앰프를 홈 네트워크에 연결하면 안 됩니다. 아날로그 오디오 입력은 디지털에서 아날로그로 변환을
거치지 않고 SDEC4500P로 IN되고(최대 12채널) SDA8300 및/또는 SDA4600으로 OUT됩니다. 최대 20채널이 표준이며,
128채널로 확장 가능합니다.
포함된 선택 트리거를 사용하여 후면 패널의 GPIO 입력에 연결된 두 가지 대체 구성을 선택합니다.
SDA8300 앰프는 단순 7채널 시스템으로 구성되어 출하됩니다. SDA8300은 두(2) 가지 추가 구성을 이용할 수 있습니다.
이러한 구성을 조합하여 시스템이 단순한 7 x 300W 시스템에서 좌측-중앙-우측에 활성화된 바이 앰프 출력이 있는 각
채널에 대한 별도의 DSP가 적용된 최대 16 x 300W까지 출력할 수 있습니다.
SDA4600은 4채널 서브우퍼로 구성되어 출하됩니다(4 x 600W). 각 출력을 위한 별도 채널 DSP가 적용된 브리지 고성능
서브우퍼 출력(2 x 1200W)에 대해 최대 두(2) 개의 추가 구성을 이용할 수 있습니다. 이러한 구성은 SDEC4500P에서
Harman의 특허 받은 “Sound Field Management”와 함께 사용합니다.
SDEC-4500P는 크로스오버 설정에서 모든 DSP 및 바이 앰프(BI-AMP) 스피커를 제어하며 “JBL Synthesis ARCOS”
소프트웨어 또는 “SDEC Control Panel Software v1.5”로 구성해야 합니다. www.jblsynthesis.com으로 이동하여 알맞은
소프트웨어를 다운로드하십시오.
Step by Step Setup Guide / 단계별 설치 가이드
1. 프리앰프/서라운드 프로세서 및 SDEC4500P를 연결합니다
2. 표준 이더넷 Cat5e 케이블을 사용하여 Blu-Link 디지털 오디오 링크를 SDEC4500P에서 SDA 앰프로 연결합니다
3. [옵션] 전원이 공급된 서브우퍼를 SDEC4500P에 연결합니다
4. 단일(8채널) 또는 이중 장치(16채널) 구성에 대해 SDA8300을 설치하고 스피커를 연결합니다
5. 단일(4채널 x 600W) 또는 브리지(2채널 x 1200W) 또는 브리지 이중 장치 구성에 대해 SDA4600을 설치하고 서브우퍼를
연결합니다
Blu-Link Digital Connection / Blu-Link 디지털 연결
디지털 오디오가 장치에서 다음 장치로 표준 Cat5e 패치 케이블을 사용하여 데이지 체인에
전송됩니다. SDEC4500P의 OUT을 첫 번째 앰프의 IN에 연결합니다. 계속해서 시스템의 각
앰프를 OUT에서 IN으로 연결합니다. 최대 60개의 앰프를 최대 128개의 개별 채널에 연결할 수
있습니다.
JBL SYNTHESIS SDA8300 / SDA4600 QUICKSTART
15 | J B L S y n t h e s i s S D A A m p l i f i e r Q u i c k S t a r t G u i d e
Amplifier Configuration / 앰프 구성
주의: 시작하기 전에 앰프를 전원에서 분리하고 모든 레버 컨트롤을 INF로 설정하십시오.
적절한 냉각 확인
장비 랙을 사용할 경우, 여러 장치를 겹쳐서 장착하십시오. 블랭크 패널로 랙의 열린 공간을 모두 닫으십시오(열린 공간은 냉각 효율을
저하시킵니다). 전면이나 후면 공기 구멍을 막지 마십시오.
랙은 앰프에서 최소 5.1cm(2인치) 떨어져야 하며 랙의 후면은 앰프 후면 패널에서 최소 10.2cm(4인치) 떨어져야 합니다.
공기는 그림 2와 같이 앞에서 뒤로 흐릅니다.
경고: 이 커넥터의 세 번째 막대(접지)는 중요한 안전 기능입니다. 어댑터나 다른 방법을 사용하여 이 접지 연결을
비활성화하려고 하지 마십시오.
포함된 점퍼 플러그와 후면 패널의 GPIO 포트를 사용하여 각 앰프를 다른 작동 모드로 구성할 수 있습니다. 플러그는 "구성 2" 및 "구성
3"이라는 라벨이 부착되어 있습니다. GPIO 포트에 다른 것을 연결하지 마십시오.
Speaker Connection / 스피커 연결
출력 장치를 전원 공급 장치, 배터리 또는 주 전원에 절대로 연결하지 마십시오. 감전될 수 있습니다.
SDA 앰프의 각 출력은 특정 스피커 채널에 할당되어 있습니다. 이는 올바른 스피커에 대한 구성 및 SDEC4500P의 설치에 따릅니다.
다음 페이지의 도표와 그림을 이용하여 스피커를 알맞게 연결하십시오. 카테고리 2 스피커 케이블을 사용하십시오.
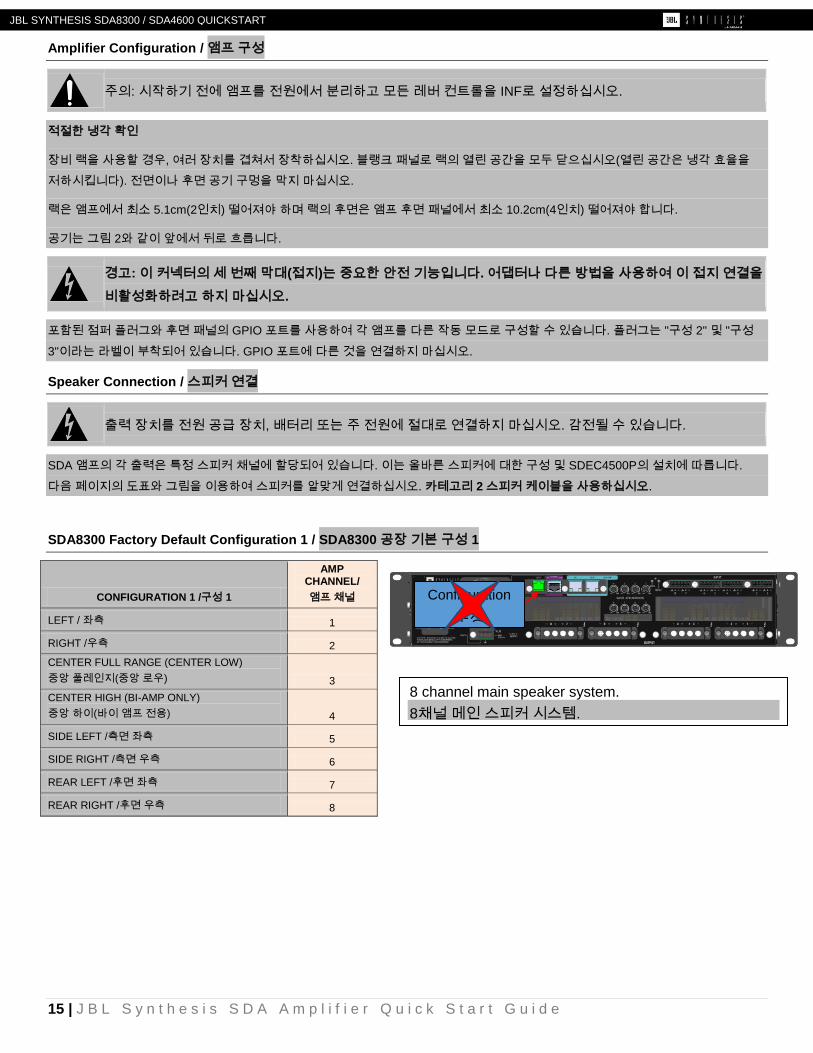
SDA8300 Factory Default Configuration 1 / SDA8300 공장 기본 구성 1
CONFIGURATION 1 /구성 1
AMP CHANNEL/
앰프 채널
LEFT / 좌측 1
RIGHT /우측 2
CENTER FULL RANGE (CENTER LOW)
중앙 풀레인지(중앙 로우) 3
CENTER HIGH (BI-AMP ONLY)
중앙 하이(바이 앰프 전용) 4
SIDE LEFT /측면 좌측 5
SIDE RIGHT /측면 우측 6
REAR LEFT /후면 좌측 7
REAR RIGHT /후면 우측 8
8 channel main speaker system.
8채널 메인 스피커 시스템.
Configuration
구성

JBL SYNTHESIS SDA8300 / SDA4600 QUICKSTART
16 | J B L S y n t h e s i s S D A A m p l i f i e r Q u i c k S t a r t G u i d e
SDA8300 Configuration 2 / SDA8300 구성 2
CONFIGURATION 2 /구성 2
AMP CHANNEL/
앰프 채널
LEFT FULL RANGE / LEFT LOW
좌측 풀레인지 / 좌측 로우 1
LEFT HIGH
좌측 하이 2
RIGHT FULL RANGE / RIGHT LOW
우측 풀레인지 / 우측 로우 3
RIGHT HIGH
우측 하이 4
CENTER FULL RANGE / CENTER LOW
중앙 풀레인지 / 중앙 로우 5
CENTER HIGH
중앙 하이 6
AUX 1 LEFT / HEIGHT LEFT FRONT
AUX 1 좌측 / HEIGHT 좌측 전면 7
AUX 1 RIGHT / HEIGHT RIGHT FRONT
AUX 1우측 / HEIGHT 우측 전면 8
SDA8300 Configuration 3 / SDA8300 구성 3
CONFIGURATION 3 /구성 3
AMP CHANNEL/
앰프 채널
SIDE LEFT 1
측면 좌측 1 1
SIDE RIGHT 1
측면 우측 1 2
SIDE LEFT 2
측면 좌측 2 3
SIDE RIGHT 2
측면 우측 2 4
SIDE LEFT 3 / HEIGHT LEFT REAR
측면 좌측 3 / HEIGHT 좌측 후면 5
SIDE RIGHT 3 / HEIGHT RIGHT REAR
측면 우측 3 / HEIGHT 우측 후면 6
REAR LEFT
후면 좌측 7
REAR RIGHT
후면 우측 8
16 channel main speaker system (ch 1- ch 8)
16채널 메인 스피커 시스템(채널 1 ~ 8)
16 channel main speaker system (ch 9- ch 16)
16채널 메인 스피커 시스템(채널 9 ~ 16)
Configuration 2
구성 2
Configuration 3
구성 3
Fuse
A fuse (F1) located near the IEC power inlet protects the amplifier from excessive AC current draw. The fuse is field replaceable. Replace with same type fuse; LittelFuse 314 Series F20AH 250V. The 8|600 and 4|250 utilize a resettable breaker instead of a fuse. Please contact JBL Service department for more information.
퓨즈
IEC 전원 입구 근처의 퓨즈(F1)가 앰프의 과도한 AC 전류
소비를 방지합니다. 퓨즈는 같은 형식의 퓨즈(LittelFuse
314 시리즈 F20AH 250v)로 현장에서 교체할 수
있습니다. 8|600 및 4|250은 퓨즈 대신 리셋 가능한
브레이커를 사용합니다. 자세한 내용은 JBL Service
부서로 문의하십시오.

JBL SYNTHESIS SDA8300 / SDA4600 QUICKSTART
17 | J B L S y n t h e s i s S D A A m p l i f i e r Q u i c k S t a r t G u i d e
SDA4600 Factory Default Configuration 1 / SDA4600 공장 구성 1
CONFIGURATION 1 /구성 1
AMP CHANNEL/
앰프 채널
SUBWOOFER 1
서브우퍼 1 1
SUBWOOFER 2
서브우퍼 2 2
SUBWOOFER 3
서브우퍼 3 3
SUBWOOFER 4
서브우퍼 4 4
SDA4600 Configuration 2 / SDA4600 구성 2
CONFIGURATION 2 /구성 2
AMP CHANNEL/
앰프 채널
SUBWOOFER 1
서브우퍼 1
1 + [POSITIVE]
1 + [양극]
2 + [NEGATIVE]
2 + [음극]
SUBWOOFER 2
서브우퍼 2
3 + [POSITIVE]
3 + [양극]
4 + [NEGATIVE]
4 + [음극]
낮은 임피던스 부하의 경우 앰프에서 스피커까지의
거리를 기반으로 적합한 크기의 전선을 선택하십시오.
거리 전선 크기
최대 7.6m(25피트) 16AWG
7.9 ~ 12.2m(26 ~ 40피트) 14AWG
12.5 ~ 18.3m(41 ~ 60피트) 12AWG
> 18.3m(60피트) 10AWG
주의: 출력 배선에 차폐된 케이블을 절대로 사용하지 마십시오.
주의: 스피커를 앰프 섀시에 절대로 재연결하지 마십시오. 앰프가 손상될 수 있습니다.
주: 맞춤형 배선은 유자격자만 수행해야 합니다. 2등급 출력 배선이 필요합니다.
4 channel subwoofer speaker system.
4채널 서브우퍼 스피커 시스템.
Bridged Subwoofer speaker system (ch1 - ch2).
브리지 서브우퍼 스피커 시스템(채널 1 ~ 2).
Configuration
구성
Configuration 2
구성 2

JBL SYNTHESIS SDA8300 / SDA4600 QUICKSTART
18 | J B L S y n t h e s i s S D A A m p l i f i e r Q u i c k S t a r t G u i d e
SDA4600 Configuration 3 / SDA4600 구성 3
CONFIGURATION 3 /구성 3
AMP CHANNEL/
앰프 채널
SUBWOOFER 3
서브우퍼 3
1 + [POSITIVE]
1 + [양극]
2 + [NEGATIVE]
2 + [음극]
SUBWOOFER 4
서브우퍼 4
3 + [POSITIVE]
3 + [양극]
4 + [NEGATIVE]
4 + [음극]
주의: 감전을 방지하려면 커버를 제거하지 마십시오. 장비 내부에는 사용자가 수리할 수 있는 부품이 없습니다.
자격을 갖춘 기술자에게 수리를 의뢰하십시오.
Bridged Subwoofer speaker system (ch3 - ch4)
브리지 서브우퍼 스피커 시스템(채널 3 ~ 4).
Configuration 3
구성 3
JBL SYNTHESIS SDA8300 / SDA4600 QUICKSTART
19 | J B L S y n t h e s i s S D A A m p l i f i e r Q u i c k S t a r t G u i d e
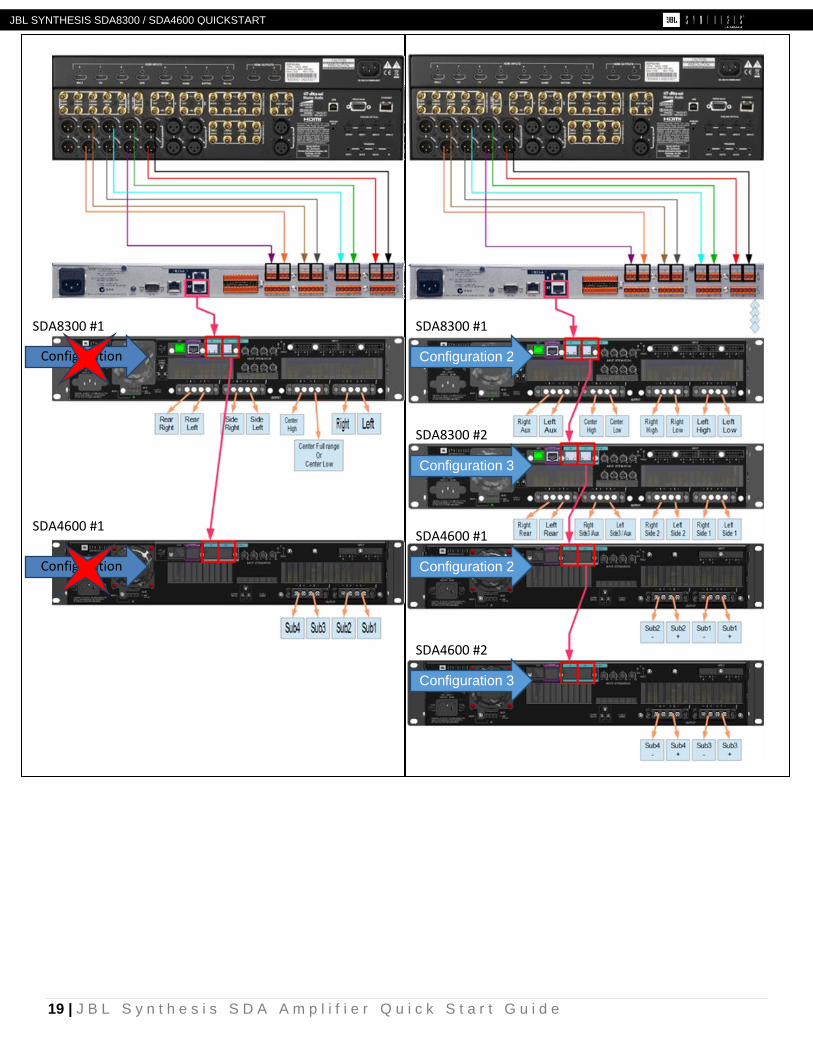
Configuration
SDA8300 #1
SDA4600 #1
Configuration
SDA8300 #1
SDA8300 #2
SDA4600 #1
SDA4600 #2
Configuration 2
Configuration 3
Configuration 2
Configuration 3

JBL SYNTHESIS SDA8300 / SDA4600 QUICKSTART
20 | J B L S y n t h e s i s S D A A m p l i f i e r Q u i c k S t a r t G u i d e