seat cover installation instructions - sor · pdf filespecter off-road seat covers are...
TRANSCRIPT

Specter Off-Road Seat Covers are designed and sewn by our own upholstery professionals on our premises. They are made to industry specifications to be installed by upholstery professionals and will exhibit a factory original fit. With a little forethought the average home mechanic will successfully achieve that same original fit. For a proper fit, we also recommend replacing worn and torn seat foam. Replacement foam can be purchased from Specter Off-Road. Headrests were a factory option on some 40 series Land Cruisers and are therefore headrest covers are sold separately, see part numbers below.
Bottom Seat Foam
Headrest Cover
Seat Cover Installation Instructions 1973 - 1984 40 Series Front Bucket Seat Covers
SOR Parts: #310-73D, #310-79D, #310-80D, 310-73D-BD & 310-73D-GD
Specter Off-Road, Inc.21600 Nordhoff St. Chatsworth, CA 91311 USA,
www.sor.com, (818)882-1238, Fax: (818) 882-7144
310-73D_0816R3AS Page 1 © Copyright 2016 Specter Off-Road, Inc.
All rights reserved
#310-81D SOR High Density Bottom Molded Foam Fits 1973-1978 FJ40 & BJ40 front driver or passenger seat bottom
#310-82D SOR High Density Bottom Molded Foam Fits 1979-1984 FJ40 & BJ40 front driver or passenger seat bottom
310-73D-AHR SOR Deluxe Vinyl Headrest Covers-Dark Charcoal Grey vinyl-Fits 1973-1978
310-79D-H SOR Deluxe Vinyl Headrest Covers-Light Charcoal Grey Fits 1979-8/80
310-80D-H SOR Deluxe Vinyl Headrest Covers-Light Charcoal Grey Fits 8/80-1984
310-73D-GDHR SOR Deluxe Gray Denim Headrest Covers Fits 1973-1978 FJ40 & BJ40-
310-73D-BDHR SOR Deluxe Black Denim Headrest Covers Fits 1973-1978 FJ40 & BJ40

Specter Off-Road, Inc. 21600 Nordhoff St. Chatsworth, CA 91311 USA, www.sor.com,
[email protected], (818) 882-1238, Fax: (818) 882-7144
Preparation1. READ THESE INSTRUCTIONS IN THEIR ENTIRETY BEFORE YOU PROCEED.
2. Unbolt and remove your seats from your Land Cruiser.
3. Detach the bottom cushion from the backrests. Remove the seat belts where applicable and remove the pivot brackets from the sides of the seat. Disassemble one seat at a time so you have a reference.
4. Clean and repaint mounting brackets as necessary. Replace any damaged, rusted or missing hardware. Replacement parts can be purchased from Specter Off-Road. Now is also a good time to service the seat adjustment tracks. Clean and re-lubricate the tracks
5. Your kit came with a length of retainer wire. You have been supplied with enough to properly install your new SOR seat covers. This wire is used to reinforce hems that attach the vinyl to seat frame. Pass the curled end of the wire through the mounting seams of the seat cover. The curl in the wire prevents the sharpened ends of the cut wire from damaging the vinyl. Cut the wire to length leaving enough excess at each end of the hem to curl into a small loop. Make a ½ curl in the newly cut ends with a pair of pliers.
6. It is not advisable to install this kit in temperatures under 75 degrees Fahrenheit. Lay the covers in the sun to warm them. Work in a clean environment. Use an old blanket or towel as a work surface to prevent damage to your new seat covers during the installation process.
Parts List2 bottom seat covers2 back rest coverRetainer wireHog rings
Page 2 © Copyright 2016 Specter Off-Road, Inc. All rights reserved
Tools RequiredWire cutters12, 14 & 17 mm Wrenches Open End or SocketPhillips Screwdriver Hog Ring PliersPliersScissorsUtility KnifeAwl
4 Small kitchen trash bags (Not included)
Specter Off-Road, Inc. 21600 Nordhoff St. Chatsworth, CA 91311 USA, www.sor.com, [email protected], (818) 882-1238, Fax: (818) 882-7144
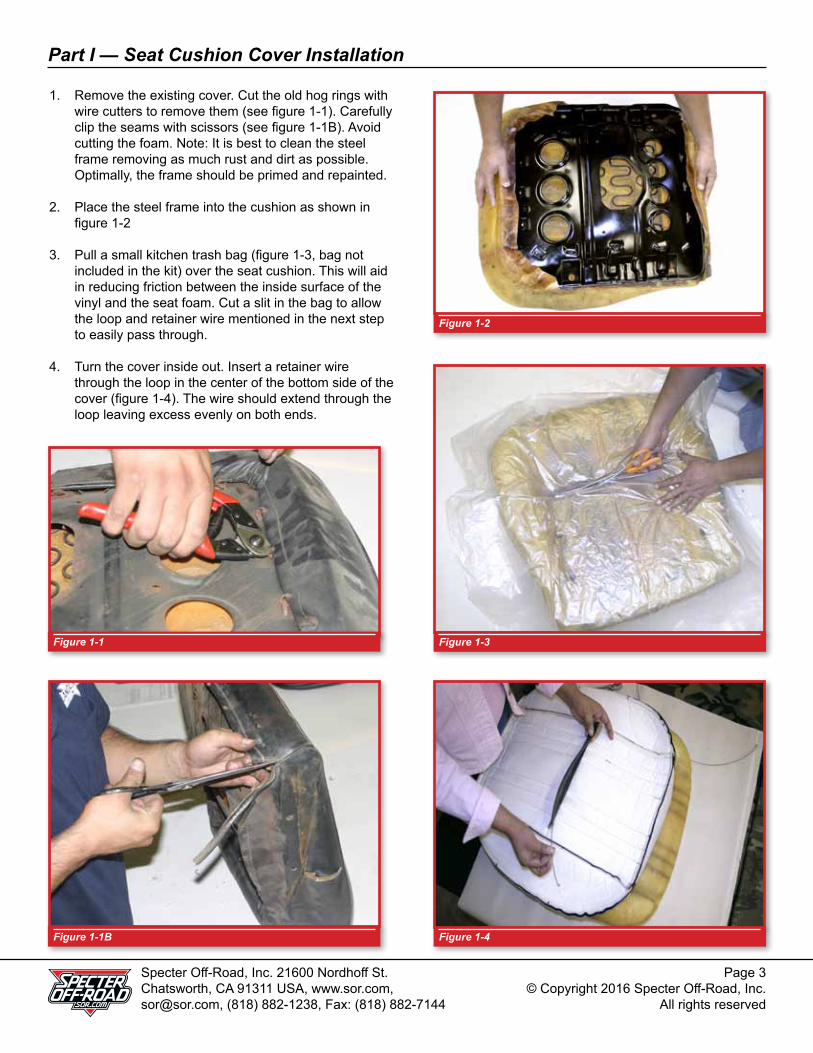
1. Remove the existing cover. Cut the old hog rings with wire cutters to remove them (see figure 1-1). Carefully clip the seams with scissors (see figure 1-1B). Avoid cutting the foam. Note: It is best to clean the steel frame removing as much rust and dirt as possible. Optimally, the frame should be primed and repainted.
2. Place the steel frame into the cushion as shown in figure 1-2
3. Pull a small kitchen trash bag (figure 1-3, bag not included in the kit) over the seat cushion. This will aid in reducing friction between the inside surface of the vinyl and the seat foam. Cut a slit in the bag to allow the loop and retainer wire mentioned in the next step to easily pass through.
4. Turn the cover inside out. Insert a retainer wire through the loop in the center of the bottom side of the cover (figure 1-4). The wire should extend through the loop leaving excess evenly on both ends.
Part I — Seat Cushion Cover Installation
Page 3 © Copyright 2016 Specter Off-Road, Inc.
All rights reserved
Figure 1-1
Figure 1-2
Figure 1-4
Figure 1-3
Figure 1-1B

Specter Off-Road, Inc. 21600 Nordhoff St. Chatsworth, CA 91311 USA, www.sor.com,
[email protected], (818) 882-1238, Fax: (818) 882-7144
Page 4 © Copyright 2016 Specter Off-Road, Inc. All rights reserved
5. With the cloth side of the seat cover against the cushion, position it over the cushion and frame making sure it is properly oriented front to back. The loop and wire installed in the previous step should align with the slot in the cushion (see figure 1-5). Push the loop and wire into the slot in the seat cushion.
6. Figure 1-6 — From the top side of seat, connect the cover to the cushion and frame assembly. Through the slot in the cushion, clamp hog rings around the retainer wire to the steel rod or “S” shaped spring of the seat frame depending on what year your 40 series is (see figure 1-6B & 1-6C ). Figure 1-6D shows a hog ring properly held in Hog Ring Pliers.
Figure 1-6
Figure 1-6B — 1973-1978 40 Series Seat Frame Steel Rod. Shown through the slot in the seat cushion.
Figure 1-6C — 1979-1984 Seat Frame “S” Spring. Shown from the bottom of the seat cushion.
Figure 1-5
Figure 1-6D — Hog Ring Pliers Demo. Hold the Hog Ring tightly in the Hog Ring Pliers. Position the hog ring so it pierces the vinyl and bends around an anchor point attaching the seat cover to the seat frame.

Specter Off-Road, Inc. 21600 Nordhoff St. Chatsworth, CA 91311 USA, www.sor.com, [email protected], (818) 882-1238, Fax: (818) 882-7144
7. Figure 1-7 — Starting at the front of the cushion, roll the cover over the cushion turning it right side out over the cushion. Make sure to keep the seams aligned with the edges of the cushion. Continue working the seat cover over the cushion working from front to back checking alignment (figure 1-7B). Double check fit and alignment (figure 1-7C).
8. Figure 1-8 — Place the seat top side down on a soft surface as to prevent damage to the new cover. Use an old blanket or large towel. From the bottom side of the seat, pull the cover tight by pushing down on the frame while pulling up on the edges of the cover. Turn the seat over and recheck alignment.
9. Figure 1-9 — Working from the bottom of the seat again, thread the appropriate length retainer wire through seams in the all bottom edges of the seat cover. Cinch it tight by pulling firmly but gently on the ends of the wire being careful not to tear the vinyl.
10. Starting at the center on the front edge of the seat, begin attaching the cover to the frame. Clamp hog rings around the retainer wire through the vinyl and through the loops in the seat frame (see figure 1-10). Work from the front of the seat to the back working both sides simultaneously.
Page 5 © Copyright 2016 Specter Off-Road, Inc.
All rights reserved
Figure 1-7C
Figure 1-7B
Figure 1-8
Figure 1-7 Figure 1-9
Figure 1-10

Specter Off-Road, Inc. 21600 Nordhoff St. Chatsworth, CA 91311 USA, www.sor.com,
[email protected], (818) 882-1238, Fax: (818) 882-7144
Part II — Seat Back Cover Installation
1. Remove the existing cover from the seat back (see figure 2-1). As you did with the seat cushion, clip the seams with scissors and cut the old hog rings with the wire cutters to remove them.
2. If you plan to reinstall your headrests, carefully remove the plastic headrest guides. The guides are no longer available from Toyota.
1973-1978 seats (figure 2-2): There are two catches on the inner rim of the outer guide that engage the inner guide. Starting with the one on the back side of the seat. Work a small flat screwdriver between them and gently pry toward the center while pulling out the guide.
1979-1984 seats (figure 2-2B): Reach into the cavity at the top of the seat and feel for the base of the headrest guide. Pinch the two prongs together side-to-side while pushing the guide out through the top of the seat.
3. Pull a small kitchen trash bag (not included in the kit) over the seat back. The kitchen bag can be seen in figure 2-4. This will aid in reducing friction between the inside surface of the vinyl and the foam.
4. Turn the new seat cover inside out. Holding the seat back upright, position the new cover upside down over the top of the seat back. Make sure the front of the cover is evenly aligned with the front of the seat back. Begin pulling the seat cover down over the seat back (see figure 2-4).
Page 6 © Copyright 2016 Specter Off-Road, Inc. All rights reserved
Figure 2-1
Figure 2-2B — Headrest guide removal - 1979 - 1984 40 Series
Figure 2-2 — Headrest guide removal - 1973 - 1978 40 Series
Figure 2-4

Specter Off-Road, Inc. 21600 Nordhoff St. Chatsworth, CA 91311 USA, www.sor.com, [email protected], (818) 882-1238, Fax: (818) 882-7144
5. Locate the loops sewn inside of the seat cover. There are two sets of loops. One on the inside side front of the seat cover and one on the inside back. As you did with the seat cushion, insert a retainer wire through the loops (see figure 2-5). The wire should extend all the way through the loops. The loops and wire should align with the slot in the seat back foam.
6. Starting with the back set of loops and working through the slot in the seat pad (figure 2-6), use hog rings to attach the loops and retainer wire (figure 2-6B) to the seat frame. Repeat the process to attach the front seat cover loops and retainer wire to the frame.
7. Check to confirm the seat cover is aligned to the foam. Continue unfolding the seat cover until it completely covers the entire seat back (figure 2-7). Turn the back rest upside down. Pull the cover tight over the foam.
8. Figure 2-8 — Thread retainer wires through the front and back seams at the bottom of the seat cover. Use hog rings to attach the front and back seams together (figure 2-8B).
Figure 2-5
Page 7 © Copyright 2016 Specter Off-Road, Inc.
All rights reserved
Figure 2-7
Figure 2-8 Figure 2-8B
Figure 2-6BFigure 2-6

Specter Off-Road, Inc. 21600 Nordhoff St. Chatsworth, CA 91311 USA, www.sor.com,
[email protected], (818) 882-1238, Fax: (818) 882-7144
9. The procedure followed to reinstall the headrest guides is the same for both early and late 40 series bucket seats. Start by locating and marking the headrest guide holes in the top of the seat back. Feel for the indentation with your finger and use a ball point pen to mark an X across the center (figure 2-9).
10. Hold a guide up to the X to get an idea of how long to make the cuts. It is better to under cut the X and adjust it if needed. Be careful not to over cut the vinyl. Cut the X with a sharp utility knife (figure 2-10).
11. Push the guide through the hole until it snaps into place.
73-78 models, the guide slopes to the back of the vehicle.
79-84 models, the guide with catch button is put in the hole near the door of vehicle and the button faces the door.
12. To reinstall back panel, position it on the seat back. Use a strait pin to locate the screw holes in the seat frame through the screw holes in the panel and vinyl (figure 2-12).
13. Once you locate the screw hole you may need to punch a larger hole with an awl or nail. Fasten the panel by pushing a screw through the vinyl. Work diagonally at first, corner to corner to center the panel on the seat back and do not set the screws until they are all in place (figure 2-13).
11. Reassemble and reinstall the seats.
Page 8 © Copyright 2016 Specter Off-Road, Inc. All rights reserved
Figure 2-11 — Headrest guide installation
Figure 2-9
Figure 2-10
Figure 2-12 — Back Panel installation Figure 2-13 — Back Panel installation