section 4 – preparation for horizontal siding
TRANSCRIPT

21
SECTION 4 – Preparation for Horizontal Siding
Preparing Wall Surfaces
New ConstructionMake sure all studs are straight and true. Correct any bowedstuds.
NOTE: Vinyl siding must be applied over a rigid sheathingthat provides a smooth, flat surface or an underlayment(such as wood, wood composition, rigid foam or fibersheathing) that is no more than 1" thick. Vinyl sidingcannot be applied directly to studs.
Make sure sheathing is fastened securely to studs.
If you’re planning to use a conventional house wrap or buildingfelt, apply according to the manufacturer’s recommendations.In all cases, however, install the products so they are securedfirmly to the substrate so that they provide a smooth, evensurface for the final siding installation.
Before applying siding, make certain substrate is watertight.In order to be properly protected from precipitation, thesubstrate may need to be properly flashed around areas such as windows, doors, other openings and corners so as to shed water to the exterior. The siding alone is not meantto be a watertight barrier.
Drop-In Foam Backer BoardsSome drop-in foam backers can restrict the movement of vinylsiding. Therefore, CertainTeed vinyl siding may not be appliedover any drop-in foam backer other than a contoured drop-infoam backer designed specifically for each profile.IMPORTANT: CertainTeed will not accept any responsibility orliability in the event the drop-in foam backer restricts themovement of the vinyl. The use, fit, and performance of thesiding backer board is the responsibility of the installer and thebacker board manufacturer.
NOTE: Contoured drop-in foam backer boards are not asubstitute for rigid foam sheathing.
Home Improvement ProjectsYou can prepare your current siding surface to receive vinylsiding in one of three ways:
Strip off old siding and level the wall. If felt paper covers thewall, you have two alternatives: either strip it off completely orstaple or nail it to create a smooth surface. If there is no solidsheathing under the old siding, you must apply it as describedin the instructions for New Construction, above.
CertainTeed Vinyl Siding Installation Guide

Apply rigid sheathing to existing siding to provide a smooth surface. Nail securely to old siding. Nail evenly to bridge low spots.
NOTE: Failure to establish a smooth, solid surfaceconstitutes misapplication under the terms of thewarranty.
Apply vertical furring to old siding to straighten noticeablesurface unevenness. (See “Tips for applying wood furring”. )Then apply rigid sheathing, following the instructionspresented under New Construction.
NOTE: For information on installing siding over asbestosand for historic applications, see page 150.
Tips for applying wood furringIf you are working on an older home with noticeably unevenwalls, you must correct this condition before proceeding. If notcorrected during preparation, this uneven surface will producea wavy appearance in siding applied over it.
For best results, space strips 12" on center. Do not exceed16". To correct an uneven wall, use furring strips (and woodshims if necessary) to eliminate low spots.
NOTE: You must apply rigid sheathing over furring.
When covering over masonry or bricks, it’s better to use 1"x 3" furring. For best thermal performance, install aminimum of 1/4" foam over furring strips.
Furring and/or foam is also used below eaves and windowsillsto maintain correct slope angles when siding panels must becut to a narrower dimension to fit.
Similarly, when panels are cut to fit over doors or windows, furring and/or foam is used to establish the correct slope angle.
22
CertainTeed Vinyl Siding Installation Guide
sill
undersill trim
J-channel
siding
siding
undersill trim
J-channel
sill
furring strip
furring strip

Applying over stuccoWhen applying vinyl siding over stucco, you first have to besure you’re working on an even surface. To create thatsurface, you may have to knock down high spots wherefurring strips will be applied. Use caution when chipping offthese spots – you don’t want to crack or damage theremaining stucco.
Apply 1" x 3" furring to the stucco, using ring-shanked nails orscrews. Stucco will not hold fasteners tightly, so be sure nailsor screws are anchored securely to studs. Furring stripsshould be spaced 16" on center.
Applying rigid foam sheathing to furringInstall sheathing according to manufacturer’s instructions. Do not apply siding directly to furring strips. For best thermalperformance, install a minimum of 1/4" foam over furring strips.
Applying over steel studsPre-planning is the key when installing vinyl siding andaccessories over steel studs. Pre-planning includes theselection of siding style and the types of accessories. Pre-planning proper stud placement will eliminate many of theproblems that could surface once the job has been started,such as at corners, windows, and transitional areas.
Follow the same guidelines as in a wood surface – except forthe type of fasteners used. Wall sheathing must be installedover the studs. This will provide a straighter, smoother andmore rigid wall surface and help prevent studs from twisting.Siding must be secured into metal studs if the substrate is nota nailable surface such as exterior dry wall, gypsum board, etc.
The application of vinyl siding, soffits and accessories oversteel stud framing rather than typical wood framing is straight-forward. The main difference is the use of screws to hangcomponents that make up a completed siding job.
Use noncorrosive, self-tapping screws with at least 3/8" (9.5 mm) diameter head, 1/8" (3 mm) diameter shaft, and atleast 1-1/8" (29 mm) long.
Although the fastening method for steel studs differs fromwood construction, all other procedures still apply, includingfastening in the center of the nail slot and not overtighteningthe fasteners.
Application for high wind areasUsing a 5/8" nylon washer with a 1/4" hole between the nailand siding increases the wind load capabilities of theinstallation. (Washer tested was 0.071" thick.)
23
CertainTeed Vinyl Siding Installation Guide
stucco
1 x 3 furring
ring-shanked nails for
attaching furring
foam sheathing
nails with washers for foam
16"
typical of a pan head,“wafer,” “s” truss heador washer head screw
sheathing or substrate
nails with washers
even with washers,center nail in slots

Nailing, Stapling and Other Fastening Methods
If you want to ensure a quality vinyl siding installation, focusyour attention on nailing techniques. Unfortunately, a lot ofinstallers don’t. They feel nailing is a routine task, somethingeveryone knows how to do. But that’s not the case. AtCertainTeed, we analyzed reported installation problems, andwe found that more than half of them can be traced back toimproper nailing. So if you want to save yourself lost time andfrustration, carefully observe the following guidelines wheninstalling accessories, siding panels, soffit, or porch ceilings.
Lock the panel and begin nailing at the center of the panel,working toward the ends. This helps maintain a level line.
With horizontal accessories and panels, position the nails inthe center of the elongated nailing slots to allow for expansionand contraction. Never nail through the panel surface.
With vertical accessories and panels, position the first nail atthe upper edge of the topmost nailing slot. This allows apanel to hang from the nail. Position the remaining nails in thecenter of the nailing slots. Allow for 1/3 of the total expansionat the top and 2/3 of the total expansion at the bottom.
NOTE: Do not nail too tightly. To permit expansion andcontraction, panels should hang freely from nails. Thisallows the panels to move as the temperature changes.Drive the nails until there is between 1/8" to 1/16" ofspace between the nail head and the nailing flange.
Drive the nails straight in. Do not angle nails.
Per the ASTM specification for vinyl siding installation (D4756),proper nail penetration is at least 3/4". In most cases, thatrequires anchoring to studs.
Nails must be spaced a maximum of 16" apart. (In newconstruction, nail to studs on 16" centers. Do not skip studs.)Elongate factory nail slots if necessary to hit a stud.Monogram siding may be used in 24" o.c. construction withnails spaced a maximum of 24" apart in areas without specialwindload requirements. Check with your local building codeofficial for special requirements.
24
CertainTeed Vinyl Siding Installation Guide
center of all slots
upper edge of topmost nailing slot
up to 1/16"
too tight too loose correct

Other fastening techniques:Manual nailing is the most common way of fastening vinylsiding to a wall. That’s because it offers greater control,making it easier to learn how to fasten panels securely, but not tightly. You also can use power screwdrivers or pneumaticstaplers/nailers to attach vinyl siding to a wall, but you musttake the time to develop the proper skills. If you choose to use one of these alternate techniques, follow all the recom-mendations above for nail positioning and spacing and therecommendations for substrate preparation on page 57 forhorizontal applications and page 65 for vertical, including Board& Batten. In addition, be sure to observe the following guidelines:
Power screwdriversUse noncorrosive, self-tapping truss head screws. Screwsmust have at least 5/16" diameter head and 1/8" diametershaft. Screws must be at least 1-1/8" long. If underlayment isless than 3/4" thick and is not considered a nailable surface(for example, foam or exterior grade gypsum), be sure screwsare long enough to penetrate at least 3/4" into wood studs or substrate, 1/8" through a steel stud. Be sure screws arecentered in the nail slot. Leave 1/16"-1/8" space between thescrew head and the panel nailing flange.
Pneumatic staplers/nailersUse corrosion-resistant fasteners only. Fasteners must becentered in the nail slot, no more than 16" on center.
NOTE: Some power staplers/nailers use an attachmentthat helps position the fastener in the nail slot. If your unitdoes not have that feature, you must carefully position thefastener by sight.
Fasteners must penetrate a nailable surface at least 3/4". Besure to leave up to 1/16" between the fastener and the panelnailing flange. If you’re using a power stapler, drive the stapleperpendicular to the nailing slot with one leg of the staplecentered in the slot and the other leg above the panel.
25
CertainTeed Vinyl Siding Installation Guide
center staples in slots

Expansion and Contraction
It’s normal for vinyl building products to expand and contractwith temperature changes. To ensure a successful sidinginstallation, you must allow for this movement duringapplication.
Use the following guidelines to determine the space requiredfor expansion and contraction between siding and trim:
1/4" at both ends of the panel when the temperature is above40° F at the time of application.
3/8" at both ends of the panel when the temperature is 40° For below at the time of application.
In a horizontal siding installation, a vinyl panel tends to expandequally in both directions.
In a vertical siding installation, on the other hand, most of theexpansion is downward. So instead of allowing equal spacefor expansion at both ends of a vertical panel, leave morespace at the lower end: 1/3 of the total expansion is allowedat the top of a panel, and 2/3 of the total expansion is allowedat the bottom.
For example, if the temperature is below 40° F, total expansionequals 3/4" (3/8" + 3/8"), so you allow 1/4" at top and 1/2" atthe bottom of a vertical panel.
Installing Accessories
Snapping a chalk lineTo ensure proper installation, you must establish a straightreference line to guide the positioning of the starter strip andthe first course of siding.
If the house is reasonably level, find the lowest point of the oldsiding (or sheathing if working on new construction). Partiallydrive a nail at one corner, starter height minus 1/4" above thelowest corner. Attach chalk line. Go to other corner and pullthe chalk line taut. Stretch the chalk line from this nail to theopposite corner of the house. Make sure the line is level, usinga line level or 4' (minimum) level. Snap chalk line and repeatthe procedure around the entire house.
26
CertainTeed Vinyl Siding Installation Guide
1/4" to 3/8"
1/3 total expansion
2/3 total expansion
top most nailat the top ofthe top mostfull nail slot
centerremainingnails in the slot

A water level, a long clear plastic tube 90% filled with water, isuseful in marking level points around the house and onopposite sides of openings such as doors. Water will alwaysseek a level state, ensuring the markings will always be at thesame level.
NOTE: If after establishing a chalk line you find that yourstarter strip will be positioned below an easily nailedsurface, you may have to apply a nailable base.
If you have added sheathing, you may want to bend trim coilto act as flashing and help prevent entry of insects. Bend thecoil in a “Z” shape so the top edge of the coil is on the chalkline and the bottom edge extends down over the foundation.(See illustration.)
NOTE: The general guidelines for cutting and nailing vinylpanels and for allowing for expansion and contraction alsoapply to vinyl accessory items.
Installing the starter stripPosition the starter strip with the top edge on the chalk lineand the ends 6-1/2" away from the outside and inside corners(when using lineal systems or wide corners), 4" if usingstandard one-piece corners. Nail to wall following previouslymentioned nailing instructions. When hollows occur in the wallsurface, shim out the starter strip to avoid a wavy appearancein the finished siding job. Nail every 8" to 10".
As you add starter strip sections, be sure to leave 1/4" spacebetween them for expansion.
Sometimes – especially at sills above garage doors, porchesor brick surfaces where the siding has been cut lengthwise –you may find it easier to use a combination of utility trim and J-channel as a starter strip to secure a panel (see illustrationon page 22).
27
CertainTeed Vinyl Siding Installation Guide
sheathing
starter strip
metal flashing
foundation
6-1/2"for widecorners & lineals
4" forstandardcorners
chalkline
8"-10"

Installing Outside Cornerposts
Flash the corners of the home by bending a 10" wide piece ofaluminum trim coil 90° so you have two 5" legs. Cover theentire length of the corner, lapping the upper pieces over thelower pieces. (Self-adhering flashing may be substituted fortrim coil. Follow manufacturer’s installation instructions andobserve local building code requirements.)
NOTE: Traditional, fluted and beaded SuperCorners orfour piece corner systems require 14" strips of coil for flashing.
Position outside cornerpost with the top of the post 1/4" fromthe underside of the eave and the bottom of the cornerpost3/4" below the starter strip. Remove the bottom 3/4" of thenailing flange so it will not show below the siding wheninstalled.
Make sure posts are straight and true before nailing.
Hang cornerposts by first positioning a nail at the top ofthe topmost nail slot. Position all remaining nails in the centerof nail slots a maximum of every 8" to 10". Leave 1/8" to 1/16"between the nail head and the cornerpost to allow thecornerpost to move during normal expansion and contraction.(DO NOT NAIL TIGHT.) This nailing pattern is to be followedon both nail flanges of each post.
NOTE: CedarBoards corners install similar to standardoutside cornerposts.
If posts must be spliced for high walls, you have two options:
Option 1: Cut 1" off the nailing flanges and back from thebottom portion of the upper post. Then lap 3/4" of the upperpost over the lower post, allowing 1/4" gap for expansion. Thismethod will provide an obvious joint between the two posts,but will allow water to flow over the joint, reducing the chanceof water infiltration.
28
CertainTeed Vinyl Siding Installation Guide
1/4" to 3/8"
hang from top nail,center remainingnails
flashing
nail every 8" to 10"
3/4"
1/4"
1"

Option 2: Cut a 6" length of cornerpost and trim the nailflange, receiving channel, and sides until you have just a 90°bend of vinyl. Using PVC primer and PVC cement, glue thebent piece to the inside of the upper post and lower post. Buttthe two posts together. Nail the entire assembly as one postwith all nails in the lower post centered in the nail slots.
Also see additional instructions covering installation of four-piece cornerposts (page 30).
Capping an outside cornerpostOne method of capping an outside cornerpost is to cut apiece of J-channel twice as long as the width of thecornerpost face. Mark a 90° angle from the center and cut out this area. Then cut 7/8" away from each end, except forthe nailing flange. Bend the J-channel in the center and nail itto the outside of the corner of the house. Then insert thecornerpost into the J-channel.
Another alternative is to trim the nail flange, receiving channel,and sides from the bottom 1" of the cornerpost. Notch 1" atthe 90° bend, fold the bottom 1" of the cornerpost face, andfasten these “flaps” with a pop rivet.
29
CertainTeed Vinyl Siding Installation Guide
1 pc. outside corner piece
flashing behind finished corner assembly
butted splice joint
splice backer (hidden)
PVC adhesive on backside of
cornerposts
PVC primer andPVC cement
must be used
cornerpost
splice backer
7/8"

Installing Traditional, Beaded, and Fluted SuperCorners™
Flash the corners of the home by bending a 14" wide piece ofaluminum trim coil 90° so you have two 7" legs. Cover theentire length of the corner, lapping the upper pieces over thelower pieces. (Self-adhering flashing may be substituted fortrim coil. Follow manufacturer’s installation instructions andobserve local building code requirements.)
Position outside cornerpost with the top of the post 1/4" fromthe underside of the eave and the bottom of the cornerpost3/4" below the starter strip. Remove the bottom 3/4" of thenailing flange so it will not show below the siding wheninstalled.
Make sure posts are straight and true before nailing.
Hang cornerposts by first positioning a nail at the top ofthe topmost nail slot. Position all remaining nails in the centerof nail slots a maximum of every 8" to 10". Leave 1/8" to 1/16"between the nail head and the cornerpost to allow thecornerpost to move during normal expansion and contraction.(DO NOT NAIL TIGHT.) This nailing pattern and depth are tobe followed on both nail flanges of each post.
Extra Wide Corner Posts (Four-Piece Corner System)
Extra-wide cornerposts give you a distinctive, easy-to-installmethod of finishing outside corners. Each cornerpost consistsof four parts: Corner starter, two lineals and a 1/4 round snap-in molding.
Lineals are available in two board styles: 5" smooth and 3-1/2" smooth.
The installation procedure is identical for all lineals and inserts.To install this four-part accessory, follow these steps:
NOTE: Make sure the corners are properly flashed.
Cut cornerpost pieces. Measure the vertical span, and allow 1/4" clearance from the underside of the eave and 3/4" belowthe starter strip. Cut all four pieces using a power circular saw.
30
CertainTeed Vinyl Siding Installation Guide
1/4" to 3/8"
hang from top nail,center remainingnails
flashing
nail every 8" to 10"
3/4"

Hang a starter strip. Position the starter strip, leaving 1/4"allowance for expansion at top and 3/8" at bottom. Positionthe first nail at the uppermost edge of top nail slot (shown).Nail loosely. Working from top down, position remaining nailsevery 8"-10", with nails centered in slots.
Attach side lineals. Lock the first lineal into the starter strip.Nail to the sheathing following the procedure described above.Repeat the process for the other lineal.
Snap in the quarter-round corner insert. Working from thebottom up, begin by inserting the longer leg of the insert intothe nail flange side of the starter strip first, then snap in theshorter leg. Lightly press along the length of the molding asyou snap it into place.
NOTE: For a more secure installation, use a pop rivet toattach the molding insert to a side lineal. The rivet shouldbe positioned at the top of the cornerpost.
Inside Cornerposts
There are three options for trimming inside corners: Standard3/4" inside cornerpost, single J-channel, and two J-channels.
To flash the inside corner, bend a 12"-wide piece of aluminumcoil stock 90° so you have two 6" legs. Insert the flashing intothe corner. If you use more than one piece of flashing, overlapthe upper pieces of the flashing over the lower pieces.
To install inside cornerpost, hang the post from the top of theeave. The bottom should extend 3/4" below the starter strip.Remove the bottom 3/4" of the nailing flange so it does notshow below the siding. Set the post straight and true. Positionthe top nail in the top of the nailing slot. All other nails shouldbe in the center of the nail slots.
31
CertainTeed Vinyl Siding Installation Guide
long leg of insert
1/4" to 3/8"
flashing
8" to 10"
3/4"
hang from top nail, centerremaining nails
solid nailablesubstrate
corner flashing(scrap aluminum coil, for example)
standard 3/4" inside corner post
single J-channel two J-channels

If you have to splice the inside cornerpost, cut 1" off all butthe outer face of the lower post. Lap 3/4" of the upper postover the lower post, leaving 1/4" for expansion.
If you are using two pieces of J-channel instead of insidecornerpost, flash the corner with a 6" x 6" “L” cornerfabricated from aluminum coil stock. Hang the J-channel fromthe top of the eave. The bottom should extend 3/4" below thestarter strip. Remove the bottom 3/4" of the nailing flange sothat it will not show below the siding. Use the samepositioning and nailing guidelines as inside cornerpost.
To create a narrower corner, you can also use a single lengthof J-channel and flashing. First, install the siding on one wall,then place the J-channel lightly against the siding and nail it tothe substrate on the adjacent wall. Follow the samepositioning and nailing guidelines as inside cornerposts.
NOTE: When using a single J-channel, the corner musthave corner flashing
Federal Corners
To create a federal-style corner, flash the corner withaluminum trim coil or other flashing materials. Hang a newconstruction starter strip. Position the top nail in the top of thenailing slot. All other nails should be centered in the slotsspaced 8" to 10" apart.
Position and secure the 3-1/2" lineal.
Position and secure an aluminum starter strip.
Position and secure the 5" lineal.
NOTE: Aluminum starter can be used for both lineals. Ifthe aluminum starter used for the 5" lineal is not longenough, fashion a starter using a metal brake and coilstock to a length that allows for proper nailing into thesubstrate.
32
CertainTeed Vinyl Siding Installation Guide
“L” shapedflashing
insidecornerpost
splice

Inside Federal Corners
Flash the corner with aluminum trim coil or other flashingmaterials.
Position and secure the 5" lineals (or a 3-1/2" lineal) by buttingthe lineal up to the inside corner. Using a 5" lineal will create asymmetric 3-1/2" exposure in the corner. If two 3-1/2" linealsare used, one exposure will be approximately 2-1/4" and onewill be 3-1/2".
NOTE: Attaching the second lineal will keep the first linealin place. You will not need a starter strip. Always positionthe top nail in the top of the nailing slot. All other nailsshould be centered in the slots spaced 8" to 10" apart.
Position and secure the starter strip.
Position and secure the remaining lineal.
33
CertainTeed Vinyl Siding Installation Guide
“L” shapedflashing

Trimming Bay Window Corners
There are several ways to trim the odd angles of bay windows.Here are two of them:
1. Install bay window cornerpost.
2. Install J-channel with a quarter-round insert.
Before you begin, make sure the corner is properly flashed.
Install Bay Window Cornerpost• Cut bay window cornerpost to the proper length.
• For angles less than 45°, push down on the face of thecorner until the nail flanges seat flat against the wallsurfaces.
• Hang the cornerpost by nailing loosely into the topmostnail slot.
• Make sure the cornerpost is straight and true.
• Position all remaining nails in the center of nail slots amaximum of every 8" to 10". Leave 1/8" to 1/16"between the nail head and the cornerpost to allow thecornerpost to move during normal expansion andcontraction.
• Fit the siding into the cornerpost. Leave 1/4" forexpansion.
Install J-Channel with Quarter-Round Insert• Cut two pieces of J-channel and one piece of
quarter-round insert to length.
• Pop rivet the J-channels to each side of the quarter-round insert in at least three places.
• Nail the assembly to the corner, remembering to hang the assembly from the topmost full nail slot.
• Position all remaining nails in the center of nail slots amaximum of every 8" to 10". Leave 1/8" to 1/16"between the nail head and the J-channel for normalexpansion and contraction.
• Fit the siding into the J-channels. Leave 1/4" forexpansion.
34
CertainTeed Vinyl Siding Installation Guide
for anglesless than 45°
pop rivets
removehalf of thelonger leg
nail loosely every 8"-10"
push down until nail flanges seat flat
for angles45° andlarger

Decorative Trim Options around Windows and Doors
J-channelSystem requires standard J-channel.
• 1/2" J-channel• 3/4" J-channel• 1" J-channel• 1-1/4" J-channel
3-1/2" Snap-On LinealSystem requires 1" face J-channel
3-1/2" Lineal SystemSystem requires 3-1/2" lineals and starter strips.
5" x 3-1/2" Lineal SystemSystem requires 5" lineals, 3-1/2" lineals, and starter strips.
3-1/2" Lineal System with Corner BlockSystem requires 3-1/2" lineals, starter strips, and lineal corner block.
3-1/2" Lineal System with Corner Block and RosetteSystem requires 3-1/2" lineals, starter strips, lineal cornerblock, and rosette.
35
CertainTeed Vinyl Siding Installation Guide

Window Flashing
The width of all flashings is determined by the type ofaccessory surrounding the window and where the finalcomplete course of siding stops below the window (in thecase of the flashing under the window). The flashing shouldextend past the nail flanges of the accessory. The width of theflashing under the window must allow for the diversion ofwater.
*see NOTE below
Apply the vertical flashings by overlapping the previouslysecured bottom flashing. As noted above, the length andwidth of the flashings will be determined by the type ofaccessories used.
Secure top flashing.
NOTE: The flashing is long enough to direct water over the nail flange of the last course of complete siding panels.
For even greater protection,make a slit in the buildingwrap and insert the topflashing behind it. Tape theseam as shown.
36
CertainTeed Vinyl Siding Installation Guide

Installing Window and Door Trim
Install J-channel along the top and sides of door casings andaround windows.
NOTE: When installing J-channel around replacementwindows that do not have nail flanges, add flashing forgreater protection against water infiltration. For anexample of completed flashing, see the previous page.
There are two methods of joining J-channels at corners. Theeasiest method is to square cut the corners. For a morefinished appearance, you can miter the corners. To preventgaps, do not butt ends. Instead, lap them as shown.
To Square Cut CornersInstall J-channels at sides of windows. Notch as shown.
NOTE: For best results, use aviation snips when cutting J-channel.
Cut top and bottom J-channels so the ends extend beyondthe casing to the width of side J-channels.
Place top J-channel along the casing shoulder and nail it tothe wall.
Make two cuts in the bottom of the upper channel and bend itdown to overlap side J-channel. Repeat for the other side.This forms a water drain and allows J-channel to receivesiding panel.
Nail the bottom J-channel in place. Cut the channel aspreviously described. Fold rain tabs into receiving pockets fora tighter miter joint.
To Miter Cut CornersFor best results, make sure you cut all J-channels to theproper length, leaving the proper allowance for the width ofthe face of the J-channel.
Square cut the bottom J-channel so that its ends extendbeyond the window casing to the width of the face of the side J-channels. Notch the ends for clearance. Position and nail the J-channel.
Measure side J-channels, adding the width of both the topand bottom J-channels. Miter cut (45° angle) the lower ends ofboth side J-channels. Notch the channel, position and nail.
Mark the top J-channel so its ends extend beyond the casingto the width of the side J-channels. Miter cut (45° angle) theends. Cut and bend water tabs. Position and nail.
37
CertainTeed Vinyl Siding Installation Guide
rain tab
3/4"
3/4"
3/4"
3/4"
(3/4" ordimension ofJ-channelface)
3/4"
3/4"

Drip Clip
The Drip-Clip is an easy and effective way to create rain tabsfor lineals. To install Drip-Clips, miter lineals with a power miterbox/chop saw, etc. Apply Drip-Clip to the top cut lineal. Slidethe vertical lineal behind the vertical edge of the clip tocomplete the application.
Lineals and Decorative Trim
Lineals are a great way to accessorize a window. This pageillustrates how the lineal pieces fit around a window. The nextfew pages describe the step-by-step process for installing thelineals.
38
CertainTeed Vinyl Siding Installation Guide
vertical leg has slight inward bends to control water flow
top surfacehas burrs to grip PVC
window ordoor frame
45°angle
linealwindow and door starter
cutaway ofadjoiningaccessory
pocket of lineal
water flow

3-1/2" Snap-on Lineal Application aroundWindows and Doors
This application works only on 1"-faced J-channel .
The installation of J-channel for snap-on lineals is the sameprocedure as installing lineal starter strip. Measure theopenings and cut the J-channel 1/2" less than yourmeasurement. Install the J-channel around the opening,centering the J-channel so that each end of the J-channel is1/4" from the opening. Nail the J-channel every 8" to 10".
Lineal application around windowsMeasure the top of the casing and add 7" (3-1/2" extra foreach side). After the piece is cut to length, flip it over and cut3/8" off the locking leg as shown.
Snap over the J-channel as shown.
Repeat for the bottom of the casing.
39
CertainTeed Vinyl Siding Installation Guide

Measure the side casing and add 7". Use a triangle to create a45˚ angle or measure 3-1/2" in from the edge of the part. Usesnips or a miter saw to remove this portion.
Flip the part over and remove the locking leg as shown. Thisshould be done to both ends.
Snap the lineal over the J-channel as shown. Use the samemeasurements for both sides.
Corner blocksInstall J-channel around the perimeter of the window opening.J-channel should be the same length as the casing.
Install corner blocks on all 4 corners as shown. Leave blocksloose until the lineals are installed.
Cut the lineals the same length as the window casing.
Start with one end and angle a lineal into the corner block andsnap it over the J-channel.
Continue installing lineals around the window.
Crown moldingCrown molding will fit over the top of the lineal system.
Install J-channel and lineals around window casing.
Measure the top lineal and add 2-1/2". This will be the crownmolding length.
Insert crown molding cap into the crown molding and tracethe shape. Trim off the marked line.
The crown molding requires a tab 2" long – cut from thepocket receiver as shown.
Cut the crown molding cap in half and apply the halves with abead of caulk.
Insert the crown molding into the top of the lineal as shown.
40
CertainTeed Vinyl Siding Installation Guide

Lineal Starter Application for Windows and Door Surrounds
When securing window and corner starter strips, outsidecorner pieces (OSCP), inside corner pieces (ISCP), one piececorners, lineals – basically, any vertically mounted sidingproduct – always place the top nail (or staple) first, and in amanner that allows the part to hang from it without dropping.This promotes movement downward only, a must for a goodcorner joint. This is the only time you should not center anail (or staple). It is also preferred to use the nail slots closestto the locking area (when using product with double nail slots).
Remember to place the nails for the horizontal pieces in thecenter of the nailing slots as shown. Space nails 8"-10" apart.
Using a 1/2" J-channel as a starter for lineals.
NOTE: The lineals must be slid on from either end of the J-channel (the lineal will not snap over the J-channel aswith a New Construction Starter Strip), or by pulling the J-channel away from the window slightly and zipping thelineal into place.
If the opening has no framework, such as a brick molding,use the metal starter (illustrated below left), or the RemodelingWindow and Door Starter (illustrated below) in place of theNew Construction Window and Door Starter Strip shownabove. The lineal’s locking leg will fit behind the aluminumstarter and into the receiving pocket of the RemodelingWindow and Door Starter.
41
CertainTeed Vinyl Siding Installation Guide
measure window and subtract 1/2"(leaving 1/4" per side as shown)
vertical pieces: place the uppermost nailin top of nail slot (still loose nailed)
1/4"
1/4"
remaining vertical nails and all horizontalnails: place in center of slots
windowor doorframe
1/2" J-channel
wall (substrate)wall (substrate)
door openingdoor opening
position of nail
invertedmetalstarter
remodelingwindow anddoor starter

Lineal Application around Windows
Measure the top of the opening and add 7" (3-1/2" extra foreach side) if the side lineals are also 3-1/2". Add 10" total ifusing 5" lineals.
Use a triangle to create a 45° angle or measure 3-1/2" in fromthe locking leg.
NOTE: The nail flange is always the longest part of asurrounding miter.
Use snips to remove the part as shown.
Cut a 3/4" rain tab (as shown)
Completed top lineal snapped into the previously attachedstarter strip.
NOTE: The bottom miter of side lineals has the same cutas both ends of a top lineal; however, a rain tab is notrequired.
42
CertainTeed Vinyl Siding Installation Guide
3-1/2"
window ordoor frame
cut for rain tab
rain tab
back-side view of mitered lineal
45°
3-1/2"
remove

Measure the height of the window or door. Add 7" (for the 3-1/2" header and bottom lineal) and cut.
NOTE: Add additional material if using 5" lineals.
Trim a minimum of 3/4" from the top end of the side lineals.
Snap the side lineals into place, making sure the rain tabs ofthe top lineal are bent down into the receiving pocket of theside lineals.
If the lineal surrounds a window frame, the bottom cornerrequires a 45° miter as done previously for the top lineal.
NOTE: Rain tabs are not required here.
43
CertainTeed Vinyl Siding Installation Guide
window ordoor frame
windowframe
rain tab shown bent intoreceiving pocket of side lineal
view of above notchesfrom back side of lineal
1/2"
3-1/2"
3/4"

Measure the bottom of the opening and add 7" (3-1/2" extrafor each side) if the side lineals are also 3-1/2". Add 10" total ifusing 5" lineals.
Trim 3/4" tabs from the lineal as shown.
Snap the lineal in place and secure by nailing (or stapling) itthrough center of the nail slots.
44
CertainTeed Vinyl Siding Installation Guide
finishedassemblywith sidelineal
windowframe
view ofnotchingfrom backside (same onboth ends)
3-1/2"
3/4"
3/4"

Blind Miter
An alternative to a standard blind miter offers support to thecorner without adding material. The measurements shown for the fold are for a 5" lineal. The same method can be usedwith 3-1/2" lineals, but the fold would be changed from 1-1/2"to 1-3/8".
45
45ß
CertainTeed Vinyl Siding Installation Guide
Measure atleast 1-1/2"and notchwith snips
Measure and notch 1-1/2"
Dotted linerepresentsthe positionof a 45˚mitered 5" lineal
Remove this corner(dimension dependenton 1/2" minimum shownbelow)
3/4"

Corner Blocks
Corner BlockInstall starter as previously described. Measure and cut theside lineals to the exact size of the window or door opening.Cut the top and bottom lineals 1/4" longer than the window.
Using vinyl snips, make two 1" long cuts in the pocket areason both sides of each lineal. These cuts allow the lineals toconnect with the corner block and help provide properdrainage.
NOTE: It may be helpful to hold off securing the linealsuntil the corner block is in place.
Position the corner block by inserting the top lineal into thecorner block’s receiving area – making sure the lineal’s pocketis inside that of the corner block.
Position the vertical (side) lineal into the corner block byinserting the pocket of the corner cover into the pocket of thelineal. This will ensure proper drainage.
Corner Block with RosetteLocate the small dimple on the back side of the block’s faceor measure 2-5/16" as shown and mark.
Drill or punch a 3/32" - 1/8" diameter hole through the face ofthe block – the hole must not be larger than 1/8".
NOTE: Check the back side of the block for this location –marked by “+”.
Apply the rosette clip from the backside. If desired, a smallamount of caulk can be applied over the hole prior to applyingthe rosette.
46
CertainTeed Vinyl Siding Installation Guide
rosette clip
rosette center(back side)
2-5/16"
2-5/16"
1/8" per side
make 1" cuts

5" Square Header with Endcaps over 3-1/2" Lineals Sides and Bottoms
Assemble 5" header and cap. The side 3-1/2" lineals shouldextend approximately 1" inside the header assembly.
Finish the corner by sliding the 3-1/2" side lineals behind theheader, making sure the 2" rain tab on the end cap extendsinto the receiving area of the side lineals.
NOTE: If using crown molding, see page 50.
47
CertainTeed Vinyl Siding Installation Guide
1-1/2" - 1-3/4"slit in pocketarea of the 3-1/2" sidelineals
3-1/2"1-1/8"
5" linealheader
removing thissection allowsside 3-1/2" linealto slide behindthe 5"
2" rain tab
end cap(from 5"lineal)
3/4"
3/4" rain tab

Creating End Caps for 5" Lineals
To create the header, first cut a 7" piece of 5" lineal. Measureand trim as shown.
The resulting piece fits into the end of the 5" lineal.
The ends of the 5" lineal also need trimming to receive the endcaps. Create a 3/4" rain tab in the pocket area and trim off a3/4" tab from the bottom.
NOTE: To make end caps for 3-1/2" lineals, simply startwith a 5-1/2" piece and remove the 3/4" and 2" areas asshown for the 5" end caps.
48
CertainTeed Vinyl Siding Installation Guide
3/4"
3/4"
3/4"
3/4"
rain tab
2"
removeremove
remove
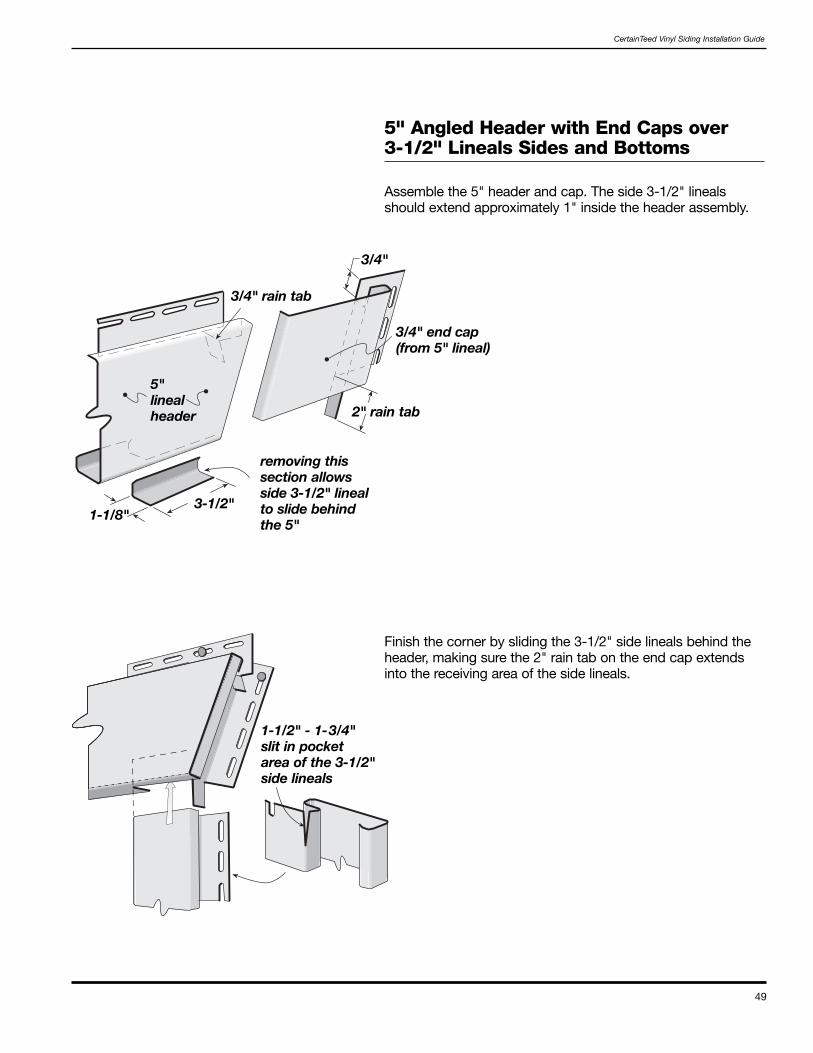
5" Angled Header with End Caps over 3-1/2" Lineals Sides and Bottoms
Assemble the 5" header and cap. The side 3-1/2" linealsshould extend approximately 1" inside the header assembly.
Finish the corner by sliding the 3-1/2" side lineals behind theheader, making sure the 2" rain tab on the end cap extendsinto the receiving area of the side lineals.
49
CertainTeed Vinyl Siding Installation Guide
1-1/2" - 1-3/4" slit in pocket area of the 3-1/2"side lineals
3-1/2"1-1/8"
removing thissection allowsside 3-1/2" linealto slide behindthe 5"
5" linealheader 2" rain tab
3/4" end cap(from 5" lineal)
3/4"
3/4" rain tab

Crown Molding Treatment Options
Option 1 (page 51)• Crown molding
• (2) crown molding end caps
• 3/4" pocket J-channel header and surround
Other options are possible with the crown molding: Forexample, use 3-1/2" lineals vertically and at the window basealong with a J-channel and crown molding header. The onlyrequirement for using the crown molding is having receivingchannels 3/4" wide.
Option 2 (page 51)• Crown molding
• (2) crown molding end caps
• 3-1/2" lineal header
• 3-1/2" lineal surrounds
NOTE: Corner blocks/rosettes can be used to join linealsat the corner.
Option 3 (page 52)• Crown molding
• (2) crown molding end caps
• 5" lineal header
• (2) 5" header end caps
• 3-1/2" lineal surrounds
Instructions for each option are on pages 51-53.
50
CertainTeed Vinyl Siding Installation Guide

Crown Molding and Cap for 3/4" Pocket J-Channel
To use crown molding with 3/4" pocket J-channels, measure the length of the completed J-channel surround and add 2-1/2" (the crown molding overlaps the J-channels by 1-1/4" per side).
Insert crown molding cap into the crown molding and tracethe tip shape. Trim as shown.
Insert 1/2 of the crown molding cap into each end of thecrown molding lineal. Secure the crown molding with a beadof caulk.
Miter or square cut the J-channel (mitered corner shown).Insert the 3/4" wide rain tab into the receiving channel of theside J-channel.
Crown Molding with 3-1/2" Lineal Surround
In addition to J-channel, crown moldings can also be usedwith lineals. The next two pages demonstrate how crownmolding can be used with various lineal configurations. Aboveall, remember that before applying accessories and siding,make certain the substrate is watertight. In order to beproperly protected from precipitation, the substrate may needto be properly flashed to shed water to the exterior. The sidingalone is not meant to be a watertight barrier.
51
CertainTeed Vinyl Siding Installation Guide
insert cap(see above for instructions on assembling the cap)
2" rain tab
2" rain tab
windowflashing
windowor doorframe
cut crown moldingcap in half
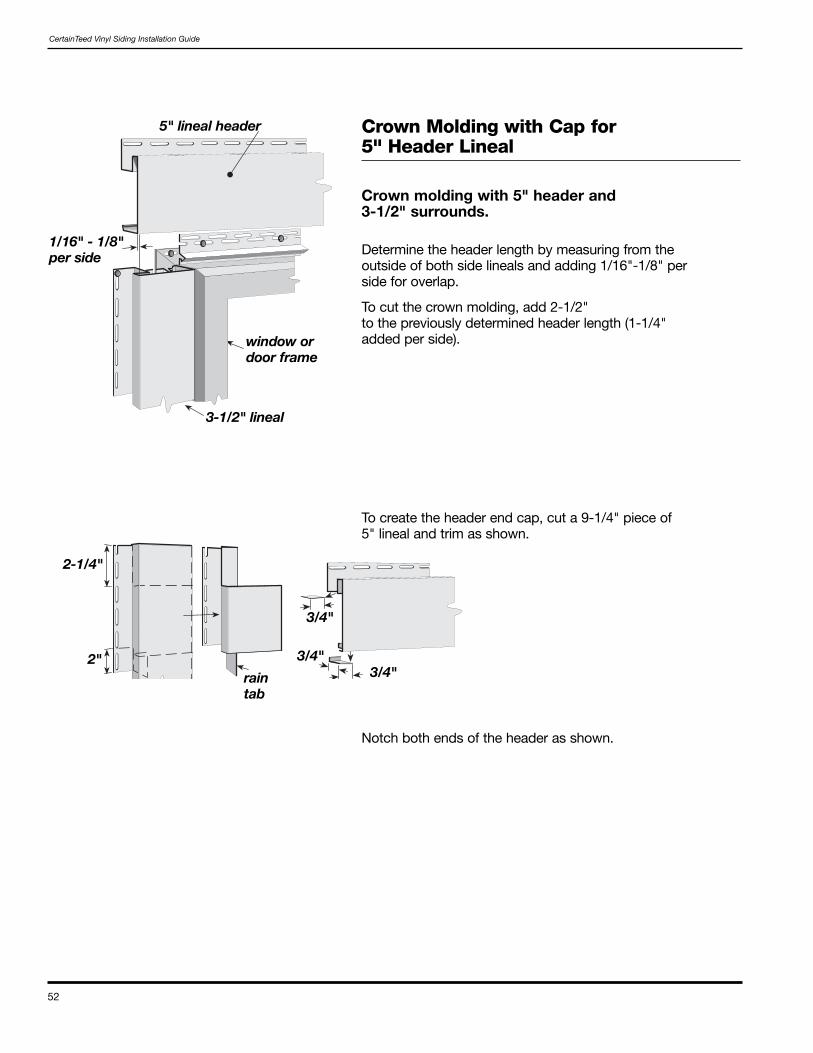
Crown Molding with Cap for 5" Header Lineal
Crown molding with 5" header and 3-1/2" surrounds.
Determine the header length by measuring from the outside of both side lineals and adding 1/16"-1/8" per side for overlap.
To cut the crown molding, add 2-1/2" to the previously determined header length (1-1/4" added per side).
To create the header end cap, cut a 9-1/4" piece of 5" lineal and trim as shown.
Notch both ends of the header as shown.
52
CertainTeed Vinyl Siding Installation Guide
5" lineal header
1/16" - 1/8"per side
2-1/4"
2"
3/4"
3/4"3/4"
window ordoor frame
3-1/2" lineal
rain tab

Insert a crown molding cap into the crown molding and tracethe shape. Trim as shown.
Insert the header cap.
Cut the crown molding cap in half. Apply each half to the endof the crown molding and secure it with a bead of caulk.
53
CertainTeed Vinyl Siding Installation Guide
the crown moldingrequires a rain tab 2"long – cut from thepocket receiver
apply the crownmolding to the headerwith a bead of caulk
rain tab todivert waterfrom crownmolding to side lineals
finishedassembly

Installing J-Channel as Gable End Trim
Install J-channel to receive siding at gable ends, as shown in illustration. To create a clean, professional look, follow these steps:
To create an angle template, hold a piece of J-channel againstthe slope while transferring the angle to another J-channel with a pencil.
Next, transfer angle of template to the end of a length of J-channel. Be sure to extend line onto nail flange. Cut awaychannel face and nail flange.
Turn pattern over and transfer opposite angle to second J-channel, being sure to extend line onto nail flange. Cut awaynail flange and return lip, but do not cut J-channel face.
Insert the full-faced J-channel into the mitered J-channel. Ifthe nail flange or return lips butt and prevent a tight fit, trim offadditional material from the second J-channel.
NOTE: For a more decorative appearance, you also canuse 3-1/2" or 5" lineals to trim gable ends (see next pagefor details).
To splice the J-channel, follow these steps:Cut out a 1" section of the nailing flange and face return asshown.
Install inverted J-channel along the top of the wall, under theeave. Here again, leave a 1/4" gap between J-channel andcornerposts. Overlap J-channels 3/4" to allow for expansion.When positioning the upper J-channel, be sure to allow forexpansion of the siding panel. In most cases, position the J-channel at a point equal to the length of the panel plus 5/8"(1/4" for upper expansion and 3/8" for lower expansion).
54
CertainTeed Vinyl Siding Installation Guide
90°
90°
1"
3/4"

Using Lineals as Gable Trim
You can give gable end trim a more dramatic appearance byusing 3-1/2" or 5" lineals instead of J-channel.
To install the lineals:
Make a pattern duplicating the gable slope. To create an angletemplate, lock a piece of lineal into the previous course ofsiding or other gable starter. Hold a second piece of lineal orstarter against the slope and transfer the angle with a pencil.
Transfer the angle of the template to the end of a length oflineal. Cut away lineal face and nail flange.
Turn pattern over and transfer opposite angle to second lineal.Trim nail flange and receiving channel from opposite lineal tothis line. Do not cut lineal face.
Insert the full-faced lineal into the mitered lineal. If the nailflange or return lips butt and prevent a tight fit, trim offadditional material from the second lineal.
Installing trim at roof lineTo prevent water infiltration along the intersection of roof andwall, install flashing before installing J-channel. At pointswhere vinyl siding and accessories will meet at a roof line –such as areas where a gable dormer or a second story sidewall intersect with the roof – it’s best to position the J-channelso it’s 3/4" to 1" away from the roof line. Placing the J-channeldirectly on the roof line would subject it to a build-up of heat,which could result in excessive expansion.
NOTE: If you use more than one length of J-channel tospan a wall surface, be sure to overlap J-channels 3/4".
55
CertainTeed Vinyl Siding Installation Guide
90°
starter strip
3/4" x 1"
90°

Cutting Panels
To cut panels to size, follow these procedures:
Cross cutsFor a precise cut, use a power circular saw equipped with asharp, fine-tooth plywood blade. For best results, reverseblade direction.
Cut one or two panels at a time, carefully advancing the sawthrough the vinyl. A rule of thumb: The lower the temperature,the slower the feed rate.
Panels can also be cut with snips. Use a square to mark cutline. Start cut at top lock and continue to bottom of panel.
NOTE: Whenever you cross cut a panel to be used in anoverlap area, you also have to duplicate the factory notchat the cut end.
Rip cutsUse a utility knife to score panel along cut line. Bend panelback and forth along score line until it snaps apart cleanly.
Use a combination of tin snips and utility knife to cut panels tofit around windows and doors.
Overlapping Panels
When lapping horizontal panels, overlap the ends 1".
NOTE: The Carolina Beaded panel is factory-notched in three places. For best results, overlap panels usingfactory notched ends only. If a panel must be cut on site,insert cut ends into receiving channels in cornerposts or J-channel. If this isn’t possible, create an exactduplicate of notches using aviation or tin snips.
56
SECTION 5 – Installing Horizontal Siding
CertainTeed Vinyl Siding Installation Guide
factorynotches
1"
Carolina Beaded factory notches

Preparing Wall Surfaces
The key to successful vinyl siding application is properpreparation of the nailing surface. It is essential that you workover a smooth nailing surface. The more level and even thewall surface, the better the finished installation will look.
The steps involved in preparation differ for new homes andold, so choose the instructions (page 21) that pertain to yourproject.
Installing the First CourseIt’s important to work with care and planning as you installsiding panels. This is especially true when you’re installing thefirst course of siding. (See pages 24-25 for fasteningmethods.)
For best results, follow these guidelines:
The key to creating a visually attractive installation is to lapaway from areas where people normally walk or gather. Forexample, on the front wall, work from the corners to theentrance door (so overlaps face away from door). On sidewalls, work from the rear corners toward the front. Thisapproach minimizes the effect of lapping and produces thebest appearance. Keep lap appearance in mind throughoutinstallation.
NOTE: Lap appearance is also improved when you avoidusing panels less than 3' long.
Slide the first panel into the cornerpost recess. Leave room forexpansion (see page 26).
Hook the bottom lock of the panel into the interlock bead ofthe starter strip by applying upward pressure.
Before nailing, double check to make certain you’ve lockedthe panel along its entire length. A slight upward pressure maybe required to snap the interlock securely. Don’t force the locktoo tightly, however. You may distort your laps. Also, makecertain the panel can slide freely. Nail properly. Start at thecenter of the panel and work out.
Install the remaining starter course panels, overlapping panelends 1". The last nail should be at least 4" from the end of thepanel to allow for a neat lap.
Remember to leave room for expansion when fitting panelsinto remaining inside and outside cornerposts.
57
CertainTeed Vinyl Siding Installation Guide
lock not fully engaged lock fully engaged
room for expansion
lock panel tostarter strip

Installing remaining coursesTo ensure best appearance, position the laps to avoidunsightly joint patterns. The illustration at left shows a well-planned staggering of panel joints. Follow these guidelines:
Separate joints by at least two courses.
Avoid joints above and below windows.
Leave at least 3' separating joints on successive courses.
Use short cutoff lengths for fitting at narrow openings betweenwindows.
Follow the planned pattern when applying the next courses ofsiding.
Fitting under windowsYou’ll probably have to cut panels to fit under windows. To make this task easier, plan panel positioning as shown atleft so a single panel extends beyond both sides of windowopening. Follow these steps to measure and cut panels:
Hold panel in place and mark the width of window opening.Add 1/4"-3/8" to both ends to allow for expansion. Theresulting marks show location of vertical cuts. Extend marksonto panel using a square.
Create a template for horizontal cut using small piece of scrapsiding. Lock this piece into the lower panel and mark 1/4"below sill height. This provides clearance for undersill trim.Repeat procedure on opposite side of window. (You can’tassume windows will be perfectly level.)
Transfer marks from template to panel. Connect marks usingstraightedge.
Cut panel, using tin snips to make vertical cuts and a utilityknife to make horizontal cut.
Install panelIf necessary to maintain slope angle, install furring under sill asdescribed on page 22.
NOTE: You can eliminate this step by using dual undersilltrim. This trim has two receiving channels. Use the innerchannel if you’ve cut the siding panel near the lockingedge. Use the outer channel if the cut has been madenear the butt edge.
Use a snap lock punch to raise tab faces on the outside of thepanel. Punch out tab every 6".
Push horizontal edge of cut into utility trim. Slide verticaledges of cut into J-channels at window sides. Make certainthe installed panel locks into the panel below.
58
CertainTeed Vinyl Siding Installation Guide
1/4"
1/4"
window
J-channel
utility trim
horizontalsiding
dualundersilltrim

Fitting over windows and doorsThe procedure for cutting panels for installation over windowsand doors is similar to that explained earlier.
If necessary to maintain slope angle, install furring abovewindow or door as explained on page 22.
Drop panel into position, making certain it fits into undersilltrim and J-channel at top and J-channels at sides. Interlockwith the siding panels below.
Fitting at narrow openings between windowsTo simplify installation in areas such as that shown in theillustration, install J-channels on both sides of opening. Bowthe panel toward you and slip into channel.
If the area is very narrow, leave one J-channel unnailed exceptat lowest point (as shown). Bend this channel out slightly toinsert panel. When panel is in place and nailed, nail J-channelimmediately above panel and repeat procedure. Be sure toleave adequate tolerances for expansion and contraction.
Fitting at light blocksWhen cutting panels to fit at a light block, be sure to allow forexpansion.
59
CertainTeed Vinyl Siding Installation Guide
installing trimmed panels with dual undersill trim
1/4" - 3/8"
light blockmounting bracket

STUDfinder Installation System
The STUDfinder™ Installation System combines preciselyengineered nail slot locations with graphics to create a sidingpanel that is designed to help ensure quick, accurate andsecure installation.
The nail slots are positioned 16" and 24" on center to allow foralignment with studs, with STUDfinder graphics centereddirectly under each nail slot.
Locate the first stud and fasten in the center of the nail slot.Ensure that nail/staple penetration is at least 3/4" to complywith ASTM D4756 (specification for vinyl siding installation).Notice which STUDfinder letter appears below the slot.
Go to the next repeat of the letter to find the next stud. Forexample, if your first stud is at “T,” so will the succeedingstuds in 16" o.c. applications (every 10th slot).
When you apply the next panel, adjust the overlap, asnecessary, to line up with studs and repeat the steps above.
24" o.c. applications will use a similar pattern of letters, with 2 letters that repeat every-other stud (every 15th slot). Forexample, if the first stud is located at “S,” then the next will beat “I,” then “S,” then “I,” etc.
NOTE: The overlap must be a minimum of 1" - 1-1/2". Theoverlapping panels may not use the same letter as yourinitial panel.
60
24"
16"
CertainTeed Vinyl Siding Installation Guide

Installing trim at roof lineTo prevent water infiltration along the intersection of roof andwall, install flashing before installing J-channel. At pointswhere vinyl siding and accessories will meet at a roof line –such as areas where a gable dormer or a second-story sidewall intersect with the roof – it’s best to position the J-channelso it’s 3/4" to 1" away from the roof line. Placing the J-channeldirectly on the roof line would subject it to a buildup of heat,which could result in excessive expansion.
NOTE: If you use more than one length of J-channel tospan a wall surface, be sure to overlap J-channels 3/4".
Do not butt J-channel pieces end-to-end.
Fitting at gable ends
Make a pattern duplicating gable slope. Use this pattern toguide cutting of panels to fit gable ends.
To make pattern:
Lock short piece of siding into panel gable starter course asshown in illustration.
Hold second piece of siding against J-channel at slope. Runpencil along edge of this piece, transferring slope angle to firstpiece of siding.
Cut along line using power saw or tin snips. Use resultingpattern to mark siding panels before cutting.
NOTE: Double-check angle on pattern at every course. If necessary, cut new pattern.
To install cut panels:
Slip angled end of panel into J-channel along gable edge.Leave space for expansion.
Interlock with siding panel below.
If necessary to securely fasten the last panel at gable peak,face nail as shown in illustration. This is the only place you willface nail. Use 1-1/4" to 1-1/2" aluminum nail with paintedhead.
NOTE: Do not cover louvers in gables.
61
CertainTeed Vinyl Siding Installation Guide
colored aluminum nail finish
3/4"-1"

Fitting under soffitWhen you reach the last course of siding, you will probablyhave to rip cut panels lengthwise to fit under soffit.
NOTE: If necessary to ensure proper panel slope angle,make certain to furr out this area.
To cut and install this last course:
Install J-channel and undersill trim or dual undersill.
Measure from soffit to base of upper lock on previous courseof panels. Subtract 1/4". Mark this dimension on the panel tobe cut, taking measurement from bottom edge of panel. For amore precise cut, repeat this procedure at several other pointsalong the span to be covered by the panel.
Using a square or straightedge, draw a pencil line connectingthese points. Then score along line with utility knife. Bendpanel back and forth until it snaps.
Use snap lock punch to create tabs on outside face of panel,1/4" below cut edge. Space tabs every 6".
To install, lock bottom of cut panel into panel below. Push topedge into J-channel or undersill trim. Tabs will catch in trimand hold panel firmly in place.
NOTE: Since you will not nail this last course, it isimportant that the tabs fit properly in the trim to providesupport while allowing movement for expansion.
62
CertainTeed Vinyl Siding Installation Guide
distance minus 1/4"

Completion
Attaching objects to sidingAll external products (downspouts, shutters, and lights, for example) are attached to walls after you’ve applied thevinyl siding.
NOTE: All external fixtures must be attached to a solidbacking (such as 3/4" exterior grade plywood) to provide a secure mounting surface. Never attach a fixture directlyto vinyl siding.
When installing external products, you must allow forexpansion and contraction of siding.
You can allow for this movement in two ways:
The most convenient way to attach light fixtures is with lightblocks. Because they contain receiving channels to holdsiding panels, light blocks provide a simple way to allow forexpansion.
When attaching other fixtures, drill holes in the siding threetimes the diameter of screws, bolts, or nails being used tofasten objects. This provides adequate clearance so sidingcan move freely underneath attached objects. Whenattaching objects, do not fasten tightly. It is alsorecommended that you apply caulk around the screws.
63
CertainTeed Vinyl Siding Installation Guide

Shutter Installation
The ideal application (shown at the top) has a joint betweenthe two shutters where the shutters are secured to the home.In this way, the siding panel is not “hard nailed” between thetwo shutters and the siding is allowed free movement.
When there is no joint between shutters where the shutters aresecured to the home (as shown on the bottom), the shutter’sfasteners do not allow the siding panel to move. The sidingpanel then fails to perform because it cannot expand orcontract with the temperature changes.
Enlarge the hole in the siding for securing the shutter – the holeclearance should be approximately 1/8". If possible, staggerthe screws securing the shutter so that they do not line up onthe same panel. It is also a good idea to apply caulk aroundthe screws.
64
CertainTeed Vinyl Siding Installation Guide