section 4 shooting technique biomechanics · pdf filebiomechanics 3 bio -mechanical ......
TRANSCRIPT

Section 4 SHOOTING TECHNIQUE
BIOMECHANICS

Biomechanics Version 4 June 2010 Page 2 Copyright Archery Australia June 2011
INDEX Page Introduction 3 Biomechanics 3 Bio-Mechanical Efficiency 3 Control 3 Essentials 4 How do we aim steady? 4 Understanding the Principals of Biomechanics 5 Maximising bone and minimising muscle use 5 Using muscles at mid extension 5 The Shoulder and Arm 6 How do muscles work from a technical aspect? 9 How do muscles work the simple explanation? 11 Use strong muscles and only the necessary muscles 12 Eliminating or minimising injury 13 The contrary argument 13 Shooting Technique and Biomechanics 15 Bow arm, shoulder joint, elbow and wrist 19 Head Position and Spine 22 Drawing arm, shoulder, elbow and wrist 23 Compound Archer 24 Release 25
Drawing Technique 25 Predraw 26 Bow Shoulder 26 Drawing the Bow 26

Biomechanics Version 4 June 2010 Page 3 Copyright Archery Australia June 2011
INTRODUCTION Biomechanics Biomechanics is the science that applies the laws of mechanics and physics to human performance and examines the internal and external forces acting on the human body and the effects produced by these forces. It is a diverse interdisciplinary field, with branches in Zoology, Botany, Physical Anthropology, Orthopaedics, Bioengineering and Human Performance. The general role of Biomechanics is to understand the mechanical cause-effect relationships that determine the motions of living organisms. In relation to sport, Biomechanics contributes to the description, explanation, and prediction of the mechanical aspects of human exercise, sport and play. In archery biomechanics is not new the principles have been around for centuries it is only in recent times that the term “Biomechanics” has been used. If we examine archery publications from the 1850’s to the 1960’s although the word biomechanics is not used the principle and technique detailed relates directly to biomechanics. The simple principle that should be applied is that muscles fatigue, bones do not, so an archer should develop a shooting technique that relies on the maximum use of our bones and the minimum use of our muscles. The human body is a collection of levers with the skeleton as the base of these levers, the muscles providing the strength and control the bones require to achieve a particular action. The process of drawing, holding and shooting the bow should be the process of engaging the body’s natural levers principally utilising our bones with the minimum use of our muscles to achieve an outcome .
Bio-Mechanical Efficiency Maximum effectiveness of the use of the archer's bone structure and muscles is gained when the forces are as much as possible directly along the bones and through the joints. This minimises the amount of muscular effort required from the archer. However, it is not possible to achieve this perfectly for example, it is not possible to have the force of the bow exactly in line with the bones of the archer's bow arm so some level of muscular effort is required. Nevertheless, the smaller the angles between the bones and the line of force minimises the use of muscles and reduces fatigue and increases the archers ability to hold the bow steady and most importantly ensure all the forces required to shoot the bow remain directly behind the arrow increasing accuracy. Control Control of movement depends on the amount of muscular energy in excess of the minimum amount required for the movement or activity in the muscles being employed.
Biomechanics Version 4 June 2010 Page 4 Copyright Archery Australia June 2011
Apply this to the archer when drawing the bow, if the muscles on one side of the body exert more force than the muscles on the other, control is reduced by the asymmetrical movement. The fatigue rate is increased in the muscles employed leading to a reduction of control. However, if drawing the bow muscle use is kept symmetrical and relies on the use of the body’s natural levers, control is increased with a reduction in the work done by the muscles. This reduces fatigue and maintains control of the movement over a longer period. To reduce fatigue and maintain control, the efficient use of biomechanics with a strict economy of muscle use is essential. Essentials The essentials of the perfect archery technique can be summarised as: •••• Constant length of draw. •••• Constant line of force. •••• Balanced control. •••• Economy of effort. On the basis of these four essentials, the ideal position at full draw will be: •••• Stance - upright, balanced and comfortable position. •••• Constant draw length. •••• Balanced control - maintained by the balanced forces from the forward pressure of the bow arm
and the equal traction (pull) through the drawing hand. •••• Alignment - The nock of the arrow, the bow and drawing hand, and elbow of the drawing arm in
the same straight line (“Line of Force”). •••• Ideally the drawing shoulder should be low in a natural position and most importantly never
rotated. Summary The drawing sequence must be economical, systematic and repeatable. The draw must be a smooth flowing process of planned physical movement resulting from a practiced technique. Tension, both physical and mental, is the archer’s greatest enemy – the archer must learn to relax throughout the entire shooting process and most importantly do not use muscles that are not required. How do we aim steadily? Aiming is the critical aspect of shooting; a steady relies on using the body in the optimum manner. We do not aim using our sight but we achieve accurate and consistent aiming by developing a biomechanical shooting technique, using our bones and muscles in the most optimum manner. A few guiding principles to biomechanics 1) The archer should use the same technique shooting either a recurve bow or compound bow; there should be no difference in technique. 2) Where possible the archer should use bones and minimise the use of muscles – remember bones don’t get tired yet muscles most certainly fatigue. A coach must structure a shooting technique that maximise the use of bones and minimise the un-necessary use of muscles, all forces should as much as possible be along bones and through joints. 3) It is inevitable there will be some use of muscles, where possible only use muscles in mid extension. 4) Use only large muscles

Biomechanics Version 4 June 2010 Page 5 Copyright Archery Australia June 2011
5) Use only muscles that are necessary for the process. 6) If an archer starts to us a muscle they must use it all the way through the shooting process, it is
impossible to relax or transfer tension from one muscle to another when a muscle is under tension.
7) The coach and archer must think bones not muscles. It is difficult for the human mind to think
about the complex structure of muscles and the process required using muscles, but the mind finds the concept of bones and the movement of bones easier to understand and undertake.
8) The coach should instruct and the archer should use a technique that eliminates or minimises risk of injury.
Understanding the Principle of Biomechanics Maximising bone and minimising muscle use Clearly we need to use muscles for any motion or action, but the archer should develop a shooting technique that wherever possible maximises the use of bones and minimises the use of muscles. For example, the bones of the upper arm and lower arm. If we have the force straight through the centre of the bones and joints we don’t need to excessively use muscles to keep the bones and joints in place . Where the line of force is not through the joint, we now have no choice but to use the muscles to control the joint leading to muscular stress and fatigue. This should be the same principle for all the joints throughout the body. What this means is as far as possible forces must be along the bones and through the joints. This is not always possible but wherever it is possible the archer must develop a technique that utilises this principle. Using muscles at mid extension
Where we have to use muscles these should only be used at mid contraction. For example if we take the upper arm and lift an object you must use your bicep, you are at the strongest when at mid contraction

Biomechanics Version 4 June 2010 Page 6 Copyright Archery Australia June 2011
To allow for maximum strength and movement we must always use a muscle at mid extension. The Shoulder and Arm The two main bones of the shoulder are the humerus and the scapula (shoulder blade). The scapula extends up and around the shoulder joint at the rear to form a roof called the acromion , and around the shoulder joint at the front to form the coracoid process. The scapula is connected to the body by the collar bone (Clavicle) through the Acromio-Clavicular Joint.
You are at your weakest when at maximum contraction
When at minimum contraction you may be strong but you have run out of muscular movement and as such you are also very weak.

Biomechanics Version 4 June 2010 Page 7 Copyright Archery Australia June 2011
Front view of right hand scapular Side view of scapular The end of the scapula, called the glenoid , meets the head of the humerus to form a glenohumeral cavity that acts as a flexible ball-and-socket joint. The joint cavity is cushioned by articular cartilage covering the head of the humerus and face of the glenoid . The joint is stabilized by a ring of fibrous cartilage surrounding the glenoid called the labrum .
Biomechanics Version 4 June 2010 Page 8 Copyright Archery Australia June 2011
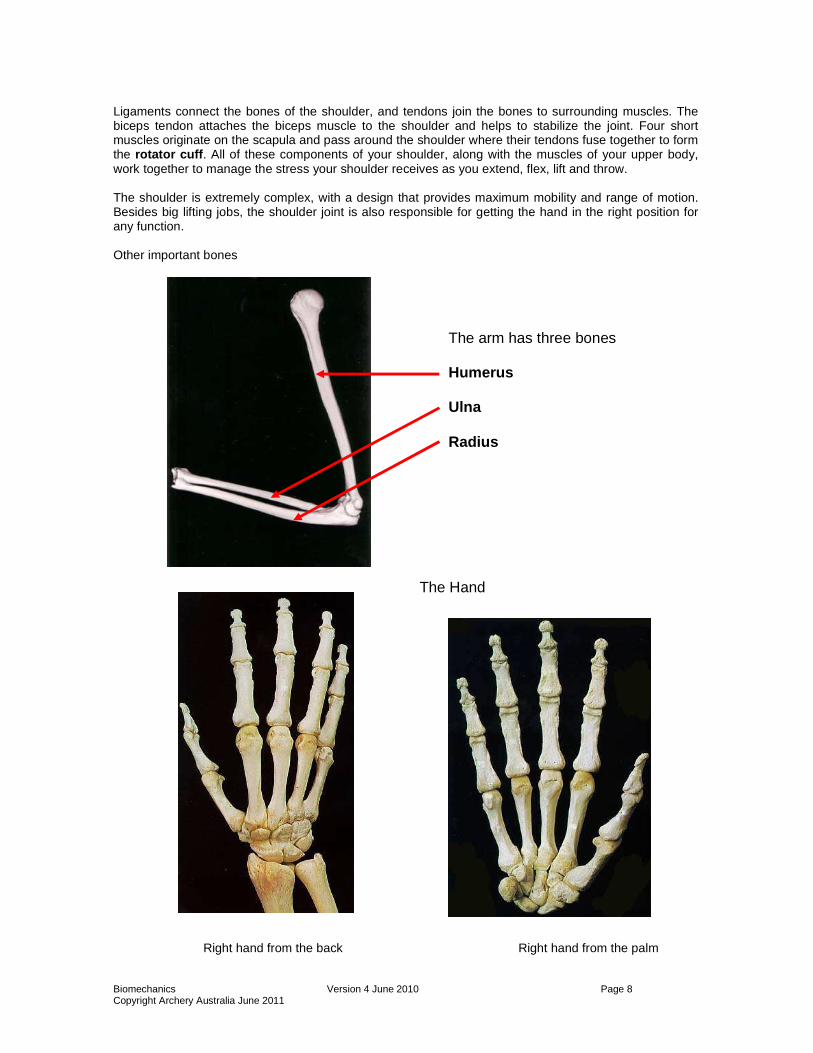
Ligaments connect the bones of the shoulder, and tendons join the bones to surrounding muscles. The biceps tendon attaches the biceps muscle to the shoulder and helps to stabilize the joint. Four short muscles originate on the scapula and pass around the shoulder where their tendons fuse together to form the rotator cuff . All of these components of your shoulder, along with the muscles of your upper body, work together to manage the stress your shoulder receives as you extend, flex, lift and throw. The shoulder is extremely complex, with a design that provides maximum mobility and range of motion. Besides big lifting jobs, the shoulder joint is also responsible for getting the hand in the right position for any function. Other important bones
The Hand
Right hand from the back Right hand from the palm
The arm has three bones Humerus Ulna Radius

Biomechanics Version 4 June 2010 Page 9 Copyright Archery Australia June 2011
How do muscles work from a technical aspect?
The skeletal muscle has a complex structure that is essential to how it contracts. To understand the skeletal muscle we must tear it apart, starting with the largest structures and working our way to the smaller ones.
The basic action of any muscle is contraction . For example, when you think about moving your arm using your biceps muscle, your brain sends a signal down a nerve cell telling your biceps muscle to contract. The amount of force that the muscle creates varies -- the muscle can contract a little or a lot depending on the signal that the nerve sends. All that any muscle can do is create contraction force.
A muscle is a bundle of many cells called fibres . You can think of muscle fibres as long cylinders , and compared to other cells in your body, muscle fibres are quite big. They are from about 1 to 40 microns long and 10 to 100 microns in diameter. For comparison, a strand of hair is about 100 microns in diameter, and a typical cell in your body is about 10 microns in diameter.
A muscle fibre contains many myofibrils , which are cylinders of muscle proteins. These proteins allow a muscle cell to contract. Myofibrils contain two types of filaments that run along the long axis of the fibre, and these filaments are arranged in hexagonal patterns. There are thick and thin filaments. Each thick filament is surrounded by six thin filaments.
Thick and thin filaments are attached to another structure called the Z-disk or Z-line , which runs perpendicular to the long axis of the fibre (the myofibril that runs from one Z-line to another is called a sarcomere ). Running vertically down the Z-line is a small tube called the transverse or T-tubule , which is actually part of the cell membrane that extends deep inside the fibre. Inside the fibre, stretching along the long axis between T-tubules, is a membrane system called the sarcoplasmic reticulum , which stores and releases the calcium ions that trigger muscle contraction.
Contracting a Muscle
The thick and thin filaments do the actual work of a muscle, and the way they do this is pretty cool. Thick filaments are made of a protein called myosin . At the molecular level, a thick filament is a shaft of myosin molecules arranged in a cylinder. Thin filaments are made of another protein called actin . The thin filaments look like two strands of pearls twisted around each other.
During contraction, the myosin thick filaments grab on to the actin thin filaments by forming crossbridges . The thick filaments pull the thin filaments past them, making the sarcomere shorter. In a muscle fibre, the signal for contraction is synchronized over the entire fibre so that all of the myofibrils that make up the sarcomere shorten simultaneously.
There are two structures in the grooves of each thin filament that enable the thin filaments to slide along the thick ones: a long, rod-like protein called tropomyosin and a shorter, bead-like protein complex called troponin . Troponin and tropomyosin are the molecular switches that control the interaction of actin and myosin during contraction.
While the sliding of filaments explains how the muscle shortens, it does not explain how the muscle creates the force required for shortening. To understand how this force is created, let's think about how you pull something up with a rope:
1. Grab the rope with both hands, arms extended. 2. Loosen your grip with one hand, let's say the left hand, and maintain your grip with the right.
3. With your right hand holding the rope, change your right arm's shape to shorten its reach and
pull the rope toward you.
4. Grab the rope with your extended left hand and release your right hand's grip.
5. Change your left arm's shape to shorten it and pull the rope, returning your right arm to its original extended position so it can grab the rope.
Repeat steps 2 through 5, alternating arms, until you finish.

Biomechanics Version 4 June 2010 Page 10 Copyright Archery Australia June 2011
To understand how muscle creates force, let's apply the rope example.
Myosin molecules are golf-club shaped. For our example, the myosin clubhead (along with the crossbridge it forms) is your arm, and the actin filament is the rope:
1. During contraction, the myosin molecule forms a chemical bond with an actin molecule on the thin filament (gripping the rope). This chemical bond is the crossbridge . For clarity, only one cross-bridge is shown in the figure above (focusing on one arm).
2. Initially, the crossbridge is extended (your arm extending) with adenosine diphosphate (ADP) and inorganic phosphate (Pi) attached to the myosin.
3. As soon as the crossbridge is formed, the myosin head bends (your arm shortening), thereby creating force and sliding the actin filament past the myosin (pulling the rope). This process is called the power stroke . During the power stroke, myosin releases the ADP and Pi.
4. Once ADP and Pi are released, a molecule of adenosine triphosphate (ATP) binds to the myosin. When the ATP binds, the myosin releases the actin molecule (letting go of the rope).
5. When the actin is released, the ATP molecule gets split into ADP and Pi by the myosin. The energy from the ATP resets the myosin head to its original position (re-extending your arm).
6. The process is repeated. The actions of the myosin molecules are not synchronized -- at any given moment, some myosins are attaching to the actin filament (gripping the rope), others are creating force (pulling the rope) and others are releasing the actin filament (releasing the rope).
Triggering and Reversing Contraction
The trigger for a muscle contraction is an electrical impulse. The electrical signal sets off a series of events that lead to crossbridge cycling between myosin and actin, which generates force. The series of events is slightly different between skeletal, smooth and cardiac muscle.
Let's take a look at what occurs within a skeletal muscle, from excitation to contraction to relaxation :
1. An electrical signal (action potential ) travels down a nerve cell, causing it to release a chemical message (neurotransmitter ) into a small gap between the nerve cell and muscle cell. This gap is called the synapse .
2. The neurotransmitter crosses the gap, binds to a protein (receptor ) on the muscle-cell membrane and causes an action potential in the muscle cell.
3. The action potential rapidly spreads along the muscle cell and enters the cell through the T-tubule.
4. The action potential opens gates in the muscle's calcium store (sarcoplasmic reticulum ). 5. Calcium ions flow into the cytoplasm, which is where the actin and myosin filaments are. 6. Calcium ions bind to troponin-tropomyosin molecules located in the grooves of the actin
filaments. Normally, the rod-like tropomyosin molecule covers the sites on actin where myosin can form crossbridges.
7. Upon binding calcium ions, troponin changes shape and slides tropomyosin out of the groove, exposing the actin-myosin binding sites.
8. Myosin interacts with actin by cycling crossbridges, as described previously. The muscle thereby creates force, and shortens.
9. After the action potential has passed, the calcium gates close , and calcium pumps located on the sarcoplasmic reticulum remove calcium from the cytoplasm.
10. As the calcium gets pumped back into the sarcoplasmic reticulum, calcium ions come off the troponin.
11. The troponin returns to its normal shape and allows tropomyosin to cover the actin-myosin binding sites on the actin filament.
12. Because no binding sites are available now, no crossbridges can form, and the muscle relaxes .
As you can see, muscle contraction is regulated by the level of calcium ions in the cytoplasm. In skeletal muscle, calcium ions work at the level of actin (actin-regulated contraction ). They move the troponin-tropomyosin complex off the binding sites, allowing actin and myosin to interact. All of this activity requires energy. Muscles use energy in the form of ATP. The energy from ATP is used to reset the myosin crossbridge head and release the actin filament. To make ATP, the muscle does the following:
1. Breaks down cretin phosphate , adding the phosphate to ADP to create ATP

Biomechanics Version 4 June 2010 Page 11 Copyright Archery Australia June 2011
2. Carries out anaerobic respiration , by which glucose is broken down to lactic acid and ATP is
formed
3. Carries out aerobic respiration , by which glucose, glycogen, fats and amino acids are broken down in the presence of oxygen to produce ATP.
Muscles have a mixture of two basic types of fibres: fast twitch and slow twitch. Fast-twitch fibres are capable of developing greater forces, contracting faster and have greater anaerobic capacity. In contrast, slow-twitch fibres develop force slowly, can maintain contractions longer and have higher aerobic capacity. Training can increase muscle mass, probably by changing the size and number of muscle fibres rather than the types of fibres. Some athletes also use performance enhancing drugs, specifically anabolic steroids , to build muscle, although this practice is dangerous and is banned in most athletic competitions.
In archery we do not trigger a muscle contraction to release the arrow. While maintaining the push/pull action at full draw we simply relax the muscles of the forearm (recurve) which relaxes the drawing fingers and the string is pulled from the fingers by the weight of the bow. The compound is the same although to release, the archer does not relax the forearm but increases the pulling tension to trigger the release device. The release instantly reverses the contraction of the muscles, although ideally only a limited number of muscles should be under isotonic contraction such as the back and shoulder muscles. How do muscles work the simple explanation? To give a simplistic view; muscles are made up of a large number of fibres which interlock. Attached to each fibre are a number of hooks. As the muscle is used the hooks lock onto each other and grip, giving strength. Muscle in mid contraction, results in good strength and movement. Muscle in maximum contraction, although a large number of hooks are possible there is little or no muscle extension or movement available and the result is strength is very limited. Muscle is at minimum contraction; only a small number of hooks are being used giving little strength.

Biomechanics Version 4 June 2010 Page 12 Copyright Archery Australia June 2011
When developing our shooting technique it must be ensured the archer is not using muscles in minimum or full extension. If this is done the archer will not be very strong and will fatigue quickly. Overview In simple terms the shooting technique should allow us to use only the minimum number of muscles for a given task, only use large muscles and muscles in mid contraction as this will always give maximum flexibility, strength and endurance. One point that must be stressed with the drawing arm, it is common for many to draw using the Bicep muscle which is usually at or near maximum contraction and correspondingly the Tricep muscle will be at minimum contraction. If the archer uses their Bicep to draw and shoot the bow they will immediately encounter problems, other then fatigue it is importable to executive a release with the Bicep muscle under contraction.
The drawing and release process should be executed by the movement of the drawing shoulder and the use of the scapular and large strong muscles of the upper back and shoulder.
This is particularly important with the bow arm, if the archer develops a technique which results in a bent elbow then will be forced to use their Bicep and Tricep, which will lead to strength and fatigue problems and poor aiming. Eliminating or minimising injury Archery is a good sport in relation to eliminating and avoiding injuries, we don’t tackle, hit people, or throw objects at people, but injuries in archery do happen and can take a long time to repair.
This graph compares muscle extension against strength. It should be noted maximum strength and movement is achieved in mid extension. In fact the strength difference between mid extension and no extension and full extension is about 50% in strength

Biomechanics Version 4 June 2010 Page 13 Copyright Archery Australia June 2011
The shooting technique should be such as not to cause injury, for example develop a technique that requires us to move joints when under load. If under load never move joints, moving joints requires muscular effort; fatigue will follow r and potentially cause injury. It is particularly important to the coach to instruct a technique that minimises the possibility of causing injury; a coach is not only responsible for developing the skill of the archer but also ensuring their health and safety. The contrary argument Of course the argument will always be that many top archers around the world use a shooting technique that relies on the use of muscles, and in particular the drawing arm Bicep and Tricep (shooting using a bent elbow). This is a valid argument: many a top score has been shot and tournament won by people who have a shooting technique contrary to good Biomechanical practices. Although this is not true in recurve archery, only archers with the correct Biomechanical technique consistently win. This has not always been the case with compound archers: archers with a poor technique have shot good scores and have won tournaments. If you analyse the results you will find these archers are very inconsistent, one day they will shoot a good score and the next day a poor score. In recent times with compound scores reaching higher and higher standards the importance of being able to hold steady and maintain strength for a full days shooting is becoming the most important aspect. The consistent performers are those with the correct Biomechanical technique. The high let-off of compound bows coupled with increased arrow speed have allowed compound archers to get away with poor technique. But, in recent times as compound scores are raising to almost unheard of levels 10 or even 5 years ago, only compound archers who rely on a good Biomechanical technique are the winners. The others may still be around but their names are way down on the result lists. Another point about archers with poor technique: if you study their records you find they are not always consistent in their performances. They may win today with a great score but the next event they will come in with disappointing results for no apparent reason. A good Biomechanical technique will give you consistency in performance; because you are always strong relying on your bones to control the shot and not your muscles which will fatigue, good Biomechanical technique will give you maximum endurance: you will come back day after day with consistent results. Archers who rely on muscles to shoot need to put in hours and hours of training to build up strength; while the biomechanical correct archer still must practice but the practice is more constructive and better focused on results and not building brute strength.

Biomechanics Version 4 June 2010 Page 14 Copyright Archery Australia June 2011
Shooting Technique and Biomechanics Ideally the archer should develop a shooting technique that employs all of the principles of biomechanics establishing a strong and efficient archery technique. It does not matter what style of archery you are engaged, tournament archery field archery, hunting or simply social archery always strive to use the correct technique. This is not always possible due to each individual’s own unique body shape and structure or disability. The skill of the coach is the ability to identify and recognise each individual’s unique requirements. A coach must have the ability to identify, analyse and be prepared to make comprises from what may be the optimum technique. It must be accepted that not everyone can shoot using the correct biomechanical model but let’s try and get close. In saying this, the role of a coach is to – 1) Have a thorough understanding of biomechanics, bow and arrow dynamics and coaching
principals. 2) Be able to observe and identify an individual’s unique requirement and develop a shooting
technique that allows them to achieve maximum performance and enjoyment from the sport. 3) The coach should also be able to develop variances to the biomechanical model to suit each
individual’s unique requirements To develop the correct biomechanical model, let’s look at the archers and examine how they stand and position their body. We need to observe and see if the bones and muscles are being used in an appropriate manner. We should divide the shooting technique into two parts – We should be striving to set up a shooting machine that can repeat shot after shot without loosing strength and endurance. 1) Waist down - the archer should have a stable platform that assists in orientating the top of the
body appropriately, like the legs of a shooting machine. 2) Waist up – this is our shooting machine, providing maximum strength and endurance. What should be the structure of the Human Shooting Machine? Lets first look at bones of the upper body used to draw, hold and shoot the arrow. The joints and relevant bones of the upper body are –
What the archer is attempting to achieve is to have all the forces along the bones and through the joints.
Biomechanics Version 4 June 2010 Page 15 Copyright Archery Australia June 2011
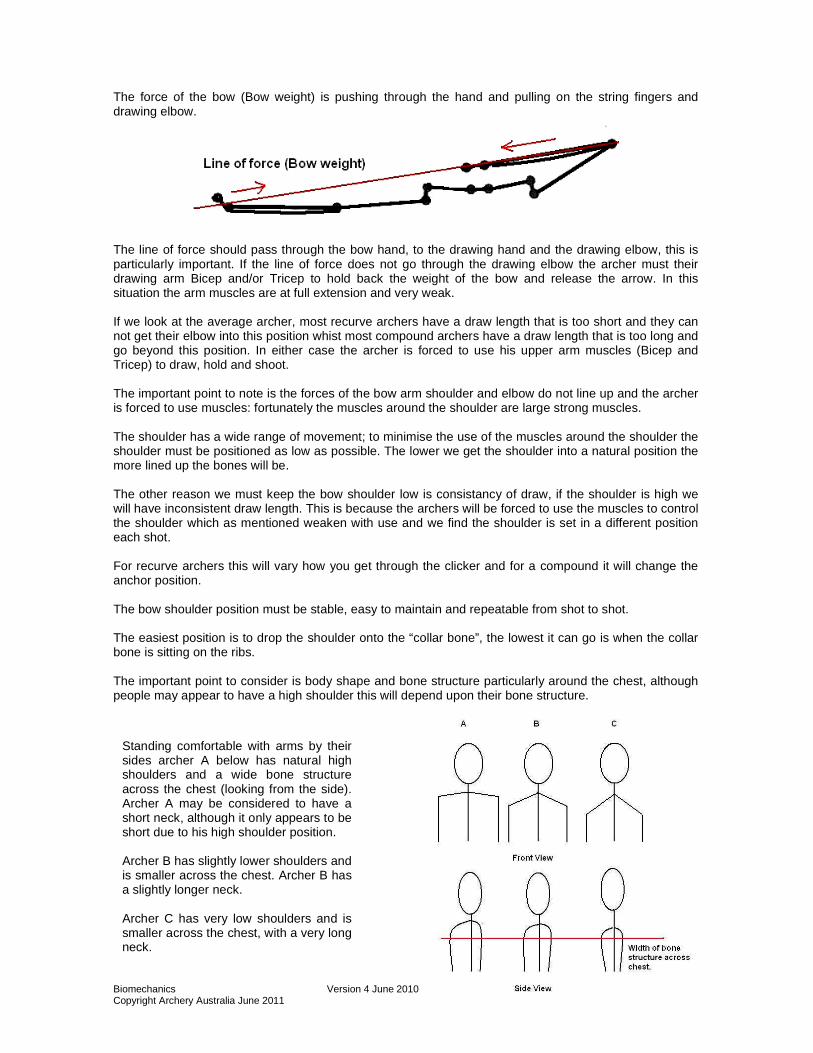
The force of the bow (Bow weight) is pushing through the hand and pulling on the string fingers and drawing elbow.
The line of force should pass through the bow hand, to the drawing hand and the drawing elbow, this is particularly important. If the line of force does not go through the drawing elbow the archer must their drawing arm Bicep and/or Tricep to hold back the weight of the bow and release the arrow. In this situation the arm muscles are at full extension and very weak. If we look at the average archer, most recurve archers have a draw length that is too short and they can not get their elbow into this position whist most compound archers have a draw length that is too long and go beyond this position. In either case the archer is forced to use his upper arm muscles (Bicep and Tricep) to draw, hold and shoot. The important point to note is the forces of the bow arm shoulder and elbow do not line up and the archer is forced to use muscles: fortunately the muscles around the shoulder are large strong muscles. The shoulder has a wide range of movement; to minimise the use of the muscles around the shoulder the shoulder must be positioned as low as possible. The lower we get the shoulder into a natural position the more lined up the bones will be. The other reason we must keep the bow shoulder low is consistancy of draw, if the shoulder is high we will have inconsistent draw length. This is because the archers will be forced to use the muscles to control the shoulder which as mentioned weaken with use and we find the shoulder is set in a different position each shot. For recurve archers this will vary how you get through the clicker and for a compound it will change the anchor position. The bow shoulder position must be stable, easy to maintain and repeatable from shot to shot. The easiest position is to drop the shoulder onto the “collar bone”, the lowest it can go is when the collar bone is sitting on the ribs. The important point to consider is body shape and bone structure particularly around the chest, although people may appear to have a high shoulder this will depend upon their bone structure.
Standing comfortable with arms by their sides archer A below has natural high shoulders and a wide bone structure across the chest (looking from the side). Archer A may be considered to have a short neck, although it only appears to be short due to his high shoulder position. Archer B has slightly lower shoulders and is smaller across the chest. Archer B has a slightly longer neck. Archer C has very low shoulders and is smaller across the chest, with a very long neck.

Biomechanics Version 4 June 2010 Page 16 Copyright Archery Australia June 2011
If you view each of these 3 archers shooting and they all had low bow shoulder it would be common for people to consider that Archer A has a much higher bow shoulder then archer C. By the nature of the rib cage structure they can all have low bow shoulders but when viewed by the untrained eye Archer A may be thought to have a high bow shoulder compared to Archer C. This is not the case and this point must be considered by coaches when assessing archers. The important point is a low bowarm is one that is resting on the “collar bone”. To determine the lowest point a person can drop their shoulder, have them stand with their arms by their side, view the position of their shoulders: this is the lowest position the shoulders can go. The important point when looking at various archers is that the position of the shoulder will vary from person to person based on their build. This is an important point when deciding which bow to use, recurve or compound. A person with a smaller chest, smaller frame and lower shoulders generally makes for a much better recurve archer while a person with a broader chest, stockier frame and higher shoulders better suits a compound bow. This case in point is borne out when you study current and past recurve and compound champions
Correct alignment with “Line of Force” going through bow hand, drawing hand and drawing elbow.
Poor “Line of Force” drawing elbow too high which will require the drawing arm Bicep and Tricep to take all the force this creates fatigue, common with recurve archers.
Poor “Line of Force” drawing elbow too bow which will require the drawing arm Bicep and Tricep to control the do take all the force and fatigue, common with compound archers.

Biomechanics Version 4 June 2010 Page 17 Copyright Archery Australia June 2011
View from above The Bow Arm. We cannot have the bow arm wrist, bow arm elbow and bow arm shoulder joint on the line of force, if we do the string would need to travel down the middle of our arm As we can not have the line of force along the wrist, elbow and shoulder joints we then need to use muscles, so if we need to use muscles then we must use the least amount of muscles possible. The way we do this is to push the bow arm shoulder in toward the arrow as far as it will go. But be aware of a common mistake many people make: that is to roll the bow shoulder joint toward the string. Never do this: the shoulder must be pushed toward the arrow. To roll the shoulder requires the use of a number of muscles which will cause fatigue. You must also use some if the smaller muscles in the shoulder which can lead to long term injury, the most common injury is to the “rotor cuff”, which is very painful and requires a long time to repair.
The shoulder has a lot of movement left to right so it’s easy to push the shoulder toward the arrow, but depending on body shape you may run out of clearance with the forearm and the string. So learn how far you can push the shoulder in and still maintain clearance. If a person has their shoulder pushed in as far as possible toward the arrow the natural reaction is for the drawing shoulder to move back away from the body, this then gives a straight line between both shoulder joints, the bow arm elbow and bow wrist and requires minimum use of muscles. If we were to draw a line between shoulder joints this line will point to the right of the target (for a right hand archer).
What you do not want is to have the drawing shoulder in front of the “Line of Force” (Drawing A below) which is common with recurve archers or behind the “Line of Force” (drawing B below) which is common with compound archers and in most cases a result of too long a draw length.

Biomechanics Version 4 June 2010 Page 18 Copyright Archery Australia June 2011
Bow arm, shoulder joint, elbow and wrist The arm is made up of three bones, the forearm has the ulna and the radius and the upper arm the humerus. The ulna and radius attach to the humerus at the elbow joint. The humerus attaches to the shoulder blade (scapula) as a ball and socket, this allows for arm movement and rotation. The arm is controlled principally by two large muscles along with a number of smaller muscles 1) the biceps muscle which sits on the top upper arm and go between two points at the elbow attaching to the ulna and radius and two points on the collar bone and 2) the triceps which sit on the bottom of the upper arm and attaches to two points to the ulna and radius and two points on the scapula. These muscles along with a number of smaller muscles control the movement of the arm, the biceps pulls the forearm toward the upper arm and the triceps counteracts the biceps by extending and straightening the forearm. The orientation of the humerus (upper arm bone), around the shoulder is controlled by a number of very large muscles around the shoulder joint and influence the orientation of the arm, there are also some quite small deep muscles around the shoulder called the rotor cuff which influence the rotation of the arm. It is common to hear of injuries to the shoulder and these are referred to as rotor cuff injuries, what is being damaged are the tendons associated with the rotor cuff. Of course we want an archer to have a technique that provides them with maximum results but with no injuries, the guiding principle of biomechanics is not to use muscles that are not necessary, so if there is a way we can shoot without the need to use muscles then we should use this method. Muscles should be as relaxed as possible during shooting and only use muscles that must be used. If we were to stand upright with our arms by our sides and simply raise our bow arm to shoulder level with the palm of the hand pointing at the ground without rotating the arm this is the shoulder orientation and in particular the position of the humerus that is required to shoot a bow without the need to use rotor cuff muscles. You will also note the position of the bones (ulna and radius) in our forearm and that the palm of our hand is pointing toward the ground which is important for a correct bow hand position. It is common to see archers rotate the shoulder toward the arrow this immediately requires the use of the rotor cuff muscles and placing them under stress, they will fatigue quickly and long term will cause injury. The bow shoulder should at all times be positioned in a neutral position.

Biomechanics Version 4 June 2010 Page 19 Copyright Archery Australia June 2011
The correct orientation of the elbow should have the ulna and radius aligned with the shoulder, drawing A below; this orientation of the bow arm requires almost no use of muscles to control the elbow, this position also gives you clearance for the string. If the archer were to rotate your shoulder they would find the ulna is rotated out toward the string and radius back away from the string drawing B below. This places excessive loading on the elbow and then requires the use of muscles to control the elbow, in many cases this will place the arm into the path of the string.
By having a relaxed bow shoulder in a natural position will now make it much easier to move the shoulder joint in toward the arrow when at full draw. Ideally we should have our shoulder joint positioned as close as possible towards the arrow when at full draw without creating clearance problems with our forearm. Having the bow shoulder joint as close to the arrow as possible is very advantageous from the point of view of minimising the muscles being used.
The other point is to pull the rib cage down, this gives very beneficial results in a number of areas. Firstly it helps to move the shoulder joint in toward the arrow even closer, thus moving the rib cage down is what is referred to as “Chest Down” position.
A B

Biomechanics Version 4 June 2010 Page 20 Copyright Archery Australia June 2011
The ‘Chest Down” position; this is an excellent technique and not only helps to bring the bow shoulder joint closer to the arrow at full draw but also helps to –
• Bring the drawing hand into a more vertical position without the need to rotate the forearm and hand.
• Assist with bringing the drawing elbow into alignment with the drawing hand and bow
The “Chest Down” position uses the abdominal muscles to pull the chest down to the hips. Not to be confused with sucking the stomach in, rather, just flexing the abdominal muscles, this position also helps to straighten the lower spine. Never bend forward at the waist thinking this is the “Chest down” position.
Correct “Chest Down” position Incorrect technique Bow Hand Ideally the “Line of Force” should be over the wrist joint where the ulna joint meets the hand. If the force is not over this ulna wrist joint the bow hand will be under unnecessary tension and will result in side to side bow torque upon release. Bow torque is the most common cause of arrow clearance problems as the arrows passes the bow upon release
Elbow The most important point is the elbow joint should be straight not bent, if the bow elbow is bent this forces you to use muscles unnecessarily to control the elbow joint.
Ideally the knuckles of the bow hand should be at 45o; this can also be used as a quick visual reference to see if a person has their bow arm correctly orientated and relaxed. If the bow arm is not orientated correctly the knuckles of the bow hand will not be at 45 o.

Biomechanics Version 4 June 2010 Page 21 Copyright Archery Australia June 2011
One important point to note, if you shoot with a bent arm you will long term invariably suffer from “tendonitis” which can be a painful injury requiring a long time to repair.
Correct - Straight bow arm requires little or no use of muscles to control the elbow
Incorrect – Bent bow arm, requires the use of muscles to control the elbow Head Position and Spine The head should be in a natural upright position with none of the neck muscles under tension and the head turned toward the target. The spine should be vertical throughout the shooting sequence. The heels should be set up slightly further apart then the hip joints, this allows for the orientate of the upper body for shooting at different distance i.e. 90m compared to 30m or shooting up or down hills in field archery without the need to change the geometry of the body. If the geometry of the body is changed this will vary the muscles used and change the forces in the body. To change the orientation of the upper body simply move the pelvis.

Biomechanics Version 4 June 2010 Page 22 Copyright Archery Australia June 2011
Drawing arm, shoulder, elbow and wrist With the drawing arm, we must also consider in particular the orientation of the humerus (upper arm bone), and the use of the rotor cuff muscles to control the drawing shoulder. It is critical to ensure when drawing the bow that the rotor cuff muscles, biceps or triceps are not excessively used. Again if we were to stand upright with our arms by our sides and simply raise our drawing arm to shoulder level with the palm of the hand pointed down and without rotating the arm, this is the shoulder orientation and in particular the position of the humerus that is required at full draw. Now we have our arm at shoulder height with the palm of our hand pointing down, bend the elbow of the drawing arm bringing the hand (with the palm down) to our face. This is the desired orientation required to hold the bow. What is now required is to rotate the hand into the anchor position, to achieve this will require the use used additional muscular tension which is unavoidable. Recurve Archer For a recurve archer the anchor position is achieved by rotating the hand into a vertical position. When you do this you will feel an increase in tension in the forearm and biceps but this is a compromise that recurve archers have to make.

Biomechanics Version 4 June 2010 Page 23 Copyright Archery Australia June 2011
There is a natural tendency for the drawing hand to rotate out from the body as your draw the bow and come to anchor. The result is the drawing hand is rotated out from the body at full draw and the drawing hand not held in a vertical position which will result in inconsistent finger pressures on the bow string and excessive forces in the wrist and forearm It is ideal that the drawing hand should be as vertical as possible at full draw as this provides even tension on the fingers, relaxes the wrist and forearm and does not cause side interference to the string upon release. Never attempt to force the hand into a vertical position when under load; this will further increase tension on already tense muscles. By slightly rotating the drawing hand in towards the body at Predraw and when commencing the draw, you will find as the hand naturally rotates during draw and when you reach full draw the hand will be in a vertical position with no added tension in the muscles.
Archer displaying good firm anchor position, square and consistent finger pressure on the string with no
tension in forearm/biceps or triceps but good even string contact. As mentioned above, the “Chest Down” position is an excellent technique for overcoming many problems, one of these is obtaining a vertical drawing hand at full draw, the “Chest Down” technique also helps with
• Moving the bow shoulder joint in toward the arrow. • Assists with bringing the drawing elbow into alignment with the drawing hand and bow
The “Chest Down” position uses the abdominal muscles to pull the chest down to the hips. Not to be confused with sucking the stomach in, rather, just flexing the abdominal muscles, this technique also helps to straighten the lower spine. Never bend forward at the waist thinking this is the “Chest Down” position. Compound Archer It is a very common practice for compound archers to excessively rotate their hand holding the release device. As the archer excessively rotates their drawing hand tension builds up your forearm, biceps and triceps and most importantly in the shoulder as the rotor cuff muscles are now under tension. The other result of excessively rotating the hand is the elbow joint at full draw this generally forces the elbow below the “Line of Force” due to the use of the triceps and biceps resulting in a low elbow at full draw. The natural reaction upon release is a downward motion with the elbow, which can result in high scatter of arrows.

Biomechanics Version 4 June 2010 Page 24 Copyright Archery Australia June 2011
Archer with an excessive rotation of the drawing hand. Ideally the compound archer should have an anchor position that is horizontal or just slightly rotated out from the face.
Archer displaying good deep grip on the release device and minimal rotation of the hand. It is important to note that, unlike a recurve archer who must maintain a consistent solid anchor under the jaw, the compound archer should have a floating anchor that varies from distance to distance. As the peep sight is always the same location above the nocking point, the angle of the archers head varies to enable the archer to see clearly through the peep sight at different distances, this means the hand position (holding the release device) against the side of the archers face varies at different distances. Also to give the best possible string clearance there should be no or minimal string contact with the face. Release When shooting a recurve bow the release must be a surprise and must be made immediately the clicker goes off. With a compound the release must be a surprise and not forced. As the archer releases and the arrow leaves the bow the forces will come off the body and the body must react to the forces and move, this movement is the follow through. The follow through is a very powerful diagnostic tool, if you watch the follow through upon release (before the archer proactively moves their body), and see how they react upon release this will tell what forces were in play and if the technique was correct. If all the forces were correct the drawing hand should move back in a straight line and bow arm (and bow) should move to the left and down (for a right hand archer).

Biomechanics Version 4 June 2010 Page 25 Copyright Archery Australia June 2011
If this happens then it tells you immediately that the archer is only using the muscle they should and the release is a surprise. Drawing Technique Now that we have detail biomechanics and how it world on various parts of the body, we should look at the most efficient technique for drawing the bow, employing all of the principals of biomechanics, the so called “High Draw”. Predraw Raise the bow arm and drawing arm together above shoulder level ideally around eye level. This lowers the bow shoulder into a natural position. Take a deep breath while raising the bow into the Predraw position. The drawing hand should be relaxed with the back of the hand flat (rotated in slightly toward the body) the back of the hand, wrist and forearm in a straight line behind the line of the arrow. The bow arm should be straight and pointed toward the target. Sat this point the archer should transfer 60% to 70% of your body weight onto your front foot; this enables the archer to transfer their body weight evenly on both feet as they draw the bow.
Bow Shoulder It is imperative that the bow shoulder remains low throughout the draw and the bow arm extends towards the target. Drawing the Bow To utilise the benefits of “biomechanics” and ensure the minimum use of muscles to draw and hold the bow, the bow hand and drawing hand should be raised above shoulder level ideally around mouth/nose/eye level in the Predraw stage. By raising the bow hand and drawing hand above shoulder level into a high Predraw position this lowers the bow shoulder into the correct position with the “collar bone” sitting onto the ribs and sets up the rest of the body for the draw and shooting process.
At “FULL DRAW” the archer should be standing upright with body weight evenly distributed on both feet. There should be between 60% to 70% of body weight toward the front of each foot and only 40% to 30% on your heels. If there is a backward lean to the body this may indicate, the bow may be too heavy in draw weight or in the case of a compound bow also the draw length is too long, although the most common cause is the tendency is to transfer the body weigh t onto the back foot upon drawing the bow: to overcome this issue -
1) Change the draw weight of the bow to a lighter draw weight bow or in the case of a compound bow shortening the draw length.
2) At “Predraw” transfer 70% to 80% of the body
weight on the front foot, as they draw the bow and the natural tendency to transfer the bodies weight to the back foot will then result in even distribution of weight.

Biomechanics Version 4 June 2010 Page 26 Copyright Archery Australia June 2011
The draw is then achieved by drawing back the string and rotating the drawing shoulder back and around into the anchor position while at the same time ensuring the bow shoulder is kept low and the bow arm is extended toward the target. The draw must finish with the bow hand, drawing hand, arrow and draw arm elbow in line behind each other. It is imperative that during the drawing process, as the drawing arm moves back toward the anchor position, the bow arm shoulder is kept down and the bow hand extended toward the target through the pivot point of the bow. The string should be drawn back to the head, never move the head to the string. Once the drawing action has commenced, most of the work must be done by the muscles in the back and shoulders, with very little tension in the biceps and forearm. The draw must be along as straight a line as is physically possible, drawing back close to the bow shoulder, finishing with bow and hand, arrow and draw arm elbow in line behind each other. NOTE – It may be suggested that this “High Draw” method is against FITA Shooting Rules. This is not correct as both the drawing hand and bow hand are on the same line. The FITA rule is concerned where an archer raised the bow height and keeps the drawing hand low, the arrow is now aimed high and if shot accidentally the arrow may fly out of the field of play creating a hazard. Compromises

Biomechanics Version 4 June 2010 Page 27 Copyright Archery Australia June 2011
Not everyone is built the same or they may have a disability. A good coach should be able to establish compromises to deal with these issues, but unfortunately compromises can translate into a loss of scores. IMPORTANT POINTS Once you have started using a muscle you are committed to use that muscle for the entire shot, you can not switch off a muscle when under tension, so develop a technique that only uses muscles that are necessary. If the archer is using muscles they don’t have to use, they won’t aim as steady and they won’t be able to score as well. The guiding principle is - In drawing the bow the archer must not use a muscle they will not need at full draw. Using a low draw. So, if they have a technique that requires they to draw the bow low (under shoulder height) then they must use muscles to draw back the bow, in fact to draw back the bow they must use far more muscles in their arms and shoulders then they will need at full draw. They are using muscles at full draw they do not require and can not stop using the result will be they can not hold still and will fatigue. The archer will also need to move joints when under load, it is important to avoid moving joints when under load this will cause injury. The high technique detailed above brings all joints into correct line and reduces the muscles that need to be used. Remember the guiding principles to biomechanics 1) We use the same technique shooting either a recurve bow or compound bow, there should be no
difference in technique. 2) Use bones, not muscles – bones don’t get tired yet muscles most certainly fatigue, we must
consider how to structure a shooting technique to maximise the use of bones and minimises the use of muscles.
3) If we must use muscles, only use muscles at mid extension 4) Use only large muscles 5) Use only the necessary muscles we have to use 6) Use a technique that eliminates or minimises injury Copyright Archery Australia September 2011 Written and images by Jim Larven Technical Information and Research by James Larven Reference material – Archery Australia Shooting Technique – Step by Step Archery Australia Introduction to Archery
Archery Anatomy by Ray Axford