secure socket layer introduction and ikeyman user’s guide
TRANSCRIPT

Secure Socket Layer Introduction and iKeyman User’s Guide
By using the iKeyman utility ("Utility"), you are agreeing to the following: Except as set forth below, the terms and conditions contained in the International Program License Agreement ("IPLA") govern your use of the Utility. However, notwithstanding anything to the contrary in the IPLA, you acknowledge and agree that the Utility has not been tested by Tivoli or its affiliates and is being provided "AS IS" with all faults and without service or support of any kind. TIVOLI AND ITS AFFILIATES DISCLAIM ALL WARRANTIES AND CONDITIONS EXPRESS AND IMPLIED WITH REGARD TO THE UTILITY, INCLUDING, WITHOUT LIMITATION, WARRANTIES AND CONDITIONS OF MERCHANTABILITY AND FITNESS FOR A PARTICULAR PURPOSE. Because software is inherently complex and may not be completely free of errors, you are advised to verify your work. TIVOLI AND ITS AFFILIATES SHALL HAVE NO LIABILITY FOR DIRECT, INDIRECT, SPECIAL, INCIDENTAL, CONSEQUENTIAL OR TORT DAMAGES ARISING OUT OF THE USE, INABILITY TO USE, OR PERFORMANCE OF THE UTILITY, EVEN IF TIVOLI OR ITS AFFILIATES HAVE BEEN ADVISED OF THE POSSIBILITY OF SUCH DAMAGES.


Secure Socket Layer Introduction and iKeyman
User’s Guide

Secure Socket Layer Introduction and iKeyman User’s Guide
Copyright NoticeCopyright © 2000, 2001 by Tivoli Systems Inc., an IBM Company, including this documentation and all software. All rights re-served. May only be used pursuant to a Tivoli Systems Software License Agreement or Addendum for Tivoli Products to IBM Customer or License Agreement. No part of this publication may be reproduced, transmitted, transcribed, stored in a retrieval system, or translated into any computer language, in any form or by any means, electronic, mechanical, magnetic, optical, chemical manual, or otherwise, without prior written permission of Tivoli Systems. Tivoli Systems grants you limited permis-sion to make hardcopy or other reproductions of any machine-readable documentation for your own use, provided that each such reproduction shall carry the Tivoli Systems copyright notice. No other rights under copyright are granted without prior written permission of Tivoli Systems. The document is not intended for production and is furnished "as is" without warranty of any kind. All warranties on this document are hereby disclaimed including the warranties of merchantability and fitness for a particular purpose.
Note to U.S. Government Users-Documentation related to restricted rights--Use, duplication or disclosure is subject to restric-tions set forth in GSA ADP Schedule Contract with IBM Corporation.
TrademarksThe following product names are trademarks of Tivoli Systems or IBM Corporation: AIX, IBM, OS/2, RS/6000, Tivoli, Tivoli ADSM, Tivoli Application Development Environment, Tivoli Application Extension Facility, Tivoli Asset Management, Tivoli Change Management, Tivoli Cross-Site for Availability, Tivoli Cross-Site for Deployment, Tivoli Cross-Site for Security, Tivoli Decision Support, Tivoli Developer Kit for PowerBuilder, Tivoli Distributed Monitoring, Tivoli Enterprise Console, Tivoli Event Integration Facility, Tivoli Global Enterprise Manager, Tivoli Integration Toolkit, Tivoli Inventory, Tivoli IT Director, Tivoli LAN Access, Tivoli Maestro, Tivoli Management Framework, Tivoli Manager for CATIA, Tivoli Manager for DB2, Tivoli Manager for Domino Tivoli Manager for Informix, Tivoli Manager for MCIS, Tivoli Manager for MCIS, Tivoli Manager for Microsoft Exchange, Tivoli Manager for MQSeries, Tivoli Manager for NIS SQL Server, Tivoli Manager for Oracle, Tivoli Manager for R/3, Tivoli Manager for SuiteSpot, Tivoli Manager for Sybase, Tivoli Manager for Year 2000, Tivoli Net Access, Tivoli NetView, Tivoli NetView Access Services, Tivoli NetView Distribution Manager, Tivoli NetView for OS/390, Tivoli NetView FTP, Tivoli NetView Performance Monitor, Tivoli OPC, Tivoli Output Manager, Tivoli Performance Reporter for OS/390, Tivoli Plus for ADSM, Tivoli Plus for AR System Tivoli Plus for Compaq Insight, Tivoli Problem Management, Tivoli Remote Control, Tivoli Reporter, Tivoli Security Management, Tivoli Service Desk, Tivoli Service Desk for OS/390, Tivoli Software Distribution, Tivoli User Administration, and Tivoli Workload Scheduler.
Microsoft, Windows, Windows NT, and the Windows logo are trademarks or registered trademarks of Microsoft Corporation.
Java and all Java-based trademarks are trademarks of Sun Microsystems, Inc., in the United States, other countries, or both.
UNIX is a registered trademark in the United States and other countries licensed exclusively through X/Open Company Limit-ed.
Other company, product, and service names mentioned in this document may be trademarks or servicemarks of others.
NoticeReferences in this publication to Tivoli Systems or IBM products, programs, or services do not imply that they will be available in all countries in which Tivoli Systems or IBM operates. Any reference to these products, programs, or services is not intended to imply that only Tivoli Systems or IBM products, programs, or services can be used. Subject to Tivoli Systems' or IBM's valid intellectual property or other legally protectable right, any functionally equivalent product, program, or service can be used in-stead of the referenced product, program or service. The evaluation and verification of operation in conjunction with other prod-ucts, except those expressly designated by Tivoli Systems or IBM, are the responsibility of the user.
Tivoli Systems or IBM may have patents or pending patent applications covering subject matter in this document. The furnish-ing of this document does not give you any license to these patents. You can send license inquiries, in writing, to the IBM Direc-tor of Licensing, IBM Corporation, North Castle Drive, Armonk, New York 10504-1785 U.S.A.
By using the iKeyman utility ("Utility"), you are agreeing to the following: Except as set forth below, the terms and conditions contained in the International Program License Agreement ("IPLA") govern your use of the Utility. However, notwithstanding anything to the contrary in the IPLA, you acknowledge and agree that the Utility has not been tested by Tivoli or its affiliates and is being provided "AS IS" with all faults and without service or support of any kind. TIVOLI AND ITS AFFILIATES DISCLAIM ALL WARRANTIES AND CONDITIONS EXPRESS AND IMPLIED WITH REGARD TO THE UTILITY, INCLUDING, WITHOUT LIMITATION, WARRANTIES AND CONDITIONS OF MERCHANTABILITY AND FITNESS FOR A PARTICULAR PURPOSE. Because software is inherently complex and may not be completely free of errors, you are advised to verify your work. TIVOLI AND ITS AFFILIATES SHALL HAVE NO LIABILITY FOR DIRECT, INDIRECT, SPECIAL, INCIDENTAL, CONSEQUENTIAL OR TORT DAMAGES ARISING OUT OF THE USE, INABILITY TO USE, OR PERFORMANCE OF THE UTILITY, EVEN IF TIVOLI OR ITS AFFILIATES HAVE BEEN ADVISED OF THE POSSIBILITY OF SUCH DAMAGES.

Secure Socket Layer Introduction and iKeyman User’s Guide iii
ContentsPreface........................................................................................................................................................ v
Chapter 1—Secure Sockets Layer overviewDigital certificates ...................................................................................................................................1-1
Format of digital certificates ..........................................................................................................1-2
Security considerations for digital certificates ...............................................................................1-4
Certificate authorities and trust hierarchies....................................................................................1-4
Uses for digital certificates in Internet applications.......................................................................1-5
Digital certificates and certificate requests ....................................................................................1-6
Global server certificates................................................................................................................1-7
How SSL works ......................................................................................................................................1-8
The SSL handshake ........................................................................................................................1-8
Digital certificates and trust chains with SSL ..............................................................................1-10
SSL with global server certificates...............................................................................................1-11
Chapter 2—Managing digital certificates with iKeymanCreating a key database ..........................................................................................................................2-1
Creating a self-signed digital certificate for testing................................................................................2-4
Adding a CA root digital certificate........................................................................................................2-5
Deleting a CA root digital certificate......................................................................................................2-6
Adding a site certificate ..........................................................................................................................2-6
Copying certificates from one key database to another ..........................................................................2-7
Requesting a digital certificate................................................................................................................2-9
Receiving a digital certificate ...............................................................................................................2-11
Deleting a digital certificate..................................................................................................................2-11
Setting a new default key......................................................................................................................2-12
Changing a database password .............................................................................................................2-13
Index

iv Version 1.0

Secure Socket Layer Introduction and iKeyman User’s Guide v
Preface
Preface
About this bookThis book is for system administrators who want to plan and integrate security for Web based systems. You should already understand your network and your e-business applications.
Who should read this book
This book is intended for network or system security administrators who install, administer, and use the Secure Socket Layer (SSL) based systems.
How this book is organized
This book contains the following chapters:
■ “Chapter 1. Secure Sockets Layer overview,” on page 1 provides an overview of SSL and digital certificates.
■ “Chapter 2. Managing digital certificates with iKeyman,” on page 1 describes the iKeyman utility, which is a tool you can use to manage your digital certificates.
Conventions
This book uses the following conventions:
Convention Meaning
bold User interface elements such as check boxes, buttons, and commands
monospace Syntax and directory defaults that are relevant to IBM SecureWay Toolkit
-> Shows a series of selections from a menu. For example: Select File-> Run means click File, and then click Run

vi Version 1.0
Preface

Secure Socket Layer Introduction and iKeyman User’s Guide 1–1
Secure S
ockets Layer overview1
1Secure Sockets Layer overview
Privacy and security are concepts that are more critical than ever in today’s electronic business environment.
Every business professional needs to be concerned about security over open communication networks, such as the Internet. It is not enough to have a secure Web site; you also need to have secure communication between Web sites, communication that cannot be monitored by outside parties. Both you and your users need to be confident that you have a secure environment in which to conduct your business.
That kind of secure communication requires encryption, and encryption is what the Secure Sockets Layer (SSL), provides: security for the connection over which you can communicate.
SSL was developed jointly by Netscape Communications and RSA Data Security. Many companies worldwide have adopted SSL as their communication protocol of choice. In fact, many financial transactions on the Internet, including online banking, are now conducted using SSL.
Because digital certificates are an important component of SSL, this chapter consists of two sections:
■ “Digital certificates,” on page 1-1
■ “How SSL works,” on page 1-8
Digital certificatesDigital certificates allow unique identification of an entity; they are, in essence, electronic ID cards issued by trusted parties. Digital certificates allow a user to verify to whom a certificate is issued as well as the issuer of the certificate.
Digital certificates are the vehicle that SSL uses for public-key cryptography. Public-key cryptography uses two different cryptographic keys: a private key and a public key. Public-key cryptography is also known as asymmetric cryptography, because you can encrypt information with one key and decrypt it with the complement key from a given public-private key pair.
Public-private key pairs are simply long strings of data that act as keys to a user's encryption scheme. The user keeps the private key in a secure place (for example, encrypted on a computer's hard drive) and provides the public key to anyone with whom the user wants to communicate. The private key is used to digitally sign all secure communications sent from the user; the public key is used by the recipient to verify the sender's signature.

1–2 Version 1.0
Digital certificates
Public-key cryptography is built on trust; the recipient of a public key needs to have confidence that the key really belongs to the sender and not to an impostor. Digital certificates provide that confidence.
A digital certificate serves two purposes: it establishes the owner’s identity, and it makes the owner's public key available. A digital certificate is issued by a trusted authority—a certificate authority (CA)—and it is issued only for a limited time. When its expiration date passes, the digital certificate must be replaced.
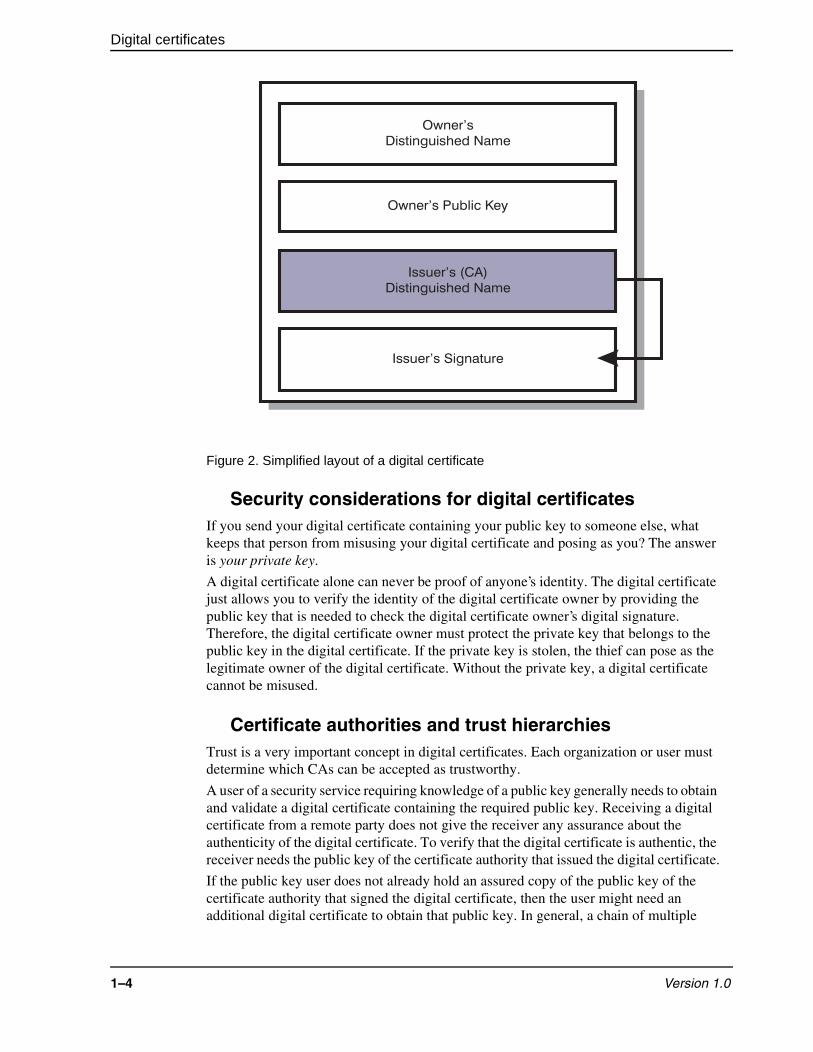
Format of digital certificatesThe digital certificate contains specific pieces of information about the identity of the certificate owner and about the certificate authority:
■ Owner's distinguished name. A distinguished name is the combination of the owner's common name and its context (position) in the directory tree. In the simple directory tree shown in Figure 1, “A simple directory tree,” on page 1-3, for example, LaurenA is the owner's common name, and the context is OU=Engnring.O=XYZCorp; therefore, the distinguished name is:
.CN=LaurenA.OU=Engnring.O=XYZCorp
■ Owner's public key.
■ Date the digital certificate was issued.
■ Date the digital certificate expires.
■ Issuer's distinguished name. This is the distinguished name of the CA.
■ Issuer's digital signature.

Secure Socket Layer Introduction and iKeyman User’s Guide 1–3
Secure S
ockets Layer overview
Digital certificates
Picture: A simple directory tree
Figure 1. A simple directory tree
Figure 2, “Simplified layout of a digital certificate,” on page 1-4 shows the layout of a typical digital certificate.
O=XYZ Corp
OU=Engnring OU=Accting
CN=ChrisRCN=LaurenA
1–4 Version 1.0
Digital certificates
Simplified layout of a digital certificate
Figure 2. Simplified layout of a digital certificate
Security considerations for digital certificatesIf you send your digital certificate containing your public key to someone else, what keeps that person from misusing your digital certificate and posing as you? The answer is your private key.
A digital certificate alone can never be proof of anyone’s identity. The digital certificate just allows you to verify the identity of the digital certificate owner by providing the public key that is needed to check the digital certificate owner’s digital signature. Therefore, the digital certificate owner must protect the private key that belongs to the public key in the digital certificate. If the private key is stolen, the thief can pose as the legitimate owner of the digital certificate. Without the private key, a digital certificate cannot be misused.
Certificate authorities and trust hierarchiesTrust is a very important concept in digital certificates. Each organization or user must determine which CAs can be accepted as trustworthy.
A user of a security service requiring knowledge of a public key generally needs to obtain and validate a digital certificate containing the required public key. Receiving a digital certificate from a remote party does not give the receiver any assurance about the authenticity of the digital certificate. To verify that the digital certificate is authentic, the receiver needs the public key of the certificate authority that issued the digital certificate.
If the public key user does not already hold an assured copy of the public key of the certificate authority that signed the digital certificate, then the user might need an additional digital certificate to obtain that public key. In general, a chain of multiple
Owner’s
Distinguished Name
Owner’s Public Key
Issuer’s (CA)
Distinguished Name
Issuer’s Signature

Secure Socket Layer Introduction and iKeyman User’s Guide 1–5
Secure S
ockets Layer overview
Digital certificates
digital certificates might be needed, comprising a digital certificate of the public key owner (the end entity) signed by one CA, and optionally one or more additional digital certificates of CAs signed by other CAs. Figure 3, “Chain of trust — CAs signing CA digital certificates up to the root CA,” on page 1-5 shows a chain of trust.
Picture: Chain of trust — CAs signing CA digital certificates up to the root CA
Figure 3. Chain of trust — CAs signing CA digital certificates up to the root CA
Note that many applications that send a subject’s digital certificate to a receiver send not only that digital certificate, but also send all the CA digital certificates necessary to verify the initial digital certificate up to the root CA.
The chain of trust begins at the root CA. The root CA’s digital certificate is self-signed; that is, the certificate authority uses its own private key to sign the digital certificate. The public key used to verify the signature is the public key in the digital certificate itself (see Figure 4, “Self-signed digital certificate,” on page 1-7). To establish a chain of trust, the public-key user must have received the digital certificate of the root CA in one of the following ways:
■ On a diskette received by registered mail or picked up in person
■ Pre-loaded with software received from a reliable source or downloaded from an authenticated server
Uses for digital certificates in Internet applicationsApplications using public-key cryptography systems for key exchange or digital signatures need to use digital certificates to obtain the needed public keys. Internet applications of this kind are numerous. Following are brief descriptions of a few of the commonly used Internet applications that use public-key cryptography:
Root CA’s
Distinguished Name
Root CA’s Public Key
Root CA’s Signature
Owner’s
Distinguished Name
Owner’s Public Key
Issuer’s (CA)
Distinguished Name
Issuer’s Signature
Owner’s (CA’s)
Distinguished Name
Owner’s Public Key
Issuer’s (Root CA’s)
Distinguished Name
Issuer’s Signature
Verify Signature
Verify Signature
1–6 Version 1.0
Digital certificates
(SSL) A protocol that provides privacy and integrity for communications. This protocol is used by Web servers to provide security for connections between Web servers and Web browsers, by the LDAP to provide security for connections between LDAP clients and LDAP servers, and by Host-on-Demand V2 to provide security for connections between the client and the host system. Additional applications based on this protocol are in development.
SSL uses digital certificates for key exchange, server authentication, and optionally, client authentication.
Client Authentication Client authentication is an option in SSL that requires a server to authenticate a client’s digital certificate before allowing the client to log on or access certain resources. The server requests and authenticates the client’s digital certificate during the SSL handshake. At that time the server can also determine whether it trusts the CA that issued the digital certificate to the client.
Secure Electronic Mail Many electronic mail systems, using standards such as Privacy Enhanced Mail (PEM) or Secure/Multipurpose Internet Mail Extensions (S/MIME) for secure electronic mail, use digital certificates for digital signatures and for the exchange of keys to encrypt and decrypt messages.
Virtual Private Networks (VPNs) Virtual private networks, also called secure tunnels, can be set up between firewalls to enable protected connections between secure networks over insecure communication links. All traffic destined to these networks is encrypted between the firewalls.
The protocols used in tunneling follow the IP Security (IPsec) standard. For the key exchange between partner firewalls, the Internet key exchange (IKE) standard, previously known as ISAKMP/Oakley, has been defined.
The standards also allow for a secure, encrypted connection between a remote client (for example, an employee working from home) and a secure host or network.
Secure Electronic Transaction (Set)
SET is a standard designed for secure credit card payments in insecure networks (the Internet). Digital certificates are used for card holders (electronic credit cards) and merchants. The use of digital certificates in SET allows for secure, private connections between card holders, merchants, and banks. The transactions created are secure and indisputable, and they cannot be forged. The merchants receive no credit card information that can be misused or stolen.
Digital certificates and certificate requestsSimplified, a signed digital certificate contains the owner’s distinguished name, the owner’s public key, the certificate authority’s (issuer’s) distinguished name, and the signature of the certificate authority over these fields.
A self-signed digital certificate contains the owner’s distinguished name, the owner’s

Secure Socket Layer Introduction and iKeyman User’s Guide 1–7
Secure S
ockets Layer overview
Digital certificates
public key, and the owner’s own signature over these fields, as shown in Figure 4, “Self-signed digital certificate,” on page 1-7.
Picture: Self-signed digital certificate
Figure 4. Self-signed digital certificate
A root CA's digital certificate is an example of a self-signed digital certificate. You can also create your own self-signed digital certificates to use when developing and testing a server product. See “Creating a self-signed digital certificate for testing,” on page 2-4 for details.
A certificate request that is sent to a certificate authority to be signed contains the owner's (requester's) distinguished name, the owner's public key, and the owner's own signature over these fields. The certificate authority verifies this signature with the public key in the digital certificate to ensure that:
■ The certificate request was not modified in transit between the requester and the CA.
■ The requester is in possession of the private key that belongs to the public key in the certificate request.
The CA is also responsible for some level of identification verification. This can range from very little proof to absolute assurance of the owner's identity.
Global server certificatesThere is a special kind of server digital certificate for Web servers, called a global server certificate.
Global server certificates are needed because of restrictions on export of cryptographic hardware and software imposed by the United States government:
■ Users in the United States and Canada can use any available cryptographic algorithm with any key length. Delivery of cryptographic hardware and software to customers in the United States and Canada is unrestricted.
■ Users in other countries using United States products may use only cryptographic algorithms up to certain key lengths. Delivery of cryptographic hardware and
Owner’s
Distinguished Name
Owner’s Public Key
Owner’s Signature

1–8 Version 1.0
How SSL works
software to customers outside the United States and Canada is restricted and controlled by the United States government.
The United States government export regulations allow certain industries in countries outside the United States and Canada (currently financial institutions such as banks, insurance companies, and health industry organizations) to use cryptographic products with the same key lengths as in the United States.
To comply with the U.S. government export regulations, global server certificates were created. The United States government has authorized VeriSign, Inc. to issue special server digital certificates to customers eligible to use strong encryption, such as banks and other financial institutions, insurance companies, and health-industry organizations. These digital certificates are recognized by Microsoft Internet Explorer Version 3.02 and later and by Netscape Navigator/Communicator Version 4 and later. When the Web browser recognizes the special digital certificate, it enables strong encryption routines, such as RC4 with 128-bit keys or Triple DES with 168-bit keys. The SSL Toolkit; supports global server certificates in the same fashion.
Global server certificates can be used by:
■ Banks, financial institutions, insurance companies, and healthcare organizations outside the United States and Canada that require SSL between their Web servers and their customers’ and users’ Web browsers with encryption stronger than RC2 or RC4 with 40-bit keys.
■ Banks, financial institutions, insurance companies, and healthcare organizations inside the United States or Canada that require SSL between their Web servers and the Web browsers of customers or users located outside the United States or Canada with encryption stronger than RC2 or RC4 with 40-bit keys.
How SSL worksSSL is a protocol that provides privacy and integrity between two communicating applications using TCP/IP. The Hypertext Transfer Protocol (HTTP) for the World Wide Web uses SSL for secure communications.
The data going back and forth between client and server is encrypted using a symmetric algorithm such as DES or RC4. A public-key algorithm—usually RSA—is used for the exchange of the encryption keys and for digital signatures. The algorithm uses the public key in the server's digital certificate. With the server's digital certificate, the client can also verify the server's identity. Versions 1 and 2 of the SSL protocol provide only server authentication. Version 3 adds client authentication, using both client and server digital certificates.
The SSL handshakeA (SSL) connection is always initiated by the client using a URL starting with https:// instead of with http://. At the beginning of an SSL session, an SSL handshake is performed. This handshake produces the cryptographic parameters of the session. A simplified overview of how the SSL handshake is processed is shown in Figure 5, “SSL handshake with server authentication,” on page 1-9.

Secure Socket Layer Introduction and iKeyman User’s Guide 1–9
Secure S
ockets Layer overview
How SSL works
Picture: SSL handshake with server authentication
Figure 5. SSL handshake with server authentication
1. The client sends a client "hello" message that lists the cryptographic capabilities of the client (sorted in client preference order), such as the version of SSL, the cipher suites supported by the client, and the data compression methods supported by the client. The message also contains a 28-byte random number.
2. The server responds with a server "hello" message that contains the cryptographic method (cipher suite) and the data compression method selected by the server, the session ID, and another random number.
Note: The client and the server must support at least one common cipher suite, or else the handshake fails. The server generally chooses the strongest common cipher suite.
3. The server sends its digital certificate. (The server uses X.509 V3 digital certificates with SSL.)
If the server uses SSL V3, and if the server application (for example, the Web server) requires a digital certificate for client authentication, the server sends a "digital certificate request" message. In the "digital certificate request" message, the server sends a list of the types of digital certificates supported and the distinguished names of acceptable certificate authorities.
4. The server sends a server "hello done" message and waits for a client response.
Client issues secure session request
( ://someserver.org/somedata.html)HTTPS
Server sends X.509 certificate containing
server’s public key.
Client authenticates certificate against list of known CAs. (If CA is unknown,
browser can give user option to accept certificate at user’s risk.)
Client generates random symmetric key and
encrypts it using server’s public key.
Client and Server now both know the symmetric key and encrypt
end-user data using symmetric key for duration of session.

1–10 Version 1.0
How SSL works
5. Upon receipt of the server "hello done" message, the client (the Web browser) verifies the validity of the server’s digital certificate and checks that the server’s "hello" parameters are acceptable.
If the server requested a client digital certificate, the client sends a digital certificate, or if no suitable digital certificate is available, the client sends a "no digital certificate" alert. This alert is only a warning, but the server application can fail the session if client authentication is mandatory.
6. The client sends a "client key exchange" message. This message contains the pre-master secret, a 46-byte random number used in the generation of the symmetric encryption keys and the message authentication code (MAC) keys, encrypted with the public key of the server.
If the client sent a digital certificate to the server, the client sends a "digital certificate verify" message signed with the client’s private key. By verifying the signature of this message, the server can explicitly verify the ownership of the client digital certificate.
Note: An additional process to verify the server digital certificate is not necessary. If the server does not have the private key that belongs to the digital certificate, it cannot decrypt the pre-master secret and create the correct keys for the symmetric encryption algorithm, and the handshake fails.
7. The client uses a series of cryptographic operations to convert the pre-master secret into a master secret, from which all key material required for encryption and message authentication is derived. Then the client sends a "change cipher spec" message to make the server switch to the newly negotiated cipher suite. The next message sent by the client (the "finished" message) is the first message encrypted with this cipher method and keys.
8. The server responds with a "change cipher spec" and a "finished" message of its own.
9. The SSL handshake ends, and encrypted application data can be sent.
Digital certificates and trust chains with SSLSecure Sockets Layer V3 can use server digital certificates as well as client digital certificates. As previously explained, server digital certificates are mandatory for an SSL session, while client digital certificates are optional, depending on client authentication requirements.
The public key infrastructure (PKI) used by SSL allows for any number of root certificate authorities. An organization or end user must decide for itself which CAs it will accept as being trusted. To be able to verify the server digital certificates, client Web browsers require possession of the root CA digital certificates used by servers. Popular Web browsers such as Netscape Navigator/Communicator or Microsoft Internet Explorer usually come with a key ring where a number of CA digital certificates, called trusted roots, are already installed. This list can be edited, and the digital certificates of untrusted CAs can be deleted.
If an SSL session is about to be established with a server that sends a digital certificate whose root CA digital certificate is not in the key ring, the browser displays a warning window and presents options either to import the digital certificate or to abort the session.

Secure Socket Layer Introduction and iKeyman User’s Guide 1–11
Secure S
ockets Layer overview
How SSL works
To avoid this situation, import the root CA digital certificate from a Web page or use a JavaScript program that imports the digital certificate.
If client authentication is used, the Web server requires possession of the root CA digital certificates used by clients. Because it is not possible to import root CA digital certificates into the server application dynamically, all root CA digital certificates that are not part of the server key ring at delivery time must be installed using the iKeyman utility before any client digital certificates are issued by these CAs. For more information on iKeyman, see Chapter 2, “Managing digital certificates with iKeyman,” on page 2-1.
SSL with global server certificatesWhen an SSL session is established between the international version of Netscape Navigator/Communicator V4, Microsoft Internet Explorer V4, IBM SSL-enabled client applications, or client applications written using the SSL Toolkit and a Web server equipped with a global server certificate, a normal SSL handshake (described in Figure 5, “SSL handshake with server authentication,” on page 1-9) is performed initially. Usually, the Web server and the Web browser settle on the cipher suite SSL_RSA_EXPORT_WITH_RC4_40_MD5. They use 512-bit RSA keys for key exchange, RC4 with 40-bit keys for encryption, and MD5 for message authentication.
During the handshake, the browser receives and verifies the server digital certificate and realizes that this digital certificate authorizes stronger encryption. Remember that the browser sends the list of cryptographic suites it supports with the "client hello" message before the server sends its digital certificate. At this point, the browser has no knowledge of the server's global server certificate.
The first handshake is completed with the "change cipher specification" and "finished" messages from both client and server. At this point, the client initiates another SSL handshake. This time, in the "client hello" message, the client includes the strong cryptographic suites such as:
■ SSL_RSA_WITH_RC4_128_MD5 (1024-bit RSA keys for key exchange, RC4 with 128-bit keys for encryption, and MD5 for message authentication)
■ SSL_RSA_WITH_3DES_EDE_CBC_SHA (1024-bit RSA keys for key exchange, triple DES with 168-bit keys for encryption, and SHA-1 for message authentication)
After the second handshake is completed, one of the stronger cryptographic suites is used.
This double handshake is also known as the SSL step-up protocol. Actually, all application data exchanged in the SSL session are encrypted with the stronger encryption protocol. Compared to the use of a United States browser, the only drawback is the higher overhead of performing an SSL handshake twice.

1–12 Version 1.0
How SSL works

Secure Socket Layer Introduction and iKeyman User’s Guide 2–1
Managing digital certificates
with iK
eyman
22Managing digital certificates with iKeyman
The iKeyman utility is a tool you can use to manage your digital certificates. With iKeyman, you can create a new key database or a test digital certificate, add CA roots to your database, copy certificates from one database to another, request and receive a digital certificate from a CA, set default keys, and change passwords.
The iKeyman utility is automatically installed with the SSL Toolkit.
Creating a key databaseA key database enables a client application to connect to those servers that have digital certificates signed by those CAs for which you have signed digital certificates. A Java class file (*.class) is used with com.ibm.net.ssl code.
To create a Java class file, follow these steps:
1. Start iKeyman by clicking Start→ Programs→ IBM SecureWay SSL Toolkit→ iKeyman. The IBM Key Management window is displayed.
2. Click Key Database File→ New. The New window is displayed, as shown in Figure 6, “New Key Database File window,” on page 2-1.
Picture: New Key Database File window
Figure 6. New Key Database File window
3. Select SSLight key database class for the Key database type field.

2–2 Version 1.0
Creating a key database
4. Type a File Name, such as KeyRing.class.
5. Accept the default value for the Location field, or type a new value for the field, or use the Browse button to select a new value.
6. Click OK. The Password Prompt window is displayed, as shown in Figure 7, “Password Prompt window,” on page 2-2.
Picture: Password Prompt window
Figure 7. Password Prompt window
7. Type a password in the Password field, and type it again in the Confirm Password field.
8. Click OK. A confirmation window is displayed, verifying that you have created a key database.
9. Click OK. You have successfully created a key database, and the IBM Key Management window is displayed.
As shown in Figure 8, “IBM Key Management window,” on page 2-3, the IBM Key Management window now reflects your new key file name (in this example, C:\ProgramFiles\IBM\SSL\bin\KeyRing.class) and your signer digital certificates.

Secure Socket Layer Introduction and iKeyman User’s Guide 2–3
Managing digital certificates
with iK
eyman
Creating a key database
Picture: IBM Key Management window
Figure 8. IBM Key Management window
The following signer digital certificates are provided with iKeyman:
■ RSA Secure Server CA
■ Thawte Personal Premium CA
■ Thawte Personal Freemail CA
■ Thawte Personal Basic CA
■ Thawte Premium Server CA
■ Thawte Server CA
■ VeriSign Class 1 Public Primary CA
■ VeriSign Class 2 Public Primary CA
■ VeriSign Class 3 Public Primary CA
■ VeriSign Test CA Root Certificate
These signer digital certificates enable your clients to connect to servers that have valid digital certificates from these signers. Now that you have created a key database, you can use it on your client and connect to a server that has a valid digital certificate from one of the signers.
If you need to use a signer digital certificate that is not on this list, you need to request it from the CA and add it to your key database (see “Adding a CA root digital certificate,” on page 2-5).

2–4 Version 1.0
Creating a self-signed digital certificate for testing
Note: The VeriSign Test CA Root Certificate is a low-assurance CA that is included for testing purposes. You should remove this root before placing a key database class into a production application.
Creating a self-signed digital certificate for testingWhen you are developing a production application, you might not want to purchase a true digital certificate until after you are done testing the product. With iKeyman, you can create a self-signed digital certificate to use until testing is complete. A self-signed digital certificate is a temporary digital certificate you issue to yourself, with yourself as the CA.
Note: Do not release a production application with a self-signed digital certificate; no browser or client will be able to recognize or communicate with your server.
To create a self-signed digital certificate, follow these steps:
1. Start iKeyman by clicking Start→ Programs→ IBM SecureWay SSL Toolkit→ iKeyman. The IBM Key Management window is displayed.
2. Click Key Database File→ Open. The Open window is displayed.
3. Select the key database file to which you want to add a self-signed digital certificate and click Open. The Password Prompt window is displayed.
4. Type the password and click OK. The IBM Key Management window is displayed. The title bar shows the name of the key database file you selected, indicating that the file is open and ready.
5. Select Personal Certificates from the pulldown list.
6. Click New Self-Signed. The Create New Self-Signed Certificate window is displayed, as shown in Figure 9, “Create New Self-Signed Certificate window,” on page 2-5.

Secure Socket Layer Introduction and iKeyman User’s Guide 2–5
Managing digital certificates
with iK
eyman
Adding a CA root digital certificate
Picture: Create New Self-Signed Certificate window
Figure 9. Create New Self-Signed Certificate window
7. Type a Key Label, such as keytest, for the self-signed digital certificate.
8. Type a Common Name and Organization, and select a Country. For the remaining fields, either accept the default values, or type or select new values.
9. Click OK. The IBM Key Management window is displayed. The Personal Certificates field shows the name of the self-signed digital certificate you created.
Adding a CA root digital certificateAfter you have requested and received a CA root digital certificate from a CA, you can add it to your database. Most root digital certificates have the form *.arm (for example, cert.arm).
To add a CA root digital certificate to a database, follow these steps:
1. Start iKeyman by clicking Start→ Programs→ IBM SecureWay SSL Toolkit→ iKeyman. The IBM Key Management window is displayed.
2. Click Key Database File→ Open. The Open window is displayed.
3. Select the key database file to which you want to add a CA root digital certificate and click Open. The Password Prompt window is displayed.
4. Type the password and click OK. The IBM Key Management window is displayed. The title bar shows the name of the key database file you selected, indicating that the file is open and ready.
5. Select Signer Certificates from the pulldown list.
6. Click Add. The Add CA’s Certificate from a File window is displayed.
7. Click Data type and select a data type, such as Base64-encoded ASCII data.

2–6 Version 1.0
Deleting a CA root digital certificate
8. Type a Certificate file name and Location for the CA root digital certificate, or click Browse to select the name and location.
9. Click OK. The Enter a Label window is displayed.
10. Type a label for the CA root digital certificate, such as VeriSignTest CA Root Certificate, and click OK. The IBM Key Management window is displayed.
The Signer Certificates field now shows the label of the CA root digital certificate you just added.
Deleting a CA root digital certificateIf you no longer want to support one of the signers in your signer digital certificate list, you need to delete the CA root digital certificate.
Note: Before deleting a CA root digital certificate, create a backup copy in case you later want to re-create the CA root.
To delete a CA root digital certificate from a database, follow these steps:
1. Start iKeyman by clicking Start→ Programs→ IBM SecureWay SSL Toolkit→ iKeyman. The IBM Key Management window is displayed.
2. Click Key Database File→ Open. The Open window is displayed.
3. Select the key database file from which you want to delete a CA root digital certificate and click Open. The Password Prompt window is displayed.
4. Type the password and click OK. The IBM Key Management window is displayed. The title bar shows the name of the key database file you selected, indicating that the file is open and ready.
5. Select Signer Certificates from the pulldown list.
6. Select the CA root digital certificate you want to delete and click Delete. The Confirm window is displayed.
7. Click Yes. The IBM Key Management window is displayed. The label of the CA root digital certificate you just deleted no longer appears in the Signer Certificates field.
Adding a site certificateThe SSL Toolkit lets an application trust the connection to its partner in two ways:
■ An application can trust any certificate issued by a particular CA.
■ An application can trust a specific certificate.
A trusted, specific certificate is known as a site certificate. Generally, site certificates are not used to issue more certificates. An application can trust any other application that has a certificate issued by a trusted root certificate in the key database, or an application can trust another application that has added that site’s certificate into the database as a site certificate. The certificate evaluation in com.ibm.net.ssl will first check if the partner’s certificate has been signed by one of the trusted roots and, if not, it then checks if the certificate from the partner application is listed as one of the site certificates.
To add a certificate as a site certificate, you need to obtain a binary DER or a
Secure Socket Layer Introduction and iKeyman User’s Guide 2–7
Managing digital certificates
with iK
eyman
Copying certificates from one key database to another
Base64-encoded certificate and follow these steps:
1. Start iKeyman by clicking Start→ Programs→ IBM SecureWay SSL Toolkit→ iKeyman. The IBM Key Management window is displayed.
2. Click Key Database File→ Open. The Open window is displayed.
3. Select the key database file to which you want to add the certificate as a site certificate and click Open. The Password Prompt window is displayed.
4. Type the password and click OK. The IBM Key Management window is displayed. The title bar shows the name of the key database file you selected, indicating that the class is open and ready.
5. Select Site Certificates from the pulldown list.
6. Click Add. The Add Site Certificate from a File window is displayed.
7. Click Data type and select a data type, such as Base64-encoded ASCII data.
8. Type the certificate file name and location for the site certificate, or click Browse to select the name and location.
9. Click OK. The Enter a Label window is displayed.
10. Type a label for the certificate, such as Certificate for host ABC.com, and click OK. The IBM Key Management window is displayed. The Site Certificates field now shows the label of the site certificate you just added.
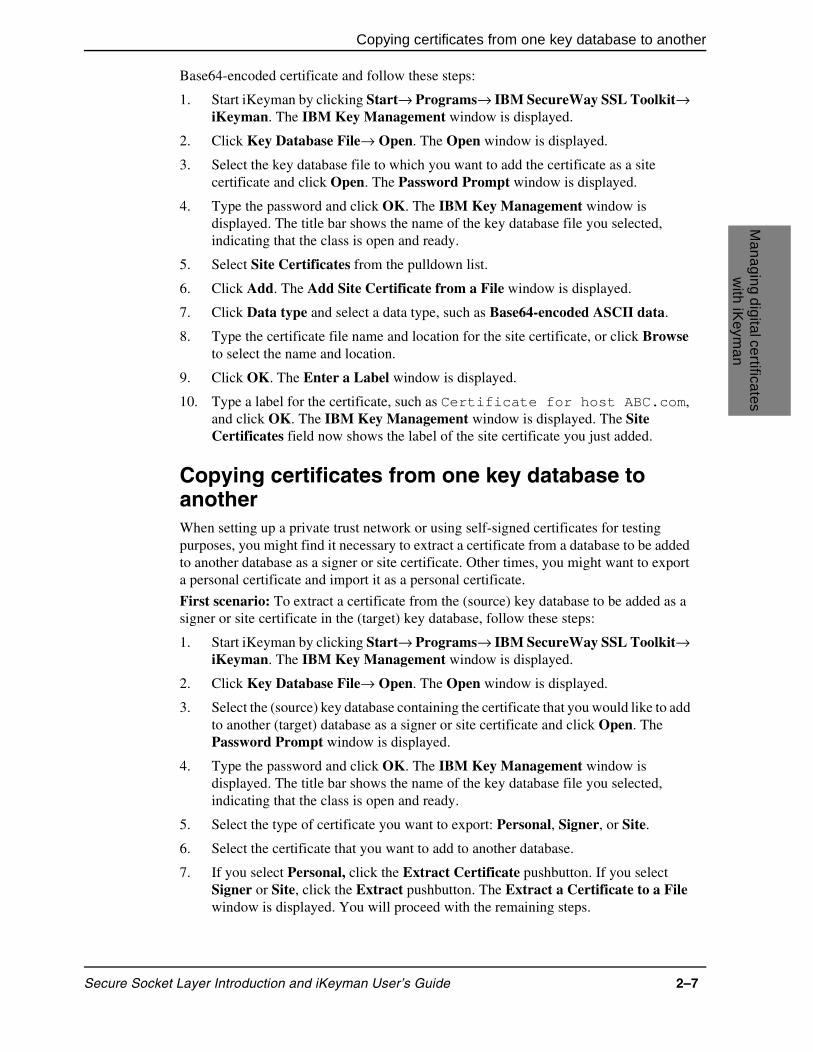
Copying certificates from one key database to anotherWhen setting up a private trust network or using self-signed certificates for testing purposes, you might find it necessary to extract a certificate from a database to be added to another database as a signer or site certificate. Other times, you might want to export a personal certificate and import it as a personal certificate.
First scenario: To extract a certificate from the (source) key database to be added as a signer or site certificate in the (target) key database, follow these steps:
1. Start iKeyman by clicking Start→ Programs→ IBM SecureWay SSL Toolkit→ iKeyman. The IBM Key Management window is displayed.
2. Click Key Database File→ Open. The Open window is displayed.
3. Select the (source) key database containing the certificate that you would like to add to another (target) database as a signer or site certificate and click Open. The Password Prompt window is displayed.
4. Type the password and click OK. The IBM Key Management window is displayed. The title bar shows the name of the key database file you selected, indicating that the class is open and ready.
5. Select the type of certificate you want to export: Personal, Signer, or Site.
6. Select the certificate that you want to add to another database.
7. If you select Personal, click the Extract Certificate pushbutton. If you select Signer or Site, click the Extract pushbutton. The Extract a Certificate to a File window is displayed. You will proceed with the remaining steps.

2–8 Version 1.0
Copying certificates from one key database to another
8. Click Data type and select a data type, such as Base64-encoded ASCII data. The data type needs to match the data type of the certificate stored in the certificate file. The iKeyman tool supports Base64-encoded ASCII files and binary DER-encoded certificates.
9. Type the certificate file name and location where you want to store the certificate, or click Browse to select the name and location.
10. Click OK. The certificate is written to the specified file, and the IBM Key Management window is displayed.
To add a certificate as a signer or site certificate to the database (target), follow these steps:
1. Start iKeyman by clicking Start→ Programs→ IBM SecureWay SSL Toolkit→ iKeyman. The IBM Key Management window is displayed.
2. Click Key Database File→ Open. The Open window is displayed.
3. Select the key database to which you would like to add the certificate that has been extracted from above and click Open. The Password Prompt window is displayed.
4. Type the password and click OK. The IBM Key Management window is displayed. The title bar shows the name of the key database file you selected, indicating that the class is open and ready.
5. Select the type of certificate you would like to add: Signer or Site.
6. Click Add. If you had selected Signer Certificates from the pulldown list the Add CA’s Certificate from a File window displays. If you had selected Site Certificates from the pulldown list the Add Site Certificate window displays. For more information concerning these two windows see step 8 above.
7. Type the certificate file name that you used when you extracted a certificate. For more information, see step 9 above.
8. The Enter a Label window displays.
9. Specify the name of the certificate, and click OK.
The certificate is now added to the (target) database.
Second scenario: In the previous scenario, you extracted a personal, signer, or site certificate from a source database and added it to the target database as a signer or site certificate. This scenario exports a personal certificate from a source database and imports it to a target database as a personal certificate.
To export a personal certificate from the (source) key database to be imported as a personal certificate in the (target) key database follow these steps:
1. Start iKeyman by clicking Start→ Programs→ IBM SecureWay SSL Toolkit→ iKeyman. The IBM Key Management window is displayed.
2. Click Key Database File→ Open. The Open window is displayed.
3. Select the (source) key database containing the certificate that you would like to add to another (target) key database as a personal certificate and click Open. The Password Prompt window is displayed.
4. Type the password and click OK. The IBM Key Management window is displayed. The title bar shows the name of the key database file you selected, indicating that the class is open and ready.

Secure Socket Layer Introduction and iKeyman User’s Guide 2–9
Managing digital certificates
with iK
eyman
Requesting a digital certificate
5. Select Personal Certificates from the pulldown list.
6. Select the personal certificate you want to export.
7. Select the Export/Import pushbutton to transfer keys between the current database and a PKCS#12 file or another database. The Export/Import Key window displays.
8. Select Export from the Choose Action Type.
9. Select Key File Type (for example, PKCS12 file) from the pulldown to export list.
10. Type the certificate file name (for example. copy.p12) that you would like to export and the location where you want to store the certificate, or click Browse to select the name and location and click OK. The Password Prompt window displays.
11. Enter a password for the password file, confirm the password, and click OK.
The certificate is now extracted from the (source) database.
Note: The PKCS#12 file is a temporary file and should be deleted after use.
To import a personal certificate to the (target) key database, follow these steps:
1. Start iKeyman by clicking Start→ Programs→ IBM SecureWay SSL Toolkit→ iKeyman. The IBM Key Management window is displayed.
2. Click Key Database File→ Open. The Open window is displayed.
3. Select the (target) key database to which you would like to import the certificate that has been exported above and click Open. The Password Prompt window is displayed.
4. Type the password and click OK. The IBM Key Management window is displayed. The title bar shows the name of the key database file you selected, indicating that the class is open and ready.
5. Select the Personal Certificates from the pulldown list.
6. If the target key database has no personal certificate, click the Import pushbutton to import keys from a PKCS#12 file or another database. The Import Key window displays. If target key database has one or more personal certificates, do:
■ Click the Export/Import key pushbutton, the Export/Import key window displays.
■ Select Import from the Choose Action Type.
7. Select the same key file type that you specified from the export. For more information, see step 10 on page 8, and click OK. The Password Prompt window is displayed.
8. Specify the password from when you exported. For more information, see step 11 on page 9 and click OK.
The certificate is now imported to the (target) database.
Requesting a digital certificateA digital certificate is required to run the SSL-enabled server code and might be required for client applications. To acquire a digital certificate, generate a request using iKeyman and submit the request to a CA. The CA will verify your identity and send you a digital

2–10 Version 1.0
Requesting a digital certificate
certificate.
To request a digital certificate, follow these steps:
1. Start iKeyman by clicking Start→ Programs→ IBM SecureWay SSL Toolkit→ iKeyman. The IBM Key Management window is displayed.
2. Click Key Database File→ Open. The Open window is displayed.
3. Select the key database file from which you want to generate the request and click Open. The Password Prompt window is displayed.
4. Type the password and click OK. The IBM Key Management window is displayed. The title bar shows the name of the key database file you selected, indicating that the file is open and ready.
5. Select Personal Certificate Requests from the pulldown list.
6. Click New. The Create New Key and Certificate Request window is displayed, as shown in Figure 10, “Create New Key and Certificate Request window,” on page 2-10.
Picture: Create New Key and Certificate Request window
Figure 10. Create New Key and Certificate Request window
7. Type a Key Label, such as Production Certificate for MyWebat My Company, for the self-signed digital certificate.
8. Type a Common Name and Organization, and select a Country. For the remaining fields, either accept the default values, or type or select new values.
9. At the bottom of the window, type a name for the file, such as certreq.arm.

Secure Socket Layer Introduction and iKeyman User’s Guide 2–11
Managing digital certificates
with iK
eyman
Receiving a digital certificate
10. Click OK. A confirmation window is displayed, verifying that you have created a request for a new digital certificate.
11. Click OK. The IBM Key Management window is displayed. The Personal Certificate Requests field shows the key label of the new digital certificate request you created.
12. Send the file to a CA to request a new digital certificate, or cut and paste the request into the request forms of the CA’s Web site.
Receiving a digital certificateAfter the CA sends you a new digital certificate, you need to add it to the key database from which you generated the request.
To receive a digital certificate, follow these steps:
1. Start iKeyman by clicking Start→ Programs→ IBM SecureWay SSL Toolkit→ iKeyman. The IBM Key Management window is displayed.
2. Click Key Database File→ Open. The Open window is displayed.
3. Select the key database file from which you generated the request and click Open. The Password Prompt window is displayed.
4. Type the password and click OK. The IBM Key Management window is displayed. The title bar shows the name of the key database file you selected, indicating that the file is open and ready.
5. Select Personal Certificates from the pulldown list.
6. Click Receive. The Receive Certificate from a File window is displayed.
7. Click Data type and select the data type of the new digital certificate, such as Base64-encoded ASCII data. If the CA sends the certificate as part of an e-mail message, then you might need to cut and paste the certificate into a separate file.
8. Type the Certificate file name and Location for the new digital certificate, or click Browse to select the name and location.
9. Click OK. The Enter a Label window is displayed.
10. Type a label, such as RALVS6 Banking Certificate, for the new digital certificate and click OK. The IBM Key Management window is displayed. The Personal Certificates field shows the label of the new digital certificate you added.
Deleting a digital certificateIf you no longer need one of your digital certificates, you need to delete it from your database.
Note: Before deleting a digital certificate, create a backup copy in case you later want to re-create it.
To delete a digital certificate, follow these steps:
1. Start iKeyman by clicking Start→ Programs→ IBM SecureWay SSL Toolkit→ iKeyman. The IBM Key Management window is displayed.
2. Click Key Database File→ Open. The Open window is displayed.

2–12 Version 1.0
Setting a new default key
3. Select the key database file from which you want to delete the digital certificate and click Open. The Password Prompt window is displayed.
4. Type the password and click OK. The IBM Key Management window is displayed. The title bar shows the name of the key database file you selected, indicating that the file is open and ready.
5. Select Personal Certificates from the pulldown list.
6. Select the digital certificate you want to delete and click Delete. The Confirm window is displayed.
7. Click Yes. The IBM Key Management window is displayed. The label of the digital certificate you just deleted no longer appears in the Personal Certificates field.
Setting a new default keyTo make it easy to configure an SSL application, the iKeyman utility lets you specify a default digital certificate for applications to use when the key database contains more than one Personal Certificate entry. (You might have more than one digital certificate in a database if you started using a self-signed digital certificate in the application (for testing) while waiting for the official digital certificate from your chosen CA.) After receiving the official digital certificate from the CA, you can leave the self-signed digital certificate in the database and begin using the CA-issued digital certificate by making it the default digital certificate. The default digital certificate is indicated by an asterisk (*) in front of the entry label.
The first digital certificate that is received or created as self-signed is marked as the default digital certificate. Each time a new digital certificate is received or a self-signed digital certificate is created, you are given the option to make that digital certificate the default digital certificate. However, you can also explicitly change the default digital certificate at any time.
To change the default digital certificate, follow these steps:
1. Start iKeyman by clicking Start→ Programs→ IBM SecureWay SSL Toolkit→ iKeyman. The IBM Key Management window is displayed.
2. Click Key Database File→ Open. The Open window is displayed.
3. Select the key database file in which you want to change the default digital certificate and click Open. The Password Prompt window is displayed.
4. Type the password and click OK. The IBM Key Management window is displayed. The title bar shows the name of the key database file you selected, indicating that the file is open and ready.
5. Select Personal Certificates from the pulldown list. The default digital certificate is indicated by an asterisk (*) in front of the entry label.
6. Select the digital certificate you want to set as the default digital certificate and click View/Edit, or double-click on the entry. The Key Information window is displayed for the digital certificate entry, as shown in Figure 11, “Key Information window,” on page 2-13.

Secure Socket Layer Introduction and iKeyman User’s Guide 2–13
Managing digital certificates
with iK
eyman
Changing a database password
Picture: Key Information window
Figure 11. Key Information window
7. To set this digital certificate as the default digital certificate, select Set the certificate as the default and click OK. The IBM Key Management window is displayed. The label of the digital certificate you just set as the default is identified as the default digital certificate by an asterisk (*) in front of the entry.
Changing a database passwordThe iKeyman tool allows you to change a database password.
To change a database password, follow these steps:
1. Start iKeyman by clicking Start→ Programs→ IBM SecureWay SSL Toolkit→ iKeyman. The IBM Key Management window is displayed.
2. Click Key Database File→Open. The Open window is displayed.
3. Select the key database file in which you want to change the password and click Open. The Password Prompt window is displayed.
4. Type the password and click OK. The IBM Key Management window is

2–14 Version 1.0
Changing a database password
displayed. The title bar shows the name of the key database file you selected, indicating that the file is open and ready.
5. Click Key Database File→ Change Password. The Change Password window is displayed.
6. Type a new password in the Password field, and type it again in the Confirm Password field.
7. Click OK. A message in the status bar indicates that the request completed successfully.

Secure Socket Layer Introduction and iKeyman User’s Guide Index–1
Index
Aadding a CA root digital certificate 2-5adding a site certificate 2-6asymmetric cryptography 1-1authentication
client 1-6, 1-11
CCA root digital certificate
adding 2-5deleting 2-6
certificate authority (CA)and digital certificates 1-2and trust hierarchies 1-4root CA 1-5
chain of trust 1-4, 1-5, 1-10changing a database password 2-13client authentication 1-6, 1-11creating a key database 2-1creating a self-signed digital certificate 2-4cryptography
asymmetric 1-1description 1-1export of 1-7public-key 1-1
Ddatabase
changing a password 2-13creating a key database 2-1
default key, setting 2-12deleting a CA root digital certificate 2-6deleting a digital certificate 2-11digital certificate
adding a root CA 2-5and SSL and trust chains 1-10certificate authority (CA) 1-2, 1-4deleting 2-11deleting a root CA 2-6expiration 1-2extracting 2-7format 1-2global server certificate 1-7layout 1-3
overview 1-1purpose 1-2receiving 2-11requesting 1-6, 2-9RSA Secure Server CA 2-3security considerations 1-4self-signed 1-5, 1-6, 2-4setting a new default key 2-12signed 1-6signer 2-3Thawte Personal Basic CA 2-3Thawte Personal Freemail CA 2-3Thawte Personal Premium CA 2-3Thawte Premium Server CA 2-3Thawte Server CA 2-3uses 1-5VeriSign Class 1 Public Primary CA 2-3VeriSign Class 2 Public Primary CA 2-3VeriSign Class 3 Public Primary CA 2-3VeriSign Test CA Root Certificate 2-3, 2-4
digital signature, issuer’s 1-2distinguished name
issuer’s 1-2owner’s 1-2
double handshake 1-11
Eelectronic mail 1-6encryption 1-1export of cryptographic hardware and software 1-7extracting a digital certificate 2-7
Fformat of digital certificate 1-2
Gglobal server certificate
description 1-7with SSL 1-11

Index–2 Version 1.0
Hhandshake
description 1-8double 1-11
hierarchy of trust 1-4HTTP 1-8
IIKE standard 1-6iKeyman
adding a CA root digital certificate 2-5adding a site certificate 2-6changing a database password 2-13creating a key database 2-1creating a self-signed digital certificate 2-4deleting a CA root digital certificate 2-6deleting a digital certificate 2-11extracting a digital certificate 2-7overview 2-1receiving a digital certificate 2-11requesting a digital certificate 2-9setting a new default key 2-12
IP Security 1-6IPsec standard 1-6issuer’s distinguished name 1-2
Kkey database, creating 2-1key pair 1-1key ring 1-10
Llayout of digital certificate 1-3Lightweight Directory Access Protocol (LDAP) 1-6
Mmaster secret 1-10message authentication code (MAC) 1-10
Oowner’s distinguished name 1-2owner’s public key 1-2
Ppassword, changing for a database 2-13PEM 1-6pre-master secret 1-10private key 1-1, 1-4private-public key pair 1-4public key 1-1public key infrastructure (PKI) 1-10public key, owner’s 1-2public-key cryptography 1-1public-private key pair 1-1, 1-4
Rreceiving a digital certificate 2-11requesting a digital certificate 1-6, 2-9root CA 1-5RSA Secure Server CA 2-3
SS/MIME 1-6secure electronic mail 1-6secure electronic transaction (SET) 1-6secure tunnels 1-6security considerations 1-4self-signed digital certificate
contents 1-6creating 2-4description 1-5
SET 1-6setting a new default key 2-12signed digital certificate 1-6signer digital certificates, list of 2-3site certificate
adding 2-6SSL
and digital certificates and trust chains 1-10definition 1-6double handshake 1-11encryption 1-1handshake 1-8how SSL works 1-8overview 1-1, 1-8with global server certificates 1-11
SSL step-up protocol 1-11step-up protocol 1-11

Secure Socket Layer Introduction and iKeyman User’s Guide Index–3
TThawte
Personal Basic CA 2-3Personal Freemail CA 2-3Personal Premium CA 2-3Premium Server CA 2-3Server CA 2-3
trust chainand digital certificates and SSL 1-10description 1-4, 1-5
trust hierarchy 1-4
VVeriSign, Inc.
authorization from US government 1-8Class 1 Public Primary CA 2-3Class 2 Public Primary CA 2-3Class 3 Public Primary CA 2-3Test CA Root Certificate 2-3, 2-4
virtual private network (VPN) 1-6

Index–4 Version 1.0