security explorer 5 2 user guide - axantech · security explorer ™ is a powerful and intuitive...
TRANSCRIPT

ScriptLogic® Security Explorer™ 5
User Guide

SECURITY EXPLORER™ II
UPDATED 18 JANUARY 2006
© 2005 by ScriptLogic Corporation All rights reserved. This publication is protected by copyright and all rights are reserved by ScriptLogic Corporation. It may not, in whole or part, be copied, photocopied, reproduced, translated, or reduced to any electronic medium or machine-readable form without prior consent, in writing, from ScriptLogic Corporation. This publication supports Security Explorer 5.x. It is possible that it may contain technical or typographical errors. ScriptLogic Corporation provides this publication “as is,” without warranty of any kind, either expressed or implied. ScriptLogic Corporation 6000 Broken Sound Parkway NW Boca Raton, Florida 33487-2742 1.561.886.2400 www.scriptlogic.com Trademark Acknowledgements: Security Explorer is a registered trademark of ScriptLogic Corporation in the United States and/or other countries. The names of other companies and products mentioned herein may be the trademarks of their respective owners. Printed in the United States of America (1/2006)

SECURITY EXPLORER™ III
UPDATED 18 JANUARY 2006
DOCUMENTATION CONVENTIONS
Typeface Conventions
Bold Indicates a button, menu selection, tab, dialog box title, text to type, selections from drop-down lists, or prompts on a dialog box.
CONTACTING SCRIPTLOGIC
ScriptLogic may be contacted about any questions, problems or concerns you might have at:
ScriptLogic Corporation 6000 Broken Sound Parkway NW Boca Raton, Florida 33487-2742
561.886.2400 Sales and General Inquiries 561.886.2450 Technical Support
561.886.2499 Fax
www.scriptlogic.com
SCRIPTLOGIC ON THE WEB
ScriptLogic can be found on the web at www.scriptlogic.com. Our web site offers customers a variety of information:
Download product updates, patches and/or evaluation products.
Locate product information and technical details.
Find out about Product Pricing.
Search the Knowledge Base for Technical Notes containing an extensive collection of technical articles, troubleshooting tips and white papers.
Search Frequently Asked Questions, for the answers to the most common non-technical issues.
Participate in Discussion Forums to discuss problems or ideas with other users and ScriptLogic representatives.

SECURITY EXPLORER™ IV
UPDATED 18 JANUARY 2006
Contents WHAT IS SECURITY EXPLORER?................................................................................................................... 1 GETTING STARTED ........................................................................................................................................ 3
STARTING SECURITY EXPLORER ................................................................................................................. 3 EXAMINING THE MAIN WINDOW................................................................................................................. 4 ADJUSTING THE VIEW ................................................................................................................................. 5 QUICK REFERENCE: TOOLBAR, CONTROL BUTTONS BAR, MENUS.............................................................. 7 MENUS ........................................................................................................................................................ 8 STATUS BAR.............................................................................................................................................. 11
MANAGING PERMISSIONS............................................................................................................................ 12 VIEWING PERMISSIONS ............................................................................................................................. 13 GRANTING PERMISSIONS........................................................................................................................... 14 REVOKING PERMISSIONS........................................................................................................................... 18 CLONING PERMISSIONS ............................................................................................................................. 21
Selecting Users/Groups Automatically................................................................................................. 23 Updating Permissions Relating to a User’s SID History ..................................................................... 24
Viewing SID History Detail .............................................................................................................................. 25 CREATING PERMISSION TEMPLATES.......................................................................................................... 26 COPYING PERMISSIONS ............................................................................................................................. 28 COPYING PERMISSIONS TO SUBFOLDERS AND FILES ................................................................................. 29 SETTING OWNERSHIP ................................................................................................................................ 30 BROWSING ALL GROUPS AND USERS ........................................................................................................ 31 SEARCHING FOR PERMISSIONS .................................................................................................................. 32
Setting Groups/Users Options .............................................................................................................. 32 Setting Folders and Files Options ........................................................................................................ 34 Setting Permissions Options................................................................................................................. 35 Starting the Search ............................................................................................................................... 37
Sorting the Results............................................................................................................................................. 38 Interpreting the Permissions Column................................................................................................................. 38 Replacing Permissions....................................................................................................................................... 38
MODIFYING PERMISSIONS ......................................................................................................................... 39 MANAGING GROUP MEMBERSHIPS ........................................................................................................... 41
Adding a User or Group....................................................................................................................... 42 RENAMING ACCOUNTS.............................................................................................................................. 42 DELETING PERMISSIONS............................................................................................................................ 43 PRINTING PERMISSIONS............................................................................................................................. 44
MANAGING SECURITY ................................................................................................................................. 46 BACKING UP SECURITY............................................................................................................................. 46 SCHEDULING A BACKUP............................................................................................................................ 47 USING THE BACKUP SCHEDULER .............................................................................................................. 48 RESTORING SECURITY............................................................................................................................... 50 EXPORTING PERMISSIONS ......................................................................................................................... 53

SECURITY EXPLORER™ V
UPDATED 18 JANUARY 2006
MANAGING OBJECTS................................................................................................................................... 55 CREATING A NEW FOLDER ........................................................................................................................ 55 DELETING A FOLDER................................................................................................................................. 55 VIEWING OPEN FILES ................................................................................................................................ 56
Closing Open Resources....................................................................................................................... 56 VIEWING PROPERTIES ............................................................................................................................... 57 OPENING WINDOWS EXPLORER ................................................................................................................ 58 CREATING A NEW REGISTRY KEY............................................................................................................. 58 DELETING A REGISTRY KEY...................................................................................................................... 58 CREATING A NEW SHARE.......................................................................................................................... 59 REMOVING A SHARE ................................................................................................................................. 59 USING FAVORITES..................................................................................................................................... 60
Adding an Object to the Favorites List................................................................................................. 60 Removing Objects from the Favorites List ........................................................................................... 61
USING ENTERPRISE SCOPES....................................................................................................................... 62 Creating an Enterprise Scope............................................................................................................... 62
Creating Scopes by Selecting Objects ............................................................................................................... 63 Creating Scopes by Managing Scopes ............................................................................................................... 64
Adding Paths to an Enterprise Scope ................................................................................................... 65 Removing Paths from an Enterprise Scope .......................................................................................... 65 Removing an Enterprise Scope............................................................................................................. 66
VIEWING LICENSED SERVERS.................................................................................................................... 66 Removing a Server................................................................................................................................ 67
MANAGING NETWORK DRIVES ................................................................................................................. 67 Mapping a Network Drive .................................................................................................................... 67 Disconnecting a Network Drive............................................................................................................ 67
CONFIGURING SECURITY EXPLORER ......................................................................................................... 68 SETTING GENERAL OPTIONS ..................................................................................................................... 68 SETTING VIEW OPTIONS............................................................................................................................ 69 SETTING ADVANCED OPTIONS .................................................................................................................. 70
Warnings............................................................................................................................................................ 71 USING THE COMMAND LINE........................................................................................................................ 72
ACCESSING A COMMAND PROMPT ............................................................................................................ 72 SXPBACKUP.EXE ....................................................................................................................................... 73 SXPCLONE.EXE ......................................................................................................................................... 73 SXPEXPORT.EXE........................................................................................................................................ 73 SXPGRANT.EXE......................................................................................................................................... 74 SXPOWNER.EXE ........................................................................................................................................ 75 SXPINHERITANCE.EXE.............................................................................................................................. 75
TROUBLESHOOTING .................................................................................................................................... 76 REPAIRING INHERITANCE .......................................................................................................................... 76 VIEWING ERROR MESSAGES ..................................................................................................................... 78 UNINSTALLING SECURITY EXPLORER 5..................................................................................................... 78
INDEX ........................................................................................................................................................... 79

SECURITY EXPLORER™ 1
UPDATED 18 JANUARY 2006
What is Security Explorer? Security Explorer ™ is a powerful and intuitive solution that searches for and modifies Windows NT/2000/XP/2003 security on NTFS drives, the registry, printers and file shares. Security Explorer’s graphical interface increases administrator productivity and provides centralized control, simplifying and standardizing the management of the security of Windows server resources.
Security Explorer overcomes the difficulties encountered when using Explorer or command line tools to manage file security. Comprehensive backup, restore, search, grant, revoke, clone and export functions take management of permissions to new levels. Tasks that were previously either impossible or extremely difficult are now as simple as Point, Click, Done!
Manage Permissions
Permissions are automatically presented as each folder, file, Registry key, share or printer is selected. Security Explorer allows specific changes to be made without affecting any of the existing permissions. Permissions changes can be made on individual objects or en-masse.
Security Explorer’s multi-threaded architecture allows continued use of the interface while long operations continue in separate window. Shortcut menus reduce switching between Security Explorer and Windows built-in tools.

SECURITY EXPLORER™ 2
UPDATED 18 JANUARY 2006
Manage Security
With Security Explorer, administrators can back up and restore permissions, providing the ability to recover permissions. Prior to initiating the restore process, you can verify the permissions against the current permissions.
The Backup Scheduler provides a convenient place in which to create, edit, and delete backup jobs for NTFS Permissions on local or remote computers.
Additionally, you can export permissions on a folder to a Microsoft Access 2000 database (.mdb file) or to a delimited file for use with Microsoft Excel.
Manage Objects
In addition to managing permissions and security, Security Explorer provides features to manage objects so you don’t need to leave the application. You can create folders, Registry keys, and shares right in Security Explorer. You also can manage your network drives.
You can add frequently-accessed objects to a Favorites list or group objects into Enterprise Scopes. The Favorites list speeds access to frequently-used collections of files, shares, registry keys, and printers. An Enterprise Scope is grouping of objects, similar to a folder that contains multiple files, on which you can manipulate permissions. Unlike Favorites, where you can list single paths, Enterprise Scopes can contain multiple paths. For example, you could target multiple drives on one or many servers located across your network. You could group together all home directories, even if they span several drives on several servers. You also could use Enterprise Scopes for quick access of frequently-used paths.

SECURITY EXPLORER™ 3
UPDATED 18 JANUARY 2006
Getting Started Security Explorer provides a tool for viewing and modifying permissions on groups, users, registry items, shares, and printers. To streamline your tasks, you can create Enterprise Scopes that group commonly accessed servers and paths or add objects to your Favorites folder.
The main window in Security Explorer offers many choices for ease of use. You can manipulate the panes to maximize the viewing area. Depending on your preference, select functions from the main menu, toolbar, control buttons bar, or shortcut menus.
STARTING SECURITY EXPLORER Click Start, point to Programs > ScriptLogic Corporation > Security Explorer 5, and then
select Security Explorer Console.
Each time you run the program you will be greeted by the splash screen, which displays the initialization of the program and the licensing information.

SECURITY EXPLORER™ 4
UPDATED 18 JANUARY 2006
EXAMINING THE MAIN WINDOW
Security Explorer is organized around four tabs: NTFS Permissions, Registry Permissions, Share Permissions, and Printer Permissions. Clicking a tab changes the focus of the three panes, which constitute the Security Explorer interface. For example, click the Share Permissions tab to manage share permissions or click the Printer Permissions tab to manage printer permissions.
The left Directory pane contains the hierarchy for the selected tab. You can browse and select an object.
The top right Objects pane displays the folders, files, and objects as you browse the hierarchy. You also can type a path in the Path box to view the contents of a folder.
The lower right Permissions pane displays the permissions for the selected object.
SECURITY EXPLORER™ 5
UPDATED 18 JANUARY 2006
ADJUSTING THE VIEW
To rearrange the view, you can size all three panes by dragging the vertical and horizontal split bars.
Note: The position of the horizontal split bar between the Objects and Permissions panes is saved on each individual tab.
To hide the Permissions and Objects panes, Toolbar, Status Bar, and Control Buttons Bar, clear the corresponding check boxes on the View menu.
To return the display to the original configuration, choose Reset to Defaults from the View menu.

SECURITY EXPLORER™ 6
UPDATED 18 JANUARY 2006
To hide the Directory pane, click the AutoHide button . The Directory pane collapses to a vertical toolbar along the left side of the window. This configuration provides maximum view of the Objects and Permissions panes.
Click the vertical button to expand the Directory pane. Click anywhere in the right panes to roll the left pane out of sight.
To return the Directory pane back to the original configuration, click the AutoHide button .
SECURITY EXPLORER™ 7
UPDATED 18 JANUARY 2006
QUICK REFERENCE: TOOLBAR, CONTROL BUTTONS BAR, MENUS
The most common operations performed in Security Explorer can be accessed through the Toolbar. Some Toolbar buttons are unavailable depending on which tab is selected. The Control Buttons Bar offers frequently used buttons for each tab. The same operations on the Toolbar and Control Buttons Bar are available from the menus.
Note: You can show or hide the Toolbar and Control Buttons Bar by clearing the corresponding check box on the View menu. See View Menu.
Toolbar Control Buttons
Menu Option Description
Security Grant Permissions Grant permissions to the selected object.
Security Revoke Permissions Revoke permissions from the selected object.
Security Clone Group or User Clone permissions of the selected object.
Security Search for Permissions Search for a group’s or user’s access rights.
Security Set Ownership Set ownership on the selected object.
Security Modify Permissions Modify the selected object’s permissions.
Security Delete Permission Delete the selected object’s permissions.
Security Backup Security Back up permissions to a file.
Security Restore Security Restore permissions from a backup file.
Security Backup Scheduler Schedule a backup.
Security Export Permissions to Database
Export file and directory permissions to a file.
Tools Create Share Create a new share.
Tools Open with Windows Explorer
Open the selected folder in Windows Explorer.
Tools Command Prompt Here Open a command prompt window.
Tools Properties Open the Properties window.
Tools Manage Favorites Open the Manage Favorites window.
Tools Add to Favorites Add the selected object to Favorites.
Security Manage Enterprise Scope
Open the Manage Enterprise Scope window.
Security Add to Enterprise Scope Add new enterprise scope.
Tools Options Customize Security Explorer.
View Refresh Re-initialize the directory tree.
Help Help View help for Security Explorer.
File Print Print the selected object’s permissions.
File Exit Close Security Explorer.

SECURITY EXPLORER™ 8
UPDATED 18 JANUARY 2006
MENUS
Note: The available menu options vary depending on the selected tab. The menus shown are for the NTFS Permissions tab.
File Menu
Menu Option Description
Print Print the selected object’s permissions.
Exit Close Security Explorer
View Menu
Menu Option Description
Refresh Re-initialize the tree from my computer.
Reset to Defaults Returns main window to original settings.
Toolbar Show the toolbar buttons (default).
Status Bar Show the status bar (default).
Control Buttons Bar Show the buttons at the bottom of the tab (default).
Objects Show the Objects pane (default).
Permissions Show the Permissions pane (default).
Objects Show the Objects pane (default).
SECURITY EXPLORER™ 9
UPDATED 18 JANUARY 2006
Security Menu
Menu Option Description
Grant Permissions Grant permissions to the selected object.
Revoke Permissions Revoke permissions from the selected object.
Clone Group or User Clone the permissions of the selected object.
Search for Permissions Search for permissions on the selected object.
Set Ownership Set the owner of the selected object[s].
Copy to Subfolders and Files
Copy permissions from a parent folder to its subfolders and files. Permissions on the parent folder do not change.
Repair Inheritance Restore inheritance to the selected folder.
Modify Permission Change the permissions of the selected object.
Delete Permission Delete permissions of the selected object[s].
Copy Permission Copy the selected permission[s] to clipboard.
Paste Permission Paste permissions from clipboard.
Select All Permissions Select all permissions in the active pane.
Backup Security Back up permissions to a file.
Restore Security Restore permissions from a file.
Backup Scheduler Add, edit, or delete backup tasks.
Export Permissions to Database
Export file and directory permissions to a file.
Permission Templates Create permission templates.

SECURITY EXPLORER™ 10
UPDATED 18 JANUARY 2006
Tools Menu
Menu Option Description
New Object Create a new folder or Registry key.
Delete Object Delete the selected folder[s] or Registry key[s].
Create Share Create a new share.
Map Network Drive Assign a drive letter to a network drive.
Disconnect Network Drive Disconnect a selected network drive.
Open with Windows Explorer
Open Windows Explorer to the selected folder or file.
Command Prompt Here Open a DOS window
Properties Open the Properties window for the selected object.
Manage Favorites Open the Manage Favorites window.
Add to Favorites Add the selected object[s] to list of favorites.
Manage Enterprise Scope Open the Manage Enterprise Scope window.
Add to Enterprise Scope Add selected object[s] to Enterprise Scope.
Browse all Groups and Users
Look through all the groups and users in the system
View Licensed Server List Manage Security Explorer licenses.
Options Customize Security Explorer.
Window Menu
Menu Option Description
NTFS Permissions Open the NTFS Permissions tab.
Registry Permissions Open the Registry Permissions tab.
Share Permissions Open the Share Permissions tab.
Printer Permissions Open the Printer Permissions tab.
Open Files Open the Open Files tab.

SECURITY EXPLORER™ 11
UPDATED 18 JANUARY 2006
Help Menu
Menu Option Description
Help Display online help.
Security Explorer on the Web
Go to the ScriptLogic Web site.
Create Test Folders and Files
Create a directory structure of files and folders for evaluation.
About View information about the version of Security Explorer installed on your computer, to apply a license file, or to visit the ScriptLogic website.
STATUS BAR
The status bar is displayed along the bottom of the Security Explorer window. The left area of the status bar displays the number of selected objects and permissions.
Note: You can show or hide the status bar from the View menu. See View Menu.

SECURITY EXPLORER™ 12
UPDATED 18 JANUARY 2006
Managing Permissions To help you manage your security, Security Explorer is organized into tabs, which organize the permissions that are available to manage. First, open the tab that matches the permissions you want to manage. Browse for or type in a server name, select one or more objects, and then use the Toolbar buttons, Control Buttons Bar buttons, menus, and/or shortcut menus to manage permissions. For ease of use, each tab functions in the same fashion, although the menu choices and available buttons may vary from tab to tab.
Use the NTFS Permissions tab to browse for and manage permissions on directories and files across your network.
Use the Registry Permissions tab to browse for and manage permissions on registry keys across the network.
Note: To use Security Explorer 5 to manage permissions on registry keys on remote computers:
The Remote Registry service must be running on the target computer.
If Windows XP Service Pack 2 is installed on the target computer, the firewall must be enabled and the Allow file and print sharing option must be enabled on the firewall.
Use the Share Permissions tab to browse for and manage permissions on shares across the network.
Use the Printer Permissions tab to browse for and manage permissions on the printers across the network.
Use the Open Files tab to view open resources. You can close selected or all open resources.
Use the Messages tab to view errors that occur during processing. The Message tab is hidden by default. If you want to view errors that occur with Security Explorer, turn on the Messages tab. See Viewing Error Messages.

SECURITY EXPLORER™ 13
UPDATED 18 JANUARY 2006
VIEWING PERMISSIONS
1. Click the tab that reflects the object you want to view: NTFS, Registry, Share, or Printer.
2. Select an item from the hierarchical list in Directory pane. The location displays in the Path box. The top right Objects pane displays objects along with the extended information. The bottom right Permissions pane displays permissions for the selected object. The Owner box displays the user or group that owns the selected object.
Alternatively, type a path, in either drive letter notation or UNC pathname format, in the Path box, and then click Load. The hierarchical list in the Directory pane updates to reflect your entry.
Time Saver: On the NTFS Permissions tab, you set the root node for a domain or computer so that the Directory pane shows only that object. Type either the domain or computer name in the box at the top of the Directory pane, and then click Go. To return the Directory pane to its original state, click Reset.
Note: On the NTFS Permissions tab, you can restrict what displays in the Objects pane. By default, Show All is selected so both folders and files display. To restrict the list to folders only, choose Show Folders Only from the drop-down list. To hide both folders and files, choose None from the drop-down list. You also can hide the Objects pane on all tabs by clearing the Objects check box on the View menu.

SECURITY EXPLORER™ 14
UPDATED 18 JANUARY 2006
Allow inheritable permissions from parent to propagate to this object Select to propagate permissions to the selected object from the parent. If you select this check box, a warning box displays the selected object and its parent along with the parent’s permissions so you can decide whether or not to continue.
If you clear the check box, a warning box displays the choices you have for preventing propagation of permissions from the parent. To copy the inherited permissions to the object, click Copy. To remove the inherited permissions, click Remove.
Show permissions
Select to display permissions (default) for a selected object. Clear the check box to prevent the display of permissions in all windows and dialog boxes. This setting reverts to the default each time you open Security Explorer.
GRANTING PERMISSIONS
You can grant permissions to users and groups without affecting any other user's permissions. First, choose the permissions to grant, and then select a user or group. You can grant different permissions for several users and groups with one operation.
1. Open the tab for the type of permission you want to grant: NTFS, Registry, Share, or Printer.
2. From the hierarchical list in the Directory pane, select an item; or type a path in the Path box, and then click Go.
3. Click or . Alternatively, right-click the object, and then choose Grant Permissions; or choose Grant Permissions from the Security menu.
The Grant Folder Permissions dialog box displays the path, and the associated groups and users for the current object.
4. Select the groups and users to apply the permission. There are a variety of ways to select groups and users.
To select a group or user, you can choose from the Groups and Users list in the left pane, or from the list in the right pane. The selected group or user displays in the Group/User box and the currently applied permission displays in the Permission box.

SECURITY EXPLORER™ 15
UPDATED 18 JANUARY 2006
Time Saver: If you want to apply the same permission to several groups and users, select the permission settings first, and then double-click the groups and users in the hierarchical list in the left pane. The groups and users are added to the List of users and groups to grant list with the selected permission settings.
Note: If you select a category in the left pane, and the loading is taking too long, you can click Stop.
Note: On a computer that is not a domain controller, the My Computer icon displays, which makes it quicker to set up local user/group permissions on the local computer.
To change to another domain or to the local computer, select the domain or the local computer from the List Names From list.
To display users in the list, click Show Users. To return the list to show only groups, click Refresh.
To add a group or user not included in the current Names list, click Advanced User Selection.
To select a group/user who is not displayed, type a name or click Advanced User Selection.

SECURITY EXPLORER™ 16
UPDATED 18 JANUARY 2006
5. From the Permission list, select the permissions to grant. The options are:
NTFS Permissions Full Control Modify Read and Execute List Folder Contents Read Write Special
Registry Permissions Full control Read Special
Share Permissions Full control Change Special
Printer Permissions Print (Pr) Manage Printer (Mp) Manage documents (Md) Special
Note: If you select Special, the Folder Permission tab opens. You also can open the tab by clicking Advanced Permission Selection. The Folder Permission tab displays the permissions based on the selection in the Permission list. If you make any changes, the Permission type changes to Special with the selected permissions in parenthesis.
Note: Selecting the List Folder Contents permission grants a Read and Execute permission, but excludes files. The scope for Read and Execute includes files; the scope for List Folder Contents excludes files.
6. From the Applies To list, select how to apply the permissions. The options are:
NTFS Permissions This folder only This folder, subfolders and files This folder and subfolders This folder and files Subfolders and files only Subfolders only Files only
Registry Permissions This key only This key and subkeys Subkeys only
Share Permissions This share only
Printer Permissions This printer only Documents only This printer and documents
7. From the Action list, select whether to replace or add to the group/user’s current permissions.
8. To add the group/user to the List of users and groups to grant list, click Add. The selection is added to the list.
Note: To add a selected group or user automatically to the List of users and groups to grant list with the selected permission settings, you can hold down CTRL and click a group or user in the top pane, or double-click a group or user in the left pane.

SECURITY EXPLORER™ 17
UPDATED 18 JANUARY 2006
To remove a selected user or group from the list, click Remove.
Overwrite ALL permissions with the groups and users listed below (use with caution)
Select to overwrite the permissions on the selected folders, subfolders, and/or files with the specified permissions.
Include protected objects (objects with ‘Inherit Permissions from Parent’ disabled) Select to grant permissions on protected accounts.
Note: Only users and groups in the List of users and groups to grant list are affected by the grant action. You can sort each column by clicking the column heading. To remove a selected user or group from the list, click Remove.
9. Click OK. The Granting Permissions box displays the progress in the Granting permissions on box. The Errors area displays any errors that occur during the process.
Note: The grant process can occur so quickly that the Grant Completed box appears before you can change any settings.
Display progress (unchecking this option will speed-up processing)
Select to display the progress in real time. Uncheck to stop the display.
At the end of the grant process, the Grant Completed box displays the errors, objects changed, and elapsed time.
Close this dialog when processing completes. Select to close the Granting Permissions box when the processing is complete.

SECURITY EXPLORER™ 18
UPDATED 18 JANUARY 2006
REVOKING PERMISSIONS
You can revoke access for users and groups. The type of permission revoked depends on the selected tab. For example, if you want to revoke permissions for a printer, open the Printer Permissions tab.
1. Open the tab for the type of permission you want to revoke: NTFS, Registry, Share, or Printer.
2. In the Directory or Object pane, select an object. The Path box displays the path to the selected object.
3. Click or . Alternatively, right-click the object, and then choose Revoke Permissions; or choose Revoke Permissions from the Security menu.
The Revoke Folder Permissions dialog box displays the path, and the associated groups and users for the current object.
4. Select the groups and users to revoke the permission. There are a variety of ways to select groups and users.
To select a group or user, you can choose from the Groups and Users list in the left pane, or from the list in the right pane. The selected group or user displays in the Group/User box.
Time Saver: If you want to revoke the same permission from several groups and users, select the permission settings first, and then double-click the groups and users in the hierarchical list in the left pane. The groups and users are added to the List of users and groups to revoke list with the selected permission settings.
Note: If you select a category in the left pane, and the loading is taking too long, you can click Stop.

SECURITY EXPLORER™ 19
UPDATED 18 JANUARY 2006
Note: On a computer that is not a domain controller, the My Computer icon displays, which makes it quicker to revoke local user/group permissions on the local computer.
To change to another domain or to the local computer, select the domain or the local computer from the List Names From list.
To change to another domain, select the domain from the List Names From list.
To display users in the list, click Show Users. To return the list to show only groups, click Refresh.
To add a group or user not included in the current Names list, click Advanced User Selection.
To select a group/user who is not displayed, type a name or click Advanced User Selection.
5. From the Permission list, select the permissions to revoke, and whether or not to Allow or Deny. If the choice is not available in the list, click Advanced Permission Selection to create a custom choice.
Revoke all permissions (Allow and Deny) for the selected user Select to revoke all permissions (Allow and Deny) for the selected user.
Include SID history search when adding permissions for revoking Select to invoke a SID history search when you click Add to add the selected group/user to the List of users and groups to revoke list. Since there may be more than one SID associated with the selected account, selecting this check box adds all existing SIDs to the List of users and groups to revoke list so that all existing permissions are revoked.
6. To add the group/user to the List of users and groups to revoke list, click Add.
Note: If you double-click a group or user in the left pane, it is added automatically to the List of users and groups to revoke list with the selected permission settings
To remove a selected user or group from the list, click Remove.

SECURITY EXPLORER™ 20
UPDATED 18 JANUARY 2006
Revoke all unknown and deleted accounts Select to revoke permissions on unknown or deleted accounts. A message box asks for confirmation. To revoke all unknown and deleted accounts, click Yes. The dialog box becomes inactive, so the other users/groups and permissions you selected are not included in this action.
Log Actions Select to create a log file. Click to name the file. Active only when the Revoke all unknown and deleted accounts check box is selected.
Include protected objects (objects with ‘Inherit Permissions from Parent’ disabled) Select to revoke permissions on protected accounts.
Note: Only users and groups in the List of users and groups to revoke list are affected by the revoke action. You can sort each column by clicking the column heading. To remove a selected user or group from the list, click Remove.
7. Click OK. The Revoking Permissions box displays the progress in the Revoking permissions on box. The Errors area displays any errors that occur during the process.
Note: The revoking process can occur so quickly that the Revoke Completed box appears before you can change any settings.
Display progress (unchecking this option will speed-up processing)
Select to display the progress in real time. Uncheck to stop the display.
At the end of the revoke process, the Revoke Completed box displays the errors, objects changed, and elapsed time.
Close this dialog when processing completes. Select to close the Revoking Permissions box when the processing is complete.

SECURITY EXPLORER™ 21
UPDATED 18 JANUARY 2006
CLONING PERMISSIONS
The Clone feature allows you to copy individual permissions, permissions in an entire domain, or permissions relating to a user’s SID history.
You can clone across subfolders without having to worry about modifying anyone else's permissions. For example, use the Manual User/Group Selection to clone the permissions on the Everyone group to the BobV user account. The BobV user account will have the same access rights as the Everyone group.
The Clone feature is useful when you are migrating domains. After you create all the new groups and users in the new domain, use Automatic User/Group Selection to copy the permissions from the old domain to the new domain.
Use SID History to update Access Control Lists (ACLs) with SIDs relating to the user’s SID in the new domain, which is valuable in migrating from Windows NT4 to Active Directory.
1. Open the tab that is associated with the permissions you want to clone: NTFS, Registry, Share, or Printer.
2. In the Directory or Object pane, select an object. The Path box displays the path to the selected object.
3. Click or . Alternatively, you can right-click the object, and then choose Clone Permissions; or choose Clone Permissions from the Security menu.
The Clone Permissions dialog box opens to the Manual User/Group Selection tab and displays the path to the selected object and the associated groups and users.

SECURITY EXPLORER™ 22
UPDATED 18 JANUARY 2006
The top pane changes depending on the tab you select. The bottom tab remains the same for each tab.
To: Open:
Select individual users/groups to clone Manual User/Group Selection tab
Select entire domains to clone Automatic User/Group Selection tab
Update permissions relating to a user’s SID history SID History tab
4. In the Source Group or User area, select the domain or object from which to pull the permissions. The default is the current object, whose path displays in the top box.
In the Destination Group or User area, select the domain or object to receive the cloned permissions. The default is the current object, whose path displays in the top box.
To add all users to the list, click Show Users.
To select a specific user to add to the list, click Advanced User Selection.
To return the list to groups only, click Refresh.
Note: The manual method allows you to select permissions one at a time. To select multiple permissions easily to clone from one domain to another, use the Automatic User/Group Selection tab.
5. Click Add. The selected pair displays in the List of users and groups to clone list.
Note: Only users and groups in the List of users and groups to clone list are affected by the clone action. You can sort each column by clicking the column heading. To remove selected user[s] or group[s] from the list, click Remove. To remove all users and groups from the list, click Clear.

SECURITY EXPLORER™ 23
UPDATED 18 JANUARY 2006
To: Click:
Save clone settings as a Security Explorer Clone List (.dat)
Load a previously saved Security Explorer Clone List (.dat)
Clear all pairs from the list
Replace source permissions with destination permissions. Select to change the source permissions to match the destination permissions.
Include protected folders and files when cloning (files and folders with ‘Inherit Permissions from Parent’ disabled) Select to include those files and folders for which the Allow inheritable permissions from parent to propagate to this object check box is unavailable. See Viewing Permissions.
6. To initiate the clone operation, click OK.
Selecting Users/Groups Automatically
This method of selecting pairs loads an entire domain into the bottom pane. Once all the permissions are loaded, you can choose to remove individual pairs to customize the list.
1. Open the Automatic User/Group Selection tab.
2. From the Source list, select the domain to use as the source.
3. From the Destination list, select the domain to use as the destination.
Search for groups
Select to include groups in the list. Clear to exclude groups.
Search for users Select to include users in the list. Clear to exclude users.
4. Click Start Automatic Selection. The pairs display in the bottom pane.

SECURITY EXPLORER™ 24
UPDATED 18 JANUARY 2006
Updating Permissions Relating to a User’s SID History
Use SID History to update Access Control Lists (ACLs) with SIDs relating to the user’s SID in the new domain, which is valuable in migrating from Windows NT4 to Active Directory.
1. Open the SID History tab.
2. In the Domain and AD Query boxes, create a query filter to find the user or group in
Active Directory.
Note: For assistance in constructing a query filter, see http://msdn.microsoft.com/library /default.asp?url=/library/en-us/ad/ad/creating_a_query_filter.asp.
To display a progress bar while Security Explorer searches Active Directory, select the Display Progress check box.
3. Click Find SID History Accounts.
Security Explorer finds a set of groups and users based on the specified domain and AD query, and then steps through each of the groups and users looking for any SID history.
When the process is complete, the number of groups and users checked display.
4. Click Close. If you want to see the groups and users that were checked, use the
Advanced button. See Viewing SID History Detail.

SECURITY EXPLORER™ 25
UPDATED 18 JANUARY 2006
Viewing SID History Detail
Finding SID history does not show the groups and users that were checked. To see the groups and users checked during the process, use the Advanced button.
1. From the SID History tab, click Advanced. The Browse SID History dialog box displays the domain and AD query entered on the SID History tab. You can change the domain and AD query, if necessary.
To include the SID in the display, select the Include SID check box.
2. Click Load. The groups and users are listed as they are checked.
To sort the list in alphabetical order, click Sort.
If you selected the Include SID check box, you can use the scroll bar to view the entire SID, or point the cursor to group or user.
SECURITY EXPLORER™ 26
UPDATED 18 JANUARY 2006
CREATING PERMISSION TEMPLATES
Security Explorer provides six built-in permission templates that you can use to apply permissions. You cannot modify the built-in permission templates, but you can create custom permission templates.
1. From the Security menu, choose Permission Templates. The NTFS Permission Templates dialog box displays the Full Control permission template. The other built-in templates are Modify, Read and Execute, List Folder Contents, Read, and Write.
2. To create a new permission template, click New. The Create New Permission Template
box appears.
3. In the Name box, type a name for the template, and then click OK. The template name
displays in the Template box.
4. Select or clear the check boxes to create the template.

SECURITY EXPLORER™ 27
UPDATED 18 JANUARY 2006
5. Click Close. When you apply permissions, the template is available for selection.

SECURITY EXPLORER™ 28
UPDATED 18 JANUARY 2006
COPYING PERMISSIONS
To save time, you can copy and paste permissions.
1. Right-click a permission in the Permissions pane, and then choose Copy Permission. Alternatively, you can select a permission, and then choose Copy Permissions from the Security menu, or press Ctrl-C.
Note: To select all permissions in the list, right-click any permission, and then choose Select All Permissions. Alternatively, you can select a permission, and then choose Select All Permissions from the Security menu, or press Ctrl-A.
2. Open the object where you want to paste the selected permissions, right-click any permission, and then choose Paste Permission. Alternatively, you can select a permission, and then choose Paste Permission from the Security menu, or press Ctrl-V.
The Grant Folder Permissions dialog box opens showing the pasted permissions in the List of users and groups to grant list. See Granting Permissions for details about the Grant Folder Permissions dialog box.
3. To overwrite the permission, click OK.

SECURITY EXPLORER™ 29
UPDATED 18 JANUARY 2006
COPYING PERMISSIONS TO SUBFOLDERS AND FILES
You can copy permissions from a parent folder to its subfolders and files. The permissions on the parent folder do not change; the subfolders and files inherit the permissions from the parent.
Note: The Copy Permissions to Subfolders and Files function is available only on the NTFS Permissions tab.
1. Open the NTFS Permissions tab.
2. In the Directory or Objects panes, right-click a folder, and then choose Copy to Subfolders and Files. Alternatively, you can select a folder, and then choose Copy to Subfolders and Files from the Security menu. A message box displays.
3. To remove all the explicitly-defined permissions on all subfolders and files for the
selected parent folder, click Yes. All subfolders and files inherit permissions from the selected parent folder.

SECURITY EXPLORER™ 30
UPDATED 18 JANUARY 2006
SETTING OWNERSHIP
You can set the owner on a file or directory structure, which is very helpful when setting up home directories. Choose the user or group to be the owner of the file or folder, and then choose how to apply the ownership.
Note: The Set Ownership function is available only on the NTFS Permissions tab.
1. Open the NTFS Permissions tab.
2. In the Directory pane or the Object pane, select an object. The Path box displays the path to the selected object.
3. To set ownership on the selected object, click . Alternatively, you can right-click the object, and then choose Set Ownership; or choose Set Ownership from the Security menu.
The Owner dialog box displays the selection and the associated groups and users.
4. To change the owner, select a group from the list. The selection displays in the Owner
box. You also can type a name in the Owner box.
Note: By default only groups display. To view a list of users, click Advanced User Selection. The Select Users or Groups selection box opens where you can choose a user to be the owner of the folder.

SECURITY EXPLORER™ 31
UPDATED 18 JANUARY 2006
5. In the Folder Options area, choose whether to set the ownership on files and/or folders. To target specific file types, enter a wildcard, such as *.exe. You also can choose to recurse across subfolders.
Note: To grant permissions to the current folder only, clear all check boxes in the Folder Options area. To grant permissions to all files and folders, and recurse through all subfolders, select all check boxes.
Set ownership on files Select to set ownership on all files within the chosen folder.
Set ownership on subfolders Select to set ownership on all subfolders within the current folder.
Recurse all subfolders Select to set ownership on folders or files within the subfolders of the current folder.
6. Click OK.
BROWSING ALL GROUPS AND USERS
While you are in the Grant, Revoke, and Search dialog boxes, you see only domain groups and users, or groups and users for the local computer. If you need to see local groups and users on individual computers on the network, you can browse a list.
Note: This is a display only list box. You cannot select a group or user to perform an action.
From the Tools menu, choose Browse All Groups and Users. The Browse All Groups and Users list box appears.
You can set the root node for a domain or computer so that the list box shows only that object. Type either the domain or computer name in the box at the top, and then click Go. To return the list to its original state, click Reset.
If you select a category and the loading is taking too long, you can click Stop.

SECURITY EXPLORER™ 32
UPDATED 18 JANUARY 2006
SEARCHING FOR PERMISSIONS
Have you ever wondered just which files and directories on your network the group Everyone has delete permissions on? Finding information like this is a snap with Security Explorer. Simply choose a group or user, and a set of permissions to search for, and begin your search. A dialog box will pop up with your search results. At that point, you can click on any files or directories in your search results to modify their permissions immediately. This is a very powerful tool to analyze your user's permissions and close hard-to-find security holes.
Note: The Search for Permissions function is available only on the NTFS Permissions tab.
1. Open the NTFS Permissions tab.
2. In the Directory pane or the Object pane, select an object. The Path box displays the path to the selected object.
3. To search for permissions on the selected object, click . Alternatively, you can right-click the object, and then choose Search for Permissions; or choose Search for Permissions from the Security menu.
The Search dialog box displays the path to the selected object. The Group/Users Options tab lists the associated accounts.
Note: If you cleared the Show permissions check box on the main window, the permissions do not display.
There are three options you can set to search for permissions, which are grouped into three tabs: Group/User Options, Folder and File Options, and Permission Options.
Setting Groups/Users Options
1. From the Search dialog box, open the Group/User tab.
2. Select a group or user from the list. If a user is not listed, click Advanced User Selection. The Select Users or Groups selection box opens where you can choose a user. The selected group or user displays in the Group/User box.
Note: To change the path at any time, click , and then select a new path.

SECURITY EXPLORER™ 33
UPDATED 18 JANUARY 2006
Note: If you select a category in the left pane, and the loading is taking too long, you can click Stop.
Note: On a computer that is not a domain controller, the My Computer icon displays, which makes it quicker to search for local user/group permissions on the local computer.
4. Select any other groups or users to include in the search.
Note: These selections do not display in the Group/User box.
Include all group memberships Select to include all groups of which the selected group or user is a member. The groups display in the list box.
Include “Everyone” Group Select to include the Everyone group in the search.
Include “Network” Group Select to include the Network group in the search.
Include “Authenticated Users” Group Select to include the Authenticated Users group in the search.
Include “Interactive” User Select to include the Interactive user in the search.
Search for unknown accounts Select to include unknown accounts in the search.
Note: To return to the default selections on all three tabs, click Defaults.

SECURITY EXPLORER™ 34
UPDATED 18 JANUARY 2006
Setting Folders and Files Options
By default, a search includes folder and file permissions and all subfolders.
1. From the Search dialog box, open the Folder and File Options tab.
Note: To change the path at any time, click , and then select a new path.
2. Choose whether to search files and/or folders. You can choose to recurse across all subfolders or to a specific depth. To target specific file types, enter a file extension, such as *.exe, in the File Extension box.
Search for folder permissions Select to include folder permissions in the search results.
Search for file permissions Select to include file permissions in the search results.
Recurse all subfolders Select to include all subfolders in the search results.
Recurse to Depth Select to include subfolders to the depth specified in the box. The default depth is 1, which is one level below the folder displayed in the path box.
Note: To return to the default selections on all three tabs, click Defaults.

SECURITY EXPLORER™ 35
UPDATED 18 JANUARY 2006
Setting Permissions Options
By default, the Discretionary Access Control List (DACL) is searched for any allow or deny permissions. Inherited and explicit permissions are included.
1. From the Search dialog box, open the Permission Options tab.
Note: To change the path at any time, click , and then select a new path.
2. Choose what to search.
Search for permissions (DACL) Search the Discretionary Access Control List (DACL) for the permissions on the selected file or folder.
Search for owner Select to include the owner of the selected file or folder in the search.
3. In the Folder and File boxes, select the permissions to search in the selected folders and files.
Permissions Options Search for any permission Full Control Modify List Folder Contents Read Write Special
Type Options Allow or Deny Allow Deny

SECURITY EXPLORER™ 36
UPDATED 18 JANUARY 2006
To create special permissions, click Advanced Permission Selection. Select the specific permissions to search. The abbreviations display next to Special in the Folder or File boxes.
4. Select how to search.
Search for exact permissions (as set above) Perform the search using the exact permissions settings in the Folder and File boxes. For example, if you search for Write(W), only that permission is included in the results.
Note: Selecting some permissions, such as Write (W), select other permissions automatically (Rp, Ad, Wd, Wa, Wx). If you do not want to include those permissions in the results, click Advanced Permission Selection to manually deselect those permissions.
Search for exact permissions or better Include the exact permissions settings in the Folder and File boxes, along with any other permissions that include the permissions specified. For example, if you search for Write (W), Full Control (All) is also included in the results, along with any Special permissions that include Write (W).
Invert results set (applies to DACL only) Select to search for permissions other than those specified. For example, if you are searching for Write (W), the search results return all permissions except Write (W).
Example: This table shows how the Invert permissions result set check box affects a search for the Write permission.

SECURITY EXPLORER™ 37
UPDATED 18 JANUARY 2006
Permissions Invert permissions Invert permissions
User1 Full Control User2 Write User3 Read User4 Full Control
User 2 Write User1 Full Control User3 Read User4 Full Control
Note: Selecting some permissions, such as Write (W), select other permissions automatically (Rp, Ad, Wd, Wa, Wx). If you select the Invert permissions result set check box, those permissions are not included in the results. If you want to include those permissions in the results, click Advanced Permission Selection to manually deselect those permissions. This rule does not apply to Full Control (All), so even though you searched for permissions other than Write (W), Full Control (All) is included in the results.
Inherited Permissions Includes inherited permissions in the search results. Inherited permissions are indicated by (I) in the Type column.
Explicit Permissions Includes explicit permissions in the search results.
Note: To return to the default selections on all three tabs, click Defaults.
Starting the Search
Click Start Search. The results display in the Search Results area. The status bar displays the number of objects searched and permissions found.
Note: To stop the search, click Stop Search. To clear the results, click Clear Results.
Within the Search Results area, you can use the buttons along the bottom, the toolbar icons, or the menus to grant, revoke, clone, modify, delete, or print the permissions. See Quick Reference: Toolbar, Control Buttons Bar, Menus. You also can replace selected permissions with those of another. See Replacing Permissions.

SECURITY EXPLORER™ 38
UPDATED 18 JANUARY 2006
Sorting the Results
By default, the results are sorted alphabetically in ascending order. You can sort each column in the Search Results area by clicking on the column heading.
Interpreting the Permissions Column
The Permissions column lists the abbreviations of some permissions.
Permissions Abrv
Full control ALL
Generic Read R
Generic Write W
Generic Execute X
Delete De
Change permissions Wp
Take Ownership To
List folders Lf
Read data Rd
Read attributes Ra
Read extended attributes Rx
Read permissions Rp
Append data Ad
Create subfolders Cs
Create files Cf
Write data Wd
Write attributes Wa
Write extended attributes Wx
Execute file Ex
Traverse folders Tf
Delete subfolders and files Ds
Replacing Permissions
In the Search Results area, you can select one or more permissions, and then replace them with the permissions of a selected user or group.
1. Select one or more of the permissions displayed in the Search Results area, and then click Replace.
Note: Only explicit permissions can be replaced. If any of the selected permissions are inherited, a warning message box displays. When you click OK, the inherited permissions are removed from the selection.
The Replace Group/User dialog box displays the selected permission[s].

SECURITY EXPLORER™ 39
UPDATED 18 JANUARY 2006
2. In the Select New Group or User area, select a group or user whose permissions will be used as the replacement.
You can select other sources from the List Names From list. By default, only the groups display. To include users in the list, click Show Users. Select a group or user from the list. The name displays in the Group or User box.
You can type a group or user name in the Group or User box or click Advanced User Selection to select a group or user name from a list.
3. Click OK. The permissions associated with the group or user that displays in the Group
or User box replaces those of the group or user selected from the Search Results area.
MODIFYING PERMISSIONS
Modify the permissions of a group or user on the selected directory or file. Use for quick changes to someone who is already in the list. Use the Grant feature to give permissions to accounts that are not in the permissions list already. See Granting Permissions.
Important: You cannot modify inherited permissions directly. Inherited permissions are indicated by (I) next to the Permission Type. To modify these permissions, you must modify the parent object.
1. Open the tab that is associated with the permissions you want to modify: NTFS, Registry, Share, or Printer.
2. In the Directory or Objects pane, select an object. The Path box displays the path to the selected object.
3. Click or . Alternatively, you can right-click the object, and then choose Modify Permissions; or choose Modify Permissions from the Security menu. The Modify Permission dialog box displays the current permission settings.

SECURITY EXPLORER™ 40
UPDATED 18 JANUARY 2006
Note: The permissions listed vary depending on the tab and object selected. This graphic shows the permission lists for a folder and a file selected on the NTFS Permissions tab.
The permissions in blue denote standard set of permissions for Windows NT and Windows 2000.
The permissions in black denote the extended set of permissions defined by Windows 2000. Windows NT 4.0 supports these extended permissions; however, you need to use Security Explorer, Windows 2000, or the Security Configuration Editor to view them.
Note: If you want to change the display to a different user or group, click Change.
4. From the Permissions lists, select the permission and how to apply it. The resultant permissions display in the check boxes. If you make changes to the check boxes, the permission type changes to Special Access.
Note: You also can create custom permission templates to refer to non-standard sets of permissions. See Creating Permission Templates.
5. Select whether to modify permissions on protected objects manually (default) or automatically.
Only apply permissions to objects directly inside this folder (No Propagate) Select to apply the permissions inside the current folder. Permissions are not propagated down the directory tree.
Include protected objects Select to modify permissions on the selected account down the directory tree even if a file or folder is protected.
6. Click OK.

SECURITY EXPLORER™ 41
UPDATED 18 JANUARY 2006
MANAGING GROUP MEMBERSHIPS
1. Right-click a group in the Permissions pane, and then choose Display Group Members. The Group memberships dialog box opens displaying the currently selected group name, description, and members.
2. Select a member, and then click a button corresponding to the action you want to
perform.
To: Click:
Add members to a selected group Remove members from a selected group Save the list as a .txt file View the members of a selected group

SECURITY EXPLORER™ 42
UPDATED 18 JANUARY 2006
Adding a User or Group
2. Select a group or user from the Members list, and then click Add. The Add to Group Membership dialog box appears listing the permissions for the currently selected object.
To change to another domain, select the domain from the List Names From list.
To display users in the list, click Show Users. To return the list to show only groups, click Refresh.
To add a group or user not included in the current Names list, click Advanced User Selection.
3. Select users and/or groups, and then click Add to list to add them to the List of users and groups to add list. You also can double-click a group/user to add it to the list. Only users and groups in the List of users and groups to add are added.
To remove a selected user or group from the list, click Remove.
4. To apply the selections, click OK.
RENAMING ACCOUNTS
1. In the Permissions pane, right-click a group or user, and then choose Rename Group or User. The Rename Group or User box displays the selected user or group in the Name box.
2. In the Name box, type a new name. Do not include any domain information.
3. Click OK.

SECURITY EXPLORER™ 43
UPDATED 18 JANUARY 2006
DELETING PERMISSIONS
Note: You cannot delete inherited permissions, which are indicated by (I) in the Type column of the Permissions pane. Navigate up the directory hierarchy to locate the parent, and then continue with the delete process.
1. In the Permissions pane, select the permission(s), and then click or . Alternatively, you can right-click the selected permission(s), and then choose Delete Permission; or choose Delete Permission from the Security menu.
The Delete options dialog box appears.
Force deletion down entire tree (including protected objects)
Select to delete the selected permission(s) down the directory tree even if a file or folder is protected.
2. To delete the permission(s), click Yes.

SECURITY EXPLORER™ 44
UPDATED 18 JANUARY 2006
PRINTING PERMISSIONS
The Print function formats the permissions displayed in the Permissions pane for printing.
From the File menu, choose Print, or click . The Print Permissions tab displays the default settings.
Button Description
Set the font for the header, report content, and footer. Click Font and then choose a font, font type, font size, font color, and whether to underline or strikeout the text.
Opens the Page Setup dialog box where you can specify the paper size, paper source, paper orientation, set the margins for the report, and specify the printer to use.
Prints the report to the default system printer. To specify a different printer, click Setup, and then click Printer.
Opens the Print Preview window where you can see the report before it is printed.
Show Border Select to add a rectangle around each page at the set margin.
Show Date Select to display the date and time at the bottom of each page (default).
Show Page Numbers Select to display the page number at the bottom of each page (default).
Show Header Select to display the path and owner of the selected object (default).

SECURITY EXPLORER™ 45
UPDATED 18 JANUARY 2006
Use column widths from main window display Select to mimic the column layout shown in the Permissions pane (default). If the check box is cleared, the columns are sized equally depending on the width of the paper.

SECURITY EXPLORER™ 46
UPDATED 18 JANUARY 2006
Managing Security With Security Explorer, administrators can back up and restore their NTFS permissions, providing the ability to recover permissions. Additionally, permissions can be exported for reporting and backup.
BACKING UP SECURITY
Before modifying any security permissions, make a backup in case you need to restore the permissions to their original state. You also can back up permissions on files for which you don't have access. As long as you are an administrator, or have the Backup files and directories user right, you can back up and restore permissions on all files, which is helpful when backing up and restoring a user's home directories.
Note: The Backup and Restore functions are not available on the Printer Permissions tab.
1. Open the tab that is associated with the object[s] you want to back up: NTFS, Registry, or Share.
2. From the Directory or Object pane, select an object to back up, and then click . Alternatively, you can right-click an object, and then select Backup Security, or select Backup Security from the Security menu. The Backup Security dialog box appears with the selected objects displayed in the Path list box.
3. In the Backup File Name box, type the full path and name for the backup file, or click to locate a path and name the backup file.

SECURITY EXPLORER™ 47
UPDATED 18 JANUARY 2006
To: Click:
Add a path to the list
Delete a selected path from the list
Delete all paths from the list
Load a previously saved Security Explorer Backup List (*.bkn) file
Save the list of paths to a Security Explorer Backup List (*.bkn) file
Note: The Registry Security dialog box does not support the addition of deletion of paths from the Path list, saving and loading the Path list, nor scheduling a backup.
4. To back up only specified file types, type a value, such as *.exe, in the Wildcard box.
Note: The Wildcard box is not available when backing up Registry Permissions.
5. To schedule the backup, type a name for the backup job in the Job Name box, and then click Schedule. See Scheduling a Backup.
6. To back up the selected paths, click Backup Security.
SCHEDULING A BACKUP
If you would prefer to run the backup at a set time, schedule it as a Windows task.
1. From the Backup Security dialog box, type a name for the job in the Job Name box, and then click Schedule. The Schedule a Backup dialog box opens. Depending on if the backup job is local or remote, the appropriate option is selected.
Note: You can make changes to a single job directly. If you want to edit a remote job, click Edit.

SECURITY EXPLORER™ 48
UPDATED 18 JANUARY 2006
2. In the Account box, click to locate an account under which to run the backup. If you do not enter an account, the backup runs under the local system account. For remote jobs, click Edit, and then add an account.
3. To schedule the task, click Schedule. The task is assigned the default run time of Weekly, every Monday at midnight. If you want to change the run time, edit the backup using the Backup Scheduler.
USING THE BACKUP SCHEDULER
The Backup Scheduler provides a convenient place in which to create, edit, and delete backup jobs for NTFS Permissions only.
Open the NTFS Permissions tab, and then click . Alternatively, you can right-click an object, and then select Backup Scheduler, or select Backup Scheduler from the Security menu. The Backup Scheduler Task List dialog box lists the currently defined backup jobs in ascending alphabetical order by computer name.
To sort the columns, click the column heading once for ascending order and again for descending order.
To create a new backup job, click New. The Backup Security dialog box opens where you can create a new backup job. See Backing Up Security.

SECURITY EXPLORER™ 49
UPDATED 18 JANUARY 2006
To edit a selected backup job, click Edit. The Backup Security dialog box opens where you can make changes to the backup job. To make changes to the schedule, click Open Task Dialog.
To delete a selected backup job, click Delete. A warning message appears. To continue with the deletion, click Yes.
To locate a backup job for a specific computer, select the Browse tasks by computer check box. The Backup Scheduler Alternate View appears. Expand the hierarchical list to locate the computer.
To edit a selected backup job, click Edit. The Backup Security dialog box opens where you can make changes to the backup job. To make changes to the schedule, click Open Task Dialog.

SECURITY EXPLORER™ 50
UPDATED 18 JANUARY 2006
RESTORING SECURITY
You can restore your permissions from a backup file created by using the Backup function. You can restore some or all of the backup file. Prior to initiating the restore process, you can verify the permissions against the current permissions.
Note: The Restore function is not available on the Printer Permissions tab.
1. Open the tab that is associated with the object[s] you want to restore: NTFS, Registry, or Share.
2. Click . Alternatively, you can right-click an object, and then select Restore Security, or select Restore Security from the Security menu. The Restore Security dialog box appears.
3. In the Backup File Name box, type the full path and name for the backup file, or click Load to locate a backup file. The contents of the backup file display in the left pane.
4. Expand the backup file and examine the contents. You can choose specific objects to restore by selecting the box next to the object.
Show differences (folders and files only)
Select to show the folders and files that have different permissions than the ones in the backup file. If the permissions for a folder or file are different than those in the backup file, the name displays in red in the hierarchy. If a folder contains sub-folders or files with different permissions, a red star displays next to the folder icon. If you select this check box, the backup file reloads.

SECURITY EXPLORER™ 51
UPDATED 18 JANUARY 2006
Include files when previewing backup Select to include files in the display. By default, only folders display. If you select this check box, the backup file reloads.
Important: Only select the Include files when previewing backup check box if you are restoring a small number of individual files. If you are restoring a large number of objects, selecting this check box can slow the loading of the backup file, so restore the parent folder instead.
Restore owner Restore permissions
By default, both the owner and permissions are restored. Clear the appropriate check box for the item you do not want to restore.
Restore to a different path To restore the permissions to a different path, select the Restore to a different path check box, and then click to locate the path.
Note: The restore location must have the same folder structure as the backup file.
5. To further restrict the permissions restored using a wildcard, click Advanced. The Advanced dialog box appears.
Note: The Advanced button is available only when restoring permissions from the NTFS Permissions tab.
Path Wildcard
Select to enter a wildcard to filter folders and files. For example, *docs will skip any path that does not include docs.
Selected Paths Wildcard = *docs Wildcard = *test* Wildcard = *test?
Folder1 = c:\work skipped skipped skipped
Folder2 = c:\work\docs restored skipped skipped
Folder3 = c:\work\test skipped restored skipped
Folder4 = c:\work\test1 skipped restored restored
Folder5 = c:\work\test2 skipped restored restored

SECURITY EXPLORER™ 52
UPDATED 18 JANUARY 2006
Group/User Wildcard Select to enter a wildcard to filter groups or users. For example, *smith will skip any group or user that does not include smith in the path. To select a group or user, click Advanced User Selection.
Selected Users Wildcard = *smith
User1 = Accounting\anewman skipped
User2 = Accounting\csmith restored
User4 = Accounting\mandrew skipped
Group1 = BUILTIN\users skipped
Note: If both check boxes are selected, the path wildcard is applied to the selection first, and then the group/user wildcard is applied.
Important: If a wildcard is not supplied, the permissions displayed in the Current Permissions pane are replaced with those displayed in the Backed-up Permissions pane. If a wildcard is supplied, the matching permissions in the backup file are added to the pre-existing permissions.
Note: Before restoring, you can grant or revoke permissions on either the Current Permissions or the Backed-up Permissions panes. Right-click a permission, and then choose either Grant Permissions or Revoke Permissions. The corresponding dialog box opens populated with the specific permission you selected.
6. Click Restore.

SECURITY EXPLORER™ 53
UPDATED 18 JANUARY 2006
EXPORTING PERMISSIONS
You can export permissions on a folder to a Microsoft Access 2000 database (.mdb file) or to a delimited file for use with Microsoft Excel.
Note: You can export permissions on folders only. This feature is available only on the NTFS Permissions tab.
1. Open the NTFS Permissions tab.
2. In the Directory pane or the Objects pane, select a folder, or type a path in the Path box.
3. From the Security menu, choose Export Permissions to Database, or click . The Export Permissions dialog box displays the path of the selected folder.
4. In the Folder Options area, select whether to include files and/or subfolder permissions.
You also can choose to recurse down all subfolders or to a specified depth. For example, if you are only concerned with the subfolders, and not the sub-sub-folders, type 1 in the Recurse to depth box.
Export file permissions Select to export the permissions of the files (default).
Export subfolder permissions Select to export the subfolder permissions (default).
Recurse subfolders Select to retrieve the subfolders and sub files of the parent directory (default).
Recurse all subfolders Select to retrieve all of the subfolders and sub files of the parent directory (default).

SECURITY EXPLORER™ 54
UPDATED 18 JANUARY 2006
Recurse to Depth Select to choose how many directory levels to export. For example, if you are only concerned with the subfolders, and not the sub-sub-folders, then choose to recurse to a depth of 1.
5. If you want to export only files with a certain extension, type the extension in the Wildcard box. For example, if you are only concerned with exporting the permissions of all executable files, type *.exe in the Wildcard box.
6. In the Output Options area, select an output file.
Save to Microsoft Access(R) Database Select to save to a Microsoft Access 2000 .mdb database. Type a path in the Destination box or click to locate a destination for the file.
Save to Microsoft Excel(R) Spreadsheet Select to save to a delimited file for use with Microsoft Excel. Select either Comma-delimited file (.CSV) or Tab-delimited file (.TXT). Type a path in the Destination box or click to locate a destination for the file.
Summary mode: export only when permissions differ from parent Select to export only permissions that differ from the parent.
7. To specify which items to export, click Advanced. Depending on which Output Option you selected the corresponding tab displays. Deselect the fields or columns that you do not want to export, and then click OK.
Microsoft Access
Microsoft Excel
8. To export the data in the specified format, click Export.

SECURITY EXPLORER™ 55
UPDATED 18 JANUARY 2006
Managing Objects In addition to managing permissions and security, Security Explorer provides features to manage objects so you don’t need to leave the application.
CREATING A NEW FOLDER
1. Open the NTFS Permissions tab.
2. In the Directory or Objects pane, right-click the object under which to create the new folder, and then choose New Object. Alternatively, choose New Object from the Tools menu. The Create New Folder box displays the path to the selected object in the Name box.
3. In the Name box, type a name for the new folder, and then click OK. A confirmation
message appears.
4. Click OK.
DELETING A FOLDER
1. Open the NTFS Permissions tab.
2. In the Directory or Objects pane, right-click the folder, and then choose Delete Object. Alternatively, choose Delete Object from the Tools menu. A warning message appears.
3. To delete the folder, click Yes.
Note: If the selected folder is included in an Enterprise Scope, the folder is not removed from the Enterprise Scope. You also must remove the folder from the Enterprise Scope. Use the Managed Scope feature to delete the folder from the Enterprise Scope. See Removing Paths from an Enterprise Scope.
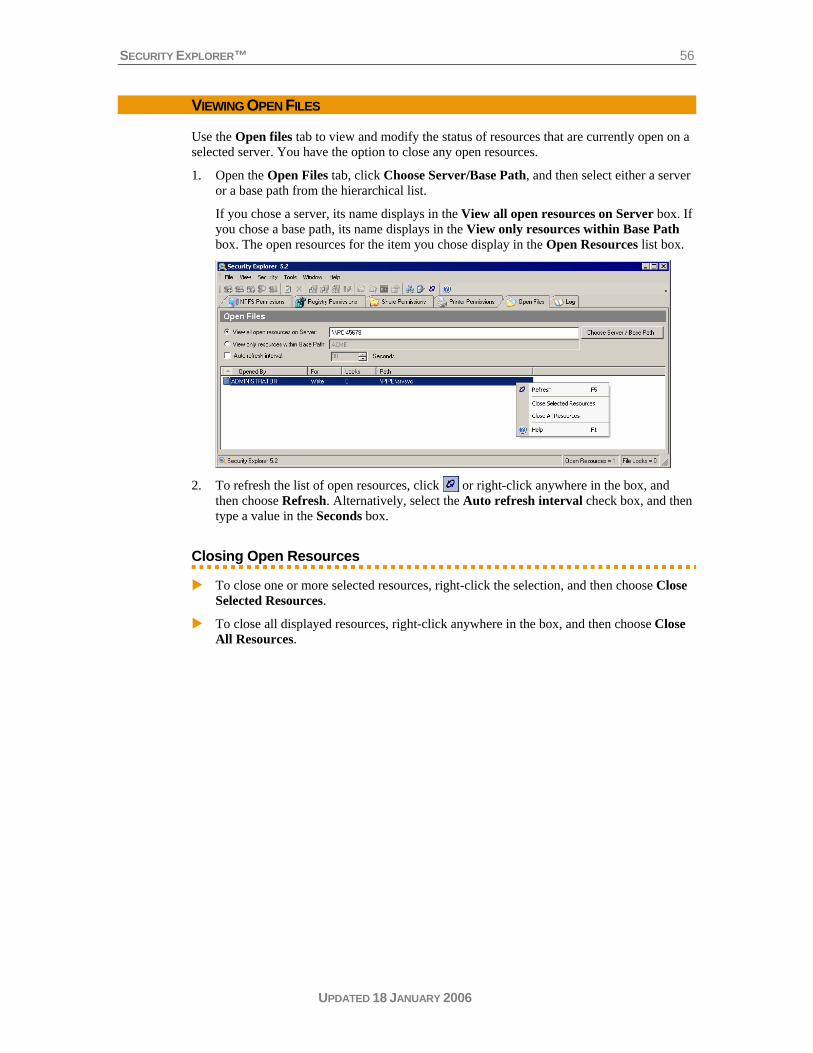
SECURITY EXPLORER™ 56
UPDATED 18 JANUARY 2006
VIEWING OPEN FILES
Use the Open files tab to view and modify the status of resources that are currently open on a selected server. You have the option to close any open resources.
1. Open the Open Files tab, click Choose Server/Base Path, and then select either a server or a base path from the hierarchical list.
If you chose a server, its name displays in the View all open resources on Server box. If you chose a base path, its name displays in the View only resources within Base Path box. The open resources for the item you chose display in the Open Resources list box.
2. To refresh the list of open resources, click or right-click anywhere in the box, and
then choose Refresh. Alternatively, select the Auto refresh interval check box, and then type a value in the Seconds box.
Closing Open Resources
To close one or more selected resources, right-click the selection, and then choose Close Selected Resources.
To close all displayed resources, right-click anywhere in the box, and then choose Close All Resources.

SECURITY EXPLORER™ 57
UPDATED 18 JANUARY 2006
VIEWING PROPERTIES
You can view properties on files and folders accessed from the NTFS Permissions tab.
1. Open the NTFS Permissions tab.
2. In the Directory or Objects pane, select the object, and then click . Alternatively, right-click the object, and then choose Properties, or select Properties from the Tools menu. The Properties window for the selected object appears.

SECURITY EXPLORER™ 58
UPDATED 18 JANUARY 2006
OPENING WINDOWS EXPLORER
You can select a folder or file, and then open Windows Explorer to the same location.
1. Open the NTFS Permissions or Share Permissions tab.
2. In the Objects pane, select a folder or file, and then click . Alternatively, right-click an object, and then choose Open with Windows Explorer, or choose Open with Windows Explorer from the Tools menu. Windows Explorer opens to the select object.
CREATING A NEW REGISTRY KEY
1. Open the Registry Permissions tab.
2. In the Directory or Objects pane, right-click the object in which to create the key, and then choose New Object. Alternatively, you can choose New Object from the Tools menu. The Create New Registry Key box appears.
3. In the Name box, type the name of the Registry key, and then click OK.
DELETING A REGISTRY KEY
1. Open the Registry Permissions tab.
2. In the Directory or Objects pane, right-click the Registry key, and then choose Delete Object. Alternatively, choose Delete Object from the Tools menu. A warning message appears.
3. To delete the Registry key, click Yes.
Note: If the selected Registry key is included in an Enterprise Scope, the folder is not removed from the Enterprise Scope. You also must remove the Registry key from the Enterprise Scope. Use the Managed Scope feature to delete the Registry key from the Enterprise Scope. See Removing Paths from an Enterprise Scope.

SECURITY EXPLORER™ 59
UPDATED 18 JANUARY 2006
CREATING A NEW SHARE
Note: You can create a share only on the NTFS Permissions tab. To remove a share, use the Share Permissions tab. See Removing a Share.
1. Open the NTFS Permissions tab.
2. In the Objects pane, select the object in which to create the share, and then click . Alternatively, you can right-click the object, and then choose Create Share; or choose Create Share from the Tools menu. The Create New Share box displays the path to the selected object.
3. In the Share Name box, type a name for the share.
4. In the Description box, type a free-form comment about the share if desired.
5. To create the share, click OK.
REMOVING A SHARE
Note: You can remove a share only on the Share Permissions tab. To create a share, use the NTFS Permissions tab. See Creating a New Share.
1. Open the Share Permissions tab.
2. In the Objects pane, right-click the share, and then choose Remove Share. Alternatively, choose Remove Share from the Tools menu. A warning box appears.
3. To remove the share, click Yes. A confirmation message appears.
4. Click OK.

SECURITY EXPLORER™ 60
UPDATED 18 JANUARY 2006
USING FAVORITES
Note: The Favorites function is not available on the Printer Permissions tab.
You can add frequently-accessed objects to a list of favorites. Each tab has a separate list of favorites in the Directory pane.
Adding an Object to the Favorites List
1. Open the tab that is associated with the object[s] you want to add to the Favorites list.
2. Click . Alternatively, you can right-click an object, and then select Add to Favorites, or select Add to Favorites from the Tools menu. The Add to Favorites dialog box opens showing the selected path in the New Favorites list.
To add a path to the New Favorites list, click Browse, and then select a path; or type a path in the Path box, and then click Add.
To remove a selected path from the New Favorites list, click Del.
To remove all paths from the New Favorites list, click Clear.

SECURITY EXPLORER™ 61
UPDATED 18 JANUARY 2006
3. Click OK. The object appears under the Favorites heading in the Directory pane.
Removing Objects from the Favorites List
You can remove a single object from the Favorites list shown in the Directory pane. To view all the Favorites regardless of type, and remove multiple objects, use the Manage Favorites function.
To remove a single object from the Favorites list, open the tab that is associated with the object, right-click the object in the Directory pane, and then choose Remove from Favorites.
To remove multiple objects from the Favorites list, choose Manage Favorites from the Tools menu, or click . The Manage Favorites box lists all the objects in the Favorites list on all the tabs. Select the object, and then click Remove.

SECURITY EXPLORER™ 62
UPDATED 18 JANUARY 2006
USING ENTERPRISE SCOPES
Use Enterprise Scopes to organize objects into logical groups so that you can more easily manage the permissions associated with these objects. For example, you could target multiple drives on one or many servers located across your network. You could group together all home directories, even if they span several drives on several servers. You also could use Enterprise Scopes for quick access of frequently-used paths.
When you have created a scope and added objects to it, there are several options that you can choose depending on the type of the scope.
Creating an Enterprise Scope
An Enterprise Scope is grouping of objects, similar to a folder that contains multiple files, on which you can manipulate permissions. Unlike Favorites, where you can list single paths, Enterprise Scopes can contain multiple paths.
There are two ways to create an Enterprise Scope. You can select an object and add it to an Enterprise Scope, which is a quick method for creating scopes when you are navigating through the Directory and Object panes. You also can create Enterprise Scopes through the Manage Enterprise Scopes dialog box, which is an efficient method for creating multiple scopes in an organized manner.

SECURITY EXPLORER™ 63
UPDATED 18 JANUARY 2006
Creating Scopes by Selecting Objects
When you are navigating through the Directory and Object panes, you can create a scope quickly by selecting an object and then adding it to a scope.
1. In the Directory or Objects pane, select an object, and then click . Alternatively, you can right-click an object, and then select Add to Enterprise Scope, or select Add to Enterprise Scope from the Tools menu. The Enterprise Scope dialog box displays the path to the selected object in the Paths box.
To create a new Enterprise Scope with the selected object, select Create and add into a new Enterprise Scope, and then type a name for the scope in the Name box.
To add the selected object to an existing Enterprise Scope, select Add to existing Enterprise Scope, and then select the Enterprise Scope from the Name list.
Edit contents of enterprise scope Select to open the Manage Enterprise Scope dialog box where you can add or remove objects from the Enterprise scope. See Adding Paths to an Enterprise Scope.
2. Click OK. The scope appears under Enterprise Scope in the Directory pane. The selected path displays under the scope name on the current tab.
Note: Enterprise Scopes are associated with a specific tab. For example, scopes that you create on the NTFS Permissions tab do not display in the Directory pane on the Registry Permissions tab.

SECURITY EXPLORER™ 64
UPDATED 18 JANUARY 2006
Creating Scopes by Managing Scopes
If you have several Enterprise Scopes to define, creating the scopes through the Manage Enterprise Scope feature is efficient.
Note: The Manage Enterprise Scope function is specific to the tab that you open. For example, to create an Enterprise Scope that contains paths to Share Permissions, open the Share Permissions tab.
1. Open the tab that is associated with the Enterprise Scope you want to create: NTFS, Registry, Share, or Printer.
2. Click . Alternatively, choose Manage Enterprise Scope from the Tools menu. The Manage Enterprise Scope dialog box lists the existing Enterprise Scopes for the selected tab.
3. Click New. The Create Enterprise Scope box opens.
4. In the Name box, type a name for the Enterprise Scope, and then click OK.
To add paths to the Enterprise scope, see Adding Paths to an Enterprise Scope.

SECURITY EXPLORER™ 65
UPDATED 18 JANUARY 2006
Adding Paths to an Enterprise Scope
1. Open the tab that is associated with the Enterprise Scope you want to edit: NTFS, Registry, Share, or Printer.
2. Click . Alternatively, choose Manage Enterprise Scope from the Tools menu. The Manage Enterprise Scope dialog box lists the existing Enterprise Scopes for the selected tab.
3. Select an Enterprise Scope, and then click Edit. The Edit Enterprise Scope list box displays the paths currently assigned to the selected Enterprise Scope.
Note: The paths included in the selected Enterprise Scope are listed in ascending alphabetical order. To change the order to descending, click the Name column heading.
To add a path to the Name list, click Browse, and then select a path; or type a path in the Path box, and then click Add.
To remove a selected path from the Name list, click Del.
To remove all paths from the Name list, click Clear.
4. When you are finished editing, click OK to apply the changes.
Removing Paths from an Enterprise Scope
1. Open the tab that is associated with the Enterprise Scope you want to edit: NTFS, Registry, Share, or Printer.
2. Click . Alternatively, choose Manage Enterprise Scope from the Tools menu. The Manage Enterprise Scope dialog box lists the existing Enterprise Scopes for the selected tab.
3. Select an Enterprise Scope, and then click Edit. The Edit Enterprise Scope list box displays the paths currently assigned to the selected Enterprise Scope.
Note: The paths included in the selected Enterprise Scope are listed in ascending alphabetical order. To change the order to descending, click the Name column heading.

SECURITY EXPLORER™ 66
UPDATED 18 JANUARY 2006
4. To delete a selected path, click Del. To delete all paths from the Enterprise Scope, click Clear.
5. When you are finished editing, click OK to apply the changes.
Removing an Enterprise Scope
Note: The Manage Enterprise Scope function is specific to the tab that you open. For example, to remove an Enterprise Scope that contains paths to Share Permissions, open the Share Permissions tab.
1. Open the tab that is associated with the Enterprise Scope you want to remove.
2. Click . Alternatively, choose Manage Enterprise Scope from the Tools menu. The Manage Enterprise Scope dialog box lists the existing Enterprise Scopes for the selected tab.
3. Select the Enterprise Scope[s] to remove, and then click Remove. A confirmation message appears. To remove the selected Enterprise Scope[s], click Yes.
VIEWING LICENSED SERVERS
Security Explorer 5 helps you keep track of the number of server licenses.
From any tab, click . Alternatively, select View Licensed Server List from the Tools menu. The Server List dialog box displays the number of licenses used and available.

SECURITY EXPLORER™ 67
UPDATED 18 JANUARY 2006
Removing a Server
1. Contact the Support Team at ScriptLogic for an authorization code.
2. In the Server list, select a server.
3. In the Authorization Code box, type the code that you obtained from the Support Team.
4. Click Remove Selected Server.
MANAGING NETWORK DRIVES
Security Explorer lets you access Windows functionality to help you manage your network drives easily.
Mapping a Network Drive
1. From any tab, select Map Network Drives from the Tools menu. The Windows Map Network Drive wizard appears.
2. Map the drive, and then click Finish.
Disconnecting a Network Drive
1. From any tab, select Disconnect Network Drives from the Tools menu. The Windows Disconnect Network Drive window appears.
2. Select the drive to disconnect, and then click OK.

SECURITY EXPLORER™ 68
UPDATED 18 JANUARY 2006
Configuring Security Explorer The Security Explorer Options provide flexibility to the appearance and functionality of Security Explorer.
SETTING GENERAL OPTIONS
From the Tools menu, select Options, or click . The Options dialog box opens to the General tab.
Reload at startup
Window state (size and location) Select to restore the size of the Security Explorer window and the location on your display as it appeared upon exiting the application. Clear to use the standard size and center the Security Explorer window on your display (default).
NTFS folder Registry location Share location Printer location
Select to restore the value in the Path box on the corresponding tab as it appeared upon exiting Security Explorer (default). The corresponding location is selected in the hierarchical directory tree and the Object pane and the associated permissions display in the Permissions pane. Clear to start Security Explorer with a blank Path box on the corresponding tab, a collapsed hierarchical directory tree, and empty Object and Permissions panes.

SECURITY EXPLORER™ 69
UPDATED 18 JANUARY 2006
Modifying Permissions
Always display progress bar
Display progress bar for long operations only
Never display progress bar Select an option to manage the display of the progress bar when you modify permissions. Choosing to display the progress bar for long operations only (default) or to never display the progress bar may help with memory management.
Logging
Log all security changes Select to log all permission changes to the selected root path displayed in the Folder box. Click to locate the root folder. Only information about the selected root path is logged; no information about changes to sub-items is logged.
SETTING VIEW OPTIONS
From the Tools menu, select Options, or click . The Options dialog box opens to the General tab. Open the View tab.
Appearance
Use standard Windows color scheme Select to change the colors of the Security Explorer window to standard Windows colors. Clear to use the Windows XP color scheme (default).

SECURITY EXPLORER™ 70
UPDATED 18 JANUARY 2006
Tabs
NTFS Permissions Registry Permissions Share Permissions Printer Permissions Enterprise Scopes Open Files Messages
Select to include the tab along the top right Objects pane. Clear to exclude the tab. The Messages tab is excluded by default. The NTFS Permissions tab is unavailable for selection.
Permissions
Use advanced style for users and groups By default, the name column includes a UPN, if available, following the name. For example: Joseph Smith ([email protected]). If the UPN is unavailable, the basic style is used. The advanced style may slow the display in the Permissions pane.
Use basic style for users and groups (ie name only) Select to display only the domain name\user name in the name column. For example: ACME\JSmith.
Include SID on permission change/search dialogs Select to show the SID column in dialog boxes. By default, the SID column is hidden.
SETTING ADVANCED OPTIONS
From the Tools menu, select Options, or click . The Options dialog box opens to the General tab. Open the Advanced tab.

SECURITY EXPLORER™ 71
UPDATED 18 JANUARY 2006
Domains and Computers
Check connection before loading (Ping) Select to ping computers before loading. If a computer is unavailable, a warning message appears. The default time-out is set to 1,500 ms. By default, Security Explorer does not check the connection, which could cause a response delay if that computer is unavailable.
Show unknown computers Select to include unknown computers in the Directory pane.
Skip domain loading for computers when computer path is manually entered Select to skip loading of the domain objects and permissions when you type a path into the Path box.
Windows Explorer
Include Security Explorer context menu During the installation process, a Security Explorer 5.0 context menu is added to Windows Explorer. You can access the context menu from the Windows Explorer File menu or a shortcut menu. Clear the check box to remove the Security Explorer 5.0 menu from Windows Explorer.
Modifying Permissions (NTFS)
Do not set ‘Archive’ attribute when setting security By default, the Archive attribute is set to Archive when a change is made to a permission. Select to leave the Archive attribute set to Normal if a change is made.
Warnings
Display warning before loading large folders By default, Security Explorer displays a warning message before loading large folders. Clear the check box to turn off the display.

SECURITY EXPLORER™ 72
UPDATED 18 JANUARY 2006
Using the Command Line Security Explorer 5 includes support for command line usage through separate programs that were copied to your install directory during the installation process.
Command Description
SxpBackup.exe Backs up permissions
SxpClone.exe Clones group or user permissions on a set of files or folders on the network
SxpExport.exe Exports group or user NTFS file permissions
SxpGrant.exe Grants group and user file permissions without affecting other users
SxpOwner.exe Sets the owner of the selected object Note: All utilities should be run while logged on as an Administrator.
ACCESSING A COMMAND PROMPT
You can open a DOS window directly from a selected folder
1. Open the NTFS Permissions or Share Permissions tab.
2. In the Directory or Objects pane, select a folder, and then click . A DOS window opens showing the selected path at the command line.

SECURITY EXPLORER™ 73
UPDATED 18 JANUARY 2006
SXPBACKUP.EXE
Back up permissions from the command line. You may wish to schedule regular backups through the schedule service or any other scheduling software.
Usage SXPBackup -file [parameter file]
SXPBackup -backup [wild card] [source file] [backup file]
Note: Target backup file must have a .sec extension.
SXPCLONE.EXE
Use to clone group or user permissions on a set of files and folders on the network.
Usage SXPClone <options> <source user name> <destination user name> <source path> <options> Switch letters can be in any order, upper or lower case /? This help message /progress Show progress /force Force down tree /overwrite Overwrite permissions /replace Add/Replace flag (Replace=true, Add=false) /file Source path represents a file (default: folder)
SXPEXPORT.EXE
You can export permissions on a folder to a Microsoft Access 2000 database (.mdb file) or to a delimited file for use with Microsoft Excel. Used in conjunction with any scheduling utility, you can export permissions to a database off hours automatically.
Usage SXPExport <options> <source path> <destination file name>
<options> Switch letters can be in any order, upper or lower case /? This help message /s Export to spreadsheet /d Export to database
Note: You must include either /s or /d.
/csv Use CSV format /summary Summary mode /folders Process subfolders /files Process files /recurse [recursion depth] Recurse /all Recurse all /wildcard [wildcard characters] Wildcard Note: Do not use asterisk (*) as a wildcard character. For example, if you want only JPG files, use /wildcard .jpg

SECURITY EXPLORER™ 74
UPDATED 18 JANUARY 2006
SXPGRANT.EXE
Grant group and user file permissions without affecting other users. Will not affect any other user's and group's permissions while recursing across subfolders. This utility should be run while logged on as an Administrator.
Usage SXPGrant <options> <user name> <source path>
<options> Switch letters can be in any order, upper or lower case /? This help message /progress Show progress /force Force down tree /overwrite Overwrite permissions /replace Add/Replace flag (Replace=true, Add=false) /allow Allow/Deny flag (Allow=true, Deny=false) (default:Allow) /noprop No propagate /noarch Do not set archive attribute /file Source path represents a file (default: folder)
/perm [permission type] Permission (default: full control) [permission type]
full Full control modify Modify readexecute Read and execute list List folder contents read Read write Write
/scope [scope type] Scope (default: this folder, subfolders and files) [scope type]
1 This folder only 2 This folder subfolders and files 3 This folder and subfolders 4 This folder and files 5 Subfolders and files only 6 Subfolders only 7 Files only

SECURITY EXPLORER™ 75
UPDATED 18 JANUARY 2006
SXPOWNER.EXE
Set the owner an object. This utility should be run while logged on as an Administrator.
Usage SXPOwner <options> <user name> <source path>
<options> Switch letters can be in any order, upper or lower case /? This help message /progress Show progress /files Process files /folders Process Folders /recurse Recurse subfolders and files /wildcard [wildcard characters] Wildcard Note: Do not use asterisk (*) as a wildcard character. For example, if you want only JPG files, use /wildcard .jpg
SXPINHERITANCE.EXE
Repairs the inheritance on the specified source path. See Repairing Inheritance.
Important: The process of repairing inheritance changes the permissions on the selected folder, subfolder, and file. Review the selected folder to verify that important permissions are not removed during the process.
Usage SXPInheritance <options> <source path>
<options> Switch letters can be in any order, upper or lower case /? This help message /progress Show progress /file Source path represents a file (default: folder) /add Add inheritance to specified path /copy Remove inheritance from specified path (and make inherited permissions explicit) /remove Remove inheritance from specified path

SECURITY EXPLORER™ 76
UPDATED 18 JANUARY 2006
Troubleshooting In its Knowledge Base, ScriptLogic Corporation has a library of articles that may provide an answer to a problem you are experiencing. Before calling technical support, check to see if your problem is documented here. You might also browse the Discussion Forums to see if anyone else is experiencing the same issue.
http://www.scriptlogic.com/support
REPAIRING INHERITANCE
On occasion, you man need to repair the inheritance on folders and files because some or all subfolders and files are not inheriting permissions correctly from their parent. The incorrect inheritance can include missing permissions, such as a subfolder is missing an inherited permission from the parent, and unwanted extra permissions, such as a subfolder contains an extra inherited permission that is not present on the parent.
Important: The process of repairing inheritance changes the permissions on the selected folder, subfolder, and file. Review the selected folder to verify that important permissions are not removed during the process.
1. In the Directory pane, select the folder on which to repair inheritance.
2. From the Security menu, choose Repair Inheritance. A warning message appears.

SECURITY EXPLORER™ 77
UPDATED 18 JANUARY 2006
3. Click Yes. The Modifying Permissions box displays the progress in the Modifying permissions on box. The Errors area displays any errors that occur during the process.
Note: The process can occur so quickly that the Completed box appears before you can change any settings.
Display progress (un-checking this option will speed-up processing)
Select to display the progress in real time. Uncheck to stop the display.
At the end of the repair process, the Completed box displays the errors, objects changed, and elapsed time.
Close this dialog when processing completes.
Select to close the Modifying Permissions box when the processing is complete.

SECURITY EXPLORER™ 78
UPDATED 18 JANUARY 2006
VIEWING ERROR MESSAGES
The Messages tab is hidden by default. If you want to view errors that occur with Security Explorer, turn on the Messages tab.
1. From the Tools menu, select Options, or click . The Options dialog box opens to the General tab. Open the View tab.
2. Select the Messages check box, and then click OK. The Messages tab appears.
3. Open the Messages tab to view the errors.
UNINSTALLING SECURITY EXPLORER 5
1. From the Windows Control Panel, double-click Add/Remove Programs.
2. Select Security Explorer 5.
3. Click Remove. A message box prompts you for confirmation.
4. To remove the application, click Yes. A status dialog box displays for the few seconds necessary to remove the application.
Note: The installation directory that contained Security Explorer remains after the process is complete. This directory contains the license file for the product and any files created after the product was installed. These may be deleted manually if you wish to completely remove Security Explorer.

SECURITY EXPLORER™ 79
UPDATED 18 JANUARY 2006
Index
. .csv, 53 .mbd, 53, 73 .txt, 53
A abbreviations
permissions, 38 Ad, 38 adding
user or group, 42 adjusting
panes, 5 archive setting, 71 authorization code, 67 Autohide button, 6
B backing up
security, 46 backup
deleting, 49 editing, 49 restoring, 50 scheduler, 48 scheduling, 47
backup files filtering, 51
blue permissions, 40 browsing
all groups and users, 31 building a query, 24 buttons, 7
Autohide, 6 Clone, 21 Delete, 43 Grant, 14 Manage Enterprise Scope, 64 Managing Favorites, 61 Modify, 39 Print, 44 Revoke, 18 Search, 32 Set Owner, 30
C Cf, 38 Clone button, 21
cloning permissions, 21 selecting by SID history, 24 selecting pairs automatically, 23
collapsing Directory pane, 6
colors changing, 69
command line sxpbackup.exe, 73 sxpclone.exe, 73 sxpexport.exe, 73 sxpgrant.exe, 74 sxpinheritance.exe, 75 sxpowner.exe, 75
context menu hiding, 71
Control Bar, 7 hiding, 7
copying permissions, 28 permissions to subfolders and files, 29
creating enterprise scopes, 62, 63, 64 favorites, 60 new folder, 55 new share, 59 permission templates, 26 Registry key, 58
Cs, 38 customizing
permissions report, 44
D date, 44 De, 38 defaults
restore to, 5 Delete button, 43 deleted accounts
revoking permissions, 20 deleting
backup job, 49 enterprise scopes, 66 folders, 55 permissions, 43 Registry key, 58
Directory pane, 4 collapsing, 6 expanding, 6
Ds, 38

SECURITY EXPLORER™ 80
UPDATED 18 JANUARY 2006
E editing
backup job, 49 enterprise scope, 65
enterprise scopes, 62 adding paths to, 65 creating, 62, 63, 64 editing, 65 removing, 66 removing paths from, 65
errors logging, 78
Ex, 38 exiting
Security Explorer, 7 expanding
Directory pane, 6 Explorer
opening in, 58 exporting
permissions, 53
F favorites, 60
removing, 61 File menu, 8 files
opening in Explorer, 58 properties, 57
filtering backup files, 51
folders creating new, 55 deleting, 55 opening in Explorer, 58 properties, 57
font changing print, 44
G Grant button, 14 granting
permissions, 14 group memberships, 41 groups
renaming, 42
H header, 44 Help menu, 11 hiding
Control Bar, 7 panes, 5 status bar, 11 Toolbar, 7
I inheritance
repairing, 76 inherited permissions
deleting, 43 modifying, 39
L Lf, 38 local groups and users
browsing all, 31 Log tab, 70 logging
errors, 78 security changes, 69
M Manage Enterprise Scope button, 64 Managing Favorites button, 61 mapping
network drives, 67 Md, 16 menus, 8
File, 8 Help, 11 Security, 9 Tools, 10 View, 8 Window, 10
Microsoft Access, 53, 73 Microsoft Excel, 53, 73 Modify button, 39 modifying
permissions, 39 Mp, 16
N names
changing display of, 70 network drives
disconnecting, 67 mapping, 67
NTFS permissions types of, 16
O Objects pane, 4 open resources
closing, 56 viewing, 56
opening Security Explorer, 3
options setting, 68
overwrite permissions, 17 ownership

SECURITY EXPLORER™ 81
UPDATED 18 JANUARY 2006
setting, 30
P page numbers, 44 panes
adjusting, 5 Directory, 4 hiding, 5 Objects, 4 Permissions, 4
pasting permissions, 28
permission templates, 26
permissions abbreviations, 38 backing up, 46 cloning, 21 copying, 28 copying to subfolders and files, 29 customizing printout, 44 deleting, 43 exporting, 53 granting, 14 logging changes to, 69 modifying, 39 overwriting, 17 pasting, 28 printing, 44 propagate, 13 restoring, 50 revoking, 18 searching for, 32 select all, 28 types of, 16 viewing, 13
Permissions pane, 4 ping, 71 Pr, 16 Print button, 44 printer permissions
types of, 16 printing
permissions, 44 progress bar
hiding, 69 propagate permissions, 13 properties
viewing, 57 protected accounts
granting permissions, 17 revoking permissions, 20
Q query
constructing, 24
R R, 38 Ra, 38 Rd, 38 Registry key
creating, 58 deleting, 58
remote computers managing permissions, 12
remove group/user from list, 17, 19
removing favorite, 61 shares, 59
removing servers, 67 renaming
users and groups, 42 repairing
inheritance, 76 Resistry permissions
types of, 16 restore view, 5 restoring
permissions, 50 using wildcards, 51
Revoke button, 18 revoking
permissions, 18 Rp, 38 Rx, 38
S scheduling
backup, 47 Search button, 32 searching
for permissions, 32 setting folders and files options, 34 setting group/user options, 32 setting permission options, 35 sorting search results, 38 starting the search, 37
security backing up, 46 logging changes to, 69 restoring, 50
Security Explorer exiting, 7 removing, 78 setting options, 68 starting, 3
Security menu, 9 select all permissions, 28 servers
licenses, 66 removing, 67
Set Owner button, 30 setting
ownership, 30 share permissions

SECURITY EXPLORER™ 82
UPDATED 18 JANUARY 2006
types of, 16 shares
creating, 59 removing, 59
showing status bar, 11 Toolbar, 7
SID history selecting, 24
sizing windows, 68
sorting search results, 38
start menu, 3 starting
Security Explorer, 3 status bar, 11 sxpbackup.exe, 73 sxpclone.exe, 73 sxpexport.exe, 73 sxpgrant.exe, 74 sxpinheritance.exe, 75 sxpowner.exe, 75
T tabs, 4
hiding, 70 templates
permission, 26 Tf, 38 To, 38 toolbar, 7 Tools menu, 10
U unknown accounts
revoking permissions, 20 searching for, 33
users renaming, 42
V view
adjusting, 5 restore to default, 5
View menu, 8 viewing
open resources, 56 permissions, 13 properties, 57 server licenses, 66
W W, 38 Wa, 38 Wd, 38 wildcards, 47
using to restore, 51 Window menu, 10 windows
color scheme, 69 Windows Explorer, 58 Wp, 38 Wx, 38
X X, 38