security gateway virtual appliance r75 - check … · security gateway virtual appliance r75.40...
TRANSCRIPT

5 March 2013
Getting Started Guide
Security Gateway Virtual Appliance R75.40
for Amazon Web Services VPC
[Protected]

© 2013 Check Point Software Technologies Ltd.
All rights reserved. This product and related documentation are protected by copyright and distributed under licensing restricting their use, copying, distribution, and decompilation. No part of this product or related documentation may be reproduced in any form or by any means without prior written authorization of Check Point. While every precaution has been taken in the preparation of this book, Check Point assumes no responsibility for errors or omissions. This publication and features described herein are subject to change without notice.
RESTRICTED RIGHTS LEGEND:
Use, duplication, or disclosure by the government is subject to restrictions as set forth in subparagraph (c)(1)(ii) of the Rights in Technical Data and Computer Software clause at DFARS 252.227-7013 and FAR 52.227-19.
TRADEMARKS:
Refer to the Copyright page (http://www.checkpoint.com/copyright.html) for a list of our trademarks.
Refer to the Third Party copyright notices (http://www.checkpoint.com/3rd_party_copyright.html) for a list of relevant copyrights and third-party licenses.

Important Information Latest Software
We recommend that you install the most recent software release to stay up-to-date with the latest functional improvements, stability fixes, security enhancements and protection against new and evolving attacks.
Latest Documentation
The latest version of this document is at: http://supportcontent.checkpoint.com/documentation_download?ID=23994
For additional technical information, visit the Check Point Support Center (http://supportcenter.checkpoint.com).
For more about this release, see the Security Gateway Virtual Appliance R75.40 for Amazon VPC home page (sk92438) (http://supportcontent.checkpoint.com/solutions?id=sk92438).
Revision History
Date Description
5 March 2013 Added the AMI for the region: us-gov-west-1 ("Launching the Security Gateway Instance" on page 11).
28 February 2013 First release of this document
Feedback
Check Point is engaged in a continuous effort to improve its documentation.
Please help us by sending your comments (mailto:[email protected]?subject=Feedback on Security Gateway Virtual Appliance R75.40 for Amazon Web Services VPC Getting Started Guide).

Contents
Important Information ............................................................................................. 3 Introduction ............................................................................................................. 5
Glossary .............................................................................................................. 5 Overview ............................................................................................................. 6 Deployment Components .................................................................................... 6 Security Gateway Deployment ............................................................................ 7
Setting Up the VPC Environment ........................................................................... 8 Planning the Network Topology ........................................................................... 8 Preparing the VPC............................................................................................... 8 Creating the SSH Key Pair .................................................................................. 8 Creating the Amazon VPC Internet Gateway ....................................................... 9 Creating the Check Point Security Gateway Subnet ............................................ 9 Preparing the Routing Table ................................................................................ 9 Creating Security Groups .................................................................................... 9
Installing and Configuring Check Point Security Gateway Virtual Appliance .. 11 Launching the Security Gateway Instance ..........................................................11 Routing Traffic Through the Security Gateway ...................................................12 Assigning an Elastic IP Address .........................................................................12 Securely Accessing the Security Gateway ..........................................................12 Installing Check Point Software Blades ..............................................................13
Protecting a Web Server....................................................................................... 14 Setting Up a VPN Tunnel ...................................................................................... 17
Tunnel between Centrally Managed Gateways ...................................................17 VPN Tunnel with Externally Managed Gateway ..................................................18
Inspecting Traffic Between VPC Networks ......................................................... 19 Environment Requirements ................................................................................19 Workflow ............................................................................................................20

Security Gateway Virtual Appliance R75.40 Getting Started Guide for Amazon Web Services VPC | 5
Chapter 1
Introduction
In This Chapter Glossary 5
Overview 6
Deployment Components 6
Security Gateway Deployment 7
Note - This document explains how to deploy the Check Point Security Gateway virtual appliance in the Amazon Web Services VPC environment. All names and trademarks of Amazon.com and AWS services and technologies belong to Amazon. For more about Amazon names, see http://aws.amazon.com/trademark-guidelines/.
This document assumes that you have basic expertise with:
Check Point Security Gateway and Security Management Server
Amazon Web Services VPC and EC2
Glossary
Term Definition
Amazon EC2 A service provided by Amazon.com that lets users use virtual computers (http://aws.amazon.com/ec2/).
Amazon VPC Virtual Private Cloud (http://aws.amazon.com/vpc/). A private cloud that exists within the public cloud of Amazon. You can run EC2 instances within a VPC.
Customer VPC network The address range of the customer VPC.
Private subnet The part of the customer VPC network that is protected by the Security Gateway and separated by it from the rest of the cloud services and traffic.
Security Gateway subnet
A network subnet that connects the private subnet with the VPC Internet gateway. The R75.40 Security Gateway is the only gateway connected to this subnet. Traffic that leaves the private subnet (Outbound Traffic), is routed to the Security Gateway. Traffic destined for the private subnet (Inbound Traffic) must go through the Security Gateway.

Introduction
Security Gateway Virtual Appliance R75.40 Getting Started Guide for Amazon Web Services VPC | 6
Overview The cloud technology lets a company use computing resources from professional IT vendors. It takes advantage of externally managed IT resources with a flexible capacity using a pay-as-you-go model. Amazon Web Services (AWS) provides cloud computing services which let companies launch a wide range of servers and services. The Virtual Private Network (VPC) lets companies keep their cloud IT resources in a private network, in the AWS public cloud.
Having part of your IT resources in a public cloud can introduce security issues. Check Point Security Gateway Virtual Appliance for Amazon Web Services VPC helps you meet the security challenges of the public cloud. With this solution, you can:
Establish and maintain multiple VPN tunnels between your VPC and your corporate networks.
Inspect data entering and leaving the VPC private subnet.
Segregate networks in the VPC.
Protect your VPC resources with Check Point Software Blades.
Centrally manage this solution from your existing Check Point management server deployment.
Deployment Components
Key Example IP Address
1 Your AWS instances in private subnets, separated from the rest of the Amazon cloud by the VPC, and protected by the Security Gateway.
10.0.1.0/24
2 Check Point Security Gateway Virtual Appliance for VPC, in the Security Gateway Subnet, optionally apply NAT-hide on internal private subnets (1).
10.0.0.10 - instance of Security Gateway 10.0.0.0/28 - Security Gateway Subnet
3 VPC routes outgoing traffic from the Security Gateway Subnet to the VPC Internet gateway.
4 The Amazon VPC Internet Gateway.
5 Internet. Traffic to and from the Internet is routed through the Amazon VPC Internet Gateway.

Introduction
Security Gateway Virtual Appliance R75.40 Getting Started Guide for Amazon Web Services VPC | 7
Security Gateway Deployment A company using Amazon Web Services VPC can run servers at the virtual environment and on the local premises. An administrator uses a local Security Management Server to manage the Security Gateways running in the company site and in the AWS virtual environment. This gives you one policy protecting on-site and cloud computing resources.
If you already have a VPC, you can secure your assets with Check Point. If you have a Check Point secured environment, you can meet the unique security challenges of cloud computing while enjoying its advantages.
Centrally Managed or Stand-Alone Deployments:
The Check Point Security Gateway Virtual Appliance running in the Amazon Web Services VPC can be deployed in stand-alone configuration (Security Gateway and Security Management Server) or be centrally managed from an on-premises Check Point Security Management Server.
Security Gateway Virtual Appliance R75.40 Getting Started Guide for Amazon Web Services VPC | 8
Chapter 2
Setting Up the VPC Environment
In This Chapter Planning the Network Topology 8
Preparing the VPC 8
Creating the SSH Key Pair 8
Creating the Amazon VPC Internet Gateway 9
Creating the Check Point Security Gateway Subnet 9
Preparing the Routing Table 9
Creating Security Groups 9
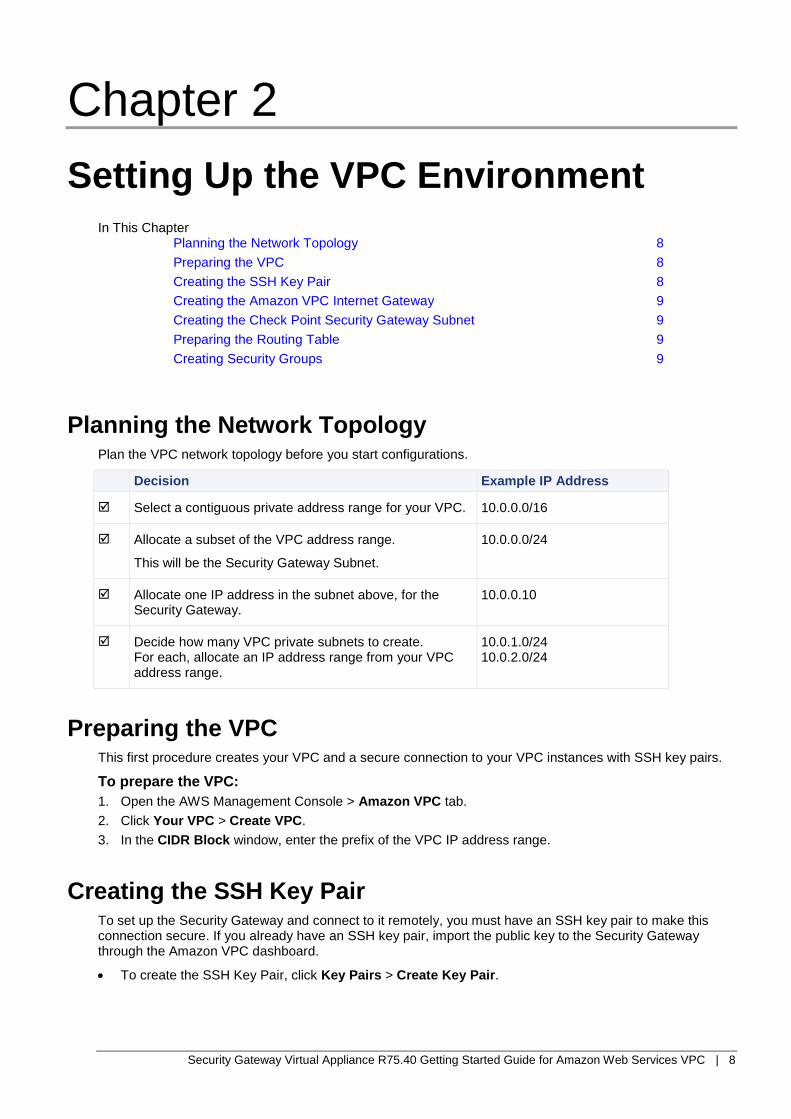
Planning the Network Topology Plan the VPC network topology before you start configurations.
Decision Example IP Address
Select a contiguous private address range for your VPC. 10.0.0.0/16
Allocate a subset of the VPC address range.
This will be the Security Gateway Subnet.
10.0.0.0/24
Allocate one IP address in the subnet above, for the Security Gateway.
10.0.0.10
Decide how many VPC private subnets to create. For each, allocate an IP address range from your VPC address range.
10.0.1.0/24 10.0.2.0/24
Preparing the VPC This first procedure creates your VPC and a secure connection to your VPC instances with SSH key pairs.
To prepare the VPC:
1. Open the AWS Management Console > Amazon VPC tab.
2. Click Your VPC > Create VPC.
3. In the CIDR Block window, enter the prefix of the VPC IP address range.
Creating the SSH Key Pair To set up the Security Gateway and connect to it remotely, you must have an SSH key pair to make this connection secure. If you already have an SSH key pair, import the public key to the Security Gateway through the Amazon VPC dashboard.
To create the SSH Key Pair, click Key Pairs > Create Key Pair.

Setting Up the VPC Environment
Security Gateway Virtual Appliance R75.40 Getting Started Guide for Amazon Web Services VPC | 9
Creating the Amazon VPC Internet Gateway The Amazon VPC Internet Gateway is the only connection point between the VPC components and the Internet. You must configure an Internet Gateway in your VPC.
To configure a new Internet Gateway in the VPC:
1. Open the AWS Management Console > Amazon VPC tab.
2. Click Your VPC.
3. In the VPC area, click Internet Gateway.
4. Attach the newly created Internet Gateway to your VPC.
Creating the Check Point Security Gateway Subnet Create a subnet in the VPC to be the Security Gateway Subnet, containing only the Security Gateway.
To create the Security Gateway subnet:
1. Open the AWS Management Console > Amazon VPC tab.
2. Select the Subnets menu.
3. Click Create Subnet.
4. Enter the subnet prefix (for example, 10.0.0.0/24) and create the Security Gateway Subnet.
Preparing the Routing Table The Check Point Security Gateway must be able to route outbound Internet traffic through the Amazon VPC Internet gateway.
Configure the VPC routing tables.
To configure the Security Gateway Subnet routing table:
1. In the VPC section, click Route Tables.
2. Click Create Route Table.
3. Select the current VPC.
4. Add a default routing entry:
Destination = 0.0.0.0/0
Target = the Internet Gateway
The routing table is then:
<VPC network CIDR> local
<Default route> Internet Gateway
5. Open the Associations tab.
6. Associate this routing table with the Security Gateway Subnet.
Creating Security Groups The Check Point Security Gateway can enforce a more sophisticated security policy, making the Amazon VPC security groups redundant. This procedure explains how to create a permissive VPC security group, to make sure that the Amazon VPC security groups do not conflict with the Check Point security policy.
To create a new security group:
1. Open the Security Groups menu.
2. Click Create Security Group.
3. Name the new group PermissiveSecGrp, and select the VPC.
4. In the Security Groups list, select PermissiveSecGrp and open the Inbound tab.
5. Create a new rule that accepts all traffic from any source address.
6. Add the rule to the security group.

Setting Up the VPC Environment
Security Gateway Virtual Appliance R75.40 Getting Started Guide for Amazon Web Services VPC | 10

Security Gateway Virtual Appliance R75.40 Getting Started Guide for Amazon Web Services VPC | 11
Chapter 3
Installing and Configuring Check Point Security Gateway Virtual Appliance
In This Chapter Launching the Security Gateway Instance 11
Routing Traffic Through the Security Gateway 12
Assigning an Elastic IP Address 12
Securely Accessing the Security Gateway 12
Installing Check Point Software Blades 13
Launching the Security Gateway Instance Currently, the available AMI (Amazon machine image) names for Check Point Security Gateway Virtual Appliance are:
Region AMI ID
us-east-1 ami-4c108025
us-west-2 ami-28159f18
us-west-1 ami-10230155
eu-west-1 ami-564f4722
sa-east-1 ami-3bcb1026
ap-southeast-1 ami-4879341a
ap-northeast-1 ami-6561e664
ap-southeast-2 ami-1cd84926
us-gov-west-1 ami-cd85e1ee
For all these AMIs, the AMI Description is: Check Point Security Gateway R75.40VS for VPC (take-023) GAIA/x86_64
To launch a new instance of Check Point Security Gateway Virtual Appliance:
1. Select the Amazon EC2 tab.
2. Click Launch Instance.
3. Select the Check Point AMI from the above table, according to our VPC region.
4. Select the instance type.
Note - the "Micro" instance type is not supported.
5. Select Launch Instances Into Your Virtual Private Cloud.
6. Select the Check Point Security Gateway Subnet ("Deployment Components" on page 6).

Installing and Configuring Check Point Security Gateway Virtual Appliance
Security Gateway Virtual Appliance R75.40 Getting Started Guide for Amazon Web Services VPC | 12
7. In IP Address, enter the private IP address of the Security Gateway (for example, 10.0.0.10).
8. In Key Pair, select the SSH key pair ("Creating the SSH Key Pair" on page 8).
9. Select the security group ("Creating Security Groups" on page 9).
10. Launch the instance.
Routing Traffic Through the Security Gateway To let the Security Gateway route traffic of your private subnets, make this change.
To route traffic through the Security Gateway:
1. Open EC2 > instance list.
2. Right-click the Check Point Security Gateway Virtual Appliance instance.
3. Clear Source/Destination Check.
Assigning an Elastic IP Address An Amazon VPC elastic IP address is a public IP address. The Security Gateway has a private IP address and must also have an elastic IP address. The Amazon VPC Internet Gateway translates the elastic IP address of the Security Gateway to its private IP address.
To assign an elastic IP address to the Check Point Security Gateway Virtual Appliance instance:
1. On the Amazon VPC tab, open Elastic IPs.
2. Click Allocate New Address.
3. From EIP used in, select VPC and then click Yes, Allocate.
4. Select the IP address in the list and click Associate Address.
5. Select the Security Gateway instance and click Yes, Associate.
Securely Accessing the Security Gateway In this section, you access the Security Gateway instance. Before you can install Software Blades, you must connect to the instance using SSH. Connect as the admin user. Compare the public fingerprint from the Security Gateway instance, to the public key from the AWS Console.
If you do not compare the fingerprints, you are vulnerable to a man-in-the-middle attack on your SSH session.
Note - It can take up to three minutes after the launch of an instance before the system log is available on the AWS Console.
To get the SSH public key fingerprint of the Security Gateway from the AWS Console:
1. Open EC2 Instances.
2. Right-click the Check Point Security Gateway Virtual Appliance instance and select Get System Log.
3. Take note of the fingerprint string.
To connect to the Security Gateway:
1. Open an SSH client.
2. In the SSH client, connect using the SSH Private Key ("Creating the SSH Key Pair" on page 8), as admin, to the elastic IP address of the Security Gateway.
For example, in Linux: ssh -i MyKey.pem admin@<elasticIP>
3. Compare the public key fingerprint with the string sent by the Security Gateway.

Installing and Configuring Check Point Security Gateway Virtual Appliance
Security Gateway Virtual Appliance R75.40 Getting Started Guide for Amazon Web Services VPC | 13
Installing Check Point Software Blades
Note - The host IP address and the default route are set automatically and should not be changed.
1. Set the administrator password. Run: set user admin password
At the prompt, enter the administrator password.
2. Run: save config
3. Exit the gateway shell. Run: exit
The gateway is now ready for configuration.
4. Using a browser, connect to https://<elasticIP>
5. In the Gaia Portal window, log in using the administrator name (admin) and password that you defined earlier.
6. The WebUI shows the First Time Configuration Wizard.
Click Next.
7. Set the date and time (manually, or enter the hostname or IP address of the NTP server).
Click Next.
8. Set the host name for the appliance.
9. Optional: Set the domain name, and IPv4 addresses for the DNS servers.
You can configure IPv6 DNS servers.
Click Next.
10. The interface page shows the internal IPv4 address of the interface. Do not change this setting.
Click Next.
11. Set the username and password for the Security Management server administrator account.
Click Next.
12. Select Security Gateway and/or Security Management
Note: ClusterXL is not supported.
Click Next.
13. Define the GUI Clients that can log in to the Security Management server.
Click Next.
14. Click Finish and then OK.
15. If the Help Check Point Improve Software Updates window shows, click Yes or No as necessary.
16. After some minutes, you can use the WebUI to configure your standalone environment.

Security Gateway Virtual Appliance R75.40 Getting Started Guide for Amazon Web Services VPC | 14
Chapter 4
Protecting a Web Server You can configure Check Point Security Gateway Virtual Appliance to protect servers located in VPC, in particular to protect Web servers from malicious users from the Internet.
Environment requirements
Connectivity: Clients on the Internet can access web servers inside VPC.
Security: Traffic to the Web servers passes through the Check Point Security Gateway Virtual Appliance.
In this configuration, the Check Point Security Gateway Virtual Appliance does load balancing of traffic between multiple Web servers.
Example environment
To explain the configuration steps, we use this example environment. Replace the addresses for your environment when you do the steps.
Key Component Example IP Address
1 Internet Gateway
2 Amazon Virtual Private Cloud (VPC) CIDR 10.0.0.0/16
3 External subnet 10.0.0.0/24
4 Check Point Security Gateway Virtual Appliance external private address 10.0.0.10
5 Check Point Security Gateway Virtual Appliance secondary external private address
10.0.0.20

Protecting a Web Server
Security Gateway Virtual Appliance R75.40 Getting Started Guide for Amazon Web Services VPC | 15
Key Component Example IP Address
6 Check Point Security Gateway Virtual Appliance internal private address 10.0.1.10
7 Internal subnet 10.0.1.0/24
8 Web server instances
9 Gateway Elastic IP address Allocated by AWS
10 Web servers Elastic IP address Allocated by AWS
To configure the Check Point Security Gateway Virtual Appliance:
1. Create a VPC using the VPC CIDR (10.0.0.0/16).
2. Create these subnets inside the VPC:
External subnet (10.0.0.0/24)
Internal subnet (10.0.2.0/24)
Note: These subnets must be in the same Availability Zone.
3. Create this routing table and associate it with the external subnet:
10.0.0.0/16 Local 0.0.0.0/0 Internet-GW
4. Run a Check Point Security Gateway Virtual Appliance instance with the following interfaces and IP addresses:
Network interface eth0 eth1
Subnet
Private IP address
Source/Dest check
Security Group
10.0.0.0/24 (external subnet)
10.0.0.10
false
permissive
10.0.1.0/24 (internal subnet)
10.0.1.10
false
permissive
5. Allocate an Elastic IP address and associate it with the Check Point Security Gateway Virtual Appliance external private address. This address is used to manage the Check Point Security Gateway Virtual Appliance.
6. Create this routing table and associate it with the internal subnet:
10.0.0.0/16 Local 0.0.0.0/0 Check Point Security Gateway Virtual Appliance
internal private address
7. Add to eth0 a secondary IP address (10.0.0.20).
8. Allocate another Elastic IP address and associate it with the Check Point Security Gateway Virtual Appliance secondary external private IP address. Use this address to connect to the Web servers.
9. Launch multiple Web servers into the internal subnet.
10. In SmartDashboard:
a) For each Web server create a network object.
b) Create a simple group object containing all Web servers.
c) Create a logical server object with the following properties:
IP Address: 10.0.0.20
Server's Type: Other (Note that the HTTP server type is not supported).
Servers group: The simple group object you created above

Protecting a Web Server
Security Gateway Virtual Appliance R75.40 Getting Started Guide for Amazon Web Services VPC | 16
d) In the Firewall rule base, create a rule using the logical server in the Destination column
e) Install the policy.
The web servers are now accessible from the Internet using the Elastic IP address you allocated in step 8.

Security Gateway Virtual Appliance R75.40 Getting Started Guide for Amazon Web Services VPC | 17
Chapter 5
Setting Up a VPN Tunnel
In This Chapter Tunnel between Centrally Managed Gateways 17
VPN Tunnel with Externally Managed Gateway 17
This is optional. You can create a tunnel of encrypted traffic between the Security Gateway in the VPC and a Security Gateway in your company local site.
These procedures explain how to configure the VPN for these deployments only. For more about defining VPN tunnels with gateways on different sites and different servers, see the R75.40Virtual Private Network Administration Guide (http://supportcontent.checkpoint.com/solutions?id=sk67581).
Tunnel between Centrally Managed Gateways In this deployment, the company’s local site Security Management Server centrally manages the Security Gateway at the company local site and the Security Gateway protecting the company’s private subnets in the Amazon VPC. You can encrypt the data going between the company local site and the company's private subnets in the Amazon VPC: create a VPN tunnel between the two Security Gateways.
To create the VPN tunnel:
1. Open SmartDashboard.
2. Create a group network object for the encryption domain behind the VPC Security Gateway. Add the VPC private subnets to the group.
3. Edit the VPC gateway object:
a) In General Properties, click VPN.
b) In Topology, in the VPN Domain section, click Manually defined. Set the encryption domain to the object you created in step 2.
c) Open IPSec VPN > Link Selection.
d) Select Always Use this IP Address.
e) Select Statically NATed IP.
f) Enter the elastic IP address.
4. Create a group network object for the encryption domain behind the company local site gateway. Add the local site internal networks to this object.
5. Edit the company local site Security Gateway object:
a) In General Properties, click VPN.
b) In Topology, in the VPN Domain section, click Manually defined and set the encryption domain to the object you created in step 4.
6. Add the VPC peer gateway object and the VPC gateway object to the My Intranet community.
7. Install the policy on the two Security Gateways.

Setting Up a VPN Tunnel
Security Gateway Virtual Appliance R75.40 Getting Started Guide for Amazon Web Services VPC | 18
VPN Tunnel with Externally Managed Gateway In this deployment, two Security Management Servers manage the Security Gateways. There is one Security Management Server at the company’s local site, and the other Security Management Server is in the Amazon VPC network. The VPN tunnel must be configured on each of the two Security Management Servers. In each Security Management Server, define the other peer gateway (the other Security Gateway) as an externally managed gateway.
Do these steps in the local site Security Management Server:
1. Open SmartDashboard, connecting to the Security Management Server.
2. Define the encryption domains for each of the VPN peers ("Tunnel between Centrally Managed Gateways" on page 17).
3. Edit the Security Gateway object of the company local site:
a) In General Properties, click VPN.
b) In Topology, make sure the topology is set.
4. Create an externally managed VPN gateway object for the VPC gateway.
a) In General Properties > Gateway IP, enter the elastic IP address of the VPC Security Gateway.
b) In Topology, set the encryption domain of the VPC object.
c) In Topology > Interface, set the interface IP address to the private IP address of the VPC Security Gateway.
Connect to the Security Management Server of the VPC Security Gateway and do the symmetrical settings:
1. Open SmartDashboard, connecting to the Security Management Server at the VPC.
2. Define the encryption domains for each of the VPN peers ("Tunnel between Centrally Managed Gateways" on page 17).
3. Edit the VPC site Security Gateway object:
a) In General Properties, click VPN.
b) In Topology, in the VPN Domain section, click Manually defined and set the encryption domain.
4. Create an externally managed VPN gateway object for the local site gateway.
a) In General Properties > Gateway IP, enter the IP address of the local site gateway.
b) In Topology, set the encryption domain of the local site gateway.

Security Gateway Virtual Appliance R75.40 Getting Started Guide for Amazon Web Services VPC | 19
Chapter 6
Inspecting Traffic Between VPC Networks
In This Chapter Environment Requirements 19
Workflow 20
You can configure Check Point Security Gateway Virtual Appliance to inspect traffic between networks in the VPC, in particular, to protect web applications in the VPC.
The web application environment in the VPC is assumed to have:
Internet facing web servers in the VPC
Back-end servers in the VPC (such as Tomcat or database servers)
Servers inside the corporate network
Clients inside the corporate network that manage this environment
Environment Requirements This environment will give you the required connectivity and security.
Connectivity:
The web servers must have access to the back-end servers.
The back-end servers must have access to servers inside the corporate network.
Security:
Traffic from the web servers to the back-end servers must be inspected and logged by the Check Point gateway.
Traffic between the VPC and the corporate network must be carried over a VPN.
To make this true, create these subnets in the VPC:
A public subnet that hosts the web servers
A private subnet that hosts the back-end servers
A dedicated subnet that hosts the Check Point Security Gateway
Because routing inside the VPC is direct, use NAT to force traffic between these subnets to pass through the gateway.

Inspecting Traffic Between VPC Networks
Security Gateway Virtual Appliance R75.40 Getting Started Guide for Amazon Web Services VPC | 20
Key
1 Web server subnet
2 Back-end subnet
3 Check Point Security Gateway Virtual Appliance subnet
4 VPC routes outgoing traffic from the Security Gateway Subnet to VPC Internet gateway
5 Amazon VPC Internet Gateway
6 Internet
7 Corporate network
Workflow To best explain the configuration steps, we use this example environment. Make sure to replace the addresses to reflect your environment when you do the steps.
Component / Range Address
VPC CIDR address range 10.0.0.0/16
Check Point Security Gateway subnet 10.0.0.0/24
Check Point Security Gateway private address 10.0.0.10
Back-end subnet 10.0.1.0/24
Web servers subnet 10.0.2.0/24
Corporate network 200.0.0.0/24
NAT Components Masking Addresses*
Back-end NAT 172.16.1.0/24
Web servers subnet 172.16.2.0/24
* NAT masking addresses must be outside the VPC CIDR address range.
To protect your Internet facing web applications:
1. Create a VPC using the VPC CIDR address range (10.0.0.0/16).
2. Create these subnets inside the VPC:
Check Point Security Gateway subnet (10.0.0.0/24)
Inspecting Traffic Between VPC Networks
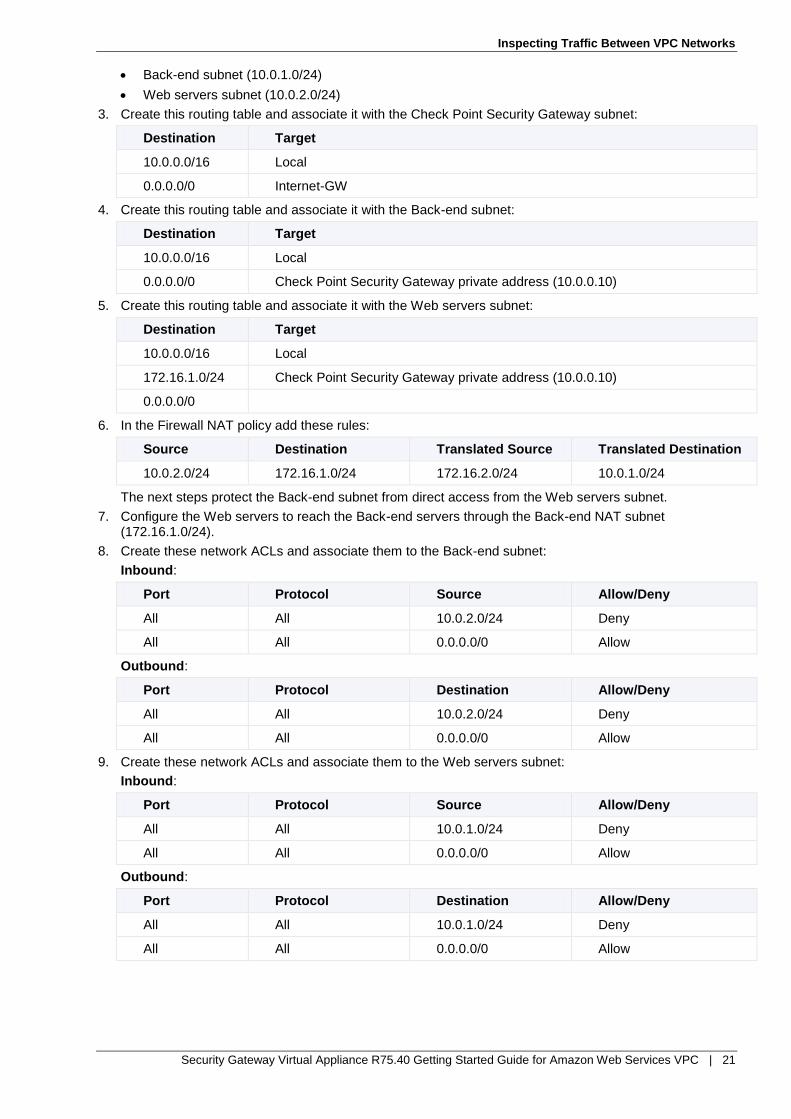
Security Gateway Virtual Appliance R75.40 Getting Started Guide for Amazon Web Services VPC | 21
Back-end subnet (10.0.1.0/24)
Web servers subnet (10.0.2.0/24)
3. Create this routing table and associate it with the Check Point Security Gateway subnet:
Destination Target
10.0.0.0/16 Local
0.0.0.0/0 Internet-GW
4. Create this routing table and associate it with the Back-end subnet:
Destination Target
10.0.0.0/16 Local
0.0.0.0/0 Check Point Security Gateway private address (10.0.0.10)
5. Create this routing table and associate it with the Web servers subnet:
Destination Target
10.0.0.0/16 Local
172.16.1.0/24 Check Point Security Gateway private address (10.0.0.10)
0.0.0.0/0
6. In the Firewall NAT policy add these rules:
Source Destination Translated Source Translated Destination
10.0.2.0/24 172.16.1.0/24 172.16.2.0/24 10.0.1.0/24
The next steps protect the Back-end subnet from direct access from the Web servers subnet.
7. Configure the Web servers to reach the Back-end servers through the Back-end NAT subnet (172.16.1.0/24).
8. Create these network ACLs and associate them to the Back-end subnet:
Inbound:
Port Protocol Source Allow/Deny
All All 10.0.2.0/24 Deny
All All 0.0.0.0/0 Allow
Outbound:
Port Protocol Destination Allow/Deny
All All 10.0.2.0/24 Deny
All All 0.0.0.0/0 Allow
9. Create these network ACLs and associate them to the Web servers subnet:
Inbound:
Port Protocol Source Allow/Deny
All All 10.0.1.0/24 Deny
All All 0.0.0.0/0 Allow
Outbound:
Port Protocol Destination Allow/Deny
All All 10.0.1.0/24 Deny
All All 0.0.0.0/0 Allow