sediments rock - disl.org · sediments rock (and sometimes roll) dauphin island sea lab ... basalt...
TRANSCRIPT
National Science Teachers Association Anaheim, CA
April 6 – 9, 2006
Sediments Rock (and sometimes roll)
Dauphin Island Sea Lab
101 Bienville Blvd Dauphin Island AL 36528
Website: http://www.disl.org Mendel Graeber

1
REFERENCES: http://waynesword.palomar.edu/ww0704b.htm http://www.fossweb.com/modulesK-2/PebblesSandandSilt/index.html http://www.ed.uri.edu/homepage/projects/ocean/Sand4.htm http://www.microscopy-uk.org.uk/mag/indexmag.html http://www.microscopy-uk.org.uk/mag/artjun01/clsand.html http://www.enchantedleaming.com/subiects/astronomy/planets/earth/Continents.shtml http://pubs.usgs.gov/gip/dynamic/historical.html#anchor9490426 http://csep10.phys.utk.edu/astr161/lect/earth/tectonics.html

2
Sand Activity Assemble several items, some of which are made using sand, and some of which are not. We used these items: Sand paper Glass votive/baby food jar Lava Soap Emery board Paper (waxed on one side) Pearl beads (to represent real pearls) Shell Sand-colored felt Asphalt shingles (be careful to seal shingles, as they are made with fiberglass) Ask students to identify the items that are made using sand. Use this activity as a lead-in for discussing what sand is. Sand is used to make sand paper, glass, Lava Soap, emery boards, and asphalt shingles. A sand grain is often the “seed” that irritates a bivalve, causing it to turn the sand into a pearl. In a round-about way, the nacre of shells and pearls could be said to form from sand. The calcium carbonate that mollusks use to form shells and pearls is taken out of solution in the water (not in solid, sand form). However, the calcium carbonate cycles through different forms, from solution to shells, pearls, sand, rock and back again. Activity by Jenny Cook, DISL
3
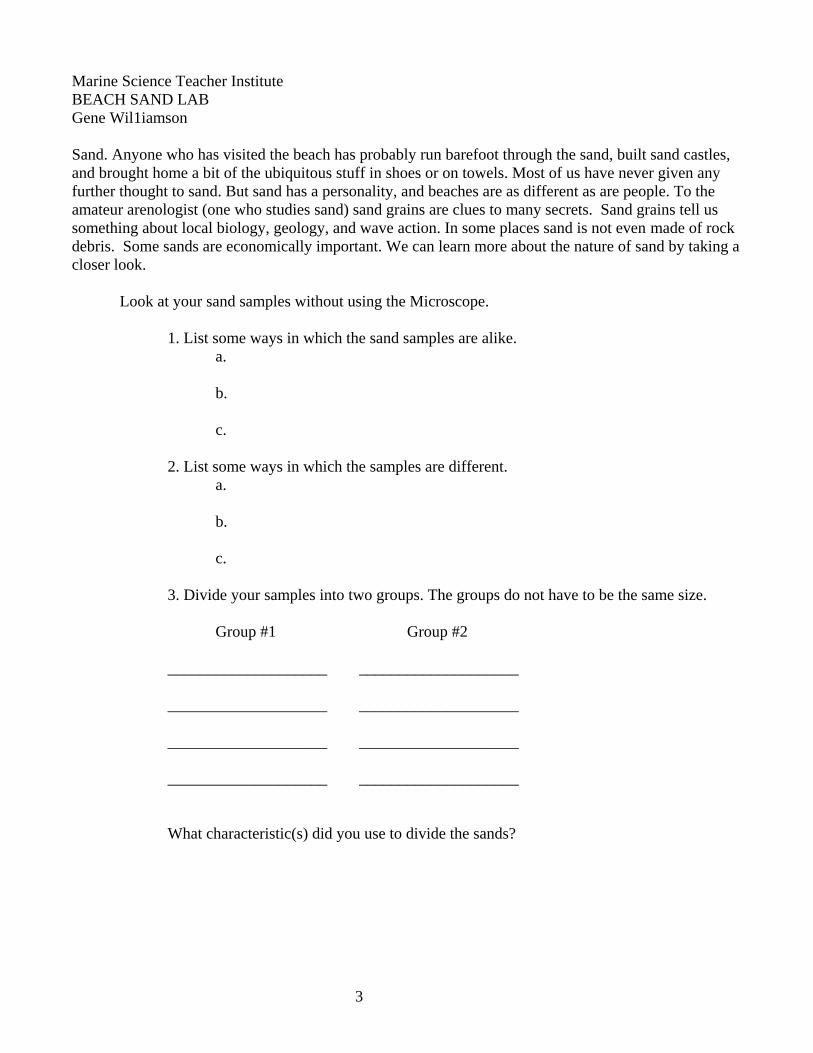
Marine Science Teacher Institute BEACH SAND LAB Gene Wil1iamson Sand. Anyone who has visited the beach has probably run barefoot through the sand, built sand castles, and brought home a bit of the ubiquitous stuff in shoes or on towels. Most of us have never given any further thought to sand. But sand has a personality, and beaches are as different as are people. To the amateur arenologist (one who studies sand) sand grains are clues to many secrets. Sand grains tell us something about local biology, geology, and wave action. In some places sand is not even made of rock debris. Some sands are economically important. We can learn more about the nature of sand by taking a closer look. Look at your sand samples without using the Microscope. 1. List some ways in which the sand samples are alike. a. b. c. 2. List some ways in which the samples are different. a. b. c. 3. Divide your samples into two groups. The groups do not have to be the same size. Group #1 Group #2 ____________________ ____________________ ____________________ ____________________ ____________________ ____________________ ____________________ ____________________ What characteristic(s) did you use to divide the sands?
4
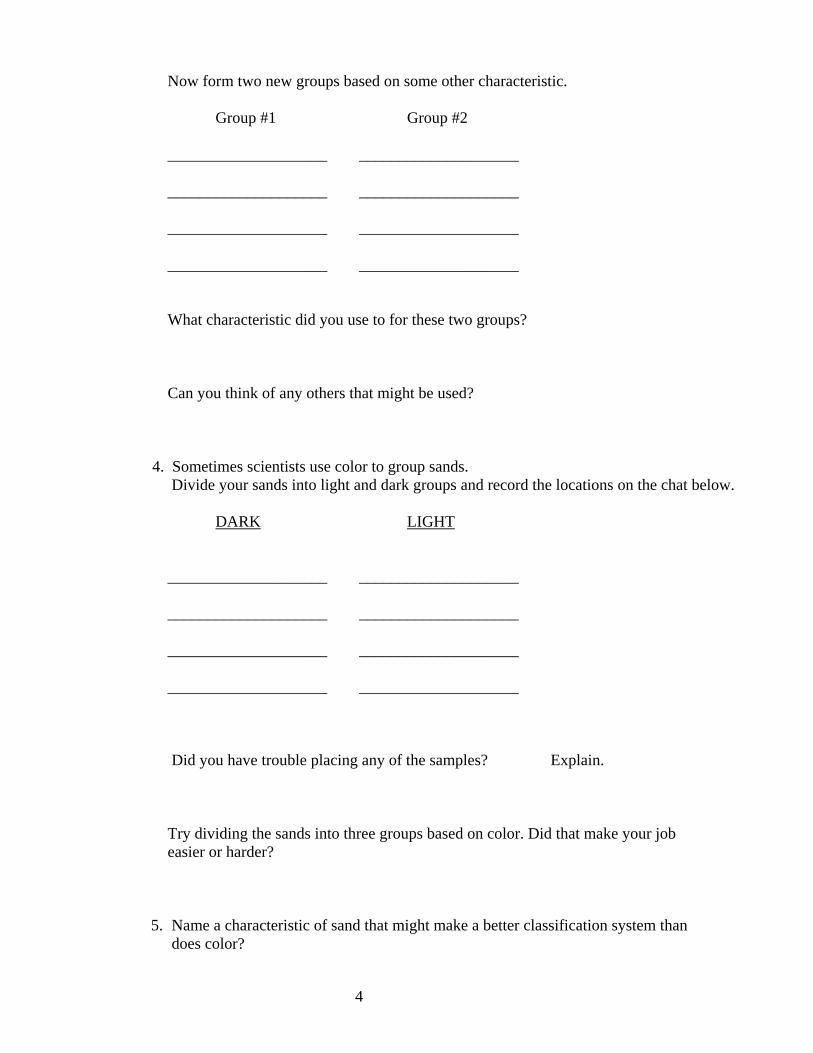
Now form two new groups based on some other characteristic. Group #1 Group #2 ____________________ ____________________ ____________________ ____________________ ____________________ ____________________ ____________________ ____________________ What characteristic did you use to for these two groups? Can you think of any others that might be used? 4. Sometimes scientists use color to group sands. Divide your sands into light and dark groups and record the locations on the chat below. DARK LIGHT ____________________ ____________________ ____________________ ____________________ ____________________ ____________________ ____________________ ____________________ Did you have trouble placing any of the samples? Explain. Try dividing the sands into three groups based on color. Did that make your job easier or harder?
5. Name a characteristic of sand that might make a better classification system than does color?
5
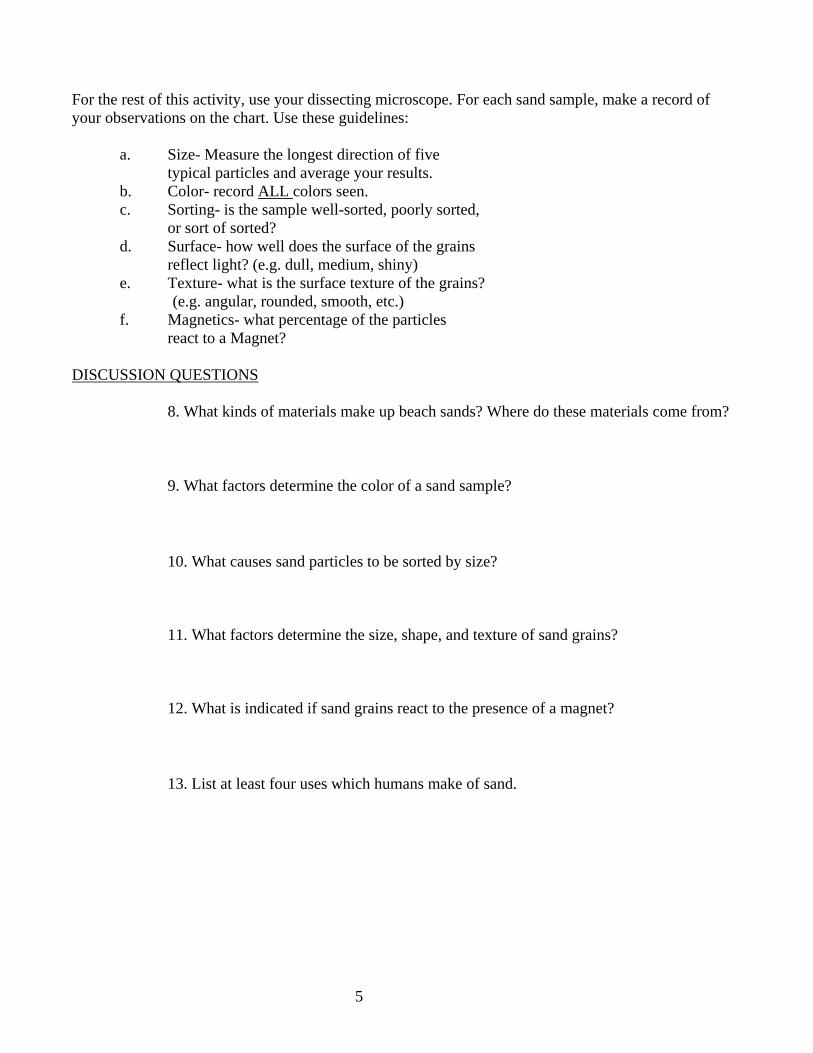
For the rest of this activity, use your dissecting microscope. For each sand sample, make a record of your observations on the chart. Use these guidelines: a. Size- Measure the longest direction of five
typical particles and average your results. b. Color- record ALL colors seen. c. Sorting- is the sample well-sorted, poorly sorted, or sort of sorted?
d. Surface- how well does the surface of the grains reflect light? (e.g. dull, medium, shiny) e. Texture- what is the surface texture of the grains? (e.g. angular, rounded, smooth, etc.) f. Magnetics- what percentage of the particles react to a Magnet? DISCUSSION QUESTIONS
8. What kinds of materials make up beach sands? Where do these materials come from? 9. What factors determine the color of a sand sample? 10. What causes sand particles to be sorted by size? 11. What factors determine the size, shape, and texture of sand grains? 12. What is indicated if sand grains react to the presence of a magnet? 13. List at least four uses which humans make of sand.

6
NAME ________________________________ SAND LAB DATA SHEET
Loca
tion
Col
ors
Ave
rage
Le
ngth
Ave
rage
W
idth
Sket
ch
Surf
ace
Lust
er
Sorti
ng
Mag
netic
s
Orig
in o
f Pa
rticl
es
(Hyp
othe
sis)
7
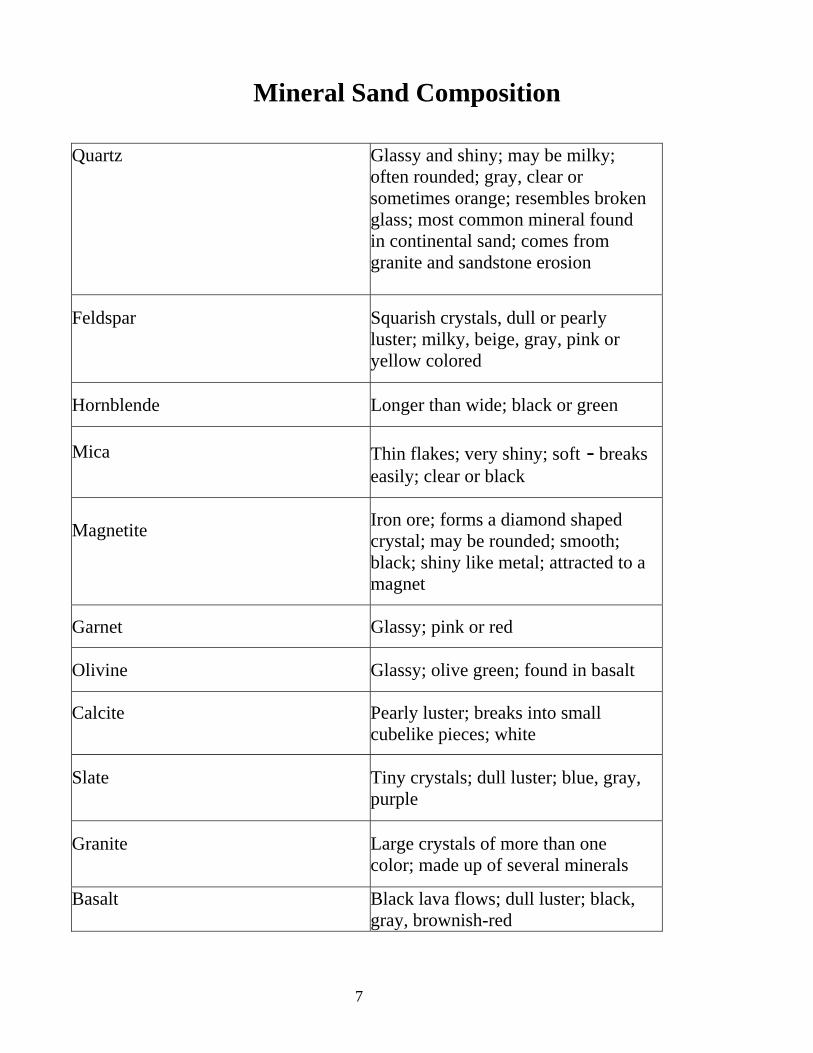
Mineral Sand Composition Quartz
Glassy and shiny; may be milky; often rounded; gray, clear or sometimes orange; resembles broken glass; most common mineral found in continental sand; comes from granite and sandstone erosion
Feldspar
Squarish crystals, dull or pearly luster; milky, beige, gray, pink or yellow colored
Hornblende Longer than wide; black or green
Mica
Thin flakes; very shiny; soft - breaks easily; clear or black
Magnetite
Iron ore; forms a diamond shaped crystal; may be rounded; smooth; black; shiny like metal; attracted to a magnet
Garnet Glassy; pink or red
Olivine Glassy; olive green; found in basalt
Calcite
Pearly luster; breaks into small cubelike pieces; white
Slate
Tiny crystals; dull luster; blue, gray, purple
Granite
Large crystals of more than one color; made up of several minerals
Basalt
Black lava flows; dull luster; black, gray, brownish-red
8
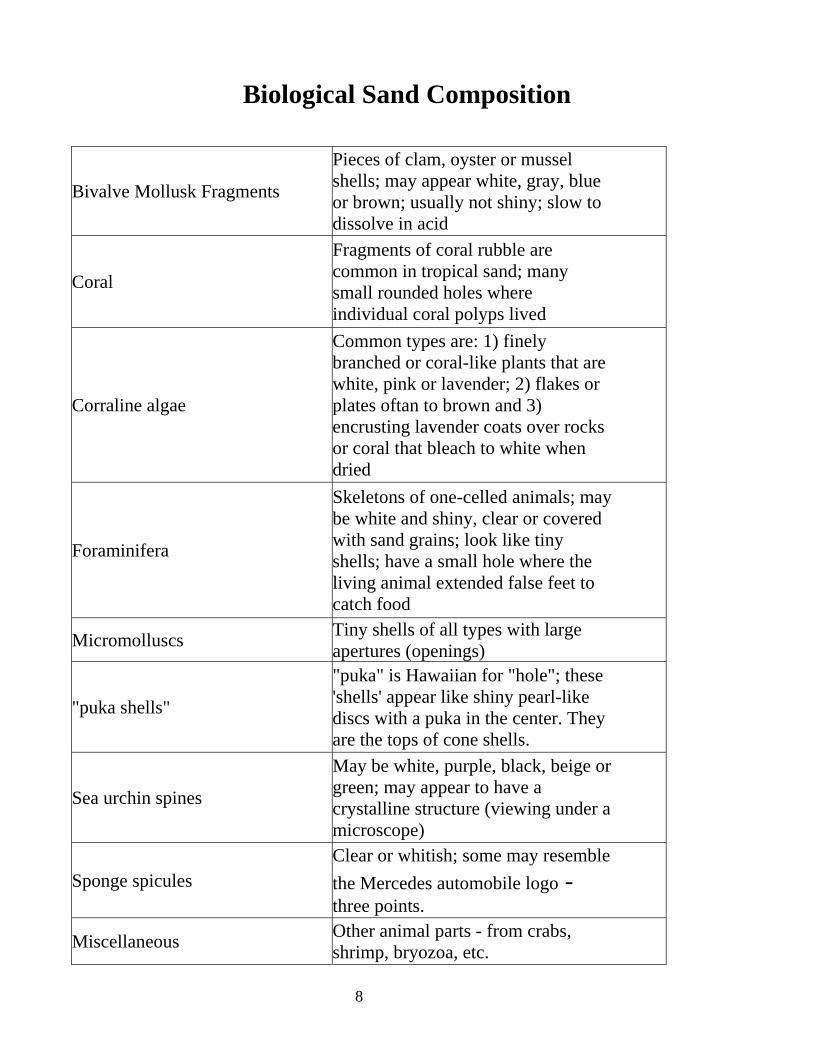
Biological Sand Composition
Bivalve Mollusk Fragments
Pieces of clam, oyster or mussel shells; may appear white, gray, blue or brown; usually not shiny; slow to dissolve in acid
Coral
Fragments of coral rubble are common in tropical sand; many small rounded holes where individual coral polyps lived
Corraline algae
Common types are: 1) finely branched or coral-like plants that are white, pink or lavender; 2) flakes or plates oftan to brown and 3) encrusting lavender coats over rocks or coral that bleach to white when dried
Foraminifera
Skeletons of one-celled animals; may be white and shiny, clear or covered with sand grains; look like tiny shells; have a small hole where the living animal extended false feet to catch food
Micromolluscs Tiny shells of all types with large apertures (openings)
"puka shells"
"puka" is Hawaiian for "hole"; these 'shells' appear like shiny pearl-like discs with a puka in the center. They are the tops of cone shells.
Sea urchin spines
May be white, purple, black, beige or green; may appear to have a crystalline structure (viewing under a microscope)
Sponge spicules Clear or whitish; some may resemble the Mercedes automobile logo - three points.
Miscellaneous Other animal parts - from crabs, shrimp, bryozoa, etc.
9
Exploring Beach Sand Objective: To find out about sand - its composition, its movement and the effects of oil on sand. Materials Needed: Beach sand Sheet of paper Magnifying glass Quart jar and lid Oil- any kind Small bowl Magnet 1) Look at your sand sample. a) What color is it? Why? b) Do you think it has shell fragments in it? 2) Some heavy minerals, especially those with iron in them, will be attracted by a magnet. Put a magnet in contact with the sand. Are the grains attracted to it? 3) Pour a little of the sand onto a sheet of paper. Look at the grains through a magnifying glass or hand lens. Do all the grains look the same? Shell fragments tend to be more rounded and less jagged looking. Can you find one? If so, draw a picture of it. 4) Pour a little sand into your hand. Describe what it feels like.

10
5) Put about an inch of sand in a jar. Fill it almost full with water. Put the lid on. Tip the jar. What does the sand do? Shake the jar. Does the sand settle back to the bottom immediately? The water in the oceans is constantly moving. Waves strike the beach endlessly, one after the other. What effect do you think this constant movement of water might have on the sand that is under the water? 6) Put some dry sand in a bowl. Gently blow on it. Can you blow some of the sand grains around? 7) Gently drain as much water as you can out of the jar. Into the sand, pour enough oil to get the sand covered with it. Then try to wash the oil out of the sand. Can you do it? 8) Occasionally an oil taker will spill some oil our at sea. This oil is much heavier and thicker than the oil you just used. When it floats to the beach, it covers everything with sticky, black goo. Do you think oil spills might be a problem to clean up? 9) What other ways can you think of to experiment with sand?
11
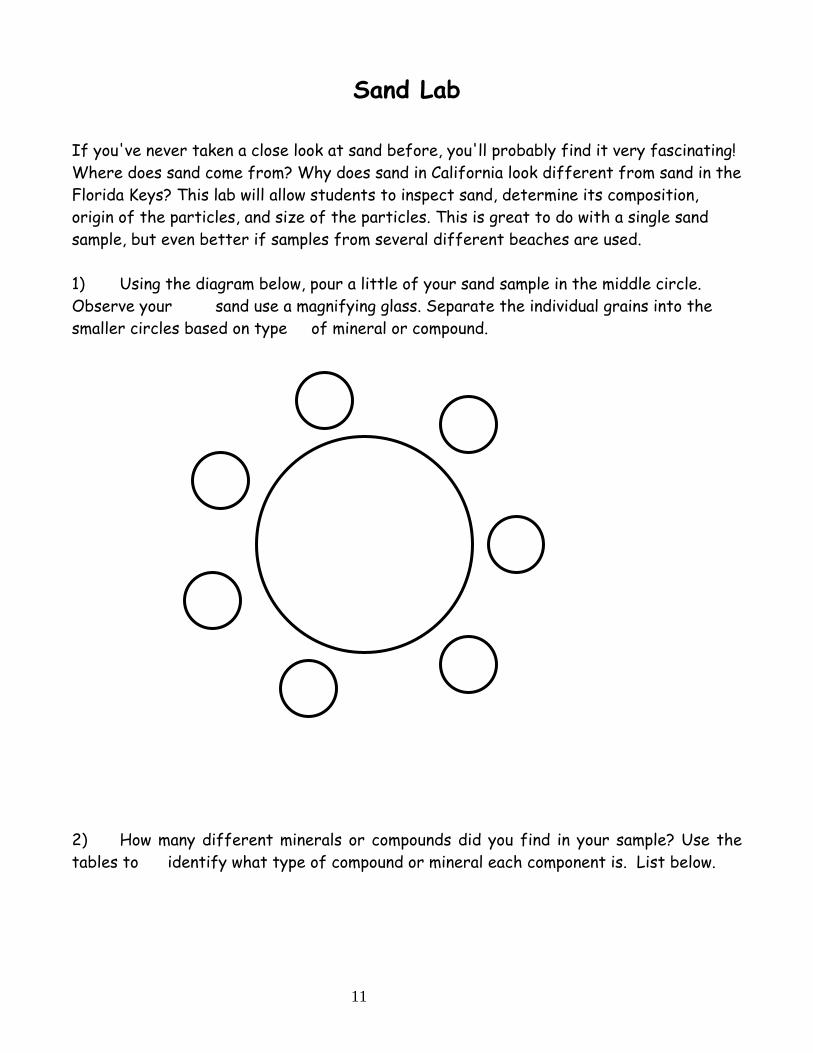
Sand Lab If you've never taken a close look at sand before, you'll probably find it very fascinating! Where does sand come from? Why does sand in California look different from sand in the Florida Keys? This lab will allow students to inspect sand, determine its composition, origin of the particles, and size of the particles. This is great to do with a single sand sample, but even better if samples from several different beaches are used. 1) Using the diagram below, pour a little of your sand sample in the middle circle. Observe your sand use a magnifying glass. Separate the individual grains into the smaller circles based on type of mineral or compound. 2) How many different minerals or compounds did you find in your sample? Use the tables to identify what type of compound or mineral each component is. List below.
12
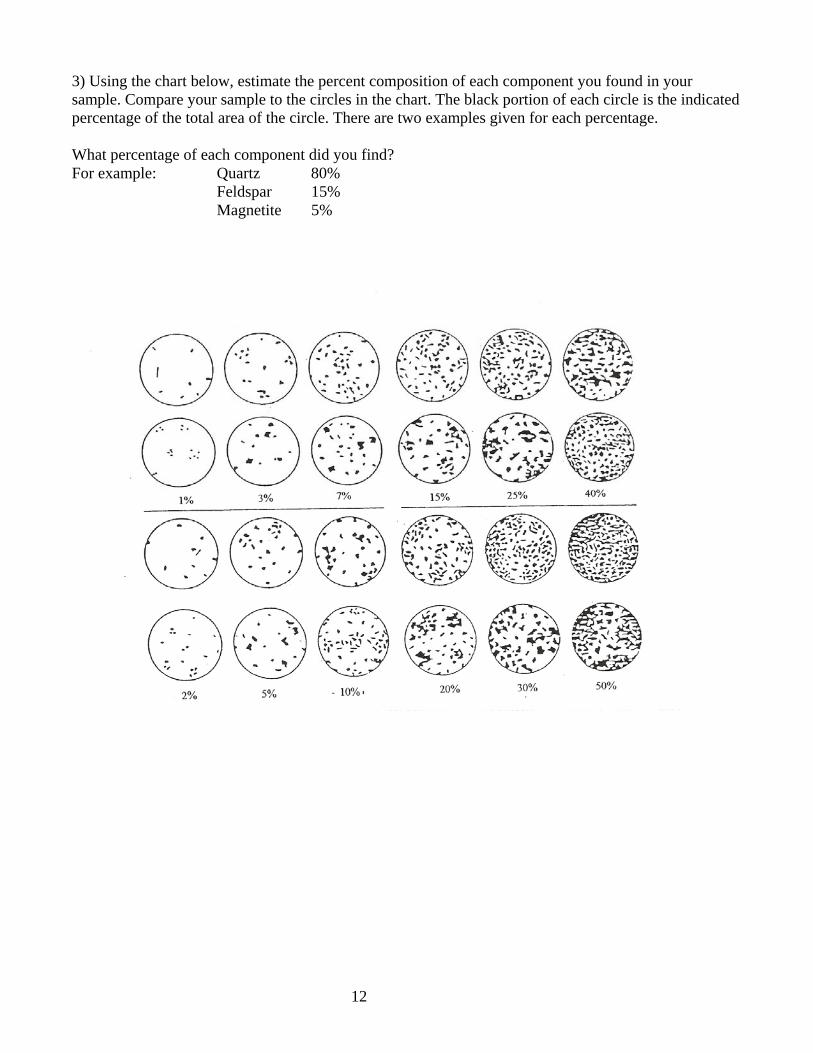
3) Using the chart below, estimate the percent composition of each component you found in your sample. Compare your sample to the circles in the chart. The black portion of each circle is the indicated percentage of the total area of the circle. There are two examples given for each percentage. What percentage of each component did you find? For example: Quartz 80% Feldspar 15% Magnetite 5%
13
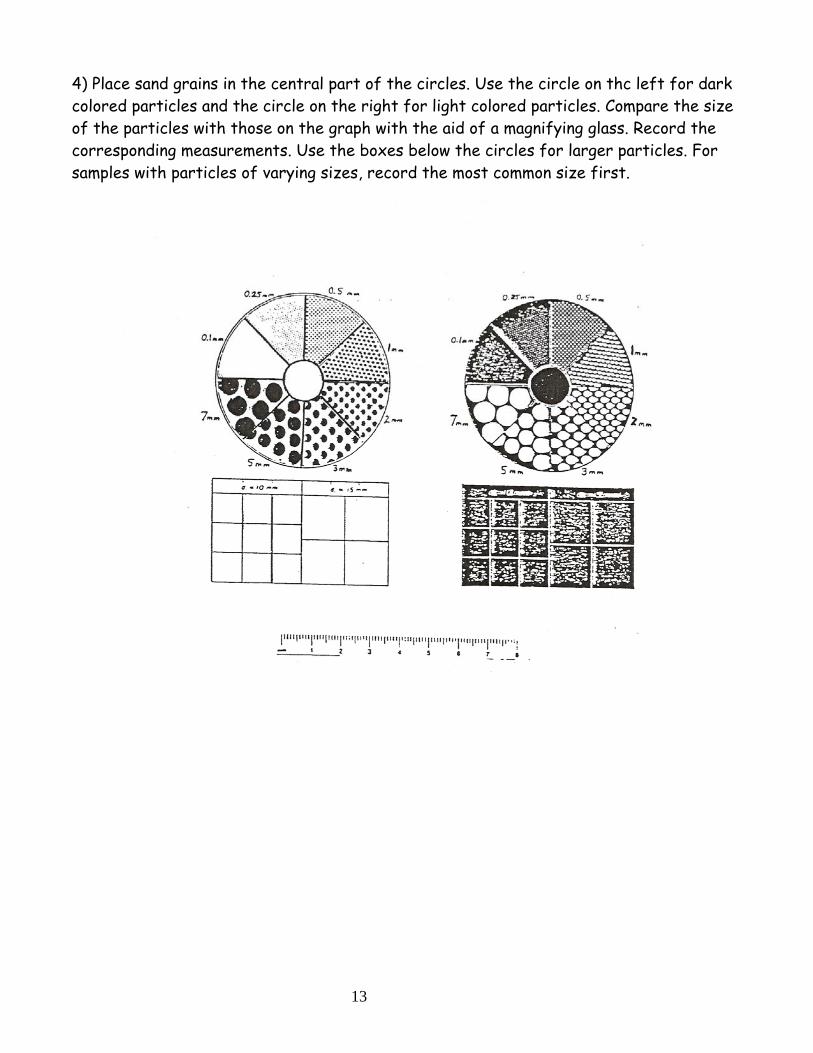
4) Place sand grains in the central part of the circles. Use the circle on thc left for dark colored particles and the circle on the right for light colored particles. Compare the size of the particles with those on the graph with the aid of a magnifying glass. Record the corresponding measurements. Use the boxes below the circles for larger particles. For samples with particles of varying sizes, record the most common size first.
14
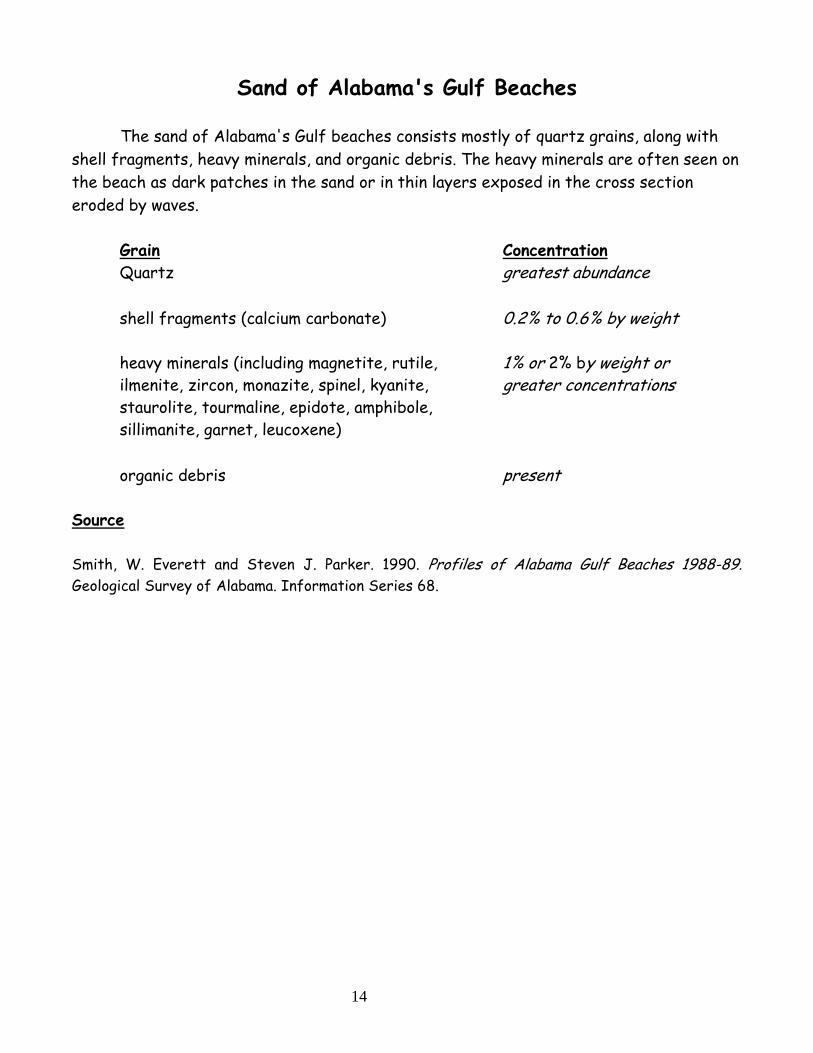
Sand of Alabama's Gulf Beaches
The sand of Alabama's Gulf beaches consists mostly of quartz grains, along with shell fragments, heavy minerals, and organic debris. The heavy minerals are often seen on the beach as dark patches in the sand or in thin layers exposed in the cross section eroded by waves.
Grain Concentration Quartz greatest abundance
shell fragments (calcium carbonate) 0.2% to 0.6% by weight heavy minerals (including magnetite, rutile, 1% or 2% by weight or ilmenite, zircon, monazite, spinel, kyanite, greater concentrations staurolite, tourmaline, epidote, amphibole, sillimanite, garnet, leucoxene) organic debris present Source Smith, W. Everett and Steven J. Parker. 1990. Profiles of Alabama Gulf Beaches 1988-89. Geological Survey of Alabama. Information Series 68.
15
Sand Studies
Geological sleuthing solves sand mysteries
EVERAL YEARS AGO, I ATIENDED AN inservice workshop based on a sand collection bequeathed to my district by a local woman named Martha Schuder. "Two thousand aspirin bottles full of sand,
'I said, "How eccentric!” I dutifully looked into the microscope, and the rest is history.
The first sample I viewed contained beautiful crystals, "Quartz weathered from granite, common in old continental sand, the presenter said. Then there was a sample of black grains, each with lavalike holes indicating that they had been blown from a volcano. I was hooked. Sand through a microscope is a fascinating world of fossils, shell fragments, and clues to many unsolved mysteries. As Rachel Carson Said, In every grain of sand is a story of earth."
Sand is the term applied to natural particles with a grain diameter between 1/16 mm and 2 mm. Sand can also be defined as a deposit, a loose aggregate of sand sized particles. Sands are classified in many ways. One way is based on the parent rock. Some are continental sands, which are formed from weathered continental rock, usually granite. Continental sand is most commonly composed of silicate minerals, with quartz and feldspar being the most abundant. Other sands are ocean floor sands, which are formed from volcanic material, usually basalt. Sands in other categories include: carbonate sands, those composed of various forms of calcium carbonate. Most of these grains are fragments of shells or remains of marine life, often identifiable as mollusks, sea urchin spines or tests, or coral. Others are ooliths, spherical particles form like pearls on a seed (a shell fragment, pellet, or small quartz sand grain). Layers of calcium carbonate coat the seed, forming an egg like sand grain. A different chemical sand form is tufa sand, formed when calcium ions from underground
springs precipitate with carbonate ions in salt water in a salt lake, such as Mono Lake in California. All these carbonate sands dissolve in acid with the fizzing release of carbon dioxide.
The district's collection languished for a year or two in labeled plastic bags but is now smartly housed, with support from an NSTA/Toyota TAPESTRY Grant, in uniform plastic vials in a glass showcase. An index card for each sample is kept near a microscope for use as an independent learning station. These sand cards have a small piece of double-sided tape near the bottom for microscope access. The cards are dipped in a container of sand, and grains stick to the tape. Samples are best observed under a 20x microscope, hut a conventional light microscope or a hand lens works well.
Students have contributed sand to the collection upon returning from vacations (the Sacramento Valley has little or no sand!). Students' family members, teachers, and community members have also contributed to the collection. People know (because I constantly remind them) to bring me at least a film container of sand from any trip. Students who contribute to the collection receive extra credit. Neighbors throughout my small hometown near Sacramento now seem to regard me as the 'eccentric sand lady," and I constantly find neatly labeled samples on my doorstep. People are always interested in hearing about their sand or seeing it under a microscope. The characteristics of sands collected from different locations vary considerably, and this variation can be the basis for numerous classroom activities. Students' observation, comparison, writing, vocabulary, and critical thinking skills are enhanced by these activities.
THE SCIENCE TEACHER
16
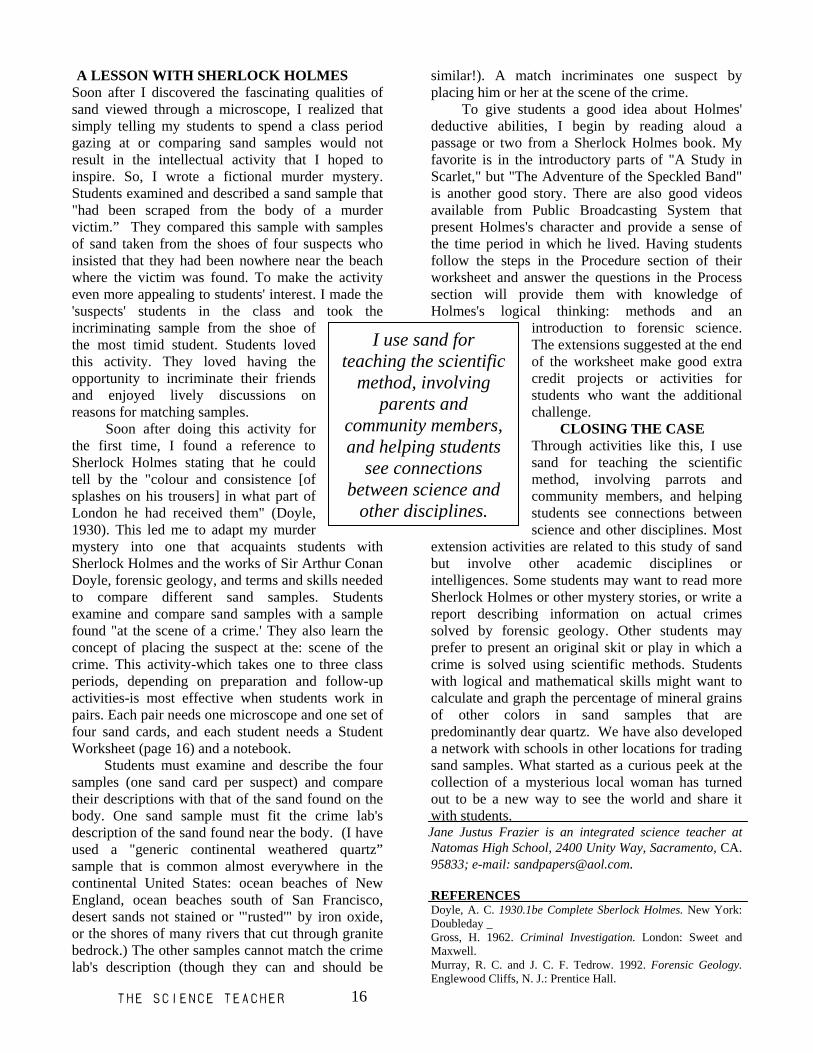
I use sand for teaching the scientific
method, involving parents and
community members, and helping students
see connections between science and
other disciplines.
A LESSON WITH SHERLOCK HOLMES Soon after I discovered the fascinating qualities of sand viewed through a microscope, I realized that simply telling my students to spend a class period gazing at or comparing sand samples would not result in the intellectual activity that I hoped to inspire. So, I wrote a fictional murder mystery. Students examined and described a sand sample that "had been scraped from the body of a murder victim.” They compared this sample with samples of sand taken from the shoes of four suspects who insisted that they had been nowhere near the beach where the victim was found. To make the activity even more appealing to students' interest. I made the 'suspects' students in the class and took the incriminating sample from the shoe of the most timid student. Students loved this activity. They loved having the opportunity to incriminate their friends and enjoyed lively discussions on reasons for matching samples.
Soon after doing this activity for the first time, I found a reference to Sherlock Holmes stating that he could tell by the "colour and consistence [of splashes on his trousers] in what part of London he had received them" (Doyle, 1930). This led me to adapt my murder mystery into one that acquaints students with Sherlock Holmes and the works of Sir Arthur Conan Doyle, forensic geology, and terms and skills needed to compare different sand samples. Students examine and compare sand samples with a sample found "at the scene of a crime.' They also learn the concept of placing the suspect at the: scene of the crime. This activity-which takes one to three class periods, depending on preparation and follow-up activities-is most effective when students work in pairs. Each pair needs one microscope and one set of four sand cards, and each student needs a Student Worksheet (page 16) and a notebook.
Students must examine and describe the four samples (one sand card per suspect) and compare their descriptions with that of the sand found on the body. One sand sample must fit the crime lab's description of the sand found near the body. (I have used a "generic continental weathered quartz” sample that is common almost everywhere in the continental United States: ocean beaches of New England, ocean beaches south of San Francisco, desert sands not stained or '"rusted'" by iron oxide, or the shores of many rivers that cut through granite bedrock.) The other samples cannot match the crime lab's description (though they can and should be
similar!). A match incriminates one suspect by placing him or her at the scene of the crime.
To give students a good idea about Holmes' deductive abilities, I begin by reading aloud a passage or two from a Sherlock Holmes book. My favorite is in the introductory parts of "A Study in Scarlet," but "The Adventure of the Speckled Band" is another good story. There are also good videos available from Public Broadcasting System that present Holmes's character and provide a sense of the time period in which he lived. Having students follow the steps in the Procedure section of their worksheet and answer the questions in the Process section will provide them with knowledge of Holmes's logical thinking: methods and an
introduction to forensic science. The extensions suggested at the end of the worksheet make good extra credit projects or activities for students who want the additional challenge.
CLOSING THE CASE Through activities like this, I use sand for teaching the scientific method, involving parrots and community members, and helping students see connections between science and other disciplines. Most
extension activities are related to this study of sand but involve other academic disciplines or intelligences. Some students may want to read more Sherlock Holmes or other mystery stories, or write a report describing information on actual crimes solved by forensic geology. Other students may prefer to present an original skit or play in which a crime is solved using scientific methods. Students with logical and mathematical skills might want to calculate and graph the percentage of mineral grains of other colors in sand samples that are predominantly dear quartz. We have also developed a network with schools in other locations for trading sand samples. What started as a curious peek at the collection of a mysterious local woman has turned out to be a new way to see the world and share it with students. Jane Justus Frazier is an integrated science teacher at Natomas High School, 2400 Unity Way, Sacramento, CA. 95833; e-mail: [email protected].
REFERENCES Doyle, A. C. 1930.1be Complete Sberlock Holmes. New York: Doubleday _ Gross, H. 1962. Criminal Investigation. London: Sweet and Maxwell. Murray, R. C. and J. C. F. Tedrow. 1992. Forensic Geology. Englewood Cliffs, N. J.: Prentice Hall.
THE SCIENCE TEACHER
17
STUDENT WORKSHEET
SHERLOCK HOLMES: THE BODY ON THE BEACH
Background: Sir Arthur Conan Doyle received his training as an eye specialist the Edinburgh Infirmary as a student of Dr. Joseph Bell. He began writing Sherlock Holmes stories to fill time between patients. Many believe the Holmes character was based on Doyle's mentor, Joe Bell. Sherlock Holmes became the world's best known detective. His activities have been followed by millions of readers delighted by his ability to solve crimes through an amazing use of observation and deduction. Holmes drew incredible conclusions from minute details, such as a ticket fragment or a spot of mud or sand on a boot. His amazing powers of concentration and broad knowledge of science also helped him solve many mysteries. Doyle wrote a story in 1893 in which Holmes was killed, but public outcry forced him to bring Holmes back to life in another story. Dr. Watson, Holmes's physician friend and assistant, observed in A Study in Scarlet that Holmes had a knowledge of
"Gea/ogy--practical, but limited. Tells at a glance different soils from each other. After walks has shown me splashes upon his trousers, -and told me by their colour and consistence in what part of London he had received them" (Doyle, 1930).
Doyle never did achieve success as an eye specialist but became famous as an author and man of ideas. Though
Holmes was a fictional character, H. Gross incorporated Holmes's methods and ideas into the rapidly developing field of forensic science in Criminal Investigation, a handbook for investigators (Murray and Tedrow, 1992). Literature affects science! I Problem: The victim of a brutal murder was recently found on a beach. Police detectives gathered small samples of sand from the murder scene and rounded up four suspects within a week. Each suspect had a motive for the killing and sand on his or her shoes. Each suspect swears that he or she was not near the murder scene at the time of the crime or at any recent time. Your job is to identify the murderer by proving that one of the suspects was at the scene of the crime. To do this, you will need to determine that the sand from the killer's shoes matches that from the murder scene. Procedure: 1. In your notebook, copy the description of the sand found near the body (see description below). looking back through your class notes, define each term in the description. 2. Examine sand from the shoes of each suspect at 20X magnification. Beside each suspect's name, write words that describe the sample and be sure to mention characteristics like size, color, transparency, roundness, and sorting. 3. Compare these descriptions (From question 2) to those of the sand found near the victim. Name the guilty suspect and give reasons why the sand from his or her shoe is the same as that found near the victim. 4. How is the sand on the other suspects' shoes different from the incriminating sand? Sand Description from Crime Lab: Weathered granite sand consisting largely of well-sorted grains of quartz (transparent, colorless, and slightly rounded) with trace amounts of othher minerals. Process: Answer these questions in complete sentences in your notebook. 1. How was the incriminating sand, different from other samples you examined? 2. Why does knowing the suspect was at the crime scene make him mare suspect? 3. Why must forensic geologists be extremely careful in their observations and conclusions? Extensions: 1. Read Sherlock Holmes books or stories by Sir Arthur Conan Doyle. 2. Write a mystery story or play using scientific crime solutions. 3. Write a report on a crime that was solved using forensic geology.
THE SCIENCE TEACHER
18
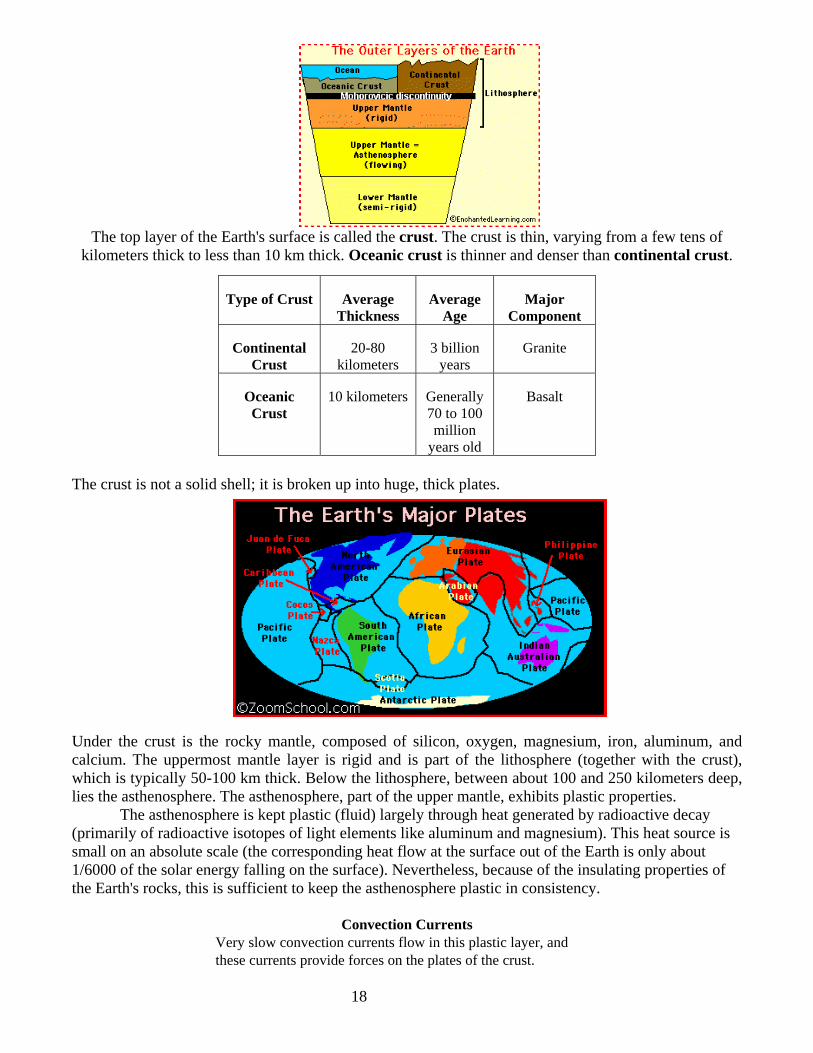
The top layer of the Earth's surface is called the crust. The crust is thin, varying from a few tens of kilometers thick to less than 10 km thick. Oceanic crust is thinner and denser than continental crust.
The crust is not a solid shell; it is broken up into huge, thick plates.
Under the crust is the rocky mantle, composed of silicon, oxygen, magnesium, iron, aluminum, and calcium. The uppermost mantle layer is rigid and is part of the lithosphere (together with the crust), which is typically 50-100 km thick. Below the lithosphere, between about 100 and 250 kilometers deep, lies the asthenosphere. The asthenosphere, part of the upper mantle, exhibits plastic properties.
The asthenosphere is kept plastic (fluid) largely through heat generated by radioactive decay (primarily of radioactive isotopes of light elements like aluminum and magnesium). This heat source is small on an absolute scale (the corresponding heat flow at the surface out of the Earth is only about 1/6000 of the solar energy falling on the surface). Nevertheless, because of the insulating properties of the Earth's rocks, this is sufficient to keep the asthenosphere plastic in consistency.
Convection Currents Very slow convection currents flow in this plastic layer, and these currents provide forces on the plates of the crust.
Type of Crust Average Thickness
Average Age
Major Component
Continental Crust
20-80 kilometers
3 billion years
Granite
Oceanic Crust
10 kilometers Generally 70 to 100 million
years old
Basalt
19
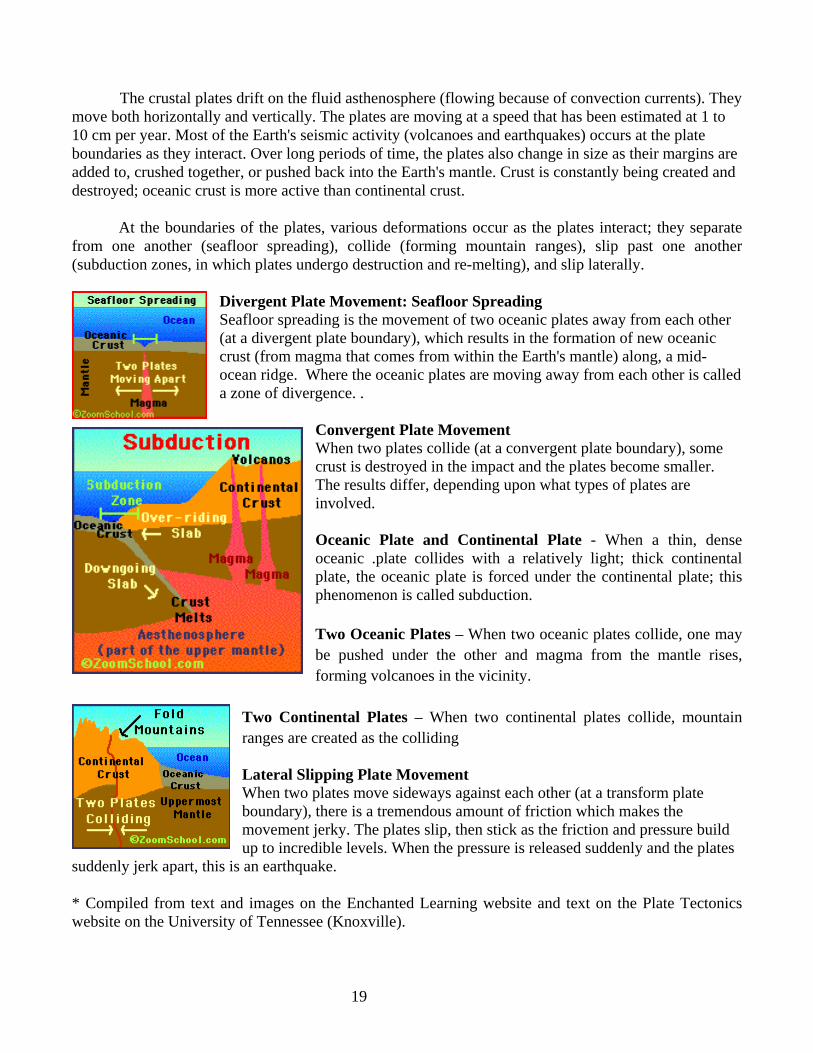
The crustal plates drift on the fluid asthenosphere (flowing because of convection currents). They
move both horizontally and vertically. The plates are moving at a speed that has been estimated at 1 to 10 cm per year. Most of the Earth's seismic activity (volcanoes and earthquakes) occurs at the plate boundaries as they interact. Over long periods of time, the plates also change in size as their margins are added to, crushed together, or pushed back into the Earth's mantle. Crust is constantly being created and destroyed; oceanic crust is more active than continental crust.
At the boundaries of the plates, various deformations occur as the plates interact; they separate
from one another (seafloor spreading), collide (forming mountain ranges), slip past one another (subduction zones, in which plates undergo destruction and re-melting), and slip laterally.
Divergent Plate Movement: Seafloor Spreading Seafloor spreading is the movement of two oceanic plates away from each other (at a divergent plate boundary), which results in the formation of new oceanic crust (from magma that comes from within the Earth's mantle) along, a mid-ocean ridge. Where the oceanic plates are moving away from each other is called a zone of divergence. .
Convergent Plate Movement When two plates collide (at a convergent plate boundary), some crust is destroyed in the impact and the plates become smaller. The results differ, depending upon what types of plates are involved. Oceanic Plate and Continental Plate - When a thin, dense oceanic .plate collides with a relatively light; thick continental plate, the oceanic plate is forced under the continental plate; this phenomenon is called subduction. Two Oceanic Plates – When two oceanic plates collide, one may be pushed under the other and magma from the mantle rises, forming volcanoes in the vicinity.
Two Continental Plates – When two continental plates collide, mountain ranges are created as the colliding Lateral Slipping Plate Movement When two plates move sideways against each other (at a transform plate boundary), there is a tremendous amount of friction which makes the movement jerky. The plates slip, then stick as the friction and pressure build up to incredible levels. When the pressure is released suddenly and the plates
suddenly jerk apart, this is an earthquake. * Compiled from text and images on the Enchanted Learning website and text on the Plate Tectonics website on the University of Tennessee (Knoxville).
20
Milky Way Plates
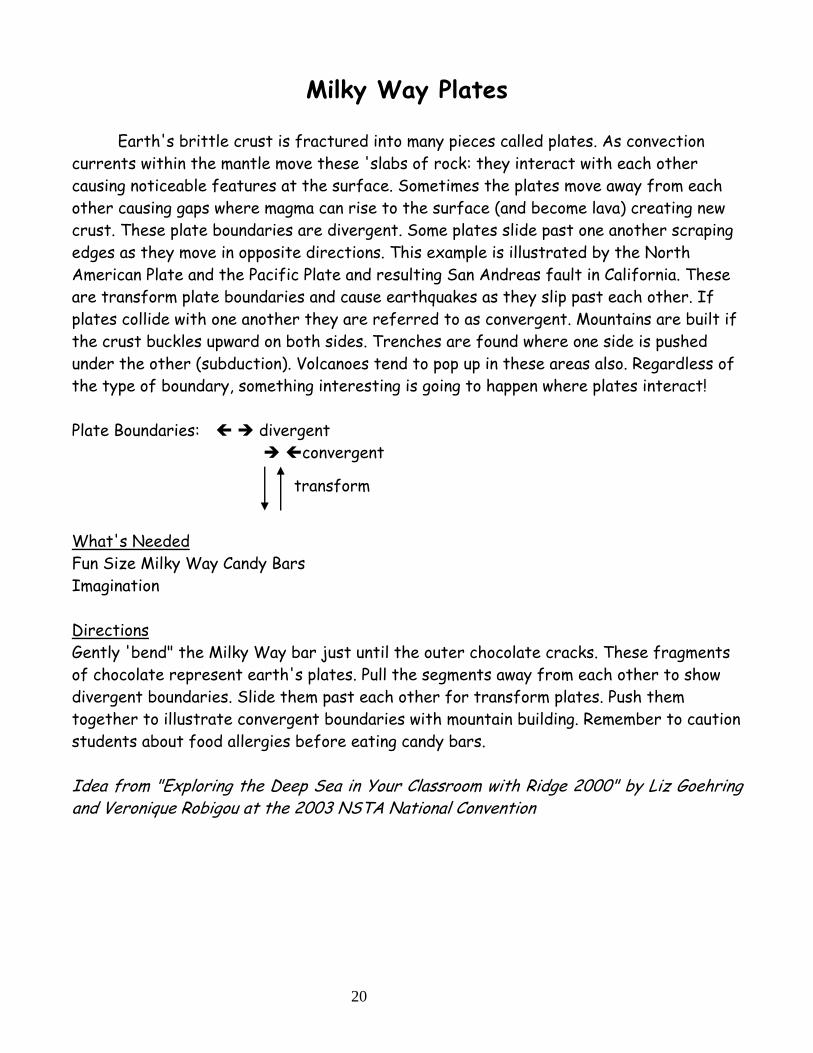
Earth's brittle crust is fractured into many pieces called plates. As convection currents within the mantle move these 'slabs of rock: they interact with each other causing noticeable features at the surface. Sometimes the plates move away from each other causing gaps where magma can rise to the surface (and become lava) creating new crust. These plate boundaries are divergent. Some plates slide past one another scraping edges as they move in opposite directions. This example is illustrated by the North American Plate and the Pacific Plate and resulting San Andreas fault in California. These are transform plate boundaries and cause earthquakes as they slip past each other. If plates collide with one another they are referred to as convergent. Mountains are built if the crust buckles upward on both sides. Trenches are found where one side is pushed under the other (subduction). Volcanoes tend to pop up in these areas also. Regardless of the type of boundary, something interesting is going to happen where plates interact!
Plate Boundaries: divergent convergent
transform
What's Needed Fun Size Milky Way Candy Bars Imagination Directions Gently 'bend" the Milky Way bar just until the outer chocolate cracks. These fragments of chocolate represent earth's plates. Pull the segments away from each other to show divergent boundaries. Slide them past each other for transform plates. Push them together to illustrate convergent boundaries with mountain building. Remember to caution students about food allergies before eating candy bars. Idea from "Exploring the Deep Sea in Your Classroom with Ridge 2000" by Liz Goehring and Veronique Robigou at the 2003 NSTA National Convention
21
Mantle Soup and Milky Way Plates
Circular currents caused by temperature differences within any fluid are called convection currents. This phenomenon inside earth's mantle is believed to move huge crustal plates. Radioactive ingredients inside the core radiate heat to surrounding magma, decreasing its density and causing it to move away from the core toward earth's surface. Magma farther from the core cools, increases in density, and 'sinks' back to the center of the earth. Plates at the surface are moved as they float along on these mantle currents.
Mantle Soup
Materials Instant Miso Soup Hot Water Clear Pyrex Cups Spoons Directions Heat water and caution students that it is hot. Follow directions on package of Miso Soup adding the correct amount of hot water to the cup. Add soup and stir. Miso Soup has many granules that will not dissolve. These particles will ride the convection currents making them visible. The center is the most insulated and will stay the hottest longer. The edges of the cup will lose heat through the glass and begin to cool first. Look directly over the cup and see the granules rising to the surface in the middle. View the sides of the clear cup and see the granules sinking. You are looking at convection! Remember to caution students about food allergies before eating soup. Idea used on several web sites to illustrate convection.