self-propelled auger kit - wheatheart · 2017-05-31 · wheatheart - self-propelled auger kit 2....
TRANSCRIPT

SELF-PROPELLED AUGER KITCOMPETITOR MODELS
ASSEMBLY & OPERATION MANUAL
Part Number: 30766 R0
Revised: Jan/12
Read this manual before using product. Failure to follow instructions and safety precautions can result in serious injury, death, or property damage. Keep manual for future reference.

WHEATHEART - SELF-PROPELLED AUGER KIT
COMPETITOR MODELS
This product has been designed and constructed according to general engineering standardsa. Other local regulations may apply and must be followed by the operator. We strongly recommend that all personnel associated with this equipment be trained in the correct operational and safety procedures required for this product. Periodic reviews of this manual with all employees should be standard practice. For your convenience, we include this sign-off sheet so you can record your periodic reviews.
a. Standards include organizations such as the American Society of Agricultural and Biological Engineers, American National Standards Institute, Canadian Standards Association, International Organization for Standardization, and/or others.
Date Employee Signature Employer Signature
2 30766 R0

TABLE OF CONTENTS
WHEATHEART - SELF-PROPELLED AUGER KIT COMPETITOR MODELS
1. Introduction .......................................................................................................................... 5
2. Safety First............................................................................................................................ 72.1. General Safety ......................................................................................................... 82.2. Assembly Safety....................................................................................................... 92.3. Operation Safety ...................................................................................................... 92.4. Transport & Placement Safety ............................................................................... 112.5. Storage Safety........................................................................................................ 122.6. Maintenance Safety................................................................................................ 122.7. Hydraulic Safety ..................................................................................................... 122.8. Engine Safety ......................................................................................................... 132.9. Tire Safety .............................................................................................................. 132.10. Safety Decals ....................................................................................................... 13
2.10.1. Decal Installation .................................................................................... 132.10.2. Safety Decal Locations........................................................................... 14
3. Assembly ............................................................................................................................ 153.1. Gear Pump Assembly ............................................................................................ 153.2. Pump Guard Assembly .......................................................................................... 153.3. Oil Reservoir Assembly .......................................................................................... 163.4. Gear Drive Assembly ............................................................................................. 173.5. Over-Center Drive Assembly—Round Axles.......................................................... 183.6. Over-Center Drive Assembly—Square Axles......................................................... 193.7. Pinion Gear Adjustment ......................................................................................... 203.8. Undercarriage Installation ...................................................................................... 203.9. Ram Extension Installation..................................................................................... 223.10. Cable Installation.................................................................................................. 233.11. Winch Assembly................................................................................................... 24
3.11.1. Winch Alignment..................................................................................... 243.12. Hose Kit Layout—No Bin Sweep.......................................................................... 253.13. Hose Kit Layout With Bin Sweep.......................................................................... 273.14. Hose Kit Assembly ............................................................................................... 293.15. Cushion Valve Installation .................................................................................... 30
4. Transport & Placement ...................................................................................................... 314.1. Transport Procedure .............................................................................................. 314.2. Placement Procedure............................................................................................. 32
5. Operation ............................................................................................................................ 335.1. Start-Up .................................................................................................................. 335.2. Operating Procedure .............................................................................................. 34
30766 R0 3

TABLE OF CONTENTS
WHEATHEART - SELF-PROPELLED AUGER KIT
COMPETITOR MODELS
6. Maintenance & Storage...................................................................................................... 376.1. Maintenance ........................................................................................................... 37
6.1.1. Hydraulic Winch Valve.............................................................................. 376.1.2. Ram Speed Adjustment............................................................................ 386.1.3. Hydraulic Pressure Relief Valve Adjustment ............................................ 386.1.4. Cushion Valve Adjustment........................................................................ 39
6.2. Storage ................................................................................................................... 39
7. Troubleshooting ................................................................................................................. 41
8. Appendix ............................................................................................................................. 438.1. Bolt Torque Values ................................................................................................. 438.2. Tightening O-Ring Fittings...................................................................................... 448.3. Parts ....................................................................................................................... 46
8.3.1. Self-Propelled Auger Kit ........................................................................... 468.3.2. Wheel Motor ............................................................................................. 488.3.3. Tank Upgrade Kit, 43 L............................................................................. 498.3.4. In-Line Hydraulic Oil Filter (Optional)........................................................ 508.3.5. Hydraulic Winch & Control Valve.............................................................. 51
Limited Warranty ..................................................................................................................... 53
4 30766 R0

WHEATHEART - SELF-PROPELLED AUGER KIT 1. INTRODUCTION
COMPETITOR MODELS
1. IntroductionCongratulations. As the new owner of a Wheatheart self-propelled auger, you will be working with equipment especially designed to complement and improve your farming operation. Before using this auger, we recommend that you read this manual to familiarize yourself with the various features of the machine, and the necessary precautions for efficient and safe operation. In addition, we suggest that anyone using this auger be required, as a matter of record, to be familiar with all safety precautions. A sign-off form is supplied on the inside cover for your convenience and permanent records.
Keep this manual handy for frequent reference and to review with new personnel. Call your Wheatheart distributor or dealer if you need assistance, information, or additional copies of the manual.
OPERATOR ORIENTATION—The directions left, right, front, and rear, as mentioned throughout the manual, are as seen from the tractor or towing vehicle’s driver’s seat, and facing in the direction of travel when the unit is being transported.
SERIAL NUMBER: _______________________
DATE PURCHASED: _____________________
DEALER NAME: ________________________
30766 R0 5

1. INTRODUCTION WHEATHEART - SELF-PROPELLED AUGER KIT
COMPETITOR MODELS
6 30766 R0

WHEATHEART - SELF-PROPELLED AUGER KIT 2. SAFETY FIRST
COMPETITOR MODELS
2. Safety FirstThe Safety Alert symbol to the left identifies important safety messages on the product and in the manual. When you see this symbol, be alert to the possibil-ity of personal injury or death. Follow the instructions in the safety messages. Why is SAFETY important to you?
Three big reasons:
• Accidents disable and kill.• Accidents cost.• Accidents can be avoided.
SIGNAL WORDS
Note the use of the signal words DANGER, WARNING, CAUTION, and NOTICE with the safety messages. The appropriate signal word for each message has been selected using the definitions below as a guideline.
The Safety Alert symbol means: “ATTENTION, BE ALERT! YOUR SAFETY IS INVOLVED”.
DANGER
Indicates an imminently hazardous situation that, if not avoided, will result in serious injury or death.
WARNING
Indicates a hazardous situation that, if not avoided, could result in serious injury or death.
CAUTION
Indicates a hazardous situation that, if not avoided, may result in minor or moderate injury.
NOTICE
Indicates a potentially hazardous situation that, if not avoided, may result in property damage.
30766 R0 7

2. SAFETY FIRST WHEATHEART - SELF-PROPELLED AUGER KIT
2.1. GENERAL SAFETY COMPETITOR MODELS
2.1. GENERAL SAFETY
Important: This general safety section includes instructions that apply to all safety practices. Any instructions specific to a certain safety practice (e.g., assembly safety), can be found in the appropriate section. Always read the complete instructional sections and not just these safety summaries before doing anything with the equipment.
YOU are responsible for the SAFE use and maintenance of your equipment. YOU must ensure that you and anyone else who is going to work around the equipment understands all procedures and related SAFETY information contained in this manual.
Remember, YOU are the key to safety. Good safety practices not only protect you, but also the people around you. Make these practices a working part of your safety program.
• It is the equipment owner and the operator's responsibility to read and under-stand ALL safety instructions, safety decals, and manuals and follow them before assembling, operating, or maintaining the equipment. All accidents can be avoided.
• Equipment owners must give instructions and review the information initially and annually with all personnel before allowing them to operate this product. Untrained users/operators expose themselves and bystanders to possible serious injury or death.
• Use this equipment for its intended purposes only.• Do not modify the equipment in any way. Unauthorized modification may
impair the function and/or safety, and could affect the life of the equipment. Any modification to the equipment voids the warranty.
• Do not allow children, spectators, or bystanders within the work area.• Have a first-aid kit available for use should the need arise, and know how to
use it.• Provide a fire extinguisher for use in case of an accident. Store in a highly vis-
ible and accessible place.• Wear appropriate protective gear. This list includes, but
is not limited to:• a hard hat• gloves• protective shoes with slip-resistant soles• protective goggles• hearing protection• dust mask or respirator
• For Powered Equipment: before servicing, adjusting, or repairing powered equipment, unplug, place all controls in neutral or off position, stop the engine or motor, remove ignition key or lock out power source, and wait for all mov-ing parts to stop.
8 30766 R0

WHEATHEART - SELF-PROPELLED AUGER KIT 2. SAFETY FIRST
COMPETITOR MODELS 2.2. ASSEMBLY SAFETY
• Follow good shop practices:• keep service area clean and dry• be sure electrical outlets and tools are properly
grounded• use adequate light for the job at hand• Think SAFETY! Work SAFELY!
2.2. ASSEMBLY SAFETY
• Read the instructions and familiarize yourself with the subassemblies and hardware making up the equipment.
• The components are large, heavy, and can be hard to handle. Be sure to use the proper tools, stands, jacks, and hoists for the job.
• Have 2 people handle the heavy bulky components.• Place safety stands or large blocks under the machine or components before
going beneath the component for assembly.• Stay away from overhead power lines and obstructions when lifting the
machine during assembly. Electrocution can occur without direct contact. Contact with obstructions can damage components or cause them to fail.
• Tighten all fasteners to their specified torque before using the machine. )
2.3. OPERATION SAFETY
• Have another person nearby who can shut down the equipment in case of accident.
• Do not operate with any of the safety guards removed.• Keep body, hair, and clothing away from moving parts. Stay away from intake
during operation.
30766 R0 9

2. SAFETY FIRST WHEATHEART - SELF-PROPELLED AUGER KIT
2.3. OPERATION SAFETY COMPETITOR MODELS
Figure 2.1 Auger Hazard Areas
10 30766 R0

WHEATHEART - SELF-PROPELLED AUGER KIT 2. SAFETY FIRST
COMPETITOR MODELS 2.4. TRANSPORT & PLACEMENT SAFETY
2.4. TRANSPORT & PLACEMENT SAFETY
• Before raising/lowering/mov-ing the auger, make sure the area around the auger is clear of obstructions and/or unau-thorized personnel. Never allow anyone to stand on or beneath auger while transport-ing or placing auger.
• Wheels must be free to move when raising or lowering auger.
• Do not stand between towing vehicle and grain auger when hitching.
• Make certain that the hitch pin is in place and the safety chain is properly attached. Use a type of hitch pin that will not permit auger to separate from towing vehicle.
• Use extreme care and mini-mum ground speed when operating or transporting on hillsides, over rough ground, or near ditches or fences.
• Always attach an SMV (slow moving vehicle) sign before transporting auger, and equip the auger with the necessary lights for transportation where required by law. Always use hazard warning flashers on the tractor/towing vehicle when transporting unless prohibited by law.
• Do not allow riders on the machine, towing vehicle, tractor, or skid steer dur-ing transport.
• Stay away from overhead obstructions and power lines when operating and transporting. Electrocution can occur without direct contact.
• Ensure that tires are inflated to the manufacturer's recommended pressure.• Review the work safety area diagram before starting work.• Check with local authorities regarding transport on public roads. Obey all
applicable laws and regulations.• Always travel at a safe speed, never exceeding 15 mph (24 km/hr). Reduce
speed on rough surfaces and use caution when turning corners or meeting traffic.
• Transport auger in full down position with slight tension on cable.• Ensure that the wheel drive motors are disengaged before towing.
Figure 2.2 Work Safety Area
30766 R0 11

2. SAFETY FIRST WHEATHEART - SELF-PROPELLED AUGER KIT
2.5. STORAGE SAFETY COMPETITOR MODELS
2.5. STORAGE SAFETY
• Store in an area away from human activity.• Do not permit children to play on or around the stored machine.
2.6. MAINTENANCE SAFETY
• Before applying pressure to a hydraulic system, make sure all components are secure, hoses are in good condition, and couplings are tightly connected and undamaged.
• Relieve pressure from hydraulic circuit before servicing or disconnecting from tractor.
• Place stands or blocks under the frame before working beneath the machine.• After maintenance is complete, replace and secure all safety guards and
safety devices, and if applicable, service doors and cleanout covers.• Remove all tools and unused parts from machine before operation.• Remove buildup of grease, oil, and debris.• Inspect all parts. Ensure parts are in good condition and installed properly.
Use only genuine Wheatheart replacement parts or equivalent. Replacement parts must meet ASAE standards or serious injury may result. Use of unauthorized parts will void the warranty. If in doubt, contact Wheatheart or your Wheatheart dealer.
2.7. HYDRAULIC SAFETY
• Always place all hydraulic controls in neutral and relieve system pressure before disconnecting or working on hydraulic system.
• Keep all components in the hydraulic system tightly secured, clean and in good condition.
• Replace any worn, cut, abraded, flattened, or crimped hoses.• Do not attempt any makeshift repairs to the hydraulic fittings or hoses with
tape, clamps, or adhesive. The hydraulic system operates under extremely high pressure; such repairs will fail suddenly and create a hazardous and unsafe condition.
12 30766 R0

WHEATHEART - SELF-PROPELLED AUGER KIT 2. SAFETY FIRST
COMPETITOR MODELS 2.8. ENGINE SAFETY
• Before moving a hydraulic cylinder, ensure that the attached component is safely secured.
2.8. ENGINE SAFETY
• Be sure to stop engine and remove key or lock out power before inspecting or servicing engine
• Refer to engine operation manual for further details.
2.9. TIRE SAFETY
• Failure to follow proper procedures when mounting a tire on a wheel or rim can produce an explosion that may result in serious injury or death.
• Do not attempt to mount a tire unless you have the proper equipment and experience to do the job.
• Have a qualified tire dealer or repair service perform required tire mainte-nance.
• When replacing worn tires, make sure they meet the original tire specifica-tions. Never undersize the replacement tire.
• Do not weld to the tire rim with the tire mounted on the rim. This action may cause an explosion which could result in serious injury or death.
• Inflate tires to the manufacturers's recommended pressure.
2.10. SAFETY DECALS
• Keep safety decals clean and legible at all times.• Replace safety decals that are missing or have become illegible. See decal
location figures that follow.• Replaced parts must display the same decal(s) as the original part.• Safety decals are available from your distributor, dealer, or factory.
2.10.1. DECAL INSTALLATION
1. Decal area must be clean and dry, with a temperature above 50°F (10°C).
WARNING
Hydraulic fluid can cause serious injury if it penetrates the skin. If it does, see a doctor immediately.• Relieve pressure before disconnecting
hydraulic line.• Wear proper hand and eye protection and
use wood or cardboard, not hands, when searching for leaks.
30766 R0 13

2. SAFETY FIRST WHEATHEART - SELF-PROPELLED AUGER KIT
2.10. SAFETY DECALS COMPETITOR MODELS
2. Decide on the exact position before you remove the backing paper.3. Align the decal over the specified area and carefully press the small portion
with the exposed sticky backing in place.4. Slowly peel back the remaining paper and carefully smooth the remaining
portion of the decal in place.5. Small air pockets can be pierced with a pin and smoothed out using the sign
backing paper.
2.10.2. SAFETY DECAL LOCATIONS
Replicas of the safety decals that are attached to the equipment are shown in the figure(s) that follow. Proper safety procedures require that you familiarize yourself with the various safety decals and the areas or particular functions that the decals apply to as well as the safety precautions that must be taken to avoid serious injury, death, or damage.
Figure 2.3 Safety Decal Locations
Decal # 9700024
Decal # 28128
Decal # 17698
14 30766 R0
WHEATHEART - SELF-PROPELLED AUGER KIT 3. ASSEMBLY
COMPETITOR MODELS 3.1. GEAR PUMP ASSEMBLY
3. Assembly
3.1. GEAR PUMP ASSEMBLY
Refer to Figure 3.1 for assembly.
Note: The engine pulley guard is removed from Figure 3.1 for illustrative purposes only.
1. The over-center (o/c) pump bracket comes pre-assembled and is attached to the engine block with two 3/8” bolts. Use 1” pump shims to provide a flat mounting surface for the o/c pump bracket (Figure 3.1).
2. Install the single groove engine pulley and 1/2” x 4-1/2” pump pulley so they are in line.
3. Install the belt and slide the over-center bracket back to increase tension on the belt.
4. Tighten the 2 bolts holding the over-center bracket to the engine, then push down on the over-center handle to lock the belt in place. Allow belt to deflect approximately 3/4” to 1” at the center.
Important: The gear pump placement may be changed, but the pump MUST run counter-clockwise (when facing pump) at a maximum of 3600 rpm.
3.2. PUMP GUARD ASSEMBLY
1. Bolt the pump guard bracket to the over-center pump bracket (Figure 3.1).• Install the pump guard bracket at the pump end of the long, adjustable
slot, through the middle of the over-center bracket.• Place 2 washers between the pump guard bracket, and the over-center
bracket so that the angle of the bracket may be adjusted to the belt.2. Attach the pump guard to the pump guard bracket.
• Align the pump guard with the belt that runs between the pump and the engine.
• Ensure that the belt does not contact the pump guard with belt engaged and disengaged.
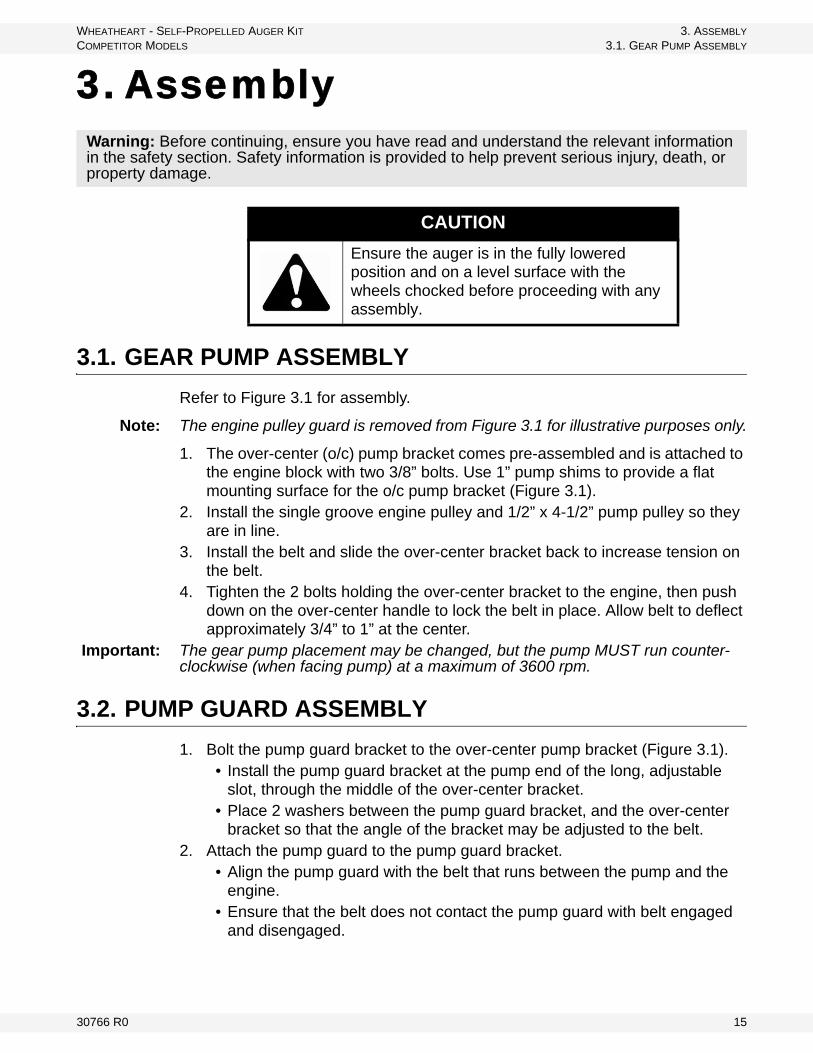
Warning: Before continuing, ensure you have read and understand the relevant information in the safety section. Safety information is provided to help prevent serious injury, death, or property damage.
CAUTION
Ensure the auger is in the fully lowered position and on a level surface with the wheels chocked before proceeding with any assembly.
30766 R0 15

3. ASSEMBLY WHEATHEART - SELF-PROPELLED AUGER KIT
3.3. OIL RESERVOIR ASSEMBLY COMPETITOR MODELS
Figure 3.1 Gear Pump Installation Guard
3.3. OIL RESERVOIR ASSEMBLY
1. Bolt the double tank mount brackets to the frame with 3/8” x 2-5/8” u-bolts 3/8” washers and 3/8” nylock nuts (Figure 3.2).
2. Secure the 43 L oil reservoir is attached to the double tank mount brackets using two 25” gear clamps joined together.
• Take care not to crush the oil reservoir when tightening hose clamps. • The reservoir must be mounted so that the oil level remains above the
gear pump (use general purpose ISO 32 oil). • To reduce weight at the intake end, mount the tank as close as possible to
the axle of the auger.
16 30766 R0

WHEATHEART - SELF-PROPELLED AUGER KIT 3. ASSEMBLY
COMPETITOR MODELS 3.4. GEAR DRIVE ASSEMBLY
Figure 3.2 Hydraulic Reservoir Installation
3.4. GEAR DRIVE ASSEMBLY
CAUTION
Before removing the tires from the auger, ensure the auger is in the fully lowered position. Position the auger on a flat level surface and block the axle to fully support the auger while removing the wheels.
30766 R0 17

3. ASSEMBLY WHEATHEART - SELF-PROPELLED AUGER KIT
3.5. OVER-CENTER DRIVE ASSEMBLY—ROUND AXLES COMPETITOR MODELS
1. Remove tires from auger.2. Insert ring gear into rim
(Figure 3.3). Use a hammer to be sure the ring gear seats evenly into the rim.
3. Tighten the 4 set screws in rotation to lock gear evenly into place.
4. Hit the ring gear with a hammer again at each set screw and retighten in rotation.
5. Put tires back on auger.
3.5. OVER-CENTER DRIVE ASSEMBLY—ROUND AXLES
1. Ensure shims fit on round axle. On some augers, shims are welded to hub; this can be checked by lining up with the tire rim. Shims are normally sized and supplied by the factory for individual augers.
2. Weld fitted shims to each axle cap (Figure 3.4).
3. Bolt axle cap axle near wheels, but do not tighten bolts. Use level to ensure axle caps are straight and flush.
4. Bolt the drive assembly on the axle caps. Adjust position until pinion gear is flush with ring gear (Figure 3.5).
5. Weld shims to axle.6. Reassemble the tires. Bolt on the
drive clamp with the handle down when the gear is disengaged.
Figure 3.3 Ring Gear Installation
Figure 3.4 Axle Shims
18 30766 R0

WHEATHEART - SELF-PROPELLED AUGER KIT 3. ASSEMBLY
COMPETITOR MODELS 3.6. OVER-CENTER DRIVE ASSEMBLY—SQUARE AXLES
Figure 3.5 Over-Center Assembly Positioning
3.6. OVER-CENTER DRIVE ASSEMBLY—SQUARE AXLES
1. Once the wheel is bolted to the hub, the over-center drive assembly can be installed.
2. Position the axle cap of the over-center drive assembly squarely on the axle tube as shown in Figure 3.6.
3. With the pinion gear flush with the ring gear (Figure 3.5), weld the axle cap to the axle tube.
Figure 3.6 Over-Center Assembly Positioning
Figure 3.7 Square Axle over-Center for Competitor Models
30766 R0 19

3. ASSEMBLY WHEATHEART - SELF-PROPELLED AUGER KIT
3.7. PINION GEAR ADJUSTMENT COMPETITOR MODELS
3.7. PINION GEAR ADJUSTMENT
For gear depth alignment, refer to Figure 3.8.
The pinion gear should mesh with the ring gear to provide maximum tooth contact (Figure 3.5).
If the pinion gear does not mesh fully with the ring gear, adjust the handle slot bolt (which bolts to the drive mount clamp) so full meshing of pinion gear is achieved when handle is in over-center position (Figure 3.8).
Gear teeth binding: If the handle will not ‘lock’ into over-center position, loosen the slot bolt nuts and slide the handle away from the tire.
Insufficient Meshing: If the pinion gear will barely mesh with the ring gear, loosen the slot bolt jam nuts and slide the handle towards the tire until the pinion gear teeth mesh with the ring gear teeth without binding.
Figure 3.8 Over-Center Assembly Adjustment
3.8. UNDERCARRIAGE INSTALLATION
Important: Pre-Assembly: When assembling the frame pipes, ram extension, and cylinder under the auger, the components should form a straight line from the axle to the ram mount ring when the auger is fully lowered. If the frame components prevent the transport frame pipes from forming a straight line, then the frame pipes and axle tabs must be mounted on the auger support arms.
1. Lower the auger completely.2. Install axle tabs by clamping (not welding yet) on auger axle frame (Figure
3.10).
NOTICE
Failure to ensure proper gear meshing will result in gear damage.
20 30766 R0

WHEATHEART - SELF-PROPELLED AUGER KIT 3. ASSEMBLY
COMPETITOR MODELS 3.8. UNDERCARRIAGE INSTALLATION
3. Make sure that tabs are square to axle and oriented straight down.4. Attach transport frame pipes to axle tabs on the auger axle frame as shown
in Figure 3.10 using the bolts and locknuts provided. 5. In the location noted in Figure 3.9, bolt the control panel ring to the auger
tube approximately 9’ from the intake cage. Do not tighten the bolts yet. Note: The hydraulic ram is normally mounted to a separate ram mount ring, not the
control ring (Figure 3.9). The only exception to this is if the straight line path from the axle to the tube intersects the control ring.
6. Mount the ram mount ring to the tube as indicated ahead of the control ring; refer to Figure 3.9.
7. Connect the fully retracted cylinder to the tab on the ram mount ring and the ram extension.
8. The ram extension slides into the a-frame attached to the tabs on the v-frame as shown in Figure 3.11. The ram extension length must be set at the proper distance from the ram mounting a-frame for proper operation of the transport kit. To set the ram extension length, elevate the v-frame to adequately clear the ground, but not interfere with the auger support arms.
9. Elevate the v-frame, undercarriage pipes, and ram assembly to form a straight line (transport position) as shown in Figure 3.9. Tighten the control ring and ram mount ring bolts.
10. If the frame components prevent the transport frame pipes from forming a straight line, then the frame pipes and axle tabs must be mounted on the auger support arms. To do this, slide the ram mount ring, cylinder, ram extension, and frame pipes toward the hopper until they form a straight line and can be attached to the support arms. The transport frame pipes should not have to be moved more than 2’ in most circumstances.
11. Make sure that the tabs are square and oriented straight down before final welding.
Figure 3.9 Control Ring Installation
30766 R0 21

3. ASSEMBLY WHEATHEART - SELF-PROPELLED AUGER KIT
3.9. RAM EXTENSION INSTALLATION COMPETITOR MODELS
Figure 3.10 Self-Propelled Auger Frame Installation
12. One end of the crossbrace is attached to the v-frame tab, the other is attached to the transport tube using clamp bands (Figure 3.10).
13. When attaching to the v-frame, be sure to mount one crossbrace to the top side of the v-frame tab, and the other to the bottom.
3.9. RAM EXTENSION INSTALLATION
The ram extension slides into the a-frame attached to the tabs on the v-frame.
The ram extension length must be set at the proper distance from the ram mounting a-frame for proper operation of the transport kit (see Table 3.1 and Figure 3.11 (measurement “X”)).
Table 3.1 Recommended Transport Pipe Length
Auger Tube Length (ft)Ram Extension
LengthTransport Pipe
Length
30’-36’ 6”-20” 76”
35’-41’ 7”-23” 86”
40’-46’ 8”-27” 101”
47’-60’ 14”-38” 120”
22 30766 R0

WHEATHEART - SELF-PROPELLED AUGER KIT 3. ASSEMBLY
COMPETITOR MODELS 3.10. CABLE INSTALLATION
Figure 3.11 Ram Extension Installation
3.10. CABLE INSTALLATION
1. Loop cable over top of drum, through hole in drum end, through cable clamp, and then tighten with two 3/8” set screws.
Important: Cable must enter winch on the top side of drum and must have a minimum of 3 wraps on the drum when auger is in the transport position.
FOR NEW INSTALLATIONS, USE STEPS 2 AND 3
2. Thread lift cable under and around roller on track shoe then back to the cable-attach rod welded to lower end of track (Figure 3.12).
Note: On augers equipped with a lower angle-iron track stop, the cable must be threaded between track stop and auger tube so the cable rests on top of the track stop (Figure 3.12).
3. Wrap cable 1-1/2 times around the cable attach rod and secure with two 1/4” cable clamps. Position cable clamps as shown (Figure 3.12). Tighten cable clamps securely.
4. Rotate drum until cable is taut. Ensure drum is rotating in direction shown in Figure 3.12 when raising auger.
5. Tie up winch motor hydraulic hose as needed to prevent damage to the hose. 6. Check gearbox for oil—make certain it is half full.
30766 R0 23

3. ASSEMBLY WHEATHEART - SELF-PROPELLED AUGER KIT
3.11. WINCH ASSEMBLY COMPETITOR MODELS
Figure 3.12
3.11. WINCH ASSEMBLY
1. Lower auger completely and remove the hand winch on the lower auger frame.
2. Place the winch on the frame.Important: The hydraulic winch position should be adjusted until the drum is 1” away from
the auger tube when in transport position.
3. Attach 2 u-bolts to frame and secure to hydraulic winch. Do not tighten.4. Angle the winch so it lines up with the cable wrapping around the track roller.
Tighten all nuts.
3.11.1. WINCH ALIGNMENT
To check the alignment of the winch, watch the cable wrapping on the drum as the auger is raised. Proper alignment is achieved when the cable indexes properly, meaning that it fills each row on the drum evenly and does not pile up against one side.
If the cable does not index properly, lower the auger fully until there is slack in the cable. Loosen the nuts on the u-bolts. Adjust the winch, retighten nuts, and retest.
24 30766 R0
WHEATHEART - SELF-PROPELLED AUGER KIT 3. ASSEMBLY
COMPETITOR MODELS 3.12. HOSE KIT LAYOUT—NO BIN SWEEP
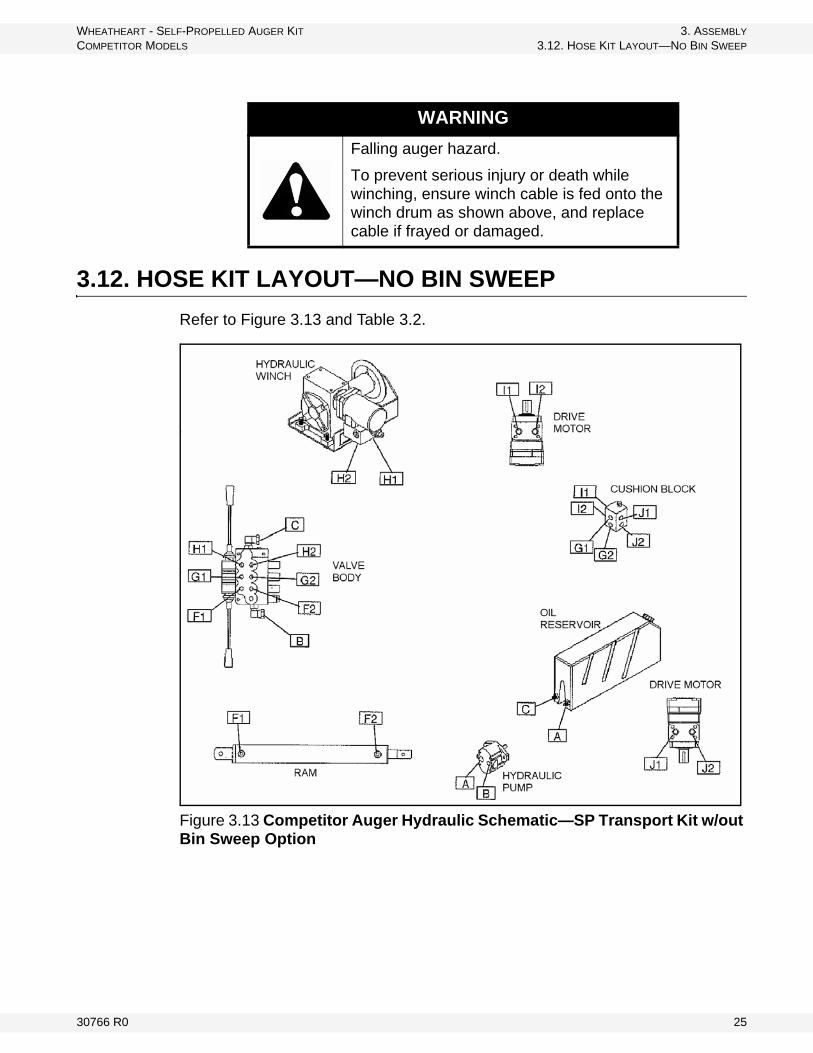
3.12. HOSE KIT LAYOUT—NO BIN SWEEP
Refer to Figure 3.13 and Table 3.2.
Figure 3.13 Competitor Auger Hydraulic Schematic—SP Transport Kit w/out Bin Sweep Option
WARNING
Falling auger hazard.
To prevent serious injury or death while winching, ensure winch cable is fed onto the winch drum as shown above, and replace cable if frayed or damaged.
30766 R0 25

3. ASSEMBLY WHEATHEART - SELF-PROPELLED AUGER KIT
3.12. HOSE KIT LAYOUT—NO BIN SWEEP COMPETITOR MODELS
Table 3.2 Competitor Auger Hydraulic Hose Lengths - SP Transport Kit w/out Bin Sweep Option
3/8” Hoses 1/2” Hoses
H1, H2
F1 F2G1, G2
I1, I2
J1, J2
B C A
Brandt Supercharger 52 x 8 156 59 47 246 38 48 250 164 48
Brandt Supercharger 47 x 8 112 20 30 206 34 46 196 130 48
Brandt Supercharger 42 x 8 80 20 30 172 38 48 170 110 48
Brandt 60 x 8 146 60 74 279 54 60 258 180 48
Brandt 50 x 7 or 8 144 42 52 232 48 38 236 166 48
Brandt 45 x 7 or 8 98 20 30 186 38 48 180 114 48
Brandt 35 x 7 80 20 30 144 38 48 158 106 48
Brandt 30 x 8 92 30 20 132 32 24 126 60 48
Farm King
51 x 7 192 42 26 250 58 42 258 122 48
Farm King
46 x 7 or 8 312 24 34 212 80 14 186 84 48
Farm King
41 x 7 or 8 300 20 30 206 14 72 186 92 48
Farm King
31 x 8 204 20 30 194 14 72 174 96 48
Sakun-diak
HD1800 x 8 272 94 108 330 56 74 340 276 48
Sakun-diak
HD1600 x 7 or 8 210 66 80 278 48 62 288 226 48
Sakun-diak
HD1400 x 7 or 8 170 38 52 236 46 60 288 178 48
Sakun-diak
HD1200 x 7 or 8 120 20 30 186 50 60 192 122 48
Sakun-diak
HD1000 x 7 or 8 88 20 30 152 50 60 166 96 48
Sakun-diak
49 x 7 or 8 188 54 70 280 40 50 288 220 48
Sakun-diak
45 x 7 or 8 160 50 62 234 34 44 244 170 48
Sakun-diak
41 x 7 or 8 120 38 54 200 40 30 204 122 48
Sakun-diak
37 x 7 or 8 82 20 30 168 36 46 180 106 48
West-field
J 51 x 7 or 8 202 20 30 236 68 12 240 174 48
West-field
J 46 x 7 166 20 30 208 68 16 220 148 48
West-field
J 41 x 8 156 20 30 192 12 68 196 106 48
26 30766 R0

WHEATHEART - SELF-PROPELLED AUGER KIT 3. ASSEMBLY
COMPETITOR MODELS 3.13. HOSE KIT LAYOUT WITH BIN SWEEP
3.13. HOSE KIT LAYOUT WITH BIN SWEEP
Refer to Figure 3.14 and Table 3.3.
Figure 3.14 Competitor Auger Hydraulic Schematic—SP Transport Kit w/ Bin Sweep Op-tion
Table 3.3 Competitor Auger Hydraulic Hose Lengths—SP Transport Kit w/ Bin Sweep Option
3/8” Hoses 1/2” Hoses
H1, H2
F1 F2G1, G2
I1, I2
J1, J2
B CK, L
D A
Brandt Supercharger 52 x 8156
59 47246
38 48250
14 116178
48
Brandt Supercharger 47 x 8 112 20 30206
34 46196
28 96158
48
Brandt Supercharger 42 x 8 80 20 30172
38 48170
16120
126
48
Brandt 60 x 8 146
60 74279
54 60258
60102
240
48
30766 R0 27

3. ASSEMBLY WHEATHEART - SELF-PROPELLED AUGER KIT
3.13. HOSE KIT LAYOUT WITH BIN SWEEP COMPETITOR MODELS
Brandt 50 x 7 or 8144
42 52232
48 38236
20100
186
48
Brandt 45 x 7 or 8 98 20 30186
38 48180
16 114130
48
Brandt 35 x 7 80 20 30144
38 48158
32 74138
48
Brandt 30 x 8 92 30 20132
32 24126
18 15 78 48
Farm King
51 x 7192
42 26250
58 42258
147
20 90 48
Farm King
46 x 7 or 8312
24 34212
80 14186
16104
100
48
Farm King
41 x 7 or 8300
20 30206
14 72186
16 84108
48
Farm King
31 x 8204
20 30194
14 72174
16 72 112 48
Sakun-diak
HD1800 x 8272
94108
330
56 74340
24 110300
48
Sakun-diak
HD1600 x 7 or 8210
66 80278
48 62288
24 88250
48
Sakun-diak
HD1400 x 7 or 8170
38 52236
46 60288
16 112194
48
Sakun-diak
HD1200 x 7 or 8120
20 30186
50 60192
22108
144
48
Sakun-diak
HD1000 x 7 or 8 88 20 30152
50 60166
22104
118 48
Sakun-diak
49 x 7 or 8188
54 70280
40 50288
16134
236
48
Sakun-diak
45 x 7 or 8160
50 62234
34 44244
24 110194
48
Sakun-diak
41 x 7 or 8120
38 54200
40 30204
24102
146
48
Sakun-diak
37 x 7 or 8 82 20 30168
36 46180
32108
138
48
West-field
J 51 x 7 or 8202
20 30236
68 12240
32 110206
48
West-field
J 46 x 7166
20 30208
68 16220
16 110164
48
West-field
J 41 x 8156
20 30192
12 68196
16 94122
48
Table 3.3 Competitor Auger Hydraulic Hose Lengths—SP Transport Kit w/ Bin Sweep Option
3/8” Hoses 1/2” Hoses
H1, H2
F1 F2G1, G2
I1, I2
J1, J2
B CK, L
D A
28 30766 R0

WHEATHEART - SELF-PROPELLED AUGER KIT 3. ASSEMBLY
COMPETITOR MODELS 3.14. HOSE KIT ASSEMBLY
3.14. HOSE KIT ASSEMBLY
Refer to Figures 3.12 - 3.15.
1. Assemble hoses as illustrated.2. Keep free of dirt while assembling.3. Keep pressure and return sides aligned.4. Tighten after being satisfied that the hoses are in the proper position.5. Check operation.6. Secure hoses in place with the cable ties supplied
Important: Before disassembling the hoses, fully lower the auger and relieve the oil pressure.
Figure 3.15 Control Ring Hydraulic Hose Connections
WARNING
The SP Transport unit MUST operate as indicated on the control panel decal. The auger MUST move in the direction that the handle is moved.
SERIOUS OPERATOR INJURY could occur if the transport unit and hydraulic hoses are not assembled correctly. If necessary, disconnect the hoses and re-assemble.
NOTICE
Do not over-tighten!
Over-tightening hose fittings can crack the fitting or motor body and cause the fittings to leak, and will void the motor warranty.
30766 R0 29

3. ASSEMBLY WHEATHEART - SELF-PROPELLED AUGER KIT
3.15. CUSHION VALVE INSTALLATION COMPETITOR MODELS
3.15. CUSHION VALVE INSTALLATION
Connect the hoses as shown in Figure 3.16 and 3.17, ensuring that the hoses are not crossed. Connect the lower cushion block hoses to the lower ports on each hydraulic motor as shown.
Figure 3.16 Cushion Block Installation
Figure 3.17 Cushion Block Installation Schematic
NOTICE
Do not over-tighten fittings! Over-tightening hose fittings can crack the fittings or motor body and will void the warranty.
30 30766 R0

WHEATHEART - SELF-PROPELLED AUGER KIT 4. TRANSPORT & PLACEMENT
COMPETITOR MODELS 4.1. TRANSPORT PROCEDURE
4. Transport & Placement
4.1. TRANSPORT PROCEDURE
Note: Use only a tractor or towing vehicle of adequate power and capacity to transport the machine.
Follow this procedure when placing the unit into its transport position:
1. Attach the auger intake to the towing vehicle with a minimum 1/2” diameter pin with retainer clip and safety chain.
2. Fully raise the v-frame assembly by retracting the hydraulic cylinder. For transportation on public roadways, secure the v-frame to the auger frame to prevent it from accidentally dropping.
3. Before transporting, disengage the over-center handle at each wheel (Figure 4.1) by pulling up on the handle.
Figure 4.1 Over-Center Transport and Working Position
Warning: Before continuing, ensure you have read and understand the relevant information in the safety section. Safety information is provided to help prevent serious injury, death, or property damage.
NOTICE
Ensure that the over-center bolts are tight enough to prevent the handle from engaging. If they are not tight enough, damage to the gears and motor will result.
30766 R0 31

4. TRANSPORT & PLACEMENT WHEATHEART - SELF-PROPELLED AUGER KIT
4.2. PLACEMENT PROCEDURE COMPETITOR MODELS
4.2. PLACEMENT PROCEDURE
Follow this procedure when placing the machine into its working position:
1. Be sure there is enough clearance from overhead obstructions, power lines, or other equipment to move the machine into its working position.
2. Position machine in the desired area. For operating instructions, see Section 5.2.
WHEN PLACING UNDER HOPPER BOTTOM BINS:
1. Ensure the wheel v-frame can easily pass through the hopper bin vertical legs.
2. Ensure the wheel v-frame does not have to travel over an obstruction.3. Auger intake is centered between the hopper bin vertical legs. This ensures
that the operator has adequate clearance for auger operation.4. Ensure the auger gearbox will not contact the hopper cone when in it’s final
position.
WHEN PLACING INTO FLAT BOTTOM BINS:
1. Ensure the wheel v-frame won’t contact the side of the bin when auger is in its final position.
2. Ensure the door of the bin is not obstructed. 3. Ensure the auger intake will fit through the bin access door.
32 30766 R0

WHEATHEART - SELF-PROPELLED AUGER KIT 5. OPERATION
COMPETITOR MODELS 5.1. START-UP
5. Operation
Operators must observe safety procedures at all times and follow the pre-opera-tional checklist before each start-up.
PRE-OPERATION CHECKLIST
Before operating each time, the operator must follow the checklist, which should confirm the following:
• Follow the service schedule.• Check hydraulic system oil level.• Ensure that all hydraulic lines are free from damage, and that all fittings
are tight.• Visually inspect the unit for damage to components. Replace or repair any
damaged or questionable parts.• Check that all guards are installed, secured, and functioning as intended.• Check the worksite and clean up the area, if needed.
• Ensure that the auger is securely attached to the towing vehicle or tractor.
5.1. START-UP
Although there are no operational restrictions on the machine when used for the first time, it is recommended that the following mechanical items be checked:
BEFORE STARTING:
• Read power unit operational manual.• Inspect hydraulic hose fittings for leaks. Tighten if necessary, and replace
worn or damaged hoses.• Inspect hydraulic mount bolts for tightness.
DURING THE FIRST FEW MINUTES:
• Ensure unit is running properly.• Some air may be trapped in the hydraulic system; slowly activate hydrau-
lic control valves to ensure all air is out of the system.
Warning: Before continuing, ensure you have read and understand the relevant information in the safety section. Safety information is provided to help prevent serious injury, death, or property damage.
WARNING
Shut off and remove key or lock out power source before inspecting or servicing the machine.
30766 R0 33

5. OPERATION WHEATHEART - SELF-PROPELLED AUGER KIT
5.2. OPERATING PROCEDURE COMPETITOR MODELS
AFTER OPERATING OR TRANSPORTING FOR 1/2 HOUR:
• Retorque all wheel bolts (if applicable). • Retorque all fasteners and hardware.
• Check all safety decals are installed and legible. Apply new ones if needed.
• Check all guards are installed and working as intended.
AFTER 3 HOURS:
• Change oil for best results.
AFTER 5 AND 10 HOURS:
• Check all hydraulic hoses and fittings for leaks. Tighten fittings where required, and replace worn or damaged hoses.
• Retorque all wheel bolts (if applicable), fasteners, and hardware.
5.2. OPERATING PROCEDURE
Important: Ensure the over-center handle at each wheel is fully engaged by pushing down on the handle at each wheel and checking that the gears fully mesh (see Section 3.7. for adjustment if necessary).
1. With the engine at idle, use the hydraulic controls (Figure 5.1, and 5.2) to fully lower the auger with the winch control lever on the valve before moving the auger into position.
2. Raise the auger intake end off the ground using the hydraulic ram control lever on the valve.
3. Move the auger into place by moving the wheel move control forward or backward to control the direction of travel. Steering is accomplished by grasping the handle bar and either leaning in or pulling away from the auger. Steering is easier if the auger is in motion.
4. When unloading a bin, aim the auger intake into the bottom of the center of the bin. Use the winch control lever and hydraulic ram control lever to help position the auger.
5. When loading a bin, use the winch control to raise the auger to the desired height. Use the hydraulic ram control to raise the intake of the auger off the ground as the auger is winched up. Turn the wheel move control to change the direction of travel. Leave extra clearance for making wide turns.
Note: Refer to Section 6.1.1. for winch valve kickout adjustment, 6.1.4. for cushion valve adjustment, and 6.1.2. for adjustment of the ram speed.
CAUTION
Do not attempt to move the auger on uneven or hilly terrain. The mover will not perform well under these conditions and could damage the machine or injure the operator.
34 30766 R0

WHEATHEART - SELF-PROPELLED AUGER KIT 5. OPERATION
COMPETITOR MODELS 5.2. OPERATING PROCEDURE
Figure 5.1 Hydraulic Control Valve Decal
Figure 5.2 Hydraulic Control Valve
30766 R0 35

5. OPERATION WHEATHEART - SELF-PROPELLED AUGER KIT
5.2. OPERATING PROCEDURE COMPETITOR MODELS
36 30766 R0

WHEATHEART - SELF-PROPELLED AUGER KIT 6. MAINTENANCE & STORAGE
COMPETITOR MODELS 6.1. MAINTENANCE
6. Maintenance & Storage
6.1. MAINTENANCE
Before performing any maintenance on this unit, shut off and remove key or lock out power source.
1. Periodically check for wear and proper meshing of the ring gear and pinion. See Section 3.7.
2. Change oil annually to remove any accumulation of dirt or condensation in the system. Replace with Type A automatic transmission oil. Do not over-fill reservoir. Leave 1/2 quart (0.47L) space to allow for level fluctuation.
3. Inspect hoses and fittings. Replace as required.
6.1.1. HYDRAULIC WINCH VALVE
The hydraulic winch option allows the operator to safely and easily lower and raise the auger.
The winch is equipped with a factory preset safety valve that allows the winch to completely raise the auger, but it will stop once the auger is fully raised.
The safety valve is non-adjustable and does not require any maintenance.
The only item that an operator must inspect is the cable, and if this cable is frayed or worn, it must be replaced.
Important: Winch speed is adjusted at the factory. Cold temperatures may cause the winch to operate slowly.
Figure 6.1 Hydraulic Winch
Warning: Before continuing, ensure you have read and understand the relevant information in the safety section. Safety information is provided to help prevent serious injury, death, or property damage.
30766 R0 37

6. MAINTENANCE & STORAGE WHEATHEART - SELF-PROPELLED AUGER KIT
6.1. MAINTENANCE COMPETITOR MODELS
6.1.2. RAM SPEED ADJUSTMENT
Ram speed is regulated at the control valve. The adjustable stroke limiter screws and lock nuts set the speed of ram travel individually in each direction (Figure 6.2).
Adjust the stroke limiter screws and lock nuts until the desired rate of travel is achieved.
• Turning the screws in results in a slower speed.• Turning the screws out results in a faster speed.
Figure 6.2 Three Spool Valve Adjustment
6.1.3. HYDRAULIC PRESSURE RELIEF VALVE ADJUSTMENT
Note: Before adjusting, ensure auger is fully lowered (intake and discharge ends) and that the auger is on a level surface.
If the controls are “jerky” or act too fast, it may be necessary to increase the hydraulic pressure on the self-propelled auger kit. To do this, follow the steps below (Figure 6.2).
1. Ensure auger engine is idling and that the auger flighting is disengaged before adjusting.
2. To decrease hydraulic pressure: loosen jam nut on 3 spool valve (bottom right side of valve) and turn adjustment screw out (counter-clockwise) 1/4 turn. Tighten jam nut.
WARNING
Winch cable must be wound onto the drum of the winch from the top of the drum. This ensures the safe and proper operation of the hydraulic winch.
38 30766 R0

WHEATHEART - SELF-PROPELLED AUGER KIT 6. MAINTENANCE & STORAGE
COMPETITOR MODELS 6.2. STORAGE
3. To increase hydraulic pressure: repeat step 2. except turn adjustment screw in (clockwise) 1/4 turn. Tighten jam nut.
6.1.4. CUSHION VALVE ADJUSTMENT
To control the speed of the mover, the adjustable needle valve (Figure 6.3) can be:
• screwed in for increased speed (adjust by 1/8 turn increments)• screwed out for decreased speed (adjust by 1/8 turn increments)
Figure 6.3 Cushion Valve Adjustment
6.2. STORAGE
To ensure a long, trouble-free life, prepare unit for storage after the season’s use following the procedure below:
• Store the machine on a level surface, free of debris, and in an area away from human activity. Store in a dry place, or use a tightly secured tarp to protect the equipment from the weather.
• Ensure that the unit is in transport position.• Remove all residual material and clean the machine thoroughly. • Inspect the unit at stress points for cracks.• Repair or replace any worn or damaged components to prevent any
unnecessary downtime at the start of the next season.• Touch up paint nicks and scratches to prevent rusting. • Check hydraulic fittings, hoses, lines, couplers, and valves. Tighten any
loose fittings. Replace any hose that is badly cut, nicked, abraded, or is separating from the crimped end of the fitting. Secure the hoses to the machine.
• Inspect and tighten all fasteners; replace fasteners if required. • Check tire inflation.
• Retract all cylinders or grease exposed shafts.• Inspect hydraulic cylinders for leaks; replace seals if necessary
30766 R0 39

6. MAINTENANCE & STORAGE WHEATHEART - SELF-PROPELLED AUGER KIT
6.2. STORAGE COMPETITOR MODELS
40 30766 R0

WHEATHEART - SELF-PROPELLED AUGER KIT 7. TROUBLESHOOTING
COMPETITOR MODELS
7. TroubleshootingPROBLEM CAUSE SOLUTION
Valve is leaking.• loose/cracked fittings • tighten/replace fittings• worn hose • replace hose• valve spools are worn • replace valve
Machine operates slowly.
• oil is hot • check oil level and add oil if required (use general purpose ISO 32 hydraulic oil)
• blockage in hydraulic lines • suction hose blocked or kinked• power source is not produc-
ing enough oil volume and/or pressure
• speed up the engine to produce more flow/pressure
• the power unit may not have enough capacity to operate properly
• cushion block needs adjust-ing
• adjust valve on cushion block by turning inward 1/8 of a turn at a time, refer to “Cushion Valve Adjustment” on page 39
• Filter plugged (if equipped) • Change filter.
Hydraulic winch will not raise auger.
• relief valve pressure set too low
• adjust relief valve pressure, refer to “Hydraulic Pressure Relief Valve Adjustment” on page 38
• oil level is too low • check oil level• pump is worn out • replace pump
Hydraulic cylinder leaking. • worn seal • replace seal
Winch coupler spins off (Dutton winch).
• internal winch parts worn • replace worn parts• damage or obstruction on
tracking• check tracking for damage or
obstructions
Auger doesn’t drive.
• cushion block needs adjust-ing
• adjust needle valve by turning clockwise 1/8 of a turn - try and repeat if necessary, refer to “Cushion Valve Adjustment” on page 39.
Pinion gear slipping or binding.
• pinion gear not adjusted properly
• Adjust the pinion gear. See “Pin-ion Gear Adjustment” on page 20.
30766 R0 41

7. TROUBLESHOOTING WHEATHEART - SELF-PROPELLED AUGER KIT
COMPETITOR MODELS
42 30766 R0

WHEATHEART - SELF-PROPELLED AUGER KIT 8. APPENDIX
COMPETITOR MODELS 8.1. BOLT TORQUE VALUES
8. Appendix8.1. BOLT TORQUE VALUES
The tables shown below give correct torque values for various bolts and capscrews. Tighten all bolts to the torque specified in the chart unless otherwise noted. Check tightness of bolts periodically, using bolt torque chart as your guide. Replace hardware with the same strength bolt.
Figure 8.1 Pattern for Tightening Wheel Bolts
Table 8.1 Imperial Bolt Torque
BOLT DIAMETER
(Nm) (lb-ft) (Nm) (lb-ft) (Nm) (lb-ft)
1/4" 8 6 12 9 17 125/16" 13 10 25 19 36 273/8" 27 20 45 33 63 45
7/16" 41 30 72 53 100 751/2" 61 45 110 80 155 115
9/16" 95 60 155 115 220 1655/8" 128 95 215 160 305 2203/4" 225 165 390 290 540 4007/8" 230 170 570 420 880 6501" 345 225 850 630 1320 970
30766 R0 43

8. APPENDIX WHEATHEART - SELF-PROPELLED AUGER KIT
8.2. TIGHTENING O-RING FITTINGS COMPETITOR MODELS
Torque figures indicated above are valid for non-greased or non-oiled threads and head unless otherwise specified. Therefore, do not grease or oil bolts or capscrews unless otherwise specified in this manual. When using locking elements, increase torque values by 5%.
8.2. TIGHTENING O-RING FITTINGS
1. Inspect o-ring and seat for dirt or obvious defects.2. On the angle fittings, back the lock nut off until washer bottoms out at top of
groove.3. Hand-tighten fitting until back up washer or washer face (if straight fitting)
bottoms on face and o-ring is seated.4. Position angle fittings by unscrewing no more than one turn.5. Tighten straight fittings to torque shown.6. Tighten while holding body of fitting with a wrench.
Table 8.2 Metric Bolt Torque
BOLT DIAMETER (Nm) (lb-ft) (Nm) (lb-ft)M3 0.5 0.4 1.8 1.3M4 3 2.2 4.5 3.3M5 6 4 9 7M6 10 7 15 11M8 25 18 35 26
M10 50 37 70 52M12 90 66 125 92M14 140 103 200 148M16 225 166 310 229M20 435 321 610 450M24 750 553 1050 774M30 1495 1103 2100 1550M36 2600 1917 3675 2710
44 30766 R0

WHEATHEART - SELF-PROPELLED AUGER KIT 8. APPENDIX
COMPETITOR MODELS 8.2. TIGHTENING O-RING FITTINGS
Table 8.3 “O” Ring FittingsTube Size OD (in.)
Nut Size Across Flats (in.)
Torque
Valuesa (Nm)
Torque
Valuesa (Lb-ft)# of Turns to
Tighten (Flats)(After Finger
Tightening) (Turn)
3/8 1/2 8 6 2 1/37/16 9/16 12 9 2 1/31/2 5/8 16 12 2 1/3
9/16 11/16 24 18 2 1/33/4 7/8 46 34 2 1/37/8 1 62 46 1-1/2 1/4
1-1/16 1-1/4 102 75 1 1/61-3/16 1-3/8 122 90 1 1/61-5/16 1-1/2 142 105 3/4 1/81-5/8 1-7/8 190 140 3/4 1/87/8 2-1/8 217 160 1/2 1/12
a. The torque values shown are based on lubricated connections as in reassemble.
30766 R0 45

8. APPENDIX WHEATHEART - SELF-PROPELLED AUGER KIT
8.3. PARTS COMPETITOR MODELS
8.3. PARTS
8.3.1. SELF-PROPELLED AUGER KIT
46 30766 R0

WHEATHEART - SELF-PROPELLED AUGER KIT 8. APPENDIX
COMPETITOR MODELS 8.3. PARTS
Table 8.4
Item Part No. Description Qty
1 0200322WH WHEEL V FRAME ASSY, W/ BEARINGS 1
2 9900248 LOCKING COLLAR, 1" 2
3 0200314WH WHEEL YOKE 2
4 0200006 1" ID BALL BEARING 4
5 29748WH 2012 RAM MOUNTING A-FRAME ASSEMBLY 1
6 29747WH RAM MOUNTING CLAMP 1
7A 29741WH RAM EXTENSION PIPE, 15" (8/10-36'/41') 1
7B 29743WH RAM EXTENSION PIPE, 28" (8-46'/51') 1
8A 0200319-86WH TRANSPORT FRAME PIPE (8-36') 2
8B 0200319-92WH TRANSPORT FRAME PIPE (10-36') 2
8C 0200319-120WH TRANSPORT FRAME PIPE (8/10-41', 8-46') 2
8D 0200319-144WH TRANSPORT FRAME PIPE (8-51') 2
9 0200320WH CROSSBRACE PIPE 2
10 0200321WH CROSSBRACE, CLAMPBAND (2") 2
10A 27242WH CROSSBRACE, CLAMPBAND (2.5") 2
11 9900316 TIRE AND RIM (4.8-8") 2
12 0200308 CYL, 2"x15.625x1.125" ROD, 1
13 28263 BOLT, 3/4" x 6" GR5 PLTD 2
14 19975 BOLT, 3/8" x 1-1/4" GR5 PLTD 16
15 27816 BOLT, 1/2" x 2" GR5 PLTD 4
16 18699 BOLT, 3/8" x 2-1/2"" GR5 PLTD 1
17 29979 BOLT, 3/8" x 2" GR5 PLTD 2
18 19599 NYLON LOCKNUT, 1/2" PLTD 5
19 19601 NYLON LOCKNUT, 3/4" PLTD 2
20 17402 NYLON LOCKNUT, 3/8" PLTD 19
21 19598 NYLON LOCKNUT, 7/16" PLTD 8
22 17392 FLAT WASHER, 3/8" 32
23 9900339 1" ROUND POLY PLUG 2
24 0200334 RING GEAR W/ SET SCREWS 2
25 0200350 CUSHION BLOCK, COMPLETE 1
26 0200303WH CONTROL HANDLE W/ GRIP 1
27 0200007-4 HANDLE GRIP 2
28 0200305WH BAR HANDLE W/ GRIP 1
29 19965 BOLT, 5/16" x 2-3/4" GR2 PLTD 3
30 19980 NYLON LOCKNUT, 5/16" PLTD 3
31 19603 LOCKWASHER, 5/16" 1
32 9900852 BOLT HEX M8 x 1.25" GR8.8 PLT 1
33 1600007 CONTROL LEVER, SD5 VALVE 2
34A 29756WH 8" HALF CLAMP, VALVE MOUNT, (8" WIDE) 1
34B 29775WH 10" HALF CLAMP, VALVE MOUNT, (8" WIDE) 1
30766 R0 47

8. APPENDIX WHEATHEART - SELF-PROPELLED AUGER KIT
8.3. PARTS COMPETITOR MODELS
8.3.2. WHEEL MOTOR
35A 29749WH 8" HALF CLAMP RAM MOUNT (8" WIDE) 1
35B 29774WH 10" HALF CLAMP RAM MOUNT (8" WIDE) 1
36A 29750WH 8" HALF CLAMP (8" WIDE) (NOT SHOWN) 2
36B 29773WH 10" HALF CLAMP (8" WIDE) (NOT SHOWN) 2
37 19542 BOLT, 7/16" x 1" GR5 PLTD 16
38 28184 FTG ELB, 1/2" MNPT TO 3/8" FSW 2
39 28504 FTG ELB 45°, 6MORB x 6MJIC 6
40 1600006 3 SPOOL VALVE, 2 HANDLES, NO FTGS 1
41 990050 BOLT, 1/2" x 2-1/4" GR5 PLTD 1
Table 8.4
Item Part No. Description Qty
Table 8.5
Item Part No. Description Qty
1 0200348 SQR Axle Cap for O/Center (Bolt on) 1
2 0200347 Axle Clamp, Bolt on for 2-1/2" SQR Tubing 2
3 0200007-1 Handle No Grip, SP O/C 1
4 P1211303 Rubber Handle Cover 1/4” x 1” 1
5 0200338A Motor Bracket Drilled 1
6 0200009 Spring, Over Center 1
7 19599 Nut Nylock 1/2” UNC Plt 3
8 27816 Bolt Hex 1/2” x 2” UNC GR5 Plt 1
9 28261 Nut Flange 1/2” 2
10 17401 Washer Flat, 1/2”, Plt 3
11 17746 Bolt Hex 1/2” x 1-1/2” UNC GR5 Plt 1
12 0200008-2 Over-Center Link SP Wheel Move, Bent 1
13 17807 Carriage Bolt 1/2” x 1-1/2” 2
14 9900980 Carriage Bolt - FT 3/”8 x1-1/4” 4
15 17402 Nut Nylock 3/8” UNC Plt 4
48 30766 R0
WHEATHEART - SELF-PROPELLED AUGER KIT 8. APPENDIX
COMPETITOR MODELS 8.3. PARTS
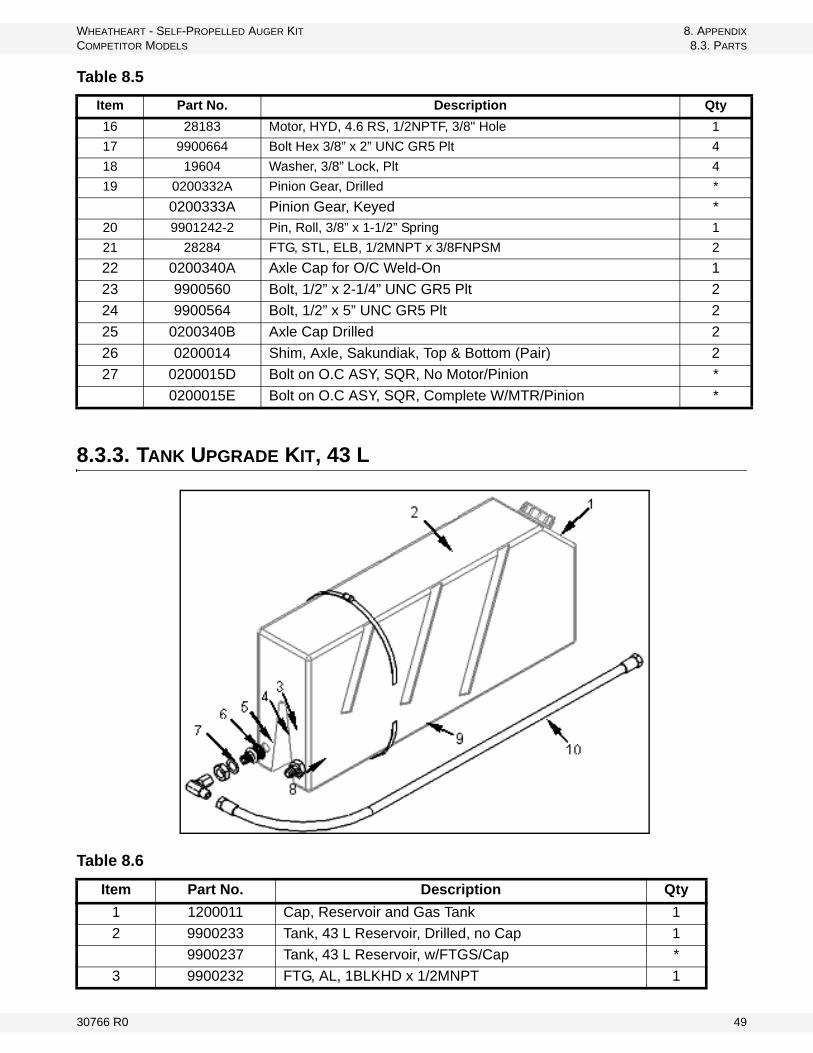
8.3.3. TANK UPGRADE KIT, 43 L
16 28183 Motor, HYD, 4.6 RS, 1/2NPTF, 3/8" Hole 1
17 9900664 Bolt Hex 3/8” x 2” UNC GR5 Plt 4
18 19604 Washer, 3/8” Lock, Plt 4
19 0200332A Pinion Gear, Drilled *
0200333A Pinion Gear, Keyed *
20 9901242-2 Pin, Roll, 3/8” x 1-1/2” Spring 1
21 28284 FTG, STL, ELB, 1/2MNPT x 3/8FNPSM 2
22 0200340A Axle Cap for O/C Weld-On 1
23 9900560 Bolt, 1/2” x 2-1/4” UNC GR5 Plt 2
24 9900564 Bolt, 1/2” x 5” UNC GR5 Plt 2
25 0200340B Axle Cap Drilled 2
26 0200014 Shim, Axle, Sakundiak, Top & Bottom (Pair) 2
27 0200015D Bolt on O.C ASY, SQR, No Motor/Pinion *
0200015E Bolt on O.C ASY, SQR, Complete W/MTR/Pinion *
Table 8.5
Item Part No. Description Qty
Table 8.6
Item Part No. Description Qty
1 1200011 Cap, Reservoir and Gas Tank 1
2 9900233 Tank, 43 L Reservoir, Drilled, no Cap 1
9900237 Tank, 43 L Reservoir, w/FTGS/Cap *
3 9900232 FTG, AL, 1BLKHD x 1/2MNPT 1
30766 R0 49

8. APPENDIX WHEATHEART - SELF-PROPELLED AUGER KIT
8.3. PARTS COMPETITOR MODELS
8.3.4. IN-LINE HYDRAULIC OIL FILTER (OPTIONAL)
4 9900240 O-Ring, #318 2
5 9900052-2 Bushing, 1” Machinery 18GA 2
6 9900760 Nut Jam 1” UNF Plt 2
7 9900331 FTG, STL, ELB, 1/2MNPT x 1/2FNPSM 1
8 9900021 FTG, AL, 1” BLKHD x 3/4” HB 1
9 9900216-1 Clamp, Reservoir #116, 25” 4
10 H12X42PS Hose, HYD, 1/2 x 42,1/2FNPSM x1/2FNPSM,1W 1
11 0200025 Tank Upgrade Kit, Complete *
Table 8.6
Item Part No. Description Qty
Table 8.7
Item Part No. Description Qty
1 9900994 Filter HYD, 10 Micron, 3/4" FNPT 1
2 17402 Nut Nylock 3/8” UNC Plt 2
3 9900038 U-Bolt SQ 3/8”NC x 2-5/8” x 3-3/4” x 1-1/4” Thd 1
4 2300053 FTG, STL, 3/4MNPT x 1/2FNPSM 2
5 9900800 Bolt Hex 1/4” x 3/4” UNC GR5 Plt 2
6 9900783 Washer Lock 1/4” Plt 2
7 2300202 Filter Mount 1
8 9900993 Filter Head, In-line, 3/4" FNPT 1
50 30766 R0

WHEATHEART - SELF-PROPELLED AUGER KIT 8. APPENDIX
COMPETITOR MODELS 8.3. PARTS
8.3.5. HYDRAULIC WINCH & CONTROL VALVE
Table 8.8
Item Part No. Description Qty
1 17628 Winch Frame Weld't 1
2 17625 Gearbox, 20:1, 60WPuds 1
3 0700023 Valve, Winch, Relief Block, Manifold 1
4 0700024 Valve, Winch, Non-Adj Relief (Manifold) 1
5 17626 Motor, HYD, 3.2 RS, Man, 1/4" Key 1
6 17629 Winch Drum Wldt 1
7 28744 Bolt, 7/16” x 1-1/2” UNC GR5 Pld 4
8 19598 Nut Nylock 7/16” UNC GR5 Plt 4
9 18097 1" Rim Washer 1
10 18496 Rope Keeper Kit 1
11 18955 Bolt, 3/8” x 1” UNC GR5 Pld 4
12 19604 Washer, 3/8” Lock, Plt 4
13 17631 Bolt, 5/16” x 2-1/2” UNC GR5 Pld 4
14 17105 DCL, Warn, Rotating Cable Sheaves (not shown) 1
15 17108 DCL, Warn, Inspect Cable (not shown) 1
16 17698 DCL, Warn, High-Pressure Fluid HAZ (not shown) 1
17 28129 DCL, Warn, Falling Auger Hazard (not shown) 1
18 1100625 FTG, ELB, 3/8MNPT x 1/2FNPSM 2
19 19222 Zerk, 5/16”, Press-in Style (Yellow Zinc) 1
20 19149 Bushing, BRS, 1”ID x 1-1/4”OD x 1-3/4” WF 1
21 28455 U-Bolt SQ 3/8” NC x 2-5/8” x 3-3/4” x 1-1/4” Thd GR5 Plt 2
22 17402 Nut Nylock 3/8” UNC GR5 Plt 4
23 17392 Washer Flat 3/8” Plt 4
30766 R0 51

8. APPENDIX WHEATHEART - SELF-PROPELLED AUGER KIT
8.3. PARTS COMPETITOR MODELS
52 30766 R0

LIMITED WARRANTYWheatheart warrants to the buyer that the new machinery is free from defects in material and workmanship.
This warranty is only effective for any new machinery that has not been altered, changed, repaired, or treated since its delivery to the buyer, other than by Wheatheart or its authorized dealers or employees, and does not apply to accessories, attachments, tools, or parts sold or operated with the new machinery if they have not been manufactured by Wheatheart.
Wheatheart shall only be liable for defects in the material or workmanship attributed to faulty material or bad workmanship that can be proved by the buyer, and specifically excludes liability for repairs arising as a result of normal wear and tear of the new machinery or in any other man-ner whatsoever, and without limiting the generality of the foregoing, excludes application or installation of parts not completed in accordance with Wheatheart operation manual, specifica-tions, or printed instructions.
A Warranty Registration Form and Inspection Report must be completed at the time of delivery and returned to Wheatheart Manufacturing within thirty (30) days.
Warranty Period
Defective parts are subject to inspection by a Wheatheart representative prior to approval of a warranty claim. All returned parts must be sent to the factory, freight pre-paid, in order to qualify for warranty replacement. Repaired or replaced parts will be returned freight collect.
If these conditions are fulfilled, Wheatheart shall at its own cost and its own option either repair or replace any defective parts provided that the buyer shall be responsible for all expenses incurred as a result of repairs, labor, parts, transportation, or any other work, unless Wheatheart has authorized such expenses in advance. Normal wear and service items such as belts, hoses, flashing, etc. are excluded from warranty.
The warranty shall not extend to any repairs, changes, alterations, or replacements made to the new equipment other than by Wheatheart or its authorized dealers or employees.
This warranty extends only to the original owner of the new equipment.
This warranty is limited to the terms stated herein and is in lieu of any other warranties whether expressed or implied, and without limiting the generality of the foregoing, excluded all warran-ties, expressed or implied, or conditions whether statutory or otherwise as to quality and fitness for any purpose of the new equipment, Wheatheart disclaims all liability for incidental or conse-quential damages.
This machine is subject to design changes and Wheatheart shall not be required to retro-fit or exchange items on previously sold units except at its own option.
WARRANTY VOID IF NOT REGISTERED
Private Farm Use One (1) year from date of purchase.
Commercial, Custom, or Rental Use Ninety (90) days from date of purchase.
Replacement Parts Ninety (90) days from date of replacement

Wheatheart
Part of the Ag Growth International Inc. Group
P.O. Box 39
Rosenort, Manitoba, Canada R0G 1W0
Phone: (866) 467-7207 (Canada & USA)
Fax: (866) 768-4852
website: www.wheatheart.com
email: [email protected]
© Ag Growth International Inc. 2013
Printed In Canada