self service budget development training guide
TRANSCRIPT

Banner Finance Self Service
Budget Development Training Guide

BudgetDevelopmentTrainingGuide Page2August2016
Table of Contents
Introduction and Assistance…................................................................................3 FOAPAL….……………………….................................................................................4 Accessing Finance Self Service…………….............................................................5
Create a Budget Development Query................................................................ 6 Query Results…………………................................................................................... 9 Drilling Down by Organization Hierarchy............................................................ 10 Create Budget Worksheet.................................................................................... 12 Create Budget Worksheet Sections..................................................................... 15
Worksheet Parameter and Mass Change Parameters............................... 15 Worksheet…………………………..................................................................... 16 New Rows Additions…….………..................................................................... 17
Action Buttons and Summary Totals.............................................................. 18 Changing a Budget Worksheet........................................................................... 18
Deleting Rows……………………..................................................................... 18 Adding Free-Form Text to Records................................................................ 20
Maintain Organization Lock................................................................................. 21 Budget Development History…........................................................................... 25

BudgetDevelopmentTrainingGuide Page3August2016
Introduction Banner is a comprehensive and integrated information system comprised of modules in the areas of finance, financial aid, human resources, student and advancement. The finance module of this administrative software is used to record financial transactions resulting from activity at the University. It stores transactional data in an Oracle relational database and users view information via a web based self-service system. Internet Native Banner is used by University departments including the budget office, general accounting, purchasing, and accounts payable to input financial transactions. Banner Finance Self Service, used by departmental representatives, is a web based interface that allows users to extract information from Internet Native Banner and view it in a user friendly format. The data is posted in real time. The Budget Development extension of Banner Finance Self Service is an application that enables selected users to query their proposed non-salary operating budgets for the upcoming year. Users will be able to propose changes with a user friendly worksheet. Proposed changes are submitted to the next organizational level for review. That level can permit or prevent changes through an organizational lock feature. Budget proposal submissions travel up through the approval chain until they reach the Budget Office, which will review, approve and compile the proposals into the annual operating budget. The goal of this document is to provide an introduction to Budget Development on Finance Self Service at the University of Portland. The instructions included in this manual are intended to assist the user in understanding and performing the steps required to create their proposed upcoming fiscal year budget and submit that budget to the next organizational level. Assistance Budgeting and the construction of the annual operating budget are functions performed in the Office of Financial Affairs. For assistance with Budget Development on Finance Self Service, or for questions regarding your budget, please contact:
Rowena Bramlette 503.943.8017 Budget Director [email protected] Waldschmidt Hall Room 525

BudgetDevelopmentTrainingGuide Page4August2016
FOAPAL The Chart of Accounts is the numbering system used by Banner to capture financial transactions and facilitate retrieval of information and financial reporting. There is only one Chart of Accounts in Banner and it is defined by the number 7. The chart of accounts structure in Banner is composed of six elements: Fund, Organization, Account, Program, Activity and Location (FOAPAL). Each element of the Chart of Accounts is described below. Fund: The fund element is used to specify the funding source. Examples of funds include: educational and general, endowment, auxiliary, agency and capital. Organization: The organization code is used to identify the organizational unit that is responsible for financial activity captured within the code. Organization codes are arranged in a hierarchy. The lowest level in the organization hierarchy in Banner represents the code used for data entry purposes, usually three digits. The organization code is used to query transactions for most University activities. Account: The account code is used to classify revenues and expenditures by type. Revenue account codes identify the type of revenue received, such as tuition, assessment and fee, gift, room/board or miscellaneous. Expenditure account codes identify the type of expense, such as salaries, fringe benefit, supplies or services purchased. Revenue account codes start with the number 5, personnel expenditures with the number 6, direct expenditures with the numbers 07, and inter-departmental charges with the numbers 71. Program: The program code is used to identify the functional purpose of expenditures. Program codes accumulate expenditure information into major categories such as instruction, research, academic support, student services and auxiliary. This code is used primarily for financial reporting purposes. Activity: The activity code is an optional number that may be used to capture information for a specific project or activity. Location: The location code is used to specify the assigned physical location of an asset or the location of a transaction that is different from the normal location of the organization. This code is not used at UP.

BudgetDevelopmentTrainingGuide Page5August2016
Accessing Finance Self Service As a web-based product, Finance Self Service is accessed via your web browser. http://www. up.edu/ and then PilotsUP It may also be accessed by going directly to the UP portal. https://pilots.up.edu/ Enter using your Screen Name (networkID) and Password. One you have logged in, click on the yellow Ssb icon located in the upper left hand corner of the screen.
You may be requested to enter a User Name (networkID) and Password again.

BudgetDevelopmentTrainingGuide Page6August2016
Click Finance.
Budget Development Click Budget Development.
Budget Development allows users to query budget information as well as create budget scenarios. There is a feature that prevents (locks) any changes to budget scenarios so that no additional changes can be posted.
Create a Budget Development Query The Create Budget Development Query is useful for viewing the status of the existing budget or querying on changes that have been made while building the budget. Creating and running a Budget Development Query is an easy process and is similar to using the general Self Service Budget Queries application. It may be helpful to run the Create Budget Development Query application before running Create Budget Worksheet.

BudgetDevelopmentTrainingGuide Page7August2016
There are two options available
Create a new budget query Retrieve an existing budget query
Begin by creating a new budget query. When budget queries are created and saved, they can be retrieved by choosing it from the drop down list and then clicking the Retrieve Query button. Click Create Query. This brings up the Budget Development Query parameter page. This screen allows users to select the columns to display in the query. It is recommended that Base Budget and Cumulative Change be selected. It is also recommended that Line Item Detail format be chosen for the query.
Field Name Input Data Usage Adopted Budget Check Box Original adopted budget. Permanent Budget Adjustments
Check Box Adjustments to the budget made during the year that are permanent.
Temporary Adopted
Check Box Temporary adjustments to the adopted budget.
Temporary Adjustments
Check Box Adjustments to the budget made during the year that are temporary.
Base Budget and Cumulative Change
Check Box Base Budget is the initial proposed budget from the operating ledger when the budget build process was run. Cumulative Change is the difference between the proposed budget amount and base budget amount.

BudgetDevelopmentTrainingGuide Page8August2016
Lock Status Check Box Select this to display the current lock status. Current lock status is displayed only for an organization hierarchy query.
Organization Hierarchy
Radio Button Select this option to generate a display that begins with a summary by organization.
Line Item Detail Radio Button Select this option to produce a listing of individual budget line rows that match the parameter criteria chose.
Click Continue. This will open the second parameter screen. This screen further defines the parameters of the query. You will only be able to run a Budget Development Query for the organizations to which you have been granted access.
Enter the appropriate parameters for your query.
Chart of Accounts is a required field and equals 7. Budget ID and Budget Phase will be provided to you in the budget development
guidelines. Index and Program can be left blank. FOAPAL – typically you will enter your Fund and Org. Wildcard character % can
be incorporated to refine the query results. Simply leaving a field blank will produce all results for which you have been granted access.
Budget Duration Code provides the choice of viewing the permanent budget or a temporary budget or the default “All”. UP does not process a temporary budget. Simply keep at default.
Display Fin Mgr from provides a drop down for None, Organization, or Fund. UP does not label the financial manager in its Chart of Accounts, therefore simply keep at default “None”.

BudgetDevelopmentTrainingGuide Page9August2016
You can select to include Revenue Accounts, Labor Accounts, Expenses, Transfers, and Deleted Items. Checking Deleted Items means deleted rows will display on the query.
Enter a query name in the Save Query as field if you want to save this query if it is to be used more than one time, for ease of use. Note: If you wish to share this query with other users, click on the Shared check box.
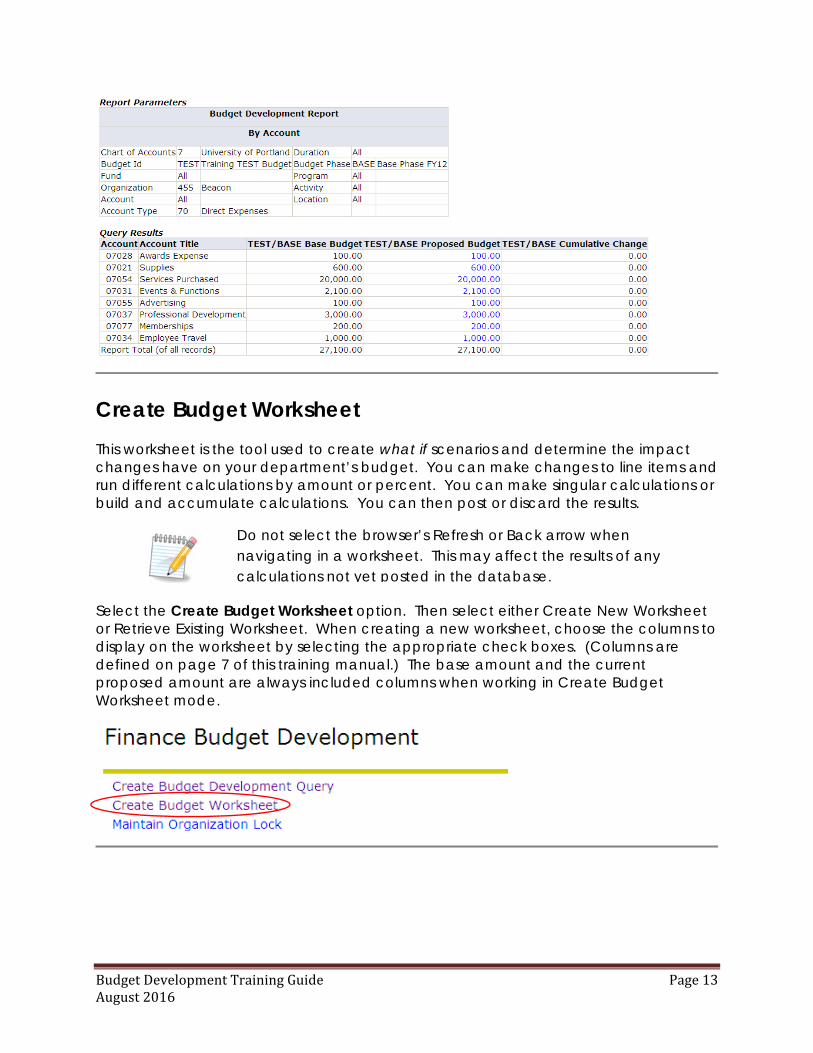
Click Submit. Query Results
Self Service will return a Budget Development Report with the information you wished to query on. Any text items shown in blue will display further detail information by clicking on the item. As with other queries, you may download all columns or selected columns to an Excel spreadsheet. For more information on downloading, refer to the Self Service Training manual. The query above reflects the following:
Base Budget column is the data from the current year base budget. Proposed Budget column shows any changes that have been submitted and
posted during the Create Budget Worksheet application. (This process will be explained later in the manual.)
Changes are highlighted in blue. You can click on the item to display the Budget Development History. (This process will be explained later in the manual.)
BudgetDevelopmentTrainingGuide Page10August2016
The Cumulative Change column shows the difference between the base budget and the proposed budget.
Query results only display 15 rows at a time. Click on Next 15 to display the next 15 rows.
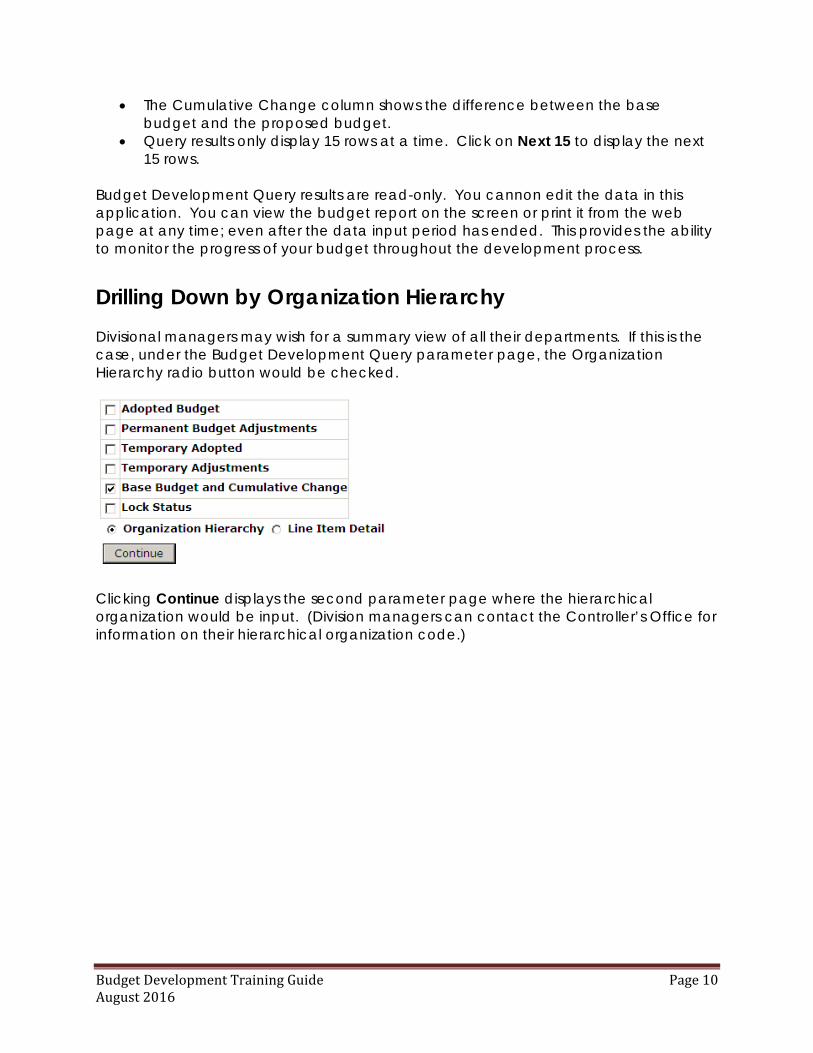
Budget Development Query results are read-only. You cannon edit the data in this application. You can view the budget report on the screen or print it from the web page at any time; even after the data input period has ended. This provides the ability to monitor the progress of your budget throughout the development process. Drilling Down by Organization Hierarchy Divisional managers may wish for a summary view of all their departments. If this is the case, under the Budget Development Query parameter page, the Organization Hierarchy radio button would be checked.
Clicking Continue displays the second parameter page where the hierarchical organization would be input. (Division managers can contact the Controller’s Office for information on their hierarchical organization code.)

BudgetDevelopmentTrainingGuide Page11August2016
Click Submit to display all the departments that fall under the hierarchical code. By continuing to click on blue highlighted fields, the manager will ultimately drill down to the same view comparing the base budget column, proposed budget column, and the cumulative change column.

BudgetDevelopmentTrainingGuide Page12August2016
BudgetDevelopmentTrainingGuide Page13August2016
Create Budget Worksheet This worksheet is the tool used to create what if scenarios and determine the impact changes have on your department’s budget. You can make changes to line items and run different calculations by amount or percent. You can make singular calculations or build and accumulate calculations. You can then post or discard the results.
Select the Create Budget Worksheet option. Then select either Create New Worksheet or Retrieve Existing Worksheet. When creating a new worksheet, choose the columns to display on the worksheet by selecting the appropriate check boxes. (Columns are defined on page 7 of this training manual.) The base amount and the current proposed amount are always included columns when working in Create Budget Worksheet mode.
Do not select the browser’s Refresh or Back arrow when navigating in a worksheet. This may affect the results of any calculations not yet posted in the database.
BudgetDevelopmentTrainingGuide Page14August2016
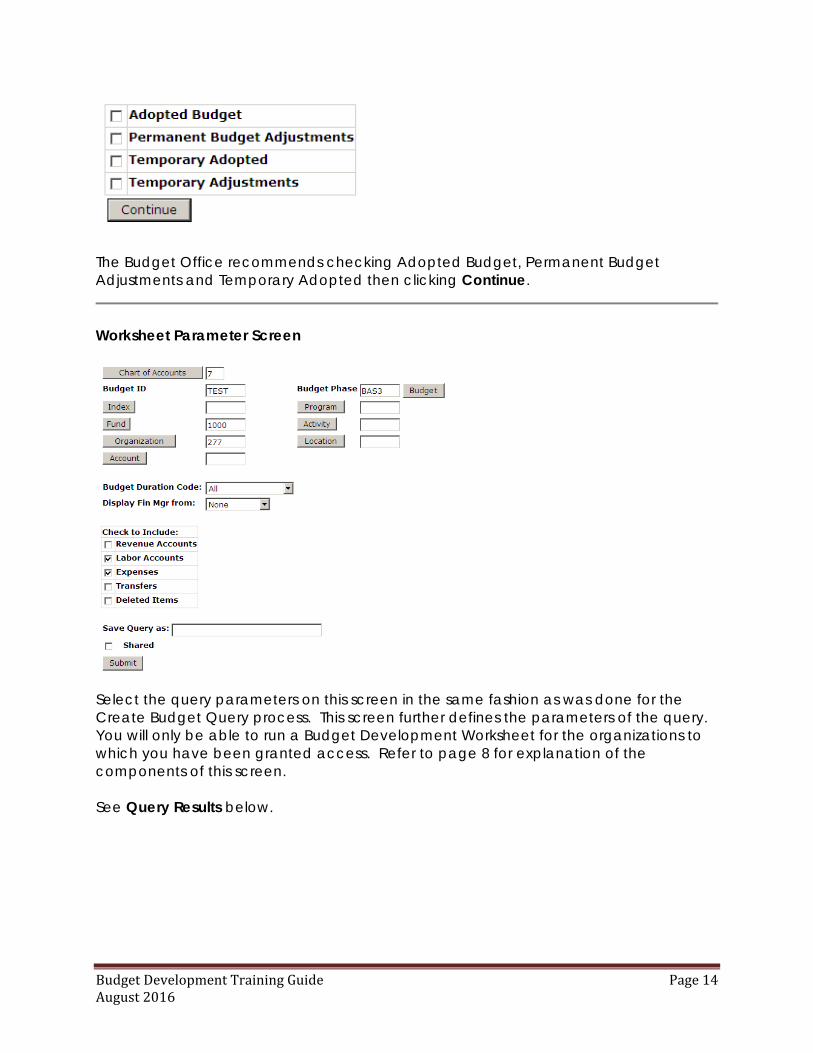
The Budget Office recommends checking Adopted Budget, Permanent Budget Adjustments and Temporary Adopted then clicking Continue.
Worksheet Parameter Screen
Select the query parameters on this screen in the same fashion as was done for the Create Budget Query process. This screen further defines the parameters of the query. You will only be able to run a Budget Development Worksheet for the organizations to which you have been granted access. Refer to page 8 for explanation of the components of this screen. See Query Results below.

BudgetDevelopmentTrainingGuide Page15August2016
BudgetDevelopmentTrainingGuide Page16August2016
Create Budget Worksheet Sections The following six sections are displayed on the Budget Development Worksheet:
1. Worksheet Parameters 2. Mass Change Parameters 3. Worksheet 4. New Row Additions 5. Action Buttons (no heading) 6. Summary Totals
Worksheet Parameters The parameters entered in the Worksheet Parameter Screen are summarized here. Mass Change Parameters You can calculate mass changes to Budget Development data in this section. Changes to specific lines are made within the actual worksheet (Section #3). Mass changes apply to all rows in the worksheet that do not have line-specific changes. To make changes to all items on the worksheet, enter information in the Mass Change Parameters section. Select Calculate to apply the mass change and see the effect of the change under the column New Budget. Mass changes are not saved until you select Post. You can enter changes in specific amounts (positive or negative) or as a percent.
Specific Amount – enter an amount in the Change Value field, leave the Percent box unchecked (blank), and choose Calculate. The amount can be either positive or negative. The system adds (or subtracts) this dollar amount to the amount in the New Budget column. If you select Post, the amount is added (or subtracted) to the New Budget column and the Proposed Budget column.
Percent – enter a value in the Change Value field, and then select the Percent check box. The system takes the percent amount and multiplies the percent by the value in the New Budget column. The New Budget amount increases or decreases accordingly. If you select Post, the percentage change is added (or subtracted) to the New Budget column and the Proposed Budget column. The result is rounded based on the selections made in the Round To Nearest section.
If you have entered changes and hit Calculate but have not yet Posted any changes, exiting the query will force you to lose any changes you may have entered.
To round all entries in an existing budget, enter a zero as the amount, check the percent box, and select Calculate.

BudgetDevelopmentTrainingGuide Page17August2016
Worksheet The worksheet is where individual line item changes can be made. Line item changes override mass changes during calculation. The body of the worksheet displays each line item with Base Budget, Proposed Budget, and New Budget amounts. The Base Budget is the budget for the current fiscal year. The Base Budget amount will never change. With the worksheet, changes entered calculate off of the New Budget amount (just like under the Mass Change section). The New Budget amounts equal the Proposed Budget amounts the first time the worksheet is created. Line item changes are not saved until you select Post. For each line item, you can enter changes in specific amounts (positive or negative) or as a percent.
Specific Amount – enter an amount in the Change Value field for the line item, leave the Percent box unchecked (blank), and choose Calculate. The amount can be either positive or negative. The system adds (or subtracts) this dollar amount to the New Budget amount. If you select Post, the change is posted to the New Budget amount and the Proposed Budget amount.
Percent – enter a value in the Change Value field for the line item, and then select the Percent check box. The system takes the percent amount and multiplies it by the New Budget amount and increases or decreases the New Budget accordingly. If you select Post, the change is posted to the New Budget amount and the Proposed Budget amount. The result is rounded based on the selections made in the Round To Nearest section.
If you have entered changes and hit Calculate but have not yet Posted any changes, exiting the query will force you to lose any changes you may have entered. Explanation of Worksheet Fields
Field Name Description Status Indicates that the budget line was built from the Operating
Ledger. Text Indicates if text exists. To view or enter text, select the hypertext
link in the account code field. Program Program code. Account Type/Code
Account Type (left-justified) signifies the predecessor hierarchy code. Account Code (right-justified) signifies the account number.
Title Account Type or Account Code description. Base Budget Typically is the budget for the current fiscal year. Specifically, it is
the amount captured as the proposed base when the budget was initially downloaded from the Finance module.
Budget Duration Code
Type of budget: Permanent or Temporary. UP does not operate temporary budgets.
BudgetDevelopmentTrainingGuide Page18August2016
Proposed Budget
The latest proposed budget posted. The proposed budget initially equals the base budget the first time a worksheet is created.
Change Value Amount by which you want to change this line item. Percent Associated with Change Value field. If selected, indicates that
the line item should be changed by a specified percentage amount.
Cumulative Change
Difference between the Base Budget and the New Budget amounts.
New Budget Current proposed budget, including changes from this session that are not yet posted. The new budget equals the proposed budget whenever the worksheet is created.
Delete Record Check box that, when selected, changes the new budget amount for this line item to .00 and marks the item for deletion.
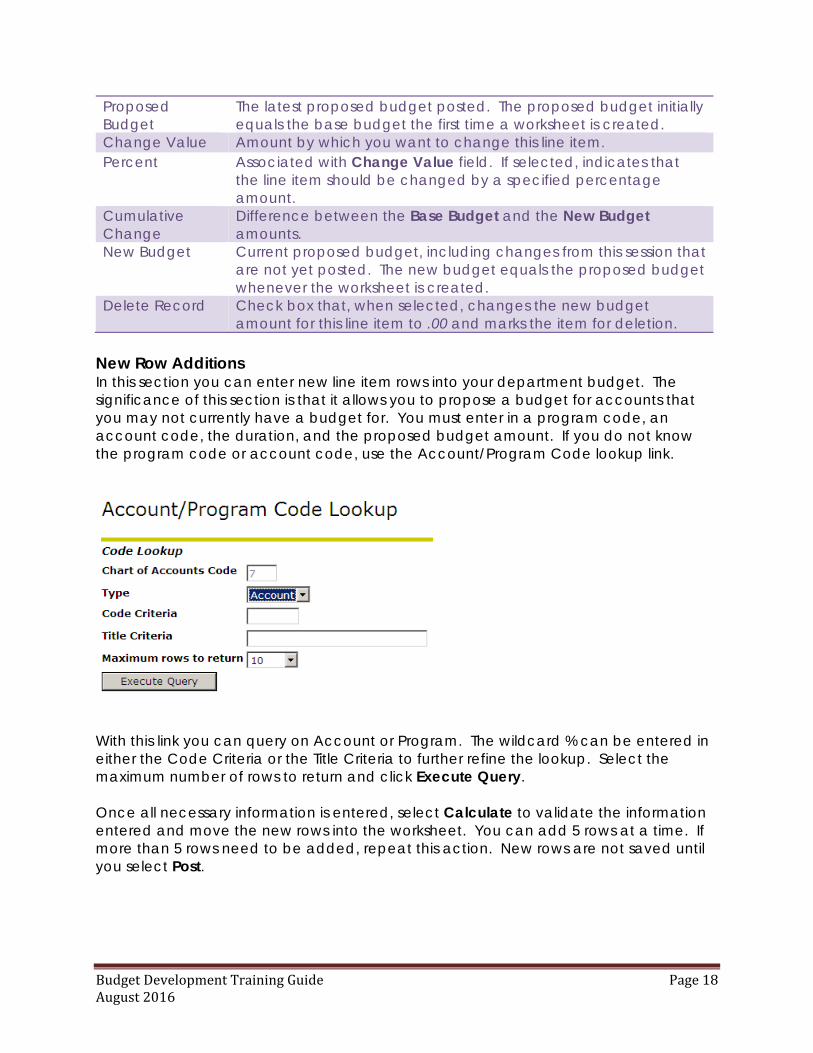
New Row Additions In this section you can enter new line item rows into your department budget. The significance of this section is that it allows you to propose a budget for accounts that you may not currently have a budget for. You must enter in a program code, an account code, the duration, and the proposed budget amount. If you do not know the program code or account code, use the Account/Program Code lookup link.
With this link you can query on Account or Program. The wildcard % can be entered in either the Code Criteria or the Title Criteria to further refine the lookup. Select the maximum number of rows to return and click Execute Query. Once all necessary information is entered, select Calculate to validate the information entered and move the new rows into the worksheet. You can add 5 rows at a time. If more than 5 rows need to be added, repeat this action. New rows are not saved until you select Post.

BudgetDevelopmentTrainingGuide Page19August2016
Action Buttons (no heading) This section controls the processing of the worksheet. There are 5 action buttons that appear beneath the main worksheet area but above the Summary Totals section.
Requery – brings you back to the last posted transactions and discards any current calculations from this session.
Calculate – calculate changes, additions, and deletions as many times as you choose without saving or recording each change. This functionality provides you the ability to create scenarios with the data and see the bottom line before it is committed to the database.
Post – used when you want to commit a change of the budget numbers to the database. Always click the Post button to save your changes you wish to preserve before exiting the application.
Download All Worksheet Columns – downloads all available columns of the worksheet to an Excel spreadsheet. Columns will be downloaded whether or not they contain information.
Download Selected Worksheet Columns – downloads the specific column you have chosen on the parameter page.
Summary Totals This section provides summary totals information for all the data that is contained in the worksheet. Changing a Budget Worksheet You can modify a worksheet by deleting specific rows and associating text with specific line items. Deleting Rows To delete rows from the worksheet, select the Delete Record check box, then select Calculate.

BudgetDevelopmentTrainingGuide Page20August2016
This will mark the section for deletion.
Deleted rows that have been Calculated are not deleted until you select Post. Once a deleted row has been Posted, to include information about a deleted record on your worksheet, you must select the Deleted Items check box on the query criteria page.
If you do not include Deleted Items in your worksheet, only the summary by account type located at the bottom of the worksheet section will include this information.

BudgetDevelopmentTrainingGuide Page21August2016
Adding Free-Form Text to Records You can add free-form text to any budget line item on the worksheet. On the Worksheet, select the Account Code link.
The Budget Development Text page displays. Enter text in the appropriate box and select Save.
After you enter text for a record, the Text column on the Worksheet will continue to display an N until you select Calculate, Post, or Requery. You can continue to access the text from the account code link and make additional changes. The maximum number of characters allowed per print box is 1,500. The Print/No Print distinction carries no effect in Budget Development. The Budget Office suggests that budget mangers use the top Print box for their comments and the Budget Office will use the bottom No Print box for budget office comments.

BudgetDevelopmentTrainingGuide Page22August2016
Maintain Organization Lock (Dean’s & Vice President Offices Only) The Maintain Organization Lock option is used to prevent (lock) or permit (unlock) any changes so that no further alterations can be posted via Create Budget Worksheet. Lock means to prevent changes. Unlock means to permit changes. The locking process has a cascading effect; when you lock or unlock a higher organization level, the other organizations beneath it will lock or unlock too. You can selectively unlock organizations beneath a locked organization, if you have the appropriate access. If any organization above your highest access level is locked, you will not be able to change lock statuses. Setting up an Organization Lock Select Maintain Organization Lock.
Enter the parameters indicated in the following chart. Select Submit. A summary page displays the parameters you selected and the organization’s lock status.

BudgetDevelopmentTrainingGuide Page23August2016
Field Name Description Chart of Accounts
Accounting Chart of Accounts code. The UP code is “7”.
Budget Distinct budget identification provided in guidelines. Phase Distinct budget phase provided in guidelines. Current Status Drop down choices of Locked, Unlocked or All. If you choose a
specific status only records matching that status will display. The recommended choice is All.
Organization Enter a specific organization or leave this field blank to retrieve the highest-level organization(s) for which you have authority.
Summary Page of Parameters Selected
Click the highlighted Organization to see the current status of each successor organization.
In this screen, you can select individual organizations and change the status one at a time or all successor organization statuses can be changed en masse via the Change Status box in the previous screen.

BudgetDevelopmentTrainingGuide Page24August2016
Results of clicking Review button.
Click Update to accept the Review results.
In this example, ORGs 217, 218, and 219 will change to Locked status once the Update button has been clicked. To review the change, you can click Review and a preview screen will display.
If you like, you can make additional changes by using the back button on your browser and redoing your selection(s). You can continue to toggle back and forth and make additional changes until you are satisfied with the results.
The following message will display indicating that the changes have been applied.

BudgetDevelopmentTrainingGuide Page25August2016
Also, if a user attempts to make changes under application Create Budget Worksheet, a message will display in the Worksheet that no changes can be made because the Organization is locked.
When an organization is locked, the Summary Page of Parameters will indicate the status.

BudgetDevelopmentTrainingGuide Page26August2016
Budget Development History You can review budget development history. This is a listing of all posted changes made to a line item as budgets are revised via the Create Budget Worksheet application. To review the history for a budget line item, choose the link for a Proposed Budget amount from the Budget Development Worksheet or from the Budget Development Query page labeled Line Item Detail.
Click on highlighted amount under Proposed Budget.
The resulting screen first shows the Summary Parameters of the query. The Query Results field then indicates the change history.

BudgetDevelopmentTrainingGuide Page27August2016
Below is a history review from Budget Development Query page under Line Item Detail that shows a series of changes made to the Proposed Budget amount.