server - filemaker
TRANSCRIPT

FileMaker
®
Server
5
©1994-1995, 1997, 1999 FileMaker, Inc. All Rights Reserved.FileMaker, Inc.5201 Patrick Henry DriveSanta Clara, California 95054www.filemaker.comFileMaker is a trademark of FileMaker, Inc., registered in the U.S. and other countries, and the file folder logo is a trademark of FileMaker, Inc. All other trademarks are the property of their respective owners.This software is based in part on the work of the Independent JPEG group.Portions of this software are © 1990 Access Softek, © 1991-1998 Merant, or © 1992-1996 Novell, Inc. All Rights Reserved.All persons and companies listed in the examples are purely fictitious and any resemblance to existing persons and companies is purely coincidental.Mention of third party companies and products is for informational purposes only and does not constitute an endorsement. FileMaker assumes no responsibility with regard to the selection, performance, or use of these products. All understandings, agreements or warranties, if any, take place directly between the vendor and prospective users.
Administrator’s Guide
For Windows and Mac

Contents
Preface
Using the FileMaker Server documentation
About this guide
vii
Using FileMaker Server Help
vii
Starting FileMaker Server Help
viii
About the Help topic window
viii
Finding a topic using the Help Contents
viii
Finding a topic using the Help Index
ix
Finding a topic using specific words
x
Finding information about specific items in FileMaker Server
xi
Getting Help while administering FileMaker Server remotely
xi
Chapter 1
Welcome to FileMaker Server 5
Registration and customer support
1-1
Introducing FileMaker Server
1-1
How does FileMaker Server work?
1-2
What’s in the FileMaker Server package
1-3
What’s new or improved in FileMaker Server 5
1-3
Before you begin
1-4
Chapter 2
Installing FileMaker Server in Windows
What you need
2-1
Intel-Pentium compatible systems
2-1
Networking requirements
2-1
Installing FileMaker Server
2-2
Where files are stored on your hard disk
2-3
Starting FileMaker Server (Windows NT)
2-4
Starting FileMaker Server (Windows 2000)
2-5
Stopping FileMaker Server (Windows NT)
2-5
Stopping FileMaker Server (Windows 2000)
2-6
Installing the Server Administration plug-in on a remote computer running Windows
2-6
Installing the plug-in on a remote computer running Windows NT
2-6
Installing the plug-in on a remote computer running Windows 95 or Windows 98
2-7
Enabling the Server Administration plug-in using FileMaker Pro (Windows)
2-7
Uninstalling FileMaker Server (Windows)
2-8
Chapter 3
Installing FileMaker Server in the Mac OS
What you need
3-1
Mac OS system requirements
3-1
Networking requirements
3-1
Installing FileMaker Server
3-1
Adjusting memory (Mac OS)
3-2
Changing the amount of memory used
3-2
FileMaker Server, virtual memory, and physical memory requirements
3-3
Where files are stored on your hard disk
3-4
Starting FileMaker Server (Mac OS)
3-4
Making an alias
3-4
Quitting FileMaker Server (Mac OS)
3-5
Installing the Server Administration plug-in on a remote computer running the Mac OS
3-5
Enabling the Server Administration plug-in using FileMaker Pro (Mac OS)
3-6

iv
FileMaker Server Administrator’s Guide
Chapter 4
Configuring FileMaker Server
Using the configuration assistants (Windows)
4-1
Opening the Properties dialog box (Windows)
4-2
Opening the Preferences dialog box (Mac OS)
4-2
Setting the number of guests
4-3
Allowing disconnection of idle guests
4-3
Setting a time to disconnect idle guests
4-3
Setting the pre-disconnect message
4-4
Setting the maximum number of files
4-4
Changing the amount of memory used by FileMaker Server
4-4
Setting how often the cache is flushed
4-5
Allowing single user files to be hosted
4-5
Opening runtime solutions automatically (Windows)
4-5
Opening runtime solutions automatically (Mac OS)
4-6
Enabling remote administration
4-6
Specifying a custom host name
4-7
Maximizing performance (Mac OS)
4-8
Choosing network protocols
4-8
Setting the preferred IP address
4-9
Recording usage statistics and setting size limits
4-9
Setting a size limit for the application log (Windows NT)
4-10
Setting a size limit for the application log (Windows 2000)
4-10
Setting a size limit for the Server Event Log (Mac OS)
4-11
Protecting files with a password
4-11
How FileMaker Server behaves during system sleep
4-11
Chapter 5
Administering FileMaker Server
Administering FileMaker Server remotely
5-1
Opening the Remote Administration window
5-2
Listing hosted files and current guests remotely
5-3
Viewing usage statistics for FileMaker Server remotely
5-3
Hosting FileMaker Pro 5 files remotely
5-4
Closing hosted files remotely
5-5
Disconnecting guests remotely
5-6
Viewing detailed information about hosted files and guests remotely
5-6
Sending messages to guests remotely
5-7
Sending messages to all guests remotely
5-7
Administering FileMaker Server locally
5-8
Monitoring performance locally (Windows NT)
5-8
Monitoring performance locally (Windows 2000)
5-9
Opening the local administration window (Mac OS)
5-9
Listing hosted files and guests locally (Mac OS)
5-9
Viewing usage statistics locally (Mac OS)
5-11
Hosting FileMaker Pro 5 files locally (Mac OS)
5-11
Closing hosted files locally (Mac OS)
5-12
Disconnecting guests locally (Mac OS)
5-13
Sending messages to guests locally (Mac OS)
5-13
Using reported events to track activities
5-14
Viewing activities in the Event Viewer (Windows NT)
5-14
Viewing activities in the Event Viewer (Windows 2000)
5-15
Keeping event data current (Windows)
5-15
Viewing activities in the Server Event Log (Mac OS)
5-15
Recalculating the Today function in hosted databases
5-16
Chapter 6
Scheduling administrative tasks with FileMaker Server
Scheduling tasks to run automatically (Windows)
6-1
Scheduling tasks to run automatically (Mac OS)
6-1
Viewing scheduled tasks in the Schedules list (Windows)
6-3
Administering scheduled tasks with the toolbar (Windows)
6-3
Updating Last Run and Next Run information (Windows)
6-4
Viewing scheduled tasks in the Schedules window (Mac OS)
6-4
Running scheduled tasks manually
6-4

Contents
v
Changing scheduled tasks
6-4
Duplicating scheduled tasks
6-5
Deleting scheduled tasks
6-5
Enabling and disabling scheduled tasks
6-5
Using the command line to automate tasks (Windows)
6-6
Example: Backing up hosted databases on the command line (Windows)
6-7
Using an AppleScript to automate tasks (Mac OS)
6-8
Making sure you don’t run out of disk space
6-8
Appendix A
Technical specifications and optimization
Limits for files and usage
A-1
Hardware and network considerations
A-1
Software considerations
A-2
Appendix B
Performance and usage tips
Performance tips
B-1
Usage tips
B-2
Appendix C
Event log messages and troubleshooting
FileMaker Server Event Log messages
C-1
Troubleshooting
C-4
Appendix D
About the TechInfo database
Searching the TechInfo database
D-1
Sample TechInfo article
D-1
Information on the web
D-1
Index
I-1


Preface
Using the FileMaker Server documentation
The documentation for the FileMaker
®
Server software provides information, illustrations, and step-by-step instructions to help you learn the most about FileMaker Server—a powerful application that enhances database sharing across a network.
The FileMaker Server documentation includes:
1
this book, the
FileMaker Server Administrator’s Guide
1
FileMaker Server Help,
a comprehensive online help system
1
Context-sensitive Help for dialog box options (Windows) and Balloon Help for menu items (Mac OS)
Information on the Web
You can also find more information, tips, and database ideas by visiting FileMaker, Inc. on the Web:
Windows: Choose the Start button > Programs > FileMaker Server 5 > FileMaker on the Web or point your browser to www.filemaker.com.
Mac OS: While running FileMaker Server, choose Help menu > FileMaker on the Web or point your browser to www.filemaker.com.
About this guideThe FileMaker Server Administrator’s Guide and FileMaker Server Help are written for administrators of the Windows NT, Windows 2000, and Mac OS operating systems. In many instances, information and instructions are the same for all three operating systems. In these sections and topics, any platform-specific information, such as the name of a command, is followed by the name of the platform in parentheses. For example:
In the Properties (Windows) or Preferences (Mac OS) dialog box, click the Administration tab, and choose one of the following options.
Information marked (Windows) applies to both Windows NT and Windows 2000. Information marked for one of these operating system versions alone indicates the information is version-specific.
Where instructions are significantly different, you see separate sections or topics for each operating system. Windows NT information appears first, followed by information for Windows 2000, and then information for the Mac OS.
A note about the illustrationsIllustrations throughout the book are mixed, depicting situations for both platforms. Windows NT 4.0 and Mac OS 8.6 systems were used for these illustrations. What you see on your screen may vary from the instructions in this book depending on the platform and operating system of your computer.
Using FileMaker Server HelpFileMaker Server onscreen Help is available when you are working in the FileMaker Server console (Windows) or when you are working with the FileMaker Server application (Mac OS) locally, which run on the server computer.
If you are administering FileMaker Server remotely (from another computer on your network), you can use the Help accessed through the Remote Administration window. For more information, see “Getting Help while administering FileMaker Server remotely” on page xi.
viii FileMaker Server Administrator’s Guide
Starting FileMaker Server HelpWhenever you open FileMaker Server Help, you start the Windows Help application (Windows) or the FileMaker Help Viewer application (Mac OS). These help applications run independently of FileMaker Server.
To start FileMaker Server Help when you’re working in the FileMaker Server console (Windows) or FileMaker Server application (Mac OS), do one of the following:
1 Windows: Press F1, click on the toolbar, or choose Action menu > Help.
The topic you see is dependent on whether FileMaker Server or Schedules is selected in the Console Tree (left pane of the FileMaker Server console). The Help topic displayed is specific to the area of FileMaker Server you are working with.
1 Mac OS: Choose FileMaker Server Help from the Help menu, press the Help key, or press 2+?.
The topic you see is dependent on the window or dialog box that is open. The Help topic displayed is specific to the area of FileMaker Server you are working with.
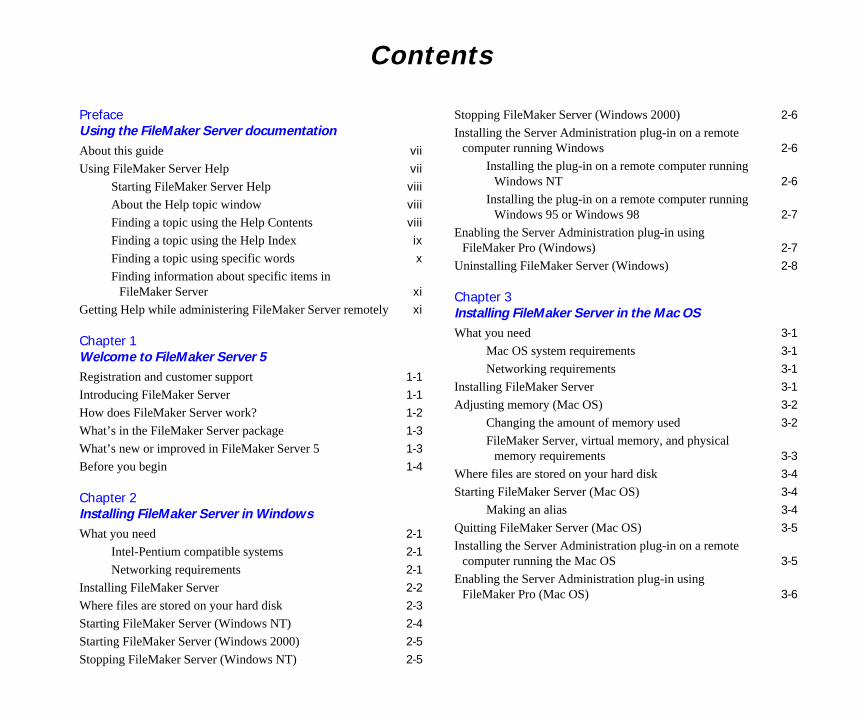
About the Help topic windowTo navigate to other topics in FileMaker Server Help, you click buttons and underlined text in the Help topic window.
For specific information about using FileMaker Server Help—such as printing a Help topic—review the Help topics on using onscreen Help.
Finding a topic using the Help ContentsWindows: In the FileMaker Server console, choose Action menu > Help, then click Help Topics.
Mac OS: In FileMaker Server, choose Help menu > Contents and Index.
If a FileMaker Server Help topic is displayed, click Help Topics in the Help topic window, then click Contents (if necessary) to display the Help Contents.
Title of the current topic
Click to return to the last topic viewed
Click to see asubject overview
for this topic
Click to print the topic
Click solid underlinedtext to display more
information aboutthis step
Click to move to the previous or next topic
Click to see the Help Contents, Index,or to search Help for specific text
A Help topic
Click to see a listof related topics
Click dotted underlinedtext to display a
glossary definition

Using the FileMaker Server documentation ix
When you open the FileMaker Server Help Contents, you see a list of Help subjects, like the table of contents in a book. Double-click a book icon to display a list of topics for each subject. Then double-click a topic to display the Help topic window.
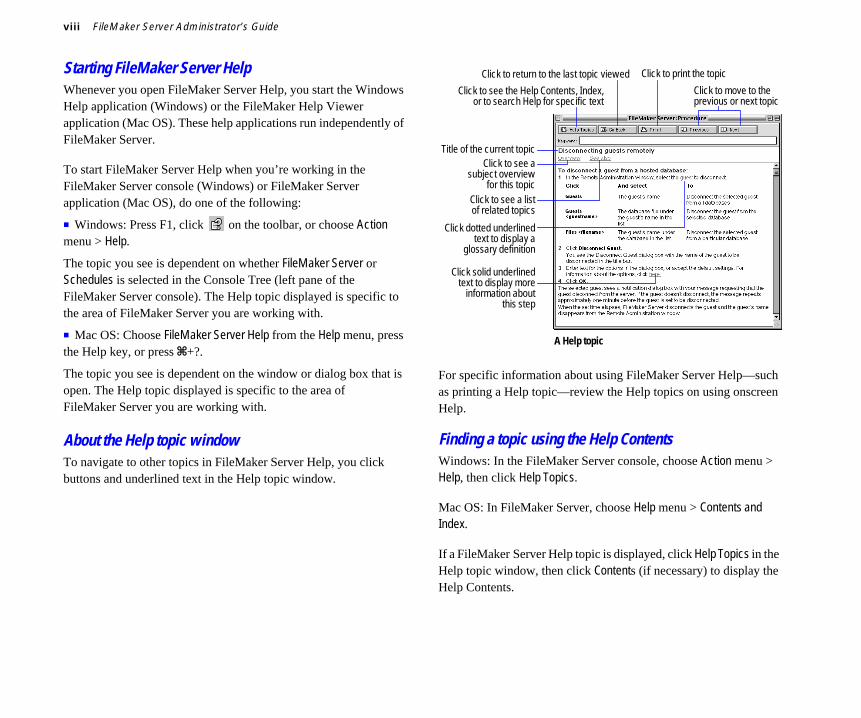
Finding a topic using the Help Index FileMaker Server Help includes an alphabetical list of index entries—significant words and phrases—to help you find the topics containing the information you want. Each index entry is associated with one or more topics.
To use the Help Index:
1. Windows: In the FileMaker Server console, choose Action menu > Help, click Help Topics, then click Index (if necessary).
Mac OS: In FileMaker Server, choose Help menu > Contents and Index, then click Index (if necessary).
2. In the Index window, type all or part of an index entry you want to find.
The Help Index displays a list of entries beginning with the characters you typed. Under some index entries is a list of more than one Help topic.
Help Contents in FileMaker Server Help (Windows)
Help Contents in FileMaker Server Help (Mac OS)
x FileMaker Server Administrator’s Guide
3. Double-click an entry to display a list of topic choices (Windows) or the topic itself.
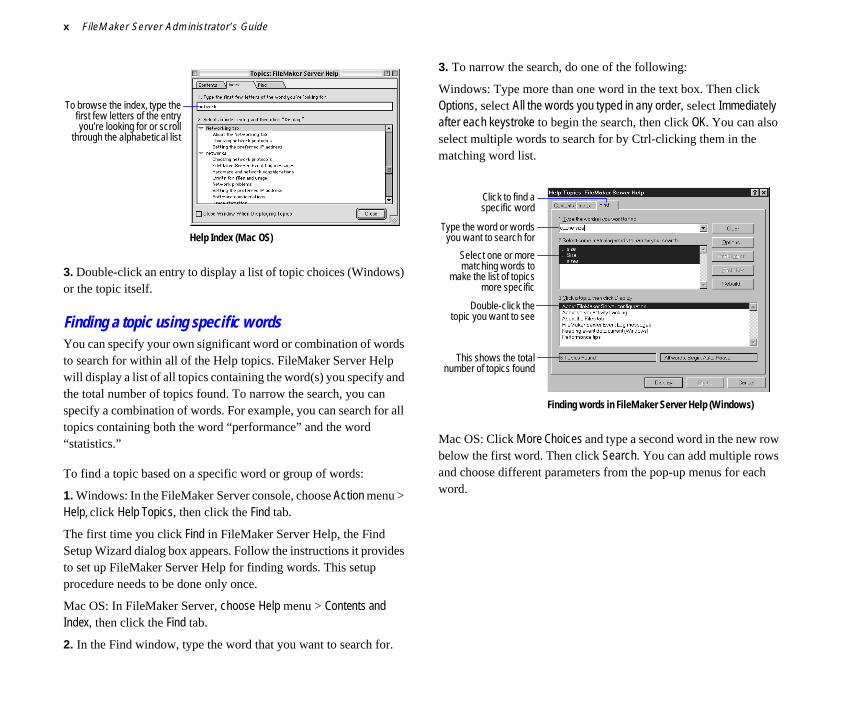
Finding a topic using specific wordsYou can specify your own significant word or combination of words to search for within all of the Help topics. FileMaker Server Help will display a list of all topics containing the word(s) you specify and the total number of topics found. To narrow the search, you can specify a combination of words. For example, you can search for all topics containing both the word “performance” and the word “statistics.”
To find a topic based on a specific word or group of words:
1. Windows: In the FileMaker Server console, choose Action menu > Help, click Help Topics, then click the Find tab.
The first time you click Find in FileMaker Server Help, the Find Setup Wizard dialog box appears. Follow the instructions it provides to set up FileMaker Server Help for finding words. This setup procedure needs to be done only once.
Mac OS: In FileMaker Server, choose Help menu > Contents and Index, then click the Find tab.
2. In the Find window, type the word that you want to search for.
3. To narrow the search, do one of the following:
Windows: Type more than one word in the text box. Then click Options, select All the words you typed in any order, select Immediately after each keystroke to begin the search, then click OK. You can also select multiple words to search for by Ctrl-clicking them in the matching word list.
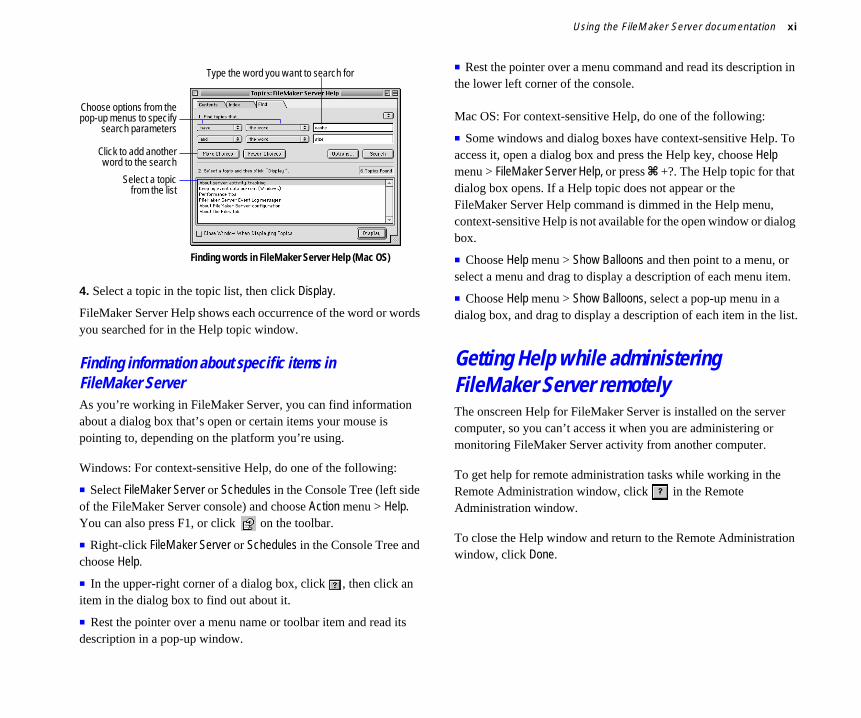
Mac OS: Click More Choices and type a second word in the new row below the first word. Then click Search. You can add multiple rows and choose different parameters from the pop-up menus for each word.
To browse the index, type thefirst few letters of the entryyou’re looking for or scroll
through the alphabetical list
Help Index (Mac OS)
Click to find aspecific word
Type the word or wordsyou want to search for
Select one or morematching words to
make the list of topicsmore specific
Double-click thetopic you want to see
This shows the totalnumber of topics found
Finding words in FileMaker Server Help (Windows)
Using the FileMaker Server documentation xi
4. Select a topic in the topic list, then click Display.
FileMaker Server Help shows each occurrence of the word or words you searched for in the Help topic window.
Finding information about specific items in FileMaker ServerAs you’re working in FileMaker Server, you can find information about a dialog box that’s open or certain items your mouse is pointing to, depending on the platform you’re using.
Windows: For context-sensitive Help, do one of the following:
1 Select FileMaker Server or Schedules in the Console Tree (left side of the FileMaker Server console) and choose Action menu > Help. You can also press F1, or click on the toolbar.
1 Right-click FileMaker Server or Schedules in the Console Tree and choose Help.
1 In the upper-right corner of a dialog box, click , then click an item in the dialog box to find out about it.
1 Rest the pointer over a menu name or toolbar item and read its description in a pop-up window.
1 Rest the pointer over a menu command and read its description in the lower left corner of the console.
Mac OS: For context-sensitive Help, do one of the following:
1 Some windows and dialog boxes have context-sensitive Help. To access it, open a dialog box and press the Help key, choose Help menu > FileMaker Server Help, or press 2 +?. The Help topic for that dialog box opens. If a Help topic does not appear or the FileMaker Server Help command is dimmed in the Help menu, context-sensitive Help is not available for the open window or dialog box.
1 Choose Help menu > Show Balloons and then point to a menu, or select a menu and drag to display a description of each menu item.
1 Choose Help menu > Show Balloons, select a pop-up menu in a dialog box, and drag to display a description of each item in the list.
Getting Help while administering FileMaker Server remotelyThe onscreen Help for FileMaker Server is installed on the server computer, so you can’t access it when you are administering or monitoring FileMaker Server activity from another computer.
To get help for remote administration tasks while working in the Remote Administration window, click in the Remote Administration window.
To close the Help window and return to the Remote Administration window, click Done.
Choose options from thepop-up menus to specify
search parameters
Select a topicfrom the list
Click to add anotherword to the search
Type the word you want to search for
Finding words in FileMaker Server Help (Mac OS)


Chapter 1Welcome to FileMaker Server 5
Welcome to the FileMaker Server 5 application for Windows NT, Windows 2000, and the Mac OS from FileMaker, Inc.
FileMaker Server gives you enhanced file sharing capabilities on your network when used with the FileMaker Pro 5 database management application.
Registration and customer supportPlease take the time to complete and mail the registration card for your product or register online:
1 Windows: In the FileMaker Server console, choose View menu > FileMaker on the Web
1 Mac OS: Start FileMaker Server and choose Help menu > FileMaker on the Web
1 Point your browser to www.filemaker.com/register
For information about technical support and customer service, see:
www.filemaker.com (North American customers)www.filemaker.com/intl (customers outside North America)
or choose:Windows: View menu > FileMaker on the WebMac OS: Help menu > FileMaker on the Web
At the web site, you will find the FileMaker, Inc. Service Directory, which details the service options available to North American customers, as well as links to FileMaker, Inc. international sites, answers to frequently asked questions, and access to extensive software libraries used by the technical support staff. If you do not have access to the Web, please refer to the Technical Support and Customer Service sheet included in the software box. North America customers can also call 1-800-965-9090 to learn about the service options available.
Introducing FileMaker ServerYou’ve always been able to share database files in FileMaker Pro using a peer-to-peer sharing scheme with the Multi-User command. You can also use the FileMaker Server application as a dedicated host to open FileMaker Pro 5 files and make them available to FileMaker Pro guests on your network, allowing better performance among more guests. FileMaker Server acts only as a host, and uses advanced client/server technology to take care of much of the background work associated with managing files, thereby enhancing performance for FileMaker Pro guests accessing those files.
FileMaker Server can host up to 125 database files and support up to 250 simultaneously connected FileMaker Pro guests. (AppleTalk support is limited to 124 simultaneous guests.)
FileMaker Server 5 includes a new remote administration capability. Remote administration lets you easily monitor and administer hosted databases and guests and track statistical information from a computer running FileMaker Pro 5.

1-2 FileMaker Server Administrator’s Guide
Avoid installing FileMaker Server on a computer that is a user’s primary workstation or network file server. FileMaker Server should be run on a dedicated computer reserved for use as a database server.
When FileMaker Server is hosting many guests or a large number of database files, it uses a high level of processor, hard disk, and network capacity. Other processor-intensive applications (for example, Web-server or disk-backup software) or heavy network traffic on the same computer will cause FileMaker Server to run more slowly and degrade the performance of FileMaker Pro on guest computers.
In addition, file sharing should be turned off on the computer running FileMaker Server.
Note This guide assumes you’re familiar with general database concepts as well as the basics of FileMaker Pro. If you’re not, refer to the tutorial in the FileMaker Pro 5 Getting Started Guide or to the FileMaker Pro 5 User’s Guide (especially the first two chapters) for more information.
How does FileMaker Server work?The FileMaker Server application is a tool to use with FileMaker Pro 5 in a network environment to:
1 enhance database guest performance
1 increase the number of FileMaker Pro guests who can connect to a file hosted by FileMaker Server
1 increase the number of files that can be hosted by FileMaker Server
1 host files using more than one network protocol simultaneously
You can use the remote administration capability of FileMaker Server to administer the server software from a different computer on your network. When administering remotely, you can:
1 open—or host—a FileMaker Pro database file, making it available to FileMaker Pro guests on the network
1 view information about the files being hosted, like the number of guests accessing each database
1 send messages to connected guests
1 close a hosted FileMaker Pro file, making it unavailable to FileMaker Pro guests
1 disconnect a selected FileMaker Pro guest from a particular hosted file or all hosted files
Some of these administrative tasks require that you install the Server Administration plug-in for FileMaker Server on your remote computer. For more information about installing the plug-in, see:
1 “ Installing the Server Administration plug-in on a remote computer running Windows” on page 2-6
1 “ Installing the Server Administration plug-in on a remote computer running the Mac OS” on page 3-5
For more information about administering remotely, see chapter 5, “Administering FileMaker Server.”
When you start FileMaker Server, it automatically opens and hosts all multi-user FileMaker Pro 5 files located in the same folder (or the first level of subfolders) as the FileMaker Server application. This common folder architecture lets you easily set up the database files that you always want FileMaker Server to host on the network.

Welcome to FileMaker Server 5 1-3
Keep in mind the following points about the different uses of FileMaker Server and FileMaker Pro:
1 Use FileMaker Server to open and host FileMaker Pro files that you want to make available to FileMaker Pro guests on your network.
1 As a dedicated host, FileMaker Server only hosts the files. FileMaker Server can’t access or modify the information in the files.
1 Use FileMaker Pro to create database files or modify the structure of existing files (for example, to password-protect each hosted FileMaker Pro file or to access field definitions).
The FileMaker Web Companion feature of FileMaker Pro can be used to publish files hosted by FileMaker Server on the World Wide Web or a company’s intranet. For more information about web publishing, see the documentaiton for FileMaker Developer, FileMaker Pro, or FileMaker Pro Unlimited.
What’s in the FileMaker Server packageThe FileMaker Server package includes:
What’s new or improved in FileMaker Server 5 The new and improved features of FileMaker Server include:
1 Added support for up to 250 simultaneous guests (AppleTalk support is limited to 124 simultaneous guests)
1 Ability to host up to 125 files simultaneously
1 Automatic disconnection of guests who have been idle for a period of time you specify
1 Ability to host single user files without having to change them to multi-user using FileMaker Pro
1 Ability to set the frequency with which the cache is flushed
1 Ability to specify a preferred IP address for FileMaker Server communication
1 Ability to set the sampling frequency for usage statistics collection
1 Ability to set a preferred size for the statistics log file, used for performance monitoring
1 Improved detail in logged messages
Windows1 Ability to automatically open and host runtime database solution files by registering non-.fp5 filename extensions
1 Ability to use the Windows Event Viewer to monitor FileMaker Server activities
1 Usage statistics monitoring in the Windows Performance Monitor
1 Ability to schedule automatic backups of hosted databases using the FileMaker Server console
1 Ability to sort and resize columns in the Schedules list
1 Better performance through improved asynchronous I/O support
Package component Description
FileMaker Server CD-ROM
The Setup application (Windows), the Start Here application (Mac OS), as well as all the files you need to use FileMaker Server
FileMaker Server Administrator’s Guide
This guide. Installation instructions and information about how to use FileMaker Server
FileMaker registration card
Information to register your copy of FileMaker Server

1-4 FileMaker Server Administrator’s Guide
Mac OS1 User interface improvements to both the Administration and Schedules windows that provide more room for viewing hosted files, guest information, and scheduled tasks. You can also resize columns, maintain your selection in the active window, and sort by column.
1 Ability to specify a preferred size for the Event Log file, which records server activity
1 Ability to see network protocol settings (AppleTalk, TCP/IP, or both) in the Administration window
1 Support for the following additional Apple events: get statistics, list users, list schedules, and run schedules
1 Ability to set a preferred cache size
1 Notification when you change configuration preferences that require increased application memory. FileMaker Server suggests a new memory allocation that you can accept or decline. The new memory setting takes effect after you restart FileMaker Server.
Before you beginBefore you begin the installation process, quit other open programs, and turn off virus protection utilities. For instructions on installing FileMaker Server, see chapter 2, “Installing FileMaker Server in Windows” or chapter 3, “Installing FileMaker Server in the Mac OS.”
Chapter 2Installing FileMaker Server in Windows
This chapter provides step-by-step instructions for installing FileMaker Server and associated files on a computer using the Windows NT 4.0 or Windows 2000 operating system.
What you needTo use FileMaker Server, you need the following equipment and software.
Intel-Pentium compatible systemsTo use FileMaker Server on Intel-Pentium and compatible systems, you need:
1 an Intel compatible PC with a Pentium or later processor
1 at least 32 MB of installed RAM (Windows NT) or 64 MB of installed RAM (Windows 2000)
1 one of the following operating system software configurations:
1 Windows NT Server 4.0 or later or Windows NT Workstation 4.0 or later (10 or fewer users only) and Windows NT Service Pack 3, 4, or 5. See the End User License Agreement that came with the Windows NT operating system for more information concerning the allowed number of connections.
1 Windows 2000 Server or Windows 2000 Professional (10 or fewer users only)
1 Microsoft Management Console (MMC) 1.1 or later (installed by the FileMaker Server Installer if not already installed on your computer)
1 Internet Explorer 4.01 or later
1 FileMaker Pro 5 for running the remote administration capability and for creating and converting databases to be hosted by FileMaker Server 5. FileMaker Server 5 supports only FileMaker Pro 5 databases.
1 a login account with administrative privileges for installing FileMaker Server
1 a CD-ROM disk drive
1 a hard disk with at least 4 MB free disk space for the FileMaker Server files. Be sure to allow additional space for the database files you intend to host, which should be located on the same disk as the FileMaker Server application.
Important Up to 20 MB of free disk space may be required during the installation process.
Networking requirementsTo share files among users on a network, you need to have the following additional software and hardware installed on the host computer running FileMaker Server:
1 a Windows NT or Windows 2000 compatible network card. If you want to specify a preferred IP address for FileMaker Server, a second network card is required. For more information, see “Setting the preferred IP address” on page 4-9.
1 the software driver for your network card
1 NWLink IPX/SPX Compatible Transport and/or TCP/IP network protocol for Windows NT or Windows 2000

2-2 FileMaker Server Administrator’s Guide
Guests can use the following network protocols to access database files hosted by FileMaker Server:
Important FileMaker Server uses a proprietary networking scheme and operates independently of your network operating system (NOS) access privileges. Multi-user FileMaker Pro databases will be available to FileMaker Pro guests regardless of NOS privileges. To restrict access to FileMaker databases, use the access privileges available in FileMaker Pro 5. For more information, see “Protecting files with a password” on page 4-11. Database files should be shared using networking available in FileMaker Pro. Do not share FileMaker Pro files using Windows file sharing.
Installing FileMaker ServerUse the Setup program to install FileMaker Server on your hard disk. This installation procedure describes how to install the:
1 FileMaker Server application and supporting files
1 FileMaker Server example files
By default, the Setup program creates a folder named FileMaker Server 5 in the Program Files\FileMaker\ folder on your hard disk, then installs FileMaker Server and example files in it. However, you can choose a different location during installation.
To install FileMaker Server on your hard disk:
1. Exit all other applications and turn off virus protection utilities.
2. Insert the FileMaker Server CD-ROM into your CD-ROM drive.
3. Double-click the Read Me icon to read important information about this release of FileMaker Server. Then close the Read Me file.
4. Double-click setup.exe.
You see the Welcome screen of the FileMaker Server Setup Wizard.
5. Click Next.
6. Read the license agreement, select I accept the terms in the License Agreement, then click Next.
7. Personalize this copy of FileMaker Server by typing your name, organization name, and indicate who can access FileMaker Server from this computer (only you or anyone who uses the computer). Then click Next.
8. Choose Complete in the Setup Type screen to install FileMaker Server and the example files, then click Next.
Note If you don’t have enough disk space on the server computer, you see the Out of Disk Space dialog box. Quit the installation, remove files from the installation volume to free some space, and try again.
9. Select an option for FileMaker Server start-up, then click Next.
Network protocol Windows guest Mac OS guest
IPX/SPX NWLink IPX/SPX Compatible Transport (Windows NT client)
Microsoft IPX/SPX Compatible Transport (Windows 95 or Windows 98 client)
IPX is not supported
TCP/IP TCP/IP Apple Open Transport 1.1.1 (or later)
Select If you want FileMaker Server to start
Automatic Whenever Windows starts.
Note After installation, you must start the FileMaker Server service manually the first time. For more information, see “Starting FileMaker Server (Windows NT)” on page 2-4 or “Starting FileMaker Server (Windows 2000)” on page 2-5. Thereafter, FileMaker Server will start when you restart the computer.
Manual After you turn on the FileMaker Server service in the Services control panel (Windows NT) or Services console (Windows 2000). For more information, see “Starting FileMaker Server (Windows NT)” on page 2-4 or “Starting FileMaker Server (Windows 2000)” on page 2-5.

Installing FileMaker Server in Windows 2-3
10. Type your installation code, then click Next.
Your installation code is located on a card in the FileMaker Server product box, or on the FileMaker Server installation CD-ROM envelope.
11. If the Microsoft Management Console (MMC) software is not installed on your server computer, the Setup Wizard will prompt you to install it now. The installation of MMC can take several minutes and you can’t cancel this installation once it has begun. If you want to install MMC and continue the installation of FileMaker Server, click Next.
12. Click Install to begin FileMaker Server file installation.
The Setup Wizard installs FileMaker Server 5 and the example files.
13. Click Finish to close the Setup Wizard. Remember to turn virus protection utilities back on.
See “Starting FileMaker Server (Windows NT)” on page 2-4 or “Starting FileMaker Server (Windows 2000)” on page 2-5 for information about starting FileMaker Server the first time.
Note To administer FileMaker Server from a remote computer (open files, close files, and so on), you must install the Server Administration plug-in on each remote computer you plan to use for remote administration. For more information, see “ Installing the Server Administration plug-in on a remote computer running Windows” on page 2-6 or “ Installing the Server Administration plug-in on a remote computer running the Mac OS” on page 3-5.
Where files are stored on your hard diskThe following table describes the FileMaker Server files that are installed on your hard disk.
File Description Default location
fmserver.exe FileMaker Server service hard_drive:\Program Files\FileMaker \FileMaker Server 5
fmpsmesg.dll FileMaker Server message resource (required by Event Viewer)
fmserver.msc FileMaker Server console (MMC saved console)
fmserver.dbg FileMaker Server debug symbol file (required by the Dr. Watson debugger)
fmpsprop.dll FileMaker Server properties component (MMC snap-in)
fmpsschd.dll FileMaker Server Task Scheduler component (MMC snap-in)
fmpsmema.dll Performance Monitor support
fmpsperf.dll FileMaker Server component required by the Performance Monitor
fmshelp.hlp FileMaker Server onscreen Help
fmshelp.cnt FileMaker Server onscreen Help Contents
fmshelp.gid Support files for FileMaker Server onscreen Help
fmshelp.fts Support files for FileMaker Server onscreen Help
readme.wri Text file containing important information about this release of FileMaker Server
Go_FileMaker.html
HTML document for FileMaker on the Web
fms_logo.gif Graphic file of FileMaker Server logo for the FileMaker on the Web document

2-4 FileMaker Server Administrator’s Guide
Notes
1 The FileMaker Server Installer installs MMC files on the server computer, if MMC is not already installed. In this situation, a few MMC-related files are installed in the System32 and Help folders on your server computer in addition to the files listed in the table.
1 When you install the Server Administration plug-in on a remote computer, the plug-in is installed in the System folder inside the FileMaker Pro 5 folder on the remote computer. For more information, see page 2-6.
Starting FileMaker Server (Windows NT)To start the FileMaker Server service:
1. Place the FileMaker Pro 5 files that you want FileMaker Server to open—or shortcuts to those files—in the same folder as FileMaker Server (or in subfolders one level down).
Up to 125 FileMaker Pro 5 database files can be automatically opened when FileMaker Server starts up.
2. Click the Start button > Settings > Control Panel.
3. Double-click the Services icon.
4. Select FileMaker Server in the list, then click Start.
FileMaker Server opens the FileMaker Pro files for access by FileMaker Pro 5 guests on the network.
Note The Services control panel also lets you change how FileMaker Server starts: either manually or automatically. If you want to start FileMaker Server manually when Windows restarts, click the Startup button, then click Manual. If you want FileMaker Server to start automatically when Windows restarts, click the Startup button, then click Automatic.
For information about starting the FileMaker Server service from the command prompt, see “Using the command line to automate tasks (Windows)” on page 6-6.
Sample batch files
Sample template scripts to use for running backups on the command line
hard_drive:\Program Files\FileMaker \FileMaker Server 5\ Examples
fmpctrnm.h Used for manual setup of FileMaker Server Performance Monitor support
hard_drive:\Program Files\FileMaker \FileMaker Server 5\ Perfctrs
fmpsperf.ini Used for manual setup of FileMaker Server Performance Monitor support
mmc.exe Microsoft Management Console application
system_root\System32
File Description Default location
Sets FileMaker Server to start up automatically or manually
Starts the FileMaker Server serviceStops the FileMaker Server service
Services control panel (Windows NT)

Installing FileMaker Server in Windows 2-5
Starting FileMaker Server (Windows 2000)To start the FileMaker Server service:
1. Place the FileMaker Pro 5 files that you want FileMaker Server to open—or shortcuts to those files—in the same folder as FileMaker Server (or in subfolders one level down).
Up to 125 FileMaker Pro 5 database files can be automatically opened when FileMaker Server starts up.
2. Click the Start button > Settings > Control Panel.
3. Open the Administrative Tools folder.
4. Double-click the Services icon.
5. Select FileMaker Server in the list.
6. Choose Action menu > Start.
FileMaker Server opens the FileMaker Pro files for access by FileMaker Pro 5 guests on the network.
For information about starting the FileMaker Server service from the command prompt, see “Using the command line to automate tasks (Windows)” on page 6-6.
Stopping FileMaker Server (Windows NT)Stopping the FileMaker Server service disconnects all FileMaker Pro guests and closes all database files hosted by FileMaker Server.
To stop FileMaker Server:
1. Click the Start button > Settings > Control Panel.
2. Double-click the Services icon.
3. Select FileMaker Server in the list, then click Stop.
4. Click Yes in the confirmation dialog box if you’re sure you want to stop the service.
FileMaker Server gives guests five minutes to close files before disconnecting them. Guests see a notification dialog box requesting that they close the files hosted by FileMaker Server.
If guests don't close the files, the dialog box reappears one minute before the files are closed.
After five minutes, FileMaker Server disconnects any remaining guests and begins closing all open files.
Completing the process of stopping the service and closing the files may take several minutes.
Important Stop the FileMaker Server service before shutting down Windows to give FileMaker Server adequate time to alert guests and prepare to shut down.
Message guests seewhen you stop
FileMaker Server
Shut down notification dialog box on Mac OS guest computer
2-6 FileMaker Server Administrator’s Guide
Stopping FileMaker Server (Windows 2000)Stopping the FileMaker Server service disconnects all FileMaker Pro guests and closes all database files hosted by FileMaker Server.
To stop FileMaker Server:
1. Click the Start button > Settings > Control Panel.
2. Open the Administrative Tools folder.
3. Double-click the Services icon.
4. Select FileMaker Server in the list, then choose Action menu > Stop.
Installing the Server Administration plug-in on a remote computer running WindowsTo have full administrative capabilities when administering FileMaker Server from a remote computer (a computer that is not running the server software), you must install the Server Administration plug-in on each remote computer you plan to use for remote administration.
In addition to viewing information about databases, guests, and FileMaker Server activities, the plug-in also lets you use a remote computer to:
1 open FileMaker Pro 5 files for access by FileMaker Pro guests through FileMaker Server
1 close files hosted by FileMaker Server
1 disconnect a selected FileMaker Pro guest from one or all hosted files
1 send messages to guests of hosted files
This section describes how to install the Server Administration plug-in on Windows based remote computers. For instructions on installing the plug-in on a remote computer running the Mac OS, see page 3-5.
Note The plug-in does not get installed during a Complete installation. You must install it separately using the Custom installation option in the FileMaker Server Installer.
Before you can use FileMaker Pro 5 to administer files hosted by FileMaker Server, you must use FileMaker Pro to enable the Server Administration plug-in (see page 2-7) and use FileMaker Server to enable remote administration (see page 4-6).
For information about using remote administration, see chapter 5, “Administering FileMaker Server.”
Installing the plug-in on a remote computer running Windows NT1. Exit all other applications and turn off virus protection utilities.
2. Install FileMaker Pro 5 on the remote computer, if it’s not already installed.
3. Insert the FileMaker Server CD-ROM into your CD-ROM drive.
4. Double-click setup.exe.
You see the FileMaker Server Setup Wizard.
5. Click Next.
6. Read the license agreement, select I accept the terms in the License Agreement, then click Next.
7. Type your name and organization, and indicate who can access FileMaker Server from this computer (only you or anyone who uses the computer). Then click Next.
8. Select Custom, then click Next.
You see the Custom Setup screen in the Setup Wizard.

Installing FileMaker Server in Windows 2-7
9. Click the disk icon to the left of FileMaker Server 5 and choose This feature will not be made available.
10. Click the disk icon to the left of FileMaker Server Examples and choose This feature will not be made available.
11. Click the disk icon to the left of FileMaker Server Remote Administration and choose This feature will be installed on local hard drive, then click Next.
12. Click Install.
The Installer installs the plug-in (fmpsadm.fmx) on your hard disk.
The Installer checks if FileMaker Pro 5 is installed on the remote computer. If the Installer finds FileMaker Pro 5, it uses the FileMaker Pro 5 path as the default location for the Server Administration plug-in. If FileMaker Pro 5 is not found, the Installer sets the default installation path to: Program Files\FileMaker\FileMaker Pro 5\System
13. Click Finish to close the Setup Wizard.
Installing the plug-in on a remote computer running Windows 95 or Windows 981. Exit all other applications and turn off virus protection utilities.
2. Install FileMaker Pro 5 on the remote computer, if it’s not already installed.
3. Insert the FileMaker Server CD-ROM into your CD-ROM drive.
4. Double-click setup.exe.
You see the FileMaker Server Setup Wizard.
5. Click Next.
6. Read the license agreement, select I accept the terms in the License Agreement, then click Next.
7. Type your name and organization, then click Next
You see the Custom Setup screen in the Setup Wizard.
8. Click the disk icon to the left of FileMaker Server Remote Administration and choose This feature will be installed on local hard drive, then click Next.
9. Click Install.
The Installer installs the plug-in (fmpsadm.fmx) on your hard disk.
The Installer checks if FileMaker Pro 5 is installed on the remote computer. If the Installer finds FileMaker Pro 5, it uses the FileMaker Pro 5 path as the default location for the Server Administration plug-in. If FileMaker Pro 5 is not found, the Installer sets the default installation path to: Program Files\FileMaker\FileMaker Pro 5\System
10. Click Finish to close the Setup Wizard.
Enabling the Server Administration plug-in using FileMaker Pro (Windows)To enable the Server Administration plug-in:
1. Start FileMaker Pro 5.
2. Click Cancel in the New Database dialog box.
3. Choose Edit menu > Preferences > Application.
4. Click the Plug-ins tab, select Server Administration, then click OK.
If you want to administer FileMaker Server now, see “Enabling remote administration” on page 4-6 and “Opening the Remote Administration window” on page 5-2. Otherwise, choose File menu > Exit to exit FileMaker Pro.

2-8 FileMaker Server Administrator’s Guide
Uninstalling FileMaker Server (Windows)Should you need to remove FileMaker Server from your computer, you must first stop the FileMaker Server service. For more information, see “Stopping FileMaker Server (Windows NT)” or “Stopping FileMaker Server (Windows 2000)” on page 2-6.
To remove FileMaker Server from your computer:
1. Start Windows.
2. Click the Start button > Settings > Control Panel.
3. Double-click the Add/Remove Programs icon.
You see the Add/Remove Programs Properties dialog box.
4. Select FileMaker Server 5, then click the Add/Remove button.
You see the FileMaker Server 5 Setup Wizard.
5. Click Next.
6. Select Remove, click Next, then click Remove again.
The Uninstaller removes the FileMaker Server files from the hard disk. After all the files are removed, a final dialog box tells you FileMaker Server was removed successfully.
7. Click Finish and then OK to close the Add/Remove Programs Properties dialog box.
Chapter 3Installing FileMaker Server in the Mac OS
This chapter provides step-by-step instructions for installing the FileMaker Server application and associated files on your Mac OS computer.
What you needTo use FileMaker Server, you need the following equipment and software.
Mac OS system requirementsTo use FileMaker Server, you need:
1 any Apple Power Macintosh or compatible computer, running Mac OS 8.6 or later. FileMaker Server runs in native mode on a Power Macintosh.
1 FileMaker Pro 5 for running the remote administration capability and for creating and converting databases to be hosted by FileMaker Server 5. FileMaker Server 5 supports only FileMaker Pro 5 databases.
1 a web browser for accessing FileMaker on the Web information from the Help menu
1 a CD-ROM disk drive
1 32 MB of available system memory (RAM). For information about running FileMaker Server with virtual memory turned on, see “FileMaker Server, virtual memory, and physical memory requirements” on page 3-3.
1 an internal or external hard disk drive with at least 4 MB of free disk space to install the FileMaker Server application and all related files. Be sure to allow additional space for the database files you intend to host, which should be located on the same disk as the FileMaker Server application.
Networking requirementsTo share files among users on a network, you can use AppleTalk or TCP/IP networking. TCP/IP is recommended for best performance. Apple Open Transport 2.0.1 (or later) is required on the computer running FileMaker Server.
Guests can use the following network protocols to access database files hosted by FileMaker Server:
Installing FileMaker ServerUse the Installer to install the complete FileMaker Server package on your hard disk. The Installer creates a folder called FileMaker Server 5.
To install FileMaker Server on your hard disk:
1. Quit all other applications, especially virus protection software, and disable file sharing.
2. Insert the FileMaker Server CD-ROM into your CD-ROM drive.
You see the CD window on your screen. If you see only the disc icon, double-click the icon to open its window.
Network protocol Mac OS guest Windows guest
AppleTalk Apple LocalTalk (provided by your system) or Apple EtherTalk (Phase I or II)
AppleTalk isn’t supported on FileMaker Pro 5 running in Windows
TCP/IP Apple Open Transport 1.1.1 (or later)
Microsoft TCP/IP-32

3-2 FileMaker Server Administrator’s Guide
3. Double-click the Installer icon named Start Here.
4. Read the license agreement, then click Accept.
You see the FileMaker Server Installer dialog box.
5. To install the application onto a different disk or into a specific folder, click the Install Location pop-up menu and choose Select Folder. In the dialog box that appears, choose a destination disk and folder, then click Select.
6. Click Install.
7. Type your name, company name (optional), and your installation code.
Your installation code is located on a card in the FileMaker Server product box, or on the FileMaker Server installation CD-ROM envelope.
8. Click OK.
If the hard disk you chose has enough space, the Installer begins installing files.
9. Click Quit to leave the Installer when the installation is finished.
10. If you turned off virus protection and file sharing before installing, turn them back on now.
For information about starting the application, see “Starting FileMaker Server (Mac OS)” on page 3-4.
Note If you want to fully administer FileMaker Server from remote computers (open files, close files, and so on), you must install the Server Administration plug-in on each remote computer you plan to use for remote administration. For more information, see “ Installing the Server Administration plug-in on a remote computer running Windows” on page 2-6 or “ Installing the Server Administration plug-in on a remote computer running the Mac OS” on page 3-5.
Adjusting memory (Mac OS)Your computer sets aside a certain amount of memory for each application. When you start FileMaker Server, it tells the computer how much memory it needs.
You can increase the amount of memory (RAM) set aside for FileMaker Server if you want to host large database files or a large number of files.
Changing the amount of memory usedTo change the amount of memory reserved for FileMaker Server, keep these points in mind:
1 FileMaker Server comes configured with 8 MB of memory (RAM) allocated to it. This configuration supports the default number of guests (25) and files (50). Increasing memory can speed up overall performance, especially if you are working with large files or a large number of guests or files.
1 The amount of memory you give to other applications affects the performance of FileMaker Server. FileMaker Server is designed to run by itself on a dedicated computer. By not running other applications, you can assign all available memory to FileMaker Server.
Folder and disk whereFileMaker Server is
installed
Select a different folder or disk
Installing FileMaker Server in the Mac OS 3-3
1 Avoid specifying less memory than the Suggested Size in the FileMaker Server Info dialog box.
1 If you make changes to FileMaker Server preferences while running FileMaker Server, FileMaker Server asks you if you want to automatically adjust the application memory setting in the FileMaker Server Info dialog box (if needed) to accommodate the new settings. If you click OK in the confirmation dialog box, application memory is adjusted for you. If you click Cancel in the confirmation dialog box, you should use the following procedure to adjust the application memory manually.
See appendix B, “Performance and usage tips” for suggestions for optimizing memory settings.
To change the amount of memory FileMaker Server uses:
1. If FileMaker Server is running, close the application by choosing File menu > Quit.
2. Select the FileMaker Server application icon.
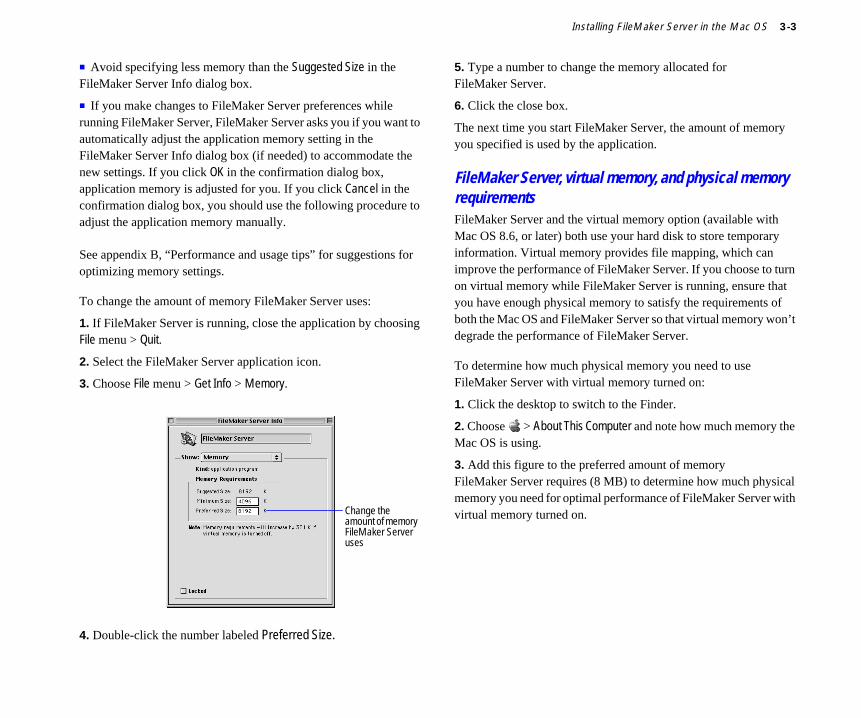
3. Choose File menu > Get Info > Memory.
4. Double-click the number labeled Preferred Size.
5. Type a number to change the memory allocated for FileMaker Server.
6. Click the close box.
The next time you start FileMaker Server, the amount of memory you specified is used by the application.
FileMaker Server, virtual memory, and physical memory requirementsFileMaker Server and the virtual memory option (available with Mac OS 8.6, or later) both use your hard disk to store temporary information. Virtual memory provides file mapping, which can improve the performance of FileMaker Server. If you choose to turn on virtual memory while FileMaker Server is running, ensure that you have enough physical memory to satisfy the requirements of both the Mac OS and FileMaker Server so that virtual memory won’t degrade the performance of FileMaker Server.
To determine how much physical memory you need to use FileMaker Server with virtual memory turned on:
1. Click the desktop to switch to the Finder.
2. Choose > About This Computer and note how much memory the Mac OS is using.
3. Add this figure to the preferred amount of memory FileMaker Server requires (8 MB) to determine how much physical memory you need for optimal performance of FileMaker Server with virtual memory turned on.Change the
amount of memory FileMaker Server uses
3-4 FileMaker Server Administrator’s Guide
Where files are stored on your hard diskThe following table shows the location and contents of the installed items.
When you install the Server Administration plug-in on a remote computer, the plug-in is installed in the FileMaker Extensions folder inside the FileMaker Pro 5 folder on the remote computer. For more information, see page 3-5.
Starting FileMaker Server (Mac OS)Start FileMaker Server by double-clicking its icon in the FileMaker Server 5 Folder, or by selecting the icon and choosing File menu > Open.
You can also make an alias to start FileMaker Server automatically each time you start your computer. See the next section for more information.
Making an aliasPrevious versions of FileMaker Server automatically put an alias of the application in the Startup Items folder of your System Folder. This caused FileMaker Server to start up whenever you started your computer.
Important Throw away any alias from a previous version of FileMaker Server in your Startup Items folder.
To make an alias for FileMaker Server:
1. In the Finder, select the FileMaker Server icon in the FileMaker Server 5 folder.
2. Choose File menu > Make Alias.
You see an alias of FileMaker Server in the application folder.
File DescriptionPreferred location on hard disk
FileMaker Server FileMaker Server application FileMaker Server 5 folder
FileMaker Server Apple Events
A FileMaker Pro database that gives an introduction to the Apple events supported by FileMaker Server, so you can control it using AppleScript or similar applications. See the documentation that came with AppleScript or other applications for details on how to send events to FileMaker Server.
FileMaker Server 5 folder:AppleScript Examples:Apple Events Information
FileMaker Help Viewer
Application that displays FileMaker Server onscreen Help
FileMaker Server 5 folder:FileMaker Help
FileMaker Server Help
Onscreen Help for FileMaker Server
Apple Script files Sample template scripts to use for running backups in the Schedules dialog box
FileMaker Server 5 folder:AppleScript Examples
Read Me A text file containing important information about this release of FileMaker Server
FileMaker Server 5 folder
FileMaker on the Web
Alias for Go_FileMaker.html
Go_FileMaker.html HTML document source file for FileMaker on the Web
FileMaker Server 5 folder:FMI
FMS_Logo.gif Graphic file of FileMaker Server logo for the FileMaker on the Web document
Application icon

Installing FileMaker Server in the Mac OS 3-5
3. Copy or drag the alias into the Startup Items folder in your System Folder.
Quitting FileMaker Server (Mac OS)Quitting FileMaker Server disconnects all FileMaker Pro guests and closes all database files hosted by FileMaker Server.
To quit FileMaker Server:
1. Choose File menu > Quit.
2. Enter text for disconnection options in the dialog box, or accept the default settings, and then click OK.
After you select Quit, you see a diamond next to the command in the File menu. In the Local Administration dialog box, all databases or guest names become italicized to show that FileMaker Server is attempting to close all files, disconnect all guests, and quit.
FileMaker Server will give guests five minutes, or the amount of time you specify in the dialog box, to close files before disconnecting them. Guests see a notification dialog box requesting that they close the files hosted by FileMaker Server. If guests don’t close the files, the dialog box reappears one minute before the files are closed by FileMaker Server.
It might take FileMaker Server several minutes to complete the process of quitting.
Installing the Server Administration plug-in on a remote computer running the Mac OSTo have full administrative capabilities when administering FileMaker Server from a remote computer (a computer that is not running the server software), you must install the Server Administration plug-in on each remote computer you plan to use for remote administration. The plug-in is available as a custom installation option in the FileMaker Server Installer.
In addition to viewing information about databases, guests, and FileMaker Server activities, the plug-in also lets you use a remote computer to:
1 open FileMaker Pro 5 files for access by FileMaker Pro guests through FileMaker Server
1 close files hosted by FileMaker Server
1 disconnect a selected FileMaker Pro guest from one or all hosted files
1 send messages to guests of hosted files
These instructions describe how to install the Server Administration plug-in on a remote computer running the Mac OS. For instructions on installing the plug-in on a Windows based remote computer, see page 2-6.
Note The plug-in does not get installed during an Easy Install. You must install it separately using the Custom installation option in the FileMaker Server Installer. In addition, you must be running Mac OS 7.6.1 or later on the remote computer to install the Server Administration plug-in.
To install the Server Administration plug-in on a computer running the Mac OS:
1. Quit all other applications, especially virus protection software, and disable file sharing.
For this option Do this
Message to send Type text you want the guests to see.
Minutes until guests forced to disconnect
Enter a value (the default is 5 minutes or the last-entered value).
Application alias
3-6 FileMaker Server Administrator’s Guide
2. Install FileMaker Pro 5 on the remote computer, if it’s not already installed.
3. Insert the FileMaker Server CD-ROM into your CD-ROM drive.
You see the CD window on your screen. If you see only the disc icon, double-click the icon to open its window.
4. Double-click the Installer icon named Start Here.
5. Read the license agreement, then click Accept.
You see the FileMaker Server Installer dialog box.
6. Click Easy Install and select Custom Install.
Note The Easy Install/Custom Install menu does not appear if you are running a version of Mac OS prior to 8.6.
7. Select FileMaker Server Remote Administration.
The plug-in must be installed in the FileMaker Extensions folder in the FileMaker Pro 5 folder. If FileMaker Pro 5 is installed, the FileMaker Server Installer locates this folder on your hard disk and installs the Server Administration plug-in there. If FileMaker Pro 5 is not installed on your computer, the Installer creates the following folder and installs the plug-in here:
hard_disk:FileMaker Server 5 folder:FileMaker Extensions
8. Click Install.
9. Click Quit to leave the Installer when the installation is finished.
10. If you turned off virus protection and file sharing before installation, turn them back on now.
Before you can use FileMaker Pro to administer files hosted by FileMaker Server, you must use FileMaker Pro to enable the Server Administration plug-in (see the next section) and use FileMaker Server to enable remote administration (see page 4-6).
For information about using remote administration, see chapter 5, “Administering FileMaker Server.”
Enabling the Server Administration plug-in using FileMaker Pro (Mac OS)To enable the Server Administration plug-in:
1. Start FileMaker Pro 5.
2. Click Cancel in the New Database dialog box.
3. Choose Edit menu > Preferences > Application.
4. Click the Plug-ins tab, select Server Administration, then click OK.
If you want to administer FileMaker Server now, see “Enabling remote administration” on page 4-6 and “Opening the Remote Administration window” on page 5-2. Otherwise, choose File menu > Exit to exit FileMaker Pro.
Select Custom Install
Select theplug-in

Chapter 4Configuring FileMaker Server
Configuration settings allow you to customize FileMaker Server for optimal performance at your site.
Windows: Use the FileMaker Server console’s configuration assistants or the Properties dialog box to configure FileMaker Server.
Mac OS: Use the Preferences dialog box to configure FileMaker Server.
Configuration settings include:
1 setting the maximum number of guests
1 setting idle disconnect time and customizing the pre-disconnect message
1 setting the maximum number of open files
1 allocating the amount of memory (RAM) that FileMaker Server can use as a database cache
1 setting how often the database cache is flushed
1 allowing single user files to be hosted and shared
1 enabling runtime files created using FileMaker Developer software to be opened automatically by FileMaker Server (Windows)
1 enabling remote administration and specifying a password
1 specifying a custom server name that appears in the FileMaker Pro Hosts dialog box
1 maximizing performance (Mac OS)
1 specifying the network protocol(s) FileMaker Server will use and choosing a preferred IP address
1 enabling usage statistics to be recorded in a log file and setting a maximum size for the log
Note The memory requirements of FileMaker Server are directly related to the number of guests and open files. If you select large values for these, you should also increase the amount of RAM reserved for the database cache. See “Changing the amount of memory used by FileMaker Server” on page 4-4 or “Adjusting memory (Mac OS)” on page 3-2 for more details.
Using the configuration assistants (Windows)In Windows, FileMaker Server comes with configuration assistants to help you set up server options. These assistants step you through the configuration process, giving you helpful instructions along the way. You can use these assistants to set up your initial configuration, and then use the Properties dialog box as described in this chapter to change settings, if needed.
To access the assistants:
1. Click the Start button > Programs > FileMaker Server > FileMaker Server Console.
You see the FileMaker Server console.
4-2 FileMaker Server Administrator’s Guide
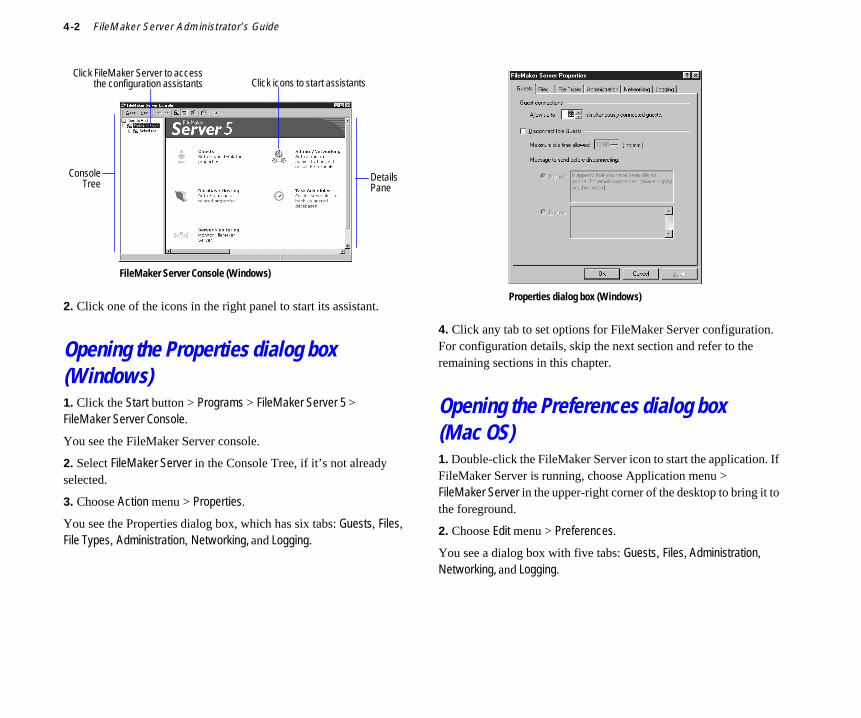
2. Click one of the icons in the right panel to start its assistant.
Opening the Properties dialog box (Windows)1. Click the Start button > Programs > FileMaker Server 5 > FileMaker Server Console.
You see the FileMaker Server console.
2. Select FileMaker Server in the Console Tree, if it’s not already selected.
3. Choose Action menu > Properties.
You see the Properties dialog box, which has six tabs: Guests, Files, File Types, Administration, Networking, and Logging.
4. Click any tab to set options for FileMaker Server configuration. For configuration details, skip the next section and refer to the remaining sections in this chapter.
Opening the Preferences dialog box (Mac OS)1. Double-click the FileMaker Server icon to start the application. If FileMaker Server is running, choose Application menu > FileMaker Server in the upper-right corner of the desktop to bring it to the foreground.
2. Choose Edit menu > Preferences.
You see a dialog box with five tabs: Guests, Files, Administration, Networking, and Logging.
FileMaker Server Console (Windows)
Click FileMaker Server to accessthe configuration assistants
ConsoleTree
Details Pane
Click icons to start assistants
Properties dialog box (Windows)

Configuring FileMaker Server 4-3
3. Click any tab to set options for FileMaker Server configuration. For configuration details, refer to the remaining sections in this chapter.
Setting the number of guestsYou can specify the number of guests who are simultaneously connected to FileMaker Server. Specifying a lower number leaves more memory available for FileMaker Server to operate.
See appendix B, “Performance and usage tips” for more information about memory optimization.
To set the number of FileMaker Pro guests:
1. In the Properties (Windows) or Preferences (Mac OS) dialog box, click the Guests tab.
2. Enter a number for the Allow up to n simultaneously connected guests option.
The minimum number of guests is 1 and the maximum is 250. (AppleTalk support is limited to 124 simultaneous guests.) For example, if you monitor guest usage over time and notice you rarely have more than 22 guests active at one time, set this option to allow 25 guests for best performance on your server.
3. Set any other options, then click OK.
If you increase the number of guests allowed, you must restart FileMaker Server for the new setting to take effect.
Allowing disconnection of idle guestsFileMaker Server can disconnect guests who have been idle for more than a specified period of time. You can:
1 specify the amount of time before idle guests are disconnected
1 use the default disconnect message to warn guests that they will be disconnected, or write a custom message
Setting a time to disconnect idle guestsFileMaker Server can disconnect guests after a specified amount of idle time.
Tip To avoid being disconnected, guests should periodically show some activity (for example, move to a different record, then click in one of the fields) when working in databases hosted by FileMaker Server.
1. In the Properties (Windows) or Preferences (Mac OS) dialog box, click the Guests tab.
2. Select Disconnect Idle Guests.
3. Click the up or down arrow to select the amount of idle time after which inactive guests should be disconnected. The minimum setting is 30 minutes and the maximum setting is 24 hours.
4. Set any other options, then click OK.
Preferences dialog box (Mac OS)

4-4 FileMaker Server Administrator’s Guide
Setting the pre-disconnect messageBefore an idle guest is disconnected from a hosted database, FileMaker Server sends the guest a message to warn that disconnection will occur soon. You can send a default message from FileMaker Server or you can type your own message.
To customize the pre-disconnect message:
1. In the Properties (Windows) or Preferences (Mac OS) dialog box, click the Guests tab, and select Disconnect Idle Guests.
2. Select Custom message, then type a message in the text box.
3. Set any other options, then click OK.
Setting the maximum number of filesYou can specify the maximum number of database files FileMaker Server can open at one time. If you consistently monitor database usage, you can set the maximum number of files for best performance on your server. Specifying a lower number leaves more memory available for FileMaker Server. See appendix B, “Performance and usage tips” for more information about memory optimization.
To set the maximum number of files FileMaker Server can host:
1. In the Properties (Windows) or Preferences (Mac OS) dialog box, click the Files tab.
2. Enter a number close to the number of files you expect to host on FileMaker Server.
The minimum setting is 1 file and the maximum is 125.
3. Set any other options, then click OK.
If you increase the number of files allowed, you must restart FileMaker Server for the new setting to take effect.
Changing the amount of memory used by FileMaker Server The operating system sets aside a certain amount of memory for each application. When you start FileMaker Server, it tells Windows or the Mac OS how much memory it needs based on its Reserve n MB of RAM for database cache setting. Increasing the RAM reserved for the database cache can speed up overall performance, especially if your server hosts large files or a large number of guests or files.
Files tab (Windows)

Configuring FileMaker Server 4-5
Mac OS: The amount of application memory specified in the FileMaker Server Info dialog box also affects the operation of FileMaker Server. For more information, see “Adjusting memory (Mac OS)” on page 3-2.
To change the amount of memory FileMaker Server uses:
1. In the Properties (Windows) or Preferences (Mac OS) dialog box, click the Files tab.
2. Enter the amount of RAM you want to allocate in the Reserve n MB of RAM for database cache box.
The minimum setting is 2 MB and the maximum is 40 MB.
Important Do not specify more RAM than is physically available on the server computer. Be sure to leave at least 16 to 32 MB (Windows) or 24 MB (Mac OS) of physical RAM available for the operating system.
3. Set any other options, then click OK.
You must restart FileMaker Server for the new setting to take effect.
Setting how often the cache is flushedFileMaker Server writes (flushes) information stored in temporary storage (the cache) to disk whenever FileMaker Server is idle, but you can set the cache to be flushed at specific intervals. If the cache is flushed frequently, data integrity in hosted files is improved but performance may decline.
1. In the Properties (Windows) or Preferences (Mac OS) dialog box, click the Files tab.
2. Select Flush cache every n minutes or hours.
3. Click the up or down arrow to select the time interval.
The minimum setting is 15 minutes and the maximum setting is 2 hours.
4. Set any other options, then click OK.
Allowing single user files to be hostedFor your convenience, you can set FileMaker Server to host single user files. This setting lets you host databases without first having to manually change them to multi-user in FileMaker Pro.
1. In the Properties (Windows) or Preferences (Mac OS) dialog box, click the Files tab.
2. Select Allow FileMaker Server to host Single User files.
3. Set any other options, then click OK.
Opening runtime solutions automatically (Windows)You can have FileMaker Server automatically host runtime solution files that have been bound using FileMaker Developer 5 and have a custom filename extension.
About FileMaker DeveloperFileMaker Developer lets database developers create and distribute complete single user database solutions with layouts that are not modifiable by users.
Runtime solution files typically have unique filename extensions. For example, rather than the standard .fp5 extension, a runtime solution file might have the extension .cm1. Registering these runtime solution filename extensions in the FileMaker Server Properties dialog box enables FileMaker Server to open these files automatically when they are placed in the same folder as the FileMaker Server application (or subfolders one level down).
To enable FileMaker Server to open runtime solution files automatically:
1. In the Properties dialog box, click the File Types tab.
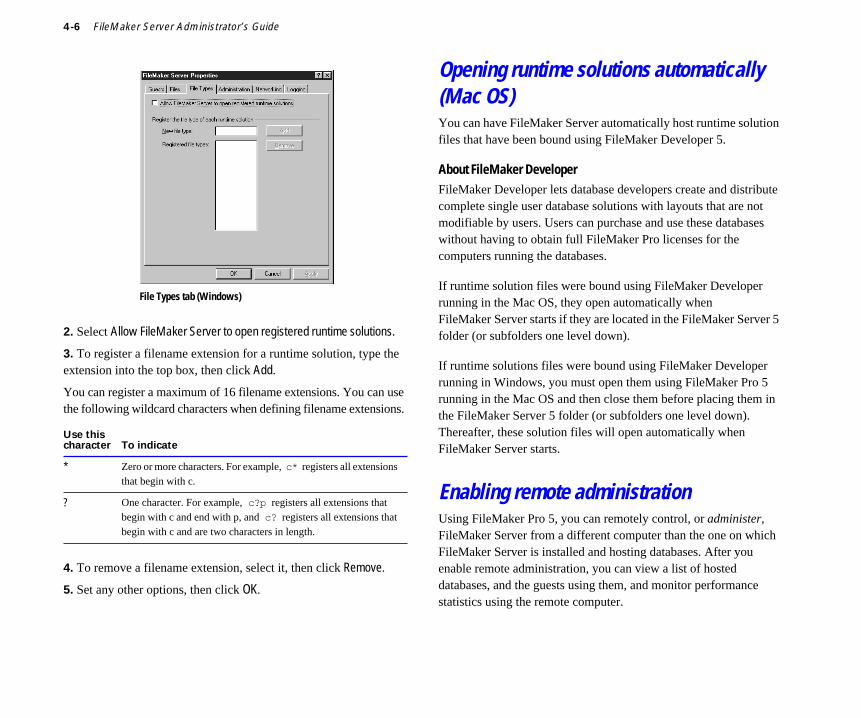
4-6 FileMaker Server Administrator’s Guide
2. Select Allow FileMaker Server to open registered runtime solutions.
3. To register a filename extension for a runtime solution, type the extension into the top box, then click Add.
You can register a maximum of 16 filename extensions. You can use the following wildcard characters when defining filename extensions.
4. To remove a filename extension, select it, then click Remove.
5. Set any other options, then click OK.
Opening runtime solutions automatically (Mac OS)You can have FileMaker Server automatically host runtime solution files that have been bound using FileMaker Developer 5.
About FileMaker DeveloperFileMaker Developer lets database developers create and distribute complete single user database solutions with layouts that are not modifiable by users. Users can purchase and use these databases without having to obtain full FileMaker Pro licenses for the computers running the databases.
If runtime solution files were bound using FileMaker Developer running in the Mac OS, they open automatically when FileMaker Server starts if they are located in the FileMaker Server 5 folder (or subfolders one level down).
If runtime solutions files were bound using FileMaker Developer running in Windows, you must open them using FileMaker Pro 5 running in the Mac OS and then close them before placing them in the FileMaker Server 5 folder (or subfolders one level down). Thereafter, these solution files will open automatically when FileMaker Server starts.
Enabling remote administrationUsing FileMaker Pro 5, you can remotely control, or administer, FileMaker Server from a different computer than the one on which FileMaker Server is installed and hosting databases. After you enable remote administration, you can view a list of hosted databases, and the guests using them, and monitor performance statistics using the remote computer.
Use this character To indicate
* Zero or more characters. For example, c* registers all extensions that begin with c.
? One character. For example, c?p registers all extensions that begin with c and end with p, and c? registers all extensions that begin with c and are two characters in length.
File Types tab (Windows)

Configuring FileMaker Server 4-7
If you have installed the Server Administration plug-in on your remote computer, you can also send messages to guests, disconnect guests, and open or close files remotely. For more information about remote administration tasks, see chapter 5, “Administering FileMaker Server.” For more information about installing the Server Administration plug-in, see page 2-6 for Windows or page 3-5 for the Mac OS.
To enable remote administration of FileMaker Server:
1. In the Properties (Windows) or Preferences (Mac OS) dialog box, click the Administration tab.
2. Choose one of the following options for remote administration.
If you select Disabled, the FileMaker Server name is dimmed (not selectable) when FileMaker Pro guests view it in the Hosts dialog box.
3. Set any other options, then click OK.
Important If you choose to require a password for security reasons, also remember to restrict access to the server computer. Do not put the computer in an insecure room.
In Windows, you can use Windows administrative tools to password-protect a computer. If you do, remember to always log off when leaving the computer unattended.
To prevent guests from viewing or modifying the data, scripts, and layouts in FileMaker Pro, you must create a password in each of the hosted files in FileMaker Pro. See “Protecting files with a password” on page 4-11 for more information.
Specifying a custom host nameYou can specify a host name for the computer running FileMaker Server that’s different from the name registered by the operating system. When you define a custom name, guests see this new name when they open the Hosts dialog box in FileMaker Pro and when they administer FileMaker Server remotely.
Note Guests connecting to databases hosted by FileMaker Server might see the host name displayed in different ways. IPX/SPX displays names using only numerals, uppercase characters, underscores (_), and periods (.), and replaces any other characters with underscores. For example, TCP/IP guests would see a server named Mktg’s FileMaker Server exactly as named, but IPX/SPX guests would see the name MKTG_S_FILEMAKER_ SERVER. Choose custom and system names carefully to reduce confusion between different protocols.
Choose To
Disabled Disable remote administration
Requires no password Let any FileMaker Pro 5 guest remotely view statistics or control FileMaker Server
Requires password Let FileMaker Pro 5 guests remotely view statistics or control FileMaker Server only after entering the password you specify. Passwords are limited to 31 characters.
Administration tab (Mac OS)
This option, describedon page 4-8, is available
for FileMaker Serverrunning in the Mac OS
only

4-8 FileMaker Server Administrator’s Guide
To specify the host name that is displayed in the Hosts dialog box:
1. In the Properties (Windows) or Preferences (Mac OS) dialog box, click the Administration tab.
2. Choose one of the following options for Host name.
Names are limited to 31 characters.
3. Set any other options, then click OK.
You must restart FileMaker Server for the new setting to take effect.
Maximizing performance (Mac OS)You can specify that FileMaker Server uses more CPU (central processing unit) cycles than any other application installed on your server computer.
Important Do not enable this feature unless your server computer is dedicated to only FileMaker Server and unless FileMaker Server always runs in the foreground. If you switch to the Finder on a computer running FileMaker Server in maximum performance mode, expect Finder response time to be slow.
To maximize performance of FileMaker Server:
1. In the Preferences dialog box, click the Administration tab.
2. Select Maximize performance (less CPU time for other applications).
3. Set any other options, then click OK.
4. Select FileMaker Server in the Finder menu to ensure that it is running in the foreground.
Choosing network protocolsWith FileMaker Server, you can simultaneously host FileMaker databases using TCP/IP and IPX/SPX networks (Windows) or TCP/IP and AppleTalk networks (Mac OS). TCP/IP is highly recommended.
To choose the network protocols FileMaker Server uses:
1. In the Properties (Windows) or Preferences (Mac OS) dialog box, click the Networking tab.
2. Click the button for the network protocol(s) you want FileMaker Server to use when communicating with FileMaker Pro guests.
3. Set any other options, then click OK.
You must restart FileMaker Server for the new setting to take effect.
Choose To
System name Have FileMaker Server use the name of the computer in the Network control panel (Windows) or File Sharing control panel (Mac OS)
Custom name Have FileMaker Server use the custom name you specify
Networking tab (Windows)

Configuring FileMaker Server 4-9
Setting the preferred IP addressIf you have multiple IP addresses, you can specify the one you want FileMaker Server to use.
Windows: There is one IP address per network card.
Mac OS: Apple Open Transport determines the number of IP addresses there are for each network card in your computer.
1. In the Properties (Windows) or Preferences (Mac OS) dialog box, click the Networking tab.
2. Select an IP address from the menu.
3. Set any other options, then click OK.
You must restart FileMaker Server for the new setting to take effect.
Recording usage statistics and setting size limitsWhen you enable statistical logging for FileMaker Server, a file named fmsvplog.txt (Windows) or Server Statistics Log (Mac OS) is created in your FileMaker Server 5 folder.
Windows: You can view information from this log in the Usage Statistics window when you administer remotely, or you can display it graphically in real-time on your server computer using the Performance Monitor. For more information about viewing statistics, see “Viewing usage statistics for FileMaker Server remotely” on page 5-3 and “Monitoring performance locally (Windows NT)” on page 5-8.
Mac OS: You can view information from this log in the Usage Statistics window when you administer both remotely or locally. For more information, see “Viewing usage statistics for FileMaker Server remotely” on page 5-3 and “Viewing usage statistics locally (Mac OS)” on page 5-11.
Tips
1 FileMaker Server saves statistical information in a log file named fmsvplog.txt (Windows) or Server Statistics Log (Mac OS) in the FileMaker Server 5 folder. This is a tab-delimited text file, so you can import it into, or drag and drop it onto, FileMaker Pro (or any other application that supports tab-delimited input). You can then examine historical statistical information about how FileMaker Server is performing.
When FileMaker Server is stopped and restarted, the existing log file is renamed fmsvplas.txt (Windows) or Server Last Statistics Log (Mac OS) and a new one is created to record information for the current session. To save statistics for more than two sessions, rename the backup copy of the log before restarting FileMaker Server or it will be overwritten.
1 Mac OS: To display statistical information graphically in real-time, you can use Apple events to transfer information from the Server Statistics Log to Microsoft Excel. You can then use Microsoft Excel to chart statistics. For more information about supported Apple events, see the AppleScript Examples folder inside the FileMaker Server 5 folder.
To record usage statistics in a log file:
1. In the Properties (Windows) or Preferences (Mac OS) dialog box, click the Logging tab.
Logging tab (Mac OS)
This option, describedon page 4-11, is
available forFileMaker Server
running in theMac OS only
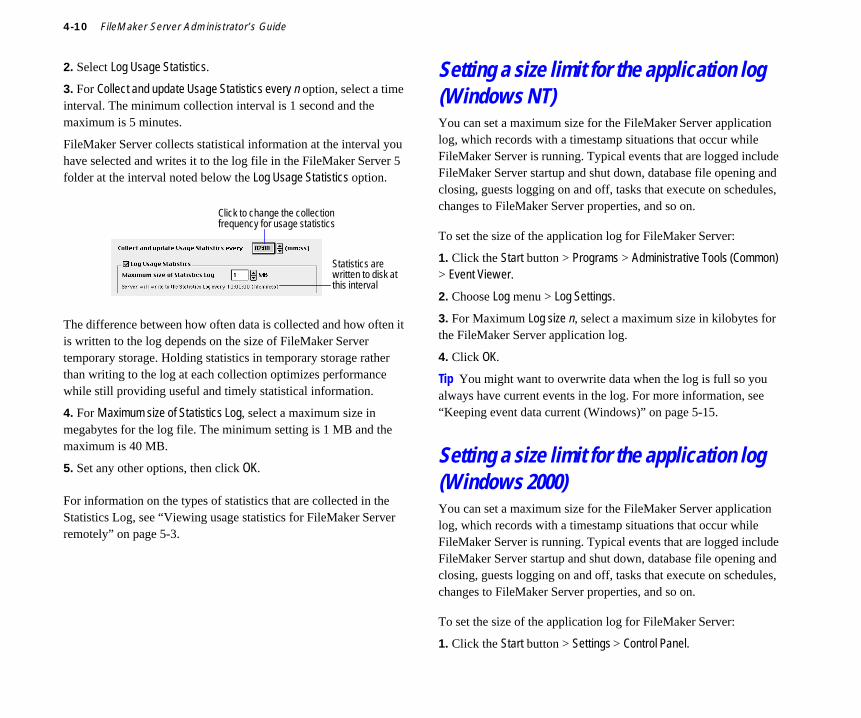
4-10 FileMaker Server Administrator’s Guide
2. Select Log Usage Statistics.
3. For Collect and update Usage Statistics every n option, select a time interval. The minimum collection interval is 1 second and the maximum is 5 minutes.
FileMaker Server collects statistical information at the interval you have selected and writes it to the log file in the FileMaker Server 5 folder at the interval noted below the Log Usage Statistics option.
The difference between how often data is collected and how often it is written to the log depends on the size of FileMaker Server temporary storage. Holding statistics in temporary storage rather than writing to the log at each collection optimizes performance while still providing useful and timely statistical information.
4. For Maximum size of Statistics Log, select a maximum size in megabytes for the log file. The minimum setting is 1 MB and the maximum is 40 MB.
5. Set any other options, then click OK.
For information on the types of statistics that are collected in the Statistics Log, see “Viewing usage statistics for FileMaker Server remotely” on page 5-3.
Setting a size limit for the application log (Windows NT)You can set a maximum size for the FileMaker Server application log, which records with a timestamp situations that occur while FileMaker Server is running. Typical events that are logged include FileMaker Server startup and shut down, database file opening and closing, guests logging on and off, tasks that execute on schedules, changes to FileMaker Server properties, and so on.
To set the size of the application log for FileMaker Server:
1. Click the Start button > Programs > Administrative Tools (Common) > Event Viewer.
2. Choose Log menu > Log Settings.
3. For Maximum Log size n, select a maximum size in kilobytes for the FileMaker Server application log.
4. Click OK.
Tip You might want to overwrite data when the log is full so you always have current events in the log. For more information, see “Keeping event data current (Windows)” on page 5-15.
Setting a size limit for the application log (Windows 2000)You can set a maximum size for the FileMaker Server application log, which records with a timestamp situations that occur while FileMaker Server is running. Typical events that are logged include FileMaker Server startup and shut down, database file opening and closing, guests logging on and off, tasks that execute on schedules, changes to FileMaker Server properties, and so on.
To set the size of the application log for FileMaker Server:
1. Click the Start button > Settings > Control Panel.
Statistics are written to disk at this interval
Click to change the collection frequency for usage statistics

Configuring FileMaker Server 4-11
2. Open the Administrative Tools folder.
3. Double-click the Event Viewer icon.
4. Choose Action menu > Properties.
5. For Maximum Log size n, select a maximum size in kilobytes for the FileMaker Server application log.
6. Click OK.
Tip You might want to overwrite data when the log is full so you always have current events in the log. For more information, see “Keeping event data current (Windows)” on page 5-15.
Setting a size limit for the Server Event Log (Mac OS)You can set a maximum size for the Server Event Log, which records with a timestamp situations that occur while FileMaker Server is running. Typical events that are logged include FileMaker Server startup and shut down, database file opening and closing, guests logging on and off, tasks that execute on schedules, and changes to FileMaker Server preferences.
To set the size of the Event Log:
1. In the Preferences dialog box, click the Logging tab.
2. For Maximum size of Event Log, select a maximum size in megabytes.
The minimum size setting for the Server Event Log is 1 MB and the maximum is 40 MB.
3. Set any other options, then click OK.
Protecting files with a passwordIt is especially important to use the access privileges in FileMaker Pro when files are shared on a network. Using FileMaker Pro, you can restrict what users see and do in a database file by defining passwords and groups. Passwords limit what users can do and groups limit the layouts and fields they can see.
Important Protect shared FileMaker Pro 5 files by using FileMaker Pro access privileges. Although the shared FileMaker Pro files reside on a file server, which may have its own security scheme, any files available to FileMaker Pro guests bypass network and file server protection. For more information about protecting files with a password, see the FileMaker Pro 5 User’s Guide.
How FileMaker Server behaves during system sleepWindows 2000 supports Power Conservation mode, which can cause your server computer to sleep (hibernate or enter Standby mode), suspending access to hosted databases. Computers running the Mac OS can suspend operation when they enter an energy-saving system sleep state.
To prevent your system from sleeping unexpectedly:
1 Windows 2000: Disable Hibernation and Standby Mode in the Power options control panel on the computer running FileMaker Server.
1 Mac OS: Disable system sleep in the Energy Saver control panel by setting the slider control to Never in the Put the system to sleep whenever it’s inactive.

4-12 FileMaker Server Administrator’s Guide
If sleep is enabled on the computer running FileMaker Server, it’s important to understand how FileMaker Server reacts, should the computer enter sleep mode:
1 If there are no guests connected to hosted files when the operating system notifies FileMaker Server that it is going to sleep, FileMaker Server flushes the cache to disk and leaves hosted databases open. Because the cache is saved to disk before the computer sleeps, hosted databases experience no data loss and are open when the operating system wakes up.
Note Database backups or scripts scheduled in FileMaker Server do not run while the operating system is sleeping.
1 If there are guests connected to FileMaker Server when the operating system notifies FileMaker Server that it is going to sleep, FileMaker Server responds to the operating system, instructing that it should not sleep while FileMaker Server is running.
If the operating system shuts down unexpectedly while guests are connected and before the cache can be written to disk (for example, because the battery is critically low, the computer is overheating, or a user turns off the server computer in an emergency), FileMaker Server attempts to recover the state of hosted files when it restarts. As it opens the files located in the FileMaker Server 5 folder (or subfolders one level down), FileMaker Server performs a consistency check on each file. If a file is found to be corrupt, FileMaker Server logs a corruption event in the application log (Windows 2000) or Server Event Log (Mac OS).
Important Files that were open but are not located in the FileMaker Server folder (or subfolders one level down) are not reopened or checked for consistency.
Whenever FileMaker Server restarts after sleep or a forced shutdown, you should always check the application event log (Windows 2000) or Server Event Log (Mac OS) for database corruption notifications. For more information about viewing the events, see “Viewing activities in the Event Viewer (Windows 2000)” or “Viewing activities in the Server Event Log (Mac OS)” on page 5-15.
Also, check your scheduled tasks to ensure that important backups or scripts were not scheduled to run while the operating system was asleep or off. These tasks will not run until the next scheduled time when FileMaker Server is running and the operating system is awake.
To find out the last time a scheduled task ran:
1. Open the FileMaker Server console (Windows 2000) or bring FileMaker Server to the foreground (Mac OS).
2. Click Schedules in the FileMaker Server Console Tree (Windows) or choose Window menu > Schedule Window (Mac OS).
3. Look at the time and date displayed in the Last Run column.
Chapter 5Administering FileMaker Server
You can view information about guests and control database files hosted by one or more servers from a different computer than the one running FileMaker Server. This process is called remote administration.
With FileMaker Server running in the Mac OS, you can also control the hosted files and guests using the same computer that’s running FileMaker Server. This process is called local administration.
Administering FileMaker Server remotelyThe remote administration capability in FileMaker Server is provided through three FileMaker Pro 5 databases. These databases are created in the server computer’s temporary directory when you enable remote administration in the Administration Properties (Windows) or Preferences (Mac OS) dialog box, or when you start FileMaker Server (if remote administration is already enabled).
The databases are created in a subdirectory named Remote Administration, which appears as an active folder when you view the Folders tab of the Remote Administration window. Likewise, the remote administration databases appear when you view the Files tab in the Remote Administration window. However, the remote administration databases do not appear in the Hosts dialog box when you use FileMaker Pro 5 to view hosted files on your server computer.
The names of the remote administration databases contain the name of the FileMaker Server computer. The computer name is truncated if it exceeds 31 characters when combined with the name of a remote administration database. This name defaults to the computer’s system name, but you can change the name displayed in the Hosts dialog box using the Administration Properties (Windows) or Preferences (Mac OS) dialog box.
For example, if your FileMaker Server computer is named Database Server, you see the following filenames:
1 Database Server_Admin
1 Database Server_Usage
1 Database Server_Data
If you disable remote administration in FileMaker Server or you stop or quit FileMaker Server, the remote administration databases are removed from the server computer. If remote administration is enabled in the Administration Properties (Windows) or Preferences (Mac OS) dialog box when you restart FileMaker Server, the remote administration files are recreated.
Important FileMaker, Inc. does not recommend running FileMaker Pro to view the remote administration databases on the server computer. Always administer a Windows-based server from a remote computer and use local administration when working directly on a Mac OS-based server.
When you administer FileMaker Server remotely, your administration capabilities are limited depending on whether or not the Server Administration plug-in for FileMaker Pro is installed on the remote computer.
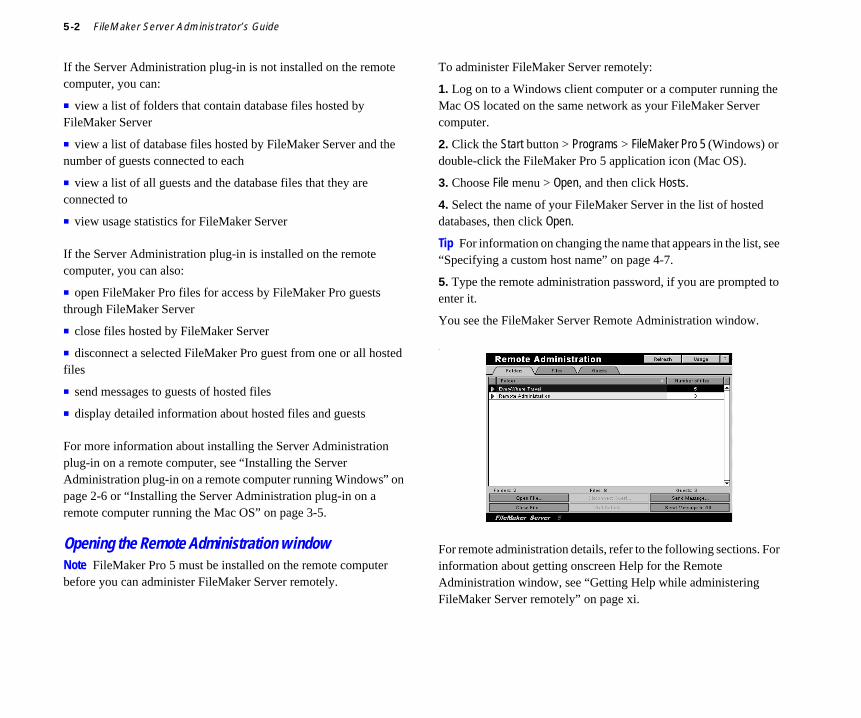
5-2 FileMaker Server Administrator’s Guide
If the Server Administration plug-in is not installed on the remote computer, you can:
1 view a list of folders that contain database files hosted by FileMaker Server
1 view a list of database files hosted by FileMaker Server and the number of guests connected to each
1 view a list of all guests and the database files that they are connected to
1 view usage statistics for FileMaker Server
If the Server Administration plug-in is installed on the remote computer, you can also:
1 open FileMaker Pro files for access by FileMaker Pro guests through FileMaker Server
1 close files hosted by FileMaker Server
1 disconnect a selected FileMaker Pro guest from one or all hosted files
1 send messages to guests of hosted files
1 display detailed information about hosted files and guests
For more information about installing the Server Administration plug-in on a remote computer, see “ Installing the Server Administration plug-in on a remote computer running Windows” on page 2-6 or “ Installing the Server Administration plug-in on a remote computer running the Mac OS” on page 3-5.
Opening the Remote Administration windowNote FileMaker Pro 5 must be installed on the remote computer before you can administer FileMaker Server remotely.
To administer FileMaker Server remotely:
1. Log on to a Windows client computer or a computer running the Mac OS located on the same network as your FileMaker Server computer.
2. Click the Start button > Programs > FileMaker Pro 5 (Windows) or double-click the FileMaker Pro 5 application icon (Mac OS).
3. Choose File menu > Open, and then click Hosts.
4. Select the name of your FileMaker Server in the list of hosted databases, then click Open.
Tip For information on changing the name that appears in the list, see “Specifying a custom host name” on page 4-7.
5. Type the remote administration password, if you are prompted to enter it.
You see the FileMaker Server Remote Administration window.
.
For remote administration details, refer to the following sections. For information about getting onscreen Help for the Remote Administration window, see “Getting Help while administering FileMaker Server remotely” on page xi.

Administering FileMaker Server 5-3
Listing hosted files and current guests remotelyRemote administration gives you several ways to list information about hosted databases and the guests accessing them.
Tips
1 You can see a summary of all folders containing databases, the number of all databases, and the number of all guests just below the list no matter which tab is displayed.
1 You can sort information in columns by clicking the column heading. The triangle in the selected column heading indicates the sort order: up for ascending (A–Z, 0–n, or shortest to longest for time durations) or down for descending (Z–A, n-0, or longest to shortest for time durations).
1 Mac OS: To view database and guest information while working on the server computer, see “Listing hosted files and guests locally (Mac OS)” on page 5-9.
Viewing usage statistics for FileMaker Server remotelyWhen you administer remotely, you can display usage statistics, such as how FileMaker Server is performing and how many guests are logged into FileMaker Server.
To display usage statistics for FileMaker Server, click Usage in the Remote Administration window.
You see the Usage Statistics window.
Click this tab To see
Folders A list of folders on the computer running FileMaker Server that contain hosted databases and the number of databases in each folder. Click to display the database files located in a folder.
Files A list of the database files hosted by FileMaker Server, regardless of which folder they are located in. Also included is the status (for example, Closing, Pausing, Paused, Disk Full, or Exclusive) and the number of guests connected to each database.
Guests A list of FileMaker Pro guests logged onto the database files hosted by FileMaker Server. Also included is the length of time guests have been connected and their inactive time. Click
next to guest names to view a list of databases that they are connected to.
Choose Guests to see a list of guests and their activity
Click to reverse the sort order
5-4 FileMaker Server Administrator’s Guide
The following statistics are listed in the Usage Statistics window:
By default, FileMaker Server updates the statistics in the Usage Statistics window every 15 seconds or less but no more than once a second. Although this reduces the overhead required to calculate the statistics, it means the statistics are approximations of how FileMaker Server is using resources. For information about where usage statistics are stored and how to display them in a chart, see “Recording usage statistics and setting size limits” on page 4-9.
Tip In Mac OS, you can also collect usage statistics information by using Apple events. For more information about Apple events, see the Apple Events Information folder in the AppleScript Examples folder inside the FileMaker Server 5 folder.
Mac OS: To view usage statistics while working on the server computer, see “Viewing usage statistics locally (Mac OS)” on page 5-11.
Hosting FileMaker Pro 5 files remotelyImportant FileMaker Server 5 supports only FileMaker Pro 5 databases. Therefore, any existing databases you have from a previous version of FileMaker Pro must be converted to FileMaker Pro 5 format before you can host them using FileMaker Server 5.
When FileMaker Server starts, it automatically opens or hosts all multi-user files in the FileMaker Server 5 folder including those in subfolders one level down. It also opens single user files, if you have enabled the Allow FileMaker Server to host Single User files option in the Files tab of the Properties (Windows) or Preferences (Mac OS) dialog box. For more information, see “Allowing single user files to be hosted” on page 4-5. Don’t use personal file sharing to share FileMaker Pro files.
Note To open database files while administering remotely, you must have the Server Administration plug-in for FileMaker Pro installed on the remote computer. For Windows remote computers, see “ Installing the Server Administration plug-in on a remote computer running Windows” on page 2-6. For Mac OS remote computers, see “ Installing the Server Administration plug-in on a remote computer running the Mac OS” on page 3-5.
To open files remotely while FileMaker Server is running:
1. Click Open File in the Remote Administration window.
You see a dialog box with a list of FileMaker Pro 5 files available for hosting.
Statistic Description
Transactions/second
Number of guest requests handled per second.
Network (Kbytes/sec)
Amount of data being moved across the network or to and from disk. Data is measured in KB unless network activity is greater than 10 MB per second. In that case, the value displayed represents MB per second.
Guests Number of connected guests. Use this information to help configure the Allow up to n simultaneously connected guests option.
Files Number of open databases. Use this information to configure the Maximum number of files to host option.
Disk (Kbytes/sec) Amount of data being written to disk. Data is measured in KB unless data written to disk is greater than 10 MB per second. In that case, the value displayed represents MB per second.
Cache Unsaved % Percentage of cache that is currently unsaved. This should be a relatively low number, such as 0 or 5, so you won’t lose data if you experience a system crash. If the number is consistently high, consider increasing the frequency with which the cache is flushed.
Cache Hit % Percentage of the times FileMaker Server retrieved data from the cache (RAM) rather than the hard disk. Reading data from RAM is much more efficient than rereading it from the hard disk, so this value should be a high number, like 90 or 95. If it isn’t, you might need to allocate more memory to FileMaker Server database cache.
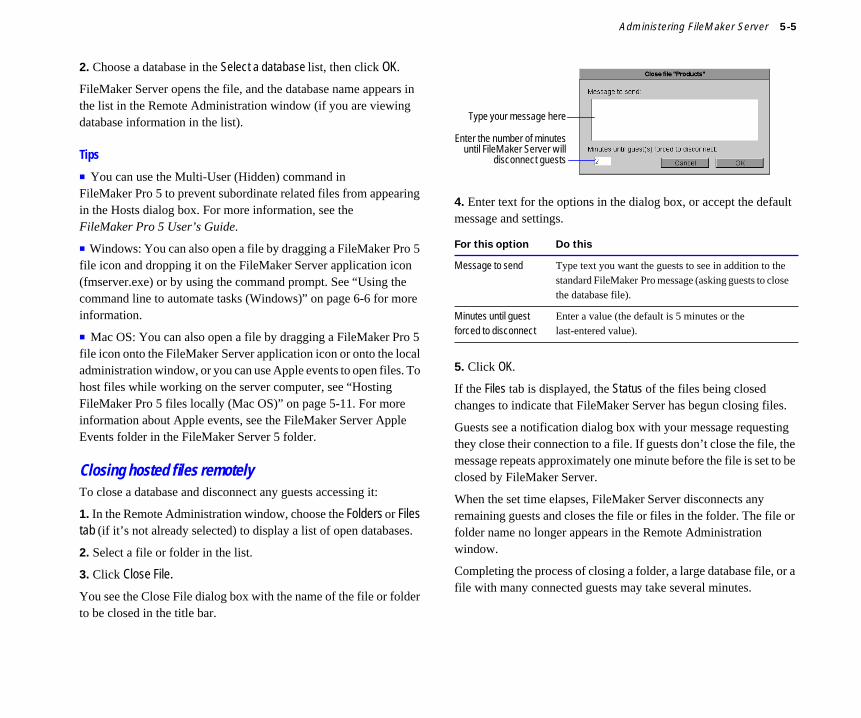
Administering FileMaker Server 5-5
2. Choose a database in the Select a database list, then click OK.
FileMaker Server opens the file, and the database name appears in the list in the Remote Administration window (if you are viewing database information in the list).
Tips
1 You can use the Multi-User (Hidden) command in FileMaker Pro 5 to prevent subordinate related files from appearing in the Hosts dialog box. For more information, see the FileMaker Pro 5 User’s Guide.
1 Windows: You can also open a file by dragging a FileMaker Pro 5 file icon and dropping it on the FileMaker Server application icon (fmserver.exe) or by using the command prompt. See “Using the command line to automate tasks (Windows)” on page 6-6 for more information.
1 Mac OS: You can also open a file by dragging a FileMaker Pro 5 file icon onto the FileMaker Server application icon or onto the local administration window, or you can use Apple events to open files. To host files while working on the server computer, see “Hosting FileMaker Pro 5 files locally (Mac OS)” on page 5-11. For more information about Apple events, see the FileMaker Server Apple Events folder in the FileMaker Server 5 folder.
Closing hosted files remotelyTo close a database and disconnect any guests accessing it:
1. In the Remote Administration window, choose the Folders or Files tab (if it’s not already selected) to display a list of open databases.
2. Select a file or folder in the list.
3. Click Close File.
You see the Close File dialog box with the name of the file or folder to be closed in the title bar.
4. Enter text for the options in the dialog box, or accept the default message and settings.
5. Click OK.
If the Files tab is displayed, the Status of the files being closed changes to indicate that FileMaker Server has begun closing files.
Guests see a notification dialog box with your message requesting they close their connection to a file. If guests don’t close the file, the message repeats approximately one minute before the file is set to be closed by FileMaker Server.
When the set time elapses, FileMaker Server disconnects any remaining guests and closes the file or files in the folder. The file or folder name no longer appears in the Remote Administration window.
Completing the process of closing a folder, a large database file, or a file with many connected guests may take several minutes.
For this option Do this
Message to send Type text you want the guests to see in addition to the standard FileMaker Pro message (asking guests to close the database file).
Minutes until guest forced to disconnect
Enter a value (the default is 5 minutes or the last-entered value).
Type your message here
Enter the number of minutesuntil FileMaker Server will
disconnect guests

5-6 FileMaker Server Administrator’s Guide
Tips
1 Windows: You can also close files from the command line. See “Using the command line to automate tasks (Windows)” on page 6-6 for more information.
1 Mac OS: You can also close files using Apple events. For more information about Apple Events, see the AppleScript Examples folder in the FileMaker Server 5 folder.
1 Mac OS: To close files while working on the server computer, see “Closing hosted files locally (Mac OS)” on page 5-12.
Disconnecting guests remotelyTo disconnect a guest from a hosted database:
1. In the Remote Administration window, select the guest to disconnect.
2. Click Disconnect Guest.
You see the Disconnect Guest dialog box with the name of the guest to be disconnected in the title bar.
3. Enter text for the options in the dialog box, or accept the default settings.
4. Click OK.
The selected guest sees a notification dialog box with your message requesting that the guest disconnect from the server. If the guest doesn’t disconnect, the message repeats approximately one minute before the guest is set to be disconnected.
When the set time elapses, FileMaker Server disconnects the guest and the guest’s name disappears from the Remote Administration window.
Mac OS: To disconnect guests while working on the server computer, see “Disconnecting guests locally (Mac OS)” on page 5-13.
Viewing detailed information about hosted files and guests remotelyIf you have the Server Administration plug-in installed on your remote computer, you can use FileMaker Pro 5 to view detailed information about hosted files and the guests that are currently connected to them. For each hosted database, you can display:
1 the name of the file
1 the number of guests connected to it
1 the number of records it contains
1 the number of layouts it has
1 its current size in bytes
1 file status: Normal (active), Closing, Pausing, Paused, Nearly full, Exclusive by username
For each guest, you can display:
1 the name of the guest
1 the network protocol that the guest is using
1 the guest’s network address
1 the number of files the guest is currently connected to
Click And select To
Guests The guest’s name Disconnect the selected guest from all databases
Guests guestname The database file under the guest’s name in the list
Disconnect the guest from the selected database
Files filename The guest’s name under the database in the list
Disconnect the selected guest from a particular database
For this option Do this
Message to send Type text you want the guest to see in addition to the standard FileMaker Pro message (the default).
Minutes until guest forced to disconnect
Enter a value (the default is 5 minutes or the last-entered value).
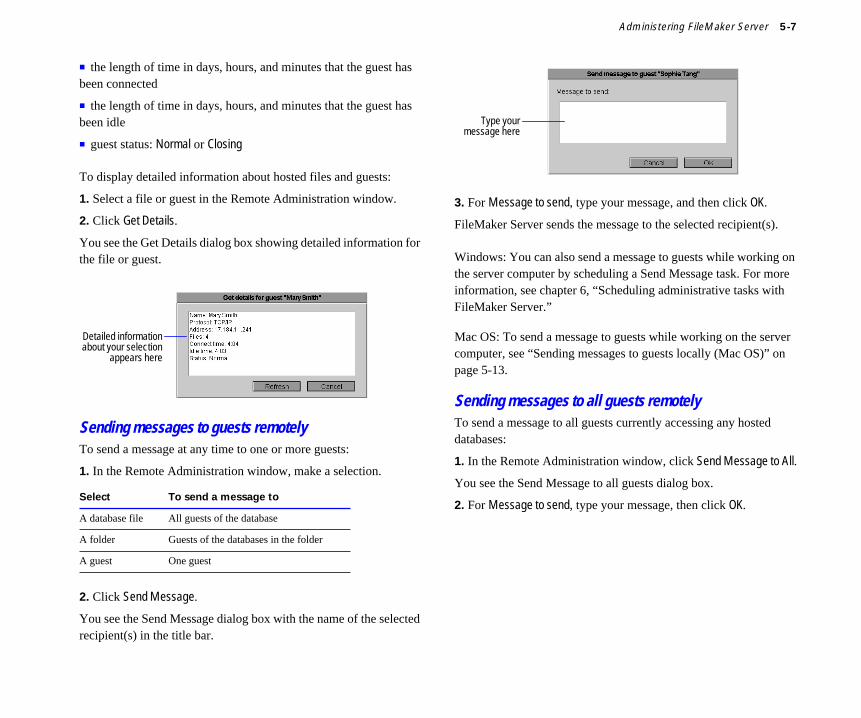
Administering FileMaker Server 5-7
1 the length of time in days, hours, and minutes that the guest has been connected
1 the length of time in days, hours, and minutes that the guest has been idle
1 guest status: Normal or Closing
To display detailed information about hosted files and guests:
1. Select a file or guest in the Remote Administration window.
2. Click Get Details.
You see the Get Details dialog box showing detailed information for the file or guest.
Sending messages to guests remotelyTo send a message at any time to one or more guests:
1. In the Remote Administration window, make a selection.
2. Click Send Message.
You see the Send Message dialog box with the name of the selected recipient(s) in the title bar.
3. For Message to send, type your message, and then click OK.
FileMaker Server sends the message to the selected recipient(s).
Windows: You can also send a message to guests while working on the server computer by scheduling a Send Message task. For more information, see chapter 6, “Scheduling administrative tasks with FileMaker Server.”
Mac OS: To send a message to guests while working on the server computer, see “Sending messages to guests locally (Mac OS)” on page 5-13.
Sending messages to all guests remotelyTo send a message to all guests currently accessing any hosted databases:
1. In the Remote Administration window, click Send Message to All.
You see the Send Message to all guests dialog box.
2. For Message to send, type your message, then click OK.Select To send a message to
A database file All guests of the database
A folder Guests of the databases in the folder
A guest One guest
Detailed informationabout your selection
appears here
Type yourmessage here

5-8 FileMaker Server Administrator’s Guide
Administering FileMaker Server locally If you’re running FileMaker Server in Windows, you must use the remote administration capability from a different computer (not the one running FileMaker Server) to perform most administrative tasks. However, you can monitor usage statistics from the server computer using the Performance Monitor (Windows NT) or Performance console (Windows 2000). For more information, see the next section, “Monitoring performance locally (Windows NT),” or “Monitoring performance locally (Windows 2000)” on page 5-9.
If you’re running FileMaker Server in the Mac OS, you can perform all the administrative activities described in the previous sections in this chapter from the computer running the server software. The steps you follow, however, are different and are described beginning on page 5-9. In addition, you can perform many administrative tasks using Apple events both from the local computer or a remote computer. For more information about Apple events, see the AppleScript Examples folder inside the FileMaker Server 5 folder.
Monitoring performance locally (Windows NT)Using the Windows Performance Monitor, you can chart real-time statistics for various aspects of FileMaker Server performance.
To view FileMaker Server statistics in Windows Performance Monitor:
1. Click the Start button > Programs > Administrative Tools (Common) > Performance Monitor.
2. Choose Edit menu > Add To Chart.
3. For Object, choose FileMaker Server.
4. For Counter, choose the FileMaker Server statistics that you want to track, then click Add after each selection.
Tip Transactions, Network KB/sec, Disk KB/sec. Cache Hit %, and Cache Unsaved % give you the most information about how your system is performing.
5. Click Done.
Real-time statistical information for FileMaker Server appears in the Performance Monitor.
For information about the statistics displayed, see “Viewing usage statistics for FileMaker Server remotely” on page 5-3.
ChooseFileMaker Server
Name of the serveryou are monitoring
Click to add a selected counter to your chart
Click to see your chart
SelectFileMaker Server
usage statisticscounters to add
to your chart
Windows Performance Monitor
FileMaker Serverusage statistics
counters
Statistics arecharted in
real-time here
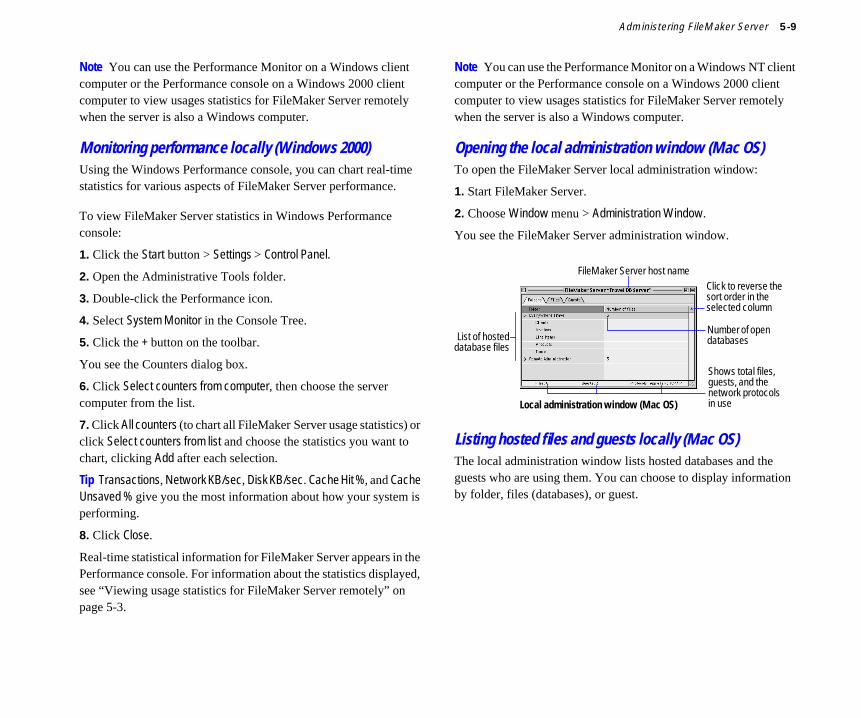
Administering FileMaker Server 5-9
Note You can use the Performance Monitor on a Windows client computer or the Performance console on a Windows 2000 client computer to view usages statistics for FileMaker Server remotely when the server is also a Windows computer.
Monitoring performance locally (Windows 2000)Using the Windows Performance console, you can chart real-time statistics for various aspects of FileMaker Server performance.
To view FileMaker Server statistics in Windows Performance console:
1. Click the Start button > Settings > Control Panel.
2. Open the Administrative Tools folder.
3. Double-click the Performance icon.
4. Select System Monitor in the Console Tree.
5. Click the + button on the toolbar.
You see the Counters dialog box.
6. Click Select counters from computer, then choose the server computer from the list.
7. Click All counters (to chart all FileMaker Server usage statistics) or click Select counters from list and choose the statistics you want to chart, clicking Add after each selection.
Tip Transactions, Network KB/sec, Disk KB/sec. Cache Hit %, and Cache Unsaved % give you the most information about how your system is performing.
8. Click Close.
Real-time statistical information for FileMaker Server appears in the Performance console. For information about the statistics displayed, see “Viewing usage statistics for FileMaker Server remotely” on page 5-3.
Note You can use the Performance Monitor on a Windows NT client computer or the Performance console on a Windows 2000 client computer to view usages statistics for FileMaker Server remotely when the server is also a Windows computer.
Opening the local administration window (Mac OS)To open the FileMaker Server local administration window:
1. Start FileMaker Server.
2. Choose Window menu > Administration Window.
You see the FileMaker Server administration window.
Listing hosted files and guests locally (Mac OS)The local administration window lists hosted databases and the guests who are using them. You can choose to display information by folder, files (databases), or guest.
FileMaker Server host name
List of hosteddatabase files
Number of open databases
Local administration window (Mac OS)
Shows total files, guests, and the network protocols in use
Click to reverse the sort order in the selected column
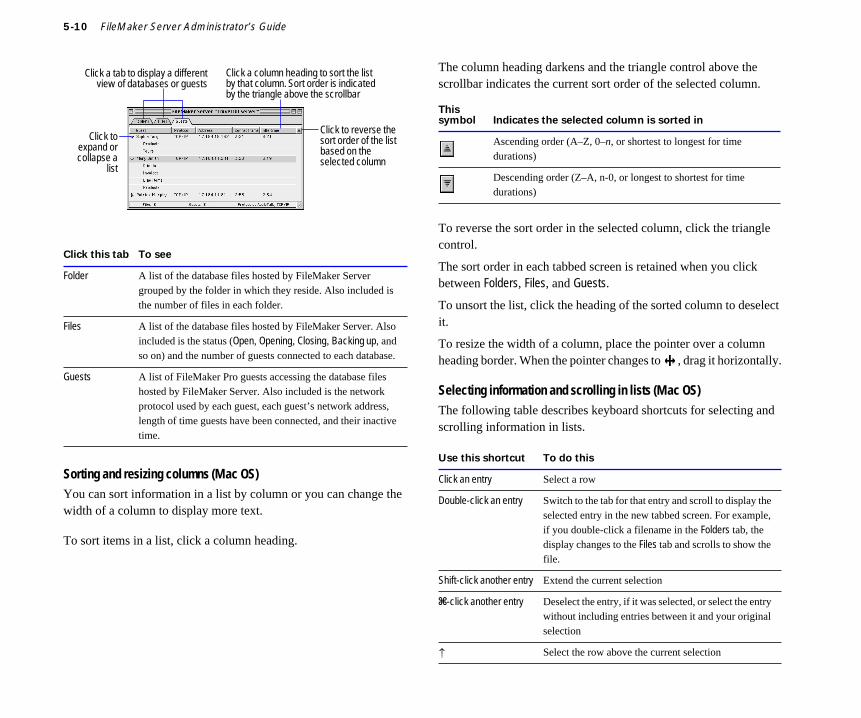
5-10 FileMaker Server Administrator’s Guide
Sorting and resizing columns (Mac OS)You can sort information in a list by column or you can change the width of a column to display more text.
To sort items in a list, click a column heading.
The column heading darkens and the triangle control above the scrollbar indicates the current sort order of the selected column.
To reverse the sort order in the selected column, click the triangle control.
The sort order in each tabbed screen is retained when you click between Folders, Files, and Guests.
To unsort the list, click the heading of the sorted column to deselect it.
To resize the width of a column, place the pointer over a column heading border. When the pointer changes to , drag it horizontally.
Selecting information and scrolling in lists (Mac OS)The following table describes keyboard shortcuts for selecting and scrolling information in lists.
Click this tab To see
Folder A list of the database files hosted by FileMaker Server grouped by the folder in which they reside. Also included is the number of files in each folder.
Files A list of the database files hosted by FileMaker Server. Also included is the status (Open, Opening, Closing, Backing up, and so on) and the number of guests connected to each database.
Guests A list of FileMaker Pro guests accessing the database files hosted by FileMaker Server. Also included is the network protocol used by each guest, each guest’s network address, length of time guests have been connected, and their inactive time.
Click toexpand orcollapse a
list
Click a tab to display a differentview of databases or guests
Click to reverse the sort order of the list based on the selected column
Click a column heading to sort the list by that column. Sort order is indicated by the triangle above the scrollbar
This symbol Indicates the selected column is sorted in
Ascending order (A–Z, 0–n, or shortest to longest for time durations)
Descending order (Z–A, n-0, or longest to shortest for time durations)
Use this shortcut To do this
Click an entry Select a row
Double-click an entry Switch to the tab for that entry and scroll to display the selected entry in the new tabbed screen. For example, if you double-click a filename in the Folders tab, the display changes to the Files tab and scrolls to show the file.
Shift-click another entry Extend the current selection
2-click another entry Deselect the entry, if it was selected, or select the entry without including entries between it and your original selection
C Select the row above the current selection
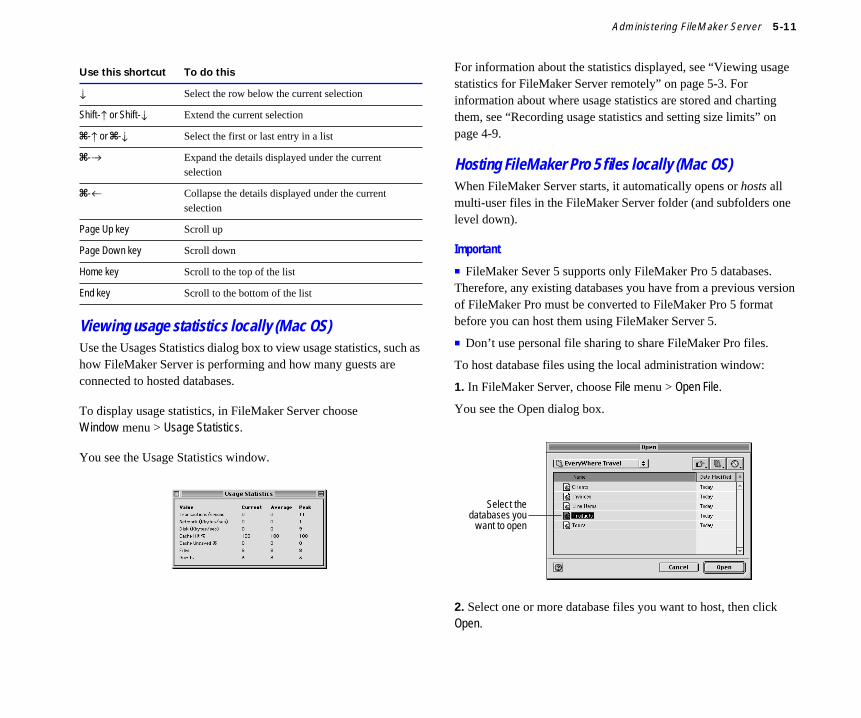
Administering FileMaker Server 5-11
Viewing usage statistics locally (Mac OS)Use the Usages Statistics dialog box to view usage statistics, such as how FileMaker Server is performing and how many guests are connected to hosted databases.
To display usage statistics, in FileMaker Server choose Window menu > Usage Statistics.
You see the Usage Statistics window.
For information about the statistics displayed, see “Viewing usage statistics for FileMaker Server remotely” on page 5-3. For information about where usage statistics are stored and charting them, see “Recording usage statistics and setting size limits” on page 4-9.
Hosting FileMaker Pro 5 files locally (Mac OS)When FileMaker Server starts, it automatically opens or hosts all multi-user files in the FileMaker Server folder (and subfolders one level down).
Important
1 FileMaker Sever 5 supports only FileMaker Pro 5 databases. Therefore, any existing databases you have from a previous version of FileMaker Pro must be converted to FileMaker Pro 5 format before you can host them using FileMaker Server 5.
1 Don’t use personal file sharing to share FileMaker Pro files.
To host database files using the local administration window:
1. In FileMaker Server, choose File menu > Open File.
You see the Open dialog box.
2. Select one or more database files you want to host, then click Open.
D Select the row below the current selection
Shift-C or Shift-D Extend the current selection
2-C or 2-D Select the first or last entry in a list
2-B Expand the details displayed under the current selection
2-A Collapse the details displayed under the current selection
Page Up key Scroll up
Page Down key Scroll down
Home key Scroll to the top of the list
End key Scroll to the bottom of the list
Use this shortcut To do this
Select thedatabases you
want to open

5-12 FileMaker Server Administrator’s Guide
The database files appear in the Folders tab of the administration window.
Tips
1 Alternatively, you can drag one or more database files onto the FileMaker Server administration window to open them for guest access.
1 FileMaker Server can open files set to Single User in FileMaker Pro, if you have enabled the Allow FileMaker Server to host Single User files option. For more information, see “Allowing single user files to be hosted” on page 4-5.
1 You can use the Multi-User (Hidden) command in FileMaker Pro 5 to prevent subordinate related files from appearing in the Hosts dialog box. For more information, see the FileMaker Pro 5 User’s Guide.
1 You can Shift-click additional files in the Open dialog box to open more than one file at a time.
Closing hosted files locally (Mac OS)To close a hosted database and disconnect any guests currently accessing it:
1. In FileMaker Server, choose Window menu > Administration Window to display the list of currently hosted files.
2. Select a database file in the list that you want to close.
Tip You can Shift-click additional databases in the list to close more than one at a time. If you are viewing databases by folder, you can select one folder to close all files in it or Shift-click an assortment of files and folders to close them.
3. Choose File menu > Close File.
You see the Close selected files/folders dialog box.
4. Enter text for the options in the dialog box, or accept the default message and settings.
5. Click OK.
The file or folder name in the list changes to italicized text to show that FileMaker Server is closing it.
Guests see a notification dialog box with your message requesting they close their connection to a file. If guests don’t close the file, the message repeats approximately one minute before the file is set to be closed by FileMaker Server.
For this option Do this
Message to send Type text you want the guests to see in addition to the standard FileMaker Pro message (asking guests to close the database file).
Minutes until guests forced to disconnect
Enter a value (the default is 5 minutes or the last-entered value).
Type yourmessage here
Specify how longguests have to
disconnect beforethe file will be
closed
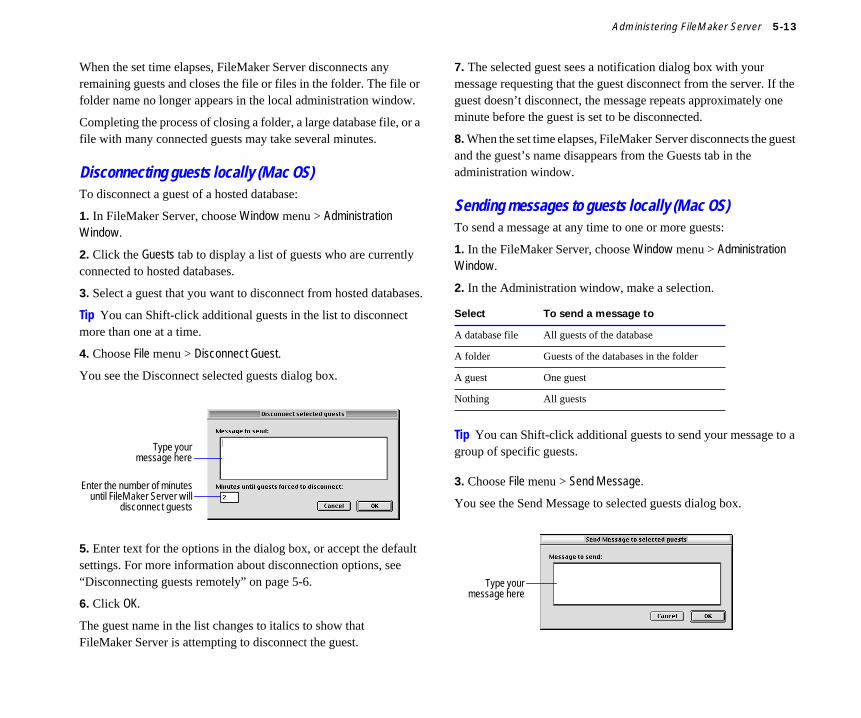
Administering FileMaker Server 5-13
When the set time elapses, FileMaker Server disconnects any remaining guests and closes the file or files in the folder. The file or folder name no longer appears in the local administration window.
Completing the process of closing a folder, a large database file, or a file with many connected guests may take several minutes.
Disconnecting guests locally (Mac OS)To disconnect a guest of a hosted database:
1. In FileMaker Server, choose Window menu > Administration Window.
2. Click the Guests tab to display a list of guests who are currently connected to hosted databases.
3. Select a guest that you want to disconnect from hosted databases.
Tip You can Shift-click additional guests in the list to disconnect more than one at a time.
4. Choose File menu > Disconnect Guest.
You see the Disconnect selected guests dialog box.
5. Enter text for the options in the dialog box, or accept the default settings. For more information about disconnection options, see “Disconnecting guests remotely” on page 5-6.
6. Click OK.
The guest name in the list changes to italics to show that FileMaker Server is attempting to disconnect the guest.
7. The selected guest sees a notification dialog box with your message requesting that the guest disconnect from the server. If the guest doesn’t disconnect, the message repeats approximately one minute before the guest is set to be disconnected.
8. When the set time elapses, FileMaker Server disconnects the guest and the guest’s name disappears from the Guests tab in the administration window.
Sending messages to guests locally (Mac OS)To send a message at any time to one or more guests:
1. In the FileMaker Server, choose Window menu > Administration Window.
2. In the Administration window, make a selection.
Tip You can Shift-click additional guests to send your message to a group of specific guests.
3. Choose File menu > Send Message.
You see the Send Message to selected guests dialog box.
Type yourmessage here
Enter the number of minutesuntil FileMaker Server will
disconnect guests
Select To send a message to
A database file All guests of the database
A folder Guests of the databases in the folder
A guest One guest
Nothing All guests
Type yourmessage here

5-14 FileMaker Server Administrator’s Guide
4. In the Message to send box, type your message, then click OK.
FileMaker Server sends the message to the selected recipient(s).
Windows: You can also send a message to guests while working on the server computer by scheduling a Send Message task. For more information, see chapter 6, “Scheduling administrative tasks with FileMaker Server.”
Using reported events to track activitiesFileMaker Server uses the Windows Event Viewer (Windows) or creates a Server Event Log file (Mac OS) to help you keep track of activities on the server. These log files contain time-stamped information on:
1 FileMaker Server starting and stopping, as well as the size of the database cache
1 database files opened and closed by FileMaker Server
1 guests that connect to and disconnect from FileMaker Server, as well as the files they access
1 guests that are disconnected by FileMaker Server
1 new, completed, upcoming, and currently running schedules
1 pre-defined errors and other unusual conditions that occur when FileMaker Server is running
1 properties (Windows) or preferences (Mac OS) settings that are changed during a FileMaker Server session
Tip If you want to log four-digit dates in the Event Viewer (for example, 2000 rather than 00), adjust the system date setting on your server computer.
Viewing activities in the Event Viewer (Windows NT)To view information about FileMaker Server activities:
1. Click the Start button > Programs > Administrative Tools (Common) > Event Viewer.
2. Choose Log menu > Application.
You see a list of FileMaker Server Events in the Event Viewer.
3. Double-click an event to display details about it.
For more information about the error conditions reported in the Event Log, see appendix C, “Event log messages and troubleshooting.”
Windows NT Event Viewer dialog box
Double-click an event
The event isdescribed here

Administering FileMaker Server 5-15
Tip Choose Log menu > Save As to save information displayed in the Event Viewer as a tab-delimited text file (.TXT) and then import the information into a FileMaker Pro database for further analysis.
Viewing activities in the Event Viewer (Windows 2000)To view information about FileMaker Server activities:
1. Click the Start button > Settings > Control Panel.
2. Open the Administrative Tools folder.
3. Double-click the Event Viewer icon.
4. Click Application Log in the Console Tree.
5. Choose View menu > Filter.
6. For Source, choose FileMaker Server.
7. Click OK.
You see a list of FileMaker Server Events in the Details Pane of the Event Viewer console.
8. Double-click an event to display details about it.
Tip Choose Action menu > Export List to save information displayed in the Event Viewer as a tab-delimited text file (.TXT) and then import the information into a FileMaker Pro database for further analysis.
For more information about the error conditions reported in the Event Log, see appendix C, “Event log messages and troubleshooting.”
Keeping event data current (Windows)You might want to configure the Event Viewer to overwrite event information, because the default setting is to stop recording events when the application log becomes full. If you have many databases open with many users accessing them, and if you flush the cache often, the log could fill up quickly and the information in the Event Viewer could quickly become out of date.
To overwrite event information when the log is full:
1. Choose one of the following:
1 Windows NT: In the Event Viewer, choose Log menu > Log Settings.
1 Windows 2000: In the Event Viewer, choose Action menu > Properties.
2. For Event Log Wrapping, select Overwrite Events as Needed.
3. Click OK.
Tip You might want to increase the Maximum Log Size setting from the default 512 KB to 4096 KB or more, depending on how much FileMaker Server activity you anticipate on your server computer.
Viewing activities in the Server Event Log (Mac OS)The Server Event Log file is created in the FileMaker Server 5 folder. You can use any application capable of opening plain text files to view or print it. You can have the log file open when FileMaker Server is running, but you won’t see recent updates in the file until you close the log file and reopen it. For more information about the error conditions reported in the Server Event Log, see appendix C, “Event log messages and troubleshooting.”
A new log file is created each time you start FileMaker Server. The log from the previous session is backed up in the FileMaker Server 5 folder and renamed Server Last Event Log. Therefore, you always have the current log file and the previous one available for review. To save a specific log file, use the Finder to rename it before it is overwritten by FileMaker Server.
You can set a maximum size for the Event Log to prevent it from taking up too much space on your disk. For more information, see “Setting a size limit for the Server Event Log (Mac OS)” on page 4-11.
5-16 FileMaker Server Administrator’s Guide
Recalculating the Today function in hosted databasesThe Today function in FileMaker Pro updates whenever a database file is opened. If a database file you’re hosting with FileMaker Server contains fields that use the Today function, you must close that file and reopen it each day for this function to recalculate correctly. See the FileMaker Pro 5 User’s Guide for information on the Today function.
Tip You can avoid using the Today function by creating a calculation field that uses the Status(CurrentDate) function in FileMaker Pro.
If you have the Server Administration plug-in installed on a client computer, you can use the FileMaker Server remote administration capability to recalculate the Today function as described below.
Mac OS: You can alternatively open and close the database using the local administration capability as described on page 5-11.
To recalculate the Today function:
1. Log on to a Windows client computer or a computer running the Mac OS located on the same network as your FileMaker Server computer.
2. Click the Start button > Programs > FileMaker Pro 5 (Windows) or double-click the FileMaker Pro 5 application icon (Mac OS).
3. Click Hosts and select the name of your FileMaker Server computer.
4. In the Remote Administration window, select the database containing the Today function in the Files or Folders tab, then click Close File.
5. Click Open File, select the file that you just closed, then click OK.
Closing and reopening the database in FileMaker Server causes the Today function to be recalculated by the next FileMaker Pro guest who opens the hosted file.
6. Choose File menu > Close to close the Remote Administration window.
7. In FileMaker Pro, choose File menu > Open.
8. In the Open dialog box, click Hosts.
9. Double-click the file containing the Today function to access it as a guest.
A message appears stating that the Today function is being calculated. This process may take some time depending on the number of records and other database calculations in the file.
Tips
1 You can automate the process of opening and closing files by setting up a schedule in FileMaker Server to run a .CMD script (Windows) or an AppleScript (Mac OS). For more information about running scripts on a schedule, see chapter 6, “Scheduling administrative tasks with FileMaker Server.”
1 Windows: You can use the Schedule service provided with Windows to perform these steps each day. See the sample files in the RCToday folder in the Examples folder, inside the FileMaker Server 5 folder, and the Windows documentation for more information about the Schedule service.
1 Mac OS: You can automate how you recalculate the Today function in hosted databases using the sample AppleScript named Recalculate Today Function located in the AppleScript Examples folder inside the FileMaker Server 5 folder.

Chapter 6Scheduling administrative tasks with FileMaker Server
You can create schedules to perform these tasks:
1 back up hosted databases
1 run command files (Windows)
1 run AppleScript scripts (Mac OS)
1 send messages to guests
You can define up to 50 schedules in FileMaker Server. If you set up schedules that overlap, FileMaker Server starts the first task and holds the next task in queue. When the first task has completed, the next task will begin.
Windows: In addition to defining scheduled tasks in FileMaker Server, you can also automate administrative tasks by using the command line interface. You can use utilities that come with Windows, such as Windows Backup and Schedule services, for running automated tasks similar to those provided by FileMaker Server.
Scheduling tasks to run automatically (Windows)You can use the Task Scheduling assistant to define three unique kinds of tasks and set the times that they execute. You can:
1 schedule database backups
1 run command files
1 send messages to guests of hosted databases
To create a scheduled task:
1. Click the Start button > Programs > FileMaker Server 5 > FileMaker Server Console.
You see the FileMaker Server console. FileMaker Server is selected in the Console Tree and the Details Pane displays the configuration assistants.
2. Click Task Scheduler in the Details Pane of the FileMaker Server console.
You see the Task Scheduling assistant.
3. Follow the directions provided by the assistant to define a task and set up a schedule for when it will run.
Scheduling tasks to run automatically (Mac OS)1. Choose Schedules menu > New Schedule.
You see the New Schedule dialog box.
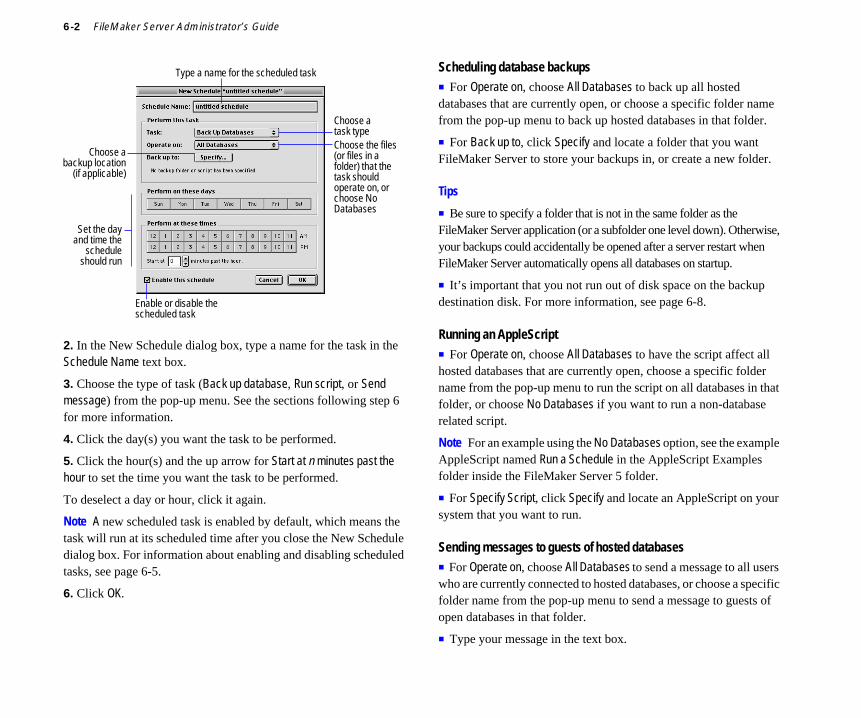
6-2 FileMaker Server Administrator’s Guide
2. In the New Schedule dialog box, type a name for the task in the Schedule Name text box.
3. Choose the type of task (Back up database, Run script, or Send message) from the pop-up menu. See the sections following step 6 for more information.
4. Click the day(s) you want the task to be performed.
5. Click the hour(s) and the up arrow for Start at n minutes past the hour to set the time you want the task to be performed.
To deselect a day or hour, click it again.
Note A new scheduled task is enabled by default, which means the task will run at its scheduled time after you close the New Schedule dialog box. For information about enabling and disabling scheduled tasks, see page 6-5.
6. Click OK.
Scheduling database backups1 For Operate on, choose All Databases to back up all hosted databases that are currently open, or choose a specific folder name from the pop-up menu to back up hosted databases in that folder.
1 For Back up to, click Specify and locate a folder that you want FileMaker Server to store your backups in, or create a new folder.
Tips
1 Be sure to specify a folder that is not in the same folder as the FileMaker Server application (or a subfolder one level down). Otherwise, your backups could accidentally be opened after a server restart when FileMaker Server automatically opens all databases on startup.
1 It’s important that you not run out of disk space on the backup destination disk. For more information, see page 6-8.
Running an AppleScript1 For Operate on, choose All Databases to have the script affect all hosted databases that are currently open, choose a specific folder name from the pop-up menu to run the script on all databases in that folder, or choose No Databases if you want to run a non-database related script.
Note For an example using the No Databases option, see the example AppleScript named Run a Schedule in the AppleScript Examples folder inside the FileMaker Server 5 folder.
1 For Specify Script, click Specify and locate an AppleScript on your system that you want to run.
Sending messages to guests of hosted databases1 For Operate on, choose All Databases to send a message to all users who are currently connected to hosted databases, or choose a specific folder name from the pop-up menu to send a message to guests of open databases in that folder.
1 Type your message in the text box.
Type a name for the scheduled task
Choose a task typeChoose the files (or files in a folder) that the task should operate on, or choose No Databases
Set the dayand time the
scheduleshould run
Enable or disable the scheduled task
Choose abackup location
(if applicable)

Scheduling administrative tasks with FileMaker Server 6-3
Viewing scheduled tasks in the Schedules list (Windows)After you create scheduled tasks, they appear in the Schedules list. The list shows you a summary of each defined schedule, including the last time the task ran and the next time it will run.
To display the Schedules list, select Schedules in the Console Tree.
You can use this view of your scheduled tasks to change, duplicate, enable, disable, and run tasks manually.
Tip To change the way items are displayed in the scheduled task list, choose View menu and then choose a display option.
Administering scheduled tasks with the toolbar (Windows)Use the toolbar to work with scheduled tasks in the list. First, select one or more schedules in the list, then click an active tool on the toolbar.
Note The tools available on the toolbar change depending on your selection in the FileMaker Server window. Therefore, not all tools described below will always be visible.
Click a column heading to sort by this column
Click buttons on the toolbar toadminister scheduled tasks
Drag the border to change the column width
Console Tree Details Pane
Use this tool To perform this action
Display the information that was previously displayed in the Details Pane of the FileMaker Server console. Information is displayed in reverse historical order.
Display the information that was previously displayed in the Details Pane of the FileMaker Server console. This button activates after you have used the Back button (above) to display a previous page in the Details Pane and lets you go “forward” in historical order.
Move the selection up one level in the folder hierarchy in the Console Tree.
Hide the Console Tree.
Delete the current selection.
Display properties for the current selection.
Update information displayed in the Details Pane of the FileMaker Server console (such as the last time a schedule ran).
Display procedural FileMaker Server Help.
Open the New Schedule assistant to create a new schedule to add to the list.
Run the selected scheduled tasks right now, regardless of the execution time defined by the schedule.
Enable or disable the selected scheduled tasks. If the selected tasks are enabled to run on their defined schedule, clicking this button disables them, removing the checkmark from their list entry. If the selected tasks are disabled and are prevented from running on their defined schedule, clicking this button enables them, placing a checkmark on the left of their list entry.

6-4 FileMaker Server Administrator’s Guide
Tip You can place the pointer over a tool to display a description of it.
Updating Last Run and Next Run information (Windows)Last Run and Next Run information gets updated in the Schedules list every 15 seconds. You can update it more often, if you want.
To update the information about when a scheduled task ran last and when it will run again, select one or more scheduled tasks and choose Action menu > Refresh.
Viewing scheduled tasks in the Schedules window (Mac OS)After you create a scheduled task, it appears in the Schedules window.
To display the Schedules window, choose Window menu > Schedules Window.
The list shows you a summary of each defined schedule, including the task it performs, the last time it ran, and the next time it will run. For information on working with lists see “Sorting and resizing columns (Mac OS)” and “Selecting information and scrolling in lists (Mac OS)” on page 5-10.
You can use this view of your scheduled tasks to change, duplicate, enable, disable, and run them manually as described in the following sections.
Running scheduled tasks manually1. In the Schedules list (Windows) or Schedules window (Mac OS), select a scheduled task that you want to run.
2. Choose Action menu > Run Now (Windows) or Schedules menu > Run Schedule (Mac OS).
The Last Run column is updated with the current date and time.
Changing scheduled tasks1. In the Schedules list (Windows) or Schedules window (Mac OS), select a scheduled task.
Prevent all scheduled tasks from running, even if they are enabled (checked) in the Schedules list. This option lets you turn off all schedules at once and is convenient for performing administrative tasks on the server computer. When you click this button, checkmarks of enabled tasks are dimmed in the Schedules list.
Allow all scheduled and enabled tasks to run. Tasks that you have individually disabled will not run.
Duplicate one or more selected scheduled tasks to use as a template for creating a new scheduled task.
Display FileMaker on the Web information in the Details Pane of the console, which gives you easy access to the official FileMaker, Inc. web site. Click this tool again to return to the previously displayed page in the Details Pane.
Use this tool To perform this action
Drag the border tochange the column width
Click a checkbox todisable or enable
an individualscheduled task
Click to reverse the sort order of the list based on the selected column
Click a column heading to sort the list by that column. Sort order is indicated by the triangle above the scrollbar
Scheduling administrative tasks with FileMaker Server 6-5
2. Choose Action menu > Properties (Windows) or Schedules menu > Edit Schedule (Mac OS).
See page 6-2 for an illustration of the options in the Edit Schedule dialog box.
3. Make changes to the scheduled task, then click OK.
Tips
1 You can double-click a schedule in the list to open the schedule Properties (Windows) or Edit Schedule dialog box (Mac OS).
1 To change the format of dates or times in the Schedules list, change the date or time format settings in the Regional Settings control panel (Windows) or the Date & Time control panel (Mac OS).
Duplicating scheduled tasksSometimes it’s easier to use an existing scheduled task as a template, rather than defining a completely new schedule. To duplicate an existing schedule and use it as a base for a new one:
1. In the Schedules list (Windows) or Schedules window (Mac OS), select one or more scheduled tasks.
2. Choose Action menu > Duplicate (Windows) or Schedules menu > Duplicate Schedule (Mac OS).
The schedule appears with the word “copy” appended to its name. For more information about editing the duplicate schedule, see the previous section and “Scheduling tasks to run automatically (Mac OS)” on page 6-1.
Deleting scheduled tasks1. In the Schedules list (Windows) or Schedules window (Mac OS), select one or more scheduled tasks.
2. Choose Action menu > Delete (Windows) or Schedules menu > Delete Schedule (Mac OS).
You see a confirmation message asking you to confirm that you want to delete the selected schedule.
Note You can’t undo the deletion of a schedule.
3. Click OK.
Enabling and disabling scheduled tasksYou can enable or disable specific schedules or disable all schedules at once.
To perform this action Do this
Enable a schedule when creating it
In the scheduled task’s Properties dialog box (Windows) or New Schedule dialog box (Mac OS), be sure Enable this schedule is selected.
Windows: If you use the Task Scheduling assistant to create a schedule, the scheduled task is enabled by default.
Enable a schedule that was disabled
Windows: Select one or more disabled schedules in the Schedules list and choose Action menu > Enabled. A checkmark appears next to the Enabled command in the Action menu to indicate the current selection is enabled.
Mac OS: In the Schedules window, click the empty checkbox to the left of the schedule name. A checkmark appears, indicating that the scheduled task is enabled.
Disable a selected schedule
Windows: Select one or more enabled schedules in the Schedules list and choose Action menu > Enabled. The checkmark next to the Enabled command in the Action menu disappears to indicate the current selection is disabled.
Mac OS: In the Schedules window, click the checkbox to the left of the schedule name. The checkmark disappears, indicating that the scheduled task is disabled.

6-6 FileMaker Server Administrator’s Guide
Windows: You can also use tools on the toolbar in the Schedules list to enable and disable scheduled tasks. For more information, see “Viewing scheduled tasks in the Schedules list (Windows)” on page 6-3.
Using the command line to automate tasks (Windows)You can use the command line interface to automate tasks with FileMaker Server, such as backing up files using the Windows Backup and Schedule services, or administering files from the FileMaker Server computer.
You can use the command line to:
1 start or stop FileMaker Server
1 host FileMaker Pro files
1 close files hosted by FileMaker Server
1 pause or resume a file or files to periodically flush the cache
Below is a list of commands available with FileMaker Server. Text enclosed in the [ ] characters indicates that the item is optional. [path] indicates one or more filenames (possibly including wildcard characters) or folder names are optional parameters to the command. #minutes indicates you need to type a numeric value for the number of minutes before guests are disconnected after a stop or close command.
Prevent all schedules from running
Windows: Choose Action menu > Allow schedules to run.
Mac OS: Choose Schedules menu > Allow Schedules to Run.
The checkmark on this command disappears, indicating that this option is turned off.
This setting overrides any individual schedule settings you have enabled and all checkmarks in the list are dimmed indicating that all schedules are disabled. If you open the Properties (Windows) or Edit Schedule dialog box (Mac OS) for a disabled scheduled task, however, the checkmark in the Enable this schedule option might still be checked.
Allow enabled schedules to run
Windows: Choose Action menu > Allow schedules to run.
Mac OS: Choose Schedules menu > Allow Schedules to Run.
A checkmark appears on this command, indicating that all scheduled tasks that are individually checked in the scheduled task list are enabled.
Scheduled tasks that were individually disabled are not re-enabled until you enable them individually.
To perform this action Do this
Command syntax Description
fmserver start [-s] Start the FileMaker Server service. Include the -s option to skip automatically opening files in the FileMaker Server 5 folder (and subfolders one level down).
fmserver stop [-m “message text”] [-t #minutes]
Stop the FileMaker Server service, send a custom message to guests, and set the number of minutes before the files close.
fmserver open [path] Host specific FileMaker Pro files.
fmserver close [path] [-m “message text”] [-t #minutes]
Close specific FileMaker Pro files, send a custom message to guests, and set the number of minutes before the files close.
fmserver pause [path] Pause activity on specific or all FileMaker Pro files. Pause files before copying them to another folder, for example, when backing them up. Useful with the NT Backup and Schedule services. If you don’t specify a path, all hosted files are paused.
Pause causes all changes for a particular file to be written from cache to disk and prevents guests from making any changes to the file until the file is “resumed.” After a file is successfully paused, it’s safe to copy it using a script or back-up program.
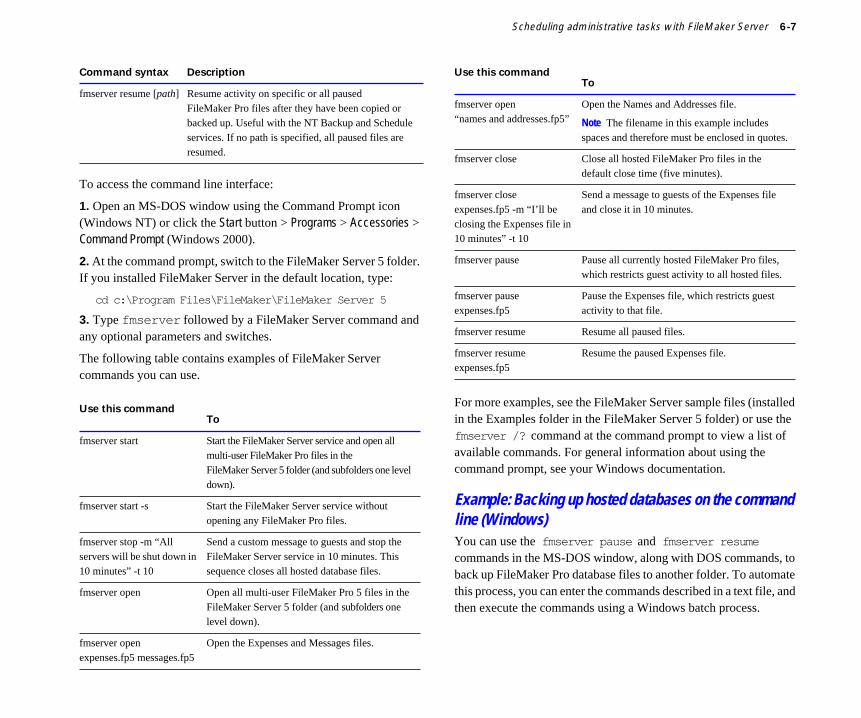
Scheduling administrative tasks with FileMaker Server 6-7
To access the command line interface:
1. Open an MS-DOS window using the Command Prompt icon (Windows NT) or click the Start button > Programs > Accessories > Command Prompt (Windows 2000).
2. At the command prompt, switch to the FileMaker Server 5 folder. If you installed FileMaker Server in the default location, type:
cd c:\Program Files\FileMaker\FileMaker Server 5
3. Type fmserver followed by a FileMaker Server command and any optional parameters and switches.
The following table contains examples of FileMaker Server commands you can use.
For more examples, see the FileMaker Server sample files (installed in the Examples folder in the FileMaker Server 5 folder) or use the fmserver /? command at the command prompt to view a list of available commands. For general information about using the command prompt, see your Windows documentation.
Example: Backing up hosted databases on the command line (Windows)You can use the fmserver pause and fmserver resume commands in the MS-DOS window, along with DOS commands, to back up FileMaker Pro database files to another folder. To automate this process, you can enter the commands described in a text file, and then execute the commands using a Windows batch process.
fmserver resume [path] Resume activity on specific or all paused FileMaker Pro files after they have been copied or backed up. Useful with the NT Backup and Schedule services. If no path is specified, all paused files are resumed.
Use this commandTo
fmserver start Start the FileMaker Server service and open all multi-user FileMaker Pro files in the FileMaker Server 5 folder (and subfolders one level down).
fmserver start -s Start the FileMaker Server service without opening any FileMaker Pro files.
fmserver stop -m “All servers will be shut down in 10 minutes” -t 10
Send a custom message to guests and stop the FileMaker Server service in 10 minutes. This sequence closes all hosted database files.
fmserver open Open all multi-user FileMaker Pro 5 files in the FileMaker Server 5 folder (and subfolders one level down).
fmserver open expenses.fp5 messages.fp5
Open the Expenses and Messages files.
Command syntax Description
fmserver open“names and addresses.fp5”
Open the Names and Addresses file.
Note The filename in this example includes spaces and therefore must be enclosed in quotes.
fmserver close Close all hosted FileMaker Pro files in the default close time (five minutes).
fmserver close expenses.fp5 -m “I’ll be closing the Expenses file in 10 minutes” -t 10
Send a message to guests of the Expenses file and close it in 10 minutes.
fmserver pause Pause all currently hosted FileMaker Pro files, which restricts guest activity to all hosted files.
fmserver pause expenses.fp5
Pause the Expenses file, which restricts guest activity to that file.
fmserver resume Resume all paused files.
fmserver resume expenses.fp5
Resume the paused Expenses file.
Use this commandTo

6-8 FileMaker Server Administrator’s Guide
The process of backing up hosted databases using the command line is to create a directory in which to temporarily store the backups, pause hosted databases to limit access to them on your network, copy the files to the new directory, restore availability of the files to guests, and remove the temporary backup directory you created. These steps are described in detail below.
1. Use the DOS mkdir command to create a new directory, for example, Backups.
2. Use the fmserver pause command, which pauses a specified file or files hosted by FileMaker Server.
Guest activity on paused database files is restricted, so it’s best to limit overall pause time as much as possible.
3. Use the DOS xcopy command to copy all files (including files in subdirectories) from the FileMaker Server 5 directory to the Backups directory.
4. Use the fmserver resume command to restore guest access to paused database files.
5. Move the files from the Backups directory to a permanent backup location and use the rmdir/s/q command to delete the Backups directory and subdirectories.
Tips
1 A sample command file named Backup.cmd containing this sequence of commands is in the Examples folder inside the FileMaker Server 5 folder. You can use this file as a template for backing up your own hosted databases.
1 To execute this set of commands on an automatic schedule, you need to use the at command and Schedule service provided by Windows. For more information, see your Windows documentation. If you have a tape drive, you can use the backup command provided by Windows to copy files directly to tape.
Using an AppleScript to automate tasks (Mac OS)You can use an AppleScript to automate administrative tasks performed by FileMaker Server. For more information about AppleScript application programs that are provided with FileMaker Server and about supported Apple events, see the AppleScript Examples folder inside the FileMaker Server 5 folder.
Making sure you don’t run out of disk space It’s important that the destination disk where you plan to store your hosted files and backups has plenty of free space. If the hard disk runs out of space while a file is being modified or if a database file reaches the 2GB size limit, FileMaker Server will automatically begin compressing the hosted file to reduce the amount of disk space it uses. During the compression, all guest activity to the server is paused and guests see the coffee cup icon or the network icon. Compression may take some time to complete. To avoid automatic compression, leave plenty of free disk space on the computer running FileMaker Server.
If the hard disk runs out of space during a backup, the backup stops and FileMaker Server logs an error in the application event log (Windows) or Server Event Log (Mac OS). It’s a good idea to periodically check the Schedules list for error conditions, which are reported in the Last Run column. To avoid running out of disk space when backing up files, choose tape or a different hard disk as your backup destination.
For additional help troubleshooting command line problems, see appendix C, “Event log messages and troubleshooting.”

Appendix ATechnical specifications and optimization
Limits for files and usage Hardware and network considerations Keep the following points in mind when you’re setting up FileMaker Server on your computer and configuring the network where it will run.
Use a dedicated computerUse FileMaker Server by itself on a computer on which no other applications are normally running and that isn’t a user’s primary workstation. When FileMaker Server is hosting many guests or a large number of database files, it uses a high level of processor, disk, and network capacity. Other processor-intensive applications or heavy network traffic on the same computer causes FileMaker Server to run more slowly, and the performance of FileMaker Pro on guest computers to degrade.
Use as fast a computer as possibleThe faster the computer, the better the performance of FileMaker Server.
1 Windows: FileMaker Server requires at minimum a Pentium processor.
1 Mac OS: FileMaker Server requires at minimum a PowerPC processor. FileMaker Server is optimized for the PowerPC G3 processor in a Power Macintosh G3 computer.
Item Limitation
Number of files hosted by FileMaker Server
Maximum of 125 files depending on the Maximum number of files to host setting (other network applications may limit this number).
Number of files open at the same time
Maximum of 50 per FileMaker Pro 5 guests.
Number of network users Maximum number of guests is 250. (AppleTalk support is limited to 124 simultaneous guests.) You can restrict the number of simultaneously connected guests with the Allow up to n simultaneously connected guests setting. Specifying a realistic number of guests fewer than 250 can optimize performance.
File size Maximum of 2 GB (gigabytes) per file. The combined size of all open files is limited only by disk space.
Length of host name Maximum of 31 characters.
Length of FileMaker Server password
Maximum of 31 characters.
Length of filename Windows: Maximum of 255 characters.
Note To open the files in FileMaker Server, the first 31 characters of the filename must be unique.
Mac OS: Maximum of 31 characters.
A-2 FileMaker Server Administrator’s Guide
Use a fast hard diskBecause of the way FileMaker Pro stores information in files, FileMaker Server benefits a great deal from fast disk input/output. Try to use a hard disk with software (or drivers) that supports asynchronous disk I/O. This technology lets FileMaker Server perform other operations after starting a read or write operation on a file, rather than having to wait for the disk I/O to complete. If FileMaker Server can take advantage of asynchronous I/O when opening a file, it notes it in the corresponding log file entry. (See “Viewing activities in the Server Event Log (Mac OS)” on page 5-15 for more information.) To determine whether your hardware supports asynchronous I/O, refer to the documentation that came with your hardware.
Use a fast networkMac OS: If possible, use a network faster than LocalTalk, such as Ethernet.
Software considerations Consider the following issues when deciding which software to use with FileMaker Server.
Only FileMaker Pro 5 databases can be hostedFileMaker Server 5 supports only FileMaker Pro 5 databases. Therefore, any existing databases you have from a previous version of FileMaker Pro must be converted to FileMaker Pro 5 format before you can host them using FileMaker Server 5.
Coexistence with screen saver softwareAvoid using screen saver software that creates moving images on the monitor of the computer running FileMaker Server. This type of software can use significant system resources, which hinders the processing of FileMaker Server networking traffic. Instead, use a screen saver that blacks out your monitor or dims its brightness, or manually dim the monitor.
Turn off file sharingMake sure operating system file sharing is turned off on the server computer.
Coexistence with AppleShare software (Mac OS)Running AppleShare software (including AppleShare and AppleShare Pro) and the FileMaker Server application on the same computer is not recommended. If you must use that configuration, keep the following information in mind:
1 Limit connected AppleShare users.
Users connected to an AppleShare server through the AppleTalk protocol occupy a physical connection to the server known as an AppleTalk socket. AppleTalk sockets are also used by FileMaker Server when guests access a hosted file using the AppleTalk protocol. If many users are connected to the AppleShare server and are occupying these AppleTalk sockets, fewer sockets are available to FileMaker Server running on the same computer. This could cause FileMaker Pro guests using the AppleTalk protocol to receive a message indicating that they have exceeded host capacity, which prevents them from accessing hosted databases on the server even if server limit requirements on page A-1 haven’t been reached.
1 Use a third-party server access monitoring utility to keep the number of AppleShare connections to a minimum and to allow only active connections.
This lets FileMaker Server use the maximum number of sockets for guests of FileMaker Pro files. For more information about configuring AppleShare software, see your AppleShare documentation.

Technical specifications and optimization A-3
Don’t allow the server to sleep Windows 2000 supports Power Conservation Mode, which can cause your computer to hibernate or enter Standby mode, affecting the operation of FileMaker Server. Similarly, computers running the Mac OS can suspend operations when they enter an energy-saving system sleep state. Therefore, FileMaker, Inc. recommends that you disable Power Conservation mode (Windows 2000) or system sleep (Mac OS) on the computer running FileMaker Server. For more information, see “How FileMaker Server behaves during system sleep” on page 4-11.


Appendix BPerformance and usage tips
Performance tipsIf you find that FileMaker Server is sluggish when performing certain operations, try the following:
1 Run FileMaker Server on a dedicated computer.
1 Use as fast a computer and network as possible.
1 Always use remote administration to perform administrative tasks on hosted files, such as sending messages to connected guests.
1 Reduce the number of guests able to access FileMaker Server. (See “Setting the number of guests” on page 4-3.)
1 Reduce the maximum number of files that can be hosted by FileMaker Server. (See “Setting the maximum number of files” on page 4-4.)
1 Monitor the cache hit percentage in usage statistics. You can view real-time usage statistics using the Performance Monitor (Windows NT), Performance console (Windows 2000), or the Usage Statistics window (Mac OS or remote administration).
The value for Cache Hits is the percentage of times FileMaker Pro retrieves data from the cache (RAM) rather than the hard disk. Reading data from RAM is much more efficient than reading it from the hard disk, so this value should be a high number, like 90 or 95. If it isn’t, you might need to allocate more memory to FileMaker Server.
FileMaker Server tracks three values for Cache Hits: Current, Average, and Peak. It’s best to monitor the Current value periodically, as an average value can be skewed by running even one data-intensive report on a hosted database.
1 Monitor the percentage of unsaved cache in usage statistics. This value indicates how much data could potentially be lost if your server computer shut down unexpectedly before writing data stored in cache to the hard disk.
The percentage reported is the portion unsaved in the total cache. For example, if the cache is set to 2 MB and the Cache Unsaved % value is 50, you would lose 1 MB of data should your computer fail unexpectedly.
If the Cache Unsaved % value is consistently high, increase the frequency with which the cache is flushed, or schedule backups that occur more often. For more information about changing cache flush frequency, see “Setting how often the cache is flushed” on page 4-5.
1 Don’t collect statistical information too frequently. FileMaker, Inc. recommends setting the collection rate no lower than 15 seconds. For more information, see “Recording usage statistics and setting size limits” on page 4-9.
1 Perform calculation-intensive operations on a small found set. Sorting, replacing data, viewing and printing summary report layouts, and other calculation-intensive operations performed on many database records affect the overall performance of FileMaker Server for connected guests. Try to perform these types of operations on a smaller found set of only the records you’re interested in. (See the FileMaker Pro 5 User’s Guide for more information about using found sets.) In addition, it’s best to schedule these types of operations to be performed during low usage periods.

B-2 FileMaker Server Administrator’s Guide
1 Avoid automatic file compression. If the hard disk runs out of space while a file is being modified or if a database file reaches the 2 GB size limit, FileMaker Server will automatically begin compressing the hosted file to reduce the amount of disk space it uses. During the compression, all guest activity to that file is paused. To avoid automatic compression, leave plenty of free hard disk space on the computer running FileMaker Server and monitor database file sizes.
1 Enable FileMaker Server to open files automatically. Put database files you want FileMaker Server to host in the same folder as FileMaker Server (and subfolders one level down) to take advantage of the application’s ability to open these files automatically on startup and when remote administration is enabled.
1 Avoid using FileMaker Server on the same computer that is operating as a file server as performance will be significantly decreased for both services.
1 Increase the cache size in the Properties (Windows) or Preferences (Mac OS) dialog box. See “Changing the amount of memory used by FileMaker Server” on page 4-4 for details.
1 Verify that no other processor-intensive programs or applications that create a high level of network traffic are being used on the computer running FileMaker Server. Examples of software that can cause performance problems for FileMaker Server include screen savers, Internet Information Server (Windows), or SQL Server (Windows).
Windows: Consider using either the Logon screen saver or the Blank Screen screen saver that is available with Windows.
1 Don’t use personal file sharing to share FileMaker Pro files. Guests should access hosted FileMaker Pro files using the Hosts button in the Open dialog box in FileMaker Pro.
Usage tips 1 FileMaker Server can host FileMaker Pro 5 files created on either the Windows or Mac OS platform, but the files should reside in the FileMaker Server 5 folder (and subfolders one level down). With Windows, you can have the files in other folders if you place shortcuts to the FileMaker Pro files (or to folders containing FileMaker Pro files) in the FileMaker Server 5 folder. You can also drag database files on top of the fmserver.exe (Windows) or FileMaker Server (Mac OS) application icon to open them.
1 Windows: If you modify the .fp5 extension of a FileMaker Pro file, FileMaker Server can't automatically open the file when started. To open files with modified filename extensions:
1 Register the non-standard file extension using the File Type properties (see page 4-5) and place the file in the FileMaker Server 5 folder (and subfolders one level down) so it opens when the FileMaker Server service starts.
1 Manually drop the file with the non-standard extension on top of the FMServer.exe file.
1 Use the command line to open the file with the non-standard extension. For more information about command line options, see “Using the command line to automate tasks (Windows)” on page 6-6.
1 If you have duplicate filenames in the FileMaker Server 5 folder and subfolders one level down, FileMaker Server opens the first copy it finds.
1 FileMaker Server administration allows several operations to be performed simultaneously on all of the files in a single subfolder (for example, Pause, Resume, Close, and Open from the command line or Back-up and Send Message from a scheduled task). To take advantage of this feature, place related databases into the same subfolder. When FileMaker Server is started, these files will be hosted as a group.

Performance and usage tips B-3
1 Up to a maximum of 125 files can be made accessible to FileMaker Pro 5 guests on the network. Each FileMaker Pro guest can open a maximum of 50 files. Since FileMaker Server can host up to 125 files, it is possible to have multiple files available for access by multiple workgroups.
1 Remember that double-clicking a FileMaker Pro file opens that file in FileMaker Pro 5, not FileMaker Server. See “Hosting FileMaker Pro 5 files remotely” on page 5-4 to learn about opening files with FileMaker Server.
1 FileMaker Server displays a message if it can’t open the selected database file and writes a description of the problem to the application log (Windows) or the Server Event Log (Mac OS). See “Using reported events to track activities” on page 5-14 for more information.
1 If the database file you’re hosting uses the Today function to calculate dates, you must close and reopen it using FileMaker Server each day to update the dates correctly. See “Recalculating the Today function in hosted databases” on page 5-16 for more information.


Appendix CEvent log messages and troubleshooting
FileMaker Server Event Log messages The following is a list of some of the log file messages you might see and an expanded explanation. Variables, such as the name of the user or file, are in italics.
Message Explanation
AppleTalk network initialization failed; an unexpected error occurred (error number)
FileMaker Server couldn’t initialize AppleTalk due to an unexpected operating system error. See your operating system documentation for an explanation of the specified error. Check the AppleTalk configuration and reconfigure or reinstall, if needed.
AppleTalk network initialization failed; not enough memory There is insufficient memory to use AppleTalk. See “What you need” on page 3-1 for RAM requirements.
AppleTalk network initialization failed; protocol not installed FileMaker Server can’t initialize AppleTalk, because the AppleTalk protocol is not installed or not configured correctly in the AppleTalk control panel. Check the network installation and setup procedures in the operating system documentation and reinstall, if necessary.
Closing file filename due to a serious error (error number) The specified file is being closed by FileMaker Server due to an error condition. The file may need to be recovered in the FileMaker Pro 5 application. See the FileMaker Pro 5 User’s Guide for information about recovering damaged files.
Could not pause file filename because of an outstanding database lock from guest guestname
FileMaker Server is trying to get exclusive use of the file to pause it for an operation (for example, a backup or cache flush), but can’t because a guest is changing the file. You can try the backup later, or close the file to force the guest(s) to disconnect.
File could not be opened: database may be damaged; try opening in FileMaker Pro
The file may be damaged and needs to be opened in FileMaker Pro 5. Start the FileMaker Pro application, open the file, and follow any instructions on your screen. (See appendix B in the FileMaker Pro 5 User’s Guide for more information about recovering files.) Then try opening the file with FileMaker Server.
File could not be opened: must be set to Multi-User in FileMaker Pro
FileMaker Server can’t open files set to single user by default. However, you can select Allow FileMaker Server to host Single User files in the Files tab of the Properties dialog box (Windows) or the Preferences dialog box (Mac OS) to open the file without changing it using FileMaker Pro. Alternatively, you can open the file in the FileMaker Pro 5 application and choose File menu > Sharing > Multi-User before opening it with FileMaker Server.
File filename full, compression started When a FileMaker Pro file approaches the 2 GB file size limit or there is no longer enough free space on the hard disk, FileMaker Server attempts to compress it by reclaiming unused space in the file. This process is automatic, and this message is written to the log file when the process begins.

C-2 FileMaker Server Administrator’s Guide
File filename compressed, freeing x blocks The specified file has been successfully compressed, leaving FileMaker Server enough room to continue working with the file safely. (One block equals 1,024 bytes.)
File filename compressed, but still nearly full. Only x block(s) free
The specified file was compressed, but there isn’t enough room for FileMaker Server to continue safely working with the file. The administrator should close the file, back it up, and take steps to reduce the size of the file and create more room on the hard disk.
FileMaker Server is now awake. All schedules will be resumed.
This message is sent to the log by FileMaker Server when the server computer wakes up from hibernation (Windows 2000) or system sleep mode (Mac OS). Files that were hosted by FileMaker Server before hibernation or sleep occurred are now available for guest access once again.
FileMaker Server is going to sleep. The entire cache will be flushed. All schedules will be suspended.
If the server computer is configured to sleep during periods of inactivity, before doing so the operating system prompts each open service or application to find out if the service or application can accommodate sleep mode. If any guests are currently connected to a hosted database, FileMaker Server denies the sleep request and the server computer does not sleep. If no guests are connected, FileMaker Server writes any unsaved changes to disk (flushes the cache) and allows the server computer to sleep. During sleep, all scheduled tasks are suspended and do not run again until the next scheduled time when the server computer is awake.
FileMaker Server quitting! (error number) FileMaker Server detects a severe error during network use, due to a network failure or other causes. Check network installation, settings, and the system error log (Windows).
FileMaker Server quitting! Network initialization failed; an unexpected error occurred
FileMaker Server can’t use any network protocol because of an unexpected error. Check network installation, settings, and the system error log (Windows).
FileMaker Server quitting! Network initialization failed; not enough memory
FileMaker Server can’t use any network protocol due to insufficient memory. See “What you need” on page 2-1 (Windows) or page 3-1 (Mac OS) for RAM requirements.
FileMaker Server quitting! This disk is full FileMaker Server detects that the disk volume is full. Free some space on the disk and restart FileMaker Server.
FileMaker Server quitting! Network initialization failed (error number)
FileMaker Server is unable to start because of missing required software or hardware. See “What you need” on page 2-1 (Windows) or page 3-1 (Mac OS) for more information.
Quit forced; User username forced to close connection (error number)
During a shutdown or disconnect operation, the named user didn’t close the file within the specified time. The user’s connection was forcibly closed by FileMaker Server.
Remote administration has been disabled because the databases could not be opened (error number)
The system’s storage area for temporary files might be full or set to read-only. Check the temporary storage area on the server computer and try again.
Schedule schedulename aborted; destination could not be found
The specified destination could not be found. If the destination is a removable medium, make sure it is inserted in its drive. If the destination volume is an external or network drive, connect the drive or network. Try again after the destination is correctly set up.
Message Explanation

Event log messages and troubleshooting C-3
Schedule schedulename aborted; the destination destination is not writable
The specified destination is locked or read-only. If the destination is a removable medium, you might need to remove it, make it writable, and reinsert it.
Schedule schedulename aborted; no open databases to operate on
The schedule specifies a directory in which FileMaker Server currently has no databases open. Therefore, the scheduled task can’t proceed. Make sure that the schedule specifies the correct directory to operate on, and that all databases have been opened correctly.
Schedule schedulename was unable to back up file filename; can’t replace item with that name on destination
When FileMaker Server backs up a file, it first checks if a file with the same name already exists on the destination volume and attempts to rename the existing file. In this case, the existing file could not be renamed, and therefore it could not be replaced with the new backup. Move the existing file to another location or give it a name that doesn’t conflict with the file being backed up.
Schedule schedulename was unable to back up file filename; error writing to destination (error number)
An unexpected operating system error occurred when FileMaker Server attempted to copy files to the destination volume. Refer to the system error log or look up the specified error number in your operating system documentation to determine the cause of the problem.
Schedule schedulename was unable to back up file filename; file on destination is locked
The named file already exists on the destination volume and is locked or read-only. For the backup to succeed, you need to either move the locked/read-only file to a different folder or change the schedule definition to use a different destination. The file could also be open by another application, in which case it must be closed before it can be moved or renamed.
Schedule schedulename was unable to back up file filename; not enough free space on destination
The destination volume does not have enough free space to hold a copy of the specified file. Check the free space on the destination or choose a different destination for the backup.
TCP/IP network initialization failed; an unexpected error occurred (error number)
FileMaker Server couldn’t initialize TCP/IP due to an unexpected operating system error. See the system event log (Windows) or your operating system documentation for an explanation of the specified error. Check the TCP/IP configuration and reconfigure or reinstall, if needed.
TCP/IP network initialization failed; the TCP/IP address is already in use or an address could not be obtained (error number)
The IP address selected for use by FileMaker Server is already in use or isn’t correctly configured. Verify the IP address and TCP/IP configuration in the Networks (Windows) or TCP/IP (Mac OS) control panel. If FileMaker Pro 5 is already running on the same computer and is set to use TCP/IP, FileMaker Server is prevented from using the same IP address. You should run FileMaker Server on a dedicated computer.
TCP/IP network initialization failed; not enough memory There is insufficient memory to use TCP/IP. See “What you need” on page 2-1 (Windows) or page 3-1 (Mac OS) for RAM requirements.
TCP/IP network initialization failed; protocol is not installed (error number)
Windows: FileMaker Server can’t initialize TCP/IP, because the TCP/IP protocol is not installed or not configured correctly in the Networks control panel. Check the network installation and setup procedures in the Windows documentation and reinstall, if necessary.
IPX/SPX network initialization failed; an unexpected error occurred (error number)
Windows: FileMaker Server can’t initialize IPX/SPX. Check network settings and system error log.
Message Explanation
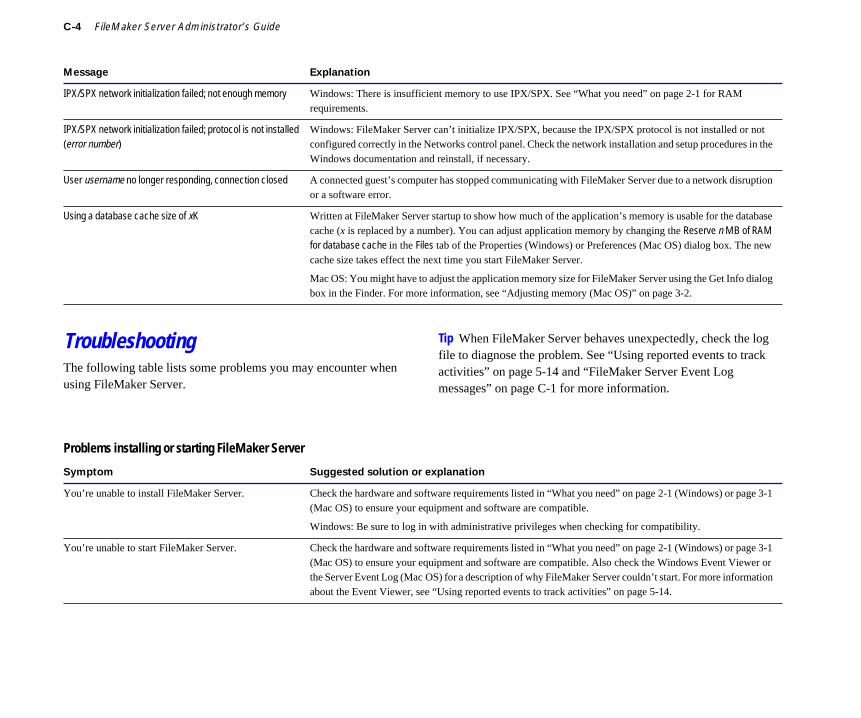
C-4 FileMaker Server Administrator’s Guide
TroubleshootingThe following table lists some problems you may encounter when using FileMaker Server.
Tip When FileMaker Server behaves unexpectedly, check the log file to diagnose the problem. See “Using reported events to track activities” on page 5-14 and “FileMaker Server Event Log messages” on page C-1 for more information.
IPX/SPX network initialization failed; not enough memory Windows: There is insufficient memory to use IPX/SPX. See “What you need” on page 2-1 for RAM requirements.
IPX/SPX network initialization failed; protocol is not installed (error number)
Windows: FileMaker Server can’t initialize IPX/SPX, because the IPX/SPX protocol is not installed or not configured correctly in the Networks control panel. Check the network installation and setup procedures in the Windows documentation and reinstall, if necessary.
User username no longer responding, connection closed A connected guest’s computer has stopped communicating with FileMaker Server due to a network disruption or a software error.
Using a database cache size of xK Written at FileMaker Server startup to show how much of the application’s memory is usable for the database cache (x is replaced by a number). You can adjust application memory by changing the Reserve n MB of RAM for database cache in the Files tab of the Properties (Windows) or Preferences (Mac OS) dialog box. The new cache size takes effect the next time you start FileMaker Server.
Mac OS: You might have to adjust the application memory size for FileMaker Server using the Get Info dialog box in the Finder. For more information, see “Adjusting memory (Mac OS)” on page 3-2.
Message Explanation
Problems installing or starting FileMaker Server
Symptom Suggested solution or explanation
You’re unable to install FileMaker Server. Check the hardware and software requirements listed in “What you need” on page 2-1 (Windows) or page 3-1 (Mac OS) to ensure your equipment and software are compatible.
Windows: Be sure to log in with administrative privileges when checking for compatibility.
You’re unable to start FileMaker Server. Check the hardware and software requirements listed in “What you need” on page 2-1 (Windows) or page 3-1 (Mac OS) to ensure your equipment and software are compatible. Also check the Windows Event Viewer or the Server Event Log (Mac OS) for a description of why FileMaker Server couldn’t start. For more information about the Event Viewer, see “Using reported events to track activities” on page 5-14.
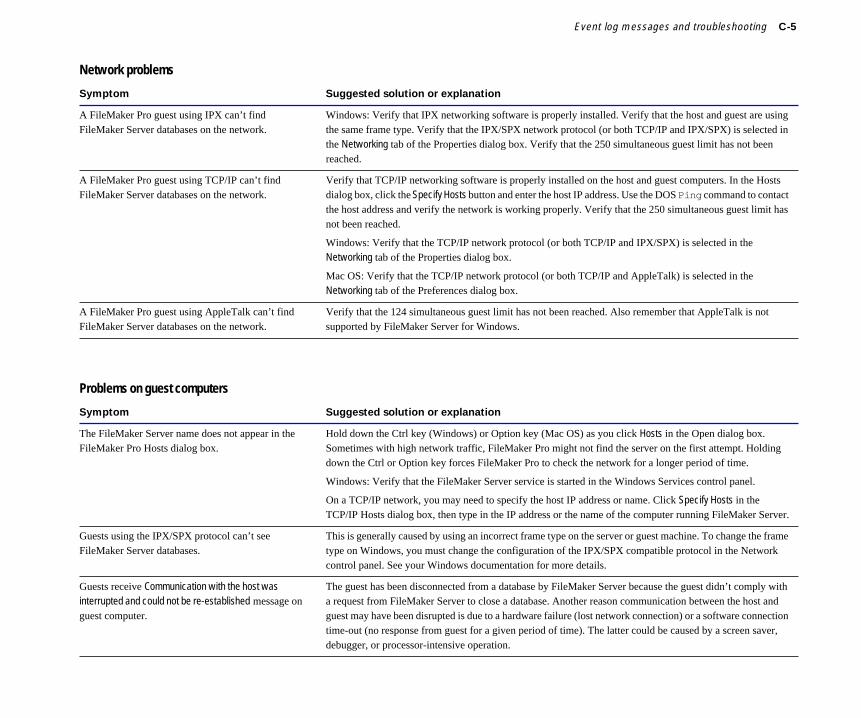
Event log messages and troubleshooting C-5
Network problems
Symptom Suggested solution or explanation
A FileMaker Pro guest using IPX can’t find FileMaker Server databases on the network.
Windows: Verify that IPX networking software is properly installed. Verify that the host and guest are using the same frame type. Verify that the IPX/SPX network protocol (or both TCP/IP and IPX/SPX) is selected in the Networking tab of the Properties dialog box. Verify that the 250 simultaneous guest limit has not been reached.
A FileMaker Pro guest using TCP/IP can’t find FileMaker Server databases on the network.
Verify that TCP/IP networking software is properly installed on the host and guest computers. In the Hosts dialog box, click the Specify Hosts button and enter the host IP address. Use the DOS Ping command to contact the host address and verify the network is working properly. Verify that the 250 simultaneous guest limit has not been reached.
Windows: Verify that the TCP/IP network protocol (or both TCP/IP and IPX/SPX) is selected in the Networking tab of the Properties dialog box.
Mac OS: Verify that the TCP/IP network protocol (or both TCP/IP and AppleTalk) is selected in the Networking tab of the Preferences dialog box.
A FileMaker Pro guest using AppleTalk can’t find FileMaker Server databases on the network.
Verify that the 124 simultaneous guest limit has not been reached. Also remember that AppleTalk is not supported by FileMaker Server for Windows.
Problems on guest computers
Symptom Suggested solution or explanation
The FileMaker Server name does not appear in the FileMaker Pro Hosts dialog box.
Hold down the Ctrl key (Windows) or Option key (Mac OS) as you click Hosts in the Open dialog box. Sometimes with high network traffic, FileMaker Pro might not find the server on the first attempt. Holding down the Ctrl or Option key forces FileMaker Pro to check the network for a longer period of time.
Windows: Verify that the FileMaker Server service is started in the Windows Services control panel.
On a TCP/IP network, you may need to specify the host IP address or name. Click Specify Hosts in the TCP/IP Hosts dialog box, then type in the IP address or the name of the computer running FileMaker Server.
Guests using the IPX/SPX protocol can’t see FileMaker Server databases.
This is generally caused by using an incorrect frame type on the server or guest machine. To change the frame type on Windows, you must change the configuration of the IPX/SPX compatible protocol in the Network control panel. See your Windows documentation for more details.
Guests receive Communication with the host was interrupted and could not be re-established message on guest computer.
The guest has been disconnected from a database by FileMaker Server because the guest didn’t comply with a request from FileMaker Server to close a database. Another reason communication between the host and guest may have been disrupted is due to a hardware failure (lost network connection) or a software connection time-out (no response from guest for a given period of time). The latter could be caused by a screen saver, debugger, or processor-intensive operation.
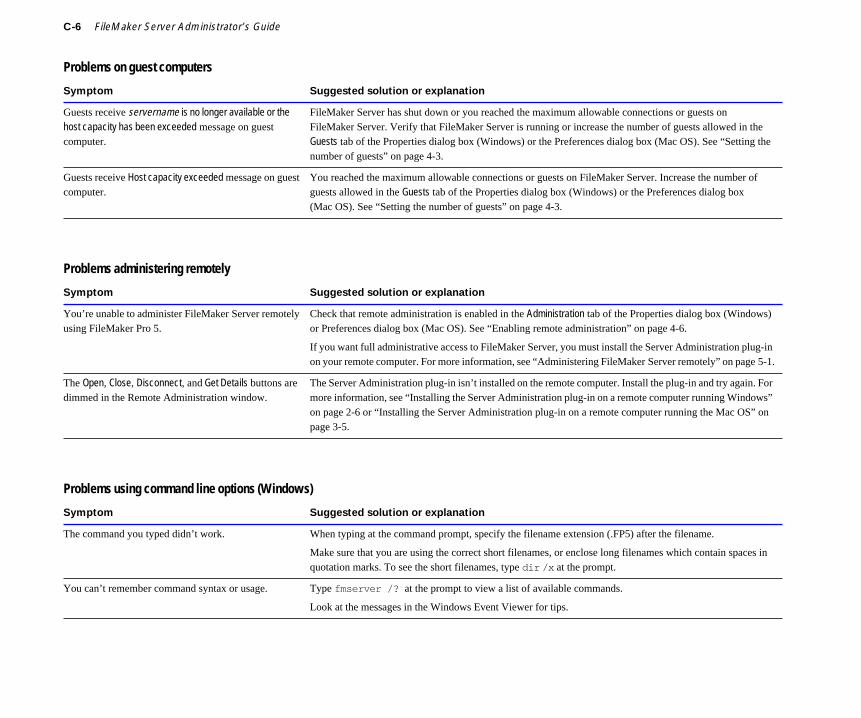
C-6 FileMaker Server Administrator’s Guide
Guests receive servername is no longer available or the host capacity has been exceeded message on guest computer.
FileMaker Server has shut down or you reached the maximum allowable connections or guests on FileMaker Server. Verify that FileMaker Server is running or increase the number of guests allowed in the Guests tab of the Properties dialog box (Windows) or the Preferences dialog box (Mac OS). See “Setting the number of guests” on page 4-3.
Guests receive Host capacity exceeded message on guest computer.
You reached the maximum allowable connections or guests on FileMaker Server. Increase the number of guests allowed in the Guests tab of the Properties dialog box (Windows) or the Preferences dialog box (Mac OS). See “Setting the number of guests” on page 4-3.
Problems on guest computers
Symptom Suggested solution or explanation
Problems administering remotely
Symptom Suggested solution or explanation
You’re unable to administer FileMaker Server remotely using FileMaker Pro 5.
Check that remote administration is enabled in the Administration tab of the Properties dialog box (Windows) or Preferences dialog box (Mac OS). See “Enabling remote administration” on page 4-6.
If you want full administrative access to FileMaker Server, you must install the Server Administration plug-in on your remote computer. For more information, see “Administering FileMaker Server remotely” on page 5-1.
The Open, Close, Disconnect, and Get Details buttons are dimmed in the Remote Administration window.
The Server Administration plug-in isn’t installed on the remote computer. Install the plug-in and try again. For more information, see “ Installing the Server Administration plug-in on a remote computer running Windows” on page 2-6 or “ Installing the Server Administration plug-in on a remote computer running the Mac OS” on page 3-5.
Problems using command line options (Windows)
Symptom Suggested solution or explanation
The command you typed didn’t work. When typing at the command prompt, specify the filename extension (.FP5) after the filename.
Make sure that you are using the correct short filenames, or enclose long filenames which contain spaces in quotation marks. To see the short filenames, type dir /x at the prompt.
You can’t remember command syntax or usage. Type fmserver /? at the prompt to view a list of available commands.
Look at the messages in the Windows Event Viewer for tips.
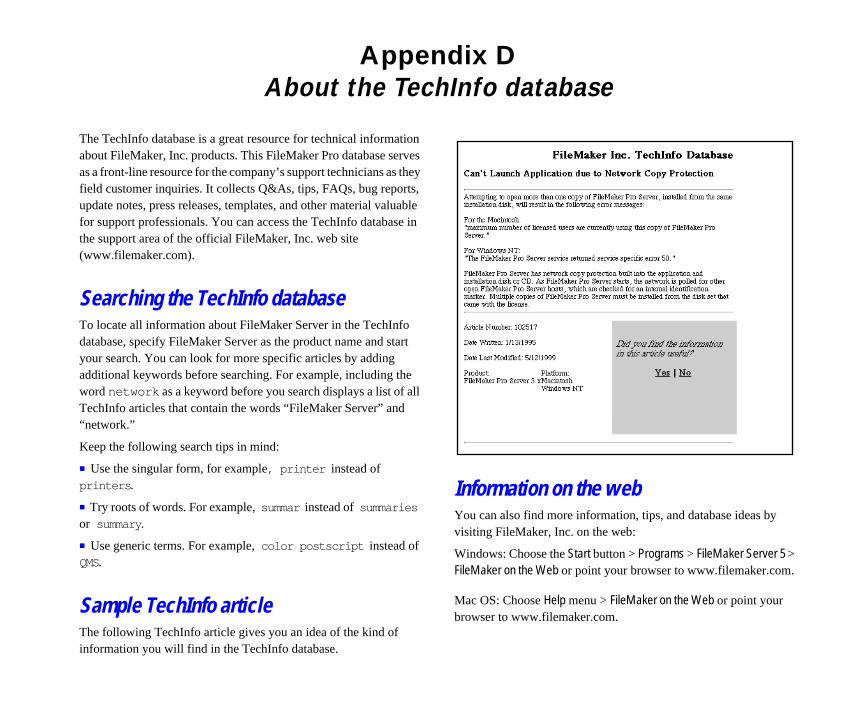
Appendix DAbout the TechInfo database
The TechInfo database is a great resource for technical information about FileMaker, Inc. products. This FileMaker Pro database serves as a front-line resource for the company’s support technicians as they field customer inquiries. It collects Q&As, tips, FAQs, bug reports, update notes, press releases, templates, and other material valuable for support professionals. You can access the TechInfo database in the support area of the official FileMaker, Inc. web site (www.filemaker.com).
Searching the TechInfo databaseTo locate all information about FileMaker Server in the TechInfo database, specify FileMaker Server as the product name and start your search. You can look for more specific articles by adding additional keywords before searching. For example, including the word network as a keyword before you search displays a list of all TechInfo articles that contain the words “FileMaker Server” and “network.”
Keep the following search tips in mind:
1 Use the singular form, for example, printer instead of printers .
1 Try roots of words. For example, summar instead of summaries or summary .
1 Use generic terms. For example, color postscript instead of QMS.
Sample TechInfo articleThe following TechInfo article gives you an idea of the kind of information you will find in the TechInfo database.
Information on the webYou can also find more information, tips, and database ideas by visiting FileMaker, Inc. on the web:
Windows: Choose the Start button > Programs > FileMaker Server 5 > FileMaker on the Web or point your browser to www.filemaker.com.
Mac OS: Choose Help menu > FileMaker on the Web or point your browser to www.filemaker.com.


Index
AAccess privileges
FileMaker Pro 4-11Windows 2-2
Activities, FileMaker Servermessage descriptions C-1viewing
Mac OS 5-15Windows 2000 5-15Windows NT 5-14
Administeringclosing files
locally (Mac OS) 5-12remotely 5-5
disconnecting guestslocally (Mac OS) 5-13remotely 5-6
from different platforms 2-2local administration, described 5-1, 5-8
opening fileslocally (Mac OS) 5-11remotely 5-4
remote administration, described 5-1
sending messageslocally (Mac OS) 5-13remotely 5-7
setting passwords for remote access 4-6
using command line (Windows) 6-6–6-8
viewing usage statisticslocally (Mac OS) 5-11remotely 5-3
Administration tab 4-7Administration window (Mac OS) 5-9
Alias, making (Mac OS) 3-4
Apple eventsnew events supported 1-4support described 3-4using to
close files 5-6collect statistics 5-4graph statistics 4-9open databases 5-5
AppleScriptexample file location 3-4recalculating Today function 5-16
running on a schedule 6-2using to automate tasks 6-8
AppleShare softwareSee also Networks; Performance
coexistence with FileMaker Server A-2
connections A-2AppleTalk
See also Networkshosting with (Mac OS) 3-1, 4-8
Application log. See Log filesAssistants (Windows)
configuration 4-1starting 4-1Task Scheduling 6-1
Asynchronous disk I/O A-2
BBacking up database files
running out of disk space 6-8using command line (Windows) 6-7
using FileMaker Server 6-1Bug reports, looking up D-1
CCache
flush setting 4-5hit percentage 5-4log file message C-2, C-4monitoring B-1percentage unsaved 5-4size in log file (Windows) 5-14
viewing percentages locally (Mac OS) 5-11
Close command (Windows) 6-6Closing files
See also Administering; Disconnecting guests; FileMaker Server; Files; Quitting FileMaker Server
locally (Mac OS) 5-12remotely 5-5using command line (Windows) 6-6
Coffee cup icon 6-8Columns, resizing and sorting
in Schedules listMac OS 6-4Windows 6-3
locally (Mac OS) 5-10Command file, running on a schedule 6-1
Command line (Windows)examples 6-7sample files 6-7troubleshooting C-6using 6-6–6-8
Compression, database file 6-8, B-2, C-1
Computer, dedicated. See Dedicated host
Configuration assistants (Windows) 4-1
Configuringallowing single user files 4-5choosing network protocols 4-8
customizing host name 4-7disconnection message 4-4flushing cache 4-5idle disconnect time 4-3IP address 4-9maximum number of files 4-4memory considerations 4-1multiple network cards 4-9number of guests 4-3opening preferences dialog box (Mac OS) 4-2
opening properties dialog box (Windows) 4-2
overview 4-1remote administration password 4-6
Connections, AppleShare A-2Console, FileMaker Server 4-1Contents, using in Help viiiControl panel, Services 2-4, 2-5Copying schedules 6-5Corrupted database 4-11CPU, maximizing for FileMaker Server (Mac OS) 4-8
Crash, system 4-12Cross-platform issues vii, 2-2, 3-1Custom host name. See Host name
Customer support 1-1Customizing FileMaker Server. See Configuring

I-2 FileMaker Server Administrator’s Guide
DDatabase files. See FilesDates, incorrect calculation 5-16Dedicated host
described 1-1, A-1performance issues 4-8
DeletingFileMaker Server (Windows) 2-8
scheduled tasks 6-5Dialog boxes, getting Help xiDimmed icon, in Hosts dialog box 4-7
Disablingremote administration 4-6scheduled tasks 6-5
Disconnecting guestsSee also Administering; Guests
locally (Mac OS) 5-13remotely 5-6troubleshooting C-5
Disconnection message 4-4Disk
running out of room when backing up files 6-8
writing guest data 4-5writing statistics to log file 4-10
Disk I/O, asynchronous A-2Disk KB/sec statistics, described 5-4
Documentation, for FileMaker Server vii
DOS command line (Windows) 6-6–6-8, C-6
EEdit Schedule dialog box 6-4Enabling
remote administration 4-6scheduled tasks 6-5Server Administration plug-in
Mac OS 3-6Windows 2-7
Error messages. See Messages; Log files; Troubleshooting
Ethernet. See NetworksEvent Viewer (Windows)
described 5-14keeping data current 5-15message descriptions C-1
EventsSee also Log fileschecking for file corruption 4-12
recordingWindows 2000 4-10Windows NT 4-10
Exiting FileMaker ServerSee also Quitting FileMaker Server
Windows 2000 2-6Windows NT 2-5
Extensions, filename (Windows)registering 4-5
FFAQ for FileMaker Server D-1Features, new and improved 1-3File sharing
cross-platform issues 2-2, 3-1Windows B-2
File Types tab (Windows) 4-5FileMaker Developer, described 4-5, 4-6
FileMaker Proenabling server plug-in
Mac OS 3-6Windows 2-7
FileMaker Server, comparison 1-3
filename extensions, registering (Windows) 4-5, 4-6
opening filesusing command line (Windows) 6-6
using FileMaker Server 5-4
passwords on files 4-11Remote Administration window 5-2
runtime solutions (Windows) 4-5, 4-6
FileMaker ServerSee also Administering; Configuring
activitiespausing using command line (Windows) 6-6
resuming using command line (Windows) 6-7
tracking remotely 5-4viewing (Windows) 5-14
automatic file hosting B-2closing files
locally (Mac OS) 5-12remotely 5-5using command line (Windows) 6-6
coexistence with other software A-2
configuring 4-1console (Windows) 4-1customizing 4-1described 1-1–1-3documentation, described vii
FileMaker Pro, comparison 1-3
files, describedMac OS 3-4Windows 2-3
guests per file A-1hardware requirements
Mac OS 3-1Windows 2-1
installingMac OS 3-1Windows 2-2
limits A-1making alias (Mac OS) 3-4memory, changing
Mac OS 3-2, 4-4Windows 4-4
network requirementsMac OS 3-1Windows 2-1
new features 1-3opening files
locally (Mac OS) 5-11remotely 5-4using command line (Windows) 6-6
optimizing B-1, C-1performance tips B-1, C-1quitting
Mac OS 3-5Windows 2000 2-6Windows NT 2-5
recordingevents 4-10, 4-11usage statistics 4-9
sample filesMac OS 3-4Windows 2-3, 2-4
scheduling tasks 6-1security 4-7

Index I-3
software requirementsMac OS 3-1Windows 2-1
startingMac OS 3-4using command line (Windows) 6-6
Windows 2000 2-5Windows NT 2-4
stoppingMac OS 3-5using command line (Windows) 6-6
Windows 2000 2-6Windows NT 2-5
system requirementsMac OS 3-1Windows 2-1
technical specifications A-1troubleshooting C-4uninstalling (Windows) 2-8
FileMaker Server 5 folder, contents 2-3, 3-4
FileMaker Server HelpBalloon Help (Mac OS) xiContents, using viiiFind, using xfor dialog boxes xifor remote administration xifor toolbar (Windows) xiHelp topic window viiiIndex, using ixnavigating viiiprinting topics viiisearching for specific words xstarting viiitopics on using Help viiiusing Help topic window viii
FileMaker Proopening files
using FileMaker Server 5-11
FileMaker, Inc. web site vii, D-1Filename extensions for runtime solutions (Windows) 4-5
Filesbacking up 6-1backup example using command line (Windows) 6-7
closingfrom the command line (Windows) 6-6
locally (Mac OS) 5-12remotely 5-5
compression 6-8, B-2, C-1corrupted after restart 4-11filename length A-1limits A-1location of related B-2maximum
number 4-4, A-1size A-1
openinglocally (Mac OS) 5-11remotely 5-4using command line (Windows) 6-6
remote administration databases 5-1
resetting data 5-16restricting access to 4-7, 4-11single user 4-5size A-1unable to open C-1viewing
details, remotely 5-6hosted, locally (Mac OS) 5-9
hosted, remotely 5-3Files tab 4-4Find, using in Help xfmpsadm.fmx 2-7fmsvplas.txt file (Windows) 4-9
fmsvplog.txt file (Windows) 4-9Folders, described
Mac OS 3-4Windows 2-3
Found sets, optimizing performance B-1
Frame types, troubleshooting C-5
GGet Details button 5-6Groups, for FileMaker Pro passwords 4-11
Guestsdisconnecting
locally (Mac OS) 5-13remotely 5-6
maximum number A-1number of 4-3sending messages
locally (Mac OS) 5-13remotely 5-7to all guests, remotely 5-7using schedule 6-1
troubleshooting C-5viewing
details about guests, remotely 5-6
locally (Mac OS) 5-9remotely 5-3
Guests tab 4-3
HHardware requirements
See also Memory; System requirements; Troubleshooting
asynchronous disk I/O A-2described
Mac OS 3-1Windows 2-1
networkingMac OS 3-1Windows 2-1
performance A-1Help. See FileMaker Server HelpHibernation (Windows 2000) 4-11
Hit percentage, cache 5-4Host name
maximum length A-1setting 4-7unavailable C-5
Hosting filesSee also Administering; FileMaker Server; Files; Guests; Remote administration
automatically B-2described 5-4errors C-1maximum number 4-4, A-1runtime solutions
Mac OS 4-6Windows 4-5
sending messages to guestslocally (Mac OS) 5-13remotely 5-7
troubleshooting C-1using command line 6-6
Hosts dialog boxdescribed 4-7dimmed icon 4-7host name
setting 4-7troubleshooting C-5
I, JIdle disconnect time 4-3Index, using in Help ixInstalling FileMaker Server
before beginning 1-4

I-4 FileMaker Server Administrator’s Guide
in Mac OS 3-1–3-2in Windows 2-2–2-3recommendations 1-2remote administration plug-in
Mac OS 3-5Windows 2-6
troubleshooting C-4Intel-compatible systems 2-1IP address
setting 4-9troubleshooting C-5
IPX/SPXhosting with (Windows) 2-1, 4-8
incorrect frame types C-5troubleshooting C-5
Italicized text, in local administration window (Mac OS) 5-12, 5-13
KKeyboard shortcuts (Mac OS) 5-10
LLimits for files and usage A-1Listing information (Mac OS) 5-10
Local administrationdescribed 5-1, 5-8hosting files (Mac OS) 5-11viewing databases and guests (Mac OS) 5-9
LocalTalk. See NetworksLog files
application logWindows 2000 4-10Windows NT 4-10
format of 4-9keeping data current (Windows) 5-15
message descriptions C-1Server Event Log, viewing (Mac OS) 5-15
statisticsdescribed 5-4maximum size 4-10writing to disk 4-10
viewing events (Windows) 5-14
Logging tab 4-9
MMaximum number of files
described A-1setting 4-4
Maximum number of guestsSee also Cache; Guestsdescribed A-1troubleshooting C-6with AppleShare (Mac OS) A-2
MemorySee also Cache; Hardware requirements; Optimization; Performance; System requirements
adjustingMac OS 3-2, 4-4Windows 4-4
minimumMac OS 3-1, 3-3Windows 2-1
virtual memory (Mac OS) 3-3Messages
FileMaker Server log file C-1sending to guests
locally (Mac OS) 5-13remotely 5-7
Monitoring FileMaker Server. See Administering
NNetwork KB/sec statistics, described 5-4
Networking tab 4-8Networks
See also Optimization; Troubleshooting
choosing protocols 4-8error messages C-2initialization failure C-2mixed networks 2-2, 3-1, 4-8performance considerations A-2
requirementsMac OS 3-1Windows 2-1
setting IP address 4-9sockets, AppleTalk A-2traffic and performance B-2troubleshooting C-5
New Schedule dialog box 6-1NOS (network operating system) 2-2
Number of guestsmaximum A-1setting 4-3
OOnscreen Help. See FileMaker Server Help
Open command (Windows) 6-6Opening files
automatically B-2locally (Mac OS) 5-11remotely 5-2, 5-4runtime solutions
Mac OS 4-6Windows 4-5
using command line (Windows) 6-6
Optimization B-1, C-1
See also FileMaker Server; Log files; Hardware requirements; Memory; Networks; Performance
PPasswords
in FileMaker Pro files 4-11maximum length for remote administration A-1
setting for remote administration 4-7
Path, for installed files (Windows) 2-3
Pause command (Windows) 6-6Performance
coexistence with other software A-2
hardware A-1maximize mode (Mac OS) 4-8network A-2tips A-1, B-1
Performance console (Windows 2000)
using 5-9Performance Monitor (Windows NT)
described 4-9using 5-8
Plug-in, remote administrationdescribed 5-2installing
Mac OS 3-5Windows 2-6
Power Conservation mode (Windows 2000) 4-11
Preferences. See ConfiguringPrinting Help topics viiiProduct features, new and improved 1-3
Product registration 1-1

Index I-5
Properties. See ConfiguringProtocols, network
setting 4-8supported
Mac 0S 3-1Windows 2-1
QQ&A for FileMaker Server D-1Quitting FileMaker Server
Mac OS 3-5Windows 2000 2-6Windows NT 2-5
RRAM. See MemoryRegistering
filename extensions for runtime solutions (Windows) 4-5
software license 1-1Related database files, location B-2
Remote administrationdatabases 5-1described 1-1, 5-1getting Help xihosting files 5-4installing plug-in
Mac OS 3-5Windows 2-6
setting password 4-7troubleshooting C-6
Remote administration plug-in. See Server Administration plug-in
Remote Administration windowdescribed 5-3sorting columns 5-3
Removing
FileMaker Server (Windows) 2-8
scheduled tasks 6-5Replacing data, performance issues B-1
Requirements. See Hardware requirements; Memory; Networks; System requirements
Resizing columnsin Schedules list
Mac OS 6-4Windows 6-3
locally (Mac OS) 5-10Resume command (Windows) 6-7
Runtime solutions, hosting automatically
Mac OS 4-6Windows 4-5
SSample files
command line (Windows) 6-7Mac OS 3-4Windows 2-3, 2-4
Scheduleschanging 6-4creating
Mac OS 6-1Windows 6-1
deleting 6-5described 6-1duplicating 6-5enabling and disabling 6-5running manually 6-4troubleshooting 4-12viewing (Windows) 6-3
Screen saver software, and FileMaker Server A-2, B-2
Scripts, running on a schedule 6-1Searching
Help xTechInfo database D-1
Securitypassword protection 4-11recommendations 4-7
Selecting information in lists (Mac OS) 5-10
Sending messagesSee also Administering; Messages
disconnecting guestslocally (Mac OS) 5-13
to guestsall, remotely 5-7locally (Mac OS) 5-13remotely 5-7using a schedule 6-1
Server Administration plug-indescribed 5-2enabling
Mac OS 3-6Windows 2-7
installingMac OS 3-5Windows 2-6
Server Event Log (Mac OS)See also Log filesdescribed 5-15size limit 4-11
Server Last Statistics Log file (Mac OS) 4-9
Server name. See Host nameServer Statistics Log file (Mac OS) 4-9
Services control panel 2-4, 2-5Shutdown
and FileMaker ServerWindows NT 2-5
checking for file corruption 4-12
Single user files 4-5
Sleep, by operating system 4-11Sockets, network. See Connections, AppleShare; Networks; Optimization
Software requirementsMac OS 3-1Windows 2-1
Sortingcolumns
locally (Mac OS) 5-10remotely 5-3
performance issues B-1scheduled tasks
Mac OS 6-4Windows 6-3
usage statistics, remotely 5-3Specify Hosts button C-5Standby mode (Windows 2000) 4-11
Start command (Windows) 6-6Starting
FileMaker Server, automatically
Mac OS 3-4troubleshooting C-4Windows NT 2-4
FileMaker Server, manuallyMac OS 3-4troubleshooting C-4using command line (Windows) 6-6
Windows 2000 2-5Windows NT 2-4
Statisticscollecting 4-9viewing
locally (Mac OS) 5-11Performance console (Windows 2000) 5-9
Performance Monitor (Windows NT) 5-8

I-6 FileMaker Server Administrator’s Guide
remotely 5-3Statistics log file. See Log filesStatus (Current Date) function 5-16
Stop command (Windows) 6-6Stopping FileMaker Server
Mac OS 3-5Windows 2000 2-6Windows NT 2-5
Summary reports B-1Support, technical 1-1System crash, checking for file corruption 4-12
System requirementsSee also Hardware requirements; Memory; Troubleshooting
Mac OS 3-1Windows 2-1
TTask Scheduling assistant (Windows) 6-1
Tasks, scheduling. See SchedulesTCP/IP
host address C-5hosting with
Mac OS 4-8Windows 2-1, 4-8
troubleshooting C-5TechInfo database D-1Technical specifications A-1
See also FileMaker Server; Optimization; Performance
Technical supportcontacting 1-1TechInfo database D-1
Tips. See Optimization; Performance; Troubleshooting
Today function 5-16
TokenTalk. See NetworksToolbar (Windows)
described 6-3displaying descriptions for buttons xi
Transaction statistics, described 5-4
Troubleshooting C-4–C-6See also Log files; Hardware requirements; Networks; Optimization; Performance
UUninstalling FileMaker Server (Windows) 2-8
Unsaved cache percentage 5-4Unselectable icon, in Hosts dialog box 4-7
Unused cache percentage B-1Usage statistics
logging 4-9viewing
locally (Mac OS) 5-11remotely 5-3
Usage Statistics window (Mac OS) 4-9
Users. See Guests
VViewing
details about files and guests, remotely 5-6
FileMaker Server eventsMac OS 5-15Windows 2000 5-15Windows NT 5-14
scheduled tasksMac OS 6-4Windows 6-3
usage statisticslocally (Mac OS) 5-11remotely 5-3
Virtual memory. See Memory; Performance
W, X, Y, ZWeb site
FileMaker, Inc. viifor registering software 1-1TechInfo database D-1technical support 1-1
Writing guest data to disk 4-5