service bulletin 592a - bd · service bulletin 592a p/n p00000213 page 5 of 8 resetting the...
TRANSCRIPT

AlarisTM PC Unit
Service Bulletin 592A
Products Affected: AlarisTM PC Unit
Date: November 2016
Subject: Updated Battery Care and Battery Conditioning Test
PurposeThis service bulletin replaces Service Bulletin 592. It informs Biomedical Engineers of:• Updated battery care and maintenance.• Updated instructions for performing the Battery Conditioning Test (Fast or Optimal) in
Maintenance Mode on the Alaris PC unit published in: Alaris PC Unit, Models 8000 and 8015 Alaris Pump Module, Model 8100: Technical Service Manual - section “6.3.4 Battery Conditioning Test” and the Alaris System Maintenance Software User Manual - “The Battery Conditioning Task for Alaris PC Unit.”
• The process to reset the battery capacity estimate after performing the Battery Conditioning Test (Fast or Optimal Conditioning) in Maintenance Mode due to overestimation of battery capacity.
• Instructions for performing the Manual Battery Conditioning Test to update the battery capacity estimate.
References• Alaris PC Unit, Models 8000 and 8015 Alaris Pump Module, Model 8100: Technical Service
Manual (TSM) (PN 12239273, order as: PN 10848481)• Alaris System User Manuals• Alaris System Maintenance (ASM) Software User Manual
Accessing DocumentationFor North American customers, service manuals, service bulletins, and software upgrade instructions are available through the CareFusion Customer Portal. The link below takes you to the portal’s Welcome screen:https://cp.carefusion.com/1. If you are registered, enter your email and password, and click LOGIN. If you are not registered
yet, click SIGN UP, and follow the prompts.
2. On the CareFusion Customer Portal home page, click CONTENT LIBRARY.
3. When the library page appears, select Service bulletins and manuals in the Content Type field to find the information you seek.
For customers outside of North America, contact CareFusion Customer Support with Infusion Technical queries/questions at: [email protected].
P/N P00000213 Page 1 of 8
Service Bulletin 592A
Parts and Tools RequiredThe following parts are required for each PC unit that will undergo the Battery Conditioning Test (Fast or Optimal Conditioning) in Maintenance Mode:• One IV pole, standard (Model/Part Number 925-0176 or equivalent)
The following parts are required for each PC unit that will undergo the Manual Battery Conditioning Test:• One IV pole, standard (Model/Part Number 925-0176 or equivalent)• Four Alaris Pump modules per PC unit• Four Test IV Segments for Alaris Pump modules (P/N 2220-07; available in case of 20). • A computer with Alaris System Maintenance software installed on it• Serial to USB Port Adapter kit (P/N 12273817, or equivalent) (if computer being used does not
have a DB-9 serial port).These are in addition to parts, tools, and equipment referenced in the service manual.
EnvironmentBoth the Battery Conditioning Test (Fast or Optimal Conditioning) in Maintenance Mode and the Manual Battery Conditioning Test are intended to be performed at room temperature.
Introductory InformationIn certain situations the Low Battery alarm (< 30 minutes) and/or Very Low battery alarm (< 5 minutes) may not be generated when the battery power is low. In these situations the PC unit generates a BATTERY DISCHARGED alarm and immediately suspends the infusion without any prior warning.
ExplanationThe following are actions that you should take to mitigate this situation:
Proper Battery Maintenance• The battery should be replaced every 2 years by qualified service personnel.• The battery should be conditioned every 12 months by qualified service personnel. Conditioning
can be achieved by performing the Battery Conditioning Test (Fast or Optimal Conditioning) in Maintenance Mode: see Battery Conditioning Test (Fast or Optimal Conditioning) in Maintenance Mode on page 3.
• If PC units with their existing battery have had the Battery Conditioning Test (Fast or Optimal Conditioning) performed in Maintenance Mode but have not had the battery capacity reset following the instructions in this Service Bulletin, then that same battery and PC unit pair must have the battery capacity estimate reset.• To reset the battery capacity estimate, perform the Battery Conditioning Test (Fast or
Optimal) in Maintenance Mode: see Battery Conditioning Test (Fast or Optimal Conditioning) in Maintenance Mode on page 3. Alternatively, the battery capacity estimate may be updated by performing the Manual Battery Conditioning Test: see Manual Battery Conditioning Test on page 5.
• The PC unit is shipped with the battery in a discharged condition. Before the PC unit is released for use, it should be plugged into a hospital grade AC outlet and the battery charged for at least 16 hours. This ensures proper battery operation when the Alaris System is first set up for patient use.
• Leave the power cord connected to a hospital grade AC power source whenever available. The battery is intended as a backup system.
P/N P00000213 Page 2 of 8

Service Bulletin 592A
• If the device has been used on battery power, ensure that the battery is fully charged prior to using the device on battery power again. To fully charge a depleted battery connect the device to a hospital grade AC power source for 16 hours.
• If you plan to store the PC unit at temperatures in excess of 86°F (30°C) for one or more months, remove the battery from the PC unit and store the battery in an environment of 50 - 86°F (10 - 30°C).
• If the batteries are to be stored for more than 1 year, they should be fully charged (16 hours) at least once per year to prevent leakage and deterioration in performance due to self-discharge.
• When the battery has been out of use for one or more months, it will not have full capacity. Battery capacity may be restored by performing the Battery Conditioning Test (Fast or Optimal Conditioning) in Maintenance Mode: see Battery Conditioning Test (Fast or Optimal Conditioning) in Maintenance Mode on page 3.
• Some temporary reduction in capacity may occur if the battery is partially discharged repeatedly. Battery capacity may be restored by performing the Battery Conditioning Test (Fast or Optimal Conditioning) in Maintenance Mode: see Battery Conditioning Test (Fast or Optimal Conditioning) in Maintenance Mode on page 3.
Only Use CareFusion-Supplied BatteriesUse only CareFusion-supplied batteries. The use of batteries not supplied by CareFusion could affect the safety and efficacy of Alaris products.Batteries that are not supplied by CareFusion may have voltage and capacity characteristics which are inconsistent with CareFusion-supplied batteries. This may contribute to missing low battery alarms.
Replacement of Batteries Frequent use of battery power and insufficient battery charging may decrease battery life, which may result in missing low battery alarms. CareFusion recommends replacing the battery every 2 years at minimum, if used under proper conditions.When replacing existing batteries with new batteries received from CareFusion, battery conditioning is not required for 12 months. However, new batteries need to be charged for at least 16 hours prior to first use.
Battery Removal from PC UnitIf the battery has been removed from the PC unit during maintenance or repair, and the same battery is reinstalled, the battery capacity needs to be checked by performing the Battery Conditioning Test (Fast or Optimal Conditioning) in Maintenance Mode.
Battery Conditioning Test (Fast or Optimal Conditioning) in Maintenance ModeThe Battery Conditioning Test (Fast or Optimal Conditioning) in Maintenance Mode on the Alaris PC unit may only be used when following the below steps. Following the steps below will mitigate the risk of not receiving low battery alarms due to overestimation of battery capacity.The following steps describe how to perform the Battery Conditioning Test (Fast or Optimal Conditioning) in Maintenance Mode.1. Attach PC unit to IV pole.
2. Plug the PC unit into a hospital grade AC outlet.
3. Access Maintenance Mode. To access Maintenance Mode options, hold down the Tamper resist switch on the rear of the PC unit during power up (see Alaris PC Unit Models 8000 and 8015 Alaris Pump Module, Model 8100: Technical Service Manual [TSM]).
4. Press Proceed soft key on Maintenance Mode.
P/N P00000213 Page 3 of 8

Service Bulletin 592A
5. Press Standalone Test/Maintenance soft key.
6. Press Hardware Tests soft key.
7. Press Battery Conditioning Test soft key.
8. Press Fast Conditioning or Optimal Conditioning. Fast Conditioning is more time efficient and may take up to 12 hours depending on the health of the battery. Optimal Conditioning may take 20 hours or more to complete.
NOTE: During the conditioning process, do not disconnect AC power. If AC power is disconnected during conditioning, the process must be re-started.
9. Press Confirm soft key to start conditioning.
10.At the completion of the conditioning process, a display screen with the old and new Battery Capacity will appear. It is not necessary to run the battery conditioning test a second time. After completion of the battery conditioning test, take note of the displayed NEW battery capacity value.
• If the NEW battery capacity value is between 4000 mamphr (mAh) and 4500 mamphr (mAh), then the battery capacity is sufficient for use. However, this is an overestimate of the actual battery capacity. Complete steps 1–7 of Resetting the Estimated Battery Capacity on page 5.
• If the NEW battery capacity is between 3700 mamphr (mAh) and 3999 mamphr (mAh), you can perform the Manual Battery Conditioning Test on page 5 to get a more accurate estimate of battery capacity to determine whether the battery can be used. Alternatively, replace with a new battery. Proceed to step 11 to power down the device and complete the test.
• If the NEW battery capacity is less than 3700 mamphr (mAh) or greater than 4500 mamphr (mAh), this is outside the range of acceptable battery capacity reading. Proceed to step 11 to power down the device and complete the test. Replace with new battery.
11. Press EXIT soft key to power down device.
P/N P00000213 Page 4 of 8

Service Bulletin 592A
Resetting the Estimated Battery CapacityNOTE: Only perform these steps if the NEW battery capacity value from step 10 is between 4000 mamphr (mAh)
and 4500 mamphr (mAh) after performing the Battery Conditioning Test (Fast or Optimal) in Maintenance Mode.
1. Press EXIT soft key to power down device.
2. Unplug the PC unit from the hospital grade AC outlet.
3. Remove battery; wait for 1 minute before proceeding to the next step.
4. Reinstall the same battery that was removed in step 3.
NOTE: Removing and reinstalling the same battery will result in the battery capacity estimate being reset to 3400 mAh (mamphr). This reset will compensate for the overestimation of battery capacity that resulted from the Battery Conditioning Test. In some cases, low battery alarm(s) may generate earlier than normal.
5. Plug the PC unit into a hospital grade AC outlet. Wait at least 1 hour before proceeding to step 6.
6. Power on device and make sure that no battery alarms are present. If any battery alarms appear, charge the battery for an additional hour. If any battery alarms are still present after 1 hour, replace with new battery.
7. The device is ready for use. Always use hospital grade AC power where available.
Manual Battery Conditioning TestPerforming the Manual Battery Conditioning Test can be used to get an accurate battery capacity estimate. This test may be performed after completion of the Battery Conditioning Test (Fast or Optimal Conditioning) in Maintenance Mode to update the battery capacity estimate if the NEW battery capacity from step 10 is between 3700 mAh (mamphr) and 3999 mAh (mamphr).Battery conditioning must be performed on the battery with the PC unit with which it is intended to be used in order to maintain the battery capacity estimate.The following steps describe how to manually condition the battery.NOTE: Do not remove the battery from the PC unit during the Manual Battery Conditioning Test.1. Attach PC unit to IV pole.
2. Plug the PC unit into a hospital grade AC outlet, and charge the battery for a minimum of 24 hours. Ensure the PC unit is powered off while charging.
3. Power on the PC unit after 24 hours of charging.
4. If a Data Set is loaded on the PC unit, disable the Profiles option through System Configuration.
Refer to Alaris PC Unit, Models 8000 and 8015 Alaris Pump Module, Model 8100: Technical Service Manual, “2.4.10. Profiles” for more information.
5. If the PC unit is operating in a wireless environment, temporarily disable the wireless connectivity. Refer to Alaris System User Manual, “System Options, Wireless Connection” for more information.
NOTE: Once you have completed the preceding steps, do not power down the PC unit for the duration of the test.
6. Attach four Alaris Pump modules to the PC unit.
7. Load the Test IV Segment for each Pump module. Refer to Alaris System User Manual, “Load” section for more information.
P/N P00000213 Page 5 of 8

Service Bulletin 592A
Pump with Test IV segment
NOTE: Test IV Segments are reusable as long as the Pump module does not go into occlusion or air-in-line alarms during the Manual Battery Conditioning Test.
8. On the PC unit, set the RATE to 999 mL/hr and VBTI at 9999 mL for each pump module and press START on all modules.
9. Unplug the PC unit from the outlet. Verify that the battery icon is on.
NOTE: Ensure clean cessation of power to PC unit without jiggling the plug.
10.Run the PC unit until “BATTERY DISCHARGED” message displays, or the system shuts down. Discharging of a fully charged, good battery can take approximately 2 to 3 hours.
Upper Fitment
Incision in tubing to preventocclusion alarm duringbattery test
Lower Fitment
Safety Clamp
Silicone filled tubing toprevent air-in-line alarmduring battery test
P/N P00000213 Page 6 of 8
Service Bulletin 592A
11.Plug the PC unit into a hospital grade AC outlet.
12.Connect the PC unit to a computer with Alaris System Maintenance software installed on it.
13. From Alaris System Maintenance, download the Battery Log from the PC unit. See Alaris System Maintenance Software User Manual, “Reports and Logs” section for more information.
NOTE: If the Download Battery Log task is not included in the Alaris PC Unit Current Task List, add the task to the Current Task List. See Alaris System Maintenance Software User Manual, “Tasks” section for more information.
14. From Alaris System Maintenance, run the Battery Log report. See Alaris System Maintenance Software User Manual, “Reports and Logs” section for more information.
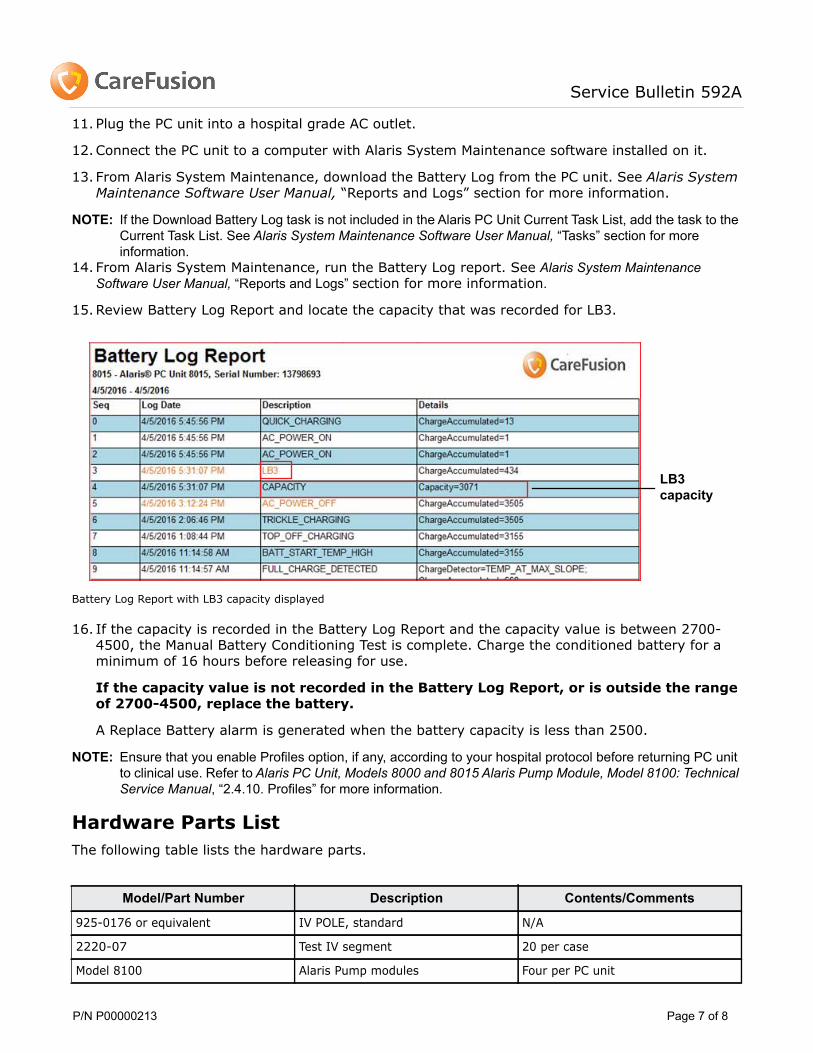
15.Review Battery Log Report and locate the capacity that was recorded for LB3.
Battery Log Report with LB3 capacity displayed
16. If the capacity is recorded in the Battery Log Report and the capacity value is between 2700-4500, the Manual Battery Conditioning Test is complete. Charge the conditioned battery for a minimum of 16 hours before releasing for use.
If the capacity value is not recorded in the Battery Log Report, or is outside the range of 2700-4500, replace the battery.
A Replace Battery alarm is generated when the battery capacity is less than 2500.
NOTE: Ensure that you enable Profiles option, if any, according to your hospital protocol before returning PC unit to clinical use. Refer to Alaris PC Unit, Models 8000 and 8015 Alaris Pump Module, Model 8100: Technical Service Manual, “2.4.10. Profiles” for more information.
Hardware Parts ListThe following table lists the hardware parts.
Model/Part Number Description Contents/Comments
925-0176 or equivalent IV POLE, standard N/A
2220-07 Test IV segment 20 per case
Model 8100 Alaris Pump modules Four per PC unit
LB3 capacity
P/N P00000213 Page 7 of 8

Service Bulletin 592A
CareFusionSan Diego, CaliforniaUnited States888.876.4287858.617.2000
Authorized EU Representative CareFusion The Crescent, Jays CloseBasingstoke, Hampshire RG22 4BS United Kingdom
Technical Inquires:Contact information is available on the CareFusion website:
http://www.carefusion.com/customer-support/index.aspx
© 2016 CareFusion Corporation or one of its affiliates. All rights reserved.
CareFusion, Alaris, and the CareFusion logo are trademarks or registered trademarks of CareFusion Corporation or one of its affiliates. All other trademarks are the property of their respective owners.
P/N P00000213 Page 8 of 8