servicemanager - help.ivanti.com were two migration tools. in heat service management release...
TRANSCRIPT

Migration Guide2017.3.1
Service Managerpowered by HEAT

Copyright NoticeThis document contains the confidential information and/or proprietary property of Ivanti, Inc. and its affiliates (referred to collectively as “Ivanti”), and may not be disclosed or copied without prior written consent of Ivanti.
Ivanti retains the right to make changes to this document or related product specifications and descriptions, at any time, without notice. Ivanti makes no warranty for the use of this document and assumes no responsibility for any errors that can appear in the document nor does it make a commitment to update the information contained herein. For the most current product information, please visit www.ivanti.com.
Copyright © 2018, Ivanti. All rights reserved.
Ivanti and its logos are registered trademarks or trademarks of Ivanti, Inc. and its affiliates in the United States and/or other countries. Other brands and names may be claimed as the property of others.
Protected by patents, see https://www.ivanti.com/patents.
Copyright © 2018 , Ivanti. All Rights Reserved. Terms of Use.
Page 2 of 45
Service Manager 2017.3.1 Migration Guide

TOCCopyright Notice 2About this Guide 4
Document Contents 4Intended Audience 4Related Documentation 4How to Contact Us 4
About Migrating Data into Ivanti Service Manager 5About the Different Migration Tools 5About the Migration Tool 5Best Practices for Migrating Data 6Migration Process 6Terminology 6Features of the Migration Tool 6Limitations of the Migration Tool 7
Installing and Configuring the Migration Tool 9Before You Begin 9Installing the Migration Tool 9Starting the Migration Tool 10Initially Configuring the Migration Tool 10
Step 1: Entering Information About the Source and Target Databases 14Step 2: Mapping Business Objects 16
About Mapping Business Objects and Fields 16Working with Mapping Templates 16Mapping Business Objects 19Fixing Error Messages 34
Step 3: Migrating Forms, Grids, and Layouts 37Step 4: Migrating Auto Tasks 40Troubleshooting the Migration Tool 42
Initial Errors 42Viewing Errors 42Common Errors and Warnings 44Logs 45
Copyright © 2018 , Ivanti. All Rights Reserved. Terms of Use.
Page 3 of 45
Service Manager 2017.3.1 Migration Guide

About this Guide• "Document Contents" below
• "Intended Audience" below
• "Related Documentation" below
• "How to Contact Us" below
Document ContentsThe Migration Guide for Ivanti Service Manager Release 2017.2 contains the following sections:
• "Installing and Configuring the Migration Tool" on page 9
• "Step 1: Entering Information About the Source and Target Databases" on page 14
• "Step 2: Mapping Business Objects" on page 16
• "Step 3: Migrating Forms, Grids, and Layouts" on page 37
• "Step 4: Migrating Auto Tasks" on page 40
• "Troubleshooting the Migration Tool" on page 42
Intended AudienceThis document is intended for system administrators who are migrating from ITSM Release 6.x, ITSM Release 7.x, and HEAT Classic to Ivanti Service Manager Release 2017.2.
Related DocumentationIvanti Service Manager has online help available within the application.
Additional documentation is available through
• The Ivanti community website. You may need to request user access if you cannot log in.
Or through
• The Ivanti Product Documentation website. Click the Service Manager tile to see a list of the documents available.
How to Contact UsTo contact us about the documentation, or if you have any other questions or issues about Ivanti Service Manager, contact Ivanti Software Global Support services by logging an incident via Self Service or at: https://www.ivanti.com/support/ivanti-support.
Copyright © 2018 , Ivanti. All Rights Reserved. Terms of Use.
Page 4 of 45
Service Manager 2017.3.1 Migration Guide

About Migrating Data into Ivanti Service Manager
• "About the Different Migration Tools" below
• "About the Migration Tool " below
• "Best Practices for Migrating Data" on the next page
• "Migration Process" on the next page
• "Terminology" on the next page
• "Features of the Migration Tool" on the next page
• "Limitations of the Migration Tool" on page 7
About the Different Migration ToolsPrior to HEAT Service Management Release 2015.2, there was only one Migration Tool. That migration tool was called the ITSM Migration Tool.
In HEAT Service Management Release 2015.2, we introduced a new migration tool, called the HEAT Classic Migration Tool, to migrate from HEAT Classic to HEAT Service Management. At this point, there were two migration tools.
In HEAT Service Management Release 2016.2, we combined the two migration tools into one tool, called the Migration Tool.
About the Migration Tool When migrating from ITSM, the Migration Tool migrates customer data (such as information about incidents) and metadata (including customizations such as workflows) from the source system (ITSM Release 6.x or ITSM Release 7.x) to Ivanti Service Manager. The Migration Tool supports transferring a large amount of data between the source and the target systems. It includes a default set of mappings for the out-of-the-box items for ITSM Release 7.x.
When migrating from HEAT Classic, the Migration Tool migrates customer data (such as call log records, profiles, assignments, and so on) and metadata from HEAT Classic to Ivanti Service Manager. The Migration Tool supports transferring a large amount of data between the source and the target systems. In HEAT System Management Release 2016.2, we added the ability to migrate forms, layouts, and lists, and also call groups.
Copyright © 2018 , Ivanti. All Rights Reserved. Terms of Use.
Page 5 of 45
Service Manager 2017.3.1 Migration Guide

Best Practices for Migrating DataWe highly recommend that you be very familiar with the business objects and fields in both the source system and in the target system.
We highly recommend that you map as many fields from the source system to the target system as possible. The tools only map data that you have set up mappings for. If you skip the mapping for a field, the tools do not migrate that field.
Migration ProcessThis document mostly describes the Migration Tool. However, there is more to the migration process than just using the tool. For example, after running the migration tool, you must perform additional steps to migrate custom items. The migration tool migrates the records from the source system to the target system, but there are additional tasks that you must do in order to complete the migration.
For example, if you are migrating from HEAT Classic, you may need to manually migrate certain quick actions that were not included as part of the quick action migration template.
TerminologyThis document uses the following terminology:
• Source: The source system. Can be HEAT Classic, ITSM Release 6.x, or ITSM Release 7.x.
• Target: The target system. In this case, it is always Ivanti Service Manager.
• Business object or table: A piece of a database. Each system has multiple business objects and tables.
• Record or field. A piece of a table. Each table has multiple records or fields.
Features of the Migration ToolThe following table lists features of the Ivanti Migration Tool and the source database systems that it can be used with.
Source Database System
Feature ITSM Release 7.x
ITSM Release 6.x
HEAT Classic
Defines custom data mappings. X X X
Restricts migration data. X X X
Provides default values for empty data records. X X X
Provides an option to create tables or records that exist in X X X
Copyright © 2018 , Ivanti. All Rights Reserved. Terms of Use.
Page 6 of 45
Service Manager 2017.3.1 Migration Guide

Source Database System
Feature ITSM Release 7.x
ITSM Release 6.x
HEAT Classic
the source database but do not exist in the target database.
Automatically adjusts the size of the records if they are different (except views).
X X X
Migrates data for link-based relationships. X X X
Assigns roles to employees. X X
Auto-corrects validation data. X X
Imports attachments related to a table or record. X X
Attaches attachments to the records in Ivanti Service Manager.
X
Selects a specific record (such as CI.Service) to import. X X
Creates business rules if they exist in the source database but not in the target database.
X X
Creates relationships. X X
Migrates the Service Catalog, including the out-of-the-box tasks.
X
Migrates request offerings. X
Migrates escalation schedules. X
Migrates workflows and any quick actions that are referenced by the workflows.
X
Migrates passwords. X
Migrates some auto tasks, but not all. X X X
Supports many-to-many mappings. X X X
Supports multiple customer types. X
Specifies the Microsoft SQL timeout settings. X X X
Converts the server time zone. X X X
Allows expressions. X X X
Migrates forms and layouts. X X
Limitations of the Migration ToolLimitations when using the Migration Tool:
Copyright © 2018 , Ivanti. All Rights Reserved. Terms of Use.
Page 7 of 45
Service Manager 2017.3.1 Migration Guide
• The Migration Tool only supports Microsoft SQL Server databases.
Limitations when migrating data from ITSM:
• The Migration Tool does not migrate quick actions for ITSM Release 6.x. For ITSM Release 7.x, the Migration Tool migrates workflows and any quick actions that are referenced by the workflows. However, those are the only quick actions that the Migration Tool migrates.
• The Migration Tool supports the transfer of most relationship data that is supported in Ivanti Service Manager. For example, Ivanti Service Manager currently does not support specified relationships, and therefore, the Migration Tool does not migrate that type of relationship.
• The Migration Tool does not migrate CMDB relationship (service map) data.
• For the audit history, Ivanti Service Manager uses a shadow table while ITSM Release 6.x and ITSM Release 7.x use a name/value pair. Therefore, the Migration Tool cannot migrate audit history data in audit history form. However, you can copy the ITSM audit history data into Ivanti Service Manager and display it (as unformatted data) side by side next to the Ivanti Service Manager audit history data.
• The Migration Tool does not migrate forms, layouts, or lists. You must manually create them after you migrate the data.
• If you are migrating from ITSM Release 7.x and use the Service Catalog predefined task, the system occasionally does not convert some business rules. The system displays an error with this information. See "Invalid Expression Data" on page 45.
• The Migration Tool does not migrate the following: business rules, Java scripts, regular expressions, and validation on-save rules.
Limitations when migrating data from HEAT Classic:
• HEAT Classic does not allow users to create custom relationships; and only uses hard-coded relationships. The Migration Tool creates these relationships:
• Relationships between teams and users.
• Relationships between the call log and the detailed screens associated with the call log.
• The Migration Tool does not migrate all auto tasks (it migrates some, but not all), BPAM rules, survey information, alerts, or business rules.
• The Migration Tool does not migrate knowledge information. However, Ivanti Service Manager provides another tool, called the Knowledge Uploader, for uploading knowledge records. See the Ivanti Service Manager online help for more information about the Knowledge Uploader. (See "Related Documentation" on page 4 for information about accessing the documentation, including the online help.)
Copyright © 2018 , Ivanti. All Rights Reserved. Terms of Use.
Page 8 of 45
Service Manager 2017.3.1 Migration Guide

Installing and Configuring the Migration Tool
• "Before You Begin" below
• "Installing the Migration Tool" below
• "Starting the Migration Tool" on the next page
• "Initially Configuring the Migration Tool" on the next page
• "About Migrating Date and Time Values" on page 11
• "Setting the Timeout Value" on page 12
Before You Begin• Ensure that the MSDTC service is running on the local machine with network DTC access
enabled.
• You must install Ivanti Service Manager before you install and run the Migration Tool.
• Set your runtime environment as follows:
• If any database table has more than 100,000 rows of data, we recommend having 16 GB of memory, 20 GB of free disk space, and a core 2 CPU.
• Otherwise, we recommend having 8 GB of memory, 10 GB of free disk space, and a core 2 CPU.
Installing the Migration Tool1. Turn off any anti-virus software.
2. Stop all Ivanti Software services. Use the Task Manager to verify that no Ivanti Software processes are running.
3. Access the installation folder on the Ivanti Software product CD or zip file and run MigrationTool.exe. Right-click and select Run as administrator to ensure proper installation.
The installer launches. The system displays the Migration Tool welcome dialog box.
4. Click Next. The system displays the License Agreement dialog box.
5. Select I accept the terms in the license agreement and click Next. The system displays the Destination Folder dialog box.
6. Click Next to accept the default installation folder, or click Change... and select a different folder. The system displays the Ready to Install the Program dialog box.
Copyright © 2018 , Ivanti. All Rights Reserved. Terms of Use.
Page 9 of 45
Service Manager 2017.3.1 Migration Guide

7. Click Install. The system installs the Migration Tool. When it finishes, the system displays the Completed dialog box.
8. Click Finish.
The system installs the Migration Tool on the Ivanti Service Manager application server in a folder called C:\Program Files\HEAT Software\HEAT\MigrationTool.
Starting the Migration ToolAfter you install the Migration Tool, the installer creates a Migration Tool icon in the start menu. Double-click the icon to open the tool.
The Migration Tool opens and displays the Data Source and Data Target screen.
Initially Configuring the Migration Tool• "Configuring the Migration Tool for Using SSL" below
• "About Migrating Date and Time Values" on the next page
• "Setting the Timeout Value" on page 12
• "Setting the Age of the Data to Migrate" on page 12
Configuring the Migration Tool for Using SSLWhen you installed Ivanti Service Manager, if you configured the system to use SSL, then you must configure the Migration Tool to use SSL. Follow these steps:
1. Navigate to and open the file called C:\Program Files\HEAT Software\HEAT\MigrationTool\MigrationLoader.exe.config in Notepad.
2. In that file, add the following to the end of the file:ServicePointManager.ServerCertificateValidationCallback += new RemoteCertificateValidationCallback((sender, certificate, chain, policyErrors) => { return true; });
3. In that file, change the following, from this:
Copyright © 2018 , Ivanti. All Rights Reserved. Terms of Use.
Page 10 of 45
Service Manager 2017.3.1 Migration Guide

to this:
4. Save and close the file.
About Migrating Date and Time ValuesIn HEAT Classic, ITSM Release 6.x, and ITSM Release 7.x, all DateTime fields are stored in the server time zone. However, in Ivanti Service Manager, DateTime fields are stored in UTC time. Therefore, when you migrate data, the dates and times will most likely be incorrect as they are in a different time zone instead of in UTC.
This feature only applies to date and time values that are stored as DateTime fields. It does not apply to fields that contain dates or times but are text fields.
To ensure that the migrated data is in the correct time zone, before you begin the migration, set the time zone of the source system:
1. Open the Migration Tool.
2. Click the system settings icon on the top right.
3. Click the Base Setting tab.
4. Check Date time conversion.
5. Select the time zone of the source server from the Server time zone drop-down list.
6. Click Save. The system displays a message stating that the system settings have been saved.
7. Click OK.
For example, if you selected (UTC-8:00) Pacific Time (US & Canada) for the server time zone, then when the Migration Tool migrates the data from the source system to Ivanti Service Manager, the data will have date and time values of 8 hours later. If an incident was created in the source system at 3:30, in Ivanti Service Manager, the record is converted so that it shows that it was created at 11:30 (8 hours later).
Copyright © 2018 , Ivanti. All Rights Reserved. Terms of Use.
Page 11 of 45
Service Manager 2017.3.1 Migration Guide

Setting the Timeout ValueTo provide a timeout value, to avoid a long waiting time if you have a timeline for migrating data, you can set the amount of time before which the Microsoft SQL Server stops running. Usually, Microsoft SQL Server commands time out after approximately 20 minutes; however, in the past, sometimes the Migration Tool took longer than 20 minutes to migrate the data, causing the Microsoft SQL Server to time out, which stopped the migration.
To ensure that all Microsoft SQL Server commands have enough time to execute completely, set the timeout value by doing the following:
1. Open the Migration Tool.
2. Click the system settings icon on the top right.
3. Click the Base Setting tab.
4. In the SQL command timeout (in mins) field, enter a number. The default is 2.
5. Click Save. The system displays a message stating that the system settings have been saved.
6. Click OK.
Setting the Age of the Data to MigrateThe system has some predefined filters. Use the settings to specify the time period for the data to migrate. You can select a predefined filter or create and add a new one.
1. Open the Migration Tool.
2. Click the system settings icon on the top right.
3. Click the Filter Setting tab. Filter Setting Tab
Copyright © 2018 , Ivanti. All Rights Reserved. Terms of Use.
Page 12 of 45
Service Manager 2017.3.1 Migration Guide

4. To select a predefined filter setting, highlight it and click Save. The system displays a message stating that the system settings have been saved.
5. Click OK.
6. To create a new filter setting, do the following:
a. In the Display Text field, enter the display text for the new filter setting.
b. Enter the amount of days.
c. Click Add.
d. Click Save. The system displays a message stating that the system settings have been saved.
e. Click OK.
Copyright © 2018 , Ivanti. All Rights Reserved. Terms of Use.
Page 13 of 45
Service Manager 2017.3.1 Migration Guide

Step 1: Entering Information About the Source and Target DatabasesWhen you open the Migration Tool, the system displays the Data Source and Data Target screen. See "Data Source and Data Target Screen" below.
Data Source and Data Target Screen
1. Enter information about how to connect to the source database, as follows:
Field Description
Data Source
The system to migrate from.
Connection Name
The name of the connection to the source database. Do one of the following:
Enter a name for a new connection.
Click the down arrow and select an existing connection from the drop-down list.
Click the down arrow and delete an existing connection from the drop-down list by clicking the red X next to its name. Click OK in the confirmation box.
User Name The user name to log in to the source database.
Password The password for the user above.
Role The role for the user above.
Database The database to use. Click Select/Create Connection to select or create the database connection.
2. Click Test Connection. If the connection is successful, the system displays a success message.
3. (Optional) Click Save Connection to save this connection.
Copyright © 2018 , Ivanti. All Rights Reserved. Terms of Use.
Page 14 of 45
Service Manager 2017.3.1 Migration Guide
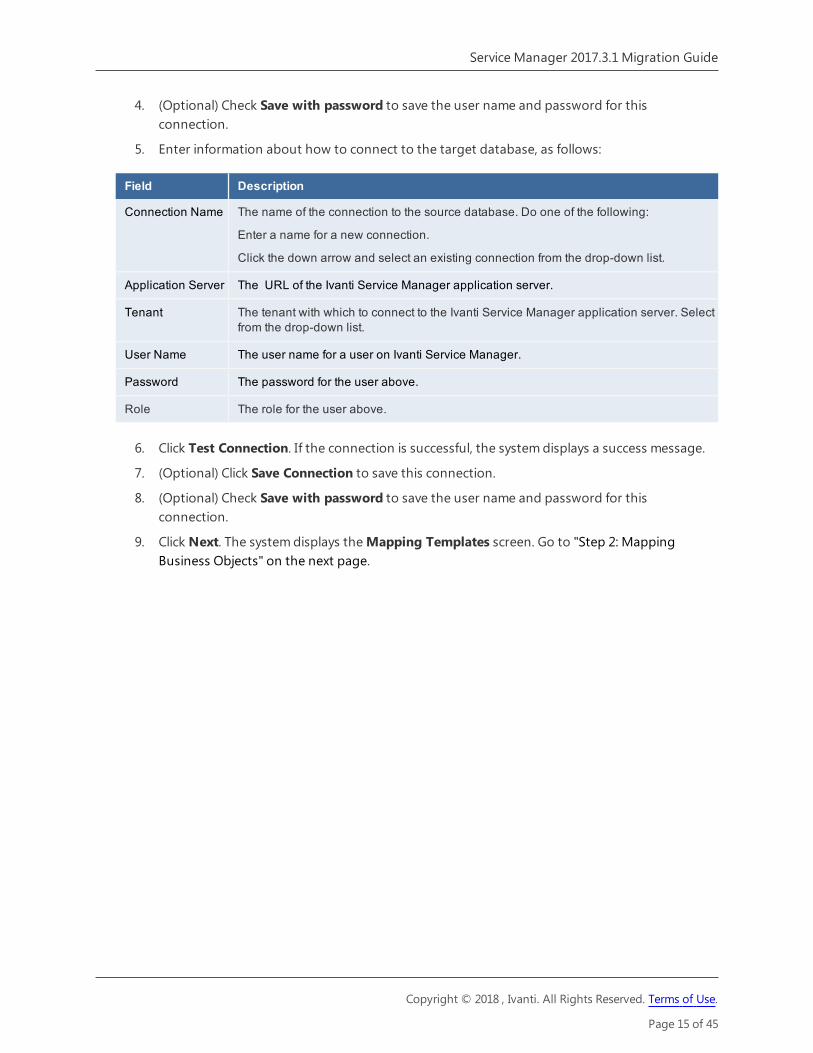
4. (Optional) Check Save with password to save the user name and password for this connection.
5. Enter information about how to connect to the target database, as follows:
Field Description
Connection Name The name of the connection to the source database. Do one of the following:
Enter a name for a new connection.
Click the down arrow and select an existing connection from the drop-down list.
Application Server The URL of the Ivanti Service Manager application server.
Tenant The tenant with which to connect to the Ivanti Service Manager application server. Select from the drop-down list.
User Name The user name for a user on Ivanti Service Manager.
Password The password for the user above.
Role The role for the user above.
6. Click Test Connection. If the connection is successful, the system displays a success message.
7. (Optional) Click Save Connection to save this connection.
8. (Optional) Check Save with password to save the user name and password for this connection.
9. Click Next. The system displays the Mapping Templates screen. Go to "Step 2: Mapping Business Objects" on the next page.
Copyright © 2018 , Ivanti. All Rights Reserved. Terms of Use.
Page 15 of 45
Service Manager 2017.3.1 Migration Guide

Step 2: Mapping Business Objects• "About Mapping Business Objects and Fields" below
• "Working with Mapping Templates" below
• "Mapping Business Objects" on page 19
• "Fixing Error Messages" on page 34
About Mapping Business Objects and FieldsDuring the migration process, you map both the business objects and the fields within the business objects in the source system to business objects and fields in the target system. The Migration Tool provides recommendations about which business objects and fields the information in the source system should be mapped to.
• You must map the items in the order in which they are listed under the Migration Objects header. However, if a default mapping has submappings, you do not have to migrate the submappings in any particular order.
• You can map a source business object or field to an existing business object or field in the target or you can create a new business object or field in the target to map it to.
• You can map more than one business object to a business object in the target. For example, you can map both the Profile .Employee and the Profile.CR business objects in the source to the Employee business object in the target.
• You must map each and every business object in the source database individually to migrate it to the target database. There is no batch function.
Working with Mapping Templates• "About Mapping Templates" below
• "Default Mappings for the Mapping Template" on page 18
About Mapping TemplatesYou use a mapping template to map business objects, without modifying the template, which allows it to be used in the future. The base template consists of default mappings for all of the major, out-of-the-box business objects. It does not contain mappings for validation tables. However, the Migration Tool detects what validation tables are used and automatically adds them.
Mapping Templates Screen
Copyright © 2018 , Ivanti. All Rights Reserved. Terms of Use.
Page 16 of 45
Service Manager 2017.3.1 Migration Guide

When mapping business objects from the source system to the target system, you can do one of the following:
• Use the default (also called the base) mapping template.
• Create a new mapping template to use.
• Use a custom mapping template that you created previously.
Mapping Templates Screen with Custom Templates
Copyright © 2018 , Ivanti. All Rights Reserved. Terms of Use.
Page 17 of 45
Service Manager 2017.3.1 Migration Guide

If you have custom mapping templates, the system displays them on the bottom. You can edit, delete, save, or rearrange them by right-clicking the name of a custom mapping template.
Default Mappings for the Mapping Template• "ITSM Release 6.x" below
• "ITSM Release 7.x" below
• "HEAT Classic" below
ITSM Release 6.x
The Migration Tool does not include any default mappings when you migrate data from ITSM Release 6.x to the current version of Ivanti Service Manager. The system only provides an empty template and you must add the mappings manually.
ITSM Release 7.x
When migrating data from ITSM Release 7.x, the Migration Tool provides one empty template and one template with mappings.
HEAT Classic
The Migration Tool includes the following out-of-the-box default mappings when migrating from HEAT Classic:
Default Mapping Name
Description
CustType Lists the different types of customer. Examples are data, equipment, and personnel.
Profile Contains information for each of the different customer types. For example, if the CustType business object contains two entries called data and equipment, then there is one table for data and one table for equipment. These tables contain information about the user, such as first name, last name, address, and so on.
Tracker Contains information about owners.
HEATCAI(Internal)
Contains information about logins and passwords for internal users. This converts the HEAT Classic password into a password for the Ivanti Service Manager system.
HEATCAI(Unified)
Contains information about passwords for unified login users.
Team Equivalent to the standard user team in Ivanti Service Manager.
CallType Contains information about the types of calls.
Copyright © 2018 , Ivanti. All Rights Reserved. Terms of Use.
Page 18 of 45
Service Manager 2017.3.1 Migration Guide

Default Mapping Name
Description
CallStatus Contains information about the status of calls.
Priority Contains information about the priority of calls.
CallLog Contains information about the calls in HEAT Classic, which are equivalent to incidents in Ivanti Service Manager.
Subset Contains information about the department, facility, and phone number of the users. The tool adds these fields to the call log.
CallLogDetail Contains details about the calls.
Journal Contains information about communication (such as email, notes, and voice activities) about the parent record (either call log or incident). This is equivalent to the activity history in Ivanti Service Manager.
Task Contains information about user and team assignments. This is equivalent to the Task.Assignment business object in Ivanti Service Manager .
Mapping Business Objects• "Starting the Mapping" below
• "Mapping Fields within Business Objects" on page 24
• "Finishing the Mapping" on page 31
• "About Working with Conversion Rules" on page 33
Starting the Mapping1. From the Mapping Templates screen, highlight the mapping template to use and click Next.
The system displays the Custom Mapping (Analyze) screen. Custom Mapping (Analyze) Screen
Copyright © 2018 , Ivanti. All Rights Reserved. Terms of Use.
Page 19 of 45
Service Manager 2017.3.1 Migration Guide

2. Highlight a business object under the Migration Objects header and click Next. The first time that you do this, the system displays a dialog box prompting you to save the mapping template file.
Saving the Mapping Template File
3. In the Template Name field, enter a name for this mapping template. You can optionally modify the template title, template description, or template icon.
4. Click Save.
Copyright © 2018 , Ivanti. All Rights Reserved. Terms of Use.
Page 20 of 45
Service Manager 2017.3.1 Migration Guide

The system analyzes the highlighted default mapping to determine if there are source and target business objects associated with it. See "Custom Mapping (Analyze) Screen" below.
Custom Mapping (Analyze) Screen
On the Custom Mapping (Analyze) screen, on the left side, the system displays the list of business objects with default mappings, along with the order in which the Migration Tool migrates them. If a business object has child business objects, the system displays an arrow next to its name.
On the right side, the system displays the business object associated with the highlighted business object. In the figure above, the Category business object is highlighted on the left. On the right side, the tool lists the name of the business object in the source system that is associated with that business object. In this example, it is the Category business object. On the very right, the tool lists the name of the business object in the target system that is associated with the category types. In this example, it is the Category business object.
If an item does not contain any data (that is, if there is a zero in parentheses next to its name), you can either leave it unmapped or remove it from the template.
5. To map a business object in the source system to a business object in the target system, do the following:
a. On the left side, under the Migration Objects header, highlight a business object. The system displays the associated business objects on the right side.
b. If the business object is a group business object, click the arrow next to its name to display the child business objects. The system automatically maps the business object to the business object listed under the Target: Ivanti Service Manager <release_version> header.
Copyright © 2018 , Ivanti. All Rights Reserved. Terms of Use.
Page 21 of 45
Service Manager 2017.3.1 Migration Guide

6. If there is no associated business object listed under the Target: Ivanti Service Manager <release version> header, you must create one. Follow these steps:
a. At the end of the line for the business object that you want to add a mapping for, click the Select target table icon (green plus sign). The system displays the Mapping dialog box.
b. In the Source Table field, if not already entered, enter the name of the source business object.
c. In the Mapping Name field, enter the name of the new target business object.
d. Do one of the following:
• To create a new business object to map the source business object to, select Create New Table and enter the name of the new business object in the New Table Name field.
• To map the source business object to an existing business object, select Select Existing Table and select a business object from the Target Tables list.
e. Click Save.
The system updates the Custom Mapping (Map) screen with this information and adds an Edit Mapping icon next to the Select target table icon.
When you create a target business object, the system automatically maps all of the fields from the source business object to the new business object. You do not need to map the fields, since they are already mapped. Therefore, you can skip the process described in "Mapping Fields within Business Objects" on page 24.
Mapping Dialog Box
Copyright © 2018 , Ivanti. All Rights Reserved. Terms of Use.
Page 22 of 45
Service Manager 2017.3.1 Migration Guide

7. To add a business object if the system did not provide it, do the following:
a. On the left side, under the Migration Objects header, highlight a business object. The system displays the associated business objects on the right side.
b. If the business object is a group business object, click the arrow next to its name to display the child business objects.
c. Highlight the business object, right-click it to display the menu, and select Add Mapping. This is useful if you have business objects that were not initially provided. Use this method with caution. The system displays the Mapping dialog box.
d. Enter values about the new business object in the fields of the dialog box and click Save. The system adds the new mapping.
Instead of mapping each child business object manually, you can also right-click the name of the group business object under the Migration Objects header, and select Create all objects. This is a shortcut to quickly map all of the child business objects.
Adding a Mapping
Copyright © 2018 , Ivanti. All Rights Reserved. Terms of Use.
Page 23 of 45
Service Manager 2017.3.1 Migration Guide

8. To remove a mapping, highlight the source business object, right-click it to display the menu, and select Delete.
9. When you have finished mapping all of the business objects, click Next. The system displays the Custom Mapping (Map) screen.
Mapping Fields within Business Objects
After you map the source business objects to the target business objects, you need to map the individual fields within each source business object to a field within a target business object.
If you created a new target business object, the system automatically maps all of the fields from the source business object to the new business object. You do not need to map the fields, since they are already mapped. Therefore, you can skip this section.
Custom Mapping (Map) Screen
Copyright © 2018 , Ivanti. All Rights Reserved. Terms of Use.
Page 24 of 45
Service Manager 2017.3.1 Migration Guide

On the Custom Mapping (Map) screen, on the right side under the HEAT Source Source BO heading, the tool displays the source fields associated with the default mapping name highlighted on the left. Under the Ivanti Service Manager <Release Version> Target BO heading, the tool displays the target fields that it recommends you map the source fields to.
You do not have to map every field in the source business object to the target business object. If you do not map a field, the Migration Tool does not migrate that data.
1. Click the Edit Mapping icon for a business object. This is the blue arrow icon on the right. See "Custom Mapping (Analyze) Screen" on page 21 for an example.
2. To map an individual field that has not been mapped already, click the Edit mapping icon. The system displays a dialog box.
Mapping an Individual Field
Copyright © 2018 , Ivanti. All Rights Reserved. Terms of Use.
Page 25 of 45
Service Manager 2017.3.1 Migration Guide

3. If not already populated, enter the source field name in the Source Field Name field and the data type in the Source Field Data Type field.
4. Do one of the following:
• Click Create a new field and enter the new field name in the New Field Name field.
• Click Select a target field. In the Target Field Name field, select a target field and optionally enter a data type for the target field. You can optionally include a conversion rule. See "About Working with Conversion Rules" on page 33.
5. Click Save.
6. (Optional) To map all of the unmapped fields, at the bottom of the page, click Add all missing fields.
7. (Optional) You can add a new field to the business object that is used to populate a field in Ivanti Service Manager, even if it does not exist in the source system (that is, there is no equivalent field in the source system for a field that is in Ivanti Service Manager). Do the following:
a. Click Add New Column.
b. In the resulting dialog box, click Select target field.
c. In the Target Field Name field, select the Ivanti Service Manager field to map the newly created field to.
d. Click Save.
8. To map any validation business objects, do the following:
Copyright © 2018 , Ivanti. All Rights Reserved. Terms of Use.
Page 26 of 45
Service Manager 2017.3.1 Migration Guide

a. Click the Table Fields Mapping tab.
b. Click Show more join/filter conditions.
c. Check Include validation tables.
9. To also map any attachments associated with business objects, do the following:
a. Click the Table Fields Mapping tab.
b. Click Show more join/filter conditions.
c. Check Include attachments.Including Validation Tables or Attachments
10. To include only data for a certain date range, do the following:
a. Click the Table Fields Mapping tab.
b. From the Include only drop-down list, select a DateTime field (the system adds all of the DateTime fields to this drop-down list).
c. Enter a date range in the next field. You can select from Last 6 months, Last year, or custom range.
11. To include only data with a certain status, do the following:
a. Click the Table Fields Mapping tab.
b. From the Status drop-down list, select a status.
Copyright © 2018 , Ivanti. All Rights Reserved. Terms of Use.
Page 27 of 45
Service Manager 2017.3.1 Migration Guide
c. In the next field, select one or more statuses, from All, Closed, Open, Pending, and Reopened.
12. To restrict the data to insert or update only, do the following:
a. Click the Table Fields Mapping tab.
b. Click Show more join/filter conditions.
c. From the Mode drop-down list, select InsertOnly, UpdateOnly, or InsertAndUpdate. By default, the migration is set to InsertAndUpdate.
13. To join the data, do the following:
a. Click the Table Fields Mapping tab.
b. Click Show more join/filter conditions.
c. In the Joined By field, select a value.
14. To include certain roles that you can later assign users to, do the following:
a. Click the Table Fields Mapping tab.
b. Click Show more join/filter conditions.
c. In the Roles field, check the roles to include.
15. To add additional functionality to anOn the right, click Advanced Mode.
16. To add additional functionality, do the following:
a. Click the Table Fields Mapping tab.
b. Click Show more join/filter conditions.
c. Enter TSQL queries in any of the following fields:
• Join using TSQL
• Truncate filter
• Filter By TSQL
• Run after copied
17. To see all matched relationships, relationship errors, and unmatched relationships, click the Relationship tab.
Viewing Mapped Relationships
Copyright © 2018 , Ivanti. All Rights Reserved. Terms of Use.
Page 28 of 45
Service Manager 2017.3.1 Migration Guide
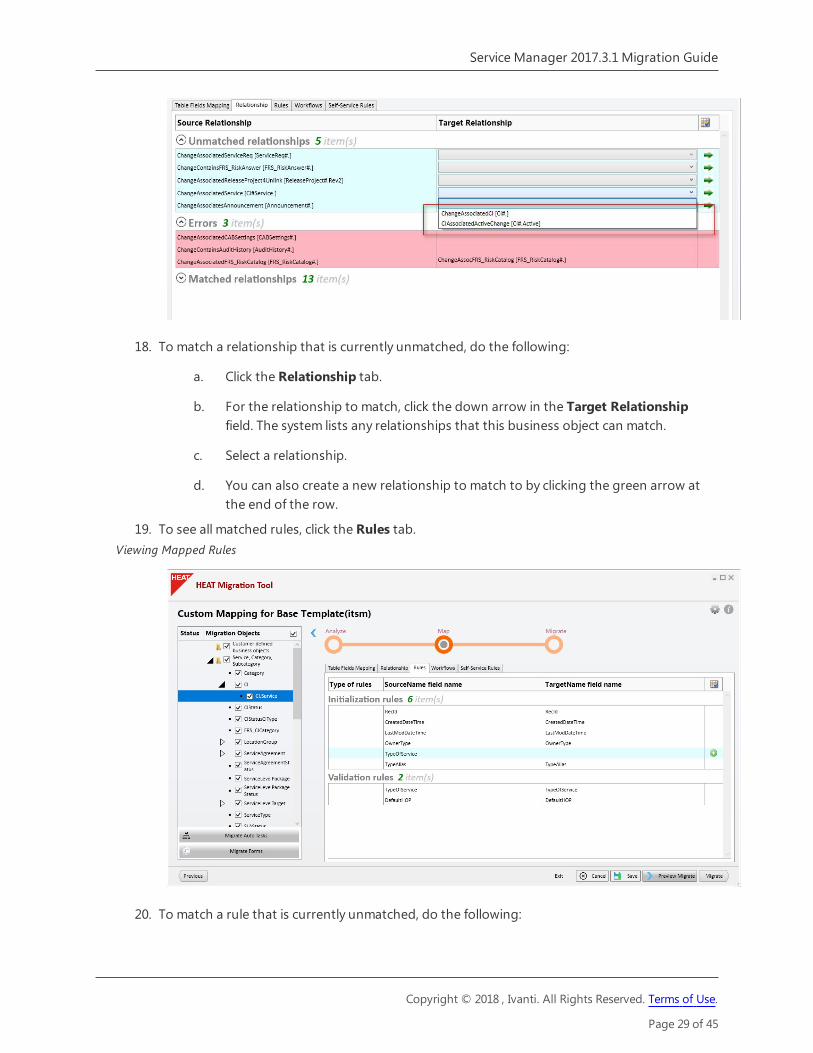
18. To match a relationship that is currently unmatched, do the following:
a. Click the Relationship tab.
b. For the relationship to match, click the down arrow in the Target Relationship field. The system lists any relationships that this business object can match.
c. Select a relationship.
d. You can also create a new relationship to match to by clicking the green arrow at the end of the row.
19. To see all matched rules, click the Rules tab.Viewing Mapped Rules
20. To match a rule that is currently unmatched, do the following:
Copyright © 2018 , Ivanti. All Rights Reserved. Terms of Use.
Page 29 of 45
Service Manager 2017.3.1 Migration Guide

a. Click the Rules tab.
b. For the rule to match, click the down arrow in the TargetName field name field. The system lists any rules that this business object can match.
c. Select a rule.
d. You can also create a new rule to match to by clicking the green plus sign at the end of the row.
21. To see all matched workflows, click the Workflows tab.Mapping Workflows
22. To match a workflow that is currently unmatched, do the following:
a. Click the Workflows tab.
b. For the workflow to match, click the down arrow in the Target workflow field. The system lists any workflows that this business object can match.
c. Select a workflow.
d. You can also create a new workflow to match to by clicking the green plus sign at the end of the row.
23. To see all matched Self Service rules, click the Self-Service Rules tab.Mapping Self Service Rules
Copyright © 2018 , Ivanti. All Rights Reserved. Terms of Use.
Page 30 of 45
Service Manager 2017.3.1 Migration Guide
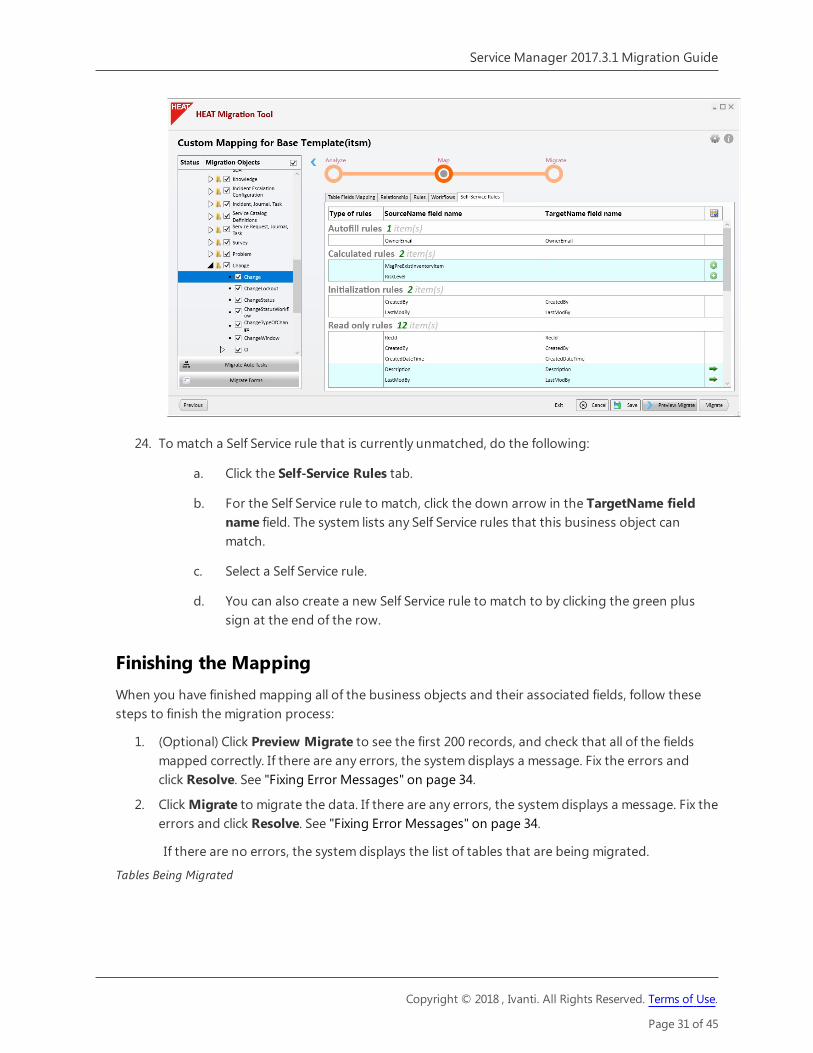
24. To match a Self Service rule that is currently unmatched, do the following:
a. Click the Self-Service Rules tab.
b. For the Self Service rule to match, click the down arrow in the TargetName field name field. The system lists any Self Service rules that this business object can match.
c. Select a Self Service rule.
d. You can also create a new Self Service rule to match to by clicking the green plus sign at the end of the row.
Finishing the MappingWhen you have finished mapping all of the business objects and their associated fields, follow these steps to finish the migration process:
1. (Optional) Click Preview Migrate to see the first 200 records, and check that all of the fields mapped correctly. If there are any errors, the system displays a message. Fix the errors and click Resolve. See "Fixing Error Messages" on page 34.
2. Click Migrate to migrate the data. If there are any errors, the system displays a message. Fix the errors and click Resolve. See "Fixing Error Messages" on page 34.
If there are no errors, the system displays the list of tables that are being migrated.
Tables Being Migrated
Copyright © 2018 , Ivanti. All Rights Reserved. Terms of Use.
Page 31 of 45
Service Manager 2017.3.1 Migration Guide

3. Click Confirm to start the migration. The system starts migrating the data and displays status messages on the progress. When the migration is complete, the system displays a message with the total number of tables that were migrated.
4. Click OK to close the message. The system displays the Custom Mapping (Map) screen with green checkmarks in the Status column for the business objects that have been migrated.
Status Column Showing Migrated Business Objects
Copyright © 2018 , Ivanti. All Rights Reserved. Terms of Use.
Page 32 of 45
Service Manager 2017.3.1 Migration Guide

5. To verify that the specific records were added to the target tables correctly, log in to the Ivanti Service Manager Configuration Console and open the business objects. Click the Fields tab to view the new records and ensure that they were created correctly.
The following are the business objects in HEAT Classic and their corresponding business objects in Ivanti Service Manager:
Table Name in HEAT Classic Corresponding Table Name in Ivanti Service Manager
HEATCust FRS_HC_CustType
Profile Employee
Tracker Employee
HEATCAI Employee
AsgnGrp StandardUserTeam
CallType FRS_HC_CallType
Status FRS_HC_Status
Priority FRS_HC_Priority
CallLog FRS_HC_CallLog
Subset FRS_HC_CallLog
Detail FRS_HC_Detail
FRS_HC_Detail#PCIncident
FRS_HC_Detail#ServiceCall
Journal Journal#Notes
Asgnmnt Task#Assignment
About Working with Conversion RulesWhen you map a field from the source business object to the target business object, if you select Select a target field, you can use conversion rules.
The following are the available conversion rules:
• To String
• String To Decimal
• String To Bit
• String To Int
• String To Date Time
Copyright © 2018 , Ivanti. All Rights Reserved. Terms of Use.
Page 33 of 45
Service Manager 2017.3.1 Migration Guide

• String To Boolean
• Expression Converter
• Merge two fields to Date Time
• Convert HEAT Classic password
If you select Expression Converter, you can enter expressions in the Source Field Name field. For example, you can enter $(FirstName) + $(LastName) to concatenate the first and last names into one field.
Select Merge two fields to DateTime to create one DateTime field in the target system from two fields in the source system. Typically, HEAT Classic uses two fields to store dates and times (one for the date and one for the time) while Ivanti Service Manager uses one field to store DateTime values.
Fixing Error MessagesThe following describes some of the common error messages that you may encounter during the migration.
• "Conflict Resolution" below
• "Mapped Fields are Not Unique" on the next page
• "Fields Missing for a Relationship in HEAT Classic" on the next page
• "Fields Missing for a Relationship in ITSM" on page 36
Conflict ResolutionMessage: There is a duplicate key value in the unique index field called field_name.
Cause: There are duplicate records with the same value and for the target system, this particular field has a constraint that every record must have a unique value. For example, for the PrimaryEmail field, there may be two records with the same email address.
To determine if a Ivanti Service Manager field has a unique constraint, go to the Ivanti Service Manager Configuration Console, open the business object, click the Fields tab, open the field, and in the Field Attributes section, see if Unique is checked. If it is, this field has a unique constraint.
Options:
• Filter out duplicate records: The Migration Tool only migrates the first record from the source system with the duplicate value and does not migrate any others.
Copyright © 2018 , Ivanti. All Rights Reserved. Terms of Use.
Page 34 of 45
Service Manager 2017.3.1 Migration Guide
• Truncate target table: Removes all of the data from the target table before starting the migration.
• Remove unique constraint: For this particular field, removes the constraint that every record must have a unique value and saves all duplicate records.
Mapped Fields are Not UniqueMessage: The mapped fields are not unique.
Cause: There are duplicate records with the same value and for the target system, this particular field has a constraint that every record must have a unique value. For example, for the PrimaryEmail field, there may be two records with the same email address.
Options:
• Filter out duplicate records: The Migration Tool only migrates the first record from the source system with the duplicate value and does not migrate any others.
• Truncate target table: Removes all of the data from the target table before starting the migration.
Fields Missing for a Relationship in HEAT ClassicMessage: The relationship defined in the template for the current mapping has fields missing in HEAT Classic. Reset the HEAT Classic relationship information.
Cause: HEAT Classic has a hard-coded relationship between the Team field and the Employee field, based on the value of the LoginID field. If you renamed the LoginID field to something else, such as HEATLogin, the Migration Tool cannot migrate the relationship. Select the field that represents the ID of the user. The tool uses this field to create a relationship between the team and employee fields.
Options:
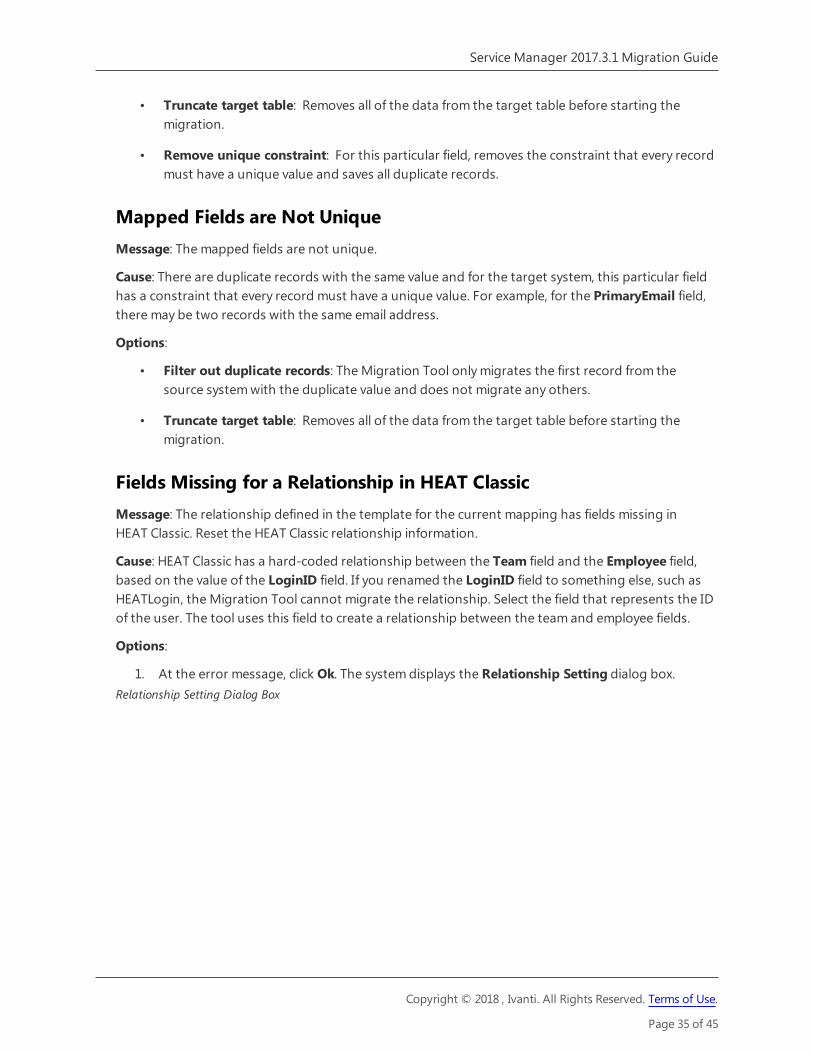
1. At the error message, click Ok. The system displays the Relationship Setting dialog box.Relationship Setting Dialog Box
Copyright © 2018 , Ivanti. All Rights Reserved. Terms of Use.
Page 35 of 45
Service Manager 2017.3.1 Migration Guide
2. For the Target Field field, from the drop-down list select a field.
3. Click Save.
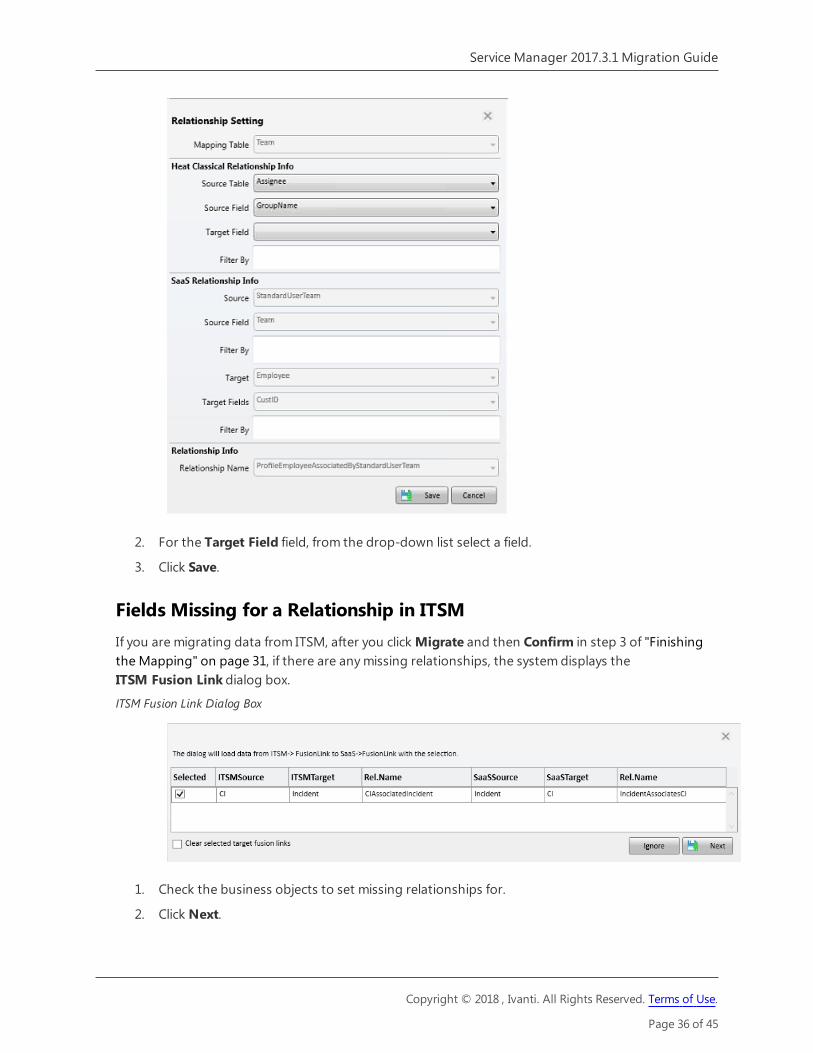
Fields Missing for a Relationship in ITSMIf you are migrating data from ITSM, after you click Migrate and then Confirm in step 3 of "Finishing the Mapping" on page 31, if there are any missing relationships, the system displays the ITSM Fusion Link dialog box.
ITSM Fusion Link Dialog Box
1. Check the business objects to set missing relationships for.
2. Click Next.
Copyright © 2018 , Ivanti. All Rights Reserved. Terms of Use.
Page 36 of 45
Service Manager 2017.3.1 Migration Guide

Step 3: Migrating Forms, Grids, and LayoutsAfter migrating the business objects, you can migrate the forms, grids, and layouts associated with the business objects.
1. From the Custom Mapping screen, click Migrate Forms on the bottom left of the screen. The system displays the screen used for migrating forms, lists (also called grids), and layouts and displays them in groups based on the business object that they are associated with.
Migrating Forms, Grids, and Layouts Screen
2. To migrate some forms, grids, and layouts associated with a business object, check and expand a business object and check the forms, grids, or layouts to migrate. Click Import Selected. (To migrate all of the forms, grids, and layouts that are listed, click Import All.)
Migrating Forms, Grids, and Layouts Associated with a Business Object
Copyright © 2018 , Ivanti. All Rights Reserved. Terms of Use.
Page 37 of 45
Service Manager 2017.3.1 Migration Guide

The Migration Tool lists the forms, grids, and layouts that were migrated, and also if any items were not correctly migrated.
List of Forms, Grids, and Layouts that Were Successfully Migrated
3. (Optional) Click Export to export the information to a Microsoft Excel spreadsheet.
4. Click OK to close the informational message.
5. Click Cancel to return to the Custom Mapping screen.
Copyright © 2018 , Ivanti. All Rights Reserved. Terms of Use.
Page 38 of 45
Service Manager 2017.3.1 Migration Guide

6. To verify that all of the auto tasks migrated correctly, log into Ivanti Service Manager, open a business object, and check that the tool migrated all of the forms, grids, and layouts that you selected.
Copyright © 2018 , Ivanti. All Rights Reserved. Terms of Use.
Page 39 of 45
Service Manager 2017.3.1 Migration Guide

Step 4: Migrating Auto TasksAfter migrating the business objects, you can migrate the auto tasks associated with the business objects.
1. From the Custom Mapping screen, click Migrate Auto Tasks on the bottom left of the screen. The system displays the screen used for migrating the auto tasks that can be migrated.
Migrating Auto Tasks Screen
The tool displays auto tasks that it cannot migrate in dark gray. They may be related to business objects that you have not migrated yet, or they may be auto tasks that are not part of the auto task migration template. Certain auto tasks are not part of the auto task template because the target system does not have the same functionality as the source system. Examples are the print-related and jump-to-a-control auto tasks.
2. To migrate some auto tasks associated with a business object, expand a business object and check the auto tasks to migrate. Click Import Selected. (To migrate all of the auto tasks that are listed, click Import All.)
The Migration Tool displays an informational message listing which auto tasks were migrated.
Auto Task Migration Message
Copyright © 2018 , Ivanti. All Rights Reserved. Terms of Use.
Page 40 of 45
Service Manager 2017.3.1 Migration Guide

3. (Optional) Click Export to export the information to a Microsoft Excel spreadsheet.
4. Click OK to close the informational message.
5. Click Cancel to return to the Custom Mapping screen.
6. To verify that all of the auto tasks migrated correctly, log into Ivanti Service Manager, open a business object, and click the Action Menu. The system should display all of the auto tasks that it migrated.
Copyright © 2018 , Ivanti. All Rights Reserved. Terms of Use.
Page 41 of 45
Service Manager 2017.3.1 Migration Guide

Troubleshooting the Migration Tool• "Initial Errors" below
• "Viewing Errors" below
• "Common Errors and Warnings" on page 44
• "Logs" on page 45
Initial Errors
Error Message
Connection failed. Network access for Distributed Transaction Manager (MSDTC) has been disabled. Please enable DTC for network access in the security configuration for MSDTC using the Component Services Administrative tool. The transaction manager has disabled its support for remote/network transactions.
Action
Review the information in the ITSM Installation and Deployment Guide (specifically the section called "Configuring MSDTC") for complete information about configuring and enabling MSDTC in your environment.
Viewing ErrorsThe system displays information about errors within the Migration Tool, as you encounter them.
Viewing Errors, Example 1
Copyright © 2018 , Ivanti. All Rights Reserved. Terms of Use.
Page 42 of 45
Service Manager 2017.3.1 Migration Guide
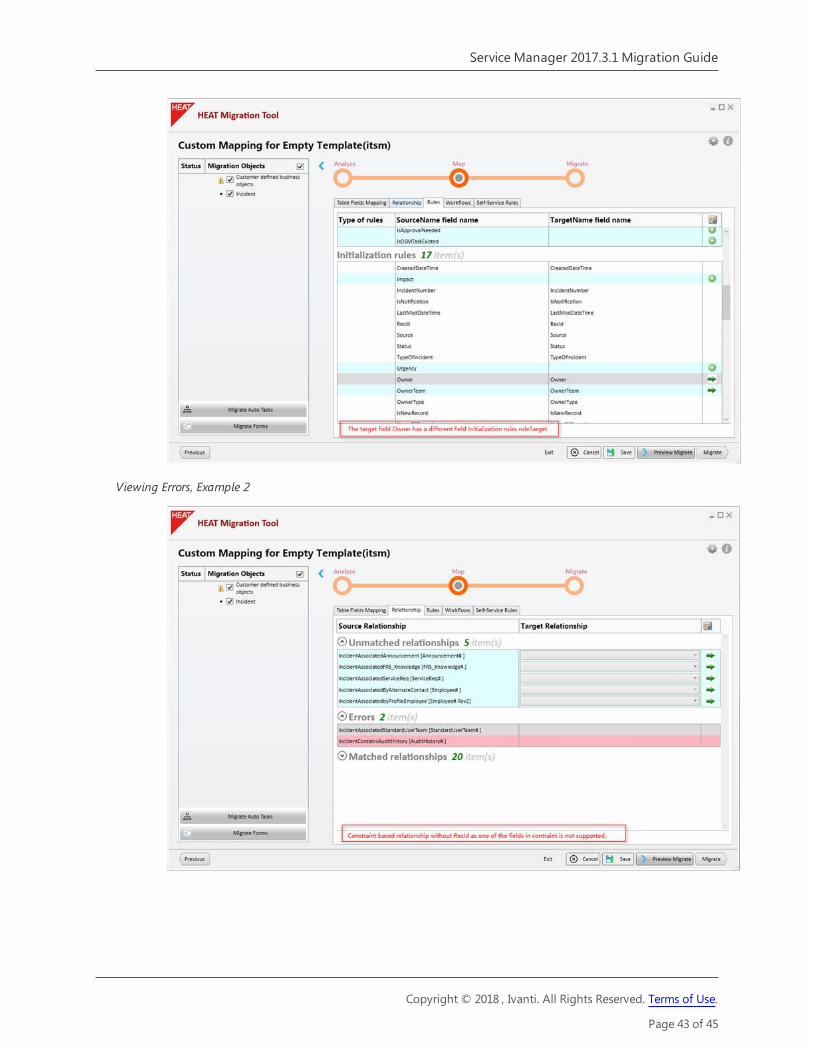
Viewing Errors, Example 2
Copyright © 2018 , Ivanti. All Rights Reserved. Terms of Use.
Page 43 of 45
Service Manager 2017.3.1 Migration Guide

Common Errors and Warnings• "Cannot Connect to Specified Database" below
• "Cannot Find a Relationship " below
• "RecID Does Not Exist" below
• "Some Records are Missing" below
• "Invalid Expression Data" on the next page
Cannot Connect to Specified DatabaseThe system displays this error message if it cannot connect to the database that you selected on the Data Source screen.
If you see this error message, click Choose another connection and select another database connection.
Cannot Find a Relationship The system gives you an error message if there is a relationship defined for the source table but not for the target table.
To fix this, copy the relationship over by clicking the green arrow at the end of the row. You can also map it to an existing relationship. To do this, click anywhere in a row without a relationship. The tool displays a drop-down list that you can use to select an already-created relationship.
RecID Does Not Exist
Error Message
Constraint-based relationship without RecID as one of the fields in constraint is not supported.
Action
Ivanti Service Manager only supports relationships that have the record called RecID. If a relationship does not contain a RecID, the Migration Tool displays the error message above. You can still migrate the data; however, you cannot migrate that particular relationship.
Some Records are MissingA common error is that the Migration Tool cannot save a record or table because some records are missing.
Copyright © 2018 , Ivanti. All Rights Reserved. Terms of Use.
Page 44 of 45
Service Manager 2017.3.1 Migration Guide

To fix this, create the missing records. The missing records are most likely from a different table that you have not migrated yet. Create the records by following the processes described in "Step 2: Mapping Business Objects" on page 16.
Invalid Expression Data
This section only applies if you are migrating from ITSM Release 7.x and you used the Service Catalog predefined task.
Occasionally, the Migration Tool cannot convert some of the expressions in the tables. View the log (see "Logs" below) for information about which expressions contain the invalid data. If you have not migrated the Profile.Employee table yet, the tool gives a warning message and does not convert the affected rules.
LogsThe Migration Tool maintains a log of all actions performed during the data import. The log file contains useful information about warnings and errors.
The log file is called log-file.txt and is located in the same folder as the HeatLoader.exe application. The Migration Tool uses the log4net framework to log the information, which is configured in the HeatLoader.exe configuration file.
The following screen is an example of the output of the log file.
Log File Screen Example
Copyright © 2018 , Ivanti. All Rights Reserved. Terms of Use.
Page 45 of 45
Service Manager 2017.3.1 Migration Guide